INFORMATION TECHNOLOGY - 802 CLASS – XI SESSION – 2020-21 (DRAFT STUDY MATERIAL)

Welcome message from author
This document is posted to help you gain knowledge. Please leave a comment to let me know what you think about it! Share it to your friends and learn new things together.
Transcript

INFORMATION TECHNOLOGY - 802
CLASS – XI
SESSION – 2020-21
(DRAFT STUDY MATERIAL)


Session 1: Fundamentals of Computer
Introduction
In today’s world we can see that almost all our work is being done with the help of computers.
Applications of computers can be seen in every electrical device nowadays whether it is television,
washing machine, watches, mobile phones and the list is endle ss. With the advancement in use
and technology, use of electronic devices has increased manifold. All this is possible because of the
ease and accuracy we get with these devices. Life has taken a fast pace and distances make hardly
any difference with the help of these machines. Let us have an insight to the basics of computers
in this chapter.
Evolution of Computers
Growth of the computer industry started with the need for performing fast calculations. The
manual method of computing was slow and prone to errors. So attempts were made to develop
faster calculating devices. The journey that started from the first calcul ating device i.e. Abacus has
led us today to extremely high speed calculating devices.
Computer is a term derived from the term ‘compute’ which means to calculate. Computer takes
input from the user, processes it and displays output. It is a device that works on a set of
instructions. It takes input from the user, processes the input according to the set of instructions
and gives the output.
Computer is an electronic device and works on electronic signals. The on and off signals denote 1
and 0 respectively. The binary language, also called machine language, works on two digits 0 and
1. Earlier computer experts used to work and give instruction in binary language only. Over the
years, many user friendly languages similar to simple English terms have developed and every
computer programmer need not learn and give instructions in binary language. Many user friendly
languages have been developed like C, C++, Java, JavaScript, Python and many more. These
languages are known as high level languages. Commands given in high level languages need to be
converted into binary language with the help of translators.
All this is achieved by an effective coordination of the components of the computer; broadly
categorized as hardware and the software. The term hardware refers to the tangible components
of a computer that we can touch and feel like the keyboard, mouse, monitor. However, the term
software refers to a set of instructions and is intangible. Some examples of software are operating
systems, word processors, spreadsheets, online calculators etc.
The data and/or instructions given by the user to the machine are termed as Input and the result
generated by the machine after processing the data is the Output.
Characteristics of a Computer
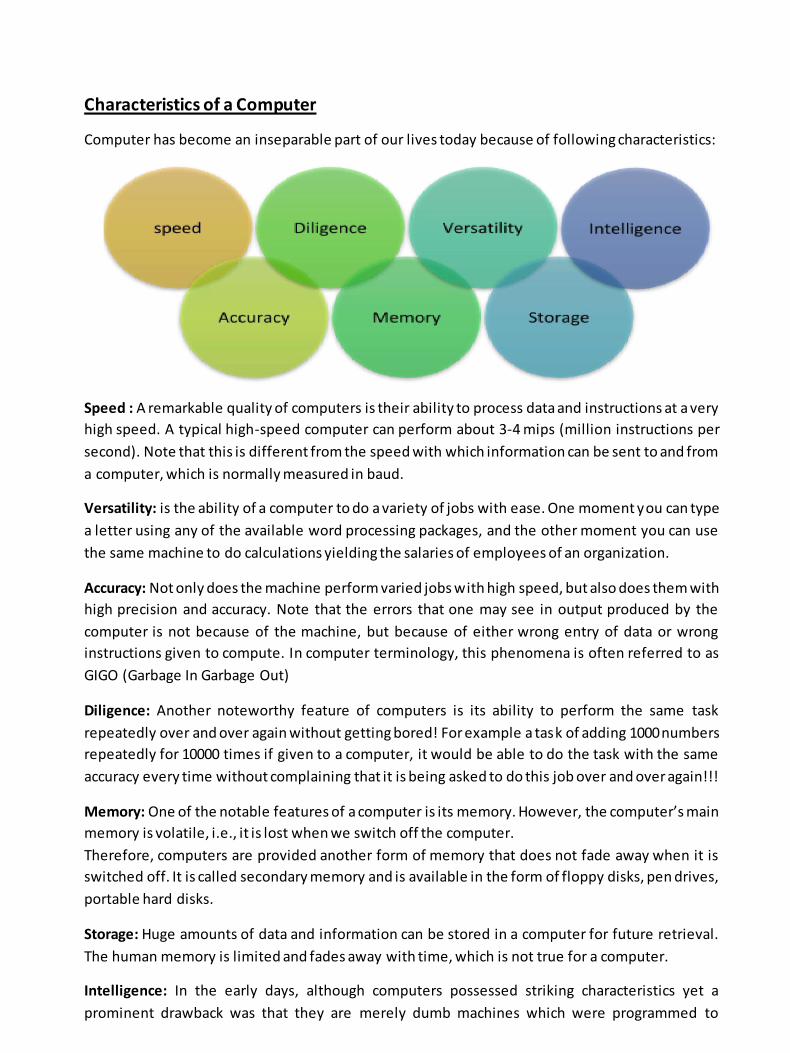
Computer has become an inseparable part of our lives today because of following characteristics:
Speed : A remarkable quality of computers is their ability to process data and instructions at a very
high speed. A typical high-speed computer can perform about 3-4 mips (million instructions per
second). Note that this is different from the speed with which information can be sent to and from
a computer, which is normally measured in baud.
Versatility: is the ability of a computer to do a variety of jobs with ease. One moment you can type
a letter using any of the available word processing packages, and the other moment you can use
the same machine to do calculations yielding the salaries of employees of an organization.
Accuracy: Not only does the machine perform varied jobs with high speed, but also does them with
high precision and accuracy. Note that the errors that one may see in output produced by the
computer is not because of the machine, but because of either wrong entry of data or wrong
instructions given to compute. In computer terminology, this phenomena is often referred to as
GIGO (Garbage In Garbage Out)
Diligence: Another noteworthy feature of computers is its ability to perform the same task
repeatedly over and over again without getting bored! For example a task of adding 1000 numbers
repeatedly for 10000 times if given to a computer, it would be able to do the task with the same
accuracy every time without complaining that it is being asked to do this job over and over again!!!
Memory: One of the notable features of a computer is its memory. However, the computer’s main
memory is volatile, i.e., it is lost when we switch off the computer.
Therefore, computers are provided another form of memory that does not fade away when it is
switched off. It is called secondary memory and is available in the form of floppy disks, pen drives,
portable hard disks.
Storage: Huge amounts of data and information can be stored in a computer for future retrieval.
The human memory is limited and fades away with time, which is not true for a computer.
Intelligence: In the early days, although computers possessed striking characteristics yet a
prominent drawback was that they are merely dumb machines which were programmed to

perform certain tasks. With the advent of artificial intelligence techniques, we now have machines
which can drive a car without a human driver or play chess against the best players.
Thus to summarize, this electronic device is capable of storing, processing huge amounts of data
and/or instructions with accuracy, diligence and high speed in an untiring manner.
Having seen the characteristics of a computer, now let us understand the way a computer works.
Components of a Computer
The computer is the combination of hardware and software. Hardware are the physical
components of a computer like motherboard, memory devices, monitor, keyboard etc. while
software is the set of programs or instructions. Both hardware and software together make the
computer system function. Let us first have a look at the functional components of a computer .
Every task given to a computer follows an Input- Process- Output Cycle (IPO cycle). It needs certain
input, processes that input and produces the desired output. The input unit takes the input, the
central processing unit does the processing of data and the output unit produces the output. The
memory unit holds the data and instructions during the processing.
Let us discuss each component and its functionality :-
Input: To initiate the process, the computer needs to be told of the problem to be solved. For this
purpose, a set of instructions and data is provided through the input devices such as keyboard and
mouse. A set of instructions provided to the computer for doing a task is called a program.
Storage: There are basically two types of computer storage devices:
Primary Memory : Data stored in Primary Memory is directly accessible by the CPU. The inputs
received in the above steps are stored in the computer memory, called random access memory
(RAM). This storage is relatively fast and expensive as compared to the secondary storage.
Primary memory is directly connected to the CPU.
It is also called main memory, primary memory, or working memory of the machine.
Primary memory is of two types :
1. RAM ( Random Access Memory) : It is a primary volatile memory i.e. its data gets lost once
the power supply is stopped.
RAM is of two types : DRAM (Dynamic Random Access Memory) and SRAM ( Static Random Access
Memory.
DRAM SRAM
Used in main memory It is used in cache
Inexpensive Expensive

Uses less power Uses more power
Slower than SRAM Faster than DRAM
2. ROM ( Read Only Memory) : It is generally used in startup operations of computer. It is a
non-volatile primary memory. Further it may be classified as : ROM, PROM(Programmable read
only memory), EPROM ( Erasable Programmable read only memory), EEPROM ( ElectricallyErasable
Programmable read only memory)
Secondary Storage: The memory which is external to the computer system forms the secondary
storage, for example, the magnetic tapes, compact disks, pen drives are all examples of the
secondary storage. These are not directly connected to the CPU.
Cache Memory : it is a very high speed memory which is used to cope-up with the high speed of
CPU. It is generally placed between CPU and Primary memory and acts as a buffer. It reduces the
average access time to data from the main memory and is comparatively expensive.
All the inputs, the intermediate results of computation carried out, and the final result are stored
in the memory of the computer. The computer also has another form of memory called secondary
memory. The programs and data not currently required are stored in secondary memory. It comes
in the forms such as a hard disk, pen drive, and CDROM. When required, for processing, these can
be retrieved and transferred to the main memory of the computer, Processing: The inputs provided
by the user are processed by the central processing unit as per the specified instructions. The result
of the processing is then either directed to the output devices or to a memory location for storage.
Control Unit: is responsible for coordination between the different units of a computer. It controls
the input, processing and output operations. For example, it coordinates with the peripheral
devices to accept the input or display the output. It is like a manager of all operations.
The manner in which the program is to be executed is managed by the control unit of the computer.
This entails deciding the address from which the instructions to be executed is to be picked up, the
memory location where the data or intermediate result is to be stored, etc.
Arithmetic Logic Unit (ALU): is responsible for actual processing of data. It retrieves the data from
the storage unit and performs the arithmetic calculations and/or comparisons on them and the
processed data is then sent back to the storage.

Output: The result of processing carried out by the computer is often directed to the display device
such as the monitor or printer. Other forms of devices are not uncommon, for example, the
computer may output music or video.
We have seen above that the input unit receives data, which is stored in the main memory, from
where it gets transferred to the Central Processing Unit and subsequently to the output device. The
Central Processing Unit has two modules; the Arithmetic Logic Unit and the Control Unit.
It also coordinates between memory and ALU by issuing timely signals. As mentioned above, the
storage unit has primary storage and secondary storage.
Block Diagram of Computer
Inside the Computer
There are various types of computers in the market these days, desktop personal computer–
popularly known as PC, laptop (also called notebook) – a small computer that can easily put on your
lap, tablet – a light computer of the size of a handbook, often used for working on the Internet.
If we look at a personal computer, from outside, it looks like a box (sometimes called CPU) that
contains CPU and hard disks, keyboard, mouse, monitor and speakers. The keyboard, mouse,
speakers, printer and other attachments like- scanner constitute the peripherals. The major
functionality in a computer is done in the Processing Unit. Processing Unit takes input and
processes it through the set of instructions ( given in the software) for that input and finally it gives
the results to the output unit.
Let’s now peep into the chassis of a processor!

Self Assessment Exercises:
1. Define the following :
a. Computer
b. Input Device
c. Output Device
d. Processor
2. Expand the following :
a. ALU
b. CPU
c. CU
d. RAM
e. EEPROM
f. ROM
g. DRAM
h. SDRAM
3. Answer the following
a. Explain the block diagram of computer
b. Describe the function of ALU and CU in short
c. Differentiate between RAM and ROM
d. Differentiate between input and output devices.
e. Explain the importance of Cache memory.

Session 2: Components of Computer
Motherboard: This is the main circuit board which holds together various components like CPU,
memory, connectors for the hard drive and optical drives, expansion cards to control the video and
audio, and connections in the form of various ports (such as USB ports). It provides a connection to
every component of the computer.
Input – Output Devices
Input devices takes input from the user. The input may be in the form of text, image, sound, video
etc. a wide range of input devices have been devised for supporting varying types of input.
Following are examples of some of the input devices of computer:
- Keyboard: this is a standard input device and takes data in the form of text.
- Mouse ; it is a pointing input device.
- Webcam: it takes data in the form of video/image
- Scanner : it generally stores data in the form of graphics
- Microphone : it is used for voice input/ audio input
- Handwriting input board: it is used for giving input from
Output Devices: devices that are used to give output to the user. Output may be in the form of
visuals, text, audio, printout etc. different types of output devices are there to support various
types of output. Following are some examples of output devices:
- Monitor/ VDU ( Visual Display Unit) : it is the standard output device and is similar to a television
screen.
- Speaker : it is an output device that gives output in the form of an audio/ voice.
- Printer : it is also a very commonly known output device that gives output in the form of print out
also called as hard copy.
- Plotter : it is a large printer like device that is used to take print of large maps, architectural
designs.
- Projector : it is an output device that gives an enlarged view of the output on a large screen. It is
generally used for giving a view of output to a large audience.
CPU: The motherboard houses the main processor or the CPU (Central Processing Unit). CPU
executes the user instructions and coordinates amongst all other
units of the computer. Thus, it is primarily responsible for the
performance of the machine. Processors may be classified on the
on the basis of their speed, technology (dual-core, quad-core, octa-
core) and their manufacturers (Intel and AMD to name just two).

Speed of processors is usually measured in megahertz (MHz) – millions of instructions per second; and gigahertz (GHz) – billions of instructions per second, is indicative of its power.
Power Supply Unit: This component of the computer is the one which converts the alternate current power supply being received by homes or offices to the low voltage direct current
required by the machine.
Random Access Memory (RAM): This memory storage plays an important role in the functioning of
a computer system. Every time you start up the computer, the operating system (the system
software that manages the device’s interaction with the peripherals and the internal resources) is
loaded in the RAM. The program that needs to be executed at any point of time also needs to be
brought in the RAM. These days the PCs have around 8-32 GB RAM. More the RAM, more will be
the space for the programs leading to faster execution. Of course, everything in computers is
subject to some limits.
Hard Disk(HD): all the data stored in c drive of a computer
is basically stored in Hard Disk.. It is a magnetic secondary
storage device for storing the data and is fixed in the box
of a computer. The program which is to be executed is first
stored in the hard disk from where it is transferred to
RAM. On completion of work, the program is again saved
on the hard disk. These days external and portable hard
disks are also available in the market for large storage of
data.
It is usually characterized by the performance and its capacity. Memory capacity is specified in
terms of bytes. These days the capacity of a hard disk is expressed in terms of Gigabytes, Terabytes.
Pen drive/Flash drives : it is a small pen-like storage device of and can be accessed by directly
inserting in the USB(Universal Serial Bus) Port. It is very popular these days because of its small size
and easy accessibility.
Let us look into the hierarchy of the terms used to specify the capacity.
Every bit of information in computer is stored in terms of Bits
(Binary Digits) i.e. 0s and 1s
1 nibble = 4 bits
1 byte = 8 bits
1024 bytes = 1 Kilobyte (KB) 1024 KB = 1 Megabyte (MB)

1024 MB = 1 Gigabyte (GB)
1024 GB = 1 Terabyte (TB) 1024 TB = 1 Petabyte (PB)
1024 PB= 1 Exabyte(EB)
1024 EB = 1 Zettabyte(ZB)
1024 ZB = 1 Yottabyte (YB)
Optical Storage devices : Compact disc (CD) and Digital Video Disc(DVD) are examples of optical
storage devices. Capacity of a DVD is higher than that of a CD. Data in a Cd/DVD may be accessed
by inserting the disc in a Disc Drive. Following is the image of a CD/ DVD drive:
All these components need to work in coordination and this is accomplished by the operating
system. It initializes the system for our use. In the next section, we study the basics of operating
systems.
Self Assessment Exercises
1. Explain storage devices of a computer.
2. Describe secondary and primary storage devices of a computer
3. Write a short note on Optical storage devices 4. Explain the role of Power Supply Unit.
5. Explain various units to measure storage capacity of a device. Give the smallest unit.
6. Do the following conversions :
a.2 GB = ___________KB
b. 210 MB = _ _________B

Session 3: Operating System
Operating System :
Operating system is the software that acts as an interface between user and computer hardware.
A computer needs to communicate with both the hardware and software; to do this; it utilizes the
services of an Operating system. Examples of some popular operating system are Windows, Linux,
Unix, MS-DOS, SOLARIS, MAC OS, Gary Arlen Kildall is known as the father of operating system.
It also acts like a government which lays down policies for efficient utilization of the resources and
provides for effective coordination amongst the various components of a computer. Every
computer system whether it is an independent system like a desktop or a cell phone must have an
operating system for performing the core functionalities like accepting input from various input
devices, directing the output to the display, managing the files and directories, communicating with
hardware, and installing /uninstalling of peripheral devices.
Figure 1.7 : Operating System as an Interface Functions of an Operating system can
be broadly categorized as:
− Communication Manager
− Resource Management
− Process Management
− File Management
− Memory Management

Figure 1.8 presents the various functions of an operating system.
Figure : 1.8 Functions of Operating System
Communication Manager: Manages the communication needs of the system, be it communicating
with the peripheral devices or the internet, are addressed by the operating system. Each of the
peripheral devices like printer, mouse have unique characteristics and the computer needs to know
these unique properties, to interact with them. For this, the operating system uses special
programs called drivers which enable recognition of these devices and their properties.
Resource Management: The working of a computer system is predominantly dependent on how its
resources are being managed. The resources that we talk of here are - the memory of the computer,
the CPU time, files, secondary storage, input/output devices etc. The operating system handles the
allocation of all such resources, the priority in which these are allotted to the various processes to
get an optimum performance from the system. We discuss here the prime resource management.
Process Management: A process is a program currently executing in the memory or waiting for the
CPU. In a computer there are multiple processes in the system. The OS manages, controls,
schedules all the processes being executed in the computer. It decides which process gets the
processor and for how long.
Memory Management: For a process to be executed, it has to be loaded in the working memory
that is the RAM (Random Access Memory). The memory management component of an operating
system allocates memory to the processes in a dynamic manner that is allocated on demand and
released when not needed.
File Management: Operating system takes care of all the files and folders (directories) maintained
on the computer disk. The basic tasks that a user needs to perform on files are creation, renaming,
deletion, copying or moving of a file or folder. All the files stored in a computer system can be
located through the file system. Two main types of file system are

Details of files in a computer are stored and traced using a file system called FAT. FAT is used by
the operating system to keep a track of files on hard disk. Various FAT systems are named on the
basis of the number of bits used to store the data of FAT. For example : FAT 16 uses 16 bits to store
data, FAT 32 uses 32 bits. Another system is NTFS (New Technology File system).
Types of Operating system
Operating systems can be classified in different ways; depending on various parameters.
Single-tasking and Multi-tasking
Single Task Operating System : such operating systems allow execution of only a single program at
any given instant.
Multi-Tasking operating system can execute more than one program simultaneously. The processor
time, in this case, is divided amongst various processes.
Single user and Multi-user
Single-user operating systems allow only one user to use the system. The desktop systems can be
classified as typical single user systems
Multi-user operating systems allow many users to access the system by maintaining an account of
all the registered users.
Real-Time Operating System
Operating systems which ensure that the response time is fixed are categorized as real -time
operating systems. They are intended for applications where data needs to be processed quickly,
without any significant delays. For example, an anti-aircraft missile system must fire as soon as it
receives a signal from the enemy aircraft, before it leaves the bomb and flies away.
Batch Processing Systems
In a batch processing system, similar jobs are clubbed together and submitted as a block to the
processor for execution. User intervention is minimal in such systems. The jobs are picked up one
by one and executed.
Exercises
Fill in the blanks
1. The unit used to measure the performance of a computer is ..................... .
2. Two main types of File system are ..................... and ..................... .
3. ________________ is the software that acts as an interface between user and the hardware.

Short Answer questions
1. List the various functions of an operating system.
2. Compare batch processing systems and multiprogramming systems.
3. What is FAT? Give an example.
Session 4: Troubleshooting and utilities
Introduction
While working with a computer you are sure to come across some hardware, software and
networking problems. The objective of this chapter is to help you find a solution to some commonly
encountered problems. Having gone through this chapter you will be able to diagnose and fix minor
issues. You may need expert advice for advanced problems not covered here. As you gain
experience, you would be more confident to handle problems.
Some of these problems would not occur if you work carefully and ensure that connections are in
place and proper settings are done. There could be many reasons/ causes for a problem on a
computer. It is sometimes difficult to judge if it is a hardware-related or software-related problem.
Troubleshooting is generally a trial and error process, requiring persistence and patience. Starting
with the simplest possible cause, we use the process of elimination to diagnose the problem. One
needs to figure out the cause of the problem, i.e., identify the part of the computer system that is
not functioning well.
Always take a backup of your important files to another source, like a pen drive or an external hard
disk. In case the problem is not solved, this ensures that a copy of your data is available.
Common Troubleshooting Steps
When you switch on the system, the power supply detects the CPU and the peripherals (the other
connected devices). The system boots, and if all peripheral devices have been successfully
detected, most systems will produce a beep. If any connected device (such as monitor, keyboard,
mouse, and printer) does not switch on, try the following:
Close running programs that are not being currently used Check the Cables: Check the cable of the specific computer hardware which is not working. Ensure
that all connections are tight, correctly plugged in, and the Power button of these devices is ON.
For wireless devices, make sure it is turned on and the batteries are charged.
For example, a laptop’s battery may not be charged. Plug the AC adapter into the electric socket,
wait a few minutes, and then try to turn on the laptop.
Repeat the Steps to See if the Problem Recurs : Repeat the sequence of steps that you performed
before the problem occurred. Observe if it causes the same response from your computer.

Use Help: Access the Help window by pressing the F1 key. This window helps to find a solution to
the problem.
Record Error Messages: Record the full error message for future reference.
Restart the Computer: Restart the peripheral device. If the device still does not switch on, shut
down the computer and start it again.
Troubleshooting Hardware Problem
1. Monitor is not Showing any Display/ The Screen is Blank
The System is in Sleep Mode: The computer may be in Sleep mode. Click the mouse or press any
key on the keyboard to wake it up.
Check All Connections: For a desktop, ensure a proper connection of a cable connecting the monitor
and a computer cabinet. Check that the power cables of the monitor and cabinet are plugged into
the electric socket and the power is turned on.
Laptop’s Battery is Low: The laptop’s battery could be very low, causing the laptop to switch of f.
Connect the charging cable to the laptop and plug it into the electric socket. The laptop will start
charging, and in a few minutes, the laptop can be switched on.
2. Keyboard Troubleshooting
If the keyboard is not responding, try the following:
Check Connections: Check the connection of the keyboard to the computer. If it is not connected,
or the connection is loose, connect it properly to the computer.
Check for any Damage: Inspect the keyboard cord for any damage. If any damage is found, the
keyboard may need to be repaired or replaced.
Change Batteries: For a wireless keyboard, the batteries may have discharged. You may need to
change the batteries.
Keys are stuck: If one of the keys on your keyboard is stuck, you need to clean the keyboard.
You will have to first turn off the computer. As the keyboard is stuck, you may need to use a mouse
if required. Remove dust with the help of a brush, and wipe the keyboard clean with a damp cloth
(water should not be dripping from the cloth).
3. Mouse Troubleshooting
In case the mouse is not working, try the following troubleshooting options:
Check Connections: Make sure that the mouse is securely plugged into the computer.
Check for any Damage: Inspect the mouse cord for any damage. If the damage is noticed, the mouse
may need to be replaced.

Check the Cordless Mouse: For a cordless mouse which is not working, switch off, and then switch
on the cordless mouse. This should re-establish a connection with the system.
Clean the Mouse: Try cleaning the mouse with a damp cloth. Clean the area around the button
located on the underside of the mouse.
4. Troubleshooting Printer Problems
Printer is Not Responding (Not Printing)
The printer could not be responding due to a number of reasons. Check for each of the following
causes, taking necessary action as required:
The Printer is Not Connected Properly or Not Switched On : Ensure that the printer cables are
connected properly. If the printer is not switched on, switch it on.
The Printer is Out Of Paper: If the printer does not have paper, put paper in the paper tray and try
printing again.
The Printer Paper Jam (Paper is caught in the Printer): Open the printer and remove the paper
caught in the printer. Close the printer and try printing again.
The Ink Cartridge of Printer is Empty: Most printers give a warning message when the ink levels are
low (insufficient for printing). Change the ink cartridge and try again.
Incorrect Printer Driver: The printer driver may be incorrect. You would need to install a new printer
driver. The latest driver can be downloaded from the manufacturer’s website. Some printers, when
connected to the internet, give a message when driver updates are available.
Consult your system administrator before installing any new software.
The Printer and Computer are Communicating Properly : This problem is more common when a
wireless connection is being used to connect a PC/ laptop to a printer. Check that the IP address
configured on your computer matches the Dynamic IP address allocated to the printer (If the
printer is connected through WI-FI (a wireless network) the configured IP Address could be
different from the one stored on your PC).
Before troubleshooting the printer’s IP address, you need to ensure that both your system and
printer are connected by means of a network – through a wireless connection or through
Ethernet.
You can access your printer settings and check the IP address and change the settings (if required).
Follow the following steps:
Step 1: Open the devices and printer dialog box by clicking Start button > Control
Panel > Hardware and Sound > Devices and Printers (or Start button > Control Panel >

All Control Panel Items > Devices and Printers), and select the printer whose IP address you wish to
check/change. (The example below, Figure 1.9, shows an HP Printer. Other printer models also have
similar interfaces).
Figure 1.9 : Screen to select device Printer
Step 2: Select the desired Printer (here HP Deskjet 3540 was selected). The following screen (Figure
1.10) shows the programs that can be selected to manage the printer, change its settings, etc.
Figure 1.10 Private Screen allowing you to choose a program
Step 3: Run the HP Print Assistant (as shown in Figure 1.11). This program manages the printer and
gives access to the Help information. The HP Print Assistant program may take some time to open,
as your PC/ laptop would try to establish a connection with the printer.

Figure 1.11 HP Assistant Processing
Step 4: Click on the Utilities icon to get the printer utilities screen (Figure 1.12)
Figure 1.12 Printer Utilities Step 5: Run the ‘Update IP Address’ utility. Before the utility program starts, a pop-up message
appears - “Do you want to allow the following program to make changes to your computer?”. On
confirmation, a screen (Figure 1.13) showing the printer’s Previous IP address appears (in this case
192.168.1.11). Please note that the box next to the Test button would be blank.
Figure 1.13 U pdate HP Software with Printer IP Address
Step 6: We have to now check whether the printer’s Previous IP address matches the Printer’s
current IP address.

Your system may be connected to the printer through a wireless or an Ethernet connection.
For Wireless Connection: Press the Wireless button or touch the wireless icon on the printer
display. The printer’s IP address appears (see Figure 1.14). As shown in this screen, it is 192.168.1.5.
In case, the printer does not have a display, print the Wireless Network Test Report. This report
includes the printer’s IP address.
Figure 1.14: Current IP Address of Printer
For an Ethernet Connection: Press the Ethernet icon on the printer display. The printer’s IP address
appears. In case the printer does not have a display, print the Network Configuration page. This
report includes the printer’s IP address.
Step 7: Update HP Software with Printer IP Address: From the above screens (Figure 1.13 and Figure
1.14), we can see that the Printer’s previous IP address saved on your system (192.168.1.11) does
not match the Printer’s current IP address (192.168.1.5). Enter
Printer’s current IP address or hostname in the box provided (HP Software screen is shown in Figure
1.13) and Click Test (to test the printer connection with the changed IP address).
On successfully connecting to a printer with the current IP address, the software shows a Success
message. Click Save to update the software with this new IP address.
Print Jobs are Being Sent to the Wrong Printer
When there are multiple printers on a network, a possible problem could be that a print job is being
sent to a wrong printer. This is because your system has set the default printer as Printer A, but you
had actually wanted the print job to go to Printer B. You could either change the default printer to
Printer B or choose Printer B for the current job.
Change the Default Printer
To change the Default Printer, open the devices and printer dialog box. Click Start button> Control
Panel > Hardware and Sound > Devices and Printers. Alternatively, click Start button > Control Panel
> All Control Panel Items > Devices and Printers.
The screen below (Figure 1.15) shows the default printer as HP Deskjet 3540 (Printer A). There is a
tick inside a small green circle next to its icon (this signifies that HP Deskjet 3540 has been set as
the default printer).

Figure 1.15: Change the Default Printer
Suppose you wish to change the default printer to say, HP Laserjet 1020 (Printer B). Right click on
the icon for this printer, a pop-up menu is displayed (as shown in screen in Figure 1.15). Select, Set
as default printer from this pop-up menu. The screen will now look like the one below (Figure 1.16).
The tick next to the HP Laserjet 1020 icon shows that it is now the default printer.
Figure 1.16: Default Printer Changed
Note: Changing the default printer to Printer B, as described above, is possible even if Printer B is
not connected to your network. Give a print job only if your system and Printer B are connected via
a network. You must ensure that Printer B is on your network and that your system can establish a
connection with it.
Choose an Alternate Printer for the Current Print Job.
When you give a print job, a Print screen opens, as shown in Figure 1.17. The Default Printer (here
HP Deskjet 3540) is automatically selected for the print job.

Figure 1.17: Print Screen
If you wish to change to an alternate printer for the current print job, click on one of the available
printer icons in the list. The next screen (Figure 1.18) shows HP Laserjet 1020 as the printer selected
for the current job. As you can see, printer HP Laserjet 1020 is offline (not connected to your system
via a network/ cable). The Print program allows you to select the printer even when the printer is
offline. Ensure that this printer is online (connected to your system via a network/cable), before
you click on the Print button and start the print job.
Figure 1.18: Print Screen
Printer is Slow
The printing speed can be improved by reducing the printing quality and using Fast Draft/ Fast
Printing. This works well for everyday printing. Change the default printer quality setting from
Normal to Fast Draft.
To do this, click the Preferences button (as seen on the screen in Figure 1.17 and 1.18).This will
open the Printing Preferences screen (Figure 1.19). Under the Printing Shortcuts Tab choose Fast/
Economical Printing.

Figure 1.19: Change to Fast Printing
Sound Troubleshooting
When you are not getting sound from the speakers, troubleshoot using the suggestions given
below:
Check Speaker Volume
Check the volume level of the speakers. Click the Audio button in Task Bar to make sure the sound
is turned on and that the volume is up (Figure 1.20).
Figure 1.20: Checking for the volume level of the Speaker
Check Audio Player Controls
Many audios and video players have their own separate audio controls. Ensure that the sound is
turned on and that the volume is set large enough to be heard.
Check the Cables
In case external speakers are used, ensure that the speakers are plugged into the electric socket,
turned on, and connected to the correct audio port or a USB port on your system. If your computer
has color-coded ports, the audio output port will usually be green.
Check the Sound Using Headphones

Connect headphones to the audio output port of your computer, and check whether you can hear
sound from the headphones. If you can, that means there is something wrong with your speakers.
Contact a Service Engineer.
Troubleshooting Software Problems
Common Troubleshooting Technique - Close the Program and Reopen it
A simple troubleshooting technique would be to close the application/program and reopen it. If
the problem persists, try other troubleshooting techniques.
An Application is Running Slow
Check for Available Updates
If restarting the application does not improve the speed of the application, check for updates.
Click the Help menu and look for an option to check for Updates. In case this option is unavailable,
you can search online for application updates.
An Application is Frozen
Sometimes an application may freeze. When this happens, you will not be able to close the
window or click any button within the application. The following troubleshooting options may be
tried:
Forcefully End the Application
On a PC / Laptop keyboard, press (and hold) Ctrl+Alt+Delete (the Control, Alt, and Delete keys).
This will open the Windows Task Manager (Figure 7.13). Open the Applications tab on this screen.
You will see a list of applications. The applications should have the status as Running. An
application which is not responding would have the status as
Not Responding. Select the application which is not responding from the list and click the End Task
button. This forcefully terminates the application. Now restart the application.
Restart the Computer
If you are unable to forcefully end an application, close all running programs and restart the
computer.
If you are unable to shutdown/ restart your system, perform a hard reboot by pressing the Power
button, i.e. manually turn off the computer. This step should be performed in extreme situations,
as a last resort. Remember that hard reboot may cause data loss.
Once the system is responding, run the virus check to scan the system for viruses.

Utilities
Utilities are the special programs that help computer systems to work more smoothly, efficiently
and effectively. Utility software programs help in :
- improving the performance of computer
- provide security from virus,
- manage disk space
- free disk space on hard Disk - provide backup etc.
1. Check for Viruses
You may have malware running in the background, which is slowing applications on your system.
Viruses generally lower the system’s performance. Run the virus scanner installed on your system.
2. Free Space on the Hard Drive
Check Minimum Free Disk Space Required
There should be at least 200-500 MB of free hard drive space on your system. Non-availability of
free space slows the functioning of the computer. To check the amount of disk space available,
Open the Windows Explorer Application and click on My Computer. This will show the different
hard disk partitions such as C, and D. To check the amount of disk space available on the C drive,
highlight the C drive and right click to get a pop-up menu as shown below:
Figure 1.21: Pop-up Menu showing operations on a Disk
Select the Properties option from this pop-up Menu. Choose ‘General’ Tab of this application. The
screenshot in Figure 1.22 shows the available Free Space on the C Disk, shown by the purple pinkish
coloured area in the Pie chart (here 1.91 GB).

Figure 1.22: Free Space on a Disk
Run a Disk Clean Up Application
To get some more disk space, run the Disk Cleanup Application. On the General tab shown in Figure
1.22, click on the Disk Cleanup button, to start disk cleanup.
Once the Disk Cleanup is complete, the Disk Cleanup dialog box opens (Figure 1.23). Click on Clean
up system files button. This will delete any unnecessary system-related files from the local disk.
Figure 1.23: Disk Cleanup
Delete Unused Files and Programs
Periodically delete files and programs you do not need. This will increase the free space on your
disk, increasing the performance of your computer. Images and videos take up a lot of space. These
can be moved to an external drive. This will free some space on the disk drive.

Empty Your Recycle Bin
This can be done by right-clicking on the Recycle Bin icon (usually on the desktop), and then
selecting Empty Recycle Bin.
Figure 1.24: Empty Recycle Bin
Remove Temporary files
It is important to periodically remove the temporary files and the Internet browsing history. This
too will increase the free space on your disk.
To do this you would need to first open the network and sharing dialog box. Click Start button>
Control Panel > Network and Internet > Network and Sharing Center (Figure 1.25 same as Figure
7.25). Alternatively click, Start button> Control panel > All Control Panel Items> Network and
Sharing Center.
Figure 1.25: Network and Sharing Center Dialog Box
On the bottom left corner of this screen, click on the link Internet Options. This opens the Internet
Properties dialog box (Figure 1.26).

Select the General tab. Under Browsing History, check the Delete browsing history on exit
checkbox, and then click the Delete… button. This deletes the browsing history. Click the OK
button to exit.
Figure 1.26: Screen to delete temporary files and browsing history
Disk Defragmentation
The information in our files changes frequently. This results in gaps or spaces in the file stored in
the memory (hard disk). The file thus takes more space on the computer, and may cause the
computer to slow down. You need to run a Disk Defragmentation program to reclaim these gaps in
space. This can be achieved as follows.
− Open the Windows Explorer Application and click on My Computer.
− Highlight the C drive and right click to get a pop-up menu.
− Select the Properties option from this popup Menu.
− The dialog box showing the properties of the local disk (C:) is displayed (Figure 1.27). − - - Choose the Tools Tab of this application. Click the Defragment now… button.
Figure 1.27: Running the Defragmentation Application

Remove Unused Programs
Old or unused programs that are not being used may still have components running behind the
scenes when you start your computer. This can slow down the system. To prevent these programs
from running when your computer starts, turn off unused program services. For this purpose, from
the Windows startup, click Start button > All Programs > Startup. Right-click the shortcuts that you
do not need and click Delete (Figure 1.28)
Figure 1.28: Removing unused Shortcuts
Disable Unused Program Services: This is done in two steps. First, the unused program service is
stopped. It is then disabled so that it does not run at Startup.
Click Start button> Control Panel> Administrative Tools> Services. For each program/service
that you are sure that you do not need, click on the Service to highlight it, click the Stop link
to stop the service from running (Figure 7.29).
Now double-click the stopped service and choose Startup Type as Disabled, and click OK (Figure
7.30).
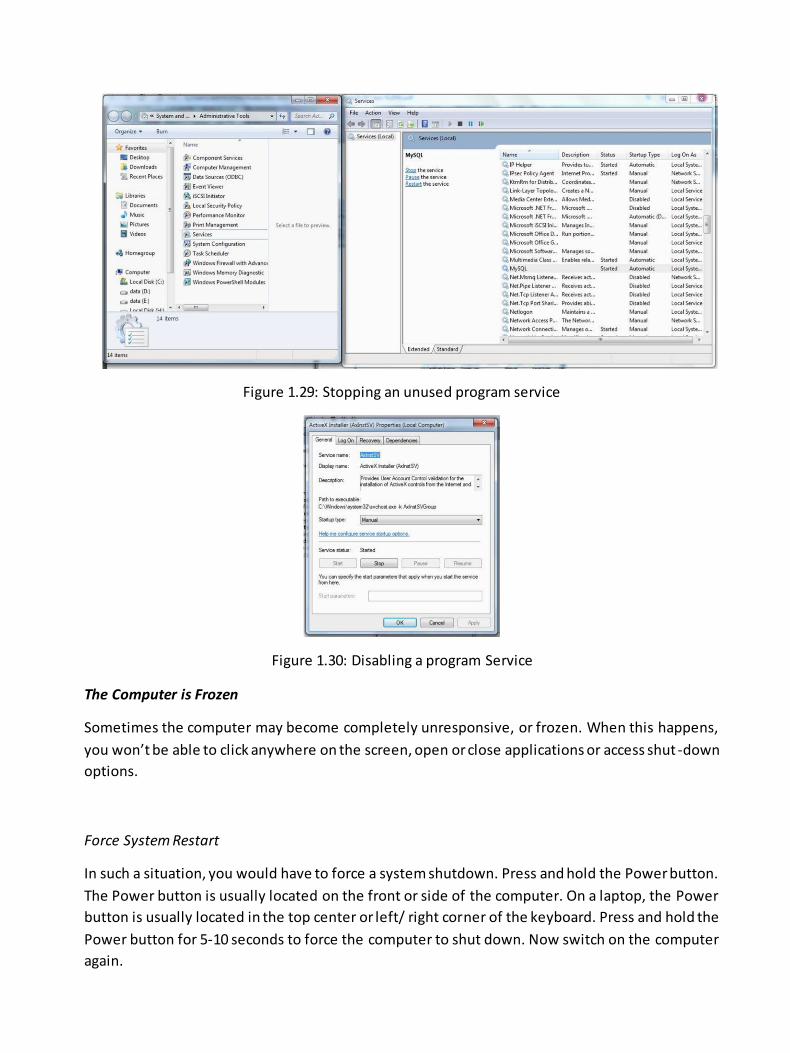
Figure 1.29: Stopping an unused program service
Figure 1.30: Disabling a program Service
The Computer is Frozen
Sometimes the computer may become completely unresponsive, or frozen. When this happens,
you won’t be able to click anywhere on the screen, open or close applications or access shut -down
options.
Force System Restart
In such a situation, you would have to force a system shutdown. Press and hold the Power button.
The Power button is usually located on the front or side of the computer. On a laptop, the Power
button is usually located in the top center or left/ right corner of the keyboard. Press and hold the
Power button for 5-10 seconds to force the computer to shut down. Now switch on the computer
again.

Troubleshooting Networking Problems
Unable to Connect to the Network
1 Checking for Network Connectivity
A common problem is that you are unable to open a web page that you had requested. This could
be because you are unable to connect to the Internet. To check the internet connection, view the
Network icon (triangular in shape). This is on the Task Bar (bottom right of the screen) (Figure 1.31).
The screenshot in this figure shows that there is no network connection (an orange star on the
network icon).
Figure 1.31: Task Bar showing no Internet connection
An alternate method to check for network connectivity is to click Start button > Control Panel >
Network and Sharing Centre (Figure 1.32). The red cross between the USER-PC and Internet shows
that the computer is not connected to the Internet. You would have to establish an internet
connection. You may need to run the diagnosis to find the cause of the problem.
Figure 1.32: Checking for network connectivity through Control Panel On the Task Bar, click the Network icon to see the available Internet connections. If you have
opened the Network and Sharing dialog box
(Start button > Control Panel > Network and Sharing Center), click on the link Connect to a network.
This will open a list of Wireless Network Connections in the vicinity of your system, (Figure 1.33).
Click on one of the connections and then click the Connect button.

Figure 1.33: Wireless Network Connections in the vicinity of the system
Once you have requested for network connectivity, the troubleshooting application will display a
few screens while the system attempts to diagnose the issue: Windows Network Diagnostics:
Investigate router or access point issues, Detecting problems, Resolving the problems, Detecting
additional problems, etc. These screens will guide you in establishing a connection. For example,
while investigating router or access point issues, it would ask you to turn off the router and restart
it again (Figure 1.34).
Figure 1.34: Investigation of router or access point issues
If you are still unable to connect to the internet, the troubleshooting application would report the
Problem in network connectivity. Figure 1.35 shows ‘Problem with wireless adapter or access
point’. Try Switching Off and then Switching On the adapter. If that still does not work, repeat the
whole process again after some time. Your network connectivity issue would probably be solved
after a few attempts.

Figure 1.35: Troubleshooting application showing the Problem in network connectivity
Check for the Validity of IP Address
If the above steps do not help in establishing a network connection, you would have to check a few
more system settings.
First check the validity of the IP address of your system. In the bottom left corner of your Windows screen click Start. In the Search box type CMD and press Enter (Figure 1.36a).
.Figure 1.36a: Opening COMMAND PROMPT from the Startup Menu
Alternatively, in the bottom left corner of your Windows screen click Start. In the Search box type
Run and press Enter. This will open the Run application, which opens a program or document that
you request it to. Type CMD in the Open textbox and press Enter (Figure 1.36b).

Figure 1.36b: Opening COMMAND PROMPT using the Run application
The COMMAND PROMPT (an MS-DOS window) will open. Type IPCONFIG and press Enter. The
results should show the Connection-specific DNS Suffix, IP Address, etc., as seen in Figure 1.37. This
information will only show if your system is connected to the internet, else, it will show Media
State: Media disconnected.
Figure 1.37: IPCONFIG showing the system’s IP address in the COMMAND PROMPT WINDOW
The Network Fly lead is Not Working Properly
The fly lead is the cable that connects the network card in your computer to a network point
(usually on the wall). A non-operational network fly lead could also cause failure in the internet
connection. The network fly lead is seated in the network slot on your computer.
This slot is located either at the back of the computer or on the side, depending on your PC/laptop.
Ensure that the fly lead is plugged securely into the network point on the wall.
Check whether the cable or point has been damaged. If so, seek assistance from a network
administrator.
Your fly lead could be faulty or damaged. To check if your fly lead is faulty, borrow a working fly
lead from someone and repeat the previous steps with the borrowed fly lead.
If this borrowed fly lead works, your own fly lead is faulty. Seek assistance f rom a network
administrator.
Sometimes, the network point on the wall may not be activated. A network point will not work until
it is activated. For this purpose, get help from your network administrator.

The Network Card is Not Working Properly
A working network card is essential to connect to the Internet. The network card lights must be
flashing or lit up. If there are no lights, either the network card is broken, or there is no network
to connect to. A broken network card needs repair or replacement. Contact a Service Engineer.
Seek assistance from a network administrator to check whether the fly lead is plugged into the
correct network card. If the machine has more than one network cards, you need to ensure that
the cable is plugged into the network card configured for it (i.e. the fly lead should connect the
network card to the network point on the wall, for which it is configured).
To check whether the network card is working open a command prompt window (Start >Run >type
CMD). An MS-DOS window will open, type ping 127.0.0.1 at the prompt.
Alternatively, click Start and in the Search box type ping 127.0.0.1 and press Enter. This will run the
ping command in the command prompt window.
If you get a reply (as seen in Figure 1.38), the network card i s working.
Figure 1.38: PING showing that the Network Card is working
Contact a Service Engineer/ your Network Administrator in case there is no reply when you ping.
Points to Remember:
While working with a computer one comes across hardware, software and networking problems. In this
chapter, we learned how to diagnose and fix minor problems. The following summarizes what we learned:
- Computer is an electronic device that takes input from the user, processes it and displays output.
- The on and off signals denote 1 and 0 respectively. The binary language, also called machine
language,
- Commands given in high level languages need to be converted into binary language with the help
of translators.
- Speed, accuracy, memory, diligence, versatility are some of the features of computer.

- Hardware are the physical components of a computer like motherboard, memory devices,
monitor, keyboard etc.
- Software is the set of programs or instructions.
- It is sometimes difficult to judge if the problem is hardware-related or software related. Identify
the part of the computer system that is not functioning properly.
- Before handing over your machine to an engineer, take a backup of important files to anothe r
source, like a pen drive or an external hard disk. This would ensure a copy of your data is available,
in case something unforeseen happens while your computer is being repaired.
- Most systems produce a beep when a system boots successfully (i.e. all peripheral devices have
been successfully detected). If any connected device does not switch on, try the common
troubleshooting tips: close running programs that are not being currently used; check the cables;
repeat to see if the problem recurs; use help; record error messages and restart the computer.
- If the monitor is not showing any display or the screen is blank: the system could be in sleep
mode; check all the connections; the laptop’s battery may be low. If the keyboard is not responding:
check connections; check for any damage; try changing batteries in a wireless keyboard; the keys
may be stuck, replacing the keyboard.
- In case the mouse is not working: check connections; check for any damage and replace the
mouse if required; restart the cordless mouse; clean the mouse.
- The printer may not be responding because: it may not be connected properly or not switched
on; the printer could be out of paper; there could be a paper caught in the printer; printer’s ink
cartridge could be empty; an incorrect printer driver may be configured.
- The printer and computer may not be communicating properly when a wireless connection is
being used to connect a PC/ laptop to a printer. The IP address configured on your computer should
match the Dynamic IP address allocated to the printer.
- When the print jobs are being sent to the wrong printer: change the default printer or choose an
alternate printer for the current print job.
- To improve the printing speed, reduce the printing quality by using Fast Draft/ Fast Pri nting.
- When there is no sound from the speakers: check speaker volume; check audio player controls;
check the cables; check the sound using headphones.
- When an application is running slow, check for available updates.
- Sometimes an application may freeze. Forcefully end the application or restart the computer.
- When all programs on the computer run slowly, check for viruses or try freeing space on the hard
disk.

- To free space on the hard drive: check minimum free disk space required; run a disk cleanup
application; delete unused files and programs; empty the recycle bin; remove temporary files; run
the disk defragmentation program; remove unused shortcuts and program services.
- Force System Restart when the computer freezes.
- When the computer is unable to connect to the network: check the network connectivity; check
the validity of IP address; the network fly lead or network card may not be working properly.
Exercises
1. List some common troubleshooting steps that you should keep in mind.
2. What steps would you take if the monitor is not showing any display, or the screen is
blank?
3. What would you do when your keyboard or mouse is not responding/ working properly?
4. What troubleshooting step will you take when the printer is not responding?
5. How can you check the IP address of a printer connected through a wireless connection?
6. What steps do you need to take to change the default printer?
7. What could be the reasons for the print jobs being sent to the wrong printer?
8. What checks would you undertake when the speaker is not working?
9. What are the troubleshooting steps taken when an application freezes?
10. What could be the possible cause for all the applications to be running slow?
11. How can one free disk space on the computer?
12. How do we remove temporary files?
13. Why is disk defragmentation required? How can we achieve disk defragmentation?
14. What steps do we take to remove unused shortcuts and program services?
15. How can we check the network connectivity of your system?
16. Explain how you would check the validity of the IP address.
17. How will you check whether the network fly lead is working properly?
18. Describe the procedure to check whether the network card is working properly

Unit-2 Networking and Internet
Computer Networking
Internet and Its Terminology
Cyber Threats and Cyber Security

Unit-2 Networking and Internet
In the beginning of civilization humans communicated via means such as oral, gestures,
and touch. Knowledge transcended from one generation to another largely by way of oral
traditions, and later on by inscriptions on stone and metal until early forms of paper were
developed. However, education remained largely confined to the elite until the invention of
printing press by Johannes Gutenberg, around 1440. It led to dissemination of information
through newspapers and books and provided a new and versatile method of communication
of information. This was followed by the era of telegraph and telephone marking in the
nineteenth century. Twentieth century saw the development of commercially viable radio
and television which became instrumental in dissemination of information and
entertainment. ARPANET that began with a network connecting computers in a few
organizations in early sixties paved the way for the Internet in early eighties that
revolutionized not only the exchange of information amongst individuals and organizations,
but also the way organizations do business, and the people educate, entertain, and
organize themselves. Social networking, instant messaging, voice calls (through VOIP),
media are influencing the definition of Internet being used.
2.1 Computer Networking
2.1.1 Evolution of Networks and Internet
In 1876 Bell came forward with the concept of communication through telephone lines
leading to development of Public Switched Telephone Network (PSTN) in 1877. It opened
the new frontiers allowing several homes to connect through telephone lines. From that
time, communication was mainly through telephone lines.
In the late 1950s, all the military communications started using telephone networks setting
up dedicated connections between the two parties. This dedicated connection made use of
technology called circuit switching. The connection consisted of several intermediary lines
and switching offices enroute. They were vulnerable to danger of damage to the switching
offices which may disrupt the entire network. At the peak of the cold war, the US Department
of Defense (DoD) realized the need to establish fault-tolerant networks that would not fail
at the time of nuclear war and could survive a single point failure in the network. Paul Baran
along with Donald Davies and Len Kleinrock came forward with the idea of digital packet
switching in which the message to be transmitted is divided into small chunks called
packets. Unlike circuit switching in which resources are reserved along the dedicated path
of communication, packet switching is based on link sharing.
The US Department of Defense realized the need to connect geographically separated
research computers together to form a network. This led to the development of Advanced
Research Projects Agency Network (ARPANET) in 1969. ARPANET made use of
technology called digital packet switching. Initially its use was restricted to non-commercial
purposes such as military and research. Subsequently, its use extended to education by
supporting various educational institutes.

Need for communication between various heterogeneous networks led to the development
of TCP/IP (Transmission Control Protocol/Internet Protocol) in 1970. Along with several
smaller networks, another large network called NSFNET was developed in 1984 by NSF,
U.S. National Science Foundation for research and education purposes. When ARPANET
and NSFNET were interconnected, the network growth increased tremendously. TCP/ IP
protocol (rules for communication) acted as a glue to connect various heterogeneous
networks together into a single network. This wide network is an Internet (network of
networks).
The Internet is a global network that comprises many voluntarily interconnected networks.
It operates without a central governing body. The standardization of the core protocols (IPv4
and IPv6) lis an activity of the Internet Engineering Task Force (IETF), To maintain
interoperability, the principal name spaces of the Internet are administered by the Internet
Corporation for Assigned Names and Numbers (ICANN). ICANN coordinates the
assignment of unique identifiers for use on the Internet, including domain names, Internet
Protocol (IP) addresses and many other parameters. Several government and private
organizations, collectively called Internet Service Providers (ISPs) joined hands to
Fig 2.1 one way communication channel
provide connectivity for the Internet. The Internet made it possible to exchange information
and communicate with remote nodes. Bandwidth describes the maximum data transfer rate
of a network or Internet connection.
2.1.2 Computer Network
Nodes or stations are electronic devices such as computers, printers, Fax machines, and
telephones which communicate with each other by sending and receiving data/message.
Figure 2.1 depicts a one-way simple communication system that comprises the following
components:
● Sender: The node that is responsible for sending the data.
● Receiver: The node that is responsible for receiving the data.
● Message: Message is the information or meaningful data that is being communicated in
a structured form.
● Channel: Channel is the communication medium through which message is transmitted

Fig 2.2 computer network
A collection of interconnected nodes which communicate by means of some channel form
a computer network. The communication taking place in a computer network can be
categorized as simplex, half-duplex, and full-duplex. In simplex mode, information can be
transferred only in one direction. This mode is termed unidirectional. In computer networks,
the data transmitted using many fiber optics and satellites is simple in nature. Half-duplex
mode is a bidirectional communication between the two nodes, however, only one node at
a time can transmit the data. This mode is generally used for transferring files between
nodes in a low-bandwidth setting. In full-duplex mode, both communicating parties can send
and receive at the same time.
interactive receive at the same time. The interactive applications use this mode of
communication, thus speeding up the data transfer.
NIC (Network Interface Card) on the systems for networking supports full-duplex mode.
Computer networks can be used as means of resource sharing and communication.
● Resource Sharing: Connecting computers through networking allows us to share
hardware and software resources. Examples of hardware resources include peripherals (for
example, printers and scanners), CPU, and memory. Examples of software resources
include system and application software, and files that may include text, audio, and video
content. Note that in the network shown in Figure 2.2, all the three computer systems are
connected with each other and to the printer through the network .
● Communication: Connecting computers through a network facilitates exchange of
information amongst the nodes in the network. For example, any of the computer systems
in Figure 3 may send data to any of the three computer systems or the printer, as it is
connected to every node in the network. Creation of a network requires various network
devices such as modems, routers, switches, and bridges, each of which plays a specific
role in the network. Networks differ on the basis of transmission media used, arrangement
of nodes in the network, their geographical span, and their purpose.

2.1.3 Transmission Medium
A transmission medium refers to the channel of transmission through which data can be
transmitted from one node to another in the form of signal. A signal encodes the data in a
form suitable for transmission on the medium. A medium is characterized by its bandwidth
defining the information carrying capacity of the medium. Common methods of Internet
access by users include dial-up with a computer modem via telephone circuits, broadband
over coaxial cable, fiber optics or copper wires, Wi-Fi, satellite, and cellular telephone
technology (e.g. 3G, 4G).A transmission medium may belong to one of the following two
categories:
● Guided Medium: The term refers to physical conductors such as twisted pairs, coaxial
cable, and fiber optics. In twisted pair and coaxial cable, the signal travels as voltage and
current signal whereas in optical fibre, the signal is in the form of light.
● Unguided Medium: The unguided mediu, m uses electro-magnetic waves that do not
require a physical conductor. Examples of unguided medium include microwave, radio
wave, infrared. Radio and microwave
Fig 2.1.3 Transmission Medium
2.1.4 Network Devices
Creation of a network requires various network devices, each of which plays a specific
role
in the network.
Repeater
With increase in distance, a signal may become weak and distorted. A repeater is used to
restore the input signal to its original form, so that it can travel a larger distance. Thus, it is
placed between two cable segments as shown in Figure 2.4 It is also known as digital
generator which reshapes and amplifies the digital signal.

.
Fig-Repeater 2.4
● Hub
Unlike a repeater which connects two cables, a
hub connects several lines, also called, cable
segments. A hub comprises several input/output
(I/O) ports, each of which connects to a single
cable as shown in Figure 2.4. Data arriving on an
incoming line is output to all lines except the line
on which the hub receives the data.
Fig 2.5 Hub
● Bridge
A bridge is a multiport device used for connecting two or more local area networks (LAN),
possibly operating at different speeds as shown in Figure 2.5. Thus, a bridge may be used
to produce bigger LAN by combining smaller LANs. A bridge enables devices on one LAN
segment to communicate with the devices on another LAN segment. Unlike hubs, they are
intelligent devices which exercise discretion while forwarding data to the outgoing line
leading to the destination
Fig. 2.5 Bridge

● Switch
Unlike bridges which connect two or more LAN segments, switches are used to connect
individual nodes in the network with each other. Each node within network is connected to
a unique port in the switch as shown in Figure 2.6. On receiving the incoming data frame,
it forwards it to only a single line connecting to the destination node. All the nodes connected
through switch forms only one LAN.
Fig 2.6 Switch
● Router
Routers are used for connecting various networks (LAN or WAN) with each other as shown
in Figure 2.7. A router transmits data from incoming network to another network. A router
maintains a routing table of various networks. Based on the destination address, the router
determines to which network the incoming packet should be transmitted
Fig 2.7 Router
● Gateway
A gateway connects networks based on different protocol technologies to communicate
with each other. Data coming from one network operating on one protocol is converted
according to the protocol of the outgoing network, and then forwarded. Thus a gateway may
be thought of as a router equipped with software for protocol conversion.
2.1.5 Network Types

On the basis of geographical span, network can be broadly categorized as PAN, LAN, MAN,
and WAN.
● Personal area network
A personal area network (PAN) is a computer network used for communication among computer and devices close to one person. Some examples of devices that are used in a PAN are personal computers, printers,
fax machines, telephones, PDAs, scanners, and even video game consoles. A PAN may include wired and
wireless devices. The reach of a PAN typically extends to 10 meters.
Fig 2.8 PAN
LAN stands for Local Area Network. Local Area networks are private networks and can span a
radius of up to 1 Km. They are generally established within a building or campus shown in Figure
2.9. LANs operate at a speed in the range 10 Mbps to 1 Gbps.
Fig 2.9 LAN
● MAN stands for Metropolitan Area Network. It may be owned by a single organization or
by many individuals or organizations. These networks are used to establish links within a
city, and span an area of radius up to 50 Km. MANs facilitate sharing of resources by
connecting various local area networks (Figure 2.10). For example, a cable television
network within a city.
Fig 2.10 MAN

● WAN stands for Wide Area Network. Typically a WAN spans a segment of about 1000
Km. They are used for long distance communication and are well suited for connecting
remote areas. They establish links within a country or continent. A WAN may be owned
and managed by several organizations. It connects various local and metropolitan area
networks.
Fig 2.11 WAN
2.1.6 Topology
The arrangement (also called layout) of nodes in a network is called network topology.
There are broadly two types of topologies broadcast and point to point. In broadcast
topology, all nodes share the same physical link. When one node transmits, all nodes
receive. Collision may occur when more than one node simultaneously transmits, and there
is a collision resolution mechanism for handling it. Broadcast topologies are mainly bus
and ring. In point to point topology, every pair of nodes has a dedicated link. Popular point
to point topologies are star and mesh.
● Bus Topology
In bus topology, there is a long cable, called backbone cable (or simply backbone), that
connects various nodes through a connector called tap as shown in Figure 2.12. In this, a
message sent by one is received by all devices connected to backbone cable. This topology
requires less cabling and is easy to install and extend the network laid using it. However,
fault detection and isolation is difficult.
Fig 2.12 Bus Topology

● Ring Topology
In ring topology, all the devices are attached through a cable in the form of ring as shown
in Figure 2.13.The message to be communicated is transmitted in one direction, thereby,
relaying the message to the intended recipient. addition and deletion of devices, and fault
detection and isolation is easy. However, the topology suffers from the limitation of single
point failure leading to disruption of the entire network. sending a message from one node
to another node may take more time (four steps while sending message from device A to
device E)
Fig 2.13 Ring Topology
● Star Topology
In star topology, all the devices are connected to the central controller called hub as shown
in Figure 2.14. communication between any two devices takes place through the hub
responsible for relaying messages. star network can be easily installed and configured.
Also, fault detection and isolation is easy. However, it requires more cabling as compared
to bus and ring topology.also, hub failure will lead to network failure
Fig 2.14 Star Topology

● Mesh Topology
In mesh topology, every node is connected with every other node in the network as shown
in Figure 2.15 Because of dedicated point to point connection between every possible pair
of nodes, the topology provides secure data transfer without any traffic problem. it requires
a large number of connections to establish the topology. This leads to difficulty in installation
as the number of nodes grow as the network grows.
Fig 2.15 Mesh Topology
● Tree Topology
● Fig 2.16 Tree Topology
Tree topology is a hybrid topology using a combination of star and bus topology. Backbone
cable in a bus topology acts like the stem of the tree, and star networks (and even individual
nodes) are connected to the main backbone cable like the branches of tree as shown in
Figure 2.16 damage to a segment of a network laid using tree topology will not affect other
segments. installation and configuration is difficult as compared to other topologies. Also, if
the backbone cable is damaged, the entire network communication is disrupted

2.1.7 Identification of computers and users over a network
● MAC Address
Once a network has been set up, the nodes can communicate among themselves. But for
proper communication, the nodes should be uniquely identifiable. If a node X sends some
information for node Y on a network, then it is mandatory that nodes X and Y are uniquely
identifiable on the network. Let us see how this is achieved. Each NIC has a universally
unique address assigned to it by its manufacturer. This address is known as the MAC
(Media Access Control) address of the card. It means that a machine with an NIC can be
identified uniquely through its NIC's MAC address. The MAC address of an NIC is
permanent and does not change.
MAC addresses are 12-digit hexadecimal (or 48 bit) numbers. By convention, MAC
addresses are usually written in one of the following two formats:
MM:MM:MM: SS: SS:SS
MM-MM-MM-SS-SS-SS
The first half (MM:MM:MM) of a MAC address contains the ID number of the adapter
manufacturer. The second half (SS: SS:SS) of a MAC address represents the serial number
assigned to the adapter (NIC) by its manufacturer.
For example, in the following MAC address,
00:A0:C9 : 14:C8:35
The prefix 00:A0:C9 indicates that the manufacturer is Intel Corporation. And the last three
numbers 14:C8:35 are given by the manufacturer (Intel in this example) to this NIC.
● IP Address
Every machine in a network has another unique identifying number, called its IP Address.
An IP address is a group of four bytes (or 32 bits) each of which can be a number from 0 to
255. A typical IP address looks like this:
59.177.134.72
To make it easier for us to remember, IP addresses are normally expressed in decimal
format as a "dotted decimal number" like the one above.
On a network, the IP address of a machine, and not the MAC address of its NIC, is used to
identify it. Do you recall IP protocol? IP protocol identifies a machine with its IP address to
route the packets.
MAC address is used only when a specific machine is to be targeted. For example, suppose
we want to block a specific PC to access some network resource. If we use the PCs IP
address, then the PC is not blocked permanently as its IP address may change when it
connects to the network next time. Instead, if the PCs MAC address is used for the purpose,
then the job is done!
An IP (Internet Protocol) address is a unique 4 digit hexadecimal number assigned to each
node on a network. IP address settings of a node can be changed by the user You might
wonder how an IP address differs from a MAC address. In fact, the IP address is assigned

by the network administrator or the internet service provider while the MAC address is
assigned by the manufacturer. Thus if a computer is transferred from one network to
another, its IP address gets changed whereas the MAC address remains the same.From
the IP address it is usually possible to track the tentative location of the computer but this
is not the case with a MAC address.
● Domain Name
So, whenever we have to communicate with a computer on internet, we can do so by using
its IP address. But it is practically impossible for a person to remember the IP addresses of
all the computers one may have to communicate with. Therefore, a system has been
developed which assigns names to some computers (web servers) and maintains a
database of these names and corresponding IP addresses. These names are called
Domain Names. Examples of some domain names are cbse.nic.in, sikkimipr.org,
indianrailway.gov.in etc. Domain names are used in URLs to identify particular Web
servers. For example, in the URL http://www.cbse.nic.in/welcome.htm, the domain name is
www.cbse.nic.in.
A domain name usually has more than one parts: top level domain name or primary domain
name and sub-domain name(s). For example, in the domain name , in is the primary domain
name; nic is the sub-domain of in; cbse is the sub-domain of nic.There are only a limited
number of top level domains, and these are divided into two categories: Generic Domain
Names and Country-Specific Domain Names. For example
Generic Domain Names:
·com - commercial business
·edu - Educational institutions
·gov - Government agencies
·mil - Military
·net - Network organizations
·org - Organizations (nonprofit)
Country Specific Domain Names:
.in - India
·au - Australia
·ca - Canada
.ch - China
.nz - New Zealand
.pk - Pakistan
.jp - Japan
.us - United States of America
● Domain Name Resolution is the process of getting the corresponding IP address from
domain name. It happens as follows:
Suppose you mention a URL in the web-browser to visit a website. The browser first checks
your computer to find if the IP address of the server corresponding to the Domain Name

(embedded in the URL) is present. If this address is present then with the help of this
address, the corresponding server is contacted and then the website opens in your browser.
Otherwise the browser sends this domain name to some specific servers (called domain
name servers) to find the corresponding IP address. Once the IP address is known, the
server is contacted and then the website opens in your browser.
2.2 INTERNET AND ITS TERMINOLOGY
The Internet is helping in relearning and digital literacy.
2.2.1Digital literacy
Digital literacy refers to raising knowledge and awareness about technology such as
desktop computers, smartphones, tablets, and other electronic gadgets. It also includes
familiarity with software tools and the Internet. This knowledge facilitates people to acquire,
analyze, share, create, and deliver information in an efficient and constructive way. Digital
literacy also aids people in several arenas such as education, social networking, e-
commerce, healthcare, and tourism. Especially in education, it provides learners with
digitally enhanced learning through use of technology. They can use technology to access
Massive Open Online Courses (MOOCs) which are providing opportunities to study
irrespective of the boundaries of time and space. Moreover, Prime Minister Narendra Modi
has taken an initiative to make India, a Digital India to use technology proficiently and
ethically. The campaign promotes building up of India-wide digital infrastructure to provide
government services digitally to people even in remote.
2.2.2 Internet Services
Network services are applications hosted by servers on a computer network, to provide
some functionality for users of the network. There are several applications of Internet
such as e-mail, file transfer, remote login, and World Wide Web (WWW).
● Electronic Mail (E-Mail)
An email may be a written text and may include multimedia attachment consisting of text,
audio, image, or video. Senders of the e-mail may send it to one or more intended
recipients. Sending and receiving of mails can take place through web based email
application also called webmail application, (such as, Gmail, Windows Live Hotmail, and
Yahoo), or a desktop based email applications (such as, Microsoft outlook, Thunderbird).
Transferring mail over the Internet is governed by a set of rules known as email protocols
such as SMTP (Simple Mail Transfer Protocol) and POP3 (Post Office Protocol).
● File Transfer
Transferring files from one machine to another through a TCP based network is done using
FTP (File Transfer Protocol). File Transfer Protocol is based on client server architecture.
Using FTP, local hosts (clients) can download or upload files to and from remote hosts
(server).
● Remote Login (TELNET)

TELNET stands for TErminaLNETwork. It is a client server based application that allows
the user working on one system to access a remote system. For initiating remote login, the
user (client) should specify the address of the remote system, and should authenticate
himself/herself using username and password mechanism. On successful login, the client
can access the remote system. TELNET service is often used for accessing data on the
remote host, or executing on the server the applications installed on it (server).
● World Wide Web (WWW)
World Wide Web (WWW), commonly known as web, is a repository of information on
machines spread all over the Internet and linked to each other. The information is organized
in the form of documents called web pages. A web page may contain text, images, audio,
videos, and information for linking the web pages in the form of hyperlinks. WWW uses
distributed client server architecture based on HTTP (HyperText Transfer Protocol). The
client request is relayed through the Internet to the appropriate server, which sends back
the reply through the Internet to the host system.
2.2.3 Internet Protocol Suite
The Internet protocol suite is a set of communications protocols used in the Internet and
computer networks. It is commonly known as TCP/IP because the foundational protocols
in the suite are the Transmission Control Protocol (TCP) and the Internet Protocol (IP).The
simple task of sending the data from one place to another through network requires several
sub-tasks such as specifying sender and receiver’s network and physical address, dividing
the message into smaller fragments so that they can be easily transmitted over Internet,
taking appropriate measures for error and flow control, and taking necessary action on
receiving the message. These sub-tasks or functions are performed by different layers of
TCP/IP model as shown in Figure 2.17
Fig 2.17
Application layer:-Data/message is created at the sender’s end and at the receiving end
it is examined and processed. This layer is also responsible for enveloping the message to
be sent with the header. Several protocols such as HTTP (HyperText Transfer Protocol),
POP3 (Post Office Protocol version 3) operate on this layer. POP3 allows you to download
email messages on your local computer and read them even when you are offline.

Transport layer:-Application layer passes the message to the Transport layer which
appends the information about the source and destination ports of the processes at two
ends. Two end-to-end protocols operate at this layer, namely TCP and UDP. TCP
(Transmission Control Protocol) is a reliable connection-oriented protocol needed when
timely and error free delivery of data is important. UDP (User Datagram Protocol) is an
unreliable connectionless protocol for short messages and client server request-reply
messages, where immediate response is more important rather than assured delivery.
Transport protocol is used for streaming video. Further, the transport layer divides the
message into a number of fragments, called segments, each segment will carry the
sequence number denoting its relative position in the message, so that the message can
be assembled at the receiver end.
Internet Layer:-Transport layer hands over the segments to the Internet layer which adds
source and destination machine network address (also termed IP address). In the Internet
layer, Internet Protocol (IP) is used. IP defines the format of packets exchanged over the
Internet.
Link layer is also called Host to Internet layer. This layer is responsible for adding the
header containing the sender and receiver physical address to the packet received from
the Internet layer.

2.3 CYBER THREATS AND CYBER SECURITY
2.3.1 Security concerns
With the increase in use of the network for accessing data and resource sharing, security
is becoming a prime concern. The Internet represents an insecure channel for exchanging
information, which leads to a high risk of intrusion or fraud, such as phishing, [viruses,
trojans, worms and more.
2.3.1.1Malwares
The term malware refers to malicious software (programs) designed with the intention to
affect the normal functionality by causing harm to the system, or with the intention of getting
unauthorized access to the system or denying access to legitimate users of computing
resources. A malware may be a virus, worm, Trojan horse.
● Virus
A virus is a software code that may harm your system by overwriting or corrupting the
system files. A computer virus is similar in action to viruses in our body which replicate
themselves and affect body cells. The affected part is called the infected area. A computer
virus may make several copies of it by inserting its code onto the system programs, files or
boot sector of hard drives and thereby may corrupt them. This causes the system to slow
down or even stop functioning like boot sector virus, file infector virus, and macro virus.
● Worm
A worm is often received via network, and it automatically keeps on creating several copies
of itself on the hard disk thereby flooding the hard disk. When a worm is received as an
email attachment, it is automatically forwarded to the recipients leading to network
congestion. Thus, a worm may crash the system and entire network. No host application is
required for worms to replicate themselves e.g. Code Red Worm which makes more than
2,50,000 copies of itself in approximately 9 hours.
● Trojan Horse
Trojan Horse is a code that appears to be desirable and useful but ends up harming the
system.
Trojan horse can attach itself with a safe application. For example, it may be attached to
any game downloaded over the Internet. Such an application when executed creates a
backdoor in the system through which a hacker can access the system. The hacker can
monitor all the activity performed on the system. He can also control the infected system by
harming the data on the system. For example, in the late 1990s, Trojan Horse named Sub7
was created which took advantage of security flaws of earlier version browsers such as
Internet Explorer and Chrome to illegally access the host computer.

2.3.1.2 Eavesdropping
Eavesdropping is the act of secretly or stealthily listening to the private conversation or
communications of others without their consent. Eavesdropping is done through telephone
lines, cellular networks, email, and instant messaging.
2.3.1.3 Denial of Service
A denial-of-service attack (DoS attack) is a cyber-attack in which the machine or network
resource becomes unavailable to its users by temporarily or indefinitely disrupting services.
Denial of service is typically accomplished by flooding the targeted machine or resource
with superfluous requests to overload systems and prevent requests from being fulfilled. A
DoS attack is like a group of people crowding the entry door of a shop, making it hard for
legitimate customers to enter.
2.3.1.4 Phishing
Phishing refers to the act of stealing a user's personal information through fraud mails.
These emails eit4er entail personal information through embedded forms or contain links
to the web page that may prompt you to provide this information. Information attempted to
be stolen may include bank account number, debit/credit card number, passwords or any
other valuable data
2.3.1.5 Cyber Crime
Cybercrimes are the crimes related to the misuse of computers or the Internet such as theft,
fraud, and forgery. The IT act defines cybercrime as an unlawful act where in the computer
is either a tool or a target or both. Some of these crimes are mentioned below
Cyber bullying
Harassment or bullying inflicted through the use of electronic or communication devices
such as computer, mobile phone, laptop, etc.
Cyber stalking
Use of electronic communication by a person to follow a person or attempts to contact a
person to foster personal interaction repeatedly despite a clear indication of disinterest by
such person.
Online Job Fraud
An attempt to defraud people who need employment by giving them a false hope/ promise
of better employment with higher wages.
Vishing
To seek personal information like Customer ID, Net Banking password, ATM PIN, OTP,
Card expiry date, CVV etc. through a phone call.

SMSing
Use of mobile phone text messages to lure victims into calling back on a fraudulent phone
number, visiting fraudulent websites or downloading malicious content via phone or web.
SIM Swap Scam
Getting a new SIM card against a registered mobile number
Credit card (or debit card) fraud
An unauthorized use of another's credit or debit card information for the purpose of
purchases or withdrawing funds from it.
Identity theft
Dishonestly making use of the electronic signature, password or any other unique
identification feature of any other person.
Spamming
Persuading a recipient to buy a product or service, or visit a website via email, SMS, MMS
where he can make purchases.
Ransomware
The victim is asked to pay the demanded ransom to get his device decrypts.
2.3.2 Network Security Tools and Services
Since the Internet has emerged as a prime tool for sharing resources and accessing data,
an exponentially growing number of users are using it with both good and bad intentions.
Everyone accessing the Internet needs to be aware of the security issues and take
protective measures to address the same.
● Network layer security
TCP/IP protocols may be secured with cryptographic methods and security protocol like
Secure Sockets Layer (SSL)
● Firewalls
A firewall aims at protecting the internal network of an organization, home, or individual
from malicious traffic from external networks. A router or a computer (often dedicated to
serve as a firewall) may be installed between external network and internal network for this
purpose. Firewall inspects the network traffic and allows only that data to pass through the
network that does not violate the security constraint. Hardware firewalls in the form of a
router prevents malicious software from entering your network from outside the network.
However, software firewalls installed on personal computers prevent unauthorized access
or malwares from gaining access to personal computers. Network firewalls may also
encrypt the incoming data by converting it to non-readable format, thus, adding further
protection.
● Antivirus
Anti-virus is software that aims to protect your system against malicious and potentially
unwanted programs. It is responsible for detecting these malicious programs by searching

for them, and removing them to keep the system protected. The software operates by
maintaining a database of malware definitions, which are automatically updated. It searches
for any malicious program by scanning the files against the stored malware definitions for
a match. In case of a match, they are declared as potentially harmful, and are disabled and
removed depending upon anti-virus software settings.
● Password managers
A password manager is a software application that helps a user store and organize
passwords. Password managers usually store passwords encrypted, requiring the user to
create a master password; a single, ideally very strong password which grants the user
access to their entire password database from top to bottom
● Cyber Law
Cyber laws are the laws for systematic use of e-resources, for example, e-business, and
serve as a measure against illegal cyber-crime. Various cyber laws have also been enacted
to prevent cyber-crimes and take action against those involved in such crimes. These laws
define the action that would be taken against people committing the offences. For cyber
security, an amendment in IT Act 2000 named Information Technology Amendment
Act,2008 was also introduced. The act also defines offences and penalties for cyber-crime.
Cyber police are responsible for detecting such crimes and taking the necessary measure
against it according to the IT Act.
2.3.3 Protective Measures while accessing Internet
● Never click on a suspicious link specified on a web page or send through a mail for which
you are not sure about its authenticity.
● Make sure that passwords are strong and are changed frequently. Passwords are the
means for authenticating users, thereby allowing access to networked systems. Weak
passwords have smaller length and use a small subset of possible characters, and thus,
are subjected to be cracked easily. One should also avoid setting obvious passwords such
as names, mobile numbers, or date of birth. Passwords should be strong, having long length
and including characters such as numbers and punctuation signs.
● Never disclose personal information such as date of birth, home address, personal phone
number, account details, passwords, credit and debit card details, work history details.
● Report phishing issues to the concerned authorities or at cybercrime.gov.in. In case of
unsolicited mails, mark them as spam mails.
● Security of the communication made over the Internet can be indicated by the security of
protocol being used. Secure Hypertext Transfer Protocol (HTTPs) is a secure version used
for communication between client and host on the Internet. So, ensure that all
communications are secure, especially online transactions. The security of the website can
be ensured if there is a padlock on the left side of the address bar. It indicates that the
website has a SSL (Secure Socket Layer) digital certificate issued by a trusted party which
ensures and proves the identity of the remote host.

● Ensure that the web browser being used for accessing the web is updated and is secure.
For example, chrome browser is up to date, if the security patch indicated by three dots on
top right corner are grey in color. Green, orange and red color security patches indicate that
browser update is available for two, four and seven days respectively.
● Be selective while making friends on the social networking site. Do not send or accept
friendship requests from any unknown user. Also, trust the authenticity of a message only
if you are sure about its origin (sender).
● Do not post any offensive content on social networking site as it may lead to a criminal
action against you.
● Beware before spreading any kind of a rumor as it may be treated as a cyber-crime.
● If someone is harassing or threatening you, take snapshot of it as a proof, and block the
person. Also, report the incident to the site administrator.
● Use updated antivirus and firewall, secure browsing, and password management
techniques.
● Make sure that the website address is properly spelled. Because there may be two
websites with almost the same name, one being a phishing website.
● Delete cookies periodically. A cookie is a small piece of information about the client
browsing a website. On receiving a request from a client, the server records the client
information such as domain name and registration id on the server site in the form of a file
or a string. The server sends this cookie along with the response requested by the client.
At the client side, the browser stores this cookie received from the server in a directory
called cookie directory. By obtaining access to these cookies, hackers may gain
unauthorized access to these websites. Thus, cookies should be deleted occasionally along
with the temporary files stored on our system during web browsing.
Points to remember
● A communication system consists of four components: sender, receiver, messages, and
channel.
● A collection of interconnected nodes (electronic devices such as computers, printers, fax
machines, and telephones) which communicate by means of some channel from computer
network. Computer networks can be used as means of resource sharing and
communication.
● A transmission medium refers to the channel of transmission through which data can be
transmitted from one node to another. a transmission medium can be categorized as guided
and unguided medium. u guided medium refers to the physical conductor such as twisted
pair, coaxial cable, and fiber optics. The unguided medium uses electro-magnetic waves
that do not require a physical conductor, for example, infrared, radio, microwave, and
satellite links.
● The arrangement (also called layout) of nodes in a network is called network topology.
● In bus topology, there is a long cable, called backbone cable (or simply backbone), that
connects various nodes through a connector called tap.
● In ring topology, all the devices are attached through a cable in the form of a ring.
● In star topology, all the devices are connected to the central controller called hub.
● In mesh topology, all nodes are connected with every other node in the network.
● Tree topology is a combination of star and bus topology. Backbone cable in a bus topology
acts like the stem of the tree, and star networks (and even individual nodes) are connected
to the main backbone cable like the branches of a tree.
● LAN stands for local area network. They are private networks and can span a radius of
up to 1Km. they are generally established within a building or campus.
● Man stands for Metropolitan area network. it may be owned by a single organization or
by many individuals or organizations. These networks are used to establish links within a
city, and span an area of radius up to 50 Km.
● Wan stands for Wide area network. Typically, a WAN spans a segment of about 1000
Km. they establish link within a country or continent
● A repeater is used to restore the input signal to its original form, so that it can travel a
larger distance. It is also known as a digital regenerator.
● A hub comprises several input/output (i/o) ports, each of which connects to a single cable
segment.
● A bridge is a multiport device used for connecting two or more local area networks (LAN),
possibly operating at different speeds.
● Switches are used to connect individual nodes in the network with each other.
● Routers are used for connecting various networks with each other. a router transmits data
from an incoming network to another network.
● Gateway connects networks based on different protocol technologies to communicate
with each other.
● A wide network of networks is known as the internet. It has made it possible to exchange
information and communicate with remote nodes.
● A network protocol defines the rules and conventions of communication that must be
followed when two devices interact with each other. it specifies what should be
communicated, and how and when communication should take place.
● An email may be written text and may include multimedia attachment. Sender of the e-
mail may send it to one or more intended recipients. sending and receiving of mails can
take place through web-based email applications.
● FTP is a File transfer Protocol used for transferring files from one machine to another.
● Telnet stands for terminal network. It is a client server-based application that allows the
user working on one system to login and access a remote system.
● World Wide Web (WWW), commonly known as web, is a repository of information on
machines spread all over the internet and linked to each other.
● A web page may contain text, images, audio, videos, and information for linking the web
pages in the form of hyperlinks.
● The TCP/IP (transmission control Protocol/internet Protocol) is the glue which holds the
internet and WWW (collection of servers where information is stored) together.

● A MAC (Media Access Control) address is a unique 12 digit (6 digits for manufacturer
code and 6 digits for serial number) hexadecimal number assigned to each NIC. MAC
address of an NIC never changes.
● An IP (Internet Protocol) address is a unique 4-digit hexadecimal number assigned to
each node on a network.
● Domain Name is a name assigned to a server through Domain Name System (DNS). A
domain name usually has more than one parts: top level domain name or primary domain
name and sub-domain name(s).
● Domain Name Resolution is the process of getting corresponding IP address from
a domain name.
● The term malware refers to malicious software (programs) designed with the intention to
affect the normal functionality by causing harm to the system, or with the intention of getting
unauthorized access to the system or denying access to legitimate users of computing
resources.
● A virus is a software code that may harm your system by overwriting or corrupting the
system files. a computer virus may make several copies of it by inserting its code onto the
system programs, files or boot sector of hard drives and thereby may corrupt them.
● A worm is a malware often received via network, and it automatically keeps on creating
several copies of itself on the hard disk thereby flooding the hard disk.
● A Trojan horse is a code that appears to be desirable and useful but ends up harming the
system. A Trojan horse can attach itself with a safe application. Such an application when
executed creates a backdoor in the system through which a hacker can access the system.
● Spams are the unwanted electronic mails, generally sent in bulk over the internet to
recipients. Such undesirable mails are generally commercial mails sent for advertisement
purpose. However, they may contain links to phishing sites that attempt to steal user
information or link to sites that contain malware or infected files.
● Phishing refers to the act of stealing user’s personal information through fraud mails.
These mails either entail personal information through embedded forms or contain links to
the web page that may prompt you to provide this information.
● Hacking may be described as having unauthorized access to someone’s computer or
computer network for stealing resources such as passwords or confidential files or causing
harm to the network or system.
● Anti-virus is software that aims to protect your system against malicious and potentially
unwanted programs. it is responsible for detecting these malicious programs by searching
for them and removing them to keep the system protected.
A firewall aims at protecting the internal network of an organization, home, or individual
from malicious traffic from external networks. a router or a computer (often dedicated to
serve as a firewall) may be installed between external network and internal network for this
purpose.
● Cybercrimes are the crimes related to the misuse of computers or the internet such as
theft, fraud, forgery. The IT Act defines cybercrime as an unlawful act where in the computer
is either a tool or a target or both. u cyber laws are the laws for systematic use of e-
resources, for example, e-business, and serve as a measure against illegal cyber-crime.

● Social network refers to the network of people interacting and sharing information such
as their views, photographs, videos and any other information.
● Digital literacy refers to raising knowledge and awareness about technology such as
desktop computers, smartphones, tablets, and other electronic gadgets. It also includes
familiarity with software tools and the internet.
Exercises
1. Give the full form of following terms:
(a) ARPANET
(b) LAN
(c) MAN
(d) WAN
(e) WWW
(f) TELNET
2. Differentiate between the following:
(a) Bus and Star Topology
(b) Star and Tree Topology
(c) Star and Mesh Topology
(d) Ring and Bus Topology
(e) LAN and WAN
(f) LAN and MAN
(g) MAN and WAN
(h) Internet and WWW
3. What is the purpose of network devices? Explain following network devices.
(a) Bridge
(b) Router
(c) Repeater
(d) Switch
4. Which of the following listed acts are cyber-crimes?
(a) Copying data from someone’s computer without his permission.
(b) Stealing someone’s device.

(c) Accessing one’s bank account for carrying online transactions.
(d) Modifying the official documents without permission.
(e) Creating a fake identity and posting on someone’s behalf.
(f) Sending friend request to someone on a social networking site.
5. What is the difference between Email and Chat?
6. What are cookies?
7. Differentiate between firewall and antivirus. How both contribute to the security of the
system?
8. Define protocol.
9. Explain TCP/IP Model.
10. What is the significance of cyber law?
11. How is TELNET used for remote login?
12. List the various security issues concerned with using the Internet. Explain each of
them
by giving proper examples.
13. List various protective measures that can be taken for network security.
14. Define cybercrime and cyber law.
15. Define Digital Literacy.

Unit - 3
Office Automation Tools
● Word Processing
● Spreadsheet
● Presentation
Word Processing
3.1 Introduction
A word processing software is required for the creation of documents that are text-based. It has tools that allow the user to edit, format and print document. A word document may also contain pictures and tables. It may be a report, letter, drawing, webpage etc. OpenOffice Writer is a popular open source software for word processing. It can be downloaded from Internet and installed for free, on Linux-based machines as well as Windows-based machines. In this chapter we discuss the usage of OpenOffice Writer software in detail.
3.2 Start OpenOffice Writer
To start using the OpenOffice Writer software, any one of the following steps needs to be performed -
<Start> <Programs> <OpenOffice>
If the OpenOffice icon (Figure 3.1) is on the desktop, double click the icon shown
in Figure 3.1.
Figure 3.1:
3.3 OpenOffice Screen and its Components

The main screen of OpenOffice Writer is shown in Figure 3.2. It consists of different components like Tabs, Ruler bar, Status bar, Scroll bar and Work Area. The Writer layout and its general features are described as follows:
Figure 3.2: OpenOffice Writer Screen
Tabs: (File, Edit, View, Insert, etc.) contain drop down menu which have commands
provided by the tab.
Ruler Bar: There are two rulers – Horizontal and Vertical. The Ruler Bar allows us to adjust the indentation and margins.
Status Bar: It displays information about the current open document. It displays the
current page number, total pages in the document, zoom slider etc.
Scroll Bar: There are two scroll bars – horizontal and vertical. They help to scroll the content or the body of document.
Work area: It is the working area where the text of the document is typed.
3.4 Writer Tabs
The OpenOffice Writer has the following tabs: File, Edit, View, Insert, Format, Tools,
Modify and Window. There is also a help tab. On clicking any of the tabs, a drop down menu appears which has several commands and options. Select the command that you want to execute.
Hide Status Bar - View ->Unselect Status Bar

The key tasks that can be performed using the tabs are as follows
File: To apply commands to current document, to open or close document
Edit: For editing the current document, for example, cut, paste
View: For controlling display of document on the screen
Insert: For inserting new elements in document, like, comments, special characters,
graphics, and objects
Format: For formatting the layout and content of document
Tools: For spelling check, gallery of object art to add to document, to configure menus
Table: To insert, edit, delete a table in a text document
Windows: For manipulating and displaying document windows
3.4.1 File Tab
The OpenOffice Writer is used to create a text document. The document is stored as a
file in the computer with the extension .odt. For example, a document stored as a file Anita.odt. The File tab consists of commands required to perform operations on a file (document). It contains several commands as shown in Figure 3.3 (a). The commands which are required to be known at this stage are described in the figure. The commonly used commands allow the user to – create, save, print, open and close a text document.

We use the words file and document interchangeably.
Figure 3.3(a): File tab
Figure 3.3(b): The New Option
Some operations performed using the commands of the File tab are described as follows –

Using New: This option is used (a) To create a new file. When you click <File><New>, a drop down menu appears as shown in Figure 3.3. (b) To create a document, select <Text Document>.
Using Save As: This is used when you want to
(1) Save a file for the first time, or (2) Save an already saved file with a different name. When you click <File Tab> <Save As>, a Save As dialog box appears Figure 3.4.
You can – Select folder (directory) where the file is to be saved, Type the File name for the document, Select “save as type” of document (.odt etc.) Click “Save” button to save the file.
Figure 3.4: SaveAs option
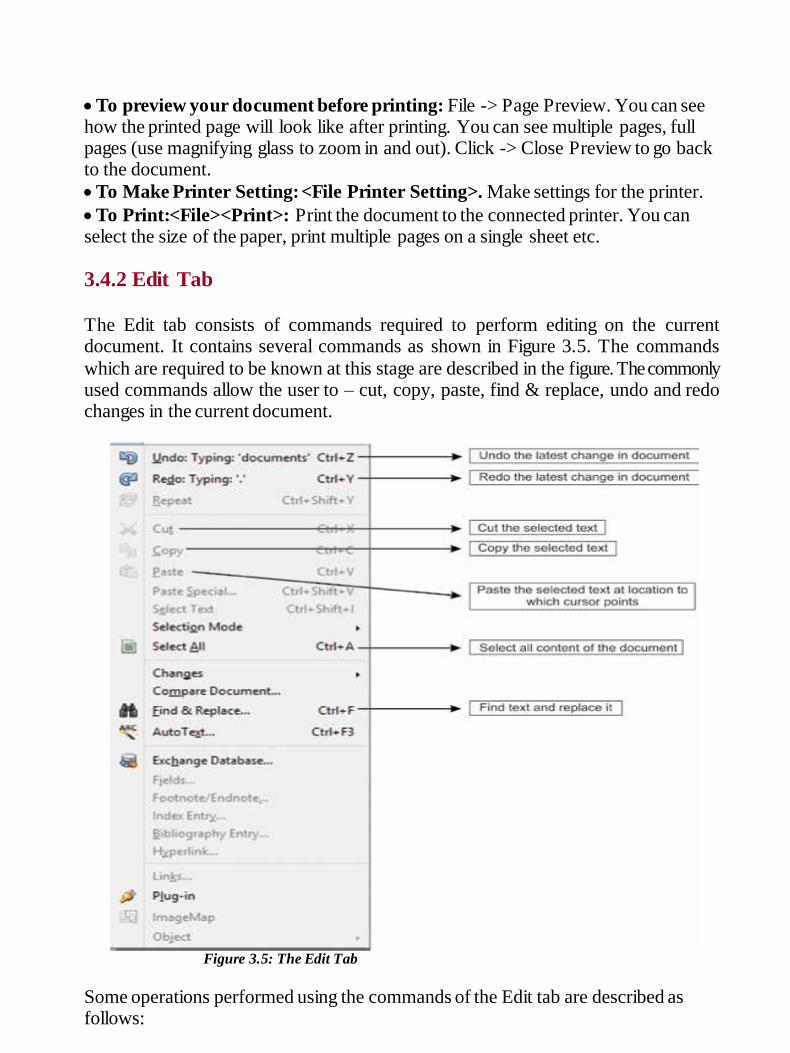
To preview your document before printing: File -> Page Preview. You can see how the printed page will look like after printing. You can see multiple pages, full pages (use magnifying glass to zoom in and out). Click -> Close Preview to go back to the document.
To Make Printer Setting: <File Printer Setting>. Make settings for the printer.
To Print:<File><Print>: Print the document to the connected printer. You can select the size of the paper, print multiple pages on a single sheet etc.
3.4.2 Edit Tab The Edit tab consists of commands required to perform editing on the current document. It contains several commands as shown in Figure 3.5. The commands
which are required to be known at this stage are described in the figure. The commonly used commands allow the user to – cut, copy, paste, find & replace, undo and redo changes in the current document.
Figure 3.5: The Edit Tab
Some operations performed using the commands of the Edit tab are described as follows:

Move Text: Remove the text to be moved by selecting the text and then applying File -> Edit -> Cut. Then take the cursor to the place in document where you want to move the text. Then do File -> Edit -> Paste.
Copy Text: Select the text to be copied and then apply the commands File -> Edit
-> Copy. Then take the cursor to the place in document where you want the copied text. Then do File -> Edit ->Paste.
Find and Replace: This is used to find words and then replace it with the new one
(Figure 3.6). This option is useful to find word at multiple places in the document and replace all of them with the new one.
Figure 3.6: Find and Replace dialog box

3.4.3 View Tab
The View tab consists of commands required for viewing the current document on the screen. It contains several commands as shown in Figure 3.7. The commands which are required to be known at this stage are described in the figure. The commonly used commands allow the user to view status bar, ruler, sidebar etc.
Figure 3.7 : View Tab

Figure 3.8: View Toolbar Options
Some operations performed using the commands of the Edit tab are described as follows -
Toolbars : Select <View><Toolbars>. A drop down menu appears, as shown in Figure 3.8. Select the toolbars that you want to be displayed on the screen. A displayed toolbar shows the icons for the commands, as shown in Figure 3.8. Generally, Standard and Formatting options of toolbars are always selected.
Figure 3.8: Toolbar on screen
3.4.4 Insert Tab
The Insert tab consist of commands required for inserting different elements in a
document. It contains several commands as shown in Figure 3.9. The commands

which are required to be known at this stage are described in the figure. The commonly used commands allow the user to insert page number, date, header, footer, tables, hyperlinks etc. in the current document.
Figure 3.9: Insert Tab
When using an Insert tab to insert an element, the insertion of element in the document happens at the location where the cursor is present on the screen. So, you must place the cursor at the right location on the screen before inserting the element. Also, when using insert, a dialog box may open for further settings and selection. Please choose the options in the dialog box and proceed further. The dialog box is self-explanatory. Some operations performed using the commands of the Insert tab are described as
follows - Insert Header: <Insert> <Header> <Default> : A Header box opens in the upper part of the document. Enter the content you want to write in the header. Insert Footer: <Insert> <Footer> <Default>: A Footer box opens in the lower part of the document. Enter the content you want to write in the header. Insert Fields: <Insert> <Fields>: A pop-up menu appears (Figure 3.10). Select the element to be inserted. The selected element will insert at the location of

the cursor. If you want to insert the field in the header or footer, then first select header/footer. Place the cursor in the correct position and then insert page number, time, date,author name, etc. Insert Hyperlink: <Insert> <Hyperlink>: A dialog box opens. On the left side of the dialog box, select where you want to link – a webpage, document, mail or to a new document. Then fill the details path, Form (text, button), etc. The Text is the name that appears in your document as hyperlink. Figure 3.11 shows an example. Insert Table of Content: <Insert> <Indexes & Tables> <Indexes &
Tables>: A dialog box appears. In Type, select Table of Content. Click OK. A table of content will be inserted in your document. Insert Table: <Insert> <Table>: A dialog box appears. Enter the table name, number of rows and columns. Click OK. A table is inserted in the document. A table toolbar appears which allows you to format the table. Insert Formula: <Insert> <Object> <Formula>: A pop up menu of elements appears (Figure 1.12a). Select the element and write the formula. Figure 1.12b shows an example.
Figure 3.10: Insert Fields Option

Figure 3.11: Example of Insert Hyperlink
Figure 3.12: Insert Formula (a) Formula menu (b) An example
3.4.5 Format Tab
The Format tab consist of commands required for formatting the document. It contains several commands as shown in Figure 3.13. The commands which are required to be
known at this stage are described in the figure. The commonly used commands allow the user to format a page, paragraph, insert bullets, styles, formatting, etc. in the current document.

Figure 3.13: Format Tab
When using the Format tab, the formatting happens on the text that has been selected. So you must select the text on which the formatting has to be applied and then use the relevant command from the Format tab. Some operations performed using commands of the Format tab are described as
follows: Format Character: <Format> <Character>: A dialog box opens (Figure 3.14). Select the font type, typeface, and size. Select font effects, background etc. The changes happen to the text selected. Format Paragraph: <Format> <Paragraph>: A dialog box opens (Figure 3.15). You can change the indentation and spacing, borders, alignment, etc. Format Bullets and Numbering: <Format> <Bullets and Numbering>: A dialog box opens (Figure 3.16). You can select from bullets of different kinds or
numbering. In the document the bullets are inserted at the location at which the cursor is present. Format Page: <Format> <Page>: A dialog box opens (Figure 3.17). This allows to format the whole page – borders, color, alignment, number of columns etc. To Change case of Text: <Format> <Change Case>: A dialog box opens (Figure 3.18a). To Change Number of Columns: <Format> <Columns>: A dialog box

opens. You can select 2-column page, three column page etc. To Change Alignment of Text: <Format> <Alignment>: A dialog box opens (Figure 3.18b). Select from left, right, centered, and justified.
Figure 3.14: Format Character

Figure 3.15: Format Paragraph
Figure 3.16: Format Bullets and Numbering

Figure 3.17: Format Page
Figure 3.18: Format (a) Change Case (b) Alignment
3.4.6 Table Tab
The Table tab consists of commands that operate on a table. It contains several commands as shown in Figure 3.19. The commands which are required to be known at this stage are described in the figure. The commonly used commands allow the user
to insert a table, insert or delete rows, or columns in a table, etc. in the current document.

Figure 3.19: Table Tab
Figure 3.20: Table Toolbar
When using the Table tab, a new table is inserted at the location of the cursor on the screen. For merge or split, select the cells on which the operation has to be applied. When a table is inserted, a Table toolbar appears for the formatting of the table (Figure 3.20). Some operations performed using the commands of the Table tab are described as follows -
Convert Table to Text or Text to Table: <Table> <Convert>: A pop up menu appears. If text is to be converted to table, the Text to Table option appears, Select it to convert text to table. If a table is already present, then Table to Text option appears. Select it to convert table to text.

3.4.7 Tools Tab The Tools tab consists of commands that can be used on the document for better results. It contains several commands as shown in Figure 3.21. The commands which are required to be known at this stage are described in the figure. The commonly used commands allow the user to check spelling and grammar of the content in the document, and count the number of words and characters in the document.
Figure 3.21: Tools Tab
Some operations performed using the commands of the Tools tab are described as follows - Check Spellings and Grammar: <Tools> <Spelling and Grammar>: The
grammar and spelling of the document is checked. A window as shown in Figure 3.22 appears if there are no grammatical and spelling errors in the document. If errors are there, then the errors are displayed with suggestions of correcting it. The user can decide to accept the suggestion or ignore it. Find Number of Words: <Tools> <Word Count>: If the text is already selected, then word count displays the number of words and characters in the selected text. Otherwise the word count displays the number of words and character in the whole document (Figure 3.23).

Figure 3.22: Tools Spelling and Grammar
Figure 3.23: Tools Word Count
3.4.8 Window Tab
The Window tab consists of commands that work on a window, as shown in Figure 3.24. The commands in this tab allow the user to open a new window or close an existing window. Also, the name of all currently open windows is also displayed.

Figure 3.24: Window Tab
3.4.9 Help Tab
The Help tab consists of commands that provide help to the user of the OpenOffice Writer software. On clicking on the help tab, a screen as shown in Figure 3.25 appears. You can browse the Help for the command you want.
Figure 3.25: Help Tab
Points to Remember
A word processing software has tools that allow creation of text-based documents.
OpenOffice Writer is an open source software for word processing.
OpenOffice Writer consists of different components like tabs, ruler bar, status
bar, scrollbar and work area.
File, Edit, View, Insert, Format, Tools, Modify and Window are the tabs in OpenOffice Writer.
File tab consists of commands like, create, save, print, open and close.
Save As option is used to save a file for the first time, or save an already saved file with a different name.
Edit tab consists of commands for editing a document, like, cut, copy, paste, find &
replace, undo and redo changes.
Move Text moves the text from the current location to the target location.
Copy Text copies the text from the current location to the target location.
View tab consists of commands like, view status bar, ruler, sidebar, that help
during viewing a document on the screen.
Insert tab allows insertion of page number, date, header, footer, tables, hyperlinks in a document.
Format tab consist of commands to format a page, paragraph, insert bullets, styles,

formatting in a document.
Table tab commands operate on a table - insert table, insert/delete rows/columns in a table, in a document.
Tools tab consists of commands to check spelling and grammar of content in the
document and count words/characters.
Window tab allow the user to open a new window or close an existing window.
The user can use Help tab to understand the working of any command of the OpenOffice Writer.
Exercises
1. What is the need of a word processing software? 2. What is the task of a word processing software? 3. Name an open source word processing software. 4. List the steps to start an OpenOffice Writer.
5. List the components of the main screen of OpenOffice Writer. 6. Define the following: a. Tabs b. Ruler Bar c. Status Bar d. Scroll Bar e. Work Area
7. List the tabs in the OpenOffice Writer. What are the key tasks performed by the tabs. 8. What is the extension of the file created in OpenOffice Writer? 9. What is the purpose of the following tabs? a. File
b. Edit c. View d. Insert e. Format f. T able g. Tools 10. What is the difference between Save command and Save As command?

11. What is the difference between Move text and Copy text? 12. How is Find and Replace option useful. 13. List the steps for inserting a hyperlink to a web page in a document. 14. What is the difference between toggle case and sentence case when using Change Case?
15. Name the tabs in which the following commnds are present:
a. Header b. Find&Replace c. Status Bar d. Ruler e. Hyperlink f. Formula
g. Paragraph h. A lignment i. Word and Count
16. Use OpenOffice Writer to create the following documents:
a. A Birthday invitation card. b. A farewell invitation card. c. A one page article that lists the steps that you take to clean the environment
(use bullets). Format the page. Insert header and footer in the document. d. Write the quadratic equation using formula symbols. e. A grocery bill using tables. Then convert this table to text. f. A 2-page 2-column article having pictures and text. Create a hyperlink to a web page. Also state the number paragraphs, lines, words and characters in the document. Perform spell check on the document. g. Create a document with text and then use find and replace option to replace a word in the document.
Spreadsheet
(OpenOffice Calc)
4.1 Introduction

A spreadsheet stores data in the form of a table comprising of rows and columns. It is used to store, arrange, and sort data, and perform calculations on numeric data. It is similar to the ruled paper accounting worksheets traditionally used for bookkeeping. The computerized version of a worksheet is called a Spreadsheet application that lets you quickly perform calculations on numerical data, represent data with charts, analyze, and print. Spreadsheets are used in various fields such as banking, finance, accounting, and education.
Following are some of the popular uses of spreadsheets: 1. Managing financial data such as bank account information, budgets, transactions, billing, and receipts. 2. Handling inventory, reviews, employee information, surveys, etc., using data entry forms. 3. Tracking student performance by calculating grades and other relevant information
such as attendance, highest score, and lowest score. 4. Creating lists of items which may not be numeric such as student list, grocery list. 5. Managing company information such as profit and sales by creating graphs from the data. There are various spreadsheet applications available that can be used to create and manipulate a spreadsheet. The most commonly used are – Microsoft Office Excel, Apache OpenOffice Calc, LibreOffice Calc, Google Sheets etc. Microsoft Excel is a
proprietary software from Microsoft for Windows. Both OpenOffice and Libre Calc are free and opensource alternatives to Excel. Google sheets is a web-based spreadsheet application which allows you to store and edit the spreadsheets online and access them from any computer. In this chapter we’ll study spreadsheets using Apache OpenOffice Calc. Figure 4.1 shows how an OpenOffice Calc spreadsheet looks like.

Figure 4.1: OpenOffice Calc Spreadsheet
4.2 Installing Calc
Calc is offered free of charge and can be downloaded from HYPERLINK ‘http://www.openoffice.org’ www.openoffice.org calc is the spreadsheet component of Apache OpenOffice an open source office software suite.
You can install the complete Apache OpenOffice which include calc 1. Open the URL: https://www.openoffice.org/download/index.html. 2. Select the operating system and language. 3. Click on – Download full Installation 4. Installing OpenOffice on Windows a. Double click on the downloaded exe file and then click Next on the following screen:
b. Click on Unpack

c. After unpacking, click on Next
d. Enter User information and then click on Next

e. Choose the setup type and then click on Next. It is recommended that the beginners should choose typical.
f. Click on Install

g. After installation, click on Finish.
h. Run OpenOffice to check if it has been installed successfully. i. Click on the Spreadsheet to open OpenOffice Calc.


4.3 Main Features of OpenOffice Calc
Calc offers the several features. In this section, we shall describe several features. If you do not understand everything, do not worry about it. Things will become clear as we move on. 4.3.1 Starting Calc To start OpenOffice Calc, there are various ways in which you can start it:
A s a Windows application, you can click Start -> Programs ->OpenOffice
If the OpenOffice icon as shown in Figure 4.2 is on the desktop, double click the icon.
Figure 4.2: OpenOffice Icon Calc’s default file format is the Open Document Format (ODF), an ISO/IEC standard, which originated with OpenOffice.org.
4.3.2 Calc Main Window Before using Calc to create spreadsheets, let us study the various menus and toolbars available in the main window of Calc as shown in Figure 4.3.

Figure 4.3: Main Window of Calc
Title Bar: The title bar at the top displays the information about the spreadsheet such as name of the current spreadsheet (ExampleSheet), extension of the spreadsheet (.ods), and name of the software (OpenOffice Calc). If the spreadsheet is new then its name is Untitled N where N is a number. The ellipsis (three dots ...) in
front of an option implies that a dialog box will open when this option is selected. For example, on selecting the Open option, a dialog box will appear which is meant for the user to enter the location of the file to be opened.
Menu Bar: Just below the title bar is the menu bar. It contains various menu options. On selecting a menu option, a submenu appears which contains other
options related to the main menu option. The menu options and few of their submenu options are discussed below: File: It contains commands to create a new file (New), open an existing file (Open), save a file (Save , Save As), print a file (Print), preview a page (Preview Page), close a file (Close), exit the software (Exit) etc. Edit: It contains commands to edit a file such as Cut, Copy, Paste, Paste
Special, Select All, Find & Replace, Delete Contents, Delete Cells, Headers & Footers.

View: It contains commands to modify the view of the Calc such as Toolbars, Full Screen, Zoom. A small in front of the Toolbars options means on selecting it, another submenu appears as shown in Figure 4.4 which shows the list of all the toolbars which can be selected or deselected based on the user’s choice of toolbars to be displayed on the Calc main window.
Figure 4.4: Toolbars Options
Insert: It contains commands for inserting Cells, Rows, Columns, Sheet, Sheet From File, Function, Function List, Picture, Chart etc. Format: It contains commands to alter the layout of the spreadsheet such as formatting Cells, altering Rows, Columns, Sheet. Tools: It contains options to o spellcheck (Spelling), insert macros (Macros)
etc. Data: It contains commands to manipulate data such as Sort, Filter, Validity. Window: It contains commands to modify the window such as New Window, Close Window. Help: It contains the options getting help related to OpenOffice Calc such as
OpenOffice Help, What’s This?, Check for Updates etc. Placing the mouse pointer on any of the icons on the Calc window displays a small box which is called a tooltip which gives a brief explanation of the icon’s function. For a more detailed explanation of any icon or function, select Help > What’s This? and hover the mouse pointer over the icon or function. To turn this feature off again, click once or press the Esc key twice.
Standard Bar: It lies below the Menu bar. It contains icons which perform similar operations as contained in the Menu bar options such as New, Open, Save, Print, Page

Preview, Cut, Copy, Paste, Sort, Chart, Find & Replace, Spelling.
Find Bar: It contains a text box which can be used to enter text which is meant to be searched in the spreadsheet. It highlights the cell which contains the text to be searched. Multiple search results can be traversed by clicking on the up and down arrows or by pressing the Enter key on the keyboard.
Formatting Bar: In the Formatting toolbar, the leftmost icon is for the Style & Formatting and the following two boxes are the Font Name and Font Size lists. They show the current settings for the selected cell or area. Click the down-arrow to the right of each box to open the list. Following the boxes, we have the three icons for changing the appearance of
the text such as making the text bold ( ), italics ( ), and underlining ( ). Next we have the icons which are used to align the text within a cell as left ( ), center ( ), right ( ), or justify ( ). Merge cells icon ( ) is used to merge multiple cells and form a single cell. It becomes active when multiple cells are selected.
Format of numbers can be changed by using the Number format icons – Currency ( ), Percent ( ), Standard ( ), Add Decimal Place ( ), Delete Decimal Place ( ). Indentation of text can be increased ( ) or decreased ( ) within a cell using the indent arrows. Borders of cells can be modified by using the border styles available by
clicking on the drop-down of the Border icon ( ). Background Color of cells can be changed by clicking the Background Color icon ( ). Click on the drop-down for more options of colors. Text color can also be changed by clicking the Font Color icon ( ). Click on the drop-down for more options of colors.
Formula Bar: On the left side of the Formula bar is the Name box which contains a letter and name combination such as C4, whenever you select a cell on the spreadsheet. This combination is called Cell Reference. The cell reference is the address of a cell. The letter is meant for the column and the number for the row. To the right of the Name box, one can see the Function Wizard ( ), Sum ( ), Function ( ) icons. Function

Wizard opens a dialog box from which you can search through a list of available functions. Sum icon inserts a formula into the current cell that totals the numbers in the cells above the current cell. If there are no numbers above the current cell, then the cells to the left are placed in the Sum formula. Function icon inserts an equals (=) sign into the selected cell and the Input line, thereby enabling the cell to accept a formula. When new data is entered into a cell, the Sum and Function icons change to Cancel ( ) and Accept ( ) icons. The contents of the current cell (data, formula, or function) are displayed in the Input
line, which is the remainder of the Formula Bar. You can either edit the cell contents of the current cell here, or you can do that in the current cell. To edit inside the Input line area, click in the area, then type your changes. To edit within the current cell, just double-click the cell.
Sheet Tabs: A single spreadsheet Calc file can contain multiple sheets. You can
traverse individual sheets by using the Sheet tabs. The current active sheet has a white tab. Clicking on another sheet tab displays that sheet, and its tab turns white. Right click on the Sheet tabs will display various options such as inserting, deleting, renaming, moving sheets, as shown in Figure 4.5.
Figure 4.5: Menu displayed when you right-click any Sheet tab
Status Bar: Status bar at the bottom provides information about the spreadsheet and convenient ways to quickly change some of its features. Sheet Sequence number shows the number of the current sheet / total number of sheets in the spreadsheet as
shown in Figure 4.6. Selected cell (or cells) information is also displayed on the Status bar. When a group of cells is selected, the sum of the contents is displayed by default. You can right-click on this field and select other functions, such as the average value,

maximum value, minimum value, or count (number of items selected) as shown in Figure 4.6.
Figure 4.6: Displaying Information of Selected Cells in Status Bar When the cursor is on an object such as a picture or chart, the information displayed includes the size of the object and its location as shown in Figure 4.7. To change the view Magnification, drag the Zoom slider (bottom left corner) or click on the + and –
signs.
Zoom Slider Figure 4.7: Information of Chart Displayed in the Status Bar
Sidebar: Located on the right side of the edit views of Calc, sidebar contains frequently used tools grouped in decks such as Properties, Styles and Formatting,
Gallery, Navigator. Clicking on any of the vertical tabs opens the deck for that tab.
Active Cell: When you select a cell, you will notice a heavy black border around the selected cell as shown in Figure 4.3. The heavy black border indicates that selected cell is the active cell.
Row Headers: Row headers are in the form of numbers -1,2,3.... which are present
at the left of each row.
Column Headers: Column headers are in the form of alphabets – A,B,C,...shown at
the top of each column. 4.3.3 Working with Spreadsheets A Spreadsheet consists of a number of individual sheets, each containing cells arranged in rows and columns. A particular cell is identified by its column letter and row number. These cells hold the individual elements—text, numbers, formulas, and so on—that make up the data to display and manipulate. Each spreadsheet can have many sheets and each sheet can have many individual cells.
Create a New Blank Worksheet : There are many ways to create a new blank worksheet as discussed below: On the menu bar, click File-> New->Spreadsheet as shown in Figure 4.8.

Figure 4.8: Creating New Blank Spreadsheet Using File Menu
On the Standard bar, click on drop-down of the New icon ( ) -> Spreadsheet as shown in Figure 4.9.
Figure 4.9: Creating New Blank Spreadsheet Using Standard Bar
On the keyboard type – Ctrl + N. The keyboard shortcuts are also

displayed next to the menu options as shown in Figure 4.8 and Figure 4.9. Open an existing Spreadsheet : On the menu bar, click File->Open as shown in Figure 4.8 and then a dialog box opens up which is used to locate the spreadsheet to be opened as shown in Figure 4.10.
Figure 4.10: Open Dialog Box On the Standard bar, click on the Open icon ( ). Click on the drop-down to open a list of recently opened OpenOffice files.
Navigating within Spreadsheets: There are many ways to navigate within a spreadsheet from cell to cell and sheet to sheet. Accessing a particular cell – Place the mouse pointer over the cell and click to access that cell. Another way is to type the cell reference or address in the Name box in the Formula bar and press Enter. For example, if you want to access cell D5, then type D5 in the Name box and press Enter. You can see cell D5 is highlighted as
shown in Figure 4.11.

Figure 4.11: Accessing a Cell using Name Box You can also use the Calc Navigator on the Standard bar or Press F5 which
opens the following Navigator dialog box in which you can enter the row number and column letter which you want to access.
Figure 4.12: Calc Navigator
Cell to Cell Navigation: You can use the Mouse and various keys on the keyboard such as Tab, Enter keys, and Arrow keys to navigate from one cell to another. Sheet to Sheet Navigation: Using sheet tabs at the bottom of the spreadsheet,
you can navigate between sheets. If you have a number of sheets, then some of the sheet tabs may be hidden behind the horizontal scroll bar at the bottom of the screen. If this is the case, then the four buttons at the left of the sheet tabs as shown in Figure 4.13 can move the tabs into view.

Figure 4.13: Sheet Navigation
Saving Worksheet: On the menu bar, click File->Save as shown in Figure 4.8.
On the Standard bar, click on Save icon . While saving a new spreadsheet for the first time, a dialog box will open to enter a
name and select the location for saving the spreadsheet. For example, in Figure 4.14 a spreadsheet file is saved on the Desktop with the name ExampleSheet and type .odf.
Figure 4.14: Saving a Spreadsheet Closing Worksheet: On the menu bar, click File->Close (Figure 4.8). A dialog box opens up if the spreadsheet has not been saved as shown in Figure 4.15. The dialog box gives options to the user to Save the file, Discard the changes or Cancel the close operation.

Figure 4.15: Save Dialog Box on Closing a File You can also directly close the OpenOffice Calc main window. 4.3.4 Working with Data:
Data– There are various types of data that can be entered in a cell:
Labels – These are alphabetic or alphanumeric entries without numeric value.
They can be a combination of letters, numbers, space, special characters etc. Labels are left justified by default.
Numbers or Values – These are numeric data which may be integers or can contain decimals or fractions. Values are right-justified by default.
Formulas – Used to perform calculations such as addition, subtraction, multiplication, division, average. Formulas must begin with an = sign.
Entering Data: Data can be entered in an active cell. Following are the steps to enter
data in say cell A1 (Figure 4.16): i) Click on the A1 cell which is at the top left of the spreadsheet. The heavy black border around the A1 cell indicates that it is the active cell.
Figure 4.16: Entering Data in Cell A1
Moving Data within a Spreadsheet: For moving data from one cell to another we have the cut-copy-paste functions. There are various ways to use these functions as described below:
Using the Edit Menu: The Cut, Copy, and Paste functions are available in the Edit menu. Following example illustrates the steps to do cut/copy-paste using Edit Menu: i) Select the cell whose contents you want to cut or copy (say cell D5). ii) Go to the Edit menu on the menu bar and click on Cut/Copy.

iii) Select the cell where you want to paste the contents of cell D5 (say cell F5). iv) Go to the Edit menu and click on Paste. If you have selected Cut option then the contents of D5 will be removed from D5 and pasted in F5. But if you have selected the Copy option, then the contents of cell D5 will remain in intact and the same will be copied in F5.
Using the Standard bar: The icons are Cut ( ), Copy ( ), and Paste ( ).
Following example illustrates the steps to do cut/copy-paste using Standard bar: i) Select the cell whose contents you want to cut or copy (say cell D5). ii) Click on the Cut / Copy icon in the Standard bar. iii) Select the cell where you want to paste the contents of cell D5 (say cell F5). iv) Click on the Paste icon in the Standard bar.
By Right -Click: Following example illustrates the steps to do cut/copy-paste
by right clicking on the cell: i) Right-Click on the cell whose contents you want to cut or copy (say cell D5). The following menu is displayed:
Figure 4.17: Right-Click Menu
ii) Select the option Cut/Copy. iii) Right-Click on the cell where you want to paste the contents of cell D5 (say cell F5).

iv) Select the Paste option.
Using AutoFill: This feature in Calc is used to automatically generate data based on a defined series. A very common example is to enter numbers in the serial number (S.No) column of a table. This is a very frequently used column which usually contains consecutive numbers. Instead of manually typing the serial numbers (say 1 to 100), you can use the AutoFill command in Calc. The procedure to generate the
series of numbers from 1 to 5 is as follows (Figure 4.18): i) Click on the first cell of the serial number column and type 1. ii) Now drag the fill handle in the bottom right corner of the cell (a solid white + sign) across the cells that you want to fill (in the given example till 5) and release the mouse button. The cells will be filled with ascending numbers 2, 3, 4, 5.
Figure 4.18: Using AutoFill Try doing the same exercise with “Monday” typed a cell and you’ll observe that the subsequent cells will be filled with the days – Tuesday, Wednesday,….etc. The AutoFill command also recognizes customized sort lists that are defined under menu Tools -> Options -> OpenOffice Calc -> Sort Lists. You can also define your
own sort list. In case you want to enter the same value, say, 1 in 10 consecutive cells simply press the Ctrl key while dragging the fill handle. Suppose you want to enter even numbers in a column. For example, entering 2, 4, 6, 8….20. Then follow the procedure:
i) Type the first two values (2 and 4) in the first two cells. ii) Then select both the cells and drag the fill handle of the cell containing value 4. You will observe that now the values filled by Calc will be 6, 8, 10…20. Unit - 3 88 Thus, if you want to generate your own series, then you have to specify two values so that Calc can determine how to generate the subsequent values.

4.3.5 Formatting Data Formatting a document means adding elements of style and presentation to documents to improve the readability and make them more attractive. To enhance the appearance of spreadsheets various formatting options are available in the Formatting Bar and Format Menu such as alignment, font, size, and style. Various formats for numbers are also available such as percentage and decimals. Following are the various formatting options available on the Formatting Bar as shown in Figure 4.19.
Figure 4.19: Formatting Bar
Numbers as Text: Calc evaluates each cell and determines whether the entry is a
Value or Label. Cells containing a combination of values and text is automatically treated as a label such as code of a product - COMP123. Such entries cannot be used for calculations. However, there might be a requirement that a cell containing numbers be treated like a label. For example telephone numbers, Aadhar card number, ZIP codes etc. should be treated as labels and not values. Whenever such a requirement arises, prefix each such entry with a single quotation mark (‘). The quotation mark will
be invisible and the numbers in the cell will be treated as labels.
Font: Font refers to the design for a set of characters. It is the combination of typeface and other qualities, such as size, pitch, and spacing. The font can be changed from the Formatting bar.
Let us discuss various Font changing options on the Formatting bar: Font Name: Various font types are there in Calc such as Arial, Arimo, and Century Schoolbook L. The font type can be selected from the Font Name box in the Formatting bar as shown in Figure 4.19. Using the drop down, you can select from the

list of font types available in Calc. The appearance of the font types listed in the drop down is how the text will look when a font type setting is applied as shown in Figure 4.20.
Figure 4.20: Font Names
Font Size: Click on the drop down arrow of the font size which is next to the Font Name box and then select the size you want to use. Font Style: You can also make the text bold, italics or underlined by clicking on the icons available on the formatting bar .
Horizontal Alignment: Alignment of data in cell with respect to the border of the
cells can be done by using the Alignment options: Left Align : The left edge of the text is along the left cell border. Center Align : Both the left and right edges are equally distant from the left and right cell borders respectively. Right Align : The right edge of the text is along the right cell border.
Justify : Aligns the text to the left and the right cell borders.
Changing Color : You can easily change the color of the background of the cells as well as the text color as shown in Figure 4.21. On the left the background color is changed and on the right the text color is changed.

Figure 4.21: Background and Text Color Change
Steps to change the background color of cells: i) Select the cells. ii) Click on the Background color icon . iii) Select the color from the palette as shown in Figure 4.22.
Figure 4.22: Background Color Palette Steps to change the text or font color: i)S elect the text or you can select the complete cells.
ii) Click on the Text color icon. iii) Select the color from the palette as shown in Figure 4.23.

Figure 4.23: Font Color Palette
Gridlines and Borders : The gray gridlines (vertical and horizontal lines) that you
can see in a Calc spreadsheet help you while you’re working in a spreadsheet. Gridlines appear automatically showing you how the data is organized into rows and columns. Borders are different from gridlines because they help you highlight important information for people to see as shown in Figure 4.24.
Figure 4.24: Gridlines and Borders Borders need to be added if you want to highlight certain cells. One more difference is that gridlines aren’t automatically printed, while borders are. Thus, to draw borders
around a cell or multiple cells, you can use the Border icon on the Formatting bar. A drop down (Figure 4.25) in the same icon provides various options to draw the left or right or top or bottom border, all borders, outer border etc. In order to create borders,

select the cells around which you want borders and then click on the required border option.
Figure 4.25: Borders
Flow of Text: In order to control the flow of text within cells, Calc provides various ways: 1) Merging / Splitting Cells: In order to merge cells, select the cells and
click on the Merge Cells icon in the Standard Bar. To split the merged cells, select the cell and click on the Merge Cells icon. 2) Wrap Text: It means to break the text into multiple lines i.e. adjusting the row height to fit the text within the cell but keeping the column width of the cell same. Steps to wrap text: i) Right-click on the cell. ii) Select the option – Format Cells.
iii) A dialog box opens up. Open the Alignment Tab and check the option – Wrap text automatically as shown in Figure 4.26.

Figure 4.26: Wrap Text
3. Shrink to Fit : This option shrinks the text to fit in the size of the existing cell. In this case neither the row height nor the column width is changed. The text size is decreased according to the cell. Steps to shrink the text size to fit the cell:
i) Right-click on the cell. ii) Select the option – Format Cells. iii) A dialog box opens up. Open the Alignment Tab and check the option – Shrink to fit cell size as shown in Figure 4.26. Following example illustrates the difference between Wrap text and Shrink to fit. Given the text “OpenOffice Calc” which cannot fit in a single cell as shown in Figure 4.27, we have two options – either to wrap the text or to shrink it to fit the
cell.
Figure 4.27: Difference between Wrap Text and Shrink to Fit

Numeric Data Formatting In Calc, there are many ways in which numerical data can be formatted i.e., changing the appearance of numbers. Some of the number formats are available on the Standard Toolbar (Currency , Percent , Standard , Add/Delete Decimal place ). For more options, right-click on the cell and click on Format Cells to open a dialog
box as shown in Figure 4.28. Click on the Numbers tab and then you can select the category of the format as per requirement.
Figure 4.28: Number Formatting Dialog Box
Some of the commonly used number formats are discussed below: 1. Currency: In the currency format, you can prefix or suffix currency symbols to the numeric data. The default currency is Rs. which is prefixed to the number, commas are inserted at the thousand, million, billion positions, and two decimal places are added to the number. 2. Percent: It displays the number as a percentage. Two decimal places are added to the number and the percent symbol (%) is suffixed at the end.
3. Standard: It sets the number in the cell to the default format by removing any other numeric formatting applied.

4. Decimals: Decimal places can be inserted or removed by using the Add Decimal place or Delete Decimal place icon respectively. If you want to remove fractional part of a cell or group of cells then you can either use the Delete Decimal place icon on the Standard toolbar or another option is to right-click on the cell (s) and then click on Format Cells to open the dialog box. On the Number tab, you can see the Decimals spin box in the Option section. You can increase or decrease the number of decimal places by using the up and down arrows. Zeros can also be prefixed to
the numbers by setting the number of zeros to be prefixed in the Leading Zeros spin box. Figure 4.29 shows an example of how the number – 23456.78 changes when different formatting options are applied on it.
5. Date: By default, the date format in Calc is dd/mm/yy. But in case you want to change the format, you can find various date formats in the Format Cells dialog box. 4.3.6 Finding and Replacing Data Data can be searched by using the Find toolbar. If you want to find and replace the data then perform the following steps:
i) Click on the Edit menu and select the Find & Replace option. ii) A dialog box opens (Figure 4.30) in which you can type the text to be searched in the “Search for” text box and the replaced text in the “Replace with” text box. You can find or replace the results individually (Find or Replace) or all of them at one go by clicking on the Find All or Replace All button.

Figure 4.30: Find & Replace Dialog Box
iii) The Match case check box when checked implies that the searching is
sensitive to the case of the text i.e., uppercase and lowercase letters are treated differently. Otherwise uppercase and lowercase letters are treated as equal. iv) Entire cells check box when checked implies that Calc will search for the whole words that are identical to the text to be searched and if the text to be searched is part of some other text then it will not highlight that in its results. If this check box is not checked then the text to be searched is
highlighted even if it is part of cell contents. 4.3.7 Deleting
Delete Data: For removing data from a cell, click inside the cell (double-click) and then press the Backspace key according to the text you want to delete.
However, if you only select the cell (single-click) and then press the Backspace key then this will result in the deletion of all the text within the cell, though the formatting of the cell remains.
Deleting Data and Formatting: Delete key (or Right-click the cell and select Delete All option) can be used to remove data as well as the formatting from a cell.
Selecting the cell and pressing the Delete key opens a dialog box (Figure 4.31) which can be used to delete different aspects of the cell. To delete everything in a cell (contents and format), check Delete all.

Figure 4.31: Delete Contents Dialog Box
Deleting Cell(s): Single or multiple cells can be deleted by selecting them and then right-click and select the Delete option. On doing so, a dialog box (Figure 4.32) opens which asks the user to shift cells up or left or delete an entire row or column after deleting the cell(s).
Figure 4.32: Delete Cells Dialog Box
4.3.8 Inserting/Deleting Rows and Columns
Sometimes when you have finished entering data in a spreadsheet you may need to add or remove rows and columns. One way is to select the row or column by clicking on the row header (number) on the left or column header (alphabet) on the top and then right-click. A menu appears (Figure 4.33) which can be used to insert and delete rows or columns and also adjust the height or width of a row or column.

Insertion of row and columns can also be performed by using the Insert menu on the Menu bar as shown in Figure 4.34.
Figure 4.34: Insert Menu
4.3.9 Using Formulas and Functions Formulas can be used for basic operations such as addition, subtraction, as well as more complex calculations such as income tax calculations, averaging. The advantage of using formulas is that even if the data is changed, Calc will automatically recalculate
the answer without the need to rewrite the formula again. Another advantage of using formulas is that they can be easily copied to a number of cells.

Let us study some examples of creating basic formulas in Calc. Example 1: Adding data in two numbers and storing the result in cell D6. Step 1: In cell D6, type the equal sign (=). This informs Calc that D6 will contain a formula. Step 2: Now type 4+5 Step 3: Press Enter Cell D6 will contain 9. You can see the formula (=4+5) in the Input line in the formula toolbar as shown in Figure 4.35.
Figure 4.35: Example of Adding Two Numbers
In the above example, we have used numbers for addition. What if we were supposed to add the contents of cell D4 and D5 and then store the result in cell D6? This can be achieved using cell reference or address of a cell.
In Calc, a cell reference identifies the location of a cell or group of cells in the worksheet. The cell reference is also called address of a cell. Cell references are used in formulas, functions, and other commands. Individual cell reference: Each cell is identified by its column letter and row number in this order. For example, the cell reference of the topmost and leftmost cell is A1 (Column=A, Row=1).
Range of cells – You can use cell referencing for a consecutive range of cells also using a colon (:). For example, cell reference for the range of first five cells in column D is D1:D5 (i.e., D1, D2, D3, D4, and D5). Cell reference for the range of first five cells in row 5 is A5:E5 (i.e., A5, B5, C5, D5, and E5). Cell reference for a group of four cells spanning first 2 columns and first 2 rows of the spreadsheet is A1:B2 (i.e., A1, A2, B1, and B2).
When you wish to add a reference to a cell in some other cell then there are

two ways. First is to type the cell reference using the keyboard. Second is using the mouse. The steps to insert cell reference using the mouse is as follows: Step 1: Double-Click on the cell in which you want to insert cell reference. Step 2: Type equal sign (=). Step 3: Now click on the cell whose reference you want to add. On Clicking you will notice that the address of the cell which you have clicked is inserted.
For example, steps to add data in two cells D4 and D5 and store the result in cell D6. Step 1: Enter numbers in cell D4 and D5. Step 2: Double-click on the cell D6 and type =. Step 3: Click on cell D4. The address D4 will be inserted in cell D6 after the = sign. Alternatively, you can type D4. Step 4: Type plus sign (+) in cell D6.
Step 5: Click on cell D5, the address D5 will be inserted in cell D6 after the + sign. Alternatively, you can type D5. Formula in cell D6 =D4+D5
After you press Enter, D6 will contain the sum of the numbers stored in cells D4 and D5. You can view the formula of cell D6 in the Input line of Formula toolbar as shown in Fig 4.36. If you double-click on cell D6, then also you can see the formula in cell D6.
Figure 4.36: Example of Adding Contents of Two Cells

Try changing the values in cell D4 and D5 and you will observe that the result in cell D6 will be automatically recalculated and updated. This is one of the most important use of Calc. Just like the plus (+) operator, you can use various other operators in Calc as shown in Table 1.
Precedence of Operations:
If multiple operators occur in a formula then the calculation is performed by using the following order: 1. Operations enclosed in parentheses. 2. Exponentiation. 3. Multiplication and division. (If both multiplication and division occurs

in a formula then the calculation is performed from left to right.) 4. Addition and Subtraction. (If both addition and subtraction occurs in a formula then the calculation is performed from left to right.) For example, consider the following formula: =1000+3000*500
In the above formula, multiplication will be performed first and then addition will be performed. If you want to perform addition first then you have to enclose the addition operation in parentheses as shown below: = (1000+3000)*500
Functions
Calc has a set of predefined formulas called functions. They differ from formulas in the sense that in a formula we provide both the operands and the operator, however in functions we only provide operands (or arguments) as functions have predefined operation to be performed on the arguments. Just like a formula, the function also
begins with an equal (=) sign. We specify the arguments enclosed in parenthesis () and separated by a comma (,). For example, SUM function is used to add as shown below: = SUM (3, 4) – This will add numbers 3 and 4. = SUM (A3, A4) – This will add numbers in cell A3 and A4. = SUM (3, 4, A3, A4) – This will add number 3, 4, contents of cell A3 and A4. Apart from SUM () there are various commonly used mathematical functions in Calc which are discussed as follows:
1. PRODUCT (n1; n2…) – To calculate the product of arguments n1, n2… 2. SQRT (n) – To calculate the square root of a number n. 3. POWER (n; p) – To calculate power p of a number n. 4. LOG (n; b) – To calculate log a number n to base b.
5. ROUND (n; d) – To round a number n to digits d.

6. SIN (n), COS (n), TAN (n) – To calculate sine, cosine and tangent of n. 7. RAND BETWEEN (f; l) – Returns a random number between f and l. 8. QUOTIENT (a; b) – To calculate integer quotient of division a/b. 9. ABS (n) – To calculate the absolute value of a number n. 10. AVERAGE (n1; n2….) – To calculate average of arguments n1, n2….
For the function which contains multiple arguments such as SUM ( ), PRODUCT ( ), AVERAGE ( ), if the arguments are consecutive then you can use a range of cells such as A1:A5 which means cells A1, A2, A3, A4, and A5. For example, addition of the numbers in cells A1:A5 in cell A6 is shown in Figure 4.37.
Figure 4.37: Adding Contents of Consecutive Range of Cells A1:A5
4.3.10 Absolute and Relative Addressing:
Relative Addressing: All cell references are by default relative i.e., they adjust and change when copied or when using AutoFill. When you enter an address A in a cell B then Calc does not store the actual address of A but instead it stores the number of rows and columns relative to the cell containing the address B or in other words how to reach A from B. For example, cell A4 contains the address A3 (=A3). Now, if you will copy the
contents of A4 to B4 then it will contain the address B3 (=B3) because the relative

address is used. That means when A4 contains the address A3, it stores the value of the cell above it (A4-one row) and hence, when it is copied in cell B4, the address of cell one above B4 (B4-one row) i.e., B3 is actually stored in B4. Consider the following worksheet as shown in Figure 4.38 which the formula in cell A6 = SUM (A1:A5) is copied into cell B6. As you can observe that now B6 contains the formula SUM (B1:B5) and not SUM (A1:A5) due to relative addressing.
Figure 4.38: Example of Relative Addressing
The same example can also be performed by using AutoFill. Instead of copying and then pasting the formula from cell A6 to B6, you can use AutoFill. Select cell A6 and move the mouse pointer to the bottom-right corner of the cell A6 until you see a hollow “+” sign. Then drag this sign towards cell B6. The formula in cell A6 will be copied relatively into cell B6.
Absolute Addressing: In some cases, the requirement is to retain the cell address even if it is copied to some other cell or when using AutoFill. In such cases, absolute addressing is used. Dollar signs ($) are used to hold a column and/or row address
constant. When you enter an address in a cell that is prefixed with a $ sign, then Calc stores the absolute address of the cell.
For example, cell A4 contains the absolute address of A3 (=$A$3). Now if you will copy the contents of A4 to B4 then it will contain the same address A3 (=$A$3) because absolute address is used as shown in Figure 4.38.

Figure 4.39: Example of Absolute Addressing
Mixed Addressing : Sometimes a combination of absolute and relative addressing is used such as $A3, B$5, A5+$B4, $A1+B$1. In such cases, whichever part (row or column) is prefixed with $ remains unchanged and the ones not prefixed with $ are calculated in a relative manner.
For example, cell A4 contains =A3+$B$3. Now if you will copy the contents of A4 to B4 then it will contain =B3+$B$3. Relative address A3 will be converted to B3 and absolute address $B$3 will remain same as shown in Figure 4.40.
Figure 4.40: Example of Mixed Addressing
Unit - 3 4.3.11 Sorting and Filtering Data

Sorting: Data can be easily sorted in Calc by using the sort command available on the Standard toolbar (Sort Ascending , Sort Descending ) and also in the Data menu which opens a dialog box for more options as shown in Figure 4.41.
Figure 4.41: Sort Dialog Box
Steps to sort data in ascending order using the Standard Toolbar: Step 1: Select the cells you want to sort. Step 2: Click on the Sort Ascending icon on the Standard Toolbar. Data will be sorted according to the first column of the selected cells.
Steps to sort data in ascending order using the Sort command: Step 1: Select the cells you want to sort. Step 2: Click on the Sort option in the Data menu which opens a dialog box. Step 3: You can change the select the column based on which you want to sort
the data. Also, you can select the Ascending or Descending option. Step 4: Click on OK. Sorting using Multiple Columns: You can also select multiple criteria (up to 3) to sort with each criterion applied one after the other.

For example, you have the following data as given in Table 2 and you want to sort it in ascending order according to the price per item and then if two items have the same price then in descending order of the number of items and if two items have the same price and the number then according to their code sorted alphabetically in increasing order.
Step 1: Select the cells you want to sort including the headings Step 2: Since the data you have selected contains headers (Price per Item and Number of Items) which you don’t want to be included in sorting then open the Options tab in the same dialog box and check the option Range contains column headers. Step 3: Click on the Sort option in the Data menu which opens a dialog box.
Step 4: In the Sort by section select the Price per Item column and ascending Radio button. Step 5: In the Then by section select the Number of Items column and Descending radio button. Step 6: Lastly in the next Then by section select the Item Code and ascending
Radio button as shown in Figure 4.42.

Figure 4.42: Sort Criteria
Step 7: Click on OK
The result after sorting is shown in Figure 4.43.
Figure 4.43: After sorting Table 2
In the Options tab, you can see various other options for sorting as shown below: Case Sensitive – If the cells to be sorted contain the same letter in the same position but different in case then the one in uppercase is placed after the one in lowercase if the sort is ascending and vice versa if the sort is descending. Direction (sorting rows or columns) – It selects whether sorting is to be performed row wise (vertically) or column wise (horizontally).
Filtering Data : Applying a filter means displaying data based on some conditions or filters. Filters can be applied by using the Filter option in the Data menu.

Three types of filters can be applied – AutoFilter, Standard Filter and Advance Filter. Let us study AutoFilter and Standard filter in detail. 1. AutoFilter This filter is added on the topmost row of the selected data in the form of a drop down list from which you can select data to be displayed or in other words apply filters. Example:
Given the following data in Table 3, the following are the steps to apply AutoFilter to display all the Female candidates.
Step 1: Select the data. Step 2: Select Data menu and click on Filter->AutoFilter.
Step 3: On the topmost cell of each column you will observe drop-down boxes. Click on the drop down in the gender column and you will see all the unique values in that column. Step 4: S elect the Female entry in the drop-down as shown in Figure 4.44.

Figure 4.44: Selecting Auto Filter Option
The resulting sheet will contain all the female entries and the drop-down in the column in which filter is applied (Gender) will be colored in blue as shown in Figure 4.45.
Figure 4.45: After Selecting the AutoFilter option
You can apply filters to other columns also. Suppose in the above example, data was to be filtered for all the female students having 98 marks. Then click on the drop-
down of the Marks column and select the 98 entry in the drop-down. The output will be as shown in Figure 4.46.
Figure 4.46: After Selecting Multiple Auto Filter Options
2. Standard Filter Standard filter is used to provide more options for filtering such as combining multiple filters by using AND and OR operator. AND operator implies that all the filters must be satisfied for displaying the data. OR operator implies that at least one filter should be satisfied for displaying the data. AND Operator Example - Suppose in Table 3, you have to select the male students
having more than 75 marks. Following are the steps to filter data based on this criterion: Step 1: Select the data Step 2: Select Data menu and click on Filter->Standard Filter. A dialog box will open.
Step 3: Add the criteria for Gender = “Male” AND Marks > 75 as shown in Figure 4.47.

Figure 4.47: Standard Filter using AND
The AND operator ensures that all the criterion are satisfied. Step 4: Click on Ok. The output will be as shown in Figure 4.48.
OR Operator Example – Suppose in Table 3, you have to select the female students or students having more than 75 marks. Following are the steps to filter data based on these criteria: Step 1: Select the data.
Step 2: Select Data menu and click on Filter->Standard Filter. A dialog box will open. Step 3: Add the criteria for Gender = Female OR Marks > 75 as shown in Figure 2.49.

Figure 4.49: Standard Filter using OR
Step 4: Click on Ok. The output will be as shown in Figure 4.50.
Figure 4.50: Output of Standard Filter (OR)
AND - OR Operators Example –
Suppose in Table 3, you have to select the female students whose name begins with the letter “S” or male students whose name begins with letter “G”. Following are the steps to filter data based on this criterion: Step 1: Select the data Step 2: Select Data menu and click on Filter->Standard Filter. A dialog box will
open. Step 3: Add the criteria for Gender = Female AND Name of the Students Begins with “S” OR Gender = Male AND Name of the Students Begins with “G” as shown in Figure 2.51.

Figure 4.51: Standard Filter using AND-OR
Step 4: Click on Ok. The output will be as shown in Figure 4.52.
Figure 4.52: Output of Standard Filter (OR)
3. Removing AutoFilter – Select the cells as selected while adding the filter. From the Data menu, select
Filter->Remove Filter as shown in Figure 4.53. The filters will be removed.
Figure 4.53: Remove Filter

5.3.12 Creating Charts and Graphs In Calc, you can create graphs and charts to represent the data graphically. Sometimes, it is very difficult to analyze spreadsheets containing huge amount of data. For example, analyzing the academic performance of students of a school over the past 10 years. Such analysis can be done effectively by using charts which provide a visual presentation of data.
Various types of charts can be created in Calc. It offers a choice of 10 chart types such as Column chart, Bar chart, Pie chart, Area chart. Each of the chart types has several sub-types. Creating Charts : Following are the steps required to insert a chart: Step 1: Select the data which is to be included in the chart.
Step 2: Go to the Insert menu and select the Chart option as shown in Figure 4.54 or another way is to click on the Chart icon in the Standard toolbar.
Figure 4.54: Inserting Chart from Menu Bar
Step 3: Chart wizard dialog box is displayed as shown in Figure 4.55 which is used to insert various options related to the chart such as the type of

chart, data range, data series and elements of the chart.
Figure 4.55: Chart Wizard
Step 4: Select the chart type (Column chart, Bar chart, Pie chart etc.) and click on the Finish button. Let us create different types of charts for the following data as shown in Table 4.
Column Chart: A Column chart is used to compare values across categories by using vertical bars. The Column chart can be inserted by selecting the Column option in the Chart type of the Chart Wizard. You can also select from the various subtypes of

Column chart from the Wizard. The Normal Column chart for the data in Table 4 is shown in Figure 4.56.
Figure 4.56: Normal Column Chart
Bar Chart: A Bar chart is the horizontal version of a column chart. It is used if you have large text labels. Select the Bar chart option in Step 3 above to create a Normal Bar chart for the Table 4 is shown in Figure 4.57.
Figure 4.57: Normal Bar Chart
Pie Chart : A Pie chart is used to display the contribution of each value (slice) to a total (pie) i.e., it can be used to plot various pieces of a single entity. The Normal Pie
chart for Table 4 is shown in Figure 4.58.

Figure 4.58: Normal Pie Chart
Line Chart : A Line chart is used to compare trends and changes in values over time.
The line chart (lines only) for the data in Table 4 is shown in Figure 4.59.
Figure 4.59: Lines Only Line Chart
Scatter Chart : A Scatter chart is used to display relationships between variables. The scatter chart for the data in Table 4 is shown in Figure 4.60. Note that the X axis labels are not the month names as in the case of line chart but numbers.

Figure 4.60: Scatter Chart
Apart from changing the chart type, chart wizard is also used to set various other options of the chart as discussed below:
Inserting Title : You can insert title and subtitle of the graph and titles of X-axis
and Y-axis in the Chart Elements of the Chart Wizard as shown in Figure 4.61.
Figure 4.61: Chart Elements of the Chart Wizard
After inserting the chart elements, the Points and Lines chart for the Table 4 is shown in Figure 4.62.

Figure 4.62: Points and Lines Chart with Chart Elements
Legends : Most commonly located on the right of the chart, legends help the
readers of the chart to decode the charted data by associating descriptive text with the colors or patterns of data in the chart. You can modify the placement of legends or even remove them in the chart by using the Chart Wizard->Chart Elements as shown in the right panel of Figure 4.61.
Grids: To make the data in a chart that displays axes easier to read, you can
display horizontal and vertical chart gridlines. By default, the horizontal gridlines are displayed. You can turn on and off the gridlines by using the Chart Wizard->Chart Elements as shown in Figure 4.61. Resizing and Moving Charts
After the chart has been inserted, you can easily move and resize it. Click anywhere in the chart area and drag it to another position in the spreadsheet for moving the chart. For resizing it, click on the chart and then click and drag any of the chart resizing handle (Eight green small squares on the border of the chart as shown in Figure 4.63).
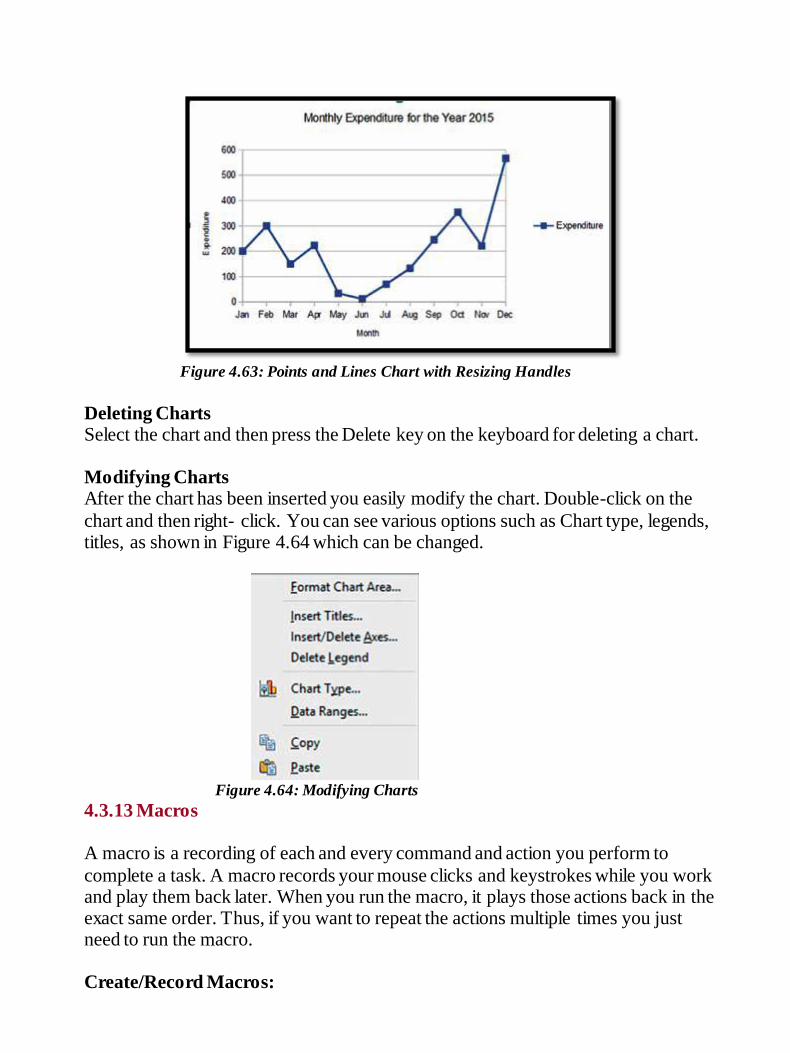
Figure 4.63: Points and Lines Chart with Resizing Handles
Deleting Charts Select the chart and then press the Delete key on the keyboard for deleting a chart. Modifying Charts After the chart has been inserted you easily modify the chart. Double-click on the
chart and then right- click. You can see various options such as Chart type, legends, titles, as shown in Figure 4.64 which can be changed.
Figure 4.64: Modifying Charts 4.3.13 Macros A macro is a recording of each and every command and action you perform to
complete a task. A macro records your mouse clicks and keystrokes while you work and play them back later. When you run the macro, it plays those actions back in the exact same order. Thus, if you want to repeat the actions multiple times you just need to run the macro. Create/Record Macros:

Following are the steps to record/create a macro: 1. Go to the Tools tab on the Menu bar->Macros->Record Macro as shown in Figure 4.65.
Figure 4.65: Macro
Observe a small dialog box (Figure 4.66) has appeared on the worksheet displaying Stop Recording.
Figure 4.66: Stop Recording Dialog Box
2. Calc has started recording the Macro. Until you stop the recording, every
Calc command and keystroke will be recorded in the macro, in the order in which they are entered. Suppose the following tasks were performed: a) We created all borders in the cells A1:C3. b) Then we changed the background color of cells A1:C3 to green.
3. After we have done all the required tasks, we will stop recording the macro by clicking on the Stop recording option on the dialog box (Figure 4.66). A new dialog box will open (OpenOffice Basic Macros) in which you have to specify the name of the macro and the location for saving it (We have named the macro as ColorChange and saved it in My Macros folder) as shown in Figure 4.67.

Figure 4.67: Saving a Macro
Now we have a macro that can perform in a single operation all the tasks we have performed during recording of the macro. Run/Use Macros created:
Following are the steps to run/use a macro that we have already created: 1. Go to the Tools tab on the Menu bar->Macros->Run Macros (Figure 4.65). 2. A dialog box will open as shown in Figure 4.68 showing all the macros created. We will select the one to run and then click on Run button.
Figure 4.68: Macro Selector 3. The tasks performed during recording of the macro will be repeated in the
same order in which they were performed. (Running ColorChange Macro will create borders around the cells A1:C3 and set their background color to green.)

By default, recorded macros use absolute cell referencing, which means that exact cell locations are recorded into the macro. Delete Macros: Following are the steps to delete a macro that we have already created: 1. Go to the Tools tab on the Menu bar->Macros->Organize Macros and select the OpenOffice Basic option. 2. A dialog box listing the macros created will open as shown in Figure 4.69.
Select the macro you want to delete and then click on the Delete button.
Figure 4.69: Deleting a Macro 4.3.14 Printing Spreadsheets Calc offers various options for printing spreadsheets. Many details can be selected for what is to be printed and what not. For printing, open the File tab on the Menu bar and select the Print option. A dialog
box will open (Figure 4.70) in which you can select various options such as: 1. All Sheets, Selected Sheets or Selected Cells. 2. All pages or specific pages. Specific page numbers separated by comma or range of pages (such as 1:10) can be entered in the Pages box.

3. Number of Copies
Figure 4.70: Print Dialog Box
After selecting the options, click on Print to print the spreadsheet(s).
Points to Remember
A spreadsheet stores data in the form of a table comprising of rows and columns.
Spreadsheets are used to store, arrange, and sort data, and perform calculations on
numeric data.
OpenOffice Calc is a free and open-source spreadsheet application available that can
be used to create and manipulate a spreadsheet.
Calc Main Window contains various toolbars such as – Title Bar, Menu Bar,
Standard Bar, Formatting Bar, Status Bar, Find Bar, Side Bar, etc.
A Spreadsheet consists of a number of individual sheets, each containing cells
arranged in rows and columns.
A particular cell is identified by its column letter and row number.
The selected cell is called as an Active Cell.
Various types of data can be entered in a cell such as labels, numbers or values,
formulas.
AutoFill feature in Calc is used to automatically generate data based on a defined
series.
To enhance the appearance of spreadsheets various formatting options are available
in the Formatting Bar and Format Menu such as alignment, font, size, color, and style.
Data can be searched and even replaced by using the Find toolbar.
Formulas in Calc can be used for basic operations such as addition, subtraction, as
well as more complex calculations such as income tax calculations, averaging.

The advantage of using formulas in the cell is that even if the data in the cell is
changed, Calc will automatically recalculate the answer without the need to rewrite
the formula again. Another advantage of using formulas is that they can be easily
copied to a number of cells.
A cell reference identifies the location of a cell or group of cells in the worksheet.
The cell reference is also called address of a cell.
Calc has a set of predefined formulas called functions.
Functions differ from formulas in the sense that in a formula we provide both the
operands and the operator, however in functions, we only provide operands (or
arguments) as functions have predefined operation to be performed on the arguments.
Some of the commonly used functions in Calc are: SUM ( ), PRODUCT ( ), SQRT
( ), POWER ( ), ROUND ( ), AVERAGE ( ), etc.
All cell references are by default relative i.e., they adjust and change when copied or
when using AutoFill.
Absolute addressing is used when the requirement is to retain the cell address even
if it is copied to some other cell or when using AutoFill. Dollar signs ($) are used to
hold a column and/or row address constant.
Mixed addressing is a combination of absolute and relative cell addressing.
Whichever part (row or column) is prefixed with $ remains unchanged and the ones
not prefixed with $ are calculated in a relative manner.
Data can be easily sorted (increasing or decreasing order) in Calc by using the sort
command available on the Standard toolbar and also in the Data menu.
Data can be filtered in Calc for displaying it based on some conditions or filters.
Filters can be applied by using the Filter option in the Data menu.
Three types of filters can be applied – AutoFilter, Standard Filter, and Advance
Filter.
In Calc, you can create graphs and charts to represent the data graphically which help
in analyzing spreadsheets containing a huge amount of data.
Various types of charts can be created in Calc. It offers a choice of 10 chart types
such as Column chart, Bar chart, Pie chart, Area chart, Line chart, Scatter chart, etc.
Each of the chart types has several sub-types.
A macro is a recording of each and every command and action you perform to
complete a task.
Calc offers various options for printing spreadsheets such as a number of copies,
selected sheets, selected cells etc.

Exercise 1. Open a new spreadsheet in Open Office Calc and save it as InternetHours The following table records the number of hours each student uses Internet in a week:
a) Copy this data into your spreadsheet.
b) Add another column titled “Total hours per user”. Using an appropriate formula, calculate the total hours each student used in the week. c) Add another column titled “Daily average hours used”. Using an appropriate formula, calculate the average hours each student used per day. The hours should be rounded to 1 decimal place.
d) Below the last student, add a row titled “Total hours per day”. Using an appropriate formula, calculate the total hours used each day of the week. e) Add another row titled “Minimum hours used”. Using an appropriate formula, find the minimum number of hours used for each of the days. f) Add another row titled “Maximum hours used”. Using an appropriate formula, find the maximum number of hours used for each of the days.
2. ABC Sports expects its sales figures for 2015 to exceed the sales in 2014 by 10%. Create the following spreadsheet: ABC Sports Yearly Sales Report
2021 Sales
Increase
10 %
2020 2021
FOOTBALL 102,078
BASKETBALL 202,090
TENNIS 20,034
NETBALL 50,234
GOLF 12,211
TOTAL
a) Enter a formula in C54 that will calculate the amount of the sales for 2021. Use an absolute reference in order that the manager can change the rate of the expected increase to be able to view likely sales figures for 2021.

b) Change the rate of the sales increase to 20% and then 25% and see what happens to the 2021 figures. c) Total the sales for the year 2020 and 2021. 3. Create the following worksheet which contains information about the subscribers of a newspaper “Daily News” during the period 21st – 25th
August 2021 Daily News DATE NAME NUMBER OF
YEARS
SUNDAY
SPECIAL
STATE
21-AUG-21 AYESHA
VERMA
2 YES DELHI
21-AUG-21 SHIVANSHI 3 YES MUMBAI
21-AUG-21 RUDRAKSHH 2 NO KANPUR
21-AUG-21 RAM KAPOOR 2 YES DELHI
New Subscribers August 2021
DATE NAME NUMBER
OF YEARS
SUNDAY
SPECIAL
STATE
22-AUG-21 ARVIND RAJAN 3 NO CHENNAI
22-AUG-21 BHAVISHYA 1 NO CHENNAI
22-AUG-21 BHAVINI 1 YES DELHI
22-AUG-21 KATHA JAISWAL 1 NO DELHI
22-AUG-21 SAHITYA 2 YES MUMBAI
22-AUG-21 SOHAM 1 YES LUCKNOW
22-AUG-21 NIVAAN BAJAJ 2 YES CHENNAI
22-AUG-21 AADDYA 3 NO KOLKATA
a) Extract records of subscribers who need Sunday special copy also. b) Sort the table on State and Name of the subscribers.
4. Create the following worksheet:

a) Create a bar graph for the above data. b) Create a pie chart for column Y. c) Create a line chart between X and Y. 5. Create a macro which will set all borders of the cells D3:J15, set the color of cells as blue and set the first row to have font style as bold and center aligned text.
Open Office Impress
5.1 Introduction Presentation software is required for the creation of the presentations for a larger audience. The presentation software has tools that allow the user to create presentations with sound, text, movies, pictures, and tables. OpenOffice Impress is a popular open source software for presentation. The
OpenOffice Impress software can be downloaded from Internet for free, and can be installed on Linux based machines and also on Windows-based machines. This chapter discusses the usage of OpenOffice Impress software in detail. 5.2 Start Openoffice Impress
To start using the OpenOffice Impress software, any one of the following steps needs to be performed:
<Start> <Programs> <OpenOffice> <Presentation> , OR,
If the OpenOffice Icon (Figure 5.1) is on the desktop, double click the icon

Figure 5.1: OpenOffice Icon Unit - 3 5.3 OpenOffice Screen and its Components
The main screen of OpenOffice Impress is shown in Figure 5.2. It consists of different components like Tabs, Ruler bar, Status bar, Scroll bar, and Slide Pane. The Impress layout and its general features are described as follows:
Figure 5.2: OpenOffice Impress Screen
Tabs (File, Edit, View, Insert etc.) contain drop down menu which have commands provided by the tab.
Status Bar: It displays information about the current open presentation. It displays the current slide number, total slides in the presentation, zoom slider, etc.
Scroll Bar: There are two scroll bars – horizontal and vertical. They help to
scroll the content or the body of the slide.

Work Area: It is the working area where the text of the slide is typed.
View Options: The slides can be viewed in different views – Normal,
Outline, Notes, Handout, and Slide Sorter. Normal is the main view. Notes shows the Notes pane where notes can be viewed and edited, Outline gives the outline of the slides, Handout allows the user to print two or more slides on a single page, and Slide Sorter view presents miniature slides where the user can change the order of the slides, delete the slide, etc. Unit - 3132
Slide Pane: It displays the slides as thumbnails. The user can view all slides
in the presentation, rearrange them or hide slides. 5.4 Impress Tabs The OpenOffice Impress has eight tabs – File, Edit, View, Insert, Format, Tools, Slide Show, and Window. There is also a help tab. On clicking any of the tabs, a dropdown menu appears which have several commands and options. Select the command that you want to execute.
The key tasks that can be performed using the tabs are as follows:
File: To apply commands to current presentation, to open or close presentation
Edit: For editing the current presentation, like cut, paste etc.
View: For controlling display of slides on the screen
Insert: For inserting new elements in the presentation, like slide, page number, hyperlink etc.
Format: For formatting the layout and content of slides.
Tools: For spelling check, gallery of object art to add to slides, to configure menus.
Slide Show: To make settings for slide show, animation and transition in a
presentation.

Window: For manipulating and displaying presentation windows 5.4.1 File Tab The OpenOffice Impress is used to create a presentation. The presentation is stored as a file in the computer with the extension .odp.
For example, a document stored as a file Chapter1.odp. The File tab consist of commands required to perform operations on a file (presentation). It contains several commands as shown in Figure 5.3. The commands which are required to be known at this stage are described in the figure. The commonly used commands allow the user to – create, save, print, open, and close a presentation file.
Unit – 3 Figure 5.3: File tab
Some operations performed using the commands of the File tab are described as
follows -
Using New: When you click <File><New>, a drop down menu appears. To create a presentation, select < Presentation >. Using Save As: This is used when you want to

(1) Save a file for the first time, or (2) Save an already saved file with a different name. When you click <File Tab> <Save As>, a Save As dialog box appears. You can –
Select folder (directory) where the file is to be saved,
Type the File name for the presentation,
Select “save as type” of presentation (.odp etc.)
Click “Save: button to save the file.
To Print:<File><Print>: Print the presentation to the connected printer. You can select the size of the paper, the slides to be printed, the number of slides on a single sheet to be printed etc.
5.4.2 Edit Tab The Edit tab consist of commands required to perform editing on the current presentation. It contains several commands as shown in Figure 5.4. The commands which are required to be known at this stage are described in the figure. The commonly used commands allow the user to – cut, copy, paste, find & replace, undo, and redo changes in the current presentation.
Figure 5.4: The Edit Tab

Unit - 3 Some operations performed using the commands of the Edit tab are described as follows -
Move Text: Remove the text to be moved by selecting the text and then applying <File><Edit><Cut>. Then take the cursor to the place in the slide where you want to move the text. Then do <File><Edit><Paste>.
Copy Text: Select the text to be copied and then apply
<File><Edit><Copy>. Then take the cursor to the place in the slide where you want the copied text. Then do <File><Edit><Paste>.
Find and Replace: This is used to find words then replace it with the new
one. This option is useful to find the word at multiple places in the presentation and replace all of them with the new one. 5.4.3 View Tab The View tab consist of commands required for viewing the current presentation on the screen. It contains several commands as shown in Figure 5.5. The commands which are required to be known at this stage are described in the figure. The
commonly used commands allow the user to view slides in different layouts, status bar, ruler, sidebar, etc.
Figure 5.5: View Tab
Unit - 3 136

Some operations performed using the commands of the View tab are described as follows -
Different ways in which presentation slides can be viewed:
View -> Normal: This is the main editing view for writing and creating slides
View -> Outline: This displays an outline of the text in the slides.
View -> Slide Sorter: This presents all slides of the presentation in a
miniature form. It helps in viewing all slides together and allows easy moving of slides.
View -> Slide Show: It shows slides as they will be actually presented. No editing can take place in this view.
View -> Notes Page: Allows user to make notes for the selected slide. The notes can be seen only by the presenter while making a presentation. The note page is not visible to the audience of the slide show presentation Figure 5.6.
View -> Handout Page: It displays slides on a page as seen when printed.
The user can vary the number of slides to be visible in a handout.
Figure 5.6: Different views (a) Normal (b) Outline (c) Notes (d) Slide Sorter
Unit - 3

Use Slide Master: Select <View> <Slide Master>: This allows changing the background color, text color, bullet type, bullet color, etc. The change in the slide master is visible in all slides of the presentation.
Insert Header and Footer in slides: Select <View> <Header and Footer>
Figure 5.7.
Figure 5.7: Header and Footer Window
5.4.4 Insert Tab The Insert tab consist of commands required for inserting different elements in the slides or inserting slides itself. It contains several commands as shown in Figure 5.8. The commands which are required to be known at this stage are described in the figure. The commonly used commands allow the user to insert slide, page number, date and time, pictures, sound, hyperlinks, etc. in the current presentation.
Unit - 3
Tip: First make the Slide Master and then start making the presentation.
Formatting of slide master gets applied to all slides.

138 Figure 5.8: Insert Tab
When using an Insert tab to insert an element, the insertion of an element in the presentation happens at the location where the cursor is present on the slide. So, you must place the cursor at the right location on the screen before inserting the element. Also, when using insert, a dialog box may open for further settings and selection. Please choose the options in the dialog box and proceed further. The dialog box is self-explanatory.
Some operations performed using the commands of the Insert tab are described as follows -
Insert Page Number, Date and Time: Insert -> Page Number : A Header and Footer Window opens. Make settings here for date, time and page number.
Insert Fields: <Insert> <Fields> : A pop-up menu appears (Figure 5.9). Select the element to be inserted. The selected element will insert at the location of the cursor.

Unit - 3 139 Figure 5.9: Insert Fields Option
Insert Hyperlink: <Insert> <Hyperlink> : A dialog box opens. On the left side of the dialog box, select where you want to link – current presentation slides, new presentation or Internet link. Then fill the details path, Form (text, button), etc. The Text is the name that appears in your document as a hyperlink.
4.4.5 Format Tab The Format tab consist of commands required for formatting the presentation slides. It contains several commands as shown in Figure 5.10. The commands which are required to be known at this stage are described in the figure. The commonly used commands allow the user to format a character, paragraph, slide design and slide layout, etc. in the current presentation.
Figure 5.10: Format Tab Unit - 3
140 When using the Format tab, the formatting happens on the text or the figure that has been selected.

So, you must select the text or the figure on which the formatting has to be applied and then use the relevant command from the Format tab. Some operations performed using the commands of the Format tab are described as follows –
Format Character: Format -> Character. A dialog box opens. Select the
font type, typeface and size. Select font effects, background etc.
Format Paragraph: Format -> Paragraph. A dialog box opens. You can change the indentation and spacing, borders, alignment etc.
Format Line: Format -> Line. A dialog box opens (Figure 5.11). You can select from line style, width, color etc. In the slide, formatting applies to the selected line.
Format Slide Layout: Format -> Slide Layout. You can select a slide
layout for the slide from the different slide layouts presented to you. (Figure 5.12).
Figure 5.11: Format Line Unit - 3

141
Figure 5.12: Format Slide Layout 4.4.6 Tools Tab
The Tools tab consists of commands that can be used on the presentation for better results. It contains several commands as shown in Figure 5.13. The commands which are required to be known at this stage are described in the figure. The commonly used commands allow the user to check the spelling of content in the presentation.
Figure 5.13: Tools Tab Unit - 3

142 Some operations performed using the commands of the Tools tab are described as follows -
Check Spellings: Tools -> Spelling . The spelling of the presentation is checked. A window appears if there are no spelling errors in the document. If errors
are there, then the errors are displayed with suggestions of correcting it. 5.4.7 Slide Show Tab The Slide Show tab consists of commands that can be used on the presentation for better results. It contains several commands as shown in Figure 5.14. The commands which are required to be known at this stage are described in the
figure.
Figure 5.14: Slide Show Tab
When using the Slide Show tab, it contains commands that are required during the presentation of the slide show. Some operations performed using the commands of the Slide Show tab are described
as follows:
Slide Show Settings: Slide Show -> Slide Show Settings. A dialog box opens (Figure 5.15). Select the slide to start from, animation allowed etc.

Custom Animation: Slide Show -> Custom Animation. A dialog box opens on the right side of the screen. Select the element on the slide on which the animation has to be applied. Click <Add>. Select the animation to be applied.
Slide Transition: Slide Show -> Slide Transition. A dialog box opens on
the right side. Select the transition you want to apply to the slide. Unit - 3 143 There is a difference between animation and transition. Slide transition applies to the pattern that will show up when one slide goes to the next (for example, wheel, diamond etc.). Slide animation applies to elements of a single slide, i.e., how the different elements in a slide will appear on the screen, their order, etc.
Figure 5.15: Slide Show Settings
5.4.8 Window Tab
The Windows tab consists of commands that work on a window, as shown in Figure 5.15.
The commands in this tab allow the user to open a new window or close an existing window.
Also, the name of all currently open windows is also displayed.

Figure 5.16: Window Tab
Unit - 3 5.4.9 Help Tab
The Help tab consists of commands that provide help to the user of the OpenOffice Impress software. On clicking on the help tab, a screen as shown in Figure 5.17 appears. You can browse the Help for the command you want.
Figure 5.17: Help Tab Points to Remember
Presentation software allows creation of presentations having text, audio, video and
pictures.
OpenOffice Impress is an open source software for presentation.
Tabs, Ruler bar, Status bar, Scrollbar and Slide Pane are the different components of
OpenOffice Impress.
OpenOffice Impress has eight tabs – File, Edit, View, Insert, Format, Tools, Slide Show, and Window.
The slides can be viewed in different views – Normal, Outline, Notes, Handout, and
Slide Sorter.
Normal view is the main editing view for creating slides.
Notes allows the user to make notes for the selected slides.
Slide Sorter view presents slides in a miniature form.
Slide Master allows making changes in appearance of the slides, applying changes to all slides in the presentation.
File tab allows operations on a presentation, like, create, save, print, open and close.
Unit - 3
Edit tab is required to perform editing on the presentation, like, cut, copy, paste, find

& replace, undo and redo changes.
View tab consist of commands required for viewing the current presentation on the screen to view slides in different layouts, status bar, ruler and sidebar.
Insert tab is required for inserting slide, page number, date and time, pictures, sound
and hyperlinks in a presentation.
Format tab allows formatting the slides - character, paragraph, slide design and slide layout.
Tools tab contains commands to check spelling of content in the presentation.
Slide Show tab consists of commands used on the presentation for better results.
Slide transition is the pattern that applies when a slide goes from one to next.
Slide animation is the pattern that applies to elements of a single slide.
Windows tab consists of commands that work on a window, like, open and close a window.
Help tab provides help to the user of OpenOffice Impress software.
Exercises 1. What is the need of a presentation software? 2. What is the task of a presentation software? 3. Name an open source presentation software 4. List the steps to start an OpenOffice Impress. 5. List the components of the main screen of OpenOffice Impress.
6. Define the following a. Tabs b. Ruler Bar c. Status Bar d. Scroll Bar e. Slide Pane Unit -f. Work Area 7. List the different view options in OpenOffice Impress.
8. List the tabs in the OpenOffice Impress. What are the key tasks performed by the tabs? 9. What is the extension of the file created in OpenOffice Impress. 10. What is the purpose of the following tabs: a. File b. Edit c. View d. Insert e. Format
f. Tools g. Slide Show 11. What is the difference between Save command and Save As command?

12. What is the difference between Move text and Copy text? 13. How is Find and Replace option useful? 14. What is the purpose of the following views - a. Normal b. Outline c. Slide Sorter d. Slide Show e. Notes Page f. Handout Page
15. What is the need to use the Slide Master? 16. List the steps for inserting a hyperlink to a video in a presentation. 17. What is the difference between slide transition and slide animation. 18. Name the tabs in which the following commands are present a. Header and Footer b. Find & Replace c. Status Bar d. Ruler
e. Hyperlink f. Animation g. Transition h. Normal view i. Copy 19. Use OpenOffice Writer to create the following presentations: a. A five slide presentation showing five years of your life
b. A presentation about the farewell party c. A five slide presentation showing the importance of saving the environment. d. A presentation having hyperlink on each slide to a web resource (audio, page, video) around the theme of beautiful nature. e. A presentation that tells about you as in your resume. f. Use Animation, Transition and Notes Page in all presentations.

UNIT-4
RELATIONAL DATABASE MANAGEMENT SYSTEM
- UNDERSTANDING RELATIONAL DATABASE MANAGEMENT SYSTEM
- INTRODUCTION TO MY SQL
- DML COMMANDS

INTRODUCTION
Today, we are living in an era of BIG DATA so there is a need to store the data efficiently. There
are software or programs used to store computerized databases being used almost everywhere.
Such as Airforce, Police force, Medical Researches, Entertainment uses various computerized
databases for different purposes. In schools, library stores details of all their books in a
computerized database. When we want to know if a book is in stock, we cannot only look it up, but
can also check when it is due to be returned. The database also records details of all the borrowers,
what books they currently have borrowed and when they are due back.
Database Management System (DBMS)
To create and maintain a database on a computer, we need a database program or software, called
a Database management system, or DBMS. Database Management System is a software that
enables users to create and maintain databases. The popular DBMSs are MySQL, PostgreSQL,
Microsoft Access, Oracle, Microsoft SQL Server, DB2 and Sybase.
DBMS allow us to:
· store data in a structured way.
· query the database (that is, ask questions about the data)
· sort and manipulate the data in the database
· validate the data entered and check for inconsistencies
· produce flexible reports, both on screen and on paper, that make it easy to comprehend the
information stored in the database.
Relational Database
In the database named Learner shown below, the data is organized into separate tables. Once the
tables have been set up, a relationship can be created to link them together. Such a database that
stores data in separate tables that are related through the use of a common column is called a
Relational database.
Benefits of using a DBMS are:

a. Redundancy can be controlled
b. Inconsistence can be avoided
c. Data can be shared
d. Security restrictions can be applied.
RDBMS Terminology
1. Domain
It is pool of values or the collection (set) of possible values from which the value for a column is derived.
2. Tables or Relation in a Database
Relational Databases store data or information in tables. A table is similar to a spreadsheet where
data is stored in rows and columns. A table refers to a two-dimensional representation of data using
rows and columns. The tables in a database are generally related to each other to facilitate efficient
management of the database. Interrelated tables also reduce the chances of errors in the database.
For example, consider the following table named Customer with details about customers:
2. Record - The horizontal subset of the Table is known as a Row/Tuple. Each row represents a
record, which is a collection of data about a particular entity such as person, place or thing.
3. Field - The vertical subset of the Table is known as a Column/Attribute. The term field is also
often used for column. Each column has a unique name and the content within it must be of the
same type.
4. MySQL: It is an Open Source RDBMS Software. It is available free of cost.

5. Key: A column or a combination of columns which can be used to identify one or more rows
(tuples) in a table is called a key of the table.
6. Primary Key: The group of one or more columns used to uniquely identify each row of a relation
is called its Primary Key.
When you got admission in the school, you were given an Admission number. The Admission
number assigned to you was not assigned to any other student of your school (it is unique). When
patients go to a hospital, each patient is given a unique patient number. When you go to open an
account in the bank, you are given a unique account number. Admission number, Patient number,
Account number are all examples of Primary key. A primary key is a field in a table that is unique
for each record. Every database table should have a column or a group of columns designated as
the primary key. The value this key holds should be unique for each record in the table. Some more
examples of Primary key are: Accession Number of a Book in the Book table, Employee ID of an
employee in the Employee Table, Item Code of an item in the Stock table, Flight Number of a flight
in the Flight Master Table, etc.
The purpose of a primary key is to uniquely identify each record in a table.
7. Candidate Key: A column or a group of columns which can be used as the primary key of a
relation is called a Candidate key because it is one of the candidates available to be the primary
key of the relation.
In a table, there may be more than one field that uniquely identifies a record. All such fields are
called candidate keys. A Candidate key is an attribute (or set of attributes) that uniquely identifies a
row. A Primary Key is one of the candidate keys. A table may have more than one candidate keys
but definitely has one and only one primary key.
8. Alternate Key: A candidate key of a table which is not selected as the primary key is called its
Alternate Key.
Example: Consider the following Table, RollNo and Admission_no both may be used to uniquely
identify each row in this Table, so both are candidate keys.
Candidate keys which are not made primary key are called Alternate keys. In the above example,
if we use one of the candidate keys, say, Admission_No as the Primary Key, the other Candidate
Key RollNo is the Alternate Key and vice-versa.

9. Foreign Key: A primary key of a base table when used in some other table is called as Foriegn
Key.
For example: Table Employee has columns : EMPID, EMPNAME, ADDRESS, CONTACT NO,
DEPTID. And the table Department has columns : DEPTID, DNAME, CITY. Then the DEPTID
column of the Employee table will be known as Foreign Key because it is declared as Primary Key
in the Department table.
Note : The primary key column and the foreign key column must have the same data type and size.
Introduction to MySQL:
MySQL is a relational database management system (RDBMS). It is pronounced as "My Sequel".
MySQL was originally founded and developed in Sweden by David Axmark, Allan Larsson and
Michael Widenius, who had worked together since the 1980s.
Characteristics of MySQL:
MySQL is released under an open-source license so it is customizable.
It requires no cost or payment for its usage.
MySQL has superior speed, is easy to use and is reliable.
MySQL uses a standard form of the well-known ANSI-SQL standards.
MySQL is a platform independent application which works on many operating systems like
Windows, UNIX, LINUX etc. and has compatibility with many languages including JAVA , C++,
PHP, PERL, etc.
MySQL is an easy to install RDBMS and is capable of handling large data sets.
Since MySQL is released under an open-source license, it does not require any cost or payment
for its usage. Any one can download this software from specific location on Internet. If you want to
download, follow the following steps. The step for two most popular OS platform, Windows and
Linux are discussed here.
DOWNLOADING MySQL [Windows Environment]:
Installation file for MySQL may be downloaded from the link:
https://www.mysql.com/downloads/

Scroll the above screen and Click on the "Download" button for the Community Server and choose
from the list of supported platforms (i.e., operating systems that it will run on), which include 32 -bit
and 64-bit Windows, several different Linux, Solaris, Mac OS X, and a few others.
(Choose appropriate download link as per the operating system)

Keep selecting the default options provided in subsequent windows. If the configuration does not
encounter any errors, then information will be prompted that the configuration file was created,
MySQL server was installed and started, and the security settings applied.

Note : In the process of configuration of MySQL, a prompt for password will be displayed - Here you
should enter a password and remember this password, as it will be required each time to start
MySQL.
Categories of SQL Commands
SQL commands can be classified into the following categories:
1. Data Definition Language (DDL) Commands
The DDL part of SQL permits database tables to be created or deleted. It also defines indices
(keys), specifies links between tables, and imposes constraints on tables.
Examples of DDL commands in SQL are:
CREATE DATABASE - creates a new database
CREATE TABLE - creates a new table
ALTER TABLE - modifies a table
DROP TABLE - deletes a table
2. The Data Manipulation Language (DML) Commands
The query and update commands form the DML part of SQL: Examples of DDL commands are:
SELECT - extracts data from a table
UPDATE - updates data in a table
DELETE - deletes data from a table
INSERT INTO - inserts new data into a table
MySQL Data Types
Before we learn about making a table, there is one thing we need to understand first: Data Types.
They indicate the type of data that you are storing in a given table column. So, what are the
different Data Types available in MySQL? Here is a list of some of the most common ones and
what type of values they hold:
Class Data Type Description Example
Text CHAR(size) A fixed-length string from 1 to 255 characters in length right-padded with spaces to the specified length when stored. Values must be enclosed in single quotes or double quotes
'Maths' "TexT"
Text VARCHAR(size) A variable-length string from 1 to 255 characters in length; i.e. VARCHAR(25). Values must be enclosed in single quotes or double quotes.
'Computer' "good morning"
Numeric DECIMAL(size,d) It can represent number with or without the fractional part. The maximum number of
17.32 345
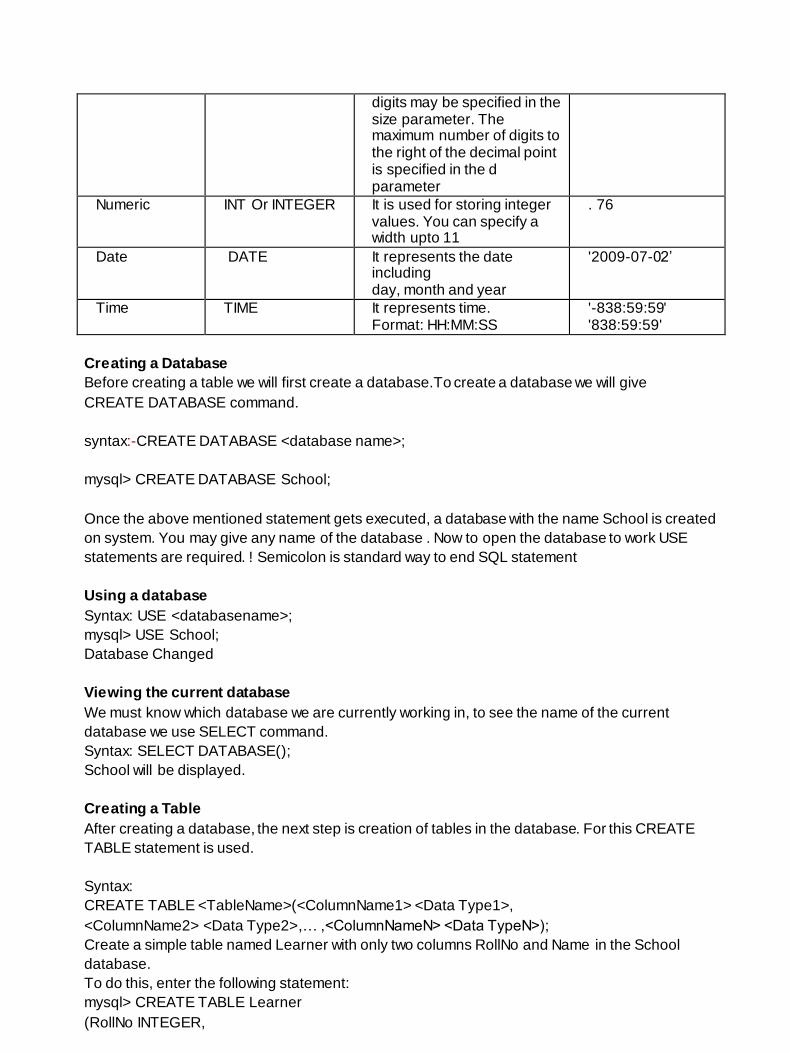
digits may be specified in the size parameter. The maximum number of digits to the right of the decimal point is specified in the d parameter
Numeric INT Or INTEGER It is used for storing integer values. You can specify a width upto 11
. 76
Date DATE It represents the date including day, month and year
'2009-07-02’
Time TIME It represents time. Format: HH:MM:SS
'-838:59:59' '838:59:59'
Creating a Database
Before creating a table we will first create a database.To create a database we will give
CREATE DATABASE command.
syntax:-CREATE DATABASE <database name>;
mysql> CREATE DATABASE School;
Once the above mentioned statement gets executed, a database with the name School is created
on system. You may give any name of the database . Now to open the database to work USE
statements are required. ! Semicolon is standard way to end SQL statement
Using a database
Syntax: USE <databasename>;
mysql> USE School;
Database Changed
Viewing the current database
We must know which database we are currently working in, to see the name of the current
database we use SELECT command.
Syntax: SELECT DATABASE();
School will be displayed.
Creating a Table
After creating a database, the next step is creation of tables in the database. For this CREATE
TABLE statement is used.
Syntax:
CREATE TABLE <TableName>(<ColumnName1> <Data Type1>,
<ColumnName2> <Data Type2>,… ,<ColumnNameN> <Data TypeN>);
Create a simple table named Learner with only two columns RollNo and Name in the School
database.
To do this, enter the following statement:
mysql> CREATE TABLE Learner
(RollNo INTEGER,

Name VARCHAR(25));
Query OK, 0 rows affected (0.16 sec) will be displayed.
If table Student already exists in database school, then the error message "Table Student already
exists" is displayed. Give meaningful name to a table. If a table will store information about students,
name it STUDENT. Table names and column names are not case sensitive. For example,
STUDENT is treated the same as STUDENT or student. Each column in the table is given a unique
name. In the example above the column names are Rollno, Name etc. This doesn't mean each
column that is named has to be unique within the entire database. It only has to be unique within
the table where it exists. Also notice that the names do not use any spaces. When naming tables
and columns be sure to keep it simple with letters and numbers. Spaces and symbols are invalid
characters except for underscore(_). Column names like first_name, last_name, email are valid
column names.
Adding constraints in table
Many times it is not possible to keep a manual check on the data that is going into the tables. The
data entered may be invalid. MySQL provides some rules, called Constraints, which help us, to
some extent, ensure validity of the data. These constraints are:
Constraint Purpose
Primary Key Sets a column or a group of columns as a primary key of the table. Therefore, NULLs and Duplicate values in this column are not accepted.
NOT NULL Makes sure that NULLs are not accepted in the specified column.
FOREIGN KEY Data will be accepted in this column, if the same data value exists in a column in another related table. This other related table name and column name are specified while creating the foreign key constraint.
UNIQUE Make sure that duplicate values in the specified column are not accepted.
Recall that the primary key of a table is a column or a group of columns that uniquely identifies a
row of the table. Therefore no two rows of a table can have the same primary key value. Now
suppose that the table Shoes is created with the following statement:
CREATE TABLE Shoes
(Code CHAR(4),
Name VARCHAR(20),
type VARCHAR(10),
size INT(2),
cost DECIMAL(6,2),
margin DECIMAL(4,2),
Qty INT(4));

We know that in this table Code is the Primary key. But, MySQL does not know that ! Therefore it is
possible to enter duplicate values in this column or to enter NULLs in this column. Both these
situations are unacceptable. To make sure that such data is not accepted by MySQL, we can set
Code as the primary key of Shoes table. It can be done by using the PRIMARY KEY clause at the
time of table creation as follows:
CREATE TABLE Shoes
(Code CHAR(4) PRIMARY KEY,
Name VARCHAR(20),
type VARCHAR(10),
size INT(2),
cost DECIMAL(6,2),
margin DECIMAL(4,2),
Qty INT(4));
or as follows:
CREATE TABLE Shoes (Code CHAR(4), Name VARCHAR(20), type VARCHAR(10),size INT(2),
cost DECIMAL(6,2), margin DECIMAL(4,2),Qty INT(4), PRIMARY KEY (Code));
To create a table Bills with the combination of columns Order_No and Cust_Code as the primary
key, we enter the statement:
CREATE TABLE bills
(Order_Num INT(4) PRIMARY KEY,
cust_code VARCHAR(4) PRIMARY KEY,
bill_Date DATE, Bill_Amt DECIMAL(8,2));
Contrary to our expectation, we get an error (Multiple primary key defined) with this statement. The
reason is that MySQL interprets this statement as if we are trying to create two primary keys of the
table - Order_Num, and Cust_code. But a table can have at most one primary key. To set this
combination of columns a primary key we have to enter the statement as follows:
CREATE TABLE bills
(Order_Num INT(4), cust_code VARCHAR(4),bill_Date date, Bill_Amt DECIMAL(8,2),
PRIMARY KEY(Order_Num, cust_code));
Let us now check the table structure with the command: DESC bills;
The table structure is as shown below:
+-----------------+---------------------+----------+--------+-----------+------------+
| Field | Type | Null | Key | Default | Extra |
+-----------------+---------------------+----------+--------+-----------+------------+
| Order_Num | INT(4) | NO | PRI | 0 | |
| cust_code | VARCHAR(4) | NO | PRI | | |
| bill_Date | date | YES | | NULL | |
| Bill_Amt | DECIMAL(8,2) | YES | | NULL | |
+-----------------+---------------------+----------+--------+-----------+------------+
NOT NULL CONSTRAINT

Many times there are some columns of a table in which NULL values should not be accepted. We
always want some known valid data values in these columns. For example, we cannot have an
order for which the customer code is not known. It means whenever we enter a row in the orders
table, corresponding customer code cannot be NULL.
Similarly while entering records in the Shoes table, we have to mention the Shoe size, it cannot be
set NULL. There may be any number of such situations.
While creating a table we can specify in which columns NULLs should not be accepted as follows:
CREATE TABLE Shoes
(Code CHAR(4) PRIMARY KEY, Name VARCHAR(20),type VARCHAR(10), size INT(2) NOT
NULL,cost DECIMAL(6,2), margin DECIMAL(4,2), Qty INT(4));
CREATE TABLE bills
(Order_Num INT(4), cust_code VARCHAR(4),bill_Date DATE, Bill_Amt DECIMAL(8,2) NOT
NULL,PRIMARY KEY (Order_Num, cust_code));
Now if we try to enter a NULL in the specified column, MySQL will reject the entry and give an
error.
Viewing the tables in the database
To see a list of tables present in the current database we will use SHOW TABLES.
Syntax: SHOW TABLES;
mysql> SHOW TABLES;
+------------------------+
| Tables_in_school |
+------------------------+
| Learner |
|-------------------------+
1 row in set (0.00 sec)
Viewing the structure of the table
The DESCRIBE statement can be used to see the structure of a table as indicated in the Create
Statement. It displays the Column names, their data types, whether Column must contain data,
whether the Column is a Primary key.
Syntax:
DESCRIBE <table name>;
OR
DESC <table name>;
mysql> DESCRIBE Student;
+-----------+-------------------+--------+-------------+---------+----------+
| Field | Type | Null | Key | Default | Extra |
+-----------+--------------------+------ +------------+---------+-----------+
| Rollno | int(11) | YES | | NULL | |
| Name | varchar(25) | YES | | NULL | |
| Gender | char(1) | YES | | NULL | |
| Marks1 | decimal(4,1) | YES | | NULL | |
+----------+-----------------+----------+------------+--------------+----------+
4 rows in set (0.01 sec)

! The word "DESC" can also be used in place of "DESCRIBE"
The table structure also includes the constraints, if any. Therefore, when we use DESC
command,we are shown the table structure as well as constraints, if any. A constraint is shown
beside the column name on which it is applicable. E.g., the statement:
DESC Shoes;
displays the table structure as follows:
+--------+-----------------------+-------+-------+---------+---------
| Field | Type | Null | Key | Default | Extra |
+--------+-----------------------+---------+-----+---------+--------
| Code | CHAR(4) | NO | PRI | NULL | |
| Name | VARCHAR(20) | YES | | | |
| type | VARCHAR(10) | YES | | NULL | |
| size | INT(2) | NO | | 0 | |
| cost | DECIMAL(6,2) | YES | | NULL | |
| margin | DECIMAL(4,2) | YES | | NULL | |
| Qty | INT(4) | YES | | NULL | |
+---------+--------------------+--------+-------+---------+--------
Modifying the structure of table
When we create a table we define its structure. We can also change its structure i.e. dd,remove or
change its column(s) using the ALTER TABLE statement.ALTER TABLE is used to add a
constraint,to remove a constraint,to remove a column from a table,to modify a table column.
Syntax:
ALTER TABLE <table_name> ADD/DROP <column_name> [datatype];
ALTER TABLE <table> MODIFY <column> <new_definition>;
If we want to add a column named Games in the student table .
mysql> ALTER TABLE Student ADD Games VARCHAR(20);
To check the structure of the table to see that the new column Games is added use DESCRIBE
command
mysql> DESCRIBE Student;
+--------+----------------+------+------+---------+--------+
| Field | Type | Null | Key | Default | Extra |
+--------+----------------+------ +-----+----------+--------+
| Rollno | int(11) | YES | | NULL | |
| Name | varchar(25) | YES | | NULL | |
| Gender | char(1) | YES | | NULL | |
| Marks1 | decimal(4,1) | YES | | NULL | |
| Games | varchar(20) | YES | | NULL | |
+--------+--------------+------+-----+---------+------------+
After execution of the above ALTER TABLE statement, the Games column is added and
a NULL value is assigned to all the rows in this column.
Now, suppose we want to change the newly added Games column to hold integers(in
place of character data) using ALTER TABLE statement:

mysql> ALTER TABLE Student MODIFY games INTEGER;
To delete a column of a table the ALTER TABLE statement is used with Drop clause.
mysql> ALTER TABLE Student DROP Games;
mysql> DESC student;
+--------+-----------------+--------+-----+---------+--------+
| Field | Type | Null | Key | Default | Extra |
+--------+-----------------+------+-----+---------+----------+
| Rollno | int(11) | YES | | NULL | |
| Name | varchar(25) | YES | | NULL | |
| Gender | char(1) | YES | | NULL | |
| Marks1 | decimal(4,1)| YES | | NULL | |
+--------+--------------+------+-----+---------+-------------+
4 rows in set (0.00 sec)
The above display shows that Games column is removed from the table.
Add, Modify, and Remove constraints:
If we create a table without specifying any primary key, we can still specify its primary key by
ALTER TABLE command. Suppose we have created the Shoes table without specifying any
Primary key, then later we can enter the statement as follows:
ALTER TABLE Shoe ADD PRIMARY KEY(code);
This will set Code as the primary key of the table. But if the Code column already contains some
duplicate values, then this statement will give an error. In MySQL, it is also possible to change the
primary key column(s) of a table. Suppose, in the Shoes table, instead of Code, we want to set
the combination of 'Name' and 'Size' as the primary key. For this first we have to DROP the
already existing primary key (i.e Code) and then add the new primary key (i.e., Name and Size).
The corresponding statements are as follows:
ALTER TABLE Shoes DROP PRIMARY KEY;
After this statement, there is no primary key for the Shoe table. Now we can add the new primary
key as follows:
ALTER TABLE Shoes ADD PRIMARY KEY (Name, Size);
Now if we see the table structure by DESC Shoes; statement, it will be shown as follows:
+--------+-----------------------+------+--------+-----------+-------+
| Field | Type | Null | Key | Default | Extra |
+--------+-----------------------+------+--------+-----------+-------+
| Code | CHAR(4) | NO | | NULL | |
| Name | VARCHAR(20) | NO | PRI| | |
| type | VARCHAR(10) | YES | | NULL | |
| size | INT(2) | NO | PRI | 0 | |
| cost | DECIMAL(6,2) | YES | | NULL | |
| margin | DECIMAL(4,2) | YES | | NULL | |

| Qty | INT(4) | YES | | NULL | |
+--------+-----------------------+------+---------+-------+-----------+
In MySQL, it is not possible to add or drop NOT NULL constraint explicitly after the table creation.
But it can be done using the MODIFY clause of ALTER TABLE command. As an example,
suppose we don't want to accept NULL values in bill_date column of bills table, we can issue the
statement:
ALTER TABLE bills MODIFY bill_date DATE NOT NULL;
Although any column of a table can be removed, MySQL puts the restriction that a primary key
column can be removed only if the remaining, primary key columns, if any, do not contain any
duplicate entry. This can be understood more clearly with the help of following example:
The Name and Size columns of the Shoe table constitute its primary key. Now if we drop the Name
column from the table, Size will be the remaining Primary Key column of the table. Therefore,
duplicate entries in the Size column should not be allowed. To ensure this, before removing the
Name column from the table, MySQL checks that there are no duplicate entries present in the Size
column of the table. If there are any, then the statement trying to remove the Name column from
the table will result in an error and the Name column will not be removed. If there are no duplicate
entries in the Size column, then the Name column will be removed. Similar will be the case with the
Name column, if we try to remove the Size column. But there won't be any problem if we try to
remove both the primary key columns simultaneously with one ALTER TABLE statement as follows:
ALTER TABLE Shoes DROP name, DROP size;
Deleting the structure of the table
Sometimes there is a requirement to remove a table from the database. In such cases we don't
want merely to delete the data from the table, but we want to delete the table itself. DROP TABLE
command is used for this purpose. The syntax of DROP TABLE command is as follows:
DROP TABLE <tablename>;
e.g. to remove the table Orders from the database we enter the statement:
DROP TABLE Orders;
And after this statement orders table is no longer available in the database. It has been removed.
DML COMMANDS :
DML stands for Data Manipulation Language. DML commands are used for retrieving, inserting,
modifying/updating or deleting data from a relation. is used to manipulate the data in the relation.
Following are the DML commands :
- INSERT
- SELECT
- UPDATE
- DELETE
INSERT COMMAND

After creating database and relations, we can add data in the relations. INSERT INTO command
is used to enter values in a table. Syntax of insert command is as follows :
INSERT INTO <TABLENAME >(COLUMN NAMES>) VALUES (value1, value2, value3,……)
INSERT command is used in various ways to insert values within a table. Following points should
be kept in mind while inserting records in a relation. :
- Numeric values may be entered as numerals
- string must be enclosed in single/ double quotes
- Date should be entered in single/double quotes in format ‘yyyy-mm-dd’
- NULL value should be entered as NULL without any quotes. NULL value means blank value in
the table.
Use of insert command to enter values for selected columns only:
Values entered in the column must be in same order as given in the list enclosed with table name
in INSERT command.
For example :
mysql> INSERT INTO STUDENT(RNO,GENDER, LNAME,FNAME) VALUES(8,'F','SHANU',
'DEEPAKSHI');
Above command will enter the values only in specified columns of the table. Remaining columns
of the table will have a NULL value inserted by default.
If we have to enter a record with values for all the attributes(columns) then list of columns is not
specified with table name in the command then we need to enter value for all the attributes of the
table. The order of values must be same as the order of attributes specified in the table
For example :
INSERT INTO STUDENT VALUES(1,'ABHISHEK','NARULA','M', '1998-10-05',98);
It can be observed that the numeric values can be inserted directly while string and date is
entered enclosed within single quotes.
The order of entering the values must be same as the order of attributes defined in the relation.
Main purpose after storing the data in a table is to retrieve the data for generating various reports.
Data from tables can be retrieved/ fetched using Select Command.
SELECT COMMAND :
SELECT command is used to view the data from a relation in a database. It returns a result set of
data/ records from one or more relations.
Syntax of SELECT Command :
SELECT <column name> FROM <table name >;
A select statement can also be used with the insert command provided, the result of select
query is of the same order as the given list of columns

Command to retrieve single column display
select Rno from STUDENT;
mysql> select rno from student;
The above command displays only the roll numbers of students.
Command to display multiple columns :
Select Rno, gender , Fname from Student;
Above command fetches the result set having roll number, first name and gender of students and
displays the list on screen as follows :
The output displayed the data in same order as the order of columns given in the command.
Command to display all the columns : ‘* ‘ symbol is used to display all the columns of the table.
Select * from Student;
* is the wild card character ( means ALL) that is used to display names of all the columns.
+----------+
| r no |
+----------+
| 1 |
| 2 |
| 3 |

DISTINCT ( Displaying values without repetition)
If a column contains repeated values then the select statement gives the result set with repeated
values like if a command is given to display DISTINCT keyword is used to eliminate repeated
values
Consider the query:
Select marks from student:
mysql> select marks from student;
+---------+
| marks |
+---------+
| 98 |
| 92 |
| 95 |
| 94 |
| 93 |
| 84 |
| 84 |
| NULL |
+---------+
8 rows in set (0.00 sec)
In above example it can be noticed that value 84 appears twice.
When duplicate value appears only one instance of the value is considered and is displayed.
For example :
Select DISTINCT marks from student;
+---------+
| marks |
+---------+
| 98 |
| 92 |
| 95 |
| 94 |
| 93 |
| 84 |
| NULL |
+---------+
7 rows in set (0.00 sec)
A number of keywords and clauses are used with SELECT statement to retrieve data as per the
requirement. These are discussed below:

ALL
Keyword ALL when used with Select statement is used to display values of all columns in the row.
It displays even the duplicate values.
WHERE Clause
Where clause is used to fetch data based on a criteria/ condition. Criteria can be given using an
expression. Table has many records in it and it is not always desirable to show all the records every
time. At times only certain set of specific rows need to be displayed. based on the criteria. Keyword
WHERE is used for selection of rows with select statement. We can also say that WHERE clause
is used to filter records. It is used to fetch only those records that satisfy a specified criterion.
Syntax:
SELECT <column name1> [,<column name> ,….] FROM <table name>
WHERE <condition>;
For example if we wish to display records of students who have a got marks greater thn we will 90
then following command needs to be entered:
mysql> select fname, marks from student
-> where marks > 90;
+------------------- +-------+
| fname | marks |
+--------------------+------+
| ABHISHEK | 98 |
| BHISHEK | 92 |
| BHUSHAN | 95 |
| CHETALI | 94 |
| CHETANYA | 93 |
+-----------------------+-------+
5 rows in set (0.11 sec)
Use of arithmetic operators
SQL supports a set of arithmetic operators that can be used .in select query. Arithmetic operators
are used with numeric values. Following is the set of arithmetic operators supported by SQL:
Operator Description
+ For addition of values
- Subtraction of values
* For finding the product of values
/ Divide
% Modulo operator. Returns the remainder

Following set of examples show the use of arithmetic operators for performing calculations :
Arithmetic operators are used to perform calculations over the numeric fields of a table.
For example, if we wish to see the result after adding 10 marks for activity in each record then
what would be the total then this can also be done using expression as shown below:
mysql> select fname, marks + 10 from student
-> where marks > 90;
+------------------- +-------+
| fname | marks |
+--------------------+--------+
| ABHISHEK | 108 |
| BHISHEK | 102 |
| BHUSHAN | 105 |
| CHETALI | 104 |
| CHETANYA | 103 |
+-----------------------+---------+
5 rows in set (0.11 sec)
Another example: in case to view the salary of employees after adding a bonus of 10 percent to
the salary , following command may be used:
mysql> select empname, salary+salary*0.1 from employee
-> where designation =’manager’;
+------------------- +---------------------------+
| empname | salary+salary*0.1 |
+--------------------+---------------------------+
| ABHINAV | 69803.20 |
| VISHESH | 49290.70 |
| B.RATNAKAR | 118982.95 |
| CHETANYA | 198675.45 |
| SOURABH | 99456. 93 |
+-----------------------+-------------------------+

5 rows in set (0.11 sec)
Note that the calculations done on column values only appear on the output screen and does not
make any changes in the records of the table. The values remain the same in table. Actually the
operation is performed over the result set and not on the actual table. For making any changes
within a UPDATE command that is discussed after this topic.
Relational Operators
Relational Operators compare two values and gives a result in the form of true of false. Every row
is filtered using the relational operator in the expression in where clause. Given below are the
relational operators used in MySQL alongwith their functions:
These operators are of great help to fetch data on a particular criteria. If we need to display data
of all the employees who belong to city ‘Jaipur’ then following command may be given :
mysql> select name
from employee
where city =’Jaipur’
mysql> select empname from employee where esal<50000.00;
mysql> select empname from employee where edept<>'Sales';

Logical Operators
SQL supports following set of logical operators:
AND, OR, NOT
AND Operator is used with where clause and returns true if both the conditions are true. Those
records are displayed which are true for both the conditions.
For example:
mysql> select fname from student where gender ='f' and marks>90;;
AND operator can be used to fetch records satisfying in a range of values as shown in the
example given below:
mysql> select fname, lname, marks
FROM student
WHERE marks >= 92 and marks<= 95;
In the above query, the output will display records of all the students who have marks greater than
or equal to 92 and less than or equal to 95. Similar result can be obtained using keyword
BETWEEN .
BETWEEN operator
Keyword BETWEEN is used to fetch data based on a range of values on a column. The result set
includes the values of the upper and lower bound given in the range.
For example , following command displays firstname, last name and marks of the students whose
marks are from 92 to 95;
mysql> select fname, lname, marks
FROM student
WHERE marks BETWEEN 92 and 95;
Output will be :

OR operator returns True if either one of the conditions is True.
For example : to view list of all the sports coach who give coaching for either football or hockey;
mysql> select Coachname, game from Sports where game=’football’ or game=’hockey’;
Coachname
Game
Birender Singh Hockey Jasvinder Pal Football
Dharmender Hockey
NOT Operator
Not is used for negation. It returns the result set that is opposite to the given condition
For example : following command displays name and salary of employees whose salary is not
less than 50000.00
mysql>select empname, esal from employee where NOT(esal<50000.00);
Following command displays name and zone of employees who are not in north zone:
mysql>select empname, zone from employee where NOT(zone=’North’);

HANDLING NULL Values
IS operator is used to match NULL value in the expression.
For example, following command is to display the records with NULL values in column edesig
from table employee
mysql>select empname, zone from employee where zone IS NULL;
IS operator is used to compare equality with NULL whereas IS NOT may be used for comparing
the values not equal to NULL;
mysql> select empname, zone from employee where zone IS NOT NULL;
Note: the operations = NULL and <> NULL are not defined!
Alias Name to columns
To make the output more user friendly we can give customized heading to column name in the
select command. Keyword AS is used to give column alias in a set of single quotes as shown in
the example below:
For example :
mysql> select rno AS ‘Roll Number’ , fname AS ‘First Name’ , marks
from Student;

Remember : the name of column if for the query only and no changes are made in the original
table.
Inserting Text within the Query SQL
To make the output more user friendly SQL supports inserting text within the output display. The
text is displayed only in the output and no changes are made in the table.
For example :
mysql> select fname ,’has roll number ‘, Rno AS ‘Roll Number’
from student;
IN operator
IN operator is very useful when we wish to fetch selected records which match a certain set of
values. Suppose we wish to display list of students who have score marks 88,90,92,95 , then IN
operator can be used as follows :
mysql> select fname, marks from student
WHERE marks IN (88, 92, 95);

Output will be :
IN operator helps in removing multiple conditions. Without IN operator the above command would
have been as follows :
mysql>select fname , marks from student
where marks=88 OR marks=92 OR marks=95;
LIKE keyword
LIKE is used for pattern matching and is very useful. Following characters used for applying
pattern matching:
% percent symbol is used to match none or more characters
_ underscore character is used to match occurrence of one character in the string
For example : To search for records having first name starting with letter ‘R’;
mysql>select * from student
where fname like ‘A%’;
output is:
Command to display names that end with letter ‘K’ is
mysql>select * from student
where fname like ‘%K’;

Command to display list of all the students whose name has upto five characters:
mysql>select * from student
where fname like ‘_ _ _ _ _’;
Following command displays list of students whose name starts and ends with a specified letter.
Notice that in case no record matches the given pattern then the query returns empty set on
execution.
Similarly many more patterns may be given as follows :
‘_ _ _ _’ matches any string with exactly four characters
‘S_ _ _ _’ matches any string of length of exactly 5 characters and starts with letter ‘S’
‘S_ _ _ %’ matches any string of length of 4 or more characters and starts with letter ‘S’
‘_ _ _H matches any string of length of exactly 4 characters and terminates with letter ‘H’
‘_ _ _ %’ matches any string with at least three or more characters
‘%in% matches any string which containing ‘in’
ORDER BY
The result set fetched by the query can be displayed in sorted order. The sorting can be on the
basis of any particular column from the table using ORDER BY clause.

Syntax is :
SELECT <column name>, [<column name >…]
FROM <table name>
[ WHERE <condition> ]
ORDER BY < column name> [DESC];
By default the records are displayed in ascending order of the column name. Keyword ASC is
used with ORDER BY clause for displaying the list in ascending order and keyword DESC is used
with ORDER BY clause to display the records in descending order.
Following commands are used to display records in sorted order of marks of students
mysql>select fname, lname, marks
from STUDENT
order by marks;
It can be observed that the output is displayed in the sorted order of marks. NULL value is
displayed first and records are displayed in ascending order.
Following command displays the records in descending order of fname:
mysql> select fname, lname
from STUDENT
ORDER BY fname DESC;
ORDER By clause can be used to sort the records on the basis of two columns also.
Following command displays the result based on order of marks and then on fname.
mysql> select fname, lname , marks from STUDENT
ORDER BY marks ASC, fname DESC;

It can be observed from the above figure that the records are d isplayed in ascending order of
marks and for records having similar value of marks are sorted on the basis of descending order
of fname.
Order by clause may be used with Where Clause as follows:
mysql> select fname, lname , marks from STUDENT
WHERE marks >90
ORDER BY marks DESC, fname ASC;
Output :
UPDATE
UPDATE command is used to modify data of records within the table. It is a type of DML and is
used to make changes in the values entered in the table :
Syntax: `
UPDATE <table name>
SET <column name> = <value>, [<column name> = <value> , …]
[WHERE <condition> ];
The command can be used to update one or more columns and WHERE clause is used for
modifying the records that matches a criteria.

For example:
Following command changes the zone from North to East for employees whose city is ‘Jaipur’;
Following command increases the salary of all the employees by 10%;
Consider the table student with following records:
Now with the help of update command we can add values to date of birth and marks for
Deepakshi :
Again the records as displayed and we can see that the changes have been made:

DELETE
DELETE Command is used to remove records from the table.
Syntax of the command is :
DELETE from <table name>
[Where <condition>];
Command to delete record of student whose roll number is 13 is
Earlier the table was having 12 records and after the execution of the command it has 11 rows. It
may be noticed that record of Saurabh Makania has been removed.
Consider the command :
mysql> DELETE FROM STUDENT;
If no condition is specified then all the records of the table are removed i.e. the table becomes
empty.
POINTS TO REMEMBER :
In an RDBMS data is stored in tables.
A table refers to a two dimensional representation of data arranged in columns and rows.
MySQL (Structured Query Language) is used to manage databases in an RDBMS.
MySQL commands are divided .into different categories: DDL, DML, and DCL.
CREATE command is used to create databases and tables.
CREATE DATABASE statement is used to create a new database.
CREATE TABLE statement is used to create a new table.
The DESCRIBE statement is used to see the structure of a table.
The DESCRIBE command is used to view the structure of a table.
ALTER TABLE statement is used to change the structure of a table ie. to add, remove or
change its column(s)
Constraints: These are the rules which are applied on the columns of tables to ensure data
integrity and consistency.

DROP TABLE command is used to delete tables.
INSERT INTO statement is used to insert a new row in a table.
The SELECT statement is used to fetch data from one or more database tables.
SELECT * means display all columns.
The WHERE clause is used to select specific rows.
The DESCRIBE statement is used to see the structure of a table.
We can change the structure of a table ie. add, remove or change its column(s) using the
ALTER TABLE statement.
The keyword DISTINCT is used to eliminate redundant data from display.
Logical operators OR and AND are used to connect relational expressions in the WHERE
clause.
Logical operator NOT is used to negate a condition.
The BETWEEN operator defines the range of values that the column values must fall into to
make the condition true.
The IN operator selects values that match any value in the given list of values.
% and _ are two wild card characters. The percent (%) symbol is used to represent any sequence
of zero or more characters. The underscore (_) symbol is used to represent a single character.
NULL represents a value that is unavailable, unassigned, unknown or inapplicable.
The results of the SELECT statement can be displayed in the ascending or descending order of
a single column or columns using ORDER BY clause.
UPDATE statement is used to modify existing data in a table.
DELETE statement is used to delete rows from a table.
EXERCISE
1. Write a short note on MySQL.
2.Mention features of a DBMS.
3.What is the difference between DBMS and RDBMS?
4.List some features of MySQL.
5.How is Primary Key different from Candidate Key?
6.Define the key(s) used in MySQL.
7.State the similarity and difference between the Primary Key, Candidate Key, Alternate Key
and Foreign Key
8.Which statement is used to select a database and make it current?
9.How is a database related to table(s)?
10Write SQL statement to view names of all the tables contained in the current database
11.In a database there is a table Cabinet. The data entry operator is not able to put NULL in a
column of Cabinet? What may be the possible reason(s)?
12. In a database there is a table Cabinet. The data entry operator is not able to put duplicate
values in a column of Cabinet? What may be the possible reason(s)?
13. Do Primary Key column(s) of a table accept NULL values?
14. There is a table T1 with combination of columns C1, C2, and C3 as its primary key? Is
it possible to enter:
a. NULL values in any of these columns?
b. Duplicate values in any of these columns?

15. At the time of creation of table X, the data base administrator specified Y as the
Primary key. Later on he realized that instead of Y, the combination of column P and
16should have been the primary key of the table. Based on this scenario, answer the
following questions:
a. Is it possible to keep Y as well as the combination of P and Q as the primary key?
b. What statement(s) should be entered to change the primary key as per the
requirement.
17. Does MySQL allow to change the primary key in all cases? If there is some special
case, please mention.
18. What are the differences between DELETE and DROP commands of SQL?
19Which statement is used to modify data in a table?
A. CHANGE
B. MODIFY
C. UPDATE
D. SAVE AS
20. Which SQL statement is used to delete data from a table?
A. DELETE
B. DROP
C. TRUNCATE
D. REMOVE
Fill up the blanks :
1, ______________ command is used to add records in a relation.
2. Select is a type of ___________ command.
3. _________ command is used to modify records in a table.
4. _________ is used to match string patterns.
5. BETWEEN operator includes __________ and _____________ values given in the range.
Lab exercises:
Consider the following table named "GYM" with details about Fitness products
being sold in the store.
Table Name : GYM
PrCode stores Codes of Products
PrName stores names of Products
(UnitPrice is in Rs.)
Write SQL statements to do the following:
a) Display the names of all the products in the store.
b) Display the names and unit price of all the products in the store
c) Display the names of all the products with unit price less than Rs.20000.00
d) Display details of all the products with unit price in the range 20000 to 30000
e) Display names of all products by the manufacturer "Fit Express"
f) Display all rows sorted in descending order of unit price.

g) Add a new row for product with the details: "P106","Vibro Exerciser", 23000, manufacturer : "Avon
Fitness".
h) Change the Unit Price data of all the rows by applying a 10% discount reduction on all the
products.
i) Display details of all products with manufacturer name starting with "A"

UNIT 5: FUNDAMENTALS TO JAVA PROGRAMMING
Chapter -1 Understand Integrated Development Environment (NETBEANS)
Learning Objectives
• Identify, name and state the usage of the different components of the NetBeans IDE.
• Identify and name the various methods and properties associated with the various form controls
Introduction
In our day to day life, we have to give information innumerable times like fill up bank deposit slips
to deposit money or type in username and password to sign in to our mail account and many more.
Forms are means to accept data (input) from us and respond as soon as we perform an action like
clicking on a button or submitting the form. This chapter deals with teaching the basic process of
designing forms in Netbeans and using them to perform simple manipulations using Java.
NetBeans ID
NetBeans IDE is used to create java applications very easily using the efficient GUI builder. It allows
us to develop applications by dragging and positioning GUI components from a palette onto a
container. The GUI builder automatically takes care of the correct spacing and alignment of the
different components relative to each other. Let us go through the different components of the
NetBeans IDE (Refer to Fig 5.1):

Figure 5.1 NetBeans IDE
1. Title Bar
2. Menu Bar with pull down menus
3. Toolbars
4. GUI builder: It is an area to place components on the form visually. There are two views of
the GUI builder- the Design View and the Source View. We can switch over from one view
to another by simply clicking on the source and design tabs directly above the Design Area.
5. Palette: Palette contains controls or components used to create GUI applications.
I PROGRAMMING - A REVIEW
6. Inspector Window: This window is used to display a hierarchy of all the components or
controls placed on the current form.
7. Properties Window: Using this window we can make changes in the properties of currently
selected control on the form.
8. Code Editor Window: - It is the area where we write code for our java application.
Components
COMPONENTS (ALSO known as "widgets") are the basic interface elements the user interacts
with: jlabels, jbuttons, jtextfields etc. Components are placed on a container (like the jFrame).
There are two types of controls (Refer to Figure 5.2):

• Parent or container controls: They act as a background for other controls. For
example-Frame. When we delete a parent control, all its child controls get deleted.
When we move a parent control all its child controls also move along with it.
• Child controls: controls placed inside a container control are called child
controls. For example-Text Field, Label, Button etc.
Figure 5.2 Parent and Child controls
Creating a New Project
The steps to create a new project are:
1. Select New Project from the File menu. You can also click the New Project
button in the IDE toolbar.
2. In the Categories pane, select the General node. In the Projects pane, choose
the Java Application type. Click the Next button.
3. Enter the name of the project in the Project Name field and specify the project
location. Do not create a Main class here.
4. Click the Finish button.
Let us recap the relation between a Project, Form and Components. Each application is treated as
a Project in NetBeans and each project can have one or multiple forms and this fact is clear from
the Projects window as shown in Figure 5.3.

Figure 5.3 Project Window Showing Multiple Forms
Further each form can have one or more elements - some of which may be visible and some
invisible. The visible components are all shown under the Frame Component and the non -visible
components are part of other components.
We use the drag and drop feature of NetBeans to place components on the form to design an
effective interface for our applications. The first step that we undertook while designing our
applications was adding a new jFrame form. The jFrame is a window with title, border, (optional)
menu bar and is used to contain all other components placed by the user on the form. Some of the
properties of the jFrame form are defaultCloseOperation and Title(Refer Figure 5.4).
Property Description
defaultCloseOperation Sets action to be performed when the user attempts to close the form.
Title Sets the text to be displayed in the Title bar of the form window.
Figure 5.4 Properties of the jFrame Form
Any component of GUI front-end (the form itself and the swing containers and controls placed in
the form) of an application is an object. Each of these objects belongs to its corresponding class
predefined in Java. For example, a form is an object of JFrame class, all the textfields are objects
of JTextField class, and so on. Each object has some properties, methods, and events associated
with it using which you can control the object's appearance and behaviour.

Properties of an object are used to specify its appearance on the form. For example, to set the
background colour of a textfield you change its background property; to set its font you change
its font property; and so on.
Methods are used to perform some action on the object. For example to display something in a
textfield you can use its setText() method, to extract the contents of a textfield you can use its
getText() method. Methods can be divided into two categories- getters and setters.
• Getters are the methods which extract some information from the object and return it
to the program. Getters start with the word get. Examples of getters are: getText(),
getForeground(), getModel(), isEditable etc.
• Setters are the methods which set some properties of the object so that the object's
appearance changes. Setters start with the word set. Examples of setters are:
setText(), setForground(), setModel() etc.
Events are the actions which are performed on controls. Examples of events are:
mouseClick, mouseMoved,keyPressed etc. When the user performs any action on a control,
an event happens and that event invokes (sends a call to) the corresponding part of the code
and the application behaves accordingly.
After setting the properties of the jFrame we can start placing components like jButton on the
jFrame form. A button is a component that the user presses or pushes to trigger a specific action.
When the user clicks on the button at runtime, the code associated with the click action gets
executed. The various methods and properties associated with the jButton are summarized in
Figure 5.5.
Property Description
Background Sets the background color.
Enabled Contains enabled state of component - true if enabled
else false.
Font Sets the font.
Foreground Sets the foreground color.
horizontal alignment Sets the horizontal alignment of text displayed on the button.
Label Sets the display text.
Text Sets the display text
Method Description
getText() Retrieves the text typed in jButton.
String result=<button-name>.getText( );

setEnabled Enables or disables the button.
<button-name>.setEnabled(boolean b);
setText() Changes the display text at runtime.
<button-name>.setText(String text);
setVisible Makes the component visible or invisible - true to make the
component visible; false to make it invisible.
<button-name>.setVisible(boolean aFlag);
Figure 5.5 Properties and Methods of the jButton
We developed simple real life applications wherein on the click of the button we accepted the data
from the user in the jTextField and after processing the data the result was displayed in a jTextField
or a jLabel. jTextField allows editing/displaying of a single line of text. jTextField is an input area
where the user can type in characters whereas a jLabel provides text instructions or information. It
displays a single line of read-only text, an image or both text and image. The various methods and
properties associated with the jTextField and jLabel are summarized in Figure 5.6 and 5.7
respectively.
Property Description
Background Sets the background color.
Border Sets the type of border that will surround the text field.
editable If set true user can edit textfield. Default is true.
enabled Contains enabled state of component- True if enabled else false.
font Sets the font.
foreground Sets the foreground color.
horizontalAlignment Sets the horizontal alignment of text displayed in the textField.
text Sets the display text
toolTipText Sets the text that will appear when cursor moves over the component.
Method Description

getText() Retrieves the text in typed in jTextField.
String result=<textfield-name>.getText( );
isEditable() Returns true if the component is editable else returns false.
boolean b=<textfield-name>.isEditable( );
isEnabled() Returns true if the component is enabled,else returns false.
boolean b =<textfield-name>.isEnabled( );
setEditable Sets whether the user can edit the text in the textField. true
if editable else false.
<textfield-name>.setEditable(boolean b);
setText() Changes the display text at runtime.
<textfield-name>.setText(String t);
setVisible() Makes the component visible or invisible - true to make the
component visible; false to make it invisible.
<textfield-name>.setVisible(boolean b);
PR
Figure 5.6 Properties and Methods of the jTextField
Property Description
background Sets the background color.
enabled Contains enabled state of component- true if enabled else false.
font Sets the font.
foreground Sets the foreground color.
horizontalAlignment Sets the horizontal alignment of text displayed in the component.
text Sets the display text
Method Description

getText() Retrieves the text in typed in jLabel.
String result=<label-name>.getText();
isEnabled() Returns true if the component is enabled,else returns false.
boolean b=<label-name>.isEnabled();
setText() Changes the display text at runtime.
<label-name>.setText(String t);
setVisible() Makes the component visible or invisible - true to make the
component visible; false to make it invisible.
<label-name>.setVisible(boolean b);
Figure 5.7 Properties and Methods of the jLabel
The Text Area component allows us to accept multiline input from the user or display multiple lines
of information. This component automatically adds vertical or horizontal scroll bars as and when
required during run time. The various methods and properties associated with the jTextArea are
summarized in Figure 5.8.
Property Description
background Sets the background color.
columns Sets number of columns preferred for display.
editable If set true user can edit textfield. Default is true.
enabled Contains enabled state of component- true if enabled else false.
font Sets the font.
RAMMING - A REVIEW
foreground Sets the foreground color.
lineWrap Indicates whether line of text should wrap in case it exceeds allocated width.(Default is false)
rows Sets number of rows preferred for display.
text Sets the display text

wrapStyleWord Sends word to next line in case lineWrap is true and it results in breaking of a word, when lines are wrapped.

Method Description
append() Adds data at the end.
<textarea-name>.append(String str);
getText() Retrieves the text in typed in jTextArea.
String str = <textarea-name>.getText();
isEditable() Returns true if the component is editable else returns false.
boolean b = <textarea-name>.isEditable();
isEnabled() Returns true if the component is enabled, else returns false.
boolean b = <textarea-name>.isEnabled();
setText() Changes the display text at runtime.
<textarea-name>.setText(String t);
Figure 5.8 Properties and Methods of the jTextArea
The jPassword component is used to enter confidential input like passwords which are single line.
We can suppress the display of input as this component allows us to input confidential information
like passwords. Each character entered can be replaced by an echo character. By default, the echo
character is the asterisk, *. The properties of jPassword are summarized below:
PROG
Property Description
background Sets the background color.
font Sets the font.
foreground Sets the foreground color.
text Sets the display text
echoChar Sets the character that will be displayed instead of text.
Figure 5.9 Properties of jPassword
The radio buttons are used to provide the user several choices and allow him to select one of the
choices (the radio buttons belong to a group allowing the user to select single option). But radio
buttons occupy a lot of space.
Thus, in case of too many options we can use Combo boxes as they help save space and are
less cumbersome to design as compared to radio button. We can use check box and list when
we want to display multiple options like selecting favourite sports or ordering multiple food items

in a restaurant.
The list is a preferred option over check box in situations wherever multiple options are required
to be selected from a large number of known set of options as they help save space and are
less cumbersome to design as compared to check boxes. The properties and methods of
jRadioButton are summarized below:
Property Description
background Sets the background color.
buttonGroup Specifies the name of the group of button to which the jRadioButton belongs.
enabled Contains enabled state of component -true if enabled else false.
font Sets the font.
foreground Sets the foreground color.
label Sets the display text.
text Sets the display text.
Selected Sets the button as selected, if set to true, default is false.
ING - A REVIEW
Method Description
getText() Retrieves the text displayed by radio button.
String str = <radiobutton-name>.getText();
isSelected() Returns true if the component is checked else returns
false.
boolean b = <radiobutton-name>.isSelected();
setText() Changes the display text at runtime.
<radiobutton-name>.setText(String t);
setSelected() Checks(true) or unchecks the radio button.
<radiobutton-name>.setSelected(boolean b);
Figure 5.10 Properties and methods of the jRadioButton
jCheckBox is a small box like component that is either marked or unmarked. When it is clicked,
it changes from checked to unchecked or vice versa automatically. The properties and methods
of jCheckBox are summarized below:

Property Description
background Sets the background color.
buttonGroup Specifies the name of the group of button to which the jCheckBox belongs.
font Sets the font.
foreground Sets the foreground color.
label Sets the display text.
text Sets the display text
selected Sets the check box as selected if set to true, default is false.
I PROGRANG - A REVIEW
Method Description
getText() Retrieves the text typed in
String str = <checkbox-name>.getText();
isSelected() Returns true if the component is checked else returns false.
boolean b = <checkbox-name>.isSelected();
setText() Changes the display text at runtime.
<checkbox-name>.setText(String t);
setSelected() Checks(true) or unchecks the checkbox.
<checkbox-name>.setSelected(boolean b);
Figure 5.11 Properties and methods of the jCheckBox
jComboBox is like a drop down box - you can click a drop-down arrow and select an option from
a list whereas jList provides a scrollable set of items from which one or more may be selected.
The properties and methods of jComboBox and jList are summarized below:
Property Description
background Sets the background color.
buttongroup Specifies the name of the group of button to which the jComboBox
belongs.
editable If set true user can edit ComboBox. Default is true.
enabled Contains enabled state of component- True if enabled else false.
font Sets the font.

foreground Sets the foreground color.
model Contains the values to be displayed in the combobox.
text Sets the display text
selectedIndex Sets the index number of the element which should be selected by
default.
selectedItem Sets the selected item in the combobox. selectedItem and
selectedIndex are in synchronization with each other.
ROGRAMMING - A REVIEW
Method Description
getSelectedItem() Retrieves the selected item.
Object result =
<combobox-name>.getSelectedItem();
getSelectedIndex() Retrieves the index of the selected item.
int result =
<combobox-name>.getSelectedIndex();
setModel() Sets the data model that the combo box uses to get its list
of elements.
<combobox-name>.setModel
(ComboBoxModel aModel);
Figure 5.12 Properties and methods of the jComboBox
Property Description
background Sets the background color.
enabled Contains enabled state of component- true if enabled else
false.
font Sets the font.
foreground Sets the foreground color.
model Contains the values to be displayed in the list.
selectedIndex Contains the index value of selected option of the control.

selectionMode Describes the mode for selecting values.
- SINGLE (List box allows single selection only)
- SINGLE_INTERVAL (List box allows single continuous
selection of options using shift key of keyboard)
- MULTIPLE_INTERVAL (List box allows multiple selections of options using ctrl key of keyboard)
ROGRAMMING - A REVIEW
Method Description
getSelectedValue() Returns the selected value when only a single item is
selected, if multiple items are selected then returns first
selected value. Returns null in case no item selected
Object result=
<list-name>.getSelectedValue();
isSelectedIndex() Returns true if specified index is selected.
boolean b =
<list-name>.isSelectedIndex(int index);
Figure 5.13 Properties and methods of the jList
We use JOptionPane when we want to request information from the user, display information to
the user or a combination of both. It requires an import statement at the top of the program.
import javax.swing.JOptionPane;
OR
import javax.swing.*;
Either of them is acceptable. The difference is that the latter will import the entire library as
denoted by the star whereas the first statement will just import the JOptionPane library.
Method Description
showMessageDialog() Shows a one-button, modal dialog box that gives the user
some information.
Example :
JOptionPane.showMessageDialog(this,"Java and
NetBeans");

OGRAMMING - A REVIEW
showConfirmDialog() Shows a three-button modal dialog that asks the user a
question. User can respond by pressing any of the suitable
buttons.
Example:
Confirm=
JOptionPane.showConfirmDialog(null,"quit?")
showInputDialog() Shows a modal dialog that prompts the user for input. It
prompts the user with a text box in which the user can enter the
relevant input.
Example :
name=
JOptionPane.showInputDialog(this,"Name:");
Figure 5.14 Properties and methods of the JOptionPane
Chapter-2 JAVA Programming
● Introduction to Object Oriented Programming
● To understand the need and usage of variables
● To understand various data types (primitive) and purpose of each data type
● To understand usage of operators (assignment, arithmetic, relational, logical,
bitwise)
● To understand how to attach a code with components like jButton, jLabel,
jTextField and create a simple application on JFrame
● To understand the use of various components like jTextarea, jRadiobutton,
jCheckbox, jPasswordField,jListBox, jComboBox, JTable,JOptionPane, JPanel
● To understand when to use selection statements (if, if else and switch case)
Object Oriented Programming
Object Oriented Programming follows bottom up approach in program design and emphasizes on
safety and security of data. It helps in wrapping up of data and methods together in a single unit
which is known as data encapsulation. Object Oriented Programming allows some special features
such as polymorphism and inheritance. Polymorphism allows the programmer to give a generic
name to various methods or operators to minimize his memorizing of multiple names. Inheritance
enables the programmer to effectively utilize already established characteristics of a class in new
classes and applications.

The major components of Object Oriented Programming are as follows:
1. Class
2. Object
3. Data Members & Methods
4. Access Specifier and Visibility Modes
A class is used to encapsulate data and methods together in a single unit. It helps the programmer to keep the data members in various visibility modes depending upon what kind of access needs to be provided in the remaining part of the application. These visibility modes are classified as private, public and protected. Usually, data members of a class are kept in private or protected visibility modes and methods are kept in the public visibility mode.
An object is an instance of a class that is capable of holding actual data in memory locations.
Class and objects are related to each other in the same way as data type and variables. For example, when we declare float variable named marks, the variable marks can be thought of as an object of type float which can be assumed as the class. If we take another hypothetical case in which Human is a class, Mr. Arun Shah, Mr. Aneek Ram will be the objects of this Human class.
Data Members and Methods:
A class contains data members and methods. As discussed in the above example, Mr.Arun Shah is an object of class Human. The phone numbers retained by Mr.Arun Shah in his brain (memory) will be the data. His eyes, ears, nose and mouth can be considered as various methods which allow Mr.Arun Shah to collect, modify and delete data from his memory.
In real java programming, this data will be required to conform to a specific data type as in char, int,
float or double whereas the methods will be a sequence of steps written together to perform a
specific task on the data. Carefully observe the illustration given in Figure 5.15 to reinstate the
theoretical concepts learnt above.
Figure 5.15 Illustration Showing the Class, Object, Members and
Methods

The methods of specific classes are able to manipulate data of their respective classes
efficiently resulting in better security of data in an Object Oriented Programming
paradigm.
The JTextField, JLabel, JTextArea, JButton, JCheckBox and JRadioButton are all
classes and the jTextField1, jLabel1, jTextArea1, jButton1, jCheckBox1 and
jRadioButton1 components are all objects. The setText(), setEnabled(), pow(),
substring() are all methods of different classes. This concept is illustrated in Figure 5.16.
Figure 5.16 JTextField and JLabel Classes

Notice that the properties like Text, Enabled, Editable are actually the data members in
the class because they store specific values as data. For example, the property Text of
jTextField1object contains the actual text to be displayed in the text field.
Variables
Variables are containers used to store the values for some input, intermediate result or the
final result of an operation. The characteristics of a variable are:
• It has a name.
• It is capable of storing values.
• It provides temporary storage.
• It is capable of changing its value during program execution.
However, as different materials require different containers, and so we used different data types
to hold different values. Java programming language requires that all variables must first be
declared before they can be used.
When programming, we store the variables in our computer's memory, but the computer has to
know what kind of data we want to store in them, since it is not going to occupy the same amount
of memory to store a simple number or to store a single letter or a large number, and they are
not going to be interpreted the same way so variables were used along with data types. The
data types supported by java are summarized as follows:
Data Types
Data type states the way the values of that type are stored, the operations that can be done on
that type, and the range for that type.
Numeric Data Types:
These data types are used to store integer values only i.e. whole numbers only. The storage
size and range is listed below:
Name Size Range Example
byte 1 byte(8 bits) -128 to 127(-27 to +(27-1)) byte rollno;
short 2 bytes(16 bits) -32768 to 32767(-215 to +(215-1)) short rate;
int 4 bytes(32 bits) -231 to +(231-1) int num1;
long 8 bytes (64 bits) -263 to +(263-1) long amount;
Figure 5.17 Storage size and range of numeric data types
Floating Data Types:
These data types are used to store numbers having decimal points i.e. they can store numbers

having fractional values.
Name Description Size Range Example
float Single precision
floating point
4 bytes
(32 bits)
(3.4x10-38) to +(3.4x1038) float
average;
double Double precisio
floating point
n 8 bytes
(64 bits)
(1.8x10-308) to +(1.8x10308) double
principal;
Figure 5.18 Storage size and range of floating data types
ROGRAMMING - A REVIEW
The decision about which numeric data type to use should be based on the range of values
that a variable can take.
Character Data Types:
These data types are used to store characters. Character data types can store any type of values
- numbers, characters and special characters. When we want to store a single character, we
use char data type and when we want to store a group of characters, we use string data type.
For example, to store grades (A, B, C, D, E) of a student we will use char type but to store name
of a student, we will use string type. The char data type value is always enclosed inside '' (single
quotes), whereas a string data type value is enclosed in "" (double quotes).
Operators
With the introduction of variables and constants there arose a need to perform certain operations
on them. We performed operations on variables and constants using operators. Operators are
symbols that manipulate, combine or compare variables. The operators available in java are
summarized below:
Assignment Operator:
One of the most common operators is the assignment operator "=" which is used to assign a
value to a variable. We assign the value given on the right hand side to the variable specified on
the left hand side. The value on the right hand side can be a number or an arithmetic expression.
For example:
int sum = 0;
int prime = 4*5;
Arithmetic Operators:
These operators perform addition, subtraction, multiplication, and division. These symbols are
similar to mathematical symbols. The only symbol that is different is "%", which divides one

operand by another and returns the remainder as its result.
+ additive operator - subtraction operator * multiplication operator / division operator % remainder operator
Relational Operator:
A relational operator is used to test for some kind of relation between two entities. A
mathematical expression created using a relational operator forms a relational expression or a
condition. The following table lists the various relational operators and their usage:
Operator Meaning Usage
== equal to Tests whether two values are equal.
!= not equal to Tests whether two values are unequal.
> greater than Tests if the value of the left expression is greater
than that of the right.
< less than Tests if the value of the left expression is less than
that of the right.
>= greater than or
equal to
Tests if the value of the left expression is greater
than or equal to that of the right.
<= less than or
equal to
Tests if the value of the left expression is less
than or equal to that of the right.
Figure 5.19 Relational Operators
Logical Operator:
A logical operator denotes a logical operation. Logical operators and relational operators are
used together to form a complex condition. Logical operators are:
Operator Use Meaning
&& a>10 && b<8 a and b are both true
|| a>10 || b<8 Either a or b is true
! ! a a is false
Figure 5.20 Logical Operators
RAMMING - A REVIEW
Bitwise Operator:
Bitwise operators are used to perform manipulation of individual bits of a number. They can be
used with any of the integral types (char, short, int, etc). They are used when performing update
and query operations of Binary indexed tree.

Creating a new Project
Creating a new Form
To create a new application project called "Book":
1. Choose File > New Project. Alternately, click the New Project icon in the toolbar.
2. From the Categories pane select Java and in the Projects pane, choose Java Application. Click Next.
3. Enter a name (in this case Book) in the Project Name field and specify the project location by clicking on the Browse button. By default, the project is saved in the NetBeans Projects folder in My Documents and so this is the default Project location displayed in this field.
4. Ensure that the Set as Main Project checkbox is selected and clear the Create Main Class field.
5. Click Finish.
Netbeans creates the Book folder on your system in the designated location. This folder will
contain all of the associated files of the project. The next step is to create a form. To proceed
with building our form, we need to create a container within which we wil l place the other required
components of the form like a button. For all our applications we will choose the JFrame Form
as the container to place other components.
To create a JFrame Form container:
1. In the Projects window, right-click the Book node and choose New > JFrame Form as shown
in Figure 5.21.
2. Enter Form Example 1 as the Class Name. This will be the name of your form.
3. Enter Book as the package. This should be the name given while creating the Project. 4. Click
Finish.
Figure 5.21 Adding a new JFrame Form

Netbeans creates The Form Example1 form within the application and opens the form in the
Builder. Now we are ready to add components to our form.
Adding a Button Component to a Form
We want to add a button so follow the given steps to add a JButton to the form:
1. In the Palette window, select the JButton component from the Swing Controls category
(displayed in Figure 5.22).
2. Move the cursor over the Form. When the guidelines appear (as displayed in Figure 5.22)
indicating that the JButton is positioned in the desired location, click to place the button. The
JButton is added to the form as displayed in Figure 5.22. Note that as soon as the button is
added on the form, a corresponding node representing the component is added to the Inspector
window.
Let us now try and recollect the conversion methods that we have used in java. When a Java
program receives input data from a user, it must often convert it from one form (e.g., String) into
another (e.g., double or int) for processing.

Figure 5.22 Adding a Button and Understanding the Different Windows
Attaching Code to a Form Component
After placing the button, the next step is to write a code to exit from the application on the click
of this button. To do the same, double click on the button to attach a code with the event i.e.
click of the button. Double clicking on the component opens up the source window and places
the cursor on the point where code is to be added. Note that certain code is pre generated and
cannot be changed. In the Source window add the single code line as shown in Figure 5.23.

Figure 5.23 Code to exit from an application
When we click the Source button, the application's Java source code in the Editor is displayed
with sections of code that are automatically generated by the Netbeans Builder indicated by
gray/blue areas, called Guarded Blocks. Guarded blocks are protected areas that are not
editable in Source view. Note that we can only edit code appearing in the white areas of the
Editor when in Source view.
Executing a File
Now that the code for the first application is ready let us test our first application. To
execute the application simply select Run>Run File or press Shift+F6 as shown in Figure
5.24.
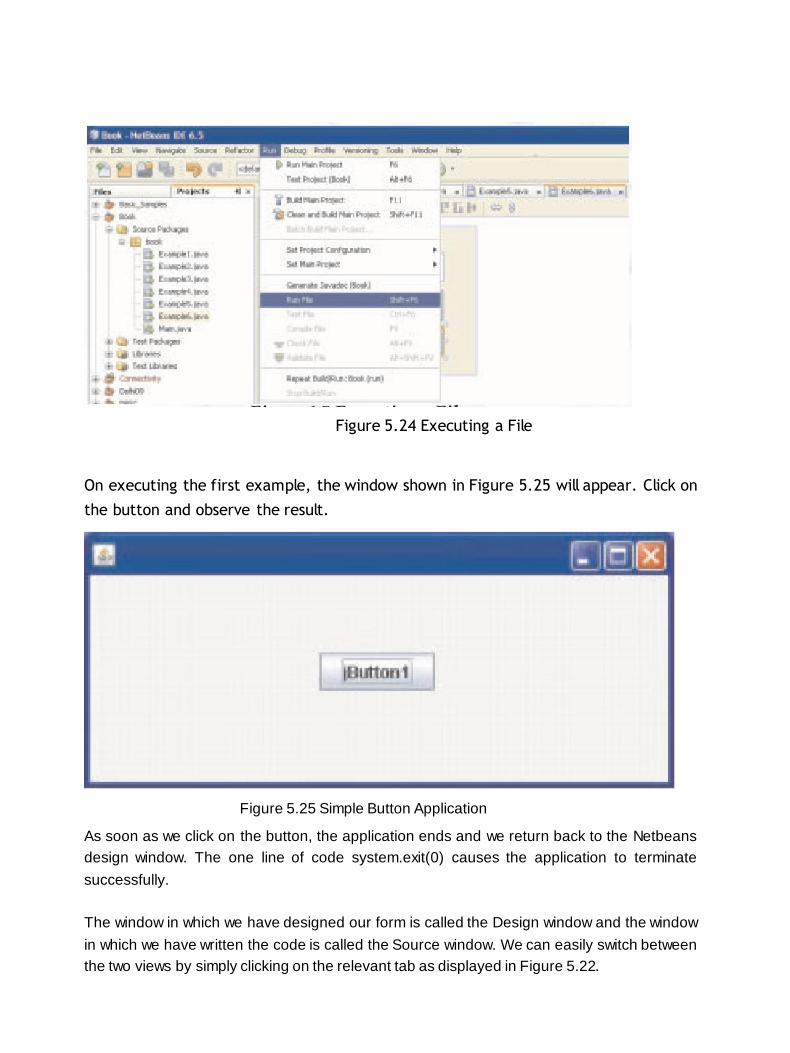
Figure 5.24 Executing a File
On executing the first example, the window shown in Figure 5.25 will appear. Click on
the button and observe the result.
Figure 5.25 Simple Button Application
As soon as we click on the button, the application ends and we return back to the Netbeans
design window. The one line of code system.exit(0) causes the application to terminate
successfully.
The window in which we have designed our form is called the Design window and the window
in which we have written the code is called the Source window. We can easily switch between
the two views by simply clicking on the relevant tab as displayed in Figure 5.22.

Changing Properties of Components
Each component of our application including the form has certain attributes associated with it.
The Properties Window displays the names and values of the attributes (properties) of the
currently selected component. We can edit the values of most properties in the Properties
window.
Figure 5.23: Using the text property of a button to change the display
text
We want to change the text displayed on the button. There are four ways of doing the same in
the design view:
● Select the button component by clicking on it. In the Properties window highlight the
text property and type STOP in the textbox adjacent to it as displayed in Figure 5.23.
● Alternatively select the object. Left click on the button to highlight the display text. Type
STOP and press Enter.
● Select the object > Press F2 - to make the display text editable. Type in the new text
and press Enter.
Right click on the button component and select Edit Text from the Drop down menu to make the
display text editable. Type in the new text and press Enter. Using the Properties window, it is
also possible to change the Font and Foreground property of the button as displayed in Figure
5.24.

Figure 5.24 Changing Properties of a Button Using the Properties Window
Now when we execute the file the button with the changed text appears as shown in Figure 5.25.
Figure 5.25 The Button with an Appropriate Display Text
Displaying a Message in a Dialog Box
Now, that we are comfortable with the creation process, let us experiment further and try to
display a message on the click of the button. Follow the same process to create a fresh form
with a simple button as shown in Figure 5.25. Modify the properties of the button as desired and
change the text property to "Wish Me".
Switch to the source window and add the single line code as shown in Figure 5.26.

Figure 5.26 Code to Display a Message on the Click of a Button
As soon as you enter the single line code given above, an error indicator and the error message
"cannot find symbol" will be displayed. This error simply means that the JOptionPane component
is missing from our application. To fix this error we need to add this component. Left click on the
error indicator to display a menu with 3 different options and select the option Add import for
javax.swing.JOptionPane from the menu.
Adding More Components to a Form
Great, now that we are comfortable with the interface, let us get back to the programming journey.
In the last example we had displayed a message on the click of a button. Now what next? All
the previous examples had only one component. Let us now delve further and try adding more
than one component to our form. Adding more components means that we will have multiple
code lines. So, first let us try and add more of similar components i.e. more buttons. So we will
design a application with 3 separate buttons and display a different message on the click of all
the three buttons. The first step is to add a new form and then we will add three buttons on the
newly created form. Drag and drop three buttons from the Swing Controls tab to complete the
form design as shown in Figure 5.27. Don't forget to change the properties and use the resize
handle to make the form appear exactly as shown in the Figure 5.27.

Figure 5.27 A Form with three buttons
Now, just think how to associate different code with each of the three buttons. Remember,
double clicking on a particular button opens up the source window with the cursor placed at the
point where code is to be added. So just do the same for all three buttons. Double click on each
of the three buttons one by one and keep on adding the relevant code for each one of them.
We are going to use the commands we have already learnt in our previous examples to: Display
the message "Good Morning" on the click of the Morning button Display the message "Good
Evening" on the click of the Evening button End the application on the click of the STOP button.
The complete code for all three buttons is displayed in Figure 5.28.
Figure 5.28 Code to Add Functionality to the Form designed in Figure 5.27

Now execute the Example and observe the result of clicking Morning and Evening Buttons.
As we create applications and add to them new objects such as buttons and textboxes, they are
automatically assigned names such as jButton1, jButton2 and so on by the IDE. But it is good
practice to give names that better match the functionality, such as BExit and BMorning.
Remember that objects on the same form cannot have same name, but two forms might contain
objects with the same name.
Using a Text Field Component to Display a message
In all the above examples we have displayed all the messages in dialog boxes. But In real life
applications we might have to display messages in Text fields too. So we will try and learn about
the text field component in our next example. The Text Field component is a text input field in
which users can enter single line of text.
Let us change the above example so that on the click of the Morning button, the message "Good
Morning" should be displayed in the Text Field and similarly on the click of the Evening button,
the message "Good Evening" should be displayed in the Text Field. The code for the same is
depicted in the figure 5.29.
Figure 5.29: Code to Display message in a Text Field on the click of a Button
The above code introduces us to a new method called setText(). This method is used to change
the display text of a component (label, text field or button) during run time. The syntax of this
method is given below:
Syntax:
component.setText("text")
The "text" is the display text to be shown for the mentioned component.
Using a Text Field Component to Accept Input
In the above example we used a text field to simply display a message but in real life applications,
we use a text field to accept input from the user. So in the next example we will use two text
fields, one to accept input and a second one to display a message. Let us first design the form
as displayed in the Figure 5.30. The purpose of this form is to accept the name of the user in

the Text Field placed at the top and then display a personalized greeting (greeting along with
the name of the user) in the Text Field placed at the bottom. Just like there is the setText()
method to change the display text of a component at run time, there is a getText() method to
retrieve the display text of a component (label, text field or button) at run time.
Figure 5.30 Form Design to Display a Personalized Time Based Greeting on the Click of a Button
Observe the Figure 5.30 carefully. we have used a new component - a label and the two text
fields. A label is a component which is used to display simple text or as a label for another
component. Out of the two text fields one of them has a white background while the other has
the same background colour as the form. The difference in the background colour tells us that
one of the text field is editable while the other is not. In simple words editable means that the
user can change the text displayed in the text field at run time. The text field at the top has to
accept the name of the user and is editable. The text field at the bottom has to display the
greeting and is non-editable.
Figure 5.31 displays the properties of both the text fields.
Figure 5.31 Setting Text Field Properties
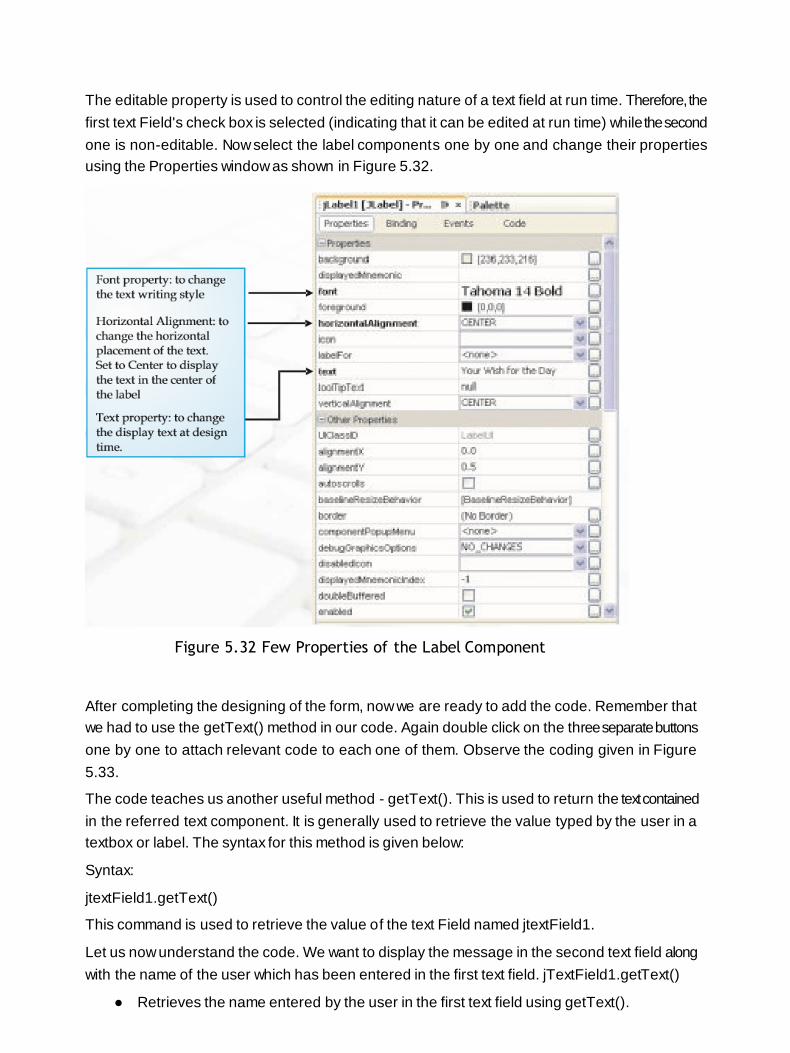
The editable property is used to control the editing nature of a text field at run time. Therefore, the
first text Field's check box is selected (indicating that it can be edited at run time) while the second
one is non-editable. Now select the label components one by one and change their properties
using the Properties window as shown in Figure 5.32.
Figure 5.32 Few Properties of the Label Component
After completing the designing of the form, now we are ready to add the code. Remember that
we had to use the getText() method in our code. Again double click on the three separate buttons
one by one to attach relevant code to each one of them. Observe the coding given in Figure
5.33.
The code teaches us another useful method - getText(). This is used to return the text contained
in the referred text component. It is generally used to retrieve the value typed by the user in a
textbox or label. The syntax for this method is given below:
Syntax:
jtextField1.getText()
This command is used to retrieve the value of the text Field named jtextField1.
Let us now understand the code. We want to display the message in the second text field along
with the name of the user which has been entered in the first text field. jTextField1.getText()
● Retrieves the name entered by the user in the first text field using getText().

"Good Morning" + jTextField1.getText()
● The message "Good Morning" is concatenated with the name retrieved from the first
text field using the + symbol.
jTextField2.setText("Good Morning" + jTextField1.getText())
● The display text of the second text field is set to the concatenated message
using setText().
Figure 5.33 Code to Display Personalized Time Based Greeting on Click of
a Button using the string concatenator operator (+)
Figure 5.34 displays an alternative method of concatenating the message and the contents of
the text field.
Figure 5.34 Code to Display Personalized Time Based Greeting on Click of a Button
using concat() method
This alternate uses the concat() method to add the two strings together. The syntax of this
method is:
Syntax:
string1.concat(string2)

This will result in adding the string2 at the end of the string1. For example: "sham".concat("poo")
returns shampoo
And
"to".concat("get").concat("her") returns together
Finally, our code is ready for execution. Figure 5.35 displays the output when the user enters
the name and clicks on the Morning button.
Figure 5.35 Execution of Time Based Personalized Greeting Code
Handling the Radio Button Component
By now we have completely familiarized ourselves with the working of text field, buttons, labels
and message box. Let us now delve further and try to explore the utility of other components.
Let us first try and modify the above example a bit. Supposing instead of displaying a message,
we need to display the title of the user (Mr. or Ms.) along with the name input in the textbox.
How to go about it? The simple answer would be to accept the title in a separate textbox and
then concatenate it with the name. But do you think it is the right approach? Using the textbox
for accepting the title will cause ambiguity thereby making the code complex as we will have to
cater to the different inputs. Different users will have different ways of entering the title. Some
might write MR. or some might write Mr. or some might write MR (without the dot). Then how do
we avoid this ambiguity? A simple solution is to use a radio button component to accept the
gender input. Radio buttons are groups of buttons in which, by convention, only one button at a
time can be selected. First design the form with the following components:
● one editable text field to accept the name
● a group of 2 radio buttons to accept the gender
● one non-editable text field to display the name along with the title
● appropriate labels to direct the user
As a first step drag a text field from the Swing Control tab of the Palette. Next drag and place
two radio buttons as shown in the following figure. Remember that out of several radio buttons

belonging to a group, only one can be selected. Therefore, the next step is to associate the two
radio buttons to each other. This is achieved by linking both the radio buttons with a ButtonGroup.
For each group of radio buttons, we need to create a ButtonGroup instance and add each radio
button to it. It is necessary to associate all the radio buttons in a group to one ButtonGroup. The
ButtonGroup takes care of unselecting the previously selected button when the user selects
another button in the group. So drag a Button Group component from the Swing Controls tab
and drop it anywhere on the form. This is an invisible component which is just used to associate
several radio buttons. Now to associate them to same button group, select the f irst radio button
and edit the buttonGroup property of this radio button using the Properties Window as shown in
Figure 5.36. Repeat the same procedure for the second radio button of this group to associate
them to same button group. Select the same Button Group from the drop down menu in the
buttonGroup property for the second radio button.
Figure 5.36 Associating First Radio Button with a buttonGroup
After both the radio buttons have been associated together, clicking on any one of them will
show an association between them informing us that they belong to a group. Add one more
non-editable text field to display the name along with the title. Double click on each of the two
radio buttons one by one to associate them with the appropriate code displayed in Figure 5.37.
Figure 5.37 Associating Code with the Radio Buttons

Now execute the program and see the output.
Using the Text Area Component
The text field allows the user to enter a single line of text only. The Text Area component is used
if we want to accept multiline input or want to display multiline output. This component
automatically adds vertical or horizontal scroll bars as and when required during run time.
Utilizing the concept of Text Area, let us design an application which accepts names of two
people and displays a short message about Friendship or Colleagues depending upon which
button is clicked.
Design the form shown in Figure 5.39. One new component - the Text Area has been added
while the rest of the components are familiar. Write the code as shown in Figure 5.38 for the two
buttons. Add the code for the STOP button.
Figure 5.38 Code for displaying Multiline Text in a Text Area on the click of a Button
Figure 5.39 shows the sample output of the code given in Figure 5.38.

Figure 5.39 Sample Run of the Text Area Application
Handling a Password Field Component
We can use the Password Field if we want that the text input by the user should not be displayed
as characters but as special characters (so that it is not readable by anyone). This component
allows confidential input like passwords which are single line. Let us design a simple application
which displays a simple message when the user inputs a user name and password. Figure 5.40
displays the sample run of the application. Remember that no checking is being done, rather a
simple message is to be displayed on the click of the LOGIN button and the application should
be terminated on the click of the CANCEL button.
Figure 5.40 Sample run of the Password Application
Figure 5.41 displays the code to display the message on the click of the LOGIN button.
Add the code for the CANCEL button also yourself.

Figure 5.41 code to display the message on the click of the LOGIN button
In all the previous examples we have been doing text manipulation. Let us now do some simple
computations and calculations. Design the form as shown in Figure 5.42. The form components
are:
● 1 editable text field to input the price per Apple
● 1 non-editable text field to display the amount to be paid
● 3 buttons, one for calculating and displaying the price of one dozen apples, one for
calculating and displaying the price of two dozen apples and one to exit out of the
application.
● 2 labels to guide the user what information is to be added.
Figure 5.42 Price Calculator
Let us first analyze the problem so that we can easily write the one line code required for all
three buttons.
● The first button with the "One Dozen" display text has to calculate the price of one
dozen apples and display it in the second text field. To calculate the price of one dozen
apples, we need to know the price of one apple. This is given in the first text field. So
we need to retrieve the value of the first text field. After retrieving the value we will
simply multiply it by 12 and display the answer in the second text field.
● The second button with the "Two Dozen" display text has to calculate the price of two
dozen apples and display it in the second text field. So the process remains similar to
the first button but only while calculating we will multiply the price of one apple by 24
and display the answer in the second text field.
● The third button with the "STOP" display text has to simply end the application.

Enter the code for each button separately as shown in Figure 5.43.
Figure 5.43 Code for the Price Calculator Application
The code has introduced us to two new methods:
● Integer.toString() - used to convert an Integer value to String type
● Integer.parseInt() - to convert a value to Integer type
We are already familiar with setText() and getText() so now we are ready to understand the code.
jTextField1.getText()
● Retrieves the value entered by the user in the first text field using getText(). This value by
default is treated as a string i.e. a group of characters and not as a number
● 12 * Integer.parseInt( jTextField1.getText()) The string value needs to be converted to an
integer number and this is achieved using the parseInt() method. After converting it to a
number it is multiplied by 12
Integer.toString(12 * Integer.parseInt( jTextField1.getText()))
The value calculated is a number which is to be displayed in a text field. So before displaying it
needs to be converted to a string type and this is achieved using the toString() method.
jTextField2.setText(Integer.toString(12 * Integer.parseInt( jTextField1.getText())))
The converted value needs to be displayed in the second text field. This is achieved using the
setText() method. Now test your code and enjoy the result of your hardwork. A sample run is shown
in Figure 5.42.
Let us now do some simple calculations involving numbers with decimals (called double in java).
Design the form as shown in Figure 5.44.

Figure 5.44 Amount Calculator using Numbers with Decimals
The form components are:
● 2 editable text fields to input the price and quantity
● 1 non-editable text field to display the amount to be paid
● 2 buttons, one for calculating and displaying the amount payable and one to
exit out of the application.
● 3 labels to guide the user what information is to be input and displayed
Let us first analyze the problem so that we can easily write the single line code required for the
Calculate Amount button.
● The first button with the "Calculate Amount" display text has to calculate the total
amount to be paid and display it in the third text field at the bottom of the screen. To
calculate the amount, we need to know the price of one item and also the quantity of
the item purchased. These values are given in the first and the second text field
respectively. So we need to retrieve these values from the two text fields. Remember
that these values will be by default string type so we need to convert them to a suitable
type (in this case double) so as to be able to perform calculations on them. After
retrieving the value we will simply multiply the two values and convert the value so
obtained to string and display the answer in the third text field.
Now add the code for the first button as given in the Figure 5.45
Figure 5.45 Code for the Amount Calculator Using Numbers with Decimals

The code has introduced us to one new method:
● Double.parseDouble() - to convert a value to Double type We are already familiar with
setText(), getText()and toString() so now we are ready to understand the code.
jTextField1.getText() and jTextField2.getText()
● Retrieves the value entered by the user in the first and second text fields respectively
using getText(). These values by default are treated as strings i.e. a group of characters
and not as numbers
Double.parseDouble( jTextField1.getText()) and
Double.parseDouble( jTextField2.getText())
● The string values need to be converted to numbers with decimals and this is achieved
using the parseDouble() method. After converting both the values they are multiplied to
get the total amount payable.
Double.toString(Double.parseDouble( jTextField1.getText()) *
Double.parseDouble( jTextField2.getText()))
● The value calculated is a number with decimals which is to be displayed in a text field. So
before displaying it needs to be converted to a string type and this is achieved using the
toString() method.
jTextField3.setText(Double.toString(Double.parseDouble( jTextField1.getText()) *
Double.parseDouble( jTextField2.getText()))
● The converted value is displayed in the third text field using the setText() method.
Relation between a Project, Form and Components
Remember each project can have multiple forms and this fact is clear from the Projects
window as shown in Figure 5.46.
Figure 5.46 Project Window Showing Multiple Forms
Further each form can have one or more elements - some of which may be visible and some
invisible. The visible components are all shown under the Frame Component and the non-
visible components are part of other components.

Each application is treated as a Project in Netbeans and it can have one or more forms.
Each form can have one or more components and this relation between a Project, form and
components is depicted in Figure 5.47.
Figure 5.47 Relations Between Project, Form and Components
Variable Declaration
We have learnt that variables are capable of storing values, which we need to use. To reference
a variable, it should have a name. Moreover, variables in java can only accept a value that
matches its data type. So before we use a variable we must decide on its name and its data
type. Giving this information to the language compiler is called variable declaration. Thus, the
declaration of a variable tells us about the name of the variable which is necessary to reference
it, the type of data it will store and optionally an initial value. Given below are some commonly
used ways of variable declaration.
Declaration Example Comment int Apples; Simple declaration of an integer variable named Apples.
float Sum = 4; Declaration of a float variable named Sum which has an
initial value of 4.0.
Variable Naming Conventions
As mentioned above, each variable needs to have a name so that it can be referenced
anywhere during the application. Each programming language has its own set of rules for
naming variables. The rules and conventions for naming variables in Java are summarized
below:
● Variable names are case sensitive.
● Keywords or words, which have special meaning in java, should not be used as
the variable names.
● Variable names should be short and meaningful.

● All variable names must begin with a letter, an underscore (_) or a dollar sign ($).
The convention is to always use a letter and avoid starting variable names with
underscore (_) and dollar sign ($).
● After the first initial letter, variable names may contain letters and digits (0 to
● 9) and (_,$), but no spaces or special characters are allowed.
Using the above conventions and rules following is an indicative list of acceptable and
unacceptable variable names.
Acceptable Variable Names - Grade, Test_Grade, TestGrade
Unacceptable Variable Names - Grade(Test), 2ndTestGrade, Test Grade, Grade_Test#2 Try to
Java variable names are case sensitive, so sum1 and SUM1 aren't the same variable.
Simple Applications Using the Concept of Variables
Now, let us develop a simple application to learn the use and handling of char data type.
Suppose we want to display the message entered by the user surrounded by four different
characters. See the sample execution of the application as shown in Figure 5.48.
Figure 5.48 Handling Character Variables
As is clear from the sample run, we need to concatenate the message and the selected
character depending upon the button clicked by the user. Let us now design the application:
First add a new JFrame form and set its title property to "Magic Text". Design the form as
shown in Figure 5.48 with the following components:
▪ one editable text field to accept the message
▪ five buttons - four to concatenate message with different characters and one to exit
from the application
▪ one non-editable text field to display the concatenated message
▪ appropriate labels to direct the user

Change the properties of the components as learnt in the previous chapter so that the form looks
exactly like the one displayed in Figure 5.48. The next step is to associate code with the all the
buttons. Double click on the buttons one by one in the design window to reach at the point in the
source window where the code needs to be written. Add the code for each of the buttons shown
as follows.
private void jButton1ActionPerformed(java.awt.event.ActionEvent evt)
{ // Concatenate * to the text in
jtextField1: char Star; Star='*';
jTextField2.setText(Star+jTextField1.getText()+Star
); }
private void jButton2ActionPerformed(java.awt.event.ActionEvent evt)
{ // Concatenate # to the text in
jtextField1: char Hash; Hash='#';
jTextField2.setText(Hash+jTextField1.getText()+Hash
); }
private void jButton3ActionPerformed(java.awt.event.ActionEvent evt) { // Concatenate % to the text in
jtextField1: char Percent; Percent='%';
jTextField2.setText(Percent+jTextField1.getText()+Percent); }
private void jButton5ActionPerformed(java.awt.event.ActionEvent evt)
{ //To STOP the
application:
System.exit(0); }

Now try to develop a similar application with four buttons to perform the basic mathematical operations of addition, subtraction, multiplication and division of any two numbers entered by the user. First design the form with the following components:
▪ two editable text fields to accept the two numbers .
▪ four buttons to decide the operation, one button to reset the fields and one
button to exit out of the application.
▪ one non-editable text field to display the result.
▪ appropriate labels to direct the user.
When the user enters two numbers and clicks on the + button, the sum of the numbers is
displayed in the jtextField3 which has been disabled (by setting its editable property to false) as
shown in Figure 5.49.
When the user clicks on the RESET button the contents of all the Text Fields are cleared.
Figure 5.49 A Simple Calculator Showing
Addition of Two Numbers
Now write the code for each button of the basic calculator shown as follows:
private void jButton4ActionPerformed(java.awt.event.ActionEvent evt) { // Concatenate “ to the text in
jtextField1: char Quotes; Quotes='"';
jTextField2.setText(Quotes+jTextField1.getText()+Quotes); }

private void jButton5ActionPerformed(java.awt.event.ActionEvent
evt) {
// Code to clear the contents of the
text field: jTextField1.setText("");
jTextField2.setText("");
jTextField3.setText(""); }
private void jButton3ActionPerformed(java.awt.event.ActionEvent
evt) {
// Code to multiply Number1
and Number2: double
Number1,Number2,Result; Number1=Double.parseDouble(jTextField1
.getText());
Number2=Double.parseDouble(jTextField2.getText()
); Result=Number1*Number2;
jTextField3.setText(Double.toString(Result)); }
private void jButton1ActionPerformed(java.awt.event.ActionEvent evt)
{ // Code to add Number1
and Number2: double
Number1,Number2,Result; Number1=Double.parseDouble(jTextField1
.getText());
Number2=Double.parseDouble(jTextField2.getText()
); Result=Number1+Number2;
jTextField3.setText(Double.toString(Result)); }
private void jButton2ActionPerformed(java.awt.event.ActionEvent evt) {
// Code to subtract Number2 from
Number1: double Number1,Number2,Result; Number1=Double.parseDouble(jTextField1.g
etText());
Number2=Double.parseDouble(jTextField2.getText());
Result=Number1-Number2;
jTextField3.setText(Double.toString(Result)); }

Let us now understand the code. We want to display the result of a computation involving numbers entered in the first and second text field in the third text field based on the button clicked. So only the operator is being changed while the basic
steps of computation remain the same. So we will explain one (coding for the first button) in detail
here:
double Number1,Number2,Result;
● declares three variables of type double
Number1=Double.parseDouble(jTextField1.getText()); and
Number2=Double.parseDouble(jTextField2.getText());
● retrieves the value entered by the user in the first and second text field using
getText(). These values by default are treated as strings i.e. a group of
characters and not as a number so the string values need to be converted to a
double type and this is achieved using the parseDouble() method. After
converting it to a double type the values are assigned to the variables declared in
the first line of code
Result=Number1+Number2;
● The two values stored in the variables are added and the calculated value is
stored in the variable Result.
jTextField3.setText(Double.toString(Result));
● The value stored in the variable Result is of type double so it is first converted to
type string using the toString() method and then the display text of the third text
private void jButton6ActionPerformed(java.awt.event.ActionEvent
evt) {
System.exit(0); }
private void jButton4ActionPerformed(java.awt.event.ActionEvent
evt) {
// Code to divide Number1
by Number2: double
Number1,Number2,Result; Number1=Double.parseDouble(jTextField1
.getText());
Number2=Double.parseDouble(jTextField2.getText()
); Result=Number1/Number2;
jTextField3.setText(Double.toString(Result)); }

field is set to the converted value using setText().
The working of the other three buttons (second, third and fourth) is similar to the one explained
above. We are already familiar with the working of the STOP button so let us give a quick look
to the coding of the RESET button
jTextField1.setText(""); and
jTextField2.setText(""); and
jTextField3.setText("");
● The display text of all the three buttons is set to an empty string (i.e.
blank) using the setText() method.
In all the applications developed so far we have used a single type of data and done simple
calculations. Next let us explore the use of multiple data types and using these data types try
to perform complex calculations.
Observe the form shown in Figure 5.50 and design a similar form.
Figure 5.50 Simple Interest Calculator
The aim of the application is to accept the principal amount, rate and time in three separate text
fields and calculate the simple interest on the click of a button. The calculated interest is
displayed in a disabled text field. The coding for the same is given in Figure 5.51 .

FFigure 5.51 Code for Simple Interest Calculator
Control Structures
We use control structures when we want to control the flow of the program. There are types of
control structures: Selection statements and Iteration statements.
Selection Statements:
A selection statement selects among a set of statements depending on the value of a controlling
expression. The selection statements are the if statement and the switch statement, which are
discussed below:
Simple if Statement - The if statement allows selection (decision making) depending upon the
outcome of a condition. If the condition evaluates to true then the statement immediately
following if will be executed and otherwise if the condition evaluates to false then the statements
following the else clause will be executed. The selection statements are also called conditional
statements or decision statements.
The syntax of if statement is as shown below:
Syntax:
if (conditional expression)
{
Statement Block;
}
else
{
Statement Block;
}
private void jButton2ActionPerformed(java.awt.event.ActionEvent
evt) {
System.exit(0); }
private void jButton1ActionPerformed(java.awt.event.ActionEvent evt) {
double Principal,Rate,SInterest; byte Time; //Expected value not more than 127 Years
Principal=Double.parseDouble(jTextField1.getText());
Rate=Double.parseDouble(jTextField2.getText());
Time=Byte.parseByte(jTextField3.getText());
SInterest=(Principal*Rate*Time)/100; //Formula to calculate SI
jTextField4.setText(Double.toString(SInterest));
}

RAMMING -REVIEW
Points to remember about if statement:
• The conditional expression is always enclosed in parenthesis.
• The conditional expression may be a simple expression or a compound
expression.
• Each statement block may have a single or multiple statements to be executed. In
case there is a single statement to be executed then it is not mandatory to enclose
it in curly braces ({}) but if there are multiple statements then they must be enclosed
in curly braces ({}).
• The else clause is optional and needs to be included only when some action is to
be taken if the test condition evaluates to false.
Let us now design another application: “Vote Eligibility Checker” where we are accepting the
age from the user and we want to validate whether the person is eligible to vote or not. We
are accepting the age of the user in a text field and testing whether the age entered by the
user is greater than 18 or not. If the age is greater than 18 then the message "You are eligible
to VOTE" is displayed. If the age is less than then the message “You are NOT eligible to VOTE”
is displayed. In such situations when we have to take action on the basis of outcome of a
condition, we need to use a Selection statement. Design the form and set the properties of
the components so that the form looks exactly like the one displayed in figure 5.52.
Figure 5.52 Sample Run of The Vote Eligibility Checker
Application
The code for this application is given as follows:
Private void
jButton1ActionPerformed(java.awt.event.ActionEvent evt) {
// Code to check eligibility to vote with else condition: if
(Integer.parseInt(jTextField1.getText())>=18)
JOptionPane.showMessageDialog(null,"You are eligible To
VOTE");
else
JOptionPane.showMessageDialog(null,"You are NOT eligible
To VOTE");
}

Let us now understand the single line code in detail.
Integer.parseInt(jTextField1.getText())
● retrieves the value entered by the user in the text field using getText().This value
by default is treated as a string and not as a number so it needs to be converted to
an integer type and this is achieved using the parseInt() method.
if (Integer.parseInt(jTextField1.getText()) >=18)
● check whether the value retrieved from the text field is greater than or equal to 18
or not. The if statement is used to check the condition and if the condition
evaluates to true then we specify what action is to be taken
if (Integer.parseInt(jTextField1.getText()) >=18)
JOptionPane.showMessageDialog(null, "You are eligible to VOTE")
● This if statement is used to check whether the value retrieved from the text field
is greater than or equal to 18 or not and if it is then it displays the message
"You are eligible to VOTE" using the showMessageDialog() method.
else
JOptionPane.showMessageDialog(null,"You are NOT eligible to VOTE");
● The else statement is executed if the value retrieved from the text field is less
than 18 and if it is then it displays the message "You are NOT eligible to VOTE"
using the showMessageDialog() method.
Nested if . . . else - These control structures are used to test for multiple conditions as against
the simple if statement which can be used to test a single condition. The syntax of nested if else
is as follows:
Syntax:
if (conditional expression1)
{
statements1;
}
else if (conditional expression2)
{
statements2;
}
else if (conditional expression3)
{
statements3;

}
else
{
statements4;
}
Let us now develop another application called the Week Day Finder in which we will learn how
to use if statement when we have multiple test conditions. The Week Day Finder will display the
name of the week in a disabled text field depending upon the day selected by the user. The days
are displayed as radio button options, which have to be selected. So, the form will have 7 radio
buttons and depending on the button selected the day of the week will be displayed.
Figure 5.53 Sample Run of the Week Day Finder
Design the form as shown in Figure 5.53. and set the properties of the components according
to the functionality required as shown in Figure 5.53. Monday is displayed when the radio
button corresponding to Day One is selected as shown in Figure 5.53 as it is the first day of
the week. If we select the radio button corresponding to Day Six then Saturday is displayed,
as it is the sixth day of the week.
It is clear from the above form that we have to test for multiple conditions. If jRadioButton1 is
selected then Monday will be displayed and if jRadioButton2 is selected then Tuesday will be
displayed and so on. All the select conditions will be checked from top to bottom and wherever
the condition evaluates to true, the statements corresponding to that jRadioButton will get
executed. What happens in case none of the jRadioButton is selected?
After understanding the working let us now write the code for the Week
Day Finder application as shown in Figure 5.54.

Figure 5.54 Code for the Week Day Finder Application
The above code introduces us to a new method called isSelected(). This method is
used to check whether a particular radio button is selected or not. The syntax of this
method is given below:
Syntax:
jRadioButton.isSelected()
This method returns a boolean value i.e. true or false. The true indicates that the
radio button is selected and false indicates that the radio button is not selected.
Let us now understand the code in detail. Since the code in each subsequent else is
almost the same except the display text, so we will try and understand the first three
lines.
if (jRadioButton1.isSelected())
● check whether the first radio button is selected or not
if (jRadioButton1.isSelected()) jTextField1.setText("Monday")
● Display "Monday" in the text field if the first radio button is
selected
if (jRadioButton1.isSelected()) jTextField1.setText("Monday")
private void jButton1ActionPerformed(java.awt.event.ActionEvent evt)
{
// To find the day of the
week if
(jRadioButton1.isSelected()) jTextField1.setText("Monday");
else if (jRadioButton2.isSelected()) jTextField1.setText("Tuesday");
else if (jRadioButton3.isSelected()) jTextField1.setText("Wednesday"
); else if
(jRadioButton4.isSelected()) jTextField1.setText("Thursday")
; else if (jRadioButton5.isSelected()) jTextField1.setText("Friday");
else if (jRadioButton6.isSelected()) jTextField1.setText("Saturday")
; else if (jRadioButton7.isSelected()) jTextField1.setText("Sunda
y"); else jTextField1.setText("Day - Not Selected");
}
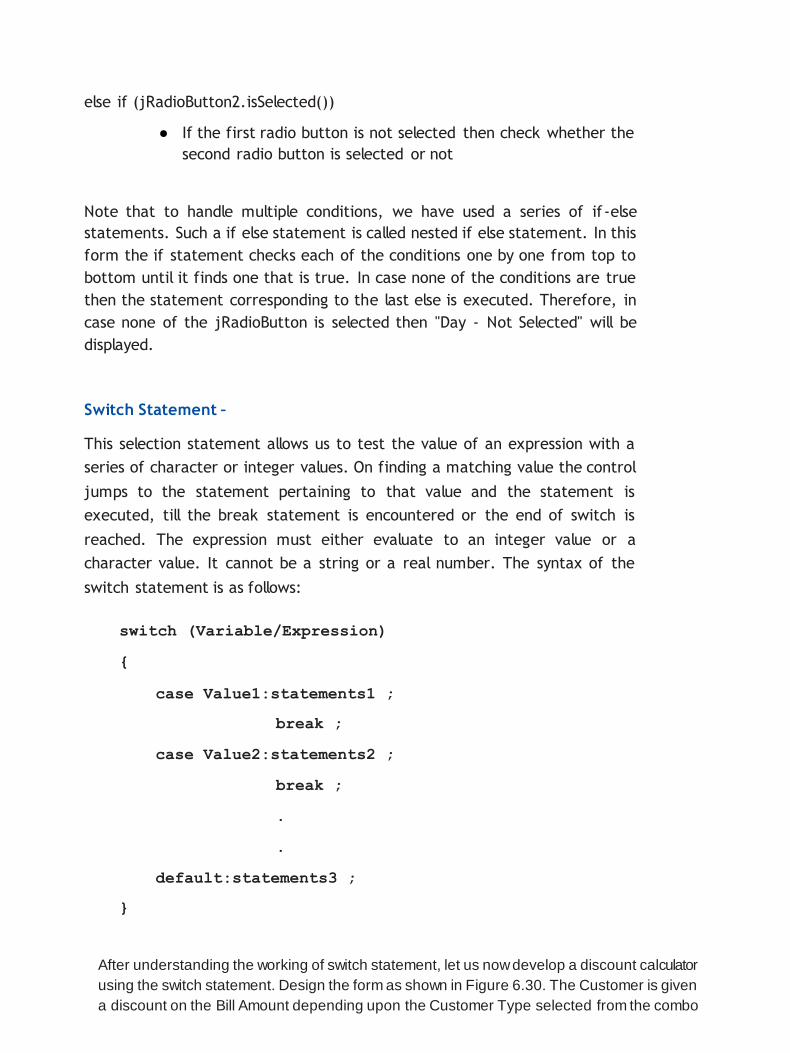
else if (jRadioButton2.isSelected())
● If the first radio button is not selected then check whether the
second radio button is selected or not
Note that to handle multiple conditions, we have used a series of if -else
statements. Such a if else statement is called nested if else statement. In this
form the if statement checks each of the conditions one by one from top to
bottom until it finds one that is true. In case none of the conditions are true
then the statement corresponding to the last else is executed. Therefore, in
case none of the jRadioButton is selected then "Day - Not Selected" will be
displayed.
Switch Statement –
This selection statement allows us to test the value of an expression with a
series of character or integer values. On finding a matching value the control
jumps to the statement pertaining to that value and the statement is
executed, till the break statement is encountered or the end of switch is
reached. The expression must either evaluate to an integer value or a
character value. It cannot be a string or a real number. The syntax of the
switch statement is as follows:
ING switch (Variable/Expression)
{
case Value1:statements1 ;
break ;
case Value2:statements2 ;
break ;
.
.
default:statements3 ;
}
After understanding the working of switch statement, let us now develop a discount calculator
using the switch statement. Design the form as shown in Figure 6.30. The Customer is given
a discount on the Bill Amount depending upon the Customer Type selected from the combo

box. Discount is calculated as follows:
Customer Type Discount
Platinum 30%
Gold 20%
Silver 10%
New Customer No Discount
When the application is executed the discount amount is deducted from the Bill Amount
depending upon the Customer Type selected by the user.
When Customer Type is Silver the customer gets a discount of 10% as shown in figure 5.55.
When Customer Type is Gold the customer gets a discount of 20% and when
Customer Type is Platinum the customer gets a discount of 30% on the Bill Amount.
Figure 5.55 Discount of 10% for Customer Type Silver
Let us now write the code for the discount calculator as shown in 5.56.

Figure 6.31 Code for Discount Calculator Using switch Statement
Now let us understand the code in detail.
double FinalAmount=0;
● Declare a variable FinalAmount of type double and initialize it to 0.
double BillAmount = Double.parseDouble(jTextField1.getText());
● Declare a variable BillAmount of type double and initialize it with the
value retrieved from the text field (using the getText() method) after
converting it to type double (using the parseDouble() method)
switch(jComboBox1.getSelectedIndex())
● The index of the selected item is retrieved using the getSelectedIndex()
method and on the basis of this value the control is transferred using
switch statement
case 1: FinalAmount=0.90*BillAmount;
● If the second value in the combo box is selected then the FinalAmount
is calculated by multiplying the BillAmount by 0.90 (to give a discount
of 10%)
break;
● Stop the execution of the switch statement and transfer the control to
private void jButton1ActionPerformed(java.awt.event.ActionEvent evt)
{
// Code to calculate discount depending upon customer type:
double FinalAmount=0;
double BillAmount = Double.parseDouble(jTextField1.getText());
switch(jComboBox1.getSelectedIndex()) {
case 0: FinalAmount=BillAmount; //No Discount for
new customer break;
case 1: FinalAmount=0.90*BillAmount; //10% Discount
for silver break;
case 2: FinalAmount=0.80*BillAmount; //20%
Discount for gold break;
case 3: FinalAmount=0.70*BillAmount;//30%
Discountfor platinum break; default:FinalAmount=BillAmount;
}
jTextField2.setText(Double.toString(FinalAmount));
}

the statement immediately following the closing brace of the switch
statement. It has to be included as the last statement of each case.
default:FinalAmount= BillAmount
● When getSelectedIndex() is not equal to either 1,2 or 3 then the code moves
to default statement and no discount is given to the customer.
Comparing Switch and If..else Statements - Switch is used to select sections of code
depending on specific integer or character values. If we are handling specific coded
values (eg, the number of the button that was clicked in a JOptionPane), or processing
characters(whose codes are treated like numbers), then switch is useful. The limitations
of switch are as follows:
• It doesn't allow ranges, eg case 90-100.
• It requires either integers or characters and doesn't allow useful
types like String.
String comment; // The generated result.
int choice = Integer.ParseInt(jTextField.getText);
//Enter 0, 1, or 2.
switch (choice)
{
case 0: comment = "You look so much better
than usual."; break;
case 1: comment = "Your work is up to its usual
standards."; break;MMING - A REVIEW
case 2: comment =
"You're quite competent for so little
experience."; break;
default: comment =
"Oops -- something is wrong with this code.";
}
Equivalent if statement
String comment; // The generated result.
int choice= Integer.ParseInt(jTextField.getText);

//Enter is 0,
1,or 2. if (choice == 0)
comment = "You look so much better than
usual."; else if (choice == 1)
comment = "Your work is up to its usual
standards."; else if (choice == 2)
comment="You're quite competent for so little
experience"; else
comment = "Oops -- something is wrong with this code.";
A switch statement can often be rewritten as an if statement. Let us look at the example given
above, when a selection is to be made based on a single value, the switch statement is generally
easier to read. The switch is useful when you need to manage a lot of if /else if / else . It has a
shorter syntax and is more appropriate in this case.
Points to Remember:
• NetBeans is an IDE using which we can develop GUI applications in Java.
• NetBeans provides various components used to create a GUI front-end
interface.
• GUI components' appearance and behaviour is controlled by their
properties and methods.
• We should use meaningful names for controls on the form and variables
in the code. It makes programming convenient.
• Some useful Data Types supported in Java are: int, double, char and boolean.
• String is an Object (reference) type supported in Java.
• A variable must be declared before it can be used.
• Different types of operators are available in Java. Operators are used to
perform various operations on data.
• The if statement selects among a set of statements depending on the
value of a controlling expression.

EXERCISES
MULTIPLE CHOICE QUESTIONS
1. What will be the final value of sum1 after the execution of the
program given below?
int sum1 = 3; sum1=sum1+1;
jTextField1.setText(""+sum1);
sum1=sum1+1; jTextField2.setText(""+sum1);
sum1=sum1+1;
jTextField3.setText(""+(sum1));
sum1=sum1+1;
jTextField4.setText(""+sum1);
jTextField5.setText(""+sum1);
a. 5 b. 6
c. 4 d. 7
2. Consider the following code snippet :
int anumber=14;
if (anumber >=10)
jLabel1.setText("first string");
else
jLabel1.setText("second string");
jLabel2.setText("third string");
What will be the output when anumber=14
a. first string b. second string
c. first string d. second string
third string third string
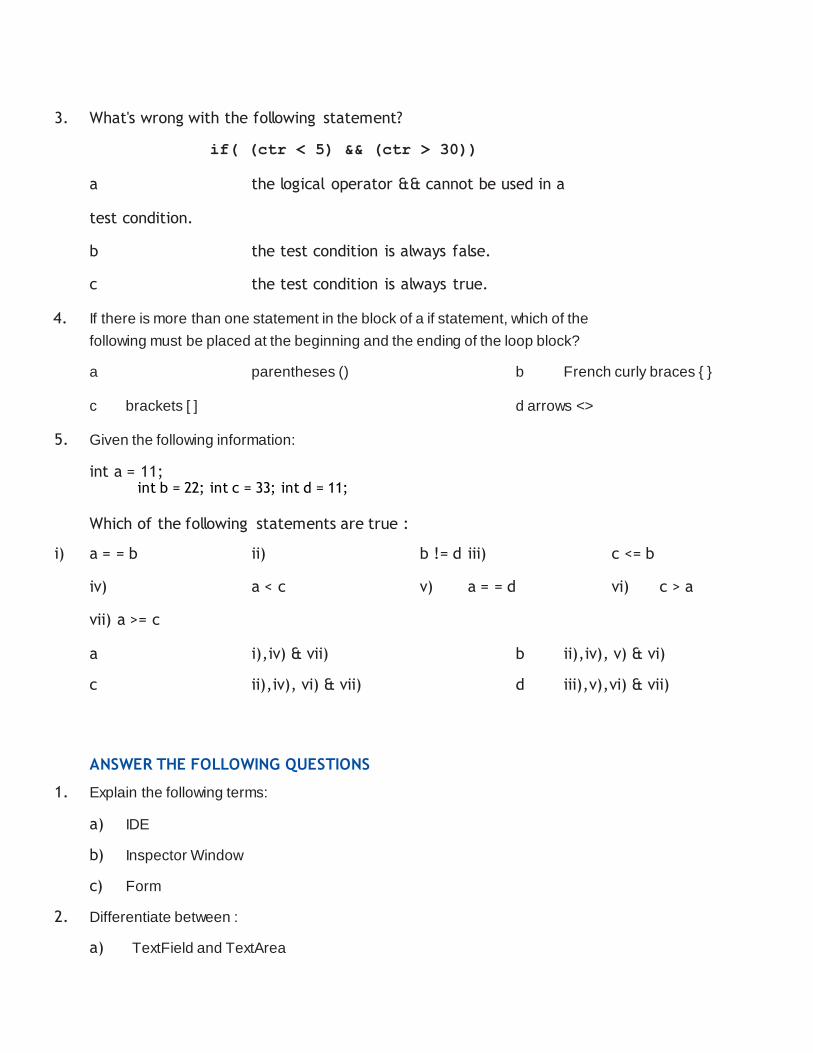
3. What's wrong with the following statement?
if( (ctr < 5) && (ctr > 30))
a the logical operator && cannot be used in a
test condition.
b the test condition is always false.
c the test condition is always true.
4. If there is more than one statement in the block of a if statement, which of the
following must be placed at the beginning and the ending of the loop block?
a parentheses () b French curly braces { } c brackets [ ] d arrows <>
5. Given the following information:
int a = 11; int b = 22; int c = 33; int d = 11;
Which of the following statements are true :AMMING - A REVIEW
i) a = = b ii) b != d iii) c <= b
iv) a < c v) a = = d vi) c > a
vii) a >= c
a i),iv) & vii) b ii),iv), v) & vi)
c ii),iv), vi) & vii) d iii),v),vi) & vii)
ANSWER THE FOLLOWING QUESTIONS
1. Explain the following terms:
a) IDE
b) Inspector Window
c) Form
2. Differentiate between :
a) TextField and TextArea

b) ComboBox and ListBox
c) getText() and setText()
3. What is the significance of the following properties in
TextArea ? LineWrap WrapStyleWord
4. What are list type controls used for ?
5. How would you determine whether a combo box is editable or not?
6. List different selection modes of a list.
7. What is a button group? Which control is generally used with a buttongroup.
8. Write and explain two methods each of check box and radio button.
AMMING - A REVIEW
LAB EXERCISES
1. Design a GUI application in which the user enters a three digit number in the text
field and on clicking the button the sum of the digits of the number should be
displayed in a label.
Hint : Suppose user enters 123 the output should be 6(1+2+3).
2. Design a GUI application to accept a number from the user in a text field and print
using option pane whether it is a positive even number or not.
3. Design a GUI application to accept the cost price and selling price form the user in
two text fields then calculate the profit or loss incurred.
4. Design a GUI application to accept a character in a text field and pr int in a label if
that character is a vowel: a, e, i, o, or u. The application should be case sensitive.
5. Design a GUI application in java to convert temperature from Celsius to Fahrenheit
or vice versa using radio buttons and two text fields
6. Design a GUI application in java to convert kilograms into grams, litres into
milliliters, rupees into paisa using combobox and text fields.
7. A book publishing house decided to go in for computerization. The database will be
maintained at the back end but you have to design the front end for the company.
You have to accept book code, Title, Author and Quantity sold from the user. The
Price will be generated depending upon the book code. Net price should be
calculated on the basis of the discount given.
Book seller - 25%

School - 20% Customer - 5% PROGRAMMING - A REVIEW
8. A networking company decided to computerize its employee salary . Develop an
application to store employee's personal data which will be saved in the back end.
The front end should accept Name, Father's Name, Mother's Name, Address,
Gender, Basic Salary, Medical and Conveyance. Calculate gross and net salary.
Basic DA HRA
>=40000 35% 37%
>=20000 25% 32%
>=10000 25% 30%
Related Documents