Guidelines for School Districts Information and Condition of Schools (ICOS) User Manual DRAFT December 2014 Randy I. Dorn State Superintendent of Public Instruction

Welcome message from author
This document is posted to help you gain knowledge. Please leave a comment to let me know what you think about it! Share it to your friends and learn new things together.
Transcript
Guidelines for School Districts
Information and Condition of Schools (ICOS) User Manual DRAFT
December 2014
Randy I. Dorn State Superintendent of
Public Instruction

Page | 2
Randy I. Dorn Superintendent
of Public
Instruction
Ken Kanikeberg Chief of Staff
JoLynn Berge Chief Financial
Officer,
Financial
Resources Gordon Beck Director,
School Facilites
and
Organization
ICOS User Manual
2014 ICOS User Manual
School Facilties and Organization
Office of Superintendent of Public Instruction
Gordon Beck, Director
OSPI provides equal access to all programs and services without discrimination based on sex, race, creed, religion, color, national origin, age, honorably discharged veteran or military status, sexual orientation including gender expression or identity, the presence of any sensory, mental, or physical disability, or the use of a trained dog guide or service animal by a person with a disability.
The following employee has been designated to handle questions and complaints of alleged discrimination:
Title IX/Section 504 Coordinator: Equity and Civil Rights Director P.O. Box 47200 Olympia, WA 98504-7200 (360) 725-6162
Page | 3
Table of Contents
Introduction ........................................................................................................ 5
Accessing ICOS .................................................................................................... 5
Obtaining a Login for ICOS ................................................................................................. 5
Logging into EDS ................................................................................................................ 6
Home Screen ...................................................................................................... 8
Navigation ......................................................................................................................... 8
Inventory and Condition ................................................................................... 10
Tree View Pane and Viewer Screen .................................................................................. 10
Navigating the Tree View ...................................................................................................... 11
General Tab – Viewing the Details ........................................................................................ 12
Navigating the General Tab Viewer Screen and Accordion .................................................. 13
District Information ......................................................................................................... 16
Add/View Files .................................................................................................................... 188
Add a Facility to the District ................................................................................................ 211
View Needed Actions for a District ........................................ Error! Bookmark not defined.1
Asset Preservation Program (APP) ................................................................................. 222
Open APP Screen ................................................................................................................ 233
Edit/Add APP Data .............................................................................................................. 233
Contacts .......................................................................................................................... 23
Contact Search ...................................................................................................................... 24
Create New Contact .............................................................................................................. 24
To create a new contact: ...................................................................................................... 24
Edit Contact ........................................................................................................................... 27
Facility Information ....................................................................................................... 300
Notes ................................................................................................................................... 322
Add/View Files .................................................................................................................... 333
Add/Edit School Code ......................................................................................................... 333
Add/Edit Facility Room Use ................................................................................................ 366
Page | 4
Building Information ...................................................................................................... 387
Select a Building .................................................................................................................... 38
Enter Building Details ............................................................................................................ 38
Building Inventory Information ........................................................................................ 41
Add Building to the Facility ................................................................................................. 433
Edit Building Inventory ........................................................................................................ 444
Edit Building Characteristics ................................................................................................. 45
Add Area ................................................................................ Error! Bookmark not defined.5
Building Condition Information ........................................................................................ 46
Edit Building Condition ......................................................................................................... 47
Rate Components ............................................................................................................... 488
Add/Edit Classrooms........................................................................................................ 52
Files Tab .......................................................................................................................... 54
Map Tab .......................................................................................................................... 54
Log Tab ............................................................................................................................ 55
Site Inventory Information ............................................................................................. 526
Parcel and Census Tract Numbers ...................................................................................... 578
View Site Map ..................................................................................................................... 599
Add/Edit Components and Sub-Components ....................................................................... 60
Add/View Files ...................................................................................................................... 61
Site Condition Information ............................................................................................... 62
Edit Site Condition ................................................................................................................ 62
Rate Components ................................................................................................................. 63
Pre-Disaster Mitigation. ................................................................................................. 656
Reports ........................................................................................................... 656
Navigate Report Pages ........................................................................................................ 678
Resize Report Viewer .......................................................................................................... 678
Find ...................................................................................................................................... 688
Download/Export Report .................................................................................................... 688
Refresh/Rerun Report ......................................................................................................... 689
Maps and Boundaries ..................................................................................... 699
Glossary of Terms ............................................................................................. 71

Page | 5
Introduction
School Facilities and Organization at OSPI supports the State Superintendent in providing
School Districts with financial and technical assistance in three primary areas. They are:
1. Capital planning, design and construction.
2. Facilities maintenance/management activities.
3. School district organization issues.
Information and Condition of Schools (ICOS) is a web-based system where inventory details
about school facilities, operated by school districts, and the current condition of those
facilities are documented and stored. The information is used to support the School
Construction Assistance Program (SCAP) and ancillary programs such as the performance-
based Asset Preservation Program (APP). The system is used to meet an increasing demand
for school facility inventory and building condition data as well as support school district
facility management and school facility information requests used for policy decisions. A goal
of this system is to benefit school districts by providing a system for inventory, record
keeping, and comparative analysis between districts.
ICOS is constantly being improved and future changes are expected. Although it is our desire
to keep this document current, it is marked “Draft” so the reader/user is aware what is
experienced in ICOS may not directly correspond to this User Manual in every detail.
Accessing ICOS
At this time, OSPI recommends using Microsoft Internet Explorer version nine or higher. To
view the ICOS system, the Silverlight Applet (a common add-in) must be downloaded onto
the user’s computer. Silverlight can be accessed, at no charge, from this website
http://www.silverlight.net/getstarted/. After installation of Silverlight, ICOS can be accessed
by following this link http://eds.ospi.k12.wa.us/Login.aspx
Obtaining a Login for ICOS
To access ICOS, users need a login for the OSPI Education Data System (EDS). EDS is an
OSPI web portal that allows users to access various systems for which they have permissions.
To request access to EDS and ICOS, contact OSPI School Facilities and Organization staff or
your School Facilities and Organization
http://www.k12.wa.us/SchFacilities/ContactInformation.aspx.

Page | 6
Logging into EDS
EDS is the OSPI platform which provides access to ICOS. School districts must obtain
permission from OSPI to logon to EDS. District users must have a User Name and a
Password and be permitted by the district’s Data Security Manager to access the ICOS
Application within EDS.
To log into EDS and view the ICOS system:
1. Follow this link http://eds.ospi.k12.wa.us/Login.aspx.
2. Enter your username and password.
3. Click the login button.
A. Click the My Applications tab or click on View my Applications link.

Page | 7
B. Click on ICOS.
You are now in the ICOS system!
If ICOS is not one of the choices in My Applications List, please contact your district data
security manager.
Note: The screen prints in this manual do not reflect any actual or real data for the displayed
school district. The screens and data are used as examples only.

Page | 8
Home Screen
Navigation
After logging into the ICOS system, the first screen displayed is the Home Screen (also
referred to as Home Page). This screen displays a navigation tool bar with various options.
The picture displayed is the Office of the Superintendent of Public Instruction building in
Olympia, Washington.
ICOS Home Screen
There are two links directly below the picture of OSPI. They are:
1. The ICOS User Manual.
2. OSPI Facility Staff Contacts.
Navigation
ICOS is developed inside an existing OSPI web portal called EDS. The headers and footers
have standard design navigation features as specified by the EDS portal (EDS Home, Help,

Page | 9
Feedback, and Logout). EDS meets accessibility standards as well as hardware and software
requirements. Those requirements include a minimum 1024 x 768 screen resolution and IE
Explorer 9.0 or higher.
The button will take you back to the ICOS Home Page. The button link opens the
School Facilities ICOS website where there are various ICOS documents. The button
opens a screen to enter comments and submit them to the Help Desk. Clicking the
button takes users out of the system and returns them to the EDS login screen.
Clicking buttons on the header navigation menu takes users to the corresponding screen.
The navigation tool bar includes the list of buttons below. They are described in more detail in
the next section:
1. Home.
The ICOS Home Page is the first screen viewed when entering the ICOS system. The
page contains links to the ICOS User manual and contact information for School
Facilities Staff. It also displays pertinent ICOS news items.
2. Inventory and Condition.
The Inventory and Condition screen contains pages used to enter data about a facility,
a site, and building inventory and condition ratings as well as Pre-Disaster Mitigation
(PDM), Asset Preservation Program (APP), and Washington Sustainable Schools
Protocol (WSSP).
3. Reports.
Select this screen to run reports based on various user-selected criteria. New data or
edits in ICOS must be approved by OSPI before they appear in a report. Reports that
can be accessed include:
A. APP Annual Report.
A report showing the current status of APP buildings.
B. Building Summary Report.
A summary of an individual building’s information including the inventory
and condition.

Page | 10
C. District Summary Report.
A summary of district information including a list of facilities and buildings.
D. Facility Report Summary.
A summary of facility information including a list of buildings.
E. OSPI Report 1049 Report.
A five year cohort survival enrollment projection, by grade, based on the last
six years of headcount enrollments as reported each October.
F. SCAP Report 1.
A report showing all the SCAP projects that were built or modernized using
state funding assistance.
G. SCAP Report 3.
A report showing the gross square footage, gross instructional square footage,
and the SCAP recognized square footage for all the district’s facilities.
4. Maps and Boundaries.
This screen displays a GIS-based interactive map that contains information on school
district boundaries, demographics, and capital projects.
The footer provides links to the OSPI Privacy Policy, a disclaimer, and Customer Support.
Clicking one of these links redirects the user to the appropriate screen.
Inventory and Condition
The Inventory and Condition screen is the primary location to find site and building inventory
and condition information as well as other related screens. Each is described in the following
sections.
Tree View Pane and Viewer Screen
All screens in the Inventory and Condition section have a Tree View pane where the screen
navigation occurs. The Viewer Screen is where the information appears after the user clicks
on a choice in the Tree View.

Page | 11
Tree View and Viewer Screen
Navigating the Tree View
The General tab displays all of the facilities within the school district. If a user clicks on the
expander triangle next to a facility, inventory and condition options for that facility can be
viewed. Once expanded, single-click on the downward pointed triangle symbol to collapse
the list.
The tree view is organized hierarchically with districts and their related facilities listed
alphabetically.

Page | 12
ICOS Hierarchy Screen Example
District level 1
APP level 2
Contacts level 2
Uploaded Files level 2
Facility level 2
Building Information level 3
General Tab – Viewing the Details
1. Click directly on a district’s name to open details in the Viewer Screen.
2. Click on the small gray expander triangle symbol next to the name to expand the
district’s tree view list. All of the facilities in the district are listed.
Expanded Tree View
Once the list is expanded, you will see a small, black, downward pointed triangle next to
the item. Clicking on this black triangle will collapse the list and hide the facilities.

Page | 13
Navigating the General Tab Viewer Screen and Accordion
The viewer screen bar is the vertical bar to the left of an opened screen. The Screen Bar is light
blue when it is maximized and white when it is minimized. All viewer screens have the same
screen controls for closing, maximizing and re-opening screens.
1. To close a screen, click on the button at the top of the Screen Bar.
2. To minimize a screen, click on the button at the bottom of the Screen Bar.
3. To re-open/maximize a screen, click on the button at the bottom of the Screen
Bar.
Minimize and Maximize Screen Examples

Page | 14
Up to five screens can be open at the same time. If a user attempts to open a sixth screen, a
pop-up message will display, “One of the current five screens must be closed before opening
a new screen.”
Accordion Screen Closed
To open or expand all accordion screens:
1. Right-click on a viewer Screen Bar.
2. Select Collapse All
3. Select Expand All.

Page | 15
A screen can also be expanded or collapsed by single-clicking on its viewer screen bar.
To increase the right-hand viewer screen and allow the fields to be viewed without the use of
scroll bars, place your cursor over the divider line between the left pane and the right-hand
viewer until your cursor turns into a the double headed arrow. Left-click when the cursor is a
double-headed arrow, and drag the screen to the left (or right) until your desired screen size is
achieved.
Main Screen Expander Arrow

Page | 16
District Information
The District Summary screen is the first screen that displays when the Inventory and
Condition tab is chosen on the navigation pane. It displays specific information about the
district including rollup totals from all of its facilities and the buildings within those facilities.
This is a read-only screen and changes cannot be made in this screen.
District Summary Screen
Fields on the District Summary screen and information included are:
1. School District Name.
2. County District Code.
This is a unique five-digit number for county and school district.
3. County Name.
Name of the county in Washington State where the district resides.

Page | 17
4. Educational Service District (ESD).
Regional educational service agency where the district resides.
5. District Headcount Enrollment.
Student headcount enrollment as reported by the school district to OSPI annually on
October first.
6. District Classification.
The student classification of a district. See the ICOS Glossary.
7. Total Number of Facilities/Sites.
8. Total Acreage.
9. Total Facilities/Sites Rated Complete.
10. Total Number of District Buildings.
11. Gross Total Square Feet.
12. Total Building Rated Completed.
13. View District Map. To view the district map:
A. Click the View District Map button. A separate Internet Explorer window
opens a Washington State map. This will take you to the same location as the
Map and Boundaries button on the main navigation toolbar. Click on a district
to see details. See Maps and Boundaries on page 69 for detailed instructions.
B. To print the district map, click on the toolbar.
C. To close the window, click in the upper right-hand.
Page | 18
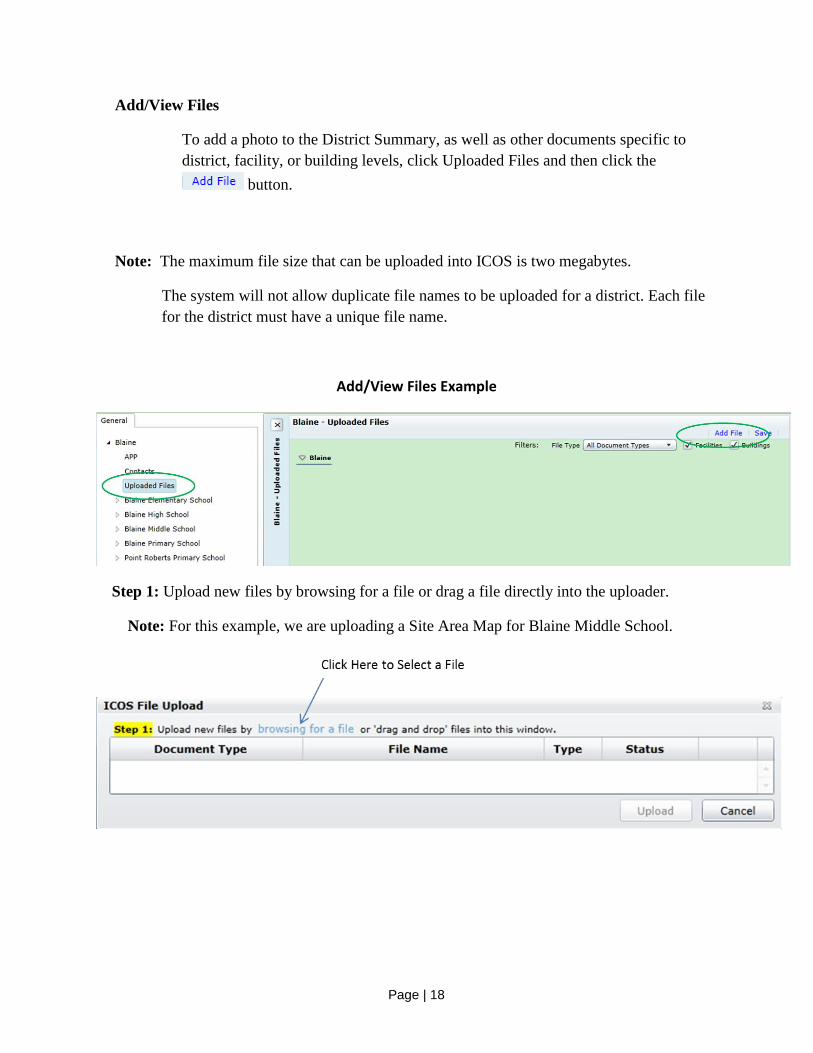
Add/View Files
To add a photo to the District Summary, as well as other documents specific to
district, facility, or building levels, click Uploaded Files and then click the
button.
Note: The maximum file size that can be uploaded into ICOS is two megabytes.
The system will not allow duplicate file names to be uploaded for a district. Each file
for the district must have a unique file name.
Add/View Files Example
Step 1: Upload new files by browsing for a file or drag a file directly into the uploader.
Note: For this example, we are uploading a Site Area Map for Blaine Middle School.

Page | 19
Step 2: After selecting a file, the file type must be picked from the drop-down menu.
Step 3: Select facilities and buildings that each file applies to by checking the boxes next to
their respective names, then click .
Page | 20
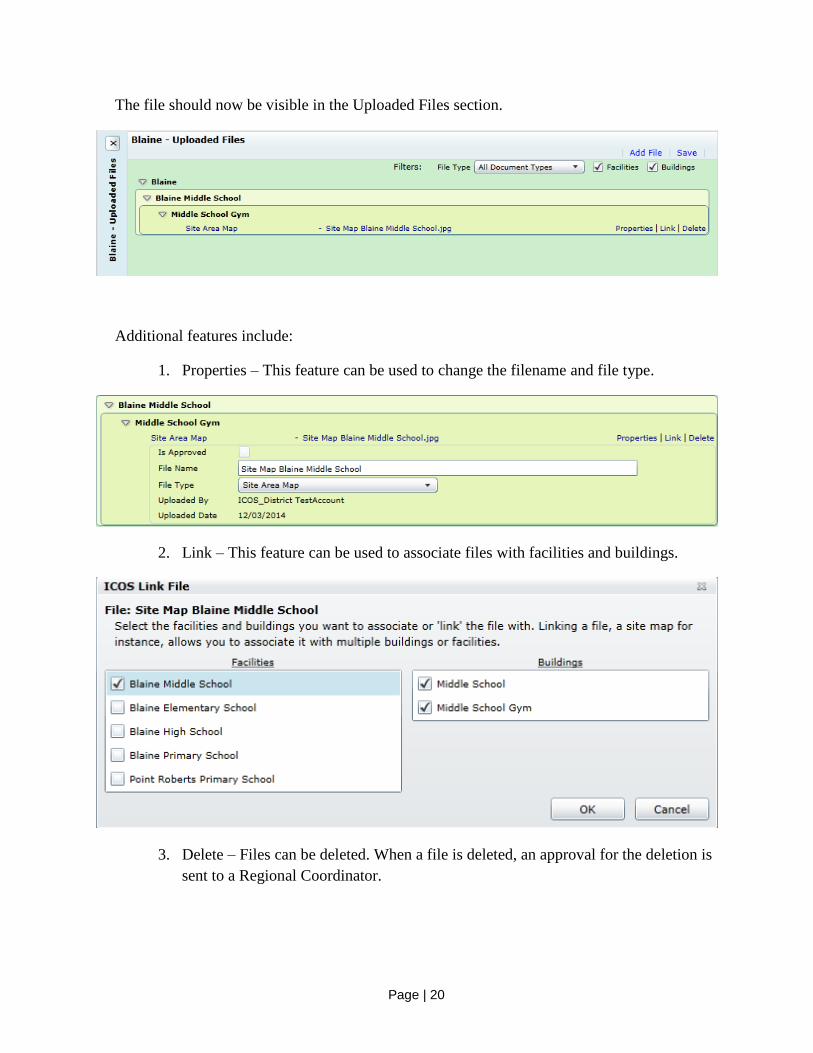
The file should now be visible in the Uploaded Files section.
Additional features include:
1. Properties – This feature can be used to change the filename and file type.
2. Link – This feature can be used to associate files with facilities and buildings.
3. Delete – Files can be deleted. When a file is deleted, an approval for the deletion is
sent to a Regional Coordinator.

Page | 21
Add a Facility to the District
To add a new facility to a district:
1. Open the District Summary screen for the district you want to add a new facility to,
and click .
2. Type the new facilities name into the Facility Name field.
3. Select a Facility Site Profile Type from the drop down box.
Warning: The correct Facility Site Profile Type must be chosen before condition rating
components. Once rating has begun, the profile type cannot be changed.
Add New Facility Window
1. In the Latitude field, enter the latitude (numbers only).
Example: +- nn.nnnnnn to +- nn.nnnnnnnn.
2. In the Longitude field, enter the longitude (numbers only).
Example: +-nnn.nnnnnnn to +- nnn.nnnnnnnn.
3. Click . The new Facility will now be listed in the Tree View. Go to Edit
Facility to edit and add additional data to a facility.
4. Click or on the accordion to close the Add Facility Screen.

Page | 22
Asset Preservation Program (APP)
Districts use the Asset Preservation Program screen for school facility buildings that are
participants in the APP.
Note: For buildings to appear in the APP screen, they must be approved in the system by your
OSPI Regional Coordinator (RC). If you have questions, please contact the RC for your
region. Contact information can be found on the School Facilities and Organization website
http://www.k12.wa.us/SchFacilities/ContactInformation.aspx.

Page | 23
Open APP Screen
To open the Asset Preservation Screen, click on Asset Preservation Program (APP) button
on the tree view. All columns are read only except for the Board Meeting Date When Report
Was Presented.
Asset Preservation Program Screen
Edit/Add APP Data
1. Enter the Board Meeting Date When Report Was Presented by using the format
MM/YY/YYYY.
2. To save the data, click .
3. To close the APP Summary screen, click .
Contacts
All contacts for a district appear in the Contacts screen when it first opens.
At least one of your APP buildings has a requirement for a 6-Year Certification Assessment.

Page | 24
Contact Search
To search for active contacts, the box must be checked. To search for in-active
contacts, the Active Contact check box must not be unchecked.
Enter one or more of the criteria listed belwo to assist in your contact search:
1. School District (defaulted to your district).
2. Facility.
3. Contact Type.
4. First Name.
5. Last Name.
Click and the search results will display in the search result grid. Click on the
contact row in the grid to view the contact details below the grid.
Create New Contact
To create a new contact:
1. Click the Contacts button, under the district, in the tree view.
2. In the Contacts window, click .

Page | 25
3. In the Add Person pop-up window, type the first name and last name of the new
contact. Please note:
A. If there is already a contact with the same name in the system, the records will
appear in the grid below the name fields.
Add Contact Search Screen
B. If the person(s) listed is not the same person that you are creating a new
contact for, click to create a new contact record.
C. If your contact is listed, click that contact row in the grid and click
to edit the contact data. See page xx for more information.
D. If you decide not to edit or add a contact, click .
4. In the Create Contact screen, enter the following:
Create New Contact Screen

Page | 26
5. Click .
6. In the Add Contact Type Detail window, enter the related data for the contact.
Note: At least one Contact Type is required to save the contact.
7. Click .
A. In the Add Phone Detail window, enter the data for each field.
B. Check the Is Primary box to make it the primary phone number.
Note: Only one phone record can be designated as primary and must be
checked at the time the record is created.
8. Click the button.
A. In the pop-up Add Email Detail window, enter the data for the contact.
B. Check the Is Primary check box to make it the main email.
Note: Only one email record can be designated as primary and must be
checked at the time the record is created.
9. Click .

Page | 27
A. In the pop-up Add Address Detail window, enter the data for the contact.
B. Check the Is Primary box to make it the main address.
Note: Only one address record can be designated as primary and must be
checked at the time the record is created.
10. Click button in the Edit screen if you do not want the contact to
appear in search results. For example, Bugs Bunny is the Business Manager for
Blaine School District. If that contact is labeled Inactive, a search by School District
> Contact Type > First Name or Last Name will not show Bugs Bunny in the results.
11. To reactive an In-Active contact, click the button on the Edit
screen. See page xx below for more information.
12. To save the data, click to save the data.
13. To close the Create screen, click the button.
Edit Contact
Note: Only facility contacts can be edited. Principal and Superintendent contact types cannot
be edited. If a contact is not editable, the Edit Contact button will not be displayed in the
upper right corner when that contact is selected.

Page | 28
Search Results Screen
To edit contacts:
1. Search for the contact you want to edit by following instructions on page xx.
2. Click on the contact row that needs to be edited in the search results grid.
3. Click . The Edit contact screen will open for the selected contact.
4. In the Edit contact screen, enter your changes.

Page | 29
Edit Contact Screen
1. To make a contact active and searchable, click in the upper right
hand corner of the screen.
2. To make a contact in-active and not displayed in searches, click the
button in the upper right hand corner of the screen.
3. The data entered in the screen cannot be edited directly. The record that needs to be
changed must first be deleted.
To delete a contact type, phone number, email or address, click on next to the
corresponding record you want to delete. A Delete Confirmation message pop-up will ask if
you are sure you want to delete the contact record. Note:
1. If you click Yes, the record is removed from the contact.
2. If you click Cancel, the record is not deleted and remains in the contact screen.
3. Click Add next to the data section you want to add the edited or new information.
4. To save changes, click .
5. To close the edit screen, click .

Page | 30
Facility Information
To view and edit faciltiy information click on a facility name in the tree view pane.
The Facility screen displays specific information about the facility including the rollup totals
from all of its buildings. To add a building click on . See page xx for detailed
instructions.
Edit Facility Screen
Edit/enter data into the desired fields including:
1. Facility Number.
This field is assigned by OSPI and cannot be edited.
2. School Code.
See page xx for instructions on how to edit the school code field.
3. Facility Name.
Change the facility name in this field if needed.
4. Facility Site Profile Type.
Change this field only if needed.

Page | 31
Warning: You must make sure that the correct Facility Site Profile Type is chosen
before condition rating any components. Once rating has begun, a Facility Site Profile
Type cannot be changed.
5. Facility Notes.
Add notes in this field if needed.
6. Students Served.
Enter the number of students that physically attend the facility.
7. Grade Span, Lower Level Grade.
This field is read only.
8. Grade Span, Upper Level Grade.
This field is read only.
9. Original Property Acqusition Date.
Enter the date by clicking on the calendar next to the field, or type the date into the
field in format M/D/YYYY.
10. Original Occupancy Date.
Enter the date by clicking on the calendar next to the field or type the date into the
field in format M/D/YYYY.
11. Original Board Acceptance Date.
Enter the date by clicking on the calendar next to the field, or type the date into the
field in format M/D/YYYY.
12. Total Acres.
This field is automatically populated from the Site Inventory screen from the Total
Site Acreage field. It may be edited in the Site Inventory screen.
13. Total Number of Buildings.
This field is automatically populated with the total count of buildings added to the
facility.
14. Gross Facility Square Feet.
This field is automatically populated with the sum of all square footage from the
buildings added in ICOS for the facility.
15. Site Shared With.
This field will only be displayed, and is automatically populated, if shared facilities
were added in the Site Inventory screen. Information may also be edited in the Site
Inventory screen.

Page | 32
16. Total Number of Teaching Stations.
Enter the number of Teaching Stations. See glossary for definition.
17. Number of Teaching Stations for Students with Disabilities.
Enter the number of Teaching Stations. See glossary for definition.
18. Facility Coordinates Latitude.
Enter latitude coordinates, (numbers only format) +- n.nnnnnnnn to +- nn.nnnnnnnn
19. Facility Coordinates Longitude.
Enter longitude coordinates, (numbers only format) +- n.nnnnnnnn to
+- n-nn.nnnnnnnn
20. Reporting Requirements and Designations:
A. Asset Preservation Program (APP) is read only. This box will be checked if
the facility has one or more APP buildings.
B. WSSP or LEED is read only. This box will be checked if the facility has one
or more WSSP or LEED buildings.
C. Remote and Necessary School is read only. This box will be checked if the
facility is designated as Remote and Necessary.
D. Skill Center Programs. If the facility is a Skill Center, or contains one or more
Skill Center programs, click the box to identify type.
1. Skills Center Type(s). Options are core, branch, sattelite or extension.
2. Skills Center Affiliated With.
If the Skills Center Type selected is Branch Satellite, or extension, a Skills Center
Affiliated With field is required from the drop down box.
3. Click .
4. Click on the accordion to close the Facility screen.
Notes
1. To edit or view Facility Notes, click .

Page | 33
2. Enter a date for the note using format MM/DD/YYYY.
3. Enter a note description into the box next to the date.
4. Click .
5. Repeat the steps above to add another note for a facility.
To delete a note:
1. Click on Delete in the Action column of the note row. A delete confirmation pop-up
message asks if you are sure you want to delete the contact record.
A. If you click Yes, the record is removed from the contact.
B. If you click Cancel, the record is not deleted and remains in the contact
screen.
C. To close the Facility Notes window, click .
Add/View Files
For detailed instruction on how to Add/View files, see page 12.
Add/Edit School Code
To add a School Code to the facility, click below to the School Code field.
Page | 34
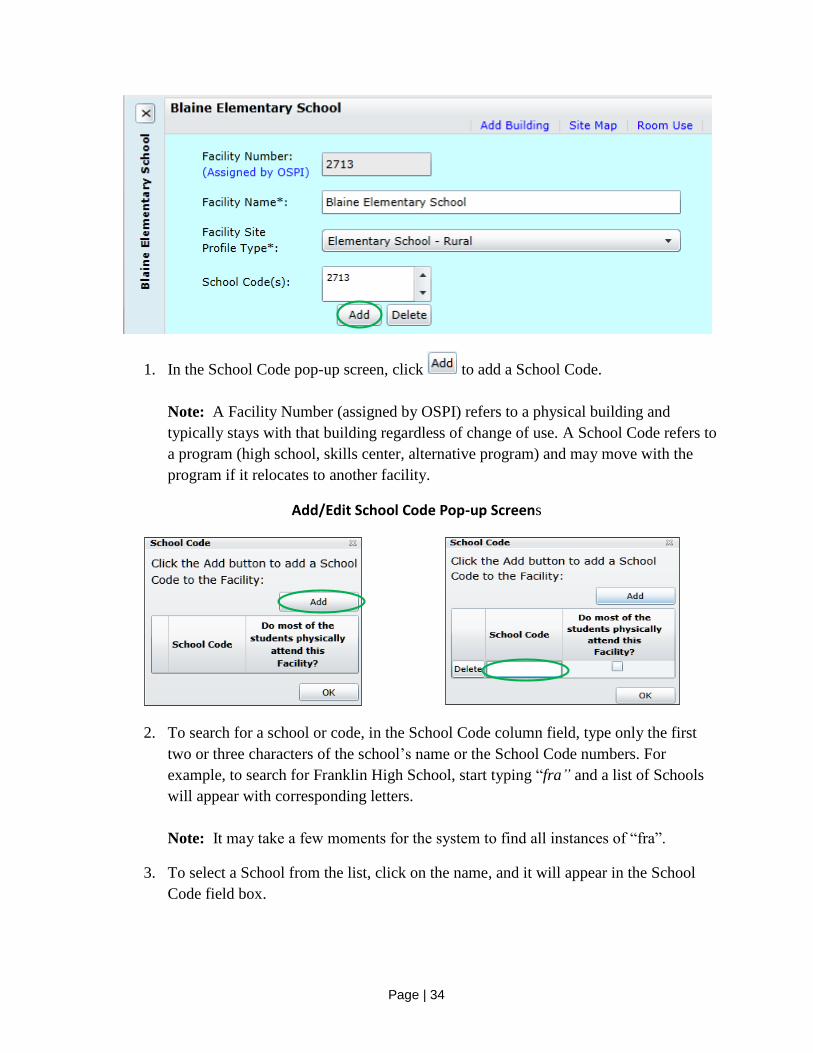
1. In the School Code pop-up screen, click to add a School Code.
Note: A Facility Number (assigned by OSPI) refers to a physical building and
typically stays with that building regardless of change of use. A School Code refers to
a program (high school, skills center, alternative program) and may move with the
program if it relocates to another facility.
Add/Edit School Code Pop-up Screens
2. To search for a school or code, in the School Code column field, type only the first
two or three characters of the school’s name or the School Code numbers. For
example, to search for Franklin High School, start typing “fra” and a list of Schools
will appear with corresponding letters.
Note: It may take a few moments for the system to find all instances of “fra”.
3. To select a School from the list, click on the name, and it will appear in the School
Code field box.

Page | 35
Click the check box Do most of the students primarily attend this facility, if the majority of
the students attend this School.
To delete a School Code row in the pop-up School Code window, click the button.
1. A delete confirmation message pop-up message asks if you are sure you want to
delete the School Code from the facility.
2. If you click Yes, then the School Code is removed from the facility.
3. If you click cancel, then the School Code is not deleted and remains in the facility
grid.
4. Click , and the added School Code displays in the School Code field box on
the Edit Facility screen.
To delete a School Code from the Facility Edit screen, select the School Code you want to
delete, and click .

Page | 36
Note:
1. A delete confirmation pop-up message asks if you are sure you want to delete the
School Code from the facility.
2. Click Yes, then the School Code is removed from the facility.
3. Click Cancel, and the School Code is not deleted and remains in the facility grid.
Add/Edit School Code Pop-up Screen – Delete School Code
Add/Edit Facility Room Use
To add/edit the Facility Room Use, click . A separate screen opens with the
facility space room use data.
Facility Space Inventory Screen
In the Quantity field, enter the quantity for each Space/Room Type for the facility in a
number format only (nn.n).

Page | 37
Tip: Double-click in the first Quantity field, then use the tab button on your keyboard to
move to the next field.
1. To close the window, click or in the upper right-hand corner.
2. To cancel your changes click .
Building Information Screen
To view the Building Information screen, click directly on Building Information underneath
the facility name in the tree view. The Details tab is shown by default.

Page | 38
Select a Building
If the facility selected in the tree view has multiple buildings on the site, buildings can be
selected from the grid at the top of the Building Information screen. The selected building
name will appear on the Details tab.
Note: Condition scores can be clicked to view the Building Condition Rating Summary report
in a new browser window.
Enter Building Details

Page | 39
Edit/enter data into the desired fields including:
1. Located at Facility.
The current facility at which a building is located. Portables can be moved between
facilities in a district by selecting the desired facility from the drop-down menu.
2. Name.
The name of the selected building.
This field is required.
3. Type, Permanent.
This indicates that the selected building is a permanent structure.
See glossary for definition. At least one Type is required.
4. Type, Portable.
This indicates that the selected building is a portable structure.
See glossary for definition.
5. Type, Flag for ICOS Removal.
This indicates that a building does not belong at the selected facility and should be
removed by a Regional Coordinator.
6. Building Profile.
Change this field only if needed.
This field is required.
Note: If a building has component condition ratings, a message will display a
warning that if the Building Profile Type is changed all of the condition ratings will
be deleted from the building.
7. Year Built.
This is the year that construction was completed, generally considered to be the first
year to be put in use.
This field is required.
8. Last Major Renovation Year.
The last year in which any major modernization, remodel, or structural changes were
made to the building.
9. Number of Floors.
See glossary for definition.
This field is required.

Page | 40
10. Characteristics; Occupied, Vacant, Surplused, or Demolished.
This field is required.
11. Characteristics, Leased.
This field is required if checked. Select “To Others” or “From Others”.
12. Characteristics, Historic.
This field is required if checked. Indicate which historic registerie(s) the building
belongs to.
13. Characteristics, Asset Preservation Program (APP).
This field is read-only with the exception of the Board Acceptance Date.
Contact a Regional Coordinator if a building is incorrectly marked/not marked as
APP.
14. Characteristics, Washington Sustainable Schools Protocal (WSSP) or LEED.
15. Add Note.
Notes can be added by clicking on this button.

Page | 41
Building Inventory Information
To view Building Inventory Summary information, click directly on Building Information
underneath the facility name in the tree view. Building Inventory will be the second tab on the
Building Information screen.
Building Inventory Summary Screen with Buildings
Any of the fields that have a white background can be edited by changing the value of the
field and pressing save.
Note: Any required fields that are not completed will be highlighted yellow.
Details of the columns in the summary screen include:
1. Year Built (Required).
This is the year that construction was completed, generally considered to be the first
year to be put in use.
2. District Assigned Area Name (Required).
An identifier for an area within a building. Typically identifies individual areas within
a building referenced by the area analysis file.
3. Gross Building Square Feet.
This is the total gross square footage of each area use for a building.

Page | 42
4. Gross Instructional Square Feet.
This is the total gross instructional square footage of each area for the building.
5. SCAP Recognized Square Feet.
This is the total square footage that is recognized for the School Construction
Assistance Program. This can only be entered and edited by OSPI.
6. District Assigned Area Use (Required).
This field contains all of the area use types in the building.
Edit this field in the drop-down menu.
Select all that apply for that area of the building.
7. Occupancy Date.
The date a building area was originally occupied for use.
Edit the information using format MM/DD/YYYY.
8. Board Acceptance Date.
The date construction of a building area was accepted as complete by the school
district board.
Edit this information for the building area using format MM/DD/YYYY.

Page | 43
Add Building to the Facility
1. To add a new Building to a facility, click .
Add Building Inventory Screen
Add Building Window
2. In the Building Name field, enter the new building name in the field box.
3. Indicate whether the new building is a permanent or portable structure.

Page | 44
4. Select the Profile Type of best fit by clicking the blue text next to Profile.
Warning: You must make sure that the correct Building Profile Type is chosen
before condition rating any components. Once rating has begun, a Building Profile
Type cannot be changed.
5. In the Year Built field, enter the year the building was first put into use.
6. In the Number of Floors field, enter a number for the number of floors (including
basements).
7. Select at least one characteristic and indicate if the building contains any classrooms
or teaching stations.
8. To save the new building data, click .
9. To close the Add Building Window, click .
Edit Building Inventory
To edit a building created in ICOS, change the values in the text boxes, drop-down, or date
forms.
Note: If buildings for a facility have not been created in ICOS, the Building Inventory
Summary will not display buildings. You must first add a new building to add inventory
information.

Page | 45
Add Area
Click the Add Area button to add data for an area in the building. A building must have at
least one area use entered. Add as many different areas as needed.
Required fields will be highlighted when a new area is added. To delete an area, click on the
button.

Page | 46
Building Condition Information
To open the Building Condition Summary screen, click directly on the Condition tab in the
Building Information pane.
View Building Condition
In the Building Condition Rating column within the building selection grid, the rating status is
displayed. If the rating has not been completed, there are three status messages. They are
Rating Not Started, Rating Not Completed, and Building Inventory Required.
To print an individual building condition rating summary, click the building rating percentage
To print building condition rating summaries for all buildings, choose Print All. These reports
can be used in the field to conduct or verify a condition assessment.
If there have been no buildings created in ICOS for the facility, the Building Condition
Summary will not display buildings. See page xx to add a building.
Page | 47
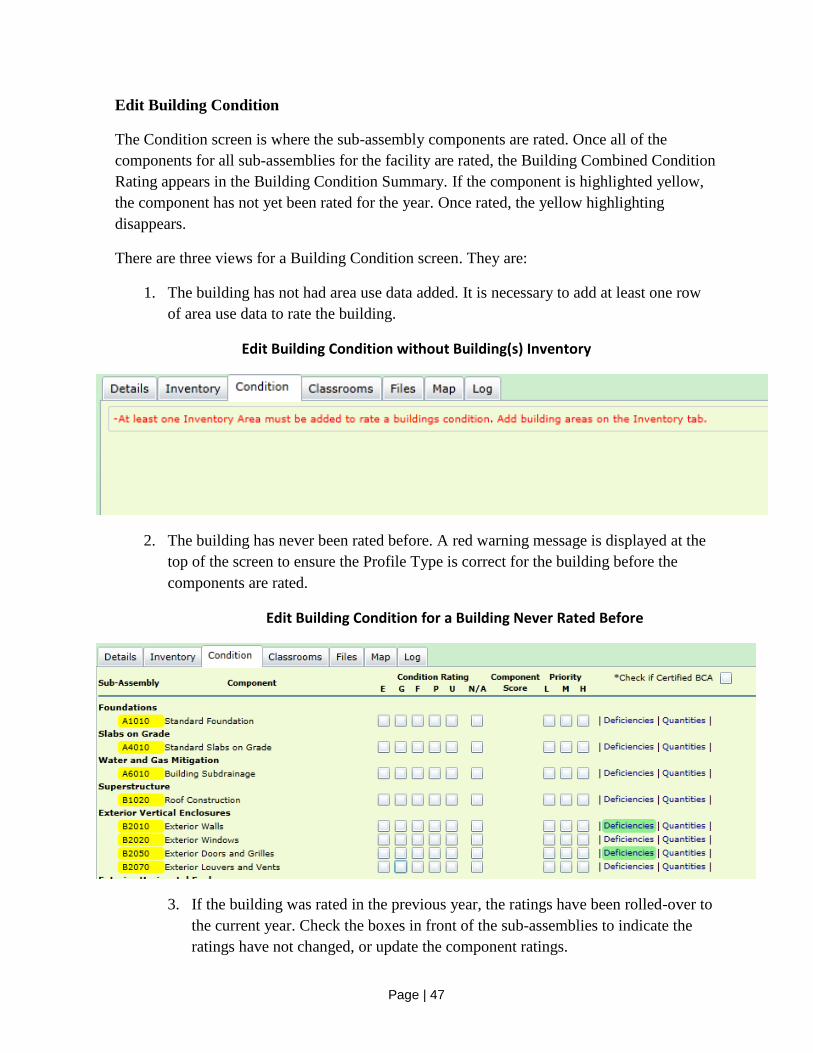
Edit Building Condition
The Condition screen is where the sub-assembly components are rated. Once all of the
components for all sub-assemblies for the facility are rated, the Building Combined Condition
Rating appears in the Building Condition Summary. If the component is highlighted yellow,
the component has not yet been rated for the year. Once rated, the yellow highlighting
disappears.
There are three views for a Building Condition screen. They are:
1. The building has not had area use data added. It is necessary to add at least one row
of area use data to rate the building.
Edit Building Condition without Building(s) Inventory
2. The building has never been rated before. A red warning message is displayed at the
top of the screen to ensure the Profile Type is correct for the building before the
components are rated.
Edit Building Condition for a Building Never Rated Before
3. If the building was rated in the previous year, the ratings have been rolled-over to
the current year. Check the boxes in front of the sub-assemblies to indicate the
ratings have not changed, or update the component ratings.
Page | 48
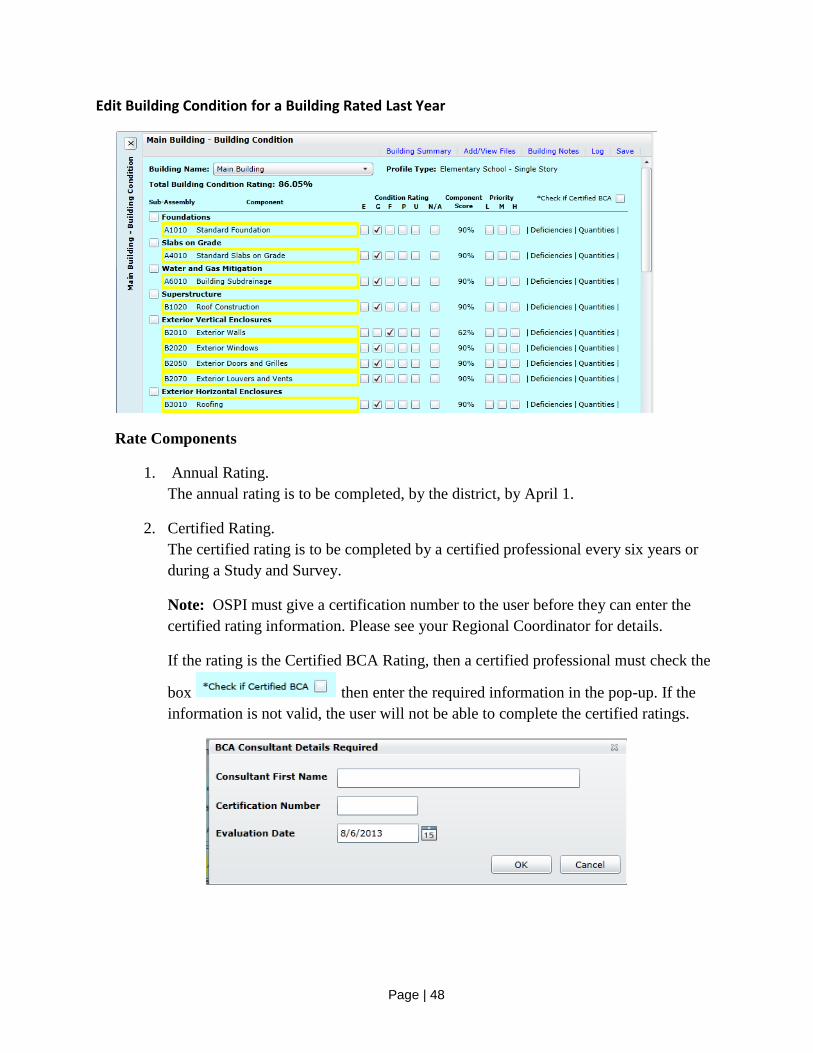
Edit Building Condition for a Building Rated Last Year
Rate Components
1. Annual Rating.
The annual rating is to be completed, by the district, by April 1.
2. Certified Rating.
The certified rating is to be completed by a certified professional every six years or
during a Study and Survey.
Note: OSPI must give a certification number to the user before they can enter the
certified rating information. Please see your Regional Coordinator for details.
If the rating is the Certified BCA Rating, then a certified professional must check the
box then enter the required information in the pop-up. If the
information is not valid, the user will not be able to complete the certified ratings.
Page | 49
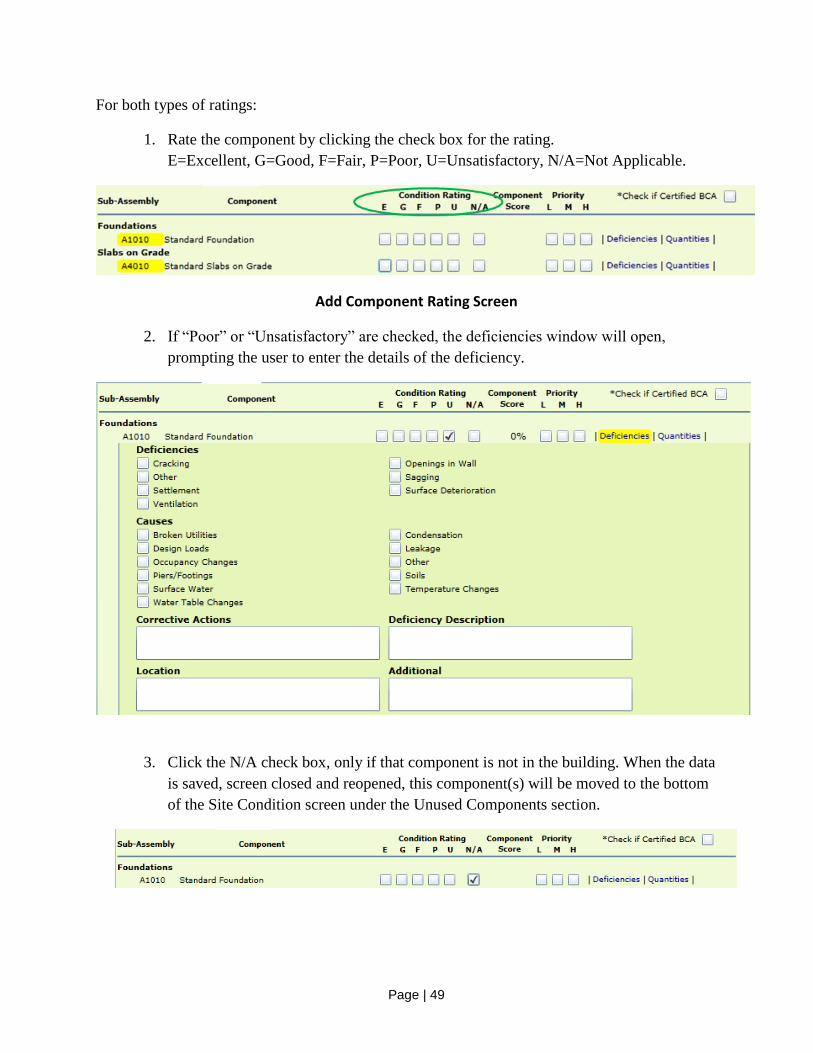
For both types of ratings:
1. Rate the component by clicking the check box for the rating.
E=Excellent, G=Good, F=Fair, P=Poor, U=Unsatisfactory, N/A=Not Applicable.
Add Component Rating Screen
2. If “Poor” or “Unsatisfactory” are checked, the deficiencies window will open,
prompting the user to enter the details of the deficiency.
3. Click the N/A check box, only if that component is not in the building. When the data
is saved, screen closed and reopened, this component(s) will be moved to the bottom
of the Site Condition screen under the Unused Components section.

Page | 50
4. To add deficiencies and causes to a component, click the button.
Add Deficiencies and Causes Screen
5. Deficiences. Select the related for the component rating.
6. Causes. Select the related for the component rating.
7. Additional Comments.
8. Location Comments.
9. Deficiency Comments.
10. Corrective Actions.
11. Click the Deficiencies button again to collapse/close the section.

Page | 51
To add Quantities for a Component, click .
Add Quantities Screen
1. Select the Unit of Measure.
2. Enter the Quantity or Estimated Size.
3. Enter the Year Installed/Replaced i.e. the component.
4. Enter the Life Span when New (in years) for the component.
5. Click the Quantities button again to collapse the window.
6. To add a priority for repair for the component, click in the correlating priority check
box. (L=Low, M=Medium, H=High).
7. Repeat the steps above for all components for all sub-assemblies.
8. To save the Building Condition information, click in the Edit Building
Condition sceen. If any of the above fields are blank, a pop-up message will
display indicating which fields need to be entered.
9. To close the Building Condition screen, click in the Edit Building
Condition screen or on the accordion.

Page | 52
Add/Edit Classrooms
Classrooms can be added or removed from a building on the Classrooms tab within
Building Information.
Add Classroom
1. Click the button.
2. Select the classroom types you would like to add, then click .
Note: If a building already contains classroom types, those types will not show up on the list
of classrooms and teaching stations shown above.

Page | 53
3. When a classroom is added, the count of that classroom is set to zero by default. Enter
the number of classrooms of each type that are contained at the selected building, then
click .
Edit/Delete Classroom
1. To delete classrooms, enter a 0 into the text box and press .
2. To edit the count of a classroom at a particular building, simply change the number
and press .
3. Removing the Has Classrooms characteristic from the Building Details tab will hide
all classrooms, but a record of the classrooms will be stored.

Page | 54
Files Tab
The Files tab on the Building Information screen shows all files that have been uploaded
and associated with the Facility or Building.
Map Tab
The map tab shows an aerial view of the facility. The green icon should be placed at the
front entrance of the facility.

Page | 55
Log Tab
The Log tab shows a list of recent ICOS activity for the selected building.

Page | 56
Site Inventory Information
To view the Site Inventory information, click directly on Site Inventory underneath the
facility name in the tree view. If you do not see Site Inventory listed, you may need to click
on the small gray expander triangle next to the facility name to expand the tree to display.
Add/Edit Site Inventory Screen
Other fields include:
1. Site Profile Type.
This field is auto populated, and it is the same profile as assigned in the facility screen.
Go to Facility Edit, if needed.
2. Total Site Acreage.
Enter the total acreage for the site to two decimal places.
A. 3. Shared Facilities.
If the site acreage is used by another facility, click on Add Shared Facility,
and a pop-up window will open.
Shared Facility Example
Page | 57
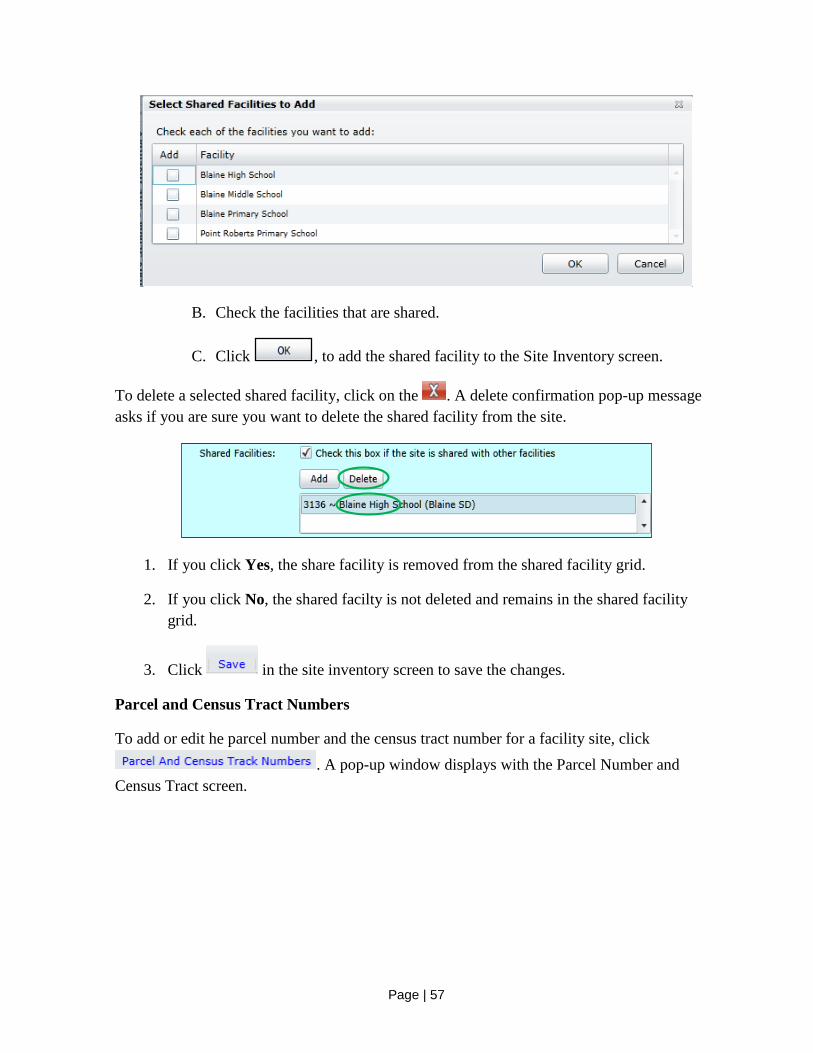
B. Check the facilities that are shared.
C. Click , to add the shared facility to the Site Inventory screen.
To delete a selected shared facility, click on the . A delete confirmation pop-up message
asks if you are sure you want to delete the shared facility from the site.
1. If you click Yes, the share facility is removed from the shared facility grid.
2. If you click No, the shared facilty is not deleted and remains in the shared facility
grid.
3. Click in the site inventory screen to save the changes.
Parcel and Census Tract Numbers
To add or edit he parcel number and the census tract number for a facility site, click
. A pop-up window displays with the Parcel Number and
Census Tract screen.

Page | 58
Add/Edit Parcel and Census Number Screen
Other fields include:
1. Census Tract Number.
If known, enter the Census Tract Number. A maximum of 11 numbers are allowed.
Note: For additional census tract information, click on the link at the bottom of the
pop-up screen.
2. Parcel Number.
To add a Parcel Number click for the site. A maximum 14 numbers are
allowed. Repeat as necessary.
3. Legal Description.
Enter the Legal Description for the parcel number.
4. For additional census tract information, click on the link at the bottom of the pop-up
screen.
To edit a Parcel Number, click in the field to be edited and make your changes.
To delete a Parcel Number, click next to the parcel.
A delete confirmation pop-up message asks if you are sure you want to delete the parcel
number from the site.
1. If you click Yes, the parcel number is removed from the site.
2. If you click No, the parcel number is not deleted and remains in the site grid.

Page | 59
3. Click , to save the changes.
4. To close the Parcel and Census Tract pop-up screen, click or on the
accordion to close.
View Site Map
1. To view the site map, click .
If a site map has been uploaded for a site, a download prompt will appear allowing
the file to be opened or saved.If a site map has not been uploaded for the site, a pop-
up message asks if you wish to upload a site map. This message will appear each time
until a site map is uploaded into ICOS.
A. Clicking Cancel will close the pop up.
B. Clicking OK will open the ICOS File Manager screen in a separate accordion
for you to upload the site map.
2. To print a site map when the document is opened click on . This icon is on the
toolbar.
3. To close the Site Map window, click the in the upper right-hand corner.
Note: The system will not allow a duplicate file name to be uploaded for a
Facility/Site. Each file for the Facility/Site must have a unique file name.
Add/Edit Components and Sub-Components
For each site component, complete the following:
Other fields include:
1. Unit of Measure.
Select a Unit of Measure from the drop down box. This is required if a value has been
entered for Quantity or Estimated Size.
2. Quantity or Estimated Size.
Enter a number for the Quantity or Estimated Size for a component. This is required
if the Unit of Measure has an option selected.
Page | 60
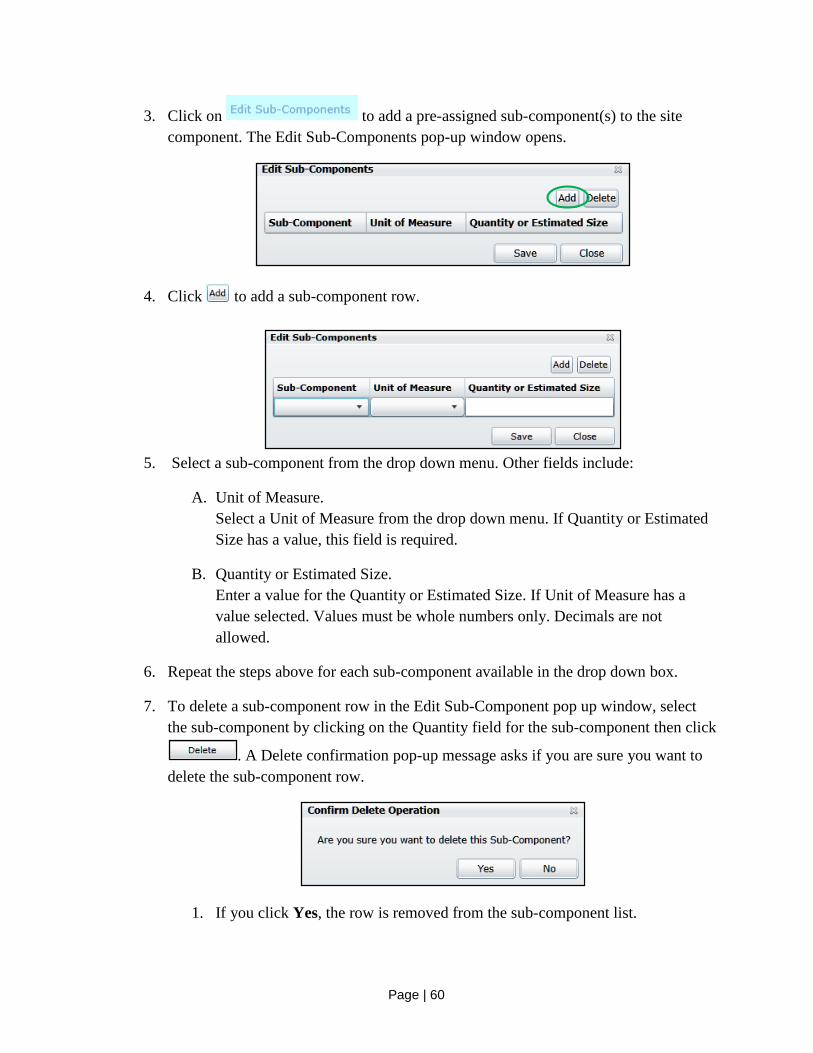
3. Click on to add a pre-assigned sub-component(s) to the site
component. The Edit Sub-Components pop-up window opens.
4. Click to add a sub-component row.
5. Select a sub-component from the drop down menu. Other fields include:
A. Unit of Measure.
Select a Unit of Measure from the drop down menu. If Quantity or Estimated
Size has a value, this field is required.
B. Quantity or Estimated Size.
Enter a value for the Quantity or Estimated Size. If Unit of Measure has a
value selected. Values must be whole numbers only. Decimals are not
allowed.
6. Repeat the steps above for each sub-component available in the drop down box.
7. To delete a sub-component row in the Edit Sub-Component pop up window, select
the sub-component by clicking on the Quantity field for the sub-component then click
. A Delete confirmation pop-up message asks if you are sure you want to
delete the sub-component row.
1. If you click Yes, the row is removed from the sub-component list.

Page | 61
2. If you click No, the row is not removed and remains in the sub-component
list.
3. Click or in the upper right hand corner of the pop-up screen.
8. Repeat the steps above for every component for the site.
9. To save the site inventory information, click in the Site Inventory screen. If any
required fields are blank, a pop-up message will display telling you which fields need to
be entered.
10. To close the Site Inventory screen, click or button on the accordion.
Add/View Files
For detailed instruction on how to Add/View files, see page xx
Site Condition Information
Edit Site Condition
To open the Site Condition screen, click directly on Site Condition under the facility, in the
tree view. If you do not see Site Condition, you may need to click on the small gray expander
triangle next to the facility name to expand the tree.

Page | 62
You will see one of the following:
1. The Site Inventory screen does not have total site acreage entered yet.
If you see the screen below, you need to return to the Site Inventory screen and add
acreage before the site can be rated. See page xx.
Edit Site Condition without Site Inventory Acreage
2. The site has never been rated before.
A red warning message is displayed at the top of the screen to assure the Profile Type
is correct before you begin to rate the components.for the Site/Facilty
Edit Site Condition Screen for a Site Never Rated Before
3. The site was rated last year and the ratings have been rolled-over to the current year.
There are check boxes, in front of sub-assemblies, allowing you to indicate that the
rating has not changed for any components for the sub-assemblies from last year.
Edit Site Condition for a Site Rated Last Year

Page | 63
Rate Components
The Site Condition Edit screen is where the sub-assembly components are rated. Once all of
the components for all sub-assemblies for the facility are rated, the Site Combined Condition
Rating appears at the top of the screen.
To rate the component:
1. Click the check box for the rating.
E=Excellent, G=Good, F=Fair, P=Poor, U=Unsatisfactory, N/A=Not Applicable.
Add Component Rating Screen
2. Click the N/A check box, only if that component is not in the building. Once the data
is saved and the screen is closed then re-opened, this component(s) will be moved to
the bottom of the Site Condition screen under the Unused Components section.
Page | 64
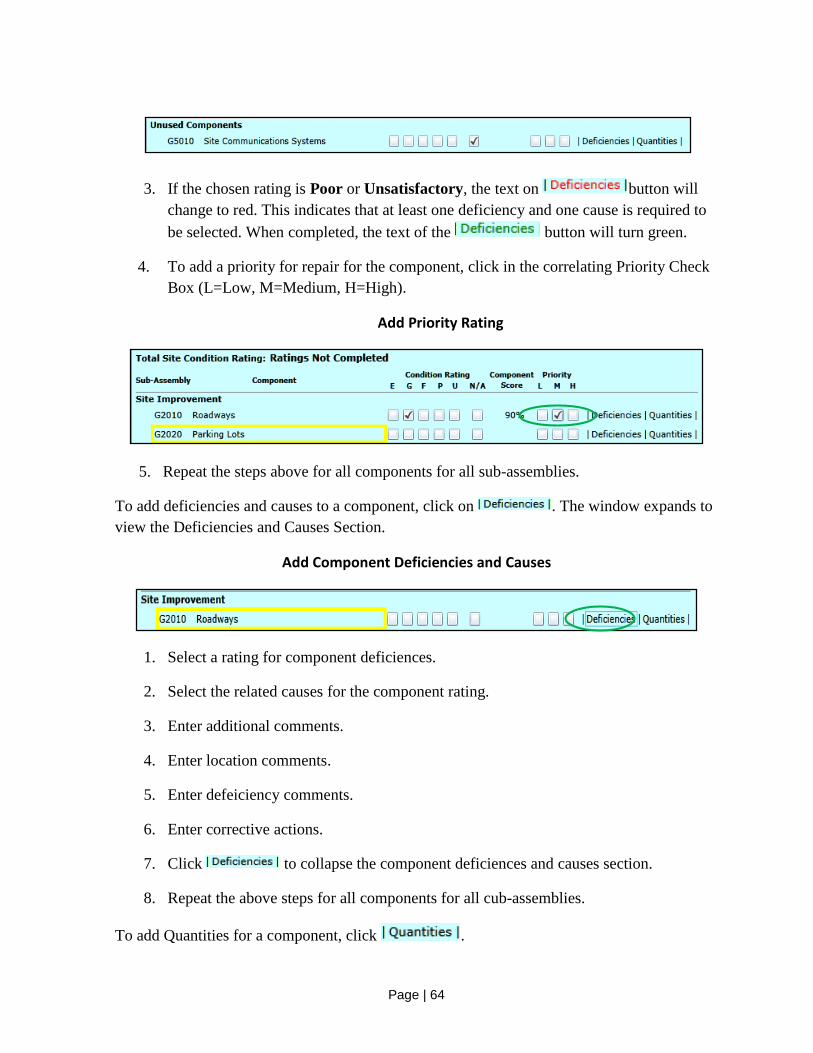
3. If the chosen rating is Poor or Unsatisfactory, the text on button will
change to red. This indicates that at least one deficiency and one cause is required to
be selected. When completed, the text of the button will turn green.
4. To add a priority for repair for the component, click in the correlating Priority Check
Box (L=Low, M=Medium, H=High).
Add Priority Rating
5. Repeat the steps above for all components for all sub-assemblies.
To add deficiencies and causes to a component, click on . The window expands to
view the Deficiencies and Causes Section.
Add Component Deficiencies and Causes
1. Select a rating for component deficiences.
2. Select the related causes for the component rating.
3. Enter additional comments.
4. Enter location comments.
5. Enter defeiciency comments.
6. Enter corrective actions.
7. Click to collapse the component deficiences and causes section.
8. Repeat the above steps for all components for all cub-assemblies.
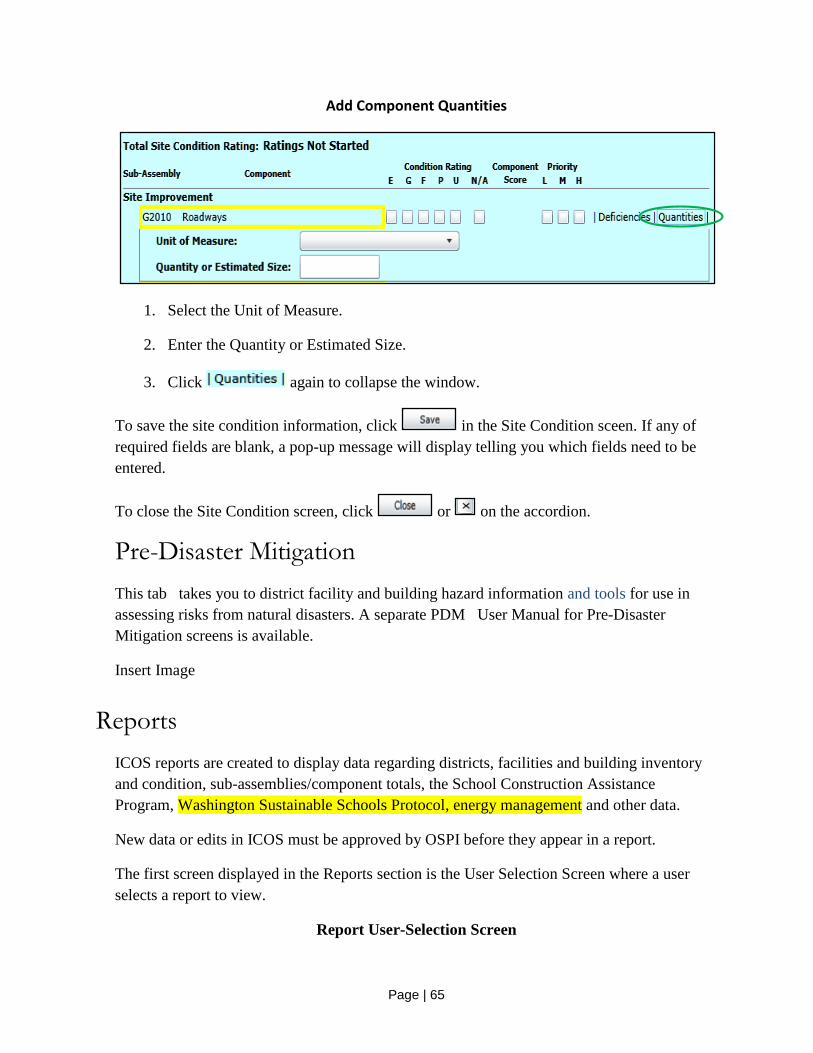
To add Quantities for a component, click .
Page | 65
Add Component Quantities
1. Select the Unit of Measure.
2. Enter the Quantity or Estimated Size.
3. Click again to collapse the window.
To save the site condition information, click in the Site Condition sceen. If any of
required fields are blank, a pop-up message will display telling you which fields need to be
entered.
To close the Site Condition screen, click or on the accordion.
Pre-Disaster Mitigation
This tab takes you to district facility and building hazard information and tools for use in
assessing risks from natural disasters. A separate PDM User Manual for Pre-Disaster
Mitigation screens is available.
Insert Image
Reports
ICOS reports are created to display data regarding districts, facilities and building inventory
and condition, sub-assemblies/component totals, the School Construction Assistance
Program, Washington Sustainable Schools Protocol, energy management and other data.
New data or edits in ICOS must be approved by OSPI before they appear in a report.
The first screen displayed in the Reports section is the User Selection Screen where a user
selects a report to view.
Report User-Selection Screen

Page | 66
To view a report:
1. Click on the drop down box to view the available reports.
2. Select other data from the drop down boxes as needed.
Report User-Selection – Choose Report Screen
3. Click to run a report. The Report Viewer opens in a separate window
with the report data. Reports require pop-ups to be enabled in the browser.

Page | 67
Report Sample Screen
Navigate Report Pages
The toolbar in the Report Viewer has four buttons:
Go to first page, go back one page, go forward one page, and go to last page.
Resize Report Viewer
The page size drop down list allows the user to resize the view of the report.
Page | 68
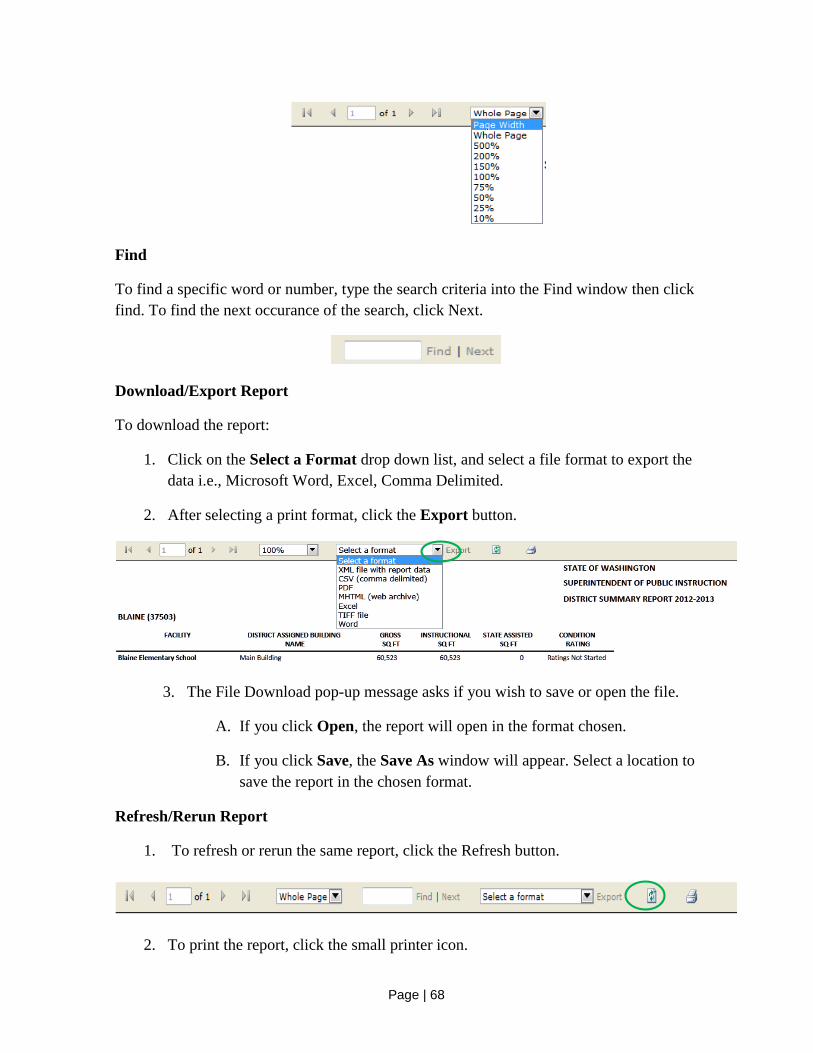
Find
To find a specific word or number, type the search criteria into the Find window then click
find. To find the next occurance of the search, click Next.
Download/Export Report
To download the report:
1. Click on the Select a Format drop down list, and select a file format to export the
data i.e., Microsoft Word, Excel, Comma Delimited.
2. After selecting a print format, click the Export button.
3. The File Download pop-up message asks if you wish to save or open the file.
A. If you click Open, the report will open in the format chosen.
B. If you click Save, the Save As window will appear. Select a location to
save the report in the chosen format.
Refresh/Rerun Report
1. To refresh or rerun the same report, click the Refresh button.
2. To print the report, click the small printer icon.

Page | 69
Maps and Boundaries
Click on the Maps and Boundaries button on the navigation tool bar to open the School
Facilities Information Portal. A map of Washington with school district boundaries outlined in
red appears.
Other controls include:
1. Zoom Bar (left of the screen).
Zoom can be used to focus on your district and other specifics.
2. Map Layer Icon.
On the tool bar, this icon can be used to view additional layered details.
Page | 70
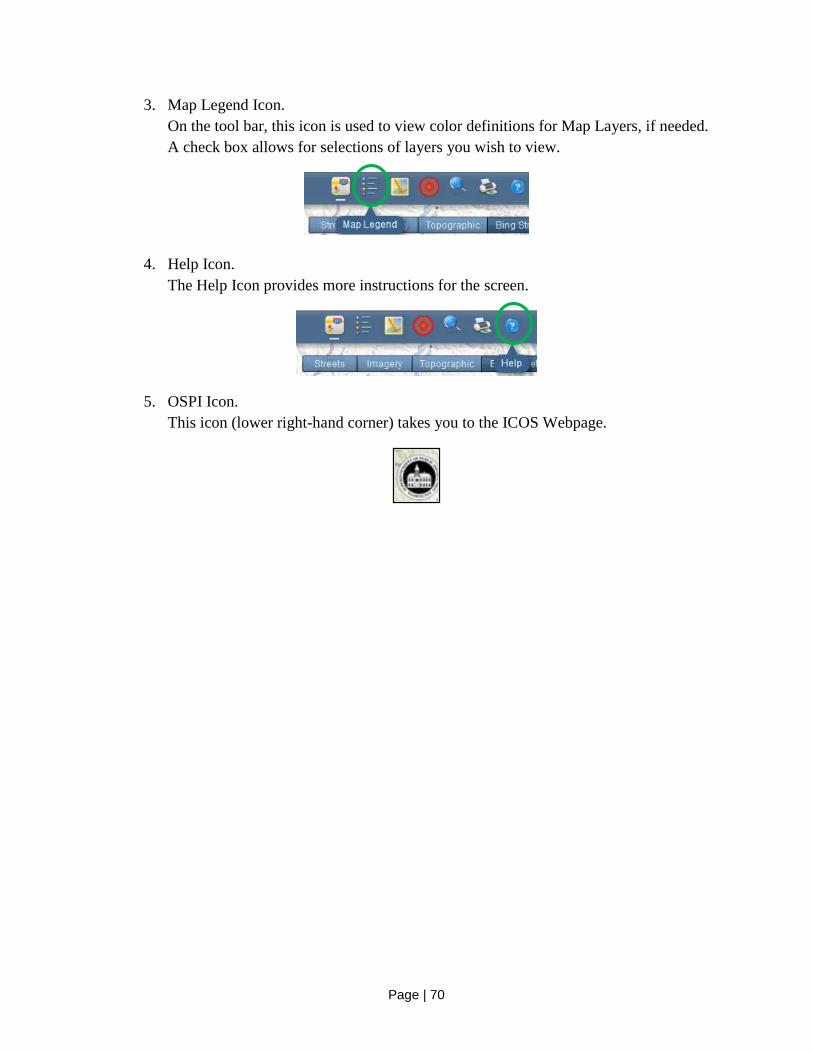
3. Map Legend Icon.
On the tool bar, this icon is used to view color definitions for Map Layers, if needed.
A check box allows for selections of layers you wish to view.
4. Help Icon.
The Help Icon provides more instructions for the screen.
5. OSPI Icon.
This icon (lower right-hand corner) takes you to the ICOS Webpage.

Page | 71
Glossary of Terms
| A | B | C | D | E | F | G | H | I | J | K | L | M | N | O | P | Q | R | S | T | U | V | W | X | Y | Z |
General Terms
Architectural/Engineering
(A/E)
Normally, the primary architectural/engineering firm for the project.
Area Original Board
Acceptance Date
The date construction of a Building Area was accepted as complete by the
school board.
Area Original Occupancy
Date
The date the building’s area is originally occupied.
Assemblies See Uniformat
Asset Preservation
Program (APP)
The Asset Preservation Program (APP) is a systematic approach to ensure
performance accountability; promote student health and safety by
maintaining and operating building systems to their design capacity;
maintain an encouraging learning environment; and extend building life,
thus minimizing future capital needs.
Asset Preservation System
(APS)
To fulfill the Asset Preservation Program requirements, a district must
develop and implement an Asset Preservation System (APS), which is a
series of tasks that are proactive, predictive or preventative to maintain the
day-to-day health, safety, and instructional quality of the school facility.
Biennium The state’s two year budget period.
Board Meeting Date
When Report was
Presented
When the APP report is presented at an open public school board meeting
Building A building is one continuous enclosed structure that may or may not be
connected with other structures by passageways. It includes the structure
itself with all plumbing, sanitary, heating, ventilation, mechanical, and
electrical systems in the structure as well as all fixed equipment.
Examples: Building A, Building 200, Shipley Hall, Covered Play building.
Building Area Analysis A scaled drawing, in square feet, of a building’s area(s) in relation to each
other.
Building Area Original
Occupancy Date
The date a building was originally occupied for use.
Examples: Black Hills High School was first occupied on 9/1/1997.
Building Areas Space defined by year of construction.
Building Characteristics For the purposes of ICOS, detailed information that describes a building’s
intangible situations: status, applicable OSPI programs, and historic

Page | 72
designation.
Example: Black Hills High School is occupied, and is not leased to or
from others. It is in the Asset Preservation Program (APP) but not a
High-Performance School. It is not a designated historic structure.
Building Condition
Assessment (BCA)
A systematic rating of common building Components based on Uniformat
coding with five major Assemblies:
Substructure.
Shell.
Interiors.
Services.
Furnishings.
Under the five major Assemblies are Sub-assemblies and Components.
The BCA scoring consists of ratings at the Component level with choices
that include excellent, good, fair, poor and unsatisfactory. The individual
Component scores are weighted and combined to produce a total building
condition score based on a 100 point scale.
Building Condition
Rating
Status of the Building Condition Assessment for the building – also see
Condition Rating.
Building Condition Score The Building Condition Score is an aggregate score of all the building’s
components on a scale of one to one-hundred. This score is calculated and
automatically entered in the Building Condition Screen.
Building Gross Area
Square Footage
The gross square footage of a building calculated and measured in
accordance with the American Institute of Architects, Document D101,
The Architectural Area and Volume of Buildings latest edition. Generally,
the total physical footprint of a building measured in square feet,
including all occupiable floor levels.
Examples: The gross area of Tumwater Hill Elementary Building A is
26,552 square feet
Building Gross
Instructional Square
Footage
The gross square footage of a building (including portables) utilized for
direct, indirect or support of instruction. Generally, this will be the same
number as gross area square footage unless a part is used for a specific
non-instructional related function, such as a district office. A school
facility space that is under lease, per the provision of
RCW 28A.335.040, is considered to be available for instructional space
and should be included.
Building Profile The profile defines or identifies the primary use of a building.
Example: Elementary School – Single Story
Page | 73
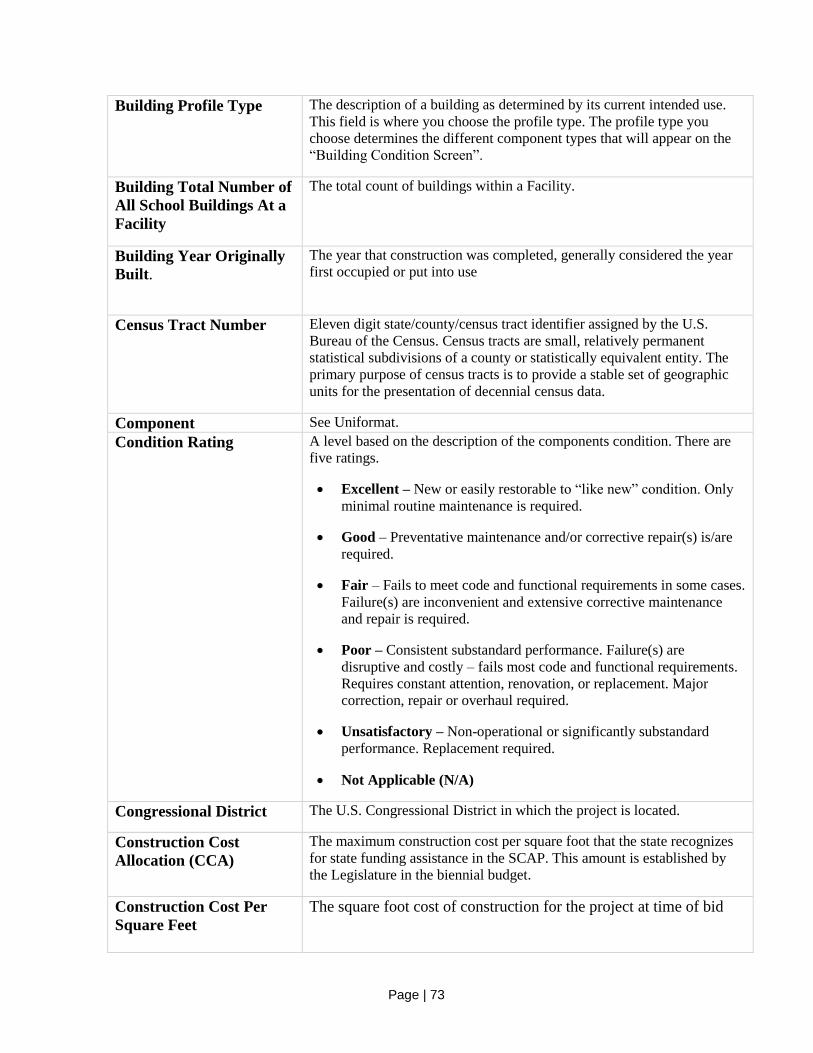
Building Profile Type The description of a building as determined by its current intended use.
This field is where you choose the profile type. The profile type you
choose determines the different component types that will appear on the
“Building Condition Screen”.
Building Total Number of
All School Buildings At a
Facility
The total count of buildings within a Facility.
Building Year Originally
Built.
The year that construction was completed, generally considered the year
first occupied or put into use
Census Tract Number Eleven digit state/county/census tract identifier assigned by the U.S.
Bureau of the Census. Census tracts are small, relatively permanent
statistical subdivisions of a county or statistically equivalent entity. The
primary purpose of census tracts is to provide a stable set of geographic
units for the presentation of decennial census data.
Component See Uniformat.
Condition Rating A level based on the description of the components condition. There are
five ratings.
Excellent – New or easily restorable to “like new” condition. Only
minimal routine maintenance is required.
Good – Preventative maintenance and/or corrective repair(s) is/are
required.
Fair – Fails to meet code and functional requirements in some cases.
Failure(s) are inconvenient and extensive corrective maintenance
and repair is required.
Poor – Consistent substandard performance. Failure(s) are
disruptive and costly – fails most code and functional requirements.
Requires constant attention, renovation, or replacement. Major
correction, repair or overhaul required.
Unsatisfactory – Non-operational or significantly substandard
performance. Replacement required.
Not Applicable (N/A)
Congressional District The U.S. Congressional District in which the project is located.
Construction Cost
Allocation (CCA)
The maximum construction cost per square foot that the state recognizes
for state funding assistance in the SCAP. This amount is established by
the Legislature in the biennial budget.
Construction Cost Per
Square Feet
The square foot cost of construction for the project at time of bid

Page | 74
Contact Type A position title for a school district staff person. .
County/District Code
(CCDD)
A five-digit number that combines the two-digit county code and the
three-digit district code.
Deficiencies A description of inadequacies of a component.
Direct Instructional Space An interior space that has, or could have, a teacher assigned to it for
instruction including:
Basic Classroom.
An enclosed space designed and dedicated for instructional learning.
Example: 1st grade classroom, Kindergarten classroom, History
classroom, portable classroom.
Classroom for Students with Disabilities.
An enclosed space for students who are assigned to a specially
designated self-contained classroom for at least 100 minutes per
school day.
Laboratory.
An enclosed space used for instruction, which requires special
purpose equipment or features for student participation,
experimentation, observation or practice in a field of study.
Examples: science labs, language labs, music practice rooms,
computer labs, media production, and vocational labs.
Library.
An enclosed space used to provide reference materials and areas for
individual study.
Examples: reading and study areas, circulation desk, and reference
media.
Physical Education.
An enclosed space used for physical education and athletics.
Examples: gymnasium, basketball courts, handball courts, swimming
pool, wrestling rooms, etc. and related service areas such as locker
rooms and associated lavatories. Excludes fixed spectator seating,
ticket booths, etc.
District Assigned Area
Name
An identifier for an area within a building.
District Assigned Area
Use
How an area is currently used regardless of its original design.
District Assigned Building
Name
A district assigned name or identifier for a building.

Page | 75
District Assigned Building
Name or Identification
The name or identification term, designated by the district, to identify a
particular building in a facility.
District Classification First Class The district has 2,000 or more students.
Second Class The district has 1,999 or fewer students.
Non-High District The school district does not instruct at the high school grade level. A
Non-High District can also be either a “First Class” or “Second
Class District”.
Document Types A description of files that can be uploaded in ICOS:
APP Board Resolution A resolution required to enter the building into the APP.
APS Certification Letter A required letter certifying that the district has an Asset Preservation
System (APS) in place to maintain their APP building(s).
Building Area Analysis An area diagram of the building (See School Facilities Manual
Exhibit 3C).
Site Area Map An aerial view, to scale, showing the extent of property lines, all
major site developments (driveways, parking areas, walks,
playgrounds, and fields, etc.) and all structures.
Photo
Other
Educational Data System
(EDS)
EDS is the OSPI web portal used to access various applications including
ICOS.
Educational Service
District (ESD)
Primarily a support agency that delivers educational services that can be
efficiently or economically performed regionally. There are nine regional
ESD’s in the state of Washington.
Facility A single site or contiguous adjacent site(s) where typically a building, or
buildings, provide or support educational activities.
A facility is commonly referred to as a “school” and has a unique
identification number assigned by OSPI. The identification number
should not to be confused with a “school code”, and a facility may contain
more than one school code. Vacant land owned by the district may also be
defined as a facility.
Examples: Tumwater Hill Elementary School, Bush Middle School,

Page | 76
District Administration Building, District Support Services Building, 3rd
Street property for a future school.
Facility Site Profile The site profile defines or identifies the primary use of a facility.
Example: – Elementary school – urban, Middle/Junior High School –
rural, transportation.
Facility Number A unique four or five character identifier assigned to a facility by OSPI.
Facility Numbers may, or may not be, the same number as a School Code.
Facility Physical
Coordinates
The global geographic coordinate, or commonly known as Global
Positioning System (GPS). Ideally, it is located at the main entrance of the
main building using latitude and longitude coordinates.
Example: 47.01619, -122.92290.
Facility Site Profile Type A description of the primary use of the site on which a school district
facility is located. This may also be applied to a site where there are no
structures present.
Fiscal Year A twelve month period from July 1 of a calendar year to June 30 of the
next calendar year.
Floor Plan A current overhead diagram of rooms and spaces of each level of a
building.
Grade Span The range of grades that the facility serves.
Example: K–8 (Kindergarten through 8th grade).
Gross Building Square
Feet
The total gross square feet for the building as measured from finished
outside face-of-stud to finished outside face-of stud. The following areas
shall not be included in any calculation of gross square feet:
Exterior covered walkways, cantilevered or supported.
Exterior porches including loading platforms.
Roof overhangs.
Gross District Total
Square Feet
The total gross square feet of all buildings within a district.
Gross Facility Square
Feet
The total square feet of all the buildings in the facility, including
portables.
Gross Instructional
Square Feet
The total square feet in a building used primarily, or exclusively, for
instruction and/or instructional support (mechanical and storage space
included). Portables, if used for instruction, should also be counted as
instructional space. School facility space that is under lease per the
provision of RCW 28A.335.040 is considered to be available for
instructional space and shall be included in the instructional space

Page | 77
inventory. The following areas shall not be included in any calculation of
gross instructional square feet:
Exterior covered walkways, cantilevered or supported.
Exterior porches including loading platforms.
Areas located above instructional spaces which are either
vacant or primarily housing mechanical and/or electrical
equipment.
Space used by central administrative personnel.
Stadia and grandstands.
Bus garages.
Free-standing warehouse space specifically designed for that
purpose.
Other square footage not otherwise available or related to
direct instruction or instructional support of the education
program in the district.
The portion(s) of any space(s) constructed from grants made as
a gift to a school district by a private entity or a public entity
which:
(a) Is dedicated by the written terms of the grant to joint use
by the school district for educational purposes and by the
general public for community activities for the useful life
of the space(s); and
(b) The school district board of directors has accepted the
gift in accordance with the joint use terms of the grant:
Provided, That this exception does not apply to space(s)
jointly financed by two or more school districts.
Facilities that are shared or collocated between multiple school
districts pursuant to a written, lawful agreement, and that are
jointly used by and/or benefit those school districts.
Gross Instructional
Square Footage
Total square footage of direct instructional space.
Historical Status The historic status is the current historic designation for the building.
Locally Designated – The building is designated as historic building
by a designated local authorizing board or committee.
State Designated – The building is on a register for historic places
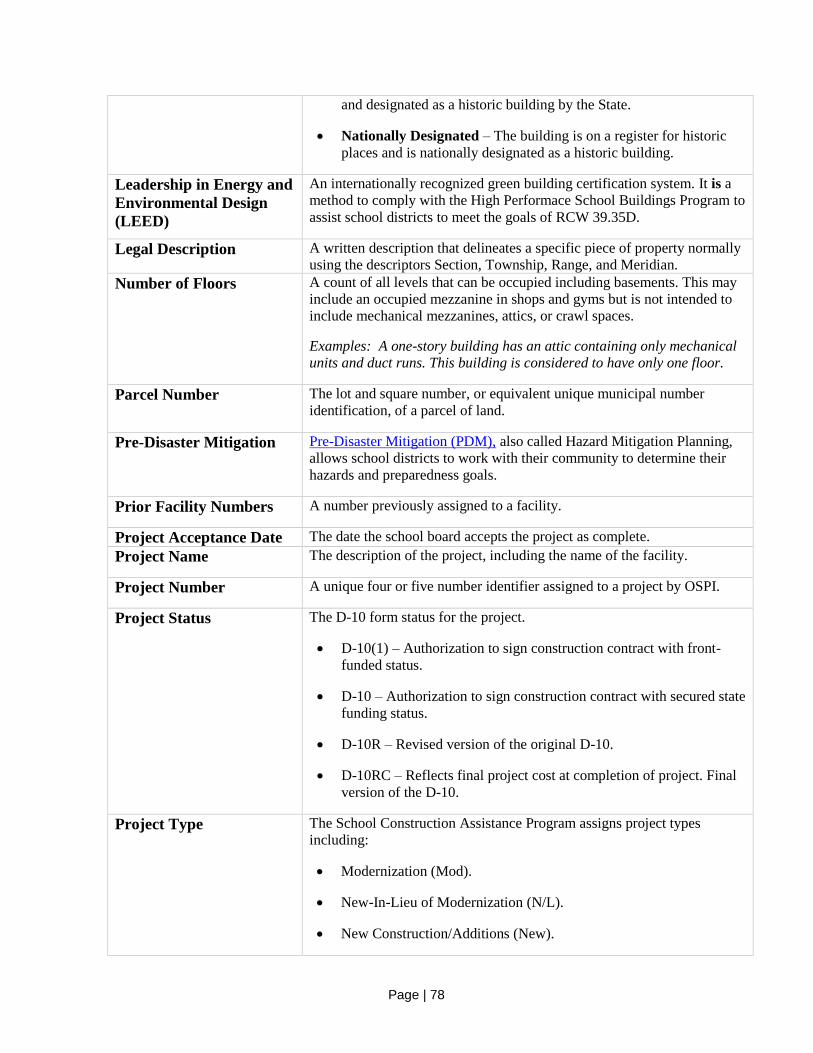
Page | 78
and designated as a historic building by the State.
Nationally Designated – The building is on a register for historic
places and is nationally designated as a historic building.
Leadership in Energy and
Environmental Design
(LEED)
An internationally recognized green building certification system. It is a
method to comply with the High Performace School Buildings Program to
assist school districts to meet the goals of RCW 39.35D.
Legal Description A written description that delineates a specific piece of property normally
using the descriptors Section, Township, Range, and Meridian.
Number of Floors A count of all levels that can be occupied including basements. This may
include an occupied mezzanine in shops and gyms but is not intended to
include mechanical mezzanines, attics, or crawl spaces.
Examples: A one-story building has an attic containing only mechanical
units and duct runs. This building is considered to have only one floor.
Parcel Number The lot and square number, or equivalent unique municipal number
identification, of a parcel of land.
Pre-Disaster Mitigation Pre-Disaster Mitigation (PDM), also called Hazard Mitigation Planning,
allows school districts to work with their community to determine their
hazards and preparedness goals.
Prior Facility Numbers A number previously assigned to a facility.
Project Acceptance Date The date the school board accepts the project as complete.
Project Name The description of the project, including the name of the facility.
Project Number A unique four or five number identifier assigned to a project by OSPI.
Project Status The D-10 form status for the project.
D-10(1) – Authorization to sign construction contract with front-
funded status.
D-10 – Authorization to sign construction contract with secured state
funding status.
D-10R – Revised version of the original D-10.
D-10RC – Reflects final project cost at completion of project. Final
version of the D-10.
Project Type The School Construction Assistance Program assigns project types
including:
Modernization (Mod).
New-In-Lieu of Modernization (N/L).
New Construction/Additions (New).

Page | 79
Quantities Information about the size or amount of a component.
Release Year The calendar year the project secured state funding assistance.
Remote and Necessary
School
Small school facilities of a school district designated by the
Superintendent of Public Instruction.
Reporting Year The reporting period for APP ending in April.
Rural Sites An adequately sized site.
SCAP Recognized Square
Feet
The total gross instructional square feet recognized by OSPI for the
administration of the School Construction Assistance Program (SCAP).
Covered play areas are counted at 50 percent. Portables and areas
designated strictly for district use such as district administration,
transportation, maintenance, etc., or the portion(s) of any space(s)
constructed from grants made as a gift to a school district per WAC
392-343-019(10) are not included. .
School Code A unique four digit number assigned to a school program by OSPI.
School codes may, or may not be, the same number as a Facility Number.
School Construction
Assistance Program
(SCAP)
The School Construction Assistance Program (SCAP) assists school
districts with funding for new construction and modernization of existing
buildings.
School District An entity of the state that is responsible for the education of school-
age children living within its boundaries. One of 295 entities in the
State of Washington managing properties and facilities related to
school district functions and activities.
School Facility Physical
Address
A physical or “street” address that is locatable by navigation and delivery
services–not a post office or postal mail box.
Example: 3120 Ridgeview Ct. SW.
Shared Facilities A site that is used by two or more district facilities.
Site The land and all improvements to the land (other than structures) such as
grading, drainage, driveways, parking areas, walks, plantings, play-courts,
and play-fields, etc. which are present within the boundaries of the legal
description.
Site Acreage The amount of property at a given facility.
Example: 13.00 acres
Site Area Map A drawing or image of a school facility site identifying property
lines and adjacent streets. The map should also display and identify
all major developments and geographical features on the property
such as building structures, fields, playgrounds, parking, walks,
drives, wetlands, streams, etc. in proportion to each other and the

Page | 80
property.
Site Condition Rating An assessment of the site – also see Condition Rating.
Skill Center Programs Skills centers are programs authorized by OSPI in core, branch, or
satellite locations. Types include:
Core – A core is the facility that houses a majority of the skills
center enrolled students.
Branch – A branch is a common school or higher education facility
which provides three or more programs and is at a location other
than the skills center core campus. Each branch campus must be
approved by OSPI.
Satellite – A satellite is facility, or site, that provides less than three
programs at a location other than the skills center core campus. Each
satellite program must be approved by OSPI, and it can only be
hosted by a core campus.
State Assisted Square
Feet
The amount of square footage that received state funding assistance
for a project.
Sub-Assembly See Uniformat.
Total Acreage The total number of acres of all facilities in the district.
Total Buildings Rated
Complete
The total number of Building Condition Assessments (BCA) completed
by the district. This is a roll up from data entered in the building condition
screen.
Total Facility/Sites Rated
Complete
The total number of site condition assessments completed by the district.
This is a roll up from data entered in the site condition screens.
Total Number of
Facilities/Sites
The total number of facilities within a district.
Total Number of
Facilities/Sites
The sum of a district’s facilities.
Total Number of
Teaching Station
The number of spaces that have, or could have, a teacher assigned
to them for classroom instruction. This includes the number of
teaching stations for students with, and without, disabilities.
Total Number of
Teaching Station for
Students with Disabilities
The number of students with disabilities (as reported on actual
October headcount enrollment) who are assigned to a specially
designated self-contained classroom for at least 100 minutes per
school day; and pre-kindergarten students with disabilities at 50
percent of the actual headcount enrollment. For this count, students
with disabilities are not all in Individualized Education Programs
(IEPs), but those students who are may need additional physical
space due to their disability. This count corresponds to Annual
Enrollment/Classroom Count, Form 1066, when applying for

Page | 81
SCAP.
Uniformat An industry standard for classifying project specifications, cost
estimating, and cost analysis. In ICOS, UniFormat is used for rating
specific categories of materials and systems. Level 1 categories
(Assemblies) are the highest level of classification. Level 2
categories (Sub-Assemblies) are broken down more specifically.
Level 3 categories (Components) are individual elements to be
rated.
Urban Sites A constricted sized site.
V When a curser is hovered over the “V”, it will show the last reported
square footage for the facility.
Washington Sustainable
Schools Protocol (WSSP)
The Washington Sustainable Schools Protocol (WSSP) is a method to
comply with the High Performace School Buildings Program to assist
school districts to meet the goals of RCW 39.35D.

Page | 82
For more information about the contents of this document, please contact:
Cameron Bell, OSPI E-mail: [email protected]
Phone: (360) 725-6418
To order more copies of this document, please call 1-888-59-LEARN (I-888-595-3276)
or visit our Web site at http://www.k12.wa.us/publications
Please refer to the document number below for quicker service: 11-0011
This document is available online at:
http://www.k12.wa.us/SchFacilities/Inventory.aspxThis material is available in alternative format upon request.
Contact the Resource Center at (888) 595-3276, TTY (360) 664-3631.
Office of Superintendent of Public Instruction Old Capitol Building
P.O. Box 47200 Olympia, WA 98504-7200
Related Documents