Informatica ® B2B Data Transformation 10.4.0 Getting Started

Welcome message from author
This document is posted to help you gain knowledge. Please leave a comment to let me know what you think about it! Share it to your friends and learn new things together.
Transcript
Informatica® B2B Data Transformation10.4.0
Getting Started

Informatica B2B Data Transformation Getting Started10.4.0February 2021
© Copyright Informatica LLC 2008, 2021
This software and documentation are provided only under a separate license agreement containing restrictions on use and disclosure. No part of this document may be reproduced or transmitted in any form, by any means (electronic, photocopying, recording or otherwise) without prior consent of Informatica LLC.
Informatica, the Informatica logo, and PowerCenter are trademarks or registered trademarks of Informatica LLC in the United States and many jurisdictions throughout the world. A current list of Informatica trademarks is available on the web at https://www.informatica.com/trademarks.html. Other company and product names may be trade names or trademarks of their respective owners.
Portions of this software and/or documentation are subject to copyright held by third parties, including without limitation: Copyright DataDirect Technologies. All rights reserved. Copyright © Sun Microsystems. All rights reserved. Copyright © RSA Security Inc. All Rights Reserved. Copyright © Ordinal Technology Corp. All rights reserved. Copyright © Aandacht c.v. All rights reserved. Copyright Genivia, Inc. All rights reserved. Copyright Isomorphic Software. All rights reserved. Copyright © Meta Integration Technology, Inc. All rights reserved. Copyright © Intalio. All rights reserved. Copyright © Oracle. All rights reserved. Copyright © Adobe Systems Incorporated. All rights reserved. Copyright © DataArt, Inc. All rights reserved. Copyright © ComponentSource. All rights reserved. Copyright © Microsoft Corporation. All rights reserved. Copyright © Rogue Wave Software, Inc. All rights reserved. Copyright © Teradata Corporation. All rights reserved. Copyright © Yahoo! Inc. All rights reserved. Copyright © Glyph & Cog, LLC. All rights reserved. Copyright © Thinkmap, Inc. All rights reserved. Copyright © Clearpace Software Limited. All rights reserved. Copyright © Information Builders, Inc. All rights reserved. Copyright © OSS Nokalva, Inc. All rights reserved. Copyright Edifecs, Inc. All rights reserved. Copyright Cleo Communications, Inc. All rights reserved. Copyright © International Organization for Standardization 1986. All rights reserved. Copyright © ej-technologies GmbH. All rights reserved. Copyright © Jaspersoft Corporation. All rights reserved. Copyright © International Business Machines Corporation. All rights reserved. Copyright © yWorks GmbH. All rights reserved. Copyright © Lucent Technologies. All rights reserved. Copyright © University of Toronto. All rights reserved. Copyright © Daniel Veillard. All rights reserved. Copyright © Unicode, Inc. Copyright IBM Corp. All rights reserved. Copyright © MicroQuill Software Publishing, Inc. All rights reserved. Copyright © PassMark Software Pty Ltd. All rights reserved. Copyright © LogiXML, Inc. All rights reserved. Copyright © 2003-2010 Lorenzi Davide, All rights reserved. Copyright © Red Hat, Inc. All rights reserved. Copyright © The Board of Trustees of the Leland Stanford Junior University. All rights reserved. Copyright © EMC Corporation. All rights reserved. Copyright © Flexera Software. All rights reserved. Copyright © Jinfonet Software. All rights reserved. Copyright © Apple Inc. All rights reserved. Copyright © Telerik Inc. All rights reserved. Copyright © BEA Systems. All rights reserved. Copyright © PDFlib GmbH. All rights reserved. Copyright © Orientation in Objects GmbH. All rights reserved. Copyright © Tanuki Software, Ltd. All rights reserved. Copyright © Ricebridge. All rights reserved. Copyright © Sencha, Inc. All rights reserved. Copyright © Scalable Systems, Inc. All rights reserved. Copyright © jQWidgets. All rights reserved. Copyright © Tableau Software, Inc. All rights reserved. Copyright© MaxMind, Inc. All Rights Reserved. Copyright © TMate Software s.r.o. All rights reserved. Copyright © MapR Technologies Inc. All rights reserved. Copyright © Amazon Corporate LLC. All rights reserved. Copyright © Highsoft. All rights reserved. Copyright © Python Software Foundation. All rights reserved. Copyright © BeOpen.com. All rights reserved. Copyright © CNRI. All rights reserved.
This product includes software developed by the Apache Software Foundation (http://www.apache.org/), and/or other software which is licensed under various versions of the Apache License (the "License"). You may obtain a copy of these Licenses at http://www.apache.org/licenses/. Unless required by applicable law or agreed to in writing, software distributed under these Licenses is distributed on an "AS IS" BASIS, WITHOUT WARRANTIES OR CONDITIONS OF ANY KIND, either express or implied. See the Licenses for the specific language governing permissions and limitations under the Licenses.
This product includes software which was developed by Mozilla (http://www.mozilla.org/), software copyright The JBoss Group, LLC, all rights reserved; software copyright © 1999-2006 by Bruno Lowagie and Paulo Soares and other software which is licensed under various versions of the GNU Lesser General Public License Agreement, which may be found at http:// www.gnu.org/licenses/lgpl.html. The materials are provided free of charge by Informatica, "as-is", without warranty of any kind, either express or implied, including but not limited to the implied warranties of merchantability and fitness for a particular purpose.
The product includes ACE(TM) and TAO(TM) software copyrighted by Douglas C. Schmidt and his research group at Washington University, University of California, Irvine, and Vanderbilt University, Copyright (©) 1993-2006, all rights reserved.
This product includes software developed by the OpenSSL Project for use in the OpenSSL Toolkit (copyright The OpenSSL Project. All Rights Reserved) and redistribution of this software is subject to terms available at http://www.openssl.org and http://www.openssl.org/source/license.html.
This product includes Curl software which is Copyright 1996-2013, Daniel Stenberg, <[email protected]>. All Rights Reserved. Permissions and limitations regarding this software are subject to terms available at http://curl.haxx.se/docs/copyright.html. Permission to use, copy, modify, and distribute this software for any purpose with or without fee is hereby granted, provided that the above copyright notice and this permission notice appear in all copies.
The product includes software copyright 2001-2005 (©) MetaStuff, Ltd. All Rights Reserved. Permissions and limitations regarding this software are subject to terms available at http://www.dom4j.org/ license.html.
The product includes software copyright © 2004-2007, The Dojo Foundation. All Rights Reserved. Permissions and limitations regarding this software are subject to terms available at http://dojotoolkit.org/license.
This product includes ICU software which is copyright International Business Machines Corporation and others. All rights reserved. Permissions and limitations regarding this software are subject to terms available at http://source.icu-project.org/repos/icu/icu/trunk/license.html.
This product includes software copyright © 1996-2006 Per Bothner. All rights reserved. Your right to use such materials is set forth in the license which may be found at http:// www.gnu.org/software/ kawa/Software-License.html.
This product includes OSSP UUID software which is Copyright © 2002 Ralf S. Engelschall, Copyright © 2002 The OSSP Project Copyright © 2002 Cable & Wireless Deutschland. Permissions and limitations regarding this software are subject to terms available at http://www.opensource.org/licenses/mit-license.php.
This product includes software developed by Boost (http://www.boost.org/) or under the Boost software license. Permissions and limitations regarding this software are subject to terms available at http:/ /www.boost.org/LICENSE_1_0.txt.
This product includes software copyright © 1997-2007 University of Cambridge. Permissions and limitations regarding this software are subject to terms available at http:// www.pcre.org/license.txt.
This product includes software copyright © 2007 The Eclipse Foundation. All Rights Reserved. Permissions and limitations regarding this software are subject to terms available at http:// www.eclipse.org/org/documents/epl-v10.php and at http://www.eclipse.org/org/documents/edl-v10.php.
This product includes software licensed under the terms at http://www.tcl.tk/software/tcltk/license.html, http://www.bosrup.com/web/overlib/?License, http://www.stlport.org/doc/ license.html, http://asm.ow2.org/license.html, http://www.cryptix.org/LICENSE.TXT, http://hsqldb.org/web/hsqlLicense.html, http://httpunit.sourceforge.net/doc/ license.html, http://jung.sourceforge.net/license.txt , http://www.gzip.org/zlib/zlib_license.html, http://www.openldap.org/software/release/license.html, http://www.libssh2.org, http://slf4j.org/license.html, http://www.sente.ch/software/OpenSourceLicense.html, http://fusesource.com/downloads/license-agreements/fuse-message-broker-v-5-3- license-agreement; http://antlr.org/license.html; http://aopalliance.sourceforge.net/; http://www.bouncycastle.org/licence.html; http://www.jgraph.com/jgraphdownload.html; http://www.jcraft.com/jsch/LICENSE.txt; http://jotm.objectweb.org/bsd_license.html; . http://www.w3.org/Consortium/Legal/2002/copyright-software-20021231; http://www.slf4j.org/license.html; http://nanoxml.sourceforge.net/orig/copyright.html; http://www.json.org/license.html; http://forge.ow2.org/projects/javaservice/, http://www.postgresql.org/about/licence.html, http://www.sqlite.org/copyright.html, http://www.tcl.tk/software/tcltk/license.html, http://www.jaxen.org/faq.html, http://www.jdom.org/docs/faq.html, http://www.slf4j.org/license.html; http://www.iodbc.org/dataspace/iodbc/wiki/iODBC/License; http://www.keplerproject.org/md5/license.html; http://www.toedter.com/en/jcalendar/license.html; http://www.edankert.com/bounce/index.html; http://www.net-snmp.org/about/license.html; http://www.openmdx.org/#FAQ; http://www.php.net/license/3_01.txt; http://srp.stanford.edu/license.txt;

http://www.schneier.com/blowfish.html; http://www.jmock.org/license.html; http://xsom.java.net; http://benalman.com/about/license/; https://github.com/CreateJS/EaselJS/blob/master/src/easeljs/display/Bitmap.js; http://www.h2database.com/html/license.html#summary; http://jsoncpp.sourceforge.net/LICENSE; http://jdbc.postgresql.org/license.html; http://protobuf.googlecode.com/svn/trunk/src/google/protobuf/descriptor.proto; https://github.com/rantav/hector/blob/master/LICENSE; http://web.mit.edu/Kerberos/krb5-current/doc/mitK5license.html; http://jibx.sourceforge.net/jibx-license.html; https://github.com/lyokato/libgeohash/blob/master/LICENSE; https://github.com/hjiang/jsonxx/blob/master/LICENSE; https://code.google.com/p/lz4/; https://github.com/jedisct1/libsodium/blob/master/LICENSE; http://one-jar.sourceforge.net/index.php?page=documents&file=license; https://github.com/EsotericSoftware/kryo/blob/master/license.txt; http://www.scala-lang.org/license.html; https://github.com/tinkerpop/blueprints/blob/master/LICENSE.txt; http://gee.cs.oswego.edu/dl/classes/EDU/oswego/cs/dl/util/concurrent/intro.html; https://aws.amazon.com/asl/; https://github.com/twbs/bootstrap/blob/master/LICENSE; https://sourceforge.net/p/xmlunit/code/HEAD/tree/trunk/LICENSE.txt; https://github.com/documentcloud/underscore-contrib/blob/master/LICENSE, and https://github.com/apache/hbase/blob/master/LICENSE.txt.
This product includes software licensed under the Academic Free License (http://www.opensource.org/licenses/afl-3.0.php), the Common Development and Distribution License (http://www.opensource.org/licenses/cddl1.php) the Common Public License (http://www.opensource.org/licenses/cpl1.0.php), the Sun Binary Code License Agreement Supplemental License Terms, the BSD License (http:// www.opensource.org/licenses/bsd-license.php), the new BSD License (http://opensource.org/licenses/BSD-3-Clause), the MIT License (http://www.opensource.org/licenses/mit-license.php), the Artistic License (http://www.opensource.org/licenses/artistic-license-1.0) and the Initial Developer’s Public License Version 1.0 (http://www.firebirdsql.org/en/initial-developer-s-public-license-version-1-0/).
This product includes software copyright © 2003-2006 Joe WaInes, 2006-2007 XStream Committers. All rights reserved. Permissions and limitations regarding this software are subject to terms available at http://xstream.codehaus.org/license.html. This product includes software developed by the Indiana University Extreme! Lab. For further information please visit http://www.extreme.indiana.edu/.
This product includes software Copyright (c) 2013 Frank Balluffi and Markus Moeller. All rights reserved. Permissions and limitations regarding this software are subject to terms of the MIT license.
See patents at https://www.informatica.com/legal/patents.html.
DISCLAIMER: Informatica LLC provides this documentation "as is" without warranty of any kind, either express or implied, including, but not limited to, the implied warranties of noninfringement, merchantability, or use for a particular purpose. Informatica LLC does not warrant that this software or documentation is error free. The information provided in this software or documentation may include technical inaccuracies or typographical errors. The information in this software and documentation is subject to change at any time without notice.
NOTICES
This Informatica product (the "Software") includes certain drivers (the "DataDirect Drivers") from DataDirect Technologies, an operating company of Progress Software Corporation ("DataDirect") which are subject to the following terms and conditions:
1. THE DATADIRECT DRIVERS ARE PROVIDED "AS IS" WITHOUT WARRANTY OF ANY KIND, EITHER EXPRESSED OR IMPLIED, INCLUDING BUT NOT LIMITED TO, THE IMPLIED WARRANTIES OF MERCHANTABILITY, FITNESS FOR A PARTICULAR PURPOSE AND NON-INFRINGEMENT.
2. IN NO EVENT WILL DATADIRECT OR ITS THIRD PARTY SUPPLIERS BE LIABLE TO THE END-USER CUSTOMER FOR ANY DIRECT, INDIRECT, INCIDENTAL, SPECIAL, CONSEQUENTIAL OR OTHER DAMAGES ARISING OUT OF THE USE OF THE ODBC DRIVERS, WHETHER OR NOT INFORMED OF THE POSSIBILITIES OF DAMAGES IN ADVANCE. THESE LIMITATIONS APPLY TO ALL CAUSES OF ACTION, INCLUDING, WITHOUT LIMITATION, BREACH OF CONTRACT, BREACH OF WARRANTY, NEGLIGENCE, STRICT LIABILITY, MISREPRESENTATION AND OTHER TORTS.
The information in this documentation is subject to change without notice. If you find any problems in this documentation, report them to us at [email protected].
Informatica products are warranted according to the terms and conditions of the agreements under which they are provided. INFORMATICA PROVIDES THE INFORMATION IN THIS DOCUMENT "AS IS" WITHOUT WARRANTY OF ANY KIND, EXPRESS OR IMPLIED, INCLUDING WITHOUT ANY WARRANTIES OF MERCHANTABILITY, FITNESS FOR A PARTICULAR PURPOSE AND ANY WARRANTY OR CONDITION OF NON-INFRINGEMENT.
Publication Date: 2021-08-08
Table of Contents
Preface . . . . . . . . . . . . . . . . . . . . . . . . . . . . . . . . . . . . . . . . . . . . . . . . . . . . . . . . . . . . . . . . . . . . . . 6Informatica Resources. . . . . . . . . . . . . . . . . . . . . . . . . . . . . . . . . . . . . . . . . . . . . . . . . . . 6
Informatica Network. . . . . . . . . . . . . . . . . . . . . . . . . . . . . . . . . . . . . . . . . . . . . . . . . 6
Informatica Knowledge Base. . . . . . . . . . . . . . . . . . . . . . . . . . . . . . . . . . . . . . . . . . . . 6
Informatica Documentation. . . . . . . . . . . . . . . . . . . . . . . . . . . . . . . . . . . . . . . . . . . . . 7
Informatica Product Availability Matrices. . . . . . . . . . . . . . . . . . . . . . . . . . . . . . . . . . . . 7
Informatica Velocity. . . . . . . . . . . . . . . . . . . . . . . . . . . . . . . . . . . . . . . . . . . . . . . . . . 7
Informatica Marketplace. . . . . . . . . . . . . . . . . . . . . . . . . . . . . . . . . . . . . . . . . . . . . . . 7
Informatica Global Customer Support. . . . . . . . . . . . . . . . . . . . . . . . . . . . . . . . . . . . . . 7
Chapter 1: Introduction. . . . . . . . . . . . . . . . . . . . . . . . . . . . . . . . . . . . . . . . . . . . . . . . . . . . . . . 8Data Processor Transformation Overview. . . . . . . . . . . . . . . . . . . . . . . . . . . . . . . . . . . . . . . 8
Data Processor Transformation Views. . . . . . . . . . . . . . . . . . . . . . . . . . . . . . . . . . . . . . . . . 9
Startup Component. . . . . . . . . . . . . . . . . . . . . . . . . . . . . . . . . . . . . . . . . . . . . . . . . . . . 10
Data Processor Transformation Wizard. . . . . . . . . . . . . . . . . . . . . . . . . . . . . . . . . . . . . . . 10
Data Processor Transformation Ports. . . . . . . . . . . . . . . . . . . . . . . . . . . . . . . . . . . . . . . . 11
Chapter 2: Wizard. . . . . . . . . . . . . . . . . . . . . . . . . . . . . . . . . . . . . . . . . . . . . . . . . . . . . . . . . . . 12Creating a Data Processor Transformation Overview. . . . . . . . . . . . . . . . . . . . . . . . . . . . . . . 12
Step 1. Create a Transformation with the Wizard . . . . . . . . . . . . . . . . . . . . . . . . . . . . . . . . . 13
Step 2. Edit the Transformation. . . . . . . . . . . . . . . . . . . . . . . . . . . . . . . . . . . . . . . . . . . . . 13
Step 3. Add the Transformation to a Mapping. . . . . . . . . . . . . . . . . . . . . . . . . . . . . . . . . . . 14
Step 4. Test the Mapping. . . . . . . . . . . . . . . . . . . . . . . . . . . . . . . . . . . . . . . . . . . . . . . . . 14
Testing a Transformation - Tips. . . . . . . . . . . . . . . . . . . . . . . . . . . . . . . . . . . . . . . . . . . . 15
Chapter 3: Parser. . . . . . . . . . . . . . . . . . . . . . . . . . . . . . . . . . . . . . . . . . . . . . . . . . . . . . . . . . . 16Creating a Parser Overview. . . . . . . . . . . . . . . . . . . . . . . . . . . . . . . . . . . . . . . . . . . . . . . 16
Step 1. Create the Transformation. . . . . . . . . . . . . . . . . . . . . . . . . . . . . . . . . . . . . . . . . . . 17
Step 2. Create a Script with a Parser. . . . . . . . . . . . . . . . . . . . . . . . . . . . . . . . . . . . . . . . . 17
Step 3. Configure the Parser. . . . . . . . . . . . . . . . . . . . . . . . . . . . . . . . . . . . . . . . . . . . . . . 18
Step 4. Test the Transformation. . . . . . . . . . . . . . . . . . . . . . . . . . . . . . . . . . . . . . . . . . . . 24
Testing a Parser - Tips. . . . . . . . . . . . . . . . . . . . . . . . . . . . . . . . . . . . . . . . . . . . . . . . . . 25
Chapter 4: Serializer. . . . . . . . . . . . . . . . . . . . . . . . . . . . . . . . . . . . . . . . . . . . . . . . . . . . . . . . 27Creating a Serializer Overview. . . . . . . . . . . . . . . . . . . . . . . . . . . . . . . . . . . . . . . . . . . . . . 27
Step 1. Create the Transformation. . . . . . . . . . . . . . . . . . . . . . . . . . . . . . . . . . . . . . . . . . . 28
Step 2. Create a Script with a Serializer. . . . . . . . . . . . . . . . . . . . . . . . . . . . . . . . . . . . . . . . 28
Step 3. Configure the Serializer. . . . . . . . . . . . . . . . . . . . . . . . . . . . . . . . . . . . . . . . . . . . . 29
Step 4. Test the Transformation. . . . . . . . . . . . . . . . . . . . . . . . . . . . . . . . . . . . . . . . . . . . 33
Testing a Serializer - Tips. . . . . . . . . . . . . . . . . . . . . . . . . . . . . . . . . . . . . . . . . . . . . . . . 33
4 Table of Contents
Chapter 5: XMap. . . . . . . . . . . . . . . . . . . . . . . . . . . . . . . . . . . . . . . . . . . . . . . . . . . . . . . . . . . . 35XMap Overview. . . . . . . . . . . . . . . . . . . . . . . . . . . . . . . . . . . . . . . . . . . . . . . . . . . . . . . 35
Step 1. Create the Transformation. . . . . . . . . . . . . . . . . . . . . . . . . . . . . . . . . . . . . . . . . . . 36
Step 2. Create an XMap. . . . . . . . . . . . . . . . . . . . . . . . . . . . . . . . . . . . . . . . . . . . . . . . . . 36
Step 3. Configure the XMap. . . . . . . . . . . . . . . . . . . . . . . . . . . . . . . . . . . . . . . . . . . . . . . 37
Step 4. Test the Transformation. . . . . . . . . . . . . . . . . . . . . . . . . . . . . . . . . . . . . . . . . . . . 38
Testing an XMap - Tips. . . . . . . . . . . . . . . . . . . . . . . . . . . . . . . . . . . . . . . . . . . . . . . . . . 39
Chapter 6: Export To PowerCenter. . . . . . . . . . . . . . . . . . . . . . . . . . . . . . . . . . . . . . . . . . . 41Export to PowerCenter Overview. . . . . . . . . . . . . . . . . . . . . . . . . . . . . . . . . . . . . . . . . . . . 41
Step 1. Export the Mapping to PowerCenter. . . . . . . . . . . . . . . . . . . . . . . . . . . . . . . . . . . . . 42
Step 2. Generate and Run a Workflow. . . . . . . . . . . . . . . . . . . . . . . . . . . . . . . . . . . . . . . . . 42
Appendix A: Glossary. . . . . . . . . . . . . . . . . . . . . . . . . . . . . . . . . . . . . . . . . . . . . . . . . . . . . . . 44
Table of Contents 5

PrefaceFollow the instructions in the Data Transformation Getting Started tutorial to learn how to use the Data Processor transformation. The tutorial includes lessons that teach you how to create a Data Processor transformation and how to export the transformation to Informatica PowerCenter®. The tutorial also includes lessons how to create a parser, a serializer, and an XMap object to use in the transformation.
The tutorial is written for developers. It assumes that you understand relational source files in CSV format, PDF source files, XML source files, XML schemas, and XPath expressions.
Informatica ResourcesInformatica provides you with a range of product resources through the Informatica Network and other online portals. Use the resources to get the most from your Informatica products and solutions and to learn from other Informatica users and subject matter experts.
Informatica NetworkThe Informatica Network is the gateway to many resources, including the Informatica Knowledge Base and Informatica Global Customer Support. To enter the Informatica Network, visit https://network.informatica.com.
As an Informatica Network member, you have the following options:
• Search the Knowledge Base for product resources.
• View product availability information.
• Create and review your support cases.
• Find your local Informatica User Group Network and collaborate with your peers.
Informatica Knowledge BaseUse the Informatica Knowledge Base to find product resources such as how-to articles, best practices, video tutorials, and answers to frequently asked questions.
To search the Knowledge Base, visit https://search.informatica.com. If you have questions, comments, or ideas about the Knowledge Base, contact the Informatica Knowledge Base team at [email protected].
6
Informatica DocumentationUse the Informatica Documentation Portal to explore an extensive library of documentation for current and recent product releases. To explore the Documentation Portal, visit https://docs.informatica.com.
If you have questions, comments, or ideas about the product documentation, contact the Informatica Documentation team at [email protected].
Informatica Product Availability MatricesProduct Availability Matrices (PAMs) indicate the versions of the operating systems, databases, and types of data sources and targets that a product release supports. You can browse the Informatica PAMs at https://network.informatica.com/community/informatica-network/product-availability-matrices.
Informatica VelocityInformatica Velocity is a collection of tips and best practices developed by Informatica Professional Services and based on real-world experiences from hundreds of data management projects. Informatica Velocity represents the collective knowledge of Informatica consultants who work with organizations around the world to plan, develop, deploy, and maintain successful data management solutions.
You can find Informatica Velocity resources at http://velocity.informatica.com. If you have questions, comments, or ideas about Informatica Velocity, contact Informatica Professional Services at [email protected].
Informatica MarketplaceThe Informatica Marketplace is a forum where you can find solutions that extend and enhance your Informatica implementations. Leverage any of the hundreds of solutions from Informatica developers and partners on the Marketplace to improve your productivity and speed up time to implementation on your projects. You can find the Informatica Marketplace at https://marketplace.informatica.com.
Informatica Global Customer SupportYou can contact a Global Support Center by telephone or through the Informatica Network.
To find your local Informatica Global Customer Support telephone number, visit the Informatica website at the following link: https://www.informatica.com/services-and-training/customer-success-services/contact-us.html.
To find online support resources on the Informatica Network, visit https://network.informatica.com and select the eSupport option.
Preface 7
C h a p t e r 1
IntroductionThis chapter includes the following topics:
• Data Processor Transformation Overview, 8
• Data Processor Transformation Views, 9
• Startup Component, 10
• Data Processor Transformation Wizard, 10
• Data Processor Transformation Ports, 11
Data Processor Transformation OverviewThe Data Processor transformation processes unstructured and semi-structured file formats in a mapping. Configure the transformation to process messaging formats, HTML pages, XML, JSON, and PDF documents. You can also convert structured formats such as ACORD, HIPAA, HL7, EDI-X12, EDIFACT, AFP, and SWIFT.
A mapping uses a Data Processor transformation to change documents from one format to another. The Data Processor transformation processes files of any format in a mapping. When you create a Data Processor transformation, you define components that convert the data.
A Data Processor transformation can contain multiple components to process data. Each component might contain other components.
For example, you might receive customer invoices in Microsoft Word files. You configure a Data Processor transformation to parse the data from each word file. Extract the customer data to a Customer table. Extract order information to an Orders table.
When you create a Data Processor transformation, you define an XMap, Script, or Library. An XMap converts an input hierarchical file into an output hierarchical file of another structure. A Library converts an industry messaging type into an XML document with a hierarchy structure or from XML to an industry standard format. A Script can parse source documents to hierarchical format, convert hierarchical format to other file formats, or map a hierarchical document to another hierarchical format.
Define Scripts in the Data Processor transformation IntelliScript editor. You can define the following types of Scripts:
• Parser. Converts source documents to XML. The output of a Parser is always XML. The input can have any format, such as text, HTML, Word, PDF, or HL7.
• Serializer. Converts an XML file to an output document of any format. The output of a Serializer can be any format, such as a text document, an HTML document, or a PDF.
8
• Mapper. Converts an XML source document to another XML structure or schema. You can convert the same XML documents as in an XMap.
• Transformer. Modifies the data in any format. Adds, removes, converts, or changes text. Use Transformers with a Parser, Mapper, or Serializer. You can also run a Transformer as stand-alone component.
• Streamer. Splits large input documents, such as multi-gigabyte data streams, into segments. The Streamer processes documents that have multiple messages or records in them, such as HIPAA or EDI files.
Data Processor Transformation ViewsThe Data Processor transformation has several views that you use to configure the transformation and run it in the Developer tool.
The Data Processor transformation has the following fixed views:
Objects view
Add, modify, or delete Script, XMap and Library objects from the transformation.
Overview view
Configure ports and define the startup component.
References view
Add or remove schemas from the transformation.
Settings view
Configure transformation settings for encoding, output control, and XML generation.
You can also access the following views for the Data Processor transformation:
Data Viewer view
View example input data, run the transformation, and view output results.
Events view
Shows information about events that occur when you run the transformation in the Developer tool. Shows initialization, execution, and summary events.
Script Help view
Shows context-sensitive help for the Script editor.
Some views do not appear in the Developer tool by default. To change the views for the transformation, click Window > Show View > Other > Informatica. Select the views you want to see.
Data Processor Transformation Views 9
Startup ComponentA startup component defines the component that starts the processing in the Data Processor transformation. Configure the startup component on the Overview view.
A Data Processor transformation can contain multiple components to process data. Each component might contain other components. You must identify which component is the entry point for the transformation.
When you configure the startup component in a Data Processor transformation, you can choose an XMap, Library, or a Script component as the startup component. In terms of Scripts, you can select one of the following types of components:
• Parser. Converts source documents to XML. The input can have any format, such as text, HTML, Word, PDF, or HL7.
• Mapper. Converts an XML source document to another XML structure or schema.
• Serializer. Converts an XML file to an output document of any format.
• Streamer. Splits large input documents, such as multi-gigabyte data streams, into segments.
• Transformer. Modifies the data in any format. Adds, removes, converts, or changes text. Use Transformers with a Parser, Mapper, or Serializer. You can also run a Transformer as stand-alone component.
Note: If the startup component is not an XMap or Library, you can also configure the startup component in a Script instead of in the Overview view.
Data Processor Transformation WizardYou can use a wizard to create an auto-generated Data Processor transformation with input and output formats such as COBOL, XML, ASN.1, relational, or JSON. You can also use the wizard to transform user-defined formats.
When you create a Data Processor transformation with the wizard, you select the input and output formats. Select from existing formats or create user defined formats. For certain formats, such as ASN.1, XML, JSON, or COBOL, add a schema, specification file, example file or copybook that defines the expected structure for the input or output.
The wizard creates a transformation with relevant Script, XMap, or Library objects that serve as templates to transform the input format to the output format. The Data Processor transformation creates a transformation solution according to the formats selected and the specification file, the example file, or the copybook. The transformation might not be complete, but it contains components that you connect and customize to complete the transformation definition.
After the wizard auto-generates a transformation, use Developer editors to configure and test the transformation components. Define the Data Processor transformation ports on the transformation Overview view.
You can add the transformation to a mapping in Developer. You can also export the transformation as a PowerCenter service and use it as an Unstructured Data Transformation in PowerCenter.
10 Chapter 1: Introduction
Data Processor Transformation PortsA Data Processor transformation reads input from input ports and converts it into other formats. The transformation sends output data to output ports. Define the Data Processor transformation ports on the transformation Overview view.
Configure the transformation input ports to define whether the transformation receives input from a file, a buffer, or a streamed buffer from a complex file reader. You can use a flat file reader as a buffer to read an entire file at one time. You can also read an input file from a database. You can configure the output ports to determine whether you want to return a string, complex files, or rows of relational data from the transformation.
You can use the Data Processor transformation wizard to automatically map relational data. To convert relational input groups into output in an XML hierarchy, you map nodes from groups of relational ports in the input to the XML ports in the output. You can pass the data from the output XML ports to another transformation downstream in the mapping for further processing.
You can also use the Data Processor transformation to map hierarchical data to relational data. You can return relational output from the Data Processor transformation. If a component returns relational data, you create groups of output ports by mapping nodes from the XML input to groups of ports. You can pass the data from the relational ports to another transformation in a mapping for further downstream processing.
Data Processor Transformation Ports 11
C h a p t e r 2
WizardThis chapter includes the following topics:
• Creating a Data Processor Transformation Overview, 12
• Step 1. Create a Transformation with the Wizard , 13
• Step 2. Edit the Transformation, 13
• Step 3. Add the Transformation to a Mapping, 14
• Step 4. Test the Mapping, 14
• Testing a Transformation - Tips, 15
Creating a Data Processor Transformation OverviewIn this lesson, you create a Data Processor transformation with the New Transformation wizard in the Developer tool. To set up the Developer tool, you connect to the Model repository and create a project and folder to store your work. If the domain includes more than one Data Integration Service, you must also select a default service to preview data and run mappings.
Lesson Concepts
A mapping uses a Data Processor transformation to transform documents from one format to another. The Data Processor transformation processes unstructured and semi-structured file formats in a mapping. When you create a Data Processor transformation with the wizard, the wizard creates a transformation with relevant Script, XMap, or Library objects that serve as templates to transform the input format to the output format. A Data Processor transformation can also contain components that perform other transformation tasks.
The Data Processor transformation creates a transformation solution according to the formats selected and the specification file, the example file, or the copybook. The transformation contains components that you connect and customize to complete the transformation definition. In this example, you create a transformation that receives hierarchical data, transforms the data, and sends rows of relational data to output ports.
Lesson Objectives
In this lesson, perform the following tasks:
• Create a Data Processor transformation to contain components that transform documents.
12
Lesson Prerequisites
Before you start this lesson, verify the following prerequisites:
• Informatica Data Transformation is installed and the services are running.
• You have downloaded the file for the tutorial. Download the Wizard_DP.zip file from the following link:https://docs.informatica.com/content/dam/source/resources/zipfiles/data-integration/Wizard_DP.zip
Add the file to the <INSTALL_DIR>\clients\DeveloperClient\Tutorials directory. Unzip the file to access the Patient_Test_Example.xml example source file.
Lesson Timing
Set aside 5 to 10 minutes to perform the tasks in this lesson.
Step 1. Create a Transformation with the WizardCreate a Data Processor transformation with XML input and relational output.
1. In the Developer tool, click File > New > Transformation.
2. Select the Data Processor transformation and click Next.
3. Enter a name for the transformation and browse for a Model Repository location to put the transformation.
4. Select Create a data processor using a wizard and click Next.
5. Select XML input format and click Next.
6. Browse to select the XML sample file named Patient_Test_Example.xml. Click Next.
7. Select relational output format and click Next.
8. Click Finish.
The Developer tool creates the transformation and the related schema in the repository. The Overview view appears in the Developer tool.
Step 2. Edit the TransformationAfter you create the Data Processor transformation, you can edit the hierarchical to relational transformation as needed. When the wizard auto-generates the transformation, the wizard might add extra groups and keys based on the structure of the schema or sample file. To avoid unexpected behavior, delete any unnecessary groups and keys.
1. To view the mapping, in the Overview view Ports area, select Output Mapping.
2. Expand the trees in the Ports grid. To the left, the Transformation input panel shows the expected hierarchical input, and to the right, the Transformation Transformation output panel shows the relational output. When the wizard auto-generates the tutorial transformation, the wizard adds an extra group based on the structure of the schema, and an extra foreign key to another group. To avoid unexpected behavior, delete the unnecessary group and key.
Step 1. Create a Transformation with the Wizard 13
3. To remove the Patient_Records input group from the Transformation output area, select the row with the name of the group and right-click to select Delete.
4. To remove the Fkey_Patient_Records port from Patient_Record input group, select the row and right-click to select Delete.
5. To save the transformation, in the Developer tool select the transformation, then click File > Save.
Step 3. Add the Transformation to a MappingAdd the Data Processor transformation to a mapping. To test that the mapping works, run the mapping.
1. In the Object Explorer view, create a mapping, or select a mapping in the Explorer and select Open Mapping.
2. Copy the file Patient_Test_Example.xml to the Informatica repository server, then create a flat file named Input from the file Patient_Test_Example.xml. Ensure that the file is read as a one line of input.
Note: You must copy the file Patient_Test_Example.xml to the Informatica repository server.
3. Drag the Field1 port in the source to the Input input port in the Data Processor transformation.
When the mapping runs it reads input from the file designated by the path in the input physical data object.
4. Create a flat file named Output and add the fields Number, PatientID, TestID, ChemicalID, Level, and Status. To link the Data Processor transformation to the Output flat file, perform the following steps:
a. Drag the Output output port in the Data Processor transformation to the Field port in the target.
b. Drag the Fkey_Patient_Records port in the Data Processor transformation to the Number port in the target.
c. Drag the Patient_ID port in the Data Processor transformation to the PatientID port in the target.
d. Drag the Test_ID port in the Data Processor transformation to the TestID port in the target.
e. Drag the Chemical_ID port in the Data Processor transformation to the ChemicalID port in the target.
f. Drag the Level port in the Data Processor transformation to the Level port in the target.
g. Drag the Status port in the Data Processor transformation to the Status port in the target.
5. To save the mapping, select the mapping, then click File > Save
Step 4. Test the MappingSave the Data Processor transformation and mapping. Then test the mapping in the Data Viewer view.
1. To test the mapping, right-click in the mapping editor, and select Run Mapping.
Review the target flat file to see the mapping results.
2. To debug an error, click Show Events to show the Data Processor Events view. Double-click an event in the Data Processor Events view to view further details.
14 Chapter 2: Wizard
Testing a Transformation - TipsUse the following tips to help you test a transformation more effectively.
Verify that the mapping logic is complete.
When you use the wizard to create a transformation, the wizard might create a complete transformation or a partial transformation. You might need to configure the transformation components to ensure that the mapping logic matches your requirements.
Verify that the Data Viewer is synched with the Editor.
For a transformation with a Script, Library, or XMap component, before you test a transformation in the Data Viewer view, verify that you synch the view with the editor. To verify that the Data Viewer view is synched, click the Synchronize with Editor button.
Check the output.
The Data Viewer view shows the entire output in an Output panel. You can scroll through the output file to verify that the transformation mapping logic works as you expect it to.
Use keyboard shortcuts.
You can use keyboard shortcuts to perform tasks in the Developer tool. To view the keyboard shortcuts, click Help > Key Assist.
Relational Input
Consider the following tips when you link relational input ports to hierarchical output nodes.
Link relational ports.
You can link an input relational port to a node in the hierarchy. You can link from an element in a hierarchical node to multiple relational groups in the input.
Link primary and foreign keys.
Link a primary key or foreign key from the relevant element or attribute in the hierarchy to a relational group in the input.
Ensure that ports have compatible data types.
When you link an input relational port and a hierarchical node, they must have compatible data types.
Testing a Transformation - Tips 15
C h a p t e r 3
ParserThis chapter includes the following topics:
• Creating a Parser Overview, 16
• Step 1. Create the Transformation, 17
• Step 2. Create a Script with a Parser, 17
• Step 3. Configure the Parser, 18
• Step 4. Test the Transformation, 24
• Testing a Parser - Tips, 25
Creating a Parser OverviewIn this lesson, you create an empty Data Processor transformation with the Developer tool. After you create a Data Processor transformation, you add a Script object with a Parser.
Lesson Concepts
When you create an empty Data Processor transformation, you define components such as the Script to transform the data. A Script transforms input data in one format and writes output data in another format. Create a Script on the Objects tab of the Data Processor transformation. Use the IntelliScript editor to view a Script, add and configure components, and set the startup component for a Script.
Parsers are Script components that read source documents in any format. In many parsing applications, the source documents have a fixed page layout. Bills, invoices, and account statements often have a fixed page layout. In such cases, you can configure a Parser that uses a positional format to find the data fields. The transformation uses an output schema to define the expected hierarchy of the output XML.
The Parser uses anchors and data holders. Anchors identify data in the input text file. Data holders identify data in the output XML file.
You use marker anchors and content anchors to identify data. You define a character or field that marks the location of a data value with a MarkerAnchor. You define the field that contains the value with a ContentAnchor.
Lesson Objectives
In this lesson, perform the following beginner tasks:
• Create a Data Processor transformation to contain components that transform documents.
• Create a Script with a Parser in the Data Processor transformation to transform PDF input to output in an XML hierarchy.
16
Lesson Prerequisites
Before you start this lesson, verify the following prerequisites:
• You have downloaded the files for the tutorial. Download the Parser_DP.zip file from the following link:https://docs.informatica.com/content/dam/source/resources/zipfiles/data-integration/Parser_DP.zip
Add the file to the <INSTALL_DIR>\clients\DeveloperClient\Tutorials directory. Unzip the file to access the input schema file, output schema file, and example source file.
Lesson Timing
Set aside 5 to 10 minutes to perform the tasks in this lesson.
Step 1. Create the TransformationCreate the Data Processor transformation in the Model Repository.
1. In the Developer tool, click File > New > Transformation.
2. Select the Data Processor transformation and click Next.
3. Enter a name for the transformation and browse for a Model repository location to put the transformation.
4. Select to create a blank Data Processor transformation.
5. Click Finish.
The Developer tool creates the empty transformation in the repository. The Overview view appears in the Developer tool.
Step 2. Create a Script with a ParserCreate a Data Processor transformation and then create a Script with a Parser for the transformation. When you create a Parser, you must have a schema that describes the output XML document. You select the element in the schema that is the root element for the output XML.
1. In the Developer Data Processor transformation Objects view, click New.
2. Select Script and click Next.
3. Enter a name for the Script and click Next..
4. By default Parser is selected. If not, select it. Enter a name for the Parser.
5. As the Script component is the first component to process data in the transformation, enable Set as startup component.
Click Next.
6. To add a schema that defines the output, select Add reference to a Schema Object. Click Create a new schema object to import a new Schema object and browse for the ParserSchema.xsd file in the <INSTALL_DIR>/tomcat/bin/source directory.
7. To add a sample PDF file that you can use to test the Parser, browse for and select the Parser.pdf file in the <INSTALL_DIR>/tomcat/bin/source directory.
You can change the sample PDF file.
Step 1. Create the Transformation 17

8. Click Finish.
The Developer tool creates a view for each Parser or other Script object that you create. Click the view to configure the Parser.
Step 3. Configure the ParserConfigure a Data Processor transformation Parser in the IntelliScript editor. To create mapping statements, first define marker anchors and content anchors for each data value in the PDF sample file. Then define data holders that identify the XML hierarchy element that is associated with each unstructured data element.
1. To open the IntelliScript editor, click the Script object that you want to edit. When you create a Script with a Parser, the IntelliScript editor displays it automatically.
In the following image, the IntelliScript editor displays the parser:
2. To preview the example source in text, perform the following steps:
a. Next to the example_source property, double‐click the equals sign and select LocalFile.
b. Expand the example_source property, then click the double‐right arrows.
c. Next to the pre_processor property, double‐click the equals sign and select PDFToTxt_4.
d. Next to the format property, double‐click the equals sign and select TextFormat.
In the following image, the Data Viewer view editor displays the PDF in text format:
3. To define a marker anchor that identifies where to find the company name, perform the following steps:
a. In the Data Viewer view, find and select the text Company Name that marks the location of the name.
18 Chapter 3: Parser

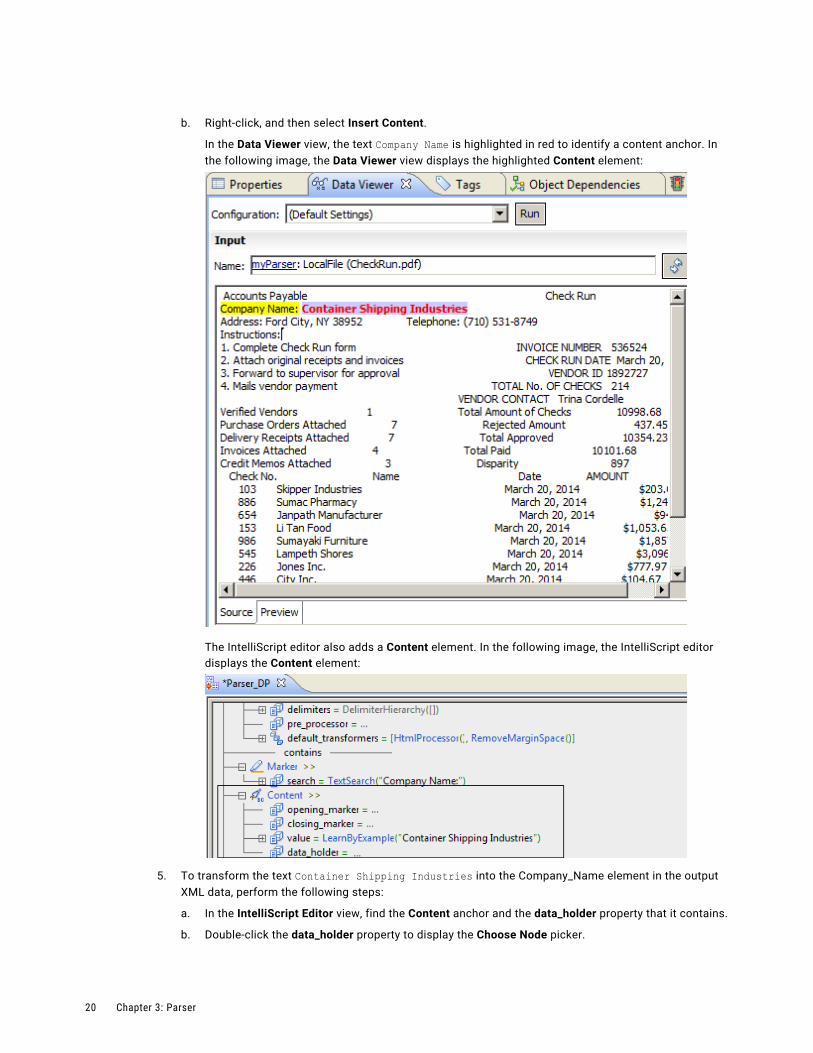
b. Right-click, and then select Insert Marker.
In the Data Viewer view, the text Company Name is highlighted in yellow to identify a marker anchor. In the following image, the Data Viewer view displays the highlighted Marker element in the Input panel:
The IntelliScript editor also adds a Marker element. In the following image, the IntelliScript editor displays the Marker element:
4. To define a content anchor that shows where the parser reads the company name, perform the following steps:
a. In the Data Viewer view, find and select the text Container Shipping Industries that marks the text to parse.
Step 3. Configure the Parser 19
b. Right-click, and then select Insert Content.
In the Data Viewer view, the text Company Name is highlighted in red to identify a content anchor. In the following image, the Data Viewer view displays the highlighted Content element:
The IntelliScript editor also adds a Content element. In the following image, the IntelliScript editor displays the Content element:
5. To transform the text Container Shipping Industries into the Company_Name element in the output XML data, perform the following steps:
a. In the IntelliScript Editor view, find the Content anchor and the data_holder property that it contains.
b. Double‐click the data_holder property to display the Choose Node picker.
20 Chapter 3: Parser
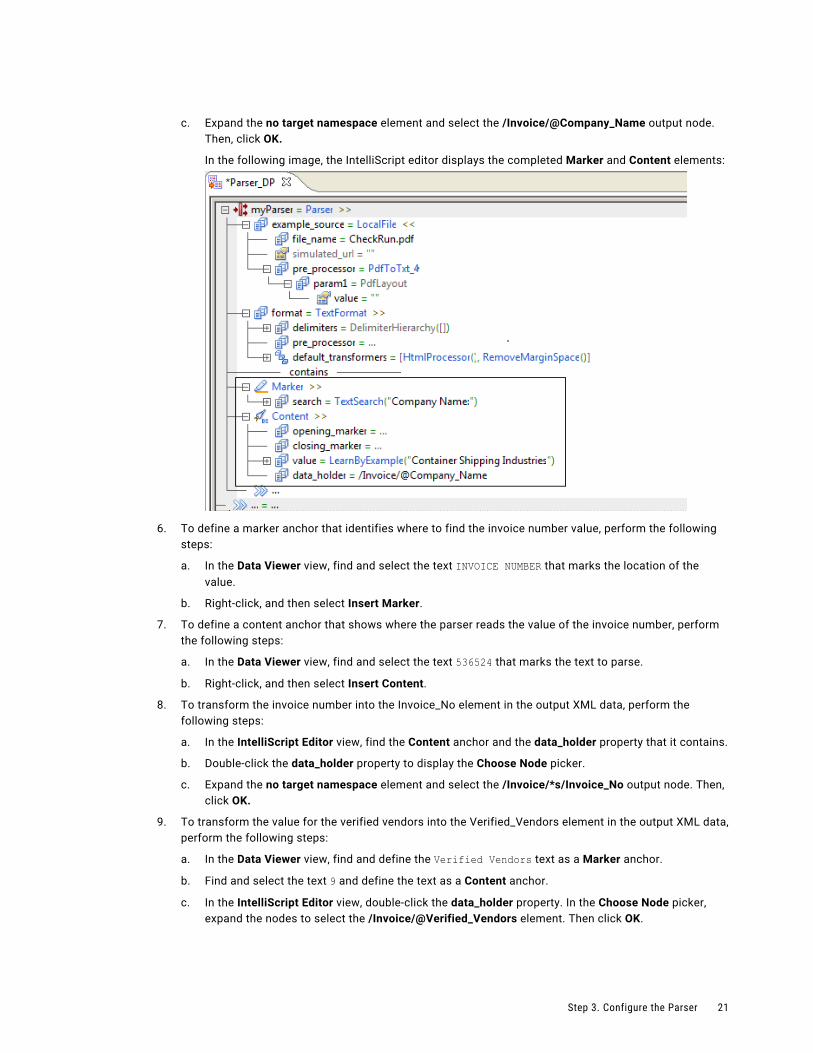
c. Expand the no target namespace element and select the /Invoice/@Company_Name output node. Then, click OK.
In the following image, the IntelliScript editor displays the completed Marker and Content elements:
6. To define a marker anchor that identifies where to find the invoice number value, perform the following steps:
a. In the Data Viewer view, find and select the text INVOICE NUMBER that marks the location of the value.
b. Right-click, and then select Insert Marker.
7. To define a content anchor that shows where the parser reads the value of the invoice number, perform the following steps:
a. In the Data Viewer view, find and select the text 536524 that marks the text to parse.
b. Right-click, and then select Insert Content.
8. To transform the invoice number into the Invoice_No element in the output XML data, perform the following steps:
a. In the IntelliScript Editor view, find the Content anchor and the data_holder property that it contains.
b. Double‐click the data_holder property to display the Choose Node picker.
c. Expand the no target namespace element and select the /Invoice/*s/Invoice_No output node. Then, click OK.
9. To transform the value for the verified vendors into the Verified_Vendors element in the output XML data, perform the following steps:
a. In the Data Viewer view, find and define the Verified Vendors text as a Marker anchor.
b. Find and select the text 9 and define the text as a Content anchor.
c. In the IntelliScript Editor view, double‐click the data_holder property. In the Choose Node picker, expand the nodes to select the /Invoice/@Verified_Vendors element. Then click OK.
Step 3. Configure the Parser 21

10. To transform the value for the total number of checks into the Total_Checks element in the output XML data, perform the following steps:
a. In the Data Viewer view, find and define the Total Amount of Checks text as a Marker anchor.
b. Find and select the text 10998.68 and define the text as a Content anchor.
c. In the IntelliScript Editor view, find the Content anchor and change the closing_marker to NewlineSearch, in case the order number is longer than in the example source.
d. Double‐click the data_holder property. In the Choose Node picker, expand the nodes to select the /Invoice/@Total_Checks element. Then click OK.
11. To transform the table of check-related data, add a group to hold a logical set of statements and a repeating group to process each line of the table. Perform the following steps:
a. In the IntelliScript Editor view, double-click the last heavy double-arrows under the parser element and select Group.
b. In the Data Viewer view, find and define the Check No. text as a Marker anchor.
c. In the IntelliScript Editor view, double-click the heavy double-arrows under the contains dividing line and select RepeatingGroup.
d. Expand the RepeatingGroup element and change the value for separator to Marker.
e. Expand the separator element and change the value for search to NewlineSearch.
f. To parse the quantity value for each line of the form, create a content marker for that value. Double-click the heavy double-arrows under the RepeatingGroup element and select Content.
g. To assign the quantity value to the Quantity element in the XML output, expand the Content anchor and double-click the data_holder element. Expand the nodes to select /Invoice/*s/Order/*s/CheckNo.
Because the data holder type is a number, the parser takes the first number in each line as the quantity value.
h. To parse the vendor name for each line of the order, create a content marker for that value. Double-click the heavy double-arrows under the previous element and select Content.
i. In the Data Viewer view, find and define the text Skipper Industries as an Offset Content anchor.
j. Since some names might be longer than the first vendor name, change the closing marker offset amount. In the IntelliScript Editor view, expand the closing_marker element and change the offset amount from 18 to 50.
k. To assign the vendor name to the Vendor_Name element in the XML output, expand the Content anchor and double-click the data_holder element. Expand the nodes to select /Invoice/*s/Order/*s/Vendor_Name.
l. To parse the check date for each line of the order, create a content marker for that value. Double-click the heavy double-arrows under the previous element and select Content.
m. In the Data Viewer view, find and define the text March 20, 2014 as an Offset Content anchor.
n. Because some dates might be longer than this date, change the closing marker offset amount. In the IntelliScript Editor view, expand the closing_marker element and change the offset amount from 14 to 26.
o. To assign the date to the Check_Date element in the XML output, expand the Content anchor and double-click the data_holder element. Expand the nodes to select /Invoice/*s/Order/*s/Check_Date.
p. To parse the check value for each line of the order, create a content marker for that value. Double-click the heavy double-arrows under the previous element and select Content.
q. Expand the Content element and change the value for phase to final.
22 Chapter 3: Parser
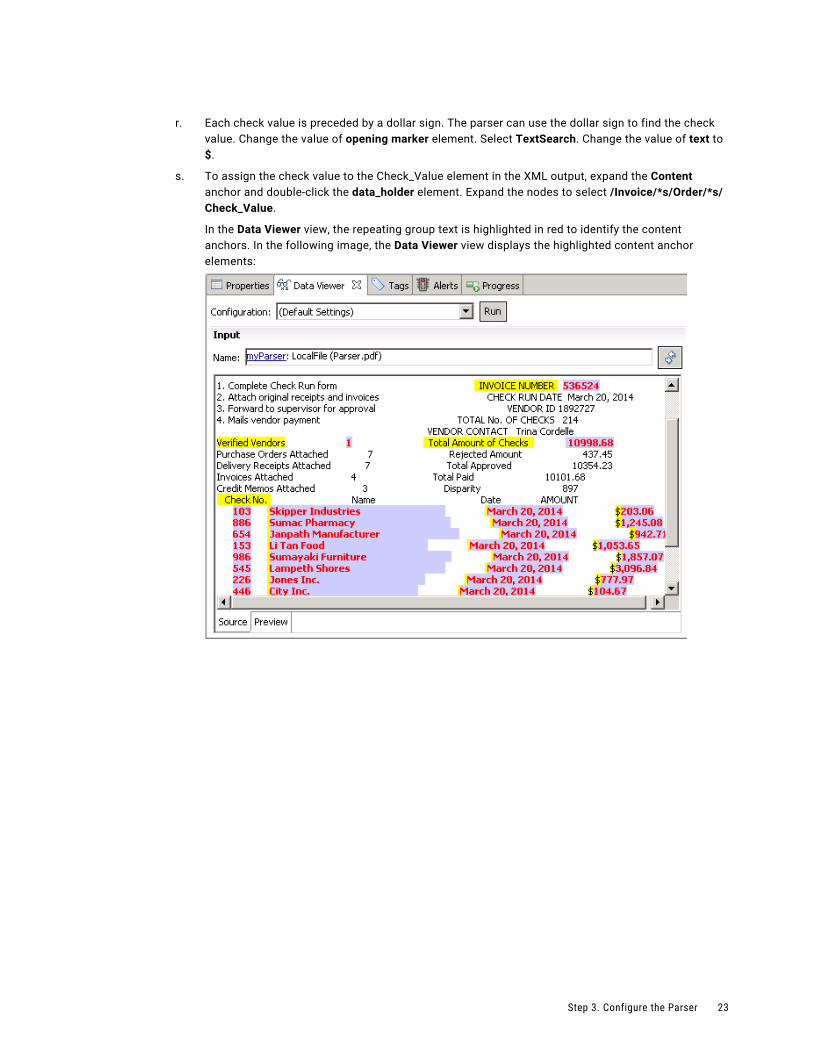
r. Each check value is preceded by a dollar sign. The parser can use the dollar sign to find the check value. Change the value of opening marker element. Select TextSearch. Change the value of text to $.
s. To assign the check value to the Check_Value element in the XML output, expand the Content anchor and double-click the data_holder element. Expand the nodes to select /Invoice/*s/Order/*s/Check_Value.
In the Data Viewer view, the repeating group text is highlighted in red to identify the content anchors. In the following image, the Data Viewer view displays the highlighted content anchor elements:
Step 3. Configure the Parser 23
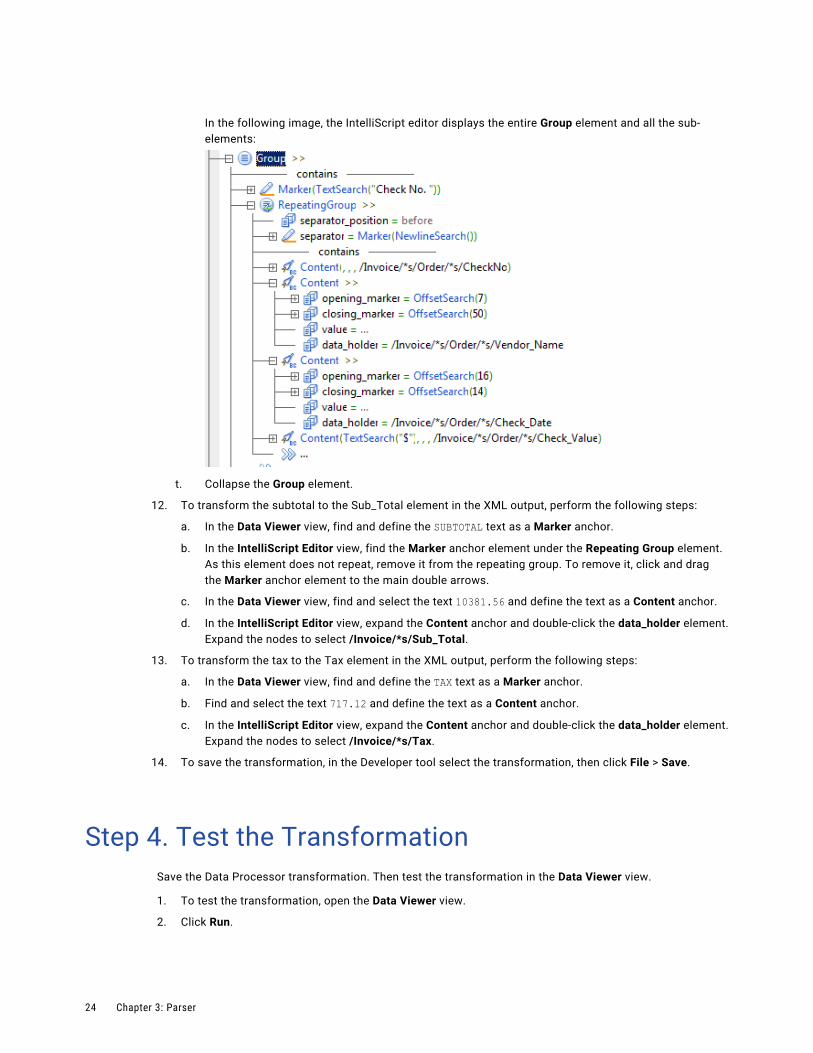
In the following image, the IntelliScript editor displays the entire Group element and all the sub-elements:
t. Collapse the Group element.
12. To transform the subtotal to the Sub_Total element in the XML output, perform the following steps:
a. In the Data Viewer view, find and define the SUBTOTAL text as a Marker anchor.
b. In the IntelliScript Editor view, find the Marker anchor element under the Repeating Group element. As this element does not repeat, remove it from the repeating group. To remove it, click and drag the Marker anchor element to the main double arrows.
c. In the Data Viewer view, find and select the text 10381.56 and define the text as a Content anchor.
d. In the IntelliScript Editor view, expand the Content anchor and double-click the data_holder element. Expand the nodes to select /Invoice/*s/Sub_Total.
13. To transform the tax to the Tax element in the XML output, perform the following steps:
a. In the Data Viewer view, find and define the TAX text as a Marker anchor.
b. Find and select the text 717.12 and define the text as a Content anchor.
c. In the IntelliScript Editor view, expand the Content anchor and double-click the data_holder element. Expand the nodes to select /Invoice/*s/Tax.
14. To save the transformation, in the Developer tool select the transformation, then click File > Save.
Step 4. Test the TransformationSave the Data Processor transformation. Then test the transformation in the Data Viewer view.
1. To test the transformation, open the Data Viewer view.
2. Click Run.
24 Chapter 3: Parser

The Developer tool validates and runs the transformation. If there is no error, the Developer tool shows the example file in the Input area. The output results appear in the Output panel. In the following image, the Data Viewer view displays the output:
3. To debug an error, click Show Events to show the Data Processor Events view. Double-click an event in the Data Processor Events view to view further details.
Testing a Parser - TipsUse the following tips to help you create a Parser more effectively.
Set the Startup Component in the IntelliScript Editor.
You can use the IntelliScript editor to set a Script component as the startup component of the Data Processor transformation. You must define a startup component to run the Script. In the IntelliScript editor, right-click a component that appears at the global level of the Script, and select Set as Startup Component.
Check the schema.
The Parser uses an output schema hierarchy and the Parser mapping logic to sort the output. If you see unexpected output, check the hierarchy of the output schema. Check that the element characteristics are defined correctly.
Check the example source.
If the output is missing elements, check the example source file. Verify that the elements and the element characteristics are defined correctly.
Define newline markers.
Avoid Marker anchors that search for a newline character followed by a carriage return character \n\r. This combination often appears in Windows but not in UNIX. Instead, configure a Marker with the built-in NewlineSearch component that searches for both the \n\r sequence and the \n or \r character alone.
Testing a Parser - Tips 25

Use relative file paths.
Use relative file paths instead of absolute file paths. Note that file paths in UNIX are case-sensitive.
Find a root element in a schema.
You can use pattern searching to search for a root element when you add a schema to a Parser. To find a match to any number of characters in a string, enter *<string>. To match a single character, enter ?<character>.
26 Chapter 3: Parser

C h a p t e r 4
SerializerThis chapter includes the following topics:
• Creating a Serializer Overview, 27
• Step 1. Create the Transformation, 28
• Step 2. Create a Script with a Serializer, 28
• Step 3. Configure the Serializer, 29
• Step 4. Test the Transformation, 33
• Testing a Serializer - Tips, 33
Creating a Serializer OverviewIn this lesson, you create an empty Data Processor transformation with the Developer tool. After you create a Data Processor transformation, you add a Script object with a Serializer.
Lesson Concepts
After you create an empty Data Processor transformation, you can create and configure different Script components to transform data from one format to another format.
A Serializer converts an XML or JSON file to an output document in any format. Serialization is the opposite of parsing. For example, the output of a Serializer can be a text document, an HTML document, or even another XML document.
Serialization anchors are the main components in a serializer. Serialization anchors read data from locations in the source document and write the data to XML.
A ContentSerializer writes the content of a data holder to the output document. A StringSerializer writes a predefined string to the output.
Lesson Objectives
In this lesson, perform the following tasks:
• Create a Data Processor transformation to contain components that transform documents.
• Create a Script with a Serializer in the Data Processor transformation to transform input in an XML hierarchy to text output.
27
Lesson Prerequisites
Before you start this lesson, verify the following prerequisites:
• You have downloaded the files for the tutorial. Download the Serializer_DP.zip file from the following link:https://docs.informatica.com/content/dam/source/resources/zipfiles/data-integration/Serializer_DP.zip
Add the file to the <INSTALL_DIR>\clients\DeveloperClient\Tutorials directory. Unzip the file to access the input schema file, output schema file, and example source file.
Lesson Timing
Set aside 20 minutes to perform the tasks in this lesson.
Step 1. Create the TransformationCreate the Data Processor transformation in the Model Repository.
1. In the Developer tool, click File > New > Transformation.
2. Select the Data Processor transformation and click Next.
3. Enter a name for the transformation and browse for a Model repository location to put the transformation.
4. Select to create a blank Data Processor transformation.
5. Click Finish.
The Developer tool creates the empty transformation in the repository. The Overview view appears in the Developer tool.
Step 2. Create a Script with a SerializerCreate a Data Processor transformation and then create a Script with a Serializer for the transformation. When you create a Serializer, you must have a schema that describes the input XML document. You select the element in the schema that is the root element for the input XML.
Before you begin, you must download and unzip the Serializer_DP.zip file. For more information, see “Creating a Serializer Overview” on page 27.
1. In the Developer Data Processor transformation Objects view, click New.
2. Select Script and click Next.
3. Enter a name for the Script and click Next..
4. Select Seralizer, and enter a name for the Serializer.
5. As the Script component is the first component to process data in the transformation, enable Set as startup component, then click Next.
6. To add a schema that defines the input, select Add reference to a Schema Object. Click Create a new schema object to import a new Schema object and browse for the SerializerSchema.xsd file in the <INSTALL_DIR>/tomcat/bin/source directory.
7. To add a sample file that you can use to test the Serializer, browse for and select the SerializerExample.pdf file in the <INSTALL_DIR>/tomcat/bin/source directory.
28 Chapter 4: Serializer
You can change the sample file.
8. Click Finish.
The Developer tool creates a view for each Serializer or other Script object that you create. Click the view to configure the Serializer.
Step 3. Configure the SerializerConfigure a Data Processor transformation Serializer in the IntelliScript editor. In this example, send hierarchical input to text output.
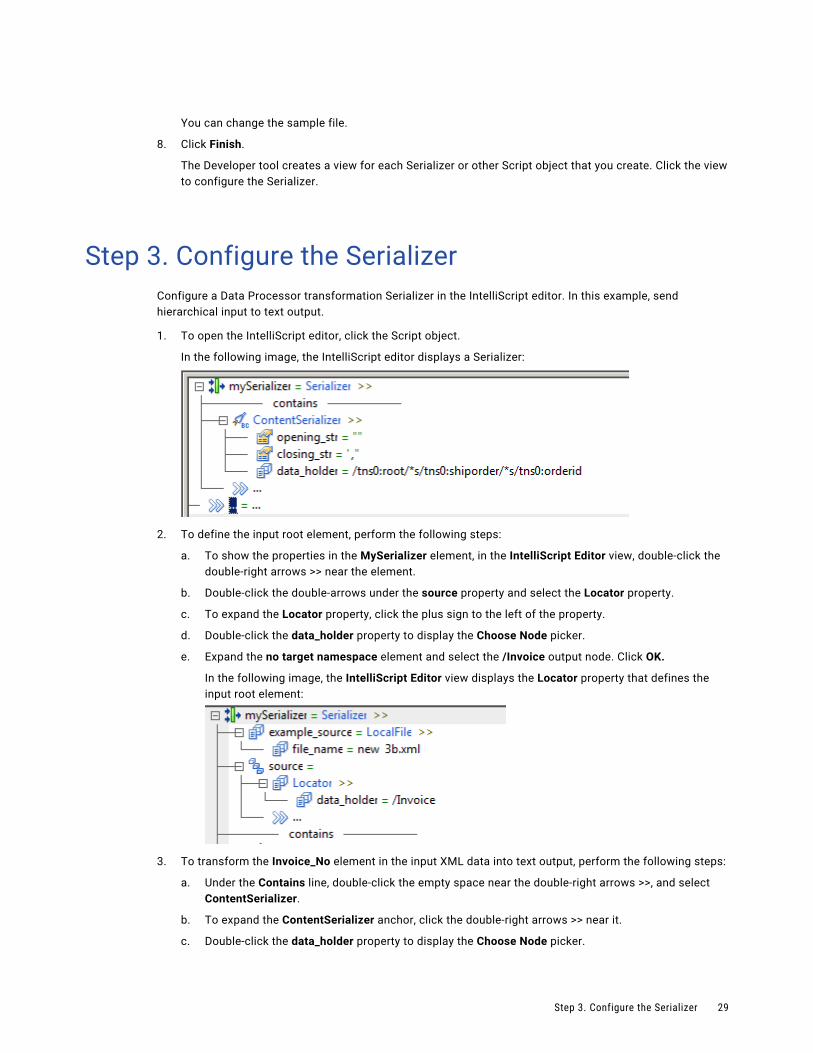
1. To open the IntelliScript editor, click the Script object.
In the following image, the IntelliScript editor displays a Serializer:
2. To define the input root element, perform the following steps:
a. To show the properties in the MySerializer element, in the IntelliScript Editor view, double-click the double-right arrows >> near the element.
b. Double‐click the double-arrows under the source property and select the Locator property.
c. To expand the Locator property, click the plus sign to the left of the property.
d. Double‐click the data_holder property to display the Choose Node picker.
e. Expand the no target namespace element and select the /Invoice output node. Click OK.
In the following image, the IntelliScript Editor view displays the Locator property that defines the input root element:
3. To transform the Invoice_No element in the input XML data into text output, perform the following steps:
a. Under the Contains line, double-click the empty space near the double-right arrows >>, and select ContentSerializer.
b. To expand the ContentSerializer anchor, click the double-right arrows >> near it.
c. Double‐click the data_holder property to display the Choose Node picker.
Step 3. Configure the Serializer 29
d. Expand the no target namespace element and select the /Invoice/*s/Invoice_No node. Then, click OK.
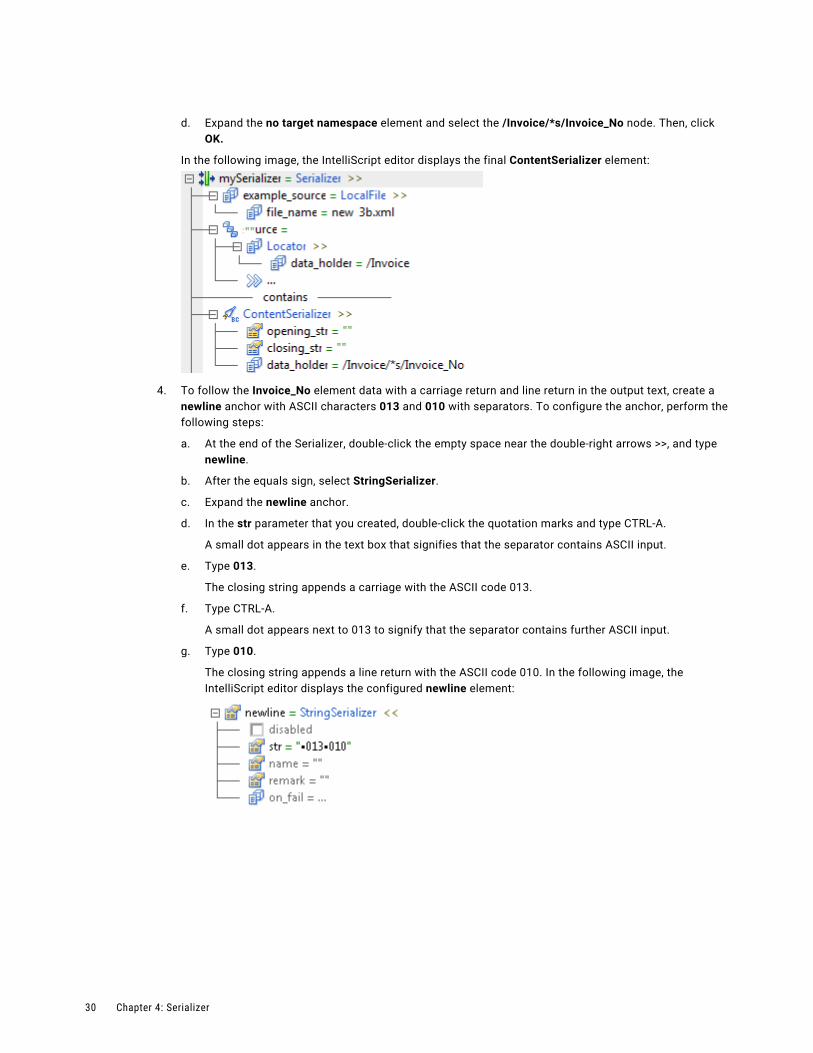
In the following image, the IntelliScript editor displays the final ContentSerializer element:
4. To follow the Invoice_No element data with a carriage return and line return in the output text, create a newline anchor with ASCII characters 013 and 010 with separators. To configure the anchor, perform the following steps:
a. At the end of the Serializer, double-click the empty space near the double-right arrows >>, and type newline.
b. After the equals sign, select StringSerializer.
c. Expand the newline anchor.
d. In the str parameter that you created, double-click the quotation marks and type CTRL-A.
A small dot appears in the text box that signifies that the separator contains ASCII input.
e. Type 013.
The closing string appends a carriage with the ASCII code 013.
f. Type CTRL-A.
A small dot appears next to 013 to signify that the separator contains further ASCII input.
g. Type 010.
The closing string appends a line return with the ASCII code 010. In the following image, the IntelliScript editor displays the configured newline element:
30 Chapter 4: Serializer
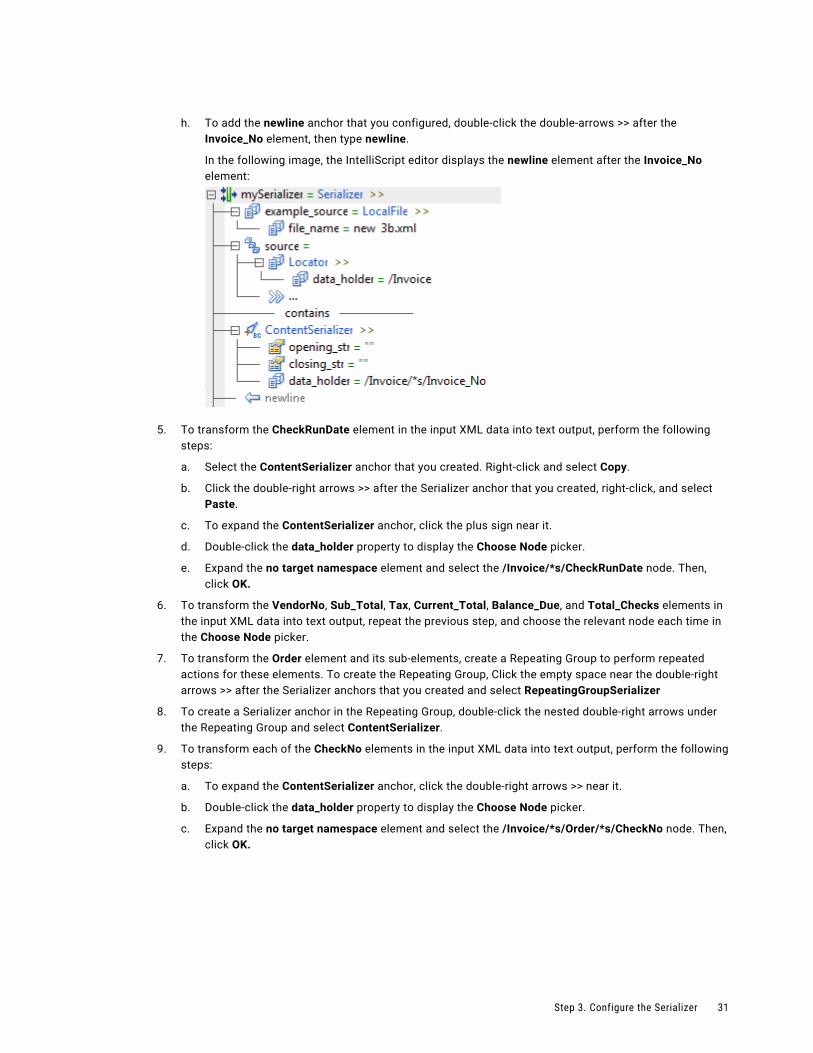
h. To add the newline anchor that you configured, double-click the double-arrows >> after the Invoice_No element, then type newline.
In the following image, the IntelliScript editor displays the newline element after the Invoice_No element:
5. To transform the CheckRunDate element in the input XML data into text output, perform the following steps:
a. Select the ContentSerializer anchor that you created. Right-click and select Copy.
b. Click the double-right arrows >> after the Serializer anchor that you created, right-click, and select Paste.
c. To expand the ContentSerializer anchor, click the plus sign near it.
d. Double‐click the data_holder property to display the Choose Node picker.
e. Expand the no target namespace element and select the /Invoice/*s/CheckRunDate node. Then, click OK.
6. To transform the VendorNo, Sub_Total, Tax, Current_Total, Balance_Due, and Total_Checks elements in the input XML data into text output, repeat the previous step, and choose the relevant node each time in the Choose Node picker.
7. To transform the Order element and its sub-elements, create a Repeating Group to perform repeated actions for these elements. To create the Repeating Group, Click the empty space near the double-right arrows >> after the Serializer anchors that you created and select RepeatingGroupSerializer
8. To create a Serializer anchor in the Repeating Group, double-click the nested double-right arrows under the Repeating Group and select ContentSerializer.
9. To transform each of the CheckNo elements in the input XML data into text output, perform the following steps:
a. To expand the ContentSerializer anchor, click the double-right arrows >> near it.
b. Double‐click the data_holder property to display the Choose Node picker.
c. Expand the no target namespace element and select the /Invoice/*s/Order/*s/CheckNo node. Then, click OK.
Step 3. Configure the Serializer 31
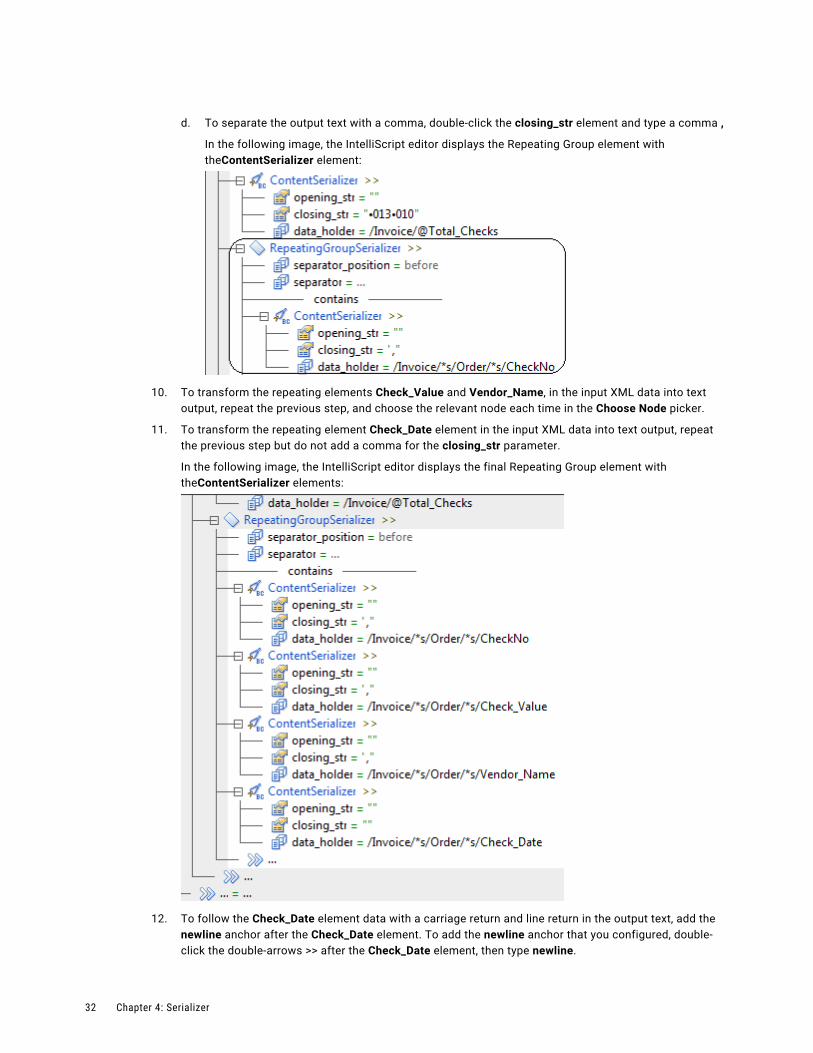
d. To separate the output text with a comma, double-click the closing_str element and type a comma ,
In the following image, the IntelliScript editor displays the Repeating Group element with theContentSerializer element:
10. To transform the repeating elements Check_Value and Vendor_Name, in the input XML data into text output, repeat the previous step, and choose the relevant node each time in the Choose Node picker.
11. To transform the repeating element Check_Date element in the input XML data into text output, repeat the previous step but do not add a comma for the closing_str parameter.
In the following image, the IntelliScript editor displays the final Repeating Group element with theContentSerializer elements:
12. To follow the Check_Date element data with a carriage return and line return in the output text, add the newline anchor after the Check_Date element. To add the newline anchor that you configured, double-click the double-arrows >> after the Check_Date element, then type newline.
32 Chapter 4: Serializer
13. To save the transformation, in the Developer tool click File > Save.
Step 4. Test the TransformationSave the Data Processor transformation. Then test the transformation in the Data Viewer view.
1. To test the transformation, open the Data Viewer view.
2. Click Run.
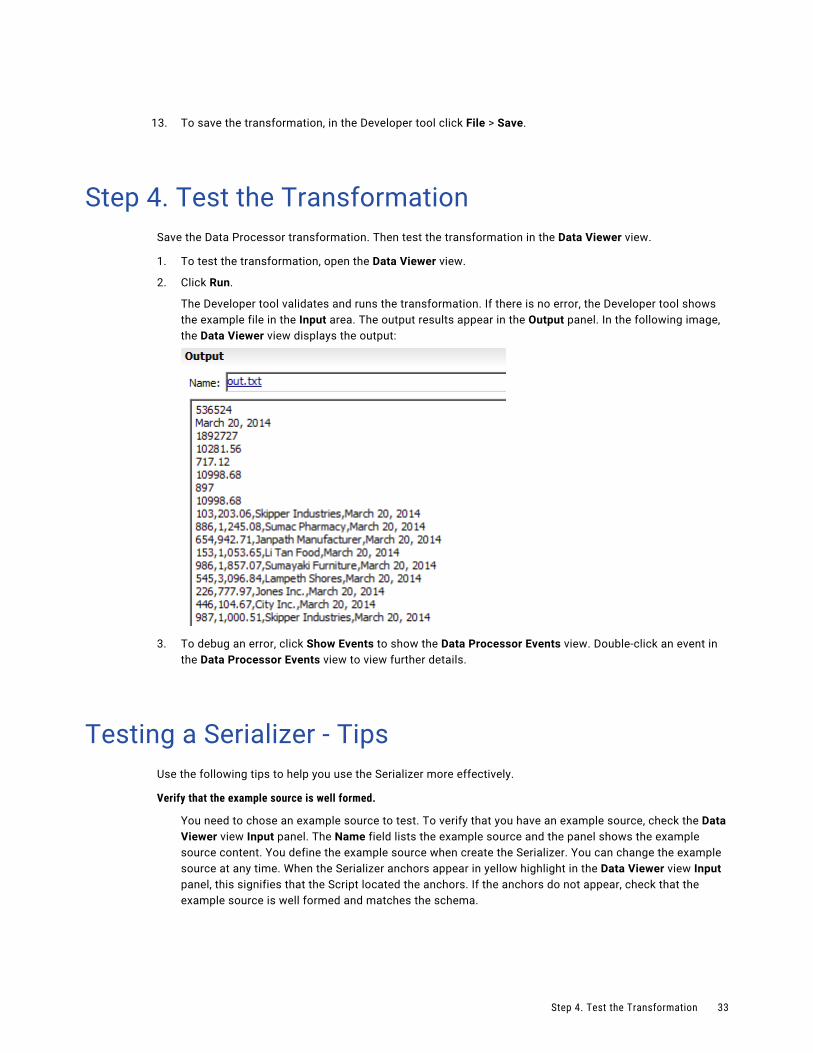
The Developer tool validates and runs the transformation. If there is no error, the Developer tool shows the example file in the Input area. The output results appear in the Output panel. In the following image, the Data Viewer view displays the output:
3. To debug an error, click Show Events to show the Data Processor Events view. Double-click an event in the Data Processor Events view to view further details.
Testing a Serializer - TipsUse the following tips to help you use the Serializer more effectively.
Verify that the example source is well formed.
You need to chose an example source to test. To verify that you have an example source, check the Data Viewer view Input panel. The Name field lists the example source and the panel shows the example source content. You define the example source when create the Serializer. You can change the example source at any time. When the Serializer anchors appear in yellow highlight in the Data Viewer view Input panel, this signifies that the Script located the anchors. If the anchors do not appear, check that the example source is well formed and matches the schema.
Step 4. Test the Transformation 33

Use a valid schema that matches the example source.
A Serializer uses a schema to define the expected structure of the input XML document. If the file that you choose is not a valid schema or is not well formed, the wizard might not be able to upload the file. If the schema does not match the example source, the Serializer will not work.
Format the output correctly.
To separate the output text with a comma, use a comma in the closing_str element. To separate the output text with a carriage return, use the ASCII code 013 in the closing_str element. To separate the output text with a line return, use the ASCII code 010 in the closing_str element. When you use ASCII codes in the closing_str element, you must indicate that a code is an ASCII code rather than regular text by entering CTRL-A as a prefix to the code.
34 Chapter 4: Serializer
C h a p t e r 5
XMapThis chapter includes the following topics:
• XMap Overview, 35
• Step 1. Create the Transformation, 36
• Step 2. Create an XMap, 36
• Step 3. Configure the XMap, 37
• Step 4. Test the Transformation, 38
• Testing an XMap - Tips, 39
XMap OverviewIn this lesson, you create an empty Data Processor transformation with the Developer tool. After you create a Data Processor transformation, you add an XMap object.
Lesson Concepts
After you create a Data Processor transformation, you add an XMap to transform the data. You configure the XMap with input and output schemas and an example source. An XMap uses input and output schemas to define the expected hierarchy of input and output documents. An XMap can transform any input XML document whose elements match the input schema hierarchy into an output document with the hierarchy of the output schema.
A mapping statement determines how to map data from the input XML document to the output XML document. When you drag a node from the input schema to the output schema, the XMap editor creates mapping statements in a grid. You can edit mapping statement fields in the grid to change the logic for a mapping statement.
A Repeating Group statement is a mapping statement that can occur multiple times. The Data Processor transformation performs the Repeating Group statement for each element or value that is a result of the Input XPath expression.
The Repeating Group input is an XPath expression that can evaluate to a sequence of elements or values. XPath is a query language used to select nodes in an XML document and perform computations.
Repeating Group statements can contain Map statements. A Map statement is the basic XMap object and maps a simple input value to a simple output value. The input is a single value or a constant value.
35
Lesson Objectives
In this lesson, you complete the following beginner tasks:
• Create a Data Processor transformation to contain components that transform documents.
• Create an XMap in the Data Processor transformation to transform input with an XML hierarchy to output with a different XML hierarchy.
• Open an XMap in the XMap editor.
• Create a Repeating Group statement to pass repeating sets of details for doctors to the output.
• Create Map statements to pass a specific doctor detail to the output.
• Validate the transformation.
Lesson Prerequisites
Before you start this lesson, verify the following prerequisites:
• You have downloaded the file for the tutorial. Download the XMap_DP.zip file from the following link:https://docs.informatica.com/content/dam/source/resources/zipfiles/data-integration/XMap_DP.zip
Add the file to the <INSTALL_DIR>\clients\DeveloperClient\Tutorials directory. Unzip the file to access the input schema file, output schema file, and example source file.
Lesson Timing
Set aside 20 minutes to complete the tasks in this lesson.
Step 1. Create the TransformationCreate the Data Processor transformation in the Model Repository.
1. In the Developer tool, click File > New > Transformation.
2. Select the Data Processor transformation and click Next.
3. Enter a name for the transformation and browse for a Model repository location to put the transformation.
4. Select to create a blank Data Processor transformation.
5. Click Finish.
The Developer tool creates the empty transformation in the repository. The Overview view appears in the Developer tool.
Step 2. Create an XMapCreate a Data Processor transformation and then create an XMap for the transformation. When you create an XMap, you must have a schema that describes the input and the output XML documents. You select the element in the schema that is the root element for the input XML.
1. In the Developer Data Processor transformation Objects view, click New.
2. Select XMap and click Next.
3. Enter a name for the XMap.
36 Chapter 5: XMap
4. The XMap component is the first component to process data in the transformation, so ensure that Set as startup component is selected.
A Data Processor transformation can contain multiple components to process data. Each component might contain other components. You must identify which component is the entry point for the transformation.
Click Next.
5. To add a schema that defines the input, select Add reference to a Schema Object.
If the schema was already imported into the repository, you can select it. However, we are using a schema that is not in the repository.
6. To import a schema and add it to the repository, click Create a new schema object and browse for the XMapInputSchema.xsd file in the following directory: <INSTALL_DIR>\clients\DeveloperClient\Tutorials
7. To add the sample XML file that you use to test the XMap, browse for and select the XMapExample.xml file in the following directory: <INSTALL_DIR>\clients\DeveloperClient\Tutorials
8. Choose the root for the input hierarchy.
In the Root Element Selection dialog box, select the fcdm:FlexCDM_PurchaseCommit element in the schema as the root element for the XML.
9. To add a schema that defines the output, select Add reference to a Schema Object.
10. To add the schema to the repository, click Create a new schema object and browse for the XMapOutputSchema.xsd file in the following directory: <INSTALL_DIR>\clients\DeveloperClient\Tutorials
11. Choose the root for the output hierarchy.
In the Root Element Selection dialog box, select the Order element in the schema as the root element for the XML.
12. Click Finish.
The Developer tool creates a view for the XMap that you created. Click the view to configure the XMap.
Step 3. Configure the XMapYou can create a mapping statement by dragging a node from the input schema to a node in the output schema. The XMap editor adds the mapping statement to the mapping statement grid.
1. To open the XMap editor, in the Overview view, click the XMap link.
The XMap editor appears and shows the input and output schemas.
2. Drag the mouse from the Line input schema node to the ProjectDetails output schema node.
Both schema nodes are repeating nodes, so the XMap editor creates a Repeating Group statement named Line to ProjectDetails in the grid. Statements under the Repeating Group statement are iterated for each group of input data to provide project order information to the output.
3. Drag the mouse from the bottom FlexCDM_PurchaseCommit input schema node to the ProjectLevel output schema node.
The XMap editor creates a Map statement in the grid.
This statement passes the project level data to the output XML.
4. Drag the mouse from the SiteName input schema node to the SupplierSite output schema node.
Step 3. Configure the XMap 37
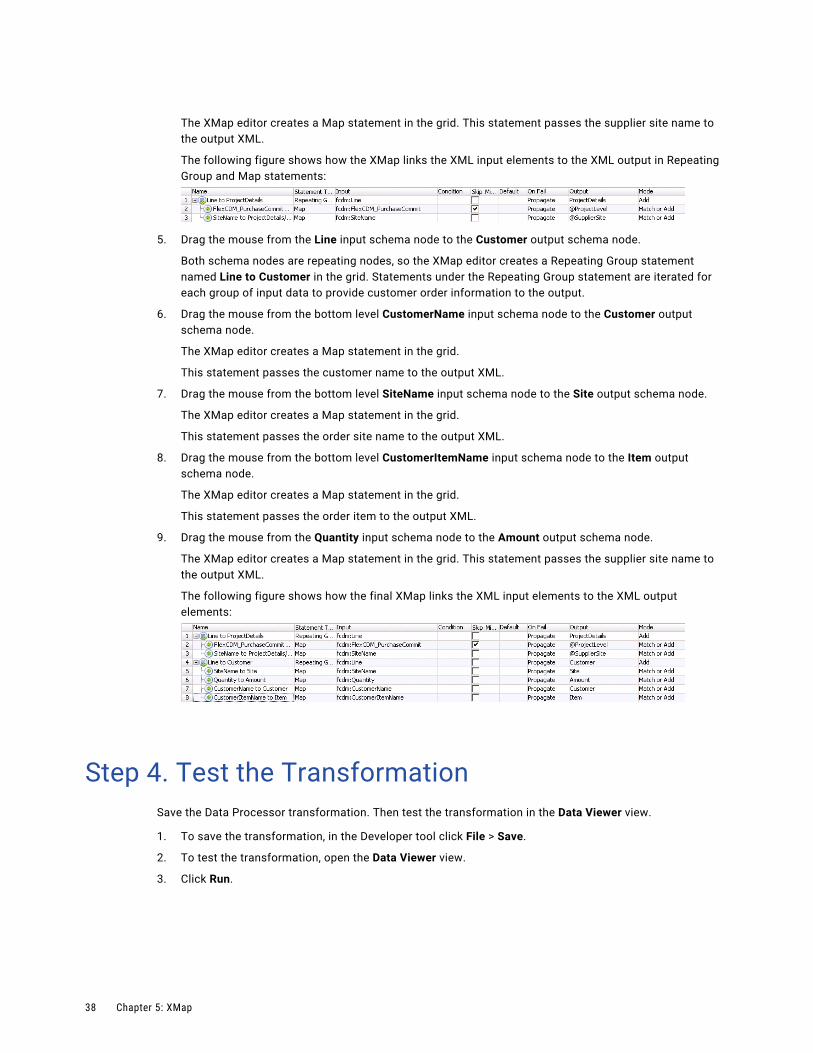
The XMap editor creates a Map statement in the grid. This statement passes the supplier site name to the output XML.
The following figure shows how the XMap links the XML input elements to the XML output in Repeating Group and Map statements:
5. Drag the mouse from the Line input schema node to the Customer output schema node.
Both schema nodes are repeating nodes, so the XMap editor creates a Repeating Group statement named Line to Customer in the grid. Statements under the Repeating Group statement are iterated for each group of input data to provide customer order information to the output.
6. Drag the mouse from the bottom level CustomerName input schema node to the Customer output schema node.
The XMap editor creates a Map statement in the grid.
This statement passes the customer name to the output XML.
7. Drag the mouse from the bottom level SiteName input schema node to the Site output schema node.
The XMap editor creates a Map statement in the grid.
This statement passes the order site name to the output XML.
8. Drag the mouse from the bottom level CustomerItemName input schema node to the Item output schema node.
The XMap editor creates a Map statement in the grid.
This statement passes the order item to the output XML.
9. Drag the mouse from the Quantity input schema node to the Amount output schema node.
The XMap editor creates a Map statement in the grid. This statement passes the supplier site name to the output XML.
The following figure shows how the final XMap links the XML input elements to the XML output elements:
Step 4. Test the TransformationSave the Data Processor transformation. Then test the transformation in the Data Viewer view.
1. To save the transformation, in the Developer tool click File > Save.
2. To test the transformation, open the Data Viewer view.
3. Click Run.
38 Chapter 5: XMap
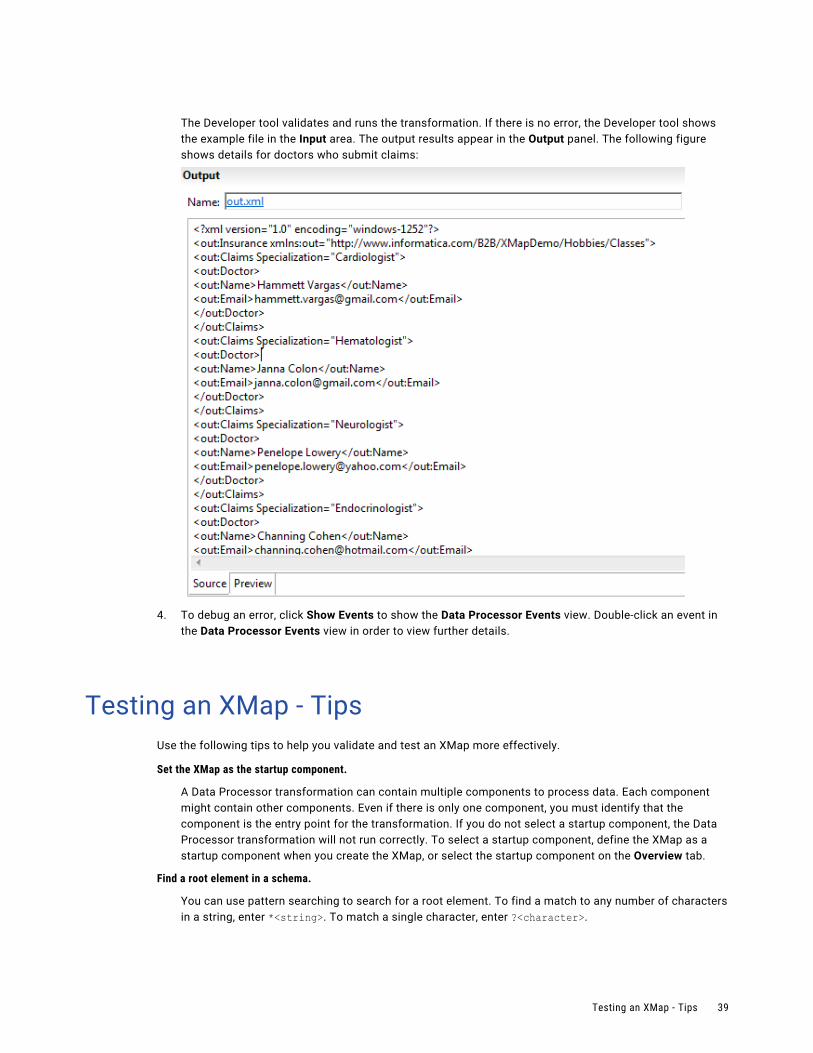
The Developer tool validates and runs the transformation. If there is no error, the Developer tool shows the example file in the Input area. The output results appear in the Output panel. The following figure shows details for doctors who submit claims:
4. To debug an error, click Show Events to show the Data Processor Events view. Double-click an event in the Data Processor Events view in order to view further details.
Testing an XMap - TipsUse the following tips to help you validate and test an XMap more effectively.
Set the XMap as the startup component.
A Data Processor transformation can contain multiple components to process data. Each component might contain other components. Even if there is only one component, you must identify that the component is the entry point for the transformation. If you do not select a startup component, the Data Processor transformation will not run correctly. To select a startup component, define the XMap as a startup component when you create the XMap, or select the startup component on the Overview tab.
Find a root element in a schema.
You can use pattern searching to search for a root element. To find a match to any number of characters in a string, enter *<string>. To match a single character, enter ?<character>.
Testing an XMap - Tips 39

Select an example source.
You can change the example source to test the XMap at any time. You can test any example source with the same XML hierarchy as the input schema.
40 Chapter 5: XMap

C h a p t e r 6
Export To PowerCenterThis chapter includes the following topics:
• Export to PowerCenter Overview, 41
• Step 1. Export the Mapping to PowerCenter, 42
• Step 2. Generate and Run a Workflow, 42
Export to PowerCenter OverviewIn this lesson, you export a Data Processor transformation in a mapping to the PowerCenter repository.
Lesson Concepts
A mapping uses a Data Processor transformation to transform documents from one format to another. After you create a Data Processor transformation with the wizard, you can add it to a mapping with source and target files.
After you create and test the mapping, you can export the mapping to the PowerCenter repository. After you export the mapping to the PowerCenter repository, generate and run a workflow.
Lesson Objectives
In this lesson, you complete the following tasks:
• Export a mapping with a Data Processor transformation to the PowerCenter repository.
Lesson Prerequisites
Before you start this lesson, verify the following prerequisites:
• Informatica Data Transformation is installed, and the services are running.
• You have configured the Developer tool.
• You have created a mapping with a Data Processor transformation.
Lesson Timing
Set aside 10 to 15 minutes to complete the tasks in this lesson.
41
Step 1. Export the Mapping to PowerCenterExport a mapping to the PowerCenter repository.
1. In the Object Explorer view, select the mapping to export. Right-click and select Export.
The Export dialog box appears.
2. Select Informatica > PowerCenter.
3. Click Next.
The Export to PowerCenter dialog box appears.
4. Select the project.
5. Select the PowerCenter release.
6. Choose to export to the PowerCenter repository.
7. Specify the export options.
8. Click Next.
The Developer tool prompts you to select the objects to export.
9. Select the objects to export and click Finish.
10. When you exported the mapping to a PowerCenter repository, the services are exported to the following directory path: %temp%\DTServiceExport2PC\ The export function creates a separate folder for each service with the following name: <date><serviceFullName>When the transformation includes relational mapping, a separate folder is created for the relational to hierarchical mapping.
11. Copy the folder or folders with Data Processor transformation services from the local location %temp%\DTServiceExport2PC\ to the PowerCenter ServiceDB folder.
12. If the mapping contains data object flat files, copy the source files from the server location, such as C:\tmp, to the PowerCenter machine folder <INSTALL_DIR>\server\infa_shared\SrcFiles.
13. To view the mapping, refresh the repository in the PowerCenter Repository Manager. Select the repository, right-click and select Disconnect, then right-click and select Connect.
Step 2. Generate and Run a WorkflowGenerate a workflow for the mapping in the Designer, then run the workflow in the Workflow Manager.
1. In the PowerCenter Designer, in the Navigator, find the mapping that you created. If you do not see the mapping, refresh the repository. To refresh the repository, select the repository, right-click and select Disconnect, then right-click and select Connect.
2. From the Navigator, drag the mapping into the workspace.
3. In the workspace, right-click and select Generate Workflow.
The Create Workflow dialog box appears. You can rename the workflow or change other workflow properties.
4. Click Next, then Next, then Next, then OK.
The Designer creates a workflow for the session.
42 Chapter 6: Export To PowerCenter
5. Select the Workflow Designer to switch to the Workflow Designer workspace. In the workspace, find the mapping that you created. To edit the workflow, double-click the workflow.
The session properties dialog box appears.
6. If the mapping contained source flat file data objects, to assign the source file to the correct path, for each source flat file perform the following steps:
a. In the session properties, in the Explorer pane to the left, select the source under the Sources node.
b. In the Mapping tab of the session properties, under the Attribute column in the Properties pane, find the Source filename field. Change the file name property to the actual name of the file itself rather than the name of the flat file data object.
7. In the Workflow Designer workspace, to start the workflow, right-click the workflow and select Start Workflow.
Step 2. Generate and Run a Workflow 43

A p p e n d i x A
GlossaryData Processor event
An occurrence during the execution of a Data Processor transformation.
document processor
A component that operates on a document as a whole, typically performing preliminary conversions before parsing.
editor
A window of Data Transformation Studio where you can create and modify the content of a project.
event log
A report of events that occurred during the execution of a transformation.
Events view
A window of Data Transformation Studio that displays the events that occur during a transformation.
example source document
A sample of the documents that a Data Processor transformation processes.
Explorer view
A window of Data Transformation Studio that displays the projects and files in the workspace.
Model Repository Service
An application service in the Informatica domain that runs and manages the Model repository. The Model repository stores metadata created by Informatica products in a relational database to enable collaboration among the products.
output document
A document that is the result of a Data Processor transformation.
perspective
A predefined layout of the Eclipse Workbench.
predicate expression
An expression that filters the data in a mapping. A predicate expression returns true or false.
preprocessor
A document processor used to perform an overall modification of a source document, before the main transformation.
project
A framework within which you can define transformations. A project is stored in a specified folder, although certain project files can also exist outside the folder.
project properties
Options for the behavior of a project. The options control features such as the input and output encodings, the authentication support, and the XML validation.
source document
A document that is the input of a Data Processor transformation.
startup component
The runnable component that Data Transformation starts first when it runs a Data Processor Transformation.
transformation
A repository object in a mapping that generates, modifies, or passes data. Each transformation performs a different function.
XMap
A Data Processor transformation object that maps an XML input document to another XML document.
XML schema
A definition of the elements, attributes, and structure used in XML documents. The schema conforms to the World Wide Web Consortium XML Schema standard, and it is stored as an *.xsd file.
XPath
A query language used to select nodes in an XML document and perform computations.
XSD schema file
An *.xsd file containing an XML schema that defines the elements, attributes, and structure of XML documents.
Appendix A: Glossary 45
Related Documents