49 Chapter 4 Incubation and rearing equipment Whilst natural parents or broody hens can do an excellent job in incubating eggs, some pheasants do not make good parents under aviary conditions as they may require more space and cover than is practical. In addition, not all breeders have access to broody hens or the room to keep them. The incubator is an extremely useful back-up should the parent birds not sit on their eggs. Incubators come in two formats, still air and moving air. Still air incubators have some ventilation holes to allow an interchange of air, and it relies on convection to circulate the air. As hot air rises, the cooler air sinks and passes the heaters, which creates the air circulation required to remove the moisture expelled from the eggs. With these machines, the temperature can vary considerably, with much higher temperatures near the top and lower temperatures in the bottom of the incubator. Moving air incubators have a fan which constantly circulates the air, so the temperature within the machine remains fairly consistent. In a still air incubator it is vital to record and measure the temperature in the same place at all times, and the usual method is to align the thermometer bulb 12 mm above the top of the eggs. For consistency, the same procedure is adopted with moving air machines. Since moving air incubators have more working parts and often have additional features such as automatic turning, temperature and humidity controls, they tend to be more expensive than still air machines. However, their complex machinery is able to return the incubator to normal temperature and humidity very quickly if the cabinet is opened for egg candling or inspection, whereas a still incubator may take several hours or even days to return to normal if opened. Whichever incubator you select, it is very likely that the more you use it the more your expertise will develop. For demonstration purposes, this chapter gives examples using machines made by AB Incubators. There are a number of other manufacturers and the breeder will need to evaluate his or her requirements and then decide on which incubator suits the quantities and sizes of the eggs that are expected. Location for your incubator When choosing a site for an incubator, select an area where the ambient temperature is steady throughout day and night time, in the region of 15˚C- 25˚C. Select a position away from sunlight and draughts. As modern incubators

Welcome message from author
This document is posted to help you gain knowledge. Please leave a comment to let me know what you think about it! Share it to your friends and learn new things together.
Transcript
49
Chapter 4
Incubation and rearing equipment Whilst natural parents or broody hens can do
an excellent job in incubating eggs, some
pheasants do not make good parents under
aviary conditions as they may require more space
and cover than is practical. In addition, not all
breeders have access to broody hens or the room
to keep them. The incubator is an extremely
useful back-up should the parent birds not sit on
their eggs.
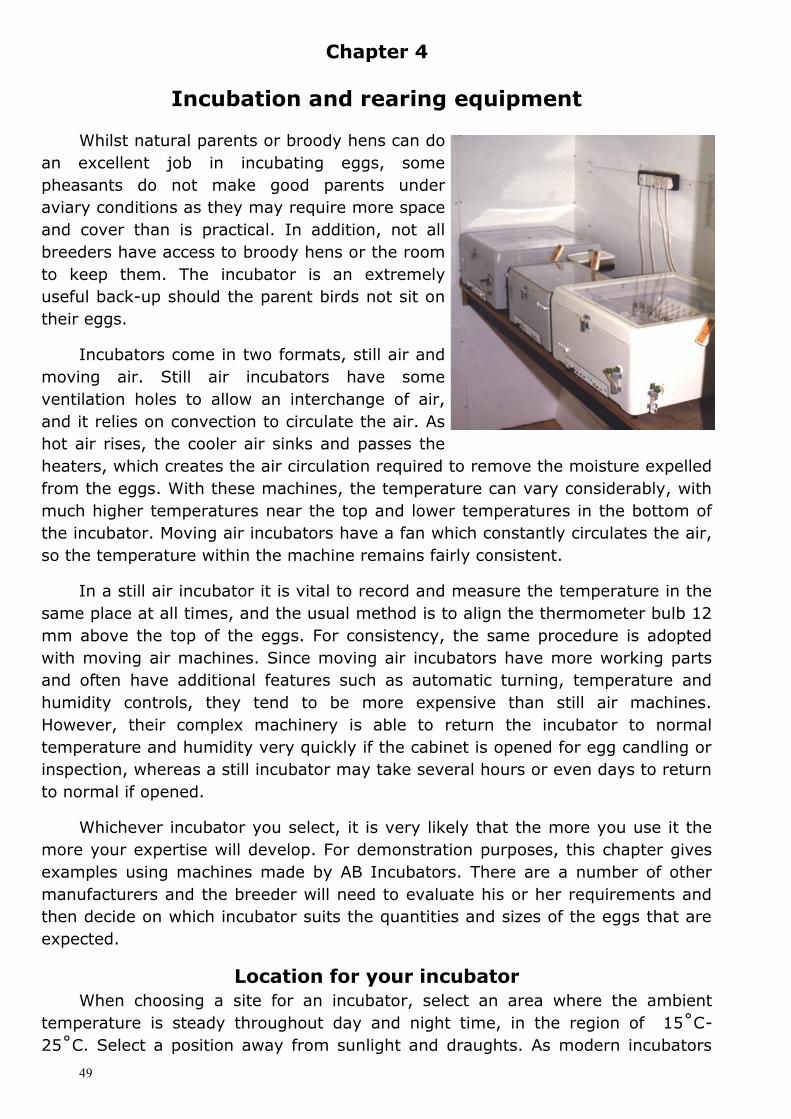
Incubators come in two formats, still air and
moving air. Still air incubators have some
ventilation holes to allow an interchange of air,
and it relies on convection to circulate the air. As
hot air rises, the cooler air sinks and passes the
heaters, which creates the air circulation required to remove the moisture expelled
from the eggs. With these machines, the temperature can vary considerably, with
much higher temperatures near the top and lower temperatures in the bottom of
the incubator. Moving air incubators have a fan which constantly circulates the air,
so the temperature within the machine remains fairly consistent.
In a still air incubator it is vital to record and measure the temperature in the
same place at all times, and the usual method is to align the thermometer bulb 12
mm above the top of the eggs. For consistency, the same procedure is adopted
with moving air machines. Since moving air incubators have more working parts
and often have additional features such as automatic turning, temperature and
humidity controls, they tend to be more expensive than still air machines.
However, their complex machinery is able to return the incubator to normal
temperature and humidity very quickly if the cabinet is opened for egg candling or
inspection, whereas a still incubator may take several hours or even days to return
to normal if opened.
Whichever incubator you select, it is very likely that the more you use it the
more your expertise will develop. For demonstration purposes, this chapter gives
examples using machines made by AB Incubators. There are a number of other
manufacturers and the breeder will need to evaluate his or her requirements and
then decide on which incubator suits the quantities and sizes of the eggs that are
expected.
Location for your incubator
When choosing a site for an incubator, select an area where the ambient
temperature is steady throughout day and night time, in the region of 15˚C-
25˚C. Select a position away from sunlight and draughts. As modern incubators
50
uses the latest electronic devices, always fit an anti-surge plug between the
incubator and the mains supply to safeguard the equipment against electricity
spikes. If the temperature is likely to exceed 30˚C, it may be necessary to provide
some form of air conditioning as incubators can not cool eggs if the air
temperature rises above the incubation temperature.
Knowing your equipment
Always choose the best equipment for the type of incubation you wish to carry
out. Do not try to incubate a large egg in a small incubator due to a lack of airflow
around the egg and the difficulty the incubator will have controlling the
temperature during the second half of the incubation period when the embryo
starts to create its own heat.
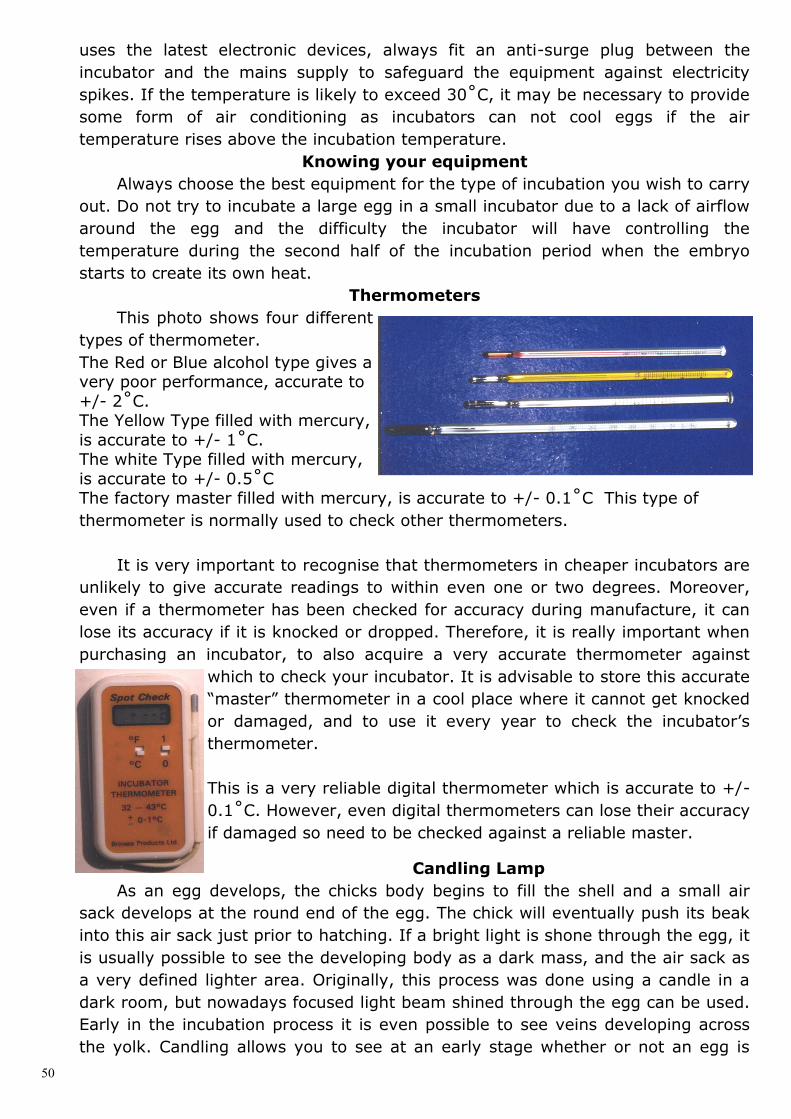
Thermometers
This photo shows four different
types of thermometer.
The Red or Blue alcohol type gives a very poor performance, accurate to
+/- 2˚C. The Yellow Type filled with mercury,
is accurate to +/- 1˚C. The white Type filled with mercury,
is accurate to +/- 0.5˚C The factory master filled with mercury, is accurate to +/- 0.1˚C This type of
thermometer is normally used to check other thermometers.
It is very important to recognise that thermometers in cheaper incubators are
unlikely to give accurate readings to within even one or two degrees. Moreover,
even if a thermometer has been checked for accuracy during manufacture, it can
lose its accuracy if it is knocked or dropped. Therefore, it is really important when
purchasing an incubator, to also acquire a very accurate thermometer against
which to check your incubator. It is advisable to store this accurate
“master” thermometer in a cool place where it cannot get knocked
or damaged, and to use it every year to check the incubator’s
thermometer.
This is a very reliable digital thermometer which is accurate to +/-
0.1˚C. However, even digital thermometers can lose their accuracy
if damaged so need to be checked against a reliable master.
Candling Lamp
As an egg develops, the chicks body begins to fill the shell and a small air
sack develops at the round end of the egg. The chick will eventually push its beak
into this air sack just prior to hatching. If a bright light is shone through the egg, it
is usually possible to see the developing body as a dark mass, and the air sack as
a very defined lighter area. Originally, this process was done using a candle in a
dark room, but nowadays focused light beam shined through the egg can be used.
Early in the incubation process it is even possible to see veins developing across
the yolk. Candling allows you to see at an early stage whether or not an egg is

51
developing. Infertile eggs should be
removed from the incubator as soon as
they are identified.
It is important to remember that the
bulb from a candler can get very hot and
that this could seriously damage the
developing egg if it is exposed to this
heat for any length of time. If using a
moving air incubator
Turning eggs
As can be seen from the diagram opposite,
inside the egg the yolk is held in position by two
twisted suspensory ligaments. If the egg stays in
one position, these ligaments gradually stretch
and the yolk sinks towards the shell below it. If it
reaches the shell, it will not develop. Therefore,
eggs should be turned regularly through 180˚ so
that the ligaments are then stretched in the
opposite direction. During incubation aim to turn
the eggs regularly, similar to what the natural
mother does constantly. When hand-turning, experience has shown that it is best
to turn eggs an odd number of times each day so that when they are not turned
(at night when the breeder is sleeping) opposite sides of the egg are facing down
on successive nights. Of course, automatic turning incubators make this process
much easier and more reliable.
To ensure eggs are turned exactly 180˚ it is advisable to mark the top and
bottom of the egg with a felt tipped pen, which will not damage the delicate shell.
Many people use the letters X and Y to mark the top and bottom,
However, it is important not just to turn eggs when they are in the incubator,
but also if you are storing them for a few days so that a group of eggs can start
their incubation at the same time. Should you wish to hold eggs prior to
incubation, for example to collect a full clutch, place them on a tray of clean sand
with each egg with the pointed end down at 45˚, at a temperature of 55˚F /
12.7˚C with humidity 65%-70%
RH. Each egg should be turned
through 180˚ daily. Another
method is to store the eggs in
something like a bin containing
clean dry sand which is kept
indoors out of the sunlight. The
eggs should still be placed at 45˚
and turned through 180˚ daily as
described above.
52
The diagram here shows the effect on eggs if
they are stored at a temperature higher than
55˚C. The higher the storage temperature, the
more rapidly the eggs become unviable.
Within an
incubator, eggs can be turned either on their
vertical or horizontal axes. Many very large
commercial incubators store their eggs as
shown in the diagram above. Some
specialist incubators also offer this facility,
as can be seen here.
This incubator uses rollers to turn eggs on their
horizontal axis— note rubber bands to hold eggs
in position and stop them moving along the
rollers when they turn. The rollers can be also be
spaced at different intervals to ensure the egg
turns 180˚.
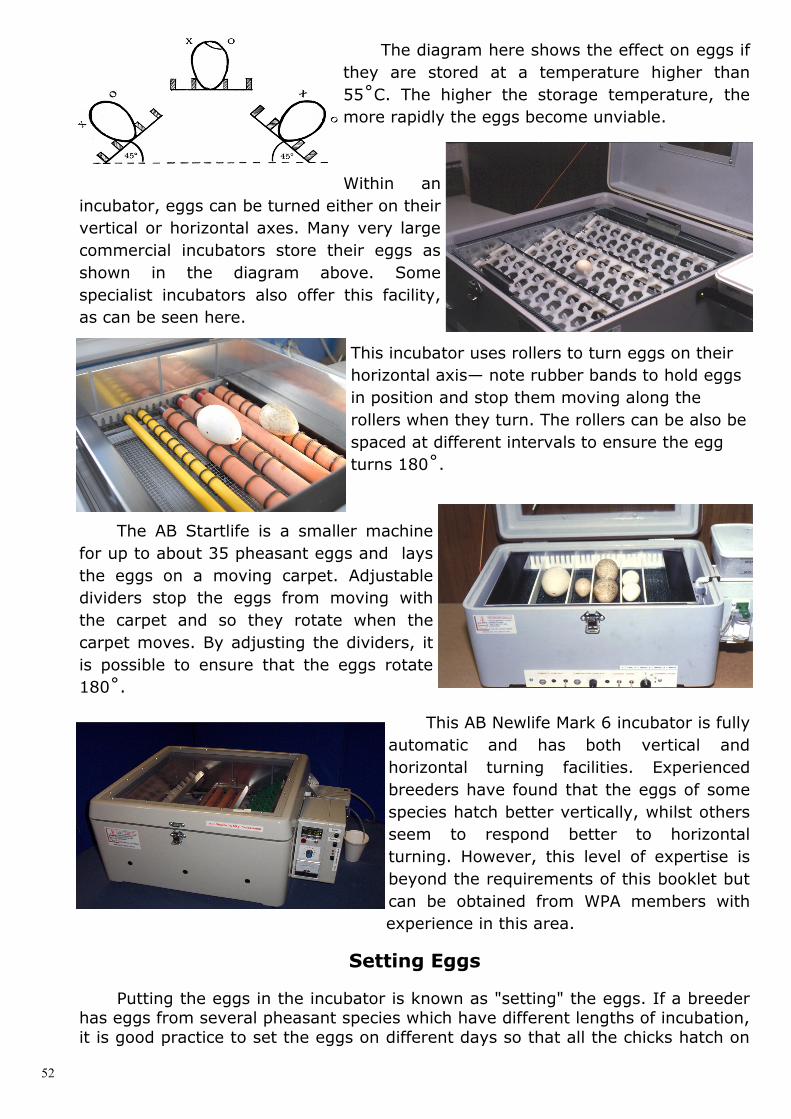
The AB Startlife is a smaller machine
for up to about 35 pheasant eggs and lays
the eggs on a moving carpet. Adjustable
dividers stop the eggs from moving with
the carpet and so they rotate when the
carpet moves. By adjusting the dividers, it
is possible to ensure that the eggs rotate
180˚.
This AB Newlife Mark 6 incubator is fully
automatic and has both vertical and
horizontal turning facilities. Experienced
breeders have found that the eggs of some
species hatch better vertically, whilst others
seem to respond better to horizontal
turning. However, this level of expertise is
beyond the requirements of this booklet but
can be obtained from WPA members with
experience in this area.
Setting Eggs
Putting the eggs in the incubator is known as "setting" the eggs. If a breeder has eggs from several pheasant species which have different lengths of incubation,
it is good practice to set the eggs on different days so that all the chicks hatch on

53
the same day. For example, if a monal egg,
which takes 28 days to hatch, is set six days before a golden pheasant egg, which takes
22 days, they should both hatch on the same day and then be able to be raised together in
one brooder box. Breeders who raise peacock-pheasants, which are often difficult
to hand feed in their early days, often hatch them with some bantam or game pheasant
chicks, which will show the peacock-pheasants how to feed themselves.
Most chicks seem able to get on well together in their early stages and can
stimulate each other to feed. As they develop, need to be watched to ensure
bullying does not take place.
Incubation temperature - 37.5˚C A bird's internal temperature is higher
than that of a human - usually around 40˚C.
So when a pheasant hen sits on her eggs,
her brood patch maintains them at an
average temperature of around 37.5˚C.
Therefore, this is the temperature which
most breeders set in their incubator. It is
advisable to turn on the incubator about a week before it is needed to ensure that
it has settled to a consistent temperature and humidity.
The hen turns the eggs underneath herself very regularly and also re-
positions them frequently so that they do not always remain in the centre or edge
of the clutch. Turing the eggs in the incubator, replicates what the hen does
naturally.
Most breeders would probably agree that a good pheasant or broody hen will
out-perform most incubators, particularly in the early stages of incubation. When a
pheasant hen lays her clutch of eggs, she always lays the last egg in the clutch
and immediately commences incubation. Since most hen seem to lay in the
evening, this means that her incubation starts in the evening. Usually, the breeder
will not collect eggs until the following morning so they cannot be set until about
12 hours after the last egg has been laid. Perhaps this partially explains why the
hen normally incubates so well.
Breeders who wish to maximise the output of their birds, often allow the
natural mother to commence incubation for the first week or ten days. The eggs
can then be taken from the nest and placed in the incubator. The hen will act as
though her eggs have been predated and, after a few weeks, will lay a second
clutch. She can then be allowed to raise this clutch herself, giving her the
experience of natural motherhood and producing chicks that behave more
naturally.
An example of an Egg Recording Chart
54
Humidity - 55%
Humidity is the amount of moisture that the air carries. Different weather
and temperature create conditions where the amount of moisture in the air can
vary. A very hot, wet rainforest will have very high humidity, whereas a dry desert
will very low humidity. The warmer the air, the more moisture it is capable of
carrying. Humidity is usually measured by the percentage of moisture in the air
and most incubator manufacturers recommend that the humidity control is set to
55%. With experience, breeders may chose to vary the humidity, but it is probably
best to start with the manufacturer’s recommendation.
Water needs to be added to all makes of incubator and there are many
different methods employed to ensure that the correct amount of water enters the
incubating chamber. Humidity may be controlled by the size of the area of water
exposed within the incubator, whereas more expensive machines have fully
automated electronic controls with very accurate sensors to control the water
intake.
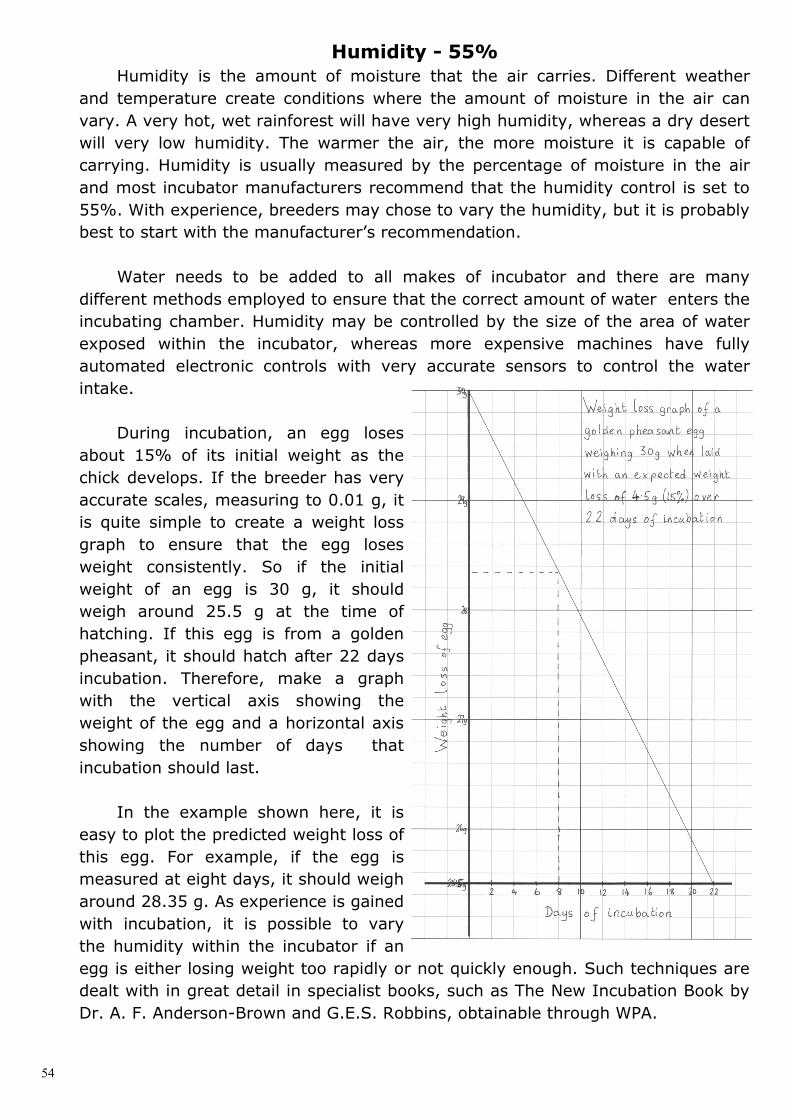
During incubation, an egg loses
about 15% of its initial weight as the
chick develops. If the breeder has very
accurate scales, measuring to 0.01 g, it
is quite simple to create a weight loss
graph to ensure that the egg loses
weight consistently. So if the initial
weight of an egg is 30 g, it should
weigh around 25.5 g at the time of
hatching. If this egg is from a golden
pheasant, it should hatch after 22 days
incubation. Therefore, make a graph
with the vertical axis showing the
weight of the egg and a horizontal axis
showing the number of days that
incubation should last.
In the example shown here, it is
easy to plot the predicted weight loss of
this egg. For example, if the egg is
measured at eight days, it should weigh
around 28.35 g. As experience is gained
with incubation, it is possible to vary
the humidity within the incubator if an
egg is either losing weight too rapidly or not quickly enough. Such techniques are
dealt with in great detail in specialist books, such as The New Incubation Book by
Dr. A. F. Anderson-Brown and G.E.S. Robbins, obtainable through WPA.
55
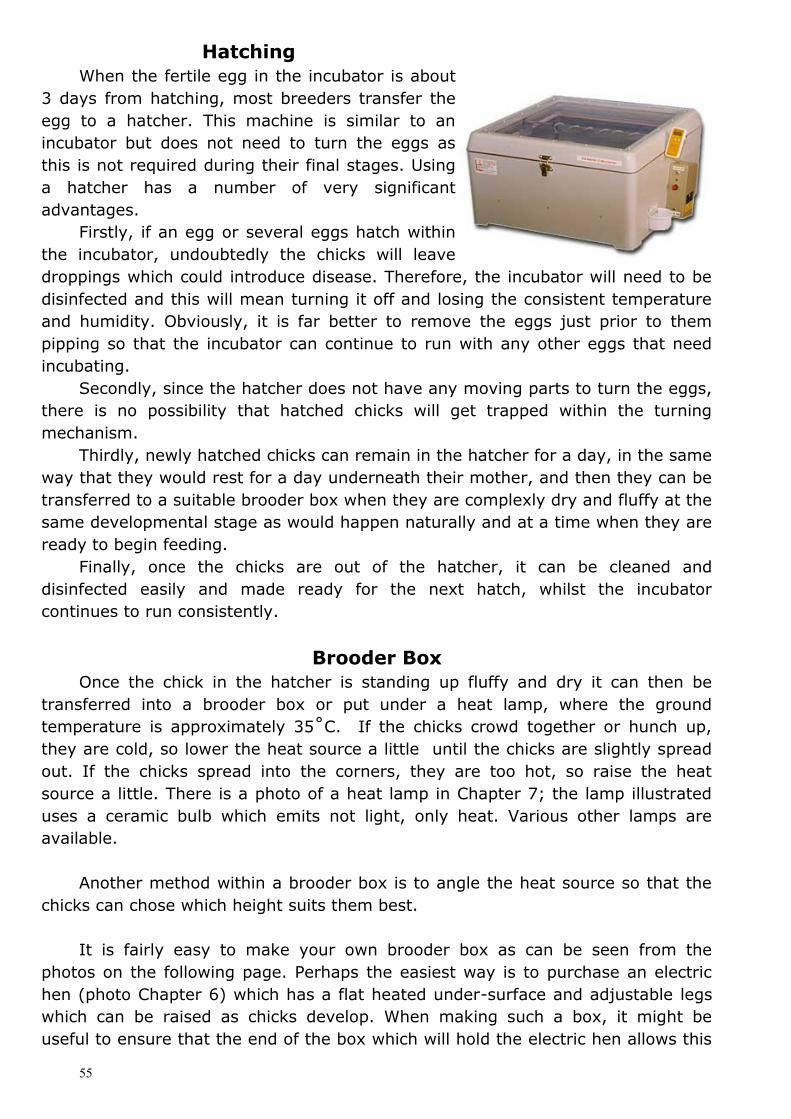
Hatching
When the fertile egg in the incubator is about
3 days from hatching, most breeders transfer the
egg to a hatcher. This machine is similar to an
incubator but does not need to turn the eggs as
this is not required during their final stages. Using
a hatcher has a number of very significant
advantages.
Firstly, if an egg or several eggs hatch within
the incubator, undoubtedly the chicks will leave
droppings which could introduce disease. Therefore, the incubator will need to be
disinfected and this will mean turning it off and losing the consistent temperature
and humidity. Obviously, it is far better to remove the eggs just prior to them
pipping so that the incubator can continue to run with any other eggs that need
incubating.
Secondly, since the hatcher does not have any moving parts to turn the eggs,
there is no possibility that hatched chicks will get trapped within the turning
mechanism.
Thirdly, newly hatched chicks can remain in the hatcher for a day, in the same
way that they would rest for a day underneath their mother, and then they can be
transferred to a suitable brooder box when they are complexly dry and fluffy at the
same developmental stage as would happen naturally and at a time when they are
ready to begin feeding.
Finally, once the chicks are out of the hatcher, it can be cleaned and
disinfected easily and made ready for the next hatch, whilst the incubator
continues to run consistently.
Brooder Box
Once the chick in the hatcher is standing up fluffy and dry it can then be
transferred into a brooder box or put under a heat lamp, where the ground
temperature is approximately 35˚C. If the chicks crowd together or hunch up,
they are cold, so lower the heat source a little until the chicks are slightly spread
out. If the chicks spread into the corners, they are too hot, so raise the heat
source a little. There is a photo of a heat lamp in Chapter 7; the lamp illustrated
uses a ceramic bulb which emits not light, only heat. Various other lamps are
available.
Another method within a brooder box is to angle the heat source so that the
chicks can chose which height suits them best.
It is fairly easy to make your own brooder box as can be seen from the
photos on the following page. Perhaps the easiest way is to purchase an electric
hen (photo Chapter 6) which has a flat heated under-surface and adjustable legs
which can be raised as chicks develop. When making such a box, it might be
useful to ensure that the end of the box which will hold the electric hen allows this

56
to fit snugly. Most breeders
put corrugated card on the
floor of the brooder box
which allows the chicks to
grip well and stops them
sliding and possibly injuring
themselves. A roll of
corrugated card will last for
many years and is often 75
cm long, so the internal
length of your brooder box
is probably best made to
this length so that the card
fits well.
This brooder box was
made by Carl Garnham
from an original design by
Maurice Williams, and has
served reliably for 25
years. The unheated area
on the right has a wire
mesh lid which slides off for
easy access and cleaning.
The heater is located
at the left end of the box. It
rests on pegs (3) which slot into the side walls and can be raised or lowered
according the needs and size of the chicks.
A curved piece of hardboard (4) can be used when the chicks first hatch to
stop them straying too far from the heater.
At the end of the unheated area is a pop-hole (5) which can allow the chicks
access to an outside run when they are sufficiently mature.
Very occasionally, chicks develop the habit of pecking at each other’s toes, so
a hessian sacking lid can be fitted to limit the amount of light in the brooder (6).
Perhaps the pecking starts by one chick mistaking toes on another chick for
mealworms. The limited amount of light allows the chicks to see well enough to
feed but seems to stop toe pecking. As soon as the chicks learn how to use the
pop-hole this lid is not needed.
Feeding chicks
Chicks from large clutches usually seem to start feeding well by themselves
with little encouragement. However, some species, such as peacock-pheasants,
instinctively expect to take all their food from their mother’s beak. This process
can be replicated by presenting food such as chick crumbs, mini-mealworms and
chopped hard-boiled egg. If such chicks will not drink, a small paint brush dipped
into the water and then touched onto the chick’s beak is usually effective. Indeed,
a slightly damp paint brush will allow chick crumbs to stick to it and then can
entice the chick into eating.
1 2
3 4
5 6
57
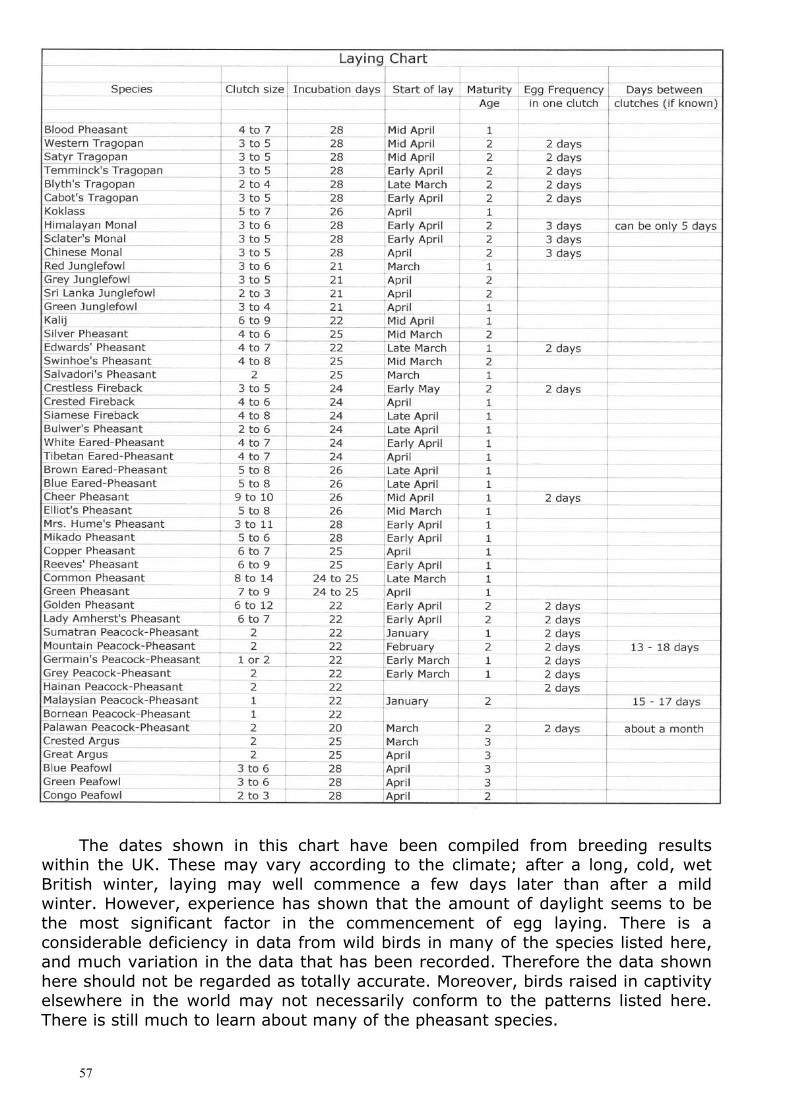
The dates shown in this chart have been compiled from breeding results within the UK. These may vary according to the climate; after a long, cold, wet
British winter, laying may well commence a few days later than after a mild winter. However, experience has shown that the amount of daylight seems to be
the most significant factor in the commencement of egg laying. There is a
considerable deficiency in data from wild birds in many of the species listed here, and much variation in the data that has been recorded. Therefore the data shown
here should not be regarded as totally accurate. Moreover, birds raised in captivity elsewhere in the world may not necessarily conform to the patterns listed here.
There is still much to learn about many of the pheasant species.

58
When a pheasant hen sits on her own eggs and hatches them she remains
sitting on the young chicks for a whole day after the hatch. Perhaps this is to allow the chicks' yolk sacks to be fully absorbed and for the chicks to learn to recognise
their mother's calls before venturing into the world. Thus, if a golden pheasant hatches her eggs on day 22, the breeder will not see the chicks until day 23. Of
course, if the same eggs had been hatched in an incubator, the chicks would be seen on day 22. This might explain why some reference books give the hatching
time for a golden pheasant as 22 - 23 days. Much of this data comes from breeding establishments where eggs are
routinely taken for incubation. Therefore, pheasant hens will usually emulate their wild cousins and lay a second and possibly a third clutch, just as a wild bird will do
if its first clutch is predated. However, little data exists for the usual time between different clutches so, when eggs are taken for incubation, the hen may continue
with a second clutch in the same place where she laid her first. This has resulted in many species being attributed much larger clutch sizes than is natural, and can
explain why there can be a wide discrepancy between references for wild and
captive birds. Good record keeping can usually help determine accurate egg laying patterns and clutch sizes and, with most species, if every egg is recorded on a
data chart, it is fairly obvious when one clutch ends and another starts. However, there is at least one species, the Himalayan monal, where accurate data collection
has shown that the gap between clutches can be as little as five days. Since the normal frequency between individual eggs in this species is three days, it can be
very easy to record the second clutch with the first clutch. Another factor which has commonly confused clutch sizes is when more than
one hen uses the same nest. This can even occur in the wild with species like red junglefowl that live in groups. There are a number of scientific observations where
variations from the norm can be explained in this way. One very recent observation in the Shanxi mountains in China even found eggs from two different
species in the same nest - blood pheasant and koklass! The age and maturity of the hen may also be a factor which might affect
laying; hens breeding for the first time often lay later than fully adult birds and
they might also lay smaller clutches. Elderly hens can follow a similar pattern. In the wild, the length of the breeding season may vary very considerably in
one species. For example, the Grey peacock-pheasant can be found from the Himalayas in north-eastern India to the rainforests of Laos. Himalayan birds tend
to have a limited breeding season, which follows weather patterns in the mountains, whereas rainforest birds might breed for most of the year.
In captivity, many pheasant species breed earlier than their counterparts in the wild, probably as a result of better access to food and a regular supply of high
quality food. This can particularly affect female pheasants that might well lay a year earlier in captivity than in the wild. Even young males in immature plumage
have been known to breed on a regular basis in captivity. With young female pheasants that lay a year earlier than expected, it is quite common for the first
clutch to be infertile and smaller than for mature birds, but fertility can improve even during this first breeding season.
As mentioned earlier, the length and start of the breeding season for wild
pheasants may vary considerably from that experienced with their captive relatives. However, it was interesting to note that when Malaysian peacock-
pheasants first came to the UK and were kept in aviaries where they had access to heat all the year round, these birds retained their natural laying patterns. This
species has been known to breed in any month in Malaysia where the climate is tropical throughout the year. However, breeding seems to be most frequent with
59
wild birds after the monsoon finishes in December, perhaps because this will relate
to the amount of insects available to feed young birds. Thus, birds bred in Malaysia and then brought to the UK have continued to lay their first eggs at the
end of December or early January if provided with suitably heated enclosures.
Finally, it is well worth noting that individual birds within the same species can vary considerably in their laying habits. One well researched Palawan peacock-
pheasant only ever laid a single egg in each clutch, whereas the norm for this species is a two-egg clutch. Interestingly, her daughters seemed to inherit this
characteristic and also laid a single egg clutch. If your birds do not conform to an exact laying specification, this does not need to cause major concern.
As mentioned earlier, one of the most useful books on incubation is:
The New Incubation Book, second revised edition (2002) by Arthur
Anderson Brown and Gary Robbins. The ISBN is 0 86230 061 4. It can be
purchased from WPA or A B Incubators.
This book contains a mine of useful information, particularly when problems
are experienced with incubation.
Related Documents