GMT GAMES RULEBOOK RISORGIMENTO 1859 The Battles Magenta ( June 4) and Solferino ( June 24) in the Second Italian War for Independence TABLE OF CONTENTS 1.0 INTRODUCTION . . . . . . 2 2.0 COMPONENTS . . . . . . 2 2.1 The Maps . . . . . . 2 2.2 The Counters . . . . . . 2 2.3 The Die . . . . . . 3 2.4 Definitions & Abbreviations . 3 2.5 The Scale . . . . . . 3 2.6 Ratings . . . . . . . . . . 4 2.7 Questions? . . . . . . 4 3.0 SEQUENCE OF PLAY . . 4 4.0 THE COMMAND SYSTEM . 4 4.1 The Brigadiers and Their Commands . . . 4 4.2 Corps-Level Command . . . 6 4.3 Overall Command and Initiative . . . 6 4.4 Activation Capabilities . . . 6 4.5 Continuity . . . . . . 6 4.6 In Reserve . . . . . . . 8 5.0 MOVEMENT . . . . . . . 8 5.1 Strategic Movement . . 8 5.2 Terrain . . . . . . . . . . . 8 5.3 Movement Restrictions . . . 9 5.4 Stacking . . . . . . . 9 5.5 Towns . . . . . . . . . 10 5.6 Reinforcements . . . . . 10 6.0 POSITION. . . . . . . . 10 6.1 Facing . . . . . . . . 10 6.2 Zones Of Control (ZOC) . 11 6.3 Moving Adjacent . . 11 7.0 COMBAT . . . . . . . . 12 7.1 Artillery Fire . . . . . . 12 7.2 Jägers, Chasseurs and Light Infantry . . 13 7.3 Infantry Attack . . . . . . 14 7.4 Resolving Attack . . 14 7.5 Cavalry Charge . . . . . . 15 8.0 COMBAT RESULTS . . 16 8.1 Hits . . . . . . . . . . 16 8.2 Disorder . . . . . . 17 8.3 Retreat . . . . . . . . . . 17 8.4 Commanders & Combat . 17 8.5 Rally and Recovery . . 17 9.0 DEMORALIZATION . . 18 9.1 Hors de Combat . . 18 9.2 Corps Demoralization . . 18 SOURCES . . . . . . . . . 18 CREDITS . . . . . . . . . 19 A RICHARD H. BERG Game Design

Welcome message from author
This document is posted to help you gain knowledge. Please leave a comment to let me know what you think about it! Share it to your friends and learn new things together.
Transcript
GMTGAMES
RULEBOOK
RISORGIMENTO 1859The Battles
Magenta ( June 4) and Solferino ( June 24)in the Second Italian War for Independence
TABLE OF CONTENTS1.0 INTRODUCTION . . . . . . 22.0 COMPONENTS . . . . . . 2
2.1 The Maps . . . . . . 22.2 The Counters . . . . . . 22.3 The Die . . . . . . 32.4 Definitions & Abbreviations . 32.5 The Scale . . . . . . 32.6 Ratings . . . . . . . . . . 42.7 Questions? . . . . . . 4
3.0 SEQUENCE OF PLAY . . 44.0 THE COMMAND SYSTEM . 4
4.1 The Brigadiers and Their Commands . . . 4
4.2 Corps-Level Command . . . 64.3 Overall Command and
Initiative . . . 64.4 Activation Capabilities . . . 64.5 Continuity . . . . . . 64.6 In Reserve . . . . . . . 8
5.0 MOVEMENT . . . . . . . 85.1 Strategic Movement . . 85.2 Terrain . . . . . . . . . . . 85.3 Movement Restrictions . . . 95.4 Stacking . . . . . . . 95.5 Towns . . . . . . . . . 105.6 Reinforcements . . . . . 10
6.0 POSITION. . . . . . . . 106.1 Facing . . . . . . . . 106.2 Zones Of Control (ZOC) . 116.3 Moving Adjacent . . 11
7.0 COMBAT . . . . . . . . 127.1 Artillery Fire . . . . . . 127.2 Jägers, Chasseurs and
Light Infantry . . 137.3 Infantry Attack . . . . . . 147.4 Resolving Attack . . 147.5 Cavalry Charge . . . . . . 15
8.0 COMBAT RESULTS . . 168.1 Hits . . . . . . . . . . 168.2 Disorder . . . . . . 178.3 Retreat . . . . . . . . . . 178.4 Commanders & Combat . 178.5 Rally and Recovery . . 17
9.0 DEMORALIZATION . . 189.1 Hors de Combat . . 189.2 Corps Demoralization . . 18
SOURCES . . . . . . . . . 18CREDITS . . . . . . . . . 19
A RICHARD H. BERG Game Design

RISORGIMENTO 1859: THE BATTLES
RulebookPage 2
1.0 INTRODUCTION
RISORGIMENTO 1859: THE BATTLES coversthe two major engagements in the SecondWar for Italian Independence in 1859:Magenta, the opening battle of the war;and Solferino, one of the largest battlesin European pre-20th century history. Itwas also a war in which two emperors—Napoleon III and Franz Josef—and aking—Victor Emmanuel—all tookbattlefield command.
A Word on Complexity. It is thedesigner’s intent to give the players thefeel and sweep of a large, 19th centuryland battle. At the same time, it is alsoour intent to make the game as playableas possible, within its scope and size. Tothat end we have tried to make thesystems and mechanics as simple aspossible, and to keep adherents of bothstyles of gaming happy.
2.0 COMPONENTS
The game includes the following items:2 Game maps (22”x34” and back-
printed)3 Sheets of counters1 Rulebook1 Playbook with scenarios2 Playing aid charts1 Activation Card2 Ten-sided dice
2.1 The Maps
The maps cover the area over which thebattles were fought. Each map is overlaidwith a grid of hexagons—hexes—whichare used to regulate movement. Thevarious types of terrain represented arediscussed in the rules below. The Solferinobattlefield uses two maps: the Solferinomap and the San Martino map. Magentaand the campaign map are on the othersides of these maps.
Design Note: The battlefields, andespecially Solferino, are virtually dotted
with small villages, many of which wehave not included for purposes of clarity.They did not affect the battles greatly,and we apologize to anyone living in thearea who feels left out.
2.2 The Counters
RISORGIMENTO 1959 contains threetypes of counters (playing pieces): 1)combat units—the infantry battalions,cavalry regiments and artillery batteries;2) leaders (virtually all brigadiers); and 3)a variety of informational markers, suchas Hits, used to note status. All combatunits are printed on both sides; the reverseshows the unit as “Disordered.” Thecombat units are color-coded for ease inidentifying to which command [2.4] theybelong.
Play and Design Note: Combat units donot have any Strength Points, the usualindication of a unit’s numerical strength.
Infantry Unit
Disordered Infantry Unit (Back)
Jäger/Chasseur Unit
Light Infantry Unit
Cavalry Units: Light and Heavy
Artillery Unit
Disordered Artillery Unit (Back)
Most units are infantry, organized asfollows:
Austria: Each infantry counter is abattalion, usually part of a four-battalionregiment. Usually a Grenzer or Jägerbattalion was attached. Thus, theregiment has a different name than thebrigade to which it belonged. Thus,Hoditz’s Brigade (2nd Division of the ICorps), contains all four battalions of theErnst regiment plus the 14th Jägerbattalion.
Historical Note: We use the word“Austrian” to cover all the units of theHabsburg Empire, which included a lotof non-Austrian peoples.
At Magenta
Unit Name (Bn/Regt)Brigadier (At Magenta/ At Solferino)
Cohesion Rating
Corps Affiliation(Color Band)Brigade SymbolNationality Color
MovementAllowance
Restricted: May not Fire or Attack
Nationality Color:Blue: FrenchRed-Orange: PiedmontLight Gray: Austrian 1st ArmyDark Gray: Austrian 2nd Army
Yellow-Boxed Cohesion Rating
White-Boxed Cohesion RatingAt Solferino
Cavalry Type
Cohesion Rating Movement
Unit Name(Battery/Corps)Brigadier
Maximum Range
Gun Type
Corps(Color Band)Brigade SymbolAt Magenta
MovementAllowance
May Not Fire

Copyright © GMT Games, 2000 Page 3
The Second Italian War for Independence
France: The French brigades tended tobe bigger. Thus, Goze’s brigade (3/I)includes the battalions (three each) of the1st Zouave, 33rd and 34th regiments.
Piedmont-Sardinia: This army wasorganized along lines very similar to thatof the Austrians. Thus, Colliano’s brigadeconsists of the 1st and 2nd Grenadiersregiments (four battal ions each—although some counters represent twobattalions), plus the 3rd Bersagliaribattalion.
NOTE: Some units have two brigadiers.This indicates that the brigade wascommanded by different brigadiers ineach battle. Thus, the 1st GrenadierGuards was led by Cler at Magenta andNiol at Solferino.
2.3 The Die
The game uses a ten-sided die toresolve combat. A 0 is a 0, not a 10.
2.4 Definitions and Abbreviations
2.41 Key Definitions. Awareness of thefollowing terms will help as you readthrough the rules:
Cohesion: The numerically-rated abilityof a combat unit to withstand thevigors of combat.
Command: A group of combat unitsunder one leader/brigadier, the nameon the Command Indicator line on thecounter. The basic “maneuver”command in this game is the brigade;the basic activation command in thegame is the corps, with thePiedmontese Army being treated asone corps.
DRM: Die Roll Modifier—used to adjustthe value of a rolled die.
Jägers/Chasseurs: For those not up fluentin the languages of the opponents,Jägers and Chasseurs are the same unittype; the words mean the same thingin each language—“hunter.” They are
highly-mobile units which fought indispersed formations.
Leader: Those generals (and ranks below)commanding at brigade level. Alsocalled Brigadiers.
ZOC: Zone of Control—the ability of aunit, through its maneuverability anduse of skirmishers, to extend itspresence into adjacent hexes.
2.42 Abbreviations
Full corps commander and brigadiernames can be found in the Orders ofBattle section of the Playbook. Othersignificant unit abbreviations on countersor in the scenario setups are found below.
Arty ArtilleryBde BrigadeBn BattalionBrsglri BersaglieriChssr or Chs ChasseurCursr CuirrassierDiv DivisionDrgn or Dgn DragoonEtrg Foreign LegionGd GuardGrn GrenadierGrnt GranatieriGrz GrenzerHus HussarImp or IG Imperial GuardJgr JägerRegt RegimentUhl UhlanZve Zouave
2.5 The Scale
The map scale for the battles is about 325yards per hex. Each turn covers about onehour of real time.
Each infantry unit is a battalion or two(the latter applies to most of the Piedmontarmy). All units are treated as having thesame strength, equalized as follows:
• The Austrian battalions containedabout 750 men. However, theuneducated, multilingual Austriantrooper had not yet figured out howto fire his new rifled muskets.
• The French battalions usually hadabout 550 men, but their small-armsweapons, and thus their firepower,was much better … and, other thanthe chasseurs and light infantry, theymainly relied on the bayonet charge,which the Austrians, sans firepower,were not very good at repelling.
• Piedmontese battalions, which hadabout 500 men each, had only tepidtraining, l itt le experience andantiquated weapons. Thus, we havegrouped two of these together (exceptfor a few that were used asdetachments) to render them “equal”to the others. The PiedmonteseBersaglieri units held 700+ men each,so these stand alone.
Cavalry units (regiments) containedaround 500 men each, sometimesdropping to 400, sometimes as high as 600or more. The Piedmontese cavalry wasusually around 600.
Each artillery unit represents a 6-8 gunbattery. The batteries are divided into fivetypes:
Field guns (usually 6- and 8-lbers).
“Heavy” artillery (usually 12-and 16-lbers).
The new French Rifled fieldguns [7.11].
Rockets (see Solferino battlein Playbook).
Horse artillery were similar insize to field guns, but withlighter carr iages, whichenabled them to move “faster”but slightly restricted theirrange.
RISORGIMENTO 1859: THE BATTLES
RulebookPage 4
To compare overall strengths, usingSolferino as a measuring stick:• An Austrian corps contained around
18,000 men (somewhat lower for theundermanned VII and XI Corps)
• French corps ran from 11,000 (IIICorps; see notes on this corps inplaybook) to 22,000 (I Corps).
• The Sardinian Army had about 29,000men at Solferino, or 50 per cent morethan Benedek’s VIII Corps.
2.6 Ratings
Determining combat/cohesion ratings forunits is, at best, a “pièce de guess,” as thereis no source that lays it outmathematically, like numbers, guns, etc.Add to that the fact that the sole combatrating on most units—Cohesion—coversa whole lot more than just “cohesion,” andyou have, in respect to other systems, alot of seeming anomalies. For example, theAustrian Jägers were actually “elite” units,yet their Cohesion is low. This reflectsmore their manpower, formation andtactical doctrine than the soldiers’ ability.As for individual ratings, often your guessis as good as mine, and if you adhere tothat doctrine literally, feel free to bumpany unit up or down. It ’s not going toaffect the game greatly.
2.7 Questions?
Any questions about play?
We can be reached on-line at:
www.gmtgames.com [company][email protected] [Designer]
or by mail at:
GMT GamesATTN: RISORGIMENTO
P.O. Box 1308Hanford, CA 93232-1308
www.gmtgames.com(800) 523-6111
3.0 SEQUENCE OFPLAY
Each turn follows a set sequence asdescribed below.
A. Initiative Determination PhaseRoll the die to see who goes first [4.3].
B. Activation Phase1. Reserve Placement Segment. Both
players may place eligible brigadesin Reserve [4.6].
2. Corps Activation Segment. TheInitiative Player selects which ofhis corps he wishes to activate.When a corps is activated, he mayperform available actions [4.4] withall of the brigades in that corps.Each brigade finishes its actionsbefore the next brigade goes.
3. Continuity Segment. When theplayer undergoing B2 finishes hemay now either:• Pass play to his opponent, in
which case the latter goesback to B2; or
• Roll for Continuity byselecting a new corps (it mayNOT be the same corps thatjust went) and rolling againstthe selected CorpsCommander’s ContinuityRating. If he succeeds hereturns to B2. If he fails, hisopponent goes to B2.
When all corps are Finished orplayers pass in succession [4.56],go to Phase C.
C. End of Turn Phase.1. Recover y Segment. Conduct
Recovery for Reserve units [8.5].2. Out of Reserve Segment. Bring
commands out of reserve [4.6].3. Move Corps Commanders
Segment [4.2]4. Demoralization Segment. Check
for Corps Demoralization andBrigade Hors de Combat [9.0].
5. Start a new turn.
4.0 THE COMMANDSYSTEM
The Command system is used todetermine an army’s efficiency, its abilityto use its resources. The most importantleaders are the brigadiers. Higher levelsof command—divisions, corps, army—arecovered differently.
Design Note: The Austrian (andPiedmontese) leaders, with the exceptionof VIII Corps commander, Benedek, arerated comparatively lower than theirFrench counterparts. The Habsburgs usedsocial rank as the main (if not only)criterion for advancement in the army,and, in this war, it served them quitepoorly. The Piedmontese were simply notup to the level of their allies … at leastnot yet.
4.1 The Brigadiers and TheirCommands
4.11 Ratings. The brigadiers commandthe actual combat units. They have tworatings, aside from their MovementAllowance. Brigadiers may move withtheir brigade, when their Corps isactivated.• Commitment DRM: A rating,
expressed as a die roll modifier, usedwhen any of his In Command unitswishes to attack [7.42].
• Range: Used to determine which ofhis combat units is In Command.Units not within range are Out ofCommand. However, if a combat unitis outside its Brigade leader’s range,
Brigadier’s NameDivision/CorpsRank (Brigade)Command Range
Commitment DRM
Corps Affiliation(Color Band)Brigade SymbolNationality ColorAt MagentaMovement Allowance
Front
BackFinished
Copyright © GMT Games, 2000 Page 5
The Second Italian War for Independence
but adjacent to a unit from the samebrigade that is In Command, it, too,is considered to be In Command.
Play Note: Thus if only one unit from abrigade is in Range, but all the others areadjacent to one another, they are all InCommand.
4.12 Command Range. The ability to“command” troops is maintained throughthe Command Range of the brigadier.This range is the number of LeaderMovement Points (not hexes) over whichthe Leader may extend his influence.Command Range is always counted frombrigadier to combat unit, including thelatter hex, but not the leader’s.
4.13 Orders. Brigades can be eitherUnder Orders or Without Orders [4.22].Brigadiers that are Without Orders canattempt to change that to Under Orders.To do this, the player rolls one die. Headjusts this rol l by the br igadier ’sCommitment DRM.• If the adjusted roll is 4 or less, his
brigade is Under Orders.• If the adjusted roll is 5 or more, that
brigade may not do anything, exceptRally.
Example [from Solferino]: Austrian IIICorps is activated. The brigadiersPokorny, Dientsel and Wezlar are allwithin Schwarzenberg’s Range of 3.They are Under Orders, and their InCommand combat units have fullcapabilities. However, Hartung andRosgen are outside Schwarzenberg’srange, so their brigades are WithoutOrders. If the Austrian player wishes, hemay, when it is time to move each of thesebrigades, roll to see if they will becomeUnder Orders. Hartung would need anatural roll of 0-4; Rosgen, because of his+1 Commitment Rating, would need anatural roll of 0-3.
4.14 Artillery. Most batteries are assignedto a specific brigade, that brigade beinglisted on the second line of the counter.Thus, the French 7(11)/I battery—battery#7 of the I Corps—is assigned to Douay’sbrigade. Each so-named battery is underthe command of its brigadier.
There are also a large minorityof batteries that are “Reserve.”(This includes batteries in theAustr ian Army Reser ves.)
These batteries may never be commandedby infantry brigadiers. They may, however,be treated as an individual commandwhen their corps is activated—i.e., allnon-attached batteries are moved/fired atthe same time.
Play Note: The Austrian’s ID system forbatteries produces a fair number of unitswith the same “ID.” There are at leastthree batteries of the 10th cavalry nomde guerre. These are the 10th from threedifferent artillery regiments, though (e.g.,10cv/II). Ultimately, the historical ID ofthe battery is unimportant for playpurposes; it is the name of the brigadierof assignment, or the Reserve notation,that matters.
See 7.12 for how and when batteries maycombine fire.
4.15 Cavalry
France. All French cavalry is assigned toa specific brigadier, as listed on thecounter.
Austria. The Austrians have cavalryassigned either to individual Corps or tothe Army Cavalry Reserves.• Corps-assigned cavalry has no leader;
one unit (per br igade) may becommanded by any Brigadier in thatcorps.
• Army Reserve cavalry is led by anamed brigadier (e.g., the Prinz vonBayern Hussars are led byVopaterney).
Piedmont. Individual cavalry units areassigned to brigades; they may not useMassed Cavalry Attack.
Historical Note: There was aPiedmontese Cavalry ReserveDivision—Lt.Gen. Sambuy commandedfour regiments of cavalry—but they donot appear to have been involved ineither battle.
4.16 Massed Cavalry Attack. A playermay decide to use his cavalry in a Massed
Attack. Each player may undertake oneMassed Attack per turn. To do so, heannounces this (within the parametersbelow). The eligible cavalry units mustCharge when so activated; units that donot charge are considered to not have beenactivated.• France. The French Player selects a
cavalry brigadier. All cavalry units,regardless of assignment, within thatcavalry leader’s range are eligible forMassed Cavalry Attack. To activatea Massed Attack, the player uses theCorps Activation to which the chosenleader belongs. This is considered tobe that corps’ activation. However,only the massed cavalry may move/fight; all other units are not activated… and it is considered one of thatcorps’ activations.
• Austria. Their cavalry operates similarto the French, with the followingdifferences:
a) 1st Army cavalry may not combinewith 2nd Army cavalry (and viceversa).
b) Only Vopaterney, Palffyor Zichy are eligible tolead a Massed Attack.
c) The Austrian uses theReserve Activation for this.
Historical Note: There was a somewhatineffective, but massive, cavalry vs.cavalry battle mid-day, east of thelightly-cultivated area around Medolo.
4.17 Austrian Reserve Units. CertainAustrian units (which do not have theirown corps commander) areactivated by treating them as anersatz corps (“The Reserve”—not to be confused with thegame function of being inReserve [4.6]):• The 1st Army Reserve batteries• The cavalry brigades from the 1st
Army and 2nd Army
All units present are considered activewhen activating The Reser ve. TheReserve has a Continuity Rating of 2; ithas no other command function.
Play Note: It is possible that the 1st ArmyArtillery, for example, may include otherbatteries. Conversely, individual cavalry

RISORGIMENTO 1859: THE BATTLES
RulebookPage 6
units may be “attached ” to brigades/divisions.
4.2 Corps-Level Command
Corps commanders provide initiative andorders for their brigades.
Design Note: We have “skipped” over thedivision level of command; thecapabilities of those leaders has beenfactored into the Corps Continuity andCohesion Ratings.
4.21 Ratings. Corps Commanders havethree ratings:• Range. The number of hexes that a
Brigadier from that corps must bewithin to be Under Orders [4.22]
• Continuity [See 4.5; 9.2].• Movement Allowance [4.23].
Play Note: The Continuity rating is alsoprinted on the Activation Card.
4.22 Range and Orders. Brigadiers thatare within range of their corpscommanders are Under Orders. Thosethat are not are Without Orders.• A Brigadier that is Under Orders has
all his combat units within range asIn Command [4.41], except for thosewho are not within range [4.42].
• A Brigadier WithoutOrders has all his unitsOut of Command,regardless of where theyare.
4.23 Movement. Corps commanders maymove only in the End-Turn Phase in theCorps Commander movement segment.However, if they move more than 12Movement Points worth of hexes, they areflipped to their Reverse Side, which haslower ratings. They may be returned tofull status after any Corps Commander
movement segment that they do not movemore than 12 MP.
4.24 Guard Commander. Thecommnander of the French ImperialGuard, St.Jean d’Angely, has two Rangeratings. He may use the higher one (6) ifhe is within one hex of Napoleon III.
4.25 Piedmont Command. VittorioEmanuele acts as both Overall Commanderof the Piedmont army as well as its (sole)corps commander. Brigades treat him as acorps commander. His “3” rating also servesas his Range and Continuity Ratings whenused as Corps Commander.
4.3 Overall Commandand Initiative
The abil it ies of an army ’soveral l command arerepresented by the player, although wegive you each OC as a counter. The solepurpose of the OC counter is to providea DRM for Initiative, which he may doas long as he is on the map.
In the Initiative Determination Phase,each player rolls the die. One of theplayers may get to add a modifier to thatroll, depending on the scenario. The highroller gets the Initiative for that turn. Iftied, roll again. The player with theInitiative gets a Free Activation [4.52],indicating which corps command hewants to start that turn.
4.4 Activation Capabilities
A player’s units are activated by corps.Corps are activated individually, either byFree Activation [4.52) or Continuity[4.51]. When a player’s corps is activated,all of the brigades (plus cavalry andartillery) in that corps are activated,regardless of where they are. See 4.22 forwhat status they have.
Play Note: Use the Activation Card andthe Hit markers, to keep track of thenumber of Activations a Corps hasundertaken.
4.41 Under Orders. When their brigadeis activated and is Under Orders (4.22),the individual units that are In Commandmay:• Move• Fire (if eligible)• Attack• Rally (if they have not done any of the
above)
4.42 Without Orders. W hen theirbrigade is activated and is WithoutOrders, or there are individual units thatare Out of Command they may:• Move, but they may not move adjacent
to an enemy combat unit. If alreadyadjacent, they may stay or move away.
• Rally (if they have not moved).• They may NOT fire or attack, but they
will defend normally.
4.43 Extended Activation. Normally,each corps may be activated twice in asingle turn. However, a corps may beactivated a third time in a non-weatherturn [4.44], at the risk of increasing theHits incurred by the units in that corps.Whenever a corps gets an ExtendedActivation [4.54]:• For each unit that moves—and this
does not inc lude movementassociated with combat, such as attackinto a hex or Retreat—roll a die andcompare it to that unit ’s AdjustedCohesion. If it is higher, the unitincurs a Hit.
• Each unit that attacks (fire is notattack for this purpose) earns anautomatic Hit.
Play Note: It is possible for a unit to incurtwo Hits during an Extended Activation.
4.44 Weather Turn. In any turns withWeather—that means Heat and/or Rain(see the turn tracks and the scenariorules)—the normal number of activationsper turn is one. A second activation wouldbe an Extended Activation … and thereare no third activations.
4.5 Continuity
After a player has undertaken all hisactions with his activated corps he may
Corp Commander’s Name
Corps/ArmyRank (Corps)
Command Range
Continuity
Corps Affiliation (Color Band)Nationality/Army Color
Movement Allowance
Copyright © GMT Games, 2000 Page 7
The Second Italian War for Independence
either Pass play to his opponent or try toactivate another corps. He does thisthrough Continuity.
4.51 Continuity Roll. In order for aplayer to continue his turn he selectswhich corps with which he wishes to doso and rolls the die. If the roll is:• Equal to or lower than the Corps
Continuity Rating, that corps is nowactivated.
• Higher than the rating, then playspasses to his opponent.
4.52 Free Activation. Whenever a playerfails a Continuity Roll, or Passes to theopponent, the opposing player gets toactivate one of his corps “free” (withoutrolling the die). Passing occurs when aplayer has corps he can try to activate butchooses not to do so at the time.
4.53 Consecutive Activation. If a playergets two consecutive activation segments,his opponent gets a Free Activation, afterwhich the original player may resume hisContinuity Rolls [4.51]. No Corps mayever be selected for activation twice in arow. A player, having activated Command“A” must either select a differentcommand for Continuity or else Pass tothe opponent. An opponent’s “Pass” isconsidered an “interruption” for thispurpose.
Exception: If the player has only onecommand lef t el igible to beactivated—and it was the one he justactivated—he may select thatcommand (or Pass). However, in orderto select a command twice in a rowunder these circumstances, the playermust roll for Continuity … and a failedresult finishes that command for thatturn.
4.54 Extended Activation. If a playerwishes to use Extended Activation (a thirdactivation) for a corps, he MUST make aContinuity Roll for that corps, even in anormally “Free” situation. A player mayattempt Extended Activation only once.If the roll fails, that corps is Finished forthe turn. When a corps is Finished, flipall the Corps’ Brigade Commanders totheir “Finished” side.
4.55 One Side Finished.W henever one side hasFinished and the other side hascorps that may sti l l beactivated, activation occurs as follows:1) The first corps, selected from those
left, gets a Free Activation.2) For all subsequent corps, the player
rolls the die to activate.• If the roll is the same as or lower than
the Corps Continuity, the corps getsa normal activation.
• If the roll is higher, the corps isactivated but may not attack. (It mayfire.)
Play Note: This rule “kicks in” wheneverone side has activated all of hiscommands/corps twice; declaring yourself“Finished” does not trigger the rule.
4.56 End of Activations. The ActivationPhase ends whenever one of the followingoccurs:1) Both players voluntar i ly Pass
(consecutively) in either of thefollowing orders:
• Austrian, then French, or• French, then Austrian, then French.2) Neither player has a command that is
eligible to be activated (they are all“Finished).
Design Note: The different sequence ofPasses represents the overall Frenchinitiative advantage, compliments oftheir vastly superior middle and juniorlevel of command. In essence, the Frencharmy was “active.”
An Example of Activation and Continuity
Solferino. (For purposes of this example,assume all brigades are Under Orders.) Itis the start of the turn. The French playergets the Initiative and chooses I Corps(d ’Hilliers) as his active corps. He finishesmoving the units therein and then choosesIV Corps (Niel) for his next activation, forwhich he must roll for Continuity. He rollsa 3, which is lower than Niel ’s Continuityrating of 4. He then undertakes actions withthe units of IV Corps.
The French player having activated twoconsecutive corps, the Austrian playerreceives a Free Activation. He selectsStadion’s V Corps—he does not have to rollthe die, their activation is “free”— andundertakes actions for those units. Play nowreturns to the French player, who wishes toactivate I Corps again (second time). Hemust roll, however, and rolls a 7, higherthan d ’Hillier’s rating of 3. Play passes tothe Austrian.
The Austrian, with a Free selection, choosesto activate Stadion’s V Corps once again;this he can do, as its second activation isnot consecutive (there have been otheractivation attempts, albeit unsuccessful, inthe interim, which serve to break the“consecutive” chain). After activatingStadion, the Austrian wishes to Continue,selecting Benedek’s VIII Corps (not withinArmy Commander range), for which he rollsa 4, lower than Benedek’s rating of 5, so hegoes.
After Benedek, the French player gets a FreeActivation, activating the Piedmontese.Play then goes back to the Austrian. He triesto activate Schwartzenberg’s III Corps byroll and fails. The French player gets a FreeActivation, activating the Piedmontese.After they finish, he attempts to activate IICorps, but fails.
The Austrian has a free selection. However,because of the situation developing, he feelshe must activate Stadion’s V Corps for athird time (Extended Activation). Thus,even though it is normally “free,” because itis an Extended Activation, he must roll. Hedoes, and rolls a 6, higher than Stadion’sContinuity Rating. Not only does he fail toattain Continuity, but Stadion is nowFinished for the turn.

RISORGIMENTO 1859: THE BATTLES
RulebookPage 8
4.6 In Reserve
Brigades may be placed intoReserve and some brigadesstar t a battle in Reser ve.Brigades are placed in Reserve
status only in the Reserve PlacementSegment. All In Command units in abrigade, regardless of proximity, aretogether placed in Reserve. They mayvoluntarily be brought out of Reserve onlyin the Out of Reserve Segment.
Design Note: This is a tad on thesimplistic side, but it does make the gameeasier to play.
4.61 Reserve Effects. Units in Reservestatus:• May not move, fire or attack.• May overstack while in Reserve to the
extent that all units from the samebrigade may stack in one hex.
• May Rally and/or Recover[8.5]. Beingin Reserve is the only way a unit canRecover (Rally is available to anyactivated unit).
4.62 Involuntary Release. A brigade willbe released involuntarily from Reserve theinstant any enemy combat unit moveswithin three hexes of any of the brigade’scombat units, regardless of Chain ofCommand. Upon such involuntar yrelease, any Reser ve units that areoverstacked get an “interphase” in whichthey may move up to one hex to conformto stacking rules. There are no restrictionsconcerning in which direction the“unstacking” units may move, other than“no further than one hex.”
Play Note: Each scenario states whateveradditional restrictions apply to releasingReserves, as well as what turn a corps inReserve is automatically released.
5.0 MOVEMENT
A Movement Allowance (MA)represents the maximum number ofMovement Points (MPs) that any unitmay “normally” expend during a singleactivation segment. Units may alwaysmove less than their allowed MA.
5.1 Strategic Movement
A unit using StrategicMovement (SM) places aStrategic Movement markernear it, to so indicate. That
marker may not be removed from theunit until its next activation (if it choosesnot to continue using SM). See 7.45 forcombat effects.
5.11 Movement Effects. Using SM, theunit’s MA is double what is printed onthe counter. However, when using SM:• No unit may start or move within
THREE hexes of any enemy combatunit.
• Units may not move in any Heavily-Cultivated hex unless it is by Road(not Trail).
• Units may not move in any Lightly-Cultivated hex unless it is by Roador Trail.
• Only one combat unit is allowed in anyone hex.
5.12 Artillery SM. The maximum MAof a non-horse artiller y unit usingstrategic movement is 10. Horse artilleryuse SM like infantry or cavalry.
5.2 Terrain
A unit expends Movement Points for eachhex it enters. MP costs depend on unittype and terrain entered (see the TerrainEffects Chart). Movement into/acrosscertain terrain types will cause certainunits to become Reduced.
5.21 Roads. Units using Roads pay theRoad cost if they are entering that hexfrom a hex containing a connecting roadhex; otherwise, they pay the cost of the
other terrain in the hex. A unit using aroad to cross an elevated hexside, or aridge, treats that hexside as the nextlower-level hexside. Thus, the roadleading from S1424 into S1425 allows theunit to ignore the elevation change cost.A Major Road is different from a MinorRoad only in that it is not affected by Rain(see Playbook).
5.22 Trails and Railroads. Trails halve(rounding fractions down) the cost toenter a specific type of hex. However, theyhave no effect on elevation costs.Railroads are treated as if they were Trails.
5.23 Water Terrain. Running water istreated as follows:• The River Ticino (Magenta map) is
impassable, except where traversed bybridges.
• Canals and Deep Streams are difficultto cross; for some unit types they areuncrossable (see Terrain EffectsChart). In addition, infantry crossingsuch hexsides incurs an automaticDisorder.
• Shallow Streams are treated asindicated in the Terrain EffectsChart.
• Fords. Where Roads cross streamswithout a bridge, that is considered aFord. Trails do not create fords.
Design Note: It’s somewhat difficult todetermine the effect of the streams andcanals, especially at Solferino, mostly forlack of narrative information. The canalswere at least three yards wide, and deeperthan a man … but no more than 10-15yards wide. That makes them a problem,but not a major barrier. As for thestreams, their difficulty lay in the factthat most were “sunk” into the terrain,with fairly steep banks. The battledescriptions do not mention any greatdifficulties with these barriers (except forthe big canal flowing through Medole).This could mean that they avoided them,of course.
5.24 Elevated Terrain. The hexsideswhere the elevation changes (for gamepurposes, if not in reality) are calledSlopes. There are three types of Slope,each with a different visual indication (seethe sample terrain on the maps):
Copyright © GMT Games, 2000 Page 9
The Second Italian War for Independence
• Gradual: One-level change (no icon)• Sharp: Two-level change• Steep: Three-level change
Rough. All hexes on level 4 and 5 areRough Terrain (some are also Woodedand Rough).
Artillery Firing Angle. Artillery firingover distances must consider the totalnumber of level changes as affectingthe angle of their fire. For example,Artillery firing up two levels over adistance of several hexes would beconsidered as firing up a Sharp slopefor terrain effects purposes.
5.25 Ridges (Solferino only). Ridgesrepresent sharp, but narrow, rises inelevation. The color of the ridge hexsideis its level, comparable to the color codefor hex levels. (Most are one level abovethe surrounding terrain; a few are steeper.)The cost to cross a Ridge is based on itselevation level change, as listed on theTerrain Effects Chart. Note, though, thatwhen crossing a ridge such movementnegates any elevation change cost for thehex entered.
Example: an infantry unit moving fromS2218 to S2117 would pay 3 MPs (oneto enter the hex plus two for crossing aSharp Ridge). The Ridge negated theSlope elevation cost between the twohexes.
5.26 Impassable Hexsides. Certainhexes/hexsides are impassable; units maynot enter or cross them (unless they aretraversed by a Bridge or Road). Note thatthe “one hex” allowance rule [5.31] doesnot allow passage of impassable hexes/hexsides.
Example: Cavalry and artillery unitsmay not cross Steep Slope hexsides, unlessby Road.
5.27 Cultivated Hexes. Most level 2hexes on the Magenta map are HeavilyCultivated. Aside from the movementcosts, Heavily-Cultivated hexes havesome unusual rules regarding ZOC[6.23], movement and combat (seeMagenta in the Playbook). The Lightly-Cultivated hexes at Solferino also have
important ZOC rules in addition to theircosts.
Play Note: The important rule forMagenta is No Stacking if you want touse roads/Trails through these hexes.
5.28 Towns and Villages. These aretreated distinctly, mostly in terms ofmovement and combat benefits [see 5.5on Towns]. Hexes with only one buildingare treated like the other terrain in thehex.
5.29 Castles. Essentially, there are onlytwo: one above the village of Solferino,and Monte Rolondo at Magenta. Onlyone unit may gain/use the benefits of acastle—and that unit may not be cavalry.All other units are considered outside thecastle. If more than one unit is in that hex,the bottom unit is considered to be insidethe castle. When a castle hex is attacked,the units outside the hex are treatedseparately, and attacked separately.
5.3 Movement Restrictions
As a unit moves it traces a path ofcontiguous hexes through the hex grid,paying the cost of each hex entered. Eachunit moves separately, and one unit ’smovement must be completed beforeanother can begin. A unit may be movedin any direction or combination ofdirections. A unit’s Facing [6.1] has noeffect on how or where it may move.
Exception: See the Awareness rule forthe Heavily-Cultivated hexes atMagenta.
5.31 Entrance Minimum. A movingunit must have enough MP’s to pay theterrain (and ZOC) cost of entering a hex;if it doesn’t, it may not enter that hex.However, a unit may move one hex,regardless of available MP, if it ispermitted to enter that hex at all.
5.32 Firing Artillery. Artilleryunits that fire may also move,but they may use only half(rounded down) of their MAfor that segment. Artillery
units may move, and then fire. In thiscase, such fire incurs a –1 DRM.Artillery using Strategic Movement maynot fire in that activation.
5.33 Adjacency Prohibitions. Cavalrymay not move adjacent to an enemycombat unit unless such movement ispart of a Charge. Artillery units may notmove adjacent to an enemy unit unlessthe two are separated by impassableterrain.
5.34 Protected Entry. No unit may movewithin two hexes of an enemy Entry Hex[5.6] until all reinforcements have enteredthe game.
5.4 Stacking
Stacking refers to having more than oneunit in a hex at any one time.
5.41 Normal Stacking. The basic rulesare:
1) Up to TWO infantry or cavalry unitsof the same brigade may stacktogether.
Example: Two infantry battalions fromDauber’s brigade (VIII, Austrian) maystack together. But one of Dauber’s unitsmay not stack with one of Lippert’s, eventhough they are from the same division(Lang).
2) ONE artillery unit may stack withone infantr y or cavalr y unit(regardless of parent command).
3) THREE artillery units may stacktogether.
4) When using Strategic Movement,only one combat unit is allowed perhex.
5) When in Reserve status, units mayoverstack at no penalty.
6) Infantry in a Town have specialrestrictions [5.5].
7) Markers and Leaders do not count forstacking purposes.
RISORGIMENTO 1859: THE BATTLES
RulebookPage 10
5.42 Combat Stacking. S tackingrestrictions apply at all times, exceptduring an attack. A unit may move intoa hex containing an enemy unit—that ishow attack occurs [7.42]. A unit may notmove through a hex containing an enemycombat unit.
5.43 Stacking Order. Artillery may fireregardless where they are in a stack.Jägers, Chasseurs and Lights may fireonly if they are the top unit in a stack.
5.5 Towns
The narrow streets, close, stone buildingsand walled perimeters of the Italiantowns (e.g., Magenta) made for strongdefensive positions. This rule does NOTapply to villages.
5.51 Town Stacking. A player may stackup to three infantry units, or two infantryand one artillery unit, in a town hex,regardless of their parent organization.Cavalry stacking restrictions still apply.
5.52 Town Effects. If two or moreinfantry units are in any one town hex,they each gain the following advantages:• They have all-around, six-hex frontal
facing and ZOC. However, thatZOC does not extend into Heavily-Cultivated or Woods hexes [6.23].
• When leaving the hex, or attacking outof that hex, they may do so throughany one hexside.
These advantages do not apply to singleinfantry units in a town hex, nor do theyapply to cavalry.
5.53 Town Restrictions. A unit that startsits movement in a town hex that is takingadvantage of town stacking pays an extraMP to leave that hex. Only two units mayattack out of a Town hex, even if thereare three in that hex. This includes firingJägers, Chasseurs or Light Infantry.
5.54 Cavalry and Towns. Cavalry doesnot gain ANY of the benefits of a Townhex (including the terrain benefit appliedto infantry). They may not charge anenemy in a Town hex.
5.6 Reinforcements
Reinforcements enter the game in theturn listed in the reinforcement arrivalschedule for the scenario (see Playbook).They enter when their corps is activated.They enter through the Entry Hex(es)stated in the scenario, as if they were in a“line” extending off the map. That is, thefirst unit in that command pays the costto enter the map edge. Each additionalreinforcing unit that enters the map paysthe terrain cost multiplied by the numberof reinforcement units that have enteredahead of it through that entry hex.
Some Reinforcements specify that theymay be activated only once that turn. Thisrepresents units that arrived about halfwaythrough the turn’s time frame.
Reinforcements may enter using StrategicMovement, if they are eligible and theplayer wishes.
6.0 POSITION
The position of counters (facing,adjacency and zones of control) have animpact upon what units can and/or mustdo in the game.
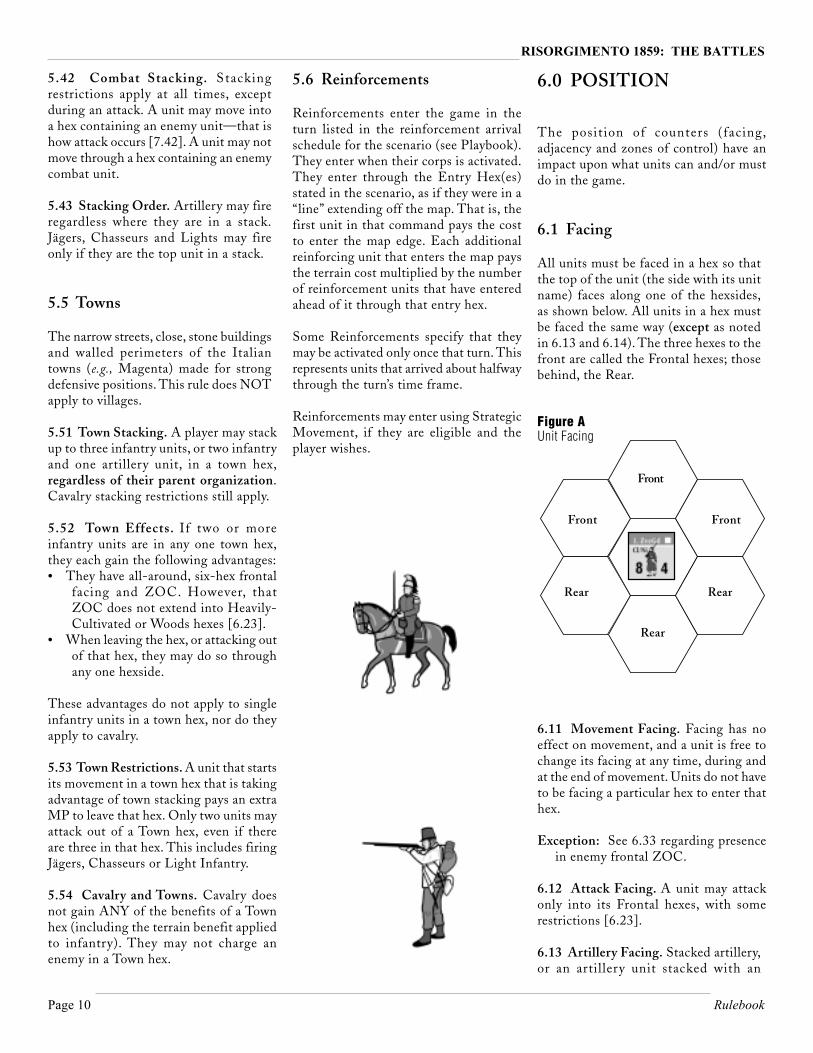
6.1 Facing
All units must be faced in a hex so thatthe top of the unit (the side with its unitname) faces along one of the hexsides,as shown below. All units in a hex mustbe faced the same way (except as notedin 6.13 and 6.14). The three hexes to thefront are called the Frontal hexes; thosebehind, the Rear.
6.11 Movement Facing. Facing has noeffect on movement, and a unit is free tochange its facing at any time, during andat the end of movement. Units do not haveto be facing a particular hex to enter thathex.
Exception: See 6.33 regarding presencein enemy frontal ZOC.
6.12 Attack Facing. A unit may attackonly into its Frontal hexes, with somerestrictions [6.23].
6.13 Artillery Facing. Stacked artillery,or an artillery unit stacked with an
Front Front
Rear Rear
Rear
Front
Figure AUnit Facing
Copyright © GMT Games, 2000 Page 11
The Second Italian War for Independence
infantry unit, do NOT have to have thesame facing. Any facing effects on theattack DR apply to the infantry unit’sorientation.
6.14 Square. To protect against a cavalrycharge, non-Jäger/Chasseur infantryunit(s) (within normal stacking limits[5.41]) may assume different facings toform a Square. To do so the unit must
not be adjacent to an enemyunit and must pay 1 MP to doso, after which it may move nofurther that turn. Place aSquare marker atop the unit.
Square confers the following effects:• Units in Square may not move.• All hexes adjacent to the Square are
Frontal.• All units in the Square may fire, but
they still fire separately.• Cavalry units add one (+1) to their
Charge Commitment die roll [7.42]when charging a Square.
Units may leave Square by paying 1 MP.They may not do so if adjacent to anenemy unit.
6.15 Rally Facing. Rallied units maychange facing [7.9].
6.2 Zones Of Control (ZOC)
Zones of Control represent the extensionof a unit ’s presence outside theimmediate hex in which it is located,usually through skirmishers andmaneuverability.6.21 Frontal ZOCs. Infantr y andcavalry units exert a ZOC into all threeFrontal hexes adjacent to the hex theyoccupy. There are no ZOCs to a unit’sRear.
Exception: Artillery and Disorderedunits do not exert any ZOC.
6.22 ZOC Limitations. A ZOC doesnot extend:• Across impassable hexsides or into
Town hexes• Through bridges (but they do extend
across Fords).
• UP sheer or steep hexsides (but theydo extend DOWN for infantry).
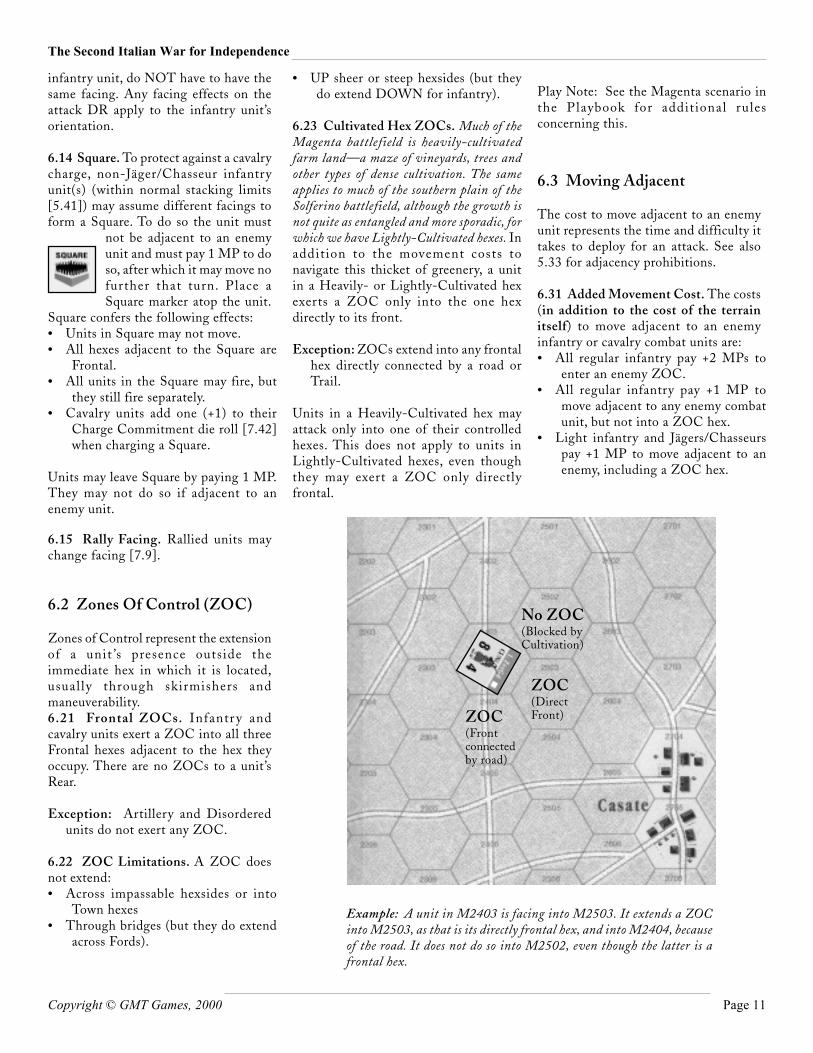
6.23 Cultivated Hex ZOCs. Much of theMagenta battlefield is heavily-cultivatedfarm land—a maze of vineyards, trees andother types of dense cultivation. The sameapplies to much of the southern plain of theSolferino battlefield, although the growth isnot quite as entangled and more sporadic, forwhich we have Lightly-Cultivated hexes. Inaddition to the movement costs tonavigate this thicket of greenery, a unitin a Heavily- or Lightly-Cultivated hexexerts a ZOC only into the one hexdirectly to its front.
Exception: ZOCs extend into any frontalhex directly connected by a road orTrail.
Units in a Heavily-Cultivated hex mayattack only into one of their controlledhexes. This does not apply to units inLightly-Cultivated hexes, even thoughthey may exert a ZOC only directlyfrontal.
Play Note: See the Magenta scenario inthe Playbook for additional rulesconcerning this.
6.3 Moving Adjacent
The cost to move adjacent to an enemyunit represents the time and difficulty ittakes to deploy for an attack. See also5.33 for adjacency prohibitions.
6.31 Added Movement Cost. The costs(in addition to the cost of the terrainitself) to move adjacent to an enemyinfantry or cavalry combat units are:• All regular infantry pay +2 MPs to
enter an enemy ZOC.• All regular infantry pay +1 MP to
move adjacent to any enemy combatunit, but not into a ZOC hex.
• Light infantry and Jägers/Chasseurspay +1 MP to move adjacent to anenemy, including a ZOC hex.
Example: A unit in M2403 is facing into M2503. It extends a ZOCinto M2503, as that is its directly frontal hex, and into M2404, becauseof the road. It does not do so into M2502, even though the latter is afrontal hex.
ZOC(DirectFront)ZOC
(Frontconnectedby road)
No ZOC(Blocked byCultivation)
RISORGIMENTO 1859: THE BATTLES
RulebookPage 12
• There is no MP cost to move adjacentto an enemy artillery unit not stackedwith supporting infantry/cavalry.
• Cavalry may move adjacent to anenemy unit only as part of a Charge[7.5], though there is no additionalMP cost.
6.32 Stops Movement. Units must stopupon moving into to an enemy ZOC(although they can alter their facing asthey enter that hex). They do not haveto stop if they do not enter a ZOC.
6.33 Inhibits Movement. A unit thatstarts movement in an enemy ZOC maydo one of three things, in terms ofmovement:• Stand still• Stay and change its facing one hexside
(not more).• They may leave an enemy ZOC if they
start their phase there, but to do socosts one additional MP (in additionto the terrain cost of the hex entered),and that unit may not move directlyinto another enemy ZOC.
6.34 Cavalry Withdrawal. Ifan enemy infantry unit is aboutto move adjacent to a cavalryunit, the cavalry may react bywithdrawing two hexes away. The enemymay move into the vacated hex and thencontinue moving if it has MPs remaining.It does not pay the cost to enter thecavalry ZOC once the latter haswithdrawn. Horse Artillery—thosebatteries with an MA of 8—is consideredto be cavalry for the purposes of thisability.
Exception: Cavalry cannot withdraw ifit is in the ZOC of another enemyunit.
6.35 Jäger/Chasseur Withdrawal. Jägerand Chasseur units [7.2] may, even ifDisordered, withdraw before anenemy unit moves into one ofits ZOC hexes. To withdraw,the unit moves one hex to therear. The enemy unit may moveno further, but the withdrawing unit maynot Reaction Fire.
7.0 COMBAT
Combat consists of three types: artilleryfire, a limited amount of Small-ArmsFire and attack (which combines close-range fire and charges).• Artillery cannot attack [7.35].• Small-Arms Fire is limited to Jägers,
Chasseurs and Light infantry [7.2].
Design Note: We have combined theusual fire and shock aspects of combatinto one mechanic. This is as much aresult of the scale (325 yards per hex) asour desire to keep things as accessible aspossible.
7.1 Artillery Fire
Artillery may fire any time it isactivated, once per activationsegment (see 5.32 formovement effects of firing).Artillery can change facing (withoutleaving the hex) and fire in the samephase. It may also fire in Reaction, duringan opposing player’s activation segment[7.17].
7.11 Fire Procedure. Artillery fire isresolved by rolling the die for each firingunit, and adjusting that roll [see 7.18 onfire resolution]. Artillery fire resultsaffect al l units in the target hex,individually. The effectiveness of the firelargely depends upon gun type and range.• Gun Type: The gun type is printed
on the counter: F, for Field, H forHeavy, R for Rockets and Rf forRifled. The Horsehead indicatesHorse Artillery.
• Ranged Fire: Artillery may fire attargets more than one hex away. Themaximum distance, in hexes, overwhich artillery may fire is printed onthe counter. Range effects are used asa DRM to the fire resolution (consultthe Artillery Range Effects Chart forthe DRM for that type at that range).Ranged fire may also be restricted byLine-of-Sight considerations [7.13].
Historical Note: The French ImperialGuard ’s brand new, muzzle-loading
rifled guns were superior to that of eitherthe Austrians or Piedmontese, at leastin terms of accuracy and range.However, it appears that the French didnot have (or use) grape or canister forthe new rifled barrels, which is why theyhave lower ratings at short ranges.
7.12 Combined Fire. If artillery unitsfrom the same Corps are stacked in thesame hex, or in adjacent hexes, they maycombine fire IF (and only if ) they arewithin range of the Corps Commander.Army Reserve batteries may be assignedto any corps for this purpose, OR theymay combine fire as part of the ArmyReserve activation (but not both).
Example: Schwarzenberg can commandany/all batteries from the III corps,whether they are in his Reserve orassigned to a specific brigade.
When combining fire, ADD TWO tothe roll for EACH additional battery.Otherwise, artillery units fire separately.If guns of different type combine fire,they use the “worst” Range DRM.
Exceptions:• French artillery may only combine fire
when stacked in the SAME HEX.• Piedmont batter ies may NOT
combine fire.
7.13 Line of Sight. Artillery firing at arange of two hexes or more—countedfrom guns to target, not counting the hexthe firing unit is in—can fire only if theycan see the target (called having a Lineof Sight). Intervening elevations andunits (friendly or otherwise) can blockthe Line of Sight (LOS) to the target.Ridges are treated as the level of theircolor. Woods, Villages, Towns andCastles are treated as being one levelhigher than the hex they are in.
LOS is blocked if:• Any intervening hex is of a higher
elevation than both target and firinghex.
• Any intervening hex between targetand firer is Woods, Heavily-Cultivated, or a hex occupied by acombat unit (friendly or otherwise),and neither target nor firer is at a
Copyright © GMT Games, 2000 Page 13
The Second Italian War for Independence
higher elevation than that woods/occupied hex.
• The firing hex is higher than the targetand higher than the interveningWoods or Heavily-Cultivated hex,and if the obstruction is halfwaybetween the two or closer to thetarget.
• The target hex is higher than the firinghex and higher than the interveningwoods or HC hex, and if the woodsis halfway between the two or closerto the firing hex.
The hexside of a potentially blocking hexis part of that hex and thus that hex willblock LOS that travels along thathexside. Artificial? You bet.
If both target and firing hexes are higherthan intervening obstructions, fire isallowed (for the benefits of firing from ahigher elevation, see 7.14).
7.14 Elevated Fire. Guns at ameasurably higher elevation than theirtargets were usually more effective, aslong as the target was not too close.Therefore, if the target is NOTADJACJENT, then artillery gains thefollowing elevation benefits:• +1 DRM if firing down two levels• +2 DRM if firing down three levels
Artillery may not fire at an adjacent hexthat is two or more levels higher or lower.
7.15 Dispersed Target. If the hexcontains only Jägers or Chasseurs, theplayer applies a –2 DRM.
7.16 Massed Target. When artillery firesat any hex in which there are two or morenon-artillery units stacked, it gets a +1DRM. Jägers and Chasseurs do not count.
7.17 Reaction Fire. Artillery batteriesmay fire during an opposing player’sactivation segment, in Reaction tocertain actions by that player. They maydo one of each type of fire listed belowfor each activation segment.• Counter-Battery Fire. An artillery
unit may always fire back at anyartillery unit that fires at it. Such fireis not simultaneous; it occurs after theoriginal fire, and the unit may only
Counter-Battery Fire once in eachactivation segment.
• Pre-Attack Fire. An artillery batterythat is about to be fired at [7.2] orattacked [7.3], or into whose frontalhex an enemy unit moves,may fire at any one frontalhex. It may do so only oncein each activation segment.
Play Note: Thus, a battery may eitherfire when an enemy moves adjacent orwait until it decides to attack. The choiceis up to the non-phasing player.
7.18 Fire Resolution. Roll the die andadd or subtract any modifiers to fire(see below). Then consult the ArtilleryFire Table for the result . Note:Disordered artillery may not fire.
The artillery fire roll may be adjusted by:• Range [7.11]• Terrain (see the Terrain Effects Chart)• Combined Fire—add two for each
additional battery firing [7.12]• Elevated Fire [7.14]• Massed or Dispersed Target [7.15 and
7.16]
KEY TO FIRE RESULTS:NE No EffectCDR Cohesion Die Roll: Roll a die
and compare it to the unit ’spresent Cohesion. If higherthan that rating, the unit isDisordered; if not, then thereis no effect. The CDR resulthas no effect on artillery.
D All units in hex DisorderedD+1 All units in hex Disordered, 1
Hit is applied to any oneunit.
7.2 Jägers, Chasseurs and LightInfantry
Design Note: Jäger and Chasseurbattalions are prohibited from attacksimply because, while they were trainedin shock attack, it does not appear thatthey were used for that purpose duringthis war. The Austrian light infantry ismostly second-line, Grenzer battalions,
and, while the French light infantry israted much better, it was usuallysomewhat smaller (at least as far as wecan tell). Anyway, it made up for sizewith skill at more than one job. It alsoprovides a dash of flavor for the stew thatis wargaming.
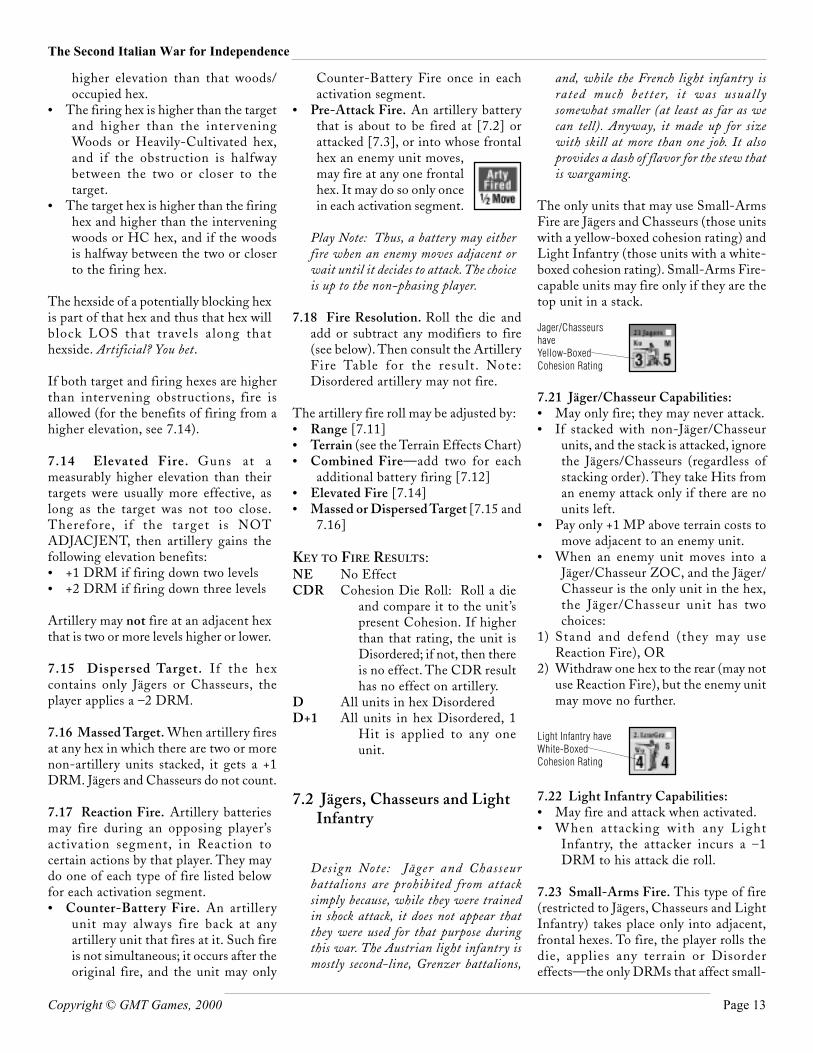
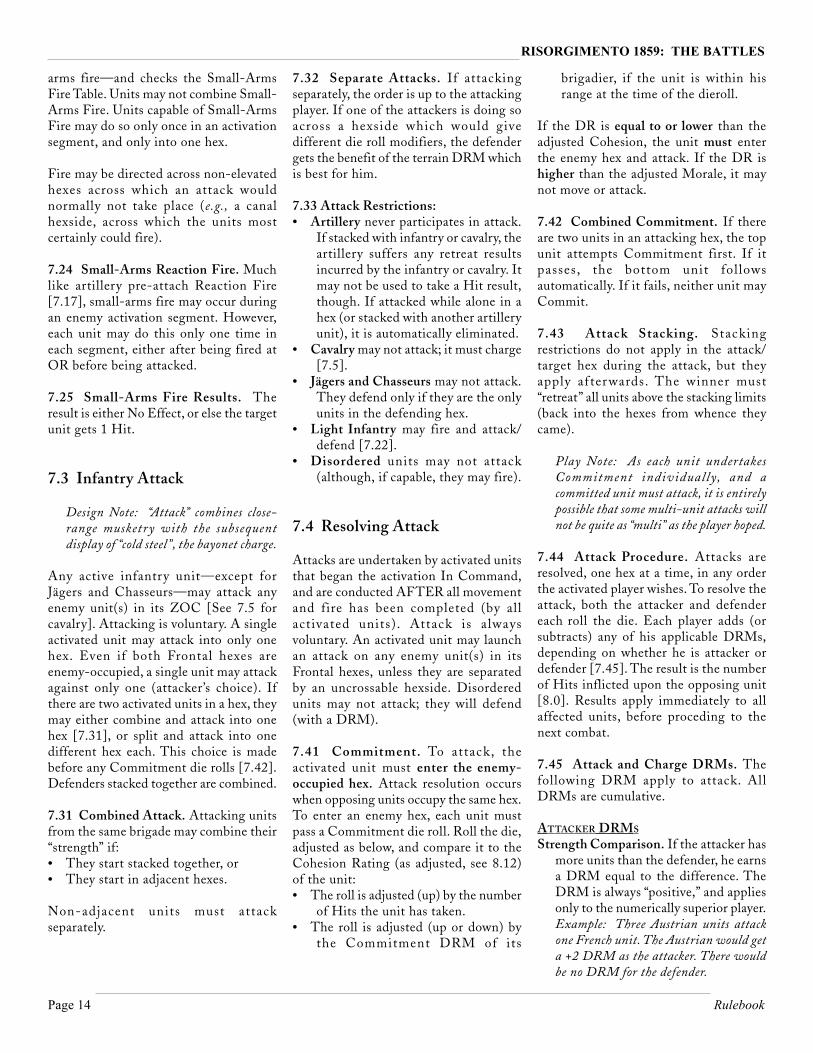
The only units that may use Small-ArmsFire are Jägers and Chasseurs (those unitswith a yellow-boxed cohesion rating) andLight Infantry (those units with a white-boxed cohesion rating). Small-Arms Fire-capable units may fire only if they are thetop unit in a stack.
7.21 Jäger/Chasseur Capabilities:• May only fire; they may never attack.• If stacked with non-Jäger/Chasseur
units, and the stack is attacked, ignorethe Jägers/Chasseurs (regardless ofstacking order). They take Hits froman enemy attack only if there are nounits left.
• Pay only +1 MP above terrain costs tomove adjacent to an enemy unit.
• When an enemy unit moves into aJäger/Chasseur ZOC, and the Jäger/Chasseur is the only unit in the hex,the Jäger/Chasseur unit has twochoices:
1) Stand and defend (they may useReaction Fire), OR
2) Withdraw one hex to the rear (may notuse Reaction Fire), but the enemy unitmay move no further.
7.22 Light Infantry Capabilities:• May fire and attack when activated.• W hen attacking with any Light
Infantry, the attacker incurs a –1DRM to his attack die roll.
7.23 Small-Arms Fire. This type of fire(restricted to Jägers, Chasseurs and LightInfantry) takes place only into adjacent,frontal hexes. To fire, the player rolls thedie, applies any terrain or Disordereffects—the only DRMs that affect small-
Jager/ChasseurshaveYellow-BoxedCohesion Rating
Light Infantry haveWhite-BoxedCohesion Rating
RISORGIMENTO 1859: THE BATTLES
RulebookPage 14
arms fire—and checks the Small-ArmsFire Table. Units may not combine Small-Arms Fire. Units capable of Small-ArmsFire may do so only once in an activationsegment, and only into one hex.
Fire may be directed across non-elevatedhexes across which an attack wouldnormally not take place (e.g., a canalhexside, across which the units mostcertainly could fire).
7.24 Small-Arms Reaction Fire. Muchlike artillery pre-attach Reaction Fire[7.17], small-arms fire may occur duringan enemy activation segment. However,each unit may do this only one time ineach segment, either after being fired atOR before being attacked.
7.25 Small-Arms Fire Results. Theresult is either No Effect, or else the targetunit gets 1 Hit.
7.3 Infantry Attack
Design Note: “Attack” combines close-range musketry with the subsequentdisplay of “cold steel ”, the bayonet charge.
Any active infantry unit—except forJägers and Chasseurs—may attack anyenemy unit(s) in its ZOC [See 7.5 forcavalry]. Attacking is voluntary. A singleactivated unit may attack into only onehex. Even if both Frontal hexes areenemy-occupied, a single unit may attackagainst only one (attacker’s choice). Ifthere are two activated units in a hex, theymay either combine and attack into onehex [7.31], or split and attack into onedifferent hex each. This choice is madebefore any Commitment die rolls [7.42].Defenders stacked together are combined.
7.31 Combined Attack. Attacking unitsfrom the same brigade may combine their“strength” if:• They start stacked together, or• They start in adjacent hexes.
Non-adjacent units must attackseparately.
7.32 Separate Attacks. If attackingseparately, the order is up to the attackingplayer. If one of the attackers is doing soacross a hexside which would givedifferent die roll modifiers, the defendergets the benefit of the terrain DRM whichis best for him.
7.33 Attack Restrictions:• Artillery never participates in attack.
If stacked with infantry or cavalry, theartillery suffers any retreat resultsincurred by the infantry or cavalry. Itmay not be used to take a Hit result,though. If attacked while alone in ahex (or stacked with another artilleryunit), it is automatically eliminated.
• Cavalry may not attack; it must charge[7.5].
• Jägers and Chasseurs may not attack.They defend only if they are the onlyunits in the defending hex.
• Light Infantry may fire and attack/defend [7.22].
• Disordered units may not attack(although, if capable, they may fire).
7.4 Resolving Attack
Attacks are undertaken by activated unitsthat began the activation In Command,and are conducted AFTER all movementand fire has been completed (by allactivated units). Attack is alwaysvoluntary. An activated unit may launchan attack on any enemy unit(s) in itsFrontal hexes, unless they are separatedby an uncrossable hexside. Disorderedunits may not attack; they will defend(with a DRM).
7.41 Commitment. To attack, theactivated unit must enter the enemy-occupied hex. Attack resolution occurswhen opposing units occupy the same hex.To enter an enemy hex, each unit mustpass a Commitment die roll. Roll the die,adjusted as below, and compare it to theCohesion Rating (as adjusted, see 8.12)of the unit:• The roll is adjusted (up) by the number
of Hits the unit has taken.• The roll is adjusted (up or down) by
the Commitment DRM of its
brigadier, if the unit is within hisrange at the time of the dieroll.
If the DR is equal to or lower than theadjusted Cohesion, the unit must enterthe enemy hex and attack. If the DR ishigher than the adjusted Morale, it maynot move or attack.
7.42 Combined Commitment. If thereare two units in an attacking hex, the topunit attempts Commitment first. If itpasses, the bottom unit fol lowsautomatically. If it fails, neither unit mayCommit.
7.43 Attack Stacking. Stackingrestrictions do not apply in the attack/target hex during the attack, but theyapply af terwards. The winner must“retreat” all units above the stacking limits(back into the hexes from whence theycame).
Play Note: As each unit undertakesCommitment individually, and acommitted unit must attack, it is entirelypossible that some multi-unit attacks willnot be quite as “multi” as the player hoped.
7.44 Attack Procedure. Attacks areresolved, one hex at a time, in any orderthe activated player wishes. To resolve theattack, both the attacker and defendereach roll the die. Each player adds (orsubtracts) any of his applicable DRMs,depending on whether he is attacker ordefender [7.45]. The result is the numberof Hits inflicted upon the opposing unit[8.0]. Results apply immediately to allaffected units, before proceding to thenext combat.
7.45 Attack and Charge DRMs. Thefollowing DRM apply to attack. AllDRMs are cumulative.
ATTACKER DRMS
Strength Comparison. If the attacker hasmore units than the defender, he earnsa DRM equal to the difference. TheDRM is always “positive,” and appliesonly to the numerically superior player.Example: Three Austrian units attackone French unit. The Austrian would geta +2 DRM as the attacker. There wouldbe no DRM for the defender.
Copyright © GMT Games, 2000 Page 15
The Second Italian War for Independence
Higher Cohesion. The side with the unitwith the highest Cohesion ADDSONE to its roll. If tied, neither sidebenefits.
Position DRMs. If any units are attackingby entering the target hex through thetarget’s Rear hexside, ADD ONE tothe attacker’s roll. If attacking units areattacking through both Front and Rearhexsides, ADD TWO to the roll.
Terrain DRM. Check the Terrain EffectsChart for any Terrain DRM thatnegatively affects the attacker’s roll.
Strategic Movement. Ifdefender is using StrategicMovement, the attackergets a +2 DRM.
Morale. If any defender is froma brigade that is Hors deCombat [9.1], the attackergets a +1 DRM.
Unit Type. If ALL defendingunits are Jägers orChasseurs, the attacker getsa +2 DRM. If only some ofthe defenders are Jäger/Chasseur, simply ignorethem. If more than half ofthe attackers are LightInfantry, the attacker incursa –1 DRM.
Cavalry Charge vs. Infantry[7.5]. If more than half ofan attacking force is LightCavalry charging infantry, itincurs a –2 DRM forattacker.
Cavalry Charge vs. Cavalry [7.5].Heavy Cavalry
charging LightCavalry receives a+1 DRM.
Light Cavalry chargingHeavy Cavalryincurs a –1 DRM.
If the attackers (ordefenders) are mixed types,there is no DRM.
Surprise (Magenta only, seePlaybook). An attackingunit gains a +2 DRM.
DEFENDER DRMS
Strength Comparison. If defender hasmore units, he earns a DRM equal tothe difference. The DRM is always“positive,” and applies only to thenumerically superior player. Example:If one French attacked three Austrians,the latter, as defender, would get a +2DRM.
Higher Cohesion. The side with the unitwith the highest Cohesion ADDSONE to its roll. If tied, neither sidebenefits.
Disordered . If any defender isDisordered, he SUBTRACTS ONEfrom his roll.
Infantry defending vs. Cavalry. ADDTWO to the defender’s roll [see 7.53].(This represents the infantry’s firepower).
7.46 Unsupported Artillery. Artilleryunits that are alone in a hex (with noinfantr y or cavalry support) areautomatically eliminated when attacked,after they use Reaction Fire (see 7.61regarding Horse Artillery). The attackersfirst must pass Commitment for this tohappen.
7.47 Continued Attack. Any time theattacker has lost fewer Hits than thedefender (and, therefore, controls the hexhe attacked [8.31], he may (voluntary)attempt to Continue his attack. He maydo so only with the unit(s) that remain inthe hex after meeting stacking limits[7.43]. To do this, he rolls the die,subtracting the difference between enemyHits suffered and victorious Hits suffered,and compares the adjusted roll it to theadjusted Morale of the unit intended toattack again.• If the adjusted roll is the same as or
lower than the adjusted Morale, thatunit (or stack) may move into any onehex adjacent to the original battle hexand attack any enemy therein, usingregular combat rules.
• If the adjusted roll is higher, the unitsstay in the original battle hex, andthere is no further movement.
Example: Thus, if the attacker loses 1 Hitand the defender loses Hits, the attacker,as winner, may opt to attempt ContinuedAttack with a –2 DRM.
At the conclusion of the ContinuedAttack, regardless of the result, the unit(s)that Continued suffer 1 Hit each. Onlyone Continued Attack may be undertakenby each unit in an activation segment.
7.5 Cavalry Charge
Historical Note: Cavalry effectivenesswas much reduced since the Napoleonicera, mostly because of the increased rangeand effectiveness of infantry fire. A bigcavalry action occurred at Solferino, inthe plains west of Medole. Very littlecavalry was at Magenta, although theFrench Chasseurs of the Guard did charge,and take, an Austr ian entrenchedposition.
To attack an enemy unit, cavalry mustCharge. Charges are undertaken byactivated units that began the activationIn Command, and are conducted AFTERall movement and fire has been completed(by all activated units). Charge is alwaysvoluntary. To Charge in its segment, thecavalry unit must Charge into the target’shex, starting at least two, but not morethan three, hexes away. A cavalry unit mayCharge only against a target it can seebefore it started its Charge move (see 7.13LOS). Disordered cavalr y may notCharge. In order to continue with theCharge, cavalr y must rol l forCommitment [7.41].
7.51 Enemy Obstruction. Cavalry unitsthat start their activation adjacent to anenemy combat unit may either stay there(and change facing) or move away. Theymay NOT Charge. Moreover, cavalry maynot voluntarily move adjacent to an enemycombat unit except during a Charge. Itmay do so if required by a Retreat result[8.3].
7.52 Terrain Obstruction. Terrain alsodetermines whether a cavalry unit may ormay not Charge.• Cavalry may NOT Charge into a non-
road or non-trail Heavily-Cultivated,Marsh or Woods hex.
• Cavalry MAY Charge into a Heavily-Cultivated hex if moving via Road,but incurs a –1 DRM (in addition to

RISORGIMENTO 1859: THE BATTLES
RulebookPage 16
the DRM the terrain usually brings).Thus, at Magenta, a cavalry unit in4609 could charge a unit in 4507(with a –1 DRM), but not one in4408.
• Cavalry may NOT Charge into anyCastle, Town or V il lage hexregardless of road presence.
• During charge movement a cavalryunit may not move through any hex,or across any hexside (including theone which separates attacker fromdefender) that would cost more than2 MP.
Historical Note: Normally, we wouldexclude charges across fortifications(which exist at Magenta). However, mostof those fortifications were“entrenchments,” and the Frenchcavalry—the Chasseurs of the Guard—did charge entrenched Austrians atMagenta.
7.53 Cavalry Reaction. Cavalry has theability to avoid—or instigate—an infantryattack either by moving away at the firstsign of danger, or by charging into theoncoming units.Whenever an enemyinfantry unit moves into a cavalry ZOC,the “defending” cavalry must do one ofthe following:• React by withdrawing two hexes away.
The enemy may move into thevacated hex (at least), and thencontinue moving if it has MPsremaining. Horse Artillery (thosebatter ies with an MA of 8) isconsidered to be cavalry for thepurposes of this ability. The choiceas to whether to withdraw or notmust be made the instant the enemyunit enters the ZOC.
• React by countercharging theincoming infantry. That combat isresolved instantly, with thecountercharging cavalr y as theattacker and the attack taking placein the original target hex. NoCommitment roll is needed.
Design Note: So why can’t the cavalryjust stand and defend? Because, at thelevel of complexity and design intent, theinfantry would be firing at the cavalry,not meleeing. The cavalry would haveonly two choices in the face of that
firepower: retreat or charge. If it stoodin place, the infantry would, most likely,shoot it to ribbons.
7.54 Reaction Restrictions. Cavalry maynot use Reaction if it is in the ZOC of adifferent enemy unit at the time. If suchis the case, it can neither withdraw norcountercharge. Disordered cavalry mayuse reaction to withdraw, but not tocountercharge. Reaction withdrawal doesnot cost any MPs. However, the unit maynever react farther than it could normallymove (in terms of MPs it would spend).It may not react into an enemy ZOC.
Cavalry may Countercharge only intohexes into which it could normally charge[7.52]. If, for reasons of terrain/ZOC, thecavalry can neither withdraw nor charge“legally,” it must stand and defend againstthe attack.
Example of Cavalry Reaction:[Solferino] The 3/4 Sicilian Uhlans aresitting in S3732, guarding the bridgeacross the canal. Directly to their rear (in3731/3632) are three battalions ofinfantry from Dientsl ’s brigade (III) plusan artillery battery. Two battalions fromO’Farrel ’s brigade (IV Corps) move fromS3836 to S3832. As they enter S3832,the Uhlans must decide what to do. Tocountercharge would be most foolish(heavy negative DRMs), so they opt towithdraw (to 3831). The Frenchinfantry may not move any further. If itcould, it would have been a difficultdecision for the French player, as he wouldbe moving into the face of an Austrianbattery (and some hefty opposition).
8.0 COMBAT RESULTS
Combat causes units to suffer Hits [8.1],Disorder [8.2] and Retreats [8.3].Disorder can be removed with Rally, whileHits can be removed with Recovery [8.5].
8.1 Hits
The term “Hits” is shorthand for thecumulative and corrosive effects of combaton a unit. It represents more than just theloss of manpower, although that iscertainly one of the aspects. All Hits arecumulative. Keep track of them by placingthe appropriate Hit markers under theaffected counter.
8.11 Hit Results. Combat results fromeither attack or fire may include Hits, thenumbered combat result. Hits are alwaysapplied to the hex as a whole. Thus, ifthere are two units in a hex, and it incurs1 Hit, only one of those units gets thatHit. If there is a choice as to how to divideHits, they must be divided as evenly aspossible, with the affected player choosingwhen there is a “leftover” Hit.
8.12 Effect of Hits:• The number of Hits a unit has
accumulated is used to determine itsAdjusted Cohesion. Unless the rulessay specifically to use the “printed”Cohesion, whenever a roll is madeagainst a unit’s Cohesion Rating, theCohesion Rating is adjusted (down)by the number of Hits it hasaccumulated. Example: A unit with aCohesion Rating of 6 with 2 Hits hasan adjusted Cohesion Rating of 4.
• The instant a unit has accumulatedHits GREATER THAN itsCohesion Rating, the unit iseliminated (and is unrecoverable).
• Hits have no affect on a unit’s basicability to fire or attack/defend. It willaffect Commitment, though.
Design Note: It is important to keep inmind that, as Cohesion Ratings reflect
Copyright © GMT Games, 2000 Page 17
The Second Italian War for Independence
more than just morale or manpowercasualties. Hits affect the endurance aunit has. To that extent, the Cohesion +Hit system simulates a unit ’s stayingpower.
3) The side which has a brigadier inthe combat “wins,” forcing theother side to retreat.
4) The side with the brigadier withthe superior Commitment Rating(–1 is better than +1) wins, forcingthe other side to retreat.
5) The attacker retreats.
8.32 Attacker Retreat. An attacking unitmust retreat into the hex(es) from whenceit came. It does not move any further.There are no other restrictions.
8.33 Defender Retreat. A defending unitforced to retreat moves into any hexadjacent to the target hex, with thefollowing “preferences”:• It may never retreat into an enemy-
occupied hex.• It may not retreat into a hex that was
occupied by an enemy unit prior tothe attack (the attacker’s hex oforigin).
• It will retreat into the least costly hex(in MP cost terms) available.
• If it retreats into an enemy ZOC,which it may do, it incurs anadditional Hit.
If a defending unit cannot retreat it iseliminated.
8.4 Commanders and Combat
Leaders are endangered when one of thefollowing occurs:• They are stacked with units that
receive an artillery fire result of D+1.• They are stacked with units that
receive two or more Hits in an attack.• They are alone in a hex and an enemy
combat unit moves adjacent.
When endangered, roll the die.If it is 7 or higher that Leaderis Finished for the turn. Thismeans he may not be used forany of his game functions untilnext turn. For brigadiers, itmeans all his units are Out ofCommand.
Design Note: The temporary loss of aleader represents the time needed for a
subordinate to assume command, withoutusing a new counter.
8.5 Rally and Recovery
Rally applies to removing Disorder.Recovery is used to reduce the number ofHits a unit has accumulated.
8.51 Rally. Rally is an action a unit mayundertake when it is activated. If thedesignated unit is not adjacent to anenemy combat unit, and it does nothingelse that activation, the player may removethe Disorder.
8.52 Recovery. In the RecoverySegment, from each unit inReserve status, a player may:• Remove Disorder status
AND• Remove two Hits.
8.53 No Full Recovery. In removing Hits,a unit may never recover its original status.The first Hit it receives is permanent.Anything beyond that first Hit may berecovered.
8.2 Disorder
Disorder is a result incurred from ArtilleryFire. Indicate such status by flipping theunit.to its Disordered side.
8.21 Disorder Effects. Disordered unitsmay not Artillery Fire, attack, Charge orCountercharge. They may fire Small-Arms.
A Disordered unit incurs the followingDRMs:• When defending against attack: –1• When firing small-arms: –1
8.24 Additional Disorder. If aDisordered unit suffers an additionalDisorder result, it remains Disordered andincurs a Hit (in addition to any other Hitsit might have incurred). Artillery unitsthat suffer an additional Disorder areeliminated.
8.3 Retreat
Retreat applies only to the aftermath ofan attack; it is not used in fire.
8.31 Determine Loser. After all Hitshave been applied when resolving anattack, determine the loser of the attack(which must retreat all his units), usingthe following list of priorities (use the firstone that applies):
1) The player whose units received themost hits must retreat.
2) The player with the unit with thelowest Adjusted Cohesion (afterhits from that attack have beenapplied) must retreat.

RISORGIMENTO 1859: THE BATTLES
RulebookPage 18
9.0 DEMORALIZATION
Demoralization takes into account theoverall effect of “wear and tear” during abattle. Combat is hard work, at best. Inthe two battles herein, because of the heat,it was even worse.
9.1 Hors de Combat
A brigade becomes hors decombat (HDC)—unfit forbattle—when more than one-half of its units are eitherDisordered or Eliminated. This status isdetermined at the conc lusion of abrigade’s activation. Indicate such with anHors de Combat marker.
9.11 HDC Effects. Units in an HDCbrigade may not attack, nor may theyvoluntarily move into an enemy ZOC.Units may still fire, move, etc.
9.12 Rally and Recovery. Players may useRecovery and/or Rally to “cure” the HDCstatus. When a brigade no longer qualifiesas HDC, remove the marker.
9.2 Corps Demoralization
Demoralization is determined by corps.In the Demoralization Segment, theplayer rolls the die for each corps that hasat least one brigade that is HDC. Adjustthe roll as follows:• Add to the roll the number of HDC
brigades.• Subtract from that roll the Corps
Commander’s Contintuity Rating[4.14].
If the adjusted roll is 7 or higher (the“Demoralization Level”), that corps isDemoralized.
Example: Austrian V Corps (2nd Army)has five brigades; its Corps Commander,Stadion, has a Cohesion Rating of 2.Three of its brigades are HDC. TheAustrian player rolls a 7 forDemoralization: 7 – 2 (Stadion) + 3 (#of HDC brigades) = 8. That is more than
the Demoralization Level of 7, so the VCorps is now Demoralized.
9.21 Demoralization Effects. If a corpshas become Demoralized it:• Must roll for Continuity each time it
is selected for Activation, even for ausually Free Activation. If it fails theroll, it is considered to have used upone of its possible activations for thatturn.
• May not attempt an ExtendedActivation.
• Is subject to possible “CorpsWithdrawal” during Rain (seeSolferino scenario rules).
9.22 No Recovery. Once a corps isDemoralized it remains Demoralized.Changing the HDC status of its brigadeshas no further effect.
Design Note: It is much easier for theAustrian corps to become demoralizedthan the French. This reflects the ratherbrittle nature of the Austrian army. Ifyou feel this makes the game unbalanced,lower the French Demoralization Levelto 6 or 5 (which would be rather drastic).
SOURCES
English
The pickings are slim for this campaignin English. There are, for the most part,two readily available sources ofinformation, although neither is good forOoB.
Turnbull, Patrick, Solferino (St MartinsPress, NY, 1985). This is a very generalsurvey approach, but not entirelyworthless. Nice bookcover picture.
Wylly, H.C., 1859, Magenta and Solferino.Also a general overview, but far betterthan Turnbull’s book. Maps are okay,and battle details—at least for a gamedesigner ’s purpose—are moreinformative.
Non-English
As a result, much research was donein some period sources in three languages:German, Italian and French. Most of thatresearch was done by good friends inEurope, who provided some of thesecitations, and to whom I am mostindebted.
Campagne de L’Empereur Napoleon III enItalie (Paris, 1865). This was the sourcewe used for Magenta as: (a) we couldread it ; and (b) it had the mostdiscernable detail, of which there wasplenty.
Bazancourt, Baron de, La campagned ’Italie de 1859 (Paris, 1860).
Der Krieg in Italien (Vienna, 1872-6).
Italian General Staff, L’armata Sada a SanMartino, La insurrezione milanese demarzo 1848 (Official History of the1859 campaign). Gives a blow-by-blow, hour-by-hour, who-arrived-when for the Italians. All in one bigfootnote.
Montanar i , Gen. Mario , Politica eStrategia in Cento Anni di Guerre
Extra Counters
The backs of a few counters have beenprinted with counters not presently usedby the rules. These may be incorporatedin the variant rules in a future article inC3i magazine.
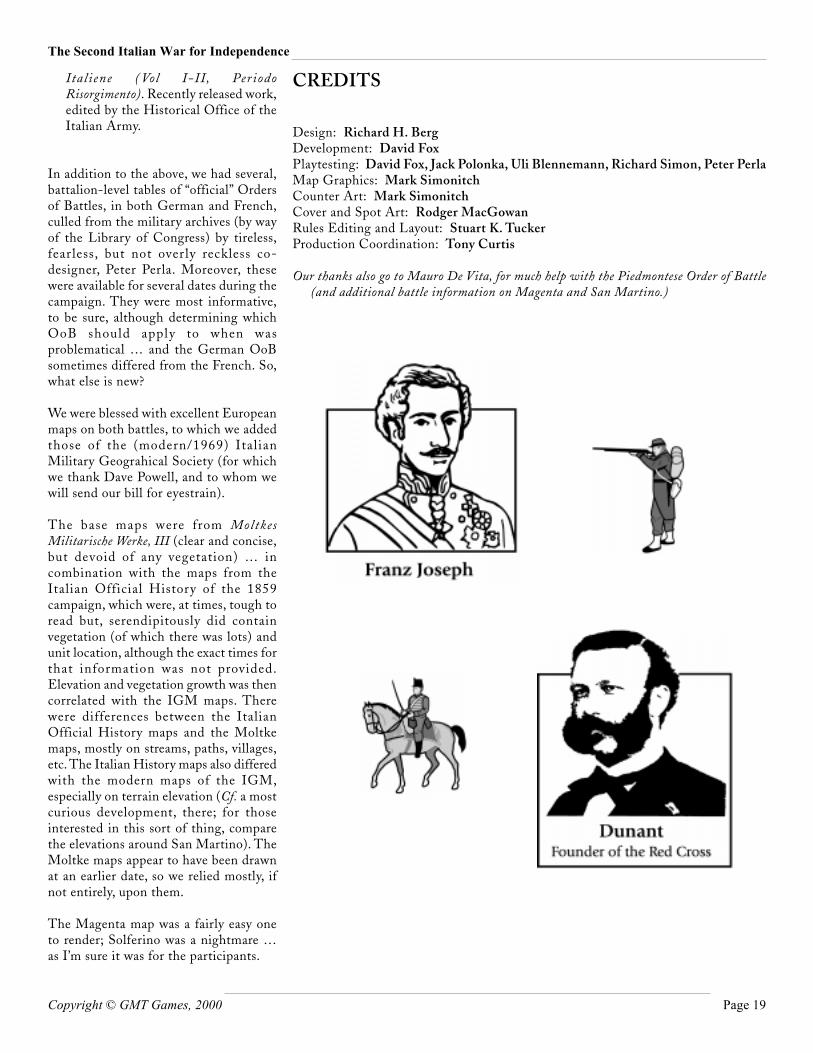
Copyright © GMT Games, 2000 Page 19
The Second Italian War for Independence
Italiene ( Vol I-II, PeriodoRisorgimento). Recently released work,edited by the Historical Office of theItalian Army.
In addition to the above, we had several,battalion-level tables of “official” Ordersof Battles, in both German and French,culled from the military archives (by wayof the Library of Congress) by tireless,fear less, but not overly reckless co-designer, Peter Perla. Moreover, thesewere available for several dates during thecampaign. They were most informative,to be sure, although determining whichOoB should apply to when wasproblematical … and the German OoBsometimes differed from the French. So,what else is new?
We were blessed with excellent Europeanmaps on both battles, to which we addedthose of the (modern/1969) ItalianMilitary Geograhical Society (for whichwe thank Dave Powell, and to whom wewill send our bill for eyestrain).
The base maps were from MoltkesMilitarische Werke, III (clear and concise,but devoid of any vegetation) … incombination with the maps from theItalian Official History of the 1859campaign, which were, at times, tough toread but, serendipitously did containvegetation (of which there was lots) andunit location, although the exact times forthat information was not provided.Elevation and vegetation growth was thencorrelated with the IGM maps. Therewere differences between the ItalianOfficial History maps and the Moltkemaps, mostly on streams, paths, villages,etc. The Italian History maps also differedwith the modern maps of the IGM,especially on terrain elevation (Cf. a mostcurious development, there; for thoseinterested in this sort of thing, comparethe elevations around San Martino). TheMoltke maps appear to have been drawnat an earlier date, so we relied mostly, ifnot entirely, upon them.
The Magenta map was a fairly easy oneto render; Solferino was a nightmare …as I’m sure it was for the participants.
CREDITS
Design: Richard H. BergDevelopment: David FoxPlaytesting: David Fox, Jack Polonka, Uli Blennemann, Richard Simon, Peter PerlaMap Graphics: Mark SimonitchCounter Art: Mark SimonitchCover and Spot Art: Rodger MacGowanRules Editing and Layout: Stuart K. TuckerProduction Coordination: Tony Curtis
Our thanks also go to Mauro De Vita, for much help with the Piedmontese Order of Battle(and additional battle information on Magenta and San Martino.)
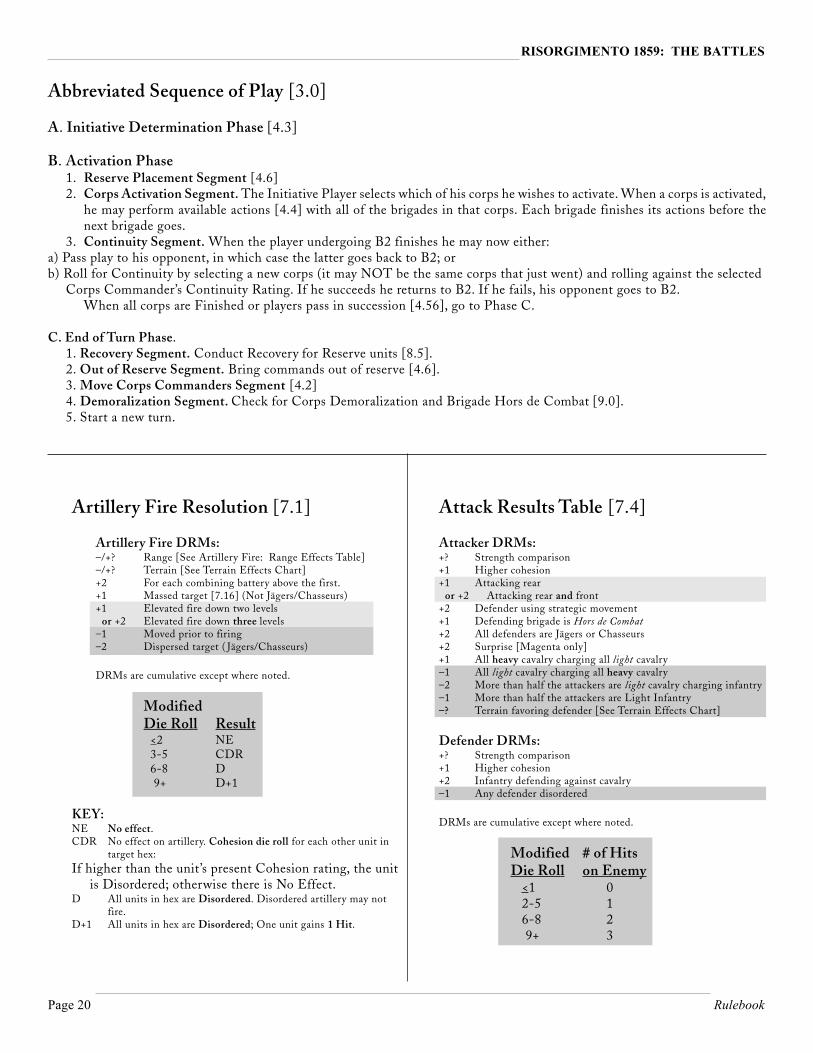
RISORGIMENTO 1859: THE BATTLES
RulebookPage 20
Abbreviated Sequence of Play [3.0]
A. Initiative Determination Phase [4.3]
B. Activation Phase1. Reserve Placement Segment [4.6]2. Corps Activation Segment. The Initiative Player selects which of his corps he wishes to activate. When a corps is activated,
he may perform available actions [4.4] with all of the brigades in that corps. Each brigade finishes its actions before thenext brigade goes.
3. Continuity Segment. When the player undergoing B2 finishes he may now either:a) Pass play to his opponent, in which case the latter goes back to B2; orb) Roll for Continuity by selecting a new corps (it may NOT be the same corps that just went) and rolling against the selected
Corps Commander’s Continuity Rating. If he succeeds he returns to B2. If he fails, his opponent goes to B2.When all corps are Finished or players pass in succession [4.56], go to Phase C.
C. End of Turn Phase.1. Recovery Segment. Conduct Recovery for Reserve units [8.5].2. Out of Reserve Segment. Bring commands out of reserve [4.6].3. Move Corps Commanders Segment [4.2]4. Demoralization Segment. Check for Corps Demoralization and Brigade Hors de Combat [9.0].5. Start a new turn.
Attack Results Table [7.4]
Attacker DRMs:+? Strength comparison+1 Higher cohesion+1 Attacking rear or +2 Attacking rear and front+2 Defender using strategic movement+1 Defending brigade is Hors de Combat+2 All defenders are Jägers or Chasseurs+2 Surprise [Magenta only]+1 All heavy cavalry charging all light cavalry–1 All light cavalry charging all heavy cavalry–2 More than half the attackers are light cavalry charging infantry–1 More than half the attackers are Light Infantry–? Terrain favoring defender [See Terrain Effects Chart]
Defender DRMs:+? Strength comparison+1 Higher cohesion+2 Infantry defending against cavalry–1 Any defender disordered
DRMs are cumulative except where noted.
Modified # of HitsDie Roll on Enemy <1 0 2-5 1 6-8 2 9+ 3
Artillery Fire Resolution [7.1]
Artillery Fire DRMs:–/+? Range [See Artillery Fire: Range Effects Table]–/+? Terrain [See Terrain Effects Chart]+2 For each combining battery above the first.+1 Massed target [7.16] (Not Jägers/Chasseurs)+1 Elevated fire down two levels or +2 Elevated fire down three levels–1 Moved prior to firing–2 Dispersed target ( Jägers/Chasseurs)
DRMs are cumulative except where noted.
ModifiedDie Roll Result <2 NE 3-5 CDR 6-8 D 9+ D+1
KEY:NE No effect.CDR No effect on artillery. Cohesion die roll for each other unit in
target hex:If higher than the unit’s present Cohesion rating, the unit
is Disordered; otherwise there is No Effect.D All units in hex are Disordered. Disordered artillery may not
fire.D+1 All units in hex are Disordered; One unit gains 1 Hit.
Related Documents