CDP Private Cloud Base 7 In-Place Upgrade CDH 6 to CDP Private Cloud Base Date published: 2019-11-22 Date modified: 2022-04-13 https://docs.cloudera.com/

Welcome message from author
This document is posted to help you gain knowledge. Please leave a comment to let me know what you think about it! Share it to your friends and learn new things together.
Transcript
CDP Private Cloud Base 7
In-Place Upgrade CDH 6 to CDP Private CloudBaseDate published: 2019-11-22Date modified: 2022-04-13
https://docs.cloudera.com/
Legal Notice
© Cloudera Inc. 2022. All rights reserved.
The documentation is and contains Cloudera proprietary information protected by copyright and other intellectual propertyrights. No license under copyright or any other intellectual property right is granted herein.
Unless otherwise noted, scripts and sample code are licensed under the Apache License, Version 2.0.
Copyright information for Cloudera software may be found within the documentation accompanying each component in aparticular release.
Cloudera software includes software from various open source or other third party projects, and may be released under theApache Software License 2.0 (“ASLv2”), the Affero General Public License version 3 (AGPLv3), or other license terms.Other software included may be released under the terms of alternative open source licenses. Please review the license andnotice files accompanying the software for additional licensing information.
Please visit the Cloudera software product page for more information on Cloudera software. For more information onCloudera support services, please visit either the Support or Sales page. Feel free to contact us directly to discuss yourspecific needs.
Cloudera reserves the right to change any products at any time, and without notice. Cloudera assumes no responsibility norliability arising from the use of products, except as expressly agreed to in writing by Cloudera.
Cloudera, Cloudera Altus, HUE, Impala, Cloudera Impala, and other Cloudera marks are registered or unregisteredtrademarks in the United States and other countries. All other trademarks are the property of their respective owners.
Disclaimer: EXCEPT AS EXPRESSLY PROVIDED IN A WRITTEN AGREEMENT WITH CLOUDERA,CLOUDERA DOES NOT MAKE NOR GIVE ANY REPRESENTATION, WARRANTY, NOR COVENANT OFANY KIND, WHETHER EXPRESS OR IMPLIED, IN CONNECTION WITH CLOUDERA TECHNOLOGY ORRELATED SUPPORT PROVIDED IN CONNECTION THEREWITH. CLOUDERA DOES NOT WARRANT THATCLOUDERA PRODUCTS NOR SOFTWARE WILL OPERATE UNINTERRUPTED NOR THAT IT WILL BEFREE FROM DEFECTS NOR ERRORS, THAT IT WILL PROTECT YOUR DATA FROM LOSS, CORRUPTIONNOR UNAVAILABILITY, NOR THAT IT WILL MEET ALL OF CUSTOMER’S BUSINESS REQUIREMENTS.WITHOUT LIMITING THE FOREGOING, AND TO THE MAXIMUM EXTENT PERMITTED BY APPLICABLELAW, CLOUDERA EXPRESSLY DISCLAIMS ANY AND ALL IMPLIED WARRANTIES, INCLUDING, BUT NOTLIMITED TO IMPLIED WARRANTIES OF MERCHANTABILITY, QUALITY, NON-INFRINGEMENT, TITLE, ANDFITNESS FOR A PARTICULAR PURPOSE AND ANY REPRESENTATION, WARRANTY, OR COVENANT BASEDON COURSE OF DEALING OR USAGE IN TRADE.

CDP Private Cloud Base | Contents | iii
Contents
Upgrading CDH 6 to CDP Private Cloud Base...................................................10
Assessing the Impact of an Upgrade.................................................................... 11
How much time should I plan for to complete my upgrade?.............................11
About using this online Upgrade Guide...............................................................12
CDP Private Cloud Base Pre-upgrade transition steps...................................... 13Set log level for KeyTrustee KMS to INFO..................................................................................................... 13Transitioning from Sentry Policy Files to the Sentry Service...........................................................................14Transitioning the Sentry service to Apache Ranger.......................................................................................... 15
Configuring a Ranger or Ranger KMS Database: MySQL/MariaDB................................................... 15Configuring a Ranger Database: PostgreSQL........................................................................................17Configuring a Ranger or Ranger KMS Database: Oracle......................................................................18
Transitioning Navigator content to Atlas...........................................................................................................18High-level transition process.................................................................................................................. 19Mapping Navigator metadata to Atlas................................................................................................... 29Transitioning Navigator audits............................................................................................................... 30What's new in Atlas for Navigator Users?............................................................................................ 31
Migrating Hive 1-2 to Hive 3............................................................................................................................ 32Hive Configuration Changes Requiring Consent...................................................................................32Remove transactional=false from Table Properties............................................................................... 36Check SERDE Definitions and Availability.......................................................................................... 36
Checking Apache HBase....................................................................................................................................37Check co-processor classes.................................................................................................................... 37Clean the HBase Master procedure store...............................................................................................39
CDH cluster upgrade requirements for Replication Manager........................................................................... 40Installing dependencies for Hue before upgrading to CDP............................................................................... 40
Upgrading the JDK................................................................................................ 42Manually Installing Oracle JDK 1.8.................................................................................................................. 43OpenJDK.............................................................................................................................................................45
Manually Installing OpenJDK................................................................................................................45Manually Migrating to OpenJDK.......................................................................................................... 46
Using AES-256 Encryption................................................................................................................................50Configuring a Custom Java Home Location......................................................................................................50Tuning JVM Garbage Collection....................................................................................................................... 51
Upgrading the Operating System......................................................................... 54Step 1: Getting Started with Operating System Upgrades................................................................................ 54
Prerequisites............................................................................................................................................ 54Step 2: Backing Up Host Files Before Upgrading the Operating System.........................................................54

CDP Private Cloud Base | Contents | iv
Backing Up............................................................................................................................................. 55Backing up Cloudera Manager databases.............................................................................................. 55
Step 3: Before You Upgrade the Operating System..........................................................................................56Decommission and Stop Running Roles................................................................................................56Stop Cloudera Manager Agent...............................................................................................................57Stop Cloudera Manager Server & Agent...............................................................................................58Stop Databases........................................................................................................................................58Remove Packages & Parcels..................................................................................................................58Upgrade the Operating System.............................................................................................................. 59
Step 4: After You Upgrade the Operating System............................................................................................ 59Establish Access to the Software........................................................................................................... 60Reinstall Cloudera Manager Daemon & Agent Packages..................................................................... 61Reinstall Cloudera Manager Server, Daemon & Agent Packages.........................................................62Start Databases........................................................................................................................................63Start Cloudera Manager Server & Agent...............................................................................................63Start Roles...............................................................................................................................................63
Upgrading Cloudera Manager 6...........................................................................63Step 1: Getting Started Upgrading Cloudera Manager 6...................................................................................64
Collect Information.................................................................................................................................65Preparing to Upgrade Cloudera Manager.............................................................................................. 66
Step 2: Backing Up Cloudera Manager 6..........................................................................................................67Collect Information for Backing Up Cloudera Manager....................................................................... 67Back Up Cloudera Manager Agent........................................................................................................68Back Up the Cloudera Management Service......................................................................................... 68Back Up Cloudera Navigator Data........................................................................................................ 69Stop Cloudera Manager Server & Cloudera Management Service....................................................... 70Back Up the Cloudera Manager Databases........................................................................................... 70Back Up Cloudera Manager Server....................................................................................................... 72(Optional) Start Cloudera Manager Server & Cloudera Management Service......................................73
Step 3: Upgrading the Cloudera Manager Server..............................................................................................73Establish Access to the Software........................................................................................................... 77Install Java (JDK)................................................................................................................................... 79Upgrade the Cloudera Manager Server..................................................................................................81
Step 4: Upgrading the Cloudera Manager Agents.............................................................................................85Upgrade the Cloudera Manager Agents (Cloudera Manager 7.0.3 and higher).....................................85
Step 5: After You Upgrade Cloudera Manager................................................................................................. 88Perform Post-Upgrade Steps.................................................................................................................. 88Upgrade Key Trustee Server to 7.1.x.................................................................................................... 90Upgrade Navigator Encrypt to 7.1.x...................................................................................................... 91Upgrading Cloudera Navigator Key HSM.............................................................................................94Upgrading Key Trustee KMS................................................................................................................ 96
Troubleshooting a Cloudera Manager Upgrade.................................................................................................97The Cloudera Manager Server fails to start after upgrade.....................................................................97Re-Running the Cloudera Manager Upgrade Wizard............................................................................97
Reverting a Failed Cloudera Manager Upgrade................................................................................................ 98Ensure Cloudera Manager Server and Agent are stopped..................................................................... 98Restore the Cloudera Manager Database (if necessary)........................................................................ 98Establish Access to the Software........................................................................................................... 99Downgrade the Cloudera Manager Packages.......................................................................................101Restore the Cloudera Manager Directory............................................................................................ 102Start Cloudera Manager Again.............................................................................................................103
Validate TLS configurations................................................................................103

CDP Private Cloud Base | Contents | v
Expediting the Hive upgrade...............................................................................104Overview of the expedited Hive upgrade........................................................................................................ 105
Preparing tables for migration..............................................................................................................105Configuring HSMM to prevent migration....................................................................................................... 107Understanding the Hive upgrade......................................................................................................................107
Upgrading a CDH 6 Cluster................................................................................108Step 1: Getting Started Upgrading a Cluster................................................................................................... 109
Collect Information...............................................................................................................................111Preparing to Upgrade a Cluster............................................................................................................111
Step 2: Review Notes and Warnings............................................................................................................... 113Step 3: Backing Up the Cluster....................................................................................................................... 115
Back Up Databases...............................................................................................................................116Back Up ZooKeeper............................................................................................................................. 117Back Up HDFS.....................................................................................................................................117Back Up Key Trustee Server and Clients............................................................................................118Back Up HSM KMS............................................................................................................................ 118Back Up Navigator Encrypt................................................................................................................. 119Back Up HBase.................................................................................................................................... 119Back Up Sqoop 2................................................................................................................................. 119Back Up Hue........................................................................................................................................ 119
Step 4: Back Up Cloudera Manager................................................................................................................ 120Collect Information for Backing Up Cloudera Manager..................................................................... 120Back Up Cloudera Manager Agent......................................................................................................120Back Up the Cloudera Management Service....................................................................................... 121Back Up Cloudera Navigator Data...................................................................................................... 122Stop Cloudera Manager Server & Cloudera Management Service..................................................... 122Back Up the Cloudera Manager Databases......................................................................................... 122Back Up Cloudera Manager Server..................................................................................................... 125(Optional) Start Cloudera Manager Server & Cloudera Management Service....................................126
Step 5: Complete Pre-Upgrade steps for upgrades to CDP Private Cloud Base............................................. 126Run Hue Document Cleanup................................................................................................................129Check Oracle Database Initialization................................................................................................... 131
Step 6: Access Parcels......................................................................................................................................131Step 7: Configure Streams Messaging Manager..............................................................................................132
...............................................................................................................................................................132Step 8: Configure Schema Registry.................................................................................................................133
...............................................................................................................................................................133
...............................................................................................................................................................133Step 9: Enter Maintenance Mode.....................................................................................................................134Step 10: Run the Upgrade Cluster Wizard...................................................................................................... 134
Fair Scheduler to Capacity Scheduler transition..................................................................................140Configure TLS/SSL for Ranger in a manually configured TLS/SSL environment............................. 159
Step 11: Finalize the HDFS Upgrade.............................................................................................................. 163Step 12: Complete Post-Upgrade steps for upgrades to CDP Private Cloud Base.......................................... 163Step 13: Exit Maintenance Mode.....................................................................................................................165Troubleshooting Upgrades................................................................................................................................165
"Access denied" in install or update wizard........................................................................................ 165Cluster hosts do not appear..................................................................................................................166Cannot start services after upgrade...................................................................................................... 166HDFS DataNodes fail to start.............................................................................................................. 166Cloudera services fail to start...............................................................................................................167Host Inspector Fails..............................................................................................................................167

CDP Private Cloud Base | Contents | vi
Manual upgrade to CDP Private Cloud Base....................................................167Upgrade Ranger database and apply patches...................................................................................................168Setup Ranger Admin Component.................................................................................................................... 168Start Ranger...................................................................................................................................................... 168Set up the Ranger Plugin service.....................................................................................................................168Start Kudu......................................................................................................................................................... 168Start ZooKeeper................................................................................................................................................ 169Upgrade HDFS Metadata................................................................................................................................. 169Start HDFS........................................................................................................................................................169Start YARN QueueManager.............................................................................................................................169Import Sentry Polices to Ranger...................................................................................................................... 169Start HBASE.....................................................................................................................................................169Start YARN QueueManager.............................................................................................................................170Clean NodeManager Recovery Directory (YARN)......................................................................................... 170Reset ACLs on YARN Zookeeper nodes........................................................................................................ 170Install YARN MapReduce Framework Jars.................................................................................................... 170Start YARN.......................................................................................................................................................170Deploy Client Configuration Files................................................................................................................... 170Reinitialize Solr State for Upgrade.................................................................................................................. 171Bootstrap Solr Configuration............................................................................................................................171Start Solr........................................................................................................................................................... 171Bootstrap Solr Collections................................................................................................................................171Create HDFS Home directory.......................................................................................................................... 171Create Ranger Plugin Audit Directory.............................................................................................................171Start infrastructure Solr.................................................................................................................................... 172Start HBASE.....................................................................................................................................................172Start KAFKA.................................................................................................................................................... 172Create Ranger Kafka Plugin Audit Directory..................................................................................................172Create HBase tables for Atlas..........................................................................................................................172Start Atlas......................................................................................................................................................... 172Create Ranger Atlas Plugin Audit Directory................................................................................................... 173Start Phoenix.....................................................................................................................................................173Install MapReduce Framework Jars.................................................................................................................173Start YARN.......................................................................................................................................................173Deploy Client Configuration Files................................................................................................................... 173Upgrade the Hive Metastore Database.............................................................................................................173Start Hive.......................................................................................................................................................... 174Create Hive Warehouse Directory................................................................................................................... 174Create Hive Warehouse External Directory.....................................................................................................174Create Hive Sys database................................................................................................................................. 174Create Ranger Plugin Audit Directory.............................................................................................................174Start Impala.......................................................................................................................................................175Create Ranger Plugin Audit Directory.............................................................................................................175Create Spark Driver Log Dir........................................................................................................................... 175Start Spark.........................................................................................................................................................175Start Livy.......................................................................................................................................................... 175Upgrade Oozie Database Schema.................................................................................................................... 175Upgrade Oozie SharedLib................................................................................................................................ 176Upload Tez tar file to HDFS........................................................................................................................... 176Migrate Hive tables for CDP upgrade............................................................................................................. 176Create Ranger Plugin Audit Directory.............................................................................................................176Start Hive on Tez............................................................................................................................................. 176Start Hue........................................................................................................................................................... 177Start DAS..........................................................................................................................................................177

CDP Private Cloud Base | Contents | vii
Start the Remaining Cluster Services.............................................................................................................. 177Validate the Hive Metastore Database Schema............................................................................................... 177Test the Cluster and Finalize HDFS Metadata................................................................................................ 177Clear the Upgrade State Table......................................................................................................................... 178
Rolling Back a CDH 6 to CDP Private Cloud Base 7 Upgrade........................178Review Limitations...........................................................................................................................................179Stop the Cluster................................................................................................................................................ 179(Parcels) Downgrade the Software...................................................................................................................180Stop Cloudera Manager....................................................................................................................................180Restore Cloudera Manager Databases..............................................................................................................180Restore Cloudera Manager Server................................................................................................................... 181Start Cloudera Manager....................................................................................................................................181Roll Back ZooKeeper....................................................................................................................................... 182Roll Back HDFS...............................................................................................................................................182Start the HBase Service....................................................................................................................................186Restore CDH Databases................................................................................................................................... 187Start the Sentry Service....................................................................................................................................187Roll Back Cloudera Search.............................................................................................................................. 187Roll Back Hue.................................................................................................................................................. 188Roll Back Kafka............................................................................................................................................... 188Deploy the Client Configuration...................................................................................................................... 189Restart the Cluster............................................................................................................................................ 189Roll Back Cloudera Navigator Encryption Components................................................................................. 189
Roll Back Key Trustee Server............................................................................................................. 189Start the Key Management Server....................................................................................................... 190Roll Back Key HSM............................................................................................................................ 190Roll Back Key Ranger KMS Parcels...................................................................................................191Roll Back HSM KMS Parcels..............................................................................................................191Roll Back Navigator Encrypt............................................................................................................... 191
(Optional) Cloudera Manager Rollback Steps................................................................................................. 192Stop Cloudera Manager........................................................................................................................192Restore the Cloudera Manager 6 Repository Files.............................................................................. 193Restore Packages.................................................................................................................................. 193Restore Cloudera Manager Databases..................................................................................................194Restore Cloudera Manager Server....................................................................................................... 194Start the Cloudera Manager Server and Agents.................................................................................. 195
Configuring a Local Package Repository...........................................................196Creating a Permanent Internal Repository....................................................................................................... 196
Setting Up a Web server...................................................................................................................... 196Downloading and Publishing the Package Repository for Cloudera Manager.................................... 197
Creating a Temporary Internal Repository...................................................................................................... 197Configuring Hosts to Use the Internal Repository.......................................................................................... 197
Configuring a Local Parcel Repository..............................................................198Using an Internally Hosted Remote Parcel Repository................................................................................... 198
Setting Up a Web Server..................................................................................................................... 198Downloading and Publishing the Parcel Repository............................................................................200Configuring Cloudera Manager to Use an Internal Remote Parcel Repository................................... 200
Using a Local Parcel Repository......................................................................................................................200

CDP Private Cloud Base | Contents | viii
CDH 6 to CDP Private Cloud Base post-upgrade transition steps.................. 201Update permissions for Replication Manager service..................................................................................... 201Migrating Spark workloads to CDP.................................................................................................................202
Spark 1.6 to Spark 2.4 Refactoring......................................................................................................202Spark 2.3 to Spark 2.4 Refactoring......................................................................................................216
Apache Hive Expedited Migration Tasks........................................................................................................ 222Preparing tables for migration..............................................................................................................222Creating a list of tables to migrate...................................................................................................... 224Migrating tables to CDP.......................................................................................................................224
Apache Hive Changes in CDP.........................................................................................................................225Preparing tables for migration..............................................................................................................225Hive Configuration Property Changes................................................................................................. 226LOCATION and MANAGEDLOCATION clauses.............................................................................235Handling table reference syntax...........................................................................................................235Identifying semantic changes and workarounds.................................................................................. 236Unsupported Interfaces and Features................................................................................................... 242Changes to CDH Hive Tables..............................................................................................................243
Apache Hive Post-Upgrade Tasks....................................................................................................................244Customizing critical Hive configurations.............................................................................................244Setting Hive Configuration Overrides..................................................................................................244Hive Configuration Requirements and Recommendations.................................................................. 245Fixing the canary test after upgrading................................................................................................. 247Configuring HiveServer for ETL using YARN queues.......................................................................248Removing Hive on Spark Configurations............................................................................................ 248Configuring authorization to tables......................................................................................................249Making the Hive plugin for Ranger visible......................................................................................... 249Setting up access control lists.............................................................................................................. 250Configure encryption zone security..................................................................................................... 251Configure edge nodes as gateways...................................................................................................... 251Use HWC/Spark Direct Reader for Spark Apps/ETL......................................................................... 251Configure HiveServer HTTP mode......................................................................................................252Configuring HMS for high availability................................................................................................252Installing Hive on Tez and adding a HiveServer role......................................................................... 253Updating Hive and Impala JDBC/ODBC drivers................................................................................ 255
Apache Impala changes in CDP...................................................................................................................... 256Set ACLs for Impala............................................................................................................................ 259Impala Configuration Changes.............................................................................................................261Interoperability between Hive and Impala...........................................................................................263Revert to CDH-like Tables...................................................................................................................264Authorization Provider for Impala....................................................................................................... 265Data Governance Support by Atlas......................................................................................................266Handling Data Files..............................................................................................................................266
Hue post-upgrade tasks.....................................................................................................................................267Updating group permissions for Hive query editor............................................................................. 267Adding Security Browser to the blocked list of applications.............................................................. 267
Importing Sentry privileges into Ranger policies............................................................................................ 268Apache Ranger TLS Post-Upgrade Tasks....................................................................................................... 269Migrating ACLs from Key Trustee KMS to Ranger KMS............................................................................. 269
Key Trustee KMS operations not supported by Ranger KMS............................................................ 273ACLs supported by Ranger KMS and Ranger KMS Mapping........................................................... 273
Apache Hadoop YARN default value changes................................................................................................275Upgrade Notes for Apache Kudu 1.15 / CDP 7.1........................................................................................... 275Apache HBase post-upgrade tasks................................................................................................................... 276Configure SMM to monitor SRM replications................................................................................................ 277

CDP Private Cloud Base | Contents | ix
Configure SMM's service dependency on Schema Registry........................................................................... 277Apache Sqoop Changes....................................................................................................................................278
Check Parquet writer implementation property................................................................................... 279Configure a Sqoop Action globally and for all Hue workspaces........................................................ 279
Cloudera Search changes..................................................................................................................................280
Applications Upgrade........................................................................................... 281
Procedure to Rollback from CDP 7.1.7 SP1 to CDP 7.1.7............................... 281
CDP Private Cloud Base Upgrading CDH 6 to CDP Private Cloud Base
Upgrading CDH 6 to CDP Private Cloud Base
High-level upgrade procedures for upgrades from CDH to CDP Private Cloud Base.
Upgrading CDP Private Cloud Base consists of two major steps, upgrading Cloudera Manager and upgrading thecluster. You are not required to upgrade Cloudera Manager and the cluster at the same time, but the versions ofCloudera Manager and the cluster must be compatible. The major+minor version of Cloudera Manager must be equalto or higher than the major+minor version of CDH or Cloudera Runtime.
Workflow
An upgrade from CDH 6 to CDP Private Cloud Base has the following high-level workflow:
1. Prepare to upgrade:
a. Review the Supported Upgrade Paths for your upgrade.b. Review the Requirements and Supported Versions for your upgradec. Review the Release Notes for the version of CDP Private Cloud Base you are upgrading to.d. Gather information on your deployment. See Step 1: Getting Started Upgrading Cloudera Manager 6 on page
64 and Step 1: Getting Started Upgrading a Cluster on page 109.e. Plan how and when to begin your upgrade.
2. If necessary, Upgrade the JDK.3. If necessary, Upgrade the Operating System.4. Perform any needed pre-upgrade transition steps for the components deployed in your clusters. See CDP Private
Cloud Base Pre-upgrade transition steps on page 135. Upgrade Cloudera Manager to version 7.4.4 or higher. After upgrading to Cloudera Manager 7.4.4 or higher,
Cloudera Manager can manage upgrading your cluster to a higher version. See Upgrading Cloudera Manager 6 onpage 63.
6. Use Cloudera Manager to Upgrade CDH to Cloudera Runtime 7, or from Cloudera Runtime to a higher version ofCloudera Runtime. See Upgrading a CDH 6 Cluster on page 108.
7. Perform any needed post-upgrade transition steps for the components deployed in your clusters. See CDH 6 toCDP Private Cloud Base post-upgrade transition steps on page 201.
Component Changes in CDP Private Cloud Base 7
YARN Fair Scheduler is being removed.
The YARN Fair Scheduler is being replaced with the YARN Capacity Scheduler. A transition tool will be provided toconvert the Fair Scheduler configurations to Capacity Scheduler.
Hive-on-Spark and Hive-on-MapReduce have been removed. Similar functionality is available with Hive-on-Tez.
Pig, Flume, Sentry, and Navigator have been removed.
• Pig can be replaced with Hive or Spark.• Flume has been replaced with Cloudera Flow Management (CFM). CFM is a no-code data ingestion and
management solution powered by Apache NiFi. Contact your Cloudera account team for more information aboutmoving from Flume to CFM.
• Sentry has been replaced with Ranger. A Sentry-to-Ranger policy transition tool is available for CDP PrivateCloud Base 7.1 and transitions will be supported when Replication Manager is used to transition Hive tables fromCDH to CDP.
• Navigator has been replaced with Atlas. Navigator lineage data is transferred to Atlas as part of the CDH to CDPPrivate Cloud Base upgrade process. Navigator audit data is not transferred to Atlas.
10

CDP Private Cloud Base Assessing the Impact of an Upgrade
Assessing the Impact of an Upgrade
Understanding the impact of an upgrade.
Plan for a sufficient maintenance window to perform an upgrade. Depending on which components you areupgrading, the number of hosts in your cluster, and the type of hardware, you might need up to a full day to upgradeyour cluster. Before you begin the upgrade, you need to gather some information; these steps are also detailed in theupgrade procedures.
Important: Cloudera recommends that you test upgrades on non-production clusters before upgrading yourproduction clusters.
There are three types of upgrades: major, minor, and maintenance:Major Upgrades
Major upgrades include the following:
• From Cloudera Manager 5.x or 6.x and CDH 5.x or 6.x to Cloudera Manager and ClouderaRuntime 7.1.1 or higher
• From Cloudera Manager and Cloudera Runtime 7.0.3 to Cloudera Manager and ClouderaRuntime 7.2 (CDP Private Cloud Base)
• From Cloudera Manager 6.x to Cloudera Manager 7.1.1
A major upgrade typically has the following characteristics:
• Large changes to functionality and update of Hadoop to a more recent version• Incompatible changes in data formats• Significant changes and additions to the user interface in Cloudera Manager• Database schema changes for Cloudera Manager that are automatically handled by the upgrade
process• Significant down time is required to upgrade the cluster.• Client Configurations are redeployed.
Minor Upgrades
Minor upgrades upgrade your software to a higher minor version of a major release—for examplefrom version 7.1.0 to version 7.2.0—and typically include the following:
• New functionality• Bug fixes• Potential database schema changes for Cloudera Manager that are handled automatically• Client Configurations are redeployed.
Incompatible changes or changes to data formats are generally not introduced in minor upgrades.
Patch Upgrades
Patches fix critical bugs or address security issues. The version numbers for maintenance releasesdiffer only in the fourth digit, for example, when upgrading from version 7.1.3 to 7.1.4.
How much time should I plan for to complete myupgrade?
An in-place upgrade can take a variable amount of time to complete. Learn about how to plan for and shorten theamount of time required for your upgrade.
The amount of time required for an in-place upgrade depends on many factors, including:
11

CDP Private Cloud Base About using this online Upgrade Guide
• The number of hosts in your clusters.• The mix of services you have deployed in your clusters.• The amount of data stored in your clusters.
Generally, an upgrade can be completed in 24-48 hours. Upgrades from HDP to CDP may take somewhat longer dueto the Ambari to Cloudera Manager conversion process (AM2CM).
The following table provides some additional information to help you plan for your upgrade.
Table 1: Upgrade Time Planning
Component/Process Notes
Cloudera Runtime Parcel The Cloudera Runtime parcel must be distributed to all hosts before upgrading the hosts.Downloading the parcel directly from archive.cloudera.com over the internet mayadd additional time. You can download the parcels and serve them from a local web server todecrease this time.
In addition, after downloading the parcels to a local repository, you can distribute them inadvance of launching the upgrade wizard to save additional time.
Cloudera Manager You must upgrade Cloudera Manager before upgrading your clusters. Cloudera Manager cancontinue to mange older versions of Cloudera Runtime and CDH until the upgrade.
Cluster cold start The cluster will need to be restarted at least once during an in-place upgrade. The amount oftime required for a restart depends on how many files and blocks are stored in the cluster andthe number of hosts in the cluster.
Navigator to Atlas Migration Depending on the amount of data, this can take a significant amount of time. SeeTransitioning Navigator content to Atlas Transitioning Navigator content to Atlas
Hive The Hive strict managed migration process can take a significant amount of time. See formore information about mitigating that impact. See Understanding the Hive upgrade (CDH)Understanding the Hive upgrade (CDH)
HBase checks While Running HBase checks does not take significant time, remediating any issues can takesignificant time. To save time during the upgrade, you can plan to do this before running theUpgrade Wizard.
Sentry to Ranger migration This process runs quickly and usually takes less than 20 minutes.
Solr export/backup This process depends on how much data has to be imported after the upgrade.
About using this online Upgrade Guide
How to fill in forms to customize the documentation for your upgrade.
This online version of the Cloudera Upgrade Guide allows you to create a customized version of the guide on manypages that only includes the steps required for your upgrade. Use the My Environment form at the top of pagesin this guide to select the Cloudera Manager, CDH or Cloudera Runtime version for your upgrade as well as theoperating system version, database type, and other information about your upgrade. After making these selections, thepages in the guide will only include the required steps for your upgrade. The information you enter is retained on eachpage in the guide.
Figure 1: My Environment Form Example
12

CDP Private Cloud Base CDP Private Cloud Base Pre-upgrade transition steps
Note: The HDP upgrade procedures do not include a My Environment form at the top of the page.
CDP Private Cloud Base Pre-upgrade transition steps
The following procedures must be completed before performing a cluster upgrade to CDP Private Cloud Base (clusterversion Cloudera Runtime 7.4.4 or higher). Only complete the procedures for services running in your source cluster.
Set log level for KeyTrustee KMS to INFOReduce the log output from org.apache.ranger.plugin.* by changing the log level setting for your RangerKMS from DEBUG to INFO.
About this task
Upgrading a CDH cluster to CDP includes converting KeyTrustee KMS to Ranger KMS.
In some rare cases, the KeyTrustee KMS logging may be set to DEBUG level when investigating services issues.When KeyTrustee KMS is converted to Ranger KMS during a CDH to CDP upgrade, some configuration settings,such as the log_threshold setting, may be transferred over. While log_level set to DEBUG minimally impactsCDH clusters, clusters upgraded to CDP may experience a negative performance impact from Ranger KMS if thelog_threshold setting remains at DEBUG.
13

CDP Private Cloud Base CDP Private Cloud Base Pre-upgrade transition steps
Recommended Practice: leave the log_threshold setting configured to INFO or higher, unless actively debugging aservice issue in Ranger KMS.
Setting the log_threshold to DEBUG on Ranger KMS can produce a huge number of log entries fromorg.apache.ranger.plugin.*. Due to the frequency of logs generated, the Ranger KMS can experience periods of slowresponse, negatively impacting file operations on HDFS.
Note: Additional information:
For CDH5 clusters, setting log level to DEBUG does not afftect Tomcat logging.
For CDH6 clusters, Jetty embedded inside KMS magnifies this issue.
Procedure
1. During pre-upgrade, review the logging level of your KeyTrustee KMS service.
2. Make sure that DEBUG/TRACE is not enabled for KeyTrustee KMS.
3. During post-upgrade, review the logging level of your Ranger KMS service.
4. Make sure that DEBUG/TRACE is not enabled for Ranger KMS.
What to do nextComplete additional pre-upgrade tasks.
Transitioning from Sentry Policy Files to the Sentry Service
If your cluster uses Sentry policy file authorization, you must transition the policy files to the database-backed Sentryservice before you upgrade to CDH 6 or CDP Private Cloud Base 7.1.
Complete the following steps to upgrade from Sentry policy files to the database-backed Sentry service:
Minimum Required Role: Cluster Administrator (also provided by Full Administrator) This feature is notavailable when using Cloudera Manager to manage Data Hub clusters.
1. Disable the existing Sentry policy file for any Hive, Impala, or Solr services on the cluster. To do this:
a. Go to the Hive, Impala, or Solr service.b. Click the Configuration tab.c. Select Scope > Service Name (Service-Wide).d. Select Category > Policy File Based Sentry.e. Clear Enable Sentry Authorization using Policy Files. Cloudera Manager throws a validation error if you
attempt to configure the Sentry service while this property is checked.f. Repeat for any remaining Hive, Impala, or Solr services.
2. Add the new Sentry service to your cluster. For instructions, see Installing and Upgrading the Sentry Service.3. To begin using the Sentry service, see Configuring the Sentry Service4. (Optional) Use command line tools to transition existing policy file grants.
• If you want to transition existing Sentry configurations for Solr, use the solrctl sentry --convert-policy-file command, described in solrctl Reference.
• For Hive and Impala, use the command-line interface Beeline to issue grants to the Sentry service to match thecontents of your old policy file(s). For more details on the Sentry service and examples on using Grant/Revokestatements to match your policy file, see Hive SQL syntax for use with Sentry.
5. Restart the affected services to apply the changes.
14

CDP Private Cloud Base CDP Private Cloud Base Pre-upgrade transition steps
Transitioning the Sentry service to Apache RangerBefore transitioning your cluster to CDP Private Cloud Base, you must prepare the Apache Sentry authorizationprivileges so they can be converted to Apache Ranger permissions. Apache Ranger supports the components likeHDFS, Hive, and YARN. Apache Ranger functions as a centralized security administrator and provides greater accesscontrols and auditing capabilities.
Warning: Before upgrading CDH 5 clusters with Sentry to Cloudera Runtime 7.1.x clusters where Sentryprivileges are to be transitioned to Apache Ranger:
• The cluster must have Kerberos enabled.• Verify that HDFS gateway roles exist on the hosts that runs the Sentry service.
Important: If HDFS ACL sync is enabled (hdfs_sentry_sync_enable=true) on the CDH cluster, then youmust install Ranger RMS to support the same functionality. For steps to install Ranger RMS, see InstallingRanger RMS.
Perform the following steps after you have upgraded Cloudera Manager to version 7.1 or higher:
1. Verify that the HDFS service is in the Start state.
Starting from Cloudera Manager 7.4.4, the Export Sentry Permissions command is executed as part of the upgradeflow that requires the HDFS service to be in the start state.
If you are using Cloudera Manager 7.3.1, 7.2.4, or any Cloudera Manager 7.1.x version, go to the Sentry serviceand select Actions > Export Permissions to export the sentry permissions.
2. Make sure a MySQL, Oracle, or PostgreSQL database instance is running and available to be used by Rangerbefore you create a new cluster or upgrade your cluster from CDH to Cloudera Runtime. See the links below forprocedures to set up these databases.
Important: The Ranger database should not be shared with other services or applications.
3. After you have set up the database, you can continue upgrading the cluster.
After upgrading Cloudera Manager and the cluster, you must import Sentry privileges using Ranger so that Sentryprivileges translate to Ranger service policies. For more information about completing this translation process, seeImporting Sentry privileges into Ranger policies on page 268.
Warning: The automated translation process does not manage Solr permissions. You must translate Solrpermissions manually. For more information, see Mapping Sentry permissions for Solr to Ranger policies.
Note: Authorization through Apache Ranger is just one element of a secure production cluster: Clouderasupports Ranger only when it runs on a cluster where Kerberos is enabled to authenticate users.
Configuring a Ranger or Ranger KMS Database: MySQL/MariaDBPrior to upgrading your cluster to CDP Private Cloud Base you must configure the MySQL or MariaDB databaseinstance for Ranger by creating a Ranger database and user. Before you begin the transition, review the supportpolicies of database and admin policy support for transactions.
Before you begin
A supported version of MySQL or MariaDB must be running and available to be used by Ranger. See DatabaseRequirements.
Important:
• Ranger and Ranger KMS should use separate databases.• Ranger only supports the InnoDB engine for MySQL and MariaDB databases.
15

CDP Private Cloud Base CDP Private Cloud Base Pre-upgrade transition steps
When using MySQL or MariaDB, the storage engine used for the Ranger admin policy store tables must supporttransactions. InnoDB supports transactions. A storage engine that does not support transactions is not suitable as apolicy store.
Procedure
1. Log in to the host where you want to set up the MySQL database for Ranger.
2. Make sure you have the MYSQL connector version 5.7 or higher in the /usr/share/java/ directory withname mysql-connector-java.jar.
3. Edit the following file: /etc/my.cnf and add the following line:
log_bin_trust_function_creators = 1
Warning: If you do not add this configuration, the upgrade will fail and reverting your deployment to astable state will be difficult.
4. Restart the database:
systemctl restart mysqld
or:
systemctl restart mariadb
5. Log in to mysql:
mysql -u root
6. Run the following commands to create the Ranger database and user.
Substitute the following in the command:
• (optional) Replace rangeradmin with a username of your choice. Note this username, you will need toenter it later when running the Upgrade Cluster command.
• (optional) Replace cloudera with a password of your choice. Note this password, you will need to enter itlater when running the Upgrade Cluster command.
• <Ranger Admin Role hostname> – the name of the host where the Ranger Admin role will run. Note this host,you will need to enter it later when running the Upgrade Cluster command.
CREATE DATABASE ranger;CREATE USER 'rangeradmin'@'%' IDENTIFIED BY 'cloudera';CREATE USER 'rangeradmin'@'localhost' IDENTIFIED BY 'cloudera';CREATE USER 'rangeradmin'@'<Ranger Admin Role hostname>' IDENTIFIED BY 'cloudera';GRANT ALL PRIVILEGES ON ranger.* TO 'rangeradmin'@'%';GRANT ALL PRIVILEGES ON ranger.* TO 'rangeradmin'@'localhost';GRANT ALL PRIVILEGES ON ranger.* TO 'rangeradmin'@'<Ranger Admin Role hostname>';FLUSH PRIVILEGES;
7. Use the exit; command to exit MySQL.
8. Test connecting to the database using the following command:
mysql -u rangeradmin -pcloudera
9. After testing the connection, use the exit; command to exit MySQL.
10. Continue with the cluster installation or upgrade to complete the transition.
16

CDP Private Cloud Base CDP Private Cloud Base Pre-upgrade transition steps
Configuring a Ranger Database: PostgreSQLPrior to upgrading your cluster to CDP Private Cloud Base you must configure the PostgreSQL database instancefor Ranger by creating a Ranger database and user. Before you begin the transition, review the support policies ofdatabase and admin policy support for transactions.
Before you begin
A supported version of PostgreSQL must be running and available to be used by Ranger. See Install and ConfigurePostgreSQL for CDP.
Procedure
1. Log in to the host where you want to set up the PostgreSQL database for Ranger.
2. On the PostgreSQL host, install the applicable PostgreSQL connector:
RHEL/CentOS/Oracle Linux
yum install postgresql-jdbc*
SLES
zypper install -y postgresql-jdbc
3. Edit the pg_hba.conf file, located either in the /var/lib/pgsql/data or /etc/postgresql/<version>/main directory and add the following line:
host all all 127.0.0.1/32 md5
If this file contains the line host all all 127.0.0.1/32 ident, then
4. Edit the /var/lig/pgsql/data/postgresql.conf file and add the following line if it is not alreadythere:
listen_addresses='*'
5. Enable the PostgreSQL server to start automatically on boot-up:
sudo systemctl enable postgresql
6. Restart the PostgreSQL server:
sudo systemctl restart postgresql
7. Log in to PostgreSQL:
sudo -u postgres psql postgres
8. Create the Ranger database and user. Run the following commands:
create user rangeradmin with createdb login password 'rangeradmin';create database ranger with owner rangeradmin;GRANT ALL PRIVILEGES ON SCHEMA public TO rangeradmin;GRANT ALL PRIVILEGES ON ALL TABLES IN SCHEMA public TO rangeradmin;GRANT ALL PRIVILEGES ON ALL SEQUENCES IN SCHEMA public TO rangeradmin;
9. Use the \q command to exit PostgresSQL.
What to do nextContinue installing or upgrading your cluster.
17

CDP Private Cloud Base CDP Private Cloud Base Pre-upgrade transition steps
Configuring a Ranger or Ranger KMS Database: OraclePrior to upgrading your cluster to CDP Private Cloud Base you must configure the Oracle database instance forRanger by creating a Ranger database and user. Before you begin the transition, review the support policies ofdatabase and admin policy support for transactions.
Before you begin
A supported version of Oracle must be running and available to be used by Ranger.
Procedure
1. On the Ranger host, install the appropriate JDBC .jar file.
a) Download the Oracle JDBC (OJDBC) driver from https://www.oracle.com/technetwork/database/features/jdbc/index-091264.html.
• For Oracle Database 12c: select Oracle Database 12c Release 2 driver > ojdbc8.jar.b) Copy the .jar file to the Java share directory.
cp ojdbc8-12.2.0.1.jar /usr/share/java/
Make sure the .jar file has the appropriate permissions. For example:
chmod 644 /usr/share/java/ojdbc8-12.2.0.1
2. Log in to the host where the Oracle database is running and launch Oracle sqlplus:
sqlplus sys/root as sysdba
3. Create the Ranger database and user. Run the following commands:
CREATE USER rangeradmin IDENTIFIED BY rangeradmin;GRANT SELECT_CATALOG_ROLE TO rangeradmin;GRANT CONNECT, RESOURCE TO rangeradmin;QUIT;GRANT CREATE SESSION,CREATE PROCEDURE,CREATE TABLE,CREATE VIEW,CREATE SEQUENCE,CREATE PUBLIC SYNONYM,CREATE ANY SYNONYM,CREATE TRIGGER,UNLIMITED TABLESPACE TO rangeradmin;ALTER USER rangeradmin DEFAULT TABLESPACE <tablespace>;ALTER USER rangeradmin quota unlimited on <tablespace>;
What to do nextContinue installing or upgrading your cluster.
Transitioning Navigator content to AtlasDuring the transition from CDH to CDP Private Cloud Base, you can transition the metadata from Navigator toApache Atlas, for a scalable and robust infrastructure that supports enhanced metadata searchability by collecting ofmetadata directly from your cluster.
Cloudera Runtime 7 includes Apache Atlas to collect technical metadata from cluster services. Atlas replacesCloudera Navigator Data Management for these clusters. Cloudera has incorporated many features from Navigatorinto Apache Atlas to make sure that the rich metadata collected in Navigator can be represented in Atlas. Atlasprovides scalable and robust infrastructure that supports metadata searches and lineage across enterprise productionclusters.
Note: Governance through Apache Atlas is just one element of a secure production cluster: Clouderasupports Atlas when it runs on a cluster where Kerberos is enabled to authenticate users. When upgradingfrom to Cloudera Runtime 7.1.1 and running Apache Atlas, the new cluster must have Kerberos enabled.
18

CDP Private Cloud Base CDP Private Cloud Base Pre-upgrade transition steps
You may choose not to transition Navigator content to Atlas at all: this document describes how to think aboutarchiving your Navigator audits and metadata.
Whether you choose to transition Navigator contents to Atlas or not, this document describes how to use Atlas toaccomplish the tasks you are accustomed to performing in Navigator.
What's transitioned?
Business metadata is transitioned into Atlas, including:
• Tags• Custom properties (definitions and entity assignments)• Managed metadata properties (definitions and entity assignments)• Original and updated entity names and descriptions
Technical metadata from the following sources are transitioned into Atlas:
• Hive• Impala• Spark• Referenced HDFS / S3
What's NOT transitioned?
• Audits. In CDP, Ranger collects audit information for successful and failed access to objects under its control.This audit system is focused and powerful, but it's enough different from how Navigator collected audits thattransition isn't appropriate. This document includes information on how to transition your auditing to Ranger andhow to archive your existing Navigator audit information.
• Entity Metadata. The following metadata entities in Navigator are not transitioned to Atlas:
• Unreferenced S3 and HDFS entities. Files in HDFS and S3 that are not included in lineage from Hive, Spark,or Impala entities are not transitioned.
• Metadata for Sqoop, Pig, Map-Reduce v1 and v2, Oozie, and YARN.• Policies. Navigator policies are not transitioned to Atlas.• Configuration settings. Configuration properties you've set in Cloudera Manager that determine Navigator
behavior are not transitioned to the new environment. If you have properties that may apply in Atlas, such asauthentication credentials, you'll need to reset them in the new environment.
Will Navigator still run in Cloudera Manager?
After upgrading Cloudera Manager to CDP, Navigator continues to collect metadata and audit information fromCDH cluster services. There are no changes to Navigator functionality; all Navigator data is retained in the ClouderaManager upgrade.
After upgrading a CDH cluster, services that previously sent metadata and audit information to Navigator, suchas Hive, Impala, Spark, and HBase, are configured to pass metadata to Atlas. Navigator audit collection for thoseservices is disabled. You can still access audits and metadata through Navigator; however, Navigator will not collectnew information from cluster services. When you decide you have exhausted the value of the Navigator audits andafter you've converted Navigator metadata to Atlas content, you can disable Navigator servers.
High-level transition processBefore transitioning from Navigator to Apache Atlas, review the transition paths. You must extract, transform, andimport the content from Navigator to Apache Atlas. After the transition, services start producing metadata for Atlasand audits for Ranger.
There are two main paths that describe a Navigator-to-Atlas transition scenario:
• Upgrading Cloudera Manager to CDP 7 and upgrading all of your CDH clusters to CDP Runtime.
In this case, you can stop Cloudera Navigator after migrating its content to Atlas.
19

CDP Private Cloud Base CDP Private Cloud Base Pre-upgrade transition steps
• Upgrading Cloudera Manager to CDP 7 but managing some or all of your existing CDH clusters as CDH 5.x or6.x.
In this case, CDP runs Cloudera Navigator to continue extracting metadata and audits from existing CDH clustersand runs Atlas and Ranger to support metadata and audit extraction from new or potential new CDP runtimeclusters.
In both scenarios, you'll complete the upgrade of Cloudera Manager first. While Cloudera Manager is upgrading,Navigator pauses collection of metadata and audits from cluster activities. After the upgrade is complete, Navigatorprocesses the queued metadata and audits.
In the timeline diagrams that follow, the blue color indicates steps that because you trigger them manually, you cancontrol their timing.
The transition of Navigator content to Atlas occurs in the upgrade from CDH to CDP. The transition involves threephases:
• Extracting metadata from Navigator.
The Atlas installation includes a script (cnav.sh) that calls Navigator APIs to extract all technical and businessmetadata from Navigator. The process takes about 4 minutes per one million Navigator entities. The scriptcompresses the result and writes it to the local file system on the host where the Atlas server is installed. Plan forabout 100 MB for every one million Navigator entities; lower requirements for larger numbers of entities.
• Transforming the Navigator metadata into a form that Atlas can consume.
The Atlas installation includes a script (nav2atlas.sh) that converts the extracted content and againcompresses it and writes it to the local file system. This process takes about 1.5 minutes per million Navigatorentities. The script compresses the results and writes it to the local file system on the host where the Atlas server isinstalled. Plan for about 100 to 150 MB for every one million Navigator entities; higher end of the range for largernumbers of entities.
• Importing the transformed metadata into Atlas.
After the CDP upgrade completes, Atlas starts up in "migration mode," where it waits to find the transformeddata file and does not collect metadata from cluster services. When the transformation is complete, Atlas beginsimporting the content, creating equivalent Atlas entities for each Navigator entity. This process takes about35 minutes for each one million Navigator entities, counting only the entities that are migrated into Atlas.
20

CDP Private Cloud Base CDP Private Cloud Base Pre-upgrade transition steps
To make sure you don't miss metadata for cluster operations, give time after the CM upgrade and before the CDHupgrade for Navigator to process all the metadata produced by CDH service operations. See Navigator ExtractionTiming for more information.
You can start extracting metadata from Navigator as soon as the CDP parcel is deployed on the cluster. After CDPis started, Navigator no longer collects metadata or audits from the services on that cluster; instead services producemetadata for Atlas and audits for Ranger.
Important: After the CDH upgrade, Atlas starts in migration mode and does not process metadata. When thetransition completes, you must manually update the Atlas configuration in Cloudera Manager to have Atlasbegin processing metadata.
The following topics describe the details of the events in these timelines:
Assumptions and prerequisitesBefore you transition your cluster to CDP Private Cloud Base or migrating content from Navigator to ApacheAtlas, ensure that you have collected all the credentials and set expectations for the time required for completing thetransition. The prerequisites in this section help you to prepare in advance to transition.
In addition to the prerequisites outlined for the Cloudera Manager and CDP upgrades, you'll need the following forthe Navigator to Atlas transition:
• Deleted entities in Navigator. Check the Navigator Administration page to make sure that a successful purge hasrun recently. If it hasn't, consider running a purge before the transition. See Managing Metadata Storage withPurge.
• Role to host assignments. Before you begin upgrading to CDP, make a plan for where you will install theAtlas server. In addition, Atlas depends upon HBase, Kafka, and Solr services; your plan should include hostassignments for installing the components of these services. See Runtime Cluster Hosts and Role Assignments.
• Resources for Atlas service. Atlas requires 16 GB of Java heap (Atlas Max Heapsize property) and 4 Solr shards(Initial Solr Shards for Atlas Collections property). Make sure the host you choose for Atlas has enough resourcesfor all the services' requirements.
Attention: You must note about the default values for Initial Solr Shards for Atlas Collections in yourCloudera Manager UI. Before you commence the Atlas initialization process, based on your performancerequirements, you must decide the actual (correct) values for Initial Solr Shards for Atlas Collections inyour Cloudera Manager instance. Cloudera recommends to set 4 Solr shards (Initial Solr Shards for AtlasCollections property). You must also note that, you must not update or modify these values once the Atlasinitialization has commenced. Additionally, note that once the Atlas initialization process is completed,modifying the value of Initial Solr Shards for Atlas Collections or Initial Solr Replication Factor forCollections will not have any effect on the collections for Atlas in Solr.
• Resources for Solr service. During transition, Solr running to serve as Atlas' index requires 12 GB of Java heap(Java Heap Size of Solr Server in Bytes property). You can reset this back to Make sure the host you choose forAtlas has enough resources for all the services' requirements.
21

CDP Private Cloud Base CDP Private Cloud Base Pre-upgrade transition steps
• Navigator credentials. The transition requires the username and password for a Navigator user with administratorprivileges.
• Local disk space needed for intermediate processing. The first two phases of the Navigator-to-Atlas transitionproduce intermediate files in /tmp in the local file system where Atlas is installed. See Estimating the time andresources needed for transition on page 22.
• Local disk space for transition staging files. The first two phases of the Navigator-to-Atlas transition producestaging files on the local disk where Atlas is installed. See Estimating the time and resources needed for transitionon page 22.
• Time estimates for transition phases. Each phase of the transition runs independently from the upgrade. You cantrigger them to run when convenient. See Estimating the time and resources needed for transition on page 22.
Estimating the time and resources needed for transition
While the cluster is starting up, you can plan for and start the transition process.
1. Inspect Navigator installation to determine the number of Navigator entities that will be transitioned. See Howmany Navigator entities are transitioned? on page 23
2. Estimate the time and disk space required for each phase of the transition.
The following transition rates are approximate and depend on the resources available on the Atlas host and otherunknown factors. Note that the number of entities actually imported may be considerably less that the numberof entities extracted. The transition process discards HDFS entities that are not referenced by processes that aretransitioned (Hive, Impala, Spark).
TransitionPhase
Transition Rate Disk Space Output File Size Trial Data Points
Extraction 4 minutes /1 million entities
100 MB / 1 millionentities, less asvolumes increase
65 MB / 1 millionentities
10 million entities takes about 30 minutes; 256million takes about 18 hours.
Transformation 1.5 minutes /1 million entities
100 to 150 MB /1 million entities,higher end of rangewith larger volumes
150 MB / 1 millionentities
10 million entities takes about 20 minutes; 256million takes about 6 hours.
Import 35 minutes /1 millionmigrated entities
N/A N/A 10 million entities takes about 4 hours; 256 milliontakes about 6 days.
Migration from Navigator to Atlas can be run only in non-HA mode
Migration import works only with a single Atlas instance.
If Atlas has been set up in HA mode before migration, you must remove the additional instances of Atlas, so thatAtlas service has only one instance.
22

CDP Private Cloud Base CDP Private Cloud Base Pre-upgrade transition steps
Later, start Atlas in the migration mode and complete the migration. Perform the necessary checks to verify if the datahas been imported correctly.
Restart Atlas in non-migration mode.
• If you have Atlas setup in HA mode, retain only one instance and remove the others.• Ensure that the ZIP files generated as output of Nav2Atlas conversion are placed at the same location where the
Atlas node is present.
How many Navigator entities are transitioned?
When preparing to transition content from Navigator to Atlas, it helps in planning the transition to know how manyNavigator entities will be extracted. Use Navigator's search facets to figure this out.
To determine the number of Navigator entities extracted for extraction and transformation phases of the transition:
1. Log into Navigator.2. In the Cluster Group facet in the left panel, select the cluster you are migrating from.
The main panel displays the count of entities in that cluster. Use this value for estimating the extraction andtransformation phase durations.
Not all Navigator entities are imported into Atlas. To estimate the subset of entities included in the import phase:
1. Log into Navigator.2. In the Cluster Group facet in the left panel, select the cluster you are migrating from.3. In the Source Type facet in the left panel, select "Hive", "Impala", and "Spark".
The main panel displays the count of entities in from these sources in this cluster.4. Double the number from the search results to account for the physical files that correspond to the tables and jobs.
The HDFS entities referenced by the Hive, Impala, and Spark entities are included in the transition.
The transition brings over all business metadata definitions and associations with transitioned entities. To determinethe number of Navigator managed properties to transition:
1. Log into Navigator.2. In the left Search panel, find the Tags facet.
This facet lists all the tags defined in Navigator. Navigator tags are imported into Atlas as labels.
23

CDP Private Cloud Base CDP Private Cloud Base Pre-upgrade transition steps
3. Go to Administration > Managed Properties.
The Navigator namespaces are imported as Atlas business metadata collections. Each managed property isimported as a business metadata attribute.
Installing Atlas in the Cloudera Manager upgrade wizardYou can use the wizard in Cloudera Manager to transition from CDH to CDP Private Cloud Base, install ApacheAtlas and its dependencies, and to generate customized commands to initiate the migration phases. After the wizard iscomplete, you can run the migration commands from the host where Atlas is installed.
This page describes the Cloudera Manager wizard steps that help you to setup Atlas and its service dependencies.
Attention: Before you peform the upgrade process, note the following pertaining to Atlas operations.
When a cluster is upgraded from CDH 5 or CDH 6 to CDP 7, by default the atlas.metadata.namespaceproperty is set to cm.
If a different namespace property needs to be set, for example: cluster1, the same needs to be set while running thenav2atlas script as "-clusterName" parameter and also in the atlas-application properties in theupgrade wizard.
Post-upgrade, note that the different value "cluster1" is not automatically updated in Hooks for services like Hive,HBase, Impala, Spark, and Kafka. You must make sure that before you upgrade your cluster and once the servicesare installed, you must set the value "cluster1" for all the available services. And later complete the upgrade process.
As an example process, follow these steps if namespace other than default "cm" needs to be set:
1. Provide the namespace ("cluster1") in the transformation step of Nav2Atlas script.2. Add atlas.metadata.namespace =cluster1 in atlas-application properties in the
following window of the upgrade wizard for Atlas.3. Open another tab of the Cloudera Manager while upgrade process is in progress and add atlas.metadata.n
amespace =cluster1 in Safety Valve of atlas-application.properties for all theHook services (Hive, HiveServer2 , Spark , HBase, Impala, and Kafka).
4. Perform all the other steps in the upgrade wizard and complete the upgrade.5. Remove Atlas from the migration mode.
To return to the main wizard documentation, go to Upgrading a CDH 6 Cluster on page 108.
Follow instructions in the upgrade wizard "Install Services" section
See Step 10: Run the Upgrade Cluster Wizard on page 134.
• Enable Atlas install.
If the CDH cluster being upgraded was running Navigator, the upgrade wizard shows a note recommending thatyou enable Atlas in the new cluster. Check the Install Atlas option.
24

CDP Private Cloud Base CDP Private Cloud Base Pre-upgrade transition steps
• Install Atlas dependencies.
The wizard steps through the installation for Atlas' dependencies, assuming these services haven't already beenincluded in the installation:
• ZooKeeper. Assign one or more hosts for the ZooKeeper role.• HDFS. Already included in the installation.• Kafka. Select the optional dependency of HDFS. Atlas requires configuring the Broker service only, not
MirrorMaker, Connect, or Gateway.• HBase. Atlas requires configuring HBase Master and RegionServers only, not REST or Thrift Server. Assign a
Master role on at least one host. Assign RegionServers to all hosts.• Solr. Assign a host for the Solr Server role. Set the Java Heap Size of Solr Server in Bytes property to 12 GB
(to support the migration operation).
For recommendations on where in the cluster to install the service roles, see Runtime Cluster Hosts and RoleAssignments.
25

CDP Private Cloud Base CDP Private Cloud Base Pre-upgrade transition steps
• Click Add Atlas Service. The wizard steps through choosing a host and setting migration details.
• Set the host for the Atlas server roles and click Continue.
Tip: Remember this host as you'll need to SSH to it later to trigger the content migration fromNavigator.
• The Atlas Migrate Navigator Data screen displays.
This screen contains migration commands that are customized to your environment. When you fill in theoutput file paths, the command text changes to incorporate your settings.
1. Set migration data-staging locations.
The migration process creates two data files on the local file system on the host where Atlas is installed.Make sure there is enough disk space to hold these files; see Estimating the time and resources needed fortransition on page 22.
2. Copy the extraction command text to an editor.
3. Copy the transformation command text to an editor.
4. Confirm the output file location. This is the location where Atlas will look for the content to import. Makesure it matches the location you plan to use for the output of the transformation command.
5. Click Continue.• The Atlas Enable Migration Mode screen displays. Review the Atlas Safety Valve content and click
Continue.
After the migration is complete, you will manually remove these settings to start Atlas in normal operation.• The Atlas Review Changes screen displays. Review the configurations and make any necessary changes.You
must provide a value for the following:
• Admin Password – choose a password for the preconfigured admin user.• Atlas Max Heapsize – set the max heapsize to the default value by clicking the curved blue arrow. If you
plan to migrate content from Cloudera Navigator to Atlas, consider setting the heapsize to 16 GB.
26

CDP Private Cloud Base CDP Private Cloud Base Pre-upgrade transition steps
• Click Continue.
To complete the Navigator-to-Atlas migration outside of the CDP Runtime upgrade, see Transitioning Navigatordata using customized scripts on page 27.
Continue with the upgrade wizard
The Cloudera Manager upgrade wizard continues with "Other Tasks" and "Inspector Checks" sections. The wizardsteps for installing Atlas are complete at this point and you can continue to complete the CDP Runtime upgrade.
Related InformationConfigure Atlas file-based authentication
Transitioning Navigator data using customized scriptsYou can run the customized scripts generated by the Cloudera Manager wizard to configure the Apache Atlasinstallation and start the Navigator-to-Atlas data migration process when you step into the CDP upgrade wizard. Youcan also run the migration scripts independently from the CDP upgrade.
The transition has three phases: extraction, transformation, and import. If you haven't already, estimate the time andresource requirements for the migration steps as described in Assumptions and prerequisites on page 21.
Run the extraction
You can run the extraction in the background as soon as the CDP runtime parcel is deployed. To customize and runthe extraction command:
1. Go back to the editor where you saved the extraction commands, from Copy the extraction command text from thestep "Click Add Atlas Service."
2. Open a terminal window or command prompt where you have access to the cluster.3. Using the provided command, SSH into the Atlas host.4. Make sure the JAVA_HOME variable is set; if it isn't, run the export command pointing to the location of the JDK.5. Customize the extraction command to include the Navigator admin user and password.6. Run the extraction command.
When the extraction is complete, you'll see a status message in the command output.
If Navigator is configured with TLS/SSL enabled, the cnav script needs the following credential information:
• Truststore path• Truststore password• Keystore path• Keystore password
To make these parameters available, run the following commands before running the cnav script:
export KEYSTORE_PATH=<keystore-path>; export KEYSTORE_PASSWORD=<keystore-password>;export TRUSTSTORE_PATH=<truststore-path>; export TRUSTSTORE_PASSWORD=<truststore-password>
27
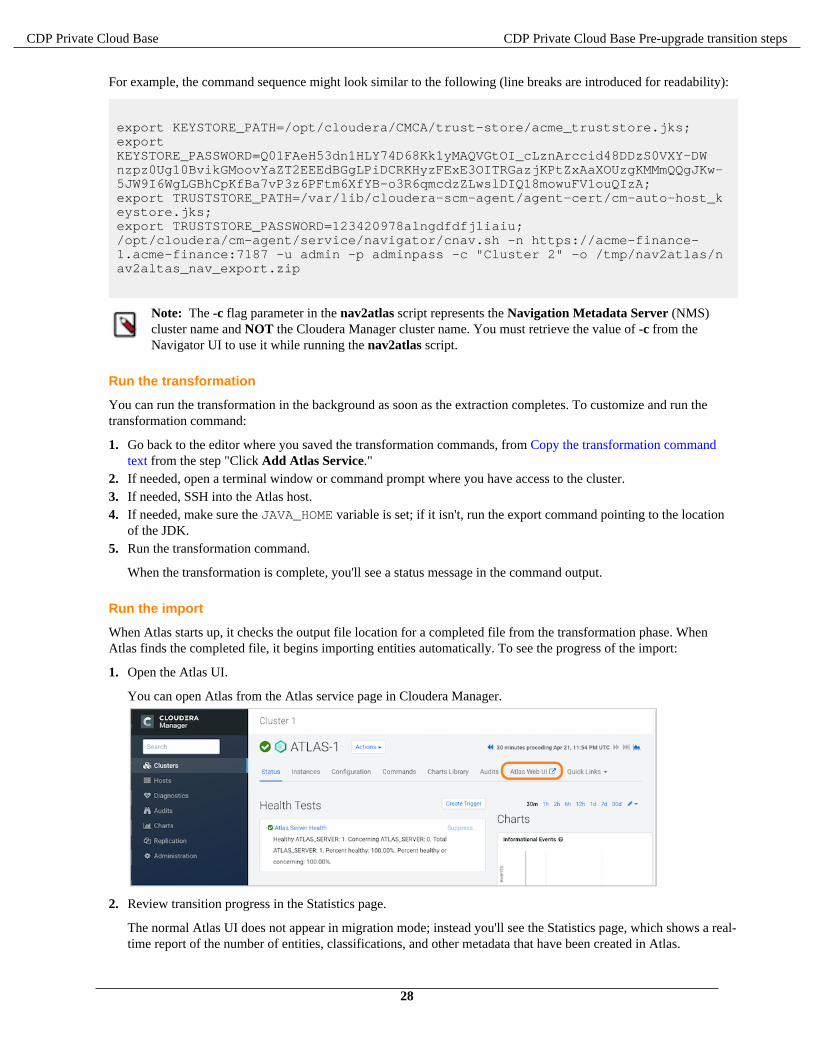
CDP Private Cloud Base CDP Private Cloud Base Pre-upgrade transition steps
For example, the command sequence might look similar to the following (line breaks are introduced for readability):
export KEYSTORE_PATH=/opt/cloudera/CMCA/trust-store/acme_truststore.jks; exportKEYSTORE_PASSWORD=Q01FAeH53dn1HLY74D68Kk1yMAQVGtOI_cLznArccid48DDzS0VXY-DWnzpz0Ug10BvikGMoovYaZT2EEEdBGgLPiDCRKHyzFExE3OITRGazjKPtZxAaXOUzgKMMmQQgJKw-5JW9I6WgLGBhCpKfBa7vP3z6PFtm6XfYB-o3R6qmcdzZLwslDIQ18mowuFV1ouQIzA;export TRUSTSTORE_PATH=/var/lib/cloudera-scm-agent/agent-cert/cm-auto-host_keystore.jks; export TRUSTSTORE_PASSWORD=123420978alngdfdfjliaiu; /opt/cloudera/cm-agent/service/navigator/cnav.sh -n https://acme-finance-1.acme-finance:7187 -u admin -p adminpass -c "Cluster 2" -o /tmp/nav2atlas/nav2altas_nav_export.zip
Note: The -c flag parameter in the nav2atlas script represents the Navigation Metadata Server (NMS)cluster name and NOT the Cloudera Manager cluster name. You must retrieve the value of -c from theNavigator UI to use it while running the nav2atlas script.
Run the transformation
You can run the transformation in the background as soon as the extraction completes. To customize and run thetransformation command:
1. Go back to the editor where you saved the transformation commands, from Copy the transformation commandtext from the step "Click Add Atlas Service."
2. If needed, open a terminal window or command prompt where you have access to the cluster.3. If needed, SSH into the Atlas host.4. If needed, make sure the JAVA_HOME variable is set; if it isn't, run the export command pointing to the location
of the JDK.5. Run the transformation command.
When the transformation is complete, you'll see a status message in the command output.
Run the import
When Atlas starts up, it checks the output file location for a completed file from the transformation phase. WhenAtlas finds the completed file, it begins importing entities automatically. To see the progress of the import:
1. Open the Atlas UI.
You can open Atlas from the Atlas service page in Cloudera Manager.
2. Review transition progress in the Statistics page.
The normal Atlas UI does not appear in migration mode; instead you'll see the Statistics page, which shows a real-time report of the number of entities, classifications, and other metadata that have been created in Atlas.
28

CDP Private Cloud Base CDP Private Cloud Base Pre-upgrade transition steps
Validate the transition
To give yourself confidence that the transition was successful, use the Statistics page in Atlas to compare to themetadata in Navigator. See How many Navigator entities are transitioned? on page 23 for instructions on how tolookup counts in Navigator.
• Count of migrated entities. Does the total number of imported entities match what you expect from Navigator?Remember that not all Navigator entities are not migrated: HDFS entities are only migrated if they are referencedin Hive, Impala, or Spark operations that are included in the transition.
• Count of managed metadata that became business metadata in Atlas.• Count of managed metadata assignments. Consider reproducing searches on commonly used business metadata to
validate that you see the same results in each system.
Move Atlas out of migration mode
After installation, Atlas runs in migration mode:
• Atlas does not collect metadata from services running on the cluster. The metadata remains in Kafka topics andwill be collected later.
• Atlas starts importing metadata when it finds a final transformation file in the location you specified in Confirmthe output file location from the step "Click Add Atlas Service."
To move Atlas from migration mode into normal operation:
1. Open Cloudera Manager to the Atlas service.2. Go to the Configuration tab.3. Filter the list of properties by typing "Safety" in the filter field.4. Remove the migration-specific entries from the Atlas Server Advanced Configuration Snippet (Safety Valve)
for conf/atlas-application.properties.
Remove the following properties:
atlas.migration.data.filenameatlas.migration.mode.batch.sizeatlas.migration.mode.workers
5. Reset the Atlas Max Heapsize property back to the default value.
6. Click Save Changes.7. Restart Atlas.
Choose Action > Restart.
Mapping Navigator metadata to AtlasYou must validate the Navigator to Apache Atlas transition by reviewing the list of metadata mapping and its typestransitioned from the Navigator.
Use this topic as a checklist to help you validate the transition of metadata from Navigator to Atlas.
User-supplied metadata mapping
The following user-supplied metadata is transitioned to Atlas, including definitions and assignments to entities.Enumerations defined in Navigator are created as instances of the enumeration type in Atlas.
29

CDP Private Cloud Base CDP Private Cloud Base Pre-upgrade transition steps
Navigator Construct Atlas Construct
Tag Label
User-defined Properties
• Key• Value
User-defined properties
• Key• Value
Managed Properties
• Namespace• Namespace description• Property Name (original name)• Classes (entity types that property can be assigned to) • Display Name• Property description• Multivalued• Type (Text, Number, Boolean, Date,
Enumeration)
Business Metadata Attributes
• Business Metadata name• Business Metadata description• Attribute name• Applicable Types (entity types that property can be assigned to)• Display Name (not used in the UI)• Description (not used in the UI)• Enable Multivalues• Type (string, Boolean, byte, short, int, float, double, long, date,
enumeration)
Policy mapping
Navigator policies provided the ability to apply metadata to Navigator entities. They do not have an equivalentfunction in Atlas and are not transitioned. You may be able to implement similar functionality through data profilersin the Data Catalog. You can create a report of Navigator policies using the Navigator API, for example, use a GETcall to the /policy API:
curl -X GET "<navigator host>:<port>/api/v14/policy" -u <username>:<password>
Technical metadata mapping
The transition process maps all the needed technical metadata for entities from Navigator to be represented in Atlas.There are some instances where the transition has to convert data from one type to another or generate new content toconform to the Atlas data model. The details of the entity mapping are exhaustively described in the Atlas technicalmetadata transition reference.
Transitioning Navigator auditsExisting Cloudera Navigator audits are not transitioned to the CDP cluster. To transition reports running againstNavigator data to Apache Ranger and other resources you must review the available options.
To manage Navigator audits in a CDP Runtime cluster, consider the following options:
Maintain legacy audits in Navigator
You can continue to run Navigator to access your existing audits (and/or metadata). If you choose tokeep Navigator running, make sure that its users don't add content to the archived system rather thanthe new Atlas instance. Consider:
• Removing editing privileges from users. If Navigator is configured for LDAP or ActiveDirectory authentication, you can modify users or groups to remove privileges for adding orediting metadata. For details, see Administering Navigator User Roles.
• Marking Navigator entities as stale. If you are managing more than one cluster in Navigator, youcan mark entities from the upgraded cluster to indicate to users that the entities are no longermaintained in Navigator. One way to do this is to create a policy that assigns a tag to the entitiesfrom the upgraded cluster. For details, see Using Policies to Automate Metadata Tagging.
Archive your Navigator audits
When Cloudera Manager upgrades to 7.x, it maintains the database of Navigator audits. After theupgrade, you can access audits through Navigator as normal; new audits continue to be collectedfrom CDH services.
30
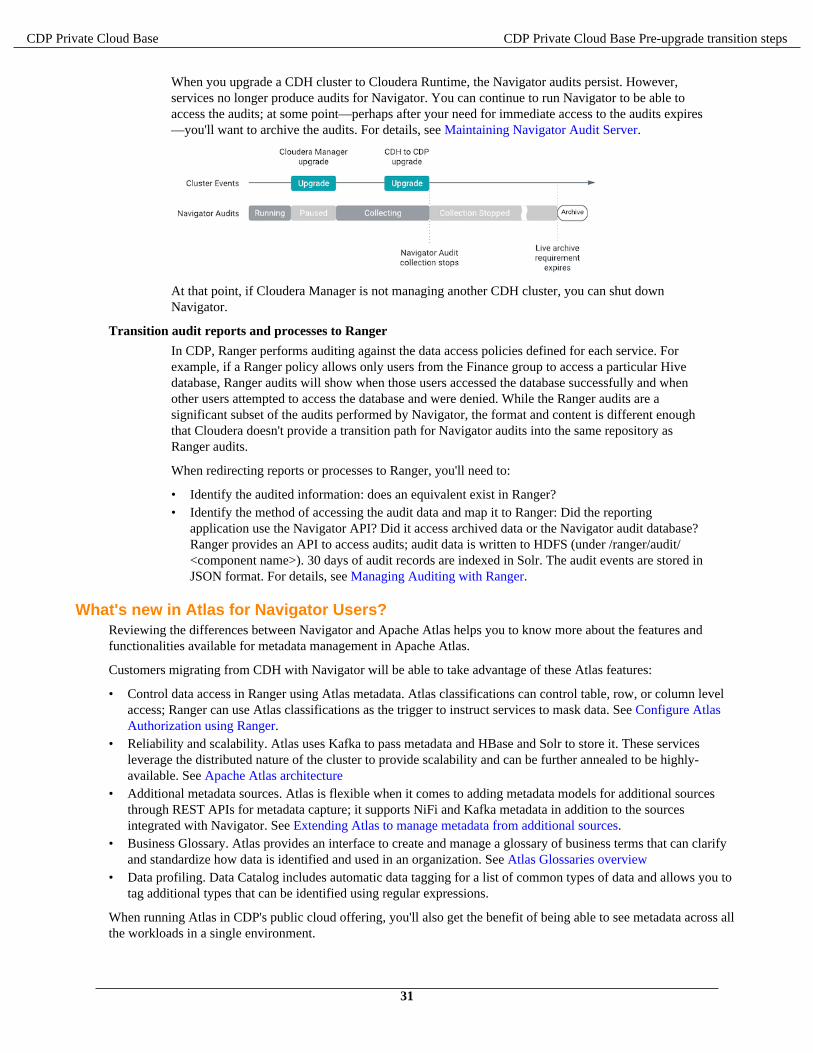
CDP Private Cloud Base CDP Private Cloud Base Pre-upgrade transition steps
When you upgrade a CDH cluster to Cloudera Runtime, the Navigator audits persist. However,services no longer produce audits for Navigator. You can continue to run Navigator to be able toaccess the audits; at some point—perhaps after your need for immediate access to the audits expires—you'll want to archive the audits. For details, see Maintaining Navigator Audit Server.
At that point, if Cloudera Manager is not managing another CDH cluster, you can shut downNavigator.
Transition audit reports and processes to Ranger
In CDP, Ranger performs auditing against the data access policies defined for each service. Forexample, if a Ranger policy allows only users from the Finance group to access a particular Hivedatabase, Ranger audits will show when those users accessed the database successfully and whenother users attempted to access the database and were denied. While the Ranger audits are asignificant subset of the audits performed by Navigator, the format and content is different enoughthat Cloudera doesn't provide a transition path for Navigator audits into the same repository asRanger audits.
When redirecting reports or processes to Ranger, you'll need to:
• Identify the audited information: does an equivalent exist in Ranger?• Identify the method of accessing the audit data and map it to Ranger: Did the reporting
application use the Navigator API? Did it access archived data or the Navigator audit database?Ranger provides an API to access audits; audit data is written to HDFS (under /ranger/audit/<component name>). 30 days of audit records are indexed in Solr. The audit events are stored inJSON format. For details, see Managing Auditing with Ranger.
What's new in Atlas for Navigator Users?Reviewing the differences between Navigator and Apache Atlas helps you to know more about the features andfunctionalities available for metadata management in Apache Atlas.
Customers migrating from CDH with Navigator will be able to take advantage of these Atlas features:
• Control data access in Ranger using Atlas metadata. Atlas classifications can control table, row, or column levelaccess; Ranger can use Atlas classifications as the trigger to instruct services to mask data. See Configure AtlasAuthorization using Ranger.
• Reliability and scalability. Atlas uses Kafka to pass metadata and HBase and Solr to store it. These servicesleverage the distributed nature of the cluster to provide scalability and can be further annealed to be highly-available. See Apache Atlas architecture
• Additional metadata sources. Atlas is flexible when it comes to adding metadata models for additional sourcesthrough REST APIs for metadata capture; it supports NiFi and Kafka metadata in addition to the sourcesintegrated with Navigator. See Extending Atlas to manage metadata from additional sources.
• Business Glossary. Atlas provides an interface to create and manage a glossary of business terms that can clarifyand standardize how data is identified and used in an organization. See Atlas Glossaries overview
• Data profiling. Data Catalog includes automatic data tagging for a list of common types of data and allows you totag additional types that can be identified using regular expressions.
When running Atlas in CDP's public cloud offering, you'll also get the benefit of being able to see metadata across allthe workloads in a single environment.
31

CDP Private Cloud Base CDP Private Cloud Base Pre-upgrade transition steps
Migrating Hive 1-2 to Hive 3If you have a large Hive metastore implementation, preparing the metastore for the upgrade by finding missing tables,missing partitions, and problematic SERDE definitions can take a long time. Cloudera Community tools can savesignificant time. For more information, see Expediting the Hive Upgrade. Check with your Cloudera account teamresources regarding professional services.
Hive Configuration Changes Requiring ConsentBefore the CDH to CDP upgrade process starts, the pre-upgrade wizard asks you to consent to a number of criticalconfiguration changes that occur after the upgrade. To prepare for this step, you can review the default before andafter upgrade values of the properties.
Property Values Before and After Upgrade
Before starting the upgrade process, you are asked to consent to changes in the values of the following properties:
hive.conf.hidden.list
Before upgrade:
javax.jdo.option.ConnectionPassword,hive.server2.keystore.password,hive.metastore.dbaccess.ssl.truststore.password,fs.s3.awsAccessKeyId,fs.s3.awsSecretAccessKey,fs.s3n.awsAccessKeyId,fs.s3n.awsSecretAccessKey,fs.s3a.access.key,fs.s3a.secret.key,fs.s3a.proxy.password,dfs.adls.oauth2.credential,fs.adl.oauth2.credential,fs.azure.account.oauth2.client.secret
After upgrade:
javax.jdo.option.ConnectionPassword,hive.server2.keystore.password,hive.druid.metadata.password,hive.driver.parallel.compilation.global.limit
hive.conf.restricted.list
Before upgrade:
hive.security.authenticator.manager,hive.security.authorization.manager,hive.users.in.admin.role,hive.server2.xsrf.filter.enabled,hive.spark.client.connect.timeout,hive.spark.client.server.connect.timeout,hive.spark.client.channel.log.level,hive.spark.client.rpc.max.size,hive.spark.client.rpc.threads,hive.spark.client.secret.bits,hive.spark.client.rpc.server.address,hive.spark.client.rpc.server.port,hive.spark.client.rpc.sasl.mechanisms,hadoop.bin.path,yarn.bin.path,spark.home,bonecp.,hikaricp.,hive.driver.parallel.compilation.global.limit,_hive.local.session.path,_hive.hdfs.session.path,_hive.tmp_table_space,_hive.local.session.path,_hive.hdfs.session.path,_hive.tmp_table_space
After upgrade:
hive.security.authenticator.manager,hive.security.authorization.manager,hive.security.metastore.authorization.manager,hive.security.metastore.authenticator.manager,hive.users.in.admin.role,hive.server2.xsrf.filter.enabled,hive.security.authorization.enabled,hive.distcp.privileged.doAs,hive.server2.authentication.ldap.baseDN,hive.server2.authentication.ldap.url,hive.server2.authentication.ldap.Domain,hive.server2.authentication.ldap.groupDNPattern,hive.server2.authentication.ldap.groupFilter,hive.server2.aut
32

CDP Private Cloud Base CDP Private Cloud Base Pre-upgrade transition steps
hentication.ldap.userDNPattern,hive.server2.authentication.ldap.userFilter,hive.server2.authentication.ldap.groupMembershipKey,hive.server2.authentication.ldap.userMembershipKey,hive.server2.authentication.ldap.groupClassKey,hive.server2.authentication.ldap.customLDAPQuery,hive.privilege.synchronizer.interval,hive.spark.client.connect.timeout,hive.spark.client.server.connect.timeout,hive.spark.client.channel.log.level,hive.spark.client.rpc.max.size,hive.spark.client.rpc.threads,hive.spark.client.secret.bits,hive.spark.client.rpc.server.address,hive.spark.client.rpc.server.port,hive.spark.client.rpc.sasl.mechanisms,bonecp.,hive.druid.broker.address.default,hive.druid.coordinator.address.default,hikaricp.,hadoop.bin.path,yarn.bin.path,spark.home,hive.driver.parallel.compilation.global.limit,_hive.local.session.path,_hive.hdfs.session.path,_hive.tmp_table_space,_hive.local.session.path,_hive.hdfs.session.path,_hive.tmp_table_space
hive.default.fileformat.managed
Before upgrade: None
After upgrade: ORC
hive.default.rcfile.serde
Before upgrade: org.apache.hadoop.hive.serde2.columnar.ColumnarSerDe
After upgrade: org.apache.hadoop.hive.serde2.columnar.LazyBinaryColumnarSerDe
hive.exec.dynamic.partition.mode
Before upgrade: strict
After upgrade: nonstrict
hive.exec.max.dynamic.partitions
Before upgrade: 1000
After upgrade: 5000
hive.exec.max.dynamic.partitions.pernode
Before upgrade: 100
After upgrade: 2000
hive.exec.post.hooks
Before upgrade:
com.cloudera.navigator.audit.hive.HiveExecHookContext,org.apache.hadoop.hive.ql.hooks.LineageLogger
After upgrade: org.apache.hadoop.hive.ql.hooks.HiveProtoLoggingHook
hive.execution.engine
Before upgrade: mr
After upgrade: tez
hive.metastore.disallow.incompatible.col.type.changes
Before upgrade: FALSE
After upgrade: TRUE
hive.metastore.warehouse.dir
Before upgrade: /user/hive/warehouse
After upgrade: /warehouse/tablespace/managed/hive
33

CDP Private Cloud Base CDP Private Cloud Base Pre-upgrade transition steps
hive.script.operator.env.blacklist
Before upgrade: hive.txn.valid.txns,hive.script.operator.env.blacklist
After upgrade:
hive.txn.valid.txns,hive.txn.tables.valid.writeids,hive.txn.valid.writeids,hive.script.operator.env.blacklist
hive.security.authorization.sqlstd.confwhitelist
Before upgrade:
hive\.auto\..*hive\.cbo\..*hive\.convert\..*hive\.exec\.dynamic\.partition.*hive\.exec\..*\.dynamic\.partitions\..*hive\.exec\.compress\..*hive\.exec\.infer\..*hive\.exec\.mode.local\..*hive\.exec\.orc\..*hive\.exec\.parallel.*hive\.explain\..*hive\.fetch.task\..*hive\.groupby\..*hive\.hbase\..*hive\.index\..*hive\.index\..*hive\.intermediate\..*hive\.join\..*hive\.limit\..*hive\.log\..*hive\.mapjoin\..*hive\.merge\..*hive\.optimize\..*hive\.orc\..*hive\.outerjoin\..*hive\.parquet\..*hive\.ppd\..*hive\.prewarm\..*hive\.server2\.proxy\.userhive\.skewjoin\..*hive\.smbjoin\..*hive\.stats\..*hive\.strict\..*hive\.tez\..*hive\.vectorized\..*mapred\.map\..*mapred\.reduce\..*mapred\.output\.compression\.codecmapred\.job\.queuenamemapred\.output\.compression\.typemapred\.min\.split\.sizemapreduce\.job\.reduce\.slowstart\.completedmapsmapreduce\.job\.queuenamemapreduce\.job\.tagsmapreduce\.input\.fileinputformat\.split\.minsizemapreduce\.map\..*mapreduce\.reduce\..*mapreduce\.output\.fileoutputformat\.compress\.codecmapreduce\.output\.fileoutputformat\.compress\.typeoozie\..*tez\.am\..*tez\.task\..*tez\.runtime\..*tez\.queue\.namehive\.transpose\.aggr\.joinhive\.exec\.reducers\.bytes\.per\.reducerhive\.client\.stats\.countershive\.exec\.default\.partition\.namehive\.exec\.drop\.ignorenonexistenthive\.counters\.group\.namehive\.default\.fileformat\.managedhive\.enforce\.bucketmapjoinhive\.enforce\.sortmergebucketmapjoinhive\.cache\.expr\.evaluationhive\.query\.result\.fileformathive\.hashtable\.loadfactorhive\.hashtable\.initialCapacityhive\.ignore\.mapjoin\.hinthive\.limit\.row\.max\.sizehive\.mapred\.modehive\.map\.aggrhive\.compute\.query\.using\.statshive\.exec\.rowoffsethive\.variable\.substitutehive\.variable\.substitute\.depthhive\.autogen\.columnalias\.prefix\.includefuncnamehive\.autogen\.columnalias\.prefix\.labelhive\.exec\.check\.crossproductshive\.cli\.tez\.session\.asynchive\.compathive\.exec\.concatenate\.check\.indexhive\.display\.partition\.cols\.separatelyhive\.error\.on\.empty\.partitionhive\.execution\.enginehive\.exec\.copyfile\.maxsizehive\.exim\.uri\.scheme\.whitelisthive\.file\.max\.footerhive\.insert\.into\.multilevel\.dirshive\.localize\.resource\.num\.wait\.attemptshive\.multi\.insert\.move\.tasks\.share\.dependencieshive\.support\.quoted\.identifiershive\.resultset\.use\.unique\.column\.nameshive\.analyze\.stmt\.collect\.partlevel\.statshive\.exec\.schema\.evolutionhive\.server2\.logging\.operation\.levelhive\.server2\.thrift\.resultset\.serialize\.in\.taskshive\.support\.special\.characters\.tablenamehive\.exec\.job\.debug\.capture\.stacktraceshive\.exec\.job\.debug\.timeouthive\.llap\.io\.enabledhive\.llap\.io\.use\.fileid\.pathhive\.llap\.daemon\.service\.hostshive\.llap\.execution\.modehive\.llap\.auto\.allow\.uberhive\.llap\.auto\.enforce\.treehive\.llap\.auto\.enforce\.vectorizedhive\.llap\.auto\.enforce\.statshive\.llap\.auto\.max\.input\.sizehive\.llap\.auto\.max\.output\.sizehive\.llap\.skip\.compile\.udf\.checkhive\.llap\.client\.consistent\.splitshive\.llap\.enable\.grace\.join\.in\.llaphive\.llap\.allow\.permanent\.fnshive\.exec\.max\.created\.fileshive\.exec\.reducers\.maxhive\.reorder\.nway\.joinshive\.output\.
34
CDP Private Cloud Base CDP Private Cloud Base Pre-upgrade transition steps
file\.extensionhive\.exec\.show\.job\.failure\.debug\.infohive\.exec\.tasklog\.debug\.timeouthive\.query\.id
After upgrade:
hive\.auto\..*hive\.cbo\..*hive\.convert\..*hive\.druid\..*hive\.exec\.dynamic\.partition.*hive\.exec\.max\.dynamic\.partitions.*hive\.exec\.compress\..*hive\.exec\.infer\..*hive\.exec\.mode.local\..*hive\.exec\.orc\..*hive\.exec\.parallel.*hive\.exec\.query\.redactor\..*hive\.explain\..*hive\.fetch.task\..*hive\.groupby\..*hive\.hbase\..*hive\.index\..*hive\.index\..*hive\.intermediate\..*hive\.jdbc\..*hive\.join\..*hive\.limit\..*hive\.log\..*hive\.mapjoin\..*hive\.merge\..*hive\.optimize\..*hive\.materializedview\..*hive\.orc\..*hive\.outerjoin\..*hive\.parquet\..*hive\.ppd\..*hive\.prewarm\..*hive\.query\.redaction\..*hive\.server2\.thrift\.resultset\.default\.fetch\.sizehive\.server2\.proxy\.userhive\.skewjoin\..*hive\.smbjoin\..*hive\.stats\..*hive\.strict\..*hive\.tez\..*hive\.vectorized\..*hive\.query\.reexecution\..*reexec\.overlay\..*fs\.defaultFSssl\.client\.truststore\.locationdistcp\.atomicdistcp\.ignore\.failuresdistcp\.preserve\.statusdistcp\.preserve\.rawxattrsdistcp\.sync\.foldersdistcp\.delete\.missing\.sourcedistcp\.keystore\.resourcedistcp\.liststatus\.threadsdistcp\.max\.mapsdistcp\.copy\.strategydistcp\.skip\.crcdistcp\.copy\.overwritedistcp\.copy\.appenddistcp\.map\.bandwidth\.mbdistcp\.dynamic\..*distcp\.meta\.folderdistcp\.copy\.listing\.classdistcp\.filters\.classdistcp\.options\.skipcrccheckdistcp\.options\.mdistcp\.options\.numListstatusThreadsdistcp\.options\.mapredSslConfdistcp\.options\.bandwidthdistcp\.options\.overwritedistcp\.options\.strategydistcp\.options\.idistcp\.options\.p.*distcp\.options\.updatedistcp\.options\.deletemapred\.map\..*mapred\.reduce\..*mapred\.output\.compression\.codecmapred\.job\.queue\.namemapred\.output\.compression\.typemapred\.min\.split\.sizemapreduce\.job\.reduce\.slowstart\.completedmapsmapreduce\.job\.queuenamemapreduce\.job\.tagsmapreduce\.input\.fileinputformat\.split\.minsizemapreduce\.map\..*mapreduce\.reduce\..*mapreduce\.output\.fileoutputformat\.compress\.codecmapreduce\.output\.fileoutputformat\.compress\.typeoozie\..*tez\.am\..*tez\.task\..*tez\.runtime\..*tez\.queue\.namehive\.transpose\.aggr\.joinhive\.exec\.reducers\.bytes\.per\.reducerhive\.client\.stats\.countershive\.exec\.default\.partition\.namehive\.exec\.drop\.ignorenonexistenthive\.counters\.group\.namehive\.default\.fileformat\.managedhive\.enforce\.bucketmapjoinhive\.enforce\.sortmergebucketmapjoinhive\.cache\.expr\.evaluationhive\.query\.result\.fileformathive\.hashtable\.loadfactorhive\.hashtable\.initialCapacityhive\.ignore\.mapjoin\.hinthive\.limit\.row\.max\.sizehive\.mapred\.modehive\.map\.aggrhive\.compute\.query\.using\.statshive\.exec\.rowoffsethive\.variable\.substitutehive\.variable\.substitute\.depthhive\.autogen\.columnalias\.prefix\.includefuncnamehive\.autogen\.columnalias\.prefix\.labelhive\.exec\.check\.crossproductshive\.cli\.tez\.session\.asynchive\.compathive\.display\.partition\.cols\.separatelyhive\.error\.on\.empty\.partitionhive\.execution\.enginehive\.exec\.copyfile\.maxsizehive\.exim\.uri\.scheme\.whitelisthive\.file\.max\.footerhive\.insert\.into\.multilevel\.dirshive\.localize\.resource\.num\.wait\.attemptshive\.multi\.insert\.move\.tasks\.share\.dependencieshive\.query\.results\.cache\.enabledhive\.query\.results\.cache\.wait\.for\.pending\.resultshive\.support\.quoted\.identifiershive\.resultset\.use\.unique\.column\.nameshive\.analyze\.stmt\.collect\.partlevel\.statshive\.exec\.schema\.evolutionhive\.server2\.logging\.operation\.levelhive\.server2\.thrift\.resultset\.serialize\.in\.taskshive\.support\.special\.characters\.tablenamehive\.exec\.job\.debug\.capture\.stacktraceshive\.exec\.job\.debug\.timeouthive\.llap
35

CDP Private Cloud Base CDP Private Cloud Base Pre-upgrade transition steps
\.io\.enabledhive\.llap\.io\.use\.fileid\.pathhive\.llap\.daemon\.service\.hostshive\.llap\.execution\.modehive\.llap\.auto\.allow\.uberhive\.llap\.auto\.enforce\.treehive\.llap\.auto\.enforce\.vectorizedhive\.llap\.auto\.enforce\.statshive\.llap\.auto\.max\.input\.sizehive\.llap\.auto\.max\.output\.sizehive\.llap\.skip\.compile\.udf\.checkhive\.llap\.client\.consistent\.splitshive\.llap\.enable\.grace\.join\.in\.llaphive\.llap\.allow\.permanent\.fnshive\.exec\.max\.created\.fileshive\.exec\.reducers\.maxhive\.reorder\.nway\.joinshive\.output\.file\.extensionhive\.exec\.show\.job\.failure\.debug\.infohive\.exec\.tasklog\.debug\.timeouthive\.query\.idhive\.query\.tag
hive.security.command.whitelist
Before upgrade: set,reset,dfs,add,list,delete,reload,compile
After upgrade: set,reset,dfs,add,list,delete,reload,compile,llap
hive.server2.enable.doAs
Before upgrade: TRUE (in case of unsecure cluster only)
After upgrade: FALSE (in all cases)
hive.server2.parallel.ops.in.session
Before upgrade: TRUE
After upgrade: FALSE
hive.support.special.characters.tablename
Before upgrade: FALSE
After upgrade: TRUE
Remove transactional=false from Table PropertiesIn CDH 5.x it is possible to create tables with having the property transactional=false set. While this is a no-op setting, if any of your Hive tables explicitly set this, the upgrade process fails.
About this task
You must remove 'transactional'='false' from any tables you want to upgrade from CDH 5.x to CDP.
Procedure
Alter the table as follows:
ALTER TABLE my_table UNSET TBLPROPERTIES ('transactional');
Check SERDE Definitions and AvailabilityEnsure correct Serde definitions and a reference to a SERDE exists to ensure a successful upgrade.
About this taskYou perform this step if you do not modify the HSMM process for expediting the Hive upgrade.
Procedure
1. Check Serde definitions for correctness and check for SERDE availability.
36
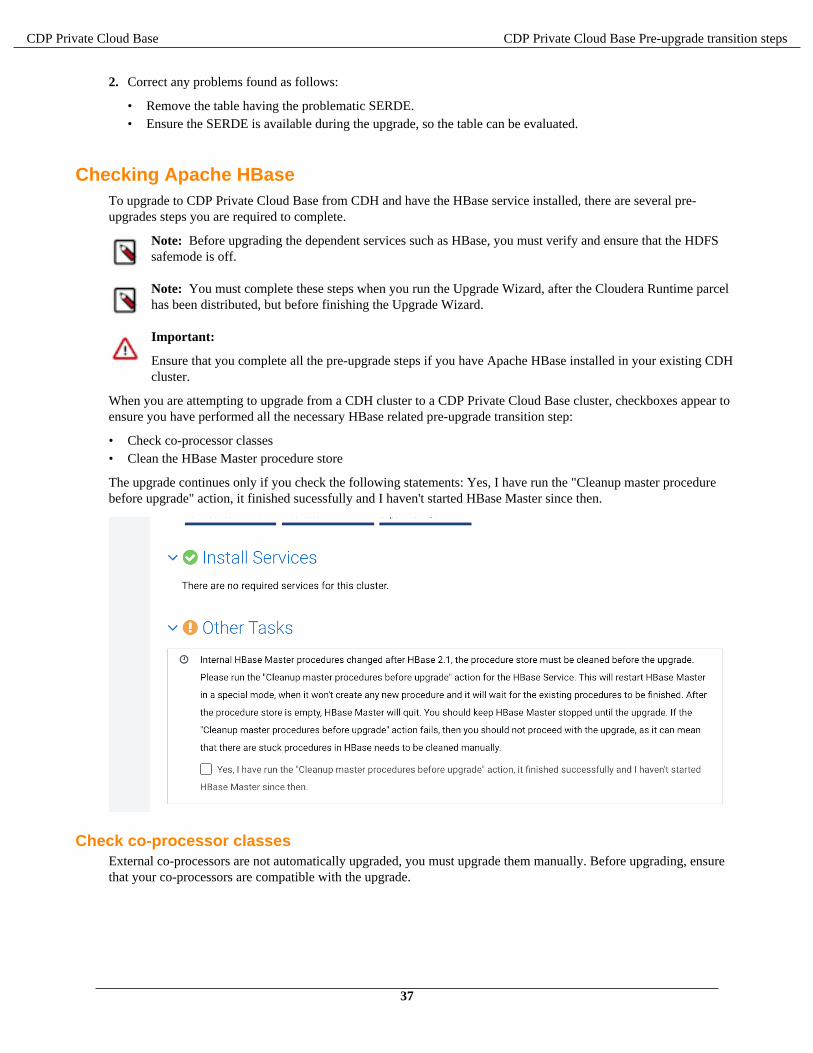
CDP Private Cloud Base CDP Private Cloud Base Pre-upgrade transition steps
2. Correct any problems found as follows:
• Remove the table having the problematic SERDE.• Ensure the SERDE is available during the upgrade, so the table can be evaluated.
Checking Apache HBaseTo upgrade to CDP Private Cloud Base from CDH and have the HBase service installed, there are several pre-upgrades steps you are required to complete.
Note: Before upgrading the dependent services such as HBase, you must verify and ensure that the HDFSsafemode is off.
Note: You must complete these steps when you run the Upgrade Wizard, after the Cloudera Runtime parcelhas been distributed, but before finishing the Upgrade Wizard.
Important:
Ensure that you complete all the pre-upgrade steps if you have Apache HBase installed in your existing CDHcluster.
When you are attempting to upgrade from a CDH cluster to a CDP Private Cloud Base cluster, checkboxes appear toensure you have performed all the necessary HBase related pre-upgrade transition step:
• Check co-processor classes• Clean the HBase Master procedure store
The upgrade continues only if you check the following statements: Yes, I have run the "Cleanup master procedurebefore upgrade" action, it finished sucessfully and I haven't started HBase Master since then.
Check co-processor classesExternal co-processors are not automatically upgraded, you must upgrade them manually. Before upgrading, ensurethat your co-processors are compatible with the upgrade.
37

CDP Private Cloud Base CDP Private Cloud Base Pre-upgrade transition steps
About this task
Important:
Ensure that you complete all the pre-upgrade steps if you have Apache HBase installed in your existing CDHcluster.
There are two ways to handle co-processor upgrade:
• Upgrade your co-processor jars manually before continuing the upgrade.• Temporarily unset the co-processors and continue the upgrade.
Once they are manually upgraded, they can be reset.
Attempting to upgrade without upgrading the co-processor jars can result in unpredictable behaviour such as HBaserole start failure, HBase role crashing, or even data corruption.
If your cluster is Kerberized, ensure that you run the kinit command as a hbase user before running the pre-upgrade commands.
Procedure
1. Download and distribute parcels for target version of CDP Private Cloud Base.
Important: Do not activate the parcel yet.
If the downloaded parcel version is higher than the current Cloudera Manager version, the following errormessage displayed:
Error for parcel CDH-7.X.parcel : Parcel version 7.X is not supported bythis version of Cloudera Manager. Upgrade Cloudera Manager to at least 7.Xbefore using this version of the parcel.
You can safely ignore this error message.
2. Run the hbase pre-upgrade validate-cp commands to check if your co-processors are compatible withthe upgrade.
Use the CDP parcel to run the pre-upgrade commands. Cloudera recommends that you run them on an HMasterhost.
For example, you can check for co-processor compatibility on master:
$ /opt/cloudera/parcels/CDH-7.1.1-1.cdh7.1.1.p0.3224867/bin/hbase pre-upgrade validate-cp -jar /opt/cloudera/parcels/CDH-7.1.1-1.cdh7.1.1.p0.3224867/jars/ -config
Or, you can validate every table level co-processors where the table name matches to the .* regular expression:
$ /opt/cloudera/parcels/CDH-7.1.1-1.cdh7.1.1.p0.3224867/bin/hbase pre-upgrade validate-cp -table '.*'
Optinally, you can run the following command for a more detailed output:
HBASE_ROOT_LOGGER=DEBUG,console hbase pre-upgrade validate-cp -table '.*'
This way you can verify that all of the required tables were checked. The detailed output should contain lines likethe following where test_table is a table on the server:
21/05/10 11:07:58 DEBUG coprocessor.CoprocessorValidator: Validating table test_table
38

CDP Private Cloud Base CDP Private Cloud Base Pre-upgrade transition steps
3. Check the output to determine if your co-processors are compatible with the upgrade.
The output looks similar to the following:
$ hbase pre-upgrade validate-cp -config... some output ...$ echo $?0
If echo $? prints 0, the check was successful and your co-processors are compatible. A non-zero value meansunsuccessful, your co-processors are not compatible.
What to do next
Clean the HBase Master procedure store.
Clean the HBase Master procedure storeHBase Master procedures changed after HBase 2.1, therefore the procedure store must be cleaned before upgradingfrom CDH 6 to CDP.
About this task
From HBase 2.2 it is changed how HBase Master performs internal, housekeeping operations such as table creationor region removal. As a result if a procedure is started in HBase 2.1 (CDH 6 version), it cannot be continued afterupgrading to HBase 2.2 (CDP version).
To prevent such cases you must clean the HMase Master procedure store before starting the upgrade.
Procedure
1. In Cloudera Manager, select the HBase service.
2. Click Actions > Cleanup master procedures before upgrade > .HBase Master rules are stopped and restarted in a so-called upgrade mode. In this mode HBase Masters arewaiting for all ongoing procedures to finish. Once an HBase Master procedure store is empty, its HBase Masterquits automatically.
3. Optional: If the cleanup command fails, check if there are any stuck procedures that need to be cleaned manuallybefore upgrade.
If the comman fails, the following error message is displayed: Failed to prepare HBase for theupgrade. There might be some HBase Master procedures which haven’t beenfinished in time. Please make sure you clean these procedures before youwould continue the upgrade.
4. Start the upgrade.
5. Find the Other Tasks section of the Upgrade Wizard.
39

CDP Private Cloud Base CDP Private Cloud Base Pre-upgrade transition steps
6. Check the Yes, I have run the "Cleanup master procedure before upgrade" action, it finished sucessfullyand I haven't started HBase Master since then.
What to do nextContinue the upgrade using the Cloudera Manager upgrade wizard.
CDH cluster upgrade requirements for Replication ManagerReviewing the CDH cluster upgrade guidelines and requirements for Replication Manager help you to upgradesuccessfully. Before you start the upgrade, check the version numbers to ensure that the clusters are in sync.
• Ensure that the supported source and target clusters and the corresponding Cloudera Manager versions are in syncwith respect to the cluster configurations prior to starting the upgrade.
• Upgrade your target cluster to CDP Private Cloud Base first. Upgrading the target CDH cluster first ensures thatyour data on the source cluster is not corrupted or rendered invalid.
• Upgrade the source cluster to CDP Private Cloud Base after the data is transitioned to the CDP Private Cloud Basecluster (target). And, later verify that both source and target clusters are upgraded to CDP Private Cloud Baseclusters.
Installing dependencies for Hue before upgrading to CDPIf you want to use PostgreSQL as a backend database to store Hue metadata, job and query history, and accountinformation, then you must install PostgreSQL server, Python 2.7.5, and the Python psycopg2 package on the Huehosts to connect Hue to the PostgreSQL database.
Warning: Only Python version 2.7.5 is supported. Other versions are not supported.
On RHEL 7 and CentOS 7, Python version 2.7.5 is included by default. Verify by running the following command:
source /opt/rh/python275/enablepython --version
Oracle Linux 7 includes Python version 2.7. Install Python 2.7.5 as follows:
40

CDP Private Cloud Base CDP Private Cloud Base Pre-upgrade transition steps
1. Download the Software Collections Library repository:
sudo wget -O /etc/yum.repos.d/public-yum-ol7.repo http://yum.oracle.com/public-yum-ol7.repo
2. Edit /etc/yum.repos.d/public-yum-ol7.repo and make sure that enabled is set to 1, as follows:
[ol7_software_collections]name=Software Collection Library release 3.0 packages for Oracle Linux 7 (x86_64)baseurl=http://yum.oracle.com/repo/OracleLinux/OL7/SoftwareCollections/x86_64/gpgkey=file:///etc/pki/rpm-gpg/RPM-GPG-KEY-oraclegpgcheck=1enabled=1
For more information, see Installing the Software Collection Library Utility From the Oracle Linux Yum Server inthe Oracle documentation.
3. Install the Software Collections utilities:
sudo yum install scl-utils
4. Install Python 2.7.5:
sudo yum install python275
5. Verify that Python 2.7.5 is installed:
(On Oracle Linux):
source /opt/rh/python275/enablepython --version
(On RHEL or CentOS):
python --version
Installing the psycopg2 Python Package
Note: Psycopg2 library is needed for PostgreSQL-backed Hue on RHEL 8 or Ubuntu 20 platforms.
RHEL 7
1. Install the python-pip package:
sudo yum install python-pip
2. Install psycopg2 2.7.5 using pip:
sudo pip install psycopg2==2.7.5 --ignore-installed
RHEL 8
1. Install the python-pip package:
yum install python2
2. Install psycopg2 2.7.5 using pip:
alternatives --set python /usr/bin/python2
41

CDP Private Cloud Base Upgrading the JDK
Ubuntu 18 / Debian
1. Install the python-pip package as follows:
sudo apt-get install python-pip
2. Install psycopg2 2.7.5 using pip:
sudo pip install psycopg2==2.7.5 --ignore-installed
Ubuntu 20
1. Add the APT repository to automatically get the latest resources.
sudo add-apt-repository universe curl https://bootstrap.pypa.io/pip/2.7/get-pip.py --output get-pip.py
2. Install the python-pip package.
apt install python2
3. Check the pip2 version.
pip2 --version
4. Install psycopg2 2.7.5 using pip:
pip2 install psycopg2==2.7.5 --ignore-installed
SLES 12
Install the python-psycopg2 package as follows:
sudo zypper install python-psycopg2
Upgrading the JDK
Cloudera Manager, Cloudera Runtime, and CDH require a supported version of the Java Development Kit (JDK) tobe installed on all hosts. For details, see CDP Java Requirements.
Loading Filters ...
42

CDP Private Cloud Base Upgrading the JDK
Warning:
• If you are upgrading from a lower major version of the JDK to JDK 1.8 or from JDK 1.6 to JDK 1.7,and you are using AES-256 bit encryption, you must install new encryption policy files. (In a ClouderaManager deployment, you automatically install the policy files; for unmanaged deployments, install themmanually.) See Using AES-256 Encryption on page 50. This step is not required when using JDK1.8.0_162 or greater. JDK 1.8.0_162 enables unlimited strength encryption by default.
You must also ensure that the Java Truststores are retained during the upgrade. (
Cloudera recommends the following for keystores and truststores for Cloudera Manager clusters:
• Create a separate keystore for each host. Each keystore should have a name that helps identify it as tothe type of host—server or agent, for example. The keystore contains the private key and should bepassword protected.
• Create a single truststore that can be used by the entire cluster. This truststore contains the root CA andintermediate CAs used to authenticate certificates presented during TLS/SSL handshake. The truststoredoes not need to be password protected. (See Understanding Keystores and Truststores to Truststorefor more information about the truststore for TLS/SSL and Cloudera clusters.)
There are several procedures you can use to upgrade the JDK:
• Installing Java During an Upgrade
If you are upgrading to Cloudera Manager 6.0.0 or higher, you can manually install JDK 1.8 on the ClouderaManager server host, and then, as part of the Cloudera Manager upgrade process, you can specify that ClouderaManager upgrade the JDK on the remaining hosts.
Note: Cloudera Manager only installs Oracle JDK. You can upgrade to OpenJDK using these steps.
• Manually Installing Oracle JDK 1.8 on page 43
You can manually install JDK 1.8 on all managed hosts. If you are upgrading to any version of Cloudera Manager5.x, you must use this procedure. Continue with the steps in the next section.
• Manually Migrating to OpenJDK on page 46
Manually Installing Oracle JDK 1.8Important: Manual upgrade of Oracle JDK 1.8 requires down time to stop and restart your cluster.
You can manually install Oracle JDK 1.8 on all managed hosts. If you are upgrading to any version of ClouderaManager 5.x, you must use the following procedure:
1. Download the .tar.gz file for one of the 64-bit versions of Oracle JDK 1.8 from Java SE 8 Downloads. (Thislink is correct at the time of writing, but can change.)
2. Perform the following steps on all hosts that you are upgrading:
a. Log in to the host as root using ssh.b. Copy the downloaded .tar.gz file to the host.c. Extract the JDK to the folder /usr/java/jdk-version. For example:
tar xvfz /path/to/jdk-8u<update_version>-linux-x64.tar.gz -C /usr/java/
43

CDP Private Cloud Base Upgrading the JDK
3. If you have configured TLS for Cloudera Manager (see Encrypting Data in Transit), copy the jssecacertsfile from the previous JDK installation to the new JDK installation. This step is not required when using JDK1.8.0_162 or greater. JDK 1.8.0_162 enables unlimited strength encryption by default.
For example:
cp previous_java_home/jre/lib/security/jssecacerts new_java_home/jre/lib/security
(Substitute previous_java_home and new_java_home with the paths to the JDK installations.)4. Configure the location of the JDK on cluster hosts.
a. Open the Cloudera Manager Admin Console.b. In the main navigation bar, click the Hosts tab. If you are configuring the JDK location on a specific host only,
click the link for that host.c. Click the Configuration tab.d. Select Category > Advanced.e. Set the Java Home Directory property to the custom location.f. Click Save Changes.
5. On the Cloudera Manager Server host only (not required for other hosts):
a. Open the file /etc/default/cloudera-scm-server in a text editor.b. Edit the line that begins with export JAVA_HOME (if this line does not exist, add it) and change the
path to the path of the new JDK (you can find the path under /usr/java).
For example: (RHEL and SLES)
export JAVA_HOME="/usr/java/jdk1.8.0_141-cloudera"
For example: (Ubuntu)
export JAVA_HOME="/usr/lib/jvm/java-8-oracle-cloudera"
c. Save the file.d. Restart the Cloudera Manager Server.
sudo systemctl restart cloudera-scm-server
6. Restart the Cloudera Management Service.
a. Log in to the Cloudera Manager Admin Console.b. Select Clusters > Cloudera Management Service.c. Select Actions > Restart.
7. Restart all clusters:
a. On the Home > Status tab, click the Options menu to the right of the cluster name and select Restart.b. Click Restart that appears in the next screen to confirm. If you have enabled high availability for HDFS, you
can choose Rolling Restart instead to minimize cluster downtime. The Command Details window shows theprogress of stopping services.
When All services successfully started appears, the task is complete and you can close the Command Detailswindow.
8. Delete the files from your previous Java installation. If you do not delete these files, Cloudera Manager and othercomponents may continue to use the old version of the JDK.
44

CDP Private Cloud Base Upgrading the JDK
OpenJDKYou must install a supported version of OpenJDK. If your deployment uses a version of OpenJDK lower than1.8.0_181, see this release note.
Important: For OpenJDK 8u241 and higher versions running on Kerberized clusters, you must disablereferrals:
• Cloudera Manager 7.1.1 or higher:
1. Log in to the Cloudera Manager Admin Console.2. Go to Administration > Settings.3. Select the Advanced category.4. Locate the JVM Arguments for Java-based services parameter and enter the following:
-Dsun.security.krb5.disableReferrals=true
5. Restart any stale services.• Cloudera Manager 7.0.3 or lower:
1. Edit the Java Security file on all hosts by adding or changing the following configuration :2.
sun.security.krb5.disableReferrals=true
If the configuration already exists and is set to false, change it to true.3. Restart the cluster.
For more information, see the KB article.
Manually Installing OpenJDK
Before installing or upgrading Cloudera Manager and zCDH/Cloudera Runtime, perform the steps in this section toinstall OpenJDK on all hosts in your cluster(s).
When you install Cloudera Enterprise, Cloudera Manager includes an option to install Oracle JDK. De-select thisoption.
You must install a supported version of OpenJDK. If your deployment uses a version of OpenJDK lower than1.8.0_181, see TLS Protocol Error with OpenJDK.
Note: If you intend to enable Auto TLS, note the following:
You can specify a PEM file containing trusted CA certificates to be imported into the Auto-TLS truststore.If you want to use the certificates in the cacerts truststore that comes with OpenJDK, you must convert thetruststore to PEM format first. However, OpenJDK ships with some intermediate certificates that cannotbe imported into the Auto-TLS truststore. You must remove these certificates from the PEM file beforeimporting the PEM file into the Auto-TLS truststore. This is not required when upgrading to OpenJDK from acluster where Auto-TLS has already been enabled.
45

CDP Private Cloud Base Upgrading the JDK
1. Log in to each host and run the following command:RHEL
OpenJDK 8
sudo yum install java-1.8.0-openjdk-devel
OpenJDK 11
sudo yum install java-11-openjdk
Ubuntu
OpenJDK 8
sudo apt-get install openjdk-8-jdk
OpenJDK 11
sudo apt install openjdk-11-jdk
SLES
OpenJDK 8
sudo zypper install java-1_8_0-openjdk-devel
OpenJDK 11
zypper install java-11-openjdk
2. If you are using the SLES operating system, Cloudera Manager needs an additional configuration so that the JDKcan be located:
a. Log in to the Cloudera Manager server host.b. Open the following file in a text editor:
/etc/default/cloudera-scm-server
c. Add the following line:
export JAVA_HOME=path to the Java installation directory
For example:
export JAVA_HOME=/usr/lib64/jvm/java-1.8.0-openjdk-1.8.0
d. Save the file.e. Restart the Cloudera Manager Server.
sudo systemctl restart cloudera-scm-server
Manually Migrating to OpenJDK
If you have Oracle JDK 1.7, Oracle JDK 1.8, or OpenJDK 8 installed on the hosts managed by Cloudera Manager,use the steps in this section to transition your deployment to use OpenJDK. The steps below require you to restart allclusters, which will cause downtime as the hosts restart. If your clusters have enabled high availability for HDFS, youcan use a Rolling Restart to restart the clusters without downtime. Note that until the rolling restart completes, someof the hosts in your cluster will still be using the Oracle JDK. If you do not want a temporarily mixed environment,you can stop the cluster before performing the steps in this section to transition the JDK.
46

CDP Private Cloud Base Upgrading the JDK
OpenJDK 11 is supported as of Cloudera Manager and CDH 6.3. Note the following:
• You must upgrade to Cloudera Manager 6.3 or higher, before upgrading to OpenJDK 11.• The package names used when installing the OpenJDK 11 are different and are noted in the steps below.• The path for the default truststore has changed from (OpenJDK 8) jre/lib/security/cacerts to
(OpenJDK 11) lib/security/cacerts• See the following blog post for general information about migrating to Java 11: All You Need to Know For
Migrating To Java 11.• You must install a supported version of OpenJDK. If your deployment uses a version of OpenJDK lower than
1.8.0_181, see TLS Protocol Error with OpenJDK.
1. Find out the package name of your currently installed JDK by running the following commands. The grepcommands attempt to locate the installed JDK. If the JDK package is not returned, try looking for the string sdk.RHEL
Oracle JDK 8
yum list installed |grep oracle
OpenJDK 8
yum list installed |grep openjdk
Ubuntu
Oracle JDK 8
apt list --installed | grep oracle
OpenJDK 8
apt list --installed | grep openjdk
SLES
Oracle JDK 8
zypper search --installed-only |grep oracle
OpenJDK 8
zypper search --installed-only |grep openjdk
The command will return values similar to the following example::
oracle-j2sdk1.7.x86_64 1.7.0+update67-1 java-1.8.0-openjdk-devel
The Oracle JDK package name in the above example is: oracle-j2sdk1.7.x86_64. The OpenJDK packageis java-1.8.0-openjdk-devel.
47

CDP Private Cloud Base Upgrading the JDK
2. Log in to each host managed by Cloudera Manager (including the Cloudera Manager server host) and run thefollowing command to install OpenJDK:RHEL
OpenJDK 8
sudo yum install java-1.8.0-openjdk-devel
OpenJDK 11
sudo yum install java-11-openjdk
Ubuntu
OpenJDK 8
sudo apt-get install openjdk-8-jdk
OpenJDK 11
sudo apt install openjdk-11-jdk
SLES
OpenJDK 8
sudo zypper install java-1_8_0-openjdk-devel
OpenJDK 11
zypper install java-11-openjdk
3. (This step is required for Oracle JDK 8 or Open JDK 8 only) On the Cloudera Manager Server host only (notrequired for other hosts):
a. Open the file /etc/default/cloudera-scm-server in a text editor.b. Edit the line that begins with export JAVA_HOME (if this line does not exist, add it) and change the
path to the path of the new JDK (the JDK is usually installed in /usr/lib/jvm)(or /usr/lib64/jvm onSLES 12), but the path may differ depending on how the JDK was installed).
For example:
RHEL 7, 8
export JAVA_HOME="/usr/lib/jvm/java-1.8.0-openjdk"
Ubuntu
export JAVA_HOME="/usr/lib/jvm/openjdk-8-jdk"
SLES
export JAVA_HOME="/usr/lib64/jvm/java-1.8.0-openjdk"
c. Save the file.d. Restart the Cloudera Manager Server.
sudo systemctl restart cloudera-scm-server
48

CDP Private Cloud Base Upgrading the JDK
4. Tune the JDK (OpenJDK 11 only.)
OpenJDK 11 uses new defaults for garbage collection and other Java options specified when launching Javaprocesses. Due to these changes you may need to tune the garbage collection by adjusting the Java options used torun cluster services, which are configured separately for each service using the service's configuration parameters.To locate the correct parameter, log in to the Cloudera Manager Admin Console, go to the cluster and service youwant to configure and search for "Java Configuration Options".
When using OpenJDK 11, Cloudera Manager and most services use G1GC as the default method of garbagecollection. Java 8 used "ConcurrentMarkSweep" (CMS) for garbage collection. When using G1GC, the pausesfor garbage collection are shorter, so components will usually be more responsive, but they are more sensitive toJVMs with overcommitted memory usage. See Tuning JVM Garbage Collection on page 51.
5. Restart the Cloudera Management Service.
a. Log in to the Cloudera Manager Admin Console.b. Select Clusters > Cloudera Management Service.c. Select Actions > Restart.
6. Restart all clusters:
a.On the Home > Status tab, click to the right of the cluster name and select either Restart or RollingRestart. Selecting Rolling Restart minimizes cluster downtime and is available only If you have enabledAuto TLS.
b. Click Restart or Rolling Restart that appears in the next screen to confirm. The Command Details windowshows the progress of stopping services.
When All services successfully started appears, the task is complete and you can close the Command Detailswindow.
7. Remove the JDK:
a. Perform the following steps on all hosts managed by Cloudera Manager:
1. Run the following command to remove the JDK, using the package names from Step 1: (If you do notdelete these files, Cloudera Manager and other components may continue to use the old version of theJDK.)RHEL
yum remove <JDK package name>
Ubuntu
apt-get remove <JDK package name>
SLES
zypper rm <JDK package name>
2. Confirm that the package has been removed:RHEL
yum list installed |grep -i oracle
Ubuntu
apt list --installed | grep -i oracle
SLES
zypper search --installed-only |grep -i oracle
49

CDP Private Cloud Base Upgrading the JDK
Using AES-256 Encryption
Note: This step is not required when using JDK 1.8.0_162 or greater. JDK 1.8.0_162 enables unlimitedstrength encryption by default.
If you are using CentOS/Red Hat Enterprise Linux 5.6 or higher, or Ubuntu, which use AES-256 encryption bydefault for tickets, you must install the Java Cryptography Extension (JCE) Unlimited Strength JurisdictionPolicy File on all cluster and Hadoop user machines. For JCE Policy File installation instructions, see the README.txt file included in the jce_policy-x.zip file. For more information, see Java Cryptography Extension (JCE)Unlimited Strength Jurisdiction Policy File
Alternately, you can configure Kerberos to not use AES-256 by removing aes256-cts:normal from the supported_enctypes field of the kdc.conf or krb5.conf file. After changing the kdc.conf file, you mustrestart both the KDC and the kadmin server for those changes to take affect. You may also need to re-create or changethe password of the relevant principals, including, potentially the Ticket Granting Ticket principal (krbtgt/REALM@REALM). If AES-256 is still used after completing steps, the aes256-cts:normal setting existed when theKerberos database was created. To fix this, create a new Kerberos database and then restart both the KDC and thekadmin server.
To verify the type of encryption used in your cluster:
1. On the local KDC host, type this command to create a test principal:
kadmin -q "addprinc test"
2. On a cluster host, type this command to start a Kerberos session as the test principal:
kinit test
3. On a cluster host, type this command to view the encryption type in use:
klist -e
If AES is being used, output like the following is displayed after you type the klist command; note that AES-256 is included in the output:
Ticket cache: FILE:/tmp/krb5cc_0Default principal: test@SCMValid starting Expires Service principal05/19/11 13:25:04 05/20/11 13:25:04 krbtgt/SCM@SCM Etype (skey, tkt): AES-256 CTS mode with 96-bit SHA-1 HMAC, AES-256 CTS mode with 96-bit SHA-1 HMAC
Configuring a Custom Java Home Location
Note: Cloudera strongly recommends installing Oracle JDK at /usr/java/<jdk-version> andOpenJDK at /usr/lib/jvm, which allows Cloudera Manager to auto-detect and use the correct JDKversion. If you install the JDK anywhere else, you must follow these instructions to configure ClouderaManager with your chosen location. The following procedure changes the JDK location for ClouderaManagement Services and CDH cluster processes only. It does not affect the JDK used by other non-Clouderaprocesses.
Although not recommended, the Java Development Kit (JDK), which Cloudera services require, may be installed at acustom location if necessary. These steps assume you have already installed the JDK during product installation or aspart of an upgrade.
To modify the Cloudera Manager configuration to ensure the JDK can be found:
50

CDP Private Cloud Base Upgrading the JDK
1. Log into the Cloudera Manager server host.2. Open the following file in a text editor:
/etc/default/cloudera-scm-server
3. Add the following line:
export JAVA_HOME=path to the Java installation directory
For example:
export JAVA_HOME=/usr/lib64/jvm/java-1.8.0-openjdk-1.8.0
4. Save the file.5. Restart the Cloudera Manager Server.
sudo systemctl restart cloudera-scm-server
6. Open the Cloudera Manager Admin Console.7. In the main navigation bar, click the Hosts tab. If you are configuring the JDK location on a specific host only,
click the link for that host.8. Click the Configuration tab.9. Select Category > Advanced.10. Set the Java Home Directory property to the custom location.11. Click Save Changes.12. Restart all services.
Tuning JVM Garbage Collection
When using OpenJDK 11, Cloudera Manager and most Cloudera Runtime services use G1GC as the default methodof garbage collection. (Java 8 used "ConcurrentMarkSweep" (CMS) for garbage collection.) When using G1GC,the pauses for garbage collection are shorter, so components will usually be more responsive, but they are moresensitive to overcommitted memory usage. You should monitor memory usage to determine whether memory isovercommitted.
Cloudera Manager alerts you when memory is overcommitted on cluster hosts. To view these alerts and adjust theallocations:
1. Log in to the Cloudera Manager Admin Console2. Go to Home > Configuration > Configuration Issues.3. Look for entries labeled Memory Overcommit Validation Threshold and note the hostname of the affected host.4. Go to Hosts > All Hosts and click on the affected host.5. Click the Resources tab.6. Scroll down to the Memory section.
A list of roles instances and their memory allocations are displayed. The Description column displays theconfiguration property name where the memory allocation can be set.
7. To adjust the memory allocation, search for the configuration property and adjust the value to reduce theovercommitment of memory. You may need to move some roles to other hosts if there is not sufficient memoryfor the roles running on the host.
8. After making any changes, Cloudera Manager will indicate that the service has a stale configuration and promptyou to restart the service.
You may also need to adjust the Java options used to start Java processes. You can add Java startup options usingCloudera Manager configuration properties that are available for all service roles. Cloudera has provided default
51

CDP Private Cloud Base Upgrading the JDK
arguments for some of the services where they are needed. You can add to these, or completely override all of theprovided Java options. For more information on configuring G1GC. see The OpenJDK documentation.
If default options are provided, the role configuration specifies a single value, {{JAVA_GC_ARGS}}. This value is aplaceholder for the default Java Garbage Collection options provided with Cloudera Manager and Cloudera Runtime.
To modify Java options:
1. Log in to the Cloudera Manager Admin Console.2. Go to the service where you want to modify the options. (For the Cloudera Manager Service Monitor, select the
Cloudera Management Service.)3. Select the Configuration tab.4. Enter "Java" in the search box.5. Locate the Java Configuration Options property named for the role you want to modify. For example, in the
HDFS service, you will see parameters like Java Configuration Options for DataNode and Java ConfigurationOptions for JournalNode.
6. To add to the Java options, enter additional options before or after the {{JAVA_GC_ARGS}} placeholder,separated by spaces. For example:
{{JAVA_GC_ARGS}} -XX:MaxPermSize=512M
7. To replace the default Java options, delete the {{JAVA_GC_ARGS}} placeholder and replace it with one or moreJava options, separated by spaces.
8. The service will now have a stale configuration and must be restarted. See Restarting a service.
52

CDP Private Cloud Base Upgrading the JDK
Table 2: Default Java Options
Service and Role Default Java 8 Options Default Java 11 Options
• Cloudera Manager Service Monitor-XX:+UseConcMarkSweepGC -XX:+UseParNewGC
To enable G1GC:
-XX:+UseG1GC -XX:-UseConcMarkSweepGC -XX:-UseParNewGC
• HDFS DataNode• HDFS NameNode• HDFS Secondary NameNode
-XX:+UseParNewGC -XX:+UseConcMarkSweepGC -XX:CMSInitiatingOccupancyFraction=70 -XX:+CMSParallelRemarkEnabled
-XX:+UseConcMarkSweepGC -XX:CMSInitiatingOccupancyFraction=70 -XX:+CMSParallelRemarkEnabled
• Hive Metastore Server• HiveServer 2• WebHCat Server
-XX:+UseParNewGC -XX:+UseConcMarkSweepGC -XX:CMSInitiatingOccupancyFraction=70 -XX:+CMSParallelRemarkEnabled
None, G1GC is enabled by default.
• HBase REST Server• HBase Thrift Server• HBase Master• HBase RegionServer
-XX:+UseParNewGC -XX:+UseConcMarkSweepGC -XX:CMSInitiatingOccupancyFraction=70 -XX:+CMSParallelRemarkEnabled
None, G1GC is enabled by default.
• HBase Region Server-XX:+UseParNewGC -XX:+UseConcMarkSweepGC -XX:CMSInitiatingOccupancyFraction=70 -XX:+CMSParallelRemarkEnabled-verbose:gc -XX:+PrintGCDetails -XX:+PrintGCDateStamps
-verbose:gc -Xlog:gc
• MapReduce JobTracker• MapReduce TaskTracker -XX:+UseParNewGC
-XX:+UseConcMarkSweepGC -XX:CMSInitiatingOccupancyFraction=70 -XX:+CMSParallelRemarkEnabled
None, G1GC is enabled by default.
• Solr Server-XX:+UseParNewGC -XX:+UseConcMarkSweepGC -XX:CMSInitiatingOccupancyFraction=70 -XX:+CMSParallelRemarkEnabled
None, G1GC is enabled by default.
• YARN JobHistory Server• YARN NodeManager• YARN Resource Manager
-XX:+UseParNewGC -XX:+UseConcMarkSweepGC -XX:CMSInitiatingOccupancyFraction=70 -XX:+CMSParallelRemarkEnabled-Dlibrary.leveldbjni.path={{CMF_CONF_DIR}}
-Dlibrary.leveldbjni.path={{CMF_CONF_DIR}}
53

CDP Private Cloud Base Upgrading the Operating System
Upgrading the Operating System
This topic describes the additional steps needed to upgrade the operating system of a host managed by ClouderaManager to a higher version, including major and minor releases.
Upgrading the operating system to a higher version but within the same major release is called a minor releaseupgrade. For example, upgrading from Redhat 6.8 to 6.9. This is a relatively simple procedure that involves properlyshutting down all the components, performing the operating system upgrade, and then restarting everything in reverseorder.
Upgrading the operating system to a different major release is called a major release upgrade. For example, upgradingfrom Redhat 6.8 to 7.4. This is a much more complex procedure to do it in-place, and some operating systems do notsupport these upgrades. Therefore, the procedures for upgrading specific operating systems are not covered in thistopic.
This topic primarily describes all the additional steps such as backing up essential files and removing and reinstallingall the necessary Cloudera Enterprise packages and parcels.
Note: You must determine whether to upgrade the operating system or Cloudera Manager first:
For example, consider the following upgrade from Cloudera Manager 5.13.3 to Cloudera Manager 7.1.4 andan operating system upgrade from RHEL 7.6 to RHEL 7.8
• Cloudera Manager 5.13.3 supports only RHEL 7.6• Cloudera Manager 7.1.4 supports RHEL 7.6 and RHEL 7.8
In this case you must upgrade Cloudera Manager first, otherwise Cloudera Manager version 5.13.3 would bedeployed on an unsupported operating system (RHEL 7.6) and may fail.
Step 1: Getting Started with Operating System Upgrades
Prerequisites
• Ensure that the versions of Cloudera Manager and CDH or Cloudera Runtime support your new operating system.
• See Operating System Requirements for CDP Private Cloud Base.
If you are using unsupported versions, see Upgrade Cloudera Manager or Upgrading a Cluster.• Ensure that the host has access to the Cloudera Manager server, daemon and agent packages that are supported for
the new operating system, either by having access to https://archive.cloudera.com or a local packagerepository.
• Ensure that the Cloudera Manager server has access to the parcels that are using supported for the new OperatingSystem, either by having access to https://archive.cloudera.com or a local parcel repository.
• If you have a patched package or parcel installed, make sure you have the same package or parcel for the newOperating System and it has been made available to Cloudera Manager.
• Understand that performing a major release upgrade for the operating system in-place may be quite tricky andrisky.
Step 2: Backing Up Host Files Before Upgrading the Operating System
This topic describes how to backup important files on your host before upgrading the operating system.
54

CDP Private Cloud Base Upgrading the Operating System
Backing Up
1. Create a top-level backup directory.
export CM_BACKUP_DIR="`date +%F`-CM"echo $CM_BACKUP_DIRmkdir -p $CM_BACKUP_DIR
2. Back up the Agent directory and the runtime state.
sudo -E tar -cf $CM_BACKUP_DIR/cloudera-scm-agent.tar --exclude=*.sock /etc/cloudera-scm-agent /etc/default/cloudera-scm-agent /var/run/cloudera-scm-agent /var/lib/cloudera-scm-agent
3. Back up the Cloudera Manager Server directories:
sudo -E tar -cf $CM_BACKUP_DIR/cloudera-scm-server.tar /etc/cloudera-scm-server /etc/default/cloudera-scm-server
4. Back up the Cloudera Manager databases. See Backing up Cloudera Manager databases on page 55
Note: Backup is recommended but not always required for a minor release upgrade.
Backing up Cloudera Manager databases
Cloudera recommends that you schedule regular backups of the databases that Cloudera Manager uses to storeconfiguration, monitoring, and reporting data and for managed services that require a database:
Backing Up PostgreSQL Databases
To back up a PostgreSQL database, use the same procedure whether the database is embedded or external:
1. Log in to the host where the Cloudera Manager Server is installed.2. Get the name, user, and password properties for the Cloudera Manager database from /etc/cloudera-scm-
server/db.properties:
com.cloudera.cmf.db.name=scmcom.cloudera.cmf.db.user=scmcom.cloudera.cmf.db.password=NnYfWIjlbk
3. Run the following command as root using the parameters from the preceding step:
# pg_dump -h hostname -p 7432 -U scm > /tmp/scm_server_db_backup.$(date +%Y%m%d)
4. Enter the password from the com.cloudera.cmf.db.password property in step 2.5. To back up a database created for one of the roles on the local host as the roleuser user:
# pg_dump -h hostname -p 7432 -U roleuser > /tmp/roledb
6. Enter the password specified when the database was created.
Backing Up MariaDB Databases
To back up the MariaDB database, run the mysqldump command on the MariaDB host, as follows:
mysqldump -hhostname -uusername -ppassword database > /tmp/database-backup.sql
55

CDP Private Cloud Base Upgrading the Operating System
For example, to back up the Activity Monitor database amon created in Creating Databases for Cloudera Software,on the local host as the root user, with the password amon_password:
mysqldump -pamon_password amon > /tmp/amon-backup.sql
To back up the sample Activity Monitor database amon on remote host myhost.example.com as the root user,with the password amon_password:
mysqldump -hmyhost.example.com -uroot -pamon_password amon > /tmp/amon-backup.sql
Backing Up MySQL Databases
To back up the MySQL database, run the mysqldump command on the MySQL host, as follows:m
mysqldump -hhostname -uusername -ppassword database > /tmp/database-backup.sql
For example, to back up the Activity Monitor database amon created in Creating Databases for Cloudera Software,on the local host as the root user, with the password amon_password:
mysqldump -pamon_password amon > /tmp/amon-backup.sql
To back up the sample Activity Monitor database amon on remote host myhost.example.com as the root user,with the password amon_password:
mysqldump -hmyhost.example.com -uroot -pamon_password amon > /tmp/amon-backup.sql
You can back up all database using the following command:
mysqldump --all-databases -ppassword > /tmp/all1/all.sql
Backing Up Oracle Databases
For Oracle, work with your database administrator to ensure databases are properly backed up.
Step 3: Before You Upgrade the Operating System
This topic describes steps you must perform before upgrading the operating system on a host managed by ClouderaManager.
Decommission and Stop Running Roles
1. Log in to the Cloudera Manager Admin Console.2. From the All Hosts page, select the host that you wish to upgrade. Cloudera recommends that you upgrade only
one host at a time.3. Select Begin Maintenance (Suppress Alerts/Decommission) from the Actions menu.4. Select Host Decommission from the Actions menu. Any roles that do not require decommission will be skipped.
56

CDP Private Cloud Base Upgrading the Operating System
5. If the operating system upgrade procedure takes less than 30 minutes per node, you do not need to decommissionthe DataNode.
If the Cloudera Manager and CDH/ version are both 5.14 or greater, you can also choose the Take DataNodeOffline feature.
If in doubt, decommission the roles.
• When a DataNode is decommissioned, the NameNode ensures that every block from the DataNode is stillavailable across the cluster as specified by the replication factor. This procedure involves copying blocks offthe DataNode in small batches. In cases where a DataNode has several thousand blocks, decommissioningtakes several hours.
• When a DataNode is turned off without being decommissioned:
• The NameNode marks the DataNode as dead after a default of 10m 30s (controlled by the dfs.heartbeat.interval and dfs.heartbeat.recheck.interval configuration properties).
• The NameNode schedules the missing replicas to be placed on other DataNodes.• When the DataNode comes back online and reports to the NameNode, the NameNode schedules blocks to
be copied to it while other nodes are decommissioned or when new files are written to HDFS.• You can also speed up the decommissioning of a DataNode by increasing values for these properties:
• dfs.max-repl-streams: The number of simultaneous streams used to copy data.• dfs.balance.bandwidthPerSec: The maximum amount of bandwidth that each DataNode can
utilize for balancing, in bytes per second.• dfs.namenode.replication.work.multiplier.per.iteration: NameNode
configuration requiring a restart, defaults to 2 but can be raised to 10 or higher.
This determines the total amount of block transfers to begin in parallel at a DataNode for replication, whensuch a command list is being sent over a DataNode heartbeat by the NameNode. The actual number isobtained by multiplying this value by the total number of live nodes in the cluster. The result number is thenumber of blocks to transfer immediately, per DataNode heartbeat.
6. Once that is completed, select the same host again and choose Stop Roles on Hosts.
Warning: If you have not enabled high availability for HDFS, HBase, MapReduce, YARN, Oozie, orSentry, stopping the running single master role will cause an outage for that service. Specifically, secondaryroles on other hosts will stop abruptly. Cloudera recommends that you stop these services prior to the hostupgrade.
Important: When upgrading hosts that are part of a ZooKeeper quorum, ensure that the majority of thequorum is still available.
Stop Cloudera Manager Agent
1. Hard Stop the Cloudera Manager Agent.RHEL 7, SLES 12, Ubuntu 18.04 and higher
sudo systemctl stop cloudera-scm-supervisord.service
RHEL 5 or 6, SLES 11, Debian 6 or 7, Ubuntu 12.04 or 14.04
sudo service cloudera-scm-agent hard_stop
Important: This will ask you to confirm with hard_stop_confirmed because this will terminateany Hadoop services on the host (if any) unconditionally.
57

CDP Private Cloud Base Upgrading the Operating System
Stop Cloudera Manager Server & Agent
1. Hard Stop the Cloudera Manager Agent.RHEL 7, SLES 12, Ubuntu 18.04 and higher
sudo systemctl stop cloudera-scm-supervisord.service
RHEL 5 or 6, SLES 11, Debian 6 or 7, Ubuntu 12.04 or 14.04
sudo service cloudera-scm-agent hard_stop
Important: This will ask you to confirm with hard_stop_confirmed because this will terminateany Hadoop services on the host (if any) unconditionally.
2. Stop the Cloudera Management Service.
a. Log in to the Cloudera Manager Admin Console.b. Select Clusters > Cloudera Management Service.c. Select Actions > Stop.
3. Stop the Cloudera Manager Server.
sudo systemctl stop cloudera-scm-server
Stop Databases
1. If you are using the embedded PostgreSQL database, stop the Cloudera Manager Embedded PostgreSQLdatabase:RHEL 7, SLES 12, Ubuntu 18.04 and higher
sudo systemctl stop cloudera-scm-server-db
RHEL 5 or 6, SLES 11, Debian 6 or 7, Ubuntu 12.04 or 14.04
sudo service cloudera-scm-server-db stop
If you are not using the embedded PostgreSQL database and you attempt to stop it, you might see a messageindicating that the service cannot be found. If you see a message that the shutdown failed, then the embeddeddatabase is still running, probably because services are connected to the Hive metastore. If the database shutdownfails due to connected services, issue the following command:
RHEL-compatible 7 and higher, Ubuntu 16.04
sudo service cloudera-scm-server-db next_stop_fastsudo service cloudera-scm-server-db stop
All other Linux distributions
sudo service cloudera-scm-server-db fast_stop
2. If there are other database servers running on this host, they must be stopped also.
Remove Packages & Parcels
Packages for the older operating system won’t be able to start on the new operating system. Remove old packagesfrom the host.
58

CDP Private Cloud Base Upgrading the Operating System
1. RHEL / CentOS
sudo yum remove cloudera-manager-daemons cloudera-manager-agent cloudera-manager-server-db-2
SLES
sudo zypper remove cloudera-manager-daemons cloudera-manager-agent cloudera-manager-server-db-2
Ubuntu
sudo apt-get purge cloudera-manager-daemons cloudera-manager-agent cloudera-manager-server-db-2
2. RHEL / CentOS
sudo yum remove cloudera-manager-server cloudera-manager-daemons cloudera-manager-agent cloudera-manager-server-db-2
SLES
sudo zypper remove cloudera-manager-server cloudera-manager-daemons cloudera-manager-agent cloudera-manager-server-db-2
Ubuntu
sudo apt-get purge cloudera-manager-server cloudera-manager-daemons cloudera-manager-agent cloudera-manager-server-db-2
3. Remove old CDH parcels from the host. These are built for your old operating system.
The Cloudera Manager agent will download and activate the proper parcel for the new operating system when it isstarted.
Empty the contents of the following directories. These are the defaults for parcel storage - if you use otherdirectories, please change accordingly.
sudo rm -rf /opt/cloudera/parcels/*
sudo rm -rf /opt/cloudera/parcel-cache/*
Upgrade the Operating System
Important: When there are no Hadoop services or Cloudera Manager roles running from this host, you mayproceed to upgrade the operating system of this host, make sure to leave the data partitions (for example,dfs.data.dir) unchanged.
Use the operating system upgrade procedures provided by your operating system vendor (for example: RedHat orUbuntu) to download their software and perform the operating system upgrade.
Step 4: After You Upgrade the Operating System
Minimum Required Role: Cluster Administrator (also provided by Full Administrator) This feature is notavailable when using Cloudera Manager to manage Data Hub clusters.
This topic describes how to upgrade the operating system on a Cloudera Manager managed host.
59

CDP Private Cloud Base Upgrading the Operating System
Establish Access to the Software
Cloudera Manager needs access to a package repository that contains the updated software packages. You canchoose to access the Cloudera public repositories directly, or you can download those repositories and set up a localrepository to access them from within your network. If your cluster hosts do not have connectivity to the Internet, youmust set up a local repository.
1. Log in to the Cloudera Manager Server host.
ssh my_cloudera_manager_server_host
2. Log in to each cluster host.
ssh cluster_host
3. Remove any older files in the existing repository directory:RHEL / CentOS
sudo rm /etc/yum.repos.d/cloudera*manager.repo*
SLES
sudo rm /etc/zypp/repos.d/cloudera*manager.repo*
Ubuntu
sudo rm /etc/apt/sources.list.d/cloudera*.list*
4. Fill in the form at the top of this page.5. Create a repository file so that the package manager can locate and download the binaries. Do one of the
following, depending on whether or not you are using a local package repository:
• Using a local package repository. (Required when cluster hosts do not have access to the internet.)
a. Configure a local package repository hosted on your network.b. In the Package Repository URL, replace the entire URL with the URL for your local package repository.
A username and password are not required to access local repositories.c. Click Apply.
• Using the Cloudera public repository
a. Substitute your USERNAME and PASSWORD in the Package Repository URL where indicated in the URL.b. Click Apply
Tip: If you have a mixed operating system environment, adjust the Operating System filter at the top ofthe page for each operating system. The guide will generate the repo file for you automatically here.
6. RHEL / CentOS
Create a file named /etc/yum.repos.d/cloudera-manager.repo with the followingcontent:
[cloudera-manager]# Packages for Cloudera Managername=Cloudera Managerbaseurl=https://archive.cloudera.com/cm5/redhat/7/x86_64/cm/5.15gpgkey=https://archive.cloudera.com/cm5/redhat/7/x86_64/cm/RPM-GPG-KEY-cloudera
60
CDP Private Cloud Base Upgrading the Operating System
gpgcheck=1
SLES
Create a file named /etc/zypp/repos.d/cloudera-manager.repo with the followingcontent:
[cloudera-manager]# Packages for Cloudera Managername=Cloudera Managerbaseurl=https://archive.cloudera.com/cm5/sles/12/x86_64/cm/5.15gpgkey=https://archive.cloudera.com/cm5/sles/12/x86_64/cm/RPM-GPG-KEY-clouderagpgcheck=1
Ubuntu
Create a file named /etc/apt/sources.list.d/cloudera_manager.list with thefollowing content:
# Packages for Cloudera Managerdeb https://archive.cloudera.com/cm5/debian/jessie/amd64/cm/ jessie-cm5.15 contribdeb-src https://archive.cloudera.com/cm5/debian/jessie/amd64/cm/ jessie-cm5.15 contrib
Run the following command:
sudo apt-get update
The repository file, as created, refers to the most recent maintenance release of the specified minor release. If youwould like to use a specific maintenance version, for example 5.15.1, replace 5.15 with 5.15.1 in the generatedrepository file shown above.
7. A Cloudera Manager upgrade can introduce new package dependencies. Your organization may have restrictionsor require prior approval for installation of new packages. You can determine which packages may be installed orupgraded:RHEL / CentOS
yum deplist cloudera-manager-agent
SLES
zypper info --requires cloudera-manager-agent
Ubuntu
apt-cache depends cloudera-manager-agent
Reinstall Cloudera Manager Daemon & Agent Packages
Re-install the removed Cloudera packages.
1. Install the agent packages. Include the cloudera-manager-server-db-2 package in the command only ifyou are using the embedded PostgreSQL database.RHEL / CentOS
sudo yum clean all
61

CDP Private Cloud Base Upgrading the Operating System
sudo yum install cloudera-manager-daemons cloudera-manager-agent cloudera-manager-server-db-2
SLES
sudo zypper clean --allsudo zypper install cloudera-manager-daemons cloudera-manager-agent cloudera-manager-server-db-2
Ubuntu
sudo apt-get clean
sudo apt-get update
sudo apt-get install cloudera-manager-daemons cloudera-manager-agent cloudera-manager-server-db-2
Verify that the configuration files (that were backed up) are intact. Correct if necessary.
Reinstall Cloudera Manager Server, Daemon & Agent Packages
Re-install the removed Cloudera packages.
1. Install the packages. Include the cloudera-manager-server-db-2 package in the command only if youare using the embedded PostgreSQL database.RHEL / CentOS
sudo yum clean allsudo yum install cloudera-manager-server cloudera-manager-daemons cloudera-manager-agent cloudera-manager-server-db-2
SLES
sudo zypper clean --allsudo zypper install cloudera-manager-server cloudera-manager-daemons cloudera-manager-agent cloudera-manager-server-db-2
Ubuntu
sudo apt-get clean
sudo apt-get update
sudo apt-get install cloudera-manager-server cloudera-manager-daemons cloudera-manager-agent cloudera-manager-server-db-2
Verify that the configuration files (that were backed up) are intact. Correct if necessary.
If you customized the /etc/cloudera-scm-agent/config.ini file, your customized file is renamed withthe extension .rpmsave or .dpkg-old. Merge any customizations into the /etc/cloudera-scm-agent/config.ini file that is installed by the package manager.
Edit Cloudera repository file to point to the repositories designed for your new operating system.
62

CDP Private Cloud Base Upgrading Cloudera Manager 6
Start Databases
1. If you are using the embedded PostgreSQL database, start the database:
sudo systemctl start cloudera-scm-server-db
2. If there were database servers stopped, they must be restarted.
Start Cloudera Manager Server & Agent
The appropriate services typically will start automatically on reboot. Otherwise, start the Cloudera Manager Server &Agent as necessary.
1. Start the rpcbind service if it is not automatically started.
sudo service rpcbind start
2. Start the Cloudera Manager Agent.RHEL 7, SLES 12, Ubuntu 18.04 and higher
sudo systemctl start cloudera-scm-agent
If the agent starts without errors, no response displays.
RHEL 5 or 6, SLES 11, Debian 6 or 7, Ubuntu 12.04 or 14.04
sudo service cloudera-scm-agent start
You should see the following:
Starting cloudera-scm-agent: [ OK ]
3. Start the Cloudera Manager Server.
sudo systemctl start cloudera-scm-server
4. Verify that the Cloudera Manager Agent downloaded a proper parcel for your new operating system. You can usethe following command to check in Cloudera Manager logs for downloaded parcels:
grep "Completed download" /var/log/cloudera-scm-agent/cloudera-scm-agent.log
(Download might take some time. Look for the operating system in the names of the downloaded parcels.
Start Roles
1. From the All Hosts page, select the host that you have just upgraded.2. Choose End Maintenance (Enable Alerts/Decommission) from the Actions menu and confirm.3. Start any Cloudera Management Service roles that were running on this host and were stopped.4. Choose Host Recommission from the Actions menu and confirm.5. Choose Start Roles on Hosts from the Actions menu and confirm.6. Start any services that were stopped due to lack of high availability.
Upgrading Cloudera Manager 6
Minimum Required Role: Cluster Administrator (also provided by Full Administrator) This feature is notavailable when using Cloudera Manager to manage Data Hub clusters.
63

CDP Private Cloud Base Upgrading Cloudera Manager 6
Note: To upgrade to CDP Private Cloud Base from CDH 5, see In-place upgrade of CDH 5 to CDP PrivateCloud Base
Note: To upgrade to a higher version of CDP Private Cloud Base from CDP, see In-place upgrade of CDPPrivate Cloud Base.
Attention: To upgrade to Cloudera Manager or CDH 5.x or 6.x, do not use the instructions on this page. Seethe Cloudera Enterprise Upgrade Guide.
These topics describes how to upgrade Cloudera Manager from any 5.x or 6.x version to a higher version of ClouderaManager 7.1 and higher, including major, minor, and maintenance releases. The upgrade procedures use operatingsystem command-line package commands to upgrade Cloudera Manager, and then complete the upgrade usingCloudera Manager.
When you upgrade Cloudera Manager, you use RPM-based package commands to upgrade the software on theCloudera Manager server host and then Cloudera Manager manages upgrading the Cloudera Manager Agents on theremaining managed hosts. Cloudera Manager can also automatically install some versions of the required JDK on themanaged hosts.
Upgrades are not supported between all versions of Cloudera Manager, CDH, or Cloudera Runtime. See SupportedUpgrade Paths.
Cloudera Navigator is also upgraded when you upgrade Cloudera Manager 5.x or 6.x. Cloudera Navigator hasbeen replaced by Apache Atlas as of Cloudera Runtime 7.0.3. If you are using Cloudera Manager 7.0.3 or higher tomanage CDH clusters, those clusters can continue using Cloudera Navigator.
The Cloudera Manager upgrade process does the following:
• Upgrades the database schema to reflect the current version.• Upgrades the Cloudera Manager Server and all supporting services.• Upgrades the Cloudera Manager agents on all hosts.• Redeploys client configurations to ensure that client services have the most current configuration.• Upgrades Cloudera Navigator (for upgrades to Cloudera Manager 7.1, you can transition Cloudera Navigator to
Apache Atlas).
To upgrade Cloudera Manager, you perform the following tasks:
1. Back up the Cloudera Manager server databases, working directories, and several other entities. These backupscan be used to restore your Cloudera Manager deployment if there are problems during the upgrade.
2. Upgrade the Cloudera Manager server software on the Cloudera Manager host using package commands from thecommand line (for example, yum on RHEL systems). Cloudera Manager automates much of this process and isrecommend for upgrading and managing your CDH/Cloudera Runtime clusters.
3. Upgrade the Cloudera Manager agent software on all cluster hosts. The Cloudera Manager upgrade wizard canupgrade the agent software (and, optionally, the JDK), or you can install the agent and JDK software manually.The CDH or Cloudera Runtime software is not upgraded during this process.
Upgrading Cloudera Manager does not upgrade CDH/Cloudera Runtime clusters. See Upgrading a CDH 6 Cluster onpage 108 for upgrade procedures.
Step 1: Getting Started Upgrading Cloudera Manager 6
Note: Not all combinations of Cloudera Manager and Cloudera Runtime are supported. Ensure that theversion of Cloudera Manager you are using supports the version of Cloudera Runtime you have selected. Fordetails, see Cloudera Manager support for Cloudera Runtime, CDH and CDP Private Cloud Experiences .
Important: Do not upgrade to Cloudera Manager 7.6.1 if you are running CDP Private Cloud Data Servicesin your deployment.
64
CDP Private Cloud Base Upgrading Cloudera Manager 6
Note: CDP Private Cloud Data Services version 1.3.4 requires Cloudera Manager 7.5.5 and ClouderaRuntime version 7.1.6 or 7.1.7 For more information, see CDP Private Cloud Data Services.
Note: If you are upgrading to Cloudera Manager 7.5.1 or higher in order to install CDP Private CloudExperiences version 1.3.1, you must use Cloudera Runtime version 7.1.6 or 7.1.7. For more information, seeCDP Private Cloud Exeriences.
Important: Upgrades to Cloudera Manager 7.0.3 are not supported.
Before you upgrade Cloudera Manager, you need to gather some information and review the limitations and releasenotes. Fill in the My Environment form below to customize your Cloudera Manager upgrade procedures. See theCollect Information section below for assistance in locating the required information.
Note: If you are upgrading to Cloudera Manager 7.5.1 or higher in order to install CDP Private CloudExperiences version 1.3.1, you must use Cloudera Runtime version 7.1.6.
Warning: Upgrades from Cloudera Manager 5.12 and lower to Cloudera Manager 7.1.1 or higher are notsupported
Warning: For upgrades from CDH clusters with Cloudera Navigator to Cloudera Runtime 7.1.1 (or higher)clusters where Navigator is to be migrated to Apache Atlas, the cluster must have Kerberos enabled beforeupgrading.
Warning: Before upgrading CDH 5 clusters with Sentry to Cloudera Runtime 7.1.x clusters where Sentryprivileges are to be transitioned to Apache Ranger:
• The cluster must have Kerberos enabled.• Verify that HDFS gateway roles exist on the hosts that runs the Sentry service.
Important: If HDFS ACL sync is enabled (hdfs_sentry_sync_enable=true) on the CDH cluster, then youmust install Ranger RMS to support the same functionality. For steps to install Ranger RMS, see InstallingRanger RMS.
Note: If the cluster you are upgrading will include Atlas, Ranger, or both, the upgrade wizard deploys oneinfrastructure Solr service to provide a search capability of the audit logs through the Ranger Admin UI and/or to store and serve Atlas metadata. Cloudera recommends that you do not use this service for customerworkloads to avoid interference with audit and timeline performance.
Warning: You cannot upgrade from a cluster that uses Oracle 12.
Warning: You cannot upgrade from a cluster that uses Oracle 19.
Collect Information
1. Log in to the Cloudera Manager Server host.
ssh my_cloudera_manager_server_host
65

CDP Private Cloud Base Upgrading Cloudera Manager 6
2. Collect the following information about your environment and fill in the form above. This information will beremembered by your browser on all pages in this Upgrade Guide.
a. The current version of the Operating System:
lsb_release -a
Database parameters:
cat /etc/cloudera-scm-server/db.properties
...com.cloudera.cmf.db.type=mysqlcom.cloudera.cmf.db.host=database_hostname:database_portcom.cloudera.cmf.db.name=scmcom.cloudera.cmf.db.user=scmcom.cloudera.cmf.db.password=SOME_PASSWORD
b. Log in to the Cloudera Manager Admin console and find the following:
1. The version of Cloudera Manager used in your cluster. Go to Support > About.2. The version of the JDK deployed in the cluster. Go to Support > About.
Preparing to Upgrade Cloudera Manager
• Access to Cloudera Manager binaries for production purposes requires authentication. In order to downloadthe software, you must first have an active subscription agreement and obtain a license key file along with therequired authentication credentials (username and password). See Cloudera Manager Download Information.
• You must have SSH access to the Cloudera Manager server hosts and be able to log in using the root account or anaccount that has password-less sudo permission for all hosts.
• Review the following when upgrading to Cloudera Manager 7.1 or higher:
CDP Private Cloud Base Requirements and Supported Versions• You may be required to upgrade the operating system before upgrading. See Operating System Requirements to
determine operating system support for the version of Cloudera Manager you are upgrading to. Depending on thesupport, you may need to upgrade the operating system.
If you must or choose to upgrade to a supported operating system, you must determine whether to upgrade theoperating system first or Cloudera Manager first. If the current version of Cloudera Manager and the version youare upgrading to both support a newer version of the operating system but the new version of Cloudera Managerdoes not support the older operating system, you must upgrade to the newer operating system before upgradingCloudera Manager. If this is not true, then you must upgrade Cloudera Manager before upgrading the operatingsystem.
See Upgrading the Operating System on page 54.• Install a supported version of the Java Development Kit (JDK) on all hosts. If you are upgrading to Cloudera
Manager and CDP Private Cloud Base 7.1.1 and higher, you can choose to install OpenJDK 1.8 instead of theOracle JDK.
There two options for JDK installation:
• Manually install the Oracle JDK or OpenJDK on all hosts.• Manually install the Oracle JDK 1.8 on the Cloudera Manager host, and then select the Install Oracle Java
SE Development Kit checkbox when prompted while running the Cloudera Manager Upgrade wizard.
See Upgrading the JDK on page 42
66
CDP Private Cloud Base Upgrading Cloudera Manager 6
• Review the Release Notes.
• CDP Private Cloud Base
• Cloudera Manager Release Notes• Cloudera Runtime Release Notes
• Hortonworks Data Platform
• HDP 2.6.5 Release Notes• Review the Cloudera Security Bulletins.• The embedded PostgreSQL database installed with the Trial Installer is not supported in production environments
because a trial installation cannot easily be upgraded, backed up, or migrated into a production-readyconfiguration without manual steps requiring down time.
Consider migrating from the Cloudera Manager embedded PostgreSQL database server to an external PostgreSQLdatabase before upgrading Cloudera Manager.
• If your cluster uses Oracle for any databases, before upgrading CDH 5, check the value of the COMPATIBLEinitialization parameter in the Oracle Database using the following SQL query:
SELECT name, value FROM v$parameter WHERE name = 'compatible'
The default value is 12.2.0. If the parameter has a different value, you can set it to the default as shown in theOracle Database Upgrade Guide.
Note: Before resetting the COMPATIBLE initialization parameter to its default value, make sure youconsider the effect this change can have on your system.
Step 2: Backing Up Cloudera Manager 6
This topic contains procedures to back up Cloudera Manager. Cloudera recommends that you perform these backupsteps before upgrading. The backups will allow you to rollback your Cloudera Manager upgrade if needed.
Collect Information for Backing Up Cloudera Manager
1. Log in to the Cloudera Manager Server host.
ssh my_cloudera_manager_server_host
2. Collect database information by running the following command:
cat /etc/cloudera-scm-server/db.properties
For example:
...com.cloudera.cmf.db.type=...com.cloudera.cmf.db.host=database_hostname:database_portcom.cloudera.cmf.db.name=scmcom.cloudera.cmf.db.user=scmcom.cloudera.cmf.db.password=SOME_PASSWORD
67
CDP Private Cloud Base Upgrading Cloudera Manager 6
3. Collect information (host name, port number, database name, user name and password) for the followingdatabases.
• Reports Manager• Activity Monitor
You can find the database information by using the Cloudera Manager Admin Console. Go to Clusters >Cloudera Management Service > Configuration and select the Database category. You may need to contactyour database administrator to obtain the passwords.
4. Find the host where the Service Monitor, Host Monitor and Event Server roles are running. Go to Clusters >Cloudera Manager Management Service > Instances and note which hosts are running these roles.
Back Up Cloudera Manager Agent
Note: Commands are provided below to backup various files and directories used by Cloudera ManagerAgents. If you have configured custom paths for any of these, substitute those paths in the commands. Thecommands also provide destination paths to store the backups, defined by the environment variable CM_BACKUP_DIR, which is used in all the backup commands. You may change these destination paths in thecommand as needed for your deployment.
The tar commands in the steps below may return the following message. It is safe to ignore this message:
tar: Removing leading `/' from member names
Backup up the following Cloudera Manager agent files on all hosts:
• Create a top level backup directory.
export CM_BACKUP_DIR="`date +%F`-CM"echo $CM_BACKUP_DIRmkdir -p $CM_BACKUP_DIR
• Back up the Agent directory and the runtime state.
sudo -E tar -cf $CM_BACKUP_DIR/cloudera-scm-agent.tar --exclude=*.sock /etc/cloudera-scm-agent /etc/default/cloudera-scm-agent /var/run/cloudera-scm-agent /var/lib/cloudera-scm-agent
• Back up the existing repository directory.RHEL / CentOS
sudo -E tar -cf $CM_BACKUP_DIR/repository.tar /etc/yum.repos.d
SLES
sudo -E tar -cf $CM_BACKUP_DIR/repository.tar /etc/zypp/repos.d
Ubuntu
sudo -E tar -cf $CM_BACKUP_DIR/repository.tar /etc/apt/sources.list.d
Back Up the Cloudera Management Service
Note: Commands are provided below to backup various files and directories used by Cloudera ManagerAgents. If you have configured custom paths for any of these, substitute those paths in the commands. Thecommands also provide destination paths to store the backups. You may change these destination paths in thecommand as needed for your deployment.
68

CDP Private Cloud Base Upgrading Cloudera Manager 6
1. Stop the Cloudera Management Service.
a. Log in to the Cloudera Manager Admin Console.b. Select Clusters > Cloudera Management Service.c. Select Actions > Stop.
2. On the host where the Service Monitor role is configured to run, backup the following directory:
sudo cp -rp /var/lib/cloudera-service-monitor /var/lib/cloudera-service-monitor-`date +%F`-CM
3. On the host where the Host Monitor role is configured to run, backup the following directory:
sudo cp -rp /var/lib/cloudera-host-monitor /var/lib/cloudera-host-monitor-`date +%F`-CM
4. On the host where the Event Server role is configured to run, back up the following directory:
sudo cp -rp /var/lib/cloudera-scm-eventserver /var/lib/cloudera-scm-eventserver-`date +%F`-CM
5. Start the Cloudera Management Service.
a. Log in to the Cloudera Manager Admin Console.b. Select Clusters > Cloudera Management Service.c. Select Actions > Start.
Back Up Cloudera Navigator Data
1. Important: Upgrading from Cloudera Manager 5.9 (Navigator 2.8) and earlier can take a significantamount of time, depending on the size of the Navigator Metadata storage directory. When the ClouderaManager upgrade process completes and Cloudera Navigator services restart, the Solr indexing upgradeautomatically begins. No other actions can be performed until Solr indexing completes (a progressmessage displays during this process). It can take as long as two days to upgrade a storage directory with60 GB. To help mitigate this extended upgrade step, make sure to clear out all unnecessary metadata usingpurge, check the size of the storage directory, and consider rerunning purge with tighter conditions tofurther reduce the size of the storage directory.
2. Make sure a purge task has run recently to clear stale and deleted entities.
• You can see when the last purge tasks were run in the Cloudera Navigator console (From the ClouderaManager Admin console, go to Clusters > Cloudera Navigator. Select Administration > Purge Settings.)
• If a purge hasn't run recently, run it by editing the Purge schedule on the same page.• Set the purge process options to clear out as much of the backlog of data as you can tolerate for your upgraded
system. See Managing Metadata Storage with Purge.3. Stop the Navigator Metadata Server.
a. Go to Clusters > Cloudera Management Service > Instances.b. Select Navigator Metadata Server.c. Click Actions for Selected > Stop.
4. Back up the Cloudera Navigator Solr storage directory.
sudo cp -rp /var/lib/cloudera-scm-navigator /var/lib/cloudera-scm-navigator-`date +%F`-CM
5. If you are using an Oracle database for audit, in SQL*Plus, ensure that the following additional privileges are set:
GRANT EXECUTE ON sys.dbms_crypto TO nav; GRANT CREATE VIEW TO nav;
where nav is the user of the Navigator Audit Server database.
69

CDP Private Cloud Base Upgrading Cloudera Manager 6
Stop Cloudera Manager Server & Cloudera Management Service
1. Stop the Cloudera Management Service.
a. Log in to the Cloudera Manager Admin Console.b. Select Clusters > Cloudera Management Service.c. Select Actions > Stop.
2. Log in to the Cloudera Manager Server host.
ssh my_cloudera_manager_server_host
3. Stop the Cloudera Manager Server.
sudo systemctl stop cloudera-scm-server
Back Up the Cloudera Manager Databases
1. Back up the Cloudera Manager server database – Run the following command. Replace placeholders with theactual values returned from the db.properties file):MySQL/Maria DB
mysqldump --databases database_name --host=database_hostname --port=database_port -u user_name -p > $HOME/database_name-backup-`date +%F`-CM.sql
Note: If the db.properties file does not contain a port number, omit the portnumber parameter from the above command.
PostgreSQL/Embedded
pg_dump -h database_hostname -U user_name -W -p database_port database_name > $HOME/database_name-backup-`date +%F`-CM.sql
Oracle
Work with your database administrator to ensure databases are properly backed up.
70

CDP Private Cloud Base Upgrading Cloudera Manager 6
2. Back up All other Cloudera Manager databases - Use the database information that you collected in a previousstep. You may need to contact your database administrator to obtain the passwords.
These databases can include the following:
• Cloudera Manager Server - Contains all the information about services you have configured and their roleassignments, all configuration history, commands, users, and running processes. This relatively small database(< 100 MB) is the most important to back up.
Important: When you restart processes, the configuration for each of the services is redeployed usinginformation saved in the Cloudera Manager database. If this information is not available, your clustercannot start or function correctly. You must schedule and maintain regular backups of the ClouderaManager database to recover the cluster in the event of the loss of this database.
• Oozie Server - Contains Oozie workflow, coordinator, and bundle data. Can grow very large. (Only availablewhen installing CDH 5 or CDH 6 clusters.)
• Sqoop Server - Contains entities such as the connector, driver, links and jobs. Relatively small. (Only availablewhen installing CDH 5 or CDH 6 clusters.)
• Reports Manager - Tracks disk utilization and processing activities over time. Medium-sized.• Hive Metastore Server - Contains Hive metadata. Relatively small.• Hue Server - Contains user account information, job submissions, and Hive queries. Relatively small.• Sentry Server - Contains authorization metadata. Relatively small.• Cloudera Navigator Audit Server - Contains auditing information. In large clusters, this database can grow
large.(Only available when installing CDH 5 or CDH 6 clusters.)• Cloudera Navigator Metadata Server - Contains authorization, policies, and audit report metadata. Relatively
small.(Only available when installing CDH 5 or CDH 6 clusters.)• DAS PostgreSQL server - Contains Hive and Tez event logs and DAG information. Can grow very large.• Ranger Admin - Contains administrative information such as Ranger users, groups, and access policies.
Medium-sized.• Streaming Components:
• Schema Registry - Contains the schemas and their metadata, all the versions and branches. You can useeither MySQL, Postgres, or Oracle.
Important: For the Schema Registry database, you must set collation to be case sensitive.
• Streams Messaging Manager Server - Contains Kafka metadata, stores metrics, and alert definitions.Relatively small.
Run the following commands to back up the databases. (The command displayed below depends on the databaseyou selected in the form at the top of this page. Replace placeholders with the actual values.):
MySQL
To back up the MySQL database, run the mysqldump command on the MySQL host, as follows:m
mysqldump -hhostname -uusername -ppassword database > /tmp/database-backup.sql
For example, to back up the Activity Monitor database amon created in Creating Databases forCloudera Software, on the local host as the root user, with the password amon_password:
mysqldump -pamon_password amon > /tmp/amon-backup.sql
To back up the sample Activity Monitor database amon on remote host myhost.example.comas the root user, with the password amon_password:
mysqldump -hmyhost.example.com -uroot -pamon_password amon > /tmp/amon-backup.sql
71

CDP Private Cloud Base Upgrading Cloudera Manager 6
You can back up all database using the following command:
mysqldump --all-databases -ppassword > /tmp/all1/all.sql
PostgreSQL/Embedded
To back up a PostgreSQL database, use the same procedure whether the database is embedded orexternal:
a. Log in to the host where the Cloudera Manager Server is installed.b. Get the name, user, and password properties for the Cloudera Manager database from /etc/
cloudera-scm-server/db.properties:
com.cloudera.cmf.db.name=scmcom.cloudera.cmf.db.user=scmcom.cloudera.cmf.db.password=NnYfWIjlbk
c. Run the following command as root using the parameters from the preceding step:
# pg_dump -h hostname -p 7432 -U scm > /tmp/scm_server_db_backup.$(date +%Y%m%d)
d. Enter the password from the com.cloudera.cmf.db.password property in step 2.e. To back up a database created for one of the roles on the local host as the roleuser user:
# pg_dump -h hostname -p 7432 -U roleuser > /tmp/roledb
f. Enter the password specified when the database was created.
Oracle
Work with your database administrator to ensure databases are properly backed up.
Back Up Cloudera Manager Server
Note: Commands are provided below to backup various files and directories used by Cloudera ManagerAgents. If you have configured custom paths for any of these, substitute those paths in the commands. Thecommands also provide destination paths to store the backups, defined by the environment variable CM_BACKUP_DIR, which is used in all the backup commands. You may change these destination paths in thecommand as needed for your deployment.
The tar commands in the steps below may return the following message. It is safe to ignore this message:
tar: Removing leading `/' from member names
1. Log in to the Cloudera Manager Server host.
ssh my_cloudera_manager_server_host
2. Create a top-level backup directory.
export CM_BACKUP_DIR="`date +%F`-CM"echo $CM_BACKUP_DIRmkdir -p $CM_BACKUP_DIR
3. Back up the Cloudera Manager Server directories:
sudo -E tar -cf $CM_BACKUP_DIR/cloudera-scm-server.tar /etc/cloudera-scm-server /etc/default/cloudera-scm-server
72

CDP Private Cloud Base Upgrading Cloudera Manager 6
4. Back up the existing repository directory.RHEL / CentOS
sudo -E tar -cf $CM_BACKUP_DIR/repository.tar /etc/yum.repos.d
SLES
sudo -E tar -cf $CM_BACKUP_DIR/repository.tar /etc/zypp/repos.d
Ubuntu
sudo -E tar -cf $CM_BACKUP_DIR/repository.tar /etc/apt/sources.list.d
(Optional) Start Cloudera Manager Server & Cloudera Management Service
Start the Cloudera Manager server and Cloudera Manager Management service.
If you will be immediately upgrading Cloudera Manager, skip this step and continue with Step 3: Upgrading theCloudera Manager Server on page 73.
1. Log in to the Cloudera Manager Server host.
ssh my_cloudera_manager_server_host
2. Start the Cloudera Manager Server.
sudo systemctl start cloudera-scm-server
3. Start the Cloudera Management Service.
a. Log in to the Cloudera Manager Admin Console.b. Select Clusters > Cloudera Management Service.c. Select Actions > Start.
Step 3: Upgrading the Cloudera Manager Server
Important: Upgrades to Cloudera Manager 7.0.3 are not supported.
Note: Upgrades from CDH 6.x are supported only for upgrades to Cloudera Manager 7.4.4 or higher andCloudera Runtime 7.1.7 or higher. Upgrades from CDH 6.0 are not supported.
Note: Not all combinations of Cloudera Manager and Cloudera Runtime are supported. Ensure that theversion of Cloudera Manager you are using supports the version of Cloudera Runtime you have selected.
The versions of Cloudera Runtime and CDH clusters that can be managed by Cloudera Manager are limited to thefollowing:
73

CDP Private Cloud Base Upgrading Cloudera Manager 6
Table 3: Cloudera Manager support for CDH and Cloudera Runtime
Cloudera Manager Version Supported CDH/Runtime versions Supported CDP Private Cloud DataServices versions
7.6.5 • Cloudera Runtime 7.1.7 SP1• Cloudera Runtime 7.1.7• Cloudera Runtime 7.1.6• Cloudera Runtime 7.1.5• Cloudera Runtime 7.1.4• Cloudera Runtime 7.1.3• Cloudera Runtime 7.1.2• Cloudera Runtime 7.1.1• Cloudera Runtime 7.0.3• CDH 6.3• CDH 6.2• CDH 6.1• CDH 6.0• CDH 5.13 - 5.16
1.3.1, 1.3.2, 1.3.3. 1.3.4, 1.4.0
Supported with Cloudera Runtime 7.1.6 ,7.1.7, and 7.1.7 SP1 only
7.6.1
Important: Do not upgrade toCloudera Manager 7.6.1 if you arerunning CDP Private Cloud DataServices in your deployment.
• Cloudera Runtime 7.1.7 SP1• Cloudera Runtime 7.1.7• Cloudera Runtime 7.1.6• Cloudera Runtime 7.1.5• Cloudera Runtime 7.1.4• Cloudera Runtime 7.1.3• Cloudera Runtime 7.1.2• Cloudera Runtime 7.1.1• Cloudera Runtime 7.0.3• CDH 6.3• CDH 6.2• CDH 6.1• CDH 6.0• CDH 5.13 - 5.16
None
7.5.5 • Note: Cloudera Manager 7.5.5is not compatible with theSpark 3 CDS parcel.
• Cloudera Runtime 7.1.7• Cloudera Runtime 7.1.6
1.3.1, 1.3.2, 1.3.3. 1.3.4
Supported with Cloudera Runtime 7.1.6 and7.1.7 only
7.5.4 • Note: Cloudera Manager 7.5.4is not compatible with theSpark 3 CDS parcel.
• Cloudera Runtime 7.1.7• Cloudera Runtime 7.1.6
1.3.1, 1.3.2, 1.3.3
Supported with Cloudera Runtime 7.1.6 and7.1.7 only
7.5.1 • Note: Cloudera Manager 7.5.1is not compatible with theSpark 3 CDS parcel.
•• Cloudera Runtime 7.1.7• Cloudera Runtime 7.1.6
1.3.1
Supported with Cloudera Runtime 7.1.6 and7.1.7 only
74

CDP Private Cloud Base Upgrading Cloudera Manager 6
Cloudera Manager Version Supported CDH/Runtime versions Supported CDP Private Cloud DataServices versions
7.4.4 • Cloudera Runtime 7.1.7• Cloudera Runtime 7.1.6• Cloudera Runtime 7.1.5• Cloudera Runtime 7.1.4• Cloudera Runtime 7.1.3• Cloudera Runtime 7.1.2• Cloudera Runtime 7.1.1• Cloudera Runtime 7.0.3• CDH 6.3• CDH 6.2• CDH 6.1• CDH 6.0• CDH 5.13 - 5.16
None
7.3.1 • Cloudera Runtime 7.1.6• Cloudera Runtime 7.1.5• Cloudera Runtime 7.1.4• Cloudera Runtime 7.1.3• Cloudera Runtime 7.1.2• Cloudera Runtime 7.1.1• Cloudera Runtime 7.0.3• CDH 6.3• CDH 6.2• CDH 6.1• CDH 6.0• CDH 5.13 - 5.16
None
7.2.4 • Cloudera Runtime 7.1.5• Cloudera Runtime 7.1.4• Cloudera Runtime 7.1.3• Cloudera Runtime 7.1.2• Cloudera Runtime 7.1.1• Cloudera Runtime 7.0.3• CDH 6.3• CDH 6.2• CDH 6.1• CDH 6.0• CDH 5.13 - 5.16
1.2
Supported with Cloudera Runtime 7.1.5 only
7.1.4 • Cloudera Runtime 7.1.4• Cloudera Runtime 7.1.3• Cloudera Runtime 7.1.2• Cloudera Runtime 7.1.1• Cloudera Runtime 7.0.3• CDH 6.3• CDH 6.2• CDH 6.1• CDH 6.0• CDH 5.13 - 5.16
75

CDP Private Cloud Base Upgrading Cloudera Manager 6
Cloudera Manager Version Supported CDH/Runtime versions Supported CDP Private Cloud DataServices versions
7.1.3 • Cloudera Runtime 7.1.3• Cloudera Runtime 7.1.2• Cloudera Runtime 7.1.1• Cloudera Runtime 7.0.3• CDH 6.3• CDH 6.2• CDH 6.1• CDH 6.0• CDH 5.13 - 5.16
1.1
7.1.2 • Cloudera Runtime 7.1.2• Cloudera Runtime 7.1.1• Cloudera Runtime 7.0.3• CDH 6.3• CDH 6.2• CDH 6.1• CDH 6.0• CDH 5.13 - 5.16
1.0
7.1.1 • Cloudera Runtime 7.1.1• Cloudera Runtime 7.0.3• CDH 6.3• CDH 6.2• CDH 6.1• CDH 6.0• CDH 5.13 - 5.16
7.0.3 • Cloudera Runtime 7.0.3
This topic provides procedures for backing up the Cloudera Manager Server.
Minimum Required Role: Cluster Administrator (also provided by Full Administrator) This feature is notavailable when using Cloudera Manager to manage Data Hub clusters.
After you complete the steps in Step 1: Getting Started Upgrading Cloudera Manager 6 on page 64 and Step 2:Backing Up Cloudera Manager 6 on page 67, continue with the following:
Warning: Upgrades from Cloudera Manager 5.12 and lower to Cloudera Manager 7.1.1 or higher are notsupported
Warning: For upgrades from CDH clusters with Cloudera Navigator to Cloudera Runtime 7.1.1 (or higher)clusters where Navigator is to be migrated to Apache Atlas, the cluster must have Kerberos enabled beforeupgrading.
Warning: Before upgrading CDH 5 clusters with Sentry to Cloudera Runtime 7.1.x clusters where Sentryprivileges are to be transitioned to Apache Ranger:
• The cluster must have Kerberos enabled.• Verify that HDFS gateway roles exist on the hosts that runs the Sentry service.
Important: If HDFS ACL sync is enabled (hdfs_sentry_sync_enable=true) on the CDH cluster, then youmust install Ranger RMS to support the same functionality. For steps to install Ranger RMS, see InstallingRanger RMS.
Note: If the cluster you are upgrading will include Atlas, Ranger, or both, the upgrade wizard deploys oneinfrastructure Solr service to provide a search capability of the audit logs through the Ranger Admin UI and/or to store and serve Atlas metadata. Cloudera recommends that you do not use this service for customerworkloads to avoid interference with audit and timeline performance.
76

CDP Private Cloud Base Upgrading Cloudera Manager 6
Important: Please note the following:
• A valid Cloudera Enterprise license file and a username and password are required to download and installthe software. You can obtain the username and password from the Cloudera CDH Download page. SeeYour license file must be current and uploaded to Cloudera Manager.
To upload a license:
1. Download the license file and save it locally.2. In Cloudera Manager, go to the Home page.3. Select Administration > License.4. Click Upload License.5. Browse to the license file you downloaded.6. Click Upload.
• If you are using Cloudera Express, you cannot upgrade Cloudera Manager or CDH.• Several steps in the procedures have changed and now require the username and password.• Download URLs have changed.
Important: If you encounter problems, see the following:
• Troubleshooting a Cloudera Manager Upgrade on page 97• Reverting a Failed Cloudera Manager Upgrade on page 98
Establish Access to the Software
Cloudera Manager needs access to a package repository that contains the updated software packages. You canchoose to access the Cloudera public repositories directly, or you can download those repositories and set up a localrepository to access them from within your network. If your cluster hosts do not have connectivity to the Internet, youmust set up a local repository.
1. Log in to the Cloudera Manager Server host.
ssh my_cloudera_manager_server_host
2. Remove any older files in the existing repository directory:RHEL / CentOS
sudo rm /etc/yum.repos.d/cloudera*manager.repo*
SLES
sudo rm /etc/zypp/repos.d/cloudera*manager.repo*
Ubuntu
sudo rm /etc/apt/sources.list.d/cloudera*.list*
3. Fill in the form at the top of this page.
77

CDP Private Cloud Base Upgrading Cloudera Manager 6
4. Create a repository file so that the package manager can locate and download the binaries.
Do one of the following, depending on whether or not you are using a local package repository:
• Use a local package repository. (Required when cluster hosts do not have access to the internet.) SeeConfiguring a Local Package epository.
• Use the Cloudera public repository
RHEL / CentOS
a. Create a file named /etc/yum.repos.d/cloudera-manager.repo with the followingcontent:
[cloudera-manager]name=Cloudera Manager baseurl=https://archive.cloudera.com/p/cm7/<Cloudera Manager version>/redhat<OS major version>/yum/gpgkey =https://archive.cloudera.com/p/cm7/<Cloudera Manager version>/redhat<OS major version>/yum/RPM-GPG-KEY-clouderausername=changemepassword=changemegpgcheck=1enabled=1autorefresh=0type=rpm-md
Replace changeme with your username and password in the /etc/yum.repos.d/cloudera-manager.repo file.
SLES
a. Create a file named /etc/zypp/repos.d/cloudera-manager.repo with thefollowing content:
[cloudera-manager]name=Cloudera Manager baseurl=https://archive.cloudera.com/p/cm7/<Cloudera Manager version>/sles<OS major version>/yum/gpgkey =https://archive.cloudera.com/p/cm7/<Cloudera Manager version>/sles<OS major version>/yum/RPM-GPG-KEY-clouderausername=changemepassword=changemegpgcheck=1enabled=1autorefresh=0type=rpm-md
b. Replace changeme with your username and password in the /etc/zypp/repos.d/cloudera-manager.repo file.
Ubuntu
Debian is not a supported operating system for Cloudera Manager 6.x.
a. Create a file named /etc/apt/sources.list.d/cloudera_manager.list with thefollowing content:
# Cloudera Manager <Cloudera Manager version>deb [arch=amd64] http://username:[email protected]/p/cm7/<Cloudera Manager version>/ubuntu1804/apt -cm<Cloudera Manager version> contrib
78
CDP Private Cloud Base Upgrading Cloudera Manager 6
b. Run the following command:
sudo apt-get update
c. Replace changeme with your username and password in the /etc/apt/sources.list.d/cloudera_manager.list file.
Tip: If you have a mixed operating system environment, adjust the Operating System filter at the top ofthe page for each operating system. The guide will generate the repo file for you automatically here.
5. A Cloudera Manager upgrade can introduce new package dependencies. Your organization may have restrictionsor require prior approval for installation of new packages. You can determine which packages may be installed orupgraded:RHEL / CentOS
yum deplist cloudera-manager-agent
SLES
zypper info --requires cloudera-manager-agent
Ubuntu
apt-cache depends cloudera-manager-agent
Install Java (JDK)
Oracle JDK 1.8 is required on all cluster hosts managed by Cloudera Manager 6.0.0 or higher. If it is supportedfor your version of Cloudera Manager, you can also install OpenJDK 1.8 or OpenJDK 11. See Manually InstallingOpenJDK. If JDK 1.8 is already installed on your hosts, skip the steps in this section.
If you are upgrading to Cloudera Manager 6.0.0 or higher, you can manually install JDK 8 on the Cloudera Managerserver host, and then, as part of the Cloudera Manager upgrade process, you can specify that Cloudera Managerupgrade the JDK on the remaining hosts.
A supported JDK is required on all hosts. During a Cloudera Manager upgrade, you can install OpenJDK 8 on theCloudera Manager server host, and then Cloudera Manager can install the new JDK on the managed hosts. Youcan also choose to install Oracle JDK 8, OpenJDK 8, or OpenJDK 11 manually, on all hosts before beginning theupgrade.
Note: Cloudera Manager no longer installs Oracle JDKs.
1. Log in to the Cloudera Manager Server host.
ssh my_cloudera_manager_server_host
2. Stop the Cloudera Manager Server.
sudo systemctl stop cloudera-scm-server
79

CDP Private Cloud Base Upgrading Cloudera Manager 6
3. Remove the JDK:
a. Perform the following steps on all hosts managed by Cloudera Manager:
1. Run the following command to remove the JDK, using the package names from Step 1: (If you do notdelete these files, Cloudera Manager and other components may continue to use the old version of theJDK.)RHEL
yum remove <JDK package name>
Ubuntu
apt-get remove <JDK package name>
SLES
zypper rm <JDK package name>
2. Confirm that the package has been removed:RHEL
yum list installed |grep -i oracle
Ubuntu
apt list --installed | grep -i oracle
SLES
zypper search --installed-only |grep -i oracle
80

CDP Private Cloud Base Upgrading Cloudera Manager 6
4. Install OpenJDKRHEL
OpenJDK 8
sudo yum install java-1.8.0-openjdk-devel
OpenJDK 11
sudo yum install java-11-openjdk
Ubuntu
OpenJDK 8
sudo apt-get install openjdk-8-jdk
OpenJDK 11
sudo apt install openjdk-11-jdk
SLES
OpenJDK 8
sudo zypper install java-1_8_0-openjdk-devel
OpenJDK 11
zypper install java-11-openjdk
5. Start the Cloudera Manager Server.
sudo systemctl start cloudera-scm-server
Upgrade the Cloudera Manager Server
1. Log in to the Cloudera Manager Admin Console.2. If your cluster is running the embedded PostgreSQL database, stop all services that are using the embedded
database. These can include:
• Hive service and all services such as Impala and Hue that use the Hive metastore• Oozie• Sentry• Sqoop
3. Stop the Cloudera Management Service.
a. Log in to the Cloudera Manager Admin Console.b. Select Clusters > Cloudera Management Service.c. Select Actions > Stop.
Important: Not stopping the Cloudera Management Service at this point might cause management rolesto crash or the Cloudera Manager Server might fail to restart.
4. Ensure that you have disabled any scheduled replication or snapshot jobs and wait for any running commandsfrom the Cloudera Manager Admin Console to complete before proceeding with the upgrade.
Important: If there are replication jobs, snapshot jobs, or other commands running when you stopCloudera Manager Server, Cloudera Manager Server might fail to start after the upgrade.
81

CDP Private Cloud Base Upgrading Cloudera Manager 6
5. If you have any Hive Replication Schedules that replicate to a cloud destination, delete these replication clustersbefore continuing with the upgrade. You can re-create these Replication Schedules after the Cloudera Managerupgrade is complete.
6. If your cluster is running Ubuntu version 18, stop all clusters before upgrading Cloudera Manager. (For eachcluster, go to Cluster Name > Actions > Stop.)
7. Log in to the Cloudera Manager Server host.
ssh my_cloudera_manager_server_host
8. Stop the Cloudera Manager Server.
sudo systemctl stop cloudera-scm-server
9. If you are using the embedded PostgreSQL database, stop the Cloudera Manager Embedded PostgreSQLdatabase:RHEL 7, SLES 12, Ubuntu 18.04 and higher
sudo systemctl stop cloudera-scm-server-db
RHEL 5 or 6, SLES 11, Debian 6 or 7, Ubuntu 12.04 or 14.04
sudo service cloudera-scm-server-db stop
If you are not using the embedded PostgreSQL database and you attempt to stop it, you might see a messageindicating that the service cannot be found. If you see a message that the shutdown failed, then the embeddeddatabase is still running, probably because services are connected to the Hive metastore. If the database shutdownfails due to connected services, issue the following command:
RHEL-compatible 7 and higher, Ubuntu 16.04
sudo service cloudera-scm-server-db next_stop_fastsudo service cloudera-scm-server-db stop
All other Linux distributions
sudo service cloudera-scm-server-db fast_stop
10. Stop the Cloudera Manager Agent.RHEL 7, SLES 12, Ubuntu 18.04 and higher
sudo systemctl stop cloudera-scm-agent
RHEL 5 or 6, SLES 11, Debian 6 or 7, Ubuntu 12.04 or 14.04
sudo service cloudera-scm-agent stop
11. Upgrade the packages. Include the cloudera-manager-server-db-2 package in the command only if youare using the embedded PostgreSQL database.RHEL / CentOS
sudo yum clean allsudo yum upgrade cloudera-manager-server cloudera-manager-daemons cloudera-manager-agent cloudera-manager-server-db-2
SLES
sudo zypper clean --all
82

CDP Private Cloud Base Upgrading Cloudera Manager 6
sudo zypper up cloudera-manager-server cloudera-manager-daemons cloudera-manager-agent cloudera-manager-server-db-2
Ubuntu
sudo apt-get clean
sudo apt-get update
sudo apt-get dist-upgrade
sudo apt-get install cloudera-manager-server cloudera-manager-daemons cloudera-manager-agent cloudera-manager-server-db-2
You might be prompted about your configuration file version:
Configuration file '/etc/cloudera-scm-agent/config.ini'==> Modified (by you or by a script) since installation.==> Package distributor has shipped an updated version.What would you like to do about it ? Your options are:Y or I : install the package maintainer's versionN or O : keep your currently-installed versionD : show the differences between the versionsZ : start a shell to examine the situationThe default action is to keep your current version.
You may receive a similar prompt for /etc/cloudera-scm-server/db.properties. Answer N to bothprompts.
You may be prompted to accept the GPG key. Answer y.
Retrieving key from https://archive.cloudera.com/.../cm/RPM-GPG-KEY-clouderaImporting GPG key ... Userid : "Yum Maintainer <[email protected]>" Fingerprint: ... From : https://archive.cloudera.com/.../RPM-GPG-KEY-cloudera
Note: If you receive the following error message when running these commands: [Errno 14] HTTP Error404 - Not Found, make sure the URL in the cloudera-manage.list cloudera-manager.repofile is correct and is reachable from the Cloudera Manager server host.
12. If you customized the /etc/cloudera-scm-agent/config.ini file, your customized file is renamedwith the extension .rpmsave or .dpkg-old. Merge any customizations into the /etc/cloudera-scm-agent/config.ini file that is installed by the package manager.
13. Verify that you have the correct packages installed.
Ubuntu
dpkg-query -l 'cloudera-manager-*'
Desired=Unknown/Install/Remove/Purge/Hold| Status=Not/Inst/Conf-files/Unpacked/halF-conf/Half-inst/trig-aWait/Trig-pend|/ Err?=(none)/Reinst-required (Status,Err: uppercase=bad)||/ Name Version Description
83
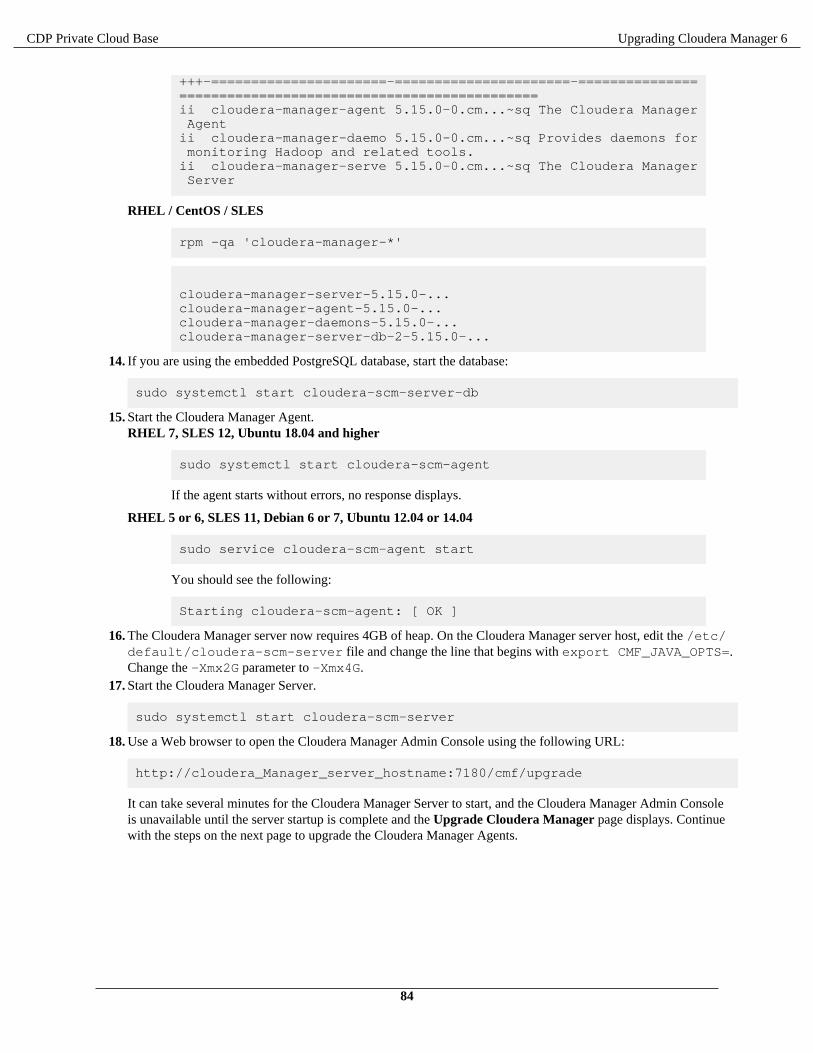
CDP Private Cloud Base Upgrading Cloudera Manager 6
+++-======================-======================-============================================================ii cloudera-manager-agent 5.15.0-0.cm...~sq The Cloudera Manager Agentii cloudera-manager-daemo 5.15.0-0.cm...~sq Provides daemons for monitoring Hadoop and related tools.ii cloudera-manager-serve 5.15.0-0.cm...~sq The Cloudera Manager Server
RHEL / CentOS / SLES
rpm -qa 'cloudera-manager-*'
cloudera-manager-server-5.15.0-...cloudera-manager-agent-5.15.0-...cloudera-manager-daemons-5.15.0-...cloudera-manager-server-db-2-5.15.0-...
14. If you are using the embedded PostgreSQL database, start the database:
sudo systemctl start cloudera-scm-server-db
15. Start the Cloudera Manager Agent.RHEL 7, SLES 12, Ubuntu 18.04 and higher
sudo systemctl start cloudera-scm-agent
If the agent starts without errors, no response displays.
RHEL 5 or 6, SLES 11, Debian 6 or 7, Ubuntu 12.04 or 14.04
sudo service cloudera-scm-agent start
You should see the following:
Starting cloudera-scm-agent: [ OK ]
16. The Cloudera Manager server now requires 4GB of heap. On the Cloudera Manager server host, edit the /etc/default/cloudera-scm-server file and change the line that begins with export CMF_JAVA_OPTS=.Change the -Xmx2G parameter to -Xmx4G.
17. Start the Cloudera Manager Server.
sudo systemctl start cloudera-scm-server
18. Use a Web browser to open the Cloudera Manager Admin Console using the following URL:
http://cloudera_Manager_server_hostname:7180/cmf/upgrade
It can take several minutes for the Cloudera Manager Server to start, and the Cloudera Manager Admin Consoleis unavailable until the server startup is complete and the Upgrade Cloudera Manager page displays. Continuewith the steps on the next page to upgrade the Cloudera Manager Agents.
84

CDP Private Cloud Base Upgrading Cloudera Manager 6
Note: If you have problems starting the server or the agent, such as database permissions problems, you canuse log files to troubleshoot the problem:
Server log:
tail -f /var/log/cloudera-scm-server/cloudera-scm-server.log
Agent log:
tail -f /var/log/cloudera-scm-agent/cloudera-scm-agent.log
or
tail -f /var/log/messages
To complete the Cloudera Manager upgrade, continue with Step 4: Upgrading the Cloudera Manager Agents on page85.
Step 4: Upgrading the Cloudera Manager Agents
Minimum Required Role: Cluster Administrator (also provided by Full Administrator) This feature is notavailable when using Cloudera Manager to manage Data Hub clusters.
Important: Upgrades to Cloudera Manager 7.0.3 are not supported.
Important: If you encounter problems, see the following:
• Troubleshooting a Cloudera Manager Upgrade on page 97
Warning: Upgrades from Cloudera Manager 5.12 and lower to Cloudera Manager 7.1.1 or higher are notsupported
Warning: For upgrades from CDH clusters with Cloudera Navigator to Cloudera Runtime 7.1.1 (or higher)clusters where Navigator is to be migrated to Apache Atlas, the cluster must have Kerberos enabled beforeupgrading.
Warning: Before upgrading CDH 5 clusters with Sentry to Cloudera Runtime 7.1.x clusters where Sentryprivileges are to be transitioned to Apache Ranger:
• The cluster must have Kerberos enabled.• Verify that HDFS gateway roles exist on the hosts that runs the Sentry service.
Important: If HDFS ACL sync is enabled (hdfs_sentry_sync_enable=true) on the CDH cluster, then youmust install Ranger RMS to support the same functionality. For steps to install Ranger RMS, see InstallingRanger RMS.
Note: If the cluster you are upgrading will include Atlas, Ranger, or both, the upgrade wizard deploys oneinfrastructure Solr service to provide a search capability of the audit logs through the Ranger Admin UI and/or to store and serve Atlas metadata. Cloudera recommends that you do not use this service for customerworkloads to avoid interference with audit and timeline performance.
Upgrade the Cloudera Manager Agents (Cloudera Manager 7.0.3 and higher)
85

CDP Private Cloud Base Upgrading Cloudera Manager 6
1. Ensure that the ptrace_scope operating system control is set to 0:
The Cloudera Manager Agent installation process uses a re-parenting mechanism to ensure that running ClouderaServices are not impacted by the Cloudera Manager Agent upgrade. This re-parenting mechanism utilizes theLinux kernel's ptrace capability. If the ptrace_scope system control is set to a non-zero value, then theinstaller will not be able to re-parent running Cloudera services. The Cloudera Manager Agent RPM will refuseto install if the ptrace_scope control has a non-zero value. For more information, see https://www.kernel.org/doc/Documentation/security/Yama.txt
• Verify that the value of ptrace_scope is set to zero. Run the following command to check the value:
cat /proc/sys/kernel/yama/ptrace_scope
• If the value is not set to 0, set the value to 0 by running the following command on all cluster hosts:
echo 0 >> /proc/sys/kernel/yama/ptrace_scope
If you do not want to allow ptrace_scope to run, run the following command on all cluster hosts to forcethe Cloudera Manager Agent upgrade:
touch /tmp/CLOUDERA_SKIP_PTRACE_CHECK_ON_UPGRADES
• If necessary, you can set ptrace_scope to its original value after the agent upgrades are complete.
Note: Ubuntu 18 and Ubuntu 20 set ptrace_scope to a non-zero value by default.
2. After upgrading and starting the Cloudera Manager server, open the Cloudera Manager Admin Console (if youhave not already done so) using the following URL:
http://cloudera_Manager_server_hostname:7180/cmf/upgrade
The Upgrade Cloudera Manager screen displays:
86

CDP Private Cloud Base Upgrading Cloudera Manager 6
3. Click Upgrade Cloudera Manager Agent packages
The Upgrade Cloudera Manager Agent Packages page displays the Select Repository step.4. Select one of the following:
• Select Public Cloudera Repository if the Cloudera Manager server host has access to the internet.• Select the Custom Repository If you are using a local package repository instead of the public repository at
https://archive.cloudera.com, option and enter the Custom Repository URL.5. Click Continue.6. The Select JDK screen displays the available options for the JDK used in the cluster. Choose one of the following
options to install a JDK:
• Manually Manage JDK – Select this option if you have already installed a supported JDK. For informationon installing a JDK, see Upgrading the JDK on page 42.
• Install a Cloudera-provided version of OpenJDK – Cloudera Manager installs OpenJDK 8 on all yourcluster hosts, except for the Cloudera Manager server host(s).
• Install a system-provided version of OpenJDK – Cloudera Manager installs the default version of OpenJDKprovided by the host operating system.
7. Click Continue.
The Enter Login Credentials page displays.8. Specify the credentials and initiate Agent installation:
a. Select root for the root account, or select Another user and enter the username for an account that haspassword-less sudo permission.
b. Select an authentication method:
• If you choose the All hosts accept same password option, enter and confirm the password.• If you choose the All hosts accept same private key option, provide a passphrase and path to the required
key files.c. Modify the default SSH port if necessary.d. Specify the maximum Number of Simultaneous Installations to run at once. The default and recommended
value is 10. Adjust this parameter based on your network capacity.9. Click Continue.
The Cloudera Manager Agent packages and, if selected, the JDK are installed.10. When the installations are complete, click Finish.
The Upgrade Cloudera Manager page displays the status of the upgrade. If you see a message listing ClouderaManager Agents not upgraded, wait a few minutes for the agents to heartbeat and the click the Refresh button.
11. After the Agents are all upgraded, Click Run Host Inspector to run the host inspector. Inspect the output andcorrect any warnings. If problems occur, you can make changes and then rerun the inspector.
12. When you are satisfied with the inspection results, click Start the Cloudera Management Service.13. Confirm that you want to start the Cloudera Management Service by clicking Continue.14. After the Cloudera Management Service has started, click Finish.
You will see a message indicating that the Cloudera Management Service has started.
The upgrade is now complete.
87

CDP Private Cloud Base Upgrading Cloudera Manager 6
15. Click the Home Page link to return to the Home page. Review and fix any critical configuration issues. You mayneed to restart any clusters if they indicate stale configurations.
To return to the Upgrade Cloudera Manager page, go to Hosts > All Hosts > Review Upgrade Status.16. If you stopped any clusters before upgrading Cloudera Manager, start them now. (For each cluster, go to Cluster
Name > Actions > Start.)17. If you set ptrace_scope to 0 and want to use the original or a different value, you can reset it by running the
following command on all hosts:
echo [new_value] >> /proc/sys/kernel/yama/ptrace_scope
18. If you have the Embedded Container Service (ECS) deployed in any clusters, do the following
a. Restart the ECS Cluster. Go to the ECS cluster, click the actions menu and select Restart.b. Unseal the Vault. Go to the ECS service and click Actions > Unseal.
Step 5: After You Upgrade Cloudera Manager
Minimum Required Role: Cluster Administrator (also provided by Full Administrator) This feature is notavailable when using Cloudera Manager to manage Data Hub clusters.
Perform Post-Upgrade Steps
1. If you upgraded the JDK, do the following:
a. If the Cloudera Manager Server host is also running a Cloudera Manager Agent, restart the Cloudera ManagerServer:
b. Restart the Cloudera Manager Server.
sudo systemctl restart cloudera-scm-server
c. Open the Cloudera Manager Admin Console and set the Java Home Directory property in the hostconfiguration:
1. Go to Home > All Hosts > Configuration.2. Set the value to the path to the new JDK.3. Click Save Changes.
d. Restart all services:
1.On the Home > Status tab, click next to the cluster name, select Restart and confirm.
2. Start the Cloudera Management Service and adjust any configurations when prompted.
a. Log in to the Cloudera Manager Admin Console.b. Select Clusters > Cloudera Management Service.c. Select Actions > Start.
3. If your deployment uses LDAP, you may see that its health test has a Disabled status, you can configure an LDAPBind Distinguished Name and password to enable the health test.
In the Cloudera Manager Admin Console, go to Administration > Settings > External Authentication and setthe following parameters:
• LDAP Bind Distinguished Name for Monitoring• LDAP Bind Password for Monitoring
88

CDP Private Cloud Base Upgrading Cloudera Manager 6
4. If your deployment uses LDAP, you may see that its health test has a Disabled status, you can configure an LDAPBind Distinguished Name and password to enable the health test.
In the Cloudera Manager Admin Console, go to Administration > Settings > External Authentication and setthe following parameters:
• LDAP Bind Distinguished Name for Monitoring• LDAP Bind Password for Monitoring
If these parameters are left blank, Cloudera Manager attempts to use the bind credentials specified forauthentication.
5. If you have deployed Apache Atlas in the cluster, restart the Apache Atlas service.6. If you have deployed Kafka in the cluster, perform a rolling restart the Kafka service.7. If Cloudera Manager reports stale configurations after the upgrade, you might need to restart the cluster services
and redeploy the client configurations. If any managed cluster includes the Hive and YARN components, this isrequired. If you will also be upgrading CDH, this step is not required.
Stale configurations can occur after a Cloudera Manager upgrade when a default configuration value has changed,which is often required to fix a serious problem. Configuration changes that result in Cloudera Manager reportingstale configurations are described the release notes:
8. If you are using Streams Messaging Manager, you need to configure database related configuration properties.
Note: If you are also upgrading your distribution to Runtime, you can choose to skip databaseconfiguration and complete it during the upgrade to Runtime.
a. Select the Streams Messaging Manager service.b. Go to Configuration.c. Find and configure the following properties:
• Streams Messaging Manager Database User Password• Streams Messaging Manager Database Type• Streams Messaging Manager Database Name• Streams Messaging Manager Database User• Streams Messaging Manager Database Host• Streams Messaging Manager Database Port
d. Click Save Changes.9. If you are using Schema Registry, you need to configure database related configuration properties.
Note: If you are also upgrading your distribution to Runtime, you can choose to skip databaseconfiguration now and complete it during the upgrade to Runtime.
a. Select the Schema Registry service.b. Go to Configuration.c. Find and configure the following properties:
• Schema Registry Database User Password• Schema Registry Database Type• Schema Registry Database Name• Schema Registry Database User• Schema Registry Database Host• Schema Registry Database Port
d. Click Save Changes.10.
On the Home > Status tab, click next to the cluster name, select Restart and confirm.11.
On the Home > Status tab, click next to the cluster name, select Deploy Client Configuration and confirm.12. If you disabled any backup or snapshot jobs before the upgrade, now is a good time to re-enable them
89
CDP Private Cloud Base Upgrading Cloudera Manager 6
13. If you deleted any Hive Replication schedules before the Cloudera Manager upgrade, re-create them now.14. The Cloudera Manager upgrade is now complete. If Cloudera Manager is not working correctly, or the upgrade
did not complete, see Troubleshooting a Cloudera Manager Upgrade on page 97.
Upgrade Key Trustee Server to 7.1.xHow to upgrade Key Trustee Server to CDP Private Cloud 7.1.x.
About this task
Running “Upgrading a Cluster” will not upgrade the Key Trustee Server. KTS is not part of the overall CDH parceland must be upgraded separately. Upgrading the KTS can be done at any point after performing Upgrading ClouderaManager.
If you are upgrading from CDH 5.13 through CDH 5.16, you must first upgrade the CDH Key Trustee Server to 5.15before upgrading to the CDP 7.1.x Key Trustee Server.
If you are upgrading from CDH 6.1 through CDH 6.3, you must first upgrade the CDH Key Trustee Server to 6.1before upgrading to the CDP 7.1.x Key Trustee Server.
From CDP Private Cloud Base 7.1.6, the KEYTRUSTEE_SERVER parcel is available in the same location in whichthe Cloudera runtime parcel is placed. If you have configured the parcel repository for CDP Private Cloud Baseupgrade, the KEYTRUSTEE_SERVER parcel is displayed automatically.
If you are using a package-based KTS install, see “Migrating Unmanaged Key Trustee Server to Cloudera Manager”.
Procedure
1. Back up the Key Trustee Server:
a) Select the Key Trustee Server service configuration that you wish to back up.b) From the Actions menu, select Create Backup on Active Server (or Create Backup on Passive Server) .
A successfully completed backup of the Key Trustee Server is indicated by the message CommandCreate Backup on Active Server finished successfully on servicekeytrustee_server.
2. Add your internal parcel repository to Cloudera Manager following the instructions in “Configuring a LocalParcel Repository” (see “Configuring Cloudera Manager to Use an Internal Remote Parcel Repository ”).
3. Download, distribute, and activate the latest Key Trustee Server parcel on the cluster containing the Key TrusteeServer host, following the instructions in “Step 6: Access Parcels”.
Important: The KEYTRUSTEE parcel in Cloudera Manager is not the Key Trustee Server parcel; it is theKey Trustee KMS parcel. The parcel name for Key Trustee Server is KEYTRUSTEE_SERVER
Note: Do not accept the prompt from CM to perform a rolling restart. Instead, restart the KTS servicesmanually, beginning with active instance followed by the passive instance(s).
What to do next
If the Key Trustee Server active or passive database does not start properly after upgrade from 5.x, 6.x or 7.0 to 7.1,manually restart the Key Trustee Server service to correct the problem: Key Trustee Server service > Actions >Restart.
Related InformationUpgrading a Cluster
Upgrading Cloudera Manager
Upgrading Cloudera Navigator Key Trustee Server
Migrating Unmanaged Key Trustee Server to Cloudera Manager
Configuring a Local Parcel Repository
Step 6: Access Parcels
90

CDP Private Cloud Base Upgrading Cloudera Manager 6
Upgrade Navigator Encrypt to 7.1.xHow to upgrade Navigator Encrypt from CDH to CDP Private Cloud 7.1.x.
About this task
Running “Upgrading a Cluster” will not upgrade Navigator Encrypt, because Navigator Encrypt is not part of theoverall CDH parcel and needs to be upgraded separately. Upgrading NavEncrypt can be done at any point afterperforming “Upgrading Cloudera Manager”.
You can upgrade from Navigator Encrypt 3.16-6.2 to 7.1.x. If you are upgrading from an older version of NavigatorEncrypt, first upgrade to 3.16+ using “Upgrading Cloudera Navigator Encrypt”.
Upgrading Navigator Encrypt (RHEL/Centos/Oracle)
1. Back up the /etc/navencrypt directory before upgrading.
If you have problems accessing encrypted data after upgrading the OS or kernel, restore /etc/navencryptfrom your backup and try again.
2. Add your internal package repository to Cloudera Manager following the instructions in “Configuring a LocalPackage Repository”.
3. Install the Cloudera Repository:
a. Add the internal repository you created by following the instructions in “Configuring a Local PackageRepository” (see “Configuring Hosts to Use the Internal Repository”.)
b. Import the GPG key by running the following command:
sudo rpm --import http://repo.example.com/path/to/gpg_gazzang.asc
4. Stop Navigator Encrypt:
sudo systemctl stop navencrypt-mount
5. Upgrade Navigator Encrypt client:
sudo yum update navencrypt
6. Start Navigator Encrypt:
sudo systemctl start navencrypt-mount
7. If using an RSA master key file, then you should change the master key to use OAEP padding:
# navencrypt key --change --rsa-oaep...>> Choose NEW MASTER key type: 1) Passphrase (single) 2) Passphrase (dual) 3) RSA private keySelect: 3Type MASTER RSA key file:Type MASTER RSA key passphrase:
To check the type of padding currently in use:
# navencrypt key --get-rsa-paddingType your Master keyType MASTER RSA key file:Type MASTER RSA key passphrase:
Verifying Master Key against keytrustee (wait a moment)...RSA_PKCS1_OAEP_PADDING
91

CDP Private Cloud Base Upgrading Cloudera Manager 6
Upgrading Navigator Encrypt (SLES)
1. Back up the /etc/navencrypt directory before upgrading.
If you have problems accessing encrypted data after upgrading the OS or kernel, restore /etc/navencryptfrom your backup and try again.
2. Add your internal package repository to Cloudera Manager following the instructions in “Configuring a LocalPackage Repository”.
3. Install the Cloudera Repository:
a. Add the internal repository you created by following the instructions in “Configuring a Local PackageRepository” (see “Configuring Hosts to Use the Internal Repository”.)
b. Import the GPG key by running the following command:
sudo rpm --import http://repo.example.com/path/to/gpg_gazzang.asc
4. Stop Navigator Encrypt:
sudo service navencrypt-mount stop
5. Upgrade the Kernel Module Package (KMP):
sudo zypper update cloudera-navencryptfs-kmp-kernel_flavor
Replace kernel_flavor with the kernel flavor for your system. Navigator Encrypt supports the default, xen,and ec2 kernel flavors.
6. Upgrade Navigator Encrypt client:
sudo zypper update navencrypt
7. Enable Unsupported Modules:
Edit /etc/modprobe.d/unsupported-modules and set allow_unsupported_modules to 1. Forexample:
## Every kernel module has a flag 'supported'. If this flag is not set loading# this module will taint your kernel. You will not get much help with a kernel# problem if your kernel is marked as tainted. In this case you firstly have# to avoid loading of unsupported modules.## Setting allow_unsupported_modules 1 enables loading of unsupported modules# by modprobe, setting allow_unsupported_modules 0 disables it. This can# be overridden using the --allow-unsupported-modules command line switch.allow_unsupported_modules 1
8. Start Navigator Encrypt:
sudo service navencrypt-mount start
9. If using an RSA master key file, then you should change the master key to use OAEP padding:
# navencrypt key --change --rsa-oaep...>> Choose NEW MASTER key type: 1) Passphrase (single) 2) Passphrase (dual) 3) RSA private key
92

CDP Private Cloud Base Upgrading Cloudera Manager 6
Select: 3Type MASTER RSA key file:Type MASTER RSA key passphrase:
To check the type of padding currently in use:
# navencrypt key --get-rsa-paddingType your Master keyType MASTER RSA key file:Type MASTER RSA key passphrase:
Verifying Master Key against keytrustee (wait a moment)...RSA_PKCS1_OAEP_PADDING
Upgrading Navigator Encrypt (Ubuntu)
1. Back up the /etc/navencrypt directory before upgrading.
If you have problems accessing encrypted data after upgrading the OS or kernel, restore /etc/navencryptfrom your backup and try again.
2. Add your internal package repository to Cloudera Manager following the instructions in “Configuring a LocalPackage Repository”.
3. Install the Cloudera Repository:
a. Add the internal repository you created by following the instructions in “Configuring a Local PackageRepository” (see “Configuring Hosts to Use the Internal Repository”.)
b. Run:
echo "deb http://repo.example.com/path/to/ubuntu/stable $DISTRIB_CODENAME main" | sudo tee -a /etc/apt/sources.list
c. Import the GPG key by running the following command:
wget -O - http://repo.example.com/path/to/gpg_gazzang.asc | apt-key add -
d. Update the repository index:
apt-get update
4. Stop Navigator Encrypt:
sudo service navencrypt-mount stop
5. Upgrade Navigator Encrypt client:
sudo apt-get install navencrypt
6. Start Navigator Encrypt:
sudo service navencrypt-mount start
7. If using an RSA master key file, then you should change the master key to use OAEP padding:
# navencrypt key --change --rsa-oaep...>> Choose NEW MASTER key type: 1) Passphrase (single) 2) Passphrase (dual) 3) RSA private keySelect: 3Type MASTER RSA key file:
93

CDP Private Cloud Base Upgrading Cloudera Manager 6
Type MASTER RSA key passphrase:
To check the type of padding currently in use:
# navencrypt key --get-rsa-paddingType your Master keyType MASTER RSA key file:Type MASTER RSA key passphrase:
Verifying Master Key against keytrustee (wait a moment)...RSA_PKCS1_OAEP_PADDING
Related InformationUpgrading Cloudera Navigator Encrypt
Configuring a Local Package Repository
Upgrading Cloudera Navigator Key HSM
Setting Up an Internal Repository
Although it is possible to upgrade Cloudera Navigator KeyHSM by using the KeyHSM RPM package directly,Cloudera recommends setting up a YUM package repository to perform the upgrade. The steps given below assumethat a repository containing the KeyHSM RPM package downloaded from the paywall has been created. For moreinformation on creating such a repository, see https://wiki.centos.org/HowTos/CreateLocalRepos.
Upgrading Key HSM (Minor and Patch Version Upgrades)
If you are upgrading from Key HSM 1.x (shipped with CDH 5.x and earlier) to Key HSM 7.x, use the instructions inUpgrading Key HSM (Major Version Upgrades) on page 95; do not use the procedure documented in this section.
Important: If you have implemented Key Trustee Server high availability, upgrade Key HSM on each KeyTrustee Server.
1. Install the KeyHSM Repository
Add the internal repository that you created.2. Stop the Key HSM Service
Stop the Key HSM service before upgrading:
sudo service keyhsm shutdown
3. Upgrade Navigator Key HSM
Upgrade the Navigator Key HSM package using yum:
sudo yum update keytrustee-keyhsm
Cloudera Navigator Key HSM is installed to the /usr/share/keytrustee-server-keyhsm directory bydefault.
4. Start the Key HSM Service
Start the Key HSM service:
sudo service keyhsm start
94
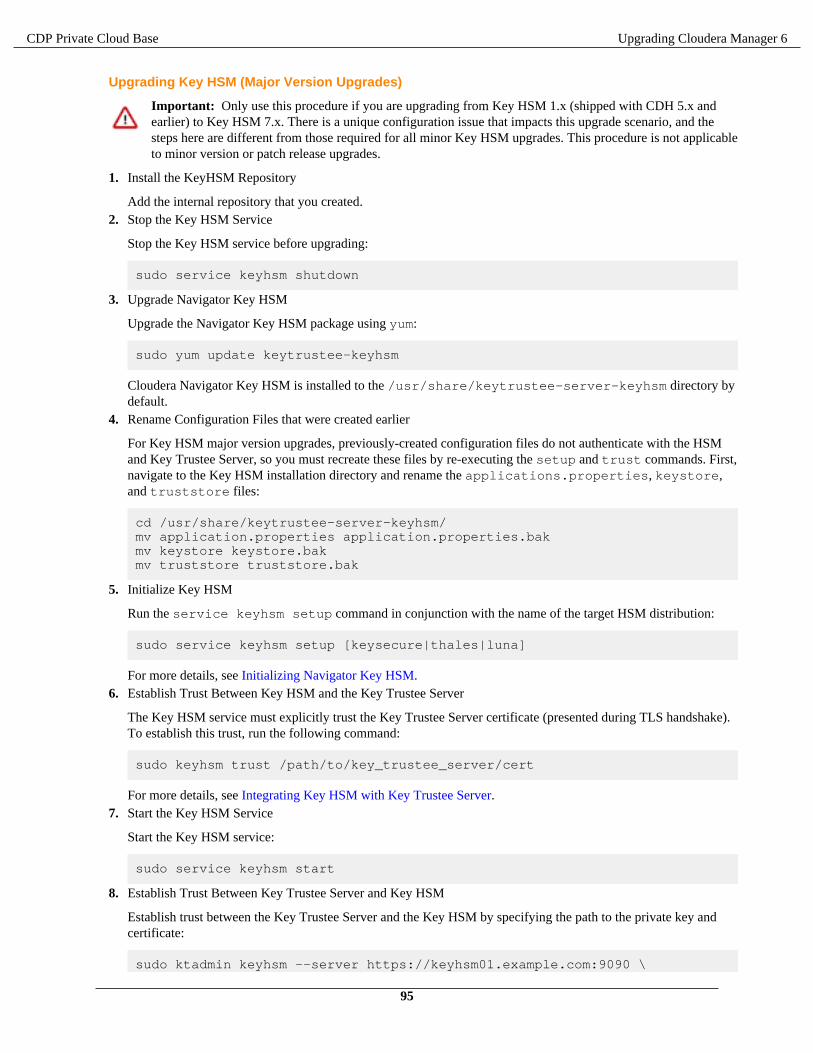
CDP Private Cloud Base Upgrading Cloudera Manager 6
Upgrading Key HSM (Major Version Upgrades)
Important: Only use this procedure if you are upgrading from Key HSM 1.x (shipped with CDH 5.x andearlier) to Key HSM 7.x. There is a unique configuration issue that impacts this upgrade scenario, and thesteps here are different from those required for all minor Key HSM upgrades. This procedure is not applicableto minor version or patch release upgrades.
1. Install the KeyHSM Repository
Add the internal repository that you created.2. Stop the Key HSM Service
Stop the Key HSM service before upgrading:
sudo service keyhsm shutdown
3. Upgrade Navigator Key HSM
Upgrade the Navigator Key HSM package using yum:
sudo yum update keytrustee-keyhsm
Cloudera Navigator Key HSM is installed to the /usr/share/keytrustee-server-keyhsm directory bydefault.
4. Rename Configuration Files that were created earlier
For Key HSM major version upgrades, previously-created configuration files do not authenticate with the HSMand Key Trustee Server, so you must recreate these files by re-executing the setup and trust commands. First,navigate to the Key HSM installation directory and rename the applications.properties, keystore,and truststore files:
cd /usr/share/keytrustee-server-keyhsm/mv application.properties application.properties.bakmv keystore keystore.bakmv truststore truststore.bak
5. Initialize Key HSM
Run the service keyhsm setup command in conjunction with the name of the target HSM distribution:
sudo service keyhsm setup [keysecure|thales|luna]
For more details, see Initializing Navigator Key HSM.6. Establish Trust Between Key HSM and the Key Trustee Server
The Key HSM service must explicitly trust the Key Trustee Server certificate (presented during TLS handshake).To establish this trust, run the following command:
sudo keyhsm trust /path/to/key_trustee_server/cert
For more details, see Integrating Key HSM with Key Trustee Server.7. Start the Key HSM Service
Start the Key HSM service:
sudo service keyhsm start
8. Establish Trust Between Key Trustee Server and Key HSM
Establish trust between the Key Trustee Server and the Key HSM by specifying the path to the private key andcertificate:
sudo ktadmin keyhsm --server https://keyhsm01.example.com:9090 \
95

CDP Private Cloud Base Upgrading Cloudera Manager 6
--client-certfile /etc/pki/cloudera/certs/mycert.crt \--client-keyfile /etc/pki/cloudera/certs/mykey.key --trust
For a password-protected Key Trustee Server private key, add the --passphrase argument to the command(enter the password when prompted):
sudo ktadmin keyhsm --passphrase \--server https://keyhsm01.example.com:9090 \--client-certfile /etc/pki/cloudera/certs/mycert.crt \--client-keyfile /etc/pki/cloudera/certs/mykey.key --trust
For additional details, see Integrating Key HSM with Key Trustee Server.9. Remove Configuration Files From Previous Installation
After completing the upgrade, remove the saved configuration files from the previous installation:
cd /usr/share/keytrustee-server-keyhsm/rm application.properties.bakrm keystore.bakrm truststore.bak
Key Trustee Server SSL Certificate Regeneration
When Key HSM is upgraded to CDP version 7.1.4 or above, the SSL certificates of the Key Trustee Server (KTS)might need to be regenerated if the self-signed certificates that are created by the ktadmin command are being used.
Perform the following steps to regenerate the KTS SSL certificate:
1. Stop the KTS service from Cloudera Manager.2. Navigate to the location /var/lib/keytrustee/.keytrustee/.ssl/ to take a backup of the certificate files ssl-cert-
keytrustee-pk.pem and ssl-cert-keytrustee.pem:
cd /var/lib/keytrustee/.keytrustee/.ssl/
3. Backup the certificate files:
mv ssl-cert-keytrustee-pk.pem ssl-cert-keytrustee-pk_backup.pemmv ssl-cert-keytrustee.pem ssl-cert-keytrustee_backup.pem
4. Regenerate the certificate file:
ktadmin init
5. Configure the Key HSM to trust the new certificate file:
keyhsm trust /var/lib/keytrustee/.keytrustee/.ssl/ssl-cert-keytrustee.pem
6. Restart the Key HSM service.7. Start the KTS service from Cloudera Manager.8. Run the following command to test and validate certificate regeneration:
curl -vk https://$(hostname -f):11371/test_hsm
Upgrading Key Trustee KMSUpgrading from CDH to CDP automatically replaces your existing Key Trustee KMS service with Ranger KMS.Your Key Trustee KMS ACLs are converted to Ranger policies.
When you upgrade from CDH 5 or 6 to CDP 7.1.1+, the Cloudera Manager removes your existing Key Trustee KMSinstallation and installs Ranger KMS. Next, Key Trustee KMS ACLs are converted to Ranger policies. Some ACLsare not supported and will be ignored by Ranger KMS.
96

CDP Private Cloud Base Upgrading Cloudera Manager 6
This process is entirely automatic. There are links below to help you learn about your new KMS service: how theACL conversion process works, which ACLs are not supported, and how Ranger KMS policy evaluation works.
Related InformationMigrating ACLs from Key Trustee KMS to Ranger KMS
Installing Ranger KMS backed with a Key Trustee Server and HA
Setting Up Data at Rest Encryption for HDFS
Configuring a database for Ranger or Ranger KMS
Troubleshooting a Cloudera Manager Upgrade
The Cloudera Manager Server fails to start after upgrade.
The Cloudera Manager Server fails to start after upgrade.
Possible Reasons
There were active commands running before upgrade. This includes commands a user might have run and alsocommands Cloudera Manager automatically triggers, either in response to a state change, or something configured torun on a schedule, such as Backup and Disaster Recovery replication or snapshot jobs.
Possible Solutions
• Stop any running commands from the Cloudera Manager Admin Console or wait for them to complete. SeeAborting a Pending Command.
• Ensure that you have disabled any scheduled replication or snapshot jobs from the Cloudera Manager AdminConsole to complete before proceeding with the upgrade. See HDFS Replication.
Re-Running the Cloudera Manager Upgrade Wizard
Minimum Required Role: Full Administrator. This feature is not available when using Cloudera Manager to manageData Hub clusters.
The first time you log in to the Cloudera Manager server after upgrading your Cloudera Manager software, theupgrade wizard runs. If you did not complete the wizard at that time, or if you had hosts that were unavailable at thattime and still need to be upgraded, you can re-run the upgrade wizard:
1. Click the Hosts tab.2. Click Re-run Upgrade Wizard or Review Upgrade Status. This takes you back through the installation wizard to
upgrade Cloudera Manager Agents on your hosts as necessary.3. Select the release of the Cloudera Manager Agent to install. Normally, this is the Matched Release for this
Cloudera Manager Server. However, if you used a custom repository (instead of archive.cloudera.com) for theCloudera Manager server, select Custom Repository and provide the required information. The custom repositoryallows you to use an alternative location, but that location must contain the matched Agent version.
4. Specify credentials and initiate Agent installation:
a. Select root for the root account, or select Another user and enter the username for an account that haspassword-less sudo privileges.
b. Select an authentication method:
• If you choose password authentication, enter and confirm the password.• If you choose public-key authentication, provide a passphrase and path to the required key files.
You can modify the default SSH port if necessary.c. Specify the maximum number of host installations to run at once. The default and recommended value is 10.
You can adjust this based on your network capacity.d. Click Continue.
97

CDP Private Cloud Base Upgrading Cloudera Manager 6
When you click Continue, the Cloudera Manager Agent is upgraded on all the currently managed hosts. You cannotsearch for new hosts through this process. To add hosts to your cluster, click the Add New Hosts to Cluster button.
Reverting a Failed Cloudera Manager Upgrade
Minimum Required Role: Cluster Administrator (also provided by Full Administrator) This feature is notavailable when using Cloudera Manager to manage Data Hub clusters.
This topic describes how to reinstall the same version of Cloudera Manager you were using previously, so that theversion of your Cloudera Manager Agents match the server. The steps below assume that the Cloudera ManagerServer is already stopped (because it failed to start after the attempted upgrade).
Important: The following instructions assume that a Cloudera Manager upgrade failed, and that theupgraded server never started, so that the remaining steps of the upgrade process were not performed. Thesteps below are not sufficient to revert from a running Cloudera Manager deployment.
Ensure Cloudera Manager Server and Agent are stopped.
1. Log in to the Cloudera Manager Server host.
ssh my_cloudera_manager_server_host
2. Stop the Cloudera Manager Server.
sudo systemctl stop cloudera-scm-server
3. Stop the Cloudera Manager Agent.RHEL 7, SLES 12, Ubuntu 18.04 and higher
sudo systemctl stop cloudera-scm-agent
RHEL 5 or 6, SLES 11, Debian 6 or 7, Ubuntu 12.04 or 14.04
sudo service cloudera-scm-agent stop
Restore the Cloudera Manager Database (if necessary)
If your Cloudera Manager upgrade fails, you need to determine whether the upgrade process has successfullycompleted updating the schema of the Cloudera Manager database. If the schema update has begun, you must restorethe Cloudera Manager database using a backup taken before you began the upgrade.
1. To determine whether the schema has been updated, examine the Cloudera Manager server logs, and look for amessage similar to the following: Updated Schema Version to 60000. (The version number may bedifferent for your environment.)
Run the following command to find the log entry (f the log file is in a different location, substitute the correctpath):
grep 'Updated Schema Version to ' /var/log/cloudera-scm-server/cloudera-scm-server.log
2. If required, restore the database.
The procedure for restoring the database depends on the type of database used by Cloudera Manager.
98

CDP Private Cloud Base Upgrading Cloudera Manager 6
3. If you are using the embedded PostgreSQL database, stop the Cloudera Manager Embedded PostgreSQLdatabase:RHEL 7, SLES 12, Ubuntu 18.04 and higher
sudo systemctl stop cloudera-scm-server-db
RHEL 5 or 6, SLES 11, Debian 6 or 7, Ubuntu 12.04 or 14.04
sudo service cloudera-scm-server-db stop
If you are not using the embedded PostgreSQL database and you attempt to stop it, you might see a messageindicating that the service cannot be found. If you see a message that the shutdown failed, then the embeddeddatabase is still running, probably because services are connected to the Hive metastore. If the database shutdownfails due to connected services, issue the following command:
RHEL-compatible 7 and higher, Ubuntu 16.04
sudo service cloudera-scm-server-db next_stop_fastsudo service cloudera-scm-server-db stop
All other Linux distributions
sudo service cloudera-scm-server-db fast_stop
Establish Access to the Software
Cloudera Manager needs access to a package repository that contains the updated software packages. You canchoose to access the Cloudera public repositories directly, or you can download those repositories and set up a localrepository to access them from within your network. If your cluster hosts do not have connectivity to the Internet, youmust set up a local repository.
1. Log in to the Cloudera Manager Server host.
ssh my_cloudera_manager_server_host
2. Remove any older files in the existing repository directory:RHEL / CentOS
sudo rm /etc/yum.repos.d/cloudera*manager.repo*
SLES
sudo rm /etc/zypp/repos.d/cloudera*manager.repo*
Ubuntu
sudo rm /etc/apt/sources.list.d/cloudera*.list*
3. Fill in the form at the top of this page.
99

CDP Private Cloud Base Upgrading Cloudera Manager 6
4. Create a repository file so that the package manager can locate and download the binaries.
Do one of the following, depending on whether or not you are using a local package repository:
• Use a local package repository. (Required when cluster hosts do not have access to the internet.) SeeConfiguring a Local Package epository.
• Use the Cloudera public repository
RHEL / CentOS
a. Create a file named /etc/yum.repos.d/cloudera-manager.repo with the followingcontent:
[cloudera-manager]name=Cloudera Manager baseurl=https://archive.cloudera.com/p/cm7/<Cloudera Manager version>/redhat<OS major version>/yum/gpgkey =https://archive.cloudera.com/p/cm7/<Cloudera Manager version>/redhat<OS major version>/yum/RPM-GPG-KEY-clouderausername=changemepassword=changemegpgcheck=1enabled=1autorefresh=0type=rpm-md
Replace changeme with your username and password in the /etc/yum.repos.d/cloudera-manager.repo file.
SLES
a. Create a file named /etc/zypp/repos.d/cloudera-manager.repo with thefollowing content:
[cloudera-manager]name=Cloudera Manager baseurl=https://archive.cloudera.com/p/cm7/<Cloudera Manager version>/sles<OS major version>/yum/gpgkey =https://archive.cloudera.com/p/cm7/<Cloudera Manager version>/sles<OS major version>/yum/RPM-GPG-KEY-clouderausername=changemepassword=changemegpgcheck=1enabled=1autorefresh=0type=rpm-md
b. Replace changeme with your username and password in the /etc/zypp/repos.d/cloudera-manager.repo file.
Ubuntu
Debian is not a supported operating system for Cloudera Manager 6.x.
a. Create a file named /etc/apt/sources.list.d/cloudera_manager.list with thefollowing content:
# Cloudera Manager <Cloudera Manager version>deb [arch=amd64] http://username:[email protected]/p/cm7/<Cloudera Manager version>/ubuntu1804/apt -cm<Cloudera Manager version> contrib
100

CDP Private Cloud Base Upgrading Cloudera Manager 6
b. Run the following command:
sudo apt-get update
c. Replace changeme with your username and password in the /etc/apt/sources.list.d/cloudera_manager.list file.
Tip: If you have a mixed operating system environment, adjust the Operating System filter at the top ofthe page for each operating system. The guide will generate the repo file for you automatically here.
5. A Cloudera Manager upgrade can introduce new package dependencies. Your organization may have restrictionsor require prior approval for installation of new packages. You can determine which packages may be installed orupgraded:RHEL / CentOS
yum deplist cloudera-manager-agent
SLES
zypper info --requires cloudera-manager-agent
Ubuntu
apt-cache depends cloudera-manager-agent
Downgrade the Cloudera Manager Packages
Note: Make sure the repository file above matches the specific maintenance version before the upgrade.
1. Downgrade the packages. Note: Only add cloudera-manager-server-db-2 if you are using theembedded PostgreSQL database.RHEL / CentOS
sudo yum clean allsudo yum repolist
sudo yum downgrade "cloudera-manager-*"
SLES
sudo zypper clean --all
sudo zypper dup -r baseurl
Ubuntu
There is no action that downgrades Cloudera Manager to the version currently in the repository.2. Verify that you have the correct packages installed.
Ubuntu
dpkg-query -l 'cloudera-manager-*'
Desired=Unknown/Install/Remove/Purge/Hold| Status=Not/Inst/Conf-files/Unpacked/halF-conf/Half-inst/trig-aWait/Trig-pend
101

CDP Private Cloud Base Upgrading Cloudera Manager 6
|/ Err?=(none)/Reinst-required (Status,Err: uppercase=bad)||/ Name Version Description+++-======================-======================-============================================================ii cloudera-manager-agent 5.15.0-0.cm...~sq The Cloudera Manager Agentii cloudera-manager-daemo 5.15.0-0.cm...~sq Provides daemons for monitoring Hadoop and related tools.ii cloudera-manager-serve 5.15.0-0.cm...~sq The Cloudera Manager Server
RHEL / CentOS / SLES
rpm -qa 'cloudera-manager-*'
cloudera-manager-server-5.15.0-...cloudera-manager-agent-5.15.0-...cloudera-manager-daemons-5.15.0-...cloudera-manager-server-db-2-5.15.0-...
Restore the Cloudera Manager Directory
1. Run the following commands to extract the backups:
cd $CM_BACKUP_DIRtar -xf cloudera-scm-agent.tartar -xf cloudera-scm-server.tar
2. Restore the Cloudera Manager server directory from a backup taken during the upgrade process:
sudo -E cp -rp $CM_BACKUP_DIR/etc/cloudera-scm-server/* /etc/cloudera-scm-server
sudo -E cp -rp $CM_BACKUP_DIR/etc/default/cloudera-scm-server /etc/default/cloudera-scm-server
3. If the Cloudera Manager server host has an agent installed, restore the Cloudera Manager agent directory from abackup taken during the upgrade process:
sudo -E cp -rp $CM_BACKUP_DIR/etc/cloudera-scm-agent/* /etc/cloudera-scm-agent
sudo -E cp -rp $CM_BACKUP_DIR/etc/default/cloudera-scm-agent /etc/default/cloudera-scm-agent
sudo -E cp -rp $CM_BACKUP_DIR/var/run/cloudera-scm-agent/* /var/run/cloudera-scm-agent
sudo -E cp -rp $CM_BACKUP_DIR/var/lib/cloudera-scm-agent/* /var/lib/cloudera-scm-agent
102

CDP Private Cloud Base Validate TLS configurations
Start Cloudera Manager Again
1. If you are using the embedded PostgreSQL database, start the database:
sudo systemctl start cloudera-scm-server-db
2. Start the Cloudera Manager Agent.RHEL 7, SLES 12, Ubuntu 18.04 and higher
sudo systemctl start cloudera-scm-agent
If the agent starts without errors, no response displays.
RHEL 5 or 6, SLES 11, Debian 6 or 7, Ubuntu 12.04 or 14.04
sudo service cloudera-scm-agent start
You should see the following:
Starting cloudera-scm-agent: [ OK ]
3. Start the Cloudera Manager Server.
sudo systemctl start cloudera-scm-server
4. Start the Cloudera Management Service.
a. Log in to the Cloudera Manager Admin Console.b. Select Clusters > Cloudera Management Service.c. Select Actions > Start.
Note: Troubleshooting: If you have problems starting the server, such as database permissions problems, youcan use the server's log to troubleshoot the problem.
vim /var/log/cloudera-scm-server/cloudera-scm-server.log
Validate TLS configurations
If you are upgrading to from CDH to Cloudera Manager 7.4.4 or earlier, you need to validate TLS configurations. Byvalidating TLS, you can avoid upgrade failure by properly configuring Cloudera Manager properties if your clustersare TLS-enabled.
About this taskCloudera Manager does not configure the following properties for Hive metastore (HMS):
• HDFS NameNode TLS/SSL Trust Store File (namenode_truststore_file)• HDFS NameNode TLS/SSL Trust Store Password (namenode_truststore_password)• Hive Metastore TLS/SSL Trust Store File (hive.metastore.dbaccess.ssl.truststore.path)• Hive Metastore TLS/SSL Trust Store Password (hive.metastore.dbaccess.ssl.truststore.password)
These configurations are required. Ranger Plugin needs to validate the TLS connection to Ranger to downloadpolicies. The Hive Strict Managed Migration (HSMM) reports success, but actually fails. The HSMM log appears asfollows:
HiveStrictManagedMigration: [main]: Found 0 databasesHiveStrictManagedMigration: [main]: Done processing databases
103

CDP Private Cloud Base Expediting the Hive upgrade
You must configure the HDFS and HMS truststore file and password properties after upgrading Cloudera Manager to7.3.1 or later.
Before you begin
• You completed the upgrade to Cloudera Manager 7.4.4 or earlier.• Your CDP cluster will be TLS-enabled.
Procedure
1. In Cloudera Manager, to configure HDFS properties click Clusters > HDFS-1 > Configuration .
2. Search for namenode_truststore.
3. Set HDFS NameNode TLS/SSL Trust Store File to {{CM_AUTO_TLS}}.
4. Set HDFS TLS/SSL Trust Store Password.
5. In Cloudera Manager, to configure Hive Metastore properties click Clusters > Hive-1 > Configuration .
6. Search for hive.metastore.dbaccess.
7. Set Hive Metastore TLS/SSL Trust Store File to {{CM_AUTO_TLS}}.
8. Set Hive Metastore TLS/SSL Trust Store Password.
9. Save changes.
Expediting the Hive upgrade
Preparing the Hive metastore for the upgrade can take a long time. Checking and correcting your Hive metastorepartitions and SERDE definitions is critical for a successful upgrade. If you have many tables and partitions, it mightbe difficult to manually identify these problems. The free Hive Upgrade Check tool helps identify these problems.
104

CDP Private Cloud Base Expediting the Hive upgrade
The Hive Upgrade Check tool is Community software that scans your Hive metastore to identify potential upgradeproblems. You can also use the tool to perform the following tasks:
• Convert legacy managed tables (non-acid) to external tables.• Report potential problems, such as tables that do not have matching HDFS directories, to resolve before the
upgrade.
The cluster upgrade to CDP runs the Hive Strict Managed Migration (HSMM) process that performs the same tasks.During the cluster upgrade, you can skip the HSMM process, migrating none of your tables and database definitions.
Overview of the expedited Hive upgradeYou perform tasks before and after the Hive migration to hasten the upgrade. The sequence of steps involved inexpediting the Hive upgrade includes identifying problems in tables and databases before upgrading, configuringthe Hive Strict Managed Migration (HSMM) to prevent migration, and completing the upgrade. After the upgrade toCDP, you migrate the tables and databases.
1. Prepare tables for migration, identifying potential migration problems using the Hive Upgrade Check tool.2. Decide to expedite the upgrade by not migrating your databases and tables during the upgrade.3. Upgrade Cloudera Manager, and then start to upgrade your cluster.4. In the upgrade wizard, after adding the Hive-on-Tez service, temporarily leave the upgrade wizard.5. Configure HSMM to prevent migration of your databases and tables.6. Return to the upgrade wizard and continue upgrading your cluster.
None of your databases or tables are migrated to CDP.
If you did not migrate your Hive data, do so after the upgrade to CDP as follows:
1. Prepare tables for migration, identifying and fixing potential migration problems using the Hive Upgrade Checktool.
2. Create a list of databases and tables to migrate.3. Migrate tables and databases to CDP.
You cannot use unmigrated tables in CDP.
Preparing tables for migrationYou download the Hive Upgrade Check tool and use it to identify problems in unmigrated tables. These problemscan cause upgrade failure. It saves time to fix the problems and avoid failure. The tool provides help for fixing thoseproblems before migrating the tables to CDP.
105
https://docs.cloudera.com/cdp-private-cloud-upgrade/latest/upgrade-hdp/topics/amb-hdp-checklist.html
https://docs.cloudera.com/cdp-private-cloud-upgrade/latest/upgrade-hdp/topics/amb-hdp-checklist.html

CDP Private Cloud Base Expediting the Hive upgrade
About this task
You use the Hive Upgrade Check community tool to help you identify tables that have problems affecting migration.You resolve problems revealed by the Hive Upgrade Check tool to clean up the Hive Metastore before migration.If you do not want to use the Hive Upgrade Check tool, you need to perform the tasks described in the followingsubtopics to migrate Hive data to CDP:
• Check SERDE Definitions and Availability• Handle Missing Table or Partition Locations• Manage Table Location Mapping• Make Tables SparkSQL Compatible
Procedure
1. Obtain the Hive Upgrade Check tool.
Download the Hive SRE Upgrade Check tool from the Cloudera labs github location.
2. Follow instructions in the github readme to run the tool.The Hive Upgrade Check (v.2.3.5.6+) will create a yaml file (hsmm_<name>.yaml) identifying databases andtables that require attention.
3. Follow instructions in prompts from the Hive Upgrade Check tool to resolve problems with the tables.
At a minimum, you must run the following processes described in the github readme:
• process ID 1 Table / Partition Location Scan - Missing Directories• process id 3 Hive 3 Upgrade Checks - Managed Non-ACID to ACID Table Migrations
Check SERDE Definitions and AvailabilityEnsure correct Serde definitions and a reference to a SERDE exists to ensure a successful upgrade.
About this taskYou perform this step if you do not modify the HSMM process for expediting the Hive upgrade.
Procedure
1. Check Serde definitions for correctness and check for SERDE availability.
2. Correct any problems found as follows:
• Remove the table having the problematic SERDE.• Ensure the SERDE is available during the upgrade, so the table can be evaluated.
Handle Missing Table or Partition LocationsYou need to identify missing table or partition locations, or both, to prevent upgrade failure. If the table and partitionlocations do not exist in the file system, you must either create a replacement partition directory (recommended) ordrop the table and partition.
About this taskYou perform this step if you did not modify the HSMM process to expedite the Hive upgrade.
Procedure
Ensure the table and partition locations exist on the file system. If these locations don’t exist either create areplacement partition directory (recommended) or drop the table and partition.
Managed Table Location MappingA managed table location must map to one managed table only. If multiple managed tables point to the same location,upgrade problems occur.
106

CDP Private Cloud Base Expediting the Hive upgrade
Make Tables SparkSQL CompatibleNon-Acid, managed tables in ORC or in a Hive Native (but non-ORC) format that are owned by the POSIX userhive will not be SparkSQL-compatible after the upgrade unless you perform manual conversions.
About this taskIf your table is a managed, non-ACID table, you can convert it to an external table using this procedure(recommended). After the upgrade, you can easily convert the external table to an ACID table, and then use the HiveWarehouse Connector to access the ACID table from Spark.
Take one of the following actions.
• Convert the tables to external Hive tables before the upgrade.
ALTER TABLE ... SET TBLPROPERTIES('EXTERNAL'='TRUE','external.table.purge'='true')
• Change the POSIX ownership to an owner other than hive.
You will need to convert managed, ACID v1 tables to external tables after the upgrade.
Configuring HSMM to prevent migrationYou need to know how to configure the Hive Strict Managed Migration (HSMM) to prevent migrating your tablesand databases as you run the upgrade process in Cloudera Manager. You briefly leave the upgrade process, do theconfiguration, and than proceed with the upgrade.
Before you begin
• You are in the middle of the CDH to CDP Private Cloud Base in-place upgrade and installed Hive-on-Tez.
About this taskIn this task, you set the table migration control file URL property to an arbitrary value, deliberatelycausing HSMM to fail to migrate your tables and databases. You must manually migrate these tables later.
Procedure
1. In Cloudera Manager, go to Clusters > Hive-on-Tez.
2. Stop the Hive-on-Tez service.
3. In Configuration, search for table migration control file URL.
4. Set the value of the Table migration control file URL property to the absolute path and file name of your YAMLinclude list.
5. Save configuration changes.
6. Start the Hive-on-Tez service.
7. Return to the CDH to CDP Private Cloud Base in-place upgrade wizard to complete the cluster upgrade.
Related InformationRunning the Hive Upgrade Check tool
Understanding the Hive upgradeYou need an understanding of the Hive Strict Managed Migration (HSMM) and the Hive Upgrade Check tool for asuccessful upgrade.
107

CDP Private Cloud Base Upgrading a CDH 6 Cluster
HSMM vs the Hive Upgrade Check tool
It is difficult to estimate how long the Hive Strict Managed Migration will take. The following factors are just a fewthat might affect how long it takes:
• Number of managed tables• Core processing power• Backend metastore database speed
The process runs across all Hive metastore databases and tables by default, identifying managed tables that need toundergo compaction or conversion to Hive 3 ACID V2 tables.
Consider expediting the upgrade process if one of the following conditions exist:
• You have few, or no, ACID tables but do have many legacy managed tables in your environment.• Reducing downtime is critical, and justifies the extra effort to expedite the upgrade process.
Why upgrading takes so long
The underlying Hive upgrade process Hive Strict Managed Migration (HSMM) is an Apache Hive conversion utilitythat makes adjustments to Hive tables under the enhanced and strict Hive 3 environment to meet the needs of the mostdemanding workloads and governance requirements for Data Lake implementations. There are some changes to thestandard behaviors in Hive table definitions and locations. The HSMM reviews every database and table to determineif changes are needed to meet these requirements.
With systems that have been around for a while, or have adopted some ingest patterns, there may be artifacts in themetastore that cannot be reconciled, including the following artifacts:
• Tables and partitions without reciprocating storage locations• Tables using SERDEs that have been abandoned.• ACIDv1 tables
These tables must be fully compacted before the upgrade. If tables are not compacted, data loss is highly likely.
When these irreconcilable conditions occur, it requires manual intervention to fix problems before it can proceed.
The Hive upgrade process iterates through the databases and tables, attempting to materialize each of them using theHive Metastore and public Thrift APIs. That creates a heavy load on the underlying metastore database and entiresystem.
Upgrading a CDH 6 Cluster
Minimum Required Role: Cluster Administrator (also provided by Full Administrator) This feature is notavailable when using Cloudera Manager to manage Data Hub clusters.
This topic describes how to upgrade a CDH or Cloudera Runtime cluster in any of the following scenarios:
Note: To upgrade to CDP Private Cloud Base from CDH 5, see In-place upgrade of CDH 5 to CDP PrivateCloud Base
Attention: To upgrade to Cloudera Manager or CDH 5.x or 6.x, do not use the instructions on this page. Seethe Cloudera Enterprise Upgrade Guide.
When you upgrade a cluster, you use Cloudera Manager to upgrade the cluster software across an entire cluster usingCloudera Parcels. Package-based installations are not supported for Cloudera Runtime and CDP Private Cloud Baseupgrades. You must transition your CDH clusters to use Parcels before upgrading to CDP Private Cloud Base. SeeMigrating from Packages to Parcels.
Cluster upgrades update the Hadoop software and other components. You can use Cloudera Manager to upgradea cluster for major, minor, and maintenance upgrades. The procedures vary depending on the version of Cloudera
108

CDP Private Cloud Base Upgrading a CDH 6 Cluster
Manager you are using, the version of the cluster you are upgrading, and the version of Cloudera Runtime you areupgrading to.
After completing preparatory steps, you use the Cloudera Manager upgrade wizard to complete the upgrade. ClouderaManager will restart all services after the upgrade.
• Atlas• HBase• HDFS• Hive-on-Tezx• Kafka• Key Trustee Server• Knox• Kudu – see Orchestrating a rolling restart with no downtime.• MapReduce• Oozie• Ranger KMS• Schema Registry• YARN• ZooKeeper
Note: Rolling Upgrades are not supported when upgrading to CDP Private Cloud Base.
Step 1: Getting Started Upgrading a ClusterTasks you should perform before starting the upgrade.
Note: Not all combinations of Cloudera Manager and Cloudera Runtime are supported. Ensure that theversion of Cloudera Manager you are using supports the version of Cloudera Runtime you have selected. Fordetails, see Cloudera Manager support for Cloudera Runtime, CDH and CDP Private Cloud Experiences .
Note: CDP Private Cloud Data Services version 1.3.4 requires Cloudera Manager 7.5.5 and ClouderaRuntime version 7.1.6 or 7.1.7 For more information, see CDP Private Cloud Data Services.
Important: Upgrades to Cloudera Runtime 7.1.7 SP1 (7.1.7.1000) are supported only from ClouderaRuntime 7.1.7.
Note: If you are upgrading to Cloudera Manager 7.5.1 or higher in order to install CDP Private CloudExperiences version 1.3.1, you must use Cloudera Runtime version 7.1.6 or 7.1.7. For more information, seeCDP Private Cloud Exeriences.
Important: Upgrades from CDH 6.1, 6.2, and 6.3 are only supported for upgrades to CDP Private CloudBase 7.1.7 or higher. Upgrades from CDH 6.0 are not supported.
Important: To upgrade to Cloudera Manager or CDH 5.x or 6.x, do not use the instructions on this page. Seethe Cloudera Enterprise Upgrade Guide.
Warning: Upgrades to Cloudera Runtime 7.0.3 are not supported.
Note: Upgrades from CDH 6.x are supported only for upgrades to Cloudera Manager 7.4.4 or higher andCloudera Runtime 7.1.7 or higher. Upgrades from CDH 6.0 are not supported.
Warning: Upgrades from CDH 5.12 and lower to CDP Private Cloud Base are not supported. You mustupgrade the cluster to CDH versions 5.13 - 5.16 before upgrading to CDP Private Cloud Base.
109

CDP Private Cloud Base Upgrading a CDH 6 Cluster
The version of CDH or Cloudera Runtime that you can upgrade to depends on the version of Cloudera Manager thatis managing the cluster. You may need to upgrade Cloudera Manager before upgrading your clusters. Upgrades arenot supported when using Cloudera Manager 7.0.3.
Before you upgrade a cluster, you need to gather information, review the limitations and release notes and runsome checks on the cluster. See the Collect Information section below. Fill in the My Environment form below tocustomize your upgrade procedures.
Minimum Required Role: Cluster Administrator (also provided by Full Administrator) This feature is notavailable when using Cloudera Manager to manage Data Hub clusters.
Important: If you have any add-on services installed using a CSD (Custom Service Descriptor), you mustuse Cloudera Manager 7.1.1 or higher to install the CDH 6 version of the CSD before upgrading the cluster toCloudera Runtime 7.1.1 or higher. During the upgrade, Cloudera Manager will prompt you to also install theCloudera Runtime 7 version of the CSD. Cloudera Manager version 7.1.4 or higher will prompt you to installany required intermediate versions of the CSD.
To successfully complete the upgrade you must have the CDH 5, CDH 6, and Cloudera Runtime 7 versions ofthe CSD installed. After the upgrade, you can delete the CDH 5 and CDH 6 versions of the add-on service.
This affects the following Cloudera services: CDSW, Nifi, and Nifi Registry as well as any CSDs created bythird parties. See Add-on Services.
Note: Isilon is not supported for CDP Private Cloud Base version 7.1.5 and lower.
Note: If your cluster uses Compute clusters in a Virtual Private Cluster (VPC) architecture, you must removethe compute cluster before upgrading the Base cluster. You can recreate the Compute cluster after the upgrade
Note:
After upgrading from CDH to CDP, the NodeManager recovery feature is enabled by default. This means thatthe yarn.nodemanager.recovery.enabled property is set to true. Cloudera recommends that youkeep the NodeManager recovery feature enabled. If you set this property to false in your CDP cluster andthen upgrade to a later CDP version, the feature will remain disabled.
Important:
In Cloudera Runtime 7.1.6 and higher, the way Streams Messaging Manager (SMM) integrates with StreamsReplication Manager (SRM) has changed. SMM can only connect to and monitor an SRM service that isrunning in the same cluster as SMM. Monitoring an SRM service that is running in a cluster that is external toSMM is no longer supported.
Connectivity between the two services is disabled by default after a successful upgrade. If you want tocontinue using SMM to monitor SRM, you must reconnect the two services following the upgrade.
110

CDP Private Cloud Base Upgrading a CDH 6 Cluster
Warning: Upgrades from Cloudera Manager 5.12 and lower to Cloudera Manager 7.1.1 or higher are notsupported
Warning: For upgrades from CDH clusters with Cloudera Navigator to Cloudera Runtime 7.1.1 (or higher)clusters where Navigator is to be migrated to Apache Atlas, the cluster must have Kerberos enabled beforeupgrading.
Warning: Before upgrading CDH 5 clusters with Sentry to Cloudera Runtime 7.1.x clusters where Sentryprivileges are to be transitioned to Apache Ranger:
• The cluster must have Kerberos enabled.• Verify that HDFS gateway roles exist on the hosts that runs the Sentry service.
Important: If HDFS ACL sync is enabled (hdfs_sentry_sync_enable=true) on the CDH cluster, then youmust install Ranger RMS to support the same functionality. For steps to install Ranger RMS, see InstallingRanger RMS.
Note: If the cluster you are upgrading will include Atlas, Ranger, or both, the upgrade wizard deploys oneinfrastructure Solr service to provide a search capability of the audit logs through the Ranger Admin UI and/or to store and serve Atlas metadata. Cloudera recommends that you do not use this service for customerworkloads to avoid interference with audit and timeline performance.
Collect Information
Collect the following information about your environment and fill in the form above. This information will beremembered by your browser on all pages in this Upgrade Guide.
1. Log in to the Cloudera Manager Server host.
ssh my_cloudera_manager_server_host
2. Run the following command to find the current version of the Operating System:
lsb_release -a
3. Log in to the Cloudera Manager Admin console and find the following:
a. The version of Cloudera Manager used in your cluster. Go to Support > About.b. The version of the JDK deployed in the cluster. Go to Support > About.c. Whether High Availability is enabled for HDFS. Go to the HDFS service and click the Actions button. If you
see Disable High Availability, the cluster has High Availability enabled.d. The Install Method and Current cluster version. The cluster version number and Install Method are displayed
on the Cloudera Manager Home page, to the right of the cluster name.
Preparing to Upgrade a Cluster
1. You must have SSH access to the Cloudera Manager server hosts and be able to log in using the root account or anaccount that has password-less sudo permission to all the hosts.
2. Review the Requirements and Supported Versions for the new versions you are upgrading to. See: CDP PrivateCloud Base 7.1 Requirements and Supported Versions If your hosts require an operating system upgrade, youmust perform the upgrade before upgrading the cluster. See Upgrading the Operating System on page 54.
3. Ensure that a supported version of Java is installed on all hosts in the cluster. See the links above. For installationinstructions and recommendations, see Upgrading the JDK on page 42.
4. Review the following documents:
Cloudera Runtime 7
• Review the following when upgrading to Cloudera Runtime 7.1 or higher:
CDP Private Cloud Base 7.1 Requirements and Supported Versions
111

CDP Private Cloud Base Upgrading a CDH 6 Cluster
5. If your deployment has defined a Compute cluster and an associated Data Context, you will need to delete theCompute cluster and Data context before upgrading the base cluster and then recreate the Compute cluster andData context after the upgrade.
See Starting, Stopping, Refreshing, and Restarting a Cluster and Virtual Private Clusters and Cloudera SDX.6. Review the upgrade procedure and reserve a maintenance window with enough time allotted to perform all steps.
For production clusters, Cloudera recommends allocating up to a full day maintenance window to perform theupgrade, depending on the number of hosts, the amount of experience you have with Hadoop and Linux, and theparticular hardware you are using.
7. If the cluster uses Impala, check your SQL against the newest reserved words listed in incompatible changes.If upgrading across multiple versions, or in case of any problems, check against the full list of Impala reservedwords.
8. If the cluster uses Hive, validate the Hive Metastore Schema:
a. In the Cloudera Manager Admin Console, Go to the Hive service.b. Select Actions > Validate Hive Metastore Schema.c. Fix any reported errors.d. Select Actions > Validate Hive Metastore Schema again to ensure that the schema is now valid.
9. Run the Security Inspector and fix any reported errors.
Go to Administration > Security > Security Inspector.10. Log in to any cluster node as the hdfs user, run the following commands, and correct any reported errors:
hdfs fsck / -includeSnapshots -showprogress
Note: The fsck command might take 10 minutes or more to complete, depending on the number of filesin your cluster.
hdfs dfsadmin -report
See HDFS Commands Guide in the Apache Hadoop documentation.11. Log in to any DataNode as the hbase user, run the following command, and correct any reported errors:
hbase hbck
12. If the cluster uses Kudu, log in to any cluster host and run the ksck command as the kudu user (sudo -u kudu). If the cluster is Kerberized, first kinit as kudu then run the command:
kudu cluster ksck <master_addresses>
For the full syntax of this command, see Checking Cluster Health with ksck.13. If you are upgrading to CDP 7.1.x or higher, and Hue is deployed in the cluster, and Hue is using PostgreSQL as
its database, you must manually install psycopg2. See Installing dependencies for Hue before upgrading to CDPon page 40.
Note:
If you are using Oracle database with Hue and are upgrading to CDP 7.x from CDH 5 or CDH 6, thendeactivate the Oracle instant client parcel, download and install the Oracle instant client separately, andthen connect it to Hue. See Configuring the Hue Server to Store Data in the Oracle database .
112
CDP Private Cloud Base Upgrading a CDH 6 Cluster
14. If your cluster uses Impala and Llama, this role has been deprecated as of CDH 5.9 and you must remove the rolefrom the Impala service before starting the upgrade. If you do not remove this role, the upgrade wizard will haltthe upgrade.
To determine if Impala uses Llama:
a. Go to the Impala service.b. Select the Instances tab.c. Examine the list of roles in the Role Type column. If Llama appears, the Impala service is using Llama.
To remove the Llama role:
a. Go to the Impala service and select Actions > Disable YARN and Impala Integrated ResourceManagement.
The Disable YARN and Impala Integrated Resource Management wizard displays.b. Click Continue.
The Disable YARN and Impala Integrated Resource Management Command page displays the progressof the commands to disable the role.
c. When the commands have completed, click Finish.15. If your cluster uses the Ozone technical preview, you must stop and delete this service before upgrading the
cluster.16. The following services are no longer supported as of CDP Private Cloud Base:
• Accumulo• Sqoop 2• MapReduce 1• Record Service
You must stop and delete these services before upgrading a cluster.17. If the cluster you are upgrading has the Hive service and does not have the Hue service, you must add the Hue
service to the cluster before starting the upgrade process.18. Open the Cloudera Manager Admin console and collect the following information about your environment:
a. The version of Cloudera Manager. Go to Support > About.b. The version of the JDK deployed. Go to Support > About.c. The version of CDH or Cloudera Runtime and whether the cluster was installed using parcels or packages. It is
displayed next to the cluster name on the Home page.d. The services enabled in your cluster.
Go to Clusters > Cluster name.e. Whether HDFS High Availability is enabled.
Go to Clusters click HDFS Service, click Actions menu. It is enabled if you see an menu item Disable HighAvailability.
19. Back up Cloudera Manager before beginning the upgrade. See Step 2: Backing Up Cloudera Manager 6 on page67.
Step 2: Review Notes and WarningsNotes and warnings to consider before upgrading to CDP.
Minimum Required Role: Cluster Administrator (also provided by Full Administrator) This feature is notavailable when using Cloudera Manager to manage Data Hub clusters.
Note the following before upgrading your clusters:
113

CDP Private Cloud Base Upgrading a CDH 6 Cluster
Important:
• The embedded PostgreSQL database is NOT supported in production environments.• The following services are no longer supported as of Enterprise 6.0.0:
• Sqoop 2• MapReduce 1• Spark 1.6• Record Service
• Running Apache Accumulo on top of CDP Private Cloud Base 7.1.x cluster is not currently supported. Ifyou try to upgrade to CDP Private Cloud Base 7.1.x, you will be asked to remove the Accumulo servicefrom your cluster.
• Upgrading Apache HBase from CDH to Cloudera Runtime 7.1.1 gives you a warning in ClouderaManager that the Dynamic Jars Directory feature property hbase.dynamic.jars.dir is deprecated.You can ignore this warning when using Apache HBase with HDFS storage on CDP Private Cloud Base.The hbase.dynamic.jars.dir property is incompatible with Apache HBase on cloud deploymentsusing cloud storage.
• The minor version of Cloudera Manager you use to perform the upgrade must be equal to or greaterthan the CDH or Cloudera Runtime minor version. Cloudera recommends that you upgrade to the latestmaintenance version of Cloudera Manager before upgrading your cluster. See Supported Upgrade Paths.To upgrade Cloudera Manager, see Upgrading Cloudera Manager 6 on page 63.
For example:
• Supported:
• Cloudera Manager 7.1 or higher and Cloudera Runtime 7.0• Cloudera Manager 7.1 and CDH 5.• Cloudera Manager 6.0.0 and CDH 5.14.0• Cloudera Manager 5.14.0 and CDH 5.13.0• Cloudera Manager 5.13.1 and CDH 5.13.3
• Not Supported:
• Cloudera Manager 5.14.0 and CDH 6.0.0• Cloudera Manager 5.12 and CDH 5.13• Cloudera Manager 6.0.0 and CDH 5.6
Note:
After upgrading from CDH to CDP, the NodeManager recovery feature is enabled by default. This means thatthe yarn.nodemanager.recovery.enabled property is set to true. Cloudera recommends that youkeep the NodeManager recovery feature enabled. If you set this property to false in your CDP cluster andthen upgrade to a later CDP version, the feature will remain disabled.
Note: Upgrades to Cloudera Runtime 7.0.3 are not supported.
114

CDP Private Cloud Base Upgrading a CDH 6 Cluster
Note:
When upgrading CDH using Rolling Restart (Minor Upgrade only):
• Automatic failover does not affect the rolling restart operation.• After the upgrade has completed, do not remove the old parcels if there are MapReduce or Spark jobs
currently running. These jobs still use the old parcels and must be restarted in order to use the newlyupgraded parcel.
• Ensure that Oozie jobs are idempotent.• Do not use Oozie Shell Actions to run Hadoop-related commands.• Rolling upgrade of Spark Streaming jobs is not supported. Restart the streaming job once the upgrade is
complete, so that the newly deployed version starts being used.• Runtime libraries must be packaged as part of the Spark application.• You must use the distributed cache to propagate the job configuration files from the client gateway hosts.• Do not build "uber" or "fat" JAR files that contain third-party dependencies or CDH/Cloudera Runtime
classes as these can conflict with the classes that Yarn, Oozie, and other services automatically add to theCLASSPATH.
• Build your Spark applications without bundling CDH/Cloudera Runtime JARs.
Warning: Cruise Control might fail during the restart process when upgrading to CDP Private Cloud Base7.1.4. For more information, see the Cruise Control Release Notes.
Important:
In Cloudera Runtime 7.1.6 and higher, the way Streams Messaging Manager (SMM) integrates with StreamsReplication Manager (SRM) has changed. SMM can only connect to and monitor an SRM service that isrunning in the same cluster as SMM. Monitoring an SRM service that is running in a cluster that is external toSMM is no longer supported.
Connectivity between the two services is disabled by default after a successful upgrade. If you want tocontinue using SMM to monitor SRM, you must reconnect the two services following the upgrade.
Step 3: Backing Up the ClusterSteps to back up your cluster before the upgrade.
This topic describes how to back up a cluster managed by Cloudera Manager prior to upgrading the cluster. Theseprocedures do not back up the data stored in the cluster. Cloudera recommends that you maintain regular backups ofyour data using the Backup and Disaster Recovery features of Cloudera Manager.
Minimum Required Role: Cluster Administrator (also provided by Full Administrator) This feature is notavailable when using Cloudera Manager to manage Data Hub clusters.
The following components do not require backups:
115

CDP Private Cloud Base Upgrading a CDH 6 Cluster
• MapReduce• YARN• Spark• Impala
Complete the following backup steps before upgrading your cluster:
Back Up Databases
Warning: Backing up databases requires that you stop some services, which might make them unavailableduring backup.
Gather the following information:
• Type of database (PostgreSQL, Embedded PostgreSQL, MySQL, MariaDB, or Oracle)• Hostnames of the databases• Database names• Port number used by the databases• Credentials for the databases
Open the Cloudera Manager Admin Console to find the database information for any of the following services youhave deployed in your cluster:
• Sqoop, Oozie, and Hue – Go to Cluster Name > Configuration > Database Settings.
Note: The Sqoop Metastore uses a HyperSQL (HSQLDB) database. See the HyperSQL documentationfor backup procedures.
Note: Sqoop 2 is not supported in CDP Private Cloud Base.
• Hive Metastore – Go to the Hive service, select Configuration, and select the Hive Metastore Databasecategory.
• Sentry – Go to the Sentry service, select Configuration, and select the Sentry Server Database category.• Ranger – Go to the Ranger service, select Configuration, and search on "database."
To back up the databases
Perform the following steps for each database you back up:
1. If not already stopped, stop the service. If Cloudera Manager indicates that there are dependent services, also stopthe dependent services.
a.On the Home > Status tab, click to the right of the service name and select Stop.
b. Click Stop in the next screen to confirm. When you see a Finished status, the service has stopped.2. Back up the database. Substitute the database name, hostname, port, user name, and backup directory path and run
the following command:MySQL
mysqldump --databases database_name --host=database_hostname --port=database_port -u database_username -p > backup_directory_path/database_name-backup-`date
116

CDP Private Cloud Base Upgrading a CDH 6 Cluster
+%F`-CDH.sql
PostgreSQL/Embedded
pg_dump -h database_hostname -U database_username -W -p database_port database_name > backup_directory_path/database_name-backup-`date +%F`-CDH.sql
Oracle
Work with your database administrator to ensure databases are properly backed up.
For additional information about backing up databases, see these vendor-specific links:
• MariaDB 10.2: https://mariadb.com/kb/en/backup-and-restore-overview/• MySQL 5.7: https://dev.mysql.com/doc/refman/5.7/en/backup-and-recovery.html• PostgreSQL10: https://www.postgresql.org/docs/10/static/backup.html• Oracle 12c: https://docs.oracle.com/en/database/oracle/oracle-database/12.2/bradv/index.html
3. Start the service.
a.On the Home > Status tab, click to the right of the service name and select Start.
b. Click Start in the next screen to confirm. When you see a Finished status, the service has started.
Back Up ZooKeeper
On all ZooKeeper hosts, back up the ZooKeeper data directory specified with the dataDir property in theZooKeeper configuration. The default location is /var/lib/zookeeper. For example:
cp -rp /var/lib/zookeeper/ /var/lib/zookeeper-backup-`date +%F`CM-CDH
To identify the ZooKeeper hosts, open the Cloudera Manager Admin console and go to the ZooKeeper service andclick the Instances tab.
Record the permissions of the files and directories; you will need these to roll back ZooKeeper.
Back Up HDFS
Follow this procedure to back up an HDFS deployment.
Note: To locate the hostnames required to backup HDFS (for JournalNodes, DataNodes, and NameNodes),open the Cloudera Manager Admin Console, go to the HDFS service, and click the Instances tab.
1. If high availability is enabled for HDFS, run the following command on all hosts running the JournalNode role:
cp -rp /dfs/jn /dfs/jn-CM-CDH
117
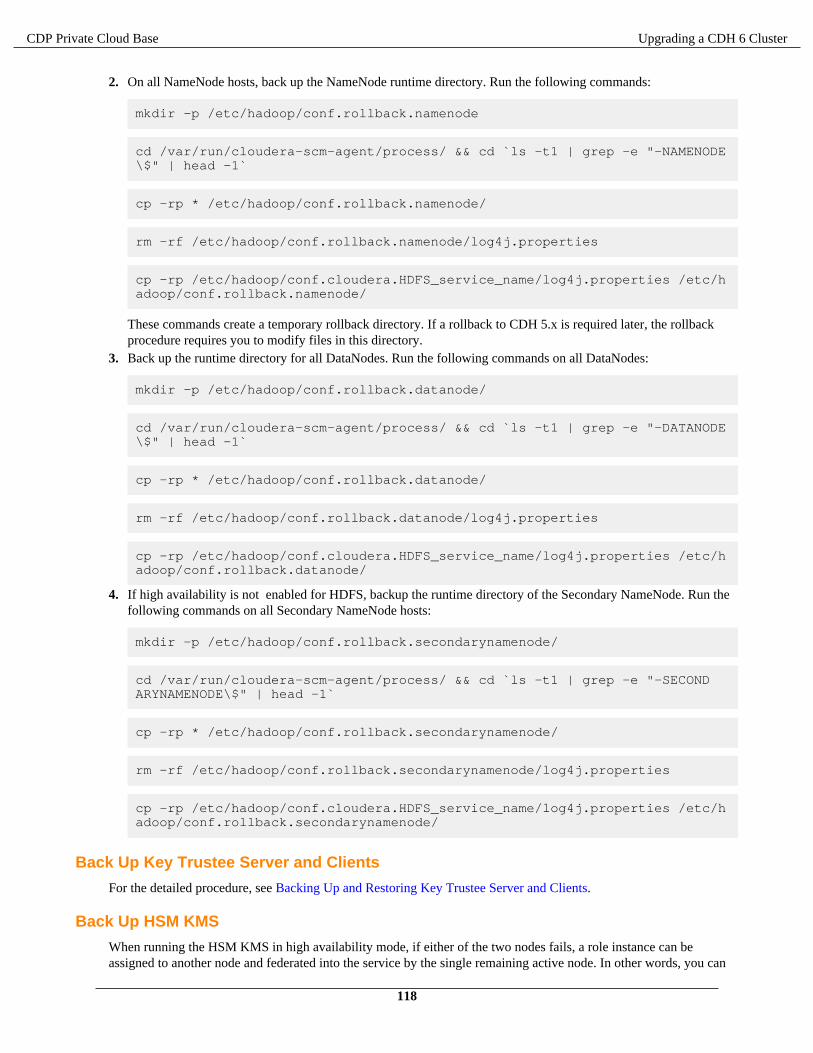
CDP Private Cloud Base Upgrading a CDH 6 Cluster
2. On all NameNode hosts, back up the NameNode runtime directory. Run the following commands:
mkdir -p /etc/hadoop/conf.rollback.namenode
cd /var/run/cloudera-scm-agent/process/ && cd `ls -t1 | grep -e "-NAMENODE\$" | head -1`
cp -rp * /etc/hadoop/conf.rollback.namenode/
rm -rf /etc/hadoop/conf.rollback.namenode/log4j.properties
cp -rp /etc/hadoop/conf.cloudera.HDFS_service_name/log4j.properties /etc/hadoop/conf.rollback.namenode/
These commands create a temporary rollback directory. If a rollback to CDH 5.x is required later, the rollbackprocedure requires you to modify files in this directory.
3. Back up the runtime directory for all DataNodes. Run the following commands on all DataNodes:
mkdir -p /etc/hadoop/conf.rollback.datanode/
cd /var/run/cloudera-scm-agent/process/ && cd `ls -t1 | grep -e "-DATANODE\$" | head -1`
cp -rp * /etc/hadoop/conf.rollback.datanode/
rm -rf /etc/hadoop/conf.rollback.datanode/log4j.properties
cp -rp /etc/hadoop/conf.cloudera.HDFS_service_name/log4j.properties /etc/hadoop/conf.rollback.datanode/
4. If high availability is not enabled for HDFS, backup the runtime directory of the Secondary NameNode. Run thefollowing commands on all Secondary NameNode hosts:
mkdir -p /etc/hadoop/conf.rollback.secondarynamenode/
cd /var/run/cloudera-scm-agent/process/ && cd `ls -t1 | grep -e "-SECONDARYNAMENODE\$" | head -1`
cp -rp * /etc/hadoop/conf.rollback.secondarynamenode/
rm -rf /etc/hadoop/conf.rollback.secondarynamenode/log4j.properties
cp -rp /etc/hadoop/conf.cloudera.HDFS_service_name/log4j.properties /etc/hadoop/conf.rollback.secondarynamenode/
Back Up Key Trustee Server and Clients
For the detailed procedure, see Backing Up and Restoring Key Trustee Server and Clients.
Back Up HSM KMS
When running the HSM KMS in high availability mode, if either of the two nodes fails, a role instance can beassigned to another node and federated into the service by the single remaining active node. In other words, you can
118

CDP Private Cloud Base Upgrading a CDH 6 Cluster
bring a node that is part of the cluster, but that is not running HSM KMS role instances, into the service by making itan HSM KMS role instance–more specifically, an HSM KMS proxy role instance and an HSM KMS metastore roleinstance. So each node acts as an online ("hot" backup) backup of the other. In many cases, this will be sufficient.However, if a manual ("cold" backup) backup of the files necessary to restore the service from scratch is desirable,you can create that as well.
To create a backup, copy the /var/lib/hsmkp and /var/lib/hsmkp-meta directories on one or more of thenodes running HSM KMS role instances.
To restore from a backup: bring up a completely new instance of the HSM KMS service, and copy the /var/lib/hsmkp and /var/lib/hsmkp-meta directories from the backup onto the file system of the restored nodes beforestarting HSM KMS for the first time.
Back Up Navigator Encrypt
It is recommended that you back up Navigator Encrypt configuration directory after installation, and again after anyconfiguration updates.
1. To manually back up the Navigator Encrypt configuration directory (/etc/navencrypt):
$ zip -r --encrypt nav-encrypt-conf.zip /etc/navencrypt
The --encrypt option prompts you to create a password used to encrypt the zip file. This password isalso required to decrypt the file. Ensure that you protect the password by storing it in a secure location.
2. Move the backup file (nav-encrypt-conf.zip) to a secure location.
Warning: Failure to back up the configuration directory makes your backed-up encrypted dataunrecoverable in the event of data loss.
Back Up HBase
Because the rollback procedure also rolls back HDFS, the data in HBase is also rolled back. In addition, HBasemetadata stored in ZooKeeper is recovered as part of the ZooKeeper rollback procedure.
If your cluster is configured to use HBase replication, Cloudera recommends that you document all replication peers.If necessary (for example, because the HBase znode has been deleted), you can roll back HBase as part of the HDFSrollback without the ZooKeeper metadata. This metadata can be reconstructed in a fresh ZooKeeper installation, withthe exception of the replication peers, which you must add back. For information on enabling HBase replication,listing peers, and adding a peer, see HBase Replication in the CDH 5 documentation.
Back Up Sqoop 2
If you are not using the default embedded Derby database for Sqoop 2, back up the database you have configuredfor Sqoop 2. Otherwise, back up the repository subdirectory of the Sqoop 2 metastore directory. This location isspecified with the Sqoop 2 Server Metastore Directory property. The default location is: /var/lib/sqoop2.For this default location, Derby database files are located in /var/lib/sqoop2/repository.
Note: Sqoop 2 is not supported in CDP Private Cloud Base.
Back Up Hue
1. On all hosts running the Hue Server role, back up the app registry file:
Parcel installations
mkdir -p /opt/cloudera/parcels_backup
119

CDP Private Cloud Base Upgrading a CDH 6 Cluster
cp -rp /opt/cloudera/parcels/CDH/lib/hue/app.reg /opt/cloudera/parcels_backup/app.reg-CM-CDH
Package installations
cp -rp /usr/lib/hue/app.reg /usr/lib/hue_backup/app.reg-CM-CDH
Step 4: Back Up Cloudera ManagerAfter upgrading Cloudera Manager and before upgrading a cluster, you should backup Cloudera Manager again.
Minimum Required Role: Cluster Administrator (also provided by Full Administrator) This feature is notavailable when using Cloudera Manager to manage Data Hub clusters.
Collect Information for Backing Up Cloudera Manager
1. Log in to the Cloudera Manager Server host.
ssh my_cloudera_manager_server_host
2. Collect database information by running the following command:
cat /etc/cloudera-scm-server/db.properties
For example:
...com.cloudera.cmf.db.type=...com.cloudera.cmf.db.host=database_hostname:database_portcom.cloudera.cmf.db.name=scmcom.cloudera.cmf.db.user=scmcom.cloudera.cmf.db.password=SOME_PASSWORD
3. Collect information (host name, port number, database name, user name and password) for the followingdatabases.
• Reports Manager• Activity Monitor
You can find the database information by using the Cloudera Manager Admin Console. Go to Clusters >Cloudera Management Service > Configuration and select the Database category. You may need to contactyour database administrator to obtain the passwords.
4. Find the host where the Service Monitor, Host Monitor and Event Server roles are running. Go to Clusters >Cloudera Manager Management Service > Instances and note which hosts are running these roles.
Back Up Cloudera Manager Agent
Note: Commands are provided below to backup various files and directories used by Cloudera ManagerAgents. If you have configured custom paths for any of these, substitute those paths in the commands. Thecommands also provide destination paths to store the backups, defined by the environment variable CM_BACKUP_DIR, which is used in all the backup commands. You may change these destination paths in thecommand as needed for your deployment.
The tar commands in the steps below may return the following message. It is safe to ignore this message:
tar: Removing leading `/' from member names
Backup up the following Cloudera Manager agent files on all hosts:
120
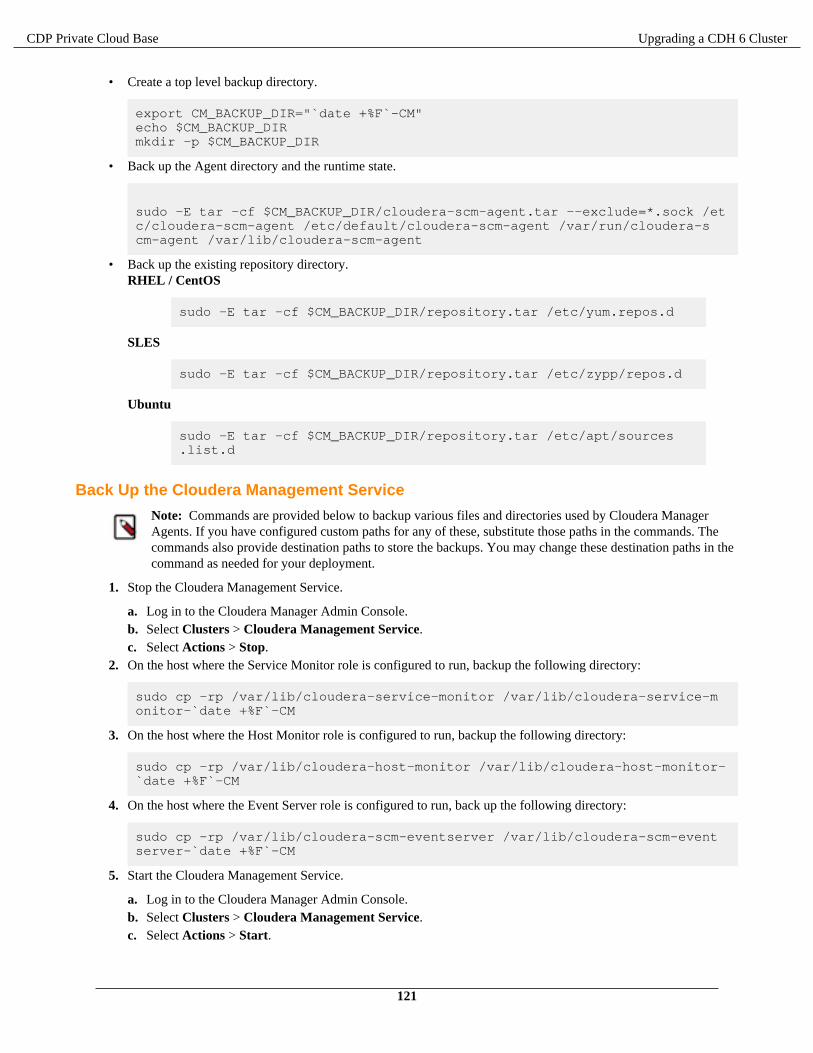
CDP Private Cloud Base Upgrading a CDH 6 Cluster
• Create a top level backup directory.
export CM_BACKUP_DIR="`date +%F`-CM"echo $CM_BACKUP_DIRmkdir -p $CM_BACKUP_DIR
• Back up the Agent directory and the runtime state.
sudo -E tar -cf $CM_BACKUP_DIR/cloudera-scm-agent.tar --exclude=*.sock /etc/cloudera-scm-agent /etc/default/cloudera-scm-agent /var/run/cloudera-scm-agent /var/lib/cloudera-scm-agent
• Back up the existing repository directory.RHEL / CentOS
sudo -E tar -cf $CM_BACKUP_DIR/repository.tar /etc/yum.repos.d
SLES
sudo -E tar -cf $CM_BACKUP_DIR/repository.tar /etc/zypp/repos.d
Ubuntu
sudo -E tar -cf $CM_BACKUP_DIR/repository.tar /etc/apt/sources.list.d
Back Up the Cloudera Management Service
Note: Commands are provided below to backup various files and directories used by Cloudera ManagerAgents. If you have configured custom paths for any of these, substitute those paths in the commands. Thecommands also provide destination paths to store the backups. You may change these destination paths in thecommand as needed for your deployment.
1. Stop the Cloudera Management Service.
a. Log in to the Cloudera Manager Admin Console.b. Select Clusters > Cloudera Management Service.c. Select Actions > Stop.
2. On the host where the Service Monitor role is configured to run, backup the following directory:
sudo cp -rp /var/lib/cloudera-service-monitor /var/lib/cloudera-service-monitor-`date +%F`-CM
3. On the host where the Host Monitor role is configured to run, backup the following directory:
sudo cp -rp /var/lib/cloudera-host-monitor /var/lib/cloudera-host-monitor-`date +%F`-CM
4. On the host where the Event Server role is configured to run, back up the following directory:
sudo cp -rp /var/lib/cloudera-scm-eventserver /var/lib/cloudera-scm-eventserver-`date +%F`-CM
5. Start the Cloudera Management Service.
a. Log in to the Cloudera Manager Admin Console.b. Select Clusters > Cloudera Management Service.c. Select Actions > Start.
121

CDP Private Cloud Base Upgrading a CDH 6 Cluster
Back Up Cloudera Navigator Data
1. Important: Upgrading from Cloudera Manager 5.9 (Navigator 2.8) and earlier can take a significantamount of time, depending on the size of the Navigator Metadata storage directory. When the ClouderaManager upgrade process completes and Cloudera Navigator services restart, the Solr indexing upgradeautomatically begins. No other actions can be performed until Solr indexing completes (a progressmessage displays during this process). It can take as long as two days to upgrade a storage directory with60 GB. To help mitigate this extended upgrade step, make sure to clear out all unnecessary metadata usingpurge, check the size of the storage directory, and consider rerunning purge with tighter conditions tofurther reduce the size of the storage directory.
2. Make sure a purge task has run recently to clear stale and deleted entities.
• You can see when the last purge tasks were run in the Cloudera Navigator console (From the ClouderaManager Admin console, go to Clusters > Cloudera Navigator. Select Administration > Purge Settings.)
• If a purge hasn't run recently, run it by editing the Purge schedule on the same page.• Set the purge process options to clear out as much of the backlog of data as you can tolerate for your upgraded
system. See Managing Metadata Storage with Purge.3. Stop the Navigator Metadata Server.
a. Go to Clusters > Cloudera Management Service > Instances.b. Select Navigator Metadata Server.c. Click Actions for Selected > Stop.
4. Back up the Cloudera Navigator Solr storage directory.
sudo cp -rp /var/lib/cloudera-scm-navigator /var/lib/cloudera-scm-navigator-`date +%F`-CM
5. If you are using an Oracle database for audit, in SQL*Plus, ensure that the following additional privileges are set:
GRANT EXECUTE ON sys.dbms_crypto TO nav; GRANT CREATE VIEW TO nav;
where nav is the user of the Navigator Audit Server database.
Stop Cloudera Manager Server & Cloudera Management Service
1. Stop the Cloudera Management Service.
a. Log in to the Cloudera Manager Admin Console.b. Select Clusters > Cloudera Management Service.c. Select Actions > Stop.
2. Log in to the Cloudera Manager Server host.
ssh my_cloudera_manager_server_host
3. Stop the Cloudera Manager Server.
sudo systemctl stop cloudera-scm-server
Back Up the Cloudera Manager Databases
1. Back up the Cloudera Manager server database – Run the following command. Replace placeholders with theactual values returned from the db.properties file):MySQL/Maria DB
122

CDP Private Cloud Base Upgrading a CDH 6 Cluster
mysqldump --databases database_name --host=database_hostname --port=database_port -u user_name -p > $HOME/database_name-backup-`date +%F`-CM.sql
Note: If the db.properties file does not contain a port number, omit the portnumber parameter from the above command.
PostgreSQL/Embedded
pg_dump -h database_hostname -U user_name -W -p database_port database_name > $HOME/database_name-backup-`date +%F`-CM.sql
Oracle
Work with your database administrator to ensure databases are properly backed up.
123

CDP Private Cloud Base Upgrading a CDH 6 Cluster
2. Back up All other Cloudera Manager databases - Use the database information that you collected in a previousstep. You may need to contact your database administrator to obtain the passwords.
These databases can include the following:
• Cloudera Manager Server - Contains all the information about services you have configured and their roleassignments, all configuration history, commands, users, and running processes. This relatively small database(< 100 MB) is the most important to back up.
Important: When you restart processes, the configuration for each of the services is redeployed usinginformation saved in the Cloudera Manager database. If this information is not available, your clustercannot start or function correctly. You must schedule and maintain regular backups of the ClouderaManager database to recover the cluster in the event of the loss of this database.
• Oozie Server - Contains Oozie workflow, coordinator, and bundle data. Can grow very large. (Only availablewhen installing CDH 5 or CDH 6 clusters.)
• Sqoop Server - Contains entities such as the connector, driver, links and jobs. Relatively small. (Only availablewhen installing CDH 5 or CDH 6 clusters.)
• Reports Manager - Tracks disk utilization and processing activities over time. Medium-sized.• Hive Metastore Server - Contains Hive metadata. Relatively small.• Hue Server - Contains user account information, job submissions, and Hive queries. Relatively small.• Sentry Server - Contains authorization metadata. Relatively small.• Cloudera Navigator Audit Server - Contains auditing information. In large clusters, this database can grow
large.(Only available when installing CDH 5 or CDH 6 clusters.)• Cloudera Navigator Metadata Server - Contains authorization, policies, and audit report metadata. Relatively
small.(Only available when installing CDH 5 or CDH 6 clusters.)• DAS PostgreSQL server - Contains Hive and Tez event logs and DAG information. Can grow very large.• Ranger Admin - Contains administrative information such as Ranger users, groups, and access policies.
Medium-sized.• Streaming Components:
• Schema Registry - Contains the schemas and their metadata, all the versions and branches. You can useeither MySQL, Postgres, or Oracle.
Important: For the Schema Registry database, you must set collation to be case sensitive.
• Streams Messaging Manager Server - Contains Kafka metadata, stores metrics, and alert definitions.Relatively small.
Run the following commands to back up the databases. (The command displayed below depends on the databaseyou selected in the form at the top of this page. Replace placeholders with the actual values.):
MySQL
To back up the MySQL database, run the mysqldump command on the MySQL host, as follows:m
mysqldump -hhostname -uusername -ppassword database > /tmp/database-backup.sql
For example, to back up the Activity Monitor database amon created in Creating Databases forCloudera Software, on the local host as the root user, with the password amon_password:
mysqldump -pamon_password amon > /tmp/amon-backup.sql
To back up the sample Activity Monitor database amon on remote host myhost.example.comas the root user, with the password amon_password:
mysqldump -hmyhost.example.com -uroot -pamon_password amon > /tmp/amon-backup.sql
124

CDP Private Cloud Base Upgrading a CDH 6 Cluster
You can back up all database using the following command:
mysqldump --all-databases -ppassword > /tmp/all1/all.sql
PostgreSQL/Embedded
To back up a PostgreSQL database, use the same procedure whether the database is embedded orexternal:
a. Log in to the host where the Cloudera Manager Server is installed.b. Get the name, user, and password properties for the Cloudera Manager database from /etc/
cloudera-scm-server/db.properties:
com.cloudera.cmf.db.name=scmcom.cloudera.cmf.db.user=scmcom.cloudera.cmf.db.password=NnYfWIjlbk
c. Run the following command as root using the parameters from the preceding step:
# pg_dump -h hostname -p 7432 -U scm > /tmp/scm_server_db_backup.$(date +%Y%m%d)
d. Enter the password from the com.cloudera.cmf.db.password property in step 2.e. To back up a database created for one of the roles on the local host as the roleuser user:
# pg_dump -h hostname -p 7432 -U roleuser > /tmp/roledb
f. Enter the password specified when the database was created.
Oracle
Work with your database administrator to ensure databases are properly backed up.
Back Up Cloudera Manager Server
Note: Commands are provided below to backup various files and directories used by Cloudera ManagerAgents. If you have configured custom paths for any of these, substitute those paths in the commands. Thecommands also provide destination paths to store the backups, defined by the environment variable CM_BACKUP_DIR, which is used in all the backup commands. You may change these destination paths in thecommand as needed for your deployment.
The tar commands in the steps below may return the following message. It is safe to ignore this message:
tar: Removing leading `/' from member names
1. Log in to the Cloudera Manager Server host.
ssh my_cloudera_manager_server_host
2. Create a top-level backup directory.
export CM_BACKUP_DIR="`date +%F`-CM"echo $CM_BACKUP_DIRmkdir -p $CM_BACKUP_DIR
3. Back up the Cloudera Manager Server directories:
sudo -E tar -cf $CM_BACKUP_DIR/cloudera-scm-server.tar /etc/cloudera-scm-server /etc/default/cloudera-scm-server
125

CDP Private Cloud Base Upgrading a CDH 6 Cluster
4. Back up the existing repository directory.RHEL / CentOS
sudo -E tar -cf $CM_BACKUP_DIR/repository.tar /etc/yum.repos.d
SLES
sudo -E tar -cf $CM_BACKUP_DIR/repository.tar /etc/zypp/repos.d
Ubuntu
sudo -E tar -cf $CM_BACKUP_DIR/repository.tar /etc/apt/sources.list.d
(Optional) Start Cloudera Manager Server & Cloudera Management Service
Start the Cloudera Manager server and Cloudera Manager Management service.
If you will be immediately upgrading Cloudera Manager, skip this step and continue with Step 3: Upgrading theCloudera Manager Server on page 73.
1. Log in to the Cloudera Manager Server host.
ssh my_cloudera_manager_server_host
2. Start the Cloudera Manager Server.
sudo systemctl start cloudera-scm-server
3. Start the Cloudera Management Service.
a. Log in to the Cloudera Manager Admin Console.b. Select Clusters > Cloudera Management Service.c. Select Actions > Start.
Step 5: Complete Pre-Upgrade steps for upgrades to CDP Private CloudBase
Steps to complete before upgrading CDH to CDP.
Minimum Required Role: Cluster Administrator (also provided by Full Administrator) This feature is notavailable when using Cloudera Manager to manage Data Hub clusters.
Ensure that you have completed the following steps when upgrading from CDH 5.x to CDP Private Cloud Base 7.1.
• Flume – Flume is not supported in CDP Private Cloud Base. You must remove the Flume service beforeupgrading to CDP Private Cloud Base.
• HBase – See Checking Apache HBase on page 37.• Hive – See Migrating Hive 1-2 to Hive 3 on page 32• Kafka – In CDH 5.x, Kafka was delivered as a separate parcel and could be installed along with CDH 5.x using
Cloudera Manager. In Runtime 7.0.3 and later, Kafka is part of the Cloudera Runtime distribution and is deployed
126

CDP Private Cloud Base Upgrading a CDH 6 Cluster
as part of the Cloudera Runtime parcels. To successfully upgrade Kafka you need to set the protocol version tomatch what's being used currently among the brokers and clients.
Important: Upgrading CDK to Cloudera Runtime 7.1.1 or higher is only supported from CDK 4.1.0.If you are running an earlier version of CDK, you must first upgrade to CDK 4.1.0 before upgrading toCloudera Runtime 7.1.1.
1. Explicitly set the Kafka protocol version to match what's being used currently among the brokers and clients.Update server.properties on all brokers as follows:
a. Log in to the Cloudera Manager Admin Consoleb. Choose the Kafka service.c. Click Configuration.d. Use the Search field to find the Kafka Broker Advanced Configuration Snippet (Safety Valve) for
kafka.properties configuration property.e. Add the following properties to the snippet:
• inter.broker.protocol.version = current_Kafka_version
• log.message.format.version = current_Kafka_version
Replace current_Kafka_version with the version of Apache Kafka currently being used. See theProduct Compatibility Matrix for CDK Powered By Apache Kafka to find out which upstream version isused by which version of CDK. Make sure you enter full Apache Kafka version numbers with three values,such as 0.10.0. Otherwise, you will see an error message similar to the following:
2018-06-14 14:25:47,818 FATAL kafka.Kafka$:java.lang.IllegalArgumentException: Version `0.10` is not a valid version at kafka.api.ApiVersion$$anonfun$apply$1.apply(ApiVersion.scala:72) at kafka.api.ApiVersion$$anonfun$apply$1.apply(ApiVersion.scala:72) at scala.collection.MapLike$class.getOrElse(MapLike.scala:128)
2. Save your changes. The information is automatically copied to each broker.• Kafka – To successfully upgrade Kafka, you need to set the protocol version to match what's being used currently
among the brokers and clients. Following a successful upgrade, you will need to reset the configuration changemade.
1. Explicitly set the Kafka protocol version to match what's being used currently among the brokers and clients.Update server.properties on all brokers as follows:
a. Log in to the Cloudera Manager Admin Consoleb. Choose the Kafka service.c. Click Configuration.d. Use the Search field to find the Kafka Broker Advanced Configuration Snippet (Safety Valve) for
kafka.properties configuration property.e. Add the following properties to the snippet:
• inter.broker.protocol.version = current_Kafka_version
• log.message.format.version = current_Kafka_version
Replace current_Kafka_version with the version of Apache Kafka currently being used. See theCDH 6 Packaging Information to find out which upstream version is used by which version of CDH 6.Make sure you enter full Apache Kafka version numbers with three values, such as 0.10.0. Otherwise, youwill see an error message similar to the following:
2018-06-14 14:25:47,818 FATAL kafka.Kafka$:java.lang.IllegalArgumentException: Version `0.10` is not a valid version
127

CDP Private Cloud Base Upgrading a CDH 6 Cluster
at kafka.api.ApiVersion$$anonfun$apply$1.apply(ApiVersion.scala:72) at kafka.api.ApiVersion$$anonfun$apply$1.apply(ApiVersion.scala:72) at scala.collection.MapLike$class.getOrElse(MapLike.scala:128)
2. Save your changes. The information is automatically copied to each broker.• Navigator –- See Transitioning Navigator content to Atlas on page 18• Replication Schedules – See CDH cluster upgrade requirements for Replication Manager on page 40.• Sentry The Sentry service has been replace with Apache Ranger in Cloudera Runtime 7.1. You must perform
several steps before upgrading your cluster. See Transitioning the Sentry service to Apache Ranger on page15.
• Virtual Private Clusters:
If your deployment has defined a Compute cluster and an associated Data Context, you will need to delete theCompute cluster and Data context before upgrading the base cluster and then recreate the Compute cluster andData context after the upgrade.
• YARN : Decommission and recommission the YARN NodeManagers but do not start the NodeManagers. Adecommission is required so that the NodeManagers stop accepting new containers, kill any running containers,and then shutdown.
1. Ensure that new applications, such as MapReduce or Spark applications, will not be submitted to the clusteruntil the upgrade is complete.
2. In the Cloudera Manager Admin Console, navigate to the YARN service for the cluster you are upgrading.3. On the Instances tab, select all the NodeManager roles. This can be done by filtering for the roles under Role
Type.4. Click Actions for Selected (number) > Decommission.
If the cluster runs CDH 5.9 or higher and is managed by Cloudera Manager 5.9 or higher, and you configuredgraceful decommission, the countdown for the timeout starts.
A Graceful Decommission provides a timeout before starting the decommission process. The timeout createsa window of time to drain already running workloads from the system and allow them to run to completion.Search for the Node Manager Graceful Decommission Timeout field on the Configuration tab for theYARN service, and set the property to a value greater than 0 to create a timeout.
5. Wait for the decommissioning to complete. The NodeManager State is Stopped and the Commission State isDecommissioned when decommissioning completes for each NodeManager.
6. With all the NodeManagers still selected, click Actions for Selected (number) > Recommission.
Important: Do not start the NodeManagers.
128

CDP Private Cloud Base Upgrading a CDH 6 Cluster
• HDFS: Review the current JVM heap size for the DataNodes on your cluster and ensure that the heap size isconfigured at the rate of 1 GB for every million blocks. Use the Java Heap Size of DataNode in Bytes propertyto configure the value.
Note: If upgrading to 7.1.7 or greater, you need not increase the heap size.
In addition, you can track the JVM heap usage through Cloudera Manager charts, as specified in the followingsteps:
1. Open the Cloudera Manager Admin Console.2. Go to the HDFS service.3. Click the Charts Library tab.4. Select DataNodes from the list on the left.5. Click the Memory tab.6. Look at the chart titled DataNode JVM Heap Used Distribution. The maximum heap usage usage is the value
in the last bucket of that histogram.
Run Hue Document Cleanup
If your cluster uses Hue, perform the following steps (not required for maintenance releases). These steps clean up thedatabase tables used by Hue and can help improve performance after an upgrade.
1. Back up your database before starting the cleanup activity.2. Check the saved documents such as Queries and Workflows for a few users to prevent data loss.3. Connect to the Hue database. See Hue Custom Databases in the Hue component guide for information about
connecting to your Hue database.4. Check the size of the desktop_document, desktop_document2, oozie_job, beeswax_session, beeswax_savedquery
and beeswax_queryhistory tables to have a reference point. If any of these have more than 100k rows, run thecleanup.
select count(*) from desktop_document;select count(*) from desktop_document2;select count(*) from beeswax_session;select count(*) from beeswax_savedquery;select count(*) from beeswax_queryhistory;select count(*) from oozie_job;
5. SSH in to an active Hue instance.6. If you are upgrading from CDH 5.x or 6.x to CDP, then follow the below steps:
a. Download the script_runner directory by any of the following methods:
git clone https://github.com/cloudera/hue/tree/master/tools/ops/script_runner /opt/cloudera/hue_scripts
b. Run the script as the root user:
DESKTOP_DEBUG=True /opt/cloudera/hue_scripts/script_runner hue_desktop_document_cleanup --keep-days 30
The logs are displayed on the console because DESKTOP_DEBUG is set to True. Alternatively, you can viewthe logs from the following location: /var/log/hue/hue_desktop_document_cleanup.log. Thefirst run can typically take around 1 minute per 1000 entries in each table.
c. Check the size of the desktop_document, desktop_document2, oozie_job, beeswax_session,beeswax_savedquery and beeswax_queryhistory tables and confirm they are now smaller.
select count(*) from desktop_document;select count(*) from desktop_document2;
129

CDP Private Cloud Base Upgrading a CDH 6 Cluster
select count(*) from beeswax_session;select count(*) from beeswax_savedquery;select count(*) from beeswax_queryhistory;select count(*) from oozie_job;
d. If the hue_scripts script has run successfully, the table size should decrease, and you can now set up acron job for scheduled cleanups.
e. Copy the wrapper script for cron by running the following command:
cp /opt/cloudera/hue_scripts/hue_history_cron.sh /etc/cron.daily
f. Specify the cleanup interval in the --keep-days property in the hue_history_cron.sh file as shownin the following example:
${SCRIPT_DIR}/script_runner hue_desktop_document_cleanup --keep-days 120
In this case, the data will be retained in the tables for 120 days.g. Change the permissions on the script so only the root user can run it.
chmod 700 /etc/cron.daily/hue_history_cron.sh
7. If you are upgrading from a previous CDP release, the follow the below steps:
a. Change to the Hue home directory:
cd /opt/cloudera/parcels/CDH/lib/hue
b. Run the following command as the root user:
DESKTOP_DEBUG=True ./build/env/bin/hue desktop_document_cleanup --keep-days x
The --keep-days property is used to specify the number of days for which Hue will retain the data in thebackend database.
For example:
DESKTOP_DEBUG=True ./build/env/bin/hue desktop_document_cleanup --keep-days 90
In this case, Hue will retain data for the last 90 days.
The logs are displayed on the console because DESKTOP_DEBUG is set to True. Alternatively, you can viewthe logs from the following location:
/var/log/hue/desktop_document_cleanup.log
The first run can typically take around 1 minute per 1000 entries in each table, but can take much longerdepending on the size of the tables.
c. Check the size of the desktop_document, desktop_document2, oozie_job, beeswax_session,beeswax_savedquery and beeswax_queryhistory tables and confirm they are now smaller.
select count(*) from desktop_document;select count(*) from desktop_document2;select count(*) from beeswax_session;select count(*) from beeswax_savedquery;select count(*) from beeswax_queryhistory;
130
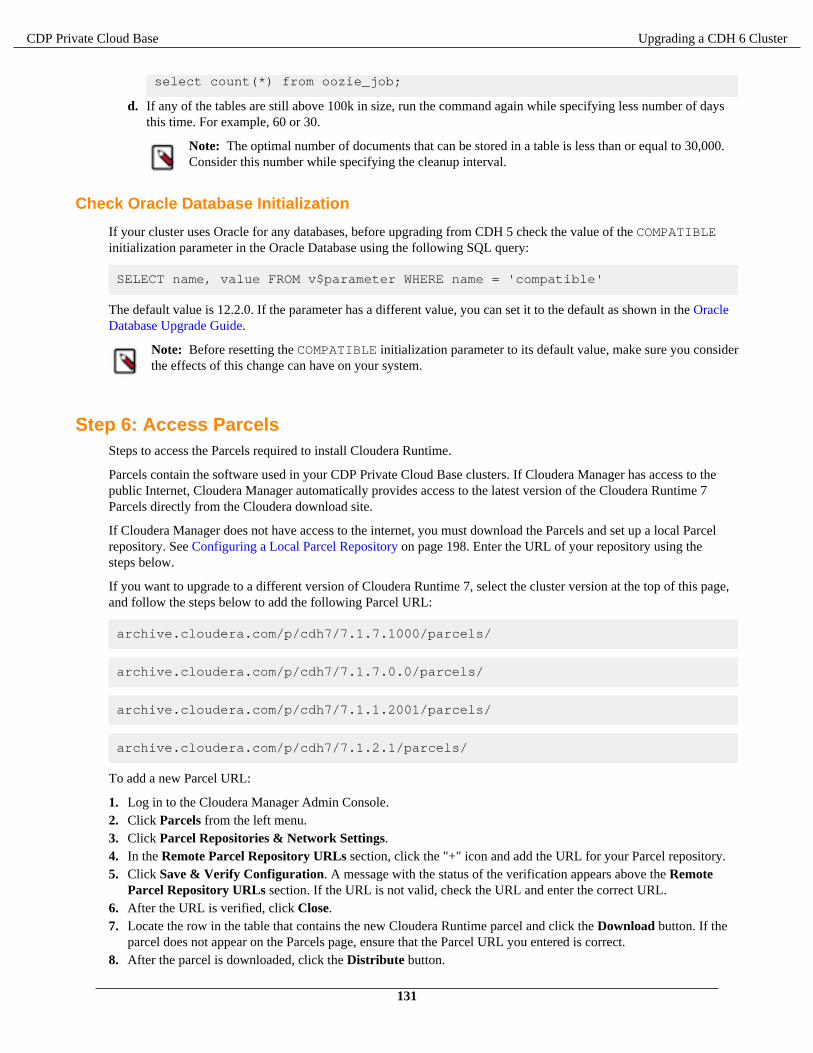
CDP Private Cloud Base Upgrading a CDH 6 Cluster
select count(*) from oozie_job;
d. If any of the tables are still above 100k in size, run the command again while specifying less number of daysthis time. For example, 60 or 30.
Note: The optimal number of documents that can be stored in a table is less than or equal to 30,000.Consider this number while specifying the cleanup interval.
Check Oracle Database Initialization
If your cluster uses Oracle for any databases, before upgrading from CDH 5 check the value of the COMPATIBLEinitialization parameter in the Oracle Database using the following SQL query:
SELECT name, value FROM v$parameter WHERE name = 'compatible'
The default value is 12.2.0. If the parameter has a different value, you can set it to the default as shown in the OracleDatabase Upgrade Guide.
Note: Before resetting the COMPATIBLE initialization parameter to its default value, make sure you considerthe effects of this change can have on your system.
Step 6: Access ParcelsSteps to access the Parcels required to install Cloudera Runtime.
Parcels contain the software used in your CDP Private Cloud Base clusters. If Cloudera Manager has access to thepublic Internet, Cloudera Manager automatically provides access to the latest version of the Cloudera Runtime 7Parcels directly from the Cloudera download site.
If Cloudera Manager does not have access to the internet, you must download the Parcels and set up a local Parcelrepository. See Configuring a Local Parcel Repository on page 198. Enter the URL of your repository using thesteps below.
If you want to upgrade to a different version of Cloudera Runtime 7, select the cluster version at the top of this page,and follow the steps below to add the following Parcel URL:
archive.cloudera.com/p/cdh7/7.1.7.1000/parcels/
archive.cloudera.com/p/cdh7/7.1.7.0.0/parcels/
archive.cloudera.com/p/cdh7/7.1.1.2001/parcels/
archive.cloudera.com/p/cdh7/7.1.2.1/parcels/
To add a new Parcel URL:
1. Log in to the Cloudera Manager Admin Console.2. Click Parcels from the left menu.3. Click Parcel Repositories & Network Settings.4. In the Remote Parcel Repository URLs section, click the "+" icon and add the URL for your Parcel repository.5. Click Save & Verify Configuration. A message with the status of the verification appears above the Remote
Parcel Repository URLs section. If the URL is not valid, check the URL and enter the correct URL.6. After the URL is verified, click Close.7. Locate the row in the table that contains the new Cloudera Runtime parcel and click the Download button. If the
parcel does not appear on the Parcels page, ensure that the Parcel URL you entered is correct.8. After the parcel is downloaded, click the Distribute button.
131

CDP Private Cloud Base Upgrading a CDH 6 Cluster
9. Wait for the parcel to be distributed and unpacked before continuing. Cloudera Manager displays the status of theCloudera Runtime parcel distribution. Click on the status display to view detailed status for each host.
10. Click the Cloudera Manager logo to return to the home page.
Step 7: Configure Streams Messaging ManagerAdditional steps
If your cluster uses Streams Messaging Manager, you need to update database related configuration properties andconfigure the streamsmsgmgr user’s home directory.
1. Stop the Streams Messaging Manager Service:
a. In Cloudera Manager, select the Streams Messaging Manager service.b. Click Actions > Stop.c. Click Stop on the next screen to confirm.
When you see a Finished status, the service has stopped.d. Click Close.
2. Configure database related properties:
Note: You can skip this step if you have already configured database related properties during theCloudera Manager upgrade.
a. In Cloudera Manager, select the Streams Messaging Manager service.b. Go to Configuration.c. Find and configure the following properties:
• Streams Messaging Manager Database User Password• Streams Messaging Manager Database Type• Streams Messaging Manager Database Name• Streams Messaging Manager Database User• Streams Messaging Manager Database Host• Streams Messaging Manager Database Port
d. Click Save Changes.
132

CDP Private Cloud Base Upgrading a CDH 6 Cluster
3. Change the streamsmsgmgr user’s home directory:
a. Log in to the Streams Messaging Manager host.
ssh [MY_STREAMS_MESSAGING_MANAGER_HOST]
b. Change the streamsmsgmgr user’s home directory to /var/lib/streams_messaging_manager.
Rhel-compatible:
usermod -d /var/lib/streams_messaging_manager -m streamsmsgmgr
Step 8: Configure Schema RegistrySteps to update database-related configurations for Schema Registry
If your cluster uses Schema Registry, you need to update database related configuration properties.
1. Configure database related properties:
Note: You can skip this step if you have already configured database related properties during theCloudera Manager upgrade.
a. In Cloudera Manager, select the Schema Registry service.b. Go to Configuration.c. Find and configure the following properties:
• Schema Registry Database User Password• Schema Registry Database Type• Schema Registry Database Name• Schema Registry Database User• Schema Registry Database Host• Schema Registry Database Port
d. Click Save Changes.
133

CDP Private Cloud Base Upgrading a CDH 6 Cluster
Step 9: Enter Maintenance ModeYou can enable Maintenance Mode to avoid unnecessary alerts during the upgrade.
To avoid unnecessary alerts during the upgrade process, enter maintenance mode on your cluster before you start theupgrade. Entering maintenance mode stops email alerts and SNMP traps from being sent, but does not stop checksand configuration validations. Be sure to exit maintenance mode when you have finished the upgrade to re-enableCloudera Manager alerts. More Information.
On the Home > Status tab, click the actions menu next to the cluster name and select Enter Maintenance Mode.
Step 10: Run the Upgrade Cluster WizardThe Upgrade Wizard manages the upgrade of your Cloudera Runtime software. The Upgrade Wizard is not used forupgrades to Service Packs or Hotfixes.
Important: You have selected an upgrade to Cloudera Runtime Service Pack 1 (7.1.7.1000). The upgradeprocess for this does not use the Upgrade Wizard. Skip the steps on this page and continue with the steps infollowing document: Upgrading to a Service Pack.
Note: Not all combinations of Cloudera Manager and Cloudera Runtime are supported. Ensure that theversion of Cloudera Manager you are using supports the version of Cloudera Runtime you have selected. SeeCloudera Manager support for Cloudera Runtime, CDH and CDP Private Cloud Experiences
Minimum Required Role: Cluster Administrator (also provided by Full Administrator) This feature is notavailable when using Cloudera Manager to manage Data Hub clusters.
1. Log in to the Cloudera Manager Admin Console.2. Ensure that you have completed the steps to add the Parcel URL in Cloudera Manager. See Step 6: Access Parcels
on page 131.3. Ensure that all services in the cluster that are being upgraded are running and in good health.4. Click the Actions menu and select Upgrade Cluster.
The Getting Started screen of the Upgrade Wizard displays.5. Click the Upgrade to Version: drop-down and select the version of Cloudera Runtime for your upgrade.
The wizard now runs several checks to make sure that your cluster is ready for upgrade. You must resolve anyreported issues before continuing.
6. The Install Services section displays any additional services that you need to install to upgrade your cluster.
If you are upgrading a cluster that has the Hive service, you will be prompted to add the Tez, Zookeeper, Hive onTez, and YARN QueueManager services.
Warning: When you add Hive-on-Tez service, the Assign Roles page displays. You must ensure that thenumber of HiveServer2 roles present in the Hive service before the upgrade are included when the AssignRoles page displays. (You can verify this by opening the Cloudera Manager Admin Console Home pagein a new browser tab, and going to the Instances tab in the Hive service.) If the number of HiveServer2roles is not the same, the cluster upgrade will fail and the cluster will be unusable. If your upgrade fails,please contact Cloudera Support.
You must also select the same hosts for the HiveServer2 roles that were used before the upgrade. If youchoose other hosts you must regenerate the keytabs for those hosts. See Managing Kerberos credentialsusing Cloudera Manager.
134

CDP Private Cloud Base Upgrading a CDH 6 Cluster
7. The Sentry service is replaced by Apache Ranger in CDP Private Cloud Base. If the cluster has the Sentry serviceinstalled, you can migrate to Apache Ranger.
The Apache Ranger service depends on the ZooKeeper and Solr services. The upgrade wizard display buttons forinstalling several dependent services that are required for Apache Ranger. If your cluster does not include theseservices, buttons will appear to install them.
Note: The Solr service used by the Apache Ranger service is a separate, dedicated service. If you haveother instances of the Solr service, ensure that these services have configurations that do not overlap.Cloudera Manager configures the following values by default for the Solr service dedicated to ApacheRanger:
• ZooKeeper Znode: /solr-infra• HDFS Data Directory: /solr-infra• Solr Data Directory: /var/lib/solr-infra• Solr Server Log Directory: /var/log/solr-infra• Solr HTTP Port: 8993• Solr HTTPS Port: 8995• Deploy Directory: /etc/solr-infra• Ranger Policy Cache Directory: /var/lib/ranger/solr-infra/policy-cache• Ranger DFS Audit Path: ${ranger_base_audit_url}/solr-infra• Ranger Audit DFS Spool Dir: /var/log/solr-infra/audit/hdfs/spool• Ranger Audit Solr Spool Dir: /var/log/solr-infra/audit/solr/spool
a. Follow the steps for Transitioning the Sentry service to Apache Ranger on page 15 before continuing.b. If the cluster does not already have the ZooKeeper service, click the Add ZooKeeper Service button.
The Assign Roles page displays with the role assignment for the ZooKeeper service. You can keep theassigned host or assign the role to a different host.
c. Click Continue.
The Review Changes screen displays where you can change the default configurations.d. Click Continue.
The upgrade wizard resumes.e. If the cluster does not already have the Solr service, click the Add Solr Service button.
The Assign Roles page displays with the role assignment for the Solr service. You can keep the assigned hostor assign the role to a different host.
f. Click Continue.
The Review Changes screen displays where you can change the default configurations.g. Click Continue.
The upgrade wizard resumes.h. Click the Add Ranger Service button
The Assign Roles page displays with the role assignment for the Ranger service.i. Assign the following Ranger roles to cluster hosts:
• Ranger Admin -- you must assign this role to the host you specified when you set up the Ranger database.• Ranger Usersync• Ranger Tagsync
j. In Setup Database, update the Ranger database parameters:
• Ranger Database Type - Choose either MySQL, PostgreSQL, or Oracle.• Ranger Database Host - enter the hostname where the Ranger database is running.• Ranger Database Name - enter the database name created for Ranger.• Ranger Database User - enter the user created to connect Ranger database.
135

CDP Private Cloud Base Upgrading a CDH 6 Cluster
• Ranger Database User Password - enter the password you created when you created the Ranger databaseand the user rangeradmin.
k. The Ranger Review Changes screen displays. Review the configurations and make any necessary changes.You must provide values for the following:
• Ranger Admin User Initial Password – choose a password.• Ranger Usersync User Initial Password – choose a password.• Ranger Tagsync User Initial Password – choose a password.• Ranger KMS Keyadmin user initial Password – choose a password.• Ranger Admin Max Heapsize – set the default value instead of minimum value by clicking the curved
blue arrow. • Ranger Tagsync Max Heapsize – set the default value instead of minimum value by clicking the curved
blue arrow. • Ranger Usersync Max Heapsize – set the default value instead of minimum value by clicking the curved
blue arrow. • If enabling Ranger TLS, see Configure TLS/SSL for Ranger in a manually configured TLS/SSL
environment on page 159.l. Update Auth-To-Local Rule in Hdfs.
IF the Additional Rules to Map Kerberos Principals to Short Names (hadoop.security.auth_to_local)configs
have been updated, THEN you must:
1. Update the Additional Rules to Map Kerberos Principals to Short Names config to include the followingrules for Ranger & Ranger KMS services principals before upgrade.
RULE:[2:$1@$0](rangeradmin@<REALM>)s/(.*)@<REALM>/ranger/RULE:[2:$1@$0](rangertagsync@<REALM>)s/(.*)@<REALM>/rangertagsync/RULE:[2:$1@$0](rangerusersync@<REALM>)s/(.*)@<REALM>/rangertagsync/RULE:[2:$1@$0](rangerkms@<REALM>)s/(.*)@<REALM>/keyadmin/
2. Append these rules to the existing ones getting used.3. Custom rules syntax may be applied to these rules. Make sure the principals are always mapped to the
above-provided user names.8. If your cluster does not have the YARN Queue Manager, installed, a button will appear to add the YARN Queue
Manager service because it is required for the Capacity Scheduler, which is the supported scheduler.
The first step of Adding YARN Queue Manager Service is to copy scheduler settings. For more information abouthow to transition from Fair Scheduler to Capacity Scheduler, see Fair Scheduler to Capacity Scheduler transitionon page 140.
136

CDP Private Cloud Base Upgrading a CDH 6 Cluster
9. Enable Atlas install.
If the cluster being upgraded was running Navigator, the upgrade wizard shows a note recommending that youenable Atlas in the new cluster. Check the Install Atlas option.
10. Install Atlas dependencies.
The wizard steps through the installation for Atlas' dependencies, assuming these services haven't already beenincluded in the installation:
• ZooKeeper. Assign one or more hosts for the ZooKeeper role.• HDFS. Already included in the installation.• Kafka. Select the optional dependency of HDFS. Atlas requires configuring the Broker service only, not
MirrorMaker, Connect, or Gateway.• HBase. Atlas requires configuring HBase Master and RegionServers only, not REST or Thrift Server. Assign a
Master role on at least one host. Assign RegionServers to all hosts.• Solr. Assign a host for the Solr Server role. Set the Java Heap Size of Solr Server in Bytes property to 12 GB
(to support the migration operation).
For recommendations on where in the cluster to install the service roles, see Runtime Cluster Hosts and RoleAssignments.
137

CDP Private Cloud Base Upgrading a CDH 6 Cluster
11. Click Add Atlas Service. The wizard steps through choosing a host and setting migration details.
• Set the host for the Atlas server roles and click Continue.
Tip: Remember this host as you'll need to SSH to it later to trigger the content migration fromNavigator.
• The Atlas Migrate Navigator Data screen displays.
This screen contains migration commands that are customized to your environment. When you fill in theoutput file paths, the command text changes to incorporate your settings.
a. Set migration data-staging locations.
The migration process creates two data files on the local file system on the host where Atlas is installed.Make sure there is enough disk space to hold these files; see Estimating the time and resources needed fortransition on page 22.
b. Copy the extraction command text to an editor.
c. Copy the transformation command text to an editor.
Important: While running the nav2atlas.sh script, make sure that the CDH cluster name does notcontain whitespaces or hyphen.
For example:
_# /opt/cloudera/parcels/CDH/lib/atlas/tools/nav2atlas/nav2atlas.sh -f '/tmp/cluster_navigator_data.zip' -o '/root/nav2atlas/cluster_atlas_data.zip' -clusterName ‘Demo_Big_Data'
d. Confirm the output file location. This is the location where Atlas will look for the content to import. Makesure it matches the location you plan to use for the output of the transformation command.
e. Click Continue.• The Atlas Enable Migration Mode screen displays. Review the Atlas Safety Valve content and click
Continue.
After the migration is complete, you will manually remove these settings to start Atlas in normal operation.• The Atlas Review Changes screen displays. Review the configurations and make any necessary changes.You
must provide a value for the following:
138

CDP Private Cloud Base Upgrading a CDH 6 Cluster
• Admin Password – choose a password for the preconfigured admin user.• Atlas Max Heapsize – set the max heapsize to the default value by clicking the curved blue arrow. If you
plan to migrate content from Cloudera Navigator to Atlas, consider setting the heapsize to 16 GB.
• Click Continue.
To complete the Navigator-to-Atlas migration outside of the CDP Runtime upgrade, see Transitioning Navigatordata using customized scripts on page 27.
12. The Other Tasks section lists other tasks or reminders to note before continuing. Select the option to confirm thatyou understand before continuing.
Note: You may need to perform some additional steps for clusters with Apache HBase installed and whentransitioning from Fair Scheduler to Capacity Scheduler.
• HBase: See Checking Apache HBase on page 37.• Transitioning from Fair Scheduler to Capacity Scheduler: See Fair Scheduler to Capacity Scheduler
transition on page 140;13. The Inspector Checks section displays sever inspectors you must run before continuing. If these inspectors report
errors, you must resolve those before continuing.
• Click the Show Inspector Results button to see details of the inspection.• Click the Run Again button to verify that you have resolved the issue.• If you are confident that the errors are not critical, select Skip this step. I understand the risks..
The Inspector Checks section includes the following inspectors:
• Host Inspector• Service Inspector
Note: If the Hive service is present in the cluster, the Inspector Checks include a Validate HiveMetastore schema step. This check may return a "green" result but the validation may actuallycontain failures tagged with the WARN label. You should look through the inspector results for Hiveand correct any failures before continuing with the upgrade.
Run these inspectors and correct any reported errors before continuing.14. The Database Backup section asks you to verify that you have completed the necessary backups. Select Yes, I
have performed these steps.15. Click Continue. (The Continue button remains greyed out until all upgrades steps are complete and all warnings
have been acknowledged.)16. Click Continue again to shut down the cluster and begin the upgrade.
The Upgrade Cluster Command screen opens and displays the progress of the upgrade.17. When the Upgrade steps are complete, click Continue.
The Summary page opens and displays any additional steps you need to complete the upgrade.18. Click Continue.
139

CDP Private Cloud Base Upgrading a CDH 6 Cluster
Fair Scheduler to Capacity Scheduler transitionYou must transition from Fair Scheduler to Capacity Scheduler when upgrading your cluster to CDP Private CloudBase. The transition process involves automatically converting certain Fair Scheduler configuration to CapacityScheduler configuration prior to the upgrade and manual fine tuning after the upgrade.
In CDP, Capacity Scheduler is the default and supported scheduler. You have to transition from Fair Scheduler toCapacity Scheduler when upgrading from CDH to CDP Private Cloud Base.
The scheduler transition process includes migrating the YARN settings from Fair Scheduler to Capacity Scheduler:
1. Preparing for cluster upgrade: As using the Upgrade Cluster Wizard in Cloudera Manager you have to add thenecessary services before you can start upgrading your cluster. When you add the YARN QueueManager Serviceyou have to copy your scheduler settings. That is when you can use the fs2cs conversion utility to automaticallyconvert Fair Scheduler into Capacity Scheduler as a part of the Upgrade Wizard in Cloudera Manager.
2. Upgrade the cluster to CDP Private Cloud Base.3. Post-upgrade: Manually configure and fine-tune the scheduler after the upgrade is completed.
Important: The features of Capacity Scheduler are not the same as the features of Fair Scheduler. Hence,the fs2cs conversion utility cannot convert every Fair Scheduler configuration into a Capacity Schedulerconfiguration. After the automatic conversion and once the upgrade is completed, you must manually tune thescheduler configurations to ensure that the resulting scheduling configuration fits your organization’s internalgoals and SLAs.
For more information, click on the step that interests you:
Plan your scheduler transitionBefore starting the scheduler transition, you must learn about what Fair Scheduler configuration can be converted intoa Capacity Scheduler configuration prior to the upgrade, what configuration requires manual configuration and fine-tuning.
The features of Capacity Scheduler are not exactly the same as the features of Fair Scheduler. Hence, the fs2csconversion utility cannot convert every Fair Scheduler configuration into a Capacity Scheduler configuration. Youmust learn about what properties are auto-converted and what requires manual configuration. In addition, there areFair Scheduler features that do not have an equivalent feature in Capacity Scheduler.
Scheduler transition limitationsThere are some hard limitations on converting a Fair Scheduler configuration into a Capacity Scheduler configurationas these two schedulers are not equivalent. Learning about these major limitations can help you understand thechallenges you might encounter after the scheduler transitions.
The features and configurations of Capacity Scheduler differ from the features and configurations of Fair Schedulerresulting in scheduler transition limitations. These limitations sometimes can be overcome either by manualconfiguration, fine-tuning or some trial-and-error, but in many cases there is no workaround.
140
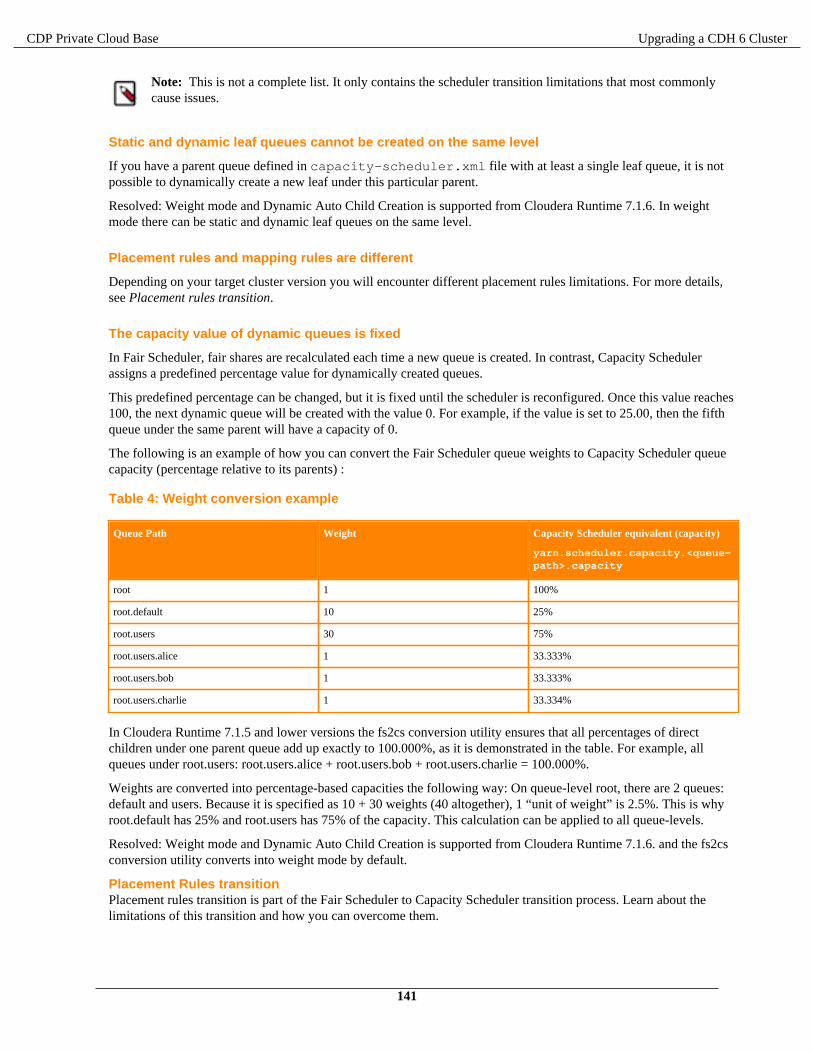
CDP Private Cloud Base Upgrading a CDH 6 Cluster
Note: This is not a complete list. It only contains the scheduler transition limitations that most commonlycause issues.
Static and dynamic leaf queues cannot be created on the same level
If you have a parent queue defined in capacity-scheduler.xml file with at least a single leaf queue, it is notpossible to dynamically create a new leaf under this particular parent.
Resolved: Weight mode and Dynamic Auto Child Creation is supported from Cloudera Runtime 7.1.6. In weightmode there can be static and dynamic leaf queues on the same level.
Placement rules and mapping rules are different
Depending on your target cluster version you will encounter different placement rules limitations. For more details,see Placement rules transition.
The capacity value of dynamic queues is fixed
In Fair Scheduler, fair shares are recalculated each time a new queue is created. In contrast, Capacity Schedulerassigns a predefined percentage value for dynamically created queues.
This predefined percentage can be changed, but it is fixed until the scheduler is reconfigured. Once this value reaches100, the next dynamic queue will be created with the value 0. For example, if the value is set to 25.00, then the fifthqueue under the same parent will have a capacity of 0.
The following is an example of how you can convert the Fair Scheduler queue weights to Capacity Scheduler queuecapacity (percentage relative to its parents) :
Table 4: Weight conversion example
Queue Path Weight Capacity Scheduler equivalent (capacity)
yarn.scheduler.capacity.<queue-path>.capacity
root 1 100%
root.default 10 25%
root.users 30 75%
root.users.alice 1 33.333%
root.users.bob 1 33.333%
root.users.charlie 1 33.334%
In Cloudera Runtime 7.1.5 and lower versions the fs2cs conversion utility ensures that all percentages of directchildren under one parent queue add up exactly to 100.000%, as it is demonstrated in the table. For example, allqueues under root.users: root.users.alice + root.users.bob + root.users.charlie = 100.000%.
Weights are converted into percentage-based capacities the following way: On queue-level root, there are 2 queues:default and users. Because it is specified as 10 + 30 weights (40 altogether), 1 “unit of weight” is 2.5%. This is whyroot.default has 25% and root.users has 75% of the capacity. This calculation can be applied to all queue-levels.
Resolved: Weight mode and Dynamic Auto Child Creation is supported from Cloudera Runtime 7.1.6. and the fs2csconversion utility converts into weight mode by default.
Placement Rules transitionPlacement rules transition is part of the Fair Scheduler to Capacity Scheduler transition process. Learn about thelimitations of this transition and how you can overcome them.
141

CDP Private Cloud Base Upgrading a CDH 6 Cluster
Placement rules (used in Fair Scheduler) and mapping rules (used in Capacity Scheduler) are very different, thereforeauto conversion of placement rules into mapping rules are not possible. You manually have to configure placementrules and mapping rules on the upgrade from CDH to CDP is completed.
The following are the most substantial limitation:
• In Fair Scheduler you can use special placement rules like "default" or "specified" which are completely absent inCapacity Scheduler.
• In Fair Scheduler you can set a "create" flag for every rule. Mapping rules do not support this.• In Fair Scheduler in case of nested rules the "create" flag is interpreted for both rules. This is not true in Capacity
Scheduler.• If a rule can return a valid queue in Fair Scheduler, it proceeds to the next rule. Capacity Scheduler, on the other
hand, returns “root.default”.
For more information see Fair Scheduler features and conversion details.
In Cloudera Runtime 7.1.6 and later releases there is a new placement engine that supports a new JSON-basedplacement rule format. These new placement rules eliminated many previous placement rules limitations caused bythe transitioning from Fair Scheduler to Capacity Scheduler. Note that in weight mode more limitations are resolvedthan in percentage mode.
The new placement engine can be thought of as a superset of Fair Scheduler and Capacity Scheduler placementevaluation logic. This means two things:
• Everything that could be described in Fair Scheduler's <queuePlacementPolicy> section can be convertedinto Capacity Scheduler with some minor exceptions.
• Full backward compatbility with the old queue-mapping rule format.
The following are the most substantial differences between the old placement and the new placement rules:
• The rules are described in JSON, however, this is transparent to the user in CDP. The generated JSON can beviewed in Cloudera Manager as part of the Capacity Scheduler Configuration Advanced ConfigurationSnippet (Safety Valve) setting.
• You can configure what should happen when a rule cannot place the application to the target queue. There arethree options: proceed ti the next rule, reject the submission, place the application in the default queue.
• New policies (mapping actions) are available: specified, defaultQueue, and reject.• The create flag was introduced: Non-existing queues are only created dynamically if it is enabled.
The following limitations remains when transitioning from the Fair Scheduler placement rules to the CapacityScheduler placement rules:
• When using nested placement rules, it is not possible to define two separate create flag.• Fair Scheduler performs a strict validation whether a rule in the chain is reachable or not. The placement engine in
Capacity Scheduler does not perform such a validation.
For more information, see Auto-converted Fair scheduler properties, Fair Scheduler features and conversion details,and Managing placement rules.
The following table shows how the fs2cs conversion utility converts the olda placement rules into the new JSON-based placement rule format. This conversion happens automatically.
Important: You cannot manage the new JSON-based placement rules by directly editing them in the capacity-scheduler.xml configuration file. Instead, you use the YARN Queue Manager UI to manageplacement rules. The table is only provided so that you can better understand how the automatic conversionhappens.
142

CDP Private Cloud Base Upgrading a CDH 6 Cluster
Table 5: Automatic placement rule conversion
Fait Scheduler placement rule JSON-based Capacity Scheduler placement rules
<rule name=”specified” /> { "type":"user", "matches":"*", "policy":"specified", "fallbackResult":"skip"}
<rule name=”user” /> { "type":"user", "matches":"*", "policy":"user", "fallbackResult":"skip"}
<rule name=”default” /> { "type":"user", "matches":"*", "policy":"defaultQueue", "fallbackResult":"skip"}
<rule name=”default” queue=”root.tmp” />
{ "type":"user", "matches":"*", "policy":"setDefaultQueue", “value”: “root.tmp”, "fallbackResult":"skip"},{ "type":"user", "matches":"*", "policy":"defaultQueue", "fallbackResult":"skip"}
or
{ "type":"user", "matches":"*", "policy":"custom", “customPlacement:”root.tmp”, "fallbackResult":"skip"}
<rule name=”primaryGroup” /> { "type":"user", "matches":"*", "policy":"primaryGroup", "fallbackResult":"skip"}
<rule name=”secondaryGroupExistingQueue” />
{ "type":"user", "matches":"*", "policy":"secondaryGroup", "fallbackResult":"skip"}
<rule name="nestedUserQueue"> <rule name="secondaryGroupExistingQueue" /> </rule>
{ "type":"user", "matches":"*", "policy":"secondaryGroupUser", "fallbackResult":"skip"}
<rule name="nestedUserQueue"> <rule name="primaryGroup" /></rule>
{ "type":"user", "matches":"*", "policy":"primaryGroupUser", "fallbackResult":"skip"}
<rule name="nestedUserQueue"> <rule name="default" queue=”root.users” /></rule>
{ "type":"user", "matches":"*", “parentQueue”: “root.users”, "policy":"user", "fallbackResult":"skip"}
<rule name=”reject” /> { "type":"user", "matches":"*", "policy":"reject", "fallbackResult":"skip"}
143

CDP Private Cloud Base Upgrading a CDH 6 Cluster
Auto-converted Fair Scheduler propertiesThe fs2cs conversion utility automatically converts certain Fair Scheduler properties into Capacity Schedulerproperties. Reviewing the list of auto-converted properties enables you to verify the conversion and plan the manualfine-tuning that requires to be done after the upgrade is completed.
Table 6: Queue resource-quota related features
Property Description
Pre-created hierarchical queues. The same queue hierarchy is achieved after conversion.
<weight> Weight: The steady fair share of a queue.
The queue.capacity property will be set with the same ratio.
<maxAMShare> Maximum AM share: Limits the fraction of the queue’s fair share thatcan be used to run application masters
<maxRunningApps> Maximum running apps: Limits the number of apps from the queue torun at once
<maxContainerAllocation> Maximum container allocation: Maximum amount of resources a queuecan allocate for a single container.
<schedulingPolicy> Scheduling policy of a queue (for example, how submitted applicationsare ordered over time).
It is converted with some limitations. For more information, see FairScheduler features and the conversion details.
<aclSubmitApps> <aclAdministerApps> ACL settings: List of users and/or groups that can submit apps to thequeue or can administer a queue.
maximum-am-resource-percent Specifies the maximum percentage of resources in the cluster whichcan be used to run application masters for the queue.
acl_submit_applications Specifies the ACL which controls who can submit applications to thegiven queue.
acl_administer_queue Specifies the ACL which controls who can administer applications inthe given queue.
ordering-policy Specifies the queue ordering policies to FIFO or fair on the givenqueue.
Table 7: Global scheduling settings
Property Description
yarn.scheduler.fair.allow-undeclared-pools Allow undeclared pools.
Sets whether new queues can be created at application submissiontime.
yarn.scheduler.fair.sizebasedweight Size based weight.
Whether to assign shares to individual apps based on their size, ratherthan providing an equal share to all apps regardless of size.
<queueMaxAppsDefault> Queue max apps default: Sets the default running app limit for allqueues.
<queueMaxAMShareDefault> Default max AM share: Sets the default AM resource limit for queue.
144

CDP Private Cloud Base Upgrading a CDH 6 Cluster
Property Description
yarn.scheduler.fair.locality.threshold.node Locality threshold node: For applications that request containers onparticular nodes, the number of scheduling opportunities since the lastcontainer assignment to wait before accepting a placement on anothernode.
yarn.scheduler.fair.locality.threshold.rack Locality threshold rack: For applications that request containers onparticular racks, the number of scheduling opportunities since the lastcontainer assignment to wait before accepting a placement on anotherrack.
yarn.scheduler.fair.max.assign Maximum assignments: If assignmultiple is true anddynamic.max.assign is false, the maximum amount of containers thatcan be assigned in one heartbeat.
yarn.scheduler.fair.assignmultiple Assign multiple: Whether to allow multiple container assignments inone heartbeat.
yarn.resourcemanager.scheduler.monitor.enable Allows higher-priority applications to preempt lower-priorityapplications.
yarn.scheduler.capacity.maximum-am-resource-percent
Specifies the maximum percentage of resources in the cluster whichcan be used to run application masters.
Table 8: Global scheduling settings
Property Description
yarn.scheduler.fair.allow-undeclared-pools Allow undeclared pools.
Sets whether new queues can be created at application submissiontime.
yarn.scheduler.fair.sizebasedweight Size based weight.
Whether to assign shares to individual apps based on their size, ratherthan providing an equal share to all apps regardless of size.
<queueMaxAppsDefault> Queue max apps default: Sets the default running app limit for allqueues.
<queueMaxAMShareDefault> Default max AM share: Sets the default AM resource limit for queue.
yarn.scheduler.fair.locality.threshold.node Locality threshold node: For applications that request containers onparticular nodes, the number of scheduling opportunities since the lastcontainer assignment to wait before accepting a placement on anothernode.
yarn.scheduler.fair.locality.threshold.rack Locality threshold rack: For applications that request containers onparticular racks, the number of scheduling opportunities since the lastcontainer assignment to wait before accepting a placement on anotherrack.
yarn.scheduler.fair.max.assign Maximum assignments: If assignmultiple is true anddynamic.max.assign is false, the maximum amount of containers thatcan be assigned in one heartbeat.
yarn.scheduler.fair.assignmultiple Assign multiple: Whether to allow multiple container assignments inone heartbeat.
yarn.resourcemanager.scheduler.monitor.enable Allows higher-priority applications to preempt lower-priorityapplications.
yarn.scheduler.capacity.maximum-am-resource-percent
Specifies the maximum percentage of resources in the cluster whichcan be used to run application masters.
<userMaxAppsDefault> Default maximum running applications.
145

CDP Private Cloud Base Upgrading a CDH 6 Cluster
Property Description
<user name="..."> <maxRunningApps>...</maxRunningApps></user>
Maximum running applications per user.
yarn.scheduler.fair.user-as-default-queue Whether to use the username associated with the allocation as thedefault queue name.
Weight mode: This behavior is simulated with a placement rule (infact, even in Fair Scheduler, this is translated into a placement ruleinternally):
{ "type":"user", "matches":"*", “parentQueue”: “root”, "policy":"user", “create”: true, "fallbackResult":"skip"}
For information about percentage mode, see Fair Scheduler features adconversion details.
Table 9: Preemption
Property Description
yarn.scheduler.fair.preemption Fair Scheduler preemption turned on.
After the conversion capacity Scheduler preemption is turned on bydefault using the default values.
<allowPreemptionFrom> Per-queue preemption disabled.
After the conversion the same queue preemption disabled by default.
yarn.scheduler.fair.waitTimeBeforeKill Wait time before killing a container
disable_preemption Disables preemption of application containers submitted to a givenqueue.
Table 10: Placement rules
Fair Scheduler placement rules Description Conversion details
create="false" or "true" Disable or enable creating a queuedynamically in YARN. This option cannotbe specified on the following placement rulepolicies:
• reject
• setDefaultQueue
• defaultQueue
Weight mode: This flag is fully supported,except for nested rules, where you can definea single “create” flag only. Therefore, “true/false” and “false/true” cannot be set.
Relative mode: Partially supported. Amanaged parent queue must be chosen as aparent. The flag has no effect on regular parentqueues.
<rule name="specified"/> If a user has submitted the application byspecifying a queue name (other than the“default” queue), then this rule will besuccessful. Hence the remaining set of ruleswon't be executed.
Supported in both weight and percentagemode.
<rule name="primaryGroup"/> If the submitted user’s(userA) primary groupname (groupA) exists, submit to groupA.
The matching policy is called primaryGroup.
<rule name="secondaryGroupExistingQueue"/>
If the submitted user’s(userA) secondarygroup name (groupB) exists, submit togroupB.
The matching policy is called secondaryGroup.
146
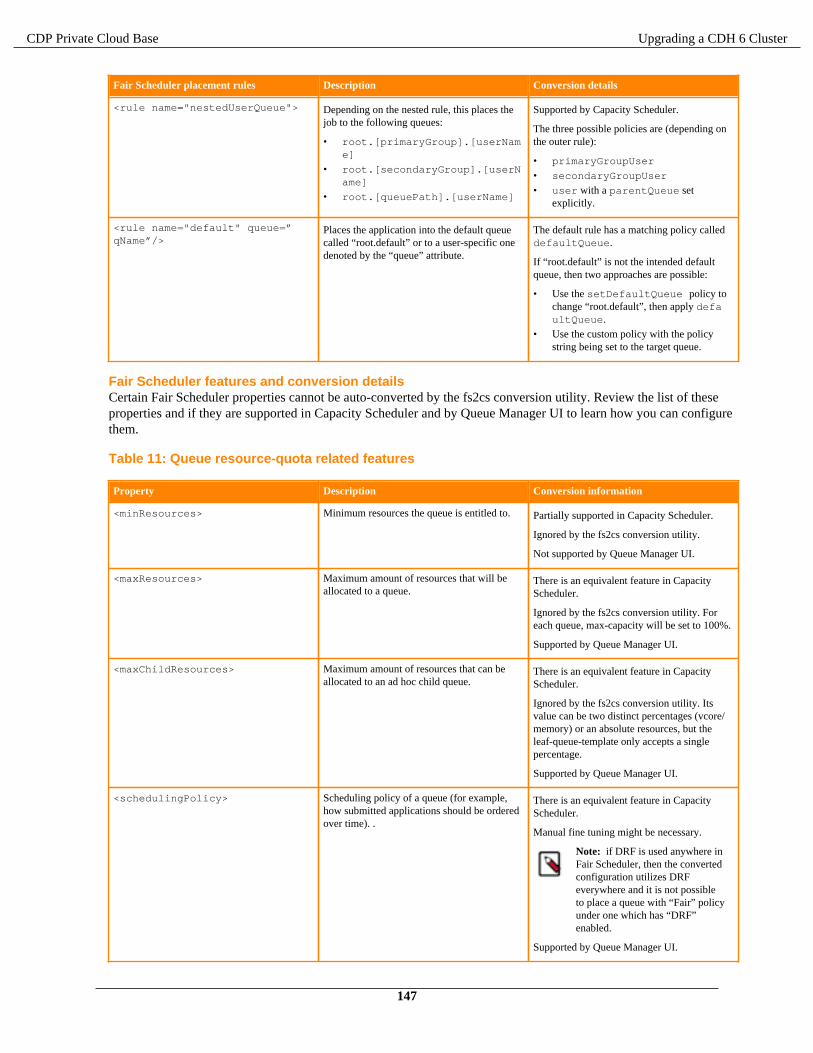
CDP Private Cloud Base Upgrading a CDH 6 Cluster
Fair Scheduler placement rules Description Conversion details
<rule name="nestedUserQueue"> Depending on the nested rule, this places thejob to the following queues:
• root.[primaryGroup].[userName]
• root.[secondaryGroup].[userName]
• root.[queuePath].[userName]
Supported by Capacity Scheduler.
The three possible policies are (depending onthe outer rule):
• primaryGroupUser
• secondaryGroupUser
• user with a parentQueue setexplicitly.
<rule name="default" queue=”qName”/>
Places the application into the default queuecalled “root.default” or to a user-specific onedenoted by the “queue” attribute.
The default rule has a matching policy calleddefaultQueue.
If “root.default” is not the intended defaultqueue, then two approaches are possible:
• Use the setDefaultQueue policy tochange “root.default”, then apply defaultQueue.
• Use the custom policy with the policystring being set to the target queue.
Fair Scheduler features and conversion detailsCertain Fair Scheduler properties cannot be auto-converted by the fs2cs conversion utility. Review the list of theseproperties and if they are supported in Capacity Scheduler and by Queue Manager UI to learn how you can configurethem.
Table 11: Queue resource-quota related features
Property Description Conversion information
<minResources> Minimum resources the queue is entitled to. Partially supported in Capacity Scheduler.
Ignored by the fs2cs conversion utility.
Not supported by Queue Manager UI.
<maxResources> Maximum amount of resources that will beallocated to a queue.
There is an equivalent feature in CapacityScheduler.
Ignored by the fs2cs conversion utility. Foreach queue, max-capacity will be set to 100%.
Supported by Queue Manager UI.
<maxChildResources> Maximum amount of resources that can beallocated to an ad hoc child queue.
There is an equivalent feature in CapacityScheduler.
Ignored by the fs2cs conversion utility. Itsvalue can be two distinct percentages (vcore/memory) or an absolute resources, but theleaf-queue-template only accepts a singlepercentage.
Supported by Queue Manager UI.
<schedulingPolicy> Scheduling policy of a queue (for example,how submitted applications should be orderedover time). .
There is an equivalent feature in CapacityScheduler.
Manual fine tuning might be necessary.
Note: if DRF is used anywhere inFair Scheduler, then the convertedconfiguration utilizes DRFeverywhere and it is not possibleto place a queue with “Fair” policyunder one which has “DRF”enabled.
Supported by Queue Manager UI.
147

CDP Private Cloud Base Upgrading a CDH 6 Cluster
Table 12: Queue resource-quota related features
Property Description Conversion information
<minResources> Minimum resources the queue is entitled to. Partially supported in Capacity Scheduler.
Ignored by the fs2cs conversion utility.
Not supported by Queue Manager UI.
<maxResources> Maximum amount of resources that will beallocated to a queue.
There is an equivalent feature in CapacityScheduler.
Ignored by the fs2cs conversion utility. Foreach queue, max-capacity will be set to 100%.
Supported by Queue Manager UI.
<maxChildResources> Maximum amount of resources that can beallocated to an ad hoc child queue.
There is an equivalent feature in CapacityScheduler.
Ignored by the fs2cs conversion utility. Itsvalue can be two distinct percentages (vcore/memory) or an absolute resources, but theleaf-queue-template only accepts a singlepercentage.
Supported by Queue Manager UI.
Table 13: Global scheduling settings
Property Description Conversion information
<user name="..."> <maxRunningApps>...</maxRunningApps></user>
Maximum running apps per user There is an equivalent feature in CapacityScheduler.
Fine-tuning of the following three propertiesare required:
• Maximum apps per queue• User limit percent• User limit factor
Supported by Queue Manager UI.
<userMaxAppsDefault> Default maximum running apps Not supported in Capacity Scheduler.
yarn.scheduler.fair.max.assign Dynamic maximum assign There is an equivalent feature in CapacityScheduler.
Fine-tuning of the following three propertiesare required:
• yarn.scheduler.capacity.per-node-heartbeat.multiple-assignments-enable
• yarn.scheduler.capacity.per-node-heartbeat.maximum-container-assignments
• yarn.scheduler.capacity.per-node-heartbeat.maximum-offswitch-assignments
Supported by Queue Manager UI.
148

CDP Private Cloud Base Upgrading a CDH 6 Cluster
Property Description Conversion information
yarn.scheduler.fair.user-as-default-queue
User as default queue There is a very similar feature in CapacityScheduler. Perform the following steps:
1. Create a queue, such as root.usersand enable the suto-create-child-queue setting for it.
2. Use the following placement rule: "u%user:%user"
The following restrictions apply:
• It is not possible to have root as a parentfor dynamically created queues.
• root.users cannot have static leafs,that is, queues that are defined in thecapacity-scheduler.xml file.
For more information, see the Placement Rulestable.
Supported by Queue Manager UI.
Table 14: Global scheduling settings
Property Description Conversion information
yarn.scheduler.fair.max.assign Dynamic maximum assign There is an equivalent feature in CapacityScheduler.
Fine-tuning of the following three propertiesare required:
• yarn.scheduler.capacity.per-node-heartbeat.multiple-assignments-enable
• yarn.scheduler.capacity.per-node-heartbeat.maximum-container-assignments
• yarn.scheduler.capacity.per-node-heartbeat.maximum-offswitch-assignments
Not supported by Queue Manager UI.
149

CDP Private Cloud Base Upgrading a CDH 6 Cluster
Property Description Conversion information
yarn.scheduler.fair.user-as-default-queue
User as default queue Relative mode:A placement rule needs to becreated.
1. Create a queue, such as "root.users" andenable Dynamic Auto Child Creation forit (make it a Managed Parent Queue).
2. Create the following placement rule:
{ "type":"user", "matches":"*", “parentQueue”: “root.users”, "policy":"user", “create”: true, "fallbackResult":"skip"}
The following limitations apply:
• It is not possible to have "root" as a parentfor dynamically created queues.
• "root.users" queue cannot have staticleafs. Those are queues that always existand are created manually.
For information about weight mode see Auto-converted Fair Scheduler properties.
Supported by Queue Manager UI.
Table 15: Preemption
Property Description Conversion information
yarn.scheduler.fair.preemption.cluster-utilization-threshold
The utilization threshold after whichpreemption kicks in.
There is an equivalent feature in CapacityScheduler: yarn.resourcemanager.monitor.capacity.preemption.max_ignored_over_capacity. Itspecifies the resource usage threshold over itsconfigured capacity that a queue must meetbefore it is eligible for preemption.
Supported by Queue Manager UI.
minSharePreemptionTimeout The number of seconds the queue is under itsminimum share before it will try to preemptcontainers to take resources from other queue.s
Not supported in Capacity Scheduler.
fairSharePreemptionTimeout The number of seconds the queue is underits fair share threshold before it will try topreempt containers to take resources fromother queues.
Partially supported in Capacity Scheduler.
This can be achieved by using the followingconfigurations together:
• yarn.resourcemanager.monitor.capacity.preemption.natural_termination_factor
• yarn.resourcemanager.monitor.capacity.preemption.max_wait_before_kill
Supported by Queue Manager UI.
150

CDP Private Cloud Base Upgrading a CDH 6 Cluster
Property Description Conversion information
fairSharePreemptionThreshold The fair share preemption threshold for thequeue.
Partially supported in Capacity Scheduler.
This can be achieved by using the followingconfigurations together:
• yarn.resourcemanager.monitor.capacity.preemption.natural_termination_factor
• yarn.resourcemanager.monitor.capacity.preemption.max_wait_before_kill
Supported by Queue Manager UI.
Table 16: Placement rules
Fair Scheduler placement rules Description Conversion information
create="false" or "true" Disable or enable creating a queuedynamically in YARN. This option can bespecified on all rules.
Partially supported in Capacity Scheduler.
Use the Capacity Scheduler Dynamic QueueMappings policies:
• u:%user:[managedParentQueueName].[queueName]
• u:%user:[managedParentQueueName].%user
• u:%user:[managedParentQueueName].%primary_group
• u:%user:[managedParentQueueName].%secondary_group
Supported by Queue Manager UI.
<rule name="specified"/> If a user has submitted the application byspecifying a queue name (other than the“default” queue), then this rule will besuccessful. Hence the remaining set of ruleswon't be executed.
Not supported in Capacity Scheduler.
<rule name="primaryGroupExistingQueue"/>
If submitted user’s(userA) primary groupname (groupA) exists, submit to groupA.
There is an equivalent placement rule inCapacity Scheduler: <value>u:%user:%primary_group</value>
Supported by Queue Manager UI.
<rule name="secondaryGroupExistingQueue"/>
If submitted user’s(userA) secondary groupname (groupA) exists, submit to groupA.
There is an equivalent placement rule inCapacity Scheduler: <value>u:%user:%secondary_group</value>
Supported by Queue Manager UI.
<rule name="nestedUserQueue"> Depending on the nested rule, this places thejob to the following queues:
• root.[primaryGroup].[userName]
• root.[secondaryGroup].[userName]
• root.[queuePath].[userName]
Not supported in Capacity Scheduler.
<rule name="default" queue=”qName”/>
Fall back policy by which rule will fall backto queue named in the property ‘queue’ orthe “default“ queue if no queue property isspecified (if all matches fail).
There is an equivalent placement rule inCapacity Scheduler: <value>u:%user:default</value>
Supported by Queue Manager UI.
151

CDP Private Cloud Base Upgrading a CDH 6 Cluster
Use the fs2cs conversion utilityYou can use the fs2cs conversion utility to automatically convert certain Fair Scheduler configuration to CapacityScheduler configuration as part of the Upgrade Cluster Wizard in Cloudera Manager.
About this task
From the CDP Private Cloud Base 7.1 release, Cloudera provides a conversion tool, called fs2cs conversion utility.This utility is a CLI application that is part of the yarn CLI command. It generates capacity-scheduler.xmland yarn-site.xml as output files.
Important: The features of Capacity Scheduler are not exactly the same as the features of Fair Scheduler.Hence, the fs2cs conversion utility cannot convert every Fair Scheduler configuration into a CapacityScheduler configuration. After the automatic conversion and once the upgrade is completed, you mustmanually tune the scheduler configurations to ensure that the resulting scheduling configuration fits yourorganization’s internal goals and SLAs after conversion.
Before you begin
• Be aware of the Fair Scheduler properties that are auto-converted, those that require manual configuration, andthose that do not have an equivalent feature in Capacity Scheduler.
• You must have downloaded and distributed parcels for the target version of CDP.• In VPC, to use your current Compute Cluster queue configurations in your new installation after the upgrade, you
must have manually saved them before starting the update process and then added the configurations to your newinstallation. Else, your Compute Cluster queue configurations will be lost because the Upgrade Wizard transitionsonly the queues from your Base Cluster.
1. In Cloudera Manager, navigate to Host > All Hosts.2. Find the host with the ResourceManager role and click the YARN ResourceManager role.3. Click the Processes tab.4. Find and save the fair-scheduler.xml and yarn-site.xml configuration files for future reference.
• Ensure that the configuration is not stale, there is no unsaved changes. Ensure that there is no unsaved changes onthe Dynamic Resource Pools view, meaning that the Refresh Dynamic Resource Pools button is inactive.
• Reach the Copy Scheduler Settings part of the upgrade process using the Upgrade Cluster Wizard in ClouderaManager. That is the first step when you add YARN Queue Manager service:
152

CDP Private Cloud Base Upgrading a CDH 6 Cluster
Procedure
1. Download the Fair Scheduler configuration files from the Cloudera Manager data store:
a) In the Copy Scheduler Settings window during the upgrade process, click Download fair-scheduler.xml andDownload yarn-site.xml to download the fair-scheduler.xml and yarn-site.xml files.
b) Copy the downloaded configuration files to any host in your cluster.
2. Use the fs2cs conversion utility:
a) Log in to the host machine where you downloaded the fair-scheduler.xml and yarn-site.xml filesusing ssh.
b) Create a new directory to save the capacity-scheduler.xml file that is generated by the fs2csconversion utility:
$ mkdir -p output
c) Use the fs2cs conversion utility to auto-convert the structure of resource pools. Options listed between braces[] are optional:
$ yarn fs2cs [--cluster-resource ***VCORES/MEMORY***][--no-terminal-rule-check] --yarnsiteconfig ***FULL PATH TO yarn-site.xml***> [--fsconfig ***FULL PATH TO fair-scheduler.xml***] --output-directory ***OUTPUT PATH*** [--print] [--skip-verification]
Important: You have to provide absolute path for the yarn-site.xml and the fair-scheduler.xml configuration file. If only the file names are provided the command fails.
For example:
yarn fs2cs --yarnsiteconfig /home/hadoop/yarn-site.xml --fsconfig /home/hadoop/fair-scheduler.xml --output-directory /tmp
3. Upload the generated Capacity Scheduler configuration files to save the configuration in Cloudera Manager:
Click Choose File and select the generated capacity-scheduler.xml file to save the configuration.
Note: The configurations in the generated yarn-site.xml output file have to be manually configuredusing Cloudera Manager Advanced configuration snippet (Safety Valves) once the upgrade is completed.
If the fs2cs conversion utility command fails, check if you provided the correct full path for the yarn-site.xmland the fair-scheduler.xml configuration file.
What to do nextProceed with the CDP upgrade.
After the upgrade is completed, manually add the yarn-site.xml configurations using Cloudera ManagerAdvanced configuration snippet (Safety Valves), and tune the configuration generated by the fs2cs conversion utilityusing Queue Manager UI and Cloudera Manager Advanced configuration snippet (Safety Valves).
CLI options of the fs2cs conversion toolBefore generating the scheduler output files, you must understand the CLI options available for the fs2cs conversiontool. These options help you to complete the scheduler conversion.
153

CDP Private Cloud Base Upgrading a CDH 6 Cluster
Option Description
-c,--cluster-resource <arg> Needs to be specified if maxResources is defined as percentagesfor any queue, otherwise this parameter can be omitted. The clusterresource setting is optional, but it can be necessary in some cases. InFair Scheduler, you can define the maximum capacity of the queue asa percentage of the total cluster resource. Capacity scheduler does notaccept a vector of capacities (work is ongoing under YARN-9936),therefore, percentages are converted to absolute resources. Theacceptable formats are:
--cluster-resource vcores=10,memory-mb=1024--cluster-resource 1024 mb,10 vcores
-d,--dry-run Performs a dry-run of the conversion. Outputs whether the conversionis possible or not.
-f,--fsconfig <arg> Absolute path to a valid fair-scheduler.xml configuration file.
By default, yarn-site.xml contains the property which defines thepath of fair-scheduler.xml. Therefore, the -f / --fsconfig settings are optional.
-h,--help Displays the list of options
-o,--output-directory <arg> Output directory for yarn-site.xml and capacity-scheduler.xml files.Must have write permission for the user who is running this script.
If -p or --print is specified, the xml files are emitted to thestandard output, so the -o / --output-directory is ignored.
-p,--print If defined, the converted configuration will only be emitted to theconsole.
If -p or --print is specified, the xml files are emitted to the standardoutput, so the -o / --output-directory is ignored.
-r,--rulesconfig <arg> Optional parameter. If specified, should point to a valid path to theconversion rules file (property format).
-s, --skip-verification It does not validate the converted Capacity Scheduler configuration.By default, the utility starts an internal Capacity Scheduler instanceto see whether it can start up properly or not. This switch disables thisbehaviour.
-t,--no-terminal-rule-check Disables checking whether a placement rule is terminal to maintainbackward compatibility with configs that were made beforeYARN-8967.
By default, Fair Scheduler performs a strict check of whether aplacement rule is terminal or not. This means that if you use a <reject>rule which is followed by a <specified> rule, then this is not allowed,because the latter is unreachable. However, before YARN-8967, FairScheduler was more lenient and allowed certain sequence of rulesthat are no longer valid. Inside the tool, a Fair Scheduler instanceis instantiated to read and parse the allocation file. To have FairScheduler accept such configurations, the -t or --no-terminal-rule-check argument must be supplied to avoid the Fair Schedulerinstance throwing an exception.
-y,--yarnsiteconfig <arg> Path to a valid yarn-site.xml configuration file.
154
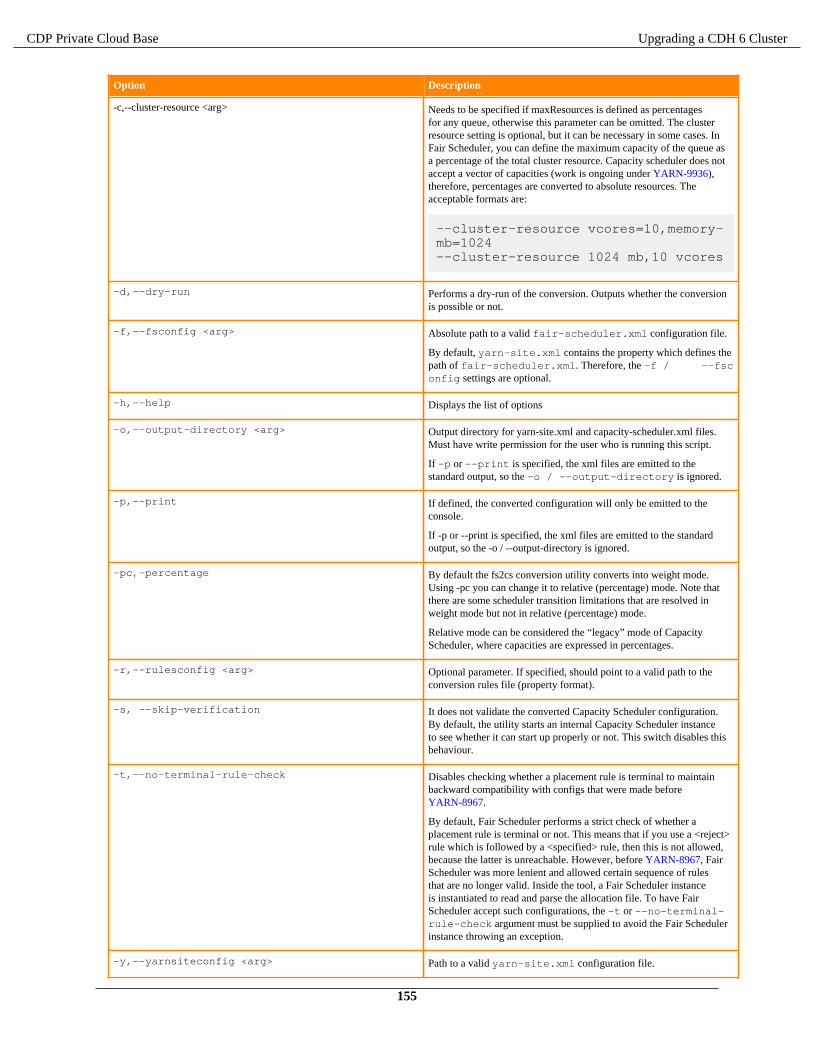
CDP Private Cloud Base Upgrading a CDH 6 Cluster
Option Description
-c,--cluster-resource <arg> Needs to be specified if maxResources is defined as percentagesfor any queue, otherwise this parameter can be omitted. The clusterresource setting is optional, but it can be necessary in some cases. InFair Scheduler, you can define the maximum capacity of the queue asa percentage of the total cluster resource. Capacity scheduler does notaccept a vector of capacities (work is ongoing under YARN-9936),therefore, percentages are converted to absolute resources. Theacceptable formats are:
--cluster-resource vcores=10,memory-mb=1024--cluster-resource 1024 mb,10 vcores
-d,--dry-run Performs a dry-run of the conversion. Outputs whether the conversionis possible or not.
-f,--fsconfig <arg> Absolute path to a valid fair-scheduler.xml configuration file.
By default, yarn-site.xml contains the property which defines thepath of fair-scheduler.xml. Therefore, the -f / --fsconfig settings are optional.
-h,--help Displays the list of options
-o,--output-directory <arg> Output directory for yarn-site.xml and capacity-scheduler.xml files.Must have write permission for the user who is running this script.
If -p or --print is specified, the xml files are emitted to thestandard output, so the -o / --output-directory is ignored.
-p,--print If defined, the converted configuration will only be emitted to theconsole.
If -p or --print is specified, the xml files are emitted to the standardoutput, so the -o / --output-directory is ignored.
-pc,-percentage By default the fs2cs conversion utility converts into weight mode.Using -pc you can change it to relative (percentage) mode. Note thatthere are some scheduler transition limitations that are resolved inweight mode but not in relative (percentage) mode.
Relative mode can be considered the “legacy” mode of CapacityScheduler, where capacities are expressed in percentages.
-r,--rulesconfig <arg> Optional parameter. If specified, should point to a valid path to theconversion rules file (property format).
-s, --skip-verification It does not validate the converted Capacity Scheduler configuration.By default, the utility starts an internal Capacity Scheduler instanceto see whether it can start up properly or not. This switch disables thisbehaviour.
-t,--no-terminal-rule-check Disables checking whether a placement rule is terminal to maintainbackward compatibility with configs that were made beforeYARN-8967.
By default, Fair Scheduler performs a strict check of whether aplacement rule is terminal or not. This means that if you use a <reject>rule which is followed by a <specified> rule, then this is not allowed,because the latter is unreachable. However, before YARN-8967, FairScheduler was more lenient and allowed certain sequence of rulesthat are no longer valid. Inside the tool, a Fair Scheduler instanceis instantiated to read and parse the allocation file. To have FairScheduler accept such configurations, the -t or --no-terminal-rule-check argument must be supplied to avoid the Fair Schedulerinstance throwing an exception.
-y,--yarnsiteconfig <arg> Path to a valid yarn-site.xml configuration file.
155

CDP Private Cloud Base Upgrading a CDH 6 Cluster
Manual configuration of scheduler propertiesAfter upgrading to CDP Private Cloud Base, you must manually add the content of the yarn-site.xml outputfile, and then fine-tune the scheduler configurations using the YARN Queue Manager UI to ensure that the resultingconfigurations suit your requirements. You can use Cloudera Manager Advanced configuration snippet (SafetyValve) to configure a property that is missing from the YARN Queue Manager UI.
The features of Capacity Scheduler are not exactly the same as the features of Fair Scheduler. Hence, the conversionutility cannot convert every Fair Scheduler configuration into a Capacity Scheduler configuration. Therefore, youmust manually tune the scheduler configurations to ensure that the resulting scheduling configuration fits yourorganization’s internal goals and SLAs after conversion. If needed, further change the scheduler properties in thecapacity-scheduler.xml and yarn-site.xml output files generated by the fs2cs conversion utility. Forinformation about the Fair Scheduler properties that are auto-converted by the fs2cs conversion utility, see Auto-converted Fair Scheduler properties.
You can configure the properties manually using the YARN Queue Manager UI. If you see any properties that areunavailable in the Queue Manager UI, you can use Cloudera Manager configuration snippet (Safety Valves) toconfigure them.
Important: You must not use the Queue Manager UI and Cloudera Manager Safety Valves at the same timeas safety valves overwrite the configuration set using Queue Manager UI.
Manually add the configurations of yarn-site.xmlOnce the upgrade to CDP Private Cloud Base is completed, you have to manually add the yarn-site.xmlconfigurations using Cloudera Manager Advanced configuration snippet (Safety Valves).
About this task
The fs2cs conversion utility generates two output files: capacity-scheduler.xml and yarn-site.xml. Thecapacity-scheduler.xml file can be uploaded using the Upgrade Wizard, but the configurations in the yarn-site.xml have to be manually added once the upgrade is completed.
Before you begin
• Use the fs2cs conversion utility to generate the capacity-scheduler.xml and yarn-site.xml outputfiles.
• Complete the upgrade process.
Procedure
1. In Cloudera Manager, select the YARN service.
2. Click the Configuration tab.
3. Search for yarn-site, and find the YARN Service Advanced Configuration Snippet (Safety Valve) foryarn-site.xml.
4. Copy the content of the yarn-site.xml output file.
156

CDP Private Cloud Base Upgrading a CDH 6 Cluster
5. Click View as XML and paste the copied content.
The yarn-site.xml file can contain the following configurations:
• Continuous scheduling enabled/disabled• Continuous scheduling interval• Preemption
• Preemption enabled/disabled• Wait time before preemption• Wait time before next starvation check
• Assign multiple enabled/disabled• Maximum number of heartbeat assignments• Locality threshold per node• Locality threshold per rack• Size-based weight enabled/disabled• Resource calculator class• Async scheduling enabled/disabled
6. Manually remove the following invalid tags:
• header• configuration tags• final tags• source tags
7. Click Save Changes.
8. Restart the YARN service.
What to do nextManually tune the configuration generated by the fs2cs conversion utility using Queue Manager UI and ClouderaManager Advanced configuration snippet (Safety Valves).Use YARN Queue Manager UI to configure scheduler propertiesAfter upgrading to CDP Private Cloud Base, you must configure the Capacity Scheduler properties using the outputfiles generated by the fs2cs conversion utility. You can configure the properties manually using the YARN QueueManager UI service.
Before you begin
• Use the fs2cs conversion utility to generate the capacity-scheduler.xml and yarn-site.xml outputfiles.
• Complete the upgrade process.• Identify properties that require manual configuration and can be configured using the Queue Manager UI.
For more information about scheduler properties, see Fair Scheduler feature and conversion details.
157
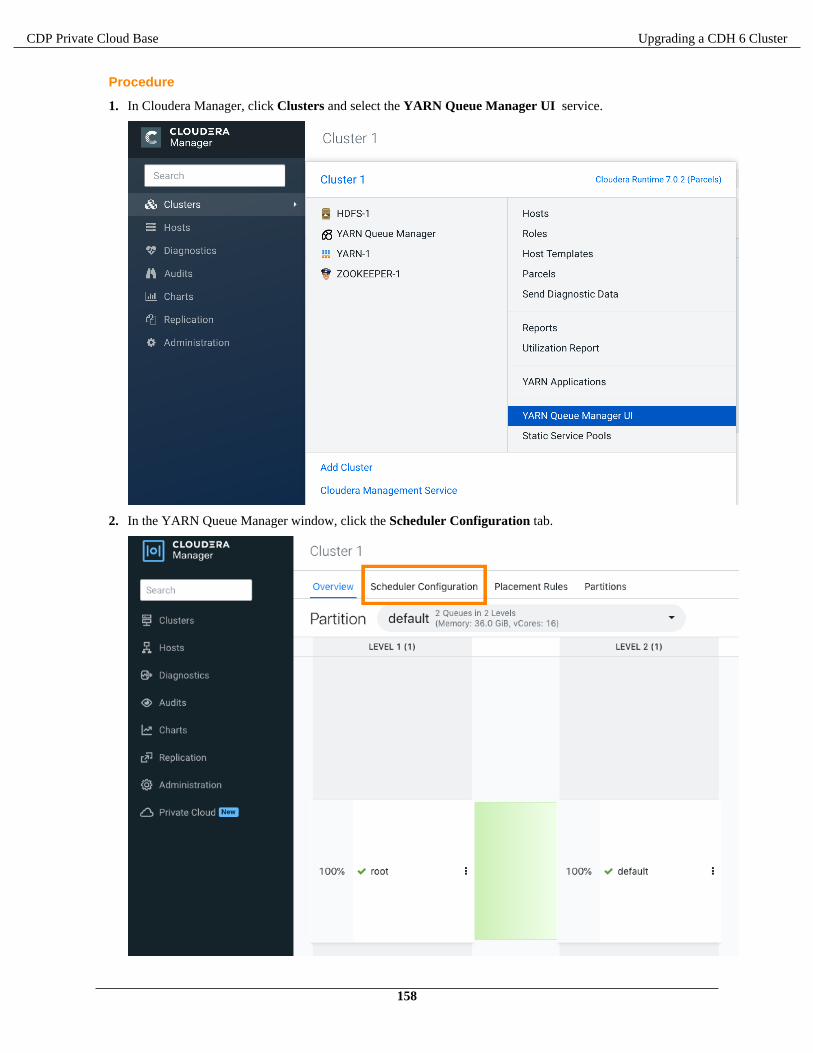
CDP Private Cloud Base Upgrading a CDH 6 Cluster
Procedure
1. In Cloudera Manager, click Clusters and select the YARN Queue Manager UI service.
2. In the YARN Queue Manager window, click the Scheduler Configuration tab.
158

CDP Private Cloud Base Upgrading a CDH 6 Cluster
3. In the Scheduler Configuration window, enter the value of the property and click Save.
Use Cloudera Manager Safety Valves to configure scheduler propertiesCertain scheduler properties can neither be converted by the fs2csconversion utility nor be configured using theYARN Queue Manager UI service. After upgrading to CDP Private Cloud Base you must manually configure theseproperties using the Cloudera Manager advanced configuration snippet (Safety Valves).
Before you begin
• Use the fs2cs conversion utility to generate the capacity-scheduler.xml and yarn-site.xml outputfiles.
• Complete the upgrade process.• Identify the scheduler properties that need to be configured manually and not supported by the Queue Manager
UI.
Procedure
1. In Cloudera Manager, select the YARN service.
2. Click the Configuration tab.
3. Search for capacity-scheduler, and find the Capacity Scheduler Configuration AdvancedConfiguration Snippet (Safety Valve).
4. Click View as XML, and insert the complete capacity-scheduler.xml file, generated by the convertertool.
5. Add the necessary configuration properties.
6. Click Save Changes.
7. Search for yarn-site, and find the YARN Service Advanced Configuration Snippet (Safety Valve) foryarn-site.xml.
8. Click View as XML and add the required configuration in an XML format.
Optionally, use + and - to add and remove properties.
9. Click Save Changes.
10. Restart the YARN service.
Configure TLS/SSL for Ranger in a manually configured TLS/SSL environmentHow to manually configure TSL/SSL for Ranger in a manually configured TLS/SSL environment.
About this task
If you use manual TLS encryption on CDH and you plan to enable TLS for Ranger during the CDP upgrade, youmust ensure that the Ranger Admin certificate is imported into the truststore file configuration of all services thatsupport Ranger plugins.
Note:
If you have existing CA-signed certificates for keystores and truststores deployed across all the clusterhosts, then continue to use the same for the Ranger service. In this case you can skip the steps in this topicthat create a self-signed certificate. Proceed to Upgrade the Cluster Step 4 : Add Ranger service from CMUpgrade Wizard and update the TLS/SSL configurations.
Procedure
1. Create a keystore file for Ranger Admin.
mkdir -p /etc/security/serverKeys
${JAVA_HOME}/bin/keytool -genkeypair -alias {ALIAS} -keyalg RSA -keysize 2048 -validity 360
159

CDP Private Cloud Base Upgrading a CDH 6 Cluster
-keystore /etc/security/serverKeys/ranger-admin-keystore.jks -storepass {STOREPASS}
WhereALIAS
A unique alias specified for creating the keystore file. This can be Ranger Admin host FQDN/UQDN where it is going to be installed or can use custom text.
Note: If upgrading to CDP <= 7.1.4, it is recommended to use the host FQDN.
STOREPASS
A password which is used to protect the keystore.
chown -R ranger:ranger /etc/security/serverKeys/ranger-admin-keystore.jks
2. Export the certificate from the Ranger Admin keystore and create a certificate file.
${JAVA_HOME}/bin/keytool -exportcert -keystore /etc/security/serverKeys/ranger-admin-keystore.jks -alias {ALIAS} -file /etc/security/serverKeys/ranger-admin-trust.cer
WhereALIAS
Use the same alias used for creating the keystore file ranger-admin-keystore.jks, as we are exportingthe certificate associated with that alias.
Note: No need to provide a -storepass password to secure the certificate file.
3. Import Ranger Admin certificate into a truststore file for creating a "trusted certificate".
${JAVA_HOME}/bin/keytool -importcert -file /etc/security/serverKeys/ranger-admin-trust.cer -alias {ALIAS} -keystore /etc/security/serverKeys/ranger-truststore.jks -storepass{STOREPASS}
WhereALIAS
Assign any alias name.
STOREPASS
A password to secure the truststore file.
Note: You must also import Solr Server certificate into /etc/security/serverKeys/ranger-truststore.jks, if Solr (CDP-INFRA-SOLR) Server has TLS enabled. This will help Ranger Adminto connect Solr for creating ranger_audits collection.
4. On Review Changes, set the TLS/SSL configurations:
Configuration Property Description
Enable TLS/SSL for Ranger Admin(ranger.service.https.attrib.ssl.enabled)
Select this check box
Ranger Admin TLS/SSL Server JKS Keystore File Location(ranger.https.attrib.keystore.file)
The path to the keystore file created in Step 1 : Creating a keystorefile for Ranger Admin
OR
The path to the existing keystore file if
using existing CA-signed certificates
160

CDP Private Cloud Base Upgrading a CDH 6 Cluster
Ranger Admin TLS/SSL Server JKS Keystore File Password(ranger.service.https.attrib.keystore.pass)
The password of the keystore file used for Ranger Admin
Ranger Admin TLS/SSL Keystore File Alias(ranger.service.https.attrib.keystore.keyalias)
Note:
This config will be shown from CM-7.3.1 for CDP-7.1.5+ onwardsin the initial wizard setup. If using CM <=7.3.1 & upgrading to CDP< 7.1.5, continue the use of alias name to FQDN of the host whilecreating Ranger Admin keystore or using the existing keystore.
Enter the alias used for the keystore file created in Step 1 : Creating akeystore file for Ranger Admin.
The {{RANGER_ADMIN_HOST}} is a placeholder value whichwill be replaced with the host FQDN where Ranger Admin will beinstalled in the current cluster when Auto-TLS is enabled which useshost FQDN as alias while creating keystore file. The placeholdercan be replaced to have custom alias value in case of manual TLS/SSL setup. If using a custom alias value which is the same as thehost short name then use {{RANGER_ADMIN_HOST_UQDN}}placeholder as a value.
Ranger Admin TLS/SSL Trust Store File (ranger.truststore.file) The path to the truststore file created in Step 3 : Import RangerAdmin certificate into a truststore file for creating a "trustedcertificate" entry
OR
The path to the existing truststore file if
using existing CA-signed certificates
Ranger Admin TLS/SSL Trust Store Password(ranger.truststore.password)
The password used for creating the trust store file
Ranger Tagsync TLS/SSL Trust Store File(xasecure.policymgr.clientssl.truststore)
The path to the truststore file created in Step 3 : Import RangerAdmin certificate into a truststore file for creating a "trustedcertificate" entry
OR
The path to the existing truststore file if
using existing CA-signed certificates
Ranger Tagsync TLS/SSL Trust Store Password(xasecure.policymgr.clientssl.truststore.password)
The password used for creating the trust store file
Ranger Usersync TLS/SSL Trust Store File(ranger.usersync.truststore.file)
The path to the truststore file created in Step 3 : Import RangerAdmin certificate into a truststore file for creating a "trustedcertificate" entry
OR
The path to the existing truststore file if
using existing CA-signed certificates
Ranger Usersync TLS/SSL Trust Store Password(ranger.usersync.truststore.password)
The password used for creating the trust store file
161

CDP Private Cloud Base Upgrading a CDH 6 Cluster
5. Import the Ranger Admin certificate into the truststore file configs for the following services, if present in thecluster. Ranger plugin is being enabled for these services during upgrade.
a) Search for the following configuration properties:
HDFS
HDFS NameNode TLS/SSL Trust Store File (namenode_truststore_file)
HDFS NameNode TLS/SSL Trust Store Password (namenode_truststore_password)
Hive (shown under Hive Configuration in CM-7.3.1+)
Hive Metastore TLS/SSL Trust Store File (hive.metastore.dbaccess.ssl.truststore.path)
Hive Metastore TLS/SSL Trust Store Password (hive.metastore.dbaccess.ssl.truststore.password)
Kafka
Kafka Broker TLS/SSL Trust Store File (ssl.truststore.location)
Kafka Broker TLS/SSL Trust Store Password (ssl.truststore.password.generator)
Impala
impala TLS/SSL Trust Store File (impala_truststore_file)
impala TLS/SSL Trust Store Password (impala_truststore_password)
Atlas
Atlas Server TLS/SSL Trust Store File (truststore.file)
Atlas Server TLS/SSL Trust Store Password (truststore.password)b) If a service has an existing truststore file, use that to import the Ranger Admin certificate. If not, then add a
new truststore file and update the above configs.c) Import the Ranger Admin certificate into the existing/new truststore file.
${JAVA_HOME}/bin/keytool -importcert -file /etc/security/serverKeys/ranger-admin-trust.cer -alias {ALIAS} -keystore {TRUSTSTORE} -storepass {STOREPASS}
WhereALIAS
Assign any alias name.
STOREPASS
A password to secure the truststore file.
TRUSTSTORE
EITHER an existing truststore file used by the service to import the Ranger Admin certificate OR anew truststore file which will have Ranger Admin certificate.
d) If using existing CA-signed certificates then add the path of the existing truststore file.e) Proceed to upgrade wizard for further other tasks.
6. Migrate Key Trustee KMS to Ranger KMS KTS.
a) If you have Key Trustee service present in the cluster, Ranger KMS KTS will be added from the backend aspart of the upgrade flow.
b) To successfull start Ranger KMS KTS service in the upgrade flow:
a) Change the alias of the keystore file used by Key Trustee KMS to point to the hostname where it is installed.Check Key Management Server Proxy TLS/SSL Server JKS Keystore File Location config to get the keystorefile.
${JAVA_HOME}/bin/keytool -changealias -alias {EXISTING_ALIAS} -destalias
162
CDP Private Cloud Base Upgrading a CDH 6 Cluster
`hostname -f` -keystore {KT_KMS_KEYSTORE}
Note: In a High Availability envrionment, perform this step on all KT KMS servers.
b) Import Ranger Admin certificate into truststore file used by KT KMS. Check Key Management Server ProxyTLS/SSL Trust Store File config to get the truststore file getting used.
Step 11: Finalize the HDFS UpgradeSteps to finalize the HDFS upgrade.
Note: Before upgrading the dependent services such as HBase, you must verify and ensure that the HDFSsafemode is off.
To determine if you can finalize the upgrade, run important workloads and ensure that they are successful. After youhave finalized the upgrade, you cannot roll back to a previous version of HDFS without using backups. Verifying thatyou are ready to finalize the upgrade can take a long time.
Make sure you have enough free disk space, keeping in mind that the following behavior continues until the upgradeis finalized:
• Deleting files does not free up disk space.• Using the balancer causes all moved replicas to be duplicated.• All on-disk data representing the NameNodes metadata is retained, which could more than double the amount of
space required on the NameNode and JournalNode disks.
If you have not performed a rolling upgrade:
1. Go to the HDFS service.2. Click the Instances tab.3. Click the link for the NameNode instance. If you have enabled high availability for HDFS, click the link labeled
NameNode (Active).
The NameNode instance page displays.4. Select Actions > Finalize Metadata Upgrade and click Finalize Metadata Upgrade to confirm.
Step 12: Complete Post-Upgrade steps for upgrades to CDP Private CloudBase
Steps to perform after upgrading a cluster.
Several components require additional steps after you complete the upgrade to CDP Private Cloud Base:
• HBase See Apache HBase post-upgrade tasks• Apache Hive See Hive Post-Upgrade Tasks.
163

CDP Private Cloud Base Upgrading a CDH 6 Cluster
• Kafka
1. Remove the following properties from the Kafka Broker Advanced Configuration Snippet (Safety Valve) configuration property.
• Inter.broker.protocol.version• log.message.format.version
2. Save your changes.3. Perform a rolling restart:
a. Select the Kafka service.b. Click Actions > Rolling Restart.c. In the pop-up dialog box, select the options you want and click Rolling Restart.d. Click Close once the command has finished.
• Kudu See Upgrade Notes for Apache Kudu 1.15 / CDP 7.1 on page 275• Stream Messaging Manager See Configure SMM to monitor SRM replications on page 277• YARN
• Scheduler: If you are using Fair Scheduler, you must migrate to Capacity Scheduler during the upgradeprocess, and once the upgrade is finished you need to manually fine tune it. For more information, see Manualconfiguration of scheduler properties on page 156.
• Considering logical processors in the calculation: The yarn.nodemanager.resource.count-logical-processors-as-cores property was not present in CDH 5. In Cloudera Runtime 7.1.1(and in CDH 6), it is set to false by default, meaning that YARN does not consider logical processorsin the calculation which can result in a performance degradatio if Linux Container Executor and CGroupsare enabled. The extent of such degradation depends on the CPU manufacturer. To solve this issue, do thefollowing:
1. In Cloudera Manager, navigate to YARN > Configuration.2. Find the YARN Service Advanced Configuration Snippet (Safety Valve) for yarn-site.xml property.3. Add the following configuration:
yarn.nodemanager.resource.count-logical-processors-as-cores=true
Using this configuration snippet ensures that all nodes that need the configuration receive it. This alsoensures different NodeManager groups are consistently configured.
4. Restart the NodeManager.• NodeManager recovery: The default value of the yarn.nodemanager.recovery.enabled property
is true. However, if in you source cluster you used safety-valves to set this property to false it will stayfalse after upgrading from CDH 6 to CDP. Cloudera recommends to have this feature enabled and set theyarn.nodemanager.recovery.enabled property to true.
• Log aggregation:: In order to see the history of applications that were launched before upgrade, do thefollowing:
1. In Cloudera Manager, navigate to YARN > Configuration > Category: Log aggreation.2. See the following configurations:
yarn.log-aggregation.TFile.remote-app-log-dir-suffix=logsyarn.log-aggregation.IFile.remote-app-log-dir-suffix=logs-ifile
• Maximum capacity: Set the yarn.scheduler.capacity.<queuepath>.user-limit-factorto a value that is greater than 1. This configuration will help to grow the queue usage beyond its configuredcapacity till its maximum capacity configured.
164

CDP Private Cloud Base Upgrading a CDH 6 Cluster
• Ranger Plugins
The following Ranger plugins are not enabled by default after the upgrade. If these services are configured in thecluster, you will need to manually enable the plugins in order for them to use Ranger:
• HBase• Kudu• Solr• YARN: If you want to enable the Ranger YARN plugin, you have to migrate the ACLs manually. For more
information, see Configure a resource-based policy: YARN.• YARN
The following Ranger plugins are enabled after an upgrade:
• Atlas• HDFS• Hive• Hive on Tez• Impala• Kafka
• ZooKeeper
Ensure, that QuorumSSL (Secure ZooKeeper) is enabled only if QuorumSASL (Server to server SASLauthentication) is also enabled. Note, that QuorumSSL is enabled by default if AutoTLS is enabled. IfQuorumSSL is enabled without QuorumSASL, then the ZooKeeper cluster can be slow to start due to someknown ZooKeeper limitations.
• Sentry – See Importing Sentry privileges into Ranger policies on page 268.
Important: If HDFS ACL sync is enabled (hdfs_sentry_sync_enable=true) on the CDH cluster, then youmust install Ranger RMS to support the same functionality.
• For more information about Ranger RMS, see Ranger Hive-HDFS ACL Sync Overview.• For steps to install Ranger RMS, see Installing Ranger RMS.
• Impala – See Apache Impala changes in CDP on page 256
Step 13: Exit Maintenance ModeIf you enabled Maintenance Mode before the upgrade, you must exit Maintenance Mode to complete the upgrade.
If you entered maintenance mode during this upgrade, exit maintenance mode.
On the Home > Status tab, click next to the cluster name and select Exit Maintenance Mode.
Troubleshooting Upgrades
"Access denied" in install or update wizard
"Access denied" in install or update wizard during database configuration for Activity Monitor or Reports Manager.
Possible Reasons
Hostname mapping or permissions are not set up correctly.
Possible Solutions
• For hostname configuration, see Configure Network Names.
165

CDP Private Cloud Base Upgrading a CDH 6 Cluster
• For permissions, make sure the values you enter into the wizard match those you used when you configured thedatabases. The value you enter into the wizard as the database hostname must match the value you entered for thehostname (if any) when you configured the database.
For example, if you had entered the following when you created the database
grant all on activity_monitor.* TO 'amon_user'@'myhost1.myco.com' IDENTIFIED BY 'amon_password';
the value you enter here for the database hostname must be myhost1.myco.com. If you did not specify a host,or used a wildcard to allow access from any host, you can enter either the fully qualified domain name (FQDN), orlocalhost. For example, if you entered
grant all on activity_monitor.* TO 'amon_user'@'%' IDENTIFIED BY 'amon_password';
the value you enter for the database hostname can be either the FQDN or localhost.
Cluster hosts do not appear
Some cluster hosts do not appear when you click Find Hosts in install or update wizard.
Possible Reasons
You might have network connectivity problems.
Possible Solutions
• Make sure all cluster hosts have SSH port 22 open.• Check other common causes of loss of connectivity such as firewalls and interference from SELinux.
Cannot start services after upgrade
You have upgraded the Cloudera Manager Server, but now cannot start services.
Possible Reasons
You might have mismatched versions of the Cloudera Manager Server and Agents.
Possible Solutions
Make sure you have upgraded the Cloudera Manager Agents on all hosts. (The previous version of the Agents willheartbeat with the new version of the Server, but you cannot start HDFS and MapReduce with this combination.)
HDFS DataNodes fail to start
After upgrading, HDFS DataNodes fail to start with exception:
Exception in secureMainjava.lang.RuntimeException: Cannot start datanode because the configured max locked memory size (dfs.datanode.max.locked.memory) of 4294967296 bytes is more than the datanode's available RLIMIT_MEMLOCK ulimit of 65536 bytes.
Possible Reasons
HDFS caching, which is enabled by default in CDH 5 and higher, requires new memlock functionality from ClouderaManager Agents.
Possible Solutions
Do the following:
166

CDP Private Cloud Base Manual upgrade to CDP Private Cloud Base
1. Stop all CDH and managed services.2. On all hosts with Cloudera Manager Agents, hard-restart the Agents. Before performing this step, ensure you
understand the semantics of the hard_restart command by reading Cloudera Manager Agents.RHEL 7, SLES 12, Ubuntu 18.04 and higher
sudo systemctl stop supervisordsudo systemctl start cloudera-scm-agent
RHEL 5 or 6, SLES 11, Debian 6 or 7, Ubuntu 12.04 or 14.04
sudo service cloudera-scm-agent hard_restart
3. Start all services.
Cloudera services fail to start
Cloudera services fail to start.
Possible Reasons
Java might not be installed or might be installed at a custom location.
Possible Solutions
See Configuring a Custom Java Home Location on page 50 for more information on resolving this issue.
Host Inspector Fails
If you see the following message in the Host Inspector:
There are mismatched versions across the system, which will cause failures. See below for details on whichhosts are running what versions of components.
When looking at the results, some hosts report Supervisord vX.X.X, while others report X.X.X-cmY.Y.Y (where Xand Y are version numbers). During the upgrade, an old file on the hosts may cause the Host Inspector to indicatemismatched Supervisord versions.
This issue occurs because these hosts have a file on them at /var/run/cloudera-scm-agent/supervisor/__STARTING_CM_VERSION__ that contains a string for the older version of Cloudera Manager.
To resolve this issue:
1. Remove or rename the /var/run/cloudera-scm-agent/supervisor/__STARTING_CM_VERSION__ file
2. Perform a hard restart of the agents:
sudo systemctl stop cloudera-scm-supervisord.servicesudo systemctl start cloudera-scm-agent
3. Run the Host inspector again. It should pass without the warning.
Manual upgrade to CDP Private Cloud Base
Manual steps to follow for upgrading a CDH or Cloudera Runtime cluster to a higher version of Cloudera Runtime ifthe Upgrade Wizard fails.
167

CDP Private Cloud Base Manual upgrade to CDP Private Cloud Base
Important:
Perform the steps in this section only if the upgrade wizard reports a failure, or if you selected ManualUpgrade from the Upgrade Wizard (the Manual Upgrade option is only available for minor or maintenanceupgrades). Manual upgrades allow you to selectively stop and restart services to prevent or mitigate downtimefor services or clusters where rolling restarts are not available.
All steps below assume the starting CDH version is at least 5.13.0 or the starting Cloudera Runtime version is at least7.0.3, because those are the lowest versions that Cloudera Manager 7.1 supports.
The steps below should be executed roughly in the order that they are listed, and should only be executed if theservice is configured.
Upgrade Ranger database and apply patchesRequired for the following upgrades:
• CDH 7.0.x to Cloudera Runtime 7.1.1 or higher
1. Go to the RANGER service.2. Select Actions > Upgrade Ranger Database and apply patches and click Upgrade Ranger Database and apply
patches to confirm.
Setup Ranger Admin ComponentRequired for the following upgrades:
• CDH to Cloudera Runtime 7.1.1 or higher
1. Go to the Ranger service.2. Select Actions > Setup Ranger Admin Component and click Setup Ranger Admin Component to confirm.
Start RangerRequired for the following upgrades:
• CDH and 7.0.x to Cloudera Runtime 7.1.1 or higher
1. Go to the Ranger service.2. Select Actions > Start.
Set up the Ranger Plugin serviceRequired for the following upgrades:
• CDH to Cloudera Runtime 7.1.1 or higher
1. Go to the Ranger service.2. Select Actions > Setup Ranger Plugin Service and click Setup Ranger Plugin Service to confirm.
Start KuduRequired for the following upgrades:
• CDH and 7.0.x to Cloudera Runtime 7.1.1 or higher
1. Go to the KUDU service.
168
CDP Private Cloud Base Manual upgrade to CDP Private Cloud Base
2. Select Actions > Start.
Start ZooKeeperRequired for the following upgrades:
• CDH and 7.0.x to Cloudera Runtime 7.1.1 to 6.0.0 or higher
1. Go to the ZooKeeper service.2. Select Actions > Start.
Upgrade HDFS MetadataRequired for the following upgrades:
• CDH to Cloudera Runtime 7.1.1 or higher
1. Go to the HDFS service.2. Select Actions > Upgrade HDFS Metadata and click Upgrade HDFS Metadata to confirm.
Start HDFSRequired for the following upgrades:
• CDH and Cloudera Runtime 7.0.x to 7.1.1 or higher
1. Go to the HDFS service.2. Select Actions > Start.
Start YARN QueueManagerRequired for the following upgrades:
• Cloudera Runtime 7.0.x to Cloudera Runtime 7.1.1 or higher
1. Go to the QueueManager service.2. Select Actions > Start.
Import Sentry Polices to RangerRequired for the following upgrades:
• CDH to Cloudera Runtime 7.1.1 or higher
1. Go to the HDFS service.2. Select Actions > Import Sentry Policies into Ranger and click Import Sentry Policies into Ranger to confirm.
Start HBASERequired for the following upgrades:
• CDH to Cloudera Runtime 7.1.1 or higher
1. Go to the HBASE service.2. Select Actions > Start.
169

CDP Private Cloud Base Manual upgrade to CDP Private Cloud Base
Start YARN QueueManagerRequired for the following upgrades:
• CDH to Cloudera Runtime 7.1.1 or higher
1. Go to the QueueManager service.2. Select Actions > Start.
Clean NodeManager Recovery Directory (YARN)Required for the following upgrades:
• CDH to Cloudera Runtime 7.1.1 or higher
1. Go to the YARN service.2. Select Actions > Clean NodeManager Recovery Directory and click Clean NodeManager Recovery
Directory to confirm.
Reset ACLs on YARN Zookeeper nodesRequired for the following upgrades:
• Upgrading from CDH to 7.1.1 or higher• Any other upgrade if Enable ResourceManager Recovery is enabled for a Resource Manager group (for example,
ResourceManager Default Group) and ZooKeeper is a dependency of YARN. Note that when YARN is running inHigh Availability mode, ResourceManager recovery is always enabled.
1. Go to the YARN service.2. Select Actions > Reset ACLs on YARN Zookeeper nodes3. Click Reset ACLs on YARN Zookeeper nodes to confirm.
Install YARN MapReduce Framework JarsRequired for all CDH upgrades:
• CDH to Cloudera Runtime 7.1.1 or higher
1. Go to the YARN service.2. Select Actions > Install YARN MapReduce Framework JARs and click Install YARN MapReduce
Framework JARs to confirm.
Start YARNRequired for the following upgrades:
• CDH to Cloudera Runtime 7.1.1 or higher
1. Go to the YARN service.2. Select Actions > Start.
Deploy Client Configuration FilesRequired for the following upgrades:
170

CDP Private Cloud Base Manual upgrade to CDP Private Cloud Base
• CDH to Cloudera Runtime 7.1.1 or higher
1. On the Home page, click to the right of the cluster name and select Deploy Client Configuration.2. Click the Deploy Client Configuration button in the confirmation pop-up that appears.
Reinitialize Solr State for UpgradeRequired for the following upgrades:
• CDH to Cloudera Runtime 7.1.1 or higher
1. Go to the SOLR service.2. Select Actions > Reinitialize Solr State for Upgrade and click Reinitialize Solr State for Upgrade to confirm.
Bootstrap Solr ConfigurationRequired for the following upgrades:
• CDH to Cloudera Runtime 7.1.1 or higher
1. Go to the SOLR service.2. Select Actions > Bootstrap Solr Configuration and click Bootstrap Solr Configuration to confirm.
Start SolrRequired for the following upgrades:
• CDH and Cloudera Runtime 7.0.x to Cloudera Runtime 7.1.1 or higher
1. Go to the SOLR service.2. Select Actions > Start.
Bootstrap Solr CollectionsRequired for the following upgrades:
• CDH to Cloudera Runtime 7.1.1 or higher
1. Go to the SOLR service.2. Select Actions > Bootstrap Solr Collections and click Bootstrap Solr Collections to confirm.
Create HDFS Home directoryRequired for the following upgrades:
• CDH to Cloudera Runtime 7.1.1 or higher
1. Go to the infrastructure SOLR service.2. Select Actions > Create HDFS Home Dir and click Create HDFS Home Dir to confirm.
Create Ranger Plugin Audit DirectoryRequired for the following upgrades:
• CDH to Cloudera Runtime 7.1.1 or higher
171

CDP Private Cloud Base Manual upgrade to CDP Private Cloud Base
1. Go to the Solr service.2. Select Actions > Create Ranger Plugin Audit Directory and click Create Ranger Plugin Audit Directory to
confirm.
Start infrastructure SolrRequired for the following upgrades:
• CDH to Cloudera Runtime 7.1.1 or higher
1. Go to the infrastructure SOLR service.2. Select Actions > Start.
Start HBASERequired for the following upgrades:
• Cloudera Runtime 7.0.x to Cloudera Runtime 7.1.1 or higher
1. Go to the HBASE service.2. Select Actions > Start.
Start KAFKARequired for the following upgrades:
• CDH and Cloudera Runtime 7.0.x to Cloudera Runtime 7.1.1 or higher
1. Go to the KAFKA service.2. Select Actions > Start.
Create Ranger Kafka Plugin Audit DirectoryRequired for the following upgrades:
• CDH to Cloudera Runtime 7.1.1 or higher
1. Go to the KAFKA service.2. Select Actions > Create Ranger Kafka Plugin Audit Directory and click Create Ranger Kafka Plugin Audit
Directory to confirm.
Create HBase tables for AtlasRequired for the following upgrades:
• CDH to Cloudera Runtime 7.1.1 or higher
1. Go to the ATLAS service.2. Select Actions > Create HBase tables for Atlas and click Create HBase tables for Atlas to confirm.
Start AtlasRequired for the following upgrades:
• CDH and Cloudera Runtime 7.0.x to Cloudera Runtime 7.1.1 or higher
172

CDP Private Cloud Base Manual upgrade to CDP Private Cloud Base
1. Go to the ATLAS service.2. Select Actions > Start.
Create Ranger Atlas Plugin Audit DirectoryRequired for the following upgrades:
• CDH to Cloudera Runtime 7.1.1 or higher
1. Go to the ATLAS service.2. Select Actions > Create Ranger Atlas Plugin Audit Directory and click Create Ranger Atlas Plugin Audit
Directory to confirm.
Start PhoenixRequired for the following upgrades:
• CDH Cloudera Runtime 7.0.x to Cloudera Runtime 7.1.1 or higher
1. Go to the PHOENIX service.2. Select Actions > Start.
Install MapReduce Framework JarsRequired for the following upgrades:
• Cloudera Runtime 7.0.x to Cloudera Runtime 7.1.1 or higher
1. Go to the YARN service.2. Select Actions > Install YARN MapReduce Framework JARs and click Install YARN MapReduce
Framework JARs to confirm.
Start YARNRequired for the following upgrades:
• Cloudera Runtime 7.0.x to Cloudera Runtime 7.1.1 or higher
1. Go to the YARN service.2. Select Actions > Start.
Deploy Client Configuration FilesRequired for the following upgrades:
• CDH to Cloudera Runtime 7.1.1 or higher
1. On the Home page, click to the right of the cluster name and select Deploy Client Configuration.2. Click the Deploy Client Configuration button in the confirmation pop-up that appears.
Upgrade the Hive Metastore DatabaseWarning: Your upgrade will fail if you do not complete this step.
173

CDP Private Cloud Base Manual upgrade to CDP Private Cloud Base
Required for the following upgrades:
• CDH to 6.0.0 or higher
1. Go to the Hive service.2. If the Hive service is running, stop it:
a. Select Actions > Stop and click Stop to confirm.3. Select Actions > Upgrade Hive Metastore Database Schema and click Upgrade Hive Metastore Database
Schema to confirm.4. If you have multiple instances of Hive, perform the upgrade on each metastore database.5. Select Actions > Validate Hive Metastore Schema and click Validate Hive Metastore Schema to check that
the schema is now valid.
Start HiveRequired for the following upgrades:
• 5.x and Cloudera Runtime 7.0.x to Cloudera Runtime 7.1.1 or higher
1. Go to the Hive service.2. Select Actions > Start.
Create Hive Warehouse DirectoryRequired for the following upgrades:
• CDH to Cloudera Runtime 7.1.1 or higher
1. Go to the HIVE service.2. Select Actions > Create Hive Warehouse Directory and click Create Hive Warehouse Directory to confirm.
Create Hive Warehouse External DirectoryRequired for the following upgrades:
• CDH to Cloudera Runtime 7.1.1 or higher
1. Go to the HIVE service.2. Select Actions > Create Hive Warehouse External Directory and click Create Hive Warehouse External
Directory to confirm.
Create Hive Sys databaseRequired for the following upgrades:
• CDH to Cloudera Runtime 7.1.1 or higher
1. Go to the HIVE service.2. Select Actions > Create Hive Sys database and click Create Hive Sys database to confirm.
Create Ranger Plugin Audit DirectoryRequired for the following upgrades:
• CDH to Cloudera Runtime 7.1.1 or higher
174

CDP Private Cloud Base Manual upgrade to CDP Private Cloud Base
1. Go to the HIVE service.2. Select Actions > Create Ranger Plugin Audit Directory and click Create Ranger Plugin Audit Directory to
confirm.
Start ImpalaRequired for the following upgrades:
• CDH to 6.0.0 or higher
1. Go to the Impala service.2. Select Actions > Start.
Create Ranger Plugin Audit DirectoryRequired for the following upgrades:
• CDH to Cloudera Runtime 7.1.1 or higher
1. Go to the Impala service.2. Select Actions > Create Ranger Plugin Audit Directory and click Create Ranger Plugin Audit Directory to
confirm.
Create Spark Driver Log DirRequired for the following upgrades:
• CDH to Cloudera Runtime 7.1.1 or higher
1. Go to the SPARK_ON_YARN service.2. Select Actions > Create Spark Driver Log Dir and click Create Spark Driver Log Dir to confirm.
Start SparkRequired for the following upgrades:
• CDH and Cloudera Runtime 7.0.x to Cloudera Runtime 7.1.1 or higher
1. Go to the SPARK_ON_YARN service.2. Select Actions > Start.
Start LivyRequired for the following upgrades:
• Cloudera Runtime 7.0.x to Cloudera Runtime 7.1.1 or higher
1. Go to the LIVY service.2. Select Actions > Start.
Upgrade Oozie Database SchemaRequired for the following upgrades:
• CDH to Cloudera Runtime 7.1.1 or higher
175

CDP Private Cloud Base Manual upgrade to CDP Private Cloud Base
1. Go to the OOZIE service.2. If the OOZIE service is running, stop it:
Select Actions > Stop and click Stop to confirm.3. Select Actions > Upgrade Oozie Database Schema and click Upgrade Oozie Database Schema to confirm.
Upgrade Oozie SharedLibRequired for the following upgrades:
• CDH and Cloudera Runtime 7.0.x to Cloudera Runtime 7.1.1 or higher
1. Go to the Oozie service.2. If the OOZIE service is stopped, start it:
Select Actions > Start and click Start to confirm.3. Select Actions > Install Oozie SharedLib and click Install Oozie SharedLib to confirm.
Upload Tez tar file to HDFSRequired for the following upgrades:
• CDH and Cloudera Runtime 7.0.x to Cloudera Runtime 7.1.1 or higher
1. Go to the TEZ service.2. Select Actions > Upload Tez tar file to HDFS and click Upload Tez tar file to HDFS to confirm.
Migrate Hive tables for CDP upgradeRequired for the following upgrades:
• CDH to Cloudera Runtime 7.1.1 or higher
1. Go to the HIVE_ON_TEZ service.2. Select Actions > Migrate Hive tables for CDP upgrade and click Migrate Hive tables for CDP upgrade to
confirm.
Create Ranger Plugin Audit DirectoryRequired for the following upgrades:
• CDH to Cloudera Runtime 7.1.1 or higher
1. Go to the Hive-on-Tez service.2. Select Actions > Create Ranger Plugin Audit Directory and click Create Ranger Plugin Audit Directory to
confirm.
Start Hive on TezRequired for the following upgrades:
• CDH and Cloudera Runtime 7.0.x to Cloudera Runtime 7.1.1 or higher
1. Go to the Hive-on-Tez service.2. Select Actions > Start.
176

CDP Private Cloud Base Manual upgrade to CDP Private Cloud Base
Start HueRequired for the following upgrades:
• CDH and Cloudera Runtime 7.0.x to Cloudera Runtime 7.1.1 or higher
1. Go to the HUE service.2. Select Actions > Start.
Start DASRequired for the following upgrades:
• Cloudera Runtime 7.0.x to Cloudera Runtime 7.1.1 or higher
1. Go to the DAS service.2. Select Actions > Start.
Start the Remaining Cluster Services1. Use rolling restart or full restart.2. Ensure that all services are started or restarted. You can use Cloudera Manager to start the cluster, or you
can restart the services individually. The Cloudera Manager Home page indicates which services have staleconfigurations and require restarting.
3. To start or restart the cluster:
a. On the Home > Status page, click the down arrow to the right of the cluster name and select Start or Restart.b. Click Start that appears in the next screen to confirm. The Command Details window shows the progress of
starting services.c. When All services successfully started appears, the task is complete and you can close the Command Details
window.
Validate the Hive Metastore Database SchemaWarning: Your upgrade will fail if you do not complete this step.
Required for the following upgrades:
• CDH to 6.0.0 or higher
1. Select Actions > Validate Hive Metastore Schema and click Validate Hive Metastore Schema to confirm.2. If you have multiple instances of Hive, perform the validation on each metastore database.3. Select Actions > Validate Hive Metastore Schema and click Validate Hive Metastore Schema to check that
the schema is now valid.
Test the Cluster and Finalize HDFS MetadataTo determine if you can finalize the upgrade, run important workloads and ensure that they are successful. After youhave finalized the upgrade, you cannot roll back to a previous version of HDFS without using backups. Verifying thatyou are ready to finalize the upgrade can take a long time.
When you are ready to finalize the upgrade, do the following:
• 1. Go to the HDFS service.
177

CDP Private Cloud Base Rolling Back a CDH 6 to CDP Private Cloud Base 7 Upgrade
2. Click the Instances tab.3. Click the link for the NameNode instance. If you have enabled high availability for HDFS, click the link
labeled NameNode (Active).
The NameNode instance page displays.4. Select Actions > Finalize Metadata Upgrade and click Finalize Metadata Upgrade to confirm.
Clear the Upgrade State TableAfter completing all of the previous steps, do the following to complete the upgrade:
1. Log in to the Cloudera Manager server host.2. Stop the Cloudera Manager Server.
sudo systemctl stop cloudera-scm-server
3. Log in to the command-line environment for the Cloudera Manager database. (mysql, sqlplus, or postgres psql).
4. Run the following command:
DELETE FROM UPGRADE_STATE;
5. Start the Cloudera Manager Server.
sudo systemctl start cloudera-scm-server
Rolling Back a CDH 6 to CDP Private Cloud Base 7Upgrade
You can roll back an upgrade from CDP Private Cloud Base 7 to CDH 6. The rollback restores your CDH cluster tothe state it was in before the upgrade, including Kerberos and TLS/SSL configurations.
Important: Any data created after the upgrade is lost.
In a typical upgrade, you first upgrade Cloudera Manager from version 6.x to version 7.x, and then you use theupgraded version of Cloudera Manager 7 to upgrade CDH 6 to CDP Private Cloud Base 7. (See Upgrading a CDH 6Cluster on page 108.) If you want to roll back this upgrade, follow these steps to roll back your cluster to its stateprior to the upgrade.
You can roll back to CDH 6 after upgrading to CDP Private Cloud Base 7 only if the HDFS upgrade has not beenfinalized. The rollback restores your CDH cluster to the state it was in before the upgrade, including Kerberos andTLS/SSL configurations.
Important: Follow all of the steps in the order presented in this topic. Cloudera recommends that you readthrough the backup and rollback steps before starting the backup process. You may want to create a detailedplan to help you anticipate potential problems.
Important:
These rollback steps depend on complete backups taken before upgrading Cloudera Manager and CDH. SeeStep 2: Backing Up Cloudera Manager 6 on page 67 and Step 3: Backing Up the Cluster on page 115.
For steps where you need to restore the contents of a directory, clear the contents of the directory beforecopying the backed-up files to the directory. If you fail to do this, artifacts from the original upgrade cancause problems if you attempt the upgrade again after the rollback.
178

CDP Private Cloud Base Rolling Back a CDH 6 to CDP Private Cloud Base 7 Upgrade
Review LimitationsThe rollback procedure has the following limitations:
• HDFS – If you have finalized the HDFS upgrade, you cannot roll back your cluster.• Compute clusters – Rollback for Compute clusters is not currently supported.• Configuration changes, including the addition of new services or roles after the upgrade, are not retained after
rolling back Cloudera Manager.
Cloudera recommends that you not make configuration changes or add new services and roles until you havefinalized the HDFS upgrade and no longer require the option to roll back your upgrade.
• HBase – If your cluster is configured to use HBase replication, data written to HBase after the upgrade might notbe replicated to peers when you start your rollback. This topic does not describe how to determine which, if any,peers have the replicated data and how to roll back that data. For more information about HBase replication, seeHBase Replication.
• Sqoop 2 – As described in the upgrade process, Sqoop2 had to be stopped and deleted before the upgrade processand therefore will not be available after the rollback.
• Kafka – Once the Kafka log format and protocol version configurations (the inter.broker.protocol.version and log.message.format.version properties) are set to the new version (or left blank, whichmeans to use the latest version), Kafka rollback is not possible.
Stop the Cluster1. If HBase is deployed in the cluster do the following before stopping the cluster:
The HBase Master procedures changed between the two versions, so if a procedure was started by HBase 2.2(CDP 7.x) then the older HBase 2.1 won't be able to continue the procedure after the rollback. For this reasonthe Procedure Store in HBase Master must be cleaned before the rollback. If CDP 7.x HBase Master was neverstarted, then the rollback should be fine. But if HBase Master was running with the new version and there is anyongoing (or stuck) HBase Master Procedure present in the CDP 7 HBase Master, then the older CDH 6 HBaseMaster will fail to start after the rollback. If this happens, HBase will need manual fix after the rollback (e.g. thesidelining of the HBase Master Procedure WAL files and the potential fixing of inconsistencies in HBase).
To avoid this problem, you should try to verify that no unfinished procedure is present before stopping HBaseMaster on the CDP 7.x Cluster. Please follow these steps:
a. Make sure there was no traffic running against the HBase Cluster recently (in the last 10 minutes) that cantrigger e.g. table creation or deletion, region assignment or split or merge, etc.
b. Disable automatic Balancer and Normalizer in HBase. Also disable Split and Merge procedures, beforestopping the CDP 7 Cluster. All these tools in HBase can cause the starting of new HBase Master Procedures,which we want to avoid now. Issue the following commands in HBase Shell:
balance_switch falsenormalizer_switch falsesplitormerge_switch 'SPLIT', falsesplitormerge_switch 'MERGE', false
c. Check the list of procedures on the HBase Master Web UI (In Cloudera Manager, go to the HBase service andopen the HBase Web UI > Procedures & Locks tab). Wait until you see procedures only with final states like'SUCCESS', 'FAILED' or 'ROLLEDBACK'.
d. Get the list of procedures from HBase shell using the 'list_procedures' command. Wait until you seeprocedures only with final states like 'SUCCESS', 'FAILED' or 'ROLLEDBACK'. The State appears in thethird column of the table returned by the 'list_procedures' command.
If the HBase Master doesn't start after the rollback and some procedure-related exceptions are found in therole logs (like "BadProcedureException" or decode errors in the "ProcedureWALFormatReader" class, or"ClassNotFoundException" for procedure classes), then this is most likely caused by CDP 7 procedures that still
179
CDP Private Cloud Base Rolling Back a CDH 6 to CDP Private Cloud Base 7 Upgrade
remain in the procedure WAL files. In this case, please open a ticket for Cloudera customer support, who will helpyou to sideline the procedure WAL files and fix any potential inconsistencies in HBase.
2. On the Home > Status tab, click the Actions menu and select Stop.3. Click Stop in the confirmation screen. The Command Details window shows the progress of stopping services.
When All services successfully stopped appears, the task is complete and you can close the Command Detailswindow.
4. Go to the YARN service and click Actions > Clean NodeManager Recovery Directory. The CDH 6NodeManager will not start up after the downgrade if it finds CDP 7.x data in the recovery directory. The formatand content of the NodeManager's recovery state store was changed between CDH 6.x and CDP 7.x. The recoverydirectory used by CDP 7.x must be cleaned up as part of the downgrade to CDH 6.
(Parcels) Downgrade the SoftwareFollow these steps only if your cluster was upgraded using Cloudera parcels.
1. Log in to the Cloudera Manager Admin Console.2. Select Hosts > Parcels.
A list of parcels displays.3. Locate the CDH 6 parcel and click Activate. (This automatically deactivates the CDP Private Cloud Base 7
parcel.) See Activating a Parcel for more information. If the parcel is not available, use the Download button todownload the parcel.
Important: If you added new services that are not part of CDH 6 during the upgrade, a list of servicesthat need to be deleted displays. You must delete these services before activating the CDH 6 parcel.
4. If you include any additional components in your cluster, such as Search or Impala, click Activate for thoseparcels.
Important:
Do not start any services. (Select the Activate Only option.)
If you accidentally restart services, stop your cluster before proceeding.
Stop Cloudera Manager1. Stop the Cloudera Management Service.
a. Log in to the Cloudera Manager Admin Console.b. Select Clusters > Cloudera Management Service.c. Select Actions > Stop.
2. Stop the Cloudera Manager Server.
sudo systemctl stop cloudera-scm-server
3. Hard stop the Cloudera Manager agents. Run the following command on all hosts:
sudo systemctl stop cloudera-scm-supervisord.service
Restore Cloudera Manager DatabasesRestore the Cloudera Manager databases from the backup of Cloudera Manager that was taken before upgrading thecluster toCDP Private Cloud Base 7. See the procedures provided by your database vendor.
• MariaDB 5.5: http://mariadb.com/kb/en/mariadb/backup-and-restore-overview/
180

CDP Private Cloud Base Rolling Back a CDH 6 to CDP Private Cloud Base 7 Upgrade
• MySQL 5.5: http://dev.mysql.com/doc/refman/5.5/en/backup-and-recovery.html• MySQL 5.6: http://dev.mysql.com/doc/refman/5.6/en/backup-and-recovery.html• PostgreSQL 8.4: https://www.postgresql.org/docs/8.4/static/backup.html• PostgreSQL 9.2: https://www.postgresql.org/docs/9.2/static/backup.html• PostgreSQL 9.3: https://www.postgresql.org/docs/9.3/static/backup.html• Oracle 11gR2: https://docs.oracle.com/cd/E11882_01/backup.112/e10642/toc.htm• HyperSQL: http://hsqldb.org/doc/guide/management-chapt.html#mtc_backup
Restore Cloudera Manager ServerUse the backup of CDH that was taken before the upgrade to restore Cloudera Manager Server files and directories.Substitute the path to your backup directory for cm7_cdh6 in the following steps:
1. On the host where the Event Server role is configured to run, restore the Events Server directory from the CM 7/CDH 6 backup.
cp -rp /var/lib/cloudera-scm-eventserver /var/lib/cloudera-scm-eventserver-CM<ph outputclass="cdoc-specific-cm-from"/>-CDH<ph outputclass="cdoc-specific-cdh-from"/>rm -rf /var/lib/cloudera-scm-eventserver/*cp -rp /var/lib/cloudera-scm-eventserver_cm7_cdh6/* /var/lib/cloudera-scm-eventserver/
2. Remove the Agent runtime state. Run the following command on all hosts:
rm -rf /var/run/cloudera-scm-agent /var/lib/cloudera-scm-agent/response.avro
This command may return a message similar to: rm: cannot remove ‘/var/run/cloudera-scm-agent/process’: Device or resource busy. You can ignore this message.
3. On the host where the Service Monitor is running, restore the Service Monitor directory:
rm -rf /var/lib/cloudera-service-monitor/*cp -rp /var/lib/cloudera-service-monitor_cm7_cdh6/* /var/lib/cloudera-service-monitor/
4. On the host where the Host Monitor is running, restore the Host Monitor directory:
rm -rf /var/lib/cloudera-host-monitor/*cp -rp /var/lib/cloudera-host-monitor_cm7_cdh6/* /var/lib/cloudera-host-monitor/
5. Restore the Cloudera Navigator storage directory from the CM 7/CDH 6 backup.
rm -rf /var/lib/cloudera-scm-navigator/*cp -rp /var/lib/cloudera-scm-navigator_cm7_cdh6/* /var/lib/cloudera-scm-navigator/
Start Cloudera Manager1. Log in to the Cloudera Manager server host.2. Start the Cloudera Manager Server.
sudo systemctl start cloudera-scm-server
181

CDP Private Cloud Base Rolling Back a CDH 6 to CDP Private Cloud Base 7 Upgrade
3. Start the Cloudera Manager Agent.
Run the following commands on all cluster hosts:
sudo systemctl start cloudera-scm-agent
4. Start the Cloudera Management Service.
a. Log in to the Cloudera Manager Admin Console.b. Select Clusters > Cloudera Management Service.c. Select Actions > Start.
The cluster page may indicate that services are in bad health. This is normal.5. Stop the cluster. In the Cloudera Manager Admin Console, click the Actions menu for the cluster and select Stop.
Roll Back ZooKeeper1. Using the backup of Zookeeper that you created when backing up your CDH 6.x cluster, restore the contents
of the dataDir on each ZooKeeper server. These files are located in a directory specified with the dataDirproperty in the ZooKeeper configuration. The default location is /var/lib/zookeeper. For example:
rm -rf /var/lib/zookeeper/*cp -rp /var/lib/zookeeper_cm7_cdh6/* /var/lib/zookeeper/
2. Make sure that the permissions of all the directories and files are as they were before the upgrade.3. Start ZooKeeper using Cloudera Manager.
Roll Back HDFSYou cannot roll back HDFS while high availability is enabled. The rollback procedure in this topic creates atemporary configuration without high availability. Regardless of whether high availability is enabled, follow the stepsin this section.
1. Roll back all of the Journal Nodes. (Only required for clusters where high availability is enabled for HDFS). Usethe JournalNode backup you created when you backed up HDFS before upgrading to CDP Private Cloud Base.
a. Log in to each Journal Node host and run the following commands:
rm -rf /dfs/jn/ns1/current/*
cp -rp <Journal_node_backup_directory>/ns1/previous/* /dfs/jn/ns1/current/
b. Start the JournalNodes using Cloudera Manager:
1. Go to the HDFS service.2. Select the Instances tab.3. Select all JournalNode roles from the list.4. Click Actions for Selected > Start.
182

CDP Private Cloud Base Rolling Back a CDH 6 to CDP Private Cloud Base 7 Upgrade
2. Roll back all of the NameNodes. Use the NameNode backup directory you created before upgrading to CDPPrivate Cloud Base. (/etc/hadoop/conf.rollback.namenode) to perform the following steps on allNameNode hosts:
a. (Clusters with TLS enabled only) Edit the /etc/hadoop/conf.rollback.namenode/ssl-server.xml file on all NameNode hosts (located in the temporary rollback directory) and update the keystorepasswords with the actual cleartext passwords.
The passwords will have values that look like this:
<property> <name>ssl.server.keystore.password</name> <value>********</value> </property> <property> <name>ssl.server.keystore.keypassword</name> <value>********</value> </property>
b. (TLS only) Edit the /etc/hadoop/conf.rollback.namenode/ssl-server.xml file and removethe hadoop.security.credential.provider.path property.
3. Edit the /etc/hadoop/conf.rollback.namenode/hdfs-site.xml file on all NameNode hosts andmake the following changes:
a. Update the dfs.namenode.inode.attributes.provider.class property. If Sentry was installedprior to the upgrade, change the value of the property from org.apache.ranger.authorization.hadoop.RangerHdfsAuthorizer to "org.apache.sentry.hdfs.SentryINodeAttributesProvider. If Sentry was not installed, remove this property.
b. Change the path in the dfs.hosts property to the value shown in the example below. The file name, dfs_all_hosts.txt, may have been changed by a user. If so, substitute the correct file name.
# Original version of the dfs.hosts property:<property><name>dfs.hosts</name><value>/var/run/cloudera-scm-agent/process/63-hdfs-NAMENODE/dfs_all_hosts.txt</value></property>
# New version of the dfs.hosts property:<property><name>dfs.hosts</name><value>/etc/hadoop/conf.rollback.namenode/dfs_all_hosts.txt</value></property>
c. Edit the /etc/hadoop/conf.rollback.namenode/core-site.xml and change the value of thenet.topology.script.file.name property to /etc/hadoop/conf.rollback.namenode.For example:
# Original property<property><name>net.topology.script.file.name</name><value>/var/run/cloudera-scm-agent/process/63-hdfs-NAMENODE/topology.py</value></property>
# New property<property><name>net.topology.script.file.name</name><value>/etc/hadoop/conf.rollback.namenode/topology.py</value></property>
183

CDP Private Cloud Base Rolling Back a CDH 6 to CDP Private Cloud Base 7 Upgrade
d. Edit the /etc/hadoop/conf.rollback.namenode/topology.py file and change the value ofMAP_FILE to /etc/hadoop/conf.rollback.namenode. For example:
MAP_FILE = '/etc/hadoop/conf.rollback.namenode/topology.map'
e. (TLS-enabled clusters only) Run the following command:
sudo -u hdfs kinit hdfs/<NameNode Host name> -l 7d -kt /etc/hadoop/conf.rollback.namenode/hdfs.keytab
f. Run the following command:
sudo -u hdfs hdfs --config /etc/hadoop/conf.rollback.namenode namenode -rollback
g. Restart the NameNodes and JournalNodes using Cloudera Manager:
1. Go to the HDFS service.2. Select the Instances tab, and then select all Failover Controller, NameNode, and JournalNode roles from
the list.3. Click Actions for Selected > Restart.
4. Rollback the DataNodes.
Use the DataNode rollback directory you created before upgrading to CDP Private Cloud Base (/etc/hadoop/conf.rollback.datanode) to perform the following steps on all DataNode hosts:
a. (Clusters with TLS enabled only) Edit the /etc/hadoop/conf.rollback.datanode/ssl-server.xml file on all DataNode hosts (Located in the temporary rollback directory.) and update the keystorepasswords (ssl.server.keystore.password and ssl.server.keystore.keypassword) withthe actual passwords.
The passwords will have values that look like this:
<property> <name>ssl.server.keystore.password</name> <value>********</value> </property> <property> <name>ssl.server.keystore.keypassword</name> <value>********</value> </property>
b. (TLS only) Edit the /etc/hadoop/conf.rollback.datanode/ssl-server.xml file and removethe hadoop.security.credential.provider.path property.
c. Edit the /etc/hadoop/conf.rollback.datanode/hdfs-site.xml file and remove the dfs.datanode.max.locked.memory property.
d. Run one of the following commands:
• If the DataNode is running with privileged ports (usually 1004 and 1006):
cd /etc/hadoop/conf.rollback.datanodeexport HADOOP_SECURE_DN_USER=hdfsexport JSVC_HOME=/opt/cloudera/parcels/<parcel_filename>/lib/bigtop-utilshdfs --config /etc/hadoop/conf.rollback.datanode datanode -rollback
• If the DataNode is not running on privileged ports:
cd /etc/hadoop/conf.rollback.datanode
184

CDP Private Cloud Base Rolling Back a CDH 6 to CDP Private Cloud Base 7 Upgrade
sudo hdfs --config /etc/hadoop/conf.rollback.datanode datanode -rollback
You may see the following error after issuing these commands:
ERROR datanode.DataNode: Exception in secureMainjava.io.IOException: The path component: '/var/run/hdfs-sockets' in '/var/run/hdfs-sockets/dn' has permissions 0755 uid 39998 and gid 1006. It is not protected because it is owned by a user who is not root and not the effective user: '0'.
The error message will also include the following command to run:
chown root /var/run/hdfs-sockets
After running this command, rerun the DataNode rollback command:
sudo hdfs --config /etc/hadoop/conf.rollback.datanode datanode -rollback
The DataNodes will now restart successfully.
When the rolling back of the DataNodes is complete, terminate the console session by typing Control-C. Lookfor output from the command similar to the following that indicates when the DataNode rollback is complete:
Rollback of /dataroot/ycloud/dfs/dn/current/BP-<Block Group number> is complete
e. If High Availability for HDFS is enabled, restart the HDFS service. In the Cloudera Manager Admin Console,go to the HDFS service and select Actions > Restart.
f. If high availability is not enabled for HDFS, use the Cloudera Manager Admin Console to restart allNameNodes and DataNodes.
1. Go to the HDFS service.2. Select the Instances tab3. Select all DataNode and NameNode roles from the list.4. Click Actions for Selected > Restart.
5. If high availability is not enabled for HDFS, roll back the Secondary NameNode.
a. (Clusters with TLS enabled only) Edit the /etc/hadoop/conf.rollback.secondarynamenode/ssl-server.xml file on all Secondary NameNode hosts (Located in the temporary rollback directory.) andupdate the keystore passwords with the actual cleartext passwords.
The passwords will have values that look like this:
<property> <name>ssl.server.keystore.password</name> <value>********</value> </property> <property> <name>ssl.server.keystore.keypassword</name> <value>********</value> </property>
b. (TLS only) Edit the /etc/hadoop/conf.rollback.secondarynamenode/ssl-server.xml fileand remove the hadoop.security.credential.provider.path property.
c. Log in to the Secondary NameNode host and run the following commands:
rm -rf /dfs/snn/*cd /etc/hadoop/conf.rollback.secondarynamenode/
185

CDP Private Cloud Base Rolling Back a CDH 6 to CDP Private Cloud Base 7 Upgrade
sudo -u hdfs hdfs --config /etc/hadoop/conf.rollback.secondarynamenode secondarynamenode -format
When the rolling back of the Secondary NameNode is complete, terminate the console session by typingControl-C. Look for output from the command similar to the following that indicates when the SecondaryNameNode rollback is complete:
2020-12-21 17:09:36,239 INFO namenode.SecondaryNameNode: Web server init done
6. Restart the HDFS service. Open the Cloudera Manager Admin Console, go to the HDFS service page, and selectActions > Restart.
The Restart Command page displays the progress of the restart. Wait for the page to display the Successfullyrestarted service message before continuing.
Start the HBase ServiceRestart the HBase Service. Open the Cloudera Manager Admin Console, go to the HBase service page, and selectActions > Start.
If you have configured any HBase coprocessors, you must revert them to the versions used before the upgrade.
If CDP 7.x HBase Master was started after the upgrade and there was any ongoing (or stuck) HBase MasterProcedure present in the HBase Master before stopping the CDP 7 Cluster, then it is expected for the CDH 6 HBaseMaster to fail with warnings and errors in the role log from the classes like 'ProcedureWALFormatReader' and'WALProcedureStore' or 'TransitRegionStateProcedure'. These errors mean that the HBase Master Write-Ahead Logfiles are incompatible with the CDH 6 HBase version. The only way to fix this problem is to sideline the log files (allthe files placed under /hbase/MasterProcWALs by default), then restart the HBase Master. After the HBase Masterhas started, Use the HBCK command to find out if there are any inconsistencies that will need to be fixed manually.
You my encounter other errors when starting HBase (for example, replication-related problems, region assignmentrelated issues, and meta region assignment problems). In this case you should delete the znode in ZooKeeper and thenstart HBase again. (This will delete replication peer information and you will need to re-configure your replicationschedules.):
1. In Cloudera Manager, look up the value of the zookeeper.znode.parent property. The default value is /hbase.
2. Connect to the ZooKeeper ensemble by running the following command from any HBase gateway host:
zookeeper-client -server zookeeper_ensemble
To find the value to use for zookeeper_ensemble, open the /etc/hbase/conf.cloudera.<HBaseservice name>/hbase-site.xml file on any HBase gateway host. Use the value of the hbase.zookeeper.quorum property.
Note:
If you have deployed a secure cluster, you must connect to ZooKeeper using a client jaas.conffile. You can find such a file in an HBase process directory (/var/run/cloudera-scm-agent/process/). Specify the jaas.conf using the JVM flags by running the following commands in theZooKeeper client:
CLIENT_JVMFLAGS= "-Djava.security.auth.login.config=/var/run/cloudera-scm-agent/process/HBase_process_directory/jaas.conf"zookeeper-client -server <zookeeper_ensemble>
The ZooKeeper command-line interface opens.
186

CDP Private Cloud Base Rolling Back a CDH 6 to CDP Private Cloud Base 7 Upgrade
3. Enter the following command:
rmr /hbase
4. After HBase is healthy, make sure you restore the states of the Balancer and Normalizer (enable them if they wereenabled before the rollback). Also re-enable the Merge and Split operations you disabled before the rollback toavoid the Master Procedure incompatibility problem. Run the following commands in HBase Shell:
balance_switch true normalizer_switch true splitormerge_switch 'SPLIT', true splitormerge_switch 'MERGE', true
Restore CDH DatabasesRestore the following databases from the CDH 6 backups:
• Hive Metastore• Hue• Oozie• Sentry Server
The steps for backing up and restoring databases differ depending on the database vendor and version you select foryour cluster and are beyond the scope of this document.
Important: Restore the databases to their exact state as of when you took the backup. Do not merge in anychanges that may have occurred during the subsequent upgrade.
See the following vendor resources for more information:
• MariaDB 5.5: http://mariadb.com/kb/en/mariadb/backup-and-restore-overview/• MySQL 5.5: http://dev.mysql.com/doc/refman/5.5/en/backup-and-recovery.html• MySQL 5.6: http://dev.mysql.com/doc/refman/5.6/en/backup-and-recovery.html• MySQL 5.7: http://dev.mysql.com/doc/refman/5.7/en/backup-and-recovery.html• PostgreSQL 8.4: https://www.postgresql.org/docs/8.4/static/backup.html• PostgreSQL 9.2: https://www.postgresql.org/docs/9.2/static/backup.html• PostgreSQL 9.3: https://www.postgresql.org/docs/9.3/static/backup.html• Oracle 11gR2: https://docs.oracle.com/cd/E11882_01/backup.112/e10642/toc.htm
Start the Sentry Service1. Log in to the Cloudera Manager Admin Console.2. Go to the Sentry service.3. Click Actions > Start.
Roll Back Cloudera Search1. Start the HDFS, Zookeeper and Sentry services.2. Delete the instancedir created during the upgrade process:
a. If the cluster is secured with Kerberos, run this command Otherwise skip this step.
export ZKCLI_JVM_FLAGS="-Djava.security.auth.login.config=~/solr-jaas.conf
187

CDP Private Cloud Base Rolling Back a CDH 6 to CDP Private Cloud Base 7 Upgrade
-DzkACLProvider=org.apache.solr.common.cloud.ConfigAwareSaslZkACLProvider"
b.sudo -u solr solrctl instancedir --delete localFSTemplate
3. Start the Solr service.
Note: If the state of one or more Solr core is down and the Solr log contains an org.apache.lucene.store.LockObtainFailedException: Lock obtain timed out: org.apache.solr.store.hdfs.HdfsLockFactory error message, it is necessary to clean up theHDFS locks in the index directories.
For each of the affected Solr nodes:
a. 1. Stop the Solr node using Cloudera Manager.b. 2. Remove the HdfsDirectory<id>-write.lock file from the index directory.
hdfs dfs -rm "/solr/<collection_name>/<core>/data/<index_directory_name>/HdfsDirectory@ <hex_id> lockFactory=org.apache.solr.store.hdfs.HdfsLockFactory@<hex_id>-write.lock"
For example:
hdfs dfs -rm "/solr/testCollection/core_node1/data/index/HdfsDirectory@5d07feac lockFactory=org.apache.solr.store.hdfs.HdfsLockFactory@7df08aad-write.lock"
c. 3. Start the Solr node using Cloudera Manager.
Roll Back Hue1. Restore the file, app.reg, from your backup:
• Parcel installations
rm -rf /opt/cloudera/parcels/CDH/lib/hue/app.regcp -rp app.reg_cm7_cdh6_backup /opt/cloudera/parcels/CDH/lib/hue/app.reg
• Package Installations
rm -rf /usr/lib/hue/app.regcp -rp app.reg_cm7_cdh6_backup /usr/lib/hue/app.reg
Roll Back KafkaA CDP Private Cloud Base 7 cluster that is running Kafka can be rolled back to the previous CDH5/CDK versions aslong as theinter.broker.protocol.version and log.message.format.version properties have notbeen set to the new version or removed from the configuration.
To perform the rollback using Cloudera Manager:
1. Activate the previous CDK parcel. Please note, that when rolling back Kafka from CDP Private Cloud Base 7to CDH 6/CDK, the Kafka cluster will restart. Rolling restart is not supported for this scenario. See Activating aParcel.
2. Remove the following properties from the Kafka Broker Advanced Configuration Snippet (Safety Valve) configuration property.
• Inter.broker.protocol.version• log.message.format.version
188

CDP Private Cloud Base Rolling Back a CDH 6 to CDP Private Cloud Base 7 Upgrade
Deploy the Client Configuration1. On the Cloudera Manager Home page, click the Actions menu and select Deploy Client Configuration.2. Click Deploy Client Configuration.
Restart the Cluster1. On the Cloudera Manager Home page, click the Actions menu and select Restart.2. Click Restart that appears in the next screen to confirm. If you have enabled high availability for HDFS, you can
choose Rolling Restart instead to minimize cluster downtime. The Command Details window shows the progressof stopping services.
When All services successfully started appears, the task is complete and you can close the Command Detailswindow.
Roll Back Cloudera Navigator Encryption ComponentsIf you are rolling back any encryption components (Key Trustee Server, Key Trustee KMS, HSM KMS, Key HSM,or Navigator Encrypt), first refer to:
• Backing up and Restoring Key Trustee Server and Clients• HSM KMS High Availability Backup and Recovery• Manually Backing Up Navigator Encrypt
Roll Back Key Trustee Server
Note: If rolling back multiple encryption product components, it is recommended that you begin with theKey Trustee Server.
To roll back Key Trustee Server, replace the currently used parcel (for example, the parcel for version 7.1.4) withthe parcel for the version to which you wish to roll back (for example, version 5.14.0). See Parcels for detailedinstructions on using parcels.
The Keytrustee Server 7.x upgrades the bundled Postgres engine from version 9.3 to 12.1. The upgrade happensautomatically, however, downgrading to CDH 6 requires manual steps to roll back the database engine to version 9.3.Because the previously upgraded database is left unchanged, the database server will fail start. Follow these steps torecreate the Postgres 9.3 compatible database:
1. Make sure that the Keytrustee Server database roles are stopped. Then rename the folder containing KeytrusteePostgres database data (both on master and slave hosts):
mv /var/lib/keytrustee/db /var/lib/keytrustee/db-12_1
2. Open the Cloudera Manager Admin Console and go to the Key Trustee Server service.3. Select the Instances tab.4. Select the Active Database role type.5. Click Actions for Selected > Set Up Key Trustee Server Database.6. Click Set Up Key Trustee Server Database to confirm.
Cloudera Manager sets up the Key Trustee Server database.7. On the master KTS node: running as user keytrustee restore the keytrustee database from the dump created during
the upgrade:
dropdb -p 11381 keytrustee psql -p 11381 postgres -f
189

CDP Private Cloud Base Rolling Back a CDH 6 to CDP Private Cloud Base 7 Upgrade
/var/lib/keytrustee/.keytrustee/kt93dump.pg
(The kt93dump.pg file was created during the upgrade to CDP 7).8. Start the Active Database role: click Actions for Selected > Start.9. Click Start to confirm.10. Start the Passive Database instance: select the Passive Database, click Actions for Selected > Start.11. Select the Active Database.12. Click Actions for Selected > Setup Enable Synchronous Replication in HA mode.
Start the Key Management Server
Restart the Key Management Server. Open the Cloudera Manager Admin Console, go to the KMS service page, andselect Actions > Start.
Roll Back Key HSM
To roll back Key HSM:
1. Install the version of Navigator Key HSM to which you wish to roll back
Install the Navigator Key HSM package using yum:
sudo yum downgrade keytrustee-keyhsm
Cloudera Navigator Key HSM is installed to the /usr/share/keytrustee-server-keyhsm directory bydefault.
2. Rename Previously-Created Configuration Files
For Key HSM major version rollbacks, previously-created configuration files do not authenticate with the HSMand Key Trustee Server, so you must recreate these files by re-executing the setup and trust commands. First,navigate to the Key HSM installation directory and rename the applications.properties, keystore,and truststore files:
cd /usr/share/keytrustee-server-keyhsm/mv application.properties application.properties.bakmv keystore keystore.bakmv truststore truststore.bak
3. Initialize Key HSM
Run the service keyhsm setup command in conjunction with the name of the target HSMdistribution:
sudo service keyhsm setup [keysecure|thales|luna]
For more details, see Initializing Navigator Key HSM.4. Establish Trust Between Key HSM and the Key Trustee Server
The Key HSM service must explicitly trust the Key Trustee Server certificate (presented during TLS handshake).To establish this trust, run the following command:
sudo keyhsm trust /path/to/key_trustee_server/cert
For more details, see Establish Trust from Key HSM to Key Trustee Server.5. Start the Key HSM Service
Start the Key HSM service:
sudo service keyhsm start
190

CDP Private Cloud Base Rolling Back a CDH 6 to CDP Private Cloud Base 7 Upgrade
6. Establish Trust Between Key Trustee Server and Key HSM
Establish trust between the Key Trustee Server and the Key HSM by specifying the path to the private key andcertificate:
sudo ktadmin keyhsm --server https://keyhsm01.example.com:9090 \--client-certfile /etc/pki/cloudera/certs/mycert.crt \--client-keyfile /etc/pki/cloudera/certs/mykey.key --trust
For a password-protected Key Trustee Server private key, add the --passphrase argument to the command(enter the password when prompted):
sudo ktadmin keyhsm --passphrase \--server https://keyhsm01.example.com:9090 \--client-certfile /etc/pki/cloudera/certs/mycert.crt \--client-keyfile /etc/pki/cloudera/certs/mykey.key --trust
For additional details, see Integrate Key HSM and Key Trustee Server.7. Remove Configuration Files From Previous Installation
After completing the rollback, remove the saved configuration files from the previous installation:
cd /usr/share/keytrustee-server-keyhsm/rm application.properties.bakrm keystore.bakrm truststore.bak
Roll Back Key Ranger KMS Parcels
Enable the desired parcel that you wish to roll back to (for example, version 6.3.4 of Key Trustee KMS). See Parcelsfor detailed instructions on using parcels. See Parcels for detailed instructions on using parcels.
Roll Back HSM KMS Parcels
To roll back the HSM KMS parcels, replace the currently used parcel (for example, the parcel for version 6.0.0)with the parcel for the version to which you wish to roll back (for example, version 5.14.0). See Parcels for detailedinstructions on using parcels.
See Upgrading HSM KMS Using Packages for detailed instructions on using packages.
Roll Back Navigator Encrypt
To roll back Cloudera Navigator Encrypt:
1. If you have configured and are using an RSA master key file with OAEP padding, then you must revert thissetting to its original value:
navencrypt key --change
2. Stop the Navigator Encrypt mount service:
sudo /etc/init.d/navencrypt-mount stop
3. Confirm that the mount-stop command completed:
sudo /etc/init.d/navencrypt-mount status
191
https://docs.cloudera.com/documentation/enterprise/upgrade/topics/cm_ig_parcels.html#cmug_topic_7_11

CDP Private Cloud Base Rolling Back a CDH 6 to CDP Private Cloud Base 7 Upgrade
4. If rolling back to a release lower than NavEncrypt 6.2:
a. a. Print the existing ACL rules and save that output to a file:
sudo navencrypt acl --print+ vim acls.txt
b. b. Delete all existing ACLs, for example, if there are a total of 7 ACL rules run:
sudo navencrypt acl --del --line=1,2,3,4,5,6,7
5. To fully downgrade Navigator Encrypt, manually downgrade all of the associated Navigator Encrypt packages (inthe order listed):
a. navencryptb. (Only required for operating systems other than SLES) navencrypt-kernel-modulec. (Only required for the SLES operating system) cloudera-navencryptfs-kmp-<kernel_flavor>
Note: Replace kernel_flavor with the kernel flavor for your system. Navigator Encrypt supports the default, xen,and ec2 kernel flavors.d. libkeytrustee
6. If rolling back to a release less than NavEncrypt 6.2
a. Reapply the ACL rules:
sudo navencrypt acl --add --file=acls.txt
7. Recompute process signatures:
sudo navencrypt acl --update
8. Restart the Navigator Encrypt mount service
sudo /etc/init.d/navencrypt-mount start
(Optional) Cloudera Manager Rollback StepsAfter you complete the rollback steps, your cluster is using Cloudera Manager 7 to manage your CDH 6 or CDH6 cluster. You can continue to use Cloudera Manager 7 to manage your CDH 6 cluster, or you can downgrade toCloudera Manager 6 by following these steps:
Stop Cloudera Manager
1. Stop the Cloudera Management Service.
a. Log in to the Cloudera Manager Admin Console.b. Select Clusters > Cloudera Management Service.c. Select Actions > Stop.
2. Stop the Cloudera Manager Server.
sudo systemctl stop cloudera-scm-server
3. Hard stop the Cloudera Manager agents. Run the following command on all hosts:
sudo systemctl stop cloudera-scm-supervisord.service
4. Back up the repository directory. You can create a top-level backup directory and an environment variable toreference the directory using the following commands. You can also substitute another directory path in thebackup commands below:
export CM_BACKUP_DIR="`date +%F`-CM"mkdir -p $CM_BACKUP_DIR
192
CDP Private Cloud Base Rolling Back a CDH 6 to CDP Private Cloud Base 7 Upgrade
5. Back up the existing repository directory.RHEL / CentOS
sudo -E tar -cf $CM_BACKUP_DIR/repository.tar /etc/yum.repos.d
SLES
sudo -E tar -cf $CM_BACKUP_DIR/repository.tar /etc/zypp/repos.d
Ubuntu
sudo -E tar -cf $CM_BACKUP_DIR/repository.tar /etc/apt/sources.list.d
Restore the Cloudera Manager 6 Repository Files
Copy the repository directory from the backup taken before upgrading to Cloudera Manager 7.x.
rm -rf /etc/yum.repos.d/*tar -xf cm6cdh6_backedUp_dir/repositary.tar -C CM6CDH6/cp -rp /etc/yum.repos.d_cm6cdh6/* /etc/yum.repos.d/
Restore Packages
1. Run the following commands on all hosts:
Operating System Command
RHELsudo yum remove cloudera-manager-daemons cloudera-manager-agent
sudo yum clean allsudo yum install cloudera-manager-agent
SLESsudo zypper remove cloudera-manager-daemons cloudera-manager-agent
sudo zypper refresh -ssudo zypper install cloudera-manager-agent
Ubuntu or Debiansudo apt-get purge cloudera-manager-daemons cloudera-manager-agent
sudo apt-get updatesudo apt-get install cloudera-manager-agent
193

CDP Private Cloud Base Rolling Back a CDH 6 to CDP Private Cloud Base 7 Upgrade
2. Run the following commands on the Cloudera Manager server host:
Operating System Command
RHELsudo yum remove cloudera-manager-server
sudo yum install cloudera-manager-server
SLESsudo zypper remove cloudera-manager-server
sudo zypper install cloudera-manager-server
Ubuntu or Debiansudo apt-get purge cloudera-manager-server
sudo apt-get install cloudera-manager-server
Restore Cloudera Manager Databases
Restore the Cloudera Manager databases from the backup of Cloudera Manager that was taken before upgrading toCloudera Manager 7. See the procedures provided by your database vendor.
These databases include the following:
• Cloudera Manager Server• Reports Manager• Navigator Audit Server• Navigator Metadata Server• Activity Monitor (Only used for MapReduce 1 monitoring).
• MariaDB 5.5: http://mariadb.com/kb/en/mariadb/backup-and-restore-overview/• MySQL 5.5: http://dev.mysql.com/doc/refman/5.5/en/backup-and-recovery.html• MySQL 5.6: http://dev.mysql.com/doc/refman/5.6/en/backup-and-recovery.html• PostgreSQL 8.4: https://www.postgresql.org/docs/8.4/static/backup.html• PostgreSQL 9.2: https://www.postgresql.org/docs/9.2/static/backup.html• PostgreSQL 9.3: https://www.postgresql.org/docs/9.3/static/backup.html• Oracle 11gR2: https://docs.oracle.com/cd/E11882_01/backup.112/e10642/toc.htm• HyperSQL: http://hsqldb.org/doc/guide/management-chapt.html#mtc_backup
Here is an sample command to restore a MySQL database:
mysql -u username -ppassword --host=hostname cm < backup.sql
Restore Cloudera Manager Server
Use the backup of Cloudera Manager 6.x taken before upgrading to Cloudera Manager 7.x for the following steps:
1. If you used the backup commands provided in Step 2: Backing Up Cloudera Manager 6 on page 67, extractthe Cloudera Manager 6 backup archives you created:
tar -xf CM6CDH6/cloudera-scm-agent.tar -C CM6CDH6/tar -xf CM6CDH6/cloudera-scm-server.tar -C CM6CDH6/
194

CDP Private Cloud Base Rolling Back a CDH 6 to CDP Private Cloud Base 7 Upgrade
2. On the host where the Event Server role is configured to run, restore the Events Server directory from theCloudera Manager 6 backup.
cp -rp /var/lib/cloudera-scm-eventserver /var/lib/cloudera-scm-eventserver-CMrm -rf /var/lib/cloudera-scm-eventserver/*cp -rp /var/lib/cloudera-scm-eventserver_cm6cdh6/* /var/lib/cloudera-scm-eventserver/
3. Remove the Agent runtime state. Run the following command on all hosts:
rm -rf /var/run/cloudera-scm-agent /var/lib/cloudera-scm-agent/response.avro
4. On the host where the Service Monitor is running, restore the Service Monitor directory:
rm -rf /var/lib/cloudera-service-monitor/*cp -rp /var/lib/cloudera-service-monitor_cm6cdh6/* /var/lib/cloudera-service-monitor/
5. On the host where the Host Monitor is running, restore the Host Monitor directory:
rm -rf /var/lib/cloudera-host-monitor/*cp -rp /var/lib/cloudera-host-monitor_cm6cdh6/* /var/lib/cloudera-host-monitor/
6. Restore the Cloudera Navigator Solr storage directory from the CM6/CDH6 backup.
rm -rf /var/lib/cloudera-scm-navigator/*cp -rp /var/lib/cloudera-scm-navigator_cm6cdh6/* /var/lib/cloudera-scm-navigator/
7. On the Cloudera Manager Server, restore the /etc/cloudera-scm-server/db.properties file.
rm -rf /etc/cloudera-scm-server/db.propertiescp -rp cm6cdh6/etc/cloudera-scm-server/db.properties /etc/cloudera-scm-server/db.properties
8. On each host in the cluster, restore the /etc/cloudera-scm-agent/config.ini file from your backup.
rm -rf /etc/cloudera-scm-agent/config.inicp -rp cm6cdh6/etc/cloudera-scm-agent/config.ini /etc/cloudera-scm-agent/config.ini
Start the Cloudera Manager Server and Agents
• Start the Cloudera Manager Server.
sudo systemctl start cloudera-scm-server
• Hard Restart the Cloudera Manager Agent.RHEL 7, SLES 12, Ubuntu 18.04 and higher
sudo systemctl stop supervisordsudo systemctl start cloudera-scm-agent
RHEL 5 or 6, SLES 11, Debian 6 or 7, Ubuntu 12.04 or 14.04
sudo service cloudera-scm-agent hard_restart
195

CDP Private Cloud Base Configuring a Local Package Repository
• Start the Cloudera Management Service.
1. Log in to the Cloudera Manager Admin Console.2. Select Clusters > Cloudera Management Service.3. Select Actions > Start.
Configuring a Local Package Repository
You can create a package repository for Cloudera Manager either by hosting an internal web repository or bymanually copying the repository files to the Cloudera Manager Server host for distribution to Cloudera ManagerAgent hosts.
Important: Select a supported operating system for the versions of Cloudera Manager or CDH that you aredownloading. See CDH and Cloudera Manager Supported Operating Systems.
Creating a Permanent Internal RepositoryThe following sections describe how to create a permanent internal repository using Apache HTTP Server:
Setting Up a Web server
To host an internal repository, you must install or use an existing Web server on an internal host that is reachableby the Cloudera Manager host, and then download the repository files to the Web server host. The examples in thissection use Apache HTTP Server as the Web server. If you already have a Web server in your organization, you canskip to Downloading and Publishing the Package Repository for Cloudera Manager on page 197.
1. Install Apache HTTP Server:RHEL / CentOS
sudo yum install httpd
SLES
sudo zypper install httpd
Ubuntu
sudo apt-get install httpd
2. Start Apache HTTP Server:RHEL 7, 8
sudo systemctl start httpd
SLES 12, Ubuntu 16 or later
sudo systemctl start apache2
196

CDP Private Cloud Base Configuring a Local Package Repository
Downloading and Publishing the Package Repository for Cloudera Manager
1. Download the package repository for the product you want to install:Cloudera Manager 7
To download the files for a Cloudera Manager release, download the repository tarball for youroperating system. Then unpack the tarball, move the files to the web server directory, and modifyfile permissions.
sudo mkdir -p /var/www/html/cloudera-repos/cm7
wget https://[username]:[password]@archive.cloudera.com/p/cm7/7.0.3/repo-as-tarball/cm7.0.3-redhat7.tar.gz
tar xvfz cm7.0.3-redhat7.tar.gz -C /var/www/html/cloudera-repos/cm7 --strip-components=1
sudo chmod -R ugo+rX /var/www/html/cloudera-repos/cm7
2. Visit the Repository URL http://<web_server>/cloudera-repos/ in your browser and verify the filesyou downloaded are present. If you do not see anything, your Web server may have been configured to not showindexes.
Creating a Temporary Internal RepositoryYou can quickly create a temporary remote repository to deploy packages on a one-time basis. Cloudera recommendsusing the same host that runs Cloudera Manager, or a gateway host. This example uses Python SimpleHTTPServer asthe Web server to host the /var/www/html directory, but you can use a different directory.
1. Download the repository you need following the instructions in Downloading and Publishing the PackageRepository for Cloudera Manager on page 197.
2. Determine a port that your system is not listening on. This example uses port 8900.3. Start a Python SimpleHTTPServer in the /var/www/html directory:
cd /var/www/htmlpython -m SimpleHTTPServer 8900
Serving HTTP on 0.0.0.0 port 8900 ...
4. Visit the Repository URL http://<web_server>:8900/cloudera-repos/ in your browser and verify thefiles you downloaded are present.
Configuring Hosts to Use the Internal RepositoryAfter establishing the repository, modify the client configuration to use it:
OS Procedure
RHEL compatible Create /etc/yum.repos.d/cloudera-repo.repo files on cluster hosts with the following content,where <web_server> is the hostname of the Web server:
[cloudera-repo]name=cloudera-repobaseurl=http://<web_server>/cm/5enabled=1gpgcheck=0
197

CDP Private Cloud Base Configuring a Local Parcel Repository
OS Procedure
SLES Use the zypper utility to update client system repository information by issuing the following command:
zypper addrepo http://<web_server>/cm <alias>
Ubuntu Create /etc/apt/sources.list.d/cloudera-repo.list files on all cluster hosts with thefollowing content, where <web_server> is the hostname of the Web server:
deb http://<web_server>/cm <codename> <components>
You can find the <codename> and <components> variables in the ./conf/distributions file in therepository.
After creating the .list file, run the following command:
sudo apt-get update
Configuring a Local Parcel Repository
You can create a parcel repository for Cloudera Manager either by hosting an internal Web repository or by manuallycopying the repository files to the Cloudera Manager Server host for distribution to Cloudera Manager Agent hosts.
Using an Internally Hosted Remote Parcel RepositoryThe following sections describe how to use an internal Web server to host a parcel repository:
Setting Up a Web Server
To host an internal repository, you must install or use an existing Web server on an internal host that is reachable bythe Cloudera Manager host, and then download the repository files to the Web server host. The examples on this pageuse Apache HTTP Server as the Web server. If you already have a Web server in your organization, you can skip toDownloading and Publishing the Parcel Repository on page 200.
1. Install Apache HTTP Server:RHEL / CentOS
sudo yum install httpd
SLES
sudo zypper install httpd
Ubuntu
sudo apt-get install httpd
198

CDP Private Cloud Base Configuring a Local Parcel Repository
2. Warning: Skipping this step could result in an error message Hash verification failed when trying todownload the parcel from a local repository, especially in Cloudera Manager 6 and higher.
Edit the Apache HTTP Server configuration file (/etc/httpd/conf/httpd.conf by default) to add or editthe following line in the <IfModule mime_module> section:
AddType application/x-gzip .gz .tgz .parcel
If the <IfModule mime_module> section does not exist, you can add it in its entirety as follows:
Note: This example configuration was modified from the default configuration provided after installingApache HTTP Server on RHEL 7.
<IfModule mime_module> # # TypesConfig points to the file containing the list of mappings from # filename extension to MIME-type. # TypesConfig /etc/mime.types # # AddType allows you to add to or override the MIME configuration # file specified in TypesConfig for specific file types. # #AddType application/x-gzip .tgz # # AddEncoding allows you to have certain browsers uncompress # information on the fly. Note: Not all browsers support this. # #AddEncoding x-compress .Z #AddEncoding x-gzip .gz .tgz # # If the AddEncoding directives above are commented-out, then you # probably should define those extensions to indicate media types: # AddType application/x-compress .Z AddType application/x-gzip .gz .tgz .parcel
# # AddHandler allows you to map certain file extensions to "handlers": # actions unrelated to filetype. These can be either built into the server # or added with the Action directive (see below) # # To use CGI scripts outside of ScriptAliased directories: # (You will also need to add "ExecCGI" to the "Options" directive.) # #AddHandler cgi-script .cgi
# For type maps (negotiated resources): #AddHandler type-map var
# # Filters allow you to process content before it is sent to the client. # # To parse .shtml files for server-side includes (SSI): # (You will also need to add "Includes" to the "Options" directive.) # AddType text/html .shtml AddOutputFilter INCLUDES .shtml</IfModule>
199

CDP Private Cloud Base Configuring a Local Parcel Repository
3. Start Apache HTTP Server:RHEL 7, 8
sudo systemctl start httpd
SLES 12, Ubuntu 16 or later
sudo systemctl start apache2
Downloading and Publishing the Parcel Repository
1. Look up the Cloudera Runtime version number for your deployment on the Cloudera Runtime DownloadInformation page. You will need this version number in the next step.
2. Download manifest.json and the parcel files for the product you want to install:
To download the files for the latest Runtime 7 release, run the following commands on the Web server host:
sudo mkdir -p /var/www/html/cloudera-repossudo wget --recursive --no-parent --no-host-directories https://[username]:[password]@archive.cloudera.com/p/cdh7/Cloudera Runtime version/parcels/ -P /var/www/html/cloudera-repos
sudo chmod -R ugo+rX /var/www/html/cloudera-repos/cdh7
3. Visit the Repository URL http://<Web_server>/cloudera-repos/ in your browser and verify the filesyou downloaded are present. If you do not see anything, your Web server may have been configured to not showindexes.
Configuring Cloudera Manager to Use an Internal Remote Parcel Repository
1. Use one of the following methods to open the parcel settings page:
• Navigation bar
a. Click the parcel icon in the top navigation bar or click Hosts and click the Parcels tab.b. Click the Configuration button.
• Menu
a. Select Administration > Settings.b. Select Category > Parcels.
2. In the Remote Parcel Repository URLs list, click the addition symbol to open an additional row.3. Enter the path to the parcel. For example: http://<web_server>/cloudera-parcels/
cdh7/7.1.7.0.0/
4. Enter a Reason for change, and then click Save Changes to commit the changes.
Using a Local Parcel RepositoryTo use a local parcel repository, complete the following steps:
1. Open the Cloudera Manager Admin Console and navigate to the Parcels page.2. Select Configuration and verify that you have a Local Parcel Repository path set. By default, the directory is /
opt/cloudera/parcel-repo.3. Remove any Remote Parcel Repository URLs you are not using, including ones that point to Cloudera archives.4. Add the parcel you want to use to the local parcel repository directory that you specified. For instructions on
downloading parcels, see Downloading and Publishing the Parcel Repository on page 200 above.5. In the command line, navigate to the local parcel repository directory.
200

CDP Private Cloud Base CDH 6 to CDP Private Cloud Base post-upgrade transition steps
6. Create a SHA1 hash for the parcel you added and save it to a file named parcel_name.parcel.sha.
For example, the following command generates a SHA1 hash for the parcelCDH-6.1.0-1.cdh6.1.0.p0.770702-el7.parcel:
sha1sum CDH-6.1.0-1.cdh6.1.0.p0.770702-el7.parcel | awk '{ print $1 }' > CDH-6.1.0-1.cdh6.1.0.p0.770702-el7.parcel.sha
7. Change the ownership of the parcel and hash files to cloudera-scm:
sudo chown -R cloudera-scm:cloudera-scm /opt/cloudera/parcel-repo/*
8. In the Cloudera Manager Admin Console, navigate to the Parcels page.9. Click Check for New Parcels and verify that the new parcel appears.10. Download, distribute, and activate the parcel.
CDH 6 to CDP Private Cloud Base post-upgrade transitionsteps
You need to understand the upgrade configuration changes and perform tasks related to Hive, Impala, Solr, and othercomponents. CDP does not support some features in CDH clusters, but alternatives might suffice.
Update permissions for Replication Manager serviceAfter the upgrade process is complete, you must update the permissions in the Ranger audit log path in HDFS, so thatthe data replication using Replication Manager works as expected.
Before you begin
Attention: If your CDP Private Cloud Base cluster has Ranger configured, the hdfs user should have accessto all Hive datasets, including all operations. Else, Hive import fails during the replication process. For moreinformation, see Providing access to hdfs user.
Perform the following steps to update the Ranger audit permissions:
Procedure
1. Add the user to the user-groups (supergroup, hdfs, hadoop) on all the hosts, including the source and targetclusters.
The user name you specify here is to be used in the Run as Username field when you create a replication policyto run the replication job.
2. Provide “hive” user permissions in HDFS in the Ranger UI.
What to do next
1. To add the user to the user-groups, run the following commands:
> sudo usermod -a -G hdfs [***user***]> sudo usermod -a -G hadoop [***user***]> id -Gn [***user***]> sudo groupadd supergroup> sudo usermod -a -G supergroup [***user***]> hdfs groups [***user***]
2. To provide permissions for the Ranger audit log path in HDFS:
201
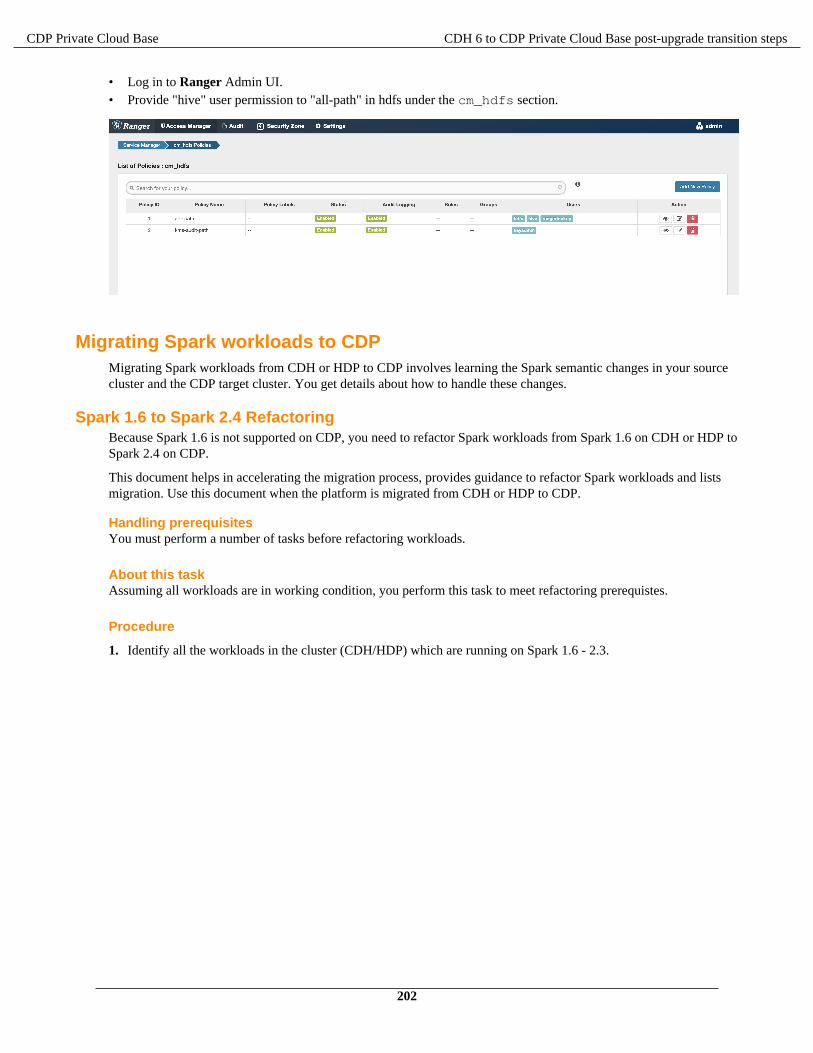
CDP Private Cloud Base CDH 6 to CDP Private Cloud Base post-upgrade transition steps
• Log in to Ranger Admin UI.• Provide "hive" user permission to "all-path" in hdfs under the cm_hdfs section.
Migrating Spark workloads to CDPMigrating Spark workloads from CDH or HDP to CDP involves learning the Spark semantic changes in your sourcecluster and the CDP target cluster. You get details about how to handle these changes.
Spark 1.6 to Spark 2.4 RefactoringBecause Spark 1.6 is not supported on CDP, you need to refactor Spark workloads from Spark 1.6 on CDH or HDP toSpark 2.4 on CDP.
This document helps in accelerating the migration process, provides guidance to refactor Spark workloads and listsmigration. Use this document when the platform is migrated from CDH or HDP to CDP.
Handling prerequisitesYou must perform a number of tasks before refactoring workloads.
About this taskAssuming all workloads are in working condition, you perform this task to meet refactoring prerequistes.
Procedure
1. Identify all the workloads in the cluster (CDH/HDP) which are running on Spark 1.6 - 2.3.
202

CDP Private Cloud Base CDH 6 to CDP Private Cloud Base post-upgrade transition steps
2. Classify the workloads.
Classification of workloads will help in clean-up of the unwanted workloads, plan resources and efforts forworkload migration and post upgrade testing.
Example workload classifications:
• Spark Core (scala)• Java-based Spark jobs• SQL, Datasets, and DataFrame• Structured Streaming• MLlib (Machine Learning)• PySpark (Python on Spark)• Batch Jobs• Scheduled Jobs• Ad-Hoc Jobs• Critical/Priority Jobs• Huge data Processing Jobs• Time taking jobs• Resource Consuming Jobs etc.• Failed Jobs
Identify configuration changes
3. Check the current Spark jobs configuration.
• Spark 1.6 - 2.3 workload configurations which have dependencies on job properties like scheduler, old pythonpackages, classpath jars and might not be compatible post migration.
• In , Capacity Scheduler is the default and recommended scheduler. Follow Fair Scheduler to CapacityScheduler transition guide to have all the required queues configured in the CDP cluster post upgrade. If anyconfiguration changes are required, modify the code as per the new capacity scheduler configurations.
• For workload configurations, see the Spark History server UI http://spark_history_server:18088/history/<application_number>/environment/.
4. Identify and capture workloads having data storage locations (local and HDFS) to refactor the workloads postmigration.
5. Refer to unsupported Apache Spark features, and plan refactoring accordingly.
Spark 1.6 to Spark 2.4 changesA description of the change, the type of change, and the required refactoring provide the information you need formigrating from Spark 1.6 to Spark 2.4.New Spark entry point SparkSessionThere is a new Spark API entry point: SparkSession.
Type of change
Syntactic/Spark core
Spark 1.6
Hive Context and SQLContext, such as import SparkContext, HiveContext are supported.
Spark 2.4
SparkSession is now the entry point.
Action Required
Replace the old SQLContext and HiveContext with SparkSession. For example:
import org.apache.spark.sql.SparkSession val spark = SparkSession .builder()
203

CDP Private Cloud Base CDH 6 to CDP Private Cloud Base post-upgrade transition steps
.appName("Spark SQL basic example") .config("spark.some.config.option", "some-value") .getOrCreate()
.
Dataframe API registerTempTable deprecatedThe Dataframe API registerTempTable has been deprecated in Spark 2.4.
Type of change:
Syntactic/Spark core change
Spark 1.6
registerTempTable is used to create a temporary table on a Spark dataframe. For example, df.registerTempTable('tmpTable").
Spark 2.4
registerTempTable is deprecated.
Action Required
Replace registerTempTable using createOrReplaceTempView. df.createOrReplaceTempView('tmpTable').
union replaces unionAllThe dataset and DataFrame API unionAll has been deprecated and replaced by union.
Type of change: Syntactic/Spark core change
Spark 1.6
unionAll is supported.
Spark 2.4
unionAll is deprecated and replaced by union.
Action Required
Replace unionAll with union. For example:val df3 = df.unionAll(df2) with val df3 = df.union(df2)
Empty schema not supportedWriting a dataframe with an empty or nested empty schema using any file format, such as parquet, orc, json, text, orcsv is not allowed.
Type of change: Syntactic/Spark core
Spark 1.6 - 2.3
Writing a dataframe with an empty or nested empty schema using any file format is allowed and will not throw anexception.
Spark 2.4
An exception is thrown when you attempt to write dataframes with empty schema. For example, if there arestatements such as df.write.format("parquet").mode("overwrite").save(somePath), thefollowing error occurs: org.apache.spark.sql.AnalysisException: Parquet data source does not support null data type.
Action Required
Make sure that DataFrame is not empty. Check whether DataFrame is empty or not as follows:
if (!df.isEmpty) df.write.format("parquet").mode("overwrite").save("somePath")
204

CDP Private Cloud Base CDH 6 to CDP Private Cloud Base post-upgrade transition steps
Referencing a corrupt JSON/CSV recordIn Spark 2.4, queries from raw JSON/CSV files are disallowed when the referenced columns only include the internalcorrupt record column.
Type of change: Syntactic/Spark core
Spark 1.6
A query can reference a _corrupt_record column in raw JSON/CSV files.
Spark 2.4
An exception is thrown if the query is referencing _corrupt_record column in these files. For example, the followingquery is not allowed: spark.read.schema(schema).json(file).filter($"_corrupt_record".isNotNull).count()
Action Required
Cache or save the parsed results, and then resend the query.
val df = spark.read.schema(schema).json(file).cache() df.filter($"_corrupt_record".isNotNull).count()
Dataset and DataFrame API explode deprecatedDataset and DataFrame API explode has been deprecated.
Type of change: Syntactic/Spark SQL change
Spark 1.6
Dataset and DataFrame API explode are supported.
Spark 2.4
Dataset and DataFrame API explode have been deprecated. If explode is used, for example dataframe.explode(), the following warning is thrown:
warning: method explode in class Dataset is deprecated: use flatMap() or select() with functions.explode() instead
Action Required
Use functions.explode() or flatMap (import org.apache.spark.sql.functions.explode).
CSV header and schema matchColumn names of csv headers must match the schema.
Type of change: Configuration/Spark core changes
Spark 1.6 - 2.3
Column names of headers in CSV files are not checked against the against the schema of CSV data.
Spark 2.4
If columns in the CSV header and the schema have different ordering, the following exception is thrown:java.lang.IllegalArgumentException: CSV file header does not contain the expected fields.
Action Required
Make the schema and header order match or set enforceSchema to false to prevent getting an exception. Forexample, read a file or directory of files in CSV format into Spark DataFrame as follows: df3 = spark.read.option("delimiter", ";").option("header", True).option("enforeSchema", False).csv(path)
The default "header" option is true and enforceSchema is False.
205

CDP Private Cloud Base CDH 6 to CDP Private Cloud Base post-upgrade transition steps
If enforceSchema is set to true, the specified or inferred schema will be forcibly applied to datasource files, andheaders in CSV files are ignored. If enforceSchema is set to false, the schema is validated against all headersin CSV files when the header option is set to true. Field names in the schema and column names in CSV headersare checked by their positions taking into account spark.sql.caseSensitive. Although the default value istrue,you should disable the enforceSchema option to prevent incorrect results.
Table properties supportTable properties are taken into consideration while creating the table.
Type of change: Configuration/Spark Core Changes
Spark 1.6 - 2.3
Parquet and ORC Hive tables are converted to Parquet or ORC by default, but table properties are ignored. Forexample, the compression table property is ignored:
CREATE TABLE t(id int) STORED AS PARQUET TBLPROPERTIES (parquet.compression 'NONE')
This command generates Snappy Parquet files.
Spark 2.4
Table properties are supported. For example, if no compression is required, set the TBLPROPERTIES as follows:(parquet.compression 'NONE').
This command generates uncompressed Parquet files.
Action Required
Check and set the desired TBLPROPERTIES.
CREATE OR REPLACE VIEW and ALTER VIEW not supportedALTER VIEW and CREATE OR REPLACE VIEW AS commands are no longer supported.
Type of change: Configuration/Spark Core Changes
Spark 1.6
You can create views as follows:
CREATE OR REPLACE [ [ GLOBAL ] TEMPORARY ] VIEW [ IF NOT EXISTS ] view_name [ column_list ] [ COMMENT view_comment ] [ properties ] AS query ALTER VIEW view_name { rename | set_properties | unset_properties | alter_body }
Spark 2.4
ALTER VIEW and CREATE OR REPLACE commands above are not supported.
Action Required
Recreate views using the following syntax:
CREATE [ [ GLOBAL ] TEMPORARY ] VIEW [ IF NOT EXISTS ] view_name [ column_list ] [ COMMENT view_comment ] [ properties ] AS query
206

CDP Private Cloud Base CDH 6 to CDP Private Cloud Base post-upgrade transition steps
Managed table locationCreating a managed table with nonempty location is not allowed.
Type of change: Property/Spark core changes
Spark 1.6 - 2.3
You can create a managed table having a nonempty location.
Spark 2.4
Creating a managed table with nonempty location is not allowed. In Spark 2.4, an error occurs when there is a writeoperation, such as df.write.mode(SaveMode.Overwrite).saveAsTable("testdb.testtable").The error side-effects are the cluster is terminated while the write is in progress, a temporary network issue occurs, orthe job is interrupted.
Action Required
Set spark.sql.legacy.allowCreatingManagedTableUsingNonemptyLocation to true at runtimeas follows:
spark.conf.set("spark.sql.legacy.allowCreatingManagedTableUsingNonemptyLocation","true")
Write to Hive bucketed tables
Type of change: Property/Spark SQL changes
Spark 1.6
By default, you can write to Hive bucketed tables.
Spark 2.4
By default, you cannot write to Hive bucketed tables.
For example, the following code snippet writes the data into a bucketed Hive table:
newPartitionsDF.write.mode(SaveMode.Append).format("hive").insertInto(hive_test_db.test_bucketing)
The code above will throw the following error:
org.apache.spark.sql.AnalysisException: Output Hive table `hive_test_db`.`test_bucketing` is bucketed but Spark currently does NOT populate bucketed output which is compatible with Hive.
Action Required
To write to a Hive bucketed table, you must use hive.enforce.bucketing=false and hive.enforce.sorting=false to forego bucketing guarantees.
Rounding in arithmetic operationsArithmetic operations between decimals return a rounded value, instead of NULL, if an exact representation is notpossible.
Type of change: Property/Spark SQL changes
Spark 1.6
Arithmetic operations between decimals return a NULL value if an exact representation is not possible.
Spark 2.4
The following changes have been made:
• Updated rules determine the result precision and scale according to the SQL ANSI 2011.
207

CDP Private Cloud Base CDH 6 to CDP Private Cloud Base post-upgrade transition steps
• Rounding of the results occur when the result cannot be exactly represented with the specified precision and scaleinstead of returning NULL.
• A new config spark.sql.decimalOperations.allowPrecisionLoss which default to true (thenew behavior) to allow users to switch back to the old behavior. For example, if your code includes importstatements that resemble those below, plus arithmetic operations, such as multiplication and addition, operationsare performed using dataframes.
from pyspark.sql.types import DecimalTypefrom decimal import Decimal
Action Required
If precision and scale are important, and your code can accept a NULL value (if exact representation is not possibledue to overflow), then set the following property to false. spark.sql.decimalOperations.allowPrecisionLoss = false
Precedence of set operationsSet operations are executed by priority instead having equal precedence.
Type of change: Property/Spark SQL changes
Spark 1.6 - 2.3
If the order is not specified by parentheses, equal precedence is given to all set operations.
Spark 2.4
If the order is not specified by parentheses, set operations are performed from left to right with the exception that allINTERSECT operations are performed before any UNION, EXCEPT or MINUS operations.
For example, if your code includes set operations, such as INTERSECT , UNION, EXCEPT or MINUS, considerrefactoring.
Action Required
Change the logic according to following rule:
If the order of set operations is not specified by parentheses, set operations are performed from left to right with theexception that all INTERSECT operations are performed before any UNION, EXCEPT or MINUS operations.
If you want the previous behavior of equal precedence then, set spark.sql.legacy.setopsPrecedence.enabled=true.
HAVING without GROUP BYHAVING without GROUP BY is treated as a global aggregate.
Type of change: Property/Spark SQL changes
Spark 1.6 - 2,3
HAVING without GROUP BY is treated as WHERE. For example, SELECT 1 FROM range(10) HAVING true is executed as SELECT 1 FROM range(10) WHERE true, and and returns 10 rows.
Spark 2.4
HAVING without GROUP BY is treated as a global aggregate. For example, SELECT 1 FROM range(10) HAVING true returns one row, instead of 10, as in the previous version.
Action Required
Check the logic where having and group by is used. To restore previous behavior, set spark.sql.legacy.parser.havingWithoutGroupByAsWhere=true.
CSV bad record handlingHow Spark treats malformations in CSV files has changed.
Type of change: Property/Spark SQL changes
208

CDP Private Cloud Base CDH 6 to CDP Private Cloud Base post-upgrade transition steps
Spark 1.6 - 2.3
CSV rows are considered malformed if at least one column value in the row is malformed. The CSV parser dropsmalformed rows in the DROPMALFORMED mode or outputs an error in the FAILFAST mode.
Spark 2.4
A CSV row is considered malformed only when it contains malformed column values requested from CSVdatasource, other values are ignored.
Action Required
To restore the Spark 1.6 behavior, set spark.sql.csv.parser.columnPruning.enabled to false.
Spark 1.4 - 2.3 CSV exampleA Spark 1.4 - 2.3 CSV example illustrates the CSV-handling change in Spark 2.6.
In the following CSV file, the first two records describe the file. These records are not considered during processingand need to be removed from the file. The actual data to be considered for processing has three columns (jersey,name, position).
These are extra line1These are extra line210,Messi,CF7,Ronaldo,LW9,Benzema,CF
The following schema definition for the DataFrame reader uses the option DROPMALFORMED. You see only therequired data; all the description and error records are removed.
schema=Structtype([Structfield(“jersy”,StringType()),Structfield(“name”,StringType()),Structfield(“position”,StringType())])df1=spark.read\.option(“mode”,”DROPMALFORMED”)\.option(“delimiter”,”,”)\.schema(schema)\.csv(“inputfile”)df1.select(“*”).show()
Output is:
jersy name position
10 Messi CF
7 Ronaldo LW
9 Benzema CF
Select two columns from the dataframe and invoke show():
df1.select(“jersy”,”name”).show(truncate=False)
jersy name
These are extra line1 null
These are extra line2 null
10 Messi
7 Ronaldo
9 Benzema
209

CDP Private Cloud Base CDH 6 to CDP Private Cloud Base post-upgrade transition steps
Malformed records are not dropped and pushed to the first column and the remaining columns will be replaced withnull.This is due to the CSV parser column pruning which is set to true by default in Spark 2.4.
Set the following conf, and run the same code, selecting two fields.
spark.conf.set(“spark.sql.csv.parser.columnPruning.enabled”,False)
df2=spark.read\ .option(“mode”,”DROPMALFORMED”)\ .option(“delimiter”,”,”)\ .schema(schema)\ .csv(“inputfile”) df2.select(“jersy”,”name”).show(truncate=False)
jersy name
10 Messi
7 Ronaldo
9 Benzema
Conclusion: If working on selective columns, to handle bad records in CSV files, set spark.sql.csv.parser.columnPruning.enabled to false; otherwise, the error record is pushed to the first column, and all theremaining columns are treated as nulls.
Configuring storage locationsTo execute the workloads in , you must modify the references to storage locations. In CDP, references must bechanged from HDFS to a cloud object store such as S3.
About this task
The following sample query shows a Spark 2.4 HDFS data location.
scala> spark.sql("CREATE TABLE IF NOT EXISTS default.sales_spark_2(Region string, Country string,Item_Type string,Sales_Channel string,Order_Priority string,Order_Date date,Order_ID int,Ship_Date date,Units_sold string,Unit_Price string,Unit_cost string,Total_revenue string,Total_Cost string,Total_Profit string) row format delimited fields terminated by ','")scala> spark.sql("load data local inpath '/tmp/sales.csv' into table default.sales_spark_2")scala> spark.sql("select count(*) from default.sales_spark_2").show()
The following sample query shows a Spark 2.4 S3 data location.
scala> spark.sql("CREATE TABLE IF NOT EXISTS default.sales_spark_2(Region string, Country string,Item_Type string,Sales_Channel string,Order_Priority string,Order_Date date,Order_ID int,Ship_Date date,Units_sold string,Unit_Price string,Unit_cost string,Total_revenue string,Total_Cost string,Total_Profit string) row format delimited fields terminated by ','")scala> spark.sql("load data inpath 's3://<bucket>/sales.csv' into table default.sales_spark_2")scala> spark.sql("select count(*) from default.sales_spark_2").show()
Querying Hive managed tables from SparkHive-on-Spark is not supported on . You need to use the Hive Warehouse Connector (HWC) to query Apache Hivemanaged tables from Apache Spark.
To read Hive external tables from Spark, you do not need HWC. Spark uses native Spark to read external tables. Formore information, see the Hive Warehouse Connector documentation.
210

CDP Private Cloud Base CDH 6 to CDP Private Cloud Base post-upgrade transition steps
The following example shows how to query a Hive table from Spark using HWC:
spark-shell --jars /opt/cloudera/parcels/CDH/jars/hive-warehouse-connector-assembly-1.0.0.7.1.4.0-203.jar --conf spark.sql.hive.hiveserver2.jdbc.url=jdbc:hive2://cdhhdp02.uddeepta-bandyopadhyay-s-account.cloud:10000/default --conf spark.sql.hive.hiveserver2.jdbc.url.principal=hive/cdhhdp02.uddeepta-bandyopadhyay-s-account.cloud@Uddeepta-bandyopadhyay-s-Account.CLOUDscala> val hive = com.hortonworks.hwc.HiveWarehouseSession.session(spark).build()scala> hive.executeUpdate("UPDATE hive_acid_demo set value=25 where key=4")scala> val result=hive.execute("select * from default.hive_acid_demo")scala> result.show()
Compiling and running Spark workloadsAfter modifying the workloads, compile and run (or dry run) the refactored workloads on Spark 2.4.
You can write Spark applications using Java, Scala, Python, SparkR, and others. You build jars from these scriptsusing one of the following compilers.
• Java (with Maven/Java IDE),• Scala (with sbt),• Python (pip).• SparkR (RStudio)
Compiling and running a Java-based jobYou see by example how to compile a Java-based Spark job using Maven.
About this taskIn this task, you see how to compile the following example Spark program written in Java:
/* SimpleApp.java */import org.apache.spark.sql.SparkSession;import org.apache.spark.sql.Dataset; public class SimpleApp { public static void main(String[] args) { String logFile = "YOUR_SPARK_HOME/README.md"; // Should be some file on your system SparkSession spark = SparkSession.builder().appName("Simple Application").getOrCreate(); Dataset<String> logData = spark.read().textFile(logFile).cache(); long numAs = logData.filter(s -> s.contains("a")).count(); long numBs = logData.filter(s -> s.contains("b")).count(); System.out.println("Lines with a: " + numAs + ", lines with b: " + numBs); spark.stop(); }}
You also need to create a Maven Project Object Model (POM) file, as shown in the following example:
<project> <groupId>edu.berkeley</groupId> <artifactId>simple-project</artifactId> <modelVersion>4.0.0</modelVersion> <name>Simple Project</name> <packaging>jar</packaging> <version>1.0</version>
211

CDP Private Cloud Base CDH 6 to CDP Private Cloud Base post-upgrade transition steps
<properties> <project.build.sourceEncoding>UTF-8</project.build.sourceEncoding> <maven.compiler.source>1.8</maven.compiler.source> <maven.compiler.target>1.8</maven.compiler.target> </properties><dependencies> <dependency> <!-- Spark dependency --> <groupId>org.apache.spark</groupId> <artifactId>spark-sql_2.12</artifactId> <version>2.4.0</version> <scope>provided</scope> </dependency></dependencies></project>
Before you begin
• Install Apache Spark 2.4.x, JDK 8.x, and maven• Write a Java Spark program .java file.• Write a pom.xml file. This is where your Scala code resides.• If the cluster is Kerberized, ensure the required security token is authorized to compile and execute the workload.
Procedure
1. Lay out these files according to the canonical Maven directory structure.For example:
$ find ../pom.xml./src./src/main./src/main/java./src/main/java/SimpleApp.java
2. Package the application using maven package command.For example:
# Package a JAR containing your application$ mvn package...[INFO] Building jar: {..}/{..}/target/simple-project-1.0.jar
After compilation, several new files are created under new directories named project and target. Among these newfiles, is the jar file under the target directory to run the code. For example, the file is named simple-project-1.0.jar.
3. Execute and test the workload jar using the spark submit command.For example:
# Use spark-submit to run your applicationspark-submit \--class "SimpleApp" \--master yarn \target/simple-project-1.0.jar
Compiling and running a Scala-based jobYou see by example how to use sbt software to compile a Scala-based Spark job.
212

CDP Private Cloud Base CDH 6 to CDP Private Cloud Base post-upgrade transition steps
About this task
In this task, you see how to use the following .sbt file that specifies the build configuration:
cat build.sbtname := "Simple Project"version := "1.0"scalaVersion := "2.12.15"libraryDependencies += "org.apache.spark" %% "spark-sql" % "2.4.0"
You also need to create a compile the following example Spark program written in Scala:
/* SimpleApp.scala */import org.apache.spark.sql.SparkSession object SimpleApp { def main(args: Array[String]) { val logFile = "YOUR_SPARK_HOME/README.md" // Should be some file on your system val spark = SparkSession.builder.appName("Simple Application").getOrCreate() val logData = spark.read.textFile(logFile).cache() val numAs = logData.filter(line => line.contains("a")).count() val numBs = logData.filter(line => line.contains("b")).count() println(s"Lines with a: $numAs, Lines with b: $numBs") spark.stop() }
Before you begin
• Install Apache Spark 2.4.x.• Install JDK 8.x.• Install Scala 2.12.• Install Sbt 0.13.17.• Wrtie an .sbt file for configuration specifications, similar to a C include file.• Write a Scala-based Spark program (a .scala file).• If the cluster is Kerberized, ensure the required security token is authorized to compile and execute the workload.
Procedure
1. Compile the code using sbt package command from the directory where the build.sbt file exists.For example:
# Your directory layout should look like this$ find .../build.sbt./src./src/main./src/main/scala./src/main/scala/SimpleApp.scala # Package a jar containing your application$ sbt package...[info] Packaging {..}/{..}/target/scala-2.12/simple-project_2.12-1.0.jar
Several new files are created under new directories named project and target, including the jar file namedsimple-project_2.12-1.0.jar after the project name, Scala version, and code version.
213
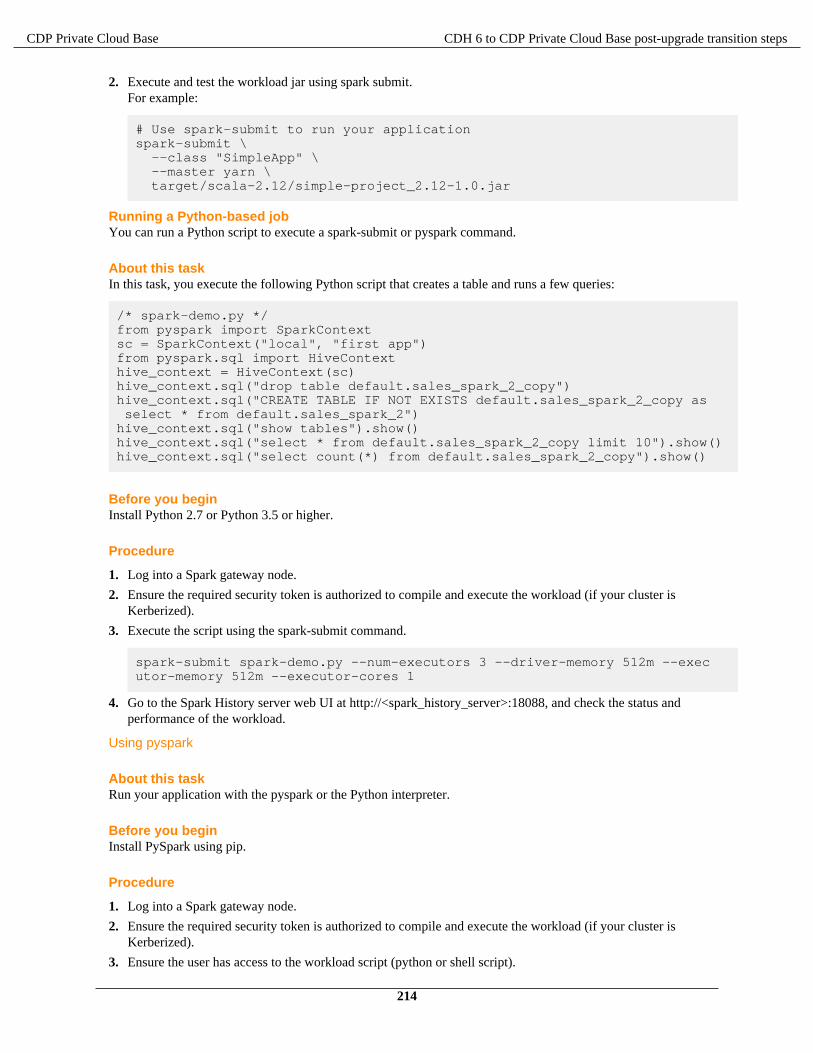
CDP Private Cloud Base CDH 6 to CDP Private Cloud Base post-upgrade transition steps
2. Execute and test the workload jar using spark submit.For example:
# Use spark-submit to run your applicationspark-submit \ --class "SimpleApp" \ --master yarn \ target/scala-2.12/simple-project_2.12-1.0.jar
Running a Python-based jobYou can run a Python script to execute a spark-submit or pyspark command.
About this taskIn this task, you execute the following Python script that creates a table and runs a few queries:
/* spark-demo.py */from pyspark import SparkContextsc = SparkContext("local", "first app")from pyspark.sql import HiveContexthive_context = HiveContext(sc)hive_context.sql("drop table default.sales_spark_2_copy")hive_context.sql("CREATE TABLE IF NOT EXISTS default.sales_spark_2_copy as select * from default.sales_spark_2")hive_context.sql("show tables").show()hive_context.sql("select * from default.sales_spark_2_copy limit 10").show()hive_context.sql("select count(*) from default.sales_spark_2_copy").show()
Before you beginInstall Python 2.7 or Python 3.5 or higher.
Procedure
1. Log into a Spark gateway node.
2. Ensure the required security token is authorized to compile and execute the workload (if your cluster isKerberized).
3. Execute the script using the spark-submit command.
spark-submit spark-demo.py --num-executors 3 --driver-memory 512m --executor-memory 512m --executor-cores 1
4. Go to the Spark History server web UI at http://<spark_history_server>:18088, and check the status andperformance of the workload.
Using pyspark
About this taskRun your application with the pyspark or the Python interpreter.
Before you beginInstall PySpark using pip.
Procedure
1. Log into a Spark gateway node.
2. Ensure the required security token is authorized to compile and execute the workload (if your cluster isKerberized).
3. Ensure the user has access to the workload script (python or shell script).
214

CDP Private Cloud Base CDH 6 to CDP Private Cloud Base post-upgrade transition steps
4. Execute the script using pyspark.
pyspark spark-demo.py --num-executors 3 --driver-memory 512m --executor-memory 512m --executor-cores 1
5. Execute the script using the Python interpreter.
python spark-demo.py
6. Go to the Spark History server web UI at http://<spark_history_server>:18088, and check the status andperformance of the workload.
Running a job interactively
About this task
Procedure
1. Log into a Spark gateway node.
2. Ensure the required security token is authorized to compile and execute the workload (if your cluster isKerberized).
3. Launch the “spark-shell”.For example:
spark-shell --jars target/mylibrary-1.0-SNAPSHOT-jar-with-dependencies.jar
4. Create a Spark context and run workload scripts.
cala> import org.apache.spark.sql.hive.HiveContextscala> val sqlContext = new HiveContext(sc)scala> sqlContext.sql("CREATE TABLE IF NOT EXISTS default.sales_spark_1(Region string, Country string,Item_Type string,Sales_Channel string,Order_Priority string,Order_Date date,Order_ID int,Ship_Date date,Units_sold string,Unit_Price string,Unit_cost string,Total_revenue string,Total_Cost string,Total_Profit string) row format delimited fields terminated by ','")scala> sqlContext.sql("load data local inpath '/tmp/sales.csv' into table default.sales_spark_1")scala> sqlContext.sql("show tables")scala> sqlContext.sql("select * from default.sales_spark_1 limit 10").show()scala> sqlContext.sql ("select count(*) from default.sales_spark_1").show()
5. Go to the Spark History server web UI at http://<spark_history_server>:18088, and check the status andperformance of the workload.
Post-migration tasksAfter the workloads are executed on Spark 2.4, validate the output, and compare the performance of the jobs withCDH/HDP cluster executions.
After the workloads are executed on Spark 2.4, validate the output, and compare the performance of the jobs withCDH/HDP cluster executions. After you perform the post migration configurations, do benchmark testing on Spark2.4.
Troubleshoot the failed/slow performing workloads by analyzing the application event logs/driver logs and fine tunethe workloads for better performance.
For more information, see the following documents:
215

CDP Private Cloud Base CDH 6 to CDP Private Cloud Base post-upgrade transition steps
• https://spark.apache.org/docs/2.4.4/sql-migration-guide-upgrade.html
https://spark.apache.org/releases/spark-release-2-4-0.html
https://spark.apache.org/releases/spark-release-2-2-0.html
https://spark.apache.org/releases/spark-release-2-3-0.html
https://spark.apache.org/releases/spark-release-2-1-0.html
https://spark.apache.org/releases/spark-release-2-0-0.html
For additional information about known issues please also refer:
Known Issues in Cloudera Manager 7.4.4 | CDP Private Cloud
Spark 2.3 to Spark 2.4 RefactoringBecause Spark 2.3 is not supported on CDP, you need to refactor Spark workloads from Spark 2.3 on CDH or HDP toSpark 2.4 on CDP.
This document helps in accelerating the migration process, provides guidance to refactor Spark workloads and listsmigration. Use this document when the platform is migrated from CDH or HDP to CDP.
Handling prerequisitesYou must perform a number of tasks before refactoring workloads.
About this taskAssuming all workloads are in working condition, you perform this task to meet refactoring prerequistes.
Procedure
1. Identify all the workloads in the cluster (CDH/HDP) which are running on Spark 1.6 - 2.3.
2. Classify the workloads.
Classification of workloads will help in clean-up of the unwanted workloads, plan resources and efforts forworkload migration and post upgrade testing.
Example workload classifications:
• Spark Core (scala)• Java-based Spark jobs• SQL, Datasets, and DataFrame• Structured Streaming• MLlib (Machine Learning)• PySpark (Python on Spark)• Batch Jobs• Scheduled Jobs• Ad-Hoc Jobs• Critical/Priority Jobs• Huge data Processing Jobs• Time taking jobs• Resource Consuming Jobs etc.• Failed Jobs
Identify configuration changes
216

CDP Private Cloud Base CDH 6 to CDP Private Cloud Base post-upgrade transition steps
3. Check the current Spark jobs configuration.
• Spark 1.6 - 2.3 workload configurations which have dependencies on job properties like scheduler, old pythonpackages, classpath jars and might not be compatible post migration.
• In , Capacity Scheduler is the default and recommended scheduler. Follow Fair Scheduler to CapacityScheduler transition guide to have all the required queues configured in the CDP cluster post upgrade. If anyconfiguration changes are required, modify the code as per the new capacity scheduler configurations.
• For workload configurations, see the Spark History server UI http://spark_history_server:18088/history/<application_number>/environment/.
4. Identify and capture workloads having data storage locations (local and HDFS) to refactor the workloads postmigration.
5. Refer to unsupported Apache Spark features, and plan refactoring accordingly.
Spark 2.3 to Spark 2.4 changesA description of the change, the type of change, and the required refactoring provide the information you need formigrating from Spark 1.6 to Spark 2.4.Empty schema not supportedWriting a dataframe with an empty or nested empty schema using any file format, such as parquet, orc, json, text, orcsv is not allowed.
Type of change: Syntactic/Spark core
Spark 1.6 - 2.3
Writing a dataframe with an empty or nested empty schema using any file format is allowed and will not throw anexception.
Spark 2.4
An exception is thrown when you attempt to write dataframes with empty schema. For example, if there arestatements such as df.write.format("parquet").mode("overwrite").save(somePath), thefollowing error occurs: org.apache.spark.sql.AnalysisException: Parquet data source does not support null data type.
Action Required
Make sure that DataFrame is not empty. Check whether DataFrame is empty or not as follows:
if (!df.isEmpty) df.write.format("parquet").mode("overwrite").save("somePath")
CSV header and schema matchColumn names of csv headers must match the schema.
Type of change: Configuration/Spark core changes
Spark 1.6 - 2.3
Column names of headers in CSV files are not checked against the against the schema of CSV data.
Spark 2.4
If columns in the CSV header and the schema have different ordering, the following exception is thrown:java.lang.IllegalArgumentException: CSV file header does not contain the expected fields.
Action Required
Make the schema and header order match or set enforceSchema to false to prevent getting an exception. Forexample, read a file or directory of files in CSV format into Spark DataFrame as follows: df3 = spark.read.option("delimiter", ";").option("header", True).option("enforeSchema", False).csv(path)
The default "header" option is true and enforceSchema is False.
217

CDP Private Cloud Base CDH 6 to CDP Private Cloud Base post-upgrade transition steps
If enforceSchema is set to true, the specified or inferred schema will be forcibly applied to datasource files, andheaders in CSV files are ignored. If enforceSchema is set to false, the schema is validated against all headersin CSV files when the header option is set to true. Field names in the schema and column names in CSV headersare checked by their positions taking into account spark.sql.caseSensitive. Although the default value istrue,you should disable the enforceSchema option to prevent incorrect results.
Table properties supportTable properties are taken into consideration while creating the table.
Type of change: Configuration/Spark Core Changes
Spark 1.6 - 2.3
Parquet and ORC Hive tables are converted to Parquet or ORC by default, but table properties are ignored. Forexample, the compression table property is ignored:
CREATE TABLE t(id int) STORED AS PARQUET TBLPROPERTIES (parquet.compression 'NONE')
This command generates Snappy Parquet files.
Spark 2.4
Table properties are supported. For example, if no compression is required, set the TBLPROPERTIES as follows:(parquet.compression 'NONE').
This command generates uncompressed Parquet files.
Action Required
Check and set the desired TBLPROPERTIES.
Managed table locationCreating a managed table with nonempty location is not allowed.
Type of change: Property/Spark core changes
Spark 1.6 - 2.3
You can create a managed table having a nonempty location.
Spark 2.4
Creating a managed table with nonempty location is not allowed. In Spark 2.4, an error occurs when there is a writeoperation, such as df.write.mode(SaveMode.Overwrite).saveAsTable("testdb.testtable").The error side-effects are the cluster is terminated while the write is in progress, a temporary network issue occurs, orthe job is interrupted.
Action Required
Set spark.sql.legacy.allowCreatingManagedTableUsingNonemptyLocation to true at runtimeas follows:
spark.conf.set("spark.sql.legacy.allowCreatingManagedTableUsingNonemptyLocation","true")
Precedence of set operationsSet operations are executed by priority instead having equal precedence.
Type of change: Property/Spark SQL changes
Spark 1.6 - 2.3
If the order is not specified by parentheses, equal precedence is given to all set operations.
Spark 2.4
218

CDP Private Cloud Base CDH 6 to CDP Private Cloud Base post-upgrade transition steps
If the order is not specified by parentheses, set operations are performed from left to right with the exception that allINTERSECT operations are performed before any UNION, EXCEPT or MINUS operations.
For example, if your code includes set operations, such as INTERSECT , UNION, EXCEPT or MINUS, considerrefactoring.
Action Required
Change the logic according to following rule:
If the order of set operations is not specified by parentheses, set operations are performed from left to right with theexception that all INTERSECT operations are performed before any UNION, EXCEPT or MINUS operations.
If you want the previous behavior of equal precedence then, set spark.sql.legacy.setopsPrecedence.enabled=true.
HAVING without GROUP BYHAVING without GROUP BY is treated as a global aggregate.
Type of change: Property/Spark SQL changes
Spark 1.6 - 2,3
HAVING without GROUP BY is treated as WHERE. For example, SELECT 1 FROM range(10) HAVING true is executed as SELECT 1 FROM range(10) WHERE true, and and returns 10 rows.
Spark 2.4
HAVING without GROUP BY is treated as a global aggregate. For example, SELECT 1 FROM range(10) HAVING true returns one row, instead of 10, as in the previous version.
Action Required
Check the logic where having and group by is used. To restore previous behavior, set spark.sql.legacy.parser.havingWithoutGroupByAsWhere=true.
CSV bad record handlingHow Spark treats malformations in CSV files has changed.
Type of change: Property/Spark SQL changes
Spark 1.6 - 2.3
CSV rows are considered malformed if at least one column value in the row is malformed. The CSV parser dropsmalformed rows in the DROPMALFORMED mode or outputs an error in the FAILFAST mode.
Spark 2.4
A CSV row is considered malformed only when it contains malformed column values requested from CSVdatasource, other values are ignored.
Action Required
To restore the Spark 1.6 behavior, set spark.sql.csv.parser.columnPruning.enabled to false.
Spark 1.4 - 2.3 CSV exampleA Spark 1.4 - 2.3 CSV example illustrates the CSV-handling change in Spark 2.6.
In the following CSV file, the first two records describe the file. These records are not considered during processingand need to be removed from the file. The actual data to be considered for processing has three columns (jersey,name, position).
These are extra line1These are extra line210,Messi,CF7,Ronaldo,LW9,Benzema,CF
219

CDP Private Cloud Base CDH 6 to CDP Private Cloud Base post-upgrade transition steps
The following schema definition for the DataFrame reader uses the option DROPMALFORMED. You see only therequired data; all the description and error records are removed.
schema=Structtype([Structfield(“jersy”,StringType()),Structfield(“name”,StringType()),Structfield(“position”,StringType())])df1=spark.read\.option(“mode”,”DROPMALFORMED”)\.option(“delimiter”,”,”)\.schema(schema)\.csv(“inputfile”)df1.select(“*”).show()
Output is:
jersy name position
10 Messi CF
7 Ronaldo LW
9 Benzema CF
Select two columns from the dataframe and invoke show():
df1.select(“jersy”,”name”).show(truncate=False)
jersy name
These are extra line1 null
These are extra line2 null
10 Messi
7 Ronaldo
9 Benzema
Malformed records are not dropped and pushed to the first column and the remaining columns will be replaced withnull.This is due to the CSV parser column pruning which is set to true by default in Spark 2.4.
Set the following conf, and run the same code, selecting two fields.
spark.conf.set(“spark.sql.csv.parser.columnPruning.enabled”,False)
df2=spark.read\ .option(“mode”,”DROPMALFORMED”)\ .option(“delimiter”,”,”)\ .schema(schema)\ .csv(“inputfile”) df2.select(“jersy”,”name”).show(truncate=False)
jersy name
10 Messi
7 Ronaldo
9 Benzema
Conclusion: If working on selective columns, to handle bad records in CSV files, set spark.sql.csv.parser.columnPruning.enabled to false; otherwise, the error record is pushed to the first column, and all theremaining columns are treated as nulls.
220

CDP Private Cloud Base CDH 6 to CDP Private Cloud Base post-upgrade transition steps
Configuring storage locationsTo execute the workloads in , you must modify the references to storage locations. In CDP, references must bechanged from HDFS to a cloud object store such as S3.
About this task
The following sample query shows a Spark 2.4 HDFS data location.
scala> spark.sql("CREATE TABLE IF NOT EXISTS default.sales_spark_2(Region string, Country string,Item_Type string,Sales_Channel string,Order_Priority string,Order_Date date,Order_ID int,Ship_Date date,Units_sold string,Unit_Price string,Unit_cost string,Total_revenue string,Total_Cost string,Total_Profit string) row format delimited fields terminated by ','")scala> spark.sql("load data local inpath '/tmp/sales.csv' into table default.sales_spark_2")scala> spark.sql("select count(*) from default.sales_spark_2").show()
The following sample query shows a Spark 2.4 S3 data location.
scala> spark.sql("CREATE TABLE IF NOT EXISTS default.sales_spark_2(Region string, Country string,Item_Type string,Sales_Channel string,Order_Priority string,Order_Date date,Order_ID int,Ship_Date date,Units_sold string,Unit_Price string,Unit_cost string,Total_revenue string,Total_Cost string,Total_Profit string) row format delimited fields terminated by ','")scala> spark.sql("load data inpath 's3://<bucket>/sales.csv' into table default.sales_spark_2")scala> spark.sql("select count(*) from default.sales_spark_2").show()
Querying Hive managed tables from SparkHive-on-Spark is not supported on . You need to use the Hive Warehouse Connector (HWC) to query Apache Hivemanaged tables from Apache Spark.
To read Hive external tables from Spark, you do not need HWC. Spark uses native Spark to read external tables. Formore information, see the Hive Warehouse Connector documentation.
The following example shows how to query a Hive table from Spark using HWC:
spark-shell --jars /opt/cloudera/parcels/CDH/jars/hive-warehouse-connector-assembly-1.0.0.7.1.4.0-203.jar --conf spark.sql.hive.hiveserver2.jdbc.url=jdbc:hive2://cdhhdp02.uddeepta-bandyopadhyay-s-account.cloud:10000/default --conf spark.sql.hive.hiveserver2.jdbc.url.principal=hive/cdhhdp02.uddeepta-bandyopadhyay-s-account.cloud@Uddeepta-bandyopadhyay-s-Account.CLOUDscala> val hive = com.hortonworks.hwc.HiveWarehouseSession.session(spark).build()scala> hive.executeUpdate("UPDATE hive_acid_demo set value=25 where key=4")scala> val result=hive.execute("select * from default.hive_acid_demo")scala> result.show()
Compiling and running Spark workloadsAfter modifying the workloads, compile and run (or dry run) the refactored workloads on Spark 2.4.
You can write Spark applications using Java, Scala, Python, SparkR, and others. You build jars from these scriptsusing one of the following compilers.
• Java (with Maven/Java IDE),• Scala (with sbt),• Python (pip).• SparkR (RStudio)
221

CDP Private Cloud Base CDH 6 to CDP Private Cloud Base post-upgrade transition steps
Post-migration tasksAfter the workloads are executed on Spark 2.4, validate the output, and compare the performance of the jobs withCDH/HDP cluster executions.
After the workloads are executed on Spark 2.4, validate the output, and compare the performance of the jobs withCDH/HDP cluster executions. After you perform the post migration configurations, do benchmark testing on Spark2.4.
Troubleshoot the failed/slow performing workloads by analyzing the application event logs/driver logs and fine tunethe workloads for better performance.
For more information, see the following documents:
• https://spark.apache.org/docs/2.4.4/sql-migration-guide-upgrade.html
https://spark.apache.org/releases/spark-release-2-4-0.html
https://spark.apache.org/releases/spark-release-2-2-0.html
https://spark.apache.org/releases/spark-release-2-3-0.html
https://spark.apache.org/releases/spark-release-2-1-0.html
https://spark.apache.org/releases/spark-release-2-0-0.html
For additional information about known issues please also refer:
Known Issues in Cloudera Manager 7.4.4 | CDP Private Cloud
Apache Hive Expedited Migration TasksIf you chose to expedite the Hive upgrade process by postponing migration of your tables and databases, you need toidentify any problems in tables and get help with fixing those problems before migrating the tables to CDP. You thenneed to migrate these tables to CDP before you can use them.
Preparing tables for migrationYou download the Hive Upgrade Check tool and use it to identify problems in unmigrated tables. These problemscan cause upgrade failure. It saves time to fix the problems and avoid failure. The tool provides help for fixing thoseproblems before migrating the tables to CDP.
About this task
You use the Hive Upgrade Check community tool to help you identify tables that have problems affecting migration.You resolve problems revealed by the Hive Upgrade Check tool to clean up the Hive Metastore before migration.If you do not want to use the Hive Upgrade Check tool, you need to perform the tasks described in the followingsubtopics to migrate Hive data to CDP:
• Check SERDE Definitions and Availability• Handle Missing Table or Partition Locations• Manage Table Location Mapping• Make Tables SparkSQL Compatible
Procedure
1. Obtain the Hive Upgrade Check tool.
Download the Hive SRE Upgrade Check tool from the Cloudera labs github location.
2. Follow instructions in the github readme to run the tool.The Hive Upgrade Check (v.2.3.5.6+) will create a yaml file (hsmm_<name>.yaml) identifying databases andtables that require attention.
222

CDP Private Cloud Base CDH 6 to CDP Private Cloud Base post-upgrade transition steps
3. Follow instructions in prompts from the Hive Upgrade Check tool to resolve problems with the tables.
At a minimum, you must run the following processes described in the github readme:
• process ID 1 Table / Partition Location Scan - Missing Directories• process id 3 Hive 3 Upgrade Checks - Managed Non-ACID to ACID Table Migrations
Check SERDE Definitions and AvailabilityEnsure correct Serde definitions and a reference to a SERDE exists to ensure a successful upgrade.
About this taskYou perform this step if you do not modify the HSMM process for expediting the Hive upgrade.
Procedure
1. Check Serde definitions for correctness and check for SERDE availability.
2. Correct any problems found as follows:
• Remove the table having the problematic SERDE.• Ensure the SERDE is available during the upgrade, so the table can be evaluated.
Handle Missing Table or Partition LocationsYou need to identify missing table or partition locations, or both, to prevent upgrade failure. If the table and partitionlocations do not exist in the file system, you must either create a replacement partition directory (recommended) ordrop the table and partition.
About this taskYou perform this step if you did not modify the HSMM process to expedite the Hive upgrade.
Procedure
Ensure the table and partition locations exist on the file system. If these locations don’t exist either create areplacement partition directory (recommended) or drop the table and partition.
Managed Table Location MappingA managed table location must map to one managed table only. If multiple managed tables point to the same location,upgrade problems occur.
Make Tables SparkSQL CompatibleNon-Acid, managed tables in ORC or in a Hive Native (but non-ORC) format that are owned by the POSIX userhive will not be SparkSQL-compatible after the upgrade unless you perform manual conversions.
About this taskIf your table is a managed, non-ACID table, you can convert it to an external table using this procedure(recommended). After the upgrade, you can easily convert the external table to an ACID table, and then use the HiveWarehouse Connector to access the ACID table from Spark.
Take one of the following actions.
• Convert the tables to external Hive tables before the upgrade.
ALTER TABLE ... SET TBLPROPERTIES('EXTERNAL'='TRUE','external.table.purge'='true')
• Change the POSIX ownership to an owner other than hive.
You will need to convert managed, ACID v1 tables to external tables after the upgrade.
223

CDP Private Cloud Base CDH 6 to CDP Private Cloud Base post-upgrade transition steps
Creating a list of tables to migrateTo run Hive Strict Managed Migration process (HSMM) after upgrading, you need to know how to create a YAMLfile that specifies the tables for migration.
Procedure
Create a YAML file in the following format:
---databaseIncludeLists:<database name>:-”<table name>”-”<table name>”…<database name>:...
---databaseIncludeLists:tpcds_bin_partitioned_orc_10:- "call_center"- "catalog_page"- "catalog_returns"- "customer"- "customer_address"bu_raw:- "cc_input"- "geo_regions"
Migrating tables to CDPYou set a Hive property to point to your YAML list of tables you want to migrate, and then migrate the tables bymanually running the Hive Strict Managed Migration process on the tables. You perform this action to use the tablesin CDP.
About this taskIn this task you set the table migration control file URL property to the path of a YAML file that lists tables anddatabases you want to migrate. You run the HSMM process to migrate the tables and databases using ClouderaManager.
Before you begin
• You completed the upgrade to CDP.• You created a YAML file listing databases and tables to migrate.
Procedure
1. In Cloudera Manager, go to Clusters > Hive-on-Tez.
2. Stop the Hive-on-Tez service.
3. In Configuration, search for table migration control file URL.
4. Set the value of the Table migration control file URL property to the absolute path and file name ofyour YAML include list.
5. Save configuration changes.
6. Click Clusters > Hive-on-Tez, and in Actions, click Migrate Hive tables for CDP upgrade.
HSMM migrates the Hive tables listed in the YAML.
224

CDP Private Cloud Base CDH 6 to CDP Private Cloud Base post-upgrade transition steps
7. To prevent problems with any subsequent HSMM run, remove the value you set for Table migration control file URL, leaving the value blank.
8. Save configuration changes.
9. Start the Hive-on-Tez service.The YAML-specified tables and databases are migrated.
Apache Hive Changes in CDPYou need to know where your tables are located and the property changes that the upgrade process makes. You needto perform some post-migration tasks before using Hive tables and handle semantic changes.
Understanding Apache Hive 3 major design features, such as default ACID transaction processing, can help you useHive to address the growing needs of enterprise data warehouse systems.
If you are expediting the Hive upgrade process and modified the upgrade process to skip materializing every tablein the metastore, you need to modify the Hive Strict Metastore Migration (HSMM) process by running the HiveUpgrade Check tool and provided scripts. Scripts are not included to address legacy Kudu storage handler classes.
Related InformationApache Hive 3 Key Features
Apache Hive 3 Architectural Overview
Preparing tables for migrationYou download the Hive Upgrade Check tool and use it to identify problems in unmigrated tables. These problemscan cause upgrade failure. It saves time to fix the problems and avoid failure. The tool provides help for fixing thoseproblems before migrating the tables to CDP.
About this task
You use the Hive Upgrade Check community tool to help you identify tables that have problems affecting migration.You resolve problems revealed by the Hive Upgrade Check tool to clean up the Hive Metastore before migration.If you do not want to use the Hive Upgrade Check tool, you need to perform the tasks described in the followingsubtopics to migrate Hive data to CDP:
• Check SERDE Definitions and Availability• Handle Missing Table or Partition Locations• Manage Table Location Mapping• Make Tables SparkSQL Compatible
Procedure
1. Obtain the Hive Upgrade Check tool.
Download the Hive SRE Upgrade Check tool from the Cloudera labs github location.
2. Follow instructions in the github readme to run the tool.The Hive Upgrade Check (v.2.3.5.6+) will create a yaml file (hsmm_<name>.yaml) identifying databases andtables that require attention.
3. Follow instructions in prompts from the Hive Upgrade Check tool to resolve problems with the tables.
At a minimum, you must run the following processes described in the github readme:
• process ID 1 Table / Partition Location Scan - Missing Directories• process id 3 Hive 3 Upgrade Checks - Managed Non-ACID to ACID Table Migrations
Check SERDE Definitions and AvailabilityEnsure correct Serde definitions and a reference to a SERDE exists to ensure a successful upgrade.
225

CDP Private Cloud Base CDH 6 to CDP Private Cloud Base post-upgrade transition steps
About this taskYou perform this step if you do not modify the HSMM process for expediting the Hive upgrade.
Procedure
1. Check Serde definitions for correctness and check for SERDE availability.
2. Correct any problems found as follows:
• Remove the table having the problematic SERDE.• Ensure the SERDE is available during the upgrade, so the table can be evaluated.
Handle Missing Table or Partition LocationsYou need to identify missing table or partition locations, or both, to prevent upgrade failure. If the table and partitionlocations do not exist in the file system, you must either create a replacement partition directory (recommended) ordrop the table and partition.
About this taskYou perform this step if you did not modify the HSMM process to expedite the Hive upgrade.
Procedure
Ensure the table and partition locations exist on the file system. If these locations don’t exist either create areplacement partition directory (recommended) or drop the table and partition.
Managed Table Location MappingA managed table location must map to one managed table only. If multiple managed tables point to the same location,upgrade problems occur.
Make Tables SparkSQL CompatibleNon-Acid, managed tables in ORC or in a Hive Native (but non-ORC) format that are owned by the POSIX userhive will not be SparkSQL-compatible after the upgrade unless you perform manual conversions.
About this taskIf your table is a managed, non-ACID table, you can convert it to an external table using this procedure(recommended). After the upgrade, you can easily convert the external table to an ACID table, and then use the HiveWarehouse Connector to access the ACID table from Spark.
Take one of the following actions.
• Convert the tables to external Hive tables before the upgrade.
ALTER TABLE ... SET TBLPROPERTIES('EXTERNAL'='TRUE','external.table.purge'='true')
• Change the POSIX ownership to an owner other than hive.
You will need to convert managed, ACID v1 tables to external tables after the upgrade.
Hive Configuration Property ChangesYou need to know the property value changes made by the upgrade process as the change might impact your work.You might need to consider reconfiguring property value defaults that the upgrade changes.
Hive Configuration Property Values
The upgrade process changes the default values of some Hive configuration properties and adds new properties. Thefollowing list describes those changes that occur after upgrading from CDH or HDP to CDP.
datanucleus.connectionPool.maxPoolSize
Before upgrade: 30
226

CDP Private Cloud Base CDH 6 to CDP Private Cloud Base post-upgrade transition steps
After upgrade: 10
datanucleus.connectionPoolingType
Before upgrade: BONECP
After upgrade: HikariCP
hive.auto.convert.join.noconditionaltask.size
Before upgrade: 20971520
After upgrade: 52428800
Exception: Preserves pre-upgrade value if old default is overridden; otherwise, uses new default.
hive.auto.convert.sortmerge.join
Before upgrade: FALSE in the old CDH; TRUE in the old HDP.
After upgrade: TRUE
hive.auto.convert.sortmerge.join.to.mapjoin
Before upgrade: FALSE
After upgrade: TRUE
hive.cbo.enable
Before upgrade: FALSE
After upgrade: TRUE
hive.cbo.show.warnings
Before upgrade: FALSE
After upgrade: TRUE
hive.compactor.worker.threads
Before upgrade: 0
After upgrade: 5
hive.compute.query.using.stats
Before upgrade: FALSE
After upgrade: TRUE
hive.conf.hidden.list
Before upgrade:
javax.jdo.option.ConnectionPassword,hive.server2.keystore.password,hive.metastore.dbaccess.ssl.truststore.password,fs.s3.awsAccessKeyId,fs.s3.awsSecretAccessKey,fs.s3n.awsAccessKeyId,fs.s3n.awsSecretAccessKey,fs.s3a.access.key,fs.s3a.secret.key,fs.s3a.proxy.password,dfs.adls.oauth2.credential,fs.adl.oauth2.credential,fs.azure.account.oauth2.client.secret
After upgrade:
javax.jdo.option.ConnectionPassword,hive.server2.keystore.password,hive.druid.metadata.password,hive.driver.parallel.compilation.global.limit
hive.conf.restricted.list
227
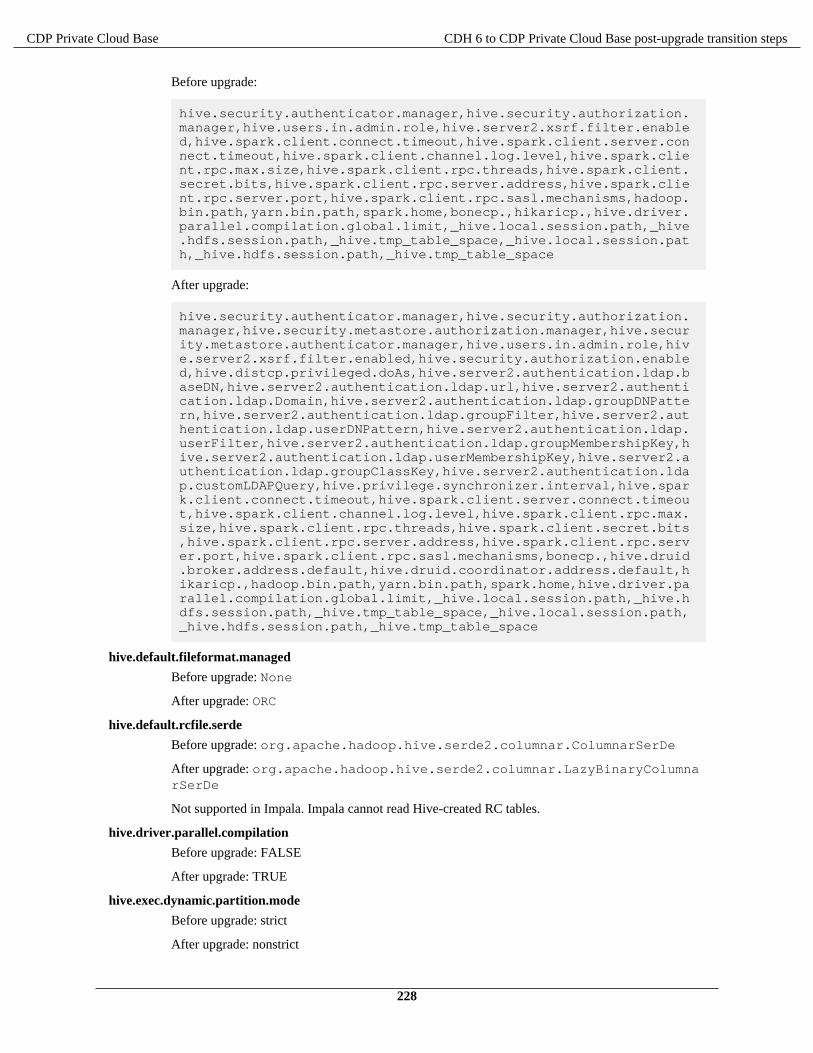
CDP Private Cloud Base CDH 6 to CDP Private Cloud Base post-upgrade transition steps
Before upgrade:
hive.security.authenticator.manager,hive.security.authorization.manager,hive.users.in.admin.role,hive.server2.xsrf.filter.enabled,hive.spark.client.connect.timeout,hive.spark.client.server.connect.timeout,hive.spark.client.channel.log.level,hive.spark.client.rpc.max.size,hive.spark.client.rpc.threads,hive.spark.client.secret.bits,hive.spark.client.rpc.server.address,hive.spark.client.rpc.server.port,hive.spark.client.rpc.sasl.mechanisms,hadoop.bin.path,yarn.bin.path,spark.home,bonecp.,hikaricp.,hive.driver.parallel.compilation.global.limit,_hive.local.session.path,_hive.hdfs.session.path,_hive.tmp_table_space,_hive.local.session.path,_hive.hdfs.session.path,_hive.tmp_table_space
After upgrade:
hive.security.authenticator.manager,hive.security.authorization.manager,hive.security.metastore.authorization.manager,hive.security.metastore.authenticator.manager,hive.users.in.admin.role,hive.server2.xsrf.filter.enabled,hive.security.authorization.enabled,hive.distcp.privileged.doAs,hive.server2.authentication.ldap.baseDN,hive.server2.authentication.ldap.url,hive.server2.authentication.ldap.Domain,hive.server2.authentication.ldap.groupDNPattern,hive.server2.authentication.ldap.groupFilter,hive.server2.authentication.ldap.userDNPattern,hive.server2.authentication.ldap.userFilter,hive.server2.authentication.ldap.groupMembershipKey,hive.server2.authentication.ldap.userMembershipKey,hive.server2.authentication.ldap.groupClassKey,hive.server2.authentication.ldap.customLDAPQuery,hive.privilege.synchronizer.interval,hive.spark.client.connect.timeout,hive.spark.client.server.connect.timeout,hive.spark.client.channel.log.level,hive.spark.client.rpc.max.size,hive.spark.client.rpc.threads,hive.spark.client.secret.bits,hive.spark.client.rpc.server.address,hive.spark.client.rpc.server.port,hive.spark.client.rpc.sasl.mechanisms,bonecp.,hive.druid.broker.address.default,hive.druid.coordinator.address.default,hikaricp.,hadoop.bin.path,yarn.bin.path,spark.home,hive.driver.parallel.compilation.global.limit,_hive.local.session.path,_hive.hdfs.session.path,_hive.tmp_table_space,_hive.local.session.path,_hive.hdfs.session.path,_hive.tmp_table_space
hive.default.fileformat.managed
Before upgrade: None
After upgrade: ORC
hive.default.rcfile.serde
Before upgrade: org.apache.hadoop.hive.serde2.columnar.ColumnarSerDe
After upgrade: org.apache.hadoop.hive.serde2.columnar.LazyBinaryColumnarSerDe
Not supported in Impala. Impala cannot read Hive-created RC tables.
hive.driver.parallel.compilation
Before upgrade: FALSE
After upgrade: TRUE
hive.exec.dynamic.partition.mode
Before upgrade: strict
After upgrade: nonstrict
228

CDP Private Cloud Base CDH 6 to CDP Private Cloud Base post-upgrade transition steps
In CDP Private Cloud Base, accidental use of dynamic partitioning feature is not prevented bydefault.
hive.exec.max.dynamic.partitions
Before upgrade: 1000
After upgrade: 5000
In CDP Private Cloud Base, fewer restrictions on dynamic paritioning occur than in the pre-upgradeCDH or HDP cluster.
hive.exec.max.dynamic.partitions.pernode
Before upgrade: 100
After upgrade: 2000
In CDP Private Cloud Base, fewer restrictions on dynamic paritioning occur than in the pre-upgradeCDH or HDP cluster.
hive.exec.post.hooks
Before upgrade:
com.cloudera.navigator.audit.hive.HiveExecHookContext,org.apache.hadoop.hive.ql.hooks.LineageLogger
After upgrade: org.apache.hadoop.hive.ql.hooks.HiveProtoLoggingHook
A prime number is recommended.
hive.exec.reducers.max
Before upgrade: 1099
After upgrade: 1009
Exception: Preserves pre-upgrade value if old default is overridden; otherwise, uses new default
hive.execution.engine
Before upgrade: mr
After upgrade: tez
Tez is now the only supported execution engine, existing queries that change execution mode toSpark or MapReduce within a session, for example, fail.
hive.fetch.task.conversion
Before upgrade: minimal
After upgrade: more
hive.fetch.task.conversion.threshold
Before upgrade: 256MB
After upgrade: 1GB
Exception: Preserves pre-upgrade value if old default is overridden; otherwise, uses new default.
hive.hashtable.key.count.adjustment
Before upgrade: 1
After upgrade: 0.99
Exception: Preserves pre-upgrade value if old default is overridden; otherwise, uses new default.
hive.limit.optimize.enable
Before upgrade: FALSE
After upgrade: TRUE
229

CDP Private Cloud Base CDH 6 to CDP Private Cloud Base post-upgrade transition steps
hive.limit.pushdown.memory.usage
Before upgrade: 0.1
After upgrade: 0.04
Exception: Preserves pre-upgrade value if old default is overridden; otherwise, uses new default.
hive.mapjoin.hybridgrace.hashtable
Before upgrade: TRUE
After upgrade: FALSE
hive.mapred.reduce.tasks.speculative.execution
Before upgrade: TRUE
After upgrade: FALSE
hive.metastore.aggregate.stats.cache.enabled
Before upgrade: TRUE
After upgrade: FALSE
hive.metastore.disallow.incompatible.col.type.changes
Before upgrade: FALSE
After upgrade: TRUE
Schema evolution is more restrictive in CDP Private Cloud Base than in CDH to avoid datacorruption. The new default disallows column type changes if the old and new types areincompatible.
hive.metastore.dml.events
Before upgrade: FALSE
After upgrade: TRUE
hive.metastore.event.message.factory
Before upgrade: org.apache.hadoop.hive.metastore.messaging.json.ExtendedJSONMessageFactory
After upgrade: org.apache.hadoop.hive.metastore.messaging.json.gzip.GzipJSONMessageEncoder
hive.metastore.uri.selection
Before upgrade: SEQUENTIAL
After upgrade: RANDOM
hive.metastore.warehouse.dir
Before upgrade from CDH: /user/hive/warehouse
Before upgrade from HDP: /apps/hive/warehouse
After upgrade from CDH: /warehouse/tablespace/managed/hive
After upgrade from HDP: /warehouse/tablespace/managed/hive
For information about the location of old tables and new tables, which you create after the upgrade,see Changes to CDH Hive Tables or Changes to HDP Hive tables.
hive.optimize.metadataonly
Before upgrade: FALSE
After upgrade: TRUE
hive.optimize.point.lookup.min
Before upgrade: 31
230

CDP Private Cloud Base CDH 6 to CDP Private Cloud Base post-upgrade transition steps
After upgrade: 2
hive.prewarm.numcontainers
Before upgrade: 10
After upgrade: 3
hive.script.operator.env.blacklist
Before upgrade: hive.txn.valid.txns,hive.script.operator.env.blacklist
After upgrade: hive.txn.valid.txns,hive.txn.tables.valid.writeids,hive.txn.valid.writeids,hive.script.operator.env.blacklist
hive.security.authorization.sqlstd.confwhitelist
Before upgrade:
hive\.auto\..*hive\.cbo\..*hive\.convert\..*hive\.exec\.dynamic\.partition.*hive\.exec\..*\.dynamic\.partitions\..*hive\.exec\.compress\..*hive\.exec\.infer\..*hive\.exec\.mode.local\..*hive\.exec\.orc\..*hive\.exec\.parallel.*hive\.explain\..*hive\.fetch.task\..*hive\.groupby\..*hive\.hbase\..*hive\.index\..*hive\.index\..*hive\.intermediate\..*hive\.join\..*hive\.limit\..*hive\.log\..*hive\.mapjoin\..*hive\.merge\..*hive\.optimize\..*hive\.orc\..*hive\.outerjoin\..*hive\.parquet\..*hive\.ppd\..*hive\.prewarm\..*hive\.server2\.proxy\.userhive\.skewjoin\..*hive\.smbjoin\..*hive\.stats\..*hive\.strict\..*hive\.tez\..*hive\.vectorized\..*mapred\.map\..*mapred\.reduce\..*mapred\.output\.compression\.codecmapred\.job\.queuenamemapred\.output\.compression\.typemapred\.min\.split\.sizemapreduce\.job\.reduce\.slowstart\.completedmapsmapreduce\.job\.queuenamemapreduce\.job\.tagsmapreduce\.input\.fileinputformat\.split\.minsizemapreduce\.map\..*mapreduce\.reduce\..*mapreduce\.output\.fileoutputformat\.compress\.codecmapreduce\.output\.fileoutputformat\.compress\.typeoozie\..*tez\.am\..*tez\.task\..*tez\.runtime\..*tez\.queue\.namehive\.transpose\.aggr\.joinhive\.exec\.reducers\.bytes\.per\.reducerhive\.client\.stats\.countershive\.exec\.default\.partition\.namehive\.exec\.drop\.ignorenonexistenthive\.counters\.group\.namehive\.default\.fileformat\.managedhive\.enforce\.bucketmapjoinhive\.enforce\.sortmergebucketmapjoinhive\.cache\.expr\.evaluationhive\.query\.result\.fileformathive\.hashtable\.loadfactorhive\.hashtable\.initialCapacityhive\.ignore\.mapjoin\.hinthive\.limit\.row\.max\.sizehive\.mapred\.modehive\.map\.aggrhive\.compute\.query\.using\.statshive\.exec\.rowoffsethive\.variable\.substitutehive\.variable\.substitute\.depthhive\.autogen\.columnalias\.prefix\.includefuncnamehive\.autogen\.columnalias\.prefix\.labelhive\.exec\.check\.crossproductshive\.cli\.tez\.session\.asynchive\.compathive\.exec\.concatenate\.check\.indexhive\.display\.partition\.cols\.separatelyhive\.error\.on\.empty\.partitionhive\.execution\.enginehive\.exec\.copyfile\.maxsizehive\.exim\.uri\.scheme\.whitelisthive\.file\.max\.footerhive\.insert\.into\.multilevel\.dirshive\.localize\.resource\.num\.wait\.attemptshive\.multi\.insert\.move\.tasks\.share\.dependencieshive\.support\.quoted\.identifiershive\.resultset\.use\.unique\.column\.nameshive\.analyze\.stmt\.collect\.partlevel\.statshive\.exec\.schema\.evolutionhive\.server2\.logging\.operation\.levelhive\.server2\.thrift\.resultset\.serialize\.in\.taskshive\.support\.special\.characters\.tablenamehive\.exec\.job\.debug\.capture\.stacktraceshive\.exec\.job\.debug\.timeouthive\.llap\.io\.enabledhive\.llap\.io\.use\.fileid\.pathhive\.llap\.daemon\.service\.hostshive\.llap\.execution\.modehive\.llap\.auto\.allow\.uberhive\.llap\.auto\.enforce\.treehive\.llap\.auto\.enforce\.vectorizedhive\.llap\.auto\.enforce\.statshive\.llap\.auto\.max\.input\.sizehive\.llap\.auto\.max\.output\.sizehive\.llap\.skip\.compile\.udf\.checkhive\.llap\.client\.consistent\.splitshive\.llap\.enable\.grace\.join\.in\.llaph
231

CDP Private Cloud Base CDH 6 to CDP Private Cloud Base post-upgrade transition steps
ive\.llap\.allow\.permanent\.fnshive\.exec\.max\.created\.fileshive\.exec\.reducers\.maxhive\.reorder\.nway\.joinshive\.output\.file\.extensionhive\.exec\.show\.job\.failure\.debug\.infohive\.exec\.tasklog\.debug\.timeouthive\.query\.id
After upgrade:
hive\.auto\..*hive\.cbo\..*hive\.convert\..*hive\.druid\..*hive\.exec\.dynamic\.partition.*hive\.exec\.max\.dynamic\.partitions.*hive\.exec\.compress\..*hive\.exec\.infer\..*hive\.exec\.mode.local\..*hive\.exec\.orc\..*hive\.exec\.parallel.*hive\.exec\.query\.redactor\..*hive\.explain\..*hive\.fetch.task\..*hive\.groupby\..*hive\.hbase\..*hive\.index\..*hive\.index\..*hive\.intermediate\..*hive\.jdbc\..*hive\.join\..*hive\.limit\..*hive\.log\..*hive\.mapjoin\..*hive\.merge\..*hive\.optimize\..*hive\.materializedview\..*hive\.orc\..*hive\.outerjoin\..*hive\.parquet\..*hive\.ppd\..*hive\.prewarm\..*hive\.query\.redaction\..*hive\.server2\.thrift\.resultset\.default\.fetch\.sizehive\.server2\.proxy\.userhive\.skewjoin\..*hive\.smbjoin\..*hive\.stats\..*hive\.strict\..*hive\.tez\..*hive\.vectorized\..*hive\.query\.reexecution\..*reexec\.overlay\..*fs\.defaultFSssl\.client\.truststore\.locationdistcp\.atomicdistcp\.ignore\.failuresdistcp\.preserve\.statusdistcp\.preserve\.rawxattrsdistcp\.sync\.foldersdistcp\.delete\.missing\.sourcedistcp\.keystore\.resourcedistcp\.liststatus\.threadsdistcp\.max\.mapsdistcp\.copy\.strategydistcp\.skip\.crcdistcp\.copy\.overwritedistcp\.copy\.appenddistcp\.map\.bandwidth\.mbdistcp\.dynamic\..*distcp\.meta\.folderdistcp\.copy\.listing\.classdistcp\.filters\.classdistcp\.options\.skipcrccheckdistcp\.options\.mdistcp\.options\.numListstatusThreadsdistcp\.options\.mapredSslConfdistcp\.options\.bandwidthdistcp\.options\.overwritedistcp\.options\.strategydistcp\.options\.idistcp\.options\.p.*distcp\.options\.updatedistcp\.options\.deletemapred\.map\..*mapred\.reduce\..*mapred\.output\.compression\.codecmapred\.job\.queue\.namemapred\.output\.compression\.typemapred\.min\.split\.sizemapreduce\.job\.reduce\.slowstart\.completedmapsmapreduce\.job\.queuenamemapreduce\.job\.tagsmapreduce\.input\.fileinputformat\.split\.minsizemapreduce\.map\..*mapreduce\.reduce\..*mapreduce\.output\.fileoutputformat\.compress\.codecmapreduce\.output\.fileoutputformat\.compress\.typeoozie\..*tez\.am\..*tez\.task\..*tez\.runtime\..*tez\.queue\.namehive\.transpose\.aggr\.joinhive\.exec\.reducers\.bytes\.per\.reducerhive\.client\.stats\.countershive\.exec\.default\.partition\.namehive\.exec\.drop\.ignorenonexistenthive\.counters\.group\.namehive\.default\.fileformat\.managedhive\.enforce\.bucketmapjoinhive\.enforce\.sortmergebucketmapjoinhive\.cache\.expr\.evaluationhive\.query\.result\.fileformathive\.hashtable\.loadfactorhive\.hashtable\.initialCapacityhive\.ignore\.mapjoin\.hinthive\.limit\.row\.max\.sizehive\.mapred\.modehive\.map\.aggrhive\.compute\.query\.using\.statshive\.exec\.rowoffsethive\.variable\.substitutehive\.variable\.substitute\.depthhive\.autogen\.columnalias\.prefix\.includefuncnamehive\.autogen\.columnalias\.prefix\.labelhive\.exec\.check\.crossproductshive\.cli\.tez\.session\.asynchive\.compathive\.display\.partition\.cols\.separatelyhive\.error\.on\.empty\.partitionhive\.execution\.enginehive\.exec\.copyfile\.maxsizehive\.exim\.uri\.scheme\.whitelisthive\.file\.max\.footerhive\.insert\.into\.multilevel\.dirshive\.localize\.resource\.num\.wait\.attemptshive\.multi\.insert\.move\.tasks\.share\.dependencieshive\.query\.results\.cache\.enabledhive\.query\.results\.cache\.wait\.for\.pending\.resultshive\.support\.quoted\.identifiershive\.resultset\.use\.unique\.column\.nameshive\.analyze\.stmt\.collect\.partlevel\.statshive\.exec\.schema\.evolutionhive\.server2\.logging\.operation\.levelhive\.server2\.thrift\.resultset\.serialize\.in\.taskshive\.support\.special\.characters\.tablenamehive\.exec\.job\.debu
232

CDP Private Cloud Base CDH 6 to CDP Private Cloud Base post-upgrade transition steps
g\.capture\.stacktraceshive\.exec\.job\.debug\.timeouthive\.llap\.io\.enabledhive\.llap\.io\.use\.fileid\.pathhive\.llap\.daemon\.service\.hostshive\.llap\.execution\.modehive\.llap\.auto\.allow\.uberhive\.llap\.auto\.enforce\.treehive\.llap\.auto\.enforce\.vectorizedhive\.llap\.auto\.enforce\.statshive\.llap\.auto\.max\.input\.sizehive\.llap\.auto\.max\.output\.sizehive\.llap\.skip\.compile\.udf\.checkhive\.llap\.client\.consistent\.splitshive\.llap\.enable\.grace\.join\.in\.llaphive\.llap\.allow\.permanent\.fnshive\.exec\.max\.created\.fileshive\.exec\.reducers\.maxhive\.reorder\.nway\.joinshive\.output\.file\.extensionhive\.exec\.show\.job\.failure\.debug\.infohive\.exec\.tasklog\.debug\.timeouthive\.query\.idhive\.query\.tag
hive.security.command.whitelist
Before upgrade: set,reset,dfs,add,list,delete,reload,compile
After upgrade: set,reset,dfs,add,list,delete,reload,compile,llap
hive.server2.enable.doAs
Before upgrade: TRUE (in case of an insecure cluster only)
After upgrade: FALSE (in all cases)
Affects only insecure clusters by turning off impersonation. Permission issues are expected to arisefor affected clusters.
hive.server2.idle.session.timeout
Before upgrade: 12 hours
After upgrade: 24 hours
Exception:Preserves pre-upgrade value if old default is overridden; otherwise, uses new default.
hive.server2.max.start.attempts
Before upgrade: 30
After upgrade: 5
hive.server2.parallel.ops.in.session
Before upgrade: TRUE
After upgrade: FALSE
A Tez limitation requires disabling this property; otherwise, queries submitted concurrently on asingle JDBC connection fail or execute slower.
hive.server2.support.dynamic.service.discovery
Before upgrade: FALSE
After upgrade: TRUE
hive.server2.tez.initialize.default.sessions
Before upgrade: FALSE
After upgrade: TRUE
hive.server2.thrift.max.worker.threads
Before upgrade: 100
After upgrade: 500
Exception: Preserves pre-upgrade value if the old default is overridden; otherwise, uses new default.
hive.server2.thrift.resultset.max.fetch.size
Before upgrade: 1000
233

CDP Private Cloud Base CDH 6 to CDP Private Cloud Base post-upgrade transition steps
After upgrade: 10000
hive.service.metrics.file.location
Before upgrade: /var/log/hive/metrics-hiveserver2/metrics.log
After upgrade: /var/log/hive/metrics-hiveserver2-hiveontez/metrics.log
This location change is due to a service name change.
hive.stats.column.autogather
Before upgrade: FALSE
After upgrade: TRUE
hive.stats.deserialization.factor
Before upgrade: 1
After upgrade: 10
hive.support.special.characters.tablename
Before upgrade: FALSE
After upgrade: TRUE
hive.tez.auto.reducer.parallelism
Before upgrade: FALSE
After upgrade: TRUE
hive.tez.bucket.pruning
Before upgrade: FALSE
After upgrade: TRUE
hive.tez.container.size
Before upgrade: -1
After upgrade: 4096
hive.tez.exec.print.summary
Before upgrade: FALSE
After upgrade: TRUE
hive.txn.manager
Before upgrade: org.apache.hadoop.hive.ql.lockmgr.DummyTxnManager
After upgrade: org.apache.hadoop.hive.ql.lockmgr.DbTxnManager
hive.vectorized.execution.mapjoin.minmax.enabled
Before upgrade: FALSE
After upgrade: TRUE
hive.vectorized.execution.mapjoin.native.fast.hashtable.enabled
Before upgrade: FALSE
After upgrade: TRUE
hive.vectorized.use.row.serde.deserialize
Before upgrade: FALSE
After upgrade: TRUE
Related InformationCustom Configuration (about Cloudera Manager Safety Valve)
234
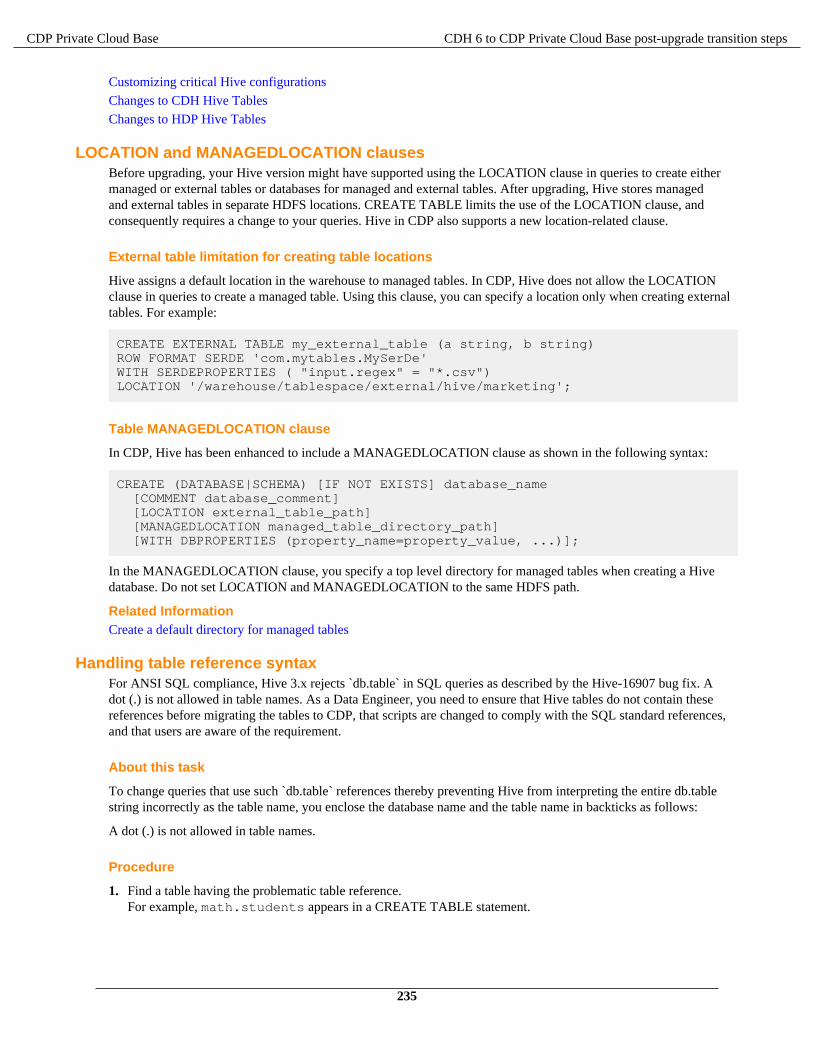
CDP Private Cloud Base CDH 6 to CDP Private Cloud Base post-upgrade transition steps
Customizing critical Hive configurations
Changes to CDH Hive Tables
Changes to HDP Hive Tables
LOCATION and MANAGEDLOCATION clausesBefore upgrading, your Hive version might have supported using the LOCATION clause in queries to create eithermanaged or external tables or databases for managed and external tables. After upgrading, Hive stores managedand external tables in separate HDFS locations. CREATE TABLE limits the use of the LOCATION clause, andconsequently requires a change to your queries. Hive in CDP also supports a new location-related clause.
External table limitation for creating table locations
Hive assigns a default location in the warehouse to managed tables. In CDP, Hive does not allow the LOCATIONclause in queries to create a managed table. Using this clause, you can specify a location only when creating externaltables. For example:
CREATE EXTERNAL TABLE my_external_table (a string, b string) ROW FORMAT SERDE 'com.mytables.MySerDe' WITH SERDEPROPERTIES ( "input.regex" = "*.csv")LOCATION '/warehouse/tablespace/external/hive/marketing';
Table MANAGEDLOCATION clause
In CDP, Hive has been enhanced to include a MANAGEDLOCATION clause as shown in the following syntax:
CREATE (DATABASE|SCHEMA) [IF NOT EXISTS] database_name [COMMENT database_comment] [LOCATION external_table_path] [MANAGEDLOCATION managed_table_directory_path] [WITH DBPROPERTIES (property_name=property_value, ...)];
In the MANAGEDLOCATION clause, you specify a top level directory for managed tables when creating a Hivedatabase. Do not set LOCATION and MANAGEDLOCATION to the same HDFS path.
Related InformationCreate a default directory for managed tables
Handling table reference syntaxFor ANSI SQL compliance, Hive 3.x rejects `db.table` in SQL queries as described by the Hive-16907 bug fix. Adot (.) is not allowed in table names. As a Data Engineer, you need to ensure that Hive tables do not contain thesereferences before migrating the tables to CDP, that scripts are changed to comply with the SQL standard references,and that users are aware of the requirement.
About this task
To change queries that use such `db.table` references thereby preventing Hive from interpreting the entire db.tablestring incorrectly as the table name, you enclose the database name and the table name in backticks as follows:
A dot (.) is not allowed in table names.
Procedure
1. Find a table having the problematic table reference.For example, math.students appears in a CREATE TABLE statement.
235

CDP Private Cloud Base CDH 6 to CDP Private Cloud Base post-upgrade transition steps
2. Enclose the database name and the table name in backticks.
CREATE TABLE `math`.`students` (name VARCHAR(64), age INT, gpa DECIMAL(3,2));
Related InformationAdd Backticks to Table References
Add Backticks to Table ReferencesCDP includes the Hive-16907 bug fix, which rejects `db.table` in SQL queries. A dot (.) is not allowed in tablenames. You need to change queries that use such references to prevent Hive from interpreting the entire db.tablestring as the table name.
Procedure
1. Find a table having the problematic table reference.
math.students
appears in a CREATE TABLE statement.
2. Enclose the database name and the table name in backticks.
CREATE TABLE `math`.`students` (name VARCHAR(64), age INT, gpa DECIMAL(3,2));
Related InformationHandling table reference syntax
Identifying semantic changes and workaroundsAs SQL Developer, Analyst, or other Hive user, you need to know potential problems with queries due to semanticchanges. Some of the operations that changed were not widely used, so you might not encounter any of the problemsassociated with the changes.
Over the years, Apache Hive committers enhanced versions of Hive supported in legacy releases of CDH and HDP,with users in mind. Changes were designed to maintain compatibility with Hive applications. Consequently, fewsyntax changes occurred over the years. A number of semantic changes, described in this section did occur, however.Workarounds are described for these semantic changes.
Casting timestampsResults of applications that cast numerics to timestamps differ from Hive 2 to Hive 3. Apache Hive changed thebehavior of CAST to comply with the SQL Standard, which does not associate a time zone with the TIMESTAMPtype.
Before Upgrade to CDP
Casting a numeric type value into a timestamp could be used to produce a result that reflected the time zone of thecluster. For example, 1597217764557 is 2020-08-12 00:36:04 PDT. Running the following query casts the numeric toa timestamp in PDT:
> SELECT CAST(1597217764557 AS TIMESTAMP); | 2020-08-12 00:36:04 |
After Upgrade to CDP
236

CDP Private Cloud Base CDH 6 to CDP Private Cloud Base post-upgrade transition steps
Casting a numeric type value into a timestamp produces a result that reflects the UTC instead of the time zone of thecluster. Running the following query casts the numeric to a timestamp in UTC.
> SELECT CAST(1597217764557 AS TIMESTAMP); | 2020-08-12 07:36:04.557 |
Action Required
Change applications. Do not cast from a numeral to obtain a local time zone. Built-in functions from_utc_timestamp and to_utc_timestamp can be used to mimic behavior before the upgrade.
Related InformationApache Hive web site summary of timestamp semantics
Casting invalid datesCasting of an invalid date differs from Hive 1 in CDH 5 to Hive 3 in CDP. Hive 3 uses a different parser formatterfrom the one used in Hive 1, which affects semantics. Hive 1 considers 00 invalid for date fields. Hive 3 considers 00valid for date fields. Neither Hive 1 nor Hive 3 correctly handles invalid dates, and Hive-25056 addresses this issue.
Before Upgrade to CDP
Casting of invalid date (zero value in one or more of the 3 fields of date, month, year) returns a NULL value:
> SELECT CAST ('0000-00-00' as date) , CAST ('000-00-00 00:00:00' AS TIMESTAMP) ;...------------_c0_c1------------NULLNULL------------1 row selected (0.154 seconds)
After Upgrade to CDP
Casting of an invalid date returns a result.
> SELECT CAST ('0000-00-00' as date) , CAST ('000-00-00 00:00:00' AS TIMESTAMP) ;...-----------------------------------+_c0_c1-----------------------------------+00002-11-30 00:00:00.0-----------------------------------+1 row selected (5.291 seconds)
Action Required
Do not cast invalid dates in Hive 3.
Changing incompatible column typesA default configuration change can cause applications that change column types to fail.
Before Upgrade to CDP
In HDP 2.x and CDH 5.x and CDH 6 hive.metastore.disallow.incompatible.col.type.changesis false by default to allow changes to incompatible column types. For example, you can change a STRING column toa column of an incompatible type, such as MAP<STRING, STRING>. No error occurs.
After Upgrade to CDP
237

CDP Private Cloud Base CDH 6 to CDP Private Cloud Base post-upgrade transition steps
In CDP, hive.metastore.disallow.incompatible.col.type.changes is true by default. Hiveprevents changes to incompatible column types. Compatible column type changes, such as INT, STRING, BIGINT,are not blocked.
Action Required
Change applications to disallow incompatible column type changes to prevent possible data corruption. CheckALTER TABLE statements and change those that would fail due to incompatible column types.
Related InformationHIVE-12320
Creating tablesTo improve useability and functionality, Hive 3 significantly changed table creation.
Hive has changed table creation in the following ways:
• Creates ACID-compliant table, which is the default in CDP• Supports simple writes and inserts• Writes to multiple partitions• Inserts multiple data updates in a single SELECT statement• Eliminates the need for bucketing.
If you have an ETL pipeline that creates tables in Hive, the tables will be created as ACID. Hive now tightly controlsaccess and performs compaction periodically on the tables. The way you access managed Hive tables from Spark andother clients changes. In CDP, access to external tables requires you to set up security access permissions.
Before Upgrade to CDP
In CDH and HDP 2.x, by default CREATE TABLE created a non-ACID table.
After Upgrade to CDP
In CDP, by default CREATE TABLE creates a full, ACID transactional table in ORC format.
Action Required
Perform one or more of the following actions:
• Configure legacy CREATE TABLE behavior (see the next section) to create external tables by default.• To read Hive ACID tables from Spark, you connect to Hive using the Hive Warehouse Connector (HWC) or the
HWC Spark Direct Reader. To write ACID tables to Hive from Spark, you use the HWC and HWC API. Sparkcreates an external table with the purge property when you do not use the HWC API. For more information, seeHWC Spark Direct Reader and Hive Warehouse Connector.
• Set up Ranger policies and HDFS ACLs for tables. For more information, see HDFS ACLs and HDFS ACLPermissions.
Related InformationHive Warehouse Connector for accessing Apache Spark data
Spark Direct Reader for accessing Spark data
HDFS ACLS
Apache Hive 3 Architectural Overview
Configure a Resource-based Policy: Hive
Apache Hive 3 Key Features
Apache Hive 3 Tables
Configuring legacy CREATE TABLE behavior
Configuring legacy CREATE TABLE behaviorAfter you upgrade to CDP and migrate old tables, you might want to briefly switch to Hive legacy behavior. Legacybehavior might solve compatibility problems with your scripts during data migration, for example, when runningETL.
238

CDP Private Cloud Base CDH 6 to CDP Private Cloud Base post-upgrade transition steps
About this task
By default, executing a CREATE TABLE statement creates a managed Apache Hive 3 table in the Hive metastore.You can change the default behavior to use the legacy CREATE TABLE behavior. When you configure legacybehavior, CREATE TABLE generates external tables. Legacy behavior is recommended only during upgrading dueto the advantages of full ACID transactional tables over external tables.
Apache Hive full ACID (transactional) tables deliver better performance, security, and user experience than non-transactional tables. By default, executing a CREATE TABLE statement creates a managed Apache Hive 3 tablein the Hive metastore. Hive 3 tables are ACID-compliant, transactional tables having the following full ACIDcapabilities on data in ORC format only:
• Insert• Update• Delete
Using ACID-compliant, transactional tables causes no performance or operational overload. Bucketing is notnecessary.
If you are a Spark user, switching to legacy behavior is unnecessary. Calling ‘create table’ from SparkSQL, forexample, creates an external table after upgrading to CDP as it did before the upgrade.
Configure legacy CREATE TABLE behavior
When you configure legacy behavior, CREATE TABLE creates an external table in your specified warehouse,which is /warehouse/tablespace/external/hive by default. To configure legacy behavior atthe session level, you can pass a property to HiveServer (HS2) in the Beeline connection string when you launchHive. Alternatively, you can pass the property on the Hive command line to switch to the old behavior. You canalso configure legacy create table behavior at the site level by configuring properties in Cloudera Manager. Whenconfigured at the site level, legacy behavior persists from session to session.
Session-level configuration
About this taskStep 1 describes two ways of configuring legacy CREATE TABLE behavior. You can override the configured legacybehavior as described in step 2 to create a managed table.
Procedure
1. Choose one of the following ways to configure legacy CREATE TABLE behavior:
• To configure legacy behavior in any JDBC client, include hiveCreateAsExternalLegacy=true in theconnection string. For example, in Beeline, include the connection string to launch Hive:
beeline -u jdbc:hive2://10.65.13.98:10000/default;hiveCreateAsExternalLegacy=true \-n <your user name> -p
• To configure legacy behavior within an existing beeline session, set hive.create.as.external.legacy=true. For example:
hive> SET hive.create.as.external.legacy=true;
You can purge the table from the file system and metastore. You can change the DROP behavior, to removemetadata only.
239

CDP Private Cloud Base CDH 6 to CDP Private Cloud Base post-upgrade transition steps
2. Override the configured legacy behavior at the session level (only) to create a managed table by using theMANAGED keyword.
CREATE MANAGED TABLE test (id INT);
When your session ends, the create legacy behavior also ends. If you issue a CREATE TABLE statement, Hivecreates either an insert-only or full ACID table, depending on how you set the following table properties:
• hive.create.as.insert.only• hive.create.as.acid
Site-level configuration
About this taskWhen you configure legacy create table behavior at the site level, the legacy behavior persists from session to session.You configure this behavior at the site level using Cloudera Manager as follows:
Procedure
1. In Cloudera Manager > Clusters > Hive On Tez, search for hive.create.
2. Configure properties in one of the following ways:
• If Create Tables as ACID Insert Only and Create Tables as Full ACID properties appear and are checked,uncheck the properties.
• If your version of Cloudera Manager does not expose these properties, in the HiveServer2 AdvancedConfiguration Snippet Safety Value for hive-site.xml, add the properties and values.
<property> <name>hive.create.as.insert.only</name> <value>false</value></property><property> <name>hive.create.as.acid</name> <value>false</value></property>
Handling the Keyword APPLICATIONIf you use the keyword APPLICATION in your queries, you might need to modify the queries to prevent failure.
240

CDP Private Cloud Base CDH 6 to CDP Private Cloud Base post-upgrade transition steps
To prevent a query that uses a keyword from failing, enclose the query in backticks.
Before Upgrade to CDP
In CDH releases, such as CDH 5.13, queries that use the word APPLICATION in queries execute successfully. Forexample, you could use this word as a table name.
> select f1, f2 from application
After Upgrade to CDP
A query that uses the keyword APPLICATION fails.
Action Required
Change applications. Enclose queries in backticks. SELECT field1, field2 FROM `application`;
Handling output of greatest and least functionsTo calculate the greatest (or least) value in a column, you need to work around a problem that occurs when thecolumn has a NULL value.
Before Upgrade to CDP
The greatest function returned the highest value of the list of values. The least function returned the lowest value ofthe list of values.
After Upgrade to CDP
Returns NULL when one or more arguments are NULL.
Action Required
Use NULL filters or the nvl function on the columns you use as arguments to the greatest or least functions.
SELECT greatest(nvl(col1,default value incase of NULL),nvl(col2,default value incase of NULL));
TRUNCATE TABLE on an external tableHive 3 does not support TRUNCATE TABLE on external tables. Truncating an external table results in an error. Youcan truncate an external table if you change your applications to set a table property to purge data.
Before Upgrade to CDP
Some legacy versions of Hive supported TRUNCATE TABLE on external tables.
After Upgrade to CDP Private Cloud Base
By default, TRUNCATE TABLE is supported only on managed tables. Attempting to truncate an external tableresults in the following error:
Error: org.apache.spark.sql.AnalysisException: Operation not allowed: TRUNCATE TABLE on external tables
Action Required
Change applications. Do not attempt to run TRUNCATE TABLE on an external table.
Alternatively, change applications to alter a table property to set external.table.purge to true to allow truncation of anexternal table:
ALTER TABLE mytable SET TBLPROPERTIES ('external.table.purge'='true');
241

CDP Private Cloud Base CDH 6 to CDP Private Cloud Base post-upgrade transition steps
Unsupported Interfaces and FeaturesYou need to know the interfaces available in HDP or CDH platforms that are no longer supported in CDP. Somefeatures you might have used are also unsupported.
Unsupported Interfaces
• Druid• Hcat CLI• Hive CLI (replaced by Beeline)• Hive View UI feature in Ambari• LLAP• MapReduce execution engine (replaced by Tez)• Pig• S3 for storing tables (available in CDP Public Cloud only)• Spark execution engine (replaced by Tez)• Spark thrift server
Spark and Hive tables interoperate using the Hive Warehouse Connector.• SQL Standard Authorization• Tez View UI feature in Ambari• WebHCat
You can use Hue in lieu of Hive View.
Storage Based Authorization
Storage Based Authorization (SBA) is not longer supported in CDP. Ranger integration with Hive metastore providesconsistency in Ranger authorization enabled in HiveServer (HS2). SBA did not provide authorization support formetadata that does not have a file/directory associated with it. Ranger-based authorization has no such limitation.
Unsupported Features
CDP does not support the following features that were available in HDP and CDH platforms:
• CREATE TABLE that specifies a managed table location
Do not use the LOCATION clause to create a managed table. Hive assigns a default location in the warehouse tomanaged tables. That default location is configured in Hive using the hive.metastore.warehouse.dir configurationproperty, but can be overridden for the database by setting the CREATE DATABASE MANAGEDLOCATIONparameter.
• CREATE INDEX and related index commands were removed in Hive 3, and consequently are not supported inCDP.
In CDP, you use the Hive 3 default ORC columnar file formats to achieve the performance benefits of indexing.Materialized Views with automatic query rewriting also improves performance. Indexes migrated to CDP arepreserved but render any Hive tables with an undroppable index. To drop the index, google the Known Issue forCDPD-23041.
• Hive metastore (HMS) high availablility (HA) load balancing in CDH
You need to set up HMS HA as described in the documentation.
Unsupported Connector Use
CDP does not support the Sqoop exports using the Hadoop jar command (the Java API) that Teradata documents.For more information, see Migrating data using Sqoop.
Related InformationConfiguring HMS for high availability
242

CDP Private Cloud Base CDH 6 to CDP Private Cloud Base post-upgrade transition steps
Hive Warehouse Connector for accessing Apache Spark data
Spark Direct Reader for accessing Spark data
Changes to CDH Hive TablesAs a Data Scientist, Architect, Analyst, or other Hive user you need to locate and use your Apache Hive 3 tables afteran upgrade. You also need to understand the changes that occur during the upgrade process. The location of existingtables after a CDH to CDP upgrade does not change. Upgrading CDH to CDP Private Cloud Base converts Hivemanaged tables to external tables in Hive 3.
About this task
When the upgrade process converts a managed table to external, it sets the table property external.table.purge to true. The table is equivalent to a managed table having purge set to true in your old CDH cluster.
Managed tables on the HDFS in /user/hive/warehouse before the upgrade remain there after the conversionto external. Tables that were external before the upgrade are not relocated. You need to set HDFS policies to accessexternal tables in Ranger, or set up HDFS ACLs.
The upgrade process sets the hive.metastore.warehouse.dir property to /warehouse/tablespace/managed/hive, designating it the Hive warehouse location for managed tables. New managed tables that youcreate in CDP are stored in the Hive warehouse. New external tables are stored in the Hive external warehouse /warehouse/tablespace/external/hive.
To change the location of the Hive warehouses, you navigate to one of the following menu items in the first stepbelow.
• Hive > Action Menu > Create Hive Warehouse Directory• Hive > Action Menu > Create Hive Warehouse External Directory
Procedure
1. Set up directories for the Hive warehouse directory and Hive warehouse external directory from ClouderaManager Actions.
2. In Cloudera Manager, click Clusters > Hive (the Hive Metastore service) > Configuration, and change thehive.metastore.warehouse.dir property value to the path you specified for the new Hive warehouse directory.
3. Change the hive.metastore.warehouse.external.dir property value to the path you specified for the Hive warehouseexternal directory.
4. Configure Ranger policies or set up ACL permissions to access the directories.
243

CDP Private Cloud Base CDH 6 to CDP Private Cloud Base post-upgrade transition steps
Related InformationHDFS ACLS
Set ACLs for Impala
Apache Hive Post-Upgrade TasksA successful upgrade requires performing a number of procedures that you can follow using step-by-step instructions.Important configuration tasks set up security on your cluster. You learn about semantic changes that might affectyour applications, and see how to find your tables or move them. You find out about the Hive Warehouse Connector(HWC) to access files from Spark.
Customizing critical Hive configurationsAs Administrator, you need property configuration guidelines. You need to know which properties you need toreconfigure after upgrading. You must understand which the upgrade process carries over from the old cluster to thenew cluster.
The CDP upgrade process tries to preserve your Hive configuration property overrides. These overrides are thecustom values you set to configure Hive in the old CDH or HDP cluster. The upgrade process does not perserve alloverrides. For example, a custom value you set for hive.exec.max.dynamic.partitions.pernode ispreserved. In the case of other properties, for example hive.cbo.enable, the upgrade ignores any override andjust sets the CDP-recommended value.
The upgrade process does not preserve overrides to the configuration values of the following properties that youlikely need to reconfigure to meet your needs:
• hive.conf.hidden.list
• hive.conf.restricted.list
• hive.exec.post.hooks
• hive.script.operator.env.blacklist
• hive.security.authorization.sqlstd.confwhitelist
• hive.security.command.whitelist
The Apache Hive Wiki describes these properties. The values of these properties are lists.
The upgrade process ignores your old list and sets a new generic list. For example, the hive.security.command.whitelist value is a list of security commands you consider trustworthy and want to keep. Any overrides ofthis list that you set in the old cluster are not preserved. The new default is probably a shorter (more restrictive) listthan the original default you were using in the old cluster. You need to customize this CDP to meet your needs.
Check and change each property listed above after upgrading as described in the next topic.
Consider reconfiguring more property values than the six listed above. Even if you did not override the default valuein the old cluster, the CDP default might have changed in a way that impacts your work.
Related InformationHive Configuration Property Changes
Apache Hive Wiki: Configuration Properties
Hive Configuration Requirements and Recommendations
Setting Hive Configuration OverridesYou need to know how to configure the critical customizations that the upgrade process does not preserve from yourold Hive cluster. Referring to your records about your old configuration, you follow steps to set at least six criticalproperty values.
244

CDP Private Cloud Base CDH 6 to CDP Private Cloud Base post-upgrade transition steps
About this taskBy design, the six critical properties that you need to customize are not visible in Cloudera Manager, as you can seefrom the Visible in CM column of Configurations Requirements and Recommendations. You use the Safety Valve toadd these properties to hive-site.xml as shown in this task.
Procedure
1. In Cloudera Manager > Clusters select the Hive on Tez service. Click Configuration, and search for hive-site.xml.
2. In Hive Service Advanced Configuration Snippet (Safety Valve) for hive-site.xml, click +.
3. In Name, add the hive.conf.hidden.list property.
4. In Value, add your custom list.
5. Customize the other critical properties: hive.conf.restricted.list, hive.exec.post.hooks,hive.script.operator.env.blacklist, hive.security.authorization.sqlstd.confwhitelist, hive.security.command.whitelist.
Use hive.security.authorization.sqlstd.confwhitelist.append, for example, to set up the list.
6. Save the changes and restart the Hive service.
7. Look at the Configurations Requirements and Recommendations to understand which overrides were preserved ornot.
Related InformationHive Configuration Requirements and Recommendations
Hive Configuration Requirements and RecommendationsYou need to set certain Hive and HiveServer (HS2) configuration properties after upgrading. You reviewrecommendations for setting up CDP Private Cloud Base for your needs, and understand which configurations remainunchanged after upgrading, which impact performance, and default values.
Requirements and Recommendations
The following table includes the Hive service and HiveServer properties that the upgrade process changes. Otherproperty values (not shown) are carried over unchanged from CDH or HDP to CDP
• Set After Upgrade column: properties you need to manually configure after the upgrade to CDP. Pre-existingcustomized values are not preserved after the upgrade.
• Default Recommended column: properties that the upgrade process changes to a new value that you are stronglyadvised to use.
• Impacts Performance column: properties changed by the upgrade process that you set to tune performance.
245
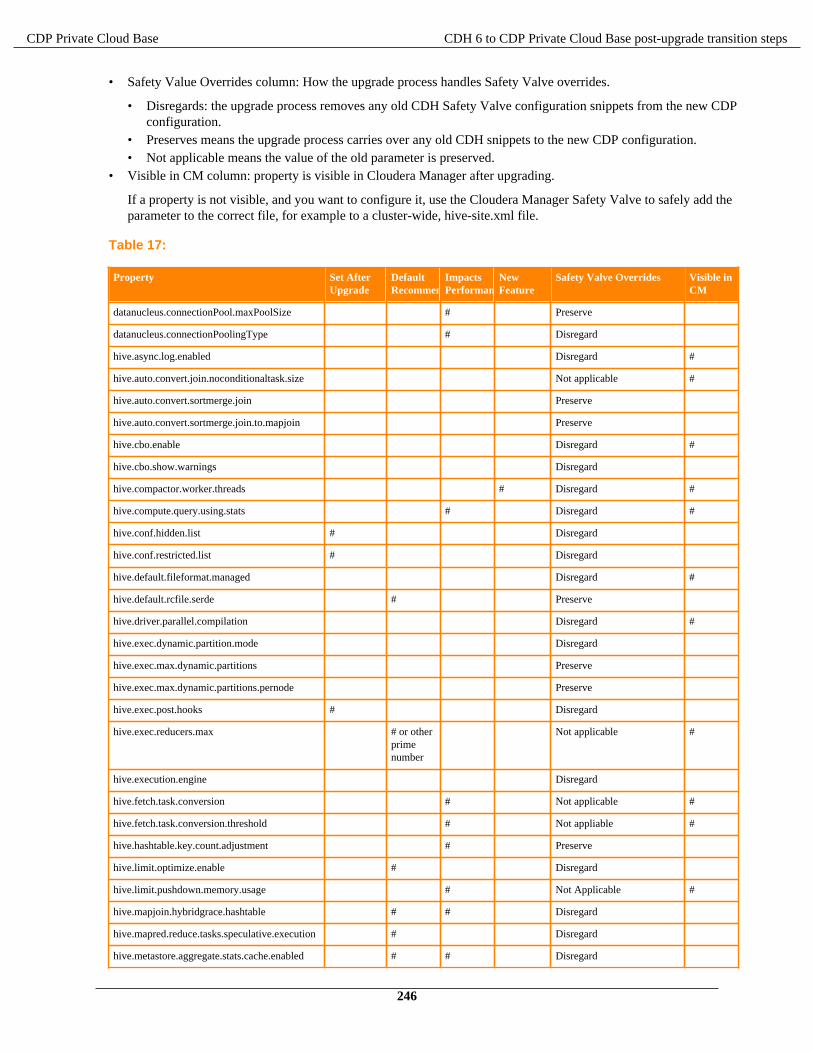
CDP Private Cloud Base CDH 6 to CDP Private Cloud Base post-upgrade transition steps
• Safety Value Overrides column: How the upgrade process handles Safety Valve overrides.
• Disregards: the upgrade process removes any old CDH Safety Valve configuration snippets from the new CDPconfiguration.
• Preserves means the upgrade process carries over any old CDH snippets to the new CDP configuration.• Not applicable means the value of the old parameter is preserved.
• Visible in CM column: property is visible in Cloudera Manager after upgrading.
If a property is not visible, and you want to configure it, use the Cloudera Manager Safety Valve to safely add theparameter to the correct file, for example to a cluster-wide, hive-site.xml file.
Table 17:
Property Set AfterUpgrade
DefaultRecommended
ImpactsPerformance
NewFeature
Safety Valve Overrides Visible inCM
datanucleus.connectionPool.maxPoolSize # Preserve
datanucleus.connectionPoolingType # Disregard
hive.async.log.enabled Disregard #
hive.auto.convert.join.noconditionaltask.size Not applicable #
hive.auto.convert.sortmerge.join Preserve
hive.auto.convert.sortmerge.join.to.mapjoin Preserve
hive.cbo.enable Disregard #
hive.cbo.show.warnings Disregard
hive.compactor.worker.threads # Disregard #
hive.compute.query.using.stats # Disregard #
hive.conf.hidden.list # Disregard
hive.conf.restricted.list # Disregard
hive.default.fileformat.managed Disregard #
hive.default.rcfile.serde # Preserve
hive.driver.parallel.compilation Disregard #
hive.exec.dynamic.partition.mode Disregard
hive.exec.max.dynamic.partitions Preserve
hive.exec.max.dynamic.partitions.pernode Preserve
hive.exec.post.hooks # Disregard
hive.exec.reducers.max # or otherprimenumber
Not applicable #
hive.execution.engine Disregard
hive.fetch.task.conversion # Not applicable #
hive.fetch.task.conversion.threshold # Not appliable #
hive.hashtable.key.count.adjustment # Preserve
hive.limit.optimize.enable # Disregard
hive.limit.pushdown.memory.usage # Not Applicable #
hive.mapjoin.hybridgrace.hashtable # # Disregard
hive.mapred.reduce.tasks.speculative.execution # Disregard
hive.metastore.aggregate.stats.cache.enabled # # Disregard
246

CDP Private Cloud Base CDH 6 to CDP Private Cloud Base post-upgrade transition steps
Property Set AfterUpgrade
DefaultRecommended
ImpactsPerformance
NewFeature
Safety Valve Overrides Visible inCM
hive.metastore.disallow.incompatible.col.type.changes Disregard
hive.metastore.dml.events Disregard #
hive.metastore.event.message.factory # Disregard
hive.metastore.uri.selection # Disregard
hive.metastore.warehouse.dir Preserve #
hive.optimize.metadataonly # Disregard
hive.optimize.point.lookup.min Disregard
hive.prewarm.numcontainers Disregard
hive.script.operator.env.blacklist # Disregard
hive.security.authorization.sqlstd.confwhitelist # Disregard
hive.security.command.whitelist # Disregard
hive.server2.enable.doAs Disregard #
hive.server2.idle.session.timeout Not applicable #
hive.server2.max.start.attempts Preserve
hive.server2.parallel.ops.in.session Preserve
hive.server2.support.dynamic.service.discovery # Disregard #
hive.server2.tez.initialize.default.sessions # Disregard
hive.server2.thrift.max.worker.threads Not Applicable #
hive.server2.thrift.resultset.max.fetch.size Preserve
hive.service.metrics.file.location Disregard #
hive.stats.column.autogather # Disregard
hive.stats.deserialization.factor # Disregard
hive.support.special.characters.tablename # Disregard
hive.tez.auto.reducer.parallelism # Disregard #
hive.tez.bucket.pruning # Disregard #
hive.tez.container.size # Disregard #
hive.tez.exec.print.summary # Disregard #
hive.txn.manager # Disregard #
hive.vectorized.execution.mapjoin.minmax.enabled # Disregard
hive.vectorized.execution.mapjoin.native.fast.hashtable.enabled # Disregard
hive.vectorized.use.row.serde.deserialize # Disregard
Related InformationCustom Configuration (about Cloudera Manager Safety Valve)
Customizing critical Hive configurations
Setting Hive Configuration Overrides
Fixing the canary test after upgradingAfter upgrading from CDH 6 to CDP, you need to make a change to a table by querying the Hive metastore backenddatabase to run the Hive canary test.
247

CDP Private Cloud Base CDH 6 to CDP Private Cloud Base post-upgrade transition steps
About this taskThe Hive canary test for Hive-on-Tez fails unless you make the changes described in the following procedure. Whenyou run the test, you get the following error:
org.apache.hadoop.hive.metastore.RetryingHMSHandler: [pool-6-thread-69]: HMSHandler Fatal error: javax.jdo.JDODataStoreException: Exception thrown flushing changes to datastore at org.datanucleus.api.jdo.NucleusJDOHelper.getJDOExceptionForNucleusException(NucleusJDOHelper.java:543)NestedThrowablesStackTrace:java.sql.BatchUpdateException: Unknown column 'MESSAGE_FORMAT' in 'field list'
Procedure
1. Backup the Hive metastore database.
2. Log into the Hive metastore database.
3. Use the metastore database.
USE metastore;
4. Add a MESSAGE_FORMAT column and modify the data type of MESSAGE in the NOTIFICATION_LOGtable.
ALTER TABLE `NOTIFICATION_LOG` ADD `MESSAGE_FORMAT` varchar(16);
ALTER TABLE `NOTIFICATION_LOG` MODIFY `MESSAGE` longtext;
Configuring HiveServer for ETL using YARN queuesYou need to set several configuration properties to allow placement of the Hive workload on the Yarn queuemanager, which is common for running an ETL job. You need to set several parameters that effectively disable thereuse of containers. Each new query gets new containers routed to the appropriate queue.
About this taskHive configuration properties affect mapping users and groups to YARN queues. You set these properties to use withYARN Placement Rules.
To set Hive properties for YARN queues:
Procedure
1. In Cloudera Manager, click Clusters > Hive-on-Tez > Configuration.
2. Search for the Hive Service Advanced Configuration Snippet (Safety Valve) for hive-site.xml setting.
3. In the Hive Service Advanced Configuration Snippet (Safety Valve) for hive-site.xml setting, click +.
4. In Name enter the property hive.server2.tez.initialize.default.sessions and in value enterfalse.
5. In Name enter the property hive.server2.tez.queue.access.check and in value enter true.
6. In Name enter the property hive.server2.tez.sessions.custom.queue.allowed and in valueenter true.
Removing Hive on Spark ConfigurationsYour scripts, or queries, include the Hive on Spark configuration, which is no longer supported, and you must knowhow to recognize and remove these configurations.
248

CDP Private Cloud Base CDH 6 to CDP Private Cloud Base post-upgrade transition steps
In CDP, there is no Hive-Spark dependency. The Spark site and libs are not in the classpath. This execution enginehas been replaced by Apache Tez.
Before Upgrade to CDP
CDH supported Hive on Spark and the following configuration to enable Hive on Spark: set hive.execution.engine=spark
After Upgrade to CDP
CDP does not support Hive on Spark. Scripts that enable Hive on Spark do not work.
Action Required
Remove set hive.execution.engine=spark from your scripts.
Configuring authorization to tablesAlthough the upgrade process makes no change to the location of external tables, you need to set up access to externaltables in HDFS. If you choose the recommended Ranger security model for authorization, you need to set up policiesand configure Hive metastore (HMS).
About this task
Set up access to external tables in HDFS using one of the following methods.
• Set up a Hive HDFS policy in Ranger (recommended) to include the paths to external table data.• Put an HDFS ACL in place. Store the external text file, for example a comma-separated values (CSV) file, in
HDFS that will serve as the data source for the external table.
If you want to use Ranger to authorize access to your tables, you must configure a few HMS properties forauthorization in addition to setting up Ranger policies. If you have not configured HMS, attempting to create a tableusing Spark SQL, Beeline, or Hue results in the following error:
org.apache.hadoop.hive.ql.ddl.DDLTask. MetaException(message:No privilege 'Create' found for outputs { database:DATABASE_NAME, table:TABLE_NAME})
Related InformationHDFS ACLS
Authorizing Apache Hive Access
Configuring HMS properties for authorization
Making the Hive plugin for Ranger visibleAfter upgrading from HDP or CDH clusters to CDP, the Hive plugin for the Hive metastore and HiveServer appearsin the Ranger Admin UI unless configuration property problems due to upgrading exist. You can remove the incorrectproperties to fix the problem.
About this taskIf the Hive plugin does not appear in the Ranger Admin UI, you need to remove the following property settings fromhive-site.xml using the Safety Valve:
• hive.security.authorization.enabled
• hive.security.authorization.manager
• hive.security.metastore.authorization.manager
You also need to set properties for HMS API-Ranger integration.
249

CDP Private Cloud Base CDH 6 to CDP Private Cloud Base post-upgrade transition steps
Procedure
1. Check to see if the Hive plugin is visible by clicking Clusters > Ranger > Ranger Admin Web UI > Audit >Plugin Status.
The Hadoop SQL service type for the hiveMetastore and hiveServer2 applications should appear. If so, skip thenext step. Your configuration is ok.
2. Using the Cloudera Manager Safety Valve, set the following properties and values for HMS API-Rangerintegration:
• hive.metastore.pre.event.listeners
Value: org.apache.hadoop.hive.ql.security.authorization.plugin.metastore.HiveMetaStoreAuthorizer
• hive.security.authenticator.manager
Value: org.apache.hadoop.hive.ql.security.SessionStateUserAuthenticator
3. If the Hadoop SQL service type and corresponding applications for Hive and Hive Metastore do not appear,remove the properties listed above from hive-site.xml for Hive and Hive on Tez services.For example, in Cloudera Manager, click Clusters > Hive > Configurations, and search for each property.Remove the property name and value from the Safety Valve for hive-site.xml.
Setting up access control listsSeveral sources of information about setting up HDFS ACLS plus a brief Ranger overview and pointer to Rangerinformation prepare you to set up Hive authorization.
In CDP Private Cloud Base, HDFS supports POSIX ACLs (Access Control Lists) to assign permissions to usersand groups. In lieu of Ranger policies, you use HDFS ACLs to check and make any necessary changes in HDFSpermission changes. For more information, see HDFS ACLs, Apache Software Foundation HDFS Permissions Guide,and HDFS ACL Permissions.
In Ranger, you give multiple groups and users specific permissions based on your use case. You apply permissions toa directory tree instead of dealing with individual files. For more information, see Authorizing Apache Hive Access.
If possible, you should use Ranger policies over HDFS ACLs to control HDFS access. Controlling HDFS accessthrough Ranger provides a single, unified interface for understanding and managing your overall governanceframework and policy design. If you need to mimic the legacy Sentry HDFS ACL Sync behavior for Hive and Impalatables, consider using Ranger RMS.
250

CDP Private Cloud Base CDH 6 to CDP Private Cloud Base post-upgrade transition steps
Related InformationHDFS ACLS
Apache Hive 3 Architectural Overview
Configure a Resource-based Policy: Hive
Configure encryption zone securityUnder certain conditions, you as Administrator, need to perform a security-related task to allow users to access totables stored in encryption zones. You find out how to prevent access problems to these tables.
About this taskHive on Tez cannot run some queries on tables stored in encryption zones under certain conditions. When the HadoopKey Management Server (KMS) connection is SSL-encrypted, perform the following procedure.
Procedure
1. Perform either of the following actions:
• Install self-signed SSL certificate into the cacerts file on all hosts and skip the steps below.• Recommended: Perform the steps below.
2. Copy the ssl-client.xml to a directory that is available on all hosts.
3. In Cloudera Manager, click Clusters > Hive on Tez > Configuration. Clusters > Hive on Tez > Configuration.
4. Search for the Hive Service Advanced Configuration Snippet (Safety Valve) for hive-site.xml setting.
5. In the Hive Service Advanced Configuration Snippet (Safety Valve) for hive-site.xml setting, click +.
6. InName enter the property tez.aux.uris and in value enter path-to-ssl-client.xml.
Configure edge nodes as gatewaysIf you use command-line clients, such as Sqoop, to access Hive, you must configure these gateways to use defaultsfor your service. You can accomplish this task in a few steps.
About this taskBy default, the HS2 instances configured in the migration already have the default beeline-site.xml file defined for theservice. Other hosts do not. Configure these hosts as a gateway for that service.
Procedure
1. Find the notes you made before the upgrade about edge nodes and default, connected endpoints.
2. In Cloudera Manager, configure hosts other than HiveServer (HS2) hosts that you want to be Hive Gateway nodesas gateways for the default beeline-site.xml file for the gateway service.
Related InformationCapture Information about Multiple HiveServers
Adding a Service
Managing Roles
Adding a Host to a Cluster
Use HWC/Spark Direct Reader for Spark Apps/ETLYou need to know a little about Hive Warehouse Connector (HWC) and how to find more information because toaccess Hive from Spark, you need to use HWC implicitly or explicitly.
HWC is a Spark library/plugin that is launched with the Spark app. Use the Spark Direct Reader and HWC for ETL.
The Hive Warehouse Connector is designed to access managed ACID v2 Hive tables from Spark. Apache Ranger andthe HiveWarehouseConnector library provide row and column, fine-grained access to the data. HWC supports spark-submit and pyspark. The spark thrift server is not supported.
251

CDP Private Cloud Base CDH 6 to CDP Private Cloud Base post-upgrade transition steps
Related InformationHive Warehouse Connector for accessing Apache Spark data
Spark Direct Reader for accessing Spark data
Configure HiveServer HTTP modeIf you use Knox, you might need to change the HTTP mode configuration. If you installed Knox on CDP PrivateCloud Base and want to proxy HiveServer with Knox, you need to change the default HiveServer transport mode(hive.server2.transport.mode).
Procedure
1. Click Cloudera Manager > Clusters > HIVE_ON_TEZ > Configuration
2. In Search, type transport.
3. In HiveServer2 Transport Mode, select http.
4. Save and restart Hive on Tez.
Configuring HMS for high availabilityTo provide failover to a secondary Hive metastore if your primary instance goes down, you need to know how to adda Metastore role in Cloudera Manager and configure a property.
About this taskMultiple HMS instances run in active/active mode. No load balancing occurs. An HMS client always reaches the firstinstance unless it is down. In this case, the client scans the hive.metastore.uris property that lists the HMSinstances for a replacement HMS. The second HMS is the designated replacement if hive.metastore.uri.selection is set to SEQUENTIAL (recommended and the default); otherwise, the replacement is selected randomlyfrom the list if hive.metastore.uri.selection is set to RANDOM.
Before you beginMinimum Required Role: Configurator (also provided by Cluster Administrator, Full Administrator)
Procedure
1. In Cloudera Manager, click Clusters > Hive > Configuration.
252
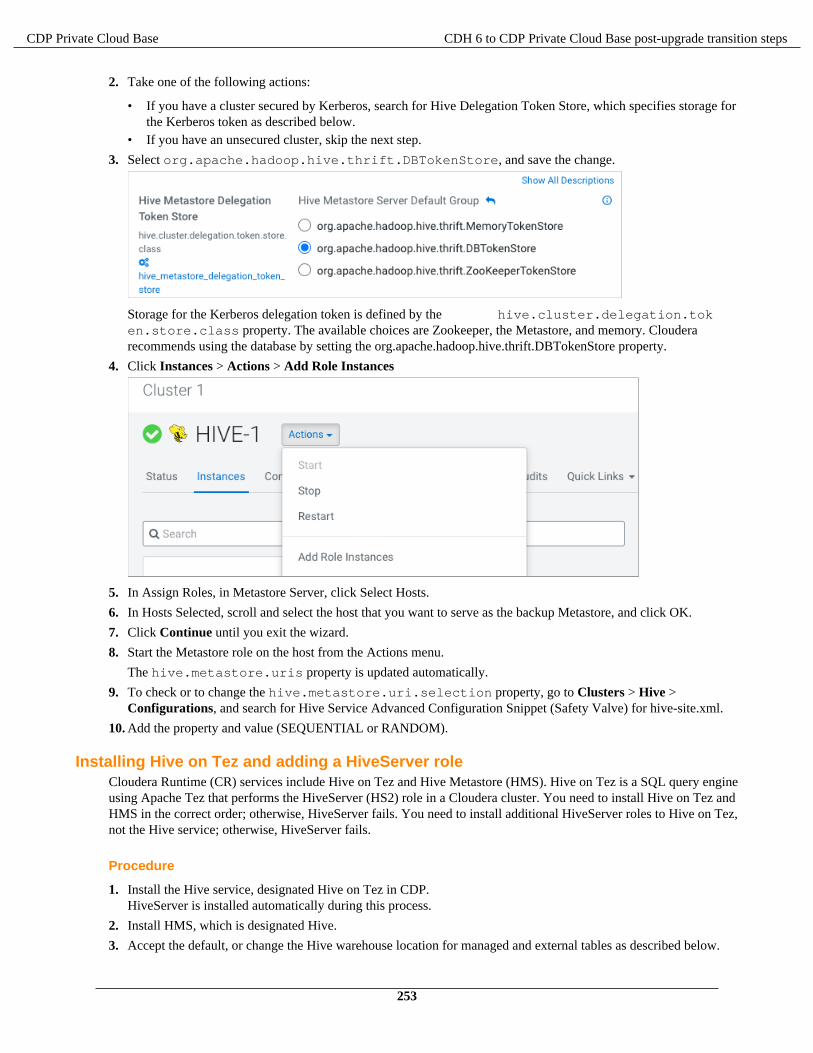
CDP Private Cloud Base CDH 6 to CDP Private Cloud Base post-upgrade transition steps
2. Take one of the following actions:
• If you have a cluster secured by Kerberos, search for Hive Delegation Token Store, which specifies storage forthe Kerberos token as described below.
• If you have an unsecured cluster, skip the next step.
3. Select org.apache.hadoop.hive.thrift.DBTokenStore, and save the change.
Storage for the Kerberos delegation token is defined by the hive.cluster.delegation.token.store.class property. The available choices are Zookeeper, the Metastore, and memory. Clouderarecommends using the database by setting the org.apache.hadoop.hive.thrift.DBTokenStore property.
4. Click Instances > Actions > Add Role Instances
5. In Assign Roles, in Metastore Server, click Select Hosts.
6. In Hosts Selected, scroll and select the host that you want to serve as the backup Metastore, and click OK.
7. Click Continue until you exit the wizard.
8. Start the Metastore role on the host from the Actions menu.
The hive.metastore.uris property is updated automatically.
9. To check or to change the hive.metastore.uri.selection property, go to Clusters > Hive >Configurations, and search for Hive Service Advanced Configuration Snippet (Safety Valve) for hive-site.xml.
10. Add the property and value (SEQUENTIAL or RANDOM).
Installing Hive on Tez and adding a HiveServer roleCloudera Runtime (CR) services include Hive on Tez and Hive Metastore (HMS). Hive on Tez is a SQL query engineusing Apache Tez that performs the HiveServer (HS2) role in a Cloudera cluster. You need to install Hive on Tez andHMS in the correct order; otherwise, HiveServer fails. You need to install additional HiveServer roles to Hive on Tez,not the Hive service; otherwise, HiveServer fails.
Procedure
1. Install the Hive service, designated Hive on Tez in CDP.HiveServer is installed automatically during this process.
2. Install HMS, which is designated Hive.
3. Accept the default, or change the Hive warehouse location for managed and external tables as described below.
253
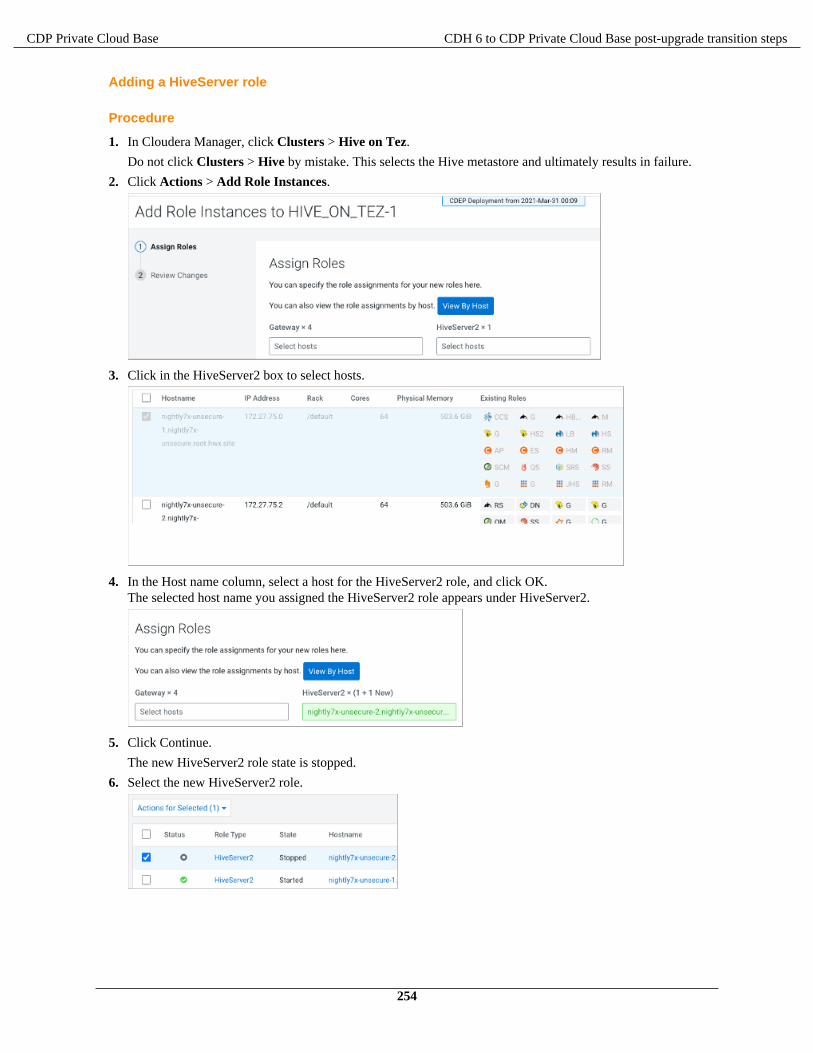
CDP Private Cloud Base CDH 6 to CDP Private Cloud Base post-upgrade transition steps
Adding a HiveServer role
Procedure
1. In Cloudera Manager, click Clusters > Hive on Tez.
Do not click Clusters > Hive by mistake. This selects the Hive metastore and ultimately results in failure.
2. Click Actions > Add Role Instances.
3. Click in the HiveServer2 box to select hosts.
4. In the Host name column, select a host for the HiveServer2 role, and click OK.The selected host name you assigned the HiveServer2 role appears under HiveServer2.
5. Click Continue.
The new HiveServer2 role state is stopped.
6. Select the new HiveServer2 role.
254

CDP Private Cloud Base CDH 6 to CDP Private Cloud Base post-upgrade transition steps
7. In Actions for Selected, select Start, and then click Start to confirm.You see that the service successfully started.
Changing the Hive warehouse location
About this taskYou use the Hive Metastore Action menu in Cloudera Manager, and navigate to one of the following menu items inthe first step below.
• Hive > Action Menu > Create Hive Warehouse Directory• Hive > Action Menu > Create Hive Warehouse External Directory
Procedure
1. Set up directories for the Hive warehouse directory and Hive warehouse external directory from ClouderaManager Actions.
2. In Cloudera Manager, click Clusters > Hive (the Hive Metastore service) > Configuration, and change thehive.metastore.warehouse.dir property value to the path you specified for the new Hive warehouse directory.
3. Change the hive.metastore.warehouse.external.dir property value to the path you specified for the Hive warehouseexternal directory.
4. Configure Ranger policies or set up ACL permissions to access the directories.
Updating Hive and Impala JDBC/ODBC driversAfter upgrading, Cloudera recommends that you update your Hive and Impala JDBC and ODBC drivers. You followa procedure to download a driver.
255
CDP Private Cloud Base CDH 6 to CDP Private Cloud Base post-upgrade transition steps
Before you begin
Configure authenticated users for running SQL queries through a JDBC or ODBC driver. For example, set up aRanger policy.
Getting the JDBC driverYou learn how to download the Cloudera Hive and Impala JDBC drivers to give clients outside the cluster access toyour SQL engines.
Procedure
1. Download the lastest Hive JDBC driver for CDP from the Hive JDBC driver download page.
2. Go to the Impala JDBC driver page, and download the latest Impala JDBC driver.
3. Follow JDBC driver installation instructions on the download page.
Getting the ODBC driverYou learn how to download the Cloudera ODBC drivers for Hive and Impala.
Procedure
1. Download the latest Hive ODBC driver for CDP from the Cloudera ODBC driver download page.
2. Go to the Impala ODBC driver page, and download the latest Impala ODBC driver.
3. Follow ODBC driver installation instructions on the download page.
Apache Impala changes in CDPYou need to understand changes that affect Impala after you upgrade from CDH 5.13-5.16 or CDH 6.1 or later toCDP Private Cloud Base. The version of Impala you used in CDH 5.11 - 5.16 or 6.1 or later changes to Impala 3.4when you upgrade to CDP Private Cloud Base.
Table Changes
Upgrading CDH to CDP Private Cloud Base converts Impala managed tables to external tables.
Location of Tables
If Impala managed tables were located on the HDFS in /user/hive/warehouse before the upgrade, the tables,converted to external, remain there. The upgrade process sets the hive.metastore.warehouse.dir propertyto this location, designating it the Hive warehouse location.
Changes to Impala Syntax or Service
• If you upgrade from 5.11-5.16 to CDP Private Cloud Base, the following changes described in detail below, arerelevant:
• Decimal V2 Default• Behavior of Column Aliases• Default PARQUET_ARRAY_RESOLUTION• Enable Clustering Hint for Inserts• Deprecated Query Options Removed• refresh_after_connect Impala Shell Option Removed• Return Type Changed for EXTRACT and DATE_PART Functions
• If you upgrade from CDH 5.15 or 5.14, the ##compact_catalog_topicimpalad flag default valuechanged to true.
256

CDP Private Cloud Base CDH 6 to CDP Private Cloud Base post-upgrade transition steps
• If you upgrade from 6.1-6.3 to CDP Private Cloud Base, the following changes, described in detail below, arerelevant:
• Port Change for SHUTDOWN Command• Change in Client Connection Timeout
• After upgrading from any CDH 5.x version to CDP Private Cloud Base 7.1, recompute the statistics for Impala.Even though CDH 5.x statistics will be available after the upgrade, the queries will not benefit from the newfeatures until the statistics are recomputed.
• Impala supports a number of file formats used in Apache Hadoop. It can also load and query data files producedby other Hadoop components such as hive. After upgrading from any CDH 5.x version to CDP Private CloudBase 7.1, if you create a RC file in Hive using the default LazyBinaryColumnarSerDe, Impala will not beable to read the RC file. However you can set the configuration option of hive.default.rcfile.serde toColumnarSerDe to maintain the interoperability between hive and impala.
• After upgrading from CDH to CDP, the on-demand use_local_catalog mode is set to True by default onall the Impala coordinators so that the Impala coordinators pull metadata as needed from catalogd and cache itlocally. This reduces memory footprint on coordinators and automate the cache eviction.
• In CDP, the catalog_topic_mode is set to minimal by default to enable on demand metadata for allcoordinators.
Decimal V2 Default
In CDP, Impala uses DECIMAL V2 by default.
If you need to continue using the first version of the DECIMAL type for the backward compatibility of your queries,set the DECIMAL_V2 query option to FALSE:
SET DECIMAL_V2=FALSE;
Column Aliases Substitution
To conform to the SQL standard, Impala no longer performs alias substitution in the subexpressions of GROUP BY,HAVING, and ORDER BY.
The example below references to the actual column sum(ss_quantity) in the ORDER BY clause instead of thealias Total_Quantity_Purchased and also references to the actual column ss_item_sk in the GROUP BYclause instead of the alias Item since aliases are no longer supported in the subexpressions.
selectss_item_sk as Item,count(ss_item_sk) as Times_Purchased,sum(ss_quantity) as Total_Quantity_Purchasedfrom store_salesgroup by ss_item_skorder by sum(ss_quantity) desclimit 5;+-------+-----------------+--------------------------+| item | times_purchased | total_quantity_purchased |+-------+-----------------+--------------------------+| 9325 | 372 | 19072 || 4279 | 357 | 18501 || 7507 | 371 | 18475 || 5953 | 369 | 18451 || 16753 | 375 | 18446 |+-------+-----------------+--------------------------+
257

CDP Private Cloud Base CDH 6 to CDP Private Cloud Base post-upgrade transition steps
Default PARQUET_ARRAY_RESOLUTION
The default value for the PARQUET_ARRAY_RESOLUTION is THREE_LEVEL to match the Parquet standard 3-level encoding.
Clustered Hint Default
The clustered hint is enabled by default, which adds a local sort by the partitioning columns HDFS and Kudu tablesto a query plan. The noclustered hint, which prevents clustering in tables having ordering columns, is ignored with awarning.
Query Options Removed
The following query options have been removed:
• DEFAULT_ORDER_BY_LIMIT
• ABORT_ON_DEFAULT_LIMIT_EXCEEDED
• V_CPU_CORES
• RESERVATION_REQUEST_TIMEOUT
• RM_INITIAL_MEM
• SCAN_NODE_CODEGEN_THRESHOLD
• MAX_IO_BUFFERS
• RM_INITIAL_MEM
• DISABLE_CACHED_READS
Shell Option refresh_after_connect
The refresh_after_connect option for starting the Impala Shell is removed.
Deprecated Support to LZOCompressed Tables
In CDH, you might have used LZO compression for the text files for more compact data. And Impala supported textfiles that employ LZO compression. But in CDP, we deprecated support to LZO compressed tables since impala-lzo plugin is no longer shipped as part of GPL Extras.
EXTRACT and DATE_PART Functions
The EXTRACT and DATE_PART functions changed in the following way:
• The output type of the EXTRACT and DATE_PART functions was changed to BIGINT.• Extracting the millisecond part from a TIMESTAMP returns the seconds component and the milliseconds
component. For example, EXTRACT (CAST('2006-05-12 18:27:28.123456789' AS TIMESTAMP), 'MILLISECOND') will return 28123.
Port for SHUTDOWN Command
If you upgraded from CDH 6.1 or later and specified a port as part of the SHUTDOWN command, change the portnumber parameter to use the Kudu7: RPC (KRPC) port for communication between the Impala brokers.
Change in Client Connection Timeout
The default behavior of client connection timeout changes after upgrading.
In CDH 6.2 and lower, the client waited indefinitely to open the new session if the maximum number of threadsspecified by --fe_service_threads has been allocated.
After upgrading, the server requires a new startup flag, --accepted_client_cnxn_timeout to controltreatment of new connection requests the configured number of server threads is insufficient for the workload.
258
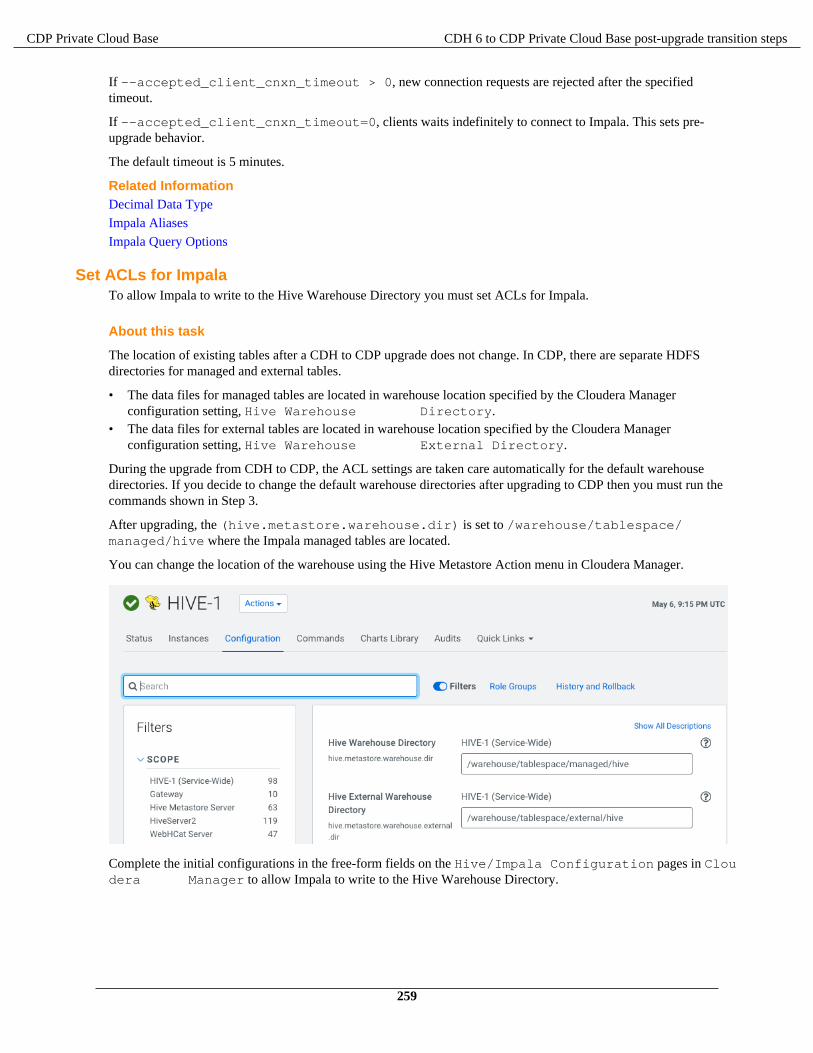
CDP Private Cloud Base CDH 6 to CDP Private Cloud Base post-upgrade transition steps
If --accepted_client_cnxn_timeout > 0, new connection requests are rejected after the specifiedtimeout.
If --accepted_client_cnxn_timeout=0, clients waits indefinitely to connect to Impala. This sets pre-upgrade behavior.
The default timeout is 5 minutes.
Related InformationDecimal Data Type
Impala Aliases
Impala Query Options
Set ACLs for ImpalaTo allow Impala to write to the Hive Warehouse Directory you must set ACLs for Impala.
About this task
The location of existing tables after a CDH to CDP upgrade does not change. In CDP, there are separate HDFSdirectories for managed and external tables.
• The data files for managed tables are located in warehouse location specified by the Cloudera Managerconfiguration setting, Hive Warehouse Directory.
• The data files for external tables are located in warehouse location specified by the Cloudera Managerconfiguration setting, Hive Warehouse External Directory.
During the upgrade from CDH to CDP, the ACL settings are taken care automatically for the default warehousedirectories. If you decide to change the default warehouse directories after upgrading to CDP then you must run thecommands shown in Step 3.
After upgrading, the (hive.metastore.warehouse.dir) is set to /warehouse/tablespace/managed/hive where the Impala managed tables are located.
You can change the location of the warehouse using the Hive Metastore Action menu in Cloudera Manager.
Complete the initial configurations in the free-form fields on the Hive/Impala Configuration pages in Cloudera Manager to allow Impala to write to the Hive Warehouse Directory.
259
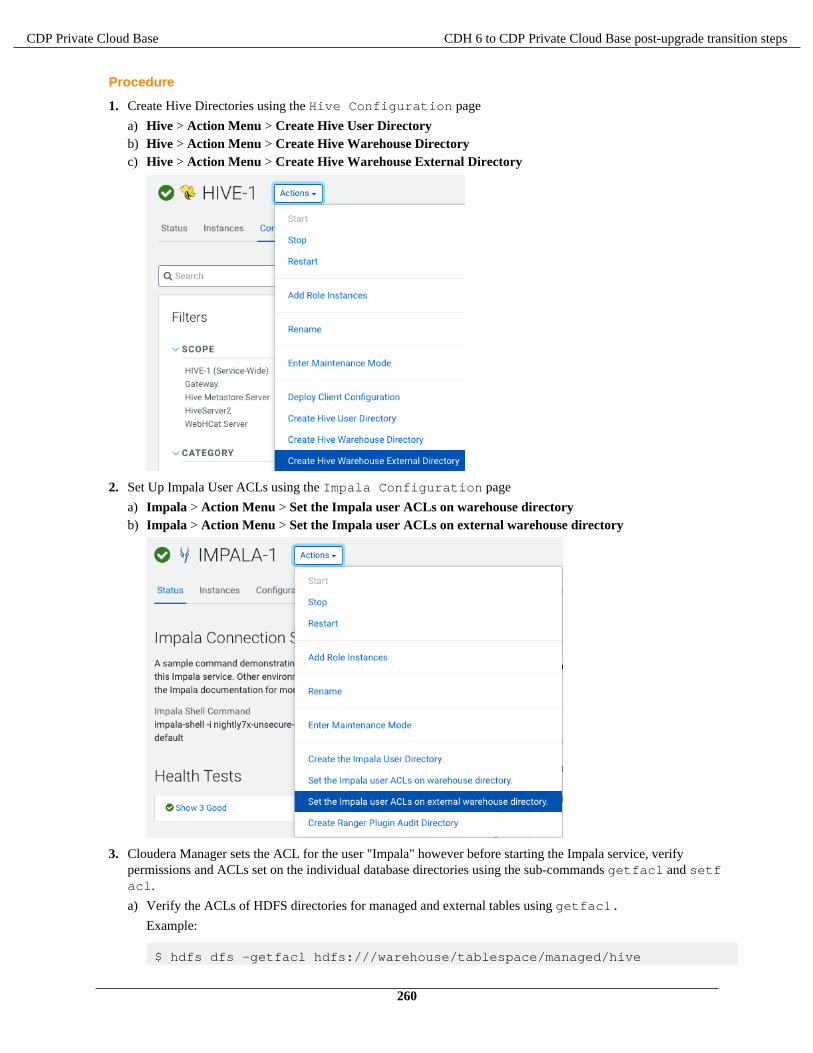
CDP Private Cloud Base CDH 6 to CDP Private Cloud Base post-upgrade transition steps
Procedure
1. Create Hive Directories using the Hive Configuration page
a) Hive > Action Menu > Create Hive User Directoryb) Hive > Action Menu > Create Hive Warehouse Directoryc) Hive > Action Menu > Create Hive Warehouse External Directory
2. Set Up Impala User ACLs using the Impala Configuration page
a) Impala > Action Menu > Set the Impala user ACLs on warehouse directoryb) Impala > Action Menu > Set the Impala user ACLs on external warehouse directory
3. Cloudera Manager sets the ACL for the user "Impala" however before starting the Impala service, verifypermissions and ACLs set on the individual database directories using the sub-commands getfacl and setfacl.
a) Verify the ACLs of HDFS directories for managed and external tables using getfacl.
Example:
$ hdfs dfs -getfacl hdfs:///warehouse/tablespace/managed/hive
260

CDP Private Cloud Base CDH 6 to CDP Private Cloud Base post-upgrade transition steps
# file: hdfs:///warehouse/tablespace/managed/hive# owner: hive# group: hiveuser::rwxgroup::rwxother::---default:user::rwxdefault:user:impala:rwxdefault:group::rwxdefault:mask::rwxdefault:other::---
$ hdfs dfs -getfacl hdfs:///warehouse/tablespace/external/hive# file: hdfs:///warehouse/tablespace/external/hive# owner: hive# group: hive# flags: --tuser::rwxgroup::rwxother::rwxdefault:user::rwxdefault:user:impala:rwxdefault:group::rwxdefault:mask::rwxdefault:other::rwx
b) If necessary, set the ACLs of HDFS directories using setfacl
Example:
$ hdfs dfs -setfacl hdfs:///warehouse/tablespace/managed/hive$ hdfs dfs -setfacl hdfs:///warehouse/tablespace/external/hive
For more information on using the sub-commands getfacl and setfacl, see Using CLI commands tocreate and list ACLs.
c) The above examples show the user Impala as part of the Hive group. If in your setup, the user Impaladoes not belong to the group Hive then ensure that the Group user Impala belongs to has WRITE privilegesassigned on the directory.
To view the Group user Impala belongs to:
$ id -Gn impalauid=973(impala) gid=971(impala) groups=971(impala),972(hive)
Related InformationHDFS ACLS
Changes to CDH Hive Tables
Impala Configuration ChangesThe upgrade process to CDP Private Cloud Base changes the default values of some Impala configuration propertiesand adds new properties.
Impala Configuration Property Values
The following list describes Impala configuration property value changes or additions that occur after upgrading fromCDH or HDP to CDP. These changes in properties ensure that CDP Hive and Impala interoperate to the best of theirabilities. The CDP default might have changed in a way that impacts your work.
Note: After an upgrade you may see some or all of the configurations listed here. If you do not see any of thefollowing configurations by default these are the recommended configurations you must consider adding postupgrade in your CDP environment.
261

CDP Private Cloud Base CDH 6 to CDP Private Cloud Base post-upgrade transition steps
default_file_format
Before upgrade: text
After upgrade: parquet
In CDP the default Impala table file format changed from text to parquet. If the file format isnot parquet, add stored as clause in the create table statements explicitly or change the queryoption default_file_format to text to revert to the behavior as CDH.
default_transactional_type
Before upgrade: N/A
After upgrade: insert_only
In CDP the default table type for managed tables is insert_only. If you must revert to thebehavior as CDH, set default_transactional_type to none. These transactional tablescannot be currently altered in Impala using an alter statement. Similarly, Impala does not supportcompaction on transaction tables currently. You must use Hive to compact the tables as needed.Other operations like select, insert, insert overwrite, truncate are supported.For latest information, see SQL transactions in Impala.
Note: default_file_format and default_transactional_type can beset under Impala > Configuration > default_query_options.
hms_event_polling_interval_s
Before upgrade: 0
After upgrade: 2
When raw data is inserted ingested into Tables, new HMS metadata and filesystem metadata aregenerated. In CDH, in order to pick up this new information, you must manually issue an Invalidateor Refresh command. However in CDP, hms_event_polling_interval_s property is set to2 seconds by default. This option automatically refreshes the tables as changes are detected in HMS.If only specific tables that are not supported by event polling need to be refreshed issue a table levelInvalidate or Refresh command.
disconnected_session_timeout
Before upgrade: N/A
After upgrade: 900
In CDP Impala supports the ability to disconnect a connection to Impala while keeping the sessionrunning. Impala clients/drivers may support re-connecting to the same session even when thenetwork connection is interrupted. By default disconnected sessions are not terminated until 15minutes if you want to reconnect. You can adjust the disconnected_session_timeout flagto a lower value so that disconnected sessions are cleaned up more quickly.
enable_orc_scanner
Before upgrade: True (preview)
After upgrade: True
While using Impala to query ORC tables, set the command line argument enable_orc_scanner = true to re-enable ORC table support.
enable_insert_events
Before upgrade: N/A
After upgrade: True
If Impala inserts into a table it refreshes the underlying table/partition. When this configurationenable_insert_eventsis set to True Impala will generate INSERT event types which
262

CDP Private Cloud Base CDH 6 to CDP Private Cloud Base post-upgrade transition steps
when received by other Impala clusters will automatically refresh the tables or partitions. Eventprocessing must be ON, for this property to work.
disable_hdfs_num_rows_estimate
Before upgrade: N/A
After upgrade: False
In CDP Impala, if there are no statistics available on a table, Impala will try to estimate thecardinality by estimating the size of table based on the number of rows in the table. This behavior isturned ON by default to use when stats are not present. However you can set the query option disable_hdfs_num_rows_estimate = true to disable this optimization.
use_local_catalog
Before upgrade: False
After upgrade: True
In CDP, the on-demand use_local_catalog mode is set to True by default on all the Impalacoordinators so that the Impala coordinators pull metadata as needed from catalogd and cache itlocally. This reduces memory footprint on coordinators and automate the cache eviction.
catalog_topic_mode
Before upgrade: full
After upgrade: minimal
In CDP, the catalog_topic_mode is set to minimal by default to enable on demand metadatafor all coordinators.
Interoperability between Hive and ImpalaThis topic describes the changes made in CDP for the optimal interoperability between Hive and Impala for theimproved user experience.
Statistics Interoperability Between Hive and Impala
New default behavior:
Statistics for tables are engine specific, namely, Hive or Impala, so that each engine could use its own statistics andnot overwrite the statistics generated by the other engine.
When you issue the COMPUTE STATS statement on Impala, you need to issue the corresponding statement on Hiveto ensure both Hive and Impala statistics are accurate.
Impala COMPUTE STATS command does not overwrite the Hive stats for the same table.
Steps to switch to the CDH behavior:
There is no workaround.
Hive Default File Format Interoperability
New default behavior:
The managed tables created by Hive are of ORC file format, by default, and support full transactional capabilities.If you create a table without specifying the STORED AS clause and load data from Hive, then such tables are notreadable or writable by Impala. But Impala can continue to read non-transactional and insert-only transactional ORCtables.
Steps to switch to the CDH behavior:
• You must use the STORED AS PARQUET clause when you create tables in Hive if you want interoperabilitywith Impala on those tables.
263
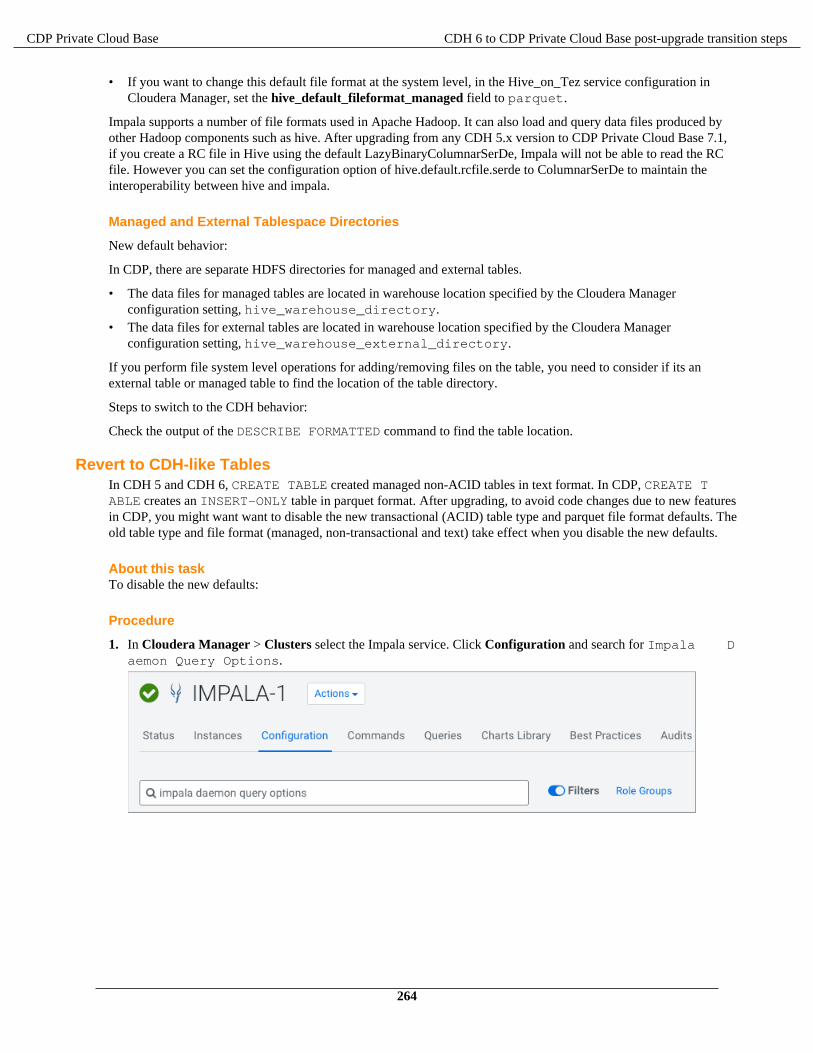
CDP Private Cloud Base CDH 6 to CDP Private Cloud Base post-upgrade transition steps
• If you want to change this default file format at the system level, in the Hive_on_Tez service configuration inCloudera Manager, set the hive_default_fileformat_managed field to parquet.
Impala supports a number of file formats used in Apache Hadoop. It can also load and query data files produced byother Hadoop components such as hive. After upgrading from any CDH 5.x version to CDP Private Cloud Base 7.1,if you create a RC file in Hive using the default LazyBinaryColumnarSerDe, Impala will not be able to read the RCfile. However you can set the configuration option of hive.default.rcfile.serde to ColumnarSerDe to maintain theinteroperability between hive and impala.
Managed and External Tablespace Directories
New default behavior:
In CDP, there are separate HDFS directories for managed and external tables.
• The data files for managed tables are located in warehouse location specified by the Cloudera Managerconfiguration setting, hive_warehouse_directory.
• The data files for external tables are located in warehouse location specified by the Cloudera Managerconfiguration setting, hive_warehouse_external_directory.
If you perform file system level operations for adding/removing files on the table, you need to consider if its anexternal table or managed table to find the location of the table directory.
Steps to switch to the CDH behavior:
Check the output of the DESCRIBE FORMATTED command to find the table location.
Revert to CDH-like TablesIn CDH 5 and CDH 6, CREATE TABLE created managed non-ACID tables in text format. In CDP, CREATE TABLE creates an INSERT-ONLY table in parquet format. After upgrading, to avoid code changes due to new featuresin CDP, you might want want to disable the new transactional (ACID) table type and parquet file format defaults. Theold table type and file format (managed, non-transactional and text) take effect when you disable the new defaults.
About this taskTo disable the new defaults:
Procedure
1. In Cloudera Manager > Clusters select the Impala service. Click Configuration and search for Impala Daemon Query Options.
264

CDP Private Cloud Base CDH 6 to CDP Private Cloud Base post-upgrade transition steps
2. In Impala Daemon Query Options Advanced Configuration Snippet (Safety Valve) for default_query_options edit the default_file_format=text and default_transactional_type=none properties.
Authorization Provider for ImpalaIn CDP, Ranger is the authorization provider instead of Sentry. There are some changes with how Ranger enforces apolicy which may be different from using Sentry.
New behavior:
• The CREATE ROLE, GRANT ROLE, SHOW ROLE statements are not supported as Ranger currently does notsupport roles.
• When a particular resource is renamed, currently, the policy is not automatically transferred to the newly renamedresource.
• SHOW GRANT with an invalid user/group does not return an error.
The following table lists the different access type requirements to run SQL statements in Impala.
SQL Statement Impala Access Requirement
DESCRIBE view VIEW_METADATA on the underlying tables
ALTER TABLE RENAME
ALTER VIEW RENAME
ALL on the target table / view
ALTER on the source table / view
SHOW DATABASES
SHOW TABLES
VIEW_METADATA
where:
• VIEW_METADATA privilege denotes the SELECT, INSERT, or REFRESH privileges.• ALL privilege denotes the SELECT, INSERT, CREATE, ALTER, DROP and REFRESH privileges.
For more information on the minimum level of privileges and the scope required to execute SQL statements inImpala, see Impala Authorization.
Migrating Sentry Policies
When upgrading from CDH to CDP, all SQL permissions and Kafka permissions will be migrated. However if youmust migrate some sentry policies from your CDH environment to the new environment you can use the ReplicationManager service available in CDH. This service migrates Sentry authorization policies into Ranger as part of thereplication policy. Sentry policy migration takes place as part of a replication policy job. When you create thereplication policy, choose the resources that you want to migrate and the Sentry policies will be migrated for thoseresources.
For more information on using the Replication Manager service to migrate Sentry policies, see Sentry PolicyReplication.
Note: Since the authorization model in Ranger is different from Sentry's not all policies can be migratedusing Replication Manager. For some resources you must manually create the permissions after upgrade.
Related InformationImpala Authorization
265

CDP Private Cloud Base CDH 6 to CDP Private Cloud Base post-upgrade transition steps
Data Governance Support by AtlasBoth CDH and CDP environments support governance functionality for Impala operations. The two environmentscollect similar information to describe Impala activities, including:
• Audits for Impala access requests• Metadata describing Impala queries• Metadata describing any new data assets created or updated by Impala operations
The services that support these operations are different in the two environment. Functionality is distributed acrossservices as follows:
Feature CDH CDP
Auditing
• Access requests Audit tab in Navigator console Audit page in Ranger console
• Service operations that create or updatemetadata catalog entries
Audit tab in Navigator console Audit tab for each entity in Atlas dashboard
• Service operations in general Audit tab in Navigator console No other audits collected.
Metadata Catalog
• Impala operations:
• CREATE TABLE AS SELECT
• CREATE VIEW
• ALTER VIEW AS SELECT
• INSERT INTO
• INSERT
• OVERWRITE
Process and Process Execution entities
Column- and table-level lineage
Process and Process Execution entities
Column- and table-level lineage
Migrating Navigator content to Atlas
As part of upgrading a CDH cluster to CDP, Atlas replaces Cloudera Navigator Data Management for your cluster.You can choose to migrate your Navigator metadata to Atlas as part of upgrading. Migrating content from Navigatorto Atlas involves 3 steps:
• extracting the content from Navigator,• transforming that content into a form Atlas can consume,• importing the content into Atlas.
See Migrating Metadata from Navigator to Atlas for more information on the high-level migration process.
Related InformationMigrating Navigator Content to Atlas
Handling Data FilesYou must know how to recursively load the data files, for transactional tables, that are not stored directly within thepartition directories, but instead are stored within subdirectories corresponding to writeIds, compactions, etc.
About this task
In CDP 7.x, Impala includes files within subdirectories. If you must restore to the old behavior and recursively loadfile lists within partition directories, you can use the Safety Valve to add the property --recursively_list_partitions inImpala service as shown in this task. This change can be done either per table or globally.
Procedure
To make the changes globally:
266

CDP Private Cloud Base CDH 6 to CDP Private Cloud Base post-upgrade transition steps
1. In Cloudera Manager > Clusters select the Impala service. Click Configuration, and search for ImpalaCommand Line Argument Advanced Configuration Snippet (Safety Valve).
2. In Impala Command Line Argument Advanced Configuration Snippet (Safety Valve) add the value --recursively_list_partitions=false.
3. Save the changes and restart the Impala service.
To make the changes on individual tables:
4. In CLI, enteralter table tablename set tblproperties('impala.disable.recursive.listing'='true'); refresh tablename;
Hue post-upgrade tasksReview the changes for the Hive editor and the Security Browser after upgrading from CDH 5 or CDH 6 to CDP toavoid access issues.
Updating group permissions for Hive query editorIn CDH 5 and CDH 6, the beeswax.access permission governs access to the Hive editor in Hue. In CDP, access to theHive editor is governed by the hive.access permission and the permission is added to the default group, by default. Ifyou upgrade from CDH 5 or CDH 6 to CDP, and if you are not a part of the default group, then you may not be ableto access the Hive editor. You must manually grant the hive.access permission to your user groups.
Procedure
1. Log in to Hue as an Administrator.
2. Go to Admin > Manage Users > Permissions and click hive under Application.
3. On the Edit hive page, select the groups to which you want to grant access to the Hive editor.
4. Click Update permission to save the changes.
Adding Security Browser to the blocked list of applicationsThe Security Browser application is no longer supported in Hue on CDP. If you were using Sentry on your CDHcluster and a Security Browser in Hue, then you must manually add the Security Browser application to the list ofblocked applications in the Hue Advanced Configuration Snippet after upgrading to CDP.
About this task
After upgrading from CDH to CDP, you may see the following error when accessing the Security Browser: “Failedto connect to Sentry server localhost”. To prevent this error:
267

CDP Private Cloud Base CDH 6 to CDP Private Cloud Base post-upgrade transition steps
Procedure
1. Log in to Cloudera Manager as an Administrator.
2. Go to Clusters > Hue service > Configuration > Hue Service Advanced Configuration Snippet (SafetyValve) for hue_safety_valve.ini and append security to the app_blacklist property. For example:
[desktop]app_blacklist=pig,spark,security
3. Click Save Changes.
4. Restart the Hue service.
Importing Sentry privileges into Ranger policiesHow to complete the process of translating Sentry privileges into Ranger policies.
About this task
No one-to-one mapping between Sentry privileges and Ranger service policies exists. Upgrading your platforminvolves translating Sentry privileges to their equivalents within Ranger service policies. After upgrading ClouderaManager and your cluster, this post-upgrade step completes the translation process.
Procedure
1. In Ranger > Actions, click Import Sentry Policies.
2. Read the following points that describe how Sentry privileges appear in Ranger after the migration:
• Sentry permissions that are granted to roles are granted to groups in Ranger.• Sentry permissions that are granted to a parent object are granted to the child object as well. The migration
process preserves the permissions that are applied to child objects. For example, a permission that is applied atthe database level also applies to the tables within that database.
• Sentry OWNER privileges are translated to the Ranger OWNER privilege.• Sentry OWNER WITH GRANT OPTION privileges are translated to Ranger OWNER with Delegated Admin
checked.• Sentry does not differentiate between tables and views. When view permissions are migrated, they are treated
as table names.• Sentry privileges on URIs use the object store location as the base location.• If your cluster contains the Kafka service and the Kafka sentry policy had "action": "ALL" permission, the
migrated Ranger policy for "cluster" resource will be missing the "alter" permission. This is only applicablefor "cluster" resource. You need to add the policy manually after the upgrade. This missing permission doesnot have any functional impact. Adding the "alter" permission post upgrade is needed only for completenessbecause the 'configure' permission allow alter operations.
• Sentry "alter" permission on cluster and topic is translated to "configure" in Ranger.
The following table shows how actions in Sentry translate to corresponding actions in Ranger:
Table 18: Sentry Actions to Ranger Actions
Sentry Action Ranger Action
SELECT SELECT
INSERT UPDATE
CREATE CREATE
REFRESH REFRESH
268

CDP Private Cloud Base CDH 6 to CDP Private Cloud Base post-upgrade transition steps
Sentry Action Ranger Action
ALL ALL
SELECT with Grant SELECT
INSERT with Grant UPDATE
CREATE with Grant CREATE
ALL with Grant ALL with Delegated Admin Checked
ALTER CONFIGURE
Apache Ranger TLS Post-Upgrade Tasks
For TLS/SSL enabled Ranger Service, to enable Yarn and Hbase plugin, you must:
1. Add Ranger Admin certificate in the following truststore files used by these services.Yarn
TLS/SSL Client Truststore File Location (ssl.client.truststore.location)
TLS/SSL Client Truststore File Password (ssl.client.truststore.password)
Hbase
HBase Master TLS/SSL Trust Store File (master_truststore_file)
HBase Master TLS/SSL Trust Store Password (master_truststore_password)
HBase Region Server TLS/SSL Trust Store File (regionserver_truststore_file)
HBase Region Server TLS/SSL Trust Store Password (regionserver_truststore_password)2. In Cloudera Manager UI > Action > Ranger KMS KTS, execute Create Ranger Plugin Audit Directory
command.
Migrating ACLs from Key Trustee KMS to Ranger KMSYou must perform the following procedures to migrate ACLs from Key Trustee Key Management Server (KMS) toRanger KMS.
Key Trustee ACL evaluation
Before going into the details of how Key Trustee ACLs are evaluated, it is critical that you understand the key rulesthat the Key Trustee Key Management Server uses in performing this evaluation.
KMS ACL Flow Rules:
• The whitelist class bypasses key.acl and default.key.acl controls.• The key.acl definitions override all default definitions.
Encryption key access is evaluated as follows:
269

CDP Private Cloud Base CDH 6 to CDP Private Cloud Base post-upgrade transition steps
1 and 2
The KMS evaluates the hadoop.kms.acl.<OPERATION> and hadoop.kms.blacklist.<OPERATION>classes to determine whether or not access to a specific KMS feature or function is authorized.
In other words, a user must be allowed by hadoop.kms.acl.<OPERATION>, and not be disallowed by hadoop.kms.blacklist.<OPERATION>.
If a user is denied access to a KMS-wide operation, then the flow halts and returns the result Denied.
If a user is allowed access to a KMS-wide operation, then the evaluation flow proceeds.
3
The KMS evaluates the whitelist.key.acl class.
The KMS ACL workflow evaluates the whitelist.key.acl.<OPERATION>, and if the user is allowed access,then it is granted (Allowed) . If not, then the flow continues with the evaluation.
4 and 5
The KMS evaluates the default.key.acl.<OPERATION> and key.acl.<OPERATION> classes.
The KMS evaluates whether or not there is a key.acl.KEY.<OPERATION> class that matches the action the useris attempting to perform. If there is, it then evaluates that value to determine whether or not the user can perform therequested operation.
270

CDP Private Cloud Base CDH 6 to CDP Private Cloud Base post-upgrade transition steps
Note: Before evaulating the default.key.acl.<OPERATION> and key.acl.<OPERATION>classes, the flow logic determines which classes exist. Only one of these can exist and be used at any time (forexample, key.acl.prodkey.READ overrides default.key.acl.READ for prodkey, so the flowlogic is configured with it’s own READ ACLs)
Depending on the result of the Key Trustee ACL evaluation, controls are applied to the key and results (Allowed orDenied).
Access evaluation with Ranger KMS policies
Access is evaluated with Ranger KMS policies as follows:
271

CDP Private Cloud Base CDH 6 to CDP Private Cloud Base post-upgrade transition steps
1
After the request is received, the Deny condition of the Global Override policy is evaluated. If the user is present, theflow halts and returns the result Deny. If the user is not present, the evaluation flow proceeds.
2
Now, the Allow condition of the Global Override policy is evaluated. If the user is present, the flow halts and returnsthe result Allow. If the user is not present, the evaluation flow proceeds.
272

CDP Private Cloud Base CDH 6 to CDP Private Cloud Base post-upgrade transition steps
3
If the Key Resource Specific policy is present, the Allow condition of the Key Resource Specific policy is evaluated.If the user is not present, the flow halts and returns the result Deny. If the user is present, the flow is complete andreturns the result Allow.
4
If the Key Resource Specific policy is not present, the Deny condition of the Default policy, all-keyname, isevaluated. If the user is present, the flow halts and returns the result Deny. If the user is not present, the evaluationflow proceeds.
5
Now, the Allow condition of the Default policy, all-keyname, is evaluated. If the user is not present, the flow haltsand returns the result Deny. If the user is present, the flow is complete and returns the result Allow.
Key Trustee KMS operations not supported by Ranger KMSThe following Key Trustee KMS operations are not supported by Ranger KMS.
• hadoop.kms.acl.<OPERATION>
The ACLs mentioned below are ignored by Ranger KMS because these ACLs are not migrated to the RangerKMS policy.
hadoop.kms.acl.CREATEhadoop.kms.acl.DELETEhadoop.kms.acl.ROLLOVERhadoop.kms.acl.GEThadoop.kms.acl.GET_KEYShadoop.kms.acl.GET_METADATAhadoop.kms.acl.SET_KEY_MATERIALhadoop.kms.acl.GENERATE_EEKhadoop.kms.acl.DECRYPT_EEK
• keytrustee.kms.acl.<OPERATION>
The ACLs mentioned below are Key Trustee-specific ACLs. These ACLs are ignored by Ranger KMS becausethey are not migrated to the Ranger KMS policy. Also, these ACLs are not supported by Hadoop KMS.
keytrustee.kms.acl.UNDELETEkeytrustee.kms.acl.PURGE
ACLs supported by Ranger KMS and Ranger KMS MappingThe following ACLs are supported by Ranger KMS and Ranger KMS mapping.
• whitelist.key.acl.<operation> and hadoop.kms.blacklist.<Operation>
In this case, you create a Global Override policy under the service cm_kms.
Service : cm_kms
Policy Key-resource Priority Key Trustee ACL Ranger PolicyCondition
Ranger PolicyPermission
whitelist.key.acl.MANAGEMENT
ALLOW CREATE, DELETE, ROLLOVER
Global OverridePolicy
* Override
whitelist.key.acl.GENERATE_EEK
ALLOW GENERATE_EEK
273

CDP Private Cloud Base CDH 6 to CDP Private Cloud Base post-upgrade transition steps
Policy Key-resource Priority Key Trustee ACL Ranger PolicyCondition
Ranger PolicyPermission
whitelist.key.acl.DECRYPT_EEK
ALLOW DECRYPT_EEK
whitelist.key.acl.READ
ALLOW GET, GET KEYS,GET METADATA
hadoop.kms.blacklist.CREATE
DENY CREATE
hadoop.kms.blacklist.DELETE
DENY DELETE
hadoop.kms.blacklist.ROLLOVER
DENY ROLLOVER
hadoop.kms.blacklist.GET
DENY GET
hadoop.kms.blacklist.GET_KEYS
DENY GET KEYS
hadoop.kms.blacklist.GET_METADATA
DENY GET METADATA
hadoop.kms.blacklist.SET_KEY_MATERIAL
DENY SET KEY MATERIAL
hadoop.kms.blacklist.GENERATE_EEK
DENY GENERATE_EEK
hadoop.kms.blacklist.DECRYPT_EEK
DENY DECRYPT_EEK
• default.key.acl.<operation>
Service : cm_kms
Policy Key-resource Priority Key Trustee ACL Ranger PolicyCondition
Ranger PolicyPermission
default.key.acl.MANAGEMENT
ALLOW CREATE, DELETE, ROLLOVER
default.key.acl.GENERATE_EEK
ALLOW GENERATE_EEK
default.key.acl.DECRYPT_EEK
ALLOW DECRYPT_EEK
Default Policy
all-keyname
* Normal
default.key.acl.READ
ALLOW GET, GET KEYS,GET METADATA
274

CDP Private Cloud Base CDH 6 to CDP Private Cloud Base post-upgrade transition steps
• key.acl.<key-name>.<OPERATION> Key Specific ACL
In this case, you create a Key Resource Specific policy under the service cm_kms.
Service : cm_kms
Policy Key-resource Priority Key Trustee ACL Ranger PolicyCondition
Ranger PolicyPermission
key.acl.<key-name>.MANAGEMENT
ALLOW CREATE, DELETE, ROLLOVER
key.acl.<key-name>.GENERATE_EEK
ALLOW GENERATE_EEK
key.acl.<key-name>.DECRYPT_EEK
ALLOW DECRYPT_EEK
key.acl.<key-name>.READ
ALLOW GET, GET KEYS,GET METADATA
Key ResourceSpecific policy
<keyname>
<keyname> Normal
key.acl.<key-name>.ALL
ALLOW SELECT ALL
Note: In Key Resource Specific policies, DENY ALL OTHER ACCESS flags are set to true.
Apache Hadoop YARN default value changesA list of default value changes when upgrading from CDH to CDP.
Note: This is not a complete list. It only contains the default value changes that cause behaviour changes.
• Scheduler: In CDP, Capacity Scheduler is the supported and default scheduler. For more information aboutscheduler migration and post-upgrade fine tuning, see Manual configuration of scheduler properties on page156.
• YARN and MapReduce daemons: YARN daemons (ResourceManager, NodeManager) and the JobHistory Serverruns with unix group hadoop instead of yarn:yarn and mapred:mapred.
• Cross-Origin Resource Sharing: CORS is enabled for every role by default.• YARN admin commands: By default YARN admin commands can be run only as yarn. In CDP Private Cloud
Base 7.1.7 and higher a placeholder value ${yarn_user} is also supported. In such cases Cloudera Managerreplace the placeholder value with the collected principal name.
• ResourceManager recovery: ResourceManager recovery is enabled by default.• Filter entity list by use (filter-entity-list-by-user): Enabled by default, meaning that users can see
only those applications on the UI which they have access to.• Log aggregation: IFile is the default file controller.• MapReduce shuffle connection keep-alive (mapreduce.shuffle.connection-keep-alive.enab
led):: Set to true by default because Auto TLS requires it.• YARN Admin ACL: If the yarn.admin.acl property is not configured before the upgrade, its default value is
changed from * to yarn. In CDP Private Cloud Base 7.1.7 and higher a placeholder value ${yarn_user} is alsosupported. In such cases Cloudera Manager replace the placeholder value with the collected principal name.
Upgrade Notes for Apache Kudu 1.15 / CDP 7.1Learn about the most important Kudu relatd changes when upgrading to CDP Private Cloud Base 7.1.
275

CDP Private Cloud Base CDH 6 to CDP Private Cloud Base post-upgrade transition steps
World-readable Kerberos keytab files
To improve security, world-readable Kerberos keytab files are no longer accepted by default. You can override thisbehaviour by setting the ##allow_world_readable_credentials property to true using the Kudu ServiceAdvanced Configuration Snippet (Safety Valve) for gflagfile advanced configuration snippet:
##allow_world_readable_credentials=true
Wire Protocol compatibility
Kudu 1.15.0 is wire-compatible with previous versions of Kudu:
• Kudu 1.15 clients may connect to servers running Kudu 1.0 or later. If the client uses features that are notavailable on the target server, an error will be returned.
• Rolling upgrade between Kudu 1.9 and Kudu 1.15 servers is believed to be possible though has not beensufficiently tested. Users are encouraged to shut down all nodes in the cluster, upgrade the software, and thenrestart the daemons on the new version.
• Kudu 1.6 and later clients may connect to servers running Kudu 1.15.
Client Library Compatibility
• The Kudu 1.15 Java client library is API- and ABI-compatible with Kudu 1.6 and later. Applications writtenagainst Kudu 1.6 and later will compile and run against the Kudu 1.15 client library and the other way around.
• The Kudu 1.15 C++ client is API- and ABI-forward-compatible with Kudu 1.6 and later. Applications written andcompiled against the Kudu 1.6 client library will run without modification against the Kudu 1.15 client library.Applications written and compiled against the Kudu 1.6 or later client library will run without modificationagainst the Kudu 1.15client library.
• The Kudu 1.15Python client is API-compatible with Kudu 1.6 and later. Applications written against Kudu 1.6and later will continue to run against the Kudu 1.15 client and the other way around.
Integration with Apache Ranger
The integration with Apachy Sentry is replaced by the integration with Apache Ranger. Kudu 1.15 natively integrateswith Apache Ranger for fine grain authorization and access control. This integration is disabled by default after theupgrade. If you want to enable fine grain authorization and access control with Kudu and Ranger, follow the stepsdescribed in Enabling Ranger authorization.
Related InformationEnabling Ranger authorization
Apache HBase post-upgrade tasksAfter upgrading from CDH to CDP Private Cloud Base, there are certain tasks that you need to perform before youcan start using the HBase cluster.
Switch to relying on shaded artifacts
After upgrading from CDH 5 to CDP, the HBase client applications have to switch to hbase-shaded-client and hbase-shaded-mapreduce artifacts as dependencies. Cloudera recommends relying on the Mavencoordinates org.apache.hbase:hbase-shaded-client for their runtime use.
Note: If you are upgrading from CDH 6, you should already use the shaded artifacts. Ensure that you haveswitched to hbase-shaded-client and hbase-shaded-mapreduce artifacts as dependencies.
Users of HBase's integration for Apache Hadoop MapReduce must switch to relying on the org.apache.hbase:hbase-shaded-mapreduce module for their runtime use. Neither org.apache.hbase:hbase-server nor org.apache.hbase:hbase-shaded-server artifacts are supported anymore.
276

CDP Private Cloud Base CDH 6 to CDP Private Cloud Base post-upgrade transition steps
Note that both artifacts expose some classes in the org.apache.hadoop package space (for example o.a.h.configuration.Configuration) to maintain source compatibility with the public API. Those classes areincluded so that they can be altered to use the same relocated third party dependencies as the rest of the HBase clientcode. In the event that you need to also use Hadoop in your code, you should ensure all Hadoop related jars precedethe HBase client jar in your classpath.
Configure SMM to monitor SRM replicationsFollowing a successful upgrade, if you want to use SMM to monitor SRM replications, you must reconnect the twoservices. This is done by enabling the STREAMS_REPLICATION_MANAGER Service SMM property which isdisabled by default.
About this task
This configuration is only required if you are upgrading from CDH 5 or CDH 6 to Cloudera Runtime 7.1.6 and higheror from Cloudera Runtime 7.1.5 and lower to Cloudera Runtime 7.1.6 and higher.
Important: SMM can only connect to and monitor an SRM service that is running in the same cluster asSMM. Monitoring an SRM service that is running in a cluster that is external to SMM is no longer supported.
Procedure
1. In Cloudera Manager, select the SMM service.
2. Go to Configuration.
3. Find and enable the STREAMS_REPLICATION_MANAGER Service property.
4. Click Save Changes.
5. Restart the service.
ResultsSMM is configured to monitor SRM replications. The Cluster Replications tab is available in the SMM UI.
Configure SMM's service dependency on Schema RegistryFollowing a successful upgrade, the integration between the SMM and Schema Registry services is disabled. If youhave previously enabled integration you must re-enable it following an upgrade. This can be done by selecting theSchema Registry Service checkbox.
About this task
This configuration is only required if you are upgrading from CDH 5 or CDH 6 to Cloudera Runtime 7.1.1 or higher.
Procedure
1. In Cloudera Manager, select the SMM service.
2. Go to Configuration.
3. Find and select the Schema Registry Service property.
4. Click Save Changes.
5. Restart the service.
277

CDP Private Cloud Base CDH 6 to CDP Private Cloud Base post-upgrade transition steps
Apache Sqoop ChangesAfter upgrading from CDH to CDP, Sqoop action errors are not logged due to an change in the log4j configuration.You must configure Oozie to log Sqoop action errors in the Oozie launcher log.
About this task
Before Upgrade to CDP
The Sqoop action in an Oozie workflow log errors to the Oozie launcher log. For example:
>>> Invoking Sqoop command line now >>> 2021-01-11 09:58:21,438 [main] WARN org.apache.sqoop.tool.SqoopTool - $SQOOP_CONF_DIR has not been set in the environment. Cannot check for additional configuration. 2021-01-11 09:58:21,489 [main] INFO org.apache.sqoop.Sqoop - Running Sqoop version: 1.4.7.7.1.5.0-257 2021-01-11 09:58:21,503 [main] WARN org.apache.sqoop.tool.BaseSqoopTool - Setting your password on the command-line is insecure. Consider using -P instead. 2021-01-11 09:58:21,516 [main] WARN org.apache.sqoop.ConnFactory - $SQOOP_CONF_DIR has not been set in the environment. Cannot check for additional configuration....
After Upgrade to CDP
The Sqoop action in an Oozie workflow does not log errors to the Oozie launcher log. For example:
>>> Invoking Sqoop command line now >>>09:39:49.715 [main] INFO org.apache.hadoop.conf.Configuration.deprecation - mapred.jar is deprecated. Instead, use mapreduce.job.jar09:39:49.738 [main] INFO org.apache.hadoop.conf.Configuration.deprecation - mapred.map.tasks is deprecated. Instead, use mapreduce.job.maps09:39:49.974 [main] INFO org.apache.hadoop.mapreduce.JobResourceUploader - Disabling Erasure Coding for path: /user/cloudera/.staging/job_1609912545960_001309:39:50.347 [main] INFO org.apache.hadoop.mapreduce.JobSubmitter - Cleaning up the staging area /user/cloudera/.staging/job_1609912545960_0013 <<< Invocation of Sqoop command completed <<< No child hadoop job is executed.Intercepting System.exit(1) java.lang.reflect.InvocationTargetExceptionat sun.reflect.NativeMethodAccessorImpl.invoke0(Native Method)...
Action Required
Configure the Sqoop action to use the log4j1 configuration for this Sqoop action and the Hue workspace only.
Procedure
1. Create a log4j.properties file and upload it to the lib directory in the workflow.xml path insideHDFS.
log4j.rootLogger=INFO , Alog4j.logger.org.apache.sqoop=INFO, Alog4j.additivity.org.apache.sqoop=falselog4j.appender.A=org.apache.log4j.ConsoleAppenderlog4j.appender.A.layout=org.apache.log4j.PatternLayout
278

CDP Private Cloud Base CDH 6 to CDP Private Cloud Base post-upgrade transition steps
log4j.appender.A.layout.ConversionPattern=%d [%t] %-5p %c %x - %m%nlog4j.logger.org.apache.sqoop=INFO, A
2. In the workflow.xml file or in the Sqoop action in Hue interface, configure the Sqoop action to use thelog4j.properties file by configuring SqoopAction > Properties > yarn.app.mapreduce.am.admin-command-opts: Dlog4j.configuration=log4j.properties.
Related InformationSqoop Documentation 1.4.7.7.1.6.0
Check Parquet writer implementation propertyYou might need to set the Parquet writer implementation property to hadoop. In releases before CDP 7.1.6/ClouderaManager 7.3.1, the Parquet writer implementation property (parquetjob.configurator.implementation) default was nothadoop.
About this taskIf you upgraded to a CDP release earlier than CDP 7.1.6, change the default value of the Parquet writerimplementation property to hadoop. Making this change prevents encountering the following error when using theSqoop client:
Post upgrade sqoop failed with the error "Invalid Parquet job configurator implementation is set: kite. Supported values are: [HADOOP]" ,
Procedure
1. In Cloudera Manager, click Clusters > Sqoop 1 Client > Configuration, and search for Parquet writerimplementation.
2. Change the value to hadoop.
Configure a Sqoop Action globally and for all Hue workspaces
279

CDP Private Cloud Base CDH 6 to CDP Private Cloud Base post-upgrade transition steps
Procedure
1. In Cloudera Manager, click Clusters > Oozie-1 > Configuration, and search for Oozie Server AdvancedConfiguration.
2. Scroll down, locate the Oozie Server Advanced Configuration Snippet (Safety Valve) for oozie-site.xml, andclick +.
3. Add the following property name and value.
<property> <name>oozie.service.HadoopAccessorService.action.configurations</name> <value>*=/var/lib/oozie/action-conf</value></property>
4. Login to the server running the Oozie service as root and run the following commands.
mkdir -p /var/lib/oozie/action-confchown -R oozie:oozie /var/lib/oozie
5. Create a sqoop.xml file that configures the yarn.app.mapreduce.am.admin-command-optsproperty.
<configuration><property><name>yarn.app.mapreduce.am.admin-command-opts</name><value>-Dlog4j.configuration=log4j.properties</value></property></configuration>
6. Copy the file to /var/lib/oozie/action-conf and ensure it is owned by oozie:oozie.
7. Copy the log4j.properties file to Oozie shared lib /user/oozie/share/lib/lib_<timestamp>/sqoop and restart Oozie service.
Cloudera Search changesLearn about the most important Search related changes when upgrading to CDP Private Cloud Base 7.1.Summary:
Admin API address has changed
Previous behavior:
In Solr 7 both curl -k --negotiate -u: "https://`hostname -f`:8985/solr/?op=GETDELEGATIONTOKEN" and curl -k --negotiate -u: "https://`hostname -f`:8985/solr/admin?op=GETDELEGATIONTOKEN" commands worked.
280

CDP Private Cloud Base Applications Upgrade
New behavior
In Solr 8 only curl -k --negotiate -u: "https://`hostname -f`:8985/solr/admin?op=GETDELEGATIONTOKEN" command (with the 'admin' string added) works.
Applications Upgrade
After you upgrade, you must test all the services that run on your platform.
Ideally, you should have an indicative subset of jobs from your workloads. These are the tasks that you shouldhave identified and run before the upgrade allowing you to compare pre-upgrade versus post-upgrade test results.These tests should also include any parts of the application that required code changes due to the changes in theplatform. For example, to cater for changes in Hive managed versus external tables. The tests should also include aperformance test. This can help to highlight missed or wrong configuration settings or point to other issues with theupgrade. Depending on your environment, perform these steps.
1. Update application code with changes required by the upgraded platform Restart applications2. Update the dependencies in the pom.xml file for custom jar files used in your applications to use the new
dependencies for CDP.3. Restart applications4. Test the applications and verify they are functioning and performing as they were prior to upgrade
Procedure to Rollback from CDP 7.1.7 SP1 to CDP 7.1.7
You can rollback from the CDP 7.1.7 SP1 to CDP 7.1.7. To rollback to CDP 7.1.7:
Procedure
1. Log in to the Cloudera Manager Admin Console.
2. Click Parcels from the left menu.
3. Click Parcel Repositories & Network Settings.
Note: If the 7.1.7.78 URL is available in the parcel repository, then you can skip to step 8. If not, thenproceed with step 4.
281
https://docs.cloudera.com/cdp-private-cloud-upgrade/latest/upgrade-hdp/topics/amb-hdp-checklist.html
https://docs.cloudera.com/cdp-private-cloud-upgrade/latest/upgrade-hdp/topics/amb-hdp-checklist.html
https://docs.cloudera.com/cdp-private-cloud-upgrade/latest/upgrade-hdp/topics/amb-hdp-checklist.html
CDP Private Cloud Base Procedure to Rollback from CDP 7.1.7 SP1 to CDP 7.1.7
4. In the Remote Parcel Repository URLs section, click the "+" icon and add the 7.1.7.78 URL for your Parcelrepository.
5. Click Save & Verify Configuration. A message with the status of the verification appears above the RemoteParcel Repository URLs section. If the URL is not valid, check the URL and enter the correct URL.
6. After the URL is verified, click Close.
7. Locate the row in the table that contains the new Cloudera Runtime parcel and click the Download button.
8. After the download of the new Cloudera Runtime parcel is complete, click the Distribute button.
Wait for the parcel to be distributed and unpacked before continuing. Cloudera Manager displays the status of theCloudera Runtime parcel distribution. Click on the status display to view detailed status for each host.
9. Click Activate. Runtime parcels are activated on the cluster.
10. When the parcel is activated, click the Cloudera Manager logo to return to the home page.The cluster is now rolled back to the CDP Private Cloud Base 7.1.7.78 version.
282
Related Documents


