Administration Guide | PUBLIC Document Version: 1H 2021 – 2021-09-17 Implementing and Configuring the People Central Hub © 2021 SAP SE or an SAP affiliate company. All rights reserved. THE BEST RUN

Welcome message from author
This document is posted to help you gain knowledge. Please leave a comment to let me know what you think about it! Share it to your friends and learn new things together.
Transcript
Administration Guide | PUBLICDocument Version: 1H 2021 – 2021-09-17
Implementing and Configuring the People Central Hub
© 2
021 S
AP S
E or
an
SAP affi
liate
com
pany
. All r
ight
s re
serv
ed.
THE BEST RUN
Content
1 What's New in the People Central Hub. . . . . . . . . . . . . . . . . . . . . . . . . . . . . . . . . . . . . . . . . . . . . . . 4
2 People Central Hub Overview. . . . . . . . . . . . . . . . . . . . . . . . . . . . . . . . . . . . . . . . . . . . . . . . . . . . . . 5
3 Recommended Implementation Sequence. . . . . . . . . . . . . . . . . . . . . . . . . . . . . . . . . . . . . . . . . . . . 6
4 Initial Configuration Tasks. . . . . . . . . . . . . . . . . . . . . . . . . . . . . . . . . . . . . . . . . . . . . . . . . . . . . . . . 94.1 Setting Basic Options. . . . . . . . . . . . . . . . . . . . . . . . . . . . . . . . . . . . . . . . . . . . . . . . . . . . . . . . . . . . . 94.2 Creating the Super Admin. . . . . . . . . . . . . . . . . . . . . . . . . . . . . . . . . . . . . . . . . . . . . . . . . . . . . . . . . 114.3 Managing Employee Central Settings . . . . . . . . . . . . . . . . . . . . . . . . . . . . . . . . . . . . . . . . . . . . . . . . . 124.4 Keeping the User Directory and Org Chart Up to Date. . . . . . . . . . . . . . . . . . . . . . . . . . . . . . . . . . . . . . 164.5 Activating Employee Central SOAP APIs. . . . . . . . . . . . . . . . . . . . . . . . . . . . . . . . . . . . . . . . . . . . . . . 174.6 Setting Up Business Rules. . . . . . . . . . . . . . . . . . . . . . . . . . . . . . . . . . . . . . . . . . . . . . . . . . . . . . . . . 17
5 Data Models, Foundation Objects, and Generic Objects. . . . . . . . . . . . . . . . . . . . . . . . . . . . . . . . . 185.1 Data Model Overview. . . . . . . . . . . . . . . . . . . . . . . . . . . . . . . . . . . . . . . . . . . . . . . . . . . . . . . . . . . . .185.2 Introduction to Foundation Objects. . . . . . . . . . . . . . . . . . . . . . . . . . . . . . . . . . . . . . . . . . . . . . . . . . 20
Characteristics of Foundation Objects. . . . . . . . . . . . . . . . . . . . . . . . . . . . . . . . . . . . . . . . . . . . . . 205.3 Introduction to Generic Objects. . . . . . . . . . . . . . . . . . . . . . . . . . . . . . . . . . . . . . . . . . . . . . . . . . . . . 21
Characteristics of Generic Objects. . . . . . . . . . . . . . . . . . . . . . . . . . . . . . . . . . . . . . . . . . . . . . . . .21
6 Managing Permissions. . . . . . . . . . . . . . . . . . . . . . . . . . . . . . . . . . . . . . . . . . . . . . . . . . . . . . . . . . 236.1 Permissions Overview. . . . . . . . . . . . . . . . . . . . . . . . . . . . . . . . . . . . . . . . . . . . . . . . . . . . . . . . . . . . 236.2 Permissions for People Central Hub. . . . . . . . . . . . . . . . . . . . . . . . . . . . . . . . . . . . . . . . . . . . . . . . . . 23
User Permissions for People Central Hub. . . . . . . . . . . . . . . . . . . . . . . . . . . . . . . . . . . . . . . . . . . . 24Administrator Permissions for People Central Hub. . . . . . . . . . . . . . . . . . . . . . . . . . . . . . . . . . . . . 36
7 Managing HRIS Sync. . . . . . . . . . . . . . . . . . . . . . . . . . . . . . . . . . . . . . . . . . . . . . . . . . . . . . . . . . . 447.1 Human Resource Information System (HRIS) Synchronization. . . . . . . . . . . . . . . . . . . . . . . . . . . . . . . 447.2 HRIS Sync Configuration Between Employee Central and Employee Profile. . . . . . . . . . . . . . . . . . . . . . 44
8 Working with Picklists. . . . . . . . . . . . . . . . . . . . . . . . . . . . . . . . . . . . . . . . . . . . . . . . . . . . . . . . . . 478.1 Introduction to Picklists. . . . . . . . . . . . . . . . . . . . . . . . . . . . . . . . . . . . . . . . . . . . . . . . . . . . . . . . . . .478.2 Working with MDF Picklists. . . . . . . . . . . . . . . . . . . . . . . . . . . . . . . . . . . . . . . . . . . . . . . . . . . . . . . . 478.3 Keeping ECV2 and MDF Picklists in Sync. . . . . . . . . . . . . . . . . . . . . . . . . . . . . . . . . . . . . . . . . . . . . . .488.4 Working with Cascading Picklists. . . . . . . . . . . . . . . . . . . . . . . . . . . . . . . . . . . . . . . . . . . . . . . . . . . . 488.5 Importing or Exporting a Picklist with Picklist Center. . . . . . . . . . . . . . . . . . . . . . . . . . . . . . . . . . . . . . 538.6 Fields Hidden in Picklist Center. . . . . . . . . . . . . . . . . . . . . . . . . . . . . . . . . . . . . . . . . . . . . . . . . . . . . 54
Making Picklist Value Fields Visible and Editable in Picklist Center. . . . . . . . . . . . . . . . . . . . . . . . . . 55
2 PUBLICImplementing and Configuring the People Central Hub
Content
8.7 Non-Unique External Code. . . . . . . . . . . . . . . . . . . . . . . . . . . . . . . . . . . . . . . . . . . . . . . . . . . . . . . . 56Disabling Sync of Non-Unique External Code. . . . . . . . . . . . . . . . . . . . . . . . . . . . . . . . . . . . . . . . . 56
9 Setting Up Payment Information. . . . . . . . . . . . . . . . . . . . . . . . . . . . . . . . . . . . . . . . . . . . . . . . . . 589.1 Prerequisites for Payment Information. . . . . . . . . . . . . . . . . . . . . . . . . . . . . . . . . . . . . . . . . . . . . . . . 58
Provisioning Switch. . . . . . . . . . . . . . . . . . . . . . . . . . . . . . . . . . . . . . . . . . . . . . . . . . . . . . . . . . . 58Setting Up Role-based Permissions. . . . . . . . . . . . . . . . . . . . . . . . . . . . . . . . . . . . . . . . . . . . . . . . 59Configuring Payment Methods. . . . . . . . . . . . . . . . . . . . . . . . . . . . . . . . . . . . . . . . . . . . . . . . . . . 60
9.2 Setting Up Payment Information. . . . . . . . . . . . . . . . . . . . . . . . . . . . . . . . . . . . . . . . . . . . . . . . . . . . 61Setting Up the Configuration UI . . . . . . . . . . . . . . . . . . . . . . . . . . . . . . . . . . . . . . . . . . . . . . . . . . 62(Optional) Using a Bank Directory. . . . . . . . . . . . . . . . . . . . . . . . . . . . . . . . . . . . . . . . . . . . . . . . . 64(Optional) Using Customized Pay Types. . . . . . . . . . . . . . . . . . . . . . . . . . . . . . . . . . . . . . . . . . . . . 74
9.3 Adding Payment Information to People Profile. . . . . . . . . . . . . . . . . . . . . . . . . . . . . . . . . . . . . . . . . . . 799.4 Frequently Asked Questions. . . . . . . . . . . . . . . . . . . . . . . . . . . . . . . . . . . . . . . . . . . . . . . . . . . . . . . 80
10 Deep Links. . . . . . . . . . . . . . . . . . . . . . . . . . . . . . . . . . . . . . . . . . . . . . . . . . . . . . . . . . . . . . . . . . . 85
Implementing and Configuring the People Central HubContent PUBLIC 3
1 What's New in the People Central Hub
Learn about changes to this guide in recent releases.
Q1 2019 - present
What's New Description More Information
No Changes We did not update this document.
Q4 2018
What's New Description More Information
Role-Based Permissions Topic completely updated and broken up for ease of use
Permissions for People Central Hub [page 23]
Q1 2018 - Q3 2018
What's New Description More Information
No Changes We did not update this document.
Q4 2017
What's New Description More Information
People Central Hub New guide for new product.
4 PUBLICImplementing and Configuring the People Central Hub
What's New in the People Central Hub
2 People Central Hub Overview
The SAP SuccessFactors People Central Hub is a central system for people data in a standardized form, that feeds SAP SuccessFactors applications and surrounding SAP systems with people data.
The hub needs to be preconfigured as much as possible, and administrative work like configuration and monitoring needs to be limited as much as possible. The People Central Hub is especially important for supporting subsequent systems such as S/4HANA (cloud and on-premise systems). Data in the hub is read-only, and brought into the hub using CSV file import. Existing SAP HCM on-premise customers can leverage the web-based integration to bring data into the People Central Hub.
Contingent workers can be part of the hub. These can be imported using SAP Fieldglass (delivered integration) or file upload.
Implementing and Configuring the People Central HubPeople Central Hub Overview PUBLIC 5
3 Recommended Implementation Sequence
This is the recommended implementation sequence for Partners and Consultants. We strongly recommend you follow this sequence for the first few implementations and discuss any variations with your Team Lead.
To help you with your implementation, we recommend following sequence of steps.
RememberAs a customer, you don't have access to Provisioning. To complete tasks in Provisioning, contact your implementation partner. If you're no longer working with an implementation partner, contact Product Support.
For information on this step… See…
Setting up a new account in Provisioning Initial Configuration Tasks [page 9]
This section describes the steps to get started with your implementation, including the different options you need to select in Provisioning to enable Employee Central.
Creating the Super Admin Initial Configuration Tasks [page 9]
The section How do you create the Super Admin describes the different steps required to create the Super Admin.
Importing the Corporate Data Model Import the latest data model from the SAP Help Portal
Navigate to SAP SuccessFactors Employee Central
Configuration Employee Central Master Data Models
Defining the Country-Specific Corporate Data Model Import the latest data model from the SAP Help Portal
Navigate to SAP SuccessFactors Employee Central
Configuration Employee Central Master Data Models
Configuring the Succession Data Model Import the latest data model from the SAP Help Portal
Navigate to SAP SuccessFactors Employee Central
Configuration Employee Central Master Data Models
Configuring the Country-Specific Succession Data Models Import the latest data model from the SAP Help Portal
Navigate to SAP SuccessFactors Employee Central
Configuration Employee Central Master Data Models
Importing Picklists Introduction to Picklists [page 47]
This section describes how to import the different values that a customer sees when they click on a dropdown menu. It also provides information on MDF picklists and cascading picklists.
6 PUBLICImplementing and Configuring the People Central Hub
Recommended Implementation Sequence
For information on this step… See…
Importing Event Reasons Import the lastest data model from the SAP Help Portal
Navigate to SAP SuccessFactors Employee Central
Configuration Other Data Model Configuration Files
Importing Foundation and Generic Objects Introduction to Foundation Objects [page 20]
Introduction to Generic Objects [page 21]
This section describes what foundation and generic objects are including how you can import them.
Managing Role-Based Permissions Permissions Overview [page 23]
This section describes which permission roles are specific to Employee Central and how you manage them.
Please refer to the Role-Based Permissions guide on the SAP Help Portal for details on how to set up role-based permissions, permission groups, and permission roles.
Setting Up the Business Configuration UI The section describes what you can do with the BCUI.
For more information, see the Setting Up and Using Business Configuration UI (BCUI) guide on the SAP Help Portal.
Setting Up the People Profile This describes how to set up the people profile.
For the information on how to do this, go to the SAP Help Portal
and navigate to SAP SuccessFactors HCM Suite
Administration People Profile
Setting Up Action Search This describes how to set up action search.
For the information on how to do this, go to the SAP Help Portal
and navigate to SAP SuccessFactors HCM Suite
Administration Action Search
Setting Up the Home Page This describes how to set up the home page.
For the information on how to do this, go to the SAP Help Portal
and navigate to SAP SuccessFactors HCM Suite
Administration Home Page
Implementing and Configuring the People Central HubRecommended Implementation Sequence PUBLIC 7

For information on this step… See…
Importing Employee Data This describes how to import employee data into your system.
For the information on how to do this, go to the SAP Help Portal
and navigate to SAP SuccessFactors Employee Central
Administration Employee Central Imports
For information regarding data protection and privacy of em
ployee data, go to the SAP Help Portal and navigate to SAP
SuccessFactors HCM Suite Configuration Setting Up and
Using Data Protection and Privacy
HRIS Sync Human Resource Information System (HRIS) Synchronization [page 44]
This section describes how you can integrate other SAP SuccessFactors modules with Employee Central.
Setting Up Payment Information This section describes how to set up payment information for employees.
Setting Up Payment Information [page 61]
For more information, go to the SAP Help Portal and navigate
to SAP SuccessFactors Employee Central Administration
Implementing and Configuring Payment Information in
Employee Central
Setting Up Mobile This section describes how to set up mobile access to the system for users.
For the information on how to do this, go to the SAP Help Portal
and navigate to SAP SuccessFactors HCM Suite
Administration SAP SuccessFactors Mobile Deployment
Guide
Using the Configuration Check Tool This describes how to use the check tool in the system for troubleshooting.
For the information about this, go to the SAP Help Portal and
navigate to SAP SuccessFactors Employee Central
Administration Using the Configuration Check Tool
8 PUBLICImplementing and Configuring the People Central Hub
Recommended Implementation Sequence
4 Initial Configuration Tasks
To get started with the customer implementation, you need to do a number of initial configuration tasks.
The tasks listed below are the minimum required provisioning settings. You will make further Provisioning settings based on the customer's requirements as you progress through the implementation.
RememberAs a customer, you don't have access to Provisioning. To complete tasks in Provisioning, contact your implementation partner. If you're no longer working with an implementation partner, contact Product Support.
Prerequisite
An instance has already been created for the customer.
4.1 Setting Basic Options
This section gives you an overview of the basic options that can be selected for Employee Central.
Context
Procedure
1. Log on to Provisioning with your user name and password, and select the company from the list shown or through the initial letter of the company ID.
2. Select Edit Company Settings Company Settings .3. Enable the company languages by selecting the checkboxes of the relevant language packs.
Make sure you select a minimum of one language pack.4. Select the following Employee Central checkboxes:
○ Enable the Attachment Manager○ Employee Profile Data Audit○ Employee Central Foundation Objects
Implementing and Configuring the People Central HubInitial Configuration Tasks PUBLIC 9
○ Enable Translation of Employee Central Foundation Objects - required Employee Central Foundation Objects, Enable Generic Object and Enable the Attachment Manager
○ Effective Dated Data Platform○ Enable Effect-Dated Fields in Basic Import○ Employee Central V2 (Event Reason Derivation) [Not Ready for Sales/Production] - requires Effective
Dated Data Platform○ Enable Business Configuration in Admin Tools - requires Enables Generic Objects, Employee Central V2
(Event Reason Derivation), Enable the Attachment Manager, Effective Dated Data Platform, Employee Profile Data Audit
○ Enable Generic Objects - requires Enable the Attachment Manager5. Select the Role-based Permission checkbox:
○ Role-based Permission (This will disable Administrative Domains)○ Dynamic Groups V2 (My Groups)
6. Select the data retention management checkbox:○ Enable Data Retention Management
Enter the minimum number of approvers required by the company
This allows the Admin to purge inactive users. For more information, see the Setting Up and Using Data Protection and Privacy guide on the SAP Help Portal.
7. Select the following profile checkboxes:○ Profile V12 (Warning: Please perform the upgrade within the Upgrade Center instead. If you use this
setting, you cannot easily switch back to V11 Profile. If Upgrade Center is not available, you should back up scorecard settings in Provisioning before proceeding with the upgrade.)
○ Enable Public Profile8. Select the following user interface checkboxes:
○ Version 12 UI Framework (Revolution)Select the field used to group users to thems from the drop-down list
○ Version 11 UI Framework (ULTRA)○ Performance Management v12 — requires Version 12 UI framework (Revolution)○ NextGen Admin Homepage (Admin v3.0) — requires Version 12 UI framework (Revolution), Enable Usage
Analytics and Enable Action Search (requires Role-based Permission, Generic Objects and Version 12 UI framework (Revolution))
9. To use the new Payment Information portlet (MDF-based, effective-dated, and employment-specific), select the following checkbox. This means, that you don't have to set up the HRIS elements directDeposit and paymentInfo in Succession Data Model. For more information, see the Implementing and Configuring Payment Information in Employee Central guide on the SAP Help Portal.○ Enable New Payment Information (MDF-based, effective-dated, and employment-specific. [CAUTION: For
existing customers, by switching on this feature via Upgrade Center, the old direct-deposit-based UIs, APIs and objects will be irreversibly deactivated. New Payment Information is integrated into Employee Central Payroll. Integration scenarios towards 3rd party systems utilizing the old direct deposits APIs might no longer work. Please check in advance and inform customers that they might need to migrate existing 3rd party integration scenarios to the new APIs, for example, compound employee API or OData API.] — requires Employee Central V2 (Event Reason Derivation), Enable Generic Objects, Effective Dated Data Platform, Employee Profile data audit and Enable the Attachment Manager
10. Scroll back up to the top and select Save Feature on the right of the screen.
10 PUBLICImplementing and Configuring the People Central Hub
Initial Configuration Tasks
4.2 Creating the Super Admin
The Super Admin is the person who can give an employee the authorizations to work as a Security Admin or System Admin in Employee Central.
Context
The Super Admin is sometimes referred to as the “Super User.” For more information about Super Admins, refer to the Role-Based Permissions Handbook.
RememberAs a customer, you don't have access to Provisioning. To complete tasks in Provisioning, contact your implementation partner. If you're no longer working with an implementation partner, contact Product Support.
Procedure
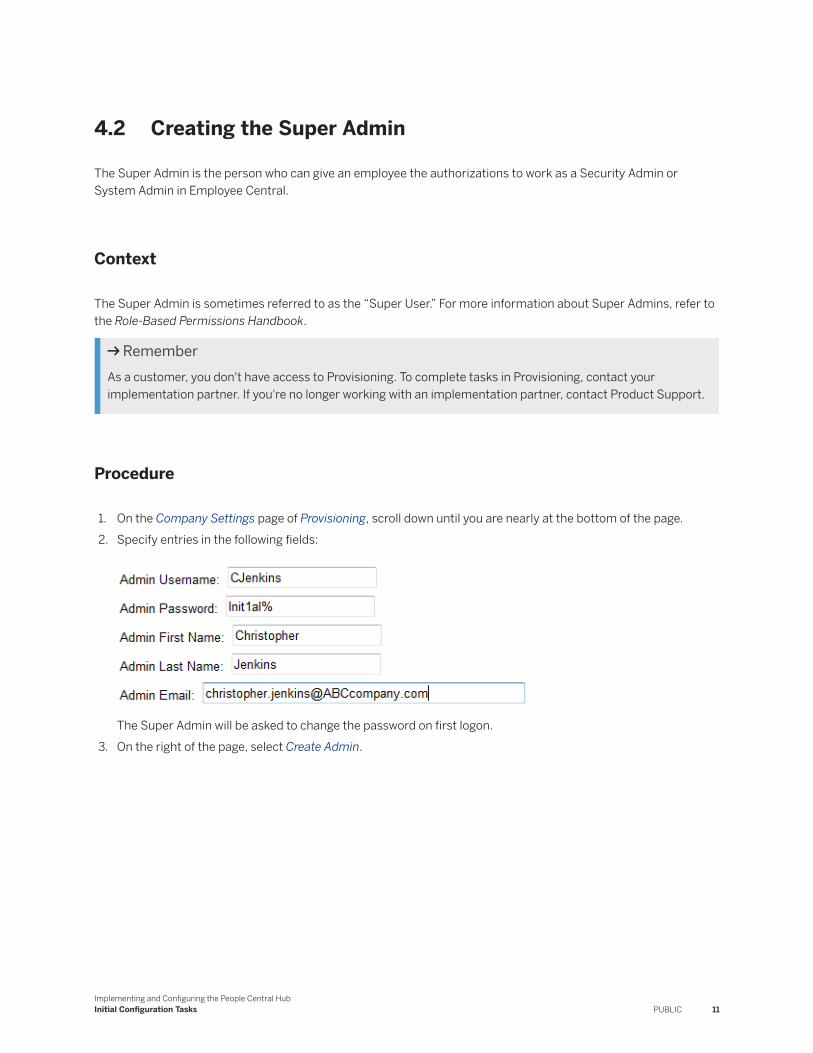
1. On the Company Settings page of Provisioning, scroll down until you are nearly at the bottom of the page.2. Specify entries in the following fields:
The Super Admin will be asked to change the password on first logon.3. On the right of the page, select Create Admin.
Implementing and Configuring the People Central HubInitial Configuration Tasks PUBLIC 11
4.3 Managing Employee Central Settings
You can manage Employee Central settings in the Admin Center: Previously, you required the assistance of SAP support to enable these features.
Context
To enable these features, you will first need to configure permissions to view the Manage Employee Central Settings page.
Procedure
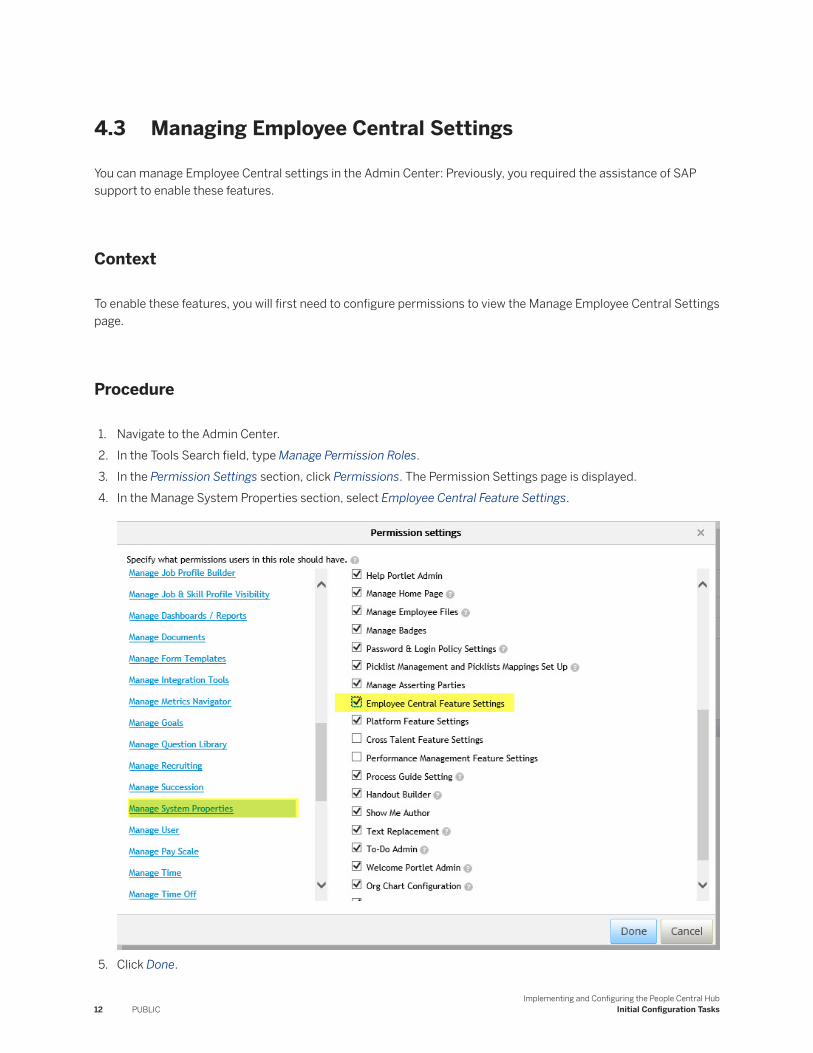
1. Navigate to the Admin Center.2. In the Tools Search field, type Manage Permission Roles.3. In the Permission Settings section, click Permissions. The Permission Settings page is displayed.4. In the Manage System Properties section, select Employee Central Feature Settings.
5. Click Done.
12 PUBLICImplementing and Configuring the People Central Hub
Initial Configuration Tasks
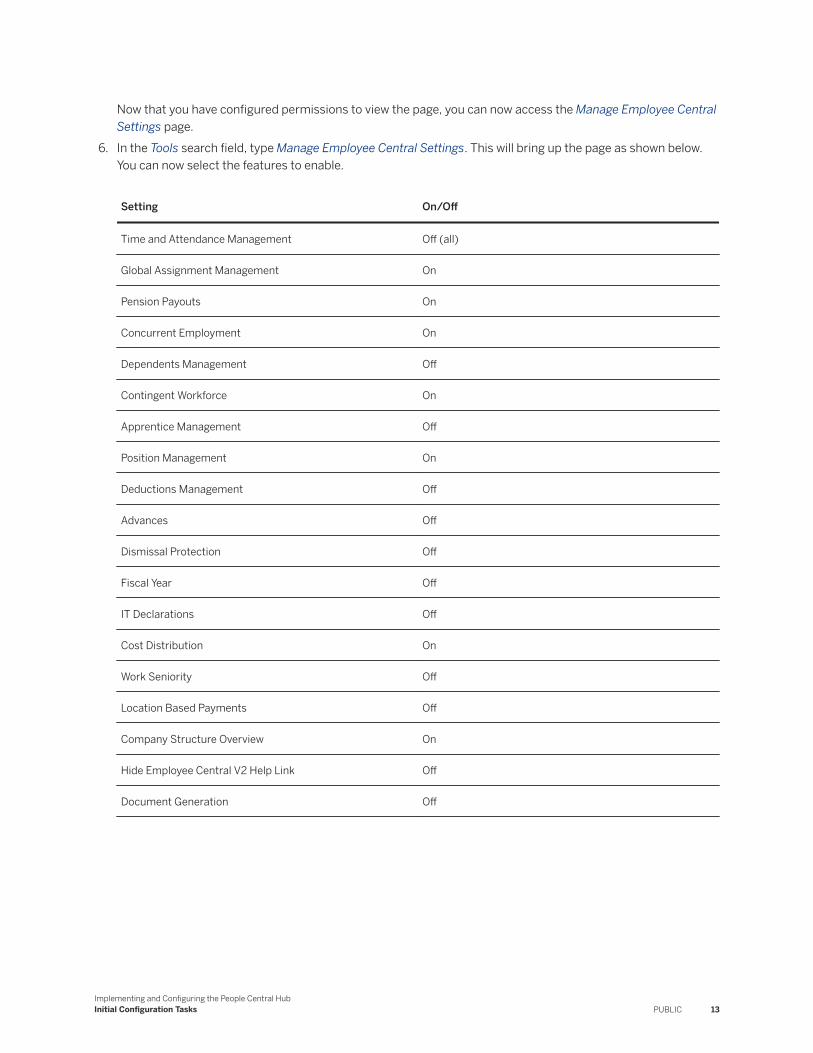
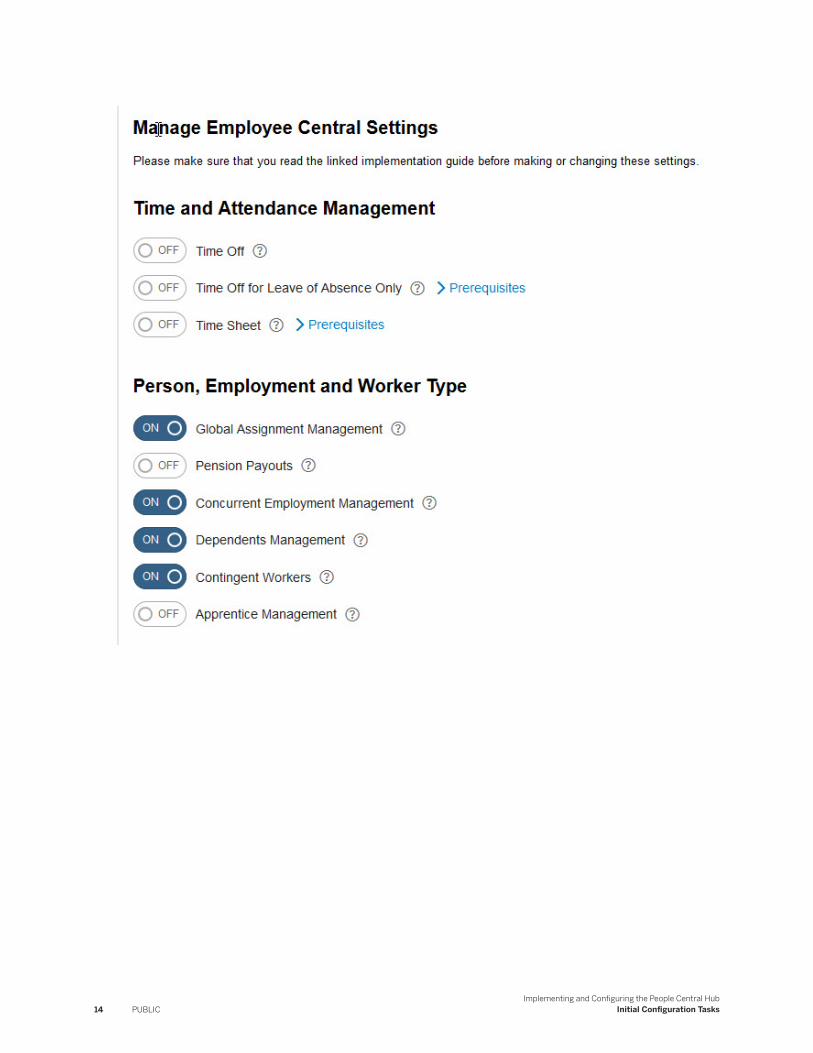
Now that you have configured permissions to view the page, you can now access the Manage Employee Central Settings page.
6. In the Tools search field, type Manage Employee Central Settings. This will bring up the page as shown below. You can now select the features to enable.
Setting On/Off
Time and Attendance Management Off (all)
Global Assignment Management On
Pension Payouts On
Concurrent Employment On
Dependents Management Off
Contingent Workforce On
Apprentice Management Off
Position Management On
Deductions Management Off
Advances Off
Dismissal Protection Off
Fiscal Year Off
IT Declarations Off
Cost Distribution On
Work Seniority Off
Location Based Payments Off
Company Structure Overview On
Hide Employee Central V2 Help Link Off
Document Generation Off
Implementing and Configuring the People Central HubInitial Configuration Tasks PUBLIC 13
14 PUBLICImplementing and Configuring the People Central Hub
Initial Configuration Tasks
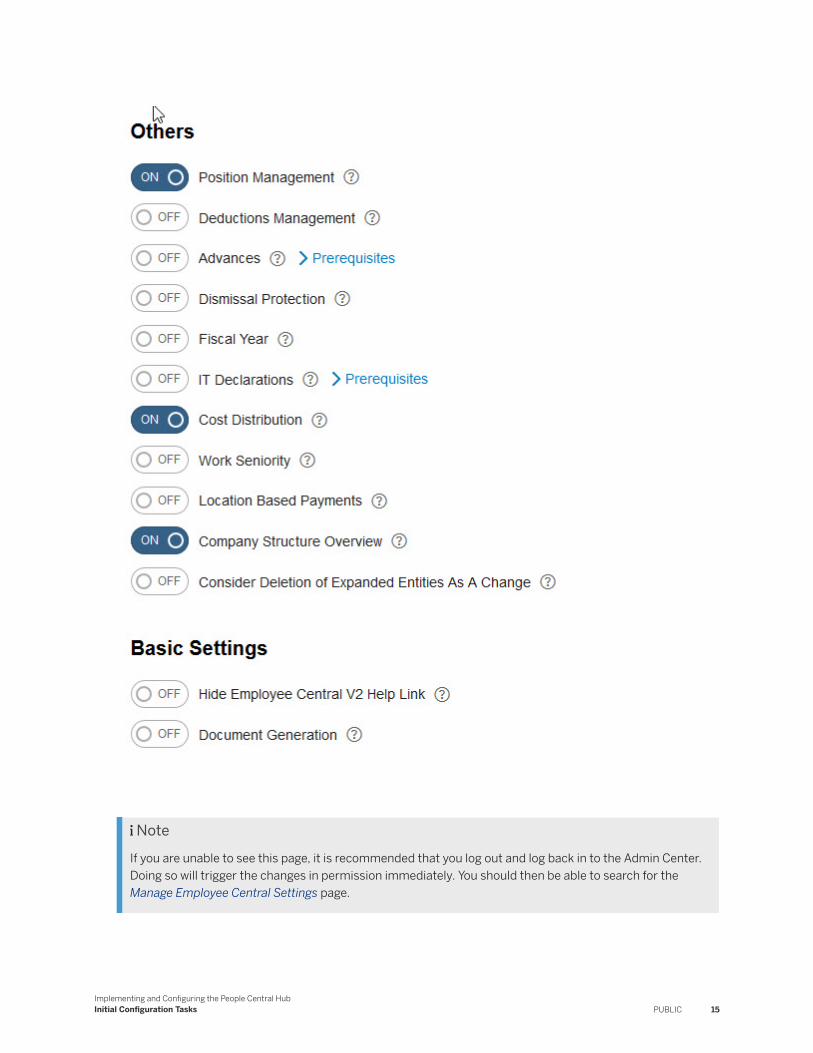
NoteIf you are unable to see this page, it is recommended that you log out and log back in to the Admin Center. Doing so will trigger the changes in permission immediately. You should then be able to search for the Manage Employee Central Settings page.
Implementing and Configuring the People Central HubInitial Configuration Tasks PUBLIC 15
4.4 Keeping the User Directory and Org Chart Up to Date
The User Directory and Org Chart use data that is maintained and stored in Employee Central. You need to make sure that the data in the different systems is kept up to date.
Context
RememberAs a customer, you don't have access to Provisioning. To complete tasks in Provisioning, contact your implementation partner. If you're no longer working with an implementation partner, contact Product Support.
Use a Quartz job to sync the data automatically, based on the dates on which changes become effective.
NoteThis is an SAP SuccessFactors Business Beyond Bias feature. Use it to support processes that detect, prevent, or eliminate the influence of bias, helping you achieve your diversity and inclusion goals.
Procedure
1. Navigate away from the Company Settings page of Provisioning by clicking the company name on the top left.
2. Scroll down and select Manage Job Scheduler Manage Scheduled Jobs .3. Select Create New Job (above the Job Type) field.4. Enter a suitable job name (such as EC Effective Dates Sync).
5. As the job owner, specify the Super Admin you created in the previous task. You can use the Find User function to do this.
6. From the dropdown list, select the job type HRIS Sync.7. Based on the customer requirements, specify the time and frequency of the job.8. Specify additional email recipients and job start notifications as required.9. On the bottom right, select Create Job.
16 PUBLICImplementing and Configuring the People Central Hub
Initial Configuration Tasks
4.5 Activating Employee Central SOAP APIs
Activate the APIs in the system so that you can use them.
Procedure
1. Go to Edit Company Settings Company Settings .2. Under Web Services flag the Employee Central SOAP API setting and save your changes.
With this option turned on, you can use Employee Central SOAP APIs.
4.6 Setting Up Business Rules
Set up business rules in Employee Central to add application logic to determine the outcome of a change made to particular data in the system.
Rules follow the logic 'If this data is changed in a certain way, then the system reacts in this way', for example, when changing a specific field or saving the job information for a newly hired employee.
You can set up business rules to do the following:
● Set field propertiesYou can dynamically default a field as visible or required.Example: If the company is COMP_USA, the phone extension is always required.
NoteHowever, hiding all fields in a portlet using a business rule is not supported and will potentially cause unexpected behavior in the system. You must have at least one field on this object enabled to avoid inconsistent behavior.
● Calculate transient fieldsYou can define transient fields that are calculated “on the fly” when the user opens a page. The calculated values are not meant to be written to the database, as they are not fix values.Example: The user can see the employee's years in service in the system.
● Validate consistency of fieldsYou can define that all relevant fields are provided.Example: If an Admin selects a Contract Type with fixed term validity the respective Contract End Date needs to be provided. This is automatically checked. You will find an example of such a business rule in the Using Business Rules in SuccessFactors Guide.
For more information, see the Implementing Business Rules in SuccessFactors Guide in the SAP Help Portal at SAP SuccessFactors Employee Central Implementation Guides .
Implementing and Configuring the People Central HubInitial Configuration Tasks PUBLIC 17
5 Data Models, Foundation Objects, and Generic Objects
5.1 Data Model Overview
Data models are used to set up the system in a way that satisfies a company's requirements. You define how a company's organizational structure is reflected in the system and what entries a user can make to set up company, person, and employment data. You can add customer-specific fields and rename fields.
The data models are:
● Corporate Data ModelThis is where you set up a company's organization, pay and job structure. The data model refers to data that is used throughout the entire instance of the customer.
● Succession Data ModelThis is where you set up the data structure of data that relates to the people working in a company, such as compensation and address information.
● Country-Specific Corporate Data ModelThis is where you set up fields that are specific to a single country. This data model might be needed if the company has locations in more than one country, for example, to define the corporate address fields for each country.
● Country-Specific Succession Data ModelThis is where you set up international formats and fields, for example, for addresses and national IDs. You might want to set this data model up even if a company operates in only one country, as your employees might live or come from abroad.
Types of Objects
Four types of data objects are used in the data models:
● Foundation objects● Generic objects (includes MDF Foundation Objects)● Person objects● Employment objects
Foundation objects define company data. Today, company data is defined using a combination of foundation objects and generic objects (MDF Foundation Objects). Previously, generic objects were used only to define customized behavior like vacation and position information. Starting with the November 2014 Release, foundation objects are being migrated in a phased manner to 'MDF Foundation Objects'. Company data like Cost Center, Business Unit, Legal Entity, Departments and Division are now being defined using 'MDF Foundation Objects'.
For more information on the migrated foundation objects, refer to the Employee Central Migrating to MDF Foundation Objects guide. Also, refer to the Working with MDF Foundation Objects chapter in this guide.
18 PUBLICImplementing and Configuring the People Central Hub
Data Models, Foundation Objects, and Generic Objects
Person and employment objects define employee data and are sometimes referred to as HR data objects. In the following section, you can find more information about these data objects.
Foundation Objects
With foundation objects you set up data that can be shared across the entire company, such as job codes, departments, or cost centers. Foundation objects can be subdivided into four main areas:
● Organization structures● Job structures● Pay structures● Other data objects, such as event reasons, workflows, and dynamic roles
You define foundation objects in the Corporate Data Model and the country-specific Corporate Data Model.
You can find more information about foundation objects in Introduction to Foundation Objects [page 20]. You can also refer to the section on Foundation Object tables in the Data Object Tables reference guide in the SAP Help Portal, under SAP SuccessFactors Employee Central Reference Information .
Generic Objects
You use generic objects for settings and information relating to the people working for a business. This information includes, for example, vacation and position information.
You have to enable generic objects in your installation before you can use them. You do this in Provisioning, by checking the Enable Generic Objects box.
RememberAs a customer, you don't have access to Provisioning. To complete tasks in Provisioning, contact your implementation partner. If you're no longer working with an implementation partner, contact Product Support.
You define generic objects using the Admin Center Configure Object Definitions page. On the other hand, fields referring to a generic object are defined in the Succession Data Model and the country-specific Succession Data Model.Person Objects
Person objects include information that is linked to the person but does not depend on the job, such as the employee's address and national ID.
You define person objects in the Succession Data Model and the country-specific Succession Data Model.
You can find more information about person objects in the Data Object Tables reference guide as mentioned above.
Employment Objects
Employment objects include job-related information about a person, such as compensation data and hire date.
You define employment objects in the Succession Data Model.
You can find more information about employment objects in the Data Object Tables reference guide as mentioned above.
Working with Data Models
The data models are XML files that you can adjust according to a company's requirements. The XML files have standard elements and fields included, so you need only touch those parts of the data model you want to adjust.
Implementing and Configuring the People Central HubData Models, Foundation Objects, and Generic Objects PUBLIC 19
You can use the existing XML coding as a guideline, and you also find XML examples and explanations in the following chapters.
5.2 Introduction to Foundation Objects
Foundation objects are used to set up data that can be shared across the entire company, such as job codes, departments, or business units. Foundation objects are sometimes referred to as “foundation tables”. Foundation objects are contained and configured in the Corporate Data Model.
Foundation Objects Migrated to MDF
● Cost Center● Business Unit● Department● Division● Legal Entity● Legal Entity Local● Job Function● Pay Group● Pay Calendar● Job Classification● Job Classification Local
Foundation objects are the first objects you should load because some of the lists of values proposed in employment information come from the foundation objects.
You can use foundation objects to populate data at employee level. For example, if you assign a job code to an employee, that employee’s record is then populated with all information based on the attributes of the job code. You create and maintain foundation objects in the Corporate Data Model. For MDF foundation objects, choose
Admin Center Configure Object Definitions to configure these MDF foundation objects. Choose Admin Center Manage Data to manage these objects .
5.2.1 Characteristics of Foundation Objects
Here's a summary of the features available in foundation objects.
Features
● Foundation objects consist of one or more fields. Some of them are required if you use the relevant object.● Each foundation element has a technical ID, called an hris-element-id. You cannot change this.● Each field within a foundation object also has a technical field ID. You cannot change this.● However, you can change the labels for the foundation objects and the fields they contain. The label is the
descriptor that appears on the user interface (UI).
20 PUBLICImplementing and Configuring the People Central Hub
Data Models, Foundation Objects, and Generic Objects
● Except for the start date and, if defined, the end date, which always appear at the top of the screen, the order in which the fields are displayed on the UI is the same as the order in which you list them in the foundation object.
● You can decide whether a field actually appears on the UI and, if so, whether:○ It is required or optional○ It is only for display or whether users can change or edit it
● Every foundation object contains custom fields. These are empty fields you can use to handle data not covered by the fields supplied as standard.
● Some, but not all foundation objects, are “effective dated”.● The search criteria for foundation objects can only be string texts. They cannot be picklists or generic objects.
NoteFor example, if you configure the city field in the Coporate Data Model as a picklist for a Country X, you can’t use city in the search criteria for location. If you do, you won’t be able to search locations by city for Country X.
5.3 Introduction to Generic Objects
You use generic objects for information and settings relating to the people working in the company.
Generic objects are created using the Metadata Framework.
You use generic objects for information and settings relating to the people working in the company, such as their compensation, vacation, and address information. You create generic objects in the Succession Data Model.
Don't confuse them with foundation objects, which apply across your whole business and are used to set up the company's organization as well as the job structure. You create foundation objects in the Corporate Data Model.
Before you can start using generic objects, you need to enable them for each company in Provisioning. Check under Admin Tools whether the generic tool options appear. If they don't, enable generic options proceed as follows:
1. Log on to Provisioning.
2. Choose Edit Company Settings Company Settings3. Select Enable Generic Objects.
5.3.1 Characteristics of Generic Objects
Here's a summary of the features available in generic objects.
Features
Here's a survey of the characteristics of generic objects.
Implementing and Configuring the People Central HubData Models, Foundation Objects, and Generic Objects PUBLIC 21
● Each object has a technical ID, which you cannot change.There are different types of technical ID. Here are some examples:○ Tab element ID: If you include a generic object with a tab element ID in your Succession Data Model, the
relevant tab is available for use in your installation. You need to configure permissions for them though (see below).
○ Field ID: If you include a generic object with a field ID, that field is available for use in your installation. Again, you need to give each user the permissions they need to use the field.
Each object has a label, which you can change to suit your requirements. It is possible to maintain this label in different languages if you need to.
● You have to enable generic objects in your system before you can use or see them. You do this by checking the Enable Generic Objects feature in Provisioning.
RememberAs a customer, you don't have access to Provisioning. To complete tasks in Provisioning, contact your implementation partner. If you're no longer working with an implementation partner, contact Product Support.
● You have to set permissions for generic objects, which determine who can use them and what they can do with them.
● In the case of field IDs, you can decide whether each field appears in your UI and, if so, whether it is for display only or whether users can change or edit the information in it.
22 PUBLICImplementing and Configuring the People Central Hub
Data Models, Foundation Objects, and Generic Objects
6 Managing Permissions
This section explains how to set up permissions for the People Central Hub.
6.1 Permissions Overview
The People Central Hub has several roles for which permissions need to be granted in the system.
The roles are:
● Employee● Manager● IT admin● HR admin
6.2 Permissions for People Central Hub
You can use role-based permissions (RBP) to control access to who sees what in regards to employee information.
Role-based permissions allow you to grant different levels of read or write access depending on the role of the employee. For example, an employee is only allowed to read their own compensation information, but an HR Admin is allowed to edit it. You define these kind of permissions by managing permission roles.
The portlets seen by users in the employee profile are directly related to permissions and roles granted to those users.
The permission categories are divided in User Permissions and Admin Permissions, which are further subdivided, for example, Employee Data or Miscellaneous Permissions . Once selected, the list of permissions associated with this category are displayed on the right side and in some areas, further divided into groups. For example, the HR Information section contains groupings, for example, for Biographical Information.
Related Information
List of Role-Based PermissionsAssigning Permissions to a Role
Implementing and Configuring the People Central HubManaging Permissions PUBLIC 23

6.2.1 User Permissions for People Central Hub
You can use role-based permissions (RBP) to control access to who sees what in regards to what users can see and do in the system.
The portlets seen by users in the employee profile are directly related to permissions and roles granted to those users.
The permission categories are divided in User Permissions and Admin Permissions, which are further subdivided, for example, Employee Data or Miscellaneous Permissions . Once selected, the list of permissions associated with this category are displayed on the right side and in some areas, further divided into groups. For example, the HR Information section contains groupings, for example, for Biographical Information.
Here is a list of the user permission categories.
Permission Category Sections Relevant for Employee Central
Employee Data ● HR Information● Employment Details● Global Assignment Details
Only available if you have activated global assignments in the Admin Center.
● Pension Payout DetailsOnly available if you have activated pension payouts in the Admin Center.
● HR Actions● Future Dated Transaction Alert● Transactions Pending Approval● View Workflow Approval History● Pay Component Groups● Pay Components
Employee Central Effective Dated Entities Set field-level permissions for effective-dated portlets and fields. These portlets are effective dated:
● Addresses● Compensation Information● Dependents● Job Information● Job Relationships● Personal Information
Employee Views Define whether the user can access the following pages from the Employee Files using the drop-down menu.
● Employment Information● Personal Information● Pending Requests
For workflows requested by you or for which you are the approver.
24 PUBLICImplementing and Configuring the People Central Hub
Managing Permissions
Related Information
List of Role-Based PermissionsAssigning Permissions to a Role
6.2.1.1 Employee Data Permissions - HR Information
Assign permissions for blocks that refer to non-effective dated entities. Non-effective dated means that the history for the changes will not be maintained (for example, for Phone Information).
The entries listed here refer to the different blocks that have been defined as HRIS elements in the Succession Data Model. You can choose these permissions:
● View: The user can see the block.
TipIf necessary, you can use OnView rules to control who can see which fields in the blocks listed here, since you cannot use role-based permissions to set field-level View permissions for these blocks. For more information about how to create such rules, refer to the Example Employee Central Business Rules.
● Edit: The user can edit the block on the Personal Information or Employment Information page by clicking the Edit link in the block:
Note that the labels depend on the labels defined in the Succession Data Model. If you have taken over the standard Succession Data Model, the following entries are displayed under HR Information:
This HR Information entry... ...refers to this HRIS element:
Biographical Information personInfo
National ID Information nationalIdCard
Select this permission to define whether users can view or edit national ID information for all countries or regions.
Implementing and Configuring the People Central HubManaging Permissions PUBLIC 25
This HR Information entry... ...refers to this HRIS element:
National ID (Restricted to only country/region of legal entity) nationalIdCard
Select this permission to restrict administrators so that they can only access the national ID information of an employee relevant to the country or region of the legal entity where the employee is currently employed. For example, an administrator responsible for an employee currently employed in the United States can’t view or add national ID information related to other countries or regions for the employee.
For an employee with multiple assignments or employments in different countries or regions, if the responsible administrators with this permission can access an assignment, they only view and edit the national ID information relevant to the assignment.
Note that selecting only View has the same impact as selecting both View and Edit, that is, administrators can both view and edit the relevant national ID information.
Phone Information phoneInfo
Email Information emailInfo
Business Email Address This entry is an exception: It refers to the Email Type field of the emailInfo HRIS element, where you can select the type Business.
It is listed here because normally every employee needs a business email address. If a company assigns the email addresses to the employees and does not want them to be editable by the employees, select only View permission here.
Social Accounts Information imInfo
Primary Emergency Contact emergencyContactPrimary
26 PUBLICImplementing and Configuring the People Central Hub
Managing Permissions
This HR Information entry... ...refers to this HRIS element:
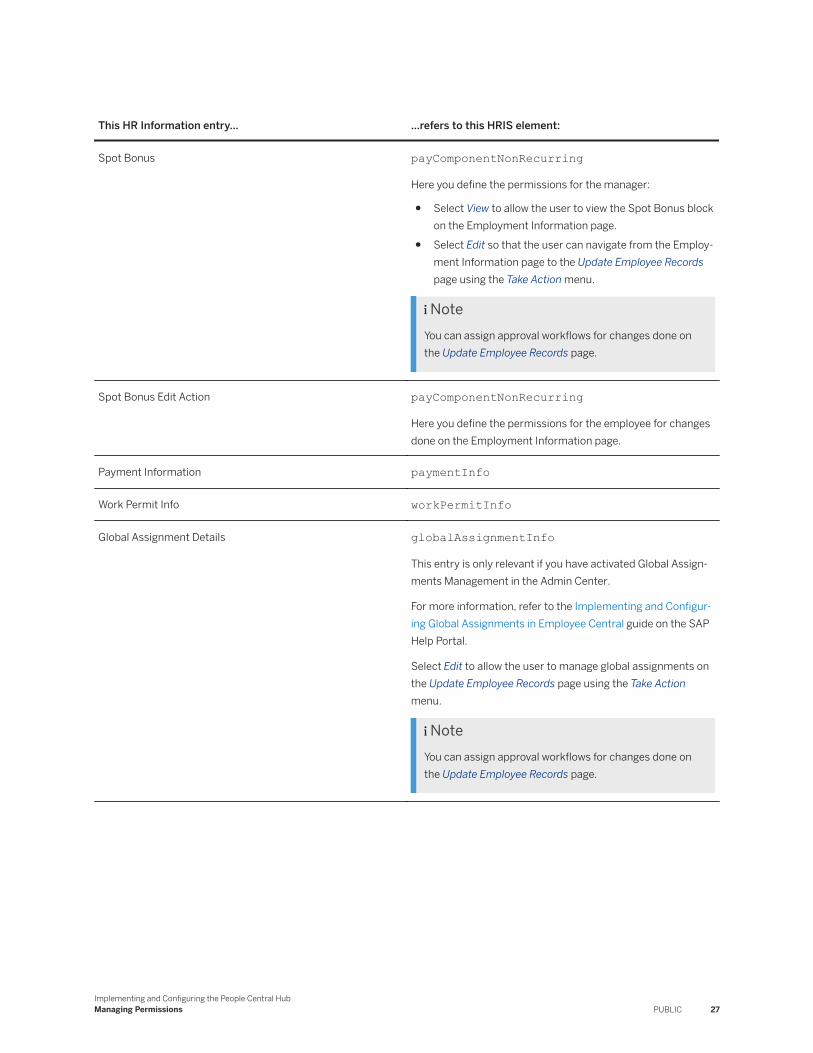
Spot Bonus payComponentNonRecurring
Here you define the permissions for the manager:
● Select View to allow the user to view the Spot Bonus block on the Employment Information page.
● Select Edit so that the user can navigate from the Employment Information page to the Update Employee Records page using the Take Action menu.
NoteYou can assign approval workflows for changes done on the Update Employee Records page.
Spot Bonus Edit Action payComponentNonRecurring
Here you define the permissions for the employee for changes done on the Employment Information page.
Payment Information paymentInfo
Work Permit Info workPermitInfo
Global Assignment Details globalAssignmentInfo
This entry is only relevant if you have activated Global Assignments Management in the Admin Center.
For more information, refer to the Implementing and Configur-ing Global Assignments in Employee Central guide on the SAP Help Portal.
Select Edit to allow the user to manage global assignments on the Update Employee Records page using the Take Action menu.
NoteYou can assign approval workflows for changes done on the Update Employee Records page.
Implementing and Configuring the People Central HubManaging Permissions PUBLIC 27
This HR Information entry... ...refers to this HRIS element:
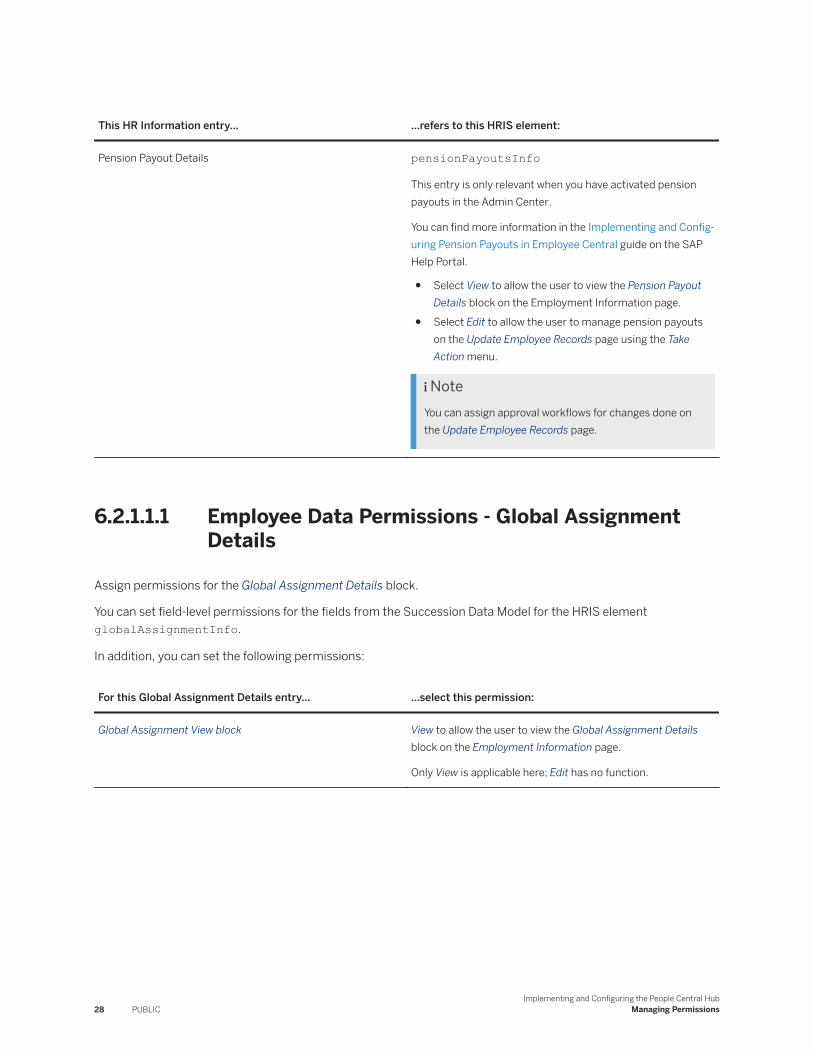
Pension Payout Details pensionPayoutsInfo
This entry is only relevant when you have activated pension payouts in the Admin Center.
You can find more information in the Implementing and Config-uring Pension Payouts in Employee Central guide on the SAP Help Portal.
● Select View to allow the user to view the Pension Payout Details block on the Employment Information page.
● Select Edit to allow the user to manage pension payouts on the Update Employee Records page using the Take Action menu.
NoteYou can assign approval workflows for changes done on the Update Employee Records page.
6.2.1.1.1 Employee Data Permissions - Global Assignment Details
Assign permissions for the Global Assignment Details block.
You can set field-level permissions for the fields from the Succession Data Model for the HRIS element globalAssignmentInfo.
In addition, you can set the following permissions:
For this Global Assignment Details entry... ...select this permission:
Global Assignment View block View to allow the user to view the Global Assignment Details block on the Employment Information page.
Only View is applicable here; Edit has no function.
28 PUBLICImplementing and Configuring the People Central Hub
Managing Permissions
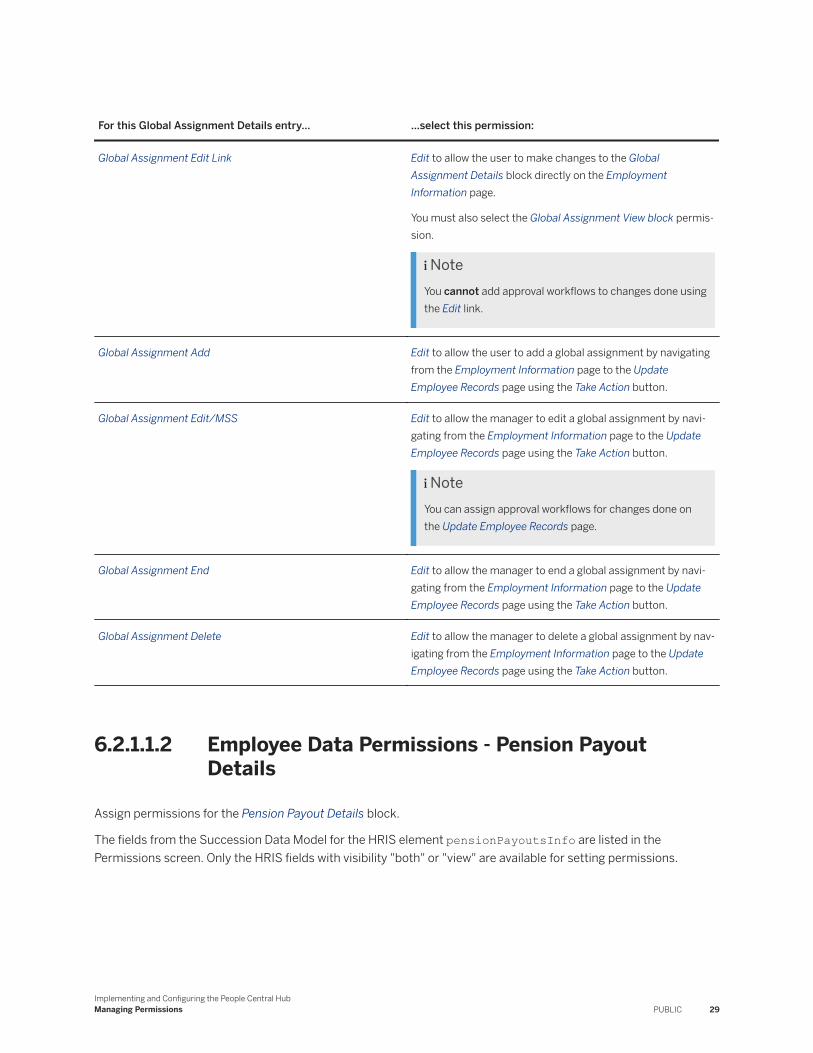
For this Global Assignment Details entry... ...select this permission:
Global Assignment Edit Link Edit to allow the user to make changes to the Global Assignment Details block directly on the Employment Information page.
You must also select the Global Assignment View block permission.
NoteYou cannot add approval workflows to changes done using the Edit link.
Global Assignment Add Edit to allow the user to add a global assignment by navigating from the Employment Information page to the Update Employee Records page using the Take Action button.
Global Assignment Edit/MSS Edit to allow the manager to edit a global assignment by navigating from the Employment Information page to the Update Employee Records page using the Take Action button.
NoteYou can assign approval workflows for changes done on the Update Employee Records page.
Global Assignment End Edit to allow the manager to end a global assignment by navigating from the Employment Information page to the Update Employee Records page using the Take Action button.
Global Assignment Delete Edit to allow the manager to delete a global assignment by navigating from the Employment Information page to the Update Employee Records page using the Take Action button.
6.2.1.1.2 Employee Data Permissions - Pension Payout Details
Assign permissions for the Pension Payout Details block.
The fields from the Succession Data Model for the HRIS element pensionPayoutsInfo are listed in the Permissions screen. Only the HRIS fields with visibility "both" or "view" are available for setting permissions.
Implementing and Configuring the People Central HubManaging Permissions PUBLIC 29
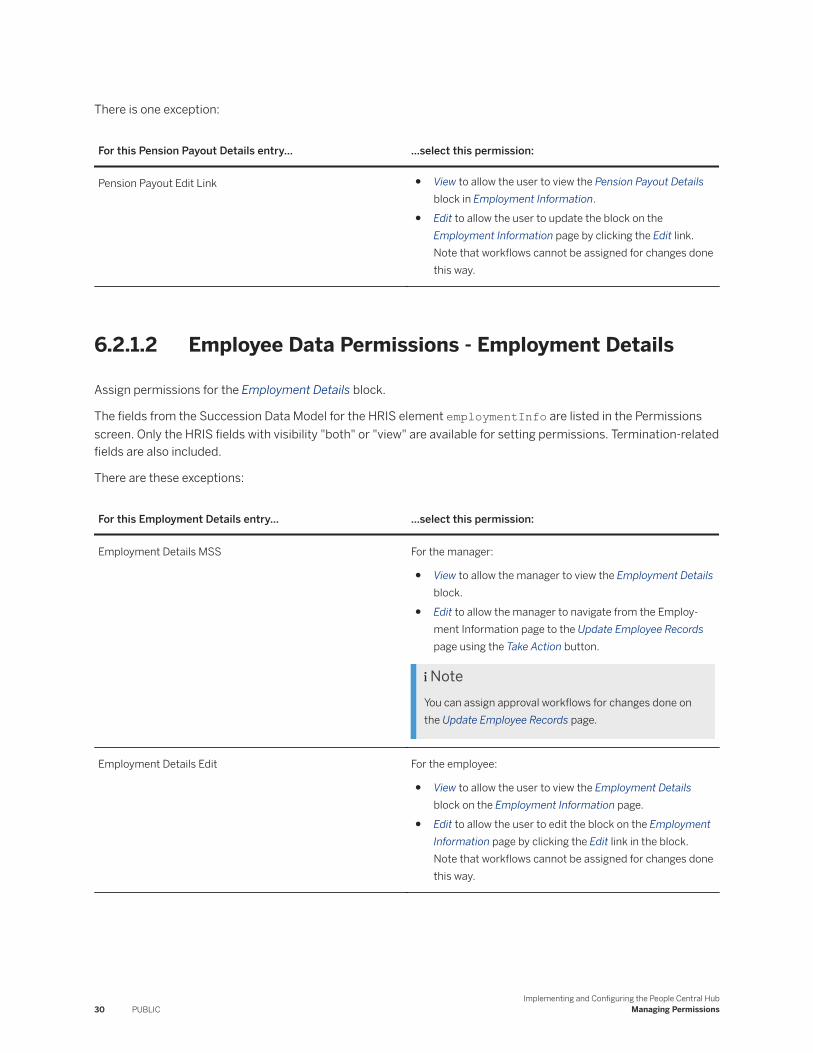
There is one exception:
For this Pension Payout Details entry... ...select this permission:
Pension Payout Edit Link ● View to allow the user to view the Pension Payout Details block in Employment Information.
● Edit to allow the user to update the block on the Employment Information page by clicking the Edit link.Note that workflows cannot be assigned for changes done this way.
6.2.1.2 Employee Data Permissions - Employment Details
Assign permissions for the Employment Details block.
The fields from the Succession Data Model for the HRIS element employmentInfo are listed in the Permissions screen. Only the HRIS fields with visibility "both" or "view" are available for setting permissions. Termination-related fields are also included.
There are these exceptions:
For this Employment Details entry... ...select this permission:
Employment Details MSS For the manager:
● View to allow the manager to view the Employment Details block.
● Edit to allow the manager to navigate from the Employment Information page to the Update Employee Records page using the Take Action button.
NoteYou can assign approval workflows for changes done on the Update Employee Records page.
Employment Details Edit For the employee:
● View to allow the user to view the Employment Details block on the Employment Information page.
● Edit to allow the user to edit the block on the Employment Information page by clicking the Edit link in the block.Note that workflows cannot be assigned for changes done this way.
30 PUBLICImplementing and Configuring the People Central Hub
Managing Permissions

For this Employment Details entry... ...select this permission:
Add New Employment For the user who is allowed to add multiple employments for one employee:
Edit.
Please note that Concurrent Employment Management needs to be enabled in the Admin Center to use this function.
Bonus Pay Expiration Date Hide this field from the user interface by deselecting View and Edit.
This field belongs to the Termination Information block. However, the permissions are included here because it requires field permission rather than permission for the whole block.
Change primary Employment The field defines whether the admins are allowed to change the employment classification of an employee in the Employment Details rather than in the Manage Data UI.
6.2.1.3 Employee Data Permissions - HR Actions
Assign permissions for the Update Employee Records page.
The HR Actions section controls mainly who has access to the Update Employee Records page for actions defined in the Succession Data Model.
This HR Action... ...defines this permission:
Update Employment Records (displayed as Take Action button)
This option overrules all other permissions in this section. It controls whether the user can see and use the Take Action button from the Employment Information page.
View Higher Grades This option defines if a manager can view an employee's job classification if it is higher than the manager's.
To restrict a manager’s view, leave the permissions unchecked. Make sure that the job classifications are assigned to a pay grade, and have a paygradeLevel maintained. When the manager goes to the Update Employee Records page for Job Information, the list of job classifications in the dropdown is limited to those whose paygradeLevel is less than the manager’s. Note that this function is limited to this page; it does not have any effect on the Job Info History page.
hireAction This is an hris-action from the Succession Data Model. It defines if the user can access the Add New Employee link in the Admin Center.
Implementing and Configuring the People Central HubManaging Permissions PUBLIC 31
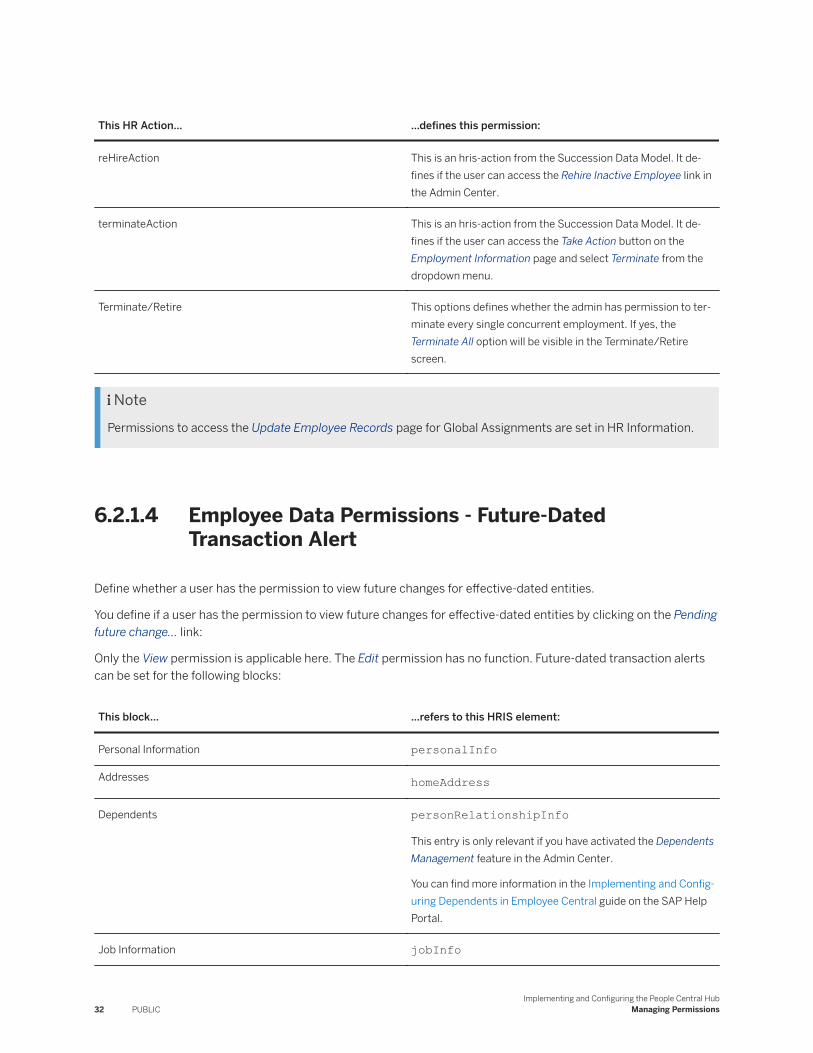
This HR Action... ...defines this permission:
reHireAction This is an hris-action from the Succession Data Model. It defines if the user can access the Rehire Inactive Employee link in the Admin Center.
terminateAction This is an hris-action from the Succession Data Model. It defines if the user can access the Take Action button on the Employment Information page and select Terminate from the dropdown menu.
Terminate/Retire This options defines whether the admin has permission to terminate every single concurrent employment. If yes, the Terminate All option will be visible in the Terminate/Retire screen.
NotePermissions to access the Update Employee Records page for Global Assignments are set in HR Information.
6.2.1.4 Employee Data Permissions - Future-Dated Transaction Alert
Define whether a user has the permission to view future changes for effective-dated entities.
You define if a user has the permission to view future changes for effective-dated entities by clicking on the Pending future change… link:
Only the View permission is applicable here. The Edit permission has no function. Future-dated transaction alerts can be set for the following blocks:
This block... ...refers to this HRIS element:
Personal Information personalInfo
Addresses homeAddress
Dependents personRelationshipInfo
This entry is only relevant if you have activated the Dependents Management feature in the Admin Center.
You can find more information in the Implementing and Config-uring Dependents in Employee Central guide on the SAP Help Portal.
Job Information jobInfo
32 PUBLICImplementing and Configuring the People Central Hub
Managing Permissions
This block... ...refers to this HRIS element:
Compensation Information compInfo
Job Relationships jobRelationsInfo
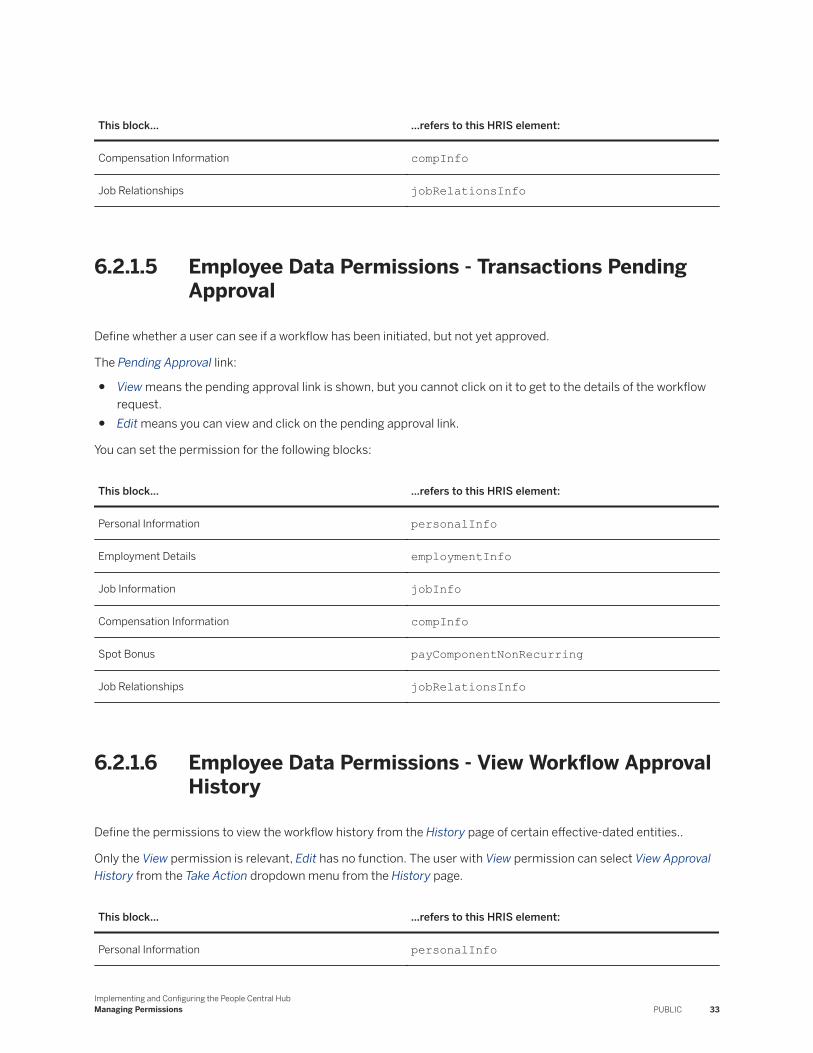
6.2.1.5 Employee Data Permissions - Transactions Pending Approval
Define whether a user can see if a workflow has been initiated, but not yet approved.
The Pending Approval link:
● View means the pending approval link is shown, but you cannot click on it to get to the details of the workflow request.
● Edit means you can view and click on the pending approval link.
You can set the permission for the following blocks:
This block... ...refers to this HRIS element:
Personal Information personalInfo
Employment Details employmentInfo
Job Information jobInfo
Compensation Information compInfo
Spot Bonus payComponentNonRecurring
Job Relationships jobRelationsInfo
6.2.1.6 Employee Data Permissions - View Workflow Approval History
Define the permissions to view the workflow history from the History page of certain effective-dated entities..
Only the View permission is relevant, Edit has no function. The user with View permission can select View Approval History from the Take Action dropdown menu from the History page.
This block… ...refers to this HRIS element:
Personal Information personalInfo
Implementing and Configuring the People Central HubManaging Permissions PUBLIC 33

This block… ...refers to this HRIS element:
Job Information jobInfo
Compensation Information compInfo
Job Relationships jobRelationsInfo
6.2.1.7 Employee Data Permissions - Event Reasons
Assign View or Edit permissions for individual event reasons. This helps distribute different functions within the company to the correct people.
Here are a few examples, of why distribution is important:
● HR admins can be the only ones given access to data changes and this action has no workflow attached.● HR admins have access to transfers outside the team.● Managers only have access to transfer to/from their team.● Payroll admins only have access to out-of-cycle salary increases.
There are many types of event reasons, for example, data changes, termination, job changes, global assignment, benefits, paid or unpaid leave, hire or rehire, transfer, and so on.
6.2.1.8 Employee Central Effective Dated Entities Permissions
Set field-level permissions for effective-dated blocks and fields.
These permissions include country/region-specific fields that are prefixed by the 3-letter ISO code (for example, FRA for France, DEU for Germany, and so on). There are 5 different permissions you can select for effective-dated entities:
● Delete: The user to delete an effective-dated entity. This is only applicable at element or block level, not at field level.
● View Current: The user can see only the current field value of an effective-dated entity. When the user looks at the History page, the past data record for this field is not displayed.
● View History: The user can see past values on the History page. This permission also includes the View Current permission, so that the user can also see the current field value.
● Edit/Insert: The user can edit an effective-dated entity by inserting a new data record for it which is effective as of a certain date. As the user does not really change the data record itself (then it would just overwrite the past data record), past data records are still available in the History. The field is also available for editing when a new data record is inserted.
● Correct: The user can make corrections on the History page. However, that means that they also need permissions for the History from Job Information Actions.
The following sections are relevant for Employee Central:
34 PUBLICImplementing and Configuring the People Central Hub
Managing Permissions
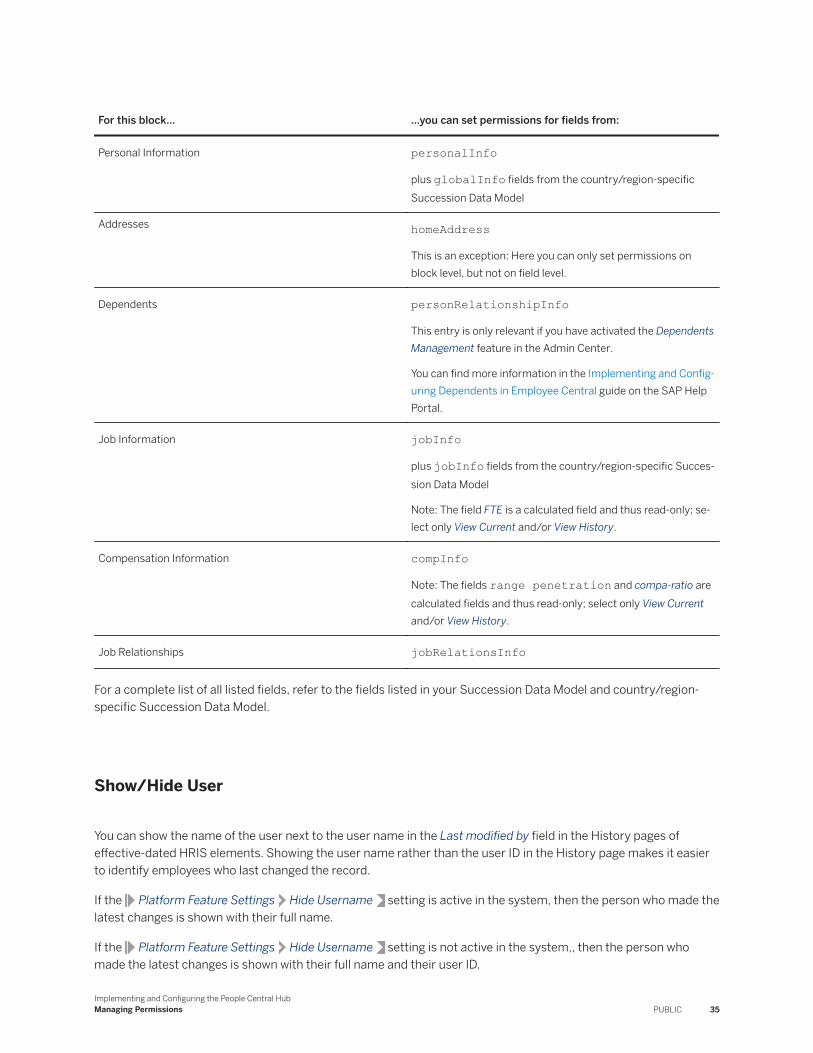
For this block… …you can set permissions for fields from:
Personal Information personalInfo
plus globalInfo fields from the country/region-specific Succession Data Model
Addresses homeAddress
This is an exception: Here you can only set permissions on block level, but not on field level.
Dependents personRelationshipInfo
This entry is only relevant if you have activated the Dependents Management feature in the Admin Center.
You can find more information in the Implementing and Config-uring Dependents in Employee Central guide on the SAP Help Portal.
Job Information jobInfo
plus jobInfo fields from the country/region-specific Succession Data Model
Note: The field FTE is a calculated field and thus read-only; select only View Current and/or View History.
Compensation Information compInfo
Note: The fields range penetration and compa-ratio are calculated fields and thus read-only; select only View Current and/or View History.
Job Relationships jobRelationsInfo
For a complete list of all listed fields, refer to the fields listed in your Succession Data Model and country/region-specific Succession Data Model.
Show/Hide User
You can show the name of the user next to the user name in the Last modified by field in the History pages of effective-dated HRIS elements. Showing the user name rather than the user ID in the History page makes it easier to identify employees who last changed the record.
If the Platform Feature Settings Hide Username setting is active in the system, then the person who made the latest changes is shown with their full name.
If the Platform Feature Settings Hide Username setting is not active in the system,, then the person who made the latest changes is shown with their full name and their user ID.
Implementing and Configuring the People Central HubManaging Permissions PUBLIC 35
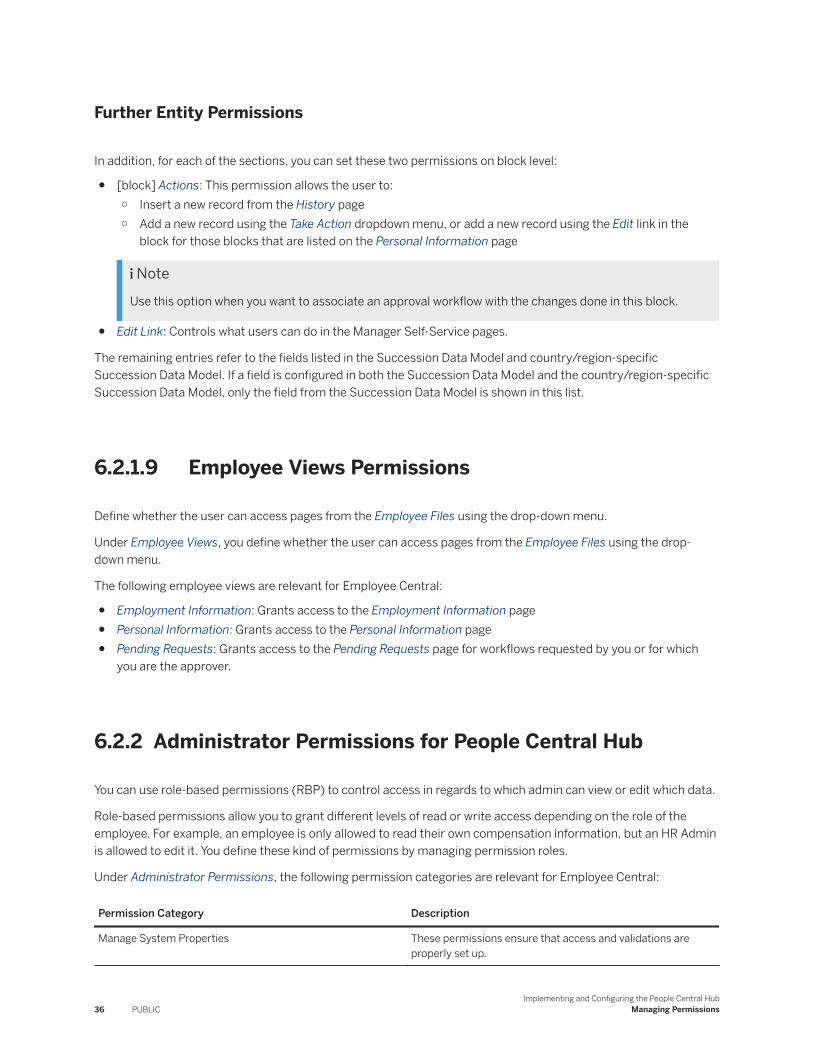
Further Entity Permissions
In addition, for each of the sections, you can set these two permissions on block level:
● [block] Actions: This permission allows the user to:○ Insert a new record from the History page○ Add a new record using the Take Action dropdown menu, or add a new record using the Edit link in the
block for those blocks that are listed on the Personal Information page
NoteUse this option when you want to associate an approval workflow with the changes done in this block.
● Edit Link: Controls what users can do in the Manager Self-Service pages.
The remaining entries refer to the fields listed in the Succession Data Model and country/region-specific Succession Data Model. If a field is configured in both the Succession Data Model and the country/region-specific Succession Data Model, only the field from the Succession Data Model is shown in this list.
6.2.1.9 Employee Views Permissions
Define whether the user can access pages from the Employee Files using the drop-down menu.
Under Employee Views, you define whether the user can access pages from the Employee Files using the drop-down menu.
The following employee views are relevant for Employee Central:
● Employment Information: Grants access to the Employment Information page● Personal Information: Grants access to the Personal Information page● Pending Requests: Grants access to the Pending Requests page for workflows requested by you or for which
you are the approver.
6.2.2 Administrator Permissions for People Central Hub
You can use role-based permissions (RBP) to control access in regards to which admin can view or edit which data.
Role-based permissions allow you to grant different levels of read or write access depending on the role of the employee. For example, an employee is only allowed to read their own compensation information, but an HR Admin is allowed to edit it. You define these kind of permissions by managing permission roles.
Under Administrator Permissions, the following permission categories are relevant for Employee Central:
Permission Category Description
Manage System Properties These permissions ensure that access and validations are properly set up.
36 PUBLICImplementing and Configuring the People Central Hub
Managing Permissions
Permission Category Description
Manage Foundation Objects These permissions ensure that users can import and work with foundation objects and translations for Job Codes.
Manage Foundation Object Types These permissions are control what the admin is allowed to do on the Manage Organization, Pay and Job Structures page. Grant permissions for each individual foundation object.
Manage User These permissions ensure that users have the correct access to all they need in the system. This is especially important for the integration between Recruiting, Onboarding, and Employee Central.
Metadata Framework These permissions ensure that users can work with generic objects in the Metadata Framework (MDF).
For more information, see the Implementing the Metadata Framework guide on the SAP Help Portal.
NoteWhat is the difference to the Manage Data permission?
Without the read/write permission, the user cannot see or manage generic objects on any page in the system. Without the Manage Data permission, the user cannot access the Manage Data page, but is still able to manage data from other pages, such as the Configure Business Rules page (if the Configure Business Rules permission is granted).
Manage Business Configuration These permissions ensure that users can work with the Business Configuration UI, which allows them to access the Succession Data Model as well as the country-specific Succession Data Model from the UI rather than having to go through Provisioning.
This entry is only displayed if you have activated the Business Configuration in Admin Tools feature in Provisioning.
For more information, see the Setting Up and Using Business Configuration UI (BCUI)guide on the SAP Help Portal.
Employee Central API These permissions ensure that users can work with the SOAP-based application programming interfaces (APIs) for Employee Central. These are relevant for integrating Employee Central with other software products.
The Foundation APIs are relevant for foundation data, the HRIS APIs for person and employment data.
For more information, see the SAP SuccessFactors Employee Central OData API: Reference Guide on the SAP Help Portal.
Implementing and Configuring the People Central HubManaging Permissions PUBLIC 37
Permission Category Description
Manage Time Off
Manage Time
These permissions ensure that users can work with Time Off and the payroll time sheet.
For more information about Time Off, see the Implementing Employee Central Time Off guide on the SAP Help Portal.
For more information about payroll time sheet, see the Implementing Employee Central Payroll Time Sheet guide on the SAP Help Portal.
Manage Positions These permissions ensure that users can work with Position Management.
For more information, see the Employee Central Position Management guide on the SAP Help Portal.
Manage Compensation
Manage Pay Scale
Manage Deductions
Manage Spot Awards
These permissions ensure that users can work with Employee Central compensation.
For more information, see the Implementing and Configuring Employee Payments in Employee Central guide on the SAP Help Portal.
Related Information
List of Role-Based PermissionsAssigning Permissions to a Role
6.2.2.1 Managing System Properties
This section explains what needs to be done to ensure admins have access to the correct pages to complete their work.
Here you define permissions for the admin that cover many aspects of the system, for example, creating & updating company settings as well as processes. Allowing admins the rights to update settings for mobile and security areas is also done here.
Ensure that at least the following are selected:
● Employee Central Feature SettingsThis allows admins to turn on features in Employee Central themselves without having to create an SAP Cloud Support ticket.
● Company System and Logo SettingsThis allows admins to make enable or disable further company settings, such as validations for sensitive data.
38 PUBLICImplementing and Configuring the People Central Hub
Managing Permissions
6.2.2.1.1 Configuring Company System Settings
Allow the admin access to the Company System and Logo Settings link in the Admin Center, which has many Employee Central relevant settings.
Prerequisites
Ensure that the permission for Administrator Permission Manage System Properties Company System and Logo Settings is enabled.
Procedure
1. Go to Admin Center Company System and Logo Settings .2. In the Company System Setting section, select what is required for the company. Go through the list carefully.
Many settings enable validations or affect search results.
We recommend that at least the following validations be selected:
○ Enable Address Validations○ Enable National ID Validations○ Enable Bank Account Validations○ Enable Payment Information Validations
3. Optional: If you use contingent workers, select the Enable target group based filtering for Worker fields checkbox.
This means that, if checked, then the values in the dropdown list for Worker fields will be based on the target group settings assigned in permissions. If not checked, then all users will be available in the dropdown list.
4. Save your settings.
6.2.2.2 Managing Foundation Objects
This section explains what needs to be done to ensure users can work with foundation objects.
Here you define permissions for working with foundation objects.
● Import Foundation Data: Grants access to the Import Foundation Data link in the Admin Center.● Import Translations: Allows the Admin to import translations for the jobCode foundation object, using the
Import Translations link in the Admin Center.
Implementing and Configuring the People Central HubManaging Permissions PUBLIC 39
6.2.2.3 Managing Foundation Object Types
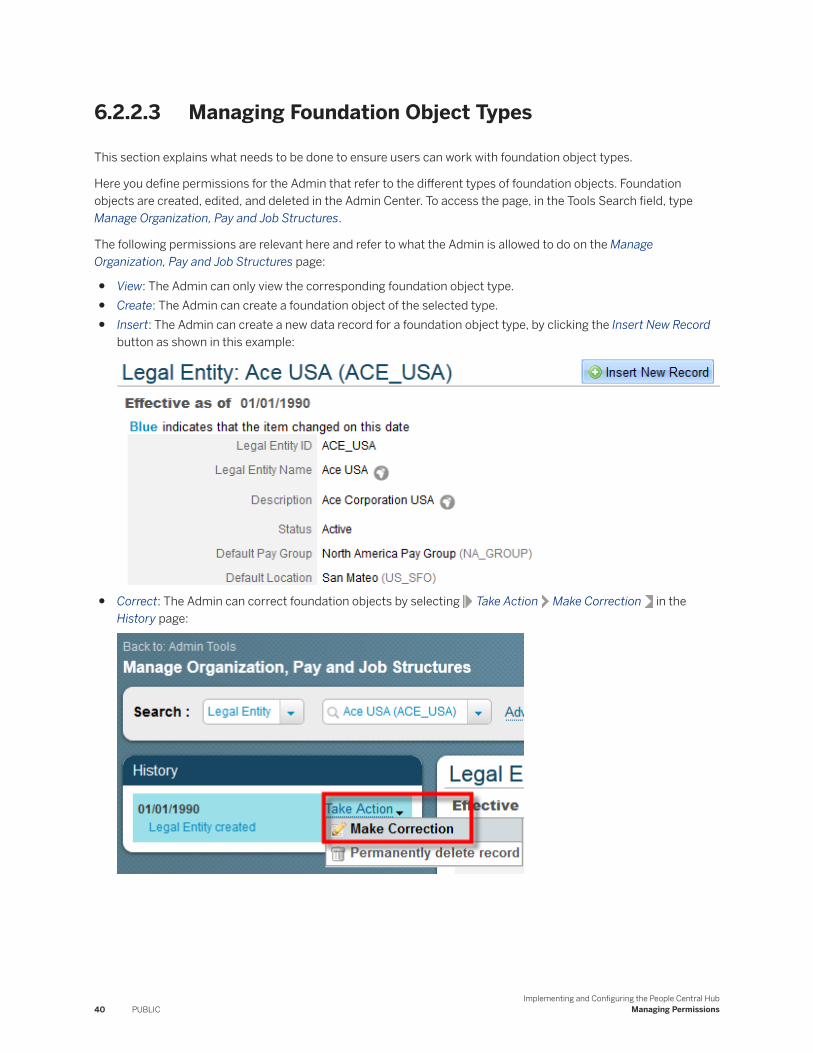
This section explains what needs to be done to ensure users can work with foundation object types.
Here you define permissions for the Admin that refer to the different types of foundation objects. Foundation objects are created, edited, and deleted in the Admin Center. To access the page, in the Tools Search field, type Manage Organization, Pay and Job Structures.
The following permissions are relevant here and refer to what the Admin is allowed to do on the Manage Organization, Pay and Job Structures page:
● View: The Admin can only view the corresponding foundation object type.● Create: The Admin can create a foundation object of the selected type.● Insert: The Admin can create a new data record for a foundation object type, by clicking the Insert New Record
button as shown in this example:
● Correct: The Admin can correct foundation objects by selecting Take Action Make Correction in the History page:
40 PUBLICImplementing and Configuring the People Central Hub
Managing Permissions
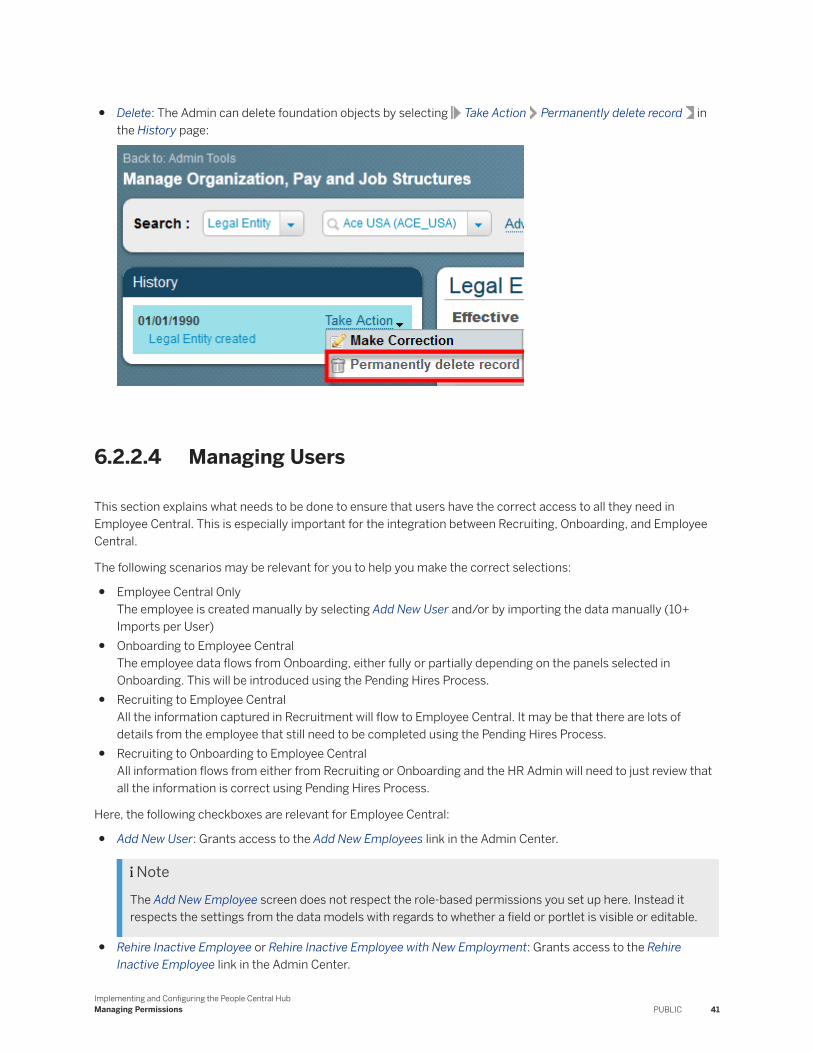
● Delete: The Admin can delete foundation objects by selecting Take Action Permanently delete record in the History page:
6.2.2.4 Managing Users
This section explains what needs to be done to ensure that users have the correct access to all they need in Employee Central. This is especially important for the integration between Recruiting, Onboarding, and Employee Central.
The following scenarios may be relevant for you to help you make the correct selections:
● Employee Central OnlyThe employee is created manually by selecting Add New User and/or by importing the data manually (10+ Imports per User)
● Onboarding to Employee CentralThe employee data flows from Onboarding, either fully or partially depending on the panels selected in Onboarding. This will be introduced using the Pending Hires Process.
● Recruiting to Employee CentralAll the information captured in Recruitment will flow to Employee Central. It may be that there are lots of details from the employee that still need to be completed using the Pending Hires Process.
● Recruiting to Onboarding to Employee CentralAll information flows from either from Recruiting or Onboarding and the HR Admin will need to just review that all the information is correct using Pending Hires Process.
Here, the following checkboxes are relevant for Employee Central:
● Add New User: Grants access to the Add New Employees link in the Admin Center.
NoteThe Add New Employee screen does not respect the role-based permissions you set up here. Instead it respects the settings from the data models with regards to whether a field or portlet is visible or editable.
● Rehire Inactive Employee or Rehire Inactive Employee with New Employment: Grants access to the Rehire Inactive Employee link in the Admin Center.
Implementing and Configuring the People Central HubManaging Permissions PUBLIC 41
● Rehire Inactive Employee with New Employment (by 'match' in New Hire) or Rehire Inactive Employee (by 'match' in New Hire): Grants access to the Match pop-up in the New Hire screen.
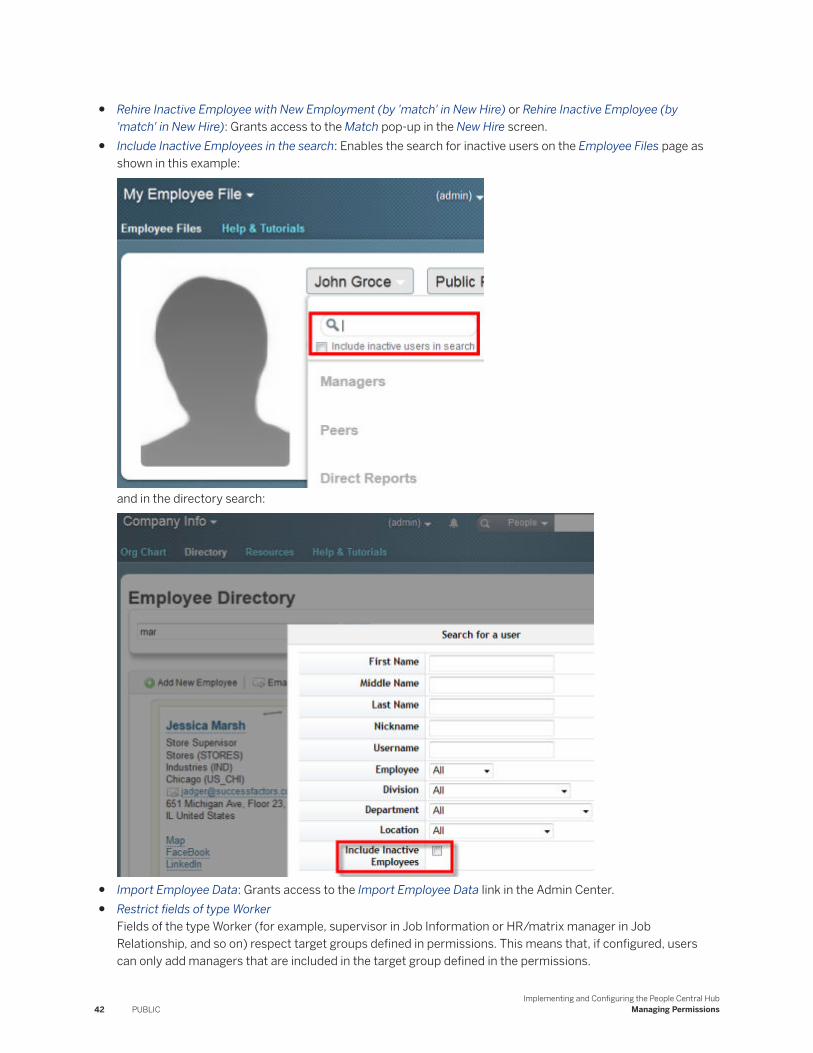
● Include Inactive Employees in the search: Enables the search for inactive users on the Employee Files page as shown in this example:
and in the directory search:
● Import Employee Data: Grants access to the Import Employee Data link in the Admin Center.● Restrict fields of type Worker
Fields of the type Worker (for example, supervisor in Job Information or HR/matrix manager in Job Relationship, and so on) respect target groups defined in permissions. This means that, if configured, users can only add managers that are included in the target group defined in the permissions.
42 PUBLICImplementing and Configuring the People Central Hub
Managing Permissions
For example, you may want to restrict the access of a user to all managers of a legal entity.● Manage Workflow Requests: Grants access to the Manage Workflow Requests link in the Admin Center, for
example, to change the approver for a particular workflow.
NoteThe Admin can only access the workflow requests for the target population to which the Admin role has been granted access.
● Manage Workflow Groups: Grants access to the Manage Workflow Groups link in the Admin Center.
6.2.2.4.1 Permissions for Rehiring an Employee
There are several ways in which you can rehire a previous employee.
For data privacy reasons, you can create a new employment record for them that doesn't contain their previous Job Information and Compensation Information but only refers to their person ID.
There are 4 ways to rehire a previous employee: 2 types of rehire (re-activate existing inactive employment, create new employment) and 2 places to rehire (Match pop-up in New Hire, Rehire inactive employee)
UI/Type of Rehire Re-activate existing inactive employment Add new employment
Rehire inactive employee Recommended when it is acceptable that the users in the new organizations can access the old employment records.
Recommended if the existing inactive employment should be shielded from users of the rehired employees new organization.
Match pop-up in New Hire Recommended when it is acceptable that the users in the new organizations can access the old employment records.
Recommended if the existing inactive employment should be shielded from users of the rehired employees new organization.
If the Rehire Inactive Employee with New Employment permission is granted, then admins will see a drop-down list in the Rehire Inactive Employee screen.
Implementing and Configuring the People Central HubManaging Permissions PUBLIC 43

7 Managing HRIS Sync
7.1 Human Resource Information System (HRIS) Synchronization
Human Resource Information System (HRIS) synchronization is the sync of data from Employee Central to user data tables when you have Employee Central enabled.
Employee Central is the core HR system of record for SAP SuccessFactors. It’s the repository of effectively dated data to manage employees through their lifecycle within an organization. However, some of our mature offerings including the User Directory continue to use data from the legacy data tables. The data in legacy tables is updated using the User Data File (UDF). Also, some Employee Profile attributes are updated online when changes are recorded in Employee Central data. Other attributes are only updated when the HRIS Sync process is run. When the HRIS Sync process is run, the data in Employee Central is also written to the legacy tables. This ensures that Employee Profile is updated with information stored in Employee Central and that user data is consistent across all modules in the SAP SuccessFactors HXM Suite.
HRIS Sync process is set up through a job that you configure in provisioning.
RememberAs a customer, you don't have access to Provisioning. To complete tasks in Provisioning, contact your implementation partner. If you're no longer working with an implementation partner, contact Product Support.
You can monitor the HRIS Sync job using the Scheduled Job Manager in the Admin Center.
The sync could be a full HRIS Sync or an incremental sync based on how the job is configured. The criteria for sync can be from a specified time, or based on one or multiple user IDs.
NoteUser based sync is always a Full Sync.
7.2 HRIS Sync Configuration Between Employee Central and Employee Profile
Map the fields between Employee Central and Employee Profile for data integration.
Integration with Employee Profile – HRIS Synchronization Process Mapping
To guarantee seamless integration between Employee Central and other SAP SuccessFactors modules, Employee Profile is updated with information stored in Employee Central. Some Employee Profile attributes are updated
44 PUBLICImplementing and Configuring the People Central Hub
Managing HRIS Sync

online when changes are recorded in Employee Central data. Other attributes are only updated when the HRIS synchronization process is run. Employee Central changes that are entered as of a future date are reflected in Employee Profile as soon as the HRIS synchronization process is run after the future date has been reached.
Decision Point
Complete the following chart with the mapping between Employee Central attributes and Employee Profile attributes:
Employee Central portlet Attribute Employee Profile attribute
Personal Information First Name First Name
Personal Information Last Name Last Name
Personal Information Middle Name Middle Name
Personal Information Gender Gender
Job Information Division (Area) Division (Area)
Job Information Department Department
Job Information Job Code Job Code
Job Information Location Location
Job Information Job Title Title
Job Information Manager (Direct Line Manager) Manager (Direct Line Manager)
Job Relationships HR Manager HR Manager
Job Relationships Matrix Manager (Dotted Line Manager) Matrix Manager (Dotted Line Manager)
Job Relationships Custom Manager Custom Manager
Job Relationships Second Manager Second Manager
Address Information Address 1 Address 1
Address Information Address 2 Address 2
Address Information City City
Address Information State State
Implementing and Configuring the People Central HubManaging HRIS Sync PUBLIC 45
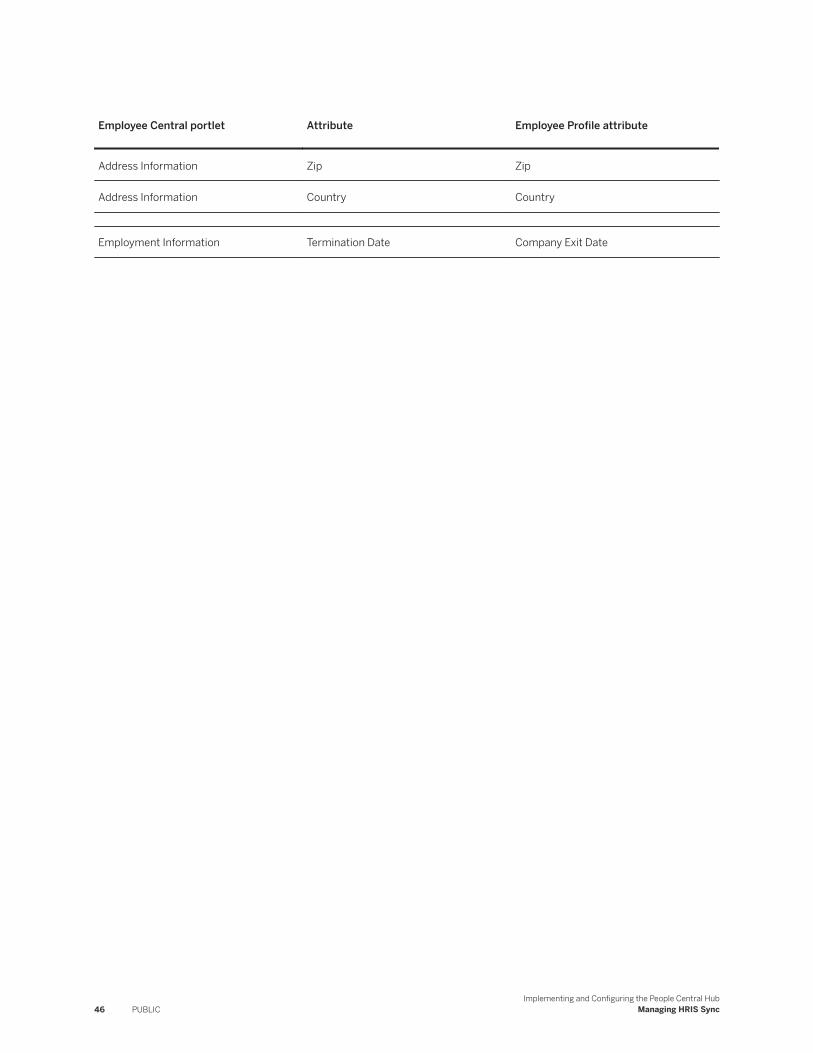
Employee Central portlet Attribute Employee Profile attribute
Address Information Zip Zip
Address Information Country Country
Employment Information Termination Date Company Exit Date
46 PUBLICImplementing and Configuring the People Central Hub
Managing HRIS Sync
8 Working with Picklists
8.1 Introduction to Picklists
Picklists allow you to restrict the values that can be specified for a field.
You could be using one of the following three picklists:
● ECV2 Picklists (also referred to as Legacy Picklists)● MDF Picklists● Cascading Picklists
The subsequent sections describe these picklists and what you can do with them.
NoteYou can now manage all picklists in the suite (legacy, non-legacy, RBP and non-RBP ) from a unified Manage Picklists user interface (UI). SAP SuccessFactors must first enable the MDF on your instance and then migrate your legacy picklist data to MDF picklists. After the data is migrated successfully, the Picklist option no longer appears on the Configure Object Definitions page in the Admin Center (you will be automatically redirected). After migration, MDF picklists are available for legacy picklist use. There is no need to deal ECV2 picklist separate from MDF. Sync is not required as it is the same.
8.2 Working with MDF Picklists
Keep MDF and ECV2 Picklists in sync to avoid any errors in the system.
For information on MDF picklists, see the SAP Help Portal. Navigate to SAP SuccessFactors HCM SuiteImplementation Implementing the Metadata Framework (MDF) Creating Custom Picklists
Related Information
Keeping ECV2 and MDF Picklists in Sync [page 48]
Implementing and Configuring the People Central HubWorking with Picklists PUBLIC 47
8.3 Keeping ECV2 and MDF Picklists in Sync
If you have different types of picklists in your system, you need to keep them in sync to avoid issues.
Prior to the November 2014 release, it was not possible to keep a V2 picklist and an MDF picklist in sync. With the November 2014 release, you can now do this for the migrated Foundation Objects and for all other V2 picklists that you want to use as MDF picklists. For the migrated foundation objects, this is done automatically during migration. For all other picklists, you would need to perform the steps below manually once to set up the sync process.
Broadly the steps for keeping your ECV2 and MDF picklists in sync are as follows:
1. Prepare your ECV2 picklist.2. Create the MDF picklist.3. Define the mapping between the ECV2 and the MDF picklist.
Once the mapping has been defined, any future changes to the MDF picklist will trigger a sync.
The subsequent sections describe these steps.
How does the sync work?
All picklist entries that will be used by both legacy objects and MDF objects need to be identical in both the ECV2 picklist and the MDF picklist when the mapping is created. After the mapping is done, all changes to the MDF picklist will get synchronized. Picklist synchronization does not compare the ECV2 picklist and the MDF picklist; it only detects changes to the MDF picklist. Only changed MDF picklist values will be synchronized, unchanged picklist values are not synchronized. If the MDF picklist and the ECV2 picklist are out of sync at the time the picklist mapping entry is created, this is not "repaired" by triggering a picklist sync.
8.4 Working with Cascading Picklists
Cascading picklists allow you to restrict the value of a field based on a previous selection.
Consider an example of three picklists with cascading relationships: Country, State, and City. Assuming State can be derived from Country, Country will acts as the parent of State. Likewise, assuming City can be derived from State, State is the parent of City.
The following screenshot shows Country as the parent picklist that has different countries as options:
NoteAlways set the Effective Start Date to 1/1/1900 to ensure that all the picklists and their relationships remain valid.
48 PUBLICImplementing and Configuring the People Central Hub
Working with Picklists
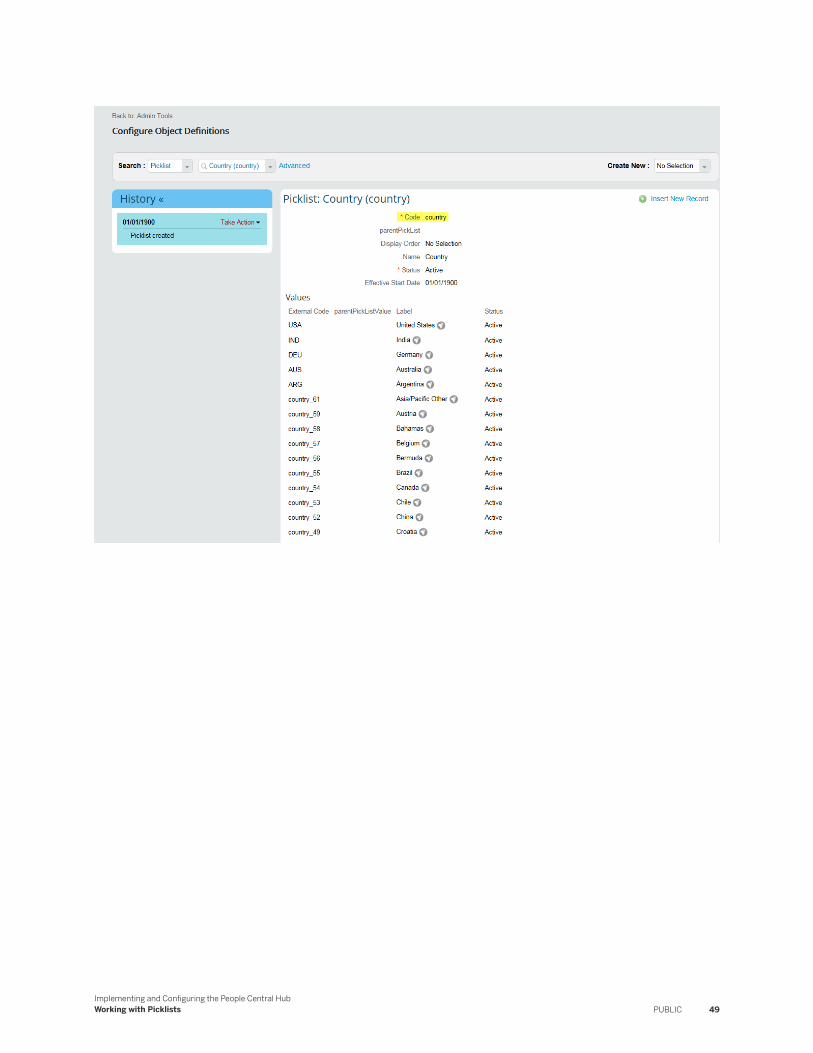
Implementing and Configuring the People Central HubWorking with Picklists PUBLIC 49
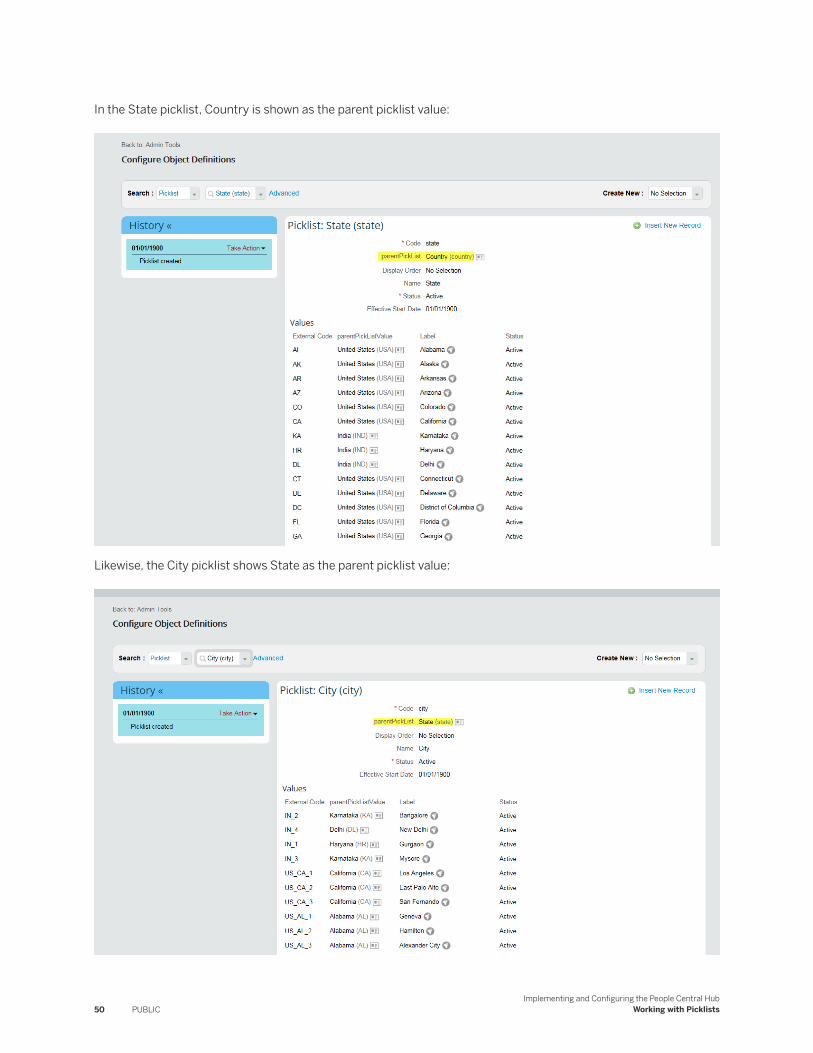
In the State picklist, Country is shown as the parent picklist value:
Likewise, the City picklist shows State as the parent picklist value:
50 PUBLICImplementing and Configuring the People Central Hub
Working with Picklists
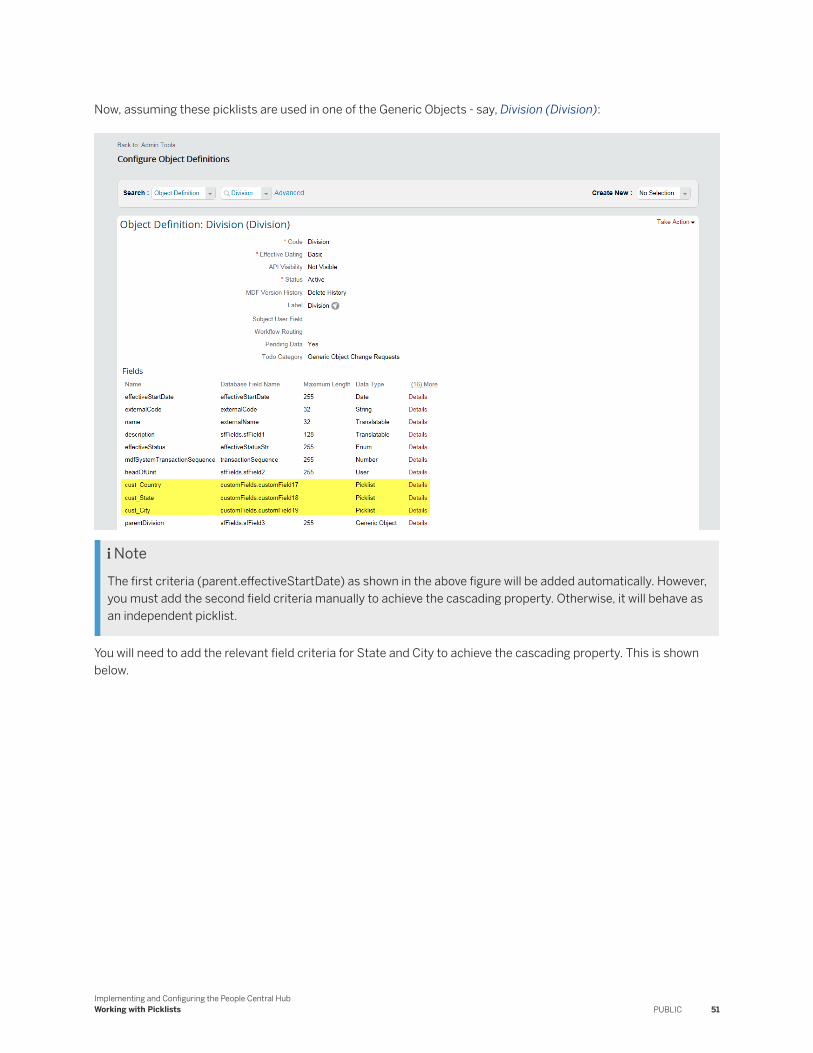
Now, assuming these picklists are used in one of the Generic Objects - say, Division (Division):
NoteThe first criteria (parent.effectiveStartDate) as shown in the above figure will be added automatically. However, you must add the second field criteria manually to achieve the cascading property. Otherwise, it will behave as an independent picklist.
You will need to add the relevant field criteria for State and City to achieve the cascading property. This is shown below.
Implementing and Configuring the People Central HubWorking with Picklists PUBLIC 51
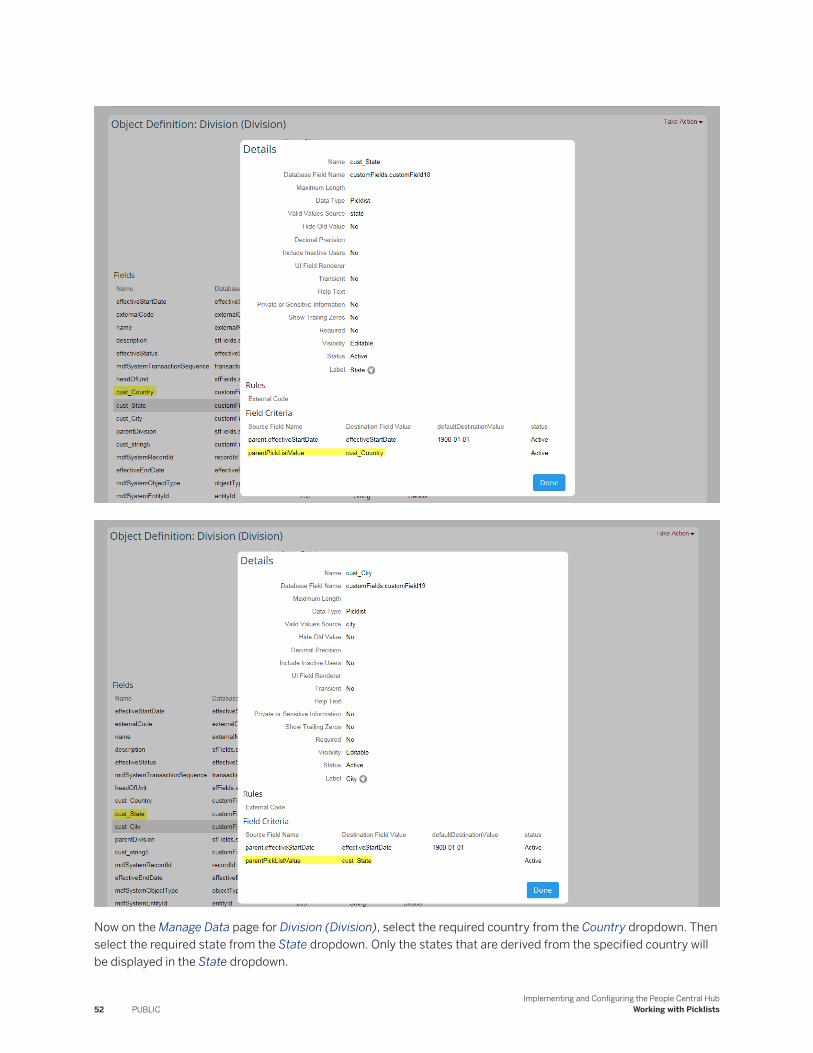
Now on the Manage Data page for Division (Division), select the required country from the Country dropdown. Then select the required state from the State dropdown. Only the states that are derived from the specified country will be displayed in the State dropdown.
52 PUBLICImplementing and Configuring the People Central Hub
Working with Picklists
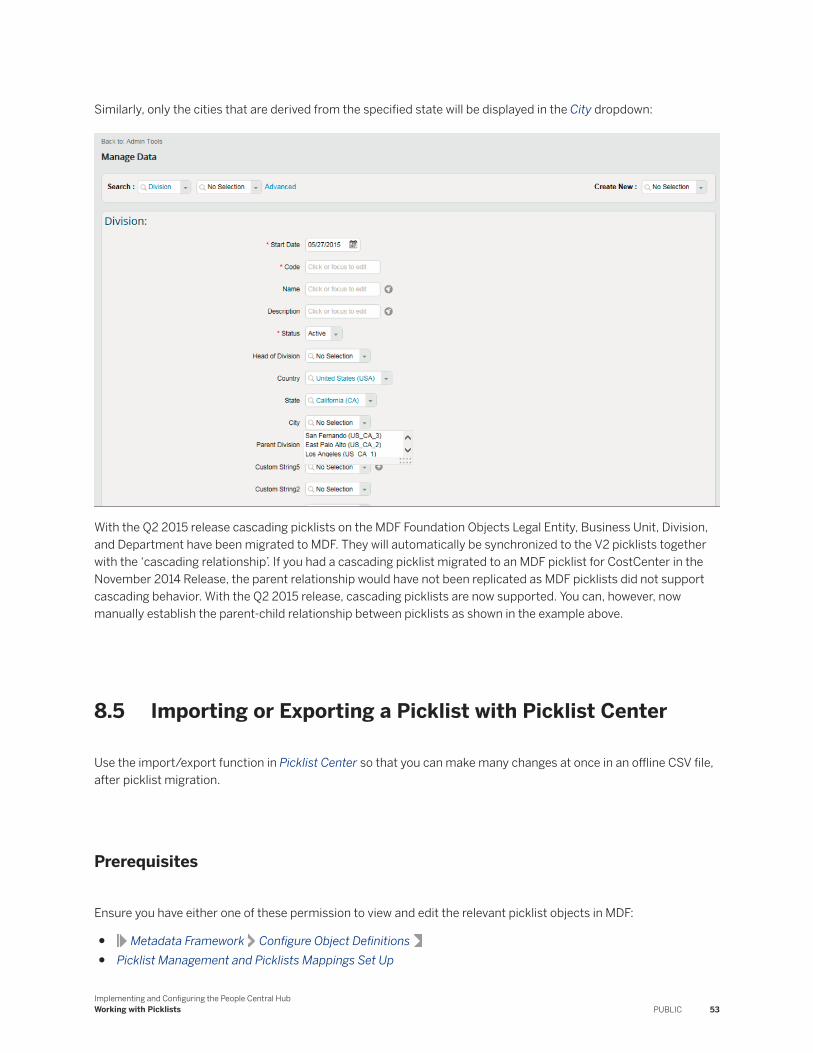
Similarly, only the cities that are derived from the specified state will be displayed in the City dropdown:
With the Q2 2015 release cascading picklists on the MDF Foundation Objects Legal Entity, Business Unit, Division, and Department have been migrated to MDF. They will automatically be synchronized to the V2 picklists together with the ‘cascading relationship’. If you had a cascading picklist migrated to an MDF picklist for CostCenter in the November 2014 Release, the parent relationship would have not been replicated as MDF picklists did not support cascading behavior. With the Q2 2015 release, cascading picklists are now supported. You can, however, now manually establish the parent-child relationship between picklists as shown in the example above.
8.5 Importing or Exporting a Picklist with Picklist Center
Use the import/export function in Picklist Center so that you can make many changes at once in an offline CSV file, after picklist migration.
Prerequisites
Ensure you have either one of these permission to view and edit the relevant picklist objects in MDF:
● Metadata Framework Configure Object Definitions● Picklist Management and Picklists Mappings Set Up
Implementing and Configuring the People Central HubWorking with Picklists PUBLIC 53
Context
Use the picklist import or export picklists to feed data from or to external systems. For example, you import picklists for the initial mass creation of values.
Procedure
1. Go to Admin Center Picklist Center .2. Choose Import/Export.3. Select an action in the dropdown.
○ Import Data
NoteWhen importing a legacy picklist, be sure to provide a value for the external code. If you leave it blank, the import fails.
○ Export Data○ Download Template
Related Information
Importing MDF DataExporting MDF Data
8.6 Fields Hidden in Picklist Center
Some MDF picklist fields are hidden in Picklist Center by default. If needed, these can be made visible by editing the PicklistValue MDF object.
By default, only the most commonly used fields are displayed in Picklist Center. Other fields exist in the database and in the PicklistValue MDF object, but are hidden from view to make Picklist Center simpler to read and use. However, in some cases, you may want to make of these hidden fields visible and editable in Picklist Center.
ExampleThe legacy picklist field Value is used by SAP SuccessFactors Recruiting. Setting this field to 99999 allows for a job requisition to be closed. The legacy field is migrated to the optValue field in MDF. If you are using SAP SuccessFactors Recruiting, you may want to make the optValue field editable in Picklist Center after your picklist migration.
54 PUBLICImplementing and Configuring the People Central Hub
Working with Picklists
8.6.1 Making Picklist Value Fields Visible and Editable in Picklist Center
Make additional picklist value fields visible and/or editable in Picklist Center if the default migration settings don't meet your requirements.
Prerequisites
You have the Configure Object Definitions permission, allowing you to manage MDF object definitions.
Context
Some MDF picklist value fields are read-only or not visible in Picklist Center by default. You can make them visible and editable by updating the PicklistValue MDF object.
ExampleThe legacy picklist field Value is used by SAP SuccessFactors Recruiting. During migration, it’s mapped to the optValue field in MDF. If you're using SAP SuccessFactors Recruiting, you can make the optValue field editable in Picklist Center after picklist migration.
Procedure
1. Go to Admin Center Configure Object Definition .2. Select Object Definition in the first search menu.3. Type Picklist Value in the second search menu and select this object.
4. In the Take Action menu, click Make Correction.5. In the Fields section, find the field you want to make editable in Picklist Center.6. Click Details to see all of the properties of this field.7. Set the Visibility property to Read Only or Editable as required.8. Click Done to close the Details dialog and Save to save your changes.
Results
You can now view and/or edit this field in Picklist Center.
Implementing and Configuring the People Central HubWorking with Picklists PUBLIC 55
NoteThe optValue field in the MDF object definition is called Value in Picklist Center because that was the original field name in legacy picklists.
8.7 Non-Unique External Code
The "non-unique external code" is a field in the PicklistValue MDF object that contains the legacy "external code" value after your picklist migration.
In legacy picklists, the "external code" field had no validation, so it could be any value, and it was not required, so it could be empty. With MDF picklists, the "external code" field is mandatory and must be unique. As a result, in many cases, the migration of this field couldn't be a straight one-to-one mapping. In such cases, the legacy "external code" value" is stored in a new MDF field called the "non-unique external code". After migration, pages in the application that previously used legacy picklists now use the "non unique external code" to read legacy picklist values and ensure that there is no change to end-user experience.
By default, after picklist migration, in the PicklistValue MDF object, the value of the unique "external code" and the value of the "non unique external code" (copied from legacy picklists) are kept in sync. That means that, after migration, any change you make to the "external code" field in the PicklistValue MDF object will automatically be copied over into the "non unique external code" field as well.
However, this behavior can be changed. You may have used the legacy "external code" field in legacy picklists for a specific purpose that we could not anticipate and not want them to be synced automatically with the MDF "external code". In this case, you can choose to disable this sync and treat the "external code" and "non unique external code" as two distinct and separate values.
8.7.1 Disabling Sync of Non-Unique External Code
Disable the automatic sync between the nonUniqueExternalCode and externalCode fields in MDF picklists.
Prerequisites
You have access to Provisioning.
RememberAs a customer, you don't have access to Provisioning. To complete tasks in Provisioning, contact your implementation partner. If you're no longer working with an implementation partner, contact Product Support.
56 PUBLICImplementing and Configuring the People Central Hub
Working with Picklists
Context
The nonUniqueExternalCode field in the PicklistValue MDF object contains the value of the EXTERNAL_CODE field from a migrated legacy picklist.
In many cases, we can't do a straight one-to-one mapping of external codes because the EXTERNAL_CODE in legacy picklists could be any value and it wasn't required, but the externalCode in MDF picklists is mandatory and unique. In such cases, we use to store the value of the legacy EXTERNAL_CODE so that applications that use it can ensure there's no change to the user experience.
By default, the value of the unique externalCode and the value of the nonUniqueExternalCode copied from legacy picklists are kept in sync in an MDF picklist. Any change you make to externalCode is automatically copied into nonUniqueExternalCode as well.
However, you can disable this behavior. If you used the EXTERNAL_CODE field in legacy picklists for a specific purpose that we couldn't anticipate and you do not want them to be synced automatically with the externalCode field in MDF picklists, you can choose to disable the sync.
Procedure
1. Log in to Provisioning for the company.2. Disable the option Picklist Management: Automatically copy External Code to Non Unique External Code.
Results
The value of the externalCode field in MDF picklists is no longer copied automatically to the nonUniqueExternalCode field. Instead, they’re treated as two distinct fields and you can use them for different purposes.
Implementing and Configuring the People Central HubWorking with Picklists PUBLIC 57
9 Setting Up Payment Information
9.1 Prerequisites for Payment Information
Here is a list of what is needed for payments information to work.
The general prerequisites for configuring Payment Information are as follows:
● Provisioning Switch● Enabling Validation Switches● Setting Up Permissions● Configuring Payment Methods
NoteThe MDF-based Payment Information is based on the employment of the employee. Therefore, in order for MDF-based Payment Information to work, the job information and job country of the employee must be set up. The country picklist should also be updated, including the 2/3-letter ISO country code.
9.1.1 Provisioning Switch
Enable payment information for it to work in your system.
The MDF-based payment information is controlled by the following Provisioning switch:
Enabling of New Payment Information (MDF-based, effective-dated, and employment-specific)
NoteFor all new Employee Central and Employee Central Payroll customers since release b1508, Payment Information is automatically enabled in Provisioning. Just configure the portlet to get started.
Employee Central Payroll Integration works with the new Payment Information automatically.
NoteEnable Payment Method in Payment Information even if Payroll Integration is not enabled
You can check if Payment Information is enabled in Provisioning using the following steps:
1. All Payment Information relevant MDF objects are activated after enabling it in Provisioning2. Go to Admin Center → Configure Object Definitions, then choose Object Definition3. Select objects related to Payment Information, such as Payment Information, Payment Method,
PaymentInformationV3. Continue setting up role-based permissions, configuring required features, business rules, uploading or entering employee’s payment information data and configuring the payment information portlet, to be displayed on Personal Information page.
58 PUBLICImplementing and Configuring the People Central Hub
Setting Up Payment Information
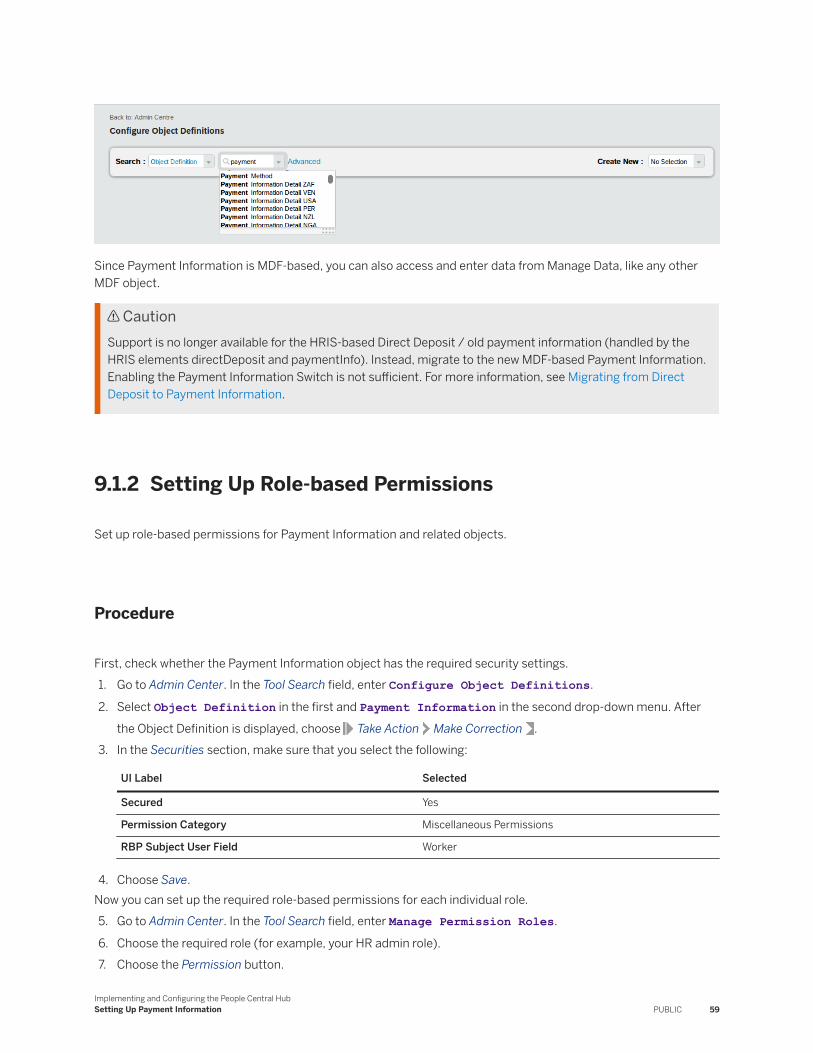
Since Payment Information is MDF-based, you can also access and enter data from Manage Data, like any other MDF object.
CautionSupport is no longer available for the HRIS-based Direct Deposit / old payment information (handled by the HRIS elements directDeposit and paymentInfo). Instead, migrate to the new MDF-based Payment Information. Enabling the Payment Information Switch is not sufficient. For more information, see Migrating from Direct Deposit to Payment Information.
9.1.2 Setting Up Role-based Permissions
Set up role-based permissions for Payment Information and related objects.
Procedure
First, check whether the Payment Information object has the required security settings.1. Go to Admin Center. In the Tool Search field, enter Configure Object Definitions.
2. Select Object Definition in the first and Payment Information in the second drop-down menu. After the Object Definition is displayed, choose Take Action Make Correction .
3. In the Securities section, make sure that you select the following:
UI Label Selected
Secured Yes
Permission Category Miscellaneous Permissions
RBP Subject User Field Worker
4. Choose Save.Now you can set up the required role-based permissions for each individual role.5. Go to Admin Center. In the Tool Search field, enter Manage Permission Roles.
6. Choose the required role (for example, your HR admin role).7. Choose the Permission button.
Implementing and Configuring the People Central HubSetting Up Payment Information PUBLIC 59
8. Choose Miscellaneous Permissions, and choose the necessary permissions for all the objects related to Payment Information: Payment Method, Payment Method Assignment, Payment Information, Payment Information Detail, Payment Information Detail USA (and other relevant countries).
9. Choose Done, and then Save Changes. Perform this action for all required roles.
Payment Information is continuously localized. Countries which require any country-specific field are listed as Payment Information Detail XXX. The XXX means the 3-letters ISO code of the country. Please specify the necessary permissions for each of the relevant country-specific Payment Information Details. When a new country is localized and it has a country-specific field it is automatically displayed in the miscellaneous permissions with all options unchecked.
9.1.3 Configuring Payment Methods
Payment Method is a key mandatory field in Payment information. You create or edit Payment Method from the Admin Center or from the Payment Information portlet (based on granted role-based permissions).
For using the access from Admin Center Manage Data proceed as follows:
1. Go to Admin Center. In the Tools Search field, enter Manage Data.
NoteFor existing customers: If you don´t know whether there are already any Payment Methods created in your instance, do the following check. Under Manage Data, enter Payment Method and open the drop-down menu. If you don´t see anything there, no Payment Methods have been created. Then, please proceed with creating Payment Methods. If any entries are displayed, just edit them or delete and create new entries.
2. In the Create New field, choose Payment Method3. Enter the relevant information:
○ External CodeEnter a code for the payment method, for example 05.
○ External NameEnter a type of payment method, for example Bank Transfer.
○ Payment Method AssignmentSelect the countries to which the payment method (for example, Bank Transfer) is associated. Ensure to use a country where the employee is employed in (job country).
4. Choose Save.
As a result, Bank Transfer (05) is displayed as an option in the Payment Method dropdown menu on the Personal Information portlet.
NoteYou can create as many Payment Methods as required by your company and enter any codes and names. However, all Payment Information templates available in SuccessStore refer to the following standard Payment Methods:
External Code External Name
05 Bank Transfer
60 PUBLICImplementing and Configuring the People Central Hub
Setting Up Payment Information
External Code External Name
06 Check
09 Cash
Do not use external codes 07 and 08. These are preserved codes. In case of different codes and names, please adjust all required Business Rules and Configuration UI rules.
NoteFor Employee Central Payroll customers, we recommend to use the standard Payment Methods. For more information, see the Employee Central Payroll integration guide.
9.2 Setting Up Payment Information
Set up payment information in your system.
There are different ways to set up Payment Information. For new customers, there is one standard set up in the first list item below. Existing customers have three possible set up methods. Check the list item headings in bold below to find the set up method that works for you.
● New Employee Central or Employee Central Payroll customerIf you started setting up Employee Central or Employee Central Payroll with or after b1508, please proceed with the following subsections:○ Setting Up the Configuration UI [page 62]○ (Optional) Using a Bank Directory [page 64]○ (Optional) Using Customized Pay Types [page 74]
● Existing Employee Central or Employee Central Payroll customer without Direct Deposit
NoteWe recommend that you migrate from Direct Deposit to Payment Information before the Q1 2019 release.
If you are an existing Employee Central customer (before b1508) without Direct Deposit, old Payment Information and MDF-based Payment Information, please enable New Payment Information in Provisioning. Then, go through the Prerequisites for Payment Information [page 58] section and move to the subsections of this section.
NoteFor more information about Direct Deposit, see Migrating from Direct Deposit to Payment Information.
● Existing Employee Central or Employee Central Payroll customer with Direct DepositIf you are an existing Employee Central customer still running the HRIS-based Direct Deposit (handled by the HRIS elements directDeposit and paymentInfo), please read Migrating from Direct Deposit to Payment Information in the Implementing and Configuring Payment Information in Employee Central guide on the SAP Help Portal under SAP SuccessFactors Employee Central Administration . Then, go through the Prerequisites section and move to the subsections of that section.
Implementing and Configuring the People Central HubSetting Up Payment Information PUBLIC 61
● Existing Employee Central or Employee Central Payroll customer with configured Payment InformationPlease check the What's New section in the Implementing and Configuring Payment Information in Employee Central guide on the SAP Help Portal under SAP SuccessFactors Employee Central Administration to find out about new features. In addition, we recommend you to upload the latest Payment Information UI, Rules, and Messages from the SAP Help Portal. To do this, see Setting Up the Configuration UI [page 62]
9.2.1 Setting Up the Configuration UI
We recommend using the standard UI template. You can import the standard configuration UI from the SAP Help Portal or create your own configuration UIs for the new Payment Information portlet. After you import and / or create configuration UIs, you use Manage Data in Admin Center to specify which configuration UI should be displayed.
NoteThe Payment Information UIs should be set in the Form layout only to avoid any problems. Once you've entered the ID and Base Object, in the Payment Information section, use the mouse to hover over the section and select Edit Properties. In the Properties pop-up, under Layout, select Form.
How do you import the configuration UI from the Help Portal?
1. Go to the SAP SuccessFactors Employee Central section of the help portal. https://help.sap.com/viewer/p/SAP_SUCCESSFACTORS_EMPLOYEE_CENTRAL
2. Go the Configuration section, and download the Payment Information Configuration UI Files
How do you create the configuration UI?
1. Go to Admin Center. In the Tool Search field, enter Manage Configuration UI.2. You can use the imported configuration UI as a basis for creating your own configuration UI, or you can create
your own configuration UI from scratch.○ To use the imported configuration UI as a basis, select XX(CurrentRelease)_Payment_Information_Portlet
in the Search field, and change the text in the Id field.
CautionWe recommend you to change the ID of the imported configuration UI. By renaming the configuration UI you can avoid overwriting issues in a future release.
○ To create your own configuration UI from scratch, click Create New and enter the relevant information.○ ID
Enter a meaningful text.○ Select Base Object
Select Payment Information in the dropdown menu.
62 PUBLICImplementing and Configuring the People Central Hub
Setting Up Payment Information
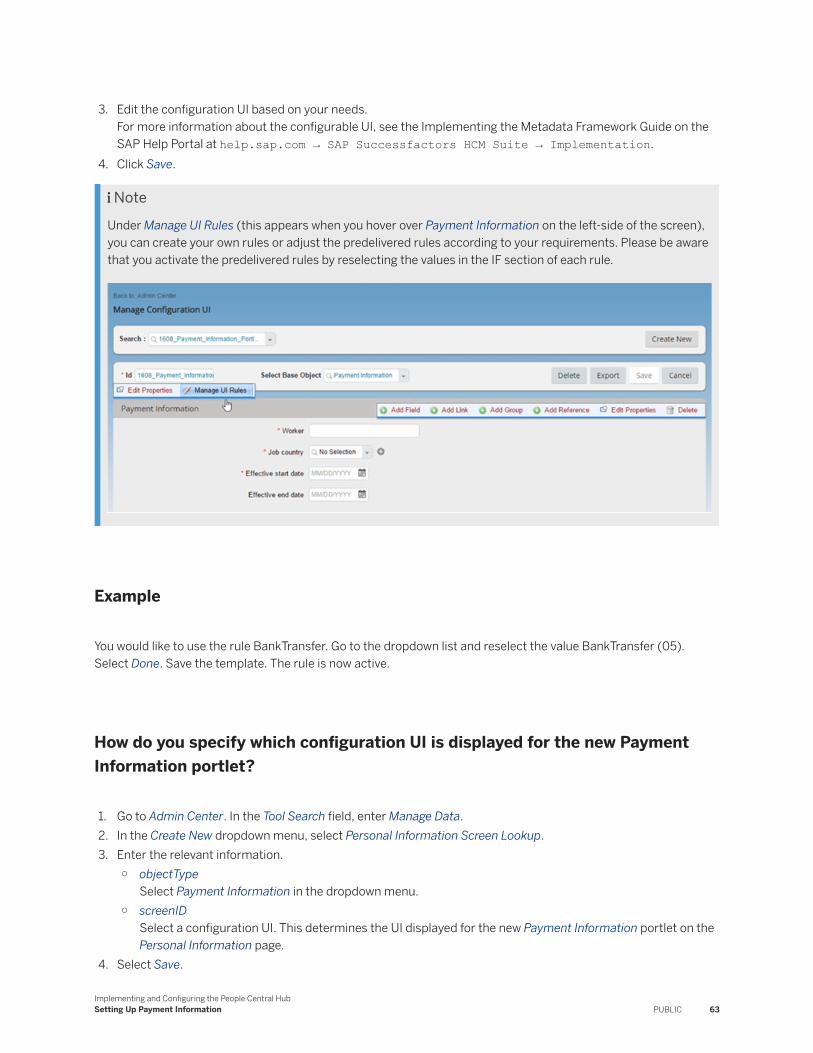
3. Edit the configuration UI based on your needs.For more information about the configurable UI, see the Implementing the Metadata Framework Guide on the SAP Help Portal at help.sap.com → SAP Successfactors HCM Suite → Implementation.
4. Click Save.
NoteUnder Manage UI Rules (this appears when you hover over Payment Information on the left-side of the screen), you can create your own rules or adjust the predelivered rules according to your requirements. Please be aware that you activate the predelivered rules by reselecting the values in the IF section of each rule.
Example
You would like to use the rule BankTransfer. Go to the dropdown list and reselect the value BankTransfer (05). Select Done. Save the template. The rule is now active.
How do you specify which configuration UI is displayed for the new Payment Information portlet?
1. Go to Admin Center. In the Tool Search field, enter Manage Data.2. In the Create New dropdown menu, select Personal Information Screen Lookup.3. Enter the relevant information.
○ objectTypeSelect Payment Information in the dropdown menu.
○ screenIDSelect a configuration UI. This determines the UI displayed for the new Payment Information portlet on the Personal Information page.
4. Select Save.
Implementing and Configuring the People Central HubSetting Up Payment Information PUBLIC 63
NoteYou can use the personal information screen lookup object for V12 and on the New Hire UI. For the People Profile 3 screen, use the MDF live block assignment. We recommend that you do NOT use the default screen in the Manage Data Default Screen field in the object definition.
9.2.2 (Optional) Using a Bank Directory
In Employee Central and Employee Central Payroll, you can set up a Bank Directory. The Bank Directory serves as an additional validator for bank details (Routing Number and Business Identifier Code), and as a value help on the Payment Information portlet.
NoteSAP SuccessFactors does not provide any content for the Bank Directory.
Setting Up Role-Based Permissions
To set up role-based permissions for Bank Directory please perform the following steps:
1. Go to Admin Center. In the Tool Search field, enter Manage Permission Roles.
2. Choose Take action Edit for the role you want to edit. Afterwards, click the Permission button.3. Click MDF Foundation Objects, and select the necessary permissions for Bank and click Done.
Manually Create or Upload the List of Banks
You can manually create or upload your list of banks. Please ensure the data in your list is correct.
NoteBank ID is an external code of the Bank Object. As of Q2 2018 it is visible on the UI. It is mandatory and must be updated manually. Previously it was of type Auto-Number and the system generated it automatically. All previously existing records will have the Bank ID field filled with the auto-number generated. For new bank entries, the following validations apply while manually entering the Bank ID:
• It can consist of numbers, capital Latin characters and underscores
• Underscore cannot be placed in the first and last positions
If you enter an invalid external code, the system will display an error message asking you to correct the entry.
For manual creation, please proceed similar to other MDF objects. Go to the Admin Center, choose Manage Data. Create New, choose Bank, and fill in all required fields. Save your changes.
64 PUBLICImplementing and Configuring the People Central Hub
Setting Up Payment Information
NoteAs of the Q2 2018 release, two new fields, 'Bank ID' and 'Branch Name', are available in the Bank Object in Employee Central. If you are importing the bank file, you need to provide the external code (Bank ID) manually following the same rules described previously. During the import the system will perform the same validations for the external code that are applied during the manual creation of a Bank Entry.
If you are importing the bank file, go to the Admin Center, choose Import and Export Data and choose Import. Under Generic Object, choose Bank and browse to find the CSV file to be uploaded. This CSV file should follow the recommended format for imported files in Employee Central (UTF-8 encoding). Import your bank CSV file. To help ensure that the file is in the correct format and has all the required columns, you can first export the Bank file. You can use this file as a template.
NoteTo help ensure that the file is in the correct format and has all the required columns, you can first export the Bank file. You can use this file as a template. Go to Admin Center Import and Export Data . Select Bank as the Generic Object, choose Yes for Include Dependencies, and choose No for the other settings.
During the import, the system performs the same format and / or deep validation for Routing Number and Business Identifier Code (BIC), as in Payment Information. If you want to turn off the validation, please uncheck Bank Account Validations under Admin Center Company Settings Company System and Logo SettingsCompany System Setting . For more information about what is validated, see Breakdown of Country-Specific Bank Validation Rules [page 66].
Setting Up the Configuration UI
Set up the configuration UI for connecting Bank Directory to Payment Information portlet.
If you use the latest Standard Configuration UI from theSuccessStore, you can skip this step. Otherwise, please adjust the Payment Information Configuration UI by adding the Bank field to it. For more information about setting up the Configuration UI, see Setting Up the Configuration UI [page 62].
Using Bank Object in Payment Information
The Bank Object is connected to Payment Information with the Bank field. You can search for a Bank Name, City, Routing Number, Business Identifier Code, Branch Name or just select a Bank from the picklist. The bank name is the displayed in this field. Routing Number and Business Identifier Code are automatically filled with the details provided in the bank directory. The Bank field displays the selected bank only, when it is unique in combination of Bank Country, Routing Number and Business Identifier Code.
In the standard Configuration UI, there is a UI rule Bankavailable, which makes the Routing Number fields and Business Identifier Code fields not editable. If a bank is selected, the employees cannot accidentally overwrite the data.
Implementing and Configuring the People Central HubSetting Up Payment Information PUBLIC 65

NoteThe BankID is now persistently stored in the payment information record. It serves as both a connector to Bank Object and a kind of value help for employees. Its availability allows to access any Bank attribute within analytics, which is important where bank information is required for compliance purposes. For example, lists of employee’s bank details required occasionally for compliance purposes can now include the bank name or any other attribute of the bank stored in the Bank object. The Bank object is now API visible and editable.
There is no enablement set up needed for this to work, it is already present in the system.
9.2.2.1 Breakdown of Country-Specific Bank Validation Rules
Depending on the bank country or region, certain format validation checks are performed for Account Number, Routing Number, Bank Identifier Code (also known as BIC or SWIFT code), IBAN and country/region-specific fields. IBAN and Bank Identifier Code format validation is based on the respective ISO norm. It is also valid for countries which are not yet officially localized in SuccessFactors Employee Central and SuccessFactors Employee Central Payroll.
NoteAs of the Q4 2017 release, these validations are performed using a country/region-specific validation object, and can be changed as needed. You can disable or enable validations. SAP does not recommend that, especially for SuccessFactors Employee Central Payroll customers. Though, you can change these settings under Admin Center Company Settings Company System and Logo Settings Enable Bank Account Validations .
NoteYou can find the steps for configuring a country/region-specific bank validation object here: Configuring a Country/Region-Specific Bank Validation Object
Country/Region Validations for Payment Information
Country/Region Account Number Routing Number IBANCountry/Region-Specific Fields
Albania - - 28 -
Andorra - - 24 -
Angola Maximum 13 alphanumeric characters
Maximum 8 alphanumeric characters
25 -
Argentina Maximum 11 digits - - Account Type:
● Current Account● Savings Account● Special Savings
Account● Salary Account
66 PUBLICImplementing and Configuring the People Central Hub
Setting Up Payment Information
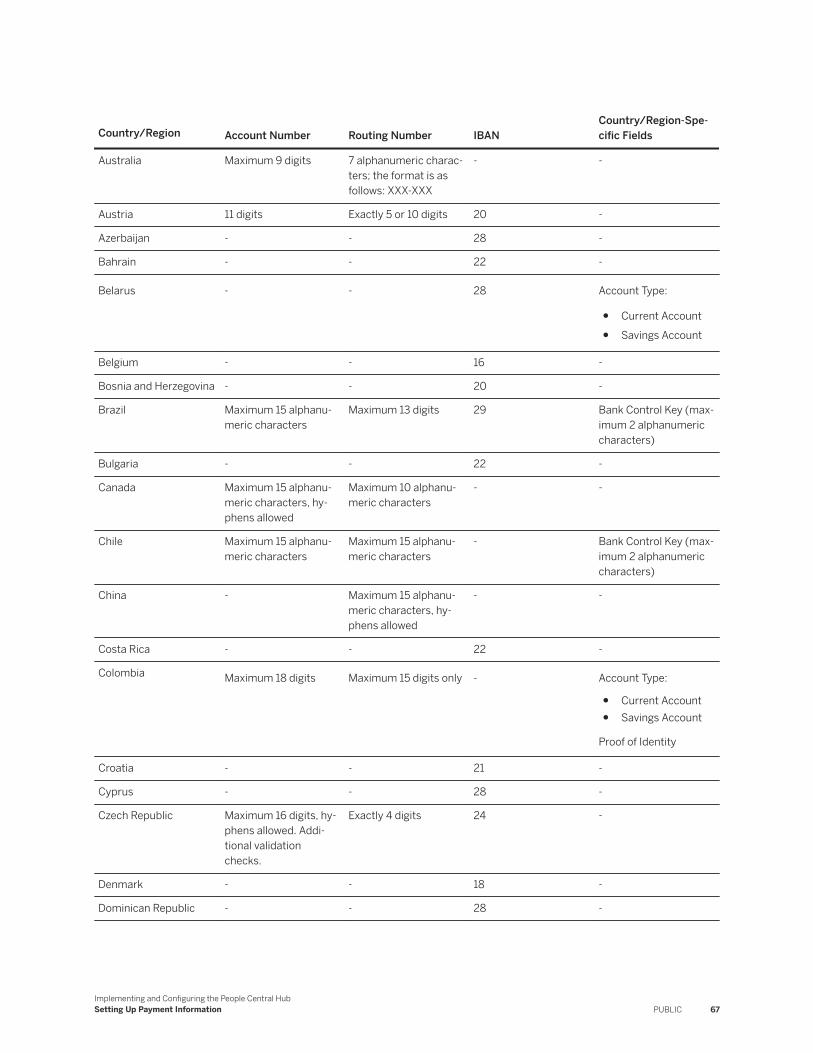
Country/Region Account Number Routing Number IBANCountry/Region-Specific Fields
Australia Maximum 9 digits 7 alphanumeric characters; the format is as follows: XXX-XXX
- -
Austria 11 digits Exactly 5 or 10 digits 20 -
Azerbaijan - - 28 -
Bahrain - - 22 -
Belarus - - 28 Account Type:
● Current Account● Savings Account
Belgium - - 16 -
Bosnia and Herzegovina - - 20 -
Brazil Maximum 15 alphanumeric characters
Maximum 13 digits 29 Bank Control Key (maximum 2 alphanumeric characters)
Bulgaria - - 22 -
Canada Maximum 15 alphanumeric characters, hyphens allowed
Maximum 10 alphanumeric characters
- -
Chile Maximum 15 alphanumeric characters
Maximum 15 alphanumeric characters
- Bank Control Key (maximum 2 alphanumeric characters)
China - Maximum 15 alphanumeric characters, hyphens allowed
- -
Costa Rica - - 22 -
Colombia Maximum 18 digits Maximum 15 digits only - Account Type:
● Current Account● Savings Account
Proof of Identity
Croatia - - 21 -
Cyprus - - 28 -
Czech Republic Maximum 16 digits, hyphens allowed. Additional validation checks.
Exactly 4 digits 24 -
Denmark - - 18 -
Dominican Republic - - 28 -
Implementing and Configuring the People Central HubSetting Up Payment Information PUBLIC 67
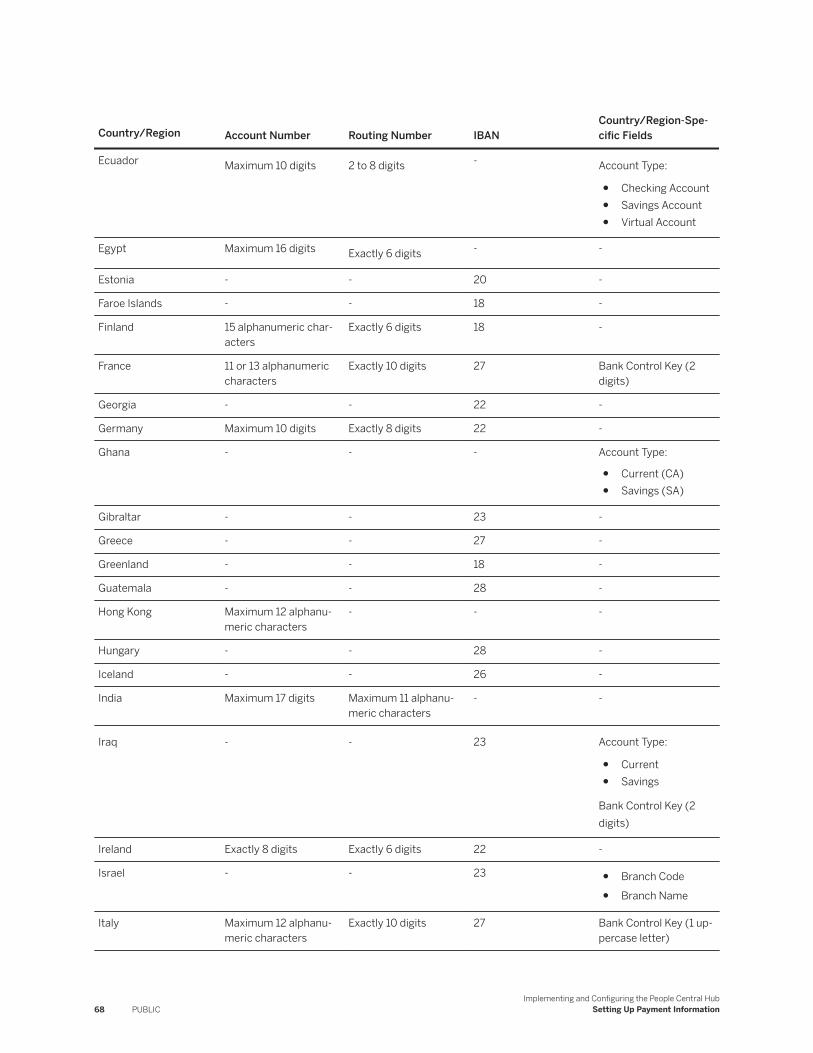
Country/Region Account Number Routing Number IBANCountry/Region-Specific Fields
Ecuador Maximum 10 digits 2 to 8 digits - Account Type:
● Checking Account● Savings Account● Virtual Account
Egypt Maximum 16 digits Exactly 6 digits - -
Estonia - - 20 -
Faroe Islands - - 18 -
Finland 15 alphanumeric characters
Exactly 6 digits 18 -
France 11 or 13 alphanumeric characters
Exactly 10 digits 27 Bank Control Key (2 digits)
Georgia - - 22 -
Germany Maximum 10 digits Exactly 8 digits 22 -
Ghana - - - Account Type:
● Current (CA)● Savings (SA)
Gibraltar - - 23 -
Greece - - 27 -
Greenland - - 18 -
Guatemala - - 28 -
Hong Kong Maximum 12 alphanumeric characters
- - -
Hungary - - 28 -
Iceland - - 26 -
India Maximum 17 digits Maximum 11 alphanumeric characters
- -
Iraq - - 23 Account Type:
● Current● Savings
Bank Control Key (2 digits)
Ireland Exactly 8 digits Exactly 6 digits 22 -
Israel - - 23 ● Branch Code● Branch Name
Italy Maximum 12 alphanumeric characters
Exactly 10 digits 27 Bank Control Key (1 uppercase letter)
68 PUBLICImplementing and Configuring the People Central Hub
Setting Up Payment Information
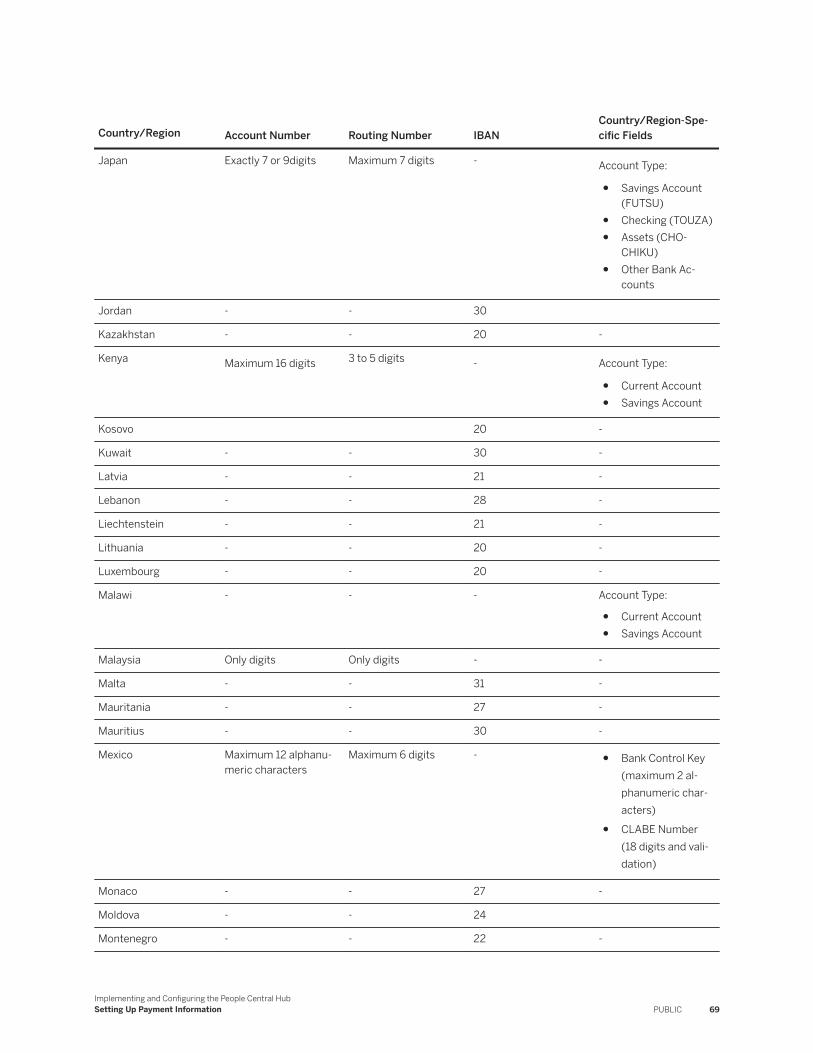
Country/Region Account Number Routing Number IBANCountry/Region-Specific Fields
Japan Exactly 7 or 9digits Maximum 7 digits - Account Type:
● Savings Account (FUTSU)
● Checking (TOUZA)● Assets (CHO
CHIKU)● Other Bank Ac
counts
Jordan - - 30
Kazakhstan - - 20 -
Kenya Maximum 16 digits 3 to 5 digits - Account Type:
● Current Account● Savings Account
Kosovo 20 -
Kuwait - - 30 -
Latvia - - 21 -
Lebanon - - 28 -
Liechtenstein - - 21 -
Lithuania - - 20 -
Luxembourg - - 20 -
Malawi - - - Account Type:
● Current Account● Savings Account
Malaysia Only digits Only digits - -
Malta - - 31 -
Mauritania - - 27 -
Mauritius - - 30 -
Mexico Maximum 12 alphanumeric characters
Maximum 6 digits - ● Bank Control Key (maximum 2 alphanumeric characters)
● CLABE Number (18 digits and validation)
Monaco - - 27 -
Moldova - - 24
Montenegro - - 22 -
Implementing and Configuring the People Central HubSetting Up Payment Information PUBLIC 69
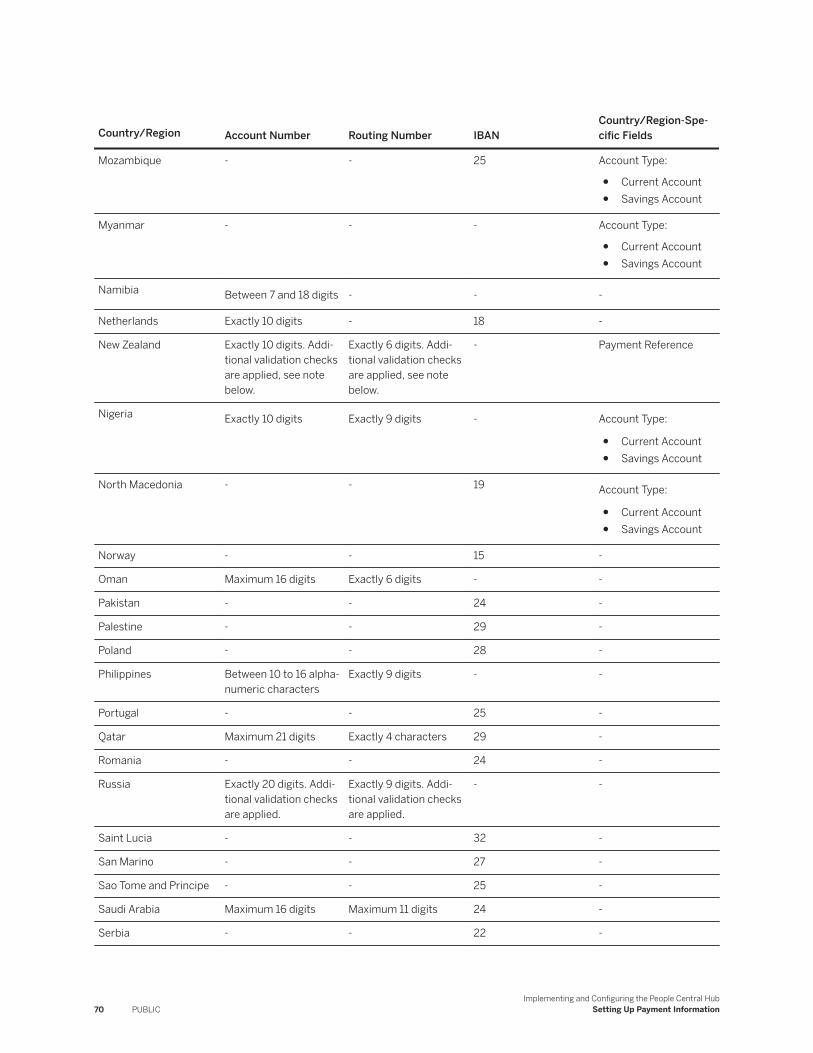
Country/Region Account Number Routing Number IBANCountry/Region-Specific Fields
Mozambique - - 25 Account Type:
● Current Account● Savings Account
Myanmar - - - Account Type:
● Current Account● Savings Account
Namibia Between 7 and 18 digits - - -
Netherlands Exactly 10 digits - 18 -
New Zealand Exactly 10 digits. Additional validation checks are applied, see note below.
Exactly 6 digits. Additional validation checks are applied, see note below.
- Payment Reference
Nigeria Exactly 10 digits Exactly 9 digits - Account Type:
● Current Account● Savings Account
North Macedonia - - 19 Account Type:
● Current Account● Savings Account
Norway - - 15 -
Oman Maximum 16 digits Exactly 6 digits - -
Pakistan - - 24 -
Palestine - - 29 -
Poland - - 28 -
Philippines Between 10 to 16 alphanumeric characters
Exactly 9 digits - -
Portugal - - 25 -
Qatar Maximum 21 digits Exactly 4 characters 29 -
Romania - - 24 -
Russia Exactly 20 digits. Additional validation checks are applied.
Exactly 9 digits. Additional validation checks are applied.
- -
Saint Lucia - - 32 -
San Marino - - 27 -
Sao Tome and Principe - - 25 -
Saudi Arabia Maximum 16 digits Maximum 11 digits 24 -
Serbia - - 22 -
70 PUBLICImplementing and Configuring the People Central Hub
Setting Up Payment Information
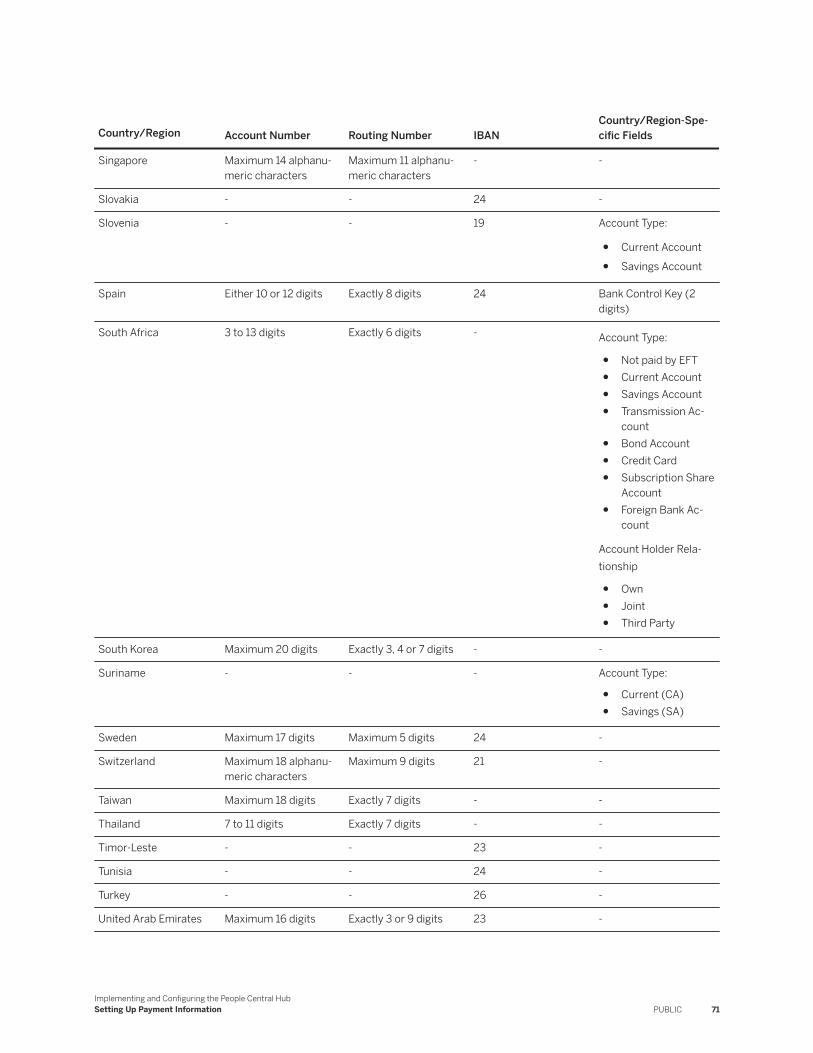
Country/Region Account Number Routing Number IBANCountry/Region-Specific Fields
Singapore Maximum 14 alphanumeric characters
Maximum 11 alphanumeric characters
- -
Slovakia - - 24 -
Slovenia - - 19 Account Type:
● Current Account● Savings Account
Spain Either 10 or 12 digits Exactly 8 digits 24 Bank Control Key (2 digits)
South Africa 3 to 13 digits Exactly 6 digits - Account Type:
● Not paid by EFT● Current Account● Savings Account● Transmission Ac
count● Bond Account● Credit Card● Subscription Share
Account● Foreign Bank Ac
count
Account Holder Relationship
● Own● Joint● Third Party
South Korea Maximum 20 digits Exactly 3, 4 or 7 digits - -
Suriname - - - Account Type:
● Current (CA)● Savings (SA)
Sweden Maximum 17 digits Maximum 5 digits 24 -
Switzerland Maximum 18 alphanumeric characters
Maximum 9 digits 21 -
Taiwan Maximum 18 digits Exactly 7 digits - -
Thailand 7 to 11 digits Exactly 7 digits - -
Timor-Leste - - 23 -
Tunisia - - 24 -
Turkey - - 26 -
United Arab Emirates Maximum 16 digits Exactly 3 or 9 digits 23 -
Implementing and Configuring the People Central HubSetting Up Payment Information PUBLIC 71
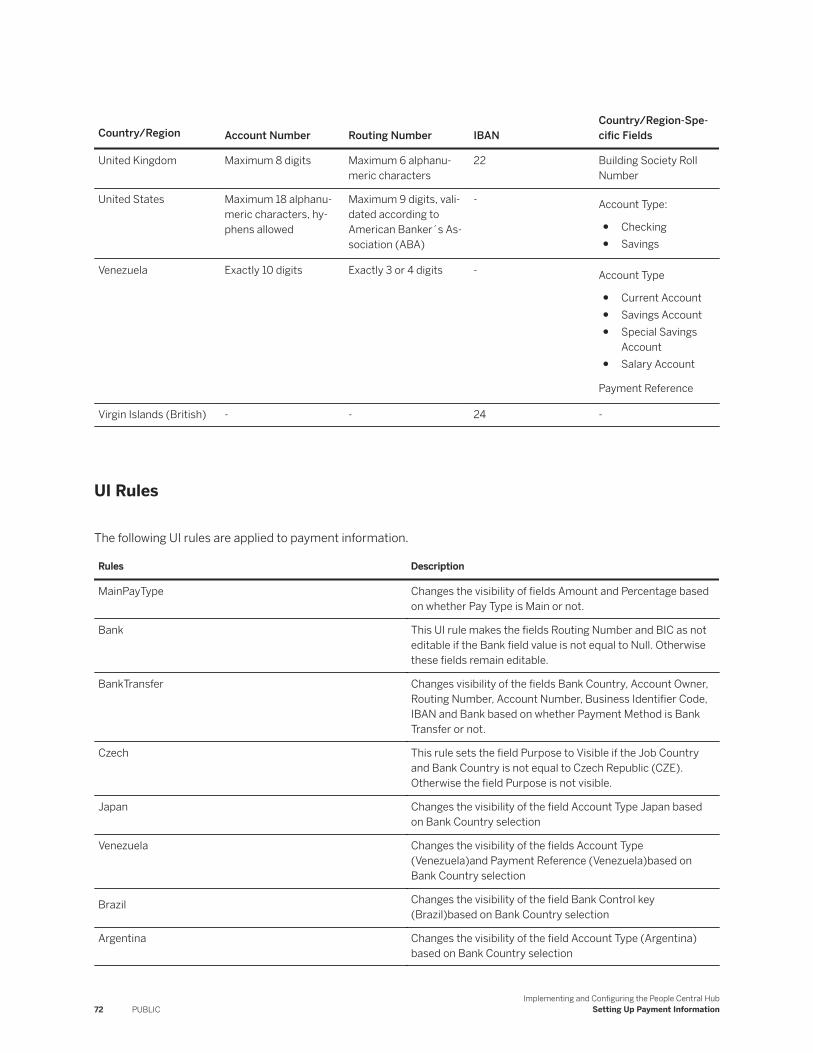
Country/Region Account Number Routing Number IBANCountry/Region-Specific Fields
United Kingdom Maximum 8 digits Maximum 6 alphanumeric characters
22 Building Society Roll Number
United States Maximum 18 alphanumeric characters, hyphens allowed
Maximum 9 digits, validated according to American Banker´s Association (ABA)
- Account Type:
● Checking● Savings
Venezuela Exactly 10 digits Exactly 3 or 4 digits - Account Type
● Current Account● Savings Account● Special Savings
Account● Salary Account
Payment Reference
Virgin Islands (British) - - 24 -
UI Rules
The following UI rules are applied to payment information.
Rules Description
MainPayType Changes the visibility of fields Amount and Percentage based on whether Pay Type is Main or not.
Bank This UI rule makes the fields Routing Number and BIC as not editable if the Bank field value is not equal to Null. Otherwise these fields remain editable.
BankTransfer Changes visibility of the fields Bank Country, Account Owner, Routing Number, Account Number, Business Identifier Code, IBAN and Bank based on whether Payment Method is Bank Transfer or not.
Czech This rule sets the field Purpose to Visible if the Job Country and Bank Country is not equal to Czech Republic (CZE). Otherwise the field Purpose is not visible.
Japan Changes the visibility of the field Account Type Japan based on Bank Country selection
Venezuela Changes the visibility of the fields Account Type (Venezuela)and Payment Reference (Venezuela)based on Bank Country selection
Brazil Changes the visibility of the field Bank Control key (Brazil)based on Bank Country selection
Argentina Changes the visibility of the field Account Type (Argentina) based on Bank Country selection
72 PUBLICImplementing and Configuring the People Central Hub
Setting Up Payment Information
Rules Description
Mexico Changes the visibility of the field Bank Control Key and CLABE number (Mexico)based on Bank Country selection
USA Changes the visibility of the field Account Type (USA) based on Bank Country selection
Iraq Changes the visibility of the field Account Type (iraq)Bank Control Key (iraq)based on Bank Country selection
UK Changes the visibility of the field Building Society Roll Number (UK) based on Bank Country selection
Myanmar Changes the visibility of the field Account Type (Myanmar) based on Bank Country selection
Kuwait Changes the visibility of the fields Routing Number and BIC (Namibia) based on Bank Country selection
Namibia Changes the visibility of the fields Routing Number and BIC and IBAN based on Bank Country selection
Kenya Changes the visibility of the field Account Type (Kenya) based on Bank Country selection
France Changes the visibility of the field Bank Control Key (France) based on Bank Country selection
Italy Changes the visibility of the field Bank Control Key (Italy) based on Bank Country selection
NewZealand Changes the visibility of the field Payment reference (NewZealand) based on Bank Country selection
Colombia Changes the visibility of the fields Account Type (Colombia) and Proof of Identity (Colombia) based on Bank Country selection
SouthAfrica Changes the visibility of the fields Account Type (SouthAfrica) and Account Holder Relationship (SouthAfrica) based on Bank Country selection
Israel Changes the visibility of the fields Branch Code (Israel) and Branch Name (Israel) based on Bank Country selection
Chile Changes the visibility of the field Bank Control Key (Chile) based on Bank Country selection
Spain Changes the visibility of the field Bank Control Key (Spain) based on Bank Country selection
Ecuador Changes the visibility of the field Account Type (Ecuador) based on Bank Country selection
Nigeria Changes the visibility of the field Account Type (Nigeria) based on Bank Country selection
Implementing and Configuring the People Central HubSetting Up Payment Information PUBLIC 73
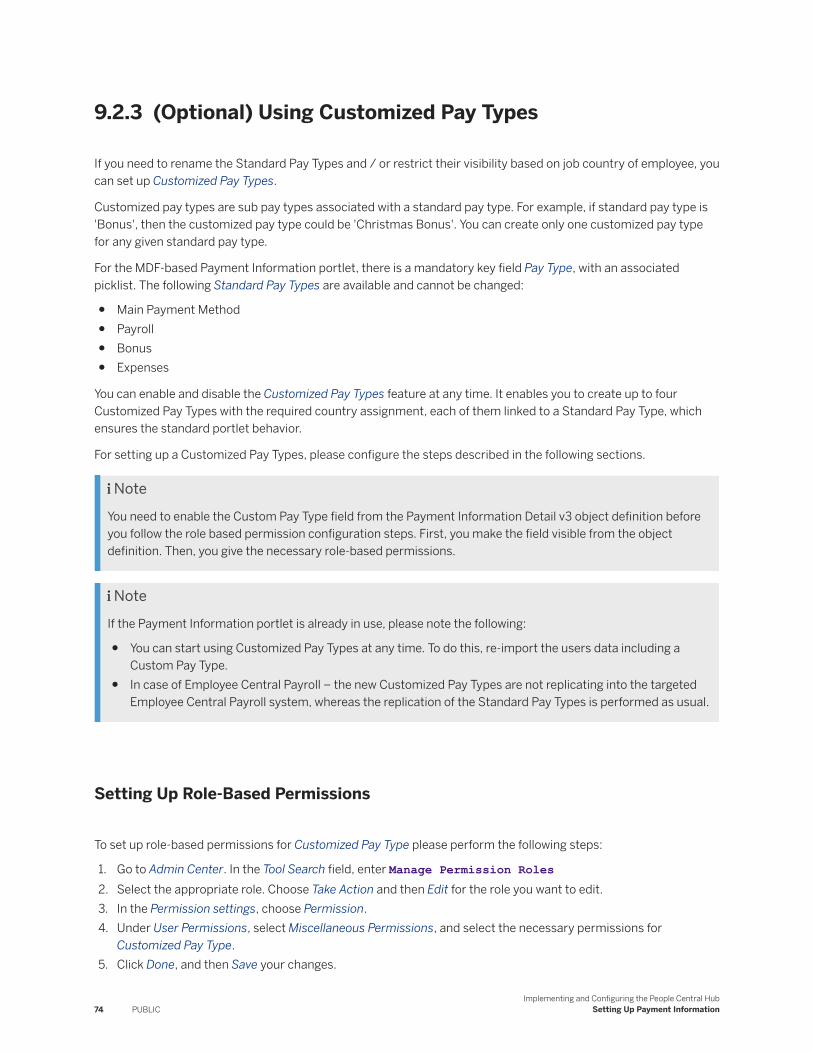
9.2.3 (Optional) Using Customized Pay Types
If you need to rename the Standard Pay Types and / or restrict their visibility based on job country of employee, you can set up Customized Pay Types.
Customized pay types are sub pay types associated with a standard pay type. For example, if standard pay type is 'Bonus', then the customized pay type could be 'Christmas Bonus'. You can create only one customized pay type for any given standard pay type.
For the MDF-based Payment Information portlet, there is a mandatory key field Pay Type, with an associated picklist. The following Standard Pay Types are available and cannot be changed:
● Main Payment Method● Payroll● Bonus● Expenses
You can enable and disable the Customized Pay Types feature at any time. It enables you to create up to four Customized Pay Types with the required country assignment, each of them linked to a Standard Pay Type, which ensures the standard portlet behavior.
For setting up a Customized Pay Types, please configure the steps described in the following sections.
NoteYou need to enable the Custom Pay Type field from the Payment Information Detail v3 object definition before you follow the role based permission configuration steps. First, you make the field visible from the object definition. Then, you give the necessary role-based permissions.
NoteIf the Payment Information portlet is already in use, please note the following:
● You can start using Customized Pay Types at any time. To do this, re-import the users data including a Custom Pay Type.
● In case of Employee Central Payroll – the new Customized Pay Types are not replicating into the targeted Employee Central Payroll system, whereas the replication of the Standard Pay Types is performed as usual.
Setting Up Role-Based Permissions
To set up role-based permissions for Customized Pay Type please perform the following steps:
1. Go to Admin Center. In the Tool Search field, enter Manage Permission Roles2. Select the appropriate role. Choose Take Action and then Edit for the role you want to edit.3. In the Permission settings, choose Permission.4. Under User Permissions, select Miscellaneous Permissions, and select the necessary permissions for
Customized Pay Type.5. Click Done, and then Save your changes.
74 PUBLICImplementing and Configuring the People Central Hub
Setting Up Payment Information
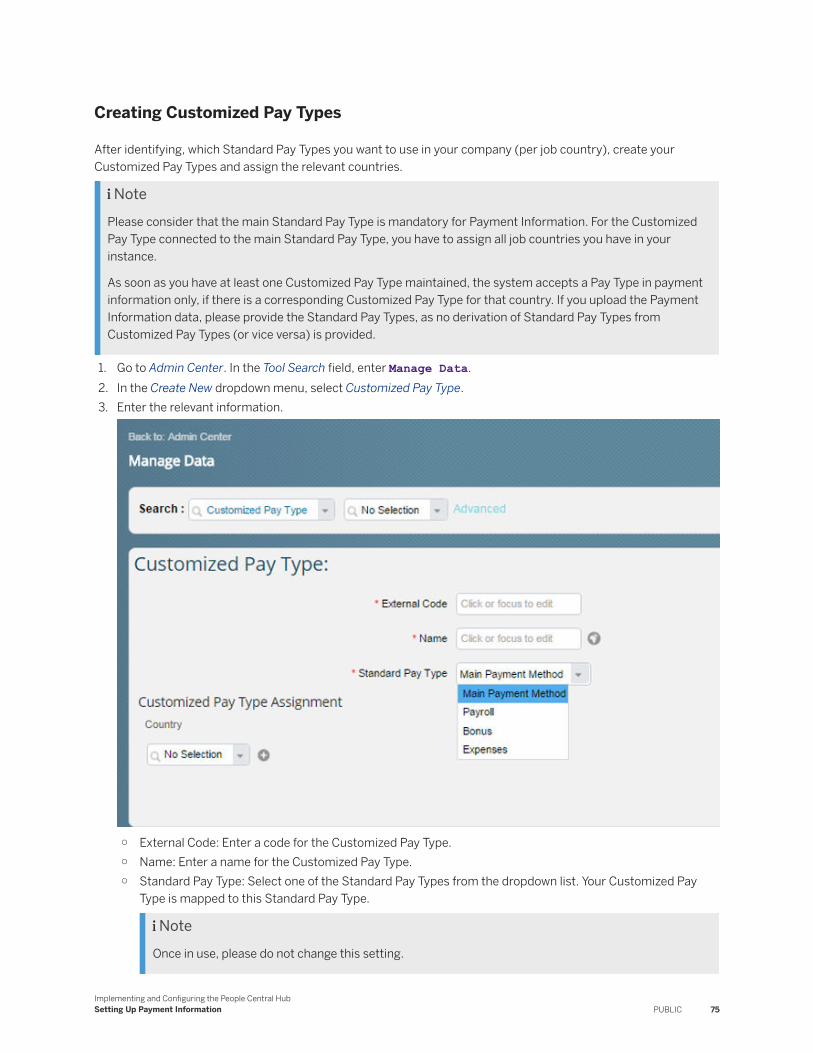
Creating Customized Pay Types
After identifying, which Standard Pay Types you want to use in your company (per job country), create your Customized Pay Types and assign the relevant countries.
NotePlease consider that the main Standard Pay Type is mandatory for Payment Information. For the Customized Pay Type connected to the main Standard Pay Type, you have to assign all job countries you have in your instance.
As soon as you have at least one Customized Pay Type maintained, the system accepts a Pay Type in payment information only, if there is a corresponding Customized Pay Type for that country. If you upload the Payment Information data, please provide the Standard Pay Types, as no derivation of Standard Pay Types from Customized Pay Types (or vice versa) is provided.
1. Go to Admin Center. In the Tool Search field, enter Manage Data.2. In the Create New dropdown menu, select Customized Pay Type.3. Enter the relevant information.
○ External Code: Enter a code for the Customized Pay Type.○ Name: Enter a name for the Customized Pay Type.○ Standard Pay Type: Select one of the Standard Pay Types from the dropdown list. Your Customized Pay
Type is mapped to this Standard Pay Type.
NoteOnce in use, please do not change this setting.
Implementing and Configuring the People Central HubSetting Up Payment Information PUBLIC 75

○ Customized Pay Type Assignment: Choose a county from the dropdown list. You can assign as many countries as you wish.
NoteMain Payment Method is a mandatory Pay Type. Therefore, for the Customized Pay Type with Standard Pay Type Main Payment Method assign all job countries of your instance. You can only have one main payment method.
NoteIf you enter a customized pay type for one standard pay type, make sure that you create customized pay types for the other three standard pay types available.
4. Click Save and repeat steps 2-4 to create more Customized Pay Types.
Setting Up Configuration UI
To expose the field to your employees on their personal information page, adjust the UI.
1. Go to Admin Center. In the Tool Search field, enter Manage Configuration UI.2. In the Search field, choose your configuration UI ID.3. In the details section choose Add Field.
The field is automatically added at the end of the list.4. To edit the properties of the new field, click Edit Properties.
1. On the Properties window choose:○ Value Type: Resolver
76 PUBLICImplementing and Configuring the People Central Hub
Setting Up Payment Information

○ Value Type Resolver: Please navigate to the entry Customized Pay Type.
Implementing and Configuring the People Central HubSetting Up Payment Information PUBLIC 77

○ Rule: To ensure the UI behavior according to the Standard Pay Type, you can assign the UI rule MainPayType here.
2. Click OK and return to the Manage Configuration UI screen.5. Place the new field on the UI. We recommend to place it on the top, by drag and drop.6. Decide how you want to treat the Pay Type field. Choose Edit Properties. You can either set the field to read-only
by selecting Editable: No. Or you can hide it by selecting Visible: No.
NoteAs a key mandatory field, you can´t delete the Pay Type field.
NoteIf you do not create a customized pay type, you cannot set the 'Main Pay Type' field to 'Not Visible'.
7. Save your changes.
78 PUBLICImplementing and Configuring the People Central Hub
Setting Up Payment Information
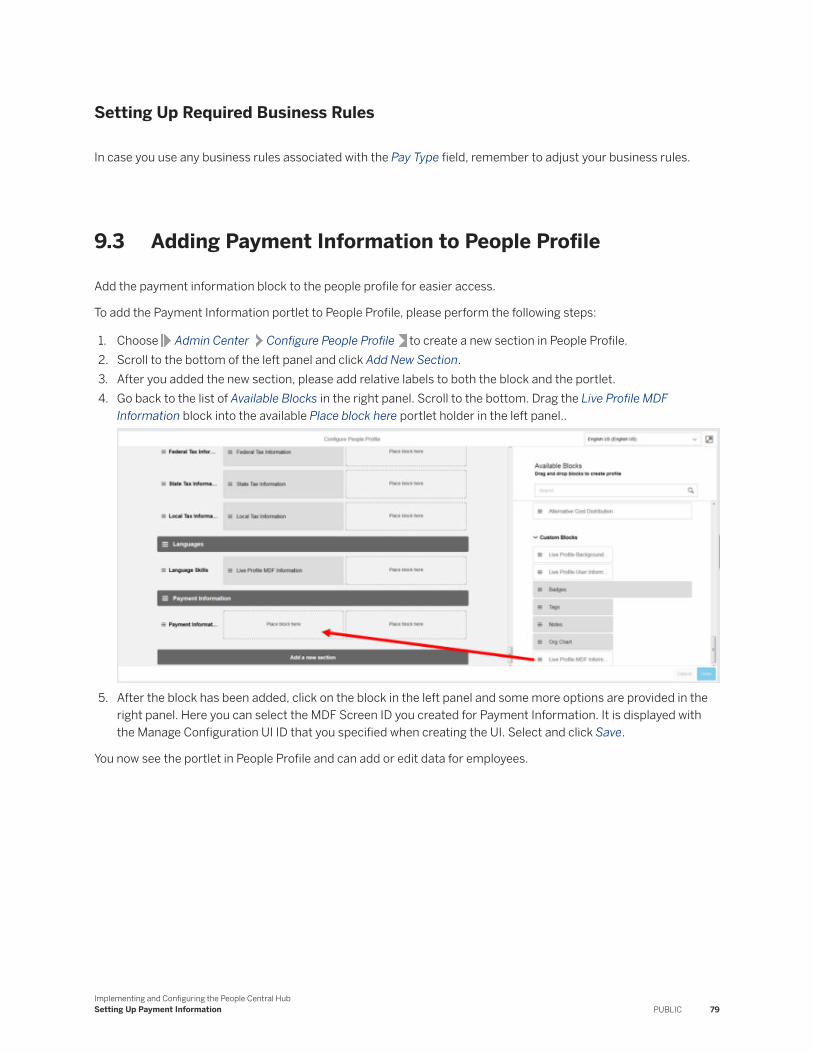
Setting Up Required Business Rules
In case you use any business rules associated with the Pay Type field, remember to adjust your business rules.
9.3 Adding Payment Information to People Profile
Add the payment information block to the people profile for easier access.
To add the Payment Information portlet to People Profile, please perform the following steps:
1. Choose Admin Center Configure People Profile to create a new section in People Profile.2. Scroll to the bottom of the left panel and click Add New Section.3. After you added the new section, please add relative labels to both the block and the portlet.4. Go back to the list of Available Blocks in the right panel. Scroll to the bottom. Drag the Live Profile MDF
Information block into the available Place block here portlet holder in the left panel..
5. After the block has been added, click on the block in the left panel and some more options are provided in the right panel. Here you can select the MDF Screen ID you created for Payment Information. It is displayed with the Manage Configuration UI ID that you specified when creating the UI. Select and click Save.
You now see the portlet in People Profile and can add or edit data for employees.
Implementing and Configuring the People Central HubSetting Up Payment Information PUBLIC 79
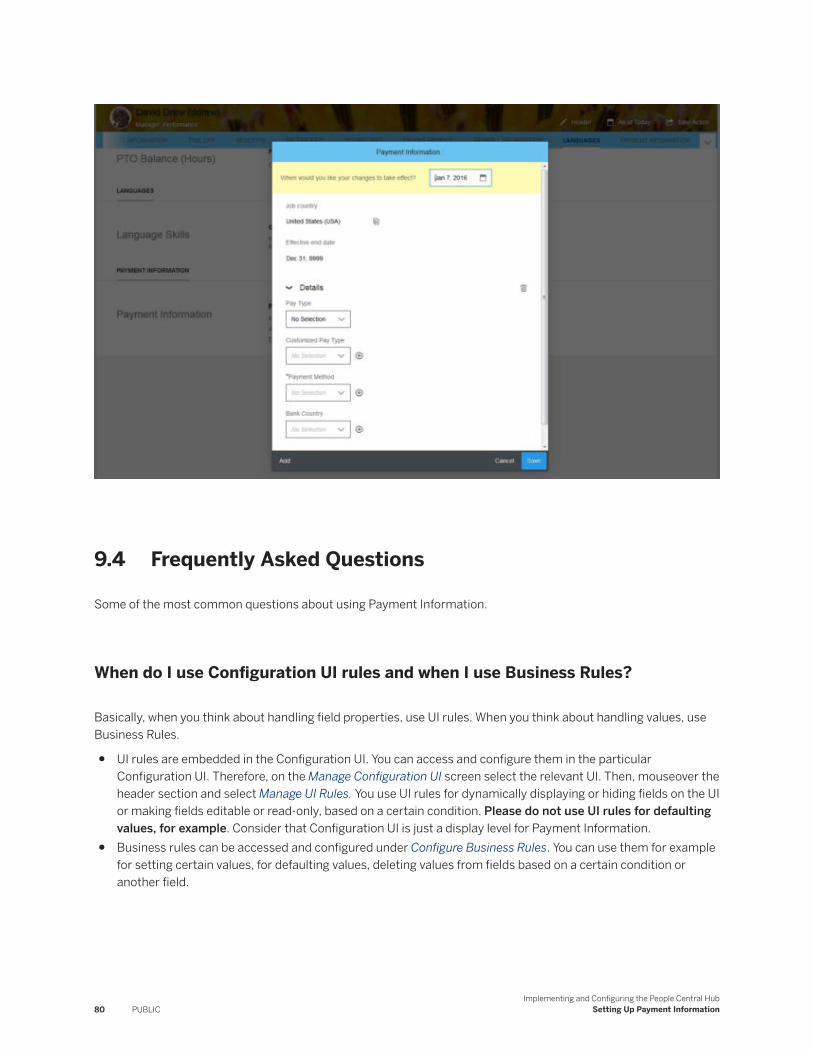
9.4 Frequently Asked Questions
Some of the most common questions about using Payment Information.
When do I use Configuration UI rules and when I use Business Rules?
Basically, when you think about handling field properties, use UI rules. When you think about handling values, use Business Rules.
● UI rules are embedded in the Configuration UI. You can access and configure them in the particular Configuration UI. Therefore, on the Manage Configuration UI screen select the relevant UI. Then, mouseover the header section and select Manage UI Rules. You use UI rules for dynamically displaying or hiding fields on the UI or making fields editable or read-only, based on a certain condition. Please do not use UI rules for defaulting values, for example. Consider that Configuration UI is just a display level for Payment Information.
● Business rules can be accessed and configured under Configure Business Rules. You can use them for example for setting certain values, for defaulting values, deleting values from fields based on a certain condition or another field.
80 PUBLICImplementing and Configuring the People Central Hub
Setting Up Payment Information
What is pay sequence in Payment Information?
When you create several Payment Information entries and save them, each of them is automatically assigned a read-only sequential number (Pay Sequence). The Pay Sequence corresponds to the order in which the entries appear on the UI, and is adjusted whenever you reorder and save them. The field is not included in the standard configuration UI template, but it is visible on the Manage Data UI. When the data is extracted via an API or downloaded, the field can be used to sort the Payment Information entries in the correct order. Note:
NoteThe field is not replicated into Employee Central Payroll.
How can I check the uniqueness of Bank in Bank Directory?
The Bank field can only display Bank data if the selected Bank is a unique entry in Bank Directory (in combination of Bank Country, Routing Number and Business Identifier Code). To check, whether the selected Bank is unique go to Admin Center Manage Data and search for Bank. Additionally, enter for example the Routing Number of the Bank. If more than one entry for the same Bank Country, Routing Number and Business Identifier Code is displayed, your Bank is not unique. Have a look into the Bank data and set any duplicate entries to Inactive.
Why are country-specific fields not imported?
When taking over and importing country-specific data from your old system into Employee Central Payroll, your data is not imported. Therefore, the data won´t be visible on the UI. To make your country-specific fields visible on the UI, execute the following steps:
1. Prepare a ZIP file containing the following files:1. Payment Information – Details.csv2. Payment Information.csv3. Payment Information Detail-Payment Information Detail <country code>.csv4. import.properties5. import_sequence.csv
2. Insert a dummy reference ID. The country-specific field data can then be mapped to the according payment information detail record.Please assign in file Payment Information – Details.csv a dummy ID in column toPaymentInformationDetailV3.externalCode and refer to it in file Payment Information Detail-Payment Information Detail <country code>.csv in column toPaymentInformationDetailV3.externalCode.
NoteYou cannot enter an external code in the country specific payment info detail objects as the external code is now an auto number.
If you have any custom objects for payment info country specific objects then you can change the external code data type from auto number to other data type but we do not recommend this.
Implementing and Configuring the People Central HubSetting Up Payment Information PUBLIC 81
3. Import the ZIP file to Employee Central Payroll.
How can the Payment Information portlet be hidden?
● You can completely remove the portlet from the personal information page. Therefore, go to Admin CenterManage Data and select Personal Information Screen Lookup / Payment Information and delete it. Only the linking of the Payment Information portlet to the Personal Information Page is then deleted. All data and the Configuration UI template remain unchanged. HR administrators can now access Payment Information via Manage Data.
NoteHR administrators are not able to enter Payment Information for Employees with Concurrent Employment / Global Assignment, as only one Job Information is supported under Manage Data. Payment information for Concurrent Employment and Global Assignment can be entered via Personal Information portlet only.
● You can hide the payment Information portlet, to update the Configuration UI with any new fields, . In this case, set role-based permissions for your Personal Information Screen Lookup. Go to Admin Center Configure Object Definitions . In the first dropdown select Object Definition and in the second dropdown list select Personal Information Screen Lookup. Choose Take Action Make Correction . In the Security section select.○ Secured: Yes○ Permission Category: Miscellaneous Permissions
Then go to Admin Center Manage Permission Roles and enter the relevant permissions. Now only administrators can see the portlet under Personal Information page. Once you are done, either reset the permissions or change back to standard in your Object Definition for Personal Information Screen Lookup.
I’m able to edit the ‘Country’ and ‘Currency’ objects from the Employee Profile Page but I should only have permission to view these objects. How can I prevent this scenario?
‘Country’ and ‘Currency’ objects can be made not-editable in ‘Employee Profile Page’ if the user has only been given permission to view these objects in the employee profile.
To make the country field non-editable for a user, you can follow steps below:
1. Go to Admin Center -> 'Configure Object Definition' of the object 'Country'Take Action -> Make CorrectionUnder 'Security' change the 'Secured' field from 'No' to 'Yes'Set the 'Permission Category' field as 'Miscellaneous Permissions' (this will cause the Object permissions to be displayed under Miscellaneous in permission role settings, that is, in ‘Manage Permission Roles’)
2. Go to Admin Center -> View User PermissionsMake note of all the Permission Roles that the particular user has for the object ‘Country’ under ‘Miscellaneous Permissions’ section in ‘View User Permissions’.
82 PUBLICImplementing and Configuring the People Central Hub
Setting Up Payment Information
3. Go to ‘Manage Permission Roles’ from the Admin Center.Go to each of the Permission Roles that you noted from Step 2 and give ‘View’ permission for the ‘Country’ object which is under the ‘Miscellaneous Permissions’ section.
Dangling reference for country and currency objects
If you see the error ‘Sorry, the selected payment method Bank Transfer for pay type Main Payment Method is not available for the country of your job.’ while saving Payment Information record, follow these steps:
•Check if there is a country assignment for the Payment Method that you have given.
Go to Manage Data -> Payment Method and check the country assignment
• If it exists, check if the country object has been deleted. If it has been deleted, create a new country object, delete the existing country reference from the Payment Method and reassign the country reference.
• If any change was made to the existing country object, delete the country reference in Payment Method and reassign the country reference.
I want to check if a user has permission to view or edit any of the fields in Payment Information object
• Go to the Admin Center -> View User Permissions
Make note of all the ‘Permission Roles’ that the particular user has for the field for that particular Payment Information object under ‘Miscellaneous Permissions’.
To view, change or edit the relevant permissions, do the following:
• Go to Admin Center. In the Tool Search field, enter Manage Permission Roles.
• Select the required role (for example, your HR admin role).
• Select the Permission button. Select Miscellaneous Permissions and select the necessary permissions for all the objects related to Payment Information, including Country Specific Payment Information Objects.
● Select the Field Level Overrides checkbox and select the fields and give the permissions as required
For object level permissions seeSetting Up Role-based Permissions [page 59]
I see an application error in PP3 when I'm trying to hire or rehire an employee. How do I find the root cause?
You can find the root cause by following these steps:
1. Check if the data is being saved on the Manage Data screen. If the application error happens at this stage, there is an issue with the Object Definition changes. You should run the relevant Provisioning Jobs to refresh the Object Definitions.
Implementing and Configuring the People Central HubSetting Up Payment Information PUBLIC 83
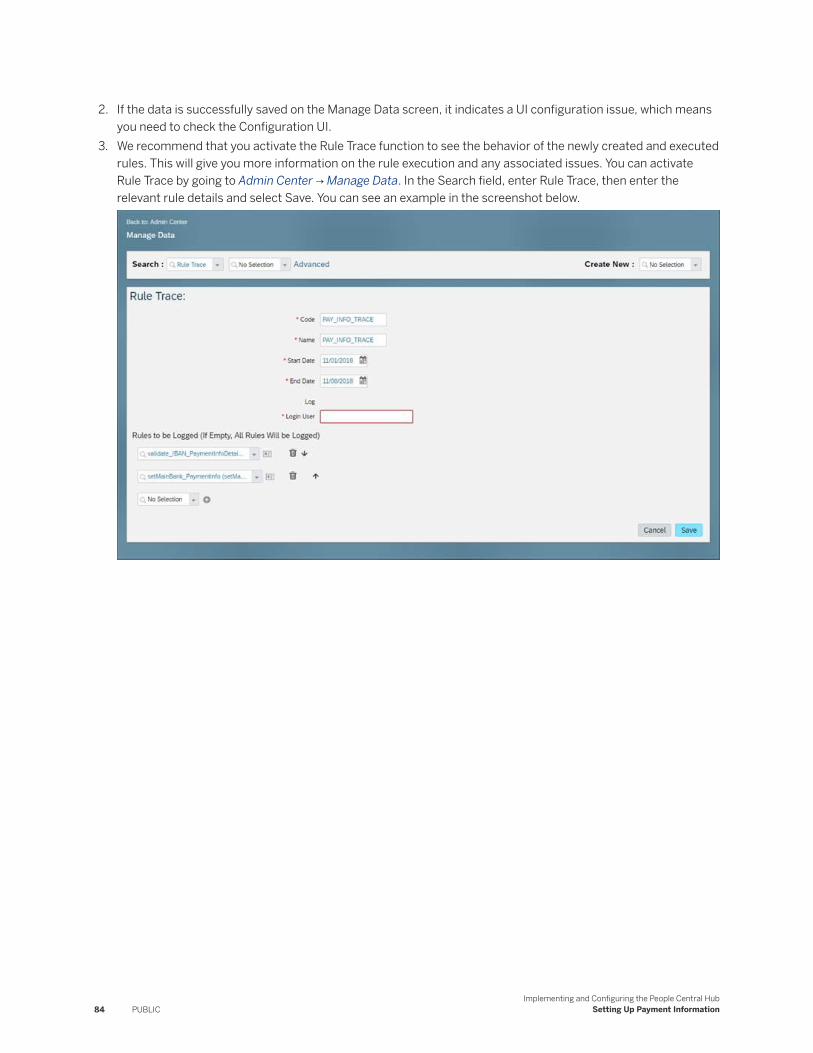
2. If the data is successfully saved on the Manage Data screen, it indicates a UI configuration issue, which means you need to check the Configuration UI.
3. We recommend that you activate the Rule Trace function to see the behavior of the newly created and executed rules. This will give you more information on the rule execution and any associated issues. You can activate Rule Trace by going to Admin Center → Manage Data. In the Search field, enter Rule Trace, then enter the relevant rule details and select Save. You can see an example in the screenshot below.
84 PUBLICImplementing and Configuring the People Central Hub
Setting Up Payment Information
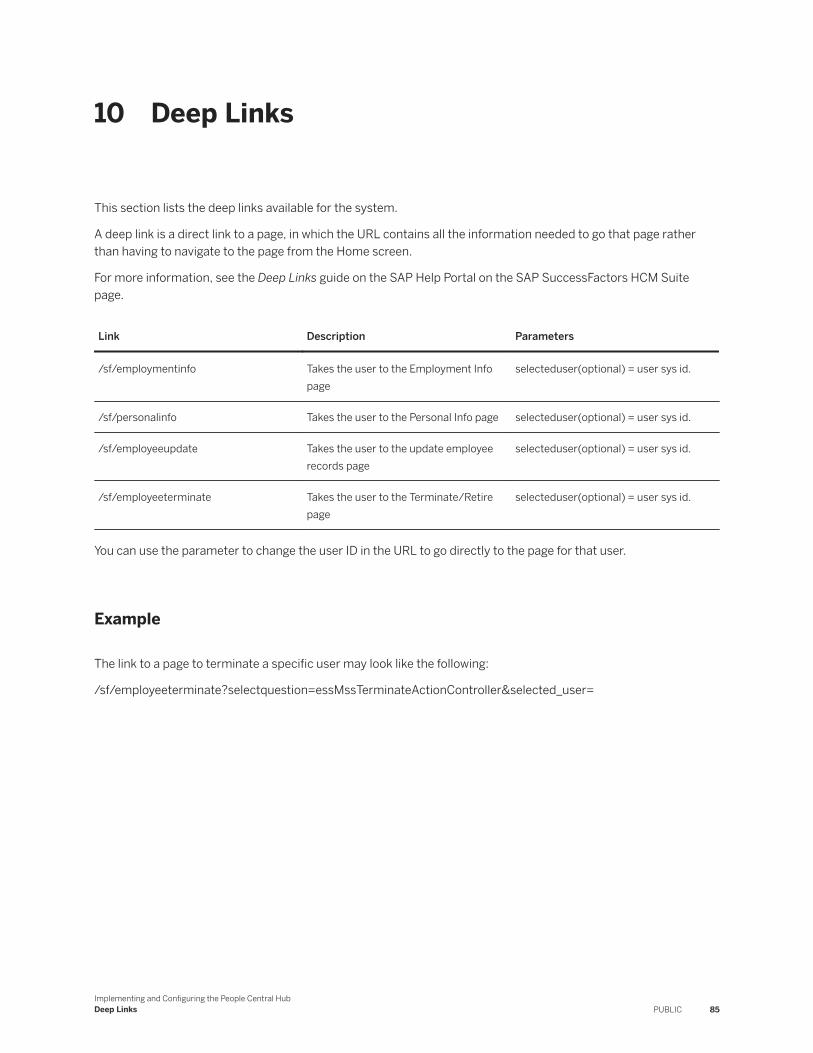
10 Deep Links
This section lists the deep links available for the system.
A deep link is a direct link to a page, in which the URL contains all the information needed to go that page rather than having to navigate to the page from the Home screen.
For more information, see the Deep Links guide on the SAP Help Portal on the SAP SuccessFactors HCM Suite page.
Link Description Parameters
/sf/employmentinfo Takes the user to the Employment Info page
selecteduser(optional) = user sys id.
/sf/personalinfo Takes the user to the Personal Info page selecteduser(optional) = user sys id.
/sf/employeeupdate Takes the user to the update employee records page
selecteduser(optional) = user sys id.
/sf/employeeterminate Takes the user to the Terminate/Retire page
selecteduser(optional) = user sys id.
You can use the parameter to change the user ID in the URL to go directly to the page for that user.
Example
The link to a page to terminate a specific user may look like the following:
/sf/employeeterminate?selectquestion=essMssTerminateActionController&selected_user=
Implementing and Configuring the People Central HubDeep Links PUBLIC 85
Important Disclaimers and Legal Information
HyperlinksSome links are classified by an icon and/or a mouseover text. These links provide additional information.About the icons:
● Links with the icon : You are entering a Web site that is not hosted by SAP. By using such links, you agree (unless expressly stated otherwise in your agreements with SAP) to this:
● The content of the linked-to site is not SAP documentation. You may not infer any product claims against SAP based on this information.● SAP does not agree or disagree with the content on the linked-to site, nor does SAP warrant the availability and correctness. SAP shall not be liable for any
damages caused by the use of such content unless damages have been caused by SAP's gross negligence or willful misconduct.
● Links with the icon : You are leaving the documentation for that particular SAP product or service and are entering a SAP-hosted Web site. By using such links, you agree that (unless expressly stated otherwise in your agreements with SAP) you may not infer any product claims against SAP based on this information.
Videos Hosted on External PlatformsSome videos may point to third-party video hosting platforms. SAP cannot guarantee the future availability of videos stored on these platforms. Furthermore, any advertisements or other content hosted on these platforms (for example, suggested videos or by navigating to other videos hosted on the same site), are not within the control or responsibility of SAP.
Beta and Other Experimental FeaturesExperimental features are not part of the officially delivered scope that SAP guarantees for future releases. This means that experimental features may be changed by SAP at any time for any reason without notice. Experimental features are not for productive use. You may not demonstrate, test, examine, evaluate or otherwise use the experimental features in a live operating environment or with data that has not been sufficiently backed up.The purpose of experimental features is to get feedback early on, allowing customers and partners to influence the future product accordingly. By providing your feedback (e.g. in the SAP Community), you accept that intellectual property rights of the contributions or derivative works shall remain the exclusive property of SAP.
Example CodeAny software coding and/or code snippets are examples. They are not for productive use. The example code is only intended to better explain and visualize the syntax and phrasing rules. SAP does not warrant the correctness and completeness of the example code. SAP shall not be liable for errors or damages caused by the use of example code unless damages have been caused by SAP's gross negligence or willful misconduct.
Gender-Related LanguageWe try not to use gender-specific word forms and formulations. As appropriate for context and readability, SAP may use masculine word forms to refer to all genders.
86 PUBLICImplementing and Configuring the People Central Hub
Important Disclaimers and Legal Information

Implementing and Configuring the People Central HubImportant Disclaimers and Legal Information PUBLIC 87
www.sap.com/contactsap
© 2021 SAP SE or an SAP affiliate company. All rights reserved.
No part of this publication may be reproduced or transmitted in any form or for any purpose without the express permission of SAP SE or an SAP affiliate company. The information contained herein may be changed without prior notice.
Some software products marketed by SAP SE and its distributors contain proprietary software components of other software vendors. National product specifications may vary.
These materials are provided by SAP SE or an SAP affiliate company for informational purposes only, without representation or warranty of any kind, and SAP or its affiliated companies shall not be liable for errors or omissions with respect to the materials. The only warranties for SAP or SAP affiliate company products and services are those that are set forth in the express warranty statements accompanying such products and services, if any. Nothing herein should be construed as constituting an additional warranty.
SAP and other SAP products and services mentioned herein as well as their respective logos are trademarks or registered trademarks of SAP SE (or an SAP affiliate company) in Germany and other countries. All other product and service names mentioned are the trademarks of their respective companies.
Please see https://www.sap.com/about/legal/trademark.html for additional trademark information and notices.
THE BEST RUN
Related Documents