Welcome message from author
This document is posted to help you gain knowledge. Please leave a comment to let me know what you think about it! Share it to your friends and learn new things together.
Transcript

800 East 96th Street, Indianapolis, Indiana 46240 USA
Craig James JohnstonCheryl Brumbaugh-Duncan
MyiMovie®
ii
Editor-in-Chief
Greg Wiegand
Senior Acquisitions
Editor
Laura Norman
Development Editor
Charlotte Kughen
Managing Editor
Kristy Hart
Senior Project Editor
Lori Lyons
Copy Editor
Karen Annett
Indexer
Lisa Stumpf
Proofreader
Dan Knott
Technical Editor
Greg Kettell
Editorial Assistant
Cindy Teeters
Cover Designer
Mark Shirar
Compositor
Bronkella Publishing
Manufacturing
Buyer
Dan Uhrig
My iMovie®Copyright © 2014 by Pearson EducationAll rights reserved. No part of this book shall be reproduced, stored in a retrieval system, or transmitted by any means, electronic, mechanical, photocopying, recording, or otherwise, without written permission from the publisher. No patent liability is assumed with respect to the use of the information contained herein. Although every precaution has been taken in the preparation of this book, the publisher and author assume no responsibility for errors or omissions. Nor is any liability assumed for damages resulting from the use of the information contained herein.
ISBN-13: 978-0-7897-4995-6ISBN-10: 0-7897-4995-5
Library of Congress Control Number: 2014930245
Printed in the United States of America
Second Printing: June 2014
TrademarksAll terms mentioned in this book that are known to be trademarks or service marks have been appropriately capitalized. Que Publishing cannot attest to the accuracy of this information. Use of a term in this book should not be regarded as affecting the validity of any trademark or service mark.
Warning and DisclaimerEvery effort has been made to make this book as complete and as accurate as possible, but no warranty or fitness is implied. The information provided is on an “as is” basis. The author and the publisher shall have neither liability nor responsibility to any person or entity with respect to any loss or damages arising from the information contained in this book or from the use of the programs accompanying it.
Special SalesFor information about buying this title in bulk quantities, or for special sales opportunities (which may include electronic versions; custom cover designs; and content particular to your business, training goals, marketing focus, or branding interests), please contact our corporate sales department at [email protected] or (800) 382-3419.
For government sales inquiries, please contact [email protected].
For questions about sales outside the U.S., please contact [email protected].
Contents at a Glance Prologue Getting to Know iMovie General Concepts ................................................3
Chapter 1 Customizing iMovie Settings and Preferences ....................................11
Chapter 2 Importing and Organizing Video, Events, and Movie Clips ........................................................................................................................29
Chapter 3 Creating a New Movie Project ................................................................................63
Chapter 4 Editing and Correcting Movie Clips ..................................................................89
Chapter 5 Adding Special Effects, Maps, Backgrounds, and Titles Clips .......................................................................................................................109
Chapter 6 Adding and Editing Voiceovers, Music, and Sound Effects ..............................................................................................................143
Chapter 7 Editing Video Color, Brightness, and More ...........................................153
Chapter 8 Adding and Customizing Video Themes ................................................165
Chapter 9 Creating and Customizing Movie Trailers ..............................................175
Chapter 10 Sharing Your Movies .......................................................................................................185
Chapter 11 Using iMovie on Your iPhone and iPad ....................................................195
Index..................................................................................................................................................219
Table of Contents P Getting to Know iMovie General Concepts 3
iMovie Layout ....................................................................................................................3
Libraries ..........................................................................................................................4
Content Library ........................................................................................................5
Movie Timeline .........................................................................................................6
Viewer ...............................................................................................................................7
Browser ............................................................................................................................7
Theater .............................................................................................................................8
Toolbar .............................................................................................................................8
1 Customizing iMovie Settings and Preferences 11
Switching the Project and Event Browsers ..........................................13
Resizing the Sidebar, Viewer, Event Browser, and Project Browser ....................................................................................................14
Hiding the iMovie Sidebar ..................................................................................16
Changing the Display of Project and Event Browser Content ........................................................................................................................17
Wrap the Movie Timeline .............................................................................17
Adjust a Clip Thumbnail in the Event Browser .........................18
Adjust the Clip Thumbnail in the Project Browser ................19
Setting iMovie Preferences .................................................................................20
Setting Movie Properties ......................................................................................21
2 Importing and Organizing Video, Events,
and Movie Clips 29
iMovie v10 Default Setup ....................................................................................30
Update Events and Projects from Older Versions of iMovie ..............................................................................................................31
Update Events and Projects from an External Drive or Mobile Device ..........................................................................................33
Importing Movies from a Camera, Memory Card, and iMovie for iOS ..............................................................................................35
Import New Media Files ................................................................................37
vTable of Contents
Importing from Other Libraries ......................................................................39
Import from iPhoto or Aperture ............................................................39
Import from Other Media Libraries ....................................................42
Working with Events and Movie Clips ....................................................47
Play a Movie Clip..................................................................................................50
Select Part of a Movie Clip ..........................................................................52
Use the Skimmer and Playhead .............................................................52
Locate a Movie File ............................................................................................54
Getting Organized ......................................................................................................54
Rename a Library or Event .........................................................................55
Create a New Event ...........................................................................................55
Rearrange Events Between Libraries .................................................56
Merge Events ..........................................................................................................57
Rating Movie Clips......................................................................................................58
Search for Tags Applied in Previous Versions of iMovie ..............................................................................................................60
3 Creating a New Movie Project 63
Creating a New Movie Project .........................................................................63
Adding Clips to Your Movie Project ............................................................65
Rearrange Clips in the Movie Timeline ............................................69
Replace a Clip in the Movie Timeline ................................................70
Adding Clip Transitions ..........................................................................................71
Switch Transitions ...............................................................................................74
Edit Transition Duration Time ..................................................................75
Fade to Transitions .............................................................................................76
Adding Photos to Your Movie ..........................................................................77
Add a Photo from iPhoto/Aperture............................................................................................77
Add a Freeze-Frame Image ........................................................................79
Use Multiple iPhoto Libraries ...................................................................80
Add Photos from Anywhere ....................................................................81
Customize the Ken Burns Effect.............................................................83
Turn Off Automatic Effects .........................................................................86

My iMovie®vi
4 Editing and Correcting Movie Clips 89
Trimming Movie Clips .............................................................................................90
Use the Clip Trimmer .......................................................................................92
Use the Precision Editor ................................................................................94
Correcting a Shaky Movie ....................................................................................99
Correcting Blurry or Distorted Video ..................................................... 101
Splitting Clips .............................................................................................................. 103
Merge Movie Clips ......................................................................................... 105
Deleting Movie Clips ............................................................................................ 106
Rotating a Movie Clip .......................................................................................... 107
5 Adding Special Effects, Maps, Backgrounds,
and Titles Clips 109
Speeding Up or Slowing Down a Clip .................................................. 110
Adjust Clip Speed............................................................................................ 110
Adjust Clip Playback Speed ................................................................... 112
Set a Preset Speed .......................................................................................... 114
Adjust Audio Pitch ......................................................................................... 115
Reverse a Movie ............................................................................................... 115
Apply the Rewind Special Effect ....................................................... 117
Creating an Instant Replay of a Clip ....................................................... 118
Adding Backgrounds Using the Green/Blue Screen ................ 120
Add a Background .......................................................................................... 121
Make Green Screen Adjustments ..................................................... 123
Using Picture-in-Picture .................................................................................... 124
Apply the Picture-in-Picture Effect.................................................. 125
Creating Side by Side Clips ............................................................................. 127
Display Side-by-Side Clips ...................................................................... 127
Adding Maps & Backgrounds to a Movie .......................................... 129
Add an Interactive Map ............................................................................. 129
Add a Background .......................................................................................... 131
Adding Titles to a Movie ................................................................................... 132
Add Title Text to Movie Clips ................................................................ 134
Customize Title Font Properties ......................................................... 136
Adding Credits at the End of Your Movie .......................................... 138

viiTable of Contents
6 Adding and Editing Voiceovers, Music,
and Sound Effects 143
Recording a Voiceover ........................................................................................ 143
Adding Music from iTunes .............................................................................. 146
Adding Sound Effects .......................................................................................... 147
Adding Audio from GarageBand .............................................................. 148
Editing Audio .............................................................................................................. 149
Slowing Down or Speeding Up Audio ................................................. 150
7 Editing Video Color, Brightness, and More 153
Using the Adjust Menu ...................................................................................... 153
Adjusting Color Balance .................................................................................... 154
Match Color .......................................................................................................... 155
Adjust White Balance ................................................................................... 155
Adjust Skin Tone............................................................................................... 156
Correcting Color ...................................................................................................... 156
Cropping ......................................................................................................................... 157
View the Cropping Menu ......................................................................... 157
Crop ............................................................................................................................. 157
Use the Ken Burns Effect .......................................................................... 158
Correcting for Stability and Rolling Shutter .................................... 158
Adjusting Volume .................................................................................................... 159
Using Noise Reduction and Equalizer Settings ............................ 161
Using Video and Audio Effects .................................................................... 161
8 Adding and Customizing Video Themes 165
Creating a New Project with a Video Theme........................................................................................................ 166
Adding a Video Theme to an Existing Project ............................... 167
Change the Theme Titles ......................................................................... 169
Add a Location .................................................................................................. 170
Change the Transition ................................................................................. 170
Use the Precision Editor ............................................................................ 171
Removing a Theme ................................................................................................ 172
My iMovie®viii
9 Creating and Customizing Trailers 175
Creating a Trailer ...................................................................................................... 175
Customize Your Trailer ................................................................................ 177
Tweak the Clips ................................................................................................. 179
Work with the Shot List ............................................................................. 180
Sharing Your Trailer ................................................................................................ 181
10 Sharing Your Movies 185
Sharing Your Movie ............................................................................................... 185
Share via Email .................................................................................................. 186
Share to iTunes .................................................................................................. 187
Share to YouTube ............................................................................................ 188
Share to Facebook .......................................................................................... 189
Share to Vimeo .................................................................................................. 190
Share to CNN iReport .................................................................................. 191
Save Your Movie to Your Mac Hard Disk ..................................... 192
Seeing Where Your Movie Is Shared ....................................................... 192
11 Using iMovie on Your iPhone and iPad 195
Creating a New Movie Project ..................................................................... 195
The Movie Project Main Screen .................................................................. 197
Adding Video, Photos, and Audio ............................................................ 199
Add Video ............................................................................................................... 199
Add Photos ........................................................................................................... 201
Add Audio .............................................................................................................. 201
Editing Your Project ............................................................................................... 202
Add Titles ................................................................................................................ 203
Speed Up or Slow Down a Clip .......................................................... 204
Trim a Clip .............................................................................................................. 205
Zoom In .................................................................................................................... 206
Duplicate a Clip ................................................................................................. 206
Create a Freeze Frame ................................................................................ 207
Split a Clip .............................................................................................................. 208
Delete a Clip......................................................................................................... 209
Change the Clip Volume ........................................................................... 209

ixTable of Contents
Detach the Audio from a Clip .............................................................. 210
Fade Audio ............................................................................................................ 212
Switch Audio Between Foreground and Background ................................................................................................... 213
Record a Voiceover ........................................................................................ 213
Edit a Transition ................................................................................................ 214
Sharing Your Movie or Trailer........................................................................ 216
Index 219

About the Authorsx
About the AuthorsCraig James Johnston has been involved with technology since his high school days at Glenwood High in Durban, South Africa, when his school was given some Apple ][ Europluses. From that moment, technology captivated him and he has owned, supported, evangelized, and written about it.
Craig has been involved in designing and supporting large-scale enterprise networks with integrated email and directory services since 1989. He has held many different IT-related positions in his career ranging from sales sup-port engineer to mobile architect for a 40,000-smartphone infrastructure at a large bank.
In addition to designing and supporting mobile computing environments, Craig cohosts the CrackBerry.com podcast as well as guest hosting on other podcasts, including iPhone and iPad Live podcasts. You can see Craig’s previ-ously published work in his book Professional BlackBerry, and many books in the My series, including books covering BlackBerry, Palm, Nexus, HTC, DROID, and Samsung devices.
Craig also enjoys high-horsepower, high-speed vehicles and tries very hard to keep to the speed limit while driving them.
Originally from Durban, South Africa, Craig has lived in the United Kingdom, the San Francisco Bay Area, and New Jersey, where he now lives with his wife, Karen, and a couple of cats.
Craig would love to hear from you. Feel free to contact Craig about your experiences with My iMovie at http://www.CraigsBooks.info.
All comments, suggestions, and feedback are welcome, including positive and negative.
Cheryl Brumbaugh-Duncan is committed to education and technology. For more than 15 years Cheryl has run her own company, Virtually Global Communications - VGC, a Web design and development company with a focus in education. Armed with a Master’s degree in Education, as well as being an expert in web design and development, she has been developing cutting-edge websites and mobile Internet applications, and teaching indi-viduals and companies about computers, technology, and web design and development.
xiAbout the Authors
Combining web technologies and education strategies, Cheryl has developed and authored books, instructor-led training curriculum, and online education courses for clientele that include QWEST, Que, Alpha Publishing, New Riders Publishing, ADIC, Dell, Virtual Training Company–VTC, and Sun Microsystems.
Cheryl has been an avid Apple Computer enthusiast for years, ever since Apple captured the education market back in the 1980s. From that time until today, she has used Apple products for her work and personal use. She has authored and taught training classes on Apple products and has used the Apple iLife suite of software since it was introduced—this includes the iMovie software product.
Cheryl currently teaches college classes in web development and design. Her commitment to the combination of education, technology, and various deliv-ery methods for communicating information keeps her very busy in this ever-changing world. Please visit her website at www.virtuallyglobal.com to learn more about Cheryl and her company Virtually Global Communications.
Acknowledgmentsxii
Dedication“Human beings, who are almost unique in having the ability to learn from the experi-ence of others, are also remarkable for their apparent disinclination to do so.”—Douglas Adams
I would like to dedicate this book to my Mom & Dad—my guiding stars!
AcknowledgmentsMany thanks go to my agent, Carole Jelen of Waterside Productions, for her many years of service. I look forward to more projects and opportunities with you and Waterside Productions, Inc.
A big thank you to Craig James Johnston, my coauthor, for all his great writ-ing, insight, ideas, and support throughout the book’s development.
I also want to thank Laura Norman, Todd Brakke, Lori Lyons, and Greg Kettell, as well as all the other editors and designers of Que, for all their dedicated work, keen eyes, and helpful comments and suggestions. This book is much better due to everyone’s efforts!
Thank you to Apple Computer for iMovie v10 and all their other products and software—they truly are innovators and leaders in today’s fast-paced, technology-driven world.
I also want to thank my husband, David Duncan, for allowing the use of his African safari movies and photos for all the images and figures in this book. And finally, I cannot forget my beautiful daughter, Tasmin: thank you for being you!
—Cheryl
xiiiReader Services
We Want to Hear from You!As the reader of this book, you are our most important critic and commenta-tor. We value your opinion and want to know what we’re doing right, what we could do better, what areas you’d like to see us publish in, and any other words of wisdom you’re willing to pass our way.
We welcome your comments. You can email or write to let us know what you did or didn’t like about this book—as well as what we can do to make our books better.
Please note that we cannot help you with technical problems related to the topic of this book.
When you write, please be sure to include this book’s title and author as well as your name and email address. We will carefully review your comments and share them with the author and editors who worked on the book.
Email: [email protected]
Mail: Que Publishing ATTN: Reader Feedback800 East 96th StreetIndianapolis, IN 46240 USA
Reader ServicesVisit our website and register this book at quepublishing.com/register for convenient access to any updates, downloads, or errata that might be avail-able for this book.
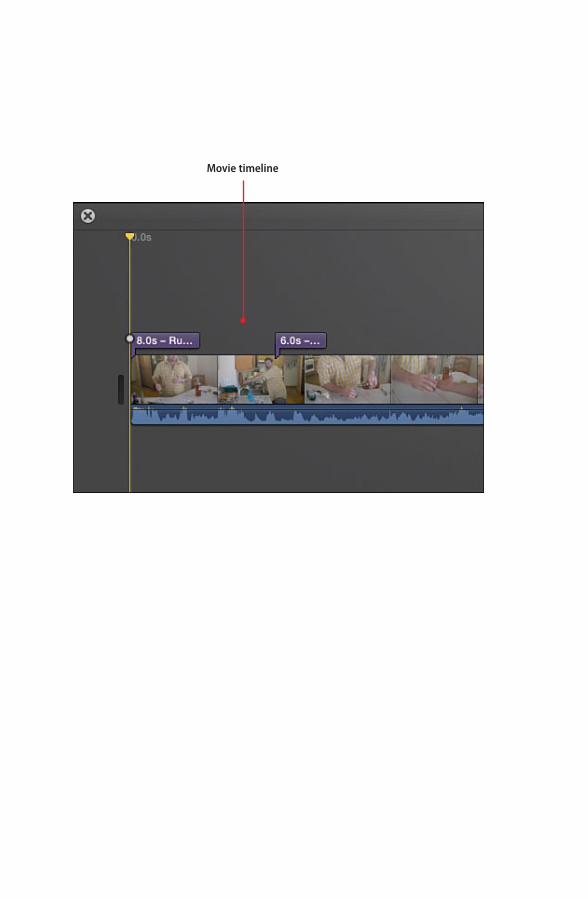
Movie timeline
PGetting to Know iMovie General Concepts
Before you start using iMovie, you should become familiar with the way iMovie looks on your screen, what the different parts of the screen are, and some general terms that are used by iMovie.
iMovie LayoutBecoming familiar with the way that iMovie divides up the screen will allow you to navigate it with ease.
In this chapter, you become familiar with the iMovie screen layout, what each part of the screen does or is for, and some general iMov-ie concepts and terminology. Topics include the following:
Becoming familiar with the iMovie layout
Examining the project screen layout
4 Prologue Getting to Know iMovie General Concepts
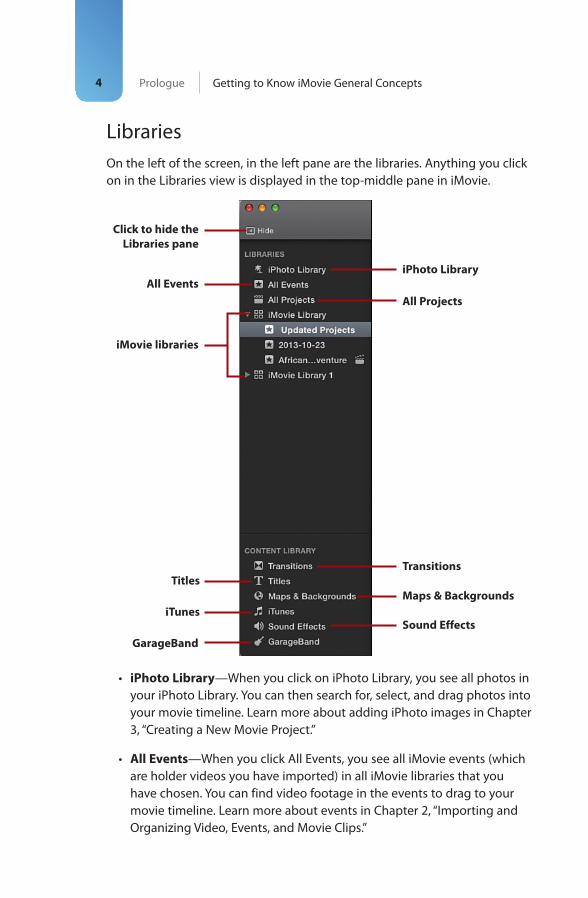
• iPhoto Library—When you click on iPhoto Library, you see all photos in your iPhoto Library. You can then search for, select, and drag photos into your movie timeline. Learn more about adding iPhoto images in Chapter 3, “Creating a New Movie Project.”
• All Events—When you click All Events, you see all iMovie events (which are holder videos you have imported) in all iMovie libraries that you have chosen. You can find video footage in the events to drag to your movie timeline. Learn more about events in Chapter 2, “Importing and Organizing Video, Events, and Movie Clips.”
LibrariesOn the left of the screen, in the left pane are the libraries. Anything you click on in the Libraries view is displayed in the top-middle pane in iMovie.
Click to hide the
Libraries pane
iPhoto Library
All Events
All Projects
iMovie libraries
Transitions
Titles
Maps & Backgrounds
iTunesSound Effects
GarageBand

5iMovie Layout
• All Projects—When you click All Projects, you see all iMovie projects in all iMovie libraries that you have chosen. You can then double-click a project to make changes to it. Learn more about projects in Chapter 3.
• iMovie Library—iMovie libraries contain events and projects. You may have selected more than one iMovie Library. Expanding an iMovie Library enables you to see only events and projects in that library.
Content LibraryThe Content Library is only visible when you are editing an iMovie project. Anything you click in the Content Library is displayed in the top-middle pane in iMovie.
• Transitions—While editing an iMovie project, you can insert transitions between clips by finding them in the Transitions list and dragging them into your movie timeline. Learn more about transitions in Chapter 3.
• Titles—While editing an iMovie project, you can insert titles between clips or over clips by finding them in the Titles list and dragging them into your movie timeline. Learn more about titles in Chapter 5, “Adding Special Effects and Titles Clips.”
• Maps & Backgrounds—While editing an iMovie project, you can insert maps and backgrounds between clips or over clips by finding them in the Maps & Backgrounds list and dragging them into your movie time-line. Read more about using maps in Chapter 5.
• iTunes—While editing an iMovie project, you can insert music from your iTunes library by finding it and dragging it into your movie timeline. Read more about adding music from your iTunes library in Chapter 6, “Adding and Editing Voiceovers, Music, and Sound Effects.”
• Sound Effects—While editing an iMovie project, you can insert sound effects by finding them and dragging them into your movie timeline. Sound effects are also covered in Chapter 6.
• GarageBand—While editing an iMovie project, you can insert music or other audio from your GarageBand library by finding them and dragging them into your movie timeline. Working with audio from GarageBand is covered in Chapter 6.

6 Prologue Getting to Know iMovie General Concepts
• Title—This shows where you have titles in your movie. Double-click a title to edit it.
• Clip—A clip is a part of your original video footage that you have used in your movie.
• Transition—This shows where you have used a transition between two clips. Double-click the transition to edit it.
• Audio waveform—This shows a visual representation of the audio that is associated with the clips in your movie.
• Playhead—The playhead indicates what part of your movie you are viewing in the Viewer pane. Click anywhere in your movie to make the playhead jump to that location. Press the spacebar to start playing your movie from the playhead. Press the spacebar again to stop playing the movie.
Movie TimelineWhen you create an iMovie project, the movie’s timeline is shown in the Timeline view.
Title
Clip
Transition
Audio
waveform
Playhead

7iMovie Layout
BrowserThe Browser window allows you to browse content that you select in the Libraries list. This would be your raw video footage or a list of projects or events. In this example, we are browsing the transitions.
ViewerThe Viewer pane, which is on the top right of the screen, shows your movie when you are playing it, but also doubles as the area where you make all of your edits.
Viewer
Browser

8 Prologue Getting to Know iMovie General Concepts
ToolbarThe iMovie toolbar allows you quick access to commonly used functions.
TheaterAfter you have finished creating your movie, you can save it to the iMovie Theater. Once there, you can easily access it in iMovie, or if you have allowed your theater to synchronize with your iCloud account, you can access the movies on any Apple device (including Apple TV) that is connected to that iCloud account.
Theater
Create
a new
project
Import
new
video
Share
your
movie
See your
library
See your
theater
Adjust
video and
audio
• Create a new project—Click here to create a new iMovie project. You will be able to choose whether your project uses a theme, and after it has been created, you will be able to drag movie clips into it.
• Import new video—Click here to import new video into iMovie so that you can use it in your movies. The video can come from memory cards or from your Mac’s hard disk. You can also use cameras connected to your Mac (including the FaceTime camera) to import video in real time.

9iMovie Layout
• Share your movie—Click here to share your movie project with others. iMovie offers many different ways to share your movie.
• See your library—Click to see your iMovie Library. This is the default view in iMovie and enables you to work on your movie projects.
• See your theater—Click to see your iMovie Theater, which contains all completed movies that you have chosen to import.
• Adjust video and audio—When you select all or part of a clip, you can use the Adjust menu to make changes not only to the look of the clip, but also to the way it sounds.

Starting frame
Image of video based on location
of playhead or skimmer
Ending frame
Skimmer
Playhead
Selected clip in timeline
4
Editing and Correcting Movie Clips
As you develop your movie project in iMovie, you’ll find that you need more control over the clips in the movie timeline. iMovie has advanced editing tools that enable you to precisely control the duration and orientation of the clip and to correct problems with the recorded video. You can quickly delete or rotate clips in the timeline and split a movie clip into two clips. iMovie can also cor-rect shaky or blurry video caused by the camera being moved too quickly when recording the video.
In this chapter, you find out how to modify your clips in a movie project by editing and correcting the clips in their duration or orien-tation as well as correcting video that is shaky or blurry. Topics include the following:
Trimming clips
Adjusting starting and ending frames with the
Clip Trimmer
Using the Precision Editor
Correcting video that is shaky or blurry
Splitting a movie clip into two clips
Deleting clips
Rotating clips
Chapter 4 Editing and Correcting Movie Clips90
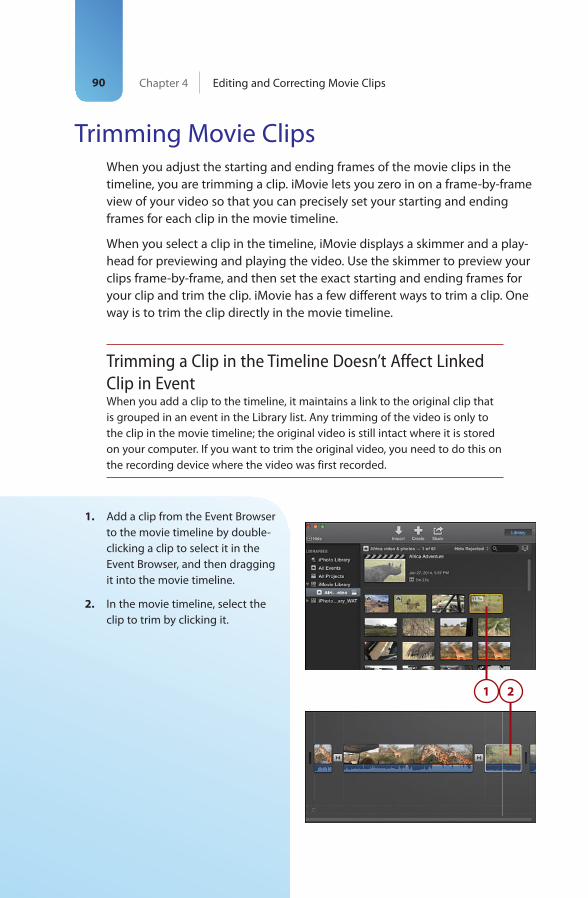
1. Add a clip from the Event Browser to the movie timeline by double-clicking a clip to select it in the Event Browser, and then dragging it into the movie timeline.
2. In the movie timeline, select the clip to trim by clicking it.
Trimming Movie ClipsWhen you adjust the starting and ending frames of the movie clips in the timeline, you are trimming a clip. iMovie lets you zero in on a frame-by-frame view of your video so that you can precisely set your starting and ending frames for each clip in the movie timeline.
When you select a clip in the timeline, iMovie displays a skimmer and a play-head for previewing and playing the video. Use the skimmer to preview your clips frame-by-frame, and then set the exact starting and ending frames for your clip and trim the clip. iMovie has a few different ways to trim a clip. One way is to trim the clip directly in the movie timeline.
Trimming a Clip in the Timeline Doesn’t Affect Linked Clip in EventWhen you add a clip to the timeline, it maintains a link to the original clip that is grouped in an event in the Library list. Any trimming of the video is only to the clip in the movie timeline; the original video is still intact where it is stored on your computer. If you want to trim the original video, you need to do this on the recording device where the video was first recorded.
1 2
91Trimming Movie Clips
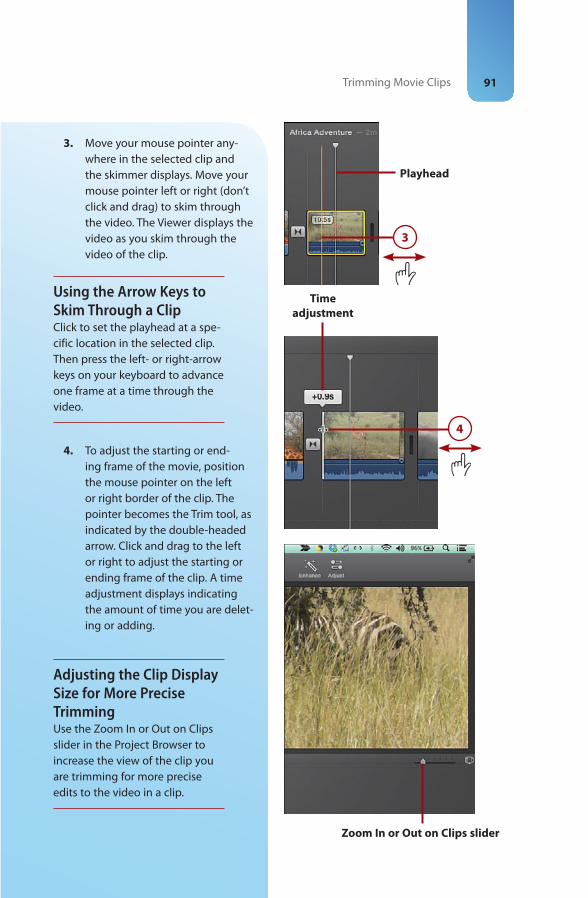
3. Move your mouse pointer any-where in the selected clip and the skimmer displays. Move your mouse pointer left or right (don’t click and drag) to skim through the video. The Viewer displays the video as you skim through the video of the clip.
Using the Arrow Keys to Skim Through a ClipClick to set the playhead at a spe-cific location in the selected clip. Then press the left- or right-arrow keys on your keyboard to advance one frame at a time through the video.
4. To adjust the starting or end-ing frame of the movie, position the mouse pointer on the left or right border of the clip. The pointer becomes the Trim tool, as indicated by the double-headed arrow. Click and drag to the left or right to adjust the starting or ending frame of the clip. A time adjustment displays indicating the amount of time you are delet-ing or adding.
Adjusting the Clip Display Size for More Precise TrimmingUse the Zoom In or Out on Clips slider in the Project Browser to increase the view of the clip you are trimming for more precise edits to the video in a clip.
3
4
Time
adjustment
Zoom In or Out on Clips slider
Playhead
Chapter 4 Editing and Correcting Movie Clips92
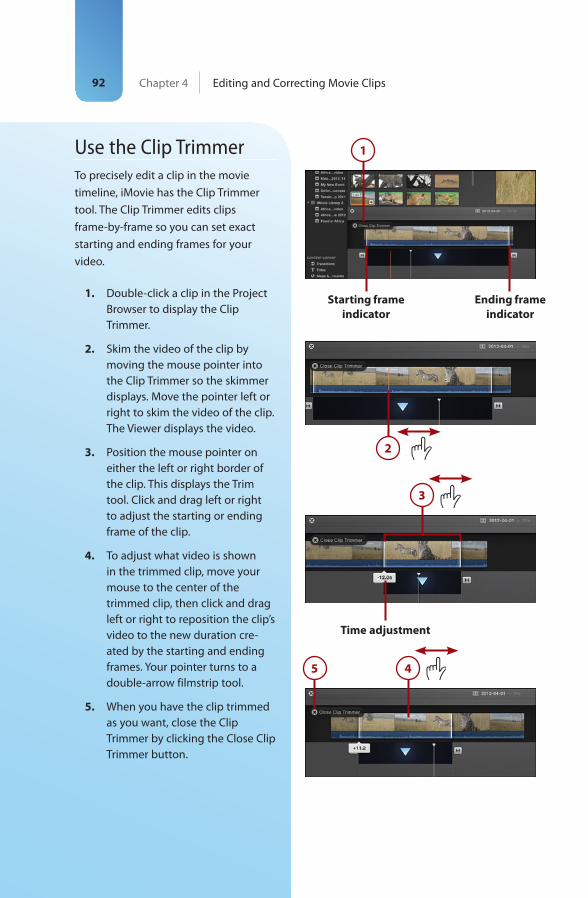
Use the Clip TrimmerTo precisely edit a clip in the movie timeline, iMovie has the Clip Trimmer tool. The Clip Trimmer edits clips frame-by-frame so you can set exact starting and ending frames for your video.
1. Double-click a clip in the Project Browser to display the Clip Trimmer.
2. Skim the video of the clip by moving the mouse pointer into the Clip Trimmer so the skimmer displays. Move the pointer left or right to skim the video of the clip. The Viewer displays the video.
3. Position the mouse pointer on either the left or right border of the clip. This displays the Trim tool. Click and drag left or right to adjust the starting or ending frame of the clip.
4. To adjust what video is shown in the trimmed clip, move your mouse to the center of the trimmed clip, then click and drag left or right to reposition the clip’s video to the new duration cre-ated by the starting and ending frames. Your pointer turns to a double-arrow filmstrip tool.
5. When you have the clip trimmed as you want, close the Clip Trimmer by clicking the Close Clip Trimmer button.
1
Ending frame
indicator
Starting frame
indicator
2
Time adjustment
5 4
3
93Trimming Movie Clips
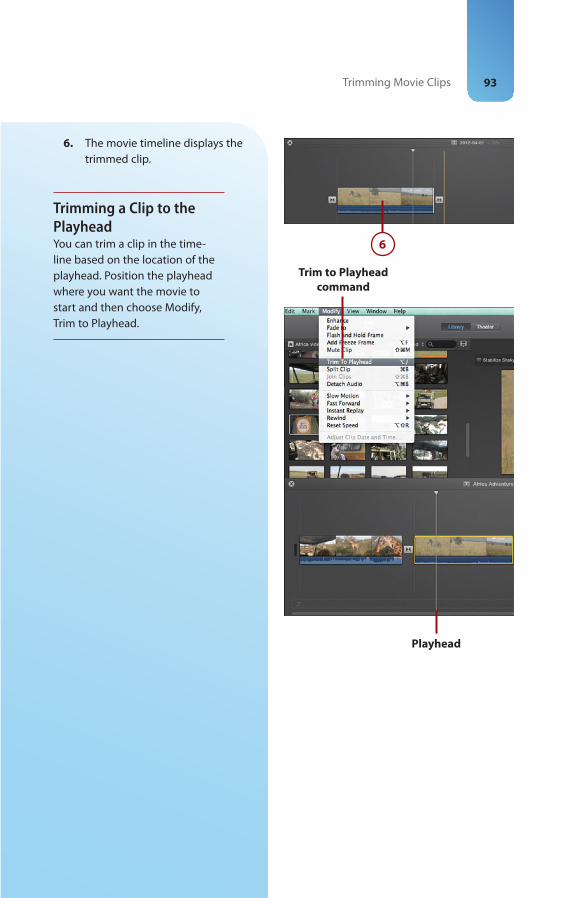
6. The movie timeline displays the trimmed clip.
Trimming a Clip to the PlayheadYou can trim a clip in the time-line based on the location of the playhead. Position the playhead where you want the movie to start and then choose Modify, Trim to Playhead.
6
Playhead
Trim to Playhead
command
94 Chapter 4 Editing and Correcting Movie Clips
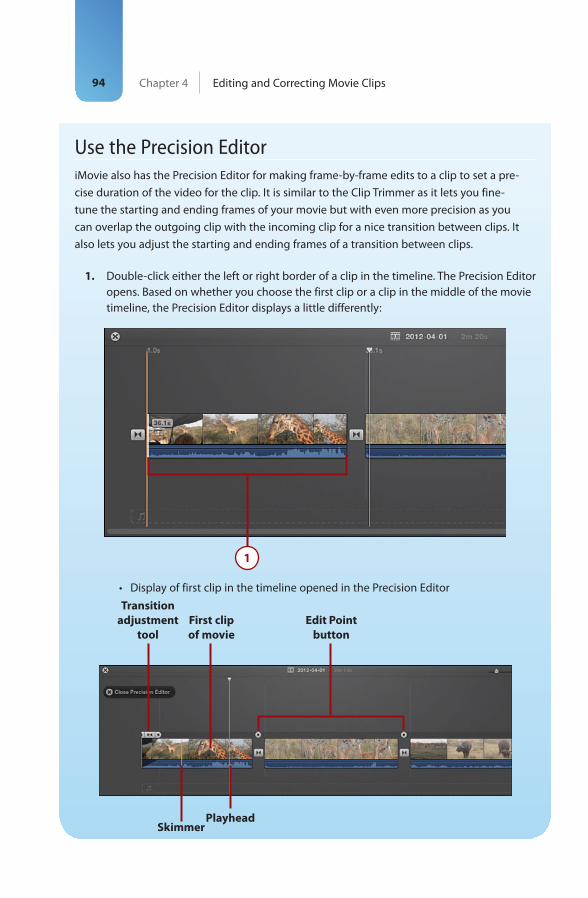
Use the Precision EditoriMovie also has the Precision Editor for making frame-by-frame edits to a clip to set a pre-cise duration of the video for the clip. It is similar to the Clip Trimmer as it lets you fine-tune the starting and ending frames of your movie but with even more precision as you can overlap the outgoing clip with the incoming clip for a nice transition between clips. It also lets you adjust the starting and ending frames of a transition between clips.
1. Double-click either the left or right border of a clip in the timeline. The Precision Editor opens. Based on whether you choose the first clip or a clip in the middle of the movie timeline, the Precision Editor displays a little differently:
• Display of first clip in the timeline opened in the Precision Editor
1
First clip
of movie
Transition
adjustment
tool
SkimmerPlayhead
Edit Point
button
95Trimming Movie Clips
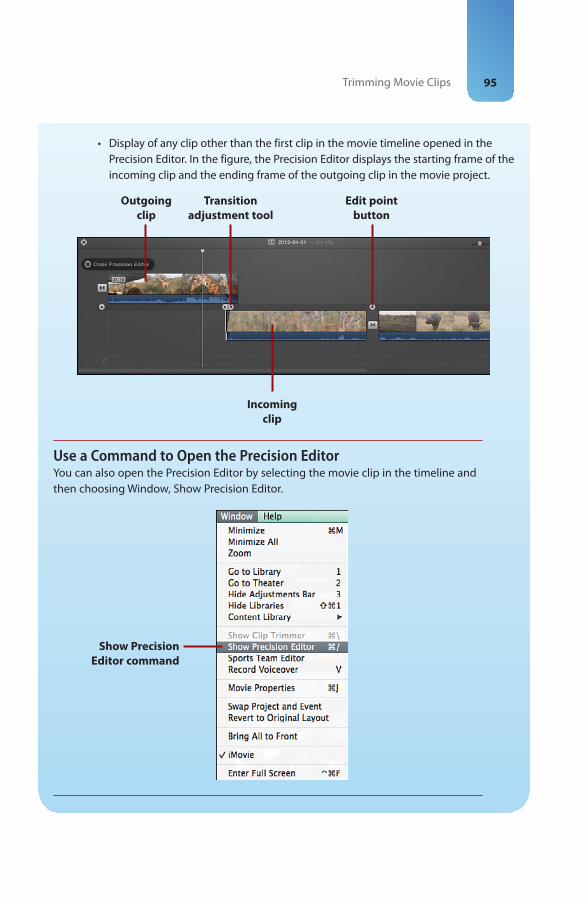
• Display of any clip other than the first clip in the movie timeline opened in the Precision Editor. In the figure, the Precision Editor displays the starting frame of the incoming clip and the ending frame of the outgoing clip in the movie project.
Use a Command to Open the Precision EditorYou can also open the Precision Editor by selecting the movie clip in the timeline and then choosing Window, Show Precision Editor.
Show Precision
Editor command
Transition
adjustment tool
Edit point
button
Incoming
clip
Outgoing
clip
96 Chapter 4 Editing and Correcting Movie Clips
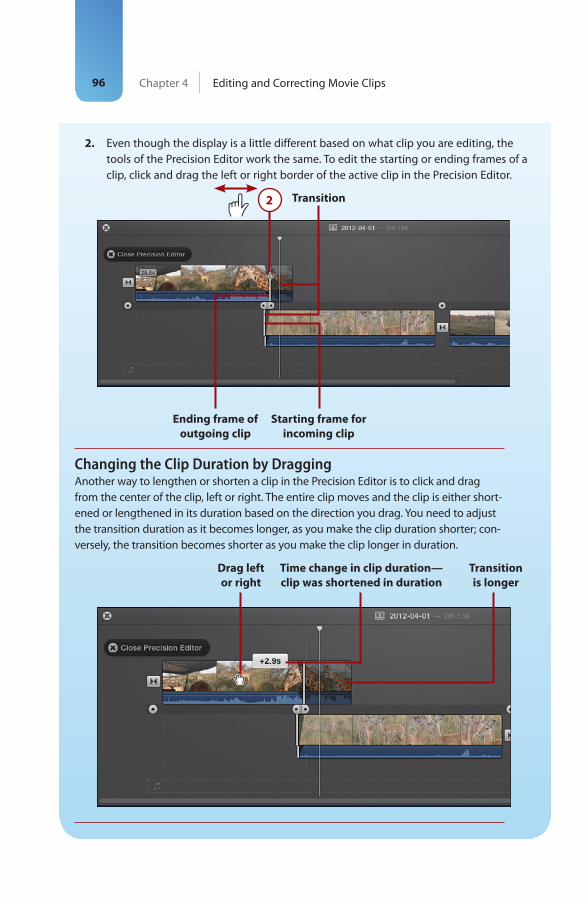
2. Even though the display is a little different based on what clip you are editing, the tools of the Precision Editor work the same. To edit the starting or ending frames of a clip, click and drag the left or right border of the active clip in the Precision Editor.
Ending frame of
outgoing clip
Starting frame for
incoming clip
Transition2
Changing the Clip Duration by DraggingAnother way to lengthen or shorten a clip in the Precision Editor is to click and drag from the center of the clip, left or right. The entire clip moves and the clip is either short-ened or lengthened in its duration based on the direction you drag. You need to adjust the transition duration as it becomes longer, as you make the clip duration shorter; con-versely, the transition becomes shorter as you make the clip longer in duration.
Drag left
or right
Time change in clip duration—
clip was shortened in duration
Transition
is longer

97Trimming Movie Clips
3. To change the incoming clip transition, drag the incoming clip transition start frame to the left to shorten or to the right to lengthen the transition.
4. To change the outgoing clip transition, drag the outgoing clip end frame to the right to shorten the transition or to the left to lengthen the transition.
5. To modify the transition starting and ending frames in both the incoming and out-going clip, click the Starting/Ending Frame button in the middle of the Transition Adjustment tool and drag left or right. The incoming and the outgoing transition lengthen or shorten based on the direction you drag.
3
4
Shading
indicates
transition
Change in
transition
timing
Transition
adjustment tool5
98 Chapter 4 Editing and Correcting Movie Clips
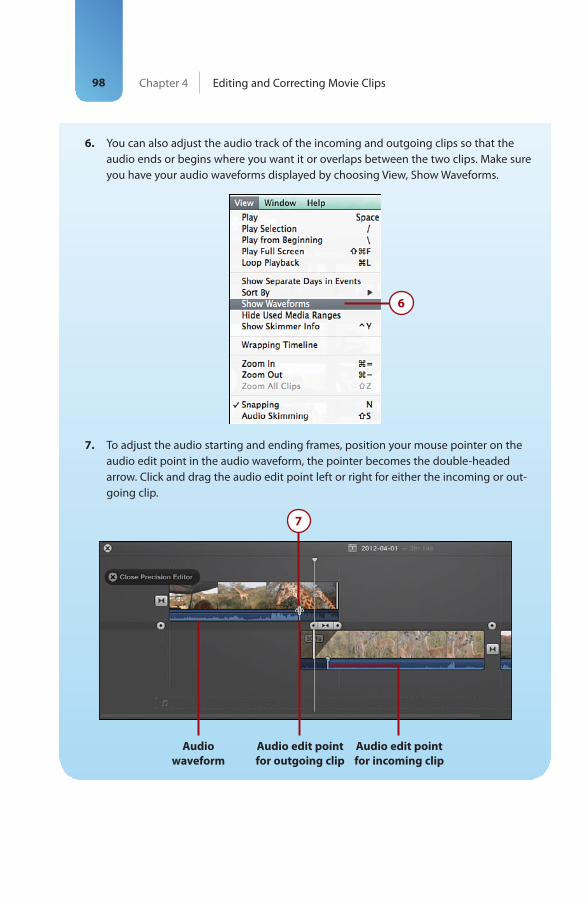
6. You can also adjust the audio track of the incoming and outgoing clips so that the audio ends or begins where you want it or overlaps between the two clips. Make sure you have your audio waveforms displayed by choosing View, Show Waveforms.
7. To adjust the audio starting and ending frames, position your mouse pointer on the audio edit point in the audio waveform, the pointer becomes the double-headed arrow. Click and drag the audio edit point left or right for either the incoming or out-going clip.
6
7
Audio
waveform
Audio edit point
for outgoing clip
Audio edit point
for incoming clip
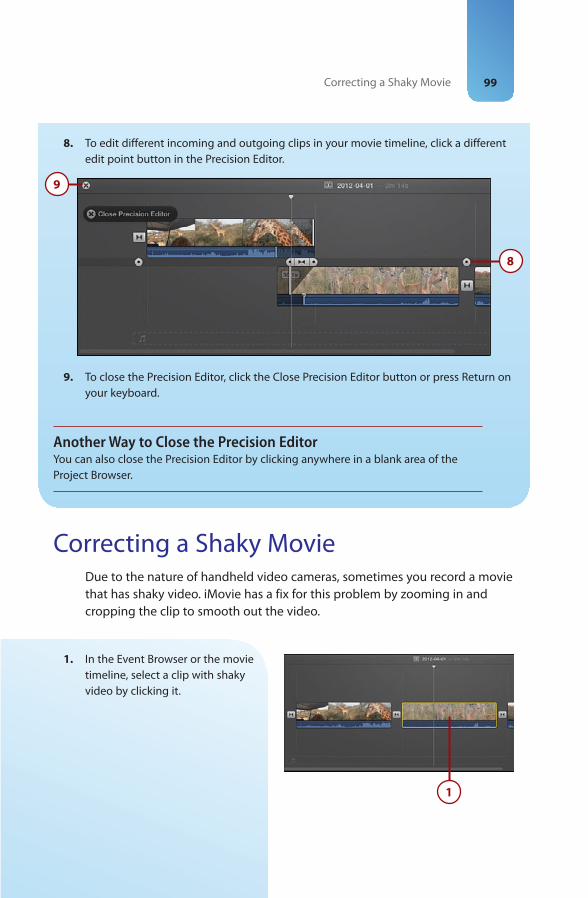
99Correcting a Shaky Movie
1. In the Event Browser or the movie timeline, select a clip with shaky video by clicking it.
8. To edit different incoming and outgoing clips in your movie timeline, click a different edit point button in the Precision Editor.
9. To close the Precision Editor, click the Close Precision Editor button or press Return on your keyboard.
Another Way to Close the Precision EditorYou can also close the Precision Editor by clicking anywhere in a blank area of the Project Browser.
9
8
Correcting a Shaky MovieDue to the nature of handheld video cameras, sometimes you record a movie that has shaky video. iMovie has a fix for this problem by zooming in and cropping the clip to smooth out the video.
1
Chapter 4 Editing and Correcting Movie Clips100
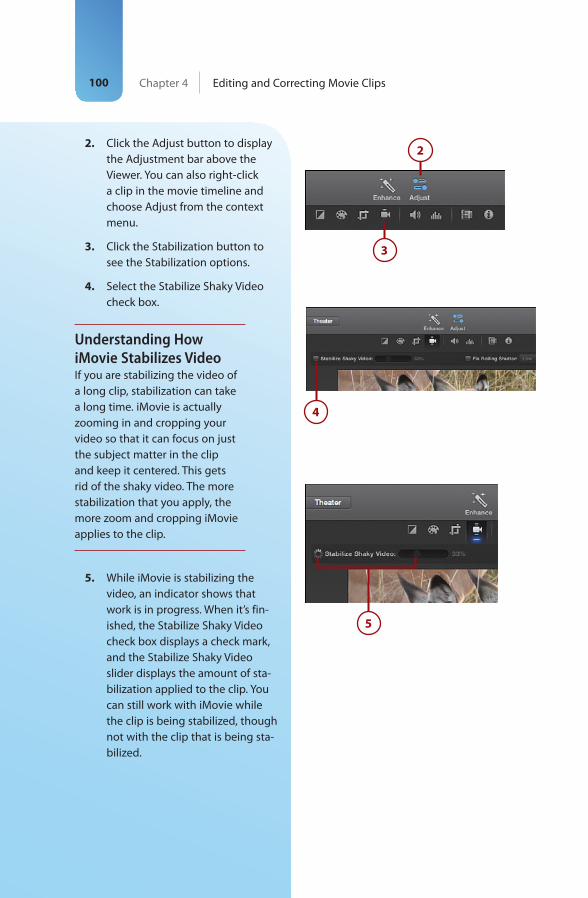
2. Click the Adjust button to display the Adjustment bar above the Viewer. You can also right-click a clip in the movie timeline and choose Adjust from the context menu.
3. Click the Stabilization button to see the Stabilization options.
4. Select the Stabilize Shaky Video check box.
Understanding How iMovie Stabilizes VideoIf you are stabilizing the video of a long clip, stabilization can take a long time. iMovie is actually zooming in and cropping your video so that it can focus on just the subject matter in the clip and keep it centered. This gets rid of the shaky video. The more stabilization that you apply, the more zoom and cropping iMovie applies to the clip.
5. While iMovie is stabilizing the video, an indicator shows that work is in progress. When it’s fin-ished, the Stabilize Shaky Video check box displays a check mark, and the Stabilize Shaky Video slider displays the amount of sta-bilization applied to the clip. You can still work with iMovie while the clip is being stabilized, though not with the clip that is being sta-bilized.
2
3
4
5
101Correcting Blurry or Distorted Video
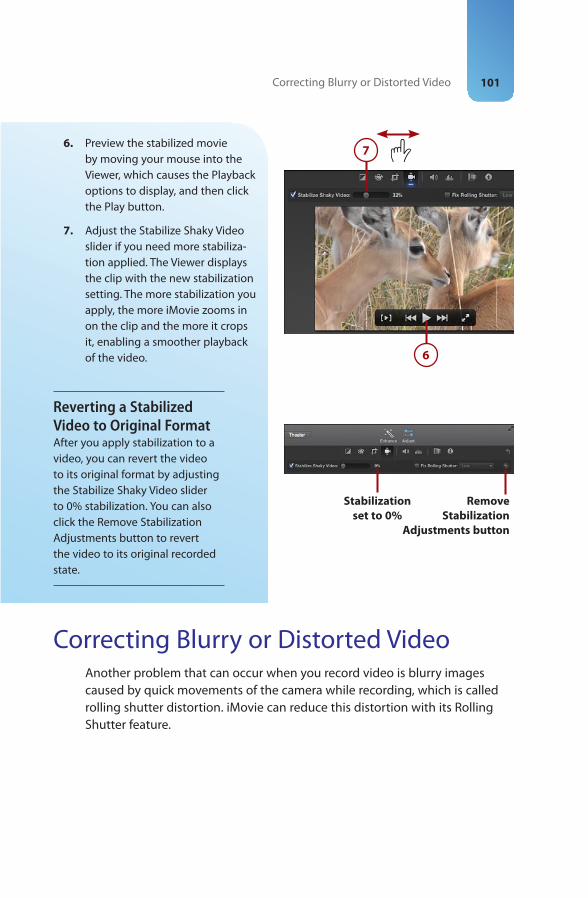
6. Preview the stabilized movie by moving your mouse into the Viewer, which causes the Playback options to display, and then click the Play button.
7. Adjust the Stabilize Shaky Video slider if you need more stabiliza-tion applied. The Viewer displays the clip with the new stabilization setting. The more stabilization you apply, the more iMovie zooms in on the clip and the more it crops it, enabling a smoother playback of the video.
Reverting a Stabilized Video to Original FormatAfter you apply stabilization to a video, you can revert the video to its original format by adjusting the Stabilize Shaky Video slider to 0% stabilization. You can also click the Remove Stabilization Adjustments button to revert the video to its original recorded state.
7
6
Remove
Stabilization
Adjustments button
Stabilization
set to 0%
Correcting Blurry or Distorted VideoAnother problem that can occur when you record video is blurry images caused by quick movements of the camera while recording, which is called rolling shutter distortion. iMovie can reduce this distortion with its Rolling Shutter feature.

Chapter 4 Editing and Correcting Movie Clips102
1. In the Event Browser or the movie timeline, select a clip with blurry or distorted video by clicking it.
2. Click the Adjust button.
3. This displays the Adjustment bar above the Viewer. Click the Shaky Video button to display the Stabilization options.
4. Select the Fix Rolling Shutter check box. The Fix Rolling Shutter check box displays with a red dash indicating that iMovie is applying this adjustment to the video. Based on the length of the video, this can take some time.
5. When iMovie is done applying the Rolling Shutter adjustment, the Fix Rolling Shutter check box displays with a check mark.
1
23
4
Indicator that iMovie is
adjusting the video
5
103Splitting Clips
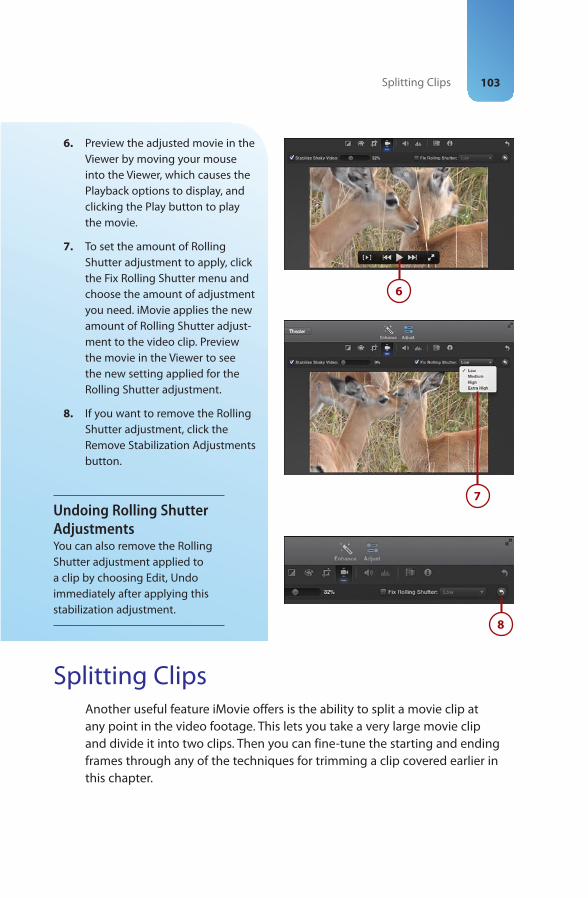
6. Preview the adjusted movie in the Viewer by moving your mouse into the Viewer, which causes the Playback options to display, and clicking the Play button to play the movie.
7. To set the amount of Rolling Shutter adjustment to apply, click the Fix Rolling Shutter menu and choose the amount of adjustment you need. iMovie applies the new amount of Rolling Shutter adjust-ment to the video clip. Preview the movie in the Viewer to see the new setting applied for the Rolling Shutter adjustment.
8. If you want to remove the Rolling Shutter adjustment, click the Remove Stabilization Adjustments button.
Undoing Rolling Shutter AdjustmentsYou can also remove the Rolling Shutter adjustment applied to a clip by choosing Edit, Undo immediately after applying this stabilization adjustment.
6
7
8
Splitting ClipsAnother useful feature iMovie offers is the ability to split a movie clip at any point in the video footage. This lets you take a very large movie clip and divide it into two clips. Then you can fine-tune the starting and ending frames through any of the techniques for trimming a clip covered earlier in this chapter.
Chapter 4 Editing and Correcting Movie Clips104
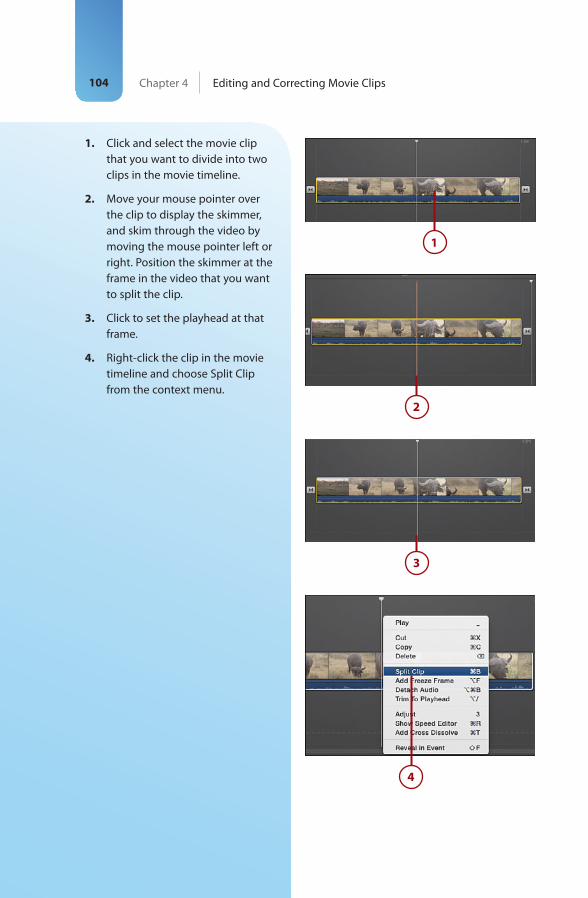
1. Click and select the movie clip that you want to divide into two clips in the movie timeline.
2. Move your mouse pointer over the clip to display the skimmer, and skim through the video by moving the mouse pointer left or right. Position the skimmer at the frame in the video that you want to split the clip.
3. Click to set the playhead at that frame.
4. Right-click the clip in the movie timeline and choose Split Clip from the context menu.
1
2
3
4
105Splitting Clips
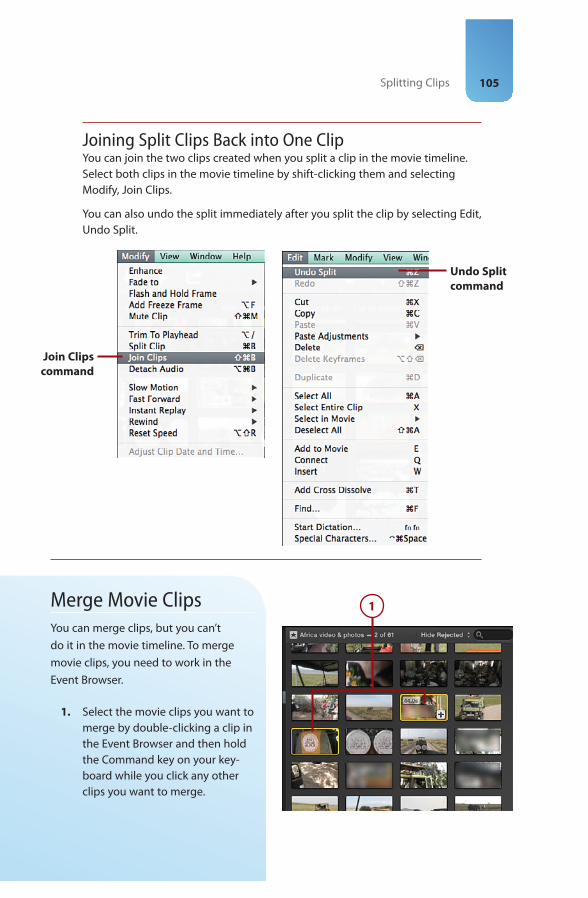
Merge Movie ClipsYou can merge clips, but you can’t do it in the movie timeline . To merge movie clips, you need to work in the Event Browser.
1. Select the movie clips you want to merge by double-clicking a clip in the Event Browser and then hold the Command key on your key-board while you click any other clips you want to merge.
Joining Split Clips Back into One ClipYou can join the two clips created when you split a clip in the movie timeline. Select both clips in the movie timeline by shift-clicking them and selecting Modify, Join Clips.
You can also undo the split immediately after you split the clip by selecting Edit, Undo Split.
Join Clips
command
Undo Split
command
1
Chapter 4 Editing and Correcting Movie Clips106
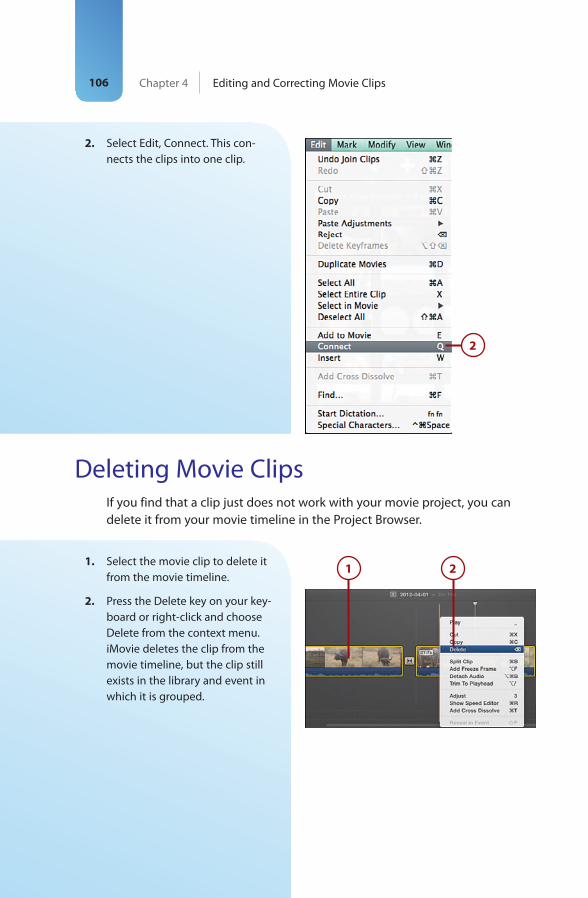
2. Select Edit, Connect. This con-nects the clips into one clip.
2
Deleting Movie ClipsIf you find that a clip just does not work with your movie project, you can delete it from your movie timeline in the Project Browser.
1. Select the movie clip to delete it from the movie timeline.
2. Press the Delete key on your key-board or right-click and choose Delete from the context menu. iMovie deletes the clip from the movie timeline, but the clip still exists in the library and event in which it is grouped.
1 2

107Rotating a Movie Clip
1. Select the movie clip that you want to rotate from the movie timeline.
2. Click the Adjust button.
3. Click the Crop tool.
4. The Crop controls are displayed. You can rotate the clip clock-wise by 90 degrees by clicking the Rotate the Clip Clockwise button. You can rotate the clip counterclockwise by 90 degrees by clicking the Rotate the Clip Counterclockwise button. Click multiple times to rotate the clip by 90-degree increments.
5. To apply the rotate adjustment to the movie clip, click the Apply Crop Adjustment button.
6. If you want to remove the rotate adjustment, click the Remove Crop Adjustment button.
Rotating a Movie ClipOne final editing technique that can enhance a clip in your movie project is to rotate the movie clip. iMovie lets you rotate clips in their orientation by 90-degree increments.
1
23
6
54

This page intentionally left blank
Aaccessing
movie properties for active movie, 22
previously opened libraries, 46title screen in Viewer, 133
active movies, accessing (movie properties), 22
addingaudio
from GarageBand, 148iPhone/iPad, 201-202
backgrounds, 131Green/Blue Screen effect, 120-124
clip transitions, 71-73credits at the end of your movie,
138-140freeze-frame images, 79-80interactive maps, 129-130locations, video themes, 170maps to movies, 129-130movie clips
with different frame per second rate to movies, 113
to movie projects, 65-68to timelines, 67
music from iTunes, 146
photos, 81iPhone/iPad, 201from iPhoto, 77-78to movie projects, 77-80
sound effects, 147titles
iPhone/iPad, 203to movies, 132-137
title style to background screen clips, 135
title text to movie clips, 134-135video
iPhone/iPad, 199-200as picture in picture, 200
video themes to existing projects, 167-171
Adjust button (Context menu), 121adjusting
audio pitch, 115clip display size, 91clip duration, 140clip playback speed, 112clip speed, 110-111clip thumbnails
Event Browser, 18Project Browser, 19
color balance, 154-156Green/Blue Screen effect, 123-124
Index
Index220 adjusting
look of trailers, 180skin tone, 156title screen clip duration, 133volume, 159-160white balance, 155
adjustments, copying to other clips, 163Adjust menu, 153-154Adjust Toolbar, 83Advanced Options icon, 200All Events, 4All Projects, 5Aperture, importing files from, 39-42arrow keys, skimming through
movie clips, 91aspect ratio, 65audio
addingfrom GarageBand, 148iPhone/iPad, 201-202
detaching from movie clips, iPhone/iPad, 210
editing, 149in original videos, 151
fading, iPhone/iPad, 212playing, 26sound effects, adding, 147speed of, 150switching between foreground and
background, iPhone/iPad, 213unavailable songs, 202unmuting, 145
audio effects, 161-163audio files, importing from other
libraries, 39audio pitch, adjusting, 115audio tracks, 211Automatic Content, 24automatic effects, turning off, 86-87
Bbackground images, Green/Blue Screen
effect, 122backgrounds, adding, 131
with Green/Blue Screen effect, 120-124
background screen clips, adding title styles, 135
blurry or distorted video, correcting, 101-103
browsers, selecting multiple movie clips, 69
Browser window, 7
Ccalculating clips and transition duration, 25click and drag, importing files, 37clip display size, adjusting, 91clip duration
adjusting, 140calculating, 25changing, Precision Editor, 96-98
clip playback speed, adjusting, 112clips, tweaking for trailers, 179-180clip speed, adjusting, 110-111clip thumbnails, adjusting
Event Browser, 18Project Browser, 19
clip transitionsadding, 71-73editing duration time, 75-76previewing, 72switching, 74-75
Clip Trimmer, trimming movie clips, 92-93clips. See also movie clips.closing Precision Editor, 99CNN iReport, sharing movies, 191codecs, 36color
correcting, 156matching, 155White Balance feature, 155
color balance, adjusting, 154-156Color Balance menu, 154Color Correction menu, 156color palette, 137containers, 36Content Library, 5controlling playback of movie clips, 51converting trailers to movies, 181
221freeze frames, iPhone/iPad
copying adjustments to other clips, 163correcting
blurry or distorted video, 101-103color, 156rolling shutter, 159shaky movies, 99-101stability, 158-159
credits, adding at the end of your movie, 138-140
Crop controls, 107cropping, 157-158
Ken Burns effect, 158Cropping menu, 157customizable font properties,
title styles, 137customizing
title font properties, 136trailers, 177-178
custom speed setting, movie clips, 114cutaway clips, creating, 71cutaway images, 79
Ddefault setup, 30deleting
events, 42, 56movie clips, 42, 56, 106
in timelines, 70iPhone/iPad, 209
photos, 42transitions, 73
detaching audio from movie clips, iPhone/iPad, 210
digital media file formats, 36digital video file formats, 36displaying side-by-side clips, 127-128duplicating movie clips, iPhone/iPad,
206-207
Eediting
audio, 149in original videos, 151
picture in picture, iPhone/iPad, 210
transition duration time, 75-76transitions, iPhone/iPad, 214
email, sharing movies, 186Equalizer, 161Event Browser, 11
adjusting clip thumbnails, 18file structure, 41resizing, 14-15showing event clips by separate
days, 20switching with Project Browser, 13
event clips, showing by separate days, 20events, 47
creating new, 55-56deleting, 42, 56merging, 57rearranging between libraries, 56-57scrolling through movie clips, 66updating
from external drives or mobile devices, 33-34
from older versions of iMovie, 31viewing library event media, 48
external devices, importing new media files, 39
external drives, updating projects/events, 33-34
FFacebook, sharing movies, 189-190fading audio, iPhone/iPad, 212files
importingfrom iPhoto or Aperture, 39-42from other media libraries, 42-46
multiple files, selecting, 38file structure, Event Browser, 41Filter By Rating menu, 59Flash and Hold effect, 80font properties, title styles, 137freeze-frame images, adding, 79-80freeze frames, iPhone/iPad, 207
Index222 GarageBand
GGarageBand, 5
adding audio, 148Green/Blue Screen effect, 120
adding backgrounds, 120-124adjusting, 123-124background images, 122
Hhiding sidebars, 16
IiCloud, 20, 21icons
Advanced Options icon, 200Media Import icon, 199
Identifying movie clips in movie projects, 68
imagesframe images, adding, 79-80sound images, Green/Blue Screen
effect, 122iMovie v10 default setup, 30iMovie for iOS, 39iMovie Library, 5iMovie Library file, 35iMovie Library list, 39iMovie movie creation screen, iPhone/iPad,
197-198iMovie preferences, setting, 20-21iMovie sidebar, hiding, 16iMovie Theater, 20iMovie toolbar, 8-9imported media, storing, 47importing
audio files from other libraries, 39files
from iPhoto or Aperture, 39-42from other media libraries, 42-46
movies, 35-36new media files, 37-38
new media files, 37-38from external devices, 39
instant replay, creating, 118-119interactive maps, adding, 129-130iPhone/iPad
addingaudio, 201-202photos, 201titles, 203video, 199-200
audiofading, 212switching between foreground and
background, 213creating movie projects, 195-197editing
picture in picture, 210transitions, 214
freeze frames, 207iMovie movie creation screen, 197-198movie clips
deleting, 209detaching audio, 210duplicating, 206-207speeding up/slowing down, 204splitting, 208trimming, 205volume, 209zooming in, 206
movies, sharing, 216-217trailers, 215
sharing, 216-217voiceovers, recording, 213-214
iPhotoadding photos to movie projects, 77-78importing files from, 39-42multiple libraries, 80-81
iPhoto events, skimming, 78iPhoto Library, 4iTunes, 5
adding music, 146unavailable songs, 202

223movie clips
Jjoining split movie clips back into
one clip, 105
KKen Burns Effect, 23, 80, 83-85, 158
Llibraries, 4
accessing previously opened libraries, 46
Content Library, 5iMovie Library, 5importing files from, 42-46iPhoto Library, 4, 80-81rearranging events, 56-57renaming, 55
library event media, viewing, 48locating movie files, 54locations, adding video themes, 170location text, 204Lower Volume feature, 160
MMac hard disk, saving movies, 192maps, adding, 129-130Maps & Backgrounds, 5matching color, 155media files, importing, 37-38Media Import icon, 199media libraries, importing from, 42-46menubar commands, rating events or
movie clips, 58menus
Adjust menu, 154Color Balance menu, 154Color Correction menu, 156Cropping menu, 157
Merge Events command, 57merging
events, 57movie clips, 105-106
mobile devices, updating projects/events, 33-34
movie clips, 47adding
with different frame per second rate to movies, 113
to movie projects, 65-68to timelines, 67title text, 134-135
changing duration, Precision Editor, 96-98
deleting, 42, 56, 106iPhone/iPad, 209in timelines, 70
detaching audio, iPhone/iPad, 210duplicating, iPhone/iPad, 206-207identifying in movie projects, 68instant replay, creating, 118-119joining split movie clips back into one
clip, 105locating, 54merging, 105-106multiple speed settings, 116playheads, 52playing, 50
manually, 53playback options, 51
previewing video, 49rating, 58-60rearranging in timeline, 69-70replacing in timelines, 70rotating, 107scrolling through in events, 66searching for tags in previous
versions, 60selecting, 46selecting with shortcuts, 49selecting multiple, in browsers, 69selecting part of, 52selecting portions of, 67skimmers, 52skimming with arrow keys, 91speed, setting, 114speeding up/slowing down, iPhone/
iPad, 204splitting, 103-104
iPhone/iPad, 208by swiping, 208
Index224 movie clips
stepping through frame by frame, 53trimming, 90
adjusting clip display size, 91Clip Trimmer, 92-93iPhone/iPad, 205to playhead, 93Precision Editor, 94-99timelines, 90
volume, iPhone/iPad, 209zooming in, iPhone/iPad, 206
movie creation screen, iPhone/iPad, 197-198
movie files, locating, 54movie projects
addingmovie clips to, 65-68photos, 77-80
creating new, 63-65creating on iPhone/iPad, 195-197identifying movie clips, 68Ken Burns effect, 83-85naming, 197turning off automatic effects, 86-87
movie propertiesaccessing for active movie, 22Automatic Content, 24setting, 21troubleshooting, 22
moviesadding titles, 132-137converting trailers to, 181correcting blurry or distorted video,
101-103importing, 35-36
new media files, 37-38movies, correcting, 99-101reversing, 115-116saving to Mac hard disk, 192sharing, 185
via CNN iReport, 191via email, 186via Facebook, 189-190iPhone/iPad, 216-217via iTunes, 187via Vimeo, 190via YouTube, 188
where movies are shared, 192
movie timelines. See timelinesmoving picture-in-picture window, 125multiple files, selecting, 38multiple movie clips, selecting in
browsers, 69music
adding from iTunes, 146unavailable songs, 202
Nnaming movie projects, 197new media files, importing, 37-38
from external devices, 39Noise Reduction, 161
Oopening Precision Editor, 95
Pphotos
adding, 81iPhone/iPad, 201from iPhoto, 77-78to movie projects, 77-80
as cutaway images, 79deleting, 42
picture in pictureadding video as, 200editing, iPhone/iPad, 210
picture-in-picture effect, 124-126picture-in-picture window, moving, 125playback of movie clips, controlling, 51playback options, playing movie clips, 51playheads, movie clips, 52
trimming, 93playing
audio, 26movie clips, 50
manually, 53playback options, 51
positioning title style, 134
225showing event clips by separate days
Precision Editorchanging video themes, 171clip duration, changing, 96-98closing, 99opening, 95trimming movie clips, 94-99
preferences, setting, 20-21previewing
clip transitions, 72video of movie clips, 49
Project Browser, 11-12clip thumbnails, adjusting, 19resizing, 14-15switching with Event Browsers, 13
projects, updatingfrom external drives or mobile devices,
33-34from older versions of iMovie, 31
propertiesaccessing for active movies, 22Automatic Content, 24customizing, 136theme titles, 169troubleshooting, 22
Qquitting iMovie updates, 32
Rrating movie clips, 58-60rearranging
events between libraries, 56-57movie clips in timeline, 69-70
recording voiceovers, 143-145iPhone/iPad, 213-214
removingthemes from movie projects, 25video themes, 172-173
renaming libraries, 55replacing movie clips in timelines, 70resizing
Event Browser, 14-15Project Browser, 14-15
sidebars, 14-15Viewer, 14-15
reversing movies, 115-116reverting
to iMovie workspace, 14stabilized video to original format, 101
Rewind effect, 117-118rolling shutter, 159Rolling Shutter adjustments, undoing, 103rotating movie clips, 107
Ssaving movies to Mac hard disk, 192scrolling through clips in events, 66searching
for tags applied in previous versions of iMovie, 60
for title style, 132selecting
movie clips, shortcuts, 49multiple files, 38multiple movie clips in browsers, 69multiple movie clips/events, 46parts of movie clips, 52portions of movie clips, 67
shaky movies, correcting, 99-101sharing
movies, 186via CNN iReport, 191via email, 186via Facebook, 189-190iPhone/iPad, 216-217via iTunes, 187via Vimeo, 190via YouTube, 188 where movies are shared, 192
trailers, 181-182iPhone/iPad, 216-217
shortcuts, selecting movie clips, 49Short List tab, 180showing event clips by separate days, 20
Index226 sidebars
sidebarshiding, 16resizing, 14-15
side-by-side clips, creating, 127-128skimmers, movie clips, 52skimming
iPhoto events, 78through movie clips with arrow keys, 91
Skin Tone Balance feature, 156slo-mo (slow motion), 205slowing down, audio, 150sound
audio effects, 161-163Equalizer, 161Noise Reduction, 161volume, adjusting, 159-160
sound effects, 5adding, 147
sound tracks, playing, 26special effects
Green/Blue Screen effect, 120picture-in-picture effect, 124-126Rewind effect, 117-118side-by-side clips, creating, 127-128
speedadjusting clip playback speed, 110-112of audio, 150
applying to movie clips, 116movie clips
iPhone/iPad, 204setting, 114
Speed Editor, 113speeding up audio, 150Speed settings, undoing, 116splitting movie clips, 103-104
iPhone/iPad, 208by swiping, 208
stability, correcting, 158-159stabilizing video, 100storing imported media, 47storyboards, 178swiping, splitting movie clips, 208switching
audio from foreground to background, iPhone/iPad, 213
clip transitions, 74-75Project and Event Browsers, 13
Ttags, searching for in previous versions, 60Theater, 8-9themes, 64, 165, 197
adding location, 170adding to existing projects, 167-171changing titles, 169changing transitions, 170creating, 166Precision Editor, 171removing, 25, 172-173
timelines, 6adding movie clips, 67deleting movie clips, 70rearranging movie clips, 69-70replacing movie clips, 70trimming movie clips, 90wrapping, 17
title font properties, customizing, 136titles, 5
addingiPhone/iPad, 203to movies, 132-137
title screen, accessing in Viewer, 133title screen clip duration, adjusting, 133title style
adding to background screen clips, 135positioning, 134searching for, 132
title styles, customizable font properties, 137
title text, adding to movie clips, 134-135toolbars
Adjust Toolbar, 83iMovie toolbar, 8-9
trailers, 175adjusting look of, 180converting to movies, 181creating, 175-176customizing, 177-178iPhone/iPad, 215
227zooming in on movie clips, iPhone/iPad
sharing, 181-182iPhone/iPad, 216-217
Shot List, 180tweaking clips, 179-180
trailer template, 176transition duration, calculating, 25Transition icon, 75transitions, 5
adding, 71-73changing in video themes, 170deleting, 73editing, iPhone/iPad, 214
Trim Background Music, 26trimming movie clips, 90
adjusting clip display size, 91Clip Trimmer, 92-93iPhone/iPad, 205to playhead, 93Precision Editor, 94-99timelines, 90
troubleshooting movie properties, 22turning off automatic effects, 86-87tweaking clips for trailers, 179-180
UUndo command, 112undoing
Rolling Shutter adjustments, 103Speed settings, 116
unmuting audio, 145update process, 34-35updates, quitting, 32UpdateToiMovie file, 34updating
eventsfrom external drives or mobile devices,
33-34from older versions of iMovie, 31
projectsfrom external drives or mobile devices,
33-34from older versions of iMovie, 31
Vvideo
addingas picture in picture, 200iPhone/iPad, 199-200
stabilizing, 100Video and Audio Effects icon, 161-163video themes, 165-167
adding to existing projects, 167-171changing titles, 169changing transitions, 170creating, 166locations, adding, 170Precision Editor, 171removing, 172-173
Viewer, 7accessing title screen, 133resizing, 14-15
viewing library event media, 48Vimeo, sharing movies, 190VOB (Video Object) file format, 37voiceovers, recording, 143-145
iPhone/iPad, 213-214volume
adjusting, 159-160Lower Volume feature, 160movie clips, iPhone/iPad, 209
W-XWhite Balance feature, 155workspace, 11-12
to iMovie workspace, 14wrapping movie timeline, 17
YYouTube, sharing movies, 188
ZZoom feature, 18zooming in on movie clips,
iPhone/iPad, 206
Related Documents