IBM Tivoli Storage Area Network Manager User’s Guide Version 1 Release 3 SC23-4698-03

Welcome message from author
This document is posted to help you gain knowledge. Please leave a comment to let me know what you think about it! Share it to your friends and learn new things together.
Transcript

IBM
Tivoli
Storage
Area
Network
Manager
User’s
Guide
Version
1
Release
3
SC23-4698-03
���


IBM
Tivoli
Storage
Area
Network
Manager
User’s
Guide
Version
1
Release
3
SC23-4698-03
���

Note!
Before
using
this
information
and
the
product
it
supports,
be
sure
to
read
the
general
information
under
Appendix
C,
“Notices,”
on
page
119.
Fourth
Edition
(December
2003)
This
edition
applies
to
version
1,
release
3
of
the
IBM
Tivoli®
Storage
Area
Network
Manager
(product
numbers
5698-SRE
and
5698-SRS)
and
to
any
subsequent
releases
until
otherwise
indicated
in
new
editions.
Changes
since
the
previous
edition
are
marked
with
a
vertical
bar
(|)
in
the
left
margin.
Ensure
that
you
are
using
the
correct
edition
for
the
level
of
the
product.
Order
publications
through
your
sales
representative
or
the
branch
office
serving
your
locality.
Your
feedback
is
important
in
helping
to
provide
the
most
accurate
and
high-quality
information.
If
you
have
comments
about
this
book
or
any
other
IBM
Tivoli
Storage
Area
Network
Manager
documentation,
please
see
“Contacting
customer
support”
on
page
vii.
©
Copyright
International
Business
Machines
Corporation
2002,
2003.
All
rights
reserved.
US
Government
Users
Restricted
Rights
–
Use,
duplication
or
disclosure
restricted
by
GSA
ADP
Schedule
Contract
with
IBM
Corp.
||

Contents
Preface
.
.
.
.
.
.
.
.
.
.
.
.
.
.
. v
Who
should
read
this
guide
.
.
.
.
.
.
.
.
. v
Publications
.
.
.
.
.
.
.
.
.
.
.
.
.
. v
IBM
Tivoli
Storage
Area
Network
Manager
Publications
.
.
.
.
.
.
.
.
.
.
.
.
. v
Related
Publications
.
.
.
.
.
.
.
.
.
. vi
Accessing
publications
online
.
.
.
.
.
.
. vi
Ordering
publications
.
.
.
.
.
.
.
.
.
. vi
Providing
feedback
about
publications
.
.
.
. vi
Accessibility
.
.
.
.
.
.
.
.
.
.
.
.
.
. vii
Contacting
customer
support
.
.
.
.
.
.
.
. vii
Reporting
a
problem
.
.
.
.
.
.
.
.
.
. viii
Conventions
used
in
this
guide
.
.
.
.
.
.
. viii
Typeface
Conventions
.
.
.
.
.
.
.
.
. viii
Summary
of
Changes
for
IBM
Tivoli
Storage
Area
Network
Manager
Version
1
.
.
.
.
.
.
.
.
.
.
.
.
.
.
.
.
. ix
Technical
Changes
for
Version
1
Release
3
–
December
2003
.
.
.
.
.
.
.
.
.
.
.
.
. ix
Technical
Changes
for
Version
1
Release
2
–
April
2003
.
.
.
.
.
.
.
.
.
.
.
.
.
.
.
.
. x
Chapter
1.
Introducing
IBM
Tivoli
Storage
Area
Network
Manager
.
.
.
.
. 1
Storage
area
network
management
.
.
.
.
.
.
. 2
Discovery
.
.
.
.
.
.
.
.
.
.
.
.
.
. 2
Topology
views
.
.
.
.
.
.
.
.
.
.
.
. 3
SNMP
events
.
.
.
.
.
.
.
.
.
.
.
.
. 4
Zones
and
zone
control
.
.
.
.
.
.
.
.
.
. 4
Fault
management
.
.
.
.
.
.
.
.
.
.
. 4
Internet
SCSI
support
.
.
.
.
.
.
.
.
.
. 5
Interfaces
to
Tivoli
Storage
Area
Network
Manager
. 6
Overview
of
administrator
tasks
.
.
.
.
.
.
.
. 6
Chapter
2.
Administering
Tivoli
Storage
Area
Network
Manager
.
.
.
.
.
.
.
. 9
Starting
the
IBM
Tivoli
Storage
Resource
Manager
user
interface
.
.
.
.
.
.
.
.
.
.
.
.
.
. 9
Managing
file
system
security
.
.
.
.
.
.
.
. 10
Configuring
and
viewing
message
logs
.
.
.
.
. 11
Configuring
and
viewing
the
user
properties
file
.
. 11
Chapter
3.
Viewing
the
network
.
.
.
. 13
Starting
Tivoli
Storage
Area
Network
Manager
graphical
user
interface
.
.
.
.
.
.
.
.
.
. 13
Using
the
Tivoli
NetView
Web
Console
.
.
.
. 13
Configuring
the
agents
.
.
.
.
.
.
.
.
.
. 14
Configuring
IBM
Tivoli
Storage
Area
Network
Manager
Agents
.
.
.
.
.
.
.
.
.
.
.
. 14
Configuring
the
SNMP
agents
.
.
.
.
.
.
. 17
Viewing
events
in
the
Tivoli
Storage
Area
Network
Manager
database
.
.
.
.
.
.
.
.
.
.
.
. 19
Filtering
Events
.
.
.
.
.
.
.
.
.
.
.
.
. 20
Scheduling
polling
.
.
.
.
.
.
.
.
.
.
.
. 20
Selecting
and
interpreting
network
views
.
.
.
. 22
SAN
view
.
.
.
.
.
.
.
.
.
.
.
.
.
. 24
Host-centric
view
.
.
.
.
.
.
.
.
.
.
. 29
Device-centric
view
.
.
.
.
.
.
.
.
.
.
. 30
Displaying
SAN
device
properties
.
.
.
.
.
. 32
Changing
the
label
property
for
a
symbol
.
.
. 35
Cisco
MDS
9000
switch
support
.
.
.
.
.
. 37
Interpreting
status
.
.
.
.
.
.
.
.
.
.
.
. 39
How
status
propagates
.
.
.
.
.
.
.
.
. 39
Status
in
the
submap
graphical
view
.
.
.
.
. 40
Status
in
the
submap
explorer
view
.
.
.
.
. 40
Clearing
the
status
history
.
.
.
.
.
.
.
. 41
Status
filtering
.
.
.
.
.
.
.
.
.
.
.
. 41
Discovering
iSCSI
devices
.
.
.
.
.
.
.
.
. 42
Discovery
Methods
.
.
.
.
.
.
.
.
.
.
. 43
Starting
the
iSCSI
discovery
.
.
.
.
.
.
.
. 43
Rescheduling
iSCSI
polling
.
.
.
.
.
.
.
. 44
Stop
iSCSI
polling
.
.
.
.
.
.
.
.
.
.
. 45
Using
a
seed
file
to
discover
iSCSI
devices
.
.
. 45
Chapter
4.
Working
with
resources
.
. 47
Launching
network
device
applications
.
.
.
.
. 47
Working
with
zones
and
zone
sets
.
.
.
.
.
.
. 49
Port
WWN
and
domain
port
zoning
.
.
.
.
. 50
Using
IBM
Tivoli
Storage
Area
Network
Manager
with
zones
.
.
.
.
.
.
.
.
.
.
.
.
.
. 50
Working
with
zones
.
.
.
.
.
.
.
.
.
. 51
Working
with
zone
sets
.
.
.
.
.
.
.
.
. 55
Switch
considerations
for
zoning
.
.
.
.
.
. 58
Using
Error
Detection
and
Fault
Isolation
.
.
.
. 60
Starting
and
stopping
EDFI
.
.
.
.
.
.
.
. 61
EDFI
event
reporting
.
.
.
.
.
.
.
.
.
. 62
Working
with
rule
sets
.
.
.
.
.
.
.
.
. 63
Managing
an
EDFI
event
.
.
.
.
.
.
.
.
. 64
Appendix
A.
Command
reference
.
.
. 71
Reading
syntax
diagrams
.
.
.
.
.
.
.
.
.
. 71
Entering
commands
.
.
.
.
.
.
.
.
.
. 73
Logging
Service
commands
.
.
.
.
.
.
.
.
. 75
srmcp
log
get
.
.
.
.
.
.
.
.
.
.
.
.
. 76
srmcp
log
help
.
.
.
.
.
.
.
.
.
.
.
. 77
srmcp
log
set
.
.
.
.
.
.
.
.
.
.
.
.
. 78
Manager
Service
commands
.
.
.
.
.
.
.
.
. 80
srmcp
ConfigService
display
.
.
.
.
.
.
.
. 81
srmcp
ConfigService
get
.
.
.
.
.
.
.
.
. 82
srmcp
ConfigService
help
.
.
.
.
.
.
.
.
. 83
srmcp
ConfigService
set
.
.
.
.
.
.
.
.
. 84
srmcp
ConfigService
setSinglePw
.
.
.
.
.
. 86
SAN
Event
Service
commands
.
.
.
.
.
.
.
. 88
srmcp
SANEvent
ChangeFilterRulePriority
.
.
. 89
srmcp
SANEvent
DeleteFilterRule
.
.
.
.
.
. 90
srmcp
SANEvent
help
.
.
.
.
.
.
.
.
.
. 91
srmcp
SANEvent
InsertFilterRule
.
.
.
.
.
. 92
srmcp
SANEvent
ListFilterRules
.
.
.
.
.
. 94
©
Copyright
IBM
Corp.
2002,
2003
iii
|||
||
|||||||||
||
|
|
|
|
|
|
|
|
|
|
|
|
|
|
|
|
|
|
|
|
|
|
|
|
|
|
|
|
|
|
|
|
|
|
|

srmcp
SANEvent
SetDefaultFilterRules
.
.
.
. 95
srmcp
SANEvent
UpdateFilterRule
.
.
.
.
. 96
Entity
Types
.
.
.
.
.
.
.
.
.
.
.
.
. 98
Default
Rules
.
.
.
.
.
.
.
.
.
.
.
.
. 98
SANAgentOutbandChangeAgent
commands
.
.
. 100
srmcp
SANAgentOutbandChangeAgent
help
101
srmcp
SANAgentOutbandChangeAgent
list
.
. 102
srmcp
SANAgentOutbandChangeAgent
add
filter
.
.
.
.
.
.
.
.
.
.
.
.
.
.
. 103
srmcp
SANAgentOutbandChangeAgent
add
address
.
.
.
.
.
.
.
.
.
.
.
.
.
. 104
srmcp
SANAgentOutbandChangeAgent
remove
filter
.
.
.
.
.
.
.
.
.
.
.
.
.
.
. 105
srmcp
SANAgentOutbandChangeAgent
remove
address
.
.
.
.
.
.
.
.
.
.
.
.
.
. 106
Using
trace
to
see
traps
.
.
.
.
.
.
.
.
. 107
Tivoli
NetView
command
.
.
.
.
.
.
.
.
. 108
nvsniffer
.
.
.
.
.
.
.
.
.
.
.
.
.
. 109
Appendix
B.
Troubleshooting
.
.
.
. 111
Checking
log
files
.
.
.
.
.
.
.
.
.
.
.
. 111
Troubleshooting
SAN
management
problems
.
.
. 112
Interpreting
device
status
.
.
.
.
.
.
.
. 116
Taking
a
database
snapshot
.
.
.
.
.
.
.
.
. 117
Appendix
C.
Notices
.
.
.
.
.
.
.
. 119
Trademarks
.
.
.
.
.
.
.
.
.
.
.
.
.
. 120
Glossary
.
.
.
.
.
.
.
.
.
.
.
.
. 123
Index
.
.
.
.
.
.
.
.
.
.
.
.
.
.
. 125
iv
IBM
Tivoli
Storage
Area
Network
Manager:
User’s
Guide
||||||||||||||||||||||||||||
|
|
|
|
Preface
IBM
Tivoli
Storage
Area
Network
Manager
manages
all
of
your
devices
on
a
storage
area
network
(SAN).
Capabilities
include
discovery,
monitoring,
availability,
and
event
management.
This
guide
describes
how
to
manage
the
resources
on
your
storage
area
network.
Who
should
read
this
guide
This
publication
is
intended
for
SAN
administrators
and
network
operators
who
need
to
manage
IBM
Tivoli
Storage
Area
Network
Manager.
Readers
should
be
familiar
with
the
following
topics:
v
Database
2
(DB2)
v
SAN
concepts
v
Simple
Network
Management
Protocol
(SNMP)
concepts
v
Tivoli
Enterprise
Console
v
Tivoli
Enterprise
Data
Warehouse
v
Tivoli
NetView
Publications
This
section
lists
publications
in
the
IBM
Tivoli
Storage
Area
Network
Manager
library
and
any
other
related
documents.
It
also
describes
how
to
access
Tivoli
publications
online,
how
to
order
Tivoli
publications,
and
how
to
submit
comments
on
Tivoli
publications.
IBM
Tivoli
Storage
Area
Network
Manager
Publications
The
following
table
lists
IBM
Tivoli
Storage
Area
Network
Manager
publications.
Publication
Title
Order
Number
IBM
Tivoli
Storage
Area
Network
Manager
User’s
Guide
SC23-4698
IBM
Tivoli
Storage
Area
Network
Manager
Planning
and
Installation
Guide
SC23-4697
IBM
Tivoli
Storage
Area
Network
Manager
Messages
SC32-0953
IBM
Tivoli
Storage
Area
Network
Manager
Warehouse
Enablement
Pack:
Implementation
Guide
SC23-4699
The
Tivoli
Storage
Area
Network
Manager
library
in
all
translated
languages
is
available
on
the
following
CD-ROM:
Title
Order
Number
IBM
Tivoli
Storage
Area
Network
Manager
Publications
CD-ROM
SCD7-0463
The
publications
are
also
available
from
the
Tivoli
publications
Web
site:
http://www.ibm.com/software/tivoli/library/
©
Copyright
IBM
Corp.
2002,
2003
v
|

Related
Publications
The
following
table
lists
related
IBM
product
publications.
Title
Order
Number
IBM
Tivoli
Storage
Area
Network
Manager:
A
Practical
Introduction
SG24-6848
Introduction
to
Storage
Area
Network,
SAN
SG24-5470
Designing
an
IBM
Storage
Area
Network
SG24-5758
NetView
for
Windows
NT
Programmer’s
Reference
SC31-8890
NetView
for
Windows
User’s
Guide
SC31-8888
The
Tivoli
Software
Glossary
includes
definitions
for
many
of
the
technical
terms
related
to
Tivoli
software.
The
Tivoli
Software
Glossary
is
available,
in
English
only,
at
the
following
Web
site:
http://publib.boulder.ibm.com/tividd/glossary/termsmst04.htm
Accessing
publications
online
You
can
access
publications
in
the
Tivoli
Information
Center
from
the
following
Customer
Support
Web
site:
http://www.ibm.com/software/tivoli/library/
The
Tivoli
Information
Center
contains
the
most
recent
version
of
the
books
in
the
product
library
in
or
HTML
formats,
or
both.
Translated
documents
are
also
available
for
some
products.
Note:
If
you
documents
on
other
than
letter-sized
paper,
select
the
Fit
to
page
check
box
in
the
Adobe
Acrobat
dialog.
This
option
is
available
when
you
click
File
→
Print.
Fit
to
page
ensures
that
the
full
dimensions
of
a
letter-sized
page
on
the
paper
that
you
are
using.
Ordering
publications
You
can
order
many
Tivoli
publications
online
at
the
following
Web
site:
http://www.elink.ibmlink.ibm.com/public/applications/publications/cgibin/pbi.cgi
You
can
also
order
by
telephone
by
calling
one
of
these
numbers:
v
In
the
United
States:
800-879-2755
v
In
Canada:
800-426-4968
In
other
countries,
see
the
following
Web
site
for
a
list
of
telephone
numbers:
http://www.ibm.com/software/tivoli/order-lit/
Providing
feedback
about
publications
If
you
have
comments
or
suggestions
about
Tivoli
products
and
documentation
complete
the
customer
feedback
survey
at
the
following
Web
site:
http://www.ibm.com/software/tivoli/contact.html/
vi
IBM
Tivoli
Storage
Area
Network
Manager:
User’s
Guide
Accessibility
Accessibility
features
help
a
user
who
has
a
physical
disability,
such
as
restricted
mobility
or
limited
vision,
to
use
software
products
successfully.
With
this
product,
you
can
use
assistive
technologies
to
hear
and
navigate
the
interface.
You
can
also
use
the
keyboard
instead
of
the
mouse
to
operate
all
features
of
the
graphical
user
interface.
For
additional
information,
see
the
Accessibility
Appendix
in
IBM
Tivoli
Storage
Area
Network
Manager
Planning
and
Installation
Guide.
Contacting
customer
support
For
support
for
this
or
any
Tivoli
product,
you
can
contact
IBM
customer
support
in
one
of
the
following
ways:
v
Visit
the
IBM
Tivoli
Storage
Area
Network
Manager
technical
support
Web
site
at
http://www.ibm.com/software/support/.
v
Submit
a
problem
management
record
(PMR)
electronically
at
IBMSERV/IBMLINK.
You
can
access
IBMLINK
at
http://www.ibmlink.ibm.com.
v
Submit
a
problem
management
record
(PMR)
electronically
at
http://www.ibm.com/software/sysmgmt/products/support/.
See
“Reporting
a
problem”
on
page
viii
for
details.
Customers
in
the
United
States
can
also
call
1-800-IBM-SERV
(1-800-426-7378).
International
customers
should
consult
the
Web
site
for
customer
support
telephone
numbers.
You
can
also
review
the
IBM
Software
Support
Handbook,
which
is
available
on
our
Web
site
at
http://techsupport.services.ibm.com/guides/handbook.html.
When
you
contact
customer
support,
be
prepared
to
provide
identification
information
for
your
company
so
that
support
personnel
can
readily
assist
you.
Company
identification
information
may
also
be
needed
to
access
various
online
services
available
on
the
Web
site.
The
support
Web
site
offers
extensive
information,
including
a
guide
to
support
services
(the
IBM
Software
Support
Handbook);
frequently
asked
questions
(FAQs);
and
documentation
for
all
IBM
Software
products,
including
Release
Notes,
Redbooks,
and
Whitepapers.
The
documentation
for
some
product
releases
is
available
in
both
and
HTML
formats.
Translated
documents
are
also
available
for
some
product
releases.
All
Tivoli
publications
are
available
for
electronic
download
or
order
from
the
IBM
Publications
Center:http://www.ibm.com/software/tivoli/library/
We
are
very
interested
in
hearing
about
your
experience
with
Tivoli
products
and
documentation.
We
also
welcome
your
suggestions
for
improvements.
If
you
have
comments
or
suggestions
about
our
documentation,
please
complete
our
customer
feedback
survey
at
http://www.ibm.com/software/sysmgmt/products/support/Tivoli_Escalation_Process.html
Preface
vii

Reporting
a
problem
Please
have
the
following
information
ready
when
you
report
a
problem:
v
The
IBM
Tivoli
Storage
Area
Network
Manager
version,
release,
modification,
and
service
level
number.
v
The
communication
protocol
(for
example,
TCP/IP),
version,
and
release
number
you
are
using.
v
The
activity
you
were
doing
when
the
problem
occurred,
listing
the
steps
you
followed
before
the
problem
occurred.
v
The
exact
text
of
any
error
messages.
Depending
on
the
problem,
you
may
also
want
to
provide
the
following
information:
v
The
switch
vendor,
model,
and
firmware
level
v
The
HBA
vendor,
model,
driver
level,
OS
platform
it
is
running
with
v
The
storage
device
vendor,
model,
and
code
Conventions
used
in
this
guide
This
book
uses
several
conventions
for
special
terms
and
actions,
operating
system-dependent
commands
and
paths,
and
margin
graphics.
Typeface
Conventions
The
following
typeface
conventions
are
used
in
this
book:
Bold
Lowercase
and
mixed
case
commands,
command
options,
and
flags
that
appear
within
text
appear
like
this,
in
bold
type.
Graphical
user
interface
elements
(except
for
titles
of
windows
and
dialogs)
and
names
of
keys
also
appear
like
this,
in
bold
type.
Italic
Variables,
values
you
must
provide,
new
terms,
and
words
and
phrases
that
are
emphasized
appear
like
this,
in
italic
type.
Monospace
Commands,
command
options,
and
flags
that
appear
on
a
separate
line,
code
examples,
output,
and
message
text
appear
like
this,
in
monospace
type.
Names
of
files
and
directories,
text
strings
you
must
type,
when
they
appear
within
text,
names
of
Java
methods
and
classes,
and
HTML
and
XML
tags
also
appear
like
this,
in
monospace
type.
viii
IBM
Tivoli
Storage
Area
Network
Manager:
User’s
Guide
||
|
|
|

Summary
of
Changes
for
IBM
Tivoli
Storage
Area
Network
Manager
Version
1
This
section
summarizes
changes
that
have
been
made
to
the
product
and
this
publication.
Technical
Changes
for
Version
1
Release
3
–
December
2003
The
following
changes
have
been
made
to
the
product
for
this
edition:
Tivoli
NetView
Web
console
IBM
Tivoli
Storage
Area
Network
Manager
now
supports
the
Tivoli
NetView
Web
console
in
a
limited
capacity.
The
IBM
Tivoli
Storage
Area
Network
Manager
dialogs
will
not
be
added
to
the
Tivoli
NetView
Web
console,
therefore
you
will
only
be
able
to
view
the
topology.
There
will
be
limited
viewing
of
the
topology
(no
property
information
will
be
available).
For
more
information,
see
“Using
the
Tivoli
NetView
Web
Console”
on
page
13
and
also
IBM
Tivoli
Storage
Area
Network
Manager
Planning
and
Installation
Guide.
Support
for
the
Cisco
Virtual
SAN
(VSAN)
IBM
Tivoli
Storage
Area
Network
Manager
supports
the
Cisco
MDS
9000
Family
of
switches.
The
Cisco
switch
introduces
the
concept
of
the
virtual
SAN
(VSAN).
For
more
information,
see
“Virtual
Storage
Area
Networks”
on
page
38.
Tivoli
Enterprise
Console
Event
Filtering
IBM
Tivoli
Storage
Area
Network
Manager
has
improved
the
processing
of
Tivoli
Enterprise
Console
events
and
SNMP
traps.
Previously,
all
events
were
issued
without
any
kind
of
filtering.
Users
can
now
control
the
types
of
events
to
suppress
or
publish.
Events
that
are
redundant
will
automatically
be
suppressed.
For
more
information,
see
“Filtering
Events”
on
page
20,
“SAN
Event
Service
commands”
on
page
88,
and
IBM
Tivoli
Storage
Area
Network
Manager
Planning
and
Installation
Guide.
Selectable
launch
of
device
applications
With
previous
versions
of
IBM
Tivoli
Storage
Area
Network
Manager,
you
could
launch
only
one
application
even
if
a
device
supported
multiple
applications.
Version
1.3
allows
you
to
choose
which
one
to
launch.
For
example,
for
a
Cisco
switch
you
can
choose
to
launch
either
Fabric
Manager
or
Device
Manager.
For
more
information,
see
“Launching
network
device
applications”
on
page
47.
IBM
Tivoli
Storage
Area
Network
Manager
Database
Snapshot
Support
To
help
troubleshoot
problems,
IBM
Tivoli
Storage
Area
Network
Manager
supports
a
database
snapshot.
The
database
snapshot
captures
the
current
state
of
the
SAN
topology.
You
would
use
this
function
at
the
request
of
customer
support.
For
more
information,
see
“Taking
a
database
snapshot”
on
page
117.
©
Copyright
IBM
Corp.
2002,
2003
ix
|
|
|||||||
|||
|
||||
||||||
|||
||||||
||
|||||
|
Zone
Control
Graphical
User
Interface
The
zone
control
graphical
user
interface
allows
you
to
create,
edit,
and
delete
zones
and
zone
sets
within
a
SAN
that
is
discovered
by
IBM
Tivoli
Storage
Area
Network
Manager
For
more
information,
see
“Working
with
zones
and
zone
sets”
on
page
49
and
also
IBM
Tivoli
Storage
Area
Network
Manager
Planning
and
Installation
Guide.
DB2
version
8.1
IBM
Tivoli
Storage
Area
Network
Manager
is
supported
on
DB2
version
8.1.
See
IBM
Tivoli
Storage
Area
Network
Manager
Planning
and
Installation
Guide
for
more
information.
Platform
support
The
manager
is
now
supported
on
Windows
2003
and
AIX
5.2
in
addition
to
Windows
2000
and
AIX
5.1.
The
managed
hosts
are
now
supported
on
Solaris
2.9.
The
remote
console
is
now
supported
on
Windows
2003.
See
IBM
Tivoli
Storage
Area
Network
Manager
Planning
and
Installation
Guide
for
more
information.
Cloudscape
database
support
The
Cloudscape
database
is
supported
in
this
release.
You
can
install
IBM
Tivoli
Storage
Area
Network
Manager
with
Cloudscape
or
with
DB2.
Cloudscape
is
intended
to
be
used
for
small
SAN
environments.
See
IBM
Tivoli
Storage
Area
Network
Manager
Planning
and
Installation
Guide
for
more
information.
Single
user
ID
and
password
You
can
use
the
same
user
ID
and
password
for
your
DB2
user
ID,
IBM
Tivoli
Storage
Area
Network
Manager
host
authentication,
and
WebSphere
Application
Server
administrator
ID.
A
new
command,
srmcp
ConfigService
setSinglePw,
can
be
used
to
set
the
same
password
for
all
of
these
user
IDs
at
once
or
to
set
each
password
separately.
This
command
replaces
srmcp
ConfigService
setPw
and
srmcp
ConfigService
setAuthenticationPw.
See
“srmcp
ConfigService
setSinglePw”
on
page
86
for
details.
Graphical
user
interface
enhancements
The
graphical
user
interface
has
been
changed
to
improve
usability
and
function.
Technical
Changes
for
Version
1
Release
2
–
April
2003
The
following
changes
have
been
made
to
the
product
for
this
edition:
Error
detection
and
fault
isolation
(EDFI)
The
EDFI
function
provides
help
with
problem
determination
on
Fibre
Channel
SAN
interconnect
links.
EDFI
uses
predictive
failure
analysis
and
provides
fault
isolation
capabilities
that
allow
you
to
identify
and
take
appropriate
action
for
components
that
may
be
failing.
For
more
information,
see
“Using
Error
Detection
and
Fault
Isolation”
on
page
60
and
also
IBM
Tivoli
Storage
Area
Network
Manager
Planning
and
Installation
Guide.
Embedded
WebSphere
Application
Server
-
Express,
Version
5.0
Installation
of
IBM
Tivoli
Storage
Area
Network
Manager
includes
the
x
IBM
Tivoli
Storage
Area
Network
Manager:
User’s
Guide
||||
|||
|||
||
||||
||
||||
||
|||||||||
|||
embedded
version
of
WebSphere
Application
Server
-
Express.
A
separate
WebSphere
installation
is
no
longer
required.
Internet
SCSI
(iSCSI)
Support
Tivoli
Storage
Area
Network
Manager
provides
basic
support
for
iSCSI
device
discovery
and
monitoring
through
Tivoli
NetView.
iSCSI
allows
SCSI
block
I/O
protocols
(commands,
sequences
and
attributes)
to
be
sent
over
a
network
using
the
TCP/IP
protocol.
For
more
information,
see
“Discovering
iSCSI
devices”
on
page
42
and
also
IBM
Tivoli
Storage
Area
Network
Manager
Planning
and
Installation
Guide.
Operating
system
support
has
been
added
for
the
following
components:
v
Managed
host
on
AIX
Version
5.2
v
Managed
host
on
Linux
Redhat
Advanced
Server
Version
2.1
v
Managed
host
on
Suse
Linux
Enterprise
Server
Version
7.0
v
Remote
Tivoli
NetView
console
on
Windows
XP
v
Tivoli
Storage
Area
Network
Manager
on
AIX
5.1.
This
support
does
not
include
Tivoli
NetView.
You
must
use
a
Windows
2000
or
Windows
XP
remote
console
for
the
Tivoli
Storage
Area
Network
Manager
on
AIX.
See
IBM
Tivoli
Storage
Area
Network
Manager
Planning
and
Installation
Guide
for
more
information.
Dynamic
IP
addresses
for
managed
hosts
and
remote
consoles
You
can
specify
dynamic
IP
addresses
instead
of
static
IP
addresses
for
managed
hosts
and
remote
consoles.
Note:
The
manager
still
requires
a
static
IP
address.
SAN
Identification
Tivoli
Storage
Area
Network
Manager
now
displays
the
SAN
name
that
an
object
is
connected
to.
Additional
Tivoli
Enterprise
Console
event
classes
Tivoli
Storage
Area
Network
Manager
provides
additional
Tivoli
Enterprise
Console
event
classes
that
allows
you
to
easily
filter
events
based
on
the
Tivoli
Enterprise
Console
event
type.
See
IBM
Tivoli
Storage
Area
Network
Manager
Planning
and
Installation
Guide
for
more
information.
Cisco
MDS
9000
Series
switch
support
IBM
Tivoli
Storage
Area
Network
Manager
has
enhanced
compatibility
for
the
Cisco
MDS
9000
Series
switch.
The
Launch
Application
menu
item
is
available
for
the
Cisco
switch.
When
the
Launch
Application
is
selected,
the
Cisco
Fabric
Manager
application
is
started.
Agent
Versioning
An
IBM
Tivoli
Storage
Area
Network
Manager
Release
1
agent
on
a
managed
host
can
coexist
with
a
Release
2
manager.
The
Tivoli
Storage
Area
Network
Manager
keeps
track
of
the
functionality
differences
between
a
Release
1
agent
and
a
Release
2
agent
and
takes
appropriate
action
based
on
this
information.
For
example,
a
Release
1
agent
does
not
support
new
function
such
as
EDFI.
You
cannot
install
a
Release
1
agent
and
a
Release
2
agent
on
the
same
managed
host.
Remote
Console
Support
on
Windows
XP
The
IBM
Tivoli
Storage
Area
Network
Manager
remote
console
is
now
supported
on
Windows
XP.
Tivoli
NetView
7.1.3
is
required
to
support
Windows
XP.
Summary
of
Changes
for
IBM
Tivoli
Storage
Area
Network
Manager
Version
1
xi

New
Icons
for
Manual
Entry
When
manual
entry
is
performed
on
unknown
devices,
the
following
icons
will
be
available:
v
ESS
v
SAN
Volume
Controller
xii
IBM
Tivoli
Storage
Area
Network
Manager:
User’s
Guide

Chapter
1.
Introducing
IBM
Tivoli
Storage
Area
Network
Manager
Tivoli
Storage
Area
Network
Manager
helps
you
manage
your
resources
by
providing
network
resource
discovery
and
management
capabilities.
Figure
1
shows
how
Tivoli
Storage
Area
Network
Manager
can
manage
all
of
your
storage
resources.
This
includes
devices
connected
to
host
systems
through
fiber-based
hubs,
bridges,
switches,
routers,
gateways,
and
directors.
Tivoli
Storage
Area
Network
Manager
also
manages
any
hosts
with
agents.
With
Tivoli
Storage
Area
Network
Manager,
one
system
acts
as
the
manager,
and
one
or
more
other
systems
are
the
managed
hosts:
Manager
The
manager
does
the
following:
v
Gathers
data
from
agents
on
managed
hosts,
such
as
descriptions
of
storage
area
networks
(SANs),
logical
unit
numbers
(LUNs),
and
file
system
and
host
information.
v
Provides
graphical
displays
of
SAN
topology.
v
Generates
Simple
Network
Management
Protocol
(SNMP)
events
when
a
change
is
detected
in
the
SAN
fabric.
v
Forwards
events
to
the
Tivoli
Enterprise
Console
or
an
SNMP
console.
Managed
hosts
An
agent
resides
on
each
managed
host.
The
agents
on
managed
hosts
do
the
following:
v
Gather
information
about
the
SAN
by
querying
switches
and
devices
for
attribute
and
topology
information.
v
Gather
host-level
information,
such
as
file
systems
and
mapping
to
LUNs.
v
Gather
event
information
detected
by
host
bus
adapters
(HBAs).
SAN
ManagedHost
(Agent)
ManagedHost
(Agent)
ManagedHost
(Agent)
Database
IBM TivoliStorage Area Network
Manager
Figure
1.
IBM
Tivoli
Storage
Area
Network
Manager
in
a
storage
area
network
environment
©
Copyright
IBM
Corp.
2002,
2003
1

Storage
area
network
management
SAN
management
automatically
discovers
SAN
components
and
devices,
and
displays
the
topology
of
your
SAN
environment.
Discovery
The
process
of
finding
resources
within
an
enterprise,
including
detection
of
network
topology,
is
called
discovery.
A
discovery
can
be
triggered
by
any
of
the
following
actions:
v
A
user
requests
a
discovery
(poll
now).
v
An
event
occurs
that
causes
IBM
Tivoli
Storage
Area
Network
Manager
to
perform
a
discovery.
v
A
scheduled
or
periodic
discovery
is
initiated.
A
scheduled
discovery
defaults
to
every
24
hours.
v
A
managed
host
or
SNMP
agent
has
been
added.
Tivoli
Storage
Area
Network
Manager
uses
the
following
methods
to
discover
your
network:
In-band
The
agent
on
each
managed
host
collects
information
about
the
host
machine
itself,
including
file
system
information.
Commands
are
sent
through
the
host
bus
adapter
(HBA)
cards
attaching
the
host
machine
to
the
SAN
to
gather
information
about
the
devices.
Out-of-band
The
manager
can
also
use
SNMP
queries
to
discover
information
about
selected
fabric
switches.
Management
information
base
(MIB)
information
is
collected
from
those
switches.
Each
method
has
its
advantages:
v
In-band
–
In-band
compliant
devices
can
discover
and
report
errors
for
adjoining
devices.
–
Agents
can
discover
and
manage
the
physical
and
logical
connections
from
the
switch
to
the
fibre-attached
storage.
–
Agents
can
discover
and
manage
fibre-attached
hosts
through
contact
with
their
HBAs.v
Out-of-band
–
If
a
Fibre
Channel
(FC)
path
is
down,
the
management
server
can
still
receive
errors
from
the
IP
path.
–
Discovery
is
not
affected
by
zoning.
Zoning
limits
in-band
requests
from
management
agents
to
discovering
only
those
end-points
within
the
zone.
There
are
two
types
of
discovery:
a
full
discovery
and
a
topology
discovery.
Table
1
on
page
3
explains
when
each
type
of
discovery
is
performed.
2
IBM
Tivoli
Storage
Area
Network
Manager:
User’s
Guide
|
|
||
||
||
|
||
||

Table
1.
Discovery
Types
A
discovery
is
performed
when:
Full
Depending
on
the
number
of
objects
to
discover,
a
full
discovery
can
take
a
long
time
to
complete.
You
may
choose
never
to
run
a
full
discovery.
You
can
specify
when
to
run
a
full
discovery.
See
“srmcp
ConfigService
set”
on
page
84.
The
defaults
are:
v
IBM
Tivoli
Bonus
Pack
for
SAN
Management:
Never
run
a
full
discovery.
v
Tivoli
Storage
Area
Network
Manager:
Run
a
full
discovery
when
Poll
Now
is
specified
and
also
when
a
scheduled
discovery
starts.
v
A
user
requests
a
discovery
(poll
now)
v
A
scheduled
or
periodic
discovery
is
initiated
v
A
managed
host
is
added
Topology
This
type
of
discovery
takes
less
time
to
perform
than
a
full
discovery.
However,
a
topology
discovery
does
not
update
the
host-centric
or
device-centric
views.
These
views
are
updated
when
a
full
discovery
is
performed.
v
When
IBM
Tivoli
Storage
Area
Network
Manager
starts
v
When
IBM
Tivoli
Storage
Area
Network
Manager
detects
changes
in
the
SAN
v
When
an
SNMP
agent
(switch)
is
added
The
data
collected
from
managed
hosts
is
stored
in
the
DB2
database.
Data
collection
is
driven
by
both
schedule
and
events.
A
schedule
triggers
discovery
and
defaults
to
every
24
hours.
When
Tivoli
Storage
Area
Network
Manager
detects
an
event
from
a
fabric
switch,
a
new
discovery
begins.
Tivoli
Storage
Area
Network
Manager
also
supports
iSCSI
discovery.
iSCSI
discovery
is
performed
independently
from
the
discovery
done
by
Tivoli
Storage
Area
Network
Manager
and
requires
that
you
enable
the
IP
discovery
of
Tivoli
NetView.
For
more
information
see
“Internet
SCSI
support”
on
page
5,
“Discovering
iSCSI
devices”
on
page
42,
and
IBM
Tivoli
Storage
Area
Network
Manager
Planning
and
Installation
Guide.
Topology
views
Tivoli
Storage
Area
Network
Manager
extracts
fabric
information
from
the
database
and
uses
Tivoli
NetView
to
display
the
fabric
topology.
Table
2
describes
the
views
available
for
SANs.
For
each
device
discovered
and
displayed,
you
can
open
a
properties
dialog
that
shows
the
attributes
and
connections
associated
with
that
device.
Table
2.
Description
of
SAN
Views
from
Tivoli
NetView
SAN
Views
Description
SAN
Symbols
(from
Root
Submap)
Displays
one
symbol
for
each
SAN.
Double-click
on
a
SAN
symbol
to
display
its
submap.
From
a
submap
you
can
choose
either
of
the
following
views:
v
Topology
View:
Displays
the
entire
SAN
with
two
types
of
symbols,
one
for
the
SAN
connection
elements
and
another
for
each
fabric
segment.
v
Zone
View:
Displays
the
SAN
as
a
grouping
of
zones.
Host-centric
Displays
all
host
systems
and
their
logical
relationships
to
local
and
SAN-attached
devices.
It
does
not
display
the
switches
and
other
connection
devices.
Chapter
1.
Introducing
IBM
Tivoli
Storage
Area
Network
Manager
3

Table
2.
Description
of
SAN
Views
from
Tivoli
NetView
(continued)
SAN
Views
Description
Device-centric
Displays
all
the
storage
devices
and
their
logical
relationships
to
all
the
hosts.
It
does
not
display
the
switches
and
other
connection
devices.
SNMP
events
Tivoli
Storage
Area
Network
Manager
can
send
events,
which
represent
a
change
in
the
state
of
the
fabric,
to
any
event
console
within
the
enterprise
that
Tivoli
Storage
Area
Network
Manager
participates
in.
These
events
are
generated
in
both
SNMP
and
Tivoli
Enterprise
Console
format.
Zones
and
zone
control
A
Storage
Area
Network
zone
is
a
grouping
of
multiple
ports
to
form
a
virtual
private
storage
network.
A
zone
set
is
a
collection
of
zones
that
belong
to
a
single
SAN.
The
IBM
Tivoli
NetView
console
lets
you
view
zones
in
SANs.
The
IBM
Tivoli
Storage
Area
Network
Manager
user
interface
lets
you
create,
update,
and
delete
zones
and
zone
sets
within
a
SAN.
In
addition,
the
interface
lets
you
do
the
following:
v
Assign
zones
to
zone
sets.
v
Activate
and
deactivate
zone
sets.
v
View
zone
membership.
v
Add
and
remove
zone
members.
See
“Zone
View”
on
page
26
for
details
about
viewing
zones
on
your
SAN
and
“Working
with
zones
and
zone
sets”
on
page
49
for
details
about
the
zone
control
user
interface.
Fault
management
Tivoli
Storage
Area
Network
Manager
provides
fault
management
capabilities
and
can
report
on
failing
hardware
devices
on
Fibre
Channel
SAN
interconnect
links
before
they
become
permanent
device
failures.
The
error
detection
and
fault
isolation
function
(EDFI)
can
perform
predictive
failure
analysis
by
analyzing
counters
associated
with
the
transmission
of
data
on
SAN
links.
Tivoli
Storage
Area
Network
Manager
provides
an
EDFI
user
interface
from
the
Tivoli
NetView
console
that
allows
you
to
manage
EDFI
notifications
and
rule
sets.
Rule
sets
specify
thresholds
and
policies
used
by
predictive
failure
analysis
and
associated
fault
isolation
functions
of
Tivoli
Storage
Area
Network
Manager.
EDFI
generates
standard
Tivoli
Enterprise
Console
events
that
you
can
use
for
reporting
purposes.
EDFI
reports
on
faulty
components
in
the
EDFI
Properties
log
and
as
an
EDFI
symbol
on
the
device
itself
on
the
SAN
manager
topology
interface.
Note,
EDFI
isolates
faults
to
the
link
level
–
either
side
of
the
link
or
cable
itself
may
be
the
faulty
component.
For
more
information
on
EDFI,
see
“Using
Error
Detection
and
Fault
Isolation”
on
page
60
and
IBM
Tivoli
Storage
Area
Network
Manager
Planning
and
Installation
Guide.
4
IBM
Tivoli
Storage
Area
Network
Manager:
User’s
Guide
|
||||||
|
|
|
|
|||

Internet
SCSI
support
Tivoli
Storage
Area
Network
Manager
provides
basic
support
for
iSCSI
device
discovery
and
monitoring
through
Tivoli
NetView.
iSCSI
allows
SCSI
block
I/O
protocols
(commands,
sequences
and
attributes)
to
be
sent
over
a
network
using
the
TCP/IP
protocol.
The
SCSI
architecture
is
based
on
a
client/server
model.
Internet
SCSI
takes
this
model
into
account
when
providing
storage
requests
over
TCP/IP
networks.
The
client
(initiator)
is
typically
a
host
system
such
as
a
file
server
that
issues
read
or
write
requests.
The
server
(target)
is
a
resource
such
as
a
disk
array
that
responds
to
client
requests.
Tivoli
Storage
Area
Network
Manager
provides
the
following
support:
v
The
iSCSI
devices
that
have
iSCSI
MIB
and
SNMP
support
can
be
discovered
using
the
Tivoli
NetView
console.
The
discovery
process
automatically
creates
an
iSCSI
SmartSet
that
contains
the
iSCSI
devices
as
its
members.
v
The
Tivoli
NetView
nvsniffer
command
can
be
manually
issued
to
discover
iSCSI
devices.
The
command
specifies
a
configuration
file
that
identifies
which
devices
provide
iSCSI
support.
v
The
iSCSI
MIB
trap
definition
files
are
used
by
Tivoli
NetView
event
processing
such
as
event
filtering,
forwarding,
pager,
e-mail,
and
custom
actions.
v
The
iSCSI
MIBs
and
iSNS
MIBs
are
installed
with
Tivoli
Storage
Area
Network
Manager
and
the
administrator
can
then
load
the
MIBs
using
the
Tivoli
NetView
MIB
Loader
panel.
The
Tivoli
Storage
Area
Network
Manager
iSCSI
support
can
be
used
either
independently
or
in
conjunction
with
the
Internet
Storage
Naming
Service
(iSNS)
management
framework.
The
iSNS
protocol
is
a
protocol
for
managing
iSCSI
devices.
If
you
use
iSNS
with
Tivoli
Storage
Area
Network
Manager,
you
can
load
the
iSNS
MIB
files
and
use
the
Tivoli
NetView
MIB
browser
to
query
the
iSNS
server
and
view
the
status
of
iSCSI
devices.
For
more
information
about
iSCSI
and
iSNS,
see
the
following
Web
site:
http://www.ietf.org
iSCSI
discovery
You
can
start
iSCSI
discovery
through
the
Tivoli
NetView
menu.
Only
devices
that
support
the
iSCSI
MIB
and
SNMP
can
be
discovered
and
managed.
The
Tivoli
NetView
iSCSI
discovery
launches
an
nvsniffer
command
that
queries
whether
the
devices
are
iSCSI
devices.
You
can
use
Tivoli
NetView
to
discover:
all
iSCSI
devices,
all
iSCSI
initiators,
or
all
iSCSI
targets.
The
discovery
process
then
creates
a
SmartSet
that
contains
the
discovered
iSCSI
devices.
For
more
information,
see
“Discovering
iSCSI
devices”
on
page
42.
The
iSCSI
device
discovery
requires
that
you
enable
the
IP
discovery
of
Tivoli
NetView,
the
default
setting
has
IP
discovery
disabled.
For
information
on
enabling
IP
discovery
refer
to
IBM
Tivoli
Storage
Area
Network
Manager
Planning
and
Installation
Guide.
You
can
also
start
or
stop
the
iSCSI
discovery
from
the
command-line
interface
by
using
the
nvsniffer
command.
For
more
information,
see
“nvsniffer”
on
page
109.
You
can
control
Tivoli
NetView
IP
network
discovery
by
creating
a
seed
file.
A
seed
file
contains
a
list
of
host
names
or
IP
addresses
of
SNMP
nodes
within
your
administrative
domain.
You
can
use
a
seed
file
to
force
the
discovery
process
to
Chapter
1.
Introducing
IBM
Tivoli
Storage
Area
Network
Manager
5

generate
the
topology
map
beginning
from
nodes
other
than
the
management
system.
For
more
information
see
NetView
for
Windows
User’s
Guide.
Interfaces
to
Tivoli
Storage
Area
Network
Manager
This
section
describes
the
types
of
interfaces
available
with
Tivoli
Storage
Area
Network
Manager.
v
Tivoli
NetView
console
You
can
use
Tivoli
NetView
to
display
the
fabric
topology,
view
events
in
the
event
database,
and
manage
EDFI
notifications
and
rule
sets.
v
Tivoli
NetView
Web
console
You
can
use
Tivoli
NetView
to
display
the
fabric
topology,
view
events
in
the
event
database,
and
manage
EDFI
notifications
and
rule
sets.
v
Command-line
interface
You
can
use
the
command-line
interface
to
issue
logging
commands,
manager
service
commands,
event
filtering
commands,
or
when
you
create
scripts
that
submit
commands.
For
more
information,
see
Appendix
A,
“Command
reference,”
on
page
71.
Overview
of
administrator
tasks
The
following
sections
outline
administrator
tasks
for
SAN
management
and
troubleshooting.
To
manage
a
storage
area
network,
an
administrator
can
use
Tivoli
Storage
Area
Network
Manager
to
perform
the
following
tasks
from
the
Tivoli
NetView
Console.
For
more
information,
see
Chapter
3,
“Viewing
the
network,”
on
page
13.
Configure
agents
Agents
are
used
to
discover
your
SAN
and
monitor
its
status.
Use
the
Agent
Configuration
panel
to
do
the
following:
v
View
and
remove
inactive
in-band
agents
v
View,
add,
remove,
and
configure
out-of-band
agents
See
Chapter
3,
“Viewing
the
network,”
on
page
13
for
more
information.
Monitor
events
You
can
use
the
Tivoli
NetView
Event
Browser
to
view
events
in
the
Tivoli
NetView
event
database.
The
following
types
of
information
can
be
found
in
the
event
database:
v
Conditions
that
NetView
detects,
such
as
a
device
going
to
critical
status
v
SNMP
traps
sent
from
devices
on
the
IP
network
v
SNMP
traps
sent
from
SAN
devices,
such
as
a
Fibre
Channel
Switch
v
SNMP
traps
sent
from
Tivoli
Storage
Area
Network
Manager
For
information
on
viewing
events,
see
“Viewing
events
in
the
Tivoli
Storage
Area
Network
Manager
database”
on
page
19.
Use
SNMP
to
manage
events
You
can
use
the
Tivoli
NetView
Event
Browser
to
view
events
in
the
Tivoli
NetView
event
database.
The
event
database
may
contain
events
for
both
IP-based
networks
and
SANs.
For
more
information,
see
“Viewing
events
in
the
Tivoli
Storage
Area
Network
Manager
database”
on
page
19.
Filter
events
You
can
use
Tivoli
Storage
Area
Network
Manager
commands
to
set
6
IBM
Tivoli
Storage
Area
Network
Manager:
User’s
Guide
||||
||

criteria
to
suppress
certain
events
and
publish
others.
See
“Filtering
Events”
on
page
20
for
more
information.
Start
discovery
of
your
SAN
Tivoli
Storage
Area
Network
Manager
discovers
your
SAN
fabric
topology
by
polling
the
agents.
You
can
poll
SAN
information
immediately
or
schedule
polling.
The
time
required
to
complete
the
polling
depends
on
the
size
of
your
storage
area
network.
The
topology
information
is
stored
in
a
DB2
database.
For
more
information
see
“Scheduling
polling”
on
page
20.
Tivoli
Storage
Area
Network
Manager
can
discover
your
iSCSI
devices
and
create
and
maintain
SmartSets
on
a
regularly
scheduled
basis.
Optionally,
you
can
discover
your
iSCSI
devices
and
schedule
polling
from
the
command-line
interface.
For
more
information
see
“Discovering
iSCSI
devices”
on
page
42.
Select
and
interpret
views
of
the
SANs
Using
the
Tivoli
NetView
Console,
you
can
choose
to
view
the
SAN
in
a
graphical
mode
or
in
a
submap
explorer
view.
If
you
prefer,
you
can
choose
to
have
both
views
displayed.
Within
the
SAN
view,
the
following
views
are
available:
Topology
view,
Zone
view,
Host-centric
view,
and
Device-centric
view.
You
can
display
SAN
device
property
information
from
the
device-centric
view.
You
can
also
view
connection
information
for
Fibre
Channel
switches,
and
sensor
information
for
a
device.
Tivoli
Storage
Area
Network
Manager
allows
you
to
change
the
labels
and
icons
for
certain
devices
in
the
topology
display.
This
allows
you
the
flexibility
to
make
the
display
easier
to
read
and
understand.
The
status
of
a
device
is
reflected
in
the
color
of
the
symbol.
A
symbol
can
represent
a
device
or
a
submap.
If
the
symbol
is
a
submap,
the
status
reflects
the
first
child
submap.
For
more
information,
see
Chapter
3,
“Viewing
the
network,”
on
page
13.
Launch
network
device
applications
Some
network
devices,
such
as
Fibre
Channel
switches
and
storage
devices,
contain
browser-based
applications
to
help
you
configure
and
manage
those
devices.
If
a
device
has
a
management
application
identified
to
Tivoli
Storage
Area
Network
Manager,
you
will
be
able
to
launch
the
application
from
the
console
menu.
Some
SAN
devices
have
management
applications,
but
do
not
support
the
architecture
for
identifying
their
application
name.
Tivoli
Storage
Area
Network
Manager
provides
an
alternate
method
for
viewing
such
devices.
For
more
information,
see
Chapter
4,
“Working
with
resources,”
on
page
47.
Use
the
graphical
user
interface
to
manage
zones
and
zone
sets.
You
can
create,
change,
and
delete
zones
and
zone
sets
within
a
SAN.
You
can
activate
and
deactivate
zone
sets.
For
more
information,
see
“Working
with
zones
and
zone
sets”
on
page
49.
Use
EDFI
to
manage
hardware
problems
on
Fibre
Channel
SAN
interconnect
links
EDFI
provides
predictive
failure
analysis
and
fault
isolation
to
identify
a
failing
component.
Use
the
ED/FI
Configuration
panel
to
do
the
following:
v
Enable
or
disable
EDFI
v
Specify
a
rule
set
that
contains
specific
thresholds
and
policies
to
be
used
by
Tivoli
Storage
Area
Network
Manager
Chapter
1.
Introducing
IBM
Tivoli
Storage
Area
Network
Manager
7
||

When
an
EDFI
event
is
reported,
you
can
manage
the
event
by
doing
the
following:
v
Find
the
EDFI
Error
Notification
in
the
SAN
manager
console
v
Use
the
EDFI
Error
Notification
to
find
the
failing
link
v
Use
device-specific
diagnostics
and
problem
determination
guides
to
isolate
the
failing
component
on
the
link
v
Schedule
a
time
to
replace
the
appropriate
component
v
Clear
the
error
notification
after
the
component
is
replaced
or
repaired.
For
more
information,
see
“Using
Error
Detection
and
Fault
Isolation”
on
page
60
Back
up
the
Tivoli
Storage
Area
Network
Manager
database
Topology
information
is
stored
in
a
DB2
database.
To
ensure
recovery
of
SAN
topology
data
in
the
event
of
loss
of
the
database,
it
is
recommended
that
you
back
up
the
DB2
database
on
a
regular
basis.
You
can
use
any
of
the
DB2
backup
facilities
available
to
back
up
the
database.
Troubleshoot
SAN
management
problems
Help
is
available
for
possible
problems
you
may
encounter
with
SAN
management.
For
more
information,
see
Appendix
B,
“Troubleshooting,”
on
page
111.
8
IBM
Tivoli
Storage
Area
Network
Manager:
User’s
Guide
Chapter
2.
Administering
Tivoli
Storage
Area
Network
Manager
After
Tivoli
Storage
Area
Network
Manager
is
installed,
you
can
perform
the
following
administrative
tasks:
v
“Starting
the
IBM
Tivoli
Storage
Resource
Manager
user
interface”
v
“Managing
file
system
security”
on
page
10
v
“Configuring
and
viewing
message
logs”
on
page
11
v
“Configuring
and
viewing
the
user
properties
file”
on
page
11
Starting
the
IBM
Tivoli
Storage
Resource
Manager
user
interface
If
IBM
Tivoli
Storage
Resource
Manager
is
installed,
it
can
be
started
by
using
the
Tivoli
Storage
Area
Network
Manager’s
Tivoli
NetView
console.
The
user
properties
file
contains
an
SRMURL
setting
that
defaults
to
the
fully
qualified
host
name
of
Tivoli
Storage
Area
Network
Manager.
This
default
assumes
that
both
IBM
Tivoli
Storage
Resource
Manager
and
Tivoli
Storage
Area
Network
Manager
are
installed
on
the
same
machine.
If
IBM
Tivoli
Storage
Resource
Manager
is
installed
on
a
separate
machine,
you
can
modify
the
SRMURL
value
to
specify
the
host
name
of
the
IBM
Tivoli
Storage
Resource
Manager
machine.
For
more
information
on
setting
the
SRMURL
value,
refer
to
“srmcp
ConfigService
set”
on
page
84.
If
the
following
conditions
are
true,
you
can
start
the
Tivoli
Storage
Resource
Manager
graphical
interface
from
the
Tivoli
NetView
console:
v
IBM
Tivoli
Storage
Resource
Manager
or
the
Tivoli
Storage
Resource
Manager
graphical
interface
is
installed
on
the
same
machine
as
Tivoli
Storage
Area
Network
Manager,
or
the
SRMURL
value
specifies
the
hostname
of
IBM
Tivoli
Storage
Resource
Manager.
v
The
Tivoli
Storage
Area
Network
Manager
is
currently
running.
This
is
the
procedure
for
starting
the
interface:
v
Click
on
the
Tivoli
NetView
icon
on
your
desktop.
The
Tivoli
NetView
console
will
appear.
v
Select
SAN
→
Storage
Resource
Manager
from
the
Tivoli
NetView
console.
©
Copyright
IBM
Corp.
2002,
2003
9

Notes:
1.
If
you
use
the
Tivoli
Storage
Area
Network
Manager
remote
console
to
launch
Tivoli
Storage
Resource
Manager
or
its
graphical
user
interface,
and
if
the
Tivoli
Storage
Area
Network
Manager
is
not
currently
running,
the
following
error
message
is
displayed:
Unable
to
Launch
2.
If
Tivoli
Storage
Resource
Manager
is
not
installed,
or
if
the
Web
server
has
not
been
set
up
for
Tivoli
Storage
Resource
Manager,
or
the
current
SRMURL
value
does
not
specify
the
correct
host
name
of
Tivoli
Storage
Resource
Manager,
the
default
Web
browser
will
not
find
the
URL
and
displays
an
error
message.
Unable
to
Launch
Web
Browser
<SRMURL>
Managing
file
system
security
Tivoli
Storage
Area
Network
Manager
security
is
dependent
on
a
secure
file
system
because
sensitive
information
such
as
certificate
keystore
passwords
and
configuration
properties
remain
on
the
manager
and
managed
hosts.
You
must
use
file
system
security
to
control
access
to
this
information.
v
A
Windows
installation
of
the
manager
and
agent
must
be
on
an
NTFS
file
system.
v
The
system
administrator
(root
user)
of
a
machine
must
always
have
access
to
the
local
file
system.
Therefore,
you
should
control
root
access
to
machines
running
Tivoli
Storage
Area
Network
Manager
software.
v
Many
files
should
have
restricted
access
for
security
reasons.
For
example:
–
services.properties
file
–
<install_dir>/lib
directory
–
setenv.bat
file
–
setenv.sh
for
the
AIX
manager
environment
–
server.xml
file
Figure
2.
Starting
Tivoli
Storage
Resource
Manager
10
IBM
Tivoli
Storage
Area
Network
Manager:
User’s
Guide

–
tsnmdbparms.properties
file
Configuring
and
viewing
message
logs
Tivoli
Storage
Area
Network
Manager
issues
four
types
of
messages:
Informational,
Warning,
Error,
and
Decision.
These
messages
are
logged
in
text
files
that
you
can
view
with
a
standard
editing
program,
such
as
Windows
Notepad.
By
default,
the
log
files
are
located
in
the
<install_dir>/log
directory
on
the
manager,
agent,
and
remote
console
machines,
see
“Checking
log
files”
on
page
111.
Before
using
Tivoli
Storage
Area
Network
Manager,
you
should
configure
the
message
logs.
From
any
manager,
managed
host,
or
remote
console
machine,
you
can
issue
commands
to
do
the
following:
v
Turn
logging
on
or
off
at
any
time.
By
default,
message
logging
is
turned
on.
v
Change
the
location
of
the
log
files.
v
Set
up
filters
so
that
only
certain
types
of
messages
are
logged.
For
example,
you
might
want
to
have
error
and
warning
messages
logged,
but
not
informational
messages.
v
Specify
the
number
of
log
files
you
want
to
have.
This
is
useful
for
assuring
that
you
can
retain
log
histories.
For
example,
if
you
have
only
one
log
file
and
it
becomes
full,
the
log
entries
are
deleted
as
new
entries
are
entered
into
the
file.
If
you
have
two
or
more
log
files,
you
will
be
able
to
retain
more
of
your
old
log
records.
You
can
also
set
the
maximum
size
of
a
log
file.
For
details
about
entering
commands,
see
“Entering
commands”
on
page
73.
For
details
about
the
command
syntax,
see
“Logging
Service
commands”
on
page
75.
Because
the
log
files
grow
larger
over
time,
you
should
occasionally
back
them
up
to
a
different
machine
or
media,
or
delete
them.
Configuring
and
viewing
the
user
properties
file
The
user
properties
file
on
the
manager
machine
contains
settings
that
control
polling,
SNMP
traps
destination,
and
the
fully
qualified
host
name
of
IBM
Tivoli
Storage
Area
Network
Manager.
As
an
administrator,
you
can
use
srmcp
manager
service
commands
to
display
and
set
the
following
values
in
the
user
properties
file:
v
The
polling
day
of
the
week
and
time.
v
The
interval
at
which
host
polling
occurs.
v
The
monitoring
interval
for
the
out–of–band
agent.
v
The
port
number
for
SNMP
traps.
v
The
community
name
for
SNMP.
v
The
fully
qualified
host
name
of
the
IBM
Tivoli
Storage
Resource
Manager
machine.
For
details
about
entering
commands
and
the
command
syntax,
see
“Entering
commands”
on
page
73
and
“Manager
Service
commands”
on
page
80.
Chapter
2.
Administration
11

12
IBM
Tivoli
Storage
Area
Network
Manager:
User’s
Guide
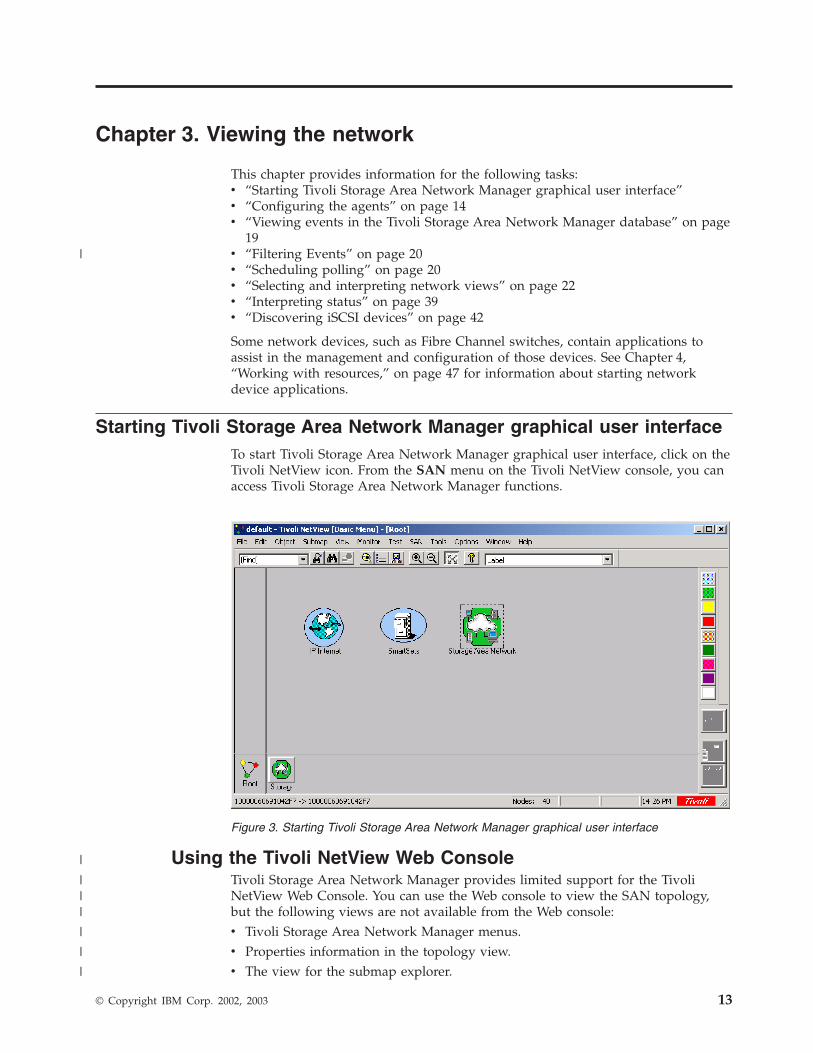
Chapter
3.
Viewing
the
network
This
chapter
provides
information
for
the
following
tasks:
v
“Starting
Tivoli
Storage
Area
Network
Manager
graphical
user
interface”
v
“Configuring
the
agents”
on
page
14
v
“Viewing
events
in
the
Tivoli
Storage
Area
Network
Manager
database”
on
page
19
v
“Filtering
Events”
on
page
20
v
“Scheduling
polling”
on
page
20
v
“Selecting
and
interpreting
network
views”
on
page
22
v
“Interpreting
status”
on
page
39
v
“Discovering
iSCSI
devices”
on
page
42
Some
network
devices,
such
as
Fibre
Channel
switches,
contain
applications
to
assist
in
the
management
and
configuration
of
those
devices.
See
Chapter
4,
“Working
with
resources,”
on
page
47
for
information
about
starting
network
device
applications.
Starting
Tivoli
Storage
Area
Network
Manager
graphical
user
interface
To
start
Tivoli
Storage
Area
Network
Manager
graphical
user
interface,
click
on
the
Tivoli
NetView
icon.
From
the
SAN
menu
on
the
Tivoli
NetView
console,
you
can
access
Tivoli
Storage
Area
Network
Manager
functions.
Using
the
Tivoli
NetView
Web
Console
Tivoli
Storage
Area
Network
Manager
provides
limited
support
for
the
Tivoli
NetView
Web
Console.
You
can
use
the
Web
console
to
view
the
SAN
topology,
but
the
following
views
are
not
available
from
the
Web
console:
v
Tivoli
Storage
Area
Network
Manager
menus.
v
Properties
information
in
the
topology
view.
v
The
view
for
the
submap
explorer.
Figure
3.
Starting
Tivoli
Storage
Area
Network
Manager
graphical
user
interface
©
Copyright
IBM
Corp.
2002,
2003
13
|
|
|||
|
|
|

v
Indication
of
licenses
exceeded.
The
Tivoli
Storage
Area
Network
Manager
Bonus
Pack
includes
a
message
to
indicate
when
license
limits
have
been
exceeded.
This
message
cannot
be
viewed
from
the
Web
console.
In
addition,
in
order
to
view
changes
to
a
label,
an
icon,
or
an
ED/FI
indicator,
you
must
recycle
NetView.
For
information
on
setting
up
and
configuring
the
NetView
Web
Console,
see
theTivoli
NetView
Web
Console
User’s
Guide
and
Tivoli
Storage
Area
Network
Manager
Planning
and
Installation
Guide.
To
start
the
Web
console
go
to
http://hostname:8080/netview/NetViewApplet.
Where
hostname
is
the
name
of
the
machine
that
has
NetView
installed.
This
can
be
any
Windows
manager
or
console
machine.
The
default
port
number
for
NetView
and
Tivoli
Storage
Area
Network
Manager
is
8080.
To
log
on
to
the
Web
Console
do
the
following:
1.
Enter
your
user
ID
and
password.
2.
Enter
the
host
name
of
the
Web
server
you
want
to
connect
to.
3.
Enter
the
port
number
of
the
Web
server
that
you
want
to
connect
to.
The
default
port
is
8080.
4.
Click
OK.
Note:
Running
more
than
200
browsers
pointed
to
the
NetView
server
is
not
recommended.
Configuring
the
agents
IBM
Tivoli
Storage
Area
Network
Manager
uses
agents
to
discover
your
storage
environment
and
to
monitor
its
status:
IBM
Tivoli
Storage
Area
Network
Manager
agents
These
agents
discover
information
about
each
managed
host
system,
its
local
storage,
and
all
of
the
SAN
observable
through
the
system
host
bus
adapter.
Host
bus
adapters
on
the
managed
host
use
in-band
discovery
protocols
to
gather
the
information.
Each
agent
should
be
in
the
Contacted
state.
SNMP
Agents
If
you
do
not
use
in-band
discovery,
you
need
to
configure
Tivoli
Storage
Area
Network
Manager
to
attempt
out-of-band
discovery.
Out-of-band
discovery
uses
SNMP
queries
through
a
TCP/IP
connection
to
gather
topology
and
attribute
information.
See
IBM
Tivoli
Storage
Area
Network
Manager
Planning
and
Installation
Guide
for
more
information
about
SNMP
agents.
If
you
use
a
combination
of
in-band
and
out-of-band
agents,
you
can
monitor
all
devices
in
the
fabric
across
all
zones.
You
also
get
storage-centric
views
for
hosts
with
agents.
Configuring
IBM
Tivoli
Storage
Area
Network
Manager
Agents
To
configure
the
agent,
do
the
following:
1.
From
the
Tivoli
NetView
console
menu
select
SAN
→
Configuration
14
IBM
Tivoli
Storage
Area
Network
Manager:
User’s
Guide
|||
||
|||
||||
|
|
|
||
|
||
|
||
||||||
|||||||
|||
|
|
||

The
Storage
Area
Network
Manager
Configuration
panel
is
displayed.
2.
Click
Configure
Manager.
The
SAN
Configuration
notebook
is
displayed.
Figure
4.
Tivoli
NetView
menu
Figure
5.
Storage
Area
Network
Manager
Configuration
panel
Chapter
3.
Viewing
the
network
15
||
||

3.
Click
the
Agent
Configuration
tab
on
the
left.
The
Agent
Configuration
panel
is
displayed.
Figure
6.
SAN
Configuration
notebook
16
IBM
Tivoli
Storage
Area
Network
Manager:
User’s
Guide
|||

4.
This
panel
shows
one
agent
on
each
managed
host.
Each
agent
should
be
in
the
Contacted
state.
You
can
remove
an
inactive
in–band
agent
by
selecting
the
agent
and
clicking
Remove.
Refer
to
the
IBM
Tivoli
Storage
Area
Network
Manager
Planning
and
Installation
Guide
if
you
have
a
system
without
an
agent.
Configuring
the
SNMP
agents
To
see
the
SNMP
agents,
click
on
the
Switches
and
Other
SNMP
Agents
tab
on
the
left
of
the
SAN
Configuration
notebook.
The
Switches
and
Other
SNMP
Agents
panel
is
displayed.
Figure
7.
Agent
Configuration
panel
Chapter
3.
Viewing
the
network
17
||||
|
||||
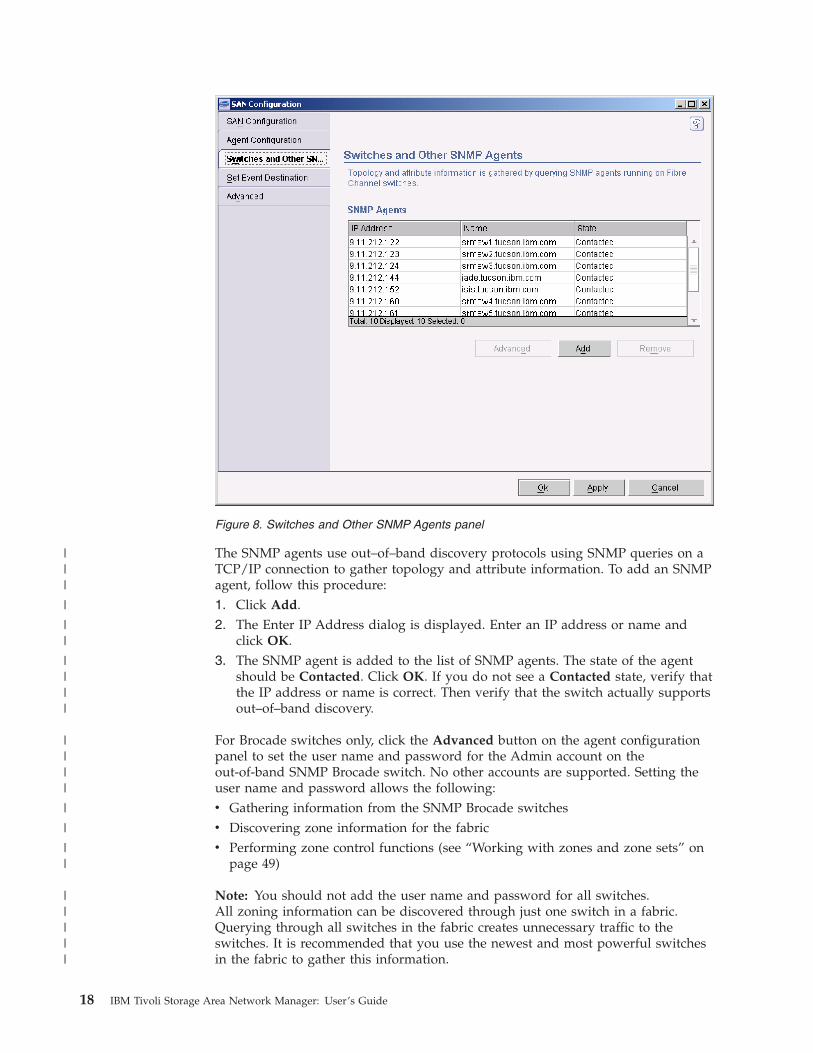
The
SNMP
agents
use
out–of–band
discovery
protocols
using
SNMP
queries
on
a
TCP/IP
connection
to
gather
topology
and
attribute
information.
To
add
an
SNMP
agent,
follow
this
procedure:
1.
Click
Add.
2.
The
Enter
IP
Address
dialog
is
displayed.
Enter
an
IP
address
or
name
and
click
OK.
3.
The
SNMP
agent
is
added
to
the
list
of
SNMP
agents.
The
state
of
the
agent
should
be
Contacted.
Click
OK.
If
you
do
not
see
a
Contacted
state,
verify
that
the
IP
address
or
name
is
correct.
Then
verify
that
the
switch
actually
supports
out–of–band
discovery.
For
Brocade
switches
only,
click
the
Advanced
button
on
the
agent
configuration
panel
to
set
the
user
name
and
password
for
the
Admin
account
on
the
out-of-band
SNMP
Brocade
switch.
No
other
accounts
are
supported.
Setting
the
user
name
and
password
allows
the
following:
v
Gathering
information
from
the
SNMP
Brocade
switches
v
Discovering
zone
information
for
the
fabric
v
Performing
zone
control
functions
(see
“Working
with
zones
and
zone
sets”
on
page
49)
Note:
You
should
not
add
the
user
name
and
password
for
all
switches.All
zoning
information
can
be
discovered
through
just
one
switch
in
a
fabric.
Querying
through
all
switches
in
the
fabric
creates
unnecessary
traffic
to
the
switches.
It
is
recommended
that
you
use
the
newest
and
most
powerful
switches
in
the
fabric
to
gather
this
information.
Figure
8.
Switches
and
Other
SNMP
Agents
panel
18
IBM
Tivoli
Storage
Area
Network
Manager:
User’s
Guide
|||
|
||
||||
||||
|
|
||
|||||

After
you
enter
the
user
ID
and
password
and
the
next
poll
is
performed,
check
the
message
log
for
the
following
message:
BTAQE1132E:
The
user
ID
or
password
entered
for
the
outband
agent
target
address
<target_address>
is
incorrect.
If
you
see
this
message
in
the
log,
reenter
the
correct
user
ID
and
password.
Viewing
events
in
the
Tivoli
Storage
Area
Network
Manager
database
You
can
use
the
Tivoli
NetView
Event
Browser
to
view
events
in
the
Tivoli
NetView
event
database.
Since
Tivoli
NetView
can
manage
both
IP-based
networks
and
SANs,
the
event
database
might
contain
events
for
both
types
of
networks.
See
the
IBM
Tivoli
Storage
Area
Network
Manager
Planning
and
Installation
Guide
for
information
about
configuring
devices
to
send
traps
and
setting
the
destinations
for
SNMP
traps
and
Tivoli
Event
Console
events.
See
“Displaying
SAN
device
properties”
on
page
32
for
information
about
displaying
sensor
information
from
a
device,
and
a
list
of
events
reported
by
the
device.
The
following
types
of
events
might
be
found
in
the
event
database:
v
Conditions
that
Tivoli
NetView
detects,
such
as
a
device
in
critical
status.
v
The
SNMP
traps
that
are
sent
from
devices
on
the
IP
network,
such
as
from
an
IP/Token
Ring
Bridge.
v
The
SNMP
traps
that
are
sent
from
SAN
devices,
such
as
from
a
Fibre
Channel
switch.
v
The
SNMP
traps
that
are
sent
from
Tivoli
Storage
Area
Network
Manager
products.
To
use
the
Tivoli
NetView
Event
Browser
to
view
events
in
the
Tivoli
NetView
event
database,
perform
the
following
steps:
1.
Start
the
Tivoli
NetView
Event
Browser
by
selecting
Monitor
→
Events
→
All
from
the
console
menu.
The
Event
Browser
window
displays.
Note
that
this
display
changes
as
new
events
occur.
Figure
9.
Event
Browser
Chapter
3.
Viewing
the
network
19
||
||
|

2.
Right-click
an
event
to
bring
up
a
context
menu.
3.
Click
Event
Details
to
view
more
information
about
an
event.
Filtering
Events
Tivoli
Storage
Area
Network
Manager
allows
you
to
filter
SNMP
and
Tivoli
Enterprise
Console
events
that
it
issues.
Filtering
events
can
help
ensure
that
you
only
see
those
events
that
are
important
to
you.
The
filtering
is
based
on
rules
that
you
can
define
and
that
are
acted
on
in
the
order
in
which
you
can
specify.
You
can
filter
events
based
on
one
or
more
of
the
following
criteria:
event
type,
event
category,
event
severity,
or
entity
type.
For
example,
you
could
create
a
rule
that
causes
all
Tivoli
Enterprise
Console
events
with
a
severity
of
harmless
to
be
suppressed.
On
a
manager
machine,
filtering
commands
can
be
issued
from
any
user
ID.
On
a
Windows
managed
host,
a
user
must
have
administrative
authority
to
issue
the
commands.
On
a
UNIX
managed
host,
a
user
must
have
root
authority.
Here
is
a
list
of
the
filtering
commands
and
their
functions:
ListFilterRules
List
the
current
filter
rules.
ChangeCurrentFilterRule
Change
the
priority
of
a
rule.
InsertFilterRule
Define
and
insert
a
new
filter
rule
in
the
current
rule
list.
UpdateFilterRule
Update
an
existing
rule
with
new
criteria.
DeleteFilterRule
Delete
a
filter
rule.
SetDefaultFilterRules
Remove
all
the
current
rules
and
replace
them
with
default
rules.
help
Display
help
for
the
filtering
commands.
For
details
of
the
commands,
see
“SAN
Event
Service
commands”
on
page
88.
Scheduling
polling
When
you
start
Tivoli
Storage
Area
Network
Manager,
it
discovers
the
devices
on
your
SAN
by
polling
the
agents.
To
schedule
polling,
do
the
following:
1.
From
the
Tivoli
NetView
console
menu
select
SAN
→
Configuration.
20
IBM
Tivoli
Storage
Area
Network
Manager:
User’s
Guide
|
||||||||
|||
|
||
||
||
||
||
||
||
|
||

The
Storage
Area
Network
Manager
Configuration
panel
is
displayed:
2.
Click
Configure
Manager.
The
SAN
Configuration
notebook
is
displayed:
Figure
10.
Tivoli
NetView
menu
Figure
11.
Storage
Area
Network
Manager
Configuration
panel
Chapter
3.
Viewing
the
network
21
||
||

v
To
poll
SAN
information
immediately,
click
Poll
Now.
v
To
schedule
polling
at
a
specific
date
and
time,
click
Enable
Automatic
Polling
and
select
the
polling
schedule.
v
To
stop
scheduled
polling,
click
Disable
Automatic
Polling
3.
Click
the
OK
button.
The
time
required
to
complete
the
polling
depends
on
the
size
of
your
SAN.
To
update
polling
information
gathered
previously,
click
the
Clear
History
button.
For
example,
if
a
device
is
reported
as
missing
because
it
is
no
longer
detected,
clearing
the
history
removes
it
from
the
console.
See
“Clearing
the
status
history”
on
page
41
for
more
information.
Selecting
and
interpreting
network
views
When
Tivoli
NetView
starts,
it
displays
the
root
submap
(see
Figure
13
on
page
23).
The
IP
Internet
and
SmartSets
symbols
are
standard
NetView
symbols
for
IP-based
submaps.
The
Storage
Area
Network
symbol
represents
the
Storage
Network
submap.
Figure
12.
SAN
Configuration
notebook
22
IBM
Tivoli
Storage
Area
Network
Manager:
User’s
Guide
|
||
|
|
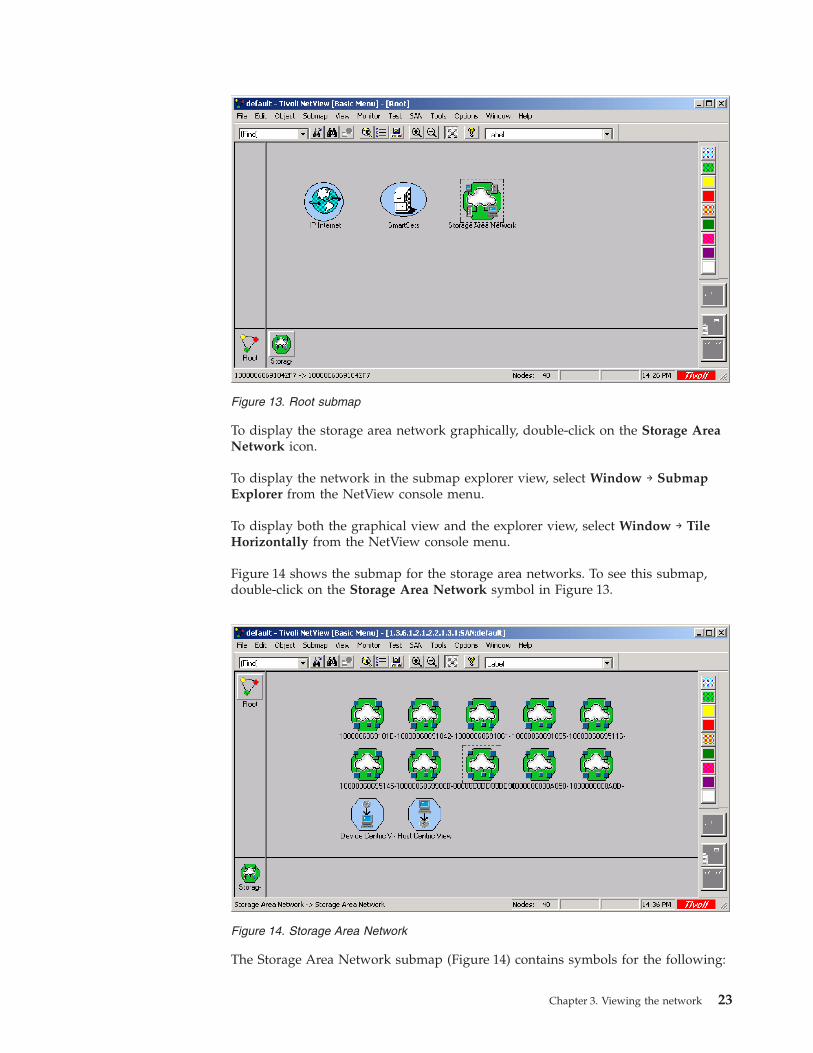
To
display
the
storage
area
network
graphically,
double-click
on
the
Storage
Area
Network
icon.
To
display
the
network
in
the
submap
explorer
view,
select
Window
→
Submap
Explorer
from
the
NetView
console
menu.
To
display
both
the
graphical
view
and
the
explorer
view,
select
Window
→
Tile
Horizontally
from
the
NetView
console
menu.
Figure
14
shows
the
submap
for
the
storage
area
networks.
To
see
this
submap,
double-click
on
the
Storage
Area
Network
symbol
in
Figure
13.
The
Storage
Area
Network
submap
(Figure
14)
contains
symbols
for
the
following:
Figure
13.
Root
submap
Figure
14.
Storage
Area
Network
Chapter
3.
Viewing
the
network
23
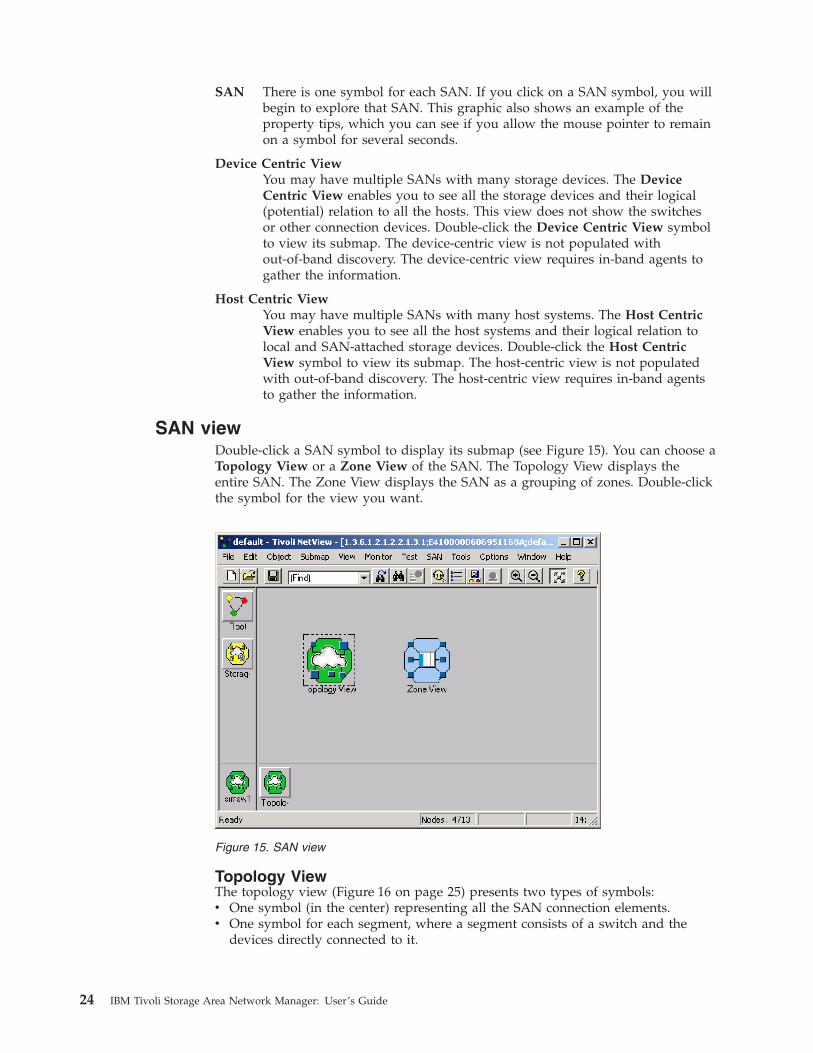
SAN
There
is
one
symbol
for
each
SAN.
If
you
click
on
a
SAN
symbol,
you
will
begin
to
explore
that
SAN.
This
graphic
also
shows
an
example
of
the
property
tips,
which
you
can
see
if
you
allow
the
mouse
pointer
to
remain
on
a
symbol
for
several
seconds.
Device
Centric
View
You
may
have
multiple
SANs
with
many
storage
devices.
The
Device
Centric
View
enables
you
to
see
all
the
storage
devices
and
their
logical
(potential)
relation
to
all
the
hosts.
This
view
does
not
show
the
switches
or
other
connection
devices.
Double-click
the
Device
Centric
View
symbol
to
view
its
submap.
The
device-centric
view
is
not
populated
with
out-of-band
discovery.
The
device-centric
view
requires
in-band
agents
to
gather
the
information.
Host
Centric
View
You
may
have
multiple
SANs
with
many
host
systems.
The
Host
Centric
View
enables
you
to
see
all
the
host
systems
and
their
logical
relation
to
local
and
SAN-attached
storage
devices.
Double-click
the
Host
Centric
View
symbol
to
view
its
submap.
The
host-centric
view
is
not
populated
with
out-of-band
discovery.
The
host-centric
view
requires
in-band
agents
to
gather
the
information.
SAN
view
Double-click
a
SAN
symbol
to
display
its
submap
(see
Figure
15).
You
can
choose
a
Topology
View
or
a
Zone
View
of
the
SAN.
The
Topology
View
displays
the
entire
SAN.
The
Zone
View
displays
the
SAN
as
a
grouping
of
zones.
Double-click
the
symbol
for
the
view
you
want.
Topology
View
The
topology
view
(Figure
16
on
page
25)
presents
two
types
of
symbols:
v
One
symbol
(in
the
center)
representing
all
the
SAN
connection
elements.
v
One
symbol
for
each
segment,
where
a
segment
consists
of
a
switch
and
the
devices
directly
connected
to
it.
Figure
15.
SAN
view
24
IBM
Tivoli
Storage
Area
Network
Manager:
User’s
Guide

Double-clicking
a
segment
displays
the
contents
of
that
segment.
See
the
results
in
Figure
17
on
page
26.
Figure
16.
Topology
view
Chapter
3.
Viewing
the
network
25

The
display
shown
in
Figure
17
can
show
connections
to
managed
host
systems,
unmanaged
host
systems,
switches,
disk
enclosures,
etc.
An
unmanaged
host
does
not
have
a
Tivoli
Storage
Area
Network
Manager
agent
running
on
it.
In
this
section,
we
have
followed
one
path
through
the
network
topology.
At
any
point,
you
could
pursue
another
path
by
clicking
on
one
of
the
symbols
in
the
submap
stack.
Zone
View
If
a
SAN
contains
switches
that
support
the
Fibre
Channel
GS-3
zoning
standards
or
if
you
have
set
the
user
name
and
password
for
out-of-band
discovery
to
Brocade
switches
on
the
Agent
Configuration
panel
(see
“Configuring
the
agents”
on
page
14),
Tivoli
Storage
Area
Network
Manager
retrieves
and
displays
the
configured
zones.
Notes:
1.
The
information
shown
in
the
zone
view
is
for
the
active
zone
configuration.
This
is
the
zoning
configuration
currently
in
effect
in
the
SAN.
See
“Changing
zone
set
properties”
on
page
56
for
details.
2.
Zone
information
is
available
only
through
the
in-band
discovery
operation
for
switches
other
than
Brocade.
If
your
switch
does
not
support
Fibre
Channel
GS-3
zoning
standards,
you
may
still
be
able
to
view
its
zoning
information
by
launching
the
switch
management
application.
To
determine
if
your
switch
supports
GS-3
zoning
standards,
search
for
information
about
the
latest
support
for
many
common
switches
at
http://www.ibm.com/software/sysmgmt/products/support/
IBMTivoliStorageAreaNetworkManager.html.
Navigate
through
the
Web
site
by
Figure
17.
Segment
display
26
IBM
Tivoli
Storage
Area
Network
Manager:
User’s
Guide
|||||
|
|||
||
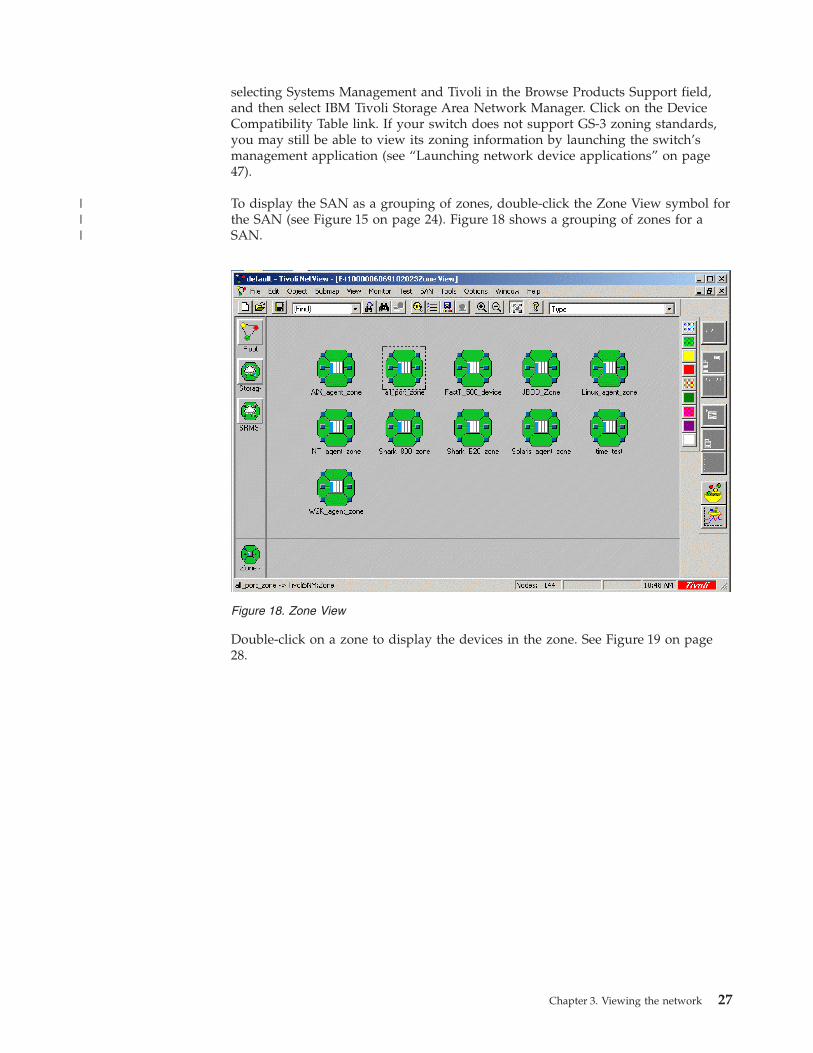
selecting
Systems
Management
and
Tivoli
in
the
Browse
Products
Support
field,
and
then
select
IBM
Tivoli
Storage
Area
Network
Manager.
Click
on
the
Device
Compatibility
Table
link.
If
your
switch
does
not
support
GS-3
zoning
standards,
you
may
still
be
able
to
view
its
zoning
information
by
launching
the
switch’s
management
application
(see
“Launching
network
device
applications”
on
page
47).
To
display
the
SAN
as
a
grouping
of
zones,
double-click
the
Zone
View
symbol
for
the
SAN
(see
Figure
15
on
page
24).
Figure
18
shows
a
grouping
of
zones
for
a
SAN.
Double-click
on
a
zone
to
display
the
devices
in
the
zone.
See
Figure
19
on
page
28.
Figure
18.
Zone
View
Chapter
3.
Viewing
the
network
27
|||
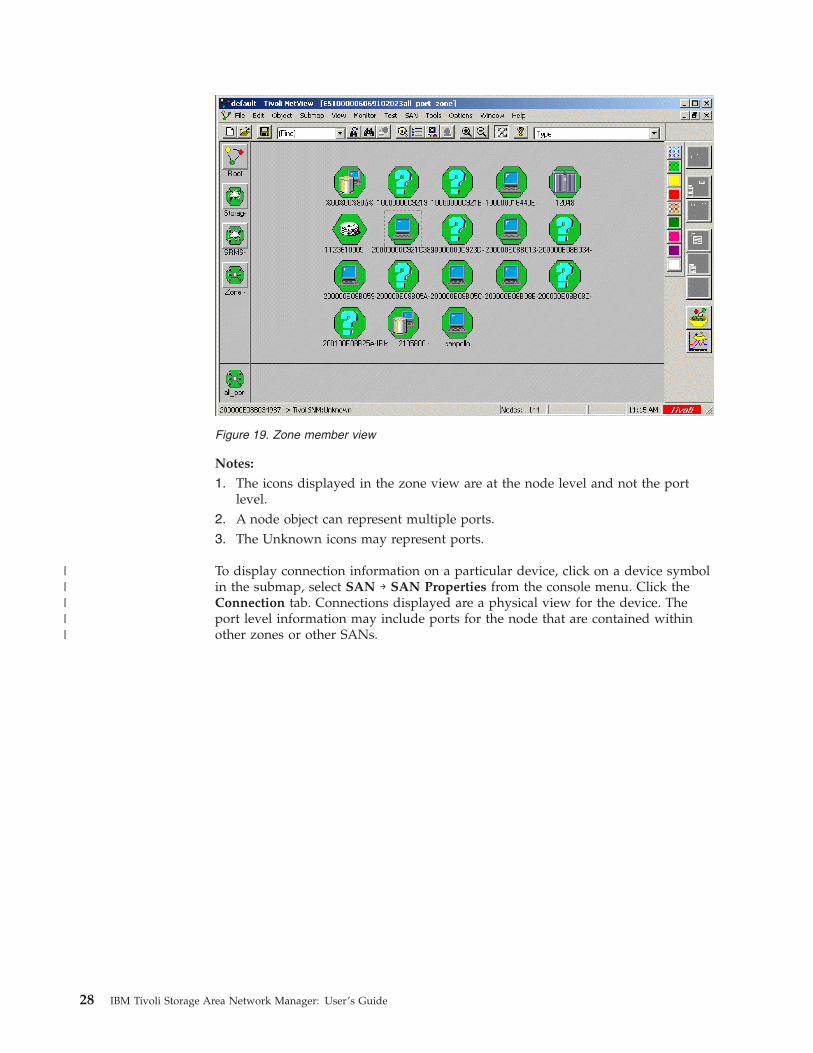
Notes:
1.
The
icons
displayed
in
the
zone
view
are
at
the
node
level
and
not
the
port
level.
2.
A
node
object
can
represent
multiple
ports.
3.
The
Unknown
icons
may
represent
ports.
To
display
connection
information
on
a
particular
device,
click
on
a
device
symbol
in
the
submap,
select
SAN
→
SAN
Properties
from
the
console
menu.
Click
the
Connection
tab.
Connections
displayed
are
a
physical
view
for
the
device.
The
port
level
information
may
include
ports
for
the
node
that
are
contained
within
other
zones
or
other
SANs.
Figure
19.
Zone
member
view
28
IBM
Tivoli
Storage
Area
Network
Manager:
User’s
Guide
|||||

Host-centric
view
The
host-centric
view
presents
the
relationship
between
host
systems
and
their
local
and
SAN-attached
storage.
This
is
a
logical
view
because
the
intervening
switches
and
other
connection
devices
are
not
shown.
Since
this
is
a
logical
view,
you
may
prefer
to
observe
this
relationship
with
the
submap
explorer.
To
access
the
submap
explorer
host-centric
view,
right-click
on
the
Host
Centric
View
symbol
and
click
on
Explore
as
shown
in
Figure
21.
The
host-centric
explorer
view
is
shown
in
Figure
22
on
page
30.
The
right
pane
shows
that
there
are
three
host
systems.
Figure
20.
Connection
information
for
a
device
Figure
21.
Selecting
the
Host
-centric
Explorer
View
Chapter
3.
Viewing
the
network
29

Notes:
1.
The
first
time
the
manager
is
started,
only
a
topology
discovery
is
performed
so
the
device-centric
and
host-centric
views
are
not
updated.
You
can
update
these
views
by
performing
a
poll
now.
See
“Scheduling
polling”
on
page
20
for
more
information.
2.
The
host-centric
view
does
not
reflect
status
(missing
or
normal)
as
does
the
topology
view.
If
a
host
is
missing,
it
just
disappears
from
this
view.
Expand
the
Host
Centric
View
symbol.
You
can
navigate
to
a
host
operating
system
and
file
systems
as
follows:
v
Double-click
on
a
host
symbol
to
display
the
host
operating
system.
v
Double-click
on
the
operating
system
symbol
to
display
the
file
systems.
v
Double-click
on
the
HostFileSys:
symbol
in
the
right
pane
to
display
logical
volumes.
v
Click
on
the
Logical
Volume:
symbol
in
the
right
pane
to
display
the
disk
storage
device.
Device-centric
view
The
device-centric
view
presents
the
logical
relationship
between
storage
devices
and
host
systems.
This
view
is
referred
to
as
a
logical
view
because
the
intervening
switches
or
other
connection
devices
are
not
shown.
Since
this
is
a
logical
view,
you
might
prefer
to
view
it
using
the
submap
explorer.
To
select
the
submap
explorer
device-centric
view,
right-click
on
the
Device
Centric
View
symbol
and
click
on
Explore
as
shown
in
Figure
23
on
page
31.
Figure
22.
Host-centric
Explorer
view
30
IBM
Tivoli
Storage
Area
Network
Manager:
User’s
Guide
|
||||
||
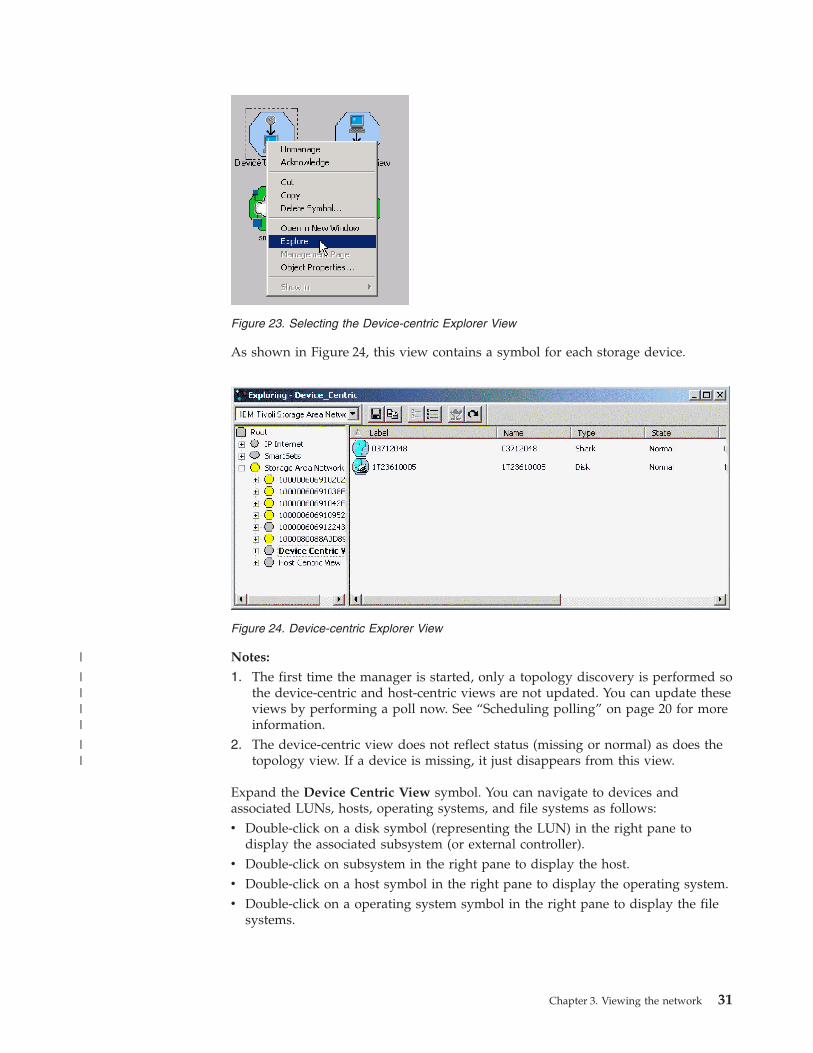
As
shown
in
Figure
24,
this
view
contains
a
symbol
for
each
storage
device.
Notes:
1.
The
first
time
the
manager
is
started,
only
a
topology
discovery
is
performed
so
the
device-centric
and
host-centric
views
are
not
updated.
You
can
update
these
views
by
performing
a
poll
now.
See
“Scheduling
polling”
on
page
20
for
more
information.
2.
The
device-centric
view
does
not
reflect
status
(missing
or
normal)
as
does
the
topology
view.
If
a
device
is
missing,
it
just
disappears
from
this
view.
Expand
the
Device
Centric
View
symbol.
You
can
navigate
to
devices
and
associated
LUNs,
hosts,
operating
systems,
and
file
systems
as
follows:
v
Double-click
on
a
disk
symbol
(representing
the
LUN)
in
the
right
pane
to
display
the
associated
subsystem
(or
external
controller).
v
Double-click
on
subsystem
in
the
right
pane
to
display
the
host.
v
Double-click
on
a
host
symbol
in
the
right
pane
to
display
the
operating
system.
v
Double-click
on
a
operating
system
symbol
in
the
right
pane
to
display
the
file
systems.
Figure
23.
Selecting
the
Device-centric
Explorer
View
Figure
24.
Device-centric
Explorer
View
Chapter
3.
Viewing
the
network
31
|
||||
||
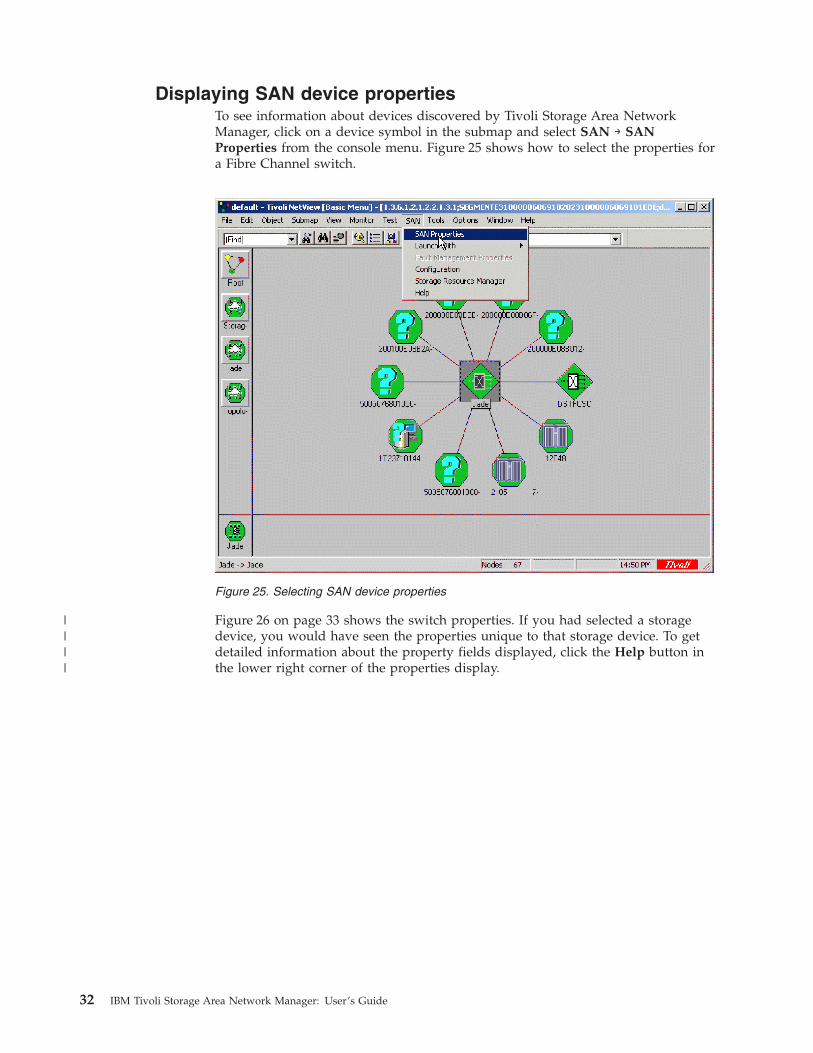
Displaying
SAN
device
properties
To
see
information
about
devices
discovered
by
Tivoli
Storage
Area
Network
Manager,
click
on
a
device
symbol
in
the
submap
and
select
SAN
→
SAN
Properties
from
the
console
menu.
Figure
25
shows
how
to
select
the
properties
for
a
Fibre
Channel
switch.
Figure
26
on
page
33
shows
the
switch
properties.
If
you
had
selected
a
storage
device,
you
would
have
seen
the
properties
unique
to
that
storage
device.
To
get
detailed
information
about
the
property
fields
displayed,
click
the
Help
button
in
the
lower
right
corner
of
the
properties
display.
Figure
25.
Selecting
SAN
device
properties
32
IBM
Tivoli
Storage
Area
Network
Manager:
User’s
Guide
||||
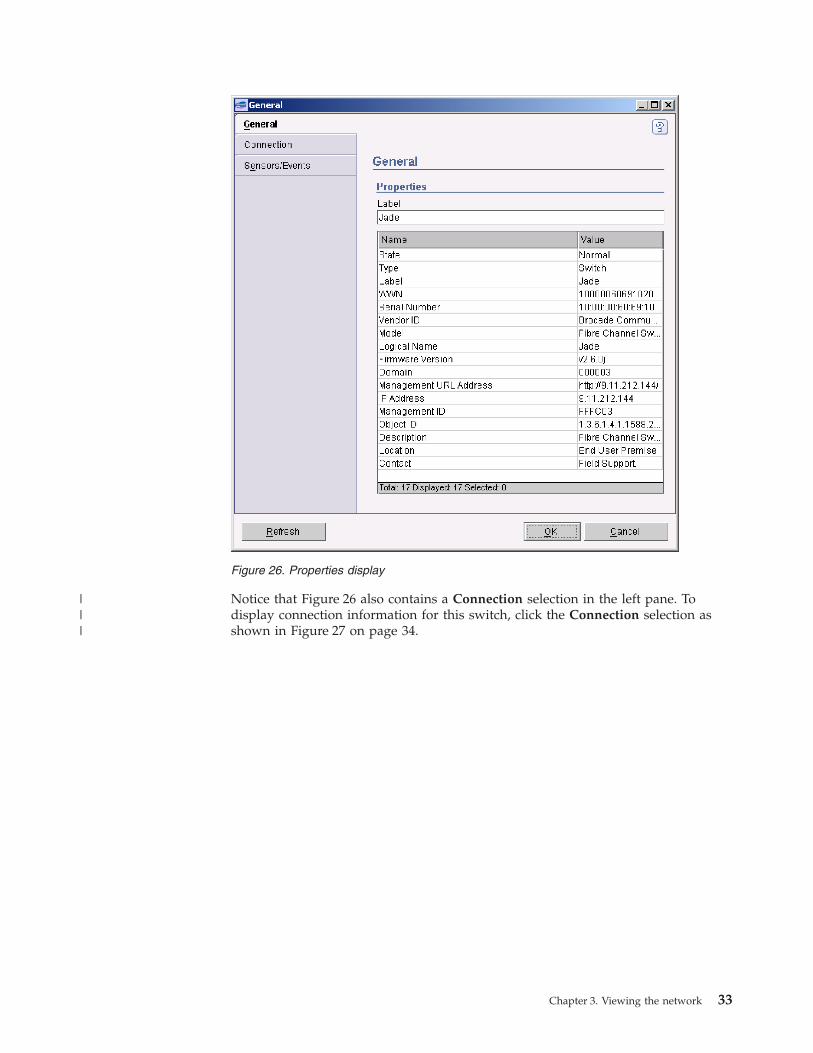
Notice
that
Figure
26
also
contains
a
Connection
selection
in
the
left
pane.
To
display
connection
information
for
this
switch,
click
the
Connection
selection
as
shown
in
Figure
27
on
page
34.
Figure
26.
Properties
display
Chapter
3.
Viewing
the
network
33
|||

Click
the
Help
button
for
a
detailed
explanation
of
all
the
fields
in
these
displays.
For
example,
the
State
field
controls
the
Status,
as
described
in
the
following
table.
Table
3.
Connection
states
State
Meaning
Status
Normal
A
connection
exists
between
two
device
ports..
Normal
Missing
Previously
detected
device
is
no
longer
detected.
Clear
History
removes
this
device
from
all
submaps
and
displays.
Critical
If
the
device
you
selected
is
a
Fibre
Channel
switch
that
can
provide
sensor
and
event
data
to
Tivoli
Storage
Area
Network
Manager
through
out-of-band
MIB
queries,
clicking
the
Sensors/Events
tab
(Figure
28
on
page
35)
displays
the
following:
v
Sensor
information
from
the
device.
v
Events
logged
by
the
device
in
response
to
a
query.
This
information
is
only
gathered
when
the
Sensors/Events
tab
is
selected
and
is
not
used
by
Tivoli
Storage
Area
Network
Manager
in
conjunction
with
Tivoli
Enterprise
Console
events
or
SNMP
trap
generation.
Figure
27.
Connection
display
34
IBM
Tivoli
Storage
Area
Network
Manager:
User’s
Guide
|||
||||
|
||||

By
default,
Tivoli
NetView
collects
information
about
all
devices
it
can
reach
through
TCP/IP
connections.
For
example,
if
you
have
a
Fibre
Channel
switch
that
also
supports
a
TCP/IP
connection,
Tivoli
NetView
uses
TCP/IP
to
gather
information
about
that
switch.
To
view
this
information,
right-click
on
a
device’s
symbol
on
the
Tivoli
NetView
console,
and
click
on
Object
Properties
in
the
resulting
context
menu.
Note:
This
information
will
be
less
accurate
than
information
gathered
by
Tivoli
Storage
Area
Network
Manager.
Changing
the
label
property
for
a
symbol
Tivoli
Storage
Area
Network
Manager
lets
you
change
the
labels
and
icons
for
certain
devices
in
the
topology
display.
This
provides
the
following
benefits:
v
Makes
the
display
easier
to
read
and
understand.
v
Useful
when
Tivoli
Storage
Area
Network
Manager
detects
a
network
device
but
cannot
obtain
information
about
that
device.
v
Useful
for
implementing
a
well-placed
agent
strategy
for
SAN
management.
Tivoli
Storage
Area
Network
Manager
allows
you
to
specify
information
about
Fibre
Channel
connected
hosts
that
are
discovered,
even
when
you
choose
not
to
deploy
an
agent
on
those
hosts.
You
can
exploit
this
flexibility
to
perform
Fibre
Channel
SAN
Management
of
hosts
without
agents.
Tivoli
Storage
Area
Network
Manager
labels
the
device
as
unknown
and
represents
that
device
with
the
Unknown
icon,
using
the
device’s
world
wide
Figure
28.
Sensors/Events
display
Chapter
3.
Viewing
the
network
35

name
(WWN)
as
the
label.
You
can
apply
your
own
label
and
icon
to
the
device
to
make
your
topology
display
more
meaningful.
Figure
29
shows
a
partial
Tivoli
NetView
topology
screen
with
several
unknown
network
objects.
To
change
the
label
and
icon
for
an
unknown
device,
perform
the
following
steps:
1.
Click
on
the
device
you
want
to
modify
and
select
SAN
→
SAN
Properties
from
the
menu
bar.
The
Properties
window
appears.
2.
Highlight
the
Label
field
on
the
General
tab
and
enter
your
new
label
for
this
device.
3.
To
change
the
icon
for
this
device,
open
the
Icon
drop-down
list
and
select
an
icon
from
the
list
(Figure
30
on
page
37).
Figure
29.
Partial
topology
screen
showing
unknown
objects
36
IBM
Tivoli
Storage
Area
Network
Manager:
User’s
Guide
||

4.
Click
OK
to
save
your
changes
and
close
the
Properties
window.
The
new
label
and
icon
will
appear
on
the
Tivoli
NetView
topology
screen.
Note:
Do
not
manually
change
object
properties
of
network
objects
by
right-clicking
on
the
icon
and
using
NetView’s
Object
Properties.
This
method
does
not
persist
the
modified
values
in
the
SAN
manager
database
during
a
Clear
History
process
or
when
NetView
is
restarted.
Cisco
MDS
9000
switch
support
IBM
Tivoli
Storage
Area
Network
Manager
supports
the
Cisco
MDS
9000
family
of
fabric
switches.
The
Cisco
MDS
9000
introduces
the
concept
of
the
virtual
SAN
(VSAN).
For
more
information
about
the
Cisco
MDS
9000
family
of
switches
and
VSAN,
see
http://www.cisco.com/univercd/home/home.htm
Note:
All
Cisco
switches
must
be
set
to
operate
with
the
SNMP
V1
protocol
instead
of
the
SNMP
V2
or
V3
protocol.
Tivoli
Storage
Area
Network
Manager
provides
the
following
features
in
support
of
the
Cisco
switch:
v
Base
SNMP
support
to
enable
out-of-band
discovery
of
the
Cisco
fabric
using
unique
private
and
standard
Cisco
MIBs.
v
A
hierarchical
view
that
shows
VSANs
within
a
Cisco
physical
infrastructure.
After
the
physical
infrastructure
is
discovered,
it
is
not
removed
unless
all
physical
and
virtual
switches
in
the
infrastructure
are
missing
and
a
clear
history
is
performed.
The
hierarchical
view
requires
base
SNMP
support
to
ensure
full
discovery
of
all
VSANs.
Agents
are
not
required
in
all
VSANs.
However,
they
are
recommended
Figure
30.
Icon
drop-down
list
Chapter
3.
Viewing
the
network
37
|
||||
||
||
||
||||
||
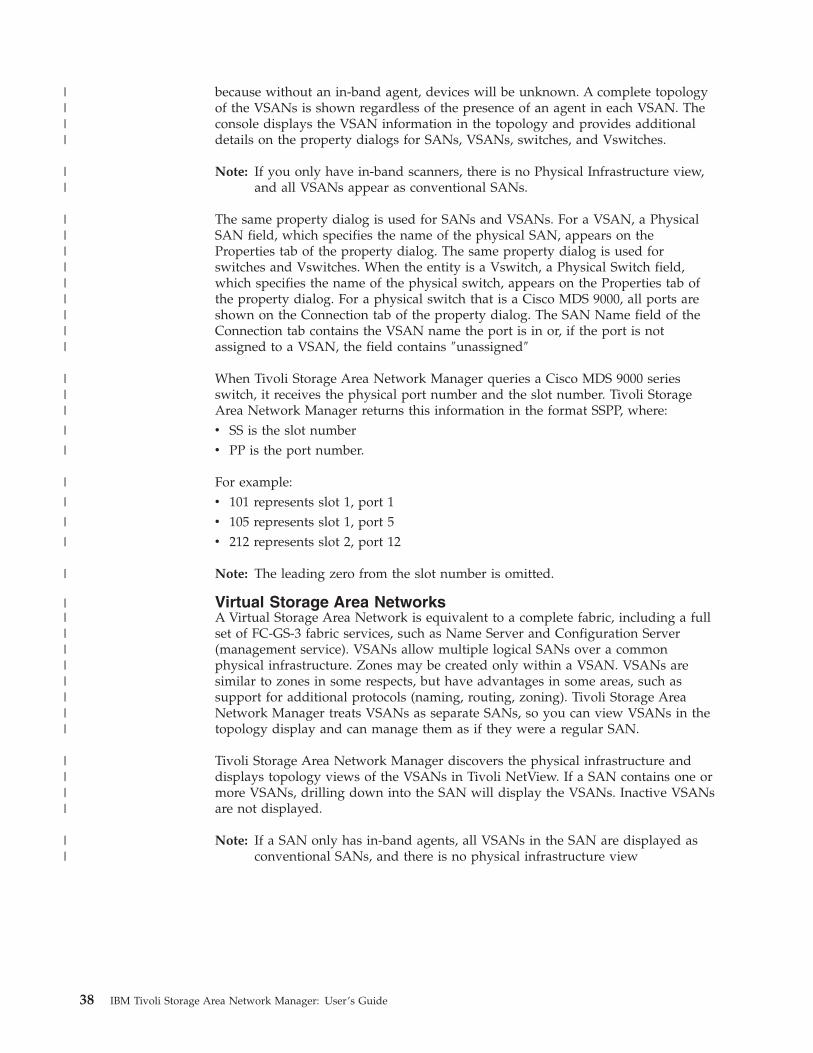
because
without
an
in-band
agent,
devices
will
be
unknown.
A
complete
topology
of
the
VSANs
is
shown
regardless
of
the
presence
of
an
agent
in
each
VSAN.
The
console
displays
the
VSAN
information
in
the
topology
and
provides
additional
details
on
the
property
dialogs
for
SANs,
VSANs,
switches,
and
Vswitches.
Note:
If
you
only
have
in-band
scanners,
there
is
no
Physical
Infrastructure
view,
and
all
VSANs
appear
as
conventional
SANs.
The
same
property
dialog
is
used
for
SANs
and
VSANs.
For
a
VSAN,
a
Physical
SAN
field,
which
specifies
the
name
of
the
physical
SAN,
appears
on
the
Properties
tab
of
the
property
dialog.
The
same
property
dialog
is
used
for
switches
and
Vswitches.
When
the
entity
is
a
Vswitch,
a
Physical
Switch
field,
which
specifies
the
name
of
the
physical
switch,
appears
on
the
Properties
tab
of
the
property
dialog.
For
a
physical
switch
that
is
a
Cisco
MDS
9000,
all
ports
are
shown
on
the
Connection
tab
of
the
property
dialog.
The
SAN
Name
field
of
the
Connection
tab
contains
the
VSAN
name
the
port
is
in
or,
if
the
port
is
not
assigned
to
a
VSAN,
the
field
contains
″unassigned″
When
Tivoli
Storage
Area
Network
Manager
queries
a
Cisco
MDS
9000
series
switch,
it
receives
the
physical
port
number
and
the
slot
number.
Tivoli
Storage
Area
Network
Manager
returns
this
information
in
the
format
SSPP,
where:
v
SS
is
the
slot
number
v
PP
is
the
port
number.
For
example:
v
101
represents
slot
1,
port
1
v
105
represents
slot
1,
port
5
v
212
represents
slot
2,
port
12
Note:
The
leading
zero
from
the
slot
number
is
omitted.
Virtual
Storage
Area
Networks
A
Virtual
Storage
Area
Network
is
equivalent
to
a
complete
fabric,
including
a
full
set
of
FC-GS-3
fabric
services,
such
as
Name
Server
and
Configuration
Server
(management
service).
VSANs
allow
multiple
logical
SANs
over
a
common
physical
infrastructure.
Zones
may
be
created
only
within
a
VSAN.
VSANs
are
similar
to
zones
in
some
respects,
but
have
advantages
in
some
areas,
such
as
support
for
additional
protocols
(naming,
routing,
zoning).
Tivoli
Storage
Area
Network
Manager
treats
VSANs
as
separate
SANs,
so
you
can
view
VSANs
in
the
topology
display
and
can
manage
them
as
if
they
were
a
regular
SAN.
Tivoli
Storage
Area
Network
Manager
discovers
the
physical
infrastructure
and
displays
topology
views
of
the
VSANs
in
Tivoli
NetView.
If
a
SAN
contains
one
or
more
VSANs,
drilling
down
into
the
SAN
will
display
the
VSANs.
Inactive
VSANs
are
not
displayed.
Note:
If
a
SAN
only
has
in-band
agents,
all
VSANs
in
the
SAN
are
displayed
as
conventional
SANs,
and
there
is
no
physical
infrastructure
view
38
IBM
Tivoli
Storage
Area
Network
Manager:
User’s
Guide
||||
||
|||||||||
|||
|
|
|
|
|
|
|
|||||||||
||||
||

Interpreting
status
A
symbol’s
color
reflects
its
status.
For
example,
the
color
green
indicates
normal
operation.
The
color
red
indicates
a
critical
failure.
See
Table
4
for
the
color
assignments.
Table
4.
Symbol
status
Status
Status
meaning
Symbol
color
Connection
color
Unknown
Status
not
determined.
Blue
Black
Normal
Normal
operational
state.
Green
Black
Marginal
Impaired,
but
still
functional.
Yellow
Yellow
Critical
Not
functioning
or
missing.
Red
Red
Unmanaged
Not
monitored.
See
explanation
below.
Wheat
(tan)
Black
Acknowledged
Not
monitored.
See
explanation
below.
Dark
Green
Black
Note:
Under
certain
conditions
or
configurations,
symbol
colors
may
require
interpretation.
See
“Interpreting
device
status”
on
page
116
for
details.
Unmanaged
Unmanaged
objects
are
not
monitored
for
changes
in
topology
and
status
as
managed
objects
are.
A
color
is
assigned
to
a
managed
object
symbol
according
to
its
status.
This
status
propagates
up
the
submap
tree.
To
stop
managing
an
object,
right-click
on
its
symbol
in
the
submap,
and
select
Unmanage
from
the
context
menu.
Its
symbol
will
change
to
the
color
for
unmanaged
objects,
and
will
remain
that
color
until
the
object
is
managed
again.
To
start
managing
the
object
again,
right-click
on
its
symbol
and
select
Manage
from
the
context
menu.
Acknowledged
You
can
change
the
status
of
an
object
to
Acknowledged
while
you
determine
why
it
was
reported
as
critical,
marginal,
or
unknown.
The
Acknowledged
status
indicates
recognition
of
a
problem
while
the
problem
is
being
resolved
or
while
searching
for
other
status
of
concern.
To
change
the
status
of
an
object
to
Acknowledged,
right-click
on
the
object
symbol
in
the
submap
and
select
Acknowledge
from
the
context
menu.
A
symbol
will
remain
in
acknowledged
state
until
another
problem
occurs
or
until
you
unacknowledge
it.
To
unacknowledge
an
object,
right-click
on
its
symbol
in
the
submap
and
select
Unacknowledge
from
the
context
menu.
How
status
propagates
If
the
symbol
represents
a
device,
the
status
shown
is
that
of
the
device.
If
the
symbol
represents
a
submap,
the
status
shown
reflects
the
status
of
one
child
submap
and
none
of
the
submaps
beneath
that
child
submap.
Table
5
on
page
40
shows
the
default
rules
used
to
propagate
status
up
from
the
child
submaps.
Note:
When
you
remove
a
device,
the
topology
view
is
always
updated.
However,
the
host-centric
and
device-centric
views
are
not
always
updated.
You
can
Chapter
3.
Viewing
the
network
39
|

update
the
host-centric
and
device-centric
views
by
selecting
SAN
→
Configure
Manager
from
the
Tivoli
NetView
console
and
schedule
polling
or
click
the
Poll
Now
button.
Table
5.
Default
status
propagation
Object
status
Condition
of
symbols
in
the
child
submap
Unknown
No
symbols
with
status
of
normal,
critical,
marginal
or
unmanaged.
Normal
All
symbols
are
normal
or
acknowledged.
Marginal
Any
of
the
following:
v
All
symbols
are
marginal
v
Normal
and
marginal
symbols
v
Normal,
marginal,
and
critical
symbols
Critical
At
least
one
symbol
is
critical
and
no
symbols
are
normal.
Status
in
the
submap
graphical
view
See
Figure
31
for
an
example
of
symbol
status
in
the
graphical
view.
If
the
property
tips
selection
(upper
right
corner
of
the
display)
is
Status
as
shown
here,
the
status
displays
in
the
status
bar
(bottom
of
the
display)
and
in
the
property
tip
that
displays
when
you
rest
the
cursor
on
an
object
symbol.
Also
if
you
place
the
cursor
over
one
of
the
color
buttons
in
the
status
filter
tool
bar,
the
meaning
of
that
color
will
be
displayed.
If
your
property
tips
selection
is
not
set
to
Status,
you
can
select
it
from
the
property
tips
drop-down
list.
Status
in
the
submap
explorer
view
This
is
different
than
in
the
graphical
view.
For
example,
the
tool
tip
menu
selections
do
not
apply
to
the
explorer
view.
And,
placing
the
cursor
over
a
symbol
will
not
cause
its
tool
tip
to
appear.
In
the
explorer
view,
the
status
information
displays
in
the
right
pane
in
the
State
column.
Figure
31.
Status
in
the
submap
graphical
view
40
IBM
Tivoli
Storage
Area
Network
Manager:
User’s
Guide

If
your
property
tips
selection
is
not
set
to
Status,
you
can
select
it
from
the
property
tips
drop-down
list.
You
can
select
this
view
from
the
drop-down
menu
shown
on
the
left
side
of
Figure
32.
Clearing
the
status
history
Tivoli
Storage
Area
Network
Manager
maintains
a
history
of
discoveries
and
uses
that
history
to
determine
status.
For
example,
if
a
previously
discovered
device
disappears
from
the
current
discovery,
that
device
is
assigned
critical
status.
If
you
want
to
stop
having
that
device
reported
as
critical,
you
must
clear
the
history
for
all
devices
and
rebuild
the
submap
views
as
follows:
1.
From
the
Tivoli
NetView
console
menu
select
SAN
→
Configuration.
The
Storage
Area
Network
Manager
Configuration
panel
is
displayed.
2.
Click
Configure
Manager.
The
SAN
Configuration
notebook
is
displayed.
3.
In
the
SAN
Configuration
tab,
click
Clear
History.
4.
Click
the
OK
button.
Note:
You
should
not
clear
the
history
until
after
all
problems
in
the
history
have
been
resolved.
Clearing
the
history
gets
rid
of
the
critical
status
by
removing
the
critical
status
from
all
devices
whether
the
problems
are
resolved
on
not.
Status
filtering
If
you
have
many
symbols
on
your
screen,
you
may
want
to
filter
some
of
them
out.
This
allows
you
to
quickly
identify
devices
of
a
particular
status,
such
as
devices
that
are
not
in
the
normal
status.
To
filter
out
a
particular
set
of
symbols,
click
one
of
the
color
buttons
in
the
status
filter
bar
on
the
right
side
of
the
display.
Click
that
button
again
to
cause
the
symbols
of
that
color
to
reappear.
Figure
32.
Toolbar
status
selection
Chapter
3.
Viewing
the
network
41
||
|
|
|
|||

Discovering
iSCSI
devices
You
can
start
iSCSI
discovery
through
the
Tivoli
NetView
menu
or
from
the
command
line.
To
perform
iSCSI
discovery,
Tivoli
Storage
Area
Network
Manager
requires
the
following:
v
Tivoli
NetView
must
have
IP
discovery
enabled.
Tivoli
NetView
shipped
with
Tivoli
Storage
Area
Network
Manager
has
IP
discovery
disabled.
For
details
on
configuring
your
environment
for
iSCSI
device
discovery,
refer
to
IBM
Tivoli
Storage
Area
Network
Manager
Planning
and
Installation
Guide.
Note:
When
IP
discovery
is
enabled
there
can
be
a
lot
of
network
activity
depending
on
how
many
devices
are
in
the
network.
When
NetView
is
started
for
the
first
time,
the
default
IP
management
region
is
the
system
on
which
the
NetView
program
is
operating
and
any
IP
networks
to
which
it
is
attached.
The
discovery
process
generates
the
IP
Internet
topology
map
by
working
outward
from
the
management
system.
IP
discovery
can
be
controlled
by
a
seed
file
that
contains
a
list
of
IP
addresses
for
your
SAN
management
domain.
You
can
customize
a
seed
file
that
discovers
a
portion
of
your
IP
network
as
needed.
Refer
to
Tivoli
NetView
for
Windows
User’s
Guide
for
more
information.
v
To
manage
iSCSI
devices
such
as
initiators,
targets,
and
switches,
an
iSCSI
MIB
definition
is
required.
The
devices
should
be
configured
so
that
the
iSCSI
MIB
support
is
enabled,
and
can
be
queried
through
SNMP.
By
default,
some
iSCSI
devices
have
their
iSCSI
support
disabled.
Use
the
device’s
management
application
to
enable
iSCSI
support.
You
can
optionally
load
iSCSI
MIB
definition
files
if
you
want
to
browse
the
iSCSI
MIBs.
Refer
to
the
IBM
Tivoli
Storage
Area
Network
Manager
Planning
and
Installation
Guide
for
information
on
loading
MIB
definition
files.
v
The
iSCSI
device
must
first
be
discovered
as
an
IP
device
(as
displayed
in
the
IP
Internet
topology
map)
before
Tivoli
Storage
Area
Network
Manager
can
discover
it
as
an
iSCSI
device.
When
you
start
an
iSCSI
discovery
from
the
Tivoli
NetView
console,
an
nvsniffer
command
is
automatically
launched
that
queries
all
discovered
IP
devices
for
iSCSI
Figure
33.
Filtering
a
set
of
symbols
42
IBM
Tivoli
Storage
Area
Network
Manager:
User’s
Guide

support.
This
discovery
process
identifies
the
iSCSI
devices
from
the
IP
Internet
topology
map
and
includes
them
in
an
iSCSI
SmartSet.
The
nvsniffer
command
is
a
NetView
command
that
takes
its
input
from
an
nvsniffer
configuration
file
to
query
whether
devices
are
iSCSI
devices.
For
more
information,
see
“nvsniffer”
on
page
109.
You
have
the
option
of
manually
issuing
the
nvsniffer
command
from
a
command
line
instead
of
launching
the
discovery
from
NetView.
See
“nvsniffer”
on
page
109.
In
both
instances,
a
device
must
first
be
a
discovered
IP
device
and
its
information
must
be
stored
in
the
NetView
database
before
the
nvsniffer
process
can
determine
if
it
is
an
iSCSI
device.
The
Tivoli
Storage
Area
Network
Manager
iSCSI
support
can
be
used
either
independently
or
in
conjunction
with
the
Internet
Storage
Naming
Service
(iSNS)
management
framework.
The
iSNS
protocol
is
a
protocol
for
managing
iSCSI
devices.
Storage
devices
and
hosts
can
self
register
with
an
iSNS
server.
Subsequently,
the
hosts
can
either
query
the
iSNS
server
or
receive
asynchronous
updates
from
the
iSNS
server
on
the
status
of
storage
devices.
The
iSNS
protocol
permits
the
iSNS
server
functions
to
be
implemented
in
a
number
of
devices,
such
as:
switches,
routers,
storage
controllers,
and
management
console
nodes.
If
you
use
iSNS
with
Tivoli
Storage
Area
Network
Manager,
you
can
load
the
iSNS
MIB
files
and
use
the
Tivoli
NetView
MIB
browser
to
query
the
iSNS
server
and
view
the
status
of
iSCSI
devices.
For
more
information
about
iSCSI
and
iSNS,
see
the
following
Web
site:
http://www.ietf.org
Discovery
Methods
The
following
methods
are
available
for
discovery
of
iSCSI
devices.
Using
the
Tivoli
NetView
console
You
can
select
Tools
→
iSCSI
Operations
from
the
NetView
console.
When
you
use
this
method,
Tivoli
Storage
Area
Network
Manager
automatically
launches
an
nvsniffer
command
that
discovers
IP
devices
including
iSCSI
devices.
This
process
creates
a
SmartSet
that
contains
the
iSCSI
device
information.
The
information
about
the
iSCSI
devices
can
be
located
in
the
iSCSI
SmartSets
and
in
the
IP
Internet
map.
You
have
the
option
of
manually
issuing
the
nvsniffer
command
from
a
command
line
instead
of
launching
the
discovery
from
NetView.
See
“nvsniffer”
on
page
109.
In
both
instances,
a
device
must
first
be
a
discovered
IP
device
and
its
information
must
be
stored
in
the
NetView
database
before
the
nvsniffer
process
can
determine
if
it
is
an
iSCSI
device.
Using
a
seed
file
You
can
use
a
seed
file
to
discover
only
iSCSI
IP
devices
and
not
all
IP
devices.
The
information
from
a
seed
file
can
be
located
in
the
IP
Internet
map.
Starting
the
iSCSI
discovery
To
start
the
iSCSI
discovery
from
the
Tivoli
NetView
console
menu
select
Tools
→
iSCSI
Operations.
Figure
34
on
page
44
shows
you
have
the
following
iSCSI
discovery
options:
v
All
iSCSI
Devices
Chapter
3.
Viewing
the
network
43
|
|
|||||||
|||
|||
||||

v
All
iSCSI
Initiators
v
All
iSCSI
Targets
You
only
need
to
start
the
iSCSI
discovery
once.
If
you
select
this
option
a
second
time,
you
will
have
multiple
discoveries
in
progress.
This
action
could
produce
unexpected
results.
The
default
polling
time
is
every
60
minutes.
If
you
want
to
change
the
polling
time,
use
the
nvsniffer
command.
See
“Rescheduling
iSCSI
polling”
and
“nvsniffer”
on
page
109.
The
discovery
process
creates
a
SmartSet
similar
to
Figure
35.
To
navigate
to
the
SmartSet
panel,
double–click
the
root
icon
on
the
left
side
of
the
Tivoli
NetView
panel,
then
double–click
the
SmartSets
icon.
Double–click
on
the
iSCSI
SmartSet
to
view
its
members.
Rescheduling
iSCSI
polling
The
default
iSCSI
discovery
polling
time
is
every
60
minutes.
If
you
want
to
change
the
polling
time,
you
must
issue
the
nvsniffer
command
and
specify
the
configuration
file
of
the
discovery
type
you
want
to
change.
Tivoli
Storage
Area
Network
Manager
provides
three
separate
configuration
files
(one
for
each
of
the
iSCSI
menu
options)
in
the
\usr\ov\prg_samples\iscsi
directory
as
follows:
v
nvsniffer.conf
(for
all
iSCSI
devices)
v
nvsnifferini.conf
(for
iSCSI
initiators)
v
nvsniffertar.conf
(for
iSCSI
targets)
The
following
example
shows
how
to
reschedule
polling
for
all
iSCSI
devices:
1.
You
must
stop
iSCSI
polling.
Obtain
the
job_ID
of
the
iSCSI
discovery
instance
you
want
to
change.
Figure
34.
Starting
iSCSI
discovery
Figure
35.
iSCSI
SmartSet
example
44
IBM
Tivoli
Storage
Area
Network
Manager:
User’s
Guide

a.
Click
on
the
Task
bar,
then
click
on
Task
Manager
b.
Click
on
the
Processes
tab.
c.
Find
nvsniffer.exe.
The
PID
column
identifies
the
job_ID.
You
can
right-click
on
the
job_ID,
then
click
End
Process.
Alternatively,
you
can
use
the
Windows
at
command
and
issue:
at
<job_ID>
/d
2.
Change
the
polling
schedule
for
the
discovery
of
all
iSCSI
devices
to
90
minutes
by
issuing
the
following
command:
nvsniffer
-c
\usr\ov\prg_samples\iscsi\nvsniffer.conf
-r
90
Stop
iSCSI
polling
You
can
stop
iSCSI
polling
by
using
the
Windows
Task
Manager
or
the
at
command.
1.
Obtain
the
job_ID
of
the
iSCSI
discovery
instance
you
want
to
stop.
a.
Click
on
the
Task
bar,
then
click
on
Task
Manager
b.
Click
on
the
Processes
tab.
c.
Find
nvsniffer.exe.
The
PID
column
identifies
the
job_ID.
You
can
right-click
on
the
job_ID,
then
click
End
Process.
Alternatively,
you
can
use
the
Windows
at
command
and
issue:
at
<job_ID>
/d
Using
a
seed
file
to
discover
iSCSI
devices
You
can
have
Tivoli
NetView
use
a
seed
file
to
discover
only
iSCSI
IP
devices
that
will
be
displayed
in
the
IP
Internet
topology
view.
Information
about
non-iSCSI
devices
will
not
be
stored
in
the
NetView
database.
A
seed
file
contains
a
list
of
host
names
or
IP
addresses
of
SNMP
nodes
within
your
administrative
domain.
You
can
use
a
seed
file
to
force
the
discovery
process
to
generate
the
topology
map
beginning
from
nodes
other
than
the
management
system.
Tivoli
Storage
Area
Network
Manager
provides
a
seed
file
(iscsi.seed)
that
contains
the
rules
to
limit
IP
discovery
to
only
iSCSI
devices.
You
can
select
this
seed
file
in
the
Discovery
tab
of
the
Server
Setup
-
Tivoli
NetView
panel.
The
iscsi.seed
file
is
located
in
the
directory
\usr\ov\conf.
Optionally,
you
can
rename
the
file
to
netmon.seed.
For
more
information
about
using
seed
files,
refer
to
Tivoli
NetView
for
Windows
User’s
Guide.
Chapter
3.
Viewing
the
network
45
|
||||||
|||||
||

46
IBM
Tivoli
Storage
Area
Network
Manager:
User’s
Guide
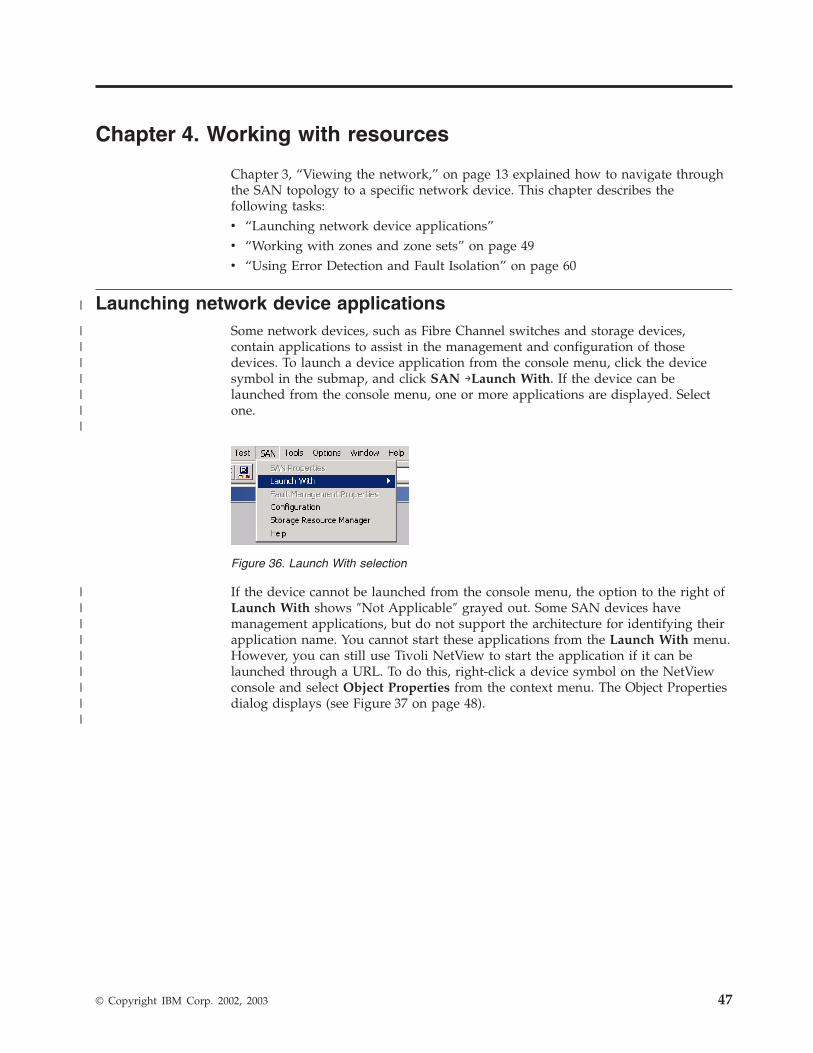
Chapter
4.
Working
with
resources
Chapter
3,
“Viewing
the
network,”
on
page
13
explained
how
to
navigate
through
the
SAN
topology
to
a
specific
network
device.
This
chapter
describes
the
following
tasks:
v
“Launching
network
device
applications”
v
“Working
with
zones
and
zone
sets”
on
page
49
v
“Using
Error
Detection
and
Fault
Isolation”
on
page
60
Launching
network
device
applications
Some
network
devices,
such
as
Fibre
Channel
switches
and
storage
devices,
contain
applications
to
assist
in
the
management
and
configuration
of
those
devices.
To
launch
a
device
application
from
the
console
menu,
click
the
device
symbol
in
the
submap,
and
click
SAN
→Launch
With.
If
the
device
can
be
launched
from
the
console
menu,
one
or
more
applications
are
displayed.
Select
one.
If
the
device
cannot
be
launched
from
the
console
menu,
the
option
to
the
right
of
Launch
With
shows
″Not
Applicable″
grayed
out.
Some
SAN
devices
have
management
applications,
but
do
not
support
the
architecture
for
identifying
their
application
name.
You
cannot
start
these
applications
from
the
Launch
With
menu.
However,
you
can
still
use
Tivoli
NetView
to
start
the
application
if
it
can
be
launched
through
a
URL.
To
do
this,
right-click
a
device
symbol
on
the
NetView
console
and
select
Object
Properties
from
the
context
menu.
The
Object
Properties
dialog
displays
(see
Figure
37
on
page
48).
Figure
36.
Launch
With
selection
©
Copyright
IBM
Corp.
2002,
2003
47
|
|||||||
|||||||||

Perform
the
following
steps
to
identify
the
management
application
in
Figure
37:
1.
Click
the
Other
tab.
2.
Select
LANMAN
from
the
drop-down
list
in
the
upper
left
corner.
3.
Select
the
IsHTTPManaged
check
box.
4.
Enter
the
URL
for
the
device
application
in
the
Management
URL
field.
5.
Click
Verify,
then
Apply,
and
then
OK.
To
start
this
application,
right-click
device
symbol
and
select
Management
Page
from
the
context
menu
(see
Figure
38
on
page
49).
Figure
37.
Object
properties
48
IBM
Tivoli
Storage
Area
Network
Manager:
User’s
Guide
||||||
|||

Working
with
zones
and
zone
sets
A
Storage
Area
Network
zone
is
a
grouping
of
multiple
ports
to
form
a
virtual
private
storage
network.
A
zone
set
is
a
collection
of
zones
that
belong
to
a
single
SAN
and
can
be
activated
or
deactivated
as
a
single
entity
across
all
switches
in
the
fabric.
A
zone
set
can
contain
one
or
more
zones,
and
a
zone
may
be
a
member
of
more
than
one
zone
set.
A
zone
may
contain
one
or
more
zone
members
(aliases),
and
an
alias
may
belong
to
more
than
one
zone.
Ports
that
are
members
of
a
group
or
zone
can
communicate
with
each
other
but
are
isolated
from
ports
in
other
zones.
Devices,
however,
can
belong
to
more
than
one
zone.
Using
zoning,
you
can
automatically
or
dynamically
arrange
fabric-connected
devices
into
logical
groups,
or
zones,
across
the
physical
fabric.
There
are
two
types
of
zoning:
Hardware
zoning
In
hardware,
or
port,
zoning
the
members
of
a
zone
are
the
physical
ports
on
the
fabric
switch.
Software
zoning
Software
zoning
uses
the
Simple
Name
Server
(SNS)
that
runs
inside
the
fabric
switch.
It
is
based
on
the
node
WWN
or
port
WWN
of
the
zone
members
to
be
included.
Software
zoning
lets
you
create
symbolic
names
for
the
zones
and
zone
members.
Figure
38.
Starting
via
NetView
Chapter
4.
Working
with
resources
49
|
||||||||||
|
|||
|||||

Port
WWN
and
domain
port
zoning
Port
WWN
and
domain
port
zoning
can
be
enforced
by
hardware
zoning,
software
zoning,
or
both.
The
following
zoning
concepts
are
not
specific
to
Tivoli
Storage
Area
Network
Manager:
An
N-Port
or
NL-Port
can
be
a
member
of
one
or
more
zones.
Zone
membership
is
specified
by:
v
-The
N_Port_Name
of
the
N_Port
connected
to
the
switch
(also
known
as
WWN
zoning
or
port
name
zoning)
v
-The
N_Port
address
identifier
assigned
during
fabric
login
(also
known
as
PortId
or
FCID
zoning)
v
-
The
Node_Name
associated
with
the
N_Port
v
-The
Domain
identification
(Domain_ID)
and
physical
port
the
Switch
Port
to
which
the
N_Port
is
attached
(also
known
as
domain,port
zoning)
Zoning
can
be
enforced
by
software
enforcement
(also
known
as
Name
Server
enforcement)
or
hardware
enforcement.
The
type
of
zoning
enforced
depends
on
the
switch
vendor
or
model
(one
or
both
methods
are
used).
Software
Enforcement
Enforcement
by
queries
to
a
name
server.
A
name
server
returns
only
devices
that
are
online
and
in
the
same
zone
as
the
requesting
devices.
The
switch
does
not
control
data
transfer
and
does
not
prevent
data
transfer
from
unauthorized
zone
members.
Hardware
Enforcement
Enforcement
by
switch
hardware.
The
switch
prevents
data
transfer
from
unauthorized
zone
members.
Using
IBM
Tivoli
Storage
Area
Network
Manager
with
zones
Consider
the
following
if
you
use
Tivoli
Storage
Area
Network
Manager
with
zones:
v
There
should
be
at
least
one
managed
host
per
zone
for
the
complete
topology
display.
This
lets
you
manage
your
switches
and
know
the
name
and
identity
of
your
RNID-capable
hosts.
Storage-related
information,
including
logical
views,
is
displayed
only
for
the
hosts
with
agents
installed.
In
addition,
the
agent
system
must
have
a
LUN
allocated
from
the
subsystem.
v
If
you
double-click
an
individual
zone,
the
members
of
that
zone
are
displayed.
v
Tivoli
Storage
Area
Network
Manager
can
retrieve
the
zone
information
from
IBM
2109
switches
and
from
Brocade
Silkworm
Fibre
Channel
Switches.
SNMP
agents
must
log
into
the
switch
with
administrative
rights.
To
see
zoning
information,
you
need
to
specify
the
login
ID
for
the
agents
you
define.
v
A
zone
set
can
be
deleted
while
it
still
contains
zones.
With
QLogic
switches,
those
zones
are
put
into
an
orphan
zone
set.
The
zones
can
later
be
moved
from
an
orphan
set
into
other
zone
sets.
The
Tivoli
Storage
Area
Network
Manager
zone
configuration
panels
cannot
display
zones
in
an
orphan
zone
set.
However,
the
zones
still
exist
on
the
switch,
and
they
can
still
be
configured
using
the
switch
vendor’s
tool.
The
IBM
Tivoli
NetView
console
lets
you
view
zones
in
SANs.
The
Tivoli
Storage
Area
Network
Manager
graphical
user
interface
lets
you
create,
update,
and
delete
zones
and
zone
sets
within
a
SAN.
In
addition,
the
interface
lets
you
do
the
following:
v
Assign
zones
to
zone
sets.
50
IBM
Tivoli
Storage
Area
Network
Manager:
User’s
Guide
|
|||
||
||
||
|
||
|||
|||||
|||
|
||
|||||
|
||||
||||||
||||
|

v
Activate
and
deactivate
zone
sets.
v
View
zone
membership.
v
Add
and
remove
zone
members.
Note:
The
following
sections
describe
zoning
operations
that
you
can
perform
with
Tivoli
Storage
Area
Network
Manager.
The
types
of
switches
in
a
SAN
can
limit
the
zoning
operations
that
you
can
perform
for
that
SAN.
For
details
about
these
limitations,
see
“Switch
considerations
for
zoning”
on
page
58.
You
will
begin
many
zoning
tasks
from
the
Storage
Area
Network
Manager
Configuration
dialog.
To
go
to
that
dialog
from
the
Tivoli
NetView
console,
select
SAN
→
Configuration.
The
following
screen
appears:
Working
with
zones
This
section
describes
how
to
create,
change,
and
delete
zones.
Creating
zones
When
you
create
zones,
you
assign
assets
to
the
zone
and
specify
the
zone
set
or
sets
to
which
the
zone
belongs.
To
create
a
zone:
1.
In
the
Storage
Area
Network
Manager
Configuration
dialog
(Figure
39),
select
a
SAN
and
click
Zone
SAN.
The
Zone
tab
of
the
SAN
zone
configuration
notebook
is
displayed.
Figure
39.
Storage
Area
Network
Manager
Configuration
dialog
Chapter
4.
Working
with
resources
51
|
|
|
|||||
|||||
|
|
|||
||||

2.
Click
Create.
The
Create
Zone
dialog
is
displayed.
Figure
40.
SAN
Zone
Configuration
Notebook
52
IBM
Tivoli
Storage
Area
Network
Manager:
User’s
Guide
||

3.
Enter
the
name
of
the
zone
and,
optionally,
a
description.
The
zone
name
must
be
unique.
4.
In
the
Assign
Assets
tree
on
the
left
side
of
the
dialog,
select
the
assets
to
be
included
in
the
new
zone.
To
select
an
asset,
click
the
asset
and
then
click
Add.
5.
Use
the
Assign
to
zone
sets
table
to
assign
a
zone
to
one
or
more
zone
sets.
Click
the
check
box
in
the
Select
column
for
each
zone
set
in
which
you
want
to
include
the
zone.
6.
Click
OK
to
save
your
changes
and
return
to
the
SAN
zone
configuration
notebook.
Changing
zone
properties
You
can
change
a
zone
name,
a
description,
the
assets
assigned
to
a
zone,
and
the
zone
set
or
sets
to
which
a
zone
belongs.
1.
In
the
Storage
Area
Network
Manager
Configuration
dialog
(Figure
39
on
page
51),
select
a
SAN
and
click
Zone
SAN.
The
Zone
tab
of
the
SAN
zone
configuration
notebook
is
displayed
(Figure
40
on
page
52).
2.
Select
the
zone
you
want
to
change
from
the
Zone
Table,
and
click
Change.
The
Change
Zone
dialog
is
displayed.
Figure
41.
Create
Zone
Chapter
4.
Working
with
resources
53
||
||
|||
||
|||
|||
|||

3.
Make
your
changes
and
click
OK.
You
are
returned
to
the
SAN
zone
configuration
notebook.
v
To
assign
or
remove
assets:
The
asset
tree
on
the
left
side
of
the
dialog
shows
the
available
switches,
ports,
devices,
and
other
assets.
On
the
right
side
is
a
list
of
assets
already
assigned
to
the
zone.
–
To
assign
assets
to
a
zone,
select
the
assets
from
the
Assign
Assets
tree.
–
To
remove
assets
from
a
zone,
select
the
asset
in
the
list
of
assigned
assets
on
the
right,
and
click
Remove.v
To
assign
or
remove
a
zone:
–
To
assign
a
zone
to
one
or
more
zone
sets,
use
the
Assign
to
zone
sets
table.
Click
the
check
box
in
the
Select
column
for
each
zone
set
you
want
the
zone
to
be
included
in.
–
To
remove
a
zone
from
a
zone
set,
click
the
check
box
in
the
Select
column
to
deselect
it.
Deleting
zones
Use
the
Zones
dialog
to
delete
one
or
more
zones
from
the
list
of
available
zones.
1.
In
the
Storage
Area
Network
Manager
Configuration
dialog
(Figure
39
on
page
51),
select
a
SAN
and
click
Zone
SAN.
The
Zone
tab
of
the
SAN
zone
configuration
notebook
is
displayed
(Figure
40
on
page
52).
Figure
42.
Change
Zone
54
IBM
Tivoli
Storage
Area
Network
Manager:
User’s
Guide
||
|
|||
|
||
|
|||
||
||
|||

2.
Click
the
name
of
the
zone
in
the
Zone
Table,
and
click
Delete.
You
can
use
the
Control
and
Shift
keys
to
select
multiple
zones.
3.
A
Delete
Confirmation
popup
asks
you
to
confirm
that
you
want
to
delete
the
selected
zone:
v
Click
Yes
to
delete
the
zone.
v
Click
No
to
cancel
the
deletion.
Working
with
zone
sets
This
section
describes
how
to
create,
activate
or
deactivate,
change,
and
delete
zones.
Creating
zone
sets
To
create
a
zone
set,
follow
this
procedure:
1.
In
the
Storage
Area
Network
Manager
Configuration
dialog
(Figure
39
on
page
51),
select
a
SAN
and
click
Zone
SAN.
The
SAN
zone
configuration
notebook
is
displayed
(Figure
40
on
page
52).
2.
Click
the
Zone
Sets
tab.
3.
Click
Create.
The
Create
Zone
Set
dialog
is
displayed.
Figure
43.
Zone
Sets
tab
Chapter
4.
Working
with
resources
55
||
||
|
|
|
||
||
|||
||
||
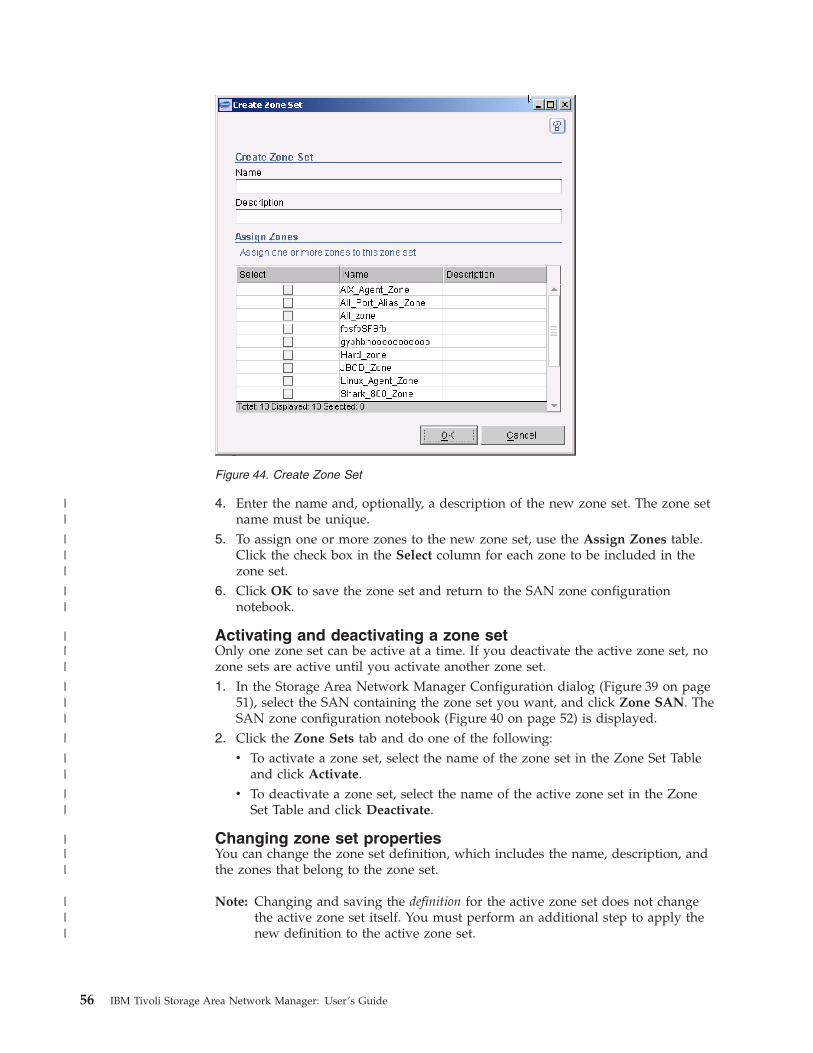
4.
Enter
the
name
and,
optionally,
a
description
of
the
new
zone
set.
The
zone
set
name
must
be
unique.
5.
To
assign
one
or
more
zones
to
the
new
zone
set,
use
the
Assign
Zones
table.
Click
the
check
box
in
the
Select
column
for
each
zone
to
be
included
in
the
zone
set.
6.
Click
OK
to
save
the
zone
set
and
return
to
the
SAN
zone
configuration
notebook.
Activating
and
deactivating
a
zone
set
Only
one
zone
set
can
be
active
at
a
time.
If
you
deactivate
the
active
zone
set,
no
zone
sets
are
active
until
you
activate
another
zone
set.
1.
In
the
Storage
Area
Network
Manager
Configuration
dialog
(Figure
39
on
page
51),
select
the
SAN
containing
the
zone
set
you
want,
and
click
Zone
SAN.
The
SAN
zone
configuration
notebook
(Figure
40
on
page
52)
is
displayed.
2.
Click
the
Zone
Sets
tab
and
do
one
of
the
following:
v
To
activate
a
zone
set,
select
the
name
of
the
zone
set
in
the
Zone
Set
Table
and
click
Activate.
v
To
deactivate
a
zone
set,
select
the
name
of
the
active
zone
set
in
the
Zone
Set
Table
and
click
Deactivate.
Changing
zone
set
properties
You
can
change
the
zone
set
definition,
which
includes
the
name,
description,
and
the
zones
that
belong
to
the
zone
set.
Note:
Changing
and
saving
the
definition
for
the
active
zone
set
does
not
change
the
active
zone
set
itself.
You
must
perform
an
additional
step
to
apply
the
new
definition
to
the
active
zone
set.
Figure
44.
Create
Zone
Set
56
IBM
Tivoli
Storage
Area
Network
Manager:
User’s
Guide
||
|||
||
|||
|||
|
||
||
|||
|||
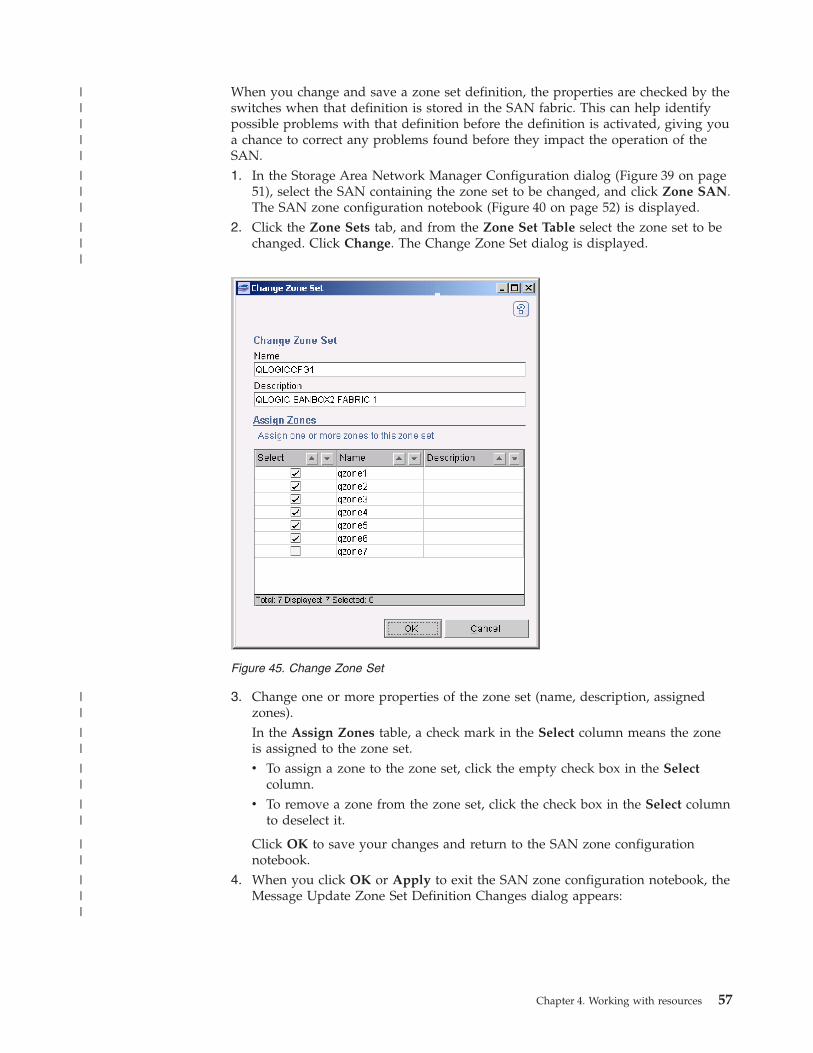
When
you
change
and
save
a
zone
set
definition,
the
properties
are
checked
by
the
switches
when
that
definition
is
stored
in
the
SAN
fabric.
This
can
help
identify
possible
problems
with
that
definition
before
the
definition
is
activated,
giving
you
a
chance
to
correct
any
problems
found
before
they
impact
the
operation
of
the
SAN.
1.
In
the
Storage
Area
Network
Manager
Configuration
dialog
(Figure
39
on
page
51),
select
the
SAN
containing
the
zone
set
to
be
changed,
and
click
Zone
SAN.
The
SAN
zone
configuration
notebook
(Figure
40
on
page
52)
is
displayed.
2.
Click
the
Zone
Sets
tab,
and
from
the
Zone
Set
Table
select
the
zone
set
to
be
changed.
Click
Change.
The
Change
Zone
Set
dialog
is
displayed.
3.
Change
one
or
more
properties
of
the
zone
set
(name,
description,
assigned
zones).
In
the
Assign
Zones
table,
a
check
mark
in
the
Select
column
means
the
zone
is
assigned
to
the
zone
set.
v
To
assign
a
zone
to
the
zone
set,
click
the
empty
check
box
in
the
Select
column.
v
To
remove
a
zone
from
the
zone
set,
click
the
check
box
in
the
Select
column
to
deselect
it.
Click
OK
to
save
your
changes
and
return
to
the
SAN
zone
configuration
notebook.
4.
When
you
click
OK
or
Apply
to
exit
the
SAN
zone
configuration
notebook,
the
Message
Update
Zone
Set
Definition
Changes
dialog
appears:
Figure
45.
Change
Zone
Set
Chapter
4.
Working
with
resources
57
|||||
|||
|||
||
||
||
||
||
|||
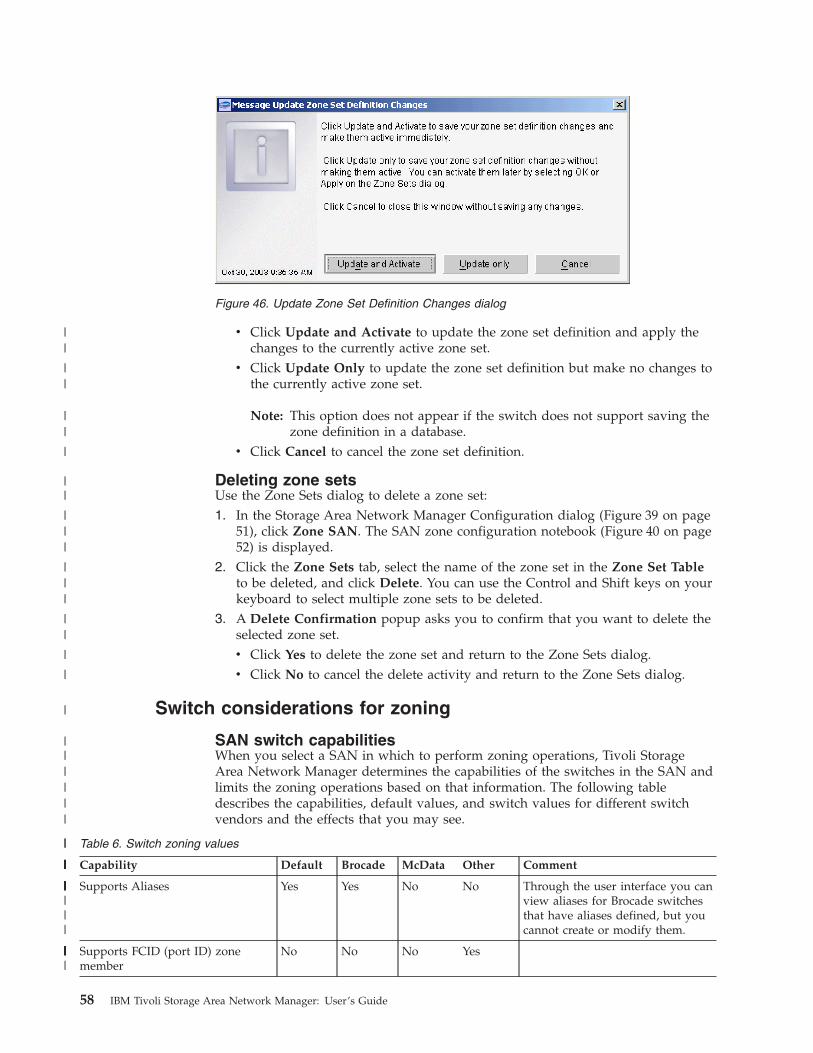
v
Click
Update
and
Activate
to
update
the
zone
set
definition
and
apply
the
changes
to
the
currently
active
zone
set.
v
Click
Update
Only
to
update
the
zone
set
definition
but
make
no
changes
to
the
currently
active
zone
set.
Note:
This
option
does
not
appear
if
the
switch
does
not
support
saving
the
zone
definition
in
a
database.
v
Click
Cancel
to
cancel
the
zone
set
definition.
Deleting
zone
sets
Use
the
Zone
Sets
dialog
to
delete
a
zone
set:
1.
In
the
Storage
Area
Network
Manager
Configuration
dialog
(Figure
39
on
page
51),
click
Zone
SAN.
The
SAN
zone
configuration
notebook
(Figure
40
on
page
52)
is
displayed.
2.
Click
the
Zone
Sets
tab,
select
the
name
of
the
zone
set
in
the
Zone
Set
Table
to
be
deleted,
and
click
Delete.
You
can
use
the
Control
and
Shift
keys
on
your
keyboard
to
select
multiple
zone
sets
to
be
deleted.
3.
A
Delete
Confirmation
popup
asks
you
to
confirm
that
you
want
to
delete
the
selected
zone
set.
v
Click
Yes
to
delete
the
zone
set
and
return
to
the
Zone
Sets
dialog.
v
Click
No
to
cancel
the
delete
activity
and
return
to
the
Zone
Sets
dialog.
Switch
considerations
for
zoning
SAN
switch
capabilities
When
you
select
a
SAN
in
which
to
perform
zoning
operations,
Tivoli
Storage
Area
Network
Manager
determines
the
capabilities
of
the
switches
in
the
SAN
and
limits
the
zoning
operations
based
on
that
information.
The
following
table
describes
the
capabilities,
default
values,
and
switch
values
for
different
switch
vendors
and
the
effects
that
you
may
see.
Table
6.
Switch
zoning
values
Capability
Default
Brocade
McData
Other
Comment
Supports
Aliases
Yes
Yes
No
No
Through
the
user
interface
you
can
view
aliases
for
Brocade
switches
that
have
aliases
defined,
but
you
cannot
create
or
modify
them.
Supports
FCID
(port
ID)
zone
member
No
No
No
Yes
Figure
46.
Update
Zone
Set
Definition
Changes
dialog
58
IBM
Tivoli
Storage
Area
Network
Manager:
User’s
Guide
||
||
||
|
||
|||
|||
||
|
|
|
||||||
||
||||||
|||||||||
|||||||
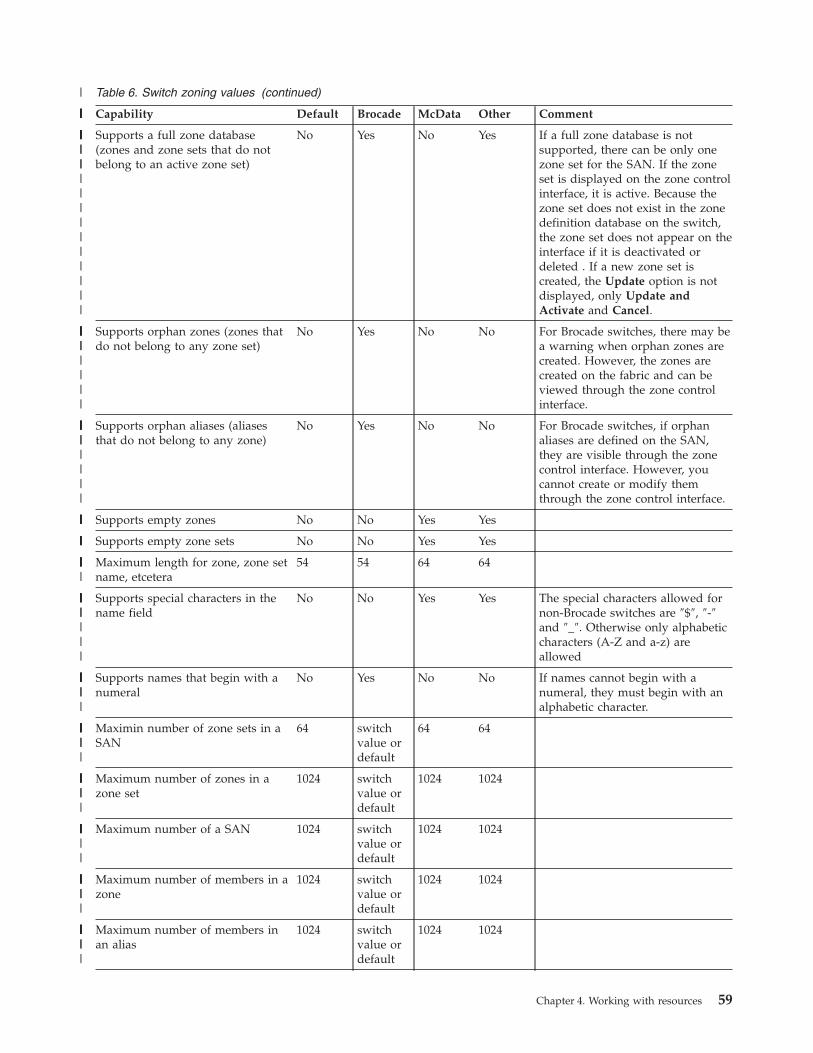
Table
6.
Switch
zoning
values
(continued)
Capability
Default
Brocade
McData
Other
Comment
Supports
a
full
zone
database
(zones
and
zone
sets
that
do
not
belong
to
an
active
zone
set)
No
Yes
No
Yes
If
a
full
zone
database
is
not
supported,
there
can
be
only
one
zone
set
for
the
SAN.
If
the
zone
set
is
displayed
on
the
zone
control
interface,
it
is
active.
Because
the
zone
set
does
not
exist
in
the
zone
definition
database
on
the
switch,
the
zone
set
does
not
appear
on
the
interface
if
it
is
deactivated
or
deleted
.
If
a
new
zone
set
is
created,
the
Update
option
is
not
displayed,
only
Update
and
Activate
and
Cancel.
Supports
orphan
zones
(zones
that
do
not
belong
to
any
zone
set)
No
Yes
No
No
For
Brocade
switches,
there
may
be
a
warning
when
orphan
zones
are
created.
However,
the
zones
are
created
on
the
fabric
and
can
be
viewed
through
the
zone
control
interface.
Supports
orphan
aliases
(aliases
that
do
not
belong
to
any
zone)
No
Yes
No
No
For
Brocade
switches,
if
orphan
aliases
are
defined
on
the
SAN,
they
are
visible
through
the
zone
control
interface.
However,
you
cannot
create
or
modify
them
through
the
zone
control
interface.
Supports
empty
zones
No
No
Yes
Yes
Supports
empty
zone
sets
No
No
Yes
Yes
Maximum
length
for
zone,
zone
set
name,
etcetera
54
54
64
64
Supports
special
characters
in
the
name
field
No
No
Yes
Yes
The
special
characters
allowed
for
non-Brocade
switches
are
″$″,
″-″
and
″_″.
Otherwise
only
alphabetic
characters
(A-Z
and
a-z)
are
allowed
Supports
names
that
begin
with
a
numeral
No
Yes
No
No
If
names
cannot
begin
with
a
numeral,
they
must
begin
with
an
alphabetic
character.
Maximin
number
of
zone
sets
in
a
SAN
64
switch
value
or
default
64
64
Maximum
number
of
zones
in
a
zone
set
1024
switch
value
or
default
1024
1024
Maximum
number
of
a
SAN
1024
switch
value
or
default
1024
1024
Maximum
number
of
members
in
a
zone
1024
switch
value
or
default
1024
1024
Maximum
number
of
members
in
an
alias
1024
switch
value
or
default
1024
1024
Chapter
4.
Working
with
resources
59
|
||||||
|||
|||||||||||||||||
||||||||||||
||||||||||||
||||||
||||||
|||||||
|||||||||||
|||||||||
||||||
|||
||||||
|||
|||||
|||
||||||
|||
||||||
|||
Table
6.
Switch
zoning
values
(continued)
Capability
Default
Brocade
McData
Other
Comment
Supports
domain,
port
zone,
member
creation
No
Yes
Yes
Yes
Zoning
for
Brocade
Switches
The
zone
control
interface
displays
zones
and
lets
you
create,
change,
and
delete
standard
zones.
Brocade
switches
support
some
non-standard
zones
such
as
quick
loop
zones,
fabric
assist
zones,
and
protocol
zones.
If
the
switch
configurations
have
these
zones
already
defined,
Tivoli
Storage
Area
Network
Manager
preserves
them
and
does
not
modify
them
in
any
way.
They
are
not
displayed
on
the
zone
control
interface.
However,
if
they
are
part
of
a
zone
set
that
is
active
at
some
time,
the
devices
that
are
part
of
such
zones
that
are
also
online
are
displayed
in
the
Zone
View
of
the
SAN.
You
can
create,
change,
and
delete
non-standard
zones
by
using
the
Brocade
switch
management
application.
Notes:
1.
A
zone
set
displayed
on
the
zone
control
interface
may
have
no
zones.
This
could
mean
that
the
zone
set
contains
a
non-standard
zone
on
a
Brocade
switch.
2.
A
zone
set
may
have
non-standard
zones
on
a
Brocade
switch
that
are
not
displayed
on
the
zone
control
interface.
3.
When
creating
a
new
zone
using
the
same
zone
name
as
that
of
a
non-standard
zone
that
already
exists
on
a
Brocade
switch,
you
may
get
a
error
that
the
zone
already
exists.
Because
the
non-standard
zone
is
not
displayed
on
the
zone
control
interface,
you
must
verify
this
using
the
switch
management
application.
Zoning
a
SAN
in
interop
mode
All
the
capabilities
mentioned
above
are
applicable
when
a
SAN
is
in
open
mode.
However,
when
a
SAN
is
in
interoperability
(or
interop)
mode
(configured
so
that
the
SAN
can
contain
heterogeneous
switches
with
switches
belonging
to
different
vendors)
certain
zone
capabilities
are
limited
by
the
SAN.
The
zone
control
interface
does
not
impose
these
restrictions,
and
the
zone
update
may
fail
when
applied
on
the
switch.
You
can
prevent
this
if
you
are
aware
of
the
limitations
in
interop
mode:
v
Zone
members
can
be
specified
only
using
port
WWN.
No
other
zone
member
types
are
allowed.
v
Any
capabilities
that
are
specific
to
a
switch
vendor
cannot
be
used.
v
The
lowest
common
denominator
of
the
capabilities
provided
by
the
switch
vendors
in
that
SAN
must
be
used.
Using
Error
Detection
and
Fault
Isolation
The
Error
Detection
and
Fault
Isolation
(EDFI)
helps
with
problem
determination
on
Fibre
Channel
SAN
interconnect
links.
EDFI
identifies
faulty
hardware
by
using
predictive
failure
analysis.
EDFI
monitors
temporary
error
data
across
the
SAN
and
analyzes
it
for
patterns.
Hardware
often
fails
in
such
a
way
that
intermittent
conditions
can
be
identified
before
they
become
a
permanent
failure.
Fault
isolation
is
performed
to
identify
the
faulty
hardware.
The
goal
is
to
identify
the
faulty
optics
and
interconnect
hardware
and
notify
users,
who
can
repair
or
replace
the
hardware
before
it
becomes
a
permanent
failure.
60
IBM
Tivoli
Storage
Area
Network
Manager:
User’s
Guide
|
||||||
|||||||
|
||||||||||
|
|||
||
|||||
||||||||
||
|
||

EDFI
does
not
analyze
errors
for
internal
components
such
as
power
supplies.
Its
function
is
to
analyze
counters
that
are
associated
with
the
transmission
of
data
on
SAN
links.
v
A
high
temporary
error
rate
causes
performance
problems,
which
can
be
quite
severe.
v
Waiting
for
a
permanent
failure
means
disruptive,
unscheduled
repair
or
replacement
of
equipment.
v
Some
failures
(for
example,
fractured
cables)
might
never
have
a
permanent
error
but
can
leave
the
system
with
a
degraded
link
indefinitely.
v
In
response
to
intermittent,
repetitive
errors,
host
systems,
storage
systems,
and
SAN
component
error
recovery
procedures
can
cause
unpredictable
changes
in
the
system
I/O,
or
Fibre
Channel
SAN
configuration,
or
both.
This
can
affect
system
and
storage
availability.
When
EDFI
identifies
a
faulty
component,
it
uses
Tivoli
NetView
to
notify
the
user.
After
an
error
has
been
fixed,
you
should
promptly
clear
the
error
indication.
Starting
and
stopping
EDFI
To
start
EDFI,
do
the
following:
1.
Open
the
Tivoli
NetView
Console
icon
on
your
desktop.
From
the
Tivoli
NetView
menu,
select
SAN
→
Configuration.
The
Storage
Area
Network
Manager
Configuration
dialog
is
displayed.
2.
From
the
Storage
Area
Network
Manager
Configuration
dialog
(Figure
39
on
page
51),
click
Fault
Management
Settings.
The
EDFI
Configuration
notebook
is
displayed.
Ensure
the
Enable
Error
Detection
and
Fault
Isolation
check
box
is
selected.
Click
OK
to
commit
the
change
and
close
the
window,
or
click
Apply
to
commit
the
change
and
leave
the
window
open.
Figure
47.
Starting
or
Stopping
EDFI
Chapter
4.
Working
with
resources
61
|||
|
||||||

To
stop
EDFI,
do
the
following:
1.
From
the
Tivoli
NetView
menu,
select
SAN
→
Configuration
→
Fault
Management
Settings.
2.
On
the
EDFI
Configuration
Properties
panel,
deselect
the
Enable
Error
Detection
and
Fault
Isolation
check
box.
Click
Ok
to
commit
the
change
and
close
the
window,
or
click
Apply
to
commit
the
change
and
leave
the
window
open.
Note:
To
avoid
false
error
notifications
appearing
in
the
SAN,
disable
EDFI
during
SAN
hardware
installation
and
reconfiguration.
For
more
information,
see
“Identifying
the
faulty
hardware”
on
page
69.
EDFI
event
reporting
EDFI
generates
standard
Tivoli
Enterprise
Console
events
that
can
be
used
for
reporting
purposes.
The
event
types
for
EDFI
are:
EDFI
service
start
This
event
is
issued
when
EDFI
has
been
started.
EDFI
service
stop
This
event
is
issued
when
EDFI
has
been
stopped.
EDFI
device
notification
This
event
is
issued
when
EDFI
has
a
notification
to
report.
EDFI
device
notification
clear
This
event
is
issued
when
the
event
has
been
cleared.
EDFI
notification
is
set
up
using
the
standard
Tivoli
event
reporting
mechanisms.
Figure
48.
EDFI
Configuration
Properties
Panel
62
IBM
Tivoli
Storage
Area
Network
Manager:
User’s
Guide
||

Working
with
rule
sets
Rule
sets
contain
thresholds
and
policies
that
are
used
in
predictive
failure
analysis
and
fault
isolation.
For
EDFI
to
use
a
rule
set,
it
must
be
loaded
into
Tivoli
Storage
Area
Network
Manager,
selected,
and
committed
by
clicking
OK
or
Apply
on
the
EDFI
Configure
panel.
Loading
a
rule
set
Hardware
products
change
frequently.
You
should
check
the
rule
sets
available
with
Tivoli
Storage
Area
Network
Manager
against
the
recommended
rule
sets
available
on
the
Tivoli
Storage
Area
Network
Manager
support
site.
If
the
site
recommends
a
different
rule
set,
copy
it
to
the
following
directory
on
the
manager
machine:
$path\tivoli\itsanm\manager\conf\edfi
The
rule
set
then
automatically
appears
in
the
list
of
rule
sets
available
for
selection
(see
Figure
48
on
page
62).
If
a
new
rule
is
copied
into
the
correct
directory
but
does
not
appear
in
the
list
of
rules
available
for
selection,
it
may
have
been
found
to
be
corrupted
by
the
EDFI
consistency
checks.
If
so,
there
will
be
an
entry
in
the
msgITSANM.log
file.
Rules
sets
are
identified
by
the
following
fields:
State
Active
The
rule
set
is
being
used
by
EDFI.
Only
one
rule
set
can
be
active
at
a
time.
Not
Active
The
rule
set
is
not
selected
and
is
not
being
used
by
EDFI.
Selected
The
rule
set
has
been
selected.
Only
one
rule
set
can
be
selected
at
a
time.
A
selected
rule
set
can
be
made
the
active
rule
set
by
clicking
Ok
or
Apply.
File
Name
of
the
file
on
the
local
file
system.
Version
The
version
number
of
the
rule
set.
The
version
number
is
in
the
form
of
XX.YY.ZZ,
where:
XX
The
major
revision
number
YY
The
minor
revision
number.
ZZ
The
incremental
revision
number.
Rule
Set
Description
A
short
name
identifying
the
rule
set.
This
briefly
describes
the
unique
characteristics
of
the
rule
set.
Viewing
and
selecting
a
rule
set
To
view
and
select
a
rule
set
that
has
been
loaded,
do
the
following:
1.
Open
the
Tivoli
NetView
Console
icon
on
your
desktop.
From
the
Tivoli
NetView
menu,
select:
SAN
→
Configuration
→
Fault
Management
Settings.
2.
The
EDFI
Configuration
Properties
panel
is
displayed
(see
Figure
48
on
page
62).
Click
OK.
3.
From
the
EDFI
Configuration
window,
select
the
Configure
panel,
highlight
the
desired
rule
set,
and
do
the
following:
v
To
view,
click
View.
Chapter
4.
Working
with
resources
63
||

v
To
select
a
rule
file
to
be
used
as
the
active
rule
set,
click
Select.
Then
click
Ok
or
Apply
to
commit
the
change.
Managing
an
EDFI
event
Normally
when
an
EDFI
event
is
reported,
a
permanent
failure
has
not
yet
occurred.
To
respond
to
an
event,
do
the
following:
1.
Go
to
the
SAN
manager
console
and
find
the
EDFI
error
notification.
2.
Use
the
EDFI
error
notification
to
find
the
faulty
link.
3.
Use
device
specific
diagnostics
and
problem
determination
guides
to
isolate
the
faulty
hardware
on
the
link.
4.
Repair
or
replace
the
identified
hardware
as
soon
as
possible.
5.
After
the
identified
hardware
is
repaired
or
replaced,
clear
the
error
notification.
The
steps
are
described
in
detail
in
the
following
sections.
Viewing
an
error
notification
When
EDFI
identifies
a
faulty
hardware,
it
puts
a
notification
in
the
EDFI
Properties
Log.
To
view
the
log,
do
the
following:
1.
From
the
Tivoli
NetView
menu,
select
SAN
→
Configuration
→
Fault
Management
Settings.
The
EDFI
Configuration
Properties
window
appears.
2.
Click
the
Properties
tab:
Figure
49.
EDFI
Rules
Panel
64
IBM
Tivoli
Storage
Area
Network
Manager:
User’s
Guide
||
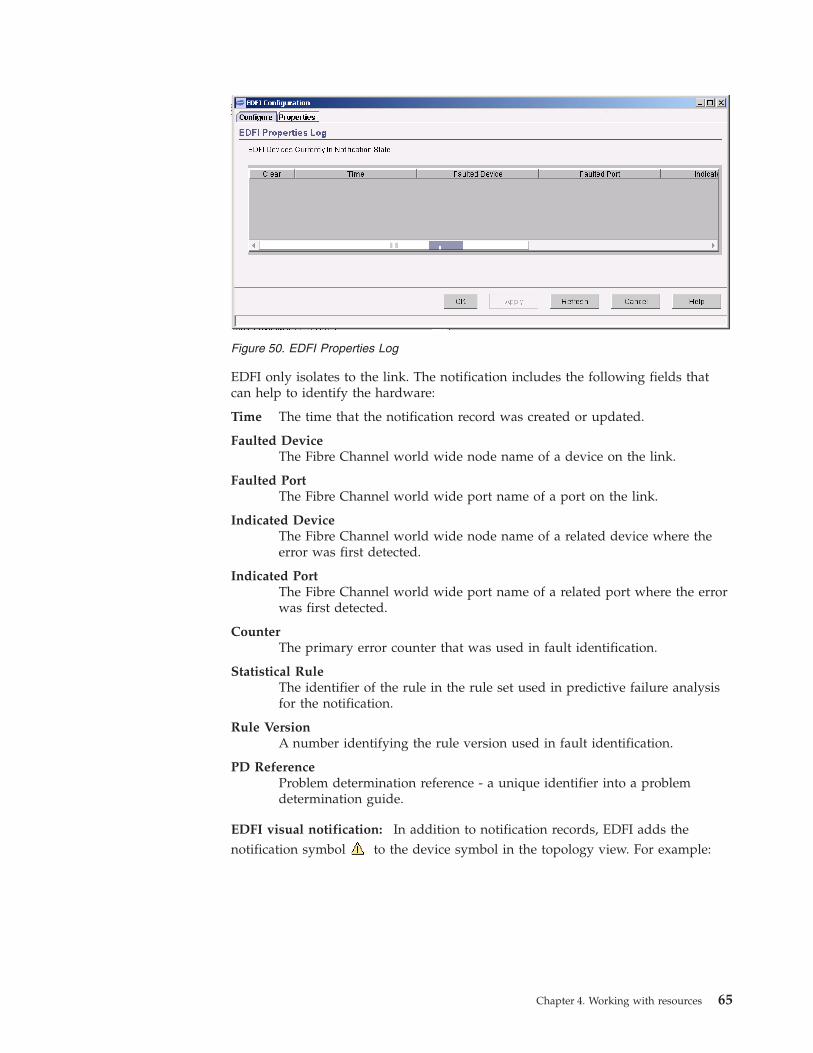
EDFI
only
isolates
to
the
link.
The
notification
includes
the
following
fields
that
can
help
to
identify
the
hardware:
Time
The
time
that
the
notification
record
was
created
or
updated.
Faulted
Device
The
Fibre
Channel
world
wide
node
name
of
a
device
on
the
link.
Faulted
Port
The
Fibre
Channel
world
wide
port
name
of
a
port
on
the
link.
Indicated
Device
The
Fibre
Channel
world
wide
node
name
of
a
related
device
where
the
error
was
first
detected.
Indicated
Port
The
Fibre
Channel
world
wide
port
name
of
a
related
port
where
the
error
was
first
detected.
Counter
The
primary
error
counter
that
was
used
in
fault
identification.
Statistical
Rule
The
identifier
of
the
rule
in
the
rule
set
used
in
predictive
failure
analysis
for
the
notification.
Rule
Version
A
number
identifying
the
rule
version
used
in
fault
identification.
PD
Reference
Problem
determination
reference
-
a
unique
identifier
into
a
problem
determination
guide.
EDFI
visual
notification:
In
addition
to
notification
records,
EDFI
adds
the
notification
symbol
to
the
device
symbol
in
the
topology
view.
For
example:
Figure
50.
EDFI
Properties
Log
Chapter
4.
Working
with
resources
65

You
can
find
more
detailed
information
about
a
device
that
has
a
notification
symbol,
do
the
following:
1.
From
the
topology
view,
select
the
device
with
the
symbol
(see
Figure
51).
2.
From
the
SAN
pull-down
menu,
select
EDFI
Properties.
The
Properties
-
EDFI
window
is
displayed.
The
EDFI
Configuration
contains
the
notification
records
for
the
entire
SAN;
the
EDFI
Properties
contains
the
notification
record
for
the
selected
device
only.
If
the
device
is
not
selected,
the
EDFI
Properties
menu
is
not
selectable
and
is
grayed
out.
Finding
an
error
in
the
SAN
topology
It
is
not
apparent
from
a
notification
record
where
in
the
topology
an
error
occurred.
However,
the
notification
record
provides
a
world
wide
name
that
you
can
use
for
searches.
If
the
SAN
is
small,
it
may
be
found
simply
by
looking
for
the
notification
symbol
(
)
in
the
topology
view.
For
larger
SANs,
you
can
use
the
device
world
wide
name
as
an
object
ID
in
the
Find
function
under
the
Edit
pull-down
menu.
See
Figure
52
on
page
67.
The
device
world
wide
name
is
also
the
object
ID
used
by
Tivoli
NetView.
Figure
51.
Notification
symbol
on
a
device
icon
66
IBM
Tivoli
Storage
Area
Network
Manager:
User’s
Guide
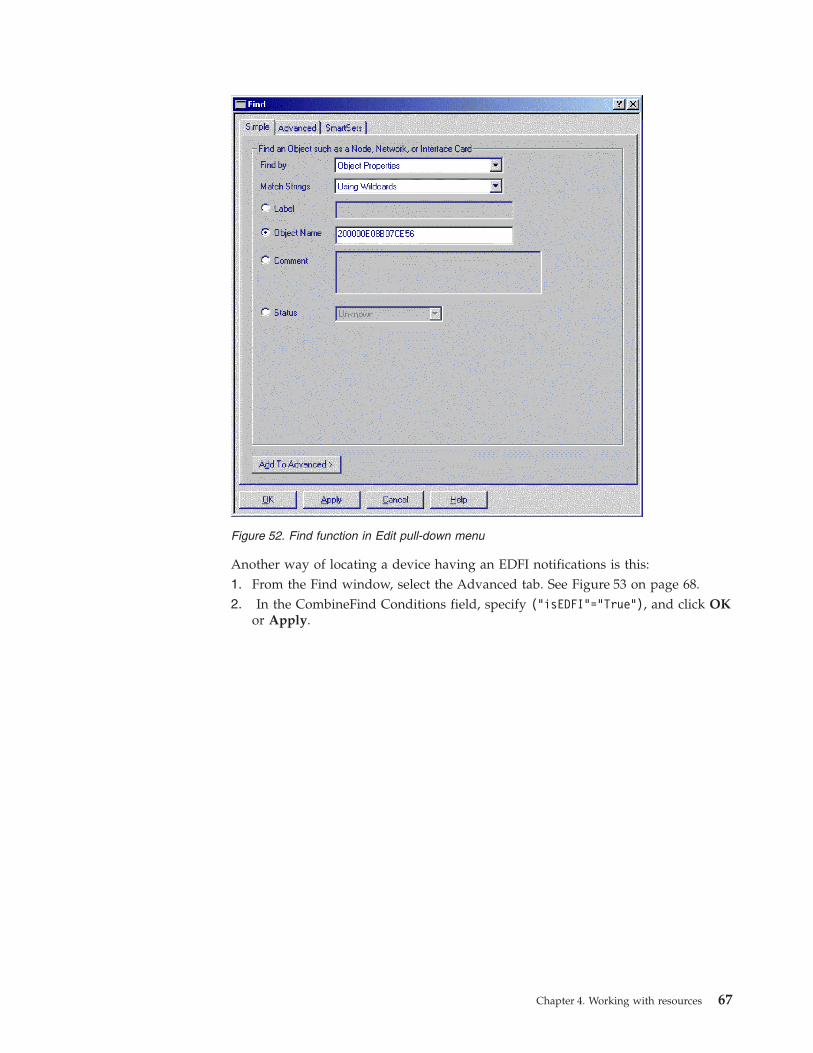
Another
way
of
locating
a
device
having
an
EDFI
notifications
is
this:
1.
From
the
Find
window,
select
the
Advanced
tab.
See
Figure
53
on
page
68.
2.
In
the
CombineFind
Conditions
field,
specify
("isEDFI"="True"),
and
click
OK
or
Apply.
Figure
52.
Find
function
in
Edit
pull-down
menu
Chapter
4.
Working
with
resources
67
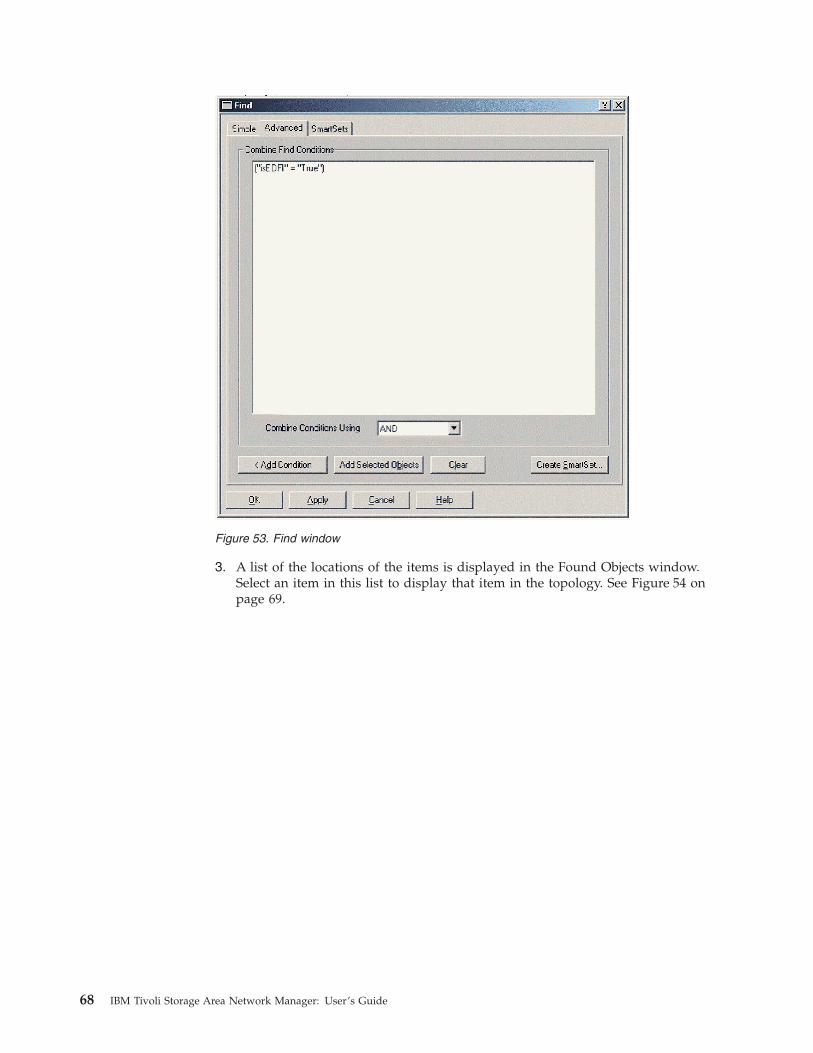
3.
A
list
of
the
locations
of
the
items
is
displayed
in
the
Found
Objects
window.
Select
an
item
in
this
list
to
display
that
item
in
the
topology.
See
Figure
54
on
page
69.
Figure
53.
Find
window
68
IBM
Tivoli
Storage
Area
Network
Manager:
User’s
Guide

Identifying
the
faulty
hardware
The
notification
record
provides
detailed
information
that
you
can
use
to
identify
the
faulty
hardware.
The
two
primary
fields
to
look
at
are
Faulted
Device
and
Faulted
Port.
These
fields
point
to
the
device
and
port
on
the
transmission
side
of
the
failure,
which
is
the
most
likely
side
to
be
faulty.
Some
possible
problems
are:
v
Faulty
SFP
or
GBIC
module
on
either
side
of
the
link
v
Cable
cracks
or
dusty
connectors
v
Excessive
cable
length
v
Excessive
number
of
intermediate
cable
couplers
EDFI
can
isolate
faults
only
to
the
link
level.
Therefore,
either
side
of
the
link
or
the
cable
itself
might
be
the
faulty
component.
Before
replacing
hardware,
you
should
consult
your
service
contracts
and
product
problem
determination
guides
for
direction.
Cleaning,
cable
seating,
and
diagnostic
execution
are
some
of
the
steps
that
might
be
recommended
that
lead
to
a
definitive
decision
on
parts
repair
or
replacement.
If
you
can
identify
a
component,
you
should
diagnose
the
problem
and
repair
or
replace
the
component
as
soon
as
possible
before
a
permanent
failure
occurs.
If
you
cannot
identify
a
component,
at
a
minimum
you
should
monitor
the
link
for
further
errors.
In
environments
where
high
systems
availability
is
a
requirement
or
service
level
agreements
are
in
place,
you
can
contact
service
representatives
about
replacing
the
Fibre
Channel
component.
Figure
54.
Found
Objects
window
Chapter
4.
Working
with
resources
69

Service
actions,
such
as
power
cycling
and
parts
replacement,
can
sometimes
cause
EDFI
to
send
false
notifications
for
the
devices
being
serviced.
Therefore,
you
should
disable
EDFI
during
these
installations.
These
events
are
usually
filtered
out
by
the
EDFI
analysis
functions,
but
disabling
EDFI
prevents
any
possibility
of
confusion.
If
an
EDFI
notification
appears
within
a
few
hours
following
a
hardware
installation
or
reconfiguration
where
EDFI
is
not
disabled
(especially
those
actions
that
take
an
hour
or
more),
you
may
want
to
clear
the
notification
and
see
if
it
reappears
before
taking
a
repair
action.
Clearing
an
error
notification
The
EDFI
notification
symbol
does
not
automatically
disappear
after
the
problem
has
been
corrected.
Because
temporary
error
counts
are
analyzed,
EDFI
cannot
distinguish
the
new
part
from
the
old
part
(unlike
what
would
be
expected
in
permanent
failure
cases
in
the
SAN).
It
is
important
to
clear
the
notification
when
hardware
is
replaced
to
avoid
confusion.
To
clear
a
notification
record,
do
the
following:
v
From
the
SAN
pull-down
menu,
select
either
the
EDFI
Properties
or
EDFI
Configuration
submenu.
v
Select
one
or
more
check
boxes
in
the
Clear
column
of
the
EDFI
Properties
Log
(see
Figure
50
on
page
65).
v
Click
either
Ok
or
Apply.
Exiting
the
window
without
clicking
OK
or
Apply
cancels
the
request
to
clear
the
notifications.
70
IBM
Tivoli
Storage
Area
Network
Manager:
User’s
Guide

Appendix
A.
Command
reference
You
can
perform
some
operations
by
using
IBM
Tivoli
Storage
Area
Network
Manager
and
Tivoli
NetView
commands.
This
is
useful
when
you
do
not
have
access
to
a
graphical
display
(for
example,
when
issuing
commands
over
a
dial-up
connection)
or
when
you
want
to
create
scripts
that
issue
commands.
The
commands
are
grouped
as
follows:
v
“Logging
Service
commands”
on
page
75
–
allow
you
to
configure
and
turn
message
logging
on
and
off.
v
“Manager
Service
commands”
on
page
80
–
allow
you
to
display
or
set
values
in
the
user
properties
file.
v
“SAN
Event
Service
commands”
on
page
88
–
allow
you
to
filter
events
issued
by
IBM
Tivoli
Storage
Area
Network
Manager.
v
“SANAgentOutbandChangeAgent
commands”
on
page
100
allow
you
to
control
which
events
on
your
system
will
cause
a
rediscovery
to
be
run.
v
The
Tivoli
NetView
command
“nvsniffer”
on
page
109
allows
you
to
discover
and
monitor
the
iSCSI
devices
on
the
network.
Within
each
group,
the
commands
are
presented
alphabetically
and
contain
the
following
information:
v
A
command
description.
v
A
syntax
diagram.
See
“Reading
syntax
diagrams”
for
an
explanation
of
these
diagrams.
v
Command
parameter
descriptions.
If
the
parameter
is
a
constant
(a
value
that
does
not
change),
the
minimum
abbreviation
appears
in
uppercase
letters.
v
Command
examples.
Reading
syntax
diagrams
This
section
describes
how
to
read
the
syntax
diagrams.
To
read
a
syntax
diagram,
follow
the
path
of
the
line
from
left
to
right
and
top
to
bottom.
v
��───
indicates
the
beginning
of
a
syntax
diagram.
v
───�
indicates
the
syntax
diagram
continues
on
the
next
line.
v
�───
indicates
a
syntax
diagram
continues
from
the
previous
line.
v
───��
indicates
the
end
of
a
syntax
diagram.
Keywords
or
variable
can
be:
v
On
the
line
—
required
v
Above
the
line
—
default
v
Below
the
line
—
optional
©
Copyright
IBM
Corp.
2002,
2003
71
||
||
||

Syntax
diagram
description
Example
Symbols:
Enter
these
symbols
exactly
as
they
appear
in
the
syntax
diagram.
*
Asterisk
{
}
Braces
:
Colon
,
Comma
=
Equal
Sign
-
Hyphen
()
Parentheses
.
Period
Space
Variables:
Italicized
lowercase
items
(var_name)
denote
variables:
��
var_name
��
Repetition:
An
arrow
returning
to
the
left
means
you
can
repeat
the
item.
A
character
or
space
within
the
arrow
means
you
must
separate
repeated
items
with
that
character
or
space.
A
footnote
by
the
arrow
references
the
number
of
times
you
can
repeat
the
item.
��
�
repeat
��
��
�
,
repeat
��
��
�
(1)
repeat
��
Notes:
1 Specify
repeat
as
many
as
5
times.
Required
choices:
When
two
or
more
items
are
in
a
stack
and
one
of
them
is
on
the
line,
you
must
specify
one
item.
In
this
example,
you
must
choose
A,
B,
or
C.
��
A
B
C
��
Optional
choice:
When
an
item
is
below
the
line,
that
item
is
optional.
In
the
first
example,
you
can
choose
A
or
nothing
at
all.
When
two
or
more
items
are
in
a
stack
below
the
line,
all
of
them
are
optional.
In
the
second
example,
you
can
choose
A,
B,
C,
or
nothing
at
all.
��
A
��
��
A
B
C
��
72
IBM
Tivoli
Storage
Area
Network
Manager:
User’s
Guide
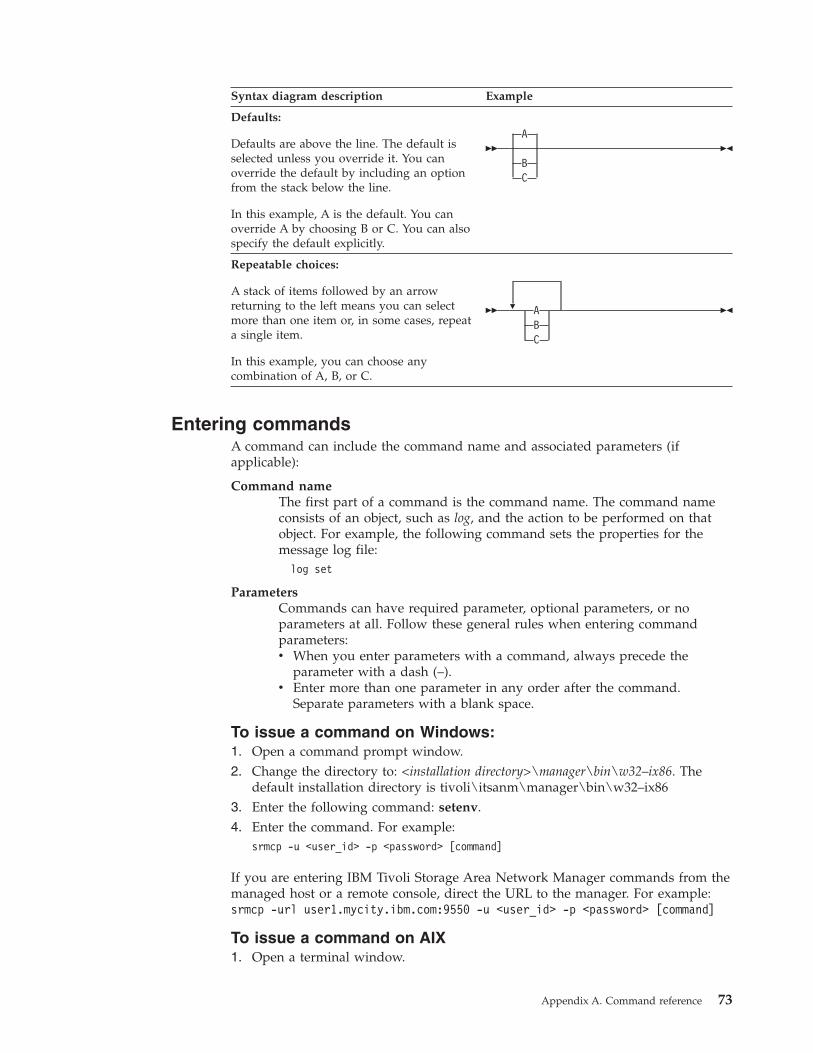
Syntax
diagram
description
Example
Defaults:
Defaults
are
above
the
line.
The
default
is
selected
unless
you
override
it.
You
can
override
the
default
by
including
an
option
from
the
stack
below
the
line.
In
this
example,
A
is
the
default.
You
can
override
A
by
choosing
B
or
C.
You
can
also
specify
the
default
explicitly.
��
A
B
C
��
Repeatable
choices:
A
stack
of
items
followed
by
an
arrow
returning
to
the
left
means
you
can
select
more
than
one
item
or,
in
some
cases,
repeat
a
single
item.
In
this
example,
you
can
choose
any
combination
of
A,
B,
or
C.
��
�
A
B
C
��
Entering
commands
A
command
can
include
the
command
name
and
associated
parameters
(if
applicable):
Command
name
The
first
part
of
a
command
is
the
command
name.
The
command
name
consists
of
an
object,
such
as
log,
and
the
action
to
be
performed
on
that
object.
For
example,
the
following
command
sets
the
properties
for
the
message
log
file:
log
set
Parameters
Commands
can
have
required
parameter,
optional
parameters,
or
no
parameters
at
all.
Follow
these
general
rules
when
entering
command
parameters:
v
When
you
enter
parameters
with
a
command,
always
precede
the
parameter
with
a
dash
(–).
v
Enter
more
than
one
parameter
in
any
order
after
the
command.
Separate
parameters
with
a
blank
space.
To
issue
a
command
on
Windows:
1.
Open
a
command
prompt
window.
2.
Change
the
directory
to:
<installation
directory>\manager\bin\w32–ix86.
The
default
installation
directory
is
tivoli\itsanm\manager\bin\w32–ix86
3.
Enter
the
following
command:
setenv.
4.
Enter
the
command.
For
example:
srmcp
-u
<user_id>
-p
<password>
[command]
If
you
are
entering
IBM
Tivoli
Storage
Area
Network
Manager
commands
from
the
managed
host
or
a
remote
console,
direct
the
URL
to
the
manager.
For
example:
srmcp
-url
user1.mycity.ibm.com:9550
-u
<user_id>
-p
<password>
[command]
To
issue
a
command
on
AIX
1.
Open
a
terminal
window.
Appendix
A.
Command
reference
73
2.
Change
the
directory
to:
<installation
directory>/agent/bin/aix.
The
default
installation
directory
is
/tivoli/itsanm/agent/bin/aix
3.
Enter
the
following
command:
.
./setenv.sh.
When
entering
.
./,
note
that
there
is
a
space
between
the
dots.
4.
Enter
the
command.
For
example:
./srmcp.sh
-u
<user_id>
-p
<password>
[command]
If
you
are
entering
IBM
Tivoli
Storage
Area
Network
Manager
commands
from
the
managed
host
or
a
remote
console,
direct
the
URL
to
the
manager.
For
example:
./srmcp.sh
-url
user1.mycity.ibm.com:9550
-u
<user_id>
-p
<password>
[command]
To
issue
a
command
on
Linux
1.
Open
a
terminal
window.
2.
Change
the
directory
to:
<installation
directory>/agent/bin/linux.
The
default
installation
directory
is
/tivoli/itsanm/agent/bin/linux
3.
Enter
the
following
command:
.
./setenv.sh.
When
entering
.
./,
note
that
there
is
a
space
between
the
dots.
4.
Enter
the
command.
For
example:
./srmcp.sh
-u
<user_id>
-p
<password>
[command]
If
you
are
entering
IBM
Tivoli
Storage
Area
Network
Manager
commands
from
the
managed
host
or
a
remote
console,
direct
the
URL
to
the
manager.
For
example:
./srmcp.sh
-url
user1.mycity.ibm.com:9550
-u
<user_id>
-p
<password>
[command]
To
issue
a
command
on
Solaris
1.
Open
a
terminal
window.
2.
Change
the
directory
to:
<installation
directory>/agent/bin/solaris2.
The
default
installation
directory
is
/tivoli/itsanm/agent/bin/solaris2
3.
Enter
the
following
command:
.
./setenv.sh.
When
entering
.
./,
note
that
there
is
a
space
between
the
dots.
4.
Enter
the
command.
For
example:
./srmcp.sh
-u
<user_id>
-p
<password>
[command]
If
you
are
entering
IBM
Tivoli
Storage
Area
Network
Manager
commands
from
the
managed
host
or
a
remote
console,
direct
the
URL
to
the
manager.
For
example:
./srmcp.sh
-url
user1.mycity.ibm.com:9550
-u
<user_id>
-p
<password>
[command]
74
IBM
Tivoli
Storage
Area
Network
Manager:
User’s
Guide

Logging
Service
commands
You
can
configure
IBM
Tivoli
Storage
Area
Network
Manager
to
log
or
record
textual
messages
of
system
events
so
that
you
can
review
these
actions
at
a
later
time.
Message
logging
commands
help
you
to
configure
your
system
to
gather
and
send
this
information
to
message
log
files.
You
can
configure
the
number,
size,
type,
and
format
of
your
message
log
files.
The
following
message
types
are
enabled
by
default:
Informational
messages
Indicate
conditions
that
are
worthy
of
noting
but
do
not
require
you
to
take
any
precautions
or
perform
an
action.
Warning
messages
Indicate
conditions
that
do
not
necessarily
require
user
action.
For
example,
a
part
of
a
program
did
not
perform
as
intended,
but
defaults
were
applied
allowing
the
program
to
continue.
You
should
examine
the
output
for
validity.
Error
messages
Inform
you
of
serious
events,
such
as
a
component
failed
to
write
a
database
entry.
The
Logging
Service
commands
are:
v
“srmcp
log
get”
on
page
76
v
“srmcp
log
help”
on
page
77
v
“srmcp
log
set”
on
page
78
Appendix
A.
Command
reference
75

srmcp
log
get
The
srmcp
log
get
command
displays
the
current
properties
of
the
message
log
file.
If
you
do
not
specify
a
parameter
for
this
command,
a
syntax
error
message
will
be
displayed.
Syntax
��
srmcp
–u
user_id
–p
password
log
get
–filterkey
–maxfiles
–maxfilesize
–format
–locale
��
Parameters
–u
user_id
The
ID
of
the
user
issuing
the
command.
This
parameter
is
required.
–p
password
The
password
for
the
user
issuing
the
command.
This
parameter
is
required.
-filterkey
Displays
the
current
types
of
messages
that
are
logged
in
the
message
log
file.
-maxfiles
Displays
the
current
maximum
number
of
log
files
to
be
created.
-maxfilesize
Displays
the
current
maximum
file
size
(in
kilobytes)
of
the
log
before
a
new
log
file
is
created.
-format
Displays
the
current
format
in
which
messages
are
saved
in
the
message
log
file.
Messages
can
be
saved
in
either
plain
text
or
XML
format.
-locale
Displays
the
current
language
locale
setting
in
which
messages
are
displayed
in
the
message
log
file.
Examples
Task
Display
the
current
types
of
messages
that
are
logged
in
the
message
log
file.
Command:
srmcp
-u
user1
-p
password1
log
get
-filterkey
Task
Display
the
current
maximum
number
of
log
files
to
be
created.
Command:
srmcp
-u
user2
-p
password2
log
get
-maxfiles
Task
Display
the
current
maximum
file
size
(in
kilobytes)
of
the
log
before
a
new
log
file
is
created.
Command:
srmcp
-u
user3
-p
password3
log
get
-maxfilesize
Task
Display
the
current
format
for
the
message
log.
Command:
srmcp
-u
user4
-p
password4
log
get
-format
Task
Display
the
current
language
locale
setting
in
which
messages
are
displayed
in
the
message
log
file.
Command:
srmcp
-u
user5
-p
password5
log
get
-locale
76
IBM
Tivoli
Storage
Area
Network
Manager:
User’s
Guide

srmcp
log
help
The
srmcp
log
help
command
provides
general
information
about
the
Logging
Service
commands.
The
srmcp
log
help
command
provides
information
about
the
specific
command
with
its
parameters.
Syntax
��
srmcp
–u
user_id
–p
password
log
help
–command
��
Parameters
–u
user_id
The
ID
of
the
user
issuing
the
command.
This
parameter
is
required.
–p
password
The
password
for
the
user
issuing
the
command.
This
parameter
is
required.
–command
You
can
specify
these
commands:
v
get
v
set
Examples
Task
Display
information
about
the
Logging
Service
commands.
Command:
srmcp
-u
user1
-p
password1
log
help
Task
Display
information
about
all
valid
parameters
for
the
srmcp
log
get
command.
Command:
srmcp
-u
user1
-p
password1
log
help
-get
Task
Display
information
about
all
valid
parameters
for
the
srmcp
log
set
command.
Command:
srmcp
-u
user2
-p
password2
log
help
-set
Appendix
A.
Command
reference
77
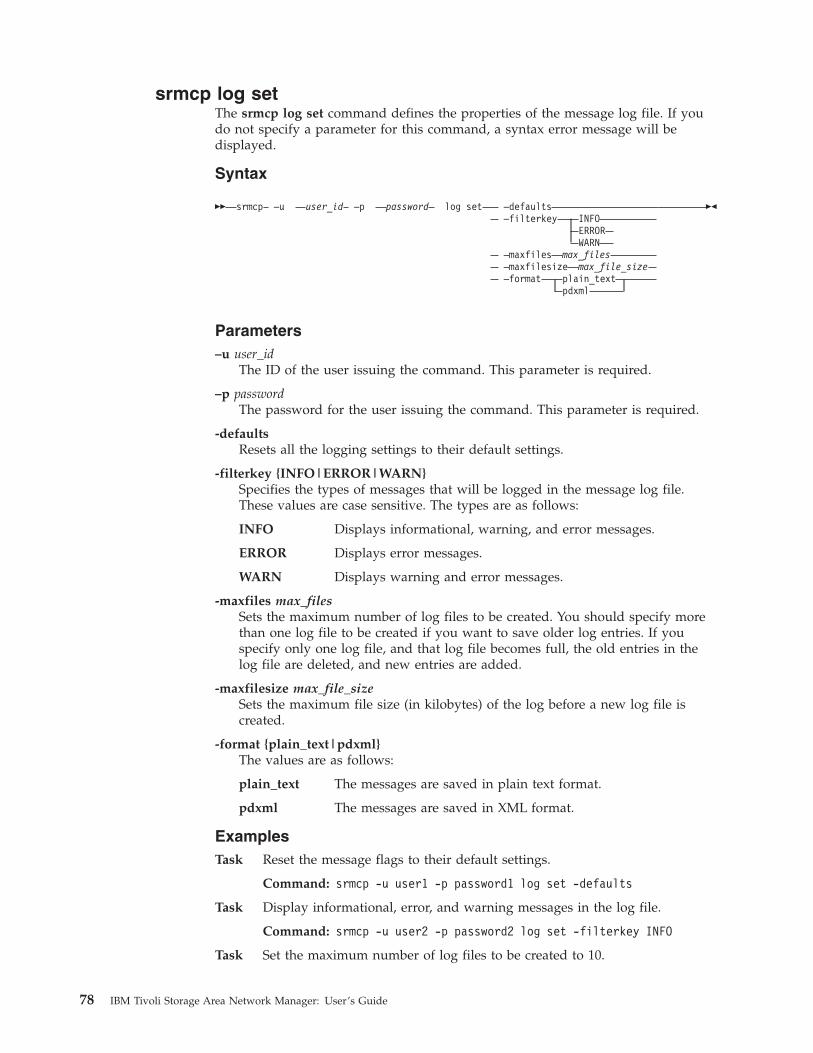
srmcp
log
set
The
srmcp
log
set
command
defines
the
properties
of
the
message
log
file.
If
you
do
not
specify
a
parameter
for
this
command,
a
syntax
error
message
will
be
displayed.
Syntax
��
srmcp
–u
user_id
–p
password
log
set
–defaults
–filterkey
INFO
ERROR
WARN
–maxfiles
max_files
–maxfilesize
max_file_size
–format
plain_text
pdxml
��
Parameters
–u
user_id
The
ID
of
the
user
issuing
the
command.
This
parameter
is
required.
–p
password
The
password
for
the
user
issuing
the
command.
This
parameter
is
required.
-defaults
Resets
all
the
logging
settings
to
their
default
settings.
-filterkey
{INFO|ERROR|WARN}
Specifies
the
types
of
messages
that
will
be
logged
in
the
message
log
file.
These
values
are
case
sensitive.
The
types
are
as
follows:
INFO
Displays
informational,
warning,
and
error
messages.
ERROR
Displays
error
messages.
WARN
Displays
warning
and
error
messages.
-maxfiles
max_files
Sets
the
maximum
number
of
log
files
to
be
created.
You
should
specify
more
than
one
log
file
to
be
created
if
you
want
to
save
older
log
entries.
If
you
specify
only
one
log
file,
and
that
log
file
becomes
full,
the
old
entries
in
the
log
file
are
deleted,
and
new
entries
are
added.
-maxfilesize
max_file_size
Sets
the
maximum
file
size
(in
kilobytes)
of
the
log
before
a
new
log
file
is
created.
-format
{plain_text|pdxml}
The
values
are
as
follows:
plain_text
The
messages
are
saved
in
plain
text
format.
pdxml
The
messages
are
saved
in
XML
format.
Examples
Task
Reset
the
message
flags
to
their
default
settings.
Command:
srmcp
-u
user1
-p
password1
log
set
-defaults
Task
Display
informational,
error,
and
warning
messages
in
the
log
file.
Command:
srmcp
-u
user2
-p
password2
log
set
-filterkey
INFO
Task
Set
the
maximum
number
of
log
files
to
be
created
to
10.
78
IBM
Tivoli
Storage
Area
Network
Manager:
User’s
Guide

Command:
srmcp
-u
user3
-p
password3
log
set
-maxfiles
10
Task
Set
the
maximum
file
size
of
the
log
to
2000
bytes
before
a
new
log
is
created.
Command:
srmcp
-u
user4
-p
password4
log
set
-maxfilesize
2000
Task
Format
the
message
log
file
in
XML
format.
Command:
srmcp
-u
user5
-p
password5
log
set
-format
pdxml
Appendix
A.
Command
reference
79

Manager
Service
commands
The
Manager
Service
commands
let
you
display
or
set
the
values
in
the
user
properties
file
(tivoli/itsanm/manager/conf/user.properties)
on
the
manager
machine.
This
file
contains
settings
that
control
host
polling,
SNMP
trap
destination,
and
the
monitoring
interval
for
the
out-of-band
agent.
The
Manager
Service
commands
are:
v
“srmcp
ConfigService
display”
on
page
81
v
“srmcp
ConfigService
get”
on
page
82
v
“srmcp
ConfigService
help”
on
page
83
v
“srmcp
ConfigService
set”
on
page
84
v
“srmcp
ConfigService
setSinglePw”
on
page
86
80
IBM
Tivoli
Storage
Area
Network
Manager:
User’s
Guide

srmcp
ConfigService
display
The
srmcp
ConfigService
display
command
displays
the
values
in
the
user
properties
file
(user.properties).
This
command
can
be
issued
only
on
the
manager
computer.
Syntax
��
srmcp
–u
user_id
–p
password
ConfigService
display
��
Parameters
–u
user_id
The
ID
of
the
user
issuing
the
command.
This
parameter
is
required.
–p
password
The
password
for
the
user
issuing
the
command.
This
parameter
is
required.
Examples
Task
Display
the
values
in
the
user.properties
file.
Command:
srmcp
-u
user1
-p
password1
ConfigService
display
Appendix
A.
Command
reference
81

srmcp
ConfigService
get
The
srmcp
ConfigService
get
command
displays
the
value
of
the
property
name
in
the
user
properties
file
(user.properties)
that
you
specify.
This
command
can
be
run
only
on
the
manager
computer.
Syntax
��
srmcp
–u
user_id
–p
password
ConfigService
get
property_name
��
Parameters
–u
user_id
The
ID
of
the
user
issuing
the
command.
This
parameter
is
required.
–p
password
The
password
for
the
user
issuing
the
command.
This
parameter
is
required.
property_name
Specifies
the
property
name
for
which
you
want
to
display
the
current
value.
Examples
Task
Display
the
value
of
the
SnmpCommunityName
property
in
the
user.properties
file.
Command:
srmcp
-u
user2
-p
password2
ConfigService
get
SnmpCommunityName
Task
Display
the
value
for
a
full
discovery
(FullAttributeScan)
property
in
the
user.properties
file.
Command:
srmcp
-u
user2
-p
password2
ConfigService
get
FullAttributeScan
Task
Display
the
URL
for
the
Tivoli
Storage
Resource
Manager
(SRMURL)
property
in
the
user.properties
file.
Command:
srmcp
-u
user2
-p
password2
ConfigService
get
SRMURL
82
IBM
Tivoli
Storage
Area
Network
Manager:
User’s
Guide
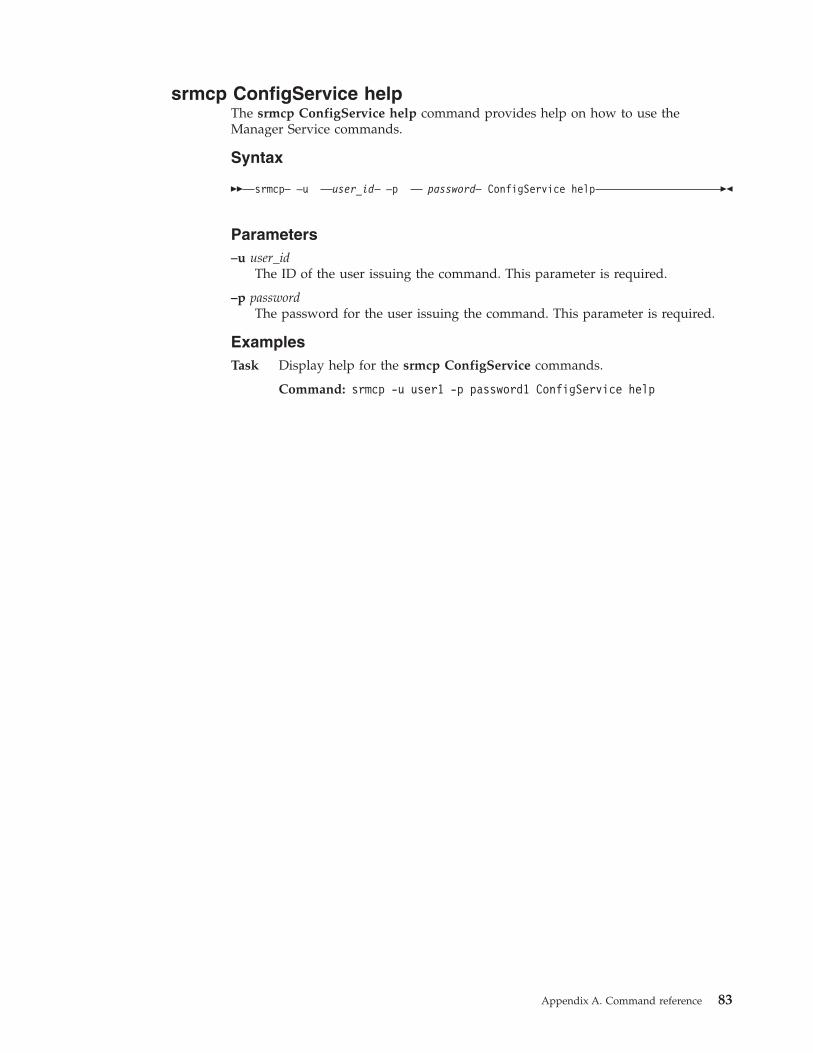
srmcp
ConfigService
help
The
srmcp
ConfigService
help
command
provides
help
on
how
to
use
the
Manager
Service
commands.
Syntax
��
srmcp
–u
user_id
–p
password
ConfigService
help
��
Parameters
–u
user_id
The
ID
of
the
user
issuing
the
command.
This
parameter
is
required.
–p
password
The
password
for
the
user
issuing
the
command.
This
parameter
is
required.
Examples
Task
Display
help
for
the
srmcp
ConfigService
commands.
Command:
srmcp
-u
user1
-p
password1
ConfigService
help
Appendix
A.
Command
reference
83

srmcp
ConfigService
set
The
srmcp
ConfigService
set
command
sets
the
value
of
the
specified
property
to
a
new
value
in
the
user
properties
file
(user.properties).
This
command
can
be
run
only
on
the
manager
computer.
Syntax
��
srmcp
–u
user_id
–p
password
ConfigService
set
property_name
value
��
Parameters
–u
user_id
The
ID
of
the
user
issuing
the
command.
This
parameter
is
required.
–p
password
The
password
for
the
user
issuing
the
command.
This
parameter
is
required.
property_name
Sets
the
value
of
the
specified
property.
Property_name
can
be:
FullAttributeScan
value
Sets
the
value
for
a
full
discovery.
The
default
values
for
a
full
discovery
are
set
as
follows:
v
IBM
Tivoli
Storage
Area
Network
Manager
for
SAN
Management
-
run
a
full
discovery
when
the
user
selects
Poll
Now
and
when
a
periodic
or
scheduled
discovery
is
initiated.
v
IBM
Tivoli
Storage
Area
Network
Manager
Bonus
Pack
for
SAN
Management
-
never
run
a
full
discovery.
Value
can
be
as
follows:
Always
Always
run
a
full
discovery.
Never
Never
run
a
full
discovery
(topology
discovery
only).
Only
top
level
information
is
presented
in
the
device-centric
and
host-centric
views.
When
you
change
this
value
from
Never
to
another
attribute
setting,
the
data
that
is
currently
in
the
database
is
displayed
in
the
device-centric
and
host-centric
views.
At
this
point,
the
data
in
the
database
might
be
old
data
and
may
not
represent
the
actual
logical
view.
The
database
information
is
updated
after
the
next
full
discovery
is
performed.
PollNow
Only
run
a
full
discovery
when
the
user
selects
Poll
Now.
TimeBased
Only
run
a
full
discovery
when
a
periodic
or
scheduled
discovery
is
initiated.
PollNowAndTimeBased
Run
a
full
discovery
when
the
user
selects
Poll
Now
or
when
a
periodic
or
scheduled
discovery
is
initiated.
hostPollingInterval
Sets
the
polling
interval
(in
milliseconds)
at
which
host
polling
occurs.
The
default
is
60000
(60
seconds).
84
IBM
Tivoli
Storage
Area
Network
Manager:
User’s
Guide
||
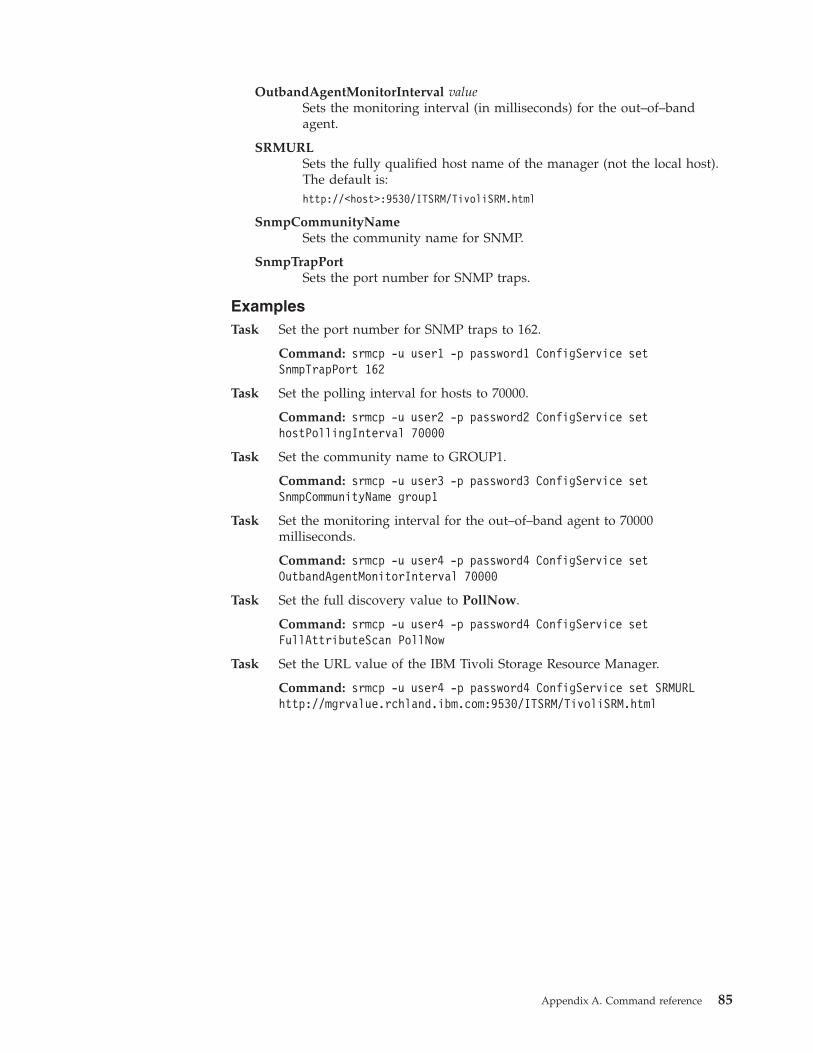
OutbandAgentMonitorInterval
value
Sets
the
monitoring
interval
(in
milliseconds)
for
the
out–of–band
agent.
SRMURL
Sets
the
fully
qualified
host
name
of
the
manager
(not
the
local
host).
The
default
is:
http://<host>:9530/ITSRM/TivoliSRM.html
SnmpCommunityName
Sets
the
community
name
for
SNMP.
SnmpTrapPort
Sets
the
port
number
for
SNMP
traps.
Examples
Task
Set
the
port
number
for
SNMP
traps
to
162.
Command:
srmcp
-u
user1
-p
password1
ConfigService
set
SnmpTrapPort
162
Task
Set
the
polling
interval
for
hosts
to
70000.
Command:
srmcp
-u
user2
-p
password2
ConfigService
set
hostPollingInterval
70000
Task
Set
the
community
name
to
GROUP1.
Command:
srmcp
-u
user3
-p
password3
ConfigService
set
SnmpCommunityName
group1
Task
Set
the
monitoring
interval
for
the
out–of–band
agent
to
70000
milliseconds.
Command:
srmcp
-u
user4
-p
password4
ConfigService
set
OutbandAgentMonitorInterval
70000
Task
Set
the
full
discovery
value
to
PollNow.
Command:
srmcp
-u
user4
-p
password4
ConfigService
set
FullAttributeScan
PollNow
Task
Set
the
URL
value
of
the
IBM
Tivoli
Storage
Resource
Manager.
Command:
srmcp
-u
user4
-p
password4
ConfigService
set
SRMURL
http://mgrvalue.rchland.ibm.com:9530/ITSRM/TivoliSRM.html
Appendix
A.
Command
reference
85
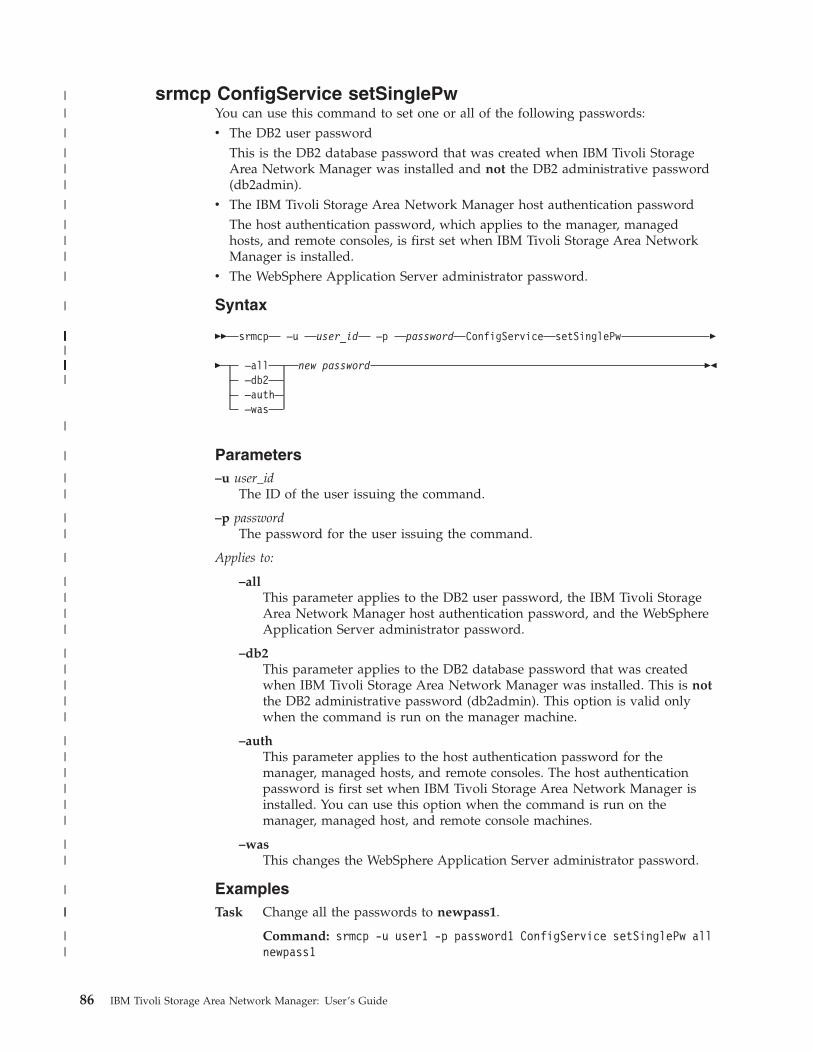
srmcp
ConfigService
setSinglePw
You
can
use
this
command
to
set
one
or
all
of
the
following
passwords:
v
The
DB2
user
password
This
is
the
DB2
database
password
that
was
created
when
IBM
Tivoli
Storage
Area
Network
Manager
was
installed
and
not
the
DB2
administrative
password
(db2admin).
v
The
IBM
Tivoli
Storage
Area
Network
Manager
host
authentication
password
The
host
authentication
password,
which
applies
to
the
manager,
managed
hosts,
and
remote
consoles,
is
first
set
when
IBM
Tivoli
Storage
Area
Network
Manager
is
installed.
v
The
WebSphere
Application
Server
administrator
password.
Syntax
��
srmcp
–u
user_id
–p
password
ConfigService
setSinglePw
�
�
–all
new
password
–db2
–auth
–was
��
Parameters
–u
user_id
The
ID
of
the
user
issuing
the
command.
–p
password
The
password
for
the
user
issuing
the
command.
Applies
to:
–all
This
parameter
applies
to
the
DB2
user
password,
the
IBM
Tivoli
Storage
Area
Network
Manager
host
authentication
password,
and
the
WebSphere
Application
Server
administrator
password.
–db2
This
parameter
applies
to
the
DB2
database
password
that
was
created
when
IBM
Tivoli
Storage
Area
Network
Manager
was
installed.
This
is
not
the
DB2
administrative
password
(db2admin).
This
option
is
valid
only
when
the
command
is
run
on
the
manager
machine.
–auth
This
parameter
applies
to
the
host
authentication
password
for
the
manager,
managed
hosts,
and
remote
consoles.
The
host
authentication
password
is
first
set
when
IBM
Tivoli
Storage
Area
Network
Manager
is
installed.
You
can
use
this
option
when
the
command
is
run
on
the
manager,
managed
host,
and
remote
console
machines.
–was
This
changes
the
WebSphere
Application
Server
administrator
password.
Examples
Task
Change
all
the
passwords
to
newpass1.
Command:
srmcp
-u
user1
-p
password1
ConfigService
setSinglePw
all
newpass1
86
IBM
Tivoli
Storage
Area
Network
Manager:
User’s
Guide
||
|
|||
|
|||
|
|
||||||||||||||||||
||||||||||||||||||||||
|
|
||
||
|
||||
|||||
||||||
||
|
||
||
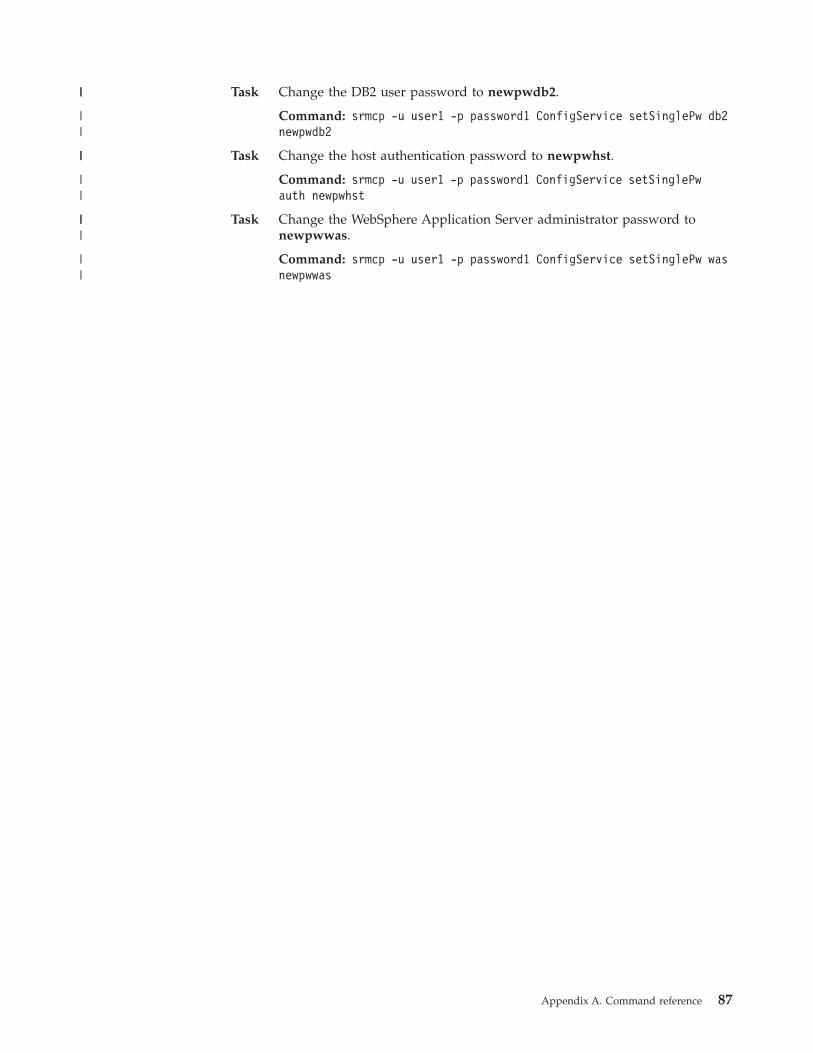
Task
Change
the
DB2
user
password
to
newpwdb2.
Command:
srmcp
-u
user1
-p
password1
ConfigService
setSinglePw
db2
newpwdb2
Task
Change
the
host
authentication
password
to
newpwhst.
Command:
srmcp
-u
user1
-p
password1
ConfigService
setSinglePw
auth
newpwhst
Task
Change
the
WebSphere
Application
Server
administrator
password
to
newpwwas.
Command:
srmcp
-u
user1
-p
password1
ConfigService
setSinglePw
was
newpwwas
Appendix
A.
Command
reference
87
||
||
||
||
|||
||

SAN
Event
Service
commands
You
can
use
the
commands
described
in
this
section
to
view,
create,
and
modify
event
filters.
These
filters
apply
to
both
SNMP
traps
and
Tivoli
Enterprise
Console
events.
The
SAN
Event
Service
commands
are:
v
“srmcp
SANEvent
ChangeFilterRulePriority”
on
page
89
v
“srmcp
SANEvent
DeleteFilterRule”
on
page
90
v
“srmcp
ConfigService
help”
on
page
83
v
“srmcp
SANEvent
InsertFilterRule”
on
page
92
v
“srmcp
SANEvent
ListFilterRules”
on
page
94
v
“srmcp
SANEvent
SetDefaultFilterRules”
on
page
95
v
“srmcp
SANEvent
UpdateFilterRule”
on
page
96
88
IBM
Tivoli
Storage
Area
Network
Manager:
User’s
Guide
|
|||
|
|
|
|
|
|
|
|
|

srmcp
SANEvent
ChangeFilterRulePriority
Use
this
command
to
change
the
priority
(the
ID)
of
a
rule.
The
highest
priority
is
1.
To
determine
the
ID
associated
with
the
rule
you
want
to
delete,
issue
the
ListFilterRules
command.
Format
��
srmcp
–u
user_id
–p
password
SANEvent
ChangeFilterRulePriority
�
�
old_rule_id
new_rule_id
��
Parameters
–u
user_id
The
ID
of
the
user
issuing
the
command.
This
parameter
is
required.
–p
password
The
password
for
the
user
issuing
the
command.
This
parameter
is
required.
old_rule_id
The
current
ID
of
the
rule
whose
priority
you
want
to
change.
This
parameter
is
required.
new_rule_id
The
new
ID
of
the
rule
whose
priority
you
want
to
change.
This
parameter
is
required.
Examples
Task
Change
the
rule
with
the
current
priority
of
7
to
a
priority
of
1.
Command:
srmcp
-u
user1
-p
password1
SANEvent
ChangeFilterRulePriority
7
1
Appendix
A.
Command
reference
89
||||
|
||||||||||||||||||
|||||||||||
|
||
||
|||
|||
|
||
||
|

srmcp
SANEvent
DeleteFilterRule
Use
this
command
to
delete
a
filter
rule.
To
determine
the
ID
associated
with
the
rule
you
want
to
delete,
issue
the
ListFilterRules
command.
Format
��
srmcp
–u
user_id
–p
password
SANEvent
DeleteFilterRule
�
�
rule_id
��
Parameters
–u
user_id
The
ID
of
the
user
issuing
the
command.
This
parameter
is
required.
–p
password
The
password
for
the
user
issuing
the
command.
This
parameter
is
required.
rule_id
The
ID
of
the
rule
you
want
to
delete.
This
parameter
is
required.
Examples
Task
Delete
the
rule
with
the
rule
ID
of
7.
Command:
srmcp
-u
user1
-p
password1
SANEvent
DeleteFilterRule
7
90
IBM
Tivoli
Storage
Area
Network
Manager:
User’s
Guide
|||
|
||||||||||||||||||
|||||||||
|
||
||
||
|
||
|
|

srmcp
SANEvent
help
Use
this
command
to
display
help
for
the
Discover
Engine
commands.
Format
��
srmcp
–u
user_id
–p
password
SANEvent
help
��
Parameters
–u
user_id
The
ID
of
the
user
issuing
the
command.
This
parameter
is
required.
–p
password
The
password
for
the
user
issuing
the
command.
This
parameter
is
required.
Examples
Task
Display
help.
Command:
srmcp
-u
user1
-p
password1
SANEvent
help
Appendix
A.
Command
reference
91
||
|
||||||||||||||||||
|
||
||
|
||
|
|

srmcp
SANEvent
InsertFilterRule
Use
this
command
to
define
and
insert
a
new
filter
rule
in
the
current
rule
list.
Note:
If
the
definition
of
the
new
rule
specifies
an
existing
rule
ID,
the
rule
ID
of
the
existing
rule
and
all
higher
rule
IDs
are
incremented.
This
allows
new
rules
to
be
inserted
with
a
priority
relative
to
existing
rules.
Format
��
srmcp
–u
user_id
–p
password
SANEvent
InsertFilterRule
�
�
Event_Action
publish
suppress
Event_Type
tec
trap
Rule_ID
rule_id
�
�
Event_Category
PhysicalEntityEvent
PhysicalRelationshipEvent
LogicalEntityEvent
LogicalRelationshipEvent
SANManagerStatusEvent
ServiceEvent
�
�
Event_Severity
fatal
critical
minor
warning
harmless
unknown
�
�
Unique_ID
unique_id
Entity_Type
entity_type
��
Parameters
–u
user_id
The
ID
of
the
user
issuing
the
command.
This
parameter
is
required.
–p
password
The
password
for
the
user
issuing
the
command.
This
parameter
is
required.
Event_Action
The
action
to
be
taken
for
this
event.
This
parameter
is
required.
publish
Publish
the
event.
suppress
Suppress
the
event.
Event_Type
The
type
of
event.
This
parameter
is
required.
tec
A
Tivoli
Enterprise
Console
event.
trap
An
SNMP
event.
Rule_ID
The
priority
of
the
new
rule.
This
parameter
is
required.
92
IBM
Tivoli
Storage
Area
Network
Manager:
User’s
Guide
||
|||
|
||||||||||||||||||
|||||||||||||||||||||||||||||
|||||||||||||||||||||||||||||||
|||||||||||||||||||||||||||||||
|||||||||||||||||||
|
|
||
||
||
||
||
||
||
||
||

Event_Category
The
category
of
the
event.
This
parameter
is
optional.
IBM
Tivoli
Storage
Area
Network
Manager
publishes
six
categories,
or
types,
of
Tivoli
Enterprise
Console
events.
These
categories
are:
PhysicalEntityEvent
Events
concerning
discovery
changes
in
physical
entities
such
as
ports,
HBAs,
or
hosts.
PhysicalRelationshipEvent
Events
concerning
discovery
changes
in
relationships
between
two
physical
entities.
For
example,
port
to
port
relationships
and
host
to
node
relationships.
LogicalEntityEvent
Events
concerning
discovery
changes
in
logical
entities
such
as
file
systems,
logical
units,
and
volume
groups.
LogicalRelationshipEvent
Events
concerning
discovery
changes
in
relationships
between
two
logical
entities.
For
example,
operating
system
to
file
system
relationships
and
operating
system
to
physical
volume
relationships.
SANManagerStatusEvent
Events
when
a
major
operation
such
as
Clear
History
has
completed.
ServiceEvent
Events
when
IBM
Tivoli
Storage
Area
Network
Manager
detects
various
internal
services
starting
up
or
shutting
down.
Event_Severity
The
severity
of
the
event,
listed
in
order
of
decreasing
severity.
This
parameter
is
optional.
The
options
are:
v
fatal
v
critical
v
minor
v
warning
v
harmless
v
unknown
Unique_ID
This
identifier
is
used
in
conjunction
with
the
Entity_Type
to
uniquely
identify
a
particular
logical
or
physical
item,
or
association,
that
has
been
discovered.
The
value
supplied
must
match
the
database
table
entry
for
the
associated
entity
type.
This
parameter
is
optional.
Entity_Type
This
parameter
is
required
if
the
Unique_ID
parameter
is
specified.
See“Entity
Types”
on
page
98
for
a
list
of
possible
options.
Examples
Task
To
create
a
rule
that
causes
all
Tivoli
Enterprise
Console
events
with
a
severity
of
harmless
to
be
suppressed
and
to
give
that
rule
a
priority
of
7:
Command:
srmcp
–u
userid1
–p
password1
SANEvent
InsertFilterRule
Event_Severity
harmless
Event_Action
suppress
Event_Type
TEC
ruleID
7
Appendix
A.
Command
reference
93
||||
|||
||||
|||
||||
||
|||
|||
|
|
|
|
|
|
|||||
|||
|
|||
|||
|

srmcp
SANEvent
ListFilterRules
Use
this
command
to
list
the
current
filter
rules.
Format
��
srmcp
–u
user_id
–p
password
SANEvent
ListFilterRules
��
Parameters
–u
user_id
The
ID
of
the
user
issuing
the
command.
This
parameter
is
required.
–p
password
The
password
for
the
user
issuing
the
command.
This
parameter
is
required.
Examples
Task
List
all
the
current
filter
rules.
Command:
srmcp
-u
user1
-p
password1
SANEvent
ListFilterRules
For
example,
the
output
from
this
command,
could
include
the
following
type
of
information:
Rule_ID:
7
Event_Severity:
minor
Entity_Type:
port
Unique_ID:
3
Event_Type:
TEC
Event_Category:
PhysicalEntityEvent
Event_Action:
suppress
94
IBM
Tivoli
Storage
Area
Network
Manager:
User’s
Guide
||
|
||||||||||||||||||||
|
||
||
|
||
|
||
|||||||
|

srmcp
SANEvent
SetDefaultFilterRules
Use
this
command
restore
the
default
rules.
See
“Default
Rules”
on
page
98
for
a
list
of
the
defaults.
Note:
When
this
command
is
issued,
all
the
current
rules
are
deleted
and
replace
by
the
default
rules.
Format
��
srmcp
–u
user_id
–p
password
SANEvent
SetDefaultFilterRules
��
Parameters
–u
user_id
The
ID
of
the
user
issuing
the
command.
This
parameter
is
required.
–p
password
The
password
for
the
user
issuing
the
command.
This
parameter
is
required.
Examples
Task
Replace
the
current
filter
rules
with
the
defaults.
Command:
srmcp
-u
user1
-p
password1
SANEvent
SetDefaultFilterRules
Appendix
A.
Command
reference
95
|||
||
|
||||||||||||||||||||
|
||
||
|
||
||
|
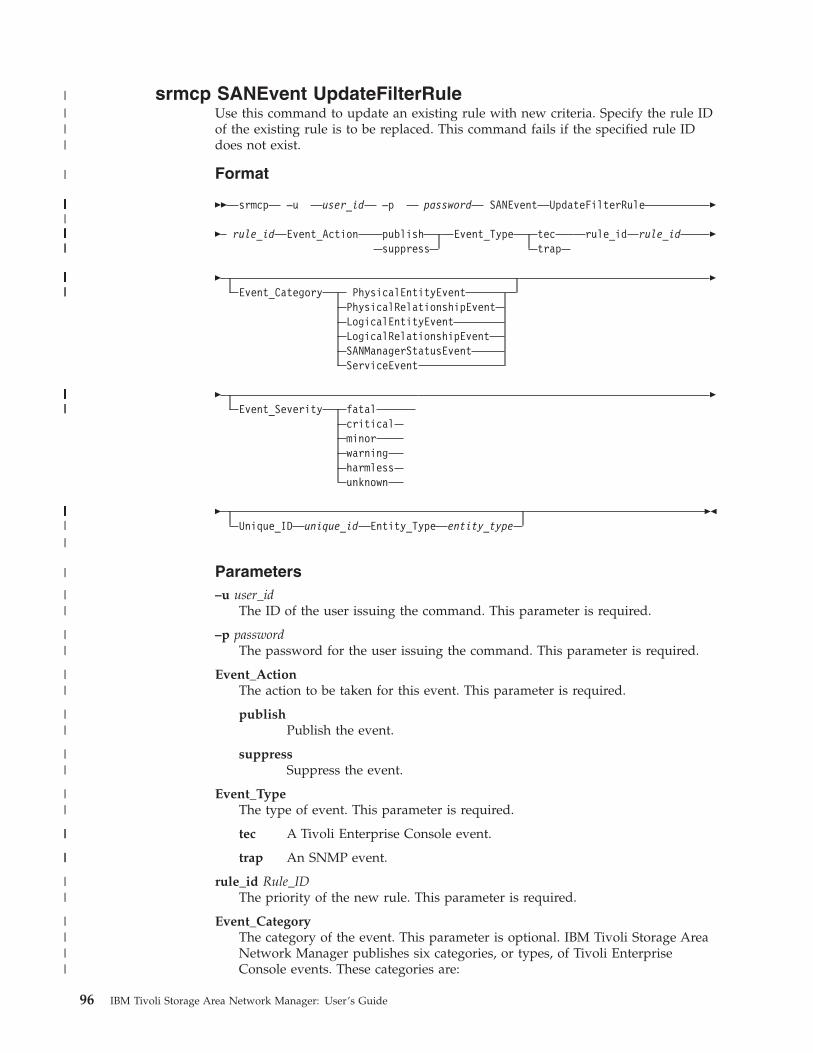
srmcp
SANEvent
UpdateFilterRule
Use
this
command
to
update
an
existing
rule
with
new
criteria.
Specify
the
rule
ID
of
the
existing
rule
is
to
be
replaced.
This
command
fails
if
the
specified
rule
ID
does
not
exist.
Format
��
srmcp
–u
user_id
–p
password
SANEvent
UpdateFilterRule
�
�
rule_id
Event_Action
publish
suppress
Event_Type
tec
trap
rule_id
rule_id
�
�
Event_Category
PhysicalEntityEvent
PhysicalRelationshipEvent
LogicalEntityEvent
LogicalRelationshipEvent
SANManagerStatusEvent
ServiceEvent
�
�
Event_Severity
fatal
critical
minor
warning
harmless
unknown
�
�
Unique_ID
unique_id
Entity_Type
entity_type
��
Parameters
–u
user_id
The
ID
of
the
user
issuing
the
command.
This
parameter
is
required.
–p
password
The
password
for
the
user
issuing
the
command.
This
parameter
is
required.
Event_Action
The
action
to
be
taken
for
this
event.
This
parameter
is
required.
publish
Publish
the
event.
suppress
Suppress
the
event.
Event_Type
The
type
of
event.
This
parameter
is
required.
tec
A
Tivoli
Enterprise
Console
event.
trap
An
SNMP
event.
rule_id
Rule_ID
The
priority
of
the
new
rule.
This
parameter
is
required.
Event_Category
The
category
of
the
event.
This
parameter
is
optional.
IBM
Tivoli
Storage
Area
Network
Manager
publishes
six
categories,
or
types,
of
Tivoli
Enterprise
Console
events.
These
categories
are:
96
IBM
Tivoli
Storage
Area
Network
Manager:
User’s
Guide
||||
|
||||||||||||||||||
|||||||||||||||||||||||||||||||
|||||||||||||||||||||||||||||||
|||||||||||||||||||||||||||||||
|||||||||||||||||||
|
|
||
||
||
||
||
||
||
||
||
||||
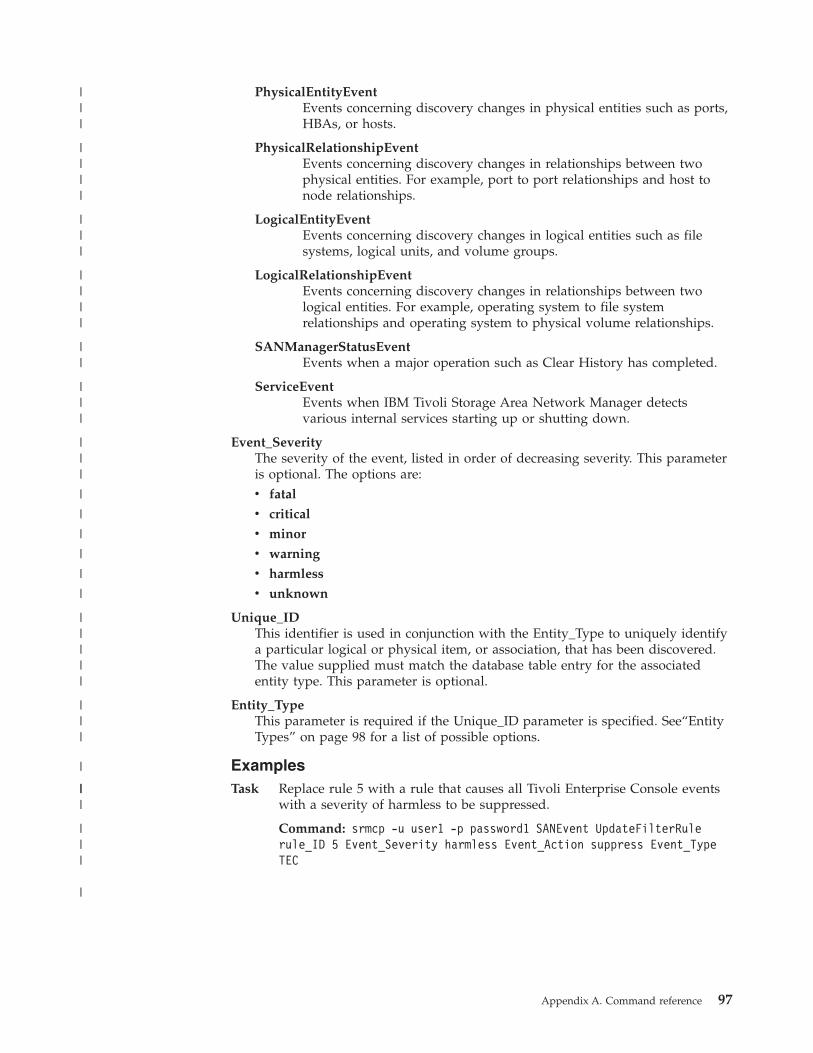
PhysicalEntityEvent
Events
concerning
discovery
changes
in
physical
entities
such
as
ports,
HBAs,
or
hosts.
PhysicalRelationshipEvent
Events
concerning
discovery
changes
in
relationships
between
two
physical
entities.
For
example,
port
to
port
relationships
and
host
to
node
relationships.
LogicalEntityEvent
Events
concerning
discovery
changes
in
logical
entities
such
as
file
systems,
logical
units,
and
volume
groups.
LogicalRelationshipEvent
Events
concerning
discovery
changes
in
relationships
between
two
logical
entities.
For
example,
operating
system
to
file
system
relationships
and
operating
system
to
physical
volume
relationships.
SANManagerStatusEvent
Events
when
a
major
operation
such
as
Clear
History
has
completed.
ServiceEvent
Events
when
IBM
Tivoli
Storage
Area
Network
Manager
detects
various
internal
services
starting
up
or
shutting
down.
Event_Severity
The
severity
of
the
event,
listed
in
order
of
decreasing
severity.
This
parameter
is
optional.
The
options
are:
v
fatal
v
critical
v
minor
v
warning
v
harmless
v
unknown
Unique_ID
This
identifier
is
used
in
conjunction
with
the
Entity_Type
to
uniquely
identify
a
particular
logical
or
physical
item,
or
association,
that
has
been
discovered.
The
value
supplied
must
match
the
database
table
entry
for
the
associated
entity
type.
This
parameter
is
optional.
Entity_Type
This
parameter
is
required
if
the
Unique_ID
parameter
is
specified.
See“Entity
Types”
on
page
98
for
a
list
of
possible
options.
Examples
Task
Replace
rule
5
with
a
rule
that
causes
all
Tivoli
Enterprise
Console
events
with
a
severity
of
harmless
to
be
suppressed.
Command:
srmcp
-u
user1
-p
password1
SANEvent
UpdateFilterRule
rule_ID
5
Event_Severity
harmless
Event_Action
suppress
Event_Type
TEC
Appendix
A.
Command
reference
97
|||
||||
|||
||||
||
|||
|||
|
|
|
|
|
|
|||||
|||
|
|||
|||
|
Entity
Types
The
following
is
a
list
of
entity
types
that
you
can
specify
with
the
Entity_Type
parameter
on
the
srmcp
SANEvent
InsertFilterRule
and
srmcp
SANEvent
UpdateFilterRule
commands:
v
Alias2Member
v
BrocadeAPI
v
File
v
System
v
HBA
v
HBA2Node
v
Host
v
Host2LUN
v
InbandAttribute
v
InbandEDFI
v
InbandManagementServer
v
Interconnect
Element
v
Logical
Unit
v
Logical
Volume
v
LUN2PE
v
Node
v
Operating
System
v
OS2FS
v
OS2LV
v
OS2PV
v
OS2VG
v
Other
v
OutbandCiscoMDS
v
OutbandEDFI
v
OutbandTopology
v
PE2Node
v
PEInbandAttribute
v
Peripheral
Entity
v
Physical
v
Volume
v
Port
v
Port2Port
v
PV2LUN
v
SAN
v
SAN2ICELT
v
San2Port
v
Unused
Volume
Group
v
Zone
Zone
v
Alias
Zone
Member
v
Zone
Set
v
Zone2Alias
v
Zone2Member
v
Zone2Port
v
ZSet2Zone
Default
Rules
The
following
are
the
default
event
filtering
rules.
If
you
define
different
rules
and
wish
to
reset
your
rules
to
these
defaults,
enter
the
srmcp
SANEvent
SetDefaultFilterRules
command
“srmcp
SANEvent
SetDefaultFilterRules”
on
page
95.
98
IBM
Tivoli
Storage
Area
Network
Manager:
User’s
Guide
|
|||||||||||||||||||||||||||||||||||||||||||||||
|
||||

Table
7.
Default
filter
rules
Rule_ID
Event_Action
Event_Type
Entity_Type
Severity
1
suppress
tec
hba2node
2
suppress
trap
hba2node
3
suppress
tec
portcport
4
suppress
trap
portcport
5
suppress
tec
pv2lunalias
6
suppress
trap
pv2lunalias
7
suppress
tec
minor
8
suppress
trap
minor
9
suppress
tec
os2fs
10
suppress
trap
os2fs
11
suppress
tec
os2lv
12
suppress
trap
os2lv
13
suppress
tec
os2pv
14
suppress
trap
os2pv
15
suppress
tec
os2vg
16
suppress
trap
os2vg
17
suppress
tec
pe2node
18
suppress
trap
pe2node
Appendix
A.
Command
reference
99
||
|||||
|||||
|||||
|||||
|||||
|||||
|||||
|||||
|||||
|||||
|||||
|||||
|||||
|||||
|||||
|||||
|||||
|||||
|||||||

SANAgentOutbandChangeAgent
commands
The
commands
in
this
section
allow
you
to
control
which
events
on
your
system
will
cause
a
rediscovery
to
be
run.
You
can
use
the
commands
to
view
the
traps
being
received
and
to
filter
out
traps
that
should
not
cause
a
rediscovery.
There
are
no
default
filters.
The
commands
perform
the
following
functions:
v
Display
the
list
of
commands
–
“srmcp
SANAgentOutbandChangeAgent
help”
on
page
101
v
List
the
filters
that
have
been
defined
–
“srmcp
SANAgentOutbandChangeAgent
list”
on
page
102
v
Create
a
new
event
filter
–
“srmcp
SANAgentOutbandChangeAgent
add
filter”
on
page
103
v
Remove
a
filter
–
“srmcp
SANAgentOutbandChangeAgent
remove
filter”
on
page
105
v
Specify
the
addresses
that
a
filter
applies
to
–
“srmcp
SANAgentOutbandChangeAgent
add
address”
on
page
104
v
Remove
an
address
from
a
filter
–
“srmcp
SANAgentOutbandChangeAgent
remove
address”
on
page
106
100
IBM
Tivoli
Storage
Area
Network
Manager:
User’s
Guide
|
||||
||
||
||
||
||
||
|

srmcp
SANAgentOutbandChangeAgent
help
Use
this
command
to
display
a
list
of
commands.
Format
��
srmcp
–u
user_id
–p
password
SANAgentOutbandChangeAgent
help
��
Parameters
–u
user_id
The
ID
of
the
user
issuing
the
command.
This
parameter
is
required.
–p
password
The
password
for
the
user
issuing
the
command.
This
parameter
is
required.
Examples
Task
Command:
srmcp
-u
user1
-p
password1
SANAgentOutbandChangeAgent
Appendix
A.
Command
reference
101
||
|
||||||||||||||||||||
|
||
||
|
|
|
|

srmcp
SANAgentOutbandChangeAgent
list
Use
this
command
to
display
a
list
of
defined
filters.
Format
��
srmcp
–u
user_id
–p
password
SANAgentOutbandChangeAgent
list
��
Parameters
–u
user_id
The
ID
of
the
user
issuing
the
command.
This
parameter
is
required.
–p
password
The
password
for
the
user
issuing
the
command.
This
parameter
is
required.
Examples
Task
Display
a
list
of
defined
filters.
Command:
srmcp
-u
user1
-p
password1
SANAgentOutbandChangeAgent
list
Outout:
----
Filter:
2
----
Enterprise:
1.2.3
Generic
Trap:
Not
Specified
Specific
Trap:Not
Specified
Addresses:
All
IP
Addresses
----
Filter:
1
----
Enterprise:
1.2.3
Generic
Trap:
Not
Specified
Specific
Trap:Not
Specified
Addresses:
8.8.8.8
9.9.9.9
In
this
example
there
are
two
defined
filters
configured.
Filter
2
will
filter
the
trap
if
the
trap
enterprise
OID
starts
with
1.2.3
102
IBM
Tivoli
Storage
Area
Network
Manager:
User’s
Guide
||
|
||||||||||||||||||||
|
||
||
|
||
||
|
||||||||||||
||
|

srmcp
SANAgentOutbandChangeAgent
add
filter
Use
this
command
to
create
a
new
event
filter.
Each
filter
should
define
its
criteria
a
specifically
as
possible.
By
default,
the
filter
applies
to
all
IP
addresses.
Therefor,
the
add
filter
command
should
always
be
followed
by
an
add
address
command
to
specify
the
IP
addresses.
None
of
the
fields
is
required
and
if
not
specified
will
match
to
all
values.
Format
��
srmcp
–u
user_id
–p
password
�
�
SANAgentOutbandChangeAgent
add
filter
enterprise
=
value
�
�
genericTrap
=
value
specificTrap
=
value
�
OID
variable
=
value
��
Parameters
–u
user_id
The
ID
of
the
user
issuing
the
command.
This
parameter
is
required.
–p
password
The
password
for
the
user
issuing
the
command.
This
parameter
is
required.
enterprise
genericTrap
specificTrap
See
the
“Using
trace
to
see
traps”
on
page
107
for
information
on
how
to
determine
the
values
for
a
specific
trap.
variable
OID
OID
Examples
Task
Filter
traps
where
the
enterprise
starts
with
’1.2.3’.
Command:
srmcp
-u
user1
-p
password1
SANAgentOutbandChangeAgent
add
filter
enterprise=1.2.3
Task
Filter
all
traps
where
the
generic
ID
is
5
and
the
specific
ID
is
2.
Command:
srmcp
-u
user1
-p
password1
SANAgentOutbandChangeAgent
add
filter
add
filter
generictrap=5
specifictrap=2
Task
Filter
traps
where
the
enterprise
starts
with
’1.2.3’
and
the
variable
with
an
OID
of
’4.5.6’
has
a
value
of
7.
Command:
srmcp
-u
user1
-p
password1
SANAgentOutbandChangeAgent
add
filter
add
filter
generictrap=5
specifictrap=2
Appendix
A.
Command
reference
103
||||||
|
||||||||||||||
|||||||||||||||
||||||||||||||||||||||||||||||
|
|
||
||
|
|
|||
|
|
|
||
||
||
||
|||
||
|

srmcp
SANAgentOutbandChangeAgent
add
address
Use
this
command
to
specify
which
address
or
addresses
the
specified
filter
applies
to.
Format
��
srmcp
–u
user_id
–p
password
�
�
SANAgentOutbandChangeAgent
add
address
filter
ID
�
address
��
Parameters
–u
user_id
The
ID
of
the
user
issuing
the
command.
This
parameter
is
required.
–p
password
The
password
for
the
user
issuing
the
command.
This
parameter
is
required.
filter
ID
The
ID
of
the
filter.
The
filter
IDs
are
displayed
in
the
list
command.
address
Examples
Task
Specify
that
traps
from
1.2.3.4
and
9.8.7.6
will
be
checked
for
filter
5
Command:
srmcp
-u
user1
-p
password1
SANAgentOutbandChangeAgent
add
address
5
1.2.3.4
9.8.7.6
104
IBM
Tivoli
Storage
Area
Network
Manager:
User’s
Guide
|||
|
||||||||||||||
||||||||||||||||||||
|
|
||
||
||
|
|
||
||
|
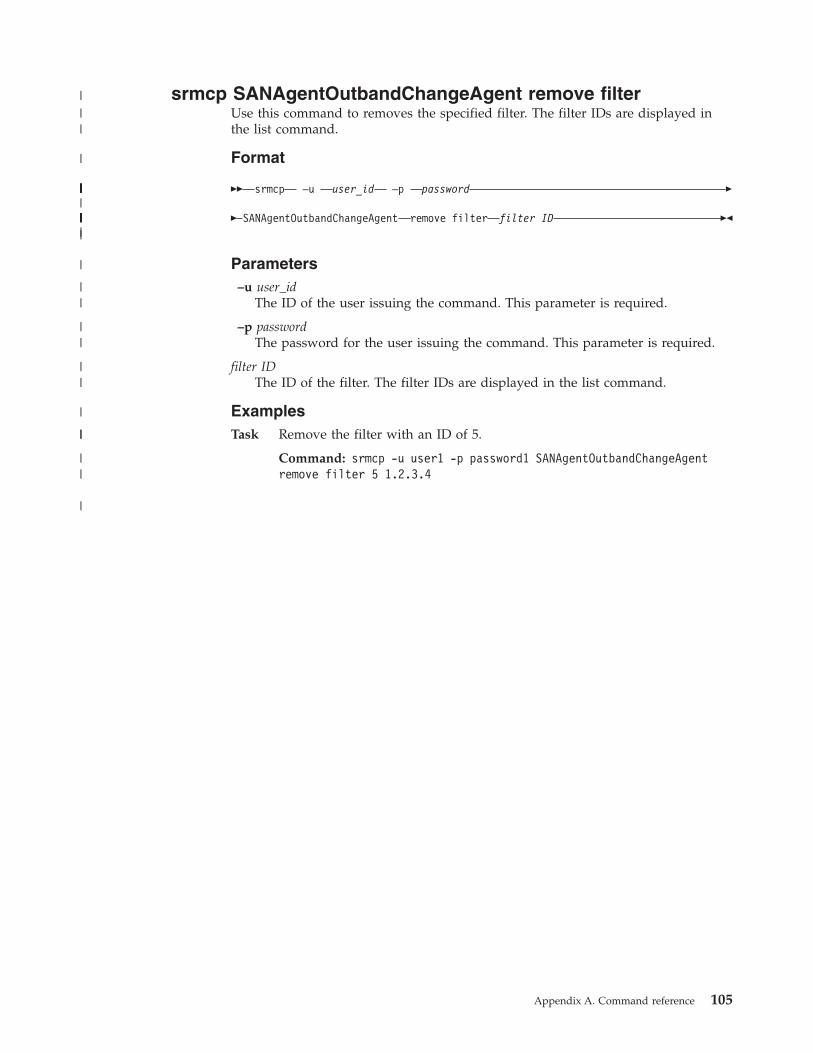
srmcp
SANAgentOutbandChangeAgent
remove
filter
Use
this
command
to
removes
the
specified
filter.
The
filter
IDs
are
displayed
in
the
list
command.
Format
��
srmcp
–u
user_id
–p
password
�
�
SANAgentOutbandChangeAgent
remove
filter
filter
ID
��
Parameters
–u
user_id
The
ID
of
the
user
issuing
the
command.
This
parameter
is
required.
–p
password
The
password
for
the
user
issuing
the
command.
This
parameter
is
required.
filter
ID
The
ID
of
the
filter.
The
filter
IDs
are
displayed
in
the
list
command.
Examples
Task
Remove
the
filter
with
an
ID
of
5.
Command:
srmcp
-u
user1
-p
password1
SANAgentOutbandChangeAgent
remove
filter
5
1.2.3.4
Appendix
A.
Command
reference
105
|||
|
||||||||||||||
|||||||||||||
|
||
||
||
|
||
||
|

srmcp
SANAgentOutbandChangeAgent
remove
address
Use
this
command
to
removes
an
address
from
a
filter.
Format
��
srmcp
–u
user_id
–p
password
�
�
SANAgentOutbandChangeAgent
remove
address
address
��
Parameters
–u
user_id
The
ID
of
the
user
issuing
the
command.
This
parameter
is
required.
–p
password
The
password
for
the
user
issuing
the
command.
This
parameter
is
required.
address
Note:
If
no
IP
addresses
are
specified
for
a
filter,
the
filter
will
apply
to
all
IP
addresses.
Examples
Task
Traps
from
1.2.3.4
are
no
longer
specifically
checked
for
trap
5.
Command:
srmcp
-u
user1
-p
password1
SANAgentOutbandChangeAgent
remove
address
5
1.2.3.4
106
IBM
Tivoli
Storage
Area
Network
Manager:
User’s
Guide
||
|
||||||||||||||
|||||||||||||
|
||
||
|
||
|
||
||
|
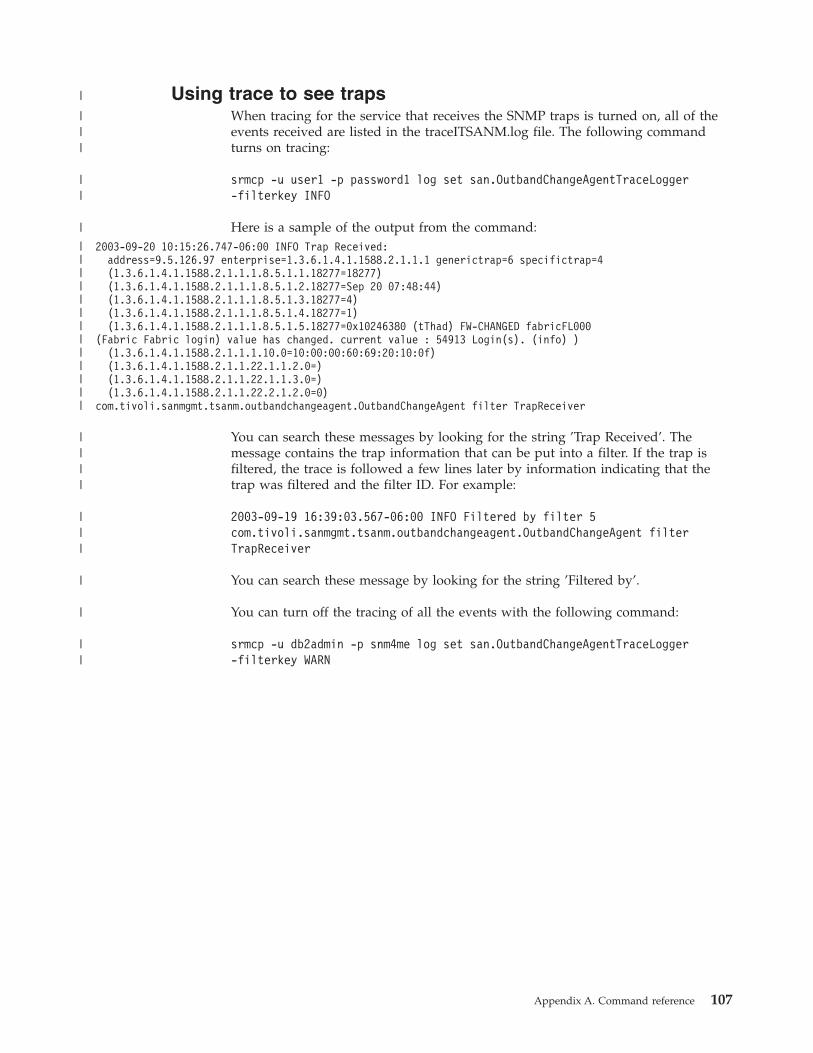
Using
trace
to
see
traps
When
tracing
for
the
service
that
receives
the
SNMP
traps
is
turned
on,
all
of
the
events
received
are
listed
in
the
traceITSANM.log
file.
The
following
command
turns
on
tracing:
srmcp
-u
user1
-p
password1
log
set
san.OutbandChangeAgentTraceLogger
-filterkey
INFO
Here
is
a
sample
of
the
output
from
the
command:
2003-09-20
10:15:26.747-06:00
INFO
Trap
Received:
address=9.5.126.97
enterprise=1.3.6.1.4.1.1588.2.1.1.1
generictrap=6
specifictrap=4
(1.3.6.1.4.1.1588.2.1.1.1.8.5.1.1.18277=18277)
(1.3.6.1.4.1.1588.2.1.1.1.8.5.1.2.18277=Sep
20
07:48:44)
(1.3.6.1.4.1.1588.2.1.1.1.8.5.1.3.18277=4)
(1.3.6.1.4.1.1588.2.1.1.1.8.5.1.4.18277=1)
(1.3.6.1.4.1.1588.2.1.1.1.8.5.1.5.18277=0x10246380
(tThad)
FW-CHANGED
fabricFL000
(Fabric
Fabric
login)
value
has
changed.
current
value
:
54913
Login(s).
(info)
)
(1.3.6.1.4.1.1588.2.1.1.1.10.0=10:00:00:60:69:20:10:0f)
(1.3.6.1.4.1.1588.2.1.1.22.1.1.2.0=)
(1.3.6.1.4.1.1588.2.1.1.22.1.1.3.0=)
(1.3.6.1.4.1.1588.2.1.1.22.2.1.2.0=0)
com.tivoli.sanmgmt.tsanm.outbandchangeagent.OutbandChangeAgent
filter
TrapReceiver
You
can
search
these
messages
by
looking
for
the
string
’Trap
Received’.
The
message
contains
the
trap
information
that
can
be
put
into
a
filter.
If
the
trap
is
filtered,
the
trace
is
followed
a
few
lines
later
by
information
indicating
that
the
trap
was
filtered
and
the
filter
ID.
For
example:
2003-09-19
16:39:03.567-06:00
INFO
Filtered
by
filter
5
com.tivoli.sanmgmt.tsanm.outbandchangeagent.OutbandChangeAgent
filter
TrapReceiver
You
can
search
these
message
by
looking
for
the
string
’Filtered
by’.
You
can
turn
off
the
tracing
of
all
the
events
with
the
following
command:
srmcp
-u
db2admin
-p
snm4me
log
set
san.OutbandChangeAgentTraceLogger
-filterkey
WARN
Appendix
A.
Command
reference
107
|
|||
||
|
|||||||||||||
||||
|||
|
|
||

Tivoli
NetView
command
This
section
describes
the
Tivoli
NetView
command,
nvsniffer.
This
command
is
used
to
discover
and
monitor
the
iSCSI
devices
on
the
network.
108
IBM
Tivoli
Storage
Area
Network
Manager:
User’s
Guide

nvsniffer
The
nvsniffer
command
is
used
for
discovering
iSCSI
devices
on
nodes
in
the
network
and
for
monitoring
the
status
of
these
devices.
Service
objects
are
created
in
the
object
database
for
each
device
that
is
discovered
at
a
node.
A
node’s
devices
are
represented
on
the
map
at
the
node’s
interface
level.
Device
objects
contain
status,
and
this
status
optionally
contributes
to
a
node’s
overall
IP
status.
The
node
automatically
becomes
a
member
of
the
corresponding
service
SmartSet
for
each
device
that
is
discovered.
Note:
This
description
is
a
subset
of
the
parameters
you
can
specify
for
the
nvsniffer
command.
For
a
complete
description
of
the
nvsniffer
command,
refer
to
NetView
for
Windows
NT
Programmer’s
Reference.
Syntax
��
nvsniffer
–c
configFile
–r
minutes
–t
numThreads
��
Parameters
–c
configFile
Specify
the
configuration
file
for
the
iSCSI
discovery.
–r
minutes
Use
this
option
to
reschedule
nvsniffer
with
the
current
settings
and
options.
The
minutes
specified
indicate
how
often
the
polling
is
done.
The
default
polling
rate
is
every
60
minutes.
The
valid
values
are
from
5
to
44640
minutes
(up
to
31
days
maximum).
–t
numThreads
Specify
the
maximum
number
of
threads
to
be
activated
when
nvsniffer
is
invoked.
The
valid
range
is
from
1
to
50,
inclusive.
Examples
Task
Perform
a
status
check
on
all
services
in
the
configuration
file
specified.
The
status
check
is
done
again
every
120
minutes.
Command:
nvsniffer
-c
\usr\ov\log\nvsniffer.conf
-r
120
Appendix
A.
Command
reference
109

110
IBM
Tivoli
Storage
Area
Network
Manager:
User’s
Guide

Appendix
B.
Troubleshooting
This
appendix
describes
SAN
management
problems
you
could
encounter,
and
how
you
can
to
recover
from
these
problems.
It
is
crucial
that
you
install
and
maintain
the
most
recent
maintenance
level
for
Tivoli
Storage
Area
Network
Manager.
Maintenance
information
and
downloads
for
Tivoli
Storage
Area
Network
Manager
can
be
obtained
at:
http://www.ibm.com/software/support/
Before
contacting
customer
support,
ensure
you
have
installed
the
most
recent
Tivoli
Storage
Area
Network
Manager
maintenance.
IBM
customer
support
might
request
that
you
send
a
snapshot
of
your
database.
See
“Taking
a
database
snapshot”
on
page
117
for
details.
For
support
for
this
or
any
IBM
Tivoli
product,
you
can
contact
IBM
Tivoli
Customer
Support.
See
“Contacting
customer
support”
on
page
vii
for
more
information.
Checking
log
files
IBM
Tivoli
Storage
Area
Network
Manager
logs
or
records
textual
messages
of
agent,
manager,
and
console
events.
You
can
check
the
log
files
for
these
components
for
event
errors
at
any
time.
The
following
tables
display
the
default
log
file
locations
for
all
the
components
and
agents.
Table
8.
Default
log
file
locations
for
manager
components
Tivoli
Storage
Area
Network
Manager
Log
File
Locations
Operating
System
Component
Log
file
location
Windows
agent
c:\tivoli\itsanm\agent\log
manager
c:\tivoli\itsanm\manager\log
console
c:\tivoli\itsanm\console\log
AIX
agent
/tivoli/itsanm/agent/log
manager
/tivoli/itsanm/manager/log
Solaris
agent
/tivoli/itsanm/agent/log
Linux
(Red
Hat
and
Suse)
agent
/tivoli/itsanm/agent/log
Table
9.
Default
log
file
locations
for
agents
Tivoli
Storage
Area
Network
Manager
Agent
Log
File
Locations
Operating
System
Component
Log
file
location
Windows
agent
c:\tivoli\itsrm\agent\log
AIX
agent
/tivoli/itsrm/agent/log
Solaris
agent
/tivoli/itsrm/agent/log
©
Copyright
IBM
Corp.
2002,
2003
111

You
can
configure
the
size,
type,
format,
and
locale
of
your
Tivoli
Storage
Area
Network
Manager
message
log
files.
See
Appendix
A,
“Command
reference,”
on
page
71
for
more
information.
Troubleshooting
SAN
management
problems
Table
10
describes
problems
you
may
encounter
when
performing
SAN
management
tasks,
and
how
to
recover
from
these
problems.
Table
10.
SAN
management
problems
and
recovery
Problem
Recovery
Two
SANs,
with
unique
WWN
names,
contain
some
of
the
same
switches
whose
symbol
colors
are
green.
The
symbol
color
for
one
SAN
is
green
and
the
other
is
yellow.
The
yellow
SAN
should
contain
a
switch
with
the
same
WWN
as
the
SAN
that
is
being
displayed
in
red.
The
principal
switch
of
a
fabric
has
either
been
powered
off
or
has
failed.
Tivoli
Storage
Area
Network
Manager
reconfigures
the
remaining
switches
with
a
new
SAN
name,
which
is
the
WWN
of
a
different
switch
that
has
become
the
principal
switch.
The
first
SAN
displays
in
yellow
because
it
contains
both
red
and
green
switch
segments.
The
green
switch
segments
reconfigure
to
form
a
new
fabric.
The
new
SAN
displays
the
reconfigured
switches,
but
the
old
SAN
(yellow)
still
references
them.
You
must
perform
a
Clear
History
to
remove
the
old
SAN
from
the
topology
view
and
leave
only
the
newly
configured
SAN.
To
Clear
History:
1.
Select
SAN
→
Configure
Manager
from
the
console
menu.
2.
From
the
SAN
Configuration
dialog,
click
the
Clear
History
button.
3.
Click
OK.
NetView
starts
up
with
an
error,
and
then
shuts
itself
off
again.
The
NetView
service
fails
to
restart
after
attempts
to
reboot
or
restart
the
service.
Contact
support
for
help
in
clearing
the
NetView
database.
If
the
NetView
database
is
cleared
while
Tivoli
Storage
Area
Network
Manager
is
running,
it
may
be
necessary
to
reinstall
NetView.
NetView
stops
working.
Configure
Manager
and
Configure
Agent
panels
will
not
come
up
and
updates
of
the
log
have
stopped.
Close
NetView
and
then
reopen
it.
Refer
to
IBM
Tivoli
Storage
Area
Network
Manager
Planning
and
Installation
Guide
Appendix
B
for
more
information.
You
click
on
NetView
SAN
menu
items
and
nothing
comes
up.
Ensure
that
the
SanManagerDaemon
Service
is
running,
then
click
on
the
menu
item
again.
If
the
menu
does
not
come
up,
close
the
NetView
console,
then
reopen
NetView
console
and
click
on
the
menu
item
again.
NetView
topology
view
displays
blue
icons
in
the
submap
stack
that
do
not
contain
topology
information
when
opened.
This
is
expected
behavior
when
it
occurs
as
Tivoli
Storage
Area
Network
Manager
updates
a
map.
The
lower
left
status
line
of
the
NetView
console
will
flash
’Updating
Map.’
If
the
status
line
displays
’Ready,’
the
icon
may
become
blue
if
that
submap
has
been
deleted.
If
you
select
a
blue
icon
and
it
is
empty,
selecting
a
non-blue
icon
opens
another
submap
and
also
clears
the
empty
blue
icon
from
the
submap
stack.
Unsure
whether
your
Fibre
Channel
switch
supports
in-band
or
out-of-band
discovery.
Go
to
the
Tivoli
web
site
http://www.ibm.com/software/support/
for
information
about
the
type
of
support
for
many
common
switches.
Select
Systems
Management
and
Tivoli
in
the
Browse
Products
Support
field,
and
then
select
IBM
Tivoli
Storage
Area
Network
Manager.
Click
on
the
link
for
the
Device
Compatibility
Table.
Contact
your
vendor
if
your
switch
is
not
on
the
list.
112
IBM
Tivoli
Storage
Area
Network
Manager:
User’s
Guide
|||||||
|||||||||
|
|
|
|
|||
|||||||
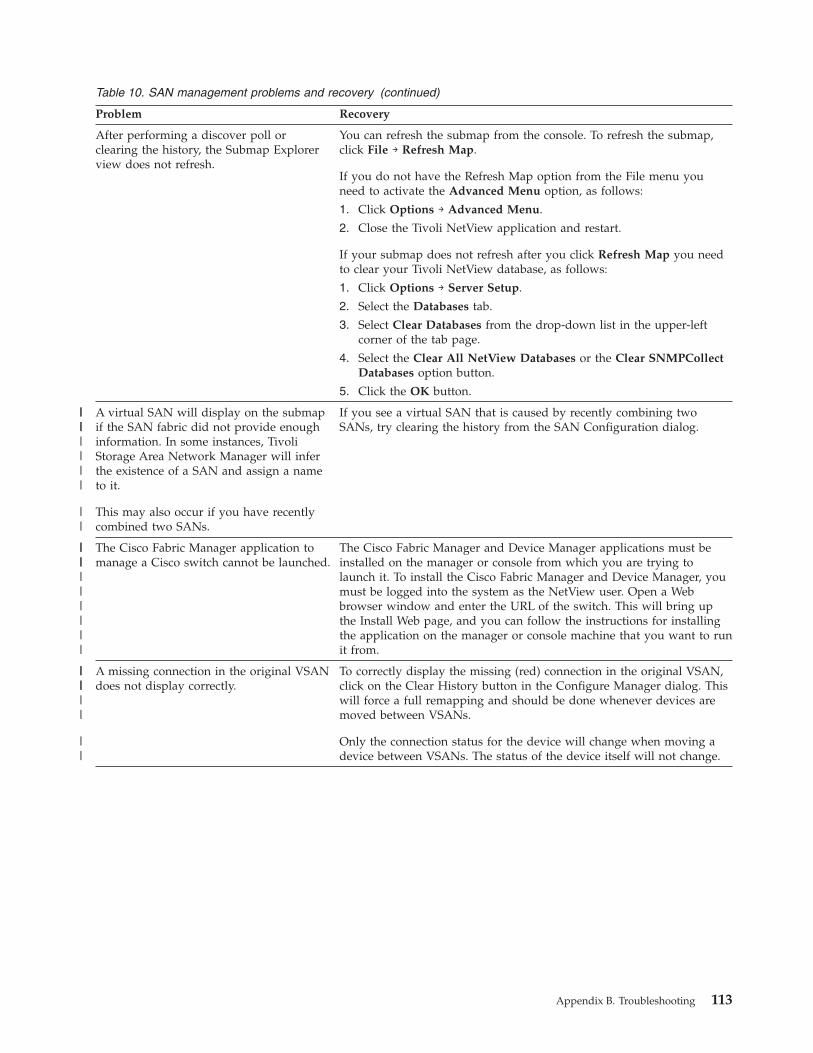
Table
10.
SAN
management
problems
and
recovery
(continued)
Problem
Recovery
After
performing
a
discover
poll
or
clearing
the
history,
the
Submap
Explorer
view
does
not
refresh.
You
can
refresh
the
submap
from
the
console.
To
refresh
the
submap,
click
File
→
Refresh
Map.
If
you
do
not
have
the
Refresh
Map
option
from
the
File
menu
you
need
to
activate
the
Advanced
Menu
option,
as
follows:
1.
Click
Options
→
Advanced
Menu.
2.
Close
the
Tivoli
NetView
application
and
restart.
If
your
submap
does
not
refresh
after
you
click
Refresh
Map
you
need
to
clear
your
Tivoli
NetView
database,
as
follows:
1.
Click
Options
→
Server
Setup.
2.
Select
the
Databases
tab.
3.
Select
Clear
Databases
from
the
drop-down
list
in
the
upper-left
corner
of
the
tab
page.
4.
Select
the
Clear
All
NetView
Databases
or
the
Clear
SNMPCollect
Databases
option
button.
5.
Click
the
OK
button.
A
virtual
SAN
will
display
on
the
submap
if
the
SAN
fabric
did
not
provide
enough
information.
In
some
instances,
Tivoli
Storage
Area
Network
Manager
will
infer
the
existence
of
a
SAN
and
assign
a
name
to
it.
This
may
also
occur
if
you
have
recently
combined
two
SANs.
If
you
see
a
virtual
SAN
that
is
caused
by
recently
combining
two
SANs,
try
clearing
the
history
from
the
SAN
Configuration
dialog.
The
Cisco
Fabric
Manager
application
to
manage
a
Cisco
switch
cannot
be
launched.
The
Cisco
Fabric
Manager
and
Device
Manager
applications
must
be
installed
on
the
manager
or
console
from
which
you
are
trying
to
launch
it.
To
install
the
Cisco
Fabric
Manager
and
Device
Manager,
you
must
be
logged
into
the
system
as
the
NetView
user.
Open
a
Web
browser
window
and
enter
the
URL
of
the
switch.
This
will
bring
up
the
Install
Web
page,
and
you
can
follow
the
instructions
for
installing
the
application
on
the
manager
or
console
machine
that
you
want
to
run
it
from.
A
missing
connection
in
the
original
VSAN
does
not
display
correctly.
To
correctly
display
the
missing
(red)
connection
in
the
original
VSAN,
click
on
the
Clear
History
button
in
the
Configure
Manager
dialog.
This
will
force
a
full
remapping
and
should
be
done
whenever
devices
are
moved
between
VSANs.
Only
the
connection
status
for
the
device
will
change
when
moving
a
device
between
VSANs.
The
status
of
the
device
itself
will
not
change.
Appendix
B.
Troubleshooting
113
||||||
||
||
||||||||||
||||||
||
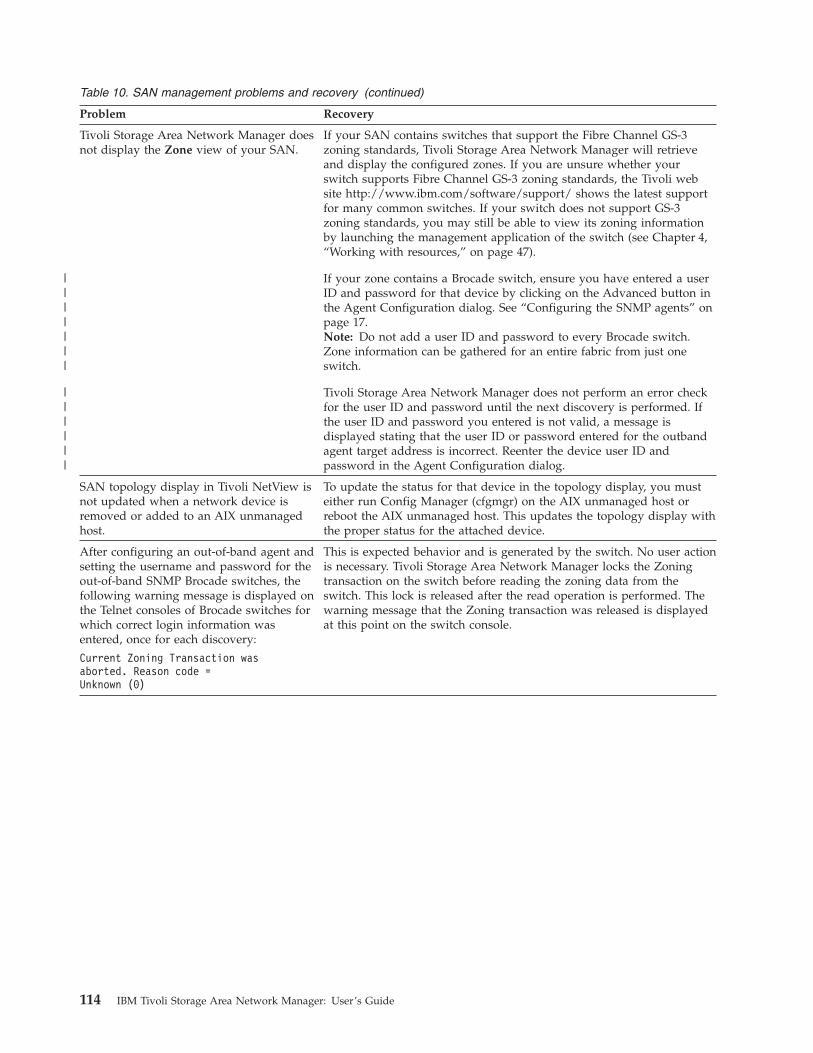
Table
10.
SAN
management
problems
and
recovery
(continued)
Problem
Recovery
Tivoli
Storage
Area
Network
Manager
does
not
display
the
Zone
view
of
your
SAN.
If
your
SAN
contains
switches
that
support
the
Fibre
Channel
GS-3
zoning
standards,
Tivoli
Storage
Area
Network
Manager
will
retrieve
and
display
the
configured
zones.
If
you
are
unsure
whether
your
switch
supports
Fibre
Channel
GS-3
zoning
standards,
the
Tivoli
web
site
http://www.ibm.com/software/support/
shows
the
latest
support
for
many
common
switches.
If
your
switch
does
not
support
GS-3
zoning
standards,
you
may
still
be
able
to
view
its
zoning
information
by
launching
the
management
application
of
the
switch
(see
Chapter
4,
“Working
with
resources,”
on
page
47).
If
your
zone
contains
a
Brocade
switch,
ensure
you
have
entered
a
user
ID
and
password
for
that
device
by
clicking
on
the
Advanced
button
in
the
Agent
Configuration
dialog.
See
“Configuring
the
SNMP
agents”
on
page
17.
Note:
Do
not
add
a
user
ID
and
password
to
every
Brocade
switch.
Zone
information
can
be
gathered
for
an
entire
fabric
from
just
one
switch.
Tivoli
Storage
Area
Network
Manager
does
not
perform
an
error
check
for
the
user
ID
and
password
until
the
next
discovery
is
performed.
If
the
user
ID
and
password
you
entered
is
not
valid,
a
message
is
displayed
stating
that
the
user
ID
or
password
entered
for
the
outband
agent
target
address
is
incorrect.
Reenter
the
device
user
ID
and
password
in
the
Agent
Configuration
dialog.
SAN
topology
display
in
Tivoli
NetView
is
not
updated
when
a
network
device
is
removed
or
added
to
an
AIX
unmanaged
host.
To
update
the
status
for
that
device
in
the
topology
display,
you
must
either
run
Config
Manager
(cfgmgr)
on
the
AIX
unmanaged
host
or
reboot
the
AIX
unmanaged
host.
This
updates
the
topology
display
with
the
proper
status
for
the
attached
device.
After
configuring
an
out-of-band
agent
and
setting
the
username
and
password
for
the
out-of-band
SNMP
Brocade
switches,
the
following
warning
message
is
displayed
on
the
Telnet
consoles
of
Brocade
switches
for
which
correct
login
information
was
entered,
once
for
each
discovery:
Current
Zoning
Transaction
was
aborted.
Reason
code
=
Unknown
(0)
This
is
expected
behavior
and
is
generated
by
the
switch.
No
user
action
is
necessary.
Tivoli
Storage
Area
Network
Manager
locks
the
Zoning
transaction
on
the
switch
before
reading
the
zoning
data
from
the
switch.
This
lock
is
released
after
the
read
operation
is
performed.
The
warning
message
that
the
Zoning
transaction
was
released
is
displayed
at
this
point
on
the
switch
console.
114
IBM
Tivoli
Storage
Area
Network
Manager:
User’s
Guide
|||||||
||||||

Table
10.
SAN
management
problems
and
recovery
(continued)
Problem
Recovery
The
topology
displayed
on
the
submap
does
not
match
the
physical
topology
of
the
loop.
When
certain
changes
occur
on
a
public
loop
of
disk
drives
attached
to
a
switch
FL_port
the
submap
might
not
match
the
actual
loop
topology.
This
occurs
when:
v
A
device
is
added
to
the
public
loop.
v
A
device
is
removed
from
the
public
loop.
v
A
device
on
a
public
loop
is
no
longer
responding.
v
A
device
on
a
public
loop
that
had
never
responded
starts
responding.
Under
any
of
the
above
conditions,
you
must
reset
the
loop
using
the
switch’s
management
application.
The
reset
loop
function
might
be
called
one
of
several
things:
v
Reset
loop.
v
Issue
Loop
Initialization
Primitive
(LIP).
v
Disable/Enable
the
FL_port.
After
resetting
the
loop,
the
Tivoli
Storage
Area
Network
Manager
console
is
automatically
refreshed.
If
the
submap
still
does
not
accurately
reflect
the
loop
topology,
begin
polling
manually.
See
the
Poll
Now
procedure
in
“Scheduling
polling”
on
page
20.
After
resetting
the
public
loop
and
refreshing
the
topology,
if
the
topology
still
does
not
accurately
reflect
the
loop
then
restart
all
Windows
NT,
Windows
2000,
Solaris,
and
Linux
managed
hosts
connected
to
the
fabric.
If
you
are
running
AIX
on
a
managed
host,
restarting
is
not
required.
The
topology
is
not
updated
after
a
disk
is
removed
or
added
to
a
JBOD.
The
switch
might
not
generate
an
event
to
notify
Tivoli
Storage
Area
Network
Manager
of
the
removal
or
addition.
The
topology
might
not
be
updated
in
this
case.
However,
the
switch
might
send
out
notification
if
it
is
doing
other
activity
and
notices
that
the
disk
has
been
added
or
removed.
This
is
specific
to
arbitrated
loop
devices.
The
topology
view
displays
a
red
host
symbol
with
a
black
connection.
The
agent
service
on
the
host
has
been
shut
down,
but
the
host
is
still
connected
to
the
switch.
After
a
single
port
is
disabled,
a
switch
is
displayed
in
a
critical
state.
Devices
attached
to
the
switch
may
still
display
as
normal,
depending
on
the
full
configuration,
but
the
connections
should
also
be
reported
as
critical.
The
switch
was
part
of
a
fabric
discovered
with
an
in-band
managed
host.
The
disabled
port
was
the
one
connecting
the
managed
host
to
the
fabric.
To
recover,
enable
the
port,
deploy
additional
agents
to
hosts
in
the
fabric
or
add
the
switch
as
an
SNMP
agent
if
it
supports
out-of-band
discovery.
Unable
to
launch
a
device
application
using
the
Tivoli
NetView
because
the
Launch
Applications
selection
is
greyed
out.
Some
SAN
devices
have
management
applications,
but
do
not
support
the
architecture
for
identifying
their
application
name.
You
cannot
launch
these
applications
from
the
Launch
Applications
context
menu.
If
you
have
such
a
device,
you
can
still
use
Tivoli
NetView
to
launch
the
application.
See
“Launching
network
device
applications”
on
page
47
for
more
information.
Appendix
B.
Troubleshooting
115
||||
||||
||||||
|||||

Table
10.
SAN
management
problems
and
recovery
(continued)
Problem
Recovery
Data
backup
or
recovery
operations
from
a
managed
host
to
local
or
SAN-attached
SCSI
tape
drives
fail.
Two
or
more
SCSI
commands
are
simultaneously
being
sent
to
the
same
removable
media
device
by
different
applications
on
the
same
system.
Because
many
HBAs
will
send
both
SCSI
commands
to
a
SCSI
tape
drive
or
CD-ROM
changer
that
does
not
support
command
queuing
causing
an
overlapped
command
error
to
occur,
the
SCSI
commands
will
fail.
The
applications
issuing
the
commands
may
terminate.
For
example,
Tivoli
Storage
Area
Network
Manager
might
be
querying
the
tape
drive
at
the
same
time
that
another
application
on
the
same
host
system
is
attempting
to
recover
data
from
that
drive.
To
avoid
this
problem,
do
not
install
Tivoli
Storage
Area
Network
Manager
software
on
systems
that
access
local
or
SAN-attached
SCSI
tape
drives.
A
SAN
does
not
appear
in
a
list
of
SANs
for
which
zone
control
can
be
performed.
Or
you
get
an
error
message
indicating
that
zoning
cannot
be
performed
for
a
SAN.
One
or
more
of
the
following
conditions
can
exist:
v
The
SAN
contains
only
Brocade
switches,
and
there
is
no
SNMP
agent
configured
for
a
switch
in
the
SAN.
v
A
user
ID
and
password
are
not
correctly
specified
for
at
least
one
Brocade
switch
in
the
SAN.
v
The
SAN
contains
non-Brocade
switches,
and
either
there
is
no
in-band
agent
connected
to
that
SAN,
or
the
HBA
API
is
not
installed
on
the
in-band
agent.
When
zone
control
is
performed
on
a
SAN
containing
Brocade
switches,
there
is
a
error
message
indicating
that
there
is
a
transaction
lock
on
the
switch.
This
can
occur
in
the
rare
case
in
which
a
network
problem
between
the
manager
machine
and
the
switch
occurs
after
a
zone
control
operation
is
started.
A
switch
reboot
may
be
needed
to
release
the
transaction
lock.
An
error
message
is
received
indicating
that
zone
control
cannot
be
performed
for
a
SAN.
An
application
lock
ensures
that
only
one
user
at
a
time
can
update
zone
information
on
a
SAN.
Wait
for
the
other
user
to
complete
the
zone
operation.
If
the
other
user
does
not
complete
the
operation
within
the
timeout
period,
the
lock
times
out.
Interpreting
device
status
In
“Interpreting
status”
on
page
39,
Table
4
on
page
39
describes
the
meaning
of
the
colors
of
the
symbols
in
the
NetView
display.
However,
under
certain
conditions
or
configurations,
the
colors
may
require
additional
interpretation.
Table
11
describes
examples
of
device
status
you
may
encounter
and
possible
causes
for
the
status.
Table
11.
Interpreting
device
status
examples
Status
Possible
Cause
NetView
displays
a
red
connection
from
the
switch
to
a
green
device
in
the
original
switch
segment
view.
The
connection
panel
in
SAN
Properties
for
the
device
should
show
missing
connections
for
any
previous
connections
and
a
normal
one
for
the
current
connection.
A
device
is
moved
from
a
port
in
one
switch
to
a
port
in
another.
To
clear
the
history,
perform
the
steps
in
“Clearing
the
status
history”
on
page
41.
NetView
displays
a
yellow
connection
from
the
switch
to
a
green
device.
Expand
the
connection
link
by
double-clicking
on
it.
Two
connections
between
the
switch
and
the
device
should
be
displayed.
One
connection
should
be
missing
and
the
other
should
be
normal.
A
device
is
moved
from
one
port
in
a
switch
to
another
port
in
the
same
switch.
To
clear
the
history,
perform
the
steps
in
“Clearing
the
status
history”
on
page
41.
116
IBM
Tivoli
Storage
Area
Network
Manager:
User’s
Guide
|||||
|
||
||
|||
||||
|||
|||
||||
|
|||||
||
||
||
|||
||
||
||
|||
||
||

Table
11.
Interpreting
device
status
examples
(continued)
Status
Possible
Cause
NetView
displays
the
removed
device
and
its
connection
to
the
switch
as
critical.
The
new
device
is
displayed
as
normal.
The
connection
panel
in
SAN
Properties
for
the
switch
will
show
two
connections
for
that
port,
but
one
will
be
missing
and
the
other
will
be
normal.
A
device
is
removed
from
a
port
on
a
switch,
and
a
different
device
is
connected
to
that
same
port.
To
clear
the
history,
perform
the
steps
in
“Clearing
the
status
history”
on
page
41.
NetView
displays
the
connection
between
the
switch
and
host
as
normal,
but
the
host
will
be
displayed
as
critical.
The
Tivoli
Storage
Area
Network
Manager
agent
service
is
shut
down
on
a
host.
NetView
displays
a
symbol
for
a
device
(for
example,
a
storage
subsystem)
as
red
with
a
black
connection
to
the
switch.
To
clear
the
history,
perform
the
steps
in
“Clearing
the
status
history”
on
page
41.
The
operation
updates
the
device
symbol
to
the
currently
available
information.
This
can
happen
if
the
device
is
discovered
through
both
in-band
and
out-of-band
mechanisms.
Extra
attribute
information
can
be
provided
through
in-band.
If
the
agent
service
is
stopped,
the
device
is
marked
red,
but
the
SNMP
agent
still
reports
the
connection
to
it
as
normal.
To
clear
the
history,
perform
the
steps
in
“Clearing
the
status
history”
on
page
41.
Taking
a
database
snapshot
If
you
contact
IBM
customer
support
about
a
problem
with
IBM
Tivoli
Storage
Area
Network
Manager,
you
may
be
asked
to
provide
a
snapshot
of
the
IBM
Tivoli
Storage
Area
Network
Manager
database.
Customer
support
uses
the
snapshot
to
view
your
SAN
topology
and
connectivity
for
troubleshooting
the
SAN
hardware
and
cabling.
You
should
create
a
database
snapshot
only
when
it
is
requested
by
customer
support.
To
take
a
snapshot
of
the
IBM
Tivoli
Storage
Area
Network
Manager
database,
do
the
following:
1.
From
the
Tivoli
NetView
menu
bar,
select
SAN
→Configuration
from
the
pull-down
menu.
2.
The
Storage
Area
Network
Manager
Configuration
panel
is
displayed.
Click
Configure
Manager.
3.
The
SAN
Configuration
notebook
is
displayed.
Click
the
Advanced
tab.
4.
The
Advanced
panel
is
displayed.
Click
Database
Snapshot
button.
This
can
take
a
few
minutes
depending
on
how
large
your
database
is.
The
status
area
indicates
the
progress
of
the
snapshot.
Appendix
B.
Troubleshooting
117
|
||
||
|||
|||
||
||||
||
|||
|||||||
|||
||
||||||
||
||
||
|
||||

When
you
create
a
snapshot
of
your
database,
Tivoli
Storage
Area
Network
Manager
immediately
saves
the
current
data
to
a
zip
file
named
ITSANMservice.zip.
You
can
locate
the
zip
file
in
the
base
installation
service
directory
of
Tivoli
Storage
Area
Network
Manager.
Customer
support
will
then
request
that
you
transmit
the
zip
file
by
using
a
method
such
as
FTP
or
e-mail.
Figure
55.
Advanced
panel
118
IBM
Tivoli
Storage
Area
Network
Manager:
User’s
Guide
|||||
Appendix
C.
Notices
This
information
was
developed
for
products
and
services
offered
in
the
U.S.A.
IBM®
may
not
offer
the
products,
services,
or
features
discussed
in
this
document
in
other
countries.
Consult
your
local
IBM
representative
for
information
on
the
products
and
services
currently
available
in
your
area.
Any
reference
to
an
IBM
product,
program,
or
service
is
not
intended
to
state
or
imply
that
only
that
IBM
product,
program,
or
service
may
be
used.
Any
functionally
equivalent
product,
program,
or
service
that
does
not
infringe
any
IBM
intellectual
property
right
may
be
used
instead.
However,
it
is
the
user’s
responsibility
to
evaluate
and
verify
the
operation
of
any
non-IBM
product,
program,
or
service.
IBM
may
have
patents
or
pending
patent
applications
covering
subject
matter
described
in
this
document.
The
furnishing
of
this
document
does
not
give
you
any
license
to
these
patents.
You
can
send
license
inquiries,
in
writing,
to:
IBM
Director
of
Licensing
IBM
Corporation
North
Castle
Drive
Armonk,
NY
10504-1785
U.S.A.
For
license
inquiries
regarding
double-byte
(DBCS)
information,
contact
the
IBM
Intellectual
Property
Department
in
your
country
or
send
inquiries,
in
writing,
to:
IBM
World
Trade
Asia
Corporation
Licensing
2-31
Roppongi
3-chome,
Minato-ku
Tokyo
106,
Japan
The
following
paragraph
does
not
apply
to
the
United
Kingdom
or
any
other
country
where
such
provisions
are
inconsistent
with
local
law:
INTERNATIONAL
BUSINESS
MACHINES
CORPORATION
PROVIDES
THIS
PUBLICATION
“AS
IS”
WITHOUT
WARRANTY
OF
ANY
KIND,
EITHER
EXPRESS
OR
IMPLIED,
INCLUDING,
BUT
NOT
LIMITED
TO,
THE
IMPLIED
WARRANTIES
OF
NON-INFRINGEMENT,
MERCHANTABILITY
OR
FITNESS
FOR
A
PARTICULAR
PURPOSE.
Some
states
do
not
allow
disclaimer
of
express
or
implied
warranties
in
certain
transactions,
therefore,
this
statement
may
not
apply
to
you.
This
information
could
include
technical
inaccuracies
or
typographical
errors.
Changes
are
periodically
made
to
the
information
herein;
these
changes
will
be
incorporated
in
new
editions
of
the
publication.
IBM
may
make
improvements
and/or
changes
in
the
product(s)
and/or
the
program(s)
described
in
this
publication
at
any
time
without
notice.
Any
references
in
this
information
to
non-IBM
Web
sites
are
provided
for
convenience
only
and
do
not
in
any
manner
serve
as
an
endorsement
of
those
Web
sites.
The
materials
at
those
Web
sites
are
not
part
of
the
materials
for
this
IBM
product
and
use
of
those
Web
sites
is
at
your
own
risk.
IBM
may
use
or
distribute
any
of
the
information
you
supply
in
any
way
it
believes
appropriate
without
incurring
any
obligation
to
you.
©
Copyright
IBM
Corp.
2002,
2003
119
Licensees
of
this
program
who
wish
to
have
information
about
it
for
the
purpose
of
enabling:
(i)
the
exchange
of
information
between
independently
created
programs
and
other
programs
(including
this
one)
and
(ii)
the
mutual
use
of
the
information
which
has
been
exchanged,
should
contact:
IBM
Corporation
Information
Enabling
Requests
Dept.
M13
5600
Cottle
Road
San
Jose
CA
95193-0001
U.S.A.
Such
information
may
be
available,
subject
to
appropriate
terms
and
conditions,
including
in
some
cases,
payment
of
a
fee.
The
licensed
program
described
in
this
information
and
all
licensed
material
available
for
it
are
provided
by
IBM
under
terms
of
the
IBM
Customer
Agreement,
IBM
International
Program
License
Agreement,
or
any
equivalent
agreement
between
us.
Information
concerning
non-IBM
products
was
obtained
from
the
suppliers
of
those
products,
their
published
announcements
or
other
publicly
available
sources.
IBM
has
not
tested
those
products
and
cannot
confirm
the
accuracy
of
performance,
compatibility
or
any
other
claims
related
to
non-IBM
products.
Questions
on
the
capabilities
of
non-IBM
products
should
be
addressed
to
the
suppliers
of
those
products.
This
information
contains
examples
of
data
and
reports
used
in
daily
business
operations.
To
illustrate
them
as
completely
as
possible,
the
examples
include
the
names
of
individuals,
companies,
brands,
and
products.
All
of
these
names
are
fictitious
and
any
similarity
to
the
names
and
addresses
used
by
an
actual
business
enterprise
is
entirely
coincidental.
If
you
are
viewing
this
information
softcopy,
the
photographs
and
color
illustrations
may
not
appear.
Trademarks
The
following
terms
are
trademarks
of
the
International
Business
Machines
Corporation
in
the
United
States
or
other
countries
or
both:
AIX
Database
2
DB2
DB2
Universal
Database
Enterprise
Storage
Server
ESCON
IBM
IBMLink
Magstar
NetView
Redbooks
RISC
System/6000
RS/6000
Tivoli
Tivoli
Enterprise
Console
Lotus®,
Lotus
Notes®,
and
Domino™
are
trademarks
or
registered
trademarks
of
International
Business
Machines
Corporation
and
Lotus
Development
Corporation
in
the
United
States,
other
countries,
or
both.
Intel
and
Pentium®
are
trademarks
or
registered
trademarks
of
Intel
Corporation
in
the
United
States,
other
countries,
or
both.
120
IBM
Tivoli
Storage
Area
Network
Manager:
User’s
Guide

Microsoft®,
Windows®,
Windows
NT®,
and
the
Windows
logo
are
trademarks
of
Microsoft
Corporation
in
the
United
States,
other
countries,
or
both.
UNIX®
is
a
registered
trademark
of
the
Open
Group
in
the
United
States,
other
countries,
or
both.
Java™
and
all
Java-based
trademarks
and
logos
are
trademarks
or
registered
trademarks
of
Sun
Microsystems,
Inc.,
in
the
United
States,
other
countries,
or
both.
Other
company,
product,
and
service
names
may
be
trademarks
or
service
marks
of
others.
Appendix
C.
Notices
121

122
IBM
Tivoli
Storage
Area
Network
Manager:
User’s
Guide

Glossary
A
agent.
An
entity
that
represents
one
or
more
managed
objects
by
(a)
emitting
notifications
regarding
the
objects
and
(b)
handling
requests
from
managers
for
management
operations
to
modify
or
query
the
objects.
See
also
IBM
Tivoli
Storage
Area
Network
Manager
agent.
C
community
name.
The
part
of
an
SNMP
message
that
represents
a
password-like
name
and
that
is
used
to
authenticate
the
SNMP
message.
D
data
collection.
See
discovery.
discovery.
The
process
of
finding
resources
within
an
enterprise,
including
finding
the
new
location
of
monitored
resources
that
were
moved.
In
IBM
Tivoli
Storage
Area
Network
Manager,
the
process
detects
logical
and
physical
storage
resources
in
the
storage
environment,
and
their
interconnections
(also
called
topology).
IBM
Tivoli
Storage
Area
Network
Manager
also
collects
attributes
of
storage
resources,
such
as
vital
product
data,
and
capacity
and
utilization
measurements.
Discovery
includes
the
detection
of
changes
in
network
topology,
such
as
new
and
deleted
nodes
or
new
and
deleted
interfaces.
See
also
discovery
interval.
discovery
interval.
The
frequency
at
which
topology
and
attribute
information
is
gathered
by
the
IBM
Tivoli
Storage
Area
Network
Manager
agents
and
sent
to
the
manager.
The
discovery
interval
is
set
by
a
schedule
to
occur
either
periodically
or
at
specific
times.
Discovery
can
also
occur
at
other
times,
such
as
when
triggered
by
an
event
from
a
SAN
switch.
E
event.
In
the
Tivoli
environment,
any
significant
change
in
the
state
of
a
system
resource,
network
resource,
or
network
application.
An
event
can
be
generated
for
a
problem,
for
the
resolution
of
a
problem,
or
for
the
successful
completion
of
a
task.
Examples
of
events
are:
the
normal
starting
and
stopping
of
a
process,
the
abnormal
termination
of
a
process,
or
the
malfunctioning
of
a
server.
G
globally
unique
identifier
(GUID).
A
16-byte
code
that
identifies
an
interface
to
an
object
across
all
computers
and
networks.
The
identifier
is
unique
because
it
contains
a
time
stamp
and
a
code
based
on
the
network
address
that
is
hard-wired
on
the
host
computer’s
LAN
interface
card.
H
host.
A
computer
that
is
connected
to
a
network
(such
as
the
Internet
or
a
SAN)
and
provides
a
point
of
access
to
that
network.
Also,
depending
on
the
environment,
the
host
can
provide
centralized
control
of
the
network.
The
host
can
be
a
client,
a
server,
both
a
client
and
a
server,
a
manager,
or
a
managed
host.
I
IBM
Tivoli
Storage
Area
Network
Manager
agent.
The
software
on
a
managed
host
that
performs
local
functions
such
as
file
system
monitoring
and
in-band
discovery.
The
functions
are
performed
in
coordination
with
the
manager.
in-band
discovery.
The
process
of
discovering
information
about
the
SAN,
including
topology
and
attribute
data,
through
the
Fibre
Channel
data
paths.
Contrast
with
out-of-band
discovery.
L
logical
unit
number
(LUN).
An
identifier
used
on
a
SCSI
bus
to
distinguish
among
devices
(logical
units)
with
the
same
SCSI
ID.
LUN.
See
logical
unit
number.
M
managed
host.
A
host
that
is
managed
by
IBM
Tivoli
Storage
Area
Network
Manager.
The
host
has
an
IBM
The
terms
in
this
glossary
are
defined
as
they
pertain
to
the
IBM
Tivoli
Storage
Area
Network
Manager
library.
If
you
do
not
find
the
term
you
need,
refer
to
the
IBM
Software
Glossary
on
the
Web
at
this
site:
http://www.ibm.com/ibm/terminology/.
©
Copyright
IBM
Corp.
2002,
2003
123

Tivoli
Storage
Area
Network
Manager
agent
installed
and
active
on
it.
Managed
hosts
are
used
for
in-band
discovery
of
the
SAN.
manager.
The
IBM
Tivoli
Storage
Area
Network
Manager
component
that
is
installed
on
a
host
and
provides
centralized
control
of
the
product.
The
manager
gathers
data
from
SNMP
agents
and
agents
on
managed
hosts
and
provides
graphical
displays
of
SANs.
The
manager
can
also
forward
events
to
the
Tivoli
Enterprise
Console
or
an
SNMP
console.
R
remote
console.
An
IBM
Tivoli
Storage
Area
Network
Manager
console
that
is
installed
on
a
machine
other
than
the
one
on
which
the
manager
is
installed.
A
remote
console
lets
you
access
IBM
Tivoli
Storage
Area
Network
Manager
from
any
location.
O
out-of-band
discovery.
The
process
of
discovering
SAN
information,
including
topology
and
device
data,
without
using
the
Fibre
Channel
data
paths.
A
common
mechanism
for
out-of-band
discovery
is
the
use
of
SNMP
MIB
queries,
which
are
invoked
over
a
TCP/IP
network.
Contrast
with
in-band
discovery.
T
topology.
The
physical
and
logical
arrangement
of
devices
in
a
storage
area
network
(SAN).
Topology
can
be
displayed
graphically,
showing
devices
and
their
interconnections.
V
VSAN.
See
virtual
storage
area
network.
virtual
storage
area
network
(VSAN).
A
Cisco
technology
that
allows
independent
logical
fabrics
to
be
defined
from
a
set
of
one
or
more
physical
switches.
A
given
switch
port
is
assigned
to
only
one
VSAN.
Each
VSAN
is
completely
isolated
from
the
other
VSANs
and
functions
as
a
separate
and
independent
fabric
with
its
own
set
of
fabric
services
(for
example,
Name
Services,
zoning,
routing,
and
so
on).
Z
zone.
A
segment
of
a
SAN
fabric
composed
of
selected
storage
devices
nodes
and
server
nodes.
Only
the
members
of
a
zone
have
access
to
one
another.
zone
members.
The
devices
in
a
zone.
zone
set.
A
group
of
zones
that
function
together
on
the
fabric.
Each
zone
set
can
accommodate
up
to
256
zones.
All
devices
in
a
zone
see
only
devices
assigned
to
that
zone,
but
any
device
in
that
zone
can
be
a
member
of
other
zones
in
the
zone
set.
124
IBM
Tivoli
Storage
Area
Network
Manager:
User’s
Guide
|
||||||||
|||
|
||
|
|
|
Index
Aagents
checking
log
files
111
configuring
14
starting
on
AIX
13
starting
on
Solaris
13
starting
on
Windows
13
Bbooks
feedback
v,
vi
online
v,
vi
ordering
v,
vi
Brocade
switch
50
user
ID
and
password
18,
26
CCisco
MDS
9000
switches
37
clearing
an
error
notification
70
commandsentering
73
nvsniffer
109
reading
syntax
diagrams
71
reference
71
setting
environment
for
issuing
73
srmcp
ConfigService
display
81,
89,
90,
91,
92,
94,
95,
96
srmcp
ConfigService
get
82
srmcp
ConfigService
help
83
srmcp
ConfigService
set
84
srmcp
log
get
76
srmcp
log
help
77
srmcp
log
set
78
types
of
71
configuringEDFI
60
IBM
Tivoli
Storage
Area
Network
Manager
agent
14
message
log
11
SNMP
agent
14
SNMP
agents
17
user
properties
files
11
Customer
Support
vii
DDB2
supported
8
device
symboldefault
status
propagation
39
filtering
based
on
status
41
status
overview
39
device-centric
viewdisplaying
associated
hosts
30
displaying
associated
LUNs
30
displaying
host
file
systems
30
displaying
host
operating
system
30
devicesclearing
status
history
41
connection
states,
defined
32
displaying
device
connections
32
displaying
properties
32
launching
device
applications
47
rebuilding
submap
views
41
symbol
status,
overview
39
symbols,
changing
labels
and
icons
35
discoverydescription
of
2
full,
setting
value
for
84
scheduling
polling
for
20
Ee-mail
contact
vi
EDFI
(Error
Detection
and
Fault
Isolation)configuring
60
error
notificationsclearing
70
viewing
64
events
62,
64
finding
an
error
on
the
topology
view
66
identifying
faulty
hardware
on
the
topology
view
69
loading
a
rule
set
63
overview
60
selecting
a
rule
set
63
starting
61
stopping
61
viewing
a
rule
set
63
Error
Detection
and
Fault
IsolationSee
EDFI
(Error
Detection
and
Fault
Isolation)
event
filtering
20
eventsEDFI
62,
64
view
in
NetView
event
database
19
Ffile
systemssecurity
for
10
filtering
events
20
finding
an
error
on
the
topology
view
(EDFI)
66
Hhost-centric
viewdisplay
29
display
host
file
systems
29
display
host
operating
system
29
display
logical
volume
disk
storage
device
29
hostsdescription
of
1
IIBM
Customer
Support
vii
IBM
Tivoli
Storage
Area
Network
Managerstarting
13
interfaces
to
Tivoli
Storage
Area
Network
Manager
6
Internet
SCSI
supportoverview
5
rescheduling
polling
44
starting
discovery
in
NetView
43
stopping
discovery
in
NetView
45
Llog
fileschecking
111
logging
service
commands
75
Mmaintenance
informationIBM
Tivoli
Storage
Area
Network
Manager
111
managed
hostsdescription
of
1
managerdescription
of
1
log
file
111
manager
service
commands
80
displaying
help
for
83
srmcp
ConfigService
display
81,
89,
90,
91,
92,
94,
95,
96
srmcp
ConfigService
get
82
srmcp
ConfigService
help
83
srmcp
ConfigService
set
84
manualsfeedback
v,
vi
online
v,
vi
ordering
v,
vi
message
loggingconfiguration
commands
11,
75
define
message
log
properties
11,
78
display
command
line
help
77
overview
11
properties,
display
76
NNetView
Web
Console
13
networkdisplay
Storage
Area
Network
22
display
submap
explorer
view
22
launching
device
applications
47
nvsniffer
command
45,
109
©
Copyright
IBM
Corp.
2002,
2003
125

Ppolling
performance
considerations
20
SAN
information
20
publicationsfeedback
v,
vi
online
v,
vi
ordering
v,
vi
Rrule
sets
(EDFI)See
also
irst
loading
63
selecting
63
viewing
63
SSAN
managementadministrator
tasks
6
problems,
troubleshooting
112
SAN
viewdisplay
topology
view
24
display
zone
view
24
security,
file
system
10
setenvsetting
to
issue
commands
73
SNMPusing
to
manage
events
19
SNMP
agentsconfiguring
17
srmcp
ConfigService
display
command
81,
89,
90,
91,
92,
94,
95,
96
srmcp
ConfigService
get
command
82
srmcp
ConfigService
help
command
83
srmcp
ConfigService
set
command
84
srmcp
log
get
command
76
srmcp
log
help
command
77
srmcp
log
set
command
78
startingagents
13
on
AIX
13
on
Solaris
13
Windows
13
EDFI
61
Tivoli
Storage
Resource
Manager
interface
9
storage
area
networkgraphically
display
22
Switch
support
for
in-band
discovery
26
switchesBrocade
admin
account
information
18
syntax
diagramoverview
71
TTivoli
Event
Browserview
NetView
event
database
19
Tivoli
NetViewlog
file
111
Tivoli
Storage
Resource
Manager,
starting
the
interface
9
topologyview
3,
24
troubleshootingSAN
management
problems
112
Uuser
properties
filedisplay
value
of
property
name
82
display
values
in
11,
81,
89,
90,
91,
92,
94,
95,
96
set
property
values
11,
84
Vviewing
the
message
log
11
user
properties
file
11
virtual
storage
area
networks
37,
38
VSAN
37,
38
WWeb
Console,
NetView
13
Web
user
interfacestarting
from
the
Tivoli
NetView
console
9
Zzone
setsactivating
56
changing
properties
56
creating
55
deactivating
56
deleting
58
working
with
49
zone
viewdisplay
24,
26
zoneschanging
properties
53
creating
51
deleting
54
working
with
49
zoninghardware
49
software
49
126
IBM
Tivoli
Storage
Area
Network
Manager:
User’s
Guide


����
Program
Number:
5698-SRS5698-SRE
Printed
in
USA
SC23-4698-03
Related Documents