October 2017 By Roman Friedman Lab Validation Report IBM Spectrum Protect v. 8.1 on Hitachi NAS Platform 4060 Using the Network Data Management Protocol

Welcome message from author
This document is posted to help you gain knowledge. Please leave a comment to let me know what you think about it! Share it to your friends and learn new things together.
Transcript

October 2017
By Roman Friedman
Lab Validation Report
IBM Spectrum Protect v. 8.1 on Hitachi NAS Platform 4060 Using the Network Data Management Protocol

FeedbackHitachi Vantara welcomes your feedback. Please share your thoughts by sending an email message to [email protected]. To assist the routing of this message, use the paper number in the subject and the title of this white paper in the text.
Revision History
Revision Changes Date
SL-010-00 Initial release October 31, 2017

Table of ContentsProduct Features 2
Hitachi NAS Platform 3
IBM Spectrum Protect 3
Test Environment Configuration 4
Network Configuration 4
IBM Spectrum Protect Server Configuration 4
Logical Configuration 4
NDMP Configuration for Hitachi NAS Platform 6
IBM Tape Library Configuration 14
IBM Spectrum Protect Version 8.1 Server Configuration 17
Label Tapes 26
Test Methodology 27
Scope 27
General Testing Steps 28
Test Scenario 28
References 41
Hitachi Vantara 41
IBM 41

1
IBM Spectrum Protect v. 8.1 on Hitachi NAS Platform 4060 Using the Network Data Management ProtocolLab Validation Report
Read the lab validation results for IBM® Spectrum Protect™ version 8.1 with Hitachi NAS Platform (HNAS) 4060 using firmware version 13.1 with the network data management protocol (NDMP). Backing up NAS storage over NDMP uses automated snapshot management, fully capturing all security descriptors. Depending on the type of NDMP backup used, the data may be diverted directly to tape drives from network attached storage attached by Fibre Channel, rather than going over the LAN.
Hitachi NAS Platform backup may protected data in a variety of ways, including the following:
File system snapshots
Local and remote object-based replication
Local and remote file-based replication
Synchronous disaster recovery for Hitachi NAS Platform
Often, the best solution includes one or more of these in addition to traditional backup.
Traditional backup uses an application, such as IBM Spectrum Protect, to schedule copies from primary storage to secondary storage.
The secondary storage may be one of the following:
Disk attached to a Spectrum Protect media server
Tape attached to a Spectrum Protect server
Tape devices directly attached or SAN attached to Hitachi NAS Platform.
Regardless, Storage Protect server controls that target.
The NDMP protocol uses a server and client model.
The Hitachi NAS Platform is the NDMP server (datamover)
The Spectrum Protect server is the NDMP client, also called a data management application (DMA)
There are three NDMP backup models:
Local NDMP
Remote NDMP
Three-way NDMP
Note — Support for NDMP is only offered in IBM Spectrum Protect extended version.
1

2
Performed tests were to ensure compatibility of the software and hardware components under specified conditions. The validation consisted of system-level tests emphasizing data movement through the NDMP device service for Hitachi NAS Platform. Testing is not intended to validate the functional capability of the IBM Spectrum Protect product nor Hitachi NAS Platform.
Note — Testing of this configuration was in a lab environment. Many things affect production environments beyond prediction or duplication in a lab environment. Follow the recommended practice of conducting proof-of-concept testing for acceptable results in a non-production, isolated test environment that otherwise matches your production environment before your production implementation of this solution.
Product FeaturesThese are the components used when testing this solution.
TABLE 1. HARDWARE COMPONENTS
Item Description Version
Hitachi NAS Platform 4060
NDMP mover NAS Platform 4060 dual node cluster
Firmware 13.1.4428.02
NDMP 4.0
Hitachi Unified Storage 130
2 ×1 TB LUNs RAID-6 (6D+2P) 0985/A-S
Rack Optimized Server for Solutions, 2U Single Node
CPU 2 Intel Xeon E5-2620 processor @ 2.10 GHZ
CPU Socket/Core 2/6
Memory 32 GB
HBA Emulex LPe12002-M8 Firmware 11.0.247.8000
IBM System Storage® T3200 Tape Library
Tape library 3573-TL FW E20/3.20e
Drive 1 Element: 256 ULT3580-HH6 (FC) FW: G9P1
Drive 2 Element: 257 ULT3580-HH6 (FC) FW: G9P1
Drive 3 Element: 258 ULT3580-HH6 (FC) FW: G9P1
Drive 4 Element: 259 ULT3580-HH6 (FC) FW: G9P1
Brocade 6510 Switch SAN Fibre Channel connection 4 × 8 Gb ports
FabOS v7.1b
2

3
Hitachi NAS Platform Hitachi NAS Platform is advanced and integrated network attached storage (NAS) solution. It provides a powerful tool for file sharing, file server consolidation, data protection, and business-critical NAS workloads.
Powerful hardware-accelerated file system with multi-protocol file services, dynamic provisioning, intelligent tiering, virtualization, and cloud infrastructure
Seamless integration with Hitachi SAN storage, Hitachi Command Suite, and Hitachi Data Discovery Suite for advanced search and index
Integration with Hitachi Content Platform for active archiving, regulatory compliance, and large object storage for cloud infrastructure
Firmware version 13.1 in NAS Platform supports SMB3 encryption. This is currently a command line-only configuration. SMB3 data encryption protects against potential eavesdropping attacks on untrusted networks.
There is FMD-based compression support for Hitachi Virtual Storage Platform F series (VSP F series).
The server protects the health of the dynamic provisioning pool by preventing file system auto-expansion, returning any vacated chunks to the dynamic provisioning pool when physical space is depleted. Vacated chunks are regions of disk space that were formerly used by file systems that have since been deleted.
Local users and Microsoft® Active Directory® groups can now be created with SMU read-only access. A read-only user has permission to view most pages of the NAS Manager.
NAS platform supports data on an external server using Hitachi Universal Volume Manager (UVM).
In addition to existing VMware-based virtual SMU support, Microsoft Hyper-V® virtual SMU support is now provided for Microsoft Windows Server® users. This free option is available for download from the support portal.
The primary default deduplication database is the permabit database. However, NAS Platform now supports the Hitachi Protection Platform family deduplication database as a secure alternative.
IBM Spectrum ProtectIBM Spectrum Protect provides automated, centrally scheduled, policy-managed backup, archive, and space-management capabilities for file servers, workstations, virtual machines, and applications.
Reduce backup infrastructure costs by up to 53% with scalable high performance delivered entirely in software. Meet your price and performance objectives with a wide choice of cloud and on-premises storage options
Review the release notes for IBM Spectrum Protect server version 8.1.
3

4
Test Environment ConfigurationWhen evaluating this solution, the tape library had been correctly attached previously to the Hitachi NAS Platform filer and the devices were configured for use. The basic IBM Spectrum Protect server configuration steps required to ready the environment for use are the following:
1. Define the Library.
2. Define the drives and their associated paths.
3. Define a device class for NDMP operations.
4. Define the storage pool for backups performed by using NDMP operations.
5. Optional: Select or define a storage pool for storing tables of contents for the backups.
6. Configure IBM Spectrum Protect Server policy for NDMP operations.
7. Register the Hitachi NAS Platform node with the server.
8. Define a data mover for the Hitachi NAS Platform file server.
9. Label and check in media to the library
Network ConfigurationEthernet connectivity utilizing TCP/IP provided the communication path between the following:
IBM Spectrum Protect management server and client (1 GbE network)
IBM Spectrum Protect server and IBM TS3200 tape library (1GbE network)
Hitachi Unified Storage 130 and Hitachi NAS Platform 4060 (10 GbE network)
IBM Spectrum Protect Server ConfigurationThe server used for testing was configured with the following hardware and software components:
Rack optimized server for solutions, 2U single node
Microsoft Windows Server 2016, standard edition
IBM Spectrum Protect extended edition, version 8.1
IBM Spectrum Protect operations center, version 8.1
IBM Spectrum Protect backup-archive client for Microsoft Windows 8.1
Logical ConfigurationFigure 1 on page 5 is the logical configuration of the test environment.
4

5
Figure 1
5

6
NDMP Configuration for Hitachi NAS Platform Hitachi NAS Platform and IBM Spectrum Protect use the NDMP protocol to execute requests, provide services, and move data. Each NAS Platform has its own NDMP-secured device file. The device file can be backed up and restored only by using NDMP.
Configure NAS Platform as described in the following:
“NDMP Communications Setting for Hitachi NAS Platform ” on page 6
“Options for Hitachi NAS Platform” on page 7
“Snapshot Configuration for NDMP Backups on Hitachi NAS Platform” on page 7
“NDMP Device Configuration on Hitachi NAS Platform” on page 8
“DMP Device List for Hitachi NAS Platform” on page 10
“Hitachi NAS Platform Device Access Details” on page 10
NDMP Communications Setting for Hitachi NAS Platform The standard Hitachi NAS Platform configuration for NDMP is to use port 10000 for communications. This port value was used when configuring the 'DATAMOVER' within IBM Spectrum Protect. The user name and password (ndmp) was also used in the IBM Spectrum Protect configuration process. Figure 2 shows the NDMP settings used for NAS Platform.
When doing this in your environment, if the NDMP server is stopped, start it. Then, verify that the option to enable the NDMP server at boot is selected.
Figure 2
6

7
Options for Hitachi NAS PlatformThese NDMP options for Hitachi NAS Platform were set to allow NDMP to work more efficiently. In your environment, failure to set these options may result in failed backup and restore operations.
To set the NDMP options utilizing SSH, connect to the system management unit (SMU) IP address for NAS Platform, and then select the NAS Platform that you want to set. Using the command line interface in NAS Platform, execute the following commands:
HNAS01:$ ndmp-option tokens on
HNAS01:$ ndmp-option report_as_fs_all
HNAS01:$ ndmp-option mover_window_adjust_recovery
Figure 3
Snapshot Configuration for NDMP Backups on Hitachi NAS PlatformIt is best practice to back up from snapshots rather than a live file system. This ensures that the data is in a consistent state and will not be affected by ongoing file activity. Using snapshots also facilitates incremental backups.
From the Home page of the Web Manager, open Data Protection and then NDMP History & Snapshots. See Figure 4 on page 8.
Click the Automatically create snapshots option and the Delete snapshot when obsolete option.
Under Automated Snapshot Retention, set the period long enough to allow any differential backup to complete before the snapshot for the previous full backup to expire.
You may view and configure these settings with the ndmp-snapshot-options command from the Hitachi NAS Platform command line interface.
7

8
Figure 4
NDMP Device Configuration on Hitachi NAS PlatformIf you are configuring Hitachi NAS Platform, skip this procedure when exclusively using remote NDMP. In that case, the backup targets are on the IBM Spectrum Protect server.
Figure 5
8

9
Figure 6
The Fibre Channel ports on Hitachi NAS Platform must be zoned with the tape drive ports in order for NAS Platform to assign pathing to the library's robotics and tape drives. Create zoning such that NAS Platform has visibility to the following:
Tape drives
Media changer
NAS Platform Fibre Channel initiator ports
Any Fibre Channel initiator port on NAS Platform may be used. NAS Platform may access disk and tape targets over the same ports.
Note — Hitachi NAS Platform servers may share tape devices with other servers. However, always ensure SAN zoning does not allow other servers access to initiator ports or array controller ports used by Hitachi NAS Platform servers.
The IBM Spectrum Protect server executes requests, sending SCSI commands to NAS Platform using the NDMP protocol; which in turn passes these commands on to the tape library.
Special device files defined by Hitachi NAS Platform are used when configuring IBM Spectrum Protect. Use the file pathing information to define the specific paths by which IBM Spectrum Protect may access the tape library for which Hitachi NAS Platform is proxying. These files define both the tape library's robotic and drives. Without the device files association, successful backup and restore operations would not be possible.
Figure 7 and Figure 8 on page 10 show the configuration details for the Hitachi NAS Platform 4060 EVS used for testing.
Figure 7
9

10
Figure 8
DMP Device List for Hitachi NAS PlatformEnsure the targets have been discovered and are presented on the device list. There are two ways to display the device list.
Using the Web Manager User Interface, from the Home page, click Data Protection, and then click NDMP Device List.
Using the command line interface, type this command: ndmp-devices-list
The devices pathing used when testing this environment are the following:
/dev/mc_d5l1 (IBM TS3200 robotic control)
/dev/mt_d5l0 (Tape Drive 1)
/dev/mt_d6l0 (Tape Drive 2)
/dev/mt_d7l0 (Tape Drive 3)
/dev/mt_d6l0 (Tape Drive 4)
The NDMP device file information obtained from Hitachi NAS Platform is shown in Table 2.
Hitachi NAS Platform Device Access DetailsEach device must be granted access to an EVS. Granting access by an EVS to a device may be accomplished in one of two ways:
Select the check box next to the devices.
Click Allow access to grant access to the drives from every EVS, which is the Hitachi NAS Platform default.
TABLE 2. NDNP DEVICE FILE INFORMATION FROM HITACHI NAS PLATFORM
EVS: Device Name WWN Node (LUN) Model Serial Number Allow Access
Status
NW91:/dev/mt_d8l0 20:01:00:0e:11:15:ba:2f(0) IBM (3573-TL) 90WT066643 Allowed OK
NW91:/dev/mc_d5l1 20:01:00:0e:11:15:ba:2f(1) IBM (ULT3580-HH6) 00L4U78W5978_LL0 Allowed OK
NW91:/dev/mt_d6l0 20:0a:00:0e:11:15:ba:2f(0) IBM (ULT3580-HH6) 10WT046622 Allowed OK
NW91:/dev/mt_d7l0 20:04:00:0e:11:15:ba:2f(0) IBM (ULT3580-HH6) 10WT046658 Allowed OK
NW91:/dev/mt_d8l0 20:07:00:0e:11:15:ba:2f(0) IBM (ULT3580-HH6) 10WT046648 Allowed OK
10

11
The Hitachi NAS Platform server detects the devices automatically. If the devices are not displayed, do one of the following:
Click the Refresh Status link.
Run the ndmp-devices-update command from a command prompt.
Click the details link for each device and select each EVS that will use the device. If more than one EVS will use the device, from the EVS list, click Any EVS. Then, click reassign. From a command prompt, the backup-device-set-evs command may be used also to set this option.
In Figure 9 through Figure 13, shows the ALL EVS, including NW91 has been granted access to all tape drives and the tape robot.
Figure 9 on page 11 shows robotic control access (/dev/mc_d5l1).
Figure 10 on page 11 shows tape drive 1 access (/dev/mt_d5l0).
Figure 11 on page 12 shows tape drive 2 access (/dev/mt_d6l0).
Figure 12 on page 12 shows tape drive 3 access (/dev/mt_d7l0).
Figure 13 on page 12 shows tape drive 4 access(/dev/mt_d8l0).
Figure 9
Figure 10
11

12
Figure 11
Figure 12
Figure 13
Allow the devices for NDMP use by one of the following:
Click allow access.
Run this command from a command prompt:
backup-device-allow-access
Backup administrators may find it helpful in this situation to assign aliases to the tape drives that are easier to remember than the server’s device name or the tape drive’s serial number. Aliases may be assigned using one of the following:
The user interface of Hitachi NAS Platform GUI
From a command prompt, type this: ndmp-device-assigned-name-set
12

13
Figure 14 is output of configured tape devices on Hitachi NAS Platform.
Figure 14
Figure 15 shows the results from this NDMP command: ndmp-option -l
Figure 15
Note — Pay attention to the option shown in Figure 16 on page 13. This matters when using EMC Networker or Veritas NetBackup software.
Figure 16
13

14
Figure 17 shows the details on CIFS share used for testing backups and restores.
Figure 17
IBM Tape Library ConfigurationTape drives and robotics within a library must be defined to the IBM Spectrum Protect server. The tape drive position within the library must be specified as well.
Each tape drive location has a corresponding element address, defining its location. Many tape libraries specify the element address for each tape drive in the user interface, which is the case for IBM tape libraries. If element information is not readily available, consult the library manufacturer's user guide.
IBM also provides this web reference:
https://www.ibm.com/support/knowledgecenter/en/STZMZN/com.ibm.storage.hollywood.doc/ltfs_supported_tape_libraries.html
This is an example IBM TS3200 (3573-TL) configuration consisting of the following components:
Four Fibre Channel-attached ULT3580-HH6 (LTO6) tape drives
One robotic changer accessible via Tape Drive1
14

15
The Element Address for each drive is used to configure IBM Spectrum Protect server. The information in Figure 18 and Figure 19 on page 16 was obtained by accessing the library’s management graphical user interface, Monitor Library, and Drive Identity.
Figure 18
15

16
Figure 19
16

17
IBM Spectrum Protect Version 8.1 Server ConfigurationThe software installation and configuration for this project was done based on IBM Spectrum Protect for Windows Version 8.1.0 Installation Guide and covered in a separated HDS ISV team's document with identical title.
IBM Spectrum Protect 8.1 Administrator's solution guides for Windows may be downloaded from the following location:
https://www.ibm.com/support/knowledgecenter/en/SSEQVQ_8.1.0/tsm/welcome.html
Configure a PolicyTo configure a policy, do the following.
1. Define a domain to be used for the Hitachi NAS Platform backups:
Use this command: define domain DOMAIN_NAME description="description"
SERVER1>define domain HNASDOMAIN description='Policy Domain for HNAS'
Figure 20
2. Define a policy set for the Hitachi NAS Platform domain.
Use this command: define policyset DOMAIN_NAME POLICY_SET_NAME
SERVER1>def policyset HNASDOMAIN HNASPOLICY standard
Figure 21
3. Define a management class for the Hitachi NAS Platform domain and policy set.
Use this command: define mgmtclass DOMAIN_NAME POLICY_SET_NAME CLASS_NAME
SERVER1> def mgmtclass HNASDOMAIN HNASPOLICY HNASMGMT standard
17

18
4. Assign the HNAS management class as the default.
Use this command: assign defmgmtclass DOMAIN_NAME POLICY_SET_NAME CLASS_NAME
SERVER1> assign defmgmtclass HNASDOMAIN HNASPOLICY HNASMGMT
Configure Storage Pools, Copy Groups, and Policy SetsTo configure storage pools, copy groups, and policy sets, do the following.
1. Create the TOC storage pool.
Use this command: define stgpool STORAGE_POOL_NAME devclass
SERVER1>define stgpool NDMPPOOL HNASCLASS maxscratch=10 dataformat=ndmpdump
If a TOC is being created, create a storage pool for the TOC.
SERVER1>define stgpool TOCPOOL DISK
2. Define the volume or volumes for of the TOC storage pool.
Use this command: define volume TOC_POOL_NAME "TOC_POOL_LOCATION" access=type formatsize=SIZE_IN_MB
SERVER1>define volume tocpool "c:\tocpool\hnas_toc_vol1.dsm" access=readwrite formatsize=10000
3. Configure the management class to use the NDMP storage pool and write the catalog to the TOC storage pool.
Define a copy group using this command: define copygroup DOMAIN_NAME POLICY_SET_NAME CLASS_NAME type=backup desitnation=NDMP_POOL_NAME tocdestination=TOC_POOL_NAME versexitst=# _versions
SERVER1> define copygroup HNASDOMAIN standard HNASMGMT destination=NDMPPOOL tocdestination=TOCPOOL verexists=4
4. Activate the policy set.
Use this command: activate policyset DOMAIN_NAME POLICY_SET_NAME
SERVER1>activate policyset HNASDOMAIN HNASPOLICY
Register an EVS as an IBM Storage Protect Node and Configure it as a DatamoverIn IBM Spectrum Protect, a node is a server that hosts the data. For Hitachi NAS Platform this host is the EVS. The Spectrum Protect client node and the EVS are synonymous.
To register an EVS as an IBM Storage Protect node and configure it as a datamover, do the following.
1. Register the node with this type: NAS
Use this command: register node HOST_NAME password userid=user_id domain=DOMAIN_NAME type=NAS
SERVER1> register node MW91 password1 userid=EVSNW91 domain=HNASDOMSAIN type=NAS
18

19
2. Define a datamover to the IBM Spectrum Protect server.
Use these commands:
define datamover HNAS_EVS type=NAS HLAddress=EVS_IPAddress
HLAddress=IPAddress_ EVS LLAddress=tcpportofHNAS USERid=usernameforHNAS
Password=passwordofHNAS Online=yes dataformat=NDMPDump
SERVER1>define datamover MW91 type=NAS HLAddress=xxx.xxx.xxx.xxx llAddress=10000 userid=ndmp password=ndmp dataformat=ndmpdump online=yes
Note — LLAddress, userid, and password are obtained from Hitachi NAS Platform communications settings. See Figure 22
Figure 22
19

20
Define Tape Library, Tape Drives, and Path to DrivesTo define the tape library, tape drives, and the path to drives, do the following.
1. Define the library to the IBM Spectrum Protect server.
Use this command: define library HNASlib libtype=scsi libtype=SCSI
SERVER1>define library HNASLIB libtype=scsi
2. Define a path to the library (Figure 23).
Use this command: define path datamover (EVS_NAME) LIBRARY_NAME desttype=library device=CHANGER_SPECIAL_FILE_NAME online=y/n
SERVER1> define path MW91 HNASLIB srctype=datamover desttype=library device=/dev/mc_d5l1 online=yes
Figure 23
20

21
3. Define the drives that are attached to the library (Figure 25).
Use this command: define drive DRIVE_NAME element=ELEMENT_NUMBER online
SERVER1>define drive HNASLIB TAP01 element=256
SERVER1>define drive HNASLIB TAP02 element=257
SERVER1>define drive HNASLIB TAP03 element=258
SERVER1>define drive HNASLIB TAP04 element=259
Note — Before proceeding to define paths to drives, pay attention to the serial number and element address for each drive, as shown in Figure 24 on page 22.
21

22
Figure 24
22

23
4. Associate each tape drive and each defined element with the serial number of the NDMP devices and appropriate device names in Hitachi NAS Platform (Figure 25).
Figure 25
5. Define a path to the drives (Figure 26 on page 24).
Use this command: define path datamover (EVS_NAME) Tape_Drive_Name srctype=datamover desttype=drive library=hnaslib device=/dev/ mc_xxxx
SERVER1>define path MW91 TAP01 srctype=datamover desttype=drive library=HNASLIB device=/dev/mt_d5l0
SERVER1>define path MW91 TAP02 srctype=datamover desttype=drive library=HNASLIB device=/dev/mt_d6l0
SERVER1>define path MW91 TAP03 srctype=datamover desttype=drive library=HNASLIB device=/dev/mt_d7l0
SERVER1>define path MW91 TAP04 srctype=datamover desttype=drive library=HNASLIB device=/dev/mt_d8l0
23

24
Figure 26
24
25
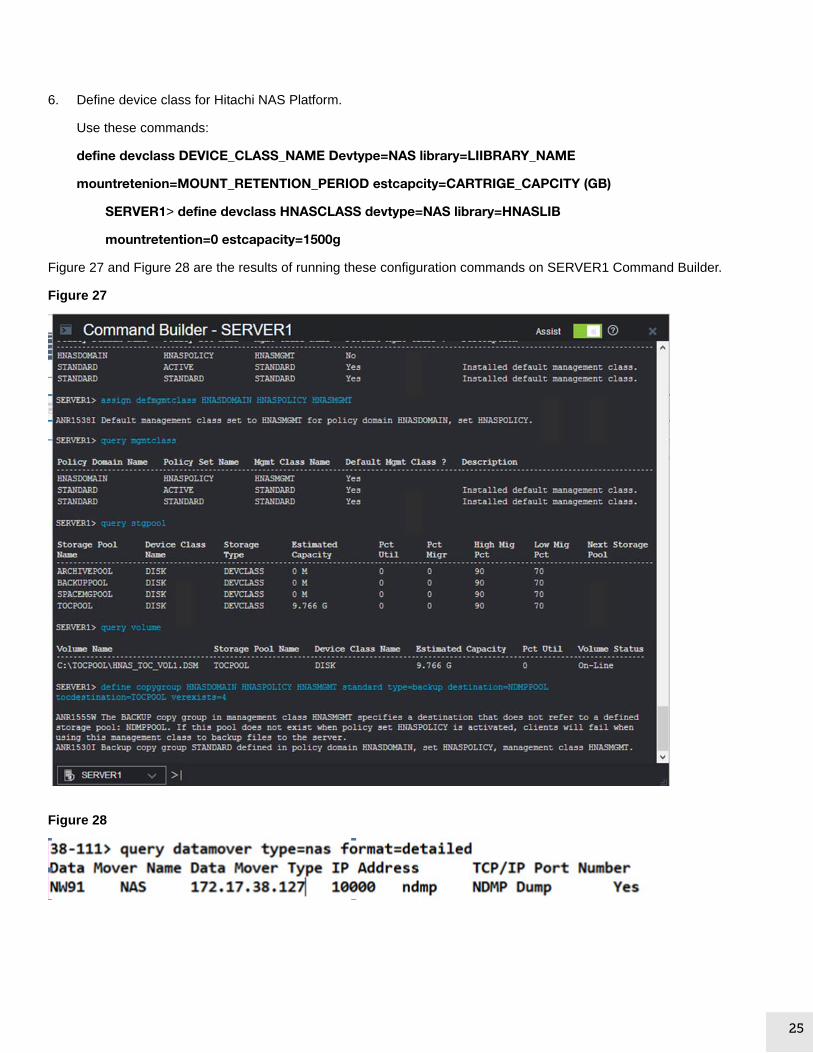
6. Define device class for Hitachi NAS Platform.
Use these commands:
define devclass DEVICE_CLASS_NAME Devtype=NAS library=LIIBRARY_NAME
mountretenion=MOUNT_RETENTION_PERIOD estcapcity=CARTRIGE_CAPCITY (GB)
SERVER1> define devclass HNASCLASS devtype=NAS library=HNASLIB
mountretention=0 estcapacity=1500g
Figure 27 and Figure 28 are the results of running these configuration commands on SERVER1 Command Builder.
Figure 27
Figure 28
25

26
Label TapesTo label and check the tape volumes into the library, type this command.
SERVER1> label libvol HNASLIB search=yes labelsource=barcode checkin=scratch
Figure 29
Use search=bulk if this is a new tape located in the I/O slot:
SERVER1> label libvol HNASLIB search=bulk labelsource=barcode checkin=scratch
The way the IBM Spectrum Protect is designed, you need to run the audit library command often. Otherwise you could observe the messages seen in Figure 30 in IBM Spectrum Protect Operations Center.
Figure 30
Figure 31 is the dashboard view.
Figure 31
26

27
See confirmation of auditing volume ANR8459I in Figure 32
Figure 32
To have a total view of all configured volumes in the database, use this command: q libvolume
Figure 33
Test MethodologyThis is an overview of the testing requirements to demonstrate interoperability of IBM Spectrum Protect software with Hitachi NAS Platform 4100 using network data management protocol (NDMP). These results may be applicable for other network attached storage devices.
ScopeVery extensive testing was done in 2014 by Hitachi for IBM TSM version 7.1 with the same version 12 firmware used on Hitachi NAS Platform 4060. Because of this previous testing, testing this time involved using a three times larger scoop of data and files, but minimized the number of backup tests to the following:
Two full and two differential backups on the Hitachi NAS Platform CIFS share with TOC
One additional Microsoft Windows Server 2016 node backup
One NDMP CIFS share directory restoration that was intentionally deleted
27

28
General Testing StepsMost of the testing procedures have a flow that is very similar. For backups and restores, the following steps were completed for testing:
1. The file system or share to be backed up was sized. The byte count, number of files, and directories was noted.
2. A backup or restore command was issued.
3. The query process command was issued a number of times during the process to confirm that the job is running, note its progress, the process number, and the tape volume mounted.
4. After the backup and restore jobs had completed, the Activity Log information was viewed to determine successful completion of the job.
5. A comparison was made of pre-backup and post-backup byte counts and files
Test ScenarioThis is the test scenario used to validate the solution.
Directory Listing of the File SystemFigure 34 shows the CIFS share test with its directories, which was backed up completely with full backup option.
Figure 34
28

29
Figure 35 shows the properties of one of subdirectories in the test share that was backed up.
Figure 35
Start Full BackupThis command was used to start the backup.
SERVER1> TSM-NODE1>backup node MW91 /__VOLUME__/EMC_NM_FileSystem1 mgmtclass=HNASMGMT toc=yes mode=full type=backupimage
Figure 36
29

30
Figure 37 shows the command line output from backing up over 51 GB of data.
Figure 37
AS platform volumes, file systems, and CIFS share have been used for backup and restore testing, as shown in Figure 38. The CIFS share test was populated with data, which included a directory consisting of over 10 million files of varying sizes. The same share's subdirectory was used to restore a backup to an original location and verify that backup data matched the restore data.
To sample the TOC post-backup, these commands were typed:
SERVER1> q toc MW91 /__ VOLUME__ /EMC_NW_FileSystem1 format=detailed
You can observe creation of a new snapshot, triggered by backup command in Command Builder
Figure 38
30

31
SERVER1>q occupancy MW91 /__ VOLUME__ /EMC_NW_FileSystem1 type=backup
Figure 39
Figure 40
IBM Spectrum Protect server also leaves logs and proof of a successful TOC backup within backup directory.
Figure 41
31

32
Directory Pre-RestoreFigure 42 shows the properties of the nqt_data director before restoration.
Figure 42
32

33
The nqt_data directory with 15,434 files and total size 4.25 GB is intentionally deleted (Figure 43).
Figure 43
Begin Restoration of Node MW91The following command was issued to begin the restoration of node NW91.
SERVER1 >restore node MW91 /__VOLUME __/EMC_NW91_FileSystem1 pitdate==today
Monitor Process in a Command Line Interface WindowThe restoration process was monitored in a command line interface window.
Results of Full Restore From the Tape Volume A00039L6Figure 44 shows a full restoration from the tape volume.
Figure 44
33

34
Deleted nqt_data Directory Restored Figure 45 on page 34 and Figure 46 on page 35 show that the nqt_data directory was restored to its size before deletion.
Figure 45
34

35
Figure 46
35

36
Here is IBM Tape Library view with volume A00007L6 in Drive 1 performing restore operation.
Figure 47
36

37
Figure 48
As backup process continues, you can also observe the Event Viewer in the graphical user interface of the SMU for Hitachi NAS Platform (Figure 49 and Figure 50).
Figure 49
Figure 50
37

38
Hitachi NAS Platform created a new snapshot once IBM Spectrum Protect executed the CIFS share backup and removed the old snapshot after ending creating a new snapshot.
Figure 51
The results are in Figure 52.
Figure 52
Differential CIFS Share BackupFigure 53 on page 38, Figure 54 on page 38, and Figure 55 on page 39 show a differential CIFS share backup.
Figure 53
Figure 54
38

39
Figure 55
Results of All Backup Jobs Figure 56 shows the results of all backup jobs in the command line interface.
Figure 56
39

40
Figure 57 shows the results of backing up on IBM Spectrum Protect of the System State directory of the Microsoft Windows Server 2016 node.
Figure 57
Note — The network's transfer rate in Figure 57 is 107 MB/s.
40

41
Figure 58 shows the view in Operations Center for IBM Spectrum Protect of the client's backup.
Figure 58
ReferencesThese are references for this lab validation report.
Hitachi VantaraThis reference is available from the Knowledge website.
Backup Administration Guide: Hitachi Virtual Storage Platform Gx00 and VSP Fx00 with NAS Modules and Hitachi NAS Platform, Release 13.2 (MK-92HNAS007-12, PDF)
IBMThese references are available from the IBM website.
Configuring Tivoli Storage Manager for NDMP operations (Tivoli® is an earlier name for Spectrum Protect)
IBM Spectrum Protect documentation
41

For More InformationHitachi Vantara Global Services offers experienced storage consultants, proven methodologies and a comprehensive services portfolio to assist you in implementing Hitachi products and solutions in your environment. For more information, see the Services website.
Live and recorded product demonstrations are available for many Hitachi products. To schedule a live demonstration, contact a sales representative. To view a recorded demonstration, see the Resources website.
Hitachi Vantara Academy provides best-in-class training on Hitachi products, technology, solutions and certifications. Hitachi Data Systems Academy delivers on-demand web-based training (WBT), classroom-based instructor-led training (ILT) and virtual instructor-led training (vILT) courses. For more information, see the Hitachi Data Systems Services Training and Certification website.
For more information about Hitachi products and services, contact your sales representative or channel partner or visit the Hitachi Vantara website.

1
Corporate Headquarters2845 Lafayette StreetSanta Clara, CA 95050-2639 USAwww.HitachiVantara.com community.HitachiVantara.com
Regional Contact InformationAmericas: +1 866 374 5822 or [email protected], Middle East and Africa: +44 (0) 1753 618000 or [email protected] Pacific: +852 3189 7900 or [email protected]
Hitachi Vantara
© Hitachi Vantara Corporation 2017. All rights reserved. HITACHI is a trademark or registered trademark of Hitachi, Ltd. VSP are registered trademarks or trademarks of Hitachi Data Systems Corporation. IBM, Spectrum Protect, System Storage, and Tivoli are trademarks or registered trademarks of International Business Machines Corporation. Microsoft, Active Directory, Hyper-V, and Windows Server are registered trademarks or trademarks of Microsoft Corporation. All other trademarks, service marks, and company names are properties of their respective owners.
Notice: This document is for informational purposes only, and does not set forth any warranty, expressed or implied, concerning any equipment or service offered or to be offered by Hitachi Vantara Corporation.
SL-010-00, October 2017.
Related Documents