HyperJuice Magic Box User Guide Magic Box User Guide Written By: Walter Galan HyperJuice Magic Box User Guide © iFixit — CC BY-NC-SA www.iFixit.com Page 1 of 21

Welcome message from author
This document is posted to help you gain knowledge. Please leave a comment to let me know what you think about it! Share it to your friends and learn new things together.
Transcript

HyperJuice Magic Box User GuideMagic Box User Guide
Written By: Walter Galan
HyperJuice Magic Box User Guide
© iFixit — CC BY-NC-SA www.iFixit.com Page 1 of 21
INTRODUCTION
The Magic Box modifies your existing Apple MagSafe Power Adapter for use with theHyperMac/HyperJuice External MacBook Batteries.
Key benefits:
It takes only two minutes to attach two "Magic Box" adapters to MagSafe Power Adapter cord.Create your own MagSafe charging cable to charge any MacBook with the HyperMac ExternalBattery or Car Charger.Recharge HyperMac with Apple MagSafe Power Adapter. No need to carry separate HyperMacpower adapters.Use as normal MagSafe Power Adapter to charge MacBooks.
TOOLS:Pen (1)
iFixit 6 Inch Metal Ruler (1)
Flush Cutter (1)
PARTS:HyperJuice Magic Box - MagSafe
Modification Kit (1)
HyperJuice Magic Box User Guide
© iFixit — CC BY-NC-SA www.iFixit.com Page 2 of 21

Step 1 — Disclaimer
IMPORTANT: PLEASE READ THISFIRST
This is a modification kit thatirreversibly modifies your AppleMacBook Power Adapter. Usage ofthis kit will void the warranty of yourApple MacBook Power Adapter fromApple Inc. While every effort ismade to ensure safe usage of thisproduct (including short-circuit andover current protection), this is still aDIY (Do-It-Yourself) kit.
Sanho shall not be liable for anyspecial, incidental or consequentialdamages, including, but not limitedto, lost revenues, lost profits, loss ofuse of software, loss or recovery ofdata, rental or replacementequipment, downtime, damage toproperty, and third- party claims,arising out of any theory of recovery,including warranty, contract,statutory or tort.
Notwithstanding the term of anylimited warranty or any warrantyimplied by law, or in the event thatany limited warranty fails of itsessential purpose, in no event willSanho's entire liability exceed thepurchase price of this product.Please refer to our website for allterms and conditions.
HyperJuice Magic Box User Guide
© iFixit — CC BY-NC-SA www.iFixit.com Page 3 of 21

By using this product, youindicate that you accept theseterms and conditions. Otherwiseplease return this product in itsoriginal packaging to the seller.
Step 2 — Materials
Before beginning, lay out the contents of the Magic Box kit. They should include (clockwise fromthe left):
Car Adapter
Large Magic Box
Small Magic Box
Wire Strippers
Also locate the MagSafe charger you wish to modify.
HyperJuice Magic Box User Guide
© iFixit — CC BY-NC-SA www.iFixit.com Page 4 of 21

Step 3 — Modifying Power Adapter
Make sure that the power adapter is disconnected from the wall outlet and MacBook.
Use a pen to make a mark on the MagSafe cable about 4" (10 cm) from the MagSafe connector.
Use a pair of wire cutters or scissors to cut the cable at the mark you made about 4 inches fromthe MagSafe connector. Set aside the MagSafe connector wire for later.
Although the wires inside the cable are copper, they may damage some scissors. We recommendusing wire cutters if possible.
HyperJuice Magic Box User Guide
© iFixit — CC BY-NC-SA www.iFixit.com Page 5 of 21
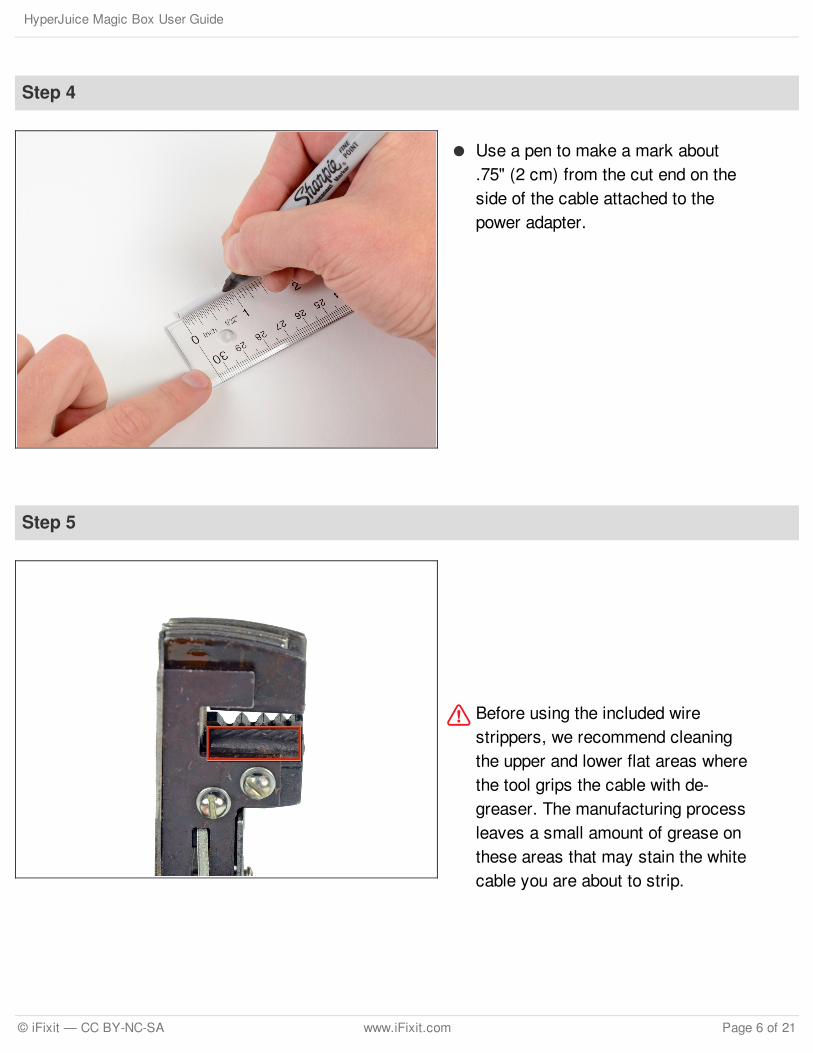
Step 4
Use a pen to make a mark about.75" (2 cm) from the cut end on theside of the cable attached to thepower adapter.
Step 5
Before using the included wirestrippers, we recommend cleaningthe upper and lower flat areas wherethe tool grips the cable with de-greaser. The manufacturing processleaves a small amount of grease onthese areas that may stain the whitecable you are about to strip.
HyperJuice Magic Box User Guide
© iFixit — CC BY-NC-SA www.iFixit.com Page 6 of 21

Step 6
There are four stripping holes of varying sizes on the wire stripper.
Carefully position the cable in the largest (innermost) hole on the wire stripper and line up the edgeof the jaws with the mark you just made as seen in the first picture.
Squeeze the wire stripper to remove the outer cord tubing, revealing wire strands beneath.
If necessary, slide the outer sheath off the end of the cable.
HyperJuice Magic Box User Guide
© iFixit — CC BY-NC-SA www.iFixit.com Page 7 of 21

Step 7
Gently move the fine wire strands aside to reveal an inner wire.
Twist the loose outer wire strands together into a single twisted strand.
If you are handy with a soldering iron, tinning the ground lead after you twist it together will helpkeep it in one piece.
Step 8
Use a pen to make a mark about3/8" (1 cm) away from the end of theinner wire.
HyperJuice Magic Box User Guide
© iFixit — CC BY-NC-SA www.iFixit.com Page 8 of 21

Step 9
Using the wire stripper again, align the edge of its jaws with the second smallest hole on the penmark made in the previous step.
Squeeze the wire stripper to strip off the insulation on the inner wire.
Step 10
As before, twist the center wirestrands tightly into a single twistedstrand.
HyperJuice Magic Box User Guide
© iFixit — CC BY-NC-SA www.iFixit.com Page 9 of 21

Step 11
Line up the outer and inner twistedstrands side by side and trim theends of both wires to make themequal in length.
Do not trim too much!
Step 12
Locate the Large Magic Box.
Remove the cover of the Large Magic Box and set it aside.
HyperJuice Magic Box User Guide
© iFixit — CC BY-NC-SA www.iFixit.com Page 10 of 21

Step 13
Before attempting to insert the wires, note their correct orientation. The center wire should beinserted into the positive (+) terminal on the left and the outer wire should be inserted into thenegative (-) terminal on the right.
Use your thumb to push back the orange spring clamps on both terminals and insert both wires intotheir respective terminals. Insert the wires as far in as possible.
Make sure that exposed strands of the positive and negative wires do not touch each other wheninstalled in their final positions in the terminals!
HyperJuice Magic Box User Guide
© iFixit — CC BY-NC-SA www.iFixit.com Page 11 of 21

Step 14
Replace the Large Magic Box cover.
HyperJuice Magic Box User Guide
© iFixit — CC BY-NC-SA www.iFixit.com Page 12 of 21

Step 15
Congratulations! You just modified the MacBook Power Adapter to be capable of recharging theHyperJuice battery directly.
To charge a first generation HyperJuice battery, plug the male connector from the Large Magic Boxinto the CHARGE port on the HyperJuice battery.
To charge a HyperJuice 1.5 or HyperJuice 2 battery, use the short male to male cable that came inthe kit to connect the Large Magic Box to the DC IN port on the HyperJuice Battery.
The female connector has the higher voltage required to change the newer batteries.
The LED light on the Large Magic Box will be RED during charging of the HyperJuice battery andwill turn GREEN when it is done charging.
HyperJuice Magic Box User Guide
© iFixit — CC BY-NC-SA www.iFixit.com Page 13 of 21

Step 16 — Modifying MagSafe Cable
Now let's repeat the process with theMagSafe end of the cable and theSmall Magic Box.
On the the cable with the MagSafeconnector, as before, make a mark.75" (2 cm) from the cut end.
Step 17
Again, use the largest (innermost) stripping hole to remove the outer cord tubing at the mark youjust made.
HyperJuice Magic Box User Guide
© iFixit — CC BY-NC-SA www.iFixit.com Page 14 of 21

Step 18
Unravel the outer loose wire strands and twist them into a single strand.
If you are handy with a soldering iron, tinning the ground lead after you twist it together will helpkeep it in one piece.
Step 19
Make a mark on the inner wire 3/8"(1 cm) away from the cut end.
HyperJuice Magic Box User Guide
© iFixit — CC BY-NC-SA www.iFixit.com Page 15 of 21

Step 20
Align the second smallest hole with the pen mark made in the previous step.
Strip off the inner tubing at the mark you just made to reveal the center wire strands.
HyperJuice Magic Box User Guide
© iFixit — CC BY-NC-SA www.iFixit.com Page 16 of 21

Step 21
Twist the center wire strands tightly into a single twisted strand.
Line up the outer and inner twisted strands side by side and trim the ends of both wires to makethem equal in length.
Do not trim too much!
HyperJuice Magic Box User Guide
© iFixit — CC BY-NC-SA www.iFixit.com Page 17 of 21

Step 22
Locate the Small Magic Box.
Remove the cover of the Small Magic Box and set it aside.
HyperJuice Magic Box User Guide
© iFixit — CC BY-NC-SA www.iFixit.com Page 18 of 21

Step 23
As in step 13, use your thumb to push back the orange spring clamps on both terminals and insertthe center wire into the positive (+) terminal on the left and the outer wire into the negative (-)terminal on the right.
Make sure that exposed strands of the positive and negative wires do not touch each other wheninstalled in their final positions in the terminals!
Step 24
Replace the Small Magic Box cover.
HyperJuice Magic Box User Guide
© iFixit — CC BY-NC-SA www.iFixit.com Page 19 of 21
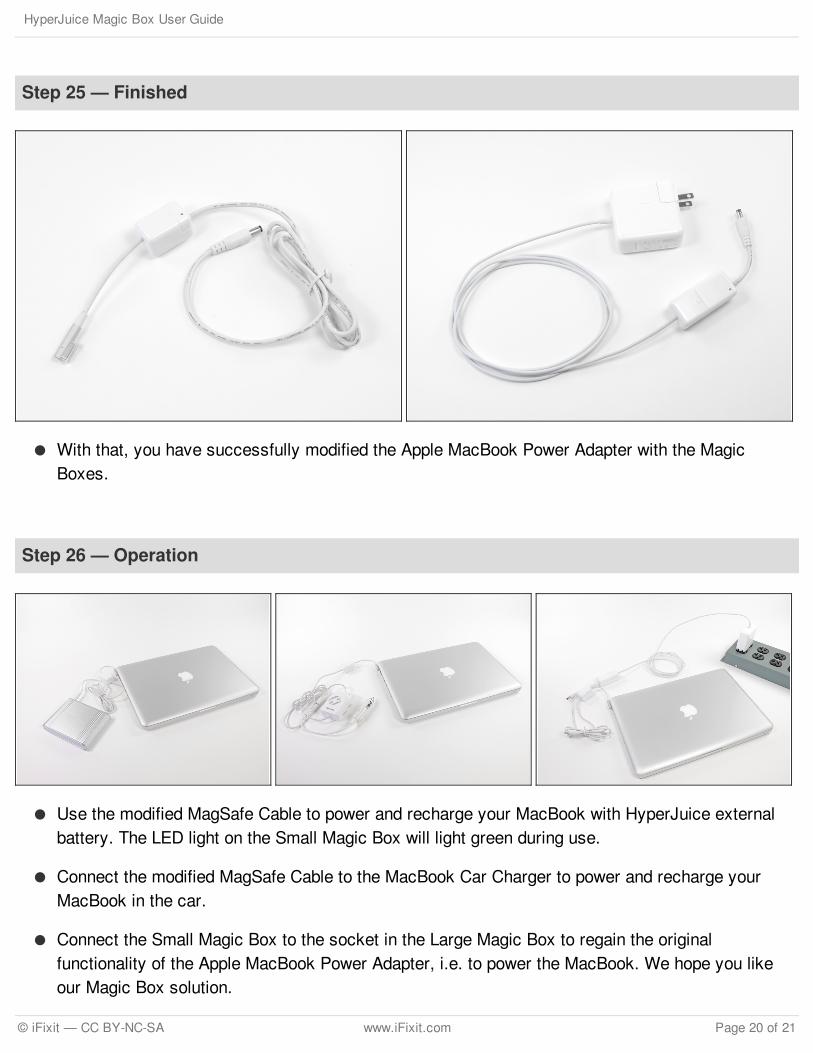
Step 25 — Finished
With that, you have successfully modified the Apple MacBook Power Adapter with the MagicBoxes.
Step 26 — Operation
Use the modified MagSafe Cable to power and recharge your MacBook with HyperJuice externalbattery. The LED light on the Small Magic Box will light green during use.
Connect the modified MagSafe Cable to the MacBook Car Charger to power and recharge yourMacBook in the car.
Connect the Small Magic Box to the socket in the Large Magic Box to regain the originalfunctionality of the Apple MacBook Power Adapter, i.e. to power the MacBook. We hope you likeour Magic Box solution.
HyperJuice Magic Box User Guide
© iFixit — CC BY-NC-SA www.iFixit.com Page 20 of 21

This document was last generated on 2017-07-08 11:07:43 AM.
HyperJuice Magic Box User Guide
© iFixit — CC BY-NC-SA www.iFixit.com Page 21 of 21
Related Documents