1 Mục lục Contents Bài tập 1: Làm quen với môi trường phát triển điện thoại di động .......................................................... 2 Bài tập 2: Thao tác với Android Virtual Device và DDMS ..................................................................... 5 Bài tập 3: Cách tạo Android Project và tìm hiểu cấu trúc bên trong của một Android Project.............. 14 Bài tập 4: Cách sửa một số lỗi thường gặp trong Android Project ......................................................... 22 Bài tập 5: Tìm hiểu vòng đời của một Ứng Dụng Android .................................................................... 24 Bài tập 6: Phân biệt Foreground Lifetime và Visible Lifetime .............................................................. 31 Bài tập 7: Làm quen với các Layout trong Android ............................................................................... 40 Bài tập 8: Các kiểu lập trình sự kiện trong Android ............................................................................... 51 Bài tập 9: Thực hành về Toast Notification và Alert Dialog .................................................................. 69 Bài tập 10: Sử dụng TextView, EditText và Button trong Android ....................................................... 72 Bài tập 11: Sử dụng Checkbox và RadioButton trong Android ...................................................... 80 Bài tập 12: Ví dụ tổng hợp TextView, EditText, CheckBox, Button và ImageButton trong Android ....................................................................................................................................... 89 Bài tập 13: Thực hành về ListView trong Android ......................................................................... 103 Bài tập 14: Thực hành về Custom Layout cho ListView trong Android ...................................... 125 Bài tập 15: Thực hành về Spinner trong Android .......................................................................... 136 Bài tập 16: Kết hợp Spinner với ListView trong Android.............................................................. 139 Bài tập 17: Thực hành về AutocompleteTextView và MultiAutocompleteTextView................. 150 Bài tập 18: Cập nhật DataSource cho AutocompleteTextView lúc Runtime .............................. 154 Bài tập 19: Thực hành Gridview trong Android ............................................................................. 167 Bài tập 21: Thực hành về Tab Selector trong Android .................................................................. 175 Bài tập 22: Thực hành về Menu trong Android.............................................................................. 184 Bài tập 23: Thực hành về Context Menu trong Android ............................................................... 193 Bài tập 24: Thực hành về Intent trong Android ............................................................................. 196 Bài tập 25: Tiếp tục củng cố kiến thức Intent, ví dụ tổng hợp Quản Lý Nhân Viên ................... 216 Bài tập 26: Dùng Implicit Intent để viết chương trình gọi điện thoại và nhắn tin SMS ........... 263 Bài tập 27: Đa ngôn ngữ trong Android .......................................................................................... 274 Bài tập 28: Xử lý tập tin trong Android ........................................................................................... 279 Bài tập 29: XML Parser trong Android ........................................................................................... 293 Bài tập 30: Thực hành về Shared Preferences ................................................................................ 299 Bài tập 31: Cách sử dụng SQLite trong Android ............................................................................ 312 Bài tập 32: Tiếp tục củng cố kiến thức SQLite, ví dụ tổng hợp quản lý sách ............................... 320 Bài tập 33: Sử dụng ContentProvider trong Android .................................................................... 345 Bài tập 34: đa tiến trình trong Android (Multi-Threading) ......................................................... 354

Welcome message from author
This document is posted to help you gain knowledge. Please leave a comment to let me know what you think about it! Share it to your friends and learn new things together.
Transcript
1
Mục lục
Contents Bài tập 1: Làm quen với môi trường phát triển điện thoại di động .......................................................... 2
Bài tập 2: Thao tác với Android Virtual Device và DDMS ..................................................................... 5
Bài tập 3: Cách tạo Android Project và tìm hiểu cấu trúc bên trong của một Android Project.............. 14
Bài tập 4: Cách sửa một số lỗi thường gặp trong Android Project ......................................................... 22
Bài tập 5: Tìm hiểu vòng đời của một Ứng Dụng Android .................................................................... 24
Bài tập 6: Phân biệt Foreground Lifetime và Visible Lifetime .............................................................. 31
Bài tập 7: Làm quen với các Layout trong Android ............................................................................... 40
Bài tập 8: Các kiểu lập trình sự kiện trong Android ............................................................................... 51
Bài tập 9: Thực hành về Toast Notification và Alert Dialog .................................................................. 69
Bài tập 10: Sử dụng TextView, EditText và Button trong Android ....................................................... 72
Bài tập 11: Sử dụng Checkbox và RadioButton trong Android ...................................................... 80
Bài tập 12: Ví dụ tổng hợp TextView, EditText, CheckBox, Button và ImageButton trong Android ....................................................................................................................................... 89
Bài tập 13: Thực hành về ListView trong Android ......................................................................... 103
Bài tập 14: Thực hành về Custom Layout cho ListView trong Android ...................................... 125
Bài tập 15: Thực hành về Spinner trong Android .......................................................................... 136
Bài tập 16: Kết hợp Spinner với ListView trong Android.............................................................. 139
Bài tập 17: Thực hành về AutocompleteTextView và MultiAutocompleteTextView ................. 150
Bài tập 18: Cập nhật DataSource cho AutocompleteTextView lúc Runtime .............................. 154
Bài tập 19: Thực hành Gridview trong Android ............................................................................. 167
Bài tập 21: Thực hành về Tab Selector trong Android .................................................................. 175
Bài tập 22: Thực hành về Menu trong Android.............................................................................. 184
Bài tập 23: Thực hành về Context Menu trong Android ............................................................... 193
Bài tập 24: Thực hành về Intent trong Android ............................................................................. 196
Bài tập 25: Tiếp tục củng cố kiến thức Intent, ví dụ tổng hợp Quản Lý Nhân Viên ................... 216
Bài tập 26: Dùng Implicit Intent để viết chương trình gọi điện thoại và nhắn tin SMS ........... 263
Bài tập 27: Đa ngôn ngữ trong Android .......................................................................................... 274
Bài tập 28: Xử lý tập tin trong Android ........................................................................................... 279
Bài tập 29: XML Parser trong Android ........................................................................................... 293
Bài tập 30: Thực hành về Shared Preferences ................................................................................ 299
Bài tập 31: Cách sử dụng SQLite trong Android ............................................................................ 312
Bài tập 32: Tiếp tục củng cố kiến thức SQLite, ví dụ tổng hợp quản lý sách ............................... 320
Bài tập 33: Sử dụng ContentProvider trong Android .................................................................... 345
Bài tập 34: đa tiến trình trong Android (Multi-Threading) ......................................................... 354
2
Bài tập 1: Làm quen với môi trường phát triển
điện thoại di động
Trong các topic sắp tới, Tôi muốn dành nhiều thời gian để hướng dẫn các sinh viên học lập trình cho
thiết bị di động. Cụ thể là hệ điều hành Android. Tôi hi vọng sau khi theo dõi tất cả các Topic từ đầu
tới cuối thì các sinh viên sẽ có khả năng triển khai được ứng dụng trên hệ điều hành Android.
Đây là topic đầu tiên Tôi hướng dẫn các bạn làm quen với môi trường phát triển điện thoại di động,
các bạn có thể Comment vào topic, trao đổi trực tiếp với Tôi qua comment, qua email, qua điện
thoại…. Đừng ngần ngại.
Nội dung kiến thức thực hành:
- Làm quen với môi trường phát triển điện thoại di động
- Sử dụng Eclipse, DDMS – cách thức Debug
- Cách cài đặt Android SDK, Update Android API, Upgrade Firmware
- Sử dụng Android Virtual Device
- Tìm hiểu các thành phần trong Android App
- Tìm hiểu các đơn vị đo lường trong Android
- Tìm hiểu vòng đời của ứng dụng
- Tìm hiểu Google Play
Trong bài tập 1 này, chúng ta phải thực hiện : Cài đặt được Java JDK, Android SDK, ADT plugin
for Eclipse, update Android SDK.
Các bước chi tiết:
- Tải và cài đặt Java JDK: http://java.sun.com/javase/downloads/index.jsp (cài đặt cái này
trước, nên chọn bản mới nhất)
- Tải và cài đặt Android SDK: http://developer.android.com/sdk/index.html , tải gói ADT
Bundle for Windows, gói này sẽ chứa các thành phần:
Eclipse + ADT plugin
3
Android SDK Tools
Android Platform tools
Android API mới nhất
Android system image mới nhất cho Emulator
- Cập nhật ADT plugin mới nhất cho Eclipse:
1. Vào menu Help / chọn Install New Software
2. Nhập đường dẫn: https://dl-ssl.google.com/android/eclipse/ và bấm nút Add ở góc bên phải
3. Chọn các thông số thích hợp để tiến hành cập nhật.
- Tiến hành Cập nhật Android SDK (nếu cần thiết)
- Tham chiếu Android SDK (bắt buộc, nếu cài gói ADT Bundle for Windows trên trang
developer.android.com thì nó đã tự tham chiếu cho chúng ta rồi).
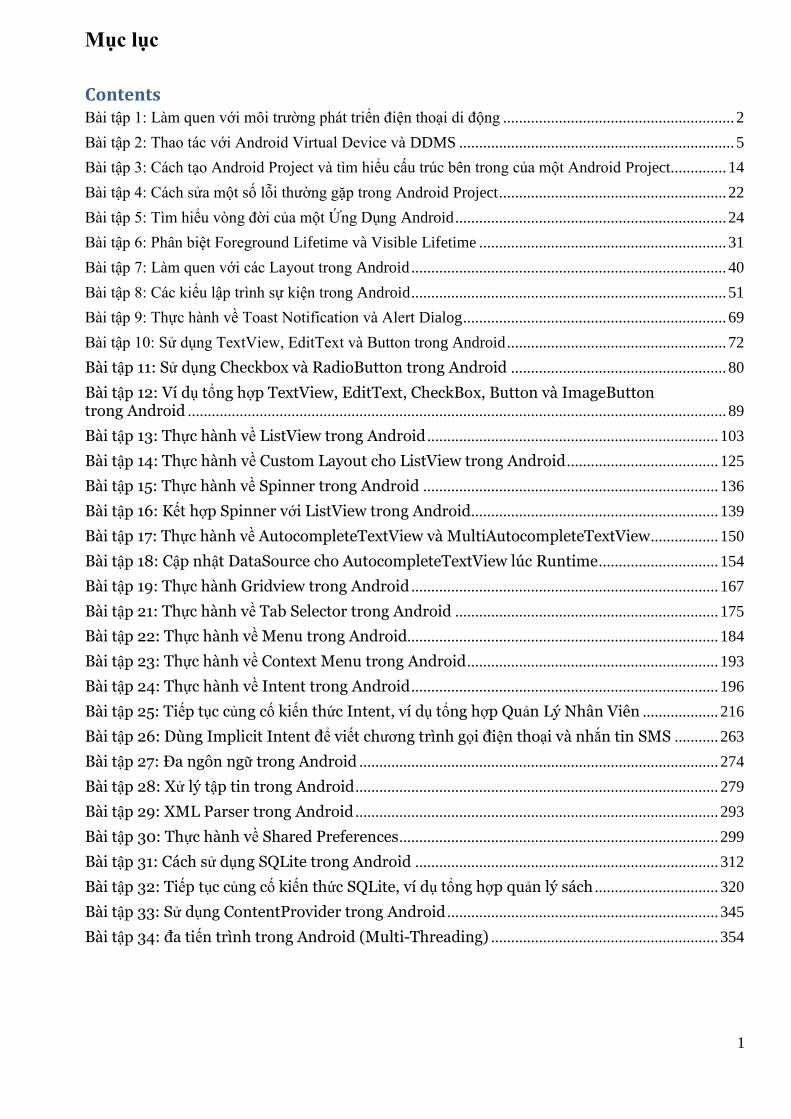
Sau khi cài đặt xong đầy đủ (JDK, Android SDK …), ta khởi động Elipse trong gói ADT Bundle for
windows, ta có giao diện như hình bên dưới:
- Đóng màn hình Welcome bằng cách click vào dấu chéo kế bên chữ Android IDE
4
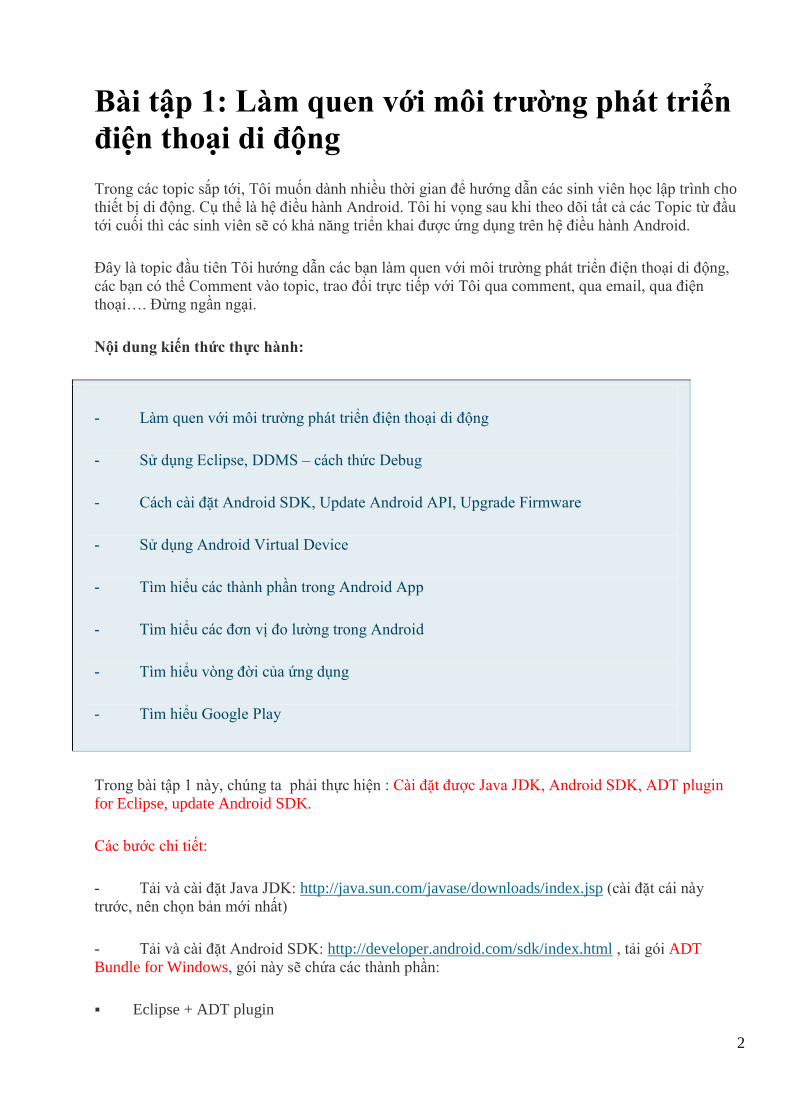
- Để tham chiếu tới Android SDK, ta vào menu Windows/ Preferences/ chọn Android và
Browse tới SDK location mà bạn lưu trữ:
Các bạn nhìn vào hình trên, thấy có Android 4.2, API 17 hiển thị ra. Đó chính là API mới nhất của
Android, tùy vào danh sách API được tải về máy nó sẽ hiển thị ra đây. Hiện tại trong máy của Tôi chỉ
có 1 API 17, nếu máy bạn có nhiều API khác thì nó sẽ liệt kê ra đây hết.
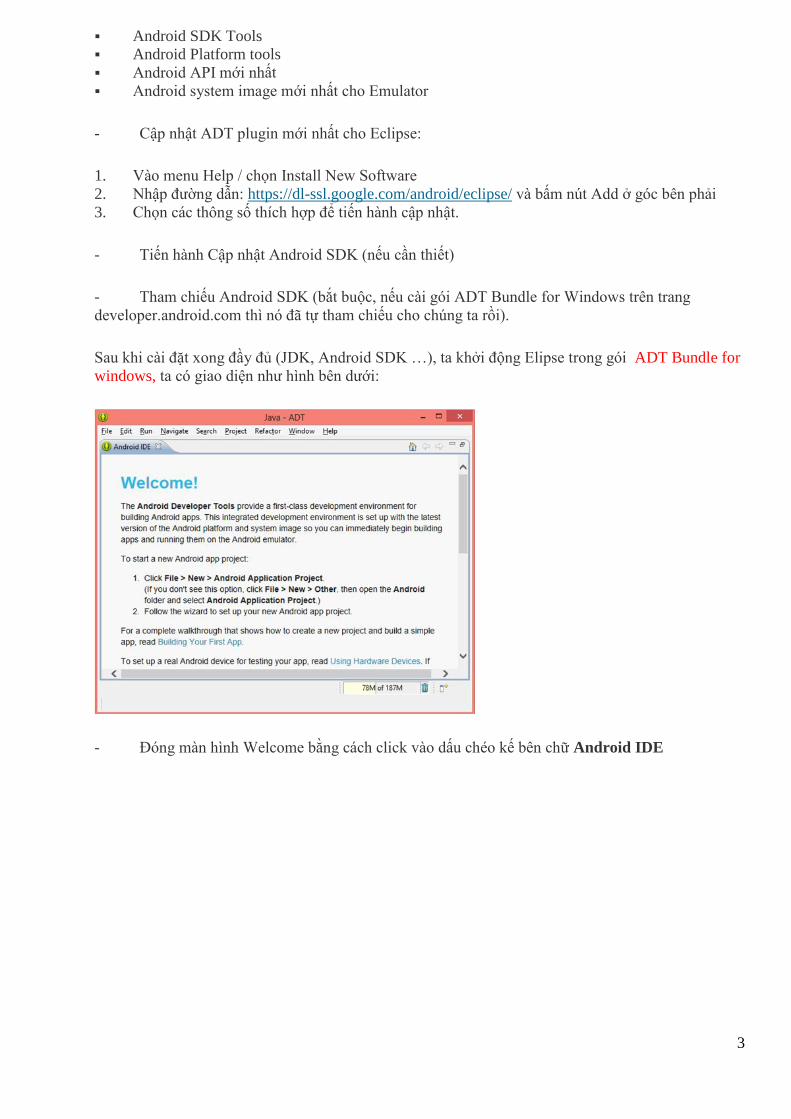
- Nếu như máy tính của bạn có kết nối internet, thì bạn có thể cập nhật API theo cách sau:
Vào menu Windows/ Android SDK Manager (hoặc bấm vào biểu tượng trên thanh toolbar), màn
hình Android SDK Manager sẽ hiện thị ra như bên dưới:
Bạn quan sát trong màn hình
bên trên, Những gói nào chưa được cài đặt thì có dòng chữ “Not installed”, bạn checked vào nó và
nhấn nút Install packages.. ở góc phải dưới cùng.
Tới đây là bạn đã biết cài đặt JDK, cài đặt Android SDK, cách chạy Eclipse và cập nhật API.
5
Bài tập 2: Thao tác với Android Virtual Device
và DDMS
Tiếp nối bài tập số 1 , Mục đích của bài tập này sẽ giúp các bạn thao tác được với AVD (tạo, sửa,
xóa, cấu hình…) và cách sử dụng DDMS cho việc nhắn tin, gọi điện thoại, sử dụng File Explorer (
Đưa tập tin từ máy tính vào máy ảo, và lấy tập tin từ máy ảo ra máy tính….). Biết được cách kết nối
một số thiết bị Android thiệt với DDMS, cũng như cách thức debug.
- Tại sao sử dụng AVD?
+ Có nhiều lý do để sử dụng AVD, còn theo Tôi thì đơn giản là nó thay thế cho thiệt bị thật (Android
Emulator) nên cho dù bạn không có chiếc Alô Android nào thì vẫn lập trình ầm ầm như thường. Mọi
sự tương tác trên Emulator cũng chính là tương tác trên thiết bị thật
+ AVD – DDMS hỗ trợ giả lập location base service với định dạng KML nên dễ dàng cho việc lập
trình LBS
+ Chỉ có một vài hạn chế của Emulator : Khó hỗ trợ Camera, không hỗ trợ thiết bị cảm ứng. Nhưng
bạn yên tâm là trên mạng cũng đã hỗ trợ thư viện tương tác cảm ứng trong Emulator (hỗ
trợ accelerometer, compass, và temperature sensors)
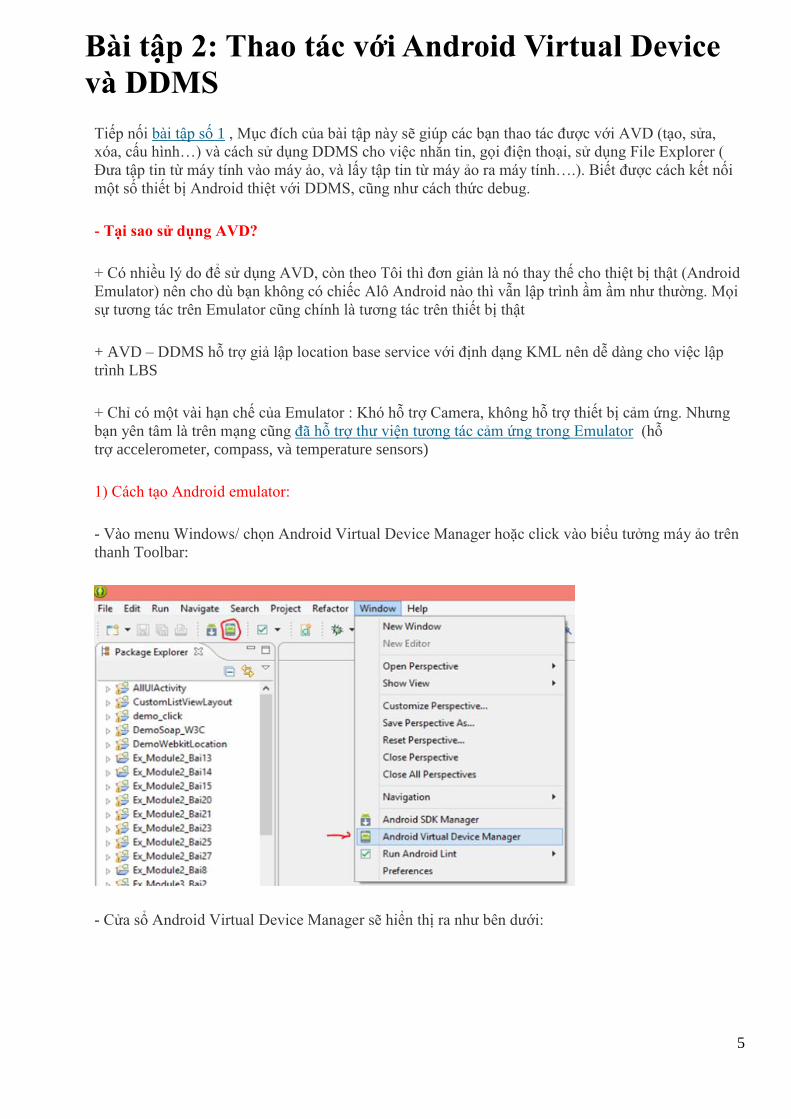
1) Cách tạo Android emulator:
- Vào menu Windows/ chọn Android Virtual Device Manager hoặc click vào biểu tưởng máy ảo trên
thanh Toolbar:
- Cửa sổ Android Virtual Device Manager sẽ hiển thị ra như bên dưới:
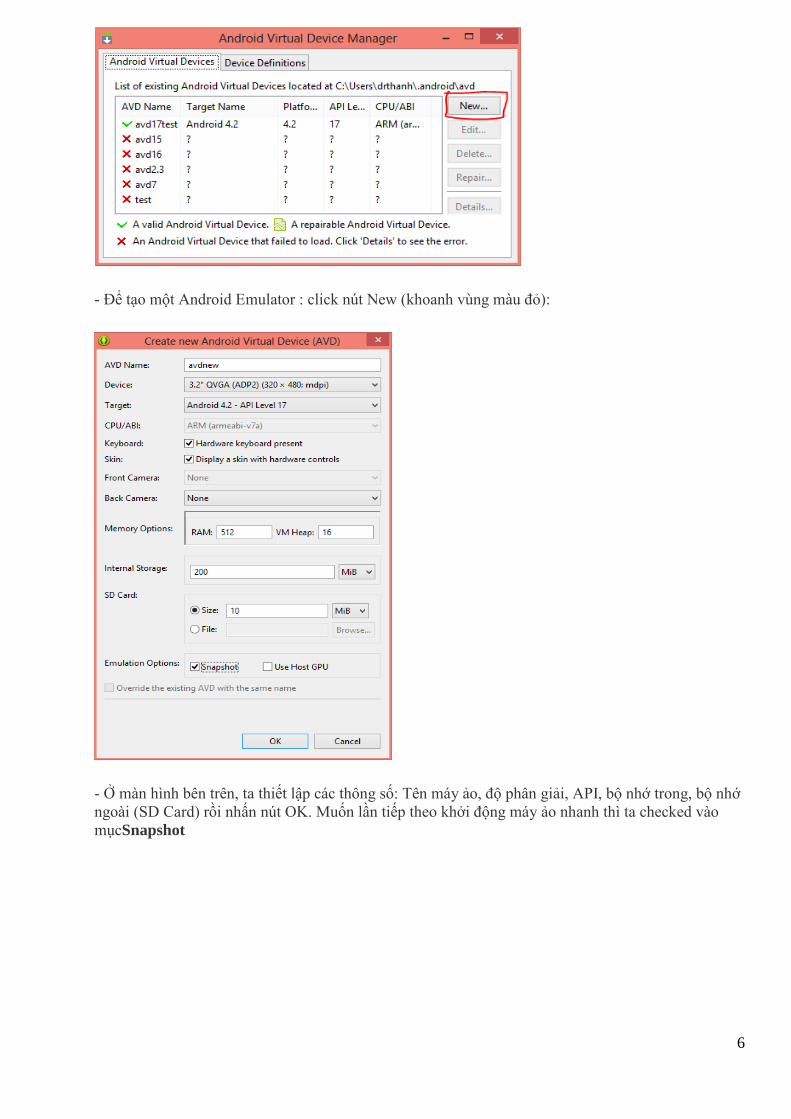
6
- Để tạo một Android Emulator : click nút New (khoanh vùng màu đỏ):
- Ở màn hình bên trên, ta thiết lập các thông số: Tên máy ảo, độ phân giải, API, bộ nhớ trong, bộ nhớ
ngoài (SD Card) rồi nhấn nút OK. Muốn lần tiếp theo khởi động máy ảo nhanh thì ta checked vào
mụcSnapshot
7
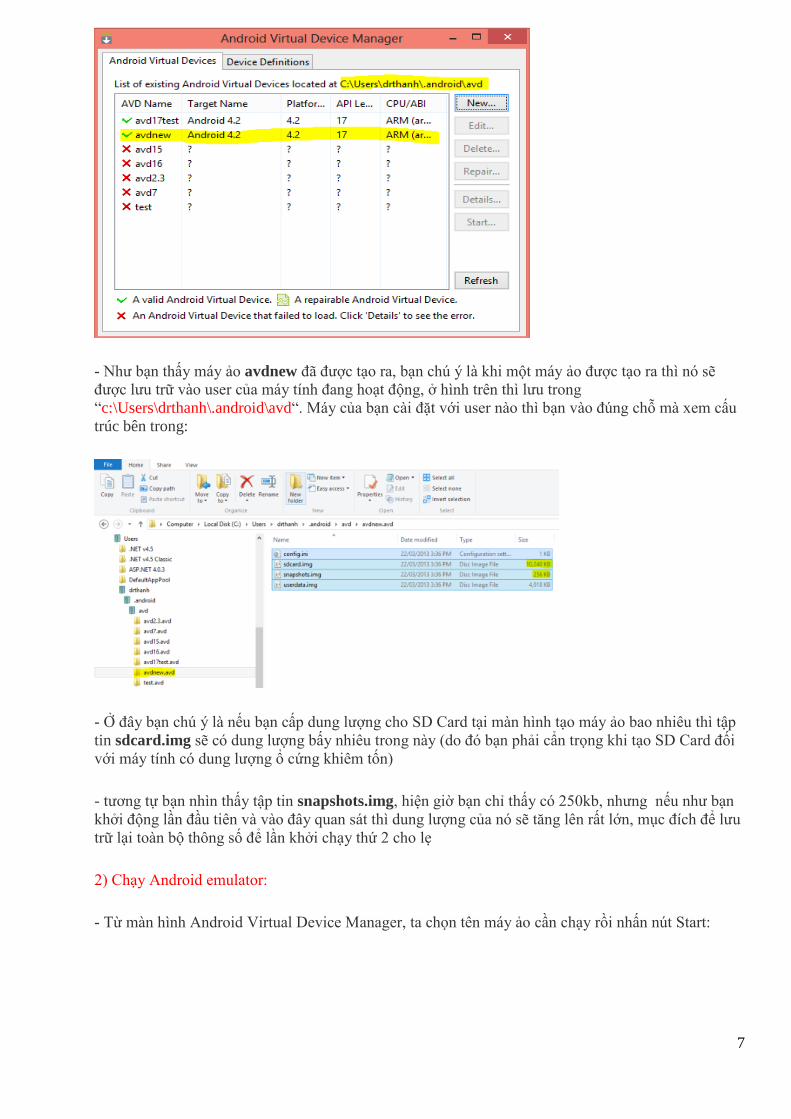
- Như bạn thấy máy ảo avdnew đã được tạo ra, bạn chú ý là khi một máy ảo được tạo ra thì nó sẽ
được lưu trữ vào user của máy tính đang hoạt động, ở hình trên thì lưu trong
“c:\Users\drthanh\.android\avd“. Máy của bạn cài đặt với user nào thì bạn vào đúng chỗ mà xem cấu
trúc bên trong:
- Ở đây bạn chú ý là nếu bạn cấp dung lượng cho SD Card tại màn hình tạo máy ảo bao nhiêu thì tập
tin sdcard.img sẽ có dung lượng bấy nhiêu trong này (do đó bạn phải cẩn trọng khi tạo SD Card đối
với máy tính có dung lượng ổ cứng khiêm tốn)
- tương tự bạn nhìn thấy tập tin snapshots.img, hiện giờ bạn chỉ thấy có 250kb, nhưng nếu như bạn
khởi động lần đầu tiên và vào đây quan sát thì dung lượng của nó sẽ tăng lên rất lớn, mục đích để lưu
trữ lại toàn bộ thông số để lần khởi chạy thứ 2 cho lẹ
2) Chạy Android emulator:
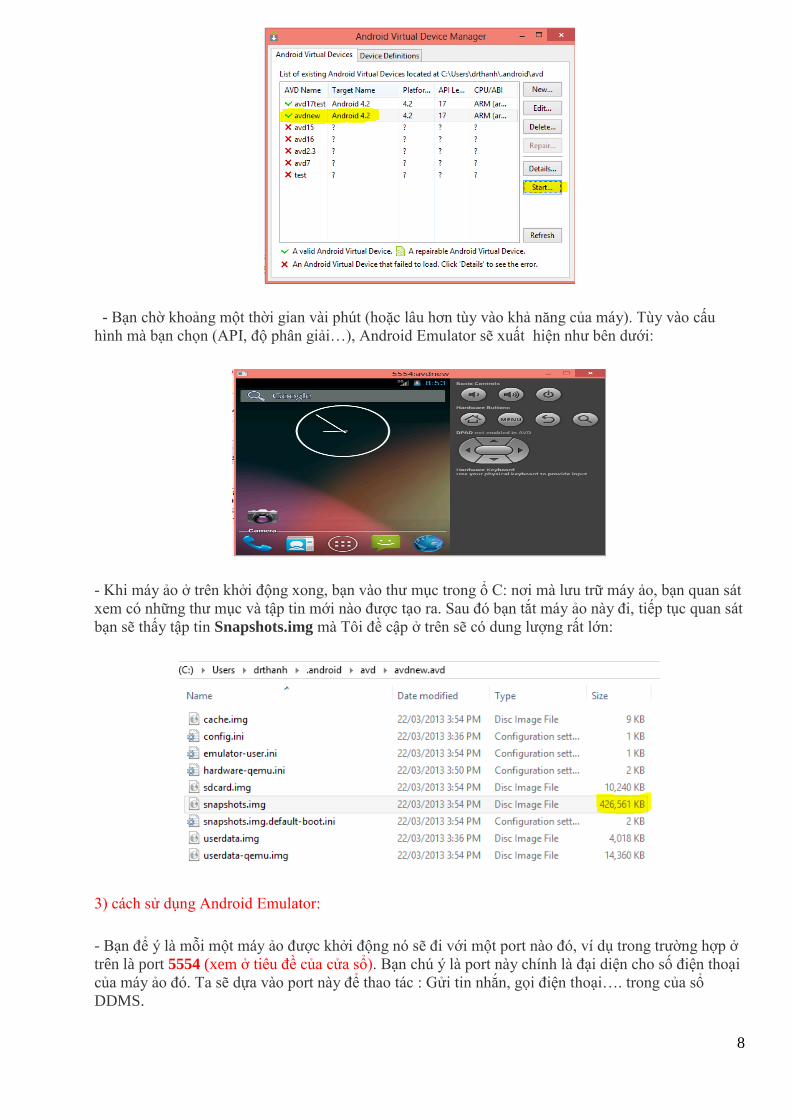
- Từ màn hình Android Virtual Device Manager, ta chọn tên máy ảo cần chạy rồi nhấn nút Start:
8
- Bạn chờ khoảng một thời gian vài phút (hoặc lâu hơn tùy vào khả năng của máy). Tùy vào cấu
hình mà bạn chọn (API, độ phân giải…), Android Emulator sẽ xuất hiện như bên dưới:
- Khi máy ảo ở trên khởi động xong, bạn vào thư mục trong ổ C: nơi mà lưu trữ máy ảo, bạn quan sát
xem có những thư mục và tập tin mới nào được tạo ra. Sau đó bạn tắt máy ảo này đi, tiếp tục quan sát
bạn sẽ thấy tập tin Snapshots.img mà Tôi đề cập ở trên sẽ có dung lượng rất lớn:
3) cách sử dụng Android Emulator:
- Bạn để ý là mỗi một máy ảo được khởi động nó sẽ đi với một port nào đó, ví dụ trong trường hợp ở
trên là port 5554 (xem ở tiêu đề của cửa sổ). Bạn chú ý là port này chính là đại diện cho số điện thoại
của máy ảo đó. Ta sẽ dựa vào port này để thao tác : Gửi tin nhắn, gọi điện thoại…. trong của sổ
DDMS.
9
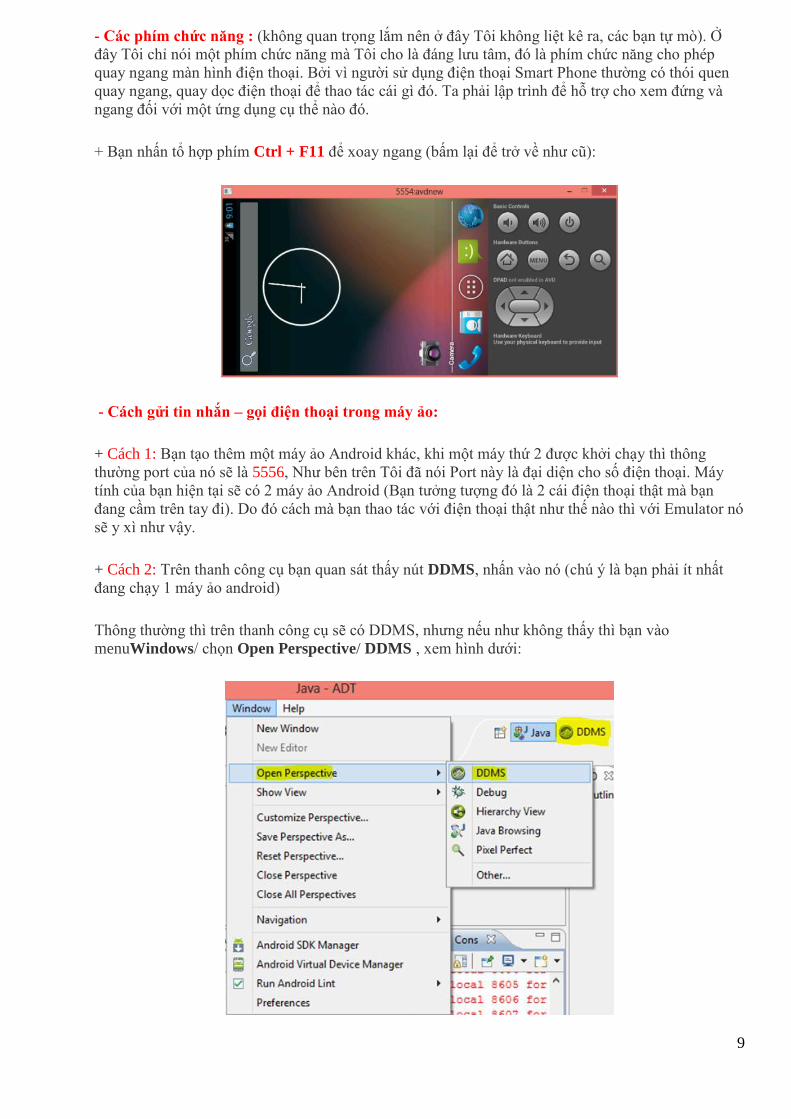
- Các phím chức năng : (không quan trọng lắm nên ở đây Tôi không liệt kê ra, các bạn tự mò). Ở
đây Tôi chỉ nói một phím chức năng mà Tôi cho là đáng lưu tâm, đó là phím chức năng cho phép
quay ngang màn hình điện thoại. Bởi vì người sử dụng điện thoại Smart Phone thường có thói quen
quay ngang, quay dọc điện thoại để thao tác cái gì đó. Ta phải lập trình để hỗ trợ cho xem đứng và
ngang đối với một ứng dụng cụ thể nào đó.
+ Bạn nhấn tổ hợp phím Ctrl + F11 để xoay ngang (bấm lại để trở về như cũ):
- Cách gửi tin nhắn – gọi điện thoại trong máy ảo:
+ Cách 1: Bạn tạo thêm một máy ảo Android khác, khi một máy thứ 2 được khởi chạy thì thông
thường port của nó sẽ là 5556, Như bên trên Tôi đã nói Port này là đại diện cho số điện thoại. Máy
tính của bạn hiện tại sẽ có 2 máy ảo Android (Bạn tưởng tượng đó là 2 cái điện thoại thật mà bạn
đang cầm trên tay đi). Do đó cách mà bạn thao tác với điện thoại thật như thế nào thì với Emulator nó
sẽ y xì như vậy.
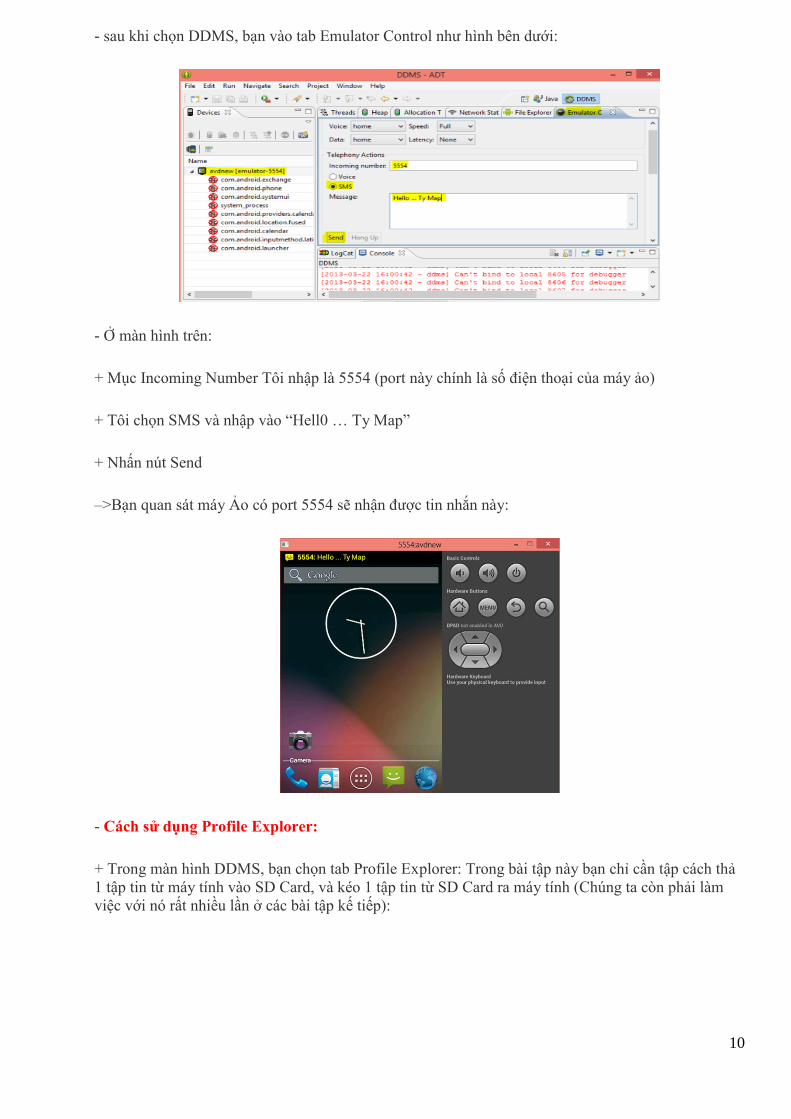
+ Cách 2: Trên thanh công cụ bạn quan sát thấy nút DDMS, nhấn vào nó (chú ý là bạn phải ít nhất
đang chạy 1 máy ảo android)
Thông thường thì trên thanh công cụ sẽ có DDMS, nhưng nếu như không thấy thì bạn vào
menuWindows/ chọn Open Perspective/ DDMS , xem hình dưới:
10
- sau khi chọn DDMS, bạn vào tab Emulator Control như hình bên dưới:
- Ở màn hình trên:
+ Mục Incoming Number Tôi nhập là 5554 (port này chính là số điện thoại của máy ảo)
+ Tôi chọn SMS và nhập vào “Hell0 … Ty Map”
+ Nhấn nút Send
–>Bạn quan sát máy Ảo có port 5554 sẽ nhận được tin nhắn này:
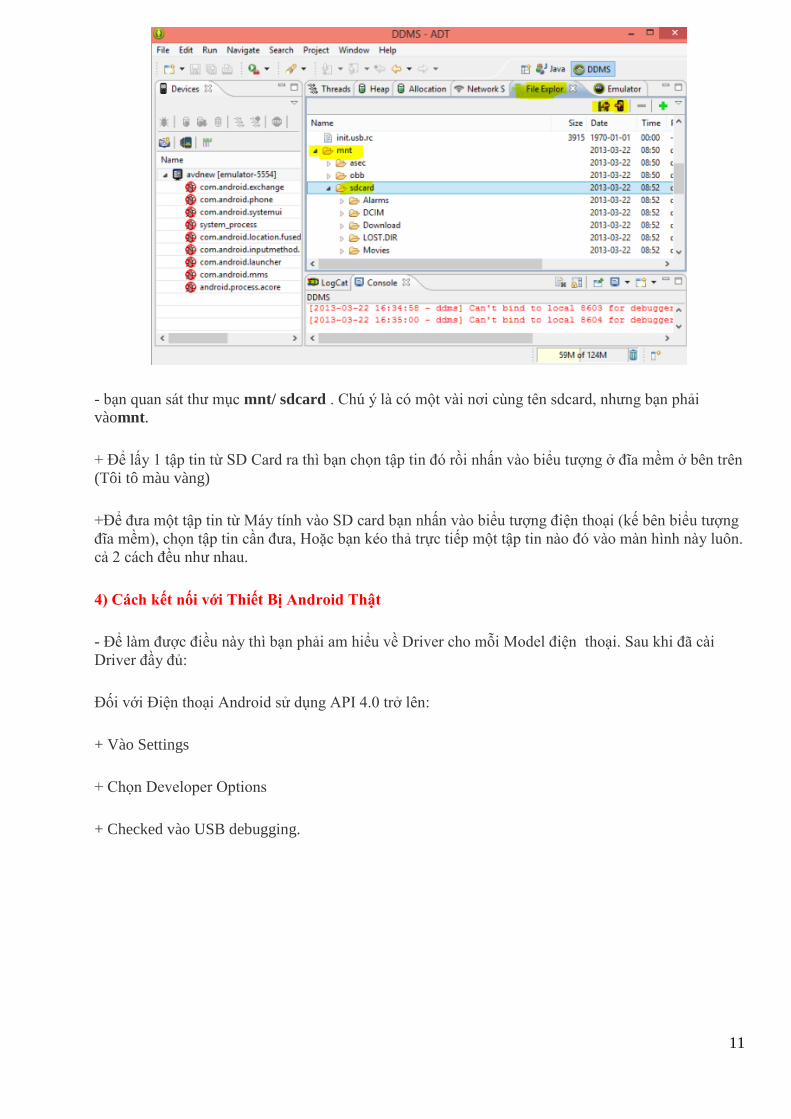
- Cách sử dụng Profile Explorer:
+ Trong màn hình DDMS, bạn chọn tab Profile Explorer: Trong bài tập này bạn chỉ cần tập cách thả
1 tập tin từ máy tính vào SD Card, và kéo 1 tập tin từ SD Card ra máy tính (Chúng ta còn phải làm
việc với nó rất nhiều lần ở các bài tập kế tiếp):
11
- bạn quan sát thư mục mnt/ sdcard . Chú ý là có một vài nơi cùng tên sdcard, nhưng bạn phải
vàomnt.
+ Để lấy 1 tập tin từ SD Card ra thì bạn chọn tập tin đó rồi nhấn vào biểu tượng ở đĩa mềm ở bên trên
(Tôi tô màu vàng)
+Để đưa một tập tin từ Máy tính vào SD card bạn nhấn vào biểu tượng điện thoại (kế bên biểu tượng
đĩa mềm), chọn tập tin cần đưa, Hoặc bạn kéo thả trực tiếp một tập tin nào đó vào màn hình này luôn.
cả 2 cách đều như nhau.
4) Cách kết nối với Thiết Bị Android Thật
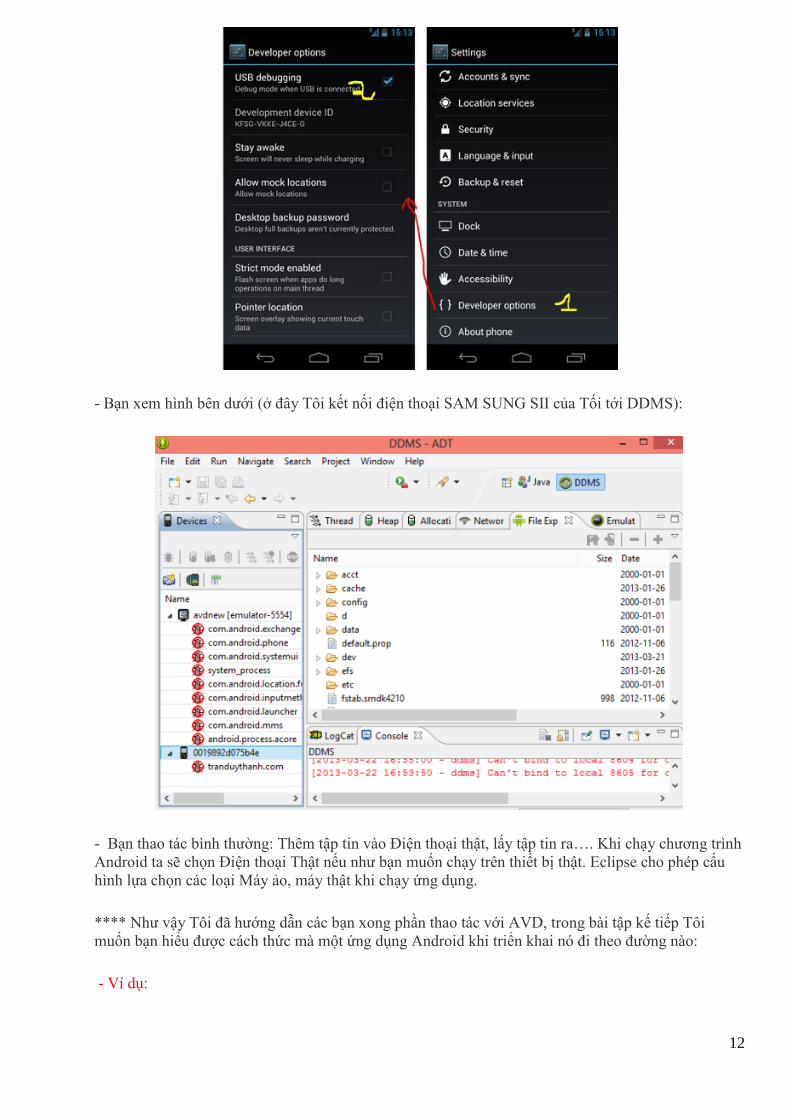
- Để làm được điều này thì bạn phải am hiểu về Driver cho mỗi Model điện thoại. Sau khi đã cài
Driver đầy đủ:
Đối với Điện thoại Android sử dụng API 4.0 trở lên:
+ Vào Settings
+ Chọn Developer Options
+ Checked vào USB debugging.
12
- Bạn xem hình bên dưới (ở đây Tôi kết nối điện thoại SAM SUNG SII của Tối tới DDMS):
- Bạn thao tác bình thường: Thêm tập tin vào Điện thoại thật, lấy tập tin ra…. Khi chạy chương trình
Android ta sẽ chọn Điện thoại Thật nếu như bạn muốn chạy trên thiết bị thật. Eclipse cho phép cấu
hình lựa chọn các loại Máy ảo, máy thật khi chạy ứng dụng.
**** Như vậy Tôi đã hướng dẫn các bạn xong phần thao tác với AVD, trong bài tập kế tiếp Tôi
muốn bạn hiểu được cách thức mà một ứng dụng Android khi triển khai nó đi theo đường nào:
- Ví dụ:
13
+ Dalvik Virtual Machine là gì? nó có tác dụng gì trong ứng dụng?
+ Biên dịch như thế nào?
+ Biên dịch xong thì làm gì?
+ Cách thức ứng dụng upload vào thiết bị
+ Cách thực ứng dụng được cài đặt vào thiết bị
+ Chạy ứng dụng như thế nào trong thiết bị
+ Làm sao tháo gỡ ứng dụng ra khỏi thiết bị
+ Làm sao kiểm tra có bao nhiêu ứng dụng đang chạy trong điện thoại.
Bài tập này Tôi hi vọng các bạn phải thao tác thật nhuần nhuyễn để khi vào sâu bên trong để lập trình
thì nó giúp ích cho các bạn rất nhiều.
14
Bài tập 3: Cách tạo Android Project và tìm hiểu
cấu trúc bên trong của một Android Project
Ở bài tập số 2, bạn đã biết cách tạo và sử dụng máy ảo Android cũng như DDMS.
- Trong bài tập này các bạn sẽ thực hành cách tạo Android Project và tìm hiểu các thành phần bên
trong của nó:
Cách tạo Android Project
Activity, Intent, View
Auto gen
Android libs
Resource
Layout, menu, values
Manifest XML
- Cũng như cách chạy chương trình Android, hiểu được cơ chế vận hành của nó.
1) Cách tạo một Android Project:
Ở đây Tôi cung cấp 2 cách tạo Android Project:
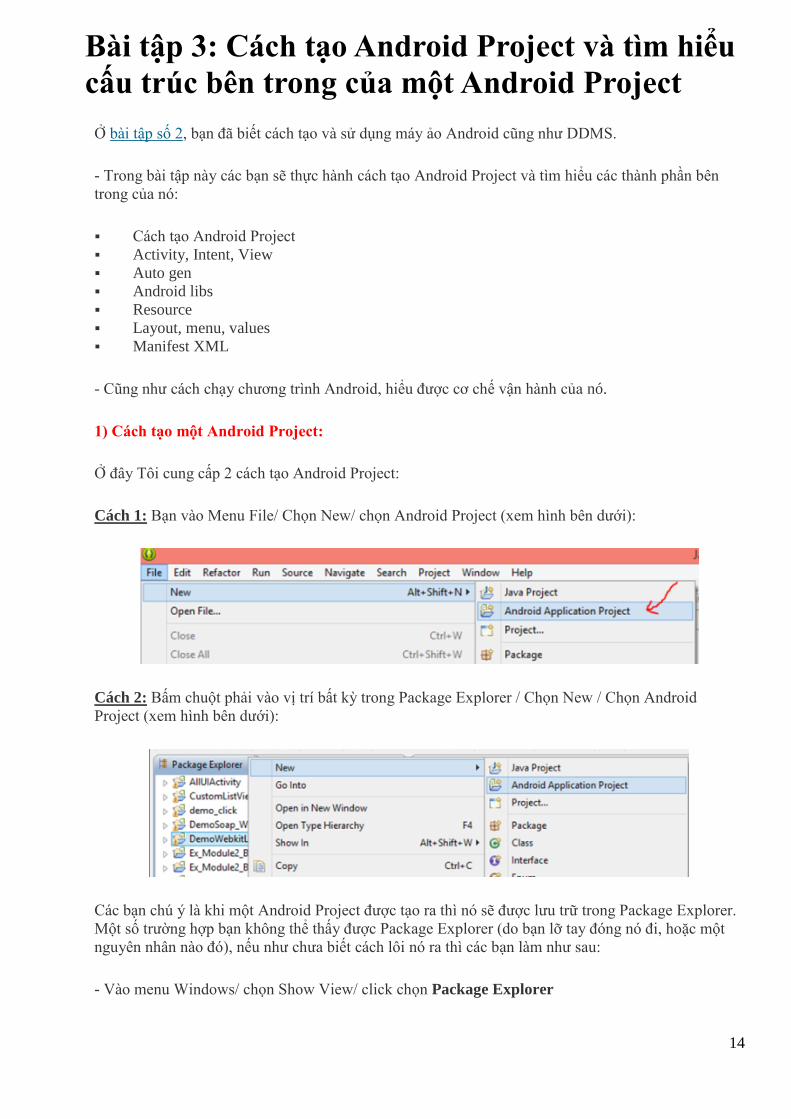
Cách 1: Bạn vào Menu File/ Chọn New/ chọn Android Project (xem hình bên dưới):
Cách 2: Bấm chuột phải vào vị trí bất kỳ trong Package Explorer / Chọn New / Chọn Android
Project (xem hình bên dưới):
Các bạn chú ý là khi một Android Project được tạo ra thì nó sẽ được lưu trữ trong Package Explorer.
Một số trường hợp bạn không thể thấy được Package Explorer (do bạn lỡ tay đóng nó đi, hoặc một
nguyên nhân nào đó), nếu như chưa biết cách lôi nó ra thì các bạn làm như sau:
- Vào menu Windows/ chọn Show View/ click chọn Package Explorer
15
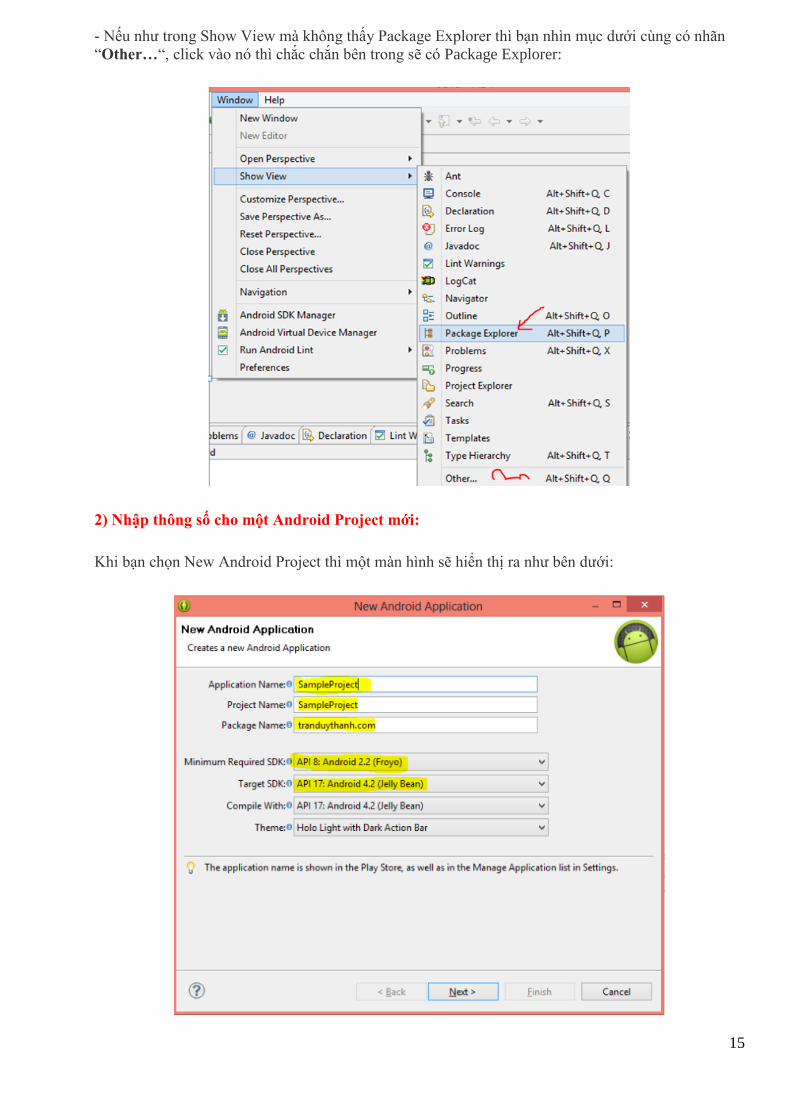
- Nếu như trong Show View mà không thấy Package Explorer thì bạn nhìn mục dưới cùng có nhãn
“Other…“, click vào nó thì chắc chắn bên trong sẽ có Package Explorer:
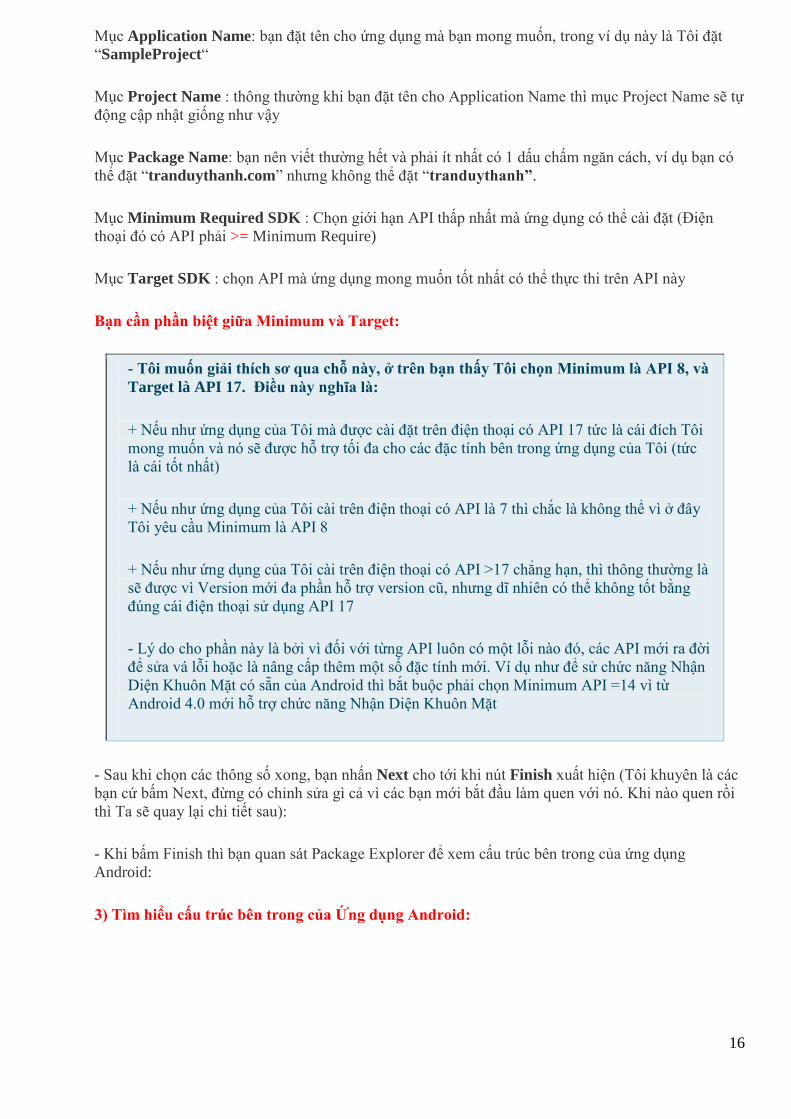
2) Nhập thông số cho một Android Project mới:
Khi bạn chọn New Android Project thì một màn hình sẽ hiển thị ra như bên dưới:
16
Mục Application Name: bạn đặt tên cho ứng dụng mà bạn mong muốn, trong ví dụ này là Tôi đặt
“SampleProject“
Mục Project Name : thông thường khi bạn đặt tên cho Application Name thì mục Project Name sẽ tự
động cập nhật giống như vậy
Mục Package Name: bạn nên viết thường hết và phải ít nhất có 1 dấu chấm ngăn cách, ví dụ bạn có
thể đặt “tranduythanh.com” nhưng không thể đặt “tranduythanh”.
Mục Minimum Required SDK : Chọn giới hạn API thấp nhất mà ứng dụng có thể cài đặt (Điện
thoại đó có API phải >= Minimum Require)
Mục Target SDK : chọn API mà ứng dụng mong muốn tốt nhất có thể thực thi trên API này
Bạn cần phần biệt giữa Minimum và Target:
- Tôi muốn giải thích sơ qua chỗ này, ở trên bạn thấy Tôi chọn Minimum là API 8, và
Target là API 17. Điều này nghĩa là:
+ Nếu như ứng dụng của Tôi mà được cài đặt trên điện thoại có API 17 tức là cái đích Tôi
mong muốn và nó sẽ được hỗ trợ tối đa cho các đặc tính bên trong ứng dụng của Tôi (tức
là cái tốt nhất)
+ Nếu như ứng dụng của Tôi cài trên điện thoại có API là 7 thì chắc là không thể vì ở đây
Tôi yêu cầu Minimum là API 8
+ Nếu như ứng dụng của Tôi cài trên điện thoại có API >17 chẳng hạn, thì thông thường là
sẽ được vì Version mới đa phần hỗ trợ version cũ, nhưng dĩ nhiên có thể không tốt bằng
đúng cái điện thoại sử dụng API 17
- Lý do cho phần này là bởi vì đối với từng API luôn có một lỗi nào đó, các API mới ra đời
để sửa vá lỗi hoặc là nâng cấp thêm một số đặc tính mới. Ví dụ như để sử chức năng Nhận
Diện Khuôn Mặt có sẵn của Android thì bắt buộc phải chọn Minimum API =14 vì từ
Android 4.0 mới hỗ trợ chức năng Nhận Diện Khuôn Mặt
- Sau khi chọn các thông số xong, bạn nhấn Next cho tới khi nút Finish xuất hiện (Tôi khuyên là các
bạn cứ bấm Next, đừng có chỉnh sửa gì cả vì các bạn mới bắt đầu làm quen với nó. Khi nào quen rồi
thì Ta sẽ quay lại chi tiết sau):
- Khi bấm Finish thì bạn quan sát Package Explorer để xem cấu trúc bên trong của ứng dụng
Android:
3) Tìm hiểu cấu trúc bên trong của Ứng dụng Android:
17
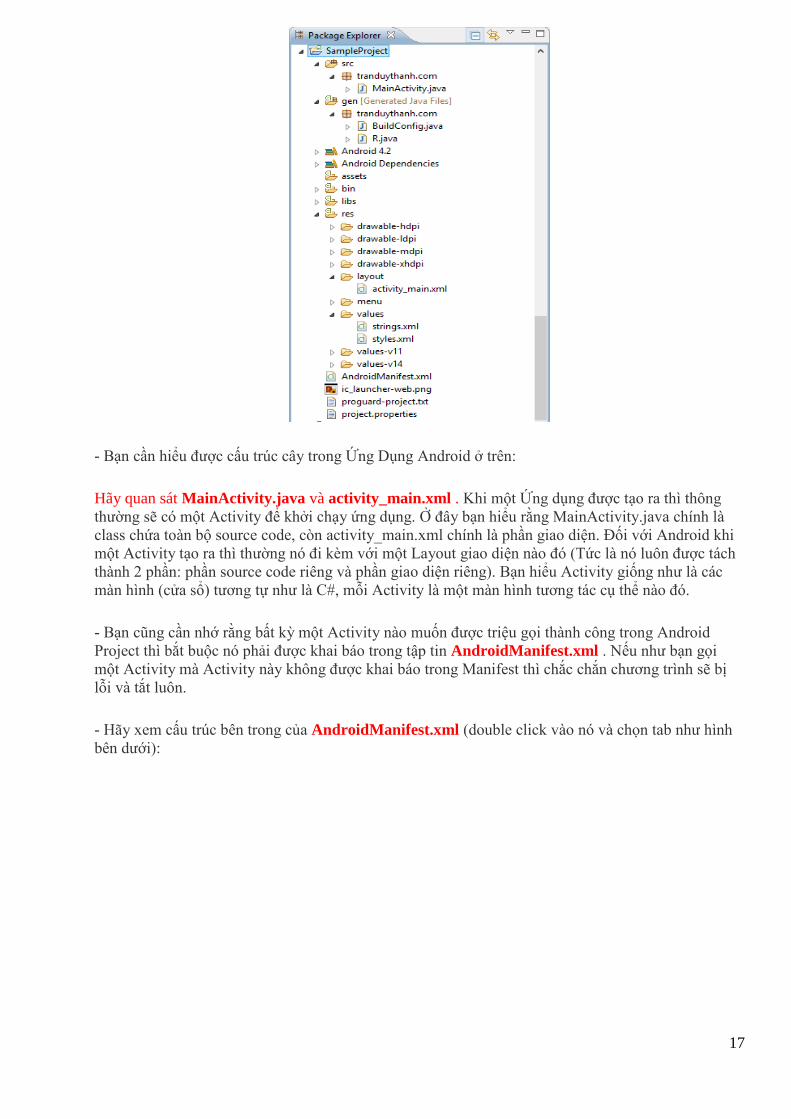
- Bạn cần hiểu được cấu trúc cây trong Ứng Dụng Android ở trên:
Hãy quan sát MainActivity.java và activity_main.xml . Khi một Ứng dụng được tạo ra thì thông
thường sẽ có một Activity để khởi chạy ứng dụng. Ở đây bạn hiểu rằng MainActivity.java chính là
class chứa toàn bộ source code, còn activity_main.xml chính là phần giao diện. Đối với Android khi
một Activity tạo ra thì thường nó đi kèm với một Layout giao diện nào đó (Tức là nó luôn được tách
thành 2 phần: phần source code riêng và phần giao diện riêng). Bạn hiểu Activity giống như là các
màn hình (cửa sổ) tương tự như là C#, mỗi Activity là một màn hình tương tác cụ thể nào đó.
- Bạn cũng cần nhớ rằng bất kỳ một Activity nào muốn được triệu gọi thành công trong Android
Project thì bắt buộc nó phải được khai báo trong tập tin AndroidManifest.xml . Nếu như bạn gọi
một Activity mà Activity này không được khai báo trong Manifest thì chắc chắn chương trình sẽ bị
lỗi và tắt luôn.
- Hãy xem cấu trúc bên trong của AndroidManifest.xml (double click vào nó và chọn tab như hình
bên dưới):
18
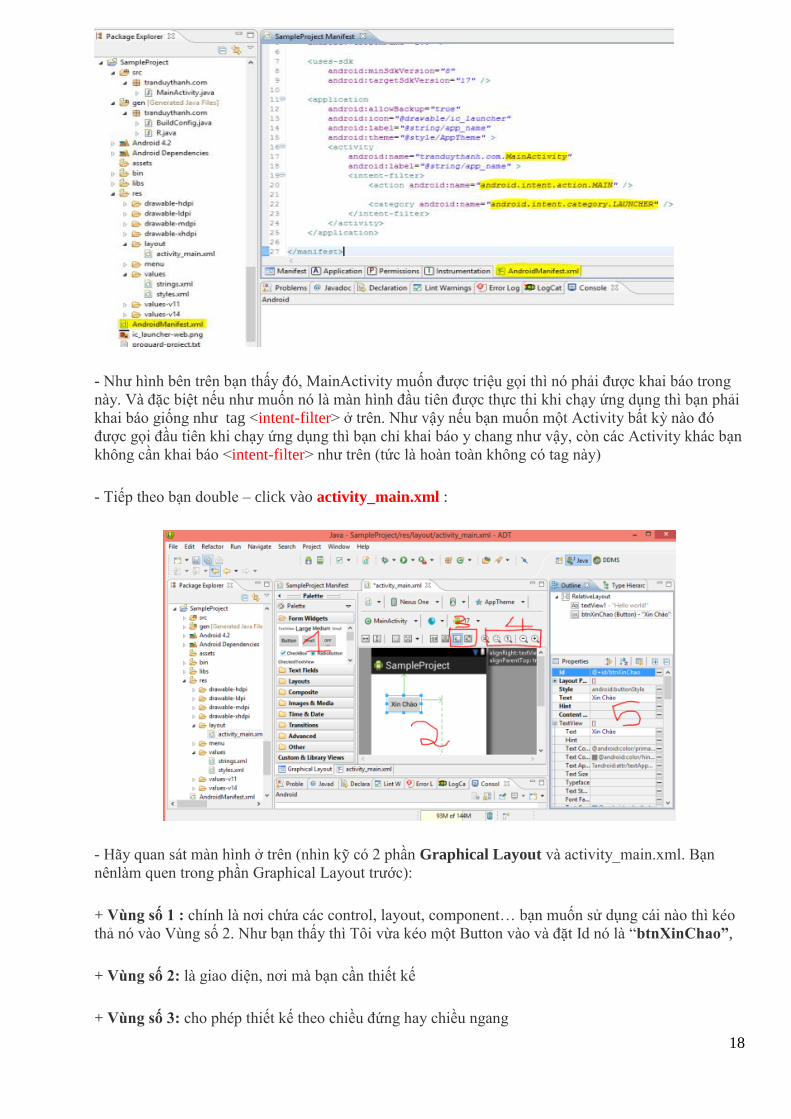
- Như hình bên trên bạn thấy đó, MainActivity muốn được triệu gọi thì nó phải được khai báo trong
này. Và đặc biệt nếu như muốn nó là màn hình đầu tiên được thực thi khi chạy ứng dụng thì bạn phải
khai báo giống như tag <intent-filter> ở trên. Như vậy nếu bạn muốn một Activity bất kỳ nào đó
được gọi đầu tiên khi chạy ứng dụng thì bạn chỉ khai báo y chang như vậy, còn các Activity khác bạn
không cần khai báo <intent-filter> như trên (tức là hoàn toàn không có tag này)
- Tiếp theo bạn double – click vào activity_main.xml :
- Hãy quan sát màn hình ở trên (nhìn kỹ có 2 phần Graphical Layout và activity_main.xml. Bạn
nênlàm quen trong phần Graphical Layout trước):
+ Vùng số 1 : chính là nơi chứa các control, layout, component… bạn muốn sử dụng cái nào thì kéo
thả nó vào Vùng số 2. Như bạn thấy thì Tôi vừa kéo một Button vào và đặt Id nó là “btnXinChao”,
+ Vùng số 2: là giao diện, nơi mà bạn cần thiết kế
+ Vùng số 3: cho phép thiết kế theo chiều đứng hay chiều ngang
19
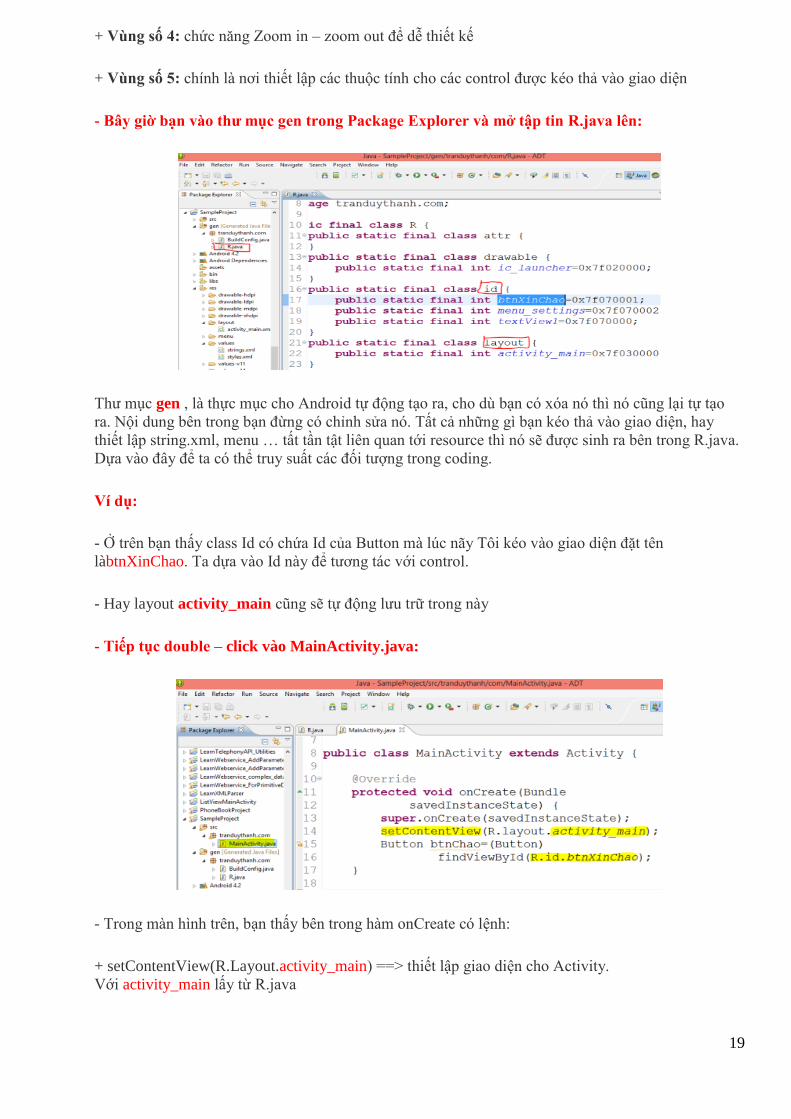
+ Vùng số 4: chức năng Zoom in – zoom out để dễ thiết kế
+ Vùng số 5: chính là nơi thiết lập các thuộc tính cho các control được kéo thả vào giao diện
- Bây giờ bạn vào thư mục gen trong Package Explorer và mở tập tin R.java lên:
Thư mục gen , là thực mục cho Android tự động tạo ra, cho dù bạn có xóa nó thì nó cũng lại tự tạo
ra. Nội dung bên trong bạn đừng có chỉnh sửa nó. Tất cả những gì bạn kéo thả vào giao diện, hay
thiết lập string.xml, menu … tất tần tật liên quan tới resource thì nó sẽ được sinh ra bên trong R.java.
Dựa vào đây để ta có thể truy suất các đối tượng trong coding.
Ví dụ:
- Ở trên bạn thấy class Id có chứa Id của Button mà lúc nãy Tôi kéo vào giao diện đặt tên
làbtnXinChao. Ta dựa vào Id này để tương tác với control.
- Hay layout activity_main cũng sẽ tự động lưu trữ trong này
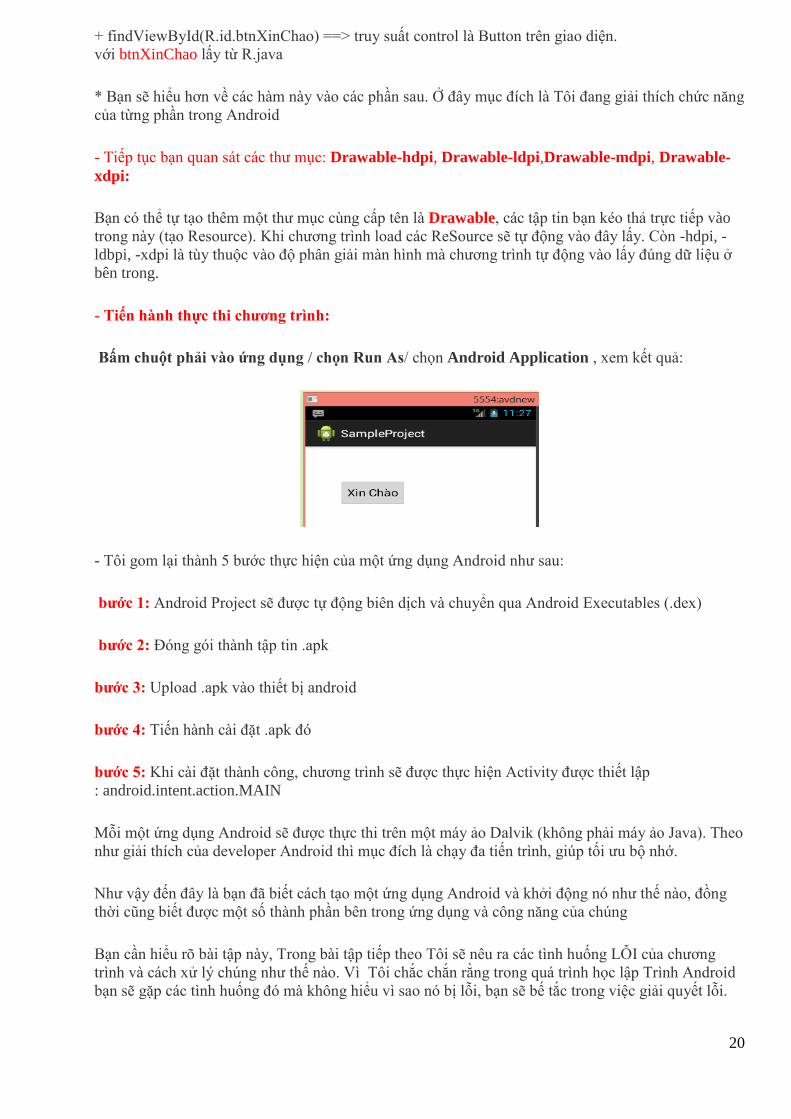
- Tiếp tục double – click vào MainActivity.java:
- Trong màn hình trên, bạn thấy bên trong hàm onCreate có lệnh:
+ setContentView(R.Layout.activity_main) ==> thiết lập giao diện cho Activity.
Với activity_main lấy từ R.java
20
+ findViewById(R.id.btnXinChao) ==> truy suất control là Button trên giao diện.
với btnXinChao lấy từ R.java
* Bạn sẽ hiểu hơn về các hàm này vào các phần sau. Ở đây mục đích là Tôi đang giải thích chức năng
của từng phần trong Android
- Tiếp tục bạn quan sát các thư mục: Drawable-hdpi, Drawable-ldpi,Drawable-mdpi, Drawable-
xdpi:
Bạn có thể tự tạo thêm một thư mục cùng cấp tên là Drawable, các tập tin bạn kéo thả trực tiếp vào
trong này (tạo Resource). Khi chương trình load các ReSource sẽ tự động vào đây lấy. Còn -hdpi, -
ldbpi, -xdpi là tùy thuộc vào độ phân giải màn hình mà chương trình tự động vào lấy đúng dữ liệu ở
bên trong.
- Tiến hành thực thi chương trình:
Bấm chuột phải vào ứng dụng / chọn Run As/ chọn Android Application , xem kết quả:
- Tôi gom lại thành 5 bước thực hiện của một ứng dụng Android như sau:
bước 1: Android Project sẽ được tự động biên dịch và chuyển qua Android Executables (.dex)
bước 2: Đóng gói thành tập tin .apk
bước 3: Upload .apk vào thiết bị android
bước 4: Tiến hành cài đặt .apk đó
bước 5: Khi cài đặt thành công, chương trình sẽ được thực hiện Activity được thiết lập
: android.intent.action.MAIN
Mỗi một ứng dụng Android sẽ được thực thi trên một máy ảo Dalvik (không phải máy ảo Java). Theo
như giải thích của developer Android thì mục đích là chạy đa tiến trình, giúp tối ưu bộ nhớ.
Như vậy đến đây là bạn đã biết cách tạo một ứng dụng Android và khởi động nó như thế nào, đồng
thời cũng biết được một số thành phần bên trong ứng dụng và công năng của chúng
Bạn cần hiểu rõ bài tập này, Trong bài tập tiếp theo Tôi sẽ nêu ra các tình huống LỖI của chương
trình và cách xử lý chúng như thế nào. Vì Tôi chắc chắn rằng trong quá trình học lập Trình Android
bạn sẽ gặp các tình huống đó mà không hiểu vì sao nó bị lỗi, bạn sẽ bế tắc trong việc giải quyết lỗi.

21
22
Bài tập 4: Cách sửa một số lỗi thường gặp trong
Android Project
Ở bài tập 3 các bạn đã biết cách tạo và thực thi một ứng dụng Android, trong bài tập này Tôi sẽ nói
một số cách sửa lỗi thường gặp trong quá trình thực thi một ứng dụng Android:
- Bạn nhớ là những lỗi này thường không phải do bạn gây ra mà do Eclipse hoặc một số nguyên nhân
nào đó (ta gọi tạm thời là Chương trình bị tưng tưng). Bạn cũng không hiểu vì sao nó lại bị lỗi, nó
không cho phép bạn biên dịch và thực thi ứng dụng mặc dù bạn chả làm gì cả?
- Khi bạn gặp những trường hợp khó đỡ như vậy thì hãy làm theo một số cách dưới đây (nếu mà vẫn
không được thì bạn có thể sử dụng phần mềm TeamView, cung cấp Id và Password Tôi sẽ login vào
máy bạn sửa giùm nếu được):
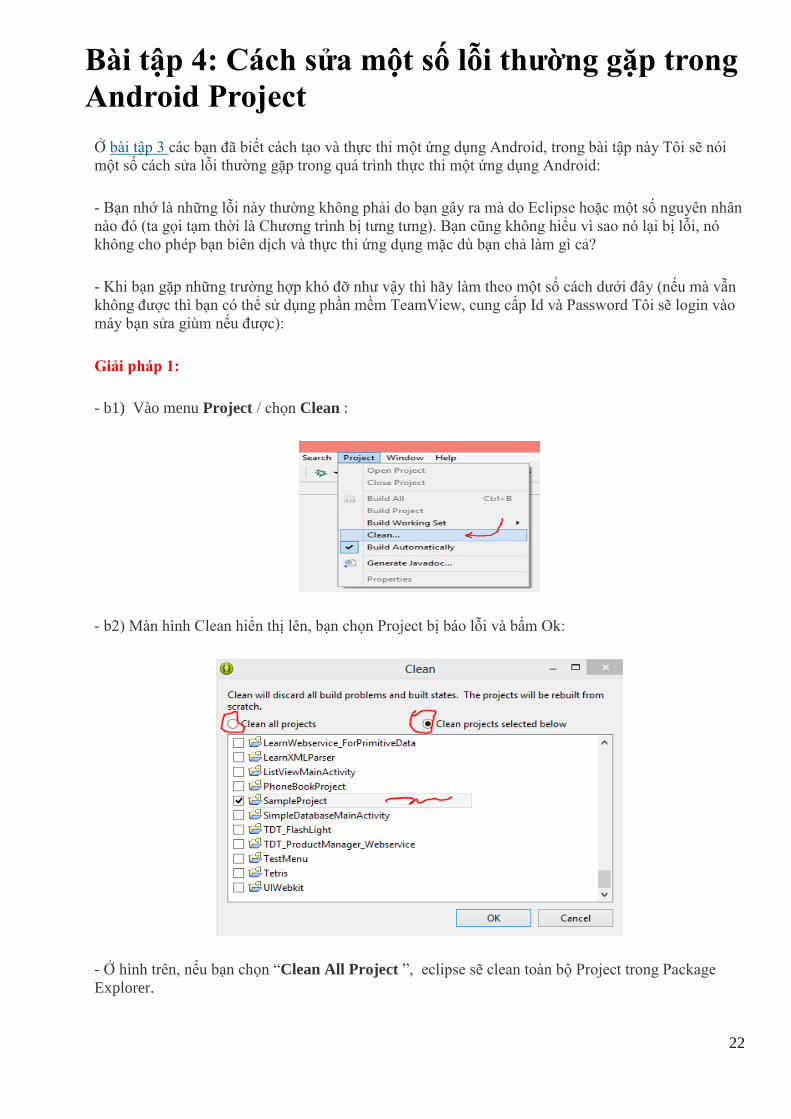
Giải pháp 1:
- b1) Vào menu Project / chọn Clean :
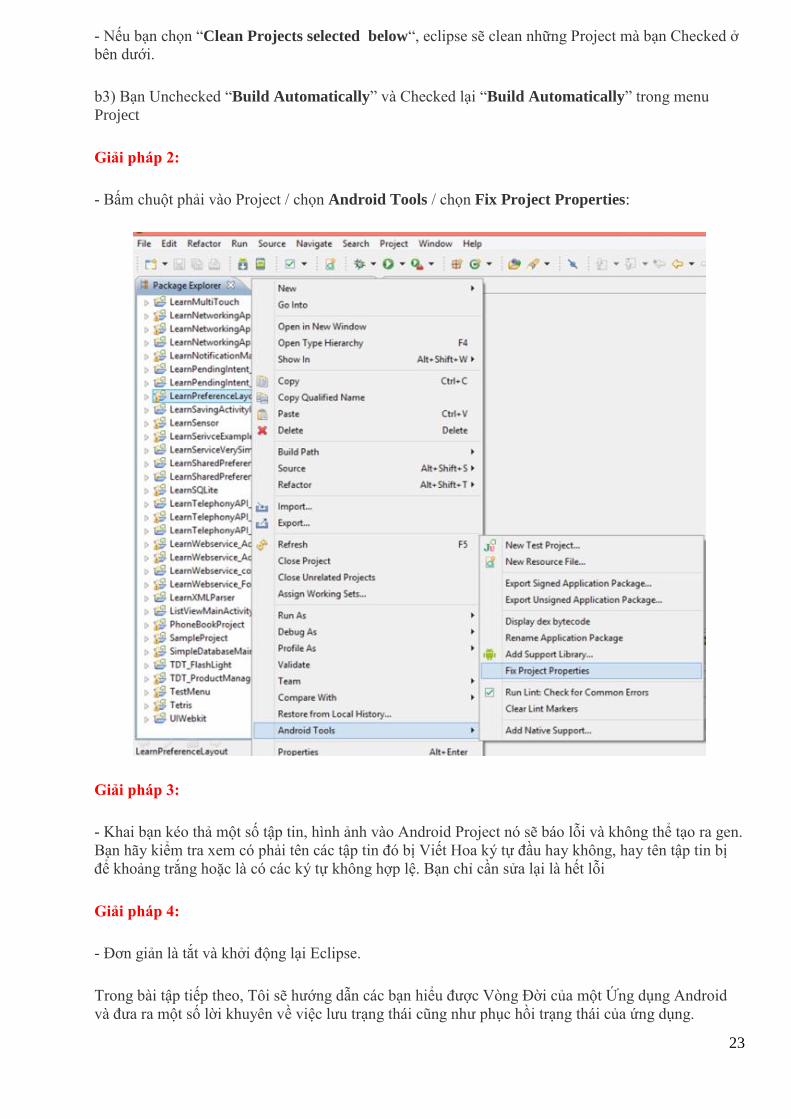
- b2) Màn hình Clean hiển thị lên, bạn chọn Project bị báo lỗi và bấm Ok:
- Ở hình trên, nếu bạn chọn “Clean All Project ”, eclipse sẽ clean toàn bộ Project trong Package
Explorer.
23
- Nếu bạn chọn “Clean Projects selected below“, eclipse sẽ clean những Project mà bạn Checked ở
bên dưới.
b3) Bạn Unchecked “Build Automatically” và Checked lại “Build Automatically” trong menu
Project
Giải pháp 2:
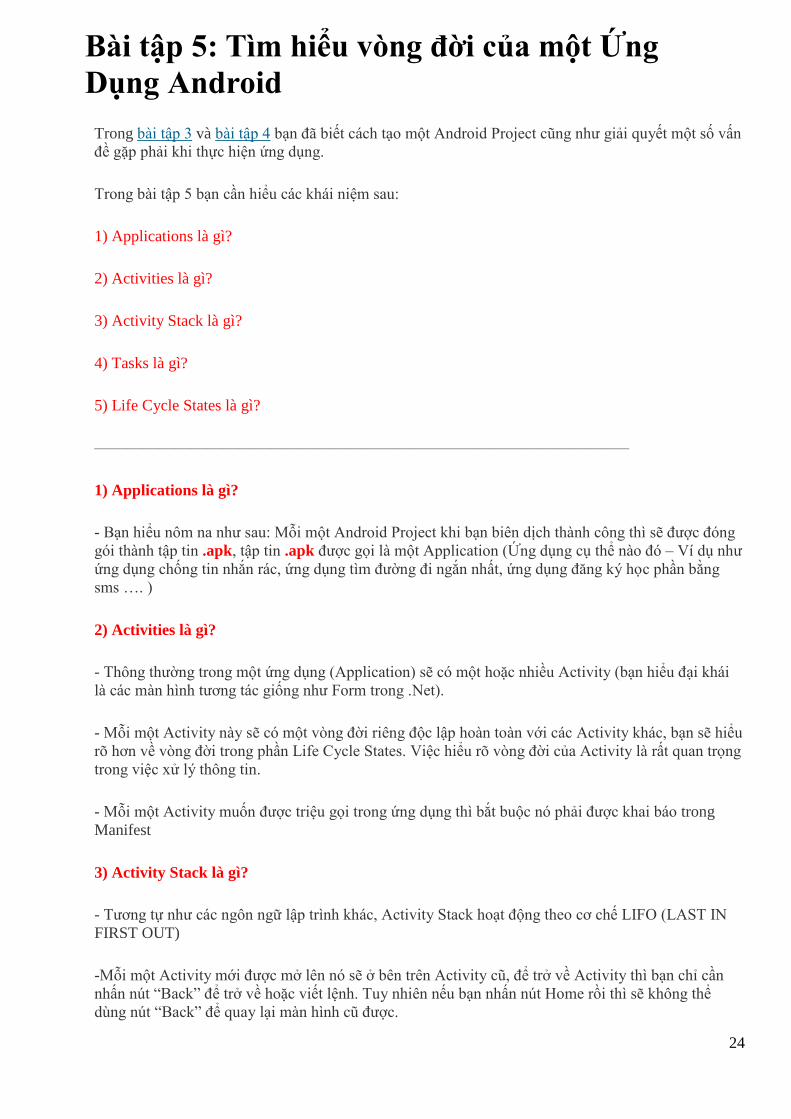
- Bấm chuột phải vào Project / chọn Android Tools / chọn Fix Project Properties:
Giải pháp 3:
- Khai bạn kéo thả một số tập tin, hình ảnh vào Android Project nó sẽ báo lỗi và không thể tạo ra gen.
Bạn hãy kiểm tra xem có phải tên các tập tin đó bị Viết Hoa ký tự đầu hay không, hay tên tập tin bị
để khoảng trắng hoặc là có các ký tự không hợp lệ. Bạn chỉ cần sửa lại là hết lỗi
Giải pháp 4:
- Đơn giản là tắt và khởi động lại Eclipse.
Trong bài tập tiếp theo, Tôi sẽ hướng dẫn các bạn hiểu được Vòng Đời của một Ứng dụng Android
và đưa ra một số lời khuyên về việc lưu trạng thái cũng như phục hồi trạng thái của ứng dụng.
24
Bài tập 5: Tìm hiểu vòng đời của một Ứng
Dụng Android
Trong bài tập 3 và bài tập 4 bạn đã biết cách tạo một Android Project cũng như giải quyết một số vấn
đề gặp phải khi thực hiện ứng dụng.
Trong bài tập 5 bạn cần hiểu các khái niệm sau:
1) Applications là gì?
2) Activities là gì?
3) Activity Stack là gì?
4) Tasks là gì?
5) Life Cycle States là gì?
—————————————————————————————————–
1) Applications là gì?
- Bạn hiểu nôm na như sau: Mỗi một Android Project khi bạn biên dịch thành công thì sẽ được đóng
gói thành tập tin .apk, tập tin .apk được gọi là một Application (Ứng dụng cụ thể nào đó – Ví dụ như
ứng dụng chống tin nhắn rác, ứng dụng tìm đường đi ngắn nhất, ứng dụng đăng ký học phần bằng
sms …. )
2) Activities là gì?
- Thông thường trong một ứng dụng (Application) sẽ có một hoặc nhiều Activity (bạn hiểu đại khái
là các màn hình tương tác giống như Form trong .Net).
- Mỗi một Activity này sẽ có một vòng đời riêng độc lập hoàn toàn với các Activity khác, bạn sẽ hiểu
rõ hơn về vòng đời trong phần Life Cycle States. Việc hiểu rõ vòng đời của Activity là rất quan trọng
trong việc xử lý thông tin.
- Mỗi một Activity muốn được triệu gọi trong ứng dụng thì bắt buộc nó phải được khai báo trong
Manifest
3) Activity Stack là gì?
- Tương tự như các ngôn ngữ lập trình khác, Activity Stack hoạt động theo cơ chế LIFO (LAST IN
FIRST OUT)
-Mỗi một Activity mới được mở lên nó sẽ ở bên trên Activity cũ, để trở về Activity thì bạn chỉ cần
nhấn nút “Back” để trở về hoặc viết lệnh. Tuy nhiên nếu bạn nhấn nút Home rồi thì sẽ không thể
dùng nút “Back” để quay lại màn hình cũ được.
25
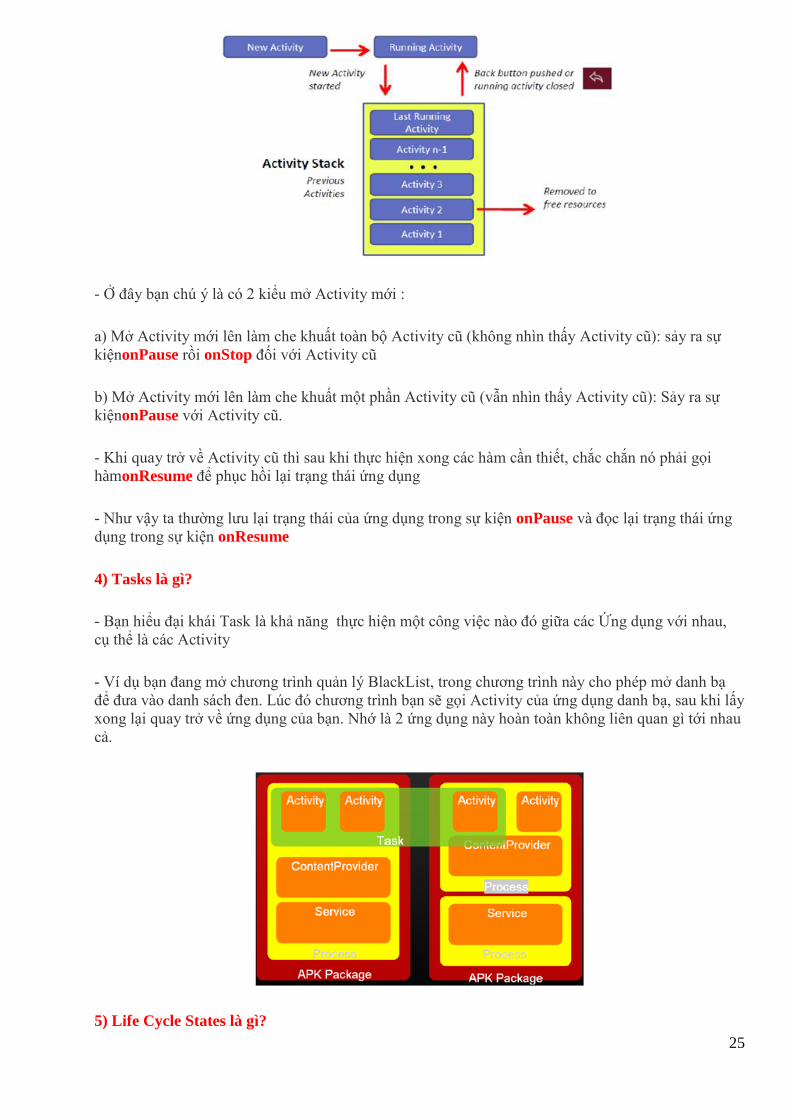
- Ở đây bạn chú ý là có 2 kiểu mở Activity mới :
a) Mở Activity mới lên làm che khuất toàn bộ Activity cũ (không nhìn thấy Activity cũ): sảy ra sự
kiệnonPause rồi onStop đối với Activity cũ
b) Mở Activity mới lên làm che khuất một phần Activity cũ (vẫn nhìn thấy Activity cũ): Sảy ra sự
kiệnonPause với Activity cũ.
- Khi quay trở về Activity cũ thì sau khi thực hiện xong các hàm cần thiết, chắc chắn nó phải gọi
hàmonResume để phục hồi lại trạng thái ứng dụng
- Như vậy ta thường lưu lại trạng thái của ứng dụng trong sự kiện onPause và đọc lại trạng thái ứng
dụng trong sự kiện onResume
4) Tasks là gì?
- Bạn hiểu đại khái Task là khả năng thực hiện một công việc nào đó giữa các Ứng dụng với nhau,
cụ thể là các Activity
- Ví dụ bạn đang mở chương trình quản lý BlackList, trong chương trình này cho phép mở danh bạ
để đưa vào danh sách đen. Lúc đó chương trình bạn sẽ gọi Activity của ứng dụng danh bạ, sau khi lấy
xong lại quay trở về ứng dụng của bạn. Nhớ là 2 ứng dụng này hoàn toàn không liên quan gì tới nhau
cả.
5) Life Cycle States là gì?
26
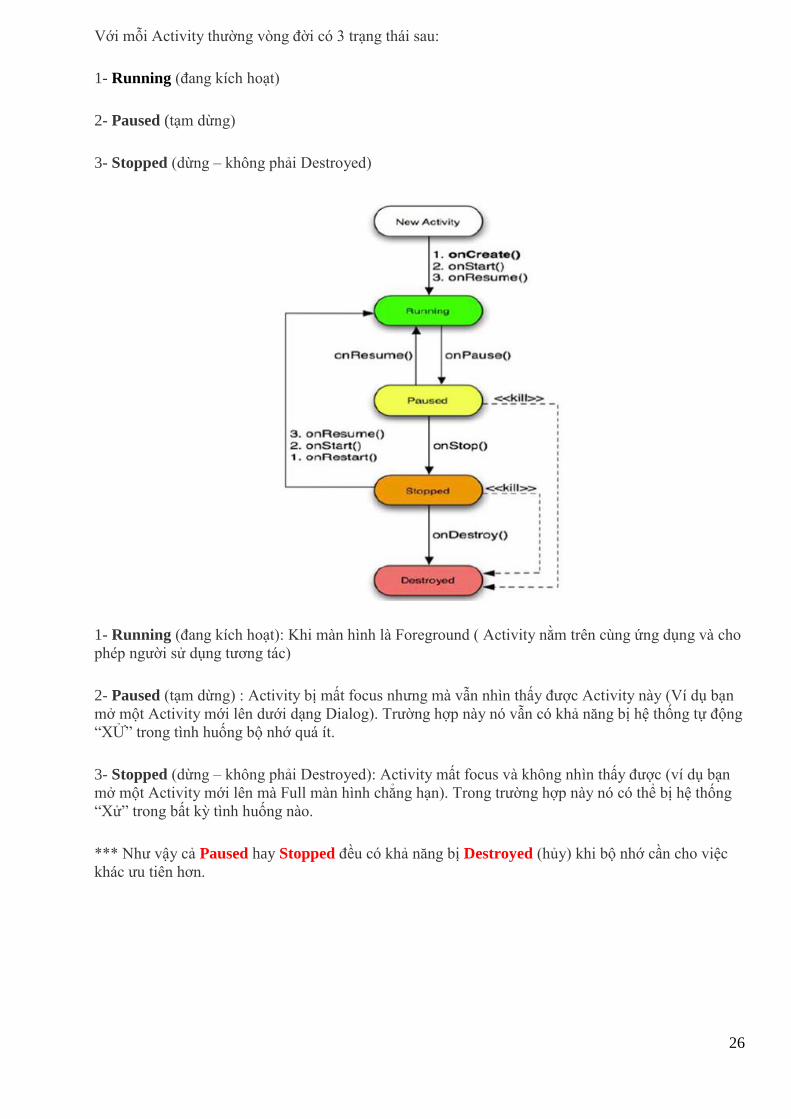
Với mỗi Activity thường vòng đời có 3 trạng thái sau:
1- Running (đang kích hoạt)
2- Paused (tạm dừng)
3- Stopped (dừng – không phải Destroyed)
1- Running (đang kích hoạt): Khi màn hình là Foreground ( Activity nằm trên cùng ứng dụng và cho
phép người sử dụng tương tác)
2- Paused (tạm dừng) : Activity bị mất focus nhưng mà vẫn nhìn thấy được Activity này (Ví dụ bạn
mở một Activity mới lên dưới dạng Dialog). Trường hợp này nó vẫn có khả năng bị hệ thống tự động
“XỬ” trong tình huống bộ nhớ quá ít.
3- Stopped (dừng – không phải Destroyed): Activity mất focus và không nhìn thấy được (ví dụ bạn
mở một Activity mới lên mà Full màn hình chẳng hạn). Trong trường hợp này nó có thể bị hệ thống
“Xử” trong bất kỳ tình huống nào.
*** Như vậy cả Paused hay Stopped đều có khả năng bị Destroyed (hủy) khi bộ nhớ cần cho việc
khác ưu tiên hơn.
27
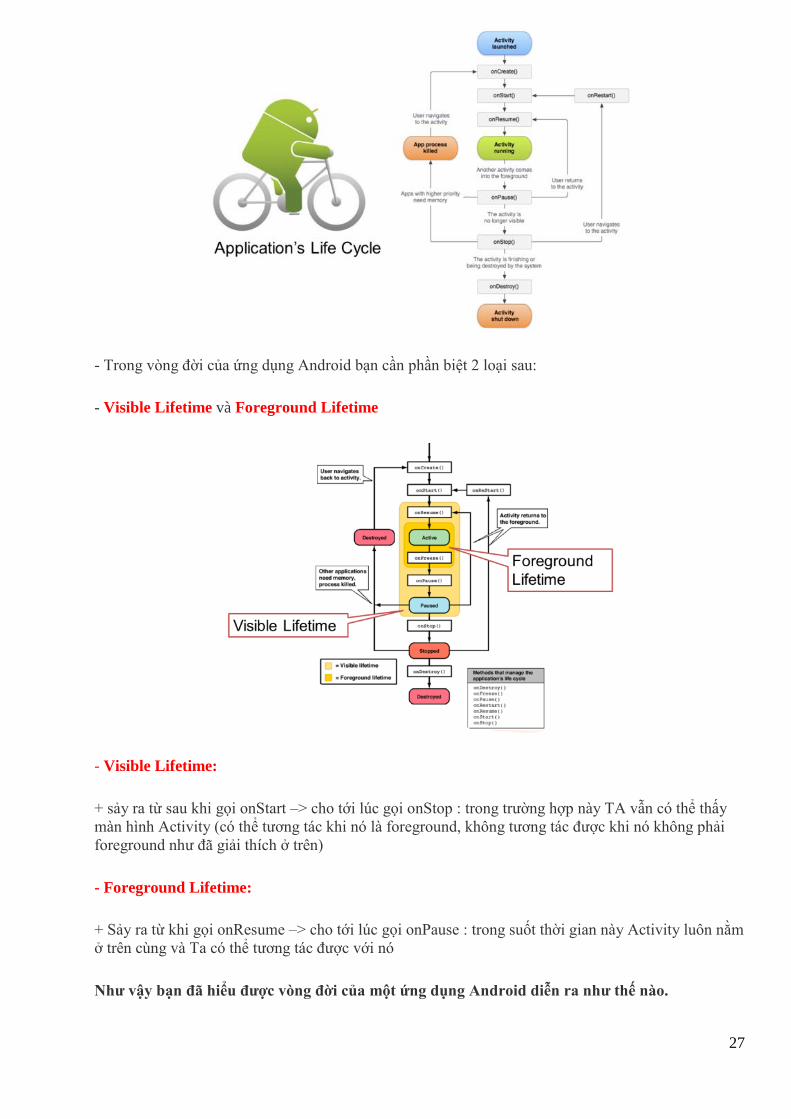
- Trong vòng đời của ứng dụng Android bạn cần phần biệt 2 loại sau:
- Visible Lifetime và Foreground Lifetime
- Visible Lifetime:
+ sảy ra từ sau khi gọi onStart –> cho tới lúc gọi onStop : trong trường hợp này TA vẫn có thể thấy
màn hình Activity (có thể tương tác khi nó là foreground, không tương tác được khi nó không phải
foreground như đã giải thích ở trên)
- Foreground Lifetime:
+ Sảy ra từ khi gọi onResume –> cho tới lúc gọi onPause : trong suốt thời gian này Activity luôn nằm
ở trên cùng và Ta có thể tương tác được với nó
Như vậy bạn đã hiểu được vòng đời của một ứng dụng Android diễn ra như thế nào.
28
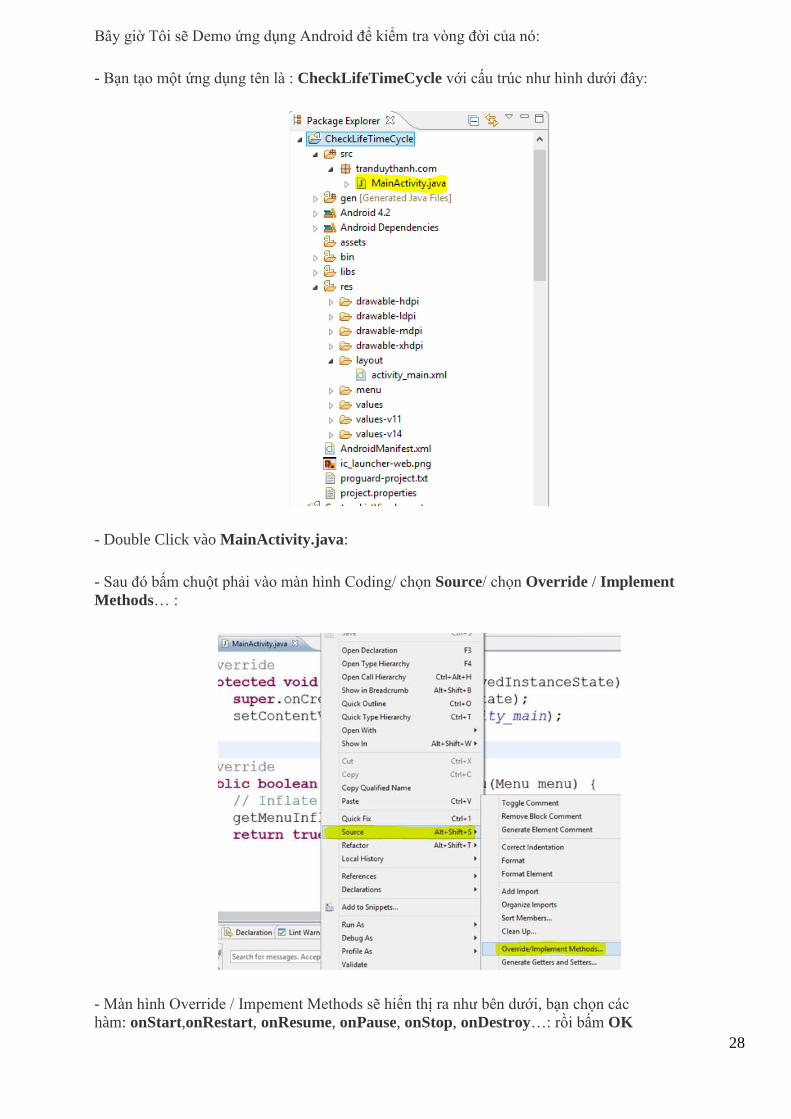
Bây giờ Tôi sẽ Demo ứng dụng Android để kiểm tra vòng đời của nó:
- Bạn tạo một ứng dụng tên là : CheckLifeTimeCycle với cấu trúc như hình dưới đây:
- Double Click vào MainActivity.java:
- Sau đó bấm chuột phải vào màn hình Coding/ chọn Source/ chọn Override / Implement
Methods… :
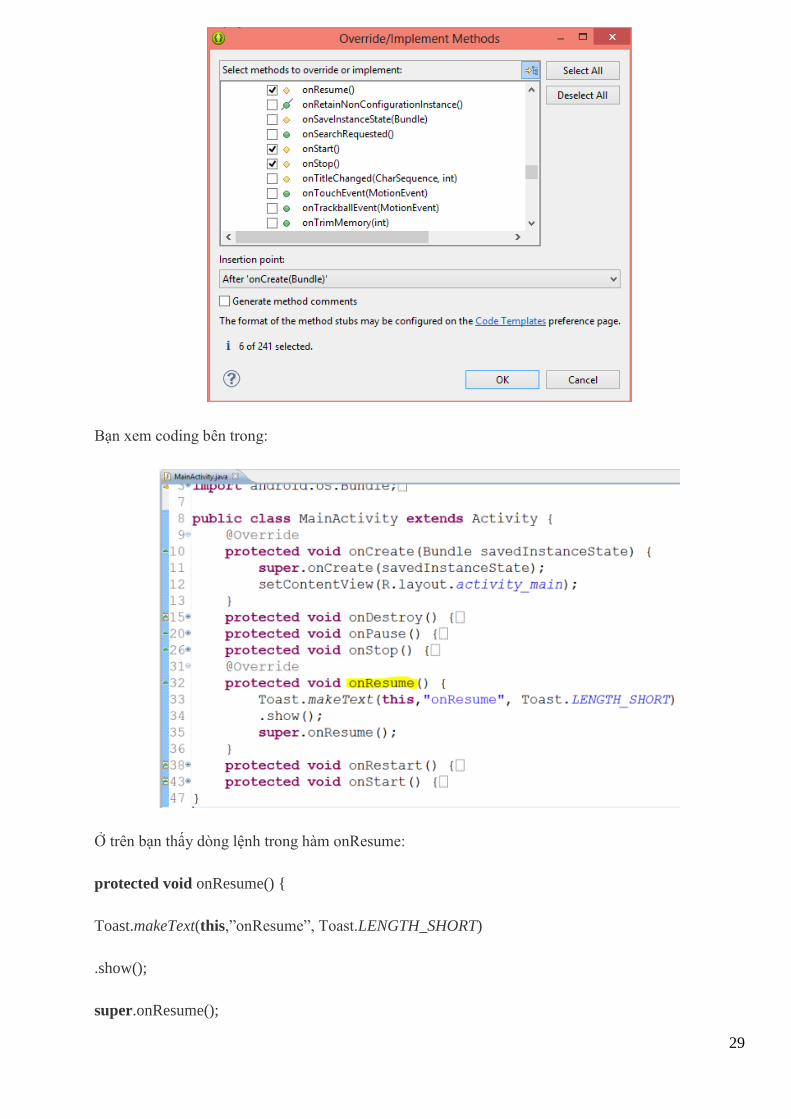
- Màn hình Override / Impement Methods sẽ hiển thị ra như bên dưới, bạn chọn các
hàm: onStart,onRestart, onResume, onPause, onStop, onDestroy…: rồi bấm OK
29
Bạn xem coding bên trong:
Ở trên bạn thấy dòng lệnh trong hàm onResume:
protected void onResume() {
Toast.makeText(this,”onResume”, Toast.LENGTH_SHORT)
.show();
super.onResume();
30
}
Đơn giản là Tôi chỉ hiển thị lên xem hàm nào sẽ được triệu gọi ứng với Life time cycle của Activity
- Bây giờ bạn chạy ứng dụng vào Máy ảo Android và thực hiện một số thao tác : Mở một ứng dụng
khác, mở Menu, nhấn nút Back, nhấn nút Home … quan sát hiện tượng bạn sẽ hiểu được cách vận
hành các hành này.
- Trong bài tập tiếp theo Tôi sẽ làm thêm một ví dụ về Life time cycle để bạn hiểu rõ hơn về nó, đặc
biệt là tận mắt chứng kiến đâu là Visible Life time, đâu là Foreground Life time
- Bạn cần phải hiểu rõ về Life time cycle để giúp ích cho việc quản lý ứng dụng
31
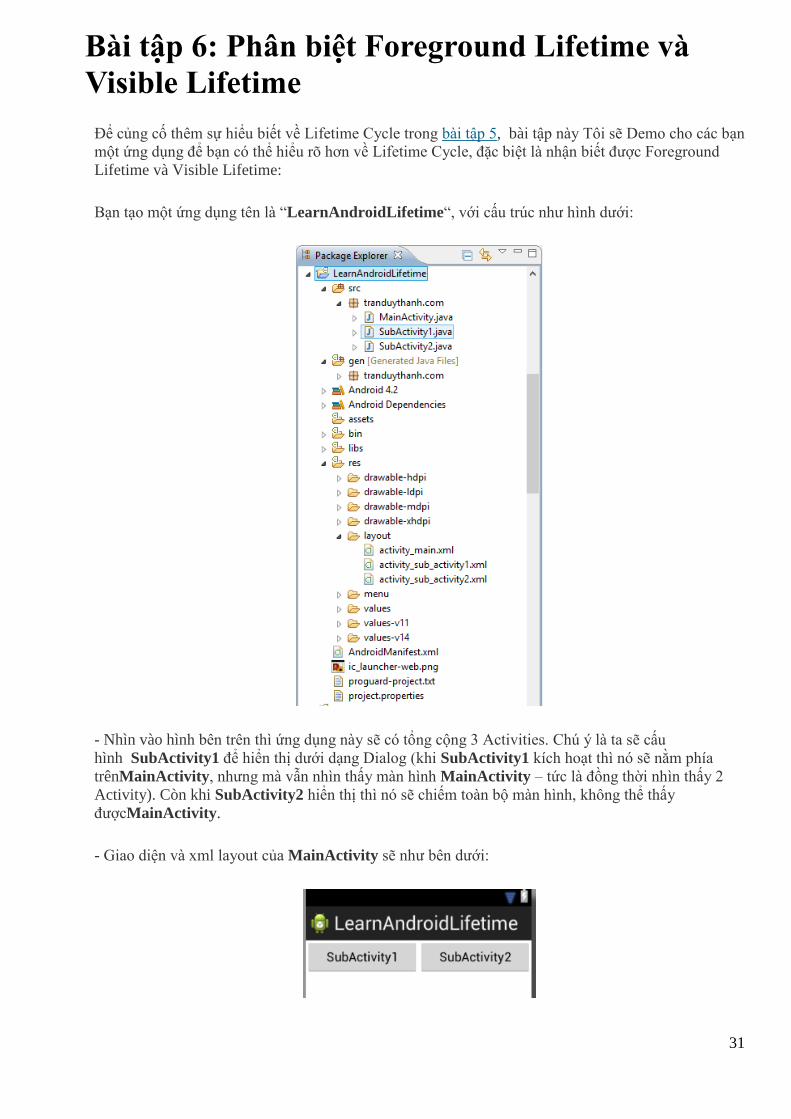
Bài tập 6: Phân biệt Foreground Lifetime và
Visible Lifetime
Để củng cố thêm sự hiểu biết về Lifetime Cycle trong bài tập 5, bài tập này Tôi sẽ Demo cho các bạn
một ứng dụng để bạn có thể hiểu rõ hơn về Lifetime Cycle, đặc biệt là nhận biết được Foreground
Lifetime và Visible Lifetime:
Bạn tạo một ứng dụng tên là “LearnAndroidLifetime“, với cấu trúc như hình dưới:
- Nhìn vào hình bên trên thì ứng dụng này sẽ có tổng cộng 3 Activities. Chú ý là ta sẽ cấu
hình SubActivity1 để hiển thị dưới dạng Dialog (khi SubActivity1 kích hoạt thì nó sẽ nằm phía
trênMainActivity, nhưng mà vẫn nhìn thấy màn hình MainActivity – tức là đồng thời nhìn thấy 2
Activity). Còn khi SubActivity2 hiển thị thì nó sẽ chiếm toàn bộ màn hình, không thể thấy
đượcMainActivity.
- Giao diện và xml layout của MainActivity sẽ như bên dưới:
32
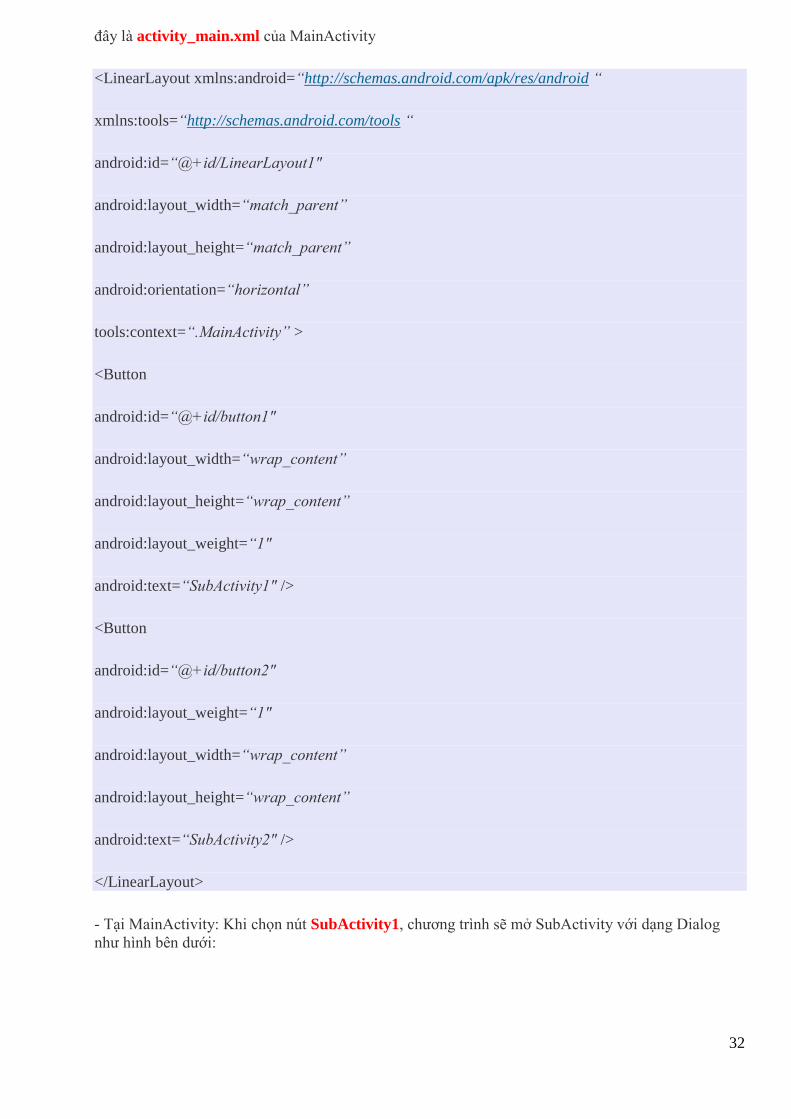
đây là activity_main.xml của MainActivity
<LinearLayout xmlns:android=“http://schemas.android.com/apk/res/android “
xmlns:tools=“http://schemas.android.com/tools “
android:id=“@+id/LinearLayout1″
android:layout_width=“match_parent”
android:layout_height=“match_parent”
android:orientation=“horizontal”
tools:context=“.MainActivity” >
<Button
android:id=“@+id/button1″
android:layout_width=“wrap_content”
android:layout_height=“wrap_content”
android:layout_weight=“1″
android:text=“SubActivity1″ />
<Button
android:id=“@+id/button2″
android:layout_weight=“1″
android:layout_width=“wrap_content”
android:layout_height=“wrap_content”
android:text=“SubActivity2″ />
</LinearLayout>
- Tại MainActivity: Khi chọn nút SubActivity1, chương trình sẽ mở SubActivity với dạng Dialog
như hình bên dưới:

33
- Khi màn hình SubActivity1 hiển thị lên như trên, nếu chọn “Trở về MainActivity”, ứng dụng sẽ
đóng SubActivity1.
- Bạn xem cấu hình AndroidManifest.xml để cho phép SubActivity1 hiển thị dưới dạng Dialog:
<?xml version=”1.0″ encoding=”utf-8″?>
<manifest xmlns:android=”http://schemas.android.com/apk/res/android “
package=”tranduythanh.com”
android:versionCode=”1″
android:versionName=”1.0″ >
<uses-sdk
android:minSdkVersion=”14″
android:targetSdkVersion=”17″ />
<application
android:allowBackup=”true”
android:icon=”@drawable/ic_launcher”
android:label=”@string/app_name”
android:theme=”@style/AppTheme” >
<activity
android:name=”tranduythanh.com.MainActivity”
android:label=”@string/app_name” >
<intent-filter>
<action android:name=”android.intent.action.MAIN” />
<category android:name=”android.intent.category.LAUNCHER” />
</intent-filter>
</activity>
<activity
android:name=”tranduythanh.com.SubActivity1“
android:label=”@string/title_activity_sub_activity1″
android:theme=”@android:style/Theme.Dialog”>
</activity>
<activity
android:name=”tranduythanh.com.SubActivity2″
android:label=”@string/title_activity_sub_activity2″ >
</activity>
</application>
</manifest>
34
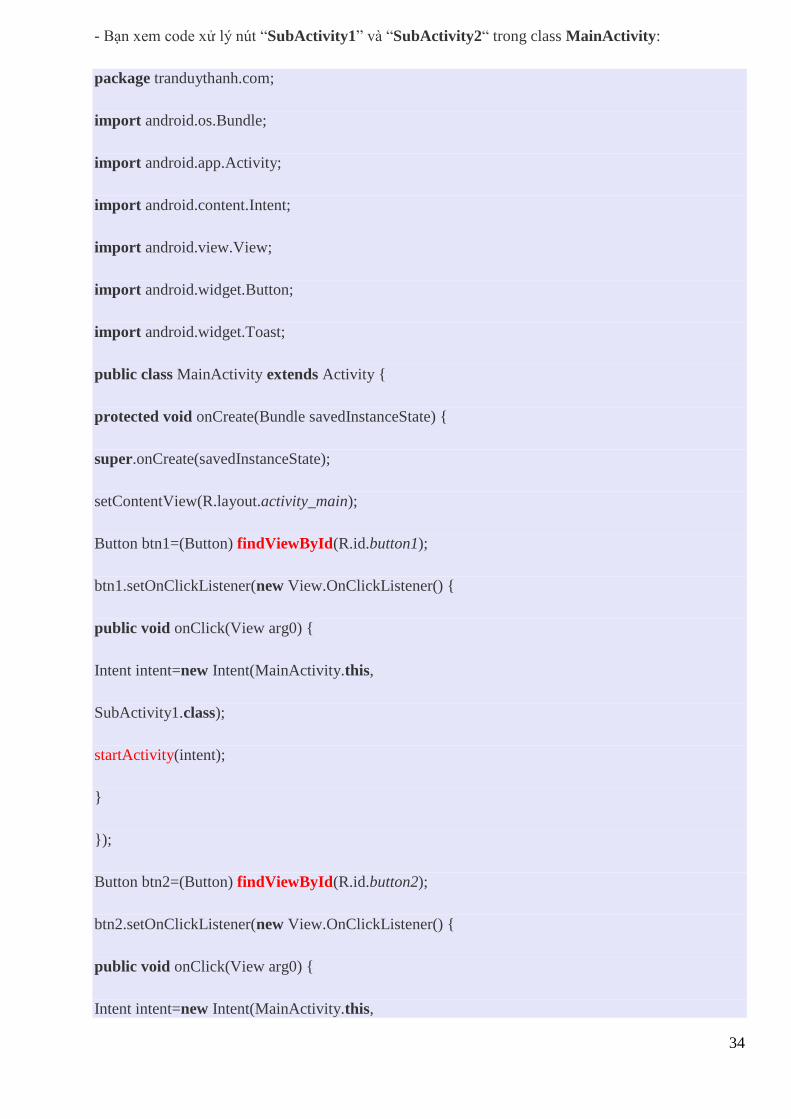
- Bạn xem code xử lý nút “SubActivity1” và “SubActivity2“ trong class MainActivity:
package tranduythanh.com;
import android.os.Bundle;
import android.app.Activity;
import android.content.Intent;
import android.view.View;
import android.widget.Button;
import android.widget.Toast;
public class MainActivity extends Activity {
protected void onCreate(Bundle savedInstanceState) {
super.onCreate(savedInstanceState);
setContentView(R.layout.activity_main);
Button btn1=(Button) findViewById(R.id.button1);
btn1.setOnClickListener(new View.OnClickListener() {
public void onClick(View arg0) {
Intent intent=new Intent(MainActivity.this,
SubActivity1.class);
startActivity(intent);
}
});
Button btn2=(Button) findViewById(R.id.button2);
btn2.setOnClickListener(new View.OnClickListener() {
public void onClick(View arg0) {
Intent intent=new Intent(MainActivity.this,
35
SubActivity2.class);
startActivity(intent);
}
});
}
}
- Phương thức findViewById để trả về View theo đúng Id truyền vào, mọi Control trong
Android đều kế thừa từ View, ở đây ta ép kiểu về cho đúng kiểu Button.
- Dùng phương thức startActivity để mở một Activity, chú ý là Activity này được đưa vào một
Intent với cách khai báo như trên.
- Cách chạy SubActivity1 và SubActivity2 là hoàn toàn giống nhau. Chỉ khác nhau ở lúc hiển
thị lên màn hình điện thoại (như đã giải thích ở trên).
- Ta sẽ học rõ hơn về Intent trong phần sau, tạm thời phần này chưa cần phải hiểu sâu về nó.
Chỉ cần biết rằng để chạy 1 Activity nào đó thì phải tiến hành như vậy.
*** Tiếp tục làm việc với class MainActivity:
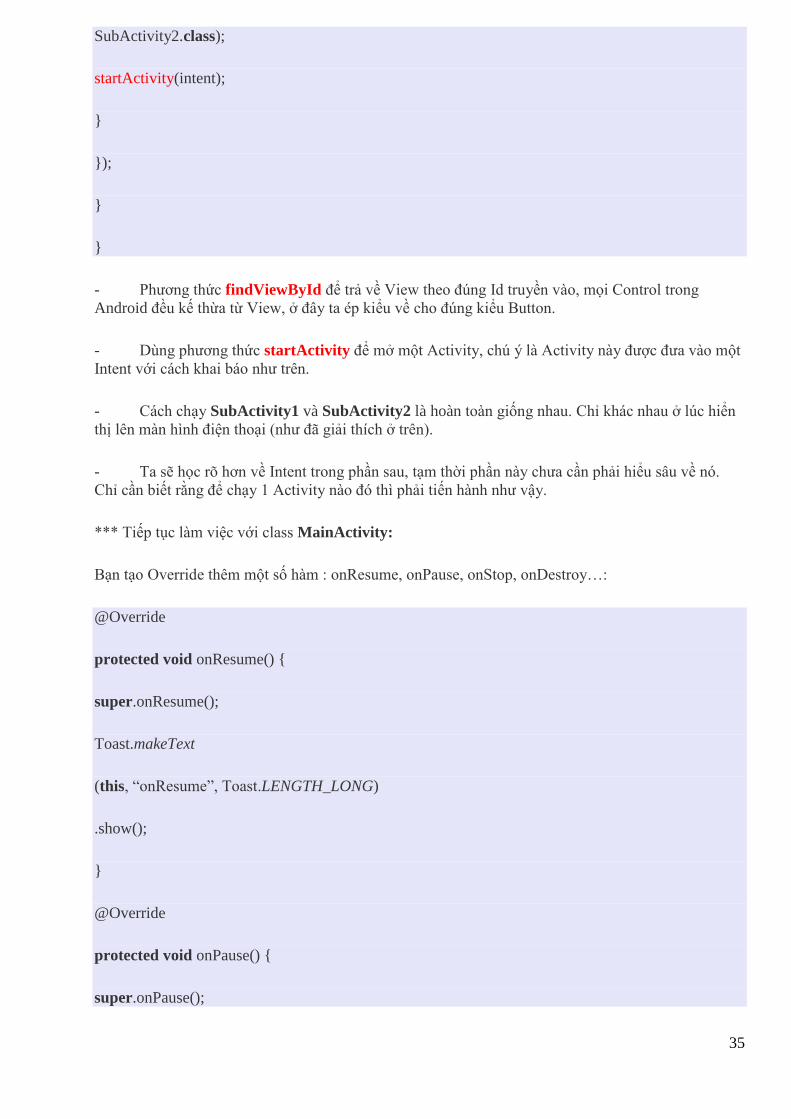
Bạn tạo Override thêm một số hàm : onResume, onPause, onStop, onDestroy…:
@Override
protected void onResume() {
super.onResume();
Toast.makeText
(this, “onResume”, Toast.LENGTH_LONG)
.show();
}
@Override
protected void onPause() {
super.onPause();
36
Toast.makeText
(this, “onPause”, Toast.LENGTH_LONG)
.show();
}
@Override
protected void onStop() {
super.onStop();
Toast.makeText
(this, “onStop”, Toast.LENGTH_LONG)
.show();
}
@Override
protected void onDestroy() {
super.onDestroy();
Toast.makeText
(this, “onDestroy”, Toast.LENGTH_LONG)
.show();
}
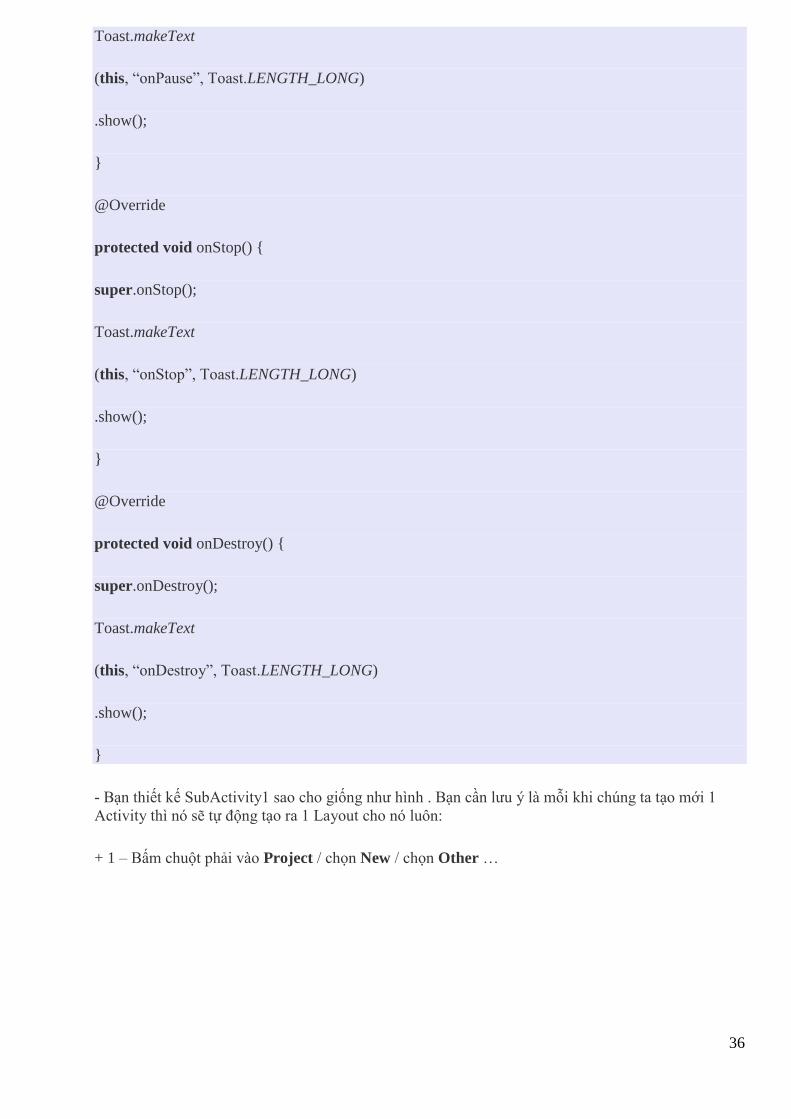
- Bạn thiết kế SubActivity1 sao cho giống như hình . Bạn cần lưu ý là mỗi khi chúng ta tạo mới 1
Activity thì nó sẽ tự động tạo ra 1 Layout cho nó luôn:
+ 1 – Bấm chuột phải vào Project / chọn New / chọn Other …
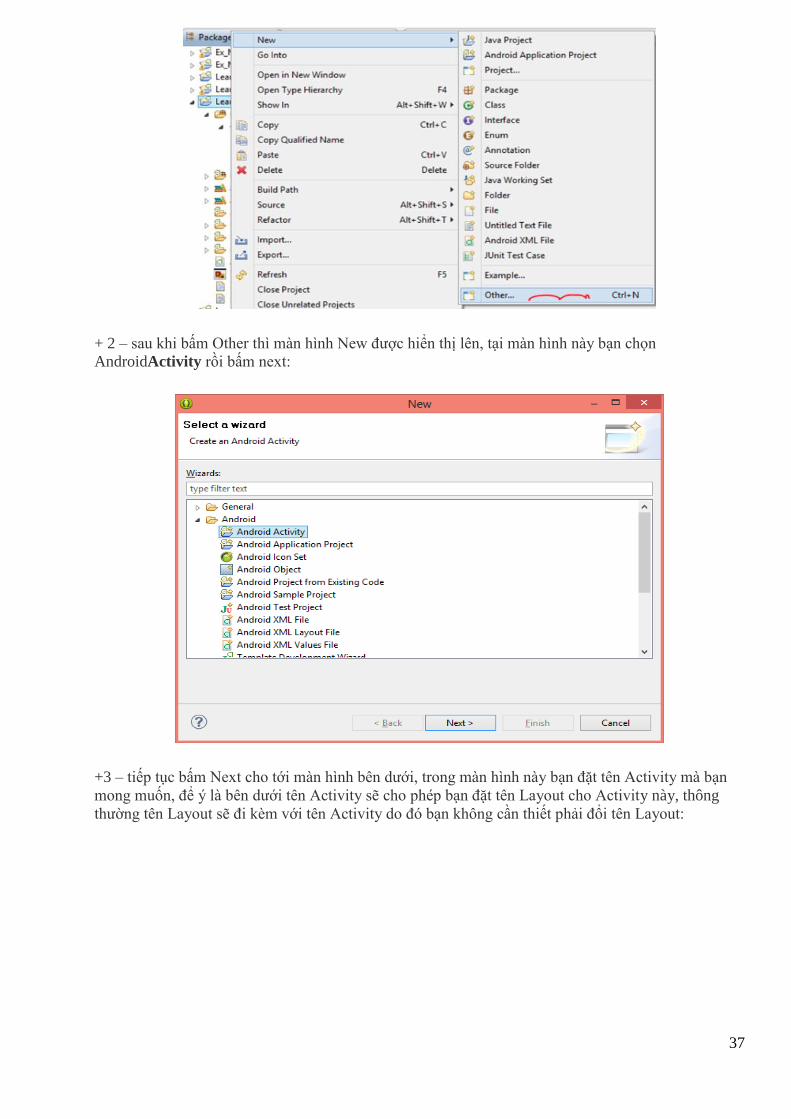
37
+ 2 – sau khi bấm Other thì màn hình New được hiển thị lên, tại màn hình này bạn chọn
AndroidActivity rồi bấm next:
+3 – tiếp tục bấm Next cho tới màn hình bên dưới, trong màn hình này bạn đặt tên Activity mà bạn
mong muốn, để ý là bên dưới tên Activity sẽ cho phép bạn đặt tên Layout cho Activity này, thông
thường tên Layout sẽ đi kèm với tên Activity do đó bạn không cần thiết phải đổi tên Layout:
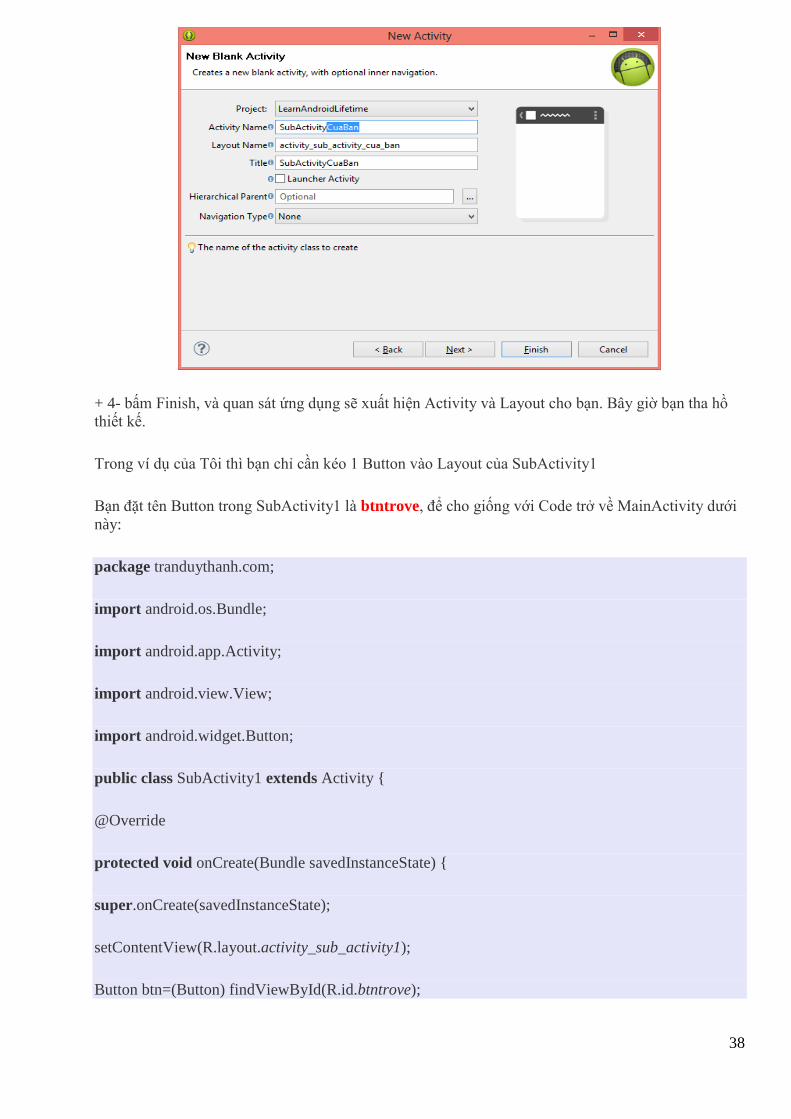
38
+ 4- bấm Finish, và quan sát ứng dụng sẽ xuất hiện Activity và Layout cho bạn. Bây giờ bạn tha hồ
thiết kế.
Trong ví dụ của Tôi thì bạn chỉ cần kéo 1 Button vào Layout của SubActivity1
Bạn đặt tên Button trong SubActivity1 là btntrove, để cho giống với Code trở về MainActivity dưới
này:
package tranduythanh.com;
import android.os.Bundle;
import android.app.Activity;
import android.view.View;
import android.widget.Button;
public class SubActivity1 extends Activity {
@Override
protected void onCreate(Bundle savedInstanceState) {
super.onCreate(savedInstanceState);
setContentView(R.layout.activity_sub_activity1);
Button btn=(Button) findViewById(R.id.btntrove);

39
btn.setOnClickListener(new View.OnClickListener() {
@Override
public void onClick(View arg0) {
finish();
}
});
}
}
- Bạn thấy trong SubActivity1 Tôi gọi hàm finish() khi chọn “Trở về MainActivity”. Công dụng của
hàm finish() là tắt màn hình hiện tại–> như vậy nó tự động mở MainActivity vì theo cơ chế
Activities Stack.
- Bây giờ bạn thực thi chương trình và làm các thao tác sau:
1) Chọn nút SubActivity1 để mở Activity này lên, quan sát hiện tượng sảy ra (chú ý những hàm nào
được gọi)
2) Khi chọn nút “Trở về MainActivity”, quan sát hiện tượng sảy ra (chú ý những hàm nào được gọi)
3) Chọn nút SubActivity2 để mở Activity này lên, quan sát hiện tượng sảy ra (chú ý những hàm nào
được gọi)
4) nhấn nút “Back” của điện thoại, quan sát hiện tượng (chú ý những hàm nào được gọi)
*** Tới đây Tôi sẽ không giải thích thứ tự các hàm sảy ra như thế nào, mà để dành cho các bạn tự
giải thích. Bạn sẽ thấy rõ sự khác biệt trong 2 trường hợp này. Và dĩ nhiên bạn sẽ tự động hiểu được
Foreground Lifetime và Visible Lifetime
Các bạn có thể tải coding mẫu ở
đây:http://www.mediafire.com/download/7ra8h7vyttkjq6u/LearnAndroidLifetime.rar
Trong bài tập kế tiếp Tôi sẽ hướng dẫn các bạn cách sử dụng XML Layout và một số control căn bản
thường dùng cũng như các kiểu lập trình sự kiện.
40
Bài tập 7: Làm quen với các Layout
trong Android
Để thiết kế giao diện tốt cho Android thì trước tiên các bạn phải biết sử dụng một số Layout cơ bản
trong Android:
1) Cách tạo Layout và kết nối Layout vào Activity
2) Cách sử dụng HierarchyViewer
3) Các Layout cơ bản:
FrameLayout
LinearLayout
TableLayout
RelativeLayout
AbsoluteLayout
*** Đồng thời bạn phải biết kết hợp các Layout này lại với nhau để cho ra được giao diện phức tạp
như ý muốn.
- Tôi chỉ nêu ra một số đặc điểm, không thể nói hết ở đây. Các bạn sẽ từ từ cập nhập sau khi đã quen
với Layout.
- Trước tiên bạn cần biết cách tạo một Layout mới và cách kết nối nó vào Activity như thế nào:
1) Cách tạo Layout và kết nối Layout vào Activity:
a) Layout mặc định đầu tiên khi bạn tạo một Android Project:
- Khi bạn tạo một Android Project thì mặc nhiên sẽ có một Activity được chỉ định chạy đầu tiên khi
bạn thực thi ứng dụng:
41
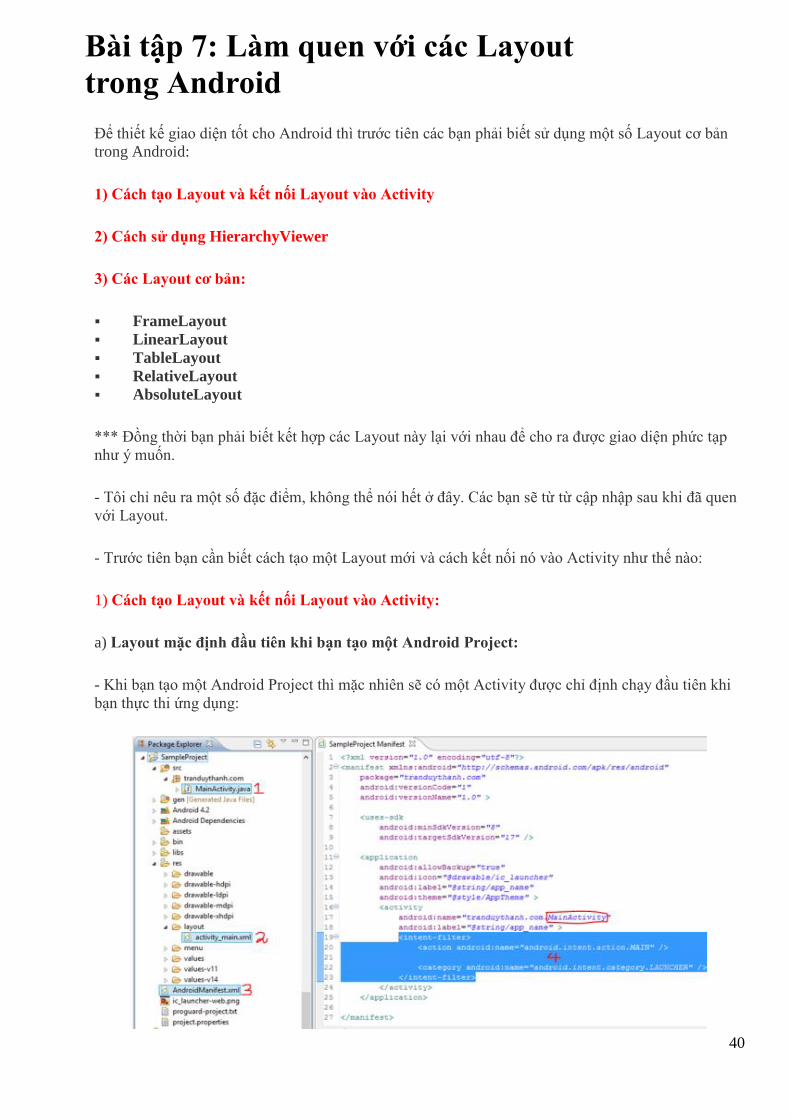
- Bạn quan sát hình trên: Khi bạn tạo một ứng dụng Android thì mặc nhiên sẽ tạo luôn một Activity
để thực thi đầu tiên khi bạn chạy ứng dụng. Ứng với một Activity thì nó sẽ có 1 Layout đi kèm.
Trong hình trên thì MainActivity.java (số 1) sẽ có layout đi kèm là activity_main.xml (số 2 - và
bạn nhớ luôn là activity_main này sẽ được tự động tạo ra trong thư mục gen của Android, dựa vào
đây để ta kết nối Layout vào Activity).
- Như đã nói ở những bài tập trước: Mọi Activity muốn được triệu gọi thành công trong ứng dụng thì
bắt buộc nó phải được khai báo trong AndroidManifest.xml (số 3). Bạn double click vào Manifest và
nhìn vào vùng số 4, MainActivity được khai báo trong này đồng thời đăng ký là Activity sẽ khởi
động lúc ứng dụng được thực thi (xem vùng Tôi bôi màu xanh phần intent-filter).
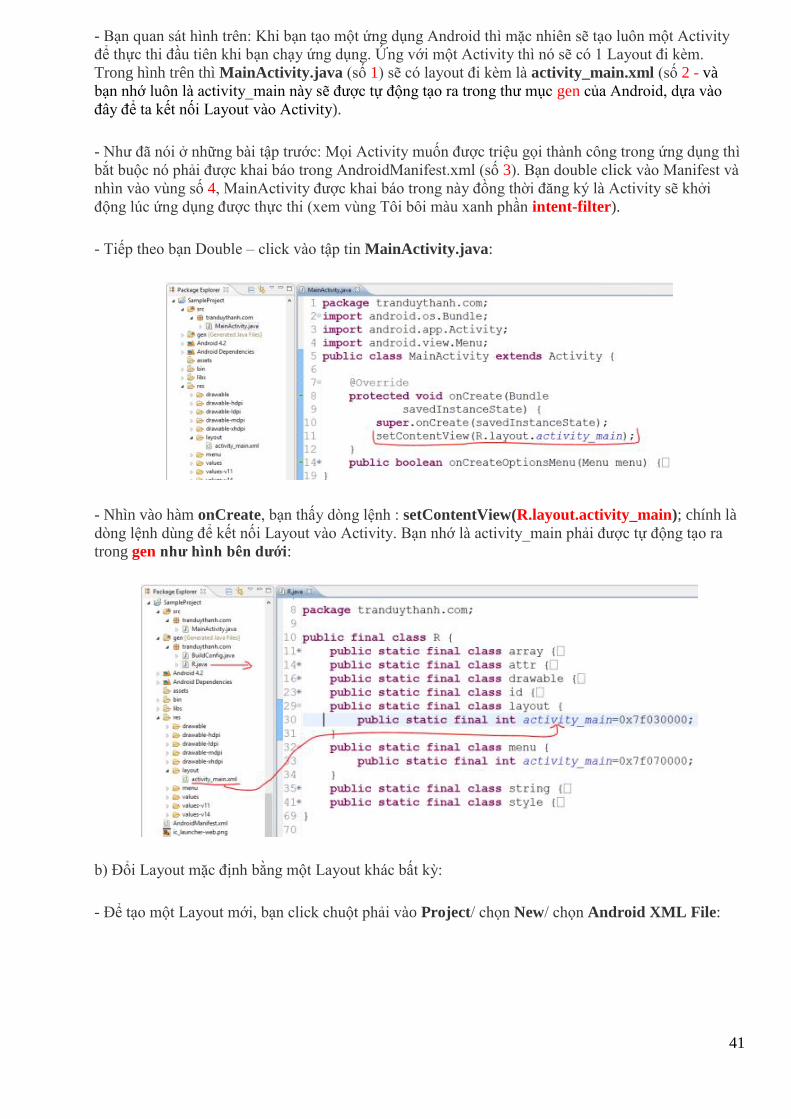
- Tiếp theo bạn Double – click vào tập tin MainActivity.java:
- Nhìn vào hàm onCreate, bạn thấy dòng lệnh : setContentView(R.layout.activity_main); chính là
dòng lệnh dùng để kết nối Layout vào Activity. Bạn nhớ là activity_main phải được tự động tạo ra
trong gen như hình bên dưới:
b) Đổi Layout mặc định bằng một Layout khác bất kỳ:
- Để tạo một Layout mới, bạn click chuột phải vào Project/ chọn New/ chọn Android XML File:

42
- Khi bạn chọn Android XML File thì màn hình bên dưới xuất hiện: Đặt tên cho Layout, chọn kiểu
Layout rồi nhấn nút Finish:
- Ở trên Tôi đặt tên là : my_new_layout, sau khi nhấn nút Finish bạn quan sát Package Explorer:
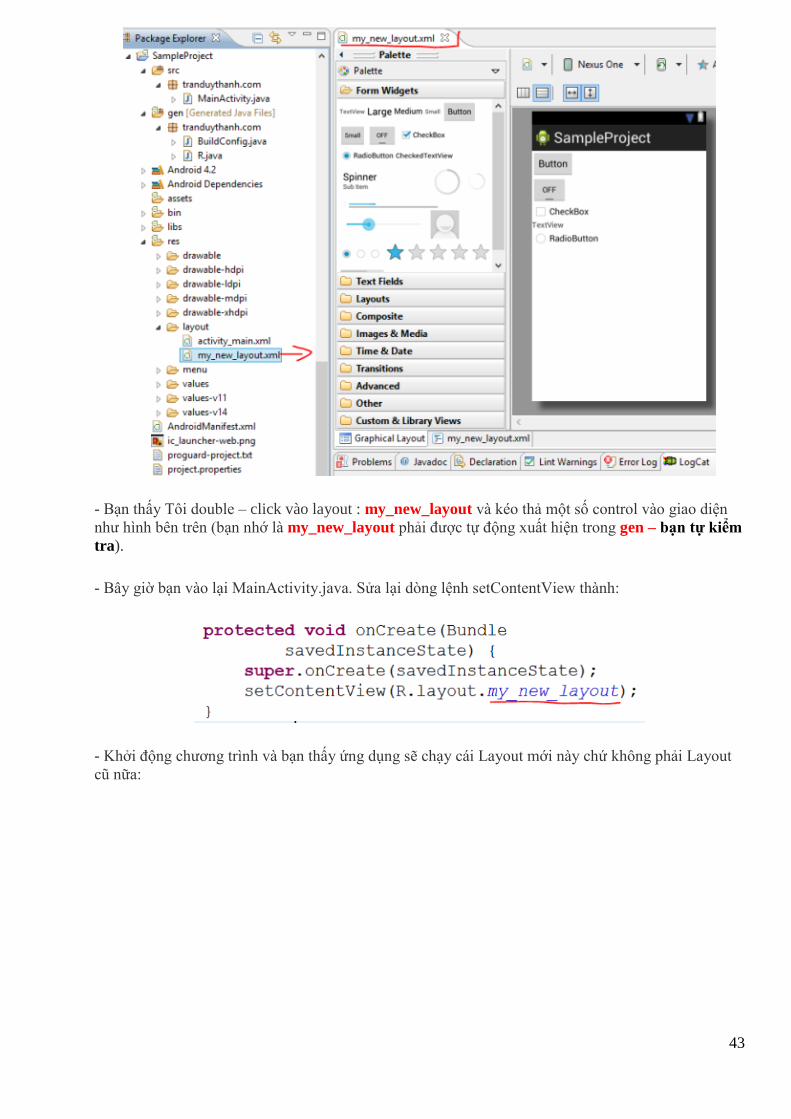
43
- Bạn thấy Tôi double – click vào layout : my_new_layout và kéo thả một số control vào giao diện
như hình bên trên (bạn nhớ là my_new_layout phải được tự động xuất hiện trong gen – bạn tự kiểm
tra).
- Bây giờ bạn vào lại MainActivity.java. Sửa lại dòng lệnh setContentView thành:
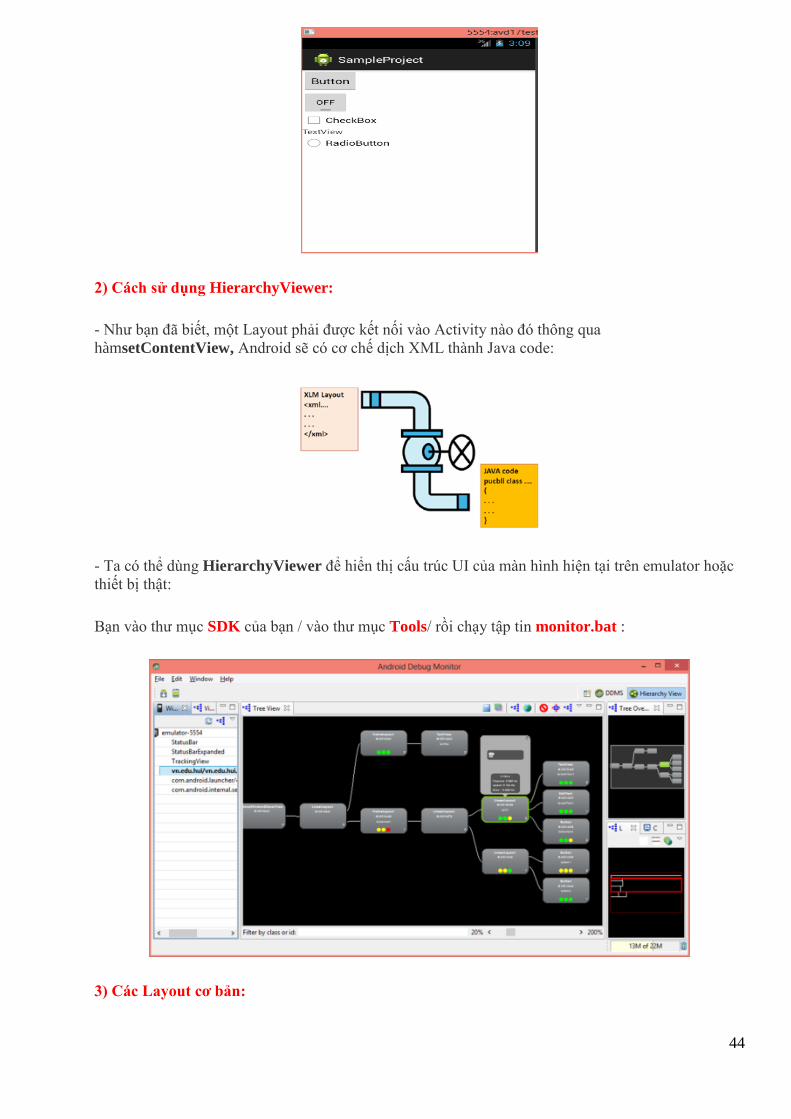
- Khởi động chương trình và bạn thấy ứng dụng sẽ chạy cái Layout mới này chứ không phải Layout
cũ nữa:
44
2) Cách sử dụng HierarchyViewer:
- Như bạn đã biết, một Layout phải được kết nối vào Activity nào đó thông qua
hàmsetContentView, Android sẽ có cơ chế dịch XML thành Java code:
- Ta có thể dùng HierarchyViewer để hiển thị cấu trúc UI của màn hình hiện tại trên emulator hoặc
thiết bị thật:
Bạn vào thư mục SDK của bạn / vào thư mục Tools/ rồi chạy tập tin monitor.bat :
3) Các Layout cơ bản:
45
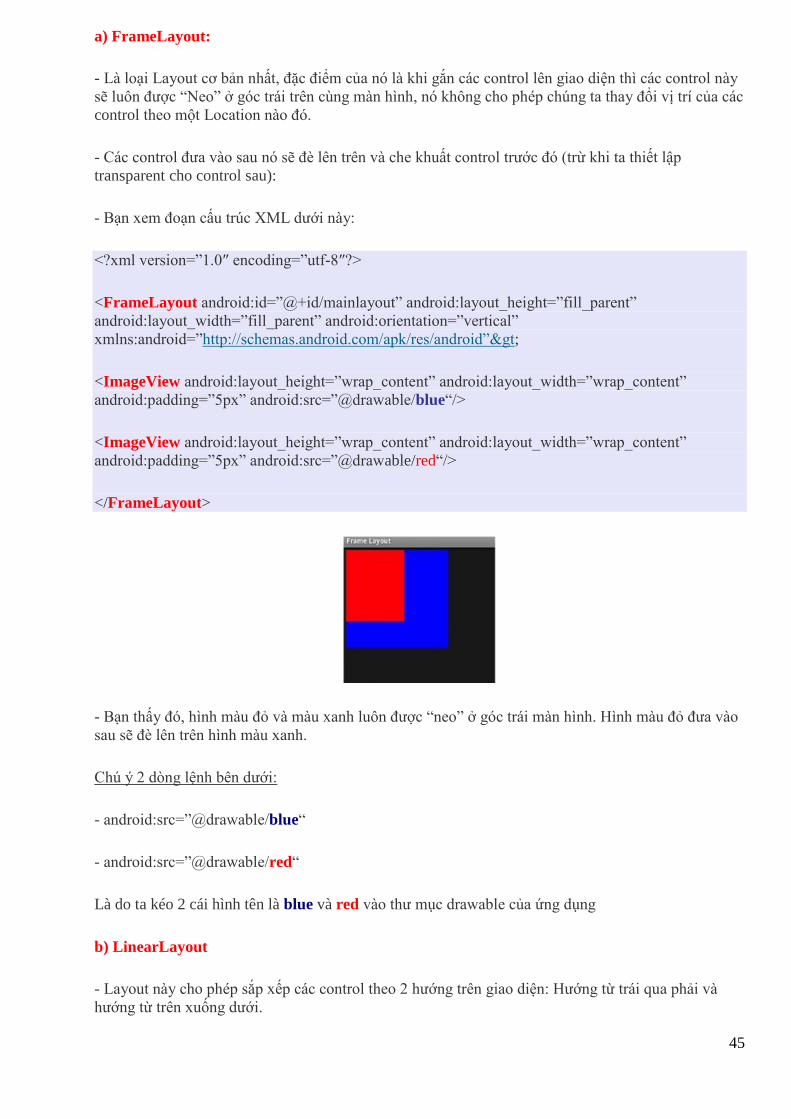
a) FrameLayout:
- Là loại Layout cơ bản nhất, đặc điểm của nó là khi gắn các control lên giao diện thì các control này
sẽ luôn được “Neo” ở góc trái trên cùng màn hình, nó không cho phép chúng ta thay đổi vị trí của các
control theo một Location nào đó.
- Các control đưa vào sau nó sẽ đè lên trên và che khuất control trước đó (trừ khi ta thiết lập
transparent cho control sau):
- Bạn xem đoạn cấu trúc XML dưới này:
<?xml version=”1.0″ encoding=”utf-8″?>
<FrameLayout android:id=”@+id/mainlayout” android:layout_height=”fill_parent”
android:layout_width=”fill_parent” android:orientation=”vertical”
xmlns:android=”http://schemas.android.com/apk/res/android”>
<ImageView android:layout_height=”wrap_content” android:layout_width=”wrap_content”
android:padding=”5px” android:src=”@drawable/blue“/>
<ImageView android:layout_height=”wrap_content” android:layout_width=”wrap_content”
android:padding=”5px” android:src=”@drawable/red“/>
</FrameLayout>
- Bạn thấy đó, hình màu đỏ và màu xanh luôn được “neo” ở góc trái màn hình. Hình màu đỏ đưa vào
sau sẽ đè lên trên hình màu xanh.
Chú ý 2 dòng lệnh bên dưới:
- android:src=”@drawable/blue“
- android:src=”@drawable/red“
Là do ta kéo 2 cái hình tên là blue và red vào thư mục drawable của ứng dụng
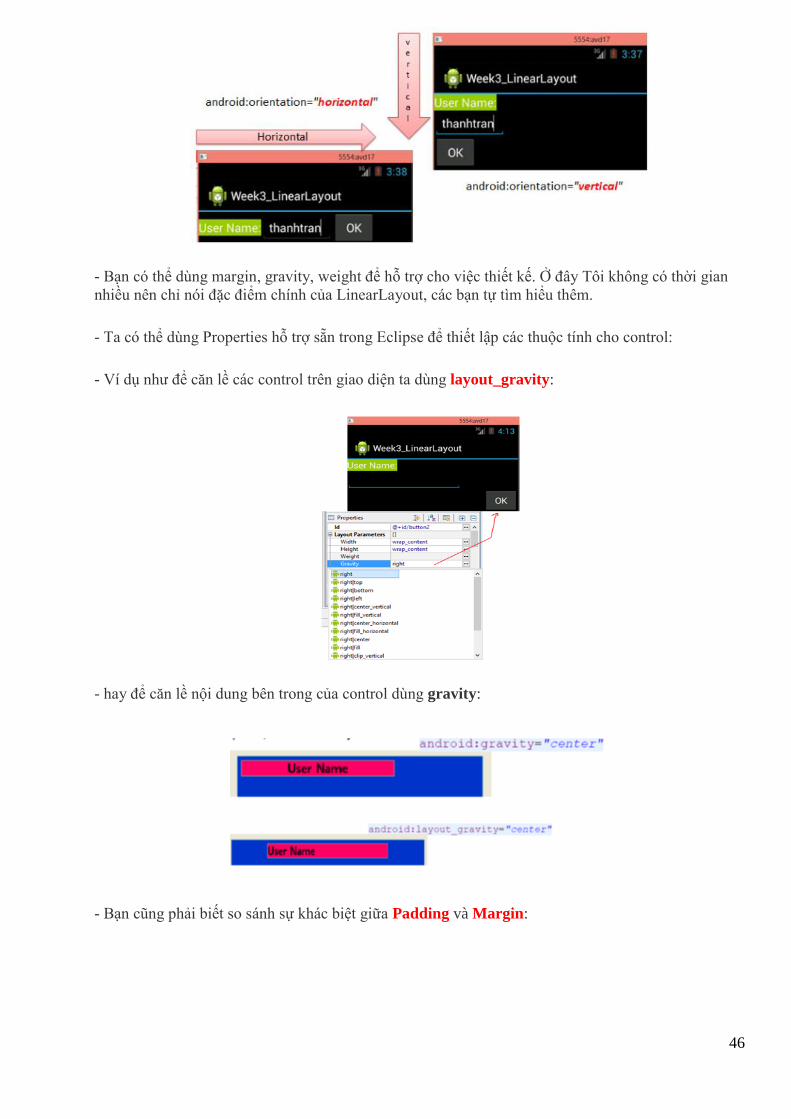
b) LinearLayout
- Layout này cho phép sắp xếp các control theo 2 hướng trên giao diện: Hướng từ trái qua phải và
hướng từ trên xuống dưới.
46
- Bạn có thể dùng margin, gravity, weight để hỗ trợ cho việc thiết kế. Ở đây Tôi không có thời gian
nhiều nên chỉ nói đặc điểm chính của LinearLayout, các bạn tự tìm hiểu thêm.
- Ta có thể dùng Properties hỗ trợ sẵn trong Eclipse để thiết lập các thuộc tính cho control:
- Ví dụ như để căn lề các control trên giao diện ta dùng layout_gravity:
- hay để căn lề nội dung bên trong của control dùng gravity:
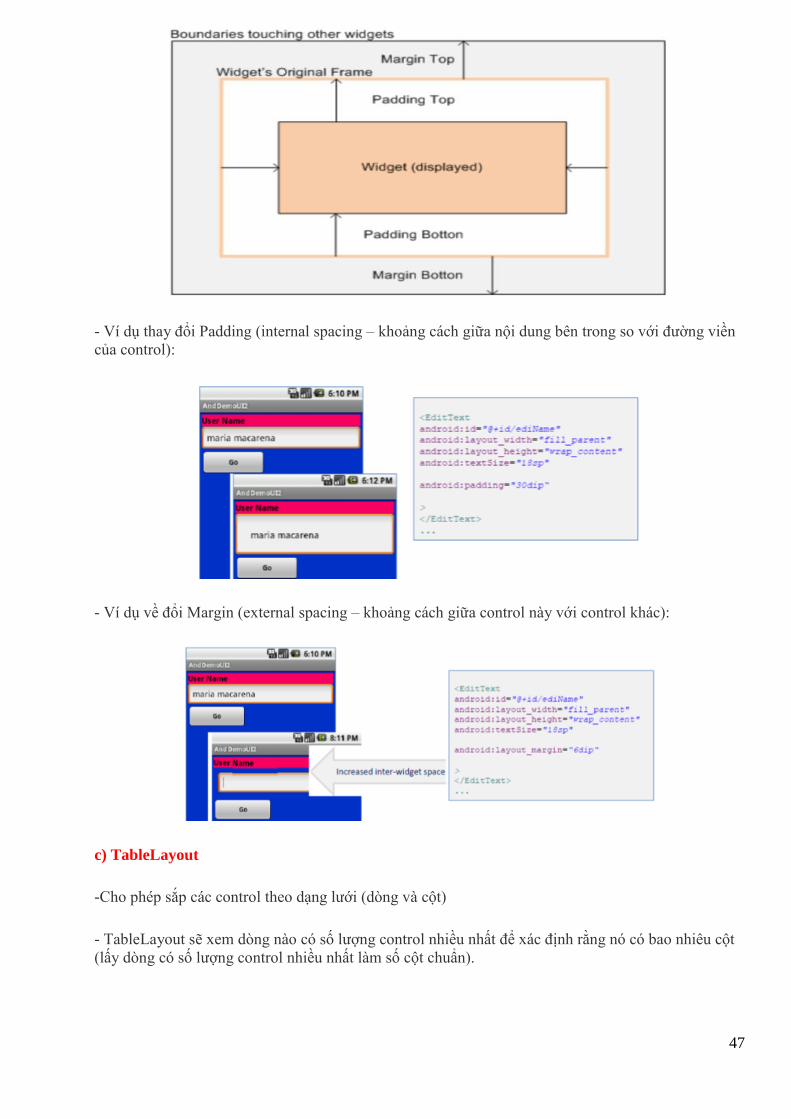
- Bạn cũng phải biết so sánh sự khác biệt giữa Padding và Margin:
47
- Ví dụ thay đổi Padding (internal spacing – khoảng cách giữa nội dung bên trong so với đường viền
của control):
- Ví dụ về đổi Margin (external spacing – khoảng cách giữa control này với control khác):
c) TableLayout
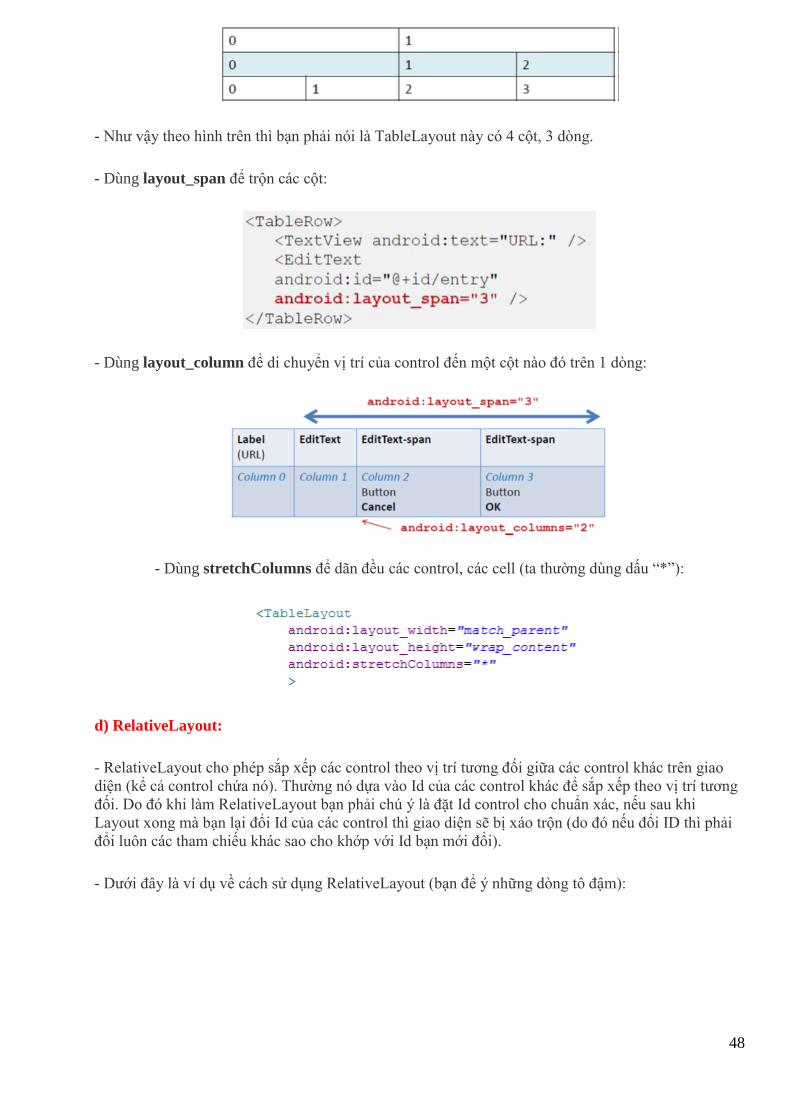
-Cho phép sắp các control theo dạng lưới (dòng và cột)
- TableLayout sẽ xem dòng nào có số lượng control nhiều nhất để xác định rằng nó có bao nhiêu cột
(lấy dòng có số lượng control nhiều nhất làm số cột chuẩn).
48
- Như vậy theo hình trên thì bạn phải nói là TableLayout này có 4 cột, 3 dòng.
- Dùng layout_span để trộn các cột:
- Dùng layout_column để di chuyển vị trí của control đến một cột nào đó trên 1 dòng:
- Dùng stretchColumns để dãn đều các control, các cell (ta thường dùng dấu “*”):
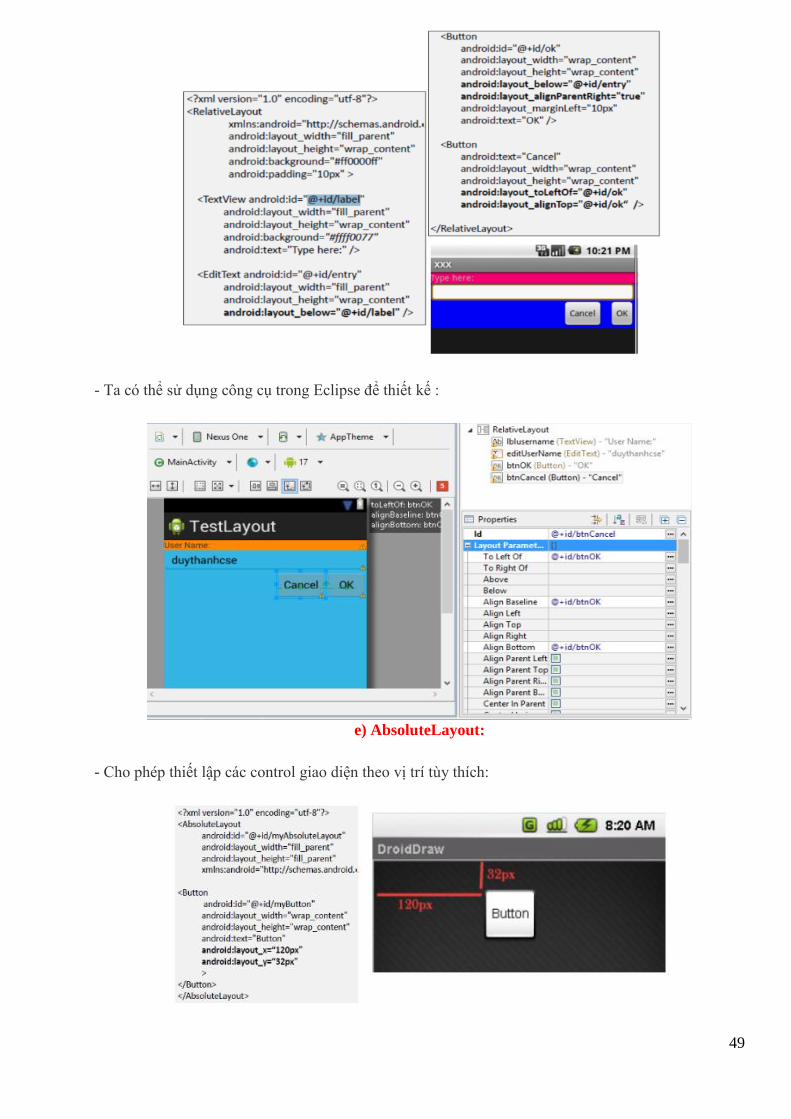
d) RelativeLayout:
- RelativeLayout cho phép sắp xếp các control theo vị trí tương đối giữa các control khác trên giao
diện (kể cả control chứa nó). Thường nó dựa vào Id của các control khác để sắp xếp theo vị trí tương
đối. Do đó khi làm RelativeLayout bạn phải chú ý là đặt Id control cho chuẩn xác, nếu sau khi
Layout xong mà bạn lại đổi Id của các control thì giao diện sẽ bị xáo trộn (do đó nếu đổi ID thì phải
đổi luôn các tham chiếu khác sao cho khớp với Id bạn mới đổi).
- Dưới đây là ví dụ về cách sử dụng RelativeLayout (bạn để ý những dòng tô đậm):
49
- Ta có thể sử dụng công cụ trong Eclipse để thiết kế :
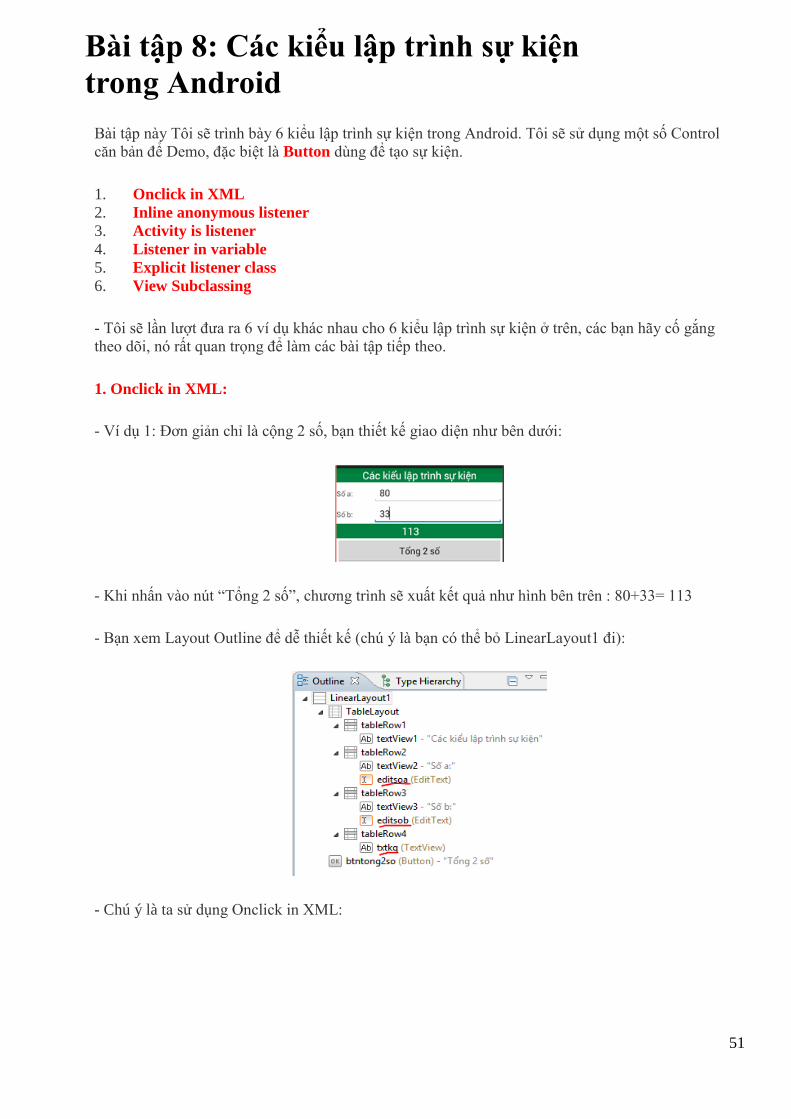
e) AbsoluteLayout:
- Cho phép thiết lập các control giao diện theo vị trí tùy thích:

50
- Như vậy các Tôi đã giới thiệu sơ qua cách tạo Layout và cách sử dụng một số Layout cụ thể, tùy
từng trường hợp mà các bạn ứng dụng vào. Thông thường ứng với mỗi một ứng dụng cụ thể thì bạn
phải kết hợp nhiều loại Layout lại với nhau.
- Bạn cần hiểu rõ các loại Layout để giúp ích cho quá trình thiết kế giao diện
- Bài tập sau Tôi sẽ hướng dẫn các bạn cách sử dụng một số control cơ bản và cách viết sự kiến cho
Button như thế nào.
51
Bài tập 8: Các kiểu lập trình sự kiện
trong Android
Bài tập này Tôi sẽ trình bày 6 kiểu lập trình sự kiện trong Android. Tôi sẽ sử dụng một số Control
căn bản để Demo, đặc biệt là Button dùng để tạo sự kiện.
1. Onclick in XML
2. Inline anonymous listener
3. Activity is listener
4. Listener in variable
5. Explicit listener class
6. View Subclassing
- Tôi sẽ lần lượt đưa ra 6 ví dụ khác nhau cho 6 kiểu lập trình sự kiện ở trên, các bạn hãy cố gắng
theo dõi, nó rất quan trọng để làm các bài tập tiếp theo.
1. Onclick in XML:
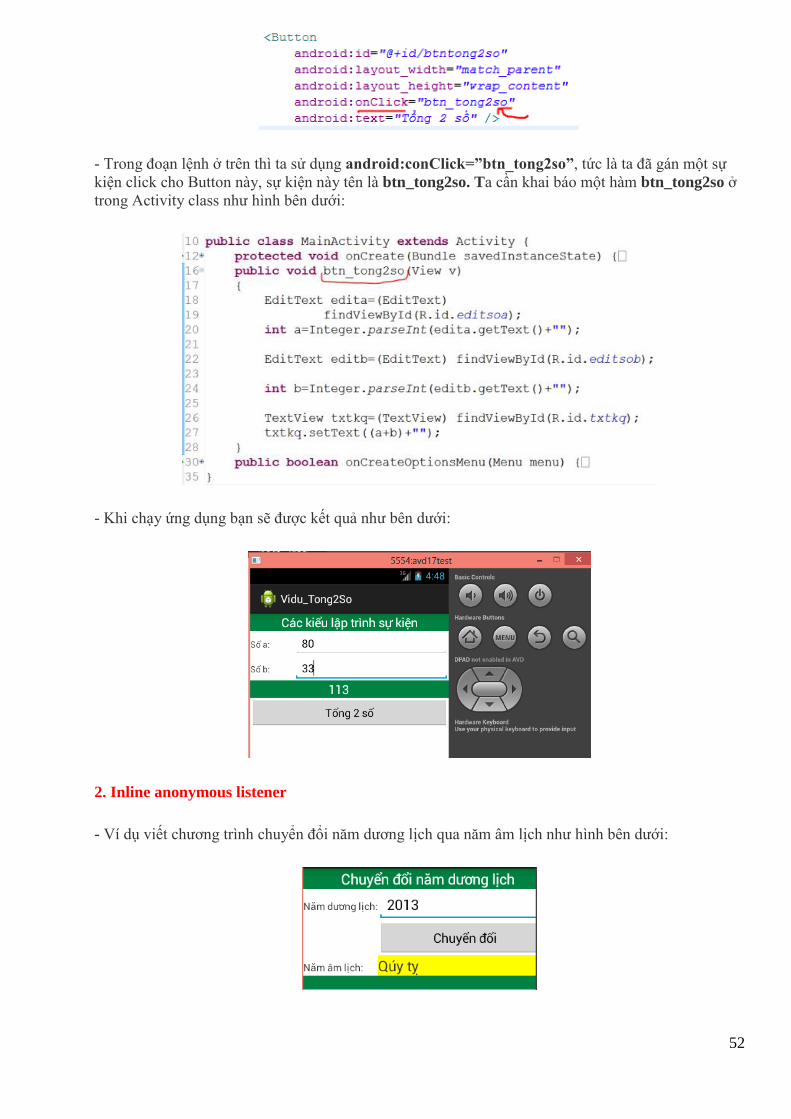
- Ví dụ 1: Đơn giản chỉ là cộng 2 số, bạn thiết kế giao diện như bên dưới:
- Khi nhấn vào nút “Tổng 2 số”, chương trình sẽ xuất kết quả như hình bên trên : 80+33= 113
- Bạn xem Layout Outline để dễ thiết kế (chú ý là bạn có thể bỏ LinearLayout1 đi):
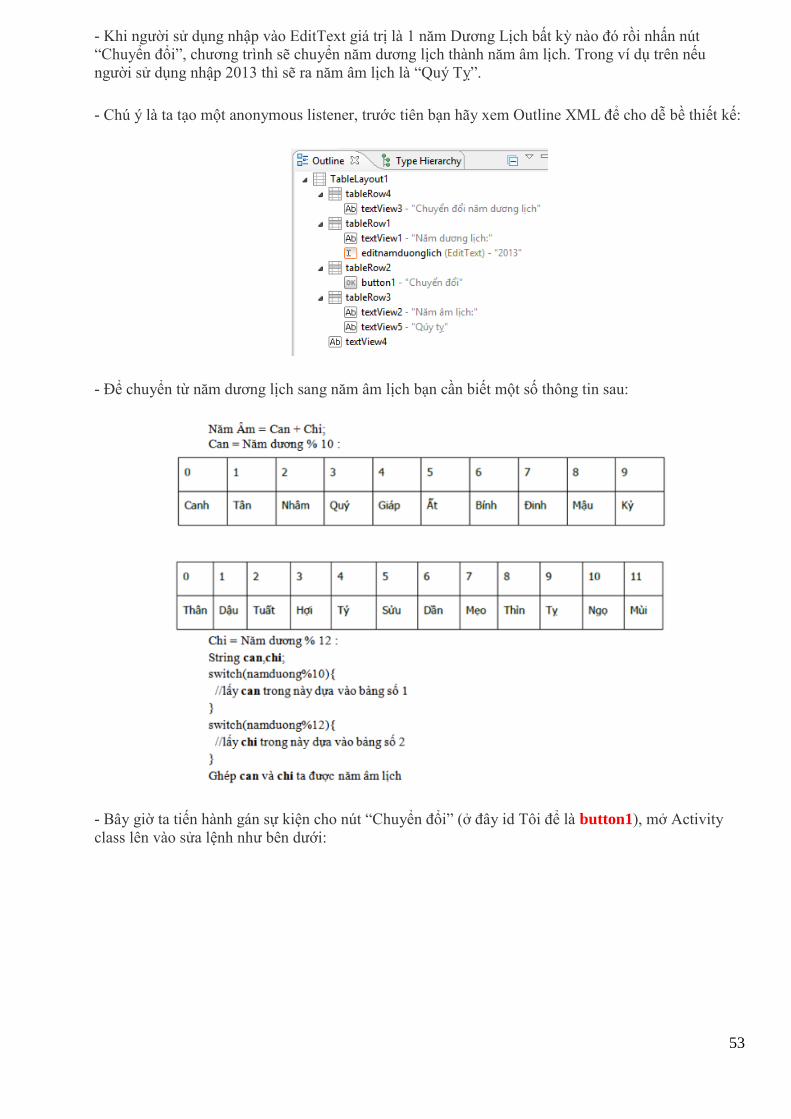
- Chú ý là ta sử dụng Onclick in XML:
52
- Trong đoạn lệnh ở trên thì ta sử dụng android:conClick=”btn_tong2so”, tức là ta đã gán một sự
kiện click cho Button này, sự kiện này tên là btn_tong2so. Ta cần khai báo một hàm btn_tong2so ở
trong Activity class như hình bên dưới:
- Khi chạy ứng dụng bạn sẽ được kết quả như bên dưới:
2. Inline anonymous listener
- Ví dụ viết chương trình chuyển đổi năm dương lịch qua năm âm lịch như hình bên dưới:
53
- Khi người sử dụng nhập vào EditText giá trị là 1 năm Dương Lịch bất kỳ nào đó rồi nhấn nút
“Chuyển đổi”, chương trình sẽ chuyển năm dương lịch thành năm âm lịch. Trong ví dụ trên nếu
người sử dụng nhập 2013 thì sẽ ra năm âm lịch là “Quý Tỵ”.
- Chú ý là ta tạo một anonymous listener, trước tiên bạn hãy xem Outline XML để cho dễ bề thiết kế:
- Để chuyển từ năm dương lịch sang năm âm lịch bạn cần biết một số thông tin sau:
- Bây giờ ta tiến hành gán sự kiện cho nút “Chuyển đổi” (ở đây id Tôi để là button1), mở Activity
class lên vào sửa lệnh như bên dưới:
54
- Bạn tự đưa lệnh vào Bước 1, Bước 2, bước 3 ở trên. Cách lấy dữ liệu nhập vào từ EditText đã
hướng dẫn ở phần Onclick in XML, làm theo cái này để lấy được giá trị là năm dương lịch ra, sau đó
lấy năm này xử lý theo bảng Can và Chi như hướng dẫn thì Ta sẽ ra được năm Âm lịch tương ứng.
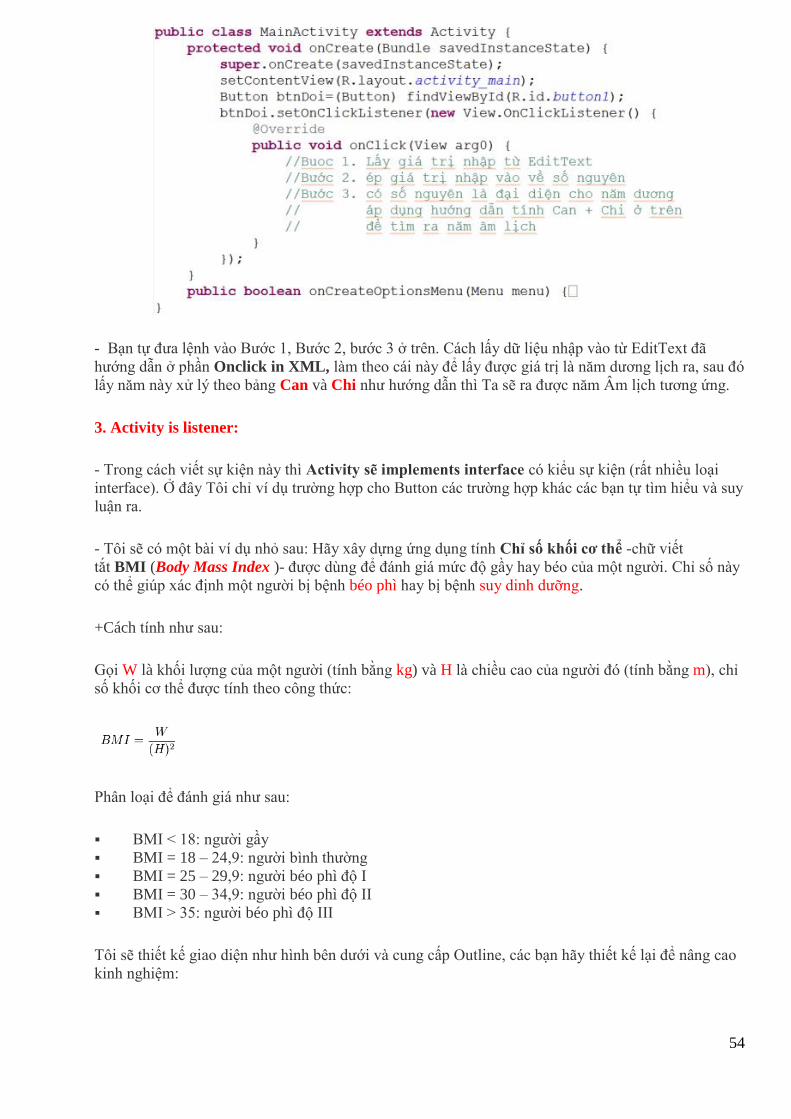
3. Activity is listener:
- Trong cách viết sự kiện này thì Activity sẽ implements interface có kiểu sự kiện (rất nhiều loại
interface). Ở đây Tôi chỉ ví dụ trường hợp cho Button các trường hợp khác các bạn tự tìm hiểu và suy
luận ra.
- Tôi sẽ có một bài ví dụ nhỏ sau: Hãy xây dựng ứng dụng tính Chỉ số khối cơ thể -chữ viết
tắt BMI (Body Mass Index )- được dùng để đánh giá mức độ gầy hay béo của một người. Chỉ số này
có thể giúp xác định một người bị bệnh béo phì hay bị bệnh suy dinh dưỡng.
+Cách tính như sau:
Gọi W là khối lượng của một người (tính bằng kg) và H là chiều cao của người đó (tính bằng m), chỉ
số khối cơ thể được tính theo công thức:
Phân loại để đánh giá như sau:
BMI < 18: người gầy
BMI = 18 – 24,9: người bình thường
BMI = 25 – 29,9: người béo phì độ I
BMI = 30 – 34,9: người béo phì độ II
BMI > 35: người béo phì độ III
Tôi sẽ thiết kế giao diện như hình bên dưới và cung cấp Outline, các bạn hãy thiết kế lại để nâng cao
kinh nghiệm:
55
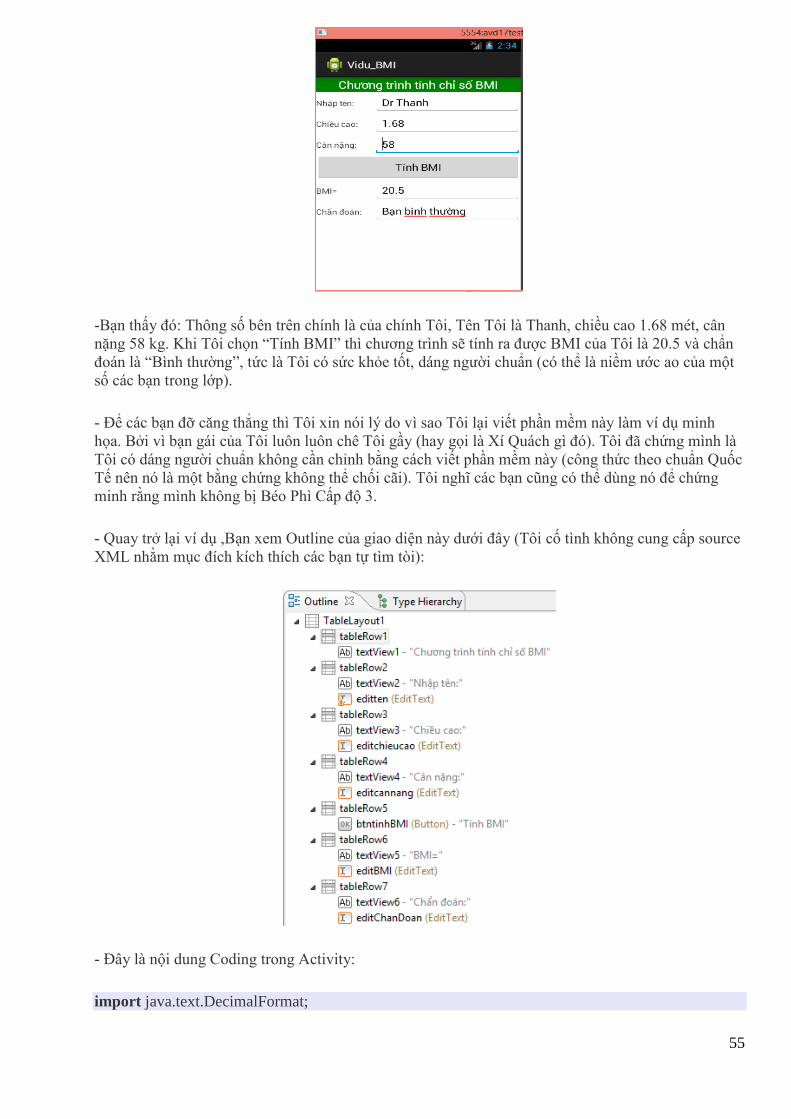
-Bạn thấy đó: Thông số bên trên chính là của chính Tôi, Tên Tôi là Thanh, chiều cao 1.68 mét, cân
nặng 58 kg. Khi Tôi chọn “Tính BMI” thì chương trình sẽ tính ra được BMI của Tôi là 20.5 và chẩn
đoán là “Bình thường”, tức là Tôi có sức khỏe tốt, dáng người chuẩn (có thể là niềm ước ao của một
số các bạn trong lớp).
- Để các bạn đỡ căng thẳng thì Tôi xin nói lý do vì sao Tôi lại viết phần mềm này làm ví dụ minh
họa. Bởi vì bạn gái của Tôi luôn luôn chê Tôi gầy (hay gọi là Xí Quách gì đó). Tôi đã chứng mình là
Tôi có dáng người chuẩn không cần chỉnh bằng cách viết phần mềm này (công thức theo chuẩn Quốc
Tế nên nó là một bằng chứng không thể chối cãi). Tôi nghĩ các bạn cũng có thể dùng nó để chứng
minh rằng mình không bị Béo Phì Cấp độ 3.
- Quay trở lại ví dụ ,Bạn xem Outline của giao diện này dưới đây (Tôi cố tình không cung cấp source
XML nhằm mục đích kích thích các bạn tự tìm tòi):
- Đây là nội dung Coding trong Activity:
import java.text.DecimalFormat;
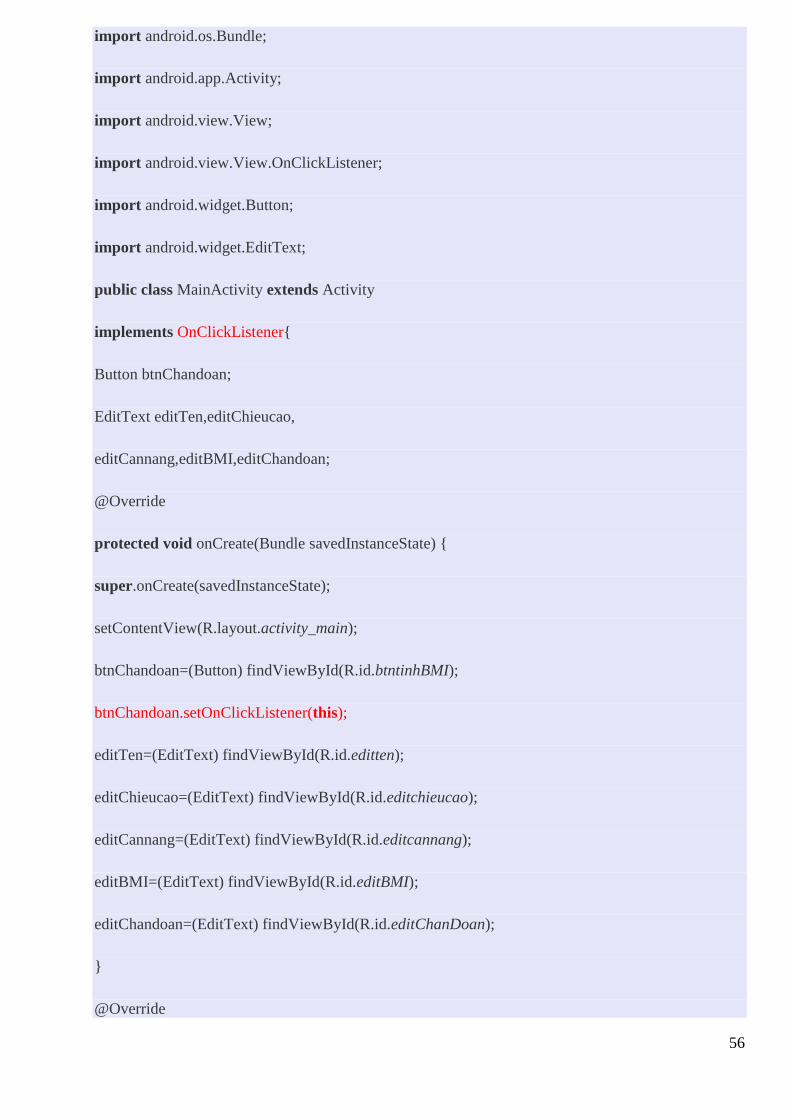
56
import android.os.Bundle;
import android.app.Activity;
import android.view.View;
import android.view.View.OnClickListener;
import android.widget.Button;
import android.widget.EditText;
public class MainActivity extends Activity
implements OnClickListener{
Button btnChandoan;
EditText editTen,editChieucao,
editCannang,editBMI,editChandoan;
@Override
protected void onCreate(Bundle savedInstanceState) {
super.onCreate(savedInstanceState);
setContentView(R.layout.activity_main);
btnChandoan=(Button) findViewById(R.id.btntinhBMI);
btnChandoan.setOnClickListener(this);
editTen=(EditText) findViewById(R.id.editten);
editChieucao=(EditText) findViewById(R.id.editchieucao);
editCannang=(EditText) findViewById(R.id.editcannang);
editBMI=(EditText) findViewById(R.id.editBMI);
editChandoan=(EditText) findViewById(R.id.editChanDoan);
}
@Override
57
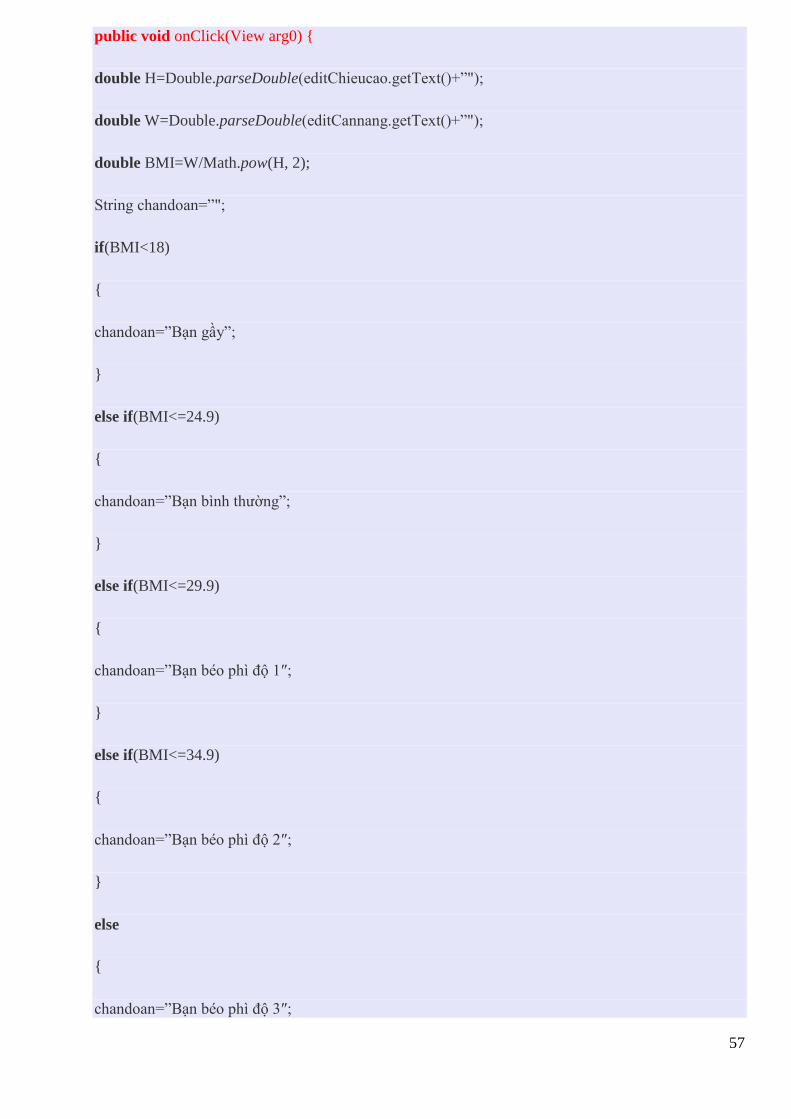
public void onClick(View arg0) {
double H=Double.parseDouble(editChieucao.getText()+”");
double W=Double.parseDouble(editCannang.getText()+”");
double BMI=W/Math.pow(H, 2);
String chandoan=”";
if(BMI<18)
{
chandoan=”Bạn gầy”;
}
else if(BMI<=24.9)
{
chandoan=”Bạn bình thường”;
}
else if(BMI<=29.9)
{
chandoan=”Bạn béo phì độ 1″;
}
else if(BMI<=34.9)
{
chandoan=”Bạn béo phì độ 2″;
}
else
{
chandoan=”Bạn béo phì độ 3″;
58
}
DecimalFormat dcf=new DecimalFormat(“#.0″);
editBMI.setText(dcf.format(BMI));
editChandoan.setText(chandoan);
}
}
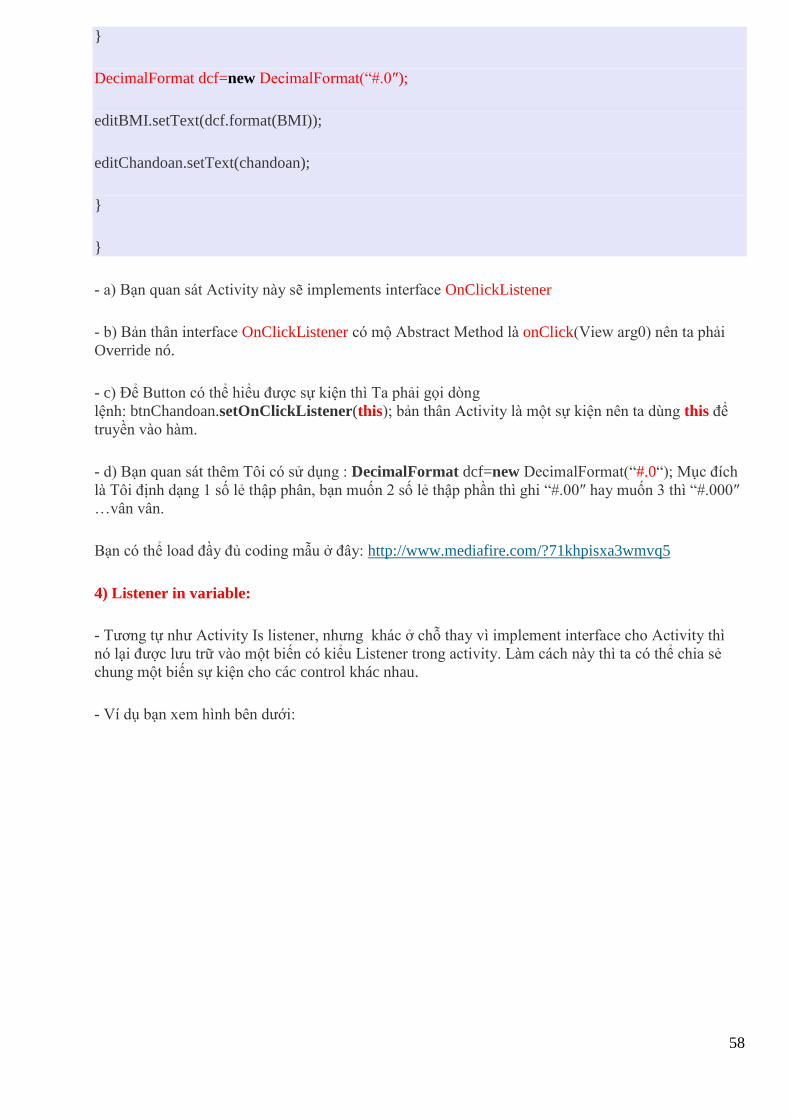
- a) Bạn quan sát Activity này sẽ implements interface OnClickListener
- b) Bản thân interface OnClickListener có mộ Abstract Method là onClick(View arg0) nên ta phải
Override nó.
- c) Để Button có thể hiểu được sự kiện thì Ta phải gọi dòng
lệnh: btnChandoan.setOnClickListener(this); bản thân Activity là một sự kiện nên ta dùng this để
truyền vào hàm.
- d) Bạn quan sát thêm Tôi có sử dụng : DecimalFormat dcf=new DecimalFormat(“#.0“); Mục đích
là Tôi định dạng 1 số lẻ thập phân, bạn muốn 2 số lẻ thập phần thì ghi “#.00″ hay muốn 3 thì “#.000″
…vân vân.
Bạn có thể load đầy đủ coding mẫu ở đây: http://www.mediafire.com/?71khpisxa3wmvq5
4) Listener in variable:
- Tương tự như Activity Is listener, nhưng khác ở chỗ thay vì implement interface cho Activity thì
nó lại được lưu trữ vào một biến có kiểu Listener trong activity. Làm cách này thì ta có thể chia sẻ
chung một biến sự kiện cho các control khác nhau.
- Ví dụ bạn xem hình bên dưới:
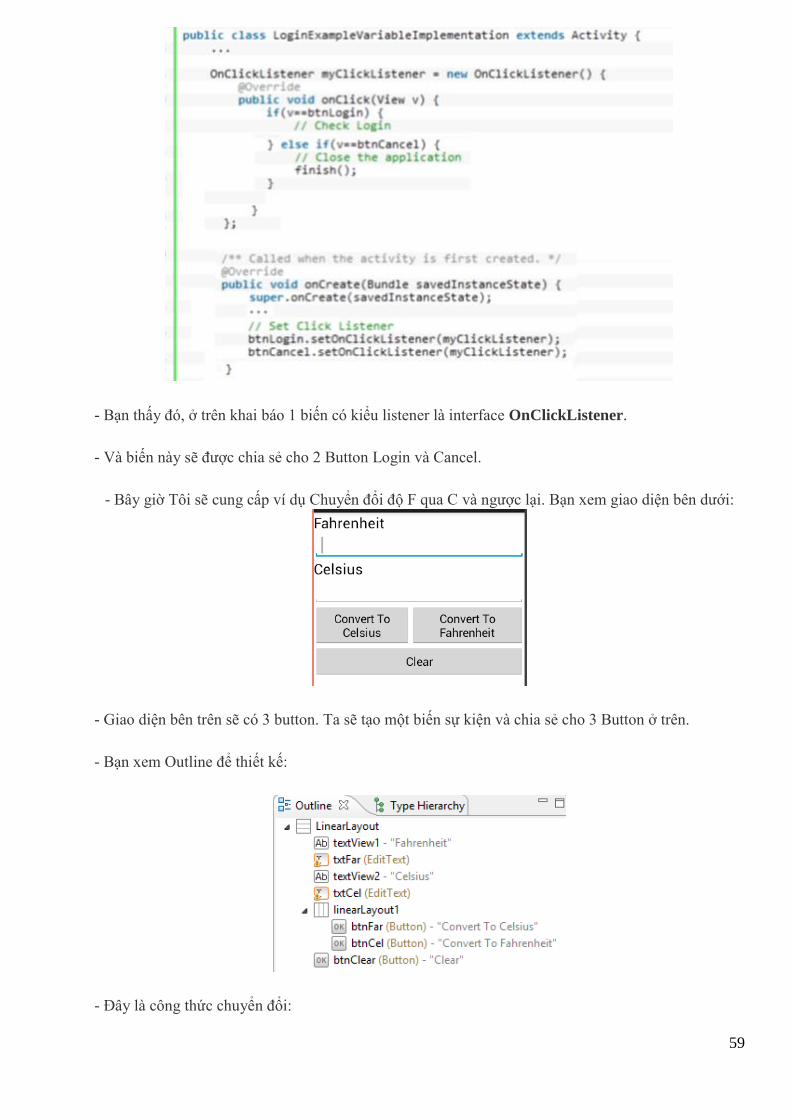
59
- Bạn thấy đó, ở trên khai báo 1 biến có kiểu listener là interface OnClickListener.
- Và biến này sẽ được chia sẻ cho 2 Button Login và Cancel.
- Bây giờ Tôi sẽ cung cấp ví dụ Chuyển đổi độ F qua C và ngược lại. Bạn xem giao diện bên dưới:
- Giao diện bên trên sẽ có 3 button. Ta sẽ tạo một biến sự kiện và chia sẻ cho 3 Button ở trên.
- Bạn xem Outline để thiết kế:
- Đây là công thức chuyển đổi:
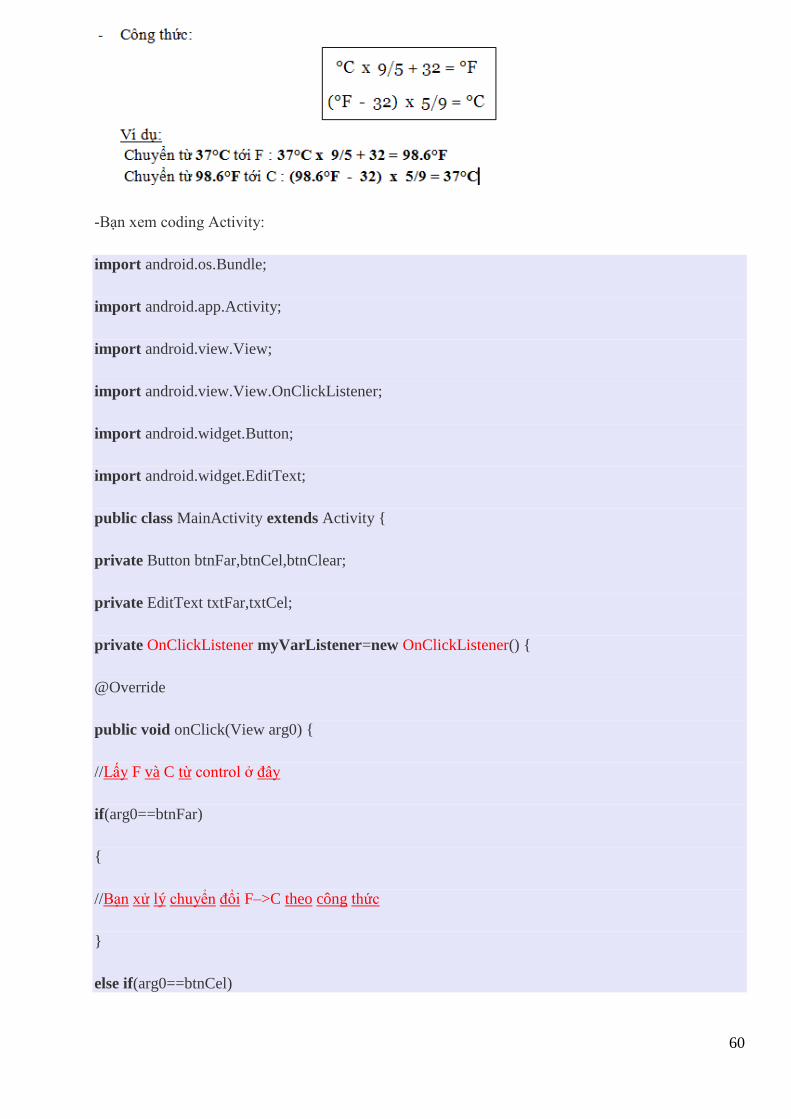
60
-Bạn xem coding Activity:
import android.os.Bundle;
import android.app.Activity;
import android.view.View;
import android.view.View.OnClickListener;
import android.widget.Button;
import android.widget.EditText;
public class MainActivity extends Activity {
private Button btnFar,btnCel,btnClear;
private EditText txtFar,txtCel;
private OnClickListener myVarListener=new OnClickListener() {
@Override
public void onClick(View arg0) {
//Lấy F và C từ control ở đây
if(arg0==btnFar)
{
//Bạn xử lý chuyển đổi F–>C theo công thức
}
else if(arg0==btnCel)
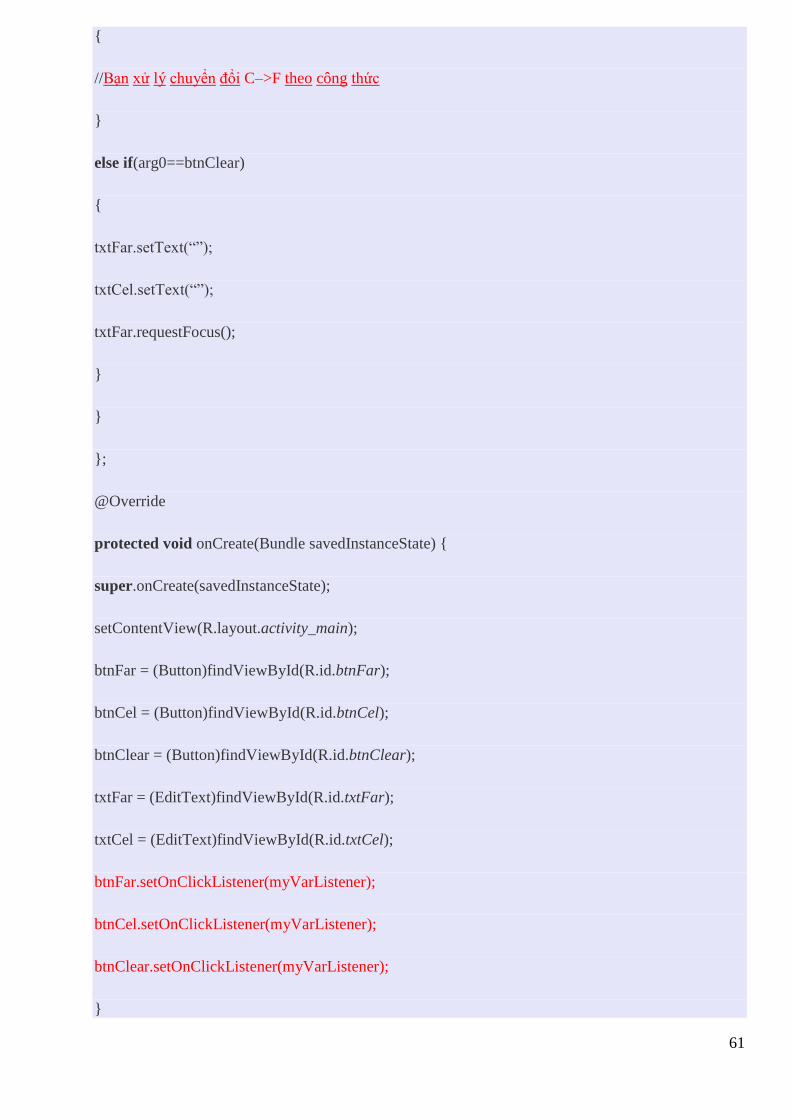
61
{
//Bạn xử lý chuyển đổi C–>F theo công thức
}
else if(arg0==btnClear)
{
txtFar.setText(“”);
txtCel.setText(“”);
txtFar.requestFocus();
}
}
};
@Override
protected void onCreate(Bundle savedInstanceState) {
super.onCreate(savedInstanceState);
setContentView(R.layout.activity_main);
btnFar = (Button)findViewById(R.id.btnFar);
btnCel = (Button)findViewById(R.id.btnCel);
btnClear = (Button)findViewById(R.id.btnClear);
txtFar = (EditText)findViewById(R.id.txtFar);
txtCel = (EditText)findViewById(R.id.txtCel);
btnFar.setOnClickListener(myVarListener);
btnCel.setOnClickListener(myVarListener);
btnClear.setOnClickListener(myVarListener);
}
62
}
Bạn tự viết lệnh cho 2 nút chuyển đổi : cách lấy dữ liệu đã hướng dẫn ở những kiểu lập trình sự kiện
trước, bắt buộc bạn phải lấy được. Sau khi lấy được thì chỉ cần ráp vào công thức là xong.
5) Explicit listener class:
- Trường hợp này ta tách riêng một class đóng vai trò là class sự kiện riêng.
- Khi nào lượng coding trong ứng dụng khổng lồ và phức tạp thì ta nên tách class sự kiện riêng để dễ
quản lý.
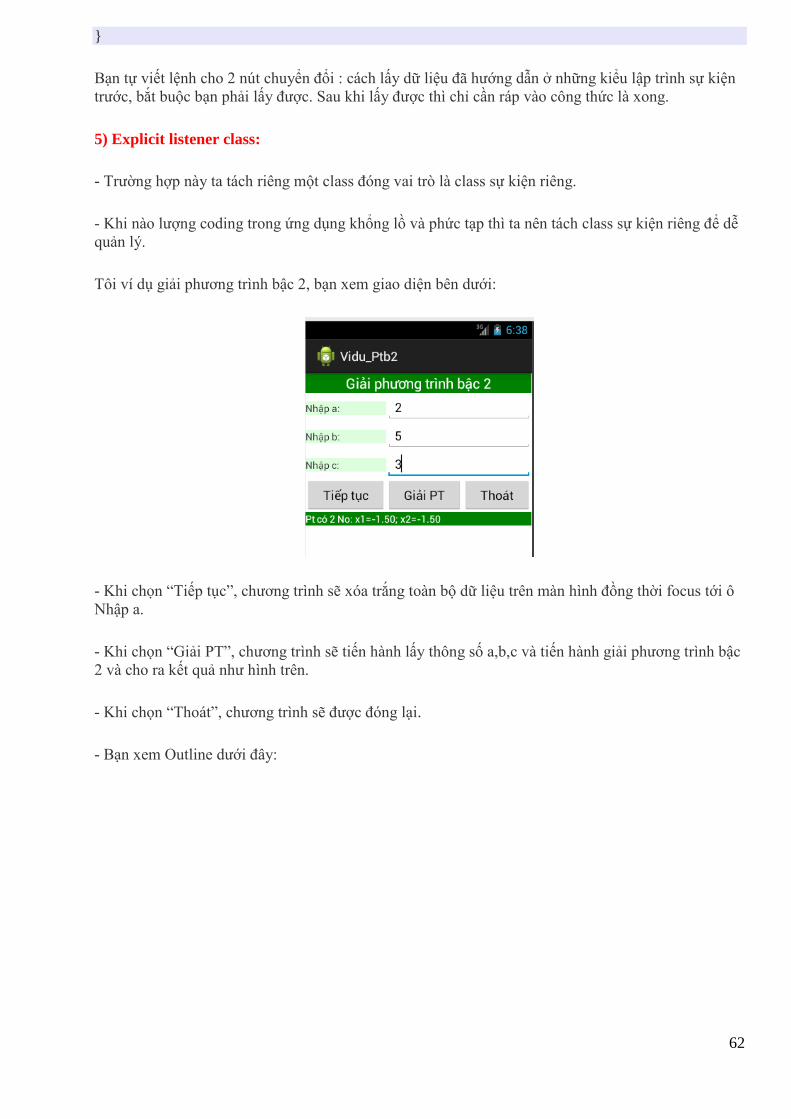
Tôi ví dụ giải phương trình bậc 2, bạn xem giao diện bên dưới:
- Khi chọn “Tiếp tục”, chương trình sẽ xóa trắng toàn bộ dữ liệu trên màn hình đồng thời focus tới ô
Nhập a.
- Khi chọn “Giải PT”, chương trình sẽ tiến hành lấy thông số a,b,c và tiến hành giải phương trình bậc
2 và cho ra kết quả như hình trên.
- Khi chọn “Thoát”, chương trình sẽ được đóng lại.
- Bạn xem Outline dưới đây:
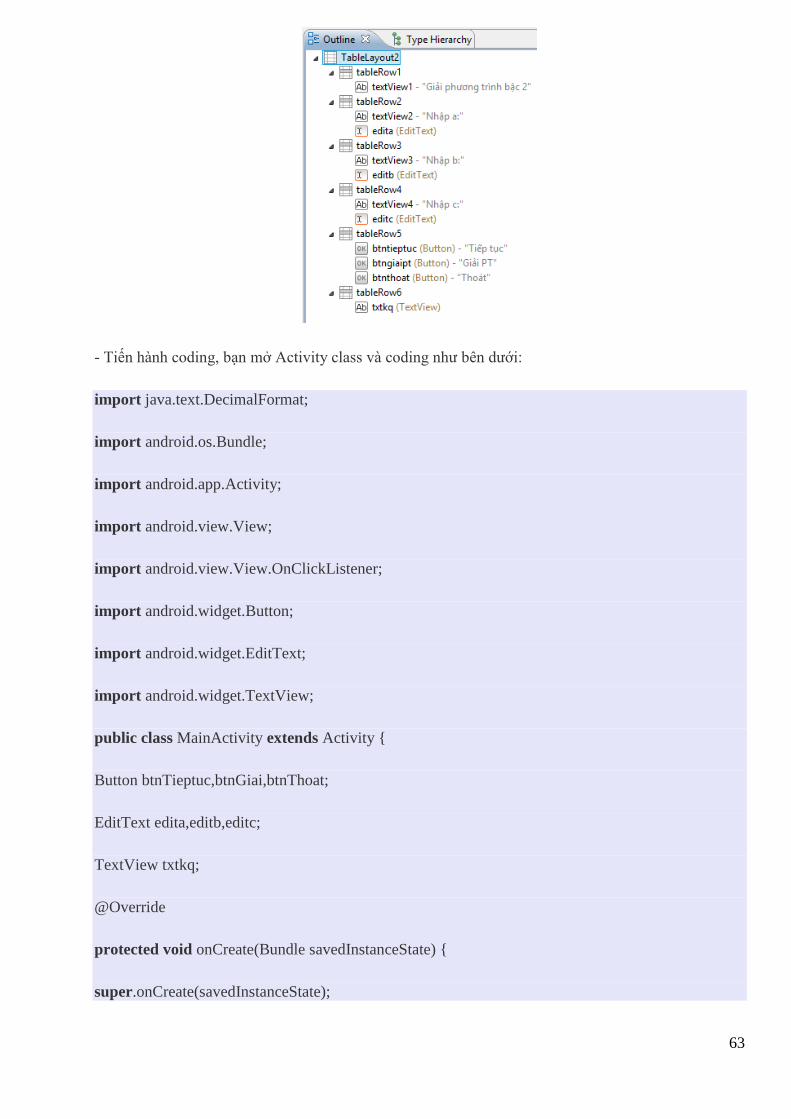
63
- Tiến hành coding, bạn mở Activity class và coding như bên dưới:
import java.text.DecimalFormat;
import android.os.Bundle;
import android.app.Activity;
import android.view.View;
import android.view.View.OnClickListener;
import android.widget.Button;
import android.widget.EditText;
import android.widget.TextView;
public class MainActivity extends Activity {
Button btnTieptuc,btnGiai,btnThoat;
EditText edita,editb,editc;
TextView txtkq;
@Override
protected void onCreate(Bundle savedInstanceState) {
super.onCreate(savedInstanceState);

64
setContentView(R.layout.activity_main);
btnTieptuc=(Button) findViewById(R.id.btntieptuc);
btnGiai=(Button) findViewById(R.id.btngiaipt);
btnThoat=(Button) findViewById(R.id.btnthoat);
btnTieptuc.setOnClickListener(new MyEvent());
btnGiai.setOnClickListener(new MyEvent());
btnThoat.setOnClickListener(new MyEvent());
edita=(EditText) findViewById(R.id.edita);
editb=(EditText) findViewById(R.id.editb);
editc=(EditText) findViewById(R.id.editc);
txtkq=(TextView) findViewById(R.id.txtkq);
}
public void giaiPtb2()
{
String sa=edita.getText()+”";
String sb=editb.getText()+”";
String sc=editc.getText()+”";
int a=Integer.parseInt(sa);
int b=Integer.parseInt(sb);
int c=Integer.parseInt(sc);
String kq=”";
DecimalFormat dcf=new DecimalFormat(“#.00″);
if(a==0)
{
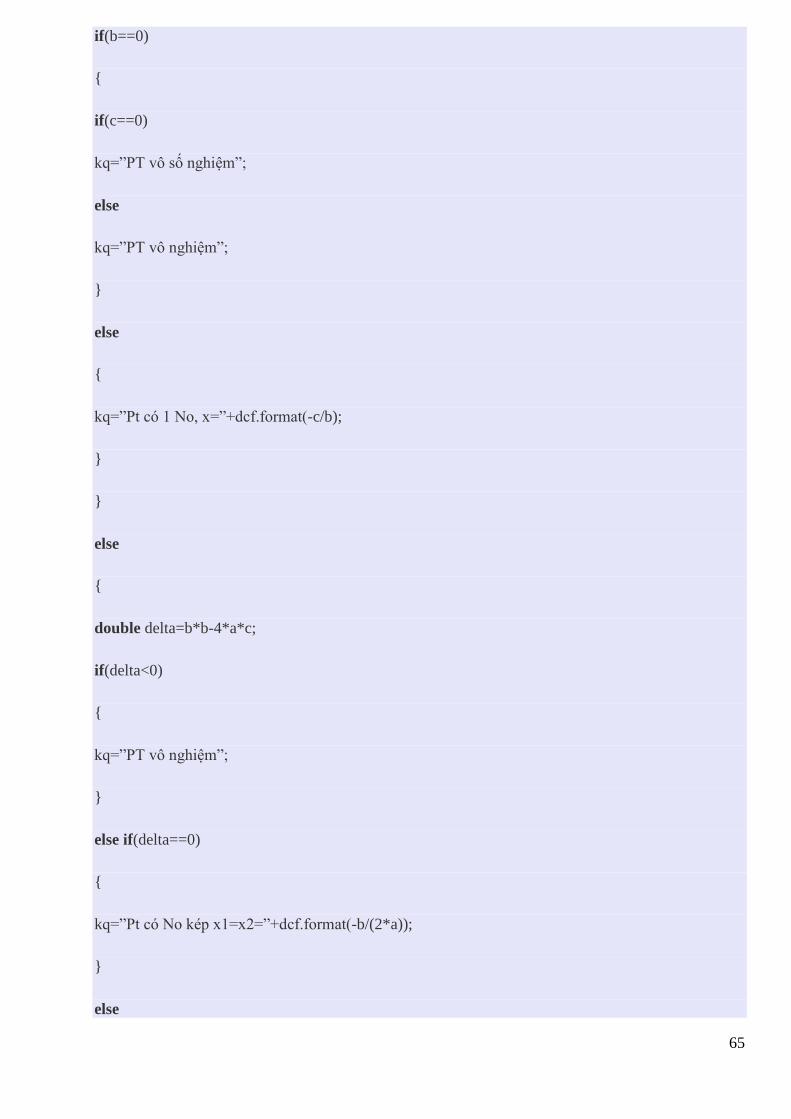
65
if(b==0)
{
if(c==0)
kq=”PT vô số nghiệm”;
else
kq=”PT vô nghiệm”;
}
else
{
kq=”Pt có 1 No, x=”+dcf.format(-c/b);
}
}
else
{
double delta=b*b-4*a*c;
if(delta<0)
{
kq=”PT vô nghiệm”;
}
else if(delta==0)
{
kq=”Pt có No kép x1=x2=”+dcf.format(-b/(2*a));
}
else

66
{
kq=”Pt có 2 No: x1=”+dcf.format((-b-Math.sqrt(delta))/(2*a))+
“; x2=”+dcf.format((-b-Math.sqrt(delta))/(2*a));
}
}
txtkq.setText(kq);
}
private class MyEvent implements OnClickListener
{
@Override
public void onClick(View arg0) {
if(arg0==btnTieptuc)
{
edita.setText(“”);
editb.setText(“”);
editc.setText(“”);
edita.requestFocus();
}
else if(arg0.getId()==R.id.btngiaipt)
{
giaiPtb2();
}
else if(arg0.getId()==R.id.btnthoat)
{
67
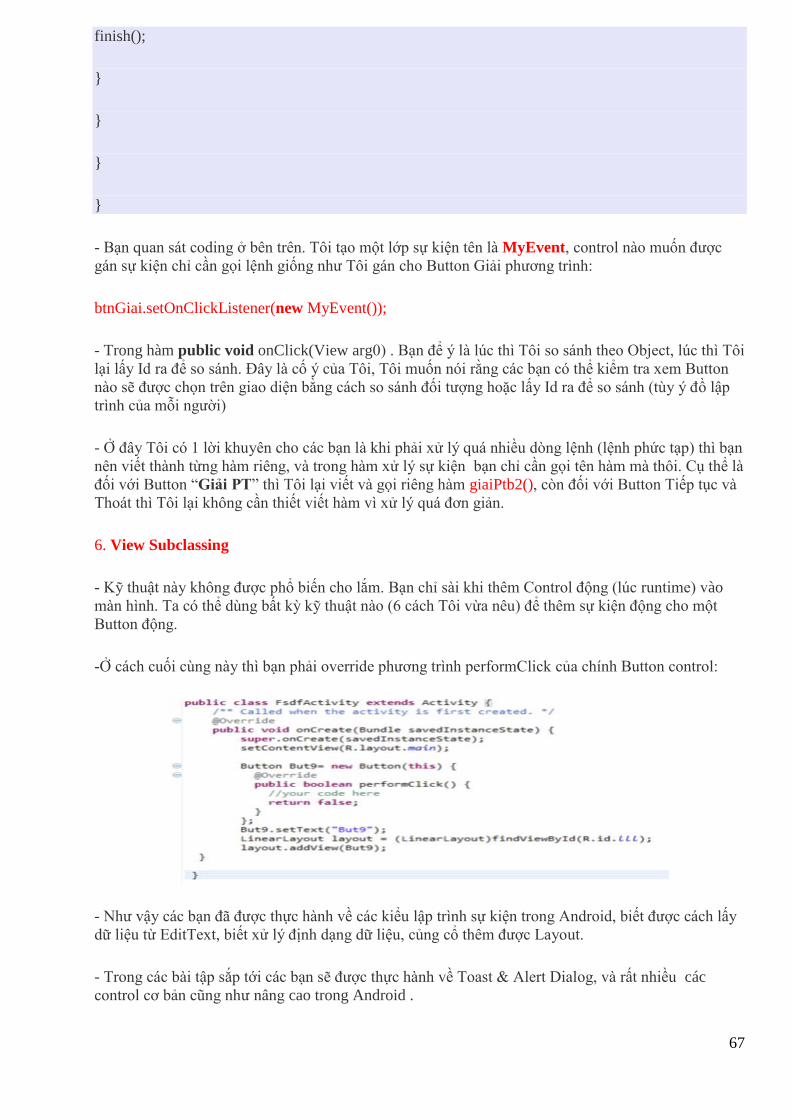
finish();
}
}
}
}
- Bạn quan sát coding ở bên trên. Tôi tạo một lớp sự kiện tên là MyEvent, control nào muốn được
gán sự kiện chỉ cần gọi lệnh giống như Tôi gán cho Button Giải phương trình:
btnGiai.setOnClickListener(new MyEvent());
- Trong hàm public void onClick(View arg0) . Bạn để ý là lúc thì Tôi so sánh theo Object, lúc thì Tôi
lại lấy Id ra để so sánh. Đây là cố ý của Tôi, Tôi muốn nói rằng các bạn có thể kiểm tra xem Button
nào sẽ được chọn trên giao diện bằng cách so sánh đối tượng hoặc lấy Id ra để so sánh (tùy ý đồ lập
trình của mỗi người)
- Ở đây Tôi có 1 lời khuyên cho các bạn là khi phải xử lý quá nhiều dòng lệnh (lệnh phức tạp) thì bạn
nên viết thành từng hàm riêng, và trong hàm xử lý sự kiện bạn chỉ cần gọi tên hàm mà thôi. Cụ thể là
đối với Button “Giải PT” thì Tôi lại viết và gọi riêng hàm giaiPtb2(), còn đối với Button Tiếp tục và
Thoát thì Tôi lại không cần thiết viết hàm vì xử lý quá đơn giản.
6. View Subclassing
- Kỹ thuật này không được phổ biến cho lắm. Bạn chỉ sài khi thêm Control động (lúc runtime) vào
màn hình. Ta có thể dùng bất kỳ kỹ thuật nào (6 cách Tôi vừa nêu) để thêm sự kiện động cho một
Button động.
-Ở cách cuối cùng này thì bạn phải override phương trình performClick của chính Button control:
- Như vậy các bạn đã được thực hành về các kiểu lập trình sự kiện trong Android, biết được cách lấy
dữ liệu từ EditText, biết xử lý định dạng dữ liệu, củng cổ thêm được Layout.
- Trong các bài tập sắp tới các bạn sẽ được thực hành về Toast & Alert Dialog, và rất nhiều các
control cơ bản cũng như nâng cao trong Android .

68
- Bạn phải hiểu rõ các kỹ thuật lập trình này để tùy vào từng trường hợp cụ thể mà bạn nên quyết
định kỹ thuật nào cho phù hợp.
69
Bài tập 9: Thực hành về Toast Notification và
Alert Dialog
Vì trong tất cả các ứng dụng Tôi thấy rằng chúng ta hay sử dụng Toast và Alert Dialog để kiểm tra
một điều gì đó, hay đơn giản chỉ là xuất thông báo. Vì vậy bài tập này Tôi sẽ hướng dẫn các bạn làm
quen với Toast & Alert Dialog, sau đó các bạn sẽ được thực hành với các control cơ bản và nâng cao.
- Cả Toast và Alert Dialog khi hiển thị lên thì các tiến trình (hay các lệnh) khác vẫn cứ tiếp tục làm
việc.
1) Toast:
- Toast có thể được tạo và hiển thị trong Activity hoặc trong Servive.
- Không cho phép người sử dụng tương tác
- Khi hiển thị sau khoảng thời gian nào đó sẽ tự đóng lại
- Có 2 giá trị mặc định (ta nên sử dụng 2 giá trị này, không nên gõ con số cụ thể vào): hằng
số Toast.LENGTH_SHORT hiển thị trong 2 giây, Toast.LENGTH_LONG hiển thị trong 3.5giây.
Cách tạo Toast:
Toast toast=Toast.makeText(YourActivity.this, “Hiển thị gì thì ghi ở
đây”, Toast.LENGTH_SHORT);
toast.show();
- Khi nào bạn nên sử dụng Toast?
Theo Tôi thì tùy bạn, bạn có thể sử dụng trong trường hợp hiển thông báo trong các mục thiết lập
thông số cấu hình, hay đơn giản chỉ là hiển thị lên để xem thông tin tạm thời nào đó (giống như để
kiểm tra một vấn đề sảy ra chẳng hạn).
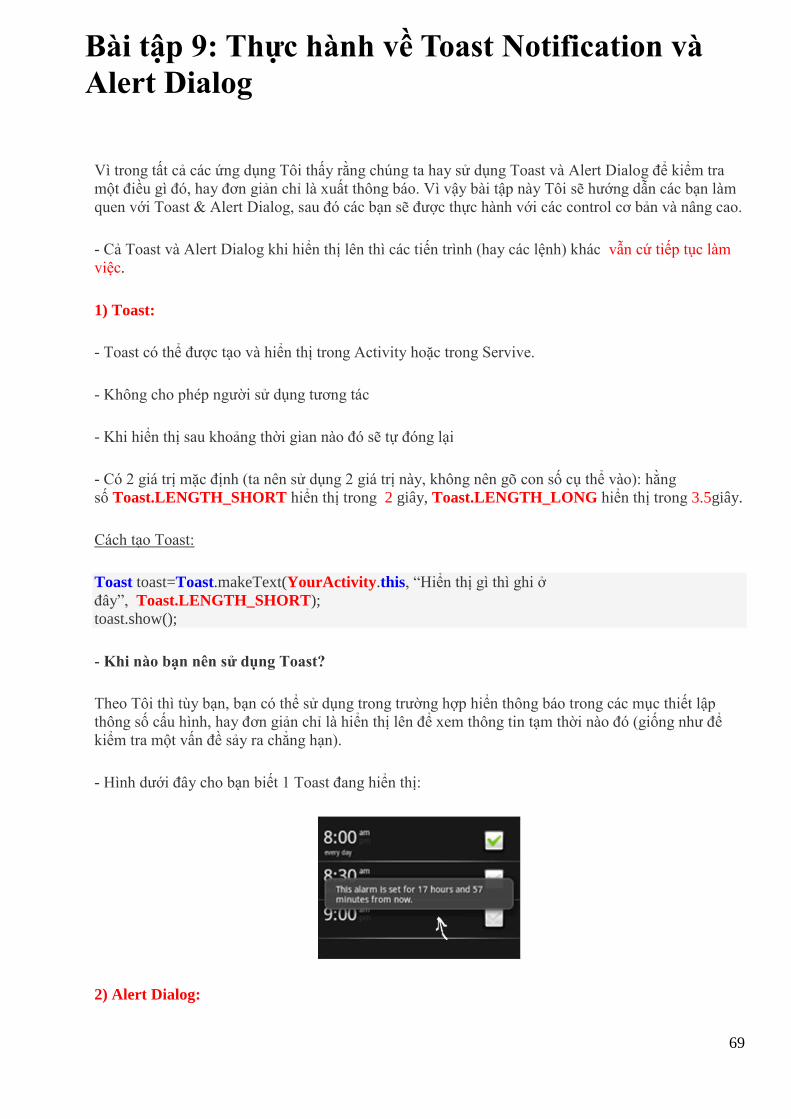
- Hình dưới đây cho bạn biết 1 Toast đang hiển thị:
2) Alert Dialog:
70
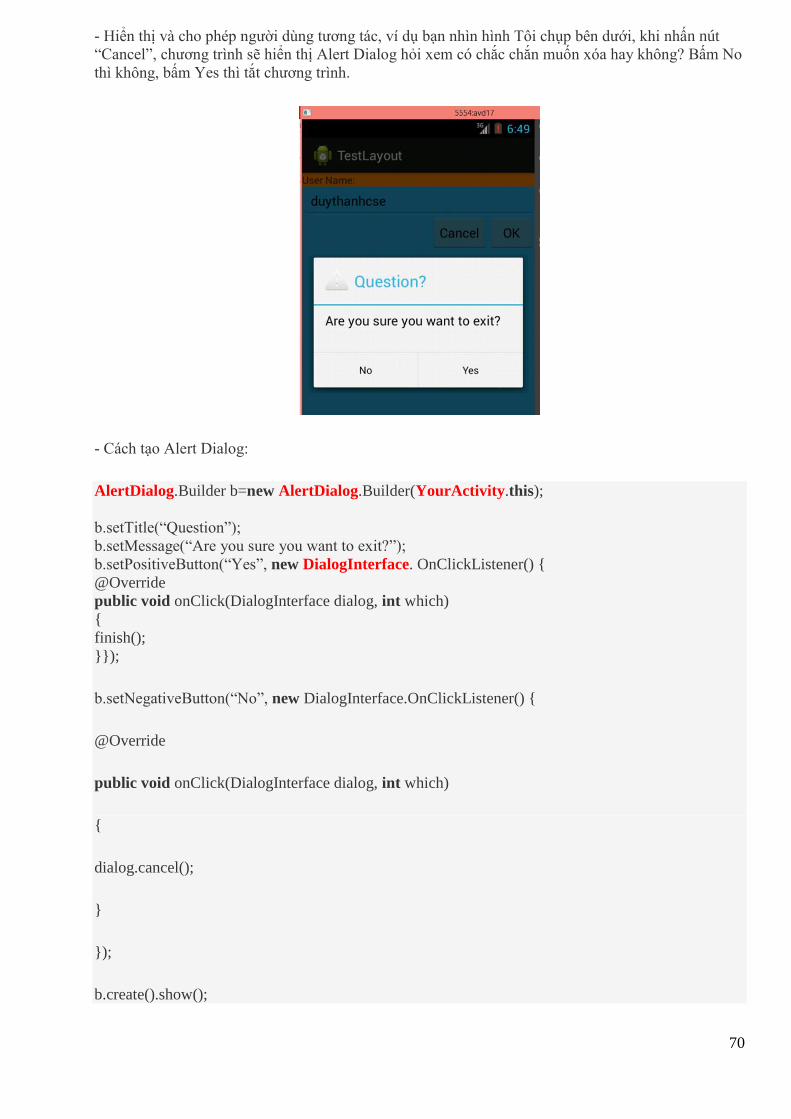
- Hiển thị và cho phép người dùng tương tác, ví dụ bạn nhìn hình Tôi chụp bên dưới, khi nhấn nút
“Cancel”, chương trình sẽ hiển thị Alert Dialog hỏi xem có chắc chắn muốn xóa hay không? Bấm No
thì không, bấm Yes thì tắt chương trình.
- Cách tạo Alert Dialog:
AlertDialog.Builder b=new AlertDialog.Builder(YourActivity.this);
b.setTitle(“Question”);
b.setMessage(“Are you sure you want to exit?”);
b.setPositiveButton(“Yes”, new DialogInterface. OnClickListener() {
@Override
public void onClick(DialogInterface dialog, int which)
{
finish();
}});
b.setNegativeButton(“No”, new DialogInterface.OnClickListener() {
@Override
public void onClick(DialogInterface dialog, int which)
{
dialog.cancel();
}
});
b.create().show();
71
Ý nghĩa của các hàm :
- setTitle : thiết lập tiêu đề cho Dialog
- setMessage: Thiết lập nội dung cho Dialog
-setIcon : để thiết lập Icon
-setPositiveButton, setNegativeButton thiết lập hiển thị Nút chọn cho Dialog (ở đây bạn không
quan tâm Nút chấp nhận hay Nút hủy nó thuộc PositiveButton hay NegativeButton vì đó là tùy thuộc
bạn chọn. Chú ý là ở đối số thứ 2 của các hàm này sẽ là DialogInterface. OnClickListener chứ
không phải View. OnClickListener
- create() để tạo Dialog
- show() để hiển thị Dialog.
72
Bài tập 10: Sử dụng TextView, EditText và
Button trong Android
- TextView, EditText, Button là 3 control cơ bản nhất của Android. Trong các bài tập trước bạn đã
được làm quen với 3 control này rồi. Bài tập này Tôi sẽ làm lại mục đích giúp các bạn ôn tập lại đồng
thời giúp hiểu thêm được một số thuộc tính mới của nó (trong Android người ta thường gọi một số
các control là Form Widgets).
1) TextView:
- Bạn chỉ muốn hiển thị thông tin mà không cho phép người dùng chỉnh sửa thì nên sử dụng control
này.
- TextView tương tự như JLabel bên Java, và như Label bên C#
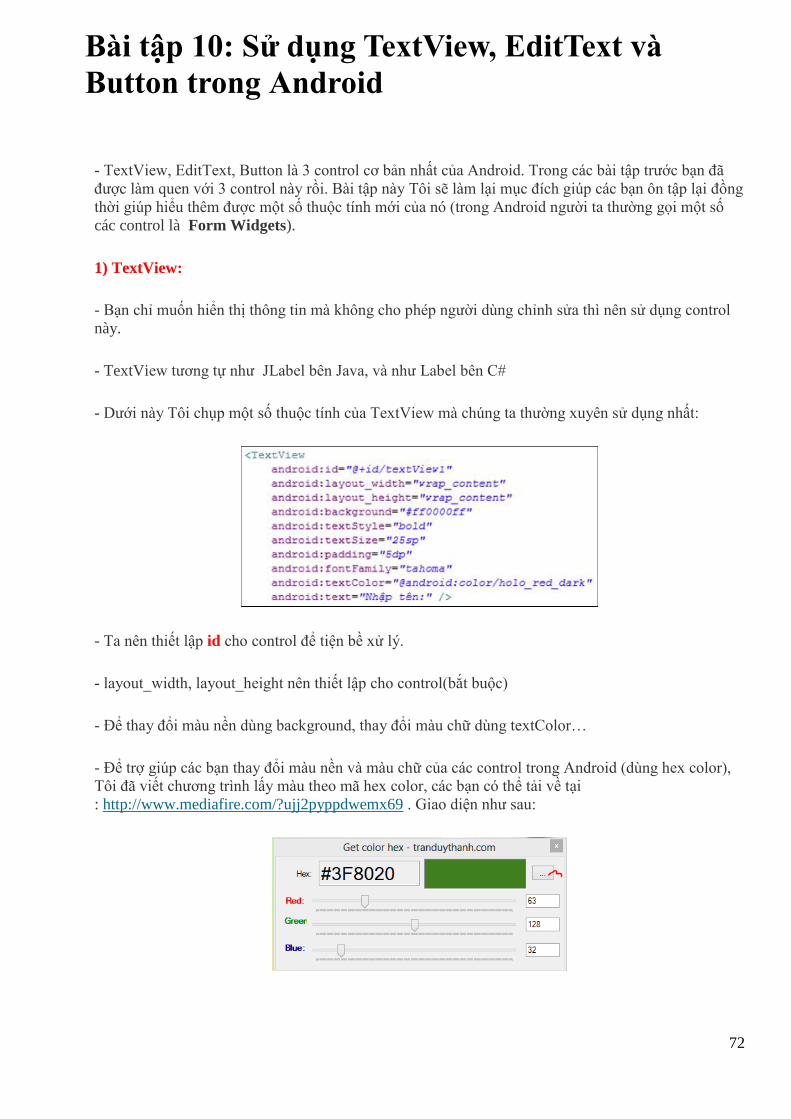
- Dưới này Tôi chụp một số thuộc tính của TextView mà chúng ta thường xuyên sử dụng nhất:
- Ta nên thiết lập id cho control để tiện bề xử lý.
- layout_width, layout_height nên thiết lập cho control(bắt buộc)
- Để thay đổi màu nền dùng background, thay đổi màu chữ dùng textColor…
- Để trợ giúp các bạn thay đổi màu nền và màu chữ của các control trong Android (dùng hex color),
Tôi đã viết chương trình lấy màu theo mã hex color, các bạn có thể tải về tại
: http://www.mediafire.com/?ujj2pyppdwemx69 . Giao diện như sau:

73
Chương trình này bạn có thể chọn button “…” để chọn custom color. Ứng với mỗi bảng màu khác
nhau thì sẽ có mã Hex color khác nhau. Bạn copy mã này dán vào Ứng dụng Android của bạn thì sẽ
có màu như ý muốn.
Thí dụ, ở màn hình trên Hex là “#3F8020“, bạn copy hex này và dán vào background của TextView
(xem hình):
-Như bên trên Tôi nói là nên đặt tên Id cho control, mục đích để xử lý một số công việc theo yêu cầu.
Dựa vào Id ta sẽ lấy được control theo đúng Id này, xem code bên dưới để biết cách lấy control theo
Id:
TextView txt1= (TextView) findViewById(R.id.textView1);
- Mọi control đều kế thừa từ View, và hàm findViewById cũng trả về 1 View theo đúng Id truyền
vào, đó là lý do ta ép kiểu về cho đúng với TextView (cách làm nhanh: ngay dòng lệnh này nhấn tổ
hợp phím Ctrl +1 là nó sẽ tự ép kiểu nhanh cho bạn)
- Để hiển thị thông tin lên control TextView ta dùng lệnh dưới đây:
txt1.setText(“Hello tèo”);
- Đẩy lấy thông tin bên trong control TextView ta dùng lệnh dưới đây:
String msg=txt1.getText().toString();
2) EditText:
- Control này kế thừa từ TextView và cho phép chỉnh sửa dữ liệu (dĩ nhiên bạn có thể cấm chỉnh sửa
dữ liệu bằng coding hay trong xml)
- Để sử dụng EditText rất đơn giản, bạn chỉ việc kéo thả control này vào giao diện và tiến hành thiết
lập một số thuộc tính:
74
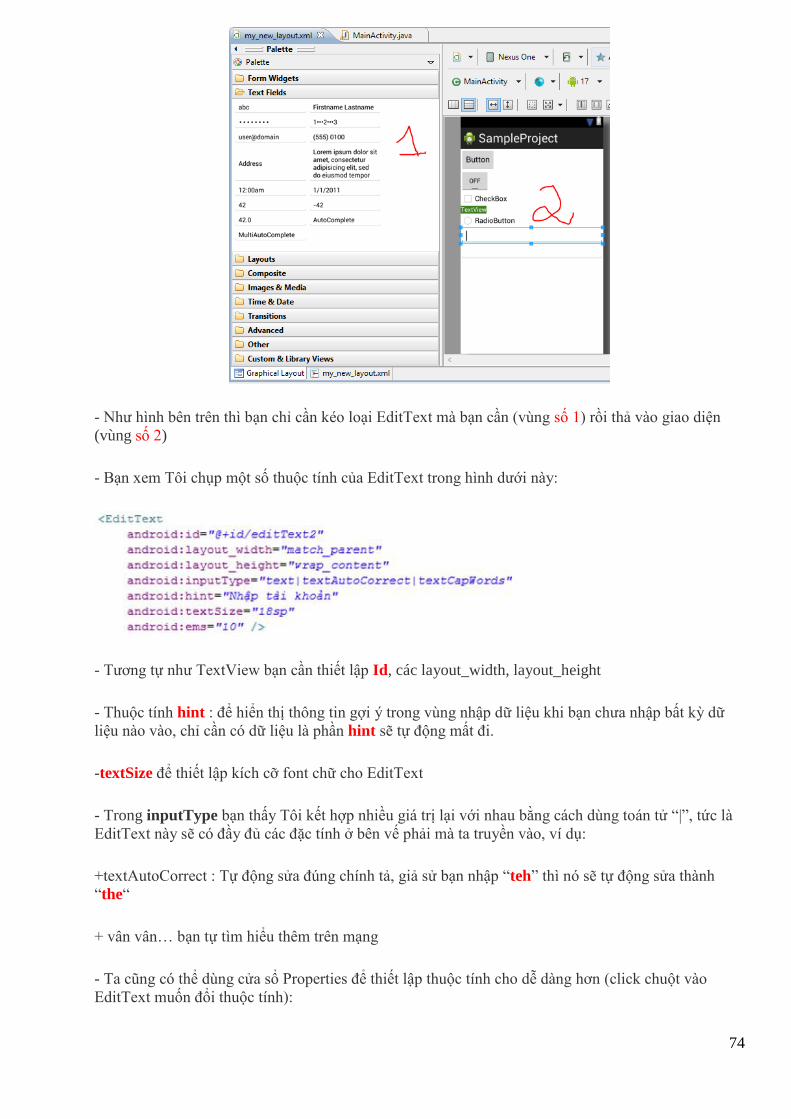
- Như hình bên trên thì bạn chỉ cần kéo loại EditText mà bạn cần (vùng số 1) rồi thả vào giao diện
(vùng số 2)
- Bạn xem Tôi chụp một số thuộc tính của EditText trong hình dưới này:
- Tương tự như TextView bạn cần thiết lập Id, các layout_width, layout_height
- Thuộc tính hint : để hiển thị thông tin gợi ý trong vùng nhập dữ liệu khi bạn chưa nhập bất kỳ dữ
liệu nào vào, chỉ cần có dữ liệu là phần hint sẽ tự động mất đi.
-textSize để thiết lập kích cỡ font chữ cho EditText
- Trong inputType bạn thấy Tôi kết hợp nhiều giá trị lại với nhau bằng cách dùng toán tử “|”, tức là
EditText này sẽ có đầy đủ các đặc tính ở bên vế phải mà ta truyền vào, ví dụ:
+textAutoCorrect : Tự động sửa đúng chính tả, giả sử bạn nhập “teh” thì nó sẽ tự động sửa thành
“the“
+ vân vân… bạn tự tìm hiểu thêm trên mạng
- Ta cũng có thể dùng cửa sổ Properties để thiết lập thuộc tính cho dễ dàng hơn (click chuột vào
EditText muốn đổi thuộc tính):
75
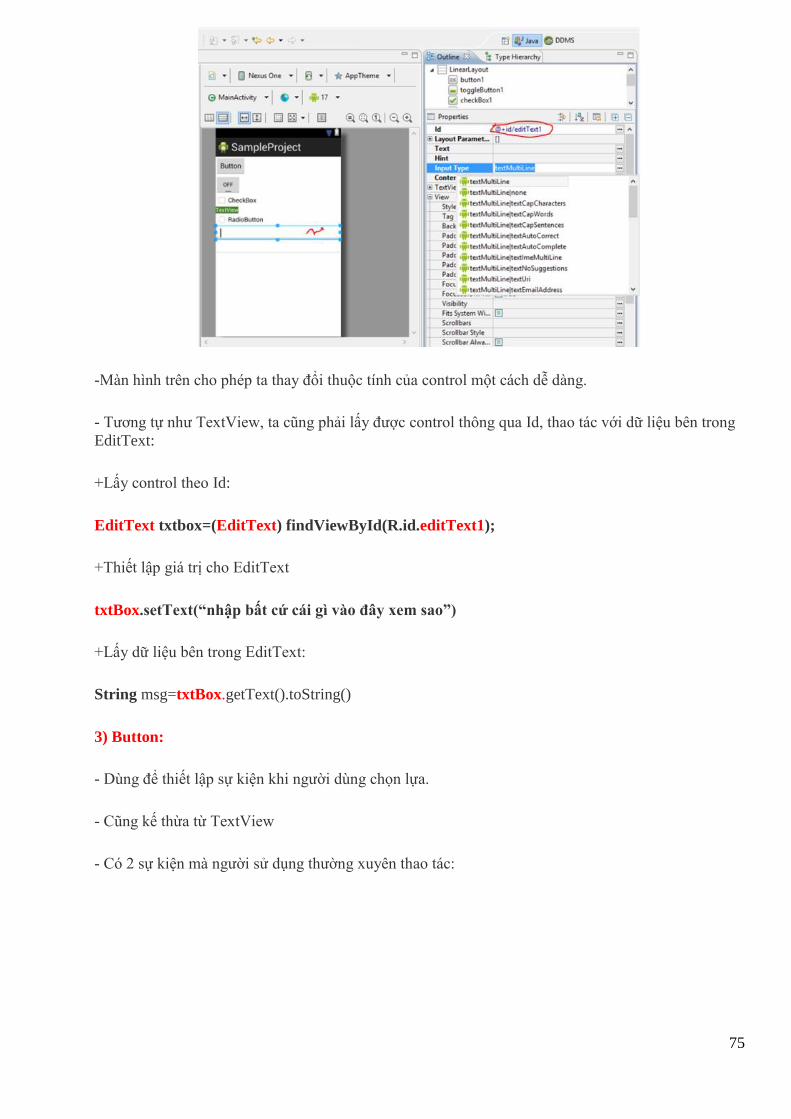
-Màn hình trên cho phép ta thay đổi thuộc tính của control một cách dễ dàng.
- Tương tự như TextView, ta cũng phải lấy được control thông qua Id, thao tác với dữ liệu bên trong
EditText:
+Lấy control theo Id:
EditText txtbox=(EditText) findViewById(R.id.editText1);
+Thiết lập giá trị cho EditText
txtBox.setText(“nhập bất cứ cái gì vào đây xem sao”)
+Lấy dữ liệu bên trong EditText:
String msg=txtBox.getText().toString()
3) Button:
- Dùng để thiết lập sự kiện khi người dùng chọn lựa.
- Cũng kế thừa từ TextView
- Có 2 sự kiện mà người sử dụng thường xuyên thao tác:
76
- Bây giờ Tôi sẽ làm
một ví dụ về cách sử dụng 3 control này (bạn có thể xem lại bài tập các kiểu lập trình sự kiện trong
Android):
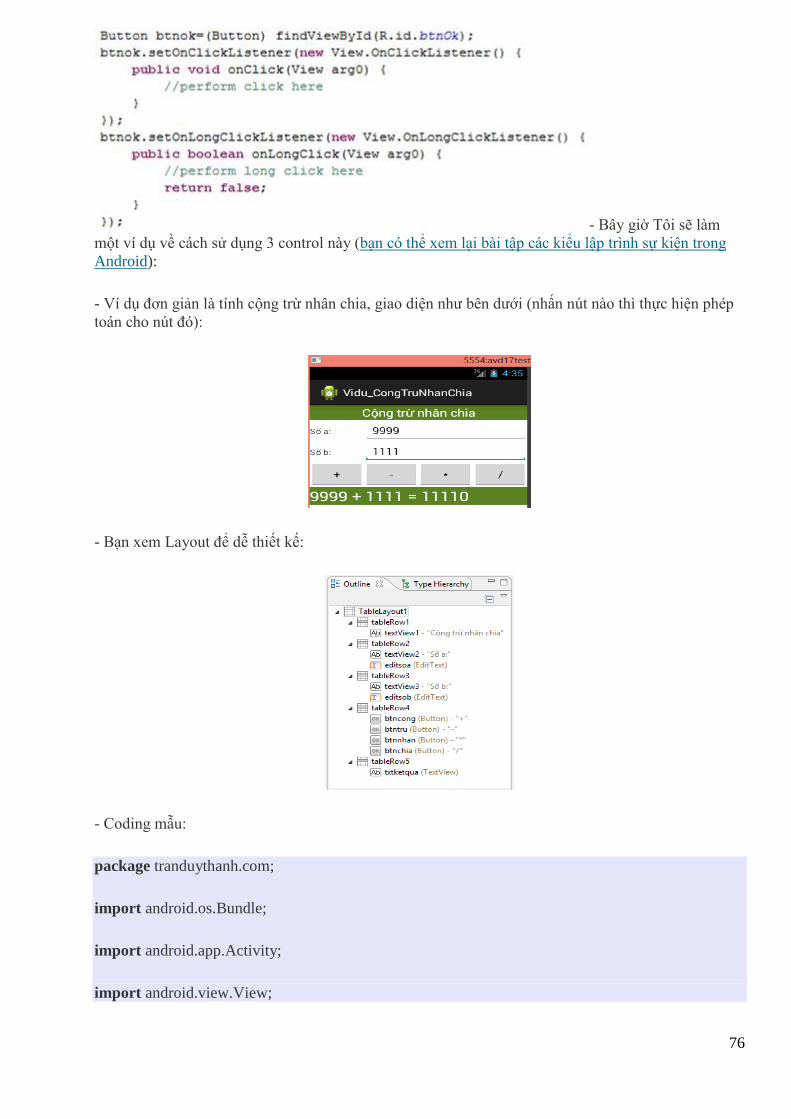
- Ví dụ đơn giản là tính cộng trừ nhân chia, giao diện như bên dưới (nhấn nút nào thì thực hiện phép
toán cho nút đó):
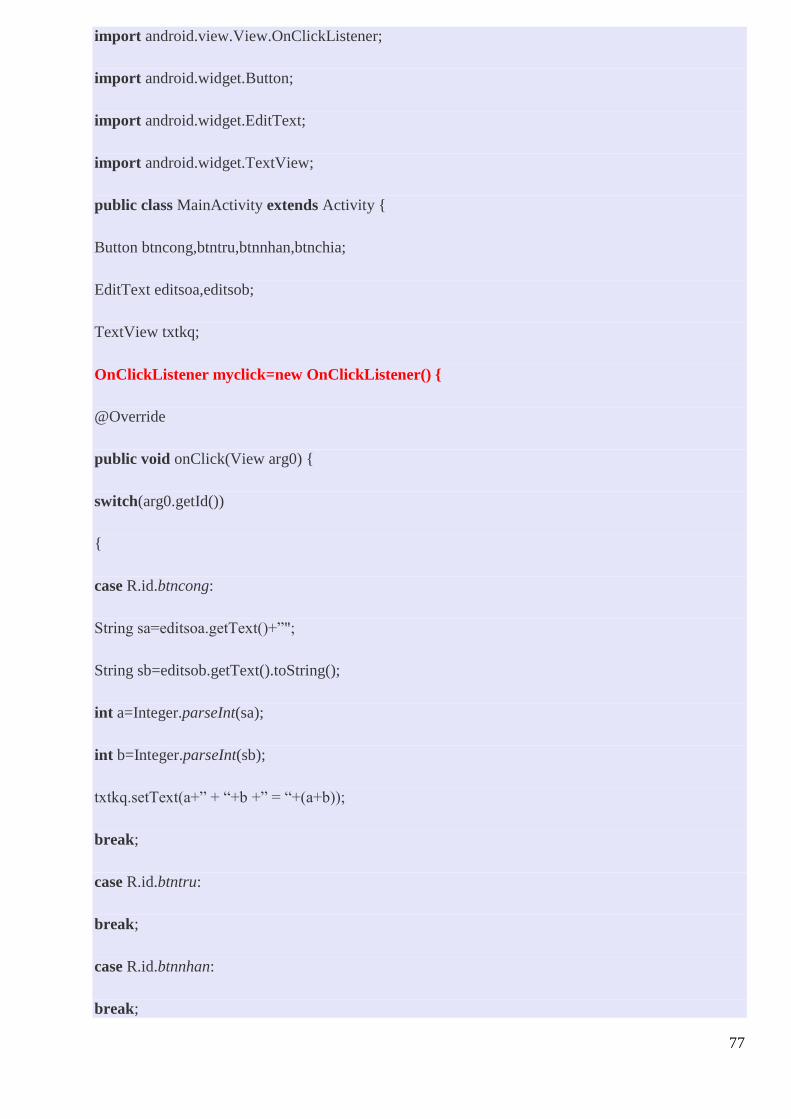
- Bạn xem Layout để dễ thiết kế:
- Coding mẫu:
package tranduythanh.com;
import android.os.Bundle;
import android.app.Activity;
import android.view.View;
77
import android.view.View.OnClickListener;
import android.widget.Button;
import android.widget.EditText;
import android.widget.TextView;
public class MainActivity extends Activity {
Button btncong,btntru,btnnhan,btnchia;
EditText editsoa,editsob;
TextView txtkq;
OnClickListener myclick=new OnClickListener() {
@Override
public void onClick(View arg0) {
switch(arg0.getId())
{
case R.id.btncong:
String sa=editsoa.getText()+”";
String sb=editsob.getText().toString();
int a=Integer.parseInt(sa);
int b=Integer.parseInt(sb);
txtkq.setText(a+” + “+b +” = “+(a+b));
break;
case R.id.btntru:
break;
case R.id.btnnhan:
break;
78
case R.id.btnchia:
break;
}
}
};
@Override
protected void onCreate(Bundle savedInstanceState) {
super.onCreate(savedInstanceState);
setContentView(R.layout.activity_main);
btncong=(Button) findViewById(R.id.btncong);
btntru=(Button) findViewById(R.id.btntru);
btnnhan=(Button) findViewById(R.id.btnnhan);
btnchia=(Button) findViewById(R.id.btnchia);
editsoa=(EditText) findViewById(R.id.editsoa);
editsob=(EditText) findViewById(R.id.editsob);
txtkq=(TextView) findViewById(R.id.txtketqua);
btncong.setOnClickListener(myclick);
btntru.setOnClickListener(myclick);
btnnhan.setOnClickListener(myclick);
btnchia.setOnClickListener(myclick);
}
}
Bạn hãy trả lời cho Tôi: Hiện giờ đoạn code trên Tôi sử dụng loại Sự Kiện nào?
- Như vậy bạn đã hiểu được cách sử dụng TextView, EditText, Button.
79
- Các bài tập sau Tôi sẽ nói về CheckBox, RadioButton.
- Bạn phải hiểu thật tốt về 3 Control Tôi vừa nêu ở trên, nó rất là cơ bản và quan trọng, đa phần ứng
dụng Android nào cũng sử dụng tối thiểu 3 Control này.
80
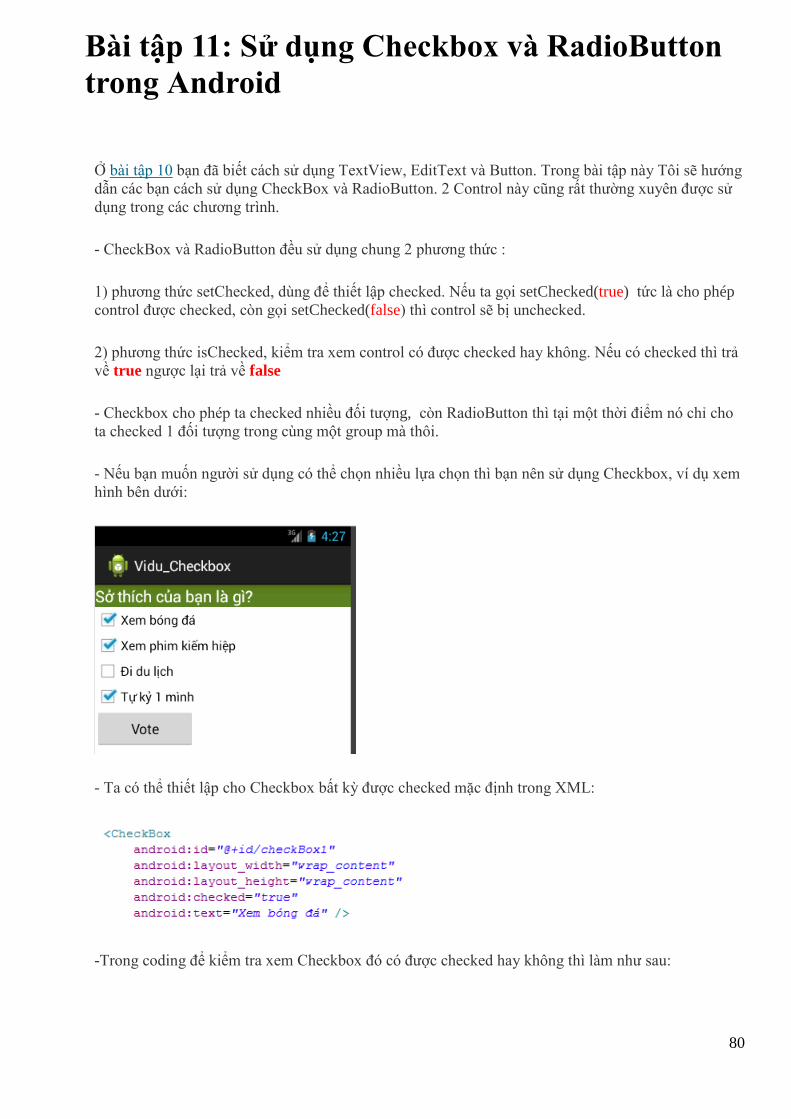
Bài tập 11: Sử dụng Checkbox và RadioButton
trong Android
Ở bài tập 10 bạn đã biết cách sử dụng TextView, EditText và Button. Trong bài tập này Tôi sẽ hướng
dẫn các bạn cách sử dụng CheckBox và RadioButton. 2 Control này cũng rất thường xuyên được sử
dụng trong các chương trình.
- CheckBox và RadioButton đều sử dụng chung 2 phương thức :
1) phương thức setChecked, dùng để thiết lập checked. Nếu ta gọi setChecked(true) tức là cho phép
control được checked, còn gọi setChecked(false) thì control sẽ bị unchecked.
2) phương thức isChecked, kiểm tra xem control có được checked hay không. Nếu có checked thì trả
về true ngược lại trả về false
- Checkbox cho phép ta checked nhiều đối tượng, còn RadioButton thì tại một thời điểm nó chỉ cho
ta checked 1 đối tượng trong cùng một group mà thôi.
- Nếu bạn muốn người sử dụng có thể chọn nhiều lựa chọn thì bạn nên sử dụng Checkbox, ví dụ xem
hình bên dưới:
- Ta có thể thiết lập cho Checkbox bất kỳ được checked mặc định trong XML:
-Trong coding để kiểm tra xem Checkbox đó có được checked hay không thì làm như sau:
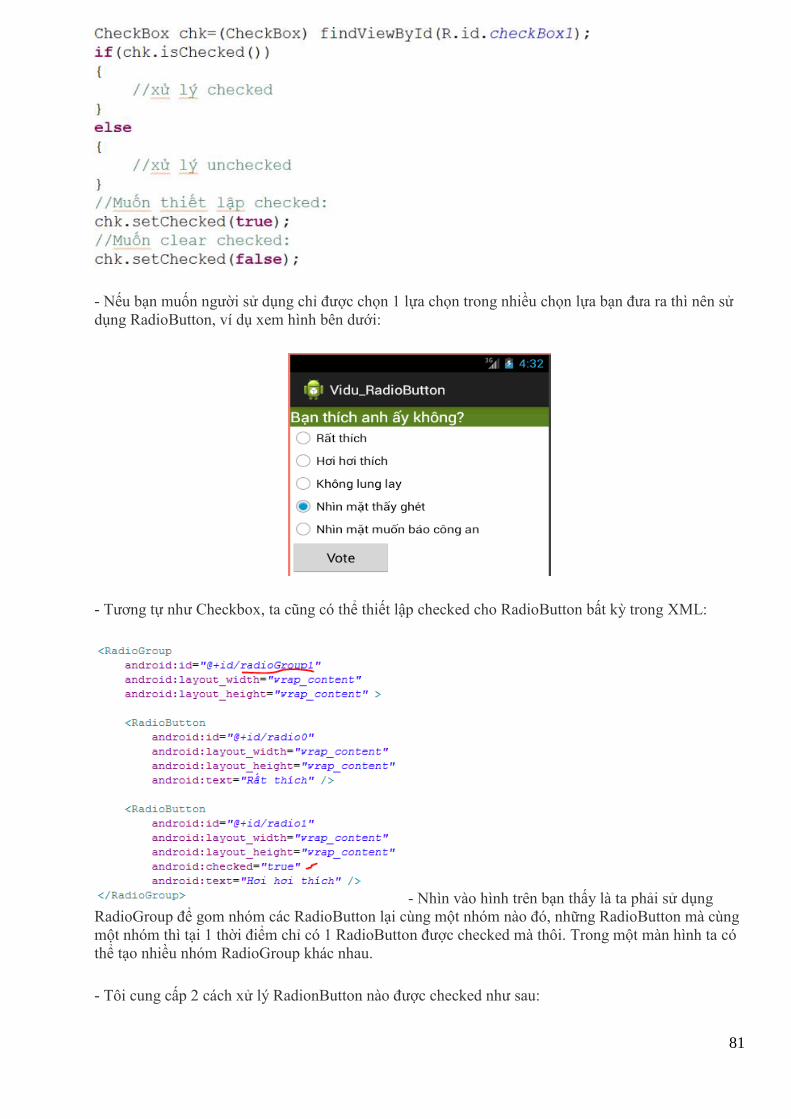
81
- Nếu bạn muốn người sử dụng chỉ được chọn 1 lựa chọn trong nhiều chọn lựa bạn đưa ra thì nên sử
dụng RadioButton, ví dụ xem hình bên dưới:
- Tương tự như Checkbox, ta cũng có thể thiết lập checked cho RadioButton bất kỳ trong XML:
- Nhìn vào hình trên bạn thấy là ta phải sử dụng
RadioGroup để gom nhóm các RadioButton lại cùng một nhóm nào đó, những RadioButton mà cùng
một nhóm thì tại 1 thời điểm chỉ có 1 RadioButton được checked mà thôi. Trong một màn hình ta có
thể tạo nhiều nhóm RadioGroup khác nhau.
- Tôi cung cấp 2 cách xử lý RadionButton nào được checked như sau:
82
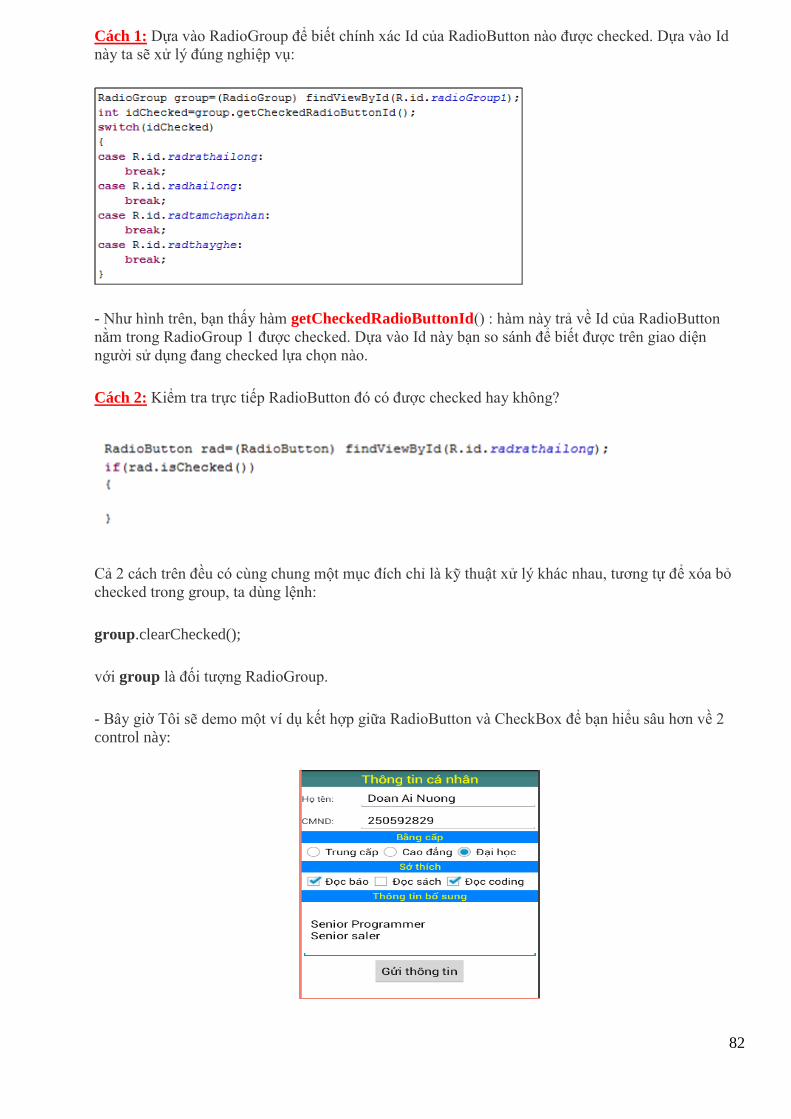
Cách 1: Dựa vào RadioGroup để biết chính xác Id của RadioButton nào được checked. Dựa vào Id
này ta sẽ xử lý đúng nghiệp vụ:
- Như hình trên, bạn thấy hàm getCheckedRadioButtonId() : hàm này trả về Id của RadioButton
nằm trong RadioGroup 1 được checked. Dựa vào Id này bạn so sánh để biết được trên giao diện
người sử dụng đang checked lựa chọn nào.
Cách 2: Kiểm tra trực tiếp RadioButton đó có được checked hay không?
Cả 2 cách trên đều có cùng chung một mục đích chỉ là kỹ thuật xử lý khác nhau, tương tự để xóa bỏ
checked trong group, ta dùng lệnh:
group.clearChecked();
với group là đối tượng RadioGroup.
- Bây giờ Tôi sẽ demo một ví dụ kết hợp giữa RadioButton và CheckBox để bạn hiểu sâu hơn về 2
control này:
83
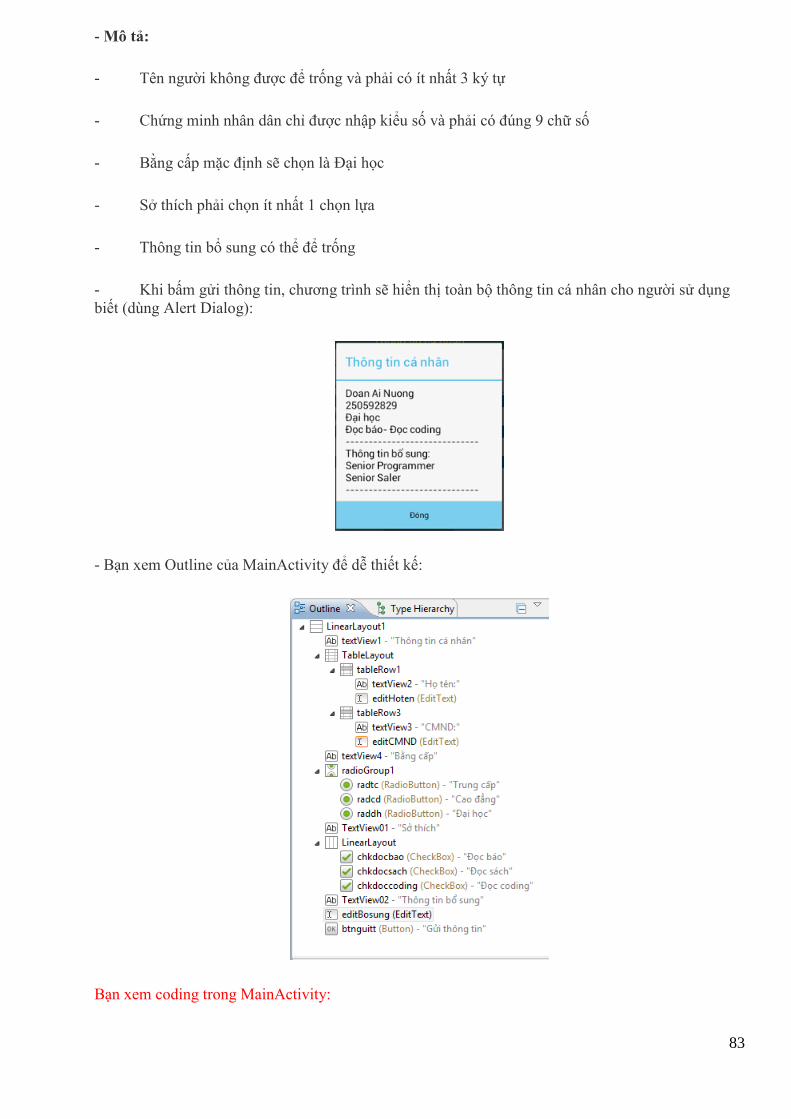
- Mô tả:
- Tên người không được để trống và phải có ít nhất 3 ký tự
- Chứng minh nhân dân chỉ được nhập kiểu số và phải có đúng 9 chữ số
- Bằng cấp mặc định sẽ chọn là Đại học
- Sở thích phải chọn ít nhất 1 chọn lựa
- Thông tin bổ sung có thể để trống
- Khi bấm gửi thông tin, chương trình sẽ hiển thị toàn bộ thông tin cá nhân cho người sử dụng
biết (dùng Alert Dialog):
- Bạn xem Outline của MainActivity để dễ thiết kế:
Bạn xem coding trong MainActivity:
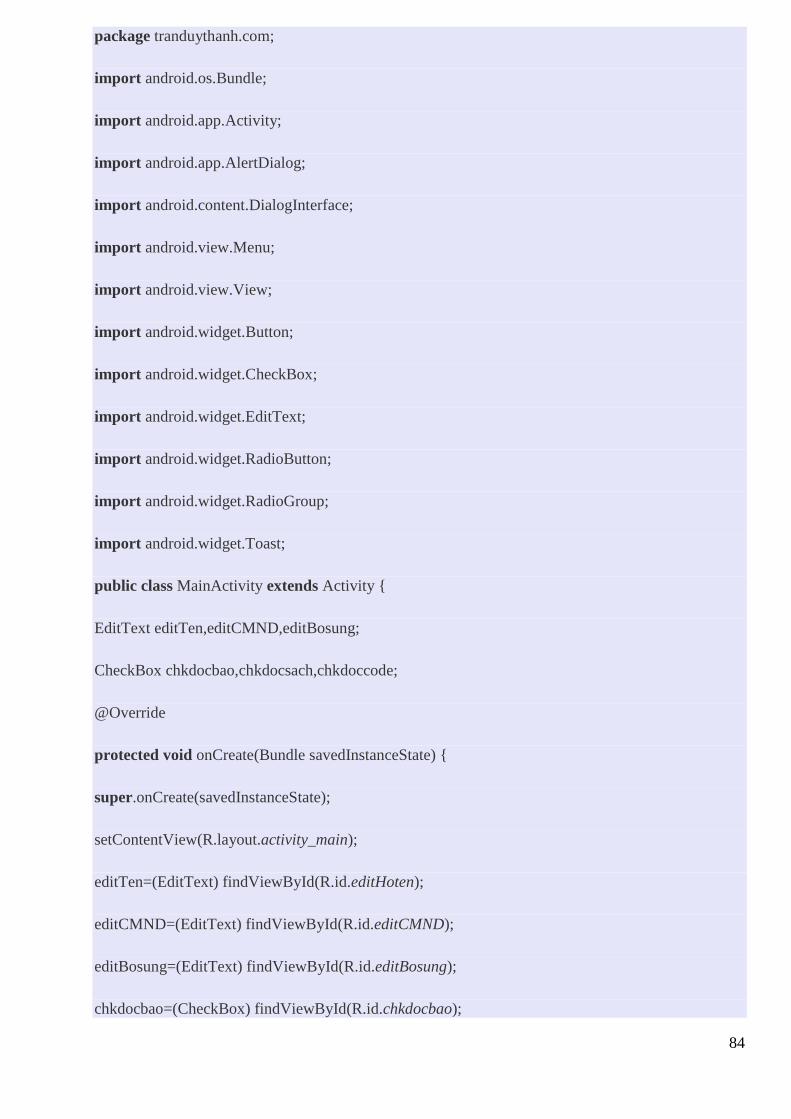
84
package tranduythanh.com;
import android.os.Bundle;
import android.app.Activity;
import android.app.AlertDialog;
import android.content.DialogInterface;
import android.view.Menu;
import android.view.View;
import android.widget.Button;
import android.widget.CheckBox;
import android.widget.EditText;
import android.widget.RadioButton;
import android.widget.RadioGroup;
import android.widget.Toast;
public class MainActivity extends Activity {
EditText editTen,editCMND,editBosung;
CheckBox chkdocbao,chkdocsach,chkdoccode;
@Override
protected void onCreate(Bundle savedInstanceState) {
super.onCreate(savedInstanceState);
setContentView(R.layout.activity_main);
editTen=(EditText) findViewById(R.id.editHoten);
editCMND=(EditText) findViewById(R.id.editCMND);
editBosung=(EditText) findViewById(R.id.editBosung);
chkdocbao=(CheckBox) findViewById(R.id.chkdocbao);
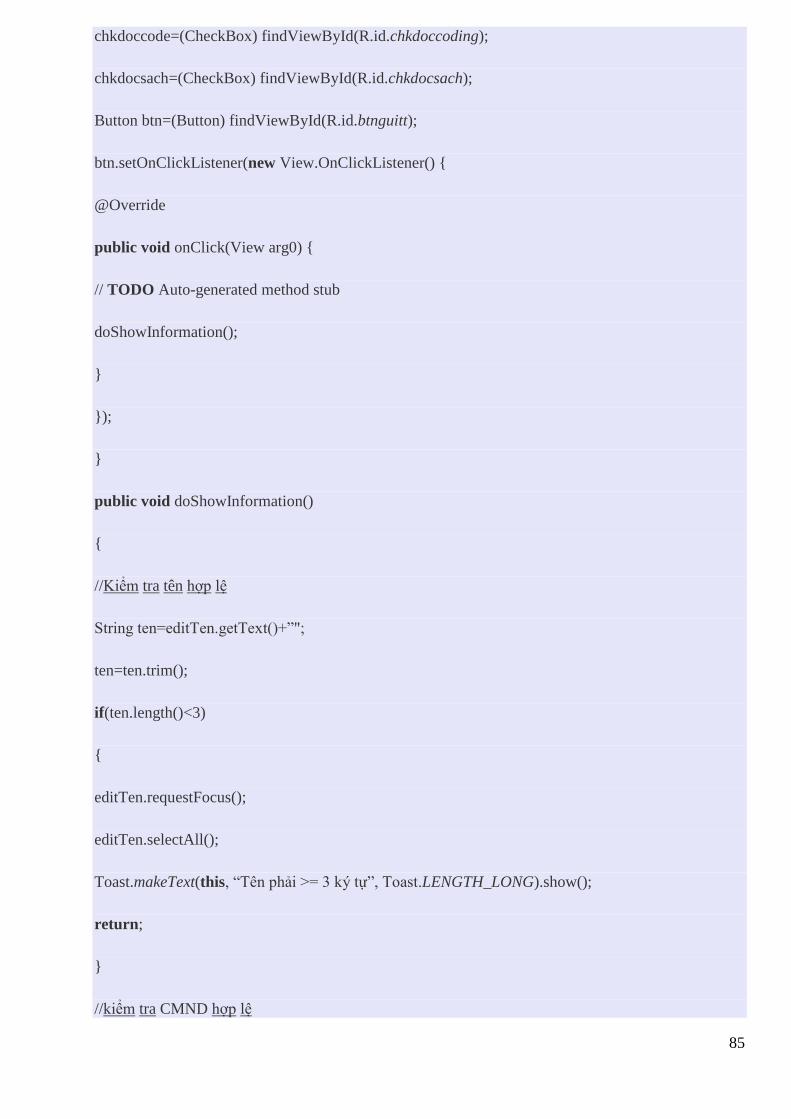
85
chkdoccode=(CheckBox) findViewById(R.id.chkdoccoding);
chkdocsach=(CheckBox) findViewById(R.id.chkdocsach);
Button btn=(Button) findViewById(R.id.btnguitt);
btn.setOnClickListener(new View.OnClickListener() {
@Override
public void onClick(View arg0) {
// TODO Auto-generated method stub
doShowInformation();
}
});
}
public void doShowInformation()
{
//Kiểm tra tên hợp lệ
String ten=editTen.getText()+”";
ten=ten.trim();
if(ten.length()<3)
{
editTen.requestFocus();
editTen.selectAll();
Toast.makeText(this, “Tên phải >= 3 ký tự”, Toast.LENGTH_LONG).show();
return;
}
//kiểm tra CMND hợp lệ
86
String cmnd=editCMND.getText()+”";
cmnd=cmnd.trim();
if(cmnd.length()!=9)
{
editCMND.requestFocus();
editCMND.selectAll();
Toast.makeText(this, “CMND phải đúng 9 ký tự”, Toast.LENGTH_LONG).show();
return;
}
//Kiểm tra bằng cấp
String bang=”";
RadioGroup group=(RadioGroup) findViewById(R.id.radioGroup1);
int id=group.getCheckedRadioButtonId();
if(id==-1)
{
Toast.makeText(this, “Phải chọn bằng cấp”, Toast.LENGTH_LONG).show();
return;
}
RadioButton rad=(RadioButton) findViewById(id);
bang=rad.getText()+”";
//Kiểm tra sở thích
String sothich=”";
if(chkdocbao.isChecked())
sothich+=chkdocbao.getText()+”\n”;
87
if(chkdocsach.isChecked())
sothich+=chkdocsach.getText()+”\n”;
if(chkdoccode.isChecked())
sothich+=chkdoccode.getText()+”\n”;
String bosung=editBosung.getText()+”";
AlertDialog.Builder builder=new AlertDialog.Builder(this);
builder.setTitle(“Thông tin cá nhân”);
builder.setPositiveButton(“Đóng”, new DialogInterface.OnClickListener() {
@Override
public void onClick(DialogInterface dialog, int which) {
// TODO Auto-generated method stub
dialog.cancel();
}
});
//tạo nội dung
String msg=ten+”\n”;
msg+= cmnd+”\n”;
msg+=bang+”\n”;
msg+=sothich;
msg+=”—————————–\n”;
msg+=”Thông tin bổ sung:\n”;
msg+=bosung+ “\n”;
msg+=”—————————–”;
builder.setMessage(msg);//thiết lập nội dung
88
builder.create().show();//hiển thị Dialog
}
@Override
public boolean onCreateOptionsMenu(Menu menu) {
// Inflate the menu; this adds items to the action bar if it is present.
getMenuInflater().inflate(R.menu.activity_main, menu);
return true;
}
}
chú ý các cách dùng sự kiện trong đoạn code ở trên.
Bạn có thể tải coding mẫu đầy đủ ở đây: http://www.mediafire.com/?wqih1ln20rilsv8
Tới đây bạn đã hiểu được phầnn nào CheckBox và RadioButton
- Bài tập kế tiếp Tôi sẽ làm một ví dụ tổng hợp về EditText, CheckBox, Button … cùng ArrayList để
bạn hiểu thêm về các control cơ bản này.
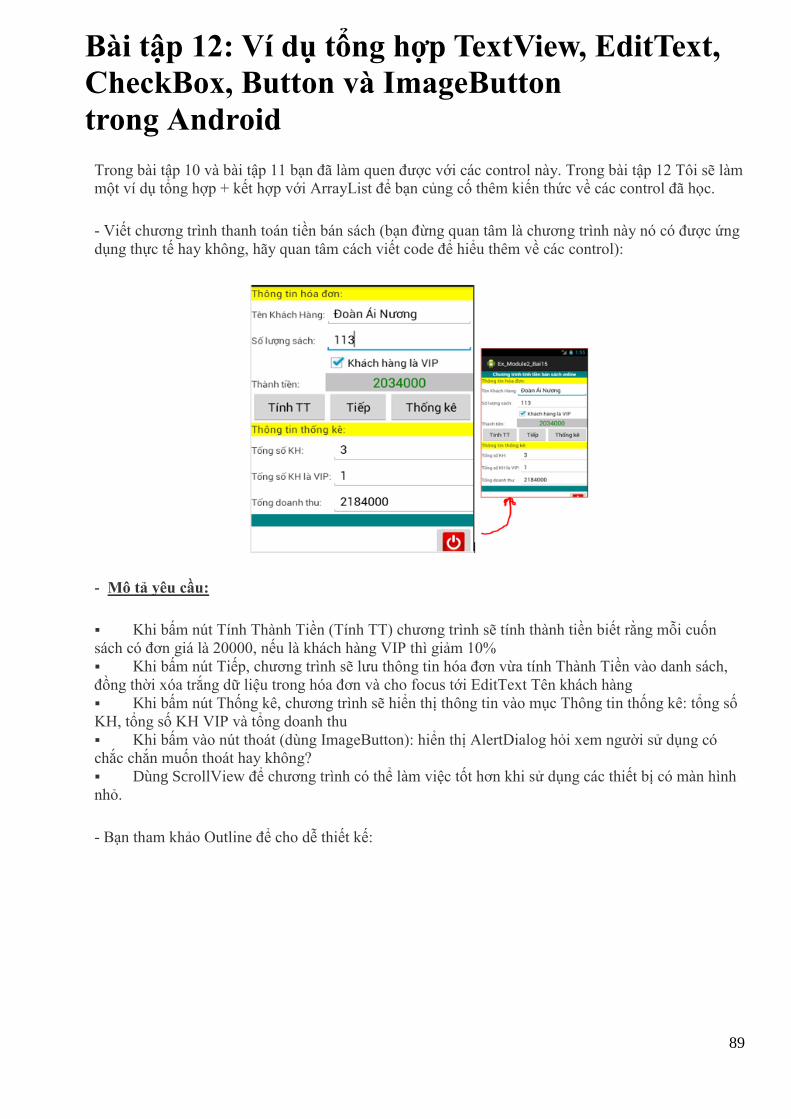
89
Bài tập 12: Ví dụ tổng hợp TextView, EditText,
CheckBox, Button và ImageButton
trong Android
Trong bài tập 10 và bài tập 11 bạn đã làm quen được với các control này. Trong bài tập 12 Tôi sẽ làm
một ví dụ tổng hợp + kết hợp với ArrayList để bạn củng cố thêm kiến thức về các control đã học.
- Viết chương trình thanh toán tiền bán sách (bạn đừng quan tâm là chương trình này nó có được ứng
dụng thực tế hay không, hãy quan tâm cách viết code để hiểu thêm về các control):
- Mô tả yêu cầu:
Khi bấm nút Tính Thành Tiền (Tính TT) chương trình sẽ tính thành tiền biết rằng mỗi cuốn
sách có đơn giá là 20000, nếu là khách hàng VIP thì giảm 10%
Khi bấm nút Tiếp, chương trình sẽ lưu thông tin hóa đơn vừa tính Thành Tiền vào danh sách,
đồng thời xóa trắng dữ liệu trong hóa đơn và cho focus tới EditText Tên khách hàng
Khi bấm nút Thống kê, chương trình sẽ hiển thị thông tin vào mục Thông tin thống kê: tổng số
KH, tổng số KH VIP và tổng doanh thu
Khi bấm vào nút thoát (dùng ImageButton): hiển thị AlertDialog hỏi xem người sử dụng có
chắc chắn muốn thoát hay không?
Dùng ScrollView để chương trình có thể làm việc tốt hơn khi sử dụng các thiết bị có màn hình
nhỏ.
- Bạn tham khảo Outline để cho dễ thiết kế:
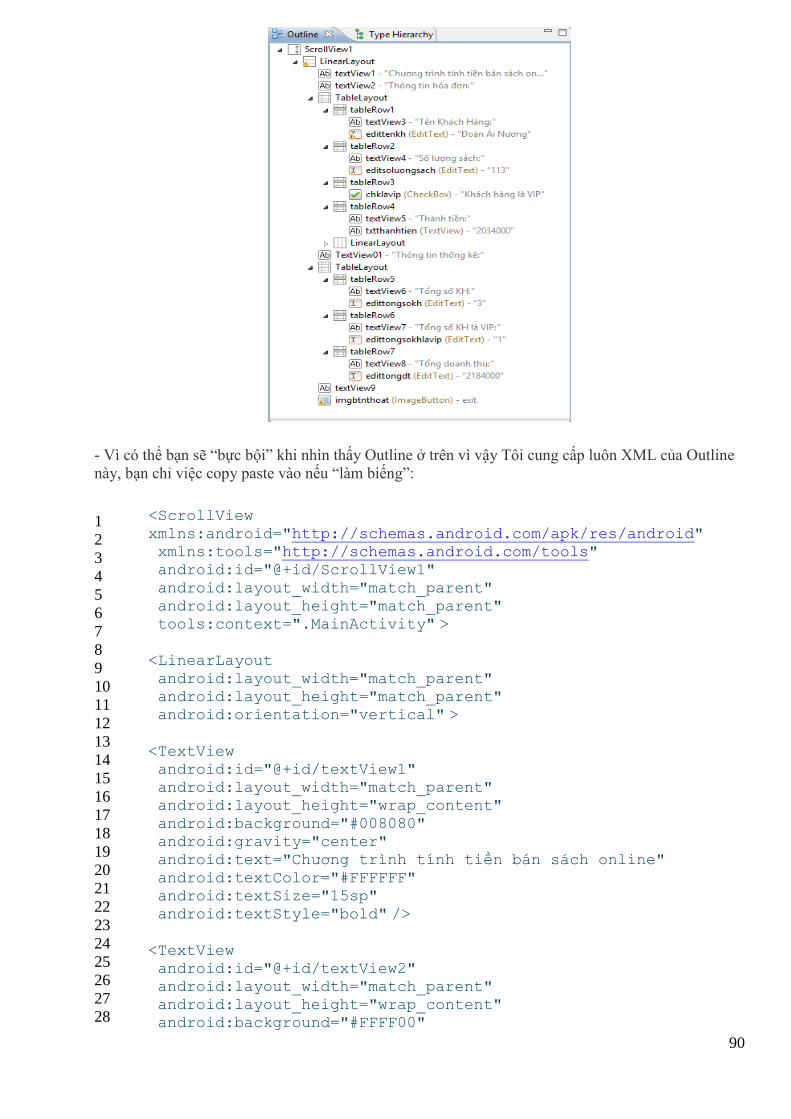
90
- Vì có thể bạn sẽ “bực bội” khi nhìn thấy Outline ở trên vì vậy Tôi cung cấp luôn XML của Outline
này, bạn chỉ việc copy paste vào nếu “làm biếng”:
1
2
3
4
5
6
7
8
9
10
11
12
13
14
15
16
17
18
19
20
21
22
23
24
25
26
27
28
<ScrollView
xmlns:android="http://schemas.android.com/apk/res/android" xmlns:tools="http://schemas.android.com/tools" android:id="@+id/ScrollView1"
android:layout_width="match_parent" android:layout_height="match_parent" tools:context=".MainActivity" >
<LinearLayout
android:layout_width="match_parent" android:layout_height="match_parent" android:orientation="vertical" >
<TextView android:id="@+id/textView1" android:layout_width="match_parent" android:layout_height="wrap_content"
android:background="#008080" android:gravity="center" android:text="Chương trình tính tiền bán sách online"
android:textColor="#FFFFFF" android:textSize="15sp" android:textStyle="bold" />
<TextView
android:id="@+id/textView2" android:layout_width="match_parent" android:layout_height="wrap_content" android:background="#FFFF00"
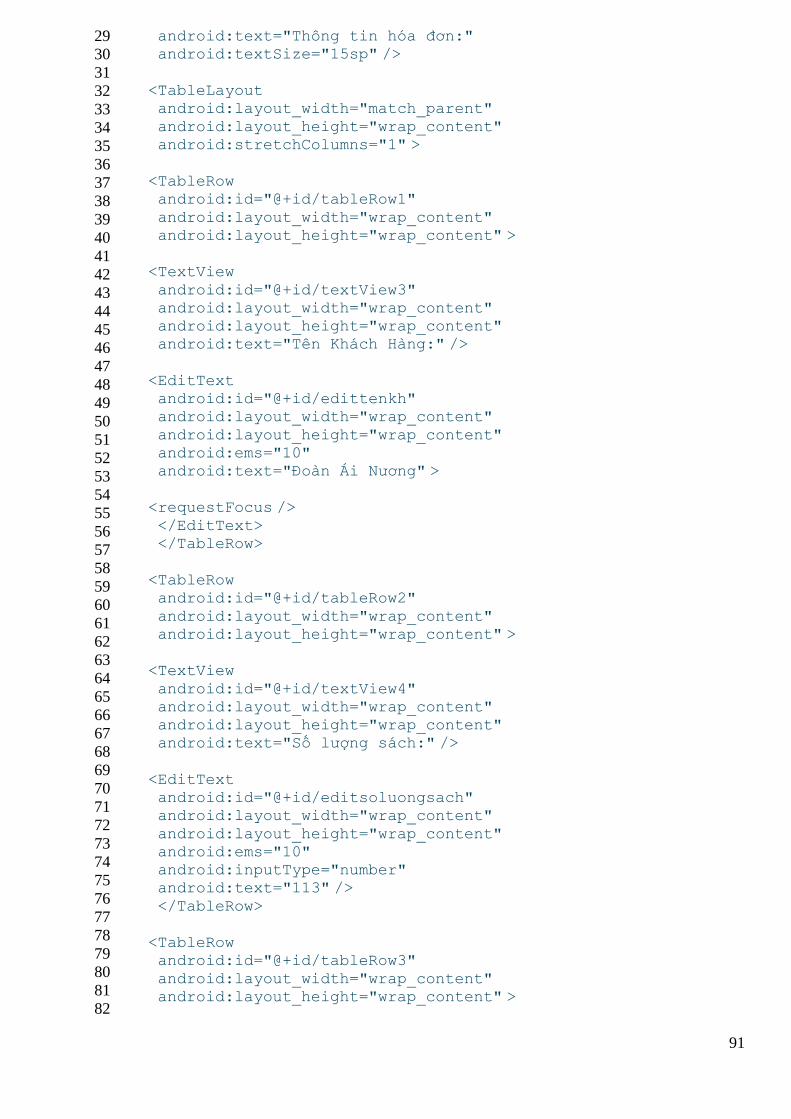
91
29
30
31
32
33
34
35
36
37
38
39
40
41
42
43
44
45
46
47
48
49
50
51
52
53
54
55
56
57
58
59
60
61
62
63
64
65
66
67
68
69
70
71
72
73
74
75
76
77
78
79
80
81
82
android:text="Thông tin hóa đơn:" android:textSize="15sp" />
<TableLayout android:layout_width="match_parent"
android:layout_height="wrap_content" android:stretchColumns="1" >
<TableRow android:id="@+id/tableRow1"
android:layout_width="wrap_content" android:layout_height="wrap_content" >
<TextView
android:id="@+id/textView3" android:layout_width="wrap_content" android:layout_height="wrap_content" android:text="Tên Khách Hàng:" />
<EditText android:id="@+id/edittenkh" android:layout_width="wrap_content"
android:layout_height="wrap_content" android:ems="10" android:text="Đoàn Ái Nương" >
<requestFocus />
</EditText> </TableRow>
<TableRow android:id="@+id/tableRow2"
android:layout_width="wrap_content" android:layout_height="wrap_content" >
<TextView
android:id="@+id/textView4" android:layout_width="wrap_content" android:layout_height="wrap_content" android:text="Số lượng sách:" />
<EditText android:id="@+id/editsoluongsach" android:layout_width="wrap_content"
android:layout_height="wrap_content" android:ems="10" android:inputType="number" android:text="113" />
</TableRow>
<TableRow android:id="@+id/tableRow3"
android:layout_width="wrap_content" android:layout_height="wrap_content" >
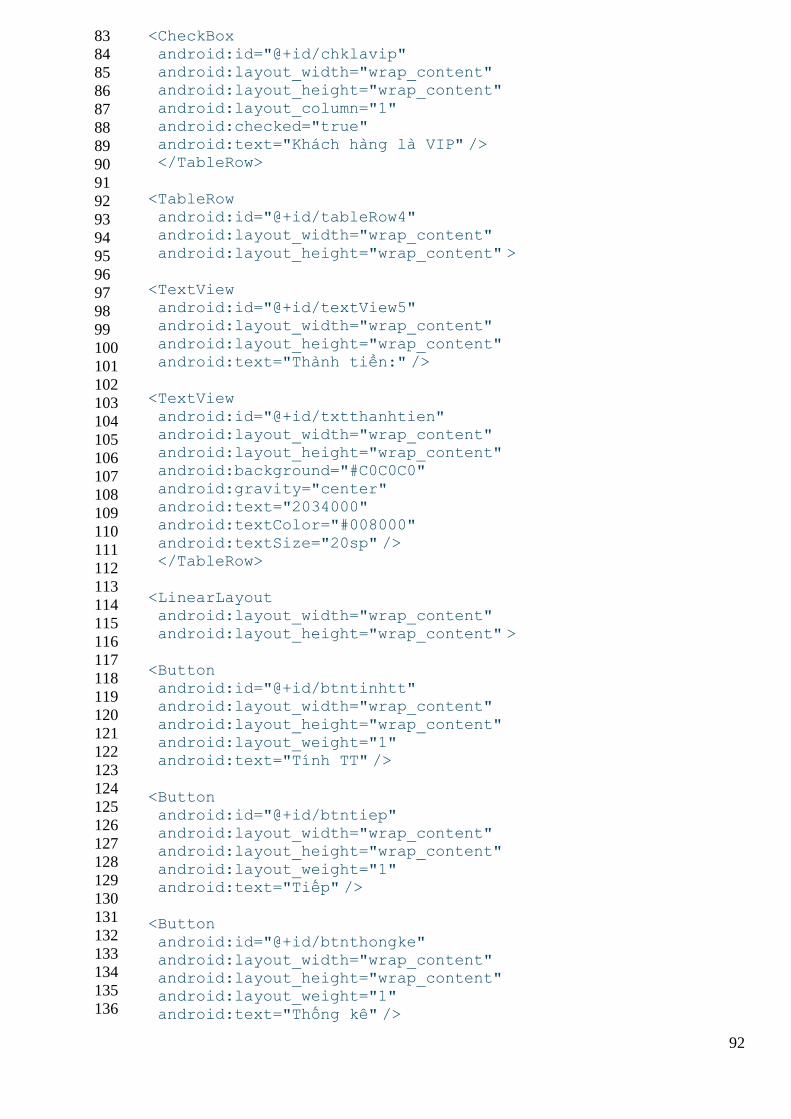
92
83
84
85
86
87
88
89
90
91
92
93
94
95
96
97
98
99
100
101
102
103
104
105
106
107
108
109
110
111
112
113
114
115
116
117
118
119
120
121
122
123
124
125
126
127
128
129
130
131
132
133
134
135
136
<CheckBox android:id="@+id/chklavip" android:layout_width="wrap_content" android:layout_height="wrap_content"
android:layout_column="1" android:checked="true" android:text="Khách hàng là VIP" /> </TableRow>
<TableRow android:id="@+id/tableRow4" android:layout_width="wrap_content"
android:layout_height="wrap_content" >
<TextView android:id="@+id/textView5" android:layout_width="wrap_content"
android:layout_height="wrap_content" android:text="Thành tiền:" />
<TextView
android:id="@+id/txtthanhtien" android:layout_width="wrap_content" android:layout_height="wrap_content" android:background="#C0C0C0"
android:gravity="center" android:text="2034000" android:textColor="#008000"
android:textSize="20sp" /> </TableRow>
<LinearLayout android:layout_width="wrap_content"
android:layout_height="wrap_content" >
<Button android:id="@+id/btntinhtt" android:layout_width="wrap_content"
android:layout_height="wrap_content" android:layout_weight="1" android:text="Tính TT" />
<Button android:id="@+id/btntiep" android:layout_width="wrap_content" android:layout_height="wrap_content"
android:layout_weight="1" android:text="Tiếp" />
<Button
android:id="@+id/btnthongke" android:layout_width="wrap_content" android:layout_height="wrap_content" android:layout_weight="1"
android:text="Thống kê" />
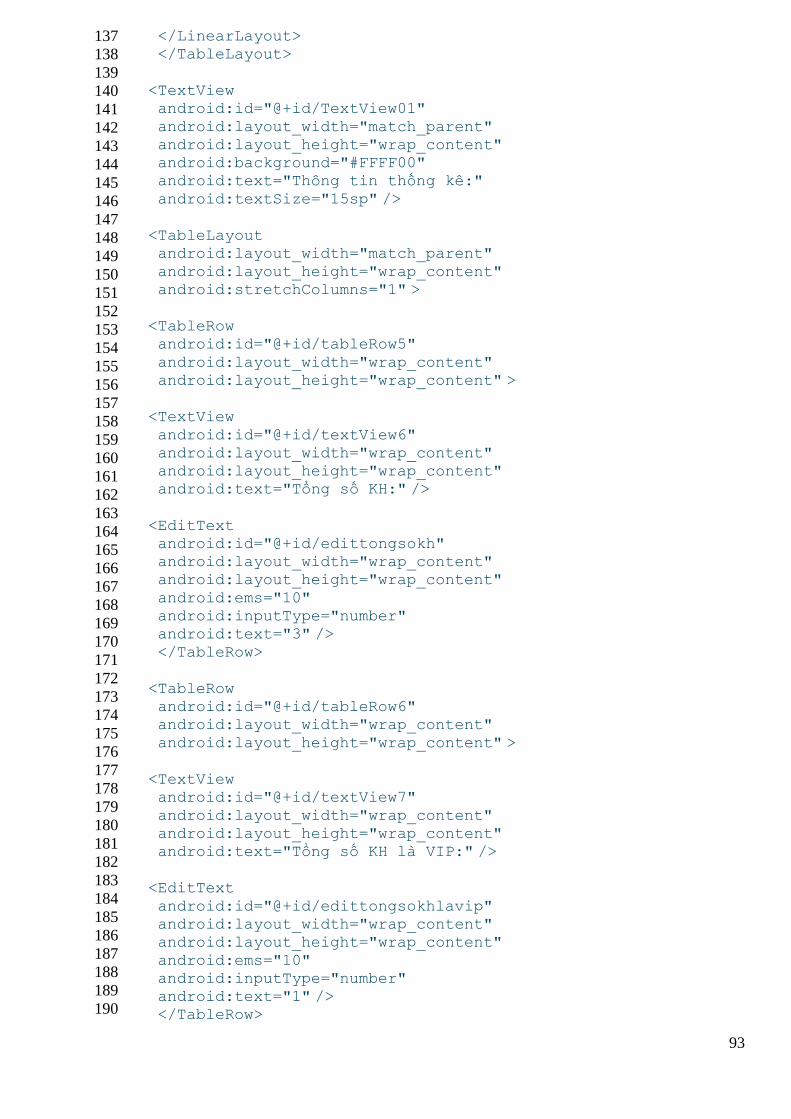
93
137
138
139
140
141
142
143
144
145
146
147
148
149
150
151
152
153
154
155
156
157
158
159
160
161
162
163
164
165
166
167
168
169
170
171
172
173
174
175
176
177
178
179
180
181
182
183
184
185
186
187
188
189
190
</LinearLayout> </TableLayout>
<TextView android:id="@+id/TextView01"
android:layout_width="match_parent" android:layout_height="wrap_content" android:background="#FFFF00" android:text="Thông tin thống kê:"
android:textSize="15sp" />
<TableLayout android:layout_width="match_parent"
android:layout_height="wrap_content" android:stretchColumns="1" >
<TableRow android:id="@+id/tableRow5"
android:layout_width="wrap_content" android:layout_height="wrap_content" >
<TextView
android:id="@+id/textView6" android:layout_width="wrap_content" android:layout_height="wrap_content" android:text="Tổng số KH:" />
<EditText android:id="@+id/edittongsokh" android:layout_width="wrap_content" android:layout_height="wrap_content"
android:ems="10" android:inputType="number" android:text="3" />
</TableRow>
<TableRow android:id="@+id/tableRow6" android:layout_width="wrap_content"
android:layout_height="wrap_content" >
<TextView android:id="@+id/textView7"
android:layout_width="wrap_content" android:layout_height="wrap_content" android:text="Tổng số KH là VIP:" />
<EditText
android:id="@+id/edittongsokhlavip" android:layout_width="wrap_content" android:layout_height="wrap_content"
android:ems="10" android:inputType="number" android:text="1" /> </TableRow>
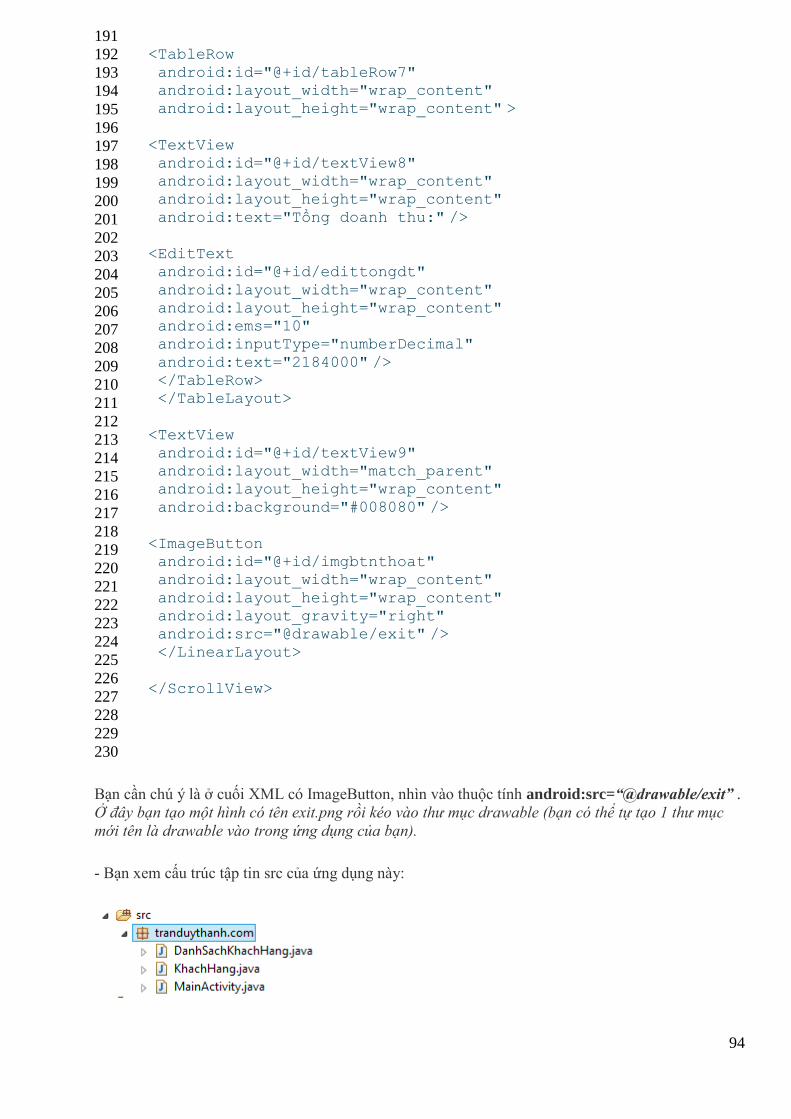
94
191
192
193
194
195
196
197
198
199
200
201
202
203
204
205
206
207
208
209
210
211
212
213
214
215
216
217
218
219
220
221
222
223
224
225
226
227
228
229
230
<TableRow
android:id="@+id/tableRow7" android:layout_width="wrap_content" android:layout_height="wrap_content" >
<TextView android:id="@+id/textView8" android:layout_width="wrap_content" android:layout_height="wrap_content"
android:text="Tổng doanh thu:" />
<EditText android:id="@+id/edittongdt"
android:layout_width="wrap_content" android:layout_height="wrap_content" android:ems="10" android:inputType="numberDecimal"
android:text="2184000" /> </TableRow> </TableLayout>
<TextView android:id="@+id/textView9" android:layout_width="match_parent" android:layout_height="wrap_content"
android:background="#008080" />
<ImageButton android:id="@+id/imgbtnthoat" android:layout_width="wrap_content"
android:layout_height="wrap_content" android:layout_gravity="right" android:src="@drawable/exit" />
</LinearLayout>
</ScrollView>
Bạn cần chú ý là ở cuối XML có ImageButton, nhìn vào thuộc tính android:src=“@drawable/exit” .
Ở đây bạn tạo một hình có tên exit.png rồi kéo vào thư mục drawable (bạn có thể tự tạo 1 thư mục
mới tên là drawable vào trong ứng dụng của bạn).
- Bạn xem cấu trúc tập tin src của ứng dụng này:
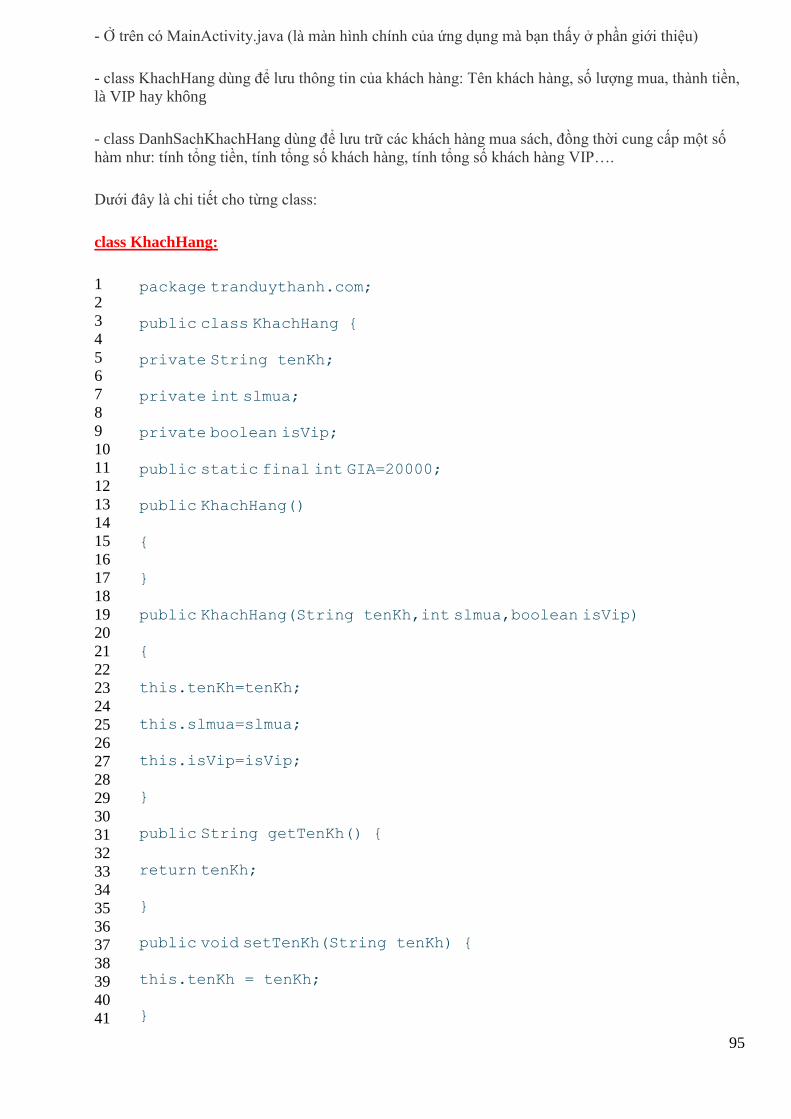
95
- Ở trên có MainActivity.java (là màn hình chính của ứng dụng mà bạn thấy ở phần giới thiệu)
- class KhachHang dùng để lưu thông tin của khách hàng: Tên khách hàng, số lượng mua, thành tiền,
là VIP hay không
- class DanhSachKhachHang dùng để lưu trữ các khách hàng mua sách, đồng thời cung cấp một số
hàm như: tính tổng tiền, tính tổng số khách hàng, tính tổng số khách hàng VIP….
Dưới đây là chi tiết cho từng class:
class KhachHang:
1
2
3
4
5
6
7
8
9
10
11
12
13
14
15
16
17
18
19
20
21
22
23
24
25
26
27
28
29
30
31
32
33
34
35
36
37
38
39
40
41
package tranduythanh.com;
public class KhachHang {
private String tenKh;
private int slmua;
private boolean isVip;
public static final int GIA=20000;
public KhachHang()
{
}
public KhachHang(String tenKh,int slmua,boolean isVip)
{
this.tenKh=tenKh;
this.slmua=slmua;
this.isVip=isVip;
}
public String getTenKh() {
return tenKh;
}
public void setTenKh(String tenKh) {
this.tenKh = tenKh;
}
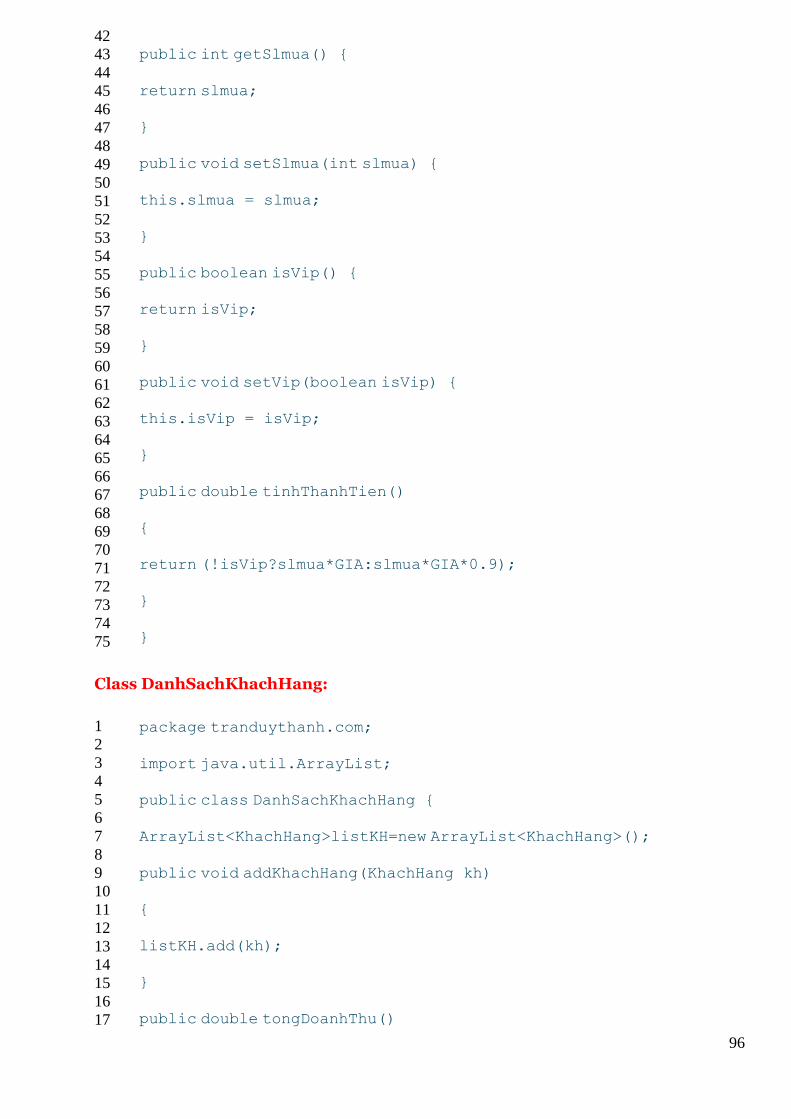
96
42
43
44
45
46
47
48
49
50
51
52
53
54
55
56
57
58
59
60
61
62
63
64
65
66
67
68
69
70
71
72
73
74
75
public int getSlmua() {
return slmua;
}
public void setSlmua(int slmua) {
this.slmua = slmua;
}
public boolean isVip() {
return isVip;
}
public void setVip(boolean isVip) {
this.isVip = isVip;
}
public double tinhThanhTien()
{
return (!isVip?slmua*GIA:slmua*GIA*0.9);
}
}
Class DanhSachKhachHang:
1
2
3
4
5
6
7
8
9
10
11
12
13
14
15
16
17
package tranduythanh.com;
import java.util.ArrayList;
public class DanhSachKhachHang {
ArrayList<KhachHang>listKH=new ArrayList<KhachHang>();
public void addKhachHang(KhachHang kh)
{
listKH.add(kh);
}
public double tongDoanhThu()
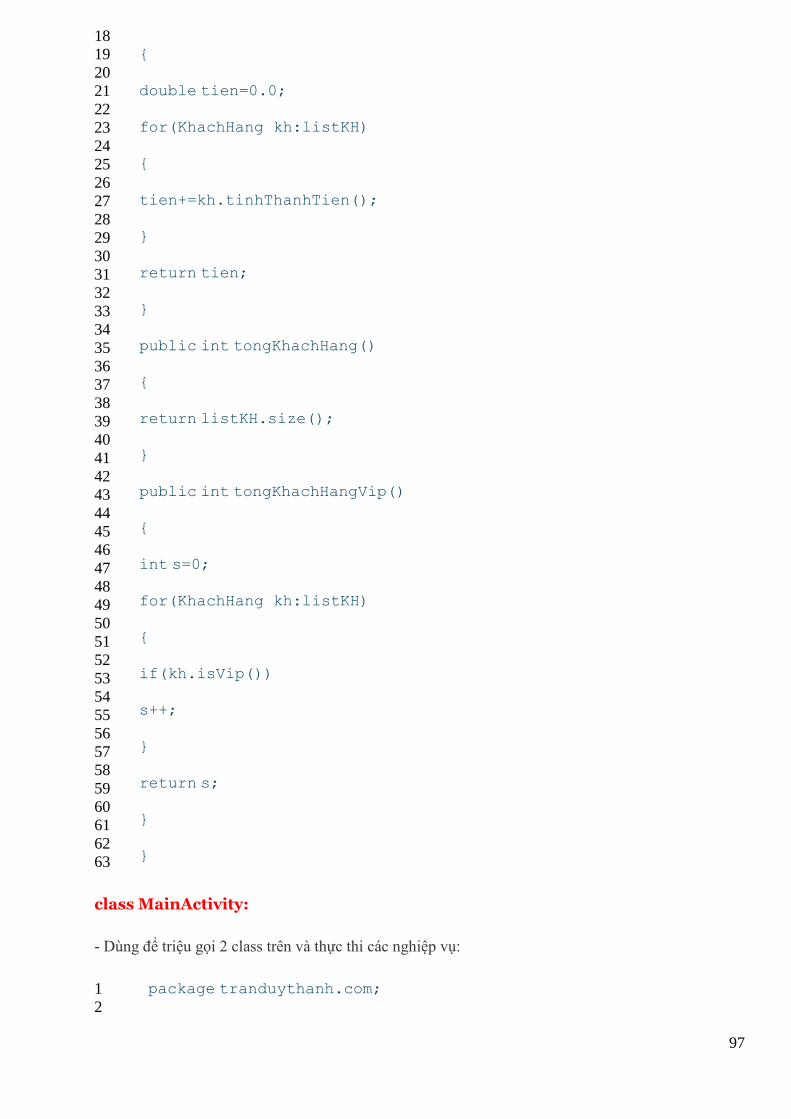
97
18
19
20
21
22
23
24
25
26
27
28
29
30
31
32
33
34
35
36
37
38
39
40
41
42
43
44
45
46
47
48
49
50
51
52
53
54
55
56
57
58
59
60
61
62
63
{
double tien=0.0;
for(KhachHang kh:listKH)
{
tien+=kh.tinhThanhTien();
}
return tien;
}
public int tongKhachHang()
{
return listKH.size();
}
public int tongKhachHangVip()
{
int s=0;
for(KhachHang kh:listKH)
{
if(kh.isVip())
s++;
}
return s;
}
}
class MainActivity:
- Dùng để triệu gọi 2 class trên và thực thi các nghiệp vụ:
1
2
package tranduythanh.com;

98
3
4
5
6
7
8
9
10
11
12
13
14
15
16
17
18
19
20
21
22
23
24
25
26
27
28
29
30
31
32
33
34
35
36
37
38
39
40
41
42
43
44
45
46
47
48
49
50
51
52
53
54
55
56
import android.os.Bundle;
import android.app.Activity;
import android.app.AlertDialog;
import android.content.DialogInterface;
import android.view.View;
import android.view.View.OnClickListener;
import android.widget.Button;
import android.widget.CheckBox;
import android.widget.EditText;
import android.widget.ImageButton;
import android.widget.TextView;
public class MainActivity extends Activity {
Button btnTT,btnTiep,btnTK;
ImageButton btnThoat;
EditText editTen,editSl,editTongKh,editTongKhVip,ediTongTT;
TextView txtTT;
CheckBox chkVip;
DanhSachKhachHang danhsach=new DanhSachKhachHang();
@Override
protected void onCreate(Bundle savedInstanceState) {
super.onCreate(savedInstanceState);
setContentView(R.layout.activity_main);
getControls();
addEvents();
}
private void getControls()
{
btnTT=(Button) findViewById(R.id.btntinhtt);
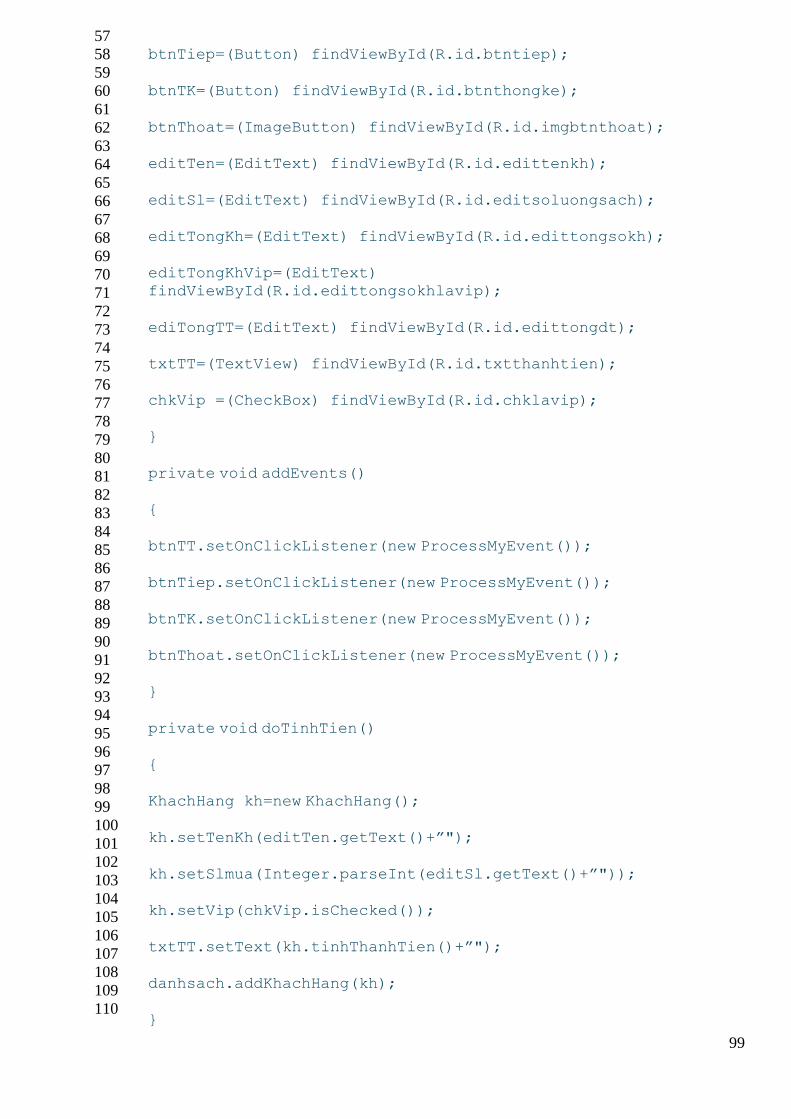
99
57
58
59
60
61
62
63
64
65
66
67
68
69
70
71
72
73
74
75
76
77
78
79
80
81
82
83
84
85
86
87
88
89
90
91
92
93
94
95
96
97
98
99
100
101
102
103
104
105
106
107
108
109
110
btnTiep=(Button) findViewById(R.id.btntiep);
btnTK=(Button) findViewById(R.id.btnthongke);
btnThoat=(ImageButton) findViewById(R.id.imgbtnthoat);
editTen=(EditText) findViewById(R.id.edittenkh);
editSl=(EditText) findViewById(R.id.editsoluongsach);
editTongKh=(EditText) findViewById(R.id.edittongsokh);
editTongKhVip=(EditText)
findViewById(R.id.edittongsokhlavip);
ediTongTT=(EditText) findViewById(R.id.edittongdt);
txtTT=(TextView) findViewById(R.id.txtthanhtien);
chkVip =(CheckBox) findViewById(R.id.chklavip);
}
private void addEvents()
{
btnTT.setOnClickListener(new ProcessMyEvent());
btnTiep.setOnClickListener(new ProcessMyEvent());
btnTK.setOnClickListener(new ProcessMyEvent());
btnThoat.setOnClickListener(new ProcessMyEvent());
}
private void doTinhTien()
{
KhachHang kh=new KhachHang();
kh.setTenKh(editTen.getText()+”");
kh.setSlmua(Integer.parseInt(editSl.getText()+”"));
kh.setVip(chkVip.isChecked());
txtTT.setText(kh.tinhThanhTien()+”");
danhsach.addKhachHang(kh);
}
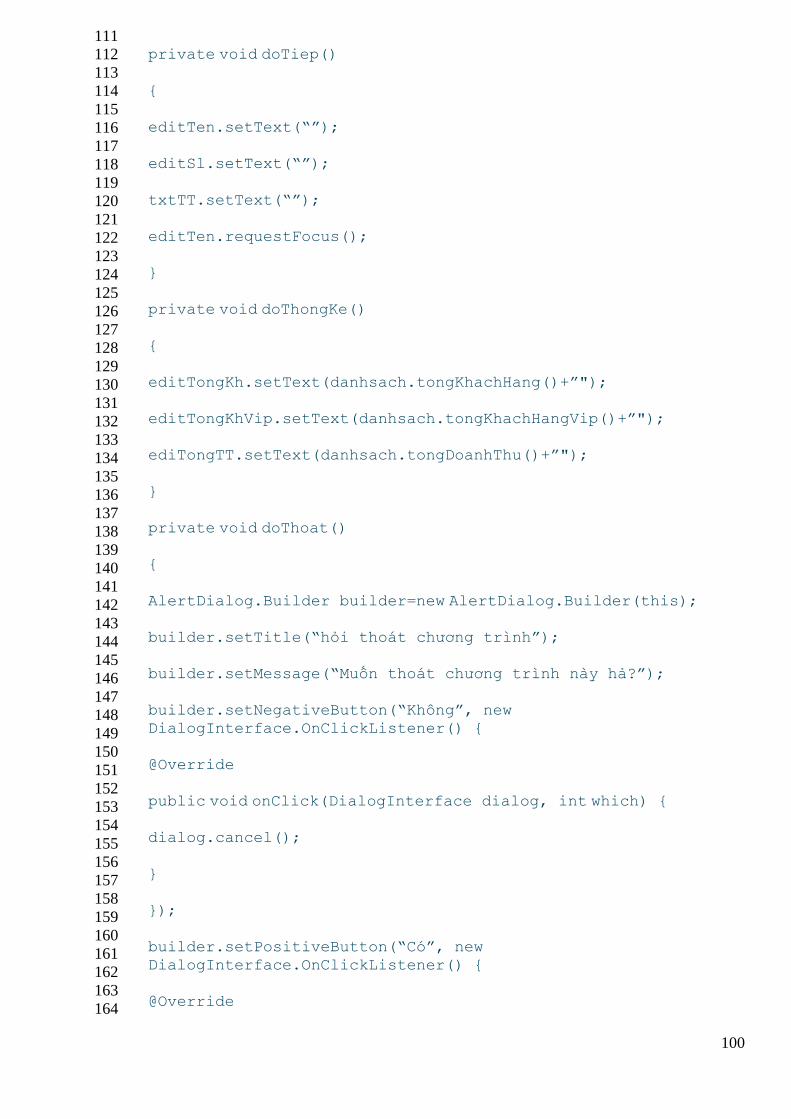
100
111
112
113
114
115
116
117
118
119
120
121
122
123
124
125
126
127
128
129
130
131
132
133
134
135
136
137
138
139
140
141
142
143
144
145
146
147
148
149
150
151
152
153
154
155
156
157
158
159
160
161
162
163
164
private void doTiep()
{
editTen.setText(“”);
editSl.setText(“”);
txtTT.setText(“”);
editTen.requestFocus();
}
private void doThongKe()
{
editTongKh.setText(danhsach.tongKhachHang()+”");
editTongKhVip.setText(danhsach.tongKhachHangVip()+”");
ediTongTT.setText(danhsach.tongDoanhThu()+”");
}
private void doThoat()
{
AlertDialog.Builder builder=new AlertDialog.Builder(this);
builder.setTitle(“hỏi thoát chương trình”);
builder.setMessage(“Muốn thoát chương trình này hả?”);
builder.setNegativeButton(“Không”, new
DialogInterface.OnClickListener() {
@Override
public void onClick(DialogInterface dialog, int which) {
dialog.cancel();
}
});
builder.setPositiveButton(“Có”, new
DialogInterface.OnClickListener() {
@Override
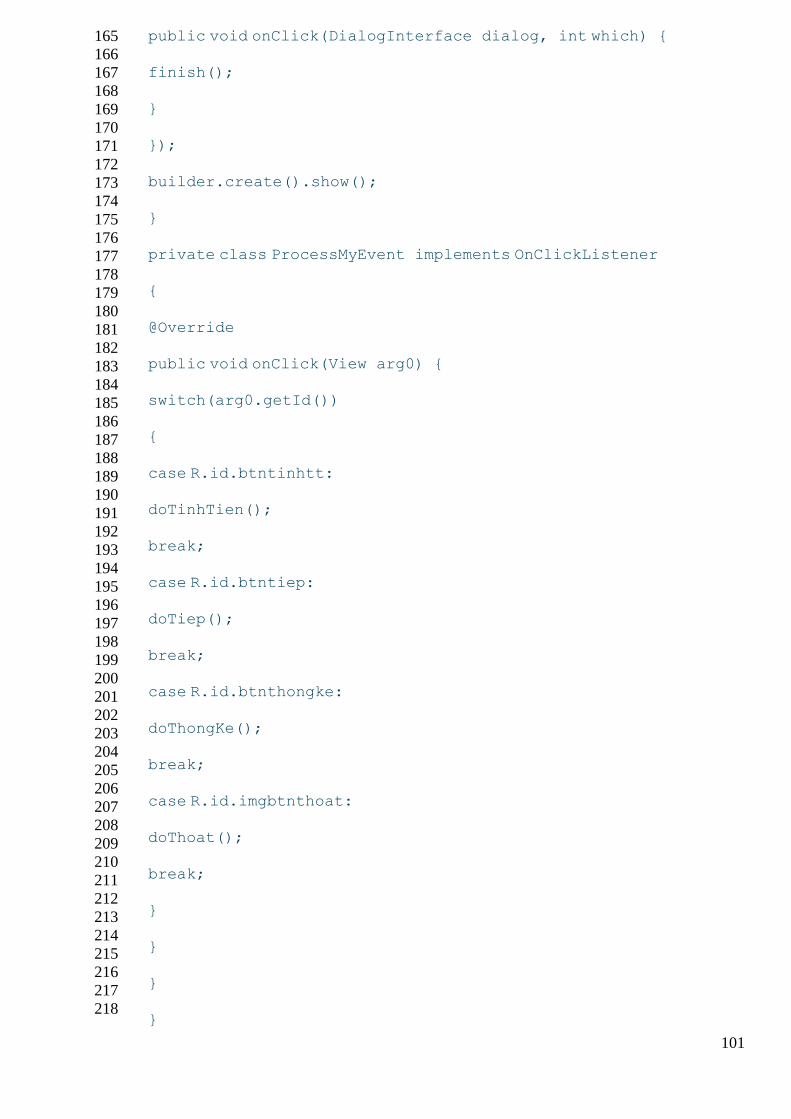
101
165
166
167
168
169
170
171
172
173
174
175
176
177
178
179
180
181
182
183
184
185
186
187
188
189
190
191
192
193
194
195
196
197
198
199
200
201
202
203
204
205
206
207
208
209
210
211
212
213
214
215
216
217
218
public void onClick(DialogInterface dialog, int which) {
finish();
}
});
builder.create().show();
}
private class ProcessMyEvent implements OnClickListener
{
@Override
public void onClick(View arg0) {
switch(arg0.getId())
{
case R.id.btntinhtt:
doTinhTien();
break;
case R.id.btntiep:
doTiep();
break;
case R.id.btnthongke:
doThongKe();
break;
case R.id.imgbtnthoat:
doThoat();
break;
}
}
}
}
102
219
- Trong MainActivity Tôi cố tình tách các nghiệp vụ ra thành các hàm riêng biệt như vậy để bạn dễ dàng xử lý. Chúng ta nên tập viết như vậy để Coding được sạch sẽ, khi có lỗi sảy ra cũng giúp các bạn dễ Fixed bug, sai hàm nào thì sửa hàm đó mà nó không bị ảnh hưởng tới các nghiệp vụ khác.
- Bạn có thể load đầy đủ coding mẫu trong link này: http://www.mediafire.com/?lgq5g2l28xb222c
- Bạn phải hiểu cách làm bài tập này để ứng dụng cho các phần sau.
- Hãy thực hành bài này nhiều lần cho tới khi thực sự hiểu logic của nó.
- Bài tập tiếp theo bạn sẽ được học về các control nâng cao trong Android, và ta sẽ thực hành thật kỹ
từng control cụ thể, đầu tiên là ListView (control rất thường xuyên được sử dụng trong một chương
trình Android nào đó)

103
Bài tập 13: Thực hành về ListView
trong Android
Trong các bài tập trước các bạn đã được làm quen với nhiều control cơ bản, bài tập này bạn sẽ được
làm quen với control nâng cao, cụ thể là ListView. Trong ứng dụng cần lưu trữ và hiển thị danh sách
các thông tin đa phần chúng ta sài control ListView. Hiện tại bạn chỉ cần biết sử dụng ListView có
sẵn của Android là được rồi, trong các bài tập tiếp theo Tôi sẽ hướng dẫn các bạn Custom Layout lại
ListView (tự làm mới ListView theo ý mình).
- Bài tập này Tôi sẽ cung cấp nhiều cách hành xử với ListView, ứng với mỗi cách là có các ví dụ mẫu
khác nhau, vì vậy các bạn nên cố gắng theo dõi và thực hành lại những ví dụ.
- Bạn hãy thực hành tốt 5 trường hợp Tôi trình bày dưới đây:
1) Trường hợp 1:- Sử dụng ListView control với mảng dữ liệu định sẵn.
-Trường hợp này Tôi đưa ra một ví dụ đơn giản là cho phép hiển thị mảng dữ liệu lên trên ListView,
bạn xem hình minh họa:
- Giao diện trên có 2 control:
+ListView : dùng để hiển thị mảng dữ liệu
+TextView có màu xanh lục: Dùng để hiển thị vị trí và giá trị của phần tử được chọn trong ListView
- Bạn tạo một Android Project tên là : Vidu_ListView_HardCode_Array, chọn layout phù hợp
và kéo thả các control vào giao diện:
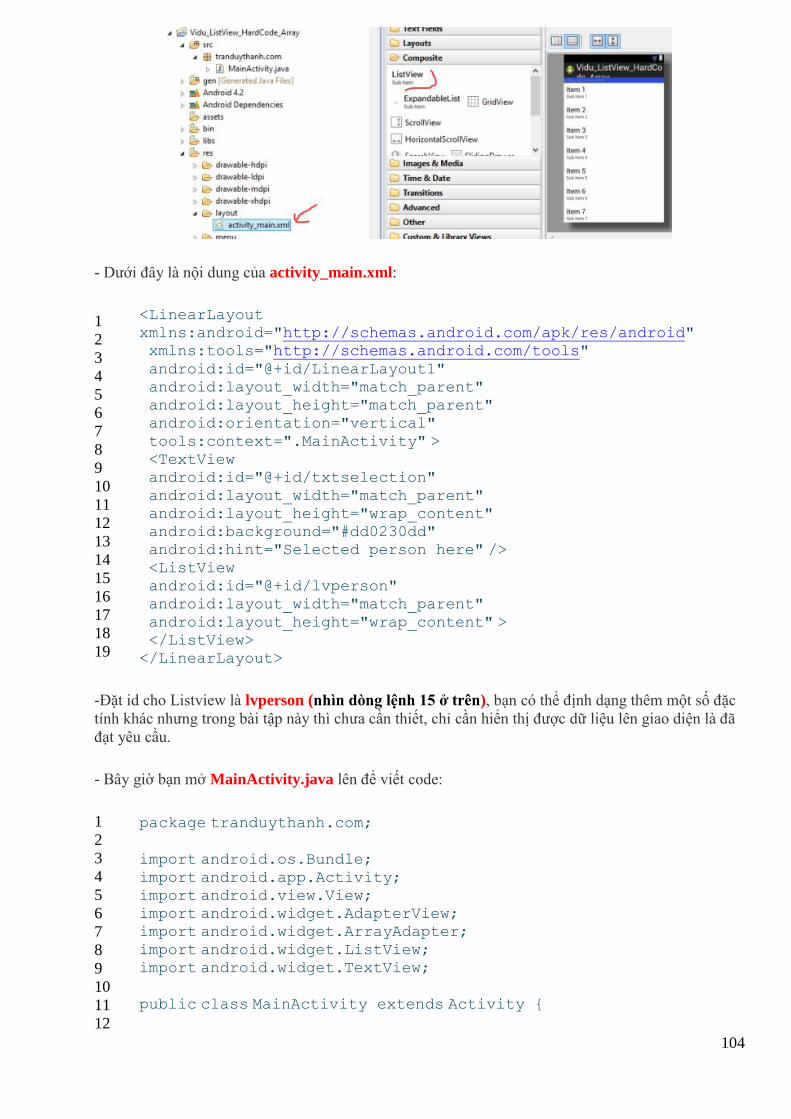
104
- Dưới đây là nội dung của activity_main.xml:
1
2
3
4
5
6
7
8
9
10
11
12
13
14
15
16
17
18
19
<LinearLayout xmlns:android="http://schemas.android.com/apk/res/android" xmlns:tools="http://schemas.android.com/tools"
android:id="@+id/LinearLayout1" android:layout_width="match_parent" android:layout_height="match_parent" android:orientation="vertical"
tools:context=".MainActivity" > <TextView android:id="@+id/txtselection"
android:layout_width="match_parent" android:layout_height="wrap_content" android:background="#dd0230dd" android:hint="Selected person here" />
<ListView android:id="@+id/lvperson" android:layout_width="match_parent"
android:layout_height="wrap_content" > </ListView> </LinearLayout>
-Đặt id cho Listview là lvperson (nhìn dòng lệnh 15 ở trên), bạn có thể định dạng thêm một số đặc
tính khác nhưng trong bài tập này thì chưa cần thiết, chỉ cần hiển thị được dữ liệu lên giao diện là đã
đạt yêu cầu.
- Bây giờ bạn mở MainActivity.java lên để viết code:
1
2
3
4
5
6
7
8
9
10
11
12
package tranduythanh.com;
import android.os.Bundle;
import android.app.Activity; import android.view.View; import android.widget.AdapterView; import android.widget.ArrayAdapter;
import android.widget.ListView; import android.widget.TextView;
public class MainActivity extends Activity {

105
13
14
15
16
17
18
19
20
21
22
23
24
25
26
27
28
29
30
31
32
33
34
35
36
37
38
protected void onCreate(Bundle savedInstanceState) { super.onCreate(savedInstanceState); setContentView(R.layout.activity_main); //1. Khởi tạo dữ liệu cho mảng arr (còn gọi là data source)
final String arr[]={"Teo","Ty","Bin","Bo"}; //2. Lấy đối tượng Listview dựa vào id ListView lv=(ListView) findViewById(R.id.lvperson); //3. Gán Data source vào ArrayAdapter
ArrayAdapter<String>adapter=new ArrayAdapter<String> (this, android.R.layout.simple_list_item_1, arr); //4. Đưa Data source vào ListView
lv.setAdapter(adapter); final TextView txt=(TextView) findViewById(R.id.txtselection); //5. Thiết lập sự kiện cho Listview, khi chọn phần tử nào thì
hiển thị lên TextView
lv.setOnItemClickListener( new AdapterView.OnItemClickListener() { public void onItemClick(AdapterView<?> arg0,
View arg1, int arg2, long arg3) { //đối số arg2 là vị trí phần tử trong Data Source (arr)
txt.setText("position :"+arg2+" ; value ="+arr[arg2]); } });
} }
- Tôi đã giải thích từng dòng lệnh ở bên trong code, giờ Tôi giải thích thêm về ArrayAdapter, bạn
nhìn vào dòng lệnh 21.
ArrayAdapter<String>adapter=new ArrayAdapter<String>(this,android.R.layout.simple_list_item_1, arr);
- Dữ liệu từ Data source (arr) sẽ được gắn vào ArrayAdapter, ArrayAdapter sẽ gắn vào ListView.
- Bạn nhìn vào đối số đầu tiên của constructor ArrayAdapter : this, chính là context của Activity hiện
tại, bạn có thể viết MainActivity.this (nếu bạn viết như thế này thì ở bất kỳ vị trí nào nó cũng hiểu là
context của MainActivity, do đó các bạn nên viết như thế này để bạn có thể copy paste nó tới bất kỳ
vị trí nào thì nó cũng hiểu)
- Đối số thứ 2 android.R.layout.simple_list_item_1 : bạn để ý android Tôi tô màu xanh, đây chính
là layout Listview mà được Android xây dựng sẵn, các bài tập kế tiếp ta sẽ tự xây dựng mà không sử
dụng cái có sẵn này. Như vậy thì simple_list_item_1 lưu ở đâu? và bên trong nó như thế nào?. Nó
được lưu trong SDK/platforms/android-api (x)/data/res/layout/simple_list_item_1.xml. Bạn có thể
xem nội dung và vị trí của layout này một cách nhanh chóng bằng đè phím Ctrl + click chuột vào
dòng lệnh này, bạn sẽ thấy như bên dưới:
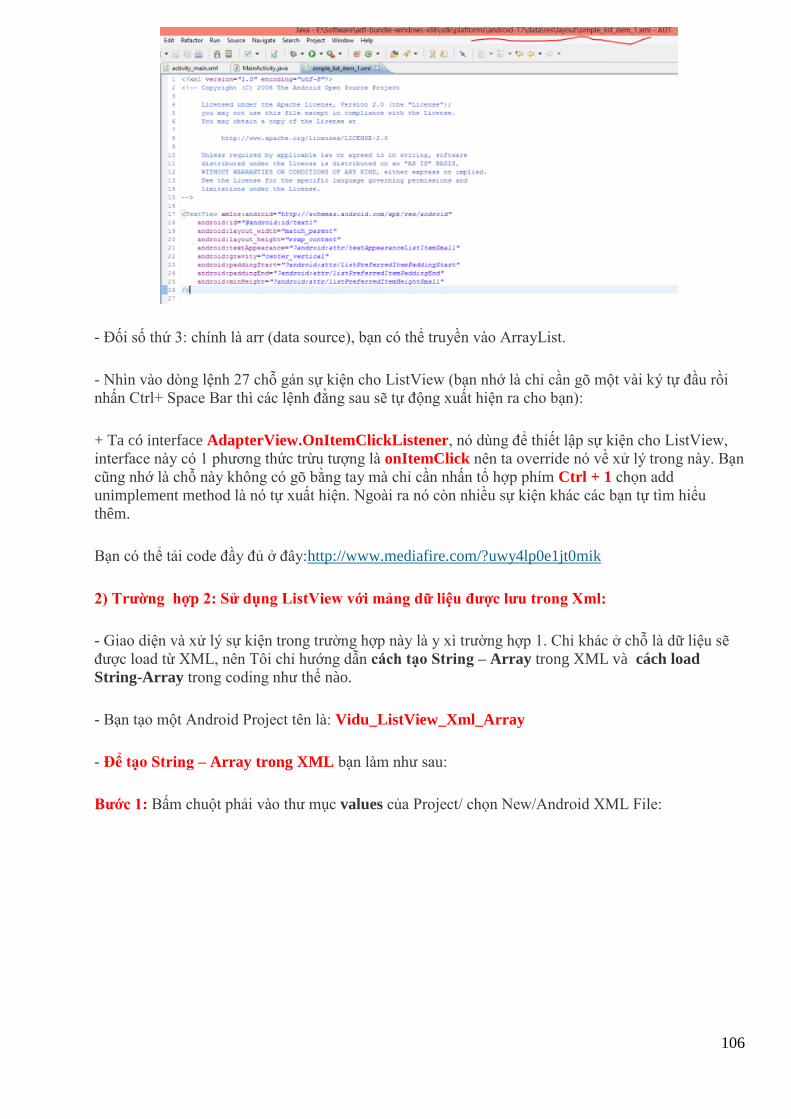
106
- Đối số thứ 3: chính là arr (data source), bạn có thể truyền vào ArrayList.
- Nhìn vào dòng lệnh 27 chỗ gán sự kiện cho ListView (bạn nhớ là chỉ cần gõ một vài ký tự đầu rồi
nhấn Ctrl+ Space Bar thì các lệnh đằng sau sẽ tự động xuất hiện ra cho bạn):
+ Ta có interface AdapterView.OnItemClickListener, nó dùng để thiết lập sự kiện cho ListView,
interface này có 1 phương thức trừu tượng là onItemClick nên ta override nó về xử lý trong này. Bạn
cũng nhớ là chỗ này không có gõ bằng tay mà chỉ cần nhấn tổ hợp phím Ctrl + 1 chọn add
unimplement method là nó tự xuất hiện. Ngoài ra nó còn nhiều sự kiện khác các bạn tự tìm hiểu
thêm.
Bạn có thể tải code đầy đủ ở đây:http://www.mediafire.com/?uwy4lp0e1jt0mik
2) Trường hợp 2: Sử dụng ListView với mảng dữ liệu được lưu trong Xml:
- Giao diện và xử lý sự kiện trong trường hợp này là y xì trường hợp 1. Chỉ khác ở chỗ là dữ liệu sẽ
được load từ XML, nên Tôi chỉ hướng dẫn cách tạo String – Array trong XML và cách load
String-Array trong coding như thế nào.
- Bạn tạo một Android Project tên là: Vidu_ListView_Xml_Array
- Để tạo String – Array trong XML bạn làm như sau:
Bước 1: Bấm chuột phải vào thư mục values của Project/ chọn New/Android XML File:
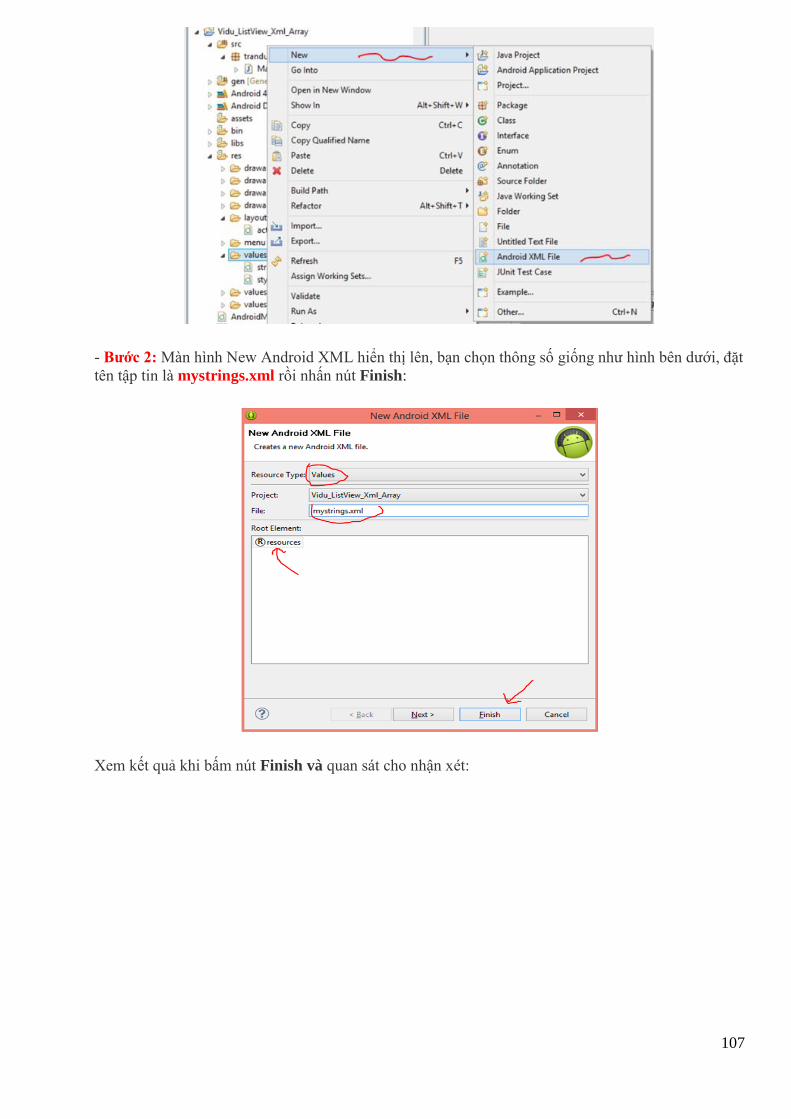
107
- Bước 2: Màn hình New Android XML hiển thị lên, bạn chọn thông số giống như hình bên dưới, đặt
tên tập tin là mystrings.xml rồi nhấn nút Finish:
Xem kết quả khi bấm nút Finish và quan sát cho nhận xét:
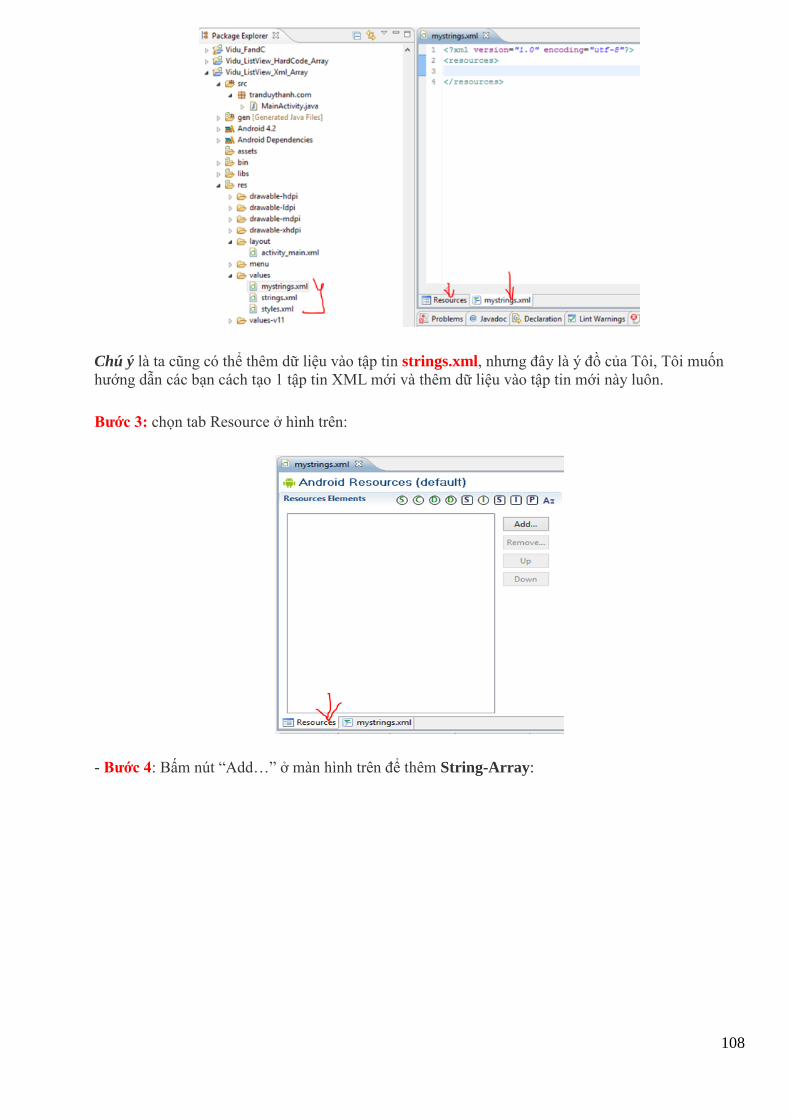
108
Chú ý là ta cũng có thể thêm dữ liệu vào tập tin strings.xml, nhưng đây là ý đồ của Tôi, Tôi muốn
hướng dẫn các bạn cách tạo 1 tập tin XML mới và thêm dữ liệu vào tập tin mới này luôn.
Bước 3: chọn tab Resource ở hình trên:
- Bước 4: Bấm nút “Add…” ở màn hình trên để thêm String-Array:
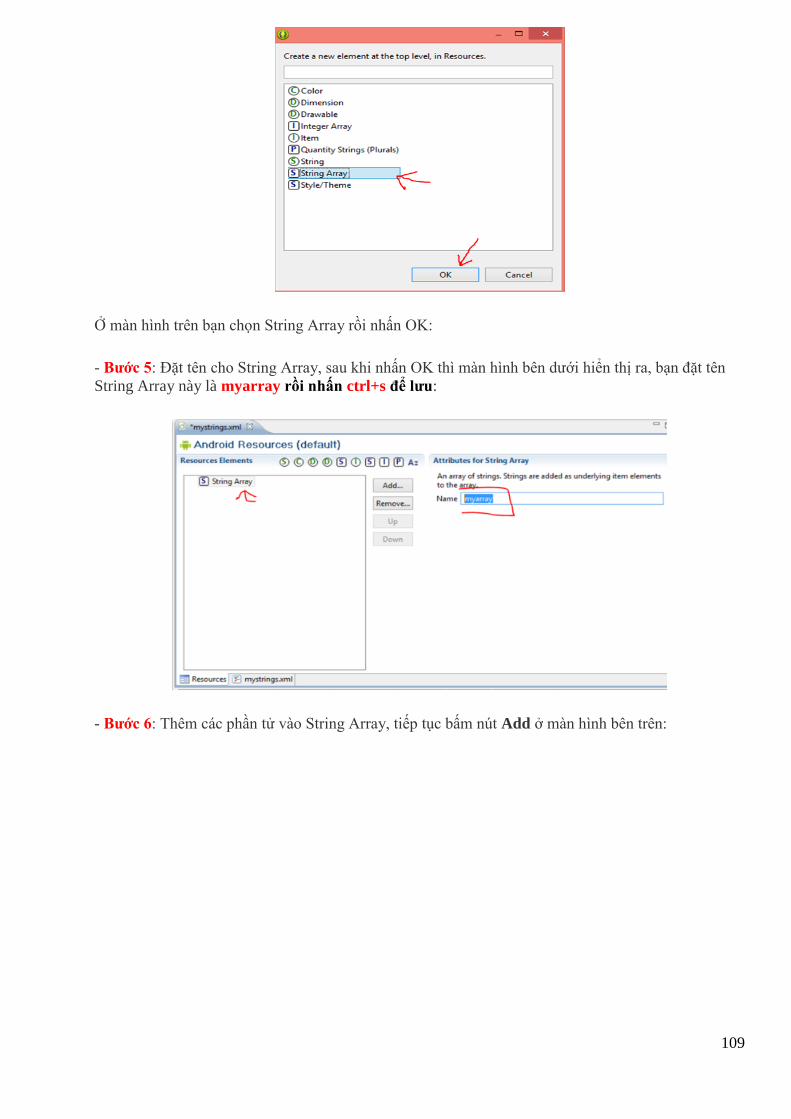
109
Ở màn hình trên bạn chọn String Array rồi nhấn OK:
- Bước 5: Đặt tên cho String Array, sau khi nhấn OK thì màn hình bên dưới hiển thị ra, bạn đặt tên
String Array này là myarray rồi nhấn ctrl+s để lưu:
- Bước 6: Thêm các phần tử vào String Array, tiếp tục bấm nút Add ở màn hình bên trên:
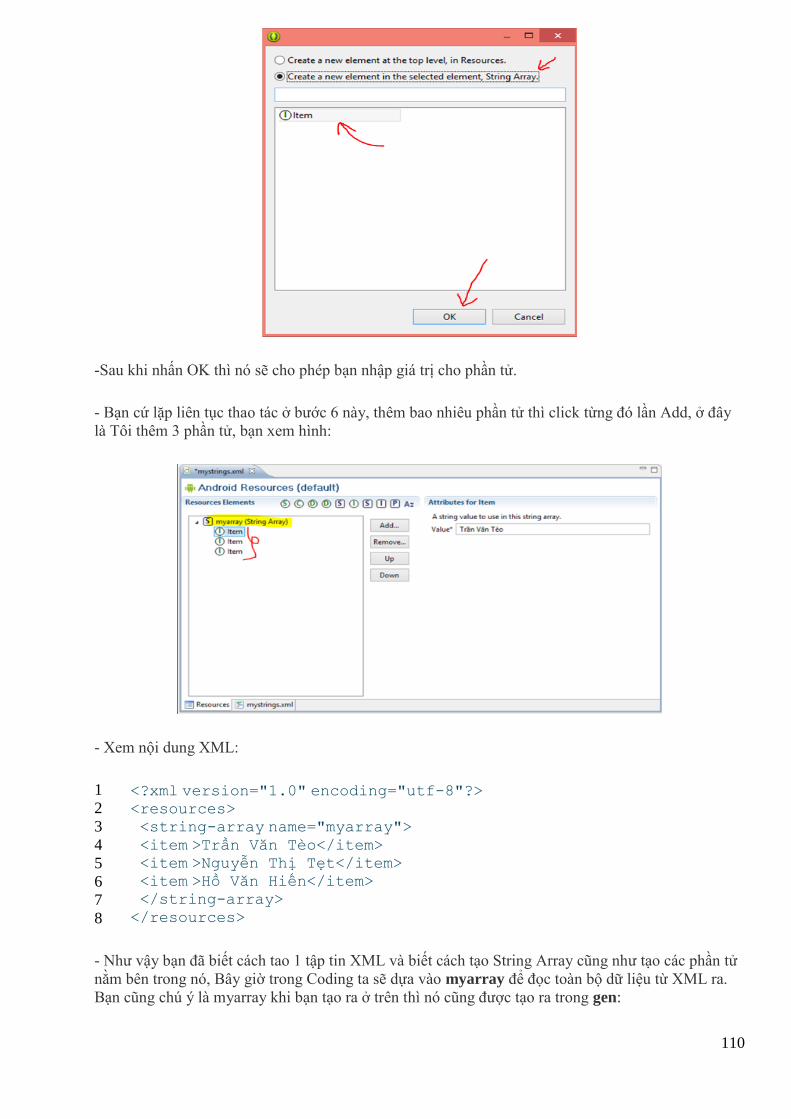
110
-Sau khi nhấn OK thì nó sẽ cho phép bạn nhập giá trị cho phần tử.
- Bạn cứ lặp liên tục thao tác ở bước 6 này, thêm bao nhiêu phần tử thì click từng đó lần Add, ở đây
là Tôi thêm 3 phần tử, bạn xem hình:
- Xem nội dung XML:
1
2
3
4
5
6
7
8
<?xml version="1.0" encoding="utf-8"?> <resources> <string-array name="myarray">
<item >Trần Văn Tèo</item> <item >Nguyễn Thị Tẹt</item> <item >Hồ Văn Hiến</item> </string-array>
</resources>
- Như vậy bạn đã biết cách tao 1 tập tin XML và biết cách tạo String Array cũng như tạo các phần tử
nằm bên trong nó, Bây giờ trong Coding ta sẽ dựa vào myarray để đọc toàn bộ dữ liệu từ XML ra.
Bạn cũng chú ý là myarray khi bạn tạo ra ở trên thì nó cũng được tạo ra trong gen:
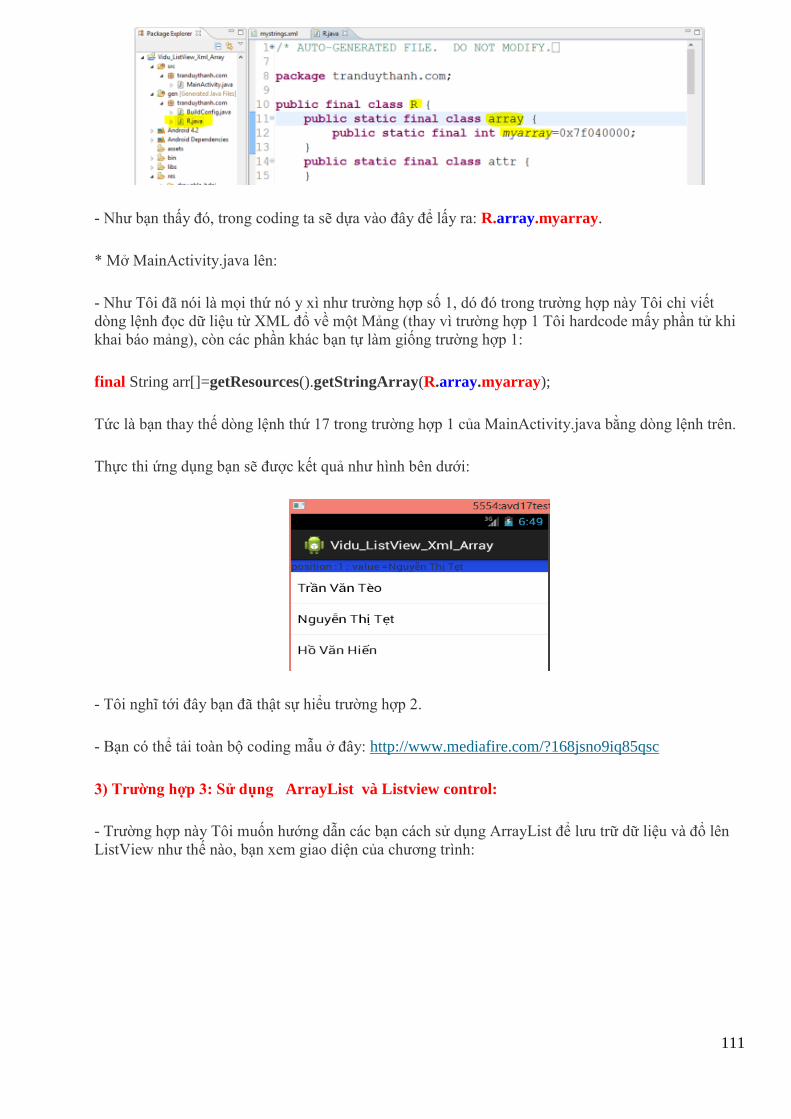
111
- Như bạn thấy đó, trong coding ta sẽ dựa vào đây để lấy ra: R.array.myarray.
* Mở MainActivity.java lên:
- Như Tôi đã nói là mọi thứ nó y xì như trường hợp số 1, dó đó trong trường hợp này Tôi chỉ viết
dòng lệnh đọc dữ liệu từ XML đổ về một Mảng (thay vì trường hợp 1 Tôi hardcode mấy phần tử khi
khai báo mảng), còn các phần khác bạn tự làm giống trường hợp 1:
final String arr[]=getResources().getStringArray(R.array.myarray);
Tức là bạn thay thế dòng lệnh thứ 17 trong trường hợp 1 của MainActivity.java bằng dòng lệnh trên.
Thực thi ứng dụng bạn sẽ được kết quả như hình bên dưới:
- Tôi nghĩ tới đây bạn đã thật sự hiểu trường hợp 2.
- Bạn có thể tải toàn bộ coding mẫu ở đây: http://www.mediafire.com/?168jsno9iq85qsc
3) Trường hợp 3: Sử dụng ArrayList và Listview control:
- Trường hợp này Tôi muốn hướng dẫn các bạn cách sử dụng ArrayList để lưu trữ dữ liệu và đổ lên
ListView như thế nào, bạn xem giao diện của chương trình:
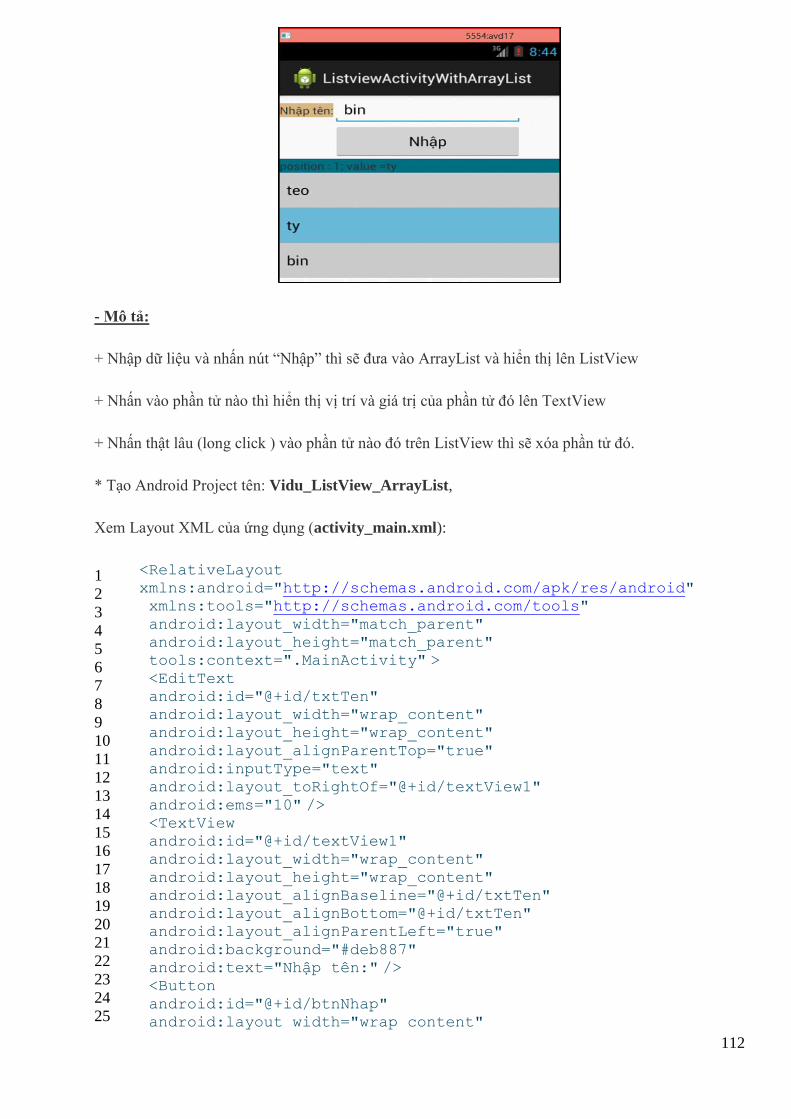
112
- Mô tả:
+ Nhập dữ liệu và nhấn nút “Nhập” thì sẽ đưa vào ArrayList và hiển thị lên ListView
+ Nhấn vào phần tử nào thì hiển thị vị trí và giá trị của phần tử đó lên TextView
+ Nhấn thật lâu (long click ) vào phần tử nào đó trên ListView thì sẽ xóa phần tử đó.
* Tạo Android Project tên: Vidu_ListView_ArrayList,
Xem Layout XML của ứng dụng (activity_main.xml):
1
2
3
4
5
6
7
8
9
10
11
12
13
14
15
16
17
18
19
20
21
22
23
24
25
<RelativeLayout xmlns:android="http://schemas.android.com/apk/res/android" xmlns:tools="http://schemas.android.com/tools"
android:layout_width="match_parent" android:layout_height="match_parent" tools:context=".MainActivity" >
<EditText android:id="@+id/txtTen" android:layout_width="wrap_content" android:layout_height="wrap_content"
android:layout_alignParentTop="true" android:inputType="text" android:layout_toRightOf="@+id/textView1"
android:ems="10" /> <TextView android:id="@+id/textView1" android:layout_width="wrap_content"
android:layout_height="wrap_content" android:layout_alignBaseline="@+id/txtTen" android:layout_alignBottom="@+id/txtTen" android:layout_alignParentLeft="true"
android:background="#deb887" android:text="Nhập tên:" /> <Button
android:id="@+id/btnNhap" android:layout_width="wrap_content"
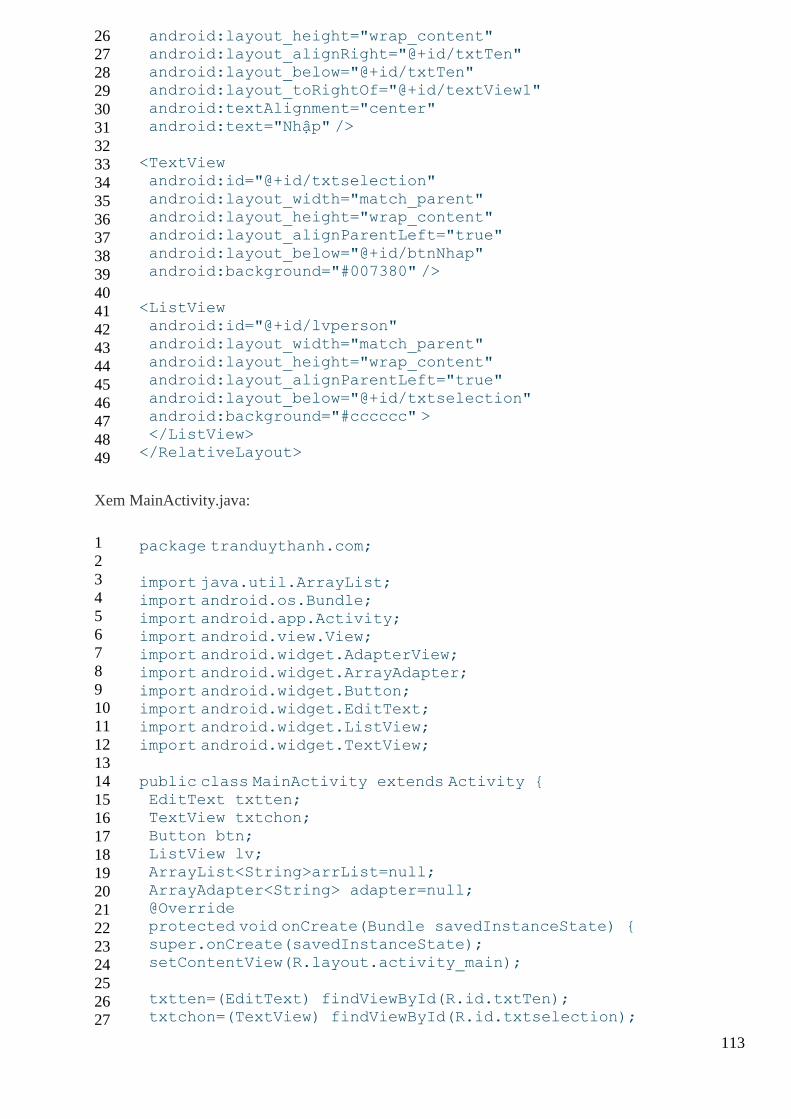
113
26
27
28
29
30
31
32
33
34
35
36
37
38
39
40
41
42
43
44
45
46
47
48
49
android:layout_height="wrap_content" android:layout_alignRight="@+id/txtTen" android:layout_below="@+id/txtTen" android:layout_toRightOf="@+id/textView1"
android:textAlignment="center" android:text="Nhập" />
<TextView android:id="@+id/txtselection"
android:layout_width="match_parent" android:layout_height="wrap_content" android:layout_alignParentLeft="true"
android:layout_below="@+id/btnNhap" android:background="#007380" />
<ListView android:id="@+id/lvperson"
android:layout_width="match_parent" android:layout_height="wrap_content" android:layout_alignParentLeft="true"
android:layout_below="@+id/txtselection" android:background="#cccccc" > </ListView> </RelativeLayout>
Xem MainActivity.java:
1
2
3
4
5
6
7
8
9
10
11
12
13
14
15
16
17
18
19
20
21
22
23
24
25
26
27
package tranduythanh.com;
import java.util.ArrayList; import android.os.Bundle;
import android.app.Activity; import android.view.View; import android.widget.AdapterView; import android.widget.ArrayAdapter;
import android.widget.Button; import android.widget.EditText; import android.widget.ListView;
import android.widget.TextView;
public class MainActivity extends Activity { EditText txtten; TextView txtchon;
Button btn; ListView lv; ArrayList<String>arrList=null;
ArrayAdapter<String> adapter=null; @Override protected void onCreate(Bundle savedInstanceState) { super.onCreate(savedInstanceState);
setContentView(R.layout.activity_main);
txtten=(EditText) findViewById(R.id.txtTen); txtchon=(TextView) findViewById(R.id.txtselection);
114
28
29
30
31
32
33
34
35
36
37
38
39
40
41
42
43
44
45
46
47
48
49
50
51
52
53
54
55
56
57
58
59
60
61
62
63
64
65
66
67
68
69
70
71
lv=(ListView) findViewById(R.id.lvperson);
//1. Tạo ArrayList object arrList=new ArrayList<String>(); //2. Gán Data Source (ArrayList object) vào ArrayAdapter
adapter=new ArrayAdapter<String> (this, android.R.layout.simple_list_item_1, arrList);
//3. gán Adapter vào ListView lv.setAdapter(adapter);
btn=(Button) findViewById(R.id.btnNhap);
//4. Xử lý sự kiện nhấn nút Nhập btn.setOnClickListener(new View.OnClickListener() { public void onClick(View arg0) { arrList.add(txtten.getText()+"");
adapter.notifyDataSetChanged(); } });
//5. Xử lý sự kiện chọn một phần tử trong ListView lv.setOnItemClickListener(new AdapterView .OnItemClickListener() { public void onItemClick(
AdapterView<?> arg0,View arg1, int arg2,long arg3) {
txtchon.setText("position : "+ arg2+
"; value ="+arrList.get(arg2)); } }); //6. xử lý sự kiện Long click
lv.setOnItemLongClickListener(new AdapterView .OnItemLongClickListener() { @Override public boolean onItemLongClick(AdapterView<?> arg0, View
arg1, int arg2, long arg3) { arrList.remove(arg2);//xóa phần tử thứ arg2
adapter.notifyDataSetChanged(); return false; } });
} }
Tôi giải thích thêm về coding:
ArrayList bạn đã được học trong môn Java 1 rồi. Ở đây Tôi nói
hàm adapter.notifyDataSetChanged(); Bạn chú ý là ArrayList được gán vào adapter nên mọi sự
thay đổi trong ArrayList thì adapter đều nhận biết được. Khi có sự thay đổi trong ArrayList bạn chỉ
cần gọi notifyDataSetChanged thì ListView sẽ được cập nhật (bởi vì Adapter được gắn vào
ListView).
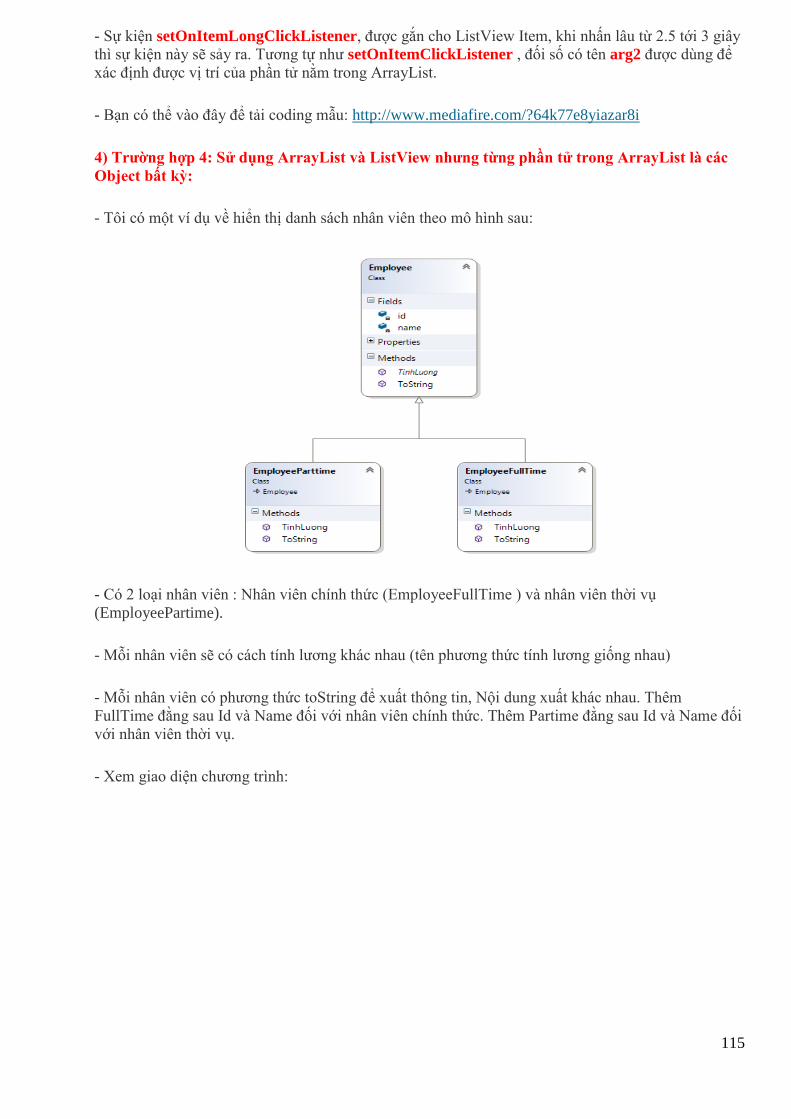
115
- Sự kiện setOnItemLongClickListener, được gắn cho ListView Item, khi nhấn lâu từ 2.5 tới 3 giây
thì sự kiện này sẽ sảy ra. Tương tự như setOnItemClickListener , đối số có tên arg2 được dùng để
xác định được vị trí của phần tử nằm trong ArrayList.
- Bạn có thể vào đây để tải coding mẫu: http://www.mediafire.com/?64k77e8yiazar8i
4) Trường hợp 4: Sử dụng ArrayList và ListView nhưng từng phần tử trong ArrayList là các
Object bất kỳ:
- Tôi có một ví dụ về hiển thị danh sách nhân viên theo mô hình sau:
- Có 2 loại nhân viên : Nhân viên chính thức (EmployeeFullTime ) và nhân viên thời vụ
(EmployeePartime).
- Mỗi nhân viên sẽ có cách tính lương khác nhau (tên phương thức tính lương giống nhau)
- Mỗi nhân viên có phương thức toString để xuất thông tin, Nội dung xuất khác nhau. Thêm
FullTime đằng sau Id và Name đối với nhân viên chính thức. Thêm Partime đằng sau Id và Name đối
với nhân viên thời vụ.
- Xem giao diện chương trình:
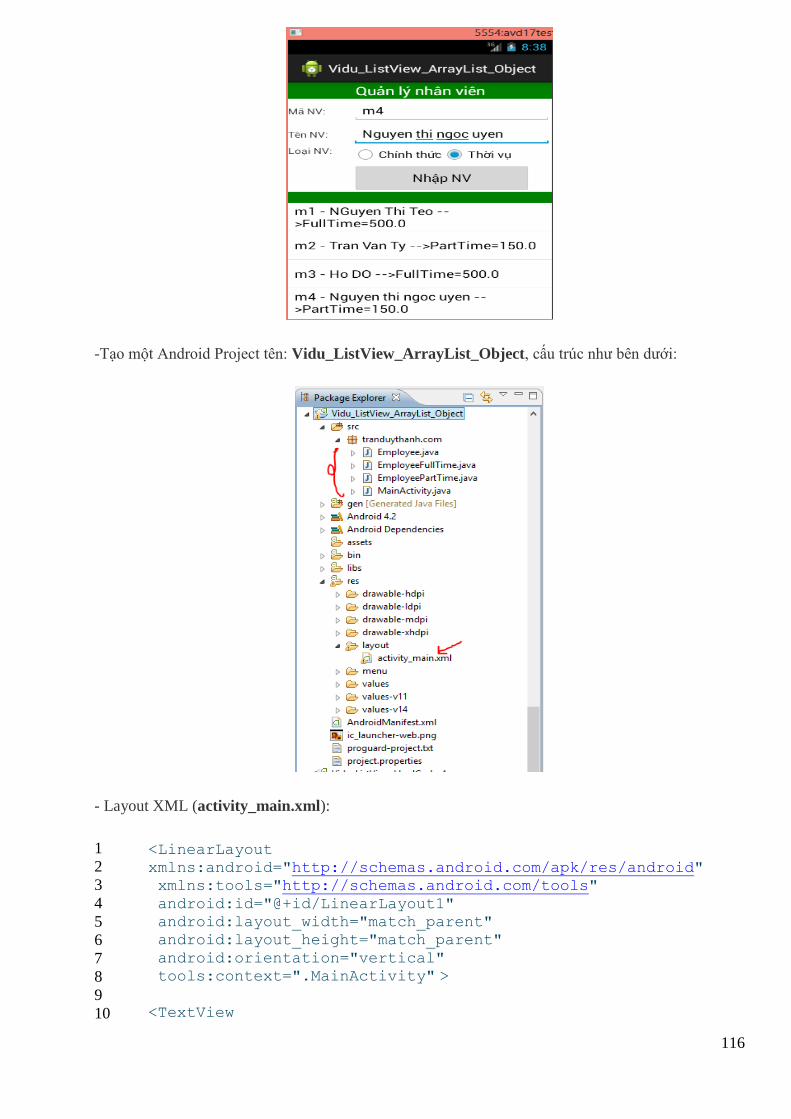
116
-Tạo một Android Project tên: Vidu_ListView_ArrayList_Object, cấu trúc như bên dưới:
- Layout XML (activity_main.xml):
1
2
3
4
5
6
7
8
9
10
<LinearLayout xmlns:android="http://schemas.android.com/apk/res/android" xmlns:tools="http://schemas.android.com/tools"
android:id="@+id/LinearLayout1" android:layout_width="match_parent" android:layout_height="match_parent"
android:orientation="vertical" tools:context=".MainActivity" >
<TextView
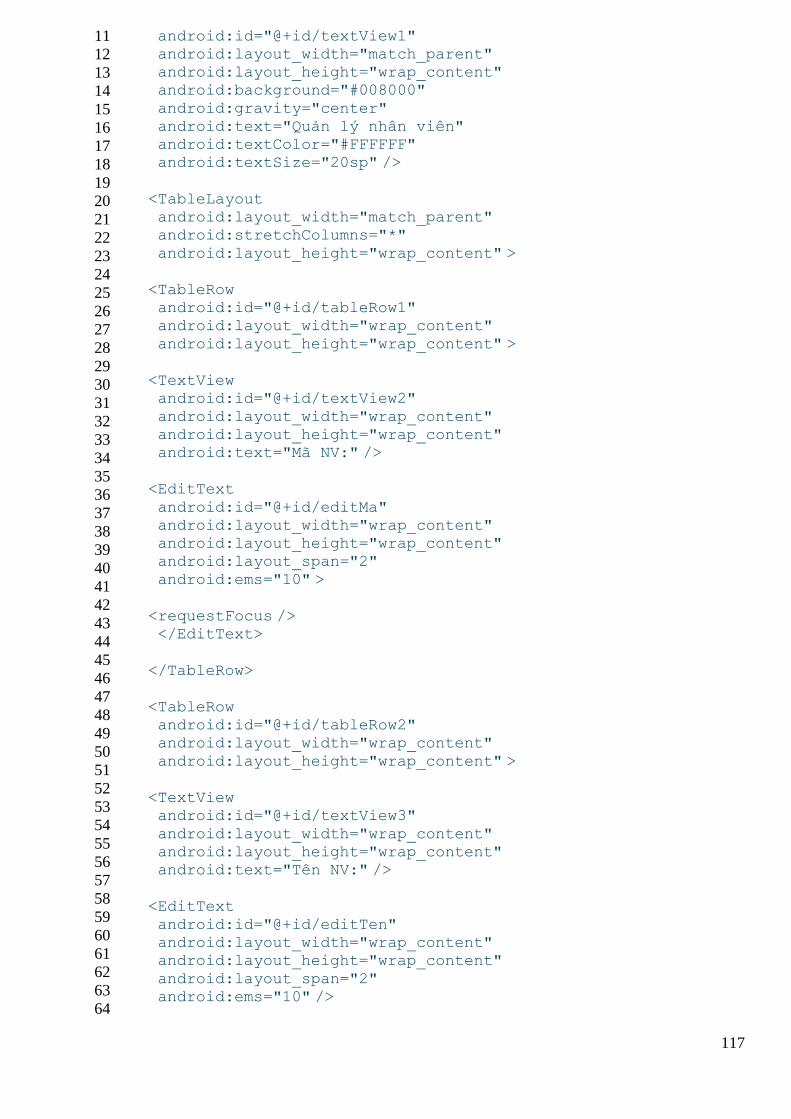
117
11
12
13
14
15
16
17
18
19
20
21
22
23
24
25
26
27
28
29
30
31
32
33
34
35
36
37
38
39
40
41
42
43
44
45
46
47
48
49
50
51
52
53
54
55
56
57
58
59
60
61
62
63
64
android:id="@+id/textView1" android:layout_width="match_parent" android:layout_height="wrap_content" android:background="#008000"
android:gravity="center" android:text="Quản lý nhân viên" android:textColor="#FFFFFF" android:textSize="20sp" />
<TableLayout android:layout_width="match_parent" android:stretchColumns="*"
android:layout_height="wrap_content" >
<TableRow android:id="@+id/tableRow1" android:layout_width="wrap_content"
android:layout_height="wrap_content" >
<TextView android:id="@+id/textView2"
android:layout_width="wrap_content" android:layout_height="wrap_content" android:text="Mã NV:" />
<EditText
android:id="@+id/editMa" android:layout_width="wrap_content" android:layout_height="wrap_content" android:layout_span="2"
android:ems="10" >
<requestFocus /> </EditText>
</TableRow>
<TableRow android:id="@+id/tableRow2" android:layout_width="wrap_content"
android:layout_height="wrap_content" >
<TextView android:id="@+id/textView3"
android:layout_width="wrap_content" android:layout_height="wrap_content" android:text="Tên NV:" />
<EditText
android:id="@+id/editTen" android:layout_width="wrap_content" android:layout_height="wrap_content"
android:layout_span="2" android:ems="10" />
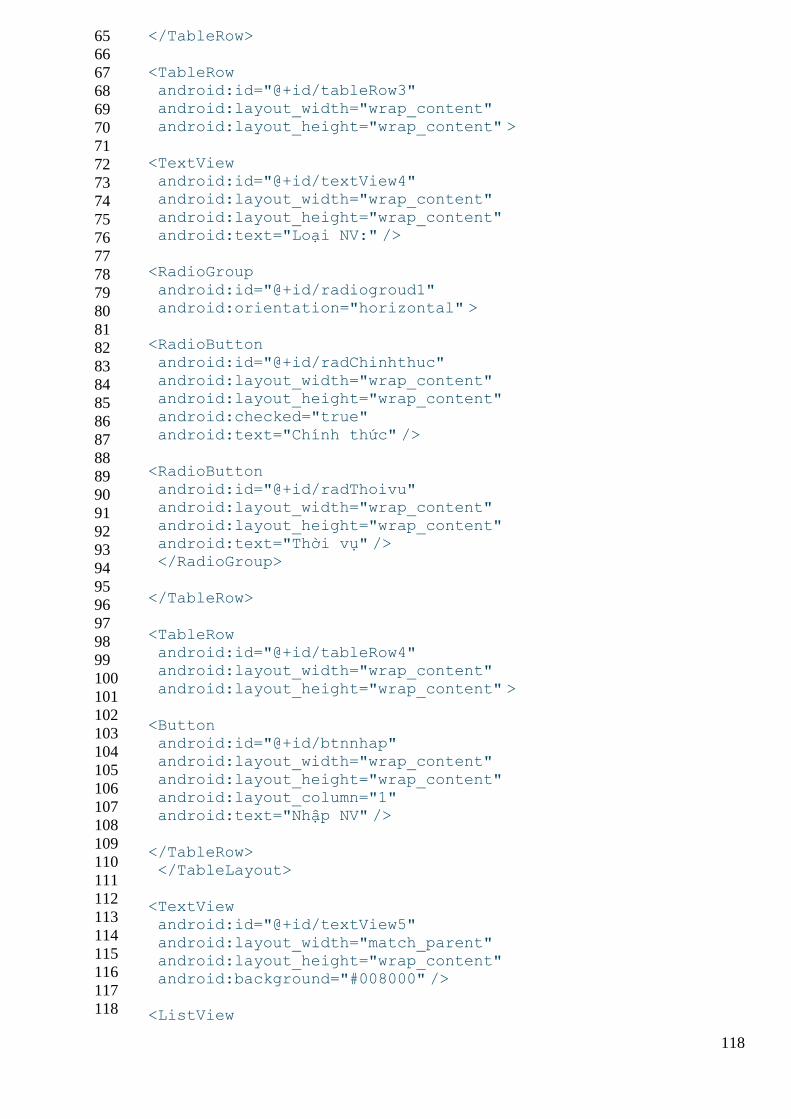
118
65
66
67
68
69
70
71
72
73
74
75
76
77
78
79
80
81
82
83
84
85
86
87
88
89
90
91
92
93
94
95
96
97
98
99
100
101
102
103
104
105
106
107
108
109
110
111
112
113
114
115
116
117
118
</TableRow>
<TableRow android:id="@+id/tableRow3" android:layout_width="wrap_content"
android:layout_height="wrap_content" >
<TextView android:id="@+id/textView4" android:layout_width="wrap_content"
android:layout_height="wrap_content" android:text="Loại NV:" />
<RadioGroup
android:id="@+id/radiogroud1" android:orientation="horizontal" >
<RadioButton android:id="@+id/radChinhthuc"
android:layout_width="wrap_content" android:layout_height="wrap_content" android:checked="true"
android:text="Chính thức" />
<RadioButton android:id="@+id/radThoivu" android:layout_width="wrap_content"
android:layout_height="wrap_content" android:text="Thời vụ" /> </RadioGroup>
</TableRow>
<TableRow android:id="@+id/tableRow4" android:layout_width="wrap_content"
android:layout_height="wrap_content" >
<Button android:id="@+id/btnnhap" android:layout_width="wrap_content"
android:layout_height="wrap_content" android:layout_column="1" android:text="Nhập NV" />
</TableRow> </TableLayout>
<TextView android:id="@+id/textView5"
android:layout_width="match_parent" android:layout_height="wrap_content" android:background="#008000" />
<ListView
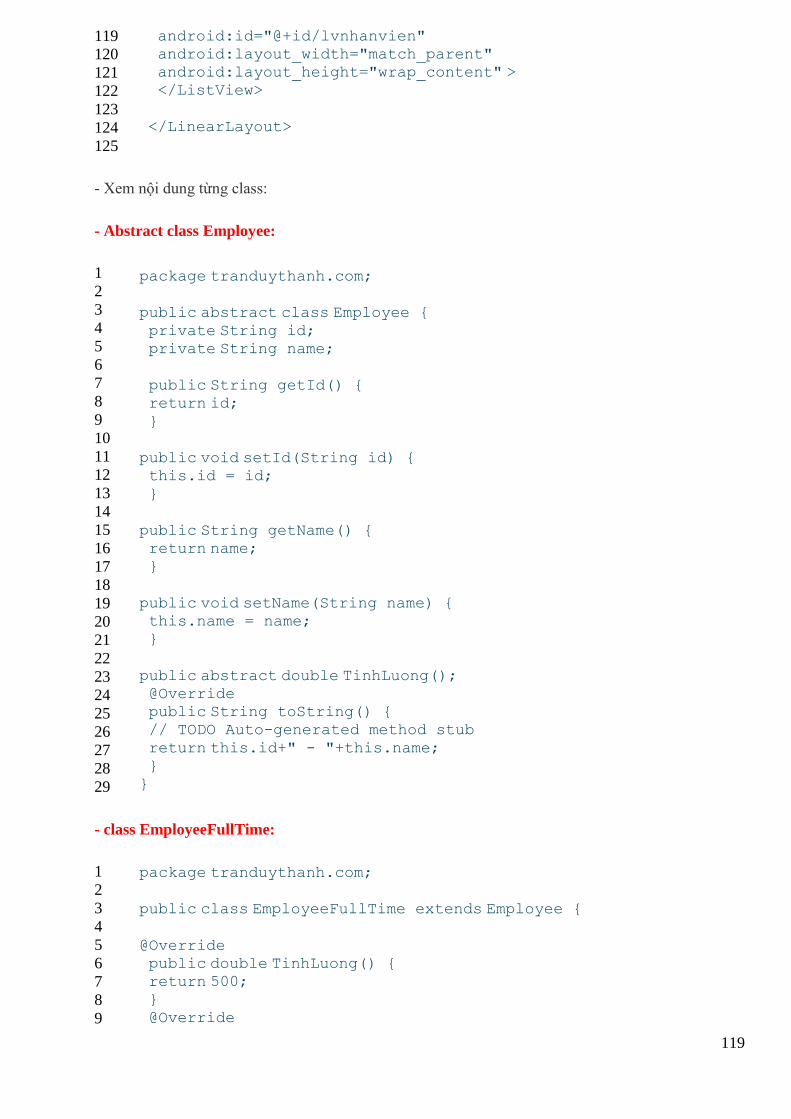
119
119
120
121
122
123
124
125
android:id="@+id/lvnhanvien" android:layout_width="match_parent" android:layout_height="wrap_content" > </ListView>
</LinearLayout>
- Xem nội dung từng class:
- Abstract class Employee:
1
2
3
4
5
6
7
8
9
10
11
12
13
14
15
16
17
18
19
20
21
22
23
24
25
26
27
28
29
package tranduythanh.com;
public abstract class Employee {
private String id; private String name;
public String getId() { return id;
}
public void setId(String id) { this.id = id;
}
public String getName() { return name; }
public void setName(String name) { this.name = name; }
public abstract double TinhLuong(); @Override public String toString() { // TODO Auto-generated method stub
return this.id+" - "+this.name; } }
- class EmployeeFullTime:
1
2
3
4
5
6
7
8
9
package tranduythanh.com;
public class EmployeeFullTime extends Employee {
@Override public double TinhLuong() { return 500; }
@Override

120
10
11
12
13
14
public String toString() { // TODO Auto-generated method stub return super.toString() +" -->FullTime="+TinhLuong(); }
}
- Class EmployeePartTime:
1
2
3
4
5
6
7
8
9
10
11
12
13
14
15
package tranduythanh.com;
public class EmployeePartTime extends Employee {
@Override public double TinhLuong() {
// TODO Auto-generated method stub return 150; } @Override
public String toString() { // TODO Auto-generated method stub return super.toString() +" -->PartTime="+TinhLuong();
} }
- Bạn thấy là 2 class dẫn xuất từ Employee Tôi làm đơn giản là cách tính lương khác nhau. Đối với
FullTime thì lương 500, Partime lương 150. và hàm Xuất toString() cũng khác nhau 1 xí.
- Ở đây ta sẽ áp dụng tính đa hình thông qua thừa kế, chỉ cần dùng một biến có kiểu Employee,
nhưng nó có thể hiểu FullTime hoặc Partime và xuất ra thông tin đúng như mình mong đợi.
- Xem class MainActivity.java:
1
2
3
4
5
6
7
8
9
10
11
12
13
14
15
16
17
18
19
20
21
package tranduythanh.com;
import java.util.ArrayList; import android.os.Bundle; import android.app.Activity;
import android.view.View; import android.view.View.OnClickListener; import android.widget.ArrayAdapter;
import android.widget.Button; import android.widget.EditText; import android.widget.ListView; import android.widget.RadioGroup;
public class MainActivity extends Activity {
EditText editId,editName; Button btnNhap;
RadioGroup radgroup; ListView lvNhanvien; ArrayList<Employee>arrEmployee=new ArrayList<Employee>(); ArrayAdapter<Employee>adapter=null;
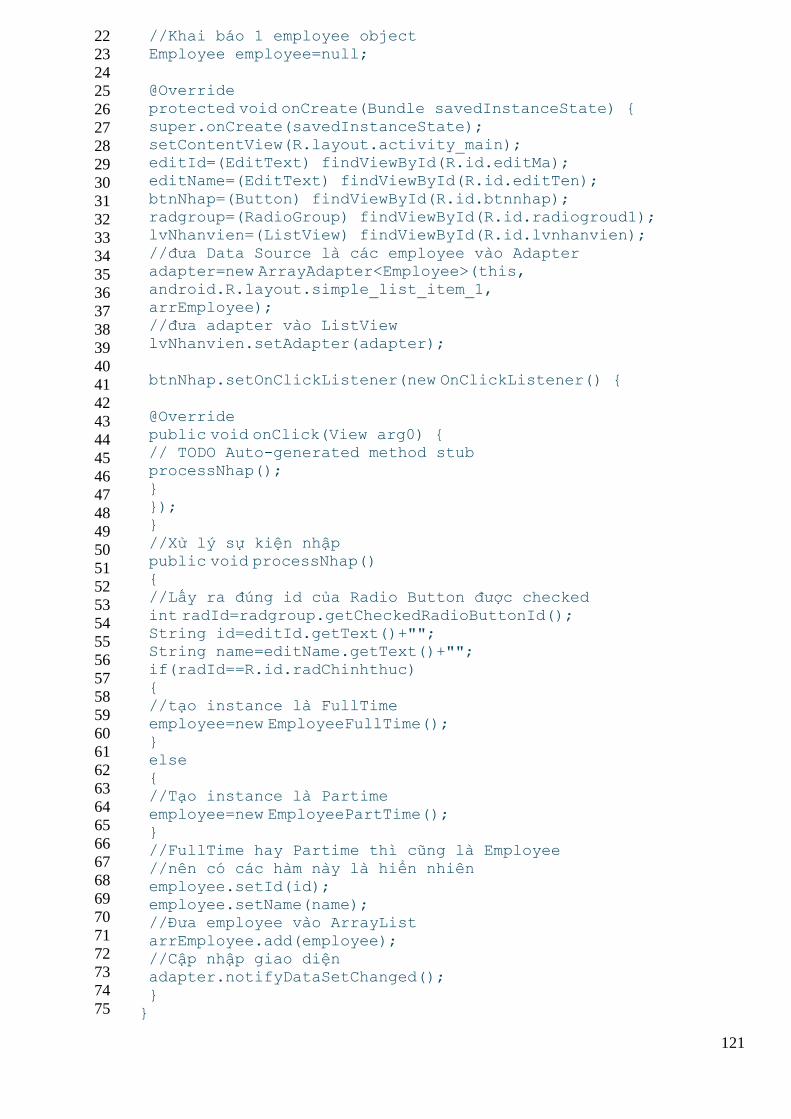
121
22
23
24
25
26
27
28
29
30
31
32
33
34
35
36
37
38
39
40
41
42
43
44
45
46
47
48
49
50
51
52
53
54
55
56
57
58
59
60
61
62
63
64
65
66
67
68
69
70
71
72
73
74
75
//Khai báo 1 employee object Employee employee=null;
@Override protected void onCreate(Bundle savedInstanceState) {
super.onCreate(savedInstanceState); setContentView(R.layout.activity_main); editId=(EditText) findViewById(R.id.editMa); editName=(EditText) findViewById(R.id.editTen);
btnNhap=(Button) findViewById(R.id.btnnhap); radgroup=(RadioGroup) findViewById(R.id.radiogroud1); lvNhanvien=(ListView) findViewById(R.id.lvnhanvien);
//đưa Data Source là các employee vào Adapter adapter=new ArrayAdapter<Employee>(this, android.R.layout.simple_list_item_1, arrEmployee);
//đưa adapter vào ListView lvNhanvien.setAdapter(adapter);
btnNhap.setOnClickListener(new OnClickListener() {
@Override public void onClick(View arg0) { // TODO Auto-generated method stub processNhap();
} }); }
//Xử lý sự kiện nhập public void processNhap() { //Lấy ra đúng id của Radio Button được checked
int radId=radgroup.getCheckedRadioButtonId(); String id=editId.getText()+""; String name=editName.getText()+""; if(radId==R.id.radChinhthuc)
{ //tạo instance là FullTime employee=new EmployeeFullTime();
} else { //Tạo instance là Partime
employee=new EmployeePartTime(); } //FullTime hay Partime thì cũng là Employee
//nên có các hàm này là hiển nhiên employee.setId(id); employee.setName(name); //Đưa employee vào ArrayList
arrEmployee.add(employee); //Cập nhập giao diện adapter.notifyDataSetChanged();
} }
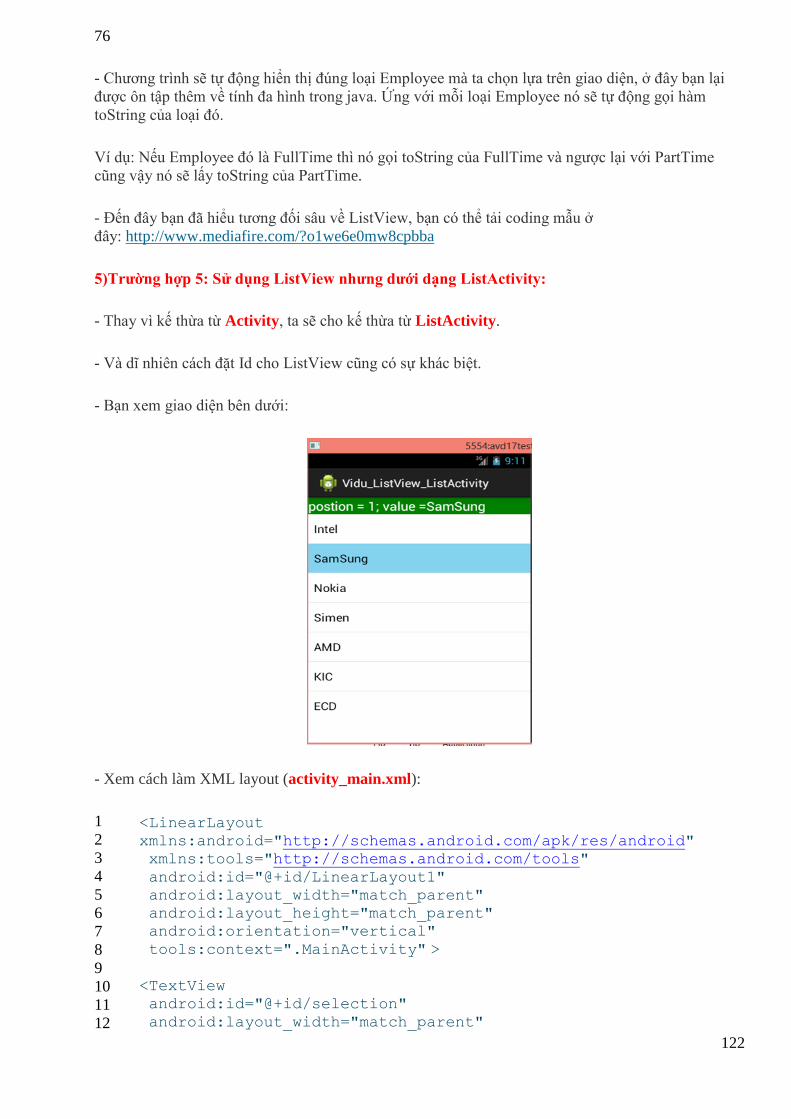
122
76
- Chương trình sẽ tự động hiển thị đúng loại Employee mà ta chọn lựa trên giao diện, ở đây bạn lại
được ôn tập thêm về tính đa hình trong java. Ứng với mỗi loại Employee nó sẽ tự động gọi hàm
toString của loại đó.
Ví dụ: Nếu Employee đó là FullTime thì nó gọi toString của FullTime và ngược lại với PartTime
cũng vậy nó sẽ lấy toString của PartTime.
- Đến đây bạn đã hiểu tương đối sâu về ListView, bạn có thể tải coding mẫu ở
đây: http://www.mediafire.com/?o1we6e0mw8cpbba
5)Trường hợp 5: Sử dụng ListView nhưng dưới dạng ListActivity:
- Thay vì kế thừa từ Activity, ta sẽ cho kế thừa từ ListActivity.
- Và dĩ nhiên cách đặt Id cho ListView cũng có sự khác biệt.
- Bạn xem giao diện bên dưới:
- Xem cách làm XML layout (activity_main.xml):
1
2
3
4
5
6
7
8
9
10
11
12
<LinearLayout xmlns:android="http://schemas.android.com/apk/res/android" xmlns:tools="http://schemas.android.com/tools"
android:id="@+id/LinearLayout1" android:layout_width="match_parent" android:layout_height="match_parent" android:orientation="vertical"
tools:context=".MainActivity" >
<TextView android:id="@+id/selection"
android:layout_width="match_parent"
123
13
14
15
16
17
18
19
20
21
22
23
24
25
26
27
28
29
android:layout_height="wrap_content" android:background="#008000" android:textColor="#FFFFFF" android:textSize="20sp" />
<ListView android:id="@android:id/list" android:layout_width="match_parent" android:layout_height="wrap_content" >
</ListView>
<TextView android:id="@android:id/empty"
android:layout_width="wrap_content" android:layout_height="wrap_content" android:text="Không có gì cả" />
</LinearLayout>
- Bạn nhìn vào dòng lệnh thứ 18:
android:id=”@android:id/list“, bạn viết y xì như thế này. Bởi vì nó là id được định nghĩa sẵn bên
trong Android.
- Tiếp tục nhìn vào dòng lệnh 24:
android:id=”@android:id/empty“ , cũng là có sẵn của Android. Nó có tác dụng tự động thông báo
khi ListView của bạn không có bất kỳ một phần tử nào cả.
- Xem class MainActivity.java:
1
2
3
4
5
6
7
8
9
10
11
12
13
14
15
16
17
18
19
20
21
22
package tranduythanh.com;
import android.os.Bundle; import android.app.ListActivity;
import android.view.View; import android.widget.ArrayAdapter; import android.widget.ListView;
import android.widget.TextView;
public class MainActivity extends ListActivity {
TextView selection; String arr[]={"Intel","SamSung",
"Nokia","Simen","AMD", "KIC","ECD"}; ArrayAdapter<String >adapter=null; @Override
protected void onCreate(Bundle savedInstanceState) { super.onCreate(savedInstanceState); setContentView(R.layout.activity_main);
//Thiết lập Data Source cho Adapter adapter=new ArrayAdapter<String>
124
23
24
25
26
27
28
29
30
31
32
33
34
35
36
37
38
39
(this, android.R.layout.simple_list_item_1, arr); //Gán Adapter vào ListView
//Nhớ là phải đặt id cho ListView theo đúng quy tắc setListAdapter(adapter);
selection=(TextView) findViewById(R.id.selection); }
@Override protected void onListItemClick(ListView l, View v, int position, long id) {
// TODO Auto-generated method stub super.onListItemClick(l, v, position, id); String txt="postion = "+position +"; value ="+arr[position]; selection.setText(txt);
} }
- Bạn nhìn vào dòng lệnh số 10: bạn thấy đấy, Tôi cho kế thừa từ ListActivity chứ không
phảiActivity. (Android đã viết class ListActivity kế thừa từ Activity rồi). Tức là ListActivity cũng
chính là Activity.
- Bạn nhìn vào dòng lệnh số 28:
setListAdapter(adapter);
Ở đây ta hoàn toàn không “Lôi” control ListView ra. Mà ta chỉ cần gọi hàm setListAdapter
thì ListView cũng tự động cập nhập dữ liệu. Bạn phải làm chính xác 2 nơi thì mới được như vậy:
1. Kết thừa từ ListActivity,
2. đặt id cho ListView theo đúng quy tắc android:id=”@android:id/list”
- Bạn load coding đầy đủ ở đây: http://www.mediafire.com/?mjxgs1yv0mvujuz
*** Như vậy bạn đã thực hành xong 5 trường hợp mà Tôi đã nêu. Tôi hi vọng các bạn hãy làm lại
nhiều lần để có thể hiểu sâu hơn về nó.
Bài tập kế tiếp bạn sẽ được thực hành về cách Custom layout lại ListView theo ý thích của bạn.
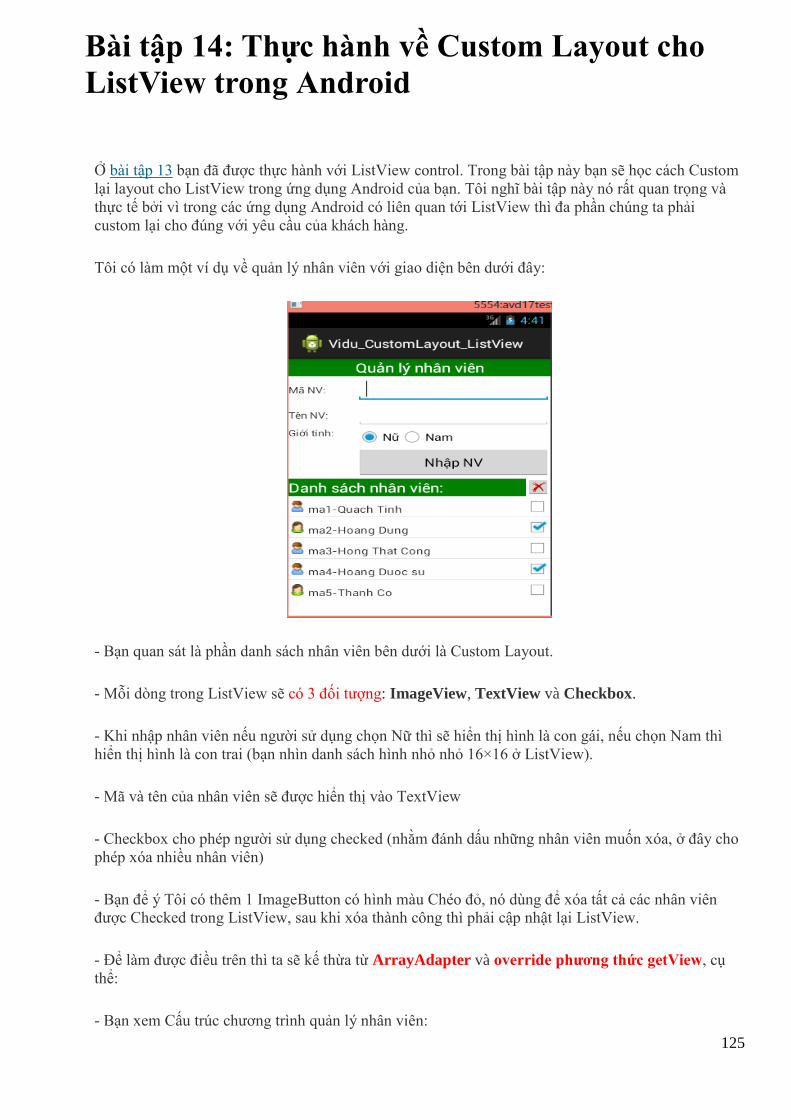
125
Bài tập 14: Thực hành về Custom Layout cho
ListView trong Android
Ở bài tập 13 bạn đã được thực hành với ListView control. Trong bài tập này bạn sẽ học cách Custom
lại layout cho ListView trong ứng dụng Android của bạn. Tôi nghĩ bài tập này nó rất quan trọng và
thực tế bởi vì trong các ứng dụng Android có liên quan tới ListView thì đa phần chúng ta phải
custom lại cho đúng với yêu cầu của khách hàng.
Tôi có làm một ví dụ về quản lý nhân viên với giao diện bên dưới đây:
- Bạn quan sát là phần danh sách nhân viên bên dưới là Custom Layout.
- Mỗi dòng trong ListView sẽ có 3 đối tượng: ImageView, TextView và Checkbox.
- Khi nhập nhân viên nếu người sử dụng chọn Nữ thì sẽ hiển thị hình là con gái, nếu chọn Nam thì
hiển thị hình là con trai (bạn nhìn danh sách hình nhỏ nhỏ 16×16 ở ListView).
- Mã và tên của nhân viên sẽ được hiển thị vào TextView
- Checkbox cho phép người sử dụng checked (nhằm đánh dấu những nhân viên muốn xóa, ở đây cho
phép xóa nhiều nhân viên)
- Bạn để ý Tôi có thêm 1 ImageButton có hình màu Chéo đỏ, nó dùng để xóa tất cả các nhân viên
được Checked trong ListView, sau khi xóa thành công thì phải cập nhật lại ListView.
- Để làm được điều trên thì ta sẽ kế thừa từ ArrayAdapter và override phương thức getView, cụ
thể:
- Bạn xem Cấu trúc chương trình quản lý nhân viên:
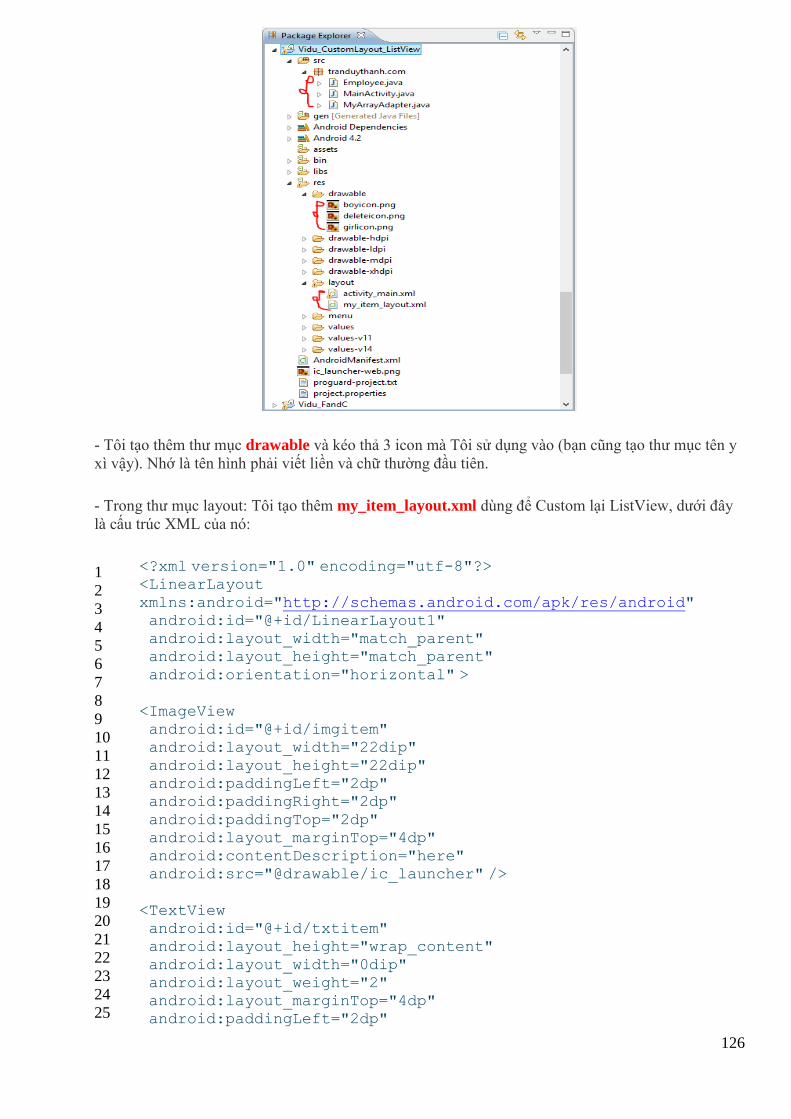
126
- Tôi tạo thêm thư mục drawable và kéo thả 3 icon mà Tôi sử dụng vào (bạn cũng tạo thư mục tên y
xì vậy). Nhớ là tên hình phải viết liền và chữ thường đầu tiên.
- Trong thư mục layout: Tôi tạo thêm my_item_layout.xml dùng để Custom lại ListView, dưới đây
là cấu trúc XML của nó:
1
2
3
4
5
6
7
8
9
10
11
12
13
14
15
16
17
18
19
20
21
22
23
24
25
<?xml version="1.0" encoding="utf-8"?> <LinearLayout
xmlns:android="http://schemas.android.com/apk/res/android" android:id="@+id/LinearLayout1" android:layout_width="match_parent" android:layout_height="match_parent"
android:orientation="horizontal" >
<ImageView android:id="@+id/imgitem" android:layout_width="22dip"
android:layout_height="22dip" android:paddingLeft="2dp" android:paddingRight="2dp"
android:paddingTop="2dp" android:layout_marginTop="4dp" android:contentDescription="here" android:src="@drawable/ic_launcher" />
<TextView android:id="@+id/txtitem" android:layout_height="wrap_content"
android:layout_width="0dip" android:layout_weight="2" android:layout_marginTop="4dp" android:paddingLeft="2dp"

127
26
27
28
29
30
31
32
33
34
35
android:paddingRight="2dp" android:paddingTop="2dp" android:textSize="15sp" />
<CheckBox
android:id="@+id/chkitem" android:layout_width="wrap_content" android:layout_height="wrap_content" />
</LinearLayout>
- Ta sẽ dựa vào các id trong này để xử lý trong hàm getView của class mà ta kế thừa từ ArrayAdapter
(các id trên là imgitem đại diện cho hình là Nữ hay Nam, txtitem dùng để hiển thị mã và tên nhân
viên, chkitem dùng để xử lý Checked)
- Bạn xem activity_main.xml:
1
2
3
4
5
6
7
8
9
10
11
12
13
14
15
16
17
18
19
20
21
22
23
24
25
26
27
28
29
30
31
32
33
34
35
36
<LinearLayout
xmlns:android="http://schemas.android.com/apk/res/android" xmlns:tools="http://schemas.android.com/tools" android:id="@+id/LinearLayout1" android:layout_width="match_parent"
android:layout_height="match_parent" android:orientation="vertical" tools:context=".MainActivity" >
<TextView android:id="@+id/textView2" android:layout_width="match_parent" android:layout_height="wrap_content"
android:background="#008000" android:gravity="center" android:text="Quản lý nhân viên"
android:textColor="#FFFFFF" android:textSize="20sp" />
<TableLayout android:layout_width="match_parent"
android:layout_height="wrap_content" android:stretchColumns="*" >
<TableRow android:id="@+id/tableRow1" android:layout_width="wrap_content" android:layout_height="wrap_content" >
<TextView android:id="@+id/textView3" android:layout_width="wrap_content" android:layout_height="wrap_content"
android:text="Mã NV:" />
<EditText
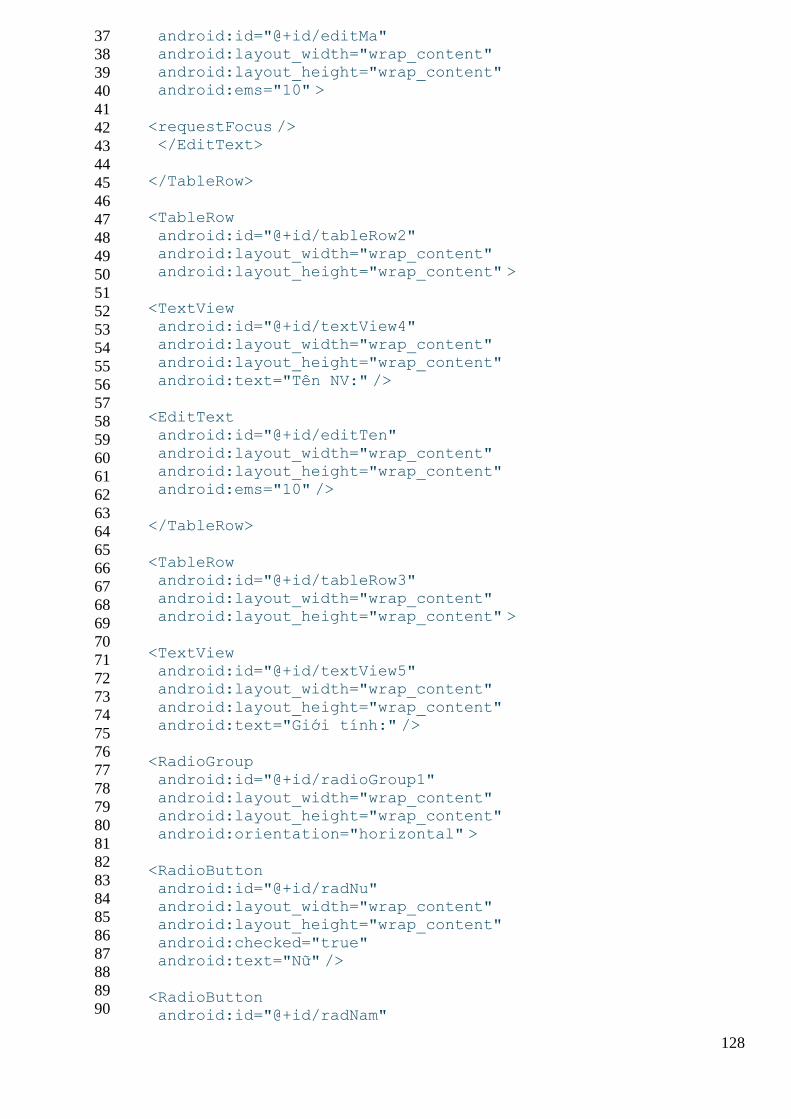
128
37
38
39
40
41
42
43
44
45
46
47
48
49
50
51
52
53
54
55
56
57
58
59
60
61
62
63
64
65
66
67
68
69
70
71
72
73
74
75
76
77
78
79
80
81
82
83
84
85
86
87
88
89
90
android:id="@+id/editMa" android:layout_width="wrap_content" android:layout_height="wrap_content" android:ems="10" >
<requestFocus /> </EditText>
</TableRow>
<TableRow
android:id="@+id/tableRow2" android:layout_width="wrap_content" android:layout_height="wrap_content" >
<TextView android:id="@+id/textView4" android:layout_width="wrap_content" android:layout_height="wrap_content"
android:text="Tên NV:" />
<EditText android:id="@+id/editTen"
android:layout_width="wrap_content" android:layout_height="wrap_content" android:ems="10" />
</TableRow>
<TableRow android:id="@+id/tableRow3" android:layout_width="wrap_content" android:layout_height="wrap_content" >
<TextView android:id="@+id/textView5" android:layout_width="wrap_content"
android:layout_height="wrap_content" android:text="Giới tính:" />
<RadioGroup android:id="@+id/radioGroup1"
android:layout_width="wrap_content" android:layout_height="wrap_content" android:orientation="horizontal" >
<RadioButton android:id="@+id/radNu" android:layout_width="wrap_content" android:layout_height="wrap_content"
android:checked="true" android:text="Nữ" />
<RadioButton android:id="@+id/radNam"
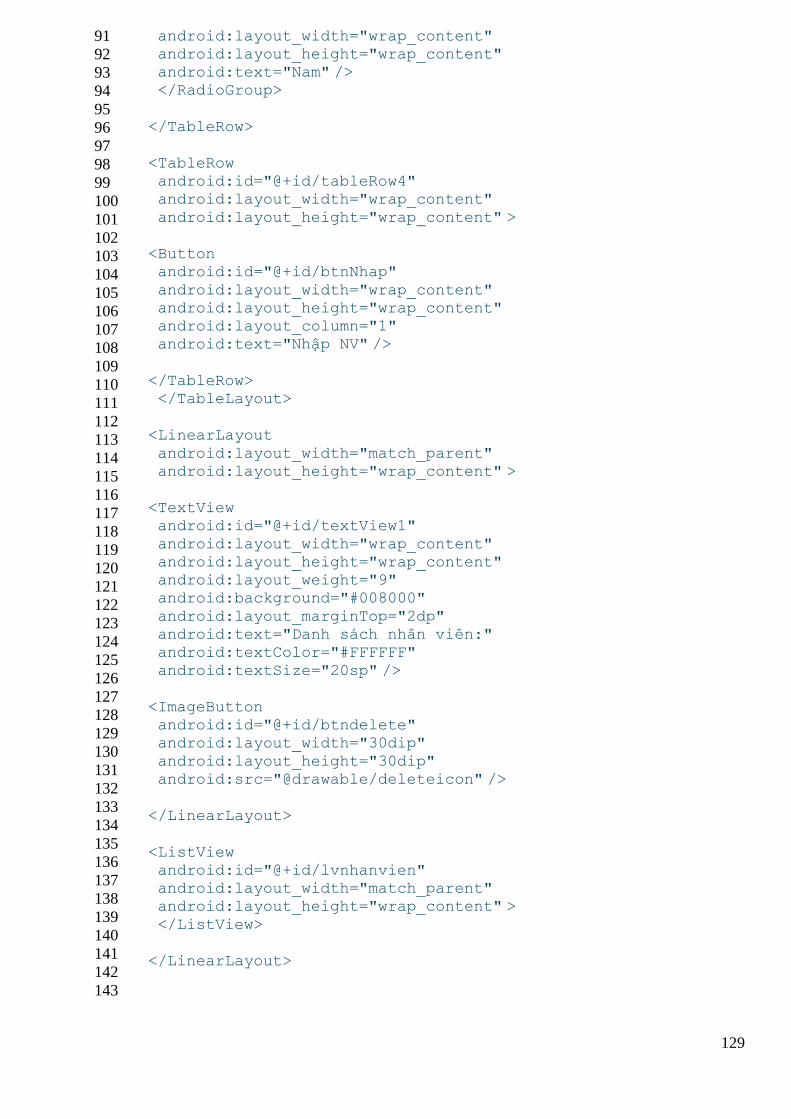
129
91
92
93
94
95
96
97
98
99
100
101
102
103
104
105
106
107
108
109
110
111
112
113
114
115
116
117
118
119
120
121
122
123
124
125
126
127
128
129
130
131
132
133
134
135
136
137
138
139
140
141
142
143
android:layout_width="wrap_content" android:layout_height="wrap_content" android:text="Nam" /> </RadioGroup>
</TableRow>
<TableRow android:id="@+id/tableRow4" android:layout_width="wrap_content"
android:layout_height="wrap_content" >
<Button android:id="@+id/btnNhap"
android:layout_width="wrap_content" android:layout_height="wrap_content" android:layout_column="1" android:text="Nhập NV" />
</TableRow> </TableLayout>
<LinearLayout
android:layout_width="match_parent" android:layout_height="wrap_content" >
<TextView android:id="@+id/textView1"
android:layout_width="wrap_content" android:layout_height="wrap_content" android:layout_weight="9" android:background="#008000"
android:layout_marginTop="2dp" android:text="Danh sách nhân viên:" android:textColor="#FFFFFF"
android:textSize="20sp" />
<ImageButton android:id="@+id/btndelete" android:layout_width="30dip"
android:layout_height="30dip" android:src="@drawable/deleteicon" />
</LinearLayout>
<ListView android:id="@+id/lvnhanvien" android:layout_width="match_parent" android:layout_height="wrap_content" >
</ListView>
</LinearLayout>
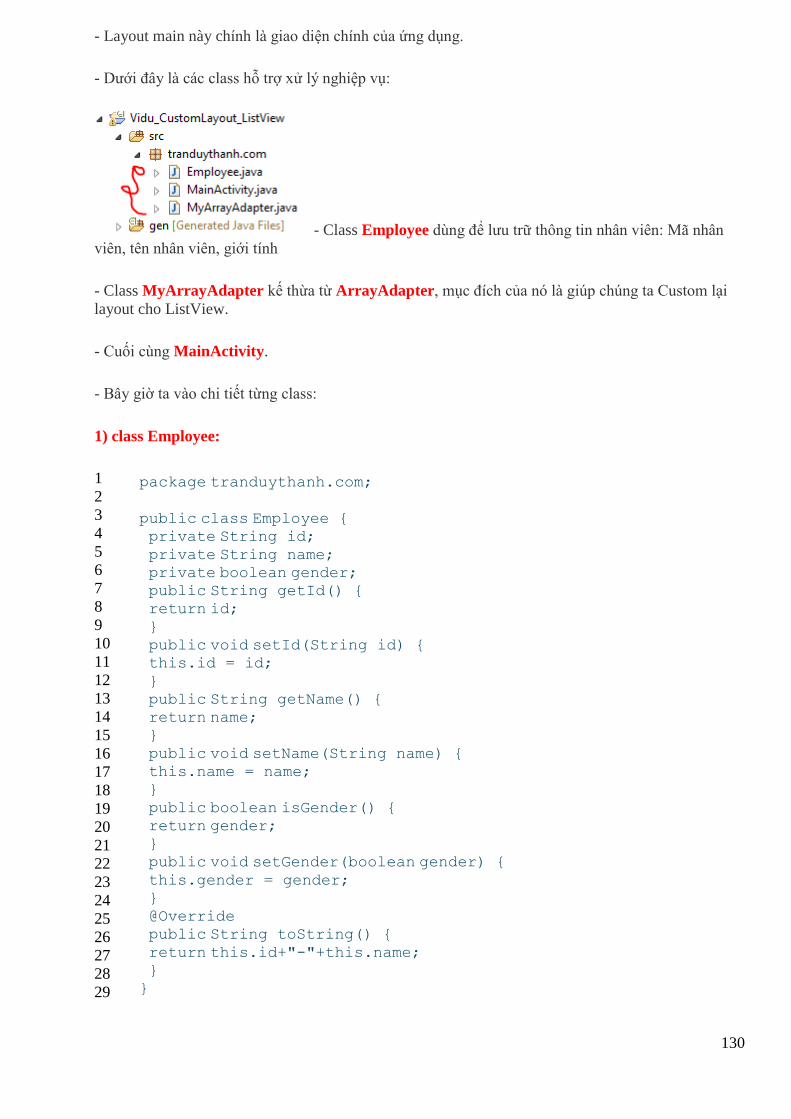
130
- Layout main này chính là giao diện chính của ứng dụng.
- Dưới đây là các class hỗ trợ xử lý nghiệp vụ:
- Class Employee dùng để lưu trữ thông tin nhân viên: Mã nhân
viên, tên nhân viên, giới tính
- Class MyArrayAdapter kế thừa từ ArrayAdapter, mục đích của nó là giúp chúng ta Custom lại
layout cho ListView.
- Cuối cùng MainActivity.
- Bây giờ ta vào chi tiết từng class:
1) class Employee:
1
2
3
4
5
6
7
8
9
10
11
12
13
14
15
16
17
18
19
20
21
22
23
24
25
26
27
28
29
package tranduythanh.com;
public class Employee { private String id;
private String name; private boolean gender; public String getId() { return id;
} public void setId(String id) { this.id = id;
} public String getName() { return name; }
public void setName(String name) { this.name = name; }
public boolean isGender() { return gender; } public void setGender(boolean gender) {
this.gender = gender; } @Override public String toString() {
return this.id+"-"+this.name; } }
131
2) class MyArrayAdapter:
1
2
3
4
5
6
7
8
9
10
11
12
13
14
15
16
17
18
19
20
21
22
23
24
25
26
27
28
29
30
31
32
33
34
35
36
37
38
39
40
41
42
43
44
45
46
47
48
49
50
51
52
package tranduythanh.com;
import java.util.ArrayList; import android.app.Activity; import android.view.LayoutInflater;
import android.view.View; import android.view.ViewGroup; import android.widget.ArrayAdapter; import android.widget.ImageView;
import android.widget.TextView;
public class MyArrayAdapter extends ArrayAdapter<Employee>
{ Activity context=null; ArrayList<Employee>myArray=null; int layoutId;
/** * Constructor này dùng để khởi tạo các giá trị * từ MainActivity truyền vào
* @param context : là Activity từ Main * @param layoutId: Là layout custom do ta tạo
(my_item_layout.xml) * @param arr : Danh sách nhân viên truyền từ Main
*/ public MyArrayAdapter(Activity context, int layoutId,
ArrayList<Employee>arr){ super(context, layoutId, arr); this.context=context; this.layoutId=layoutId;
this.myArray=arr; } /** * hàm dùng để custom layout, ta phải override lại hàm này
* từ MainActivity truyền vào * @param position : là vị trí của phần tử trong danh sách
nhân viên
* @param convertView: convertView, dùng nó để xử lý Item * @param parent : Danh sách nhân viên truyền từ Main * @return View: trả về chính convertView */
public View getView(int position, View convertView, ViewGroup parent) { /**
* bạn chú ý là ở đây Tôi không làm: * if(convertView==null) * { * LayoutInflater inflater=
* context.getLayoutInflater(); * convertView=inflater.inflate(layoutId, null); * }
* Lý do là ta phải xử lý xóa phần tử Checked, nếu dùng If
132
53
54
55
56
57
58
59
60
61
62
63
64
65
66
67
68
69
70
71
72
73
74
75
76
77
78
79
80
81
82
83
84
thì * nó lại checked cho các phần tử khác sau khi xóa vì
convertView * lưu lại trạng thái trước đó
*/ LayoutInflater inflater= context.getLayoutInflater(); convertView=inflater.inflate(layoutId, null);
//chỉ là test thôi, bạn có thể bỏ If đi if(myArray.size()>0 && position>=0) {
//dòng lệnh lấy TextView ra để hiển thị Mã và tên lên final TextView txtdisplay=(TextView) convertView.findViewById(R.id.txtitem); //lấy ra nhân viên thứ position
final Employee emp=myArray.get(position); //đưa thông tin lên TextView //emp.toString() sẽ trả về Id và Name
txtdisplay.setText(emp.toString()); //lấy ImageView ra để thiết lập hình ảnh cho đúng final ImageView imgitem=(ImageView) convertView.findViewById(R.id.imgitem);
//nếu là Nữ thì lấy hình con gái if(emp.isGender()) imgitem.setImageResource(R.drawable.girlicon);
else//nếu là Nam thì lấy hình con trai imgitem.setImageResource(R.drawable.boyicon ); } //Vì View là Object là dạng tham chiếu đối tượng, nên
//mọi sự thay đổi của các object bên trong convertView //thì nó cũng biết sự thay đổi đó return convertView;//trả về View này, tức là trả luôn
//về các thông số mới mà ta vừa thay đổi } }
- Đây là class quan trọng nhất, mới nhất; dùng để custom layout.
3) class MainActivity:
1
2
3
4
5
6
7
8
9
10
11
12
13
14
package tranduythanh.com;
import java.util.ArrayList;
import android.os.Bundle; import android.app.Activity;
import android.view.View; import android.view.View.OnClickListener; import android.widget.Button;
import android.widget.CheckBox; import android.widget.EditText; import android.widget.ImageButton; import android.widget.ListView;
import android.widget.RadioGroup;
133
15
16
17
18
19
20
21
22
23
24
25
26
27
28
29
30
31
32
33
34
35
36
37
38
39
40
41
42
43
44
45
46
47
48
49
50
51
52
53
54
55
56
57
58
59
60
61
62
63
64
65
66
67
68
public class MainActivity extends Activity {
ArrayList<Employee>arrEmployee=new ArrayList<Employee>(); //Sử dụng MyArrayAdapter thay thì ArrayAdapter MyArrayAdapter adapter=null;
ListView lvNhanvien=null;
Button btnNhap; ImageButton btnRemoveAll; EditText editMa,editTen;
RadioGroup genderGroup;
@Override protected void onCreate(Bundle savedInstanceState) {
super.onCreate(savedInstanceState); setContentView(R.layout.activity_main);
btnNhap=(Button) findViewById(R.id.btnNhap); btnRemoveAll=(ImageButton) findViewById(R.id.btndelete);
editMa=(EditText) findViewById(R.id.editMa); editTen=(EditText) findViewById(R.id.editTen); genderGroup=(RadioGroup) findViewById(R.id.radioGroup1);
lvNhanvien=(ListView) findViewById(R.id.lvnhanvien); arrEmployee=new ArrayList<Employee>(); //Khởi tạo đối tượng adapter và gán Data source adapter=new MyArrayAdapter(
this, R.layout.my_item_layout,// lấy custom layout arrEmployee/*thiết lập data source*/); lvNhanvien.setAdapter(adapter);//gán Adapter vào Lisview
btnNhap.setOnClickListener(new OnClickListener() {
@Override public void onClick(View arg0) {
// TODO Auto-generated method stub xulyNhap(); } });
btnRemoveAll.setOnClickListener(new OnClickListener() {
@Override public void onClick(View arg0) {
xulyXoa(); } }); }
//gọi hàm xử lý nhập thông tin nhân viên public void xulyNhap() {
String ma=editMa.getText()+""; String ten=editTen.getText()+""; boolean gioitinh=false;//Nam =false
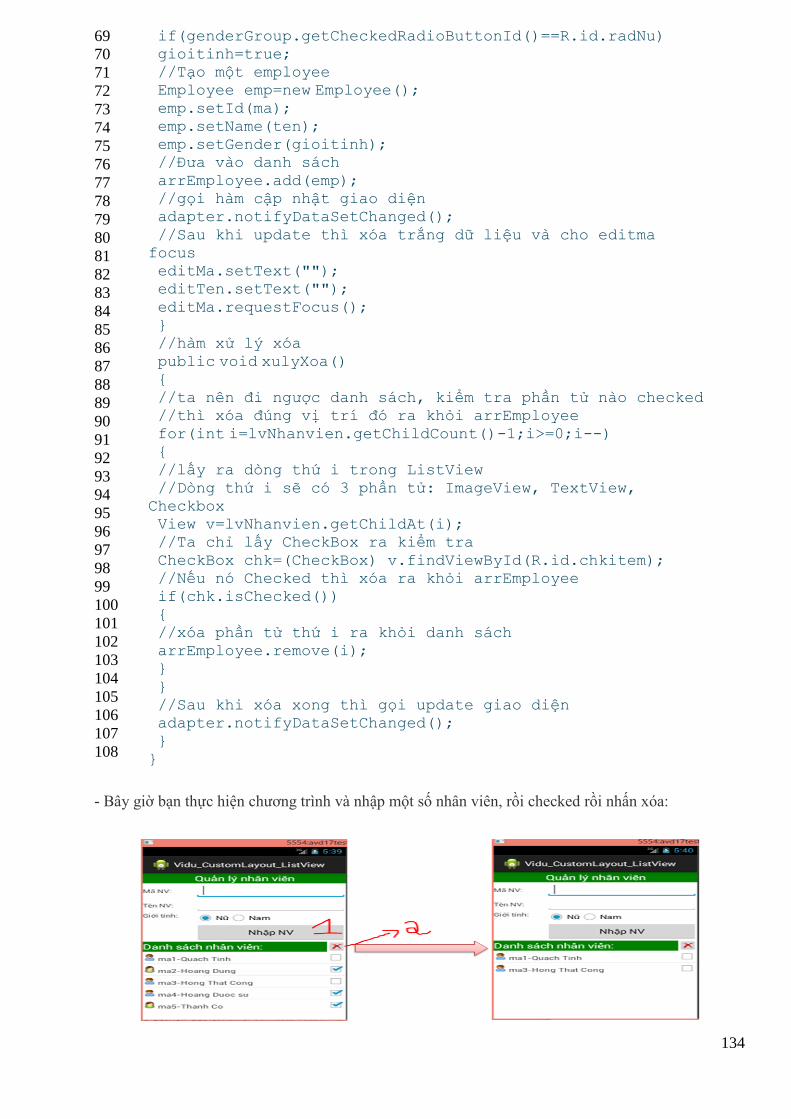
134
69
70
71
72
73
74
75
76
77
78
79
80
81
82
83
84
85
86
87
88
89
90
91
92
93
94
95
96
97
98
99
100
101
102
103
104
105
106
107
108
if(genderGroup.getCheckedRadioButtonId()==R.id.radNu) gioitinh=true; //Tạo một employee Employee emp=new Employee();
emp.setId(ma); emp.setName(ten); emp.setGender(gioitinh); //Đưa vào danh sách
arrEmployee.add(emp); //gọi hàm cập nhật giao diện adapter.notifyDataSetChanged();
//Sau khi update thì xóa trắng dữ liệu và cho editma
focus editMa.setText(""); editTen.setText("");
editMa.requestFocus(); } //hàm xử lý xóa
public void xulyXoa() { //ta nên đi ngược danh sách, kiểm tra phần tử nào checked //thì xóa đúng vị trí đó ra khỏi arrEmployee
for(int i=lvNhanvien.getChildCount()-1;i>=0;i--) { //lấy ra dòng thứ i trong ListView
//Dòng thứ i sẽ có 3 phần tử: ImageView, TextView,
Checkbox View v=lvNhanvien.getChildAt(i); //Ta chỉ lấy CheckBox ra kiểm tra
CheckBox chk=(CheckBox) v.findViewById(R.id.chkitem); //Nếu nó Checked thì xóa ra khỏi arrEmployee if(chk.isChecked())
{ //xóa phần tử thứ i ra khỏi danh sách arrEmployee.remove(i); }
} //Sau khi xóa xong thì gọi update giao diện adapter.notifyDataSetChanged(); }
}
- Bây giờ bạn thực hiện chương trình và nhập một số nhân viên, rồi checked rồi nhấn xóa:
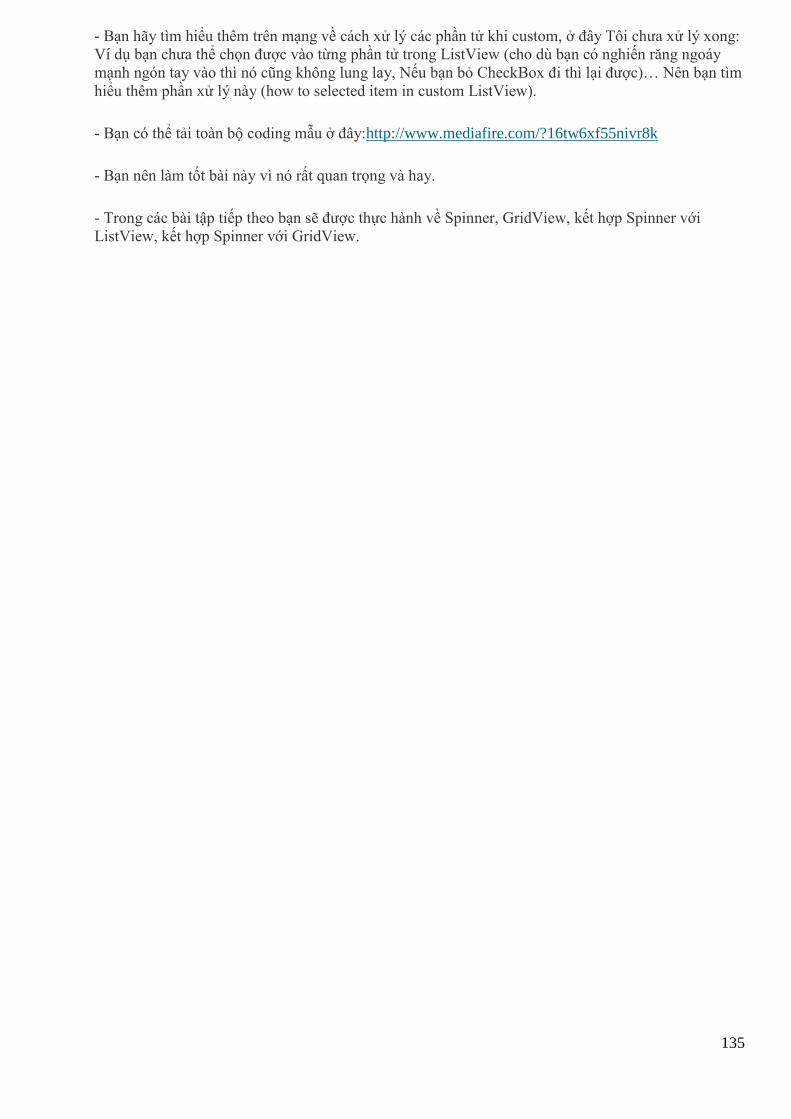
135
- Bạn hãy tìm hiểu thêm trên mạng về cách xử lý các phần tử khi custom, ở đây Tôi chưa xử lý xong:
Ví dụ bạn chưa thể chọn được vào từng phần tử trong ListView (cho dù bạn có nghiến răng ngoáy
mạnh ngón tay vào thì nó cũng không lung lay, Nếu bạn bỏ CheckBox đi thì lại được)… Nên bạn tìm
hiểu thêm phần xử lý này (how to selected item in custom ListView).
- Bạn có thể tải toàn bộ coding mẫu ở đây:http://www.mediafire.com/?16tw6xf55nivr8k
- Bạn nên làm tốt bài này vì nó rất quan trọng và hay.
- Trong các bài tập tiếp theo bạn sẽ được thực hành về Spinner, GridView, kết hợp Spinner với
ListView, kết hợp Spinner với GridView.
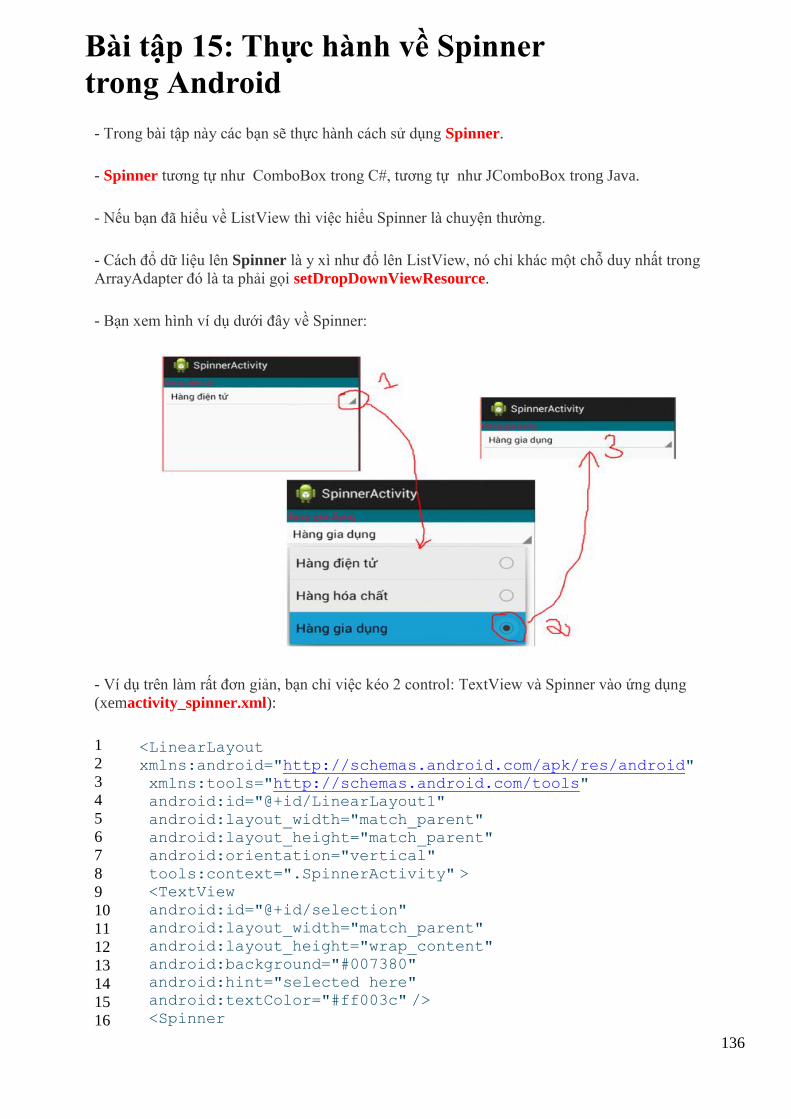
136
Bài tập 15: Thực hành về Spinner
trong Android
- Trong bài tập này các bạn sẽ thực hành cách sử dụng Spinner.
- Spinner tương tự như ComboBox trong C#, tương tự như JComboBox trong Java.
- Nếu bạn đã hiểu về ListView thì việc hiểu Spinner là chuyện thường.
- Cách đổ dữ liệu lên Spinner là y xì như đổ lên ListView, nó chỉ khác một chỗ duy nhất trong
ArrayAdapter đó là ta phải gọi setDropDownViewResource.
- Bạn xem hình ví dụ dưới đây về Spinner:
- Ví dụ trên làm rất đơn giản, bạn chỉ việc kéo 2 control: TextView và Spinner vào ứng dụng
(xemactivity_spinner.xml):
1
2
3
4
5
6
7
8
9
10
11
12
13
14
15
16
<LinearLayout xmlns:android="http://schemas.android.com/apk/res/android" xmlns:tools="http://schemas.android.com/tools" android:id="@+id/LinearLayout1"
android:layout_width="match_parent" android:layout_height="match_parent" android:orientation="vertical"
tools:context=".SpinnerActivity" > <TextView android:id="@+id/selection" android:layout_width="match_parent"
android:layout_height="wrap_content" android:background="#007380" android:hint="selected here" android:textColor="#ff003c" />
<Spinner
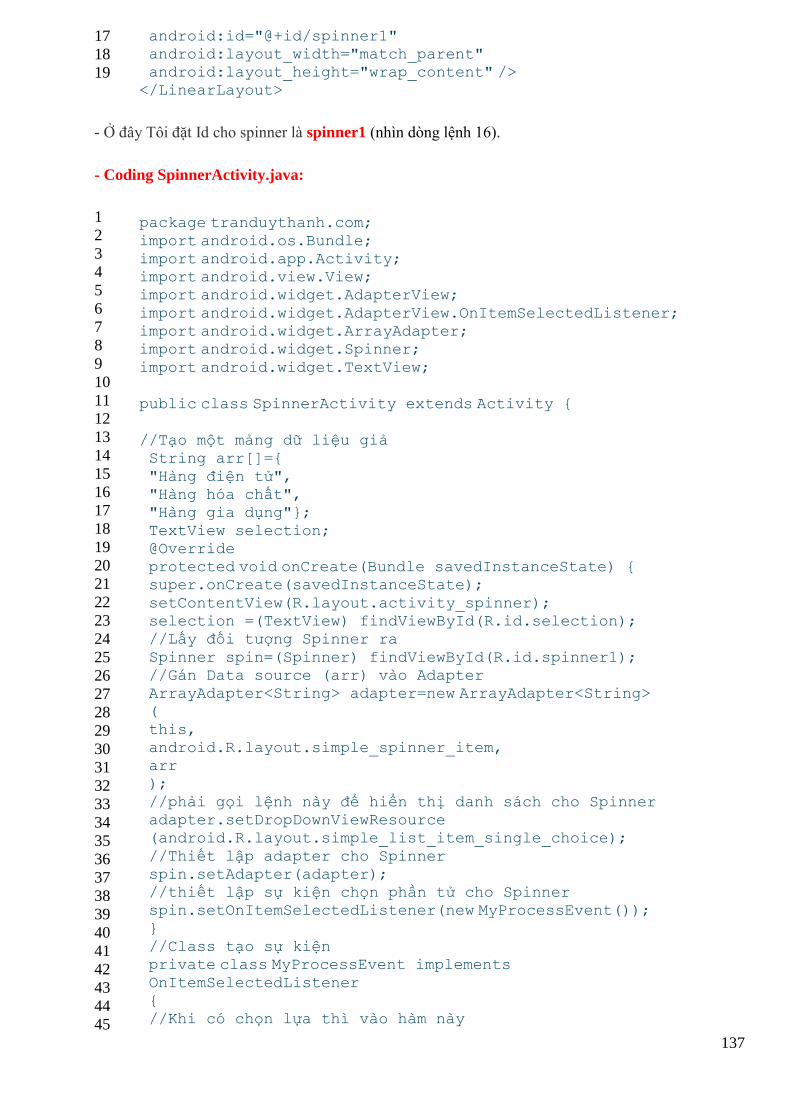
137
17
18
19
android:id="@+id/spinner1" android:layout_width="match_parent" android:layout_height="wrap_content" /> </LinearLayout>
- Ở đây Tôi đặt Id cho spinner là spinner1 (nhìn dòng lệnh 16).
- Coding SpinnerActivity.java:
1
2
3
4
5
6
7
8
9
10
11
12
13
14
15
16
17
18
19
20
21
22
23
24
25
26
27
28
29
30
31
32
33
34
35
36
37
38
39
40
41
42
43
44
45
package tranduythanh.com;
import android.os.Bundle; import android.app.Activity; import android.view.View; import android.widget.AdapterView;
import android.widget.AdapterView.OnItemSelectedListener; import android.widget.ArrayAdapter; import android.widget.Spinner;
import android.widget.TextView;
public class SpinnerActivity extends Activity {
//Tạo một mảng dữ liệu giả String arr[]={
"Hàng điện tử", "Hàng hóa chất", "Hàng gia dụng"};
TextView selection; @Override protected void onCreate(Bundle savedInstanceState) { super.onCreate(savedInstanceState);
setContentView(R.layout.activity_spinner); selection =(TextView) findViewById(R.id.selection); //Lấy đối tượng Spinner ra
Spinner spin=(Spinner) findViewById(R.id.spinner1); //Gán Data source (arr) vào Adapter ArrayAdapter<String> adapter=new ArrayAdapter<String> (
this, android.R.layout.simple_spinner_item, arr );
//phải gọi lệnh này để hiển thị danh sách cho Spinner adapter.setDropDownViewResource (android.R.layout.simple_list_item_single_choice);
//Thiết lập adapter cho Spinner spin.setAdapter(adapter); //thiết lập sự kiện chọn phần tử cho Spinner spin.setOnItemSelectedListener(new MyProcessEvent());
} //Class tạo sự kiện private class MyProcessEvent implements
OnItemSelectedListener { //Khi có chọn lựa thì vào hàm này
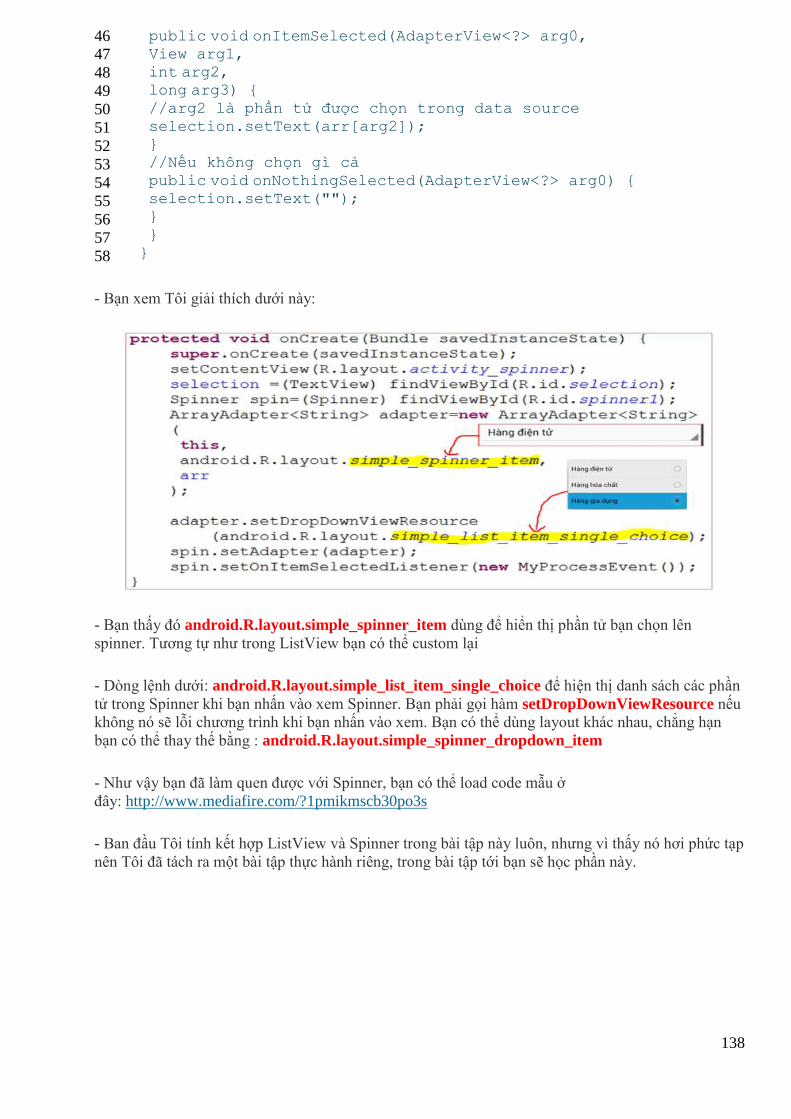
138
46
47
48
49
50
51
52
53
54
55
56
57
58
public void onItemSelected(AdapterView<?> arg0, View arg1, int arg2, long arg3) {
//arg2 là phần tử được chọn trong data source selection.setText(arr[arg2]); } //Nếu không chọn gì cả
public void onNothingSelected(AdapterView<?> arg0) { selection.setText(""); }
} }
- Bạn xem Tôi giải thích dưới này:
- Bạn thấy đó android.R.layout.simple_spinner_item dùng để hiển thị phần tử bạn chọn lên
spinner. Tương tự như trong ListView bạn có thể custom lại
- Dòng lệnh dưới: android.R.layout.simple_list_item_single_choice để hiện thị danh sách các phần
tử trong Spinner khi bạn nhấn vào xem Spinner. Bạn phải gọi hàm setDropDownViewResource nếu
không nó sẽ lỗi chương trình khi bạn nhấn vào xem. Bạn có thể dùng layout khác nhau, chẳng hạn
bạn có thể thay thế bằng : android.R.layout.simple_spinner_dropdown_item
- Như vậy bạn đã làm quen được với Spinner, bạn có thể load code mẫu ở
đây: http://www.mediafire.com/?1pmikmscb30po3s
- Ban đầu Tôi tính kết hợp ListView và Spinner trong bài tập này luôn, nhưng vì thấy nó hơi phức tạp
nên Tôi đã tách ra một bài tập thực hành riêng, trong bài tập tới bạn sẽ học phần này.

139
Bài tập 16: Kết hợp Spinner với ListView
trong Android
Ở bài tập 15 bạn đã làm quen được với Spinner, trong bài tập này bạn sẽ làm một ví dụ về cách kết
hợp giữa Spinner với ListView. Thường thì 2 control này đi với nhau sẽ tạo thành cặp bài
trùng,Spinner dùng để lưu trữ danh mục còn ListView lưu trữ danh sách của từng danh mục. Ở đây
Tôi có làm một ví dụ về quản lý sản phẩm, bạn xem hình:
- Bạn quan sát hình Tôi chụp ứng dụng, phần trên cùng là Danh mục các sản phẩm được lưu
vàoSpinner, Khi bạn chọn vào nó thì sẽ xổ ra danh sách như bên dưới. khi bạn chọn danh mục nào thì
nó sẽ load các sản phẩm thuộc danh mục đó.
- Ví dụ bây giờ bạn chọn số 1 là SamSung, nó sẽ load toàn bộ sản phẩm là SamSung vào ListView
bên dưới:
- Nếu bạn chọn 2- Iphone thì nó sẽ load toàn bộ sản phẩm là IPhone vào ListView bên dưới:
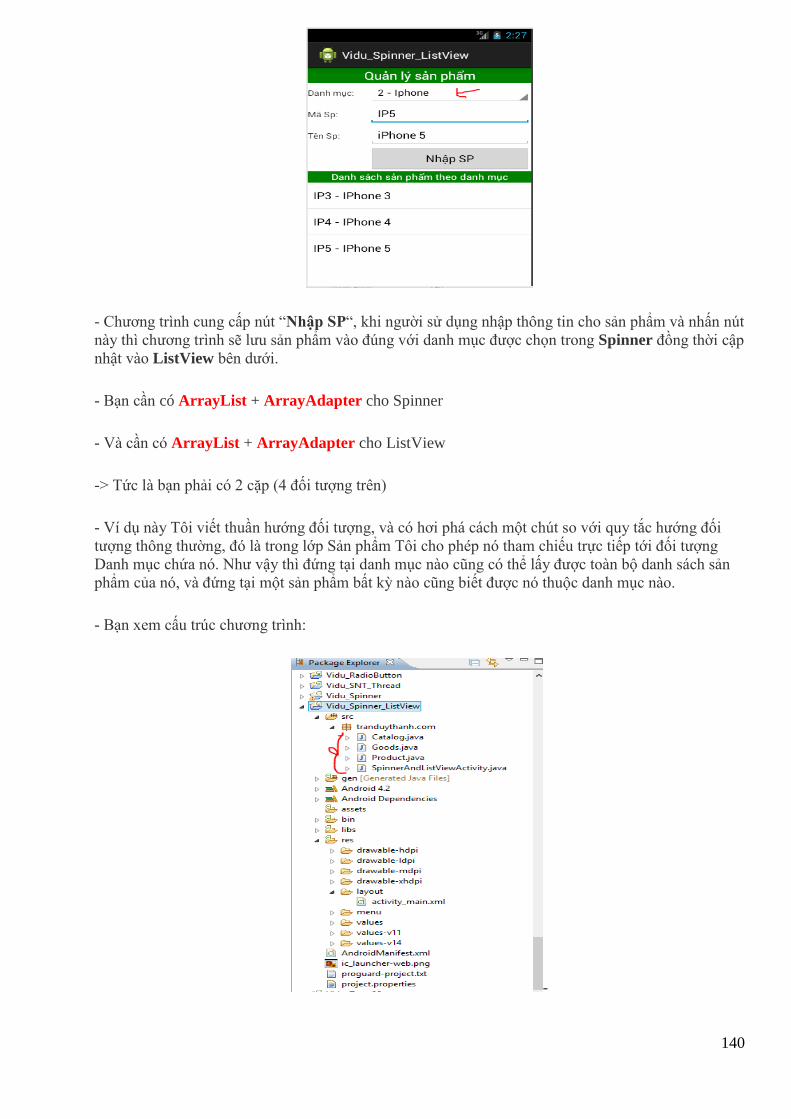
140
- Chương trình cung cấp nút “Nhập SP“, khi người sử dụng nhập thông tin cho sản phẩm và nhấn nút
này thì chương trình sẽ lưu sản phẩm vào đúng với danh mục được chọn trong Spinner đồng thời cập
nhật vào ListView bên dưới.
- Bạn cần có ArrayList + ArrayAdapter cho Spinner
- Và cần có ArrayList + ArrayAdapter cho ListView
-> Tức là bạn phải có 2 cặp (4 đối tượng trên)
- Ví dụ này Tôi viết thuần hướng đối tượng, và có hơi phá cách một chút so với quy tắc hướng đối
tượng thông thường, đó là trong lớp Sản phẩm Tôi cho phép nó tham chiếu trực tiếp tới đối tượng
Danh mục chứa nó. Như vậy thì đứng tại danh mục nào cũng có thể lấy được toàn bộ danh sách sản
phẩm của nó, và đứng tại một sản phẩm bất kỳ nào cũng biết được nó thuộc danh mục nào.
- Bạn xem cấu trúc chương trình:
-
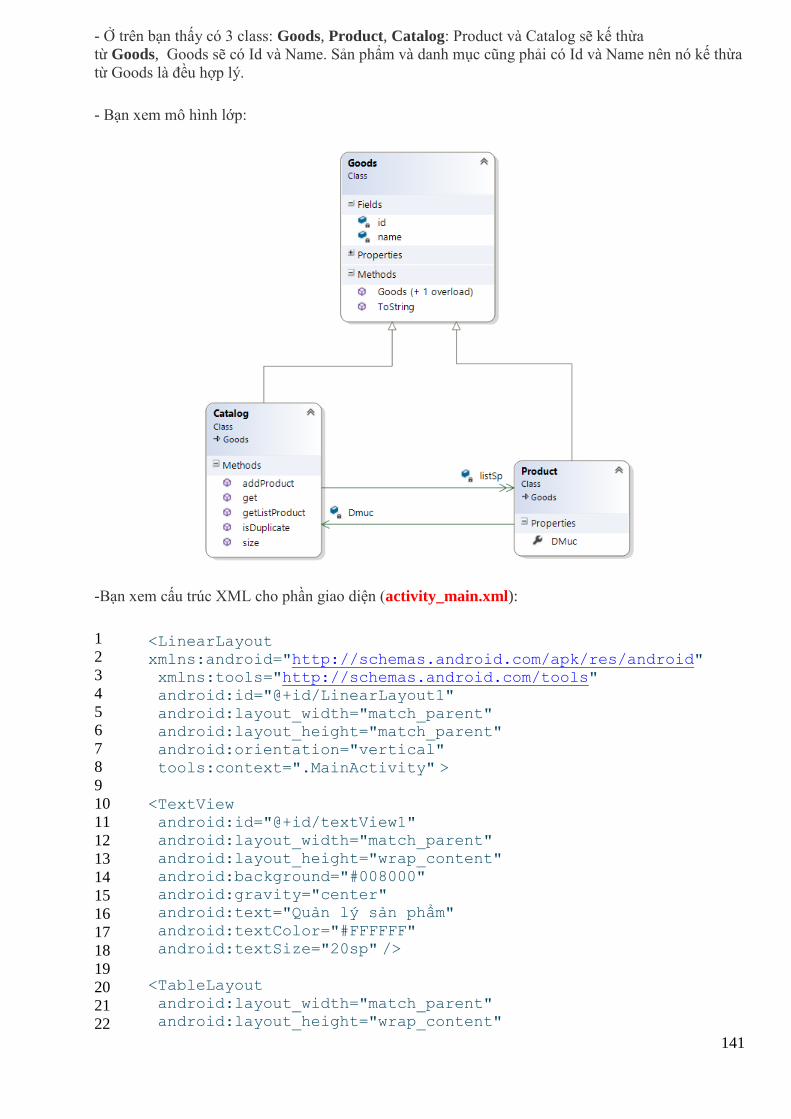
141
- Ở trên bạn thấy có 3 class: Goods, Product, Catalog: Product và Catalog sẽ kế thừa
từ Goods, Goods sẽ có Id và Name. Sản phẩm và danh mục cũng phải có Id và Name nên nó kế thừa
từ Goods là đều hợp lý.
- Bạn xem mô hình lớp:
-Bạn xem cấu trúc XML cho phần giao diện (activity_main.xml):
1
2
3
4
5
6
7
8
9
10
11
12
13
14
15
16
17
18
19
20
21
22
<LinearLayout xmlns:android="http://schemas.android.com/apk/res/android" xmlns:tools="http://schemas.android.com/tools" android:id="@+id/LinearLayout1"
android:layout_width="match_parent" android:layout_height="match_parent" android:orientation="vertical"
tools:context=".MainActivity" >
<TextView android:id="@+id/textView1" android:layout_width="match_parent"
android:layout_height="wrap_content" android:background="#008000" android:gravity="center" android:text="Quản lý sản phẩm"
android:textColor="#FFFFFF" android:textSize="20sp" />
<TableLayout
android:layout_width="match_parent" android:layout_height="wrap_content"
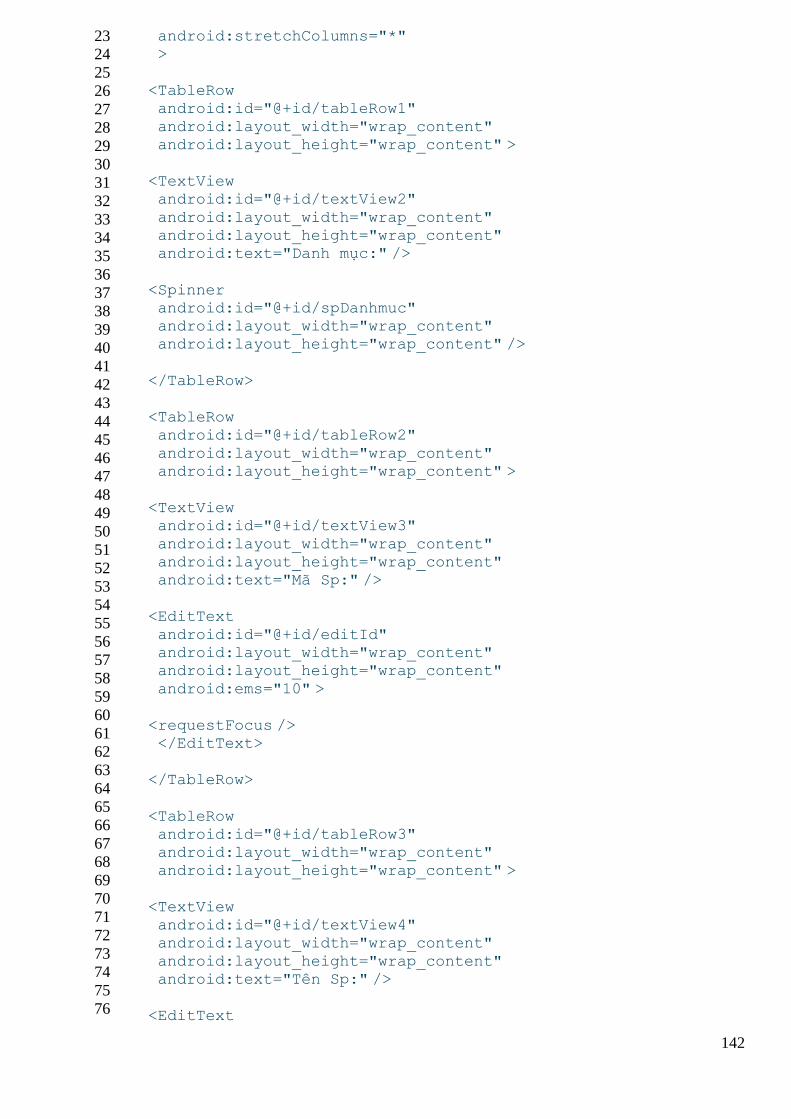
142
23
24
25
26
27
28
29
30
31
32
33
34
35
36
37
38
39
40
41
42
43
44
45
46
47
48
49
50
51
52
53
54
55
56
57
58
59
60
61
62
63
64
65
66
67
68
69
70
71
72
73
74
75
76
android:stretchColumns="*" >
<TableRow android:id="@+id/tableRow1"
android:layout_width="wrap_content" android:layout_height="wrap_content" >
<TextView android:id="@+id/textView2"
android:layout_width="wrap_content" android:layout_height="wrap_content" android:text="Danh mục:" />
<Spinner android:id="@+id/spDanhmuc" android:layout_width="wrap_content" android:layout_height="wrap_content" />
</TableRow>
<TableRow android:id="@+id/tableRow2"
android:layout_width="wrap_content" android:layout_height="wrap_content" >
<TextView android:id="@+id/textView3"
android:layout_width="wrap_content" android:layout_height="wrap_content" android:text="Mã Sp:" />
<EditText
android:id="@+id/editId" android:layout_width="wrap_content" android:layout_height="wrap_content"
android:ems="10" >
<requestFocus /> </EditText>
</TableRow>
<TableRow android:id="@+id/tableRow3" android:layout_width="wrap_content"
android:layout_height="wrap_content" >
<TextView android:id="@+id/textView4" android:layout_width="wrap_content"
android:layout_height="wrap_content" android:text="Tên Sp:" />
<EditText
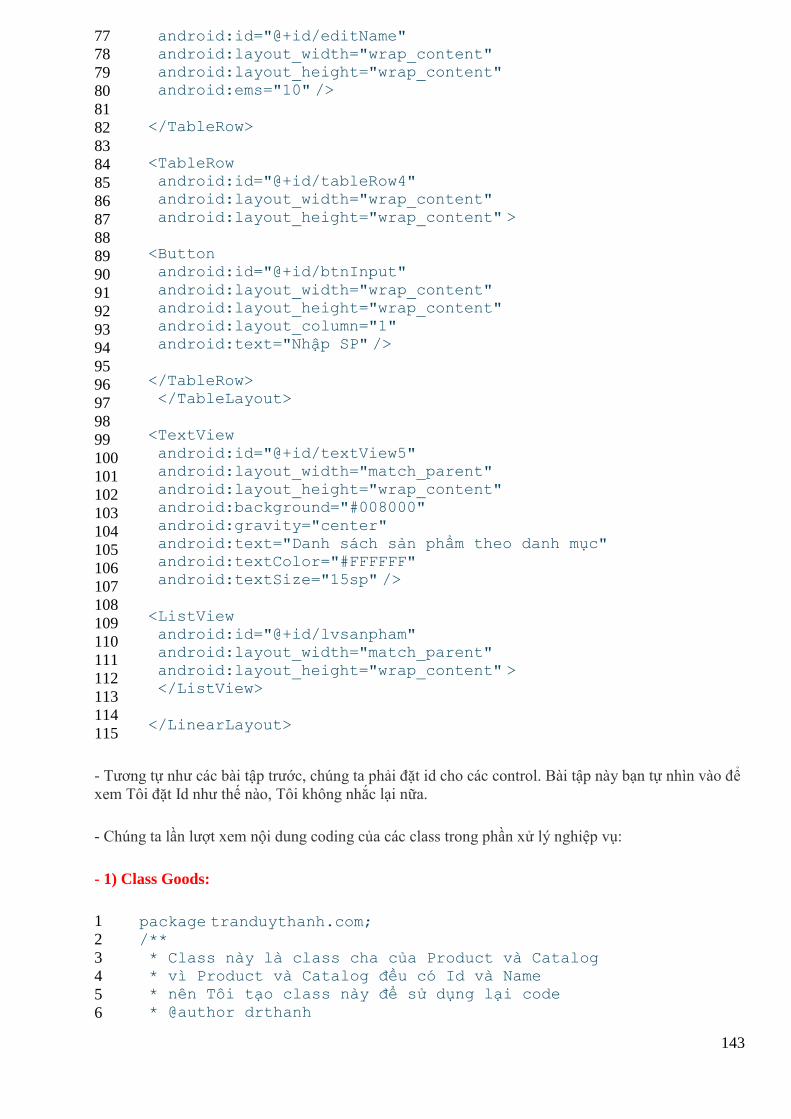
143
77
78
79
80
81
82
83
84
85
86
87
88
89
90
91
92
93
94
95
96
97
98
99
100
101
102
103
104
105
106
107
108
109
110
111
112
113
114
115
android:id="@+id/editName" android:layout_width="wrap_content" android:layout_height="wrap_content" android:ems="10" />
</TableRow>
<TableRow android:id="@+id/tableRow4" android:layout_width="wrap_content"
android:layout_height="wrap_content" >
<Button android:id="@+id/btnInput"
android:layout_width="wrap_content" android:layout_height="wrap_content" android:layout_column="1" android:text="Nhập SP" />
</TableRow> </TableLayout>
<TextView
android:id="@+id/textView5" android:layout_width="match_parent" android:layout_height="wrap_content" android:background="#008000"
android:gravity="center" android:text="Danh sách sản phẩm theo danh mục" android:textColor="#FFFFFF" android:textSize="15sp" />
<ListView android:id="@+id/lvsanpham" android:layout_width="match_parent"
android:layout_height="wrap_content" > </ListView>
</LinearLayout>
- Tương tự như các bài tập trước, chúng ta phải đặt id cho các control. Bài tập này bạn tự nhìn vào để
xem Tôi đặt Id như thế nào, Tôi không nhắc lại nữa.
- Chúng ta lần lượt xem nội dung coding của các class trong phần xử lý nghiệp vụ:
- 1) Class Goods:
1
2
3
4
5
6
package tranduythanh.com; /**
* Class này là class cha của Product và Catalog * vì Product và Catalog đều có Id và Name * nên Tôi tạo class này để sử dụng lại code
* @author drthanh
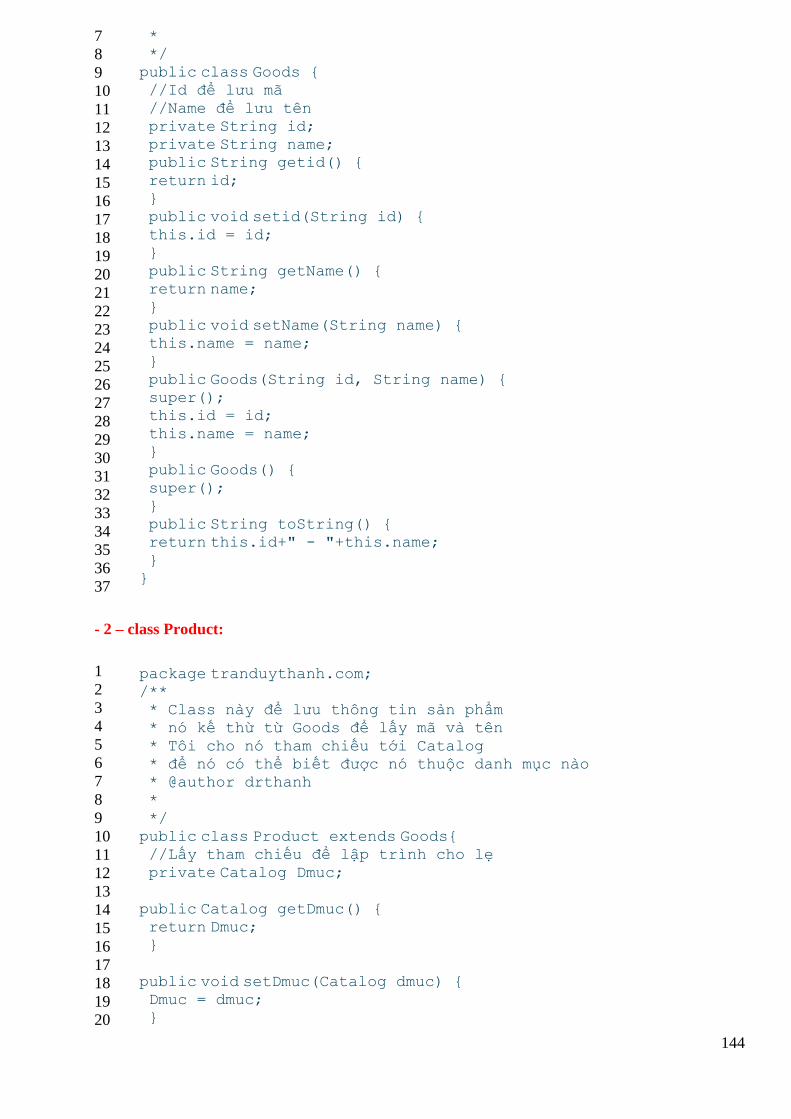
144
7
8
9
10
11
12
13
14
15
16
17
18
19
20
21
22
23
24
25
26
27
28
29
30
31
32
33
34
35
36
37
* */ public class Goods { //Id để lưu mã
//Name để lưu tên private String id; private String name; public String getid() {
return id; } public void setid(String id) {
this.id = id; } public String getName() { return name;
} public void setName(String name) { this.name = name;
} public Goods(String id, String name) { super(); this.id = id;
this.name = name; } public Goods() {
super(); } public String toString() { return this.id+" - "+this.name;
} }
- 2 – class Product:
1
2
3
4
5
6
7
8
9
10
11
12
13
14
15
16
17
18
19
20
package tranduythanh.com; /** * Class này để lưu thông tin sản phẩm * nó kế thừ từ Goods để lấy mã và tên
* Tôi cho nó tham chiếu tới Catalog * để nó có thể biết được nó thuộc danh mục nào * @author drthanh
* */ public class Product extends Goods{ //Lấy tham chiếu để lập trình cho lẹ
private Catalog Dmuc;
public Catalog getDmuc() { return Dmuc; }
public void setDmuc(Catalog dmuc) { Dmuc = dmuc; }

145
21
22
23
24
25
26
27
28
29
30
31
32
33
34
35
public Product(String ma, String name, Catalog dmuc) {
super(ma, name); Dmuc = dmuc; }
public Product(String ma, String name) { super(ma, name); }
public Product() {
super(); }
}
- 3 – class Catalog:
1
2
3
4
5
6
7
8
9
10
11
12
13
14
15
16
17
18
19
20
21
22
23
24
25
26
27
28
29
30
31
32
33
34
35
36
package tranduythanh.com;
import java.util.ArrayList; /** * Class dùng để lưu trữ thông tin danh mục
* và danh sách các sản phẩm thuộc danh mục * @author drthanh * */
public class Catalog extends Goods { private ArrayList<Product>listSp=null; public Catalog(String ma, String name) { super(ma, name);
this.listSp=new ArrayList<Product>(); }
public Catalog() {
super(); this.listSp=new ArrayList<Product>(); } /**
* kiểm tra sản phẩm đã tồn tại trong danh mục hay chưa * @param p * @return true nếu tồn tại
*/ public boolean isDuplicate(Product p) { for(Product p1: listSp)
{ if(p1.getid().trim().equalsIgnoreCase(p.getid().trim())) return true;
} return false; } /**
* thêm 1 sản phẩm vào danh mục
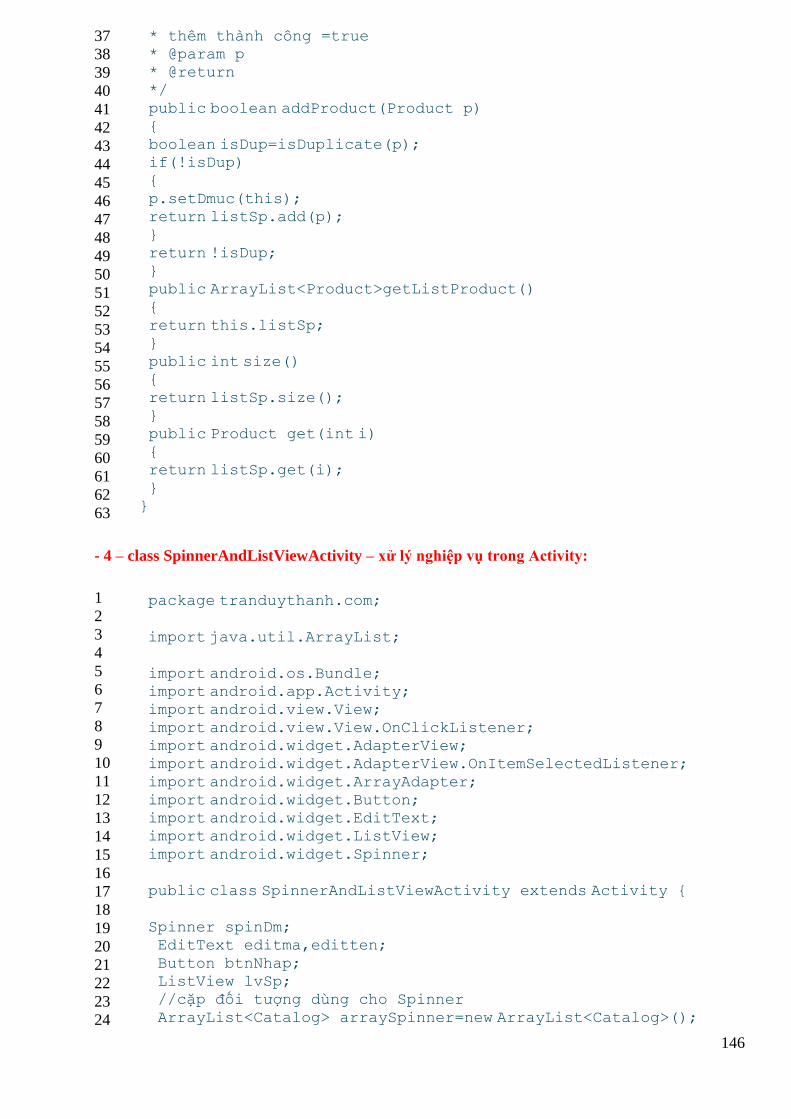
146
37
38
39
40
41
42
43
44
45
46
47
48
49
50
51
52
53
54
55
56
57
58
59
60
61
62
63
* thêm thành công =true * @param p * @return */
public boolean addProduct(Product p) { boolean isDup=isDuplicate(p); if(!isDup)
{ p.setDmuc(this); return listSp.add(p);
} return !isDup; } public ArrayList<Product>getListProduct()
{ return this.listSp; }
public int size() { return listSp.size(); }
public Product get(int i) { return listSp.get(i);
} }
- 4 – class SpinnerAndListViewActivity – xử lý nghiệp vụ trong Activity:
1
2
3
4
5
6
7
8
9
10
11
12
13
14
15
16
17
18
19
20
21
22
23
24
package tranduythanh.com;
import java.util.ArrayList;
import android.os.Bundle; import android.app.Activity; import android.view.View;
import android.view.View.OnClickListener; import android.widget.AdapterView; import android.widget.AdapterView.OnItemSelectedListener;
import android.widget.ArrayAdapter; import android.widget.Button; import android.widget.EditText; import android.widget.ListView;
import android.widget.Spinner;
public class SpinnerAndListViewActivity extends Activity {
Spinner spinDm; EditText editma,editten;
Button btnNhap; ListView lvSp; //cặp đối tượng dùng cho Spinner
ArrayList<Catalog> arraySpinner=new ArrayList<Catalog>();
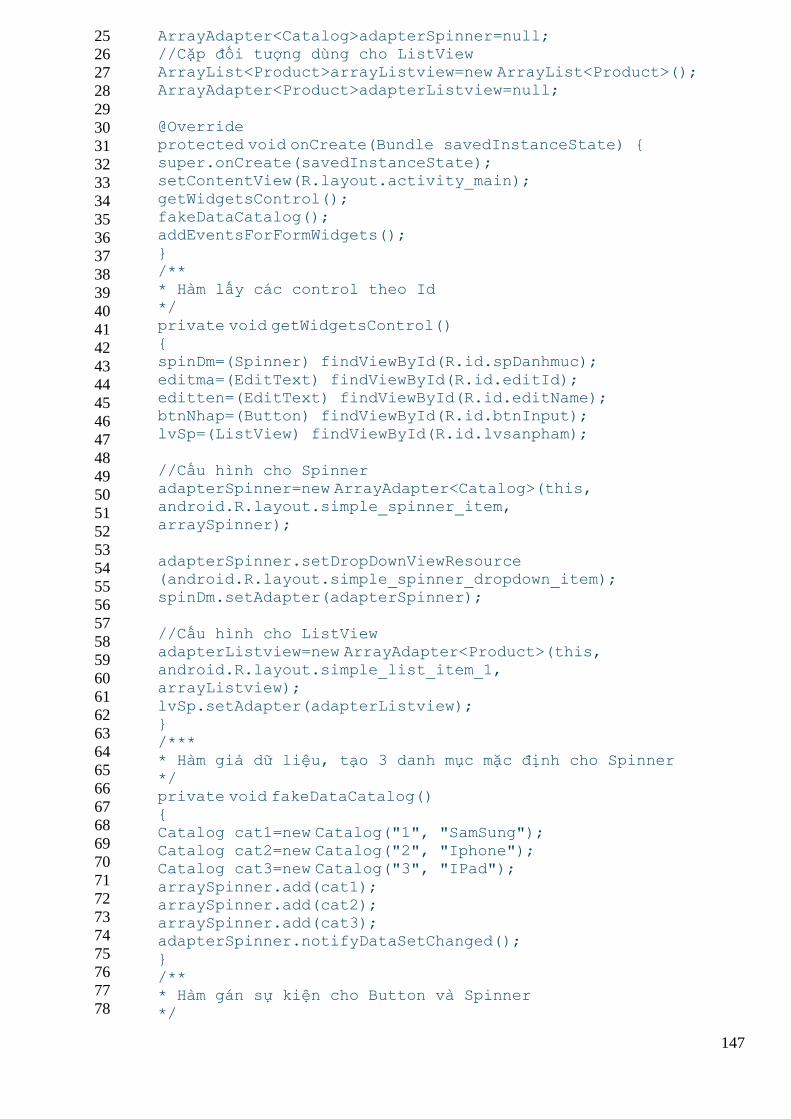
147
25
26
27
28
29
30
31
32
33
34
35
36
37
38
39
40
41
42
43
44
45
46
47
48
49
50
51
52
53
54
55
56
57
58
59
60
61
62
63
64
65
66
67
68
69
70
71
72
73
74
75
76
77
78
ArrayAdapter<Catalog>adapterSpinner=null; //Cặp đối tượng dùng cho ListView ArrayList<Product>arrayListview=new ArrayList<Product>(); ArrayAdapter<Product>adapterListview=null;
@Override protected void onCreate(Bundle savedInstanceState) { super.onCreate(savedInstanceState); setContentView(R.layout.activity_main);
getWidgetsControl(); fakeDataCatalog(); addEventsForFormWidgets();
} /** * Hàm lấy các control theo Id */
private void getWidgetsControl() { spinDm=(Spinner) findViewById(R.id.spDanhmuc);
editma=(EditText) findViewById(R.id.editId); editten=(EditText) findViewById(R.id.editName); btnNhap=(Button) findViewById(R.id.btnInput); lvSp=(ListView) findViewById(R.id.lvsanpham);
//Cấu hình cho Spinner adapterSpinner=new ArrayAdapter<Catalog>(this, android.R.layout.simple_spinner_item,
arraySpinner);
adapterSpinner.setDropDownViewResource (android.R.layout.simple_spinner_dropdown_item); spinDm.setAdapter(adapterSpinner);
//Cấu hình cho ListView adapterListview=new ArrayAdapter<Product>(this, android.R.layout.simple_list_item_1, arrayListview);
lvSp.setAdapter(adapterListview); } /***
* Hàm giả dữ liệu, tạo 3 danh mục mặc định cho Spinner */ private void fakeDataCatalog() {
Catalog cat1=new Catalog("1", "SamSung"); Catalog cat2=new Catalog("2", "Iphone"); Catalog cat3=new Catalog("3", "IPad");
arraySpinner.add(cat1); arraySpinner.add(cat2); arraySpinner.add(cat3); adapterSpinner.notifyDataSetChanged();
} /** * Hàm gán sự kiện cho Button và Spinner
*/
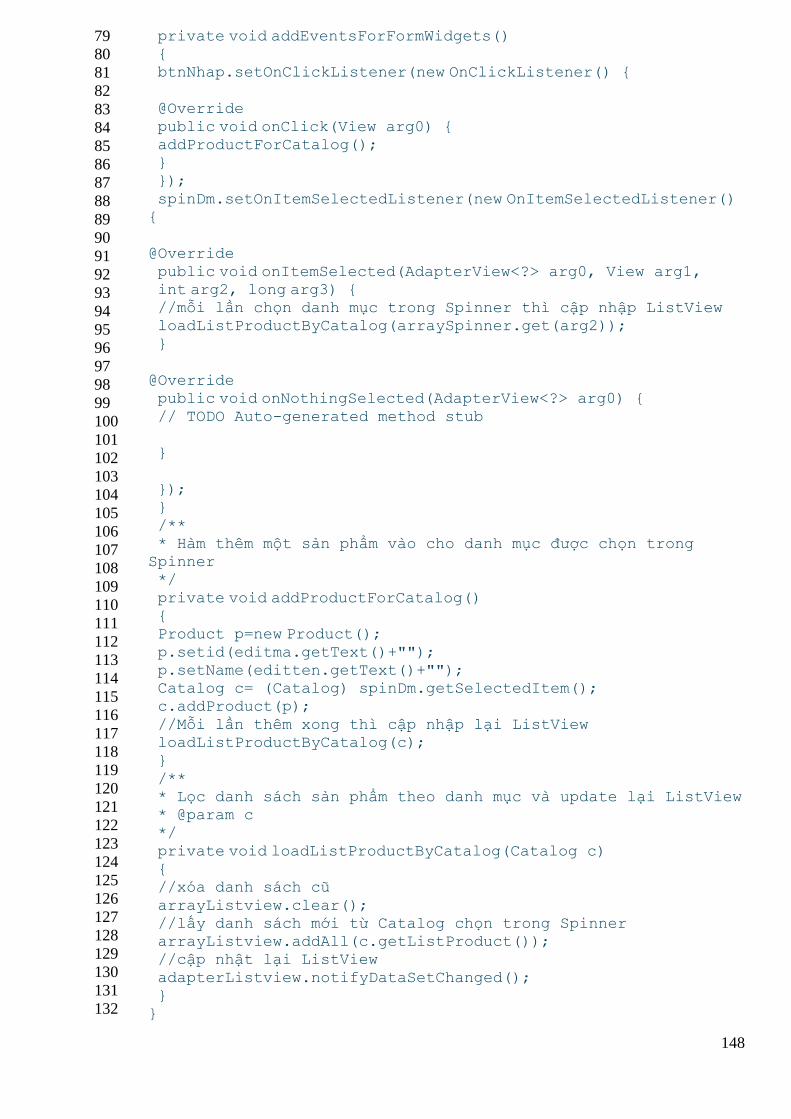
148
79
80
81
82
83
84
85
86
87
88
89
90
91
92
93
94
95
96
97
98
99
100
101
102
103
104
105
106
107
108
109
110
111
112
113
114
115
116
117
118
119
120
121
122
123
124
125
126
127
128
129
130
131
132
private void addEventsForFormWidgets() { btnNhap.setOnClickListener(new OnClickListener() {
@Override
public void onClick(View arg0) { addProductForCatalog(); } });
spinDm.setOnItemSelectedListener(new OnItemSelectedListener() {
@Override
public void onItemSelected(AdapterView<?> arg0, View arg1, int arg2, long arg3) { //mỗi lần chọn danh mục trong Spinner thì cập nhập ListView loadListProductByCatalog(arraySpinner.get(arg2));
}
@Override public void onNothingSelected(AdapterView<?> arg0) {
// TODO Auto-generated method stub
}
}); }
/** * Hàm thêm một sản phẩm vào cho danh mục được chọn trong
Spinner */
private void addProductForCatalog() { Product p=new Product();
p.setid(editma.getText()+""); p.setName(editten.getText()+""); Catalog c= (Catalog) spinDm.getSelectedItem(); c.addProduct(p);
//Mỗi lần thêm xong thì cập nhập lại ListView loadListProductByCatalog(c); }
/** * Lọc danh sách sản phẩm theo danh mục và update lại ListView * @param c */
private void loadListProductByCatalog(Catalog c) { //xóa danh sách cũ
arrayListview.clear(); //lấy danh sách mới từ Catalog chọn trong Spinner arrayListview.addAll(c.getListProduct()); //cập nhật lại ListView
adapterListview.notifyDataSetChanged(); } }

149
- Tôi đã giải thích ở ngay bên trong mã lệnh, bạn có thể đọc và ráng hiểu coding Tôi viết bên trên.
- Bạn có thể tải code mẫu đầy đủ ở đây: http://www.mediafire.com/?i4lev5ek8944kop
- Bài tập tiếp theo bạn sẽ học AutoCompleteTextview và MultiAutoCompleteTextview. 2 control
này bản chất cũng giống như EditText nhưng nó hỗ trợ người sử dụng nhập dữ liệu được nhanh hơn,
làm cho ứng dụng trở lên User Friendly hơn, bạn hãy chú ý theo dõi.
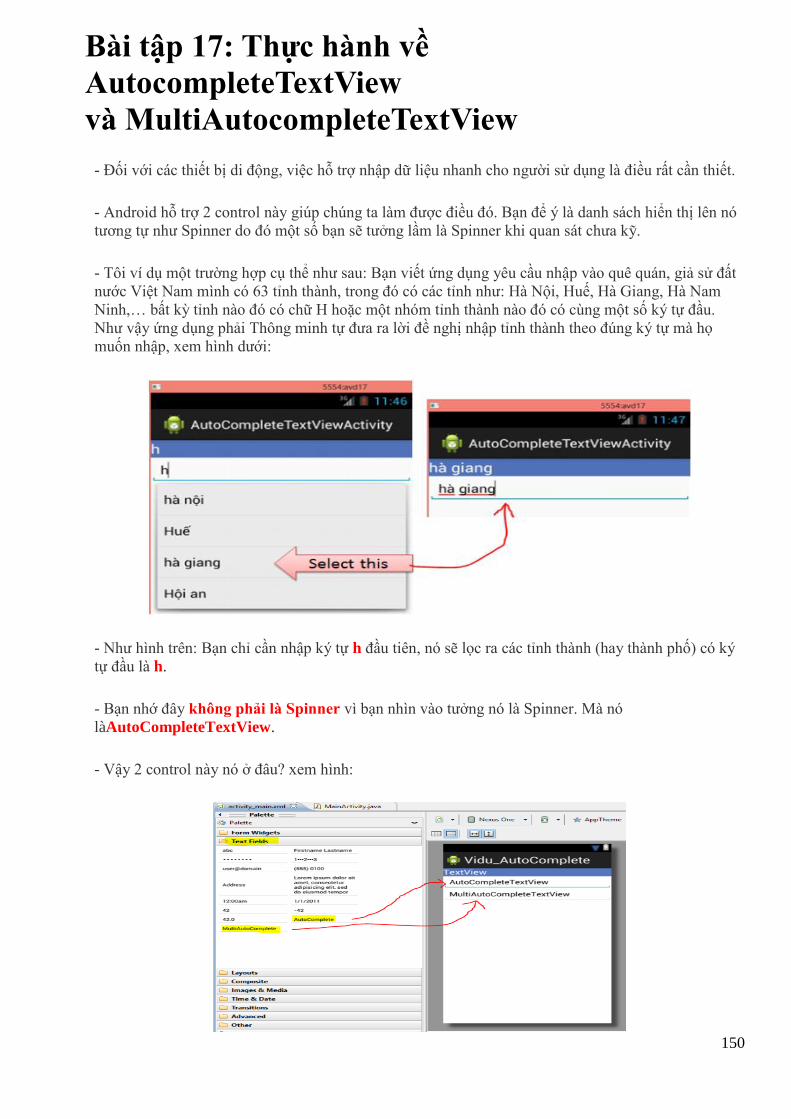
150
Bài tập 17: Thực hành về
AutocompleteTextView
và MultiAutocompleteTextView
- Đối với các thiết bị di động, việc hỗ trợ nhập dữ liệu nhanh cho người sử dụng là điều rất cần thiết.
- Android hỗ trợ 2 control này giúp chúng ta làm được điều đó. Bạn để ý là danh sách hiển thị lên nó
tương tự như Spinner do đó một số bạn sẽ tưởng lầm là Spinner khi quan sát chưa kỹ.
- Tôi ví dụ một trường hợp cụ thể như sau: Bạn viết ứng dụng yêu cầu nhập vào quê quán, giả sử đất
nước Việt Nam mình có 63 tỉnh thành, trong đó có các tỉnh như: Hà Nội, Huế, Hà Giang, Hà Nam
Ninh,… bất kỳ tỉnh nào đó có chữ H hoặc một nhóm tỉnh thành nào đó có cùng một số ký tự đầu.
Như vậy ứng dụng phải Thông minh tự đưa ra lời đề nghị nhập tỉnh thành theo đúng ký tự mà họ
muốn nhập, xem hình dưới:
- Như hình trên: Bạn chỉ cần nhập ký tự h đầu tiên, nó sẽ lọc ra các tỉnh thành (hay thành phố) có ký
tự đầu là h.
- Bạn nhớ đây không phải là Spinner vì bạn nhìn vào tưởng nó là Spinner. Mà nó
làAutoCompleteTextView.
- Vậy 2 control này nó ở đâu? xem hình:
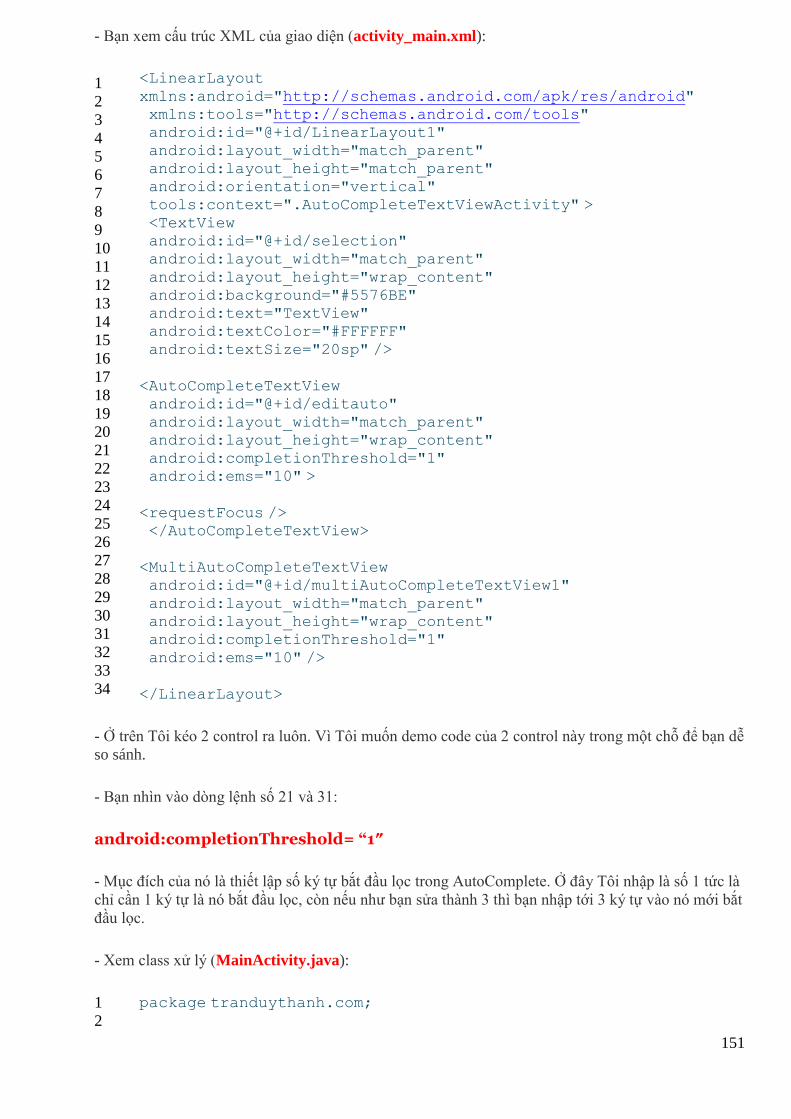
151
- Bạn xem cấu trúc XML của giao diện (activity_main.xml):
1
2
3
4
5
6
7
8
9
10
11
12
13
14
15
16
17
18
19
20
21
22
23
24
25
26
27
28
29
30
31
32
33
34
<LinearLayout
xmlns:android="http://schemas.android.com/apk/res/android" xmlns:tools="http://schemas.android.com/tools" android:id="@+id/LinearLayout1"
android:layout_width="match_parent" android:layout_height="match_parent" android:orientation="vertical" tools:context=".AutoCompleteTextViewActivity" >
<TextView android:id="@+id/selection" android:layout_width="match_parent"
android:layout_height="wrap_content" android:background="#5576BE" android:text="TextView" android:textColor="#FFFFFF"
android:textSize="20sp" />
<AutoCompleteTextView android:id="@+id/editauto"
android:layout_width="match_parent" android:layout_height="wrap_content" android:completionThreshold="1" android:ems="10" >
<requestFocus /> </AutoCompleteTextView>
<MultiAutoCompleteTextView android:id="@+id/multiAutoCompleteTextView1"
android:layout_width="match_parent" android:layout_height="wrap_content" android:completionThreshold="1"
android:ems="10" />
</LinearLayout>
- Ở trên Tôi kéo 2 control ra luôn. Vì Tôi muốn demo code của 2 control này trong một chỗ để bạn dễ
so sánh.
- Bạn nhìn vào dòng lệnh số 21 và 31:
android:completionThreshold= “1″
- Mục đích của nó là thiết lập số ký tự bắt đầu lọc trong AutoComplete. Ở đây Tôi nhập là số 1 tức là
chỉ cần 1 ký tự là nó bắt đầu lọc, còn nếu như bạn sửa thành 3 thì bạn nhập tới 3 ký tự vào nó mới bắt
đầu lọc.
- Xem class xử lý (MainActivity.java):
1
2
package tranduythanh.com;
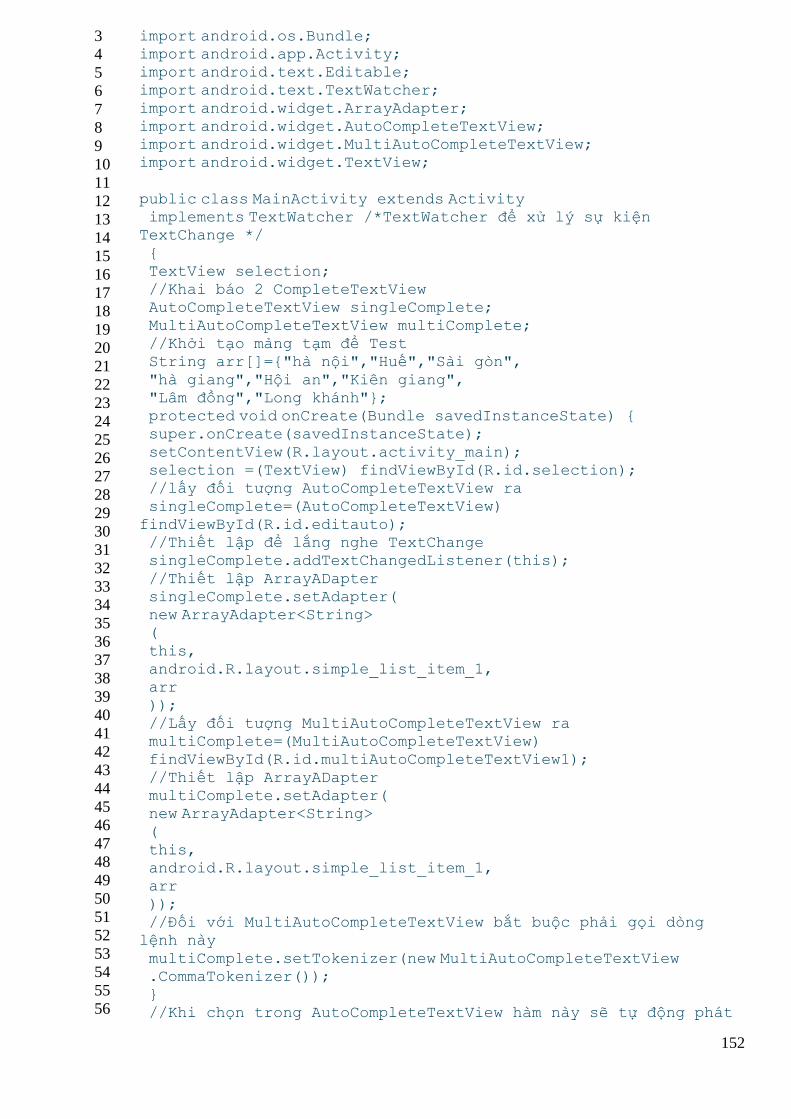
152
3
4
5
6
7
8
9
10
11
12
13
14
15
16
17
18
19
20
21
22
23
24
25
26
27
28
29
30
31
32
33
34
35
36
37
38
39
40
41
42
43
44
45
46
47
48
49
50
51
52
53
54
55
56
import android.os.Bundle; import android.app.Activity; import android.text.Editable; import android.text.TextWatcher;
import android.widget.ArrayAdapter; import android.widget.AutoCompleteTextView; import android.widget.MultiAutoCompleteTextView; import android.widget.TextView;
public class MainActivity extends Activity implements TextWatcher /*TextWatcher để xử lý sự kiện TextChange */
{ TextView selection; //Khai báo 2 CompleteTextView AutoCompleteTextView singleComplete;
MultiAutoCompleteTextView multiComplete; //Khởi tạo mảng tạm để Test String arr[]={"hà nội","Huế","Sài gòn",
"hà giang","Hội an","Kiên giang", "Lâm đồng","Long khánh"}; protected void onCreate(Bundle savedInstanceState) { super.onCreate(savedInstanceState);
setContentView(R.layout.activity_main); selection =(TextView) findViewById(R.id.selection); //lấy đối tượng AutoCompleteTextView ra
singleComplete=(AutoCompleteTextView)
findViewById(R.id.editauto); //Thiết lập để lắng nghe TextChange singleComplete.addTextChangedListener(this);
//Thiết lập ArrayADapter singleComplete.setAdapter( new ArrayAdapter<String> (
this, android.R.layout.simple_list_item_1, arr
)); //Lấy đối tượng MultiAutoCompleteTextView ra multiComplete=(MultiAutoCompleteTextView) findViewById(R.id.multiAutoCompleteTextView1);
//Thiết lập ArrayADapter multiComplete.setAdapter( new ArrayAdapter<String>
( this, android.R.layout.simple_list_item_1, arr
)); //Đối với MultiAutoCompleteTextView bắt buộc phải gọi dòng
lệnh này
multiComplete.setTokenizer(new MultiAutoCompleteTextView .CommaTokenizer()); } //Khi chọn trong AutoCompleteTextView hàm này sẽ tự động phát
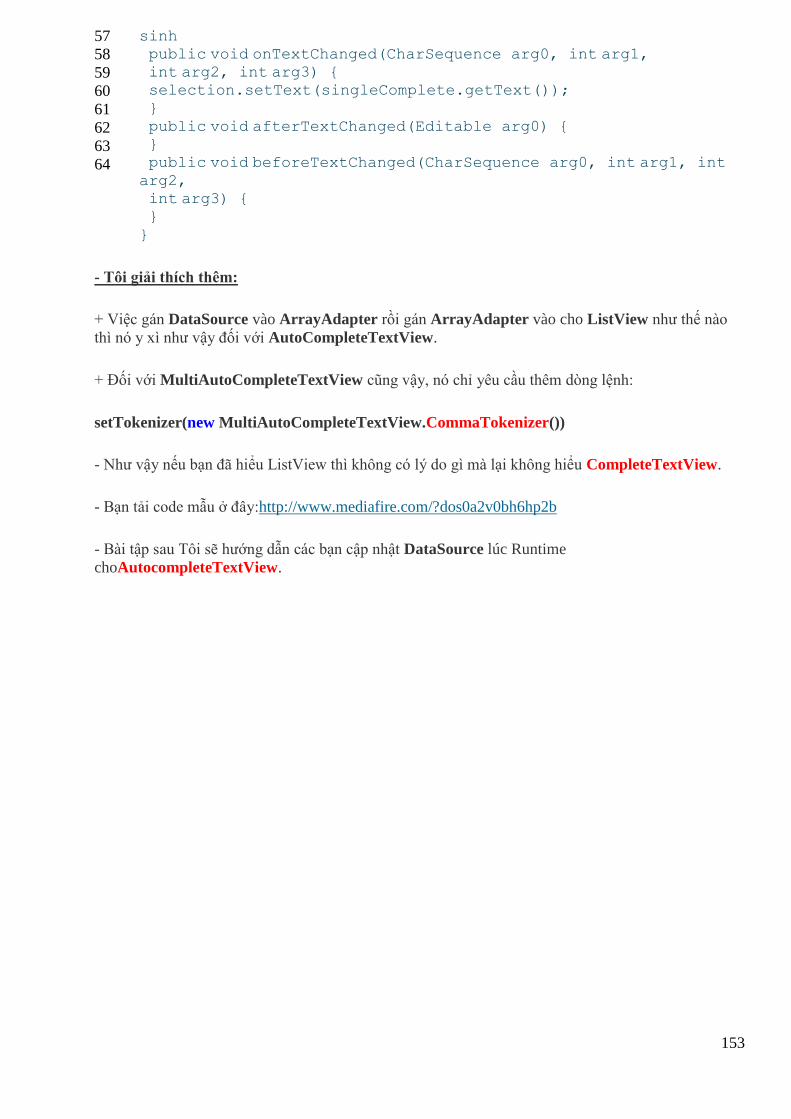
153
57
58
59
60
61
62
63
64
sinh public void onTextChanged(CharSequence arg0, int arg1, int arg2, int arg3) { selection.setText(singleComplete.getText());
} public void afterTextChanged(Editable arg0) { } public void beforeTextChanged(CharSequence arg0, int arg1, int
arg2, int arg3) { }
}
- Tôi giải thích thêm:
+ Việc gán DataSource vào ArrayAdapter rồi gán ArrayAdapter vào cho ListView như thế nào
thì nó y xì như vậy đối với AutoCompleteTextView.
+ Đối với MultiAutoCompleteTextView cũng vậy, nó chỉ yêu cầu thêm dòng lệnh:
setTokenizer(new MultiAutoCompleteTextView.CommaTokenizer())
- Như vậy nếu bạn đã hiểu ListView thì không có lý do gì mà lại không hiểu CompleteTextView.
- Bạn tải code mẫu ở đây:http://www.mediafire.com/?dos0a2v0bh6hp2b
- Bài tập sau Tôi sẽ hướng dẫn các bạn cập nhật DataSource lúc Runtime
choAutocompleteTextView.
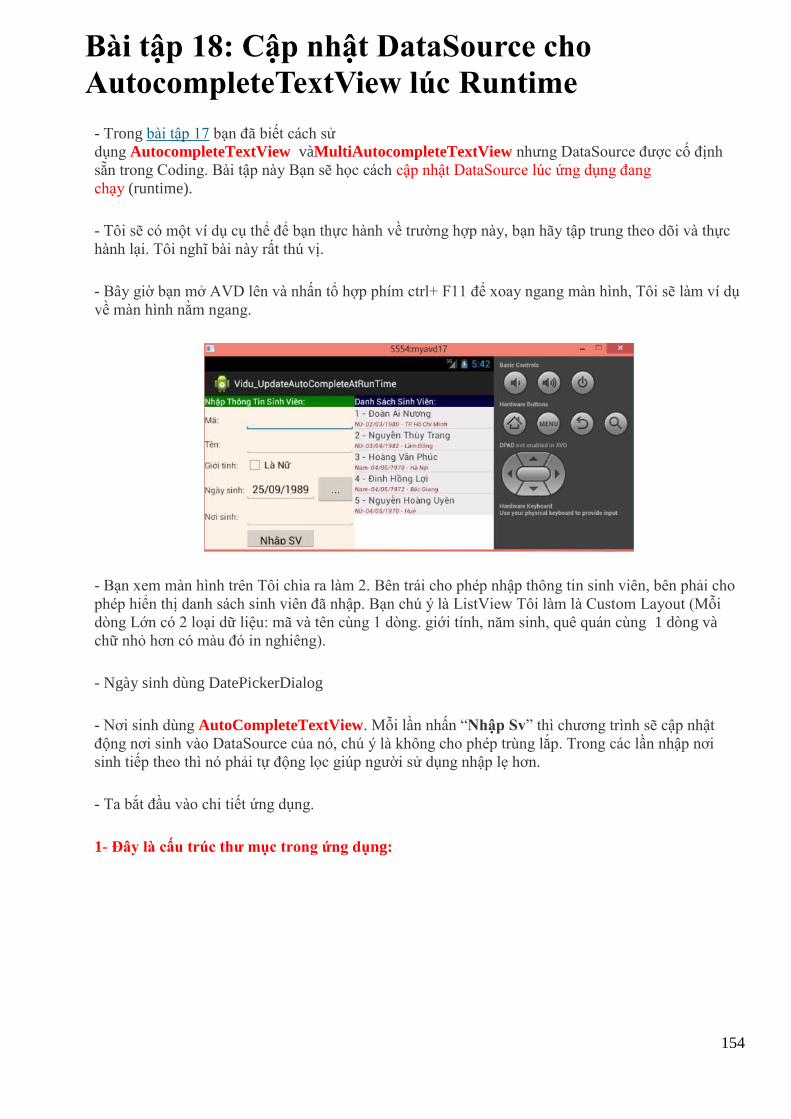
154
Bài tập 18: Cập nhật DataSource cho
AutocompleteTextView lúc Runtime
- Trong bài tập 17 bạn đã biết cách sử
dụng AutocompleteTextView vàMultiAutocompleteTextView nhưng DataSource được cố định
sẵn trong Coding. Bài tập này Bạn sẽ học cách cập nhật DataSource lúc ứng dụng đang
chạy (runtime).
- Tôi sẽ có một ví dụ cụ thể để bạn thực hành về trường hợp này, bạn hãy tập trung theo dõi và thực
hành lại. Tôi nghĩ bài này rất thú vị.
- Bây giờ bạn mở AVD lên và nhấn tổ hợp phím ctrl+ F11 để xoay ngang màn hình, Tôi sẽ làm ví dụ
về màn hình nằm ngang.
- Bạn xem màn hình trên Tôi chia ra làm 2. Bên trái cho phép nhập thông tin sinh viên, bên phải cho
phép hiển thị danh sách sinh viên đã nhập. Bạn chú ý là ListView Tôi làm là Custom Layout (Mỗi
dòng Lớn có 2 loại dữ liệu: mã và tên cùng 1 dòng. giới tính, năm sinh, quê quán cùng 1 dòng và
chữ nhỏ hơn có màu đó in nghiêng).
- Ngày sinh dùng DatePickerDialog
- Nơi sinh dùng AutoCompleteTextView. Mỗi lần nhấn “Nhập Sv” thì chương trình sẽ cập nhật
động nơi sinh vào DataSource của nó, chú ý là không cho phép trùng lắp. Trong các lần nhập nơi
sinh tiếp theo thì nó phải tự động lọc giúp người sử dụng nhập lẹ hơn.
- Ta bắt đầu vào chi tiết ứng dụng.
1- Đây là cấu trúc thư mục trong ứng dụng:
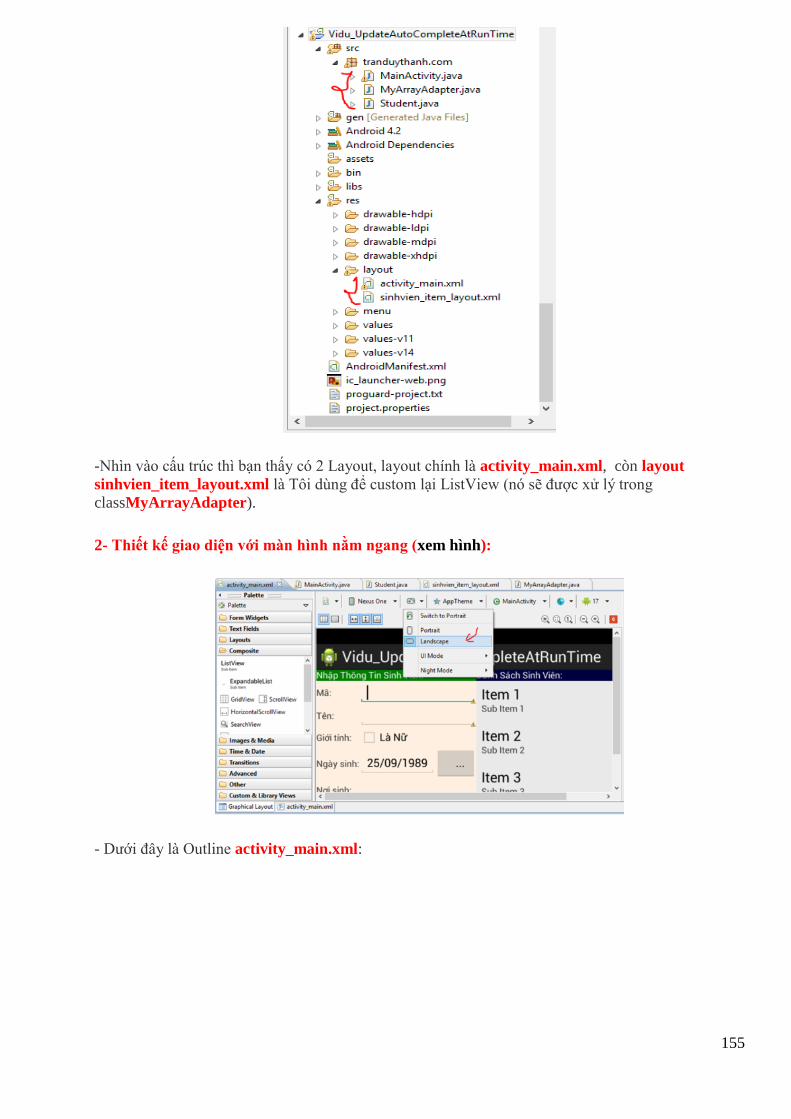
155
-Nhìn vào cấu trúc thì bạn thấy có 2 Layout, layout chính là activity_main.xml, còn layout
sinhvien_item_layout.xml là Tôi dùng để custom lại ListView (nó sẽ được xử lý trong
classMyArrayAdapter).
2- Thiết kế giao diện với màn hình nằm ngang (xem hình):
- Dưới đây là Outline activity_main.xml:
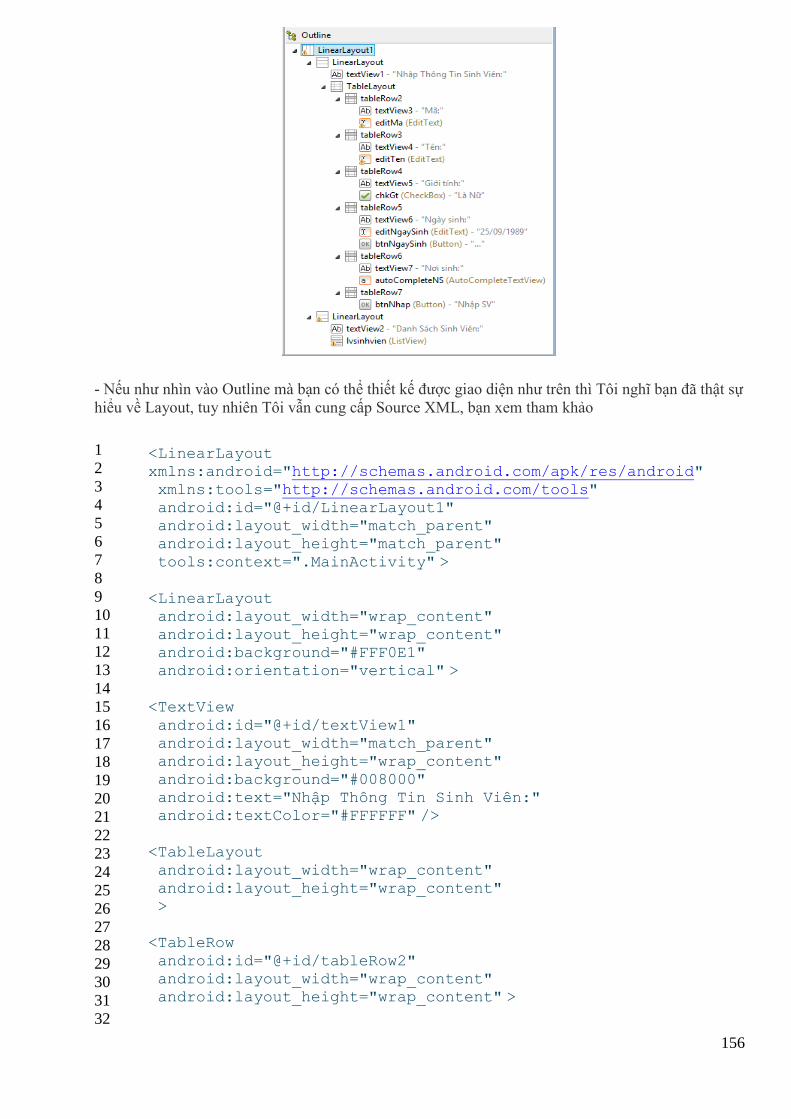
156
- Nếu như nhìn vào Outline mà bạn có thể thiết kế được giao diện như trên thì Tôi nghĩ bạn đã thật sự
hiểu về Layout, tuy nhiên Tôi vẫn cung cấp Source XML, bạn xem tham khảo
1
2
3
4
5
6
7
8
9
10
11
12
13
14
15
16
17
18
19
20
21
22
23
24
25
26
27
28
29
30
31
32
<LinearLayout xmlns:android="http://schemas.android.com/apk/res/android"
xmlns:tools="http://schemas.android.com/tools" android:id="@+id/LinearLayout1" android:layout_width="match_parent" android:layout_height="match_parent"
tools:context=".MainActivity" >
<LinearLayout android:layout_width="wrap_content"
android:layout_height="wrap_content" android:background="#FFF0E1" android:orientation="vertical" >
<TextView
android:id="@+id/textView1" android:layout_width="match_parent" android:layout_height="wrap_content"
android:background="#008000" android:text="Nhập Thông Tin Sinh Viên:" android:textColor="#FFFFFF" />
<TableLayout
android:layout_width="wrap_content" android:layout_height="wrap_content" >
<TableRow
android:id="@+id/tableRow2" android:layout_width="wrap_content" android:layout_height="wrap_content" >
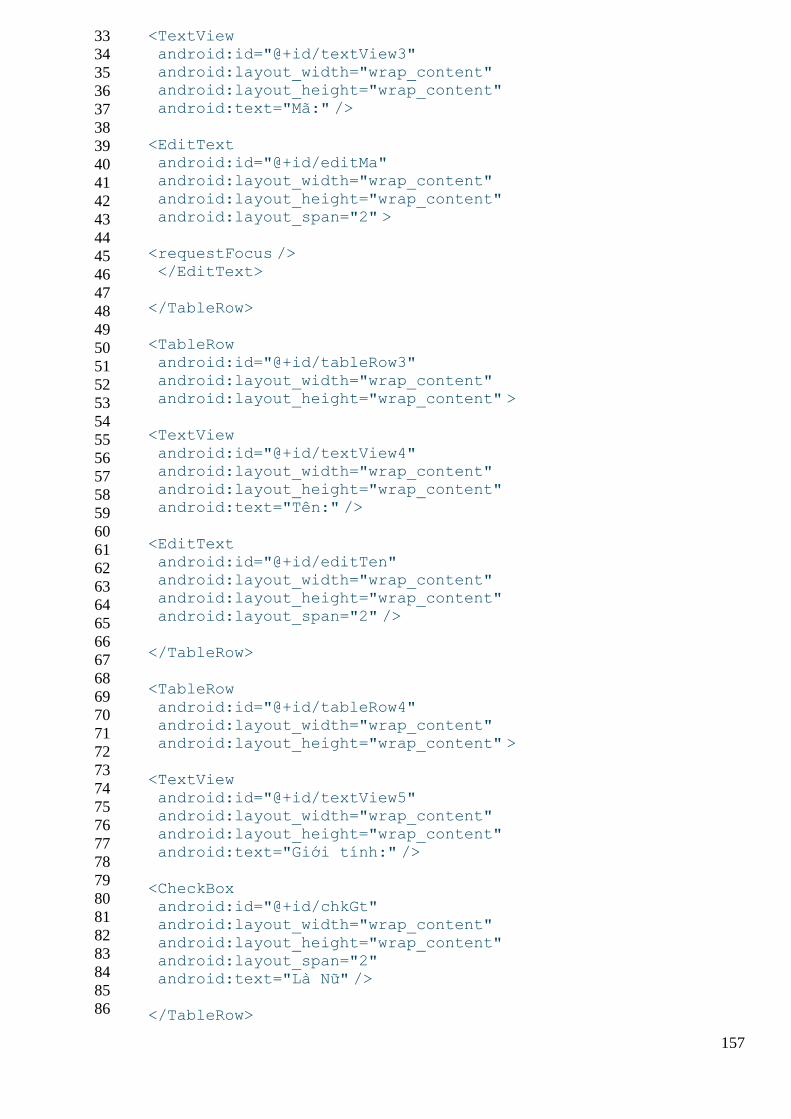
157
33
34
35
36
37
38
39
40
41
42
43
44
45
46
47
48
49
50
51
52
53
54
55
56
57
58
59
60
61
62
63
64
65
66
67
68
69
70
71
72
73
74
75
76
77
78
79
80
81
82
83
84
85
86
<TextView android:id="@+id/textView3" android:layout_width="wrap_content" android:layout_height="wrap_content"
android:text="Mã:" />
<EditText android:id="@+id/editMa" android:layout_width="wrap_content"
android:layout_height="wrap_content" android:layout_span="2" >
<requestFocus />
</EditText>
</TableRow>
<TableRow android:id="@+id/tableRow3"
android:layout_width="wrap_content" android:layout_height="wrap_content" >
<TextView
android:id="@+id/textView4" android:layout_width="wrap_content" android:layout_height="wrap_content" android:text="Tên:" />
<EditText android:id="@+id/editTen" android:layout_width="wrap_content" android:layout_height="wrap_content"
android:layout_span="2" />
</TableRow>
<TableRow
android:id="@+id/tableRow4" android:layout_width="wrap_content" android:layout_height="wrap_content" >
<TextView
android:id="@+id/textView5" android:layout_width="wrap_content" android:layout_height="wrap_content"
android:text="Giới tính:" />
<CheckBox android:id="@+id/chkGt" android:layout_width="wrap_content"
android:layout_height="wrap_content" android:layout_span="2" android:text="Là Nữ" />
</TableRow>

158
87
88
89
90
91
92
93
94
95
96
97
98
99
100
101
102
103
104
105
106
107
108
109
110
111
112
113
114
115
116
117
118
119
120
121
122
123
124
125
126
127
128
129
130
131
132
133
134
135
136
137
138
139
140
<TableRow
android:id="@+id/tableRow5" android:layout_width="wrap_content" android:layout_height="wrap_content" >
<TextView android:id="@+id/textView6" android:layout_width="wrap_content" android:layout_height="wrap_content"
android:text="Ngày sinh:" />
<EditText android:id="@+id/editNgaySinh"
android:layout_width="wrap_content" android:layout_height="wrap_content" android:inputType="date" android:text="25/09/1989" />
<Button android:id="@+id/btnNgaySinh" android:layout_width="wrap_content"
android:layout_height="wrap_content" android:text="..." />
</TableRow>
<TableRow
android:id="@+id/tableRow6" android:layout_width="wrap_content" android:layout_height="wrap_content" >
<TextView
android:id="@+id/textView7" android:layout_width="wrap_content" android:layout_height="wrap_content"
android:text="Nơi sinh:" />
<AutoCompleteTextView android:id="@+id/autoCompleteNS" android:layout_width="wrap_content"
android:layout_height="wrap_content" android:completionThreshold="1" android:layout_span="2"
android:ems="10" />
</TableRow>
<TableRow android:id="@+id/tableRow7"
android:layout_width="wrap_content" android:layout_height="wrap_content" >
<Button android:id="@+id/btnNhap"
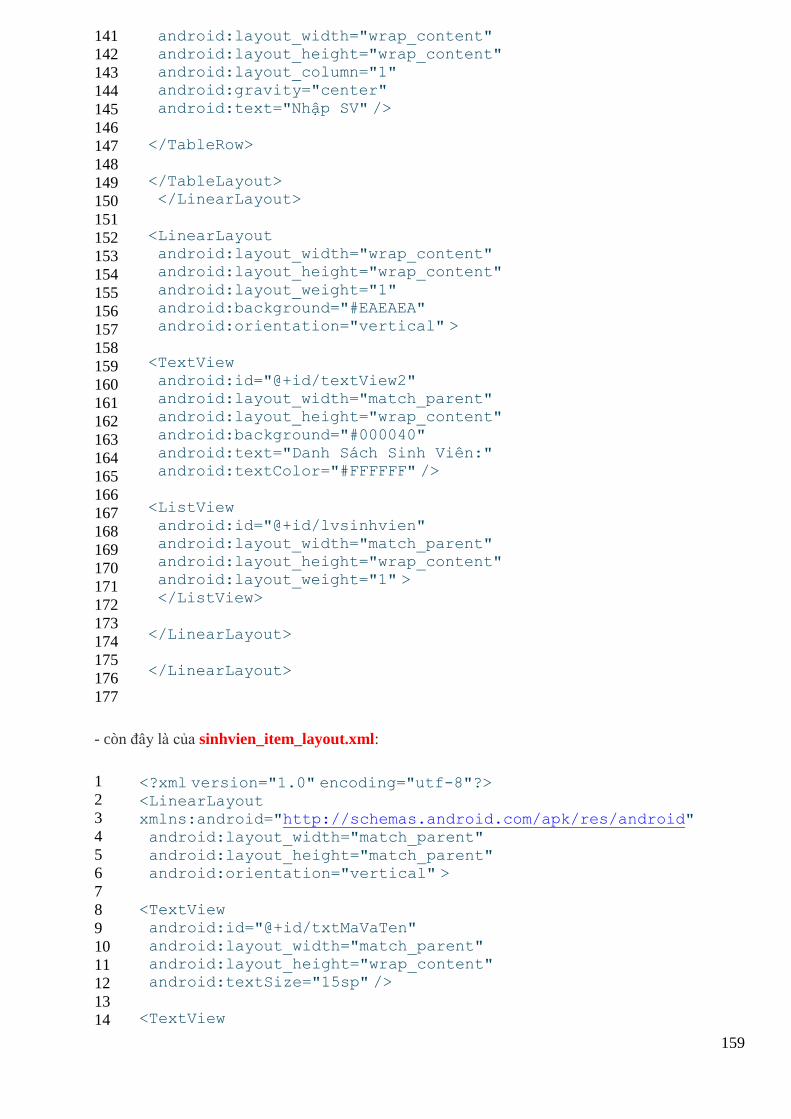
159
141
142
143
144
145
146
147
148
149
150
151
152
153
154
155
156
157
158
159
160
161
162
163
164
165
166
167
168
169
170
171
172
173
174
175
176
177
android:layout_width="wrap_content" android:layout_height="wrap_content" android:layout_column="1" android:gravity="center"
android:text="Nhập SV" />
</TableRow>
</TableLayout> </LinearLayout>
<LinearLayout android:layout_width="wrap_content" android:layout_height="wrap_content"
android:layout_weight="1" android:background="#EAEAEA" android:orientation="vertical" >
<TextView
android:id="@+id/textView2" android:layout_width="match_parent" android:layout_height="wrap_content"
android:background="#000040" android:text="Danh Sách Sinh Viên:" android:textColor="#FFFFFF" />
<ListView
android:id="@+id/lvsinhvien" android:layout_width="match_parent" android:layout_height="wrap_content" android:layout_weight="1" >
</ListView>
</LinearLayout>
</LinearLayout>
- còn đây là của sinhvien_item_layout.xml:
1
2
3
4
5
6
7
8
9
10
11
12
13
14
<?xml version="1.0" encoding="utf-8"?>
<LinearLayout xmlns:android="http://schemas.android.com/apk/res/android" android:layout_width="match_parent"
android:layout_height="match_parent" android:orientation="vertical" >
<TextView android:id="@+id/txtMaVaTen"
android:layout_width="match_parent" android:layout_height="wrap_content" android:textSize="15sp" />
<TextView
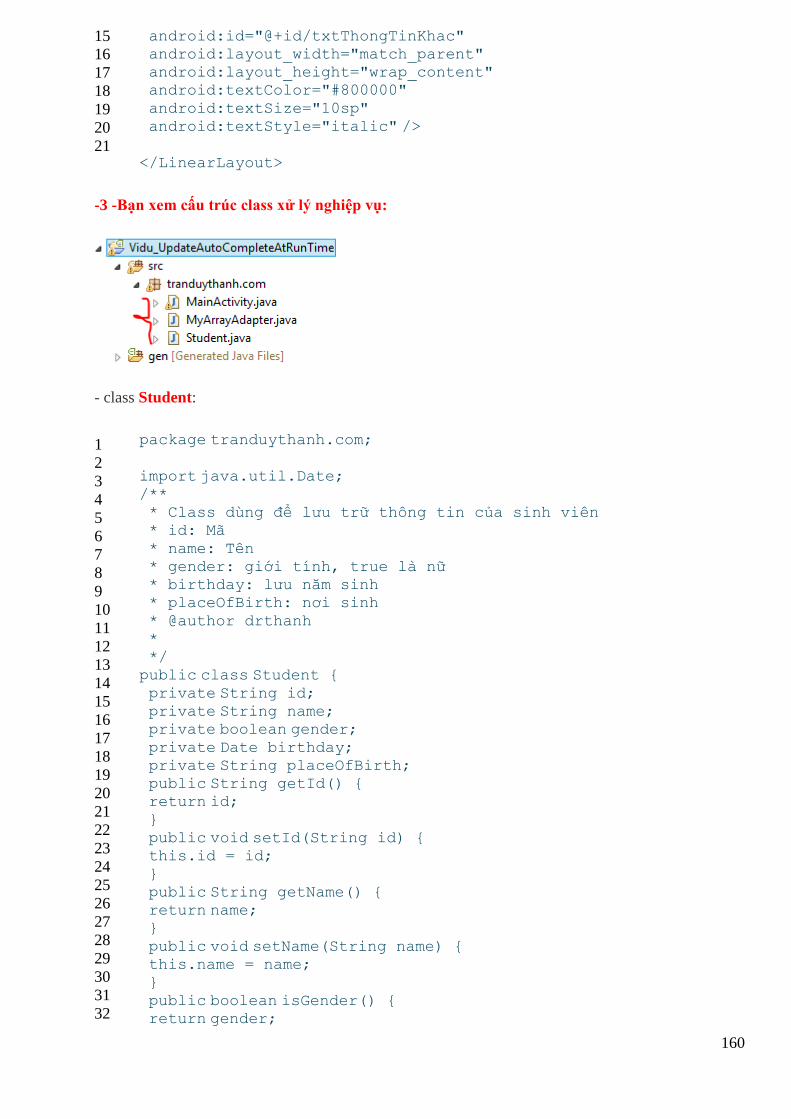
160
15
16
17
18
19
20
21
android:id="@+id/txtThongTinKhac" android:layout_width="match_parent" android:layout_height="wrap_content" android:textColor="#800000"
android:textSize="10sp" android:textStyle="italic" />
</LinearLayout>
-3 -Bạn xem cấu trúc class xử lý nghiệp vụ:
- class Student:
1
2
3
4
5
6
7
8
9
10
11
12
13
14
15
16
17
18
19
20
21
22
23
24
25
26
27
28
29
30
31
32
package tranduythanh.com;
import java.util.Date;
/** * Class dùng để lưu trữ thông tin của sinh viên * id: Mã
* name: Tên * gender: giới tính, true là nữ * birthday: lưu năm sinh * placeOfBirth: nơi sinh
* @author drthanh * */ public class Student {
private String id; private String name; private boolean gender;
private Date birthday; private String placeOfBirth; public String getId() { return id;
} public void setId(String id) { this.id = id;
} public String getName() { return name; }
public void setName(String name) { this.name = name; }
public boolean isGender() { return gender;
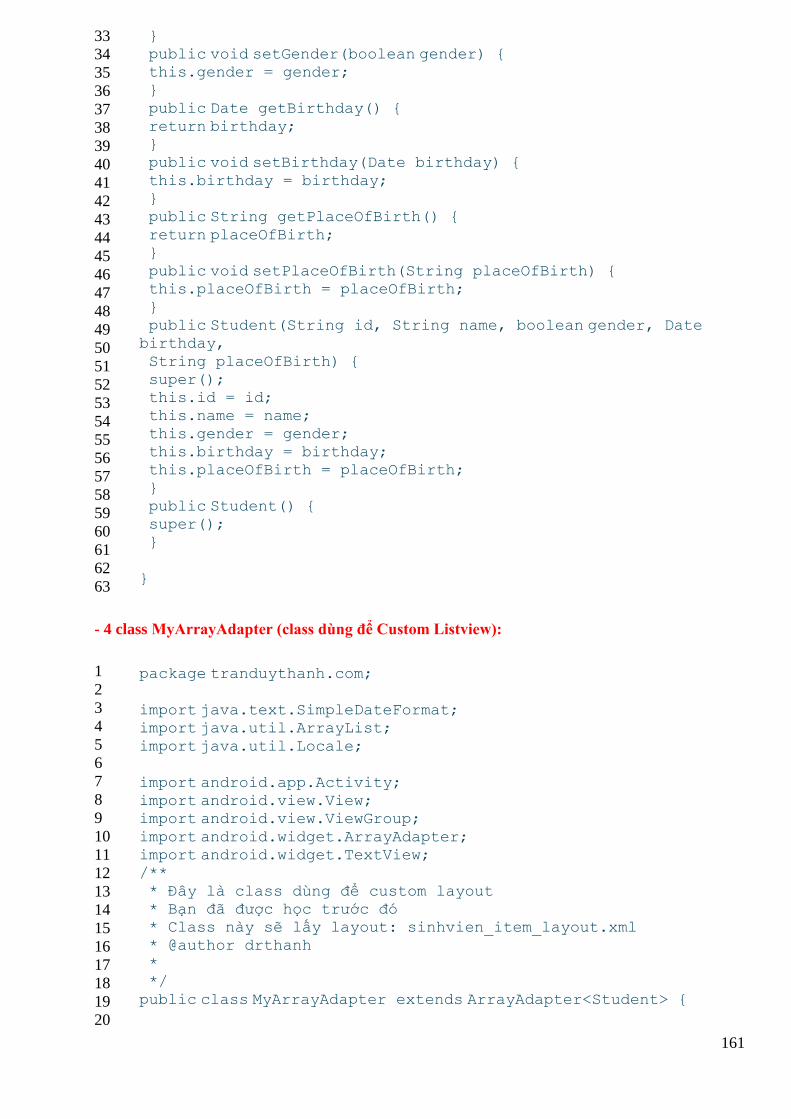
161
33
34
35
36
37
38
39
40
41
42
43
44
45
46
47
48
49
50
51
52
53
54
55
56
57
58
59
60
61
62
63
} public void setGender(boolean gender) { this.gender = gender; }
public Date getBirthday() { return birthday; } public void setBirthday(Date birthday) {
this.birthday = birthday; } public String getPlaceOfBirth() {
return placeOfBirth; } public void setPlaceOfBirth(String placeOfBirth) { this.placeOfBirth = placeOfBirth;
} public Student(String id, String name, boolean gender, Date birthday,
String placeOfBirth) { super(); this.id = id; this.name = name;
this.gender = gender; this.birthday = birthday; this.placeOfBirth = placeOfBirth;
} public Student() { super(); }
}
- 4 class MyArrayAdapter (class dùng để Custom Listview):
1
2
3
4
5
6
7
8
9
10
11
12
13
14
15
16
17
18
19
20
package tranduythanh.com;
import java.text.SimpleDateFormat; import java.util.ArrayList;
import java.util.Locale;
import android.app.Activity; import android.view.View; import android.view.ViewGroup;
import android.widget.ArrayAdapter; import android.widget.TextView; /**
* Đây là class dùng để custom layout * Bạn đã được học trước đó * Class này sẽ lấy layout: sinhvien_item_layout.xml * @author drthanh
* */ public class MyArrayAdapter extends ArrayAdapter<Student> {
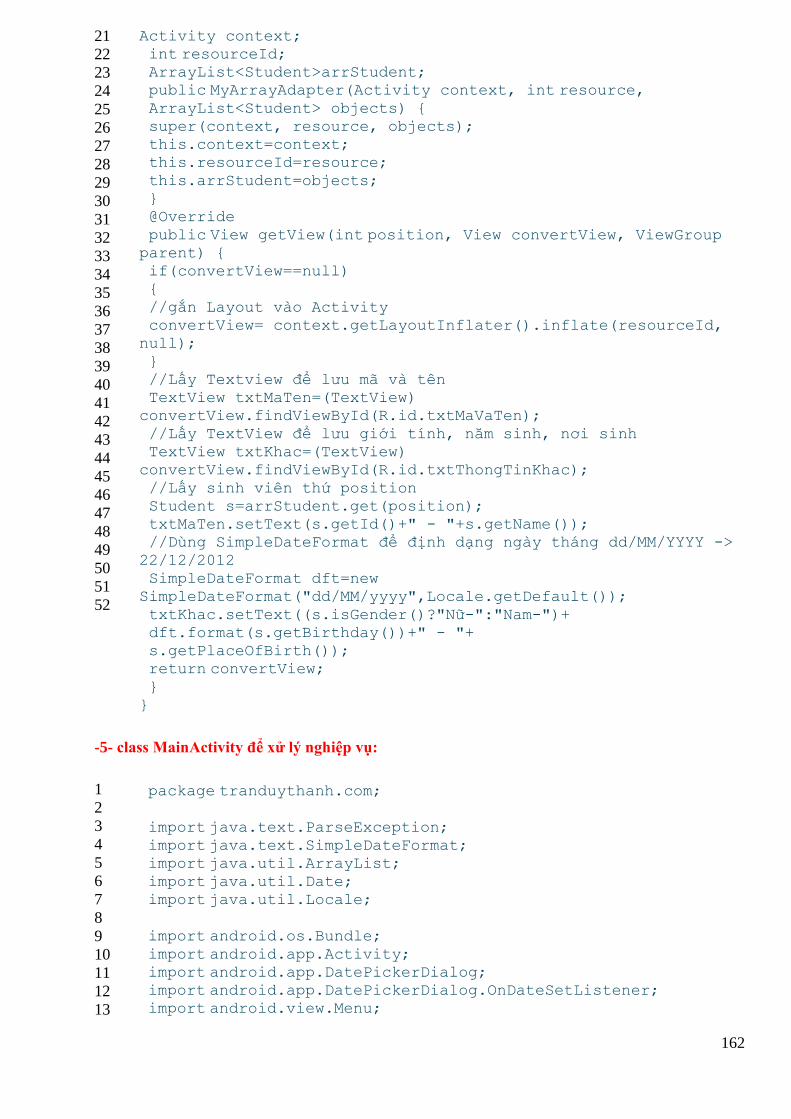
162
21
22
23
24
25
26
27
28
29
30
31
32
33
34
35
36
37
38
39
40
41
42
43
44
45
46
47
48
49
50
51
52
Activity context; int resourceId; ArrayList<Student>arrStudent; public MyArrayAdapter(Activity context, int resource,
ArrayList<Student> objects) { super(context, resource, objects); this.context=context; this.resourceId=resource;
this.arrStudent=objects; } @Override
public View getView(int position, View convertView, ViewGroup parent) { if(convertView==null) {
//gắn Layout vào Activity convertView= context.getLayoutInflater().inflate(resourceId,
null);
} //Lấy Textview để lưu mã và tên TextView txtMaTen=(TextView)
convertView.findViewById(R.id.txtMaVaTen);
//Lấy TextView để lưu giới tính, năm sinh, nơi sinh TextView txtKhac=(TextView)
convertView.findViewById(R.id.txtThongTinKhac);
//Lấy sinh viên thứ position Student s=arrStudent.get(position); txtMaTen.setText(s.getId()+" - "+s.getName()); //Dùng SimpleDateFormat để định dạng ngày tháng dd/MM/YYYY ->
22/12/2012 SimpleDateFormat dft=new SimpleDateFormat("dd/MM/yyyy",Locale.getDefault());
txtKhac.setText((s.isGender()?"Nữ-":"Nam-")+ dft.format(s.getBirthday())+" - "+ s.getPlaceOfBirth()); return convertView;
} }
-5- class MainActivity để xử lý nghiệp vụ:
1
2
3
4
5
6
7
8
9
10
11
12
13
package tranduythanh.com;
import java.text.ParseException; import java.text.SimpleDateFormat; import java.util.ArrayList;
import java.util.Date; import java.util.Locale;
import android.os.Bundle;
import android.app.Activity; import android.app.DatePickerDialog; import android.app.DatePickerDialog.OnDateSetListener; import android.view.Menu;
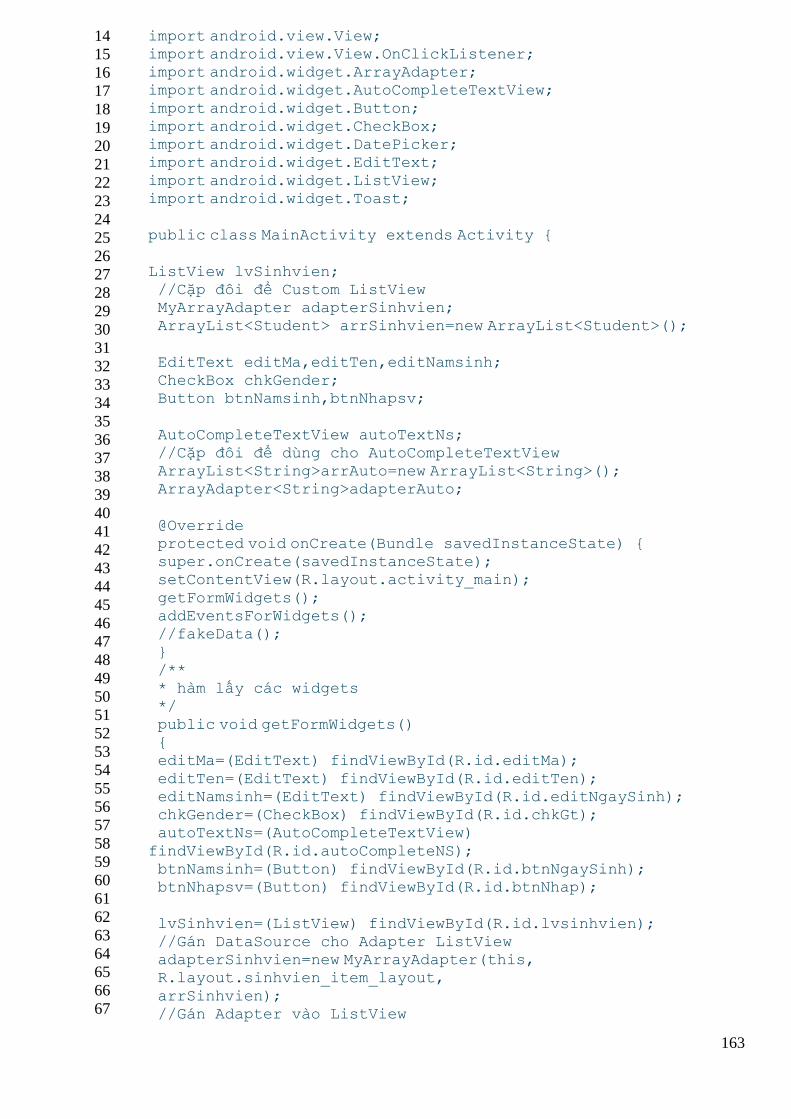
163
14
15
16
17
18
19
20
21
22
23
24
25
26
27
28
29
30
31
32
33
34
35
36
37
38
39
40
41
42
43
44
45
46
47
48
49
50
51
52
53
54
55
56
57
58
59
60
61
62
63
64
65
66
67
import android.view.View; import android.view.View.OnClickListener; import android.widget.ArrayAdapter; import android.widget.AutoCompleteTextView;
import android.widget.Button; import android.widget.CheckBox; import android.widget.DatePicker; import android.widget.EditText;
import android.widget.ListView; import android.widget.Toast;
public class MainActivity extends Activity {
ListView lvSinhvien; //Cặp đôi để Custom ListView MyArrayAdapter adapterSinhvien; ArrayList<Student> arrSinhvien=new ArrayList<Student>();
EditText editMa,editTen,editNamsinh; CheckBox chkGender; Button btnNamsinh,btnNhapsv;
AutoCompleteTextView autoTextNs; //Cặp đôi để dùng cho AutoCompleteTextView ArrayList<String>arrAuto=new ArrayList<String>(); ArrayAdapter<String>adapterAuto;
@Override protected void onCreate(Bundle savedInstanceState) { super.onCreate(savedInstanceState); setContentView(R.layout.activity_main);
getFormWidgets(); addEventsForWidgets(); //fakeData();
} /** * hàm lấy các widgets */
public void getFormWidgets() { editMa=(EditText) findViewById(R.id.editMa);
editTen=(EditText) findViewById(R.id.editTen); editNamsinh=(EditText) findViewById(R.id.editNgaySinh); chkGender=(CheckBox) findViewById(R.id.chkGt); autoTextNs=(AutoCompleteTextView)
findViewById(R.id.autoCompleteNS); btnNamsinh=(Button) findViewById(R.id.btnNgaySinh); btnNhapsv=(Button) findViewById(R.id.btnNhap);
lvSinhvien=(ListView) findViewById(R.id.lvsinhvien); //Gán DataSource cho Adapter ListView adapterSinhvien=new MyArrayAdapter(this, R.layout.sinhvien_item_layout,
arrSinhvien); //Gán Adapter vào ListView

164
68
69
70
71
72
73
74
75
76
77
78
79
80
81
82
83
84
85
86
87
88
89
90
91
92
93
94
95
96
97
98
99
100
101
102
103
104
105
106
107
108
109
110
111
112
113
114
115
116
117
118
119
120
121
lvSinhvien.setAdapter(adapterSinhvien); } /** * Hàm thiết lập sự kiện cho Button
*/ public void addEventsForWidgets() { btnNamsinh.setOnClickListener(new OnClickListener() {
@Override public void onClick(View arg0) { // TODO Auto-generated method stub
processBirthday(); } }); btnNhapsv.setOnClickListener(new OnClickListener() {
@Override public void onClick(View v) { processInput();
} }); } /**
* Hàm hiển thị DatePickerDialog để chọn năm sinh */ public void processBirthday()
{ OnDateSetListener callBack=new OnDateSetListener() {
@Override public void onDateSet(DatePicker arg0, int arg1, int arg2, int
arg3) { editNamsinh.setText(arg3+"/"+arg2+"/"+arg1); } };
//Ở đây Tôi chưa xử lý lấy ngày tháng năm trên EditText đưa vào
DatePicker //Bạn tự làm
DatePickerDialog dateDialog=new DatePickerDialog(this, callBack, 1989, 9, 25); dateDialog.setTitle("Birthday"); dateDialog.show();
} /** * Hàm xử lý nhập dữ liệu từ giao diện
*/ public void processInput() { String ma=editMa.getText()+"";
String ten=editTen.getText()+""; String ns=editNamsinh.getText()+""; String nois=autoTextNs.getText()+"";
boolean gt=chkGender.isSelected(); SimpleDateFormat dft=new
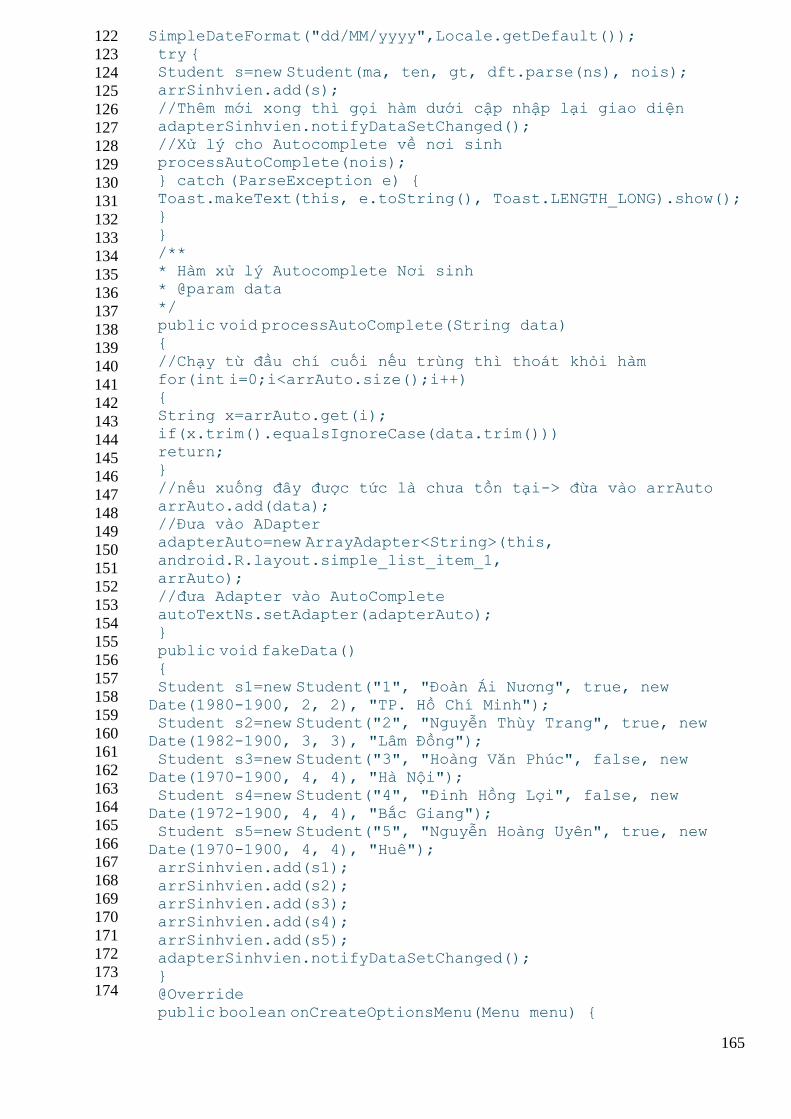
165
122
123
124
125
126
127
128
129
130
131
132
133
134
135
136
137
138
139
140
141
142
143
144
145
146
147
148
149
150
151
152
153
154
155
156
157
158
159
160
161
162
163
164
165
166
167
168
169
170
171
172
173
174
SimpleDateFormat("dd/MM/yyyy",Locale.getDefault()); try { Student s=new Student(ma, ten, gt, dft.parse(ns), nois); arrSinhvien.add(s);
//Thêm mới xong thì gọi hàm dưới cập nhập lại giao diện adapterSinhvien.notifyDataSetChanged(); //Xử lý cho Autocomplete về nơi sinh processAutoComplete(nois);
} catch (ParseException e) { Toast.makeText(this, e.toString(), Toast.LENGTH_LONG).show(); }
} /** * Hàm xử lý Autocomplete Nơi sinh * @param data
*/ public void processAutoComplete(String data) {
//Chạy từ đầu chí cuối nếu trùng thì thoát khỏi hàm for(int i=0;i<arrAuto.size();i++) { String x=arrAuto.get(i);
if(x.trim().equalsIgnoreCase(data.trim())) return; }
//nếu xuống đây được tức là chưa tồn tại-> đừa vào arrAuto arrAuto.add(data); //Đưa vào ADapter adapterAuto=new ArrayAdapter<String>(this,
android.R.layout.simple_list_item_1, arrAuto); //đưa Adapter vào AutoComplete
autoTextNs.setAdapter(adapterAuto); } public void fakeData() {
Student s1=new Student("1", "Đoàn Ái Nương", true, new Date(1980-1900, 2, 2), "TP. Hồ Chí Minh"); Student s2=new Student("2", "Nguyễn Thùy Trang", true, new Date(1982-1900, 3, 3), "Lâm Đồng");
Student s3=new Student("3", "Hoàng Văn Phúc", false, new Date(1970-1900, 4, 4), "Hà Nội"); Student s4=new Student("4", "Đinh Hồng Lợi", false, new
Date(1972-1900, 4, 4), "Bắc Giang"); Student s5=new Student("5", "Nguyễn Hoàng Uyên", true, new Date(1970-1900, 4, 4), "Huê"); arrSinhvien.add(s1);
arrSinhvien.add(s2); arrSinhvien.add(s3); arrSinhvien.add(s4);
arrSinhvien.add(s5); adapterSinhvien.notifyDataSetChanged(); } @Override
public boolean onCreateOptionsMenu(Menu menu) {
166
// Inflate the menu; this adds items to the action bar if it is
present. getMenuInflater().inflate(R.menu.activity_main, menu); return true;
}
}
- Bạn xem Tôi giải thích trong coding luôn rồi.
- Chú ý là bạn có thể yêu cầu ứng dụng chạy theo màn hình nằm ngang trong code (bạn viết
trongonCreate):
setRequestedOrientation(ActivityInfo.SCREEN_ORIENTATION_LANDSCAPE);
- Bạn hãy cố gắng làm bài này vì Tôi cảm thấy nó rất hay về ý tưởng thiết kế và kỹ thuật lập trình.
- Bạn có thể Tải code mẫu tại đây: http://www.mediafire.com/?m0jeop2fb83ib3u
- Bài tập tiếp theo bạn sẽ được thực hành về GridView, một control cũng cần phải lưu tâm.
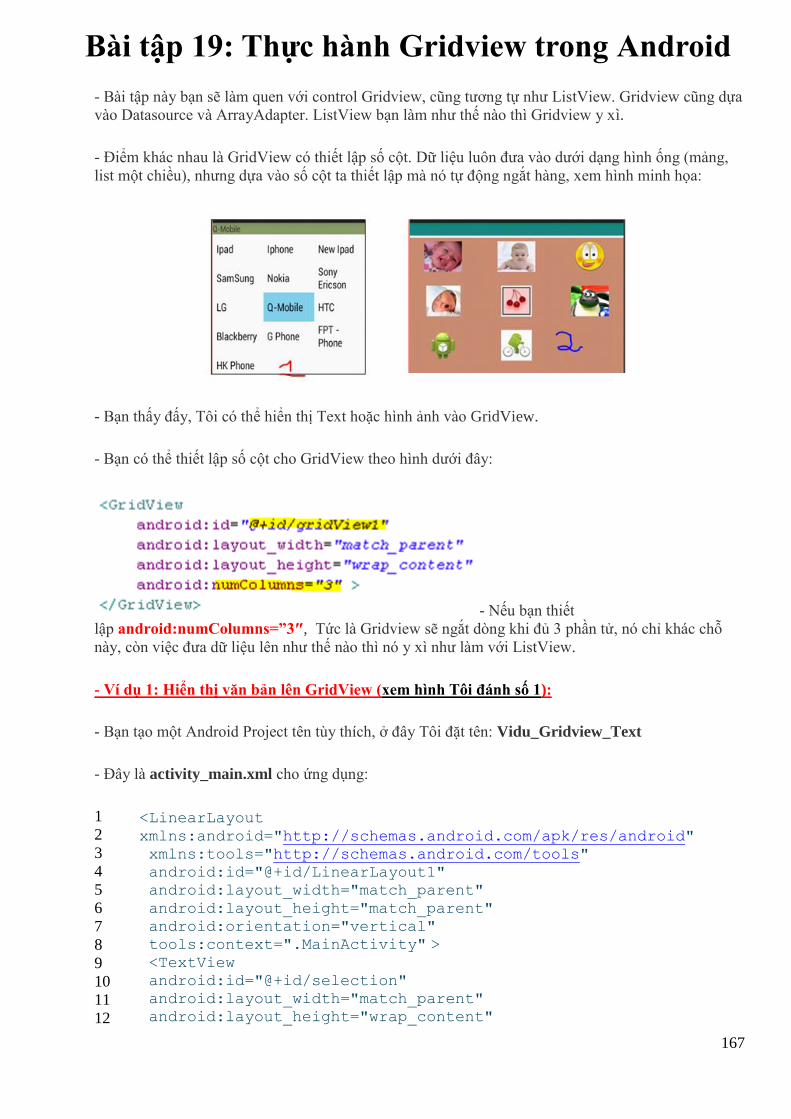
167
Bài tập 19: Thực hành Gridview trong Android
- Bài tập này bạn sẽ làm quen với control Gridview, cũng tương tự như ListView. Gridview cũng dựa
vào Datasource và ArrayAdapter. ListView bạn làm như thế nào thì Gridview y xì.
- Điểm khác nhau là GridView có thiết lập số cột. Dữ liệu luôn đưa vào dưới dạng hình ống (mảng,
list một chiều), nhưng dựa vào số cột ta thiết lập mà nó tự động ngắt hàng, xem hình minh họa:
- Bạn thấy đấy, Tôi có thể hiển thị Text hoặc hình ảnh vào GridView.
- Bạn có thể thiết lập số cột cho GridView theo hình dưới đây:
- Nếu bạn thiết
lập android:numColumns=”3″, Tức là Gridview sẽ ngắt dòng khi đủ 3 phần tử, nó chỉ khác chỗ
này, còn việc đưa dữ liệu lên như thế nào thì nó y xì như làm với ListView.
- Ví dụ 1: Hiển thị văn bản lên GridView (xem hình Tôi đánh số 1):
- Bạn tạo một Android Project tên tùy thích, ở đây Tôi đặt tên: Vidu_Gridview_Text
- Đây là activity_main.xml cho ứng dụng:
1
2
3
4
5
6
7
8
9
10
11
12
<LinearLayout
xmlns:android="http://schemas.android.com/apk/res/android" xmlns:tools="http://schemas.android.com/tools" android:id="@+id/LinearLayout1" android:layout_width="match_parent"
android:layout_height="match_parent" android:orientation="vertical" tools:context=".MainActivity" >
<TextView android:id="@+id/selection" android:layout_width="match_parent" android:layout_height="wrap_content"

168
13
14
15
16
17
18
19
20
android:background="#8A9D6F" android:hint="Slected here" /> <GridView android:id="@+id/gridView1"
android:layout_width="match_parent" android:layout_height="wrap_content" android:numColumns="3" > </GridView>
</LinearLayout>
- Bạn xem dòng 15 là id của GridView, Tôi để mặc định gridView1
- Dòng 18 có thuộc tính: android:numColumns= “3″, tức là dữ liệu sẽ được hiển thị trong Gridview
với định dạng 3 cột.
- Tiếp theo bạn xem MainActivity.java:
1
2
3
4
5
6
7
8
9
10
11
12
13
14
15
16
17
18
19
20
21
22
23
24
25
26
27
28
29
30
31
32
33
34
35
36
package tranduythanh.com; import android.os.Bundle;
import android.app.Activity; import android.view.View; import android.widget.AdapterView; import android.widget.ArrayAdapter;
import android.widget.GridView; import android.widget.TextView;
public class MainActivity extends Activity {
//Dùng mảng 1 chiều hoặc ArrayList để lưu một số dữ liệu String arr[]={"Ipad","Iphone","New Ipad", "SamSung","Nokia","Sony Ericson", "LG","Q-Mobile","HTC","Blackberry",
"G Phone","FPT - Phone","HK Phone" }; protected void onCreate(Bundle savedInstanceState) { super.onCreate(savedInstanceState);
setContentView(R.layout.activity_main); //Tối tượng này dùng để hiển thị phần tử được chọn trong
GridView
final TextView selection=(TextView) findViewById(R.id.selection); final GridView gv=(GridView) findViewById(R.id.gridView1); //Gán DataSource vào ArrayAdapter
ArrayAdapter<String>da=new ArrayAdapter<String> ( this,
android.R.layout.simple_list_item_1, arr ); //gán Datasource vào GridView
gv.setAdapter(da); //Thiết lập sự kiện cho GridView, gv.setOnItemClickListener(new AdapterView
.OnItemClickListener() {
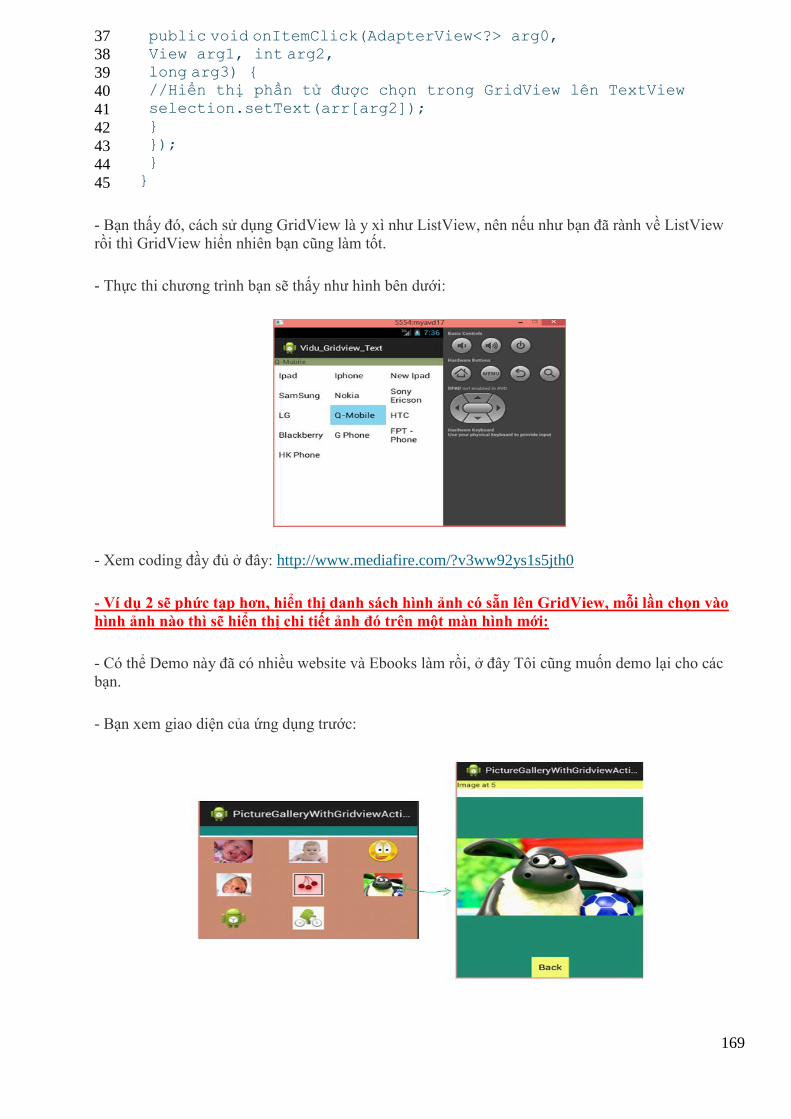
169
37
38
39
40
41
42
43
44
45
public void onItemClick(AdapterView<?> arg0, View arg1, int arg2, long arg3) { //Hiển thị phần tử được chọn trong GridView lên TextView
selection.setText(arr[arg2]); } }); }
}
- Bạn thấy đó, cách sử dụng GridView là y xì như ListView, nên nếu như bạn đã rành về ListView
rồi thì GridView hiển nhiên bạn cũng làm tốt.
- Thực thi chương trình bạn sẽ thấy như hình bên dưới:
- Xem coding đầy đủ ở đây: http://www.mediafire.com/?v3ww92ys1s5jth0
- Ví dụ 2 sẽ phức tạp hơn, hiển thị danh sách hình ảnh có sẵn lên GridView, mỗi lần chọn vào
hình ảnh nào thì sẽ hiển thị chi tiết ảnh đó trên một màn hình mới:
- Có thể Demo này đã có nhiều website và Ebooks làm rồi, ở đây Tôi cũng muốn demo lại cho các
bạn.
- Bạn xem giao diện của ứng dụng trước:
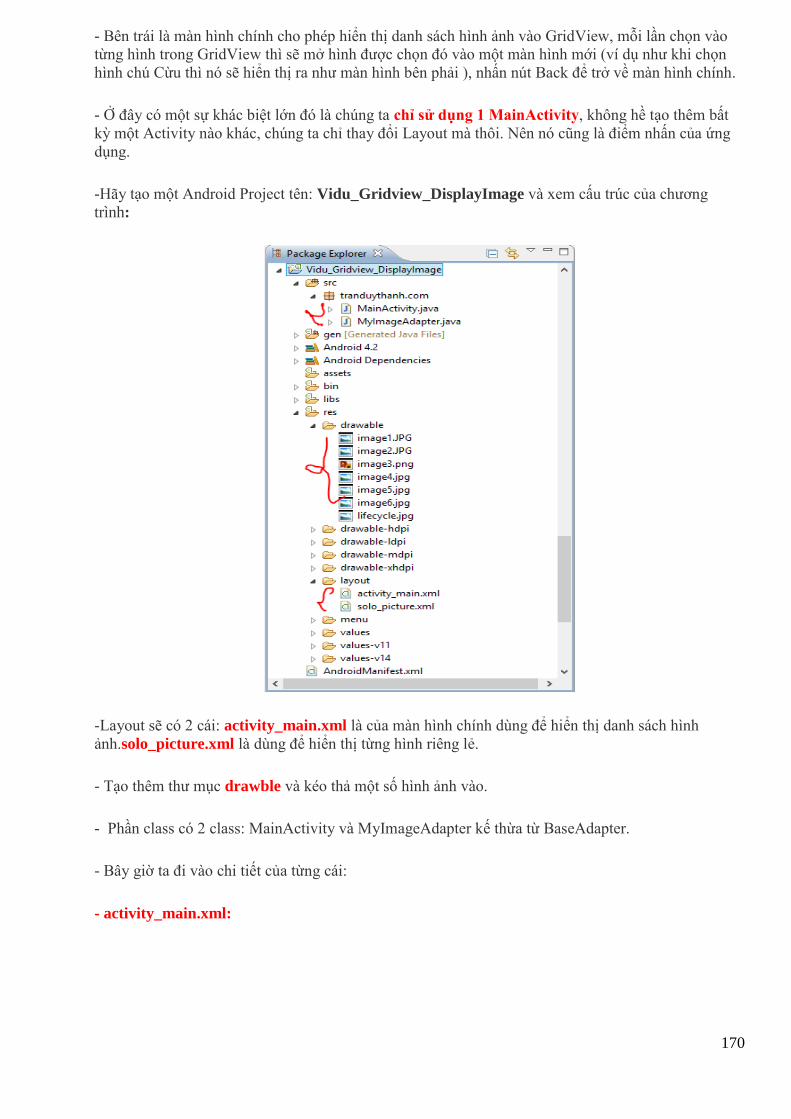
170
- Bên trái là màn hình chính cho phép hiển thị danh sách hình ảnh vào GridView, mỗi lần chọn vào
từng hình trong GridView thì sẽ mở hình được chọn đó vào một màn hình mới (ví dụ như khi chọn
hình chú Cừu thì nó sẽ hiển thị ra như màn hình bên phải ), nhấn nút Back để trở về màn hình chính.
- Ở đây có một sự khác biệt lớn đó là chúng ta chỉ sử dụng 1 MainActivity, không hề tạo thêm bất
kỳ một Activity nào khác, chúng ta chỉ thay đổi Layout mà thôi. Nên nó cũng là điểm nhấn của ứng
dụng.
-Hãy tạo một Android Project tên: Vidu_Gridview_DisplayImage và xem cấu trúc của chương
trình:
-Layout sẽ có 2 cái: activity_main.xml là của màn hình chính dùng để hiển thị danh sách hình
ảnh.solo_picture.xml là dùng để hiển thị từng hình riêng lẻ.
- Tạo thêm thư mục drawble và kéo thả một số hình ảnh vào.
- Phần class có 2 class: MainActivity và MyImageAdapter kế thừa từ BaseAdapter.
- Bây giờ ta đi vào chi tiết của từng cái:
- activity_main.xml:
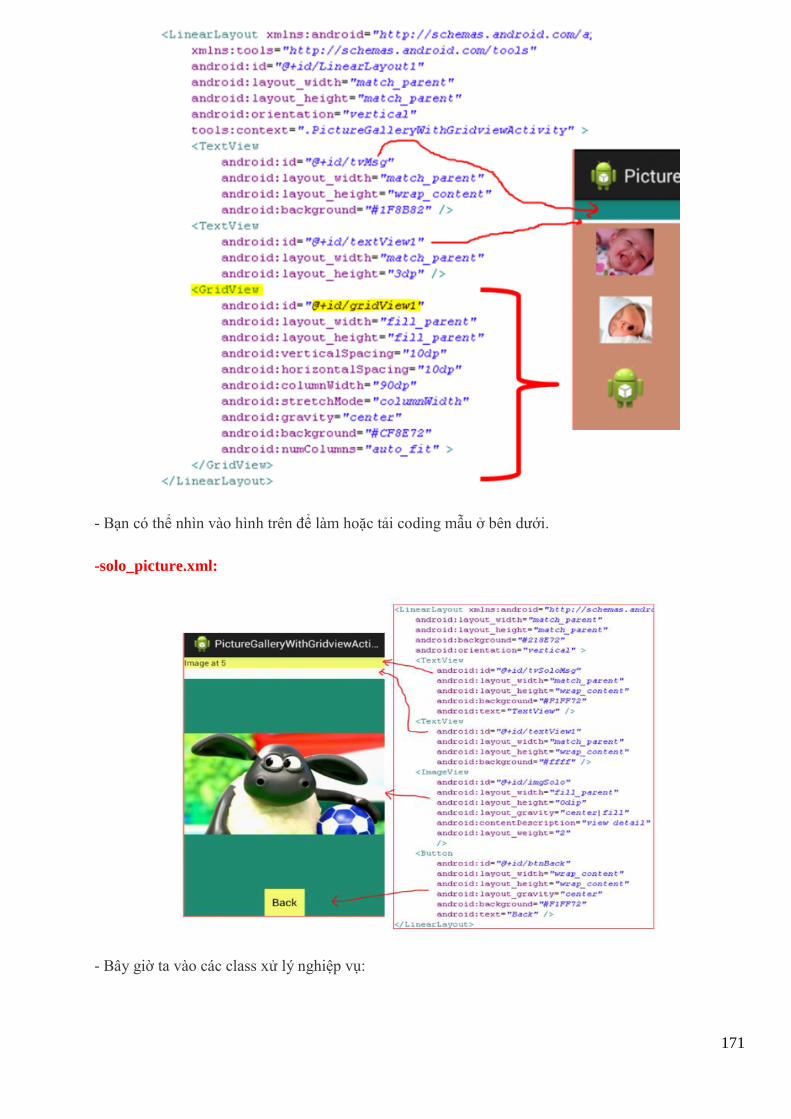
171
- Bạn có thể nhìn vào hình trên để làm hoặc tải coding mẫu ở bên dưới.
-solo_picture.xml:
- Bây giờ ta vào các class xử lý nghiệp vụ:
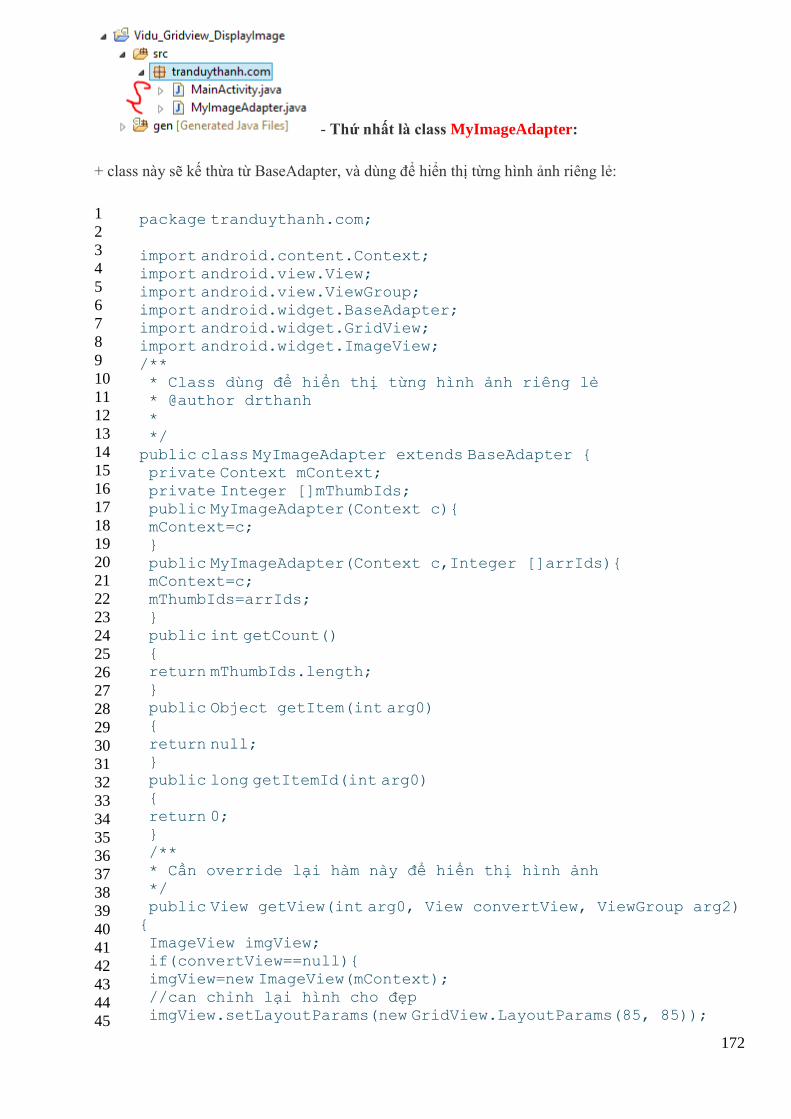
172
- Thứ nhất là class MyImageAdapter:
+ class này sẽ kế thừa từ BaseAdapter, và dùng để hiển thị từng hình ảnh riêng lẻ:
1
2
3
4
5
6
7
8
9
10
11
12
13
14
15
16
17
18
19
20
21
22
23
24
25
26
27
28
29
30
31
32
33
34
35
36
37
38
39
40
41
42
43
44
45
package tranduythanh.com;
import android.content.Context; import android.view.View;
import android.view.ViewGroup; import android.widget.BaseAdapter; import android.widget.GridView; import android.widget.ImageView;
/** * Class dùng để hiển thị từng hình ảnh riêng lẻ * @author drthanh
* */ public class MyImageAdapter extends BaseAdapter { private Context mContext;
private Integer []mThumbIds; public MyImageAdapter(Context c){ mContext=c; }
public MyImageAdapter(Context c,Integer []arrIds){ mContext=c; mThumbIds=arrIds;
} public int getCount() { return mThumbIds.length;
} public Object getItem(int arg0) {
return null; } public long getItemId(int arg0) {
return 0; } /**
* Cần override lại hàm này để hiển thị hình ảnh */ public View getView(int arg0, View convertView, ViewGroup arg2) {
ImageView imgView; if(convertView==null){ imgView=new ImageView(mContext);
//can chỉnh lại hình cho đẹp imgView.setLayoutParams(new GridView.LayoutParams(85, 85));
173
46
47
48
49
50
51
52
53
54
55
imgView.setScaleType(ImageView.ScaleType.CENTER_CROP); imgView.setPadding(8, 8, 8, 8); }else{ imgView=(ImageView) convertView;
} //lấy đúng vị trí hình ảnh được chọn //gán lại ImageResource imgView.setImageResource(mThumbIds[arg0]);
return imgView; } }
- Thứ hai là class MainActivity:
1
2
3
4
5
6
7
8
9
10
11
12
13
14
15
16
17
18
19
20
21
22
23
24
25
26
27
28
29
30
31
32
33
34
35
36
37
38
39
40
package tranduythanh.com; import android.os.Bundle; import android.app.Activity; import android.view.View;
import android.widget.AdapterView; import android.widget.Button; import android.widget.GridView;
import android.widget.ImageView; import android.widget.TextView; import android.widget.AdapterView.OnItemClickListener;
public class MainActivity extends Activity
implements OnItemClickListener { TextView tvMsg;
GridView gv; TextView tvSoloMsg; //mảng lưu danh sách các id hình ảnh có sẵn Integer[]mThumbIds;
//Adapter cho GridView MyImageAdapter adapter=null; //Vì không tạo thêm 1 Activity nên lấy luôn 2 Id ở bên
solo_picture.xml
ImageView ivSoloPicture; Button btnBack; //Lưu Bundle backup cho MainActivity
Bundle myBackupBundle; protected void onCreate(Bundle savedInstanceState) { super.onCreate(savedInstanceState); //Lưu savedInstanceState trước vào myBackupBundle
myBackupBundle=savedInstanceState; setContentView(R.layout.activity_main); tvMsg=(TextView) findViewById(R.id.tvMsg);
//gán mảng các Id hình ảnh cho mThumbIds mThumbIds=new Integer[]{R.drawable.image1,R.drawable.image2, R.drawable.image3,R.drawable.image4,
R.drawable.image5,R.drawable.image6, R.drawable.ic_launcher,R.drawable.lifecycle}; gv=(GridView) findViewById(R.id.gridView1);
//thiết lập Datasource cho Adapter
174
41
42
43
44
45
46
47
48
49
50
51
52
53
54
55
56
57
58
59
60
61
62
63
64
65
66
67
68
69
70
71
adapter=new MyImageAdapter(this, mThumbIds); //gán Adapter vào Gridview gv.setAdapter(adapter); //thiết lập sự kiện để mở từng hình ảnh chitiết
gv.setOnItemClickListener(this); } public void onItemClick(AdapterView<?> arg0, View arg1, int arg2, long arg3) {
//gọi hàm xem hình ảnh chi tiết tại ví trí thứ arg2 showdetail(arg2); }
public void showdetail(int posistion) { //Không mở Activity mới mà chỉ thiết lập lại Layout setContentView(R.layout.solo_picture);
//Vừa gọi hàm trên thì màn hình sẽ thay đổi qua cái mới //ta lấy các control trong layout mới này tvSoloMsg=(TextView) findViewById(R.id.tvSoloMsg);
tvSoloMsg.setText("Image at "+posistion); ivSoloPicture=(ImageView) findViewById(R.id.imgSolo); //thiết lập hình ảnh đang chọn lên ImageView mới ivSoloPicture.setImageResource(mThumbIds[posistion]);
btnBack=(Button) findViewById(R.id.btnBack); //Thiết lập sự kiện click Back để phục hồi lại
MainActivity
//bằng cách gọi lại onCreate(myBackupBundle); btnBack.setOnClickListener(new View.OnClickListener() { public void onClick(View arg0) { onCreate(myBackupBundle);
} }); }
}
- Khởi chạy ứng dụng bạn sẽ có kết quả như mong muốn.
- Bài tập này bạn đã biết cách sử dụng GridView, biết cách đưa hình ảnh vào GridView, đặc biệt biết
thêm một kỹ thuật mới đó là thay đổi Layout để đổi màn hình không cần chạy Activity.
- Ngoài ra còn biết thêm về BaseAdapter.
- Bạn có thể tải code mẫu đầy đủ ở đây: http://www.mediafire.com/?3o2jva4mzgp2kj8
- Bài tập tiếp theo bạn sẽ được thực hành về TimePickerDialog và DatePickerDialog, 2 control này
cũng đáng phải lưu tâm vì nó cũng dược sử dụng thường xuyên trong Android.
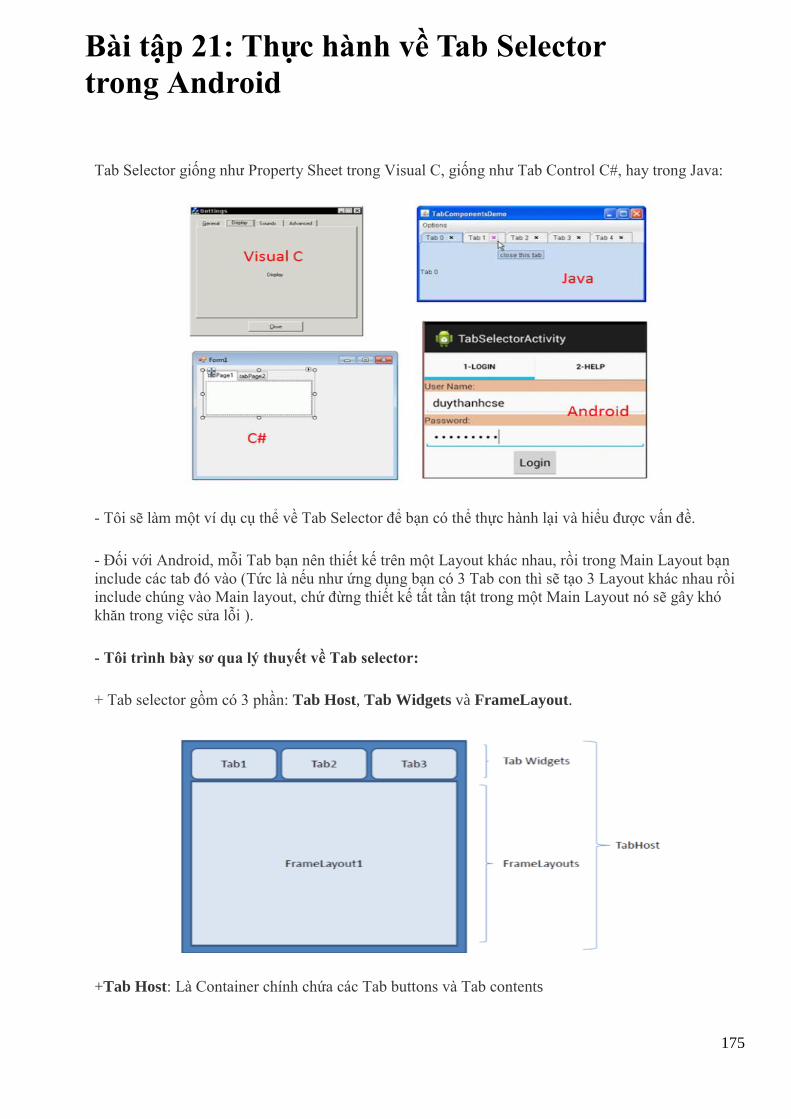
175
Bài tập 21: Thực hành về Tab Selector
trong Android
Tab Selector giống như Property Sheet trong Visual C, giống như Tab Control C#, hay trong Java:
- Tôi sẽ làm một ví dụ cụ thể về Tab Selector để bạn có thể thực hành lại và hiểu được vấn đề.
- Đối với Android, mỗi Tab bạn nên thiết kế trên một Layout khác nhau, rồi trong Main Layout bạn
include các tab đó vào (Tức là nếu như ứng dụng bạn có 3 Tab con thì sẽ tạo 3 Layout khác nhau rồi
include chúng vào Main layout, chứ đừng thiết kế tất tần tật trong một Main Layout nó sẽ gây khó
khăn trong việc sửa lỗi ).
- Tôi trình bày sơ qua lý thuyết về Tab selector:
+ Tab selector gồm có 3 phần: Tab Host, Tab Widgets và FrameLayout.
+Tab Host: Là Container chính chứa các Tab buttons và Tab contents
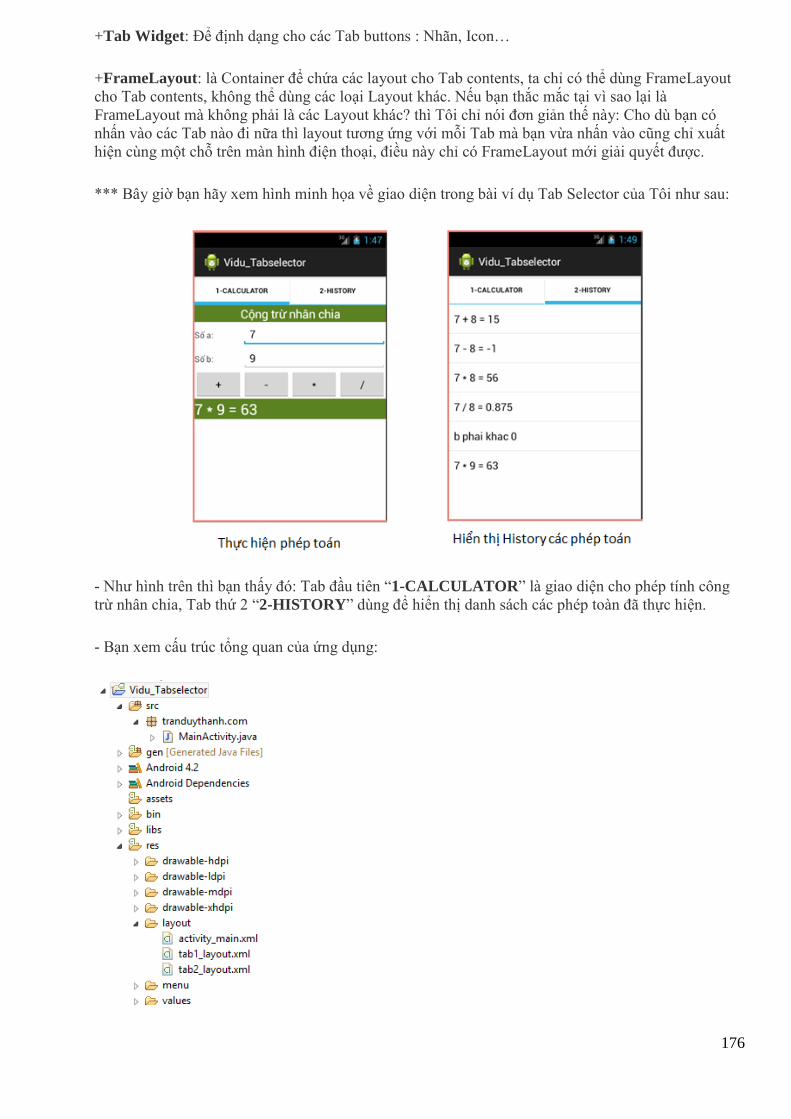
176
+Tab Widget: Để định dạng cho các Tab buttons : Nhãn, Icon…
+FrameLayout: là Container để chứa các layout cho Tab contents, ta chỉ có thể dùng FrameLayout
cho Tab contents, không thể dùng các loại Layout khác. Nếu bạn thắc mắc tại vì sao lại là
FrameLayout mà không phải là các Layout khác? thì Tôi chỉ nói đơn giản thế này: Cho dù bạn có
nhấn vào các Tab nào đi nữa thì layout tương ứng với mỗi Tab mà bạn vừa nhấn vào cũng chỉ xuất
hiện cùng một chỗ trên màn hình điện thoại, điều này chỉ có FrameLayout mới giải quyết được.
*** Bây giờ bạn hãy xem hình minh họa về giao diện trong bài ví dụ Tab Selector của Tôi như sau:
- Như hình trên thì bạn thấy đó: Tab đầu tiên “1-CALCULATOR” là giao diện cho phép tính công
trừ nhân chia, Tab thứ 2 “2-HISTORY” dùng để hiển thị danh sách các phép toàn đã thực hiện.
- Bạn xem cấu trúc tổng quan của ứng dụng:
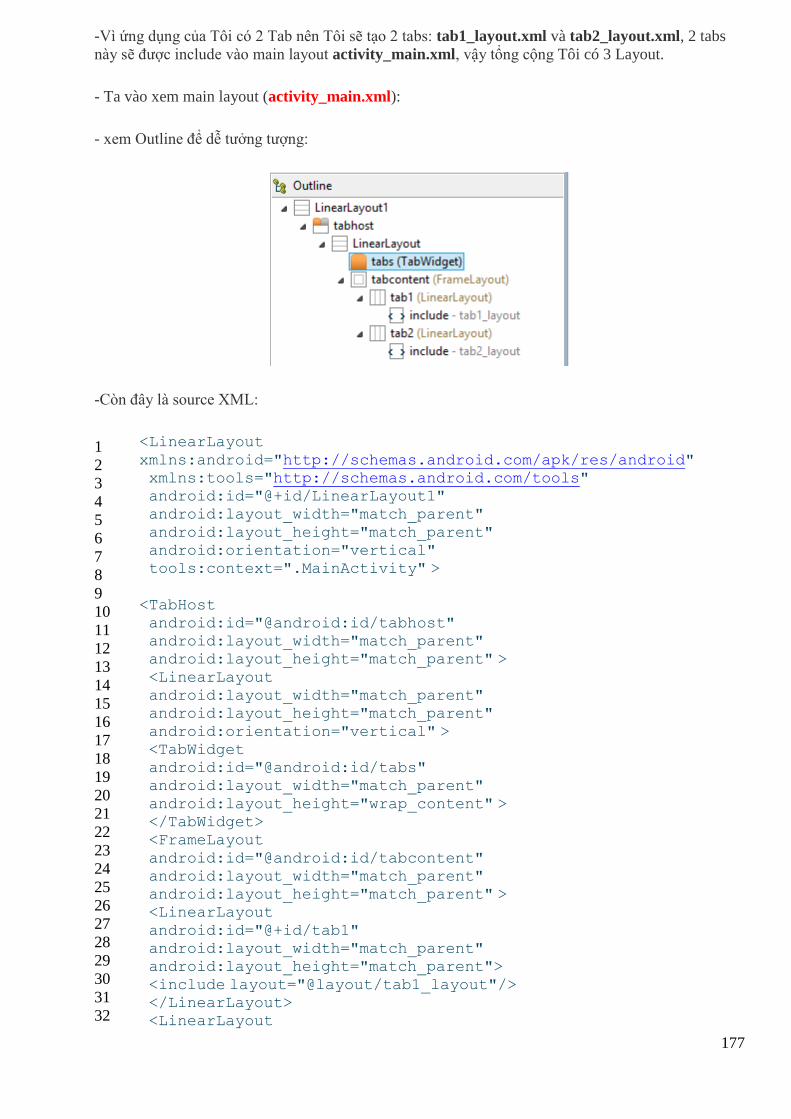
177
-Vì ứng dụng của Tôi có 2 Tab nên Tôi sẽ tạo 2 tabs: tab1_layout.xml và tab2_layout.xml, 2 tabs
này sẽ được include vào main layout activity_main.xml, vậy tổng cộng Tôi có 3 Layout.
- Ta vào xem main layout (activity_main.xml):
- xem Outline để dễ tưởng tượng:
-Còn đây là source XML:
1
2
3
4
5
6
7
8
9
10
11
12
13
14
15
16
17
18
19
20
21
22
23
24
25
26
27
28
29
30
31
32
<LinearLayout
xmlns:android="http://schemas.android.com/apk/res/android" xmlns:tools="http://schemas.android.com/tools" android:id="@+id/LinearLayout1" android:layout_width="match_parent"
android:layout_height="match_parent" android:orientation="vertical" tools:context=".MainActivity" >
<TabHost android:id="@android:id/tabhost" android:layout_width="match_parent" android:layout_height="match_parent" >
<LinearLayout android:layout_width="match_parent" android:layout_height="match_parent"
android:orientation="vertical" > <TabWidget android:id="@android:id/tabs" android:layout_width="match_parent"
android:layout_height="wrap_content" > </TabWidget> <FrameLayout
android:id="@android:id/tabcontent" android:layout_width="match_parent" android:layout_height="match_parent" > <LinearLayout
android:id="@+id/tab1" android:layout_width="match_parent" android:layout_height="match_parent">
<include layout="@layout/tab1_layout"/> </LinearLayout> <LinearLayout
178
33
34
35
36
37
38
39
40
41
42
android:id="@+id/tab2" android:layout_width="match_parent" android:layout_height="match_parent" > <include layout="@layout/tab2_layout"/>
</LinearLayout> </FrameLayout> </LinearLayout> </TabHost>
</LinearLayout>
- Bạn nhìn vào dòng lệnh 30 và 36:
<include layout=”@layout/tab1_layout”/>
<include layout=”@layout/tab2_layout”/>
Đó chính là cách include một layout này vào trong một layout khác.
- Tiếp tục ta xem tab1_layout.xml, Tôi lấy lại bài tập trước về cộng trừ nhân chia:
1
2
3
4
5
6
7
8
9
10
11
12
13
14
15
16
17
18
19
20
21
22
23
24
25
26
27
28
29
30
31
32
<TableLayout
xmlns:android="http://schemas.android.com/apk/res/android" xmlns:tools="http://schemas.android.com/tools" android:id="@+id/TableLayout1" android:layout_width="match_parent"
android:layout_height="match_parent" android:stretchColumns="*" >
<TableRow
android:id="@+id/tableRow1" android:layout_width="wrap_content" android:layout_height="wrap_content" >
<TextView
android:id="@+id/textView1" android:layout_width="wrap_content" android:layout_height="wrap_content" android:layout_span="4"
android:background="#5B8020" android:gravity="center" android:text="Cộng trừ nhân chia"
android:textColor="#FFFFFF" android:textSize="20sp" /> </TableRow>
<TableRow
android:id="@+id/tableRow2" android:layout_width="wrap_content" android:layout_height="wrap_content" >
<TextView android:id="@+id/textView2"
179
33
34
35
36
37
38
39
40
41
42
43
44
45
46
47
48
49
50
51
52
53
54
55
56
57
58
59
60
61
62
63
64
65
66
67
68
69
70
71
72
73
74
75
76
77
78
79
80
81
82
83
84
85
86
android:layout_width="wrap_content" android:layout_height="wrap_content" android:text="Số a:" />
<EditText
android:id="@+id/editsoa" android:layout_width="wrap_content" android:layout_height="wrap_content" android:layout_span="3"
android:ems="10" android:inputType="number" >
<requestFocus />
</EditText> </TableRow>
<TableRow android:id="@+id/tableRow3"
android:layout_width="wrap_content" android:layout_height="wrap_content" >
<TextView
android:id="@+id/textView3" android:layout_width="wrap_content" android:layout_height="wrap_content" android:text="Số b:" />
<EditText android:id="@+id/editsob" android:layout_width="wrap_content" android:layout_height="wrap_content"
android:layout_span="3" android:ems="10" android:inputType="number" />
</TableRow>
<TableRow android:id="@+id/tableRow4" android:layout_width="wrap_content"
android:layout_height="wrap_content" >
<Button android:id="@+id/btncong"
android:layout_width="wrap_content" android:layout_height="wrap_content" android:text="+" />
<Button
android:id="@+id/btntru" android:layout_width="wrap_content" android:layout_height="wrap_content"
android:text="-" />
<Button android:id="@+id/btnnhan"
180
87
88
89
90
91
92
93
94
95
96
97
98
99
100
101
102
103
104
105
106
107
108
109
110
111
112
113
android:layout_width="wrap_content" android:layout_height="wrap_content" android:text="*" />
<Button
android:id="@+id/btnchia" android:layout_width="wrap_content" android:layout_height="wrap_content" android:text="/" />
</TableRow>
<TableRow android:id="@+id/tableRow5"
android:layout_width="wrap_content" android:layout_height="wrap_content" >
<TextView android:id="@+id/txtketqua"
android:layout_width="wrap_content" android:layout_height="wrap_content" android:layout_span="4"
android:background="#5B8020" android:textColor="#FFFFFF" android:textSize="25sp" /> </TableRow>
</TableLayout>
- Và xem tiếp tab2_layout.xml, đơn giản là chỉ có 1 ListView chứa danh sách các phép toán đã thực
hiện bên Tab1:
1
2
3
4
5
6
7
8
9
10
11
12
13
<?xml version="1.0" encoding="utf-8"?> <LinearLayout
xmlns:android="http://schemas.android.com/apk/res/android" android:layout_width="match_parent" android:layout_height="match_parent"
android:orientation="vertical" >
<ListView android:id="@+id/lvhistory" android:layout_width="match_parent"
android:layout_height="wrap_content" > </ListView>
</LinearLayout>
- Giờ bạn xem MainActivity để biết được cách cấu hình Tabhost:
1
2
3
4
5
package tranduythanh.com;
import java.util.ArrayList;
import android.os.Bundle;
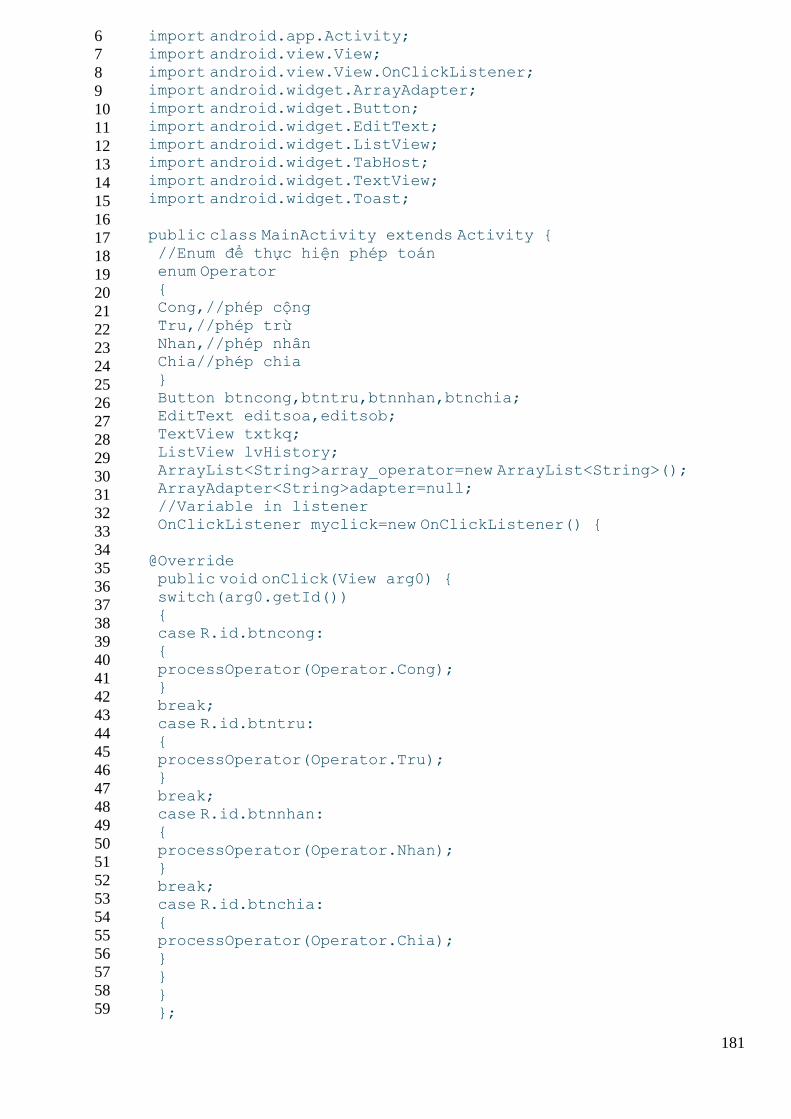
181
6
7
8
9
10
11
12
13
14
15
16
17
18
19
20
21
22
23
24
25
26
27
28
29
30
31
32
33
34
35
36
37
38
39
40
41
42
43
44
45
46
47
48
49
50
51
52
53
54
55
56
57
58
59
import android.app.Activity; import android.view.View; import android.view.View.OnClickListener; import android.widget.ArrayAdapter;
import android.widget.Button; import android.widget.EditText; import android.widget.ListView; import android.widget.TabHost;
import android.widget.TextView; import android.widget.Toast;
public class MainActivity extends Activity {
//Enum để thực hiện phép toán enum Operator { Cong,//phép cộng
Tru,//phép trừ Nhan,//phép nhân Chia//phép chia
} Button btncong,btntru,btnnhan,btnchia; EditText editsoa,editsob; TextView txtkq;
ListView lvHistory; ArrayList<String>array_operator=new ArrayList<String>(); ArrayAdapter<String>adapter=null;
//Variable in listener OnClickListener myclick=new OnClickListener() {
@Override public void onClick(View arg0) {
switch(arg0.getId()) { case R.id.btncong: {
processOperator(Operator.Cong); } break;
case R.id.btntru: { processOperator(Operator.Tru); }
break; case R.id.btnnhan: {
processOperator(Operator.Nhan); } break; case R.id.btnchia:
{ processOperator(Operator.Chia); }
} } };
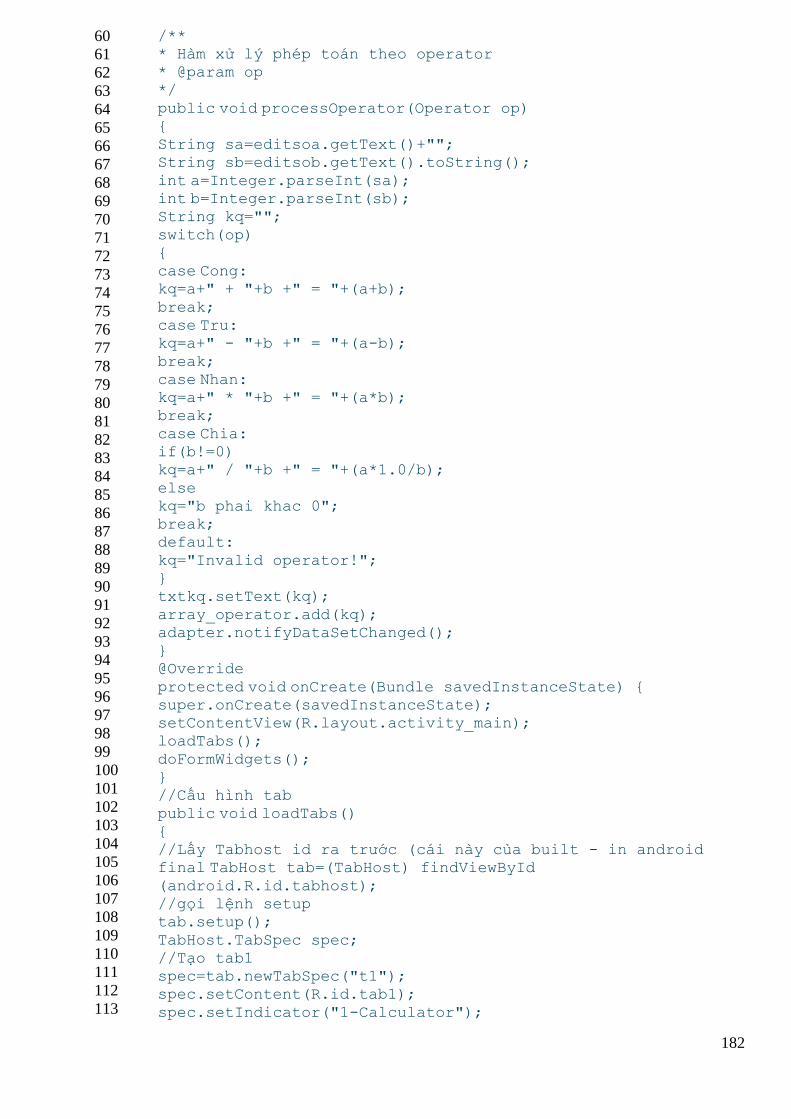
182
60
61
62
63
64
65
66
67
68
69
70
71
72
73
74
75
76
77
78
79
80
81
82
83
84
85
86
87
88
89
90
91
92
93
94
95
96
97
98
99
100
101
102
103
104
105
106
107
108
109
110
111
112
113
/** * Hàm xử lý phép toán theo operator * @param op */
public void processOperator(Operator op) { String sa=editsoa.getText()+""; String sb=editsob.getText().toString();
int a=Integer.parseInt(sa); int b=Integer.parseInt(sb); String kq="";
switch(op) { case Cong: kq=a+" + "+b +" = "+(a+b);
break; case Tru: kq=a+" - "+b +" = "+(a-b);
break; case Nhan: kq=a+" * "+b +" = "+(a*b); break;
case Chia: if(b!=0) kq=a+" / "+b +" = "+(a*1.0/b);
else kq="b phai khac 0"; break; default:
kq="Invalid operator!"; } txtkq.setText(kq);
array_operator.add(kq); adapter.notifyDataSetChanged(); } @Override
protected void onCreate(Bundle savedInstanceState) { super.onCreate(savedInstanceState); setContentView(R.layout.activity_main); loadTabs();
doFormWidgets(); } //Cấu hình tab
public void loadTabs() { //Lấy Tabhost id ra trước (cái này của built - in android final TabHost tab=(TabHost) findViewById
(android.R.id.tabhost); //gọi lệnh setup tab.setup();
TabHost.TabSpec spec; //Tạo tab1 spec=tab.newTabSpec("t1"); spec.setContent(R.id.tab1);
spec.setIndicator("1-Calculator");
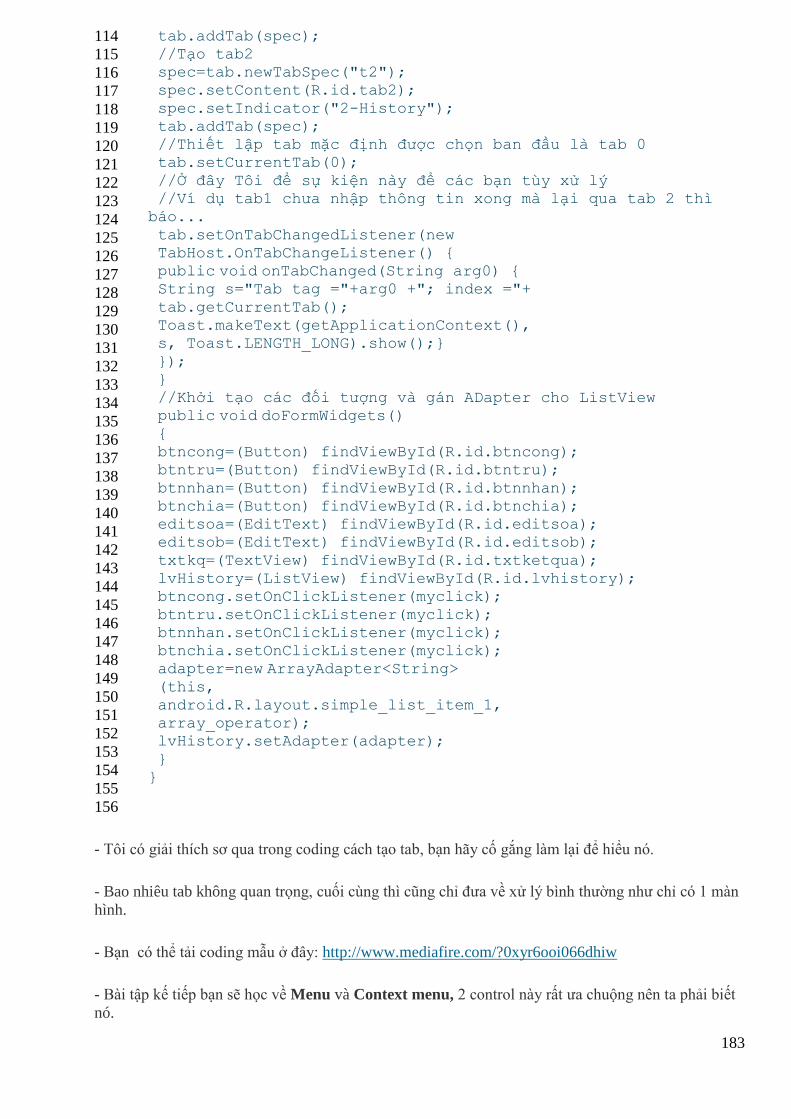
183
114
115
116
117
118
119
120
121
122
123
124
125
126
127
128
129
130
131
132
133
134
135
136
137
138
139
140
141
142
143
144
145
146
147
148
149
150
151
152
153
154
155
156
tab.addTab(spec); //Tạo tab2 spec=tab.newTabSpec("t2"); spec.setContent(R.id.tab2);
spec.setIndicator("2-History"); tab.addTab(spec); //Thiết lập tab mặc định được chọn ban đầu là tab 0 tab.setCurrentTab(0);
//Ở đây Tôi để sự kiện này để các bạn tùy xử lý //Ví dụ tab1 chưa nhập thông tin xong mà lại qua tab 2 thì
báo...
tab.setOnTabChangedListener(new TabHost.OnTabChangeListener() { public void onTabChanged(String arg0) { String s="Tab tag ="+arg0 +"; index ="+
tab.getCurrentTab(); Toast.makeText(getApplicationContext(), s, Toast.LENGTH_LONG).show();}
}); } //Khởi tạo các đối tượng và gán ADapter cho ListView public void doFormWidgets()
{ btncong=(Button) findViewById(R.id.btncong); btntru=(Button) findViewById(R.id.btntru);
btnnhan=(Button) findViewById(R.id.btnnhan); btnchia=(Button) findViewById(R.id.btnchia); editsoa=(EditText) findViewById(R.id.editsoa); editsob=(EditText) findViewById(R.id.editsob);
txtkq=(TextView) findViewById(R.id.txtketqua); lvHistory=(ListView) findViewById(R.id.lvhistory); btncong.setOnClickListener(myclick);
btntru.setOnClickListener(myclick); btnnhan.setOnClickListener(myclick); btnchia.setOnClickListener(myclick); adapter=new ArrayAdapter<String>
(this, android.R.layout.simple_list_item_1, array_operator); lvHistory.setAdapter(adapter);
} }
- Tôi có giải thích sơ qua trong coding cách tạo tab, bạn hãy cố gắng làm lại để hiểu nó.
- Bao nhiêu tab không quan trọng, cuối cùng thì cũng chỉ đưa về xử lý bình thường như chỉ có 1 màn
hình.
- Bạn có thể tải coding mẫu ở đây: http://www.mediafire.com/?0xyr6ooi066dhiw
- Bài tập kế tiếp bạn sẽ học về Menu và Context menu, 2 control này rất ưa chuộng nên ta phải biết
nó.
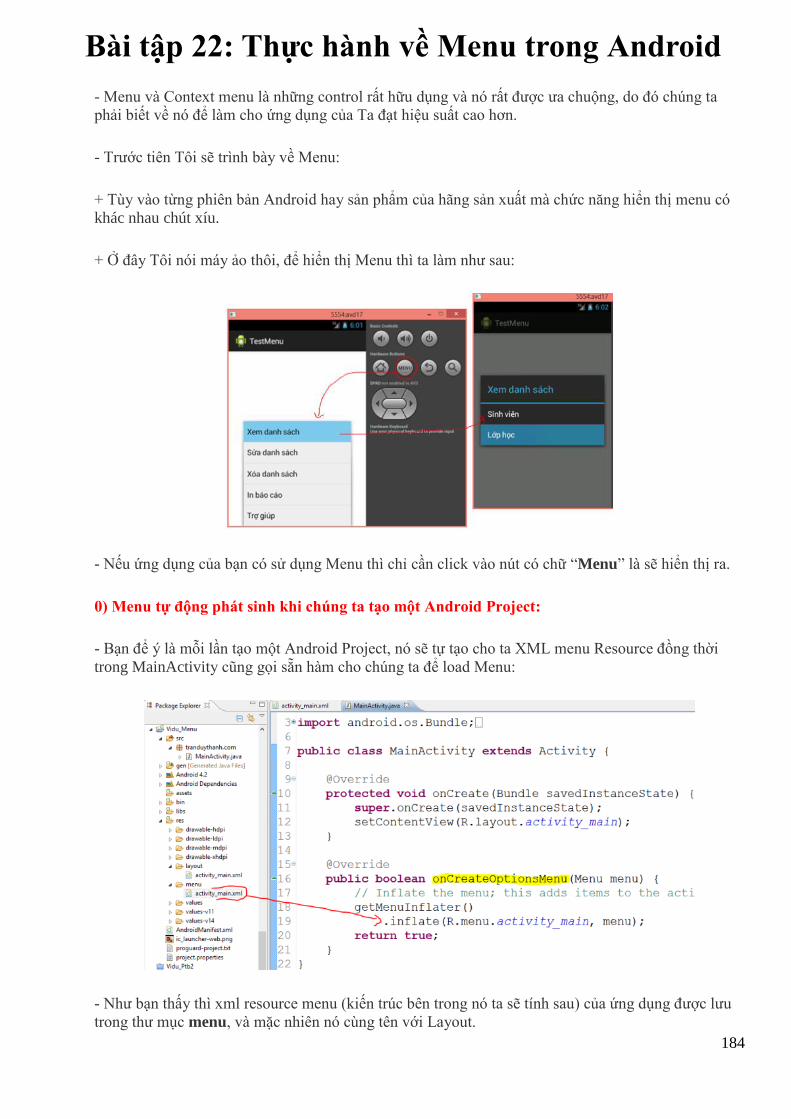
184
Bài tập 22: Thực hành về Menu trong Android
- Menu và Context menu là những control rất hữu dụng và nó rất được ưa chuộng, do đó chúng ta
phải biết về nó để làm cho ứng dụng của Ta đạt hiệu suất cao hơn.
- Trước tiên Tôi sẽ trình bày về Menu:
+ Tùy vào từng phiên bản Android hay sản phẩm của hãng sản xuất mà chức năng hiển thị menu có
khác nhau chút xíu.
+ Ở đây Tôi nói máy ảo thôi, để hiển thị Menu thì ta làm như sau:
- Nếu ứng dụng của bạn có sử dụng Menu thì chỉ cần click vào nút có chữ “Menu” là sẽ hiển thị ra.
0) Menu tự động phát sinh khi chúng ta tạo một Android Project:
- Bạn để ý là mỗi lần tạo một Android Project, nó sẽ tự tạo cho ta XML menu Resource đồng thời
trong MainActivity cũng gọi sẵn hàm cho chúng ta để load Menu:
- Như bạn thấy thì xml resource menu (kiến trúc bên trong nó ta sẽ tính sau) của ứng dụng được lưu
trong thư mục menu, và mặc nhiên nó cùng tên với Layout.
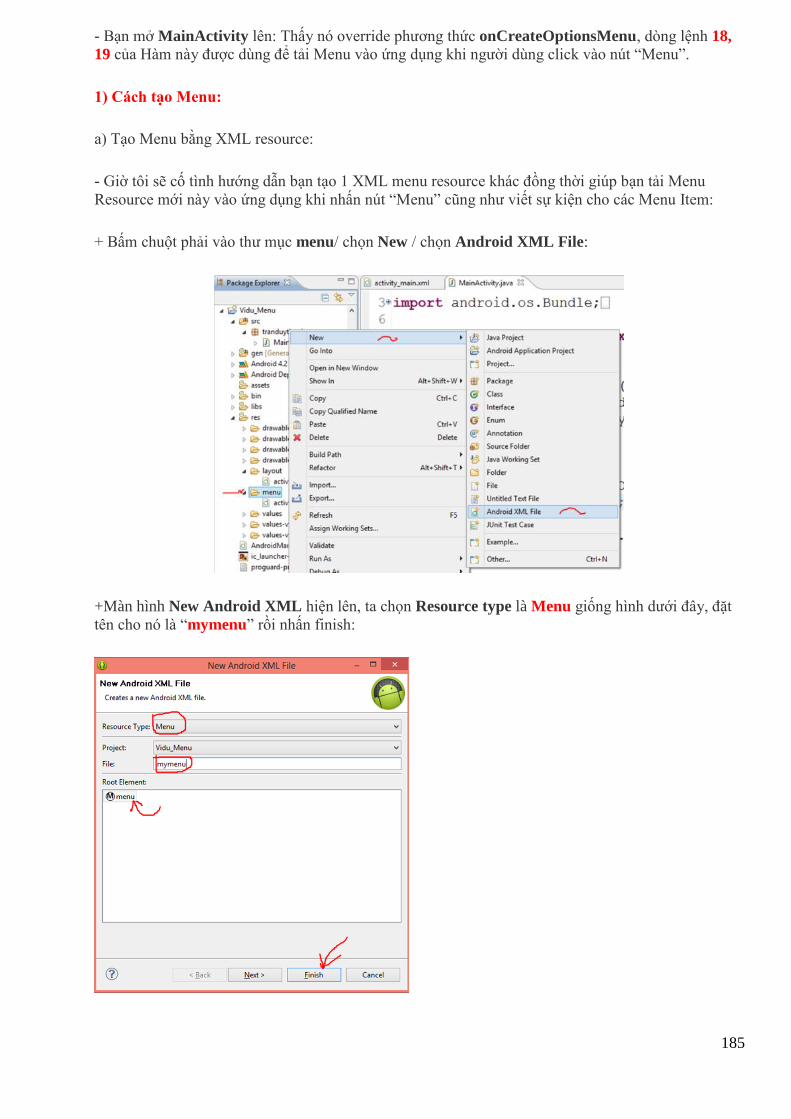
185
- Bạn mở MainActivity lên: Thấy nó override phương thức onCreateOptionsMenu, dòng lệnh 18,
19 của Hàm này được dùng để tải Menu vào ứng dụng khi người dùng click vào nút “Menu”.
1) Cách tạo Menu:
a) Tạo Menu bằng XML resource:
- Giờ tôi sẽ cố tình hướng dẫn bạn tạo 1 XML menu resource khác đồng thời giúp bạn tải Menu
Resource mới này vào ứng dụng khi nhấn nút “Menu” cũng như viết sự kiện cho các Menu Item:
+ Bấm chuột phải vào thư mục menu/ chọn New / chọn Android XML File:
+Màn hình New Android XML hiện lên, ta chọn Resource type là Menu giống hình dưới đây, đặt
tên cho nó là “mymenu” rồi nhấn finish:
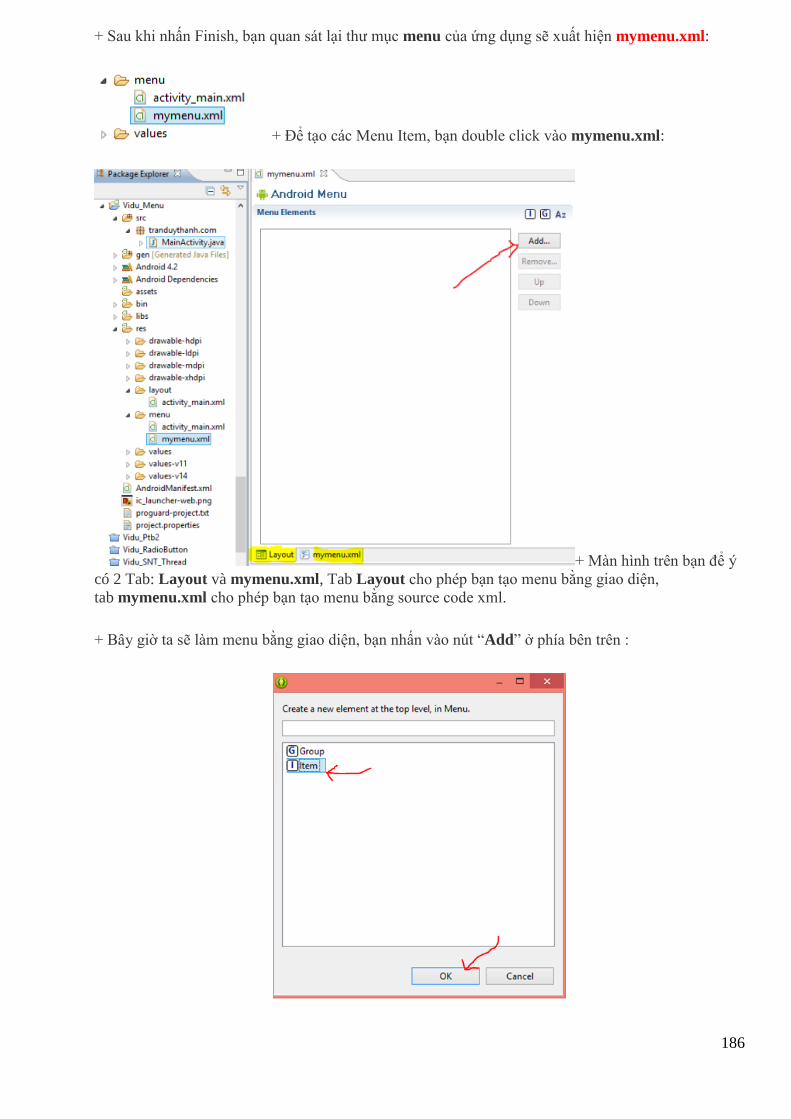
186
+ Sau khi nhấn Finish, bạn quan sát lại thư mục menu của ứng dụng sẽ xuất hiện mymenu.xml:
+ Để tạo các Menu Item, bạn double click vào mymenu.xml:
+ Màn hình trên bạn để ý
có 2 Tab: Layout và mymenu.xml, Tab Layout cho phép bạn tạo menu bằng giao diện,
tab mymenu.xml cho phép bạn tạo menu bằng source code xml.
+ Bây giờ ta sẽ làm menu bằng giao diện, bạn nhấn vào nút “Add” ở phía bên trên :
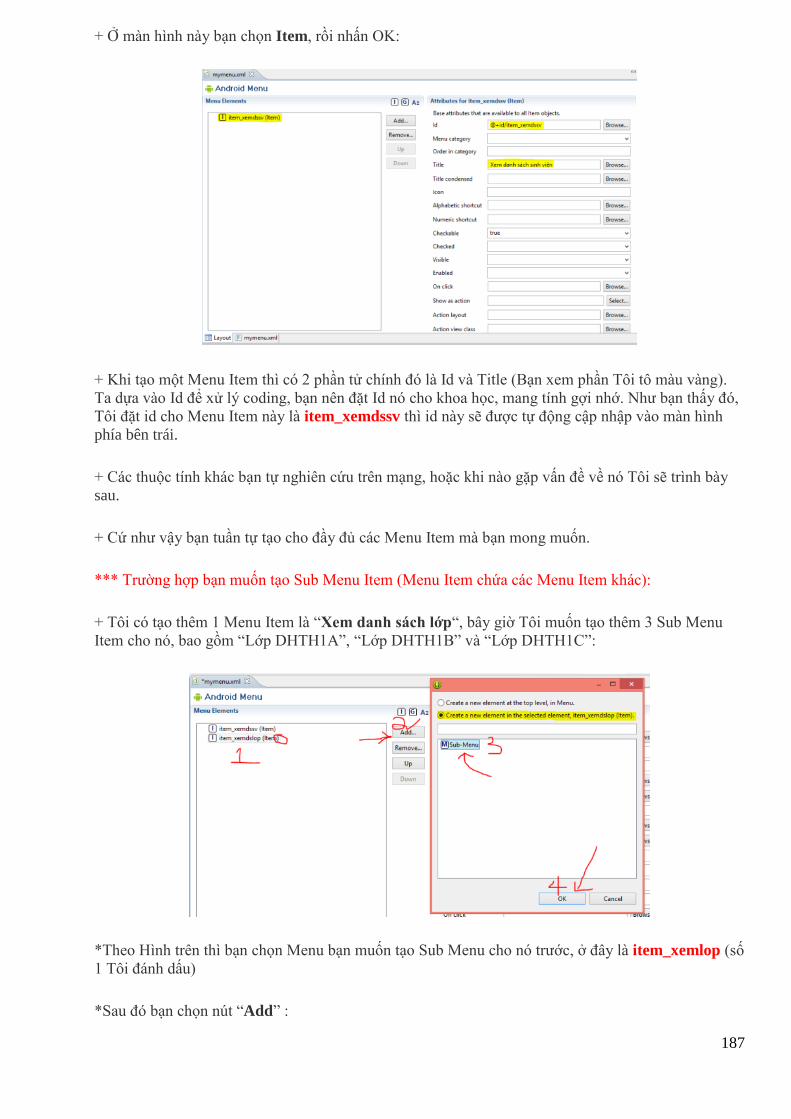
187
+ Ở màn hình này bạn chọn Item, rồi nhấn OK:
+ Khi tạo một Menu Item thì có 2 phần tử chính đó là Id và Title (Bạn xem phần Tôi tô màu vàng).
Ta dựa vào Id để xử lý coding, bạn nên đặt Id nó cho khoa học, mang tính gợi nhớ. Như bạn thấy đó,
Tôi đặt id cho Menu Item này là item_xemdssv thì id này sẽ được tự động cập nhập vào màn hình
phía bên trái.
+ Các thuộc tính khác bạn tự nghiên cứu trên mạng, hoặc khi nào gặp vấn đề về nó Tôi sẽ trình bày
sau.
+ Cứ như vậy bạn tuần tự tạo cho đầy đủ các Menu Item mà bạn mong muốn.
*** Trường hợp bạn muốn tạo Sub Menu Item (Menu Item chứa các Menu Item khác):
+ Tôi có tạo thêm 1 Menu Item là “Xem danh sách lớp“, bây giờ Tôi muốn tạo thêm 3 Sub Menu
Item cho nó, bao gồm “Lớp DHTH1A”, “Lớp DHTH1B” và “Lớp DHTH1C”:
*Theo Hình trên thì bạn chọn Menu bạn muốn tạo Sub Menu cho nó trước, ở đây là item_xemlop (số
1 Tôi đánh dấu)
*Sau đó bạn chọn nút “Add” :
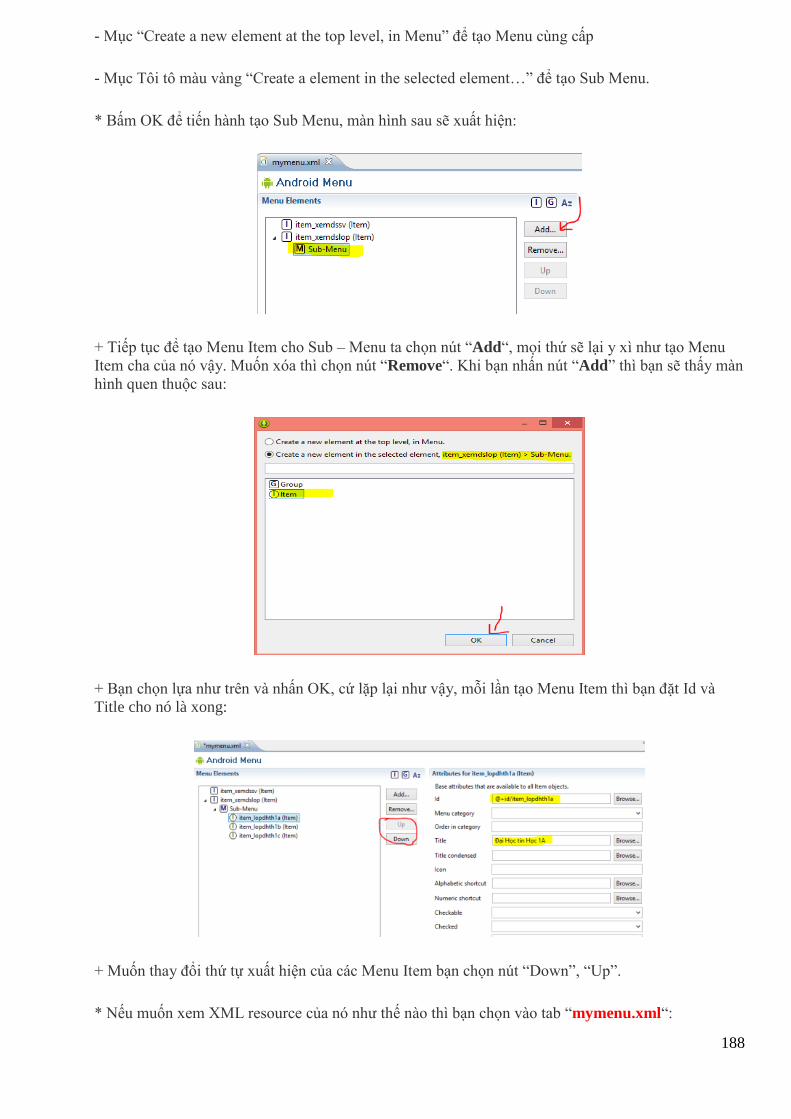
188
- Mục “Create a new element at the top level, in Menu” để tạo Menu cùng cấp
- Mục Tôi tô màu vàng “Create a element in the selected element…” để tạo Sub Menu.
* Bấm OK để tiến hành tạo Sub Menu, màn hình sau sẽ xuất hiện:
+ Tiếp tục để tạo Menu Item cho Sub – Menu ta chọn nút “Add“, mọi thứ sẽ lại y xì như tạo Menu
Item cha của nó vậy. Muốn xóa thì chọn nút “Remove“. Khi bạn nhấn nút “Add” thì bạn sẽ thấy màn
hình quen thuộc sau:
+ Bạn chọn lựa như trên và nhấn OK, cứ lặp lại như vậy, mỗi lần tạo Menu Item thì bạn đặt Id và
Title cho nó là xong:
+ Muốn thay đổi thứ tự xuất hiện của các Menu Item bạn chọn nút “Down”, “Up”.
* Nếu muốn xem XML resource của nó như thế nào thì bạn chọn vào tab “mymenu.xml“:

189
*** Bây giờ bạn xem cách gắn Menu vừa tạo vào ứng dụng như thế nào:
- Bạn mở MainActivity.java lên:
Dòng lệnh 13, 14: getMenuInflater().inflate(R.menu.mymenu, menu); dùng để gắn Menu XML
Resource vào ứng dụng, bạn chạy máy ảo lên và nhấn vào nút Menu, bạn sẽ thấy được kết quả:
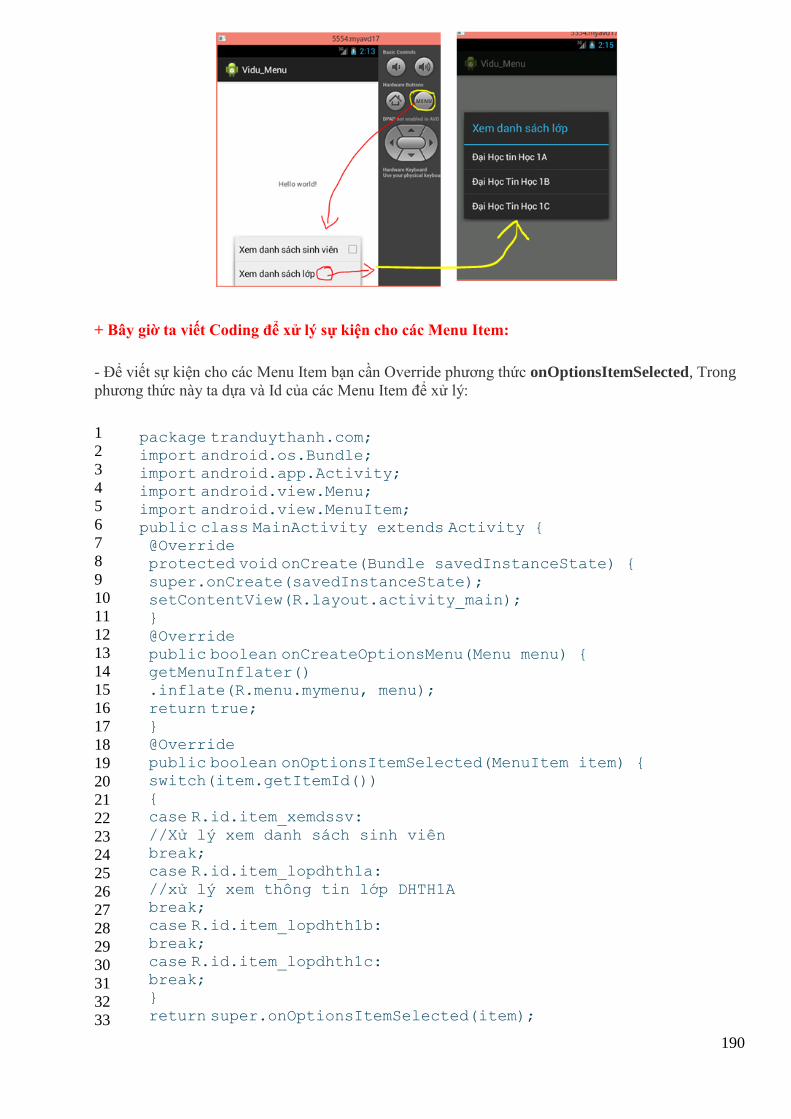
190
+ Bây giờ ta viết Coding để xử lý sự kiện cho các Menu Item:
- Để viết sự kiện cho các Menu Item bạn cần Override phương thức onOptionsItemSelected, Trong
phương thức này ta dựa và Id của các Menu Item để xử lý:
1
2
3
4
5
6
7
8
9
10
11
12
13
14
15
16
17
18
19
20
21
22
23
24
25
26
27
28
29
30
31
32
33
package tranduythanh.com; import android.os.Bundle; import android.app.Activity; import android.view.Menu;
import android.view.MenuItem; public class MainActivity extends Activity { @Override protected void onCreate(Bundle savedInstanceState) {
super.onCreate(savedInstanceState); setContentView(R.layout.activity_main); }
@Override public boolean onCreateOptionsMenu(Menu menu) { getMenuInflater() .inflate(R.menu.mymenu, menu);
return true; } @Override
public boolean onOptionsItemSelected(MenuItem item) { switch(item.getItemId()) { case R.id.item_xemdssv:
//Xử lý xem danh sách sinh viên break; case R.id.item_lopdhth1a:
//xử lý xem thông tin lớp DHTH1A break; case R.id.item_lopdhth1b: break;
case R.id.item_lopdhth1c: break; }
return super.onOptionsItemSelected(item);
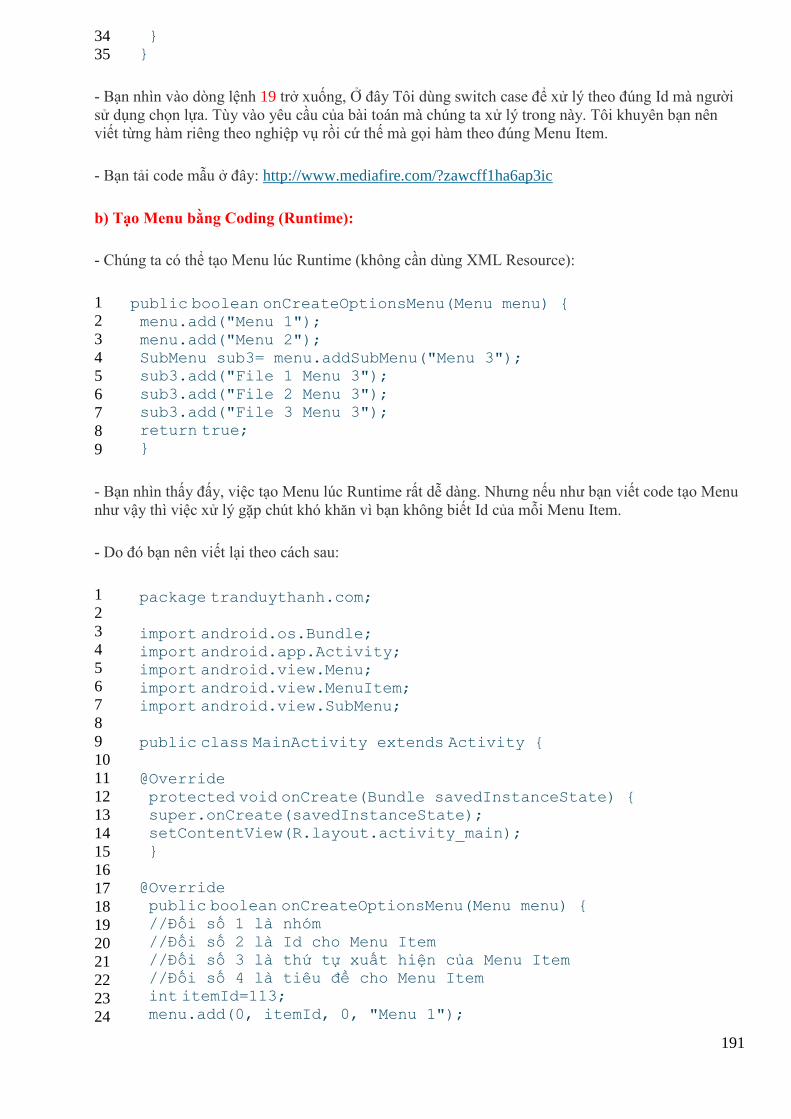
191
34
35
} }
- Bạn nhìn vào dòng lệnh 19 trở xuống, Ở đây Tôi dùng switch case để xử lý theo đúng Id mà người
sử dụng chọn lựa. Tùy vào yêu cầu của bài toán mà chúng ta xử lý trong này. Tôi khuyên bạn nên
viết từng hàm riêng theo nghiệp vụ rồi cứ thế mà gọi hàm theo đúng Menu Item.
- Bạn tải code mẫu ở đây: http://www.mediafire.com/?zawcff1ha6ap3ic
b) Tạo Menu bằng Coding (Runtime):
- Chúng ta có thể tạo Menu lúc Runtime (không cần dùng XML Resource):
1
2
3
4
5
6
7
8
9
public boolean onCreateOptionsMenu(Menu menu) { menu.add("Menu 1");
menu.add("Menu 2"); SubMenu sub3= menu.addSubMenu("Menu 3"); sub3.add("File 1 Menu 3");
sub3.add("File 2 Menu 3"); sub3.add("File 3 Menu 3"); return true; }
- Bạn nhìn thấy đấy, việc tạo Menu lúc Runtime rất dễ dàng. Nhưng nếu như bạn viết code tạo Menu
như vậy thì việc xử lý gặp chút khó khăn vì bạn không biết Id của mỗi Menu Item.
- Do đó bạn nên viết lại theo cách sau:
1
2
3
4
5
6
7
8
9
10
11
12
13
14
15
16
17
18
19
20
21
22
23
24
package tranduythanh.com;
import android.os.Bundle; import android.app.Activity; import android.view.Menu;
import android.view.MenuItem; import android.view.SubMenu;
public class MainActivity extends Activity {
@Override
protected void onCreate(Bundle savedInstanceState) { super.onCreate(savedInstanceState); setContentView(R.layout.activity_main); }
@Override public boolean onCreateOptionsMenu(Menu menu) { //Đối số 1 là nhóm
//Đối số 2 là Id cho Menu Item //Đối số 3 là thứ tự xuất hiện của Menu Item //Đối số 4 là tiêu đề cho Menu Item int itemId=113;
menu.add(0, itemId, 0, "Menu 1");
192
25
26
27
28
29
30
31
32
33
34
35
36
37
38
39
40
41
42
43
44
45
46
47
48
49
50
51
52
53
54
55
56
57
58
itemId=114; menu.add(0,itemId,1,"Menu 2"); SubMenu sub3= menu.addSubMenu("Menu 3"); itemId=115;
sub3.add(0,itemId,0,"File 1 Menu 3"); itemId=116; sub3.add(0,itemId,1,"File 2 Menu 3"); itemId=117;
sub3.add(0,itemId,2,"File 3 Menu 3"); return true; }
@Override public boolean onOptionsItemSelected(MenuItem item) { switch(item.getItemId()) {
case 113: //Xử lý Menu 1 break;
case 114: //Xử lý Menu 2 break; case 115:
//Xử lý File 1 của Menu 3 break; case 116:
//Xử lý File 2 của Menu 3 break; case 117: //Xử lý File 3 của Menu 3
break; } return super.onOptionsItemSelected(item);
} }
- Như vậy mỗi lần tạo Menu Item bạn nên gán Id cho nó và xử lý theo Id này ở trong
hàm onOptionsItemSelected.
- Bạn tải code mẫu ở đây: http://www.mediafire.com/?em82rb51dduvnou
- Bài tập này Tôi sẽ không làm ví dụ mẫu lớn, Tôi để dành khi học xong Context Menu Tôi Demo
luôn.
- Bài tập sau Tôi sẽ hướng dẫn cách làm Context Menu.
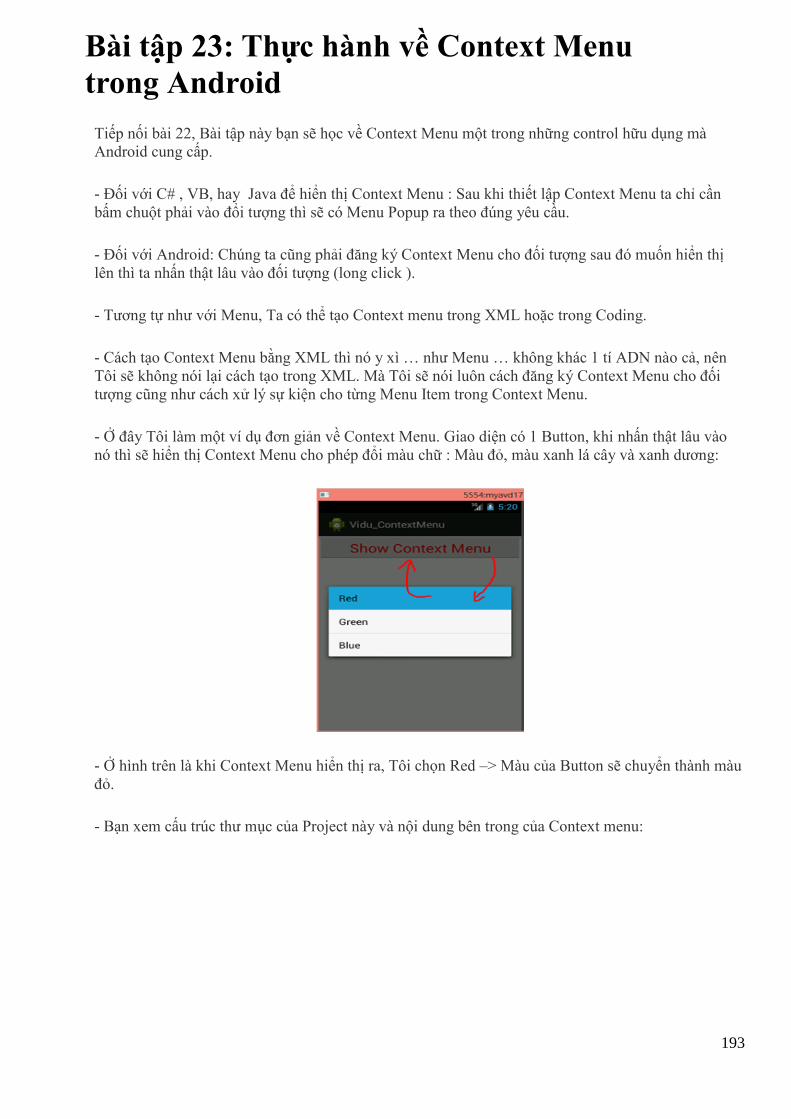
193
Bài tập 23: Thực hành về Context Menu
trong Android
Tiếp nối bài 22, Bài tập này bạn sẽ học về Context Menu một trong những control hữu dụng mà
Android cung cấp.
- Đối với C# , VB, hay Java để hiển thị Context Menu : Sau khi thiết lập Context Menu ta chỉ cần
bấm chuột phải vào đổi tượng thì sẽ có Menu Popup ra theo đúng yêu cầu.
- Đối với Android: Chúng ta cũng phải đăng ký Context Menu cho đối tượng sau đó muốn hiển thị
lên thì ta nhấn thật lâu vào đối tượng (long click ).
- Tương tự như với Menu, Ta có thể tạo Context menu trong XML hoặc trong Coding.
- Cách tạo Context Menu bằng XML thì nó y xì … như Menu … không khác 1 tí ADN nào cả, nên
Tôi sẽ không nói lại cách tạo trong XML. Mà Tôi sẽ nói luôn cách đăng ký Context Menu cho đối
tượng cũng như cách xử lý sự kiện cho từng Menu Item trong Context Menu.
- Ở đây Tôi làm một ví dụ đơn giản về Context Menu. Giao diện có 1 Button, khi nhấn thật lâu vào
nó thì sẽ hiển thị Context Menu cho phép đổi màu chữ : Màu đỏ, màu xanh lá cây và xanh dương:
- Ở hình trên là khi Context Menu hiển thị ra, Tôi chọn Red –> Màu của Button sẽ chuyển thành màu
đỏ.
- Bạn xem cấu trúc thư mục của Project này và nội dung bên trong của Context menu:
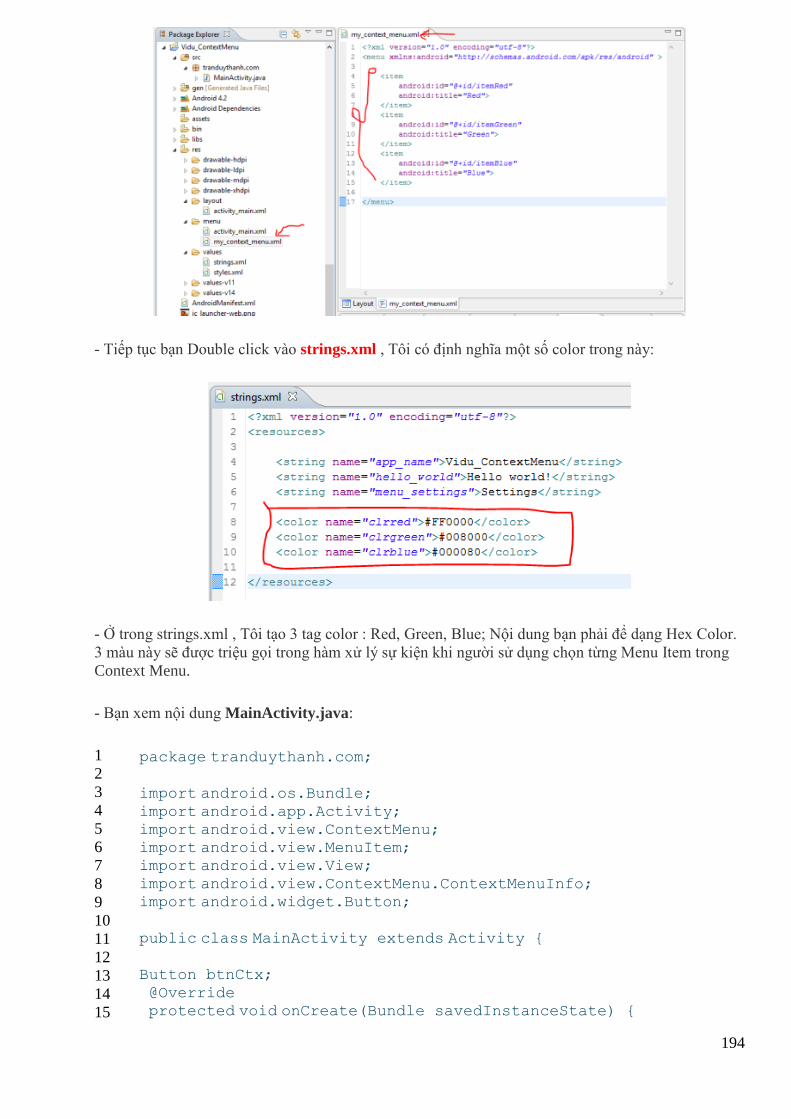
194
- Tiếp tục bạn Double click vào strings.xml , Tôi có định nghĩa một số color trong này:
- Ở trong strings.xml , Tôi tạo 3 tag color : Red, Green, Blue; Nội dung bạn phải để dạng Hex Color.
3 màu này sẽ được triệu gọi trong hàm xử lý sự kiện khi người sử dụng chọn từng Menu Item trong
Context Menu.
- Bạn xem nội dung MainActivity.java:
1
2
3
4
5
6
7
8
9
10
11
12
13
14
15
package tranduythanh.com;
import android.os.Bundle;
import android.app.Activity; import android.view.ContextMenu; import android.view.MenuItem; import android.view.View;
import android.view.ContextMenu.ContextMenuInfo; import android.widget.Button;
public class MainActivity extends Activity {
Button btnCtx;
@Override protected void onCreate(Bundle savedInstanceState) {
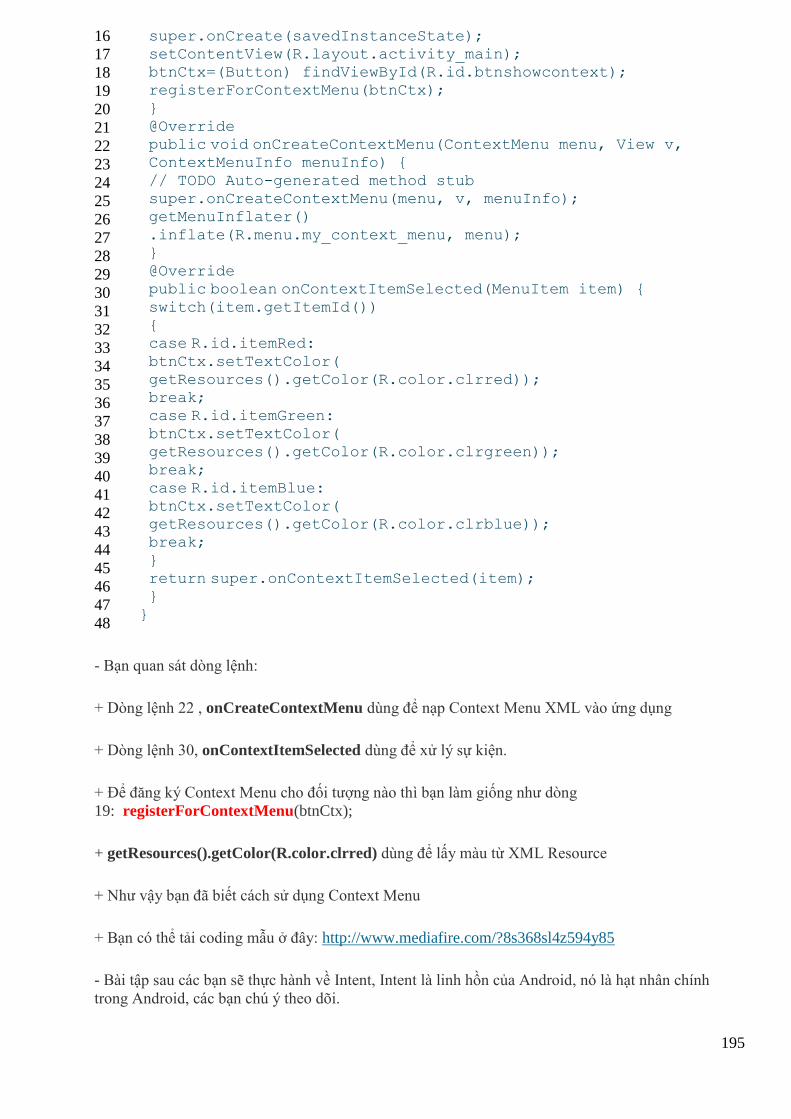
195
16
17
18
19
20
21
22
23
24
25
26
27
28
29
30
31
32
33
34
35
36
37
38
39
40
41
42
43
44
45
46
47
48
super.onCreate(savedInstanceState); setContentView(R.layout.activity_main); btnCtx=(Button) findViewById(R.id.btnshowcontext); registerForContextMenu(btnCtx);
} @Override public void onCreateContextMenu(ContextMenu menu, View v, ContextMenuInfo menuInfo) {
// TODO Auto-generated method stub super.onCreateContextMenu(menu, v, menuInfo); getMenuInflater()
.inflate(R.menu.my_context_menu, menu); } @Override public boolean onContextItemSelected(MenuItem item) {
switch(item.getItemId()) { case R.id.itemRed:
btnCtx.setTextColor( getResources().getColor(R.color.clrred)); break; case R.id.itemGreen:
btnCtx.setTextColor( getResources().getColor(R.color.clrgreen)); break;
case R.id.itemBlue: btnCtx.setTextColor( getResources().getColor(R.color.clrblue)); break;
} return super.onContextItemSelected(item); }
}
- Bạn quan sát dòng lệnh:
+ Dòng lệnh 22 , onCreateContextMenu dùng để nạp Context Menu XML vào ứng dụng
+ Dòng lệnh 30, onContextItemSelected dùng để xử lý sự kiện.
+ Để đăng ký Context Menu cho đối tượng nào thì bạn làm giống như dòng
19: registerForContextMenu(btnCtx);
+ getResources().getColor(R.color.clrred) dùng để lấy màu từ XML Resource
+ Như vậy bạn đã biết cách sử dụng Context Menu
+ Bạn có thể tải coding mẫu ở đây: http://www.mediafire.com/?8s368sl4z594y85
- Bài tập sau các bạn sẽ thực hành về Intent, Intent là linh hồn của Android, nó là hạt nhân chính
trong Android, các bạn chú ý theo dõi.
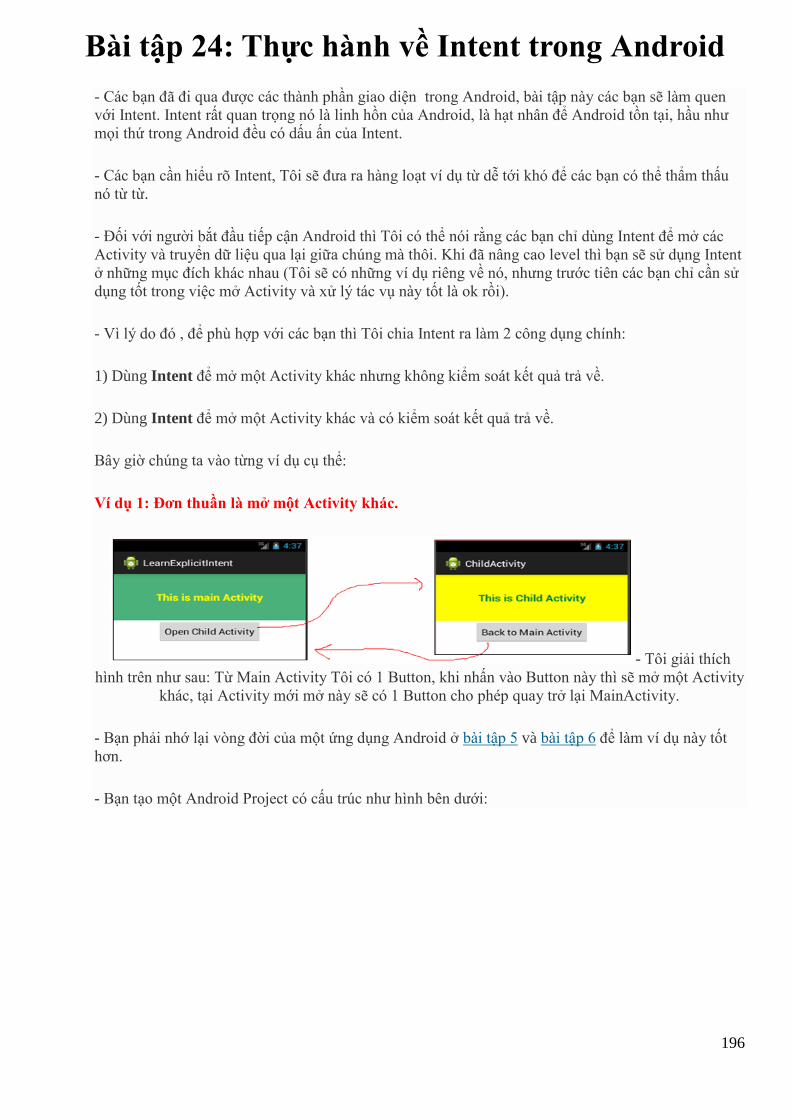
196
Bài tập 24: Thực hành về Intent trong Android
- Các bạn đã đi qua được các thành phần giao diện trong Android, bài tập này các bạn sẽ làm quen
với Intent. Intent rất quan trọng nó là linh hồn của Android, là hạt nhân để Android tồn tại, hầu như
mọi thứ trong Android đều có dấu ấn của Intent.
- Các bạn cần hiểu rõ Intent, Tôi sẽ đưa ra hàng loạt ví dụ từ dễ tới khó để các bạn có thể thẩm thấu
nó từ từ.
- Đối với người bắt đầu tiếp cận Android thì Tôi có thể nói rằng các bạn chỉ dùng Intent để mở các
Activity và truyển dữ liệu qua lại giữa chúng mà thôi. Khi đã nâng cao level thì bạn sẽ sử dụng Intent
ở những mục đích khác nhau (Tôi sẽ có những ví dụ riêng về nó, nhưng trước tiên các bạn chỉ cần sử
dụng tốt trong việc mở Activity và xử lý tác vụ này tốt là ok rồi).
- Vì lý do đó , để phù hợp với các bạn thì Tôi chia Intent ra làm 2 công dụng chính:
1) Dùng Intent để mở một Activity khác nhưng không kiểm soát kết quả trả về.
2) Dùng Intent để mở một Activity khác và có kiểm soát kết quả trả về.
Bây giờ chúng ta vào từng ví dụ cụ thể:
Ví dụ 1: Đơn thuần là mở một Activity khác.
- Tôi giải thích
hình trên như sau: Từ Main Activity Tôi có 1 Button, khi nhấn vào Button này thì sẽ mở một Activity
khác, tại Activity mới mở này sẽ có 1 Button cho phép quay trở lại MainActivity.
- Bạn phải nhớ lại vòng đời của một ứng dụng Android ở bài tập 5 và bài tập 6 để làm ví dụ này tốt
hơn.
- Bạn tạo một Android Project có cấu trúc như hình bên dưới:
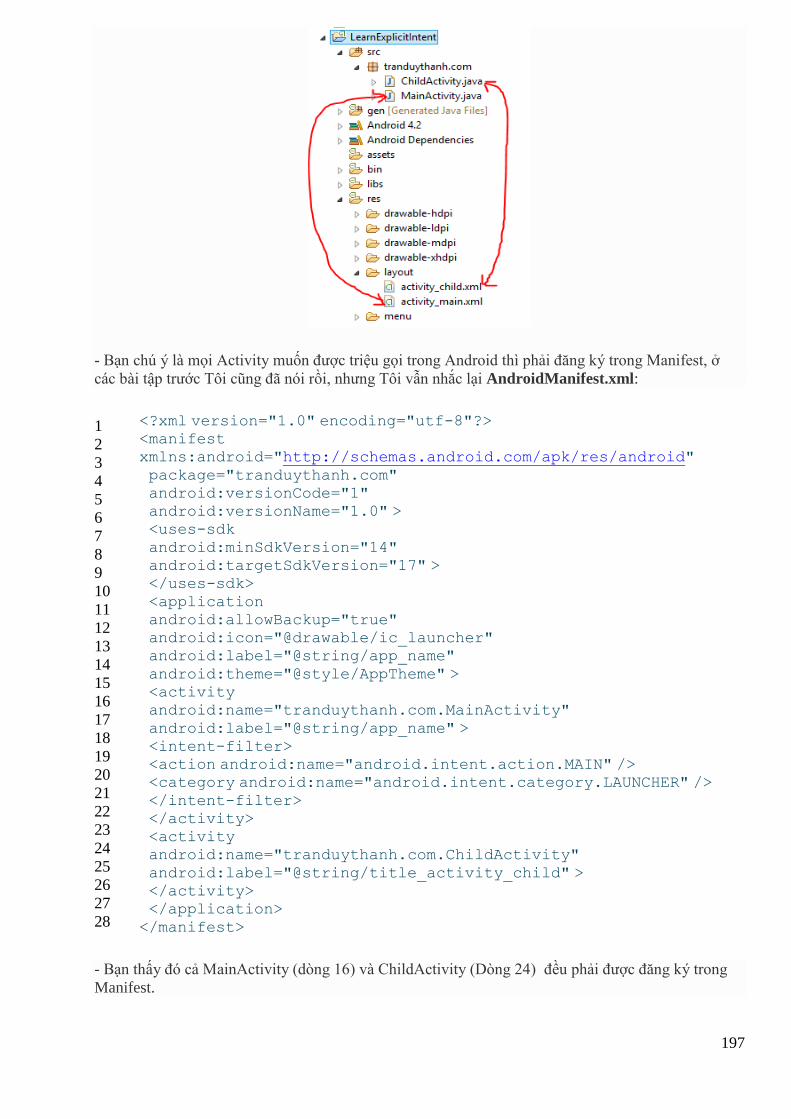
197
- Bạn chú ý là mọi Activity muốn được triệu gọi trong Android thì phải đăng ký trong Manifest, ở
các bài tập trước Tôi cũng đã nói rồi, nhưng Tôi vẫn nhắc lại AndroidManifest.xml:
1
2
3
4
5
6
7
8
9
10
11
12
13
14
15
16
17
18
19
20
21
22
23
24
25
26
27
28
<?xml version="1.0" encoding="utf-8"?> <manifest xmlns:android="http://schemas.android.com/apk/res/android"
package="tranduythanh.com" android:versionCode="1" android:versionName="1.0" > <uses-sdk
android:minSdkVersion="14" android:targetSdkVersion="17" > </uses-sdk>
<application android:allowBackup="true" android:icon="@drawable/ic_launcher" android:label="@string/app_name"
android:theme="@style/AppTheme" > <activity android:name="tranduythanh.com.MainActivity"
android:label="@string/app_name" > <intent-filter> <action android:name="android.intent.action.MAIN" /> <category android:name="android.intent.category.LAUNCHER" />
</intent-filter> </activity> <activity android:name="tranduythanh.com.ChildActivity"
android:label="@string/title_activity_child" > </activity> </application>
</manifest>
- Bạn thấy đó cả MainActivity (dòng 16) và ChildActivity (Dòng 24) đều phải được đăng ký trong
Manifest.
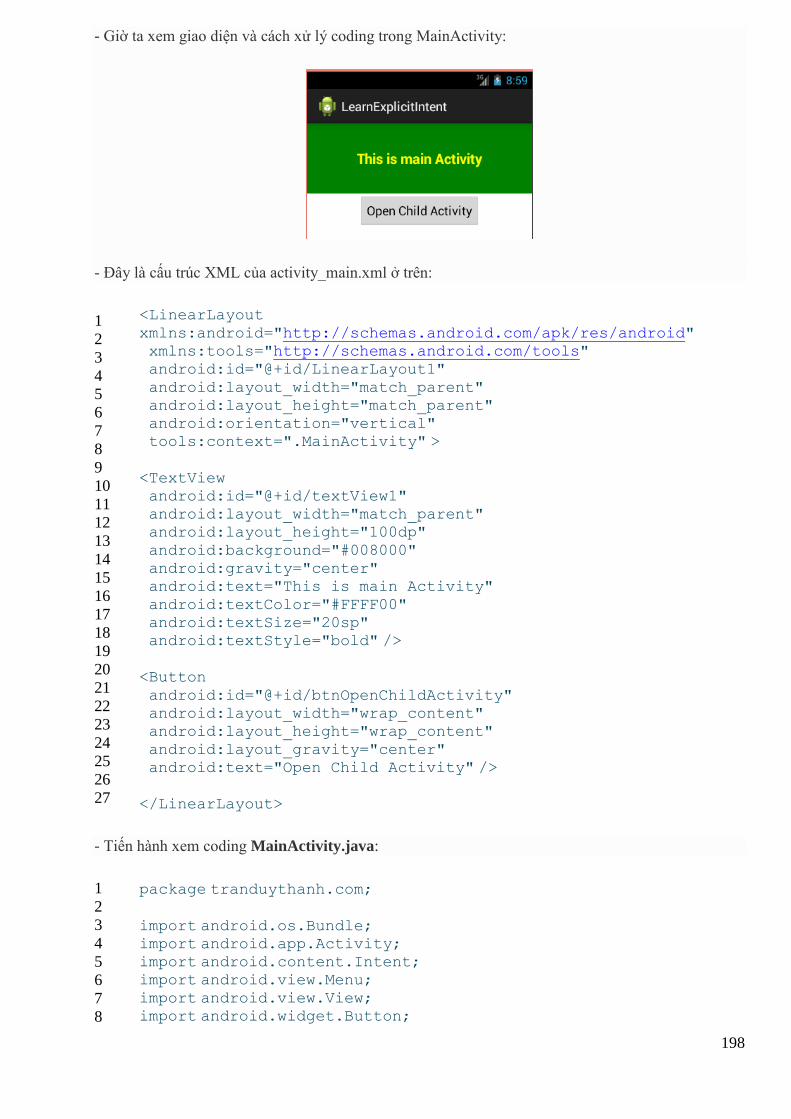
198
- Giờ ta xem giao diện và cách xử lý coding trong MainActivity:
- Đây là cấu trúc XML của activity_main.xml ở trên:
1
2
3
4
5
6
7
8
9
10
11
12
13
14
15
16
17
18
19
20
21
22
23
24
25
26
27
<LinearLayout
xmlns:android="http://schemas.android.com/apk/res/android" xmlns:tools="http://schemas.android.com/tools" android:id="@+id/LinearLayout1"
android:layout_width="match_parent" android:layout_height="match_parent" android:orientation="vertical" tools:context=".MainActivity" >
<TextView android:id="@+id/textView1" android:layout_width="match_parent" android:layout_height="100dp"
android:background="#008000" android:gravity="center" android:text="This is main Activity"
android:textColor="#FFFF00" android:textSize="20sp" android:textStyle="bold" />
<Button
android:id="@+id/btnOpenChildActivity" android:layout_width="wrap_content" android:layout_height="wrap_content"
android:layout_gravity="center" android:text="Open Child Activity" />
</LinearLayout>
- Tiến hành xem coding MainActivity.java:
1
2
3
4
5
6
7
8
package tranduythanh.com;
import android.os.Bundle; import android.app.Activity; import android.content.Intent; import android.view.Menu;
import android.view.View; import android.widget.Button;
199
9
10
11
12
13
14
15
16
17
18
19
20
21
22
23
24
25
26
27
28
29
30
31
32
33
public class MainActivity extends Activity {
protected void onCreate(Bundle savedInstanceState) { super.onCreate(savedInstanceState); setContentView(R.layout.activity_main);
Button btnOpen=(Button) findViewById(R.id.btnOpenChildActivity); btnOpen.setOnClickListener(new View.OnClickListener() {
public void onClick(View arg0) { doOpenChildActivity(); }
}); } public void doOpenChildActivity() {
Intent myIntent=new Intent(this, ChildActivity.class); startActivity(myIntent); }
public boolean onCreateOptionsMenu(Menu menu) { // Inflate the menu; this adds items to the action bar if
it is present. getMenuInflater().inflate(R.menu.activity_main, menu);
return true; } }
- Quan sát dòng lệnh 25:
Intent myIntent=new Intent(this, ChildActivity.class);
Đối số 1 là context hiện tại, nếu bạn muốn chắc ăn ở đâu nó cũng hiểu thì bạn gán tên class Activity
như thế này:
Intent myIntent=new Intent(MainActivity.this, ChildActivity.class);
Với MainActivity là một Activity tùy ý (trong Context hiện tại), viết như trên thì bạn sẽ luôn luôn
đúng trong mọi trường hợp.
Đối số 2 là : ChildActivity.class, Tức là bạn muốn mở Activity nào thì lấy tên Activity đó .class;
trong trường hợp này Tôi muốn mở ChildActivity nên Tôi ghi là ChildActivity.class
- Quan sát dòng lệnh 26
startActivity(myIntent); Hàm này có tác dụng mở Activity được truyền vào đối số thứ 2 ở trên.
- Tiến hành khám phá ChildActivity:
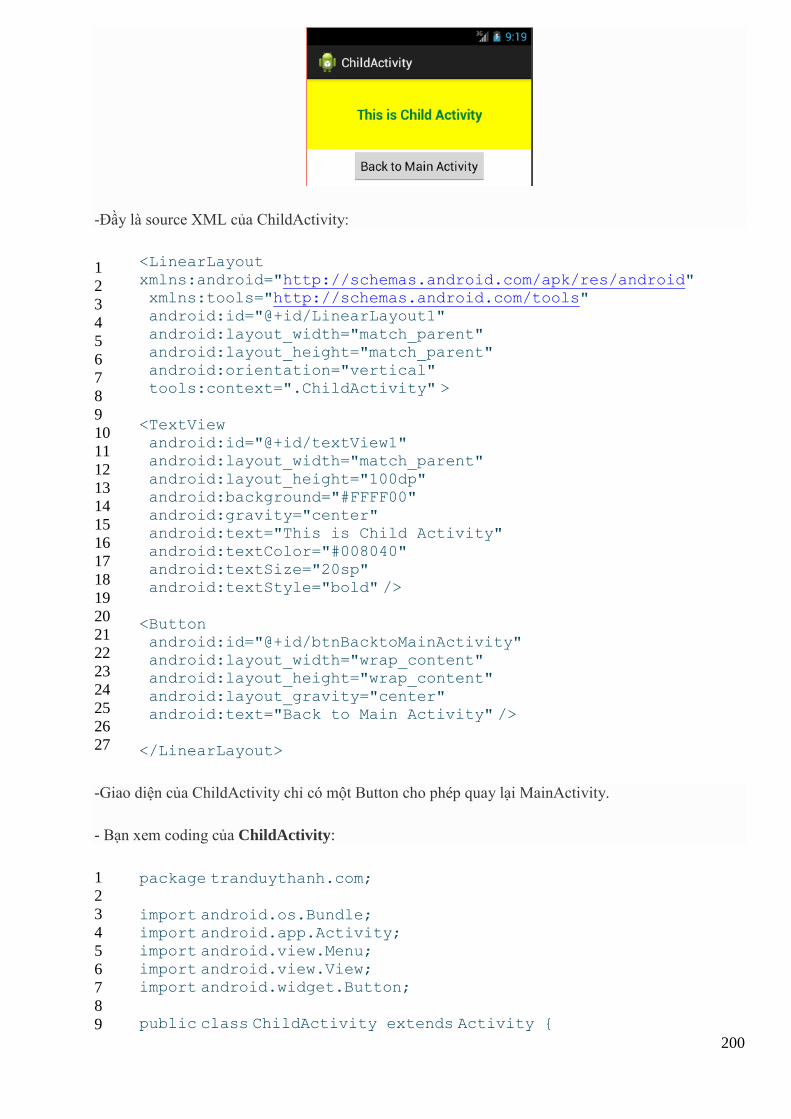
200
-Đầy là source XML của ChildActivity:
1
2
3
4
5
6
7
8
9
10
11
12
13
14
15
16
17
18
19
20
21
22
23
24
25
26
27
<LinearLayout
xmlns:android="http://schemas.android.com/apk/res/android" xmlns:tools="http://schemas.android.com/tools" android:id="@+id/LinearLayout1"
android:layout_width="match_parent" android:layout_height="match_parent" android:orientation="vertical" tools:context=".ChildActivity" >
<TextView android:id="@+id/textView1" android:layout_width="match_parent"
android:layout_height="100dp" android:background="#FFFF00" android:gravity="center" android:text="This is Child Activity"
android:textColor="#008040" android:textSize="20sp" android:textStyle="bold" />
<Button android:id="@+id/btnBacktoMainActivity" android:layout_width="wrap_content" android:layout_height="wrap_content"
android:layout_gravity="center" android:text="Back to Main Activity" />
</LinearLayout>
-Giao diện của ChildActivity chỉ có một Button cho phép quay lại MainActivity.
- Bạn xem coding của ChildActivity:
1
2
3
4
5
6
7
8
9
package tranduythanh.com;
import android.os.Bundle; import android.app.Activity; import android.view.Menu;
import android.view.View; import android.widget.Button;
public class ChildActivity extends Activity {
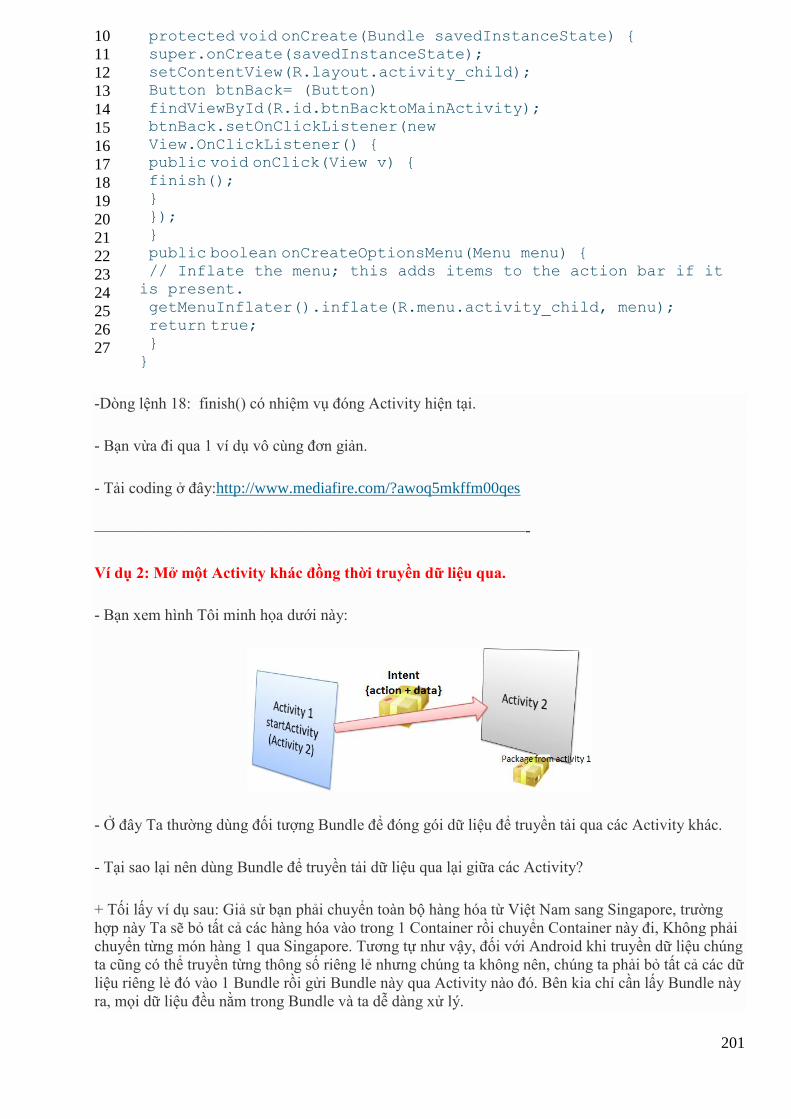
201
10
11
12
13
14
15
16
17
18
19
20
21
22
23
24
25
26
27
protected void onCreate(Bundle savedInstanceState) { super.onCreate(savedInstanceState); setContentView(R.layout.activity_child); Button btnBack= (Button)
findViewById(R.id.btnBacktoMainActivity); btnBack.setOnClickListener(new View.OnClickListener() { public void onClick(View v) {
finish(); } });
} public boolean onCreateOptionsMenu(Menu menu) { // Inflate the menu; this adds items to the action bar if it
is present.
getMenuInflater().inflate(R.menu.activity_child, menu); return true; }
}
-Dòng lệnh 18: finish() có nhiệm vụ đóng Activity hiện tại.
- Bạn vừa đi qua 1 ví dụ vô cùng đơn giản.
- Tải coding ở đây:http://www.mediafire.com/?awoq5mkffm00qes
———————————————————————————-
Ví dụ 2: Mở một Activity khác đồng thời truyền dữ liệu qua.
- Bạn xem hình Tôi minh họa dưới này:
- Ở đây Ta thường dùng đối tượng Bundle để đóng gói dữ liệu để truyền tải qua các Activity khác.
- Tại sao lại nên dùng Bundle để truyền tải dữ liệu qua lại giữa các Activity?
+ Tối lấy ví dụ sau: Giả sử bạn phải chuyển toàn bộ hàng hóa từ Việt Nam sang Singapore, trường
hợp này Ta sẽ bỏ tất cả các hàng hóa vào trong 1 Container rồi chuyển Container này đi, Không phải
chuyển từng món hàng 1 qua Singapore. Tương tự như vậy, đối với Android khi truyền dữ liệu chúng
ta cũng có thể truyền từng thông số riêng lẻ nhưng chúng ta không nên, chúng ta phải bỏ tất cả các dữ
liệu riêng lẻ đó vào 1 Bundle rồi gửi Bundle này qua Activity nào đó. Bên kia chỉ cần lấy Bundle này
ra, mọi dữ liệu đều nằm trong Bundle và ta dễ dàng xử lý.
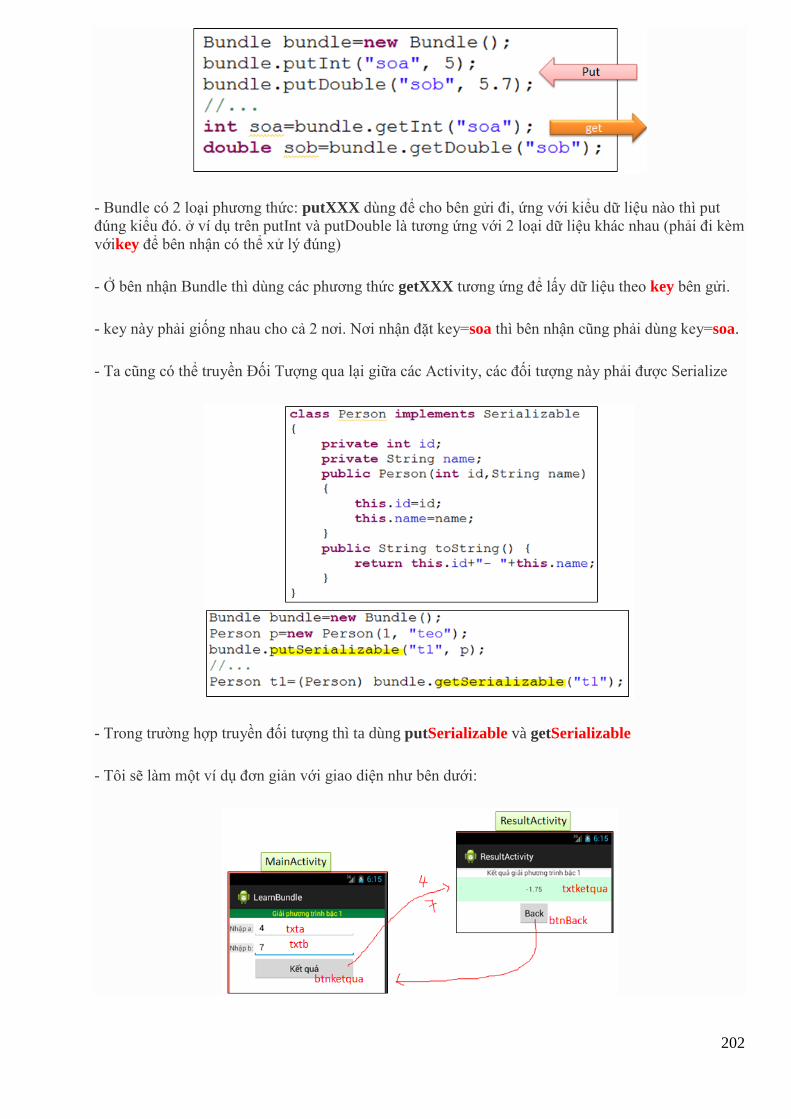
202
- Bundle có 2 loại phương thức: putXXX dùng để cho bên gửi đi, ứng với kiểu dữ liệu nào thì put
đúng kiểu đó. ở ví dụ trên putInt và putDouble là tương ứng với 2 loại dữ liệu khác nhau (phải đi kèm
vớikey để bên nhận có thể xử lý đúng)
- Ở bên nhận Bundle thì dùng các phương thức getXXX tương ứng để lấy dữ liệu theo key bên gửi.
- key này phải giống nhau cho cả 2 nơi. Nơi nhận đặt key=soa thì bên nhận cũng phải dùng key=soa.
- Ta cũng có thể truyền Đối Tượng qua lại giữa các Activity, các đối tượng này phải được Serialize
- Trong trường hợp truyền đối tượng thì ta dùng putSerializable và getSerializable
- Tôi sẽ làm một ví dụ đơn giản với giao diện như bên dưới:
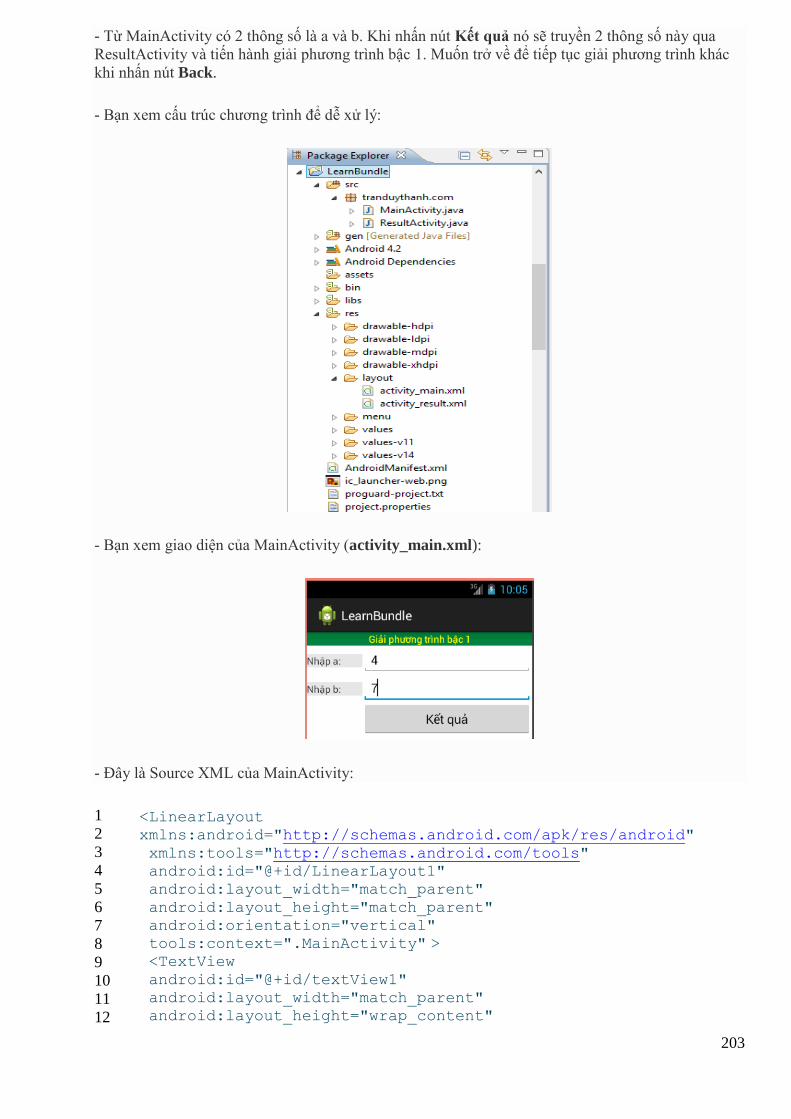
203
- Từ MainActivity có 2 thông số là a và b. Khi nhấn nút Kết quả nó sẽ truyền 2 thông số này qua
ResultActivity và tiến hành giải phương trình bậc 1. Muốn trở về để tiếp tục giải phương trình khác
khi nhấn nút Back.
- Bạn xem cấu trúc chương trình để dễ xử lý:
- Bạn xem giao diện của MainActivity (activity_main.xml):
- Đây là Source XML của MainActivity:
1
2
3
4
5
6
7
8
9
10
11
12
<LinearLayout xmlns:android="http://schemas.android.com/apk/res/android"
xmlns:tools="http://schemas.android.com/tools" android:id="@+id/LinearLayout1" android:layout_width="match_parent"
android:layout_height="match_parent" android:orientation="vertical" tools:context=".MainActivity" > <TextView
android:id="@+id/textView1" android:layout_width="match_parent" android:layout_height="wrap_content"
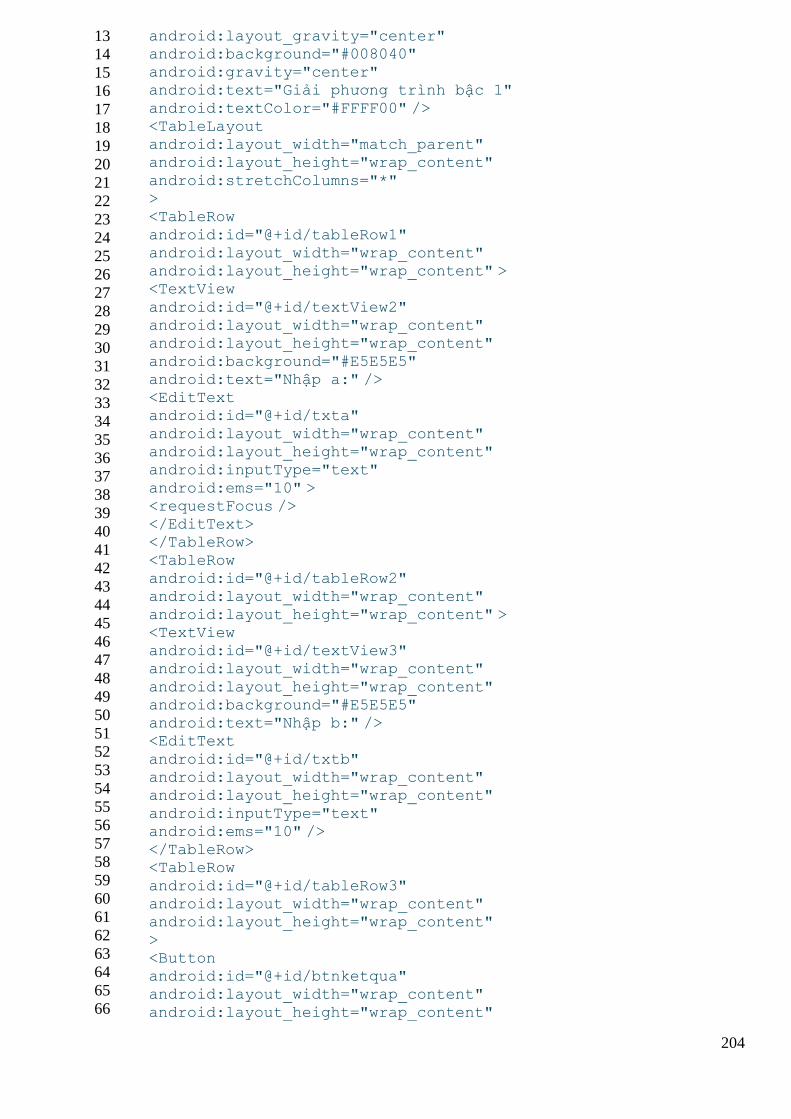
204
13
14
15
16
17
18
19
20
21
22
23
24
25
26
27
28
29
30
31
32
33
34
35
36
37
38
39
40
41
42
43
44
45
46
47
48
49
50
51
52
53
54
55
56
57
58
59
60
61
62
63
64
65
66
android:layout_gravity="center" android:background="#008040" android:gravity="center" android:text="Giải phương trình bậc 1"
android:textColor="#FFFF00" /> <TableLayout android:layout_width="match_parent" android:layout_height="wrap_content"
android:stretchColumns="*" > <TableRow
android:id="@+id/tableRow1" android:layout_width="wrap_content" android:layout_height="wrap_content" > <TextView
android:id="@+id/textView2" android:layout_width="wrap_content" android:layout_height="wrap_content"
android:background="#E5E5E5" android:text="Nhập a:" /> <EditText android:id="@+id/txta"
android:layout_width="wrap_content" android:layout_height="wrap_content" android:inputType="text"
android:ems="10" > <requestFocus /> </EditText> </TableRow>
<TableRow android:id="@+id/tableRow2" android:layout_width="wrap_content"
android:layout_height="wrap_content" > <TextView android:id="@+id/textView3" android:layout_width="wrap_content"
android:layout_height="wrap_content" android:background="#E5E5E5" android:text="Nhập b:" /> <EditText
android:id="@+id/txtb" android:layout_width="wrap_content" android:layout_height="wrap_content"
android:inputType="text" android:ems="10" /> </TableRow> <TableRow
android:id="@+id/tableRow3" android:layout_width="wrap_content" android:layout_height="wrap_content"
> <Button android:id="@+id/btnketqua" android:layout_width="wrap_content"
android:layout_height="wrap_content"
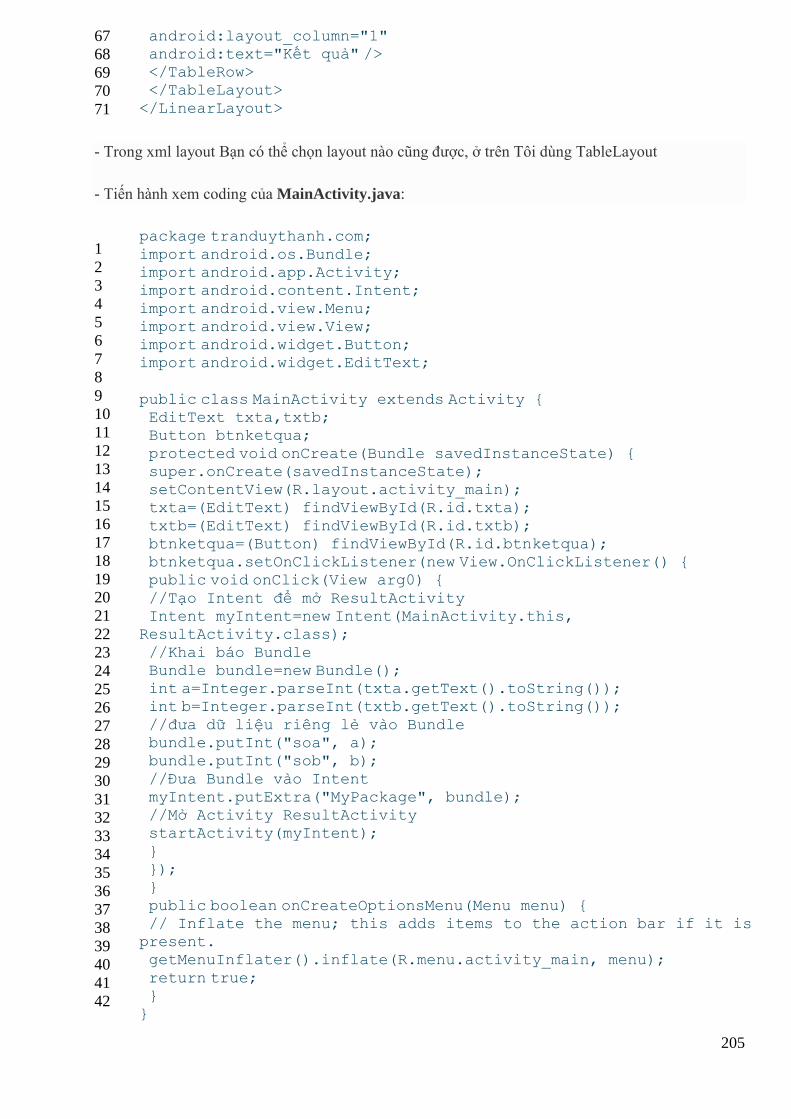
205
67
68
69
70
71
android:layout_column="1" android:text="Kết quả" /> </TableRow> </TableLayout>
</LinearLayout>
- Trong xml layout Bạn có thể chọn layout nào cũng được, ở trên Tôi dùng TableLayout
- Tiến hành xem coding của MainActivity.java:
1
2
3
4
5
6
7
8
9
10
11
12
13
14
15
16
17
18
19
20
21
22
23
24
25
26
27
28
29
30
31
32
33
34
35
36
37
38
39
40
41
42
package tranduythanh.com;
import android.os.Bundle; import android.app.Activity; import android.content.Intent;
import android.view.Menu; import android.view.View; import android.widget.Button; import android.widget.EditText;
public class MainActivity extends Activity { EditText txta,txtb; Button btnketqua;
protected void onCreate(Bundle savedInstanceState) { super.onCreate(savedInstanceState); setContentView(R.layout.activity_main); txta=(EditText) findViewById(R.id.txta);
txtb=(EditText) findViewById(R.id.txtb); btnketqua=(Button) findViewById(R.id.btnketqua); btnketqua.setOnClickListener(new View.OnClickListener() { public void onClick(View arg0) {
//Tạo Intent để mở ResultActivity Intent myIntent=new Intent(MainActivity.this, ResultActivity.class);
//Khai báo Bundle Bundle bundle=new Bundle(); int a=Integer.parseInt(txta.getText().toString()); int b=Integer.parseInt(txtb.getText().toString());
//đưa dữ liệu riêng lẻ vào Bundle bundle.putInt("soa", a); bundle.putInt("sob", b);
//Đưa Bundle vào Intent myIntent.putExtra("MyPackage", bundle); //Mở Activity ResultActivity startActivity(myIntent);
} }); }
public boolean onCreateOptionsMenu(Menu menu) { // Inflate the menu; this adds items to the action bar if it is
present. getMenuInflater().inflate(R.menu.activity_main, menu);
return true; } }
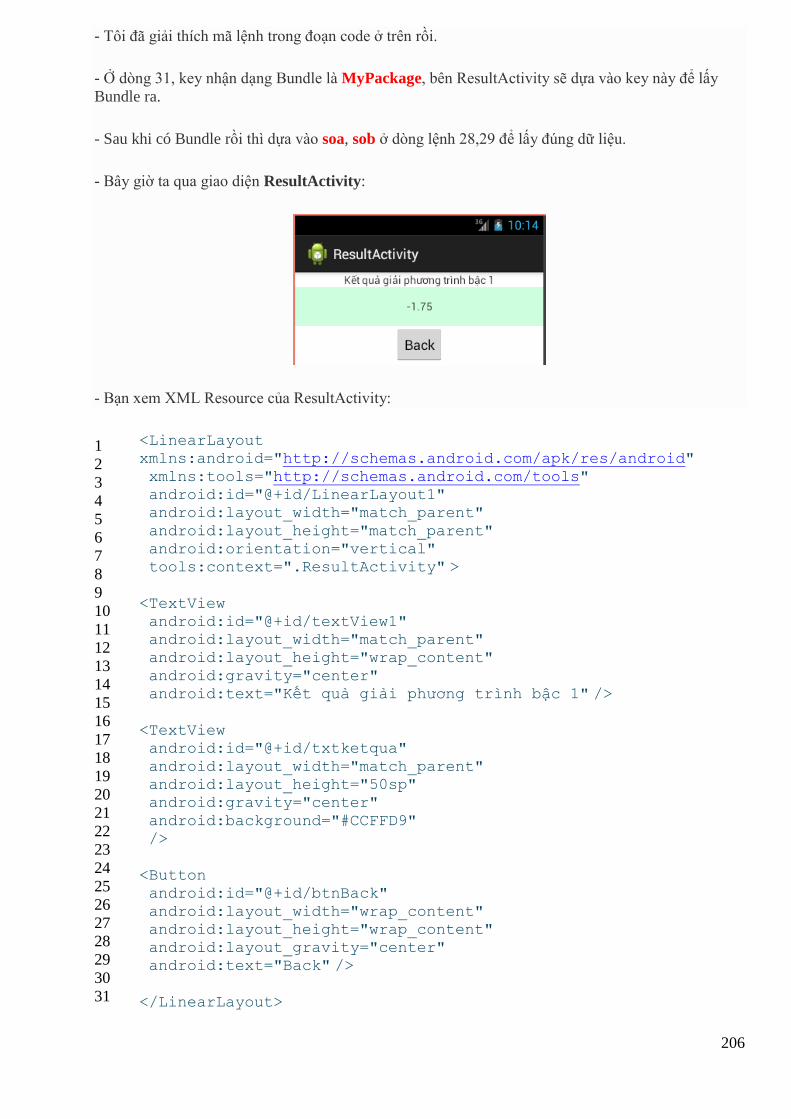
206
- Tôi đã giải thích mã lệnh trong đoạn code ở trên rồi.
- Ở dòng 31, key nhận dạng Bundle là MyPackage, bên ResultActivity sẽ dựa vào key này để lấy
Bundle ra.
- Sau khi có Bundle rồi thì dựa vào soa, sob ở dòng lệnh 28,29 để lấy đúng dữ liệu.
- Bây giờ ta qua giao diện ResultActivity:
- Bạn xem XML Resource của ResultActivity:
1
2
3
4
5
6
7
8
9
10
11
12
13
14
15
16
17
18
19
20
21
22
23
24
25
26
27
28
29
30
31
<LinearLayout xmlns:android="http://schemas.android.com/apk/res/android"
xmlns:tools="http://schemas.android.com/tools" android:id="@+id/LinearLayout1" android:layout_width="match_parent"
android:layout_height="match_parent" android:orientation="vertical" tools:context=".ResultActivity" >
<TextView
android:id="@+id/textView1" android:layout_width="match_parent" android:layout_height="wrap_content"
android:gravity="center" android:text="Kết quả giải phương trình bậc 1" />
<TextView android:id="@+id/txtketqua"
android:layout_width="match_parent" android:layout_height="50sp" android:gravity="center"
android:background="#CCFFD9" />
<Button android:id="@+id/btnBack"
android:layout_width="wrap_content" android:layout_height="wrap_content" android:layout_gravity="center" android:text="Back" />
</LinearLayout>
207
- Tiếp tục xem xử lý coding của ResultActivity:
1
2
3
4
5
6
7
8
9
10
11
12
13
14
15
16
17
18
19
20
21
22
23
24
25
26
27
28
29
30
31
32
33
34
35
36
37
38
39
40
41
42
43
44
45
46
47
48
49
50
51
52
package tranduythanh.com;
import java.text.DecimalFormat;
import android.os.Bundle; import android.app.Activity;
import android.content.Intent; import android.view.Menu; import android.view.View; import android.widget.Button;
import android.widget.TextView;
public class ResultActivity extends Activity { TextView txtketqua;
Button btnBack; protected void onCreate(Bundle savedInstanceState) { super.onCreate(savedInstanceState); setContentView(R.layout.activity_result);
btnBack=(Button) findViewById(R.id.btnBack); txtketqua=(TextView) findViewById(R.id.txtketqua); //lấy intent gọi Activity này
Intent callerIntent=getIntent(); //có intent rồi thì lấy Bundle dựa vào MyPackage Bundle packageFromCaller= callerIntent.getBundleExtra("MyPackage");
//Có Bundle rồi thì lấy các thông số dựa vào soa, sob int a=packageFromCaller.getInt("soa"); int b=packageFromCaller.getInt("sob"); //tiến hành xử lý
giaipt(a, b); btnBack.setOnClickListener(new View.OnClickListener() { public void onClick(View v) {
finish(); } }); }
public void giaipt(int a,int b) { String kq="";
if(a==0 && b==0) { kq="Vô số nghiệm"; }
else if(a==0 && b!=0) { kq="Vô nghiệm";
} else { DecimalFormat dcf=new DecimalFormat("0.##");
kq=dcf.format(-b*1.0/a); } txtketqua.setText(kq);
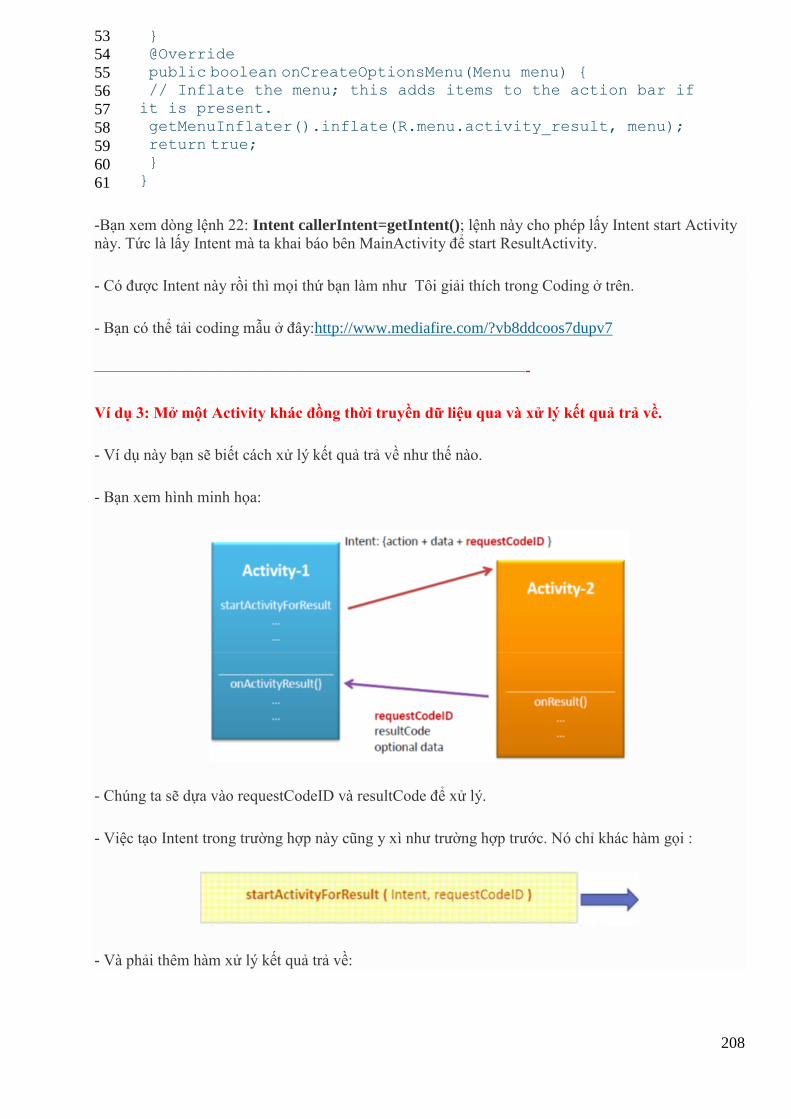
208
53
54
55
56
57
58
59
60
61
} @Override public boolean onCreateOptionsMenu(Menu menu) { // Inflate the menu; this adds items to the action bar if
it is present. getMenuInflater().inflate(R.menu.activity_result, menu); return true; }
}
-Bạn xem dòng lệnh 22: Intent callerIntent=getIntent(); lệnh này cho phép lấy Intent start Activity
này. Tức là lấy Intent mà ta khai báo bên MainActivity để start ResultActivity.
- Có được Intent này rồi thì mọi thứ bạn làm như Tôi giải thích trong Coding ở trên.
- Bạn có thể tải coding mẫu ở đây:http://www.mediafire.com/?vb8ddcoos7dupv7
———————————————————————————-
Ví dụ 3: Mở một Activity khác đồng thời truyền dữ liệu qua và xử lý kết quả trả về.
- Ví dụ này bạn sẽ biết cách xử lý kết quả trả về như thế nào.
- Bạn xem hình minh họa:
- Chúng ta sẽ dựa vào requestCodeID và resultCode để xử lý.
- Việc tạo Intent trong trường hợp này cũng y xì như trường hợp trước. Nó chỉ khác hàm gọi :
- Và phải thêm hàm xử lý kết quả trả về:
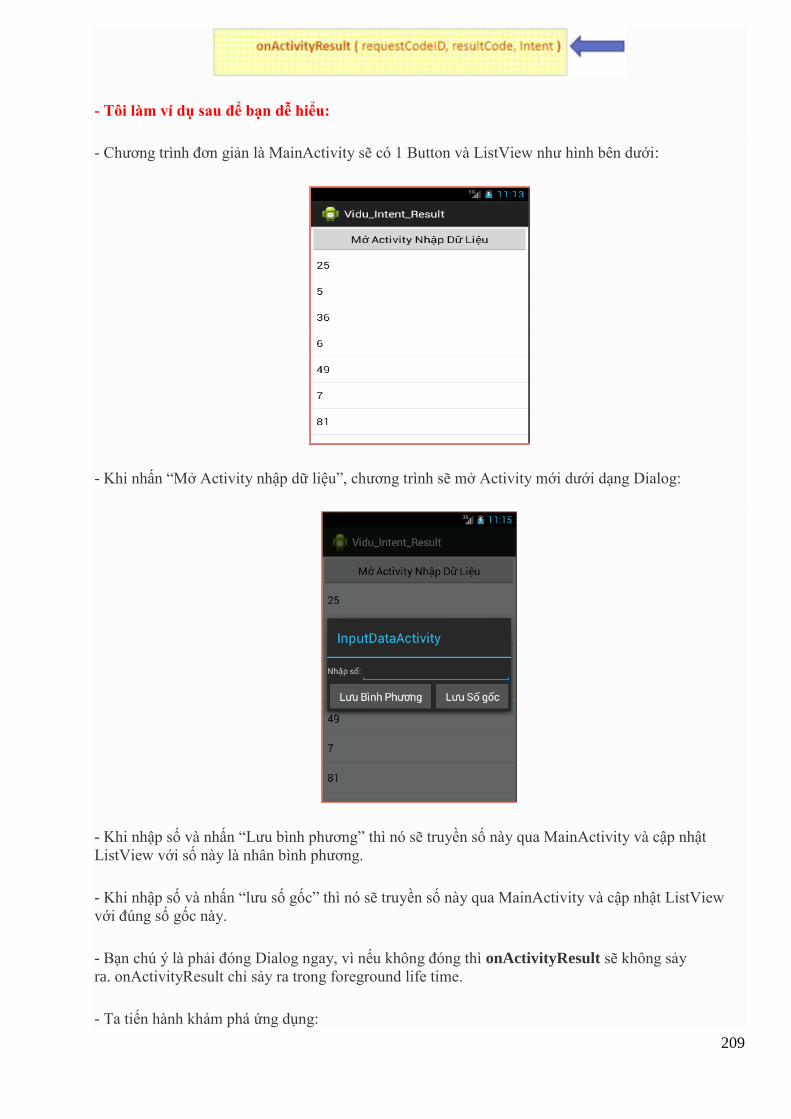
209
- Tôi làm ví dụ sau để bạn dễ hiểu:
- Chương trình đơn giản là MainActivity sẽ có 1 Button và ListView như hình bên dưới:
- Khi nhấn “Mở Activity nhập dữ liệu”, chương trình sẽ mở Activity mới dưới dạng Dialog:
- Khi nhập số và nhấn “Lưu bình phương” thì nó sẽ truyền số này qua MainActivity và cập nhật
ListView với số này là nhân bình phương.
- Khi nhập số và nhấn “lưu số gốc” thì nó sẽ truyền số này qua MainActivity và cập nhật ListView
với đúng số gốc này.
- Bạn chú ý là phải đóng Dialog ngay, vì nếu không đóng thì onActivityResult sẽ không sảy
ra. onActivityResult chỉ sảy ra trong foreground life time.
- Ta tiến hành khám phá ứng dụng:
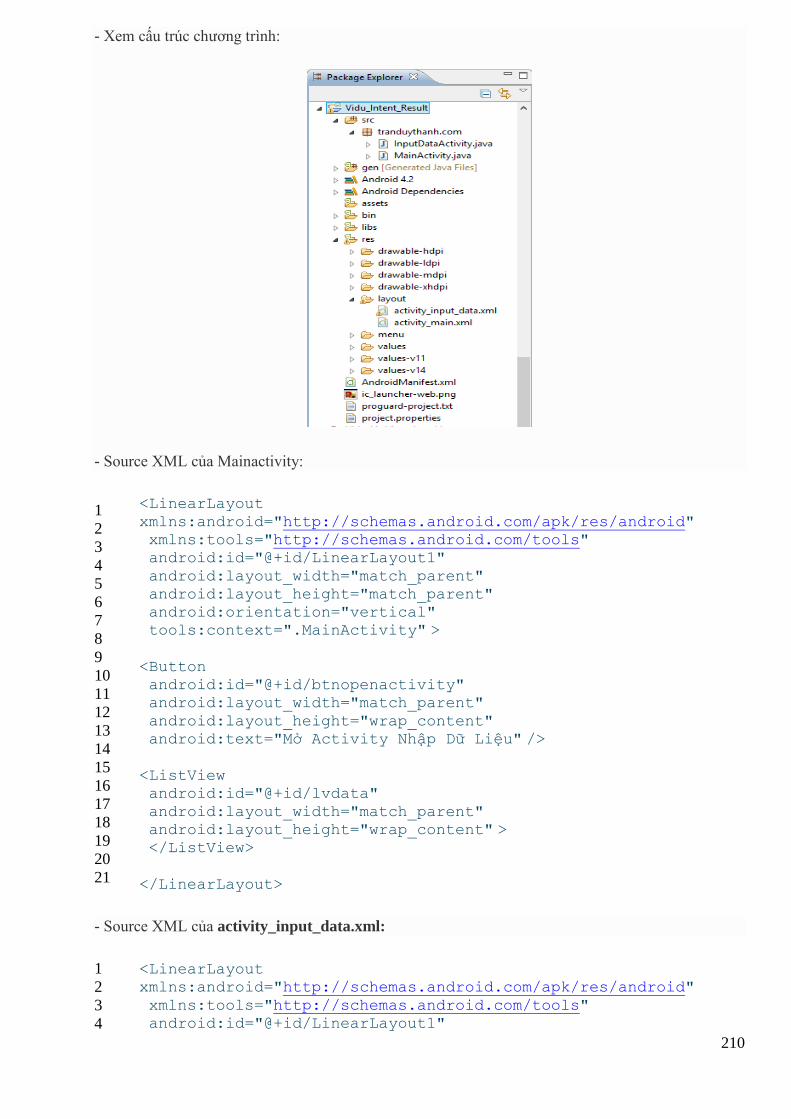
210
- Xem cấu trúc chương trình:
- Source XML của Mainactivity:
1
2
3
4
5
6
7
8
9
10
11
12
13
14
15
16
17
18
19
20
21
<LinearLayout
xmlns:android="http://schemas.android.com/apk/res/android" xmlns:tools="http://schemas.android.com/tools" android:id="@+id/LinearLayout1"
android:layout_width="match_parent" android:layout_height="match_parent" android:orientation="vertical" tools:context=".MainActivity" >
<Button android:id="@+id/btnopenactivity" android:layout_width="match_parent"
android:layout_height="wrap_content" android:text="Mở Activity Nhập Dữ Liệu" />
<ListView android:id="@+id/lvdata"
android:layout_width="match_parent" android:layout_height="wrap_content" > </ListView>
</LinearLayout>
- Source XML của activity_input_data.xml:
1
2
3
4
<LinearLayout xmlns:android="http://schemas.android.com/apk/res/android"
xmlns:tools="http://schemas.android.com/tools" android:id="@+id/LinearLayout1"

211
5
6
7
8
9
10
11
12
13
14
15
16
17
18
19
20
21
22
23
24
25
26
27
28
29
30
31
32
33
34
35
36
37
38
39
40
41
42
43
44
45
46
47
48
49
50
51
android:layout_width="match_parent" android:layout_height="match_parent" android:orientation="vertical" tools:context=".InputDataActivity" >
<LinearLayout android:layout_width="match_parent" android:layout_height="wrap_content" >
<TextView
android:id="@+id/textView1" android:layout_width="wrap_content" android:layout_height="wrap_content"
android:text="Nhập số:" />
<EditText android:id="@+id/editNumber" android:layout_width="wrap_content"
android:layout_height="wrap_content" android:layout_weight="1" android:ems="10" >
<requestFocus /> </EditText>
</LinearLayout>
<LinearLayout
android:layout_width="match_parent" android:layout_height="wrap_content" >
<Button android:id="@+id/btnSave1"
android:layout_width="wrap_content" android:layout_height="wrap_content" android:layout_weight="1"
android:text="Lưu Bình Phương" />
<Button android:id="@+id/btnSave2" android:layout_width="wrap_content"
android:layout_height="wrap_content" android:layout_weight="1" android:text="Lưu Số gốc" />
</LinearLayout>
</LinearLayout>
- Nhớ là phải cấu hình InputDataActivity dưới dạng Dialog: Mở Manifest để cấu hình như hình bên
dưới:
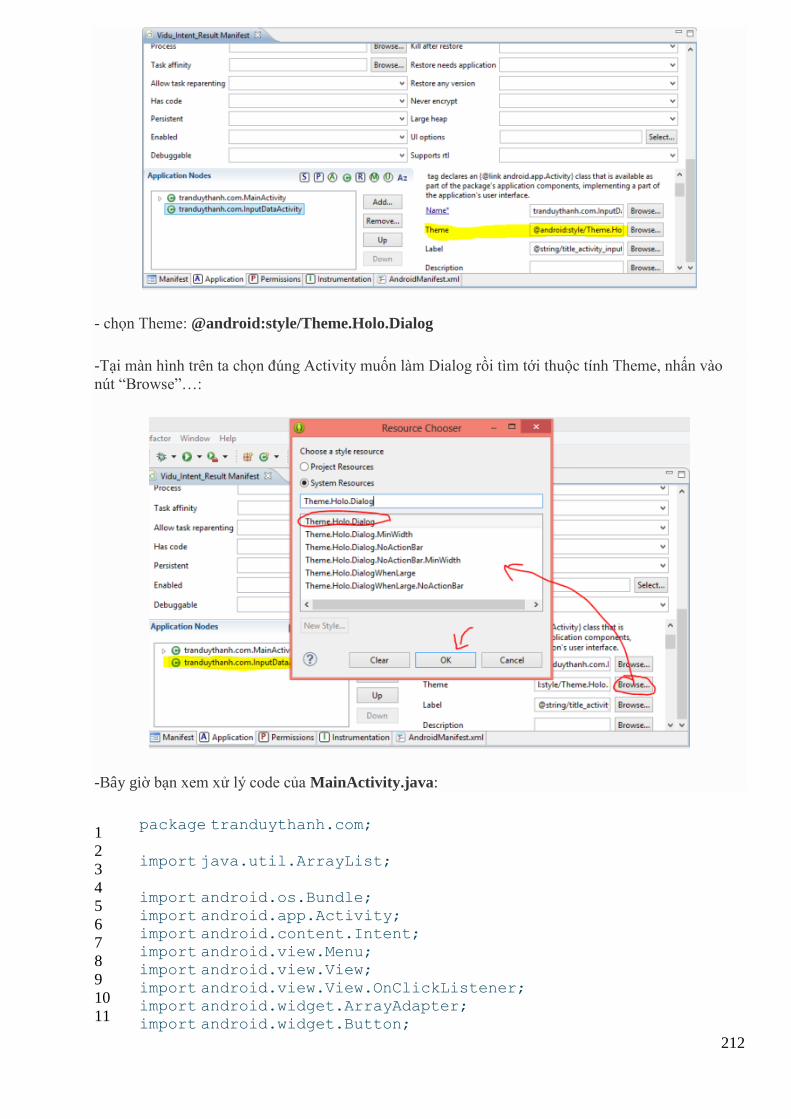
212
- chọn Theme: @android:style/Theme.Holo.Dialog
-Tại màn hình trên ta chọn đúng Activity muốn làm Dialog rồi tìm tới thuộc tính Theme, nhấn vào
nút “Browse”…:
-Bây giờ bạn xem xử lý code của MainActivity.java:
1
2
3
4
5
6
7
8
9
10
11
package tranduythanh.com;
import java.util.ArrayList;
import android.os.Bundle;
import android.app.Activity; import android.content.Intent; import android.view.Menu; import android.view.View;
import android.view.View.OnClickListener; import android.widget.ArrayAdapter; import android.widget.Button;
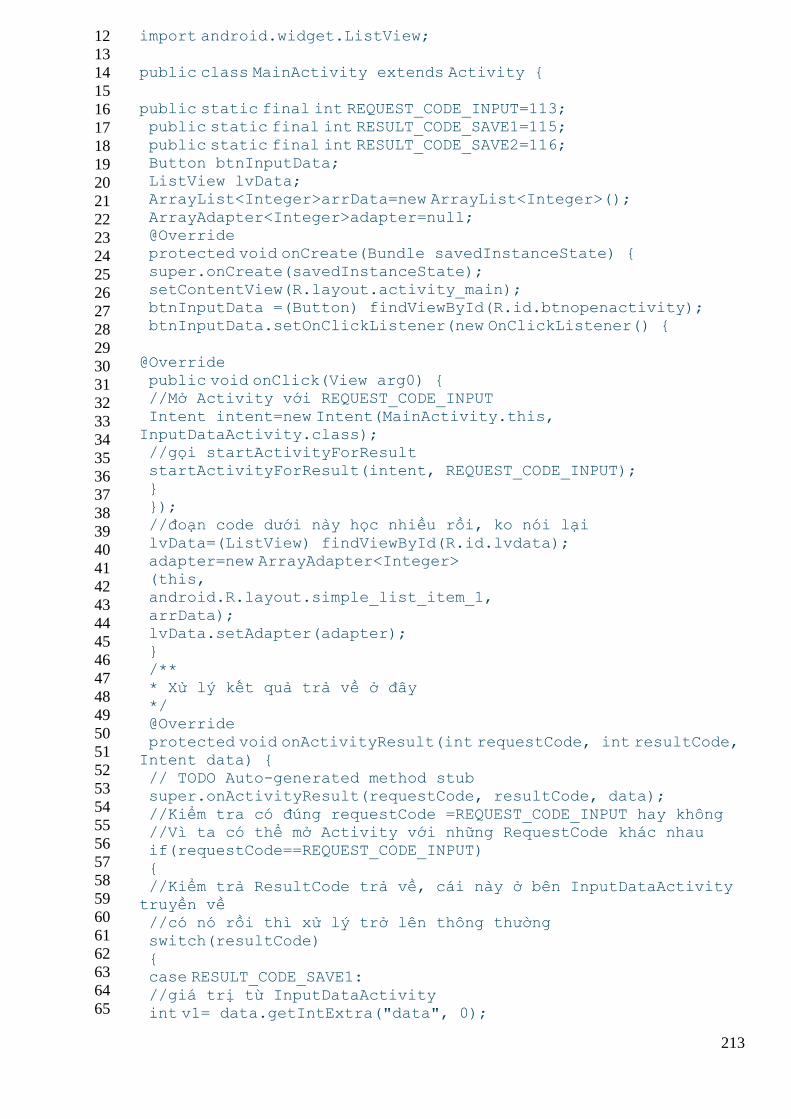
213
12
13
14
15
16
17
18
19
20
21
22
23
24
25
26
27
28
29
30
31
32
33
34
35
36
37
38
39
40
41
42
43
44
45
46
47
48
49
50
51
52
53
54
55
56
57
58
59
60
61
62
63
64
65
import android.widget.ListView;
public class MainActivity extends Activity {
public static final int REQUEST_CODE_INPUT=113; public static final int RESULT_CODE_SAVE1=115;
public static final int RESULT_CODE_SAVE2=116; Button btnInputData; ListView lvData; ArrayList<Integer>arrData=new ArrayList<Integer>();
ArrayAdapter<Integer>adapter=null; @Override protected void onCreate(Bundle savedInstanceState) {
super.onCreate(savedInstanceState); setContentView(R.layout.activity_main); btnInputData =(Button) findViewById(R.id.btnopenactivity); btnInputData.setOnClickListener(new OnClickListener() {
@Override public void onClick(View arg0) { //Mở Activity với REQUEST_CODE_INPUT
Intent intent=new Intent(MainActivity.this, InputDataActivity.class); //gọi startActivityForResult startActivityForResult(intent, REQUEST_CODE_INPUT);
} }); //đoạn code dưới này học nhiều rồi, ko nói lại
lvData=(ListView) findViewById(R.id.lvdata); adapter=new ArrayAdapter<Integer> (this, android.R.layout.simple_list_item_1,
arrData); lvData.setAdapter(adapter); } /**
* Xử lý kết quả trả về ở đây */ @Override
protected void onActivityResult(int requestCode, int resultCode, Intent data) { // TODO Auto-generated method stub super.onActivityResult(requestCode, resultCode, data);
//Kiểm tra có đúng requestCode =REQUEST_CODE_INPUT hay không //Vì ta có thể mở Activity với những RequestCode khác nhau if(requestCode==REQUEST_CODE_INPUT)
{ //Kiểm trả ResultCode trả về, cái này ở bên InputDataActivity
truyền về //có nó rồi thì xử lý trở lên thông thường
switch(resultCode) { case RESULT_CODE_SAVE1:
//giá trị từ InputDataActivity int v1= data.getIntExtra("data", 0);
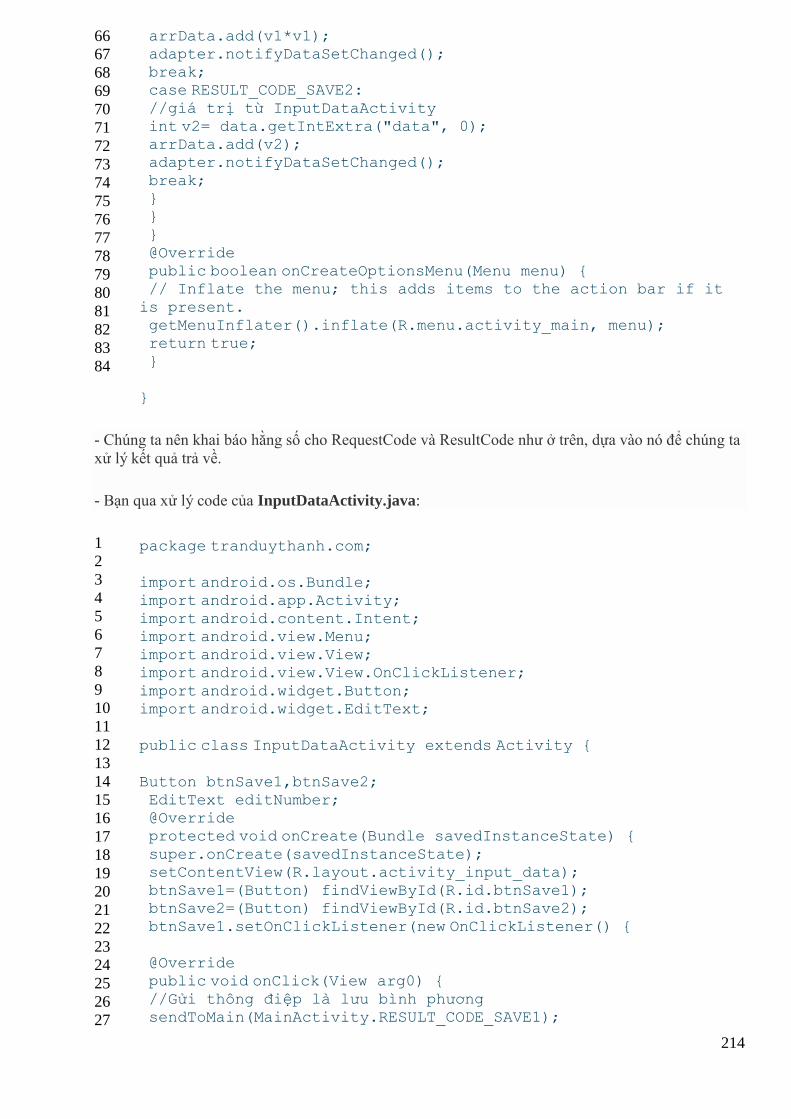
214
66
67
68
69
70
71
72
73
74
75
76
77
78
79
80
81
82
83
84
arrData.add(v1*v1); adapter.notifyDataSetChanged(); break; case RESULT_CODE_SAVE2:
//giá trị từ InputDataActivity int v2= data.getIntExtra("data", 0); arrData.add(v2); adapter.notifyDataSetChanged();
break; } }
} @Override public boolean onCreateOptionsMenu(Menu menu) { // Inflate the menu; this adds items to the action bar if it
is present. getMenuInflater().inflate(R.menu.activity_main, menu); return true;
}
}
- Chúng ta nên khai báo hằng số cho RequestCode và ResultCode như ở trên, dựa vào nó để chúng ta
xử lý kết quả trả về.
- Bạn qua xử lý code của InputDataActivity.java:
1
2
3
4
5
6
7
8
9
10
11
12
13
14
15
16
17
18
19
20
21
22
23
24
25
26
27
package tranduythanh.com;
import android.os.Bundle; import android.app.Activity;
import android.content.Intent; import android.view.Menu; import android.view.View; import android.view.View.OnClickListener;
import android.widget.Button; import android.widget.EditText;
public class InputDataActivity extends Activity {
Button btnSave1,btnSave2; EditText editNumber; @Override protected void onCreate(Bundle savedInstanceState) {
super.onCreate(savedInstanceState); setContentView(R.layout.activity_input_data); btnSave1=(Button) findViewById(R.id.btnSave1); btnSave2=(Button) findViewById(R.id.btnSave2);
btnSave1.setOnClickListener(new OnClickListener() {
@Override public void onClick(View arg0) {
//Gửi thông điệp là lưu bình phương sendToMain(MainActivity.RESULT_CODE_SAVE1);
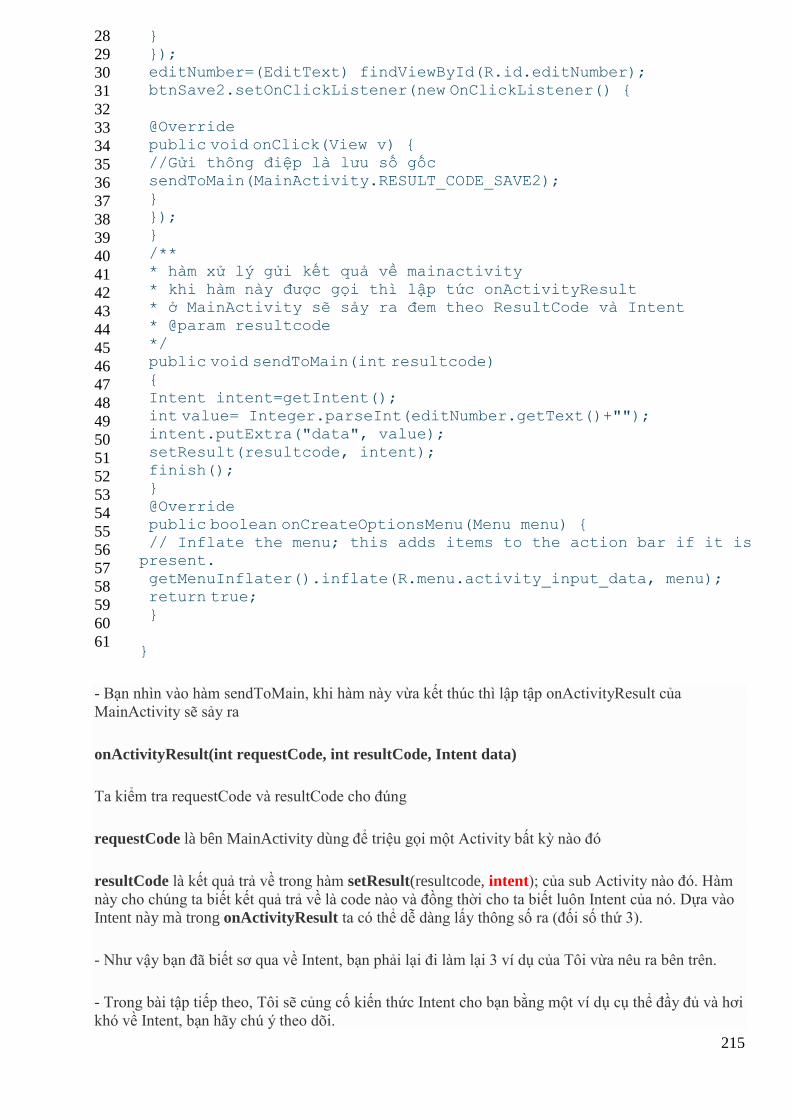
215
28
29
30
31
32
33
34
35
36
37
38
39
40
41
42
43
44
45
46
47
48
49
50
51
52
53
54
55
56
57
58
59
60
61
} }); editNumber=(EditText) findViewById(R.id.editNumber); btnSave2.setOnClickListener(new OnClickListener() {
@Override public void onClick(View v) { //Gửi thông điệp là lưu số gốc sendToMain(MainActivity.RESULT_CODE_SAVE2);
} }); }
/** * hàm xử lý gửi kết quả về mainactivity * khi hàm này được gọi thì lập tức onActivityResult * ở MainActivity sẽ sảy ra đem theo ResultCode và Intent
* @param resultcode */ public void sendToMain(int resultcode)
{ Intent intent=getIntent(); int value= Integer.parseInt(editNumber.getText()+""); intent.putExtra("data", value);
setResult(resultcode, intent); finish(); }
@Override public boolean onCreateOptionsMenu(Menu menu) { // Inflate the menu; this adds items to the action bar if it is
present.
getMenuInflater().inflate(R.menu.activity_input_data, menu); return true; }
}
- Bạn nhìn vào hàm sendToMain, khi hàm này vừa kết thúc thì lập tập onActivityResult của
MainActivity sẽ sảy ra
onActivityResult(int requestCode, int resultCode, Intent data)
Ta kiểm tra requestCode và resultCode cho đúng
requestCode là bên MainActivity dùng để triệu gọi một Activity bất kỳ nào đó
resultCode là kết quả trả về trong hàm setResult(resultcode, intent); của sub Activity nào đó. Hàm
này cho chúng ta biết kết quả trả về là code nào và đồng thời cho ta biết luôn Intent của nó. Dựa vào
Intent này mà trong onActivityResult ta có thể dễ dàng lấy thông số ra (đối số thứ 3).
- Như vậy bạn đã biết sơ qua về Intent, bạn phải lại đi làm lại 3 ví dụ của Tôi vừa nêu ra bên trên.
- Trong bài tập tiếp theo, Tôi sẽ củng cố kiến thức Intent cho bạn bằng một ví dụ cụ thể đầy đủ và hơi
khó về Intent, bạn hãy chú ý theo dõi.
216
- Bạn có thể tải code mẫu đầy đủ ở đây: http://www.mediafire.com/?d8if4q9asgso18q
Bài tập 25: Tiếp tục củng cố kiến thức Intent, ví
dụ tổng hợp Quản Lý Nhân Viên
- Ở bài tập 24 bạn đã hiểu cơ bản về Intent
- Bài tập này Tôi chủ ý viết thật phức tạp lên để các bạn tập trung công lực tìm hiểu nó.
- Xin lỗi vì để các bạn chờ lâu mới cập nhật bài tập này.
- Bây giờ Tôi tiếp tục hướng dẫn các bạn tìm hiểu sâu về Android cũng như ôn tập lại các thành phần
đã học trước đó.
- Bài tập này Tôi cũng chủ ý giải thích ít đi (vì đã giải thích quá nhiều ở các bài tập trước rồi). Bài tập
này bạn phải tập suy luận logic để hiểu nó sâu hơn.
- Tôi tin chắc rằng nếu như bạn hiểu bài tập 25 này thì bạn có thể viết được một chương trình
Android ra trò rồi. Vì nó là tổng hợp của các kiến thức về Android mà Tôi đã trình bày từ trước tới
giờ.
- Mục tiêu của bài tập này:
——————————————————————————
- Thao tác nhuần nhuyễn với Intent
- Ôn tập lại các control thường hay sử dụng
- Nhuần nhuyễn với ListView
- Xử lý Checked (radio, Checkbox) trong ListView
- Nhuần nhuyễn với Custom Layout
- Biết cách sử dụng Enum
- Cách sử dụng chung Layout cho các Activity
- … và đón nhận thêm một số ý tưởng sáng tạo trong lập trình.
——————————————————————————
- Bài này rất là khó và phức tạp, nhưng đổi lại nó rất hay. Tôi hi vọng bài tập này sẽ giúp ích cho các
bạn rất nhiều trong việc khám phá Android. Vì vậy Tôi khuyên các bạn hãy chăm chỉ làm đi làm
lại bài này.
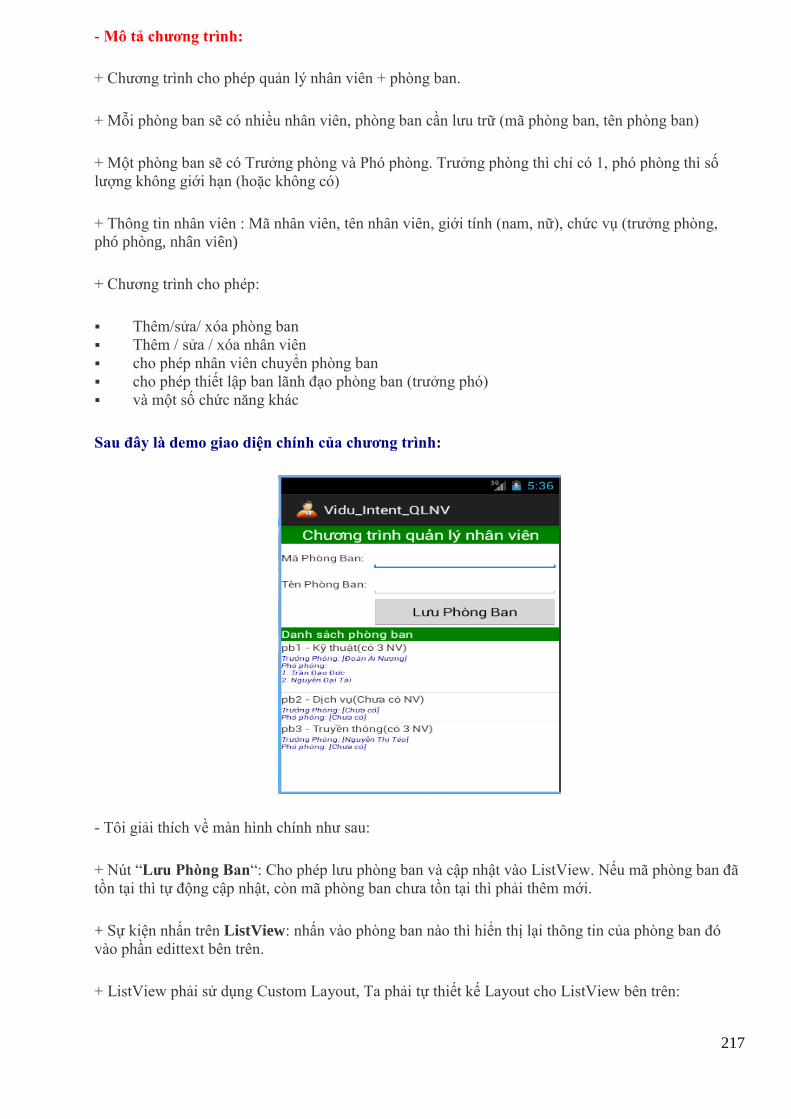
217
- Mô tả chương trình:
+ Chương trình cho phép quản lý nhân viên + phòng ban.
+ Mỗi phòng ban sẽ có nhiều nhân viên, phòng ban cần lưu trữ (mã phòng ban, tên phòng ban)
+ Một phòng ban sẽ có Trưởng phòng và Phó phòng. Trưởng phòng thì chỉ có 1, phó phòng thì số
lượng không giới hạn (hoặc không có)
+ Thông tin nhân viên : Mã nhân viên, tên nhân viên, giới tính (nam, nữ), chức vụ (trưởng phòng,
phó phòng, nhân viên)
+ Chương trình cho phép:
Thêm/sửa/ xóa phòng ban
Thêm / sửa / xóa nhân viên
cho phép nhân viên chuyển phòng ban
cho phép thiết lập ban lãnh đạo phòng ban (trưởng phó)
và một số chức năng khác
Sau đây là demo giao diện chính của chương trình:
- Tôi giải thích về màn hình chính như sau:
+ Nút “Lưu Phòng Ban“: Cho phép lưu phòng ban và cập nhật vào ListView. Nếu mã phòng ban đã
tồn tại thì tự động cập nhật, còn mã phòng ban chưa tồn tại thì phải thêm mới.
+ Sự kiện nhấn trên ListView: nhấn vào phòng ban nào thì hiển thị lại thông tin của phòng ban đó
vào phần edittext bên trên.
+ ListView phải sử dụng Custom Layout, Ta phải tự thiết kế Layout cho ListView bên trên:
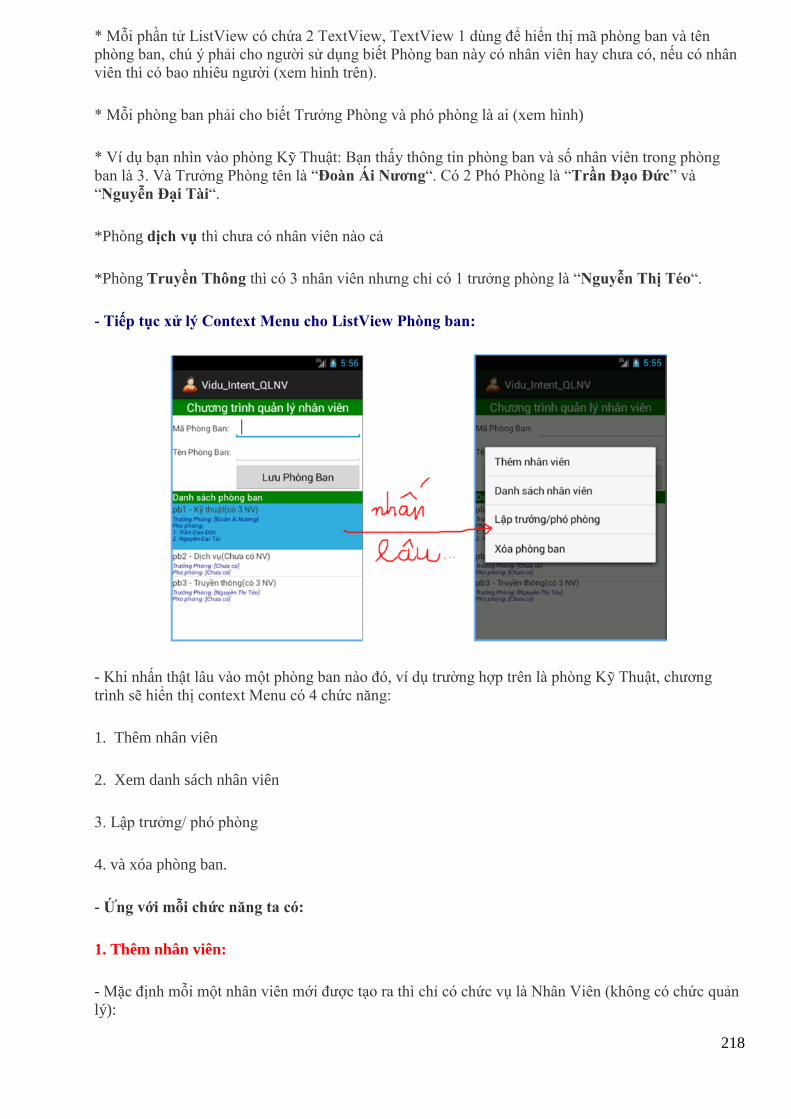
218
* Mỗi phần tử ListView có chứa 2 TextView, TextView 1 dùng để hiển thị mã phòng ban và tên
phòng ban, chú ý phải cho người sử dụng biết Phòng ban này có nhân viên hay chưa có, nếu có nhân
viên thì có bao nhiêu người (xem hình trên).
* Mỗi phòng ban phải cho biết Trưởng Phòng và phó phòng là ai (xem hình)
* Ví dụ bạn nhìn vào phòng Kỹ Thuật: Bạn thấy thông tin phòng ban và số nhân viên trong phòng
ban là 3. Và Trưởng Phòng tên là “Đoàn Ái Nương“. Có 2 Phó Phòng là “Trần Đạo Đức” và
“Nguyễn Đại Tài“.
*Phòng dịch vụ thì chưa có nhân viên nào cả
*Phòng Truyền Thông thì có 3 nhân viên nhưng chỉ có 1 trưởng phòng là “Nguyễn Thị Téo“.
- Tiếp tục xử lý Context Menu cho ListView Phòng ban:
- Khi nhấn thật lâu vào một phòng ban nào đó, ví dụ trường hợp trên là phòng Kỹ Thuật, chương
trình sẽ hiển thị context Menu có 4 chức năng:
1. Thêm nhân viên
2. Xem danh sách nhân viên
3. Lập trưởng/ phó phòng
4. và xóa phòng ban.
- Ứng với mỗi chức năng ta có:
1. Thêm nhân viên:
- Mặc định mỗi một nhân viên mới được tạo ra thì chỉ có chức vụ là Nhân Viên (không có chức quản
lý):
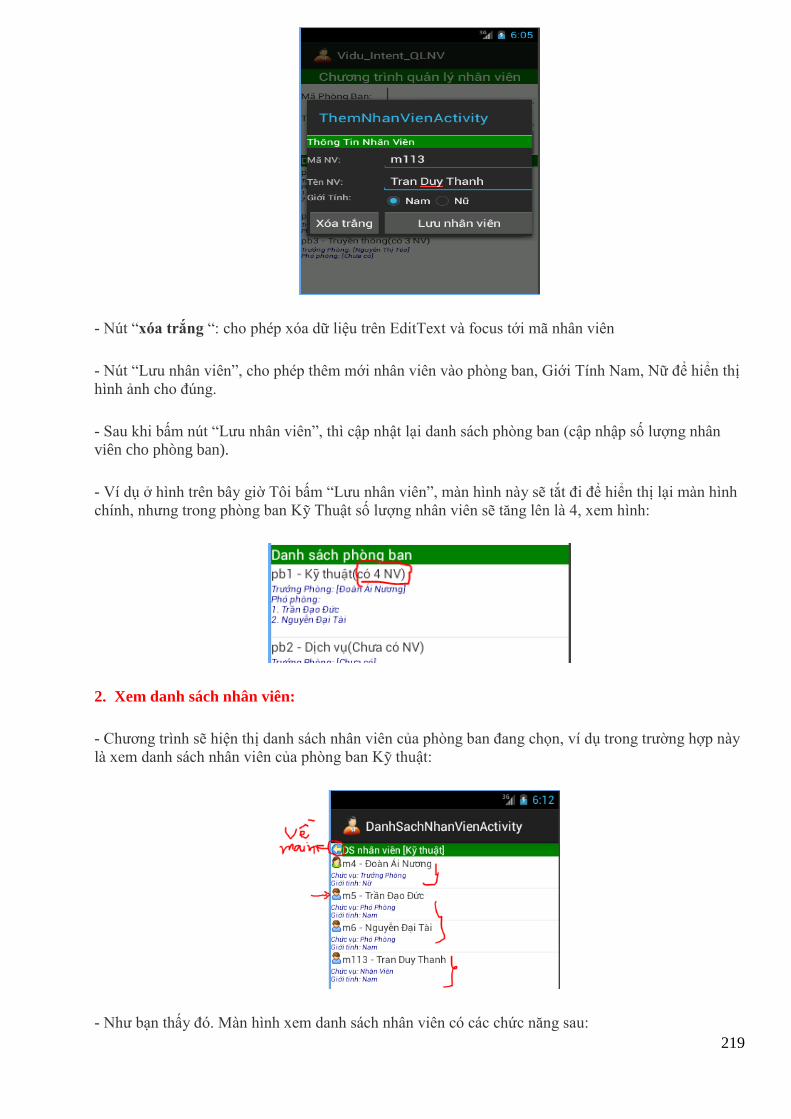
219
- Nút “xóa trắng “: cho phép xóa dữ liệu trên EditText và focus tới mã nhân viên
- Nút “Lưu nhân viên”, cho phép thêm mới nhân viên vào phòng ban, Giới Tính Nam, Nữ để hiển thị
hình ảnh cho đúng.
- Sau khi bấm nút “Lưu nhân viên”, thì cập nhật lại danh sách phòng ban (cập nhập số lượng nhân
viên cho phòng ban).
- Ví dụ ở hình trên bây giờ Tôi bấm “Lưu nhân viên”, màn hình này sẽ tắt đi để hiển thị lại màn hình
chính, nhưng trong phòng ban Kỹ Thuật số lượng nhân viên sẽ tăng lên là 4, xem hình:
2. Xem danh sách nhân viên:
- Chương trình sẽ hiện thị danh sách nhân viên của phòng ban đang chọn, ví dụ trong trường hợp này
là xem danh sách nhân viên của phòng ban Kỹ thuật:
- Như bạn thấy đó. Màn hình xem danh sách nhân viên có các chức năng sau:
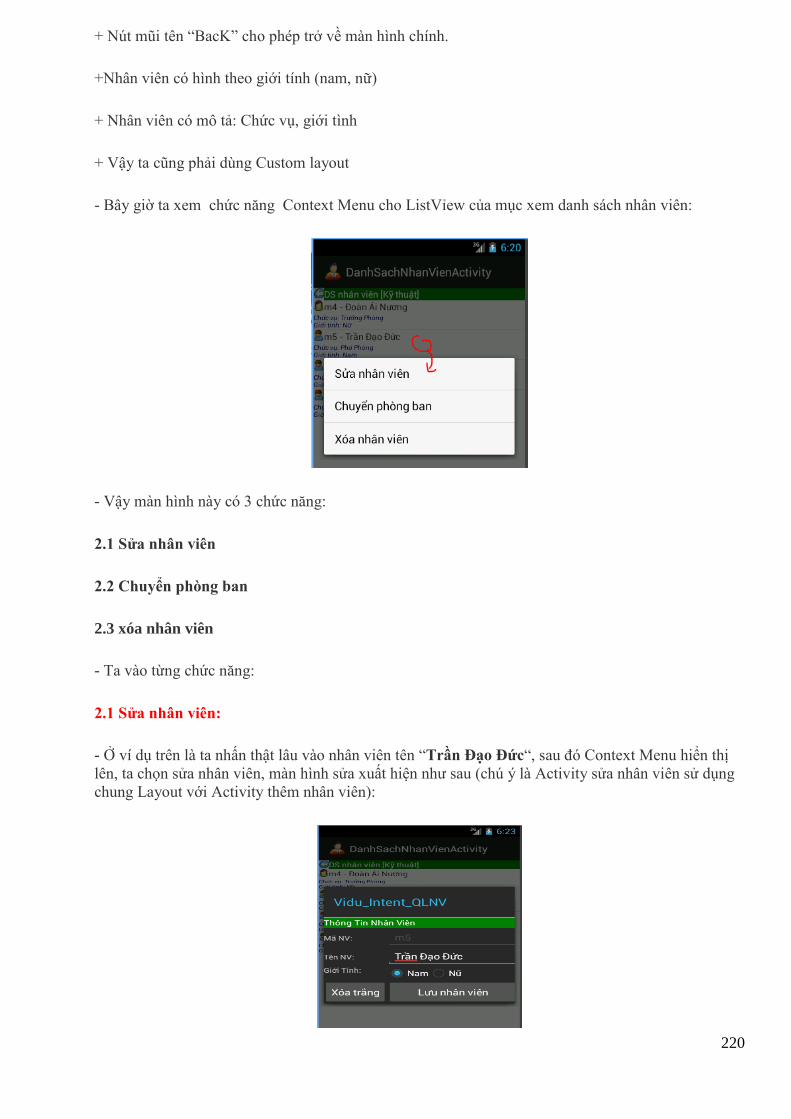
220
+ Nút mũi tên “BacK” cho phép trở về màn hình chính.
+Nhân viên có hình theo giới tính (nam, nữ)
+ Nhân viên có mô tả: Chức vụ, giới tình
+ Vậy ta cũng phải dùng Custom layout
- Bây giờ ta xem chức năng Context Menu cho ListVỉew của mục xem danh sách nhân viên:
- Vậy màn hình này có 3 chức năng:
2.1 Sửa nhân viên
2.2 Chuyển phòng ban
2.3 xóa nhân viên
- Ta vào từng chức năng:
2.1 Sửa nhân viên:
- Ở ví dụ trên là ta nhấn thật lâu vào nhân viên tên “Trần Đạo Đức“, sau đó Context Menu hiển thị
lên, ta chọn sửa nhân viên, màn hình sửa xuất hiện như sau (chú ý là Activity sửa nhân viên sử dụng
chung Layout với Activity thêm nhân viên):
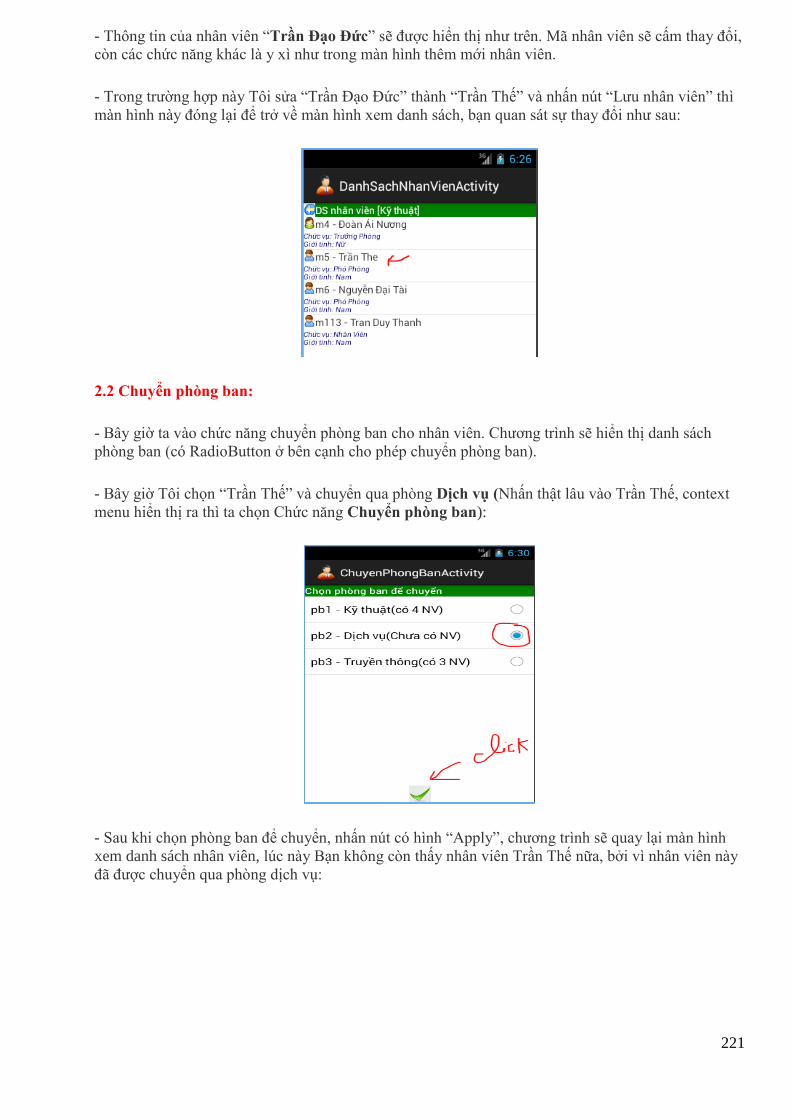
221
- Thông tin của nhân viên “Trần Đạo Đức” sẽ được hiển thị như trên. Mã nhân viên sẽ cấm thay đổi,
còn các chức năng khác là y xì như trong màn hình thêm mới nhân viên.
- Trong trường hợp này Tôi sửa “Trần Đạo Đức” thành “Trần Thế” và nhấn nút “Lưu nhân viên” thì
màn hình này đóng lại để trở về màn hình xem danh sách, bạn quan sát sự thay đổi như sau:
2.2 Chuyển phòng ban:
- Bây giờ ta vào chức năng chuyển phòng ban cho nhân viên. Chương trình sẽ hiển thị danh sách
phòng ban (có RadioButton ở bên cạnh cho phép chuyển phòng ban).
- Bây giờ Tôi chọn “Trần Thế” và chuyển qua phòng Dịch vụ (Nhấn thật lâu vào Trần Thế, context
menu hiển thị ra thì ta chọn Chức năng Chuyển phòng ban):
- Sau khi chọn phòng ban để chuyển, nhấn nút có hình “Apply”, chương trình sẽ quay lại màn hình
xem danh sách nhân viên, lúc này Bạn không còn thấy nhân viên Trần Thế nữa, bởi vì nhân viên này
đã được chuyển qua phòng dịch vụ:
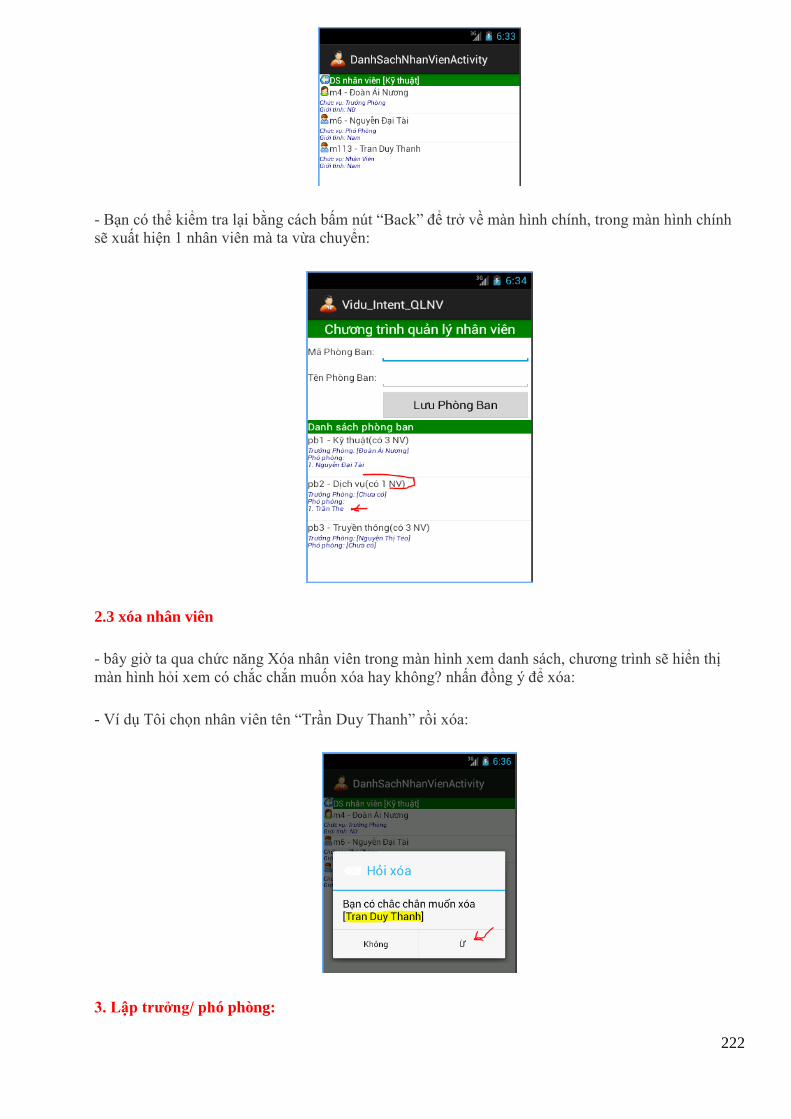
222
- Bạn có thể kiểm tra lại bằng cách bấm nút “Back” để trở về màn hình chính, trong màn hình chính
sẽ xuất hiện 1 nhân viên mà ta vừa chuyển:
2.3 xóa nhân viên
- bây giờ ta qua chức năng Xóa nhân viên trong màn hình xem danh sách, chương trình sẽ hiển thị
màn hình hỏi xem có chắc chắn muốn xóa hay không? nhấn đồng ý để xóa:
- Ví dụ Tôi chọn nhân viên tên “Trần Duy Thanh” rồi xóa:
3. Lập trưởng/ phó phòng:
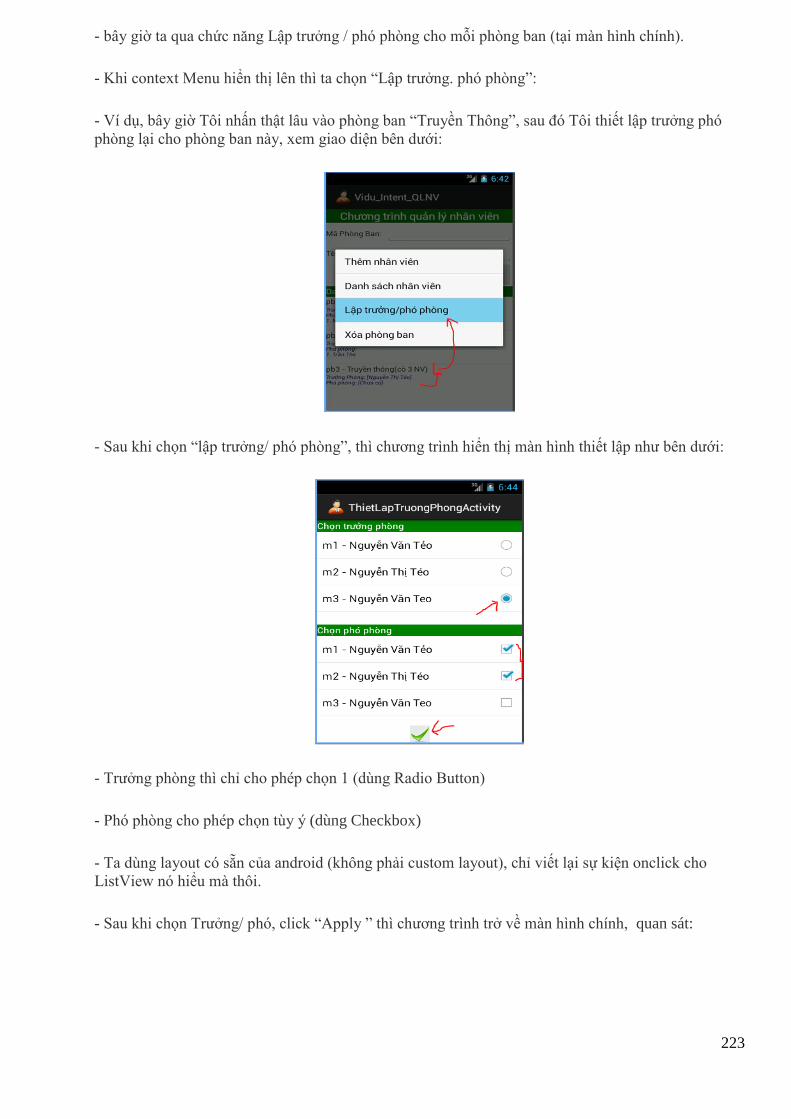
223
- bây giờ ta qua chức năng Lập trưởng / phó phòng cho mỗi phòng ban (tại màn hình chính).
- Khi context Menu hiển thị lên thì ta chọn “Lập trưởng. phó phòng”:
- Ví dụ, bây giờ Tôi nhấn thật lâu vào phòng ban “Truyền Thông”, sau đó Tôi thiết lập trưởng phó
phòng lại cho phòng ban này, xem giao diện bên dưới:
- Sau khi chọn “lập trưởng/ phó phòng”, thì chương trình hiển thị màn hình thiết lập như bên dưới:
- Trưởng phòng thì chỉ cho phép chọn 1 (dùng Radio Button)
- Phó phòng cho phép chọn tùy ý (dùng Checkbox)
- Ta dùng layout có sẵn của android (không phải custom layout), chỉ viết lại sự kiện onclick cho
ListView nó hiểu mà thôi.
- Sau khi chọn Trưởng/ phó, click “Apply ” thì chương trình trở về màn hình chính, quan sát:
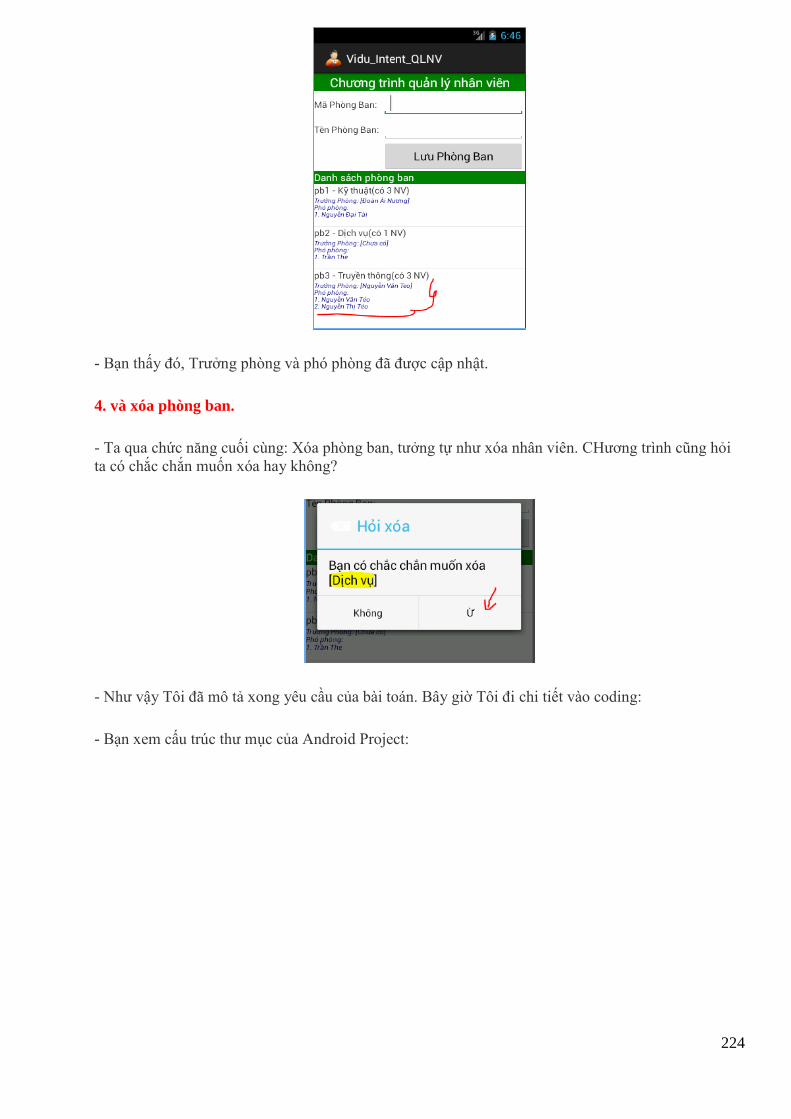
224
- Bạn thấy đó, Trưởng phòng và phó phòng đã được cập nhật.
4. và xóa phòng ban.
- Ta qua chức năng cuối cùng: Xóa phòng ban, tưởng tự như xóa nhân viên. CHương trình cũng hỏi
ta có chắc chắn muốn xóa hay không?
- Như vậy Tôi đã mô tả xong yêu cầu của bài toán. Bây giờ Tôi đi chi tiết vào coding:
- Bạn xem cấu trúc thư mục của Android Project:
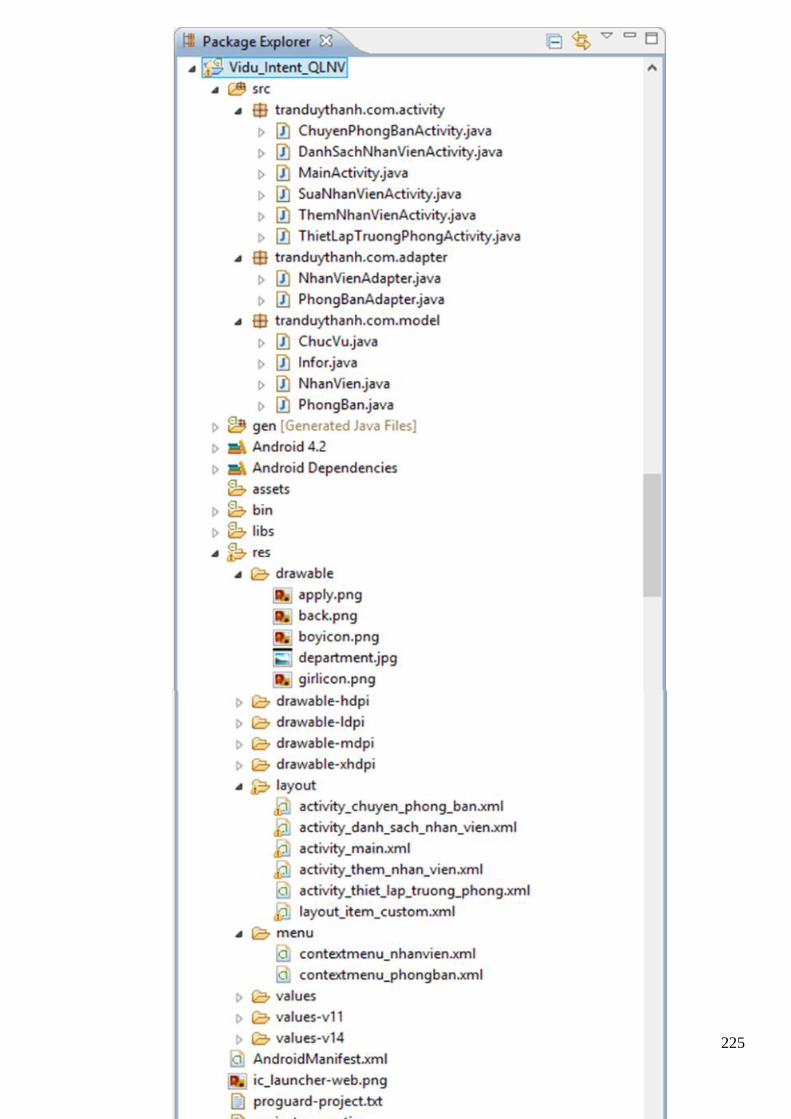
225

226
- Bạn quan sát trong phần Source Code Tôi chia ra làm 3 Package:
1) tranduythanh.com.model -> dùng để viết mô hình hóa đối tượng
2) tranduythanh.com.adapter -> dùng để viết Customlayout cho ListView
3) tranduythanh.com.activity –> dùng để lưu trữ các Activity
- Bây giờ ta vào package : tranduythanh.com.model :
- Package này có 3 class và 1 enum chức vụ (thực ra enum cũng là một class đặc biệt).
- Coding enum ChucVu.java:
1
2
3
4
5
6
7
8
9
10
11
12
13
14
15
16
17
18
19
20
21
22
package tranduythanh.com.model;
/** * Enum này để thiết lập chức vụ cho nhân viên * @author drthanh *
*/ public enum ChucVu { //Muốn gán được như thế này: TruongPhong("Trưởng Phòng") //thì phải có constructor ChucVu(String cv)
TruongPhong("Trưởng Phòng"), PhoPhong("Phó Phòng"), NhanVien("Nhân Viên");
private String cv; ChucVu(String cv) { this.cv=cv;
} public String getChucVu() {
return this.cv; } }
- Coding Infor.java:
1
2
3
4
5
6
package tranduythanh.com.model;
import java.io.Serializable; /** * Class này để lưu mã và tên là class cha của NhanVien
* và PhongBan. Vì cả nhân viên hay phòng ban đều có mã và
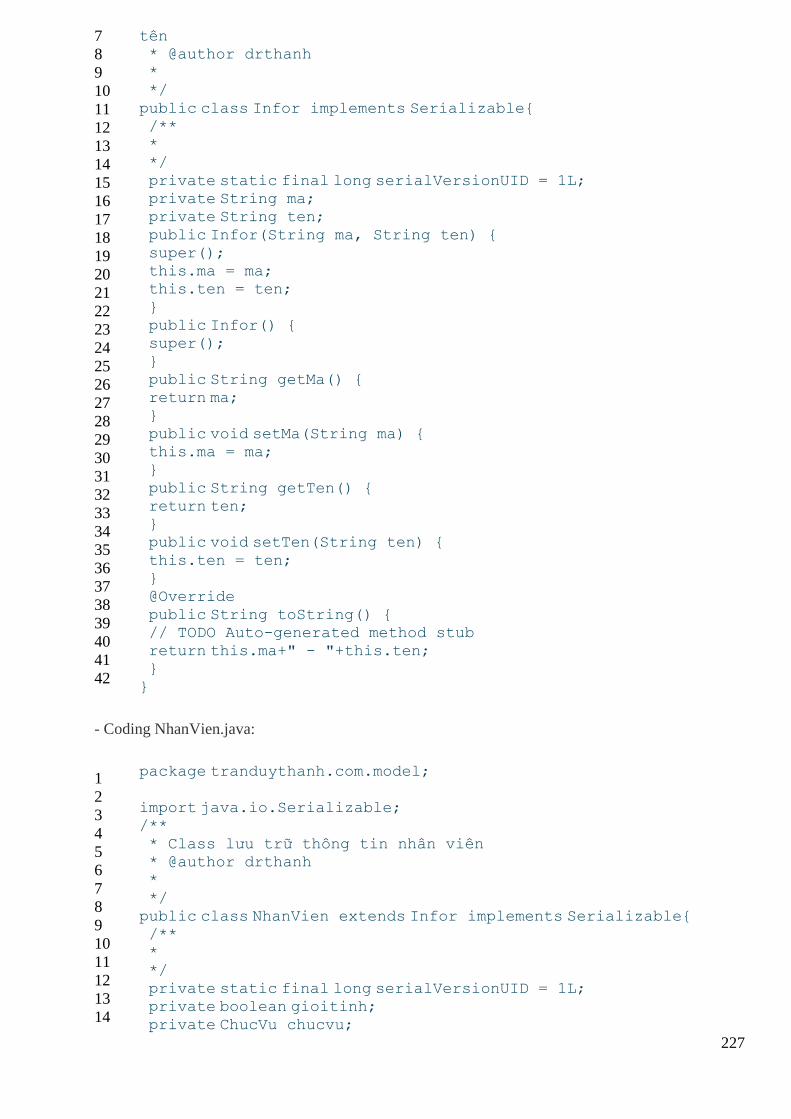
227
7
8
9
10
11
12
13
14
15
16
17
18
19
20
21
22
23
24
25
26
27
28
29
30
31
32
33
34
35
36
37
38
39
40
41
42
tên * @author drthanh * */
public class Infor implements Serializable{ /** * */
private static final long serialVersionUID = 1L; private String ma; private String ten;
public Infor(String ma, String ten) { super(); this.ma = ma; this.ten = ten;
} public Infor() { super();
} public String getMa() { return ma; }
public void setMa(String ma) { this.ma = ma; }
public String getTen() { return ten; } public void setTen(String ten) {
this.ten = ten; } @Override
public String toString() { // TODO Auto-generated method stub return this.ma+" - "+this.ten; }
}
- Coding NhanVien.java:
1
2
3
4
5
6
7
8
9
10
11
12
13
14
package tranduythanh.com.model;
import java.io.Serializable; /**
* Class lưu trữ thông tin nhân viên * @author drthanh *
*/ public class NhanVien extends Infor implements Serializable{ /** *
*/ private static final long serialVersionUID = 1L; private boolean gioitinh;
private ChucVu chucvu;
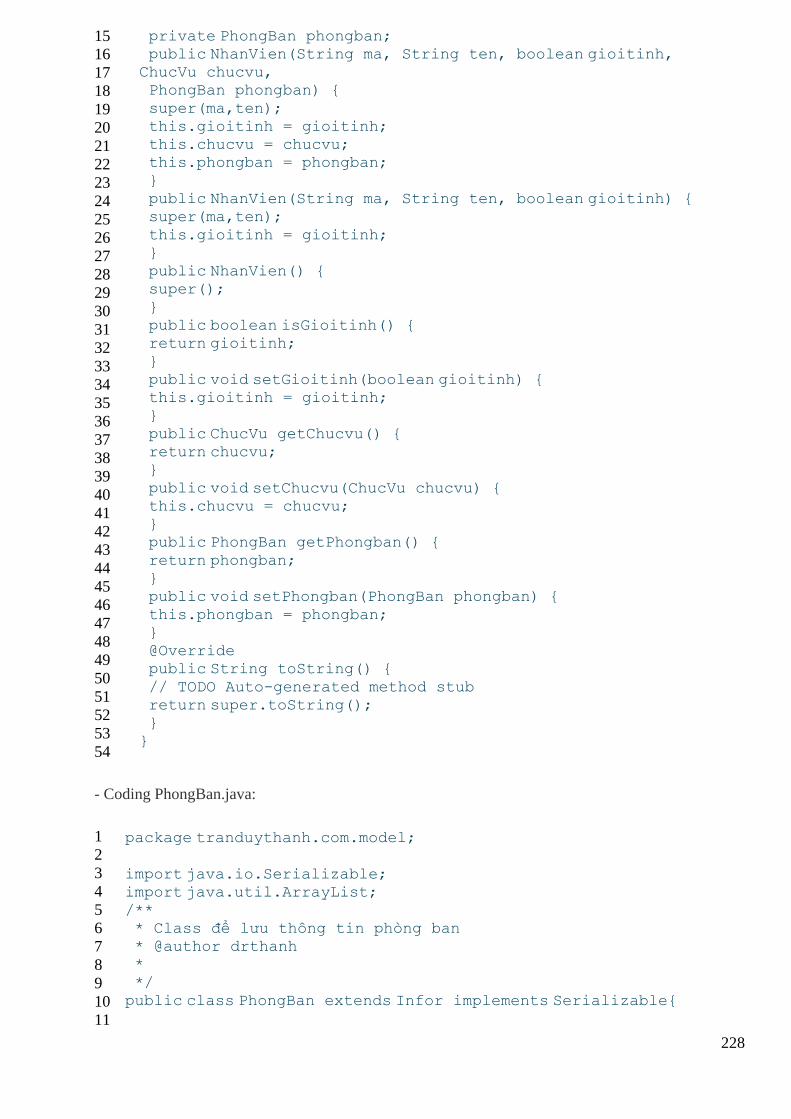
228
15
16
17
18
19
20
21
22
23
24
25
26
27
28
29
30
31
32
33
34
35
36
37
38
39
40
41
42
43
44
45
46
47
48
49
50
51
52
53
54
private PhongBan phongban; public NhanVien(String ma, String ten, boolean gioitinh, ChucVu chucvu, PhongBan phongban) {
super(ma,ten); this.gioitinh = gioitinh; this.chucvu = chucvu; this.phongban = phongban;
} public NhanVien(String ma, String ten, boolean gioitinh) { super(ma,ten);
this.gioitinh = gioitinh; } public NhanVien() { super();
} public boolean isGioitinh() { return gioitinh;
} public void setGioitinh(boolean gioitinh) { this.gioitinh = gioitinh; }
public ChucVu getChucvu() { return chucvu; }
public void setChucvu(ChucVu chucvu) { this.chucvu = chucvu; } public PhongBan getPhongban() {
return phongban; } public void setPhongban(PhongBan phongban) {
this.phongban = phongban; } @Override public String toString() {
// TODO Auto-generated method stub return super.toString(); } }
- Coding PhongBan.java:
1
2
3
4
5
6
7
8
9
10
11
package tranduythanh.com.model;
import java.io.Serializable; import java.util.ArrayList;
/** * Class để lưu thông tin phòng ban * @author drthanh *
*/ public class PhongBan extends Infor implements Serializable{
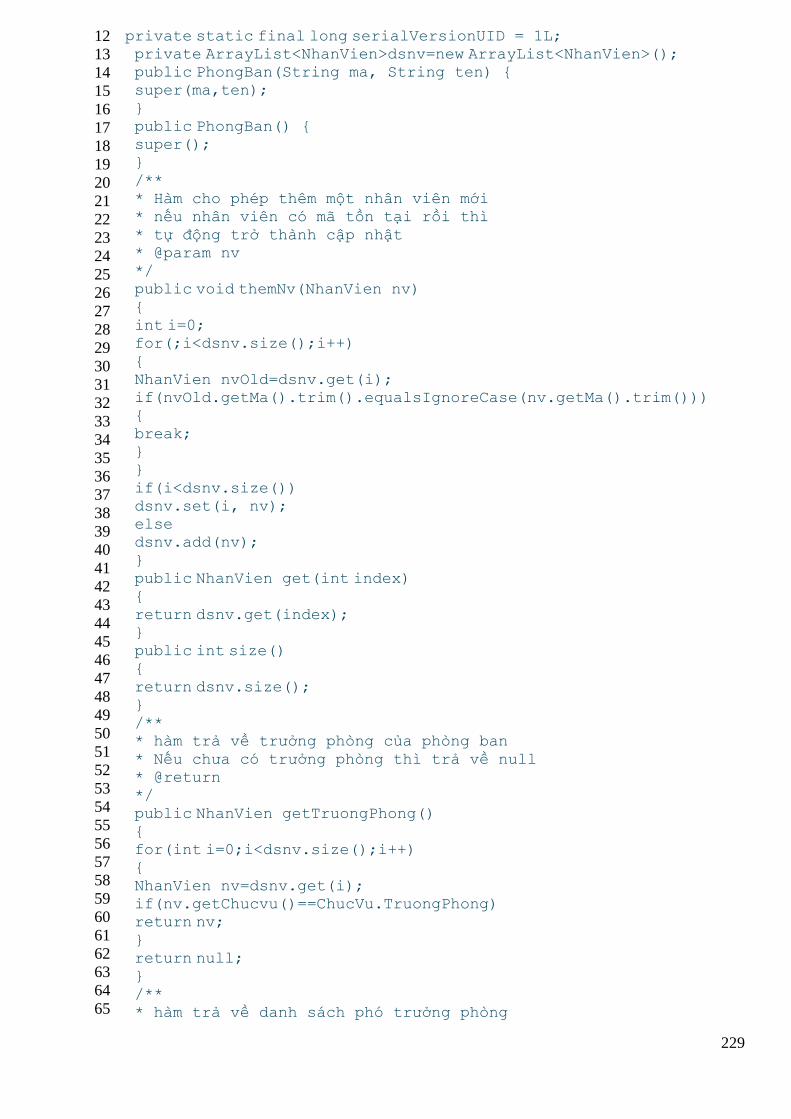
229
12
13
14
15
16
17
18
19
20
21
22
23
24
25
26
27
28
29
30
31
32
33
34
35
36
37
38
39
40
41
42
43
44
45
46
47
48
49
50
51
52
53
54
55
56
57
58
59
60
61
62
63
64
65
private static final long serialVersionUID = 1L; private ArrayList<NhanVien>dsnv=new ArrayList<NhanVien>(); public PhongBan(String ma, String ten) { super(ma,ten);
} public PhongBan() { super(); }
/** * Hàm cho phép thêm một nhân viên mới * nếu nhân viên có mã tồn tại rồi thì
* tự động trở thành cập nhật * @param nv */ public void themNv(NhanVien nv)
{ int i=0; for(;i<dsnv.size();i++)
{ NhanVien nvOld=dsnv.get(i); if(nvOld.getMa().trim().equalsIgnoreCase(nv.getMa().trim())) {
break; } }
if(i<dsnv.size()) dsnv.set(i, nv); else dsnv.add(nv);
} public NhanVien get(int index) {
return dsnv.get(index); } public int size() {
return dsnv.size(); } /** * hàm trả về trưởng phòng của phòng ban
* Nếu chưa có trưởng phòng thì trả về null * @return */
public NhanVien getTruongPhong() { for(int i=0;i<dsnv.size();i++) {
NhanVien nv=dsnv.get(i); if(nv.getChucvu()==ChucVu.TruongPhong) return nv;
} return null; } /**
* hàm trả về danh sách phó trưởng phòng
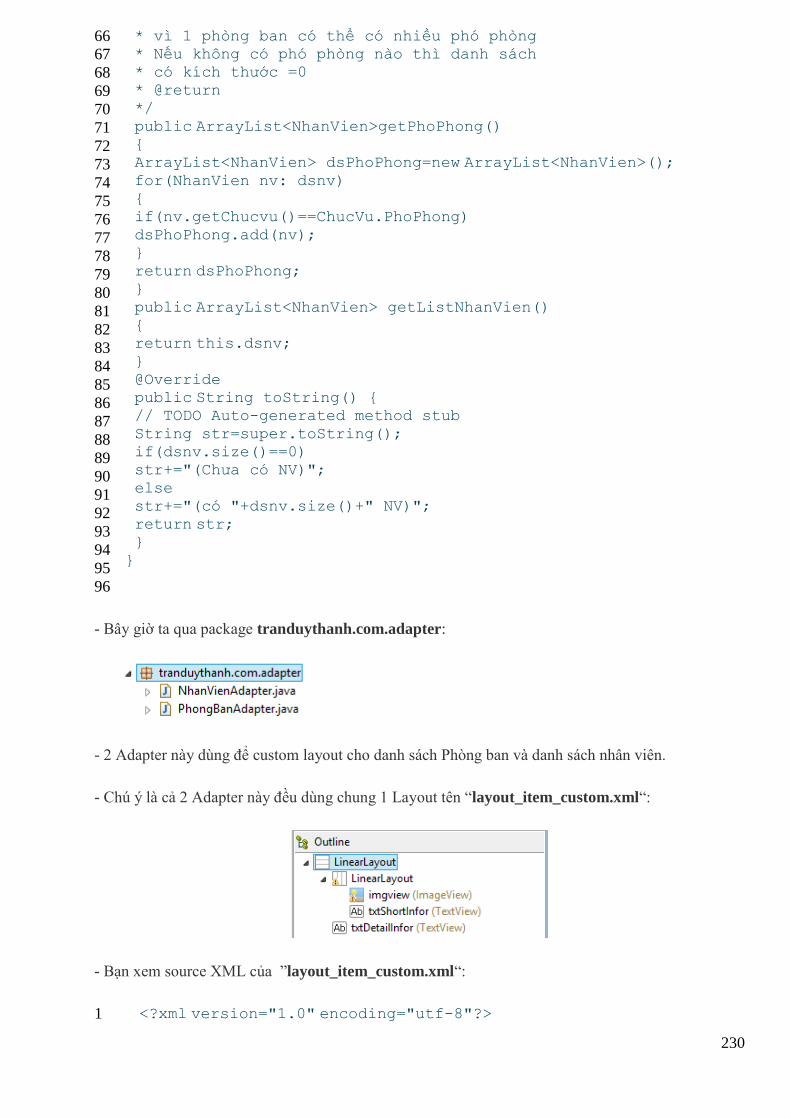
230
66
67
68
69
70
71
72
73
74
75
76
77
78
79
80
81
82
83
84
85
86
87
88
89
90
91
92
93
94
95
96
* vì 1 phòng ban có thể có nhiều phó phòng * Nếu không có phó phòng nào thì danh sách * có kích thước =0 * @return
*/ public ArrayList<NhanVien>getPhoPhong() { ArrayList<NhanVien> dsPhoPhong=new ArrayList<NhanVien>();
for(NhanVien nv: dsnv) { if(nv.getChucvu()==ChucVu.PhoPhong)
dsPhoPhong.add(nv); } return dsPhoPhong; }
public ArrayList<NhanVien> getListNhanVien() { return this.dsnv;
} @Override public String toString() { // TODO Auto-generated method stub
String str=super.toString(); if(dsnv.size()==0) str+="(Chưa có NV)";
else str+="(có "+dsnv.size()+" NV)"; return str; }
}
- Bây giờ ta qua package tranduythanh.com.adapter:
- 2 Adapter này dùng để custom layout cho danh sách Phòng ban và danh sách nhân viên.
- Chú ý là cả 2 Adapter này đều dùng chung 1 Layout tên “layout_item_custom.xml“:
- Bạn xem source XML của ”layout_item_custom.xml“:
1 <?xml version="1.0" encoding="utf-8"?>
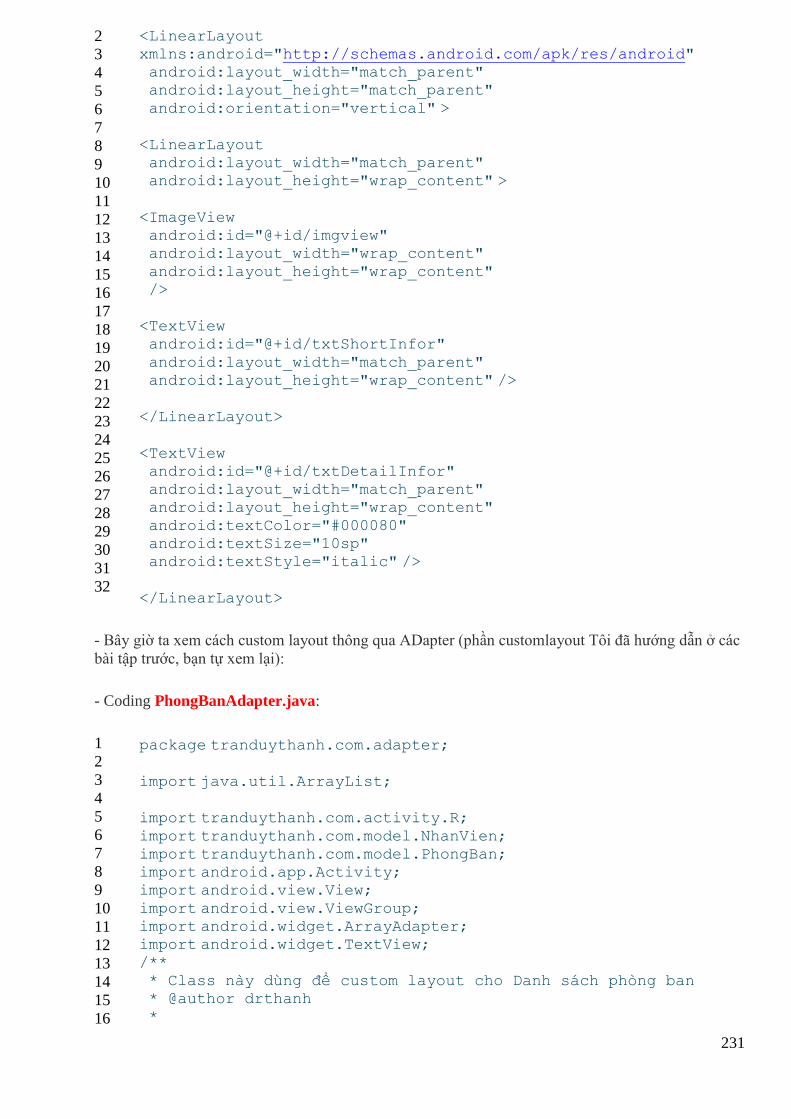
231
2
3
4
5
6
7
8
9
10
11
12
13
14
15
16
17
18
19
20
21
22
23
24
25
26
27
28
29
30
31
32
<LinearLayout xmlns:android="http://schemas.android.com/apk/res/android" android:layout_width="match_parent" android:layout_height="match_parent"
android:orientation="vertical" >
<LinearLayout android:layout_width="match_parent" android:layout_height="wrap_content" >
<ImageView android:id="@+id/imgview" android:layout_width="wrap_content"
android:layout_height="wrap_content" />
<TextView android:id="@+id/txtShortInfor"
android:layout_width="match_parent" android:layout_height="wrap_content" />
</LinearLayout>
<TextView android:id="@+id/txtDetailInfor" android:layout_width="match_parent" android:layout_height="wrap_content"
android:textColor="#000080" android:textSize="10sp" android:textStyle="italic" />
</LinearLayout>
- Bây giờ ta xem cách custom layout thông qua ADapter (phần customlayout Tôi đã hướng dẫn ở các
bài tập trước, bạn tự xem lại):
- Coding PhongBanAdapter.java:
1
2
3
4
5
6
7
8
9
10
11
12
13
14
15
16
package tranduythanh.com.adapter;
import java.util.ArrayList;
import tranduythanh.com.activity.R;
import tranduythanh.com.model.NhanVien; import tranduythanh.com.model.PhongBan; import android.app.Activity; import android.view.View;
import android.view.ViewGroup; import android.widget.ArrayAdapter; import android.widget.TextView; /**
* Class này dùng để custom layout cho Danh sách phòng ban * @author drthanh *
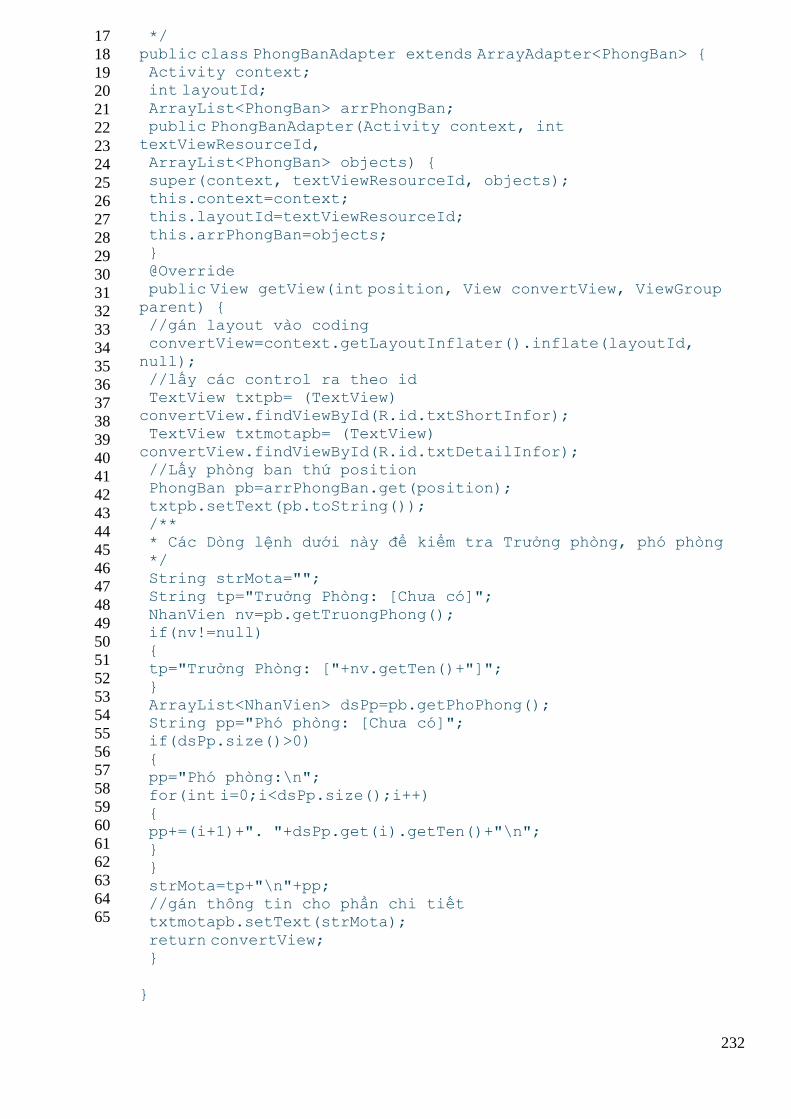
232
17
18
19
20
21
22
23
24
25
26
27
28
29
30
31
32
33
34
35
36
37
38
39
40
41
42
43
44
45
46
47
48
49
50
51
52
53
54
55
56
57
58
59
60
61
62
63
64
65
*/ public class PhongBanAdapter extends ArrayAdapter<PhongBan> { Activity context; int layoutId;
ArrayList<PhongBan> arrPhongBan; public PhongBanAdapter(Activity context, int textViewResourceId, ArrayList<PhongBan> objects) {
super(context, textViewResourceId, objects); this.context=context; this.layoutId=textViewResourceId;
this.arrPhongBan=objects; } @Override public View getView(int position, View convertView, ViewGroup
parent) { //gán layout vào coding convertView=context.getLayoutInflater().inflate(layoutId,
null); //lấy các control ra theo id TextView txtpb= (TextView)
convertView.findViewById(R.id.txtShortInfor);
TextView txtmotapb= (TextView)
convertView.findViewById(R.id.txtDetailInfor); //Lấy phòng ban thứ position
PhongBan pb=arrPhongBan.get(position); txtpb.setText(pb.toString()); /** * Các Dòng lệnh dưới này để kiểm tra Trưởng phòng, phó phòng
*/ String strMota=""; String tp="Trưởng Phòng: [Chưa có]";
NhanVien nv=pb.getTruongPhong(); if(nv!=null) { tp="Trưởng Phòng: ["+nv.getTen()+"]";
} ArrayList<NhanVien> dsPp=pb.getPhoPhong(); String pp="Phó phòng: [Chưa có]"; if(dsPp.size()>0)
{ pp="Phó phòng:\n"; for(int i=0;i<dsPp.size();i++)
{ pp+=(i+1)+". "+dsPp.get(i).getTen()+"\n"; } }
strMota=tp+"\n"+pp; //gán thông tin cho phần chi tiết txtmotapb.setText(strMota);
return convertView; }
}
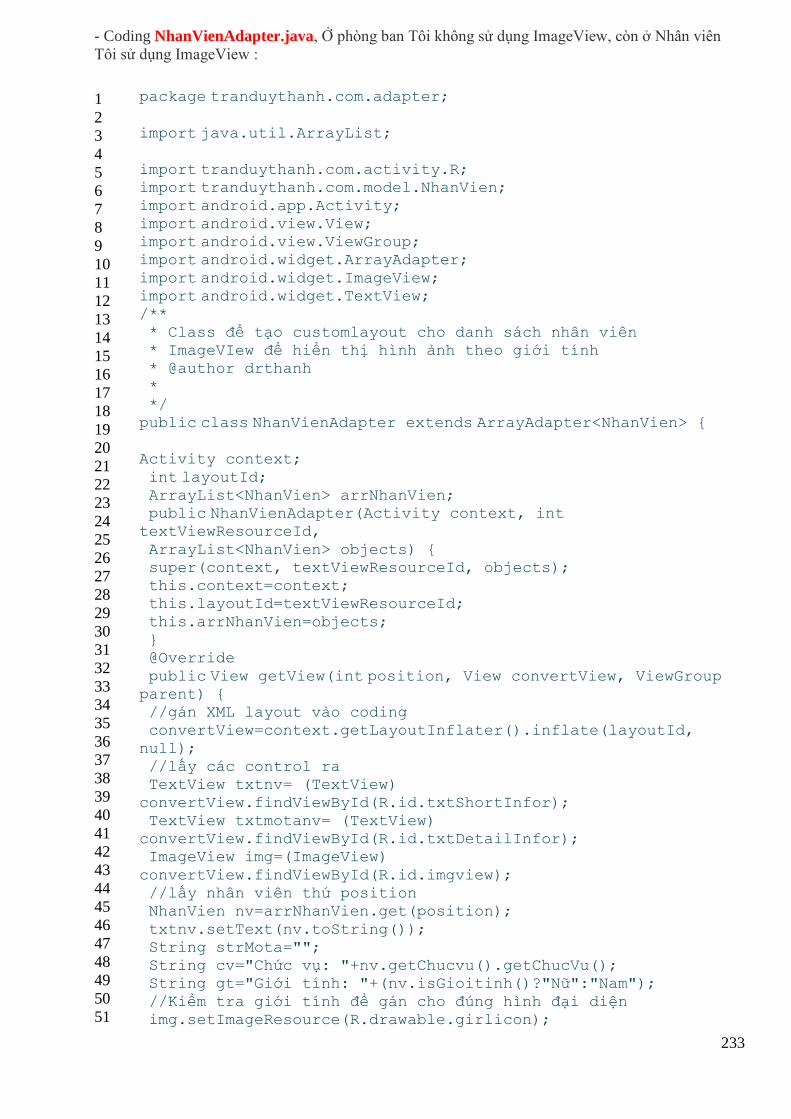
233
- Coding NhanVienAdapter.java, Ở phòng ban Tôi không sử dụng ImageView, còn ở Nhân viên
Tôi sử dụng ImageView :
1
2
3
4
5
6
7
8
9
10
11
12
13
14
15
16
17
18
19
20
21
22
23
24
25
26
27
28
29
30
31
32
33
34
35
36
37
38
39
40
41
42
43
44
45
46
47
48
49
50
51
package tranduythanh.com.adapter;
import java.util.ArrayList;
import tranduythanh.com.activity.R; import tranduythanh.com.model.NhanVien;
import android.app.Activity; import android.view.View; import android.view.ViewGroup; import android.widget.ArrayAdapter;
import android.widget.ImageView; import android.widget.TextView; /**
* Class để tạo customlayout cho danh sách nhân viên * ImageVIew để hiển thị hình ảnh theo giới tính * @author drthanh *
*/ public class NhanVienAdapter extends ArrayAdapter<NhanVien> {
Activity context;
int layoutId; ArrayList<NhanVien> arrNhanVien; public NhanVienAdapter(Activity context, int textViewResourceId,
ArrayList<NhanVien> objects) { super(context, textViewResourceId, objects); this.context=context; this.layoutId=textViewResourceId;
this.arrNhanVien=objects; } @Override
public View getView(int position, View convertView, ViewGroup parent) { //gán XML layout vào coding convertView=context.getLayoutInflater().inflate(layoutId,
null); //lấy các control ra TextView txtnv= (TextView)
convertView.findViewById(R.id.txtShortInfor); TextView txtmotanv= (TextView)
convertView.findViewById(R.id.txtDetailInfor); ImageView img=(ImageView)
convertView.findViewById(R.id.imgview); //lấy nhân viên thứ position NhanVien nv=arrNhanVien.get(position);
txtnv.setText(nv.toString()); String strMota=""; String cv="Chức vụ: "+nv.getChucvu().getChucVu(); String gt="Giới tính: "+(nv.isGioitinh()?"Nữ":"Nam");
//Kiểm tra giới tính để gán cho đúng hình đại diện img.setImageResource(R.drawable.girlicon);
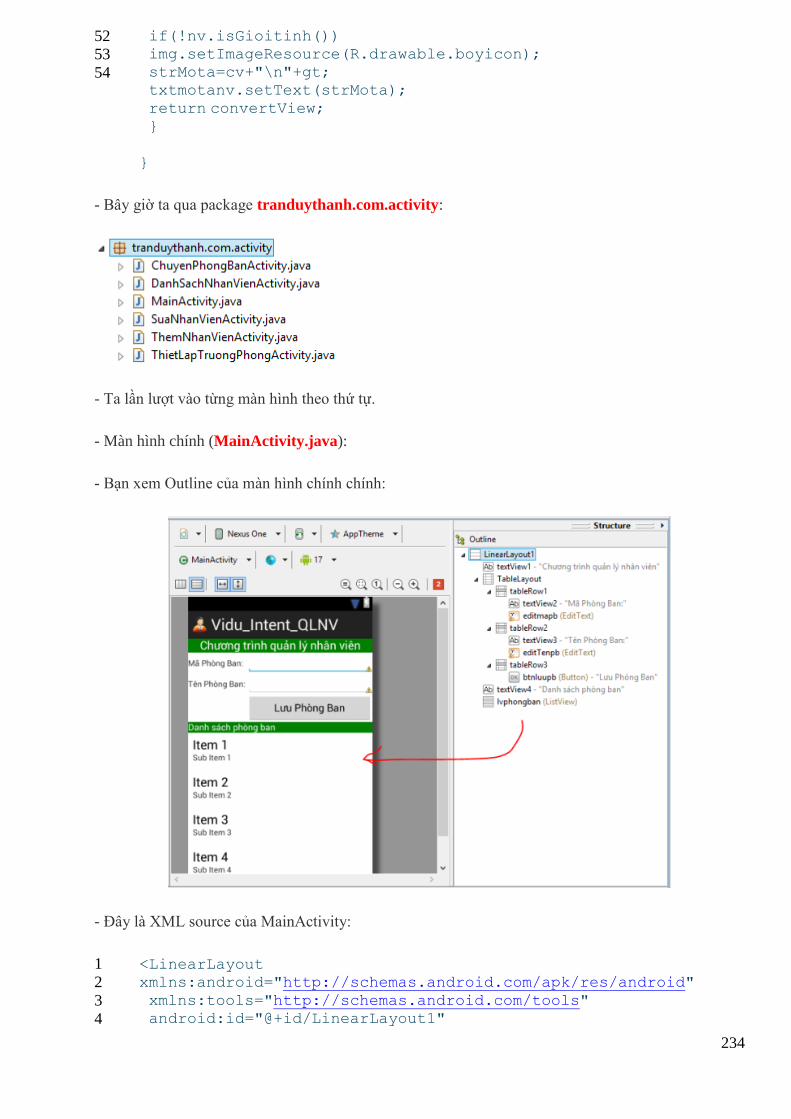
234
52
53
54
if(!nv.isGioitinh()) img.setImageResource(R.drawable.boyicon); strMota=cv+"\n"+gt; txtmotanv.setText(strMota);
return convertView; }
}
- Bây giờ ta qua package tranduythanh.com.activity:
- Ta lần lượt vào từng màn hình theo thứ tự.
- Màn hình chính (MainActivity.java):
- Bạn xem Outline của màn hình chính chính:
- Đây là XML source của MainActivity:
1
2
3
4
<LinearLayout xmlns:android="http://schemas.android.com/apk/res/android"
xmlns:tools="http://schemas.android.com/tools" android:id="@+id/LinearLayout1"
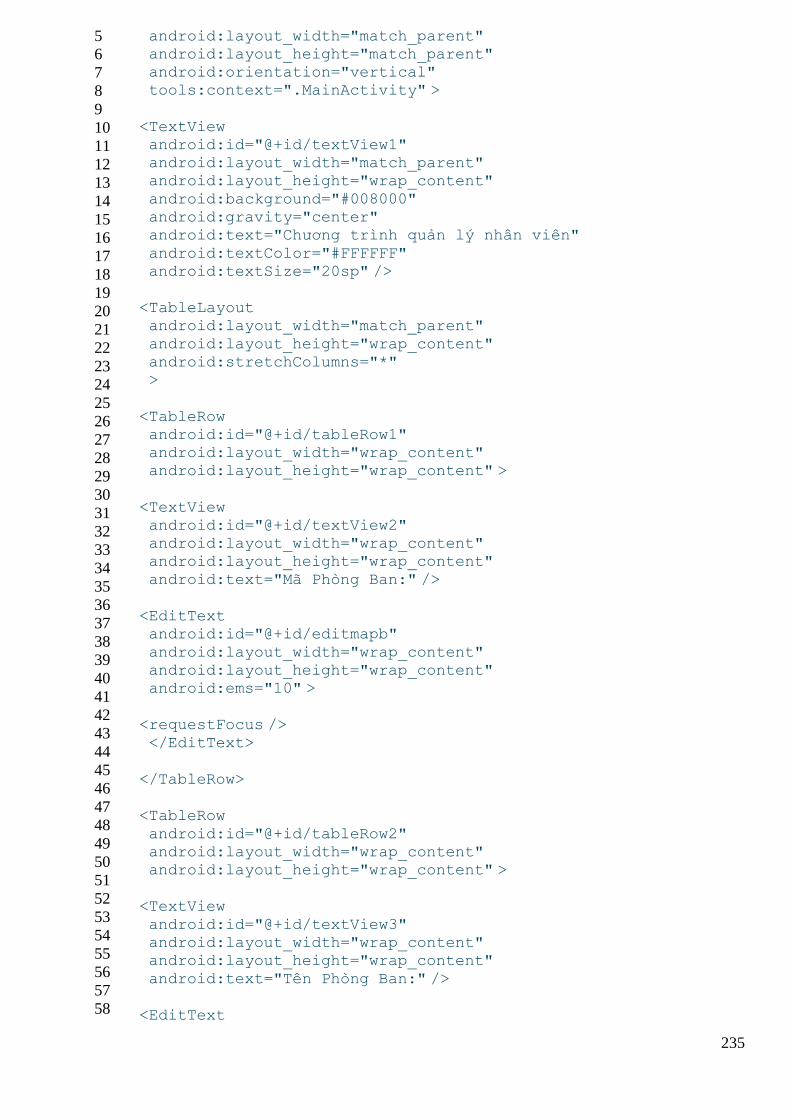
235
5
6
7
8
9
10
11
12
13
14
15
16
17
18
19
20
21
22
23
24
25
26
27
28
29
30
31
32
33
34
35
36
37
38
39
40
41
42
43
44
45
46
47
48
49
50
51
52
53
54
55
56
57
58
android:layout_width="match_parent" android:layout_height="match_parent" android:orientation="vertical" tools:context=".MainActivity" >
<TextView android:id="@+id/textView1" android:layout_width="match_parent" android:layout_height="wrap_content"
android:background="#008000" android:gravity="center" android:text="Chương trình quản lý nhân viên"
android:textColor="#FFFFFF" android:textSize="20sp" />
<TableLayout android:layout_width="match_parent"
android:layout_height="wrap_content" android:stretchColumns="*" >
<TableRow android:id="@+id/tableRow1" android:layout_width="wrap_content" android:layout_height="wrap_content" >
<TextView android:id="@+id/textView2" android:layout_width="wrap_content" android:layout_height="wrap_content"
android:text="Mã Phòng Ban:" />
<EditText android:id="@+id/editmapb"
android:layout_width="wrap_content" android:layout_height="wrap_content" android:ems="10" >
<requestFocus />
</EditText>
</TableRow>
<TableRow
android:id="@+id/tableRow2" android:layout_width="wrap_content" android:layout_height="wrap_content" >
<TextView
android:id="@+id/textView3" android:layout_width="wrap_content" android:layout_height="wrap_content"
android:text="Tên Phòng Ban:" />
<EditText
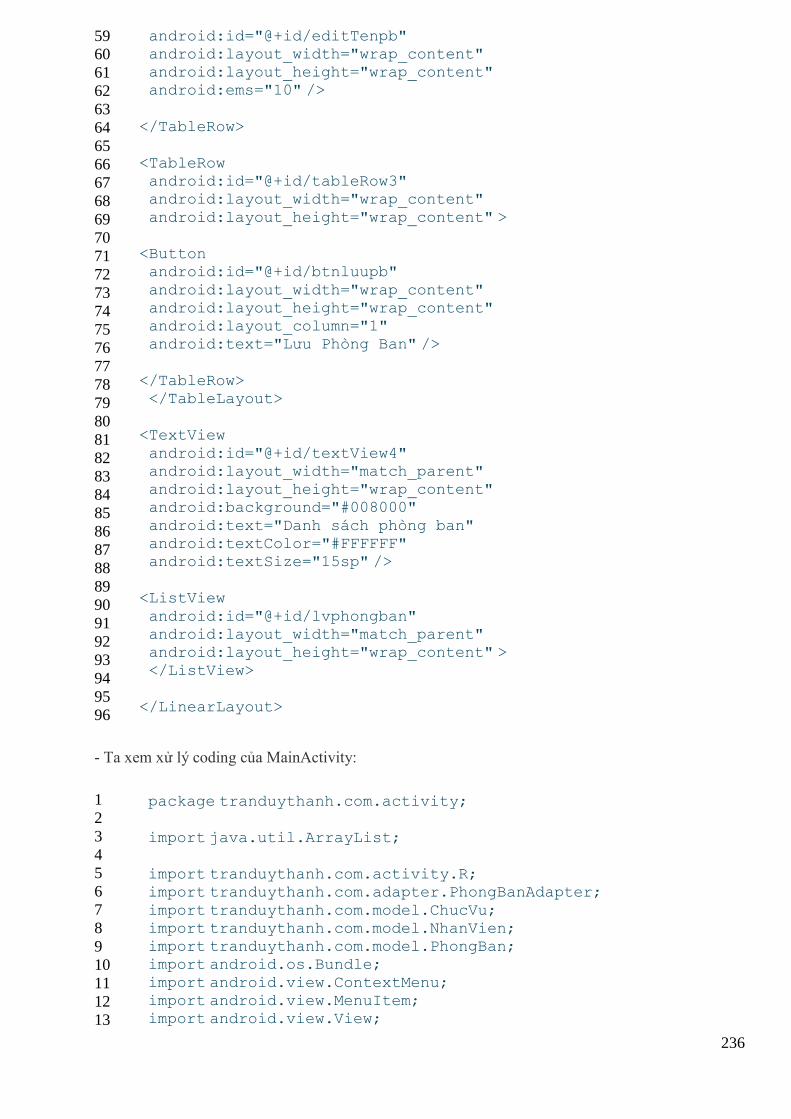
236
59
60
61
62
63
64
65
66
67
68
69
70
71
72
73
74
75
76
77
78
79
80
81
82
83
84
85
86
87
88
89
90
91
92
93
94
95
96
android:id="@+id/editTenpb" android:layout_width="wrap_content" android:layout_height="wrap_content" android:ems="10" />
</TableRow>
<TableRow android:id="@+id/tableRow3" android:layout_width="wrap_content"
android:layout_height="wrap_content" >
<Button android:id="@+id/btnluupb"
android:layout_width="wrap_content" android:layout_height="wrap_content" android:layout_column="1" android:text="Lưu Phòng Ban" />
</TableRow> </TableLayout>
<TextView
android:id="@+id/textView4" android:layout_width="match_parent" android:layout_height="wrap_content" android:background="#008000"
android:text="Danh sách phòng ban" android:textColor="#FFFFFF" android:textSize="15sp" />
<ListView
android:id="@+id/lvphongban" android:layout_width="match_parent" android:layout_height="wrap_content" >
</ListView>
</LinearLayout>
- Ta xem xử lý coding của MainActivity:
1
2
3
4
5
6
7
8
9
10
11
12
13
package tranduythanh.com.activity;
import java.util.ArrayList;
import tranduythanh.com.activity.R; import tranduythanh.com.adapter.PhongBanAdapter;
import tranduythanh.com.model.ChucVu; import tranduythanh.com.model.NhanVien; import tranduythanh.com.model.PhongBan; import android.os.Bundle;
import android.view.ContextMenu; import android.view.MenuItem; import android.view.View;
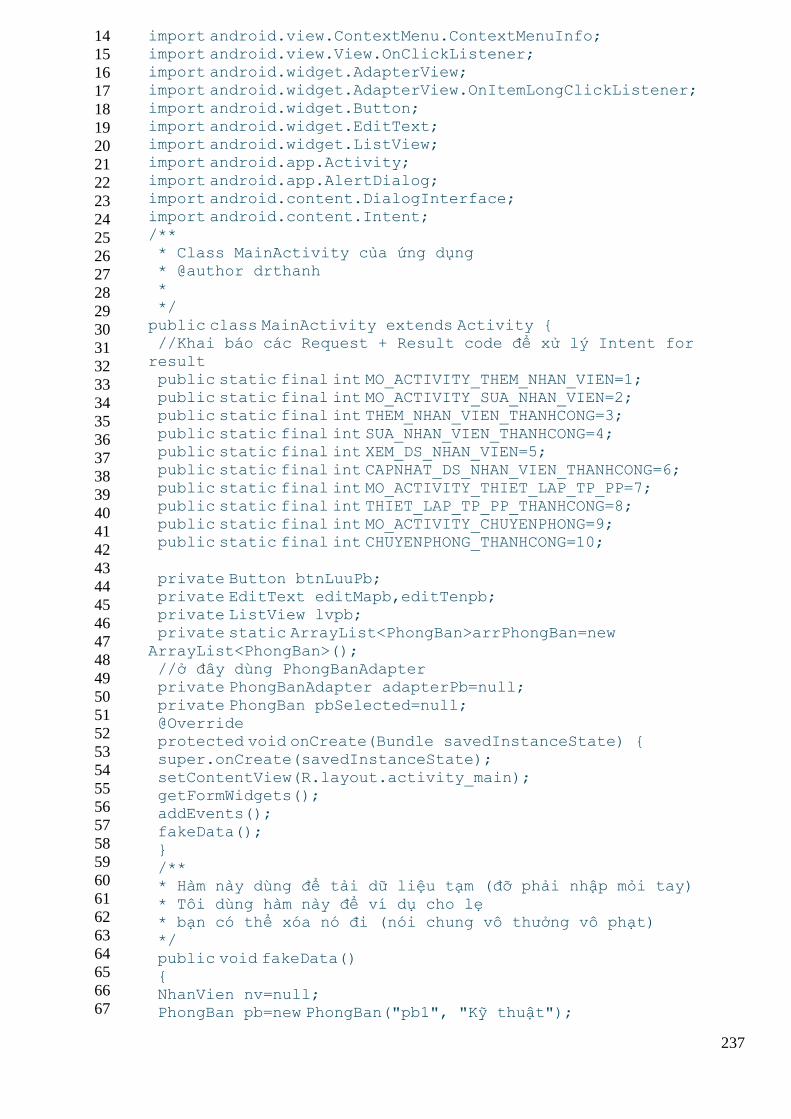
237
14
15
16
17
18
19
20
21
22
23
24
25
26
27
28
29
30
31
32
33
34
35
36
37
38
39
40
41
42
43
44
45
46
47
48
49
50
51
52
53
54
55
56
57
58
59
60
61
62
63
64
65
66
67
import android.view.ContextMenu.ContextMenuInfo; import android.view.View.OnClickListener; import android.widget.AdapterView; import android.widget.AdapterView.OnItemLongClickListener;
import android.widget.Button; import android.widget.EditText; import android.widget.ListView; import android.app.Activity;
import android.app.AlertDialog; import android.content.DialogInterface; import android.content.Intent;
/** * Class MainActivity của ứng dụng * @author drthanh *
*/ public class MainActivity extends Activity { //Khai báo các Request + Result code để xử lý Intent for
result public static final int MO_ACTIVITY_THEM_NHAN_VIEN=1; public static final int MO_ACTIVITY_SUA_NHAN_VIEN=2; public static final int THEM_NHAN_VIEN_THANHCONG=3;
public static final int SUA_NHAN_VIEN_THANHCONG=4; public static final int XEM_DS_NHAN_VIEN=5; public static final int CAPNHAT_DS_NHAN_VIEN_THANHCONG=6;
public static final int MO_ACTIVITY_THIET_LAP_TP_PP=7; public static final int THIET_LAP_TP_PP_THANHCONG=8; public static final int MO_ACTIVITY_CHUYENPHONG=9; public static final int CHUYENPHONG_THANHCONG=10;
private Button btnLuuPb; private EditText editMapb,editTenpb; private ListView lvpb; private static ArrayList<PhongBan>arrPhongBan=new
ArrayList<PhongBan>(); //ở đây dùng PhongBanAdapter private PhongBanAdapter adapterPb=null;
private PhongBan pbSelected=null; @Override protected void onCreate(Bundle savedInstanceState) { super.onCreate(savedInstanceState);
setContentView(R.layout.activity_main); getFormWidgets(); addEvents();
fakeData(); } /** * Hàm này dùng để tải dữ liệu tạm (đỡ phải nhập mỏi tay)
* Tôi dùng hàm này để ví dụ cho lẹ * bạn có thể xóa nó đi (nói chung vô thưởng vô phạt) */
public void fakeData() { NhanVien nv=null; PhongBan pb=new PhongBan("pb1", "Kỹ thuật");
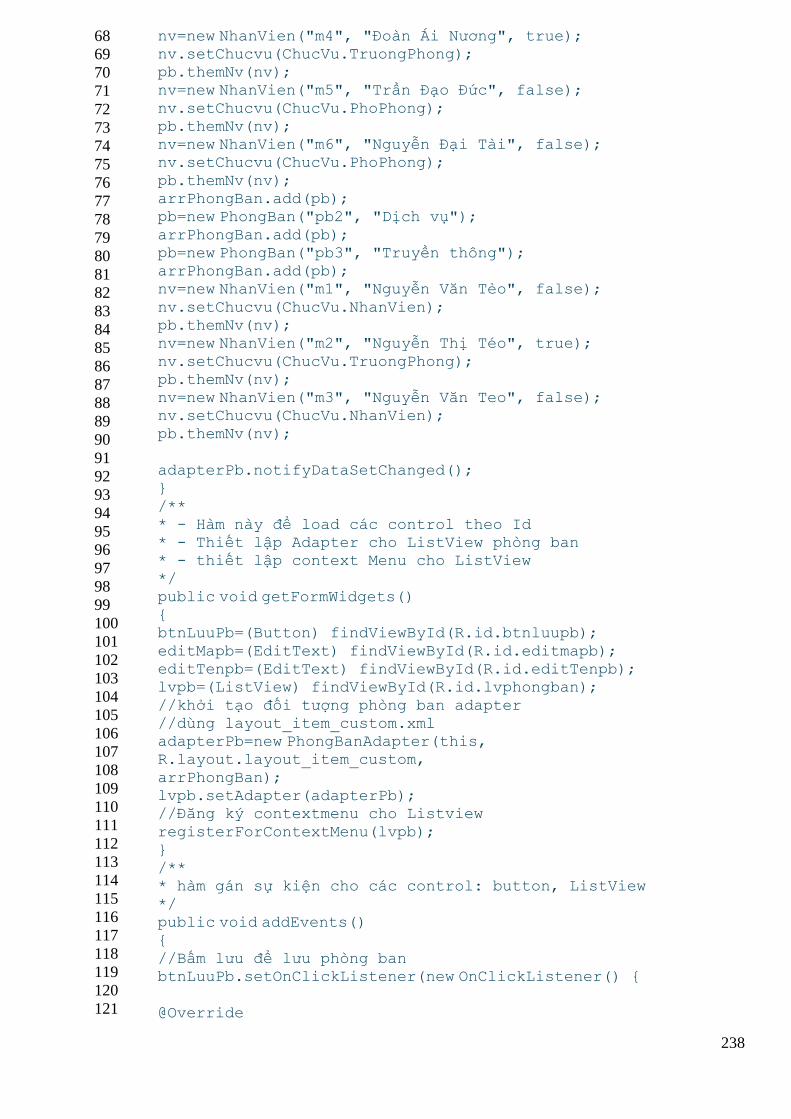
238
68
69
70
71
72
73
74
75
76
77
78
79
80
81
82
83
84
85
86
87
88
89
90
91
92
93
94
95
96
97
98
99
100
101
102
103
104
105
106
107
108
109
110
111
112
113
114
115
116
117
118
119
120
121
nv=new NhanVien("m4", "Đoàn Ái Nương", true); nv.setChucvu(ChucVu.TruongPhong); pb.themNv(nv); nv=new NhanVien("m5", "Trần Đạo Đức", false);
nv.setChucvu(ChucVu.PhoPhong); pb.themNv(nv); nv=new NhanVien("m6", "Nguyễn Đại Tài", false); nv.setChucvu(ChucVu.PhoPhong);
pb.themNv(nv); arrPhongBan.add(pb); pb=new PhongBan("pb2", "Dịch vụ");
arrPhongBan.add(pb); pb=new PhongBan("pb3", "Truyền thông"); arrPhongBan.add(pb); nv=new NhanVien("m1", "Nguyễn Văn Tẻo", false);
nv.setChucvu(ChucVu.NhanVien); pb.themNv(nv); nv=new NhanVien("m2", "Nguyễn Thị Téo", true);
nv.setChucvu(ChucVu.TruongPhong); pb.themNv(nv); nv=new NhanVien("m3", "Nguyễn Văn Teo", false); nv.setChucvu(ChucVu.NhanVien);
pb.themNv(nv);
adapterPb.notifyDataSetChanged(); }
/** * - Hàm này để load các control theo Id * - Thiết lập Adapter cho ListView phòng ban * - thiết lập context Menu cho ListView
*/ public void getFormWidgets() { btnLuuPb=(Button) findViewById(R.id.btnluupb);
editMapb=(EditText) findViewById(R.id.editmapb); editTenpb=(EditText) findViewById(R.id.editTenpb); lvpb=(ListView) findViewById(R.id.lvphongban);
//khởi tạo đối tượng phòng ban adapter //dùng layout_item_custom.xml adapterPb=new PhongBanAdapter(this, R.layout.layout_item_custom,
arrPhongBan); lvpb.setAdapter(adapterPb); //Đăng ký contextmenu cho Listview
registerForContextMenu(lvpb); } /** * hàm gán sự kiện cho các control: button, ListView
*/ public void addEvents() {
//Bấm lưu để lưu phòng ban btnLuuPb.setOnClickListener(new OnClickListener() {
@Override
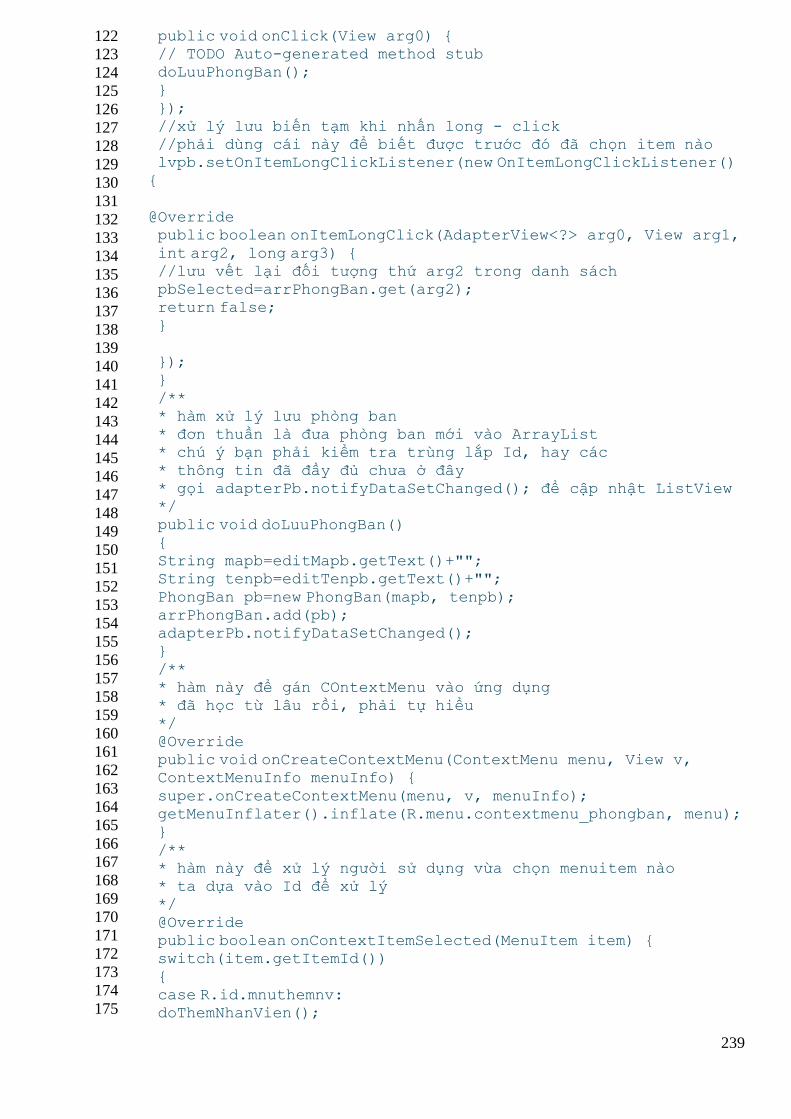
239
122
123
124
125
126
127
128
129
130
131
132
133
134
135
136
137
138
139
140
141
142
143
144
145
146
147
148
149
150
151
152
153
154
155
156
157
158
159
160
161
162
163
164
165
166
167
168
169
170
171
172
173
174
175
public void onClick(View arg0) { // TODO Auto-generated method stub doLuuPhongBan(); }
}); //xử lý lưu biến tạm khi nhấn long - click //phải dùng cái này để biết được trước đó đã chọn item nào lvpb.setOnItemLongClickListener(new OnItemLongClickListener()
{
@Override public boolean onItemLongClick(AdapterView<?> arg0, View arg1,
int arg2, long arg3) { //lưu vết lại đối tượng thứ arg2 trong danh sách pbSelected=arrPhongBan.get(arg2); return false;
}
}); }
/** * hàm xử lý lưu phòng ban * đơn thuần là đưa phòng ban mới vào ArrayList * chú ý bạn phải kiểm tra trùng lắp Id, hay các
* thông tin đã đầy đủ chưa ở đây * gọi adapterPb.notifyDataSetChanged(); để cập nhật ListView */
public void doLuuPhongBan() { String mapb=editMapb.getText()+""; String tenpb=editTenpb.getText()+"";
PhongBan pb=new PhongBan(mapb, tenpb); arrPhongBan.add(pb); adapterPb.notifyDataSetChanged(); }
/** * hàm này để gán COntextMenu vào ứng dụng * đã học từ lâu rồi, phải tự hiểu
*/ @Override public void onCreateContextMenu(ContextMenu menu, View v, ContextMenuInfo menuInfo) {
super.onCreateContextMenu(menu, v, menuInfo); getMenuInflater().inflate(R.menu.contextmenu_phongban, menu); }
/** * hàm này để xử lý người sử dụng vừa chọn menuitem nào * ta dựa vào Id để xử lý */
@Override public boolean onContextItemSelected(MenuItem item) { switch(item.getItemId())
{ case R.id.mnuthemnv: doThemNhanVien();

240
176
177
178
179
180
181
182
183
184
185
186
187
188
189
190
191
192
193
194
195
196
197
198
199
200
201
202
203
204
205
206
207
208
209
210
211
212
213
214
215
216
217
218
219
220
221
222
223
224
225
226
227
228
229
break; case R.id.mnudanhsachnv: doDanhSachNhanVien(); break;
case R.id.mnutruongphong: doThietLapLanhDao(); break; case R.id.mnuxoapb:
doXoaPhongBan(); break; }
return super.onContextItemSelected(item); } /** * khi chọn menu Thêm nhân viên, đơn thuần chỉ là hiển thị
* màn hìn thêm nhân viên (với dạng Dialog) * nhớ là dùng startActivityForResult * do đó ta lắng nghe kết quả tại hàm onActivityResult
*/ public void doThemNhanVien() { Intent i=new Intent(this, ThemNhanVienActivity.class);
startActivityForResult(i, MO_ACTIVITY_THEM_NHAN_VIEN); } /**
* hàm onActivityResult để xử lý kết quả trả về * sau khi gọi startActivityForResult kết thúc */ @Override
protected void onActivityResult(int requestCode, int resultCode, Intent data) { // TODO Auto-generated method stub
super.onActivityResult(requestCode, resultCode, data); //màn hình thêm mới nhân viên trả kết quả về if(resultCode==THEM_NHAN_VIEN_THANHCONG) {
//Cách lấy dữ liệu đã học rồi, ko nói lại Bundle bundle= data.getBundleExtra("DATA"); NhanVien nv= (NhanVien) bundle.getSerializable("NHANVIEN"); pbSelected.themNv(nv);
adapterPb.notifyDataSetChanged(); } //Màn hình thiết lập lạnh đão/ cập nhật danh sách trả
//kết quả về else if(resultCode==THIET_LAP_TP_PP_THANHCONG|| resultCode==CAPNHAT_DS_NHAN_VIEN_THANHCONG) {
//Cách lấy dữ liệu đã học rồi, ko nói lại Bundle bundle= data.getBundleExtra("DATA"); PhongBan pb= (PhongBan) bundle.getSerializable("PHONGBAN");
//đơn thuần là xóa danh sách cũ pbSelected.getListNhanVien().clear(); //rồi cập nhật lại toàn bộ danh sách mới //sinh viên có thể chọn giải pháp thông minh hơn
//tức là phần tử nào bị ảnh hưởng thì xử lý phần tử đó

241
230
231
232
233
234
235
236
237
238
239
240
241
242
243
244
245
246
247
248
249
250
251
252
253
254
255
256
257
258
259
260
261
262
263
264
265
266
267
268
269
270
271
272
273
274
275
276
277
278
279
280
281
282
283
pbSelected.getListNhanVien().addAll(pb.getListNhanVien()); adapterPb.notifyDataSetChanged(); } }
/** * hàm cho phép danh xem danh sách nhân viên của phòng * ban đang chọn, đơn thuần là mở DanhSachNhanVienActivity * và truyền phòng ban qua -->toàn bộ danh sách nhân viên
* sẽ được hiển thị trong DanhSachNhanVienActivity */ public void doDanhSachNhanVien()
{ Intent i=new Intent(this, DanhSachNhanVienActivity.class); Bundle bundle=new Bundle(); bundle.putSerializable("PHONGBAN", pbSelected);
i.putExtra("DATA", bundle); startActivityForResult(i, XEM_DS_NHAN_VIEN); }
/** * hàm cho phép mở màn hình thiết lập lãnh đạo phòng ban * Trưởng phòng và phó phòng * ThietLapTruongPhongActivity sẽ có 2 ListView
* - Listview 1 hiển thị dang radiobutton để chỉ chọn 1 trưởng
phòng * - ListView 2 hiển thị dạng Checkbox cho phép chọn nhiều phó
phòng */ public void doThietLapLanhDao() {
Intent i=new Intent(this, ThietLapTruongPhongActivity.class); Bundle bundle=new Bundle(); bundle.putSerializable("PHONGBAN", pbSelected);
i.putExtra("DATA", bundle); startActivityForResult(i, MO_ACTIVITY_THIET_LAP_TP_PP); } /**
* hàm cho phép xóa phòng ban đang chọn */ public void doXoaPhongBan() {
AlertDialog.Builder builder=new AlertDialog.Builder (this); builder.setTitle("Hỏi xóa"); builder.setMessage("Bạn có chắc chắn muốn xóa
["+pbSelected.getTen()+"]"); builder.setIcon(android.R.drawable.ic_input_delete); builder.setNegativeButton("Không", new DialogInterface.OnClickListener() {
@Override public void onClick(DialogInterface arg0, int arg1) { // TODO Auto-generated method stub
arg0.cancel(); } }); builder.setPositiveButton("Ừ", new
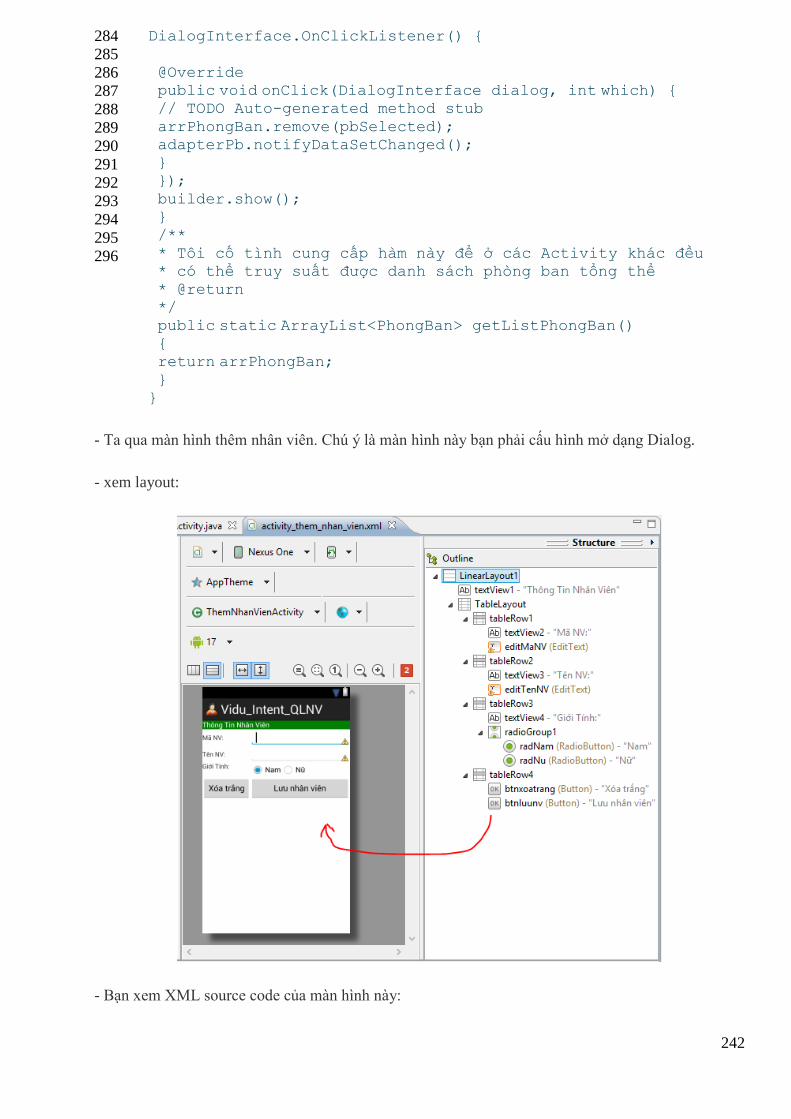
242
284
285
286
287
288
289
290
291
292
293
294
295
296
DialogInterface.OnClickListener() {
@Override public void onClick(DialogInterface dialog, int which) { // TODO Auto-generated method stub
arrPhongBan.remove(pbSelected); adapterPb.notifyDataSetChanged(); } });
builder.show(); } /**
* Tôi cố tình cung cấp hàm này để ở các Activity khác đều * có thể truy suất được danh sách phòng ban tổng thể * @return */
public static ArrayList<PhongBan> getListPhongBan() { return arrPhongBan;
} }
- Ta qua màn hình thêm nhân viên. Chú ý là màn hình này bạn phải cấu hình mở dạng Dialog.
- xem layout:
- Bạn xem XML source code của màn hình này:
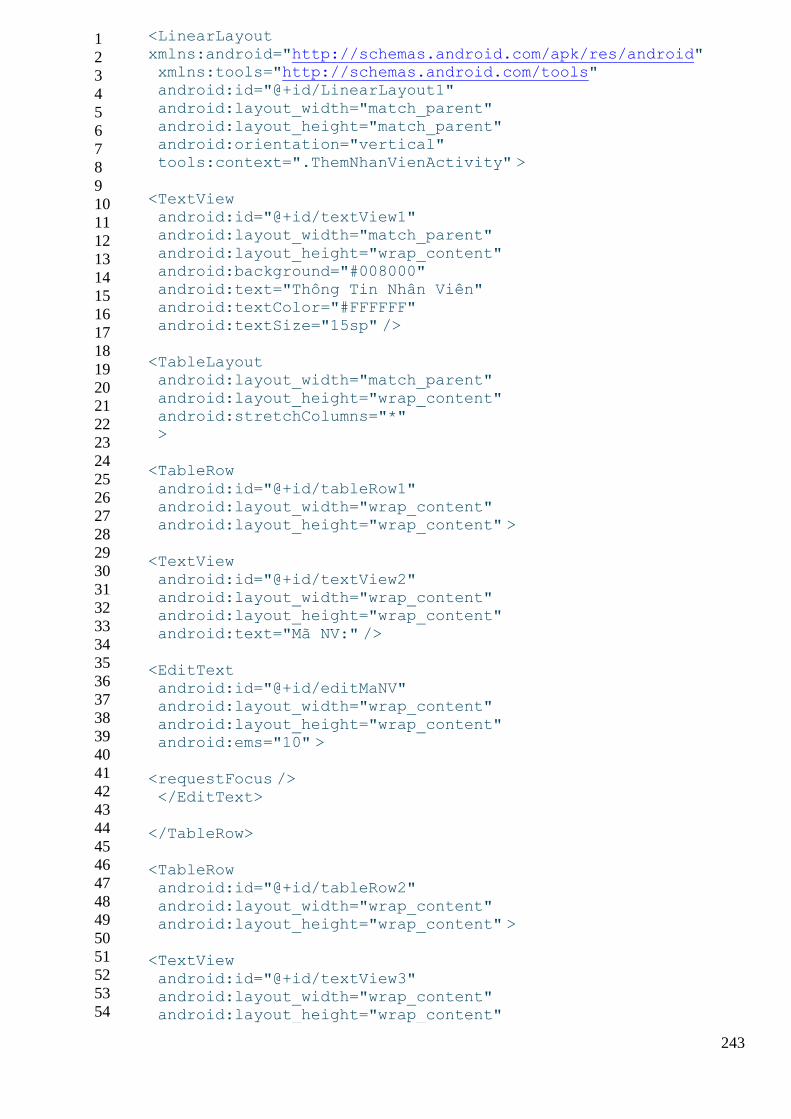
243
1
2
3
4
5
6
7
8
9
10
11
12
13
14
15
16
17
18
19
20
21
22
23
24
25
26
27
28
29
30
31
32
33
34
35
36
37
38
39
40
41
42
43
44
45
46
47
48
49
50
51
52
53
54
<LinearLayout xmlns:android="http://schemas.android.com/apk/res/android" xmlns:tools="http://schemas.android.com/tools" android:id="@+id/LinearLayout1"
android:layout_width="match_parent" android:layout_height="match_parent" android:orientation="vertical" tools:context=".ThemNhanVienActivity" >
<TextView android:id="@+id/textView1" android:layout_width="match_parent"
android:layout_height="wrap_content" android:background="#008000" android:text="Thông Tin Nhân Viên" android:textColor="#FFFFFF"
android:textSize="15sp" />
<TableLayout android:layout_width="match_parent"
android:layout_height="wrap_content" android:stretchColumns="*" >
<TableRow
android:id="@+id/tableRow1" android:layout_width="wrap_content" android:layout_height="wrap_content" >
<TextView
android:id="@+id/textView2" android:layout_width="wrap_content" android:layout_height="wrap_content"
android:text="Mã NV:" />
<EditText android:id="@+id/editMaNV" android:layout_width="wrap_content"
android:layout_height="wrap_content" android:ems="10" >
<requestFocus />
</EditText>
</TableRow>
<TableRow android:id="@+id/tableRow2"
android:layout_width="wrap_content" android:layout_height="wrap_content" >
<TextView
android:id="@+id/textView3" android:layout_width="wrap_content" android:layout_height="wrap_content"
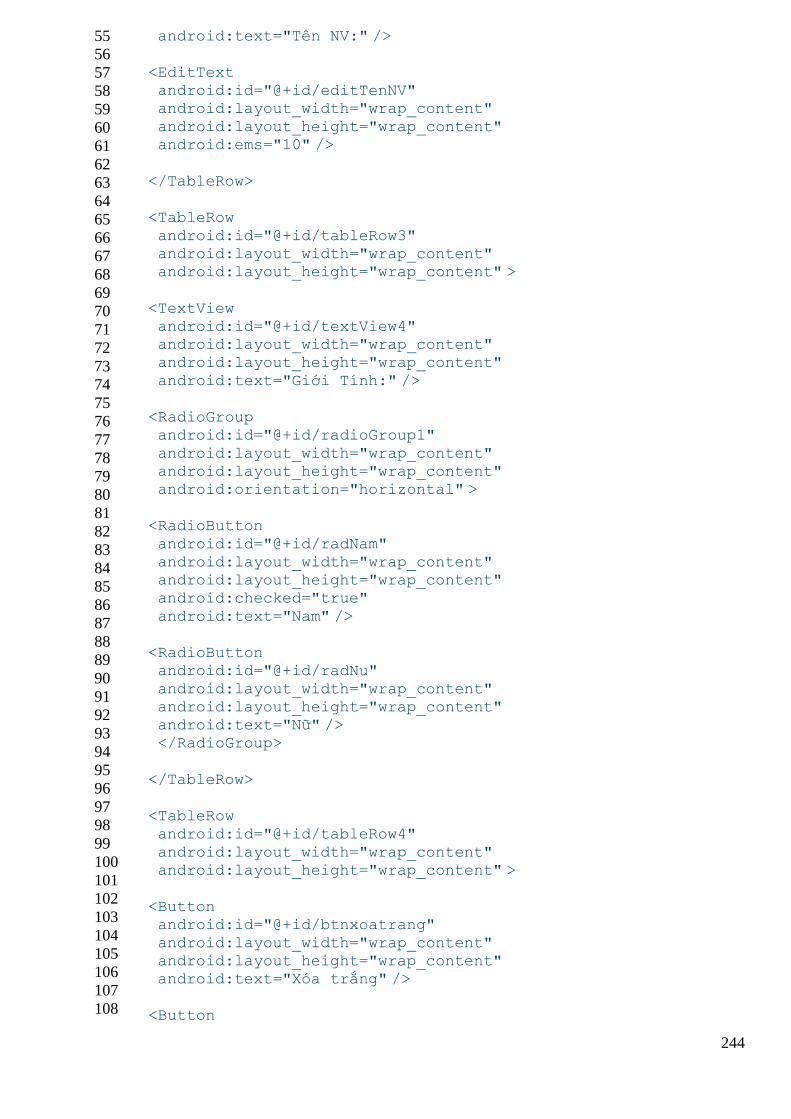
244
55
56
57
58
59
60
61
62
63
64
65
66
67
68
69
70
71
72
73
74
75
76
77
78
79
80
81
82
83
84
85
86
87
88
89
90
91
92
93
94
95
96
97
98
99
100
101
102
103
104
105
106
107
108
android:text="Tên NV:" />
<EditText android:id="@+id/editTenNV" android:layout_width="wrap_content"
android:layout_height="wrap_content" android:ems="10" />
</TableRow>
<TableRow
android:id="@+id/tableRow3" android:layout_width="wrap_content" android:layout_height="wrap_content" >
<TextView android:id="@+id/textView4" android:layout_width="wrap_content" android:layout_height="wrap_content"
android:text="Giới Tính:" />
<RadioGroup android:id="@+id/radioGroup1"
android:layout_width="wrap_content" android:layout_height="wrap_content" android:orientation="horizontal" >
<RadioButton
android:id="@+id/radNam" android:layout_width="wrap_content" android:layout_height="wrap_content" android:checked="true"
android:text="Nam" />
<RadioButton android:id="@+id/radNu"
android:layout_width="wrap_content" android:layout_height="wrap_content" android:text="Nữ" /> </RadioGroup>
</TableRow>
<TableRow android:id="@+id/tableRow4"
android:layout_width="wrap_content" android:layout_height="wrap_content" >
<Button android:id="@+id/btnxoatrang"
android:layout_width="wrap_content" android:layout_height="wrap_content" android:text="Xóa trắng" />
<Button
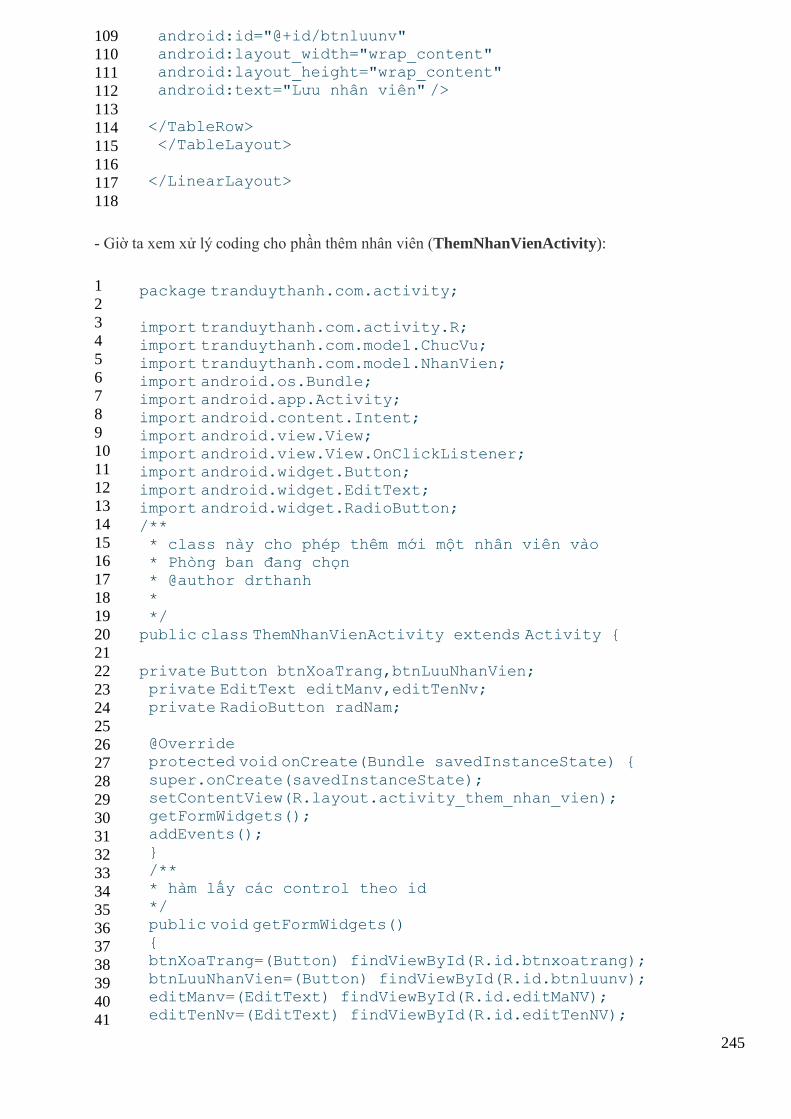
245
109
110
111
112
113
114
115
116
117
118
android:id="@+id/btnluunv" android:layout_width="wrap_content" android:layout_height="wrap_content" android:text="Lưu nhân viên" />
</TableRow> </TableLayout>
</LinearLayout>
- Giờ ta xem xử lý coding cho phần thêm nhân viên (ThemNhanVienActivity):
1
2
3
4
5
6
7
8
9
10
11
12
13
14
15
16
17
18
19
20
21
22
23
24
25
26
27
28
29
30
31
32
33
34
35
36
37
38
39
40
41
package tranduythanh.com.activity;
import tranduythanh.com.activity.R; import tranduythanh.com.model.ChucVu;
import tranduythanh.com.model.NhanVien; import android.os.Bundle; import android.app.Activity;
import android.content.Intent; import android.view.View; import android.view.View.OnClickListener; import android.widget.Button;
import android.widget.EditText; import android.widget.RadioButton; /**
* class này cho phép thêm mới một nhân viên vào * Phòng ban đang chọn * @author drthanh *
*/ public class ThemNhanVienActivity extends Activity {
private Button btnXoaTrang,btnLuuNhanVien; private EditText editManv,editTenNv;
private RadioButton radNam;
@Override protected void onCreate(Bundle savedInstanceState) {
super.onCreate(savedInstanceState); setContentView(R.layout.activity_them_nhan_vien); getFormWidgets(); addEvents();
} /** * hàm lấy các control theo id
*/ public void getFormWidgets() { btnXoaTrang=(Button) findViewById(R.id.btnxoatrang);
btnLuuNhanVien=(Button) findViewById(R.id.btnluunv); editManv=(EditText) findViewById(R.id.editMaNV); editTenNv=(EditText) findViewById(R.id.editTenNV);
246
42
43
44
45
46
47
48
49
50
51
52
53
54
55
56
57
58
59
60
61
62
63
64
65
66
67
68
69
70
71
72
73
74
75
76
77
78
79
80
81
82
83
84
85
86
87
88
89
90
91
92
93
94
95
radNam=(RadioButton) findViewById(R.id.radNam); } /** * hàm gán sự kiện
*/ public void addEvents() { btnXoaTrang.setOnClickListener(new OnClickListener() {
@Override public void onClick(View arg0) { // TODO Auto-generated method stub
doXoaTrang(); } }); btnLuuNhanVien.setOnClickListener(new OnClickListener() {
@Override public void onClick(View v) { // TODO Auto-generated method stub
doLuuNhanVien(); } }); }
/** * đơn thuần là xóa trắng dữ liệu của các control * rồi focus tới mã
*/ public void doXoaTrang() { editManv.setText("");
editTenNv.setText(""); editManv.requestFocus(); } /**
* hàm lưu nhân viên theo phòng ban * truyền nhân viên qua MainActivity * MainActivity có nhiệm vụ lấy được nhân viên này
* và đưa họ vào phòng ban chọn lúc nãy */ public void doLuuNhanVien() {
NhanVien nv=new NhanVien(); nv.setMa(editManv.getText()+""); nv.setTen(editTenNv.getText()+"");
nv.setChucvu(ChucVu.NhanVien); nv.setGioitinh(!radNam.isChecked()); Intent i=getIntent(); Bundle bundle=new Bundle();
bundle.putSerializable("NHANVIEN", nv); i.putExtra("DATA", bundle); setResult(MainActivity.THEM_NHAN_VIEN_THANHCONG, i);
finish(); } }
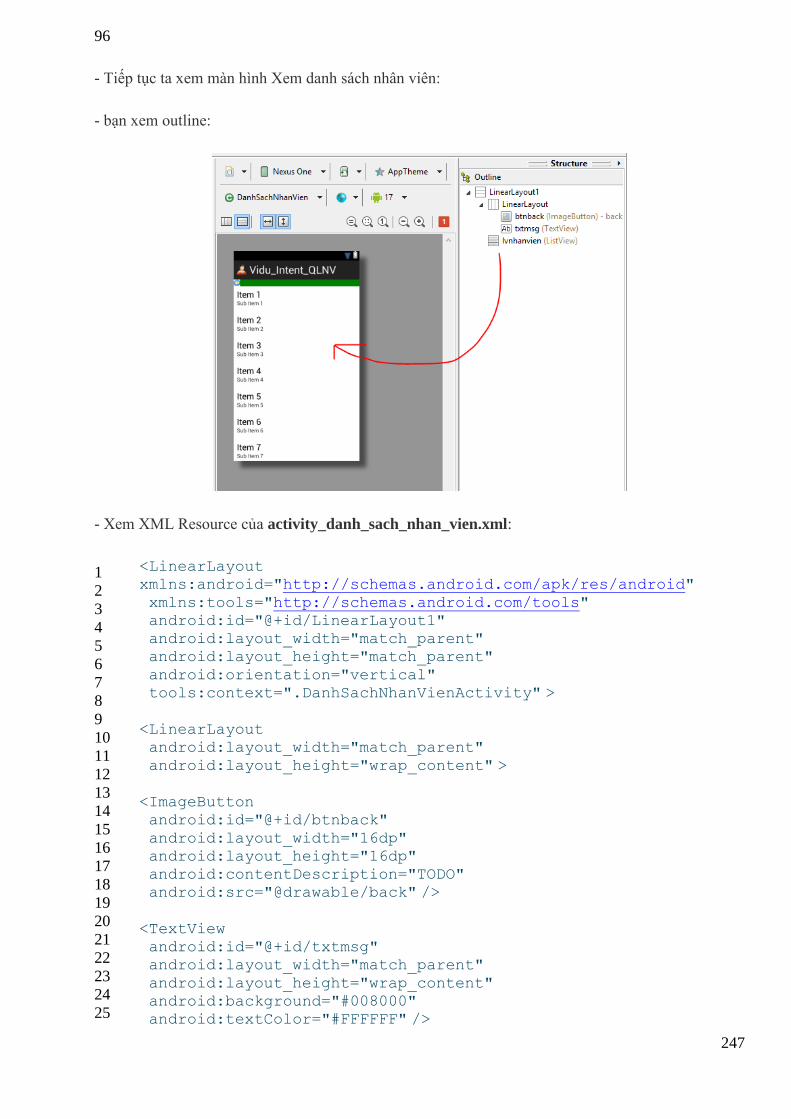
247
96
- Tiếp tục ta xem màn hình Xem danh sách nhân viên:
- bạn xem outline:
- Xem XML Resource của activity_danh_sach_nhan_vien.xml:
1
2
3
4
5
6
7
8
9
10
11
12
13
14
15
16
17
18
19
20
21
22
23
24
25
<LinearLayout xmlns:android="http://schemas.android.com/apk/res/android"
xmlns:tools="http://schemas.android.com/tools" android:id="@+id/LinearLayout1" android:layout_width="match_parent" android:layout_height="match_parent"
android:orientation="vertical" tools:context=".DanhSachNhanVienActivity" >
<LinearLayout android:layout_width="match_parent"
android:layout_height="wrap_content" >
<ImageButton android:id="@+id/btnback"
android:layout_width="16dp" android:layout_height="16dp" android:contentDescription="TODO" android:src="@drawable/back" />
<TextView android:id="@+id/txtmsg" android:layout_width="match_parent"
android:layout_height="wrap_content" android:background="#008000" android:textColor="#FFFFFF" />
248
26
27
28
29
30
31
32
33
34
35
</LinearLayout>
<ListView android:id="@+id/lvnhanvien" android:layout_width="match_parent"
android:layout_height="wrap_content" > </ListView>
</LinearLayout>
- Xem coding xử lý phần xem danh sách nhân viên (DanhSachNhanVienActivity) :
- Class này rất phức tạp, nó còn chứa Context menu để cho phép:
+ Sửa nhân viên
+ Chuyển phòng ban cho nhân viên
+ Xóa nhân viên:
1
2
3
4
5
6
7
8
9
10
11
12
13
14
15
16
17
18
19
20
21
22
23
24
25
26
27
28
29
30
31
32
package tranduythanh.com.activity;
import java.util.ArrayList;
import tranduythanh.com.activity.R; import tranduythanh.com.adapter.NhanVienAdapter; import tranduythanh.com.model.NhanVien; import tranduythanh.com.model.PhongBan;
import android.os.Bundle; import android.view.ContextMenu; import android.view.MenuItem;
import android.view.View; import android.view.ContextMenu.ContextMenuInfo; import android.view.View.OnClickListener; import android.widget.AdapterView;
import android.widget.ImageButton; import android.widget.ListView; import android.widget.TextView; import android.widget.AdapterView.OnItemLongClickListener;
import android.app.Activity; import android.app.AlertDialog; import android.content.DialogInterface;
import android.content.Intent; /** * class này dùng để hiển thị danh sách nhân viên * Class này cũng phức tạp không kém MainActivity
* nhớ là dùng custom layout * - Hiển thị danh sách * - cho phép chỉnh sửa
* - cho phép chuyển phòng ban * - cho phép xóa nhân viên * @author drthanh
249
33
34
35
36
37
38
39
40
41
42
43
44
45
46
47
48
49
50
51
52
53
54
55
56
57
58
59
60
61
62
63
64
65
66
67
68
69
70
71
72
73
74
75
76
77
78
79
80
81
82
83
84
85
86
* */ public class DanhSachNhanVienActivity extends Activity {
TextView txtmsg;
ImageButton btnback; ListView lvNhanvien; ArrayList<NhanVien> arrNhanvien=null; //Nhân viên Adapter để hiển thị thông tin
//và chi tiết : chức vụ, giới tính NhanVienAdapter adapter=null; PhongBan pb=null;
private NhanVien nvSelected=null; private int position=-1; @Override protected void onCreate(Bundle savedInstanceState) {
super.onCreate(savedInstanceState); setContentView(R.layout.activity_danh_sach_nhan_vien); txtmsg=(TextView) findViewById(R.id.txtmsg);
btnback=(ImageButton) findViewById(R.id.btnback); lvNhanvien=(ListView) findViewById(R.id.lvnhanvien); getDataFromMain(); addEvents();
registerForContextMenu(lvNhanvien); } /**
* hàm lấy giá trị từ MainActivity * sẽ truyền phòng ban qua * bên này lấy phòng ban và dựa vào phòng ban này * lấy ra danh sách nhân viên
*/ public void getDataFromMain() { Intent i=getIntent();
Bundle b=i.getBundleExtra("DATA"); pb= (PhongBan) b.getSerializable("PHONGBAN"); arrNhanvien=pb.getListNhanVien();
adapter=new NhanVienAdapter(this, R.layout.layout_item_custom, arrNhanvien); lvNhanvien.setAdapter(adapter);
txtmsg.setText("DS nhân viên ["+pb.getTen()+"]"); } /**
* hàm gán sự kiện (đã quá quen thuộc rồi) * có lưu vết lại nhân viên vừa chọn để xử lý * cho contextmenu */
public void addEvents() { btnback.setOnClickListener(new OnClickListener() {
@Override public void onClick(View arg0) { doUpdateToMain();
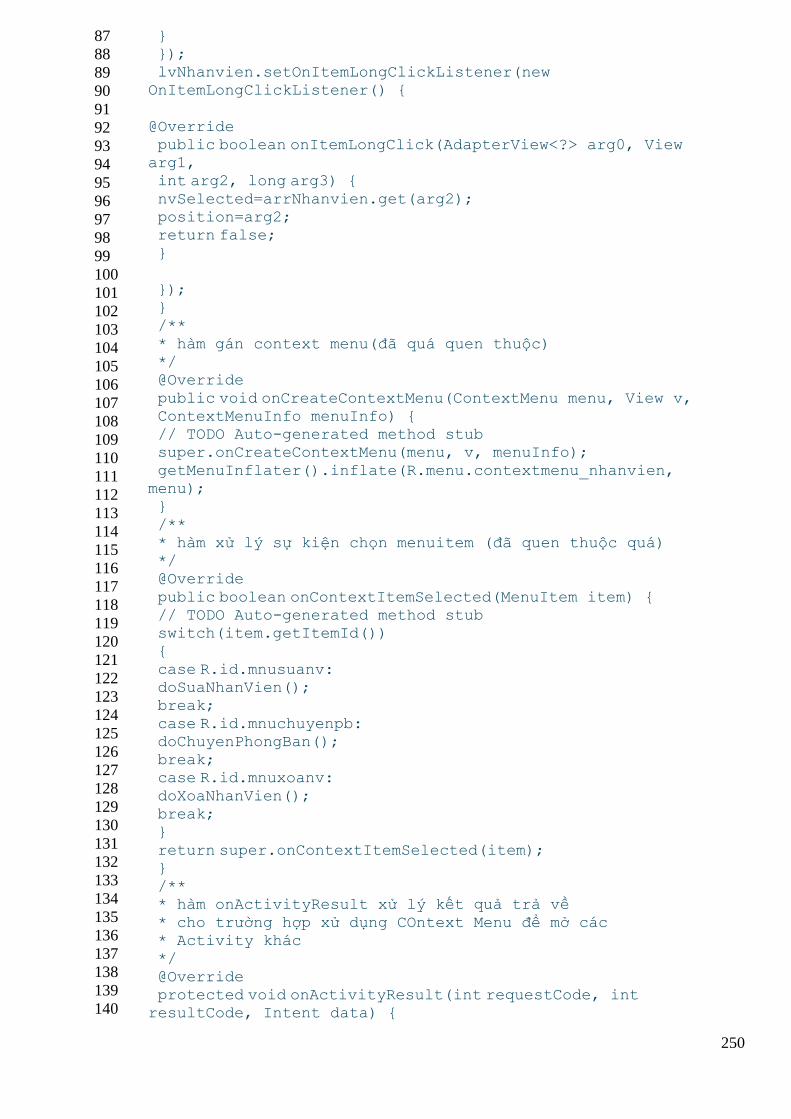
250
87
88
89
90
91
92
93
94
95
96
97
98
99
100
101
102
103
104
105
106
107
108
109
110
111
112
113
114
115
116
117
118
119
120
121
122
123
124
125
126
127
128
129
130
131
132
133
134
135
136
137
138
139
140
} }); lvNhanvien.setOnItemLongClickListener(new OnItemLongClickListener() {
@Override public boolean onItemLongClick(AdapterView<?> arg0, View arg1, int arg2, long arg3) {
nvSelected=arrNhanvien.get(arg2); position=arg2; return false;
}
}); } /**
* hàm gán context menu(đã quá quen thuộc) */ @Override
public void onCreateContextMenu(ContextMenu menu, View v, ContextMenuInfo menuInfo) { // TODO Auto-generated method stub super.onCreateContextMenu(menu, v, menuInfo);
getMenuInflater().inflate(R.menu.contextmenu_nhanvien,
menu); }
/** * hàm xử lý sự kiện chọn menuitem (đã quen thuộc quá) */ @Override
public boolean onContextItemSelected(MenuItem item) { // TODO Auto-generated method stub switch(item.getItemId()) {
case R.id.mnusuanv: doSuaNhanVien(); break;
case R.id.mnuchuyenpb: doChuyenPhongBan(); break; case R.id.mnuxoanv:
doXoaNhanVien(); break; }
return super.onContextItemSelected(item); } /** * hàm onActivityResult xử lý kết quả trả về
* cho trường hợp xử dụng COntext Menu để mở các * Activity khác */
@Override protected void onActivityResult(int requestCode, int resultCode, Intent data) {
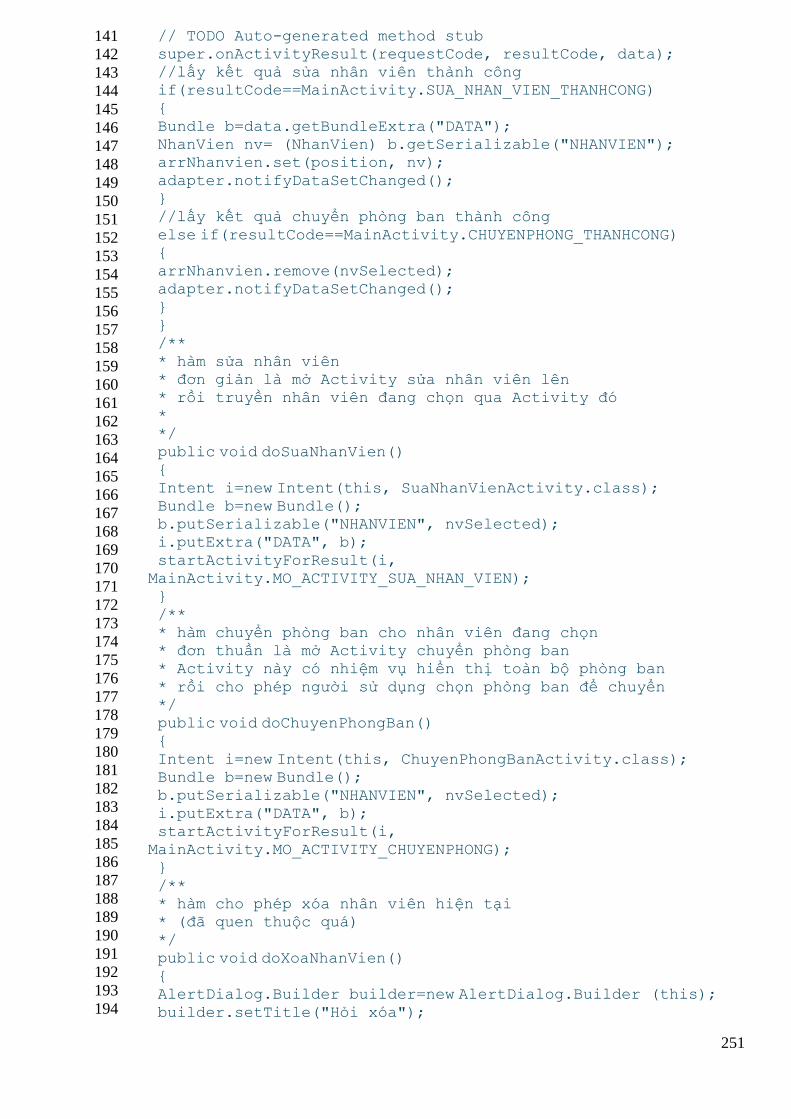
251
141
142
143
144
145
146
147
148
149
150
151
152
153
154
155
156
157
158
159
160
161
162
163
164
165
166
167
168
169
170
171
172
173
174
175
176
177
178
179
180
181
182
183
184
185
186
187
188
189
190
191
192
193
194
// TODO Auto-generated method stub super.onActivityResult(requestCode, resultCode, data); //lấy kết quả sửa nhân viên thành công if(resultCode==MainActivity.SUA_NHAN_VIEN_THANHCONG)
{ Bundle b=data.getBundleExtra("DATA"); NhanVien nv= (NhanVien) b.getSerializable("NHANVIEN"); arrNhanvien.set(position, nv);
adapter.notifyDataSetChanged(); } //lấy kết quả chuyển phòng ban thành công
else if(resultCode==MainActivity.CHUYENPHONG_THANHCONG) { arrNhanvien.remove(nvSelected); adapter.notifyDataSetChanged();
} } /**
* hàm sửa nhân viên * đơn giản là mở Activity sửa nhân viên lên * rồi truyền nhân viên đang chọn qua Activity đó *
*/ public void doSuaNhanVien() {
Intent i=new Intent(this, SuaNhanVienActivity.class); Bundle b=new Bundle(); b.putSerializable("NHANVIEN", nvSelected); i.putExtra("DATA", b);
startActivityForResult(i,
MainActivity.MO_ACTIVITY_SUA_NHAN_VIEN); }
/** * hàm chuyển phòng ban cho nhân viên đang chọn * đơn thuần là mở Activity chuyển phòng ban * Activity này có nhiệm vụ hiển thị toàn bộ phòng ban
* rồi cho phép người sử dụng chọn phòng ban để chuyển */ public void doChuyenPhongBan() {
Intent i=new Intent(this, ChuyenPhongBanActivity.class); Bundle b=new Bundle(); b.putSerializable("NHANVIEN", nvSelected);
i.putExtra("DATA", b); startActivityForResult(i,
MainActivity.MO_ACTIVITY_CHUYENPHONG); }
/** * hàm cho phép xóa nhân viên hiện tại * (đã quen thuộc quá)
*/ public void doXoaNhanVien() { AlertDialog.Builder builder=new AlertDialog.Builder (this);
builder.setTitle("Hỏi xóa");
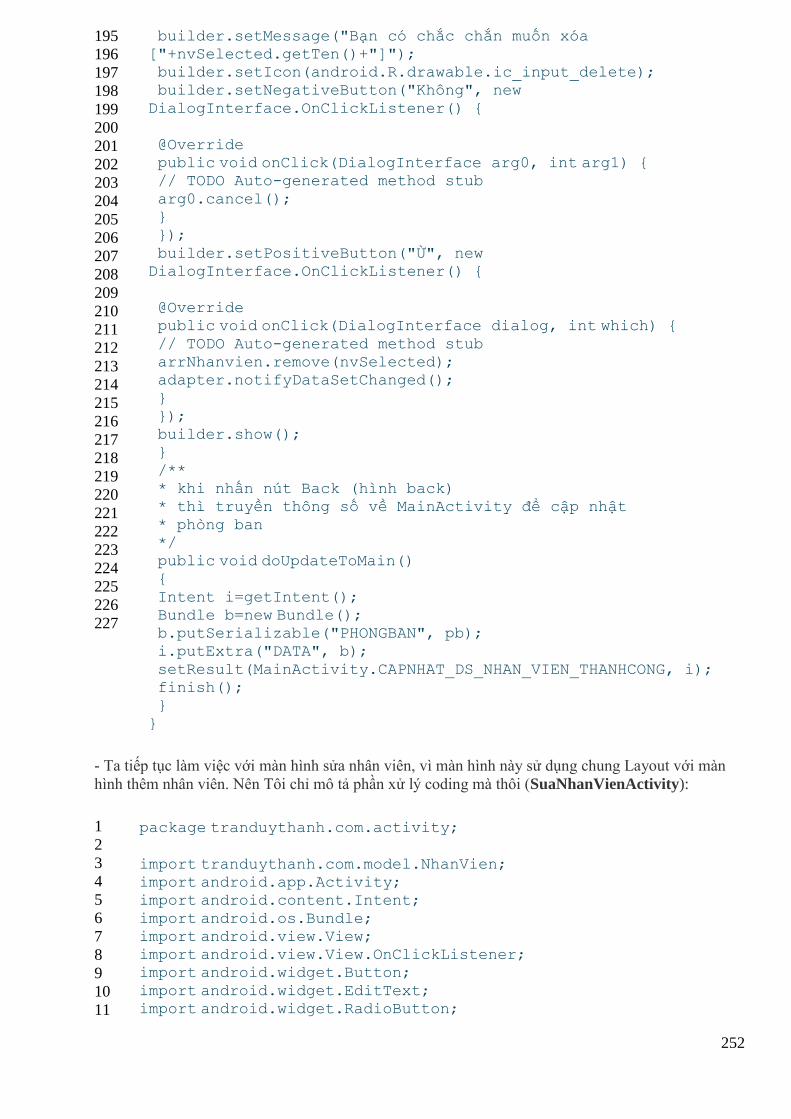
252
195
196
197
198
199
200
201
202
203
204
205
206
207
208
209
210
211
212
213
214
215
216
217
218
219
220
221
222
223
224
225
226
227
builder.setMessage("Bạn có chắc chắn muốn xóa
["+nvSelected.getTen()+"]"); builder.setIcon(android.R.drawable.ic_input_delete); builder.setNegativeButton("Không", new
DialogInterface.OnClickListener() {
@Override public void onClick(DialogInterface arg0, int arg1) { // TODO Auto-generated method stub
arg0.cancel(); } });
builder.setPositiveButton("Ừ", new DialogInterface.OnClickListener() {
@Override public void onClick(DialogInterface dialog, int which) {
// TODO Auto-generated method stub arrNhanvien.remove(nvSelected); adapter.notifyDataSetChanged();
} }); builder.show(); }
/** * khi nhấn nút Back (hình back) * thì truyền thông số về MainActivity để cập nhật
* phòng ban */ public void doUpdateToMain() {
Intent i=getIntent(); Bundle b=new Bundle(); b.putSerializable("PHONGBAN", pb); i.putExtra("DATA", b);
setResult(MainActivity.CAPNHAT_DS_NHAN_VIEN_THANHCONG, i); finish(); }
}
- Ta tiếp tục làm việc với màn hình sửa nhân viên, vì màn hình này sử dụng chung Layout với màn
hình thêm nhân viên. Nên Tôi chỉ mô tả phần xử lý coding mà thôi (SuaNhanVienActivity):
1
2
3
4
5
6
7
8
9
10
11
package tranduythanh.com.activity;
import tranduythanh.com.model.NhanVien; import android.app.Activity; import android.content.Intent;
import android.os.Bundle; import android.view.View; import android.view.View.OnClickListener; import android.widget.Button;
import android.widget.EditText; import android.widget.RadioButton;
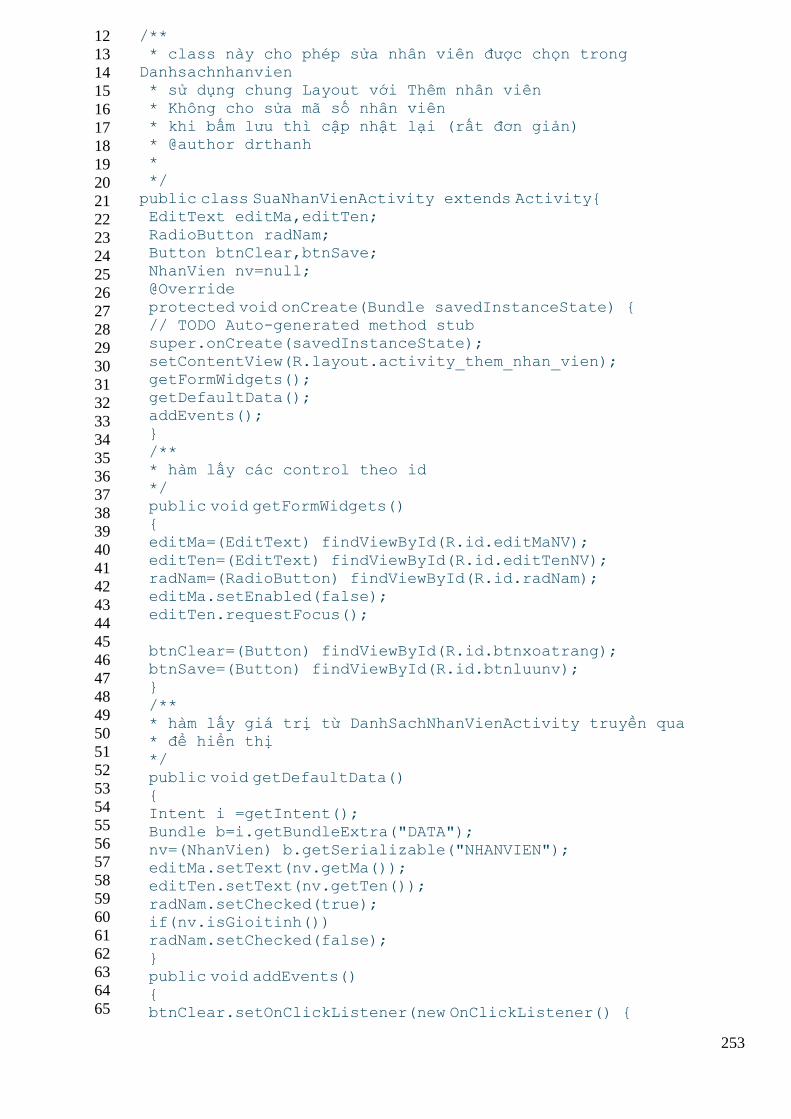
253
12
13
14
15
16
17
18
19
20
21
22
23
24
25
26
27
28
29
30
31
32
33
34
35
36
37
38
39
40
41
42
43
44
45
46
47
48
49
50
51
52
53
54
55
56
57
58
59
60
61
62
63
64
65
/** * class này cho phép sửa nhân viên được chọn trong
Danhsachnhanvien * sử dụng chung Layout với Thêm nhân viên
* Không cho sửa mã số nhân viên * khi bấm lưu thì cập nhật lại (rất đơn giản) * @author drthanh *
*/ public class SuaNhanVienActivity extends Activity{ EditText editMa,editTen;
RadioButton radNam; Button btnClear,btnSave; NhanVien nv=null; @Override
protected void onCreate(Bundle savedInstanceState) { // TODO Auto-generated method stub super.onCreate(savedInstanceState);
setContentView(R.layout.activity_them_nhan_vien); getFormWidgets(); getDefaultData(); addEvents();
} /** * hàm lấy các control theo id
*/ public void getFormWidgets() { editMa=(EditText) findViewById(R.id.editMaNV);
editTen=(EditText) findViewById(R.id.editTenNV); radNam=(RadioButton) findViewById(R.id.radNam); editMa.setEnabled(false);
editTen.requestFocus();
btnClear=(Button) findViewById(R.id.btnxoatrang); btnSave=(Button) findViewById(R.id.btnluunv); }
/** * hàm lấy giá trị từ DanhSachNhanVienActivity truyền qua * để hiển thị */
public void getDefaultData() { Intent i =getIntent();
Bundle b=i.getBundleExtra("DATA"); nv=(NhanVien) b.getSerializable("NHANVIEN"); editMa.setText(nv.getMa()); editTen.setText(nv.getTen());
radNam.setChecked(true); if(nv.isGioitinh()) radNam.setChecked(false);
} public void addEvents() { btnClear.setOnClickListener(new OnClickListener() {
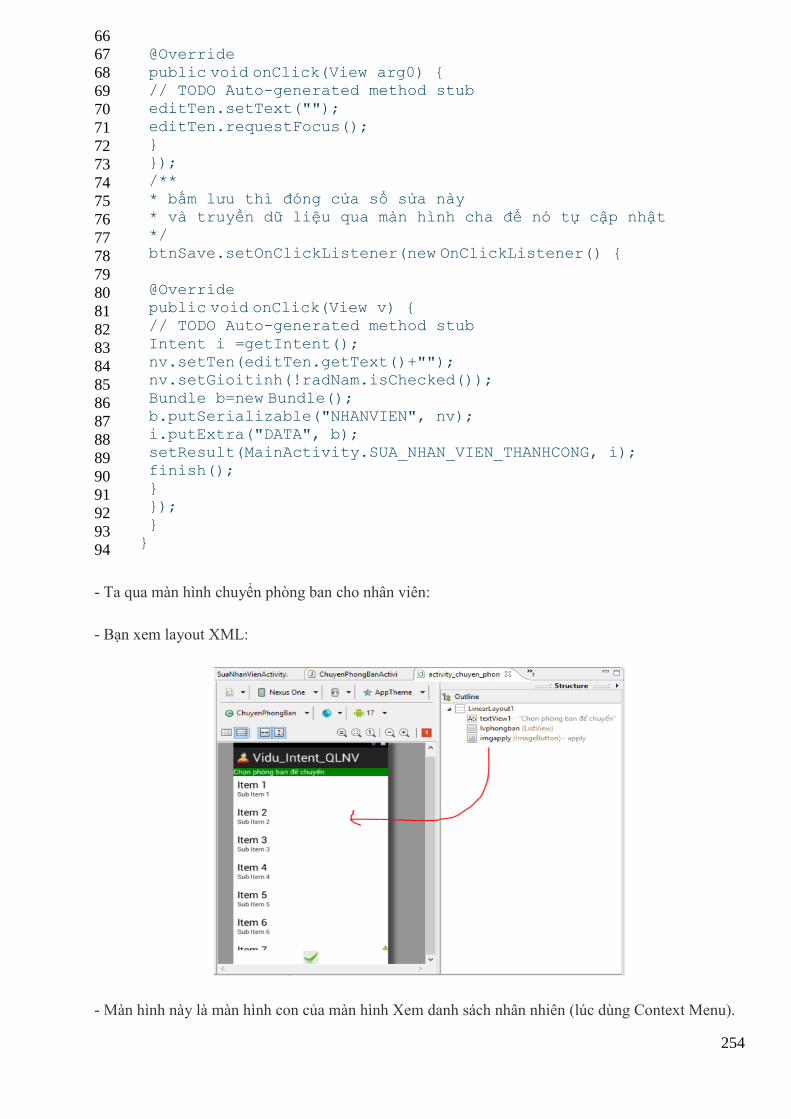
254
66
67
68
69
70
71
72
73
74
75
76
77
78
79
80
81
82
83
84
85
86
87
88
89
90
91
92
93
94
@Override
public void onClick(View arg0) { // TODO Auto-generated method stub editTen.setText("");
editTen.requestFocus(); } }); /**
* bấm lưu thì đóng cửa sổ sửa này * và truyền dữ liệu qua màn hình cha để nó tự cập nhật */
btnSave.setOnClickListener(new OnClickListener() {
@Override public void onClick(View v) { // TODO Auto-generated method stub
Intent i =getIntent(); nv.setTen(editTen.getText()+""); nv.setGioitinh(!radNam.isChecked());
Bundle b=new Bundle(); b.putSerializable("NHANVIEN", nv); i.putExtra("DATA", b); setResult(MainActivity.SUA_NHAN_VIEN_THANHCONG, i);
finish(); } });
} }
- Ta qua màn hình chuyển phòng ban cho nhân viên:
- Bạn xem layout XML:
- Màn hình này là màn hình con của màn hình Xem danh sách nhân nhiên (lúc dùng Context Menu).
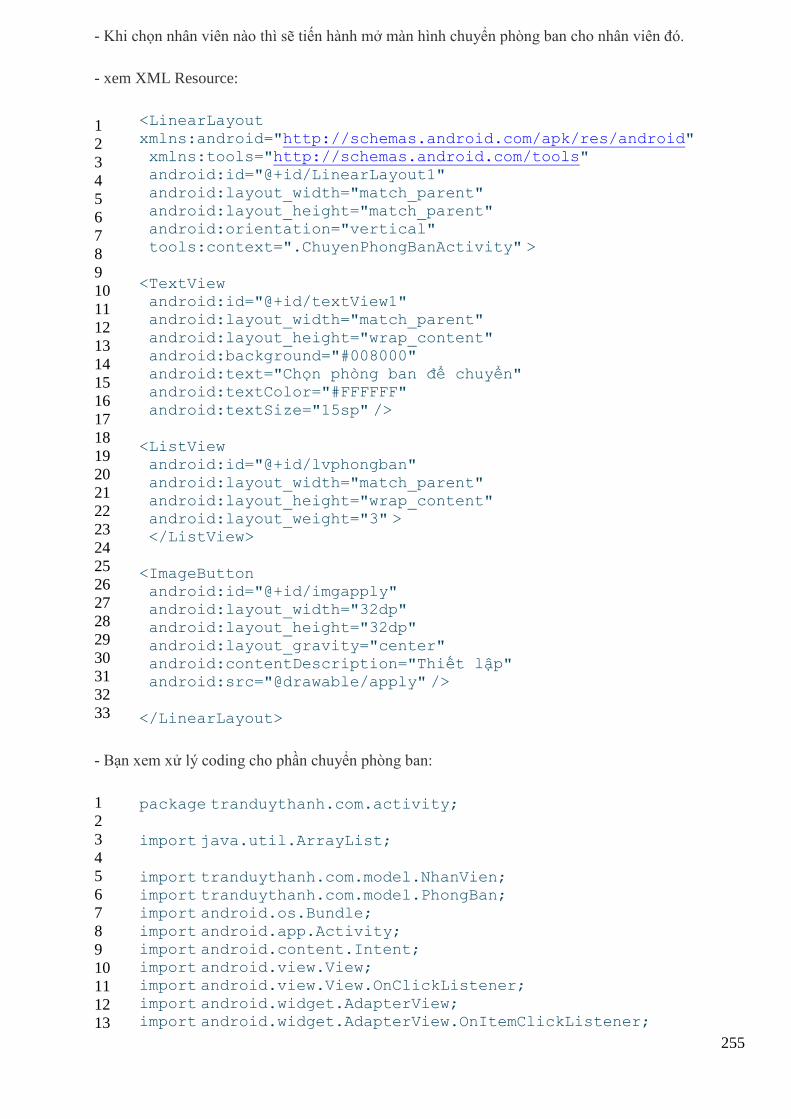
255
- Khi chọn nhân viên nào thì sẽ tiến hành mở màn hình chuyển phòng ban cho nhân viên đó.
- xem XML Resource:
1
2
3
4
5
6
7
8
9
10
11
12
13
14
15
16
17
18
19
20
21
22
23
24
25
26
27
28
29
30
31
32
33
<LinearLayout
xmlns:android="http://schemas.android.com/apk/res/android" xmlns:tools="http://schemas.android.com/tools" android:id="@+id/LinearLayout1"
android:layout_width="match_parent" android:layout_height="match_parent" android:orientation="vertical" tools:context=".ChuyenPhongBanActivity" >
<TextView android:id="@+id/textView1" android:layout_width="match_parent"
android:layout_height="wrap_content" android:background="#008000" android:text="Chọn phòng ban để chuyển" android:textColor="#FFFFFF"
android:textSize="15sp" />
<ListView android:id="@+id/lvphongban"
android:layout_width="match_parent" android:layout_height="wrap_content" android:layout_weight="3" > </ListView>
<ImageButton android:id="@+id/imgapply" android:layout_width="32dp" android:layout_height="32dp"
android:layout_gravity="center" android:contentDescription="Thiết lập" android:src="@drawable/apply" />
</LinearLayout>
- Bạn xem xử lý coding cho phần chuyển phòng ban:
1
2
3
4
5
6
7
8
9
10
11
12
13
package tranduythanh.com.activity;
import java.util.ArrayList;
import tranduythanh.com.model.NhanVien; import tranduythanh.com.model.PhongBan; import android.os.Bundle;
import android.app.Activity; import android.content.Intent; import android.view.View; import android.view.View.OnClickListener;
import android.widget.AdapterView; import android.widget.AdapterView.OnItemClickListener;
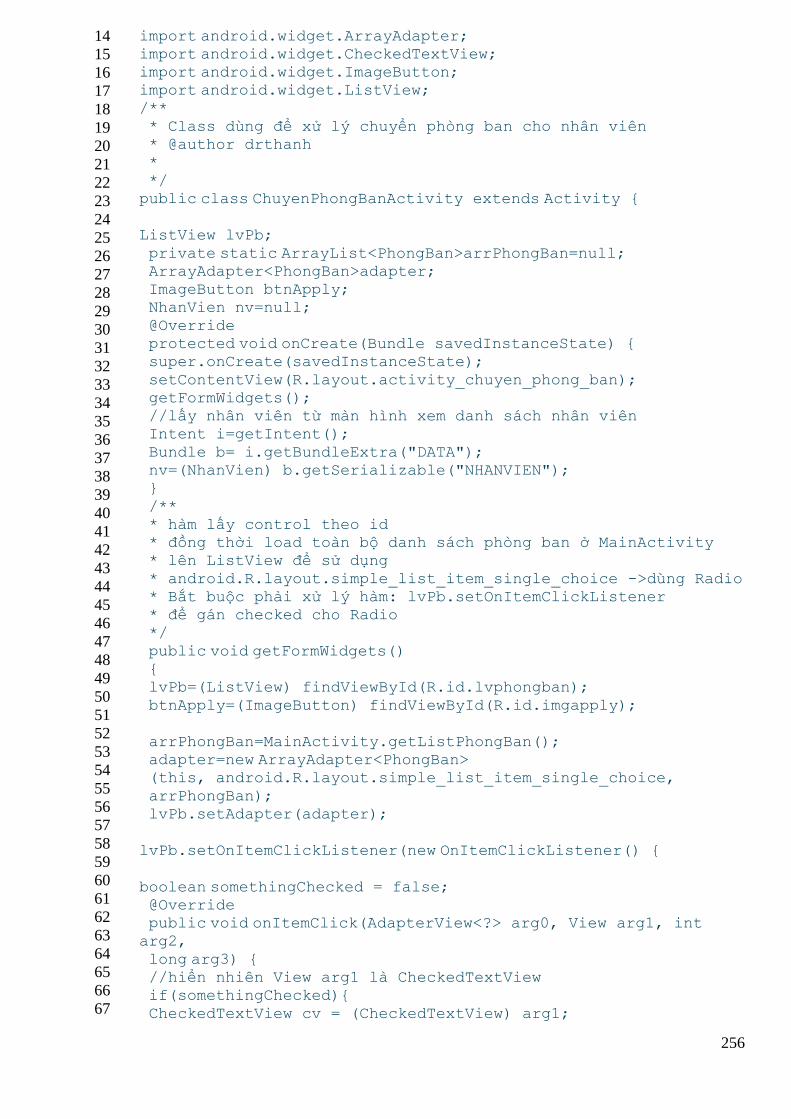
256
14
15
16
17
18
19
20
21
22
23
24
25
26
27
28
29
30
31
32
33
34
35
36
37
38
39
40
41
42
43
44
45
46
47
48
49
50
51
52
53
54
55
56
57
58
59
60
61
62
63
64
65
66
67
import android.widget.ArrayAdapter; import android.widget.CheckedTextView; import android.widget.ImageButton; import android.widget.ListView;
/** * Class dùng để xử lý chuyển phòng ban cho nhân viên * @author drthanh *
*/ public class ChuyenPhongBanActivity extends Activity {
ListView lvPb;
private static ArrayList<PhongBan>arrPhongBan=null; ArrayAdapter<PhongBan>adapter; ImageButton btnApply; NhanVien nv=null;
@Override protected void onCreate(Bundle savedInstanceState) { super.onCreate(savedInstanceState);
setContentView(R.layout.activity_chuyen_phong_ban); getFormWidgets(); //lấy nhân viên từ màn hình xem danh sách nhân viên Intent i=getIntent();
Bundle b= i.getBundleExtra("DATA"); nv=(NhanVien) b.getSerializable("NHANVIEN"); }
/** * hàm lấy control theo id * đồng thời load toàn bộ danh sách phòng ban ở MainActivity * lên ListView để sử dụng
* android.R.layout.simple_list_item_single_choice ->dùng Radio * Bắt buộc phải xử lý hàm: lvPb.setOnItemClickListener * để gán checked cho Radio */
public void getFormWidgets() { lvPb=(ListView) findViewById(R.id.lvphongban);
btnApply=(ImageButton) findViewById(R.id.imgapply);
arrPhongBan=MainActivity.getListPhongBan(); adapter=new ArrayAdapter<PhongBan> (this, android.R.layout.simple_list_item_single_choice,
arrPhongBan); lvPb.setAdapter(adapter);
lvPb.setOnItemClickListener(new OnItemClickListener() {
boolean somethingChecked = false; @Override public void onItemClick(AdapterView<?> arg0, View arg1, int arg2,
long arg3) { //hiển nhiên View arg1 là CheckedTextView if(somethingChecked){
CheckedTextView cv = (CheckedTextView) arg1;
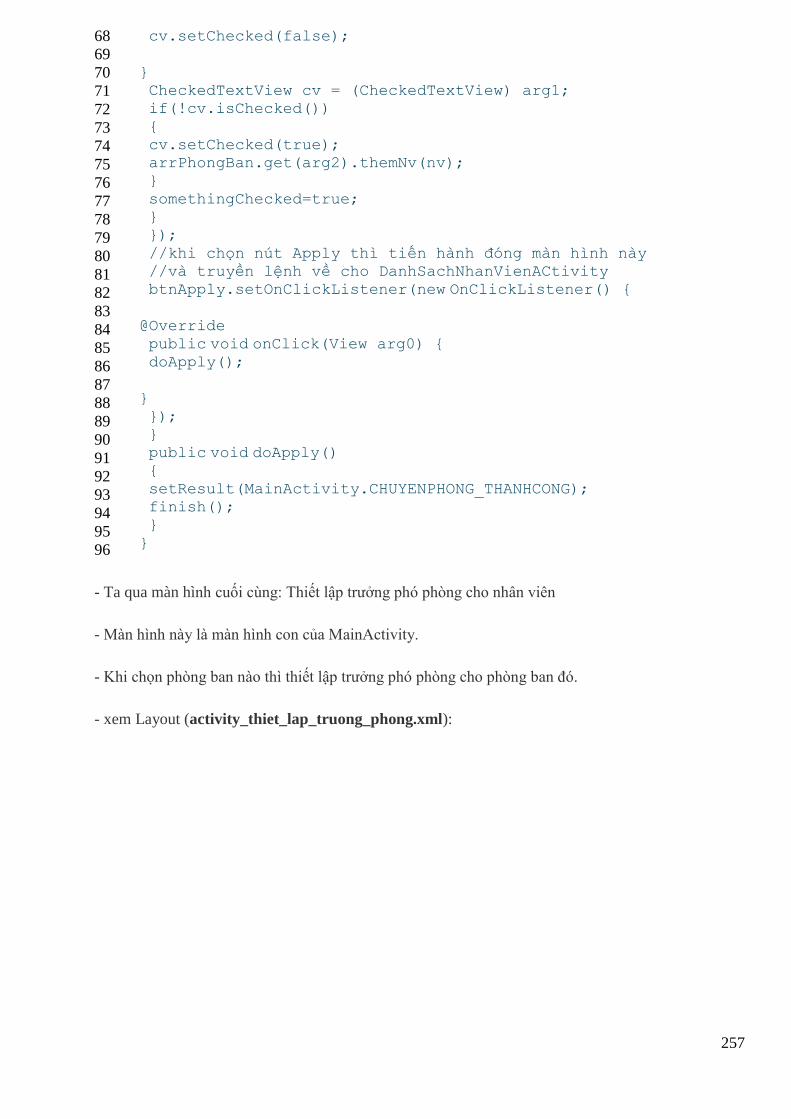
257
68
69
70
71
72
73
74
75
76
77
78
79
80
81
82
83
84
85
86
87
88
89
90
91
92
93
94
95
96
cv.setChecked(false);
} CheckedTextView cv = (CheckedTextView) arg1; if(!cv.isChecked())
{ cv.setChecked(true); arrPhongBan.get(arg2).themNv(nv); }
somethingChecked=true; } });
//khi chọn nút Apply thì tiến hành đóng màn hình này //và truyền lệnh về cho DanhSachNhanVienACtivity btnApply.setOnClickListener(new OnClickListener() {
@Override
public void onClick(View arg0) { doApply();
}
}); } public void doApply() {
setResult(MainActivity.CHUYENPHONG_THANHCONG); finish(); }
}
- Ta qua màn hình cuối cùng: Thiết lập trưởng phó phòng cho nhân viên
- Màn hình này là màn hình con của MainActivity.
- Khi chọn phòng ban nào thì thiết lập trưởng phó phòng cho phòng ban đó.
- xem Layout (activity_thiet_lap_truong_phong.xml):
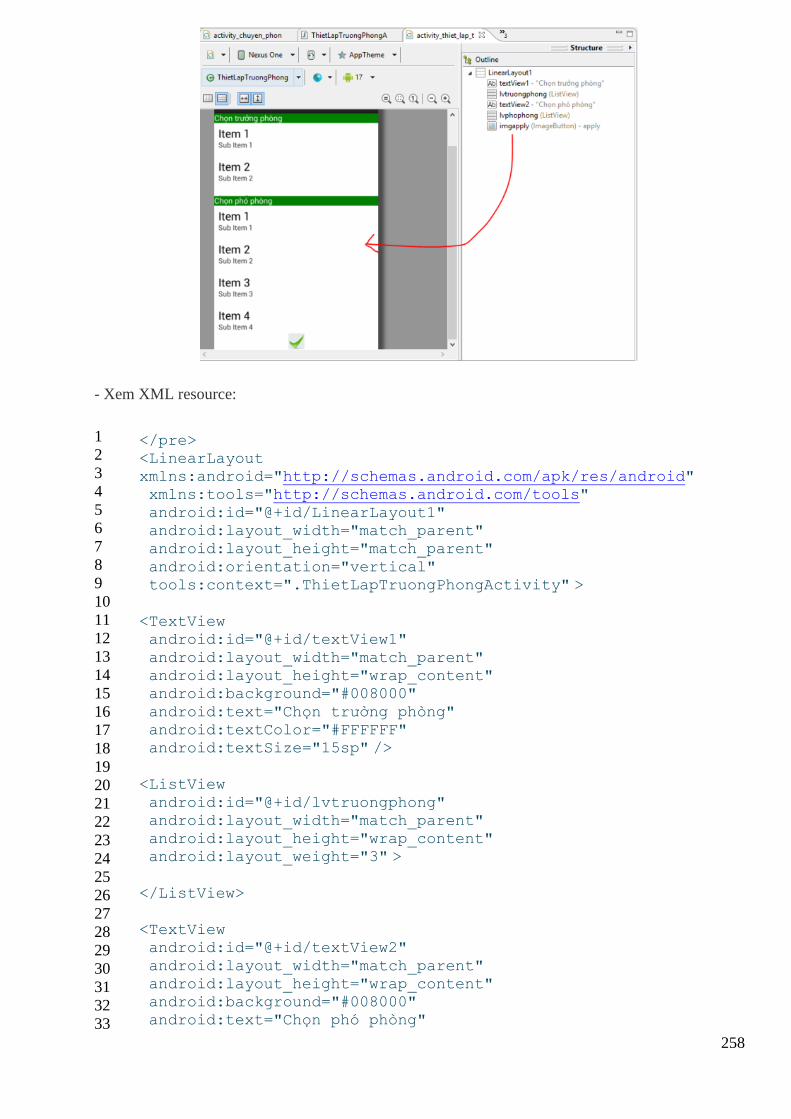
258
- Xem XML resource:
1
2
3
4
5
6
7
8
9
10
11
12
13
14
15
16
17
18
19
20
21
22
23
24
25
26
27
28
29
30
31
32
33
</pre> <LinearLayout xmlns:android="http://schemas.android.com/apk/res/android" xmlns:tools="http://schemas.android.com/tools"
android:id="@+id/LinearLayout1" android:layout_width="match_parent" android:layout_height="match_parent"
android:orientation="vertical" tools:context=".ThietLapTruongPhongActivity" >
<TextView android:id="@+id/textView1"
android:layout_width="match_parent" android:layout_height="wrap_content" android:background="#008000"
android:text="Chọn trưởng phòng" android:textColor="#FFFFFF" android:textSize="15sp" />
<ListView
android:id="@+id/lvtruongphong" android:layout_width="match_parent" android:layout_height="wrap_content" android:layout_weight="3" >
</ListView>
<TextView android:id="@+id/textView2"
android:layout_width="match_parent" android:layout_height="wrap_content" android:background="#008000" android:text="Chọn phó phòng"
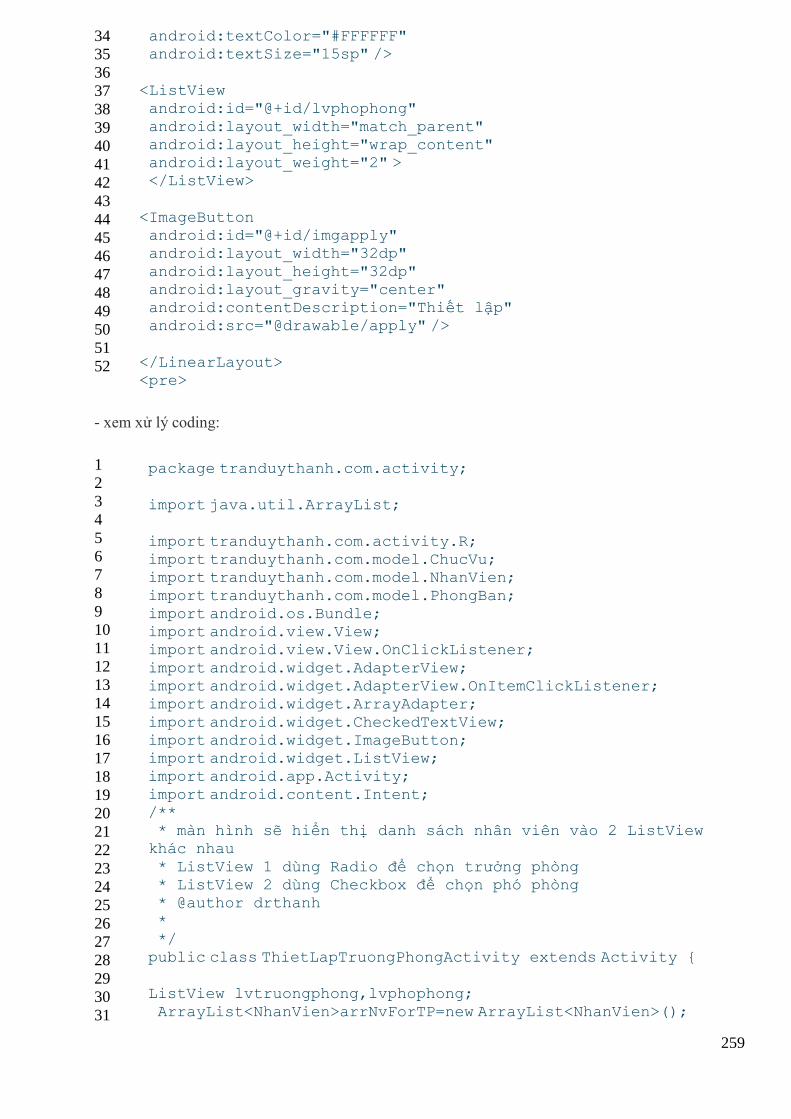
259
34
35
36
37
38
39
40
41
42
43
44
45
46
47
48
49
50
51
52
android:textColor="#FFFFFF" android:textSize="15sp" />
<ListView android:id="@+id/lvphophong"
android:layout_width="match_parent" android:layout_height="wrap_content" android:layout_weight="2" > </ListView>
<ImageButton android:id="@+id/imgapply" android:layout_width="32dp"
android:layout_height="32dp" android:layout_gravity="center" android:contentDescription="Thiết lập" android:src="@drawable/apply" />
</LinearLayout> <pre>
- xem xử lý coding:
1
2
3
4
5
6
7
8
9
10
11
12
13
14
15
16
17
18
19
20
21
22
23
24
25
26
27
28
29
30
31
package tranduythanh.com.activity;
import java.util.ArrayList;
import tranduythanh.com.activity.R; import tranduythanh.com.model.ChucVu; import tranduythanh.com.model.NhanVien;
import tranduythanh.com.model.PhongBan; import android.os.Bundle; import android.view.View; import android.view.View.OnClickListener;
import android.widget.AdapterView; import android.widget.AdapterView.OnItemClickListener; import android.widget.ArrayAdapter;
import android.widget.CheckedTextView; import android.widget.ImageButton; import android.widget.ListView; import android.app.Activity;
import android.content.Intent; /** * màn hình sẽ hiển thị danh sách nhân viên vào 2 ListView
khác nhau
* ListView 1 dùng Radio để chọn trưởng phòng * ListView 2 dùng Checkbox để chọn phó phòng * @author drthanh
* */ public class ThietLapTruongPhongActivity extends Activity {
ListView lvtruongphong,lvphophong;
ArrayList<NhanVien>arrNvForTP=new ArrayList<NhanVien>();
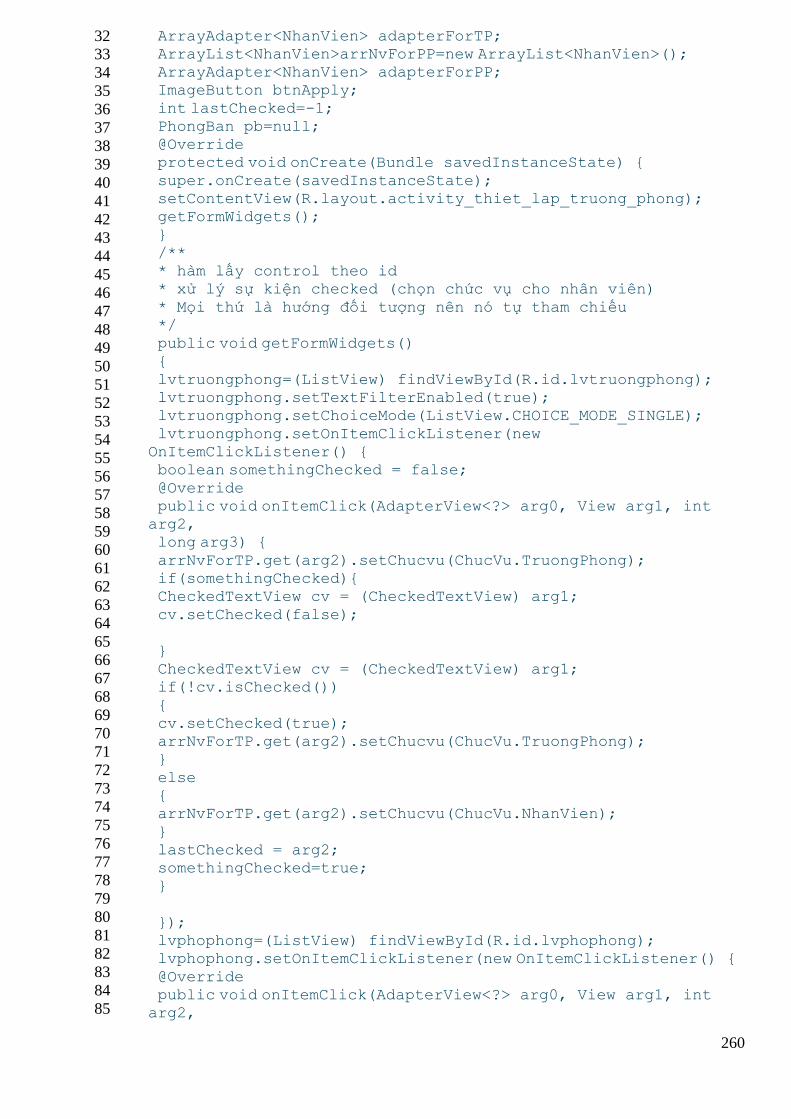
260
32
33
34
35
36
37
38
39
40
41
42
43
44
45
46
47
48
49
50
51
52
53
54
55
56
57
58
59
60
61
62
63
64
65
66
67
68
69
70
71
72
73
74
75
76
77
78
79
80
81
82
83
84
85
ArrayAdapter<NhanVien> adapterForTP; ArrayList<NhanVien>arrNvForPP=new ArrayList<NhanVien>(); ArrayAdapter<NhanVien> adapterForPP; ImageButton btnApply;
int lastChecked=-1; PhongBan pb=null; @Override protected void onCreate(Bundle savedInstanceState) {
super.onCreate(savedInstanceState); setContentView(R.layout.activity_thiet_lap_truong_phong); getFormWidgets();
} /** * hàm lấy control theo id * xử lý sự kiện checked (chọn chức vụ cho nhân viên)
* Mọi thứ là hướng đối tượng nên nó tự tham chiếu */ public void getFormWidgets()
{ lvtruongphong=(ListView) findViewById(R.id.lvtruongphong); lvtruongphong.setTextFilterEnabled(true); lvtruongphong.setChoiceMode(ListView.CHOICE_MODE_SINGLE);
lvtruongphong.setOnItemClickListener(new OnItemClickListener() { boolean somethingChecked = false;
@Override public void onItemClick(AdapterView<?> arg0, View arg1, int arg2, long arg3) {
arrNvForTP.get(arg2).setChucvu(ChucVu.TruongPhong); if(somethingChecked){ CheckedTextView cv = (CheckedTextView) arg1;
cv.setChecked(false);
} CheckedTextView cv = (CheckedTextView) arg1; if(!cv.isChecked())
{ cv.setChecked(true); arrNvForTP.get(arg2).setChucvu(ChucVu.TruongPhong); }
else { arrNvForTP.get(arg2).setChucvu(ChucVu.NhanVien);
} lastChecked = arg2; somethingChecked=true; }
}); lvphophong=(ListView) findViewById(R.id.lvphophong); lvphophong.setOnItemClickListener(new OnItemClickListener() {
@Override public void onItemClick(AdapterView<?> arg0, View arg1, int arg2,
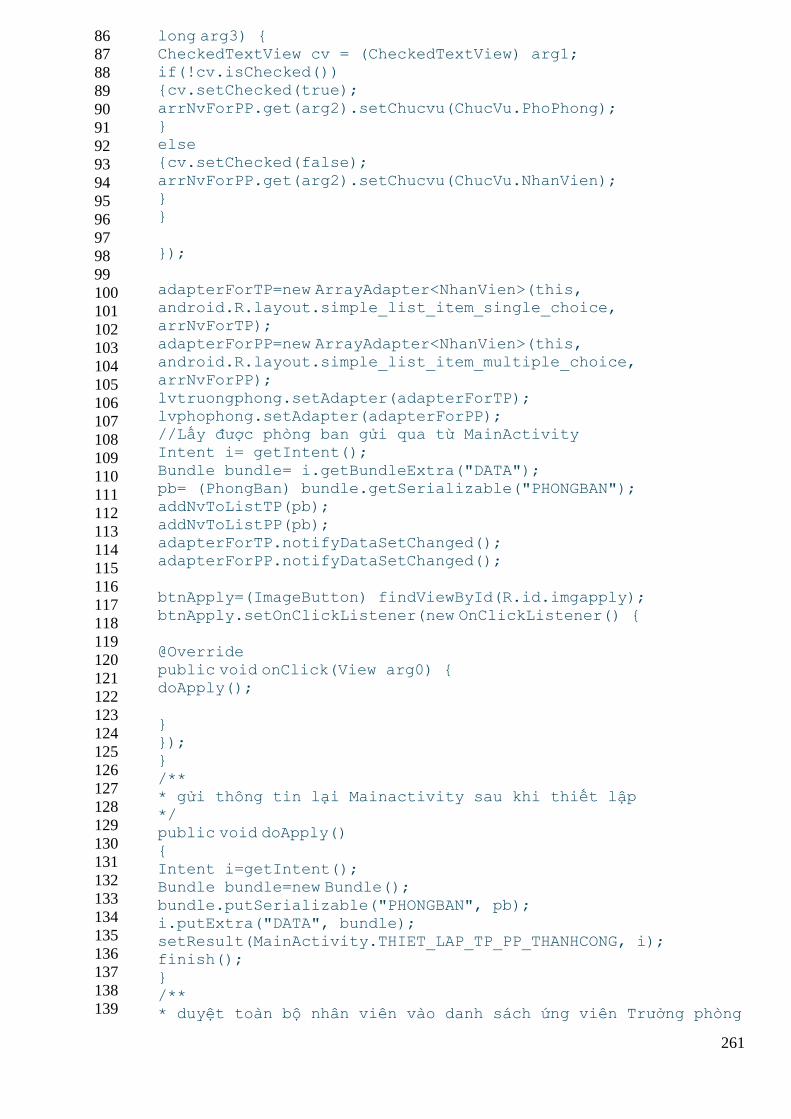
261
86
87
88
89
90
91
92
93
94
95
96
97
98
99
100
101
102
103
104
105
106
107
108
109
110
111
112
113
114
115
116
117
118
119
120
121
122
123
124
125
126
127
128
129
130
131
132
133
134
135
136
137
138
139
long arg3) { CheckedTextView cv = (CheckedTextView) arg1; if(!cv.isChecked()) {cv.setChecked(true);
arrNvForPP.get(arg2).setChucvu(ChucVu.PhoPhong); } else {cv.setChecked(false);
arrNvForPP.get(arg2).setChucvu(ChucVu.NhanVien); } }
});
adapterForTP=new ArrayAdapter<NhanVien>(this, android.R.layout.simple_list_item_single_choice, arrNvForTP);
adapterForPP=new ArrayAdapter<NhanVien>(this, android.R.layout.simple_list_item_multiple_choice, arrNvForPP);
lvtruongphong.setAdapter(adapterForTP); lvphophong.setAdapter(adapterForPP); //Lấy được phòng ban gửi qua từ MainActivity Intent i= getIntent();
Bundle bundle= i.getBundleExtra("DATA"); pb= (PhongBan) bundle.getSerializable("PHONGBAN"); addNvToListTP(pb);
addNvToListPP(pb); adapterForTP.notifyDataSetChanged(); adapterForPP.notifyDataSetChanged();
btnApply=(ImageButton) findViewById(R.id.imgapply);
btnApply.setOnClickListener(new OnClickListener() {
@Override public void onClick(View arg0) { doApply();
} }); }
/** * gửi thông tin lại Mainactivity sau khi thiết lập */ public void doApply()
{ Intent i=getIntent(); Bundle bundle=new Bundle();
bundle.putSerializable("PHONGBAN", pb); i.putExtra("DATA", bundle); setResult(MainActivity.THIET_LAP_TP_PP_THANHCONG, i); finish();
} /** * duyệt toàn bộ nhân viên vào danh sách ứng viên Trưởng phòng
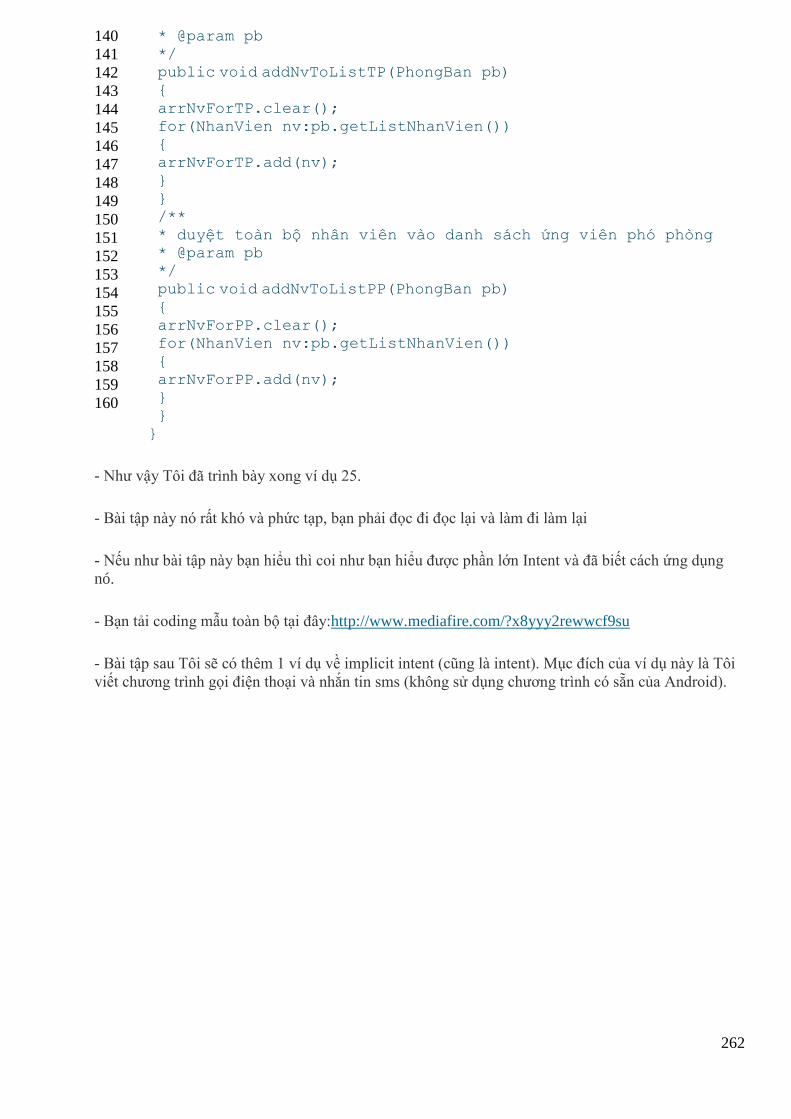
262
140
141
142
143
144
145
146
147
148
149
150
151
152
153
154
155
156
157
158
159
160
* @param pb */ public void addNvToListTP(PhongBan pb) {
arrNvForTP.clear(); for(NhanVien nv:pb.getListNhanVien()) { arrNvForTP.add(nv);
} } /**
* duyệt toàn bộ nhân viên vào danh sách ứng viên phó phòng * @param pb */ public void addNvToListPP(PhongBan pb)
{ arrNvForPP.clear(); for(NhanVien nv:pb.getListNhanVien())
{ arrNvForPP.add(nv); } }
}
- Như vậy Tôi đã trình bày xong ví dụ 25.
- Bài tập này nó rất khó và phức tạp, bạn phải đọc đi đọc lại và làm đi làm lại
- Nếu như bài tập này bạn hiểu thì coi như bạn hiểu được phần lớn Intent và đã biết cách ứng dụng
nó.
- Bạn tải coding mẫu toàn bộ tại đây:http://www.mediafire.com/?x8yyy2rewwcf9su
- Bài tập sau Tôi sẽ có thêm 1 ví dụ về implicit intent (cũng là intent). Mục đích của ví dụ này là Tôi
viết chương trình gọi điện thoại và nhắn tin sms (không sử dụng chương trình có sẵn của Android).
263
Bài tập 26: Dùng Implicit Intent để viết chương
trình gọi điện thoại và nhắn tin SMS
- Ở bài tập 24 và bài tập 25 Tôi đã hướng dẫn rất kỹ về cách sử dụng Intent (các intent này còn gọi
làExplicit Intent).
- Trong bài tập 26 Tôi sẽ hướng dẫn bạn cách sử dụng Implicit Intent (bạn cứ hiểu nôm na là những
Intent được xây dựng sẵn, được cung cấp sẵn trong hệ điều hành Android). Tạm thời bạn cứ hiểu như
vậy đi, nếu như Tôi sai thì Tôi sẽ sửa lại sau, vì có thể có nhiều cách hiểu khác hay hơn Tôi nhiều.
- Tôi đặt vấn đề như sau:
+ Một ngày đẹp trời khủng khiếp nào đó chẳng hạn 3h giờ ngày 13 tháng 3 năm 2013, “Dế” đáng
ghét của bạn bị rớt xuống nền nhà cái bạch bạch bạch…. bị mẻ, méo mấy miếng và hư luôn chương
trình gọi điện thoại và nhắn tin SMS (bị hư 2 chức năng này, nhưng mà “Dế Mẻ” đó vẫn hoạt động).
Không ai thèm sửa Dế cho bạn, xui cái bạn đang học Android lớp của Tôi, Tôi yêu cầu bạn phải tự
lập trình ra chức năng Gọi điện thoại và nhắn tin SMS cho Dế đó (dĩ nhiên thiết bị của bạn sử dụng
Android OS). Vậy bạn phải làm rồi, vì không làm sẽ bị 0 điểm.
+ Vậy dùng những kỹ thuật nào để có thể viết được chức năng nghe gọi+ nhắn tin SMS thay thế cho
chương trình có sẵn của Android?
+ Tôi sẽ hướng dẫn các bạn vào buổi sau, bạn hãy chú ý theo dõi. Trong thời gian chờ đợi thì Tôi
khuyên các bạn phải làm đi làm lại bài tập 24 và bài tập 25.
- Tôi giới hạn bài tập này như sau: Bài tập này đơn thuần chỉ là cho phép nhập tên và số điện thoại
vào bộ nhớ (không phải danh bạ điện thoại) sau đó hiển thị danh sách này vào ListView, ListView sẽ
cung cấp ContextMenu có 2 mục: “Gọi điện thoại” và “Nhắn tin”. Qua phần Content Provider và
Telephony API các bạn sẽ được học kỹ hơn về cách lấy danh bạ từ điện thoại ra, cách đọc tin nhắn
trong inbox ra, cách tương tác với danh bạ và tin nhắn… Nên bài tập này các bạn xem nó như là
“Chơi chơi” vui thôi.
- Mấu chốt của bài này là các bạn phải tự biết cách tạo một cuộc gọi, cách gửi tin nhắn trong Android
như thế nào, mấy phần “râu ria” khác các bạn đừng bận tâm.
- Để có thể gọi điện thoại và nhắn tin thì các bạn phải khai báo trong Manifest các permission sau:
<uses-permission android:name=”android.permission.CALL_PHONE” />
<uses-permission android:name=”android.permission.SEND_SMS” />
- Bạn xem giao diện của chương trình:
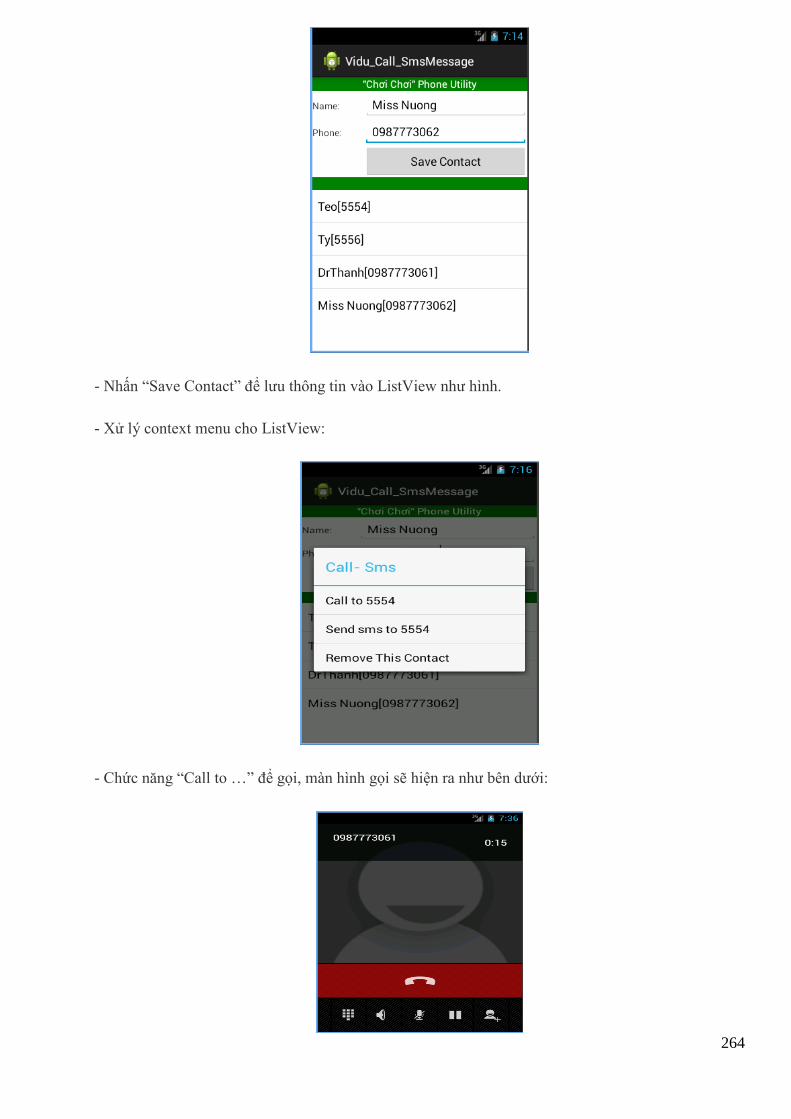
264
- Nhấn “Save Contact” để lưu thông tin vào ListView như hình.
- Xử lý context menu cho ListView:
- Chức năng “Call to …” để gọi, màn hình gọi sẽ hiện ra như bên dưới:
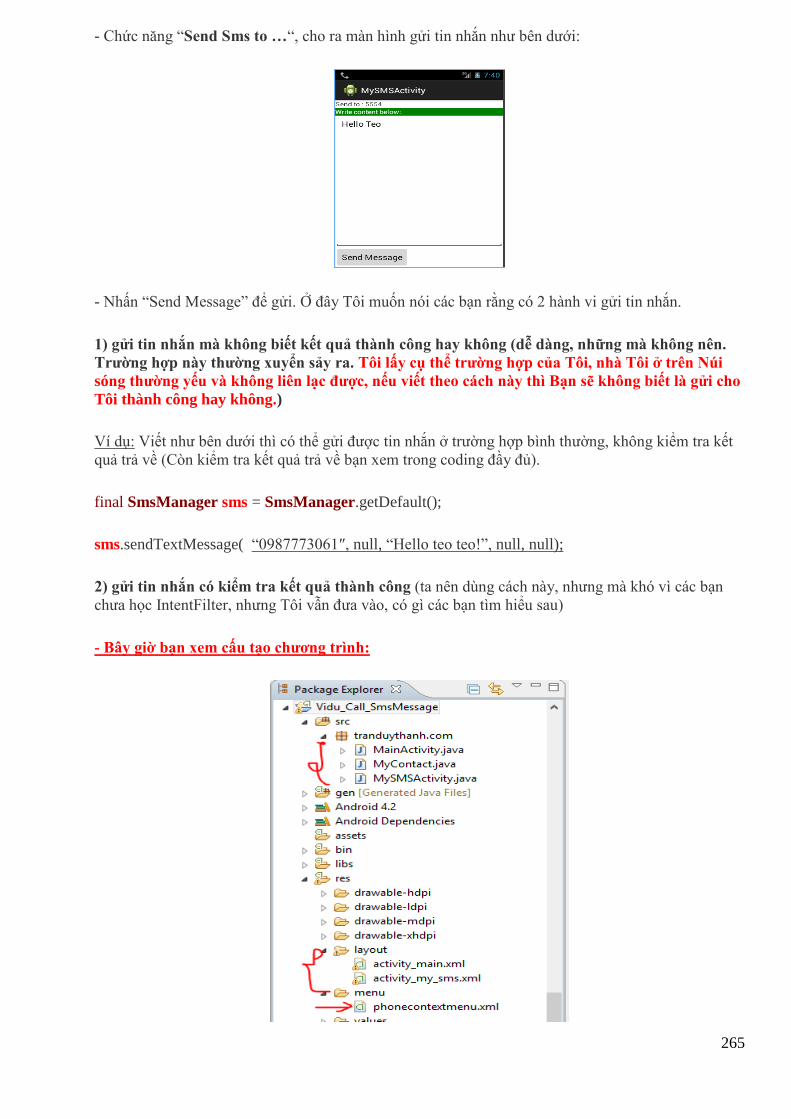
265
- Chức năng “Send Sms to …“, cho ra màn hình gửi tin nhắn như bên dưới:
- Nhấn “Send Message” để gửi. Ở đây Tôi muốn nói các bạn rằng có 2 hành vi gửi tin nhắn.
1) gửi tin nhắn mà không biết kết quả thành công hay không (dễ dàng, những mà không nên.
Trường hợp này thường xuyển sảy ra. Tôi lấy cụ thể trường hợp của Tôi, nhà Tôi ở trên Núi
sóng thường yếu và không liên lạc được, nếu viết theo cách này thì Bạn sẽ không biết là gửi cho
Tôi thành công hay không.)
Ví dụ: Viết như bên dưới thì có thể gửi được tin nhắn ở trường hợp bình thường, không kiểm tra kết
quả trả về (Còn kiểm tra kết quả trả về bạn xem trong coding đầy đủ).
final SmsManager sms = SmsManager.getDefault();
sms.sendTextMessage( “0987773061″, null, “Hello teo teo!”, null, null);
2) gửi tin nhắn có kiểm tra kết quả thành công (ta nên dùng cách này, nhưng mà khó vì các bạn
chưa học IntentFilter, nhưng Tôi vẫn đưa vào, có gì các bạn tìm hiểu sau)
- Bây giờ bạn xem cấu tạo chương trình:
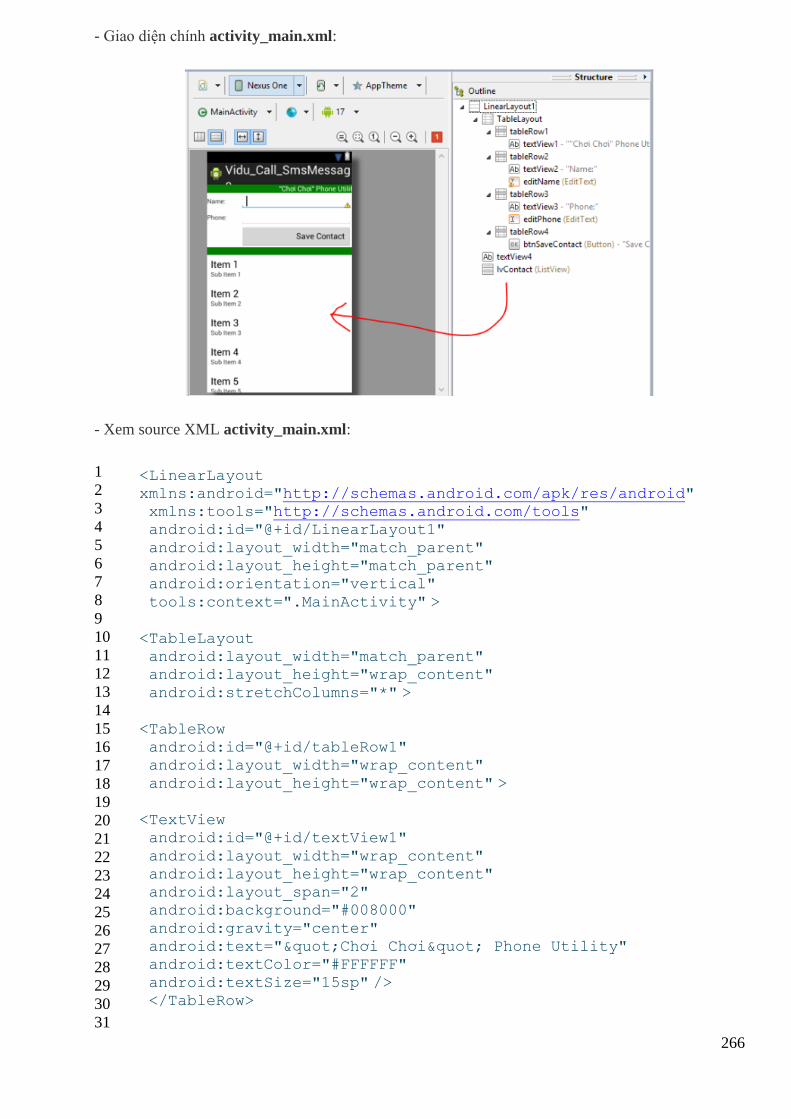
266
- Giao diện chính activity_main.xml:
- Xem source XML activity_main.xml:
1
2
3
4
5
6
7
8
9
10
11
12
13
14
15
16
17
18
19
20
21
22
23
24
25
26
27
28
29
30
31
<LinearLayout xmlns:android="http://schemas.android.com/apk/res/android" xmlns:tools="http://schemas.android.com/tools" android:id="@+id/LinearLayout1"
android:layout_width="match_parent" android:layout_height="match_parent" android:orientation="vertical"
tools:context=".MainActivity" >
<TableLayout android:layout_width="match_parent" android:layout_height="wrap_content"
android:stretchColumns="*" >
<TableRow android:id="@+id/tableRow1" android:layout_width="wrap_content"
android:layout_height="wrap_content" >
<TextView android:id="@+id/textView1"
android:layout_width="wrap_content" android:layout_height="wrap_content" android:layout_span="2" android:background="#008000"
android:gravity="center" android:text=""Chơi Chơi" Phone Utility" android:textColor="#FFFFFF"
android:textSize="15sp" /> </TableRow>
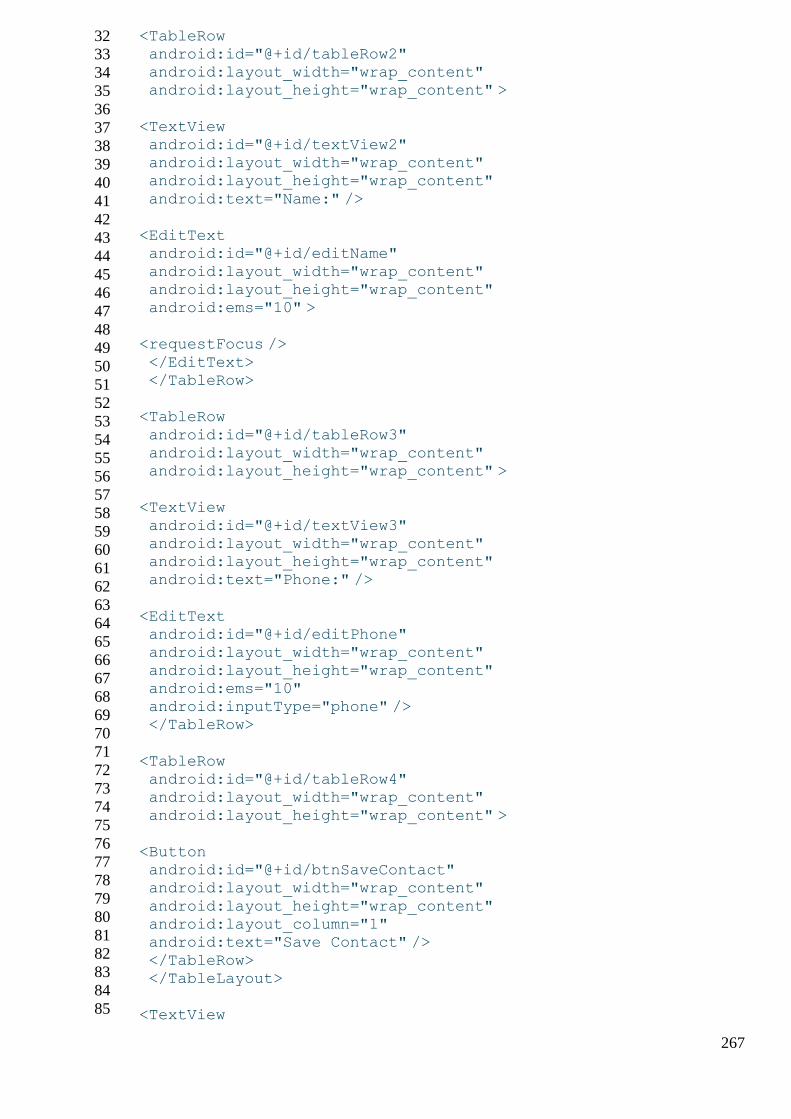
267
32
33
34
35
36
37
38
39
40
41
42
43
44
45
46
47
48
49
50
51
52
53
54
55
56
57
58
59
60
61
62
63
64
65
66
67
68
69
70
71
72
73
74
75
76
77
78
79
80
81
82
83
84
85
<TableRow android:id="@+id/tableRow2" android:layout_width="wrap_content" android:layout_height="wrap_content" >
<TextView android:id="@+id/textView2" android:layout_width="wrap_content" android:layout_height="wrap_content"
android:text="Name:" />
<EditText android:id="@+id/editName"
android:layout_width="wrap_content" android:layout_height="wrap_content" android:ems="10" >
<requestFocus />
</EditText> </TableRow>
<TableRow
android:id="@+id/tableRow3" android:layout_width="wrap_content" android:layout_height="wrap_content" >
<TextView
android:id="@+id/textView3" android:layout_width="wrap_content" android:layout_height="wrap_content" android:text="Phone:" />
<EditText android:id="@+id/editPhone" android:layout_width="wrap_content"
android:layout_height="wrap_content" android:ems="10" android:inputType="phone" /> </TableRow>
<TableRow android:id="@+id/tableRow4" android:layout_width="wrap_content"
android:layout_height="wrap_content" >
<Button android:id="@+id/btnSaveContact" android:layout_width="wrap_content"
android:layout_height="wrap_content" android:layout_column="1" android:text="Save Contact" />
</TableRow> </TableLayout>
<TextView
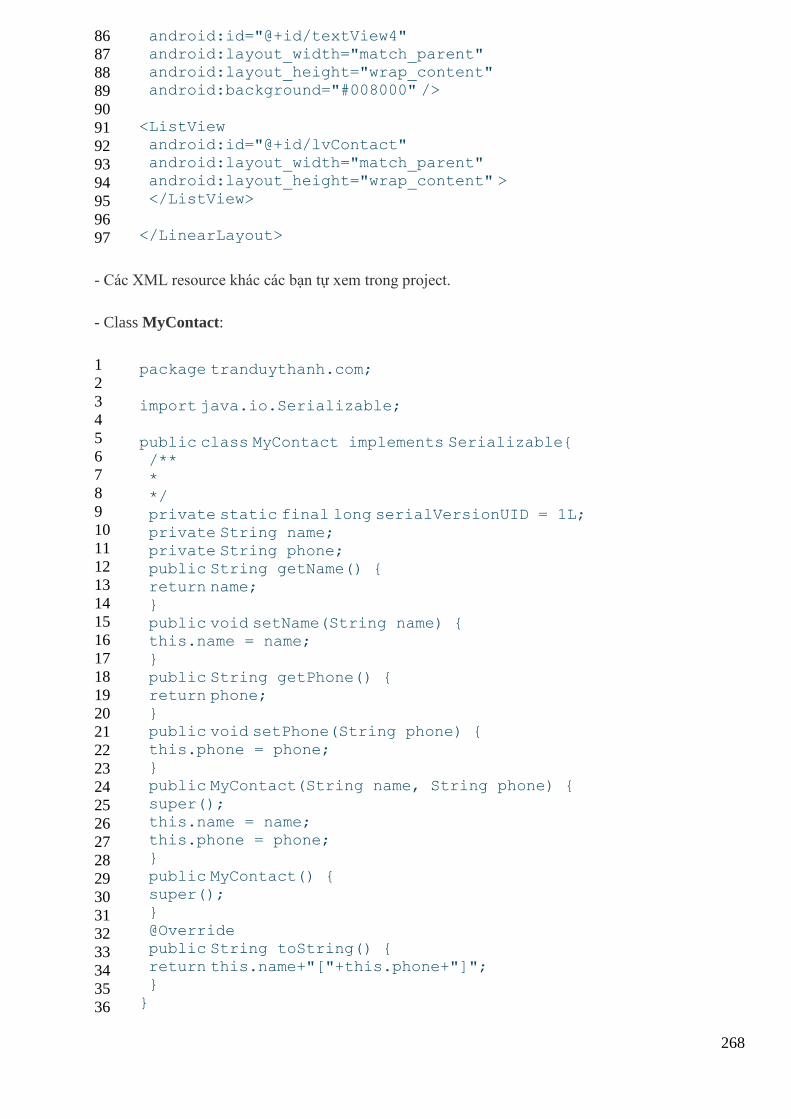
268
86
87
88
89
90
91
92
93
94
95
96
97
android:id="@+id/textView4" android:layout_width="match_parent" android:layout_height="wrap_content" android:background="#008000" />
<ListView android:id="@+id/lvContact" android:layout_width="match_parent" android:layout_height="wrap_content" >
</ListView>
</LinearLayout>
- Các XML resource khác các bạn tự xem trong project.
- Class MyContact:
1
2
3
4
5
6
7
8
9
10
11
12
13
14
15
16
17
18
19
20
21
22
23
24
25
26
27
28
29
30
31
32
33
34
35
36
package tranduythanh.com;
import java.io.Serializable;
public class MyContact implements Serializable{ /**
* */ private static final long serialVersionUID = 1L; private String name;
private String phone; public String getName() { return name; }
public void setName(String name) { this.name = name; }
public String getPhone() { return phone; } public void setPhone(String phone) {
this.phone = phone; } public MyContact(String name, String phone) {
super(); this.name = name; this.phone = phone; }
public MyContact() { super(); }
@Override public String toString() { return this.name+"["+this.phone+"]"; }
}
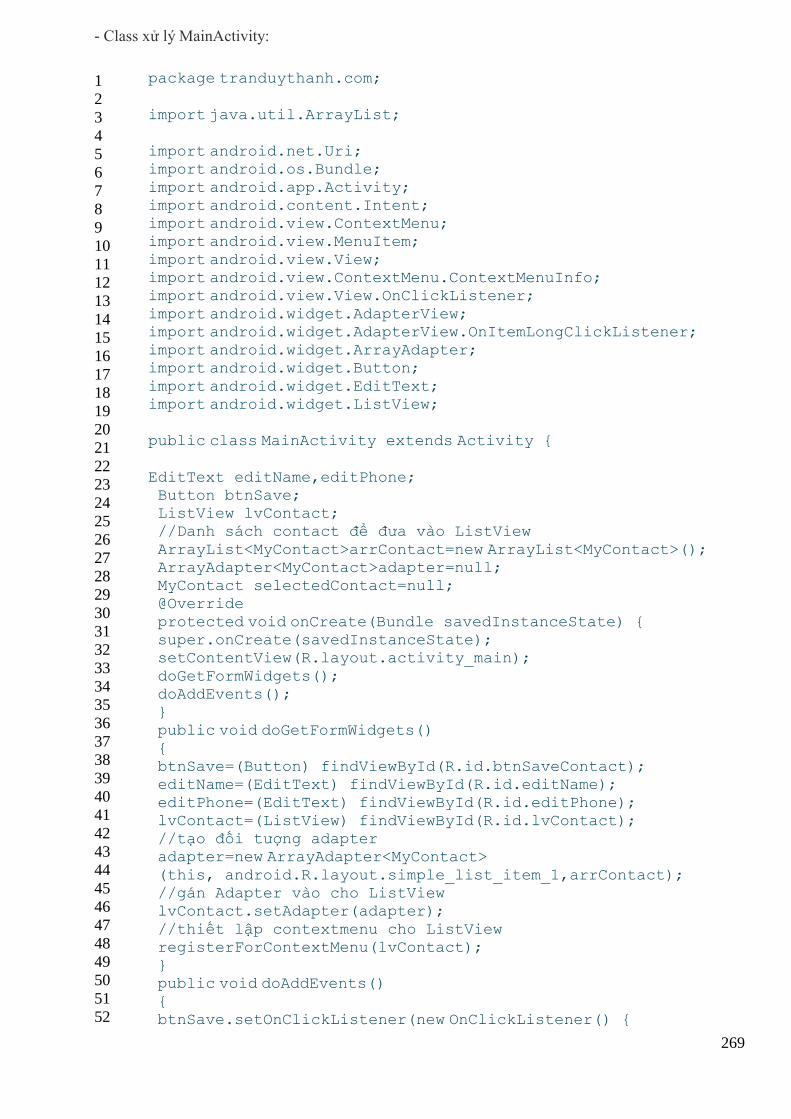
269
- Class xử lý MainActivity:
1
2
3
4
5
6
7
8
9
10
11
12
13
14
15
16
17
18
19
20
21
22
23
24
25
26
27
28
29
30
31
32
33
34
35
36
37
38
39
40
41
42
43
44
45
46
47
48
49
50
51
52
package tranduythanh.com;
import java.util.ArrayList;
import android.net.Uri; import android.os.Bundle;
import android.app.Activity; import android.content.Intent; import android.view.ContextMenu; import android.view.MenuItem;
import android.view.View; import android.view.ContextMenu.ContextMenuInfo; import android.view.View.OnClickListener;
import android.widget.AdapterView; import android.widget.AdapterView.OnItemLongClickListener; import android.widget.ArrayAdapter; import android.widget.Button;
import android.widget.EditText; import android.widget.ListView;
public class MainActivity extends Activity {
EditText editName,editPhone; Button btnSave; ListView lvContact; //Danh sách contact để đưa vào ListView
ArrayList<MyContact>arrContact=new ArrayList<MyContact>(); ArrayAdapter<MyContact>adapter=null; MyContact selectedContact=null; @Override
protected void onCreate(Bundle savedInstanceState) { super.onCreate(savedInstanceState); setContentView(R.layout.activity_main);
doGetFormWidgets(); doAddEvents(); } public void doGetFormWidgets()
{ btnSave=(Button) findViewById(R.id.btnSaveContact); editName=(EditText) findViewById(R.id.editName);
editPhone=(EditText) findViewById(R.id.editPhone); lvContact=(ListView) findViewById(R.id.lvContact); //tạo đối tượng adapter adapter=new ArrayAdapter<MyContact>
(this, android.R.layout.simple_list_item_1,arrContact); //gán Adapter vào cho ListView lvContact.setAdapter(adapter);
//thiết lập contextmenu cho ListView registerForContextMenu(lvContact); } public void doAddEvents()
{ btnSave.setOnClickListener(new OnClickListener() {
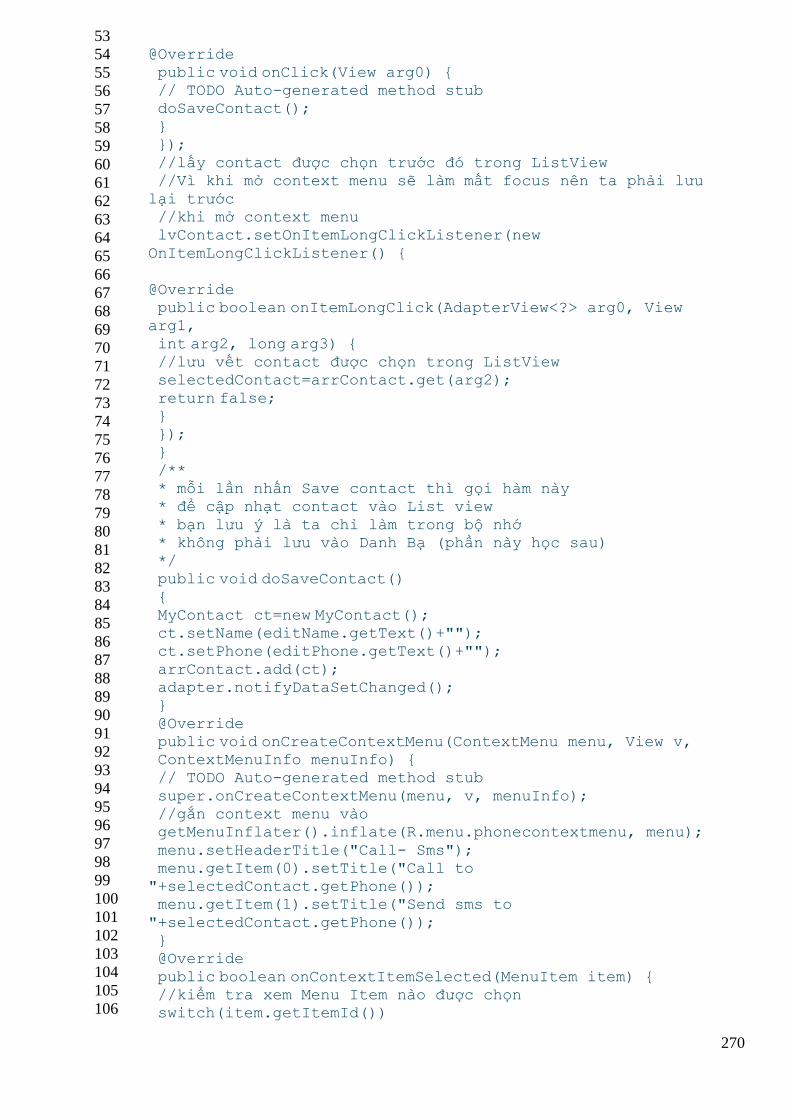
270
53
54
55
56
57
58
59
60
61
62
63
64
65
66
67
68
69
70
71
72
73
74
75
76
77
78
79
80
81
82
83
84
85
86
87
88
89
90
91
92
93
94
95
96
97
98
99
100
101
102
103
104
105
106
@Override
public void onClick(View arg0) { // TODO Auto-generated method stub doSaveContact();
} }); //lấy contact được chọn trước đó trong ListView //Vì khi mở context menu sẽ làm mất focus nên ta phải lưu
lại trước //khi mở context menu lvContact.setOnItemLongClickListener(new
OnItemLongClickListener() {
@Override public boolean onItemLongClick(AdapterView<?> arg0, View arg1,
int arg2, long arg3) { //lưu vết contact được chọn trong ListView selectedContact=arrContact.get(arg2);
return false; } }); }
/** * mỗi lần nhấn Save contact thì gọi hàm này * để cập nhạt contact vào List view
* bạn lưu ý là ta chỉ làm trong bộ nhớ * không phải lưu vào Danh Bạ (phần này học sau) */ public void doSaveContact()
{ MyContact ct=new MyContact(); ct.setName(editName.getText()+""); ct.setPhone(editPhone.getText()+"");
arrContact.add(ct); adapter.notifyDataSetChanged(); }
@Override public void onCreateContextMenu(ContextMenu menu, View v, ContextMenuInfo menuInfo) { // TODO Auto-generated method stub
super.onCreateContextMenu(menu, v, menuInfo); //gắn context menu vào getMenuInflater().inflate(R.menu.phonecontextmenu, menu);
menu.setHeaderTitle("Call- Sms"); menu.getItem(0).setTitle("Call to
"+selectedContact.getPhone()); menu.getItem(1).setTitle("Send sms to
"+selectedContact.getPhone()); } @Override
public boolean onContextItemSelected(MenuItem item) { //kiểm tra xem Menu Item nào được chọn switch(item.getItemId())
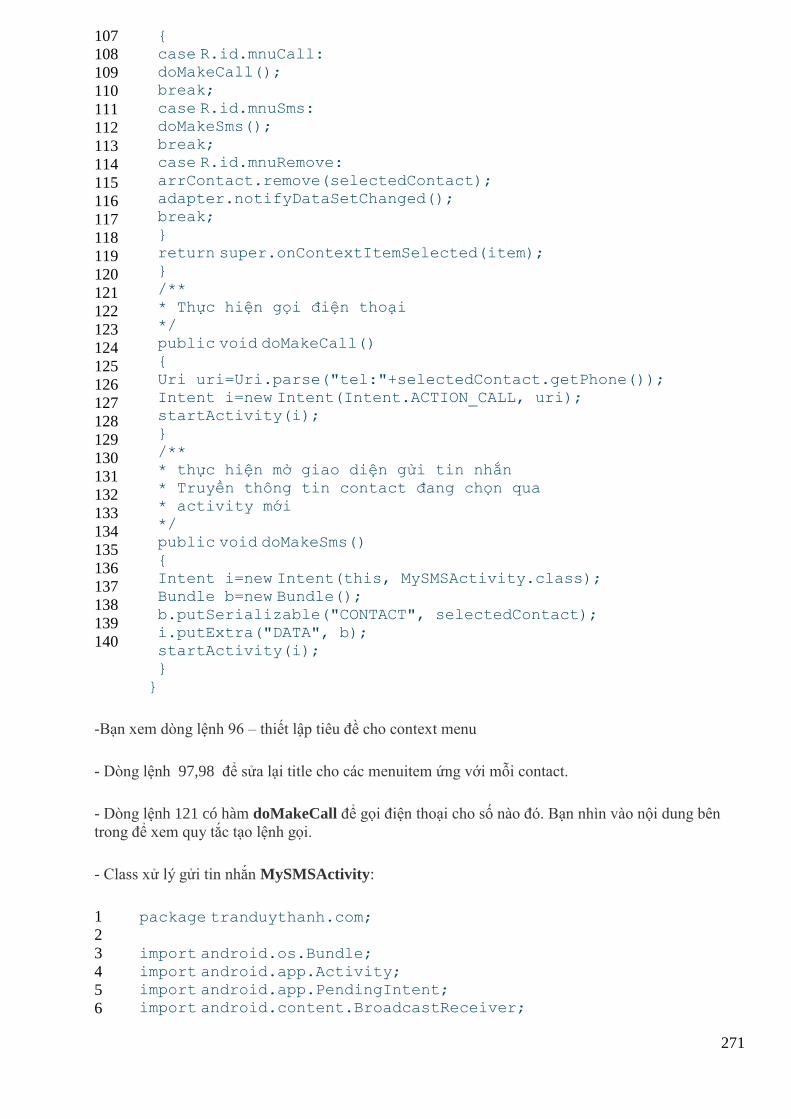
271
107
108
109
110
111
112
113
114
115
116
117
118
119
120
121
122
123
124
125
126
127
128
129
130
131
132
133
134
135
136
137
138
139
140
{ case R.id.mnuCall: doMakeCall(); break;
case R.id.mnuSms: doMakeSms(); break; case R.id.mnuRemove:
arrContact.remove(selectedContact); adapter.notifyDataSetChanged(); break;
} return super.onContextItemSelected(item); } /**
* Thực hiện gọi điện thoại */ public void doMakeCall()
{ Uri uri=Uri.parse("tel:"+selectedContact.getPhone()); Intent i=new Intent(Intent.ACTION_CALL, uri); startActivity(i);
} /** * thực hiện mở giao diện gửi tin nhắn
* Truyền thông tin contact đang chọn qua * activity mới */ public void doMakeSms()
{ Intent i=new Intent(this, MySMSActivity.class); Bundle b=new Bundle();
b.putSerializable("CONTACT", selectedContact); i.putExtra("DATA", b); startActivity(i); }
}
-Bạn xem dòng lệnh 96 – thiết lập tiêu đề cho context menu
- Dòng lệnh 97,98 để sửa lại title cho các menuitem ứng với mỗi contact.
- Dòng lệnh 121 có hàm doMakeCall để gọi điện thoại cho số nào đó. Bạn nhìn vào nội dung bên
trong để xem quy tắc tạo lệnh gọi.
- Class xử lý gửi tin nhắn MySMSActivity:
1
2
3
4
5
6
package tranduythanh.com;
import android.os.Bundle;
import android.app.Activity; import android.app.PendingIntent; import android.content.BroadcastReceiver;
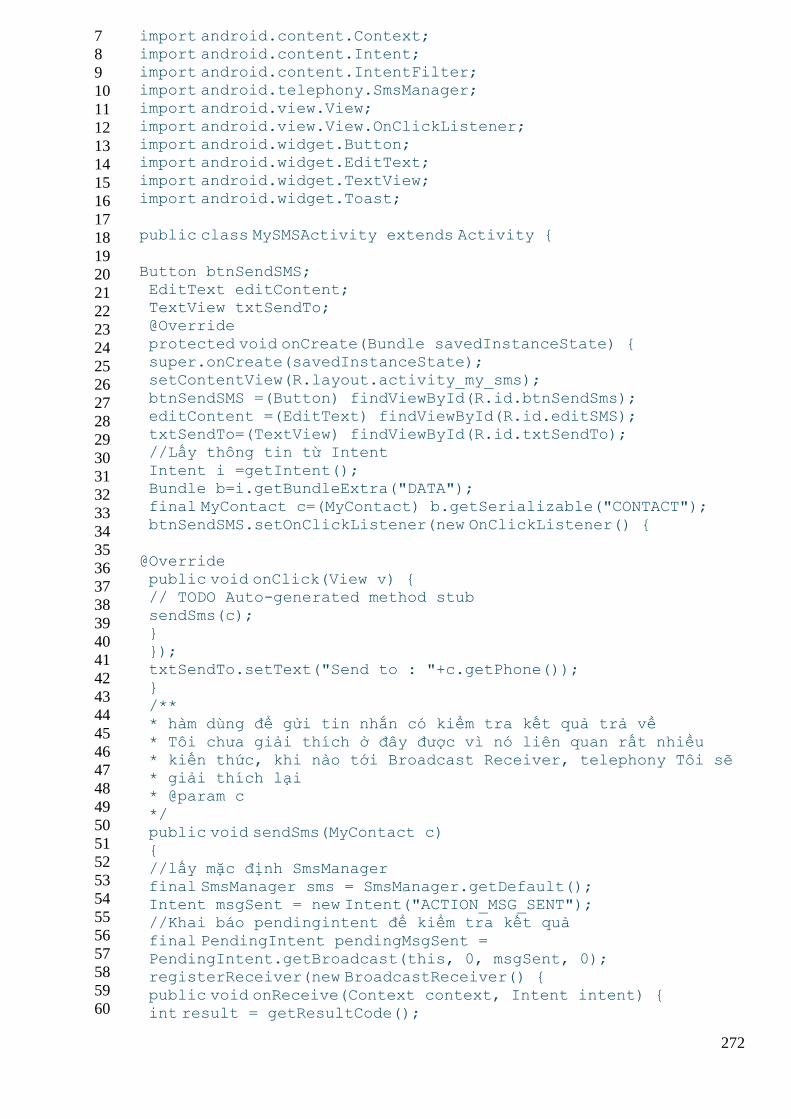
272
7
8
9
10
11
12
13
14
15
16
17
18
19
20
21
22
23
24
25
26
27
28
29
30
31
32
33
34
35
36
37
38
39
40
41
42
43
44
45
46
47
48
49
50
51
52
53
54
55
56
57
58
59
60
import android.content.Context; import android.content.Intent; import android.content.IntentFilter; import android.telephony.SmsManager;
import android.view.View; import android.view.View.OnClickListener; import android.widget.Button; import android.widget.EditText;
import android.widget.TextView; import android.widget.Toast;
public class MySMSActivity extends Activity {
Button btnSendSMS; EditText editContent; TextView txtSendTo; @Override
protected void onCreate(Bundle savedInstanceState) { super.onCreate(savedInstanceState); setContentView(R.layout.activity_my_sms);
btnSendSMS =(Button) findViewById(R.id.btnSendSms); editContent =(EditText) findViewById(R.id.editSMS); txtSendTo=(TextView) findViewById(R.id.txtSendTo); //Lấy thông tin từ Intent
Intent i =getIntent(); Bundle b=i.getBundleExtra("DATA"); final MyContact c=(MyContact) b.getSerializable("CONTACT");
btnSendSMS.setOnClickListener(new OnClickListener() {
@Override public void onClick(View v) { // TODO Auto-generated method stub
sendSms(c); } }); txtSendTo.setText("Send to : "+c.getPhone());
} /** * hàm dùng để gửi tin nhắn có kiểm tra kết quả trả về
* Tôi chưa giải thích ở đây được vì nó liên quan rất nhiều * kiến thức, khi nào tới Broadcast Receiver, telephony Tôi sẽ * giải thích lại * @param c
*/ public void sendSms(MyContact c) {
//lấy mặc định SmsManager final SmsManager sms = SmsManager.getDefault(); Intent msgSent = new Intent("ACTION_MSG_SENT"); //Khai báo pendingintent để kiểm tra kết quả
final PendingIntent pendingMsgSent = PendingIntent.getBroadcast(this, 0, msgSent, 0); registerReceiver(new BroadcastReceiver() {
public void onReceive(Context context, Intent intent) { int result = getResultCode();
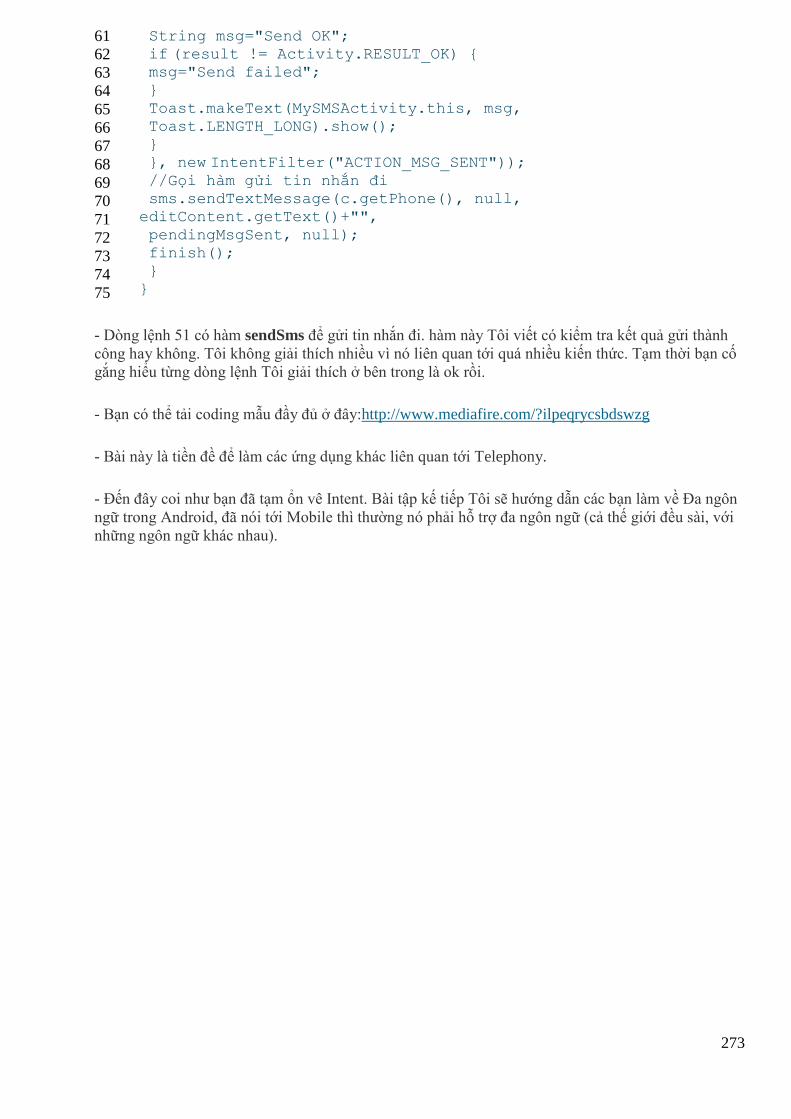
273
61
62
63
64
65
66
67
68
69
70
71
72
73
74
75
String msg="Send OK"; if (result != Activity.RESULT_OK) { msg="Send failed"; }
Toast.makeText(MySMSActivity.this, msg, Toast.LENGTH_LONG).show(); } }, new IntentFilter("ACTION_MSG_SENT"));
//Gọi hàm gửi tin nhắn đi sms.sendTextMessage(c.getPhone(), null,
editContent.getText()+"",
pendingMsgSent, null); finish(); } }
- Dòng lệnh 51 có hàm sendSms để gửi tin nhắn đi. hàm này Tôi viết có kiểm tra kết quả gửi thành
công hay không. Tôi không giải thích nhiều vì nó liên quan tới quá nhiều kiến thức. Tạm thời bạn cố
gắng hiểu từng dòng lệnh Tôi giải thích ở bên trong là ok rồi.
- Bạn có thể tải coding mẫu đầy đủ ở đây:http://www.mediafire.com/?ilpeqrycsbdswzg
- Bài này là tiền đề để làm các ứng dụng khác liên quan tới Telephony.
- Đến đây coi như bạn đã tạm ổn vê Intent. Bài tập kế tiếp Tôi sẽ hướng dẫn các bạn làm về Đa ngôn
ngữ trong Android, đã nói tới Mobile thì thường nó phải hỗ trợ đa ngôn ngữ (cả thế giới đều sài, với
những ngôn ngữ khác nhau).
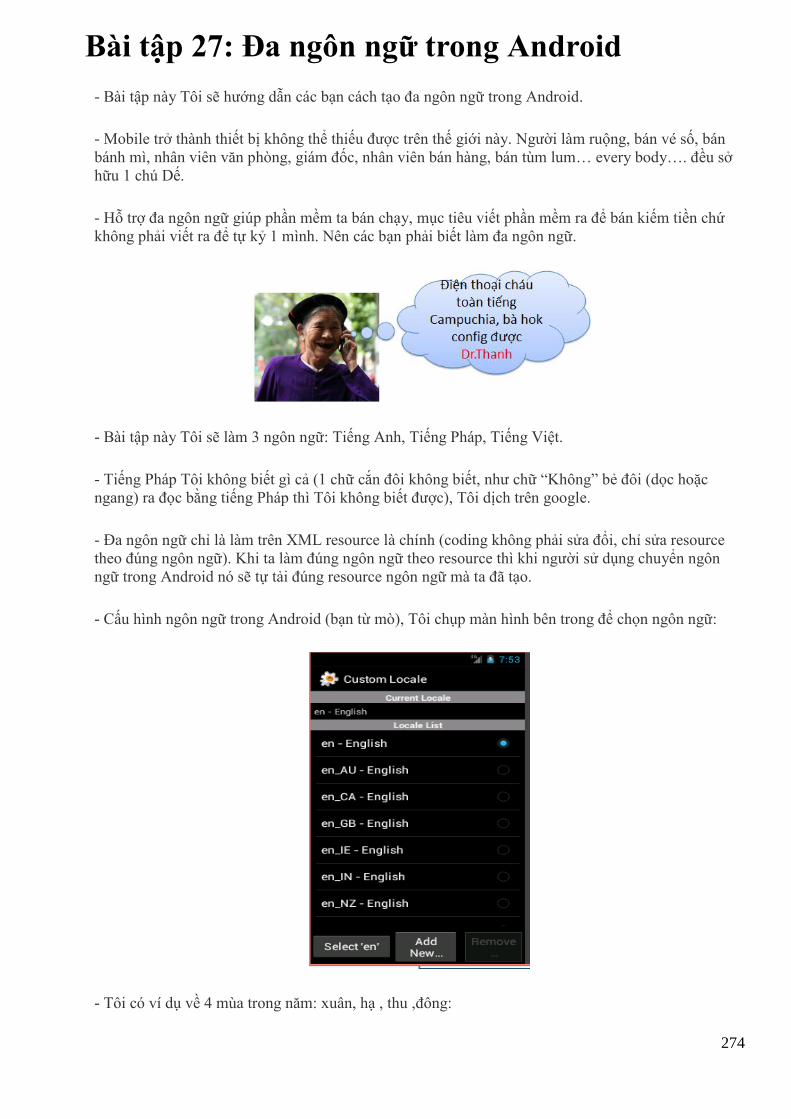
274
Bài tập 27: Đa ngôn ngữ trong Android
- Bài tập này Tôi sẽ hướng dẫn các bạn cách tạo đa ngôn ngữ trong Android.
- Mobile trở thành thiết bị không thể thiếu được trên thế giới này. Người làm ruộng, bán vé số, bán
bánh mì, nhân viên văn phòng, giám đốc, nhân viên bán hàng, bán tùm lum… every body…. đều sở
hữu 1 chú Dế.
- Hỗ trợ đa ngôn ngữ giúp phần mềm ta bán chạy, mục tiêu viết phần mềm ra để bán kiếm tiền chứ
không phải viết ra để tự kỷ 1 mình. Nên các bạn phải biết làm đa ngôn ngữ.
- Bài tập này Tôi sẽ làm 3 ngôn ngữ: Tiếng Anh, Tiếng Pháp, Tiếng Việt.
- Tiếng Pháp Tôi không biết gì cả (1 chữ cắn đôi không biết, như chữ “Không” bẻ đôi (dọc hoặc
ngang) ra đọc bằng tiếng Pháp thì Tôi không biết được), Tôi dịch trên google.
- Đa ngôn ngữ chỉ là làm trên XML resource là chính (coding không phải sửa đổi, chỉ sửa resource
theo đúng ngôn ngữ). Khi ta làm đúng ngôn ngữ theo resource thì khi người sử dụng chuyển ngôn
ngữ trong Android nó sẽ tự tải đúng resource ngôn ngữ mà ta đã tạo.
- Cấu hình ngôn ngữ trong Android (bạn từ mò), Tôi chụp màn hình bên trong để chọn ngôn ngữ:
- Tôi có ví dụ về 4 mùa trong năm: xuân, hạ , thu ,đông:
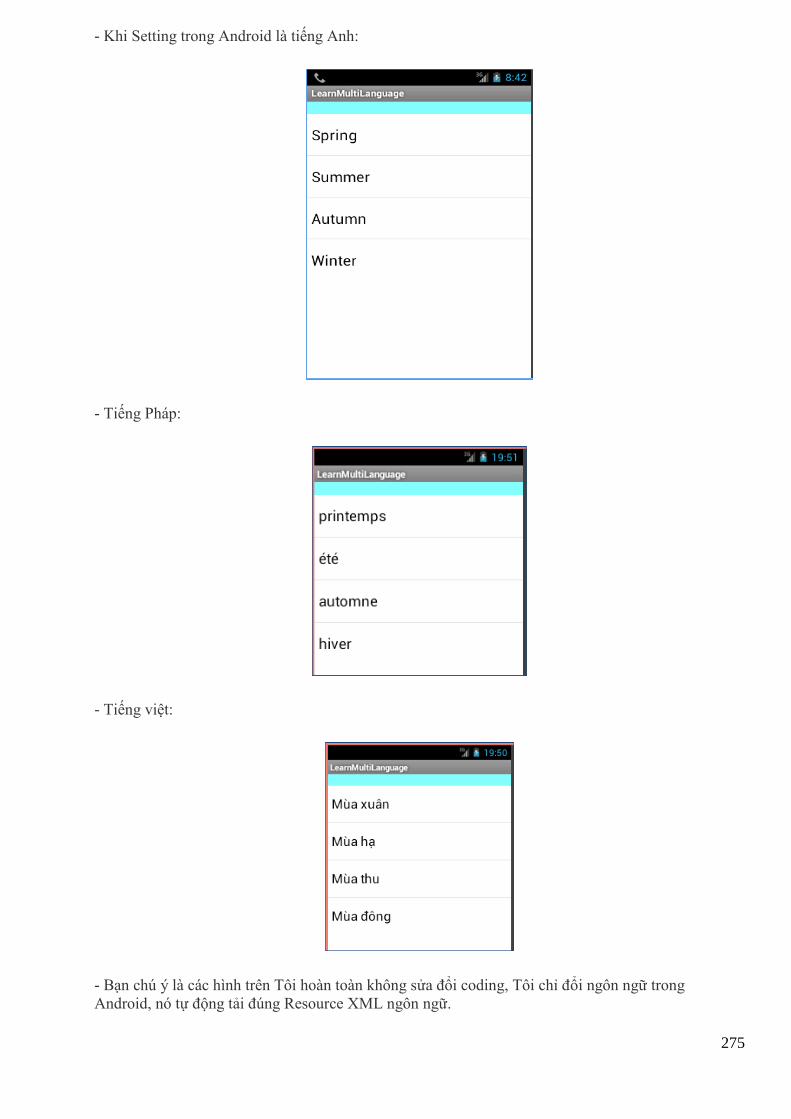
275
- Khi Setting trong Android là tiếng Anh:
- Tiếng Pháp:
- Tiếng việt:
- Bạn chú ý là các hình trên Tôi hoàn toàn không sửa đổi coding, Tôi chỉ đổi ngôn ngữ trong
Android, nó tự động tải đúng Resource XML ngôn ngữ.
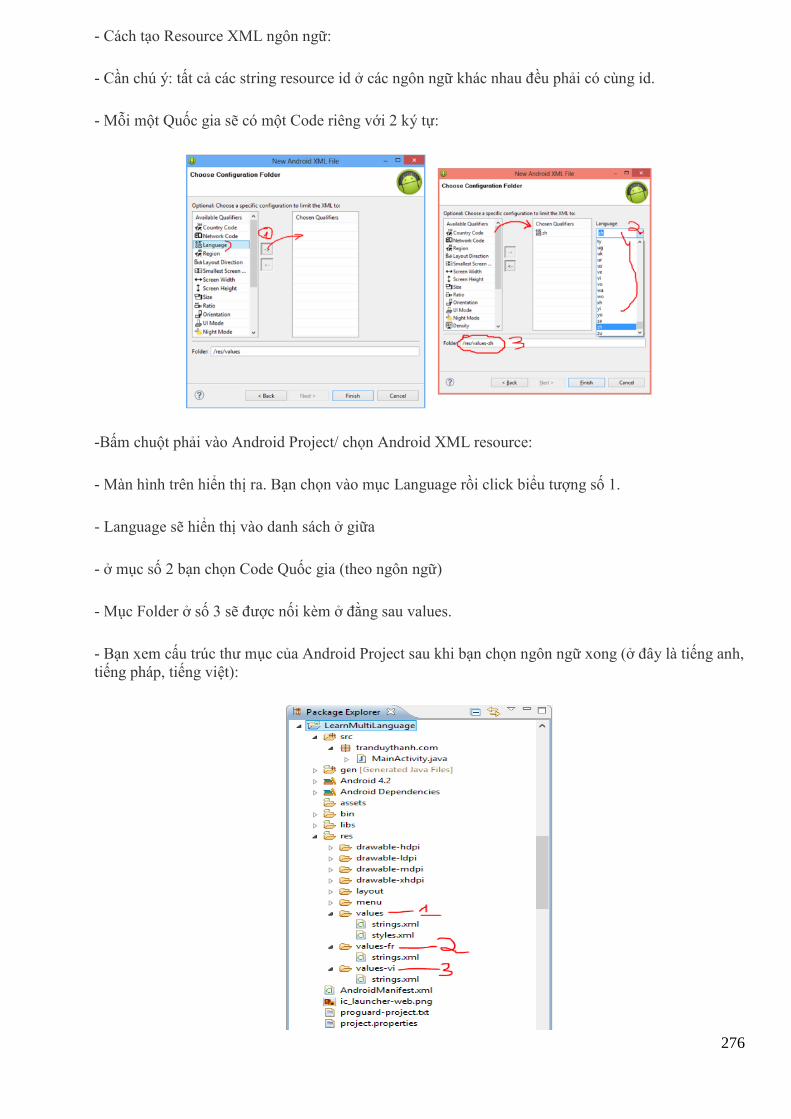
276
- Cách tạo Resource XML ngôn ngữ:
- Cần chú ý: tất cả các string resource id ở các ngôn ngữ khác nhau đều phải có cùng id.
- Mỗi một Quốc gia sẽ có một Code riêng với 2 ký tự:
-Bấm chuột phải vào Android Project/ chọn Android XML resource:
- Màn hình trên hiển thị ra. Bạn chọn vào mục Language rồi click biểu tượng số 1.
- Language sẽ hiển thị vào danh sách ở giữa
- ở mục số 2 bạn chọn Code Quốc gia (theo ngôn ngữ)
- Mục Folder ở số 3 sẽ được nối kèm ở đằng sau values.
- Bạn xem cấu trúc thư mục của Android Project sau khi bạn chọn ngôn ngữ xong (ở đây là tiếng anh,
tiếng pháp, tiếng việt):
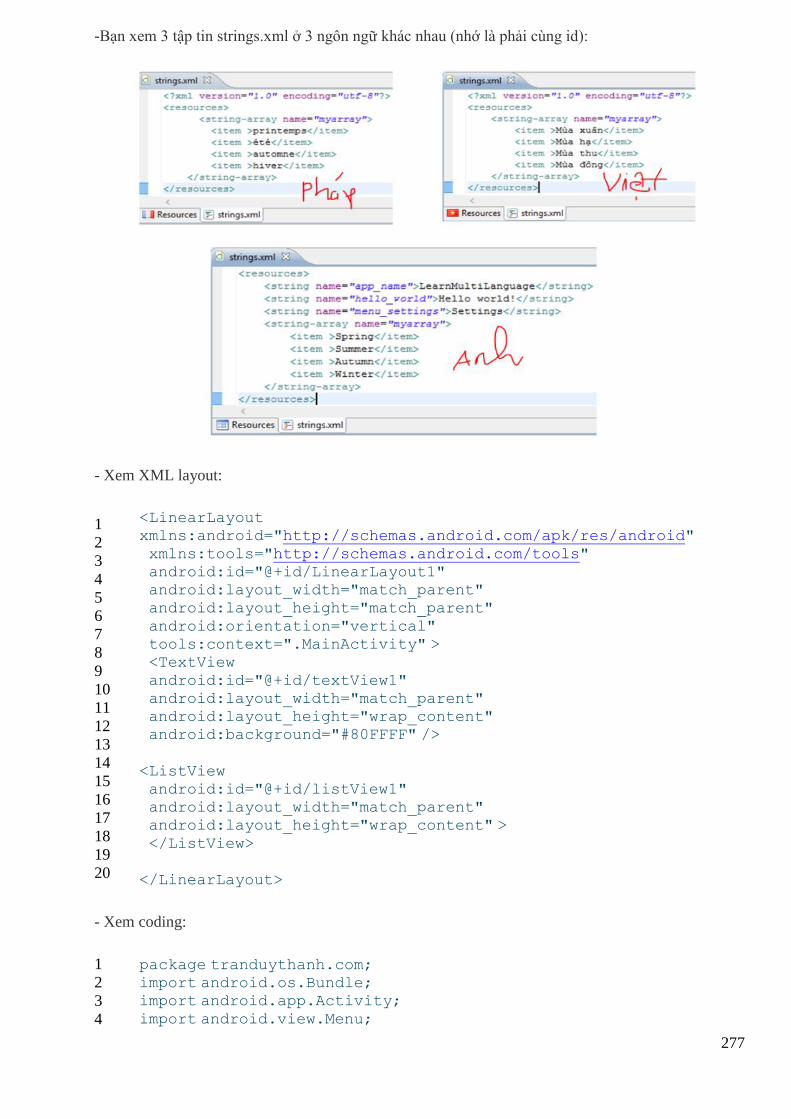
277
-Bạn xem 3 tập tin strings.xml ở 3 ngôn ngữ khác nhau (nhớ là phải cùng id):
- Xem XML layout:
1
2
3
4
5
6
7
8
9
10
11
12
13
14
15
16
17
18
19
20
<LinearLayout xmlns:android="http://schemas.android.com/apk/res/android"
xmlns:tools="http://schemas.android.com/tools" android:id="@+id/LinearLayout1" android:layout_width="match_parent" android:layout_height="match_parent"
android:orientation="vertical" tools:context=".MainActivity" > <TextView
android:id="@+id/textView1" android:layout_width="match_parent" android:layout_height="wrap_content" android:background="#80FFFF" />
<ListView android:id="@+id/listView1" android:layout_width="match_parent" android:layout_height="wrap_content" >
</ListView>
</LinearLayout>
- Xem coding:
1
2
3
4
package tranduythanh.com; import android.os.Bundle; import android.app.Activity;
import android.view.Menu;
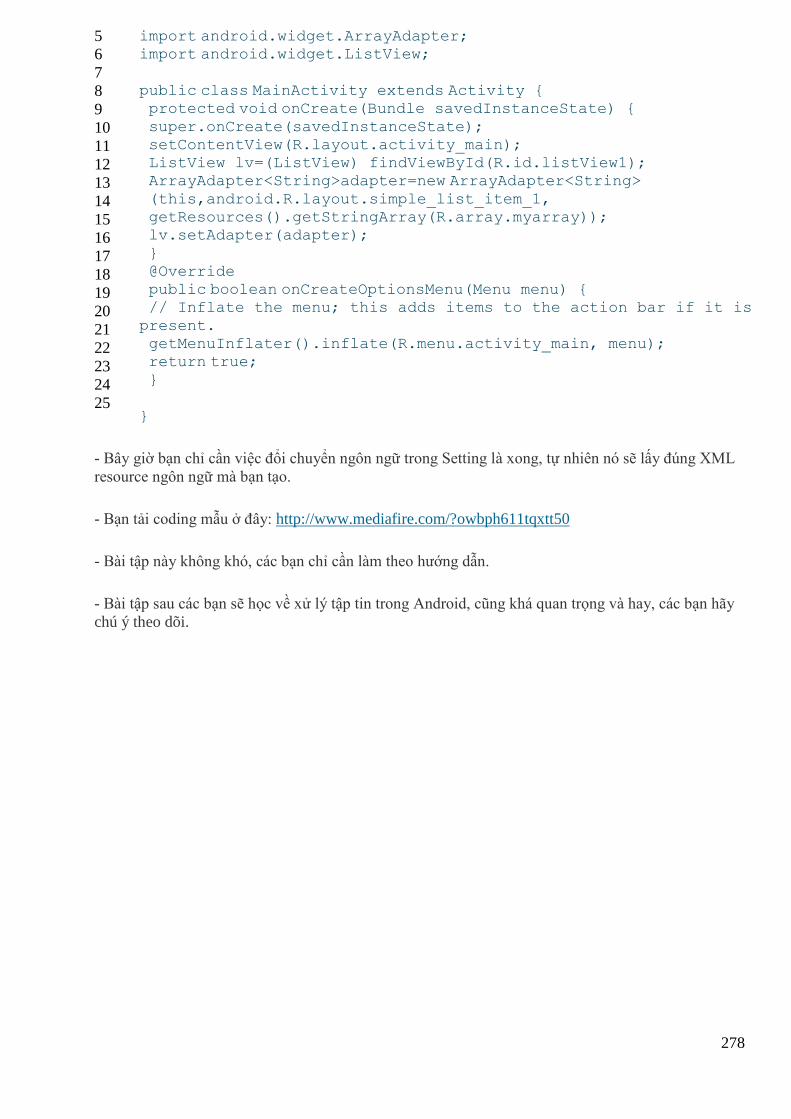
278
5
6
7
8
9
10
11
12
13
14
15
16
17
18
19
20
21
22
23
24
25
import android.widget.ArrayAdapter; import android.widget.ListView;
public class MainActivity extends Activity { protected void onCreate(Bundle savedInstanceState) {
super.onCreate(savedInstanceState); setContentView(R.layout.activity_main); ListView lv=(ListView) findViewById(R.id.listView1); ArrayAdapter<String>adapter=new ArrayAdapter<String>
(this,android.R.layout.simple_list_item_1, getResources().getStringArray(R.array.myarray)); lv.setAdapter(adapter);
} @Override public boolean onCreateOptionsMenu(Menu menu) { // Inflate the menu; this adds items to the action bar if it is
present. getMenuInflater().inflate(R.menu.activity_main, menu); return true;
}
}
- Bây giờ bạn chỉ cần việc đổi chuyển ngôn ngữ trong Setting là xong, tự nhiên nó sẽ lấy đúng XML
resource ngôn ngữ mà bạn tạo.
- Bạn tải coding mẫu ở đây: http://www.mediafire.com/?owbph611tqxtt50
- Bài tập này không khó, các bạn chỉ cần làm theo hướng dẫn.
- Bài tập sau các bạn sẽ học về xử lý tập tin trong Android, cũng khá quan trọng và hay, các bạn hãy
chú ý theo dõi.
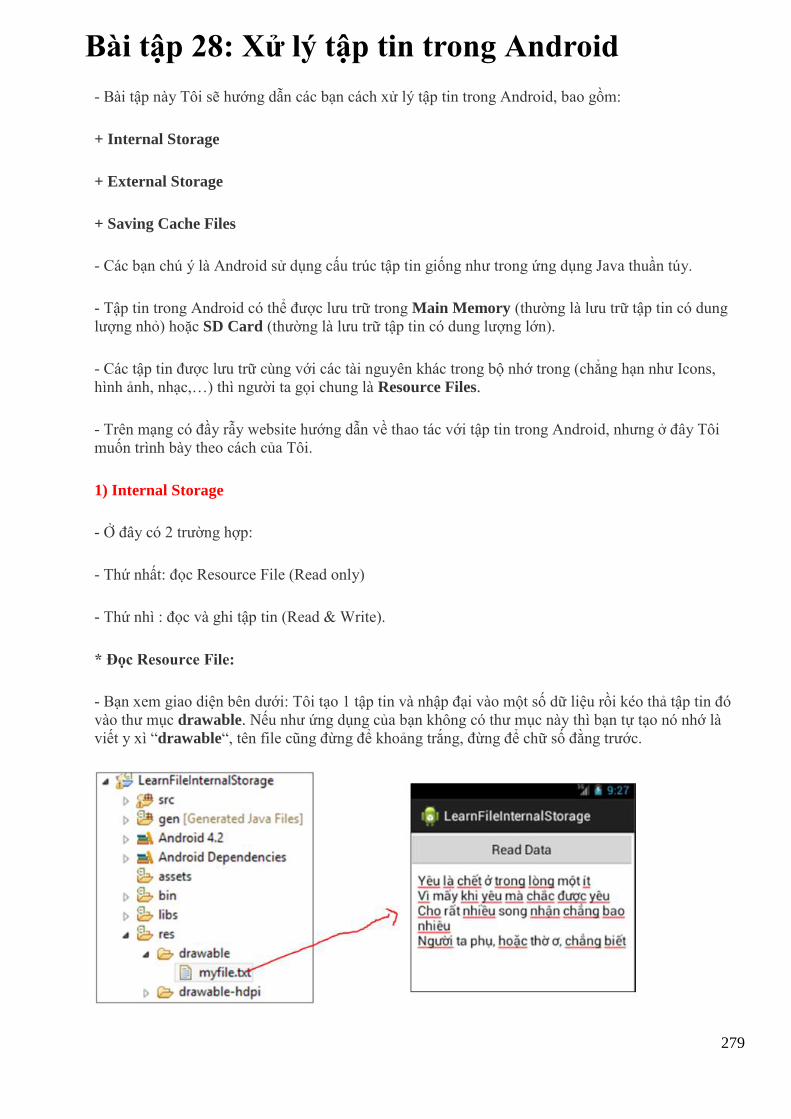
279
Bài tập 28: Xử lý tập tin trong Android
- Bài tập này Tôi sẽ hướng dẫn các bạn cách xử lý tập tin trong Android, bao gồm:
+ Internal Storage
+ External Storage
+ Saving Cache Files
- Các bạn chú ý là Android sử dụng cấu trúc tập tin giống như trong ứng dụng Java thuần túy.
- Tập tin trong Android có thể được lưu trữ trong Main Memory (thường là lưu trữ tập tin có dung
lượng nhỏ) hoặc SD Card (thường là lưu trữ tập tin có dung lượng lớn).
- Các tập tin được lưu trữ cùng với các tài nguyên khác trong bộ nhớ trong (chẳng hạn như Icons,
hình ảnh, nhạc,…) thì người ta gọi chung là Resource Files.
- Trên mạng có đầy rẫy website hướng dẫn về thao tác với tập tin trong Android, nhưng ở đây Tôi
muốn trình bày theo cách của Tôi.
1) Internal Storage
- Ở đây có 2 trường hợp:
- Thứ nhất: đọc Resource File (Read only)
- Thứ nhì : đọc và ghi tập tin (Read & Write).
* Đọc Resource File:
- Bạn xem giao diện bên dưới: Tôi tạo 1 tập tin và nhập đại vào một số dữ liệu rồi kéo thả tập tin đó
vào thư mục drawable. Nếu như ứng dụng của bạn không có thư mục này thì bạn tự tạo nó nhớ là
viết y xì “drawable“, tên file cũng đừng để khoảng trắng, đừng để chữ số đằng trước.
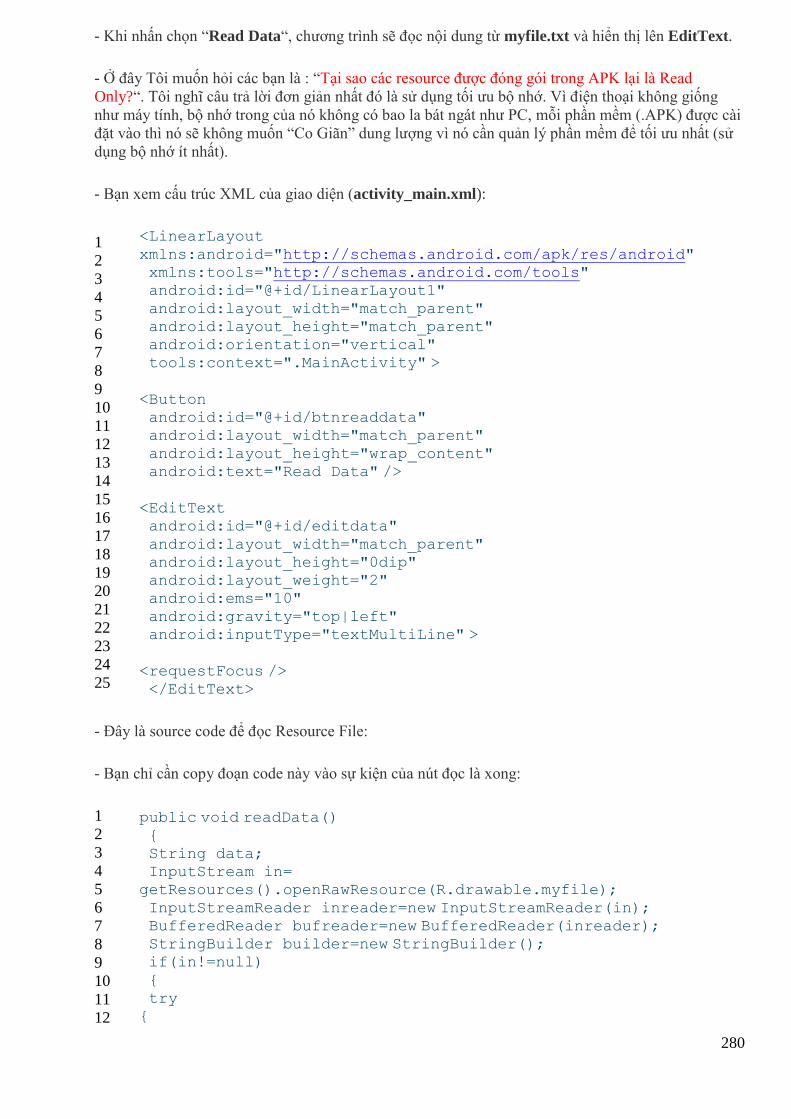
280
- Khi nhấn chọn “Read Data“, chương trình sẽ đọc nội dung từ myfile.txt và hiển thị lên EditText.
- Ở đây Tôi muốn hỏi các bạn là : “Tại sao các resource được đóng gói trong APK lại là Read
Only?“. Tôi nghĩ câu trả lời đơn giản nhất đó là sử dụng tối ưu bộ nhớ. Vì điện thoại không giống
như máy tính, bộ nhớ trong của nó không có bao la bát ngát như PC, mỗi phần mềm (.APK) được cài
đặt vào thì nó sẽ không muốn “Co Giãn” dung lượng vì nó cần quản lý phần mềm để tối ưu nhất (sử
dụng bộ nhớ ít nhất).
- Bạn xem cấu trúc XML của giao diện (activity_main.xml):
1
2
3
4
5
6
7
8
9
10
11
12
13
14
15
16
17
18
19
20
21
22
23
24
25
<LinearLayout
xmlns:android="http://schemas.android.com/apk/res/android" xmlns:tools="http://schemas.android.com/tools" android:id="@+id/LinearLayout1"
android:layout_width="match_parent" android:layout_height="match_parent" android:orientation="vertical" tools:context=".MainActivity" >
<Button android:id="@+id/btnreaddata" android:layout_width="match_parent"
android:layout_height="wrap_content" android:text="Read Data" />
<EditText android:id="@+id/editdata"
android:layout_width="match_parent" android:layout_height="0dip" android:layout_weight="2" android:ems="10"
android:gravity="top|left" android:inputType="textMultiLine" >
<requestFocus />
</EditText>
- Đây là source code để đọc Resource File:
- Bạn chỉ cần copy đoạn code này vào sự kiện của nút đọc là xong:
1
2
3
4
5
6
7
8
9
10
11
12
public void readData() {
String data; InputStream in=
getResources().openRawResource(R.drawable.myfile);
InputStreamReader inreader=new InputStreamReader(in); BufferedReader bufreader=new BufferedReader(inreader); StringBuilder builder=new StringBuilder(); if(in!=null)
{ try {
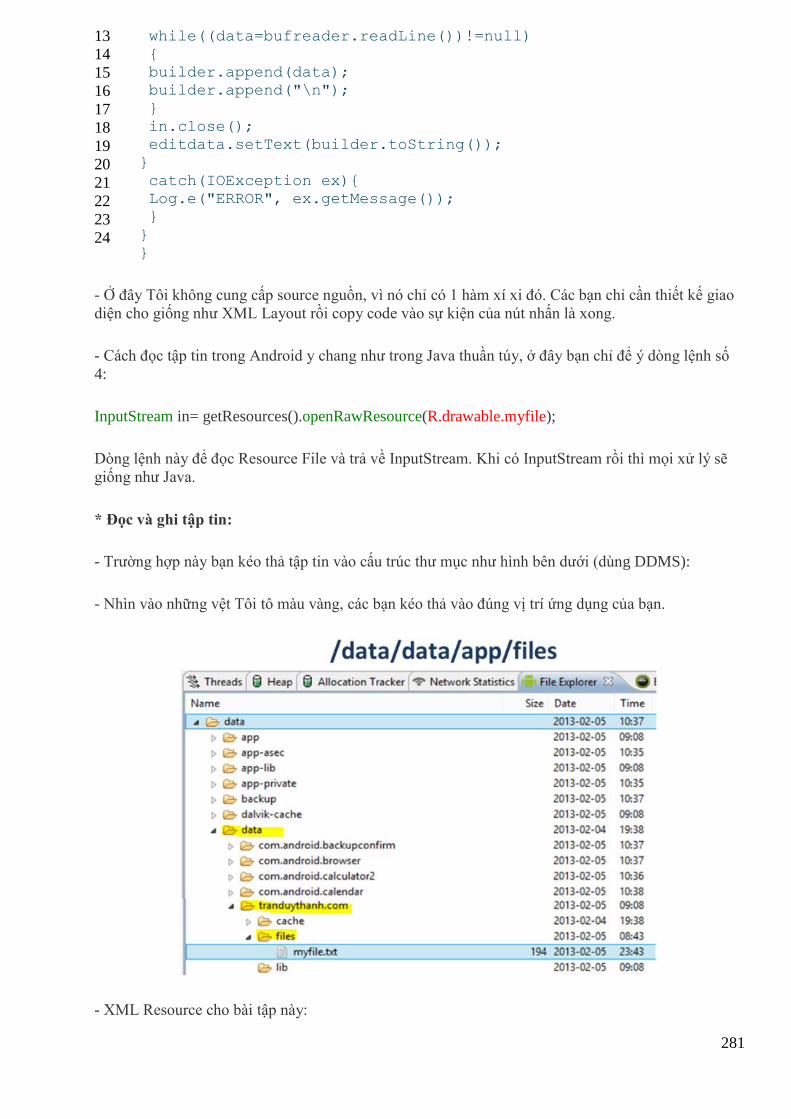
281
13
14
15
16
17
18
19
20
21
22
23
24
while((data=bufreader.readLine())!=null) { builder.append(data); builder.append("\n");
} in.close(); editdata.setText(builder.toString()); }
catch(IOException ex){ Log.e("ERROR", ex.getMessage()); }
} }
- Ở đây Tôi không cung cấp source nguồn, vì nó chỉ có 1 hàm xí xi đó. Các bạn chỉ cần thiết kế giao
diện cho giống như XML Layout rồi copy code vào sự kiện của nút nhấn là xong.
- Cách đọc tập tin trong Android y chang như trong Java thuần túy, ở đây bạn chỉ để ý dòng lệnh số
4:
InputStream in= getResources().openRawResource(R.drawable.myfile);
Dòng lệnh này để đọc Resource File và trả về InputStream. Khi có InputStream rồi thì mọi xử lý sẽ
giống như Java.
* Đọc và ghi tập tin:
- Trường hợp này bạn kéo thả tập tin vào cấu trúc thư mục như hình bên dưới (dùng DDMS):
- Nhìn vào những vệt Tôi tô màu vàng, các bạn kéo thả vào đúng vị trí ứng dụng của bạn.
- XML Resource cho bài tập này:
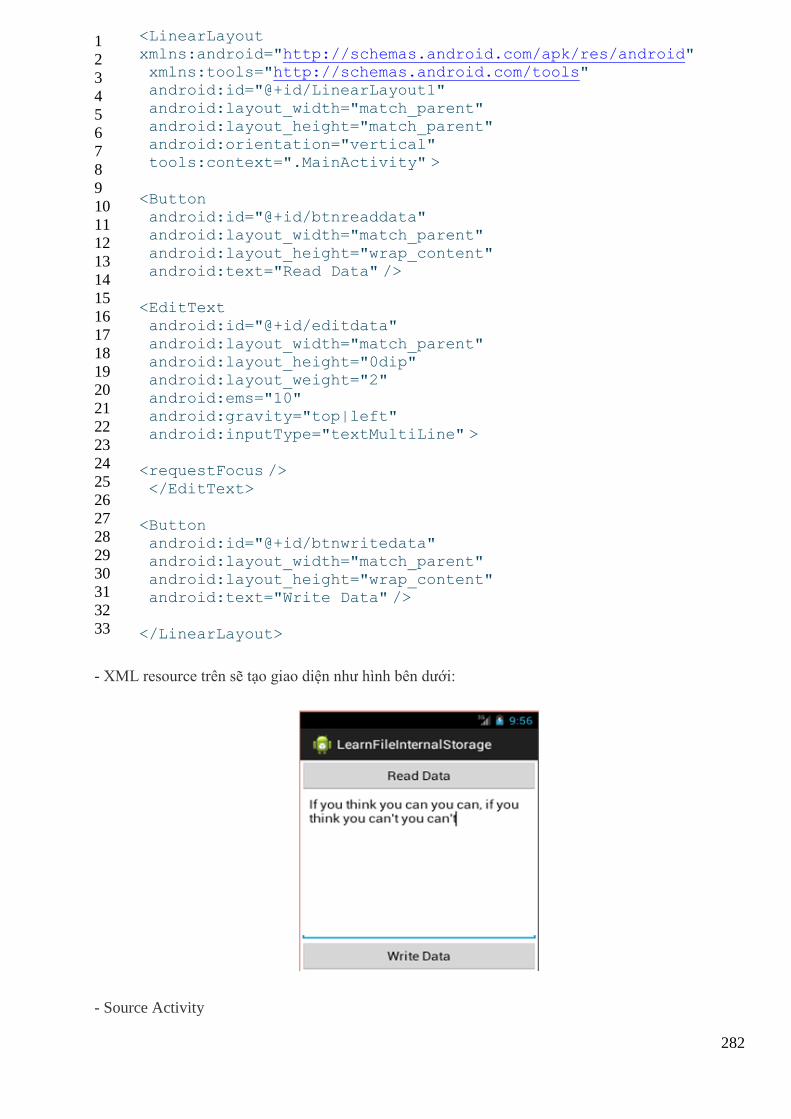
282
1
2
3
4
5
6
7
8
9
10
11
12
13
14
15
16
17
18
19
20
21
22
23
24
25
26
27
28
29
30
31
32
33
<LinearLayout xmlns:android="http://schemas.android.com/apk/res/android" xmlns:tools="http://schemas.android.com/tools" android:id="@+id/LinearLayout1"
android:layout_width="match_parent" android:layout_height="match_parent" android:orientation="vertical" tools:context=".MainActivity" >
<Button android:id="@+id/btnreaddata" android:layout_width="match_parent"
android:layout_height="wrap_content" android:text="Read Data" />
<EditText android:id="@+id/editdata"
android:layout_width="match_parent" android:layout_height="0dip" android:layout_weight="2"
android:ems="10" android:gravity="top|left" android:inputType="textMultiLine" >
<requestFocus />
</EditText>
<Button android:id="@+id/btnwritedata" android:layout_width="match_parent"
android:layout_height="wrap_content" android:text="Write Data" />
</LinearLayout>
- XML resource trên sẽ tạo giao diện như hình bên dưới:
- Source Activity
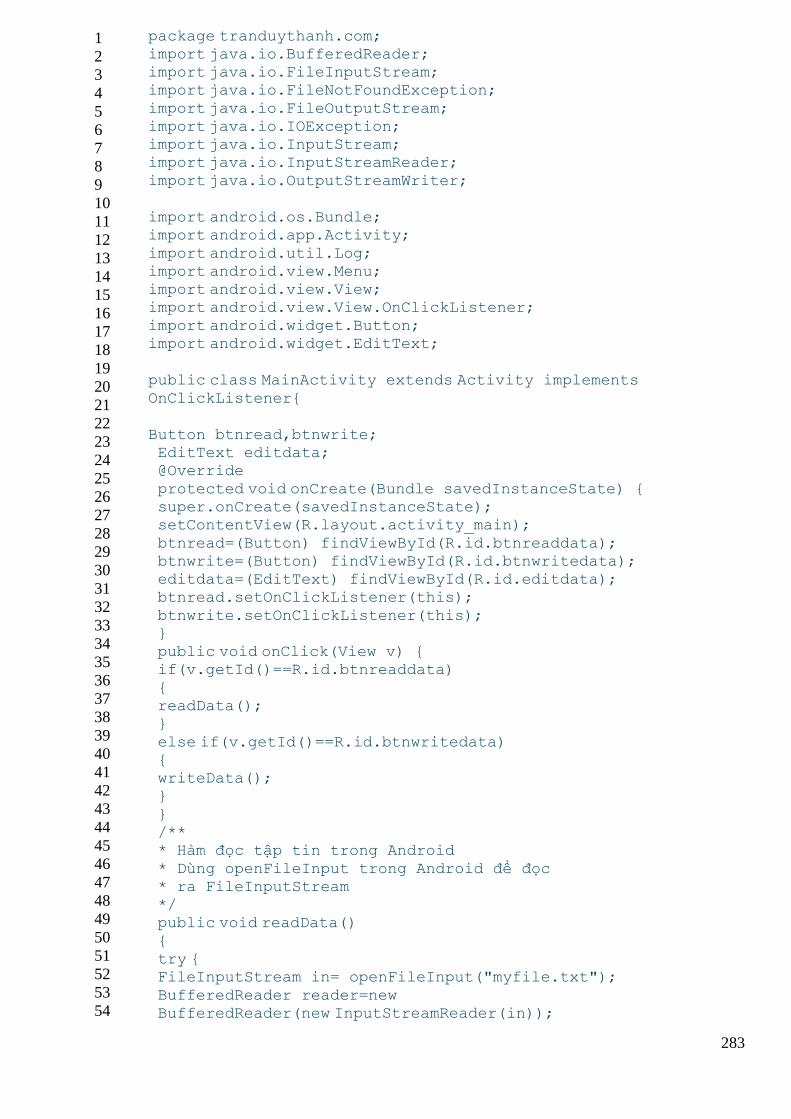
283
1
2
3
4
5
6
7
8
9
10
11
12
13
14
15
16
17
18
19
20
21
22
23
24
25
26
27
28
29
30
31
32
33
34
35
36
37
38
39
40
41
42
43
44
45
46
47
48
49
50
51
52
53
54
package tranduythanh.com; import java.io.BufferedReader; import java.io.FileInputStream; import java.io.FileNotFoundException;
import java.io.FileOutputStream; import java.io.IOException; import java.io.InputStream; import java.io.InputStreamReader;
import java.io.OutputStreamWriter;
import android.os.Bundle; import android.app.Activity;
import android.util.Log; import android.view.Menu; import android.view.View; import android.view.View.OnClickListener;
import android.widget.Button; import android.widget.EditText;
public class MainActivity extends Activity implements
OnClickListener{
Button btnread,btnwrite; EditText editdata; @Override
protected void onCreate(Bundle savedInstanceState) { super.onCreate(savedInstanceState); setContentView(R.layout.activity_main);
btnread=(Button) findViewById(R.id.btnreaddata); btnwrite=(Button) findViewById(R.id.btnwritedata); editdata=(EditText) findViewById(R.id.editdata); btnread.setOnClickListener(this);
btnwrite.setOnClickListener(this); } public void onClick(View v) { if(v.getId()==R.id.btnreaddata)
{ readData(); }
else if(v.getId()==R.id.btnwritedata) { writeData(); }
} /** * Hàm đọc tập tin trong Android
* Dùng openFileInput trong Android để đọc * ra FileInputStream */ public void readData()
{ try { FileInputStream in= openFileInput("myfile.txt");
BufferedReader reader=new BufferedReader(new InputStreamReader(in));
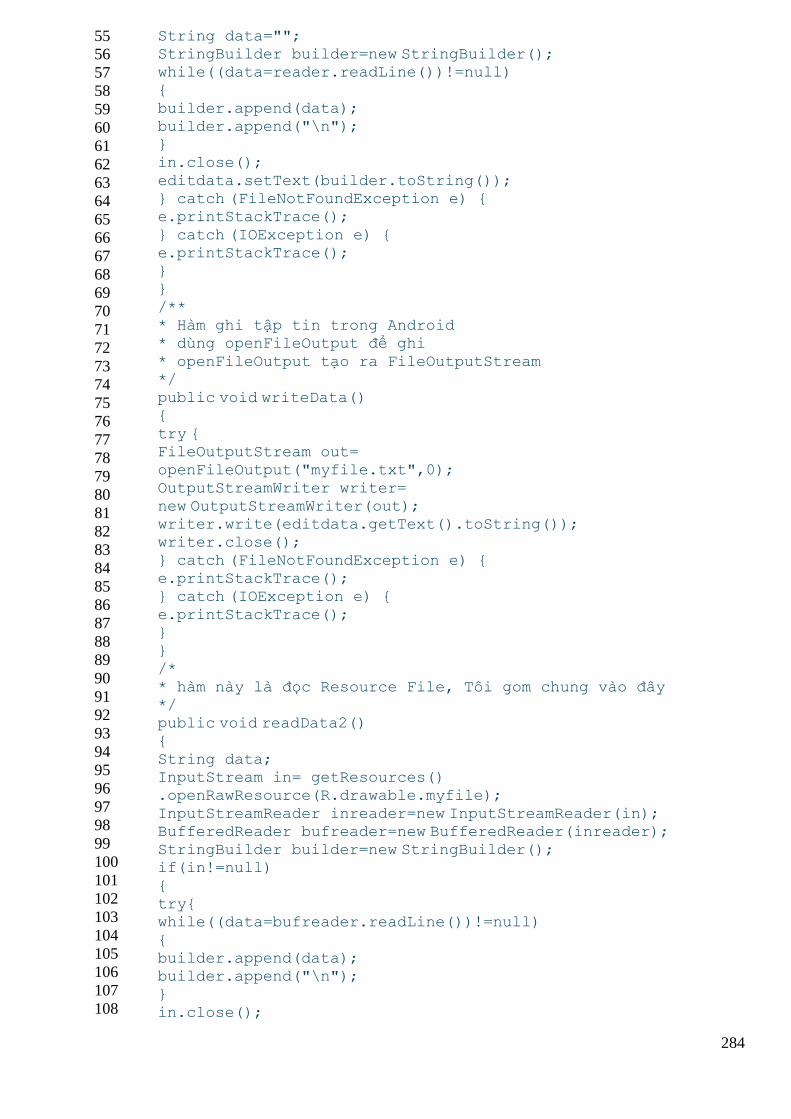
284
55
56
57
58
59
60
61
62
63
64
65
66
67
68
69
70
71
72
73
74
75
76
77
78
79
80
81
82
83
84
85
86
87
88
89
90
91
92
93
94
95
96
97
98
99
100
101
102
103
104
105
106
107
108
String data=""; StringBuilder builder=new StringBuilder(); while((data=reader.readLine())!=null) {
builder.append(data); builder.append("\n"); } in.close();
editdata.setText(builder.toString()); } catch (FileNotFoundException e) { e.printStackTrace();
} catch (IOException e) { e.printStackTrace(); } }
/** * Hàm ghi tập tin trong Android * dùng openFileOutput để ghi
* openFileOutput tạo ra FileOutputStream */ public void writeData() {
try { FileOutputStream out= openFileOutput("myfile.txt",0);
OutputStreamWriter writer= new OutputStreamWriter(out); writer.write(editdata.getText().toString()); writer.close();
} catch (FileNotFoundException e) { e.printStackTrace(); } catch (IOException e) {
e.printStackTrace(); } } /*
* hàm này là đọc Resource File, Tôi gom chung vào đây */ public void readData2() {
String data; InputStream in= getResources() .openRawResource(R.drawable.myfile);
InputStreamReader inreader=new InputStreamReader(in); BufferedReader bufreader=new BufferedReader(inreader); StringBuilder builder=new StringBuilder(); if(in!=null)
{ try{ while((data=bufreader.readLine())!=null)
{ builder.append(data); builder.append("\n"); }
in.close();
285
109
110
111
112
113
114
115
116
117
118
119
120
121
122
123
124
editdata.setText(builder.toString()); } catch(IOException ex){ Log.e("ERROR", ex.getMessage());
} } }
@Override
public boolean onCreateOptionsMenu(Menu menu) { // Inflate the menu; this adds items to the action bar if it
is present.
getMenuInflater().inflate(R.menu.activity_main, menu); return true; } }
- Bạn nhìn vào dòng lệnh 52: FileInputStream in= openFileInput(“myfile.txt”);
Lệnh ở dòng này mở tập tin lên để đọc, nó trả về FileInputStream nên mọi thứ sẽ giống như Java
thuần túy.
- Tiếp tục nhìn vào dòng lệnh 78: FileOutputStream out=openFileOutput(“myfile.txt”,0);
Lệnh ở dòng này mở tập tin lên để ghi. đối số thứ 2 Tôi để là số 0 (MODE_PRIVATE) là mặc định.
Bạn có thể
dùng MODE_APPEND, MODE_WORLD_READABLE,MODE_WORLD_WRITEABLE. Ý
nghĩa của mỗi mode bạn có thể lên mạng tìm. Hoặc chỉ cần di chuyển chuột vào hàm trên là eclipse
tự giải thích cho các bạn (nếu eclipse bạn đã cài Javadoc).
- Bạn tải source code mẫu phần này ở đây:
http://www.mediafire.com/download/toi0ht8ht0t5gd3/LearnFileInternalStorage.rar
2. External Storage:
- Phần này Tôi muốn hướng dẫn các bạn cách tương tác với tập tin được lữu trữ trên SD Card.
- Để thao tác được trên SD Card, bạn phải cấp quyền cho ứng dụng (uses – permission)
- Để vừa ghi vừa đọc trên SD Card thì ta phải sử dụng 2 permission bên dưới
trongAndroidManifest:
<uses-permission android:name=”android.permission.WRITE_EXTERNAL_STORAGE” />
<uses-permission android:name=”android.permission.READ_EXTERNAL_STORAGE” />
- Để lấy được đường dẫn của SD Card ta dùng lệnh:
String sdcard=Environment.getExternalStorageDirectory().getAbsolutePath();
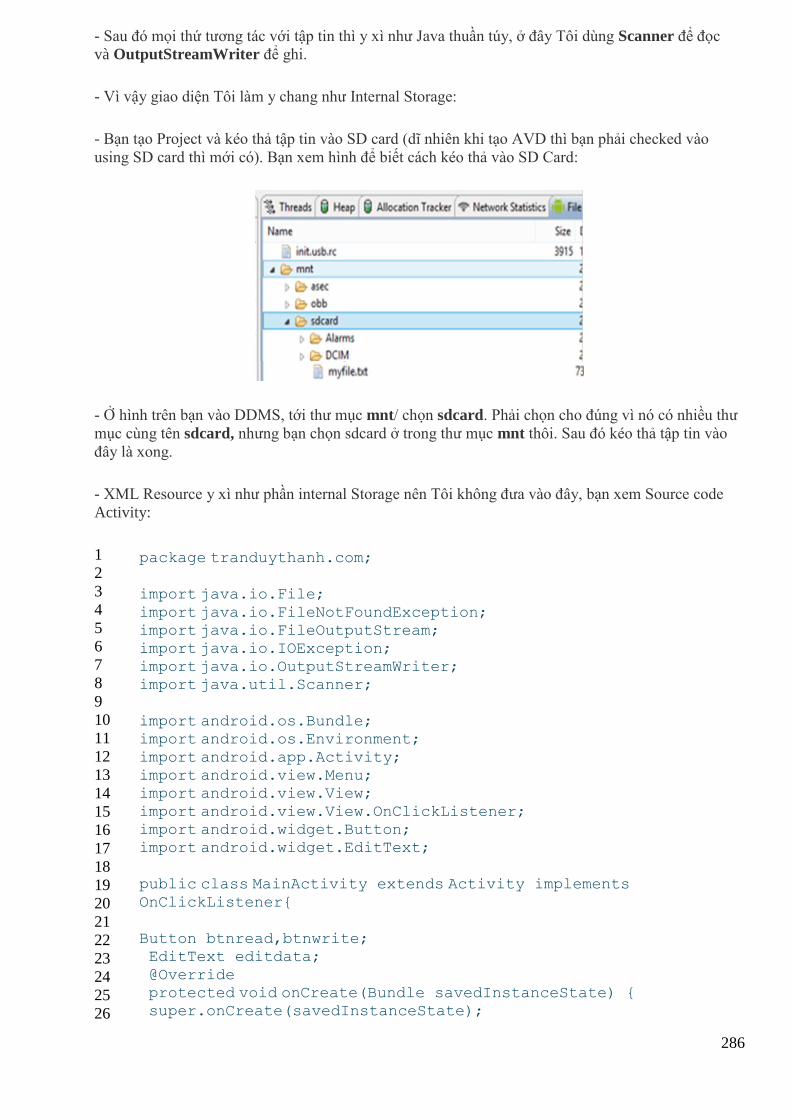
286
- Sau đó mọi thứ tương tác với tập tin thì y xì như Java thuần túy, ở đây Tôi dùng Scanner để đọc
và OutputStreamWriter để ghi.
- Vì vậy giao diện Tôi làm y chang như Internal Storage:
- Bạn tạo Project và kéo thả tập tin vào SD card (dĩ nhiên khi tạo AVD thì bạn phải checked vào
using SD card thì mới có). Bạn xem hình để biết cách kéo thả vào SD Card:
- Ở hình trên bạn vào DDMS, tới thư mục mnt/ chọn sdcard. Phải chọn cho đúng vì nó có nhiều thư
mục cùng tên sdcard, nhưng bạn chọn sdcard ở trong thư mục mnt thôi. Sau đó kéo thả tập tin vào
đây là xong.
- XML Resource y xì như phần internal Storage nên Tôi không đưa vào đây, bạn xem Source code
Activity:
1
2
3
4
5
6
7
8
9
10
11
12
13
14
15
16
17
18
19
20
21
22
23
24
25
26
package tranduythanh.com;
import java.io.File;
import java.io.FileNotFoundException; import java.io.FileOutputStream; import java.io.IOException;
import java.io.OutputStreamWriter; import java.util.Scanner;
import android.os.Bundle; import android.os.Environment;
import android.app.Activity; import android.view.Menu; import android.view.View;
import android.view.View.OnClickListener; import android.widget.Button; import android.widget.EditText;
public class MainActivity extends Activity implements
OnClickListener{
Button btnread,btnwrite; EditText editdata;
@Override protected void onCreate(Bundle savedInstanceState) { super.onCreate(savedInstanceState);
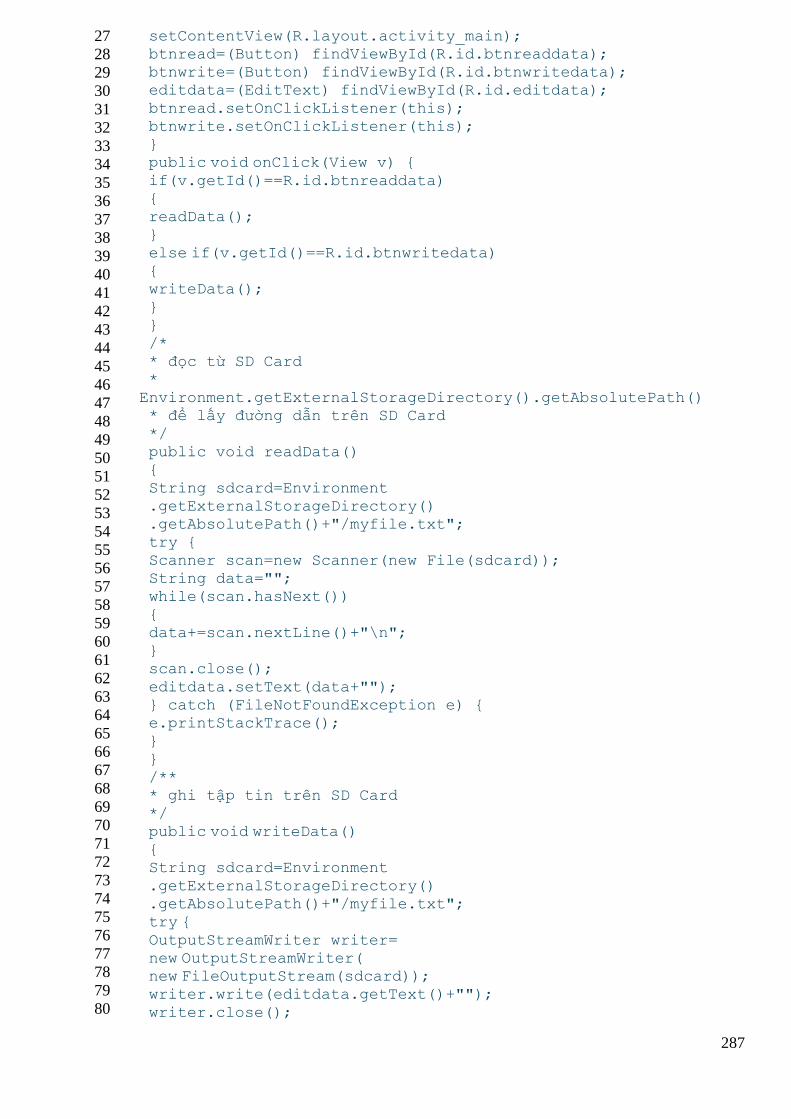
287
27
28
29
30
31
32
33
34
35
36
37
38
39
40
41
42
43
44
45
46
47
48
49
50
51
52
53
54
55
56
57
58
59
60
61
62
63
64
65
66
67
68
69
70
71
72
73
74
75
76
77
78
79
80
setContentView(R.layout.activity_main); btnread=(Button) findViewById(R.id.btnreaddata); btnwrite=(Button) findViewById(R.id.btnwritedata); editdata=(EditText) findViewById(R.id.editdata);
btnread.setOnClickListener(this); btnwrite.setOnClickListener(this); } public void onClick(View v) {
if(v.getId()==R.id.btnreaddata) { readData();
} else if(v.getId()==R.id.btnwritedata) { writeData();
} } /*
* đọc từ SD Card *
Environment.getExternalStorageDirectory().getAbsolutePath() * để lấy đường dẫn trên SD Card
*/ public void readData() {
String sdcard=Environment .getExternalStorageDirectory() .getAbsolutePath()+"/myfile.txt"; try {
Scanner scan=new Scanner(new File(sdcard)); String data=""; while(scan.hasNext())
{ data+=scan.nextLine()+"\n"; } scan.close();
editdata.setText(data+""); } catch (FileNotFoundException e) { e.printStackTrace(); }
} /** * ghi tập tin trên SD Card
*/ public void writeData() { String sdcard=Environment
.getExternalStorageDirectory() .getAbsolutePath()+"/myfile.txt"; try {
OutputStreamWriter writer= new OutputStreamWriter( new FileOutputStream(sdcard)); writer.write(editdata.getText()+"");
writer.close();
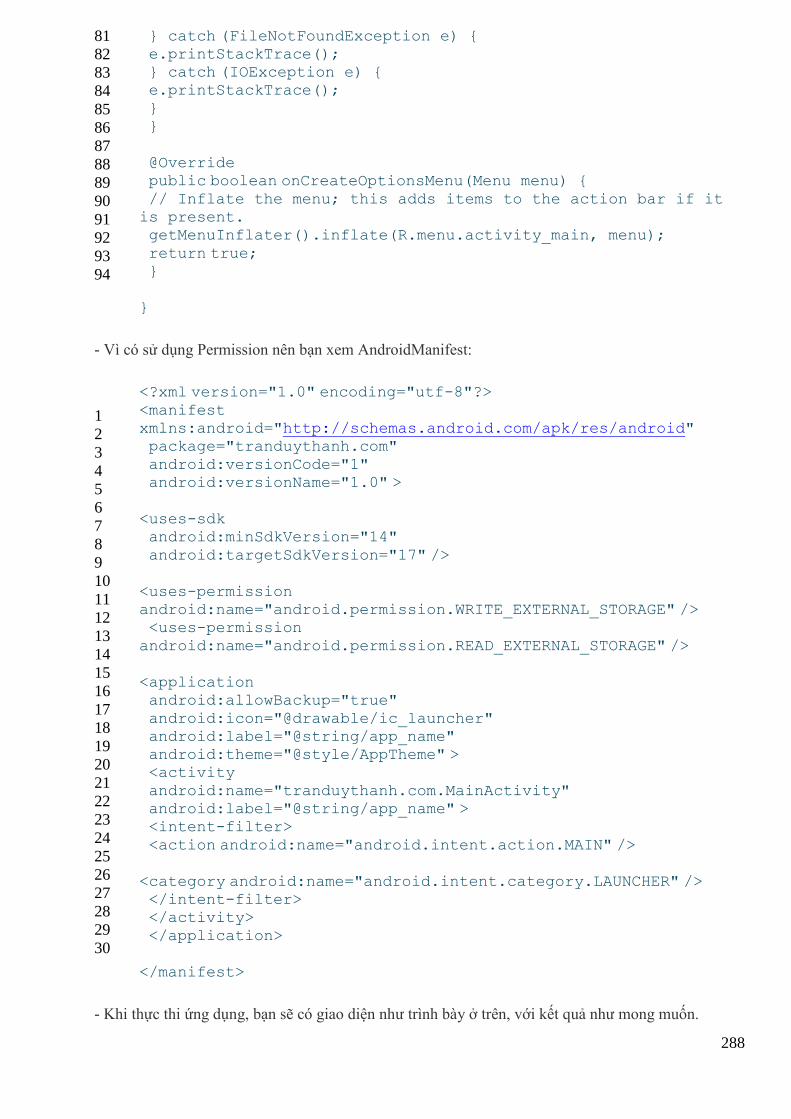
288
81
82
83
84
85
86
87
88
89
90
91
92
93
94
} catch (FileNotFoundException e) { e.printStackTrace(); } catch (IOException e) { e.printStackTrace();
} }
@Override public boolean onCreateOptionsMenu(Menu menu) {
// Inflate the menu; this adds items to the action bar if it
is present. getMenuInflater().inflate(R.menu.activity_main, menu);
return true; }
}
- Vì có sử dụng Permission nên bạn xem AndroidManifest:
1
2
3
4
5
6
7
8
9
10
11
12
13
14
15
16
17
18
19
20
21
22
23
24
25
26
27
28
29
30
<?xml version="1.0" encoding="utf-8"?>
<manifest xmlns:android="http://schemas.android.com/apk/res/android" package="tranduythanh.com"
android:versionCode="1" android:versionName="1.0" >
<uses-sdk android:minSdkVersion="14"
android:targetSdkVersion="17" />
<uses-permission android:name="android.permission.WRITE_EXTERNAL_STORAGE" /> <uses-permission
android:name="android.permission.READ_EXTERNAL_STORAGE" />
<application android:allowBackup="true"
android:icon="@drawable/ic_launcher" android:label="@string/app_name" android:theme="@style/AppTheme" > <activity
android:name="tranduythanh.com.MainActivity" android:label="@string/app_name" > <intent-filter>
<action android:name="android.intent.action.MAIN" />
<category android:name="android.intent.category.LAUNCHER" /> </intent-filter> </activity>
</application>
</manifest>
- Khi thực thi ứng dụng, bạn sẽ có giao diện như trình bày ở trên, với kết quả như mong muốn.
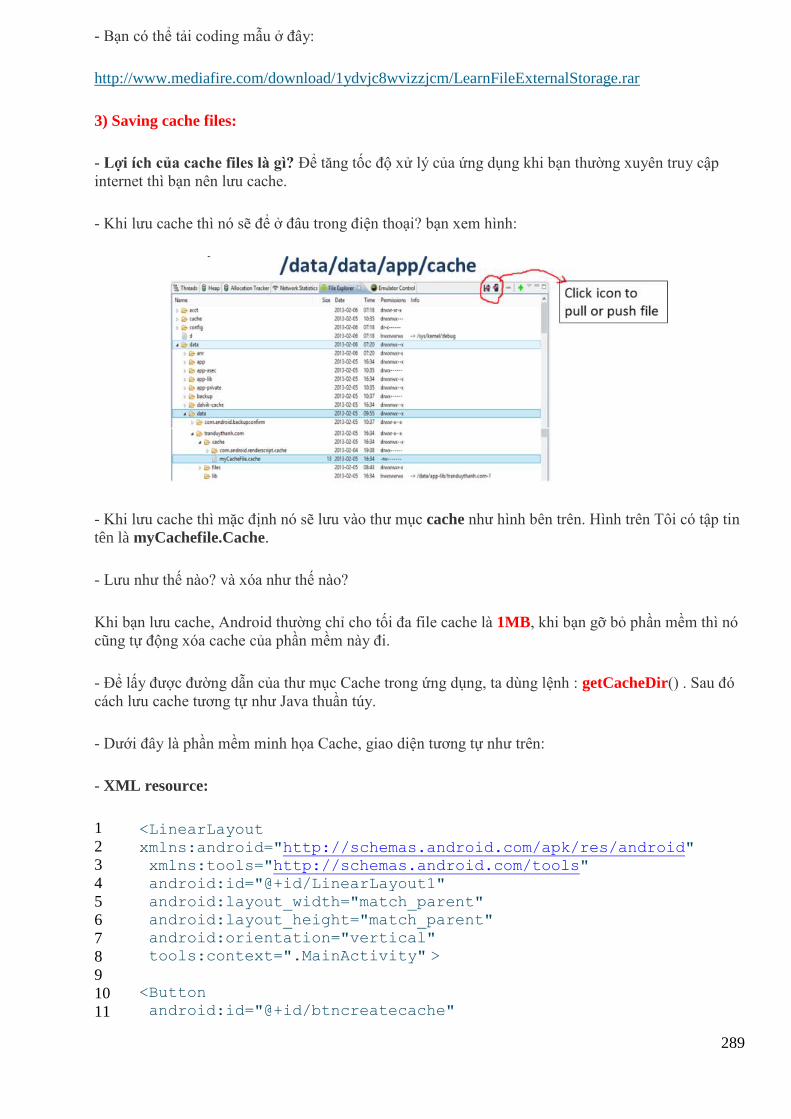
289
- Bạn có thể tải coding mẫu ở đây:
http://www.mediafire.com/download/1ydvjc8wvizzjcm/LearnFileExternalStorage.rar
3) Saving cache files:
- Lợi ích của cache files là gì? Để tăng tốc độ xử lý của ứng dụng khi bạn thường xuyên truy cập
internet thì bạn nên lưu cache.
- Khi lưu cache thì nó sẽ để ở đâu trong điện thoại? bạn xem hình:
- Khi lưu cache thì mặc định nó sẽ lưu vào thư mục cache như hình bên trên. Hình trên Tôi có tập tin
tên là myCachefile.Cache.
- Lưu như thế nào? và xóa như thế nào?
Khi bạn lưu cache, Android thường chỉ cho tối đa file cache là 1MB, khi bạn gỡ bỏ phần mềm thì nó
cũng tự động xóa cache của phần mềm này đi.
- Để lấy được đường dẫn của thư mục Cache trong ứng dụng, ta dùng lệnh : getCacheDir() . Sau đó
cách lưu cache tương tự như Java thuần túy.
- Dưới đây là phần mềm minh họa Cache, giao diện tương tự như trên:
- XML resource:
1
2
3
4
5
6
7
8
9
10
11
<LinearLayout
xmlns:android="http://schemas.android.com/apk/res/android" xmlns:tools="http://schemas.android.com/tools" android:id="@+id/LinearLayout1"
android:layout_width="match_parent" android:layout_height="match_parent" android:orientation="vertical" tools:context=".MainActivity" >
<Button android:id="@+id/btncreatecache"
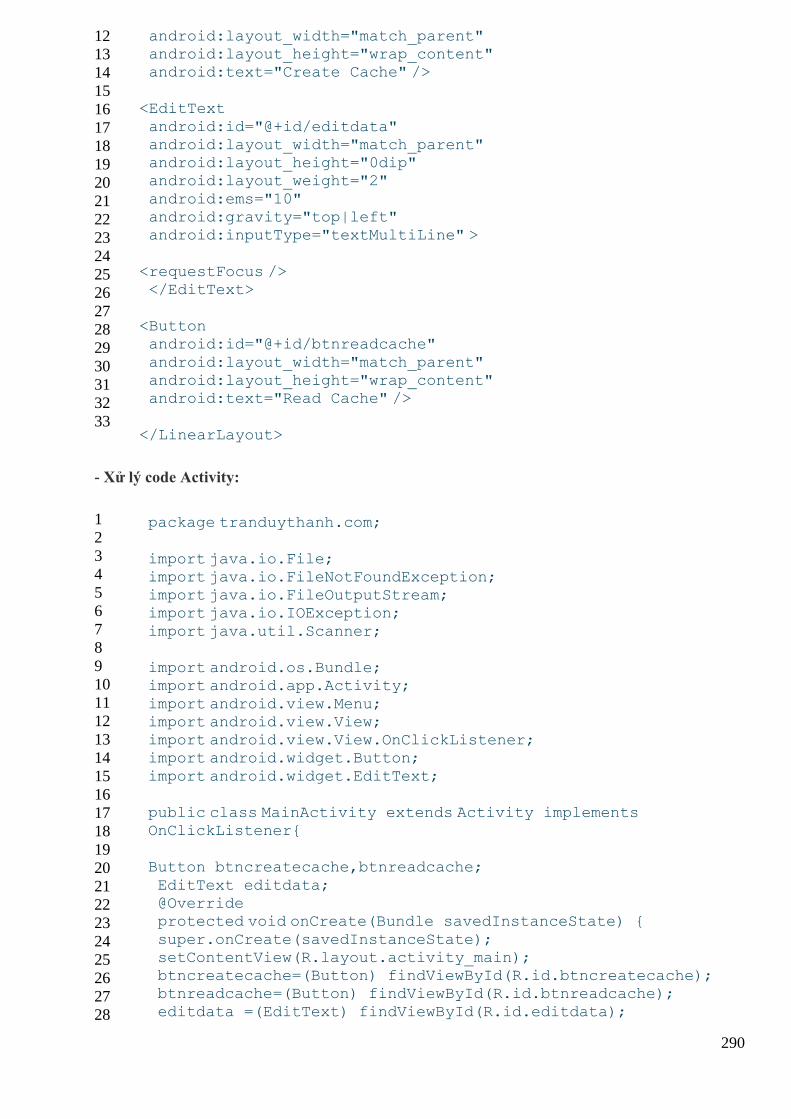
290
12
13
14
15
16
17
18
19
20
21
22
23
24
25
26
27
28
29
30
31
32
33
android:layout_width="match_parent" android:layout_height="wrap_content" android:text="Create Cache" />
<EditText
android:id="@+id/editdata" android:layout_width="match_parent" android:layout_height="0dip" android:layout_weight="2"
android:ems="10" android:gravity="top|left" android:inputType="textMultiLine" >
<requestFocus /> </EditText>
<Button android:id="@+id/btnreadcache"
android:layout_width="match_parent" android:layout_height="wrap_content" android:text="Read Cache" />
</LinearLayout>
- Xử lý code Activity:
1
2
3
4
5
6
7
8
9
10
11
12
13
14
15
16
17
18
19
20
21
22
23
24
25
26
27
28
package tranduythanh.com;
import java.io.File; import java.io.FileNotFoundException; import java.io.FileOutputStream; import java.io.IOException;
import java.util.Scanner;
import android.os.Bundle; import android.app.Activity;
import android.view.Menu; import android.view.View; import android.view.View.OnClickListener; import android.widget.Button;
import android.widget.EditText;
public class MainActivity extends Activity implements OnClickListener{
Button btncreatecache,btnreadcache;
EditText editdata; @Override protected void onCreate(Bundle savedInstanceState) {
super.onCreate(savedInstanceState); setContentView(R.layout.activity_main); btncreatecache=(Button) findViewById(R.id.btncreatecache); btnreadcache=(Button) findViewById(R.id.btnreadcache);
editdata =(EditText) findViewById(R.id.editdata);
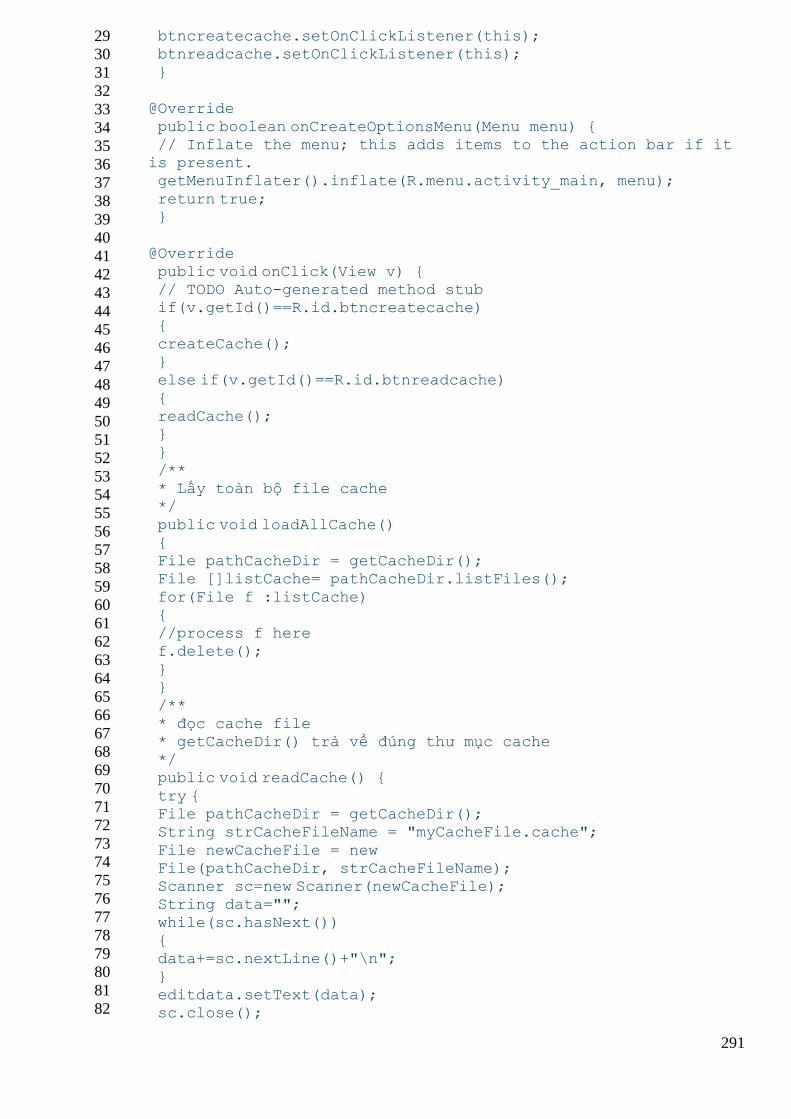
291
29
30
31
32
33
34
35
36
37
38
39
40
41
42
43
44
45
46
47
48
49
50
51
52
53
54
55
56
57
58
59
60
61
62
63
64
65
66
67
68
69
70
71
72
73
74
75
76
77
78
79
80
81
82
btncreatecache.setOnClickListener(this); btnreadcache.setOnClickListener(this); }
@Override
public boolean onCreateOptionsMenu(Menu menu) { // Inflate the menu; this adds items to the action bar if it
is present. getMenuInflater().inflate(R.menu.activity_main, menu);
return true; }
@Override
public void onClick(View v) { // TODO Auto-generated method stub if(v.getId()==R.id.btncreatecache) {
createCache(); } else if(v.getId()==R.id.btnreadcache)
{ readCache(); } }
/** * Lấy toàn bộ file cache */
public void loadAllCache() { File pathCacheDir = getCacheDir(); File []listCache= pathCacheDir.listFiles();
for(File f :listCache) { //process f here f.delete();
} } /**
* đọc cache file * getCacheDir() trả về đúng thư mục cache */ public void readCache() {
try { File pathCacheDir = getCacheDir(); String strCacheFileName = "myCacheFile.cache";
File newCacheFile = new File(pathCacheDir, strCacheFileName); Scanner sc=new Scanner(newCacheFile); String data="";
while(sc.hasNext()) { data+=sc.nextLine()+"\n";
} editdata.setText(data); sc.close();
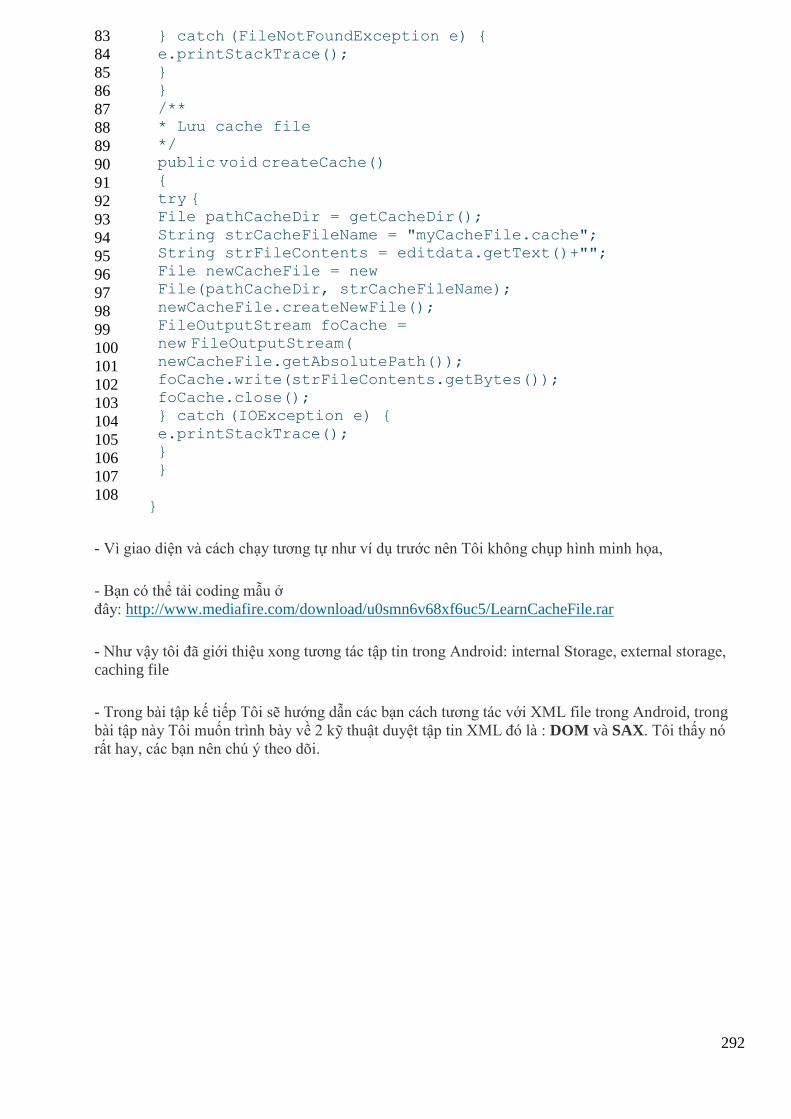
292
83
84
85
86
87
88
89
90
91
92
93
94
95
96
97
98
99
100
101
102
103
104
105
106
107
108
} catch (FileNotFoundException e) { e.printStackTrace(); } }
/** * Lưu cache file */ public void createCache()
{ try { File pathCacheDir = getCacheDir();
String strCacheFileName = "myCacheFile.cache"; String strFileContents = editdata.getText()+""; File newCacheFile = new File(pathCacheDir, strCacheFileName);
newCacheFile.createNewFile(); FileOutputStream foCache = new FileOutputStream(
newCacheFile.getAbsolutePath()); foCache.write(strFileContents.getBytes()); foCache.close(); } catch (IOException e) {
e.printStackTrace(); } }
}
- Vì giao diện và cách chạy tương tự như ví dụ trước nên Tôi không chụp hình minh họa,
- Bạn có thể tải coding mẫu ở
đây: http://www.mediafire.com/download/u0smn6v68xf6uc5/LearnCacheFile.rar
- Như vậy tôi đã giới thiệu xong tương tác tập tin trong Android: internal Storage, external storage,
caching file
- Trong bài tập kế tiếp Tôi sẽ hướng dẫn các bạn cách tương tác với XML file trong Android, trong
bài tập này Tôi muốn trình bày về 2 kỹ thuật duyệt tập tin XML đó là : DOM và SAX. Tôi thấy nó
rất hay, các bạn nên chú ý theo dõi.
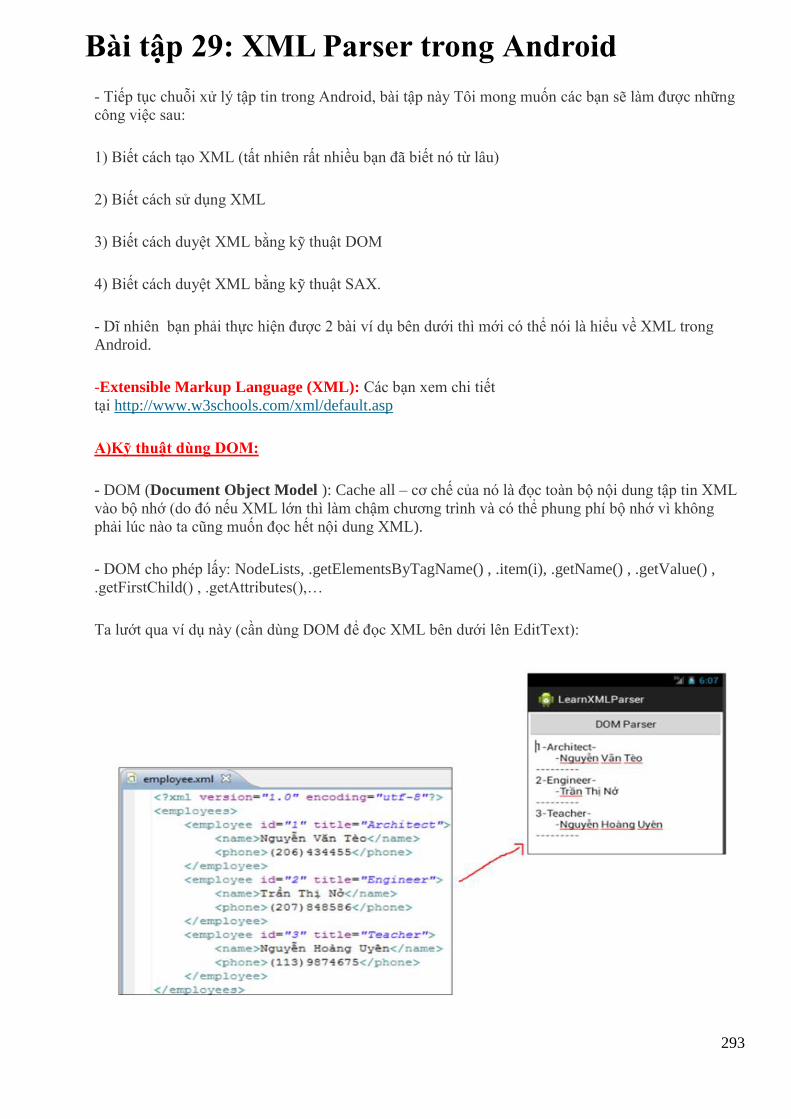
293
Bài tập 29: XML Parser trong Android
- Tiếp tục chuỗi xử lý tập tin trong Android, bài tập này Tôi mong muốn các bạn sẽ làm được những
công việc sau:
1) Biết cách tạo XML (tất nhiên rất nhiều bạn đã biết nó từ lâu)
2) Biết cách sử dụng XML
3) Biết cách duyệt XML bằng kỹ thuật DOM
4) Biết cách duyệt XML bằng kỹ thuật SAX.
- Dĩ nhiên bạn phải thực hiện được 2 bài ví dụ bên dưới thì mới có thể nói là hiểu về XML trong
Android.
-Extensible Markup Language (XML): Các bạn xem chi tiết
tại http://www.w3schools.com/xml/default.asp
A)Kỹ thuật dùng DOM:
- DOM (Document Object Model ): Cache all – cơ chế của nó là đọc toàn bộ nội dung tập tin XML
vào bộ nhớ (do đó nếu XML lớn thì làm chậm chương trình và có thể phung phí bộ nhớ vì không
phải lúc nào ta cũng muốn đọc hết nội dung XML).
- DOM cho phép lấy: NodeLists, .getElementsByTagName() , .item(i), .getName() , .getValue() ,
.getFirstChild() , .getAttributes(),…
Ta lướt qua ví dụ này (cần dùng DOM để đọc XML bên dưới lên EditText):
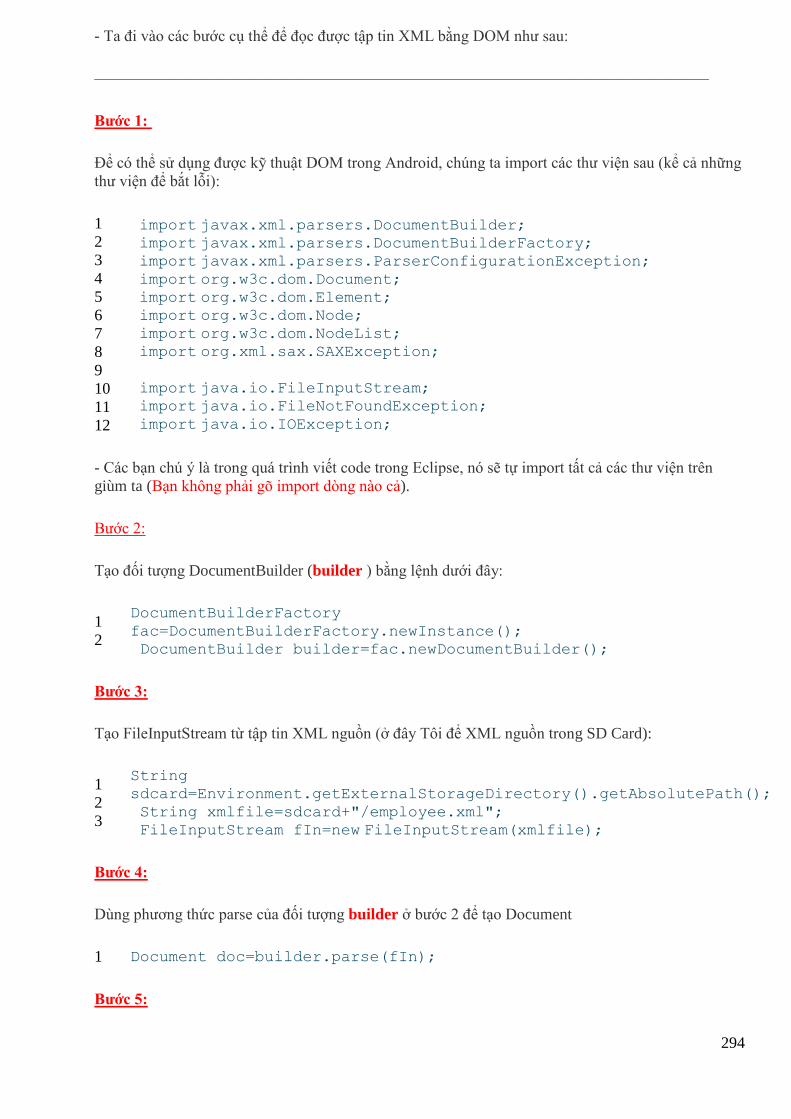
294
- Ta đi vào các bước cụ thể để đọc được tập tin XML bằng DOM như sau:
——————————————————————————————————————–
Bước 1:
Để có thể sử dụng được kỹ thuật DOM trong Android, chúng ta import các thư viện sau (kể cả những
thư viện để bắt lỗi):
1
2
3
4
5
6
7
8
9
10
11
12
import javax.xml.parsers.DocumentBuilder; import javax.xml.parsers.DocumentBuilderFactory; import javax.xml.parsers.ParserConfigurationException;
import org.w3c.dom.Document; import org.w3c.dom.Element; import org.w3c.dom.Node;
import org.w3c.dom.NodeList; import org.xml.sax.SAXException;
import java.io.FileInputStream; import java.io.FileNotFoundException;
import java.io.IOException;
- Các bạn chú ý là trong quá trình viết code trong Eclipse, nó sẽ tự import tất cả các thư viện trên
giùm ta (Bạn không phải gõ import dòng nào cả).
Bước 2:
Tạo đối tượng DocumentBuilder (builder ) bằng lệnh dưới đây:
1
2
DocumentBuilderFactory
fac=DocumentBuilderFactory.newInstance(); DocumentBuilder builder=fac.newDocumentBuilder();
Bước 3:
Tạo FileInputStream từ tập tin XML nguồn (ở đây Tôi để XML nguồn trong SD Card):
1
2
3
String
sdcard=Environment.getExternalStorageDirectory().getAbsolutePath();
String xmlfile=sdcard+"/employee.xml"; FileInputStream fIn=new FileInputStream(xmlfile);
Bước 4:
Dùng phương thức parse của đối tượng builder ở bước 2 để tạo Document
1 Document doc=builder.parse(fIn);
Bước 5:
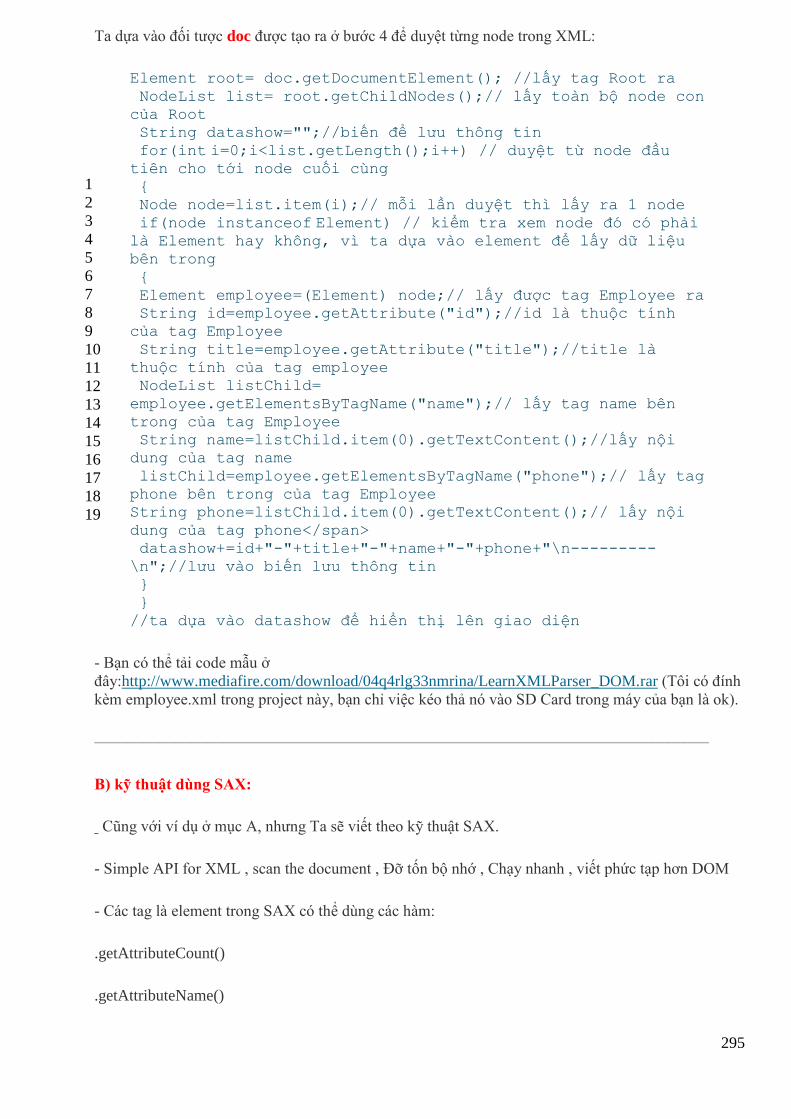
295
Ta dựa vào đối tược doc được tạo ra ở bước 4 để duyệt từng node trong XML:
1
2
3
4
5
6
7
8
9
10
11
12
13
14
15
16
17
18
19
Element root= doc.getDocumentElement(); //lấy tag Root ra
NodeList list= root.getChildNodes();// lấy toàn bộ node con
của Root String datashow="";//biến để lưu thông tin
for(int i=0;i<list.getLength();i++) // duyệt từ node đầu tiên cho tới node cuối cùng { Node node=list.item(i);// mỗi lần duyệt thì lấy ra 1 node
if(node instanceof Element) // kiểm tra xem node đó có phải là Element hay không, vì ta dựa vào element để lấy dữ liệu
bên trong
{ Element employee=(Element) node;// lấy được tag Employee ra String id=employee.getAttribute("id");//id là thuộc tính
của tag Employee
String title=employee.getAttribute("title");//title là
thuộc tính của tag employee NodeList listChild=
employee.getElementsByTagName("name");// lấy tag name bên
trong của tag Employee String name=listChild.item(0).getTextContent();//lấy nội
dung của tag name
listChild=employee.getElementsByTagName("phone");// lấy tag
phone bên trong của tag Employee String phone=listChild.item(0).getTextContent();// lấy nội
dung của tag phone</span> datashow+=id+"-"+title+"-"+name+"-"+phone+"\n---------
\n";//lưu vào biến lưu thông tin }
} //ta dựa vào datashow để hiển thị lên giao diện
- Bạn có thể tải code mẫu ở
đây:http://www.mediafire.com/download/04q4rlg33nmrina/LearnXMLParser_DOM.rar (Tôi có đính
kèm employee.xml trong project này, bạn chỉ việc kéo thả nó vào SD Card trong máy của bạn là ok).
——————————————————————————————————————–
B) kỹ thuật dùng SAX:
Cũng với ví dụ ở mục A, nhưng Ta sẽ viết theo kỹ thuật SAX.
- Simple API for XML , scan the document , Đỡ tốn bộ nhớ , Chạy nhanh , viết phức tạp hơn DOM
- Các tag là element trong SAX có thể dùng các hàm:
.getAttributeCount()
.getAttributeName()
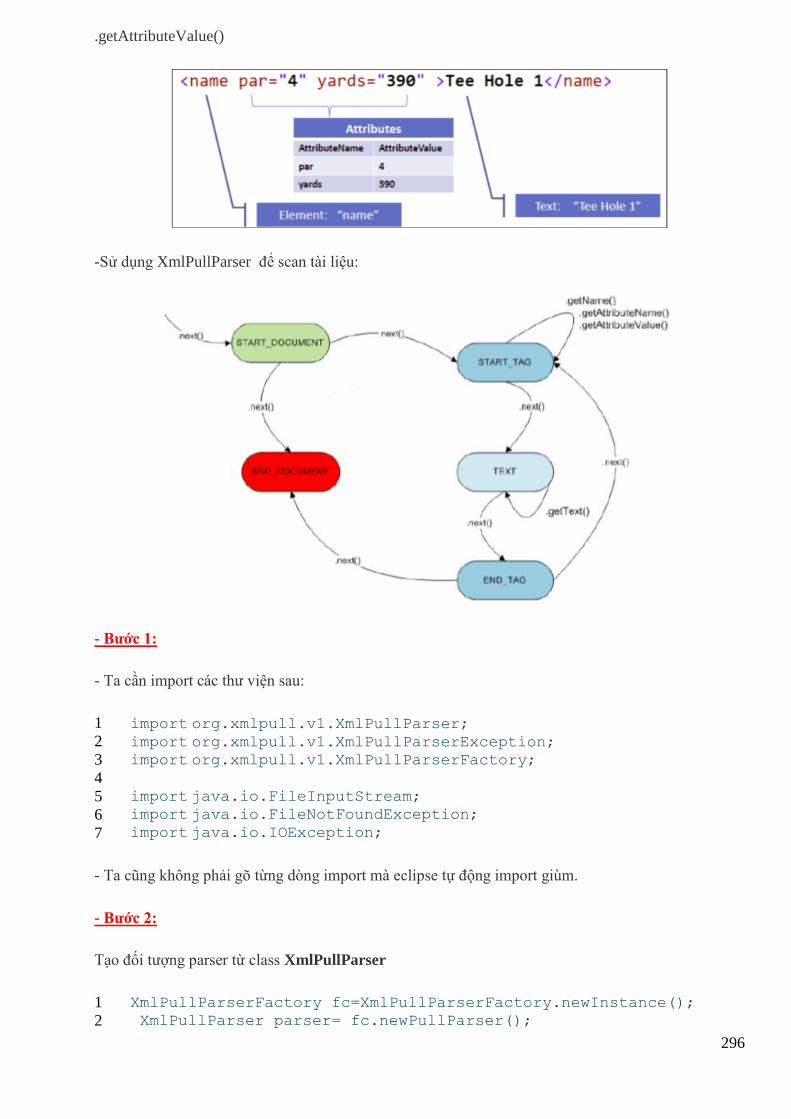
296
.getAttributeValue()
-Sử dụng XmlPullParser để scan tài liệu:
- Bước 1:
- Ta cần import các thư viện sau:
1
2
3
4
5
6
7
import org.xmlpull.v1.XmlPullParser;
import org.xmlpull.v1.XmlPullParserException; import org.xmlpull.v1.XmlPullParserFactory;
import java.io.FileInputStream; import java.io.FileNotFoundException;
import java.io.IOException;
- Ta cũng không phải gõ từng dòng import mà eclipse tự động import giùm.
- Bước 2:
Tạo đối tượng parser từ class XmlPullParser
1
2
XmlPullParserFactory fc=XmlPullParserFactory.newInstance(); XmlPullParser parser= fc.newPullParser();
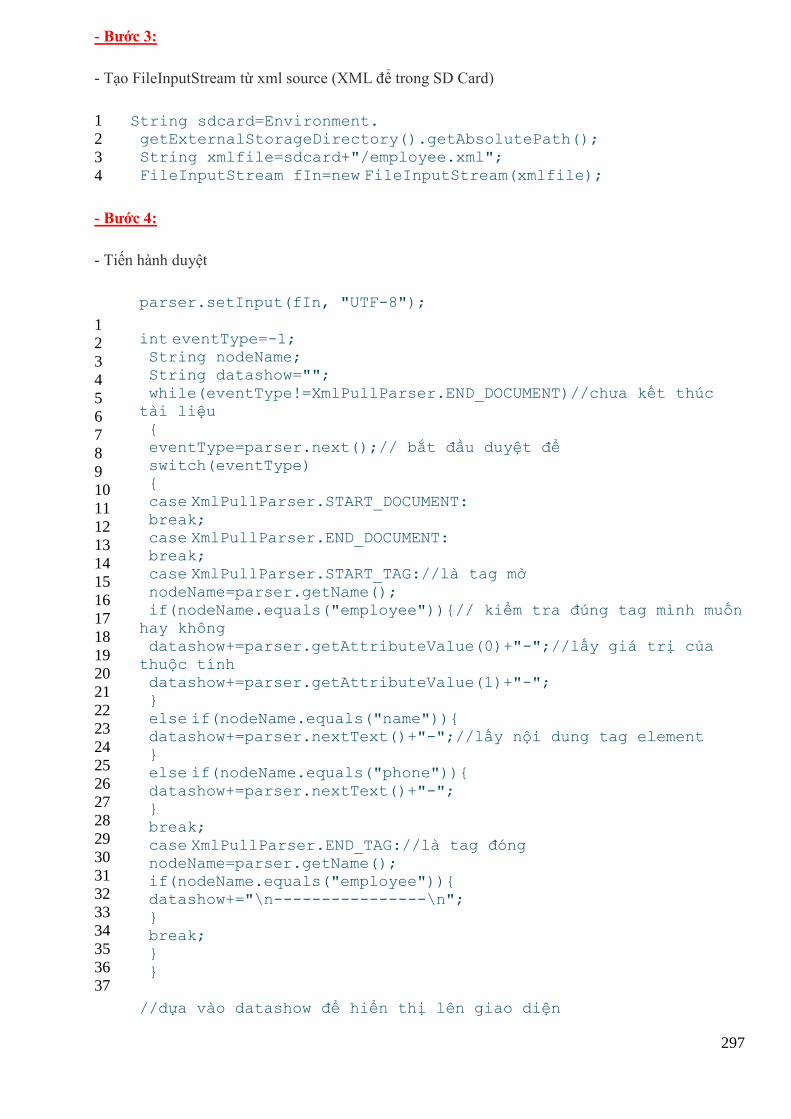
297
- Bước 3:
- Tạo FileInputStream từ xml source (XML để trong SD Card)
1
2
3
4
String sdcard=Environment. getExternalStorageDirectory().getAbsolutePath(); String xmlfile=sdcard+"/employee.xml";
FileInputStream fIn=new FileInputStream(xmlfile);
- Bước 4:
- Tiến hành duyệt
1
2
3
4
5
6
7
8
9
10
11
12
13
14
15
16
17
18
19
20
21
22
23
24
25
26
27
28
29
30
31
32
33
34
35
36
37
parser.setInput(fIn, "UTF-8");
int eventType=-1; String nodeName; String datashow="";
while(eventType!=XmlPullParser.END_DOCUMENT)//chưa kết thúc
tài liệu { eventType=parser.next();// bắt đầu duyệt để
switch(eventType) { case XmlPullParser.START_DOCUMENT:
break; case XmlPullParser.END_DOCUMENT: break; case XmlPullParser.START_TAG://là tag mở
nodeName=parser.getName(); if(nodeName.equals("employee")){// kiểm tra đúng tag mình muốn
hay không datashow+=parser.getAttributeValue(0)+"-";//lấy giá trị của
thuộc tính datashow+=parser.getAttributeValue(1)+"-"; }
else if(nodeName.equals("name")){ datashow+=parser.nextText()+"-";//lấy nội dung tag element } else if(nodeName.equals("phone")){
datashow+=parser.nextText()+"-"; } break;
case XmlPullParser.END_TAG://là tag đóng nodeName=parser.getName(); if(nodeName.equals("employee")){ datashow+="\n----------------\n";
} break; }
}
//dựa vào datashow để hiển thị lên giao diện
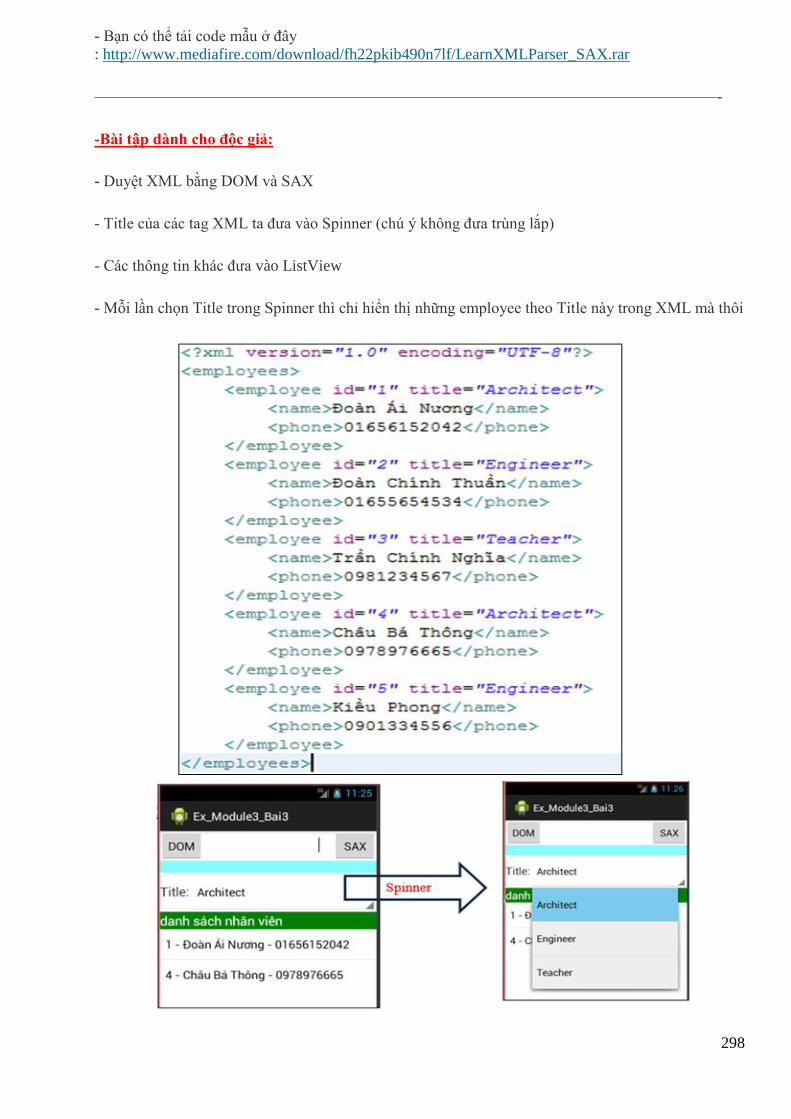
298
- Bạn có thể tải code mẫu ở đây
: http://www.mediafire.com/download/fh22pkib490n7lf/LearnXMLParser_SAX.rar
———————————————————————————————————————-
-Bài tập dành cho độc giả:
- Duyệt XML bằng DOM và SAX
- Title của các tag XML ta đưa vào Spinner (chú ý không đưa trùng lắp)
- Các thông tin khác đưa vào ListView
- Mỗi lần chọn Title trong Spinner thì chỉ hiển thị những employee theo Title này trong XML mà thôi
299
Bài tập 30: Thực hành về Shared Preferences
Trong bài tập này Tôi sẽ trình bày về cách lưu trạng thái của ứng dụng (liên quan tới Shared
Preferences) và cách tạo các màn hình cấu hình (liên quan tới Shared Preference Change Listeners)
————————————————————————————————————————–
-A- Cách lưu trạng thái của ứng dụng:
Bước 1:
- Gọi hàm getSharedPreferences, hàm này trả về SharedPreferences và nó có 2 đối. Đối số 1 là tên
tập tin để lưu trạng thái, đối số 2 là kiểu lưu. Chú ý là đối số 1 ta chỉ ghi tên tập tin (không cần ghi
phần mở rộng, vì phần mở rộng mặc nhiên của nó là .xml khi ta lưu thành công), đối số 2 thường ta
để là MODE_PRIVATE:
SharedPreferences pre=getSharedPreferences(“my_data“, MODE_PRIVATE);
Bước 2:
- Tạo đổi tượng Editor để cho phép chỉnh sửa dữ liệu:
SharedPreferences.Editor edit=pre.edit();
Bước 3:
- Đưa dữ liệu muốn lưu trữ vào edit bằng các phương thức edit.putXXX(“key”,”value”);
Tùy vào kiểu dữ liệu ta muốn lưu trữ mà XXX được thay thế bởi các kiểu dữ liệu phù hợp:
editor.putString(“user”, “drthanh”);
editor.putString(“pwd”, “hoilamgi”);
editor.putBoolean(“checked”, true);
Bước 4:
- Lưu trạng thái bằng cách gọi dòng lệnh:
editor.commit();
————————————————————————————————————————–
Sau khi bạn làm đúng 4 bước trên thì chương trình sẽ lưu được trạng thái, như trên đã nói mặc định
phần mở rộng là .xml (tức là trạng thái được lưu dưới định dạng tập tin XML). Bên trên ta đặt tên
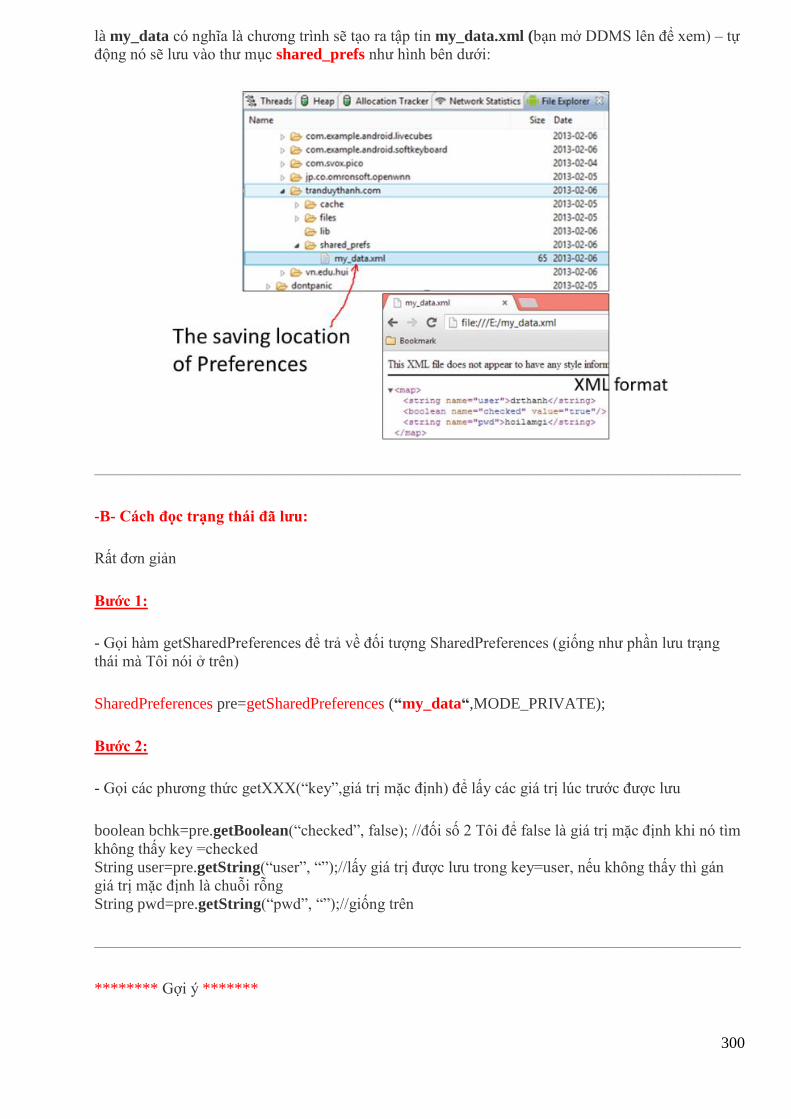
300
là my_data có nghĩa là chương trình sẽ tạo ra tập tin my_data.xml (bạn mở DDMS lên để xem) – tự
động nó sẽ lưu vào thư mục shared_prefs như hình bên dưới:
————————————————————————————————————————–
-B- Cách đọc trạng thái đã lưu:
Rất đơn giản
Bước 1:
- Gọi hàm getSharedPreferences để trả về đối tượng SharedPreferences (giống như phần lưu trạng
thái mà Tôi nói ở trên)
SharedPreferences pre=getSharedPreferences (“my_data“,MODE_PRIVATE);
Bước 2:
- Gọi các phương thức getXXX(“key”,giá trị mặc định) để lấy các giá trị lúc trước được lưu
boolean bchk=pre.getBoolean(“checked”, false); //đối số 2 Tôi để false là giá trị mặc định khi nó tìm
không thấy key =checked
String user=pre.getString(“user”, “”);//lấy giá trị được lưu trong key=user, nếu không thấy thì gán
giá trị mặc định là chuỗi rỗng
String pwd=pre.getString(“pwd”, “”);//giống trên
————————————————————————————————————————–
******** Gợi ý *******
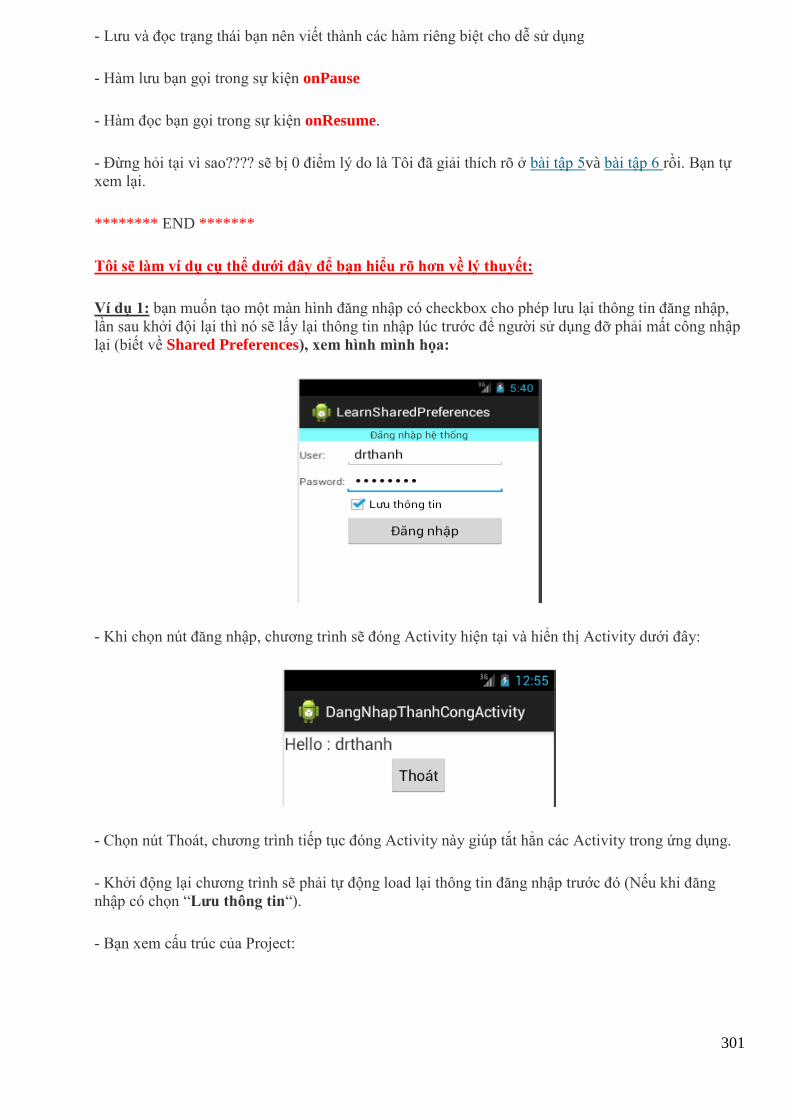
301
- Lưu và đọc trạng thái bạn nên viết thành các hàm riêng biệt cho dễ sử dụng
- Hàm lưu bạn gọi trong sự kiện onPause
- Hàm đọc bạn gọi trong sự kiện onResume.
- Đừng hỏi tại vì sao???? sẽ bị 0 điểm lý do là Tôi đã giải thích rõ ở bài tập 5và bài tập 6 rồi. Bạn tự
xem lại.
******** END *******
Tôi sẽ làm ví dụ cụ thể dưới đây để bạn hiểu rõ hơn về lý thuyết:
Ví dụ 1: bạn muốn tạo một màn hình đăng nhập có checkbox cho phép lưu lại thông tin đăng nhập,
lần sau khởi đội lại thì nó sẽ lấy lại thông tin nhập lúc trước để người sử dụng đỡ phải mất công nhập
lại (biết về Shared Preferences), xem hình mình họa:
- Khi chọn nút đăng nhập, chương trình sẽ đóng Activity hiện tại và hiển thị Activity dưới đây:
- Chọn nút Thoát, chương trình tiếp tục đóng Activity này giúp tắt hẳn các Activity trong ứng dụng.
- Khởi động lại chương trình sẽ phải tự động load lại thông tin đăng nhập trước đó (Nếu khi đăng
nhập có chọn “Lưu thông tin“).
- Bạn xem cấu trúc của Project:
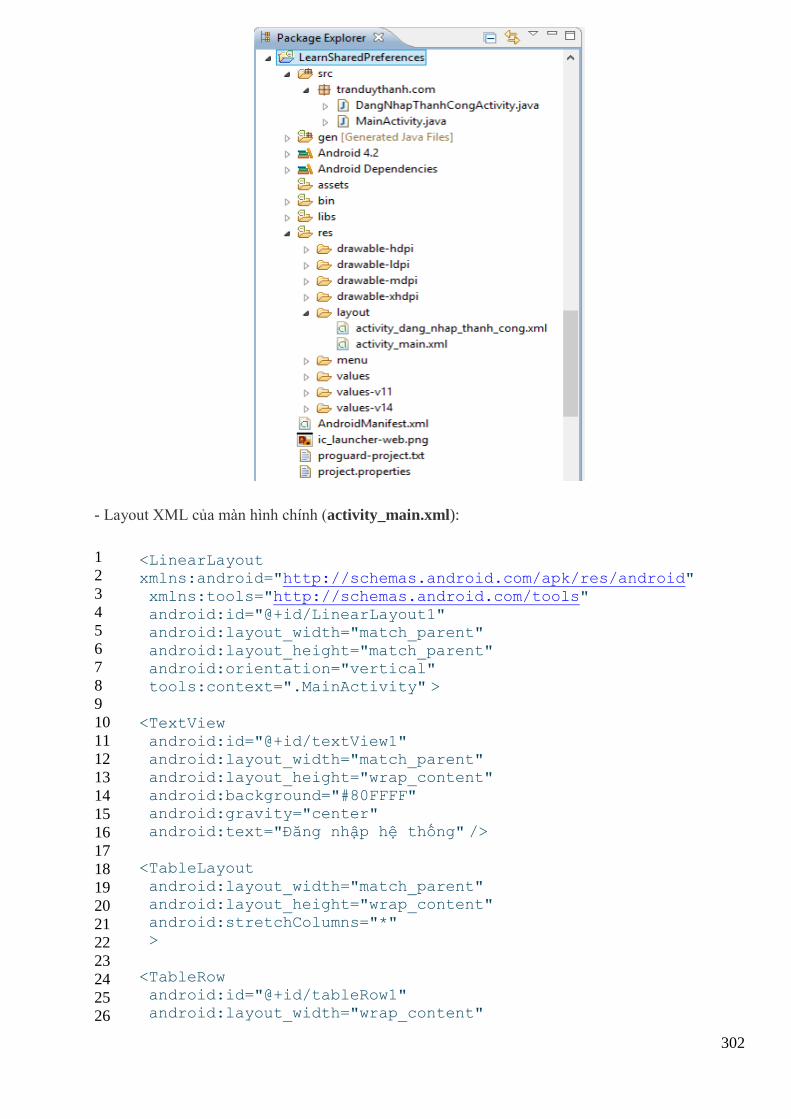
302
- Layout XML của màn hình chính (activity_main.xml):
1
2
3
4
5
6
7
8
9
10
11
12
13
14
15
16
17
18
19
20
21
22
23
24
25
26
<LinearLayout xmlns:android="http://schemas.android.com/apk/res/android"
xmlns:tools="http://schemas.android.com/tools" android:id="@+id/LinearLayout1" android:layout_width="match_parent"
android:layout_height="match_parent" android:orientation="vertical" tools:context=".MainActivity" >
<TextView
android:id="@+id/textView1" android:layout_width="match_parent" android:layout_height="wrap_content"
android:background="#80FFFF" android:gravity="center" android:text="Đăng nhập hệ thống" />
<TableLayout
android:layout_width="match_parent" android:layout_height="wrap_content" android:stretchColumns="*" >
<TableRow android:id="@+id/tableRow1" android:layout_width="wrap_content"
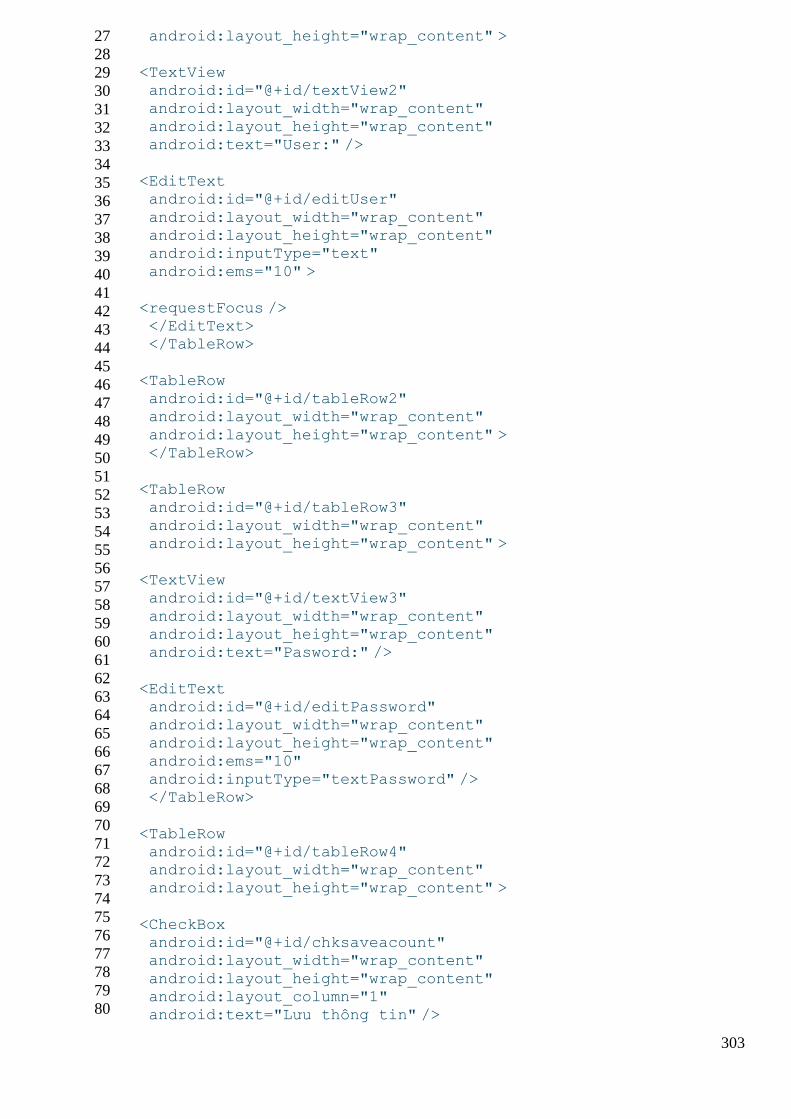
303
27
28
29
30
31
32
33
34
35
36
37
38
39
40
41
42
43
44
45
46
47
48
49
50
51
52
53
54
55
56
57
58
59
60
61
62
63
64
65
66
67
68
69
70
71
72
73
74
75
76
77
78
79
80
android:layout_height="wrap_content" >
<TextView android:id="@+id/textView2" android:layout_width="wrap_content"
android:layout_height="wrap_content" android:text="User:" />
<EditText android:id="@+id/editUser"
android:layout_width="wrap_content" android:layout_height="wrap_content" android:inputType="text"
android:ems="10" >
<requestFocus /> </EditText> </TableRow>
<TableRow android:id="@+id/tableRow2" android:layout_width="wrap_content"
android:layout_height="wrap_content" > </TableRow>
<TableRow android:id="@+id/tableRow3"
android:layout_width="wrap_content" android:layout_height="wrap_content" >
<TextView android:id="@+id/textView3"
android:layout_width="wrap_content" android:layout_height="wrap_content" android:text="Pasword:" />
<EditText android:id="@+id/editPassword" android:layout_width="wrap_content" android:layout_height="wrap_content"
android:ems="10" android:inputType="textPassword" /> </TableRow>
<TableRow android:id="@+id/tableRow4" android:layout_width="wrap_content" android:layout_height="wrap_content" >
<CheckBox android:id="@+id/chksaveacount" android:layout_width="wrap_content"
android:layout_height="wrap_content" android:layout_column="1" android:text="Lưu thông tin" />
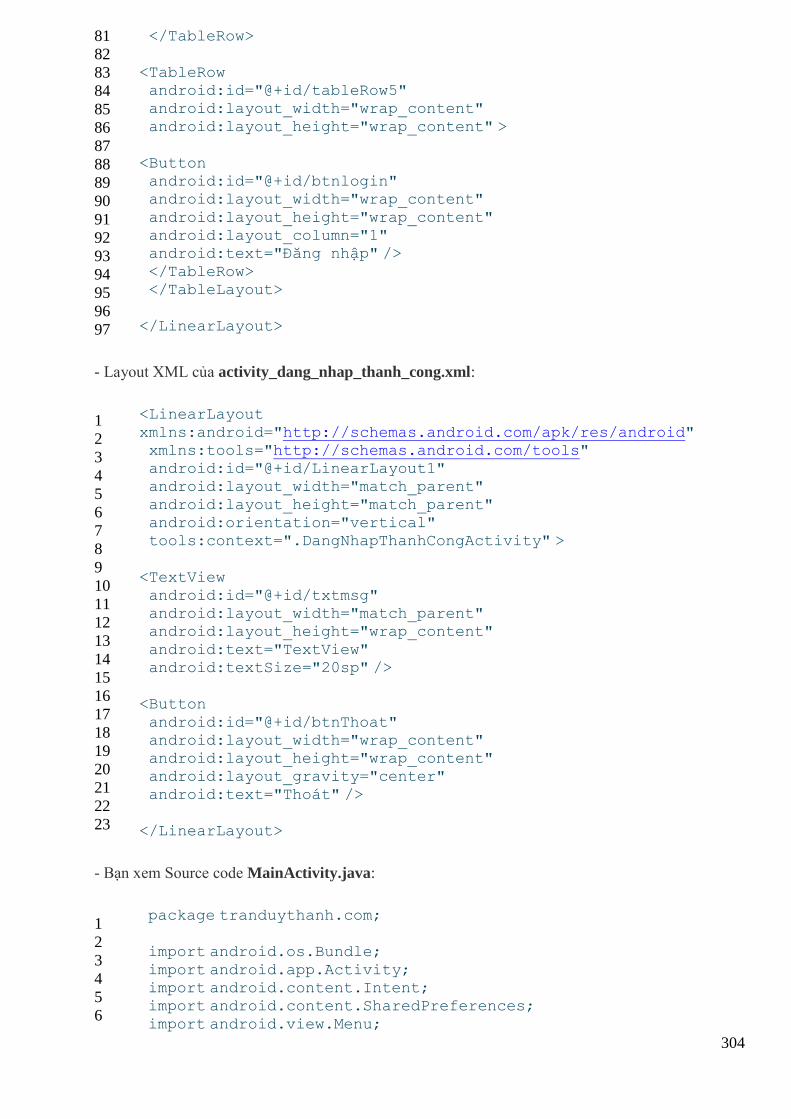
304
81
82
83
84
85
86
87
88
89
90
91
92
93
94
95
96
97
</TableRow>
<TableRow android:id="@+id/tableRow5" android:layout_width="wrap_content"
android:layout_height="wrap_content" >
<Button android:id="@+id/btnlogin" android:layout_width="wrap_content"
android:layout_height="wrap_content" android:layout_column="1" android:text="Đăng nhập" />
</TableRow> </TableLayout>
</LinearLayout>
- Layout XML của activity_dang_nhap_thanh_cong.xml:
1
2
3
4
5
6
7
8
9
10
11
12
13
14
15
16
17
18
19
20
21
22
23
<LinearLayout
xmlns:android="http://schemas.android.com/apk/res/android" xmlns:tools="http://schemas.android.com/tools" android:id="@+id/LinearLayout1" android:layout_width="match_parent"
android:layout_height="match_parent" android:orientation="vertical" tools:context=".DangNhapThanhCongActivity" >
<TextView android:id="@+id/txtmsg" android:layout_width="match_parent" android:layout_height="wrap_content"
android:text="TextView" android:textSize="20sp" />
<Button
android:id="@+id/btnThoat" android:layout_width="wrap_content" android:layout_height="wrap_content" android:layout_gravity="center"
android:text="Thoát" />
</LinearLayout>
- Bạn xem Source code MainActivity.java:
1
2
3
4
5
6
package tranduythanh.com;
import android.os.Bundle;
import android.app.Activity; import android.content.Intent; import android.content.SharedPreferences;
import android.view.Menu;
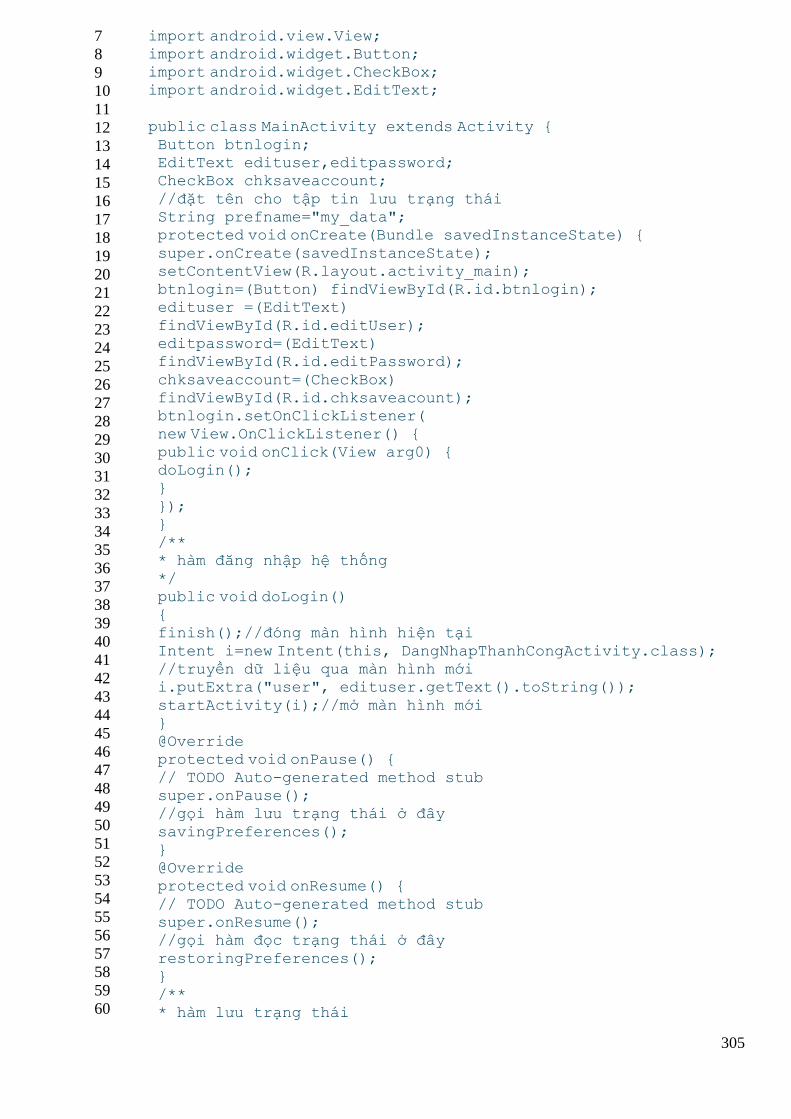
305
7
8
9
10
11
12
13
14
15
16
17
18
19
20
21
22
23
24
25
26
27
28
29
30
31
32
33
34
35
36
37
38
39
40
41
42
43
44
45
46
47
48
49
50
51
52
53
54
55
56
57
58
59
60
import android.view.View; import android.widget.Button; import android.widget.CheckBox; import android.widget.EditText;
public class MainActivity extends Activity { Button btnlogin; EditText edituser,editpassword; CheckBox chksaveaccount;
//đặt tên cho tập tin lưu trạng thái String prefname="my_data"; protected void onCreate(Bundle savedInstanceState) {
super.onCreate(savedInstanceState); setContentView(R.layout.activity_main); btnlogin=(Button) findViewById(R.id.btnlogin); edituser =(EditText)
findViewById(R.id.editUser); editpassword=(EditText) findViewById(R.id.editPassword);
chksaveaccount=(CheckBox) findViewById(R.id.chksaveacount); btnlogin.setOnClickListener( new View.OnClickListener() {
public void onClick(View arg0) { doLogin(); }
}); } /** * hàm đăng nhập hệ thống
*/ public void doLogin() { finish();//đóng màn hình hiện tại
Intent i=new Intent(this, DangNhapThanhCongActivity.class); //truyền dữ liệu qua màn hình mới i.putExtra("user", edituser.getText().toString());
startActivity(i);//mở màn hình mới } @Override protected void onPause() {
// TODO Auto-generated method stub super.onPause(); //gọi hàm lưu trạng thái ở đây
savingPreferences(); } @Override protected void onResume() {
// TODO Auto-generated method stub super.onResume(); //gọi hàm đọc trạng thái ở đây
restoringPreferences(); } /** * hàm lưu trạng thái
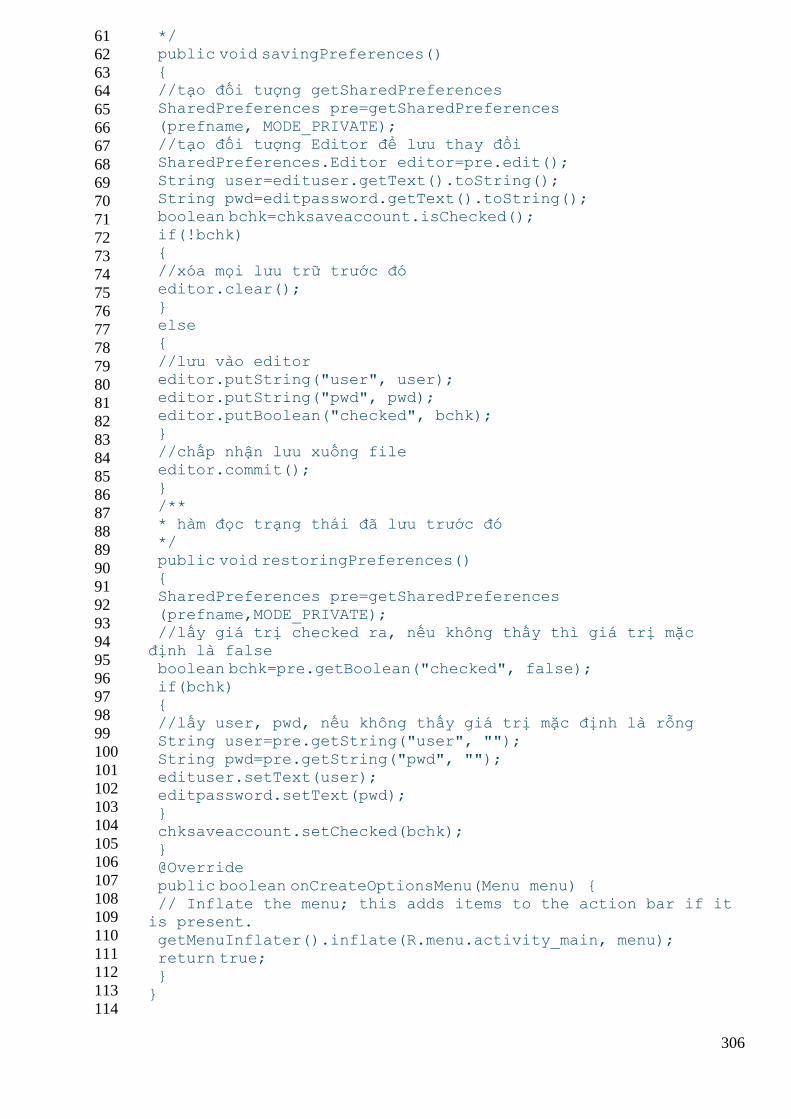
306
61
62
63
64
65
66
67
68
69
70
71
72
73
74
75
76
77
78
79
80
81
82
83
84
85
86
87
88
89
90
91
92
93
94
95
96
97
98
99
100
101
102
103
104
105
106
107
108
109
110
111
112
113
114
*/ public void savingPreferences() { //tạo đối tượng getSharedPreferences
SharedPreferences pre=getSharedPreferences (prefname, MODE_PRIVATE); //tạo đối tượng Editor để lưu thay đổi SharedPreferences.Editor editor=pre.edit();
String user=edituser.getText().toString(); String pwd=editpassword.getText().toString(); boolean bchk=chksaveaccount.isChecked();
if(!bchk) { //xóa mọi lưu trữ trước đó editor.clear();
} else {
//lưu vào editor editor.putString("user", user); editor.putString("pwd", pwd); editor.putBoolean("checked", bchk);
} //chấp nhận lưu xuống file editor.commit();
} /** * hàm đọc trạng thái đã lưu trước đó */
public void restoringPreferences() { SharedPreferences pre=getSharedPreferences
(prefname,MODE_PRIVATE); //lấy giá trị checked ra, nếu không thấy thì giá trị mặc
định là false boolean bchk=pre.getBoolean("checked", false);
if(bchk) { //lấy user, pwd, nếu không thấy giá trị mặc định là rỗng String user=pre.getString("user", "");
String pwd=pre.getString("pwd", ""); edituser.setText(user); editpassword.setText(pwd);
} chksaveaccount.setChecked(bchk); } @Override
public boolean onCreateOptionsMenu(Menu menu) { // Inflate the menu; this adds items to the action bar if it
is present.
getMenuInflater().inflate(R.menu.activity_main, menu); return true; } }
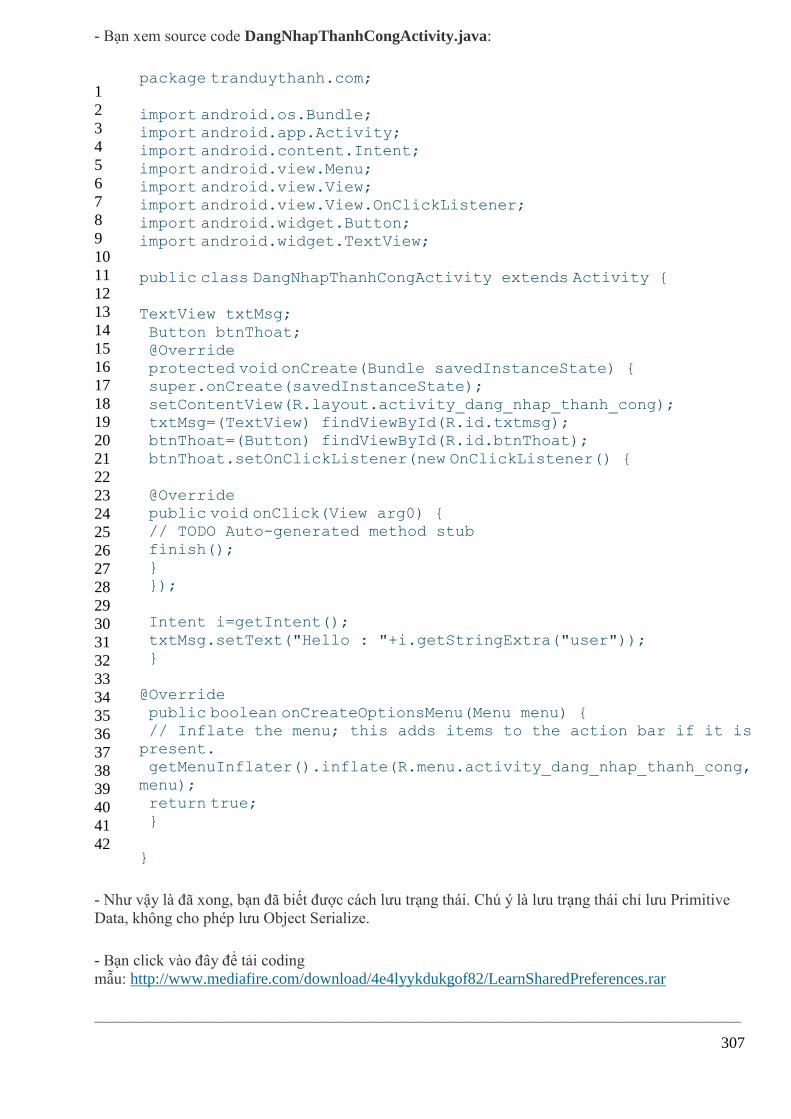
307
- Bạn xem source code DangNhapThanhCongActivity.java:
1
2
3
4
5
6
7
8
9
10
11
12
13
14
15
16
17
18
19
20
21
22
23
24
25
26
27
28
29
30
31
32
33
34
35
36
37
38
39
40
41
42
package tranduythanh.com;
import android.os.Bundle; import android.app.Activity; import android.content.Intent;
import android.view.Menu; import android.view.View; import android.view.View.OnClickListener; import android.widget.Button;
import android.widget.TextView;
public class DangNhapThanhCongActivity extends Activity {
TextView txtMsg;
Button btnThoat; @Override protected void onCreate(Bundle savedInstanceState) { super.onCreate(savedInstanceState);
setContentView(R.layout.activity_dang_nhap_thanh_cong); txtMsg=(TextView) findViewById(R.id.txtmsg); btnThoat=(Button) findViewById(R.id.btnThoat);
btnThoat.setOnClickListener(new OnClickListener() {
@Override public void onClick(View arg0) { // TODO Auto-generated method stub
finish(); } });
Intent i=getIntent();
txtMsg.setText("Hello : "+i.getStringExtra("user")); }
@Override
public boolean onCreateOptionsMenu(Menu menu) { // Inflate the menu; this adds items to the action bar if it is
present. getMenuInflater().inflate(R.menu.activity_dang_nhap_thanh_cong,
menu); return true; }
}
- Như vậy là đã xong, bạn đã biết được cách lưu trạng thái. Chú ý là lưu trạng thái chỉ lưu Primitive
Data, không cho phép lưu Object Serialize.
- Bạn click vào đây để tải coding
mẫu: http://www.mediafire.com/download/4e4lyykdukgof82/LearnSharedPreferences.rar
————————————————————————————————————————–
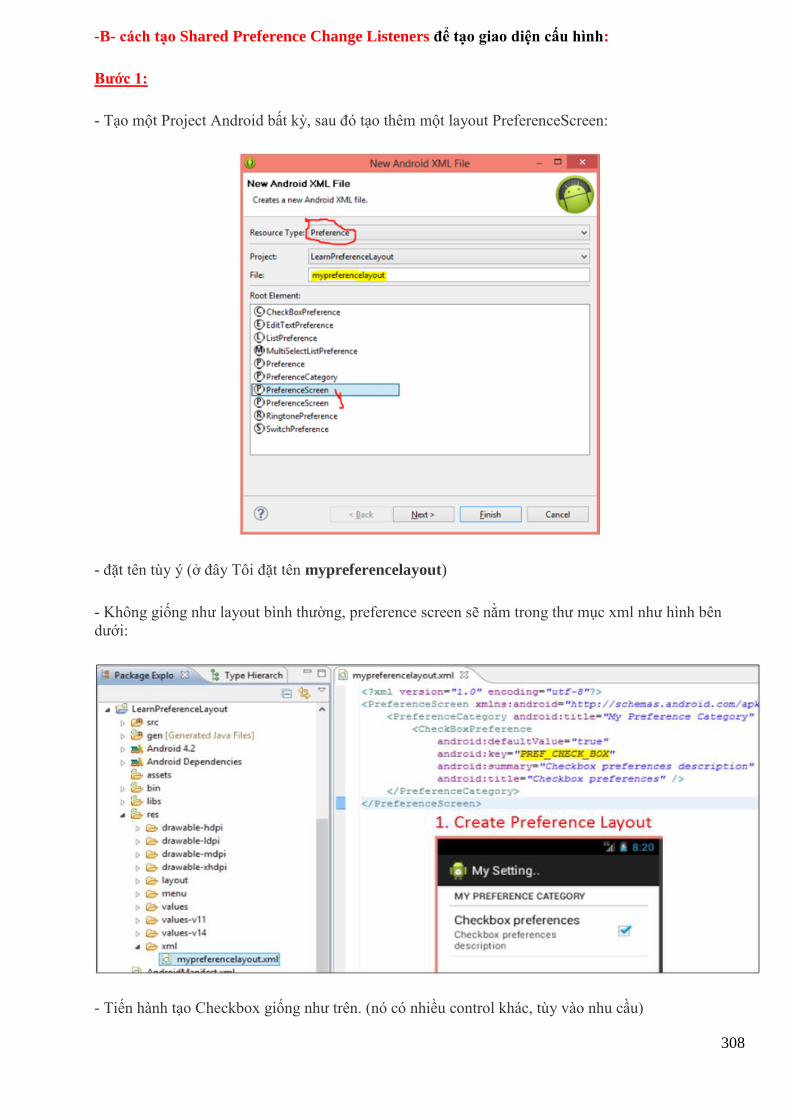
308
-B- cách tạo Shared Preference Change Listeners để tạo giao diện cấu hình:
Bước 1:
- Tạo một Project Android bất kỳ, sau đó tạo thêm một layout PreferenceScreen:
- đặt tên tùy ý (ở đây Tôi đặt tên mypreferencelayout)
- Không giống như layout bình thường, preference screen sẽ nằm trong thư mục xml như hình bên
dưới:
- Tiến hành tạo Checkbox giống như trên. (nó có nhiều control khác, tùy vào nhu cầu)
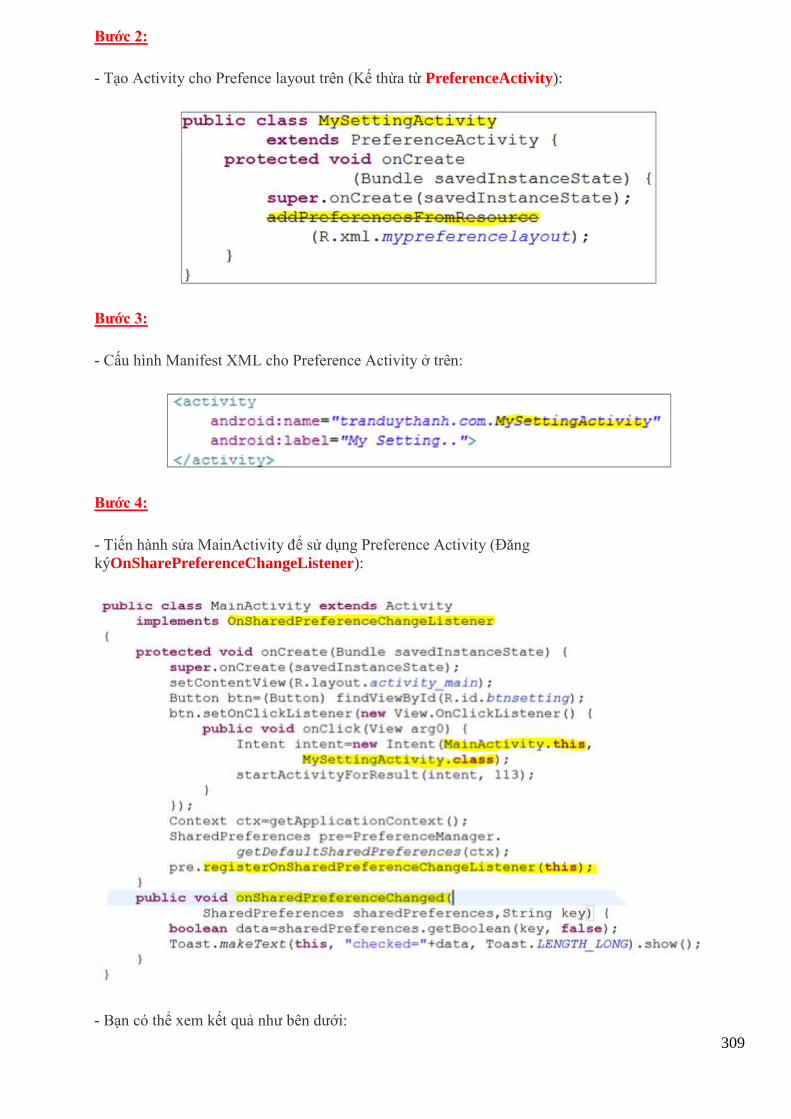
309
Bước 2:
- Tạo Activity cho Prefence layout trên (Kế thừa từ PreferenceActivity):
Bước 3:
- Cấu hình Manifest XML cho Preference Activity ở trên:
Bước 4:
- Tiến hành sửa MainActivity để sử dụng Preference Activity (Đăng
kýOnSharePreferenceChangeListener):
- Bạn có thể xem kết quả như bên dưới:
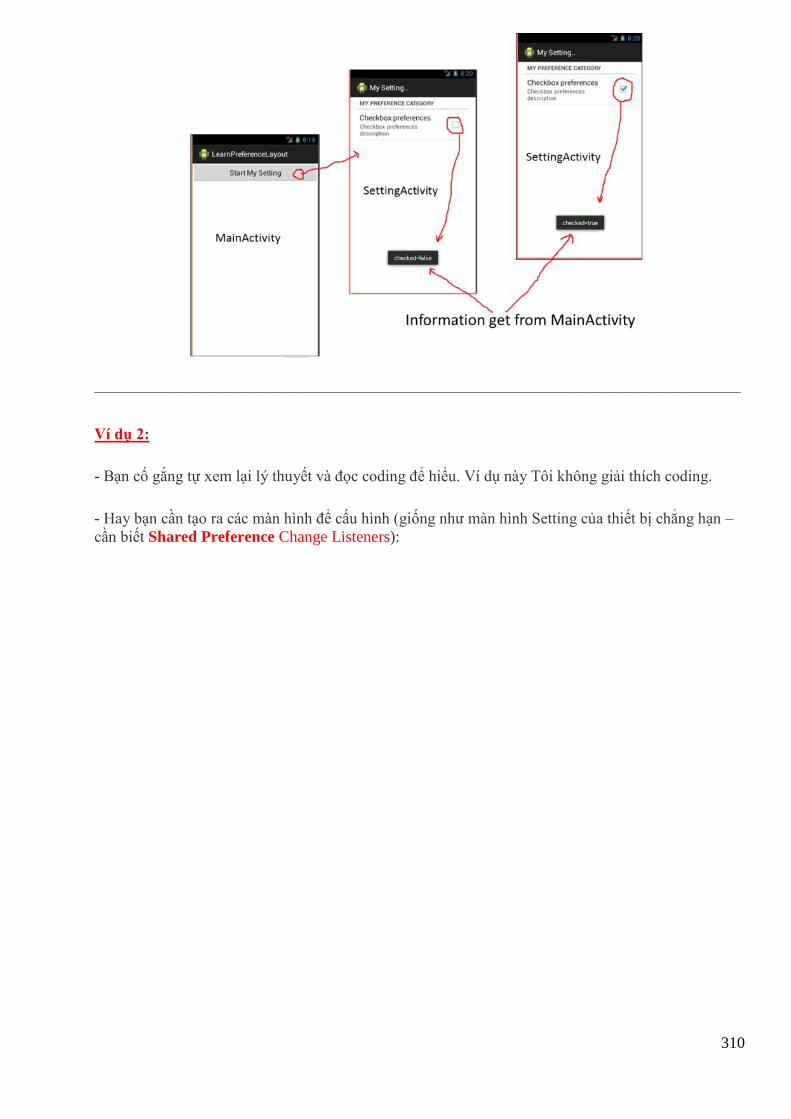
310
————————————————————————————————————————–
Ví dụ 2:
- Bạn cố gắng tự xem lại lý thuyết và đọc coding để hiểu. Ví dụ này Tôi không giải thích coding.
- Hay bạn cần tạo ra các màn hình để cấu hình (giống như màn hình Setting của thiết bị chẳng hạn –
cần biết Shared Preference Change Listeners):
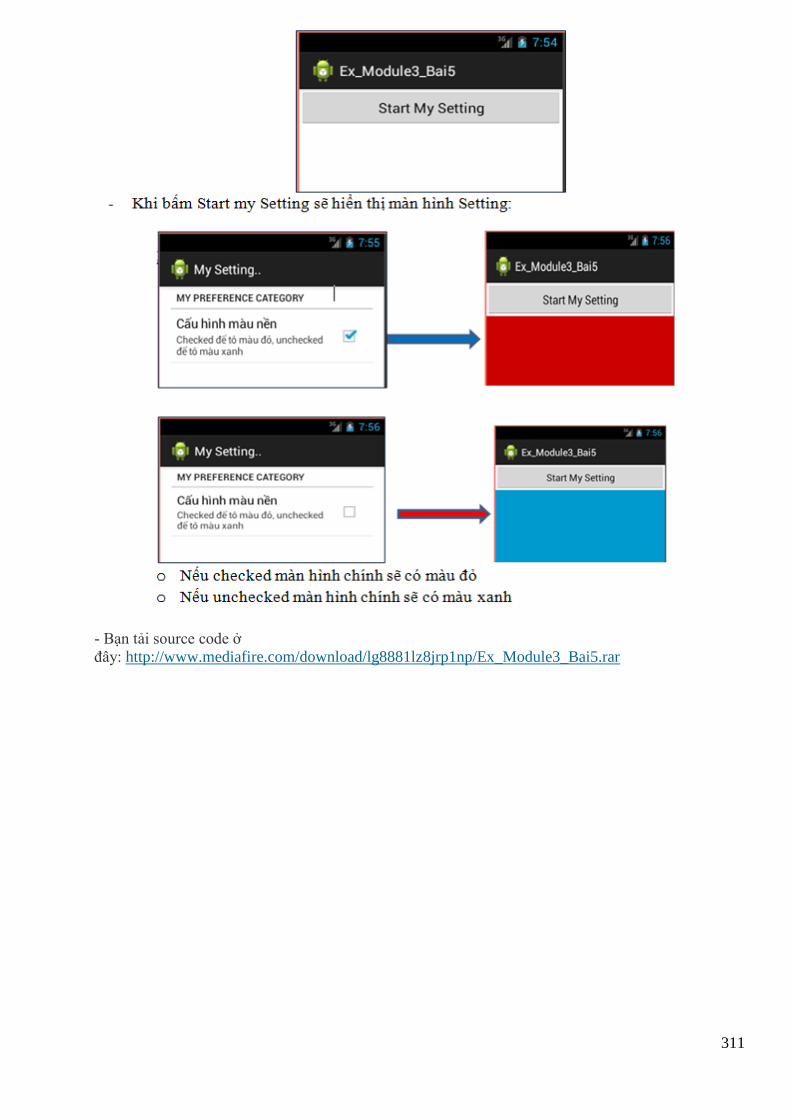
311
- Bạn tải source code ở
đây: http://www.mediafire.com/download/lg8881lz8jrp1np/Ex_Module3_Bai5.rar

312
Bài tập 31: Cách sử dụng SQLite trong Android
Bài tập này Tôi sẽ hướng dẫn các bạn cách sử dụng SQLite trong Android.
Thay vì lưu trữ bằng text file, XML hay SharePreference thì bạn cũng có thể lưu trữ thông tin bằng
SQLite. SQLite đã được tích hợp sẵn trong Android SDK.
Trong bài này các bạn sẽ học các phần sau:
1) Cách tạo / xóa một cơ sở dữ liệu SQLite trong Android
2) Cách tạo / xóa bảng trong SQLite
3) Cách thêm/ sửa/ xóa dữ liệu trong bảng
4) Cách truy vấn dữ liệu trong bảng.
- Tất nhiên còn rất nhiều chức năng khác, nhưng theo Tôi các bạn chỉ cần làm tốt 4 phần này thì có
thể viết ứng dụng Android có SQLite một cách chuyên nghiệp rồi.
- Theo Tôi thì các bạn nên sử dụng công cụ SQLite
Administrator: http://download.orbmu2k.de/files/sqliteadmin.zip để tạo hoàn chỉnh 1 CSDL sau đó
kéo thả tập tin đó vào DDMS cho lẹ (cái này bạn tải về và tự tạo, rồi kéo thả vào DDMS). Còn các
hướng dẫn dưới này Tôi muốn giúp các bạn hiểu được sâu xa bên trong (hướng programmer) CSDL
SQLite.
- Giả sử các bạn cần tạo CSDL như mô tả dưới đây (qlquanlysinhvien.db):
- Bảng Lớp học (tbllop):
tbllop
Tên cột Kiểu dữ liệu Mô tả
malop TEXT Khóa chính
tenlop TEXT
siso INTEGER
- Bảng sinh viên (tblsinhvien):
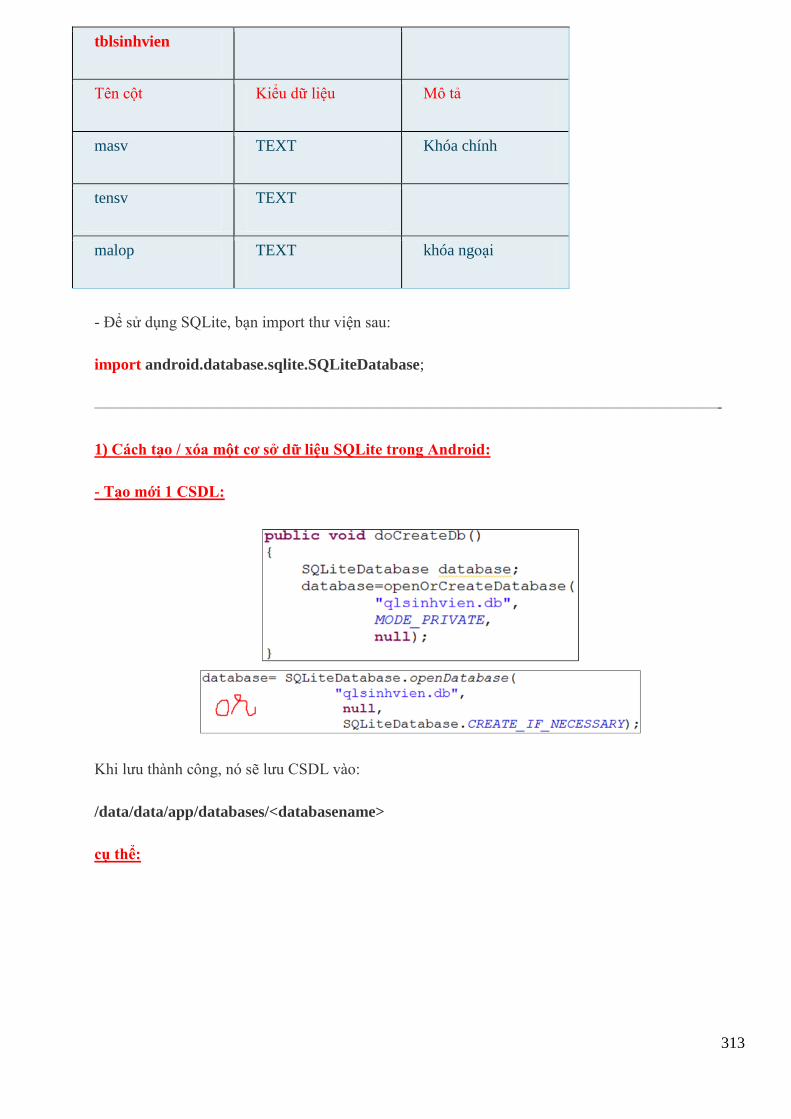
313
tblsinhvien
Tên cột Kiểu dữ liệu Mô tả
masv TEXT Khóa chính
tensv TEXT
malop TEXT khóa ngoại
- Để sử dụng SQLite, bạn import thư viện sau:
import android.database.sqlite.SQLiteDatabase;
———————————————————————————————————————-
1) Cách tạo / xóa một cơ sở dữ liệu SQLite trong Android:
- Tạo mới 1 CSDL:
Khi lưu thành công, nó sẽ lưu CSDL vào:
/data/data/app/databases/<databasename>
cụ thể:
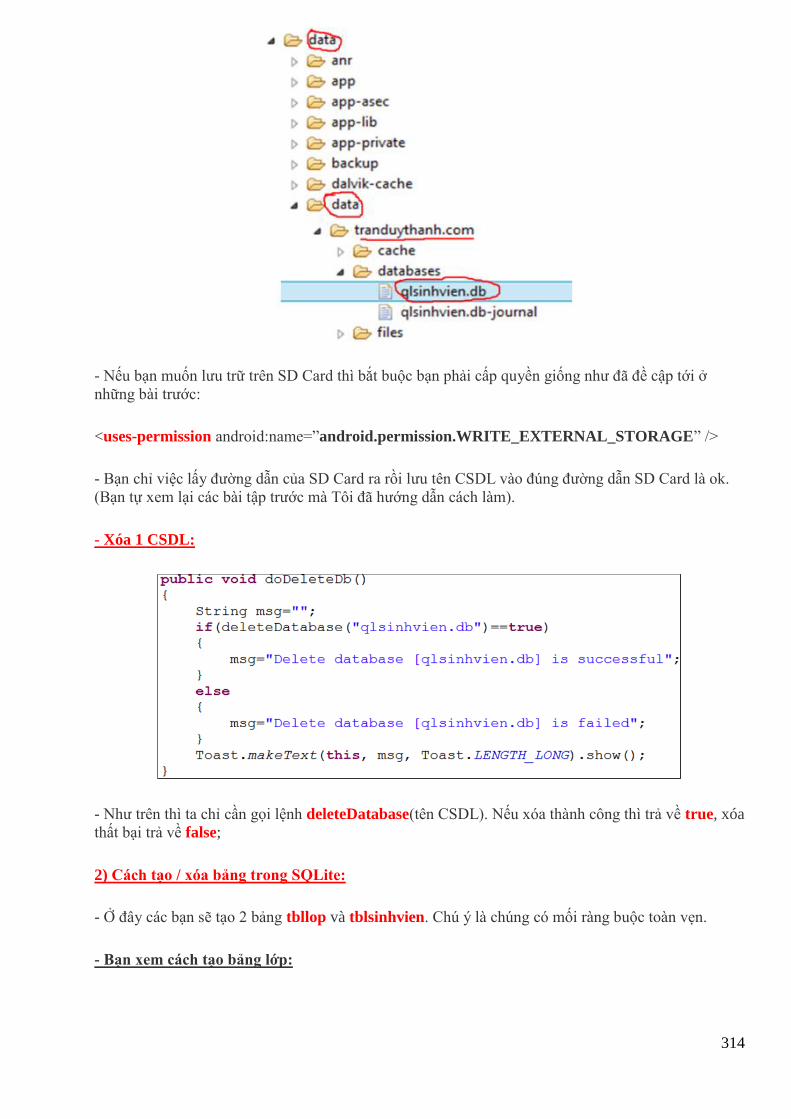
314
- Nếu bạn muốn lưu trữ trên SD Card thì bắt buộc bạn phải cấp quyền giống như đã đề cập tới ở
những bài trước:
<uses-permission android:name=”android.permission.WRITE_EXTERNAL_STORAGE” />
- Bạn chỉ việc lấy đường dẫn của SD Card ra rồi lưu tên CSDL vào đúng đường dẫn SD Card là ok.
(Bạn tự xem lại các bài tập trước mà Tôi đã hướng dẫn cách làm).
- Xóa 1 CSDL:
- Như trên thì ta chỉ cần gọi lệnh deleteDatabase(tên CSDL). Nếu xóa thành công thì trả về true, xóa
thất bại trả về false;
2) Cách tạo / xóa bảng trong SQLite:
- Ở đây các bạn sẽ tạo 2 bảng tbllop và tblsinhvien. Chú ý là chúng có mối ràng buộc toàn vẹn.
- Bạn xem cách tạo bảng lớp:

315
- Bạn chú ý là tên đối tượng database (chỗ database.execSQL(sql)) là đối tượng SQLiteDatabase
được tạo ra ở bước tạo CSDL. Bạn phải khai báo cho phù hợp để ở trong hàm này cũng có thể truy
suất.
- Tạo bảng sinh viên:
- Vì bảng sinh viên có chứa khóa ngoại để tham chiếu tới bảng lớp, nên bạn phải chú ý dòng lệnh
tham chiếu ở trên.
3) Cách thêm/ sửa/ xóa dữ liệu trong bảng:
- Cách thêm một dòng dữ liệu vào trong bảng:
+ Dùng đối tượng ContentValues để đưa dữ liệu vào bảng. Đối tượng này có các phương
thức put(tên cột , dữ liệu)
+ Sau đó gọi phương thức insert để đưa đối tượng (dòng này) vào bảng.
+ Bạn chú ý là phương thức insert có rất nhiều loại đối số khác nhau, nhưng ở đây Tôi chỉ nói 1 loại
đơn giản nhất (các kiểu khác bạn tự tìm hiểu thêm). Loại mà Tôi muốn đề cập tới đó là không liên
quan gì tới kiểm tra các điều kiện, chỉ cần đưa đối tượng ContentValues vào insert là bạn sẽ có
được 1 dòng mới:
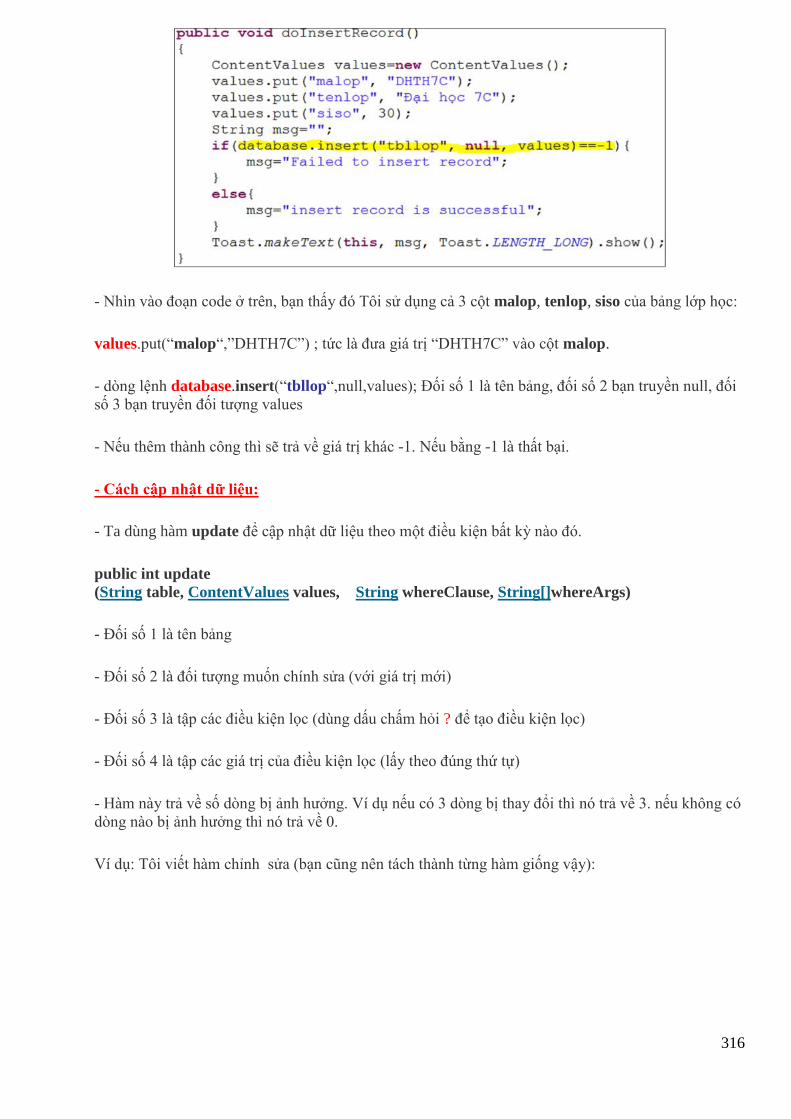
316
- Nhìn vào đoạn code ở trên, bạn thấy đó Tôi sử dụng cả 3 cột malop, tenlop, siso của bảng lớp học:
values.put(“malop“,”DHTH7C”) ; tức là đưa giá trị “DHTH7C” vào cột malop.
- dòng lệnh database.insert(“tbllop“,null,values); Đối số 1 là tên bảng, đối số 2 bạn truyền null, đối
số 3 bạn truyền đối tượng values
- Nếu thêm thành công thì sẽ trả về giá trị khác -1. Nếu bằng -1 là thất bại.
- Cách cập nhật dữ liệu:
- Ta dùng hàm update để cập nhật dữ liệu theo một điều kiện bất kỳ nào đó.
public int update
(String table, ContentValues values, String whereClause, String[]whereArgs)
- Đối số 1 là tên bảng
- Đối số 2 là đối tượng muốn chính sửa (với giá trị mới)
- Đối số 3 là tập các điều kiện lọc (dùng dấu chấm hỏi ? để tạo điều kiện lọc)
- Đối số 4 là tập các giá trị của điều kiện lọc (lấy theo đúng thứ tự)
- Hàm này trả về số dòng bị ảnh hưởng. Ví dụ nếu có 3 dòng bị thay đổi thì nó trả về 3. nếu không có
dòng nào bị ảnh hưởng thì nó trả về 0.
Ví dụ: Tôi viết hàm chỉnh sửa (bạn cũng nên tách thành từng hàm giống vậy):
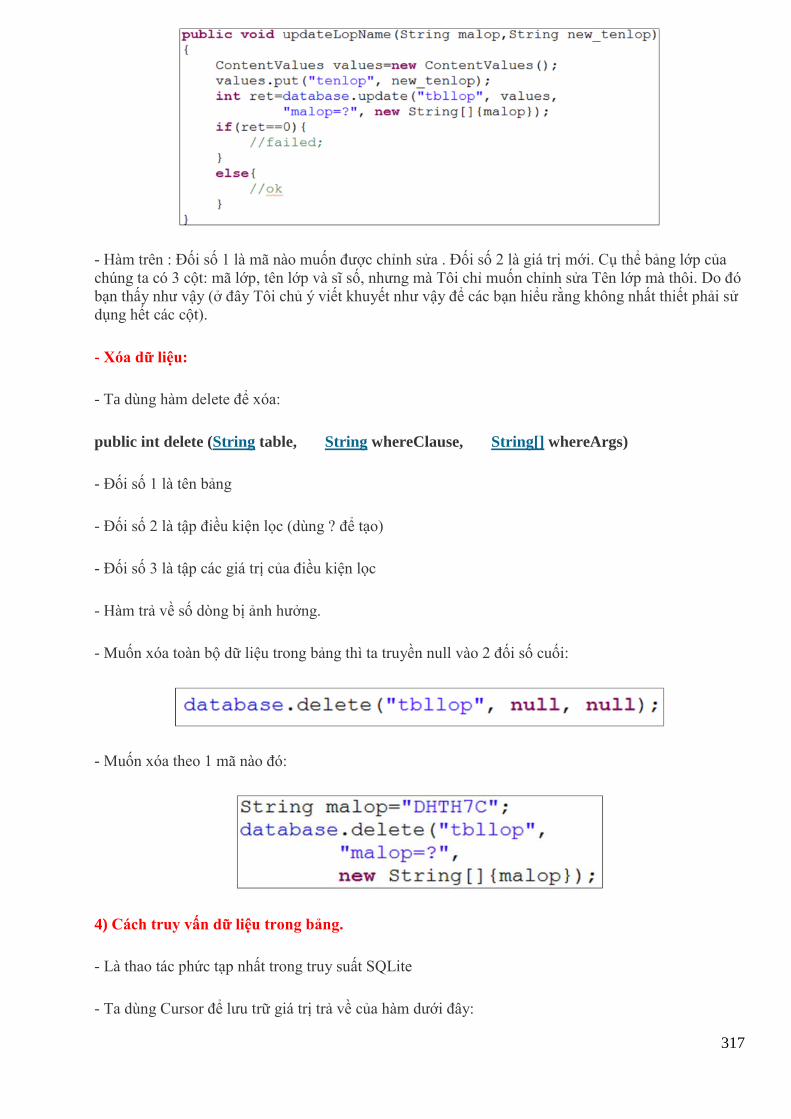
317
- Hàm trên : Đối số 1 là mã nào muốn được chỉnh sửa . Đối số 2 là giá trị mới. Cụ thể bảng lớp của
chúng ta có 3 cột: mã lớp, tên lớp và sĩ số, nhưng mà Tôi chỉ muốn chỉnh sửa Tên lớp mà thôi. Do đó
bạn thấy như vậy (ở đây Tôi chủ ý viết khuyết như vậy để các bạn hiểu rằng không nhất thiết phải sử
dụng hết các cột).
- Xóa dữ liệu:
- Ta dùng hàm delete để xóa:
public int delete (String table, String whereClause, String[] whereArgs)
- Đối số 1 là tên bảng
- Đối số 2 là tập điều kiện lọc (dùng ? để tạo)
- Đối số 3 là tập các giá trị của điều kiện lọc
- Hàm trả về số dòng bị ảnh hưởng.
- Muốn xóa toàn bộ dữ liệu trong bảng thì ta truyền null vào 2 đối số cuối:
- Muốn xóa theo 1 mã nào đó:
4) Cách truy vấn dữ liệu trong bảng.
- Là thao tác phức tạp nhất trong truy suất SQLite
- Ta dùng Cursor để lưu trữ giá trị trả về của hàm dưới đây:
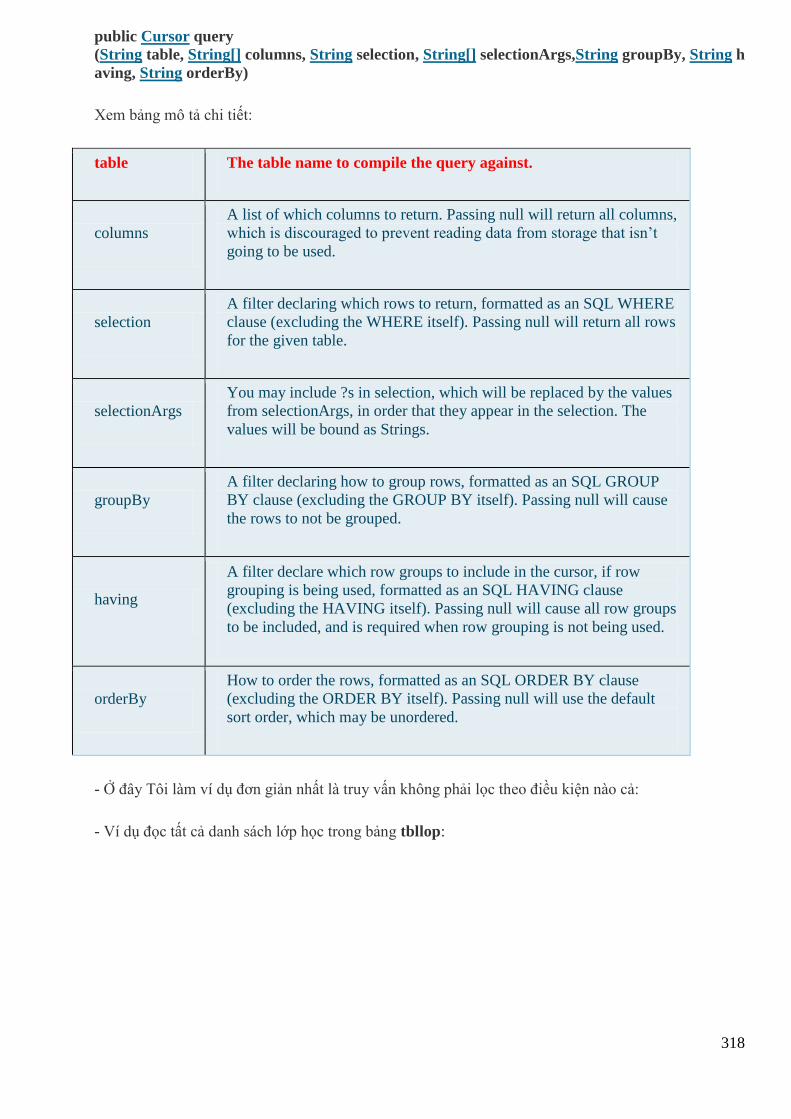
318
public Cursor query
(String table, String[] columns, String selection, String[] selectionArgs,String groupBy, String h
aving, String orderBy)
Xem bảng mô tả chi tiết:
table The table name to compile the query against.
columns
A list of which columns to return. Passing null will return all columns,
which is discouraged to prevent reading data from storage that isn’t
going to be used.
selection
A filter declaring which rows to return, formatted as an SQL WHERE
clause (excluding the WHERE itself). Passing null will return all rows
for the given table.
selectionArgs
You may include ?s in selection, which will be replaced by the values
from selectionArgs, in order that they appear in the selection. The
values will be bound as Strings.
groupBy
A filter declaring how to group rows, formatted as an SQL GROUP
BY clause (excluding the GROUP BY itself). Passing null will cause
the rows to not be grouped.
having
A filter declare which row groups to include in the cursor, if row
grouping is being used, formatted as an SQL HAVING clause
(excluding the HAVING itself). Passing null will cause all row groups
to be included, and is required when row grouping is not being used.
orderBy
How to order the rows, formatted as an SQL ORDER BY clause
(excluding the ORDER BY itself). Passing null will use the default
sort order, which may be unordered.
- Ở đây Tôi làm ví dụ đơn giản nhất là truy vấn không phải lọc theo điều kiện nào cả:
- Ví dụ đọc tất cả danh sách lớp học trong bảng tbllop:
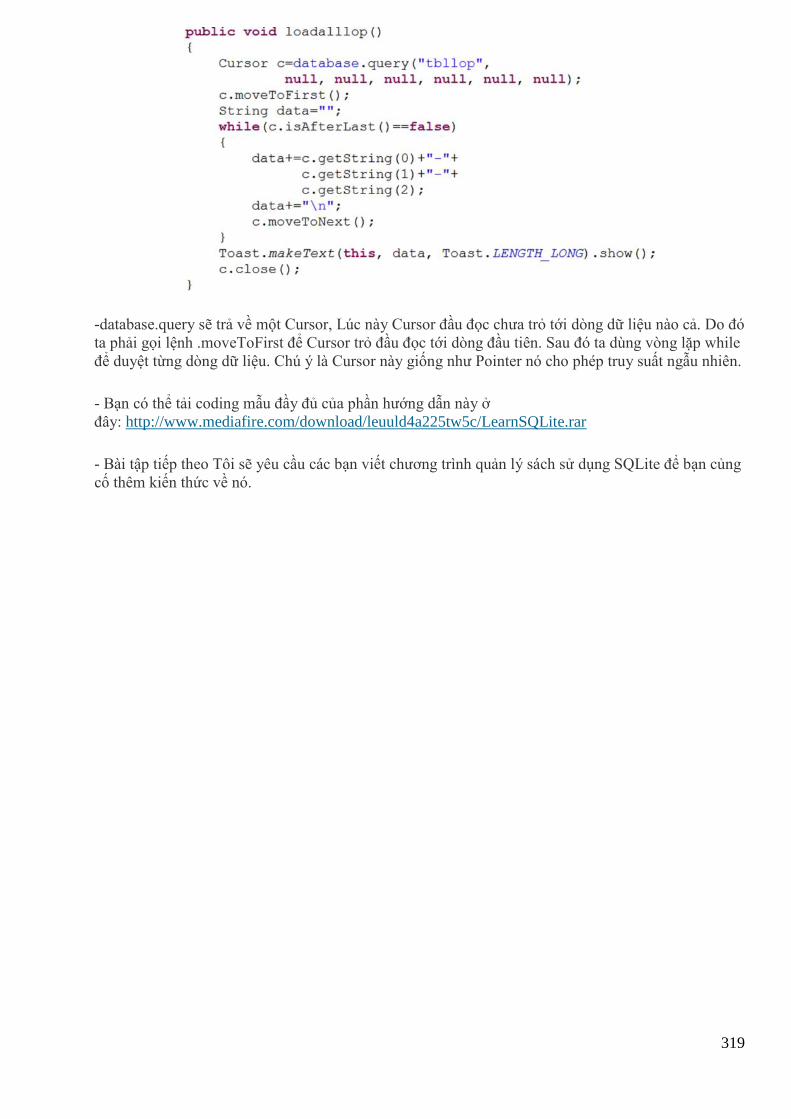
319
-database.query sẽ trả về một Cursor, Lúc này Cursor đầu đọc chưa trỏ tới dòng dữ liệu nào cả. Do đó
ta phải gọi lệnh .moveToFirst để Cursor trỏ đầu đọc tới dòng đầu tiên. Sau đó ta dùng vòng lặp while
để duyệt từng dòng dữ liệu. Chú ý là Cursor này giống như Pointer nó cho phép truy suất ngẫu nhiên.
- Bạn có thể tải coding mẫu đầy đủ của phần hướng dẫn này ở
đây: http://www.mediafire.com/download/leuuld4a225tw5c/LearnSQLite.rar
- Bài tập tiếp theo Tôi sẽ yêu cầu các bạn viết chương trình quản lý sách sử dụng SQLite để bạn củng
cố thêm kiến thức về nó.
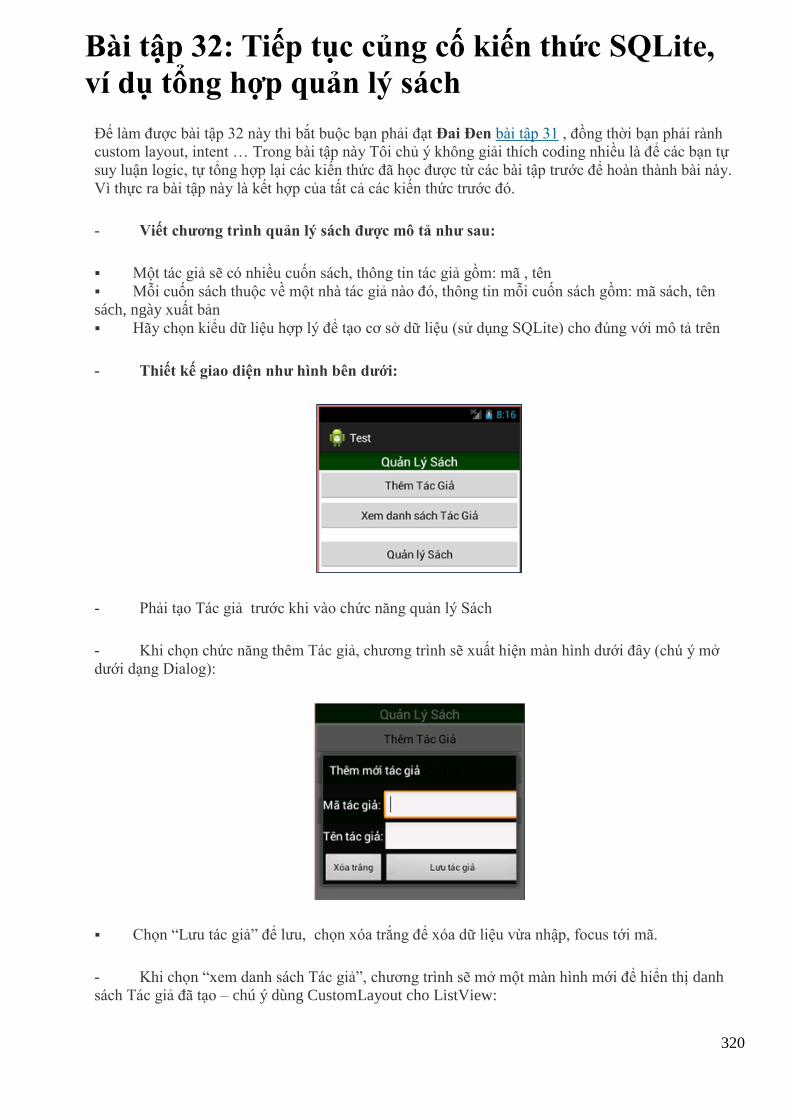
320
Bài tập 32: Tiếp tục củng cố kiến thức SQLite,
ví dụ tổng hợp quản lý sách
Để làm được bài tập 32 này thì bắt buộc bạn phải đạt Đai Đen bài tập 31 , đồng thời bạn phải rành
custom layout, intent … Trong bài tập này Tôi chủ ý không giải thích coding nhiều là để các bạn tự
suy luận logic, tự tổng hợp lại các kiến thức đã học được từ các bài tập trước để hoàn thành bài này.
Vì thực ra bài tập này là kết hợp của tất cả các kiến thức trước đó.
- Viết chương trình quản lý sách được mô tả như sau:
Một tác giả sẽ có nhiều cuốn sách, thông tin tác giả gồm: mã , tên
Mỗi cuốn sách thuộc về một nhà tác giả nào đó, thông tin mỗi cuốn sách gồm: mã sách, tên
sách, ngày xuất bản
Hãy chọn kiểu dữ liệu hợp lý để tạo cơ sở dữ liệu (sử dụng SQLite) cho đúng với mô tả trên
- Thiết kế giao diện như hình bên dưới:
- Phải tạo Tác giả trước khi vào chức năng quản lý Sách
- Khi chọn chức năng thêm Tác giả, chương trình sẽ xuất hiện màn hình dưới đây (chú ý mở
dưới dạng Dialog):
Chọn “Lưu tác giả” để lưu, chọn xóa trắng để xóa dữ liệu vừa nhập, focus tới mã.
- Khi chọn “xem danh sách Tác giả”, chương trình sẽ mở một màn hình mới để hiển thị danh
sách Tác giả đã tạo – chú ý dùng CustomLayout cho ListView:
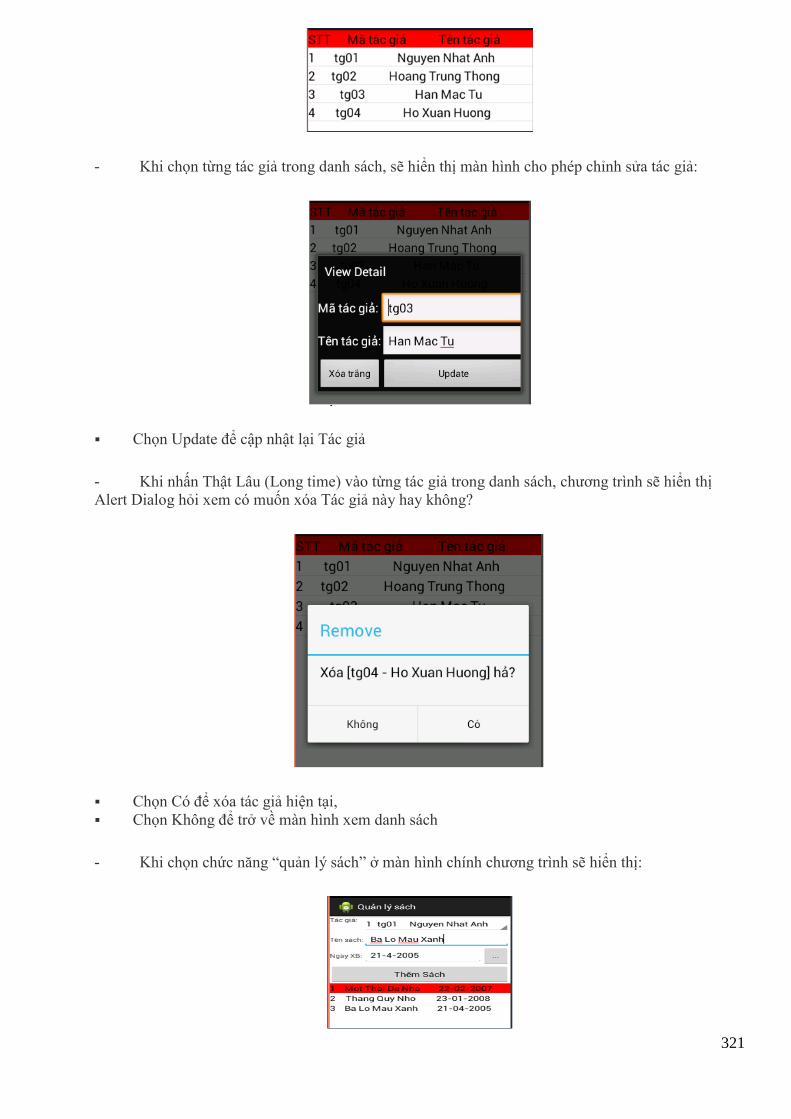
321
- Khi chọn từng tác giả trong danh sách, sẽ hiển thị màn hình cho phép chỉnh sửa tác giả:
Chọn Update để cập nhật lại Tác giả
- Khi nhấn Thật Lâu (Long time) vào từng tác giả trong danh sách, chương trình sẽ hiển thị
Alert Dialog hỏi xem có muốn xóa Tác giả này hay không?
Chọn Có để xóa tác giả hiện tại,
Chọn Không để trở về màn hình xem danh sách
- Khi chọn chức năng “quản lý sách” ở màn hình chính chương trình sẽ hiển thị:
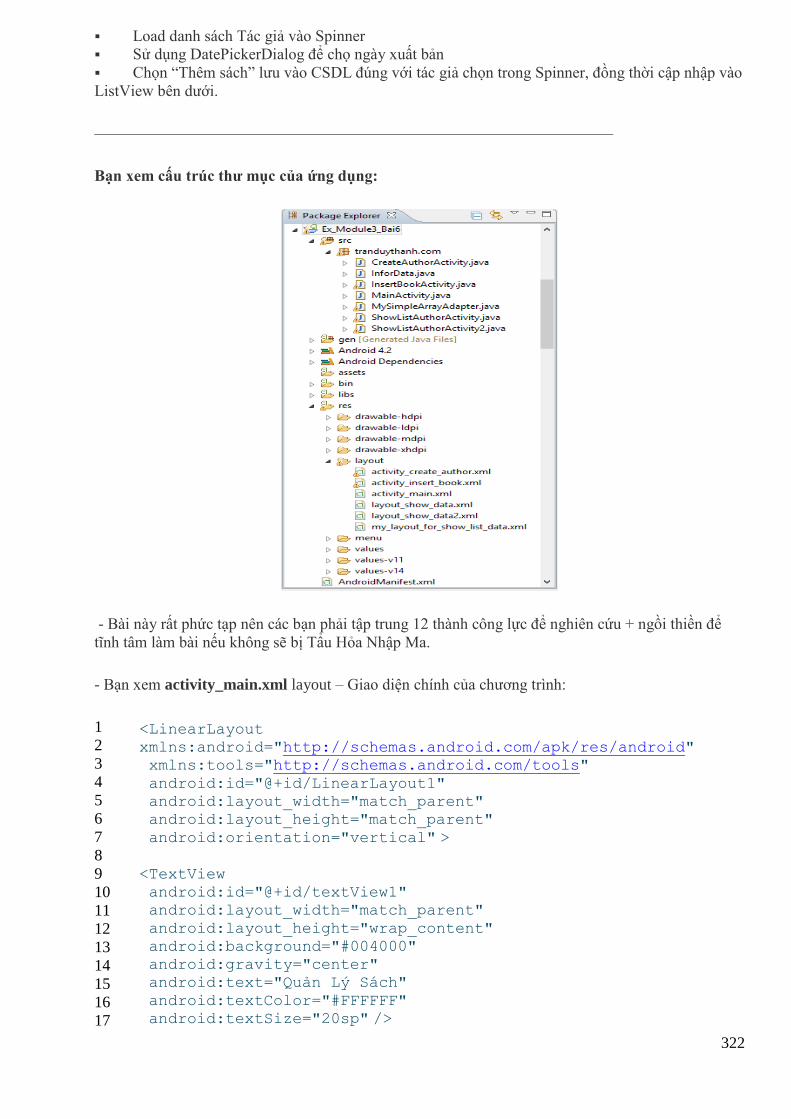
322
Load danh sách Tác giả vào Spinner
Sử dụng DatePickerDialog để chọ ngày xuất bản
Chọn “Thêm sách” lưu vào CSDL đúng với tác giả chọn trong Spinner, đồng thời cập nhập vào
ListView bên dưới.
————————————————————————————————–
Bạn xem cấu trúc thư mục của ứng dụng:
- Bài này rất phức tạp nên các bạn phải tập trung 12 thành công lực để nghiên cứu + ngồi thiền để
tĩnh tâm làm bài nếu không sẽ bị Tẩu Hỏa Nhập Ma.
- Bạn xem activity_main.xml layout – Giao diện chính của chương trình:
1
2
3
4
5
6
7
8
9
10
11
12
13
14
15
16
17
<LinearLayout xmlns:android="http://schemas.android.com/apk/res/android" xmlns:tools="http://schemas.android.com/tools"
android:id="@+id/LinearLayout1" android:layout_width="match_parent" android:layout_height="match_parent"
android:orientation="vertical" >
<TextView android:id="@+id/textView1" android:layout_width="match_parent"
android:layout_height="wrap_content" android:background="#004000" android:gravity="center" android:text="Quản Lý Sách"
android:textColor="#FFFFFF" android:textSize="20sp" />
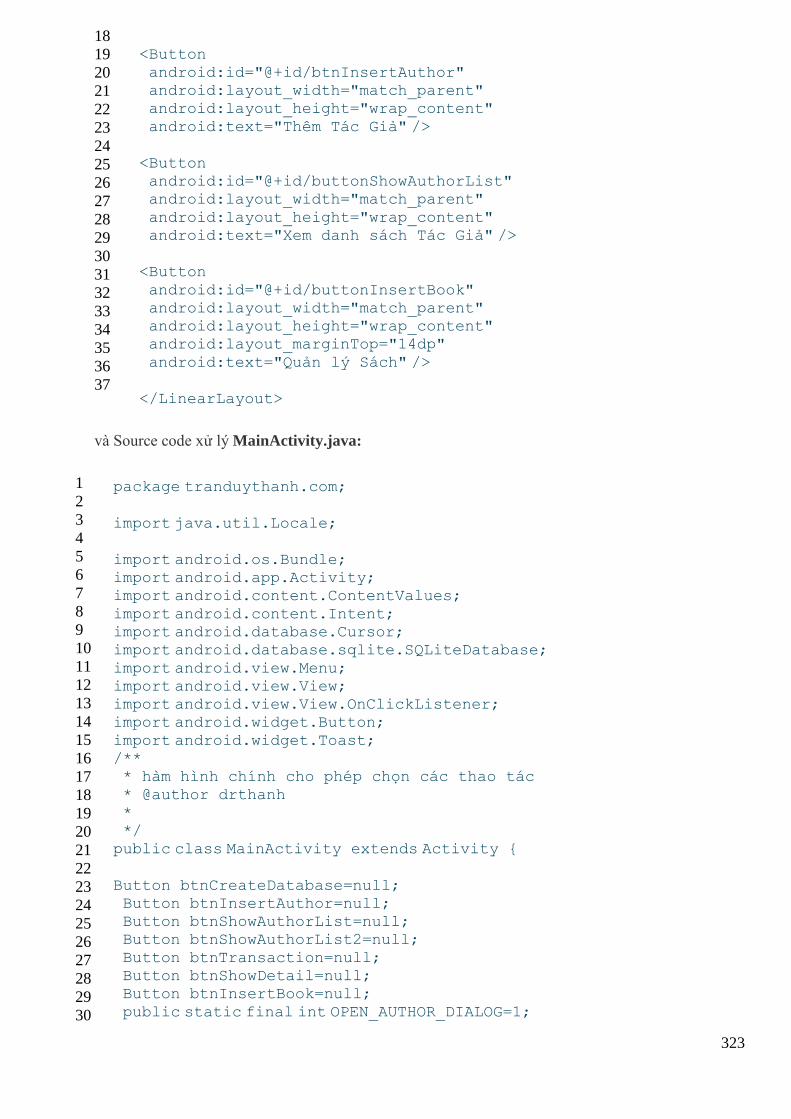
323
18
19
20
21
22
23
24
25
26
27
28
29
30
31
32
33
34
35
36
37
<Button
android:id="@+id/btnInsertAuthor" android:layout_width="match_parent" android:layout_height="wrap_content"
android:text="Thêm Tác Giả" />
<Button android:id="@+id/buttonShowAuthorList" android:layout_width="match_parent"
android:layout_height="wrap_content" android:text="Xem danh sách Tác Giả" />
<Button
android:id="@+id/buttonInsertBook" android:layout_width="match_parent" android:layout_height="wrap_content" android:layout_marginTop="14dp"
android:text="Quản lý Sách" />
</LinearLayout>
và Source code xử lý MainActivity.java:
1
2
3
4
5
6
7
8
9
10
11
12
13
14
15
16
17
18
19
20
21
22
23
24
25
26
27
28
29
30
package tranduythanh.com;
import java.util.Locale;
import android.os.Bundle; import android.app.Activity; import android.content.ContentValues;
import android.content.Intent; import android.database.Cursor; import android.database.sqlite.SQLiteDatabase;
import android.view.Menu; import android.view.View; import android.view.View.OnClickListener; import android.widget.Button;
import android.widget.Toast; /** * hàm hình chính cho phép chọn các thao tác
* @author drthanh * */ public class MainActivity extends Activity {
Button btnCreateDatabase=null; Button btnInsertAuthor=null; Button btnShowAuthorList=null; Button btnShowAuthorList2=null;
Button btnTransaction=null; Button btnShowDetail=null; Button btnInsertBook=null;
public static final int OPEN_AUTHOR_DIALOG=1;

324
31
32
33
34
35
36
37
38
39
40
41
42
43
44
45
46
47
48
49
50
51
52
53
54
55
56
57
58
59
60
61
62
63
64
65
66
67
68
69
70
71
72
73
74
75
76
77
78
79
80
81
82
83
84
public static final int SEND_DATA_FROM_AUTHOR_ACTIVITY=2; SQLiteDatabase database=null; @Override public void onCreate(Bundle savedInstanceState) {
super.onCreate(savedInstanceState); setContentView(R.layout.activity_main); btnInsertAuthor=(Button) findViewById(R.id.btnInsertAuthor); btnInsertAuthor.setOnClickListener(new MyEvent());
btnShowAuthorList=(Button)
findViewById(R.id.buttonShowAuthorList); btnShowAuthorList.setOnClickListener(new MyEvent());
btnInsertBook=(Button) findViewById(R.id.buttonInsertBook); btnInsertBook.setOnClickListener(new MyEvent()); getDatabase(); }
/** * hàm kiểm tra xem bảng có tồn tại trong CSDL hay chưa * @param database - cơ sở dữ liệu
* @param tableName - tên bảng cần kiểm tra * @return trả về true nếu tồn tại */ public boolean isTableExists(SQLiteDatabase database, String
tableName) { Cursor cursor = database.rawQuery("select DISTINCT tbl_name
from sqlite_master where tbl_name = '"+tableName+"'", null);
if(cursor!=null) { if(cursor.getCount()>0) { cursor.close(); return true;
} cursor.close(); }
return false; } /** * hàm tạo CSDL và các bảng liên quan
* @return */ public SQLiteDatabase getDatabase() {
try { database=openOrCreateDatabase("mydata.db",
SQLiteDatabase.CREATE_IF_NECESSARY, null); if(database!=null) { if(isTableExists(database,"tblAuthors"))
return database; database.setLocale(Locale.getDefault()); database.setVersion(1);
String sqlAuthor="create table tblAuthors (" +"id integer primary key autoincrement," +"firstname text, " +"lastname text)";
database.execSQL(sqlAuthor);
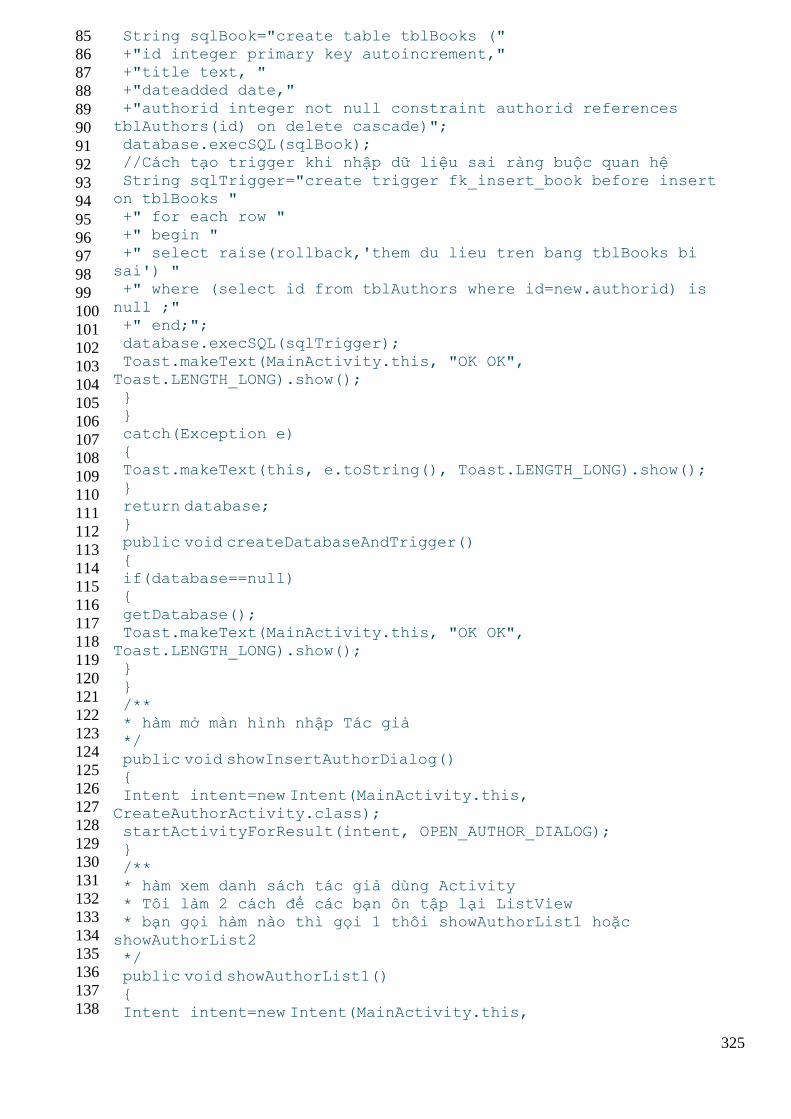
325
85
86
87
88
89
90
91
92
93
94
95
96
97
98
99
100
101
102
103
104
105
106
107
108
109
110
111
112
113
114
115
116
117
118
119
120
121
122
123
124
125
126
127
128
129
130
131
132
133
134
135
136
137
138
String sqlBook="create table tblBooks (" +"id integer primary key autoincrement," +"title text, " +"dateadded date,"
+"authorid integer not null constraint authorid references
tblAuthors(id) on delete cascade)"; database.execSQL(sqlBook); //Cách tạo trigger khi nhập dữ liệu sai ràng buộc quan hệ
String sqlTrigger="create trigger fk_insert_book before insert
on tblBooks " +" for each row "
+" begin " +" select raise(rollback,'them du lieu tren bang tblBooks bi
sai') " +" where (select id from tblAuthors where id=new.authorid) is
null ;" +" end;"; database.execSQL(sqlTrigger);
Toast.makeText(MainActivity.this, "OK OK",
Toast.LENGTH_LONG).show(); } }
catch(Exception e) { Toast.makeText(this, e.toString(), Toast.LENGTH_LONG).show();
} return database; } public void createDatabaseAndTrigger()
{ if(database==null) {
getDatabase(); Toast.makeText(MainActivity.this, "OK OK",
Toast.LENGTH_LONG).show(); }
} /** * hàm mở màn hình nhập Tác giả */
public void showInsertAuthorDialog() { Intent intent=new Intent(MainActivity.this,
CreateAuthorActivity.class); startActivityForResult(intent, OPEN_AUTHOR_DIALOG); } /**
* hàm xem danh sách tác giả dùng Activity * Tôi làm 2 cách để các bạn ôn tập lại ListView * bạn gọi hàm nào thì gọi 1 thôi showAuthorList1 hoặc
showAuthorList2 */ public void showAuthorList1() {
Intent intent=new Intent(MainActivity.this,
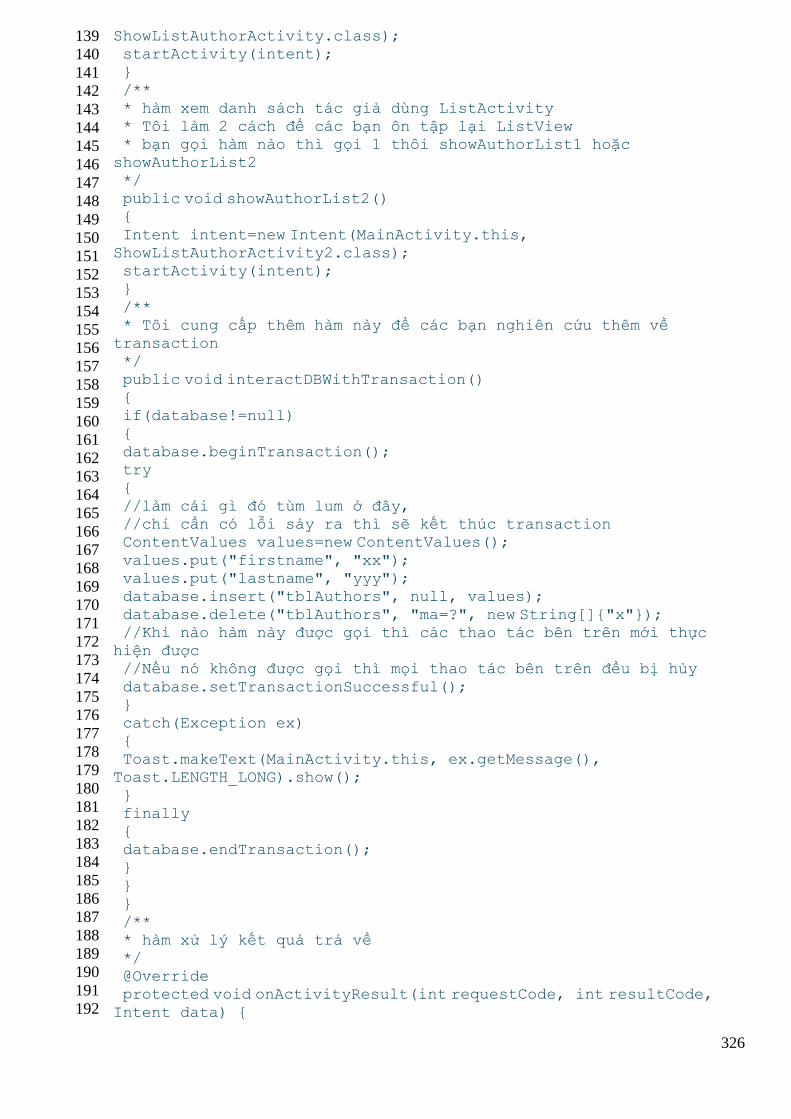
326
139
140
141
142
143
144
145
146
147
148
149
150
151
152
153
154
155
156
157
158
159
160
161
162
163
164
165
166
167
168
169
170
171
172
173
174
175
176
177
178
179
180
181
182
183
184
185
186
187
188
189
190
191
192
ShowListAuthorActivity.class); startActivity(intent); } /**
* hàm xem danh sách tác giả dùng ListActivity * Tôi làm 2 cách để các bạn ôn tập lại ListView * bạn gọi hàm nào thì gọi 1 thôi showAuthorList1 hoặc
showAuthorList2
*/ public void showAuthorList2() {
Intent intent=new Intent(MainActivity.this, ShowListAuthorActivity2.class); startActivity(intent); }
/** * Tôi cung cấp thêm hàm này để các bạn nghiên cứu thêm về
transaction
*/ public void interactDBWithTransaction() { if(database!=null)
{ database.beginTransaction(); try
{ //làm cái gì đó tùm lum ở đây, //chỉ cần có lỗi sảy ra thì sẽ kết thúc transaction ContentValues values=new ContentValues();
values.put("firstname", "xx"); values.put("lastname", "yyy"); database.insert("tblAuthors", null, values);
database.delete("tblAuthors", "ma=?", new String[]{"x"}); //Khi nào hàm này được gọi thì các thao tác bên trên mới thực
hiện được //Nếu nó không được gọi thì mọi thao tác bên trên đều bị hủy
database.setTransactionSuccessful(); } catch(Exception ex) {
Toast.makeText(MainActivity.this, ex.getMessage(),
Toast.LENGTH_LONG).show(); }
finally { database.endTransaction(); }
} } /**
* hàm xử lý kết quả trả về */ @Override protected void onActivityResult(int requestCode, int resultCode,
Intent data) {
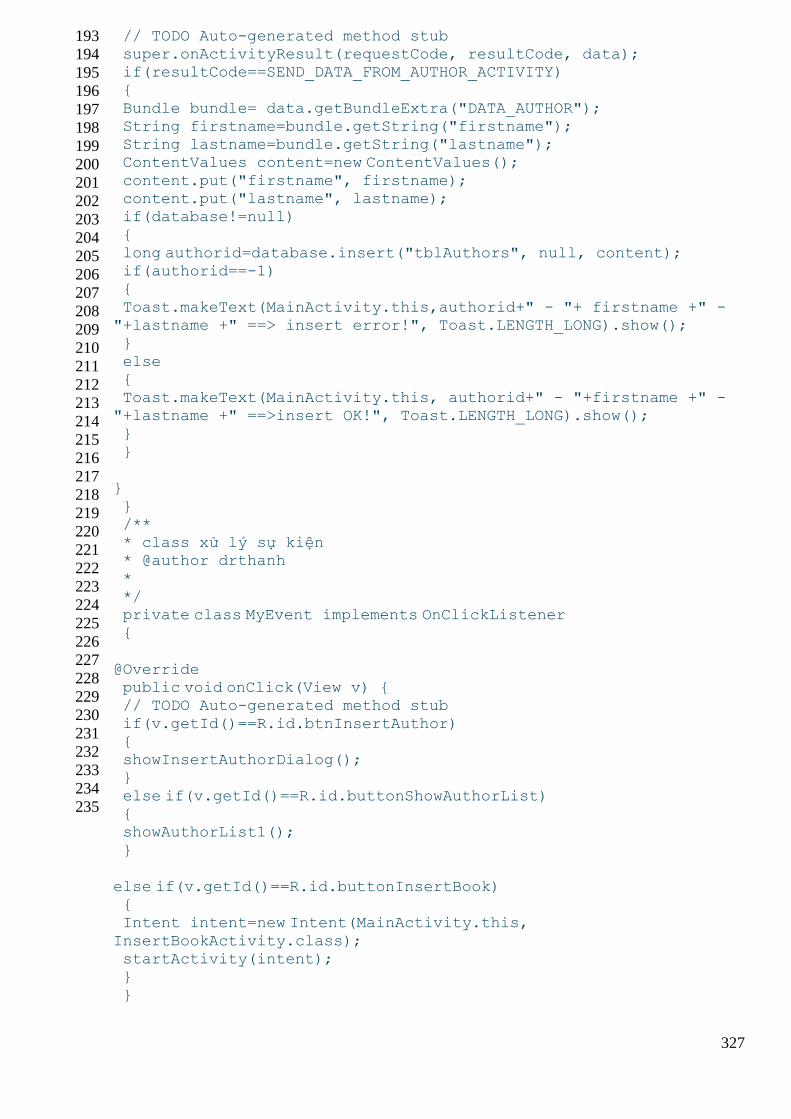
327
193
194
195
196
197
198
199
200
201
202
203
204
205
206
207
208
209
210
211
212
213
214
215
216
217
218
219
220
221
222
223
224
225
226
227
228
229
230
231
232
233
234
235
// TODO Auto-generated method stub super.onActivityResult(requestCode, resultCode, data); if(resultCode==SEND_DATA_FROM_AUTHOR_ACTIVITY) {
Bundle bundle= data.getBundleExtra("DATA_AUTHOR"); String firstname=bundle.getString("firstname"); String lastname=bundle.getString("lastname"); ContentValues content=new ContentValues();
content.put("firstname", firstname); content.put("lastname", lastname); if(database!=null)
{ long authorid=database.insert("tblAuthors", null, content); if(authorid==-1) {
Toast.makeText(MainActivity.this,authorid+" - "+ firstname +" -
"+lastname +" ==> insert error!", Toast.LENGTH_LONG).show(); }
else { Toast.makeText(MainActivity.this, authorid+" - "+firstname +" -
"+lastname +" ==>insert OK!", Toast.LENGTH_LONG).show();
} }
}
} /** * class xử lý sự kiện * @author drthanh
* */ private class MyEvent implements OnClickListener {
@Override public void onClick(View v) { // TODO Auto-generated method stub
if(v.getId()==R.id.btnInsertAuthor) { showInsertAuthorDialog(); }
else if(v.getId()==R.id.buttonShowAuthorList) { showAuthorList1();
}
else if(v.getId()==R.id.buttonInsertBook) { Intent intent=new Intent(MainActivity.this,
InsertBookActivity.class); startActivity(intent); }
}

328
} @Override public boolean onCreateOptionsMenu(Menu menu) { getMenuInflater().inflate(R.menu.activity_simple_database_main,
menu); return true; } }
- XML source thêm tác giả activity_create_author.xml:
1
2
3
4
5
6
7
8
9
10
11
12
13
14
15
16
17
18
19
20
21
22
23
24
25
26
27
28
29
30
31
32
33
34
35
36
37
38
39
40
41
42
43
<LinearLayout xmlns:android="http://schemas.android.com/apk/res/android" xmlns:tools="http://schemas.android.com/tools" android:id="@+id/LinearLayout1"
android:layout_width="match_parent" android:layout_height="match_parent" android:orientation="vertical" >
<TableLayout
android:layout_width="match_parent" android:layout_height="wrap_content" >
<TableRow
android:id="@+id/tableRow1" android:layout_width="wrap_content" android:layout_height="wrap_content" >
<TextView
android:id="@+id/textView1" android:layout_width="wrap_content" android:layout_height="wrap_content"
android:text="Mã tác giả:" android:textAppearance="?android:attr/textAppearanceMedium" /> <EditText android:id="@+id/editTextFirstName"
android:layout_width="wrap_content" android:layout_height="wrap_content" android:ems="10" >
<requestFocus />
</EditText>
</TableRow>
<TableRow
android:id="@+id/tableRow2" android:layout_width="wrap_content" android:layout_height="wrap_content" >
<TextView
android:id="@+id/textView2" android:layout_width="wrap_content" android:layout_height="wrap_content"
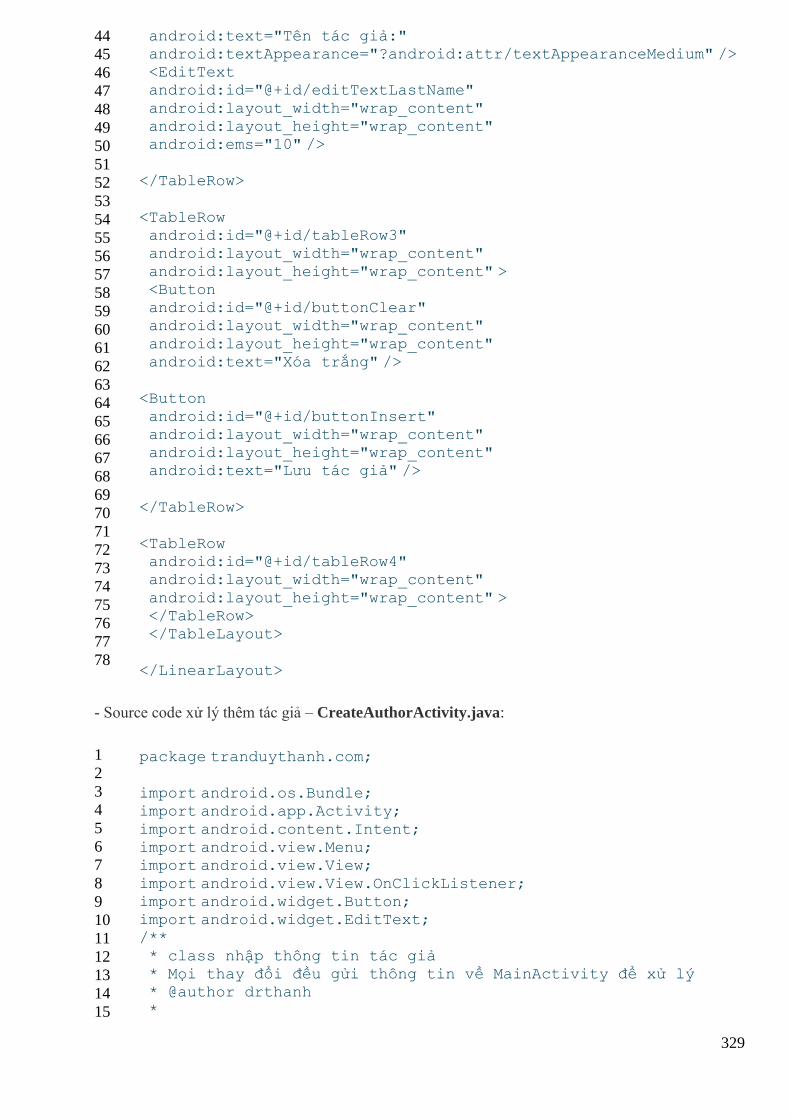
329
44
45
46
47
48
49
50
51
52
53
54
55
56
57
58
59
60
61
62
63
64
65
66
67
68
69
70
71
72
73
74
75
76
77
78
android:text="Tên tác giả:" android:textAppearance="?android:attr/textAppearanceMedium" /> <EditText android:id="@+id/editTextLastName"
android:layout_width="wrap_content" android:layout_height="wrap_content" android:ems="10" />
</TableRow>
<TableRow android:id="@+id/tableRow3" android:layout_width="wrap_content"
android:layout_height="wrap_content" > <Button android:id="@+id/buttonClear" android:layout_width="wrap_content"
android:layout_height="wrap_content" android:text="Xóa trắng" />
<Button
android:id="@+id/buttonInsert" android:layout_width="wrap_content" android:layout_height="wrap_content" android:text="Lưu tác giả" />
</TableRow>
<TableRow android:id="@+id/tableRow4" android:layout_width="wrap_content"
android:layout_height="wrap_content" > </TableRow> </TableLayout>
</LinearLayout>
- Source code xử lý thêm tác giả – CreateAuthorActivity.java:
1
2
3
4
5
6
7
8
9
10
11
12
13
14
15
package tranduythanh.com;
import android.os.Bundle; import android.app.Activity;
import android.content.Intent; import android.view.Menu; import android.view.View;
import android.view.View.OnClickListener; import android.widget.Button; import android.widget.EditText; /**
* class nhập thông tin tác giả * Mọi thay đổi đều gửi thông tin về MainActivity để xử lý * @author drthanh *
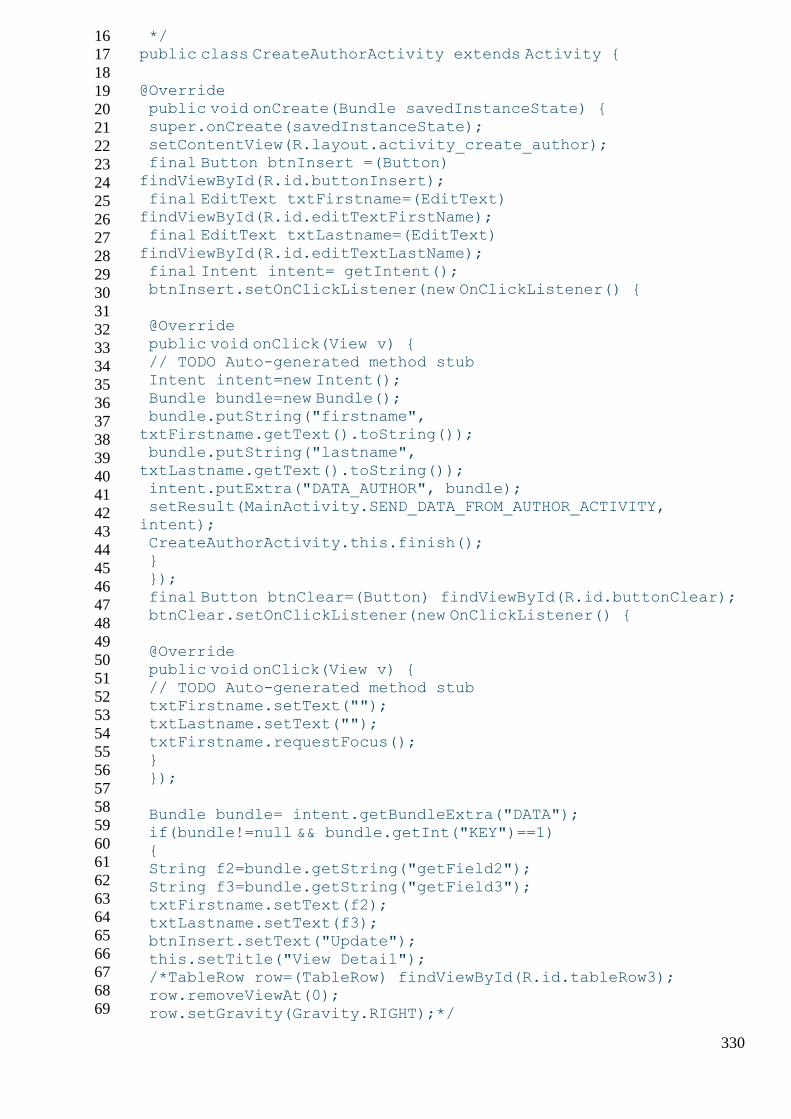
330
16
17
18
19
20
21
22
23
24
25
26
27
28
29
30
31
32
33
34
35
36
37
38
39
40
41
42
43
44
45
46
47
48
49
50
51
52
53
54
55
56
57
58
59
60
61
62
63
64
65
66
67
68
69
*/ public class CreateAuthorActivity extends Activity {
@Override public void onCreate(Bundle savedInstanceState) {
super.onCreate(savedInstanceState); setContentView(R.layout.activity_create_author); final Button btnInsert =(Button) findViewById(R.id.buttonInsert);
final EditText txtFirstname=(EditText) findViewById(R.id.editTextFirstName); final EditText txtLastname=(EditText)
findViewById(R.id.editTextLastName); final Intent intent= getIntent(); btnInsert.setOnClickListener(new OnClickListener() {
@Override
public void onClick(View v) { // TODO Auto-generated method stub Intent intent=new Intent();
Bundle bundle=new Bundle(); bundle.putString("firstname",
txtFirstname.getText().toString()); bundle.putString("lastname",
txtLastname.getText().toString()); intent.putExtra("DATA_AUTHOR", bundle); setResult(MainActivity.SEND_DATA_FROM_AUTHOR_ACTIVITY,
intent); CreateAuthorActivity.this.finish(); } });
final Button btnClear=(Button) findViewById(R.id.buttonClear); btnClear.setOnClickListener(new OnClickListener() {
@Override public void onClick(View v) {
// TODO Auto-generated method stub txtFirstname.setText(""); txtLastname.setText("");
txtFirstname.requestFocus(); } });
Bundle bundle= intent.getBundleExtra("DATA");
if(bundle!=null && bundle.getInt("KEY")==1) { String f2=bundle.getString("getField2");
String f3=bundle.getString("getField3"); txtFirstname.setText(f2); txtLastname.setText(f3); btnInsert.setText("Update");
this.setTitle("View Detail"); /*TableRow row=(TableRow) findViewById(R.id.tableRow3); row.removeViewAt(0);
row.setGravity(Gravity.RIGHT);*/
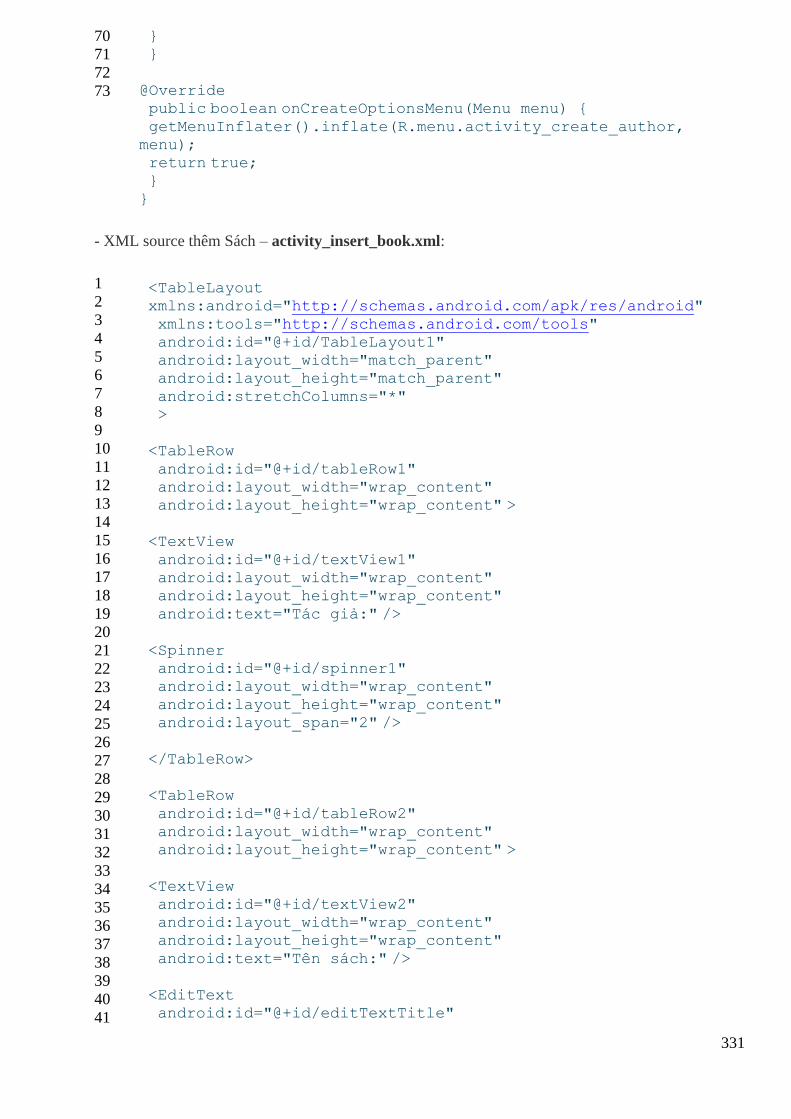
331
70
71
72
73
} }
@Override public boolean onCreateOptionsMenu(Menu menu) {
getMenuInflater().inflate(R.menu.activity_create_author,
menu); return true; }
}
- XML source thêm Sách – activity_insert_book.xml:
1
2
3
4
5
6
7
8
9
10
11
12
13
14
15
16
17
18
19
20
21
22
23
24
25
26
27
28
29
30
31
32
33
34
35
36
37
38
39
40
41
<TableLayout xmlns:android="http://schemas.android.com/apk/res/android"
xmlns:tools="http://schemas.android.com/tools" android:id="@+id/TableLayout1" android:layout_width="match_parent" android:layout_height="match_parent"
android:stretchColumns="*" >
<TableRow
android:id="@+id/tableRow1" android:layout_width="wrap_content" android:layout_height="wrap_content" >
<TextView
android:id="@+id/textView1" android:layout_width="wrap_content" android:layout_height="wrap_content"
android:text="Tác giả:" />
<Spinner android:id="@+id/spinner1" android:layout_width="wrap_content"
android:layout_height="wrap_content" android:layout_span="2" />
</TableRow>
<TableRow
android:id="@+id/tableRow2" android:layout_width="wrap_content" android:layout_height="wrap_content" >
<TextView android:id="@+id/textView2" android:layout_width="wrap_content" android:layout_height="wrap_content"
android:text="Tên sách:" />
<EditText android:id="@+id/editTextTitle"
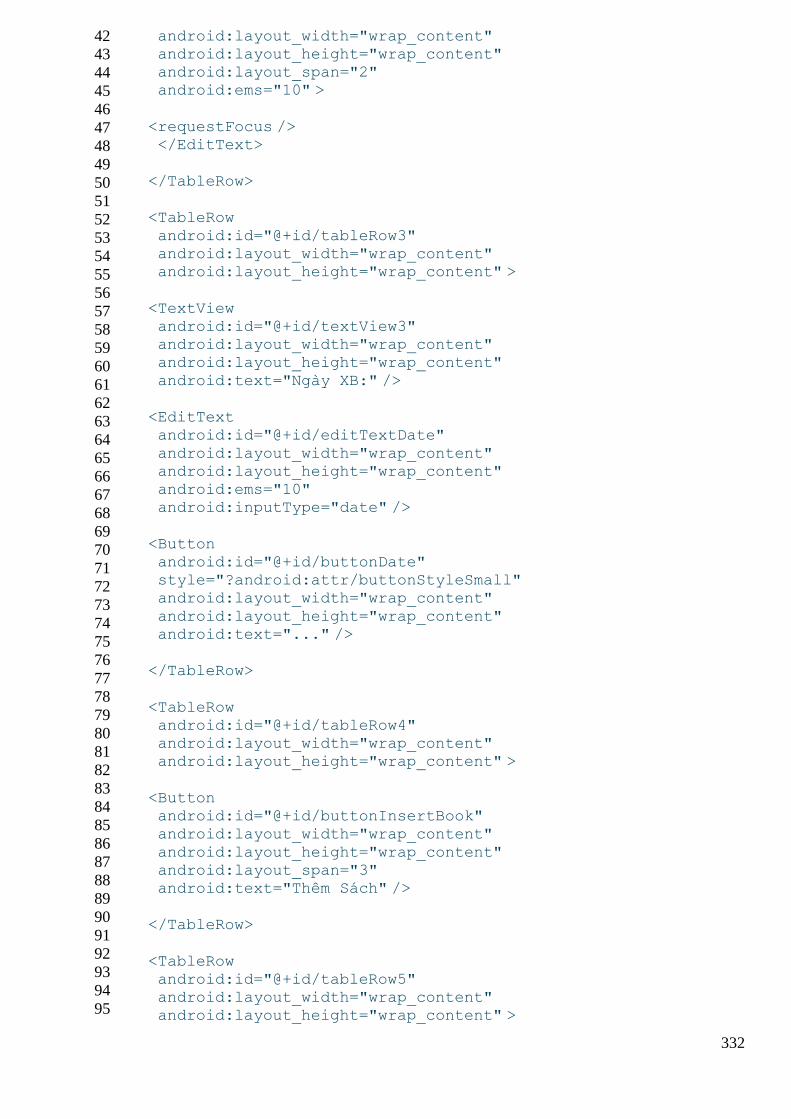
332
42
43
44
45
46
47
48
49
50
51
52
53
54
55
56
57
58
59
60
61
62
63
64
65
66
67
68
69
70
71
72
73
74
75
76
77
78
79
80
81
82
83
84
85
86
87
88
89
90
91
92
93
94
95
android:layout_width="wrap_content" android:layout_height="wrap_content" android:layout_span="2" android:ems="10" >
<requestFocus /> </EditText>
</TableRow>
<TableRow
android:id="@+id/tableRow3" android:layout_width="wrap_content" android:layout_height="wrap_content" >
<TextView android:id="@+id/textView3" android:layout_width="wrap_content" android:layout_height="wrap_content"
android:text="Ngày XB:" />
<EditText android:id="@+id/editTextDate"
android:layout_width="wrap_content" android:layout_height="wrap_content" android:ems="10" android:inputType="date" />
<Button android:id="@+id/buttonDate" style="?android:attr/buttonStyleSmall" android:layout_width="wrap_content"
android:layout_height="wrap_content" android:text="..." />
</TableRow>
<TableRow android:id="@+id/tableRow4" android:layout_width="wrap_content" android:layout_height="wrap_content" >
<Button android:id="@+id/buttonInsertBook" android:layout_width="wrap_content"
android:layout_height="wrap_content" android:layout_span="3" android:text="Thêm Sách" />
</TableRow>
<TableRow android:id="@+id/tableRow5" android:layout_width="wrap_content" android:layout_height="wrap_content" >
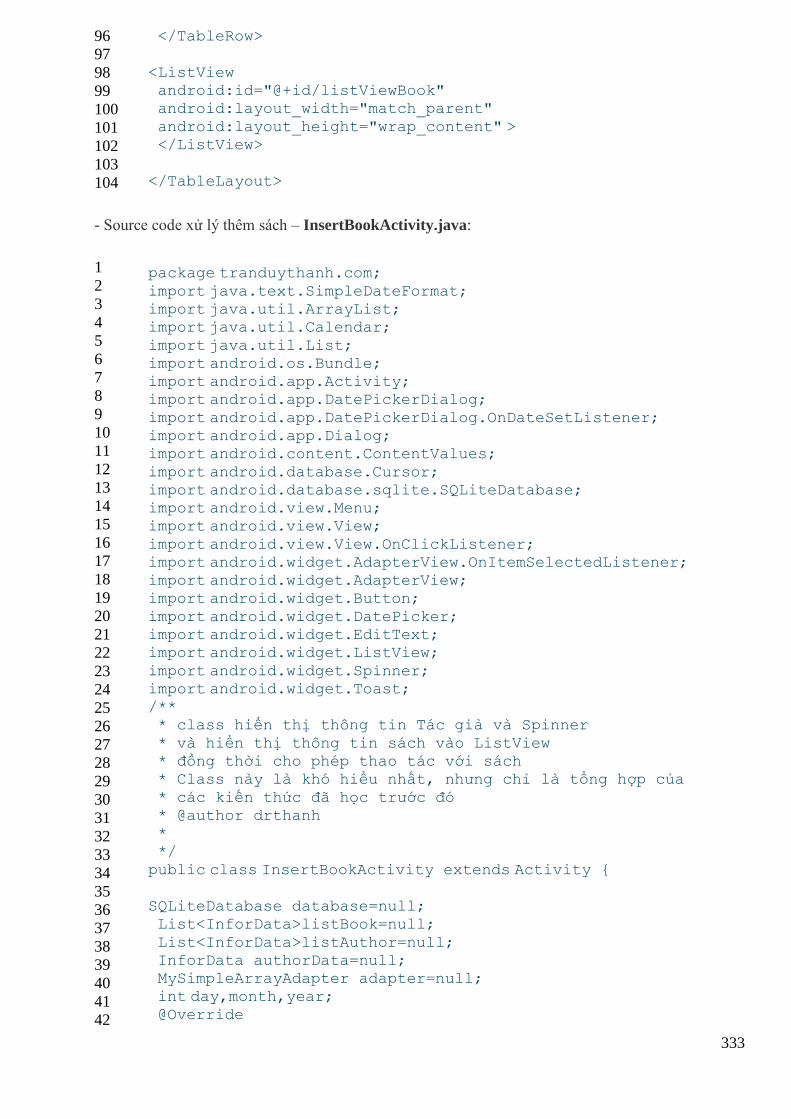
333
96
97
98
99
100
101
102
103
104
</TableRow>
<ListView android:id="@+id/listViewBook" android:layout_width="match_parent"
android:layout_height="wrap_content" > </ListView>
</TableLayout>
- Source code xử lý thêm sách – InsertBookActivity.java:
1
2
3
4
5
6
7
8
9
10
11
12
13
14
15
16
17
18
19
20
21
22
23
24
25
26
27
28
29
30
31
32
33
34
35
36
37
38
39
40
41
42
package tranduythanh.com;
import java.text.SimpleDateFormat; import java.util.ArrayList; import java.util.Calendar;
import java.util.List; import android.os.Bundle; import android.app.Activity; import android.app.DatePickerDialog;
import android.app.DatePickerDialog.OnDateSetListener; import android.app.Dialog; import android.content.ContentValues;
import android.database.Cursor; import android.database.sqlite.SQLiteDatabase; import android.view.Menu; import android.view.View;
import android.view.View.OnClickListener; import android.widget.AdapterView.OnItemSelectedListener; import android.widget.AdapterView; import android.widget.Button;
import android.widget.DatePicker; import android.widget.EditText; import android.widget.ListView;
import android.widget.Spinner; import android.widget.Toast; /** * class hiển thị thông tin Tác giả và Spinner
* và hiển thị thông tin sách vào ListView * đồng thời cho phép thao tác với sách * Class này là khó hiểu nhất, nhưng chỉ là tổng hợp của
* các kiến thức đã học trước đó * @author drthanh * */
public class InsertBookActivity extends Activity {
SQLiteDatabase database=null; List<InforData>listBook=null;
List<InforData>listAuthor=null; InforData authorData=null; MySimpleArrayAdapter adapter=null; int day,month,year;
@Override
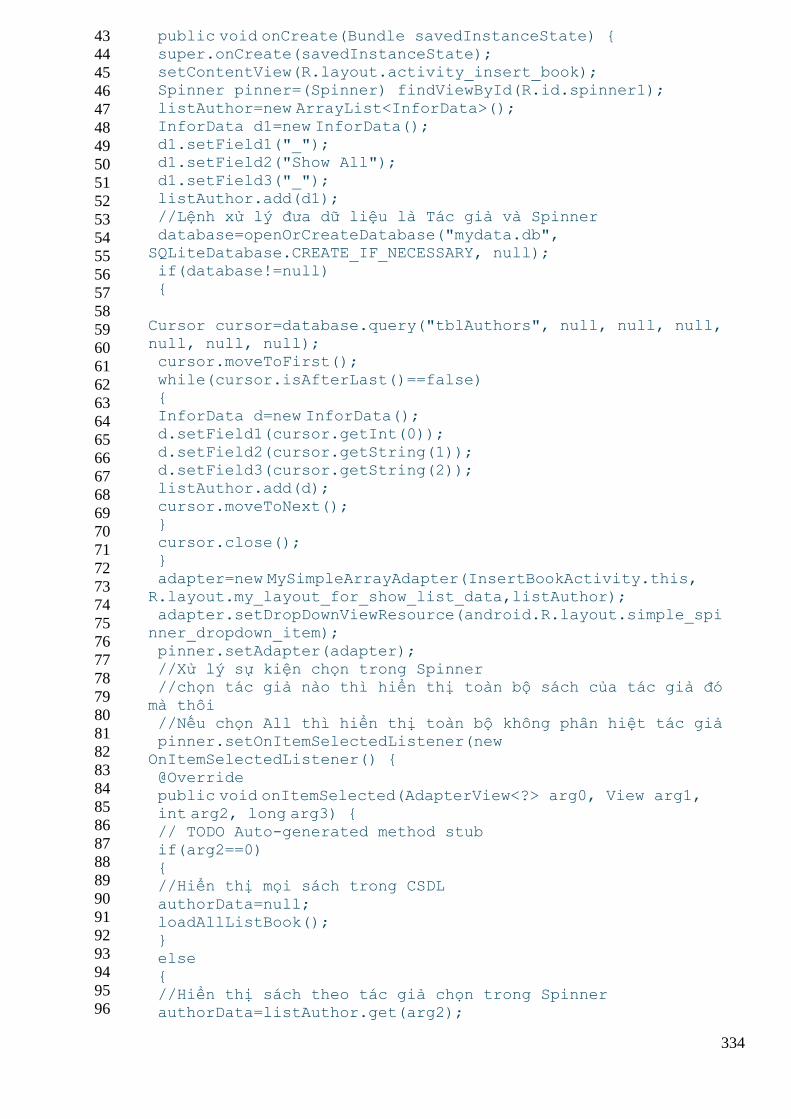
334
43
44
45
46
47
48
49
50
51
52
53
54
55
56
57
58
59
60
61
62
63
64
65
66
67
68
69
70
71
72
73
74
75
76
77
78
79
80
81
82
83
84
85
86
87
88
89
90
91
92
93
94
95
96
public void onCreate(Bundle savedInstanceState) { super.onCreate(savedInstanceState); setContentView(R.layout.activity_insert_book); Spinner pinner=(Spinner) findViewById(R.id.spinner1);
listAuthor=new ArrayList<InforData>(); InforData d1=new InforData(); d1.setField1("_"); d1.setField2("Show All");
d1.setField3("_"); listAuthor.add(d1); //Lệnh xử lý đưa dữ liệu là Tác giả và Spinner
database=openOrCreateDatabase("mydata.db",
SQLiteDatabase.CREATE_IF_NECESSARY, null); if(database!=null) {
Cursor cursor=database.query("tblAuthors", null, null, null,
null, null, null); cursor.moveToFirst();
while(cursor.isAfterLast()==false) { InforData d=new InforData(); d.setField1(cursor.getInt(0));
d.setField2(cursor.getString(1)); d.setField3(cursor.getString(2)); listAuthor.add(d);
cursor.moveToNext(); } cursor.close(); }
adapter=new MySimpleArrayAdapter(InsertBookActivity.this, R.layout.my_layout_for_show_list_data,listAuthor); adapter.setDropDownViewResource(android.R.layout.simple_spi
nner_dropdown_item);
pinner.setAdapter(adapter); //Xử lý sự kiện chọn trong Spinner //chọn tác giả nào thì hiển thị toàn bộ sách của tác giả đó
mà thôi //Nếu chọn All thì hiển thị toàn bộ không phân hiệt tác giả pinner.setOnItemSelectedListener(new OnItemSelectedListener() {
@Override public void onItemSelected(AdapterView<?> arg0, View arg1, int arg2, long arg3) {
// TODO Auto-generated method stub if(arg2==0) { //Hiển thị mọi sách trong CSDL
authorData=null; loadAllListBook(); }
else { //Hiển thị sách theo tác giả chọn trong Spinner authorData=listAuthor.get(arg2);
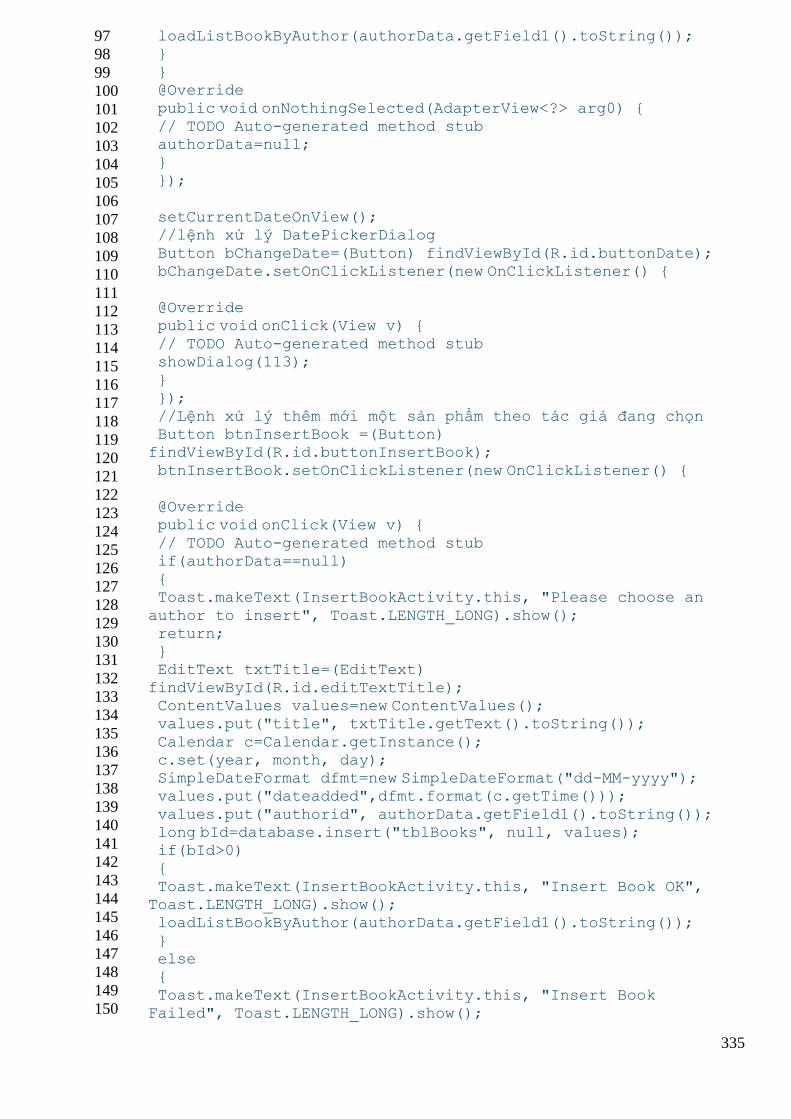
335
97
98
99
100
101
102
103
104
105
106
107
108
109
110
111
112
113
114
115
116
117
118
119
120
121
122
123
124
125
126
127
128
129
130
131
132
133
134
135
136
137
138
139
140
141
142
143
144
145
146
147
148
149
150
loadListBookByAuthor(authorData.getField1().toString()); } } @Override
public void onNothingSelected(AdapterView<?> arg0) { // TODO Auto-generated method stub authorData=null; }
});
setCurrentDateOnView(); //lệnh xử lý DatePickerDialog
Button bChangeDate=(Button) findViewById(R.id.buttonDate); bChangeDate.setOnClickListener(new OnClickListener() {
@Override public void onClick(View v) {
// TODO Auto-generated method stub showDialog(113); }
}); //Lệnh xử lý thêm mới một sản phẩm theo tác giả đang chọn Button btnInsertBook =(Button)
findViewById(R.id.buttonInsertBook);
btnInsertBook.setOnClickListener(new OnClickListener() {
@Override public void onClick(View v) {
// TODO Auto-generated method stub if(authorData==null) { Toast.makeText(InsertBookActivity.this, "Please choose an
author to insert", Toast.LENGTH_LONG).show(); return; } EditText txtTitle=(EditText)
findViewById(R.id.editTextTitle); ContentValues values=new ContentValues(); values.put("title", txtTitle.getText().toString());
Calendar c=Calendar.getInstance(); c.set(year, month, day); SimpleDateFormat dfmt=new SimpleDateFormat("dd-MM-yyyy"); values.put("dateadded",dfmt.format(c.getTime()));
values.put("authorid", authorData.getField1().toString()); long bId=database.insert("tblBooks", null, values); if(bId>0)
{ Toast.makeText(InsertBookActivity.this, "Insert Book OK",
Toast.LENGTH_LONG).show(); loadListBookByAuthor(authorData.getField1().toString());
} else {
Toast.makeText(InsertBookActivity.this, "Insert Book
Failed", Toast.LENGTH_LONG).show();
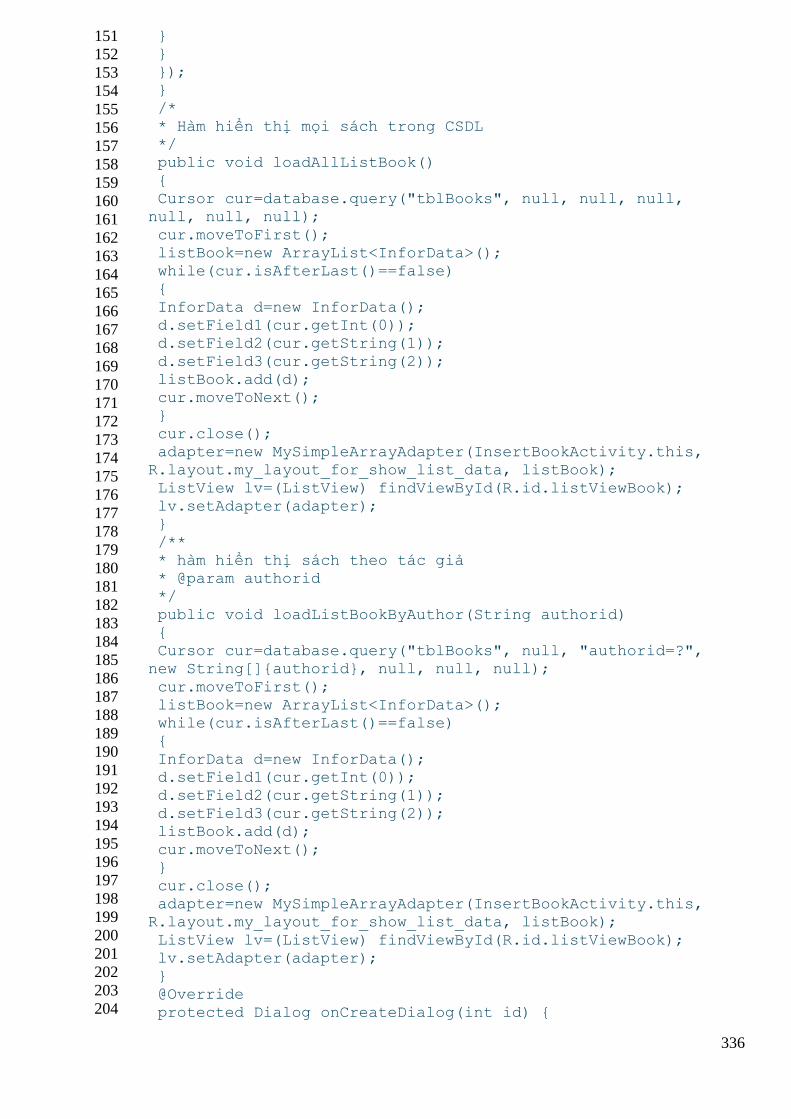
336
151
152
153
154
155
156
157
158
159
160
161
162
163
164
165
166
167
168
169
170
171
172
173
174
175
176
177
178
179
180
181
182
183
184
185
186
187
188
189
190
191
192
193
194
195
196
197
198
199
200
201
202
203
204
} } }); }
/* * Hàm hiển thị mọi sách trong CSDL */ public void loadAllListBook()
{ Cursor cur=database.query("tblBooks", null, null, null,
null, null, null);
cur.moveToFirst(); listBook=new ArrayList<InforData>(); while(cur.isAfterLast()==false) {
InforData d=new InforData(); d.setField1(cur.getInt(0)); d.setField2(cur.getString(1));
d.setField3(cur.getString(2)); listBook.add(d); cur.moveToNext(); }
cur.close(); adapter=new MySimpleArrayAdapter(InsertBookActivity.this,
R.layout.my_layout_for_show_list_data, listBook);
ListView lv=(ListView) findViewById(R.id.listViewBook); lv.setAdapter(adapter); } /**
* hàm hiển thị sách theo tác giả * @param authorid */
public void loadListBookByAuthor(String authorid) { Cursor cur=database.query("tblBooks", null, "authorid=?",
new String[]{authorid}, null, null, null);
cur.moveToFirst(); listBook=new ArrayList<InforData>(); while(cur.isAfterLast()==false) {
InforData d=new InforData(); d.setField1(cur.getInt(0)); d.setField2(cur.getString(1));
d.setField3(cur.getString(2)); listBook.add(d); cur.moveToNext(); }
cur.close(); adapter=new MySimpleArrayAdapter(InsertBookActivity.this,
R.layout.my_layout_for_show_list_data, listBook);
ListView lv=(ListView) findViewById(R.id.listViewBook); lv.setAdapter(adapter); } @Override
protected Dialog onCreateDialog(int id) {
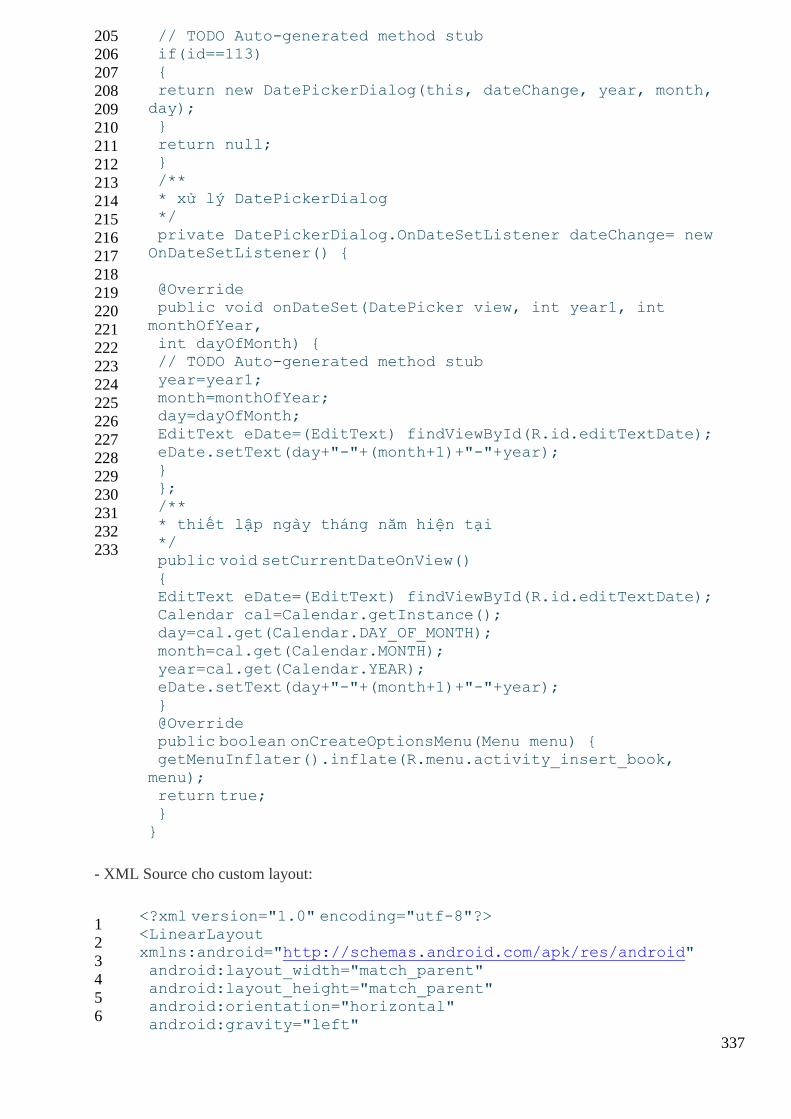
337
205
206
207
208
209
210
211
212
213
214
215
216
217
218
219
220
221
222
223
224
225
226
227
228
229
230
231
232
233
// TODO Auto-generated method stub if(id==113) { return new DatePickerDialog(this, dateChange, year, month,
day); } return null; }
/** * xử lý DatePickerDialog */
private DatePickerDialog.OnDateSetListener dateChange= new
OnDateSetListener() {
@Override public void onDateSet(DatePicker view, int year1, int
monthOfYear, int dayOfMonth) { // TODO Auto-generated method stub
year=year1; month=monthOfYear; day=dayOfMonth; EditText eDate=(EditText) findViewById(R.id.editTextDate);
eDate.setText(day+"-"+(month+1)+"-"+year); } };
/** * thiết lập ngày tháng năm hiện tại */ public void setCurrentDateOnView()
{ EditText eDate=(EditText) findViewById(R.id.editTextDate); Calendar cal=Calendar.getInstance(); day=cal.get(Calendar.DAY_OF_MONTH);
month=cal.get(Calendar.MONTH); year=cal.get(Calendar.YEAR); eDate.setText(day+"-"+(month+1)+"-"+year);
} @Override public boolean onCreateOptionsMenu(Menu menu) { getMenuInflater().inflate(R.menu.activity_insert_book,
menu); return true; }
}
- XML Source cho custom layout:
1
2
3
4
5
6
<?xml version="1.0" encoding="utf-8"?> <LinearLayout xmlns:android="http://schemas.android.com/apk/res/android"
android:layout_width="match_parent" android:layout_height="match_parent" android:orientation="horizontal"
android:gravity="left"
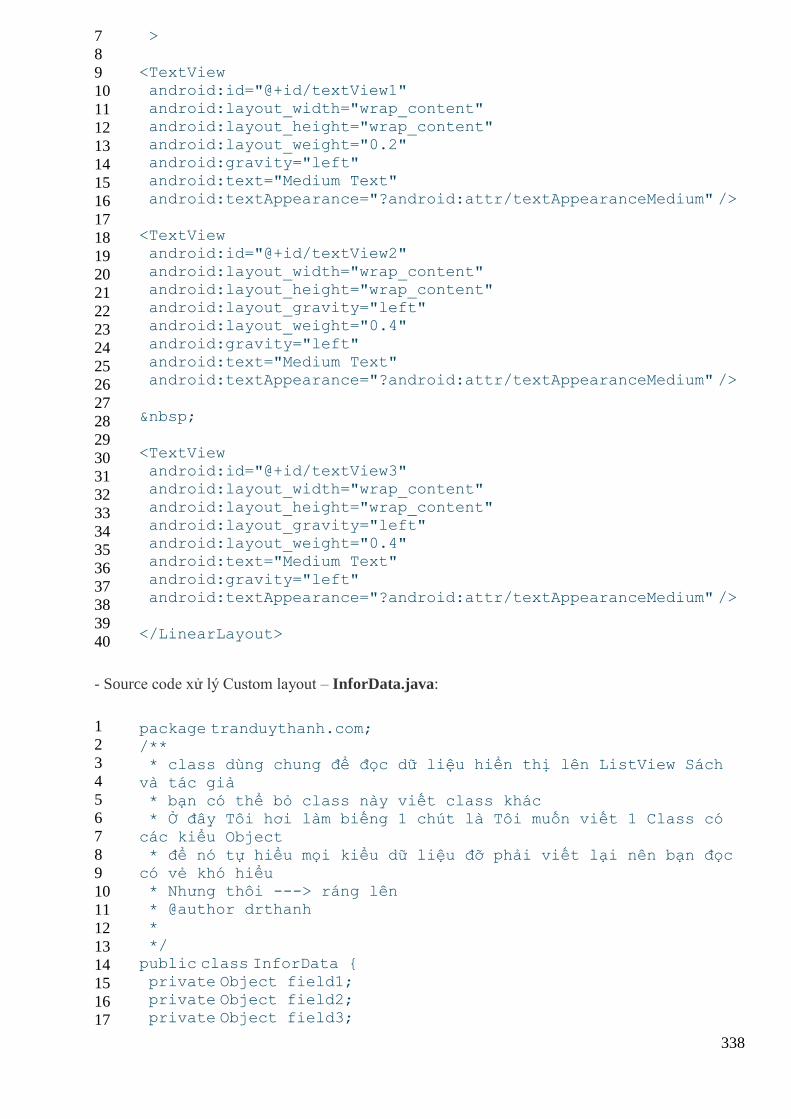
338
7
8
9
10
11
12
13
14
15
16
17
18
19
20
21
22
23
24
25
26
27
28
29
30
31
32
33
34
35
36
37
38
39
40
>
<TextView android:id="@+id/textView1" android:layout_width="wrap_content"
android:layout_height="wrap_content" android:layout_weight="0.2" android:gravity="left" android:text="Medium Text"
android:textAppearance="?android:attr/textAppearanceMedium" />
<TextView android:id="@+id/textView2"
android:layout_width="wrap_content" android:layout_height="wrap_content" android:layout_gravity="left" android:layout_weight="0.4"
android:gravity="left" android:text="Medium Text" android:textAppearance="?android:attr/textAppearanceMedium" />
<TextView android:id="@+id/textView3" android:layout_width="wrap_content"
android:layout_height="wrap_content" android:layout_gravity="left" android:layout_weight="0.4" android:text="Medium Text"
android:gravity="left" android:textAppearance="?android:attr/textAppearanceMedium" />
</LinearLayout>
- Source code xử lý Custom layout – InforData.java:
1
2
3
4
5
6
7
8
9
10
11
12
13
14
15
16
17
package tranduythanh.com; /** * class dùng chung để đọc dữ liệu hiển thị lên ListView Sách
và tác giả * bạn có thể bỏ class này viết class khác * Ở đây Tôi hơi làm biếng 1 chút là Tôi muốn viết 1 Class có
các kiểu Object
* để nó tự hiểu mọi kiểu dữ liệu đỡ phải viết lại nên bạn đọc
có vẻ khó hiểu * Nhưng thôi ---> ráng lên * @author drthanh
* */ public class InforData {
private Object field1; private Object field2; private Object field3;
339
18
19
20
21
22
23
24
25
26
27
28
29
30
31
32
33
34
35
36
37
38
public Object getField1() { return field1; } public void setField1(Object field1) {
this.field1 = field1; } public Object getField2() { return field2;
} public void setField2(Object field2) { this.field2 = field2;
} public Object getField3() { return field3; }
public void setField3(Object field3) { this.field3 = field3; }
@Override public String toString() { // TODO Auto-generated method stub return this.field1 +" - " +this.field2 +" - "+this.field3;
} }
- Source code xử lý Custom layout - MySimpleArrayAdapter.java:
1
2
3
4
5
6
7
8
9
10
11
12
13
14
15
16
17
18
19
20
21
22
23
24
25
26
27
package tranduythanh.com;
import java.util.List;
import android.app.Activity;
import android.content.Context; import android.graphics.Color; import android.view.Gravity; import android.view.LayoutInflater;
import android.view.View; import android.view.ViewGroup; import android.widget.ArrayAdapter;
import android.widget.TextView; /** * class dùng để custom layout * dùng chung cho hiển thị Sách và Tác giả
* @author drthanh * */
public class MySimpleArrayAdapter extends ArrayAdapter<InforData> {
private Activity context; private int layout;
private List<InforData>list; public MySimpleArrayAdapter(Context context, int textViewResourceId,
340
28
29
30
31
32
33
34
35
36
37
38
39
40
41
42
43
44
45
46
47
48
49
50
51
52
53
54
List<InforData> objects) { super(context, textViewResourceId, objects); // TODO Auto-generated constructor stub this.context=(Activity) context;
this.layout=textViewResourceId; this.list=objects; } @Override
public View getView(int position, View convertView, ViewGroup parent) { // TODO Auto-generated method stub
LayoutInflater flater=context.getLayoutInflater(); View row=flater.inflate(layout, parent,false); TextView txt1=(TextView) row.findViewById(R.id.textView1); TextView txt2=(TextView) row.findViewById(R.id.textView2);
TextView txt3=(TextView) row.findViewById(R.id.textView3); /*txt1.setTextAlignment(Gravity.LEFT); txt2.setTextAlignment(Gravity.LEFT);
txt3.setTextAlignment(Gravity.LEFT);*/ InforData data=list.get(position); txt1.setText(data.getField1()==null?"":data.getField1().toStri
ng());
txt2.setText(data.getField2()==null?"":data.getField2().toStri
ng()); txt3.setText(data.getField3()==null?"":data.getField3().toStri
ng()); if(position==0) { row.setBackgroundColor(Color.RED);
} return row; }
}
- XML source xem danh sách tác giả – layout_show_data.xml:
1
2
3
4
5
6
7
8
9
10
11
12
13
14
15
16
17
18
<?xml version="1.0" encoding="utf-8"?>
<LinearLayout xmlns:android="http://schemas.android.com/apk/res/android" android:layout_width="match_parent"
android:layout_height="match_parent" android:orientation="vertical" >
<LinearLayout android:layout_width="match_parent"
android:layout_height="wrap_content" android:orientation="vertical" >
<ListView
android:id="@+id/listViewShowData" android:layout_width="match_parent" android:layout_height="405dp" > </ListView>
</LinearLayout>
341
19
20
21
22
23
24
<Button android:id="@+id/buttonBack" android:layout_width="wrap_content" android:layout_height="wrap_content"
android:text="Back" />
</LinearLayout>
- Source code xử lý xem danh sách tác giả:
1
2
3
4
5
6
7
8
9
10
11
12
13
14
15
16
17
18
19
20
21
22
23
24
25
26
27
28
29
30
31
32
33
34
35
36
37
38
39
40
41
42
43
44
package tranduythanh.com;
import java.util.ArrayList;
import java.util.List; import android.app.Activity; import android.app.AlertDialog; import android.app.AlertDialog.Builder;
import android.content.ContentValues; import android.content.DialogInterface; import android.content.Intent;
import android.database.Cursor; import android.database.sqlite.SQLiteDatabase; import android.os.Bundle; import android.view.View;
import android.view.View.OnClickListener; import android.widget.AdapterView.OnItemClickListener; import android.widget.AdapterView;
import android.widget.AdapterView.OnItemLongClickListener; import android.widget.Button; import android.widget.ListView; import android.widget.Toast;
/** * class xem danh sách tác giả * @author drthanh
* */ public class ShowListAuthorActivity extends Activity{ @Override
protected void onCreate(Bundle savedInstanceState) { // TODO Auto-generated method stub super.onCreate(savedInstanceState); setContentView(R.layout.layout_show_data);
updateUI(); Button btn=(Button) findViewById(R.id.buttonBack); btn.setOnClickListener(new OnClickListener() {
@Override public void onClick(View v) { // TODO Auto-generated method stub ShowListAuthorActivity.this.finish();
} }); }
List<InforData>list=new ArrayList<InforData>();
342
45
46
47
48
49
50
51
52
53
54
55
56
57
58
59
60
61
62
63
64
65
66
67
68
69
70
71
72
73
74
75
76
77
78
79
80
81
82
83
84
85
86
87
88
89
90
91
92
93
94
95
96
97
98
InforData dataClick=null; SQLiteDatabase database=null; MySimpleArrayAdapter adapter=null; public void updateUI()
{ database=openOrCreateDatabase("mydata.db",
SQLiteDatabase.CREATE_IF_NECESSARY, null); if(database!=null)
{
Cursor cursor=database.query("tblAuthors", null, null, null,
null, null, null);
startManagingCursor(cursor); InforData header=new InforData(); header.setField1("STT"); header.setField2("Mã tác giả");
header.setField3("Tên tác giả"); list.add(header); cursor.moveToFirst();
while(!cursor.isAfterLast()) { InforData data=new InforData(); data.setField1(cursor.getInt(0));
data.setField2(cursor.getString(1)); data.setField3(cursor.getString(2)); list.add(data);
cursor.moveToNext(); } cursor.close(); adapter=new
MySimpleArrayAdapter(ShowListAuthorActivity.this,
R.layout.my_layout_for_show_list_data, list); final ListView lv= (ListView) findViewById(R.id.listViewShowData);
lv.setAdapter(adapter); lv.setOnItemClickListener(new OnItemClickListener() { @Override
public void onItemClick(AdapterView<?> arg0, View arg1, int arg2, long arg3) { // TODO Auto-generated method stub Toast.makeText(ShowListAuthorActivity.this,"View -->"+
list.get(arg2).toString(), Toast.LENGTH_LONG).show(); Intent intent=new Intent(ShowListAuthorActivity.this, CreateAuthorActivity.class);
Bundle bundle=new Bundle(); bundle.putInt("KEY", 1); bundle.putString("getField1",
list.get(arg2).getField1().toString());
bundle.putString("getField2",
list.get(arg2).getField2().toString()); bundle.putString("getField3",
list.get(arg2).getField3().toString()); intent.putExtra("DATA", bundle); dataClick=list.get(arg2); startActivityForResult(intent,
343
99
100
101
102
103
104
105
106
107
108
109
110
111
112
113
114
115
116
117
118
119
120
121
122
123
124
125
126
127
128
129
130
131
132
133
134
135
136
137
138
139
140
141
142
143
144
145
146
147
148
149
150
151
152
MainActivity.OPEN_AUTHOR_DIALOG); } }); lv.setOnItemLongClickListener(new OnItemLongClickListener()
{ @Override public boolean onItemLongClick(AdapterView<?> arg0, View arg1,
int arg2, long arg3) { // TODO Auto-generated method stub final InforData data=list.get(arg2);
final int pos=arg2; Toast.makeText(ShowListAuthorActivity.this, "Edit--
>"+data.toString(), Toast.LENGTH_LONG).show(); AlertDialog.Builder b=new
Builder(ShowListAuthorActivity.this); b.setTitle("Remove"); b.setMessage("Xóa ["+data.getField2() +" -
"+data.getField3() +"] hả?"); b.setPositiveButton("Có", new DialogInterface.OnClickListener() {
@Override
public void onClick(DialogInterface dialog, int which) { // TODO Auto-generated method stub int n=database.delete("tblAuthors", "id=?", new
String[]{data.getField1().toString()}); if(n>0) { Toast.makeText(ShowListAuthorActivity.this, "Remove ok",
Toast.LENGTH_LONG).show(); list.remove(pos); adapter.notifyDataSetChanged(); }
else { Toast.makeText(ShowListAuthorActivity.this, "Remove not ok",
Toast.LENGTH_LONG).show(); } } });
b.setNegativeButton("Không", new DialogInterface.OnClickListener() {
@Override
public void onClick(DialogInterface dialog, int which) { // TODO Auto-generated method stub dialog.cancel(); }
}); b.show(); return false;
} }); }
344
153
154
155
156
157
158
159
160
161
162
} @Override protected void onActivityResult(int requestCode, int resultCode, Intent data) {
// TODO Auto-generated method stub super.onActivityResult(requestCode, resultCode, data); if(resultCode==MainActivity.SEND_DATA_FROM_AUTHOR_ACTIVITY) {
Bundle bundle=data.getBundleExtra("DATA_AUTHOR"); String f2=bundle.getString("firstname"); String f3=bundle.getString("lastname");
String f1=dataClick.getField1().toString(); ContentValues values=new ContentValues(); values.put("firstname", f2); values.put("lastname", f3);
if(database!=null) { int n=database.update("tblAuthors", values, "id=?", new
String[]{f1}); if(n>0) { Toast.makeText(ShowListAuthorActivity.this, "update ok ok ok
", Toast.LENGTH_LONG).show(); dataClick.setField2(f2); dataClick.setField3(f3);
if(adapter!=null) adapter.notifyDataSetChanged(); } }
} } }
- Bạn có thể tải source code đầy đủ ở
đây: http://www.mediafire.com/download/nf4ghdbr44igpa6/Ex_Module3_Bai6.rar
- Bài tập kế tiếp Tôi sẽ hướng dẫn các bạn cách sử dụng Content Provider để đọc danh bạ trong điện
thoại, cách đọc lịch sử cuộc gọi, cách đọc Media trong điện thoại cũng như bookmark. Bạn chú ý
theo dõi
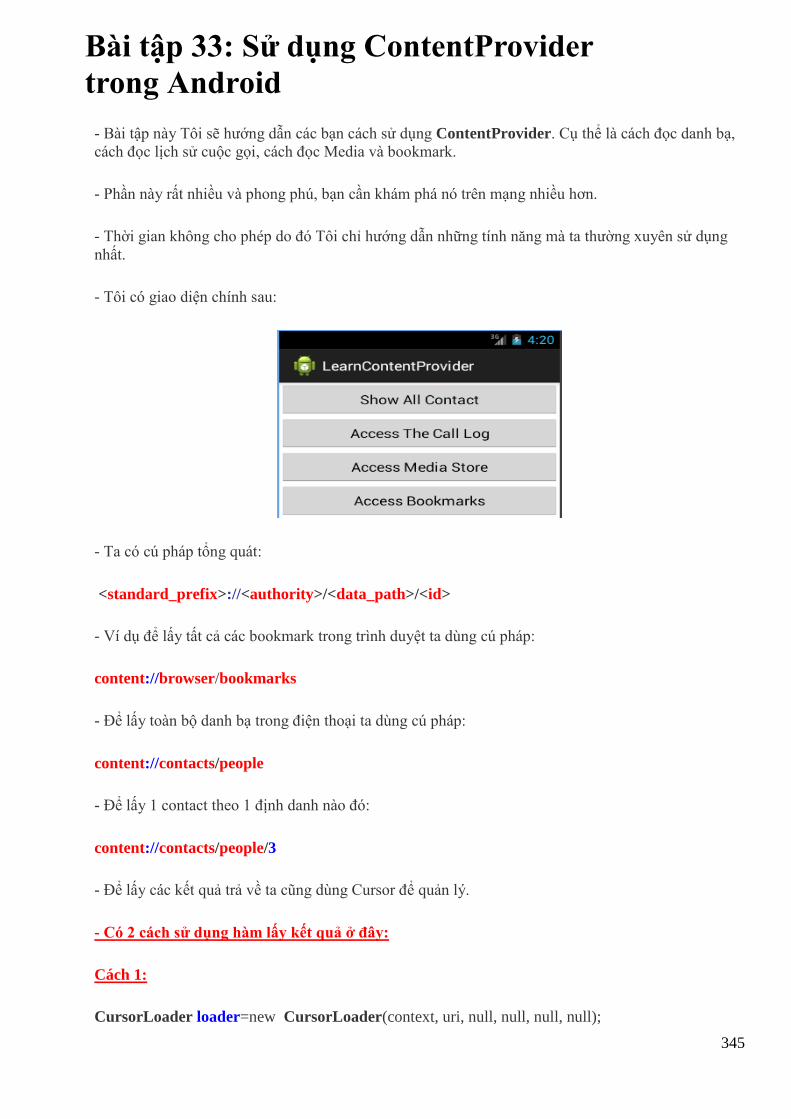
345
Bài tập 33: Sử dụng ContentProvider
trong Android
- Bài tập này Tôi sẽ hướng dẫn các bạn cách sử dụng ContentProvider. Cụ thể là cách đọc danh bạ,
cách đọc lịch sử cuộc gọi, cách đọc Media và bookmark.
- Phần này rất nhiều và phong phú, bạn cần khám phá nó trên mạng nhiều hơn.
- Thời gian không cho phép do đó Tôi chỉ hướng dẫn những tính năng mà ta thường xuyên sử dụng
nhất.
- Tôi có giao diện chính sau:
- Ta có cú pháp tổng quát:
<standard_prefix>://<authority>/<data_path>/<id>
- Ví dụ để lấy tất cả các bookmark trong trình duyệt ta dùng cú pháp:
content://browser/bookmarks
- Để lấy toàn bộ danh bạ trong điện thoại ta dùng cú pháp:
content://contacts/people
- Để lấy 1 contact theo 1 định danh nào đó:
content://contacts/people/3
- Để lấy các kết quả trả về ta cũng dùng Cursor để quản lý.
- Có 2 cách sử dụng hàm lấy kết quả ở đây:
Cách 1:
CursorLoader loader=new CursorLoader(context, uri, null, null, null, null);
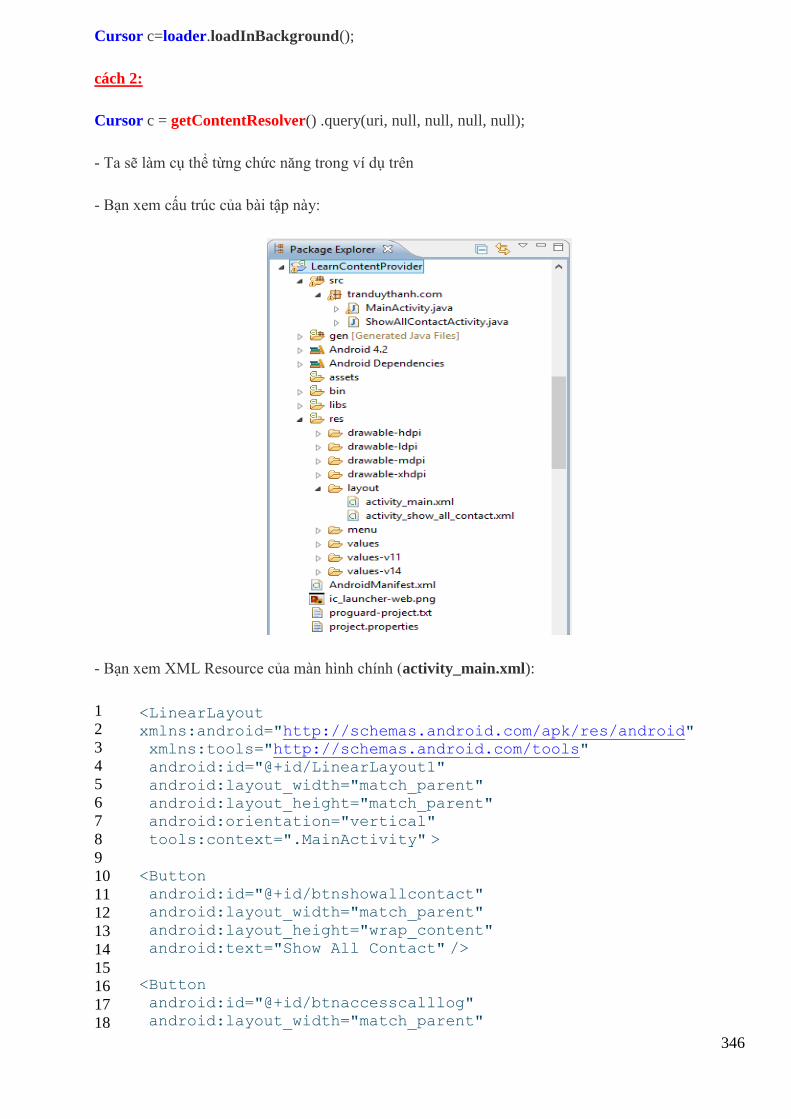
346
Cursor c=loader.loadInBackground();
cách 2:
Cursor c = getContentResolver() .query(uri, null, null, null, null);
- Ta sẽ làm cụ thể từng chức năng trong ví dụ trên
- Bạn xem cấu trúc của bài tập này:
- Bạn xem XML Resource của màn hình chính (activity_main.xml):
1
2
3
4
5
6
7
8
9
10
11
12
13
14
15
16
17
18
<LinearLayout xmlns:android="http://schemas.android.com/apk/res/android" xmlns:tools="http://schemas.android.com/tools" android:id="@+id/LinearLayout1"
android:layout_width="match_parent" android:layout_height="match_parent" android:orientation="vertical"
tools:context=".MainActivity" >
<Button android:id="@+id/btnshowallcontact" android:layout_width="match_parent"
android:layout_height="wrap_content" android:text="Show All Contact" />
<Button
android:id="@+id/btnaccesscalllog" android:layout_width="match_parent"
347
19
20
21
22
23
24
25
26
27
28
29
30
31
32
33
android:layout_height="wrap_content" android:text="Access The Call Log" />
<Button android:id="@+id/btnmediastore"
android:layout_width="match_parent" android:layout_height="wrap_content" android:text="Access Media Store" />
<Button
android:id="@+id/btnaccessbookmarks" android:layout_width="match_parent" android:layout_height="wrap_content"
android:text="Access Bookmarks" />
</LinearLayout>
- Source code xử lý MainActivity.java:
1
2
3
4
5
6
7
8
9
10
11
12
13
14
15
16
17
18
19
20
21
22
23
24
25
26
27
28
29
30
31
32
33
34
35
package tranduythanh.com;
import android.os.Bundle; import android.provider.Browser; import android.provider.CallLog;
import android.provider.CallLog.Calls; import android.provider.MediaStore; import android.provider.MediaStore.Audio.Media; import android.app.Activity;
import android.content.CursorLoader; import android.content.Intent; import android.database.Cursor;
import android.view.Menu; import android.view.View; import android.view.View.OnClickListener; import android.widget.Button;
import android.widget.Toast;
public class MainActivity extends Activity implements OnClickListener{
Button btnshowallcontact;
Button btnaccesscalllog; Button btnaccessmediastore; Button btnaccessbookmarks;
@Override protected void onCreate(Bundle savedInstanceState) { super.onCreate(savedInstanceState); setContentView(R.layout.activity_main);
btnshowallcontact=(Button)
findViewById(R.id.btnshowallcontact); btnshowallcontact.setOnClickListener(this);
btnaccesscalllog=(Button)
findViewById(R.id.btnaccesscalllog); btnaccesscalllog.setOnClickListener(this);
348
36
37
38
39
40
41
42
43
44
45
46
47
48
49
50
51
52
53
54
55
56
57
58
59
60
61
62
63
64
65
66
67
68
69
70
71
72
73
74
75
76
77
78
79
80
81
82
83
84
85
86
87
88
89
btnaccessmediastore=(Button)
findViewById(R.id.btnmediastore); btnaccessmediastore.setOnClickListener(this); btnaccessbookmarks=(Button)
findViewById(R.id.btnaccessbookmarks); btnaccessbookmarks.setOnClickListener(this); }
@Override
public boolean onCreateOptionsMenu(Menu menu) { // Inflate the menu; this adds items to the action bar if it
is present.
getMenuInflater().inflate(R.menu.activity_main, menu); return true; }
@Override
public void onClick(View v) { Intent intent=null; if(v==btnshowallcontact)
{ intent=new Intent(this, ShowAllContactActivity.class); startActivity(intent); }
else if(v==btnaccesscalllog) { accessTheCallLog();
} else if(v==btnaccessmediastore) { accessMediaStore();
} else if(v==btnaccessbookmarks) { accessBookmarks();
} } /**
* hàm lấy danh sách lịch sử cuộc gọi * với thời gian nhỏ hơn 30 giây và sắp xếp theo ngày gọi */ public void accessTheCallLog()
{ String [] projection=new String[]{ Calls.DATE,
Calls.NUMBER, Calls.DURATION }; Cursor c=getContentResolver().query(
CallLog.Calls.CONTENT_URI, projection, Calls.DURATION+"<?",new String[]{"30"},
Calls.DATE +" Asc"); c.moveToFirst(); String s="";
349
90
91
92
93
94
95
96
97
98
99
100
101
102
103
104
105
106
107
108
109
110
111
112
113
114
115
116
117
118
119
120
121
122
123
124
125
126
127
128
129
130
131
132
133
134
135
136
137
138
139
140
141
142
143
while(c.isAfterLast()==false){ for(int i=0;i<c.getColumnCount();i++){ s+=c.getString(i)+" - "; }
s+="\n"; c.moveToNext(); } c.close();
Toast.makeText(this, s, Toast.LENGTH_LONG).show(); } /**
* hàm đọc danh sách các Media trong SD CARD */ public void accessMediaStore() {
String []projection={ MediaStore.MediaColumns.DISPLAY_NAME, MediaStore.MediaColumns.DATE_ADDED,
MediaStore.MediaColumns.MIME_TYPE }; CursorLoader loader=new CursorLoader (this, Media.EXTERNAL_CONTENT_URI,
projection, null, null, null); Cursor c=loader.loadInBackground(); c.moveToFirst();
String s=""; while(!c.isAfterLast()){ for(int i=0;i<c.getColumnCount();i++){ s+=c.getString(i)+" - ";
} s+="\n"; c.moveToNext();
} Toast.makeText(this, s, Toast.LENGTH_LONG).show(); c.close(); }
/** * hàm đọc danh sách Bookmark trong trình duyệt */ public void accessBookmarks()
{ String []projection={ Browser.BookmarkColumns.TITLE,
Browser.BookmarkColumns.URL, }; Cursor c=getContentResolver() .query(Browser.BOOKMARKS_URI, projection,
null, null, null); c.moveToFirst(); String s="";
int titleIndex=c.getColumnIndex (Browser.BookmarkColumns.TITLE); int urlIndex=c.getColumnIndex (Browser.BookmarkColumns.URL);
while(!c.isAfterLast())
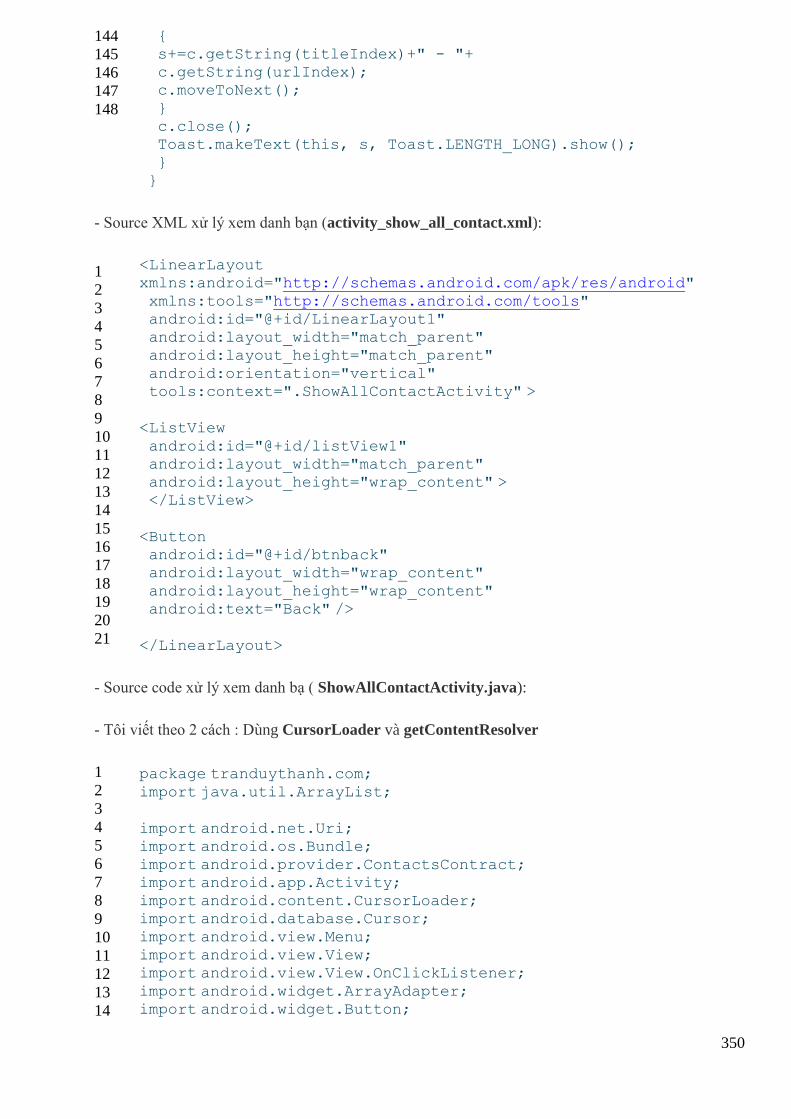
350
144
145
146
147
148
{ s+=c.getString(titleIndex)+" - "+ c.getString(urlIndex); c.moveToNext();
} c.close(); Toast.makeText(this, s, Toast.LENGTH_LONG).show(); }
}
- Source XML xử lý xem danh bạn (activity_show_all_contact.xml):
1
2
3
4
5
6
7
8
9
10
11
12
13
14
15
16
17
18
19
20
21
<LinearLayout xmlns:android="http://schemas.android.com/apk/res/android"
xmlns:tools="http://schemas.android.com/tools" android:id="@+id/LinearLayout1" android:layout_width="match_parent" android:layout_height="match_parent"
android:orientation="vertical" tools:context=".ShowAllContactActivity" >
<ListView
android:id="@+id/listView1" android:layout_width="match_parent" android:layout_height="wrap_content" > </ListView>
<Button android:id="@+id/btnback" android:layout_width="wrap_content"
android:layout_height="wrap_content" android:text="Back" />
</LinearLayout>
- Source code xử lý xem danh bạ ( ShowAllContactActivity.java):
- Tôi viết theo 2 cách : Dùng CursorLoader và getContentResolver
1
2
3
4
5
6
7
8
9
10
11
12
13
14
package tranduythanh.com;
import java.util.ArrayList;
import android.net.Uri; import android.os.Bundle;
import android.provider.ContactsContract; import android.app.Activity; import android.content.CursorLoader; import android.database.Cursor;
import android.view.Menu; import android.view.View; import android.view.View.OnClickListener;
import android.widget.ArrayAdapter; import android.widget.Button;

351
15
16
17
18
19
20
21
22
23
24
25
26
27
28
29
30
31
32
33
34
35
36
37
38
39
40
41
42
43
44
45
46
47
48
49
50
51
52
53
54
55
56
57
58
59
60
61
62
63
64
65
66
67
68
import android.widget.ListView;
public class ShowAllContactActivity extends Activity { Button btnback; @Override
protected void onCreate(Bundle savedInstanceState) { super.onCreate(savedInstanceState); setContentView(R.layout.activity_show_all_contact); btnback=(Button) findViewById(R.id.btnback);
btnback.setOnClickListener(new OnClickListener() {
@Override public void onClick(View v) {
// TODO Auto-generated method stub finish(); } });
showAllContacts1(); } /**
* hàm danh toàn bộ danh bạ * dùng CursorLoader */ public void showAllContacts1()
{ Uri uri=Uri.parse("content://contacts/people"); ArrayList<String> list=new ArrayList<String>();
CursorLoader loader=new CursorLoader(this, uri, null, null, null, null); Cursor c1=loader.loadInBackground(); c1.moveToFirst();
while(c1.isAfterLast()==false){ String s=""; String idColumnName=ContactsContract.Contacts._ID; int idIndex=c1.getColumnIndex(idColumnName);
s=c1.getString(idIndex)+" - "; String
nameColumnName=ContactsContract.Contacts.DISPLAY_NAME;
int nameIndex=c1.getColumnIndex(nameColumnName); s+=c1.getString(nameIndex); c1.moveToNext(); list.add(s);
} c1.close(); ListView lv=(ListView) findViewById(R.id.listView1);
ArrayAdapter<String>adapter=new ArrayAdapter<String>(this, android.R.layout.simple_list_item_1, list); lv.setAdapter(adapter); }
/** * hàm danh toàn bộ danh bạ * dùng getContentResolver
*/ public void showAllContacts2() {
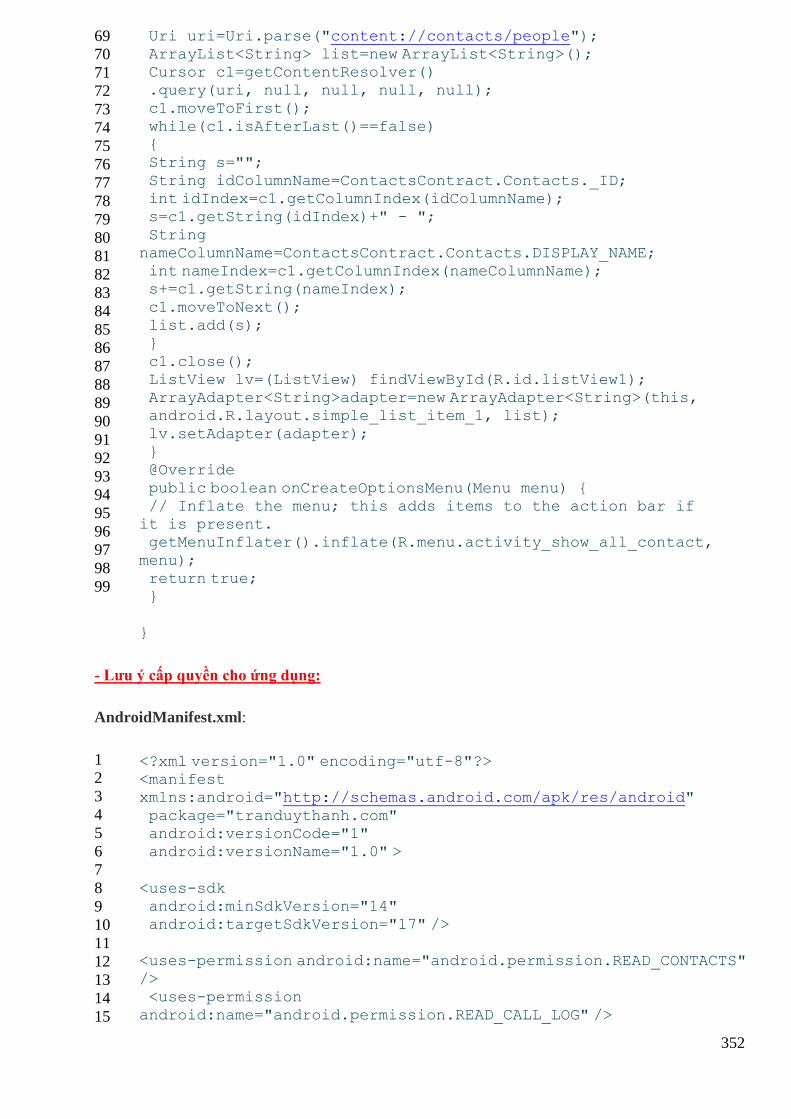
352
69
70
71
72
73
74
75
76
77
78
79
80
81
82
83
84
85
86
87
88
89
90
91
92
93
94
95
96
97
98
99
Uri uri=Uri.parse("content://contacts/people"); ArrayList<String> list=new ArrayList<String>(); Cursor c1=getContentResolver() .query(uri, null, null, null, null);
c1.moveToFirst(); while(c1.isAfterLast()==false) { String s="";
String idColumnName=ContactsContract.Contacts._ID; int idIndex=c1.getColumnIndex(idColumnName); s=c1.getString(idIndex)+" - ";
String
nameColumnName=ContactsContract.Contacts.DISPLAY_NAME; int nameIndex=c1.getColumnIndex(nameColumnName); s+=c1.getString(nameIndex);
c1.moveToNext(); list.add(s); }
c1.close(); ListView lv=(ListView) findViewById(R.id.listView1); ArrayAdapter<String>adapter=new ArrayAdapter<String>(this, android.R.layout.simple_list_item_1, list);
lv.setAdapter(adapter); } @Override
public boolean onCreateOptionsMenu(Menu menu) { // Inflate the menu; this adds items to the action bar if
it is present. getMenuInflater().inflate(R.menu.activity_show_all_contact,
menu); return true; }
}
- Lưu ý cấp quyền cho ứng dụng:
AndroidManifest.xml:
1
2
3
4
5
6
7
8
9
10
11
12
13
14
15
<?xml version="1.0" encoding="utf-8"?> <manifest xmlns:android="http://schemas.android.com/apk/res/android"
package="tranduythanh.com" android:versionCode="1" android:versionName="1.0" >
<uses-sdk android:minSdkVersion="14" android:targetSdkVersion="17" />
<uses-permission android:name="android.permission.READ_CONTACTS"
/> <uses-permission android:name="android.permission.READ_CALL_LOG" />
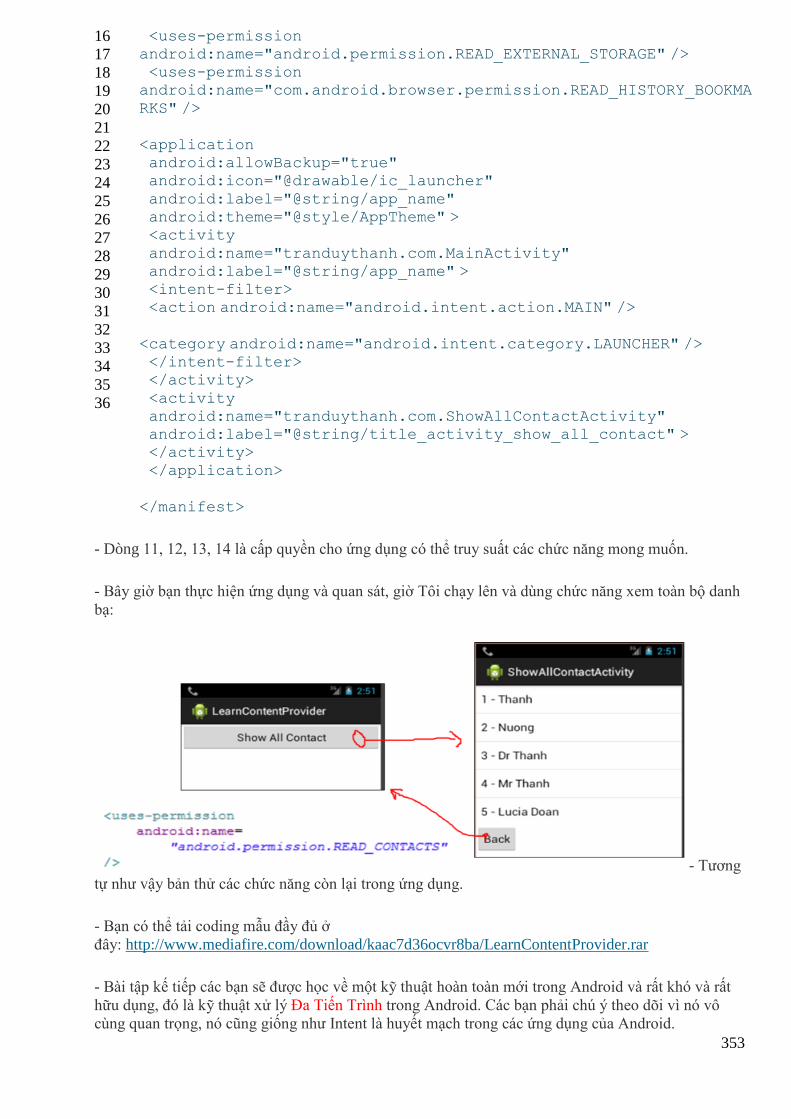
353
16
17
18
19
20
21
22
23
24
25
26
27
28
29
30
31
32
33
34
35
36
<uses-permission android:name="android.permission.READ_EXTERNAL_STORAGE" /> <uses-permission android:name="com.android.browser.permission.READ_HISTORY_BOOKMA
RKS" />
<application android:allowBackup="true" android:icon="@drawable/ic_launcher"
android:label="@string/app_name" android:theme="@style/AppTheme" > <activity
android:name="tranduythanh.com.MainActivity" android:label="@string/app_name" > <intent-filter> <action android:name="android.intent.action.MAIN" />
<category android:name="android.intent.category.LAUNCHER" /> </intent-filter> </activity>
<activity android:name="tranduythanh.com.ShowAllContactActivity" android:label="@string/title_activity_show_all_contact" > </activity>
</application>
</manifest>
- Dòng 11, 12, 13, 14 là cấp quyền cho ứng dụng có thể truy suất các chức năng mong muốn.
- Bây giờ bạn thực hiện ứng dụng và quan sát, giờ Tôi chạy lên và dùng chức năng xem toàn bộ danh
bạ:
- Tương
tự như vậy bản thử các chức năng còn lại trong ứng dụng.
- Bạn có thể tải coding mẫu đầy đủ ở
đây: http://www.mediafire.com/download/kaac7d36ocvr8ba/LearnContentProvider.rar
- Bài tập kế tiếp các bạn sẽ được học về một kỹ thuật hoàn toàn mới trong Android và rất khó và rất
hữu dụng, đó là kỹ thuật xử lý Đa Tiến Trình trong Android. Các bạn phải chú ý theo dõi vì nó vô
cùng quan trọng, nó cũng giống như Intent là huyết mạch trong các ứng dụng của Android.
354
Bài tập 34: đa tiến trình trong Android (Multi-
Threading)
- Chúc mừng các bạn đã vượt qua được 33 cửa ải bài tập Android.
-Tôi thật sự vui mừng xúc động khi các bạn đã bền bỉ theo dõi từng bài, để tới được đây thì Tôi cam
đoan rằng các bạn đã phải tốn rất nhiều công sức và thời gian, các bạn phải thức ngày đêm để làm
được những bài tập trước đó.
- Để đáp lại những cố gắng của các bạn, trong bài tập này Tôi sẽ cung cấp cho các bạn một kiến thức
hay, kiến thức mới và cực kỳ khó để các bạn quen với nỗi khổ đau để về sau có bị khổ nữa thì cũng
quen rồi sẽ không còn thấy khổ (Tôi viết theo phạm trù triết học, chỉ có lập trình quá khổ mới hiểu).
- Như Tôi đã từng nói Intent là linh hồn của Android, trong mọi ngõ nghách hẻm hay mặt tiền của
Android thì Intent vẫn tồn tại như chưa từng được tồn tại.
- Còn đa tiến trình (Multi – Threading)? nó cũng vậy, nó cũng giống như kỹ thuật truyền huyết mạch
của từng ứng dụng Android, đặc biệt là những ứng dụng Vô Đối. Ví dụ như bạn cần cập nhật giao
diện lúc thời gian thực, bạn cần kết nối internet hay làm những giao tác nào đó mà phải phân ra nhiểu
tiểu trình để chạy. Để xử lý được đa tiến trình thì bạn phải có một tư duy lập trình logic thật tốt, nếu
không tốt thì phải (Lấy Cần Cù Bù Thông Minh).
- Kỹ thuật đa tiến trình rất khó mà không khó (nếu bạn hiểu).
- Trong bài này Tôi sẽ hướng dẫn các bạn xử lý đa tiến trình với Handler class và AsyncTask class.
Tài liệu tham khảo: http://duythanhcse.wordpress.com
Related Documents