HP Select Identity Software Connector for SAP Connector Version: 3.91 Installation and Configuration Guide Document Release Date: September 2007 Software Release Date: September 2007

Welcome message from author
This document is posted to help you gain knowledge. Please leave a comment to let me know what you think about it! Share it to your friends and learn new things together.
Transcript
HP Select Identity Software
Connector for SAPConnector Version: 3.91
Installation and Configuration Guide
Document Release Date: September 2007 Software Release Date: September 2007
Legal Notices
Warranty
The only warranties for HP products and services are set forth in the express warranty statements accompanying such products and services. Nothing herein should be construed as constituting an additional warranty. HP shall not be liable for technical or editorial errors or omissions contained herein.
The information contained herein is subject to change without notice.
Restricted Rights Legend
Confidential computer software. Valid license from HP required for possession, use or copying. Consistent with FAR 12.211 and 12.212, Commercial Computer Software, Computer Software Documentation, and Technical Data for Commercial Items are licensed to the U.S. Government under vendor's standard commercial license.
Copyright Notices
© Copyright 2006-2007 Hewlett-Packard Development Company, L.P.
This product includes software developed by the Apache Software Foundation (http://www.apache.org/). Portions Copyright © 1999-2003 The Apache Software Foundation. All rights reserved.
Select Identity uses software from the Apache Jakarta Project including:
• Commons-beanutils
• Commons-collections
• Commons-logging
• Commons-digester
• Commons-httpclient
• Element Construction Set (ecs)
• Jakarta-poi
• Jakarta-regexp
• Logging Services (log4j)
Additional third party software used by Select Identity includes:
• JasperReports developed by SourceForge
• iText (for JasperReports) developed by SourceForge
• BeanShell
• Xalan from the Apache XML Project
• Xerces from the Apache XML Project
• Java API for XML Processing from the Apache XML Project
• SOAP developed by the Apache Software Foundation
• JavaMail from SUN Reference Implementation
• Java Secure Socket Extension (JSSE) from SUN Reference Implementation
• Java Cryptography Extension (JCE) from SUN Reference Implementation
• JavaBeans Activation Framework (JAF) from SUN Reference Implementation
2
• OpenSPML Toolkit from OpenSPML.org
• JGraph developed by JGraph
• Hibernate from Hibernate.org
• BouncyCastle engine for keystore management, bouncycastle.org
This product includes software developed by Teodor Danciu (http://jasperreports.sourceforge.net). Portions Copyright © 2001-2004 Teodor Danciu ([email protected]). All rights reserved.
Portions Copyright © 1994-2004 Sun Microsystems, Inc. All Rights Reserved.
This product includes software developed by the Waveset Technologies, Inc. (www.waveset.com). Portions Copyright © 2003 Waveset Technologies, Inc. 6034 West Courtyard Drive, Suite 210, Austin, Texas 78730. All rights reserved.
Portions Copyright © 2001-2004, Gaudenz Alder. All rights reserved.
Trademark Notices
AMD and the AMD logo are trademarks of Advanced Micro Devices, Inc.
Intel and Pentium are trademarks or registered trademarks of Intel Corporation in the United States, other countries, or both.
JAVA™ is a US trademark of Sun Microsystems, Inc.
Microsoft® and Windows® are U.S. registered trademarks of Microsoft Corporation.
Oracle® is a registered US trademark of Oracle Corporation, Redwood City, California
UNIX® is a registered trademark of The Open Group.
3
Support
You can visit the HP software support web site at:
http://www.hp.com/go/hpsoftwaresupport
HP Software online support provides an efficient way to access interactive technical support tools. As a valued support customer, you can benefit by using the support site to:
• Search for knowledge documents of interest
• Submit and track support cases and enhancement requests
• Download software patches
• Manage support contracts
• Look up HP support contacts
• Review information about available services
• Enter into discussions with other software customers
• Research and register for software training
Most of the support areas require that you register as an HP Passport user and sign in. Many also require an active support contract.
To find more information about support access levels, go to:
http://h20230.www2.hp.com/new_access_levels.jsp
4
Contents
1 Documentation Map . . . . . . . . . . . . . . . . . . . . . . . . . . . . . . . . . . . . . . . . . . . . . . . . . . . . . . . . . . . . . . . . . . . 7
2 Introduction . . . . . . . . . . . . . . . . . . . . . . . . . . . . . . . . . . . . . . . . . . . . . . . . . . . . . . . . . . . . . . . . . . . . . . . . . . . 9
About HP Select Identity. . . . . . . . . . . . . . . . . . . . . . . . . . . . . . . . . . . . . . . . . . . . . . . . . . . . . . . . . . . . . . . . . 9About Connectors . . . . . . . . . . . . . . . . . . . . . . . . . . . . . . . . . . . . . . . . . . . . . . . . . . . . . . . . . . . . . . . . . . . . . . . 9 About SAP Connector . . . . . . . . . . . . . . . . . . . . . . . . . . . . . . . . . . . . . . . . . . . . . . . . . . . . . . . . . . . . . . . . . . . 9
High-Level Architecture . . . . . . . . . . . . . . . . . . . . . . . . . . . . . . . . . . . . . . . . . . . . . . . . . . . . . . . . . . . . . . 10Overview of Installation Tasks . . . . . . . . . . . . . . . . . . . . . . . . . . . . . . . . . . . . . . . . . . . . . . . . . . . . . . . . . . . 11
3 Installing the Connector . . . . . . . . . . . . . . . . . . . . . . . . . . . . . . . . . . . . . . . . . . . . . . . . . . . . . . . . . . . . . . . 13
SAP Connector Files . . . . . . . . . . . . . . . . . . . . . . . . . . . . . . . . . . . . . . . . . . . . . . . . . . . . . . . . . . . . . . . . . . . 13System Requirements . . . . . . . . . . . . . . . . . . . . . . . . . . . . . . . . . . . . . . . . . . . . . . . . . . . . . . . . . . . . . . . . . . 15Prerequisite . . . . . . . . . . . . . . . . . . . . . . . . . . . . . . . . . . . . . . . . . . . . . . . . . . . . . . . . . . . . . . . . . . . . . . . . . . 15Extracting Contents of the Schema File . . . . . . . . . . . . . . . . . . . . . . . . . . . . . . . . . . . . . . . . . . . . . . . . . . . . 15Installing the Connector RAR . . . . . . . . . . . . . . . . . . . . . . . . . . . . . . . . . . . . . . . . . . . . . . . . . . . . . . . . . . . . 15
4 Configuring the Connector with Select Identity . . . . . . . . . . . . . . . . . . . . . . . . . . . . . . . . . . . . . . . . . . . 17
Configuration Procedure . . . . . . . . . . . . . . . . . . . . . . . . . . . . . . . . . . . . . . . . . . . . . . . . . . . . . . . . . . . . . . . . 17Add a New Connector . . . . . . . . . . . . . . . . . . . . . . . . . . . . . . . . . . . . . . . . . . . . . . . . . . . . . . . . . . . . . . . . 17Add a New Resource . . . . . . . . . . . . . . . . . . . . . . . . . . . . . . . . . . . . . . . . . . . . . . . . . . . . . . . . . . . . . . . . . 17Map Attributes . . . . . . . . . . . . . . . . . . . . . . . . . . . . . . . . . . . . . . . . . . . . . . . . . . . . . . . . . . . . . . . . . . . . . 19
5 Installing the Agent . . . . . . . . . . . . . . . . . . . . . . . . . . . . . . . . . . . . . . . . . . . . . . . . . . . . . . . . . . . . . . . . . . . 21
About the Agent . . . . . . . . . . . . . . . . . . . . . . . . . . . . . . . . . . . . . . . . . . . . . . . . . . . . . . . . . . . . . . . . . . . . . . . 21Installing the SAP HR Agent Module. . . . . . . . . . . . . . . . . . . . . . . . . . . . . . . . . . . . . . . . . . . . . . . . . . . . . . 22
Prerequisites . . . . . . . . . . . . . . . . . . . . . . . . . . . . . . . . . . . . . . . . . . . . . . . . . . . . . . . . . . . . . . . . . . . . . . . 22Install the Agent . . . . . . . . . . . . . . . . . . . . . . . . . . . . . . . . . . . . . . . . . . . . . . . . . . . . . . . . . . . . . . . . . . . . 23Agent Configuration . . . . . . . . . . . . . . . . . . . . . . . . . . . . . . . . . . . . . . . . . . . . . . . . . . . . . . . . . . . . . . . . . 24
Understanding the Configuration Files . . . . . . . . . . . . . . . . . . . . . . . . . . . . . . . . . . . . . . . . . . . . . . . 24Retrieving Manager Information . . . . . . . . . . . . . . . . . . . . . . . . . . . . . . . . . . . . . . . . . . . . . . . . . . . . . . . . . 29Retrieving Status Information . . . . . . . . . . . . . . . . . . . . . . . . . . . . . . . . . . . . . . . . . . . . . . . . . . . . . . . . . . . 30Running the Agent. . . . . . . . . . . . . . . . . . . . . . . . . . . . . . . . . . . . . . . . . . . . . . . . . . . . . . . . . . . . . . . . . . . . . 31
6 Uninstalling the Connector . . . . . . . . . . . . . . . . . . . . . . . . . . . . . . . . . . . . . . . . . . . . . . . . . . . . . . . . . . . . . 33
Uninstalling the Agent . . . . . . . . . . . . . . . . . . . . . . . . . . . . . . . . . . . . . . . . . . . . . . . . . . . . . . . . . . . . . . . . . 33
7 Getting Started with the SAP Connector . . . . . . . . . . . . . . . . . . . . . . . . . . . . . . . . . . . . . . . . . . . . . . . . . 35
Prerequisites . . . . . . . . . . . . . . . . . . . . . . . . . . . . . . . . . . . . . . . . . . . . . . . . . . . . . . . . . . . . . . . . . . . . . . . . . 35Example Scenario : Configuring the Connector . . . . . . . . . . . . . . . . . . . . . . . . . . . . . . . . . . . . . . . . . . . . . . 35
5

6
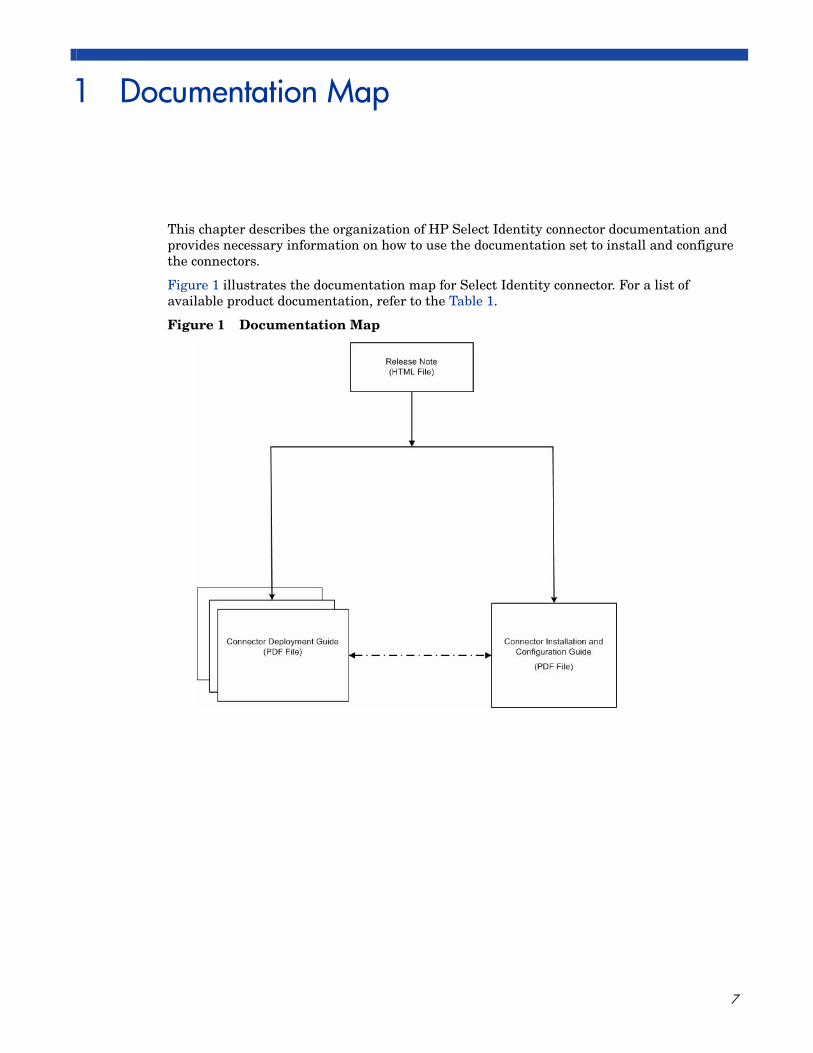
1 Documentation Map
This chapter describes the organization of HP Select Identity connector documentation and provides necessary information on how to use the documentation set to install and configure the connectors.
Figure 1 illustrates the documentation map for Select Identity connector. For a list of available product documentation, refer to the Table 1.
Figure 1 Documentation Map
7
Table 1 Connector Documentation
Document Title and Filename Contents Location
Release NoteSAP Connector v3.91 Release Note.htm
This file contains necessary information on new features of the connector, enhancements, known problems or limitations, and support information.
/Docs/ subdirectory under the connector directory.
Connector Deployment Guide (for Select Identity 4.20)connector_deploy_SI4.20.pdf
Connector deployment guides provide detailed information on:• Deploying a connector on
an application server.• Configuring a connector
with Select Identity.Refer to these guides when you need generic information on connector installation.
/Docs/ root directory on the product’s CD media.
Connector Deployment Guide (for Select Identity 4.10-4.13)connector_deploy_SI4.13.pdf
Connector Deployment Guide (for Select Identity 4.0-4.01)connector_deploy_SI4.pdf
Connector Deployment Guide (for Select Identity 3.3.1)connector_deploy_SI3.3.1.pdf
Connector Installation and Configuration GuideSAP_guide.pdf
Connector installation and configuration guide provides installation instructions for a specific connector. It contains resource specific configuration details.
/Docs/ subdirectory under the connector directory.
8 Chapter 1
2 Introduction
This chapter gives an overview of the HP Select Identity connector for SAP R/3. An HP Select Identity connector for SAP R/3 enables you to provision users and manage identities on SAP R/3 system. At the end of this chapter, you will be able to know about:
• The benefits of HP Select Identity.
• The role of a connector.
• The connector for SAP R/3.
About HP Select Identity
HP Select Identity provides a new approach to identity management. Select Identity helps you automate the process of provisioning and managing user accounts and access privileges across platforms, applications, and corporate boundaries. Select Identity communicates with the enterprise information system through connectors, and automates the tasks of identity management. The enterprise information system, which is also referred to as resource, can be a database, a directory service, or an ERP package, among many others.
About Connectors
You can establish a connection between a resource and Select Identity by using a connector. A connector is resource specific. The combination of Select Identity and connector helps you perform a set of tasks on the resource to manage identity. A connector can be unidirectional or bidirectional. A unidirectional connector helps you manage identities from Select Identity, but if any change takes place in resource, it cannot communicate that back to Select Identity. On the other hand, a bidirectional connector can reflect the changes made on resource back to Select Identity. This property of bidirectional connectors is known as reverse synchronization.
About SAP Connector
The connector for SAP R/3— hereafter referred to as SAP connector — consists of the following two modules:
• SAP R/3 Module
• SAP HR Agent Module
9
SAP R/3 module of the connector enables Select Identity to provision users on a target SAP R/3 system. It is a unidirectional module, which can perform the following tasks from Select Identity to SAP R/3 systems.
• Add, update, and remove users
• Retrieve user attributes
• Enable and disable users
• Verify a user's existence
• Change user passwords
• Reset user passwords
• Retrieve all entitlements (profiles and roles)
• Grant and revoke entitlements (profiles and roles) to users
The SAP HR agent module can push the following changes made on SAP HR module to Select Identity:
• Add new employee
• Modify employee
• Terminate employee
High-Level Architecture
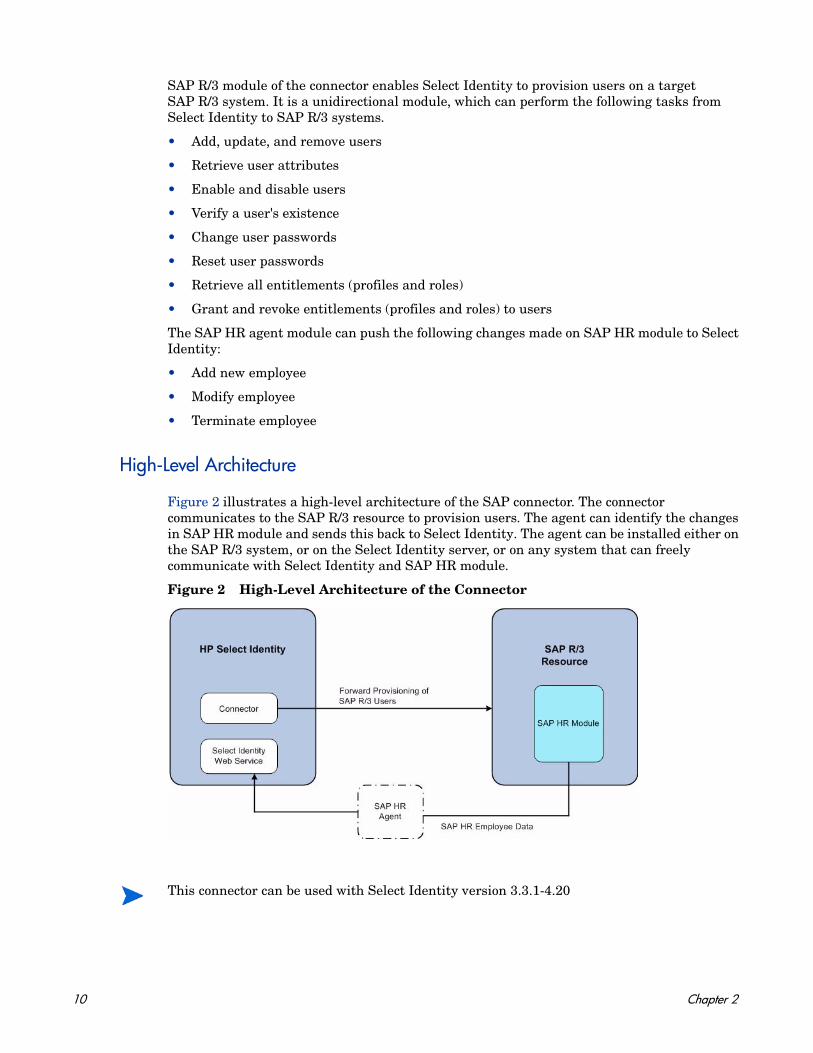
Figure 2 illustrates a high-level architecture of the SAP connector. The connector communicates to the SAP R/3 resource to provision users. The agent can identify the changes in SAP HR module and sends this back to Select Identity. The agent can be installed either on the SAP R/3 system, or on the Select Identity server, or on any system that can freely communicate with Select Identity and SAP HR module.
Figure 2 High-Level Architecture of the Connector
This connector can be used with Select Identity version 3.3.1-4.20
10 Chapter 2

Overview of Installation Tasks
Before you start installing the connector, you must ensure that system requirements and all the installation prerequisites are met. Refer to the Table 2 for an overview of installation tasks
Table 2 Overview of Installation Tasks
Task Number Task Name Reference
1 Install the connector on the Select Identity server.
See Installing the Connector on page 13.
— Meet the system requirements.
See System Requirements on page 15.
— Ensure all the prerequisites are mt.
See Prerequisite on page 15.
— Extract contents of the Schema file.
See Extracting Contents of the Schema File on page 15.
— Install the Resource Adapter Archive (RAR) file of the connector.
See Installing the Connector on page 13.
2 Configure the connector with Select Identity.
See Configuring the Connector with Select Identity on page 17.
3 Install the agent. See Installing the Agent on page 21.
Introduction 11

12 Chapter 2
3 Installing the Connector
This chapter elaborates the procedure to install the SAP connector on the Select Identity server. At the end of this chapter, you will know about
• Software requirements to install the SAP connector.
• Pre-installation tasks.
• Procedure to install the SAP connector.
SAP Connector Files
The SAP connector is packaged in the following files, which are located in the SAP R3 HR directory of the Select Identity Connector CD:
13
Table 1 SAP Connector Files
Serial Number File Name Description
1 • sapr3connector_420.rar for WebSphere
• sapr3connector_420WL9.rar for WebLogic
The Resource Adapter Archive (RAR) files of the connector. They contain a collection of binary files.
2 sapr3schema.zip This JAR file consists of the following files:
• Sap-R3.xml – the mapping file to map attributes from SAP R/3 to Select Identity.
• Sap-HR.xml – the mapping file to map attributes from SAP HR module to Select Identity.
3 SAPHRAgent.zip This zip file consists of the following files:
• SAPHRAgent.jar – contains the agent binaries
• sapHrConnector.properties – specifies the agent properties and is packaged in resources subdirectory.
• sapHrConnector.cmd – command file to start the SAP agent. It is packaged in resourcessubdirectory.
• sapHrConnector.xml – provides connectivity configuration information to SAP R/3 and Select Identity server. It is packaged in xml subdirectory.
• sapHrConnectorBapiList.xml– BAPIs for which data is retrieved. It is packaged in xml subdirectory.
• sapHrConnectorStatus.xml– used internally by the agent. It is packaged in xml subdirectory.
• sapHrAgentAdditionalBapiList.xml — used by the agent to determine the BAPIs that are used for retrieving the manager information of an employee, and retrieving the status of an employee. It is packaged in xml subdirectory.
• passwordEncoder.bat (on Windows) / passwordEncoder.sh (on Linus/Unix) — command files used to encrypt SAP resource logon password. They are packaged in resources subdirectory.
14 Chapter 3
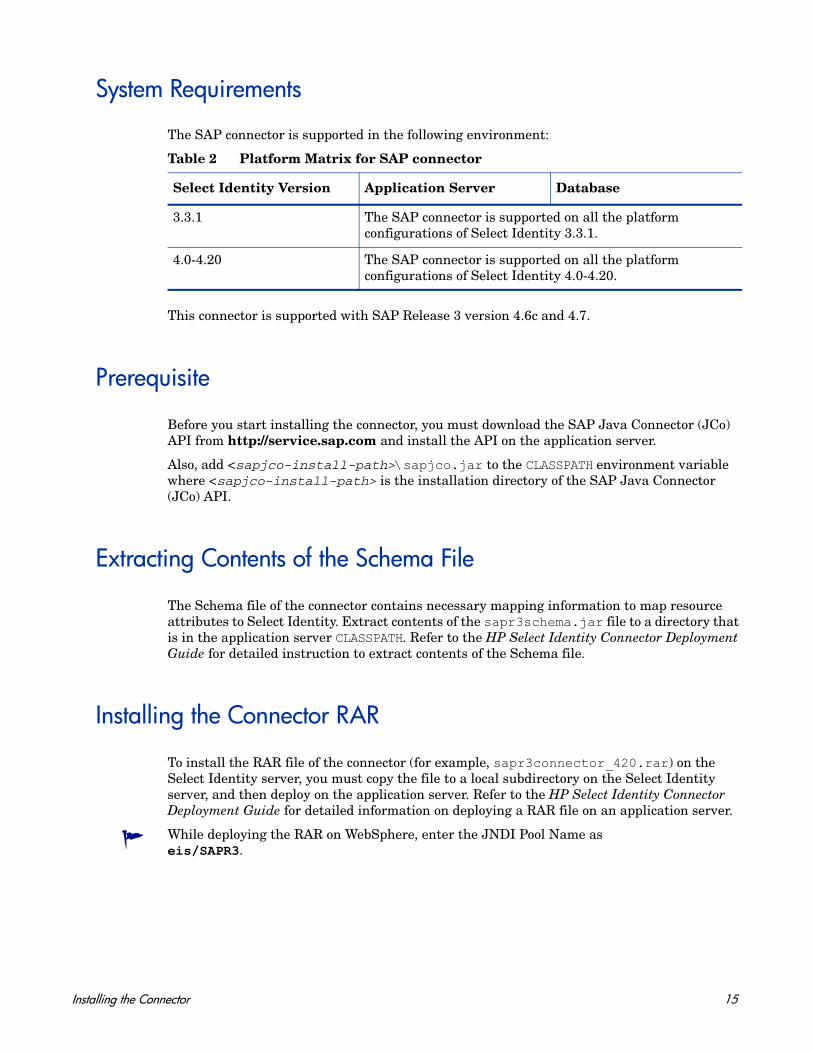
System Requirements
The SAP connector is supported in the following environment:
This connector is supported with SAP Release 3 version 4.6c and 4.7.
Prerequisite
Before you start installing the connector, you must download the SAP Java Connector (JCo) API from http://service.sap.com and install the API on the application server.
Also, add <sapjco-install-path>\sapjco.jar to the CLASSPATH environment variable where <sapjco-install-path> is the installation directory of the SAP Java Connector (JCo) API.
Extracting Contents of the Schema File
The Schema file of the connector contains necessary mapping information to map resource attributes to Select Identity. Extract contents of the sapr3schema.jar file to a directory that is in the application server CLASSPATH. Refer to the HP Select Identity Connector Deployment Guide for detailed instruction to extract contents of the Schema file.
Installing the Connector RAR
To install the RAR file of the connector (for example, sapr3connector_420.rar) on the Select Identity server, you must copy the file to a local subdirectory on the Select Identity server, and then deploy on the application server. Refer to the HP Select Identity Connector Deployment Guide for detailed information on deploying a RAR file on an application server.
Table 2 Platform Matrix for SAP connector
Select Identity Version Application Server Database
3.3.1 The SAP connector is supported on all the platform configurations of Select Identity 3.3.1.
4.0-4.20 The SAP connector is supported on all the platform configurations of Select Identity 4.0-4.20.
While deploying the RAR on WebSphere, enter the JNDI Pool Name as eis/SAPR3.
Installing the Connector 15

16 Chapter 3
4 Configuring the Connector with Select Identity
This chapter describes the procedure to configure the SAP connector with Select Identity and the connector specific parameters that you must provide while configuring the connector with Select Identity.
Configuration Procedure
After you deploy the connector RAR on application server, you must configure the connector with Select Identity. Perform the following steps to configure the SAP connector with Select Identity.
1 Add a New Connector
2 Add a New Resource
3 Map Attributes
Add a New Connector
Add a new connector in Select Identity by using the user interface. While adding the connector, do the following:
• In the Connector Name text box, specify a name for the connector.
• In the Pool Name text box, enter eis/SAPR3.
• Select No for the Mapper Available section.
Refer to the HP Select Identity Connector Deployment Guide for detailed information on adding a new connector in Select Identity.
Add a New Resource
Add a new resource in Select Identity that uses the newly added connector. Refer to the HP Select Identity Connector Deployment Guide for detailed instructions on adding a resource in Select Identity.
Refer to the following table while entering the parameters in the Basic Information and the Access Information pages:
17
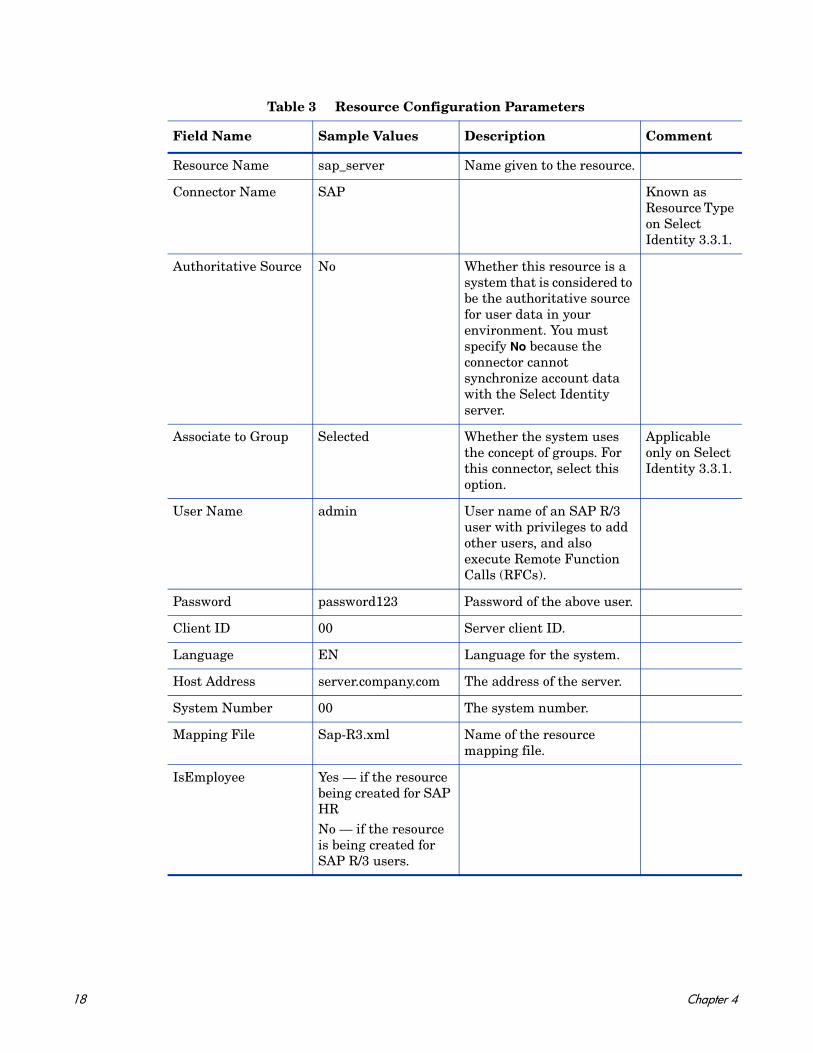
Table 3 Resource Configuration Parameters
Field Name Sample Values Description Comment
Resource Name sap_server Name given to the resource.
Connector Name SAP Known as Resource Type on Select Identity 3.3.1.
Authoritative Source No Whether this resource is a system that is considered to be the authoritative source for user data in your environment. You must specify No because the connector cannot synchronize account data with the Select Identity server.
Associate to Group Selected Whether the system uses the concept of groups. For this connector, select this option.
Applicable only on Select Identity 3.3.1.
User Name admin User name of an SAP R/3 user with privileges to add other users, and also execute Remote Function Calls (RFCs).
Password password123 Password of the above user.
Client ID 00 Server client ID.
Language EN Language for the system.
Host Address server.company.com The address of the server.
System Number 00 The system number.
Mapping File Sap-R3.xml Name of the resource mapping file.
IsEmployee Yes — if the resource being created for SAP HRNo — if the resource is being created for SAP R/3 users.
18 Chapter 4
Map Attributes
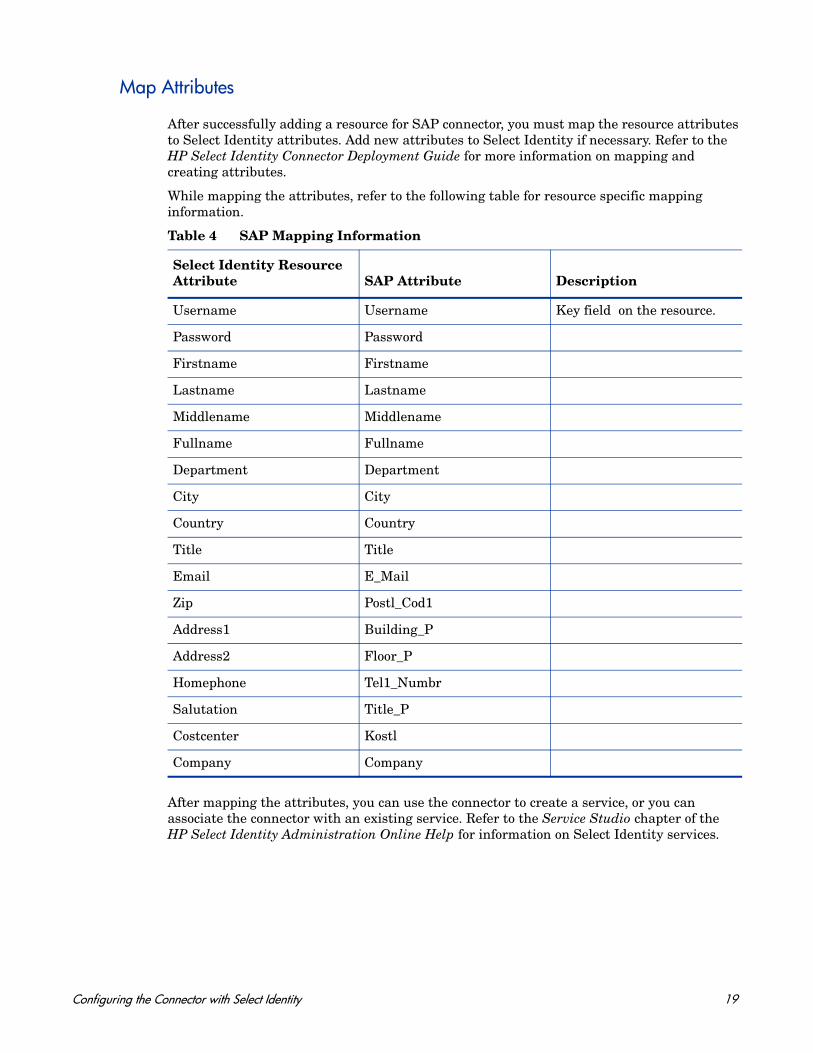
After successfully adding a resource for SAP connector, you must map the resource attributes to Select Identity attributes. Add new attributes to Select Identity if necessary. Refer to the HP Select Identity Connector Deployment Guide for more information on mapping and creating attributes.
While mapping the attributes, refer to the following table for resource specific mapping information.
After mapping the attributes, you can use the connector to create a service, or you can associate the connector with an existing service. Refer to the Service Studio chapter of the HP Select Identity Administration Online Help for information on Select Identity services.
Table 4 SAP Mapping Information
Select Identity Resource Attribute SAP Attribute Description
Username Username Key field on the resource.
Password Password
Firstname Firstname
Lastname Lastname
Middlename Middlename
Fullname Fullname
Department Department
City City
Country Country
Title Title
Email E_Mail
Zip Postl_Cod1
Address1 Building_P
Address2 Floor_P
Homephone Tel1_Numbr
Salutation Title_P
Costcenter Kostl
Company Company
Configuring the Connector with Select Identity 19

20 Chapter 4
5 Installing the Agent
This chapter gives an overview of the agent for SAP connector and the procedure to install the agent on an SAP R/3 system. At the end of the chapter, you will be able to know about:
• The role of an agent.
• The procedure to install the agent.
About the Agent
To enable the SAP connector to reconcile employee data changes made on SAP HR with the Select Identity server, you must install the SAP HR agent. The agent identifies changes on the SAP HR system and sends this information to Select Identity.
The SAP agent can be used on any SAP HR system (locally or on the network). It provides the flexibility to process all data entries of SAP JCo tables specified in the configuration files included with the agent.
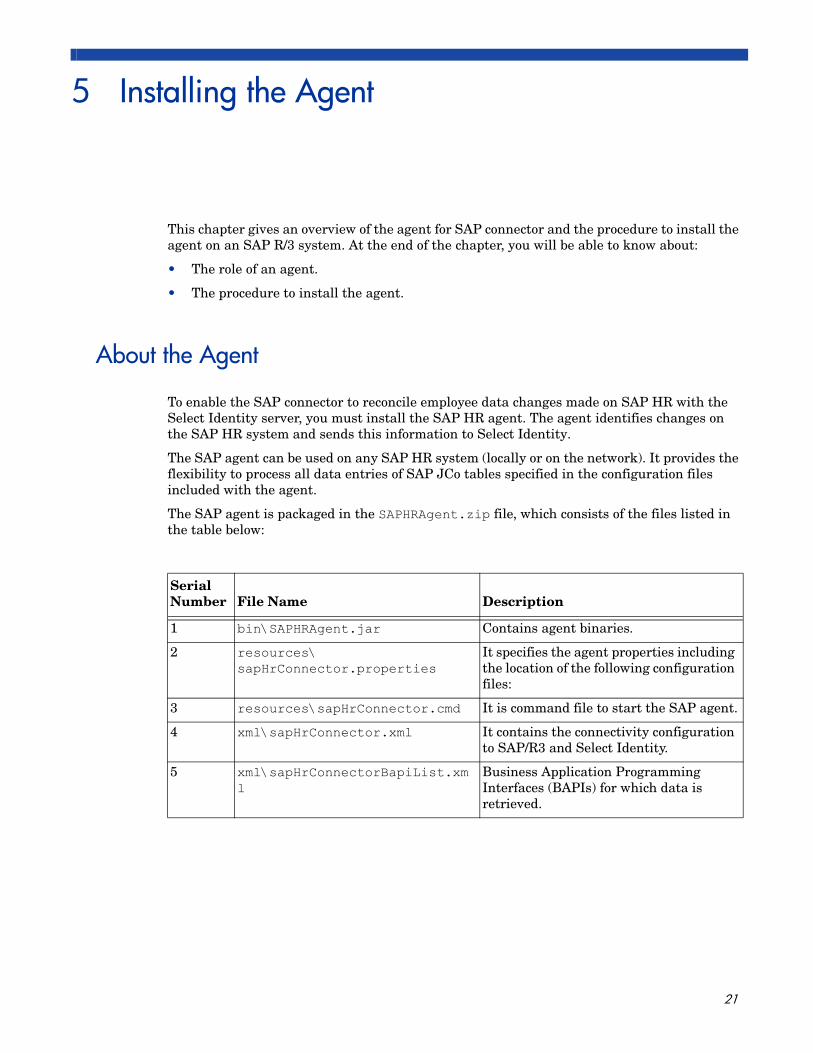
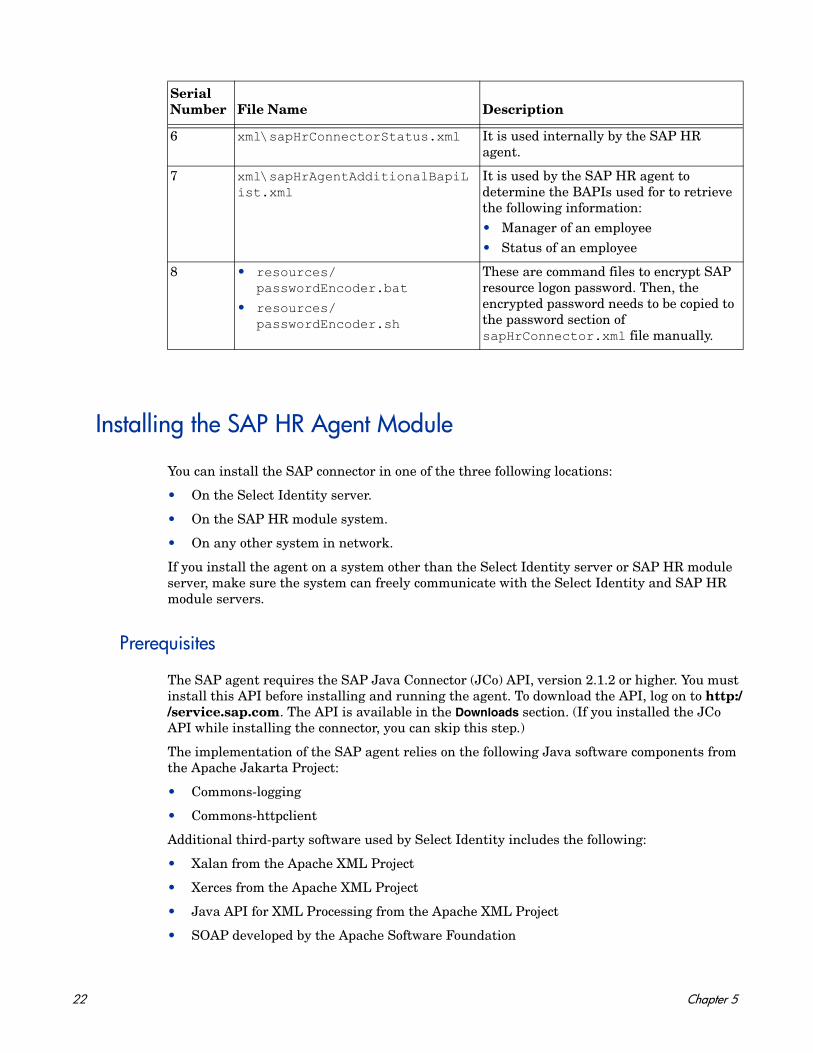
The SAP agent is packaged in the SAPHRAgent.zip file, which consists of the files listed in the table below:
Serial Number File Name Description
1 bin\SAPHRAgent.jar Contains agent binaries.
2 resources\sapHrConnector.properties
It specifies the agent properties including the location of the following configuration files:
3 resources\sapHrConnector.cmd It is command file to start the SAP agent.
4 xml\sapHrConnector.xml It contains the connectivity configuration to SAP/R3 and Select Identity.
5 xml\sapHrConnectorBapiList.xml
Business Application Programming Interfaces (BAPIs) for which data is retrieved.
21
Installing the SAP HR Agent Module
You can install the SAP connector in one of the three following locations:
• On the Select Identity server.
• On the SAP HR module system.
• On any other system in network.
If you install the agent on a system other than the Select Identity server or SAP HR module server, make sure the system can freely communicate with the Select Identity and SAP HR module servers.
Prerequisites
The SAP agent requires the SAP Java Connector (JCo) API, version 2.1.2 or higher. You must install this API before installing and running the agent. To download the API, log on to http://service.sap.com. The API is available in the Downloads section. (If you installed the JCo API while installing the connector, you can skip this step.)
The implementation of the SAP agent relies on the following Java software components from the Apache Jakarta Project:
• Commons-logging
• Commons-httpclient
Additional third-party software used by Select Identity includes the following:
• Xalan from the Apache XML Project
• Xerces from the Apache XML Project
• Java API for XML Processing from the Apache XML Project
• SOAP developed by the Apache Software Foundation
6 xml\sapHrConnectorStatus.xml It is used internally by the SAP HR agent.
7 xml\sapHrAgentAdditionalBapiList.xml
It is used by the SAP HR agent to determine the BAPIs used for to retrieve the following information:• Manager of an employee • Status of an employee
8 • resources/passwordEncoder.bat
• resources/passwordEncoder.sh
These are command files to encrypt SAP resource logon password. Then, the encrypted password needs to be copied to the password section of sapHrConnector.xml file manually.
Serial Number File Name Description
22 Chapter 5
• OpenSPML Toolkit from OpenSPML.org
These libraries are shipped with the agent, in the lib folder.
Install the Agent
Before installing the agent, ensure that the SAP JCo libraries are installed correctly and the sapjco.jar is in the system classpath.
Perform the following steps to install the SAP agent:
1 Create a directory for the agent, which is referred to as the SAP HR agent directory hereafter in this guide.
2 Extract the contents of the SAPHRAgent.zip file into this directory.
3 Copy bouncy jar to <JRE_HOME>/lib/ext directory:
If you are using JDK below 1.5 to run the agent, download BouncyCastle Provider jar file corresponding to your jdk version from http://www.bouncycastle.org/ and copy the jar file to <JRE_HOME>/lib/ext directory.
If you are using JDK 1.5 or above, modify passwordEncoder.bat or passwordEncoder.sh to comment default BouncyCastle provider out and uncomment SunJCE provider. For example, you can modify passwordEncoder.bat as below:
rem ================================
rem set JAVA_OPT=%JAVA_OPT% -Dsi.connector.rsa.provider=org.bouncycastle.jce.provider.BouncyCastleProvider
set JAVA_OPT=%JAVA_OPT% -Dsi.connector.aes.provider=com.sun.crypto.provider.SunJCE
rem ================================
Then you should also modify startSapHrConnector.cmd, make the same change as you just did to passwordEncoder.bat.
Make sure the JCE provider you use in startSapHrConnector.cmd is the same as in passwordEncoder.bat.
4 If you are using JDK 1.4 or later version, you must download US_export_policy.jar from the same location as the JDK download and copy the jar into <JRE_HOME>/lib/security directory. For more information about this, refer to the Sun documentation on the JCE. If you have not installed the policy files, you will see a message similar to the following:
java.lang.SecurityException: Unsupported keysize or algorithm parametersat javax.crypto.Cipher.init(DashoA6275)
5 Ensure that the JAVA CLASSPATH variable contains the location of the SAP JCo API sapjco.jar file, which resides in the SAP agent start script (resources/startSapHrConnector.cmd).
6 Identify the IP address and access credentials of the SAP HR system.
7 Identify the IP address, port, service name, resource name, and Select Identity administrative user credentials.
Installing the Agent 23
8 Modify the sapHrConnector.xml file with this information as described in Understanding the Configuration Files on page 24.
9 Identify the BAPIs and their import/export parameters for the following actions:
a Retrieving employee information (Default BAPI — BAPI_EMPLOYEE_GETDATA)
b Retrieving employee status
c Retrieving employee’s manager information
10 Modify the sapHrConnectorBapiList.xml, sapHrConnectorStatus.xml, and sapHrAgentAdditionalBapiList.xml files, which are described in Agent Configuration on page 24.
11 Update the sample stylesheet to implement the data mapping from SAP HR to Select Identity.
Agent Configuration
The SAP agent is deployed with the following configuration files, which must be modified in order to configure the agent:
• resources\sapHrConnector.properties — specifies the agent properties including the location of the configuration files
• xml\sapHrConnector.xml — contains the connectivity configuration to SAP HR and the Select Identity server
• xml\sapHrConnectorBapiList.xml — describes the BAPIs for which data is retrieved
• xml\sapHrAgentAdditionalBapiList.xml — describes the details of BAPIs that retrieve the manager information for an employee, and the status of an employee.
The mapping of resource data from the SAP system to Select Identity is configurable in the XSL stylesheet.
The following sections describe the configuration of the SAP agent in detail.
Understanding the Configuration Files
The configuration files for the SAP agent contain information about connectivity to the SAP HR system, the BAPI RFCs to be performed to retrieve the data, and connectivity information for the Select Identity server to send SPML requests.
sapHrConnector.properties
After installation, this file is located in the SAP agent directory/resources directory and contains the following basic configuration parameters:
• poll.interval — Polling interval (in milliseconds) that specifies the time between successive polling cycles.
• sap.config.file — Name and location of the configuration file (sapHrConnector.xml) containing the connectivity parameters for the SAP R/3 system and the Select Identity server
• sap.bapi.config.file — Name and location of the configuration file (sapHrBapiList.xml) that specifies the BAPI RFCs called to retrieve the employee data
See the SAP/SampleFiles directory on the Select Identity Connector CD for an example of each configuration file.
24 Chapter 5
• status.file — Internal status file (sapHrStatus.xml), which should not be edited or moved
• com.hp.ovsi.connector.saphr.encoding — The HR agent can encode the output SPML before sending the same to Select Identity. Edit this attribute to indicate the encoding of the Select Identity system’s locale. The default encoding is UTF-8.
• sap.additionalbapi.config.file — The configuration file that describes the BAPIs to be used for retrieving manager and employee status information.
• com.hp.ovsi.connector.saphr.managersyncrequired — This property specifies whether periodic manager information synchronization is required or not. Set this property to true if the manager information synchronization is required. Set this to false if manager information synchronization is not required.
• com.hp.ovsi.connector.saphr.managersyncintervaldays — If manager information synchronization is required, this property specifies the number of days between each synchronization.
sapHrConnector.xml
This configuration file describes the parameters for the agent to connect to the SAP R/3 system and the Select Identity server. After installation, it is located in the SAP agent directory/xml directory. Its location and name are configured in the sapHrConnector.properties file.
The XML configuration includes the following elements:
• sapConnectionList — The root element.
— sapConnection — This element describes the connectivity information for the SAP HR system including the following:
– sapApplicationServer — IP address of the SAP server
– client — SAP client ID
– language — Language for the SAP connection
– sapSystem — SAP system identifier
– user — User name for authentication to SAP HR
– password — Encrypted password of the above user to logon SAP HR. Use command file passwordEncoder.bat (on Windows) or passwordEncoder.sh (on Linux/Unix) to encrypt this password.
To encrypt the password, run passwordEncoder.bat (on Windows) or passwordEncoder.sh (on Linux/Unix), which is present in the /resources/ subdirectory. This utility prompts you for the keystore information used to encrypt the password and the password you want to encrypt, then it creates a keystore and generate the encrypted password. Below is an example:
C:\ SapHrAgent\bin>passwordEncoder.bat
2007-9-2 9:12:34 com.hp.ovsi.connector.utils.pwdenc.CryptoHelper <clinit>
INFO: si.connector.rsa.provider: BC version 1.3
Please input the full path of keystore file :mykeystore
Please input keystore password :abc123
Please input key alias :mykey
Installing the Agent 25
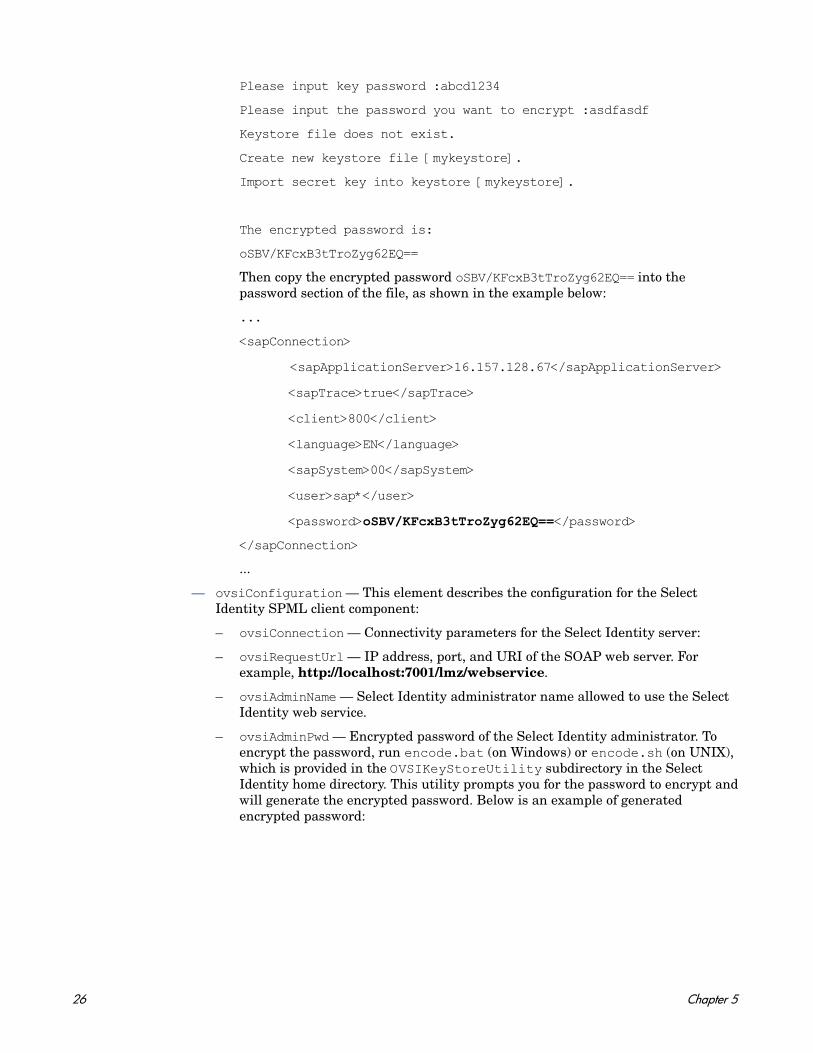
Please input key password :abcd1234
Please input the password you want to encrypt :asdfasdf
Keystore file does not exist.
Create new keystore file [mykeystore].
Import secret key into keystore [mykeystore].
The encrypted password is:
oSBV/KFcxB3tTroZyg62EQ==
Then copy the encrypted password oSBV/KFcxB3tTroZyg62EQ== into the password section of the file, as shown in the example below:
...
<sapConnection>
<sapApplicationServer>16.157.128.67</sapApplicationServer>
<sapTrace>true</sapTrace>
<client>800</client>
<language>EN</language>
<sapSystem>00</sapSystem>
<user>sap*</user>
<password>oSBV/KFcxB3tTroZyg62EQ==</password>
</sapConnection>
...
— ovsiConfiguration — This element describes the configuration for the Select Identity SPML client component:
– ovsiConnection — Connectivity parameters for the Select Identity server:
– ovsiRequestUrl — IP address, port, and URI of the SOAP web server. For example, http://localhost:7001/lmz/webservice.
– ovsiAdminName — Select Identity administrator name allowed to use the Select Identity web service.
– ovsiAdminPwd — Encrypted password of the Select Identity administrator. To encrypt the password, run encode.bat (on Windows) or encode.sh (on UNIX), which is provided in the OVSIKeyStoreUtility subdirectory in the Select Identity home directory. This utility prompts you for the password to encrypt and will generate the encrypted password. Below is an example of generated encrypted password:
26 Chapter 5
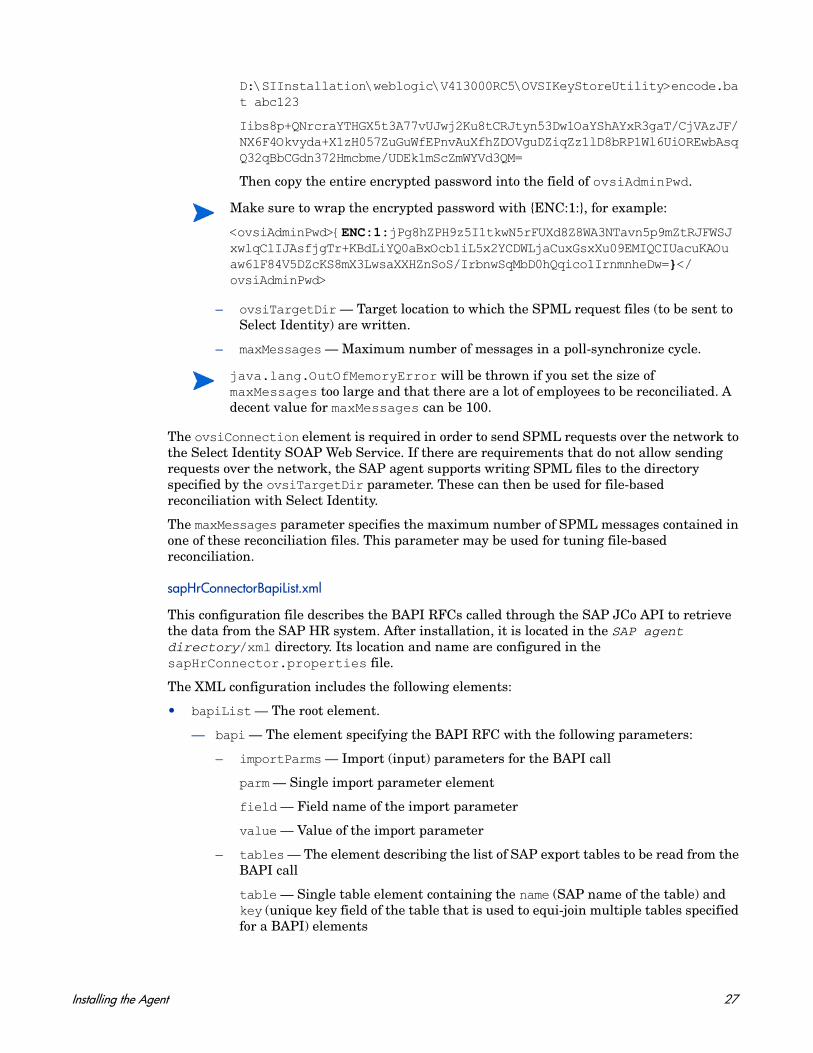
D:\SIInstallation\weblogic\V413000RC5\OVSIKeyStoreUtility>encode.bat abc123
Iibs8p+QNrcraYTHGX5t3A77vUJwj2Ku8tCRJtyn53Dw1OaYShAYxR3gaT/CjVAzJF/NX6F4Okvyda+X1zH057ZuGuWfEPnvAuXfhZDOVguDZiqZz1lD8bRP1Wl6UiOREwbAsqQ32qBbCGdn372Hmcbme/UDEk1mScZmWYVd3QM=
Then copy the entire encrypted password into the field of ovsiAdminPwd.
– ovsiTargetDir — Target location to which the SPML request files (to be sent to Select Identity) are written.
– maxMessages — Maximum number of messages in a poll-synchronize cycle.
The ovsiConnection element is required in order to send SPML requests over the network to the Select Identity SOAP Web Service. If there are requirements that do not allow sending requests over the network, the SAP agent supports writing SPML files to the directory specified by the ovsiTargetDir parameter. These can then be used for file-based reconciliation with Select Identity.
The maxMessages parameter specifies the maximum number of SPML messages contained in one of these reconciliation files. This parameter may be used for tuning file-based reconciliation.
sapHrConnectorBapiList.xml
This configuration file describes the BAPI RFCs called through the SAP JCo API to retrieve the data from the SAP HR system. After installation, it is located in the SAP agent directory/xml directory. Its location and name are configured in the sapHrConnector.properties file.
The XML configuration includes the following elements:
• bapiList — The root element.
— bapi — The element specifying the BAPI RFC with the following parameters:
– importParms — Import (input) parameters for the BAPI call
parm — Single import parameter element
field — Field name of the import parameter
value — Value of the import parameter
– tables — The element describing the list of SAP export tables to be read from the BAPI call
table — Single table element containing the name (SAP name of the table) and key (unique key field of the table that is used to equi-join multiple tables specified for a BAPI) elements
Make sure to wrap the encrypted password with {ENC:1:}, for example:
<ovsiAdminPwd>{ENC:1:jPg8hZPH9z5I1tkwN5rFUXd8Z8WA3NTavn5p9mZtRJFWSJxwlqClIJAsfjgTr+KBdLiYQ0aBxOcb1iL5x2YCDWLjaCuxGsxXu09EMIQCIUacuKAOuaw6lF84V5DZcKS8mX3LwsaXXHZnSoS/IrbnwSqMbD0hQqico1IrnmnheDw=}</ovsiAdminPwd>
java.lang.OutOfMemoryError will be thrown if you set the size of maxMessages too large and that there are a lot of employees to be reconciliated. A decent value for maxMessages can be 100.
Installing the Agent 27
— createDateField — Field name of the export table(s) containing the timestamp for creation of an entry
— modDateField — Field name of the export table(s) containing the timestamp for modification of an entry
— deleteDateField — Field name of the export table(s) containing the timestamp for deletion of an entry
— addOperation — Flag specifying whether SPML addRequests are submitted for new entries
— modifyOperation — Flag specifying whether SPML modifyRequests are submitted for modified entries
— deleteOperation — Flag specifying whether SPML deleteRequests are submitted for deleted entries
— ovsiResourceName — Select Identity resource name required for reconciliation
— ovsiServiceName — Select Identity Service name
— spmlStyleSheet — Name and location of XSL stylesheet implementing the data mapping between SAP HR and Select Identity.
The SAP agent detects changes and change types based on configurable date fields of the corresponding SAP source table(s). These are compared with the last synchronization timestamp. The last synchronization timestamp is internally managed by the agent and is set after SPML requests are successfully created.
The date field name parameters are optional and they support initial loads with a specific request type, such as <modifyOperation>true</modifyOperation> and no date fields configured results in modifyRequests for all entries returned by the BAPI call.
sapHrAgentAdditionalBapiList.xml
This file used by the agent to determine the BAPIs that are used for retrieving the manager information of an employee, and retrieving the status of an employee.
The configuration for the manager and the status BAPIs has a few additional elements over and above the basic BAPI configuration elements.
The XML configuration includes the following elements:
• isManager — This element is used to indicate that this BAPI is used to fetch manager information. Set the value to true for a manager BAPI.
• currentDateField — The field name in the BAPI return parameters that has to be used as an indicator of the current date.
• isManager — This element is used to indicate that this BAPI is used to fetch manager information. Set the value to true for a manager BAPI.
• currentDateField — The field name in the BAPI return parameters that has to be used as an indicator of the current date.
• userNameField — The field name in the BAPI return parameters that has to be used as an indicator of the employee ID over whom this BAPI was invoked.
• managerEmployeeNumberField — The field name in the BAPI return parameters that contains the employee number of the manager
• managerNameField — The field name in the BAPI return parameters that contains the name of the manager.
28 Chapter 5
• managerStructureName — The structure returned by the BAPI, which contains manager information.
• isStatus — This element is used to indicate that this BAPI is used to fetch status information for the employee. Set the value to true for a status BAPI.
• statusField — The field name in the BAPI return parameters that has to be used to indicate the status of the employee.
• statusStructureName — The structure returned by the BAPI that contains the status information.
• statusDelimiter — A single character that is used to separate the status values in the configuration file.
• validEmployeeStates — A delimited list of states that are considered valid (active employee). If an employee's statusField has one of these values, the status of that employee is considered to be active. For example,- :1:2:3:, where ":" is the delimiter.
• invalidEmployeeStates — A delimited list of states that are considered invalid (inactive employee). If an employee's statusField has one of these values, the status of that employee is considered to be inactive. For example, - :6:9:0:, where ":" is the delimiter.
sapHrConnectorStatus.xml
This configuration file is virtually identical to the sapHrConnectorBapiList.xml file. It describes internally used parameters for each BAPI. After installation, it is located in the SAP agent directory/xml directory. Its location and name are configured in the sapHrConnector.properties file.
The XML configuration includes the following elements:
• bapiList — The root element supporting the data retrieval using multiple BAPIs
— bapi — The element for a single BAPI
– rfm — Name of the BAPI RFC
– num — Identifier for the BAPI used to internally reference sapHrConnectorStatus.xml and sapHrConnectorBapiList.xml
– syncTable — Name of the export table resulting from the RFC
– sync — Last synchronization timestamp
Note that this configuration file is only modified to add or remove BAPIs and export tables configured in sapHrConnectorBapiList.xml.
Retrieving Manager Information
The SAP HR agent is capable of retrieving manager information of an employee by using a BAPI configured in the sapAdditionalBapiList.xml file. This information is normally not returned by the BAPI_EMPLOYEE_GETDATA function. In most cases, a separate BAPI has to be written in order to retrieve this information and send it to the agent.
For instance, in the default XML file shipped with the connector, ZOVSI_HRCM_EMPLOYEE_INFO_GET is a custom BAPI that has been wrapped around the standard HRCM_EMPLOYEE_INFO_GET BAPI, exposing the same interface. A similar customization could be required, based on the configuration of the SAP HR installation the the agent has to use.
Installing the Agent 29
The SAP HR Agent also retrieves the manager information for the employees. In order to enable this, the BAPI to be used for retrieving the manager information needs to be configured in the sapAdditionalBapiList.xml file. An example configuration is provided in the default configuration file shipped with the Agent.
The manager information for employees is retrieved and sent to Select Identity in one of the following two ways:
• During every employee polling cycle, for modified employees, the manager information is sent to Select Identity. As a part of each employee polling cycle, the Agent looks for modified employees. For all modified/ newly added employees, the agent retrieves the manager information (provided the BAPI is configured correctly), and adds this information along with the user information that is being sent back to Select Identity.
• When the manager reporting structure of an employee changes on SAP HR, the change information is not notified to the SAP HR Agent. Therefore, to keep the manager information on Select Identity in sync with the data on SAP HR, a periodic poll of the manager information for all active employees can be scheduled.
You can enable this periodic poll by setting the following configuration parameter to true:
com.hp.ovsi.connector.saphr.managersyncrequired=true
The time interval between every poll (in days) can be configured by setting the following configuration parameter:
com.hp.ovsi.connector.saphr.managersyncintervaldays=<number of days>
For example, if the polling is required once in every five days, the configuration will look like:
com.hp.ovsi.connector.saphr.managersyncintervaldays=5
Retrieving Status Information
The SAP HR agent uses employee status information retrieved using a Status BAPI to determine the lifecycle of an employee in an organization. The status is normally not returned by the BAPI_EMPLOYEE_GETDATA function, and the agent has to be configured separately to use the BAPI that returns this information.
The status of the employee is checked during every run of the agent. An employee whose state has changed from valid to invalid during the most recent polling interval is considered to be inactive, and is deleted from Select Identity.
In a standard installation, SAP HR does not provide a remotely available BAPI for retrieving the manager information. The HRCM_EMPLOYEE_INFO_GET BAPI returns the manager information. However, it is not available as an RFC. You must make this BAPI available as an RFC, or you must write a wrapper BAPI with the same interface.
In the absence of a Status BAPI, the agent cannot determine the lifecycle of an employee.
30 Chapter 5
Running the Agent
To run the agent, you must execute the startSapHrConnector.cmd file located in the resources directory. The syntax to execute this command file is:
startSapHrConnector.cmd <number of polling cycles>
Number of polling cycles can be any positive integer. For example, if it is 10, the agent polls the SAP HR system for 10 times, and sends the corresponding changes to Select Identity.
You can stop the agent manually from the command line by pressing Ctrl+C.
You must ensure that sapjco.jar is copied into the lib folder, under the agent’s installation folder.
Installing the Agent 31

32 Chapter 5
6 Uninstalling the Connector
To uninstall a connector from Select Identity, perform the following steps:
• Remove all resource dependencies.
• Delete the connector from Select Identity.
• Delete the connector from application server.
See HP Select Identity Connector Deployment Guide for more information on deleting the connector from application server and Select Identity.
Uninstalling the Agent
To uninstall the SAP HR agent from the system, perform the following steps:
1 If the agent is executed within a scheduled task of the operating system, remove this task from the system. If otherwise the SAP HR agent is running as a stand-alone process, stop this process.
2 Log files and reconciliation files may be required for certain purposes. If required, back up the files; the location of the files are specified in log4j.properties and sapHrConnector.xml.
3 Remove the SAP agent directory.
The SAP agent does not leave registry information on the system. If the configuration was changed, files must be manually deleted from corresponding locations.
33

34 Chapter 6
7 Getting Started with the SAP Connector
This chapter describes a sample scenario to show how to configure the SAP connector with Select Identity after installing the connector RAR on an application server. The instruction set in this chapter illustrates a sample deployment scenario of the SAP connector. For a generalized set of instructions on how to deploy a connector on an application server and how to configure the connector with Select Identity, refer to the HP Select Identity Connector Deployment Guide.
Prerequisites
Before you start to configure the connector with Select Identity, make sure the following prerequisites are met.
• The connector RAR is deployed on an application server.
• The JCo API files are installed on the Select Identity server.
• The resource system (SAP R/3 system) is available in the network.
Example Scenario : Configuring the Connector
Perform the following tasks to configure the SAP connector with Select Identity.
• Task 1 : Add a Connector to Select Identity
• Task 2 : Add a Resource
• Task 3 : Map Attributes
Task 1: Add a Connector to Select Identity
You must add the newly deployed (on application server) connector to Select Identity to be able to use it. Perform the steps below to add a connector to Select Identity.
Select Identity 4.0-4.20
1 In the Select Identity home page, click Service Studio → Resources. The Resource List screen appears.
2 Click Manage Connectors. The Manage Connectors screen appears.
3 Enter a connector name, enter the pool name as eis/SAPR3, select No under Mapper Available section, and then click Add. The SAP connector is registered with Select Identity.
35
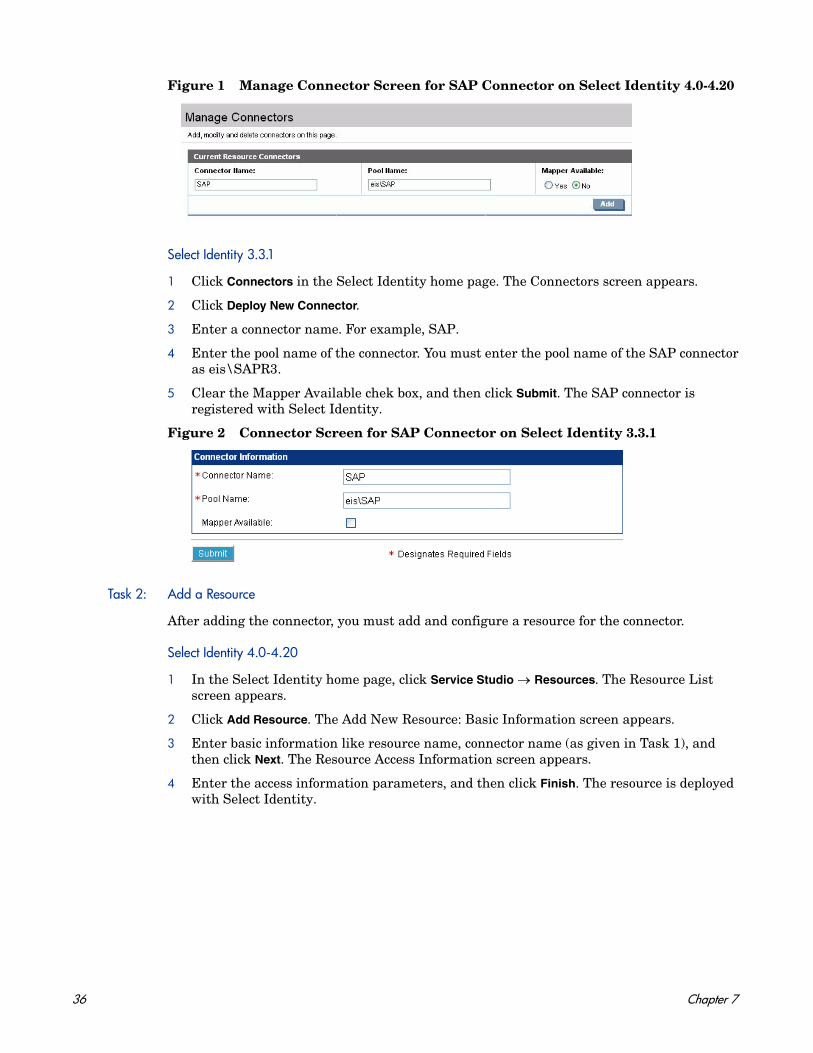
Figure 1 Manage Connector Screen for SAP Connector on Select Identity 4.0-4.20
Select Identity 3.3.1
1 Click Connectors in the Select Identity home page. The Connectors screen appears.
2 Click Deploy New Connector.
3 Enter a connector name. For example, SAP.
4 Enter the pool name of the connector. You must enter the pool name of the SAP connector as eis\SAPR3.
5 Clear the Mapper Available chek box, and then click Submit. The SAP connector is registered with Select Identity.
Figure 2 Connector Screen for SAP Connector on Select Identity 3.3.1
Task 2: Add a Resource
After adding the connector, you must add and configure a resource for the connector.
Select Identity 4.0-4.20
1 In the Select Identity home page, click Service Studio → Resources. The Resource List screen appears.
2 Click Add Resource. The Add New Resource: Basic Information screen appears.
3 Enter basic information like resource name, connector name (as given in Task 1), and then click Next. The Resource Access Information screen appears.
4 Enter the access information parameters, and then click Finish. The resource is deployed with Select Identity.
36 Chapter 7

Figure 3 View Resource Access Information Screen for SAP Connector on Select Identity 4.0-4.20
Select Identity 3.3.1
1 Click Resources in the Select Identity home page. The Resources screen appears.
2 Click Deploy New Resource.
3 In the Resource Information screen, enter the basic information and click Save & Continue.
4 In the Access Info screen, enter the access related parameters, and then click Test and Submit.
Figure 4 The View Resource Screen for SAP Connector in Select Identity 3.3.1
Task 3: Map Attributes
The attributes of the SAP resource must be mapped to the Select Identity attributes. You can create new attributes in Select Identity and map the resource attributes to the newly created Select Identity attributes. Perform the following steps to map attributes:
Select Identity 4.0-4.20
1 In the Select Identity home page, click Service Studio → Resources. The Resource List screen appears.
2 Select the newly created resource (SAP) from the Resource List, and then click Modify. Basic Information page appears.
37
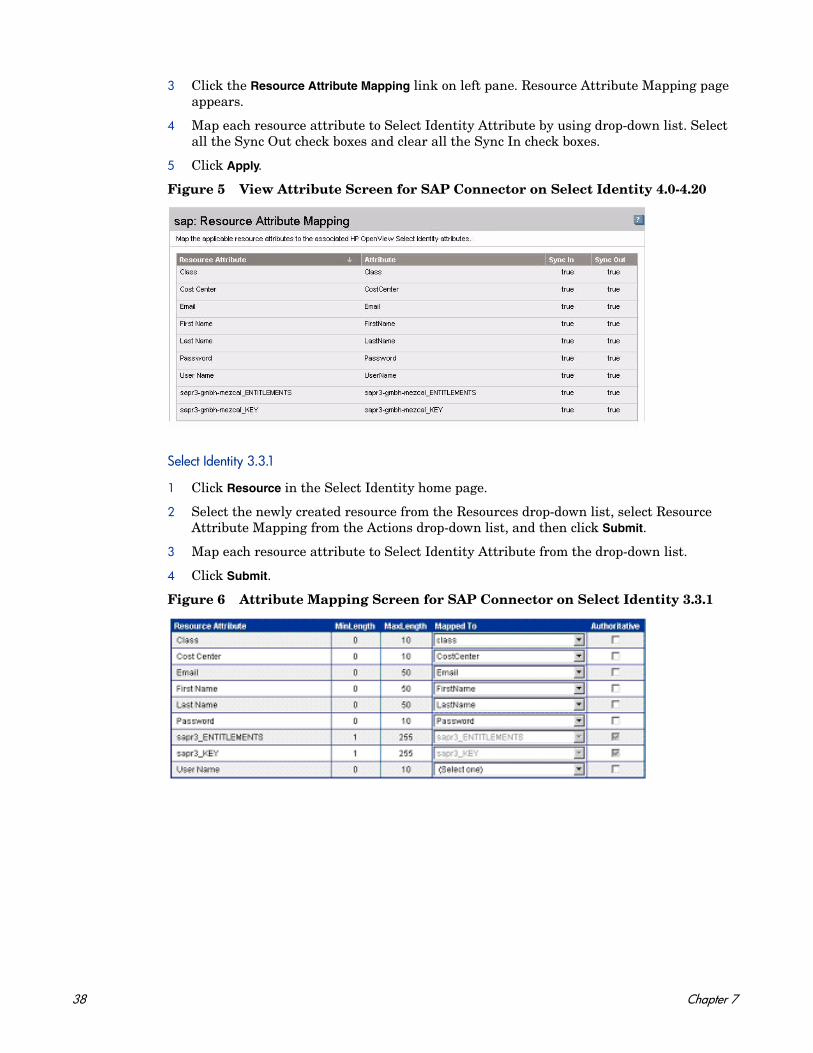
3 Click the Resource Attribute Mapping link on left pane. Resource Attribute Mapping page appears.
4 Map each resource attribute to Select Identity Attribute by using drop-down list. Select all the Sync Out check boxes and clear all the Sync In check boxes.
5 Click Apply.
Figure 5 View Attribute Screen for SAP Connector on Select Identity 4.0-4.20
Select Identity 3.3.1
1 Click Resource in the Select Identity home page.
2 Select the newly created resource from the Resources drop-down list, select Resource Attribute Mapping from the Actions drop-down list, and then click Submit.
3 Map each resource attribute to Select Identity Attribute from the drop-down list.
4 Click Submit.
Figure 6 Attribute Mapping Screen for SAP Connector on Select Identity 3.3.1
38 Chapter 7
Related Documents


![Oracle Identity Manager Connector Guide for SAP …1]Oracle® Identity Manager Connector Guide for SAP Employee Reconciliation Release 9.1.2 E11210-18 May 2017](https://static.cupdf.com/doc/110x72/5af839697f8b9a5b1e918183/oracle-identity-manager-connector-guide-for-sap-1oracle-identity-manager-connector.jpg)