hp procurve security guide www.hp.com/go/hpprocurve hp procurve routing switches 9304m, 9308m, and 9315m (software release 7.5.X or greater)

Welcome message from author
This document is posted to help you gain knowledge. Please leave a comment to let me know what you think about it! Share it to your friends and learn new things together.
Transcript

hp procurvesecurity guide
www.hp.com/go/hpprocurve
hp procurve routing switches9304m, 9308m, and 9315m
(software release7.5.X or greater)

Security Guide
for the HP ProCurve Routing Switches
9304M, 9308M, and 9315M
(Software Release 7.5.X or Greater)

Copyright 2000 – 2002
Hewlett-Packard Company
All rights reserved. Reproduction, adaptation or translation without prior written permission is prohibited, except as allowed under the copyright laws.
Publication number
5990-3042
May 2002
Applicable Products
HP J4138A, HP J4139A, HP J4874A
Trademark Credits
Microsoft®, Windows®, Microsoft Windows NT® and
Internet Explorer® are U.S. trademarks of Microsoft
Corporation. Netscape® Navigator is a U.S. trademark of Netscape Communications
Corporation. Cisco® is a trademark of Cisco Systems Inc.
Disclaimer
The information contained in this document is subject to change without notice.
HEWLETT-PACKARD COMPANY MAKES NO WARRANTY OF ANY KIND WITH REGARD TO THIS MATERIAL, INCLUDING BUT NOT LIMITED TO, THE IMPLIED WARRANTIES OF MERCHANTABILITY AND FITNESS FOR A PARTICULAR PURPOSE.
Hewlett-Packard shall not be liable for errors contained herein or for incidental or consequential damages in connection with the furnishing, performance or use of this material.
Hewlett-Packard assumes no responsibility for the use or reliability of its software on equipment that is not furnished by Hewlett-Packard.
A copy of the specific warranty terms applicable to your HP product and replacement parts can be obtained from your HP Sales and Service Office or authorized dealer.
Warranty
See the Customer Support and Warranty booklet included with the product.
A copy of the specific warranty terms applicable to your Hewlett-Packard products and replacement parts can be obtained from your HP Sales and Service Office or authorized dealer.
Safety Considerations
Prior to the installation and use of this product, review all safety markings and instructions.
Instruction Manual Symbol.
If the product is marked with the above symbol, refer to the product manual to protect the product from damage.
WARNING Denotes a hazard that can cause injury.
CAUTION Denotes a hazard that can damage equipment or data.
Do not proceed beyond a WARNING or CAUTION notice until you have understood the hazard and have taken appropriate precautions.
Use of control, adjustments or performance procedures other than those specified herein may result in hazardous radiation exposure.
Grounding
This product provides a protective earthing terminal. There must be an uninterrupted safety earth ground from the main power source to the product’s input wiring terminals, power cord or supplied power cord set. Whenever it is likely that the protection has been impaired, disconnect the power cord until the ground has been restored.
If your LAN covers an area served by more than one power distribution system, be sure their safety grounds are securely interconnected.
LAN cables may occasionally be subject to hazardous transient voltages (such as lightning or disturbances in the electrical utilities power grid). Handle exposed metal components of the network with caution.
For more safety information, see “Safety and EMC Regulatory Statements”, in the Installation and Getting Started Guide.
Servicing
There are no user-serviceable parts inside the user-installable modules comprising the product. Any servicing, adjustment, maintenance or repair must be performed only by service-trained personnel.
ii

Organization of Product Documentation
Read Me FirstThe “Read Me First” document includes software release information, a brief “Getting Started” section, an accessory parts list, troubleshooting tips, operating notes, and other information that is not included elsewhere in the product documentation.
NOTE: HP periodically updates Read Me First. The latest version is available at http://www.hp.com/go/hpprocurve. (Click on Technical Support, then Manuals.)
Main Product CoverageThe main product documentation for your Routing Switch includes:
• HP ProCurve Quick Start Guide – a printed guide you can use as an easy reference to the installation and product safety information needed for out-of-box setup, plus the general product safety and EMC regulatory statements of which you should be aware when installing and using a Routing Switch.
• HP ProCurve Installation and Getting Started Guide – an electronic (PDF) guide containing product safety and EMC regulatory statements as well as installation and basic configuration information. This guide is included on the CD shipped with your HP product, and is also available on the HP ProCurve website.
• HP ProCurve Advanced Configuration and Management Guide – contains advanced configuration information for routing protocols and Quality of Service (QoS). In addition, appendixes in this guide contain reference information for network monitoring, policies and filters, and software and hardware specifications. This manual is included in a PDF (Portable Document Format) file on the CD shipped with your HP product, and also on the HP ProCurve website.
• HP ProCurve Command Line Interface Reference – provides a dictionary of CLI commands and syntax. An electronic copy of this reference is included as a PDF (Portable Document Format) file on the CD shipped with your HP product, and is also available on the HP ProCurve website.
• HP ProCurve Security Guide – provides procedures for securing management access to HP devices and for protecting against Denial of Service (DoS) attacks. An electronic copy of this guide is included as a PDF (Portable Document Format) file on the CD shipped with your HP product, and is also available on the HP ProCurve website.
These documents also are available in PDF file format on HP's ProCurve website.
Product Documentation CD: A Tool for Finding Specific Information and/or Printing Selected PagesThis CD is shipped with your HP product and provides the following:
• A README.txt file (or README.pdf file) describing the CD contents and use, including easy instructions on how to search the book files for specific information
• A contents.pdf file to give you easy access to the documentation on the CD
• Separate PDF files of the individual chapters and appendixes in the Installation and Getting Started Guide, Advanced Configuration and Management Guide, and the Security Guide, enabling you to easily print individual chapters, appendixes, and selected pages
• Single PDF files for each of the books, enabling you to use the Adobe® Acrobat® Reader to easily search for detailed information
• Additional files. These may include such items as a copy of the device software (OS), additional Readme files, and release notes.
Release NotesThese documents describe features that became available between revisions of the main product documentation. New releases of such documents will be available on HP's ProCurve website. To register to receive email notice from HP when a new software release is available, go to http://www.hp.com/go/hpprocurve and click on Technical Support, then Software, and click on Subscriber’s Choice web page.
iii

iv

Contents
CHAPTER 1GETTING STARTED...................................................................................... 1-1INTRODUCTION ...........................................................................................................................................1-1AUDIENCE ..................................................................................................................................................1-1NOMENCLATURE .........................................................................................................................................1-1TERMINOLOGY ............................................................................................................................................1-2RELATED PUBLICATIONS .............................................................................................................................1-2WHAT’S NEW IN THIS EDITION? ...................................................................................................................1-3
ENHANCEMENTS ADDED IN SOFTWARE RELEASE 07.5.X .......................................................................1-3SUPPORT AND WARRANTY INFORMATION .....................................................................................................1-4
CHAPTER 2SECURING ACCESS TO MANAGEMENT FUNCTIONS ....................................... 2-1SECURING ACCESS METHODS .....................................................................................................................2-1RESTRICTING REMOTE ACCESS TO MANAGEMENT FUNCTIONS .....................................................................2-3
USING ACLS TO RESTRICT REMOTE ACCESS .......................................................................................2-4RESTRICTING REMOTE ACCESS TO THE DEVICE TO SPECIFIC IP ADDRESSES .........................................2-5RESTRICTING REMOTE ACCESS TO THE DEVICE TO SPECIFIC VLAN IDS ...............................................2-6DISABLING SPECIFIC ACCESS METHODS ...............................................................................................2-7
SETTING PASSWORDS ................................................................................................................................2-9SETTING A TELNET PASSWORD .........................................................................................................2-10SETTING PASSWORDS FOR MANAGEMENT PRIVILEGE LEVELS ..............................................................2-10RECOVERING FROM A LOST PASSWORD ..............................................................................................2-12DISPLAYING THE SNMP COMMUNITY STRING ......................................................................................2-13DISABLING PASSWORD ENCRYPTION ...................................................................................................2-13
SETTING UP LOCAL USER ACCOUNTS .......................................................................................................2-13CONFIGURING A LOCAL USER ACCOUNT .............................................................................................2-14
CONFIGURING TACACS/TACACS+ SECURITY .........................................................................................2-15HOW TACACS+ DIFFERS FROM TACACS .........................................................................................2-15TACACS/TACACS+ AUTHENTICATION, AUTHORIZATION, AND ACCOUNTING .......................................2-16
v

Security Guide
TACACS/TACACS+ CONFIGURATION CONSIDERATIONS ....................................................................2-19IDENTIFYING THE TACACS/TACACS+ SERVERS ...............................................................................2-20SPECIFYING DIFFERENT SERVERS FOR INDIVIDUAL AAA FUNCTIONS ...................................................2-20SETTING OPTIONAL TACACS/TACACS+ PARAMETERS .....................................................................2-21CONFIGURING AUTHENTICATION-METHOD LISTS FOR TACACS/TACACS+ .........................................2-22CONFIGURING TACACS+ AUTHORIZATION .........................................................................................2-24CONFIGURING TACACS+ ACCOUNTING ..............................................................................................2-26CONFIGURING AN INTERFACE AS THE SOURCE FOR ALL TACACS/TACACS+ PACKETS ......................2-27DISPLAYING TACACS/TACACS+ STATISTICS AND CONFIGURATION INFORMATION ..............................2-27
CONFIGURING RADIUS SECURITY ............................................................................................................2-32RADIUS AUTHENTICATION, AUTHORIZATION, AND ACCOUNTING ..........................................................2-33RADIUS CONFIGURATION CONSIDERATIONS ......................................................................................2-36RADIUS CONFIGURATION PROCEDURE ..............................................................................................2-36CONFIGURING HP-SPECIFIC ATTRIBUTES ON THE RADIUS SERVER ....................................................2-36IDENTIFYING THE RADIUS SERVER TO THE HP DEVICE ......................................................................2-37SPECIFYING DIFFERENT SERVERS FOR INDIVIDUAL AAA FUNCTIONS ...................................................2-38SETTING RADIUS PARAMETERS ........................................................................................................2-38CONFIGURING AUTHENTICATION-METHOD LISTS FOR RADIUS ............................................................2-39CONFIGURING RADIUS AUTHORIZATION .............................................................................................2-40CONFIGURING RADIUS ACCOUNTING .................................................................................................2-41CONFIGURING AN INTERFACE AS THE SOURCE FOR ALL RADIUS PACKETS .........................................2-42DISPLAYING RADIUS CONFIGURATION INFORMATION ..........................................................................2-43
CONFIGURING AUTHENTICATION-METHOD LISTS ........................................................................................2-48CONFIGURATION CONSIDERATIONS FOR AUTHENTICATION-METHOD LISTS ............................................2-48EXAMPLES OF AUTHENTICATION-METHOD LISTS ..................................................................................2-49
CHAPTER 3CONFIGURING SECURE SHELL..................................................................... 3-1SETTING THE HOST NAME AND DOMAIN NAME .............................................................................................3-2GENERATING A HOST RSA KEY PAIR ..........................................................................................................3-2
PROVIDING THE PUBLIC KEY TO CLIENTS ..............................................................................................3-3CONFIGURING RSA CHALLENGE-RESPONSE AUTHENTICATION .....................................................................3-3
IMPORTING AUTHORIZED PUBLIC KEYS INTO THE HP DEVICE .................................................................3-3ENABLING RSA CHALLENGE-RESPONSE AUTHENTICATION ....................................................................3-5
SETTING OPTIONAL PARAMETERS ...............................................................................................................3-5SETTING THE NUMBER OF SSH AUTHENTICATION RETRIES ...................................................................3-5SETTING THE SERVER RSA KEY SIZE ...................................................................................................3-6DEACTIVATING USER AUTHENTICATION .................................................................................................3-6ENABLING EMPTY PASSWORD LOGINS ..................................................................................................3-6SETTING THE SSH PORT NUMBER ........................................................................................................3-6SETTING THE SSH LOGIN TIMEOUT VALUE ...........................................................................................3-7DESIGNATING AN INTERFACE AS THE SOURCE FOR ALL SSH PACKETS ..................................................3-7CONFIGURING MAXIMUM IDLE TIME FOR SSH SESSIONS .......................................................................3-7
VIEWING SSH CONNECTION INFORMATION ..................................................................................................3-8SAMPLE SSH CONFIGURATION ...................................................................................................................3-9
vi

Contents
USING SECURE COPY ...............................................................................................................................3-10
CHAPTER 4PROTECTING AGAINST DENIAL OF SERVICE ATTACKS.................................. 4-1PROTECTING AGAINST SMURF ATTACKS ......................................................................................................4-1
AVOIDING BEING AN INTERMEDIARY IN A SMURF ATTACK .......................................................................4-2AVOIDING BEING A VICTIM IN A SMURF ATTACK .....................................................................................4-2
PROTECTING AGAINST TCP SYN ATTACKS .................................................................................................4-3DISPLAYING STATISTICS ABOUT PACKETS DROPPED BECAUSE OF DOS ATTACKS .........................................4-4
CHAPTER 5SECURING SNMP ACCESS ......................................................................... 5-1ESTABLISHING SNMP COMMUNITY STRINGS ...............................................................................................5-1
ENCRYPTION OF SNMP COMMUNITY STRINGS .....................................................................................5-2ADDING AN SNMP COMMUNITY STRING ...............................................................................................5-2DISPLAYING THE SNMP COMMUNITY STRINGS ......................................................................................5-5
USING THE USER-BASED SECURITY MODEL ................................................................................................5-5CONFIGURING YOUR NMS ...................................................................................................................5-6CONFIGURING SNMP VERSION 3 ON HP DEVICES ................................................................................5-6DEFINING THE ENGINE ID .....................................................................................................................5-6DEFINING AN SNMP GROUP ................................................................................................................5-7DEFINING AN SNMP USER ACCOUNT ...................................................................................................5-8DISPLAYING THE ENGINE ID .................................................................................................................5-8DISPLAYING SNMP GROUPS ................................................................................................................5-9DISPLAYING USER INFORMATION ..........................................................................................................5-9INTERPRETING VARBINDS IN REPORT PACKETS ...................................................................................5-10
DEFINING SNMP VIEWS ...........................................................................................................................5-10
INDEX .................................................................................................. Index-1
vii

Security Guide
viii

Chapter 1Getting Started
IntroductionThis guide describes how to secure access to management functions on the following HP devices:
• HP ProCurve Routing Switch 9315M
• HP ProCurve Routing Switch 9308M
• HP ProCurve Routing Switch 9304M
In addition, this guide explains how to secure SNMP access to these HP devices, as well as how to protect them from Denial of Service (DoS) attacks.
AudienceThis guide assumes that you have a working knowledge of Layer 2 and Layer 3 switching and routing. You also should be familiar with the following protocols if applicable to your network—IP, RIP, OSPF, BGP4, IGMP, PIM, DVMRP, IPX, AppleTalk, SRP, and VRRP.
NomenclatureThis guide uses the following typographical conventions:
Italic highlights the title of another publication and occasionally emphasizes a word or phrase.
Bold highlights a CLI command.
Bold Italic highlights a term that is being defined.
Underline highlights a link on the Web management interface.
Capitals highlights field names and buttons that appear in the Web management interface.
NOTE: A note emphasizes an important fact or calls your attention to a dependency.
WARNING: A warning calls your attention to a possible hazard that can cause injury or death.
CAUTION: A caution calls your attention to a possible hazard that can damage equipment.
1 - 1

Security Guide
TerminologyThe following table defines basic product terms used in this guide.
Related PublicationsThe following product documentation is available for your HP Routing Switch:
• HP ProCurve Quick Start Guide – a printed guide you can use as an easy reference to the installation and product safety information needed for out-of-box setup, plus the general product safety and EMC regulatory statements of which you should be aware when installing and using a Routing Switch.
• HP ProCurve Installation and Getting Started Guide – an electronic (PDF) guide containing product safety and EMC regulatory statements as well as installation and basic configuration information. This guide is included on the CD shipped with your HP product, and is also available on the HP ProCurve website.
• HP ProCurve Advanced Configuration and Management Guide – contains advanced configuration information for routing protocols and Quality of Service (QoS). In addition, appendixes in this guide contain reference information for network monitoring, policies and filters, and software and hardware specifications. This guide is included in a PDF (Portable Document Format) file on the CD shipped with your HP product, and also on the HP ProCurve website.
• HP ProCurve Command Line Interface Reference – provides a dictionary of CLI commands and syntax. An electronic copy of this reference is included in PDF format on the CD shipped with your HP product, and is also available on the HP ProCurve website.
• HP ProCurve Security Guide – provides procedures for securing management access to HP devices and for protecting against Denial of Service (DoS) attacks. An electronic copy of this guide is included in PDF format on the CD shipped with your HP product, and is also available on the HP ProCurve website.
• Documentation CD for the HP ProCurve Routing Switches 9304M, 9308M, and 9315M —This CD contains PDF files of the HP ProCurve manuals and provides a method for electronically searching either individual chapters or an entire manual for specific topics. For a brief description of the CD contents and how to use the CD to save time, do the following:
1 Insert the CD in your PC's CD-ROM drive.
2 Using the file manager in your PC, select the drive containing the CD and display the CD's directory.
3 Use a compatible text editor to display the README.txt file in the CD's root directory.
• Manual Supplement – These documents are included with your HP device if the software shipped with the device includes feature upgrades that were added after the last revision of the manual. They are also included with software upgrades when available on the World Wide Web. To check for the latest software version, go to
Table 1.1: Product Terms
Term Definition
chassis
or
Chassis device
A Switch or Routing Switch that accepts optional modules or power supplies. The HP 9315M, HP 9304M, and HP 9308M Routing Switches are Chassis devices.
Routing Switch
or
router
A Layer 2 and Layer 3 device that switches and routes network traffic. The term router is sometimes used in this document in descriptions of a Routing Switch’s Layer 3 routing protocol features.
Switch A Layer 2 device that switches network traffic.
HP9300 An example Command Line Interface (CLI) prompt. Actual prompts show the product number for the device, such as HP9300.
1 - 2

Getting Started
www.hp.com/go/hpprocurve and click on Technical Support, then Software.
• Support is as Close as the World Wide Web!—Included with your HP Routing Switch, this document is a guide to HP support services and also provides information on your HP networking product warranty.
What’s New in this Edition?The January 2002 edition of the HP ProCurve Routing Switch documentation contains descriptions of the new features listed below. (For features added in later, minor releases, see the latest release notes in the Technical Support | Manuals area at http://www.hp.com/go/hpprocurve.)
Enhancements Added in Software Release 07.5.XThe following enhancements are new in software release 07.5.X. These enhancements are present only in software release 07.5.X and higher. They are not supported in previous software releases.
Layer 3 Enhancements
• Increased route table capacity
• Support for configuring the ARP age on an individual interface
• Support for enabling or disabling ICMP redirect messages on an individual interface
• Changes to BGP4 Multi-Exit Discriminator (MED) comparison
• Cooperative BGP4 route filtering
• New command to unsuppress a neighbor's routes
• New command to use the IP default route as a valid next hop for a BGP4 route
• Named IP community and AS-path ACLs
• New BGP4 route-map options
• Support for using regular expressions in BGP4 community ACLs
• New option to display the last packet from a BGP4 neighbor that contained an error
• Support for OSPF RFC 2328 Appendix E
• New IP interface options for OSPF
• Dynamic memory allocation for IP multicast groups
• Support for PIM Sparse Mode (SM) on loopback interfaces
• Multi-protocol Border Gateway Protocol (MBGP) support
Layer 2 Enhancements
• SuperSpan – the ability to configure a common STP backbone for a large number of separate customer spanning trees
• STP per VLAN group
• GARP VLAN Registration Protocol (GVRP)
System-Level Enhancements
• Support for Maximum Transmission Unit (MTU) of 1920 bytes
• New command, trunk deploy, to activate trunk group configuration commands without reloading the software
• Support for up to eight 10/100 or Gigabit trunk ports supported per module
• New commands for naming, disabling, and re-enabling individual ports in a trunk group
• Support for monitoring individual ports in a trunk group
1 - 3

Security Guide
• Enhanced trunk group information display
• ACL packet and flow counters
• Option to add a comment to an ACL
• ACL permit logging
• Ability to display hardware serial numbers
• The show interfaces command displays an interface’s input and output load in terms of bits per second, packets per second, and utilization percentage, averaged over a configurable interval
• The show ip interface command displays additional parameters for each interface
• A new command, show ip vrrp vrid, displays information for a specific VRP VRID and even for a specific port configured with the VRID
• The show interfaces command show a virtual interface’s state as down if the interface’s VLAN is down
• Support for searching and filtering output from show commands
• Higher maximum number of Syslog buffer entries supported on Routing Switches
• IPv6 protocol VLAN support
• Support for empty VLANs
• Ability to configure the HP device to hide or show the RSA host key pair in the running-config file
• Support for TFTP source interface
• More flexible command syntax for clearing MAC addresses
• Support for Telneting to a specified port
• Ability to cancel an outbound Telnet session
• Support for reading Cisco Discovery Protocol (CDP) packets
• Enhanced show span output
• Enhanced show span vlan output
• New port number format in Web management interface
• Change to the SNMP community strings command: Specific views of the MIB can be assigned to community strings
• Support for SNMP v3 (RFCs 2570 and 2575)
• New HP MIB objects: CPU utilization, Memory utilization, Software loads, SNMP trap holddown
Support and Warranty InformationRefer to Support is as Close as the World Wide Web, which was shipped with your HP Routing Switch.
1 - 4

Chapter 2Securing Access to Management Functions
The HP 9304M, HP 9308M, and HP 9315M Routing Switches provide the following methods for securing access to the device. You can use one or more of these methods:
• “Securing Access Methods” on page 2-1 lists the management access methods available on an HP device and the ways you can secure each one
• “Restricting Remote Access to Management Functions” on page 2-3 explains how to restrict access to management functions from remote sources, including Telnet, the Web management interface, and SNMP
• “Setting Passwords” on page 2-9 explains how to set passwords for Telnet access and management privilege levels
• “Setting Up Local User Accounts” on page 2-13 explains how to define user accounts to regulate who can access management functions
• “Configuring TACACS/TACACS+ Security” on page 2-15 explains how to configure SNMP read-only and read-write community strings on an HP device
• “Configuring TACACS/TACACS+ Security” on page 2-15 explains how to configure TACACS/TACACS+ authentication, authorization, and accounting
• “Configuring RADIUS Security” on page 2-32 explains how to configure RADIUS authentication, authorization, and accounting
• “Configuring Authentication-Method Lists” on page 2-48 explains how to set the order that authentication methods are consulted when more than one is used with an access method
Securing Access MethodsThe following table lists the management access methods available on an HP device, how they are secured by default, and the ways in which they can be secured.
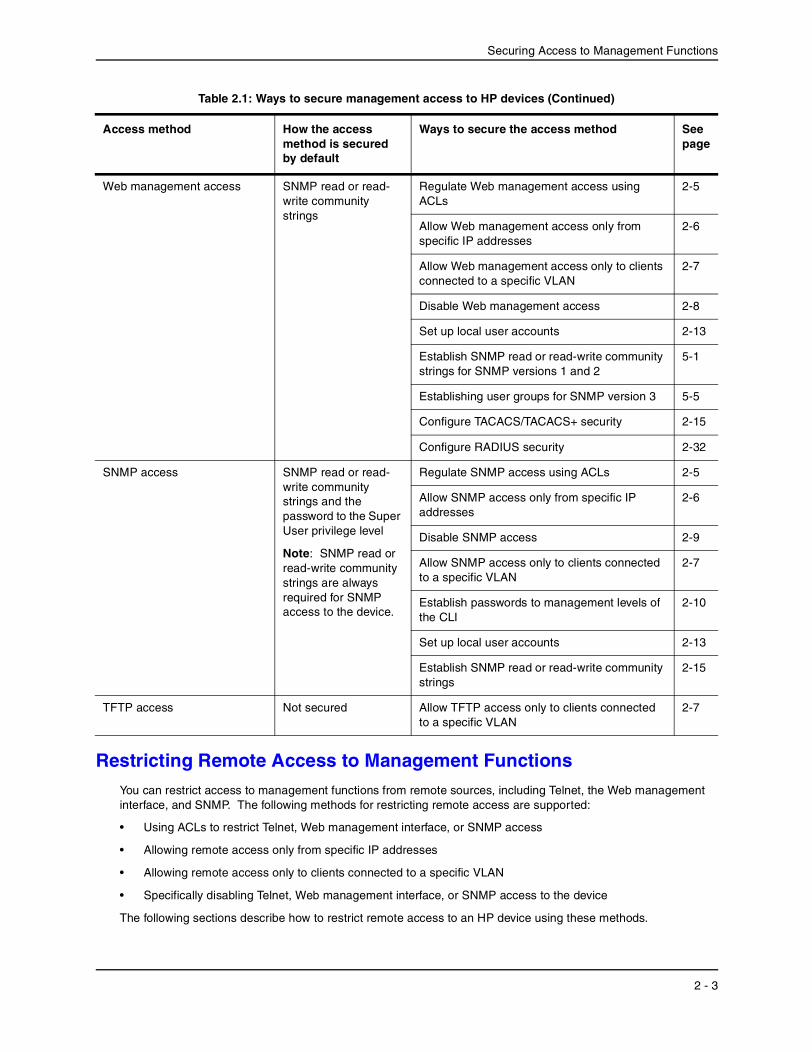
Table 2.1: Ways to secure management access to HP devices
Access method How the access method is secured by default
Ways to secure the access method See page
Serial access to the CLI Not secured Establish passwords for management privilege levels
2-10
2 - 1

Security Guide
Access to the Privileged EXEC and CONFIG levels of the CLI
Not secured Establish a password for Telnet access to the CLI
2-10
Establish passwords for management privilege levels
2-10
Set up local user accounts 2-13
Configure TACACS/TACACS+ security 2-15
Configure RADIUS security 2-32
Telnet access Not secured Regulate Telnet access using ACLs 2-4
Allow Telnet access only from specific IP addresses
2-6
Allow Telnet access only to clients connected to a specific VLAN
2-7
Disable Telnet access 2-8
Establish a password for Telnet access 2-10
Establish passwords for privilege levels of the CLI
2-10
Set up local user accounts 2-13
Configure TACACS/TACACS+ security 2-15
Configure RADIUS security 2-32
Secure Shell (SSH) access Not configured Configure SSH 3-1
Regulate SSH access using ACLs 2-4
Establish passwords for privilege levels of the CLI
2-10
Set up local user accounts 2-13
Configure TACACS/TACACS+ security 2-15
Configure RADIUS security 2-32
Table 2.1: Ways to secure management access to HP devices (Continued)
Access method How the access method is secured by default
Ways to secure the access method See page
2 - 2
Securing Access to Management Functions
Restricting Remote Access to Management FunctionsYou can restrict access to management functions from remote sources, including Telnet, the Web management interface, and SNMP. The following methods for restricting remote access are supported:
• Using ACLs to restrict Telnet, Web management interface, or SNMP access
• Allowing remote access only from specific IP addresses
• Allowing remote access only to clients connected to a specific VLAN
• Specifically disabling Telnet, Web management interface, or SNMP access to the device
The following sections describe how to restrict remote access to an HP device using these methods.
Web management access SNMP read or read-write community strings
Regulate Web management access using ACLs
2-5
Allow Web management access only from specific IP addresses
2-6
Allow Web management access only to clients connected to a specific VLAN
2-7
Disable Web management access 2-8
Set up local user accounts 2-13
Establish SNMP read or read-write community strings for SNMP versions 1 and 2
5-1
Establishing user groups for SNMP version 3 5-5
Configure TACACS/TACACS+ security 2-15
Configure RADIUS security 2-32
SNMP access SNMP read or read-write community strings and the password to the Super User privilege level
Note: SNMP read or read-write community strings are always required for SNMP access to the device.
Regulate SNMP access using ACLs 2-5
Allow SNMP access only from specific IP addresses
2-6
Disable SNMP access 2-9
Allow SNMP access only to clients connected to a specific VLAN
2-7
Establish passwords to management levels of the CLI
2-10
Set up local user accounts 2-13
Establish SNMP read or read-write community strings
2-15
TFTP access Not secured Allow TFTP access only to clients connected to a specific VLAN
2-7
Table 2.1: Ways to secure management access to HP devices (Continued)
Access method How the access method is secured by default
Ways to secure the access method See page
2 - 3

Security Guide
Using ACLs to Restrict Remote Access You can use standard ACLs to control the following access methods to management functions on an HP device:
• Telnet access
• SSH access
• Web management access
• SNMP access
To configure access control for these management access methods:
1. Configure an ACL with the IP addresses you want to allow to access the device
2. Configure a Telnet access group, SSH access group, web access group, and SNMP community strings. Each of these configuration items accepts an ACL as a parameter. The ACL contains entries that identify the IP addresses that can use the access method.
The following sections present examples of how to secure management access using ACLs. See the “IP Access Control Lists (ACLs)” chapter in the Advanced Configuration and Management Guide for more information on configuring ACLs.
Using an ACL to Restrict Telnet Access
To configure an ACL that restricts Telnet access to the device, enter commands such as the following:
HP9300(config)# access-list 10 deny host 209.157.22.32 logHP9300(config)# access-list 10 deny 209.157.23.0 0.0.0.255 logHP9300(config)# access-list 10 deny 209.157.24.0 0.0.0.255 logHP9300(config)# access-list 10 deny 209.157.25.0/24 logHP9300(config)# access-list 10 permit any HP9300(config)# telnet access-group 10HP9300(config)# write memory
Syntax: telnet access-group <num>
The <num> parameter specifies the number of a standard ACL and must be from 1 – 99.
The commands above configure ACL 10, then apply the ACL as the access list for Telnet access. The device allows Telnet access to all IP addresses except those listed in ACL 10.
To configure a more restrictive ACL, create permit entries and omit the permit any entry at the end of the ACL. For example:
HP9300(config)# access-list 10 permit host 209.157.22.32 HP9300(config)# access-list 10 permit 209.157.23.0 0.0.0.255 HP9300(config)# access-list 10 permit 209.157.24.0 0.0.0.255 HP9300(config)# access-list 10 permit 209.157.25.0/24 HP9300(config)# telnet access-group 10HP9300(config)# write memory
The ACL in this example permits Telnet access only to the IP addresses in the permit entries and denies Telnet access from all other IP addresses.
Using an ACL to Restrict SSH Access
To configure an ACL that restricts SSH access to the device, enter commands such as the following:
HP9300(config)# access-list 12 deny host 209.157.22.98 logHP9300(config)# access-list 12 deny 209.157.23.0 0.0.0.255 logHP9300(config)# access-list 12 deny 209.157.24.0/24 logHP9300(config)# access-list 12 permit anyHP9300(config)# ssh access-group 12HP9300(config)# write memory
Syntax: ssh access-group <num>
2 - 4

Securing Access to Management Functions
The <num> parameter specifies the number of a standard ACL and must be from 1 – 99.
These commands configure ACL 12, then apply the ACL as the access list for SSH access. The device denies SSH access from the IP addresses listed in ACL 12 and permits SSH access from all other IP addresses. Without the last ACL entry for permitting all packets, this ACL would deny SSH access from all IP addresses.
NOTE: In this example, the command ssh access-group 10 could have been used to apply the ACL configured in the example for Telnet access. You can use the same ACL multiple times.
Using an ACL to Restrict Web Management Access
To configure an ACL that restricts Web management access to the device, enter commands such as the following:
HP9300(config)# access-list 12 deny host 209.157.22.98 logHP9300(config)# access-list 12 deny 209.157.23.0 0.0.0.255 logHP9300(config)# access-list 12 deny 209.157.24.0/24 logHP9300(config)# access-list 12 permit anyHP9300(config)# web access-group 12HP9300(config)# write memory
Syntax: web access-group <num>
The <num> parameter specifies the number of a standard ACL and must be from 1 – 99.
These commands configure ACL 12, then apply the ACL as the access list for Web management access. The device denies Web management access from the IP addresses listed in ACL 12 and permits Web management access from all other IP addresses. Without the last ACL entry for permitting all packets, this ACL would deny Web management access from all IP addresses.
Using ACLs to Restrict SNMP Access
To restrict SNMP access to the device using ACLs, enter commands such as the following:
NOTE: The syntax for using ACLs for SNMP access is different from the syntax for controlling Telnet, SSH, and Web management access using ACLs.
HP9300(config)# access-list 25 deny host 209.157.22.98 logHP9300(config)# access-list 25 deny 209.157.23.0 0.0.0.255 logHP9300(config)# access-list 25 deny 209.157.24.0 0.0.0.255 log HP9300(config)# access-list 30 deny 209.157.25.0 0.0.0.255 logHP9300(config)# access-list 30 deny 209.157.26.0/24 logHP9300(config)# access-list 30 permit anyHP9300(config)# snmp-server community public ro 25 HP9300(config)# snmp-server community private rw 30HP9300(config)# write memory
Syntax: snmp-server community <string> ro | rw <num>
The <string> parameter specifies the SNMP community string the user must enter to gain SNMP access.
The ro parameter indicates that the community string is for read-only (“get”) access. The rw parameter indicates the community string is for read-write (“set”) access.
The <num> parameter specifies the number of a standard ACL and must be from 1 – 99.
These commands configure ACLs 25 and 30, then apply the ACLs to community strings.
ACL 25 is used to control read-only access using the “public” community string. ACL 30 is used to control read-write access using the “private” community string.
Restricting Remote Access to the Device to Specific IP AddressesBy default, an HP device does not control remote management access based on the IP address of the managing device. You can restrict remote management access to a single IP address for the following access methods:
2 - 5

Security Guide
• Telnet access
• Web management access
• SNMP access
In addition, if you want to restrict all three access methods to the same IP address, you can do so using a single command.
The following examples show the CLI commands for restricting remote access. You can specify only one IP address with each command. However, you can enter each command ten times to specify up to ten IP addresses.
NOTE: You cannot restrict remote management access using the Web management interface.
Restricting Telnet Access to a Specific IP Address
To allow Telnet access to the HP device only to the host with IP address 209.157.22.39, enter the following command:
HP9300(config)# telnet-client 209.157.22.39
Syntax: [no] telnet-client <ip-addr>
Restricting Web Management Access to a Specific IP Address
To allow Web management access to the HP device only to the host with IP address 209.157.22.26, enter the following command:
HP9300(config)# web-client 209.157.22.26
Syntax: [no] web-client <ip-addr>
Restricting SNMP Access to a Specific IP Address
To allow SNMP access to the HP device only to the host with IP address 209.157.22.14, enter the following command:
HP9300(config)# snmp-client 209.157.22.14
Syntax: [no] snmp-client <ip-addr>
Restricting All Remote Management Access to a Specific IP Address
To allow Telnet, Web, and SNMP management access to the HP device only to the host with IP address 209.157.22.69, you can enter three separate commands (one for each access type) or you can enter the following command:
HP9300(config)# all-client 209.157.22.69
Syntax: [no] all-client <ip-addr>
Restricting Remote Access to the Device to Specific VLAN IDsYou can restrict management access to an HP device to ports within a specific port-based VLAN. VLAN-based access control applies to the following access methods:
• Telnet access
• Web management access
• SNMP access
• TFTP access
By default, access is allowed for all the methods listed above on all ports. Once you configure security for a given access method based on VLAN ID, access to the device using that method is restricted to only the ports within the specified VLAN.
VLAN-based access control works in conjunction with other access control methods. For example, suppose you configure an ACL to permit Telnet access only to specific client IP addresses, and you also configure VLAN-based
2 - 6
Securing Access to Management Functions
access control for Telnet access. In this case, the only Telnet clients that can access the device are clients that have one of the IP addresses permitted by the ACL and are connected to a port that is in a permitted VLAN. Clients who have a permitted IP address but are connected to a port in a VLAN that is not permitted still cannot access the device through Telnet.
Restricting Telnet Access to a Specific VLAN
To allow Telnet access only to clients in a specific VLAN, enter a command such as the following:
HP9300(config)# telnet server enable vlan 10
The command in this example configures the device to allow Telnet management access only to clients connected to ports within port-based VLAN 10. Clients connected to ports that are not in VLAN 10 are denied management access.
Syntax: [no] telnet server enable vlan <vlan-id>
Restricting Web Management Access to a Specific VLAN
To allow Web management access only to clients in a specific VLAN, enter a command such as the following:
HP9300(config)# web-management enable vlan 10
The command in this example configures the device to allow Web management access only to clients connected to ports within port-based VLAN 10. Clients connected to ports that are not in VLAN 10 are denied management access.
Syntax: [no] web-management enable vlan <vlan-id>
Restricting SNMP Access to a Specific VLAN
To allow SNMP access only to clients in a specific VLAN, enter a command such as the following:
HP9300(config)# snmp-server enable vlan 40
The command in this example configures the device to allow SNMP access only to clients connected to ports within port-based VLAN 40. Clients connected to ports that are not in VLAN 40 are denied access.
Syntax: [no] snmp-server enable vlan <vlan-id>
Restricting TFTP Access to a Specific VLAN
To allow TFTP access only to clients in a specific VLAN, enter a command such as the following:
HP9300(config)# tftp client enable vlan 40
The command in this example configures the device to allow TFTP access only to clients connected to ports within port-based VLAN 40. Clients connected to ports that are not in VLAN 40 are denied access.
Syntax: [no] tftp client enable vlan <vlan-id>
Disabling Specific Access MethodsYou can specifically disable the following access methods:
• Telnet access
• Web management access
• SNMP access
NOTE: If you disable Telnet access, you will not be able to access the CLI except through a serial connection to the management module. If you disable SNMP access, you will not be able to use SNMP management applications.
2 - 7

Security Guide
Disabling Telnet Access
Telnet access is enabled by default. You can use a Telnet client to access the CLI on the device over the network. If you do not plan to use the CLI over the network and want to disable Telnet access to prevent others from establishing CLI sessions with the device, enter the following command:
HP9300(config)# no telnet-server
To re-enable Telnet operation, enter the following command:
HP9300(config)# telnet-server
Syntax: [no] telnet-server
Disabling Web Management Access
If you want to prevent access to the device through the Web management interface, you can disable the Web management interface.
NOTE: As soon as you make this change, the device stops responding to Web management sessions. If you make this change using your Web browser, your browser can contact the device, but the device will not reply once the change takes place.
USING THE CLI
To disable the Web management interface, enter the following command:
HP9300(config)# no web-management
To re-enable the Web management interface, enter the following command:
HP9300(config)# web-management
Syntax: [no] web-management
USING THE WEB MANAGEMENT INTERFACE
1. Log on to the device using a valid user name and password for read-write access.
2 - 8

Securing Access to Management Functions
2. Select the Management link from the System configuration panel to display the Management configuration panel.
3. Click Disable next to Web Management.
4. Click the Apply button to save the change to the device’s running-config file.
5. Select the Save link at the bottom of the dialog. Select Yes when prompted to save the configuration change to the startup-config file on the device’s flash memory.
Disabling SNMP Access
SNMP is enabled by default on all HP devices. To disable SNMP, use one of the following methods.
USING THE CLI
To disable SNMP management of the device:
HP9300(config)# snmp disable
To later re-enable SNMP management of the device:
HP9300(config)# no snmp disable
Syntax: [no] snmp disable
USING THE WEB MANAGEMENT INTERFACE
1. Log on to the device using a valid user name and password for read-write access. The System configuration dialog is displayed.
2. Select the Management link from the System configuration panel to display the Management configuration panel.
3. Click Disable next to SNMP.
4. Click the Apply button to save the change to the device’s running-config file.
5. Select the Save link at the bottom of the dialog. Select Yes when prompted to save the configuration change to the startup-config file on the device’s flash memory.
Setting PasswordsPasswords can be used to secure the following access methods:
• Telnet access can be secured by setting a Telnet password. See “Setting a Telnet Password” on page 2-10.
2 - 9

Security Guide
• Access to the Privileged EXEC and CONFIG levels of the CLI can be secured by setting passwords for management privilege levels. See “Setting Passwords for Management Privilege Levels” on page 2-10.
This section also provides procedures for enhancing management privilege levels, recovering from a lost password, and disabling password encryption.
NOTE: You also can configure up to 16 user accounts consisting of a user name and password, and assign each user account a management privilege level. See “Setting Up Local User Accounts” on page 2-13.
Setting a Telnet Password By default, the device does not require a user name or password when you log in to the CLI using Telnet. You can assign a password for Telnet access using one of the following methods.
USING THE CLI
To set the password “letmein” for Telnet access to the CLI, enter the following command at the global CONFIG level:
HP9300(config)# enable telnet password letmein
Syntax: [no] enable telnet password <string>
USING THE WEB MANAGEMENT INTERFACE
1. Log on to the device using a valid user name and password for read-write access. The System configuration panel is displayed.
2. Select the Management link from the System configuration panel to display the Management configuration panel.
3. Enter the password in the Telnet Password field.
4. Click the Apply button to save the change to the device’s running-config file.
5. Select the Save link at the bottom of the dialog. Select Yes when prompted to save the configuration change to the startup-config file on the device’s flash memory.
Suppressing Telnet Connection Rejection Messages
By default, if an HP device denies Telnet management access to the device, the software sends a message to the denied Telnet client. You can optionally suppress the rejection message. When you enable the option, a denied Telnet client does not receive a message from the HP device. Instead, the denied client simply does not gain access.
To suppress the connection rejection message, use the following CLI method.
USING THE CLI
To suppress the connection rejection message sent by the device to a denied Telnet client, enter the following command at the global CONFIG level of the CLI:
HP9300(config)# telnet server suppress-reject-message
Syntax: [no] telnet server suppress-reject-message
USING THE WEB MANAGEMENT INTERFACE
You cannot configure this option using the Web management interface.
Setting Passwords for Management Privilege LevelsYou can set one password for each of the following management privilege levels:
• Super User level – Allows complete read-and-write access to the system. This is generally for system administrators and is the only management privilege level that allows you to configure passwords.
• Port Configuration level – Allows read-and-write access for specific ports but not for global (system-wide)
2 - 10

Securing Access to Management Functions
parameters.
• Read Only level – Allows access to the Privileged EXEC mode and CONFIG mode of the CLI but only with read access.
You can assign a password to each management privilege level. You also can configure up to 16 user accounts consisting of a user name and password, and assign each user account to one of the three privilege levels. See “Setting Up Local User Accounts” on page 2-13.
NOTE: You must use the CLI to assign a password for management privilege levels. You cannot assign a password using the Web management interface.
If you configure user accounts in addition to privilege level passwords, the device will validate a user’s access attempt using one or both methods (local user account or privilege level password), depending on the order you specify in the authentication-method lists. See “Configuring Authentication-Method Lists” on page 2-48.
USING THE CLI
To set passwords for management privilege levels:
1. At the opening CLI prompt, enter the following command to change to the Privileged level of the EXEC mode:
HP9300> enableHP9300#
2. Access the CONFIG level of the CLI by entering the following command:
HP9300# configure terminalHP9300(config)#
3. Enter the following command to set the Super User level password:
HP9300(config)# enable super-user-password <text>
NOTE: You must set the Super User level password before you can set other types of passwords.
4. Enter the following commands to set the Port Configuration level and Read Only level passwords:
HP9300(config)# enable port-config-password <text>HP9300(config)# enable read-only-password <text>
NOTE: If you forget your Super User level password, see “Recovering from a Lost Password” on page 2-12.
Augmenting Management Privilege Levels
Each management privilege level provides access to specific areas of the CLI by default:
• Super User level provides access to all commands and displays.
• Port Configuration level gives access to:
• The User EXEC and Privileged EXEC levels
• The port-specific parts of the CONFIG level
• All interface configuration levels
• Read Only level gives access to:
• The User EXEC and Privileged EXEC levels
You can grant additional access to a privilege level on an individual command basis. To grant the additional access, you specify the privilege level you are enhancing, the CLI level that contains the command, and the individual command.
2 - 11

Security Guide
NOTE: This feature applies only to management privilege levels on the CLI. You cannot augment management access levels for the Web management interface.
To enhance the Port Configuration privilege level so users also can enter IP commands at the global CONFIG level:
HP9300(config)# privilege configure level 4 ip
In this command, configure specifies that the enhanced access is for a command at the global CONFIG level of the CLI. The level 4 parameter indicates that the enhanced access is for management privilege level 4 (Port Configuration). All users with Port Configuration privileges will have the enhanced access. The ip parameter indicates that the enhanced access is for the IP commands. Users who log in with valid Port Configuration level user names and passwords can enter commands that begin with “ip” at the global CONFIG level.
Syntax: [no] privilege <cli-level> level <privilege-level> <command-string>
The <cli-level> parameter specifies the CLI level and can be one of the following values:
• exec – EXEC level; for example, HP9300> or HP9300#
• configure – CONFIG level; for example, HP9300(config)#
• interface – Interface level; for example, HP9300(config-if-6)#
• virtual-interface – Virtual-interface level; for example, HP9300(config-vif-6)#
• rip-router – RIP router level; for example, HP9300(config-rip-router)#
• ospf-router – OSPF router level; for example, HP9300(config-ospf-router)#
• dvmrp-router – DVMRP router level; for example, HP9300(config-dvmrp-router)#
• pim-router – PIM router level; for example, HP9300(config-pim-router)#
• bgp-router – BGP4 router level; for example, HP9300(config-bgp-router)#
• port-vlan – Port-based VLAN level; for example, HP9300(config-vlan)#
• protocol-vlan – Protocol-based VLAN level
The <privilege-level> indicates the number of the management privilege level you are augmenting. You can specify one of the following:
• 0 – Super User level (full read-write access)
• 4 – Port Configuration level
• 5 – Read Only level
The <command-string> parameter specifies the command you are allowing users with the specified privilege level to enter. To display a list of the commands at a CLI level, enter “?” at that level's command prompt.
Recovering from a Lost PasswordRecovery from a lost password requires direct access to the serial port and a system reset.
NOTE: You can perform this procedure only from the CLI.
To recover from a lost password:
1. Start a CLI session over the serial interface to the device.
2. Reboot the device.
3. At the initial boot prompt at system startup, enter b to enter the boot monitor mode.
4. Enter no password at the prompt. (You cannot abbreviate this command.) This command will cause the device to bypass the system password check.
2 - 12

Securing Access to Management Functions
5. Enter boot system flash primary at the prompt.
6. After the console prompt reappears, assign a new password.
Displaying the SNMP Community StringIf you want to display the SNMP community string, enter the following commands:
HP9300(config)# enable password-displayHP9300(config)# show snmp server
The enable password-display command enables display of the community string, but only in the output of the show snmp server command. Display of the string is still encrypted in the startup-config file and running-config. Enter the command at the global CONFIG level of the CLI.
Disabling Password EncryptionWhen you configure a password, then save the configuration to the HP device’s flash memory, the password is also saved to flash as part of the configuration file. By default, the passwords are encrypted so that the passwords cannot be observed by another user who displays the configuration file. Even if someone observes the file while it is being transmitted over TFTP, the password is encrypted.
NOTE: You cannot disable password encryption using the Web management interface.
If you want to remove the password encryption, you can disable encryption by entering the following command:
HP9300(config)# no service password-encryption
Syntax: [no] service password-encryption
Setting Up Local User AccountsYou can define up to 16 local user accounts on an HP device. User accounts regulate who can access the management functions in the CLI using the following methods:
• Telnet access
• Web management access
• SNMP access
Local user accounts provide greater flexibility for controlling management access to HP devices than do management privilege level passwords and SNMP community strings of SNMP versions 1 and 2. You can continue to use the privilege level passwords and the SNMP community strings as additional means of access authentication. Alternatively, you can choose not to use local user accounts and instead continue to use only the privilege level passwords and SNMP community strings. Local user accounts are backward-compatible with configuration files that contain privilege level passwords. See “Setting Passwords for Management Privilege Levels” on page 2-10.
If you configure local user accounts, you also need to configure an authentication-method list for Telnet access, Web management access, and SNMP access. See “Configuring Authentication-Method Lists” on page 2-48.
For each local user account, you specify a user name. You also can specify the following parameters:
• A password
• A management privilege level, which can be one of the following:
• Super User level – Allows complete read-and-write access to the system. This is generally for system administrators and is the only privilege level that allows you to configure passwords. This is the default.
• Port Configuration level – Allows read-and-write access for specific ports but not for global (system-wide) parameters.
• Read Only level – Allows access to the Privileged EXEC mode and CONFIG mode but only with read access.
2 - 13

Security Guide
Configuring a Local User AccountTo configure a local user account, use one of the following methods.
USING THE CLI
To configure a local user account, enter a command such as the following at the global CONFIG level of the CLI.
HP9300(config)# username wonka password willy
This command adds a local user account with the user name “wonka” and the password “willy”. This account has the Super User privilege level; this user has full access to all configuration and display features.
NOTE: If you configure local user accounts, you must grant Super User level access to at least one account before you add accounts with other privilege levels. You need the Super User account to make further administrative changes.
HP9300(config)# username waldo privilege 5 password whereis
This command adds a user account for user name “waldo”, password “whereis”, with the Read Only privilege level. Waldo can look for information but cannot make configuration changes.
Syntax: [no] username <user-string> privilege <privilege-level> password | nopassword <password-string>
The privilege parameter specifies the privilege level for the account. You can specify one of the following:
• 0 – Super User level (full read-write access)
• 4 – Port Configuration level
• 5 – Read Only level
The default privilege level is 0. If you want to assign Super User level access to the account, you can enter the command without privilege 0, as shown in the command example above.
The password | nopassword parameter indicates whether the user must enter a password. If you specify password, enter the string for the user's password.
NOTE: You must be logged on with Super User access (privilege level 0) to add user accounts or configure other access parameters.
To display user account information, enter the following command:
HP9300(config)# show users
Syntax: show users
USING THE WEB MANAGEMENT INTERFACE
To configure a local user account using the Web management interface, use the following procedure.
NOTE: Before you can add a local user account using the Web management interface, you must enable this capability by entering the password any command at the global CONFIG level of the CLI.
1. Log on to the device using a valid user name and password for read-write access.
2. Select the Management link from the System configuration panel to display the Management configuration panel.
3. Select the User Account link.
• If any user accounts are already configured on the device, the account information is listed in a table. Select the Add User Account link to display the following panel. Notice that the password display is encrypted. If you want the passwords to be displayed in clear text, you can use the CLI to disable encryption of password displays. See “Disabling Password Encryption” on page 2-13.
2 - 14

Securing Access to Management Functions
• If the device does not have any user accounts configured, the following panel is displayed.
4. Enter the user name in the User Name field. The name cannot contain blanks.
5. Enter the password in the Password field. The password cannot contain blanks.
6. Select the management privilege level from the Privilege pulldown menu. You can select one of the following:
• 0 (Read-Write) – equivalent to Super User level access. The user can display and configure everything.
• 4 (Port-Config) – allows the user to configure port parameters but not global parameters.
• 5 (Read-Only) – allows the user to display information but not to make configuration changes.
7. Click the Add button to save the change to the device’s running-config file.
8. Repeat steps 4 – 7 for each user account. You can add up to 16 accounts.
9. Select the Save link at the bottom of the dialog. Select Yes when prompted to save the configuration change to the startup-config file on the device’s flash memory.
Configuring TACACS/TACACS+ SecurityYou can use the security protocol Terminal Access Controller Access Control System (TACACS) or TACACS+ to authenticate the following kinds of access to the HP device
• Telnet access
• SSH access
• Web management access
• Access to the Privileged EXEC level and CONFIG levels of the CLI
The TACACS and TACACS+ protocols define how authentication, authorization, and accounting information is sent between an HP device and an authentication database on a TACACS/TACACS+ server. TACACS/TACACS+ services are maintained in a database, typically on a UNIX workstation or PC with a TACACS/TACACS+ server running.
How TACACS+ Differs from TACACSTACACS is a simple UDP-based access control protocol originally developed by BBN for MILNET. TACACS+ is an enhancement to TACACS and uses TCP to ensure reliable delivery.
TACACS+ is an enhancement to the TACACS security protocol. TACACS+ improves on TACACS by separating the functions of authentication, authorization, and accounting (AAA) and by encrypting all traffic between the HP device and the TACACS+ server. TACACS+ allows for arbitrary length and content authentication exchanges, which allow any authentication mechanism to be utilized with the HP device. TACACS+ is extensible to provide for site customization and future development features. The protocol allows the HP device to request very precise access control and allows the TACACS+ server to respond to each component of that request.
2 - 15

Security Guide
NOTE: TACACS+ provides for authentication, authorization, and accounting, but an implementation or configuration is not required to employ all three.
TACACS/TACACS+ Authentication, Authorization, and AccountingWhen you configure an HP device to use a TACACS/TACACS+ server for authentication, the device prompts users who are trying to access the CLI for a user name and password, then verifies the password with the TACACS/TACACS+ server.
If you are using TACACS+, HP recommends that you also configure authorization, in which the HP device consults a TACACS+ server to determine which management privilege level (and which associated set of commands) an authenticated user is allowed to use. You can also optionally configure accounting, which causes the HP device to log information on the TACACS+ server when specified events occur on the device.
NOTE: In releases prior to 07.1.00, a user logging into the device via Telnet or SSH would first enter the User EXEC level. The user could then enter the enable command to get to the Privileged EXEC level.
Starting with release 07.1.00, a user that is successfully authenticated by a RADIUS or TACACS+ server is automatically placed at the Privileged EXEC level after login.
TACACS Authentication
When TACACS authentication takes place, the following events occur:
1. A user attempts to gain access to the HP device by doing one of the following:
• Logging into the device using Telnet, SSH, or the Web management interface
• Entering the Privileged EXEC level or CONFIG level of the CLI
2. The user is prompted for a username and password.
3. The user enters a username and password.
4. The HP device sends a request containing the username and password to the TACACS server.
5. The username and password are validated in the TACACS server’s database.
6. If the password is valid, the user is authenticated.
TACACS+ Authentication
When TACACS+ authentication takes place, the following events occur:
1. A user attempts to gain access to the HP device by doing one of the following:
• Logging into the device using Telnet, SSH, or the Web management interface
• Entering the Privileged EXEC level or CONFIG level of the CLI
2. The user is prompted for a username.
3. The user enters a username.
4. The HP device obtains a password prompt from a TACACS+ server.
5. The user is prompted for a password.
6. The user enters a password.
7. The HP device sends the password to the TACACS+ server.
8. The password is validated in the TACACS+ server’s database.
9. If the password is valid, the user is authenticated.
TACACS+ Authorization
HP devices support two kinds of TACACS+ authorization:
2 - 16

Securing Access to Management Functions
• Exec authorization determines a user’s privilege level when they are authenticated
• Command authorization consults a TACACS+ server to get authorization for commands entered by the user
When TACACS+ exec authorization takes place, the following events occur:
1. A user logs into the HP device using Telnet, SSH, or the Web management interface
2. The user is authenticated.
3. The HP device consults the TACACS+ server to determine the privilege level of the user.
4. The TACACS+ server sends back a response containing an A-V (Attribute-Value) pair with the privilege level of the user.
5. The user is granted the specified privilege level.
When TACACS+ command authorization takes place, the following events occur:
1. A Telnet, SSH, or Web management interface user previously authenticated by a TACACS+ server enters a command on the HP device.
2. The HP device looks at its configuration to see if the command is at a privilege level that requires TACACS+ command authorization.
3. If the command belongs to a privilege level that requires authorization, the HP device consults the TACACS+ server to see if the user is authorized to use the command.
4. If the user is authorized to use the command, the command is executed.
TACACS+ Accounting
TACACS+ accounting works as follows:
1. One of the following events occur on the HP device:
• A user logs into the management interface using Telnet or SSH
• A user enters a command for which accounting has been configured
• A system event occurs, such as a reboot or reloading of the configuration file
2. The HP device checks its configuration to see if the event is one for which TACACS+ accounting is required.
3. If the event requires TACACS+ accounting, the HP device sends a TACACS+ Accounting Start packet to the TACACS+ accounting server, containing information about the event.
4. The TACACS+ accounting server acknowledges the Accounting Start packet.
5. The TACACS+ accounting server records information about the event.
6. When the event is concluded, the HP device sends an Accounting Stop packet to the TACACS+ accounting server.
7. The TACACS+ accounting server acknowledges the Accounting Stop packet.
2 - 17

Security Guide
AAA Operations for TACACS/TACACS+
The following table lists the sequence of authentication, authorization, and accounting operations that take place when a user gains access to an HP device that has TACACS/TACACS+ security configured.
User Action Applicable AAA Operations
User attempts to gain access to the Privileged EXEC and CONFIG levels of the CLI
Enable authentication:
aaa authentication enable default <method-list>
Exec authorization (TACACS+):
aaa authorization exec default tacacs+
System accounting start (TACACS+):
aaa accounting system default start-stop <method-list>
User logs in using Telnet/SSH Login authentication:
aaa authentication login default <method-list>
Exec authorization (TACACS+):
aaa authorization exec default tacacs+
Exec accounting start (TACACS+):
aaa accounting exec default <method-list>
System accounting start (TACACS+):
aaa accounting system default start-stop <method-list>
User logs into the Web management interface
Web authentication:
aaa authentication web-server default <method-list>
Exec authorization (TACACS+):
aaa authorization exec default tacacs+
User logs out of Telnet/SSH session Command authorization for logout command (TACACS+):
aaa authorization commands <privilege-level> default <method-list>
Command accounting (TACACS+):
aaa accounting commands <privilege-level> default start-stop <method-list>
EXEC accounting stop (TACACS+):
aaa accounting exec default start-stop <method-list>
User enters system commands
(for example, reload, boot system)
Command authorization (TACACS+):
aaa authorization commands <privilege-level> default <method-list>
Command accounting (TACACS+):
aaa accounting commands <privilege-level> default start-stop <method-list>
System accounting stop (TACACS+):
aaa accounting system default start-stop <method-list>
2 - 18

Securing Access to Management Functions
AAA Security for Commands Pasted Into the Running-Config
If AAA security is enabled on the device, commands pasted into the running-config are subject to the same AAA operations as if they were entered manually.
When you paste commands into the running-config, and AAA command authorization and/or accounting is configured on the device, AAA operations are performed on the pasted commands. The AAA operations are performed before the commands are actually added to the running-config. The server performing the AAA operations should be reachable when you paste the commands into the running-config file. If the device determines that a pasted command is invalid, AAA operations are halted on the remaining commands. The remaining commands may not be executed if command authorization is configured.
TACACS/TACACS+ Configuration Considerations• You must deploy at least one TACACS/TACACS+ server in your network.
• HP devices support authentication using up to eight TACACS/TACACS+ servers. The device tries to use the servers in the order you add them to the device’s configuration.
• You can select only one primary authentication method for each type of access to a device (CLI through Telnet, CLI Privileged EXEC and CONFIG levels). For example, you can select TACACS+ as the primary authentication method for Telnet CLI access, but you cannot also select RADIUS authentication as a primary method for the same type of access. However, you can configure backup authentication methods for each access type.
• You can configure the HP device to authenticate using a TACACS or TACACS+ server, not both.
TACACS Configuration Procedure
For TACACS configurations, use the following procedure:
1. Identify TACACS servers. See “Identifying the TACACS/TACACS+ Servers” on page 2-20.
2. Set optional parameters. See “Setting Optional TACACS/TACACS+ Parameters” on page 2-21.
3. Configure authentication-method lists. See “Configuring Authentication-Method Lists for TACACS/TACACS+” on page 2-22.
TACACS+ Configuration Procedure
For TACACS+ configurations, use the following procedure:
1. Identify TACACS+ servers. See “Identifying the TACACS/TACACS+ Servers” on page 2-20.
User enters the command:
[no] aaa accounting system defaultstart-stop <method-list>
Command authorization (TACACS+):
aaa authorization commands <privilege-level> default <method-list>
Command accounting (TACACS+):
aaa accounting commands <privilege-level> default start-stop <method-list>
System accounting start (TACACS+):
aaa accounting system default start-stop <method-list>
User enters other commands Command authorization (TACACS+):
aaa authorization commands <privilege-level> default <method-list>
Command accounting (TACACS+):
aaa accounting commands <privilege-level> default start-stop <method-list>
User Action Applicable AAA Operations
2 - 19

Security Guide
2. Set optional parameters. See “Setting Optional TACACS/TACACS+ Parameters” on page 2-21.
3. Configure authentication-method lists. See “Configuring Authentication-Method Lists for TACACS/TACACS+” on page 2-22.
4. Optionally configure TACACS+ authorization. See “Configuring TACACS+ Authorization” on page 2-24.
5. Optionally configure TACACS+ accounting. See “Configuring TACACS+ Accounting” on page 2-26.
Identifying the TACACS/TACACS+ ServersTo use TACACS/TACACS+ servers to authenticate access to an HP device, you must identify the servers to the HP device.
For example, to identify three TACACS/TACACS+ servers, enter commands such as the following:
HP9300(config)# tacacs-server host 207.94.6.161HP9300(config)# tacacs-server host 207.94.6.191HP9300(config)# tacacs-server host 207.94.6.122
Syntax: tacacs-server <ip-addr>|<hostname> [auth-port <number>]
The <ip-addr>|<hostname> parameter specifies the IP address or host name of the server. You can enter up to eight tacacs-server host commands to specify up to eight different servers.
NOTE: To specify the server's host name instead of its IP address, you must first identify a DNS server using the ip dns server-address <ip-addr> command at the global CONFIG level.
If you add multiple TACACS/TACACS+ authentication servers to the HP device, the device tries to reach them in the order you add them. For example, if you add three servers in the following order, the software tries the servers in the same order:
1. 207.94.6.161
2. 207.94.6.191
3. 207.94.6.122
You can remove a TACACS/TACACS+ server by entering no followed by the tacacs-server command. For example, to remove 207.94.6.161, enter the following command:
HP9300(config)# no tacacs-server host 207.94.6.161
NOTE: If you erase a tacacs-server command (by entering “no” followed by the command), make sure you also erase the aaa commands that specify TACACS/TACACS+ as an authentication method. (See “Configuring Authentication-Method Lists for TACACS/TACACS+” on page 2-22.) Otherwise, when you exit from the CONFIG mode or from a Telnet session, the system continues to believe it is TACACS/TACACS+ enabled and you will not be able to access the system.
The auth-port parameter specifies the UDP (for TACACS) or TCP (for TACACS+) port number of the authentication port on the server. The default port number is 49.
Specifying Different Servers for Individual AAA FunctionsIn a TACACS+ configuration, you can designate a server to handle a specific AAA task. For example, you can designate one TACACS+ server to handle authorization and another TACACS+ server to handle accounting. You can set the TACACS+ key for each server.
To specify different TACACS+ servers for authentication, authorization, and accounting:
HP9300(config)# tacacs-server host 1.2.3.4 auth-port 49 authentication-only key abcHP9300(config)# tacacs-server host 1.2.3.5 auth-port 49 authorization-only key defHP9300(config)# tacacs-server host 1.2.3.6 auth-port 49 accounting-only key ghi
Syntax: tacacs-server host <ip-addr> | <server-name> [authentication-only | authorization-only | accounting-only | default] [key <string>]
2 - 20

Securing Access to Management Functions
The default parameter causes the server to be used for all AAA functions.
After authentication takes place, the server that performed the authentication is used for authorization and/or accounting. If the authenticating server cannot perform the requested function, then the next server in the configured list of servers is tried; this process repeats until a server that can perform the requested function is found, or every server in the configured list has been tried.
Setting Optional TACACS/TACACS+ ParametersYou can set the following optional parameters in a TACACS/TACACS+ configuration:
• TACACS+ key – This parameter specifies the value that the HP device sends to the TACACS+ server when trying to authenticate user access.
• Retransmit interval – This parameter specifies how many times the HP device will resend an authentication request when the TACACS/TACACS+ server does not respond. The retransmit value can be from 1 – 5 times. The default is 3 times.
• Dead time – This parameter specifies how long the HP device waits for the primary authentication server to reply before deciding the server is dead and trying to authenticate using the next server. The dead-time value can be from 1 – 5 seconds. The default is 3 seconds.
• Timeout – This parameter specifies how many seconds the HP device waits for a response from a TACACS/TACACS+ server before either retrying the authentication request, or determining that the TACACS/TACACS+ servers are unavailable and moving on to the next authentication method in the authentication-method list. The timeout can be from 1 – 15 seconds. The default is 3 seconds.
Setting the TACACS+ Key
The key parameter in the tacacs-server command is used to encrypt TACACS+ packets before they are sent over the network. The value for the key parameter on the HP device should match the one configured on the TACACS+ server. The key can be from 1 – 32 characters in length and cannot include any space characters.
NOTE: The tacacs-server key command applies only to TACACS+ servers, not to TACACS servers. If you are configuring TACACS, do not configure a key on the TACACS server and do not enter a key on the HP device.
To specify a TACACS+ server key:
HP9300(config)# tacacs-server key rkwong
Syntax: tacacs-server key [0 | 1] <string>
When you display the configuration of the HP device, the TACACS+ keys are encrypted. For example:
HP9300(config)# tacacs-server key 1 abcHP9300(config)# write terminal...tacacs-server host 1.2.3.5 auth-port 49 tacacs key 1 $!2d
NOTE: Encryption of the TACACS+ keys is done by default. The 0 parameter disables encryption. The 1 parameter is not required; it is provided for backwards compatibility.
Setting the Retransmission Limit
The retransmit parameter specifies how many times the HP device will resend an authentication request when the TACACS/TACACS+ server does not respond. The retransmit limit can be from 1 – 5 times. The default is 3 times.
To set the TACACS/TACACS+ retransmit limit:
HP9300(config)# tacacs-server retransmit 5
Syntax: tacacs-server retransmit <number>
2 - 21

Security Guide
Setting the Dead Time Parameter
The dead-time parameter specifies how long the HP device waits for the primary authentication server to reply before deciding the server is dead and trying to authenticate using the next server. The dead-time value can be from 1 – 5 seconds. The default is 3 seconds.
To set the TACACS/TACACS+ dead-time value:
HP9300(config)# tacacs-server dead-time 5
Syntax: tacacs-server dead-time <number>
Setting the Timeout Parameter
The timeout parameter specifies how many seconds the HP device waits for a response from the TACACS/TACACS+ server before either retrying the authentication request, or determining that the TACACS/TACACS+ server is unavailable and moving on to the next authentication method in the authentication-method list. The timeout can be from 1 – 15 seconds. The default is 3 seconds.
HP9300(config)# tacacs-server timeout 5
Syntax: tacacs-server timeout <number>
Configuring Authentication-Method Lists for TACACS/TACACS+You can use TACACS/TACACS+ to authenticate Telnet/SSH access and access to Privileged EXEC level and CONFIG levels of the CLI. When configuring TACACS/TACACS+ authentication, you create authentication-method lists specifically for these access methods, specifying TACACS/TACACS+ as the primary authentication method.
Within the authentication-method list, TACACS/TACACS+ is specified as the primary authentication method and up to six backup authentication methods are specified as alternates. If TACACS/TACACS+ authentication fails due to an error, the device tries the backup authentication methods in the order they appear in the list.
When you configure authentication-method lists for TACACS/TACACS+ authentication, you must create a separate authentication-method list for Telnet/SSH CLI access, and for access to the Privileged EXEC level and CONFIG levels of the CLI.
To create an authentication-method list that specifies TACACS/TACACS+ as the primary authentication method for securing Telnet/SSH access to the CLI:
HP9300(config)# enable telnet authenticationHP9300(config)# aaa authentication login default tacacs local
The commands above cause TACACS/TACACS+ to be the primary authentication method for securing Telnet/SSH access to the CLI. If TACACS/TACACS+ authentication fails due to an error with the server, authentication is performed using local user accounts instead.
To create an authentication-method list that specifies TACACS/TACACS+ as the primary authentication method for securing access to Privileged EXEC level and CONFIG levels of the CLI:
HP9300(config)# aaa authentication enable default tacacs local none
The command above causes TACACS/TACACS+ to be the primary authentication method for securing access to Privileged EXEC level and CONFIG levels of the CLI. If TACACS/TACACS+ authentication fails due to an error with the server, local authentication is used instead. If local authentication fails, no authentication is used; the device automatically permits access.
Syntax: [no] aaa authentication enable | login default <method1> [<method2>] [<method3>] [<method4>] [<method5>] [<method6>] [<method7>]
The web-server | enable | login parameter specifies the type of access this authentication-method list controls. You can configure one authentication-method list for each type of access.
2 - 22

Securing Access to Management Functions
NOTE: If you configure authentication for Web management access, authentication is performed each time a page is requested from the server. When frames are enabled on the Web management interface, the browser sends an HTTP request for each frame. The HP device authenticates each HTTP request from the browser. To limit authentications to one per page, disable frames on the Web management interface.
The <method1> parameter specifies the primary authentication method. The remaining optional <method> parameters specify additional methods to try if an error occurs with the primary method. A method can be one of the values listed in the Method Parameter column in the following table.
NOTE: For examples of how to define authentication-method lists for types of authentication other than TACACS/TACACS+, see “Configuring Authentication-Method Lists” on page 2-48.
Entering Privileged EXEC Mode After a Telnet or SSH Login
By default, a user enters User EXEC mode after a successful login through Telnet or SSH. Optionally, you can configure the device so that a user enters Privileged EXEC mode after a Telnet or SSH login. To do this, use the following command:
HP9300(config)# aaa authentication login privilege-mode
Syntax: aaa authentication login privilege-mode
The user’s privilege level is based on the privilege level granted during login.
Telnet/SSH Prompts When TACACS+ Server is Unavailable
When TACACS+ is the first method in the authentication method list, the device displays the login prompt received from the TACACS+ server. If a user attempts to login through Telnet or SSH, but none of the configured TACACS+ servers are available, the following takes place:
Table 2.2: Authentication Method Values
Method Parameter Description
line Authenticate using the password you configured for Telnet access. The Telnet password is configured using the enable telnet password… command. See “Setting a Telnet Password” on page 2-10.
enable Authenticate using the password you configured for the Super User privilege level. This password is configured using the enable super-user-password… command. See “Setting Passwords for Management Privilege Levels” on page 2-10.
local Authenticate using a local user name and password you configured on the device. Local user names and passwords are configured using the username… command. See “Configuring a Local User Account” on page 2-14.
tacacs Authenticate using the database on a TACACS server. You also must identify the server to the device using the tacacs-server command.
tacacs+ Authenticate using the database on a TACACS+ server. You also must identify the server to the device using the tacacs-server command.
radius Authenticate using the database on a RADIUS server. You also must identify the server to the device using the radius-server command.
none Do not use any authentication method. The device automatically permits access.
2 - 23
Security Guide
• If the next method in the authentication method list is "enable", the login prompt is skipped, and the user is prompted for the Enable password (that is, the password configured with the enable super-user-password command).
• If the next method in the authentication method list is "line", the login prompt is skipped, and the user is prompted for the Line password (that is, the password configured with the enable telnet password command).
Configuring TACACS+ AuthorizationHP devices support TACACS+ authorization for controlling access to management functions in the CLI. Two kinds of TACACS+ authorization are supported:
• Exec authorization determines a user’s privilege level when they are authenticated
• Command authorization consults a TACACS+ server to get authorization for commands entered by the user
Configuring Exec Authorization
When TACACS+ exec authorization is performed, the HP device consults a TACACS+ server to determine the privilege level of the authenticated user. To configure TACACS+ exec authorization on the HP device, enter the following command:
HP9300(config)# aaa authorization exec default tacacs+
Syntax: aaa authorization exec default tacacs+ | none
If you specify none, or omit the aaa authorization exec command from the device’s configuration, no exec authorization is performed.
Configuring an Attribute-Value Pair on the TACACS+ ServerDuring TACACS+ exec authorization, the HP device expects the TACACS+ server to send a response containing an A-V (Attribute-Value) pair that specifies the privilege level of the user. When the HP device receives the response, it extracts an A-V pair configured for the Exec service and uses it to determine the user’s privilege level.
To set a user’s privilege level, you can configure the “hp-privlvl” A-V pair for the Exec service on the TACACS+ server. For example:
user=bob { default service = permit member admin # Global password global = cleartext "cat" service = exec { hp-privlvl = 0 }}
In this example, the A-V pair hp-privlvl = 0 grants the user full read-write access. The value in the hp-privlvl A-V pair is an integer that indicates the privilege level of the user. Possible values are 0 for super-user level, 4 for port-config level, or 5 for read-only level. If a value other than 0, 4, or 5 is specified in the hp-privlvl A-V pair, the default privilege level of 5 (read-only) is used. The hp-privlvl A-V pair can also be embedded in the group configuration for the user. See your TACACS+ documentation for the configuration syntax relevant to your server.
If the hp-privlvl A-V pair is not present, the HP device extracts the last A-V pair configured for the Exec service that has a numeric value. The HP device uses this A-V pair to determine the user’s privilege level. For example:
user=bob { default service = permit member admin # Global password global = cleartext "cat" service = exec { privlvl = 15 }
2 - 24

Securing Access to Management Functions
}
The attribute name in the A-V pair is not significant; the HP device uses the last one that has a numeric value. However, the HP device interprets the value for a non-”hp-privlvl” A-V pair differently than it does for a “hp-privlvl” A-V pair. The following table lists how the HP device associates a value from a non-”hp-privlvl” A-V pair with an HP privilege level.
In the example above, the A-V pair configured for the Exec service is privlvl = 15. The HP device uses the value in this A-V pair to set the user’s privilege level to 0 (super-user), granting the user full read-write access.
In a configuration that has both a “hp-privlvl” A-V pair and a non-”hp-privlvl” A-V pair for the Exec service, the non-”hp-privlvl” A-V pair is ignored. For example:
user=bob { default service = permit member admin # Global password global = cleartext "cat" service = exec { hp-privlvl = 4 privlvl = 15 }}
In this example, the user would be granted a privilege level of 4 (port-config level). The privlvl = 15 A-V pair is ignored by the HP device.
If the TACACS+ server has no A-V pair configured for the Exec service, the default privilege level of 5 (read-only) is used.
Configuring Command Authorization
When TACACS+ command authorization is enabled, the HP device consults a TACACS+ server to get authorization for commands entered by the user.
You enable TACACS+ command authorization by specifying a privilege level whose commands require authorization. For example, to configure the HP device to perform authorization for the commands available at the Super User privilege level (that is, all commands on the device), enter the following command:
HP9300(config)# aaa authorization commands 0 default tacacs+
Syntax: aaa authorization commands <privilege-level> default tacacs+ | radius | none
The <privilege-level> parameter can be one of the following:
• 0 – Authorization is performed for commands available at the Super User level (all commands)
• 4 – Authorization is performed for commands available at the Port Configuration level (port-config and read-only commands)
• 5 – Authorization is performed for commands available at the Read Only level (read-only commands)
Table 2.3: HP Equivalents for non-“hp-privlvl” A-V Pair Values
Value for non-“hp-privlvl” A-V Pair HP Privilege Level
15 0 (super-user)
From 14 – 1 4 (port-config)
Any other number or 0 5 (read-only)
2 - 25

Security Guide
NOTE: TACACS+ command authorization is performed only for commands entered from Telnet or SSH sessions. No authorization is performed for commands entered at the console, the Web management interface, or SNMP management applications.
Command Authorization and Accounting for Console CommandsThe HP device supports command authorization and command accounting for CLI commands entered at the console. To configure the device to perform command authorization and command accounting for console commands, enter the following:
HP9300(config)# enable aaa console
Syntax: enable aaa console
Configuring TACACS+ AccountingHP devices support TACACS+ accounting for recording information about user activity and system events. When you configure TACACS+ accounting on an HP device, information is sent to a TACACS+ accounting server when specified events occur, such as when a user logs into the device or the system is rebooted.
Configuring TACACS+ Accounting for Telnet/SSH (Shell) Access
To send an Accounting Start packet to the TACACS+ accounting server when an authenticated user establishes a Telnet or SSH session on the HP device, and an Accounting Stop packet when the user logs out:
HP9300(config)# aaa accounting exec default start-stop tacacs+
Syntax: aaa accounting exec default start-stop radius | tacacs+ | none
Configuring TACACS+ Accounting for CLI Commands
You can configure TACACS+ accounting for CLI commands by specifying a privilege level whose commands require accounting. For example, to configure the HP device to perform TACACS+ accounting for the commands available at the Super User privilege level (that is; all commands on the device), enter the following command:
HP9300(config)# aaa accounting commands 0 default start-stop tacacs+
An Accounting Start packet is sent to the TACACS+ accounting server when a user enters a command, and an Accounting Stop packet is sent when the service provided by the command is completed.
NOTE: If authorization is enabled, and the command requires authorization, then authorization is performed before accounting takes place. If authorization fails for the command, no accounting takes place.
Syntax: aaa accounting commands <privilege-level> default start-stop radius | tacacs+ | none
The <privilege-level> parameter can be one of the following:
• 0 – Records commands available at the Super User level (all commands)
• 4 – Records commands available at the Port Configuration level (port-config and read-only commands)
• 5 – Records commands available at the Read Only level (read-only commands)
Configuring TACACS+ Accounting for System Events
You can configure TACACS+ accounting to record when system events occur on the HP device. System events include rebooting and when changes to the active configuration are made.
The following command causes an Accounting Start packet to be sent to the TACACS+ accounting server when a system event occurs, and a Accounting Stop packet to be sent when the system event is completed:
HP9300(config)# aaa accounting system default start-stop tacacs+
Syntax: aaa accounting system default start-stop radius | tacacs+ | none
2 - 26

Securing Access to Management Functions
Configuring an Interface as the Source for All TACACS/TACACS+ PacketsYou can designate the lowest-numbered IP address configured an Ethernet port, loopback interface, or virtual interface as the source IP address for all TACACS/TACACS+ packets from the Routing Switch. Identifying a single source IP address for TACACS/TACACS+ packets provides the following benefits:
• If your TACACS/TACACS+ server is configured to accept packets only from specific links or IP addresses, you can use this feature to simplify configuration of the TACACS/TACACS+ server by configuring the HP device to always send the TACACS/TACACS+ packets from the same link or source address.
• If you specify a loopback interface as the single source for TACACS/TACACS+ packets, TACACS/TACACS+ servers can receive the packets regardless of the states of individual links. Thus, if a link to the TACACS/TACACS+ server becomes unavailable but the client or server can be reached through another link, the client or server still receives the packets, and the packets still have the source IP address of the loopback interface.
The software contains separate CLI commands for specifying the source interface for Telnet, TACACS/TACACS+, and RADIUS packets. You can configure a source interface for one or more of these types of packets.
To specify an Ethernet port or a loopback or virtual interface as the source for all TACACS/TACACS+ packets from the device, use the following CLI method. The software uses the lowest-numbered IP address configured on the port or interface as the source IP address for TACACS/TACACS+ packets originated by the device.
To specify the lowest-numbered IP address configured on a virtual interface as the device’s source for all TACACS/TACACS+ packets, enter commands such as the following:
HP9300(config)# int ve 1HP9300(config-vif-1)# ip address 10.0.0.3/24HP9300(config-vif-1)# exitHP9300(config)# ip tacacs source-interface ve 1
The commands in this example configure virtual interface 1, assign IP address 10.0.0.3/24 to the interface, then designate the interface as the source for all TACACS/TACACS+ packets from the Routing Switch.
Syntax: ip tacacs source-interface ethernet <portnum> | loopback <num> | ve <num>
The <num> parameter is a loopback interface or virtual interface number. If you specify an Ethernet port, the <portnum> is the port’s number (including the slot number, if you are configuring a chassis device).
Displaying TACACS/TACACS+ Statistics and Configuration InformationThe show aaa command displays information about all TACACS+ and RADIUS servers identified on the device. For example:
HP9300# show aaaTacacs+ key: hpTacacs+ retries: 1Tacacs+ timeout: 15 secondsTacacs+ dead-time: 3 minutesTacacs+ Server: 207.95.6.90 Port:49: opens=6 closes=3 timeouts=3 errors=0 packets in=4 packets out=4no connection
Radius key: networksRadius retries: 3Radius timeout: 3 secondsRadius dead-time: 3 minutesRadius Server: 207.95.6.90 Auth Port=1645 Acct Port=1646: opens=2 closes=1 timeouts=1 errors=0 packets in=1 packets out=4no connection
2 - 27

Security Guide
The following table describes the TACACS/TACACS+ information displayed by the show aaa command.
The show web command displays the privilege level of Web management interface users. For example:
Syntax: show web
USING THE WEB MANAGEMENT INTERFACE
To configure TACACS/TACACS+ using the Web management interface:
1. Log on to the device using a valid user name and password for read-write access. The System configuration panel is displayed.
2. If you configuring TACACS/TACACS+ authentication for Telnet access to the CLI, go to step 3. Otherwise, go to step 7.
3. Select the Management link to display the Management configuration panel.
4. Select Enable next to Telnet Authentication. You must enable Telnet authentication if you want to use TACACS/TACACS+ or RADIUS to authenticate Telnet access to the device.
5. Click Apply to apply the change.
6. Select the Home link to return to the System configuration panel.
7. Select the TACACS link from the System configuration panel to display the TACACS panel.
8. If needed, change the Authentication port and Accounting port. (The default values work in most networks.)
Table 2.4: Output of the show aaa command for TACACS/TACACS+
Field Description
Tacacs+ key The setting configured with the tacacs-server key command. At the Super User privilege level, the actual text of the key is displayed. At the other privilege levels, a string of periods (....) is displayed instead of the text.
Tacacs+ retries The setting configured with the tacacs-server retransmit command.
Tacacs+ timeout The setting configured with the tacacs-server timeout command.
Tacacs+ dead-time The setting configured with the tacacs-server dead-time command.
Tacacs+ Server For each TACACS/TACACS+ server, the IP address, port, and the following statistics are displayed:
opens Number of times the port was opened for communication with the server
closes Number of times the port was closed normally
timeouts Number of times port was closed due to a timeout
errors Number of times an error occurred while opening the port
packets in Number of packets received from the server
packets out Number of packets sent to the server
connection The current connection status. This can be “no connection” or “connection active”.
HP9300(config)#show webUser Privilege IP addressset 0 192.168.1.234
2 - 28

Securing Access to Management Functions
9. Enter the key if applicable.
NOTE: The key parameter applies only to TACACS+ servers, not to TACACS servers. If you are configuring for TACACS authentication, do not configure a key on the TACACS server and do not enter a key on the HP device.
10. Click Apply if you changed any TACACS/TACACS+ parameters.
11. Select the TACACS Server link.
• If any TACACS/TACACS+ servers are already configured on the device, the servers are listed in a table. Select the Add TACACS Server link to display the TACACS configuration panel.
• If the device does not have any TACACS servers configured, the following panel is displayed.
12. Enter the server’s IP address in the IP Address field.
13. If needed, change the Authentication port and Accounting port. (The default values work in most networks.)
14. Click Home to return to the System configuration panel, then select the Save link at the bottom of the dialog. Select Yes when prompted to save the configuration change to the startup-config file on the device’s flash memory.
15. Select the Management link to display the Management configuration panel.
2 - 29
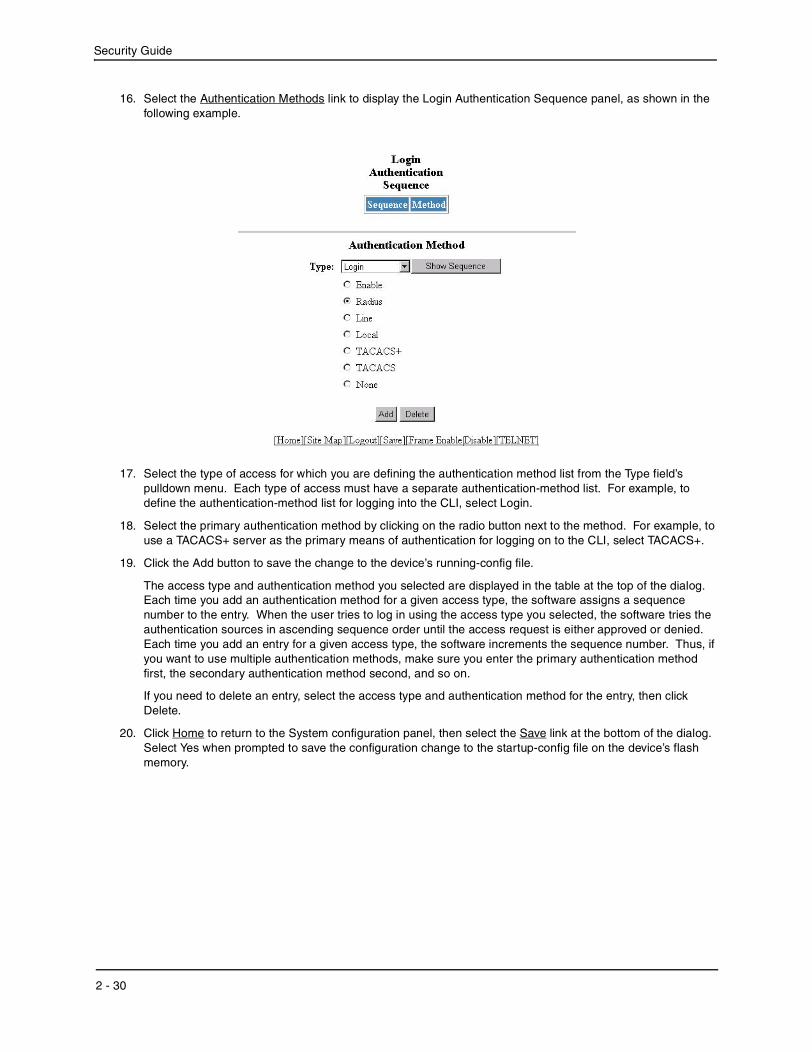
Security Guide
16. Select the Authentication Methods link to display the Login Authentication Sequence panel, as shown in the following example.
17. Select the type of access for which you are defining the authentication method list from the Type field’s pulldown menu. Each type of access must have a separate authentication-method list. For example, to define the authentication-method list for logging into the CLI, select Login.
18. Select the primary authentication method by clicking on the radio button next to the method. For example, to use a TACACS+ server as the primary means of authentication for logging on to the CLI, select TACACS+.
19. Click the Add button to save the change to the device’s running-config file.
The access type and authentication method you selected are displayed in the table at the top of the dialog. Each time you add an authentication method for a given access type, the software assigns a sequence number to the entry. When the user tries to log in using the access type you selected, the software tries the authentication sources in ascending sequence order until the access request is either approved or denied. Each time you add an entry for a given access type, the software increments the sequence number. Thus, if you want to use multiple authentication methods, make sure you enter the primary authentication method first, the secondary authentication method second, and so on.
If you need to delete an entry, select the access type and authentication method for the entry, then click Delete.
20. Click Home to return to the System configuration panel, then select the Save link at the bottom of the dialog. Select Yes when prompted to save the configuration change to the startup-config file on the device’s flash memory.
2 - 30

Securing Access to Management Functions
21. To configure TACACS+ authorization, select the Management link to display the Management configuration panel and select the Authorization Methods link to display the Authorization Method panel, as shown in the following example.
22. To configure TACACS+ exec authorization, select Exec from the Type field’s pulldown menu.
23. To configure TACACS+ command authorization, select Commands from the Type field’s pulldown menu and select a privilege level by clicking on one of the following radio buttons:
• 0 – Authorization is performed for commands available at the Super User level (all commands)
• 4 – Authorization is performed for commands available at the Port Configuration level (port-config and read-only commands)
• 5 – Authorization is performed for commands available at the Read Only level (read-only commands)
NOTE: TACACS+ command authorization is performed only for commands entered from Telnet or SSH sessions. No authorization is performed for commands entered at the console, the Web management interface, or SNMP management applications.
24. Click on the radio button next to TACACS+.
25. Click the Add button to save the change to the device’s running-config file.
The authorization method you selected are displayed in the table at the top of the dialog. Each time you add an authorization method for a given access type, the software assigns a sequence number to the entry. When authorization is performed, the software tries the authorization sources in ascending sequence order until the request is either approved or denied. Each time you add an entry for a given access type, the software increments the sequence number. Thus, if you want to use multiple authentication methods, make sure you enter the primary authentication method first, the secondary authentication method second, and so on.
If you need to delete an entry, select the access type and authorization method for the entry, then click Delete.
2 - 31

Security Guide
26. To configure TACACS+ accounting, select the Management link to display the Management configuration panel and select the Accounting Methods link to display the Accounting Method panel, as shown in the following example.
27. To send an Accounting Start packet to the TACACS+ accounting server when an authenticated user establishes a Telnet or SSH session on the HP device, and an Accounting Stop packet when the user logs out, select Exec from the Type field’s pulldown menu.
28. To configure TACACS+ accounting for CLI commands, select Commands from the Type field’s pulldown menu and select a privilege level by clicking on one of the following radio buttons:
• 0 – Records commands available at the Super User level (all commands)
• 4 – Records commands available at the Port Configuration level (port-config and read-only commands)
• 5 – Records commands available at the Read Only level (read-only commands)
29. To configure TACACS+ accounting to record when system events occur on the HP device, select System from the Type field’s pulldown menu.
30. Click on the radio button next to TACACS+.
31. Click the Add button to save the change to the device’s running-config file.
The accounting method you selected are displayed in the table at the top of the dialog. Each time you add an accounting method for a given access type, the software assigns a sequence number to the entry. When accounting is performed, the software tries the accounting sources in ascending sequence order until the request is either approved or denied. Each time you add an entry for a given access type, the software increments the sequence number. Thus, if you want to use multiple accounting methods, make sure you enter the primary accounting method first, the secondary accounting method second, and so on.
If you need to delete an entry, select the access type and accounting method for the entry, then click Delete.
32. Select the Save link at the bottom of the dialog. Select Yes when prompted to save the configuration change to the startup-config file on the device’s flash memory.
Configuring RADIUS SecurityYou can use a Remote Authentication Dial In User Service (RADIUS) server to secure the following types of access to the HP Routing Switch:
• Telnet access
• SSH access
• Web management access
2 - 32

Securing Access to Management Functions
• Access to the Privileged EXEC level and CONFIG levels of the CLI
NOTE: HP devices do not support RADIUS security for SNMP access.
RADIUS Authentication, Authorization, and AccountingWhen RADIUS authentication is implemented, the HP device consults a RADIUS server to verify user names and passwords. You can optionally configure RADIUS authorization, in which the HP device consults a list of commands supplied by the RADIUS server to determine whether a user can execute a command he or she has entered, as well as accounting, which causes the HP device to log information on a RADIUS accounting server when specified events occur on the device.
NOTE: In releases prior to 07.1.00, a user logging into the device via Telnet or SSH would first enter the User EXEC level. The user could then enter the enable command to get to the Privileged EXEC level.
Starting with release 07.1.00, a user that is successfully authenticated by a RADIUS or TACACS+ server is automatically placed at the Privileged EXEC level after login.
RADIUS Authentication
When RADIUS authentication takes place, the following events occur:
1. A user attempts to gain access to the HP device by doing one of the following:
• Logging into the device using Telnet, SSH, or the Web management interface
• Entering the Privileged EXEC level or CONFIG level of the CLI
2. The user is prompted for a username and password.
3. The user enters a username and password.
4. The HP device sends a RADIUS Access-Request packet containing the username and password to the RADIUS server.
5. The RADIUS server validates the HP device using a shared secret (the RADIUS key).
6. The RADIUS server looks up the username in its database.
7. If the username is found in the database, the RADIUS server validates the password.
8. If the password is valid, the RADIUS server sends an Access-Accept packet to the HP device, authenticating the user. Within the Access-Accept packet are three HP vendor-specific attributes that indicate:
• The privilege level of the user
• A list of commands
• Whether the user is allowed or denied usage of the commands in the list
The last two attributes are used with RADIUS authorization, if configured.
9. The user is authenticated, and the information supplied in the Access-Accept packet for the user is stored on the HP device. The user is granted the specified privilege level. If you configure RADIUS authorization, the user is allowed or denied usage of the commands in the list.
RADIUS Authorization
When RADIUS authorization takes place, the following events occur:
1. A user previously authenticated by a RADIUS server enters a command on the HP device.
2. The HP device looks at its configuration to see if the command is at a privilege level that requires RADIUS command authorization.
3. If the command belongs to a privilege level that requires authorization, the HP device looks at the list of commands delivered to it in the RADIUS Access-Accept packet when the user was authenticated. (Along
2 - 33

Security Guide
with the command list, an attribute was sent that specifies whether the user is permitted or denied usage of the commands in the list.)
NOTE: After RADIUS authentication takes place, the command list resides on the HP device. The RADIUS server is not consulted again once the user has been authenticated. This means that any changes made to the user’s command list on the RADIUS server are not reflected until the next time the user is authenticated by the RADIUS server, and the new command list is sent to the HP device.
4. If the command list indicates that the user is authorized to use the command, the command is executed.
RADIUS Accounting
RADIUS accounting works as follows:
1. One of the following events occur on the HP device:
• A user logs into the management interface using Telnet or SSH
• A user enters a command for which accounting has been configured
• A system event occurs, such as a reboot or reloading of the configuration file
2. The HP device checks its configuration to see if the event is one for which RADIUS accounting is required.
3. If the event requires RADIUS accounting, the HP device sends a RADIUS Accounting Start packet to the RADIUS accounting server, containing information about the event.
4. The RADIUS accounting server acknowledges the Accounting Start packet.
5. The RADIUS accounting server records information about the event.
6. When the event is concluded, the HP device sends an Accounting Stop packet to the RADIUS accounting server.
7. The RADIUS accounting server acknowledges the Accounting Stop packet.
AAA Operations for RADIUS
The following table lists the sequence of authentication, authorization, and accounting operations that take place when a user gains access to an HP device that has RADIUS security configured.
User Action Applicable AAA Operations
User attempts to gain access to the Privileged EXEC and CONFIG levels of the CLI
Enable authentication:
aaa authentication enable default <method-list>
System accounting start:
aaa accounting system default start-stop <method-list>
User logs in using Telnet/SSH Login authentication:
aaa authentication login default <method-list>
EXEC accounting Start:
aaa accounting exec default start-stop <method-list>
System accounting Start:
aaa accounting system default start-stop <method-list>
User logs into the Web management interface
Web authentication:
aaa authentication web-server default <method-list>
2 - 34

Securing Access to Management Functions
AAA Security for Commands Pasted Into the Running-Config
If AAA security is enabled on the device, commands pasted into the running-config are subject to the same AAA operations as if they were entered manually.
When you paste commands into the running-config, and AAA command authorization and/or accounting is configured on the device, AAA operations are performed on the pasted commands. The AAA operations are performed before the commands are actually added to the running-config. The server performing the AAA operations should be reachable when you paste the commands into the running-config file. If the device determines that a pasted command is invalid, AAA operations are halted on the remaining commands. The remaining commands may not be executed if command authorization is configured.
NOTE: Since RADIUS command authorization relies on a list of commands received from the RADIUS server when authentication is performed, it is important that you use RADIUS authentication when you also use RADIUS command authorization.
User logs out of Telnet/SSH session Command authorization for logout command:
aaa authorization commands <privilege-level> default <method-list>
Command accounting:
aaa accounting commands <privilege-level> default start-stop <method-list>
EXEC accounting stop:
aaa accounting exec default start-stop <method-list>
User enters system commands
(for example, reload, boot system)
Command authorization:
aaa authorization commands <privilege-level> default <method-list>
Command accounting:
aaa accounting commands <privilege-level> default start-stop <method-list>
System accounting stop:
aaa accounting system default start-stop <method-list>
User enters the command:
[no] aaa accounting system defaultstart-stop <method-list>
Command authorization:
aaa authorization commands <privilege-level> default <method-list>
Command accounting:
aaa accounting commands <privilege-level> default start-stop <method-list>
System accounting start:
aaa accounting system default start-stop <method-list>
User enters other commands Command authorization:
aaa authorization commands <privilege-level> default <method-list>
Command accounting:
aaa accounting commands <privilege-level> default start-stop <method-list>
User Action Applicable AAA Operations
2 - 35

Security Guide
RADIUS Configuration Considerations• You must deploy at least one RADIUS server in your network.
• HP devices support authentication using up to eight RADIUS servers. The device tries to use the servers in the order you add them to the device’s configuration. If one RADIUS server is not responding, the HP device tries the next one in the list.
• You can select only one primary authentication method for each type of access to a device (CLI through Telnet, CLI Privileged EXEC and CONFIG levels). For example, you can select RADIUS as the primary authentication method for Telnet CLI access, but you cannot also select TACACS+ authentication as the primary method for the same type of access. However, you can configure backup authentication methods for each access type.
RADIUS Configuration ProcedureUse the following procedure to configure an HP device for RADIUS:
1. Configure HP vendor-specific attributes on the RADIUS server. See “Configuring HP-Specific Attributes on the RADIUS Server” on page 2-36.
2. Identify the RADIUS server to the HP device. See “Identifying the RADIUS Server to the HP Device” on page 2-37.
3. Set RADIUS parameters. See “Setting RADIUS Parameters” on page 2-38.
4. Configure authentication-method lists. See “Configuring Authentication-Method Lists for RADIUS” on page 2-39.
5. Optionally configure RADIUS authorization. See “Configuring RADIUS Authorization” on page 2-40.
6. Optionally configure RADIUS accounting. “Configuring RADIUS Accounting” on page 2-41.
Configuring HP-Specific Attributes on the RADIUS ServerDuring the RADIUS authentication process, if a user supplies a valid username and password, the RADIUS server sends an Access-Accept packet to the HP device, authenticating the user. Within the Access-Accept packet are three HP vendor-specific attributes that indicate:
• The privilege level of the user
• A list of commands
• Whether the user is allowed or denied usage of the commands in the list
You must add these three HP vendor-specific attributes to your RADIUS server’s configuration, and configure the attributes in the individual or group profiles of the users that will access the HP device.
2 - 36

Securing Access to Management Functions
HP’s Vendor-ID is 11, with Vendor-Type 1. The following table describes the HP vendor-specific attributes.
Identifying the RADIUS Server to the HP DeviceTo use a RADIUS server to authenticate access to an HP device, you must identify the server to the HP device. For example:
HP9300(config)# radius-server host 209.157.22.99
Table 2.5: HP vendor-specific attributes for RADIUS
Attribute Name Attribute ID Data Type Description
hp-privilege-level 1 integer Specifies the privilege level for the user. This attribute can be set to one of the following:
0 Super User level – Allows complete read-and-write access to the system. This is generally for system administrators and is the only management privilege level that allows you to configure passwords.
4 Port Configuration level – Allows read-and-write access for specific ports but not for global (system-wide) parameters.
5 Read Only level – Allows access to the Privileged EXEC mode and CONFIG mode of the CLI but only with read access.
hp-command-string 2 string Specifies a list of CLI commands that are permitted or denied to the user when RADIUS authorization is configured.
The commands are delimited by semi-colons (;). You can specify an asterisk (*) as a wildcard at the end of a command string.
For example, the following command list specifies all show and debug ip commands, as well as the write terminal command:
show *; debug ip *; write term*
hp-command-exception-flag 3 integer Specifies whether the commands indicated by the hp-command-string attribute are permitted or denied to the user. This attribute can be set to one of the following:
0 Permit execution of the commands indicated by hp-command-string, deny all other commands.
1 Deny execution of the commands indicated by hp-command-string, permit all other commands.
2 - 37

Security Guide
Syntax: radius-server host <ip-addr> | <server-name> [auth-port <number> acct-port <number>]
The host <ip-addr> | <server-name> parameter is either an IP address or an ASCII text string.
The <auth-port> parameter is the Authentication port number; it is an optional parameter. The default is 1645.
The <acct-port> parameter is the Accounting port number; it is an optional parameter. The default is 1646.
Specifying Different Servers for Individual AAA FunctionsIn a RADIUS configuration, you can designate a server to handle a specific AAA task. For example, you can designate one RADIUS server to handle authorization and another RADIUS server to handle accounting. You can specify individual servers for authentication and accounting, but not for authorization. You can set the RADIUS key for each server.
To specify different RADIUS servers for authentication, authorization, and accounting:
HP9300(config)# radius-server host 1.2.3.4 authentication-only key abcHP9300(config)# radius-server host 1.2.3.5 authorization-only key defHP9300(config)# radius-server host 1.2.3.6 accounting-only key ghi
Syntax: radius-server host <ip-addr> | <server-name> [authentication-only | accounting-only | default] [key 0 | 1 <string>]
The default parameter causes the server to be used for all AAA functions.
After authentication takes place, the server that performed the authentication is used for authorization and/or accounting. If the authenticating server cannot perform the requested function, then the next server in the configured list of servers is tried; this process repeats until a server that can perform the requested function is found, or every server in the configured list has been tried.
Setting RADIUS ParametersYou can set the following parameters in a RADIUS configuration:
• RADIUS key – This parameter specifies the value that the HP device sends to the RADIUS server when trying to authenticate user access.
• Retransmit interval – This parameter specifies how many times the HP device will resend an authentication request when the RADIUS server does not respond. The retransmit value can be from 1 – 5 times. The default is 3 times.
• Timeout – This parameter specifies how many seconds the HP device waits for a response from a RADIUS server before either retrying the authentication request, or determining that the RADIUS servers are unavailable and moving on to the next authentication method in the authentication-method list. The timeout can be from 1 – 15 seconds. The default is 3 seconds.
Setting the RADIUS Key
The key parameter in the radius-server command is used to encrypt RADIUS packets before they are sent over the network. The value for the key parameter on the HP device should match the one configured on the RADIUS server. The key can be from 1 – 32 characters in length and cannot include any space characters.
To specify a RADIUS server key:
HP9300(config)# radius-server key mirabeau
Syntax: radius-server key [0 | 1] <string>
When you display the configuration of the HP device, the RADIUS key is encrypted. For example:
HP9300(config)# radius-server key 1 abcHP9300(config)# write terminal...radius-server host 1.2.3.5 radius key 1 $!2d
2 - 38

Securing Access to Management Functions
NOTE: Encryption of the RADIUS keys is done by default. The 0 parameter disables encryption. The 1 parameter is not required; it is provided for backwards compatibility.
Setting the Retransmission Limit
The retransmit parameter specifies the maximum number of retransmission attempts. When an authentication request times out, the HP software will retransmit the request up to the maximum number of retransmissions configured. The default retransmit value is 3 retries. The range of retransmit values is from 1 – 5.
To set the RADIUS retransmit limit:
HP9300(config)# radius-server retransmit 5
Syntax: radius-server retransmit <number>
Setting the Timeout Parameter
The timeout parameter specifies how many seconds the HP device waits for a response from the RADIUS server before either retrying the authentication request, or determining that the RADIUS server is unavailable and moving on to the next authentication method in the authentication-method list. The timeout can be from 1 – 15 seconds. The default is 3 seconds.
HP9300(config)# radius-server timeout 5
Syntax: radius-server timeout <number>
Configuring Authentication-Method Lists for RADIUSYou can use RADIUS to authenticate Telnet/SSH access and access to Privileged EXEC level and CONFIG levels of the CLI. When configuring RADIUS authentication, you create authentication-method lists specifically for these access methods, specifying RADIUS as the primary authentication method.
Within the authentication-method list, RADIUS is specified as the primary authentication method and up to six backup authentication methods are specified as alternates. If RADIUS authentication fails due to an error, the device tries the backup authentication methods in the order they appear in the list.
When you configure authentication-method lists for RADIUS, you must create a separate authentication-method list for Telnet or SSH CLI access and for CLI access to the Privileged EXEC level and CONFIG levels of the CLI.
To create an authentication-method list that specifies RADIUS as the primary authentication method for securing Telnet access to the CLI:
HP9300(config)# enable telnet authenticationHP9300(config)# aaa authentication login default radius local
The commands above cause RADIUS to be the primary authentication method for securing Telnet access to the CLI. If RADIUS authentication fails due to an error with the server, local authentication is used instead.
To create an authentication-method list that specifies RADIUS as the primary authentication method for securing access to Privileged EXEC level and CONFIG levels of the CLI:
HP9300(config)# aaa authentication enable default radius local none
The command above causes RADIUS to be the primary authentication method for securing access to Privileged EXEC level and CONFIG levels of the CLI. If RADIUS authentication fails due to an error with the server, local authentication is used instead. If local authentication fails, no authentication is used; the device automatically permits access.
Syntax: [no] aaa authentication enable | login default <method1> [<method2>] [<method3>] [<method4>] [<method5>] [<method6>] [<method7>]
The web-server | enable | login parameter specifies the type of access this authentication-method list controls. You can configure one authentication-method list for each type of access.
2 - 39

Security Guide
NOTE: If you configure authentication for Web management access, authentication is performed each time a page is requested from the server. When frames are enabled on the Web management interface, the browser sends an HTTP request for each frame. The HP device authenticates each HTTP request from the browser. To limit authentications to one per page, disable frames on the Web management interface.
The <method1> parameter specifies the primary authentication method. The remaining optional <method> parameters specify additional methods to try if an error occurs with the primary method. A method can be one of the values listed in the Method Parameter column in the following table.
NOTE: For examples of how to define authentication-method lists for types of authentication other than RADIUS, see “Configuring Authentication-Method Lists” on page 2-48.
Entering Privileged EXEC Mode After a Telnet or SSH Login
By default, a user enters User EXEC mode after a successful login through Telnet or SSH. Optionally, you can configure the device so that a user enters Privileged EXEC mode after a Telnet or SSH login. To do this, use the following command:
HP9300(config)# aaa authentication login privilege-mode
Syntax: aaa authentication login privilege-mode
The user’s privilege level is based on the privilege level granted during login.
Configuring RADIUS AuthorizationHP devices support RADIUS authorization for controlling access to management functions in the CLI. When RADIUS authorization is enabled, the HP device consults the list of commands supplied by the RADIUS server during authentication to determine whether a user can execute a command he or she has entered.
Table 2.6: Authentication Method Values
Method Parameter Description
line Authenticate using the password you configured for Telnet access. The Telnet password is configured using the enable telnet password… command. See “Setting a Telnet Password” on page 2-10.
enable Authenticate using the password you configured for the Super User privilege level. This password is configured using the enable super-user-password… command. See “Setting Passwords for Management Privilege Levels” on page 2-10.
local Authenticate using a local user name and password you configured on the device. Local user names and passwords are configured using the username… command. See “Configuring a Local User Account” on page 2-14.
tacacs Authenticate using the database on a TACACS server. You also must identify the server to the device using the tacacs-server command.
tacacs+ Authenticate using the database on a TACACS+ server. You also must identify the server to the device using the tacacs-server command.
radius Authenticate using the database on a RADIUS server. You also must identify the server to the device using the radius-server command.
none Do not use any authentication method. The device automatically permits access.
2 - 40

Securing Access to Management Functions
You enable RADIUS authorization by specifying a privilege level whose commands require authorization. For example, to configure the HP device to perform authorization for the commands available at the Super User privilege level (that is; all commands on the device), enter the following command:
HP9300(config)# aaa authorization commands 0 default radius
Syntax: aaa authorization commands <privilege-level> default radius | tacacs+ | none
The <privilege-level> parameter can be one of the following:
• 0 – Authorization is performed (that is, the HP device looks at the command list) for commands available at the Super User level (all commands)
• 4 – Authorization is performed for commands available at the Port Configuration level (port-config and read-only commands)
• 5 – Authorization is performed for commands available at the Read Only level (read-only commands)
NOTE: RADIUS authorization is performed only for commands entered from Telnet or SSH sessions. No authorization is performed for commands entered at the console, the Web management interface, or SNMP management applications.
NOTE: Since RADIUS authorization relies on the command list supplied by the RADIUS server during authentication, you cannot perform RADIUS authorization without RADIUS authentication.
NOTE: A user’s privilege level is set during RADIUS authentication, not with an aaa authorization command. The command aaa authorization exec default radius is ignored by the system.
Command Authorization and Accounting for Console Commands
The HP device supports command authorization and command accounting for CLI commands entered at the console. To configure the device to perform command authorization and command accounting for console commands, enter the following:
HP9300(config)# enable aaa console
Syntax: enable aaa console
WARNING: If you have previously configured the device to perform command authorization using a RADIUS server, entering the enable aaa console command may prevent the execution of any subsequent commands entered on the console.
This happens because RADIUS command authorization requires a list of allowable commands from the RADIUS server. This list is obtained during RADIUS authentication. For console sessions, RADIUS authentication is performed only if you have configured Enable authentication and specified RADIUS as the authentication method (for example, with the aaa authentication enable default radius command). If RADIUS authentication is never performed, the list of allowable commands is never obtained from the RADIUS server. Consequently, there would be no allowable commands on the console.
Configuring RADIUS AccountingHP devices support RADIUS accounting for recording information about user activity and system events. When you configure RADIUS accounting on an HP device, information is sent to a RADIUS accounting server when specified events occur, such as when a user logs into the device or the system is rebooted.
Configuring RADIUS Accounting for Telnet/SSH (Shell) Access
To send an Accounting Start packet to the RADIUS accounting server when an authenticated user establishes a Telnet or SSH session on the HP device, and an Accounting Stop packet when the user logs out:
HP9300(config)# aaa accounting exec default start-stop radius
2 - 41

Security Guide
Syntax: aaa accounting exec default start-stop radius | tacacs+ | none
Configuring RADIUS Accounting for CLI Commands
You can configure RADIUS accounting for CLI commands by specifying a privilege level whose commands require accounting. For example, to configure the HP device to perform RADIUS accounting for the commands available at the Super User privilege level (that is; all commands on the device), enter the following command:
HP9300(config)# aaa accounting commands 0 default start-stop radius
An Accounting Start packet is sent to the RADIUS accounting server when a user enters a command, and an Accounting Stop packet is sent when the service provided by the command is completed.
NOTE: If authorization is enabled, and the command requires authorization, then authorization is performed before accounting takes place. If authorization fails for the command, no accounting takes place.
Syntax: aaa accounting commands <privilege-level> default start-stop radius | tacacs | none
The <privilege-level> parameter can be one of the following:
• 0 – Records commands available at the Super User level (all commands)
• 4 – Records commands available at the Port Configuration level (port-config and read-only commands)
• 5 – Records commands available at the Read Only level (read-only commands)
Configuring RADIUS Accounting for System Events
You can configure RADIUS accounting to record when system events occur on the HP device. System events include rebooting and when changes to the active configuration are made.
The following command causes an Accounting Start packet to be sent to the RADIUS accounting server when a system event occurs, and a Accounting Stop packet to be sent when the system event is completed:
HP9300(config)# aaa accounting system default start-stop radius
Syntax: aaa accounting system default start-stop radius | tacacs+ | none
Configuring an Interface as the Source for All RADIUS PacketsYou can designate the lowest-numbered IP address configured an Ethernet port, loopback interface, or virtual interface as the source IP address for all RADIUS packets from the Routing Switch. Identifying a single source IP address for RADIUS packets provides the following benefits:
• If your RADIUS server is configured to accept packets only from specific links or IP addresses, you can use this feature to simplify configuration of the RADIUS server by configuring the HP device to always send the RADIUS packets from the same link or source address.
• If you specify a loopback interface as the single source for RADIUS packets, RADIUS servers can receive the packets regardless of the states of individual links. Thus, if a link to the RADIUS server becomes unavailable but the client or server can be reached through another link, the client or server still receives the packets, and the packets still have the source IP address of the loopback interface.
The software contains separate CLI commands for specifying the source interface for Telnet, TACACS/TACACS+, and RADIUS packets. You can configure a source interface for one or more of these types of packets.
To specify an Ethernet port or a loopback or virtual interface as the source for all RADIUS packets from the device, use the following CLI method. The software uses the lowest-numbered IP address configured on the port or interface as the source IP address for RADIUS packets originated by the device.
To specify the lowest-numbered IP address configured on a virtual interface as the device’s source for all RADIUS packets, enter commands such as the following:
HP9300(config)# int ve 1HP9300(config-vif-1)# ip address 10.0.0.3/24HP9300(config-vif-1)# exitHP9300(config)# ip radius source-interface ve 1
2 - 42

Securing Access to Management Functions
The commands in this example configure virtual interface 1, assign IP address 10.0.0.3/24 to the interface, then designate the interface as the source for all RADIUS packets from the Routing Switch.
Syntax: ip radius source-interface ethernet <portnum> | loopback <num> | ve <num>
The <num> parameter is a loopback interface or virtual interface number. If you specify an Ethernet port, the <portnum> is the port’s number (including the slot number, if you are configuring a Chassis device).
Displaying RADIUS Configuration InformationThe show aaa command displays information about all TACACS/TACACS+ and RADIUS servers identified on the device. For example:
The following table describes the RADIUS information displayed by the show aaa command.
Table 2.7: Output of the show aaa command for RADIUS
Field Description
Radius key The setting configured with the radius-server key command. At the Super User privilege level, the actual text of the key is displayed. At the other privilege levels, a string of periods (....) is displayed instead of the text.
Radius retries The setting configured with the radius-server retransmit command.
Radius timeout The setting configured with the radius-server timeout command.
Radius dead-time The setting configured with the radius-server dead-time command.
HP9300# show aaaTacacs+ key: hpTacacs+ retries: 1Tacacs+ timeout: 15 secondsTacacs+ dead-time: 3 minutesTacacs+ Server: 207.95.6.90 Port:49: opens=6 closes=3 timeouts=3 errors=0 packets in=4 packets out=4no connection
Radius key: networksRadius retries: 3Radius timeout: 3 secondsRadius dead-time: 3 minutesRadius Server: 207.95.6.90 Auth Port=1645 Acct Port=1646: opens=2 closes=1 timeouts=1 errors=0 packets in=1 packets out=4no connection
2 - 43

Security Guide
The show web command displays the privilege level of Web management interface users. For example:
Syntax: show web
USING THE WEB MANAGEMENT INTERFACE
To configure RADIUS using the Web management interface:
1. Log on to the device using a valid user name and password for read-write access. The System configuration panel is displayed.
2. If you configuring RADIUS authentication for Telnet access to the CLI, go to step 3. Otherwise, go to step 7.
3. Select the Management link to display the Management configuration panel.
4. Select Enable next to Telnet Authentication. You must enable Telnet authentication if you want to use TACACS/TACACS+ or RADIUS to authenticate Telnet access to the device.
5. Click Apply to apply the change.
6. Select the Home link to return to the System configuration panel.
7. Select the RADIUS link from the System configuration panel to display the RADIUS panel.
8. Change the retransmit interval, time out, and dead time if needed.
9. Enter the authentication key if applicable.
10. Click Apply if you changed any RADIUS parameters.
11. Select the RADIUS Server link.
• If any RADIUS servers are already configured on the device, the servers are listed in a table. Select the Add RADIUS Server link to display the following panel.
Radius Server For each RADIUS server, the IP address, and the following statistics are displayed:
Auth Port RADIUS authentication port number (default 1645)
Acct Port RADIUS accounting port number (default 1646)
opens Number of times the port was opened for communication with the server
closes Number of times the port was closed normally
timeouts Number of times port was closed due to a timeout
errors Number of times an error occurred while opening the port
packets in Number of packets received from the server
packets out Number of packets sent to the server
connection The current connection status. This can be “no connection” or “connection active”.
Table 2.7: Output of the show aaa command for RADIUS
Field Description
HP9300(config)# show webUser Privilege IP addressset 0 192.168.1.234
2 - 44

Securing Access to Management Functions
• If the device does not have any RADIUS servers configured, the following panel is displayed.
12. Enter the server’s IP address in the IP Address field.
13. If needed, change the Authentication port and Accounting port. (The default values work in most networks.)
14. Click Home to return to the System configuration panel, then select the Save link at the bottom of the dialog. Select Yes when prompted to save the configuration change to the startup-config file on the device’s flash memory.
15. Select the Management link to display the Management configuration panel.
16. Select the Authentication Methods link to display the Login Authentication Sequence panel, as shown in the following example.
17. Select the type of access for which you are defining the authentication method list from the Type field’s pulldown menu. Each type of access must have a separate authentication-method list. For example, to define the authentication-method list for logging into the CLI, select Login.
2 - 45

Security Guide
18. Select the primary authentication method by clicking on the radio button next to the method. For example, to use a RADIUS server as the primary means of authentication for logging on to the CLI, select RADIUS.
19. Click the Add button to save the change to the device’s running-config file.
The access type and authentication method you selected are displayed in the table at the top of the dialog. Each time you add an authentication method for a given access type, the software assigns a sequence number to the entry. When the user tries to log in using the access type you selected, the software tries the authentication sources in ascending sequence order until the access request is either approved or denied. Each time you add an entry for a given access type, the software increments the sequence number. Thus, if you want to use multiple authentication methods, make sure you enter the primary authentication method first, the secondary authentication method second, and so on.
If you need to delete an entry, select the access type and authentication method for the entry, then click Delete.
20. Click Home to return to the System configuration panel, then select the Save link at the bottom of the dialog. Select Yes when prompted to save the configuration change to the startup-config file on the device’s flash memory.
21. To configure RADIUS command authorization, select the Management link to display the Management configuration panel and select the Authorization Methods link to display the Authorization Method panel, as shown in the following example.
22. Select Commands from the Type field’s pulldown menu.
23. Select a privilege level by clicking on one of the following radio buttons:
• 0 – Authorization is performed for commands available at the Super User level (all commands)
• 4 – Authorization is performed for commands available at the Port Configuration level (port-config and read-only commands)
• 5 – Authorization is performed for commands available at the Read Only level (read-only commands)
NOTE: RADIUS authorization is performed only for commands entered from Telnet or SSH sessions. No authorization is performed for commands entered at the console, the Web management interface, or SNMP management applications.
NOTE: Since RADIUS authorization relies on the command list supplied by the RADIUS server during authentication, you cannot perform RADIUS authorization without RADIUS authentication.
2 - 46

Securing Access to Management Functions
NOTE: A user’s privilege level is set during RADIUS authentication, not by configuring RADIUS Exec authorization. Selecting RADIUS Exec authorization on the Authorization Method panel is ignored by the system.
24. Click on the radio button next to Radius.
25. Click the Add button to save the change to the device’s running-config file.
The authorization method you selected are displayed in the table at the top of the dialog. Each time you add an authorization method for a given access type, the software assigns a sequence number to the entry. When authorization is performed, the software tries the authorization sources in ascending sequence order until the request is either approved or denied. Each time you add an entry for a given access type, the software increments the sequence number. Thus, if you want to use multiple authentication methods, make sure you enter the primary authentication method first, the secondary authentication method second, and so on.
If you need to delete an entry, select the access type and authorization method for the entry, then click Delete.
26. To configure RADIUS accounting, select the Management link to display the Management configuration panel and select the Accounting Methods link to display the Accounting Method panel, as shown in the following example.
27. To send an Accounting Start packet to the RADIUS accounting server when an authenticated user establishes a Telnet or SSH session on the HP device, and an Accounting Stop packet when the user logs out, select Exec from the Type field’s pulldown menu.
28. To configure RADIUS accounting for CLI commands, select Commands from the Type field’s pulldown menu and select a privilege level by clicking on one of the following radio buttons:
• 0 – Records commands available at the Super User level (all commands)
• 4 – Records commands available at the Port Configuration level (port-config and read-only commands)
• 5 – Records commands available at the Read Only level (read-only commands)
29. To configure RADIUS accounting to record when system events occur on the HP device, select System from the Type field’s pulldown menu.
30. Click on the radio button next to Radius.
31. Click the Add button to save the change to the device’s running-config file.
The accounting method you selected are displayed in the table at the top of the dialog. Each time you add an accounting method for a given access type, the software assigns a sequence number to the entry. When accounting is performed, the software tries the accounting sources in ascending sequence order until the
2 - 47

Security Guide
request is either approved or denied. Each time you add an entry for a given access type, the software increments the sequence number. Thus, if you want to use multiple accounting methods, make sure you enter the primary accounting method first, the secondary accounting method second, and so on.
If you need to delete an entry, select the access type and accounting method for the entry, then click Delete.
32. Select the Save link at the bottom of the dialog. Select Yes when prompted to save the configuration change to the startup-config file on the device’s flash memory.
Configuring Authentication-Method ListsTo implement one or more authentication methods for securing access to the device, you configure authentication-method lists that set the order in which the authentication methods are consulted.
In an authentication-method list, you specify the access method (Telnet, Web, SNMP, and so on) and the order in which the device tries one or more of the following authentication methods:
• Local Telnet login password
• Local password for the Super User privilege level
• Local user accounts configured on the device
• Database on a TACACS or TACACS+ server
• Database on a RADIUS server
• No authentication
NOTE: The TACACS/TACACS+, RADIUS, and Telnet login password authentication methods are not supported for SNMP access.
NOTE: To authenticate Telnet access to the CLI, you also must enable the authentication by entering the enable telnet authentication command at the global CONFIG level of the CLI. You cannot enable Telnet authentication using the Web management interface.
NOTE: You do not need an authentication-method list to secure access based on ACLs or a list of IP addresses. See “Using ACLs to Restrict Remote Access” on page 2-4 or “Restricting Remote Access to the Device to Specific IP Addresses” on page 2-5.
In an authentication-method list for a particular access method, you can specify up to seven authentication methods. If the first authentication method is successful, the software grants access and stops the authentication process. If the access is rejected by the first authentication method, the software denies access and stops checking.
However, if an error occurs with an authentication method, the software tries the next method on the list, and so on. For example, if the first authentication method is the RADIUS server, but the link to the server is down, the software will try the next authentication method in the list.
NOTE: If an authentication method is working properly and the password (and user name, if applicable) is not known to that method, this is not an error. The authentication attempt stops, and the user is denied access.
The software will continue this process until either the authentication method is passed or the software reaches the end of the method list. If the Super User level password is not rejected after all the access methods in the list have been tried, access is granted.
Configuration Considerations for Authentication-Method Lists• For CLI access, you must configure authentication-method lists if you want the device to authenticate access
using local user accounts or a RADIUS server. Otherwise, the device will authenticate using only the locally based password for the Super User privilege level.
2 - 48
Securing Access to Management Functions
• When no authentication-method list is configured specifically for Web management access, the device performs authentication using the SNMP community strings:
• For read-only access, you can use the user name “get” and the password “public”. The default read-only community string is “public”.
• Beginning with software release 05.1.00, there is no default read-write community string. Thus, by default, you cannot open a read-write management session using the Web management interface. You first must configure a read-write community string using the CLI. Then you can log on using “set” as the user name and the read-write community string you configure as the password. See “Configuring TACACS/TACACS+ Security” on page 2-15.
• If you configure an authentication-method list for Web management access and specify “local” as the primary authentication method, users who attempt to access the device using the Web management interface must supply a user name and password configured in one of the local user accounts on the device. The user cannot access the device by entering “set” or “get” and the corresponding SNMP community string.
• For devices that can be managed using SNMP management applications, the default authentication method (if no authentication-method list is configured for SNMP) is the CLI Super User level password. If no Super User level password is configured, then access through SNMP management applications is not authenticated. To use local user accounts to authenticate access through SNMP management applications, configure an authentication-method list for SNMP access and specify “local” as the primary authentication method.
Examples of Authentication-Method ListsExample 1: The following example shows how to configure authentication-method lists for the Web management interface, SNMP management applications, and the Privileged EXEC and CONFIG levels of the CLI. In this example, the primary authentication method for each is “local”. The device will authenticate access attempts using the locally configured user names and passwords first.
To configure an authentication-method list for the Web management interface, enter a command such as the following:
HP9300(config)# aaa authentication web-server default local
This command configures the device to use the local user accounts to authenticate access to the device through the Web management interface. If the device does not have a user account that matches the user name and password entered by the user, the user is not granted access.
To configure an authentication-method list for SNMP management applications, enter a command such as the following:
HP9300(config)# aaa authentication snmp-server default local
This command configures the device to use the local user accounts to authenticate access attempts through SNMP management applications.
To configure an authentication-method list for the Privileged EXEC and CONFIG levels of the CLI, enter the following command:
HP9300(config)# aaa authentication enable default local
This command configures the device to use the local user accounts to authenticate attempts to access the Privileged EXEC and CONFIG levels of the CLI.
Example 2: To configure the device to consult a RADIUS server first to authenticate attempts to access the Privileged EXEC and CONFIG levels of the CLI, then consult the local user accounts if the RADIUS server is unavailable, enter the following command:
HP9300(config)# aaa authentication enable default radius local
Syntax: [no] aaa authentication snmp-server | web-server | enable | login default <method1> [<method2>] [<method3>] [<method4>] [<method5>] [<method6>] [<method7>]
The snmp-server | web-server | enable | login parameter specifies the type of access this authentication-method list controls. You can configure one authentication-method list for each type of access.
2 - 49

Security Guide
NOTE: TACACS/TACACS+ and RADIUS are supported only with the enable and login parameters.
The <method1> parameter specifies the primary authentication method. The remaining optional <method> parameters specify additional methods to try if an error occurs with the primary method. A method can be one of the values listed in the Method Parameter column in the following table.
USING THE WEB MANAGEMENT INTERFACE
To configure an authentication-method list with the Web management interface, use the following procedure. This example to causes the device to use a RADIUS server to authenticate attempts to log in through the CLI:
1. Log on to the device using a valid user name and password for read-write access. The System configuration panel is displayed.
2. Select the Management link to display the Management configuration panel.
Table 2.8: Authentication Method Values
Method Parameter Description
line Authenticate using the password you configured for Telnet access. The Telnet password is configured using the enable telnet password… command. See “Setting a Telnet Password” on page 2-10.
enable Authenticate using the password you configured for the Super User privilege level. This password is configured using the enable super-user-password… command. See “Setting Passwords for Management Privilege Levels” on page 2-10.
local Authenticate using a local user name and password you configured on the device. Local user names and passwords are configured using the username… command. See “Configuring a Local User Account” on page 2-14.
tacacs Authenticate using the database on a TACACS server. You also must identify the server to the device using the tacacs-server command.
tacacs+ Authenticate using the database on a TACACS+ server. You also must identify the server to the device using the tacacs-server command.
radius Authenticate using the database on a RADIUS server. You also must identify the server to the device using the radius-server command. See “Configuring RADIUS Security” on page 2-32.
none Do not use any authentication method. The device automatically permits access.
2 - 50

Securing Access to Management Functions
3. Select the Authentication Methods link to display the Login Authentication Sequence panel, as shown in the following example.
4. Select the type of access for which you are defining the authentication method list from the Type field’s pulldown menu. Each type of access must have a separate authentication-method list. For example, to define the authentication-method list for logging into the CLI, select Login.
5. Select the primary authentication method by clicking the button next to the method. For example, to use a RADIUS server as the primary means of authentication for logging on to the CLI, select RADIUS.
6. Click the Add button to save the change to the device’s running-config file. The access type and authentication method you selected are displayed in the table at the top of the dialog. Each time you add an authentication method for a given access type, the software assigns a sequence number to the entry. When the user tries to log in using the access type you selected, the software tries the authentication sources in ascending sequence order until the access request is either approved or denied. Each time you add an entry for a given access type, the software increments the sequence number. Thus, if you want to use multiple authentication methods, make sure you enter the primary authentication method first, the secondary authentication method second, and so on.
If you need to delete an entry, select the access type and authentication method for the entry, then click Delete.
7. Select the Save link at the bottom of the dialog. Select Yes when prompted to save the configuration change to the startup-config file on the device’s flash memory.
2 - 51

Security Guide
2 - 52
Chapter 3Configuring Secure Shell
Secure Shell (SSH) is a mechanism for allowing secure remote access to management functions on an HP device. SSH provides a function similar to Telnet. Users can log into and configure the device using a publicly or commercially available SSH client program, just as they can with Telnet. However, unlike Telnet, which provides no security, SSH provides a secure, encrypted connection to the device.
SSH supports Arcfour, IDEA, Blowfish, DES (56-bit) and Triple DES (168-bit) data encryption methods. Nine levels of data compression are available. You can configure your SSH client to use any one of these data compression levels when connecting to an HP device.
HP devices also support Secure Copy (SCP) for securely transferring files between an HP device and SCP-enabled remote hosts. See “Using Secure Copy” on page 3-10 for more information.
NOTE: SSH is supported only on HP 9304M, HP 9308M, and HP 9315M Routing Switches with redundant management.
NOTE: HP’s implementation of SSH supports SSH version 1 only. All references to SSH in this document are to SSH version 1.
HP’s implementation of SSH supports two kinds of user authentication:
• RSA challenge-response authentication, where a collection of public keys are stored on the device. Only clients with a private key that corresponds to one of the stored public keys can gain access to the device using SSH.
• Password authentication, where users attempting to gain access to the device using an SSH client are authenticated with passwords stored on the device or on a TACACS/TACACS+ or RADIUS server
Both kinds of user authentication are enabled by default. You can configure the device to use one or both of them.
Configuring Secure Shell on an HP device consists of the following steps:
1. Setting the HP device’s host name and domain name
2. Generating a host RSA public and private key pair for the device
3. Configuring RSA challenge-response authentication
4. Setting optional parameters
You can also view information about active SSH connections on the device as well as terminate them.
3 - 1

Security Guide
Setting the Host Name and Domain NameIf you have not already done so, establish a host name and domain name for the HP device. For example:
HP9300(config)# hostname HP9300HP9300(config)# ip dns domain-name hp.com
Syntax: hostname <name>
Syntax: ip dns domain-name <name>
Generating a Host RSA Key PairWhen SSH is configured, a public and private host RSA key pair is generated for the HP device. The SSH server on the HP device uses this host RSA key pair, along with a dynamically generated server RSA key pair, to negotiate a session key and encryption method with the client trying to connect to it.
The host RSA key pair is stored in the HP device’s system-config file. Only the public key is readable. The public key should be added to a “known hosts” file (for example, $HOME/.ssh/known_hosts on UNIX systems) on the clients who want to access the device. Some SSH client programs add the public key to the known hosts file automatically; in other cases, you must manually create a known hosts file and place the HP device’s public key in it. See “Providing the Public Key to Clients” on page 3-3 for an example of what to place in the known hosts file.
To generate a public and private RSA host key pair for the HP device:
HP9300(config)# crypto key generate rsaHP9300(config)# write memory
The crypto key generate rsa command places an RSA host key pair in the running-config file and enables SSH on the device. To disable SSH, you must delete the RSA host key pair. To do this, enter the following commands:
HP9300(config)# crypto key zeroize rsaHP9300(config)# write memory
The crypto key zeroize rsa command deletes the RSA host key pair in the running-config file and disables SSH on the device.
Syntax: crypto key generate | zeroize rsa
You can optionally configure the HP device to hide the RSA host key pair in the running-config file. To do this, enter the following command:
HP9300# ssh no-show-host-keys
Syntax: ssh no-show-host-keys
After entering the ssh no-show-host-keys command, you can display the RSA host key pair in the running-config file with the following command:
HP9300# ssh show-host-keys
Syntax: ssh show-host-keys
Notes:
• If an RSA host key pair is stored in internal memory on the HP device, it is used even if the startup-config file contains a different RSA host key pair.
• If no RSA host key pair is stored in internal memory, but the startup-config file contains an RSA host key pair, the key pair in the startup-config file is used. If you later generate an RSA host key pair with the crypto key generate rsa command, the new key pair takes effect only after you store it in internal memory with the write memory command and reboot the HP device.
• If no RSA host key pair is stored in internal memory, and the startup-config file contains an RSA host key pair, the first time you enter the write memory command, it will save the RSA host key pair in the startup-config file to internal memory and remove it from the startup-config file.
3 - 2

Configuring Secure Shell
• If no RSA host key pair is stored in internal memory, the startup-config file contains an RSA host key pair, and you generate an RSA host key pair with the crypto key generate rsa command, the new pair is stored in internal memory the first time you enter the write memory command.
• The crypto key zeroize rsa command disables the currently active RSA host key pair. If you subsequently enter the write memory command without generating another RSA host key pair, the RSA host key pair stored in internal memory is removed.
• If you enter the ssh no-show-host-keys command to hide the RSA host key pair in the running-config file, then reload the software, the RSA host key pair is once again visible in the running-config file. The setting to hide the RSA host key pair is not carried across software reloads.
Providing the Public Key to ClientsIf you are using SSH to connect to an HP device from a UNIX system, you may need to add the HP device’s public key to a “known hosts” file; for example, $HOME/.ssh/known_hosts. The following is an example of an entry in a known hosts file:
In this example, 10.10.20.10 is the IP address of an SSH-enabled HP Routing Switch. The second number, 1024, is the size of the host key, and the third number, 37, is the encoded public exponent. The remaining text is the encoded modulus.
Configuring RSA Challenge-Response AuthenticationWith RSA challenge-response authentication, a collection of clients’ public keys are stored on the HP device. Clients are authenticated using these stored public keys. Only clients that have a private key that corresponds to one of the stored public keys can gain access to the device using SSH.
When RSA challenge-response authentication is enabled, the following events occur when a client attempts to gain access to the device using SSH:
1. The client sends its public key to the HP device.
2. The HP device compares the client’s public key to those stored in memory.
3. If there is a match, the HP device uses the public key to encrypt a random sequence of bytes.
4. The HP device sends these encrypted bytes to the client.
5. The client uses its private key to decrypt the bytes.
6. The client sends the decrypted bytes back to the HP device.
7. The HP device compares the decrypted bytes to the original bytes it sent to the client. If the two sets of bytes match, it means that the client’s private key corresponds to an authorized public key, and the client is authenticated.
Setting up RSA challenge-response authentication consists of the following steps:
8. Importing authorized public keys into the HP device.
9. Enabling RSA challenge response authentication
Importing Authorized Public Keys into the HP DeviceSSH clients that support RSA authentication normally provide a utility to generate an RSA key pair. The private key is usually stored in a password-protected file on the local host; the public key is stored in another file and is not
10.10.20.10 1024 37 11877188186267703046485128873725804685603164063588767923011184247022636175804896633384620574930068397650231698985431857279323745963240790218032290842214534725157824370077028066279347840799496434041596532902240148333803390954214736797463856006016294532930756350280423103965438822043283266280424256936158342816331
3 - 3

Security Guide
protected. You should collect one public key from each client to be granted access to the HP device and place all of these keys into one file. This public key file is imported into the HP device.
The following is an example of a public key file containing two public keys:
You can import the authorized public keys into the active configuration by loading them from a file on a TFTP server. Once the authorized public keys are loaded, you can optionally save them to the startup-config file. If you import a public key file from a TFTP server, the file is automatically loaded into the active configuration the next time the device is booted.
HP devices support Secure Copy (SCP) for securely transferring files between hosts on a network. Note that when you copy files using SCP, you enter the commands on the SCP-enabled client, rather than the console on the HP device.
If password authentication is enabled for SSH, the user will be prompted for a password in order to copy the file. See “Using Secure Copy” on page 3-10 for more information on SCP.
After the file is loaded onto the TFTP server, it can be imported into the active configuration each time the device is booted.
To cause a public key file called pkeys.txt to be loaded from a TFTP server each time the HP device is booted, enter a command such as the following:
HP9300(config)# ip ssh pub-key-file tftp 192.168.1.234 pkeys.txt
Syntax: ip ssh pub-key-file tftp <tftp-server-ip-addr> <filename>
To display the currently loaded public keys, enter the following command:
HP9300# show ip client-pub-key
Syntax: show ip client-pub-key
To clear the public keys from the active configuration, enter the following command:
HP9300# clear public-key
1024 65537 162566050678380006149460550286514061230306797782065166110686648548574949573392322599631573796819248476346145327421786527672319957469414416047146826800064453679033330420291249056907718288654183965655676902543288147725297813592782167540629478392662275128774861815448523997023618173312328476660721888873946758201 user@csp_client1024 35 152676199889856769693556155614587291553826312328095300428421494164360924762074755452346792684432337622953129794188335259756957757051018052125410080748772658611985742270289700411216885214507408796984064240845174271455859236169370590874837875599405503479603024287131312793895007927438074972787423695977635251943 root@unix_machine
1024 65537 162566050678380006149460550286514061230306797782065166110686648548574949573392322599631573796819248476346145327421786527672319957469414416047146826800064453679033330420291249056907718288654183965655676902543288147725297813592782167540629478392662275128774861815448523997023618173312328476660721888873946758201 user@csp_client
1024 35 152676199889856769693556155614587291553826312328095300428421494164360924762074755452346792684432337622953129794188335259756957757051018052125410080748772658611985742270289700411216885214507408796984064240845174271455859236169370590874837875599405503479603024287131312793895007927438074972787423695977635251943 root@unix_machine
There are 2 authorized client public keys configured
3 - 4

Configuring Secure Shell
Syntax: clear public-key
To reload the public keys from the file on the TFTP server, enter the following command:
HP9300(config)# ip ssh pub-key-file reload
Syntax: ip ssh pub-key-file reload
Once the public keys are part of the active configuration, you can make them part of the startup-config file. The startup-config file can contain a maximum of 10 public keys. If you want to store more than 10 public keys, keep them in a file on a TFTP server, where they will be loaded into the active configuration when the device is booted.
To make the public keys in the active configuration part of the startup-config file, enter the following commands:
HP9300(config)# ip ssh pub-key-file flash-memoryHP9300(config)# write memory
Syntax: ip ssh pub-key-file flash-memory
To clear the public keys from the startup-config file (if they are located there), enter the following commands:
HP9300# clear public-keyHP9300# write memory
Enabling RSA Challenge-Response AuthenticationRSA challenge-response authentication is enabled by default. You can disable or re-enable it manually.
To enable RSA challenge-response authentication:
HP9300(config)# ip ssh rsa-authentication yes
To disable RSA challenge-response authentication:
HP9300(config)# ip ssh rsa-authentication no
Syntax: ip ssh rsa-authentication yes | no
Setting Optional ParametersYou can adjust the following SSH settings on the HP device:
• The number of SSH authentication retries
• The server RSA key size
• The user authentication method the HP device uses for SSH connections
• Whether the HP device allows users to log in without supplying a password
• The port number for SSH connections
• The SSH login timeout value
• A specific interface to be used as the source for all SSH traffic from the device
• The maximum idle time for SSH sessions
Setting the Number of SSH Authentication RetriesBy default, the HP device attempts to negotiate a connection with the connecting host three times. The number of authentication retries can be changed to between 1 – 5.
For example, the following command changes the number of authentication retries to 5:
HP9300(config)# ip ssh authentication-retries 5
Syntax: ip ssh authentication-retries <number>
3 - 5

Security Guide
Setting the Server RSA Key SizeThe default size of the dynamically generated server RSA key is 768 bits. The size of the server RSA key can be between 512 – 896 bits.
For example, the following command changes the server RSA key size to 896 bits:
HP9300(config)# ip ssh key-size 896
Syntax: ip ssh key-size <number>
NOTE: The size of the host RSA key that resides in the system-config file is always 1024 bits and cannot be changed.
Deactivating User AuthenticationAfter the SSH server on the HP device negotiates a session key and encryption method with the connecting client, user authentication takes place. HP’s implementation of SSH supports RSA challenge-response authentication and password authentication.
With RSA challenge-response authentication, a collection of clients’ public keys are stored on the HP device. Clients are authenticated using these stored public keys. Only clients that have a private key that corresponds to one of the stored public keys can gain access to the device using SSH.
With password authentication, users are prompted for a password when they attempt to log into the device (provided empty password logins are not allowed; see “Enabling Empty Password Logins” on page 3-6). If there is no user account that matches the user name and password supplied by the user, the user is not granted access.
You can deactivate one or both user authentication methods for SSH. Note that deactivating both authentication methods essentially disables the SSH server entirely.
To disable RSA challenge-response authentication:
HP9300(config)# ip ssh rsa-authentication no
Syntax: ip ssh rsa-authentication no | yes
To deactivate password authentication:
HP9300(config)# ip ssh password-authentication no
Syntax: ip ssh password-authentication no | yes
Enabling Empty Password LoginsBy default, empty password logins are not allowed. This means that users with an SSH client are always prompted for a password when they log into the device. To gain access to the device, each user must have a user name and password. Without a user name and password, a user is not granted access. See “Setting Up Local User Accounts” on page 2-13 for information on setting up user names and passwords on HP devices.
If you enable empty password logins, users are not prompted for a password when they log in. Any user with an SSH client can log in without being prompted for a password.
To enable empty password logins:
HP9300(config)# ip ssh permit-empty-passwd yes
Syntax: ip ssh permit-empty-passwd no | yes
Setting the SSH Port NumberBy default, SSH traffic occurs on TCP port 22. You can change this port number. For example, the following command changes the SSH port number to 2200:
HP9300(config)# ip ssh port 2200
3 - 6

Configuring Secure Shell
Note that if you change the default SSH port number, you must configure SSH clients to connect to the new port. Also, you should be careful not to assign SSH to a port that is used by another service. If you change the SSH port number, HP recommends that you change it to a port number greater than 1024.
Syntax: ip ssh port <number>
Setting the SSH Login Timeout ValueWhen the SSH server attempts to negotiate a session key and encryption method with a connecting client, it waits a maximum of 120 seconds for a response from the client. If there is no response from the client after 120 seconds, the SSH server disconnects. You can change this timeout value to between 1 – 120 seconds. For example, to change the timeout value to 60 seconds:
HP9300(config)# ip ssh timeout 60
Syntax: ip ssh timeout <seconds>
Designating an Interface as the Source for All SSH PacketsYou can designate a loopback interface, virtual interface, or Ethernet port as the source for all SSH packets from the device. The software uses the IP address with the numerically lowest value configured on the port or interface as the source IP address for SSH packets originated by the device.
NOTE: When you specify a single SSH source, you can use only that source address to establish SSH management sessions with the HP device.
To specify the numerically lowest IP address configured on a loopback interface as the device’s source for all SSH packets, enter commands such as a the following:
HP9300(config)# int loopback 2HP9300(config-lbif-2)# ip address 10.0.0.2/24HP9300(config-lbif-2)# exitHP9300(config)# ip ssh source-interface loopback 2
The commands in this example configure loopback interface 2, assign IP address 10.0.0.2/24 to the interface, then designate the interface as the source for all SSH packets from the Routing Switch.
Syntax: ip ssh source-interface ethernet <portnum> | loopback <num> | ve <num>
The <num> parameter is a loopback interface or virtual interface number. If you specify an Ethernet port, the <portnum> is the port’s number. For example:
HP9300(config)# interface ethernet 1/4HP9300(config-if-1/4)# ip address 209.157.22.110/24HP9300(config-if-1/4)# exitHP9300(config)# ip ssh source-interface ethernet 1/4
Configuring Maximum Idle Time for SSH SessionsBy default, SSH sessions do not time out. Optionally, you can set the amount of time an SSH session can be inactive before the HP device closes it. For example, to set the maximum idle time for SSH sessions to 30 minutes:
HP9300(config)# ip ssh idle-time 30
Syntax: ip ssh idle-time <minutes>
If an established SSH session has no activity for the specified number of minutes, the HP device closes it. An idle time of 0 minutes (the default value) means that SSH sessions never timeout. The maximum idle time for SSH sessions is 240 minutes.
3 - 7
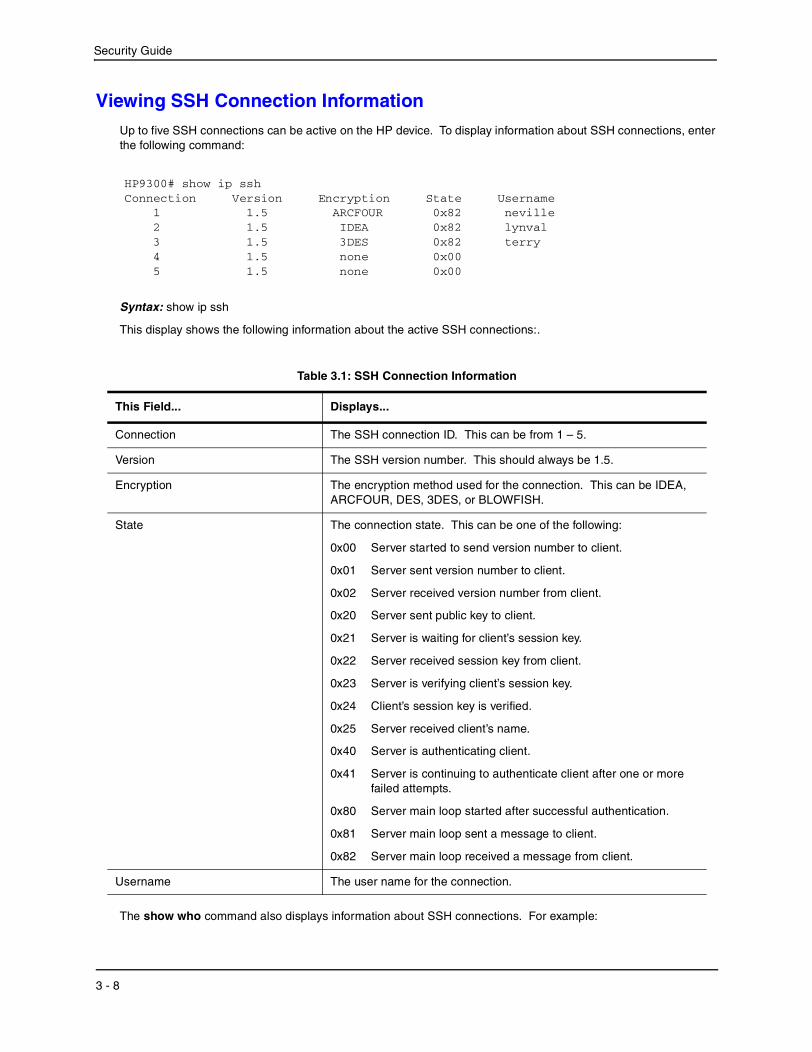
Security Guide
Viewing SSH Connection InformationUp to five SSH connections can be active on the HP device. To display information about SSH connections, enter the following command:
Syntax: show ip ssh
This display shows the following information about the active SSH connections:.
The show who command also displays information about SSH connections. For example:
Table 3.1: SSH Connection Information
This Field... Displays...
Connection The SSH connection ID. This can be from 1 – 5.
Version The SSH version number. This should always be 1.5.
Encryption The encryption method used for the connection. This can be IDEA, ARCFOUR, DES, 3DES, or BLOWFISH.
State The connection state. This can be one of the following:
0x00 Server started to send version number to client.
0x01 Server sent version number to client.
0x02 Server received version number from client.
0x20 Server sent public key to client.
0x21 Server is waiting for client’s session key.
0x22 Server received session key from client.
0x23 Server is verifying client’s session key.
0x24 Client’s session key is verified.
0x25 Server received client’s name.
0x40 Server is authenticating client.
0x41 Server is continuing to authenticate client after one or more failed attempts.
0x80 Server main loop started after successful authentication.
0x81 Server main loop sent a message to client.
0x82 Server main loop received a message from client.
Username The user name for the connection.
HP9300# show ip sshConnection Version Encryption State Username 1 1.5 ARCFOUR 0x82 neville 2 1.5 IDEA 0x82 lynval 3 1.5 3DES 0x82 terry 4 1.5 none 0x00 5 1.5 none 0x00
3 - 8

Configuring Secure Shell
Syntax: show who
To terminate one of the active SSH connections, enter the following command:
HP9300# kill ssh 1
Syntax: kill ssh <connection-id>
Sample SSH ConfigurationThe following is a sample SSH configuration for an HP device.
This aaa authentication login default local command configures the device to use the local user accounts to authenticate users attempting to log in.
Three user accounts are configured on the device. The ip ssh permit-empty-passwd no command causes users always to be prompted for a password when they attempt to establish an SSH connection. Since the device
HP9300#show whoConsole connections: established, activeTelnet connections: 1 closed 2 closed 3 closed 4 closed 5 closedSSH connections: 1 established, client ip address 209.157.22.8 16 seconds in idle 2 established, client ip address 209.157.22.21 42 seconds in idle 3 established, client ip address 209.157.22.68 49 seconds in idle 4 closed 5 closed
hostname HP9300ip dns domain-name hp.com!aaa authentication login default localusername neville password .....username lynval password .....username terry password .....!ip ssh permit-empty-passwd no!ip ssh pub-key-file tftp 192.168.1.234 pkeys.txt!crypto key generate rsa public_key "1024 35 144460146631716543532035011163035196411931951252058944526374624095222755050208450873029852099603462391729956763293572477753018866626789819564825318155162468139452068167261082818831041396224230129626883937176769776184984093100984017075369387071006637966650877224677979486802651458324218055083313313948534902409 [email protected]"!crypto key generate rsa private_key "*************************"!ip ssh authentication-retries 5
3 - 9

Security Guide
uses local user accounts for authentication, only these three users are allowed to connect to the device using SSH.
The ip ssh pub-key-file tftp command causes a public key file called pkeys.txt to be loaded from a TFTP server at 192.168.1.234. To gain access to the HP device using SSH, a user must have a private key that corresponds to one of the public keys in this file.
The crypto key generate rsa public_key and crypto key generate rsa private_key statements are both generated by the crypto key generate rsa command. By default, the RSA host key pair appears in the running-config file, but not in the startup-config file. You can optionally configure the HP device to hide the RSA host key pair in the running-config file with the ssh no-show-host-keys command. The actual private key is never visible in either the running-config file or the startup-config file.
You may need to copy the public key to a “known hosts” file (for example, $HOME/.ssh/known_hosts on UNIX systems) on the clients who want to access the device. See “Providing the Public Key to Clients” on page 3-3 for an example of what to place in the known hosts file.
The ip ssh authentication-retries 5 command sets the number of times the HP device attempts to negotiate a connection with the connecting host to 5.
Using Secure CopySecure Copy (SCP) uses security built into SSH to transfer files between hosts on a network, providing a more secure file transfer method than Remote Copy (RCP) or FTP. SCP automatically uses the authentication methods, encryption algorithm, and data compression level configured for SSH. For example, if password authentication is enabled for SSH, the user is prompted for a user name and password before SCP allows a file to be transferred. No additional configuration is required for SCP on top of SSH.
You can use SCP to copy files on the HP device, including the startup-config and running-config files, to or from an SCP-enabled remote host.
SCP is enabled by default and can be disabled. To disable SCP, enter the following command:
HP9300(config)# ip ssh scp disable
Syntax: ip ssh scp disable | enable
NOTE: If you disable SSH, SCP is also disabled.
The following are examples of using SCP to transfer files from and to an HP device
NOTE: When using SCP, you enter the scp commands on the SCP-enabled client, rather than the console on the HP device.
NOTE: Certain SCP client options, including -p and -r, are ignored by the SCP server on the HP device. If an option is ignored, the client is notified.
To copy a configuration file (c:\cfg\hp.cfg) to the running-config file on an HP device at 192.168.1.50 and log in as user terry, enter the following command on the SCP-enabled client:
C:\> scp c:\cfg\hp.cfg [email protected]:runConfig
If password authentication is enabled for SSH, the user is prompted for user terry’s password before the file transfer takes place.
To copy the configuration file to the startup-config file:
C:\> scp c:\cfg\hp.cfg [email protected]:startConfig
To copy the running-config file on an HP device to a file called c:\cfg\hprun.cfg on the SCP-enabled client:
C:\> scp [email protected]:runConfig c:\cfg\hprun.cfg
To copy the startup-config file on an HP device to a file called c:\cfg\hpstart.cfg on the SCP-enabled client:
3 - 10


Security Guide
3 - 12
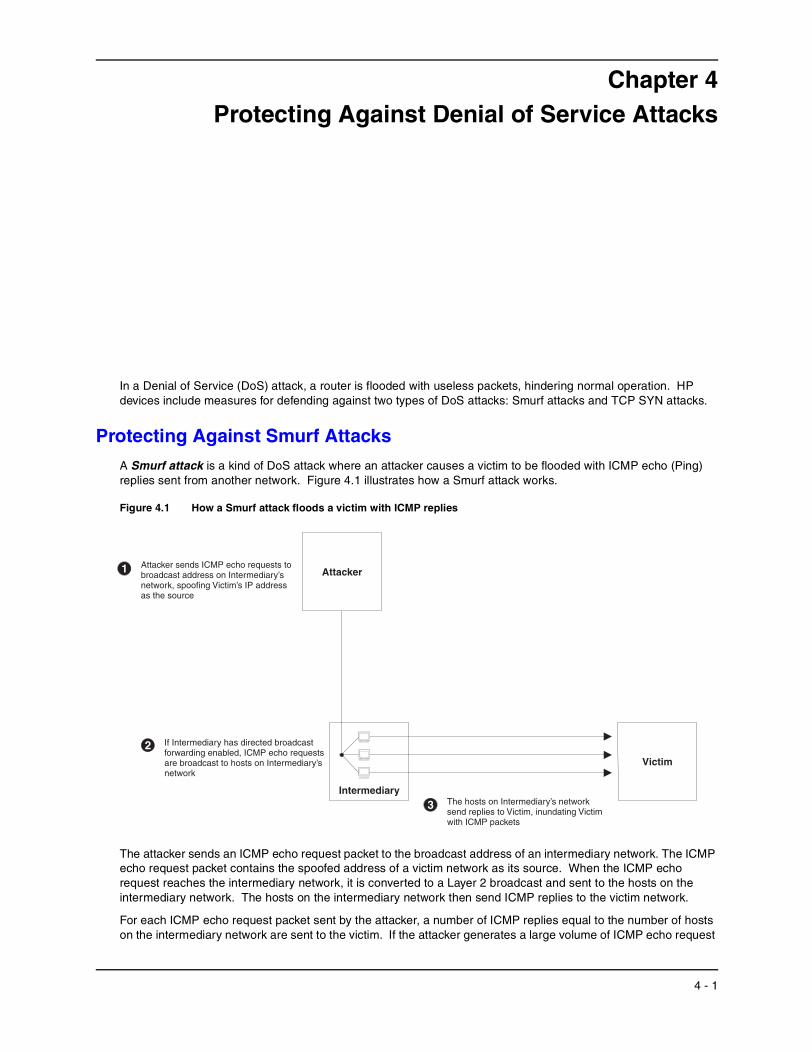
Chapter 4Protecting Against Denial of Service Attacks
In a Denial of Service (DoS) attack, a router is flooded with useless packets, hindering normal operation. HP devices include measures for defending against two types of DoS attacks: Smurf attacks and TCP SYN attacks.
Protecting Against Smurf AttacksA Smurf attack is a kind of DoS attack where an attacker causes a victim to be flooded with ICMP echo (Ping) replies sent from another network. Figure 4.1 illustrates how a Smurf attack works.
Figure 4.1 How a Smurf attack floods a victim with ICMP replies
The attacker sends an ICMP echo request packet to the broadcast address of an intermediary network. The ICMP echo request packet contains the spoofed address of a victim network as its source. When the ICMP echo request reaches the intermediary network, it is converted to a Layer 2 broadcast and sent to the hosts on the intermediary network. The hosts on the intermediary network then send ICMP replies to the victim network.
For each ICMP echo request packet sent by the attacker, a number of ICMP replies equal to the number of hosts on the intermediary network are sent to the victim. If the attacker generates a large volume of ICMP echo request
Intermediary
Victim
1 Attacker sends ICMP echo requests tobroadcast address on Intermediary’snetwork, spoofing Victim’s IP addressas the source
If Intermediary has directed broadcastforwarding enabled, ICMP echo requestsare broadcast to hosts on Intermediary’snetwork
2
The hosts on Intermediary’s networksend replies to Victim, Victimwith ICMP packets
inundating3
Attacker
4 - 1

Security Guide
packets, and the intermediary network contains a large number of hosts, the victim can be overwhelmed with ICMP replies.
Avoiding Being an Intermediary in a Smurf AttackA Smurf attack relies on the intermediary to broadcast ICMP echo request packets to hosts on a target sub-net. When the ICMP echo request packet arrives at the target sub-net, it is converted to a Layer 2 broadcast and sent to the connected hosts. This conversion takes place only when directed broadcast forwarding is enabled on the device.
To avoid being an intermediary in a Smurf attack, make sure forwarding of directed broadcasts is disabled on the HP device. Starting with release 06.0.00, directed broadcast forwarding is disabled by default. In releases prior to 06.0.00, directed broadcast forwarding is enabled by default. To disable directed broadcast forwarding, do one of the following:
USING THE CLI
HP9300(config)# no ip directed-broadcast
Syntax: [no] ip directed-broadcast
USING THE WEB MANAGEMENT INTERFACE
1. Log on to the device using a valid user name and password for read-write access. The System configuration panel is displayed.
2. Click on the plus sign next to Configure in the tree view to display the list of configuration options.
3. Click on the plus sign next to IP to display the list of IP configuration options.
4. Select the General link to display the IP configuration panel.
5. Select Disable next to Directed Broadcast Forward.
6. Click the Apply button to save the change to the device’s running-config file.
7. Select the Save link at the bottom of the dialog. Select Yes when prompted to save the configuration change to the startup-config file on the device’s flash memory.
Avoiding Being a Victim in a Smurf AttackYou can configure the HP device to drop ICMP packets when excessive numbers are encountered, as is the case when the device is the victim of a Smurf attack. You can set threshold values for ICMP packets that are targeted at the router itself or passing through an interface, and drop them when the thresholds are exceeded.
For example, to set threshold values for ICMP packets targeted at the router, enter the following command in CONFIG mode:
HP9300(config)# ip icmp burst-normal 5000 burst-max 10000 lockup 300
To set threshold values for ICMP packets received on interface 3/11:
HP9300(config)# int e 3/11HP9300(config-if-e100-3/11)# ip icmp burst-normal 5000 burst-max 10000 lockup 300
Syntax: ip icmp burst-normal <value> burst-max <value> lockup <seconds>
The burst-normal value can be from 1 – 100000.
The burst-max value can be from 1 – 100000.
The lockup value can be from 1 – 10000.
The number of incoming ICMP packets per second are measured and compared to the threshold values as follows:
• If the number of ICMP packets exceeds the burst-normal value, the excess ICMP packets are dropped.
• If the number of ICMP packets exceeds the burst-max value, all ICMP packets are dropped for the number of seconds specified by the lockup value. When the lockup period expires, the packet counter is reset and
4 - 2

Protecting Against Denial of Service Attacks
measurement is restarted.
In the example above, if the number of ICMP packets received per second exceeds 5,000, the excess packets are dropped. If the number of ICMP packets received per second exceeds 10,000, the device drops all ICMP packets for the next 300 seconds (five minutes).
Protecting Against TCP SYN AttacksTCP SYN attacks exploit the process of how TCP connections are established in order to disrupt normal traffic flow. When a TCP connection starts, the connecting host first sends a TCP SYN packet to the destination host. The destination host responds with a SYN ACK packet, and the connecting host sends back an ACK packet. This process, known as a “TCP three-way handshake”, establishes the TCP connection.
While waiting for the connecting host to send an ACK packet, the destination host keeps track of the as-yet incomplete TCP connection in a connection queue. When the ACK packet is received, information about the connection is removed from the connection queue. Usually there is not much time between the destination host sending a SYN ACK packet and the source host sending an ACK packet, so the connection queue clears quickly.
In a TCP SYN attack, an attacker floods a host with TCP SYN packets that have random source IP addresses. For each of these TCP SYN packets, the destination host responds with a SYN ACK packet and adds information to the connection queue. However, since the source host does not exist, no ACK packet is sent back to the destination host, and an entry remains in the connection queue until it ages out (after around a minute). If the attacker sends enough TCP SYN packets, the connection queue can fill up, and service can be denied to legitimate TCP connections.
To protect against TCP SYN attacks, you can configure the HP device to drop TCP SYN packets when excessive numbers are encountered. You can set threshold values for TCP SYN packets that are targeted at the router itself or passing through an interface, and drop them when the thresholds are exceeded.
For example, to set threshold values for TCP SYN packets targeted at the router, enter the following command in CONFIG mode:
HP9300(config)# ip tcp burst-normal 10 burst-max 100 lockup 300
To set threshold values for TCP SYN packets received on interface 3/11:
HP9300(config)# int e 3/11HP9300(config-if-e100-3/11)# ip tcp burst-normal 10 burst-max 100 lockup 300
Syntax: ip tcp burst-normal <value> burst-max <value> lockup <seconds>
The burst-normal value can be from 1 – 100000.
The burst-max value can be from 1 – 100000.
The lockup value can be from 1 – 10000.
NOTE: The ip tcp burst-normal command is available at the global CONFIG level on both Chassis devices and NAs. The command is available at the interface level only on Chassis devices.
The number of incoming TCP SYN packets per second are measured and compared to the threshold values as follows:
• If the number of TCP SYN packets exceeds the burst-normal value, the excess TCP SYN packets are dropped.
• If the number of TCP SYN packets exceeds the burst-max value, all TCP SYN packets are dropped for the number of seconds specified by the lockup value. When the lockup period expires, the packet counter is reset and measurement is restarted.
In the example above, if the number of TCP SYN packets received per second exceeds 10, the excess packets are dropped. If the number of TCP SYN packets received per second exceeds 100, the device drops all TCP SYN packets for the next 300 seconds (five minutes).
4 - 3
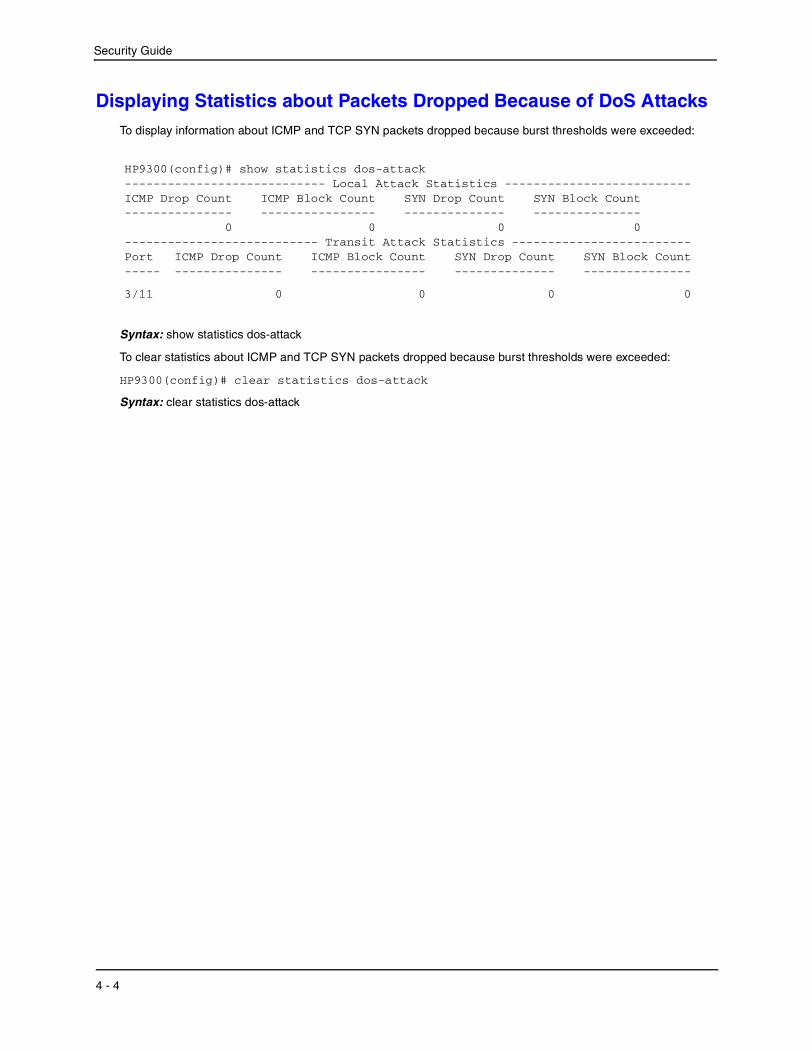
Security Guide
Displaying Statistics about Packets Dropped Because of DoS AttacksTo display information about ICMP and TCP SYN packets dropped because burst thresholds were exceeded:
Syntax: show statistics dos-attack
To clear statistics about ICMP and TCP SYN packets dropped because burst thresholds were exceeded:
HP9300(config)# clear statistics dos-attack
Syntax: clear statistics dos-attack
HP9300(config)# show statistics dos-attack---------------------------- Local Attack Statistics --------------------------ICMP Drop Count ICMP Block Count SYN Drop Count SYN Block Count--------------- ---------------- -------------- --------------- 0 0 0 0--------------------------- Transit Attack Statistics -------------------------Port ICMP Drop Count ICMP Block Count SYN Drop Count SYN Block Count----- --------------- ---------------- -------------- ---------------
3/11 0 0 0 0
4 - 4

Chapter 5Securing SNMP Access
Simple Network Management Protocol (SNMP) is a set of protocols for managing complex networks. SNMP sends messages, called protocol data units (PDUs), to different parts of a network. SNMP-compliant devices, called agents, store data about themselves in Management Information Bases (MIBs) and return this data to the SNMP requesters.
The chapter “Securing Access to Management Functions” on page 2-1 introduced a few methods used to secure SNMP access. They included the following:
• “Using ACLs to Restrict SNMP Access” on page 2-5
• “Restricting SNMP Access to a Specific IP Address” on page 2-6
• “Restricting SNMP Access to a Specific VLAN” on page 2-7
• “Disabling SNMP Access” on page 2-9
This chapter presents additional methods for securing SNMP access to HP devices. It contains the following sections:
• “Establishing SNMP Community Strings” on page 5-1
• “Using the User-Based Security Model” on page 5-5
• “Defining SNMP Views” on page 5-10
Restricting SNMP access using ACL, VLAN, or a specific IP address constitute the first level of defense when the packet arrives at an HP device. The next level uses one of the following methods:
• Community string match In SNMP versions 1 and 2
• User-based model in SNMP version 3
SNMP views are incorporated in community strings and the user-based model.
Establishing SNMP Community StringsSNMP versions 1 and 2 use community strings to restrict SNMP access. The default passwords for Web management access are the SNMP community strings configured on the device.
• The default read-only community string is “public”. To open a read-only Web management session, enter “get” and “public” for the user name and password.
• There is no default read-write community string. Thus, by default, you cannot open a read-write management session using the Web management interface. You first must configure a read-write community string using the CLI. Then you can log on using “set” as the user name and the read-write community string you configure
5 - 1
Security Guide
as the password.
You can configure as many additional read-only and read-write community strings as you need. The number of strings you can configure depends on the memory on the device. There is no practical limit.
The Web management interface supports only one read-write session at a time. When a read-write session is open on the Web management interface, subsequent sessions are read-only, even if the session login is “set” with a valid read-write password.
NOTE: If you delete the startup-config file, the device automatically re-adds the default “public” read-only community string the next time you load the software.
NOTE: As an alternative to the SNMP community strings, you can secure Web management access using local user accounts or ACLs. See “Setting Up Local User Accounts” on page 2-13 or “Using an ACL to Restrict Web Management Access” on page 2-5.
Encryption of SNMP Community Strings The software automatically encrypts SNMP community strings. Users with read-only access or who do not have access to management functions in the CLI cannot display the strings. For users with read-write access, the strings are encrypted in the CLI but are shown in the clear in the Web management interface.
Encryption is enabled by default. You can disable encryption for individual strings or trap receivers if desired. See the next section for information about encryption.
Adding an SNMP Community StringTo add a community string, use one of the following methods. When you add a community string, you can specify whether the string is encrypted or clear. By default, the string is encrypted.
USING THE CLI
To add an encrypted community string, enter commands such as the following:
HP9300(config)# snmp-server community private rwHP9300(config)# write memory
Syntax: snmp-server community [0 | 1] <string> ro | rw [ view <viewname> ] [ <standard-acl-name> | <standard-acl-id> ]
The <string> parameter specifies the community string name. The string can be up to 32 characters long.
The ro | rw parameter specifies whether the string is read-only (ro) or read-write (rw).
The 0 | 1 parameter affects encryption for display of the string in the running-config and the startup-config file. Encryption is enabled by default. When encryption is enabled, the community string is encrypted in the CLI regardless of the access level you are using. In the Web management interface, the community string is encrypted at the read-only access level but is visible at the read-write access level.
The encryption option can be omitted (the default) or can be one of the following:
• 0 – Disables encryption for the community string you specify with the command. The community string is shown as clear text in the running-config and the startup-config file. Use this option if you do not want the display of the community string to be encrypted.
• 1 – Assumes that the community string you enter is the encrypted form, and decrypts the value before using it.
5 - 2

Securing SNMP Access
NOTE: If you want the software to assume that the value you enter is the clear-text form, and to encrypt display of that form, do not enter 0 or 1. Instead, omit the encryption option and allow the software to use the default behavior.
If you specify encryption option 1, the software assumes that you are entering the encrypted form of the community string. In this case, the software decrypts the community string you enter before using the value for authentication. If you accidentally enter option 1 followed by the clear-text version of the community string, authentication will fail because the value used by the software will not match the value you intended to use.
The command in the example above adds the read-write SNMP community string “private”. When you save the new community string to the startup-config file (using the write memory command), the software adds the following command to the file:
snmp-server community 1 <encrypted-string> rw
To add an non-encrypted community string, you must explicitly specify that you do not want the software to encrypt the string. Here is an example:
HP9300(config)# snmp-server community 0 private rwHP9300(config)# write memory
The command in this example adds the string “private” in the clear, which means the string is displayed in the clear. When you save the new community string to the startup-config file, the software adds the following command to the file:
snmp-server community 0 private rw
The view <viewstring> parameter is optional. It allows you to associate a view to the members of this community string. Enter up to 32 alphanumeric characters. If no view is specified, access to the full MIB is granted. The view that you want must exist before you can associate it to a community string. Here is an example of how to use the view parameter in the community string command:
HP9300(config)# snmp-s community myread ro view sysview
The command in this example associates the view “sysview” to the community string named “myread”. The community string has read-only access to “sysview”. For information on how create views, see the section “Defining SNMP Views” on page 5-10.
The <standard-acl-name> | <standard-acl-id> parameter is optional. It allows you to specify which ACL group will be used to filter incoming SNMP packets. You can enter either the ACL name or its ID. Here are some examples:
HP9300(config) # snmp-s community myread ro view sysview 2HP9300(config) # snmp-s community myread ro view sysview myacl
The command in the first example indicates that ACL group 2 will filter incoming SNMP packets; whereas, the command in the second example uses the ACL group called “myacl” to filter incoming packets. See “Using ACLs to Restrict SNMP Access” on page 2-5 for more information.
USING THE WEB MANAGEMENT INTERFACE
NOTE: To make configuration changes, including changes involving SNMP community strings, you must first configure a read-write community string using the CLI. Alternatively, you must configure another authentication method and log on to the CLI using a valid password for that method.
To use the Web interface to add a community string, do the following:
1. Log on to the device using a valid user name and password for read-write access.
NOTE: If you have configured the device to secure Web management access using local user accounts, you must instead enter the user name and password of one of the user accounts. See “Setting Up Local User Accounts” on page 2-13.
2. Click the Management link on the System configuration panel to display the Management configuration panel.
5 - 3

Security Guide
3. Click the Community String link to display the SNMP Community String panel. This panel shows a list of configured community strings.
For example,
4. Click Add Community String to display the SNMP Community String fields.
5. Select the type of community string you are adding by clicking the "Get" or "Set" button. "Get" provides read-only access, while "Set" provides read-write access.
6. Enter the name of the community string.
7. Encryption is enabled by default. Remove the checkmark from the Encrypt box if you want to disable encryption of the string display. If you disable encryption, other users can view the community string.
To re-enable encryption, place a checkmark in the Encrypt box.
8. Enter a name for the view that will be assigned to the community string.
9. Enter the number of the ACL that will be used to filter SNMP packets for this community string.
NOTE: In this release, ACL by name is not supported in the Web Interface.
Here is an example of a completed form.
5 - 4

Securing SNMP Access
10. Click Add to apply the change to the device’s running-config file.
11. Select the Save link at the bottom of the panel. Select Yes when prompted to save the configuration change to the startup-config file on the device’s flash memory.
Displaying the SNMP Community StringsTo display the SNMP community strings, use one of the following methods.
USING THE CLI
To display the configured community strings, enter the following command at any CLI level:
HP9300(config)# show snmp server
Syntax: show snmp server
See the Command Line Interface Reference for an example of the information displayed by the command.
NOTE: If display of the strings is encrypted, the strings are not displayed. Encryption is enabled by default.
USING THE WEB MANAGEMENT INTERFACE
1. Log on to the device using a valid user name and password for read-write access.
2. Select the Management link from the System configuration panel to display the Management configuration panel.
3. Select the Community String link to display the SNMP Community String panel, as shown in the following example.
Using the User-Based Security Model
SNMP version 3 (RFC 2570 through 2575) introduces a User-Based Security model (RFC 2574) for authentication and privacy services.
SNMP version 1 and version 2 use community strings to authenticate SNMP access to management modules. This method can still be used for authentication. In SNMP version 3, the User-Based Security model of SNMP can be used to secure against the following threats:
• Modification of information
• Masquerading the identity of an authorized entity
• Message stream modification
5 - 5

Security Guide
• Disclosure of information
NOTE: The privacy portion of the User-Based Security model is currently not supported.
Furthermore, SNMP version 3 supports View-Based Access Control Mechanism (RFC 2575) to control access at the PDU level. It defines mechanisms for determining whether or not access to a managed object in a local MIB by a remote principal should be allowed. (See the section “Defining SNMP Views” on page 5-10.)
NOTE: SNMP version 3 Notification is not supported at this time. The system will generate traps in SNMP version 1 format, just as in earlier releases.
Configuring Your NMSTo be able to use the SNMP version 3 features:
1. Make sure that your Network Manager System (NMS) supports SNMP version 3.
2. Configure your NMS agent with the necessary users.
3. Configure the SNMP version 3 features in HP devices.
Configuring SNMP Version 3 on HP DevicesTo configure SNMP version 3 on HP devices, do the following:
1. Enter an engine ID for the management module using the snmp-server engineid command if you will not use the default engine ID. See “Defining the Engine ID” on page 5-6.
2. Create views that will be assigned to SNMP user groups using the snmp-server view command. See the “Defining SNMP Views” on page 5-10 for details.
3. Create ACL groups that will be assigned to SNMP user groups using the access-list command. Refer to the Command Line Interface Reference for details.
4. Create user groups using the snmp-server group command. See “Defining an SNMP Group” on page 5-7.
5. Create user accounts and associate these accounts to user groups using the snmp-server user command. See “Defining an SNMP User Account” on page 5-8.
NOTE: In this release, configuration of SNMP version 3 features is done using the CLI. No Web Interface or SNMP interface is available.
If SNMP version 3 is not configured, then community strings by default are used to authenticate access.
Defining the Engine IDA default engine ID is generated during system start up. To determine what the default engine ID of the device is, enter the show snmp engineid command and find the following line.
Local SNMP Engine ID: 800007c70300e05290ab60
See the section “Displaying the Engine ID” on page 5-8 for details.
The default engine ID guarantees the uniqueness of the engine ID for SNMP version 3. If you want to change the default engine ID, enter a command such as the following:
HP9300(config)# snmp-server engineid local 800007c70300e05290ab60
Syntax: [no] snmp-server engineid local <hex-string>
The local parameter indicates that engine ID to be entered is the ID of this device, representing an SNMP management entity.
5 - 6

Securing SNMP Access
NOTE: Since the current implementation of SNMP version 3 does not support Notification, remote engine IDs cannot be configured at this time.
The <hex-string> variable consists of 11 octets, entered as hexadecimal values. There are two hexadecimal characters in each octet. There should be an even number of hexadecimal characters in an engine ID.
The default engine ID has a maximum of 11 octets:
• Octets 1 through 4 represent the agent's SNMP management private enterprise number as assigned by the Internet Assigned Numbers Authority (IANA). The most significant bit of Octet 1 is "1".
• Octet 5 is always 03 in hexadecimal and indicates that the next set of values represent a MAC address.
• Octets 6 through 11 form the MAC address of the lowest port in the management module.
NOTE: Engine ID must be a unique number among the various SNMP engines in the management domain. Using the default engine ID ensures the uniqueness of the numbers.
Defining an SNMP GroupSNMP groups map SNMP users to SNMP views. For each SNMP group, you can configure a read view, a write view, or both. Users who are mapped to a group will use its views for access control.
To configure an SNMP user group, enter a command such as the following:
HP9300(config)# snmp-server group admin v3 auth read v1default write v1default
Syntax: [no] snmp-server group <groupname> v1 | v2 | v3 auth | noauth [access <standard-acl-id>] [read <viewstring> | write <viewstring>]
NOTE: This command is not used for SNMP version 1 and SNMP version 2. In these versions, groups and group views are created internally using community strings. (See “Establishing SNMP Community Strings” on page 5-1.) When a community string is created, two groups are created, based on the community string name. One group is for SNMP version 1 packets, while the other is for SNMP version 2 packets.
The group <groupname> parameter defines the name of the SNMP group to be created.
The v1, v2, or v3 parameter indicates which version of SNMP is used. In most cases, you will be using v3, since groups are automatically created in SNMP versions 1 and 2 from community strings.
The auth | noauth parameter determines whether or not authentication will be required to access the supported views. If auth is selected, then only authenticated packets are allowed to access the view specified for the user group. Selecting noauth means that no authentication is required to access the specified view.
The access <standard-acl-id> parameter is optional. It allows incoming SNMP packets to be filtered based on the standard ACL attached to the group.
The read <viewstring> | write <viewstring> parameter is optional. It indicates that users who belong to this group have either read or write access to the MIB.
The <viewstring> variable is the name of the view to which the SNMP group members have access. If no view is specified, then the group has no access to the MIB.
The value of <viewstring> is defined using the snmp-server view command. The SNMP agent comes with the "v1default" view, the default view that provides access to the entire MIB; however, it must be specified when creating the group. The "v1default" view also allows SNMP version 3 to be backwards compatibility with SNMP version 1 and version 2.
5 - 7

Security Guide
NOTE: If you will be using a view other than the "v1default" view, that view must be configured before creating the user group. See the section “Defining SNMP Views” on page 5-10, especially for details on the include | exclude parameters.
Defining an SNMP User AccountThe snmp-server user command does the following:
• Creates an SNMP user.
• Defines the group to which the user will be associated.
• Defines the type of authentication to be used for SNMP access by this user.
Here is an example of how to create the account:
HP9300(config)# snmp-s user bob admin v3 access 2 encrypted auth md5 md5authstring
Syntax: [no] snmp-server user <name> <groupname> v3 [[access <standard-acl-id>] [encrypted] [auth md5 <md5-password> | sha <sha-password>]]
The <name> parameter defines the SNMP user name or ID used to access the management module. This may be the login ID for an SNMP management system.
The <groupname> parameter identifies the SNMP group to which this user is associated or mapped. All users must be mapped to an SNMP group. Groups are defined using the snmp-server group command.
NOTE: The SNMP group to which the user account will be mapped should be configured before creating the user accounts; otherwise, the group will be created without any views. Also, ACL groups must be configured before configuring user accounts.
The v3 parameter is required.
The access <standard-acl-id> parameter is optional. It indicates that incoming SNMP packets are filtered based on the ACL attached to the user account.
NOTE: The ACL specified in a user account overrides the ACL assigned to the group to which the user is mapped. If no ACL is entered for the user account, then the ACL configured for the group will be used to filter packets.
See the section “Using ACLs to Restrict SNMP Access” on page 2-5 for more information.
The encrypted parameter means that the MD5 or SHA password will be a digest value. MD5 has 16 octets in the digest. SHA has 20. The digest string has to be entered as a hexadecimal string. In this case, the agent need not generate any explicit digest. If the encrypted parameter is not used, the user is expected to enter the authentication password string for MD5 or SHA. The agent will convert the password string to a digest, using the local engine ID as a parameter.
The auth md5 | sha parameter is optional. It defines the type of encryption that the user must have to be authenticated. Choose between MD5 or SHA encryption.
The <md5-password> and <sha-password> define the password the user must use to be authenticated. These password must have a minimum of 8 characters. If the encrypted parameter is used, then the digest has 16 octets for MD5 or 20 octets for SHA.
NOTE: Once a password string is entered, the generated configuration displays the digest (for security reasons), not the actual password.
Displaying the Engine IDTo display the engine ID of a management module, enter a command such as the following:
5 - 8

Securing SNMP Access
HP9300(config)# show snmp engineidLocal SNMP Engine ID: 800007c70300e05290ab60Engine Boots: 0Engine time: 0
Syntax: show snmp engineid
NOTE: “Engine Boots” and “Engine time” are not supported.
Displaying SNMP GroupsTo display the definition of an SNMP group, enter a command such as the following:
HP9300(config)# show snmp groupgroupname = exceptifgrpsecurity model = v3security level = authNoPrivACL id = 2readview = exceptifwriteview = <none>
Syntax: show snmp group
The value for security level can be one of the following:
Displaying User InformationTo display the definition of an SNMP user account, enter a command such as the following:
HP9300(config)# show snmp userusername = bobacl id = 5group = exceptifgrpsecurity model = v3group acl id = 2authtype = md5privtype = noneauthkey = a785ccc96e0e21d06aa817ad28867213engineID= 800007c70300e05290ab60
Syntax: show snmp user
NOTE: Since the privacy portion of the User-Based Security model is currently not supported, privtype shows “none”.
Security Level Authentication
<none> If the security model shows v1 or v2, then security level is blank. User names are not used to authenticate users; community strings are used instead.
noauthNoPriv Displays if the security model shows v3 and user authentication is by user name only.
authNoPriv Displays if the security model shows v3 and user authentication is by user name and the MD5 or SHA algorithm.
5 - 9
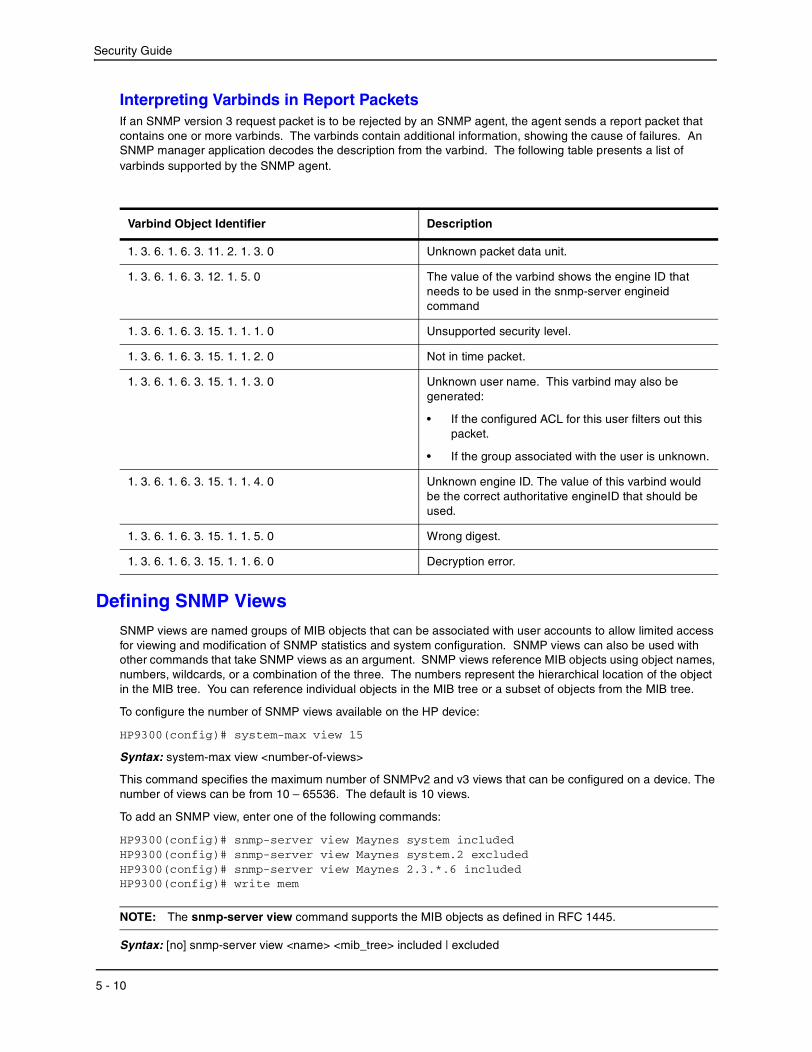
Security Guide
Interpreting Varbinds in Report PacketsIf an SNMP version 3 request packet is to be rejected by an SNMP agent, the agent sends a report packet that contains one or more varbinds. The varbinds contain additional information, showing the cause of failures. An SNMP manager application decodes the description from the varbind. The following table presents a list of varbinds supported by the SNMP agent.
Defining SNMP ViewsSNMP views are named groups of MIB objects that can be associated with user accounts to allow limited access for viewing and modification of SNMP statistics and system configuration. SNMP views can also be used with other commands that take SNMP views as an argument. SNMP views reference MIB objects using object names, numbers, wildcards, or a combination of the three. The numbers represent the hierarchical location of the object in the MIB tree. You can reference individual objects in the MIB tree or a subset of objects from the MIB tree.
To configure the number of SNMP views available on the HP device:
HP9300(config)# system-max view 15
Syntax: system-max view <number-of-views>
This command specifies the maximum number of SNMPv2 and v3 views that can be configured on a device. The number of views can be from 10 – 65536. The default is 10 views.
To add an SNMP view, enter one of the following commands:
HP9300(config)# snmp-server view Maynes system includedHP9300(config)# snmp-server view Maynes system.2 excludedHP9300(config)# snmp-server view Maynes 2.3.*.6 includedHP9300(config)# write mem
NOTE: The snmp-server view command supports the MIB objects as defined in RFC 1445.
Syntax: [no] snmp-server view <name> <mib_tree> included | excluded
Varbind Object Identifier Description
1. 3. 6. 1. 6. 3. 11. 2. 1. 3. 0 Unknown packet data unit.
1. 3. 6. 1. 6. 3. 12. 1. 5. 0 The value of the varbind shows the engine ID that needs to be used in the snmp-server engineid command
1. 3. 6. 1. 6. 3. 15. 1. 1. 1. 0 Unsupported security level.
1. 3. 6. 1. 6. 3. 15. 1. 1. 2. 0 Not in time packet.
1. 3. 6. 1. 6. 3. 15. 1. 1. 3. 0 Unknown user name. This varbind may also be generated:
• If the configured ACL for this user filters out this packet.
• If the group associated with the user is unknown.
1. 3. 6. 1. 6. 3. 15. 1. 1. 4. 0 Unknown engine ID. The value of this varbind would be the correct authoritative engineID that should be used.
1. 3. 6. 1. 6. 3. 15. 1. 1. 5. 0 Wrong digest.
1. 3. 6. 1. 6. 3. 15. 1. 1. 6. 0 Decryption error.
5 - 10

Securing SNMP Access
The <name> parameter can be any alphanumeric name you choose to identify the view. The names cannot contain spaces.
The <mib_tree> parameter is the name of the MIB object or family. MIB objects and MIB sub-trees can be identified by a name or by the numbers called Object Identifiers (OIDs) that represent the position of the object or sub-tree in the MIB hierarchy. You can use a wildcard (*) in the numbers to specify a sub-tree family.
The included | excluded parameter specifies whether the MIB objects identified by the <mib_family> parameter are included in the view or excluded from the view.
NOTE: All MIB objects are automatically excluded from any view unless they are explicitly included; therefore, when creating views using the snmp-server view command, indicate which portion of the MIB you want users to access.
To delete a view, use the no parameter before the command.
5 - 11

Security Guide
5 - 12

Index
AAccess
CLIaugmenting privilege level 2-11
local user account 2-13lost password 2-12RADIUS 2-32SNMP
configuring 5-1IP ACL 2-5restricting 2-5
TACACS/TACACS+ 2-15Telnet
setting password 2-10Web management interface 5-1
disabling 2-8ACL
SNMP access 2-5Telnet access 2-4Web management 2-4, 2-5
Authentication-method list 2-48
CCLI
local user account 2-13privilege level
augmenting 2-11Community string
configuring 5-1encryption 5-2
Configuringsecurity 2-1
Conventionsmanual 1-1
EEncryption
password 2-13SNMP community string 5-2
engine ID 5-6, 5-8
GGetting Help 1-3Grounding 1-ii
HHelp
getting 1-3
IIP ACL
securing access 2-4SNMP access 2-5Telnet access 2-4Web management 2-4, 2-5
IP addresssecurity 2-5
LLocal user account 2-13
MManual nomenclature 1-1
PPassword 2-1
encryption 2-13lost
accessing the device 2-12Telnet 2-1, 2-10
Privilege levelaugmenting 2-11
RRADIUS 2-1, 2-32Read-write community string
no default 5-2
Index - 1

Security Guide
SSecure Shell 3-1Security 2-1
Authentication-method list 2-48IP ACL 2-4IP address 2-5local user account 2-13RADIUS 2-32Secure Shell 3-1SNMP
IP ACL 2-5TACACS/TACACS+ 2-15Telnet
IP ACL 2-4Web management interface
IP ACL 2-4, 2-5Service 1-iiSNMP
ACL 5-7, 5-8community string 2-1
configuring 5-1encryption 5-2
community strings and user groups 5-7encryption 5-8engine ID 5-6, 5-8security
IP ACL 2-5user 5-9user account 5-8user group 5-8user groups 5-7, 5-9user-based model 5-5varbinds 5-10views 5-7, 5-10
SSH 3-1
TTACACS/TACACS+ 2-1, 2-15Telnet
local user account 2-13password 2-10security
IP ACL 2-4
Uuser 5-9User account 2-1user account 5-8user groups 5-7, 5-9
Vviews 5-10
WWaldo
where is 2-14
Warranty 1-iiWeb management interface
access 5-1disabling 2-8
local user account 2-13security
IP ACL 2-4, 2-5
Index - 2

Technical information in this document is subject to changewithout notice.
©Copyright Hewlett-Packard Company 2000-2002. Allrights reserved. Reproduction, adaptation, or translationwithout prior written permission is prohibited except asallowed under the copyright laws.
Manual Part Number5990-3042
Related Documents