How to Use this Guide Map Icons • As you travel through Tamriel while playing The Elder Scrolls Online, you will encounter various locales and landmarks that are marked by different icons on your map. Below is a list of the different icons that you might come across on your journey. TOWN ICONS: A list of icons that you may encounter when inside settlements. Mage’s Guild: The Mage’s Guild Headquarters in the town. Fighter’s Guild: The Fighter’s Guild Headquarters in the town. Bank: A place where you can access your personal and guild bank. Clothier: A place to buy Medium or Light Armor, usually also the location of the Tailoring Station. Armory: A place to buy Weapons and Heavy Armor. Inn / Tavern: A place to buy Food and Beverages, usually also the location of a Cooking Fire. Merchant: A place to buy Potions, Healing Kits and miscellaneous items. Stable: A place to buy, feed or store Mounts.

Welcome message from author
This document is posted to help you gain knowledge. Please leave a comment to let me know what you think about it! Share it to your friends and learn new things together.
Transcript

How to Use this Guide Map Icons
• As you travel through Tamriel while playing The Elder Scrolls Online, you will encounter various locales and landmarks that are marked by different icons on your map. Below is a list of the different icons that you might come across on your journey.
TOWN ICONS: A list of icons that you may encounter when inside settlements.
Mage’s Guild: The Mage’s Guild Headquarters in the town.
Fighter’s Guild: The Fighter’s Guild Headquarters in the town.
Bank: A place where you can access your personal and guild bank.
Clothier: A place to buy Medium or Light Armor, usually also the location of the Tailoring Station.
Armory: A place to buy Weapons and Heavy Armor.
Inn / Tavern: A place to buy Food and Beverages, usually also the location of a Cooking Fire.
Merchant: A place to buy Potions, Healing Kits and miscellaneous items.
Stable: A place to buy, feed or store Mounts.

Blacksmith: A place to craft Metal Weapons and Armor, usually also the location of the Tailoring Station, unless a separate location is present.
Woodworking: A place to craft Wooden Weapons and Shields.
Enchanting Shop: A place to buy Enchantments and also the location of the Enchanting Table. Can also be the location of the Alchemy Table unless a separate location is present.
Alchemy Shop: A place to buy Potions and is the location of the Alchemy Table. Can also be the location of the Enchanting Table unless a separate location is present.
Clothier: A place to buy Light Armor and is the location of the Tailoring Station unless another location is present.
Rededication Shrine: A place to reset your skills for a price (located in the City of Wayrest in the region of Stormhaven).
WILDERNESS: A list of icons you may encounter while travelling in the wilderness.
Tower: An old but intact tower location.
Ruined Tower: A site of the ruins of an old tower and is usually the location of an underground dungeon.
Mines: A large system of mining tunnels.

Lighthouse: A lighthouse location.
Crypts: Above or below ground burial chambers and crypts.
Aylied Ruins: Above ground Aylied ruins.
Battlezone: An open area with ongoing combat between two factions (usually NPC’s).
Farmland: A large tract of farms or a plantation.
Grotto / Grove: An area controlled by either Wood Elves or a Wyrd Coven.
Caves: A large cave system.
Docks: A Shipyard. This location can also be a travel point to new regions.
Towns: A small inhabited area, usually a place where Merchants and Crafting Stations can be located.
City: A large inhabited area, usually the location of the region’s King or Queen and is a Merchant and Crafting Hub.
Mundus Stones: A place where you can gain Boons (a bonus to your attributes). Only one Boon can be active at any one time.
Points of Interest: An exploration location that will give you Exploration Experience when visited.

Set Crafting Stations: A place where you can craft Set Armor and Weapons with bonus attributes and abilities.
Dolmens: A location that will spawn a Dark Anchor at regular intervals.
World Boss: A location that will spawn powerful enemies that usually takes a group to defeat.
Public Dungeon: A non-instanced dungeon that can be taken on by solo players.
Dungeon Plus: A non-instanced dungeon that usually requires a group of people to beat.
Group Dungeon: An instance dungeon that requires a 4-man party to defeat.
Wayshrines: Fast Travel locations where you can instantly teleport to for a price (if out on the wilderness) or for free (if using another Wayshrine). Players killed during combat may spawn at the nearest Wayshrine.
Exploration • We have included all major discoveries and quest solutions in this guide, but many things
in the Elder Scrolls Online are random spawns, such as loot from various containers, Skill Books, Racial Armor Books, some treasure chests, and so on. The more time you take to explore every area, the more crafting materials, treasures, and skill increases you'll obtain.
• Some bookshelves contain skill books that automatically levels a certain skill by 1 point (unless that skill is already at max level), be sure to investigate bookshelves when you come across them, as you never know if a skill book can be found on the shelves!
• Treasure Chests may randomly spawn in certain areas of the map, so be sure to keep an eye out for them. Opening Treasure Chests will give you experience and help you level up faster, not to mention the gold and equipment that they contain.
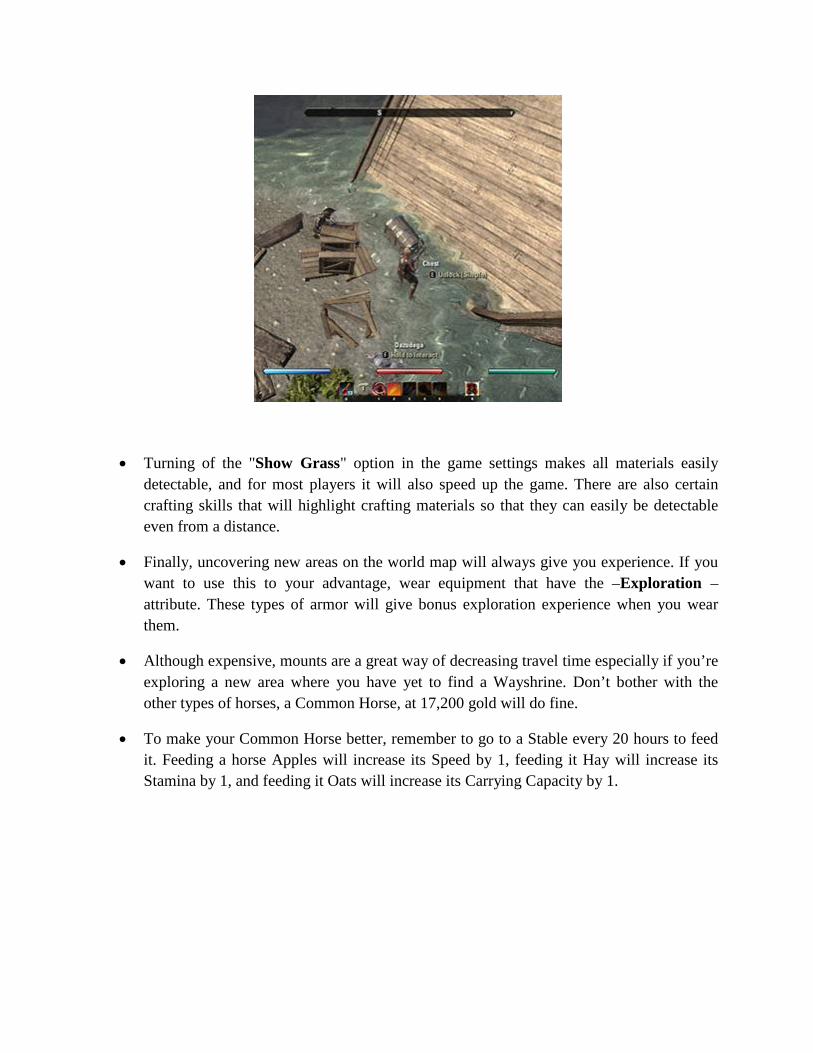
• Turning of the "Show Grass" option in the game settings makes all materials easily detectable, and for most players it will also speed up the game. There are also certain crafting skills that will highlight crafting materials so that they can easily be detectable even from a distance.
• Finally, uncovering new areas on the world map will always give you experience. If you want to use this to your advantage, wear equipment that have the –Exploration – attribute. These types of armor will give bonus exploration experience when you wear them.
• Although expensive, mounts are a great way of decreasing travel time especially if you’re exploring a new area where you have yet to find a Wayshrine. Don’t bother with the other types of horses, a Common Horse, at 17,200 gold will do fine.
• To make your Common Horse better, remember to go to a Stable every 20 hours to feed it. Feeding a horse Apples will increase its Speed by 1, feeding it Hay will increase its Stamina by 1, and feeding it Oats will increase its Carrying Capacity by 1.

Combat • We've created these guides in a way that you should be able to complete quests easily and
level quickly, hence the fights should not be too complicated at anytime. However, there are a few combat tips you need to keep in mind to speed up your leveling process even more.
• A good rule of thumb when facing multiple opponents is to take down Casters (especially Healers) first. Always keep an eye open for AoE-effects such as an archer's barrage and move out of them when you find yourself in an area marked red.
• If you have an ability that can stun or daze an enemy, time it so that you cast the skill when they are about to perform one of their skills (as indicated by the red areas that appear during fights). Not only would this cancel their ability, it will leave them open for a follow up spell or a heavy blow that will often leave them prone.
• Save your ultimate ability for tricky situations and don't waste it in simple fights.
• Keep health potions in your quick slot and press "Q" whenever you need a health boost.
• World Bosses or Group Bosses are scattered around the word of Tamriel. If you can bring a friend or even just ask a stranger to help take them down, it can be quite a lucrative venture. World Bosses will often drop Soul Gems along with gold and powerful equipment.
• Group Dungeons are a great way to level up and collect loot if you can form a party to tackle them. Some Group Dungeons are instanced and will only allow one party per

instance. Some Group Dungeons (Dungeon Plus) are open to enter by any number of people.
• Save the Soulgems that you come across. They’re quite useful for resurrecting yourself or another player at the location that you died, especially if the nearest Wayshrine is quite a distance away.
• Don’t discount the effectiveness of Food and Beverages. The additional stat boosts that a food or a Beverage can provide may mean the difference between success and defeat especially in a more challenging battle. Take a quick trip to the Inn or Tavern and buy a stack of Food or Beverages for your use or make some of your own with the cooking skill. Remember though, only one Food or Beverage effect can be active at any one time. Eating or drinking another Food or Beverage will supercede the last active effect.
Skills and Attributes • If you don't waste points on less important profession skills you can level all professions
successfully and still have all the combat skills you need maxed out.
• If you feel like you want to re-assign your skills or attributes, there is a Rededication Shrine in each faction where you can pay to do so, although this is quite expensive, at 100 gold per used skill / attribute point. For example, if you have 25 points already assigned in your skills, you will have to pay 2,500 gold to reset. Think carefully before you assign a skill or attribute point to avoid this.

Crafting • While an exhaustive guide to crafting materials, recipes, and discoveries can be found
separately in our Crafting Guide, there are three materials that most adventurers will want to start collecting right away - Jute, Rawhide Scraps, and Iron Ore, used to make the various kinds of basic armor and weaponry in the game.
• Buying armor from vendors early on isn't recommended, since gold is hard to come by at lower levels and vendor prices are incredibly expensive. Adventurers who collect these materials as they travel will easily have enough to make a quality set of armor without having to spend time scouring the terrain or wasting hard earned gold.
• Always extract any armor or weaponry you obtain from exploring or questing instead of selling it - the basic materials, rare materials, and items to improve quality that you'll get from doing so far outweigh the benefits of simply trading them in for gold.
• Jute is a tall, orange flowered plant that can be harvested for making Light Armor. • Rawhide Scraps are obtained from killing beasts such as Mudcrabs and Alit, and can be
used to make Medium Armor. • Iron Ore is collected from metallic-looking lumps that can easily be mistaken for rocks
at first. It's used for crafting Heavy Armor and Weapons. • Even if you have no interest in crafting, these three materials are easy to quickly
accumulate on your travels, and can add up to a steady supply of gold in the early stages of the game.
• Around Tamriel, there are hidden Crafting Locations where you can create Set Armor and Weapons that give additional attributes the more items that you equip. Be sure to visit these locations to see if the set armor can be beneficial to your playstyle.

• Armor can also be improved either by increasing its quality using Tempers, or by giving it Traits that can be unlocked by Researching. If you come across weapons or armor with Traits, see if you can research the Trait first before selling or de-constructing them.

Skyshards, Wayshrines, and Mundus Stones • New to the Elder Scrolls, Skyshards are special items you can interact with to obtain extra
Skill Points for your character. Wayshrines allow fast travel between themselves, saving you time and effort in your travels, and Mundus Stones offer special perks and bonuses to a player depending on the one they have currently selected. In this guide, all Skyshards are listed on the table of contents for easy reference.
• Mundus Stones give special Boons depending on which type of Mundus Stone is currently active. The Boons that each Mundus Stone gives are as follows:
• The Apprentice: Increases Spell Penetration
• The Atronarch: Increases Magicka Generation.
• The Lady: Increases Armor.
• The Lord: Increases maximum Health.
• The Lover: Reduces damage taken from spells.
• The Mage: Increases maximum Magicka.
• The Ritual: Increases Healing Effectiveness.
• The Serpent: Increases non-combat Health Regeneration.
• The Shadow: Increases Critical Strike Damage.
• The Steed: Increases Run Speed.
• The Thief: Increases Critical Chance.
• The Tower: Increases maximum Stamina.
• The Warrior: Increases Power.
• Remember that only one Mundus Stone Boon can be active at any time.
Quests at a Glance Each area has its quests organized so a player can complete them with as little wasted effort and backtracking as possible. Because of this, some quests will have multiple parts to them in different sections of the guide. Any quests split up in the manner can be easily found by searching for their unique Quest Number - for example, The Broken Spearhead starts in 2.1. and then continues in 2.2. later.
Quests are color-coded for easy reference with the following colors:
Purple: Indicates friendly NPC's or enemies who won't attack you/are unkillable.
Red: Indicates killable enemies and bosses who will attack you.
Orange: Indicates items such as levers, puzzles, etc. that must be interacted with.
Green: Indicates items that must be collected for Quests, with the number of items needed indicated in brackets.
Light Blue: Indicates Skyshards.
Dark Blue: Indicates the name of a Quest.
All quests include step-by-step instructions with detailed maps and pictures to show you exactly where to go and what to grab on the way. They also include detailed descriptions and stats on the rewards offered upon completing them, as well as any significant side objectives or landmarks you should look out for while completing each quest.
The Ebonheart Pact Quests Coldharbour Tutorial Quests Level 1 Level 2 1. Soul Shriven in Coldharbour (Main Story Quest) Level 3 Davon’s Watch Intro 2. Mages Guild Invitation (Mages Guild Quest)
3.1. Long Lost Lore (Mages Guild Quest) 4. The Wizard’s Tome (Side Quest) 5. Fighters Guild Invitation (Fighter’s Guild Quest) 6.1. Anchors from the Harbour (Fighter’s Guild Quest) 7.1. Exquisite Tears (Side Quest) 8.1. One of the Undaunted (Undaunted Guild Quest) 7.2. Exquisite Tears (Side Quest)
Level 4 Bleakrock Isle Quests 9.1. A Beginning at Bleackrock (Main Story Quest) 10. Tracking the Game (Side Quest) 9.2. A Beginning at Bleackrock (Main Story Quest) 11. What Waits Beneath (Side Quest) -Bleakrock Isle Skyshard 1/3 Level 5 12.1 The Missing of Bleakrock (Side Quest)
13. At Frost’s Edge (Side Quest) 14.1. Underfloot (Side Quest) 15. The Frozen Man (Side Quest)

-Bleakrock Isle Skyshard 2/3 14.2. Underfloot (Side Quest) 16. Dangerous Webs (Side Quest)
17. Hozzin’s Folley (Side Quest) -Bleakrock Isle Skyshard 3/3
Level 6 18.1. Lost on Bleakrock (Side Quest) 14.3. Underfloot (Side Quest) 18.2. Lost on Bleakrock (Side Quest)
14.4. Underfloot (Side Quest) 12.2. The Missing of Bleakrock (Side Quest) 19. Sparking the Flame (Side Quest) 20. Escape From Bleakrock (Side Quest) Bal Foyen Quests
21.1. If By Sea (Side Quest) 22.1. Finding the Family (Side Quest)
-Bal Foyen Skyshard 1/3 -Bal Foyen Skyshard 2/3
23.1. Unorthodox Tactics (Side Quest) 24.1. Salt of the Earth (Side Quest) 22.2. Finding the Family (Side Quest) 24.2. Salt of the Earth (Side Quest) 22.3. Finding the Family (Side Quest) 23.2. Unorthodox Tactics (Side Quest) 24.3. Salt of the Earth (Side Quest) 21.2. If By Sea (Side Quest) 25. The Bard of Hounds (Side Quest)
Level 7 21.3. If By Sea (Side Quest) 26. Crossroads (Side Quest) 27. Breaking the Tide (Side Quest)
-Bal Foyen Skyshard 3/3

28.1. Warning Davon’s Watch (Side Quest) Stonefalls Quests
-Stonefalls Skyshard 1/16 29.1 The Harborage (Main Story Quest) 28.2. Warning Davon’s Watch (Side Quest) 30. Legacy of the Ancestors (Side Quest) 31. Delaying the Daggers (Side Quest) -Stonefalls Skyshard 2/16 32. City Under Siege (Side Quest) 33.1. Quiet the Ringing Bell (Side Quest) 34.1. Through the Aftermath (Side Quest) 35. Enslaved in Death (Side Quest)
Level 8 36.1. The Fate of a Friend (Side Quest) 34.2. Through the Aftermath (Side Quest) 37.1. Giving for the Greater Good (Side Quest) 6.2. Anchors from the Harbour (Fighter’s Guild Quest) 37.2. Giving for the Greater Good (Side Quest) 29.2. The Harborage (Main Story Quest) 3.2. Long Lost Lore (Mages Guild Quest)
-Stonefalls Skyshard 3/16 36.2. The Fate of a Friend (Side Quest) 3.3. Long Lost Lore (Mages Guild Quest)
Level 9 6.3. Anchors from the Harbour (Fighter’s Guild Quest) 38.1. Proving Trust (Side Quest)
39.1. Percussive Ranching (Side Quest) 38.2. Proving Trust (Side Quest) 39.2. Percussive Ranching (Side Quest) 40. Wake the Dead (Side Quest) 41. Rending Flames (Side Quest) 42.1. To Ash Mountain (Side Quest)
43. Quieting a Heart (Side Quest) 30.2. Quiet the Ringing Bell (Side Quest) 42.2. To Ash Mountain (Side Quest) 44.1. Restoring the Guardians (Side Quest) 45.1. Close the Scamp Caves (Side Quest) 44.2. Restoring the Guardians (Side Quest) 45.2. Close the Scamp Caves (Side Quest) 44.3. Restoring the Guardians (Side Quest) 46. The Death of Balreth (Side Quest)
Level 10 47.1. In With the Tide (Side Quest) 48. Daughters of Giants (Side Quest) 49. Desperate Souls (Side Quest) -Stonefalls Skyshard 4/16 50.1. Savages of Stonefall (Side Quest) 6.4. Anchors from the Harbour (Fighter’s Guild Quest) 51.1. Restoring Order (Side Quest) 50.2. Savages of Stonefall (Side Quest) 51.2. Restoring Order (Side Quest) 52. A Bit of Sport (Side Quest) 53.1. Night of the Soul (Side Quest) 54. Taking the Tower (Side Quest) 55. The Sapling (Side Quest) 53.2. Night of the Soul (Main Story Quest) 6.5. Anchors from the Harbour (Fighter’s Guild Quest)
Level 11 51.3. Restoring Order (Side Quest) 56.1. The Dangerous Past (Fighter’s Guild Quest) -Stonefalls Skyshard 5/16 57.1. A Son’s Promise (Side Quest) -Stonefalls Skyshard 6/16 58. Decree of the Court (Side Quest) 57.2. A Son’s Promise (Side Quest) 59. Suspicious Silence (Side Quest)
-Stonefalls Skyshard 7/16 60. The Venom of Ahknara (Side Quest)
Level 12 61. Window on the Past (Side Quest) 62. The Brothers Will Rise (Side Quest) -Stonefalls Skyshard 8/16 63.1. The Coral Heart (Side Quest) 47.2. In With the Tide (Side Quest) 63.2. The Coral Heart (Side Quest) 64.1. Cleansing the Past (Side Quest) 63.3. The Coral Heart (Side Quest) 65.1. To Fort Virak (Side Quest) 64.2. Cleansing the Past (Side Quest) 66.1. Peril at the Pools (Side Quest) 67. Recovering the Guar (Side Quest) 66.2. Peril at the Pools (Side Quest) -Stonefalls Skyshard 9/16
Level 13 68. The Truth About Spiders (Side Quest) -Stonefalls Skyshard 10/16 50.3. Savages of Stonefall (Side Quest) 69. The Truth About Spiders (Side Quest) 70. Kinsman’s Revenge (Side Quest) -Stonefalls Skyshard 11/16 71.1. Hunting Invaders (Side Quest) 72.1. Enlightenment Needs Salt (Side Quest) 71.2. Hunting Invaders (Side Quest) 72.2. Enlightenment Needs Salt (Side Quest) 71.3. Hunting Invaders (Side Quest) 72.3. Enlightenment Needs Salt (Side Quest)
Level 14 73. A Storm Broken (Side Quest) 74.1. Simply Misplaced (Mage’s Guild Quest) 65.2. To Fort Virak (Side Quest) 75. Breaking Fort Virak (Side Quest)

76. Evening The Odds (Side Quest) 77. The General’s Demise (Side Quest) 78.1. City at the Spire (Side Quest)
-Stonefalls Skyshard 12/16 79. The Curse of Heimlyn’s Keep (Side Quest) 80. What Was Done Must Be Undone (Side Quest)
Level 15 81. Chasing Shadows (Main Story Quest) 8.2. One of the Undaunted (Undaunted Guild Quest)
-Stonefalls Skyshard 13/16 82. From the Wastes (Side Quest) 83. Divine Favor (Side Quest) 84. Undermined (Side Quest) 85. An Unwanted Twin (Side Quest) 86.1. Shattering Mirror (Side Quest) 87.1. A Story Told in Footprints (Side Quest) 86.2. Shattering Mirror (Side Quest) 87.2. A Story Told in Footprints (Side Quest)
Level 16 88. Darkvale Brews (Side Quest)
-Stonefalls Skyshard 14/16 78.2. City at the Spire (Side Quest) 89.1. Aggressive Negotiations (Side Quest) 90.1. This One’s a Classic (Side Quest) 89.2. Aggressive Negotiations (Side Quest) 91.1. Saving the Son (Side Quest) 90.2. This One’s a Classic (Side Quest) 91.2. Saving the Son (Side Quest) 92.1. Vengeance for House Dres (Side Quest) 93.1. To the Tormented Spire (Side Quest) 94. A Gathering of Guar (Side Quest) 92.2. Vengeance for House Dres (Side Quest) 50.5. Savages of Stonefall (Side Quest) 36.2. The Fate of a Friend (Side Quest) 95. Stem the Tide (Side Quest)

-Stonefalls Skyshard 15/16 96.1. A Goblin’s Affection (Side Quest) 97.1. Waylaid Wine Merchant (Side Quest) 96.2. A Goblin’s Affection (Side Quest) 97.2. Waylaid Wine Merchant (Side Quest)
Level 17 93.2. To the Tormented Spire (Side Quest) 98. Climbing the Spire (Side Quest) 99. Opening the Portal (Side Quest) 100. Sadal’s Final Defeat (Side Quest) -Stonefalls Skyshard 16/16
Deshaan Quests
101. Bad Medicine (Side Quest) -Deshaan Skyshard 1/16
102. Proprietary Formula (Side Quest) Level 18
103.1. The Llodos Plague (Side Quest) 104.1. Intruders in Deshaan (Side Quest) 105.1. Oathbreaker (Side Quest) 106.1. Ritual of Anguish (Side Quest) 105.2. Oathbreaker (Side Quest) 107.1. Challenge the Tide (Side Quest) 106.2. Ritual of Anguish (Side Quest) 104.2. Intruders in Deshaan (Side Quest) 107.2. Challenge the Tide (Side Quest) 108.1. For Their Own Protection (Side Quest) 103.2. The Llodos Plague (Side Quest) 108.2. For Their Own Protection (Side Quest) -Deshaan Skyshard 2/16 109. For Their Own Protection (Side Quest) 110. Fighting Back (Side Quest) 111. A Timely Matter (Side Quest)
112. Hiding in Plain Sight (Side Quest) Level 19
113.1. Tracking the Plague (Side Quest) 114.1. Honor Bound (Side Quest) 115.1. Burning Revenge (Side Quest) 114.2. Honor Bound (Side Quest) 116.1. The Medaillons of Saint Veloth (Side Quest) 114.3. Honor Bound (Side Quest) -Deshaan Skyshard 3/16 116.2. The Medaillons of Saint Veloth (Side Quest) 115.2. Burning Revenge (Side Quest) -Deshaan Skyshard 4/16 117. The Dungeon Delvers (Side Quest) 118. The Light Fantastic (Side Quest)
Level 20 119.1. A Favor Returned (Side Quest)
74.2. Simply Misplaced (Mage’s Guild Quest) 120.1. Circus of Cheerful Slaughter (Mage’s Guild Quest) 56.2. The Dangerous Past (Fighter’s Guild Quest) 121.1. The Prismatic Core (Fighter’s Guild Quest) 122.1. Vengeance of the Oppressed (Side Quest) 119.2. A Favor Returned (Side Quest)
-Deshaan Skyshard 5/16 122.2. Vengeance of the Oppressed (Side Quest) 119.3. A Favor Returned (Side Quest) 123. The Mournhold Underground (Side Quest)
Level 21 124. The Seal of Three (Side Quest) 125.1. Chasing the Magistrix (Side Quest) 122.3. Vengeance of the Oppressed (Side Quest) 126. Castle of the Worm (Main Story Quest) 127.1. You Have to Break a Few (Side Quest)
-Deshaan Skyshard 6/16 128. A Family Divided (Side Quest)

-Deshaan Skyshard 7/16 129. A Bitter Pill (Side Quest)
Level 22 113.2. Tracking the Plague (Side Quest) 130.1. Death Trap (Side Quest) 131. Nothing Left to Waste (Side Quest) 130.2. Death Trap (Side Quest) 132. Payback (Side Quest) 133. Plague Bringer (Side Quest) 134.1. Mechanical Murder (Side Quest) 135.1. That Which Matters Most (Side Quest) 134.2. Mechanical Murder (Side Quest) 135.2. That Which Matters Most (Side Quest) 134.3. Mechanical Murder (Side Quest)
-Deshaan Skyshard 8/16 136. Dissonant Commands (Side Quest) 134.4. Mechanical Murder (Side Quest) 137. By Invitation Only (Side Quest) 138. School Daze (Side Quest) 139. Vision Quest (Side Quest) 127.2. You Have to Break a Few (Side Quest) 140.1. Search and Rescue (Side Quest) 141.1. Carving Cuttle (Side Quest) 140.2. Search and Rescue (Side Quest) 141.2. Carving Cuttle (Side Quest)
Level 23 142. Trade Negotiations (Side Quest) 143.1. The Trial of the Ghost Snake (Side Quest) 144.1. Remembering Risa (Side Quest) 143.2. The Trial of the Ghost Snake (Side Quest)
-Deshaan Skyshard 9/16 -Deshaan Skyshard 10/16 -Deshaan Skyshard 11/16
145.1. A Service for the Dead (Side Quest) 125.2. Chasing the Magistrix (Side Quest)

146.1. Restless Spirits (Side Quest) 147.1. Supply Run (Side Quest) 146.2. Restless Spirits (Side Quest) 148.1. Rescue and Revenge (Side Quest) 147.2. Supply Run (Side Quest) 149.1. A Saint Asunder (Side Quest)
-Deshaan Skyshard 12/16 150. Mine All Mine (Side Quest)
Level 24 151. The Ravaged Village (Side Quest) 152.1. The Saving of Silent Mire (Side Quest)
-Deshaan Skyshard 13/16 153. Cold-Blooded Vengeance (Side Quest) 152.2. The Saving of Silent Mire (Side Quest) 154.1. Rules and Regulations (Side Quest) 144.2. Remembering Risa (Side Quest)
-Deshaan Skyshard 14/16 145.2. A Service for the Dead (Side Quest) 155. Bad Soldiers (Side Quest) 154.2. Rules and Regulations (Side Quest) 156.1. What Lies Beneath (Side Quest) 157.1. The Soldiers Alibi (Side Quest) 156.2. What Lies Beneath (Side Quest) 157.2. The Soldiers Alibi (Side Quest) 156.3. What Lies Beneath (Side Quest)
Level 25 158.1. The Tharn Speaks (Main Story Quest) 149.2. A Saint Asunder (Side Quest) 159. The Wounds in the World (Side Quest) 149.3. A Saint Asunder (Side Quest) 160. Healing Hearts (Side Quest) 161.1. Into the Mouth of Madness (Side Quest) 162.1. A Blow for Order (Side Quest) 158.2. The Tharn Speaks (Main Story Quest) 163.1. A Fair Warning (Side Quest)

158.3. The Tharn Speaks (Main Story Quest) -Deshaan Skyshard 15/16
161.2. Into the Mouth of Madness (Side Quest) 164. Motive for Heresy (Side Quest) 165. The Judgment of Veloth (Side Quest)
Level 26 166.1. Onward to Shadowfen (Side Quest) 162.2. A Blow for Order (Side Quest)
-Deshaan Skyshard 16/16 163.2. A Fair Warning (Side Quest) 158.4. The Tharn Speaks (Main Story Quest)
Shadowfen Quests
167.1. Shadowfen Smorgasbord (Side Quest) -Shadowfen Skyshard 1/16
166.2. Onward to Shadowfen (Side Quest) 168.1. Three Tender Souls (Side Quest) 121.2. The Prismatic Core (Fighter’s Guild Quest) 120.2. Circus of Cheerful Slaughter (Mage’s Guild Quest)
Level 27 168.2. Three Tender Souls (Quest) 169.1. Chateau of the Ravenous Rodent (Mage’s Guild Quest) 170.1. Proving the Deed (Fighter’s Guild Quest) 168.3. Three Tender Souls (Side Quest) 171.1. Getting to the Truth (Side Quest) 172.1. Unwelcome Guests (Side Quest) 171.2. Getting to the Truth (Side Quest) 173.1. Scouring the Mire (Side Quest) 172.2. Unwelcome Guests (Side Quest) 167.2. Shadowfen Smorgasbord (Side Quest)
-Shadowfen Skyshard 2/16 -Shadowfen Skyshard 3/16
174. Captive Souls (Side Quest) 175. The Thin Ones (Side Quest) 176. The Bargain’s End (Side Quest)
Level 28 177. Unbridled Wealth (Side Quest) 178.1. Schism (Side Quest) 179.1. A Last Reminder (Side Quest) 178.2. Schism (Side Quest) 179.2. A Last Reminder (Side Quest) 180.1. Foreign Vintage (Side Quest) 181. Life of the Party (Side Quest)
-Shadowfen Skyshard 4/16 180.2. Foreign Vintage (Side Quest) 182. Foreign Vintage (Side Quest)
-Shadowfen Skyshard 5/16 Level 29
173.2. Scouring the Mire (Side Quest) 183. Trail of the Skin-Stealer (Side Quest) 184. The Skin Stealer’s Lair (Side Quest) 185.1. Cracking the Egg (Side Quest) 186.1. The Tree-Minder’s Fate (Side Quest) 187.1. Cold-Blooded Revenge (Side Quest) 186.2. The Tree-Minder’s Fate (Side Quest) 188.1. Will of the Broken (Side Quest)
-Shadowfen Skyshard 6/16 187.2. Cold-Blooded Revenge (Side Quest) 186.3. The Tree-Minder’s Fate (Side Quest)
Level 30 189. Halls of Torment (Main Story Quest)
188.2. Will of the Broken (Side Quest) 190. Warm Welcome (Side Quest)
-Shadowfen Skyshard 7/16 191. Last One Standing (Side Quest) 192.1. A Pirate Parley (Side Quest)
-Shadowfen Skyshard 8/16
193.1. Strength of the Father (Side Quest) 192.2. A Pirate Parley (Side Quest) 194. Into the Mire (Side Quest)
Level 31 195. Clarity (Side Quest)
-Shadowfen Skyshard 9/16 196. Buried in the Past (Side Quest) 197. The Fangs of Sithis (Side Quest) 198. Pull the Last Fang (Side Quest)
-Shadowfen Skyshard 10/16 -Shadowfen Skyshard 11/16
199. Whispers of the Whisp (Side Quest) 200. A Stranger Uninvited (Side Quest) 201. Broken Apart (Side Quest)
Level 32 202.1. A Final Release (Side Quest )
203.1. A Poisoned Heart (Side Quest) 185.2. Cracking the Egg (Side Quest) 204.1. Keepers of the Shell (Side Quest) 205. Outside Interference (Side Quest) 204.2. Keepers of the Shell (Side Quest) 206.1. The Mnemic Egg (Side Quest) 207. Riches Beyond Measure (Side Quest)
-Shadowfen Skyshard 12/16 203.2. A Poisoned Heart (Side Quest) 208. Scales of Retribution (Side Quest)
Level 33 209.1. What Happened at Murkwater (Side Quest) 210. Trials of the Burnished Scales (Side Quest)
-Shadowfen Skyshard 13/16 211. Dreams From the Hist (Side Quest) 193.2. Strength of the Father (Side Quest) 167.3. Shadowfen Smorgasbord (Side Quest) 209.2. What Happened at Murkwater (Side Quest) 212. Lost Pilgrimage (Side Ques)
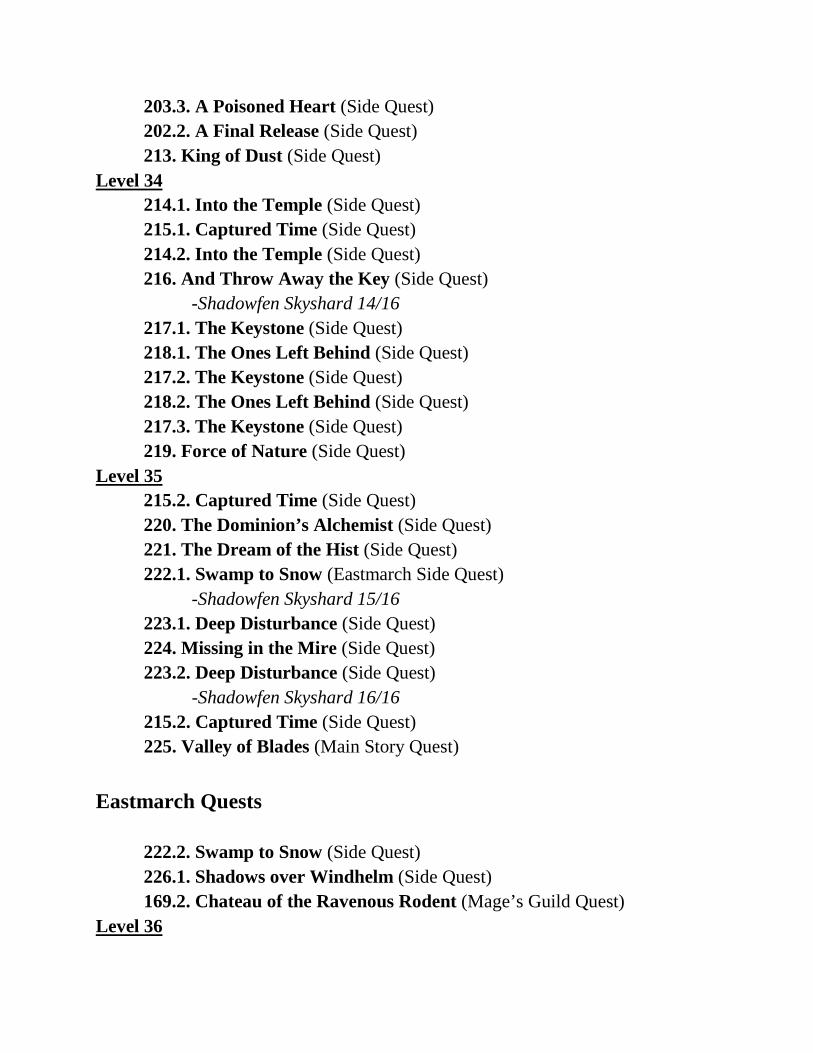
203.3. A Poisoned Heart (Side Quest) 202.2. A Final Release (Side Quest) 213. King of Dust (Side Quest) Level 34 214.1. Into the Temple (Side Quest) 215.1. Captured Time (Side Quest) 214.2. Into the Temple (Side Quest) 216. And Throw Away the Key (Side Quest)
-Shadowfen Skyshard 14/16 217.1. The Keystone (Side Quest) 218.1. The Ones Left Behind (Side Quest) 217.2. The Keystone (Side Quest) 218.2. The Ones Left Behind (Side Quest) 217.3. The Keystone (Side Quest) 219. Force of Nature (Side Quest) Level 35
215.2. Captured Time (Side Quest) 220. The Dominion’s Alchemist (Side Quest)
221. The Dream of the Hist (Side Quest) 222.1. Swamp to Snow (Eastmarch Side Quest)
-Shadowfen Skyshard 15/16 223.1. Deep Disturbance (Side Quest) 224. Missing in the Mire (Side Quest) 223.2. Deep Disturbance (Side Quest)
-Shadowfen Skyshard 16/16 215.2. Captured Time (Side Quest) 225. Valley of Blades (Main Story Quest)
Eastmarch Quests
222.2. Swamp to Snow (Side Quest) 226.1. Shadows over Windhelm (Side Quest) 169.2. Chateau of the Ravenous Rodent (Mage’s Guild Quest)
Level 36
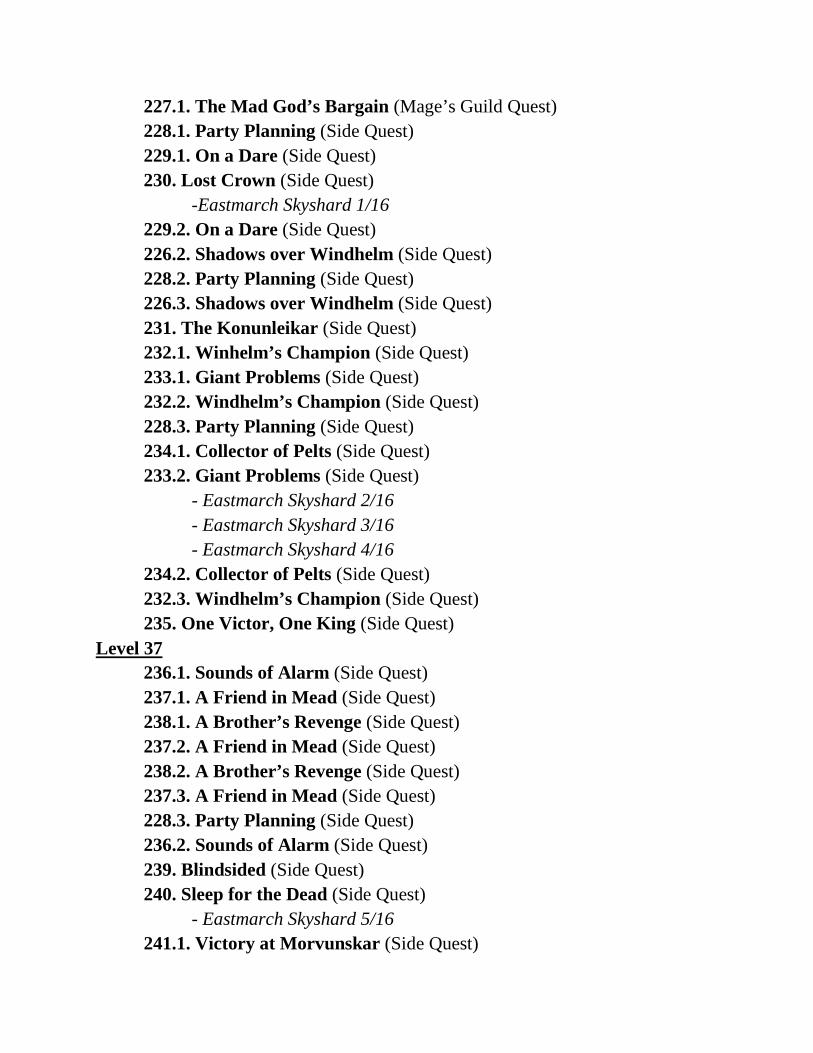
227.1. The Mad God’s Bargain (Mage’s Guild Quest) 228.1. Party Planning (Side Quest) 229.1. On a Dare (Side Quest) 230. Lost Crown (Side Quest)
-Eastmarch Skyshard 1/16 229.2. On a Dare (Side Quest) 226.2. Shadows over Windhelm (Side Quest) 228.2. Party Planning (Side Quest) 226.3. Shadows over Windhelm (Side Quest) 231. The Konunleikar (Side Quest) 232.1. Winhelm’s Champion (Side Quest) 233.1. Giant Problems (Side Quest) 232.2. Windhelm’s Champion (Side Quest) 228.3. Party Planning (Side Quest) 234.1. Collector of Pelts (Side Quest) 233.2. Giant Problems (Side Quest)
- Eastmarch Skyshard 2/16 - Eastmarch Skyshard 3/16 - Eastmarch Skyshard 4/16
234.2. Collector of Pelts (Side Quest) 232.3. Windhelm’s Champion (Side Quest) 235. One Victor, One King (Side Quest)
Level 37 236.1. Sounds of Alarm (Side Quest) 237.1. A Friend in Mead (Side Quest) 238.1. A Brother’s Revenge (Side Quest) 237.2. A Friend in Mead (Side Quest) 238.2. A Brother’s Revenge (Side Quest) 237.3. A Friend in Mead (Side Quest) 228.3. Party Planning (Side Quest) 236.2. Sounds of Alarm (Side Quest) 239. Blindsided (Side Quest) 240. Sleep for the Dead (Side Quest)
- Eastmarch Skyshard 5/16 241.1. Victory at Morvunskar (Side Quest)

242. Strange Allies (Side Quest) 243. The Siege of Cradlecrush (Side Quest)
- Eastmarch Skyshard 6/16 - Eastmarch Skyshard 7/16
244. Labor Dispute (Side Quest) Level 38
245. Mystery Metal (Side Quest) 246.1. Alchemical Analysis (Side Quest) 247.1. Sleeping on the Job (Side Quest) 246.2. Alchemical Analysis (Side Quest) 248. Best of the Best (Side Quest)
- Eastmarch Skyshard 8/16 247.2. Sleeping on the Job (Side Quest) 246.3. Alchemical Analysis (Side Quest) 247.3. Sleeping on the Job (Side Quest) 249.1. The Pride of a Prince (Side Quest) 241.2. Victory at Morvunskar (Side Quest) 170.2. Proving the Deed (Fighter’s Guild Quest) 249.2. The Pride of a Prince (Side Quest) 250. The War Council (Side Quest) 251.1. Lifeline (Side Quest) 252. Our Poor Town (Side Quest) 253. Dark Deeds (Side Quest)
- Eastmarch Skyshard 9/16 Level 39
254. A Right to Live (Side Quest) 255. The Better of Two Evils (Side Quest) 170.3. Proving the Deed (Fighter’s Guild Quest) 256.1. Shrine of Corruption (Side Quest) 257.1. A Cure for Droi (Side Quest) 256.2. Shrine of Corruption (Side Quest) 257.2. A Cure for Droi (Side Quest) 256.3. Shrine of Corruption (Side Quest) 258. For Kyne’s Honor (Side Quest)

259. Nature’s Accord (Side Quest) 260.1. Dear Cousins (Side Quest)
- Eastmarch Skyshard 10/16 261.1. Merriment and Mystery (Side Quest) 262.1. A Dying Wish (Side Quest) 261.2. Merriment and Mystery (Side Quest) 262.2. A Dying Wish (Side Quest) 260.2. Dear Cousins (Side Quest) 170.4. Proving the Deed (Fighter’s Guild Quest)
Level 40 251.2. Lifeline (Side Quest) 263. Eternal Slumber (Side Quest) 264. Gods Save the Kind (Side Quest) 265.1. Of Councils and Kings (Side Quest) 266. Bath Time (Side Quest) 267.1. Pilfered Urn (Side Quest)
- Eastmarch Skyshard 11/16 - Eastmarch Skyshard 12/16
268.1. Land Dispute (Side Quest) 269. In Search of Kireth Vanos (Side Quest)
- Eastmarch Skyshard 1316 270. Kireth’s Amazing Plan (Side Quest) 268.2. Land Dispute (Side Quest) 265.2. Of Councils and Kings (Side Quest) 271.1. Making Amends (Side Quest)
- Eastmarch Skyshard 14/16 272.1. Will of the Council (Fighters Guild Quest) 273.1. Security Details (Side Quest) 271.2. Making Amends (Side Quest) 273.2. Security Details (Side Quest) 271.3. Making Amends (Side Quest) 273.3. Security Details (Side Quest)
- Eastmarch Skyshard 15/16 274.1. Relative Matters (Side Quest) 273.4. Security Details (Side Quest)

Level 41 271.4. Making Amends (Side Quest) 275. A Council of Thanes (Side Quest) 276. Sneak Peak (Side Quest) 277. Snow and Flame (Side Quest) 278. Songs of Sovngarde (Side Quest) 279.1. Beneath the Stone (Side Quest)
- Eastmarch Skyshard 16/16 280. Noble’s Rest (Side Quest) 281. Shadows of Sancre Tor (Main Story Quest)
Level 42 The Rift Quests
279.2. Beneath the Stone (Side Quest) 282.1. Unearthed (Side Quest) 283. Move Out Miners (Side Quest) 282.2. Unearthed (Side Quest) 284.1. Storming the Hall (Side Quest) 285.1. The Troubleshooter (Side Quest) 286.1. Aiding Sigunn (Side Quest) 285.2. The Troubleshooter (Side Quest) 286.2. Aiding Sigunn (Side Quest) 284.2. Storming the Hall (Side Quest)
- The Rift Skyshard 1/16 287.1. The Rise of Sage Svari (Side Quest) 288.1. To Vermin Woods (Side Quest) 287.2. The Rise of Sage Svari (Side Quest)
Level 43 289.1. Finding Winter’s Hammer (Side Quest) 290. Drink, Drink, and Be Merry (Side Quest)
- The Rift Skyshard 2/16 272.2. Will of the Council (Fighters Guild Quest) 227.2. The Mad God’s Bargain (Mage’s Guild Quest)

291.1. In His Wake (Side Quest) 292.1. Redguard on the Run (Side Quest) 291.2. In His Wake (Side Quest) 293. All’s Fair (Side Quest) 291.3. In His Wake (Side Quest)
- The Rift Skyshard 3/16 294. Pulled Under (Side Quest)
Level 44 295.1. To The King (Side Quest) 289.1. Finding Winter’s Hammer (Side Quest) 296.1. Returning Winter’s Bite (Side Quest) 297.1. Smoke on the Horizon (Side Quest) 298. Raise the Colors (Side Quest) 297.2. Smoke on the Horizon (Side Quest) 299. Scouting the Mine (Side Quest) 300. Breaking the Coven (Side Quest)
- The Rift Skyshard 4/16 288.2. To Vermin Woods (Side Quest) 301. Dangerous Union (Side Quest) 302. Gift of the Worm (Side Quest) 303. Through the Shroud (Side Quest)
Level 45 304.1 To Nimalten (The Rift Side Quest)
- The Rift Skyshard 5/16 305. Geirmund’s Guardian (The Rift Side Quest) 306. Save Your Voice (The Rift Side Quest) 307. Shroud Heart Barrow (The Rift Side Quest)
- The Rift Skyshard 6/16 308. Problems Into Profit (The Rift Side Quest) 292.2. Redguard on the Run (The Rift Side Quest) 309. Where the Frostheart Grows (The Rift Side Quest) 310.1. Tomb Beneath the Mountain (The Rift Side Quest) 311. Research Subject (The Rift Side Quest) 310.2. Tomb Beneath the Mountain (The Rift Side Quest) 292.3. Redguard on the Run (The Rift Side Quest)
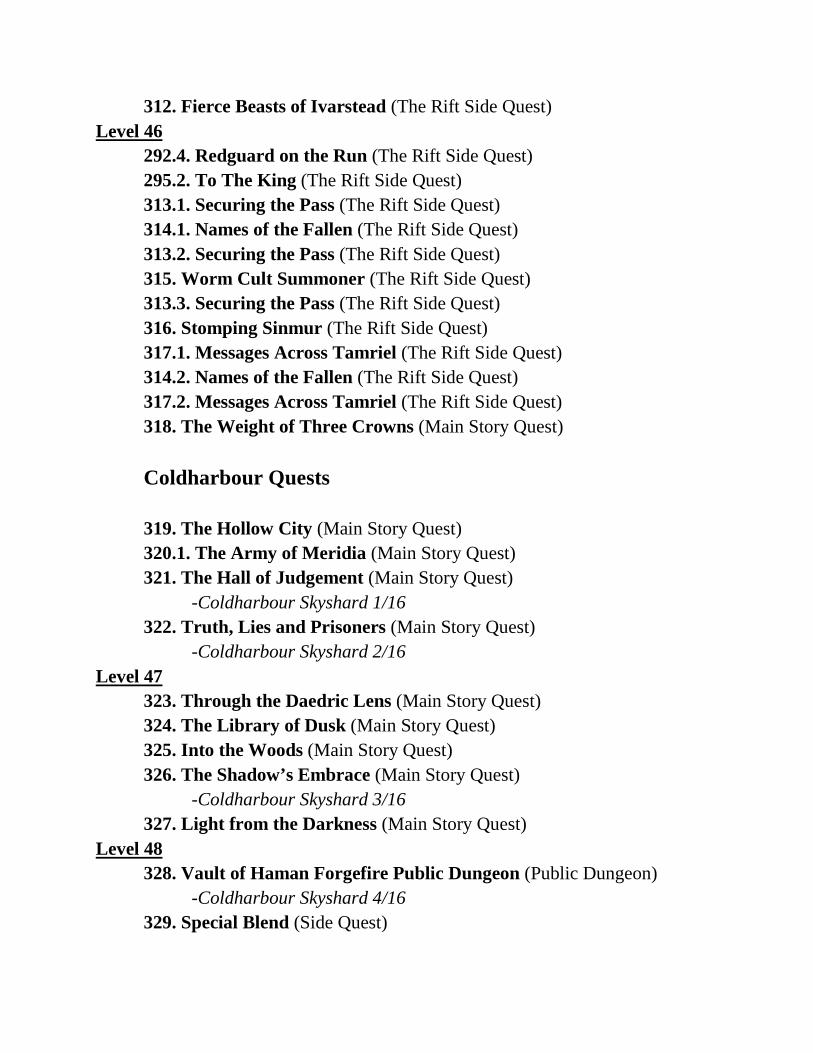
312. Fierce Beasts of Ivarstead (The Rift Side Quest) Level 46
292.4. Redguard on the Run (The Rift Side Quest) 295.2. To The King (The Rift Side Quest) 313.1. Securing the Pass (The Rift Side Quest) 314.1. Names of the Fallen (The Rift Side Quest) 313.2. Securing the Pass (The Rift Side Quest) 315. Worm Cult Summoner (The Rift Side Quest) 313.3. Securing the Pass (The Rift Side Quest) 316. Stomping Sinmur (The Rift Side Quest) 317.1. Messages Across Tamriel (The Rift Side Quest) 314.2. Names of the Fallen (The Rift Side Quest) 317.2. Messages Across Tamriel (The Rift Side Quest) 318. The Weight of Three Crowns (Main Story Quest) Coldharbour Quests 319. The Hollow City (Main Story Quest) 320.1. The Army of Meridia (Main Story Quest) 321. The Hall of Judgement (Main Story Quest)
-Coldharbour Skyshard 1/16 322. Truth, Lies and Prisoners (Main Story Quest)
-Coldharbour Skyshard 2/16 Level 47
323. Through the Daedric Lens (Main Story Quest) 324. The Library of Dusk (Main Story Quest) 325. Into the Woods (Main Story Quest) 326. The Shadow’s Embrace (Main Story Quest)
-Coldharbour Skyshard 3/16 327. Light from the Darkness (Main Story Quest)
Level 48 328. Vault of Haman Forgefire Public Dungeon (Public Dungeon)
-Coldharbour Skyshard 4/16 329. Special Blend (Side Quest)
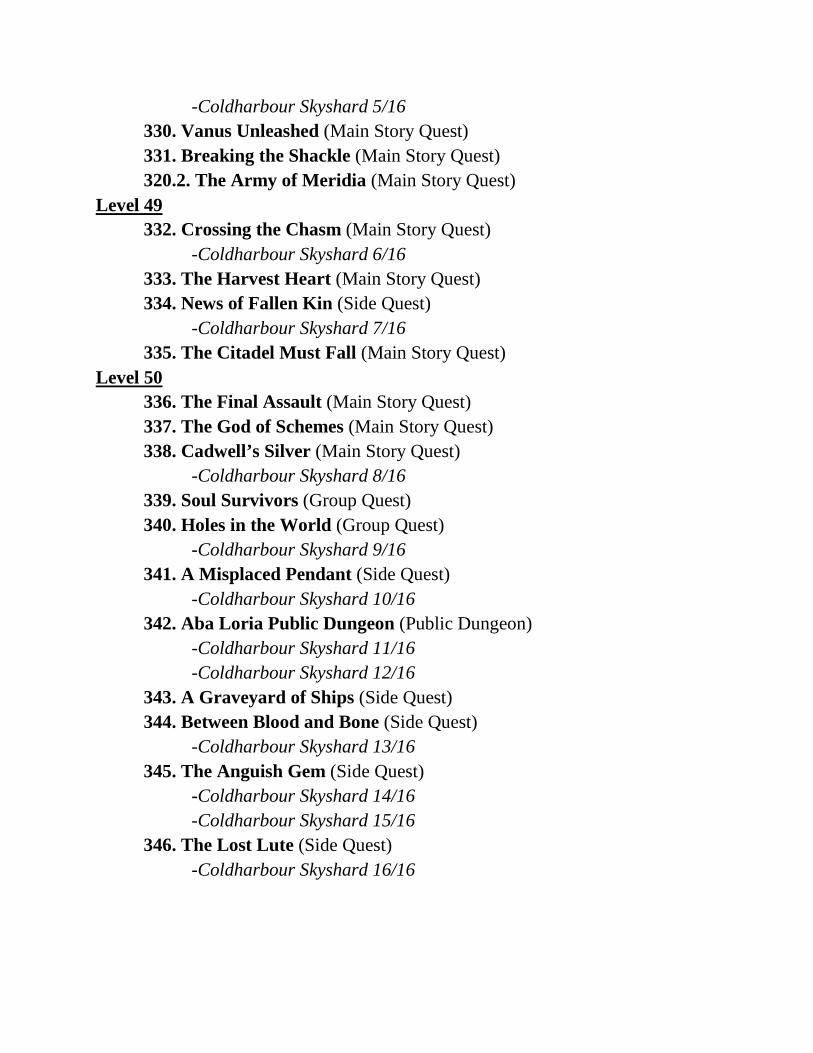
-Coldharbour Skyshard 5/16 330. Vanus Unleashed (Main Story Quest) 331. Breaking the Shackle (Main Story Quest) 320.2. The Army of Meridia (Main Story Quest)
Level 49 332. Crossing the Chasm (Main Story Quest)
-Coldharbour Skyshard 6/16 333. The Harvest Heart (Main Story Quest) 334. News of Fallen Kin (Side Quest)
-Coldharbour Skyshard 7/16 335. The Citadel Must Fall (Main Story Quest)
Level 50 336. The Final Assault (Main Story Quest) 337. The God of Schemes (Main Story Quest) 338. Cadwell’s Silver (Main Story Quest)
-Coldharbour Skyshard 8/16 339. Soul Survivors (Group Quest) 340. Holes in the World (Group Quest)
-Coldharbour Skyshard 9/16 341. A Misplaced Pendant (Side Quest)
-Coldharbour Skyshard 10/16 342. Aba Loria Public Dungeon (Public Dungeon)
-Coldharbour Skyshard 11/16 -Coldharbour Skyshard 12/16
343. A Graveyard of Ships (Side Quest) 344. Between Blood and Bone (Side Quest) -Coldharbour Skyshard 13/16 345. The Anguish Gem (Side Quest) -Coldharbour Skyshard 14/16 -Coldharbour Skyshard 15/16 346. The Lost Lute (Side Quest)
-Coldharbour Skyshard 16/16


Coldharbour Tutorial Quests

1. Soul Shriven in Coldharbour (Main Story Quest - Lvl. 1)
• Pickup Quest: Go to the cell door and talk to the Prophet. • Escape the cell and follow the other prisoners to a room with weapons you can choose
from. • Enter the Bleeding Forge and kill the Skeletal Warrior. • You should now be level 2. • Speak to Lyris Titanborn and exit to the Ashen Mines. • Kill any enemies and make your way up the wooden walkway to the door that leads to
the Tower of Eyes. • Talk to Lyris again and loot any settlement areas for random crafting materials, racial
armor skill books, lockpicks, armor, and weapons.

• Head to either quest marker to reach the Sentinel, then interact with it to destroy it. • Head towards the quest marker to reach the Prophet's cell and talk to Lyris again. • Move southeast along the river to reach a campfire with Sir Cadwell seated nearby. • Speak with Sir Cadwell, and then continue up the river to enter the Undercroft.
• Traps: Multiple timed floor spike traps everywhere to avoid, several are underwater and
invisible unless currently triggered. • Make sure to check the chests and urns here for loot, then head towards the quest marker
when you're ready and enter the Prophet's Cell by the using the ladder.
• Search all the containers in the Prophet's Cell before moving on with the quest - this area
will give you lots of lockpicks and things to sell or use and will make Khenarthi's Roost a much quicker experience for leveling.

• Talk to Lyris when you're ready to move on, then run to the other side of the blue diamond-shaped prison and disable the two Daedric Anchor Pinions by interacting with them.
• Head back to Lyris and watch the exchange, then speak with the Prophet and head towards the door that leads to the Anchor Mooring.
• As soon as you approach the Anchor Mooring, Molag Bal will appear and talk to you briefly before summoning an Anchor Guardian to defeat.
• Search the area for loot, then head up the steps in the center of the area and speak to the Prophet.
• Collect the Skyshard the Prophet gives you, then speak to him again. • Interact with the East and West Anchor Points to activate them, then use the portal to
Tamriel once the Prophet opens it. • Turn in Quest: Once you're in Eagle's Strand, speak to the Prophet. • Quest Rewards: Sealed Urn, 1 Skill Point, 112 Gold. • You should be level 3 now.
Davon’s Watch Intro
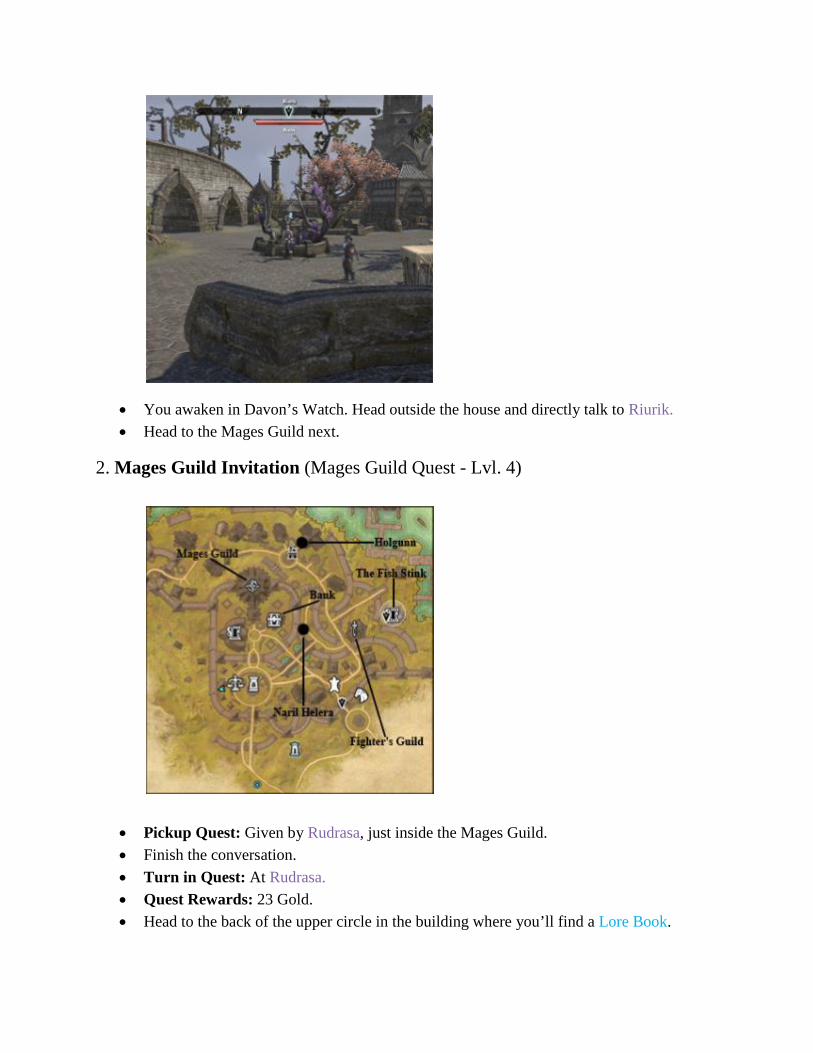
• You awaken in Davon’s Watch. Head outside the house and directly talk to Riurik. • Head to the Mages Guild next.
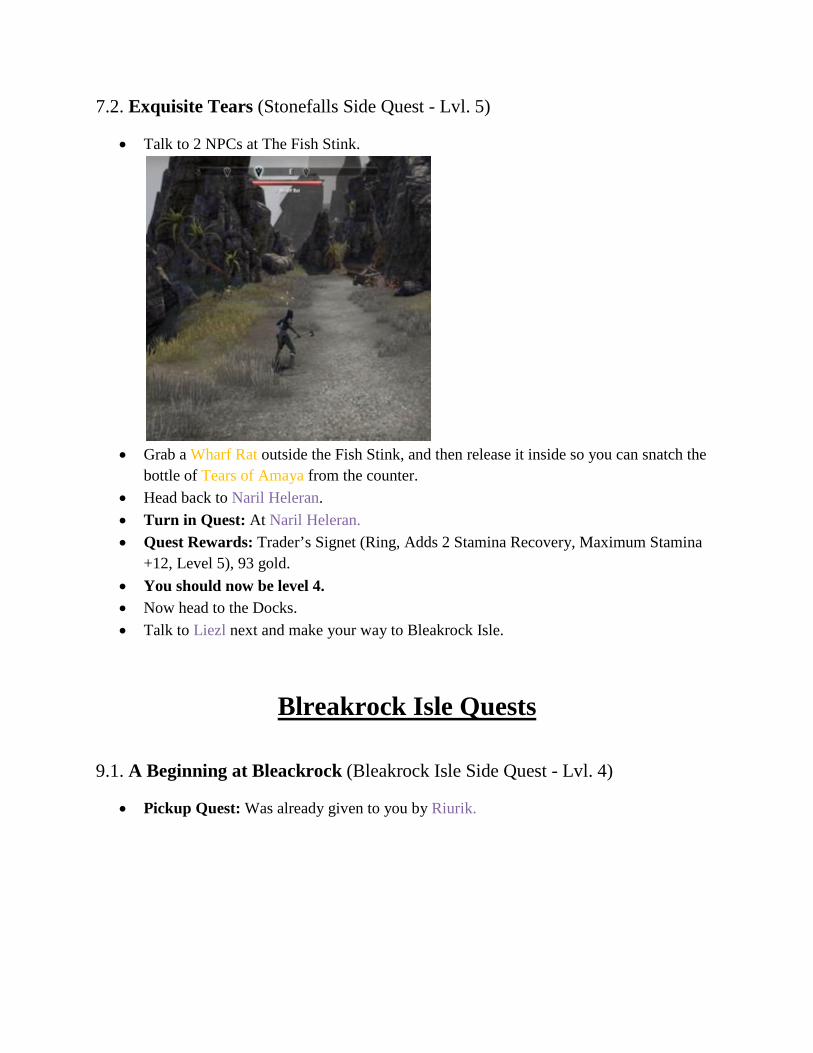
2. Mages Guild Invitation (Mages Guild Quest - Lvl. 4)
• Pickup Quest: Given by Rudrasa, just inside the Mages Guild. • Finish the conversation. • Turn in Quest: At Rudrasa. • Quest Rewards: 23 Gold. • Head to the back of the upper circle in the building where you’ll find a Lore Book.

3.1. Long Lost Lore (Mages Guild Quest - Lvl. 8)
• Pickup Quest: Jump down in the Mages Guild where Valaste gives you this quest. • (Quest line is continued in 3.2)
4. The Wizard’s Tome (Stonefalls Side Quest - Lvl. 4)
• Pickup Quest: Down in the Mages Guild Valdam Andoren gives you this quest. • Leave the Mages Guild.
• Move Northeast to the Spellbook. It’s just East of the Mages Guild. • Take the Spellbook and then return to the Wizard in the Mages Guild.

• Turn in Quest: At Valdam Andoren • Quest Rewards: Apprentices Leggings (Legs, Light Armor, 29 Armor, Adds 1 Magicka
Recovery, Armor of this item +5%, Level 4), 85 gold. • Leave the Mages Guild and head to the Fighter’s Guild.
5. Fighters Guild Invitation (Fighter’s Guild Quest - Lvl. 5)
• Join the Fighter’s Guild by talking to Hilan at the Fighter’s Guild (see map above). • Turn in Quest: At Hilan. • Quest Rewards: 23 gold.
6.1. Anchors from the Harbour (Fighter’s Guild Quest - Lvl. 8)
• Pickup Quest: From Sees-All-Colors at the Fighter’s Guild. • Head slightly West to Naril Helera. • (Quest line is continued in 6.2)
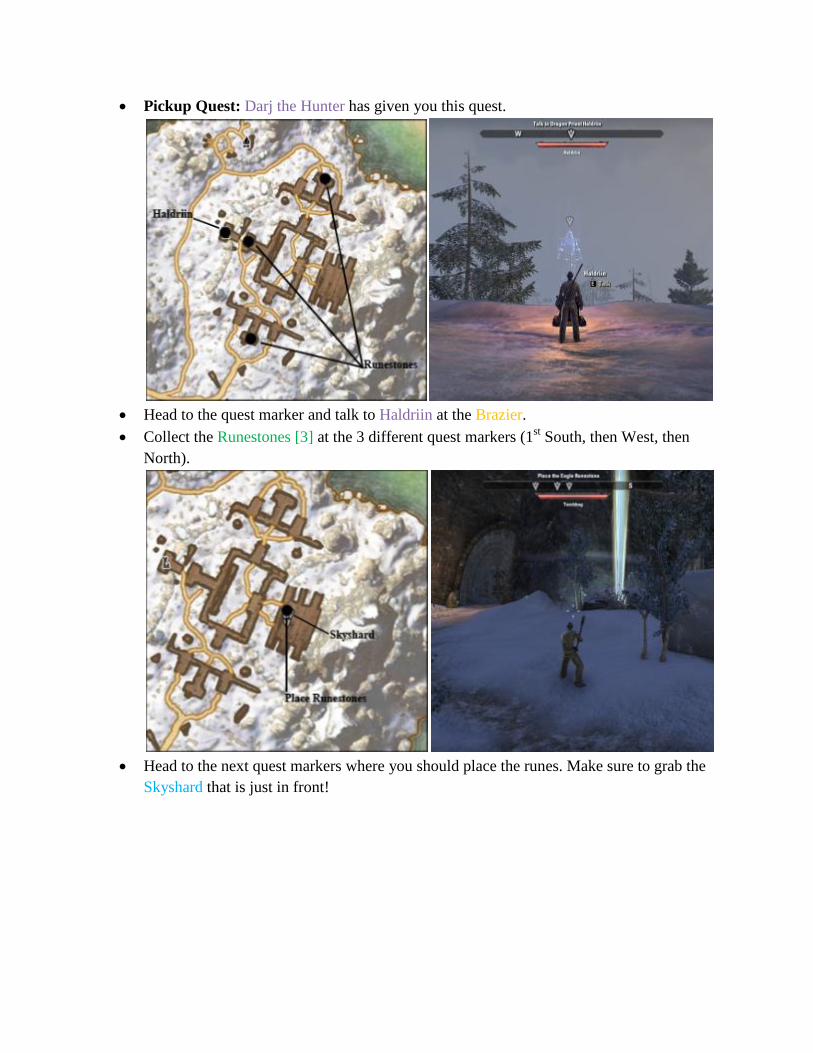
7.1. Exquisite Tears (Stonefalls Side Quest - Lvl. 5)
• Pickup Quest: From Naril Helera. • Head to The Fish Stink (see map). • (Quest line is continued in 7.2) • Talk to Kailstig the Axe.
8.1. One of the Undaunted (Undaunted Guild Quest - Lvl. 12)
• Pickup Quest: From Kailstig the Axe in The Fish Stink. • (Quest line is continued in 8.2)
7.2. Exquisite Tears (Stonefalls Side Quest - Lvl. 5)
• Talk to 2 NPCs at The Fish Stink.
• Grab a Wharf Rat outside the Fish Stink, and then release it inside so you can snatch the
bottle of Tears of Amaya from the counter. • Head back to Naril Heleran. • Turn in Quest: At Naril Heleran. • Quest Rewards: Trader’s Signet (Ring, Adds 2 Stamina Recovery, Maximum Stamina
+12, Level 5), 93 gold. • You should now be level 4. • Now head to the Docks. • Talk to Liezl next and make your way to Bleakrock Isle.
Blreakrock Isle Quests
9.1. A Beginning at Bleackrock (Bleakrock Isle Side Quest - Lvl. 4)
• Pickup Quest: Was already given to you by Riurik.

• Talk to Captain Rana and then head out the door to Bleakrock Isle. • (Quest line is continued in 9.2)
10. Tracking the Game (Bleakrock Isle Side Quest - Lvl. 4)
• Pickup Quest: Follow the road East and speak to Hoknir (see map).
• Continue on the road East until you’ve found Deathclaw’s Lair. Kill Deathclaw and
collect the Deathclaw Talon [1] it drops.

• Turn in Quest: Back at Hoknir. • Quest Rewards: 42 Gold.
9.2. A Beginning at Bleackrock (Bleakrock Isle Side Quest - Lvl. 4)
• Turn in Quest: A Beginning at Bleakrock at Darj the Hunter to the Northeast (see map).
• Quest Rewards: 85 Gold.
11. What Waits Beneath (Bleakrock Isle Side Quest - Lvl. 4)
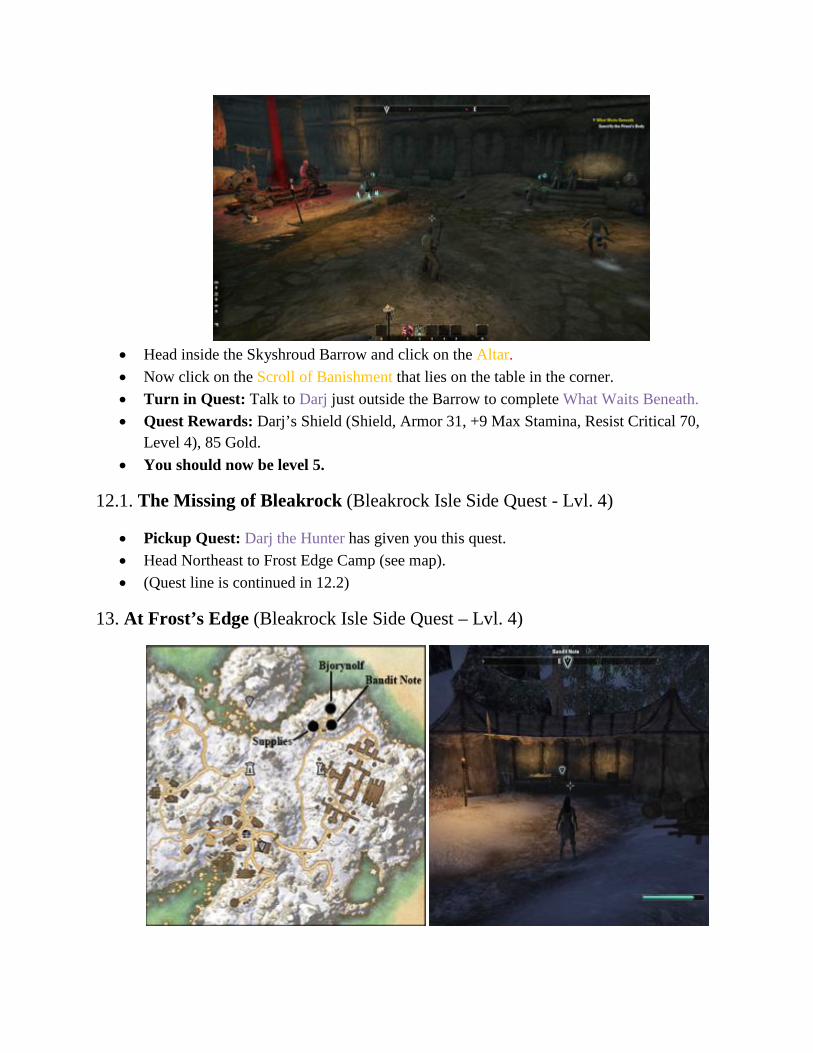
• Pickup Quest: Darj the Hunter has given you this quest.
• Head to the quest marker and talk to Haldriin at the Brazier. • Collect the Runestones [3] at the 3 different quest markers (1st South, then West, then
North).
• Head to the next quest markers where you should place the runes. Make sure to grab the
Skyshard that is just in front!
• Head inside the Skyshroud Barrow and click on the Altar. • Now click on the Scroll of Banishment that lies on the table in the corner. • Turn in Quest: Talk to Darj just outside the Barrow to complete What Waits Beneath. • Quest Rewards: Darj’s Shield (Shield, Armor 31, +9 Max Stamina, Resist Critical 70,
Level 4), 85 Gold. • You should now be level 5.
12.1. The Missing of Bleakrock (Bleakrock Isle Side Quest - Lvl. 4)
• Pickup Quest: Darj the Hunter has given you this quest. • Head Northeast to Frost Edge Camp (see map). • (Quest line is continued in 12.2)
13. At Frost’s Edge (Bleakrock Isle Side Quest – Lvl. 4)
• Pickup Quest: From a Bandit Note on the table or dropped by one of the mobs at the camp.
• Head to the quest marker at the other side of the camp and burn the Supplies.
• Turn in Quest: Speak to Bjorynolf at the quest marker at the most Northern part of the
camp. • Quest Rewards: 42 Gold.
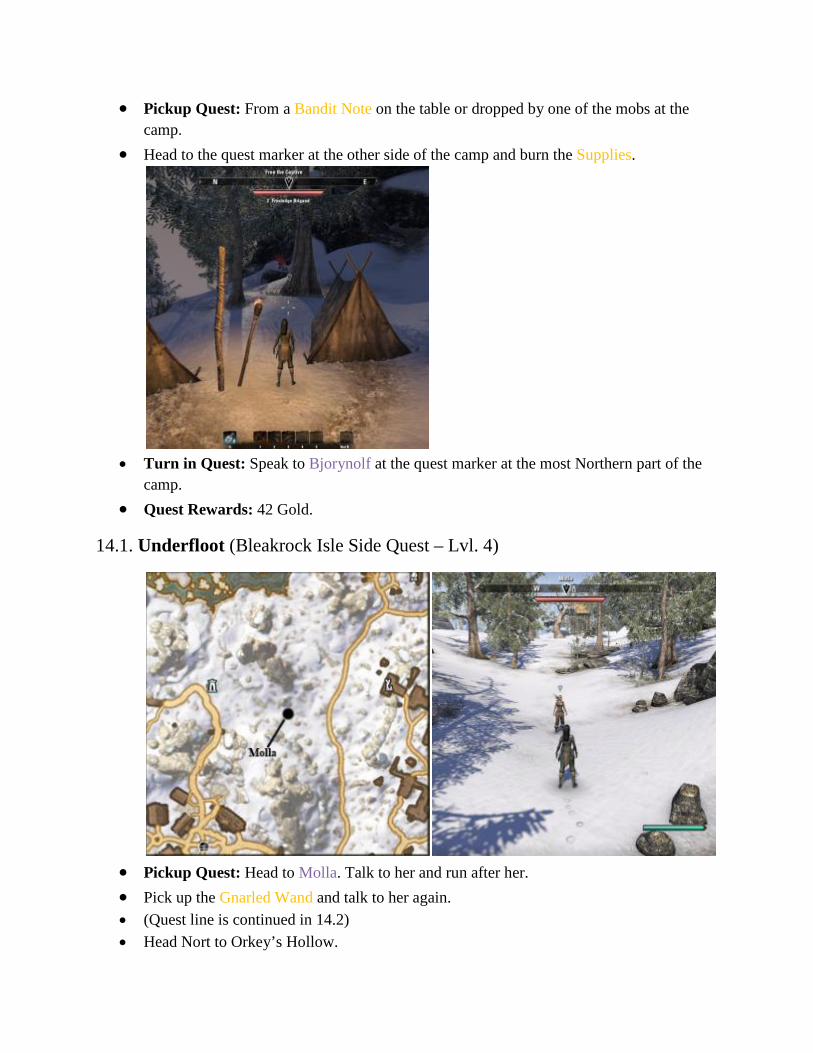
14.1. Underfloot (Bleakrock Isle Side Quest – Lvl. 4)
• Pickup Quest: Head to Molla. Talk to her and run after her. • Pick up the Gnarled Wand and talk to her again. • (Quest line is continued in 14.2) • Head Nort to Orkey’s Hollow.

15. The Frozen Man (Bleakrock Isle Side Quest - Lvl. 4)
• Pickup Quest: Talk to Rolunda. • Grab the Skyshard right behind Rolunda! • Enter Orkey’s Hollow. Directly take a left to Eiman.
• Now move to clue 1 first (see map), then head North and go right to clue 2. • Head further East to clue 3 before heading back Northwest to talk to The Frozen Man. • Head inside the Frozen Man’s Lair and talk to The Frozen Man twice. • Head to Eiman who is now released and talk to him. • Turn in Quest: Talk to Rolunda outside Orkey’s Hollow. • Quest Rewards: Bonesplinter (One-Handed Mace, 15 Damage, On Hit: 8 Point Damage
Shield for 5 Sec., Attack Speed +3%, Level 4), 106 Gold.
14.2. Underfloot (Bleakrock Isle Side Quest – Lvl. 4)
• Head East and use the Gnarled Wand on the Skeever to free Run-In-Wild. • Head West and use the Gnarled Wand on the Skeever to save Faltha. • (Quest continues in 14.3) • Head slightly further West to the Hunter’s Camp.
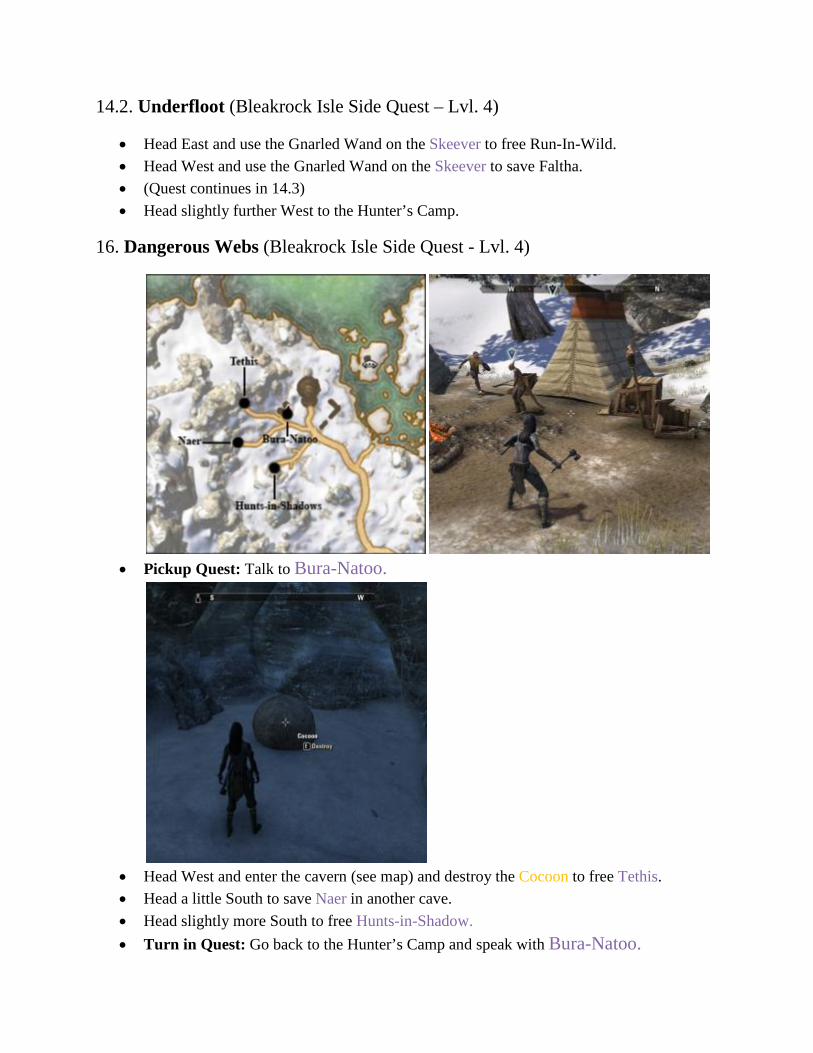
16. Dangerous Webs (Bleakrock Isle Side Quest - Lvl. 4)
• Pickup Quest: Talk to Bura-Natoo.
• Head West and enter the cavern (see map) and destroy the Cocoon to free Tethis. • Head a little South to save Naer in another cave. • Head slightly more South to free Hunts-in-Shadow. • Turn in Quest: Go back to the Hunter’s Camp and speak with Bura-Natoo.

• Quest Rewards: 42 Gold. • Follow the road south to the large crossing.
17. Hozzin’s Folley (Bleakrock Isle Side Quest - Lvl. 4)
• Pickup Quest: Talk to Sergeant Seyne. • Take the Frostedge Bandit Disguise [1] from the slain Frost Edge Brigand right next to
Sergeant Seyne and equip it.
• Move to the 3 markers and inspect the Dark Ministrations (Eastern marker), Cracked
Rune Ward (Northern Marker), Contract Scroll (Western Marker). • Move north and enter the mine. Make sure you have a Frostedge Bandit Disguise on so
you can get in and avoid most of the hostiles. Beware for hostiles with torches as they can spot you more easily.
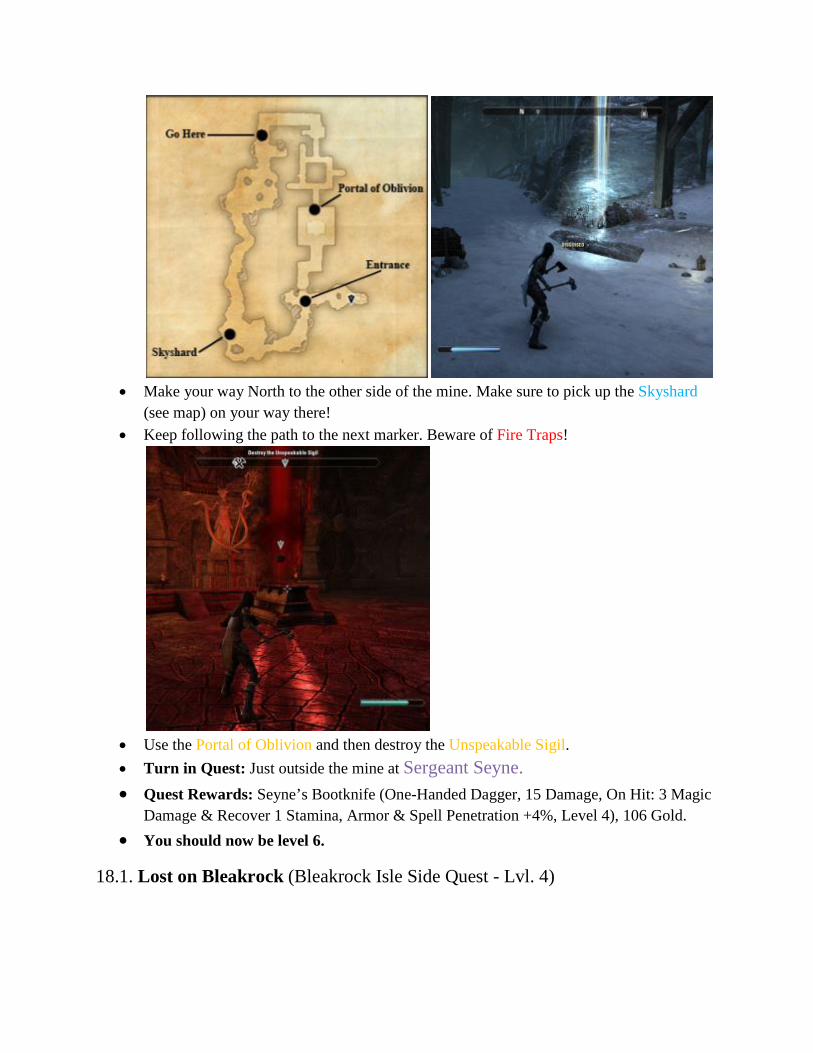
• Make your way North to the other side of the mine. Make sure to pick up the Skyshard
(see map) on your way there! • Keep following the path to the next marker. Beware of Fire Traps!
• Use the Portal of Oblivion and then destroy the Unspeakable Sigil. • Turn in Quest: Just outside the mine at Sergeant Seyne. • Quest Rewards: Seyne’s Bootknife (One-Handed Dagger, 15 Damage, On Hit: 3 Magic
Damage & Recover 1 Stamina, Armor & Spell Penetration +4%, Level 4), 106 Gold. • You should now be level 6.
18.1. Lost on Bleakrock (Bleakrock Isle Side Quest - Lvl. 4)
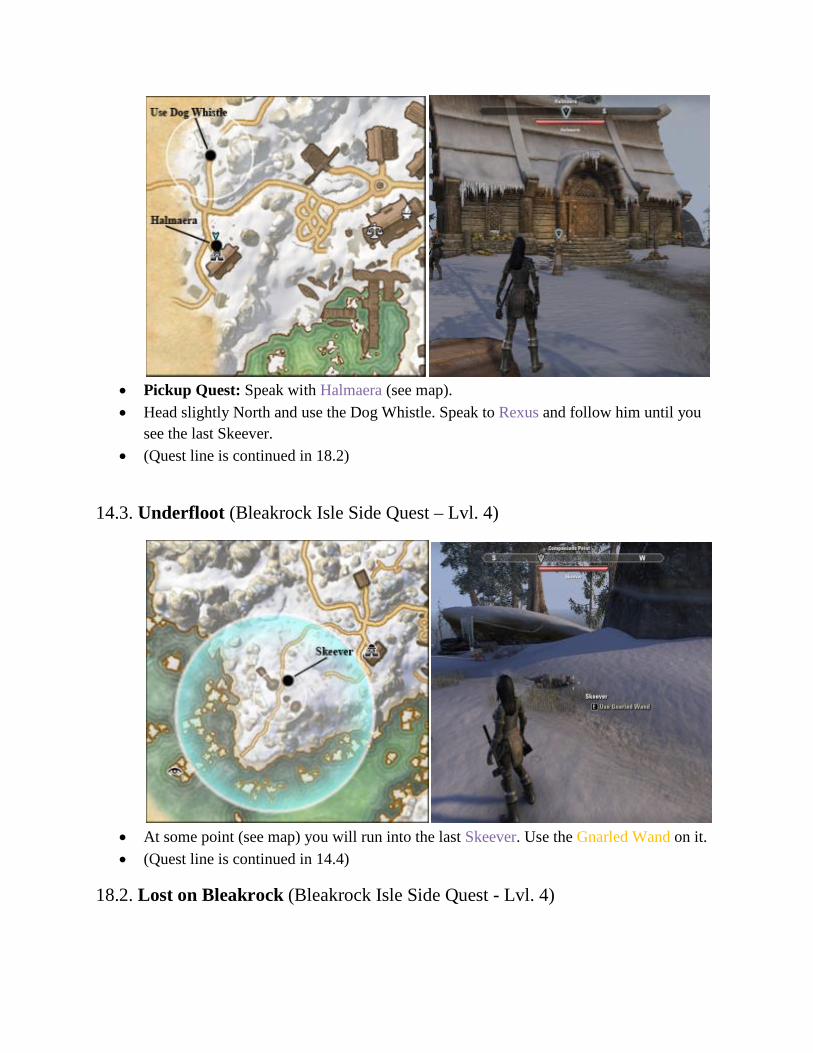
• Pickup Quest: Speak with Halmaera (see map). • Head slightly North and use the Dog Whistle. Speak to Rexus and follow him until you
see the last Skeever. • (Quest line is continued in 18.2)
14.3. Underfloot (Bleakrock Isle Side Quest – Lvl. 4)
• At some point (see map) you will run into the last Skeever. Use the Gnarled Wand on it. • (Quest line is continued in 14.4)
18.2. Lost on Bleakrock (Bleakrock Isle Side Quest - Lvl. 4)

• Continue to follow Rexus. • Turn in Quest: Talk to Geilund. • Quest Rewards: 42 gold. • Head back into town.
14.4. Underfloot (Bleakrock Isle Side Quest – Lvl. 4)
• Head to the Bleakrock Trading Hall where you can buy some much needed extra bag
space from the Pack Merchant for 400G. Right next to him you have the bank where you can store some goods for now. There are also other merchants around where you can sell some useless items, and you can work on your professions.
• Turn in Quest: Talk to Molla in town (see marker). • Quest Rewards: 42 Gold.
12.2. The Missing of Bleakrock (Bleakrock Isle Side Quest - Lvl. 4)
• Turn in Quest: Talk to Captain Rana in town (see marker). • Quest Rewards: Bleakrock Garrison Plate (Heavy Armor, Chest, 49 Armor, +13 Max
Health, Reduce Sprint Costs by 2%, Level 4), 85 Gold.
19. Sparking the Flame (Bleakrock Isle Side Quest - Lvl. 4)
• Pickup Quest: From Captain Rana.
• Follow the road south and head up the tower. Once there you should light the Signal Fire. • Go back down the hill and talk to Tillrani Snow-Bourne (see marker).

• Collect the Bucket of Water at the well to the North. • Extinguish House Fire 1, then head inside and save Denskar. • Extinguish House Fire 2, head inside and talk to Aera. • Go slightly North and save Littrek. • Head all the way Southwest to save Trynhild. • Turn in Quest: Talk to Captain Rana in front of the tomb. • Quest Rewards: 85 Gold.
20. Escape From Bleakrock (Bleakrock Isle Side Quest - Lvl. 4)
• Pickup Quest: Captain Rana has given you this new quest.
• Enter into Last Rest and talk to Captain Rana again.

• Go straight and use the first switch. • Talk to Captain Rana, then head through the door behind her. • Make your way to the next marker and unlock the door. • Follow Captain Rana and talk to her before moving to the next room where you must use
another switch. • Open the door and talk to Captain Rana again. Go through another door and then talk to
Captain Rana yet again outside. You’ll be heading to the second zone Bal Foyen now. • Turn in Quest: Talk to Captain Rana upon arrival. • Quest Rewards: 93 Gold.
Bal Foyen Quests
21.1. If By Sea (Bal Foyen Side Quest - Lvl. 6)
• Pickup Quest: Captain Rana gives this quest once you arrive in Bal Foyen. • Head West to the city of Dhalmora. • (Quest line is continued in 21.2)
22.1. Finding the Family (Bal Foyen Side Quest - Lvl. 6)

• Pickup Quest: Speak with Esqoo.
• Take the Skyshard in Dhalmora behind the largest building in the middle (see map
above). • Head out of town in Western direction.
• Find Corkie directly on the right side of the road, down the bridge, and send him home. • Follow the road south until you reach Fort Zeren.
• Enter and send home Pale-Hide. • Head to the back of Fort Zeren where you can see the Wayshrine. Behind it you’ll find
another Skyshard! • Leave Fort Zeren the way you came and head north until you reach Iron-Claws. Talk to
him. • (Quest line is continued in 22.2)
23.1. Unorthodox Tactics (Bal Foyen Side Quest - Lvl. 6)

• Pickup Quest: Speak with Iron-Claws. • Head into the fields to the North. • Use the Treated Netch Eggs on 5 Covenant hostiles you come across while working on
the next quest. • (Quest line is continued in 23.2)
24.1. Salt of the Earth (Bal Foyen Side Quest - Lvl. 6)
• Pickup Quest: Speak with Nolu-Azza (see map). • Head North to Baatus and speak with him, then do the same for Vudeelal. • (Quest line is continued in 24.2)
22.2. Finding the Family (Bal Foyen Side Quest - Lvl. 6)
• Use the Stinkweed on Rollie who’s located a bit to the East. • (Quest line is continued in 22.3)
24.2. Salt of the Earth (Bal Foyen Side Quest - Lvl. 6)
• Head even further East and talk to Wenaxi. • (Quest line is continued in 24.3) • Head back to Dhalmora.
22.3. Finding the Family (Bal Foyen Side Quest - Lvl. 6)
• Turn in Quest: At Esqoo in front of the Southern entrance to the city of Dhalmora.
Quest Rewards: 24 Gold. • Enter the city and go to the right, up the ramp where you’ll find Iron-Claws.

22.2. Unorthodox Tactics (Bal Foyen Side Quest - Lvl. 6)
• Turn in Quest: At Iron-Claws. • Quest Rewards: 24 Gold. • Run north to Nolu-Azza.
24.3. Salt of the Earth (Bal Foyen Side Quest - Lvl. 6)
• Turn in Quest: At Nolu-Azza. • Quest Rewards: 24 gold. • Leave the city in Northern direction.
21.2. If By Sea (Bal Foyen Side Quest - Lvl. 6)
• Head to the Dhalmora Watchtower. • Once there, examine the Watchtower Ledger. • Now sprint to Fort Zeren.

• Go to Quatermaster Urona (see map) and talk to her.
• Leave Fort Zeren at the North gate and follow the road all the way North to the Foyen
Dockyards. • Talk to Quartermaster Lineem. Then follow her to the Supply Tunnel but don’t enter just
yet. Talk to Bishalus near the entrance to the Supply Tunnel. • (Quest continues in 21.3)
25. The Bard of Hounds (Bal Foyen Side Quest - Lvl. 6)

• Pickup Quest: From Bishalus near the entrance to the Supply Tunnel. • Follow the road Southeast until you reach Gena and talk to her. Keep your eyes open for
locked chests; we’ve found 4 in the area.
• Now kill the Rabid Nix-Hound further down the road. • Return to Gena who is now joined by Bishalus and hand in the quest. • Turn in Quest: At Bishalus. • Quest Rewards: 49 Gold. • You should be level 7 now. • Head to the Supply Tunnel.
21.3. If By Sea (Bal Foyen Side Quest - Lvl. 6)
• Enter the tunnel and then climb up the ladder.

• Light the East Signal Fire and then light the West Signal Fire (see map for both). • Head back to Dhalmora.
• Turn in Quest: At Aera Earth-Turner. • Quest Rewards: Earth-Turner Axe (One-Handed Axe, 18 Damage, On Hit: Reduce
Targets Armor by 34 for 5 Sec, Weapon and Spell Critical +2%, Level 4), 122 Gold.
26. Crossroads (Bal Foyen Side Quest - Lvl. 6)
• Pickup Quest: Aera Earth-Turner has given you this quest.

• You’re asked to either help Darj at Fort Zeren or Rana near the Docks. Head to Eleven-
Skips as we’ll guide you to another Skyshard. • Turn in Quest: At Eleven-Skips. • Quest Rewards: 49 Gold.
27. Breaking the Tide (Bal Foyen Side Quest - Lvl. 6)
• Pickup Quest: At Eleven-Skips. • Follow the path West until you reach the marker. Open the mill and then talk to Asga
outside the mill.

• Follow the path back East and head North at the crossing until you reach Sergeant Seyne. • Talk to Sergeant Seyne and then move to the next marker just North. • Board the ship you see and grab the Skyshard!
• Get off the ship on the other side and talk to Trynhild. • Head to the docks to the North where you’ll find Captain Rana. • Follow Captain Rana below decks and kill General Vette. • Leave the ship and the dock.

• Turn in Quest: At Centurion Mobareed at the end of the docks. • Quest Rewards: General Vette’s Greatsword (Two-Handed Sword, 22 Damage, On Hit:
Deals 4 Unresistable Damage, Total Armor and Spell Resistance +8%, Level 6), 98 Gold.
28.1. Warning Davon’s Watch (Bal Foyen Main Story Quest - Lvl. 4)
• Pickup Quest: Centurion Mobareed has given you this quest.
• Follow the road South and then West to Davon’s Watch. • (Quest continues in 28.2)
Stonefalls Quests

• As soon as you enter Stonefall take the Skyshard to your left.
29.1 The Harborage (Main Story Quest - Lvl. 3)
• Pickup Quest: From The Prophet at the entrance to Davon’s Watch. • (Quest continues in 22.2)
28.2. Warning Davon’s Watch (Bal Foyen Side Quest - Lvl. 4)

• Talk to Holgunn as you enter Davon’s Watch. • Turn in Quest: At Holgunn. • Quest Rewards: 42 gold.
30. Legacy of the Ancestors (Stonefalls Side Quest - Lvl. 3)
• Pickup Quest: From Holgunn. • Head inside Indoril Manor and talk to Tanval Indoril. • Leave the Manor and enter the Indoril Crypt across the street.
• Make your way to the most Southern part of the crypt and collect the Skull of Nam
Indoril after killing the Enraged Spirit. • Leave the Crypt and head back to Tanval Indoril.

• Turn in Quest: At Tanval Indoril. • Quest Rewards: 73 gold.
31. Delaying the Daggers (Stonefalls Side Quest - Lvl. 4)
• Pickup Quest: Given by Tanval Indoril. • Talk to Garyn Indoril. He’s standing right next to Tanval.
• Make way to the West Gate and talk to Holgunn. • Follow the road East and exit the West Gate to Stonefalls.
• Moving from top to bottom, burn the 3 Ballistas and Siege Ladder (see map).

• Head North and grab the Skyshard. It can be found behind a ridge (see screenshot). • Enter the West Gate entrance to Davon’s Watch and speak with Holgunn. • Turn in Quest: At Holgunn. • Quest Rewards: 42 gold.
32. City Under Siege (Stonefalls Side Quest - Lvl. 4)
• Pickup Quest: Given by Holgunn. • Follow the road East back to the Indoril Crypt. • Head inside the Crypt and run to the other end of it.
• Protect Tanval Indoril while he summons a creature called Balreth. • Enter the Portal.

• Follow the coastline South to witness the destruction of the Covenant Camp. • Head up the stairs and back to the West Gate to enter Davon’s Watch. • Head East to the Indoril Manor. You’ll find Tanval Indoril in front. • Turn in Quest: At Tanval Indoril. • Quest Rewards: Indoril Pyrostaff (Flame Staff, 15 Damage, On Hit: Deals 4 Fire
Damage, Total Armor and Spell Resistance +6%, Level 4), 85 Gold.
33.1. Quiet the Ringing Bell (Stonefalls Side Quest - Lvl. 4)
• Pickup Quest: Given by Tanval Indoril. • (Quest line is continued in 30.2) • Leave Davon’s Watch at the South Exit which leads to the Starved Plain.
34.1. Through the Aftermath (Stonefalls Side Quest - Lvl. 5)
• Pickup Quest: From Sergeant Rhorlak, just outside Davon’s Watch’s South exit. • Talk to Furon Rii near Sergeant Rhorlak.

• Enter the Starved Plain just South and use the Smoky Pendant that was given to you on a
defeated Spectral Warrior. • Head back and talk to Furon Rii. • Talk to Reesa at the same encampment. • Head back to the Starved Plain. Defeat another Spectral Warrior and use the Argonian
Talisman. • Head back and talk to Reesa. • Now talk to Sergeant Rhorlak and choose to either follow Reesa’s or Furon Rii’s plan for
the Spirits. We chose Reesa’s plan. The follow-up quests are similar and the outcome is the same as far as we know at this point.
• Talk to either Reesa’s or Furon Rii’s depending on your choice.
• Now head to the 3 markers in the Starved Plain to gather either the Skulls [3] or Relics
[3].

• Start with the Northern marker, then go to the Southern marker, and then the Eastern marker.
• (Quest line is continued in 34.2)
35. Enslaved in Death (Stonefalls Side Quest - Lvl. 5)
• Pickup Quest: From Ix-Utha, in the tent right next to one of the Skull or Relic locations. • Kill Spectral Warriors near some of the Ethereal Slaves at the Starved Plain until 3 have
been released.
• Head to Ix-Utha’s new location to the South and talk to her. • Turn in Quest: At Ix-Utha. • Quest Rewards: Spiritmender’s Staff (Healing Staff, 17 Damage, On Hit: Deals 3 Magic
Damage & Recovers 1 Health, Attack Speed +6%, Level 5), 46 gold. • You should be level 8 now.
36.1. The Fate of a Friend (Stonefalls Side Quest - Lvl. 9)
• Pickup Quest: From Shuldrashi, behind a ridge (see map). • (Quest line is continued in 36.2)
34.2. Through the Aftermath (Stonefalls Side Quest – Lvl. 5)
• Move North to complete the ritual at the Brazier. Beware for the General Radathren who
appears and will attack you although he’s no real challenge. • Turn in Quest: At Furon Rii or Reesa, right next to the Brazier. • Quest Rewards: Rhorlak’s War Axe (Two-Handed Axe, 20 Damage, On Hit: Deals 3
Unresistable Damage, Weapon Enchantment Effect +16%, Level 5), 116 gold.
37.1. Giving for the Greater Good (Stonefalls Side Quest – Lvl. 5)

• Pickup Quest: From Reesa, right after completing the previous quest. We’re not sure if,
when you have opted for Furon Rii’s plan, you will have a similar quest at this point. For now you’ll have to complete any quest(s) provided by Furon Rii by yourself.
• Head to the Strifewswarm Kwama Mine. • Enter the Mine and take the Kwama Cap at the end of it. • Talk to Reesa just outside the Mine. • (Quest continues at 37.2)
6.2. Anchors from the Harbour (Fighter’s Guild Quest - Lvl. 8)
• Head slightly Northeast towards Merric at-Aswala. • Search the 3 nearby Worm Cultist Bodies for clues. • Talk to Aelif.

• (Quest continues in 6.3)
37.2. Giving for the Greater Good (Stonefalls Side Quest – Lvl. 5)
• Go give the Kwama Cap to Gam-Kur and Utadeek, then move to Reesa’s new location. • Turn in Quest: To Reesa. • Quest Rewards: 46 Gold. • Head North.
29.2. The Harborage (Main Story Quest – Lvl. 3)
• Head North to The Harborage (see map). • Talk to The Prophet inside and follow him.

• Learn about the Elder Scroll, The Five Companions and more by talking to The Prophet. • Turn in Quest: At The Prophet. • Quest Rewards: Prophet’s Recollection (Ring, +2 Magicka Recovery, Maximum
Magicka +12, Level 3), 146 gold, 1 Skill Point. • Leave The Harborage and head West to the Inner Sea Armature.
3.2. Long Lost Lore (Mages Guild Quest - Lvl. 8)
• Enter the Inner Sea Armature where you must collect Tomes [4]. • Collect the Tomes that are located on the 4 locations inside.
• Make sure to grab the Skyshard in the Northern room of the Inner Sea Armature. • (Quest Continues in 3.3) • Head outside and move Northwest to Still Water’s Camp.

36.2. The Fate of a Friend (Stonefalls Side Quest - Lvl. 9)
• Examine the body of Stands-in-Still-Water at Still Water’s Camp and the dagger. • (Quest continues in 36.3) • Head back to Davon’s Watch.
3.3. Long Lost Lore (Mages Guild Quest - Lvl. 8)
• Head to the Mages Guild in Davon’s Watch and talk to Valaste. Place the book on the Arcane Brazier on the opposite side of the room.
• Talk to her again then use the Ritual Orb she creates. • Talk to Arch-Mage Shalidor who appears in the centre of the room. • Step in the Portal to Cheesemonger’s Hollow where you must talk to Haskill. • He’lls ask you to close the Dark Portal in the room, but you’ll first have to kill 4 waves of
Hostiles. Drag the enemies away from the portal so you have a bit of time to replenish between each wave. If you do die, you’ll resurrect behind the Dark Portal and you can complete at the wave you were before you died.
• Talk to Haskill again, and again, and then head into the Hollow. • Be careful for the Dremora mobs and Scamps. You’d probably be wise to go around the
group of 3 for now.

• Head up the ramp at the end of the Hollow and kill Gutsripper. Examine one of the
Tomes behind him. • Talk to Sheogorath who appears and then watch his conversation with Arch-Mage
Shalidor. • Then talk to Arch-Mage Shalidor who sends you back to the Mages Guild where you
must talk to Valaste. • Turn in Quest: At Valaste. • Quest Rewards: The Amulet of Eyevea (Neck, +2 Magicka Recovery, Maximum
Magicka +16, Level 8), 228 Gold. • You should be level 9 now.
6.3. Anchors from the Harbour (Fighter’s Guild Quest - Lvl. 8)
• Head to the Fighters Guild. • Talk to Guildmaster Sees-All-Colors. • (Quest continues in 6.4) • Follow the road South.
38.1. Proving Trust (Stonefalls Side Quest – Lvl. 6)

• Pickup Quest: From Guraf Hroason on the road to Senie. • Kill Shalk in Senie and collect Shalk Chitin [6].
• Talk to Soft-Scale (see map) and then heal 6 wounded peasants throughout Senie. You
can only target the ones that are laying down. • (Quest continues in 38.2) • Follow the road South.
39.1. Percussive Ranching (Stonefalls Side Quest – Lvl. 6)
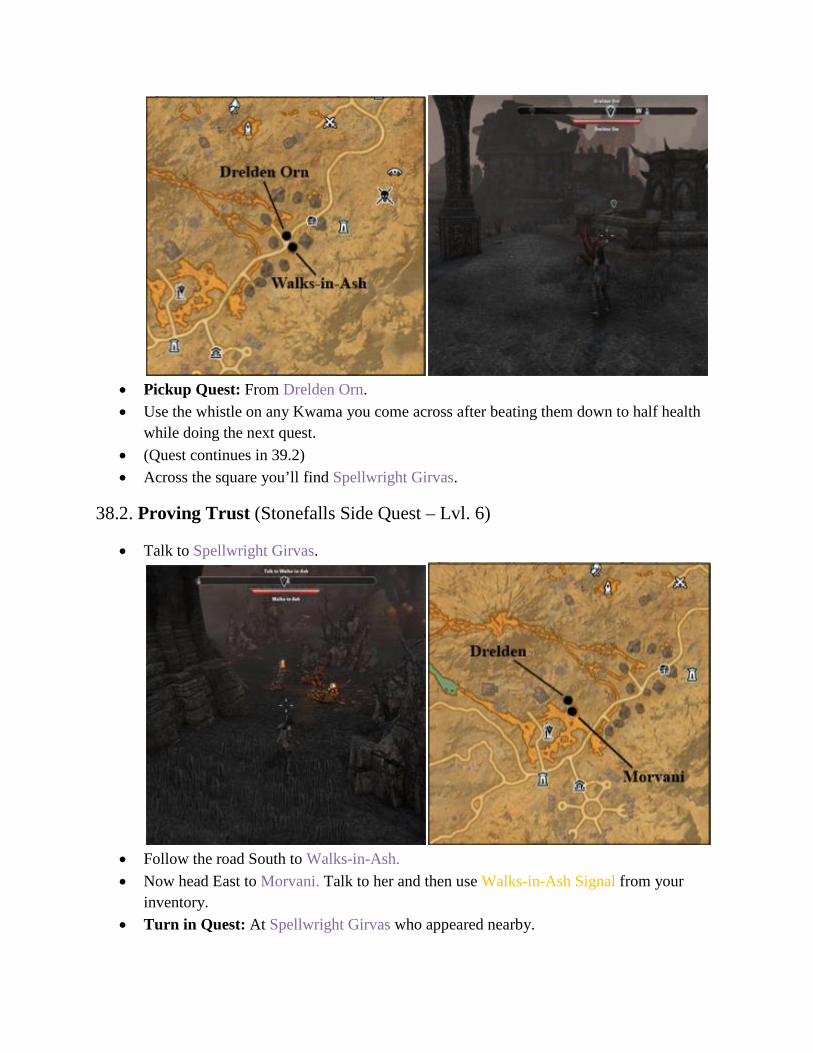
• Pickup Quest: From Drelden Orn. • Use the whistle on any Kwama you come across after beating them down to half health
while doing the next quest. • (Quest continues in 39.2) • Across the square you’ll find Spellwright Girvas.
38.2. Proving Trust (Stonefalls Side Quest – Lvl. 6)
• Talk to Spellwright Girvas.
• Follow the road South to Walks-in-Ash. • Now head East to Morvani. Talk to her and then use Walks-in-Ash Signal from your
inventory. • Turn in Quest: At Spellwright Girvas who appeared nearby.

• Quest Rewards: Cured Kwama Leggings (Medium Armor: Legs, Armor 41, +14 Max Stamina, Increases Resistance to Critical by 70, Level 6), 98 Gold.
• Head slightly North to Drelden Orn (see map above).
39.2. Percussive Ranching (Stonefalls Side Quest – Lvl. 6)
• Turn in Quest: At Drelden Orn up on the ridge above where Morvani was. • Quest Rewards: Kwama Cuttle Shield (Shield, Armor 35, +14 Max Stamina, Increases
Exploration Experience gained by 7%, Level 6), 24 Gold. • Head back to the road and move South.
40. Wake the Dead (Stonefalls Side Quest – Lvl. 7)
• Pickup Quest: From Onuja on the road to the South.
• Chant at both the Shrine of Veneration and the Shrine of Reverence. • Talk to Onuja at the center of the Ruins and then chant at the Central Brazier. Kill the 3
Othrenis Ghosts that will appear. • Talk to Onuja again and then move South up the stairs where you must speak with
Mavos Siloreth. • Turn in Quest: At Mavos Siloreth (see map above) • Quest Rewards: 53 Gold.
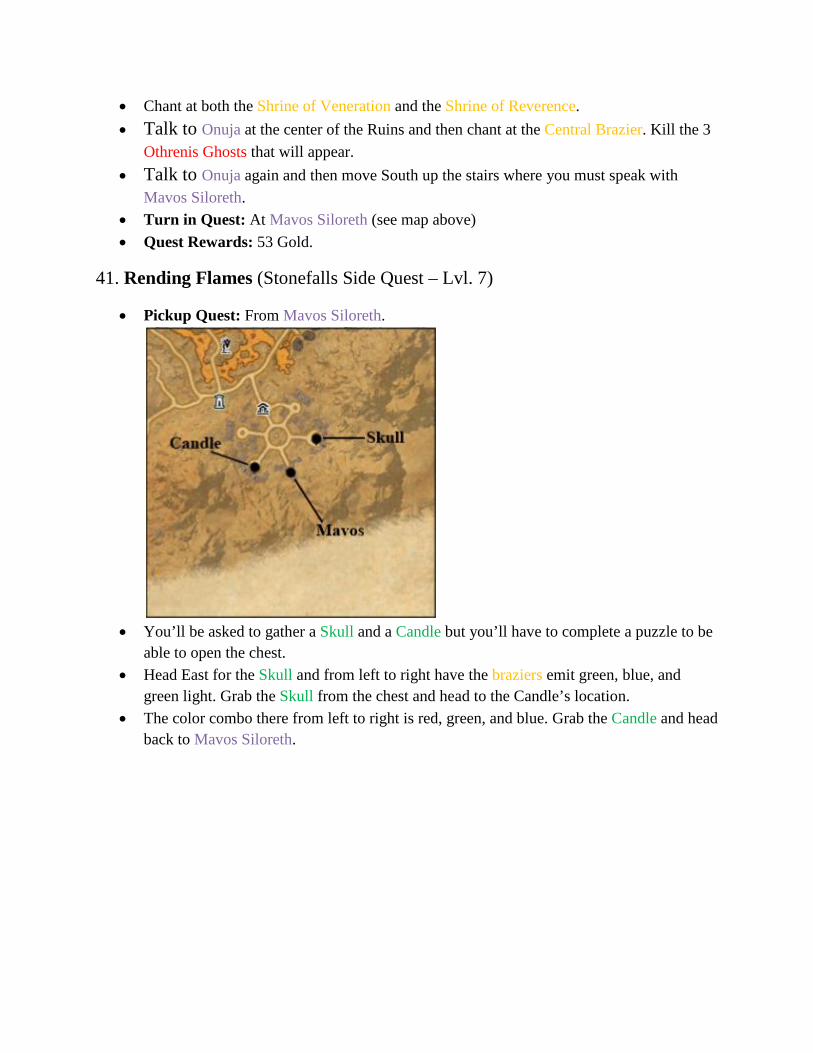
41. Rending Flames (Stonefalls Side Quest – Lvl. 7)
• Pickup Quest: From Mavos Siloreth.
• You’ll be asked to gather a Skull and a Candle but you’ll have to complete a puzzle to be
able to open the chest. • Head East for the Skull and from left to right have the braziers emit green, blue, and
green light. Grab the Skull from the chest and head to the Candle’s location. • The color combo there from left to right is red, green, and blue. Grab the Candle and head
back to Mavos Siloreth.

• Talk to Hedyn. Then head out to shut the Daedric Portals [3] shown on the map. • Talk to Magister Enuse who will ask you to summon 2 Guardians at the nearby Flame
Wells.
• Head to Mavos Siloreth, talk to him and then touch the Altar of Binding. • Turn in Quest: At Mavos Siloreth. • Quest Rewards: Ancient Warden’s Greaves (Heavy Armor: Legs, Armor 53, Max
Health +21, This Item’s Armor Value +5%, Level 7), 106 Gold.
42.1. To Ash Mountain (Stonefalls Side Quest – Lvl. 7)
• Pickup Quest: From Onuja who can be found just down the stairs from Mavos Siloreth. • (Quest continues at 42.2) • Run North.
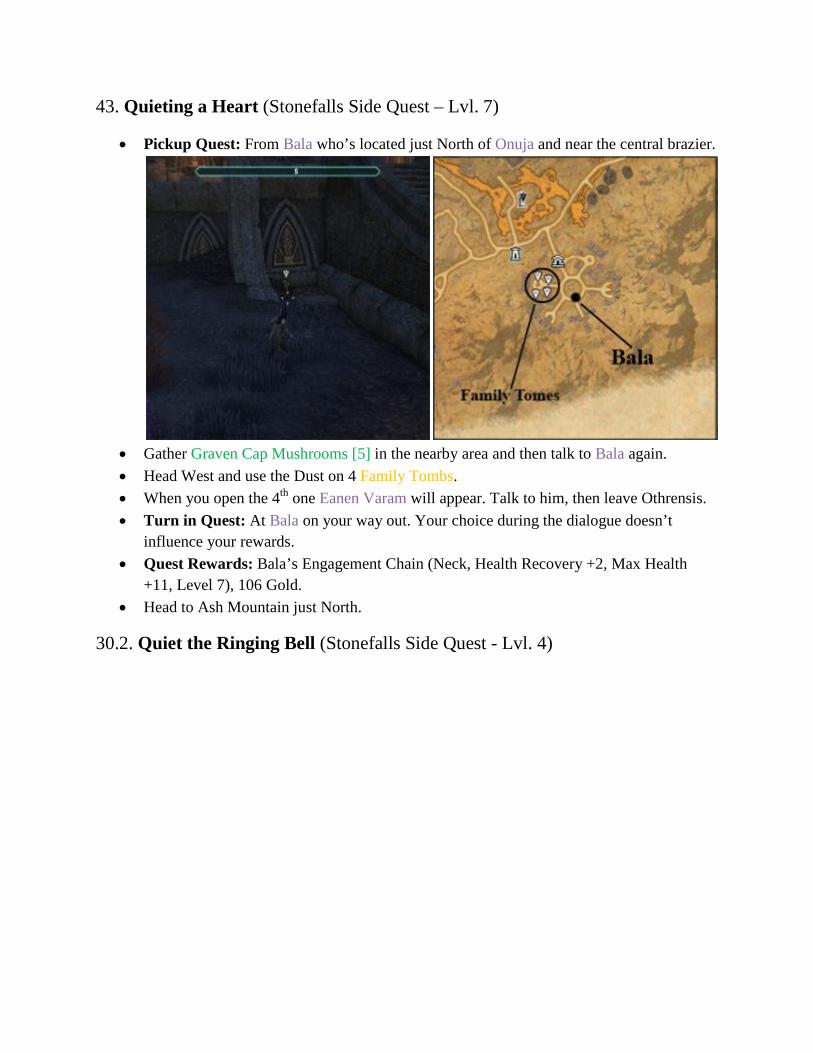
43. Quieting a Heart (Stonefalls Side Quest – Lvl. 7)
• Pickup Quest: From Bala who’s located just North of Onuja and near the central brazier.
• Gather Graven Cap Mushrooms [5] in the nearby area and then talk to Bala again. • Head West and use the Dust on 4 Family Tombs. • When you open the 4th one Eanen Varam will appear. Talk to him, then leave Othrensis. • Turn in Quest: At Bala on your way out. Your choice during the dialogue doesn’t
influence your rewards. • Quest Rewards: Bala’s Engagement Chain (Neck, Health Recovery +2, Max Health
+11, Level 7), 106 Gold. • Head to Ash Mountain just North.
30.2. Quiet the Ringing Bell (Stonefalls Side Quest - Lvl. 4)

• Turn in Quest: Talk to Garyn Indoril at Ash Mountain. • Quest Rewards: 21 Gold.
42.2. To Ash Mountain (Stonefalls Side Quest – Lvl. 7)
• Turn in Quest: At Garyn Indoril. • Quest Rewards: 26 Gold.
44.1. Restoring the Guardians (Stonefalls Side Quest – Lvl. 8)
• Pickup Quest: Given by Garyn Indoril. • Cross the bridge in Northern direction. • Collect Daedra Hearts [10] while working on the next quest. They are dropped by
Scamps and Clannfears. • (Quest continues in 44.2)
45.1. Close the Scamp Caves (Stonefalls Side Quest – Lvl. 8)
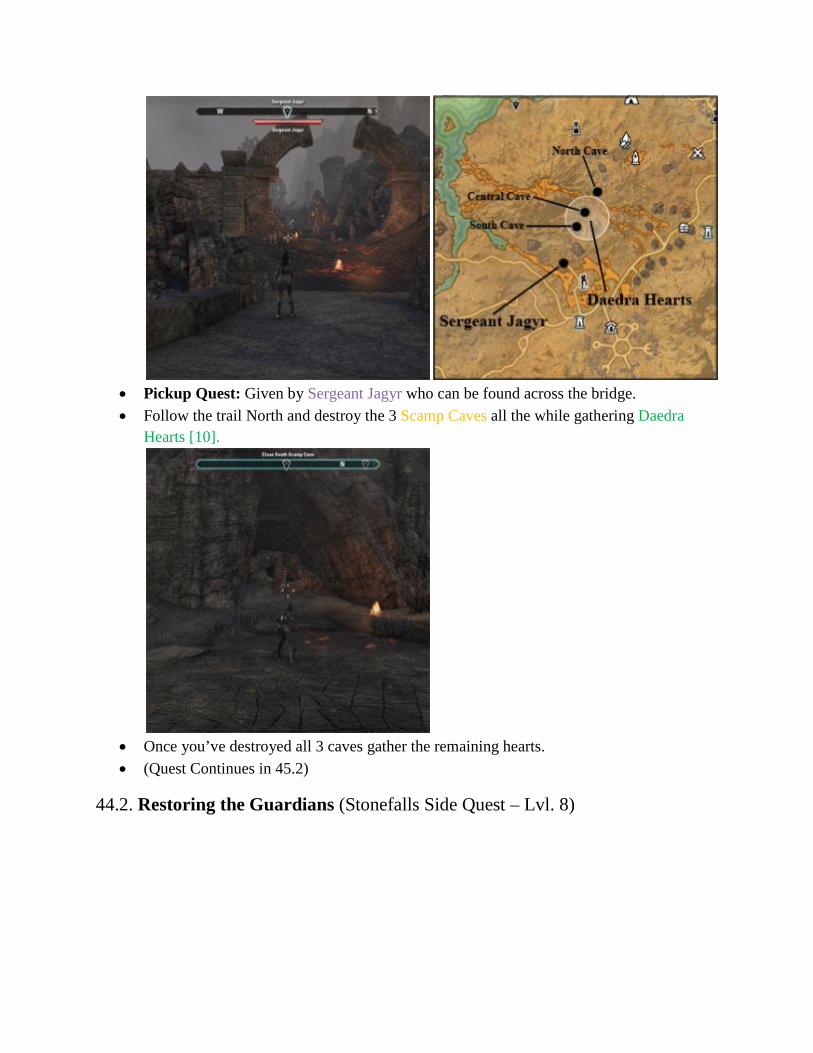
• Pickup Quest: Given by Sergeant Jagyr who can be found across the bridge. • Follow the trail North and destroy the 3 Scamp Caves all the while gathering Daedra
Hearts [10].
• Once you’ve destroyed all 3 caves gather the remaining hearts. • (Quest Continues in 45.2)
44.2. Restoring the Guardians (Stonefalls Side Quest – Lvl. 8)

• Head to the 2 locations that appear once you’ve gathered the 10 Daedra Hearts (see map). • Summon Blaze at the Northern marker and Ragebinder at the Southern marker. • (Continues at 44.3)
45.2. Close the Scamp Caves (Stonefalls Side Quest – Lvl. 8)
• Head to Captain Norra (see map above). • Turn in Quest: At Captain Norra • Quest Rewards: Scampstamper Sabatons (Heavy Armor: Feet, Armor 55, Max Stamina
+5, Reduces the Cost of Sprinting by 2%, Level 8), 28 Gold.
44.3. Restoring the Guardians (Stonefalls Side Quest – Lvl. 8)
• Turn in Quest: At Walks-in-Ash, just slightly North of Captain Norra. • Quest Rewards: 57 Gold.
46.1. The Death of Balreth (Stonefalls Side Quest - Lvl. 8)
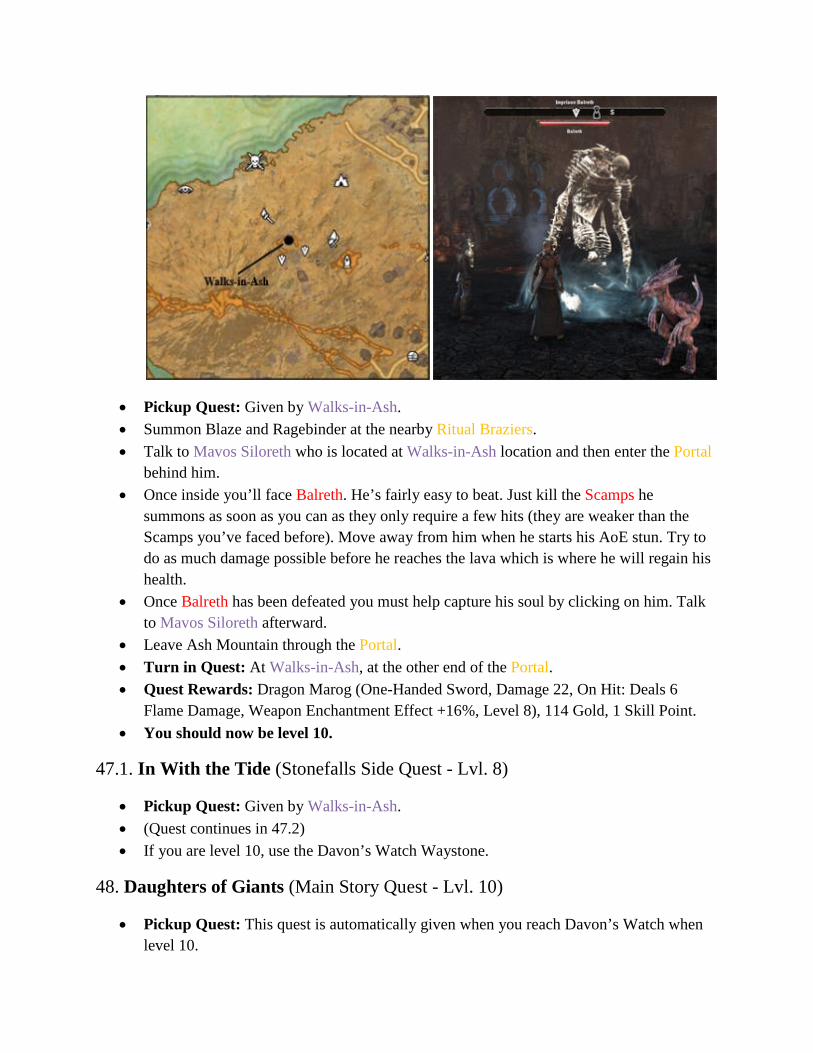
• Pickup Quest: Given by Walks-in-Ash. • Summon Blaze and Ragebinder at the nearby Ritual Braziers. • Talk to Mavos Siloreth who is located at Walks-in-Ash location and then enter the Portal
behind him. • Once inside you’ll face Balreth. He’s fairly easy to beat. Just kill the Scamps he
summons as soon as you can as they only require a few hits (they are weaker than the Scamps you’ve faced before). Move away from him when he starts his AoE stun. Try to do as much damage possible before he reaches the lava which is where he will regain his health.
• Once Balreth has been defeated you must help capture his soul by clicking on him. Talk to Mavos Siloreth afterward.
• Leave Ash Mountain through the Portal. • Turn in Quest: At Walks-in-Ash, at the other end of the Portal. • Quest Rewards: Dragon Marog (One-Handed Sword, Damage 22, On Hit: Deals 6
Flame Damage, Weapon Enchantment Effect +16%, Level 8), 114 Gold, 1 Skill Point. • You should now be level 10.
47.1. In With the Tide (Stonefalls Side Quest - Lvl. 8)
• Pickup Quest: Given by Walks-in-Ash. • (Quest continues in 47.2) • If you are level 10, use the Davon’s Watch Waystone.
48. Daughters of Giants (Main Story Quest - Lvl. 10)
• Pickup Quest: This quest is automatically given when you reach Davon’s Watch when level 10.
• Now that you’re at Davon’s Watch you can also sell your stuff, work on your professions, craft new and better armor and weapons, use the bank, etc.
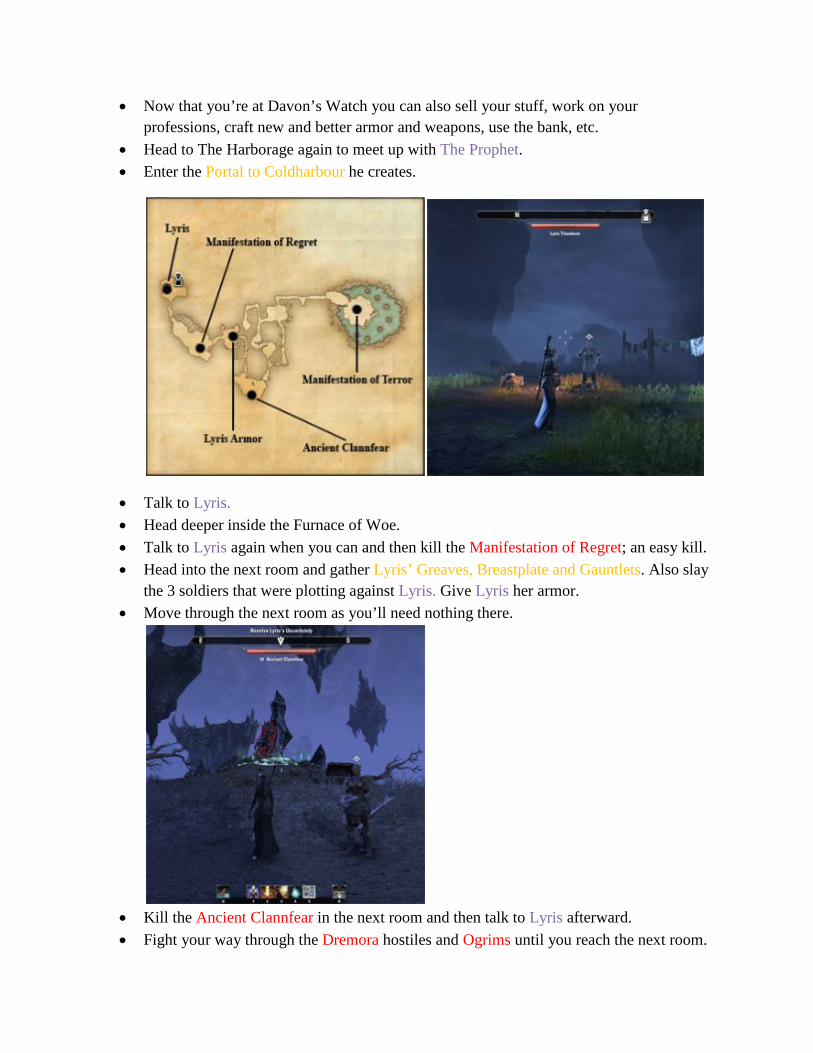
• Head to The Harborage again to meet up with The Prophet. • Enter the Portal to Coldharbour he creates.
• Talk to Lyris. • Head deeper inside the Furnace of Woe. • Talk to Lyris again when you can and then kill the Manifestation of Regret; an easy kill. • Head into the next room and gather Lyris’ Greaves, Breastplate and Gauntlets. Also slay
the 3 soldiers that were plotting against Lyris. Give Lyris her armor. • Move through the next room as you’ll need nothing there.
• Kill the Ancient Clannfear in the next room and then talk to Lyris afterward. • Fight your way through the Dremora hostiles and Ogrims until you reach the next room.

• Observe the conversation between Lyris and Sai Sahan. Then use the Door Lever and move to the next area and then make your way to the end of the Furnace of Woe.
• Take out the Manifestation of Terror. Stay out of the white circles it creates to avoid
becoming electrocuted. • Leave the Foundry of Woe through the Portal. • Turn in Quest: At The Prophet. • Quest Rewards: Titanborn Family Signet (Ring, Stamina Cost of Abilities -7, Maximum
Stamina +19, Level 10), 260 Gold, 1 Skill Point. • Head to the Othrenis Wayshrine. • Follow the road West and take the second turn to the right/North.
49. Desperate Souls (Stonefalls Side Quest - Lvl. 7)
• Pickup Quest: From Neposh who’s located near the Emberflint Mine (see map).
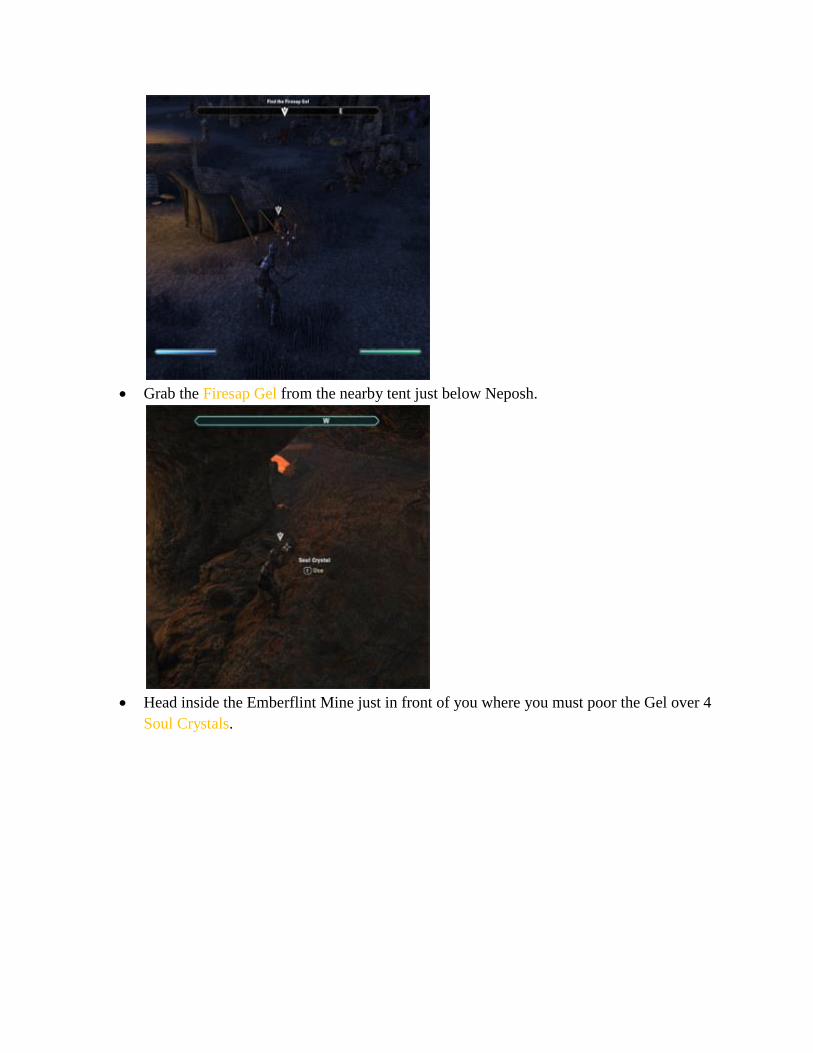
• Grab the Firesap Gel from the nearby tent just below Neposh.
• Head inside the Emberflint Mine just in front of you where you must poor the Gel over 4
Soul Crystals.
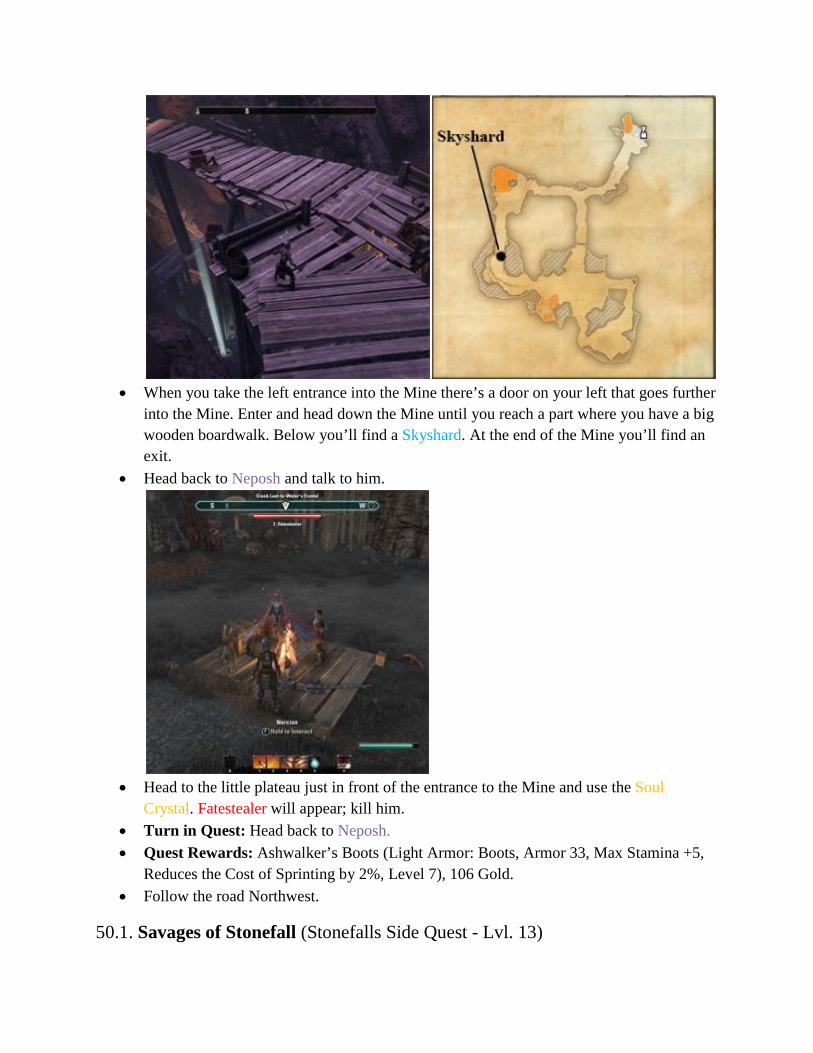
• When you take the left entrance into the Mine there’s a door on your left that goes further
into the Mine. Enter and head down the Mine until you reach a part where you have a big wooden boardwalk. Below you’ll find a Skyshard. At the end of the Mine you’ll find an exit.
• Head back to Neposh and talk to him.
• Head to the little plateau just in front of the entrance to the Mine and use the Soul
Crystal. Fatestealer will appear; kill him. • Turn in Quest: Head back to Neposh. • Quest Rewards: Ashwalker’s Boots (Light Armor: Boots, Armor 33, Max Stamina +5,
Reduces the Cost of Sprinting by 2%, Level 7), 106 Gold. • Follow the road Northwest.
50.1. Savages of Stonefall (Stonefalls Side Quest - Lvl. 13)

• Pickup Quest: Slay Varnag (see map) and you’ll be automatically given this quest. • (Quest continues in 50.2) • Head slightly south to Aelif’s location.
6.4. Anchors from the Harbour (Fighter’s Guild Quest - Lvl. 8)
• Talk to Aelif and then kill 2 waves of Scamps and Dremora mobs. Then Spinesnap will appear; kill him too.
• Head slightly West to Merric’s location. Talk to Aelif again who appears next to you. • (Quest continues at 6.5) • Head North to the city of Ebonheart.
51.1. Restoring Order (Stonefalls Side Quest - Lvl. 10)

• Pickup Quest: From Nilthis who will come running to you as soon as you approach Ebonheart.
• While in the city you can of course sell unwanted items, create new items, repair, restock etc. before you head out again.
• (Quest continues in 51.2)
50.2. Savages of Stonefall (Stonefalls Side Quest - Lvl. 13)
• Talk to Shaali Kulun in the Southern part of Ebonheart. • (Quest continues in 50.3)
51.2. Restoring Order (Stonefalls Side Quest - Lvl. 10)
• Head slightly west to talk with the Nord Hraelgar Stonecrush. • Complete the quest below to gain their allegiance. • (Quest continues in 51.3)
52. A Bit of Sport (Stonefalls Side Quest - Lvl. 10)
• Pickup Quest: From Hraelgar Stonecrush. • Take a drink from the Keg right beside Hraelgar.
• Then duel a Lumber Wagon Guard, Log Roller, and Wood Sawyer. All can be located in
the Nord encampment you’re at right now. • Turn in Quest: Head back to Hraelgar Stonecrush. • Quest Rewards: 65 Gold.
53.1. Night of the Soul (Stonefalls Side Quest - Lvl. 10)

• Pickup Quest: From Acolyte Madrana, near the Wood Sawyers. • This is the quest that ‘ll grant the Allegiance of the Dark Elves for Restoring Order. • Go to the location West for Vivec’s Blessing, and then head east of Ebonheart for
Almalexia’s Blessing. First you must burn the Pile of Offal in front before you can pray at the shrines. Talk with the Servants that appear.
• (Quest continues in 53.2) • Head back into Ebonheart.
54. Taking the Tower (Stonefalls Side Quest - Lvl. 10)
• Pickup Quest: From Naril Heleran at the Ebonheart Plaza. • Go to the second house in Southeast direction and take the Flash Powder from the desk
inside.

• Head to the White Tower slightly North and talk to Bameli the Pure inside. Use the Flash Powder in the hallway and then take the White-Gold Tower bottle from the counter.
• There’s a Lore Book upstairs. • Turn in Quest: Back at Naril Heleran • Quest Rewards: Hlaalu Trader’s Belt (Medium Armor: Waist, 22 Armor, Max Stamina
+5, Cost of Sprinting -2%, Level 10), 130 Gold.
55. The Sapling (Stonefalls Side Quest - Lvl. 10)
• Head to the Northern part of Ebonheart and enter Zasha-Ja’s House. This quest will help you gain the allegiance of the Dragonians for Restoring Order.
• Pickup Quest: Talk to Zasha-Ja.
• Head outside and kill Mudcrabs for Mudcrab Meat [3] and gather Ashreed [4] while at it. • Talk to Zasha-Ja who appears next to you once you’ve collected the required items. • Head to the Hist Sapling, the bulking tree in the center of the swampy area complete the
quest by talking to Zasha-Ja and Biiril back in her home. • Turn in Quest: At Zasha-Ja. • Quest Rewards: 65 Gold. • Header further North.
53.2. Night of the Soul (Stonefalls Side Quest – Lvl. 10)
• Pray at the last of the shrines; the Shrine of Sotha Sil and talk to the Servant. • Head just West of the Ebonheart Plaza to the Tribunal Temple where the Dark Elves
reside. • Talk to Disciple Sildras inside the Tribunal Temple. • Turn in Quest: At Disciple Sildras.

• Quest Rewards: 162 Gold. • Head even further North to Stonefang Island.
6.5. Anchors from the Harbour (Fighter’s Guild Quest - Lvl. 8)
• Talk to the old Guildmaster of the Fighters Guild when you step foot on Stonefang
Island. • He’ll ask you to enter Doshia’s Lair just North; do so. • Make your way to the back of the Lair and kill Doshia. She turns into a Medusa looking
creature halfway during the fight but even so this fight is relatively easy.
• Talk to Merric who is located in the same room and then grab Doshia’s Journal from the
table. • Talk to Guildmaster Sees-All-Colors outside.

• Turn in Quest: At Guildmaster Sees-All-Colors • Quest Rewards: Anchorstone Amulet (Neck, Health Recovery +2, Max Health +16,
Level 8) 228 Gold. • You should now be level 11. • Head back to the center of Ebonheart.
51.3. Restoring Order (Stonefalls Side Quest - Lvl. 10)
• Talk to Drathus Orthal in the large building just North of the Plaza in the center of Ebonheart.
• Head outside and go to Rhavil’s house across the Plaza to the Southwest.
• Then follow Rhavil Urano until he enters a home. Once he leaves you should enter the
home and read the Ritual Tome. • Kill the 2 Imps that appear and then leave the shack. • Head to Rhavil’s house and search the Chest of Drawers. • Kill Rhavil inside when he enters. You might need some backup for this one even though
he doesn’t have any special abilities to watch out for. • Talk to Drathus Orthal outside. • Turn in Quest: At Drathus Orthal • Quest Rewards: Redoran Archmage’s Robes (Light Armor: Chest, Armor 43, Max
Magicka +14, Resistance to Critical Hits +70, Level 10) 130 Gold. • Go back to Ebonheart where you can sell, create, etc. before moving on to the next
quests. After 56.1 you will revisit Davon’s Watch where you can use the bank and do 2 quests in Crow’s Wood.
56.1 The Dangerous Past (Fighter’s Guild Quest - Lvl. 15)

• Pickup Quest: From Bera Moorsmith, at the Fighter’s Guild location in Ebonheart. • (Quest continues in 56.2) • Head out of Ebonheart in Southern direction when you’re ready to go.
• Head to Mephala’s Nest, a public dungeon with a Torch Icon (see map) directly South of
Ebonheart.

• Enter Mephala’s Nest and make your way to the main room where you must kill Gozzak
to complete the dungeon.
• You can find a Skyshard in the hallway behind Gozzak’s room. • Use the Wayshrine to Davon’s Watch where you can drop of stuff at the bank.

• Once you’re done, head to Crow’s Woods near the Docks of Davon’s Watch.
57.1. A Son’s Promise (Stonefalls Side Quest - Lvl. 5)
• Pickup Quest: From Telbaril Oran just inside Crow’s Wood. • Head directly West to a Skyshard that is hidden in the water at the edge of the map.

• Make your way to the Old House. • Examine the Charred Notes inside. • Talk to Telbaril Oran who appears right next to you. • (Quest continues in 57.2)
58. Decree of the Court (Stonefalls Side Quest - Lvl. 5)
• Pickup Quest: From Knave of Rooks on the staircase of the Old House. • He’ll ask you to either pay a toll of flesh or a toll of silver. The toll of flesh will require
you to kill 8 Bats in the area and then blow a whistle so that a bunch of Raven can eat their remains. For the toll of silver you must head out and collect 4 Trinkets on 4 different locations shown on the map for the raven.

• Once you’ve completed your mission head to the Blackfeather Court and talk to the Seneschal of Carrion.
• Now talk to the Duke of Crows nearby. • Turn in Quest: At the Duke of Crows. • Quest Rewards: Blackfeather Court Whistle (Doesn’t add anything, but can be used to
summon crows to feasts on the remains of any enemies you kill), 116 Gold.
57.2. A Son’s Promise (Stonefalls Side Quest - Lvl. 5)
• Talk to Court Magister at the Blackfeather Court.
• Head slightly Northeast to get the Tower Key from Rulantaril’s Cursed Chest. • Head to the Tower directly South and talk to the Crow Mother.
• Head down into the basement and kill the Crow Mother.

• Then head outside the Tower and talk to Telbaril Oran back at the entrance to Crow’s Woods.
• Turn in Quest: At the Telbaril Oran. • Quest Rewards: 116 Gold. • Use the Wayshrine to Fort Arand if you have it, otherwise take the one to Othrenis and
then follow the road leading Southwest. • Follow the road to Fort Arand until you reach Captain Hjolm.
59. Suspicious Silence (Stonefalls Side Quest - Lvl. 8)
• Pickup Quest: From Captain Hjolm. • Hjolm wants you to find Covenant Orders [3] in the Covenant Camp just Northwest of
his location.
• Don’t forget to grab the Skyshard up on the hill.
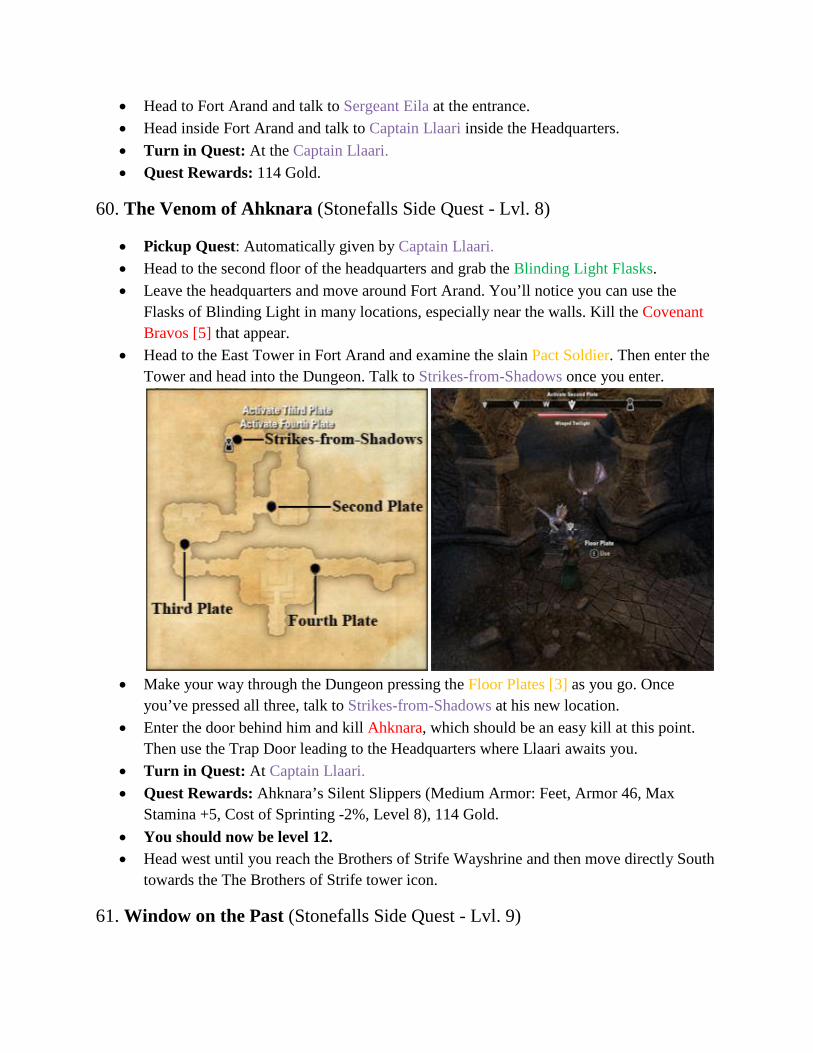
• Head to Fort Arand and talk to Sergeant Eila at the entrance. • Head inside Fort Arand and talk to Captain Llaari inside the Headquarters. • Turn in Quest: At the Captain Llaari. • Quest Rewards: 114 Gold.
60. The Venom of Ahknara (Stonefalls Side Quest - Lvl. 8)
• Pickup Quest: Automatically given by Captain Llaari. • Head to the second floor of the headquarters and grab the Blinding Light Flasks. • Leave the headquarters and move around Fort Arand. You’ll notice you can use the
Flasks of Blinding Light in many locations, especially near the walls. Kill the Covenant Bravos [5] that appear.
• Head to the East Tower in Fort Arand and examine the slain Pact Soldier. Then enter the Tower and head into the Dungeon. Talk to Strikes-from-Shadows once you enter.
• Make your way through the Dungeon pressing the Floor Plates [3] as you go. Once
you’ve pressed all three, talk to Strikes-from-Shadows at his new location. • Enter the door behind him and kill Ahknara, which should be an easy kill at this point.
Then use the Trap Door leading to the Headquarters where Llaari awaits you. • Turn in Quest: At Captain Llaari. • Quest Rewards: Ahknara’s Silent Slippers (Medium Armor: Feet, Armor 46, Max
Stamina +5, Cost of Sprinting -2%, Level 8), 114 Gold. • You should now be level 12. • Head west until you reach the Brothers of Strife Wayshrine and then move directly South
towards the The Brothers of Strife tower icon.
61. Window on the Past (Stonefalls Side Quest - Lvl. 9)
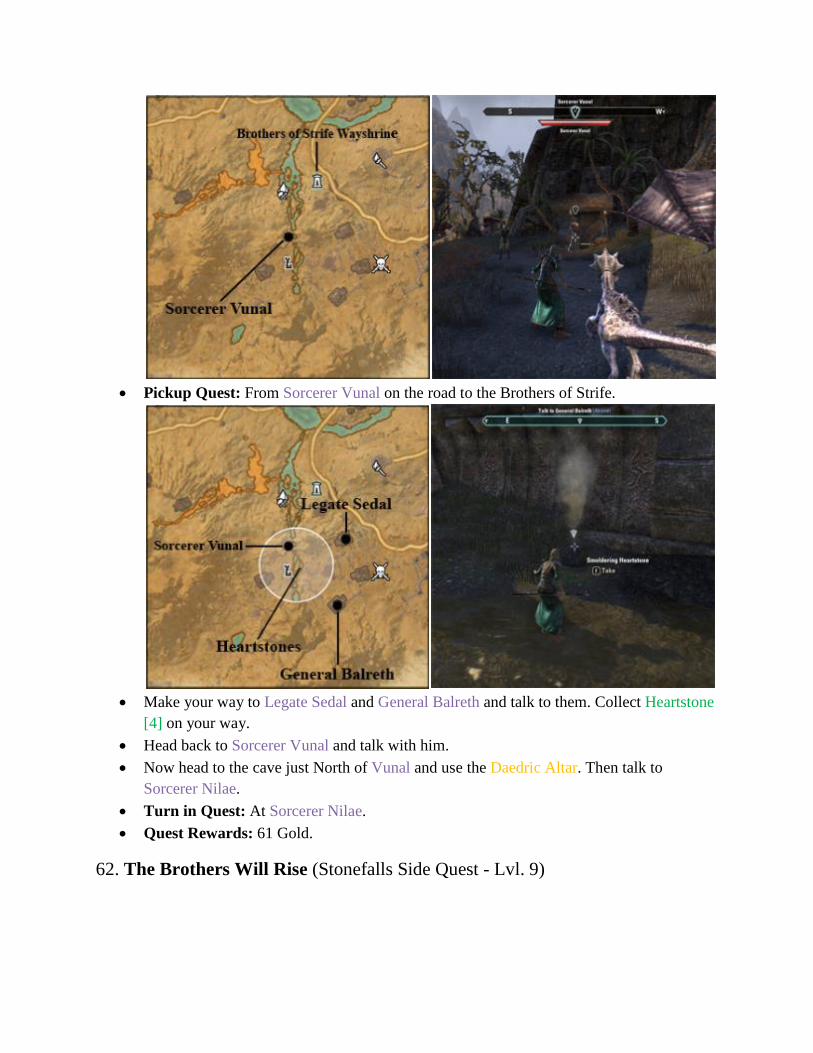
• Pickup Quest: From Sorcerer Vunal on the road to the Brothers of Strife.
• Make your way to Legate Sedal and General Balreth and talk to them. Collect Heartstone
[4] on your way. • Head back to Sorcerer Vunal and talk with him. • Now head to the cave just North of Vunal and use the Daedric Altar. Then talk to
Sorcerer Nilae. • Turn in Quest: At Sorcerer Nilae. • Quest Rewards: 61 Gold.
62. The Brothers Will Rise (Stonefalls Side Quest - Lvl. 9)

• Pickup Quest: This quest is given by Sorcerer Nilae. • Kill Nede troops and collect Nedic Hearts [4] as you make your way to Ornskar whom
you also need to kill.
• Once you have done all you need head to Sorcerer Turoni just a bit to the East and talk to
her. • Now get the Essence of Wrath and Essence of Fire by killing 2 Daedra on the two
locations indicated on the map. • Head back to where Sorcerer Turoni was and talk to Legate Sadal and General Balreth,
then use the Ritual Brazier. • Turn in Quest: At Sorcerer Vunal • Quest Rewards: Telvanni Warsarsh (Light Armor: Waist, 15 Armor, Max Magicka +5,
Armor Enchantment Effect +11%, Level 9), 122 Gold. •

• Head West, cross the lava and head further west towards another Skyshard and a Lore
Book. • Head directly North until you reach the Vivec’s Antlers Wayshrine. Then follow the road
North until you find Sergeant Larthas tending to a wounded House Dres Guard in the middle of the road.
63.1. The Coral Heart (Stonefalls Side Quest - Lvl. 10)
• Pickup Quest: From Sergeant Larthas. • Follow the road further North until you reach Captain Norris; talk to him. • (Quest continues in 63.2)
47.2. In With the Tide (Stonefalls Side Quest - Lvl. 8)
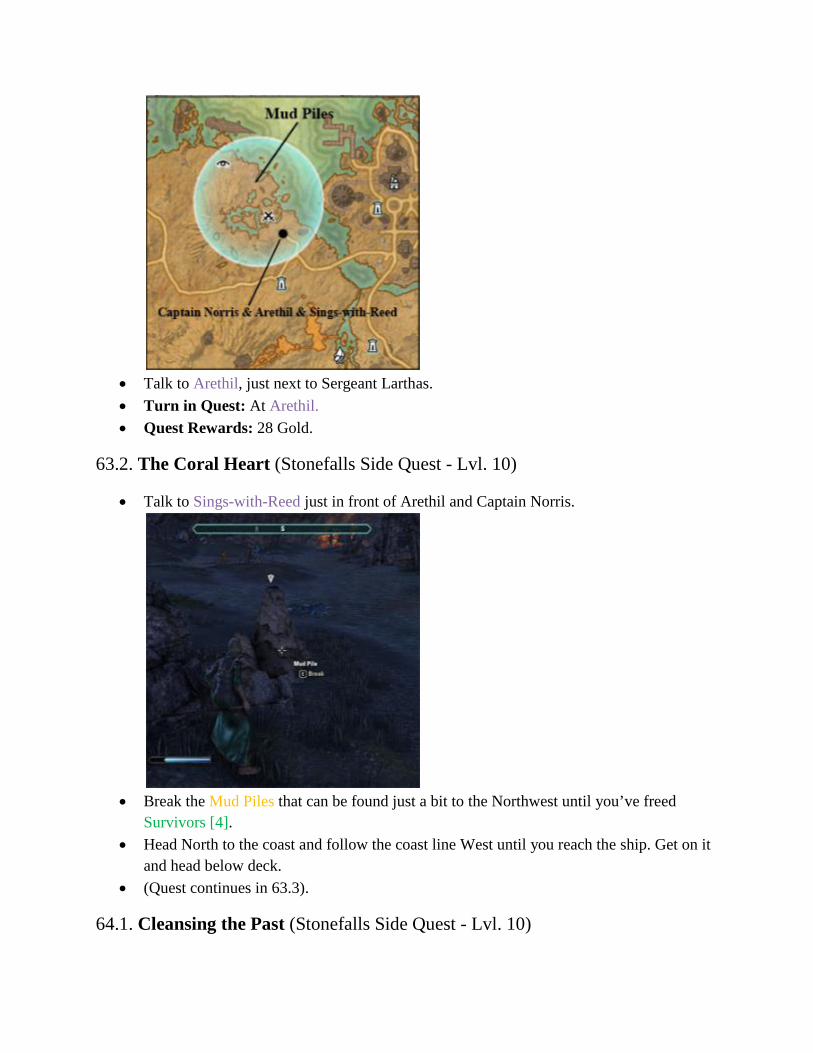
• Talk to Arethil, just next to Sergeant Larthas. • Turn in Quest: At Arethil. • Quest Rewards: 28 Gold.
63.2. The Coral Heart (Stonefalls Side Quest - Lvl. 10)
• Talk to Sings-with-Reed just in front of Arethil and Captain Norris.
• Break the Mud Piles that can be found just a bit to the Northwest until you’ve freed
Survivors [4]. • Head North to the coast and follow the coast line West until you reach the ship. Get on it
and head below deck. • (Quest continues in 63.3).
64.1. Cleansing the Past (Stonefalls Side Quest - Lvl. 10)

• Pickup Quest: From Priestess Brela, below deck.
• Use the Sacred Oil on the remains of Dark Elf Soldiers [9] in the large area indicated on
the map while working on the quest The Coral Heart. • (Quest continues in 64.2) • Stay below deck and enter the Hold at the other side of the ship.
63.3. The Coral Heart (Stonefalls Side Quest – Lvl. 10)
• Talk to Lieutenant Galyn inside the Hold.

• Head to Sings-with-Reed to the South of the ship on a ridge.
• She’ll ask you to place her Eggs [3] at the three Coral Clusters shown on the map. • Once you’ve placed the 3 Eggs you must enter the Coral Heart Chamber (see map
above). • Head further down the Coral Heart Chamber until you reach Sings-with-Reed. You’ll
have to slay Alexandra Conele after talking to her. She’ll start casting fire spells and once you get her health down completely she’ll regain full health and cast ice spells. You’ll have to bring her health down again and then she’ll regain full health again and cast lightning spells. Luckily Lieutenant Galyn will help you throughout the fight.
• Take The Coral Heart.
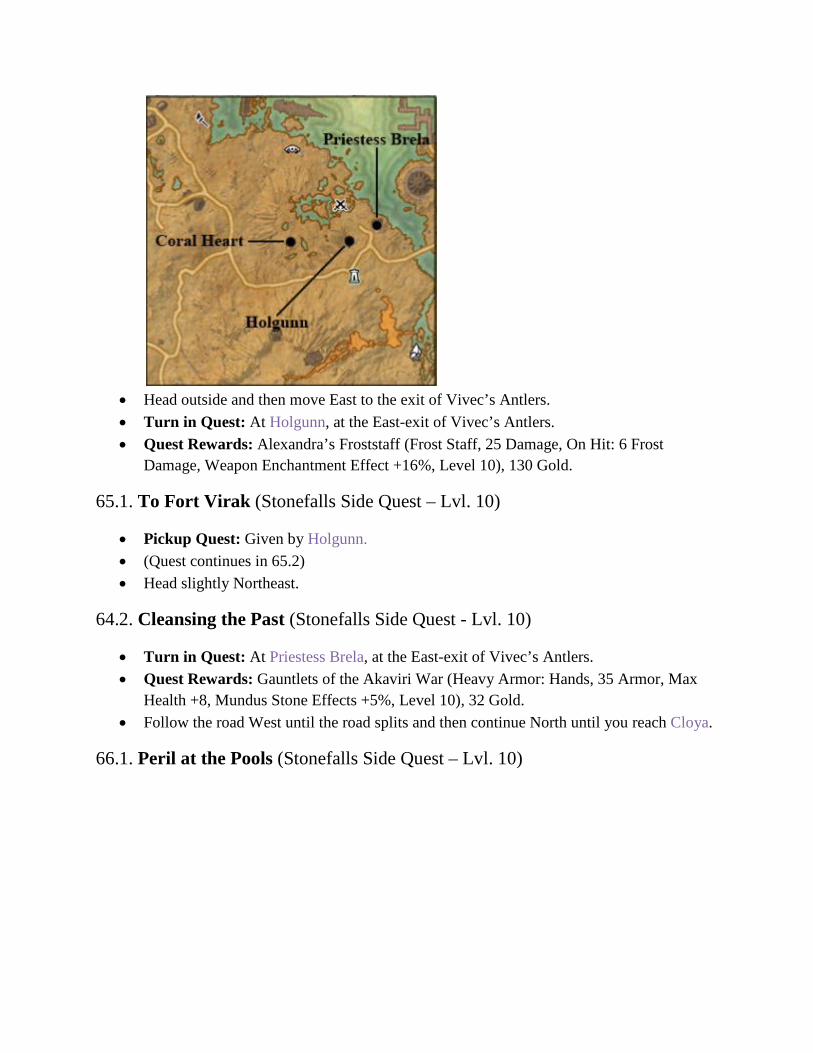
• Head outside and then move East to the exit of Vivec’s Antlers. • Turn in Quest: At Holgunn, at the East-exit of Vivec’s Antlers. • Quest Rewards: Alexandra’s Froststaff (Frost Staff, 25 Damage, On Hit: 6 Frost
Damage, Weapon Enchantment Effect +16%, Level 10), 130 Gold.
65.1. To Fort Virak (Stonefalls Side Quest – Lvl. 10)
• Pickup Quest: Given by Holgunn. • (Quest continues in 65.2) • Head slightly Northeast.
64.2. Cleansing the Past (Stonefalls Side Quest - Lvl. 10)
• Turn in Quest: At Priestess Brela, at the East-exit of Vivec’s Antlers. • Quest Rewards: Gauntlets of the Akaviri War (Heavy Armor: Hands, 35 Armor, Max
Health +8, Mundus Stone Effects +5%, Level 10), 32 Gold. • Follow the road West until the road splits and then continue North until you reach Cloya.
66.1. Peril at the Pools (Stonefalls Side Quest – Lvl. 10)

• Pickup Quest: From Cloya. • Enter the Sulfur Pools slightly West and fight your way to the location of Mevis and
Dedras Orthys and talk to the both of them. • (Quest continues in 66.2) • Head further West.
67. Recovering the Guar (Stonefalls Side Quest – Lvl. 10)
• Pickup Quest: From Hennus. • Collect Guar Harnesses [6] from 6 dead Guars in the Sulfur Pools, and then use them on
the Guars that are alive. • Talk to Jin-Ei at the Guar stables just North of the Sulfur Pools. • Turn in Quest: At Jin-Ei.

• Quest Rewards: Guarblood Ring (Ring, Health Recovery +3, Max Health +14, Level 10), 65 Gold.
66.2. Peril at the Pools (Stonefalls Side Quest – Lvl. 10)
• Head to the Cave which is indicated on the map above. • Talk to Drathyra Othrys.
• Leave the Cave and head South to one of the houses where you must burn the Barrel of
Brandy. • Kill the Covenant Lieutenant that appears and then head back to the cave with the Poison
and talk to Drathyra Othrys. • Head to the stables North again and talk to Garvas Othrys. • Turn in Quest: At Garvas Othrys. • Quest Rewards: Falkwind’s Shadewrap (Medium Armor: Chest, 58 Armor, Max
Stamina +14, Exploration Experience Gained +7%, Level 10), 130 Gold.

• Go grab the Skyshard on a cliff Northeast of the Sulfur Pools as indicated on the map. • Head to Hightide Hollow, a public dungeon just a tad to the West. • You should now be level 13.
68. The Truth About Spiders (Stonefalls Side Quest – Lvl. 10)
• Pickup Quest: From Hjagir just in front of the entrance to Hightide Hollow. • Enter Hightide Hollow and fight your way down to the down level where you can find a
Skyshard on the location indicated on the map. Note: this location is not directly in the beginning, you’ll have to go deeper down into the cave!

• Near the Skyshard you’ll also find some Notes that ‘ll lead you to the next part of this
quest. • Head further down the Hollow for a Lore Book and for the Hightide Hollow exploration
achievement/experience. You can jump down to take a shortcut on your way out. Head back to Hjagir outside.
• Turn in Quest: At Hjagir. • Quest Rewards: 32 Gold. • Head to the coastline.
50.3. Savages of Stonefall (Stonefalls Side Quest - Lvl. 13)
• Follow the coast North. You’ll have to swim around some rocks. There’s a Lore Book
just behind the rocks. Keep moving North along the shore until you bump into Bleiger who you need to kill. Grab Bleiger’s Tentacle.

• (Quest continues in 50.4) • Head land inwards until you reach Hrogar’s Hold.
69. The Truth About Spiders (Stonefalls Side Quest – Lvl. 11)
• Pickup Quest: From Hrogar, inside Hrogar’s Hold. • Head outside and head Southeast to Gar. • Gar will ask you to kill 15 Goblins or Spiders in the area, do so. • Head back to Gar’s old location and talk to Fafnyr. • Then move to Hrogar inside his Hold. Help defend the Hold and then head to Fafnyr
outside. • Turn in Quest: At Fafnyr. • Quest Rewards: 138 Gold.
70. Kinsman’s Revenge (Stonefalls Side Quest – Lvl. 11)
• Pickup Quest: Given by Fafnyr.

• Find Bjorick in one of the Cocoons out in the field nearby. • Head East towards the Goblin Cave where you’ll find Gar. Follow him further into the
cave. • Crush the Spider Eggs in the room to draw out the Shadowsilk Warlord and the Spider
Queen. Kill them once they appear. • Head back to Hrogar. • Turn in Quest: At Fafnyr. • Quest Rewards: Pauldrons of the Holdfast (Heavy Armor: Shoulders, 67 Armor, Max
Health +11, This Item’s Armor Value +5%, Level 11), 138 Gold.
• Head Southwest towards a Skyshard. You’ll have to leave the road and head into the
mountains off the road that leads West from Hrogar’s Hold. • Jump down the cliff on where the road splits where you’ll find Chitakus.
71.1. Hunting Invaders (Stonefalls Side Quest – Lvl. 11)
• Pickup Quest: Given by Chitakus. • (Quest continues in 71.2) • Head North to Lukiul Uxith where you can pick up another quest from one of the
Argonians.
72.1. Enlightenment Needs Salt (Stonefalls Side Quest – Lvl. 11)
• Pickup Quest: From Nojaxia inside one of the houses at Lukiul Uxith. • (Quest continues in 72.2) • Head to Seven-Bellies at the Northern part of Lukiul Uxith to the North.
71.2. Hunting Invaders (Stonefalls Side Quest – Lvl. 11)
• Talk to Seven-Bellies and then follow the road West. • (Quest continues in 71.3) • There’s a Lore Book in the house without door just West/left of Seven-Bellies.
72.2. Enlightenment Needs Salt (Stonefalls Side Quest – Lvl. 11)

• Follow the road to Greymist Falls where you must collect Grub Grass. • (Quest continues in 72.3) • Head North to Pash-Riha.
71.3. Hunting Invaders (Stonefalls Side Quest – Lvl. 11)
• Talk to Pash-Riha at the small crossing to the North.

• Head directly East to Meejapa. You can move through the mountains and then jump
down. Talk to him once you arrive.
• Follow the road North and make a circle to the right while fighting Covenant mobs until
you reach Borolg who is accompanied by Sorme. Kill them both. It’s best to focus on Sorme the mage first.
• Jump down the mountain behind their encampment and head back to Lukiul Uxith. • Talk to Seven-Bellies. • Turn in Quest: At Seven-Bellies. • Quest Rewards: 69 Gold.
72.3. Enlightenment Needs Salt (Stonefalls Side Quest – Lvl. 11)
• Talk to Nojaxia.

• Give the potion to Not-So-Quick who’s hidden behind her house along the mountain
wall. • Head back to Nojaxia and talk to her. • Use the Strange Elixer just outside her house. • Turn in Quest: At Nojaxia. • Quest Rewards: Murkreed Mantle (Light Armor: Shoulders, 39 Armor, Max Magicka
+7, Exploration Experience +7%, Level 11), 69 Gold. • You should now be level 14.
73. A Storm Broken (Stonefalls Side Quest – Lvl. 11)
• Pickup Quest: Automatically given by Seven-Bellies.
• Leave the town in Northern direction and then take the second turn left until you see
Pash-Riha on the right side of the road.

• Head further South and look for the Covenant Lieutenant. Kill him and put Pash-Riha’s
Dagger in his Corpse. • Talk to Pash-Riha back in town. • Turn in Quest: At Pash-Riha. • Quest Rewards: Mota Fang (Dagger, 27 Damage, On Hit: 9 Disease Damage,
Enchantment Charges +19%, Level 11), 69 Gold. • Now wouldn’t be a bad time to return to Davon’s Watch. At level 14 you can create and
wear level 14 gear so updating your gear, professions etc. might be a good idea at this point, especially if your bag is full. Just use the Wayshrines to decrease travelling time.
74.1. Simply Misplaced (Mage’s Guild Quest – Lvl. 15)
• Pickup Quest: From Shalidor, inside the Mage’s Guild in Davon’s Watch. • This quest is given when you enter the Mage’s Guild in Davon’s Watch. • (Quest continues in 74.2) • Use the Wayshrine back to Fort Virak.
65.2. To Fort Virak (Stonefalls Side Quest – Lvl. 10)

• Follow the road North from the Fort Virak Wayshrine until you run into Sergeant
Gjorring. • Turn in Quest: At Sergeant Gjorring. • Quest Rewards: 32 Gold.
75. Breaking Fort Virak (Stonefalls Side Quest – Lvl. 12)
• Pickup Quest: Automatically given by Sergeant Gjorring. • Head West and talk to Garyn Indoril.
• You’ve got the task to kill Covenant Soldiers to the North and you must loot Evidence
[3]. • Head back to Garyn when you’re done and talk to him to receive your next quest
objective.
• Head to the entrance to The Ruins to your West.
• Once inside you should talk to Walks-in-Ash. Drink the Potion and then make your way
through the ruined corridors. Then unlock the door using the Lever. • Turn in Quest: At Walks-in-Ash. • Quest Rewards: 182 Gold.
76. Evening The Odds (Stonefalls Side Quest – Lvl. 12)
• Pickup Quest: Quest is automatically given by Walks-in-Ash. • Follow the tunnel inside Fort Virak.
• Head to the South Gate and then the North Gate to unbar them. • Head to General Sien’s location, inside the Fort Virak Tower. • Inside you’ll find Gugnar, talk to him.
• Then grab the Candle behind him and burn the place down by burning General Sien’s
Library. • Leave the Tower and talk to Tanval Indoril in the Southwestern part of Fort Virak. • Turn in Quest: At Tanval Indoril. • Quest Rewards: 146 Gold.
77. The General’s Demise (Stonefalls Side Quest – Lvl. 12)
• Pickup Quest: Quest is automatically given by Tanval Indoril. • Enter the Keep at the nearby entrance. Fight your way through some Zombies until you
can actually enter the building.
• Kill General Sien with the help of the Indorils and Holgunn inside; he’s a disappointingly
easy kill. • Head outside to meet up with Holgunn.

• Turn in Quest: At Holgunn. • Quest Rewards: Lionbanner Chestplate (Heavy Armor: Chest, 76 Armor, Max Health
+28, Chance to Avoid Decay When Defeated +24%, Lvl. 12), 73 Gold, 1 Skill Point. • Leave Fort Virak.
78.1. City at the Spire (Stonefalls Side Quest – Lvl. 12)
• Pickup Quest: Quest is automatically given by Holgunn. • (Quest continues in 77.2) • Leave Fort Virak and head South towards Heimlyn Keep. • You can also start looking for a group for Fungal Grotto, an instance in the area with
recommendation level of 14. Entering the Fungal Grotto is also part of the quest for the Undaunted. You can also find a Skyshard near the entrance, but we’ll document this after Heimlyn Keep.
79. The Curse of Heimlyn’s Keep (Stonefalls Side Quest – Lvl. 12)
• Pickup Quest: From Beron Telvanni, on the road just North of Heimlyn Keep.

• Head into Heimlyn Keep and collect Spectral Essences [5] from the Ghosts you must kill
there, and collect Tainted Hearts [4] from the Corpses that lay in the area, both shown in the screenshot above.
• Head to Merarii Telvanni to the South when you’re done. • Use the Daedric Urn beside Merarri and talk to her again.
• Head inside the 4 highlighted buildings in Heimlyn’s Keep and talk to Adras Furari,
Ramalii Malena, Neron Arona, and Hadrill Diina. • Then head to the tower where the Covenant Soldier is hiding as indicated on the map and
talk to her on the second floor. • Head back to Merarii Telvanni. • Turn in Quest: At Merarii Telvanni. • Quest Rewards: 146 Gold.

80. What Was Done Must Be Undone (Stonefalls Side Quest – Lvl. 12)
• Pickup Quest: This quest was automatically given by Merarii Telvanni. • Enter the Reliquary near Merrari, to the South. • Talk to Keeper Vildras inside.
• Open the Soul Cages of Adras and Rendrasa and defeat them. • Head to Keeper Vildras talk to him, and use the Portal to the Relic Chamber.
• Use the Shattered Ritual Focus and then kill Mendicant Sulinor inside. • Head outside and talk to Keeper Vildras, and Beron Telvanni. • Turn in Quest: At Beron Telvanni. • Quest Rewards: Telvanni Spellhood (Light Armor: Head, 41 Armor, Max Magicka +21,
Armor Enchantment Effect +11%, Lvl 12), 146 Gold. • You should now be level 15.
• If you head back to Davon’s Watch at level 15 The Prophet will greet you and automatically give you the quest Chasing Shadows.
• Finish up your business in Davon’s Watch and then head to the Harborage.
81. Chasing Shadows (Main Story Quest - Lvl. 15)
• Pickup Quest: From The Prophet as soon as you get to Davon’s Watch at level 15. • Talk to The Prophet inside the Harborage.
• Head back to Davon’s Watch and talk to Feduria Llaren in the Market District and to
Okeeh near the Fighter’s Guild. • Head to the Abandoned Stable Stall to the East and enter the Cellar. • Make your way to the other end of the Cellar and face Aldimion. • Then use the Orb of Discourse and talk to Abnur Tharn.
• Kill Severinus Falco next who will appear behind you.

• Head back to the Harborage and talk The Prophet and Lyris. • Turn in Quest: At Lyris. • Quest Rewards: Aldmion’s Amulet (Neck, Weapon Damage +4, Max Health +24, Lvl.
15), 336 Gold, and 1 Skill Point.
8.2. One of the Undaunted (Undaunted Guild Quest - Lvl. 12)
• It’s about time to head to the Dungeon: Fungal Grotto, all the way to the West. You need a group for this though so try and get into one using the Grouping Tool under the Group Tab. If you can’t get into a group right now, feel free to continue with the quests below in Stonefall until you can find a group.
• Inside you’ll be able to pick up and complete the quest Kings of the Grotto by simply
making it to the end. Quest Rewards: Vila’s Recompense (Light Armor: Chest, 57 Armor, Max Magicka+25, Armor Enchantment Effect +14%, Lvl. 15), 292 Gold, and 1 Skill Point.
• There’s a Skyshard to be found just behind the entrance to the Fungal Grotto. • Turn in Quest: At Kailstig the Axe, in The Fish Stink back in Davon’s Watch. • Quest Rewards: 146 Gold. • It’s time to round up the last few quests in Stonefalls, use the Wayshrine to Davon’s
Watch. • As you reach the Lliath Temple Wayshrine an Ashlander Scout will come to you.
82. From the Wastes (Stonefalls Side Quest – Lvl. 13)
• Pickup Quest: Given by the Ashlander Scout that greets you when you enter the area.

• Talk to Hedranna Kaliki just to the South.
• Collect Alchemical Draught [12] that drop from the nearby Ziddak mobs, and a Pouch of
Aloe Extract, a Bag of Lavender Oil, and Poppy Extract, all from the encampments just in front of Lliath Temple.
• Head inside the Lliath Temple from a side entrance and talk to Farseer Tirinaat. • Use the Draughts [4] on the Dying Soldiers in your proximity and then head inside the
Temple Shrine to talk with Curate Brethnis. • Turn in Quest: At Curate Brethnis. • Quest Rewards: 76 Gold.
83. Divine Favor (Stonefalls Side Quest – Lvl. 13)
• Pickup Quest: Given by Curate Brethnis.

• Pray at the Tribunal Shrine in the room to the right and talk to the Servant of Almalexia.
• Head down the stairs and collect Nerathren and Faryon’s Ashes, then leave the building. • Go to the two Eternal Flames and spread the Ashes there so you can defeat the ghosts of
Nerathren and Faryon. • Head back to the Temple Shrine and talk to Curate Brethnis. • Turn in Quest: At Curate Brethnis. • Quest Rewards: 76 Gold.
84. Undermined (Stonefalls Side Quest – Lvl. 13)
• Pickup Quest: Given by Brother Samel right after you hand in the previous quest. • Talk to Farseer Tirinaat, and then head outside. • Talk to Ordinator Nethis behind the Temple Shrine and then grab the Pickaxe from the
crate just East.
• Enter the Temple Cave and destroy the Support Beams [4] that are indicated on the map.
Just after destroying the fourth one you’ll be attacked by Ashkhan Ziddak Dunhaki; kill him. Leave the Cave.
• Turn in Quest: At Hedranna Kaliki, just outside. • Quest Rewards: Temple Keeper’s Spaulders (Medium Armor: Shoulders, 58 Armor,
Max Stamina +7, Medium Armor Skill Line Experience +7%, Lvl. 13), 153 Gold. • Follow the road to your right.
85. An Unwanted Twin (Stonefalls Side Quest – Lvl. 13)
• Pickup Quest: From Feldsii Maren, just up the road of the Temple Cave exit. • Talk to Ulov further up the road and then enter the nearby Cellar and kill The Double. • Head outside and talk to Ruvali Manothrel in the same barn.
• Talk to Ulov and then head to the Ruvali’s House where you can grab the Idol. • Talk to Ruvali outside and then use the Idol on Tiril who’ll run into the house. Follow
him into the Cellar and kill him. • Talk to Ulov in the basement and to Ruvali on the upper floor. • Turn in Quest: At Ruvali. • Quest Rewards: 191 Gold. • You should now be level 16.
86.1. Shattering Mirror (Stonefalls Side Quest – Lvl. 13)
• Pickup Quest: Given by Ruvali. • (Quest continues in 86.2) • Move slightly South where you’ll find a Dead Khajiit.
87.1. A Story Told in Footprints (Stonefalls Side Quest – Lvl. 13)
• Pickup Quest: Given upon inspection of the Khajiit Remains. • (Quest continues in 87.2)
86.2. Shattering Mirror (Stonefalls Side Quest – Lvl. 13)
• Talk to Ra-Shadda in the barn just South.

• Use the Idol on Spirits [5] and kill them. • Head to Ruvali’s Home and talk to Ruvali on the upper floor.
• Talk to Ulov on your way out and then head to the Altar you must use just to the East. • Enter the nearby stables and talk to Ruvali, then use the Idol on Ulov. Follow him into
the Courtyard and kill him. • Talk to Ruvali back inside. • Turn in Quest: At Ruvali. • Quest Rewards: House Cousin’s Cowl (Medium Armor: Head, 58 Armor, Max Stamina
+19, Exploration Experience Gained +7%, Lvl. 13), 153 Gold.
87.2. A Story Told in Footprints (Stonefalls Side Quest – Lvl. 13)
• Head to the Rioter’s Steps and examine the Female Body there.

• Enter the nearby Quarters and read the Slave’s Scroll.
• Grab the Skyshard at the location indicated on the map. • Head Northeast to J’kur’s Remains and examine them. • Head to Vahara to the North. • Turn in Quest: At Vahara. • Quest Rewards: Rebellion Mace (One-Handed Mace, 30 Damage, On Hit: 6 Magic
Damage and +3 Magicka, Armor and Spell Penetration +4%, Lvl. 13), 76 Gold. • Head North towards the Sathram Plantation Wayshrine.
88. Darkvale Brews (Stonefalls Side Quest – Lvl. 13)

• Pickup Quest: Given by Caalorne at the Sathram Plantation Wayshrine. • Enter the nearby Public Dungeon called Sheogorath’s Tongue
• Fight your way down the dungeon until you reach Caalorne’s Potions. You can’t miss
them. • You’ll find another Skyshard in the same room. • Make your way out when you’re ready and head back to Caalorne at the Sathram
Plantation. • Turn in Quest: At Caalorne. • Quest Rewards: 40 Gold. • Follow the road South until the road splits up.
78.2. City at the Spire (Stonefalls Side Quest – Lvl. 12)
• Turn in Quest: At Riinsi Dreloth, on the road just North of Kragenmoor. • Quest Rewards: 40 Gold.
89.1. Aggressive Negotiations (Stonefalls Side Quest – Lvl. 15)
• Pickup Quest: Given by Duryn Beleran, near Riinsi Dreloth. • Head South to Kragenmoor and enter the Grandmaster’s Palace and talk to Grandmaster
Omin Dres inside. Talk to Denu Faren in the same room next. • Talk to Nadras Hlor upstairs and choose to fight your way to the Barracks, otherwise
you’ll have to pay 180G for a Vanguard Costume.
• Follow the road that leaves Kragenmoor in Eastern Direction. • Read the Notes [3] in the area indicated on the map in the Vanguard Encampment. • Head back to Kragenmoor towards Denu Faren whose new location is just West of the
Palace. On your way there you’ll come across Laughs-at-All.

90.1. This One’s a Classic (Stonefalls Side Quest – Lvl. 15)
• Pickup Quest: Given by Laughs-at-All, just in front of the Kragenmoor Palace. • (Quest continues in 90.2) • Head slightly West to Denu Faren.
89.2. Aggressive Negotiations (Stonefalls Side Quest – Lvl. 15)
• Turn in Quest: At Denu Faren. • Quest Rewards: 210 Gold.
91.1. Saving the Son (Stonefalls Side Quest – Lvl. 15)
• Pickup Quest: Given by Denu Faren upon handing in the previous quest.

• Head inside the Tunnel to the Tomb and then enter the Tomb when you get to a clearing. • Once inside you must fight your way to the Opening, Follow-up and Closing
Performances which are provided by ghostly Dark Elves, for This One’s a Classic. At the end of the Tomb you’ll find Sen Dres; free him.
• Meet Sen Dres outside the Tomb. • (Quest continues in 91.2) • Head to Laughs-at-All and tell him you didn’t find anything.
90.2. This One’s a Classic (Stonefalls Side Quest – Lvl. 15)
• Turn in Quest: At Laughs-at-All, after telling him you didn’t find anything in the Tomb. • Quest Rewards: Boltstaff of Koal Canton (Lightning Staff, 34 Damage, On Hit: 9 Shock
Damage, Weapon Attack Speed +6%, Lvl. 15), 168 Gold.
91.2. Saving the Son (Stonefalls Side Quest – Lvl. 15)
• Head inside the Palace and talk to Grandmaster Omin Dres. • Turn in Quest: At Grandmaster Omin Dres. • Quest Rewards: House Cousin’s Helm (Heavy Armor: Head, 79 Armor, Max Health
+28, Item Armor Value +5%, Lvl. 15), 84 Gold.
92.1. Vengeance for House Dres (Stonefalls Side Quest – Lvl. 15)
• Pickup Quest: Given by Grandmaster Omin Dres upon completing the previous quest. • (Quest continues in 92.2) • Talk to Sen Dres.
93.1. To the Tormented Spire (Stonefalls Side Quest – Lvl. 15)
• Pickup Quest: Given by Sen Dres. • (Quest continues in 93.2) • Head outside.
94. A Gathering of Guar (Stonefalls Side Quest – Lvl. 15)

• Pickup Quest: Given by Ral Savani in Kragenmoor. • Use the Guar Prod on 4 Guars in Kragenmoor. • Turn in Quest: At Ral Savani. • Quest Rewards: 42 Gold.
92.2. Vengeance for House Dres (Stonefalls Side Quest – Lvl. 15)
• Leave Kragenmoor in Eastern direction. Now you must kill the Vanguard Commander
where you previously found the third Note. • Head slightly South to kill Gurlisk. Collect Gurlisk’s Head for the quest Savages of
Stonefalls. • Head back to the Palace in Kragenmoor. • Turn in Quest: At Grandmaster Omin Dres.

• Quest Rewards: Sigil of House Dres (Neck, Magicka Recovery +4, Max Magicka +19, Lvl. 15), 42 Gold.
50.5. Savages of Stonefall (Stonefalls Side Quest - Lvl. 13)
• Whenever you want to unload some items or work on your professions you can hand in this quest in the Southern part of Ebonheart at Shaali Kulun.
• Turn in Quest: At Shaali Kulun. • Quest Rewards: Ashlander’s Girdle (Heavy Armor: Waist, 30 Armor, Max Health +11,
24% to Avoid Decay When Defeated), 153 Gold. • Head to Davenas Farm, which is Northeast of Kragenmoor.
36.2. The Fate of a Friend (Stonefalls Side Quest - Lvl. 9)
• Turn in Quest: At Shuldrasi at Davenas Farm. • Quest Rewards: 30 Gold. • Head North into the hills where you’ll come across Dathlyn.
95. Stem the Tide (Stonefalls Side Quest – Lvl. 11)
• Pickup Quest: Given by Dathlyn, just North of Davenas Farm. • Enter the Softloam Cavern just a bit to the East.
• Fight your way through the Covenant Forces until you reach the 2 Crystals you must
destroy.
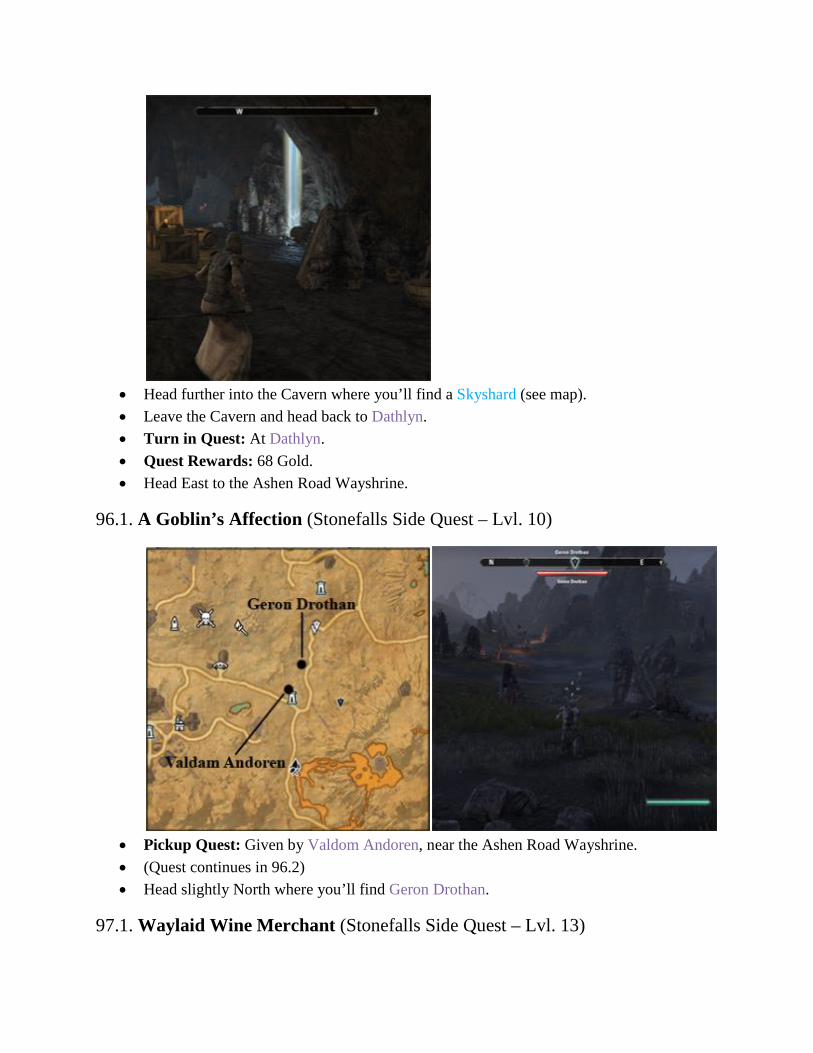
• Head further into the Cavern where you’ll find a Skyshard (see map). • Leave the Cavern and head back to Dathlyn. • Turn in Quest: At Dathlyn. • Quest Rewards: 68 Gold. • Head East to the Ashen Road Wayshrine.
96.1. A Goblin’s Affection (Stonefalls Side Quest – Lvl. 10)
• Pickup Quest: Given by Valdom Andoren, near the Ashen Road Wayshrine. • (Quest continues in 96.2) • Head slightly North where you’ll find Geron Drothan.
97.1. Waylaid Wine Merchant (Stonefalls Side Quest – Lvl. 13)

• Pickup Quest: Given by Geron Drothan.
• • Gather Balmora Blue Wine [10] in the Goblin Camp just North while working on A
Goblin’s Affection. • (Quest Continues in 97.2) • Head to the Goblin Camp to the North.
96.2. A Goblin’s Affection (Stonefalls Side Quest – Lvl. 10)
• Head to the back of the camp and kill Chieftain Grimmstall. Save Dithis Romori nearby,
all the while gathering Balmora Blue Wine. • Once you’re done and have gathered all the wine you can go hand in both quests. • Turn in Quest: At Valdom Andoren. • Quest Rewards: Spider-Wrangler’s Gloves, (Medium Armor: Hand, 29 Armor, Max
Stamina +5, Inspiration Gained by Extraction +27%, Lvl. 13), 65 Gold.

•
97.2. Waylaid Wine Merchant (Stonefalls Side Quest – Lvl. 13)
• Turn in Quest: At Geron Drothan. • Quest Rewards: Sommelier’s Gloves, (Light Armor: Hand, 24 Armor, Max Magicka +7,
24% to Avoid Decay When Defeated, Lvl.13), 38 Gold. • You should now be level 17.
93.2. To the Tormented Spire (Stonefalls Side Quest – Lvl. 15)
• Head East to the Tormented Spire and talk to Holgunn. • Turn in Quest: At Holgunn. • Quest Rewards: 42 Gold.
98. Climbing the Spire (Stonefalls Side Quest – Lvl. 15)
• Pickup Quest: Given by Holgunn. • Use the Ritual Ward Stone and Atronach Ward Stone next to Holgunn and then enter the
Tormented Spire.

• Head Northeast to Walks-in-Ash and talk to him. • Then move slightly North to the entrance to the Southern Ruins where you must lower
another Ward inside. • Head to the Northern Ruins next and lower the Ward inside.
• Head outside and head to the Pact Commanders. Talk to Tanval Indoril. • Fight your way through Scamps and Flame Atronachs as you make your way down to the
platform amidst the lava. Once there you must use the Summoning Bowl and kill Flamespinner. Collect the Key she drops.

• Head into the nearby Caldera Ruins. Avoid the moving beams as you make your way to
the Caldera Ruins Ward which you must lower. • Then leave the Ruins and talk to Tanval Indoril just in front. • Turn in Quest: At Tanval Indoril. • Quest Rewards: 210 Gold.
99. Opening the Portal (Stonefalls Side Quest – Lvl. 15)
• Pickup Quest: Given by Tanval Indoril. • Talk to Genvis Faledran nearby, on the platform where you killed Flamespinner.
• Jump on the platforms to cross the lava to prevent getting killed to get to the Focus Stone
of Flame, then speak with Genvis Faledran again.

• Make your way up the stairs to talk to Levisii Gilvayn. Then get the Focus Stone of Wrath by following the path indicated by the spells the ghostly Dark Elves cast. Talk to Levisii again.
• Now talk to Mavos Siloreth. Collect the Focus Stone of Binding in the cave in front of you. You’ll have to avoid the Red Beams. A Circle will appear on the floor indicating where the Beams will appear.
• Talk to Mavos Siloreth again, then place the Focus Stones on the Daedric Panels [3] on the platform. Talk to Tanval Indoril.
• Turn in Quest: At Tanval Indoril. • Quest Rewards: 168 Gold.
100. Sadal’s Final Defeat (Stonefalls Side Quest – Lvl. 15)
• Pickup Quest: Given by Tanval Indoril. • Enter Sadal’s Prison and use the Warding Stone.
• Follow the Pact Commanders and then kill 3 waves of Skeletons before killing Sadal; a
relatively easy fight where you can’t die. • Enter the Portal and talk to Walks-in-Ash, Tanval Indoril, and Holgunn. • Turn in Quest: At Holgunn. • Quest Rewards: Sedura Morag (Two-Handed Mace, 40 Damage, On Hit: 9 Flame
Damage, Reduces Cooldown of Weapon Enchantments by 35%, Lvl. 15), 168 Gold, and 1 Skill Point

• Follow the Ashen Road to the South where you’ll find another Skyshard on your left.
You can simply jump down and jump through the lava to get to it. • You’ve now completed all quests and have gathered all Skyshards in Stonefalls. It’s time
to move to Deshaan in the South although you might want to head to any locales in Stonefalls you haven’t previously visited. Below is a screenshot with all locales.

Deshaan Quests 101. Bad Medicine (Deshaan Side Quest – Lvl. 15)

• Pickup Quest: Just follow the road South in Deshaan and you’ll eventually be greeted by
Aerona Berendas who gives you this quest. • Enter the 3 houses indicated on the map in The Serk and talk with the Villagers inside. In
the third house you’ll discover that plagued civilians turn into some kind of monsters • Talk to Aerona Berendas about your findings, and then head West to the back gate of the
Quarantine to get the Graveyard Key from the Maulborn Pack.
• Make sure to grab the nearby Skyshard. • Then enter the Quarantine and make your way to the Catacombs.

• Once inside you must investigate the Maulborn in the 3 locations indicated on the map.
You’ll find Aerona’s brother Dethisam at the third location; talk to him. • Head deeper into the Catacombs and enter the Plague Production Chamber. You can use
Plague Husk Scent to avoid being noticed by the monsters.
• Destroy the Maulborn Research and Plague Stockpiles [3] in that room. Head out when
you’re done and meet up with Aerona in The Serk. • Turn in Quest: At Aerona Berendas. • Quest Rewards: Plague Mask (Light Armor: Head, 51 Armor, Max Health +28, Cost of
Sprinting -2%, Lvl. 15), 336 Gold.
102. Proprietary Formula (Deshaan Side Quest – Lvl. 15)

• Pickup Quest: This quest is given by Nilyne Hlor in the Serk, in front of the main
entrance to the Quarantine. • Enter the different buildings in The Serk to retrieve Maulborn Curative [5]. • Turn in Quest: At Nilyne Hlor. • Quest Rewards: 84 Gold. • You should now be level 18. • Leave The Serk in Southern direction.
103.1. The Llodos Plague (Deshaan Side Quest – Lvl. 17)
• Pickup Quest: Given by Guard Nen, once you leave The Serk he will automatically appear next to you.
• Follow the road West where the road splits. • (Quest continues in 103.2) • Follow the road West and then head to Vartis Dareel’s location.
104.1. Intruders in Deshaan (Deshaan Side Quest – Lvl. 16)
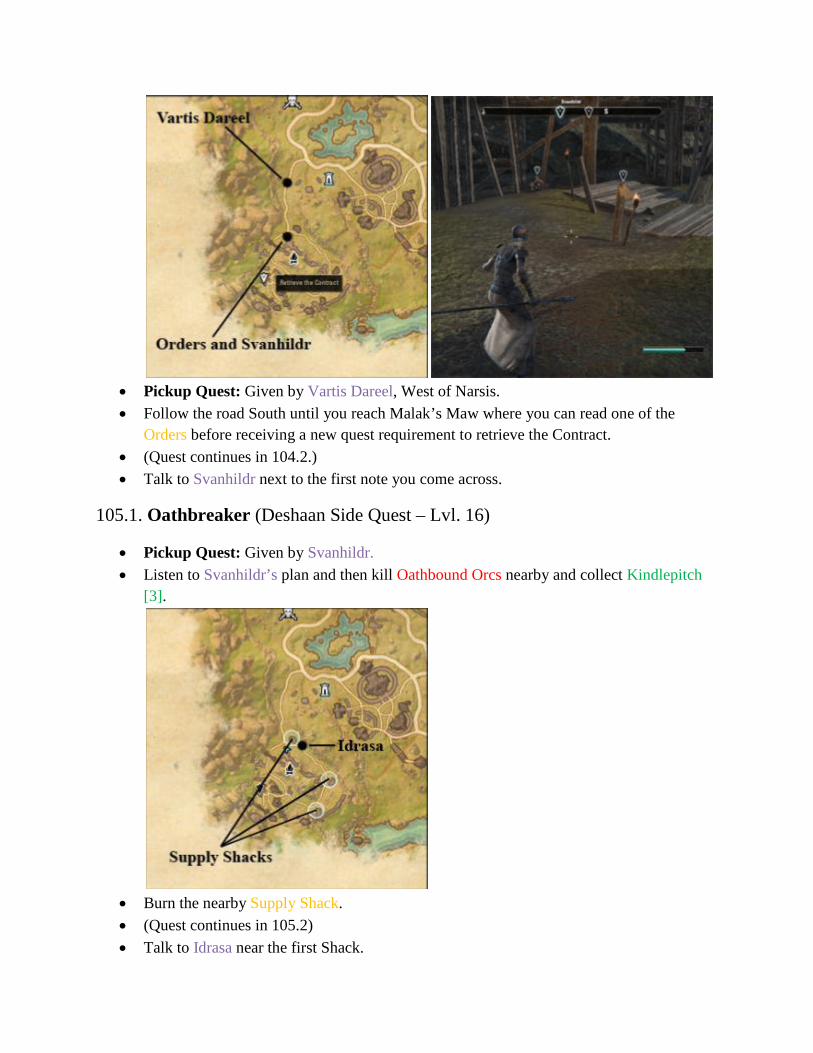
• Pickup Quest: Given by Vartis Dareel, West of Narsis. • Follow the road South until you reach Malak’s Maw where you can read one of the
Orders before receiving a new quest requirement to retrieve the Contract. • (Quest continues in 104.2.) • Talk to Svanhildr next to the first note you come across.
105.1. Oathbreaker (Deshaan Side Quest – Lvl. 16)
• Pickup Quest: Given by Svanhildr. • Listen to Svanhildr’s plan and then kill Oathbound Orcs nearby and collect Kindlepitch
[3].
• Burn the nearby Supply Shack. • (Quest continues in 105.2) • Talk to Idrasa near the first Shack.

106.1. Ritual of Anguish (Deshaan Side Quest – Lvl. 16)
• Pickup Quest: Given by Idrasa.
• Collect Skulls [6] from the Cauldrons in Malak’s Maw while working on the other
quests. • (Quest continues in 106.2)
105.2. Oathbreaker (Deshaan Side Quest – Lvl. 16)
• Burn the second and third Supply Shack. Meet up with Svanhild further down the road. • Turn in Quest: At Svanhild. • Quest Rewards: 84 Gold.
107.1. Challenge the Tide (Deshaan Side Quest – Lvl. 16)
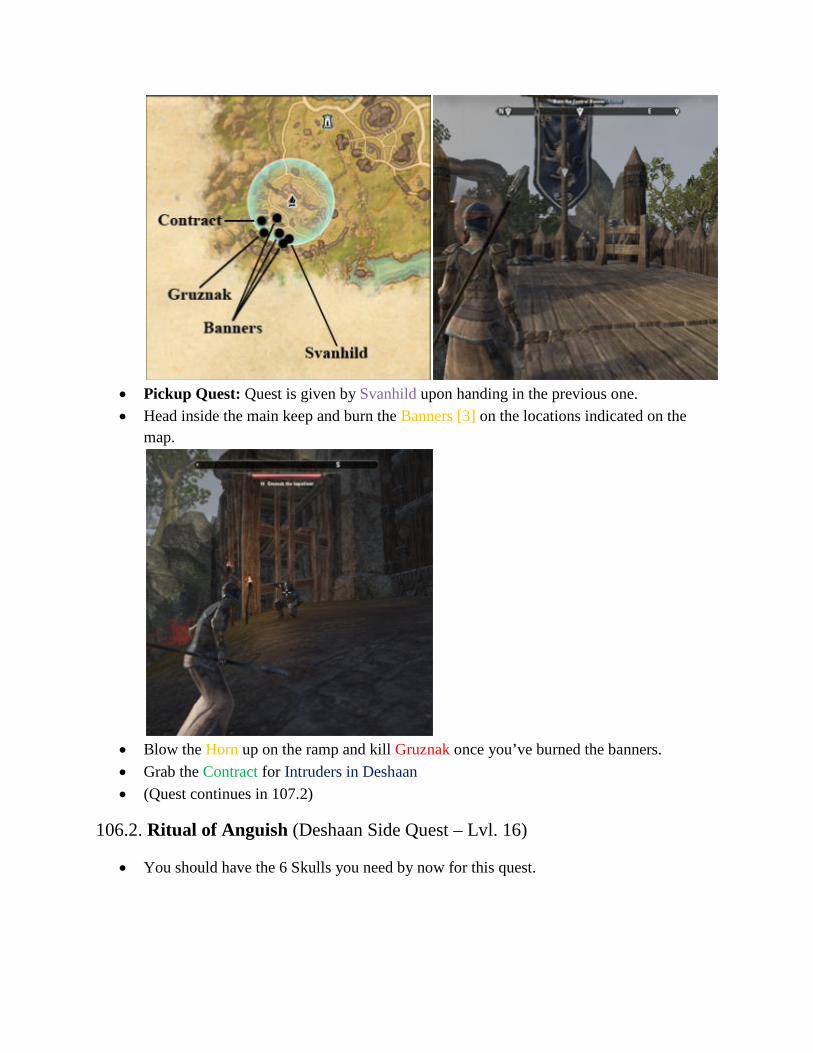
• Pickup Quest: Quest is given by Svanhild upon handing in the previous one. • Head inside the main keep and burn the Banners [3] on the locations indicated on the
map.
• Blow the Horn up on the ramp and kill Gruznak once you’ve burned the banners. • Grab the Contract for Intruders in Deshaan • (Quest continues in 107.2)
106.2. Ritual of Anguish (Deshaan Side Quest – Lvl. 16)
• You should have the 6 Skulls you need by now for this quest.

• The next quest requirement is to kill Khralek gro-Vortag in the most Eastern part of
Malak’s Maw (see map). • Talk to Idrasa who appears nearby. • Turn in Quest: At Idrasa. • Quest Rewards: Khralek’s Anguish (Flame Staff, 40 Damage, Enchantment Charges
+19%, Lvl. 16), 84 Gold. • Head back to Vartis Dareel who is now joined by Svanhild.
104.2. Intruders in Deshaan (Deshaan Side Quest – Lvl. 16)
• Turn in Quest: At Vartis Dareel. • Quest Rewards: Dark Elf Scouting Boots (Light Armor: Feet, 53 Armor, Max Stamina
+12, Cost of Sprinting -2%, Lvl. 16), 84 Gold.
107.2. Challenge the Tide (Deshaan Side Quest – Lvl. 16)
• Turn in Quest: At Svanhild. • Quest Rewards: Gruznak’s Chestplate (Heavy Armor: Chest, 102 Armor, Max Health
+46, Resistance to Critical Hits +70, Lvl. 16), 84 Gold. • Head to Narsis, the city to the East.
108.1. For Their Own Protection (Deshaan Side Quest – Lvl. 17)

• Pickup Quest: Quest is given by Guard Ren when you enter Narsis. • (Quest continues in 108.2) • Head to Guard Verilu just South.
103.2. The Llodos Plague (Deshaan Side Quest – Lvl. 17)
• Turn in Quest: At Guard Verilu. • Quest Rewards: 43 Gold.
108.2. For Their Own Protection (Deshaan Side Quest – Lvl. 17)
• Run around the largest building in Narsis, the Hlaalu Kinhouse, and you’ll run into a
Skyshard. Then head inside the Kinhouse and talk to Councilor Ralden.

• Head to the three indicated areas on the map to search for clues. In the Eastern one you
must talk to Seron Denelu and then grab the Note. You’ll be attached by a Maulborn Rogue when you do this.
• Enter the Sadri House for the second clue. Talk to Anila downstairs, and then check the Journal upstairs.
• For the third clue you must head to the Merchant’s Stall in the West and talk to Dala
Marys. Enter Varlas House nearby and talk to Naryu Virian in the basement, and ask her who’s she’s working for as she’s on the same side as you are.
• Head back to Councilor Ralden inside the Hlaalu Kinhouse. • Turn in Quest: At Councilor Ralden. • Quest Rewards: Hlaalu’s Protection (One-Handed Mace, 42 Damage, On Hit: 9
Unresistable Damage, Inspiration Gained from Extraction +57%, Lvl. 17), 173 Gold. • Head upstairs to talk to Giron Sadri.
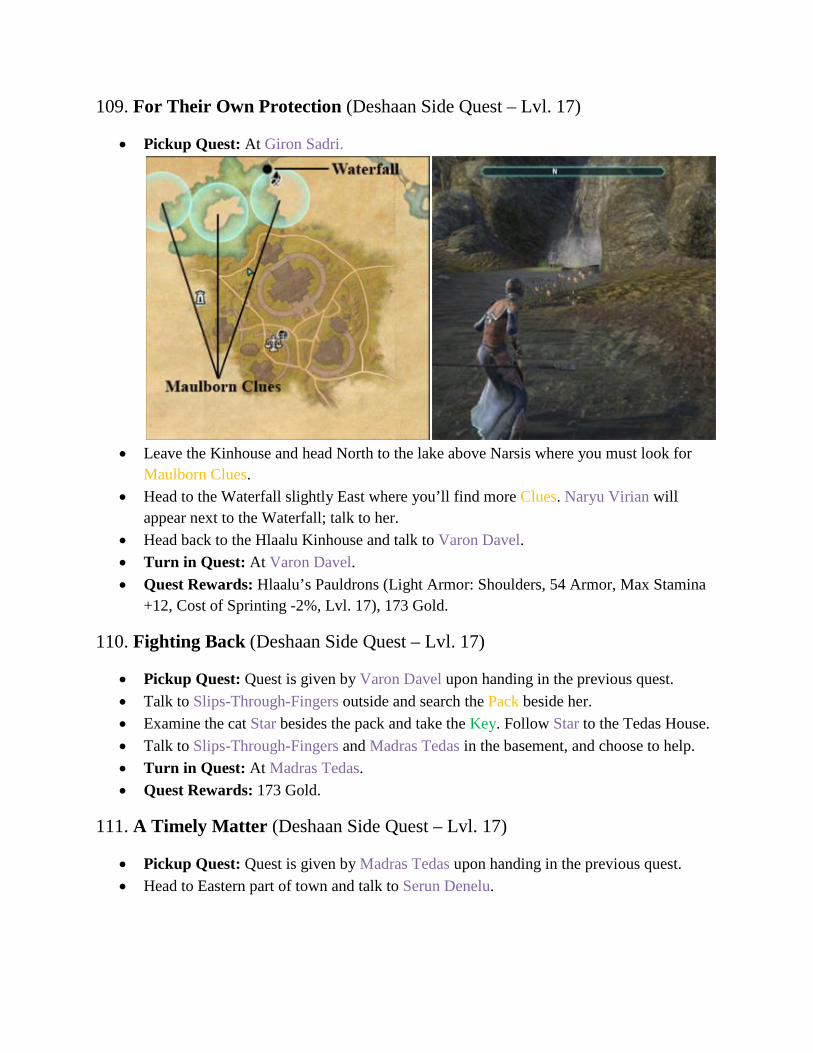
109. For Their Own Protection (Deshaan Side Quest – Lvl. 17)
• Pickup Quest: At Giron Sadri.
• Leave the Kinhouse and head North to the lake above Narsis where you must look for
Maulborn Clues. • Head to the Waterfall slightly East where you’ll find more Clues. Naryu Virian will
appear next to the Waterfall; talk to her. • Head back to the Hlaalu Kinhouse and talk to Varon Davel. • Turn in Quest: At Varon Davel. • Quest Rewards: Hlaalu’s Pauldrons (Light Armor: Shoulders, 54 Armor, Max Stamina
+12, Cost of Sprinting -2%, Lvl. 17), 173 Gold.
110. Fighting Back (Deshaan Side Quest – Lvl. 17)
• Pickup Quest: Quest is given by Varon Davel upon handing in the previous quest. • Talk to Slips-Through-Fingers outside and search the Pack beside her. • Examine the cat Star besides the pack and take the Key. Follow Star to the Tedas House. • Talk to Slips-Through-Fingers and Madras Tedas in the basement, and choose to help. • Turn in Quest: At Madras Tedas. • Quest Rewards: 173 Gold.
111. A Timely Matter (Deshaan Side Quest – Lvl. 17)
• Pickup Quest: Quest is given by Madras Tedas upon handing in the previous quest. • Head to Eastern part of town and talk to Serun Denelu.
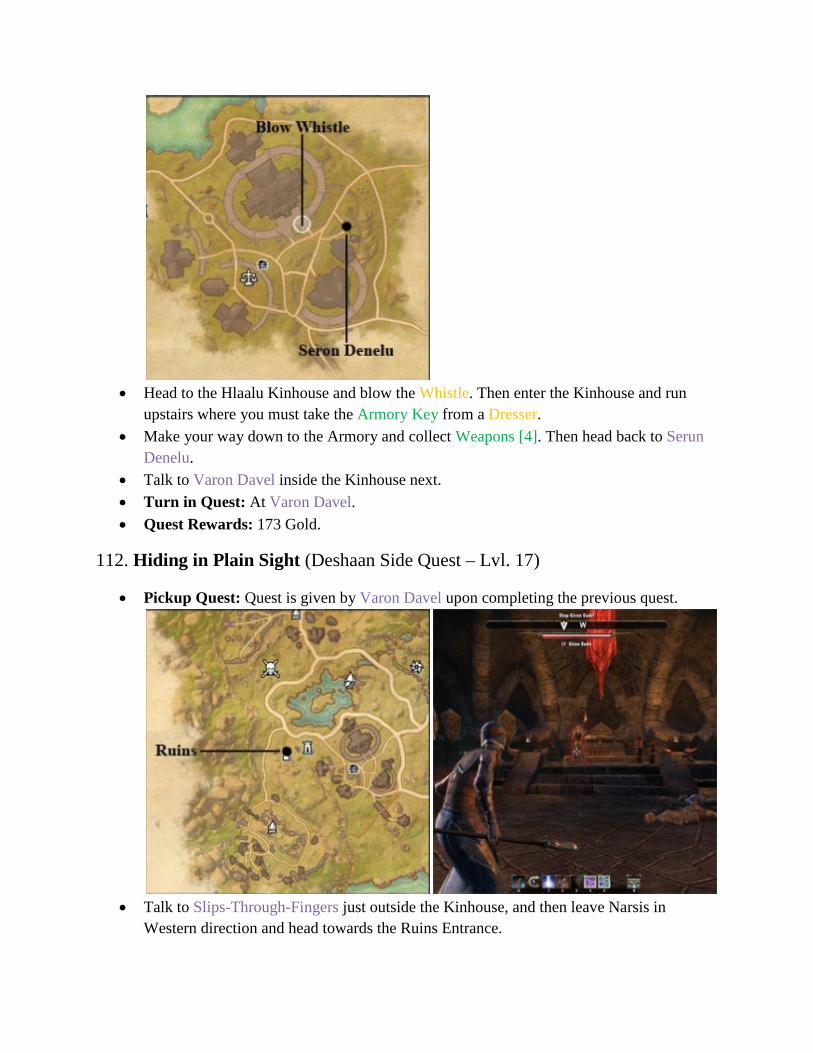
• Head to the Hlaalu Kinhouse and blow the Whistle. Then enter the Kinhouse and run
upstairs where you must take the Armory Key from a Dresser. • Make your way down to the Armory and collect Weapons [4]. Then head back to Serun
Denelu. • Talk to Varon Davel inside the Kinhouse next. • Turn in Quest: At Varon Davel. • Quest Rewards: 173 Gold.
112. Hiding in Plain Sight (Deshaan Side Quest – Lvl. 17)
• Pickup Quest: Quest is given by Varon Davel upon completing the previous quest.
• Talk to Slips-Through-Fingers just outside the Kinhouse, and then leave Narsis in
Western direction and head towards the Ruins Entrance.

• Enter the ruins and make your way to the second chamber where you’ll face Giron. Enter the small passage and enter the Abandoned Home.
• Talk to Madras Tedas and then leave the house. Talk to Varon Davel outside. • Turn in Quest: At Varon Davel. • Quest Rewards: Naryu’s Spare Blade (One-Handed Sword, 42 Damage, On Hit: 12
Poison Damage, Weapon and Spell Critical Values +2%, Lvl. 17), 173 Gold. • You should be level 19 now.
113.1. Tracking the Plague (Deshaan Side Quest – Lvl. 18)
• Pickup Quest: Quest is given by Varon Davel upon completing the previous quest. • Talk to Naryu Virian in Narsis. • (Quest continues in 113.2) • Leave Narsis following the road East. In the South you’ll find a Mundus Stone; The
Tower, which gives you a passive Stamina Boost. • Where the road East of Narsis splits you’ll find Healer Senar; talk to him.
114.1. Honor Bound (Deshaan Side Quest – Lvl. 17)
• Pickup Quest: at Healer Senar. • (Quest continues in 114.2) • Head slightly Southeast to Relnus Andalen.
115.1. Burning Revenge (Deshaan Side Quest – Lvl. 17)

• Pickup Quest: at Relnus Andalen. • Burn the nearby Supplies [3]. There’s a Lore Book on the table. • (Quest continues in 115.2)
114.2. Honor Bound (Deshaan Side Quest – Lvl. 17)
• Talk to Doril Belvay inside the most Western building in Muth Gnaar. • Rescue Afflicted Commoners and Monks [5] in Muth Gnaar while working on the next
quest. • (Quest continues in 114.3)
116.1. The Medaillons of Saint Veloth (Deshaan Side Quest – Lvl. 17)
• Pickup Quest: at Healer Ravel.
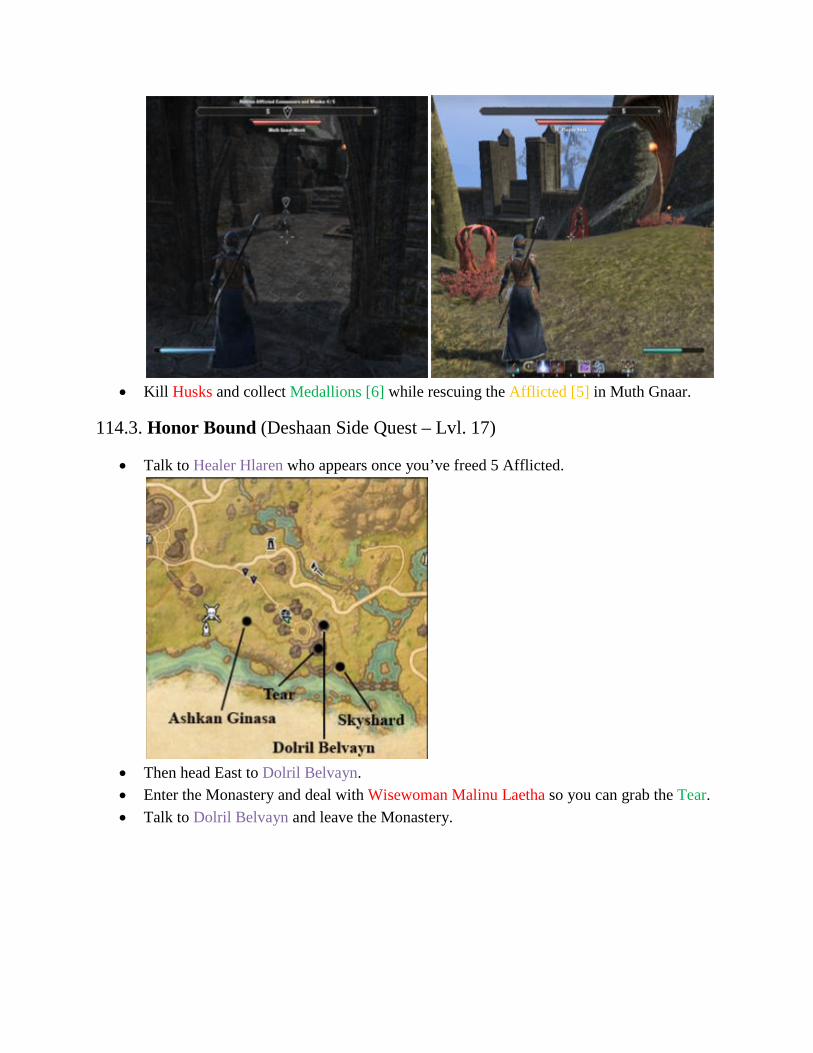
• Kill Husks and collect Medallions [6] while rescuing the Afflicted [5] in Muth Gnaar.
114.3. Honor Bound (Deshaan Side Quest – Lvl. 17)
• Talk to Healer Hlaren who appears once you’ve freed 5 Afflicted.
• Then head East to Dolril Belvayn. • Enter the Monastery and deal with Wisewoman Malinu Laetha so you can grab the Tear. • Talk to Dolril Belvayn and leave the Monastery.

• Head East to grab a Skyshard just East of Muth Gnaar (see map).
• Head West where you must kill Ashkan Ginasa. • Head just North to hand in 3 quests. • Turn in Quest: At Dolril Belvayn. • Quest Rewards: Ashlander’s Honor (Frost Staff, 42 Damage, Inspiration from
Extraction +57%, Lvl. 17), 173 Gold.
116.2. The Medaillons of Saint Veloth (Deshaan Side Quest – Lvl. 17)
• Turn in Quest: at Healer Ravel. • Quest Rewards: 43 Gold.
115.2. Burning Revenge (Deshaan Side Quest – Lvl. 17)
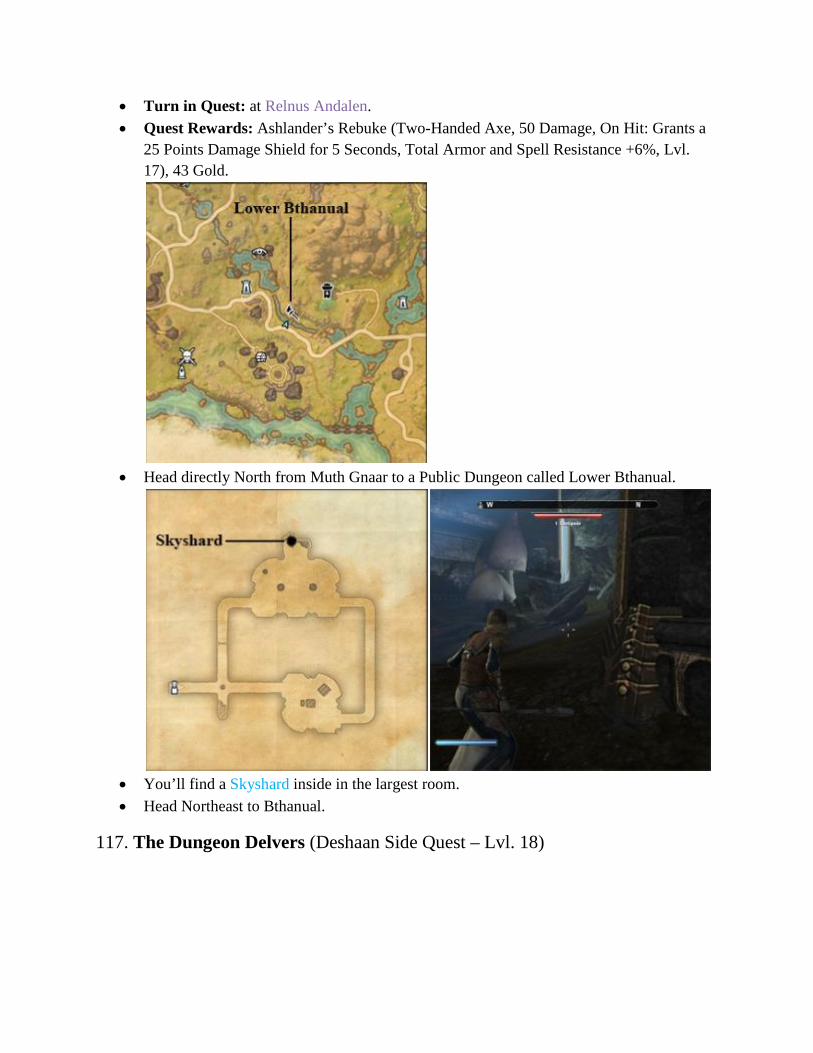
• Turn in Quest: at Relnus Andalen. • Quest Rewards: Ashlander’s Rebuke (Two-Handed Axe, 50 Damage, On Hit: Grants a
25 Points Damage Shield for 5 Seconds, Total Armor and Spell Resistance +6%, Lvl. 17), 43 Gold.
• Head directly North from Muth Gnaar to a Public Dungeon called Lower Bthanual.
• You’ll find a Skyshard inside in the largest room. • Head Northeast to Bthanual.
117. The Dungeon Delvers (Deshaan Side Quest – Lvl. 18)

• Pickup Quest: From Raynor Vanos, in front of Bthanual. • Head inside Bthanual and talk to Kireth Vanos.
• Use the Control Rod on Dwarven Spiders until one starts to follow you. Then meet up
with Kireth in the passage to the next room. • Kireth will ask you to go back to the previous room and use the Rod on Defeated Spiders
[5]. • Meet up with Kireth in the next room. • Turn in Quest: at Kireth Vanos. • Quest Rewards: 177 Gold.
118. The Light Fantastic (Deshaan Side Quest – Lvl. 18)
• Pickup Quest: Given by Raynor Ranos upon handing in the previous quest.

• Use the Dwarven Prisms and make them aim their beams towards the next Prism until
you reach the “statue” in front the large door. • Enter the Inner Chamber and use the Rod on the Greatspider inside. Then kill him and
grab the Key. Open the Dwarven Chest in the same room and grab the Relic. • Head out and talk to Kireth Vanos. • Turn in Quest: at Kireth Vanos. • Quest Rewards: Dungeon-Delving Slippers (Heavy Armor: Feet, 96 Armor, Max
Magicka +12, Exploration Experience Gained +7%, Lvl. 18), 177 Gold. • You should be level 20 now. • Head to Mournhold, the main city in Deshaan where you’ll find a Bank, all the
Merchants and Crafting Stations you may require, and Rededication Shrines, where you can reset your skills and attribute points. You can also buy a Mount if you have acquired 17000 gold. Once you do buy a mount you should remember to improve the mount every day by spending 250 gold on apples, etc. at stable masters.
119.1. A Favor Returned (Deshaan Side Quest – Lvl. 19)

• Pickup Quest: Given by Ordinator when you enter Mournhold. • (Quest continues in 119.2) • Head to the Mage’s Guild in the Southwest part of Mournhold.
74.2. Simply Misplaced (Mage’s Guild Quest – Lvl. 15)
• Talk to Valaste and Arch-Mage Shalidor inside the Mage’s Guild. • Enter the Portal and talk to Haskill, and then enter the Portal to Vuldngrav.
• Enter the Catacombs and examine the Chest. • Defeat three waves of Draugr Scourge and then move to the next room. • Kill Korthor and retrieve the Fork. Talk to Haskill in the same room. • Enter the next Portal and talk to Arch-Mage Shalidor.
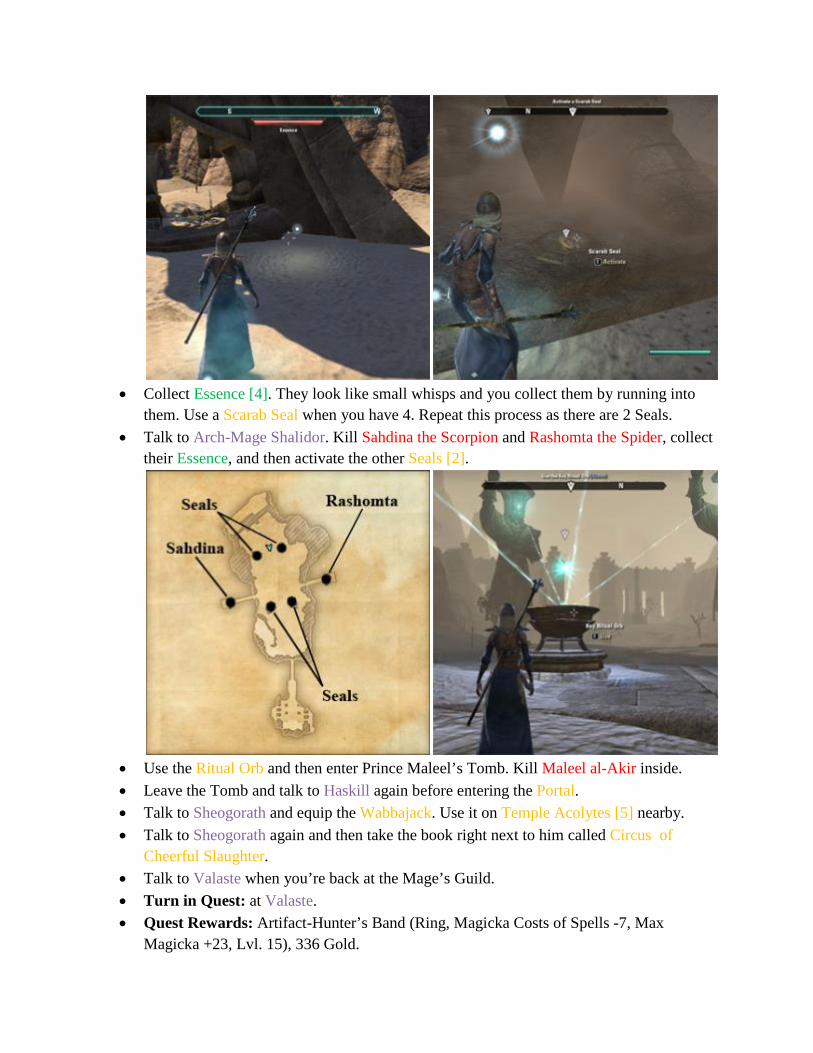
• Collect Essence [4]. They look like small whisps and you collect them by running into
them. Use a Scarab Seal when you have 4. Repeat this process as there are 2 Seals. • Talk to Arch-Mage Shalidor. Kill Sahdina the Scorpion and Rashomta the Spider, collect
their Essence, and then activate the other Seals [2].
• Use the Ritual Orb and then enter Prince Maleel’s Tomb. Kill Maleel al-Akir inside. • Leave the Tomb and talk to Haskill again before entering the Portal. • Talk to Sheogorath and equip the Wabbajack. Use it on Temple Acolytes [5] nearby. • Talk to Sheogorath again and then take the book right next to him called Circus of
Cheerful Slaughter. • Talk to Valaste when you’re back at the Mage’s Guild. • Turn in Quest: at Valaste. • Quest Rewards: Artifact-Hunter’s Band (Ring, Magicka Costs of Spells -7, Max
Magicka +23, Lvl. 15), 336 Gold.

• Head outside.
120.1. Circus of Cheerful Slaughter (Mage’s Guild Quest – Lvl. 25)
• Pickup Quest: Given by Arch-Mage Shalidor just outside the Mage’s Guild in Mournhold.
• (Quest continues in 120.2) • Head to the Fighters Guild in the most Southern part of Mournhold next.
56.2. The Dangerous Past (Fighter’s Guild Quest - Lvl. 15)
• Talk to Guildmaster Sees-all-Colors on the upper level of the Fighters Guild, and then enter the Portal.
• Talk to Guildmaster Sees-all-Colors again and then make your way down Mzeneldt until you witness a short scene. Afterwards you must read Valasha’s Journal.
• Use the Crystal Wands in the next room and align them. Move to the next area. • Open the Dwarven Chest and take the Ayleid Tome. • Kill the Dwarven Centurion and collect the Crystal. • Talk to Guildmaster Sees-all-Colors, and then to Jofnir Iceblade who appears next to the
Portal the Guildmaster opens. • Go through the Portal and talk to Merric. • Turn in Quest: at Merric. • Quest Rewards: Dwemerdark Signet (Ring, Armor +70, Max Magicka +23, Lvl. 15),
336 Gold. • Leave the Fighters Guild.

121.1. The Prismatic Core (Fighter’s Guild Quest - Lvl. 25)
• Pickup Quest: Given by Bera Moorsmith just outside the Fighters Guild in Mournhold. • (Quest continues in 121.2) • Head towards the center of Mournhold. On your way you’ll come across Sar-Keer.
122.1. Vengeance of the Oppressed (Deshaan Side Quest – Lvl. 19)
• Pickup Quest: Given by Sar-Keer. • (Quest continues in 122.2) • Head to Registrar Riivel just to the North next.
119.2. A Favor Returned (Deshaan Side Quest – Lvl. 19)
• Talk to Registrar Riivel in the City Center. • Head to the Tribunal Temple to the North next and talk to Naryu Virian. • Enter the Temple and talk to Almalexia.

• There’s a Skyshard at the bottom of a waterfall just West of the Tribunal Temple. • Head to The Flaming Nix in the East of Mournhold. • (Quest continues in 119.3) • Talk to Betina Volek in the Inn.
122.2. Vengeance of the Oppressed (Deshaan Side Quest – Lvl. 19)
• Talk to Betina Volek, we’ve decided to warn her of the ambush. If you choose the other option the outcome of this quest may differ.
• (Quest continues in 122.3) • Talk to Naryu Virian.
119.3. A Favor Returned (Deshaan Side Quest – Lvl. 19)
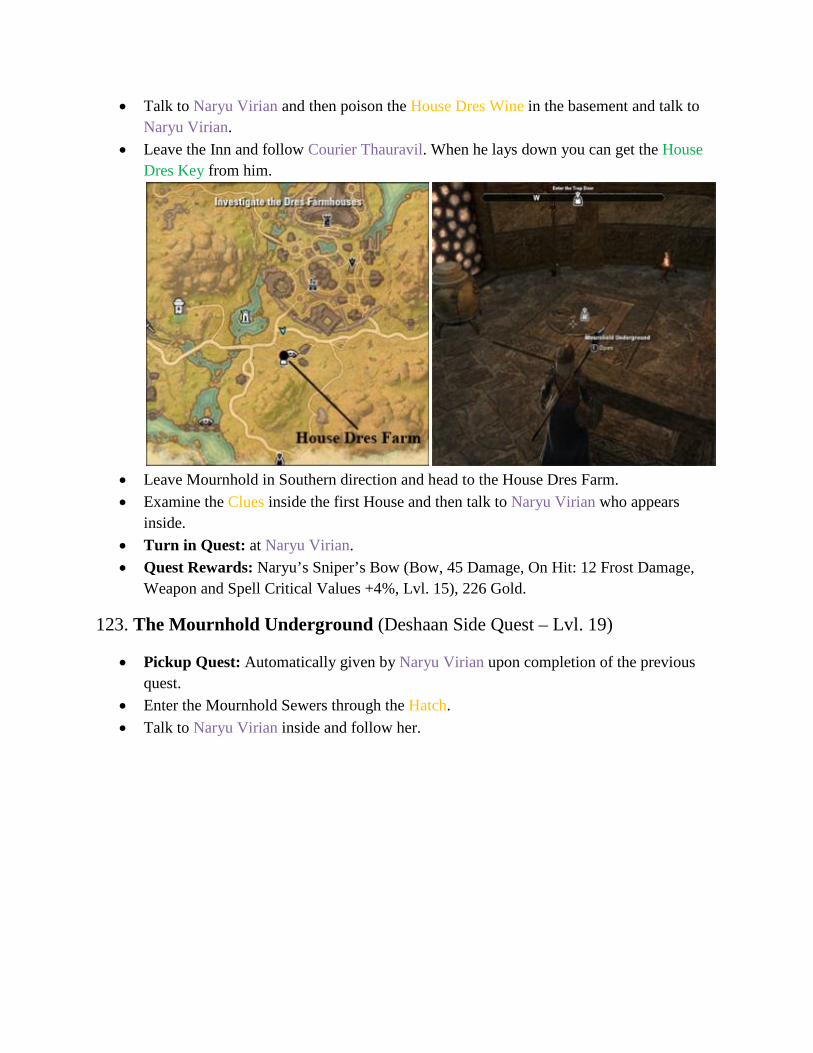
• Talk to Naryu Virian and then poison the House Dres Wine in the basement and talk to Naryu Virian.
• Leave the Inn and follow Courier Thauravil. When he lays down you can get the House Dres Key from him.
• Leave Mournhold in Southern direction and head to the House Dres Farm. • Examine the Clues inside the first House and then talk to Naryu Virian who appears
inside. • Turn in Quest: at Naryu Virian. • Quest Rewards: Naryu’s Sniper’s Bow (Bow, 45 Damage, On Hit: 12 Frost Damage,
Weapon and Spell Critical Values +4%, Lvl. 15), 226 Gold.
123. The Mournhold Underground (Deshaan Side Quest – Lvl. 19)
• Pickup Quest: Automatically given by Naryu Virian upon completion of the previous quest.
• Enter the Mournhold Sewers through the Hatch. • Talk to Naryu Virian inside and follow her.
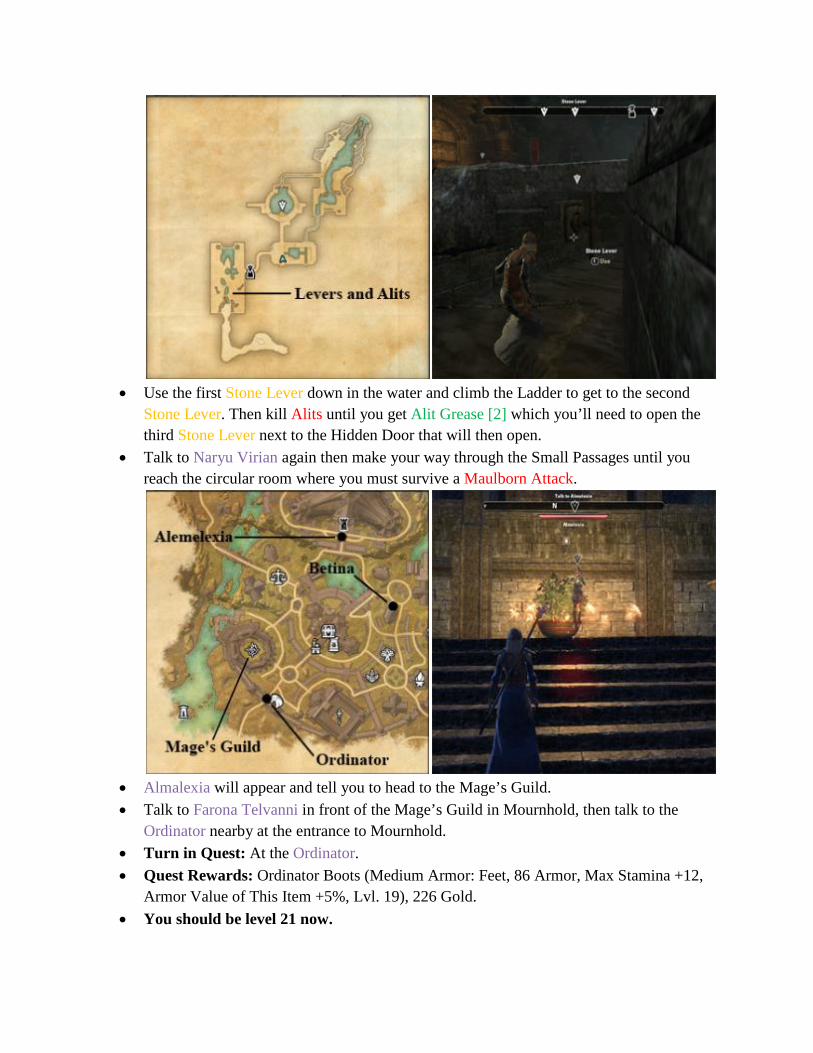
• Use the first Stone Lever down in the water and climb the Ladder to get to the second
Stone Lever. Then kill Alits until you get Alit Grease [2] which you’ll need to open the third Stone Lever next to the Hidden Door that will then open.
• Talk to Naryu Virian again then make your way through the Small Passages until you reach the circular room where you must survive a Maulborn Attack.
• Almalexia will appear and tell you to head to the Mage’s Guild. • Talk to Farona Telvanni in front of the Mage’s Guild in Mournhold, then talk to the
Ordinator nearby at the entrance to Mournhold. • Turn in Quest: At the Ordinator. • Quest Rewards: Ordinator Boots (Medium Armor: Feet, 86 Armor, Max Stamina +12,
Armor Value of This Item +5%, Lvl. 19), 226 Gold. • You should be level 21 now.

124. The Seal of Three (Deshaan Side Quest – Lvl. 21)
• Pickup Quest: Automatically given by the Ordinator upon completion of the previous quest.
• Talk to Almelexia in front of the Tribunal Temple, and then enter the Temple.
• You’ll have to close three Daedric Portals when inside. You’ll have to fight both
Dremora and Daedric Hostiles while doing so. • Pray at Almalexia’s Altar in the Southwest wing of the Temple and then talk to
Almalexia who appears next to you. • Head to Sotha Sil’s Altar in the North and Pray there, and then talk to Almalexia.
• Use the Dwarven Mechanisms that will summon Dwarven Spheres and Dwarven Spiders;
the Spheres drop Dynamo Cores [5], the Spiders drop Spinning Gears [3]. Add five

Dynamo Cores and four Spinning Gears to the Arbiter, the large Robot in the middle, which will then come to life; kill it to complete Sotha Sil’s Trial.
• Talk to the Enigma of Sotha Sil and then head to the Southeast chamber which holds Vivec’s Altar. Pray there and talk to Almalexia.
• Talk with the NPCs; your choices don’t matter, and you will receive Vivec’s Blessing either way.
• Enter the High Chapel of the Three, the larger circular room at the center of the Temple.
• Use the three Relics in the room and then kill Maulborn Priest Sathram. • Talk to Almalexia near the exit of the Temple. • Turn in Quest: At Almalexia. • Quest Rewards: Ordinator Helm (Medium Armor: Head, 87 Armor, Max Magicka +37,
Sells to Merchant for 150% More, Lvl. 21), 378 Gold, 1 Skill Point.
125.1. Chasing the Magistrix (Deshaan Side Quest – Lvl. 21)
• Pickup Quest: Automatically given by the Almalexia upon completion of the previous quest.
• (Quest continues in 125.2) • Leave the Tribunal Temple and head to Betina’s Family Home.
122.3. Vengeance of the Oppressed (Deshaan Side Quest – Lvl. 19)
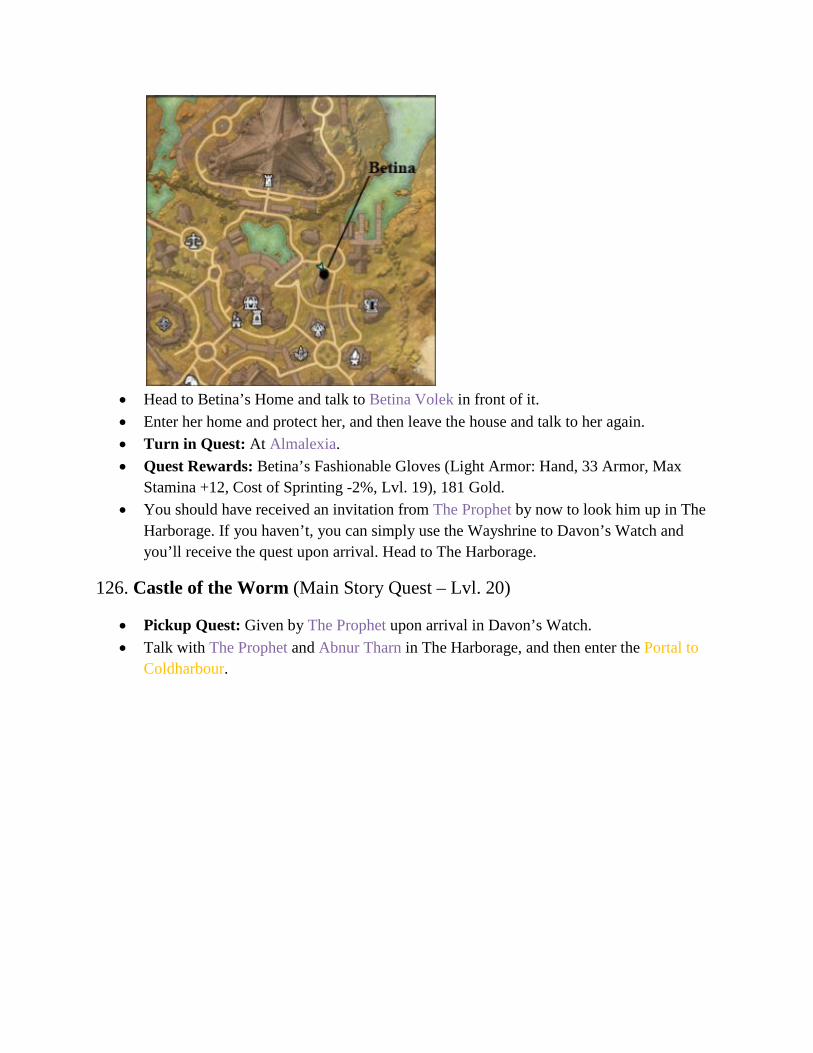
• Head to Betina’s Home and talk to Betina Volek in front of it. • Enter her home and protect her, and then leave the house and talk to her again. • Turn in Quest: At Almalexia. • Quest Rewards: Betina’s Fashionable Gloves (Light Armor: Hand, 33 Armor, Max
Stamina +12, Cost of Sprinting -2%, Lvl. 19), 181 Gold. • You should have received an invitation from The Prophet by now to look him up in The
Harborage. If you haven’t, you can simply use the Wayshrine to Davon’s Watch and you’ll receive the quest upon arrival. Head to The Harborage.
126. Castle of the Worm (Main Story Quest – Lvl. 20)
• Pickup Quest: Given by The Prophet upon arrival in Davon’s Watch. • Talk with The Prophet and Abnur Tharn in The Harborage, and then enter the Portal to
Coldharbour.

• Talk to Abnur Tharn and Lyris inside and then head outside to speak with Ghaznar, one
of the slaves that walks around for Information. • Head to Cadwell on the opposite side. You’ll have to kill Warden Cornexius inside
before you can get to him. • Cadwell will tell you to head to the Cistern, just Northwest, do so.
• Talk to Cadwell again inside and follow him killing Clannfears, Dremora and Corpse
Tearers on the way. • Enter the Inner Keep and make your way to the Tower of Bones in the North. Talk to
Abnur Tharn inside.

• Gather Usable Atronach Parts [4] down the hall. Place the parts in the Ritual Circle when
you reach the Laboratory. Read the Ritual Book and then make your way to the Tower Summit.
• Talk to Abnur Tharn, and when you do, a projection of Mannimarco will appear who will
summons 2 Waves of Skeletons and a Bone Colossus who you need to kill. • Talk to Abnur Tharn again afterwards, and then move further West where you must talk
to Cadwell. Enter the Path of the Scorned afterwards and enter the Portal to The Harborage.
• Talk to Abnur Tharn and The Prophet to learn who The Prophet is. • Turn in Quest: At The Prophet. • Quest Rewards: Signet of the Worm (Ring, Reduce Magicka Costs of Spells by 9, Max
Magicka +29, Lvl. 20), 370 Gold, 1 Skill Point.

• Head back to Deshaan, preferably porting to the Obsidian Gorge Wayshrine where you can enter Lady Llarel’s Shelter, a Public Dungeon, nearby where you’ll find a Skyshard inside. Inside you’ll be able to take the quest You Have to Break a Few.
127.1. You Have to Break a Few (Deshaan Side Quest – Lvl. 17)
• Pickup Quest: Picked up from the Dark Elf Remains just inside Lady Llarel’s Shelter. • Read the Notes and then head further down into the Shelter to find the Bag of Kwama
Eggs. Lady Llara is protecting them so you have to kill her which automatically completes this dungeon for you.
• There’s a Skyshard in the same room where Lady Llara is; grab it! • (Quest continues in 127.2)
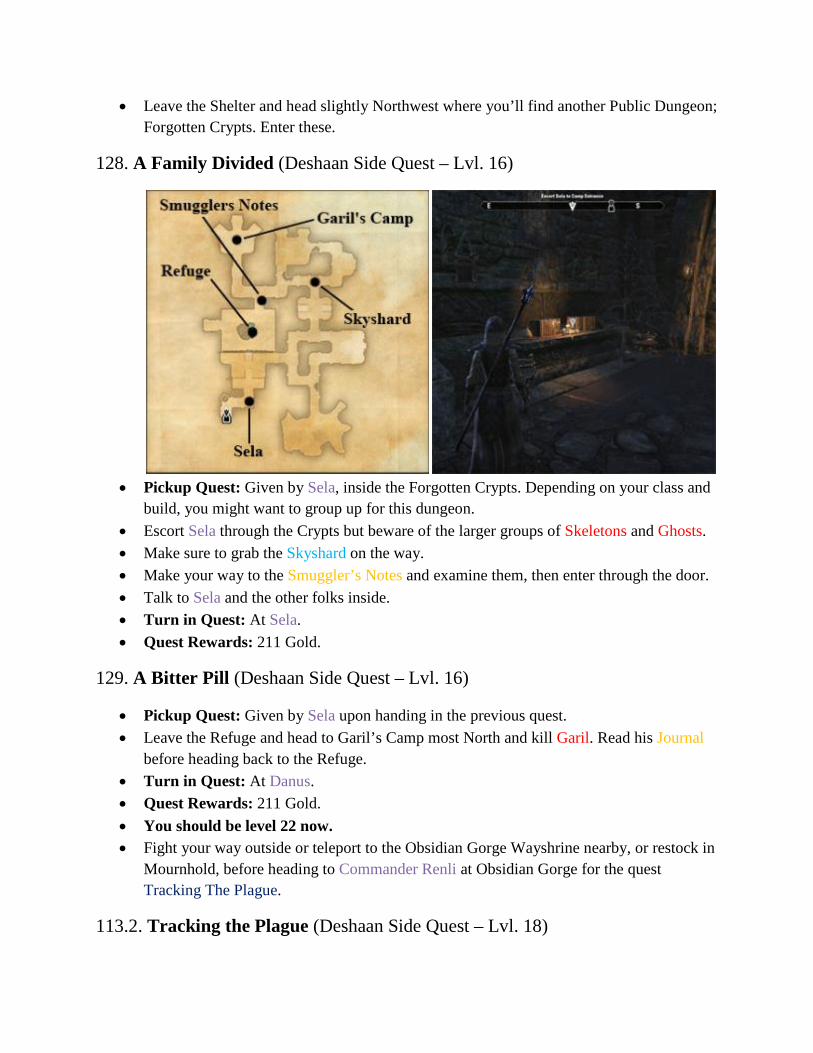
• Leave the Shelter and head slightly Northwest where you’ll find another Public Dungeon; Forgotten Crypts. Enter these.
128. A Family Divided (Deshaan Side Quest – Lvl. 16)
• Pickup Quest: Given by Sela, inside the Forgotten Crypts. Depending on your class and
build, you might want to group up for this dungeon. • Escort Sela through the Crypts but beware of the larger groups of Skeletons and Ghosts. • Make sure to grab the Skyshard on the way. • Make your way to the Smuggler’s Notes and examine them, then enter through the door. • Talk to Sela and the other folks inside. • Turn in Quest: At Sela. • Quest Rewards: 211 Gold.
129. A Bitter Pill (Deshaan Side Quest – Lvl. 16)
• Pickup Quest: Given by Sela upon handing in the previous quest. • Leave the Refuge and head to Garil’s Camp most North and kill Garil. Read his Journal
before heading back to the Refuge. • Turn in Quest: At Danus. • Quest Rewards: 211 Gold. • You should be level 22 now. • Fight your way outside or teleport to the Obsidian Gorge Wayshrine nearby, or restock in
Mournhold, before heading to Commander Renli at Obsidian Gorge for the quest Tracking The Plague.
113.2. Tracking the Plague (Deshaan Side Quest – Lvl. 18)

• Turn in Quest: At Commander Renli, Northeast of the Obsidian Gorge Wayshrine. • Quest Rewards: 88 Gold.
130.1. Death Trap (Deshaan Side Quest – Lvl. 18)
• Pickup Quest: Given by Captain Diiril, who’s standing right next to Commander Renli.
• Head just East where you’ll find the Scouting Party.

• Talk to Scout Mamyne who’ll ask you to kill Maulborn Troops and collect Mournhold
Shipping Manifests [6] from their Corpses. Do this while working on the quest below. • (Quest continues in 130.2) • Talk to Kotholl.
131. Nothing Left to Waste (Deshaan Side Quest – Lvl. 18)
• Pickup Quest: Given by Kotholl. • Grab the Keys [3] from three different locations in the nearby Maulborn camps in the
Obsidian Gorge, and then use those keys to get their respective treasures in the same area. • Head back to Kotholl once you’ve retrieved all the Treasures [3] and have the Shipping
Manifests [3]. • Turn in Quest: At Kotholl. • Quest Rewards: Merchant Guardian’s Pauldrons (Heavy Armor: Shoulders, 100 Armor,
Max Stamina +12, Armor Value of This Item +5%, Lvl. 18), 88 Gold.
130.2. Death Trap (Deshaan Side Quest – Lvl. 18)
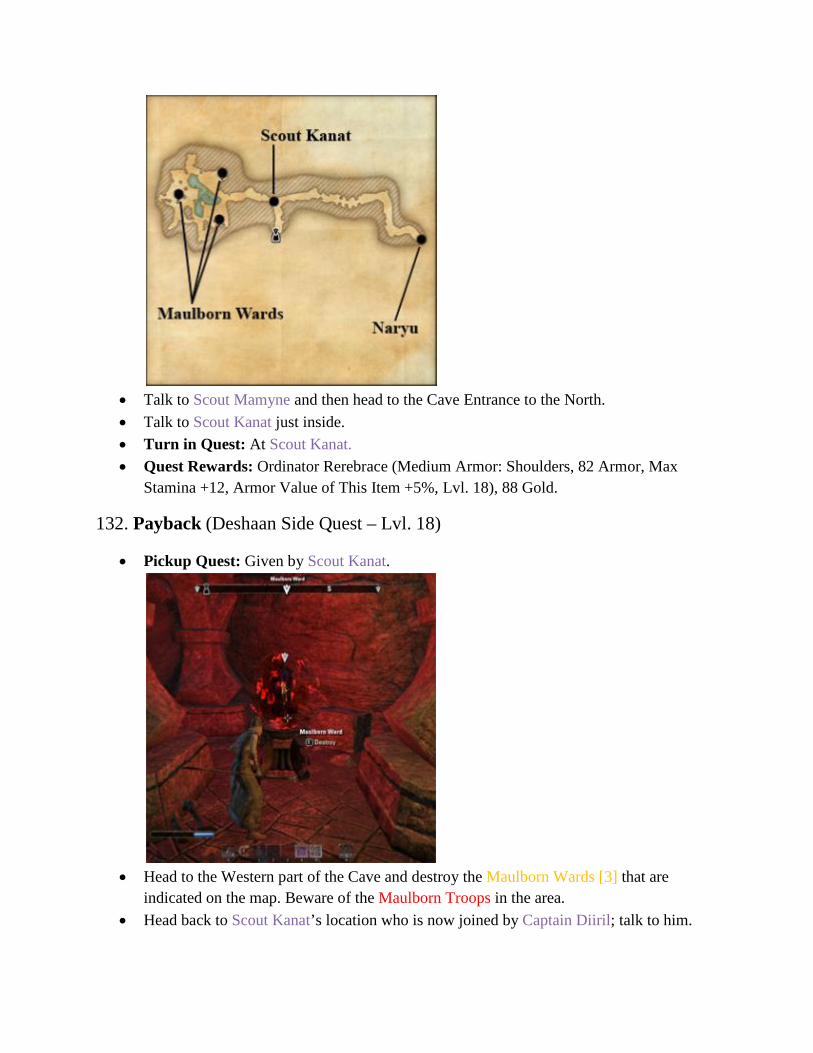
• Talk to Scout Mamyne and then head to the Cave Entrance to the North. • Talk to Scout Kanat just inside. • Turn in Quest: At Scout Kanat. • Quest Rewards: Ordinator Rerebrace (Medium Armor: Shoulders, 82 Armor, Max
Stamina +12, Armor Value of This Item +5%, Lvl. 18), 88 Gold.
132. Payback (Deshaan Side Quest – Lvl. 18)
• Pickup Quest: Given by Scout Kanat.
• Head to the Western part of the Cave and destroy the Maulborn Wards [3] that are
indicated on the map. Beware of the Maulborn Troops in the area. • Head back to Scout Kanat’s location who is now joined by Captain Diiril; talk to him.

• Now go to the other side of the Cave to meet up with Naryu. Then protect the archers
from the Maulborn Attack. • Head inside the cave again and talk to Naryu again. • Turn in Quest: At Naryu. • Quest Rewards: 177 Gold.
133. Plague Bringer (Deshaan Side Quest – Lvl. 18)
• Pickup Quest: Given by Varon Davel, next to Naryu.
• Head outside and then move to the Southern side of the Gorge where you must meet up
with Captain Diiril. • Enter the Alchemist Lair behind him. Read the Recipe inside and then kill the 2 tainted
Hlaalu Guards, Captain Diiril, and Merdyndril.

• Talk to Scout Mamyne outside. • Turn in Quest: At Scout Mamyne. • Quest Rewards: Ordinator Chausses (Medium Armor: Legs, 82 Armor, Max Stamina
+31, Armor Value of This Item +5%, Lvl. 18), 177 Gold, 1 Skill Point. • Follow the road to Mournhold until you run into a Smashed Dwarven Sphere, or use the
Wayshrine to Mournhold if you want to unload some loot and then leave the city in Northwest direction.
134.1. Mechanical Murder (Deshaan Side Quest – Lvl. 18)
• Pickup Quest: Given by Smashed Dwarven Sphere, on the road North of Mournhold. • Follow the road East until you reach Guard Lieutenant Silen to whom you must speak. • (Quest continues in 134.2) • You’ll also come across Caravan Master Girano on the road.
135.1. That Which Matters Most (Deshaan Side Quest – Lvl. 18)

• Pickup Quest: Given by Caravan Master Girano, on the road to Mzithhumz. • Gather the Stolen Cargo [8] from crates in the area and get the Cargo Manifest while
working on Mechanical Murder. • (Quest continues in 135.2)
134.2. Mechanical Murder (Deshaan Side Quest – Lvl. 18)
• Explore the Mzithumz Wayshrine and then head North to talk to the Dres Captive.
• Kill Dress Raiders [8] to the East, grab the Stolen Cargo [8] and the Cargo Manifest (see
map). • Head slightly further East towards Guard Maera and Caravan Master Girano’s new
location. • (Quest continues in 134.3)

135.2. That Which Matters Most (Deshaan Side Quest – Lvl. 18)
• Turn in Quest: At Caravan Master Girano’s. • Quest Rewards: Caravan Master’s Rings (Ring, Health Recovery +4, Max Health +25,
Lvl. 18), 44 Gold.
134.3. Mechanical Murder (Deshaan Side Quest – Lvl. 18)
• Pick up the Skyshard near the Guard, then talk to her. • Enter Mzithumz behind the Guard and talk to Bedyni the Artificer inside. • (Quest continues in 134.4)
136. Dissonant Commands (Deshaan Side Quest – Lvl. 18)
• Pickup Quest: Given by Bedyni the Artificer.

• Collect Resonators [12] that drop from Dwarven Spiders and Dwarven Spheres, and destroy Repair Stations [4] at the location indicated on the map.
• Talk to Ithis Omalor and tell him you’ll leave it up to the Hlaalu, for the quest Mechanical Murder.
• Head back to the entrance when you’re done. • Turn in Quest: At Bedyni the Artificer. • Quest Rewards: 177 Gold. • Head outside.
134.4. Mechanical Murder (Deshaan Side Quest – Lvl. 18)
• Turn in Quest: At Guard Maera. • Quest Rewards: Dres Dirk (Dagger, 44 Damage, On Hit: 12 Shock Damage, Armor and
Spell Penetration +4%, Lvl. 18), 177 Gold.
• You’ve completed this Locale now. There’s a Mundus Stone to the East called The
Tower which increases your maximum health. Get this if you want. • Head Northeast to discover the Shad Astula Wayshrine. • Talk to Instructor Ninla near the Wayshrine.
137. By Invitation Only (Deshaan Side Quest – Lvl. 21)

• Pickup Quest: Given by Instructor Ninla. • Then head back to Mournhold to sell, create, and store stuff. It’s time to head South of
Mournhold afterwards. • Head South to The Boatmaster and sail to Mournhold. • Talk to Renus Falvani on the docks as soon as you arrive and duel him.
• Head back to The Boatmaster, then talk to Registrar Bameni. • Head North and enter the Arch-Mage’s Office where you should talk to Arch-Mage
Valeyn. • Touch the Vision Orb behind the Arch-Mage and then see which Orbs start to glow.
Click on the Orbs in the same order, then talk to the Arch-Mage. • Turn in Quest: At Arch-Mage Valeyn. • Quest Rewards: 189 Gold.
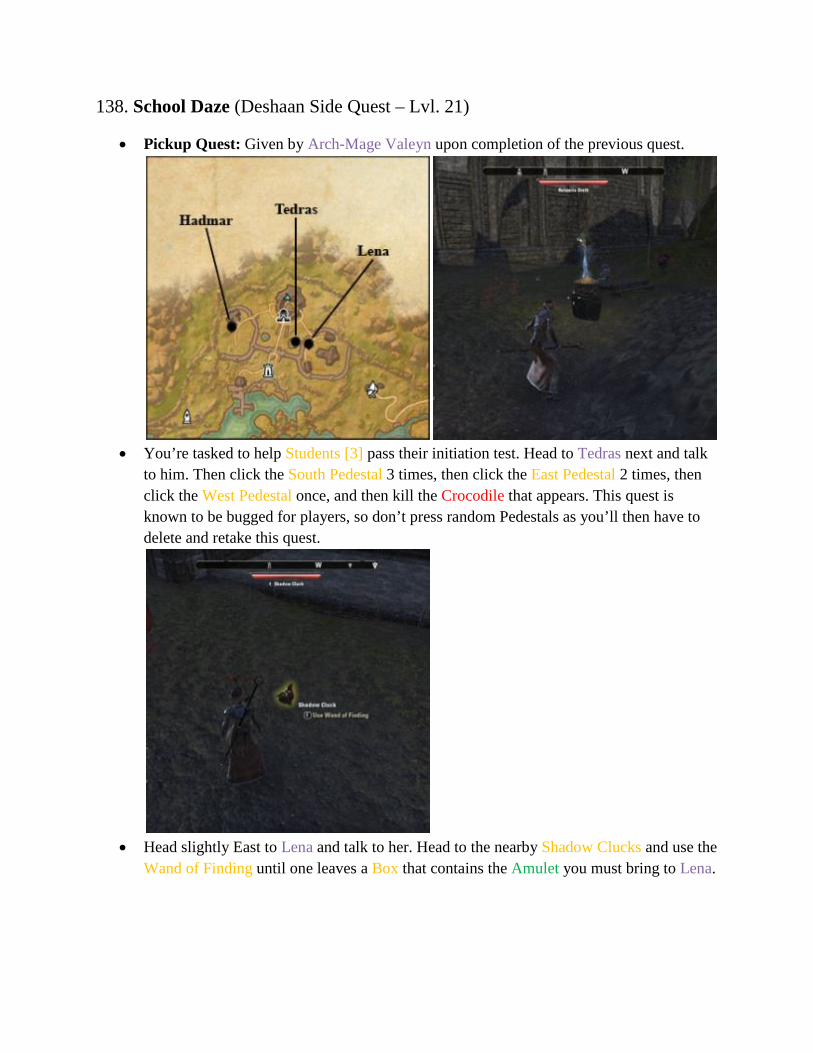
138. School Daze (Deshaan Side Quest – Lvl. 21)
• Pickup Quest: Given by Arch-Mage Valeyn upon completion of the previous quest.
• You’re tasked to help Students [3] pass their initiation test. Head to Tedras next and talk
to him. Then click the South Pedestal 3 times, then click the East Pedestal 2 times, then click the West Pedestal once, and then kill the Crocodile that appears. This quest is known to be bugged for players, so don’t press random Pedestals as you’ll then have to delete and retake this quest.
• Head slightly East to Lena and talk to her. Head to the nearby Shadow Clucks and use the
Wand of Finding until one leaves a Box that contains the Amulet you must bring to Lena.
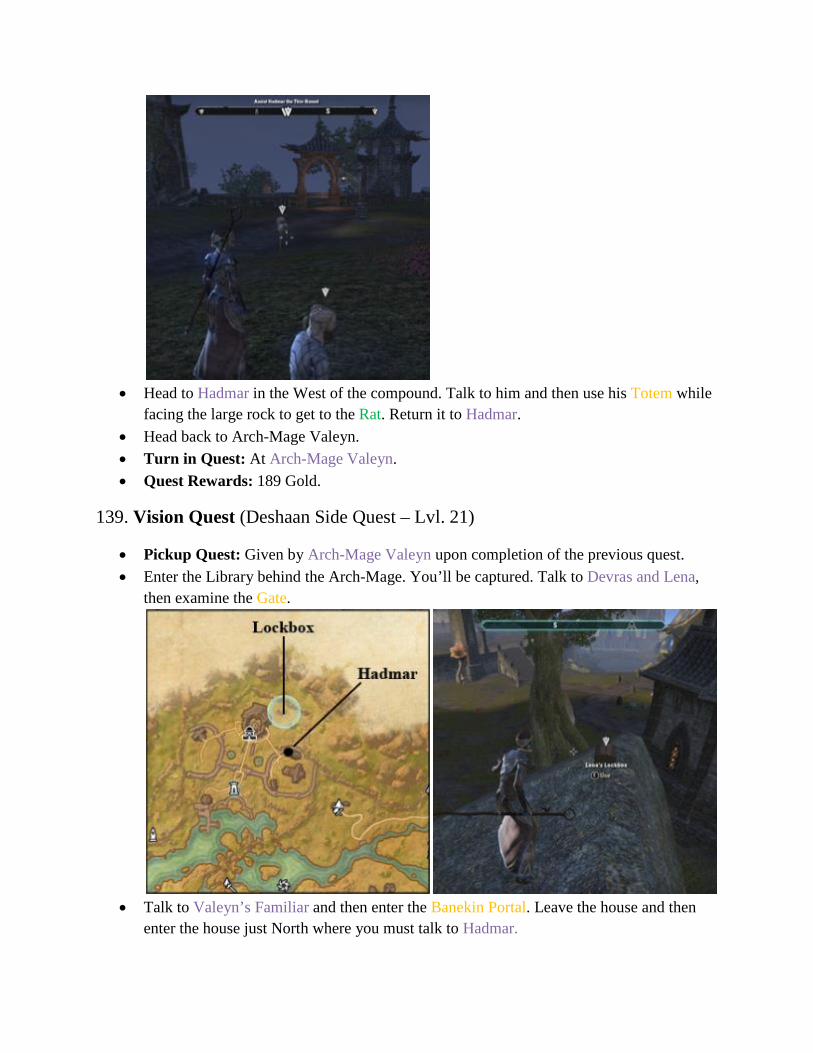
• Head to Hadmar in the West of the compound. Talk to him and then use his Totem while
facing the large rock to get to the Rat. Return it to Hadmar. • Head back to Arch-Mage Valeyn. • Turn in Quest: At Arch-Mage Valeyn. • Quest Rewards: 189 Gold.
139. Vision Quest (Deshaan Side Quest – Lvl. 21)
• Pickup Quest: Given by Arch-Mage Valeyn upon completion of the previous quest. • Enter the Library behind the Arch-Mage. You’ll be captured. Talk to Devras and Lena,
then examine the Gate.
• Talk to Valeyn’s Familiar and then enter the Banekin Portal. Leave the house and then
enter the house just North where you must talk to Hadmar.

• Head North to the circle indicated on the map and use Hadmar’s Totem to get to the Lockbox. Talk to Lena who appears next to you.
• Kill Scamps using the Wand for Scamp Hides [5] and Kagouti or Nix-Hound spirits for
Illusion Dust [6] nearby. • Talk to Tedras Relvi near the entrance to the Library, then enter the Library again.
• Fight your way through the Maulborn Troops until you reach the Maulborn General; kill
him. Destroy the Jagged Lens behind him next. • Talk to Lena, and then head outside where you should talk to Arch-Mage Valeyn, and
then speak with the Students at the Docks. • Turn in Quest: At Lena. • Quest Rewards: Shad Astula Academy Robes (Light Armor: Chest, 70 Armor, Max
Magicka +37, Cost of Sprinting -2%, Lvl. 21), 236 Gold.

• Head back to Mournhold to sell, repair, bank, work on your crafts, etc. Then it’s time to head to the area South of Mournhold.
127.2. You Have to Break a Few (Deshaan Side Quest – Lvl. 17)
• Talk with Mamma Aralosi, on the road South of Mournhold. • Turn in Quest: At Mamma Aralosi. • Quest Rewards: Chef’s Apron (Heavy Armor: Waist, 39 Armor, Max Health +18,
Chance to Avoid Decay When Defeated +24%, Lvl. 17), 86 Gold.
140.1. Search and Rescue (Deshaan Side Quest – Lvl. 21)
• Pickup Quest: Given by Edrasa Drelas, nearby the Deepcrag Den, South of Mournhold.
• Harvest Aloe Leaves or Redweed [6] just North of the quest giver then return to her.

• Enter the Deepcrag Den next. • (Quest continues in 140.2)
141.1. Carving Cuttle (Deshaan Side Quest – Lvl. 21)
• Pickup Quest: Given by Orono, just inside the Deepcrag Den. • Kill the Kwama in the mine and collect Cuttle [9] while working on the other quest. • (Quest continues in 141.2)
140.2. Search and Rescue (Deshaan Side Quest – Lvl. 21)
• You’ll run into Boril Drelas at the end of the first passage; talk to him.
• He’ll ask you to give Potions to Miners [3], and switch Valves [6]. Both can be done
throughout the Den.

• Head to Renvis when you’re done. He’s in the Southeast section of the Den. • Disturb the Kwama Egg nearby and then kill the Hive Guardian. • Enter the door to the Upper Levels of the Den and talk to Renvis again. • Leave the Den and hand in the 2 Quests. • Turn in Quest: At Edrasa or Boril Drelas. • Quest Rewards: Kwama Mining Gloves (Medium Armor: Hand, 50 Armor, Max Health
+22, Exploration Experience Gained +7%, Lvl. 21), 189 Gold.
141.2. Carving Cuttle (Deshaan Side Quest – Lvl. 21)
• Turn in Quest: At Orono. • Quest Rewards: 94 Gold. • You should now be level 23. • Follow the road North and then East, towards Vale of the Ghost Snake. You’ll come
across Tevynni Hedran at some point.
142. Trade Negotiations (Deshaan Side Quest – Lvl. 20)
• Pickup Quest: Given by Tevynni Hedran, on the road East of Mournhold. • Head Southeast and then talk to Gulakhan Harrinat, Iru-Ahan, Farseer Bodani, and
Raston Vendil in the Ashlander encampment to complete this quest. • Turn in Quest: At Raston Vendil. • Quest Rewards: 185 Gold.
143.1. The Trial of the Ghost Snake (Deshaan Side Quest – Lvl. 20)
• Pickup Quest: Given by Farseer Bodani.

• Leave the Ashlander Encampment in Eastern direction where you’ll find Rats moving
about. Gather Rats [8] using the Critter Sack.
• Follow the road East and you’ll find Risa’s Journal near one of the bridges. • (Quest continues in 143.2)
144.1. Remembering Risa (Deshaan Side Quest – Lvl. 20)
• Pickup Quest: Given by Risa’s Journal.

• Kill the Snakes in the area until one of them drops Risa’s Amulet. • (Quest continues in 144.2)
143.2. The Trial of the Ghost Snake (Deshaan Side Quest – Lvl. 20)
• Follow the road East until it ends. You’ll then find youself looking at the Fang Spires Altar where you must place the Rats in the Offering Bowl.
• Talk to the Ghost Snake that appears and then defeat him in the vision.
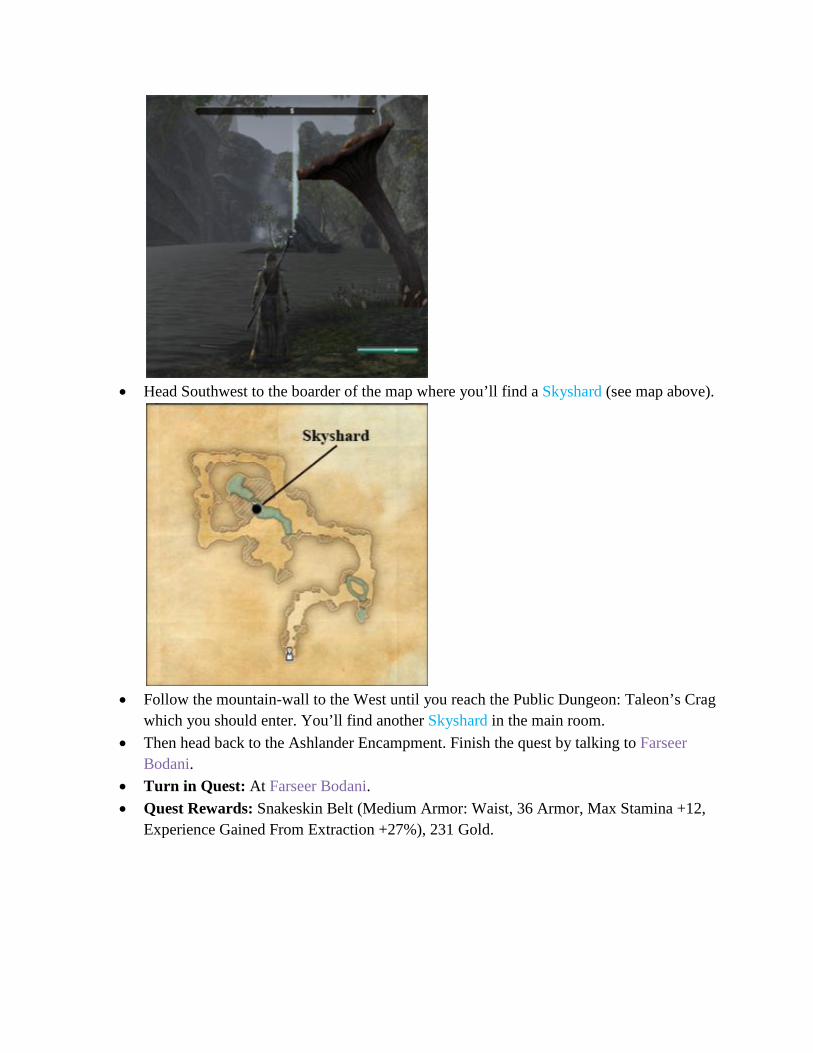
• Head Southwest to the boarder of the map where you’ll find a Skyshard (see map above).
• Follow the mountain-wall to the West until you reach the Public Dungeon: Taleon’s Crag
which you should enter. You’ll find another Skyshard in the main room. • Then head back to the Ashlander Encampment. Finish the quest by talking to Farseer
Bodani. • Turn in Quest: At Farseer Bodani. • Quest Rewards: Snakeskin Belt (Medium Armor: Waist, 36 Armor, Max Stamina +12,
Experience Gained From Extraction +27%), 231 Gold.
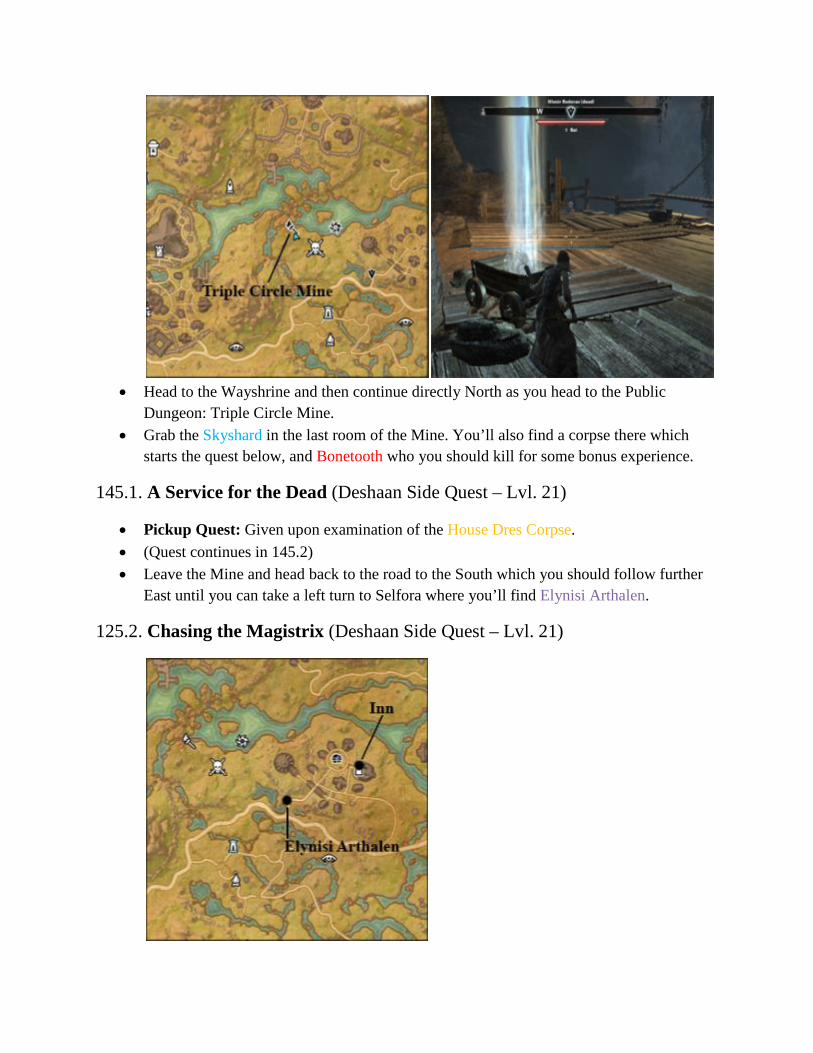
• Head to the Wayshrine and then continue directly North as you head to the Public
Dungeon: Triple Circle Mine. • Grab the Skyshard in the last room of the Mine. You’ll also find a corpse there which
starts the quest below, and Bonetooth who you should kill for some bonus experience.
145.1. A Service for the Dead (Deshaan Side Quest – Lvl. 21)
• Pickup Quest: Given upon examination of the House Dres Corpse. • (Quest continues in 145.2) • Leave the Mine and head back to the road to the South which you should follow further
East until you can take a left turn to Selfora where you’ll find Elynisi Arthalen.
125.2. Chasing the Magistrix (Deshaan Side Quest – Lvl. 21)

• Talk to Elynisi Arthalen on the road to Selfora. • Turn in Quest: At Elynisi Arthalen. • Quest Rewards: 47 Gold.
146.1. Restless Spirits (Deshaan Side Quest – Lvl. 22)
• Pickup Quest: Given by Elynisi Arthalen upon handing in the previous quest. • Head to the Inn in Selfora and listen to the conversation, then talk to Elynisi Arthalen. • (Quest continues in 146.2) • Head up the stairs in the Inn and talk to Aamela Rethandus.
147.1. Supply Run (Deshaan Side Quest – Lvl. 22)
• Pickup Quest: Given by Aamela Rethandus.
• Leave the Inn and collect Healing Supplies [5] from inside the houses while you make
your way to the Temple. • (Quest continues in 147.2)
146.2. Restless Spirits (Deshaan Side Quest – Lvl. 22)
• Head up the ramp (see map) and then make your way to the Temple. Talk to the Forlorn One inside.

• Grab the Holy Water Decanter at the lower level of the Temple and then use it on the
Brazier. You’ll be attached by the Echo of Vox; kill here and then report back to the Forlorn One.
• Turn in Quest: At the Forlorn One. • Quest Rewards: 193 Gold.
148. Rescue and Revenge (Deshaan Side Quest – Lvl. 22)
• Pickup Quest: Given by Forlorn One.
• Extinguish the Fires [2] as indicated on the map, enter the homes afterwards, and save the
Man and Woman. • Head back to the Inn to talk to Elynisi Arthalen, then head to the Town Hall and talk to
the Forlorn One inside.

• Head to the crater in the middle of town where Tidyn Arthalen will summon the Echo of Vox which you must defeat.
• Go hand in the two quests. • Turn in Quest: At Elynisi Arthalen. • Quest Rewards: Light Armor: Waist, 27 Armor, Max Magicka +14, Cost of Sprinting -
2%, Lvl. 22), 193 Gold.
147.2. Supply Run (Deshaan Side Quest – Lvl. 22)
• Turn in Quest: At Aamela Rethandus. • Quest Rewards: 48 Gold. • Talk to Acolyte Gami outside.
149.1. A Saint Asunder (Deshaan Side Quest – Lvl. 21)
• Pickup Quest: Given by Acolyte Gami, just outside the Inn in Selfora. • (Quest continues in 149.2)
• Just North of Selfora, across a small body of water you’ll find Mundus Stone: The Mage,
which increases your maximum magicka.

• Head back to the road and follow it East until you can take a turn to the South, towards
the Dungeon: Darkshade Caverns. You can find a Skyshard near the entrance. • Find a group for Darkshade Caverns.
150. Mine All Mine (Deshaan Side Quest – Lvl. 20)
• Pickup Quest: Given by Tervur Sadri inside the Darkshade Caverns. • Kill the bosses inside the Darkshade Cavern to complete this quest, then hand in the quest
before leaving the mine. • Quest Rewards: Helm of House Selos (Medium Armor: Head, 90 Armor, Max Stamina
+34, Increases Resistance to Critical Hits by 80, Lvl. 20), 370 Gold, and 1 Skill Point. • Head East to the Silent Mire Wayshrine and use it to return to Mournhold to sell stuff and
store goods you want to keep, or if you have ample bag space left follow the road further East until you reach Silent Mire.
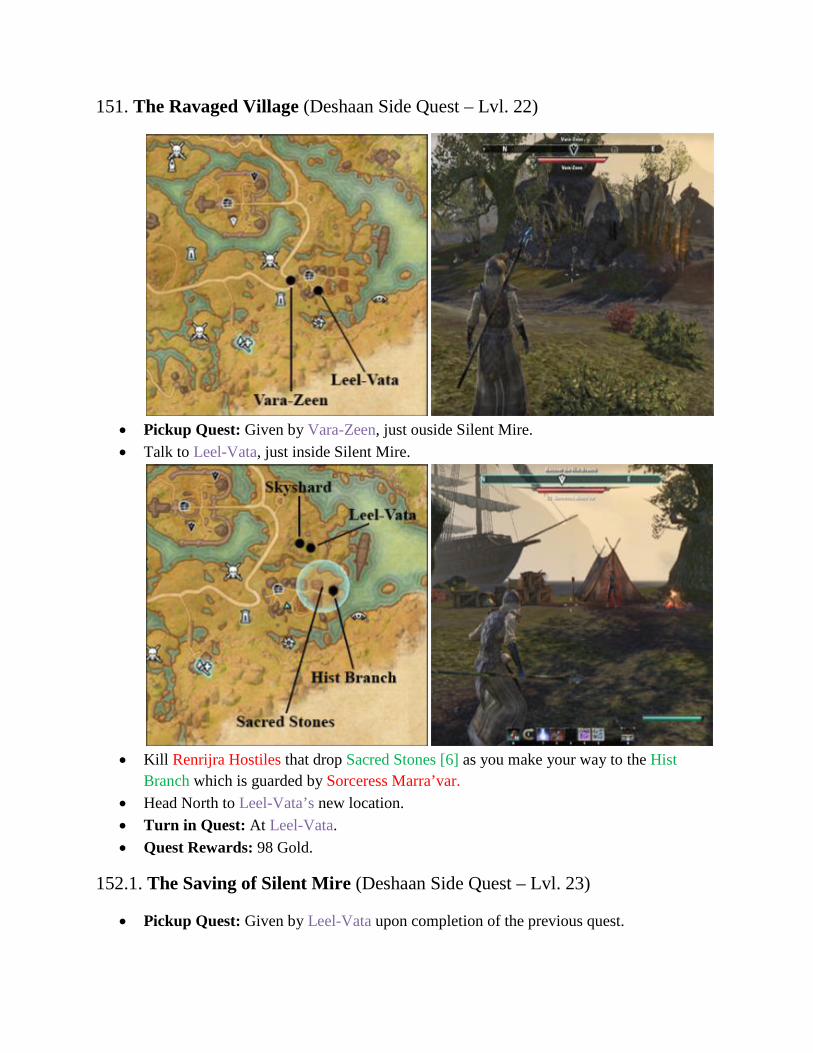
151. The Ravaged Village (Deshaan Side Quest – Lvl. 22)
• Pickup Quest: Given by Vara-Zeen, just ouside Silent Mire. • Talk to Leel-Vata, just inside Silent Mire.
• Kill Renrijra Hostiles that drop Sacred Stones [6] as you make your way to the Hist
Branch which is guarded by Sorceress Marra’var. • Head North to Leel-Vata’s new location. • Turn in Quest: At Leel-Vata. • Quest Rewards: 98 Gold.
152.1. The Saving of Silent Mire (Deshaan Side Quest – Lvl. 23)
• Pickup Quest: Given by Leel-Vata upon completion of the previous quest.

• Grab the Skyshard which overlooks the Pirate Camp (see map above).
• Grab the Pirate Key from the tent slightly North, then talk to the Shadow of Seeks-the-
Night.

• Free the Argonian Captives [9] at the three locations indicated on the map, then talk to
the Shadow of Seeks-the-Night again. • (Quest continues in 152.2) • Talk to the nearby Azeenus who’s standing behind a tree.
153. Cold-Blooded Vengeance (Deshaan Side Quest – Lvl. 23)
• Pickup Quest: Given by Azeenus nearby the Pirate Ship.

• Burn the Khajiit Boats [8] to the North and to the South. • Now enter the ship and ring the Storm Warning Bell to make Captain Sa’dir appear
whom you must kill. • Turn in Quest: Back at Azeenus. • Quest Rewards: Argonian Muck Minder (Lightning Staff, 52 Damage, Weapon
Enchantment Effect +16%, Lvl. 23), 196 Gold.
152.2. The Saving of Silent Mire (Deshaan Side Quest – Lvl. 23)
• Talk to Leel-Vata nearby, then mark Seeks-the-Night’s home with the Hist Branch. • Enter his home and kill Seeks-the-Night. • Talk to Vara-Zeen, just outside Silent Mire. • Turn in Quest: At Vara-Zeen.
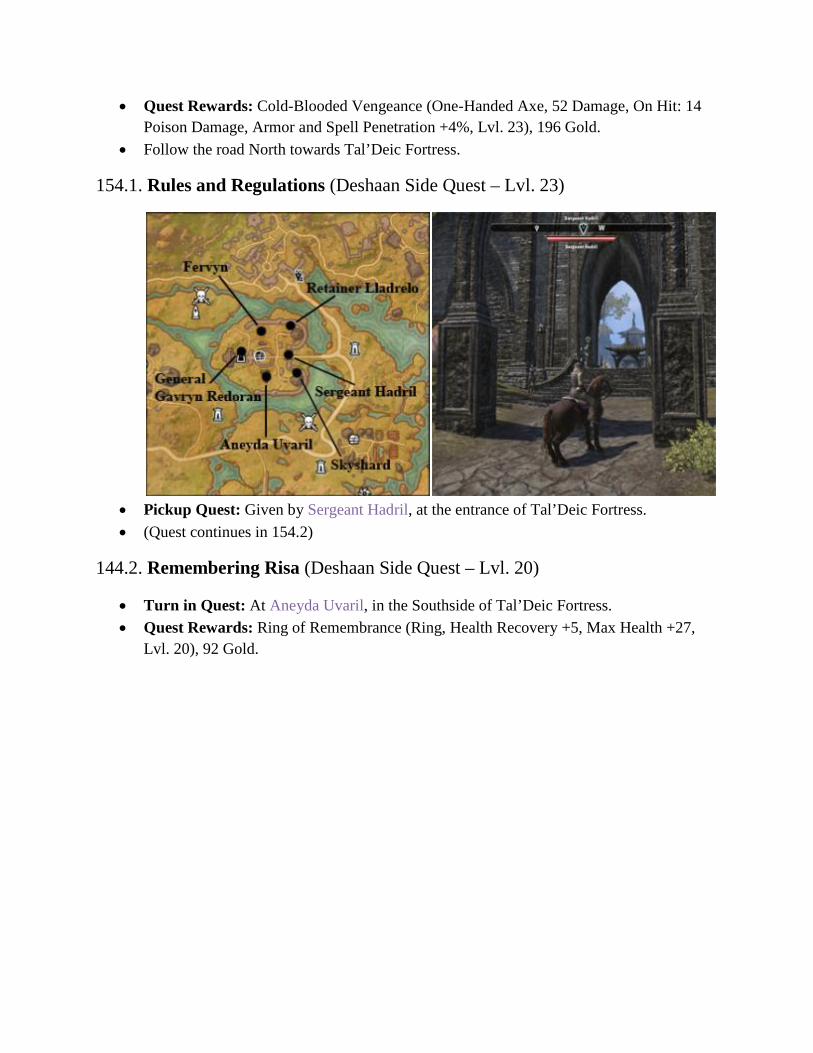
• Quest Rewards: Cold-Blooded Vengeance (One-Handed Axe, 52 Damage, On Hit: 14 Poison Damage, Armor and Spell Penetration +4%, Lvl. 23), 196 Gold.
• Follow the road North towards Tal’Deic Fortress.
154.1. Rules and Regulations (Deshaan Side Quest – Lvl. 23)
• Pickup Quest: Given by Sergeant Hadril, at the entrance of Tal’Deic Fortress. • (Quest continues in 154.2)
144.2. Remembering Risa (Deshaan Side Quest – Lvl. 20)
• Turn in Quest: At Aneyda Uvaril, in the Southside of Tal’Deic Fortress. • Quest Rewards: Ring of Remembrance (Ring, Health Recovery +5, Max Health +27,
Lvl. 20), 92 Gold.

• Grab the Skyshard just South of the entrance to the Fortress.
145.2. A Service for the Dead (Deshaan Side Quest – Lvl. 21)
• Turn in Quest: At Retainer Lladro, in the Northern part of Tal’Deic Fortress. • Quest Rewards: Redoran Cuisses (Heavy Armor: Legs, 106 Armor, Max Health +55,
Increased Resistance to Critical Hits by 70, Lvl. 21), 47 Gold.
155. Bad Soldiers (Deshaan Side Quest – Lvl. 23)
• Pickup Quest: Given by Fervyn, in the Northern part of the Fortress. • Talk to Commander Taldyn at the center of the Fortress.
• Challenge Sentinels [3] around the Fortress and defeat them in a duel.

• Turn in Quest: At Commander Taldyn. • Quest Rewards: Redoran Great Sword (Two-Handed Sword, 62 Damage, On Hit: 14
Flame Damage, Weapon and Spell Critical Values +4%, Lvl. 23), 98 Gold.
154.2. Rules and Regulations (Deshaan Side Quest – Lvl. 23)
• Enter the Tal’Deic Keep and talk to General Gavryn Redoran and Ragna Stormcrag. • Head to the General’s Chamber at the lower level of the Keep and bribe or persuade the
guard. Then have a look at all the General’s belongings. • Leave the Keep and talk to Captain Valec Doronil just outside, and grab the New
Retainer from the tent slightly North. • Talk to Ragna Stormcrag back inside the Keep • Turn in Quest: At Ragna Stormcrag. • Quest Rewards: 196 Gold.
156.1. What Lies Beneath (Deshaan Side Quest – Lvl. 23)
• Pickup Quest: Given by Ragna Stormcrag upon completion of the previous quest.
• Enter the Crypts slightly North of the Keep. • (Quest continues in 156.2)
157.1. The Soldiers Alibi (Deshaan Side Quest – Lvl. 23)

• Pickup Quest: Given by Saryvn, in the first room of the Crypts. • (Quest continues in 157.2)
156.2. What Lies Beneath (Deshaan Side Quest – Lvl. 23)
• Talk to Durel Gilveni just down the hall.
• Head South and check out the General’s Corpse. Kill the General when he appears. • (Quest continues in 156.3)
157.2. The Soldiers Alibi (Deshaan Side Quest – Lvl. 23)
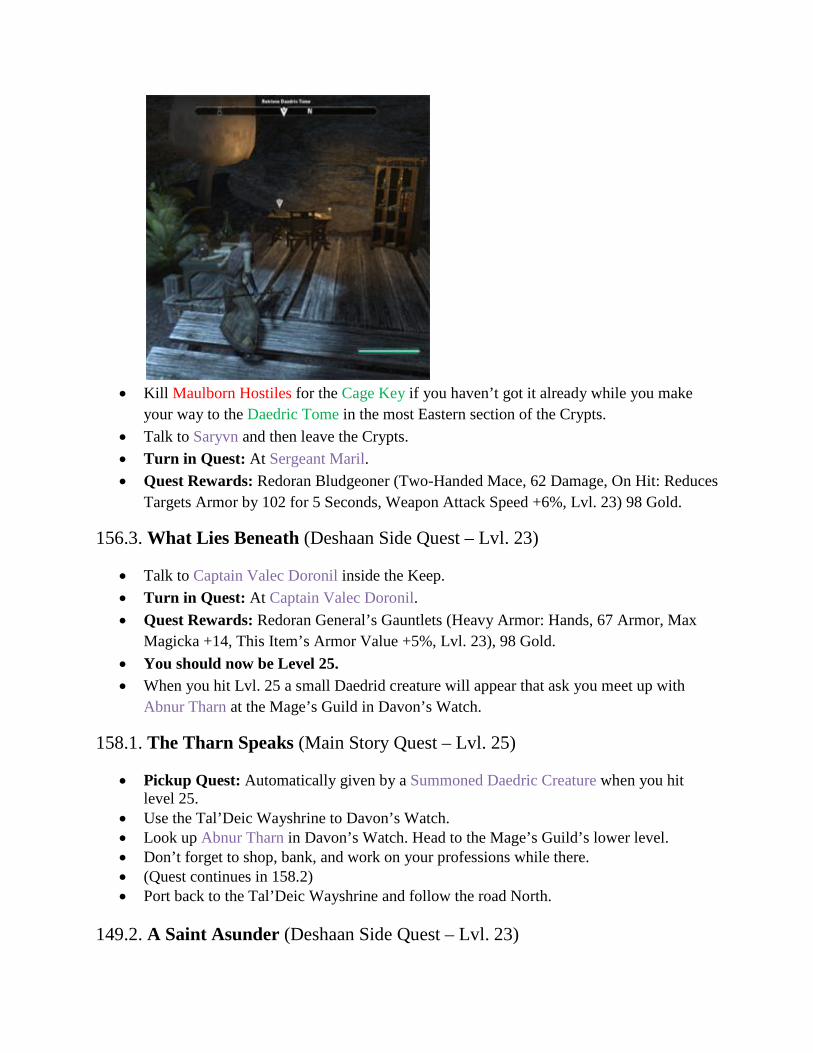
• Kill Maulborn Hostiles for the Cage Key if you haven’t got it already while you make
your way to the Daedric Tome in the most Eastern section of the Crypts. • Talk to Saryvn and then leave the Crypts. • Turn in Quest: At Sergeant Maril. • Quest Rewards: Redoran Bludgeoner (Two-Handed Mace, 62 Damage, On Hit: Reduces
Targets Armor by 102 for 5 Seconds, Weapon Attack Speed +6%, Lvl. 23) 98 Gold.
156.3. What Lies Beneath (Deshaan Side Quest – Lvl. 23)
• Talk to Captain Valec Doronil inside the Keep. • Turn in Quest: At Captain Valec Doronil. • Quest Rewards: Redoran General’s Gauntlets (Heavy Armor: Hands, 67 Armor, Max
Magicka +14, This Item’s Armor Value +5%, Lvl. 23), 98 Gold. • You should now be Level 25. • When you hit Lvl. 25 a small Daedrid creature will appear that ask you meet up with
Abnur Tharn at the Mage’s Guild in Davon’s Watch.
158.1. The Tharn Speaks (Main Story Quest – Lvl. 25)
• Pickup Quest: Automatically given by a Summoned Daedric Creature when you hit level 25.
• Use the Tal’Deic Wayshrine to Davon’s Watch. • Look up Abnur Tharn in Davon’s Watch. Head to the Mage’s Guild’s lower level. • Don’t forget to shop, bank, and work on your professions while there. • (Quest continues in 158.2) • Port back to the Tal’Deic Wayshrine and follow the road North.
149.2. A Saint Asunder (Deshaan Side Quest – Lvl. 23)

• Talk to the Vestige of Saint Veloth at The Shrine of Saint Veloth just off the road to the
North.
• You must gather the Reliquary Stones [3], Reliquary Pendant and Reliquary Spire on the
locations indicated on the map. Be careful for the Daedric Hostiles in the area. After grabbing the first Stone and when heading to the second one in the Southeast of the compound you will run into Priest Dilyne.
• (Quest continues in 149.3) • Talk to Priest Dilyne who’s located above the entrance to the area.
159. The Wounds in the World (Deshaan Side Quest – Lvl. 23)
• Pickup Quest: Given by Priest Dilyne who’s located above the entrance to the area.

• She’ll ask you to close Daedric Portals [4] which is something you can do while working
on A Saint Asunder. The Portals spawn Watchers which have more health than regular mobs. You’ll have to kill these to close the Portals.
• • When you’ve completed both quests you can hand them in atop of the compound at Priest
Dilyne and Master Aron. • Turn in Quest: At Priest Dilyne. • Quest Rewards: 98 Gold.
149.3. A Saint Asunder (Deshaan Side Quest – Lvl. 23)
• Master Aron will ask you to locate Hlen. He’s just to the West, talk to him.

• Enter the Crypt right besides Master Aron where you must kill Varvesuu Nograta and
take Saint Veloth’s Skull. • Talk to the Vestige before leaving the Crypt. • Add the Skull to the Relics atop of the compound and talk to Saint Veloth to complete the
quest. • Turn in Quest: At Saint Veloth • Quest Rewards: Saint Veloth’s Shield (Shield, 78 Armor, Max Magicka +37, Sells for
150% More, Lvl. 23), 196 Gold.
160. Healing Hearts (Deshaan Side Quest – Lvl. 23)
• Pickup Quest: Given by Acolyte Eldri nearby.

• Follow the road East until you run into a small camp where you’ll find Healer Dalen and Ordinator Murun.
• Turn in Quest: At Healer Dalen. • Quest Rewards: 49 Gold.
161.1. Into the Mouth of Madness (Deshaan Side Quest – Lvl. 24)
• Pickup Quest: Given by Ordinator Murun nearby. • Sit by the Camp Fire to hear what Almelexia has to say.
• You’ll have to destroy the Wards [3] at the locations indicated on the map. Note that you
can complete the quest below alongside this one so pick it up first. Start with the Daedric Ward which is protected by Ahzuom, then destroy the Spirit Ward which is protected by Soul of Irthari, and then destroy the Maulborn Ward is protected by General Brilnosu and a Maulborn Healer.
• (Quest continues in 161.2) • Jump down from the hill (see map) to Knife Ear Grotto.
162.1. A Blow for Order (Deshaan Side Quest – Lvl. 24)
• Pickup Quest: Given by Ordinator Gorili on the road just North towards the Daedric Ward.
• You must kill Daedra [5] and Maulborn [5] for this quest which is easily possible as you work on Into the Mouth of Madness.
• (Quest continues in 162.2)
158.2. The Tharn Speaks (Main Story Quest – Lvl. 25)

• Enter Knife Ear Grotto where you’ll meet up with Abnur Tharn. You must look for
Information on the 3 points indicated on the map. You can pick up A Fair Warning in the first room of the Grotto and you can complete these 2 quests at the same time.
• (Quest continues in 155.3)
163.1. A Fair Warning (Deshaan Side Quest – Lvl. 23)
• Pickup Quest: Given by A Fair Warning, just inside Knife Ear Grotto.
• For this quest you’ll have to grab an Artifact in the last room of this Public Dungeon. It’s
protected by Drulshasa. • Continue through the Grotto working on both quests at the same time. • (Quest continues in 163.2)
158.3. The Tharn Speaks (Main Story Quest – Lvl. 25)

• Once you’ve found all Information [3] in Knife Ear Grotto you must talk to Abnur Tharn.
• Grab the Skyshard in the hallway beyond the third piece of information, then leave the
Grotto. • (Quest continues in 158.4)
161.2. Into the Mouth of Madness (Deshaan Side Quest – Lvl. 24)
• Follow the road North to Vox’s Lair and enter it. Talk to Aspera the Forgotten just inside. • Turn in Quest: At Aspera the Forgotten. • Quest Rewards: 200 Gold.
164. Motive for Heresy (Deshaan Side Quest – Lvl. 24)
• Pickup Quest: Given by Aspera the Forgotten, just inside Eidolon’s Hollow.
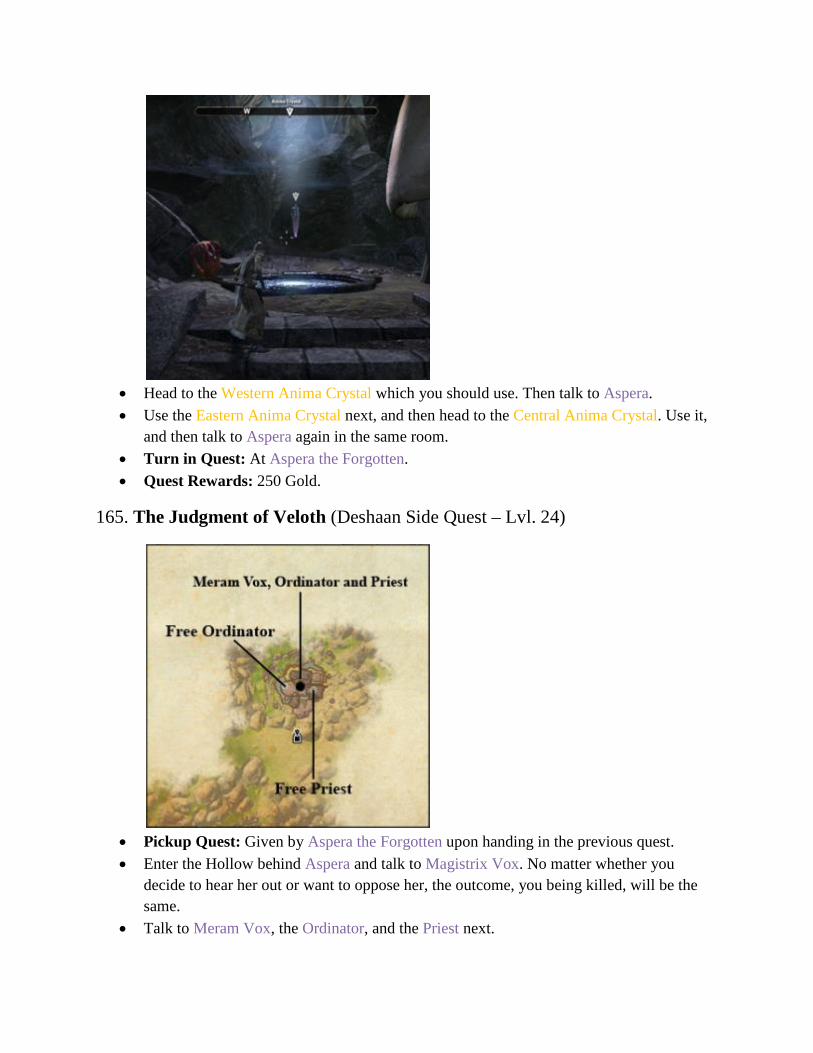
• Head to the Western Anima Crystal which you should use. Then talk to Aspera. • Use the Eastern Anima Crystal next, and then head to the Central Anima Crystal. Use it,
and then talk to Aspera again in the same room. • Turn in Quest: At Aspera the Forgotten. • Quest Rewards: 250 Gold.
165. The Judgment of Veloth (Deshaan Side Quest – Lvl. 24)
• Pickup Quest: Given by Aspera the Forgotten upon handing in the previous quest. • Enter the Hollow behind Aspera and talk to Magistrix Vox. No matter whether you
decide to hear her out or want to oppose her, the outcome, you being killed, will be the same.
• Talk to Meram Vox, the Ordinator, and the Priest next.
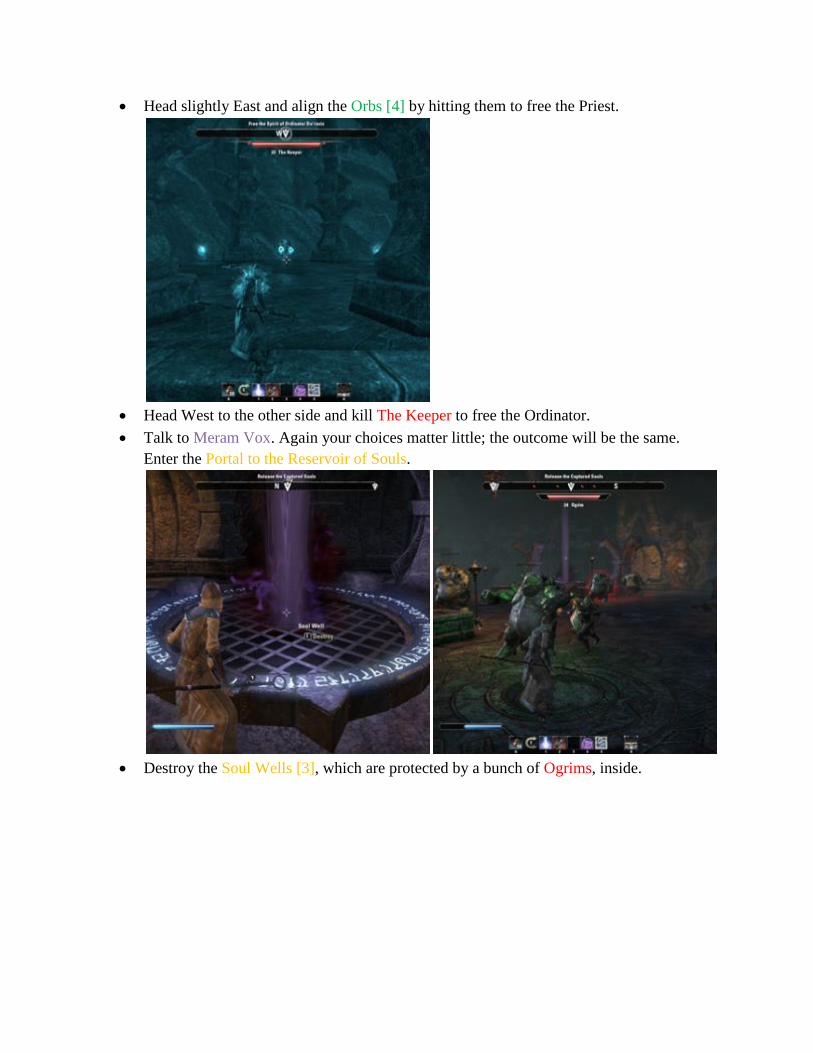
• Head slightly East and align the Orbs [4] by hitting them to free the Priest.
• Head West to the other side and kill The Keeper to free the Ordinator. • Talk to Meram Vox. Again your choices matter little; the outcome will be the same.
Enter the Portal to the Reservoir of Souls.
• Destroy the Soul Wells [3], which are protected by a bunch of Ogrims, inside.

• Defeat Magistrix Vox next. She occasionally becomes immune to damage but even so
she should be a fairly easy kill. Talk to Almalexia next. • Turn in Quest: At Almalexia. • Quest Rewards: Ordinator Breastplate (Medium Armor: Chest, 109 Armor, Max
Magicka +37, Cost of Sprinting -2%, Lvl. 24), 250 Gold, 1 Skill Point. • Enter the Portal to Mournhold and talk to Ganthis on arrival. • You should be level 26 now.
166.1. Onward to Shadowfen (Deshaan Side Quest – Lvl. 24)
• Pickup Quest: Given by Ganthis upon arrival in Mournhold. • (Quest continues in 166.2)
159.2. A Blow for Order (Deshaan Side Quest – Lvl. 24)
• Turn in Quest: At Ordinator Eron in front of the Temple of Almalexia. • Quest Rewards: 100 Gold. • Sell unwanted items, craft, and bank while in Mournhold.
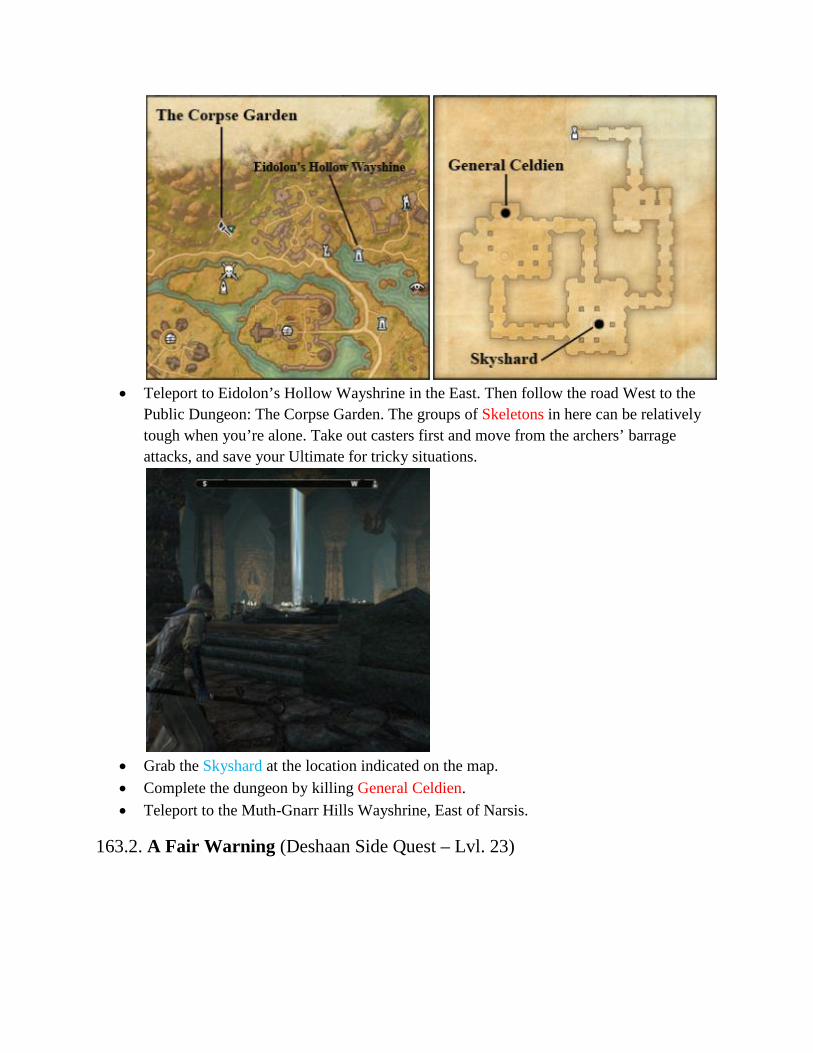
• Teleport to Eidolon’s Hollow Wayshrine in the East. Then follow the road West to the
Public Dungeon: The Corpse Garden. The groups of Skeletons in here can be relatively tough when you’re alone. Take out casters first and move from the archers’ barrage attacks, and save your Ultimate for tricky situations.
• Grab the Skyshard at the location indicated on the map. • Complete the dungeon by killing General Celdien. • Teleport to the Muth-Gnarr Hills Wayshrine, East of Narsis.
163.2. A Fair Warning (Deshaan Side Quest – Lvl. 23)
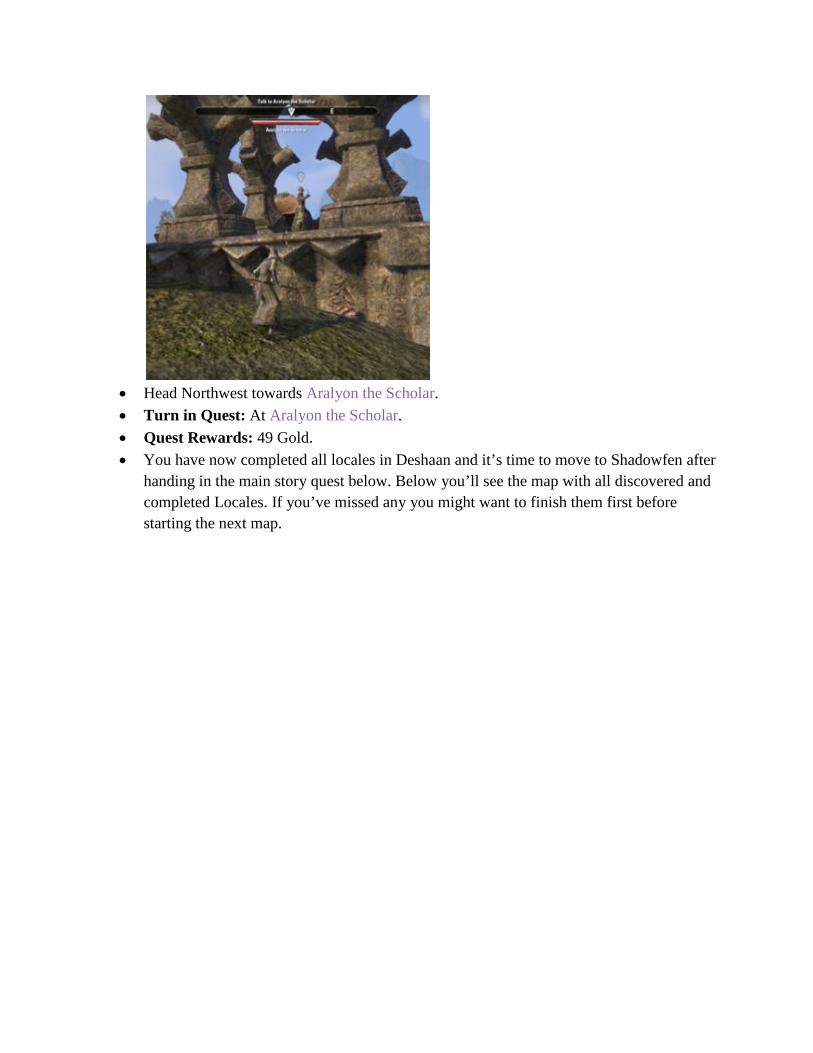
• Head Northwest towards Aralyon the Scholar. • Turn in Quest: At Aralyon the Scholar. • Quest Rewards: 49 Gold. • You have now completed all locales in Deshaan and it’s time to move to Shadowfen after
handing in the main story quest below. Below you’ll see the map with all discovered and completed Locales. If you’ve missed any you might want to finish them first before starting the next map.

158.4. The Tharn Speaks (Main Story Quest – Lvl. 25)
• Head to The Harborage and talk to Varen Aquilarios. • Turn in Quest: At Varen Aquilarios. • Quest Rewards: Tharn Family Ring (Ring, +5 Spell Damage, Max Magicka +34, Lvl.
25), 408 Gold, 1 Skill Point. • Port to Mournhold and then follow the road South to Shadowfen when you’re ready.
Shadowfen Quests

• Follow the road South to Stormhold, the main city in Shadowfen where you’ll find a
Stable to feed your Horse, a bank to store goods, and all the crafting stations you could need.
167.1. Shadowfen Smorgasbord (Shadowfen Side Quest – Lvl. 24)
• Pickup Quest: Given by Angwe at the Shadowfen Market. • (Quest continues in 167.2) • Grab your first Skyshard in Shadowfen. It can be found on top of the entrance to the
Mage’s Guild. You’ll have to go around and jump down to get to it as seen in the screenshot above.
• Enter the Mage’s and Fighters Guild which connect within an underground bunker and take a left after you enter it.
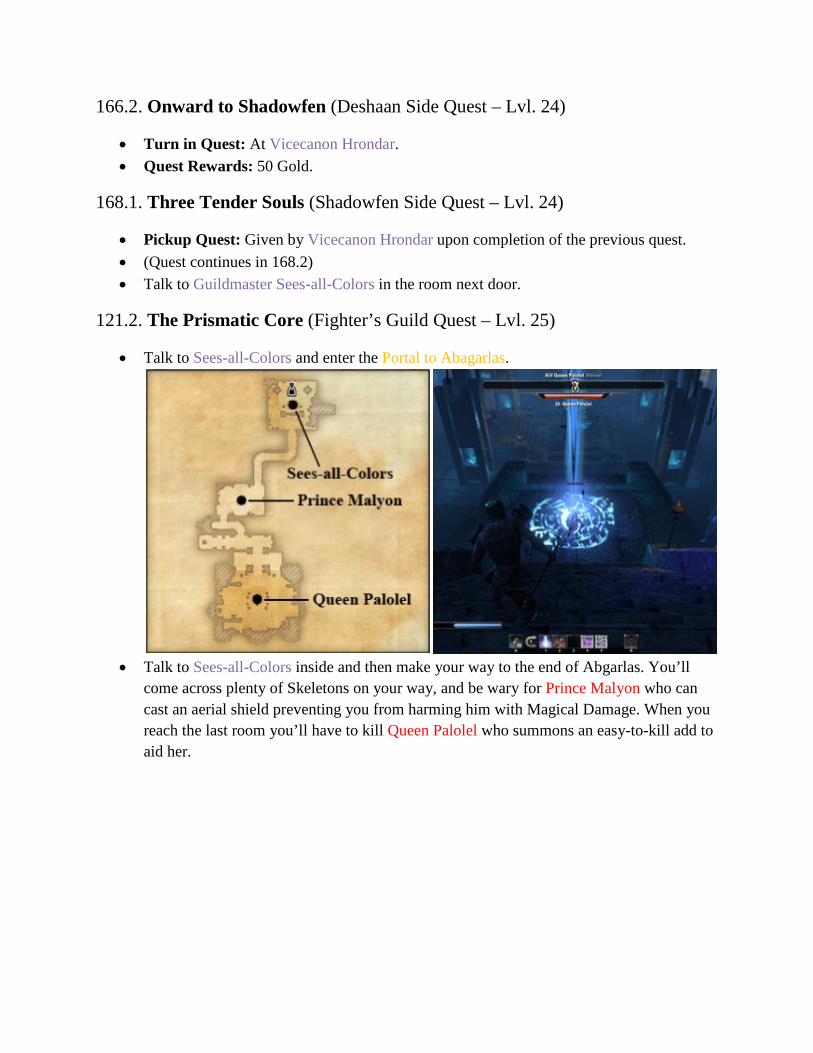
166.2. Onward to Shadowfen (Deshaan Side Quest – Lvl. 24)
• Turn in Quest: At Vicecanon Hrondar. • Quest Rewards: 50 Gold.
168.1. Three Tender Souls (Shadowfen Side Quest – Lvl. 24)
• Pickup Quest: Given by Vicecanon Hrondar upon completion of the previous quest. • (Quest continues in 168.2) • Talk to Guildmaster Sees-all-Colors in the room next door.
121.2. The Prismatic Core (Fighter’s Guild Quest – Lvl. 25)
• Talk to Sees-all-Colors and enter the Portal to Abagarlas.
• Talk to Sees-all-Colors inside and then make your way to the end of Abgarlas. You’ll
come across plenty of Skeletons on your way, and be wary for Prince Malyon who can cast an aerial shield preventing you from harming him with Magical Damage. When you reach the last room you’ll have to kill Queen Palolel who summons an easy-to-kill add to aid her.

• Destroy Mortuum Vivicus and talk to Sees-all-Colors.
• Enter the Portal to the Earth Forge and talk to Merric at the other end of it. Follow him to
the Earth Forge and then talk with him again. • Use the Valve, Bellows, Coal and Lever to make fires for Merric. Just follow his
instructions.

• Defend yourselves from Waves of Skeletons [2] and then defeat Queen Palolet a second
time. Beware of her AoE attack. • Follow Merric and then talk to him. • Talk to Sees-all-Colors about your findings next. • Turn in Quest: At Sees-all-Colors. • Quest Rewards: Forgemaster’s Band (Ring, Stamina Recovery +6, Max Stamina +33,
Lvl. 25), 408 Gold. • Head to Valaste, over at the Mage’s Guild.
120.2. Circus of Cheerful Slaughter (Mage’s Guild Quest – Lvl. 25)
• Talk to Valaste and then read the book Circus of Cheerful Slaughter next to her.
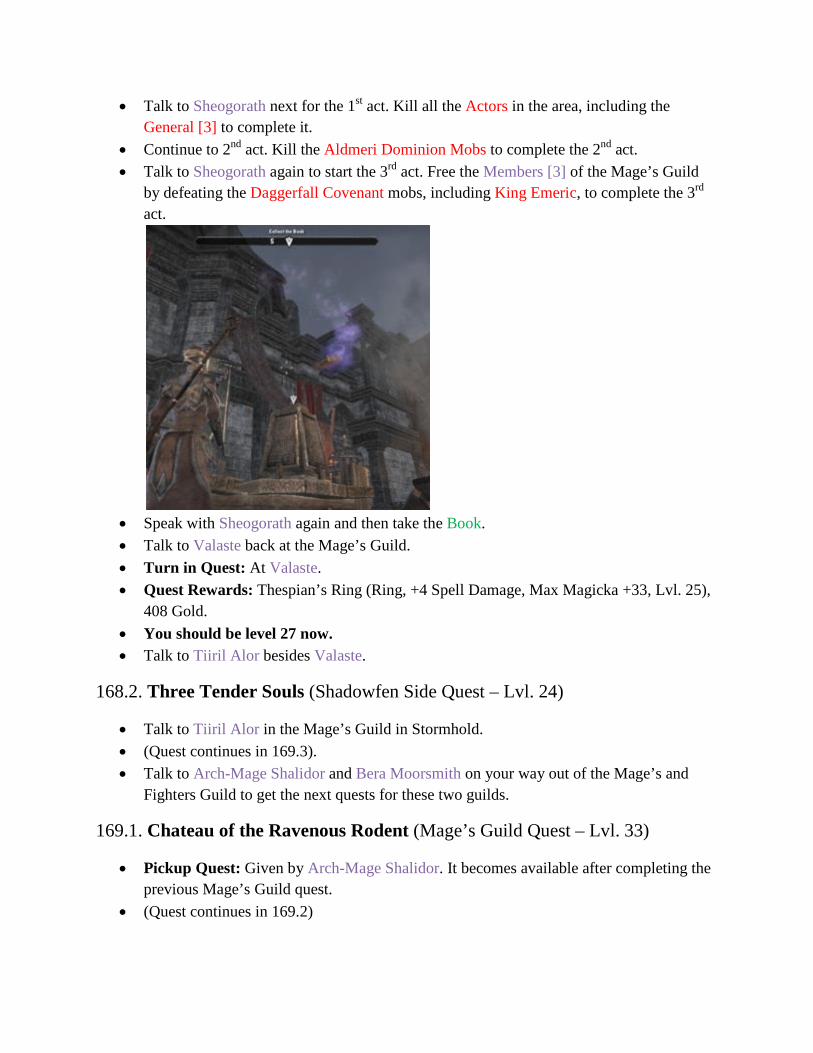
• Talk to Sheogorath next for the 1st act. Kill all the Actors in the area, including the General [3] to complete it.
• Continue to 2nd act. Kill the Aldmeri Dominion Mobs to complete the 2nd act. • Talk to Sheogorath again to start the 3rd act. Free the Members [3] of the Mage’s Guild
by defeating the Daggerfall Covenant mobs, including King Emeric, to complete the 3rd act.
• Speak with Sheogorath again and then take the Book. • Talk to Valaste back at the Mage’s Guild. • Turn in Quest: At Valaste. • Quest Rewards: Thespian’s Ring (Ring, +4 Spell Damage, Max Magicka +33, Lvl. 25),
408 Gold. • You should be level 27 now. • Talk to Tiiril Alor besides Valaste.
168.2. Three Tender Souls (Shadowfen Side Quest – Lvl. 24)
• Talk to Tiiril Alor in the Mage’s Guild in Stormhold. • (Quest continues in 169.3). • Talk to Arch-Mage Shalidor and Bera Moorsmith on your way out of the Mage’s and
Fighters Guild to get the next quests for these two guilds.
169.1. Chateau of the Ravenous Rodent (Mage’s Guild Quest – Lvl. 33)
• Pickup Quest: Given by Arch-Mage Shalidor. It becomes available after completing the previous Mage’s Guild quest.
• (Quest continues in 169.2)

170.1. Proving the Deed (Fighter’s Guild Quest – Lvl. 33)
• Pickup Quest: Given by Bera Moorsmith. It becomes available after completing the previous Fighters Guild quest.
• (Quest continues in 170.2)
168.3. Three Tender Souls (Shadowfen Side Quest – Lvl. 24)
• Talk to Dendras and Gethis in the Northern part of Stormhold. • Head to the Mortuary in the Southern part of Stormhold next. • Examine the Remains [3] of the murdered citizens. • Talk to Smith Halva in the Mortuary. • Talk to Gethis in front of his home just to the North. • Enter his house and examine the Shadowscale Scout. • Head back to the Fighters Guild and talk to Vicecanon Heita-Meen. • Turn in Quest: At Vicecanon Heita-Meen. • Quest Rewards: 200 Gold.
171.1. Getting to the Truth (Shadowfen Side Quest – Lvl. 24)
• Pickup Quest: Given by Vicecanon Heita-Meen upon handing in the previous quest. • (Quest continues in 171.2) • Head to the Merchant quarters.
172.1. Unwelcome Guests (Shadowfen Side Quest – Lvl. 24)

• Pickup Quest: Given by Doubts-the-Moon on the Stormhold Marketplace.
• Talk to Mercenary Recruits [4] in the big area located on the map on your way to Listen-
to-Water. • (Quest continues in 172.2)
171.2. Getting to the Truth (Shadowfen Side Quest – Lvl. 24)
• Head to Listen-to-Water’s home in the most Western section of Stormhold.
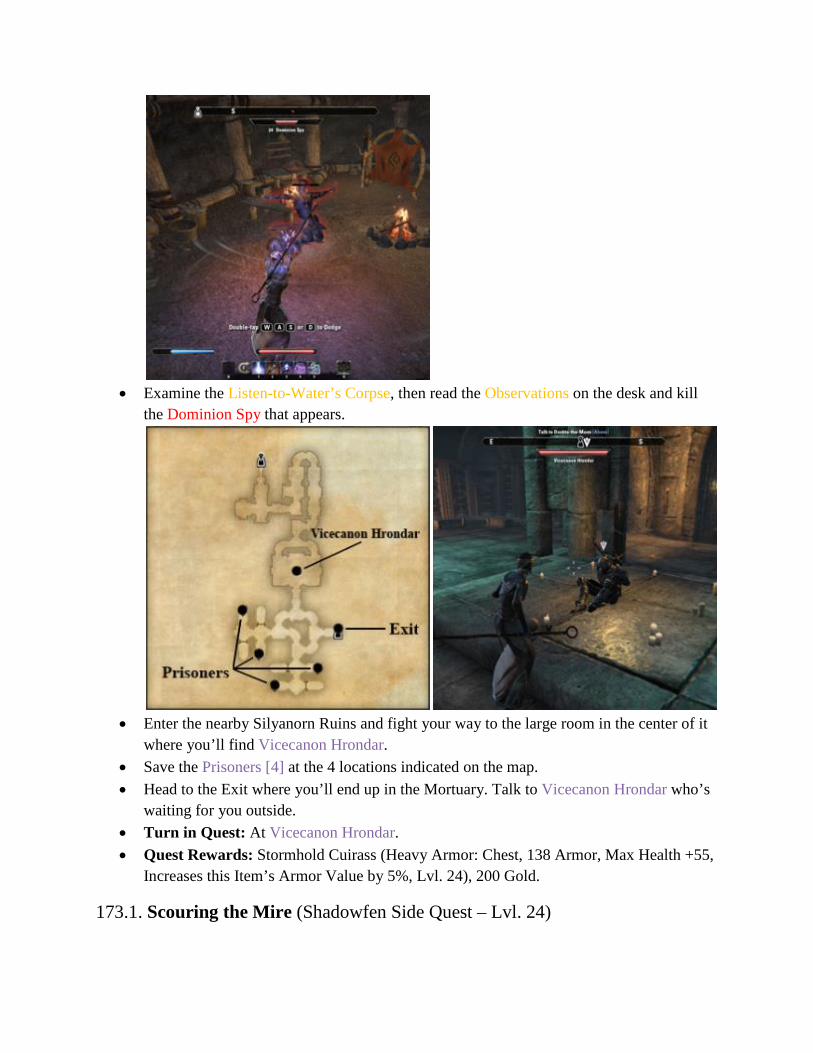
• Examine the Listen-to-Water’s Corpse, then read the Observations on the desk and kill
the Dominion Spy that appears.
• Enter the nearby Silyanorn Ruins and fight your way to the large room in the center of it
where you’ll find Vicecanon Hrondar. • Save the Prisoners [4] at the 4 locations indicated on the map. • Head to the Exit where you’ll end up in the Mortuary. Talk to Vicecanon Hrondar who’s
waiting for you outside. • Turn in Quest: At Vicecanon Hrondar. • Quest Rewards: Stormhold Cuirass (Heavy Armor: Chest, 138 Armor, Max Health +55,
Increases this Item’s Armor Value by 5%, Lvl. 24), 200 Gold.
173.1. Scouring the Mire (Shadowfen Side Quest – Lvl. 24)

• Pickup Quest: Given by Vicecanon Hrondar upon handing the previous quest. • (Quest continues in 173.2)
172.2. Unwelcome Guests (Shadowfen Side Quest – Lvl. 24)
• Head back to the Merchant’s quarter and talk to Hjotild at the location where Doubts-the-Moon was previously. Here you can also sell items, craft etc. before moving on.
• Turn in Quest: At Hjotild. • Quest Rewards: Merchant’s Favor Ring (Ring, Stamina Recovery +5, Max Stamina
+31, Lvl. 24), 100 Gold. • Leave Stormhold in Eastern direction.
167.2. Shadowfen Smorgasbord (Shadowfen Side Quest – Lvl. 24)
• Talk to Veenaza at the most Eastern part of Stormhold. • Veenaza asks you to gather Types of Food [4] from different Beasts [4] you come across
while leveling in Shadowfen. There are plenty of all Beasts to be found across Shadowfen so just kill some for the required items as you come across them. Only the Alit’s are rare and they can only be found in the Southwest of Shadowfen, Southwest of the Hatching Pools (see map for their location). Wasp: Eggs Kagouti: Ribs Alit: Heart Mudcrab: Claw Meat
• (Quest continues in 167.3)
• Head Northwest to the Public Dungeon: Shrine of the Blackmaw.

• Make your way to the Skyshard as indicated on the map above. The Gargoyles are elite
mobs that are tougher to kill but they are still very doable. Kill Peers-Through-Glass to complete the Dungeon.
• Leave the Dungeon and head South to another Skyshard as indicated on the map. • Head East until you run into The Vile Pavilion where you’ll find Daeril.
174. Captive Souls (Shadowfen Side Quest – Lvl. 25)

• Pickup Quest: Given by Daeril. • Destroy the Animus Geode [4] in the encampment you’re currently in. They look like
purple crystals.
• Talk to Daeril just to the Southwest near Stillrise Village. • Turn in Quest: At Daeril. • Quest Rewards: Worm Drain (One-Handed Sword, 56 Damage, On Hit: Reduces
Target’s Power by 8 for 5 Seconds, Increases Armor and Spell Penetration, Lvl. 25), 102 Gold.
• Talk to Chieftain Suhlak in Stillrise Village.
175. The Thin Ones (Shadowfen Side Quest – Lvl. 25)
• Pickup Quest: Given by Chieftain Suhlak in Stillrise Village.

• Enter the cellars at the three locations indicated on the map and kill the Worm Cultists
[3].
• Talk to Chieftain Suhlak again and then talk to Shaman Chirah, and War Chief Helushk. • Enter the Odious Chapel behind the War Chief and use the Bloud Fountain.

• Talk to Acolyte Morag just outside the Chapel, then head Northeast to get the Soul Gem. • Head back to town and talk to Chieftain Suhlak. • Turn in Quest: At Chieftain Suhlak. • Quest Rewards: 204 Gold.
176. The Bargain’s End (Shadowfen Side Quest – Lvl. 25)
• Pickup Quest: Given by Chieftain Suhlak upon handing in the previous quest. • Talk to Shaman Chirah and War Chief Helushk and then make your decision, whether
you decide to destroy or preserve the Soul Gem matters nothing in terms of quest rewards.
• Head back into the Odious Chapel and make your way to the Ice of Stasis and Fire of
Destruction and use the Soul Gem how you please.
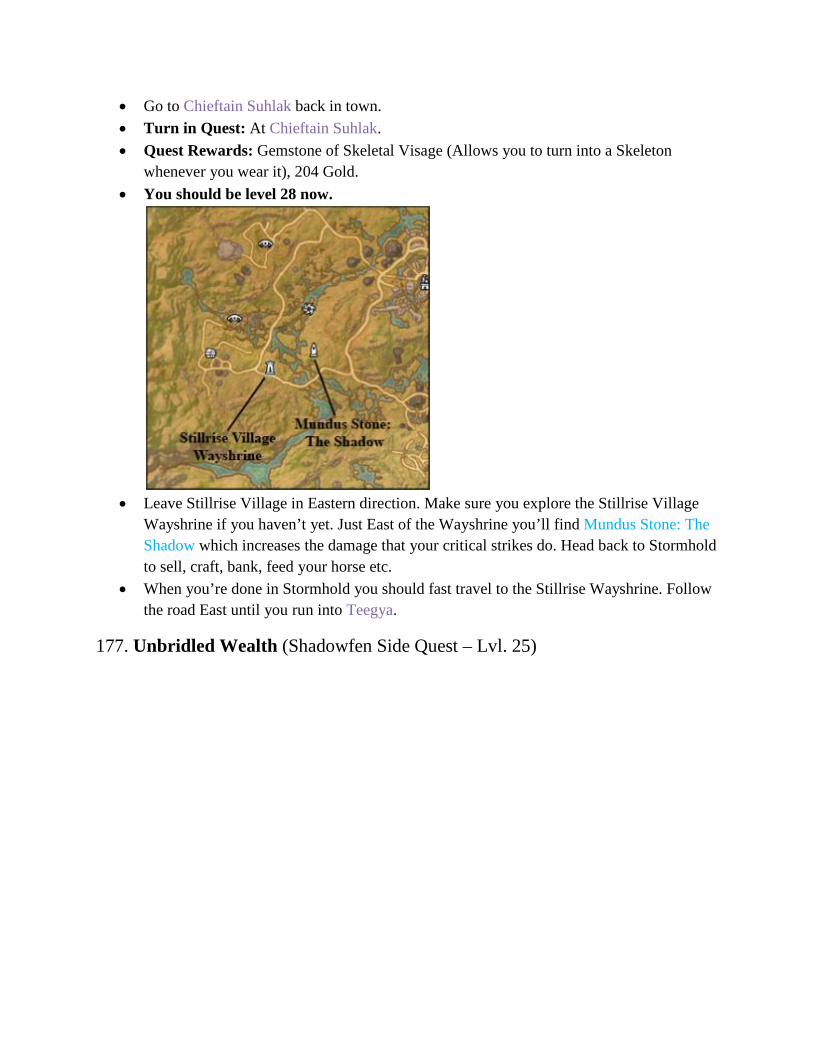
• Go to Chieftain Suhlak back in town. • Turn in Quest: At Chieftain Suhlak. • Quest Rewards: Gemstone of Skeletal Visage (Allows you to turn into a Skeleton
whenever you wear it), 204 Gold. • You should be level 28 now.
• Leave Stillrise Village in Eastern direction. Make sure you explore the Stillrise Village
Wayshrine if you haven’t yet. Just East of the Wayshrine you’ll find Mundus Stone: The Shadow which increases the damage that your critical strikes do. Head back to Stormhold to sell, craft, bank, feed your horse etc.
• When you’re done in Stormhold you should fast travel to the Stillrise Wayshrine. Follow the road East until you run into Teegya.
177. Unbridled Wealth (Shadowfen Side Quest – Lvl. 25)

• Pickup Quest: Given by Teegya, South of Stormhold.
• Head to the three locations indicated on the map and search the Guar [3]. • Head the tony circle indicated on the map to find Wades-in-Muck and give him the
Berries. • Kill Crocodiles nearby until you have the Ruby. • Turn in Quest: At Teegya. • Quest Rewards: Boots of the Swampstrider (Light Armor: Feet, 68 Armor, Max Stamina
+14, Exploration Experience Gained +7%, Lvl. 25), 204 Gold. • Follow the road East to Mud Tree Village and pick up the quest Schism from any of the
townies.
178.1. Schism (Shadowfen Side Quest – Lvl. 25)
• Pickup Quest: Given by various Townies in Mud Tree Villages • Enter the Mud Tree Mine in Mud Tree Village. • Save Eydvi and Lenam inside. • Save Miharil from within a Hut. • Leave the Mine and Examine the corpse of Hodmar. • (Continues in 178.2)
179.1. A Last Reminder (Shadowfen Side Quest – Lvl. 25)
• Pickup Quest: Given upon examination of Hodmar’s Corpse. • (Quest continues in 179.2)
178.2. Schism (Shadowfen Side Quest – Lvl. 25)

• Go to the Goblin War Chief just North. Kill him and grab the Totem. • Jump down and talk to Thragnar. • Beat down Goblins [6] at the encampment to about half health and then use the Totem on
them. • Head back inside the Mines and talk to Miharil and Thragnar. Whatever you decide the
outcome in terms of rewards will be the same. • Head back to Mud Tree Village. • Turn in Quest: At Napetui. • Quest Rewards: Stonegrinder’s Dagger (Dagger, 56 Damage, On Hit: Grants a 36
Damage Point Shield for 5 Seconds, Weapon Attack Speed +3%, Lvl. 25), 204 Gold.
179.2. A Last Reminder (Shadowfen Side Quest – Lvl. 25)
• Turn in Quest: At Eydvi Iron-Kettle. • Quest Rewards: 51 Gold. • You can sell unwanted items and do some crafting in Mud Tree Village. When done head
Northeast towards Public Dungeon: Sanguine’s Demesne.
180.1. Foreign Vintage (Shadowfen Side Quest – Lvl. 25)

• Pickup Quest: Given by Seducer Trilvath inside Sanguine’s Demesne. • This level 25-26 dungeon has a lot of packs of 5-6 mobs so you must team up with
another player. Try to find one in zone chat or wait at the entrance for a minute. You can also opt to come back here later. There’s a lot of experience to be gained here as the groups also respawn super fast.
• Head further inside Sanguine’s Demesne and make a left turn first. For this quest you
must make Aldmeri Spies [3] drink from the Goblet while you work on the other quest in this dungeon mentioned below. They are spread across the Dungeon and appear on different locations within the indicated area.
• (Quest continues in 176.2)
181. Life of the Party (Shadowfen Side Quest – Lvl. 25)

• Pickup Quest: Given by Sings-with-Drinks.
• Sings-with-Drinks wants you to raise Spirits [4]. You can complete Foreign Vintage
while working on this quest. • Head North for the first two Spirits. From there head East for the second. Then make
your way to The Guest That Wouldn’t Leave and kill him. Beware of the Bones he throws at you as those instantly kill you. You can outrun these easily though.
• Head to the fourth Spirit and then make your way to the most Eastern section of this
Dungeon where you’ll find a Skyshard. • Head back to hand in both quests. • Turn in Quest: At Sings-with-Drinks. • Quest Rewards: 255 Gold.
180.2. Foreign Vintage (Shadowfen Side Quest – Lvl. 25)
• Turn in Quest: At Seducer Trilvath. • Quest Rewards: 255 Gold. • Leave the Dungeon and head back to Stormhold to sell, repair, bank, craft, etc. • When ready, leave Stormhold in Southeast direction and follow the road South until you
reach Gerent Saervild Steel-Wind where the road forks.
182. Foreign Vintage (Shadowfen Side Quest – Lvl. 25)

• Pickup Quest: Given by Gerent Saervild Steel-Wind, South of Stormhold. • Head South into Bogmother where you must gather the Relics [4] that he requires at the
locations indicated on the map.
• Grab the Skyshard near the most Southern Relic. • When you’ve gathered all Relics [4] you’ll be greeted by Njorlund Steel-Wind. • Head to the Tree-Minders Cap North of Bogmother, then talk to Njorlund Steel-Wind.

• Search the Dreugh Mud Piles [3] nearby. • Return to the Tree-Minder’s Camp and talk to Raleetal.
• Head to the Dominion’s Camp in the South and grab the Dominion Bedroll, then head
back to Raleetal. • Place the Bedroll in the Ritual Reliquary then talk to Raleetal again. • Head back South to the Dominion’s Camp and enter the Mudshallow Cave.

• Kill Saervild Steel-Wind inside and grab the Relics, then talk to Raleetal outside. • Turn in Quest: At Raleetal. • Quest Rewards: 260 Gold. • You should be level 29 now. • Head back to the road and follow it South towards Vicecanon Hrondar.
173.2. Scouring the Mire (Shadowfen Side Quest – Lvl. 24)
• Talk to Vicecanon Hrondar on the road South of Bogmother. • Turn in Quest: At Vicecanon Hrondar. • Quest Rewards: 50 Gold.
183. Trail of the Skin-Stealer (Shadowfen Side Quest – Lvl. 26)

• Pickup Quest: Given by Vicecanon Hrondar upon handing in the previous quest.
• Head South to Ten-Maur-Wolk and make your way to the other Vicecannons [2] which
are held up in a cave. • Examine the Soldier’s Body just outside the cave. • Talk to Mudyn nearby, and then talk to Ukatsei.
• Kill Nedrasa who appears.
• Talk to Ukatsei inside the cave then follow the road East where you’ll find Vicecanon
Hrondar’s Body which you must examine. • Talk to Ukatsei. • Turn in Quest: At Ukatsei. • Quest Rewards: 260 Gold. • You should be level 29 now.
184. The Skin Stealer’s Lair (Shadowfen Side Quest – Lvl. 26)
• Pickup Quest: Given by Ukatsei upon handing in the previous quest.
• Head to the Temple Complex to the South and enter the Portal. • Talk to Lyrant just inside the Temple.

• Head deeper into the temple until you run into Bijot. We’ve decided to help him. Head to the three locations indicated on the map and use the Animus Geode [3].
• Talk to Bijot at the Inner Altar, and then talk to Lyrant before opening the Skin Stealer’s Lair.
• Destroy the Hist Vats [4] inside, then kill Vicecannon Hrondar’s Imposter. • Talk to Bijot and then enter the Portal. • Talk to Vicecanon Servyna at the other end of it. • Turn in Quest: At Vicecanon Servyna. • Quest Rewards: Wrap of My Enemy’s Skin (Light Armor: Legs, 69 Armor, Max
Magicka +43, Reduces the Cost of Sprinting by 2%, Lvl. 26), 416 Gold, 1 Skill Point.
185.1. Cracking the Egg (Shadowfen Side Quest – Lvl. 26)
• Pickup Quest: Given by Vicecanon Servyna upon handing in the previous quest. • (Quest continues in 182.2) • Head to the Forsaken Hamlet, Southeast of the Ten-Maur-Wolk. Grab the Wayshrine just
North of the village.
186.1. The Tree-Minder’s Fate (Shadowfen Side Quest – Lvl. 27)

• Pickup Quest: Given by examining one of the dead Tree-Minders at the Forsaken
Hamlet. • Collect the Key, Ancient Book, and Broken Haft at the 3 locations indicated on the map. • Talk to Tree-Minder Deyapa who appears once you’ve gathered the 3 items, and then
visit her hut nearby where you must talk with her again.
• Leave the Hut and fight the Spirits [6]. Use the Tree-Minder’s Staff on them when you
can.

• Go the Hist Tree in the center of Forsaken Hamlet and talk to Tree-Minder Deyapa. • Leave the Village in Northern direction.
187.1. Cold-Blooded Revenge (Shadowfen Side Quest – Lvl. 27)
• Pickup Quest: Given by Prowls-in-Shadows, North of the Forsaken Hamlet. • Kill Maldur and collect his Heart while working on The Tree-Minder’s Fate. • (Quest continues at 187.2)
186.2. The Tree-Minder’s Fate (Shadowfen Side Quest – Lvl. 27)

• Head North to Camp Merciful Reduction where you must burn Hist Sap Containers [4]. • Burn Maldur’s Banner, Kill Maldur and collect his Heart while at it. • Leave Camp Merciful Reduction in Northeast direction towards the Public Dungeon:
Broken Tusk. • (Quest continues in 186.3) • Enter the Dungeon and examine the Daedric Urn.
188.1. Will of the Broken (Shadowfen Side Quest – Lvl. 27)
• Pickup Quest: Given when examining the Daedric Urn. • Talk to Mallius Falto on the floor. • (Quest continues in 188.2) • Venture further into the dungeon.
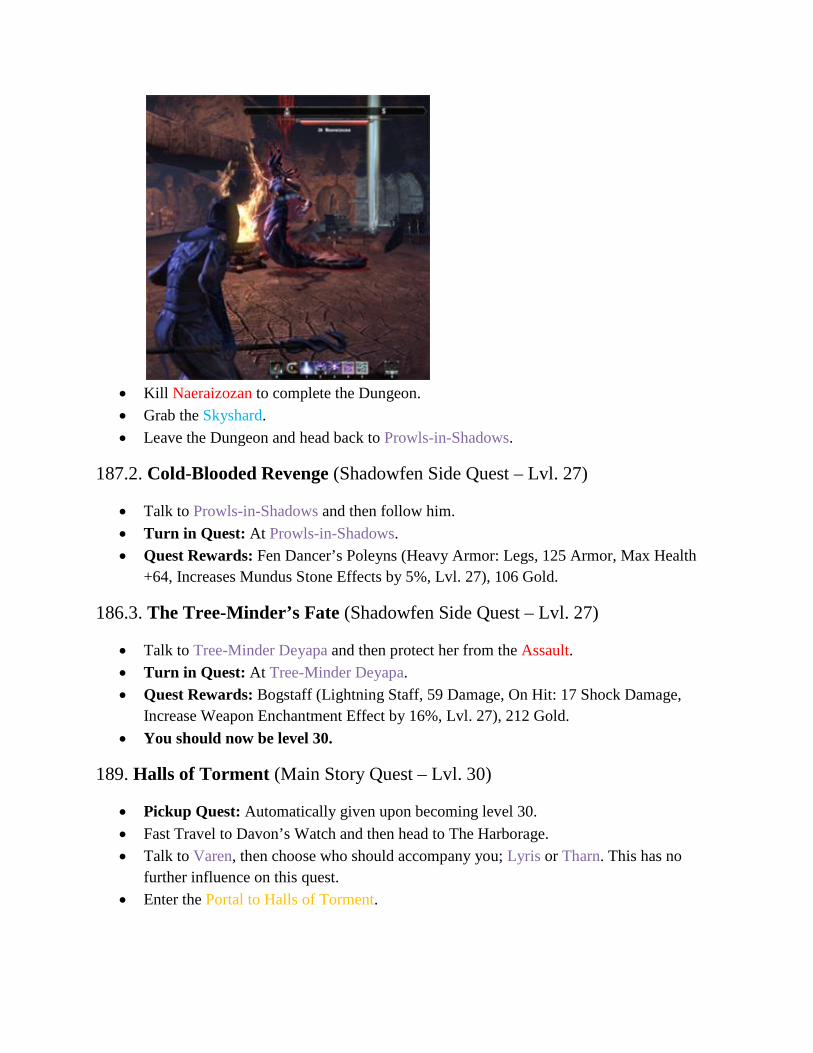
• Kill Naeraizozan to complete the Dungeon. • Grab the Skyshard. • Leave the Dungeon and head back to Prowls-in-Shadows.
187.2. Cold-Blooded Revenge (Shadowfen Side Quest – Lvl. 27)
• Talk to Prowls-in-Shadows and then follow him. • Turn in Quest: At Prowls-in-Shadows. • Quest Rewards: Fen Dancer’s Poleyns (Heavy Armor: Legs, 125 Armor, Max Health
+64, Increases Mundus Stone Effects by 5%, Lvl. 27), 106 Gold.
186.3. The Tree-Minder’s Fate (Shadowfen Side Quest – Lvl. 27)
• Talk to Tree-Minder Deyapa and then protect her from the Assault. • Turn in Quest: At Tree-Minder Deyapa. • Quest Rewards: Bogstaff (Lightning Staff, 59 Damage, On Hit: 17 Shock Damage,
Increase Weapon Enchantment Effect by 16%, Lvl. 27), 212 Gold. • You should now be level 30.
189. Halls of Torment (Main Story Quest – Lvl. 30)
• Pickup Quest: Automatically given upon becoming level 30. • Fast Travel to Davon’s Watch and then head to The Harborage. • Talk to Varen, then choose who should accompany you; Lyris or Tharn. This has no
further influence on this quest. • Enter the Portal to Halls of Torment.

• Head deeper inside the Halls of Torment where you must kill the Tharn Doppelganger. • Talk to your Companion then venture to the next area.
• Destroy the Shielding Stones [4] and then fight the Lyris Doppelganger who turns into a
Naga halfway during the fight. Save your Ultimate for that stage of the fight.

• Talk to your Companion before moving on to the Chamber of Agony where you must
deal with the Duchess of Anguish which is a relatively easy fight. • Talk to Sai Sahan when you’re ready, then enter the Portal to the Harborage. • Talk to Varen and to Sai Sahan. • Turn in Quest: At Sai Sahan. • Quest Rewards: Jewel of the Duchess (Ring, 190 Armor, Max Stamina +39), 446 Gold,
1 Skill Point. • Fast Travel to the Forsaken Hamlet Wayshrine and head South to Alten Corimont or Fast
Travel directly to the Wayshrine there if you can.
188.2. Will of the Broken (Shadowfen Side Quest – Lvl. 27)
• Talk to Vaudrie at the entrance to Alten Corimont.
• Turn in Quest: At Vaudrie. • Quest Rewards: Staff of Deadfire (Flame Staff, 57 Damage, On Hit: 17 Flame Damage,
Reduces the Cooldown of Weapon Enchantments by 35%, Lvl. 26), 104 Gold. • Talk to Senil Fenrila nearby.
190. Warm Welcome (Shadowfen Side Quest – Lvl. 26)
• Pickup Quest: Given by Senil Fenrila, at the road North of Alten Corimont.
• Enter the ship and head to the bow of the ship where you’ll find a Skyshard. • Enter the Hold of the ship and get in a fight with one of the Rowdy Pirates. • Leave the Hold and go to One-Eye. Then talk to Wayiteh nearby. • Head to the building just South of the ship where you must get in a Crate and then
eavesdrop a conversation.

• Talk to One-Eye again. • Turn in Quest: At One-Eye. • Quest Rewards: 208 Gold.
191. Last One Standing (Shadowfen Side Quest – Lvl. 26)
• Pickup Quest: Automatically given by One-Eye upon handing in the previous quest.
• Jump down the ship and talk to Pirates [3] at the docks. • Enter the nearby Warehouse and kill Tsanji. • Talk to S’jash and then leave the Hideout. • Turn in Quest: At S’jash. • Quest Rewards: 208 Gold.
192.1. A Pirate Parley (Shadowfen Side Quest – Lvl. 26)
• Pickup Quest: Automatically given by S’jash upon handing in the previous quest.

• Head to the Dominion Treasure Ship just to the North and head below deck where you’ll
find the Pirate Treasure in a Chest. • (Quest continues in 192.2). • Leave the boat and head South to the coast. Follow it until you can go land inwards
towards the Public Dungeon: Atanaz Ruins.
• Grab the Skyshard in the second large room you come across. • Kill Stormscale to complete the Dungeon. • Examine the Body of Gordag, right next to Stormscale’s location.
193.1. Strength of the Father (Shadowfen Side Quest – Lvl. 27)
• Pickup Quest: Given upon examination of the Body of Gordag. • Read Gordag’s Journal.
• Get the Seriweed for the Elixir. • (Quest continues in 193.2). • Leave the Dungeon and head to the boat you came with to take a ride back to the other
side.
192.2. A Pirate Parley (Shadowfen Side Quest – Lvl. 26)
• Talk to One-Eye. Enter the Ship and kill Sirinaire. • Talk to One-Eye again, and then to Vicecannon Servyna. • Turn in Quest: At Vicecannon Servyna. • Quest Rewards: (Dagger. 57 Damage, On Hit: 17 Poison Damage, Increase Armor and
Spell Penetration +4%, Lvl. 26), 208 Gold. • Follow the road Southeast towards Percolating Mire, visiting the locales and the
Wayshrine on your way.
194. Into the Mire (Shadowfen Side Quest – Lvl. 26)
• Pickup Quest: Given by Feyne Vildan, on the road East of Percolating Mire.

• Enter Percolating Mire and rescue its Residents [6]. • Head to Ja-Reet’s hut and kill Amyril. Then destroy the Binding Crystal. • Leave the hut and talk to Feyne nearby. • Turn in Quest: At Feyne. • Quest Rewards: 106 Gold. • You should now be level 31.
195. Clarity (Shadowfen Side Quest – Lvl. 27)
• Pickup Quest: Given by Feyne Vildan upon handing in the previous quest. • Enter Tree-Minder Fal-Xoc’s hut nearby and talk to her. • Grab the Skyshard to the East.
• Enter the Cave in the East.
• Be wary for the Wamasu and their powerful AoE Lightning Attack as you make your
way to the Lanceata Pholiota. • Head back to Tree-Minder Fal-Xoc.
• Talk to Feyne, Ja-Reet’s Father, and the Overseer. • Talk to the Hist Spirit. • Kill Carethil and her Minion.

• Destroy the Binding Crystals [2]. • Talk to Tree-Minder Fal-Xoc, and then to Ja-Reet. • Turn in Quest: At Ja-Reet. • Quest Rewards: Hist’s Root Band (Heavy Armor: Hand, 71 Armor, Max Staminia +17,
Mundus Stone Effects +5%, Lvl. 27), 265 Gold. • Head further South towards Sunscale Strand.
196. Buried in the Past (Shadowfen Side Quest – Lvl. 28)
• Pickup Quest: Given by Barvyn on the road to Sunscale Strand. • Head West to Looks-Under-Rocks. • Kill Pirates at Sunscale Strand until one of them drop the Green Puzzle Stone.

• Use the Green Puzzle Stone, then grab the Blue Puzzle Stone from the Lockbox nearby. • Use the Blue Puzzle Stone, then grab the Red Puzzle Stone from the nearby Supply
Crate. • Use the Red Puzzle Stone, then head up the large stairs where you should take to Looks-
Under-Rocks. • Turn in Quest: At Looks-Under-Rocks. • Quest Rewards: 270 Gold.
197. The Fangs of Sithis (Shadowfen Side Quest – Lvl. 28)
• Pickup Quest: Given by Looks-Under-Rocks upon handing in the previous quest. • Talk to Barvyn, Looks-Under-Rocks, and then enter the Sunscale Ruins.

• In order to pass through the Ruins in one piece you’ll have to use the Nature’s Balm in the first section, the Fireheart Salve in the second section, and the Coolmist Salve in the third section. Be careful for the Elite Monsters.
• Stop Barvyn at the end of the Ruins, then talk to him. • Leave the Ruins and talk to Looks-Under-Rocks. • Turn in Quest: At Looks-Under-Rocks. • Quest Rewards: 216 Gold.
198. Pull the Last Fang (Shadowfen Side Quest – Lvl. 28)
• Pickup Quest: Given by Looks-Under-Rocks upon handing in the previous quest.
• Enter the nearby Pirate Ship and get the Key from the Lockbox on the South side of the
ship.
• Enter the Hold and kill Captain Nahrevii. Loot the Fang. • Leave the ship and head talk to Looks-Under-Rocks to the North. Then talk to Sharava
who appears next to him, and to the Aspect of Sithis. • Turn in Quest: At Looks-Under-Rocks. • Quest Rewards: Cursed Fang of Sithis (Dagger, 61 Damage, On Hit: 17 Poison Damage,
Armor and Spell Penetration +4%, Lvl. 28), 216 Gold. • Head to the Percolating Mire Wayshrine. Use the opportunity to restock, sell and bank if
you want, then head to the Onkobra Kwama Mine just West of the Wayshrine.
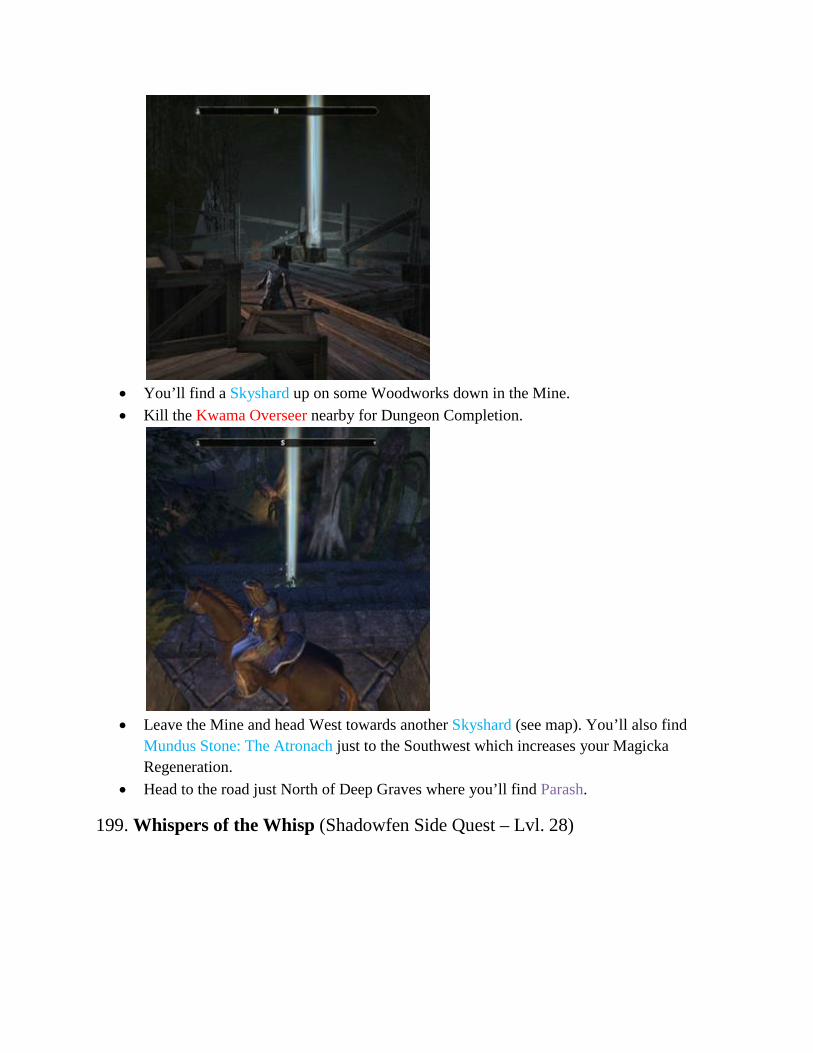
• You’ll find a Skyshard up on some Woodworks down in the Mine. • Kill the Kwama Overseer nearby for Dungeon Completion.
• Leave the Mine and head West towards another Skyshard (see map). You’ll also find
Mundus Stone: The Atronach just to the Southwest which increases your Magicka Regeneration.
• Head to the road just North of Deep Graves where you’ll find Parash.
199. Whispers of the Whisp (Shadowfen Side Quest – Lvl. 28)

• Pickup Quest: Given by Parash on the road just North of Deep Graves.
• Save Travelers [5] on the Graveyard. • Talk to Parash, then follow the Ghostly Figure and talk to Xihai-Teel. • Turn in Quest: At Xihai-Teel. • Quest Rewards: 216 Gold.
200. A Stranger Uninvited (Shadowfen Side Quest – Lvl. 28)
• Pickup Quest: Given by Xihai-Teel upon handing in the previous quest.
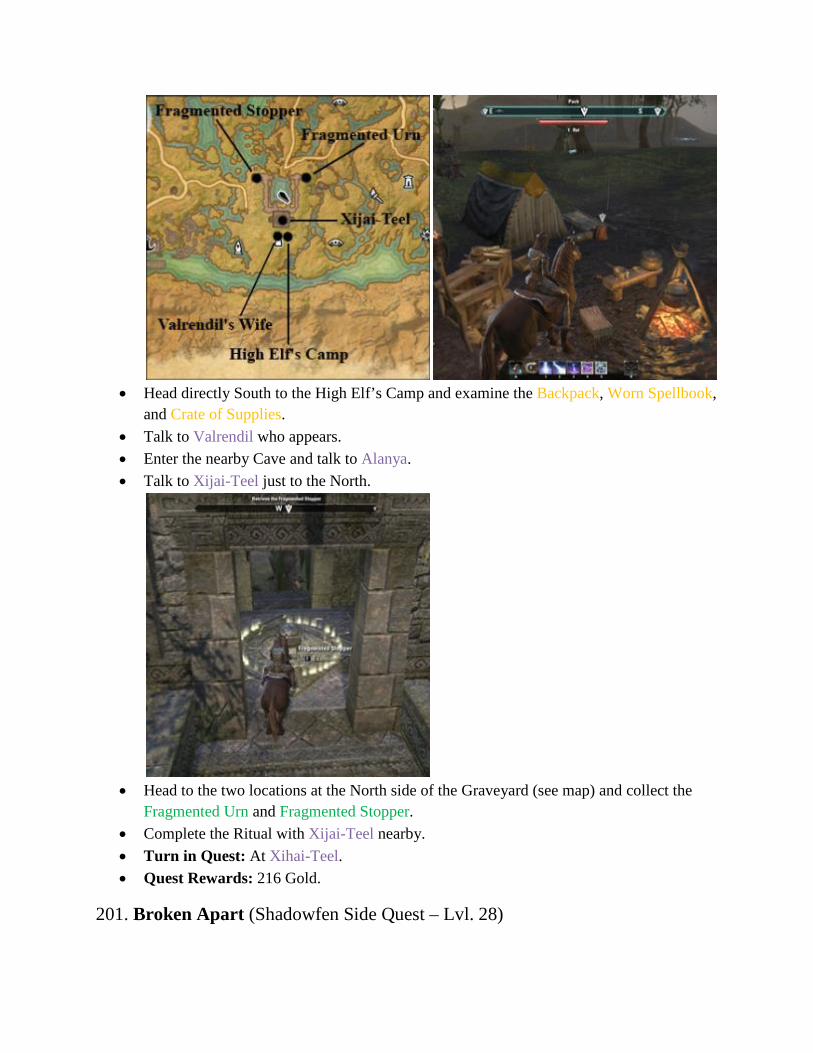
• Head directly South to the High Elf’s Camp and examine the Backpack, Worn Spellbook,
and Crate of Supplies. • Talk to Valrendil who appears. • Enter the nearby Cave and talk to Alanya. • Talk to Xijai-Teel just to the North.
• Head to the two locations at the North side of the Graveyard (see map) and collect the
Fragmented Urn and Fragmented Stopper. • Complete the Ritual with Xijai-Teel nearby. • Turn in Quest: At Xihai-Teel. • Quest Rewards: 216 Gold.
201. Broken Apart (Shadowfen Side Quest – Lvl. 28)

• Pickup Quest: Given by Xihai-Teel upon handing in the previous quest. • Head back to Valrendil’s Camp to the South. • Talk to Valrendil and play nice.
• Head inside the Cave and defeat the Wispmother, then use the Blessed Vessel on her
Remains. • Talk to Valrendil outside. • Turn in Quest: At Valrendil. • Quest Rewards: Wispcutter (One-Handed Axe, 61 Damage, On Hit: 17 Frost Damage,
Reduces the Cooldown of Weapon Enchantments by 35%, Lvl. 28), 216 Gold. • Head back to the Graveyard and talk to Bezeer if you haven’t already. • You should be level 32 now.
202.1. A Final Release (Shadowfen Side Quest – Lvl. 30)
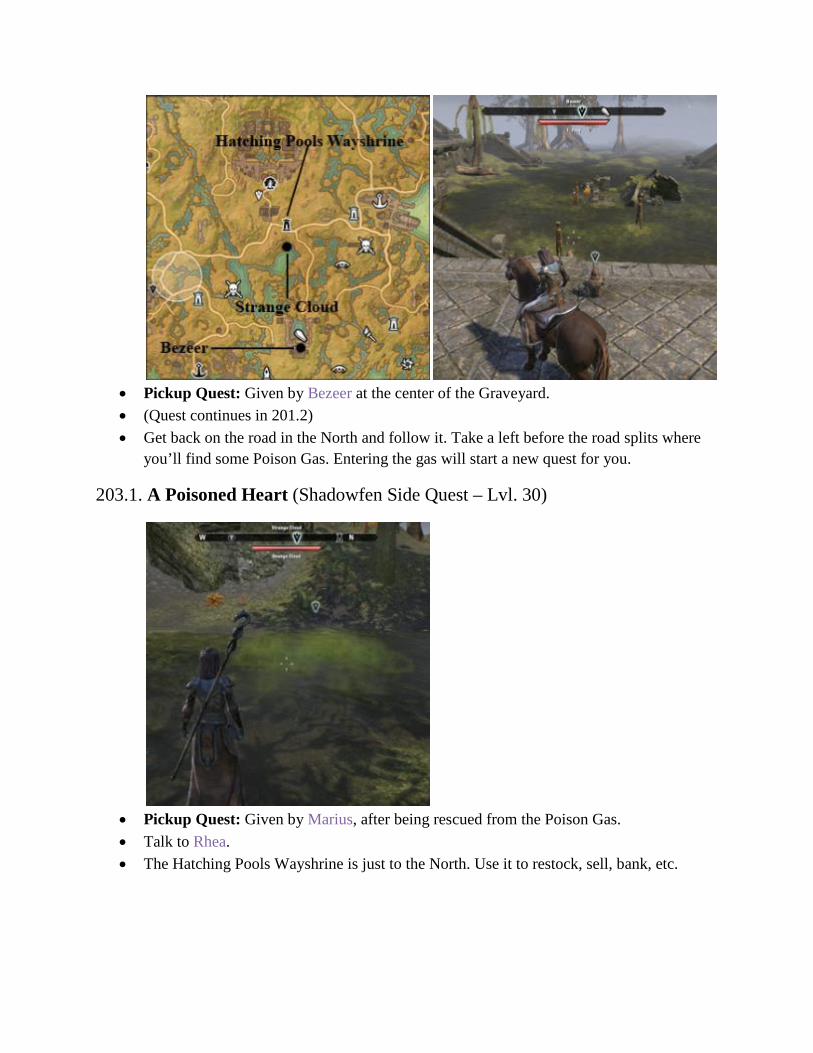
• Pickup Quest: Given by Bezeer at the center of the Graveyard. • (Quest continues in 201.2) • Get back on the road in the North and follow it. Take a left before the road splits where
you’ll find some Poison Gas. Entering the gas will start a new quest for you.
203.1. A Poisoned Heart (Shadowfen Side Quest – Lvl. 30)
• Pickup Quest: Given by Marius, after being rescued from the Poison Gas. • Talk to Rhea. • The Hatching Pools Wayshrine is just to the North. Use it to restock, sell, bank, etc.

• Kill Wasps at the Hatching Pools while working on the quests below for the Wasp Husk. • (Quest continues in 202.2) • Head to Vicecannon Servyna just South of the Hatching Pools.
185.2. Cracking the Egg (Shadowfen Side Quest – Lvl. 26)
• Talk to Vicecannon Servyna just South of the Hatching Pools. • Turn in Quest: At Vicecannon Servyna. • Quest Rewards: 52 Gold.
204.1. Keepers of the Shell (Shadowfen Side Quest – Lvl. 28)
• Pickup Quest: Given by Vicecannon Servyna upon handing in the previous quest. • Take the Keeper’s Garbs from the Chest next to the Vicecannon and wear them.

• Follow the road North to Keeper Uxith-Ei. Talk to him. • Light the Xanmeer [2] and then talk to Assistant Telixith in the Northern section of the
Compound as indicated on the map. • Kill Fimrimion, right next to the Assistant. • Head back to Keeper Uxith-Ei and watch the scene. Then talk to him again. • Head to the Center of the Hatching Pools and Gather the Argonian Eggs. • Head back to Keeper Uxith-Ei location where you’ll now find Assistant Telixith. Speak
with him. • (Quest continues in 203.2) • Head to the Southwest part of the Hatching Pools where you’ll find a Strange Device that
starts the next quest.
205. Outside Interference (Shadowfen Side Quest – Lvl. 28)

• Pickup Quest: Given when examining the Strange Device in the Southwest part of the
Hatching Pools. • Examine the Instructions. • Any of the Dominion mobs will drop the Hist Sap you need.
• Kill Wasps and collect Giant Wasp Larvae [3] from Wasp Nests or from Giant Wasps. • Test the Poultice on any of the Jungle Plants. • Talk to the Keeper at the center of the Hatching Pools. • Turn in Quest: At Keeper. • Quest Rewards: Hatching’s Keepsake Torc (Neck, Magicka Recovery +6, Max Magicka
+35, Lvl. 28), 216 Gold. • Leave the Hatching Pools in Southern direction where you’ll meet up with Vicecannon
Servyna.
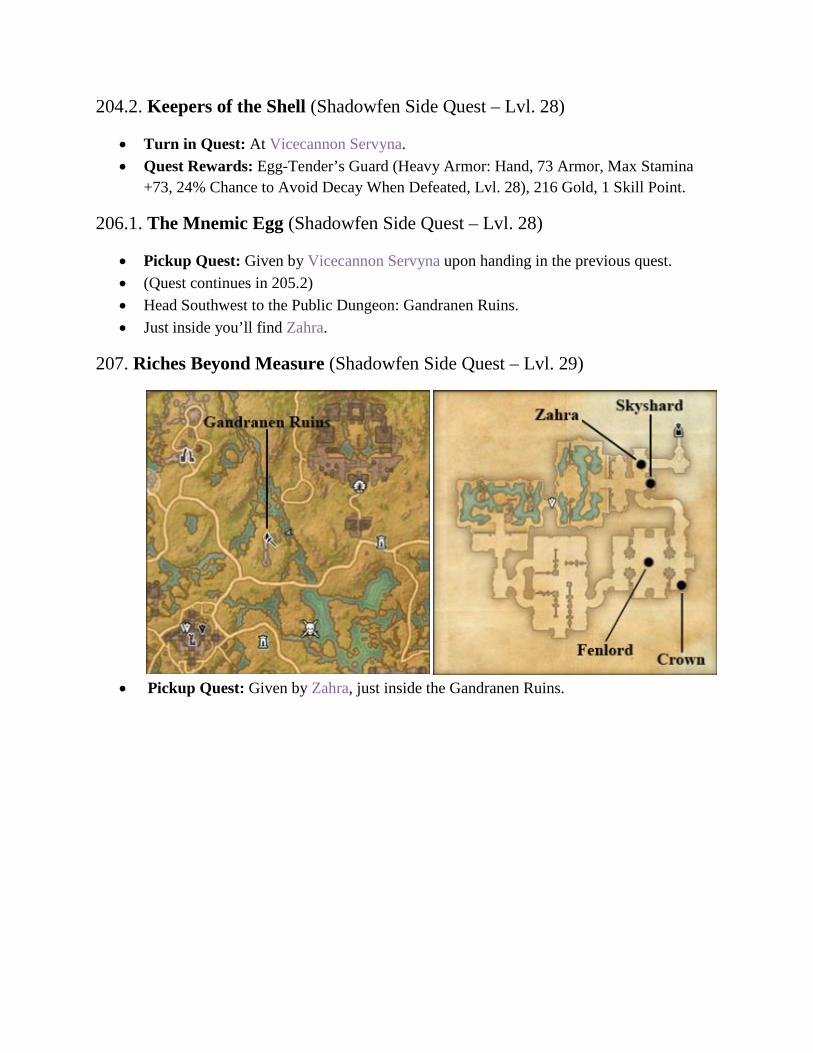
204.2. Keepers of the Shell (Shadowfen Side Quest – Lvl. 28)
• Turn in Quest: At Vicecannon Servyna. • Quest Rewards: Egg-Tender’s Guard (Heavy Armor: Hand, 73 Armor, Max Stamina
+73, 24% Chance to Avoid Decay When Defeated, Lvl. 28), 216 Gold, 1 Skill Point.
206.1. The Mnemic Egg (Shadowfen Side Quest – Lvl. 28)
• Pickup Quest: Given by Vicecannon Servyna upon handing in the previous quest. • (Quest continues in 205.2) • Head Southwest to the Public Dungeon: Gandranen Ruins. • Just inside you’ll find Zahra.
207. Riches Beyond Measure (Shadowfen Side Quest – Lvl. 29)
• Pickup Quest: Given by Zahra, just inside the Gandranen Ruins.

• Grab the Skyshard near Zahra. • Make your way through the Ruins.
• Kill the Fenlord for Dungeon Completion. • The Crown can be found in the same room. • Turn in Quest: At Zahra. • Quest Rewards: Looter’s Helm (Medium Armor: Head, 108 Armor, Max Stamina +43,
Exploration Experience Gained +7%, Lvl. 29), 216 Gold. • Leave the Dungeon and head South to Rhea. Make sure to get the Alit’s Heart from one
of the Alits in the area for Shadowfen Smorgashbord on your way if you haven’t already gotten one.
203.2. A Poisoned Heart (Shadowfen Side Quest – Lvl. 30)

• Talk to Rhea at her camp in the South, then talk to Marius. • (Quest continues in 202.3) • Follow the road from the camp to the West until you run into Silent-Moss near
Murkwater.
208. Scales of Retribution (Shadowfen Side Quest – Lvl. 30)
• Pickup Quest: Given by Silent-Moss, near Murkwater. • Free the Prisoners [3] just West of his location at the 3 locations indicated on the map. • Head South where the Shadowscales have grouped up and talk to Pale-Heart. • Head just East where you must free Villagers [3] with the help of the Shadowscales.

• Head South to Haj-Tulm’s location. • Loot the nearby Ayleid Chests until you find the Keystone. Two Skeletons will spawn
from every Chest. • Talk to Silent-Moss nearby.
• Enter the Ship to the Southwest where you must kill Khasar-dro and Velelya and retrieve
the Fire Salts. • Jump of the Ship and use the Fire Salts at the 4 locations just in front of the Ship. • Talk to Silent-Moss nearby and light the Pile of Branches next to him. • Head back to Pale-Heart. • Turn in Quest: At Pale-Heart. • Quest Rewards: Histwood Bow (Bow, 64 Damage, On Hit: 17 Disease Damage,
Weapon and Spell Critical Values +4%, Lvl. 30), 278 Gold. • You should be level 33 now.

209.1. What Happened at Murkwater (Shadowfen Side Quest – Lvl. 30)
• Pickup Quest: Given by Pale-Heart upon handing in the previous quest. • (Quest continues in 208.2) • Head North to just East of Hissmir where you’ll find Jilux.
210. Trials of the Burnished Scales (Shadowfen Side Quest – Lvl. 29)
• Pickup Quest: Given by Jilux, just East of Hissmir. • Head into Hissmir where you must talk with several NPCs for the various quests below. • Grab the Skyshard on top of the highest point in Hissmir. • Talk to Chimatei, then enter the Trial of Mind in front of her. • Pick up the Zath Stone Gems, Vial of Hist Sap, and Kothringi Axe. • Then place the Vial of Hist Sap in Jaraleet’s Chest, the Zath Stone Gems in Betzi’s Chest,
and the Kothringi Axe in Awas’s Chest. • Talk to Chimatei outside. • You must now rapidly complete a course. If you don’t do it fast enough you’ll have to
start over. Head to the first waypoint to the Southwest, then follow the road Northwest for the second one. Turn around and follow the road in Southern direction for the final waypoint.
• Talk to Nazuux where your trial ends. • Talk to Bimee-Kas to the South. • Use the Root Rot Poison and then fight one of the nearby Soldiers. • Talk to Bimee-Kas again. • Turn in Quest: At Bimee-Kas. • Quest Rewards: Cuirass of the Fang (Heavy Armor: Chest, 150 Armor, Max Health
+64, Increases Mundus Stone Effects by 5%, Lvl. 29) 273 Gold.

211. Dreams From the Hist (Shadowfen Side Quest – Lvl. 29)
• Pickup Quest: Given by Bimee-Kas upon handing in the previous quest. • Drink the Hist Sap besides Bimee-Kas. • Head slightly West and talk to Jaraleet. • Talk to Betzi further West and activate the Zaht Stone. • Head slightly North and activate the Zaht Stone near Awas. • Talk to Bimee-Kas.
• Head back North to Hissmir and talk to Kamax-Ei on top of the highest summit there.
• Head Northwest to the Ruins where Captain Henaamo can be found. Confront him. • Loot the Chest and grab the Hist Amber. • Leave the Ruins and head back to Hissmir. • Activate the Zath Stones on the four corners of Hissmir (North, East, South, and West).

• Talk to Kamax-Ei on top of the highest summit. • Turn in Quest: At Kamax-Ei. • Quest Rewards: Draws-the-sap Dagger (Dagger, 62 Damage, Reduces Target’s Power
by 9 for 5 Seconds, Increases Weapon Enchantment Effect by 16%, Lvl. 29), 219 Gold.
193.2. Strength of the Father (Shadowfen Side Quest – Lvl. 27)
• Turn in Quest: At Mozgosh in Hissmir. • Quest Rewards: Chieftain’s Greaves (Heavy Armor: Legs, 125 Armor, Max Health +71,
Increases Armor Enchantment Effect by 11%, Lvl. 27), 212 Gold.
167.3. Shadowfen Smorgasbord (Shadowfen Side Quest – Lvl. 24)
• Turn in Quest: Talk to Veenaza or Angwe in Hissmir. • Quest Rewards: Belt of Elastic Girth (Light Armor: Belt, 28 Armor, Max Stamina +14,
24% to Avoid Decay When Defeated, Lvl. 24), 100 Gold.
209.2. What Happened at Murkwater (Shadowfen Side Quest – Lvl. 30)
• Turn in Quest: Talk to Azinar just Northeast of Hissmir. • Quest Rewards: 55 Gold.
212. Lost Pilgrimage (Shadowfen Side Quest – Lvl. 29)
• Pickup Quest: Given by Kiameed just North of Hissmir. • Head slightly North and examine the Pilgrims.

• Examine another slain Pilgrim even further North. • Kill the Dominion Troops up on the hill. • Head back to Kiameed just North of Hissmir. • Turn in Quest: At Kiameed. • Quest Rewards: 109 Gold.
203.3. A Poisoned Heart (Shadowfen Side Quest – Lvl. 30)
• Head to the Poison Gas location to the Northeast, and then to the one in the West, and use
the Enchanted Container at both locations. • Hand the Containers to either Rhea or Marius. • Turn in Quest: At Kiameed.

• Quest Rewards: Strap of Mist Evasion (Heavy Armor: Waist, 57 Armor, Max Stamina +18, Increases Armor Enchantment Effect by 11%, Lvl. 30), 223 Gold.
• Head Northwest to Najeepa’s location.
202.2. A Final Release (Shadowfen Side Quest – Lvl. 30)
• Talk to Najeepa’s Spirit, Southwest of Zuuk.
• Head slightly West and enter the Tower, run to the top to recover the Remains. • Bring the Remains back to Najeepa’s Spirit. • Turn in Quest: At Kiameed. • Quest Rewards: 111 Gold. • Head to the road on the East and follow it North to Zuuk until you run into Lodyna
Arethi.

213. King of Dust (Shadowfen Side Quest – Lvl. 29)
• Pickup Quest: Given by Lodyna Arethi just South of Zuuk.
• • Head North to Zuuk and free Drillk. • Talk to Drillk inside his “Palace”.

• • Collect Broken Glass [3] and a Metal Band from any of the Crates around the compound. • Forge the Crown at the Anvil nearby. • Head back to Drillk.
• Head East to obtain a Scroll of Release from a Table.

• Free the Prisoners [3] at the locations indicated on the map. Grab the Venomous Fens
Wayshrine and the Locale while at it. • Head back to Drillk, and escort him to the Tower to the North. • Turn in Quest: At Drillk. • Quest Rewards: Helm of the Last Captain (Medium Armor: Head, 108 Armor, Max
Magicka +43, Exploration Experience Gained +7%, Lvl. 29) 273 Gold. • You should be level 34 now.
214.1. Into the Temple (Shadowfen Side Quest – Lvl. 29)
• Pickup Quest: Given by Drillk upon handing in the previous quest. • Enter the Temple of Sul just to the South. • (Quest continues in 213.2) • Examine the Book that’s on the floor to start the quest Captured Time.
215.1. Captured Time (Shadowfen Side Quest – Lvl. 29)

• Pickup Quest: Given when examining the Book on the floor just inside the Temple of
Sul.
• Awaken the Pilasters [3] at the 3 locations indicated on the map. • (Quest continues in 214.2)
214.2. Into the Temple (Shadowfen Side Quest – Lvl. 29)
• Activate the Signs [4] in the last room in the following order: The Serpent, The Tower, The Thief, The Lover.
• Talk to Morilye in the next room. • Return to Drillk. • Talk to Lodyna Arethi just South of Zuuk. • Turn in Quest: At Lodyna Arethi.

• Quest Rewards: Kothringi Plate Pauldrons (Heavy Armor: Head, 131 Armor, Max Health +25, Increase Resistance to Critical Strikes by 70, Lvl. 29) 219 Gold.
• Head to White Rose Prison where you’ll be greeted by Gerent Hernik.
216. And Throw Away the Key (Shadowfen Side Quest – Lvl. 30)
• Pickup Quest: Given by Gerent Hernik when you approach White Rose Prison.
• Talk to one of the Guards at the Prison.
• Talk to General Raetus. • Head North and grab the Medical Supplies.
• Head to the Tower in the most Northern part of the Prison and grab the Skyshard. • Deliver the Medical Supplies to Jurni in that same tower. • Turn in Quest: At Jurni. • Quest Rewards: 111 Gold.
217.1. The Keystone (Shadowfen Side Quest – Lvl. 30)
• Pickup Quest: Given by Jurni upon handing in the previous quest. • Enter the nearby Prison Dungeon. • (Quest continues in 216.2)
• Talk to Erranza just inside the Dungeon.
218.1. The Ones Left Behind (Shadowfen Side Quest – Lvl. 30)

• Pickup Quest: Given by Erranza just inside the Dungeon.
• Gather the Remains [3] from Erranza and her sons from Urns as you venture deeper into
the Dungeon to work on the Keystone quest. • (Quest continues in 217.2)
217.2. The Keystone (Shadowfen Side Quest – Lvl. 30)
• Talk to Sargon. • Make the way to the end of the Prison Dungeon all the while collecting the Remains. • Talk to Sargon and choose to destroy the Keystone. When you do this you’ll be attacked
by several Ferral Prisoners. • Leave the Prison Dungeon. • (Quest continues in 216.3)
218.2. The Ones Left Behind (Shadowfen Side Quest – Lvl. 30)

• Bury the Remains near the entrance to the Prison Dungeon. • Turn in Quest: At Erranza. • Quest Rewards: Zarukhair’s Band (Ring, Stamina Recovery +7, Max Stamina +37, Lvl
30), 111 Gold.
217.3. The Keystone (Shadowfen Side Quest – Lvl. 30)
• Head back to General Raetus. • Head to Gerent Hernik at the Northeast exit of the Prison. • Turn in Quest: At Gerent Hernik. • Quest Rewards: Warden’s Gauntlets (Heavy Armor: Hand, 77 Armor, Max Stamina
+17, Reduces the Cost of Sprinting by 2%, Lvl. 30) 278 Gold. • It’s time to head inside another Group Dungeon just Southwest of the White Rose Prison
called Arx Corinium. Find or start a group by using zone chat. If you don’t find a group right away feel free to continue questing until you do.
219. Force of Nature (Shadowfen Side Quest – Lvl. 30)
• Pickup Quest: This quest is given by the Sister of Floods inside the Group Dungeon called Arx Corinium.
• Complete the Dungeon by killing all the bosses and then hand in the quest before you leave.
• Turn in Quest: At Sister of Floods. • Quest Rewards: Boon of the Three Sisters (Light Armor: Head, 76 Armor, Max
Magicka +50, Increases Armor Enchantment Effect by 14%, Lvl. 28), 432 Gold, and 1 Skill Point.
• You should be level 35 now.

• Head back to the road and follow it South to Loriasel until you run into Gerent Nuleem-Malem.
215.2. Captured Time (Shadowfen Side Quest – Lvl. 29)
• Turn in Quest: At Gerent Nuleem-Malem. • Quest Rewards: 54 Gold.
220. The Dominion’s Alchemist (Shadowfen Side Quest – Lvl. 31)
• Pickup Quest: Given by Gerent Nuleem-Malem upon handing in the previous quest. • Talk to Vicecannon Heita-Meen Northwest of Loriasel.
• Examine Ruuvitar’s Journal, the dead Prisoner, and the Letter at the nearby camp. • Talk to Gerent Kepanuu.

• Enter the nearby Ruins.
• Talk to Kazdi 3 times in the first room. • Use the Ayleid Crystal next to him. • Talk to Vicecanon Heita-Meen,
• Use your Keystone at the Keystone Holder. • Turn in Quest: At Vicecannon Heita-Meen. • Quest Rewards: 283 Gold.
221. The Dream of the Hist (Shadowfen Side Quest – Lvl. 31)
• Pickup Quest: Given by Vicecannon Heita-Meen upon handing in the previous quest. • Enter the next room where you must place the Keystone in the Holder, then kill Ruuvitar. • Help get the Mnemic Egg in the Northern part of the room.

• For the Fumes Puzzle you must first deactivate the corner plums, and then the one in the middle.
• Talk to the Hist Brothers [3] and the Voice of the Hist at the other end of the compound. • Talk to Vicecanon Heita-Meen. • Turn in Quest: At Vicecannon Heita-Meen. • Quest Rewards: Chain of Hist’s Power (Neck, Magcka Recovery +7, Max Magicka +38,
Lvl. 31), 283 Gold, and 1 Skill Point.
222.1. Swamp to Snow (Eastmarch Side Quest – Lvl. 31)
• Pickup Quest: Given by Vicecannon Heita-Meen upon handing in the previous quest. • (Quest continues in 222.2)
• Fast Travel back to Lorisael and head South to Public Dungeon: Chid-Moska Ruins.

• Enter the Dungeon and make your way to Skyshard. • Head further to the point where you must kill Rebecca Lirlane for Dungeon completion. • Fast Travel to Lorisael and head West to Xal Ithix. • You can find Mundus Stone: The Serpent to the Northwest which increases non-combat
Health Regeneration.
223.1. Deep Disturbance (Shadowfen Side Quest – Lvl. 30)
• Pickup Quest: Given by Tree-Minder Nexith, in Xal Ixith.
• Place the Ritual Potions [4] at the locations indicated on the map at Stele. • (Quest continues in 223.2) • Talk to Sleeps-with-Open-Eyes at the South-side of Stele. • Move to the center of the compound where you’ll find Tree-Minder Nexith.

224. Missing in the Mire (Shadowfen Side Quest – Lvl. 30)
• Pickup Quest: Given by Sleeps-with-Open-Eyes, in Stele.
• Free Scavengers [3] from Stranglers around Stele. • Talk to Sleeps-with-Open-Eyes.
• Search the nearby Trash Piles until you find Nimble-Knuckle’s Bow. • Talk to Nimble-Knuckles at Stele. • Turn in Quest: At Nimble-Knuckles. • Quest Rewards: Upstream Belt (Heavy Armor: Waist, 57 Armor, Max Stamina +17,
Exploration Experience Gained +7%, Lvl. 30), 111 Gold.
223.2. Deep Disturbance (Shadowfen Side Quest – Lvl. 30)
• Talk to Tree-Minder Nexith, atop Stele.

• Head to the Hist Tree just to the West. • Search for the Buried Artifact near the tree. • Talk to Aspect of Namira. • Make your way to the Cave entrance and then head all the way up the path. • Talk to Aspect of Namira, again, and help stop the Ritual.
• Talk to Tree-Minder Nexith nearby. • Turn in Quest: At Tree-Minder Nexith. • Quest Rewards: Greaves of Corruption’s End (Heavy Armor: Legs, 141 Armor, Max
Health +64, Increases this Items Armor Value by 5%, Lvl. 30), 278 Gold. • Grab the Skyshard right next to the Tree-Minder.
215.2. Captured Time (Shadowfen Side Quest – Lvl. 29)

• Turn in Quest: Fast Travel to the Hissmir Wayshrine and talk to Neeja-Meen. • Quest Rewards: 109 Gold. • Talk to Bera Moorsmith who approaches you in Hissmir. • You have now completed all quests and locales in Shadowfen. Here’s a screenshot with
all locations.
• Head to the Harborage.
225. Valley of Blades (Main Story Quest – Lvl. 35)
• Pickup Quest: Given by Varen Aquilarios, upon turning level 35. • Head to the Harborage and talk to Sai Sahan. • Enter the Portal to Valley of Blades. • Talk to Sai Sahan again.
• Make your way to Kasura in the South. • Kill the Cultists [3] at the locations indicated on the map and destroy the Sigil Stones [3]
they protect.
• Kill Titan. • Talk to Kasura. • Enter the Crypt to the East. • Talk to Sai Sahan.
• Take the Ring from the Chest. • Talk to Kasura. • Kill the Elite Soldiers [7] that are being summoned. • Talk to Sai Sahan. • Head back to the Harborage and talk to Varen. • Turn in Quest: Ar Varen. • Quest Rewards: Sword Saint’s Choker (+9 Stamina Recovery. Max Stamina +44, Lvl.
35), 486 Gold, and 1 Skill Point.
• Fast Travel to Alten Corimont in Shadowfen, and then head to the docks where you must
speak with the Boatmaster.
Eastmarch Quests
222.2. Swamp to Snow (Eastmarch Side Quest – Lvl. 31)
• Speak with the Boatmaster and head to Eastmarch. • Once you arrive you should talk to Vicecanon Heita-Meen. • Turn in Quest: Ar Vicecanon Heita-Meen, in Windhelm. • Quest Rewards: 56 Gold. • Windhelm is a large city that has a Bank, all crafting stations, stables etc. • Talk to Murilam Dalen at the docks.
226.1. Shadows over Windhelm (Eastmarch Side Quest – Lvl. 33)
• Pickup Quest: Given by Murilam Dalen, in Windhelm. • (Quest continues in 227.2) • Head to the Mage’s Guild.
169.2. Chateau of the Ravenous Rodent (Mage’s Guild Quest – Lvl. 33)
• Talk to Valaste. • Enter the Portal to the Shivering Isles. • Talk to Shalidor.
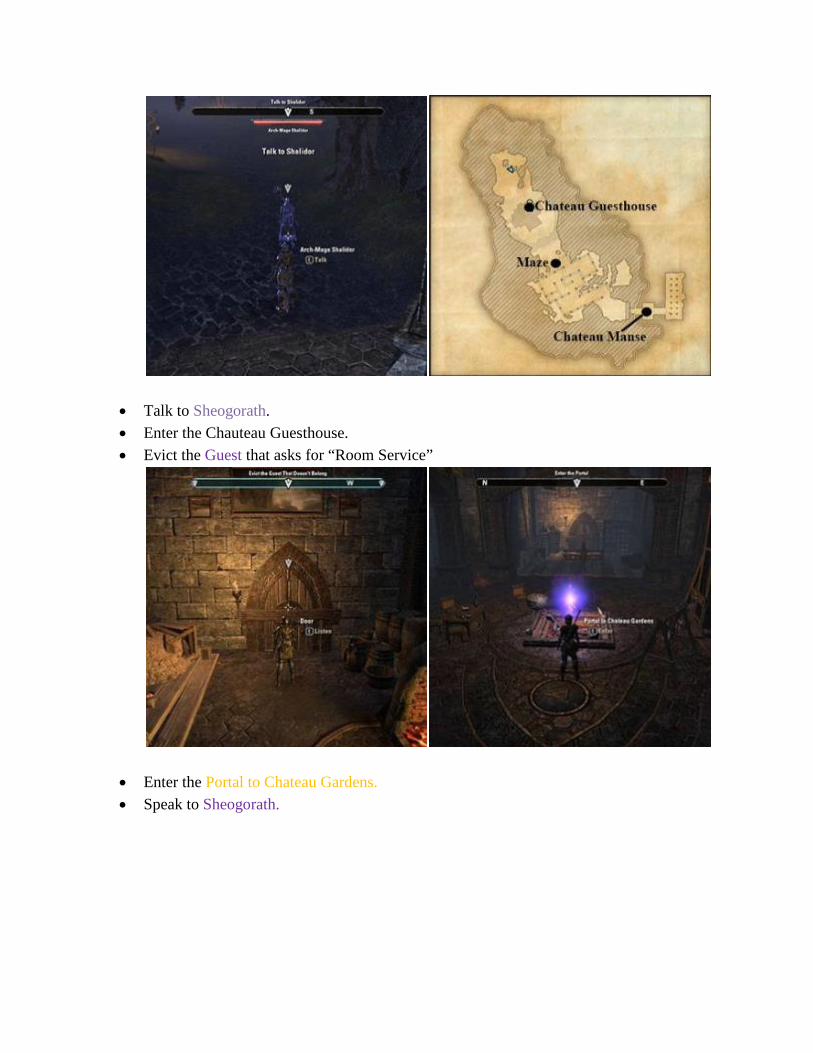
• Talk to Sheogorath. • Enter the Chauteau Guesthouse. • Evict the Guest that asks for “Room Service”
• Enter the Portal to Chateau Gardens. • Speak to Sheogorath.

• Navigate the Maze and light the Cold Braziers [4]. • Exit the Maze. • Speak to Sheogorath. • Head to the Chateau Manse.
• Channel all the Crystals [4].

• (Note: Channeling a crystal will either turn on or off another crystal adjacent to it – you should activate the 2 outer ones only.)
• Speak to Sheogorath. • Enter the Master Bedroom.
• Kill Uncle Leo. • Speak to Sheogorath. • Take A Gift of Sanctuary.

• Turn-in Quest: Speak to Valaste. • Quest Reward: Uncle Leo’s Choker (Neck, Reduce Stamina cost of abilities by 11, +41
Max Magicka, Lvl. 33), and 470 gold. • You should now be level 36. • Talk to Archmage Shalidor outside the Mage’s Guild.
227.1. The Mad God’s Bargain (Mage’s Guild Quest – Lvl. 43)
• Pickup Quest: Given by Archmage Shalidor. • (Quest continues in 228.2) • Talk to Rigurt the Brash in front of the Mage’s Guild.
228.1. Party Planning (Eastmarch Side Quest – Lvl. 33)
• Pickup Quest: Given by Rigurt the Brash in front of the Mage’s Guild. • (Quest continues in 229.2) • Head to the Public Dungeon: Halls of the Dead, which is located in Windhelm. You
might need help for this one depending on your class and spec. If you can’t find a party right away, feel free to continue with the quests below.
229.1. On a Dare (Eastmarch Side Quest – Lvl. 31)
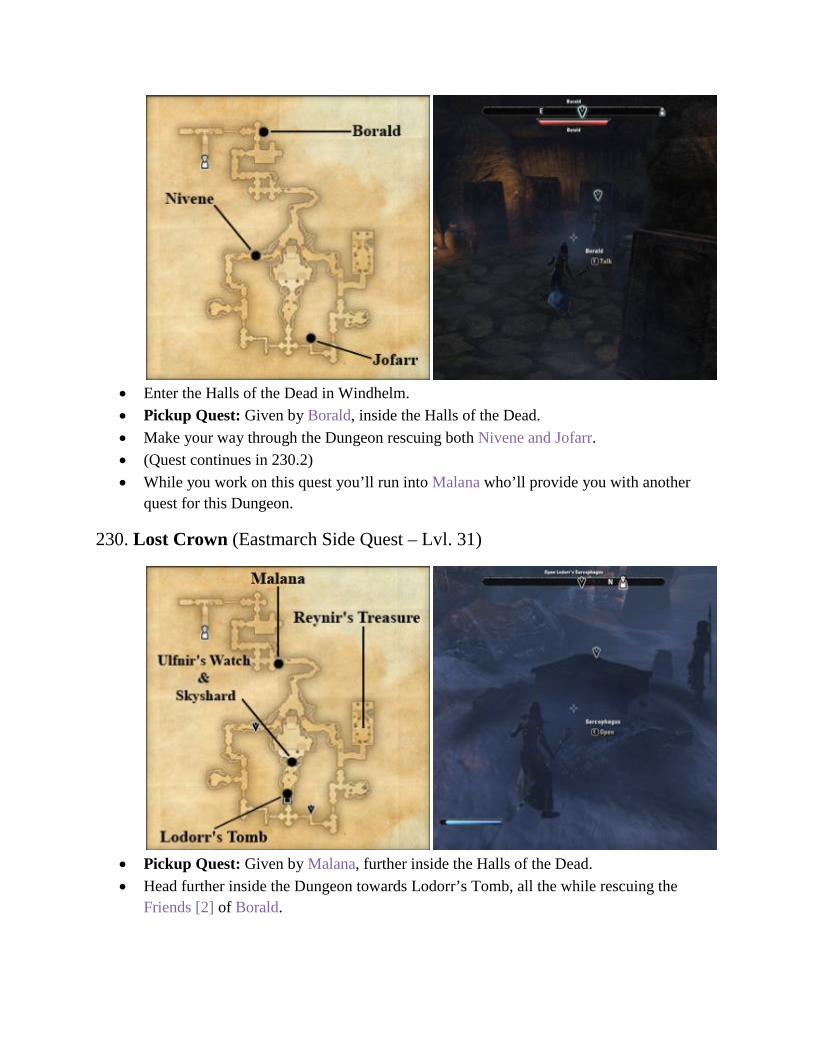
• Enter the Halls of the Dead in Windhelm. • Pickup Quest: Given by Borald, inside the Halls of the Dead. • Make your way through the Dungeon rescuing both Nivene and Jofarr. • (Quest continues in 230.2) • While you work on this quest you’ll run into Malana who’ll provide you with another
quest for this Dungeon.
230. Lost Crown (Eastmarch Side Quest – Lvl. 31)
• Pickup Quest: Given by Malana, further inside the Halls of the Dead. • Head further inside the Dungeon towards Lodorr’s Tomb, all the while rescuing the
Friends [2] of Borald.

• Open the Sarcophagus in the Tomb and then kill Lodorr. • Enter Ulfnir’s Watch and kill Ulfnir. Retrieve the Crown. • Grab the Skyshard.
• Had to the Easter part of the Halls of the Dead where you’ll find Reynir’s Treasure. It’s
not a quest but completing this trial will give you a Skill Point! You’ll first have to face some minions before killing Reynir. If you didn’t have an accomplish already, it’s likely you’ll need one now.
• Head further down the Halls and return both quests. • Turn-in Quest: Speak to Lodorr. • Quest Reward: Lodorr’s Crown, 283 gold.
229.2. On a Dare (Eastmarch Side Quest – Lvl. 31)

• Turn in Quest: At Jofarr. • Quest Rewards: 283 Gold. • Fast Travel out of the Dungeon to the Windhelm Wayshrine. • Head to Thane Mera Stormcloack.
226.2. Shadows over Windhelm (Eastmarch Side Quest – Lvl. 33)
• Talk to Thane Mera Stormcloack. • Head to the Cold Moon Inn in the Southern part of Windhelm.
• Find Evidence upstairs in the form of Leimaer the Raven’s Journal. • Gather the Caches [4] from the 4 locations as indicated on the map. Start with the South
ones then head West and Northwest. Grab the Cultural Garbs for the next quest when you’re done.

• (Quest continues in 227.3)
228.2. Party Planning (Eastmarch Side Quest – Lvl. 33)
• Take the Cultural Garb from Del Seleth or the Haystack in the Northwest of Windhelm. • (Quest continues in 229.3) • Head back to Thane Mera Stormcloack.
226.3. Shadows over Windhelm (Eastmarch Side Quest – Lvl. 33)
• Talk to Thane Mera Stormcloack. • Turn in Quest: At Thane Mera Stormcloack. • Quest Rewards: 235 Gold.
231. The Konunleikar (Eastmarch Side Quest – Lvl. 33)
• Pickup Quest: Given by Thane Mera Stormcloack automatically when completing the previous quest.

• Head to the most Western part of Windhelm and talk to Lenning the Hawk. • Start the Fire and run along the wall of Windhelm to win the race. Help Hadring the Swift
on your way. • Talk to Lenning the Hawk. • Talk to Thane Mera Stormcloack. • Turn in Quest: At Thane Mera Stormcloack. • Quest Rewards: 293 Gold.
232.1. Winhelm’s Champion (Eastmarch Side Quest – Lvl. 33)
• Pickup Quest: Given by Thane Mera Stormcloack automatically when completing the previous quest.
• (Quest continues in 233.2) • Leave Windhelm in Southern direction where you’ll find Jorygg Breakdawn.
233.1. Giant Problems (Eastmarch Side Quest – Lvl. 32)
• Pickup Quest: Given by Jorygg Breakdawn just South of Windhelm. • (Quest continues in 234.2)
232.2. Windhelm’s Champion (Eastmarch Side Quest – Lvl. 33)

• Head slightly further South of Windhelm and kill Stormstriker mobs until you find the
Stormfist Brigade Emblem.
• Take the Assasin’s Order from the Table. • (Quest continues in 233.2) • Go get the Pickled Fish just Southeast of Windhelm.
228.3. Party Planning (Eastmarch Side Quest – Lvl. 33)

• Take the Pickled Fish from Addald Cold-Eye just Southeast of Windhelm. • (Quest continues in 229.4) • Talk to Hanmaer Furmender nearby.
234.1. Collector of Pelts (Eastmarch Side Quest – Lvl. 32)
• Pickup Quest: Given by Hanmaer Furmender.
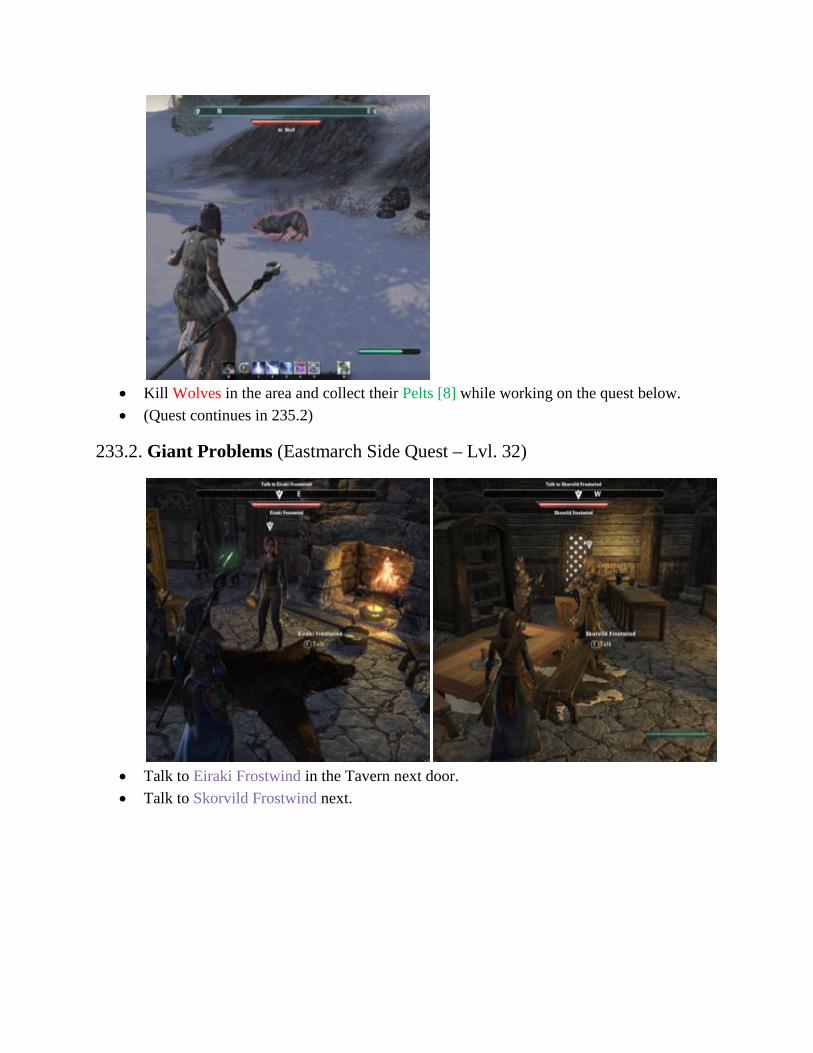
• Kill Wolves in the area and collect their Pelts [8] while working on the quest below. • (Quest continues in 235.2)
233.2. Giant Problems (Eastmarch Side Quest – Lvl. 32)
• Talk to Eiraki Frostwind in the Tavern next door. • Talk to Skorvild Frostwind next.
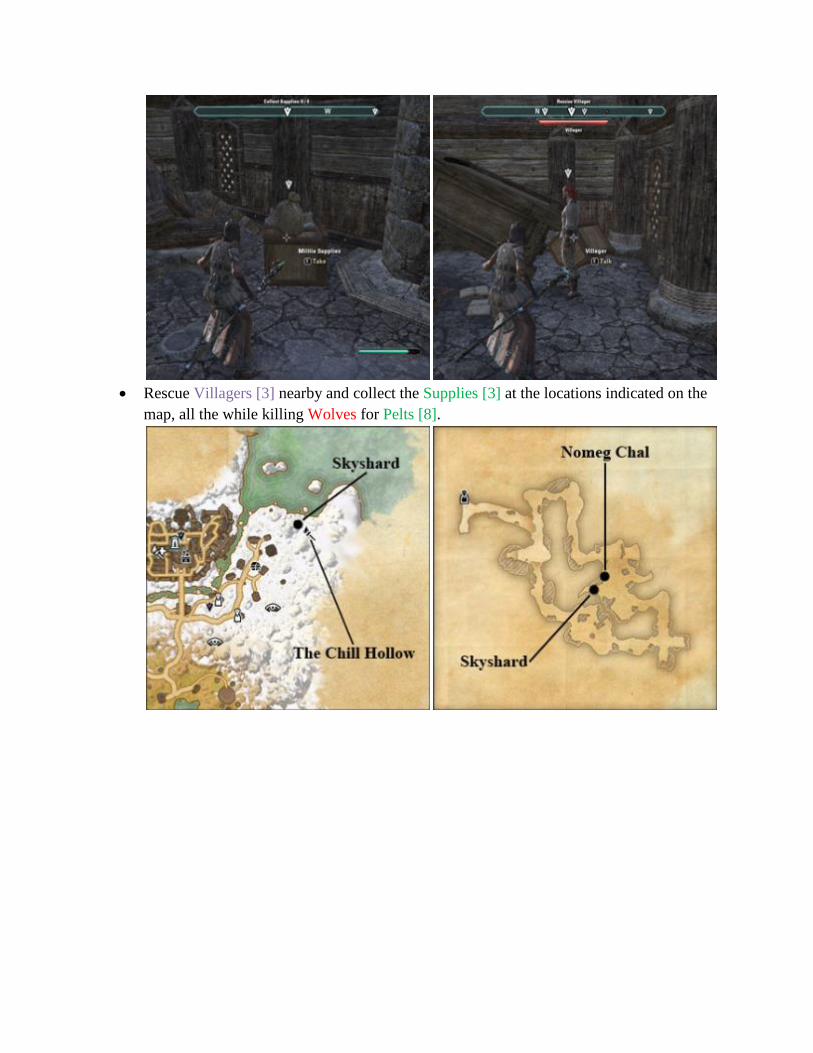
• Rescue Villagers [3] nearby and collect the Supplies [3] at the locations indicated on the
map, all the while killing Wolves for Pelts [8].
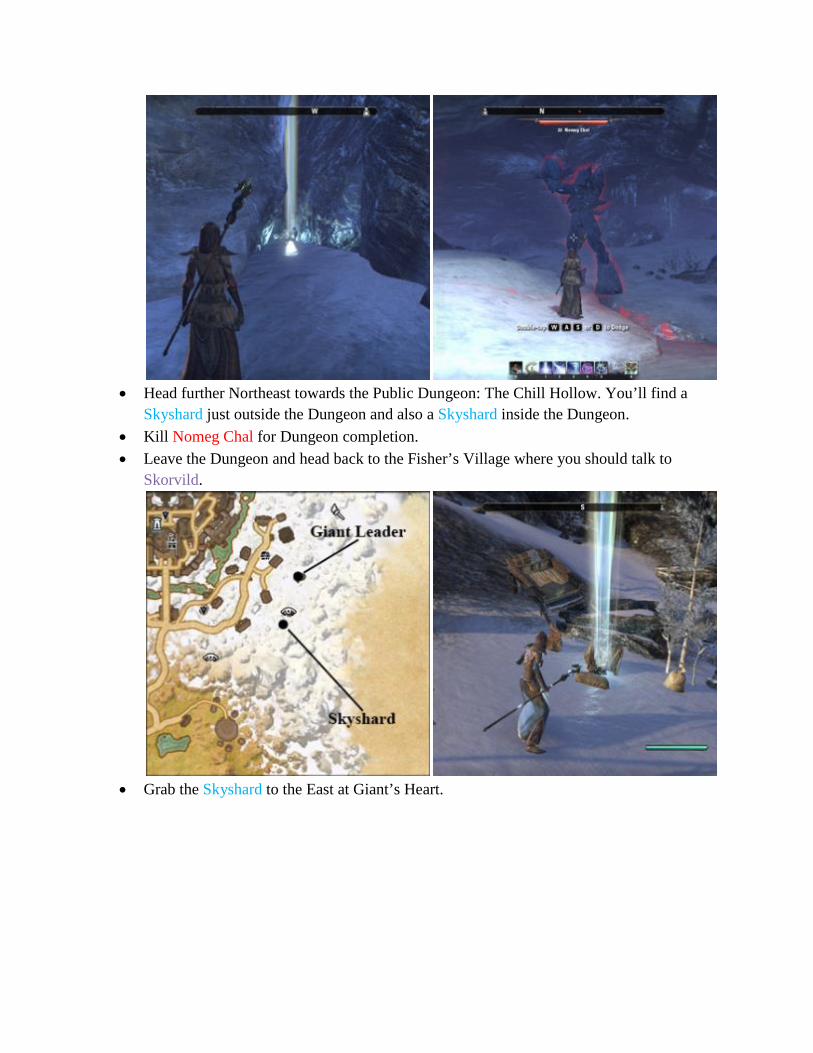
• Head further Northeast towards the Public Dungeon: The Chill Hollow. You’ll find a
Skyshard just outside the Dungeon and also a Skyshard inside the Dungeon. • Kill Nomeg Chal for Dungeon completion. • Leave the Dungeon and head back to the Fisher’s Village where you should talk to
Skorvild.
• Grab the Skyshard to the East at Giant’s Heart.

• Kill the Giant Leader “Crush” slightly North of there. • Talk to Skorvild who’ll appear next to you. • Turn in Quest: At Skorvild. • Quest Rewards: Frostwind Axe (One-Handed Axe, 68 Damage, On Hit: 20 Frost
Damage, Enchantment Charges +19%, Lvl. 32), 288 Gold. • Talk to Hanmaer Furmender on your way back to Windhelm.
234.2. Collector of Pelts (Eastmarch Side Quest – Lvl. 32)
• Turn in Quest: At Hanmaer Furmender. • Quest Rewards: Wolf Pelt Mantle (Medium Armor: Shoulders, Max Stamina +19.
Sprinting Cost -2%, Lvl. 32), 57 Gold. • Head back to Windhelm.
232.3. Windhelm’s Champion (Eastmarch Side Quest – Lvl. 33)
• Head back to Thane Mera Stormcloack. • Turn in Quest: At Thane Mera Stormcloack. • Quest Rewards: 117 Gold.
235. One Victor, One King (Eastmarch Side Quest – Lvl. 33)
• Pickup Quest: Given by Thane Mera Stormcloack upon handing in the previous quest.

• Enter the Halls of Trials in the most Eastern section of Windhelm. • Defeat the Stormstriker Clan. • Talk to Jorunn the Skald-King. • Talk to Thane Mera Stormcloack. • Turn in Quest: At Thane Mera Stormcloack. • Quest Rewards: Thane Watch (Shield, 99 Armor, Max Health +73, 24% Chance to
Avoid Decay When Defeated, Lvl. 33), 117 Gold, and 1 Skill Point. • You should be level 37 now.
236.1. Sounds of Alarm (Eastmarch Side Quest – Lvl. 33)
• Pickup Quest: Given by Thane Mera Stormcloack upon handing in the previous quest. • (Quest continues in 237.2) • Leave Windhelm and head in Western direction towards Voljar’s Meadery
237.1. A Friend in Mead (Eastmarch Side Quest – Lvl. 32)

• Pickup Quest: Given by Haraldar Snowpeak at Voljar’s Meadery. • Enter Voljar’s Farmhouse behind Haralder and take the Mead for the quest Party
Planning, by speaking to Jafrera Snowpeak. • Enter the nearby Meadery.
• Take the Fragrant Herbs at the bottom floor. • Take the Mead Recipe Book upstairs. • Enter the Storeroom and grab the Rare Spices. • Talk to Haraldar Snowpeak inside the Meadery.

• Talk to Roruld Snowpeak at the bottom floor of the Meadery. • Roruld Snowpeak inside the Meadery. • Leave the Meadery and talk to Yraldar Snowpeak.
238.1. A Brother’s Revenge (Eastmarch Side Quest – Lvl. 32)
• Pickup Quest: Given by Yraldar Snowpeak at Voljar’s Meadery.

• Kill Kozak just to the North. • (Quest continues in 239.2) • Head slightly Southeast towards the Beehives.
237.2. A Friend in Mead (Eastmarch Side Quest – Lvl. 32)
• Kick one of the Beehives and then kill Smash-Skull who appears. Loot the Giant Toe. • (Quest continues at 238.3) • Head back to Yraldar
238.2. A Brother’s Revenge (Eastmarch Side Quest – Lvl. 32)
• Turn in Quest: At Yraldar Snowpeak, after putting Kozak’s Head on a Pike.

• Quest Rewards: Voljar Meadery Trousers (Light Armor: Legs, 79 Armor, Max Stamina +49, 24% Chance to Avoid Decay When Defeated, Lvl. 32), 115 Gold.
• Head to the Meadery
237.3. A Friend in Mead (Eastmarch Side Quest – Lvl. 32)
• Talk to Roruld Snowpeak inside the Meadery.
• Head to the nearby Barn and kill Honeyripper. • Grab the Honey. • Head back to the Meadery and talk to Roruld Snowpeak. • Drink the Mead. • Talk to Haraldar Snowpeak. • Turn in Quest: At Haraldar Snowpeak. • Quest Rewards: Voljar Meadery Seal (Ring, Effect of Restoration Potions +66, Max
Magicka +39, Lvl. 32), 288 Gold. • Fast Travel from the Voljar Meadery Wayshrine to the Windhelm Wayshrine.
228.3. Party Planning (Eastmarch Side Quest – Lvl. 33)
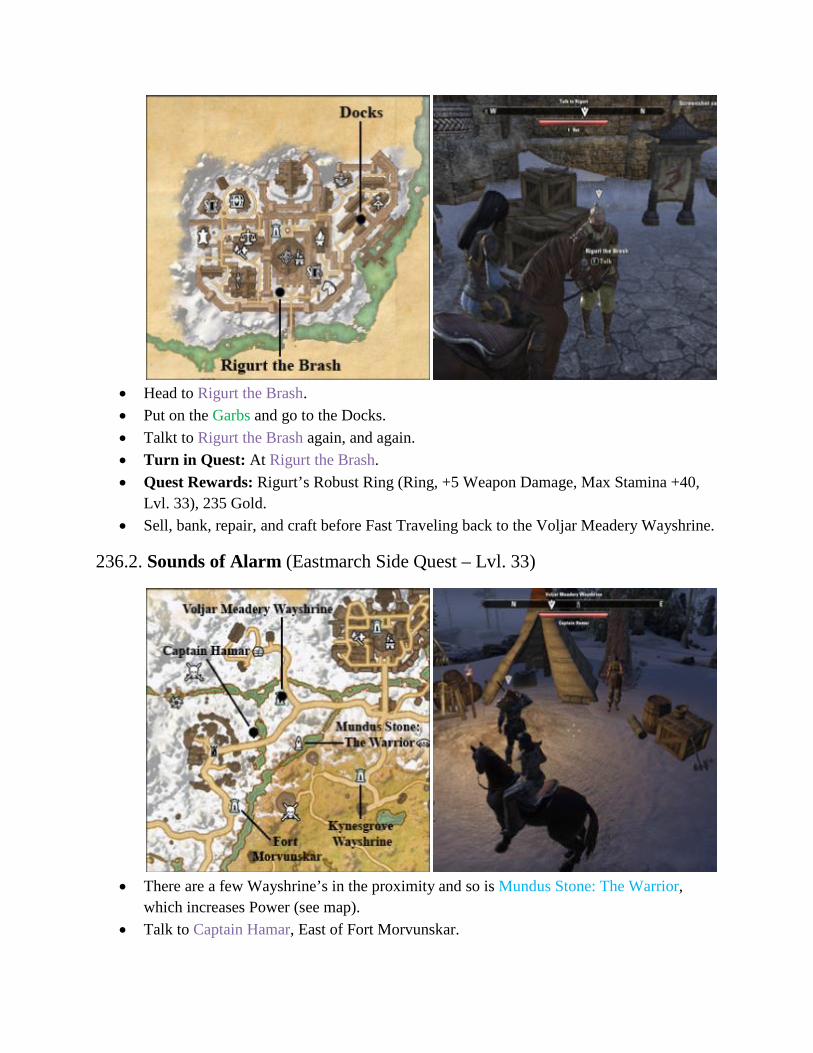
• Head to Rigurt the Brash. • Put on the Garbs and go to the Docks. • Talkt to Rigurt the Brash again, and again. • Turn in Quest: At Rigurt the Brash. • Quest Rewards: Rigurt’s Robust Ring (Ring, +5 Weapon Damage, Max Stamina +40,
Lvl. 33), 235 Gold. • Sell, bank, repair, and craft before Fast Traveling back to the Voljar Meadery Wayshrine.
236.2. Sounds of Alarm (Eastmarch Side Quest – Lvl. 33)
• There are a few Wayshrine’s in the proximity and so is Mundus Stone: The Warrior,
which increases Power (see map). • Talk to Captain Hamar, East of Fort Morvunskar.
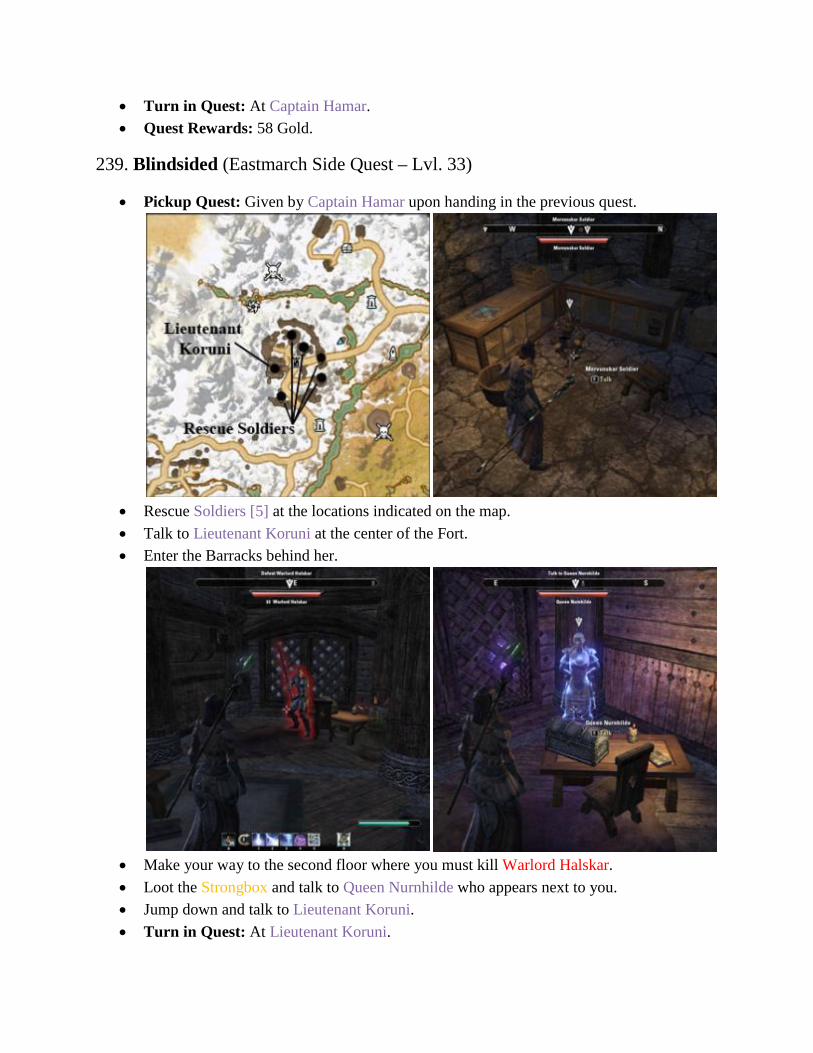
• Turn in Quest: At Captain Hamar. • Quest Rewards: 58 Gold.
239. Blindsided (Eastmarch Side Quest – Lvl. 33)
• Pickup Quest: Given by Captain Hamar upon handing in the previous quest.
• Rescue Soldiers [5] at the locations indicated on the map. • Talk to Lieutenant Koruni at the center of the Fort. • Enter the Barracks behind her.
• Make your way to the second floor where you must kill Warlord Halskar. • Loot the Strongbox and talk to Queen Nurnhilde who appears next to you. • Jump down and talk to Lieutenant Koruni. • Turn in Quest: At Lieutenant Koruni.
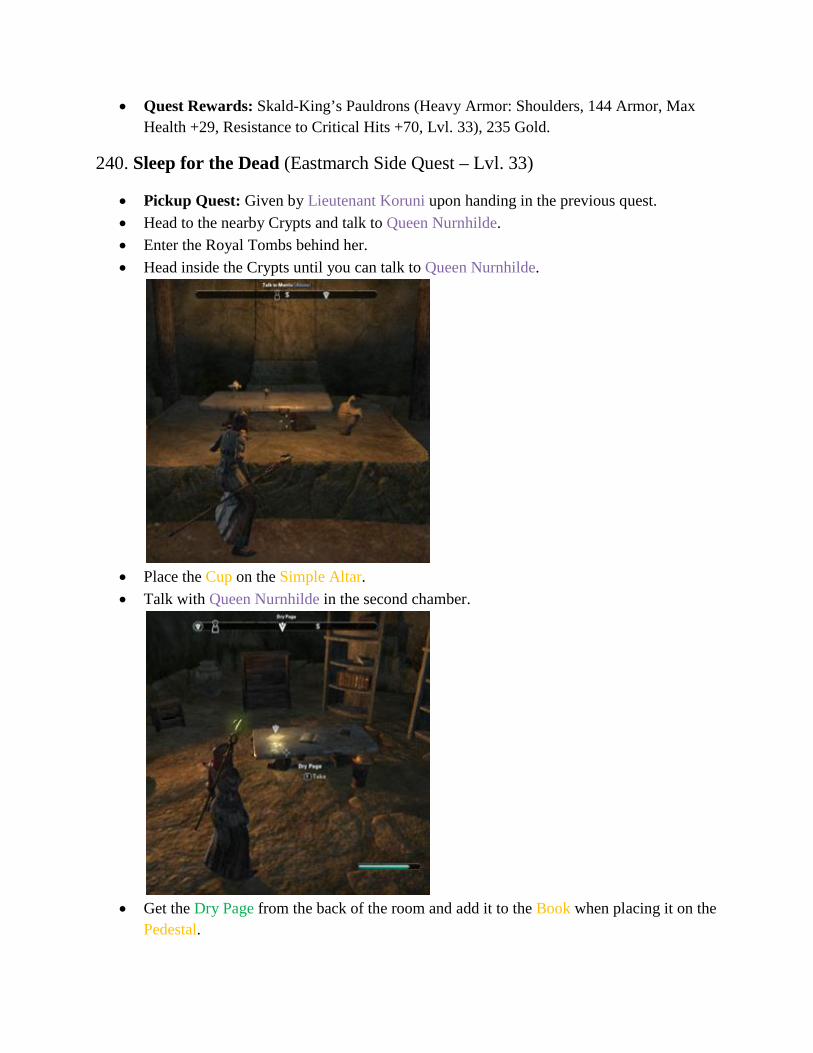
• Quest Rewards: Skald-King’s Pauldrons (Heavy Armor: Shoulders, 144 Armor, Max Health +29, Resistance to Critical Hits +70, Lvl. 33), 235 Gold.
240. Sleep for the Dead (Eastmarch Side Quest – Lvl. 33)
• Pickup Quest: Given by Lieutenant Koruni upon handing in the previous quest. • Head to the nearby Crypts and talk to Queen Nurnhilde. • Enter the Royal Tombs behind her. • Head inside the Crypts until you can talk to Queen Nurnhilde.
• Place the Cup on the Simple Altar. • Talk with Queen Nurnhilde in the second chamber.
• Get the Dry Page from the back of the room and add it to the Book when placing it on the
Pedestal.

• Talk with Queen Nurnhilde in the third chamber. • Exit the Tomb through the Tunnel.
• Kill Shukul gro-Agluk just outside.
• Grab the Skyshard. • Talk to Captain Hamar nearby. • Talk with Queen Nurnhilde. • Turn in Quest: At Queen Nurnhilde. • Quest Rewards: Burial Jewel of the Brief Queen (Neck, +330 Frost Resistance, Max
Stamina +40, Lvl. 33), 293 Gold.
241.1. Victory at Morvunskar (Eastmarch Side Quest – Lvl. 33)

• Pickup Quest: Given by Lieutenant Koruni, just next to Queen Nurnhilde where you hand in the previous quest.
• (Quest continues in 242.2) • Follow the road South and take the turn West to where the road splits. You’ll run into
Aspera Giant-Friend there.
242. Strange Allies (Eastmarch Side Quest – Lvl. 33)
• Pickup Quest: Given by Aspera Giant-Friend, Southwest of Fort Morvunskar. • Head slightly North to where you must use the Horn.
• Click on the Trees at the indicated locations so your Giant companion can smash
Stormfist Scouts out of them. Collect the Orders [4] they drop. • Talk to Aspera Giant-Friend again to the West.

• Turn in Quest: At Aspera Giant-Friend. • Quest Rewards: 235 Gold.
243. The Siege of Cradlecrush (Eastmarch Side Quest – Lvl. 33)
• Pickup Quest: Given by Aspera Giant-Friend upon handing in the previous quest.
• Poke the nearby Giant.
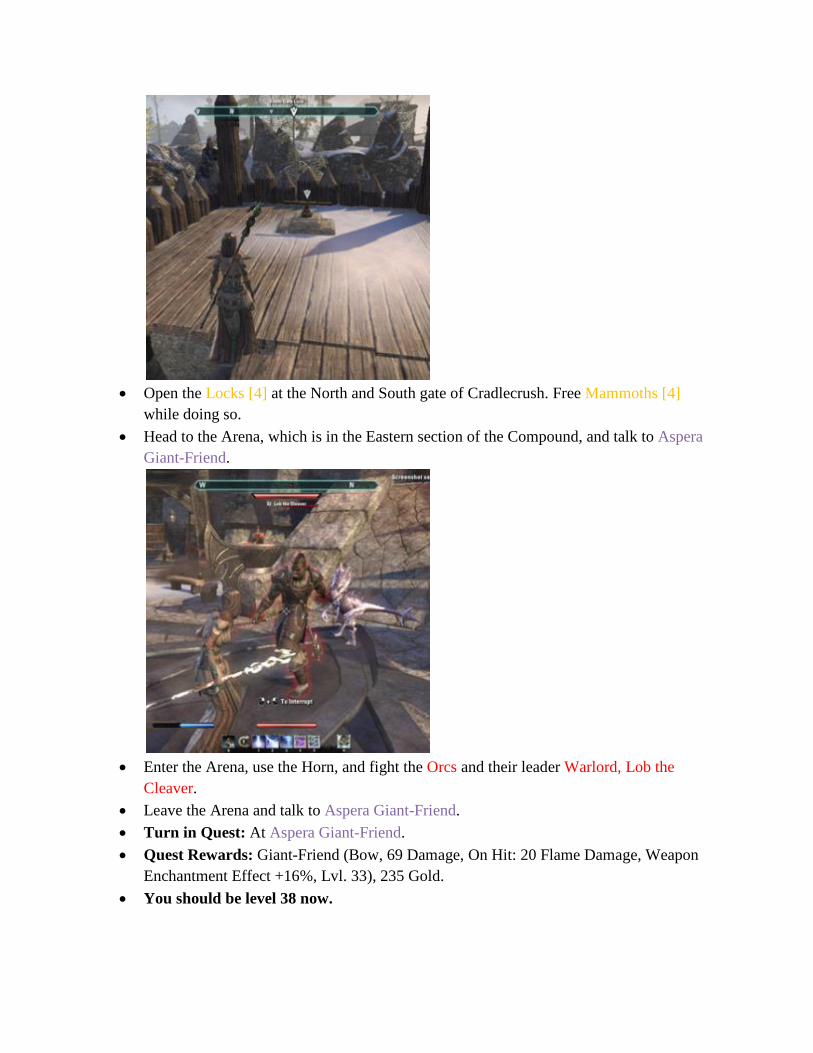
• Open the Locks [4] at the North and South gate of Cradlecrush. Free Mammoths [4]
while doing so. • Head to the Arena, which is in the Eastern section of the Compound, and talk to Aspera
Giant-Friend.
• Enter the Arena, use the Horn, and fight the Orcs and their leader Warlord, Lob the
Cleaver. • Leave the Arena and talk to Aspera Giant-Friend. • Turn in Quest: At Aspera Giant-Friend. • Quest Rewards: Giant-Friend (Bow, 69 Damage, On Hit: 20 Flame Damage, Weapon
Enchantment Effect +16%, Lvl. 33), 235 Gold. • You should be level 38 now.

• Leave Cradlecrush in Southern direction where you’ll find the Fort Amol Wayshrine.
Head into the mountains to the West towards the Public Dungeon: The Frigid Grotto. • Head to the most Northern section of the Grotto where you can grab a Skyshard. It’s
protected by Frostbite Mangler, who you need to kill for Dungeon completion anyway.
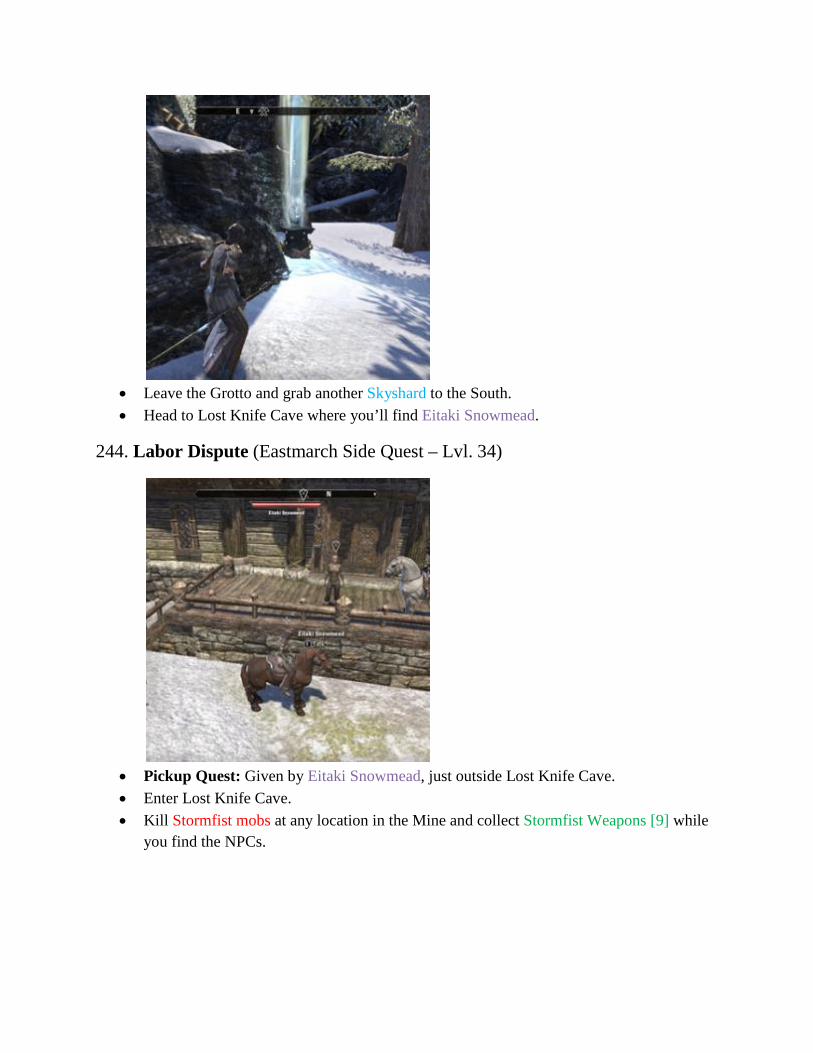
• Leave the Grotto and grab another Skyshard to the South. • Head to Lost Knife Cave where you’ll find Eitaki Snowmead.
244. Labor Dispute (Eastmarch Side Quest – Lvl. 34)
• Pickup Quest: Given by Eitaki Snowmead, just outside Lost Knife Cave. • Enter Lost Knife Cave. • Kill Stormfist mobs at any location in the Mine and collect Stormfist Weapons [9] while
you find the NPCs.

• Tridi is in the first large room.
• Nedrek is in the Eastern section of the Mine. • Talk to Jomund further North. • Turn in Quest: At Jomund. • Quest Rewards: 119 Gold.
245. Mystery Metal (Eastmarch Side Quest – Lvl. 34)
• Pickup Quest: Given by Jomund upon handing in the previous quest. • You can use a Disguise going forward but you might as well slash your way through the
Stormfist mobs for some extra XP.

• Head to the Northwest section of the Mine where you can take the Ore from the bottom
floor and can head up the stairs to get the Research Notes from an Urn. • Head through the door to the next section. • Talk to Jomund.
• Gather more Ore Samples [4] in the next room. Be wary for the Trolls and their AoE
Attack. • Exit the Mine and talk to Jomund again. • Turn in Quest: At Jomund. • Quest Rewards: Lost Knife Mining Boots (Medium Armor: Feet, 121 Armor, Max
Stamina +19, Cost of Sprinting -2%, Lvl. 34), 239 Gold.
246.1. Alchemical Analysis (Eastmarch Side Quest – Lvl. 34)

• Pickup Quest: Given by Jomund upon handing in the previous quest. • Head to Fort Amol to the East where you should now be able to continue with several
quests.
• Head to the Alchemist in the center of town. • Talk to Aleeto and get her the Varla Stone Tincture from the other side of the room. • (Quest continues in 247.2) • Leave the house and move North. On the Bridge you’ll find Commander Yjarnn.
247.1. Sleeping on the Job (Eastmarch Side Quest – Lvl. 34)
• Pickup Quest: Given by Commander Yjarnn. • (Quest continues in 248.2)
246.2. Alchemical Analysis (Eastmarch Side Quest – Lvl. 34)

• Grab Ovuld’s Study from the Island in the most Northern bit of Fort Amol. • (Quest continues in 247.3) • Just to the North is Steady-Hand.
248. Best of the Best (Eastmarch Side Quest – Lvl. 34)
• Pickup Quest: Given by Steady-Hand, in the most Northern part of Fort Amol. • Grab the Hunting Bow next to Steady-Hand. • Talk to Steady-Hand when you’re ready to do some Bunny-hunting. You must equip the
Bow and kill Bunnies [12] within one minute to complete the quest. You can retry as many times as you like so there’s no need to buy explosive arrows fro 250 Gold.
• Turn in Quest: At Steady-Hand.

• Quest Rewards: Steady-Hand’s Shot Brace (Light Armor: Waist, 35 Armor, Max Stamina +19, Cost of Sprinting -2%, Lvl. 34), 239 Gold.
• Stay on that side of the river and follow it East where you’ll find a Skyshard. • You’ll find Guard Thod right next to it.
247.2. Sleeping on the Job (Eastmarch Side Quest – Lvl. 34)
• Talk to Guard Thod. • Talk to Hloenor Chill-Owl where the Commander was previously located. • Head to the nearby Barracks and talk to Lord Vurlop in front of it. • Stand at the nearby Rocks, then follow the Commander and overhear his conversation
with Marla. • (Quest continues at 248.3) • Head back to the Alchemist.
246.3. Alchemical Analysis (Eastmarch Side Quest – Lvl. 34)
• Talk to Aleeto. • Turn in Quest: At Aleeto. • Quest Rewards: Aleeto’s Alchemy Gloves (Light Armor: Hand, 47 Armor, Max
Magicka 219, Armor Enchantment Effect +11%, Lvl. 34), 239 Gold.
247.3. Sleeping on the Job (Eastmarch Side Quest – Lvl. 34)

• Head to Marla’s House just to the North. • Read the Alchemy Report inside. • Kill Marla who appears behind you. • Talk to Hloenor Chill-Owl on the Bridge. • Turn in Quest: At Hloenor Chill-Owl. • Quest Rewards: 239 Gold.
249.1. The Pride of a Prince (Eastmarch Side Quest – Lvl. 34)
• Pickup Quest: Given by Hloenor Chill-Owl upon handing in the previous quest.
• Talk to Lord Vurlop in the Inn. • Talk to Thane Harvald to the East. • (Quest continues in 250.2)
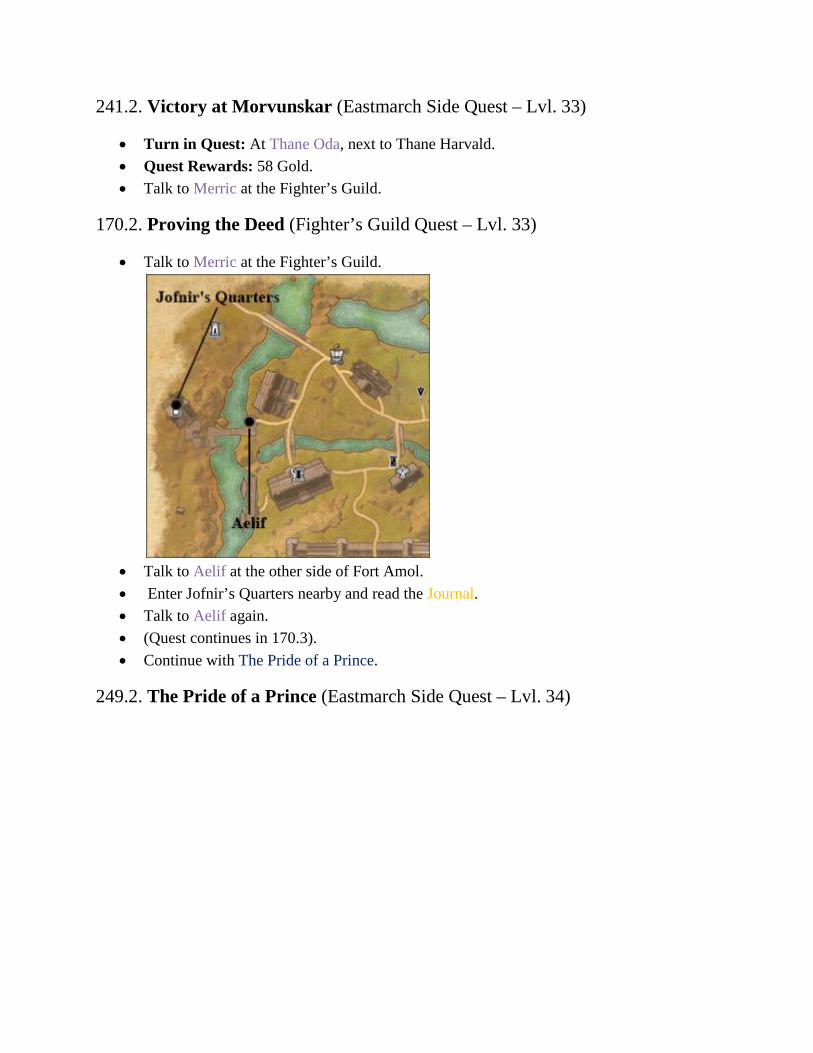
241.2. Victory at Morvunskar (Eastmarch Side Quest – Lvl. 33)
• Turn in Quest: At Thane Oda, next to Thane Harvald. • Quest Rewards: 58 Gold. • Talk to Merric at the Fighter’s Guild.
170.2. Proving the Deed (Fighter’s Guild Quest – Lvl. 33)
• Talk to Merric at the Fighter’s Guild.
• Talk to Aelif at the other side of Fort Amol. • Enter Jofnir’s Quarters nearby and read the Journal. • Talk to Aelif again. • (Quest continues in 170.3). • Continue with The Pride of a Prince.
249.2. The Pride of a Prince (Eastmarch Side Quest – Lvl. 34)
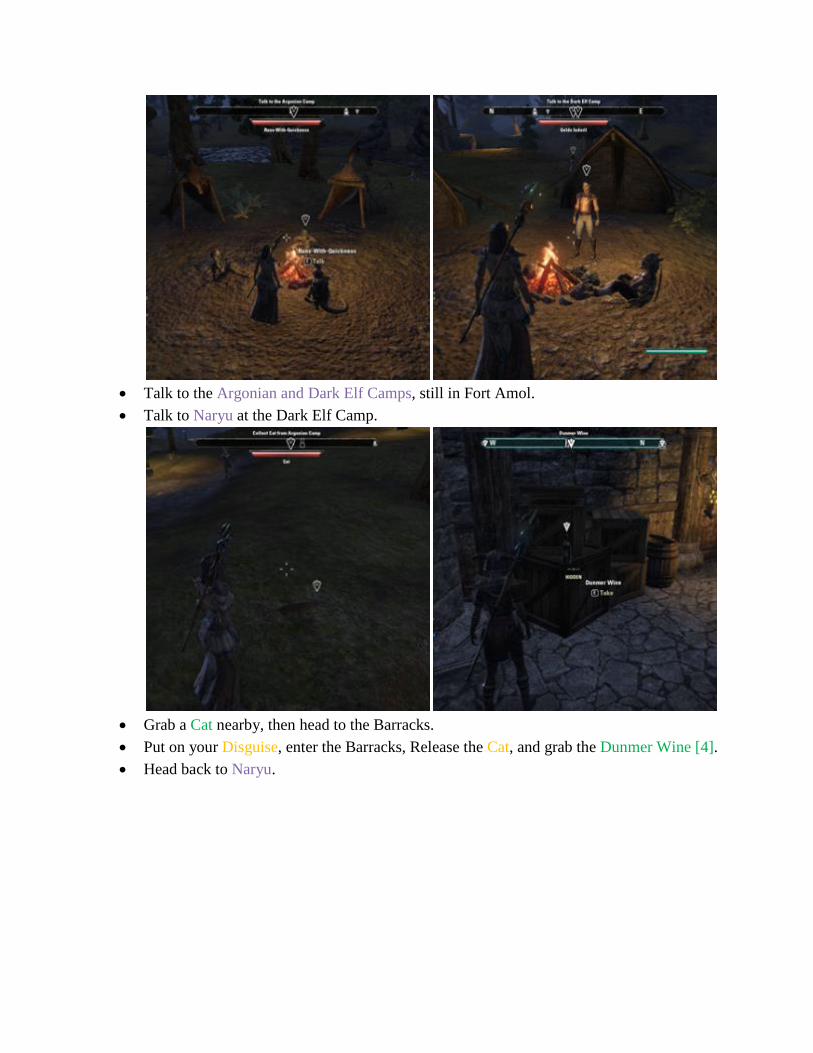
• Talk to the Argonian and Dark Elf Camps, still in Fort Amol. • Talk to Naryu at the Dark Elf Camp.
• Grab a Cat nearby, then head to the Barracks. • Put on your Disguise, enter the Barracks, Release the Cat, and grab the Dunmer Wine [4]. • Head back to Naryu.

• Leave Fort Amol in Eastern direction and head to Death-in-Winter; kill it. • Head back to the Argonian Camp in Fort Amol. • Talk to Thane Harvald. • Turn in Quest: At Thane Harvald. • Quest Rewards: 298 Gold.
250. The War Council (Eastmarch Side Quest – Lvl. 34)
• Pickup Quest: Given by Thane Harvald upon handing in the previous quest. • Head to the Keep at Fort Amol. • Talk to Naryu. • Enter the Keep. • Kill Stormfist troops until you can loot the Key. • Enter the Manor. • Talk to Naryu inside.

• Read the Note upstairs, and then examine The Quiet Room at the back of the statue.
• Examine the Argonian Statue downstairs and grab the Key. • Enter the Safe Room and talk to Jorunn the Skald-King. • Defeat the Stormfist mobs downstairs.
• Kill Dahlen, who is disguised as the Skald-King, upstairs. • Enter the Vault upstairs and talk to Way-with-Words. • Talk to Naryu outside the Vault. • Talk to Prince Irnskar downstairs. • Turn in Quest: At Prince Irnskar. • Quest Rewards: Skald-King’s Favor (Heavy Armor: Head, 155 Armor, Max Health
+73, Increases This Item’s Armor Value by 5%, Lvl. 34), 298 Gold. • Talk to Thane Oda next to the Prince.
251.1. Lifeline (Eastmarch Side Quest – Lvl. 35)
• Pickup Quest: Given by Thane Oda, next to the Prince.
• Exit the Keep and head to East to the Dreamwalker.

• (Quest continues in 252.2) • Talk to Stormy-Eyes.
252. Our Poor Town (Eastmarch Side Quest – Lvl. 35)
• Pickup Quest: Given by Stormy-Eyes, in a cave near Darkwater Crossing.
• Collect Torchbug Wings [5] outside the cave. • Loot the Discarded Urn for the Key. • Enter Storm-Eyes’ House and talk to Asmalah the Caller.
• Leave the house and confront Asmalah’s Companions and then Asmalah himself further
South. • Talk to Asmalah, we decided to let him live in order to get the Reagents.
• Get the Reagents from the nearby house. • Head back to Stormy-Eyes. • Turn in Quest: At Stormy-Eyes. • Quest Rewards: Darkwater Hand Warmers (Medium Armor: Hand, 71 Armor, Max
Stamina +19, Cost of Sprinting -2, Lvl. 35), 486 Gold. • Leave the cave and head Northeast towards Mundus Stone: The Thief which increases
your chance to deal critical strikes. Make sure to grab the nearby Wittestadr Wayshrine and visit the Locales in the area for some bonus XP. Just North of the Mundus Stone you’ll find Selgaard.
253. Dark Deeds (Eastmarch Side Quest – Lvl. 35)
• Pickup Quest: Given by Selgaard Wood-Hewer, near Mundus Stone: The Thief.

• Look for Selgaard’s Family Members [3] at the 3 locations indicated on the map. • Grab the Skyshard on the way. • Talk to Selgaard outside Jakild’s Cabin. • Head back South to Bonestrewn Crest and enter Bonestrewn Barrow.
• Read the Journal in the first room. • Read the Journal in the second room. • Defeat Ophelia in that same room.

• Enter the third room and talk to Owen. Your choice to let him live or not doesn’t
influence the quest. • Enter the fourth room and defeat Valcent. • Exit Bonestrewn Barrow and head back North to Selgaard. • Turn in Quest: At Selgaar. • Quest Rewards: Hefty Bonestrawn Gauntlets (Heavy Armor: Hand, 86 Armor, Max
Stamina +19, 24% Chance to Avoid Decay When Defeated, Lvl. 35), 303 Gold. • You should be level 39 now. • Head Southeast to Wittestadr.
254. A Right to Live (Eastmarch Side Quest – Lvl. 34)
• Pickup Quest: Given by Sena Aralor when approaching Wittestadr.

• Kill the Bloodfiend that attacks you when accepting the quest.
• Head South to Imhey’s locations and talk to Valeric. • Kill Bloodfiends in the area and gather Bloodfiend Dust [5]. • Enter Valeric’s Manor and talk to Valeric upstairs. • Turn in Quest: At Valeric. • Quest Rewards: 239 Gold.
255. The Better of Two Evils (Eastmarch Side Quest – Lvl. 35)
• Pickup Quest: Given by Valeric upon handing in the previous quest. • Talk to Jaruk downstairs. • Talk to Tunus outside. • We choose to take side with Majorn the Ancient. • Leave the Manor and capture a Bloodfiend using the Rune. • Kill the Hunters [6] nearby. • Head back to Majorn the Ancient. • Enter the Wittestadr Crypts through the Hatch in Majorn’s Manor.

• Kill Valeric and his 2 followers at the end of the Crypts. • Head back to Majorn the Ancient. • Turn in Quest: At Majorn the Ancient. • Quest Rewards: Blood Mask (Medium Armor: Head, 124 Armor, Max Magicka +49,
Cost of Sprinting -2%, Lvl. 35), 303 Gold. • Get Majorn’s Blood before leaving Wittestadr before fast travelling to Windhelm. • Sell, Bank, Craft, Repair, etc. • Leave the City in Southern direction and meet up with Aelif.
170.3. Proving the Deed (Fighter’s Guild Quest – Lvl. 33)
• Talk to Aelif and follow her. • Enter Ragnthar. • Head to the last chamber then speak to Aelif.
• Face the first Crystal and wait for Aelif to cast the spell, run to all Crystals [4] and destroy them before Aelif’s spell runs out.
• Examine the Skeletal Remains.
• Survive the ambush of Dwarven Constructs and the Auroran Battlemage.

• Speak to Aelif. • Witness Jofnir Iceblade’s Testimony then Speak to Aelif.
• Leave Ragnthar and head Southwest towards the Kynesgrove Wayshrine or Fast Travel there.
• (Quest continues in 170.4). Leave the City in Southern direction and meet up with Aelif.
256.1. Shrine of Corruption (Eastmarch Side Quest – Lvl. 33)

• Pickup Quest: At Kralald near the Kynesgrove Wayshrine. • Head South to the Missing Brigade and talk through the door. • Kill the Furrykissed mobs in the area and loot Amulets [3]. • Talk to Captain Alhana inside the house. • (Quest continues in 257.2) • Talk to Fresgil, near Captain Alhana.
257.1. A Cure for Droi (Eastmarch Side Quest – Lvl. 33)
• Pickup Quest: At Fresgil, near Captain Alhana.
• Collect Kyne’s Breath [4] flowers while working on Shrine of Corruption. • (Quest continues in 258.2)
256.2. Shrine of Corruption (Eastmarch Side Quest – Lvl. 33)
• Head outside and look for Clues [3]. • Kill Bewitched mobs you come across while making your way to the Southeast side of
Kynesgrove’s lake. They should drop the Hymn to Kyne which is your first Clue.
• At the Southside of the lake you’ll find Leifnar who’ll give you your second Clue.
• The Bewitched mobs also drop a Dresser Key you must use to open the Dresser inside the
house where Captain Alhana is. • Talk to Captain Alhana. • (Quest continues in 257.3)
257.2. A Cure for Droi (Eastmarch Side Quest – Lvl. 33)
• Turn in Quest: At Fresgil.
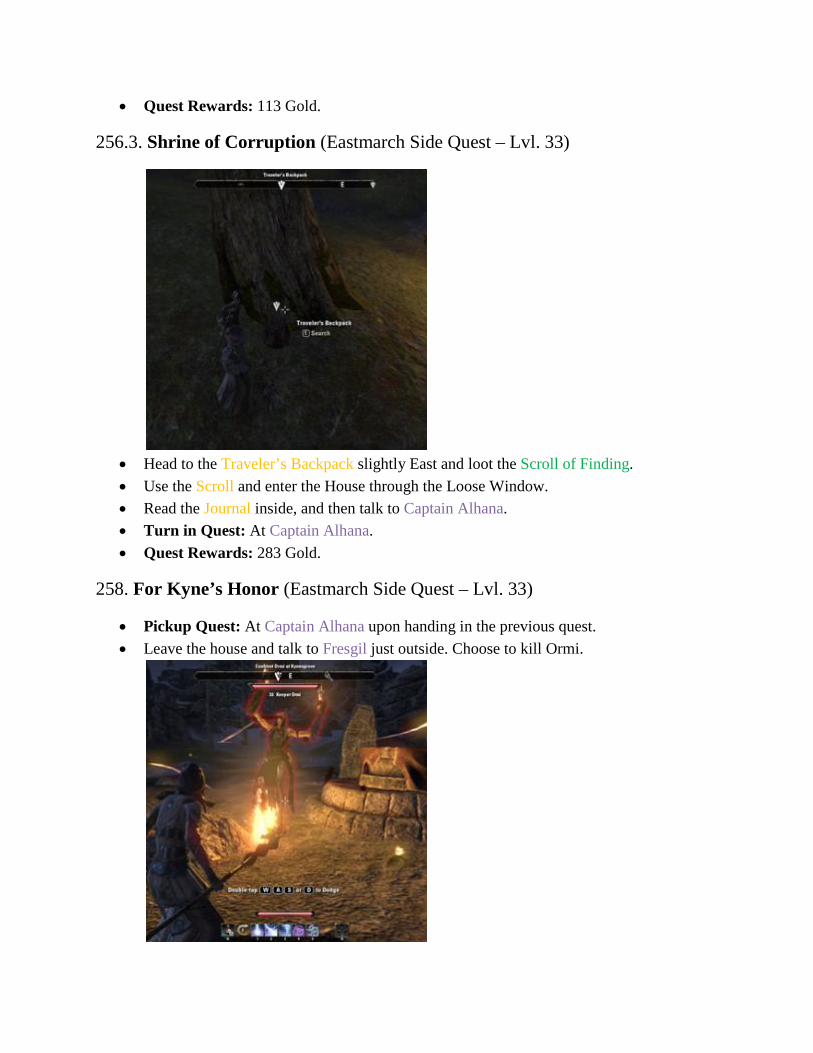
• Quest Rewards: 113 Gold.
256.3. Shrine of Corruption (Eastmarch Side Quest – Lvl. 33)
• Head to the Traveler’s Backpack slightly East and loot the Scroll of Finding. • Use the Scroll and enter the House through the Loose Window. • Read the Journal inside, and then talk to Captain Alhana. • Turn in Quest: At Captain Alhana. • Quest Rewards: 283 Gold.
258. For Kyne’s Honor (Eastmarch Side Quest – Lvl. 33)
• Pickup Quest: At Captain Alhana upon handing in the previous quest. • Leave the house and talk to Fresgil just outside. Choose to kill Ormi.
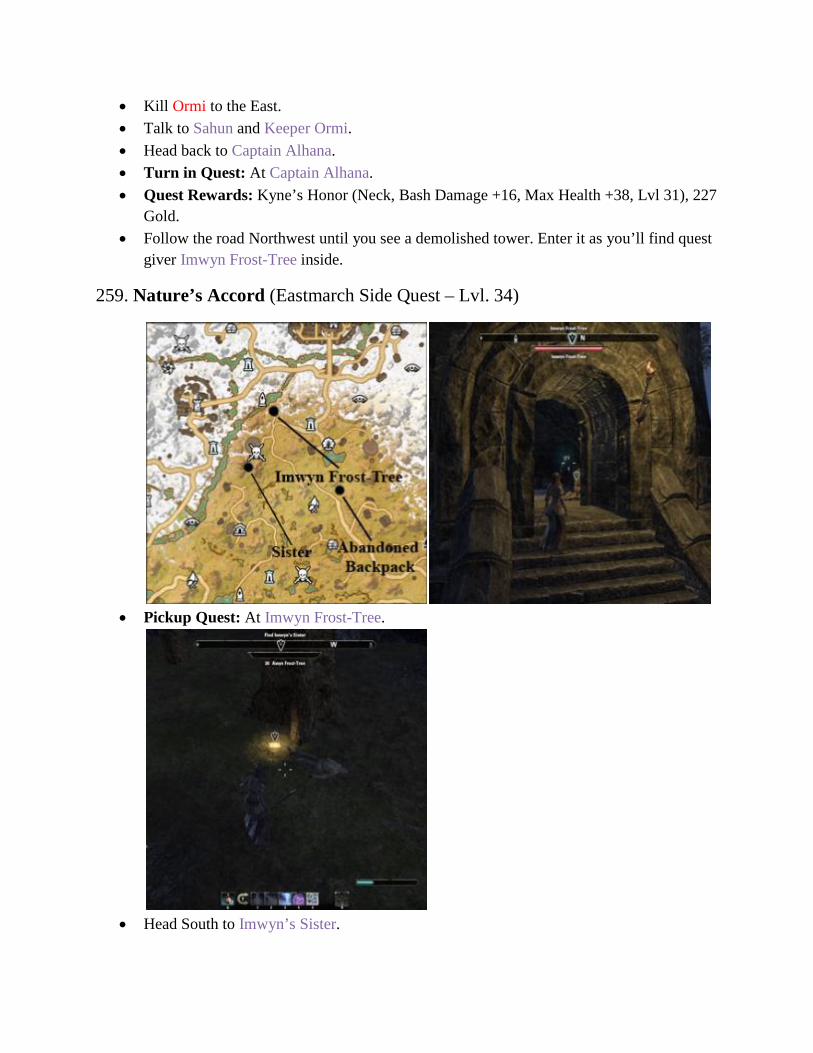
• Kill Ormi to the East. • Talk to Sahun and Keeper Ormi. • Head back to Captain Alhana. • Turn in Quest: At Captain Alhana. • Quest Rewards: Kyne’s Honor (Neck, Bash Damage +16, Max Health +38, Lvl 31), 227
Gold. • Follow the road Northwest until you see a demolished tower. Enter it as you’ll find quest
giver Imwyn Frost-Tree inside.
259. Nature’s Accord (Eastmarch Side Quest – Lvl. 34)
• Pickup Quest: At Imwyn Frost-Tree.
• Head South to Imwyn’s Sister.

• Head East for the Sigil. It can be found in an Abandoned Backpack. • Talk to Aerana Frost-Tree in Windhelm the next time you go there for repairs, crafting,
banking etc. • Turn in Quest: At Aerana Frost-Tree. • Quest Rewards: Staff of Nature’s Accord (Flame Staff, 71 Damage, Cooldown of
Weapon Enchantments -35%, Lvl 34), 239 Gold. • Head to Public Dungeon: Icehammer’s Vault, Southeast of Kynesgrove.
260.1. Dear Cousins (Eastmarch Side Quest – Lvl. 33)
• It’s best to go left where the hallway splits, and then pick up this quest on the way out.
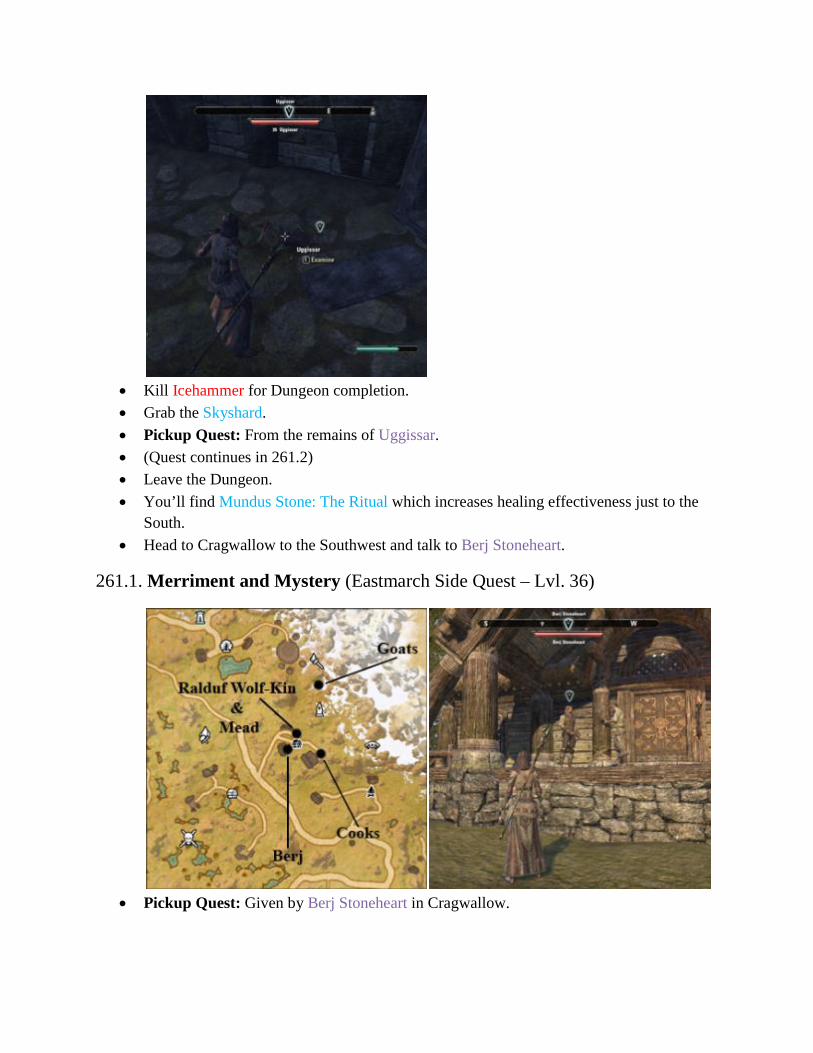
• Kill Icehammer for Dungeon completion. • Grab the Skyshard. • Pickup Quest: From the remains of Uggissar. • (Quest continues in 261.2) • Leave the Dungeon. • You’ll find Mundus Stone: The Ritual which increases healing effectiveness just to the
South. • Head to Cragwallow to the Southwest and talk to Berj Stoneheart.
261.1. Merriment and Mystery (Eastmarch Side Quest – Lvl. 36)
• Pickup Quest: Given by Berj Stoneheart in Cragwallow.
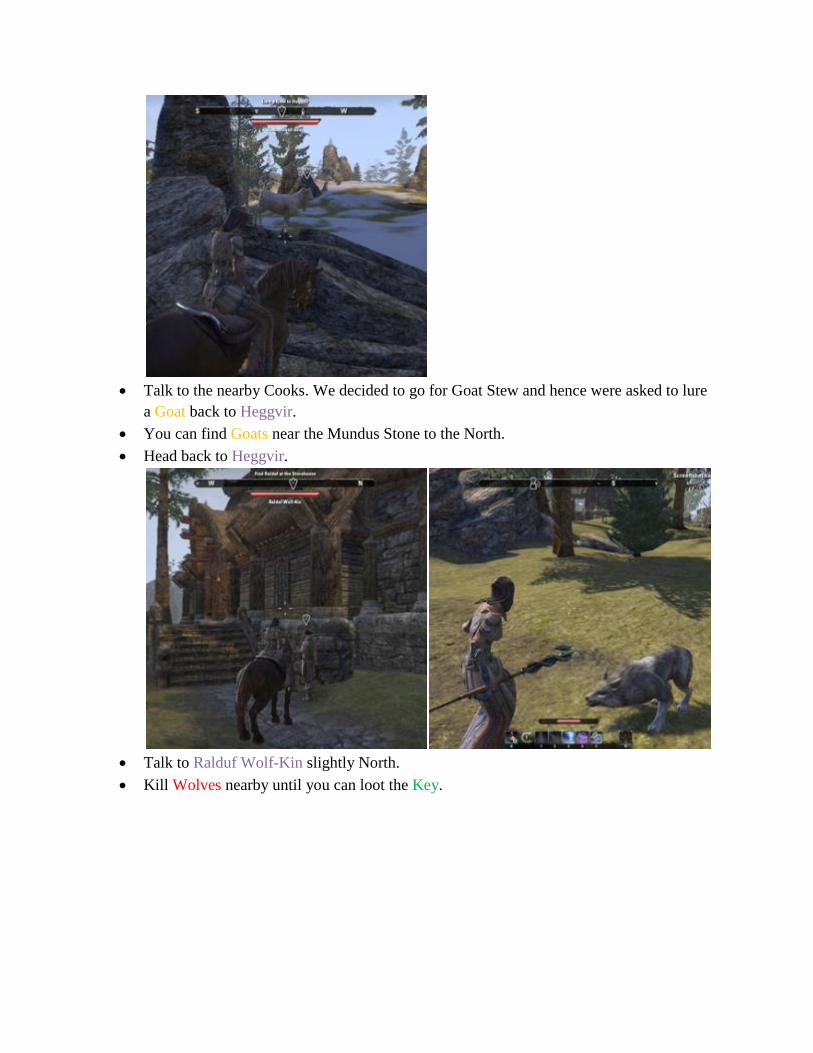
• Talk to the nearby Cooks. We decided to go for Goat Stew and hence were asked to lure
a Goat back to Heggvir. • You can find Goats near the Mundus Stone to the North. • Head back to Heggvir.
• Talk to Ralduf Wolf-Kin slightly North. • Kill Wolves nearby until you can loot the Key.

• Take the Mead from the House. • Head to Berj. • Talk to the Bard upstairs. • Talk to Arvild Gray-Sky. • Talk to the Survivors [3] downstairs. • Talk to Arvild outside.
• Examine the Primitive Blade to the East.
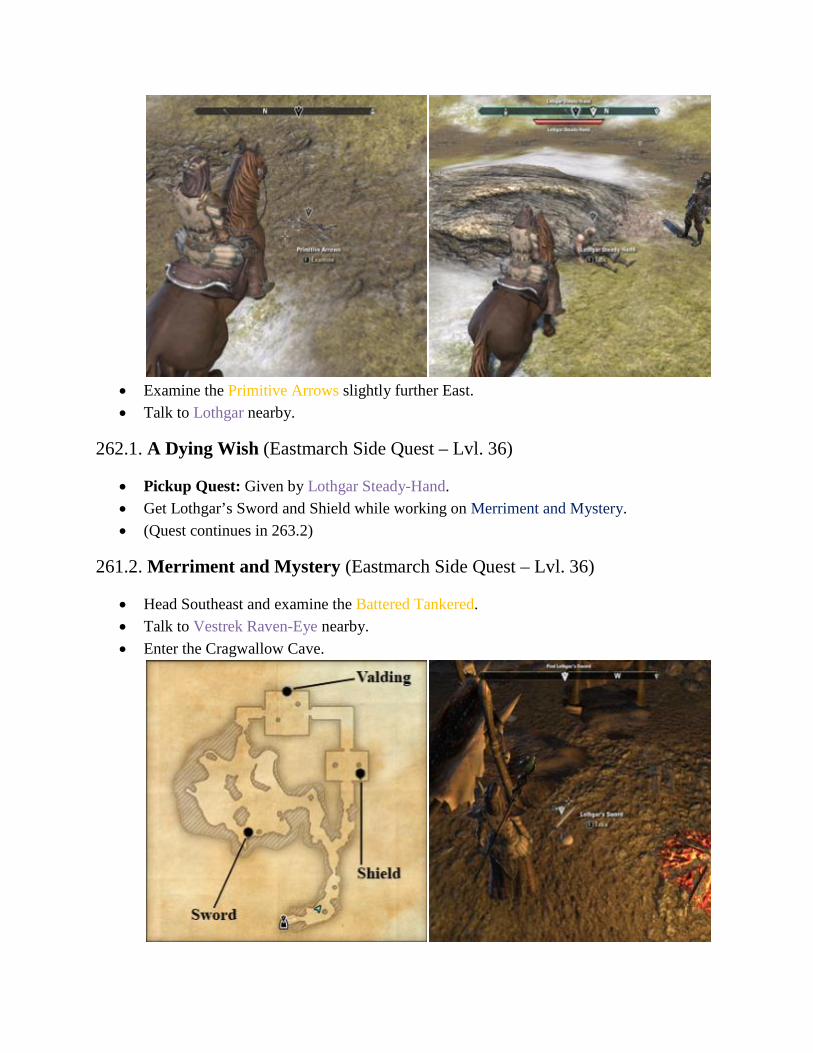
• Examine the Primitive Arrows slightly further East. • Talk to Lothgar nearby.
262.1. A Dying Wish (Eastmarch Side Quest – Lvl. 36)
• Pickup Quest: Given by Lothgar Steady-Hand. • Get Lothgar’s Sword and Shield while working on Merriment and Mystery. • (Quest continues in 263.2)
261.2. Merriment and Mystery (Eastmarch Side Quest – Lvl. 36)
• Head Southeast and examine the Battered Tankered. • Talk to Vestrek Raven-Eye nearby. • Enter the Cragwallow Cave.

• Take a left where the hallway forks and grab Lothgar’s Sword first. • Talk to Valding.
• Destroy the Lute and kill the Chieftain who comes running. • Talk to Valding.
• Take Lothgar’s Shield on the way out. • Talk to Valding outside. • Turn in Quest: At Valding the Bard. • Quest Rewards: Riekling Skull-Cleaver (Two-Handed Axe, 88 Damag, On Hit: 17
Magic Damage and Recover 7 Stamina, Weapon Attack Speed +6%, Lvl 36), 494 Gold. • Head back to Lothgar.
262.2. A Dying Wish (Eastmarch Side Quest – Lvl. 36)
• Turn in Quest: At Lothgar Steady-Hand.
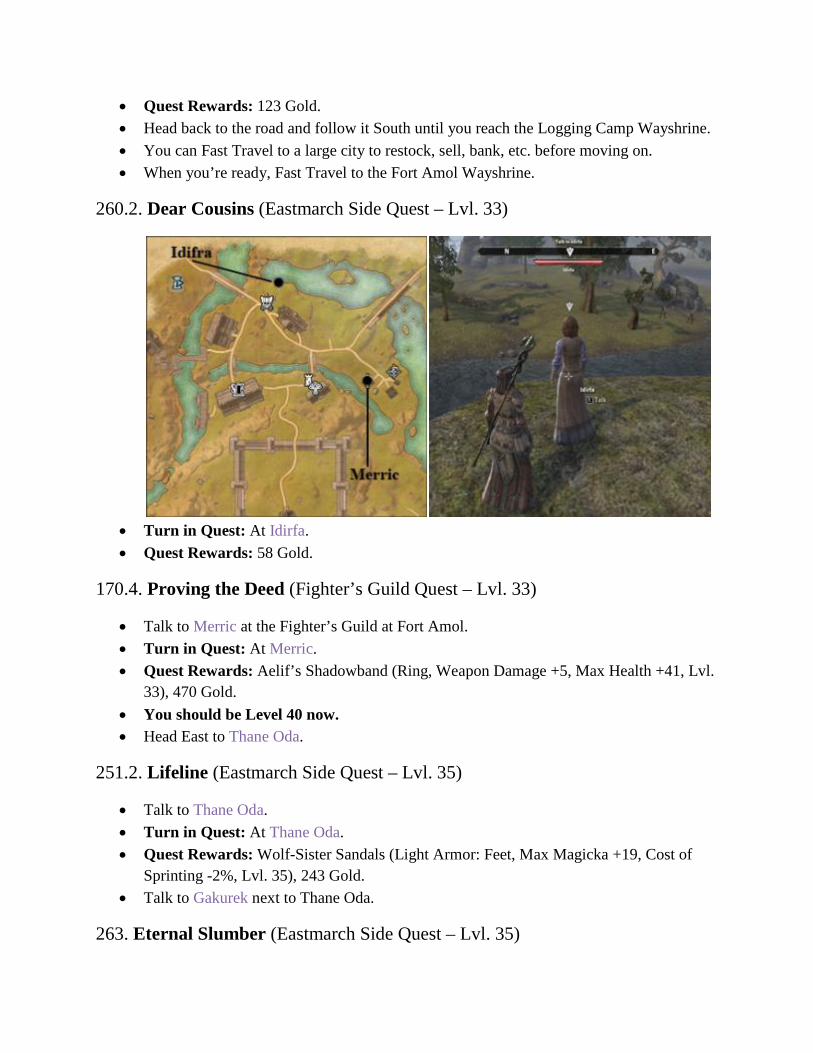
• Quest Rewards: 123 Gold. • Head back to the road and follow it South until you reach the Logging Camp Wayshrine. • You can Fast Travel to a large city to restock, sell, bank, etc. before moving on. • When you’re ready, Fast Travel to the Fort Amol Wayshrine.
260.2. Dear Cousins (Eastmarch Side Quest – Lvl. 33)
• Turn in Quest: At Idirfa. • Quest Rewards: 58 Gold.
170.4. Proving the Deed (Fighter’s Guild Quest – Lvl. 33)
• Talk to Merric at the Fighter’s Guild at Fort Amol. • Turn in Quest: At Merric. • Quest Rewards: Aelif’s Shadowband (Ring, Weapon Damage +5, Max Health +41, Lvl.
33), 470 Gold. • You should be Level 40 now. • Head East to Thane Oda.
251.2. Lifeline (Eastmarch Side Quest – Lvl. 35)
• Talk to Thane Oda. • Turn in Quest: At Thane Oda. • Quest Rewards: Wolf-Sister Sandals (Light Armor: Feet, Max Magicka +19, Cost of
Sprinting -2%, Lvl. 35), 243 Gold. • Talk to Gakurek next to Thane Oda.
263. Eternal Slumber (Eastmarch Side Quest – Lvl. 35)

• Pickup Quest: Given by Gakurek.
• Enter the cave and talk to Jadvar inside. • Enter the Portal to Mistwatch. • Talk to High Priest Esling at the other end of the Portal. • Pray at the nearby Totems [3]. • Talk to High Priest Esling. • Choose to enter the Dream. • Turn in Quest: At High Priest Esling. • Quest Rewards: Dreamwalker’s Staff (Healing Staff, 73 Damage, Increases Weapon
Enchantment Effect by 16%, Lvl. 35), 303 Gold, and 1 Skill Point.
264. Gods Save the Kind (Eastmarch Side Quest – Lvl. 35)
• Pickup Quest: Given by High Priest Esling upon handing in the previous quest. • Pray at any of three Totems to get the respective companion (Wolf, Bear, or Fox) to aid
you.

• Make your way to the end of the Dungeon and kill the Dream Eater. Then leave the
Dungeon. • Talk to High Priest Esling. • Pray at a Totem. • Talk to the King.
• Make your way through the Cave complex. You’ll notice you’ll slowly start to freeze to
death which is why you should stand near one of the Fires at times to warm up. • Kill another Dream Eater. • Talk to High Priest Esling. • Pray at a Totem. • Talk to Stormy-Eyes.

• Kill yet another Dream Eater. • Talk to the King. • Enter the Portal next to him. • Turn in Quest: At Jorunn the Skald-King. • Quest Rewards: Skald-King’s Greaves (Heavy Armor: Legs, 151 Armor, Max Magicka
+49, Sells for 150% More, Lvl. 35), 486 Gold.
265.1. Of Councils and Kings (Eastmarch Side Quest – Lvl. 35)
• Pickup Quest: Given by Stormy-Eyes. • Leave Mistwatch. • (Quest continues in 265.2) • Fast Travel to the Wittestadr Wayshrine and head in Southeastern direction until you run
into Dralof Waterwalker.
266. Bath Time (Eastmarch Side Quest – Lvl. 35)

• Pickup Quest: Given by Dralof Waterwalker. • Head directly West to Grida.
• Read the Note on the floor.

• Kill Mudcrabs and Trolls nearby for Mudcrab Claws [4] and Troll Fat [2].
• Head to Laughs-in-Danger to the South and buy the Daril or get it by persuading him. • Head North to the Mill where you’ll find Grida. Kill her and then enter the Mill. • Grind the Daril • Head back to Dralof Waterwalker in the East. • Turn in Quest: At Dralof Waterwalker or Frera Dagger-Lost. • Quest Rewards: Bathrobe of Vigor (Light Armor: Chest, 97 Armor, Max Magicka +49,
Exploration Experience Gained +7%, Lvl. 35), 243 Gold. • Head to Old Sord’s Cave to the Southeast.
267.1. Pilfered Urn (Eastmarch Side Quest – Lvl. 35)

• Pickup Quest: Given upon examination of the Urn in Old Sord’s Cave.
• Turn in this quest whenever you reach Windhelm. • Turn in Quest: At Agvar, at the Docks in Windhelm. • Quest Rewards: 60 Gold.

• Kill Eorim the Hammer deeper inside the Cave for Dungeon Completion. • Grab the Skyshard.
• Leave the cave and head East towards another Skyshard (see map above). • Then head in Northeast direction towards Thulvald Axehead.
268.1. Land Dispute (Eastmarch Side Quest – Lvl. 36)

• Pickup Quest: Given by Thulvald Axehead, South of his Logging Camp.
• Talk to Eginir Thistlebreeches at the Logging Cabin. • Talk to Jafelma inside the Chief’s Lodge. • (Quest continues in 268.2) • Head further East to Mzulft.
269. In Search of Kireth Vanos (Eastmarch Side Quest – Lvl. 37)

• Grab the Skyshard above the entrance to Mzulft.
• Pickup Quest: Given by Raynor Vanos, at Mzulft. • Enter Mzulft and make your way to Kireth Vanos. • Turn in Quest: At Kireth Vanos. • Quest Rewards: Dungeon-Delving Brigandine (Medium Armor: Chest, 148 Armor, Max
Stamina +54, Cost of Sprinting -2%, Lvl. 37), 251 Gold.
270. Kireth’s Amazing Plan (Eastmarch Side Quest – Lvl. 37)
• Pickup Quest: Given by Kireth Vanos upon handing in the previous quest. • Enter the Ice Tunnels and go around fighting of mobs while Kireth digs for the Key. • When she has the key you should read the Researcher’s Journal. • Grab the Uncharged Dwelmer Orb. • Support either Kireth or Raynor.

• Turn in Quest: At Raynor Vanos. • Quest Rewards: Dungeon-Delving Harness (Heavy Armor: Waist, 67 Armor, Max
Magicka +21, 24% to Avoid Decay When Defeated, Lvl. 37), 313 Gold. • Leave Mzulft.
268.2. Land Dispute (Eastmarch Side Quest – Lvl. 36)
• Head Southwest to a tiny lake where you’ll find the Spriggan Matron; kill her. • Return to Thulvald Axehead. • Turn in Quest: At Thulvald Axehead. • Quest Rewards: Forester Leggings (Medium Armor: Legs, 127 Armor, Max Stamina
+54, Exploration Experience Gained +7%, Lvl. 36), 123 Gold. • Head to Jorunn’s Stand next.
265.2. Of Councils and Kings (Eastmarch Side Quest – Lvl. 35)

• Talk to Hlotild the Fox just outside the main entrance to Jorunn’s Stand. • Turn in Quest: At Hlotild the Fox. • Quest Rewards: 80 Gold.
271.1. Making Amends (Eastmarch Side Quest – Lvl. 36)
• Pickup Quest: Given by Hlotild the Fox upon handing in the previous quest. • (Quest continues 271.2) • Enter Jorunn’s Stand where you can pick up the 2 more quests and grab a Skyshard.
272.1. Will of the Council (Fighters Guild Quest – Lvl. 43)
• Pickup Quest: Given by Bera Moorsmith who will come to you as you enter Jorunn’s Stand.
• (Quest continues at 272.2)
273.1. Security Details (Eastmarch Side Quest – Lvl. 36)
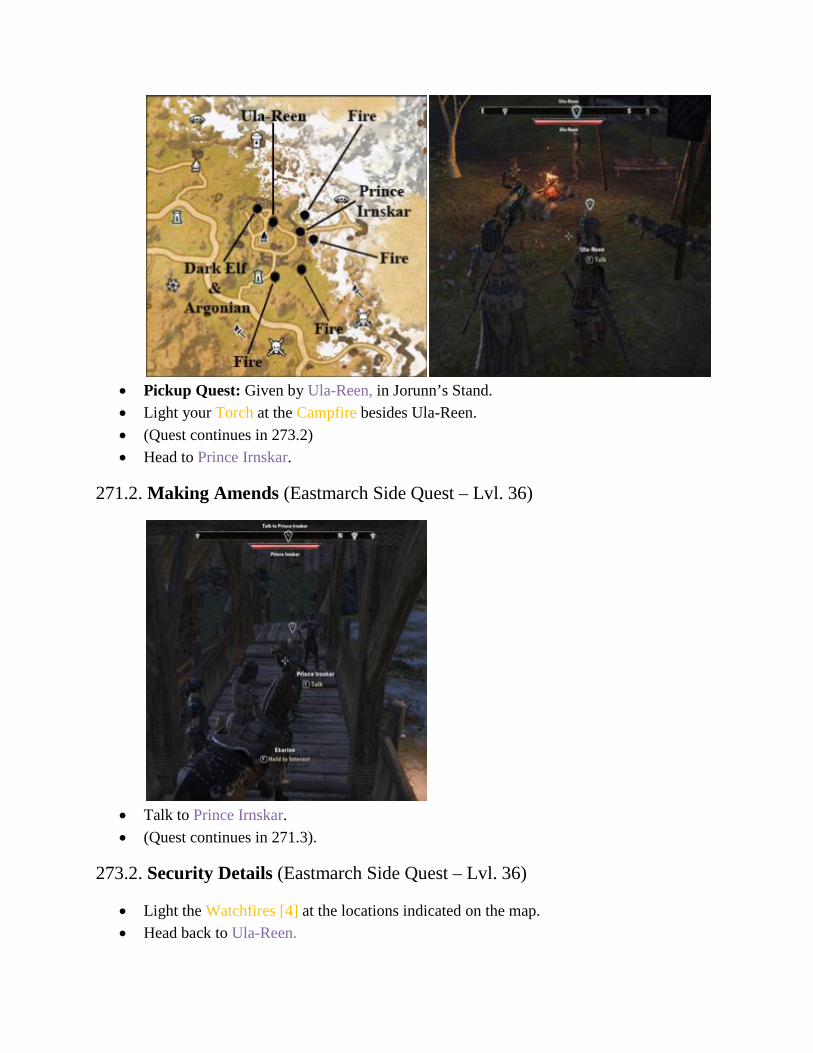
• Pickup Quest: Given by Ula-Reen, in Jorunn’s Stand. • Light your Torch at the Campfire besides Ula-Reen. • (Quest continues in 273.2) • Head to Prince Irnskar.
271.2. Making Amends (Eastmarch Side Quest – Lvl. 36)
• Talk to Prince Irnskar. • (Quest continues in 271.3).
273.2. Security Details (Eastmarch Side Quest – Lvl. 36)
• Light the Watchfires [4] at the locations indicated on the map. • Head back to Ula-Reen.
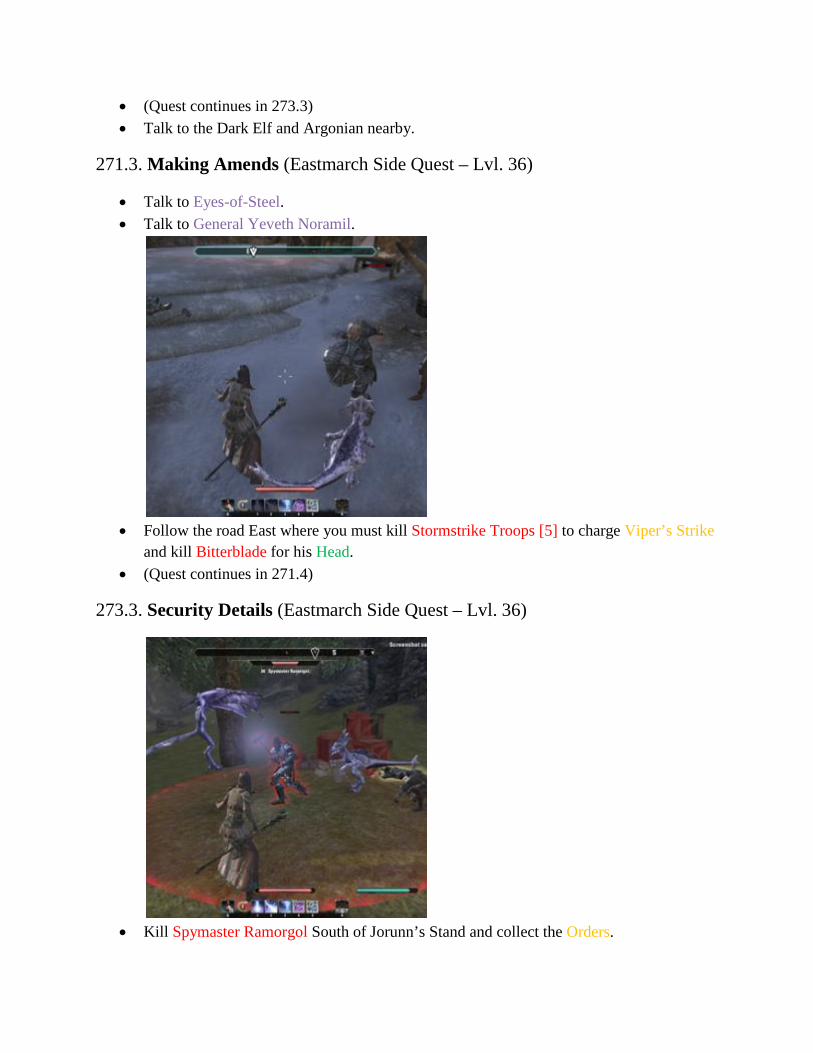
• (Quest continues in 273.3) • Talk to the Dark Elf and Argonian nearby.
271.3. Making Amends (Eastmarch Side Quest – Lvl. 36)
• Talk to Eyes-of-Steel. • Talk to General Yeveth Noramil.
• Follow the road East where you must kill Stormstrike Troops [5] to charge Viper’s Strike
and kill Bitterblade for his Head. • (Quest continues in 271.4)
273.3. Security Details (Eastmarch Side Quest – Lvl. 36)
• Kill Spymaster Ramorgol South of Jorunn’s Stand and collect the Orders.

• Talk to Speaks-with-Blades.
• Kill the Shaman nearby and collect her Orders. • Head to Public Dungeon: The Bastards Tomb just to the East.
• Take the turn to the right and you’ll end up at the Skyshard.

• Head deeper into the dungeon where you can kill Agnenor the Blade for Dungeon
completion. • Talk to Hojard.
274.1. Relative Matters (Eastmarch Side Quest – Lvl. 37)
• Pickup Quest: Given by Hojard. • Make your way out of the Dungeon and head back to Jorunn’s Stand. • Turn in Quest: At Hojard. • Quest Rewards: 62 Gold.
273.4. Security Details (Eastmarch Side Quest – Lvl. 36)
• Talk to Ula-Reen. • Turn in Quest: At Ula-Reen. • Quest Rewards: Shell Slicer (Dagger, 74 Damage, Increases Power by 10 for 5 Seconds,
Armor and Spell Penetration +4%, Lvl. 36), 247 Gold. • You should be level 41 now.
271.4. Making Amends (Eastmarch Side Quest – Lvl. 36)
• Talk to Eyes-of-Steel. • Talk to General Yeveth Noramil. • Talk to Prince Irnskar. • Turn in Quest: At Prince Irnskar. • Quest Rewards: 247 Gold.
275. A Council of Thanes (Eastmarch Side Quest – Lvl. 36)

• Pickup Quest: Given by Prince Irnskar upon handing in the previous quest.
• Talk to Thane Harvald.
• Talk to the King & War Council. • Talk to Thane Harvald again. • Talk to the Jaema just outside the Southern Gate.

• Talk to Thane Oda. • Talk to Thane Jeggi. • Grab some Mead [6] nearby and then head back to Thane Jeggi.
• Go to the War Council. • Talk to the King. • Turn in Quest: At the King. • Quest Rewards: Skald-King’s War Plackart (Heavy Armor: Chest, 176 Armor, Max
Health +81, Resistance to Critical Hits +70, Lvl. 36), 308 Gold.
276. Sneak Peak (Eastmarch Side Quest – Lvl. 36)
• Pickup Quest: Given by General Yeveth Noramil, at the War Council. • Head Northeast to Scout Snowhunter. • Turn in Quest: At the Scout Snowhunter.

• Quest Rewards: 61 Gold.
277. Snow and Flame (Eastmarch Side Quest – Lvl. 37)
• Pickup Quest: Given by Scout Snowhunter upon handing in the previous quest.
• Enter the Hidden Tunnel and make your way to Thane Mera. • Discover the Wayshrine.
• Burn the Stockpiles [3] at the locations indicated on the map. • Light the Signal Fire. • Enter the Skuldafn Tombs.
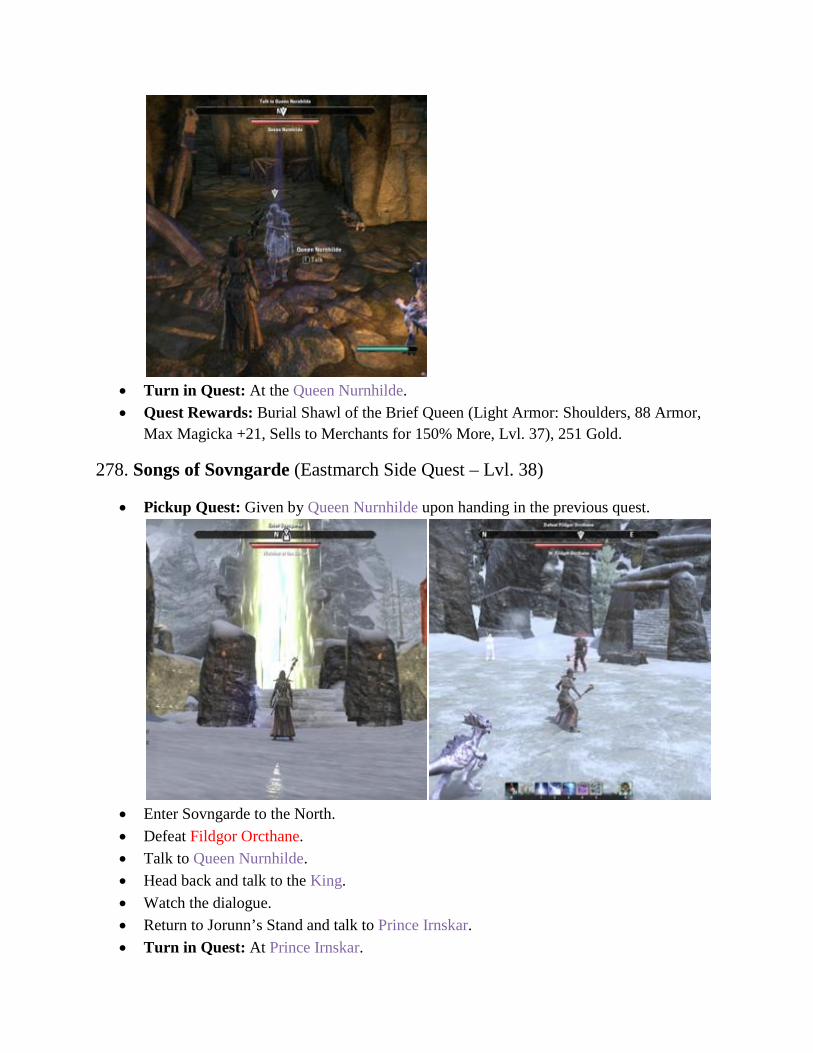
• Turn in Quest: At the Queen Nurnhilde. • Quest Rewards: Burial Shawl of the Brief Queen (Light Armor: Shoulders, 88 Armor,
Max Magicka +21, Sells to Merchants for 150% More, Lvl. 37), 251 Gold.
278. Songs of Sovngarde (Eastmarch Side Quest – Lvl. 38)
• Pickup Quest: Given by Queen Nurnhilde upon handing in the previous quest.
• Enter Sovngarde to the North. • Defeat Fildgor Orcthane. • Talk to Queen Nurnhilde. • Head back and talk to the King. • Watch the dialogue. • Return to Jorunn’s Stand and talk to Prince Irnskar. • Turn in Quest: At Prince Irnskar.

• Quest Rewards: Skald-Kings Sabaton’s (Heavy Armor: Feet, 167 Armor, Max Stamina +23, Resistance to Critical Hits +80, Lvl. 38), 318 Gold, and 1 Skill Point.
279.1. Beneath the Stone (The Rift Side Quest – Lvl. 38)
• Pickup Quest: Given by Captain Attiring, next to the Prince.
• Head West to Public Dungeon: Stormcrag Crypt.
• Make your way to the Skyshard. • Kill Deathknight Stormcrag for Dungeon completion. • Start looking for a group for Group Dungeon: Direfrost Keep.
280. Noble’s Rest (Eastmarch Side Quest – Lvl. 36)
• Pickup Quest: Given by Speaking Stone just inside the Group Dungeon: Direfrost Keep.

• Complete this quest by following this quest line inside Direfrost Keep. • Turn in Quest: At Eboric Direfrost. • Quest Rewards: Habit of the Witch-Hunter (Light Armor: Chest, 98 Armor, Max
Magicka +59, Increases Armor Enchantment Effect by 14%, Lvl. 34), 478 Gold, and 1 Skill Point.
• You’ve completed all quests and discovered all locations in Eastmarch. The next zone you’ll enter is The Rift which you can reach by follow the path from Eastmarch to the South. If you haven’t discovered or visited all locations here is a map with all of them.
281. Shadows of Sancre Tor (Main Story Quest – Lvl. 40)
• Pickup Quest: Automatically given when you reach level 40 in one of the main cities. • Head to The Harborage. • Talk to Varen. • Talk to Sai Sahan. • Enter the Portal to Sancre Tor.

• Confront Mannimarco then speak to Sai Sahan.
• Head to the Sancre Tor Inner Chamber. • Confront Mannimarco again then defeat his Summoned Minions.

• Head to the Inner Courtyard. • Speak to Sai Sahan or to Lyris.

• Enter the Dragonguard Tomb. • Head to the Shrine at the end of the Dragonguard Tomb. • Consecrate the Shrine of the Divines.
• Head out of the Dragonguard Tomb and enter the Reman Vault.

• Use the Levers [4] until they all face towards you. • (Note: Moving a Lever will move those adjacent to it as well). • Cross the Drawbridge then consecrate the Shrine to the Divines.

• Defeat the Bone Colossus that appears. • Head out and go to the Vault Antechamber.

• Defeat the Undead Minions that appear. • Enter the Vault of Kings.
• Speak to Sai Sahan. • Use the Ring of Stendarr’s Mercy.

• Defeat Mannimarco.
• Take the Amulet of Kings.

• Return to the Harborage. • Turn-in Quest: At Varen Aquilarios. • Quest Reward: Signet of Sancre Tor (Ring, Adds 250 Spell Resistance, Lvl 40), and 526
gold. • You should be level 42 now. • Head to The Rift, South of Eastmarch.
Eastmarch Quests 279.2. Beneath the Stone (The Rift Side Quest – Lvl. 38)

• Head to Vigrod Wraithbane in Shor’s Stone. • Talk to Ree-Zish nearby.
• Destroy Imbued Corpses [3] in the area around Shor’s Stone and collect the Magicka [9]
they leave. • Head back to Ree-Zish.
• Use the Effigies [2] at the entrance to the Mine and then enter the Mine. • Talk to Foreman Gandis inside. • Turn-in Quest: At Foreman Gandis. • Quest Reward: 255 gold.
282.1. Unearthed (The Rift Side Quest – Lvl. 38)

• Pickup Quest: Given by Foreman Gandis upon handing in the previous quest.
• Collect the Relics [2] from Iron Boxes as you make your way down the Mine and work
on the quest below.
283. Move Out Miners (The Rift Side Quest – Lvl. 38)
• Pickup Quest: Given by Jaknir nearby. • Save the other Miners [3] at the locations indicated on the map, while at the same time
collecting the Relics [2] for Unearthed. • By following the hallway to the North you’ll end up on 1 Relic. Then head back and
follow the hallway to the South where you’ll find everything else you need.

• Place the Medallions [2] at the entrance to the Tomb of the Companions, then enter the
Tomb. • Examine Sinmure. Giant of Legend. • Talk to Foreman Gandis on the way out. • Turn-in Quest: At Foreman Gandis. • Quest Reward: Rocksplitter (One-Handed Axe, 78 Damage, On Hit: 17 Unresistable
Damage, Weapon Attack Speed +3%, Lvl. 38), 127 Gold.
282.2. Unearthed (The Rift Side Quest – Lvl. 38)
• Leave the Mine and talk to Vigrod Wraithbane. • Turn-in Quest: At Vigrod Wraithbane. • Quest Reward: Companion’s Chausses (Medium Armor: Legs, 132 Armor, Max
Stamina +54, Cost of Sprinting -2%, Lvl. 38), 255 Gold.
284.1. Storming the Hall (The Rift Side Quest – Lvl. 38)
• Pickup Quest: Given by Vigrod Wraithbane upon handing in the previous quest. • (Quest continues in 284.2) • Talk to Aera Earth-Turner in Shor’s Stone.
285.1. The Troubleshooter (The Rift Side Quest – Lvl. 38)

• Pickup Quest: Given by Aera Earth-Turner in Shor’s Stone. • (Quest continues in 285.2) • Discover the Wayshrine just to the West.
• Talk to Sigunn just South of the Wayshrine.
286.1. Aiding Sigunn (The Rift Side Quest – Lvl. 38)
• Pickup Quest: Given by Sigunn in Shor’s Stone.

• Head West and collect the Salvageable Goods from the Cart (see map). Beware for the
Giant near it. • Head slightly North to Linele Skullcarver’s Camp. • (Quest continues in 286.2)
285.2. The Troubleshooter (The Rift Side Quest – Lvl. 38)
• Kill Lolann and Linele at Linele Skullcarver’s Camp. • Return to Aera Earth-Turner and use the Logbook. • Turn-in Quest: Automatically completed. • Quest Reward: Aera’s Tracking Slippers (Light Armor: Feet, 89 Armor, Max Health
+32, Increases Skill Line Experience With Light Armor by 7%, Lvl. 38), 127 Gold.
286.2. Aiding Sigunn (The Rift Side Quest – Lvl. 38)
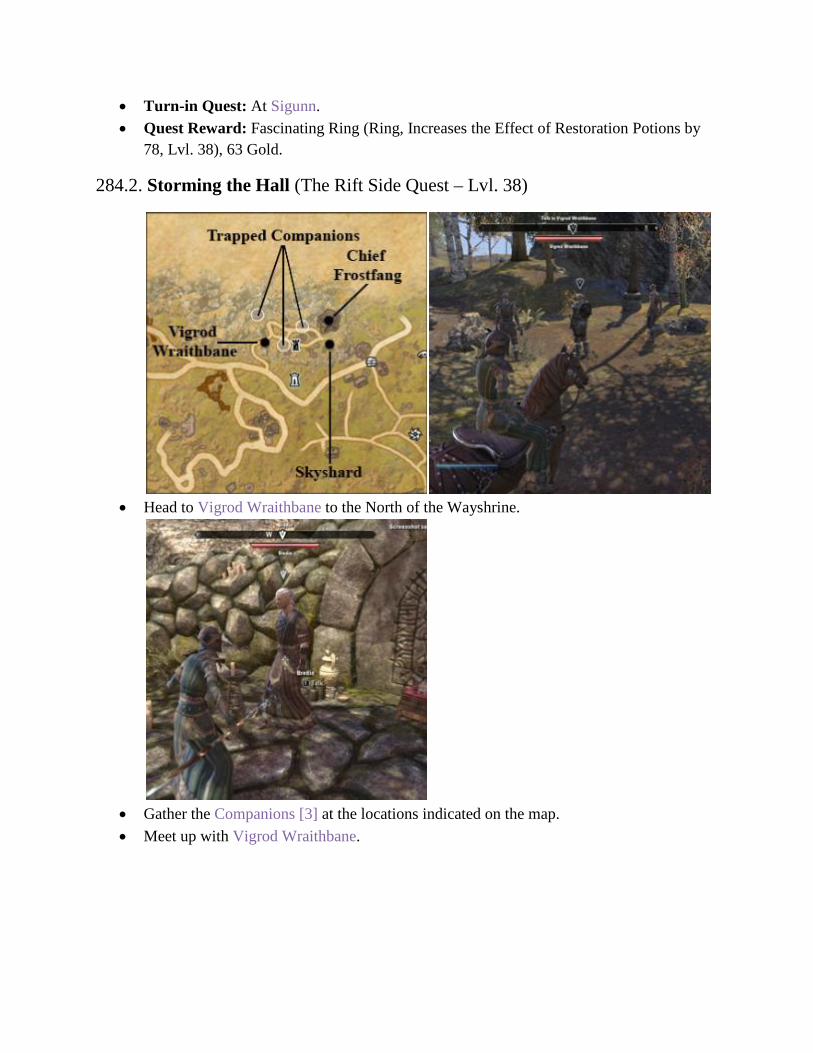
• Turn-in Quest: At Sigunn. • Quest Reward: Fascinating Ring (Ring, Increases the Effect of Restoration Potions by
78, Lvl. 38), 63 Gold.
284.2. Storming the Hall (The Rift Side Quest – Lvl. 38)
• Head to Vigrod Wraithbane to the North of the Wayshrine.
• Gather the Companions [3] at the locations indicated on the map. • Meet up with Vigrod Wraithbane.

• Grab the Skyshard just a bit to the South. • Light the Brazier’s [3] nearby until you find Sage Tirora, talk to her. • Head to the main House and kill Chieftain Frostfang in the Basement.
• Talk to Vigrod Wraithbane, and then enter the Vault. • Make your way to the main room where you must deal with Lessa Frostfang.

• Examine the Statues [3] in that same room. • Leave the Vault and talk to Vigrod Wraithbane. • Turn-in Quest: At Vigrod Wraithbane. • Quest Reward: Vigrod’s Cuirboilli Vest (Medium Armor: Chest, 151 Armor, Max
Stamina +54, Exploration Experience Gained by 7%, Lvl. 38), 318 Gold.
287.1. The Rise of Sage Svari (The Rift Side Quest – Lvl. 38)
• Pickup Quest: Given by Vigrod Wraithbane upon handing in the previous quest. • (Quest continues in 293.2) • Talk to the Pact Soldier who comes running.
288.1. To Vermin Woods (The Rift Side Quest – Lvl. 38)
• Pickup Quest: Given by Pact Soldier. • (Quest continues in 294.2)
287.2. The Rise of Sage Svari (The Rift Side Quest – Lvl. 38)
• Talk to Skald Svari nearby. • Follow her around, then talk to her again. • Watch the ceremony and then talk to Skald Svari. • Turn-in Quest: At Skald Svari. • Quest Reward: Svari’s Staff (Healing Staff, 78 Damage, On Hit: 23 Disease Damage,
Weapon Enchantment Effect +16%, Lvl. 38), 318 Gold. • Enter the House and talk to Skald Svari again.
289.1. Finding Winter’s Hammer (The Rift Side Quest – Lvl. 40)
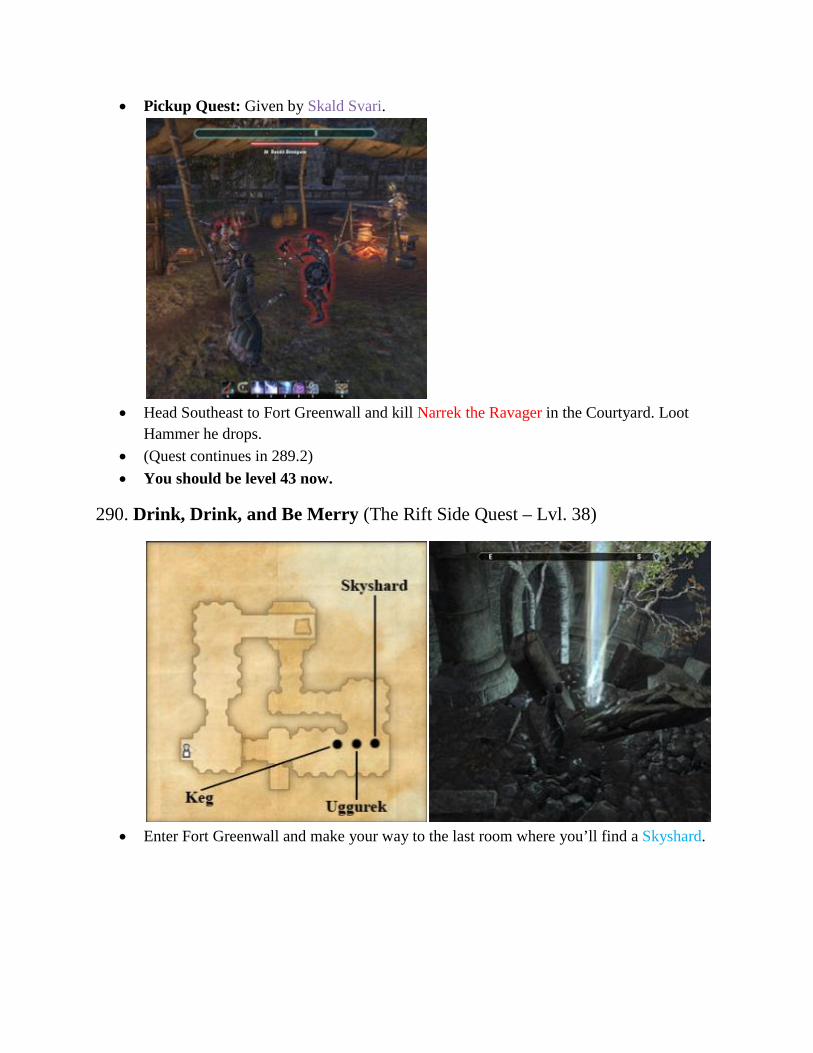
• Pickup Quest: Given by Skald Svari.
• Head Southeast to Fort Greenwall and kill Narrek the Ravager in the Courtyard. Loot
Hammer he drops. • (Quest continues in 289.2) • You should be level 43 now.
290. Drink, Drink, and Be Merry (The Rift Side Quest – Lvl. 38)
• Enter Fort Greenwall and make your way to the last room where you’ll find a Skyshard.

• Kill Uggurek the Vile in the same room for Dungeon complection. • Pickup Quest: Given upon examination of a Keg in Fort Greenwall. • Keep drinking until you wake up in Riften, the main city in The Rift. • Talk to Darva. • Talk to Innarrek, also inside the Fighters Guild. • Turn-in Quest: At Innarrek. • Quest Reward: 127 Gold. • Talk to Aelif upstairs.
272.2. Will of the Council (Fighters Guild Quest – Lvl. 43)
• Enter the Portal to the Earth Forge. • Follow Aelif. • Speak to Merric at-Aswala.

• Choose a weapon then wait for Aelif. • Take your weapon and enter the portal. • Head to the Halls of Submission. • Follow Aelif’s instructions.
• Confront Sees-All-Colors.
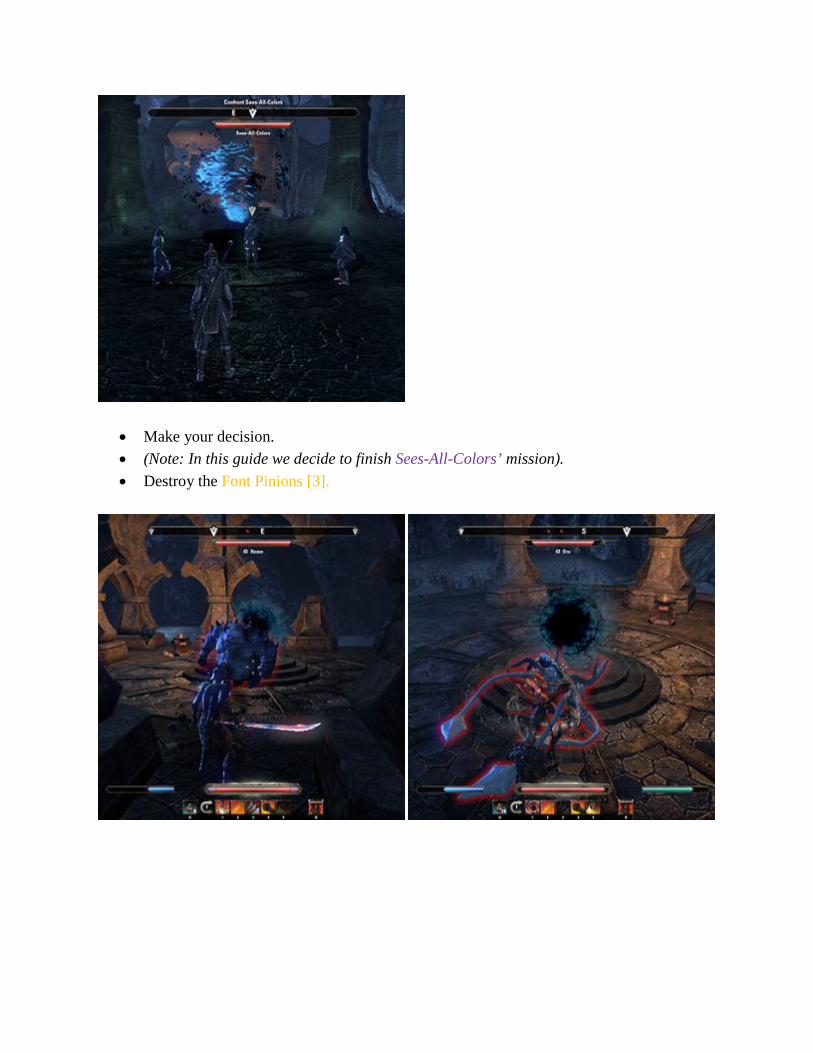
• Make your decision. • (Note: In this guide we decide to finish Sees-All-Colors’ mission). • Destroy the Font Pinions [3].

• Defeat Aelif.
• Speak to Jofnir Iceblade. • Destroy the Mortuum Vivicus. • Speak to Jofnir Iceblade.

• Speak to Merric at-Aswala. • Speak to Countess Hakruba. • Make your decision. • (Note: In this guide we let Sees-All-Colors stay). • Follow Merric at-Aswala out of the Earth Forge then speak with him. • Use the Portal to the Guildhall. • Turn-in Quest: Speak to Jofnir Iceblade. • Quest Reward: Prismatic Weapon (Note: Player’s Choice on which type of
weapon)(Variable Damage, Deals 52 Magic Damage to Undead and Daedra, Increase Weapon and Spell Critical values by 6%, Lvl. 43), and 548 gold.
• Riften is the main city in The Rift. It has a bank, crafting stations, stables and more so use them when you need them.
• Head to the Mage’s Guild next. 227.2. The Mad God’s Bargain (Mage’s Guild Quest – Lvl. 43)
• Speak to Valaste.

• Place the Books [4] in the Pillars of Light [4].
• Speak to Arch-Mage Shalidor. • Wait for Arch-Mage Shalidor to finish. • Enter the Portal to Eyevea.
• Speak to Arch-Mage Shalidor. • Head to the Guild Hall. • Speak to Sheogorath.
• Speak to Arch-Mage Shalidor. • Close the Portals [3] by taking the Crystals [3] powering them.

• Return to the Guildhall and place the Crystals [3] in the Sconces [3].
• Speak to Arch-Mage Shalidor. • Enter the Guildhall.

• Defeat Haskill. • Make your choice. • (Note: In this guide we let Valaste stay). • Turn-in Quest: Speak to Valaste. • Quest Reward: Spellbreaker’s Staff (Two-Handed Frost Staff, 88 Damage, Deals 26
Frost Damage, Reduces the cooldown of Weapon Enchantments by 40%, Lvl. 43), and 548 Gold.
• Talk to Guard Bredrek inside Riften.

291.1. In His Wake (The Rift Side Quest – Lvl. 41)
• Pickup Quest: Given by Guard Bredrek inside Riften. He’ll greet you as you enter the zone.
• (Quest continues in 288.2)
292.1. Redguard on the Run (The Rift Side Quest – Lvl. 40)
• Pickup Quest: Given by Gorgath Deadeye, near the Wayshrine in Riften. • (Quest continues in 289.2)
291.2. In His Wake (The Rift Side Quest – Lvl. 41)

• Head to the most Northern part of Riften where you must rescue Citizens [3] from the Rubble.
• (Quest continues in 288.2) • Talk to Sarisa Rothalen at the ruined houses.
293. All’s Fair (The Rift Side Quest – Lvl. 38)
• Pickup Quest: Given by Sarisa Rothalen at the ruined houses.
• Head to the Marketplace and talk to Bar-Neeus, also search the Chest near him. • Talk to Sarisa Rothalen again. • We decided to tell Bar-Neeus about Sarisa’s plan. Talk to him. • Head back to Sarisa Rothalen. • Turn-in Quest: Speak to Sarisa Rothalen. • Quest Reward: Contraband Trousers (Light Armor: Legs, 89 Armor, Max Stamina +54,
Inspiration Gained from Extraction +27%, Lvl. 38), 255 Gold.
291.3. In His Wake (The Rift Side Quest – Lvl. 41)

• Head further North and collect Buckets of Water which you must use to put out Fires [4].
• Burn Corpses [4] nearby.
• Grab the Skyshard to the West. It’s hidden behind a mountain (see map above). • Head back to Riften and talk to Guard Captain Viveka in the most Northern part. • Turn-in Quest: Speak to Guard Captain Viveka. • Quest Reward: 133 Gold.
294. Pulled Under (The Rift Side Quest – Lvl. 41)
• Pickup Quest: Given by Guard Captain Viveka upon handing in the previous quest.
• Head to Yiri’s Home in Riften and talk to Bonohild Windthorn. • Search the dead Assassin and take his Orders. • Talk to Bonohild Windthorn again.

• Leave the House and head to J’darzi at the Marketplace. Buy the White Moon Tea. • Head back to Yiri and talk to her. • Talk to Centurion Andrin to the South inside the Fighters Guild. • Talk to the Homeless People just to the East.
• Kill the Zombie that appears and take the Straw it drops. • Head to the Stables and search the Zombie corps there for the Pig Iron.
• Head to the Blacksmith and talk to Sirilu Tharam. • Kill the Zombie that appears and grab the Half-Rotten Salmon.
• Head to the Docks next and kill Anchorite Garmar. • Turn-in Quest: At Centurion Andrin. • Quest Reward: Staff of Rime (Frost Staff, 83 Damage, Reduces Target’s Power by 11
for 5 Sec, Armor and Spell Resistance +6%, Lvl. 41), 332 Gold.

• Talk to Captain Vari Warhammer nearby. • You should be level 44 now.
295.1. To The King (The Rift Side Quest – Lvl. 42)
• Pickup Quest: Given by Captain Vari Warhammer. • (Quest continues in 292.2) • Use all the amenities Riften has to offer and make sure to leave town with loads of free
space. Fast Travel to the Fallowstone Hall Wayshrine in the North.
289.1. Finding Winter’s Hammer (The Rift Side Quest – Lvl. 40)
• Turn-in Quest: Back at Sage Svari. • Quest Reward: 131 Gold.
296.1. Returning Winter’s Bite (The Rift Side Quest – Lvl. 40)
• Pickup Quest: Given by Sage Svari upon handing in the previous quest. • (Quest continues in 296.2) • Head back to the road to the South and follow it West and South until you meet Scout
Claurth.
297.1. Smoke on the Horizon (The Rift Side Quest – Lvl. 38)

• Pickup Quest: Given by Scout Claurth on the road North of Boulderfall Pass.
• Head South to Centurion Gjakil. • Save Pact Soldiers [5] from the Boneshaper Clan nearby. • Talk to Captain Jardirr in a Cave to the South. • (Quest continues in 297.2)
298. Raise the Colors (The Rift Side Quest – Lvl. 40)

• Pickup Quest: Given by Melril in the same Cave where Captain Jardirr is located.
• Kill the Reachmen Leaders [3] at the locations indicated on the map. • Mundus Stone: The Apprentice, which increases Spell Penetration, is located just to the
West.

• Plant the Banner nearby. • Turn-in Quest: At the Banner. • Quest Reward: Signaler’s Gloves (Heavy Armor: Hand, 92 Armor, Max Stamina +21,
Resistance to Critical Hits +70, Lvl. 38), 63 Gold.
297.2. Smoke on the Horizon (The Rift Side Quest – Lvl. 38)
• Enter the Signal Tower, light the Signal Fire and defend if from the Stonetalon Initiates
that appear. • Head directly East back to Captain Jardirr. • Turn-in Quest: At Captain Jardirr. • Quest Reward: Defender’s Breastplate (Heavy Armor: Hand, 193 Armor, Max Health
+81, This Item’s Armor Value +5%, Lvl. 38), 255 gold.
• Head back to the main road to the North and follow it to the Northwind Mine where you’ll quickly run into Tovisa.
299. Scouting the Mine (The Rift Side Quest – Lvl. 38)
• Pickup Quest: Given by Tovisa on the road East of the Northwind Mine. • Talk to Prisoner Tovisa near the Mine Entrance.
• Enter Alona’s Sanctum nearby and kill Alona. • Grab the Mine Key from the Chest. • Talk to Prisoner Gnarled-Root just outside. • Enter the Northwind Mine. • Talk to Tovisa just inside. • Turn-in Quest: At Tovisa.
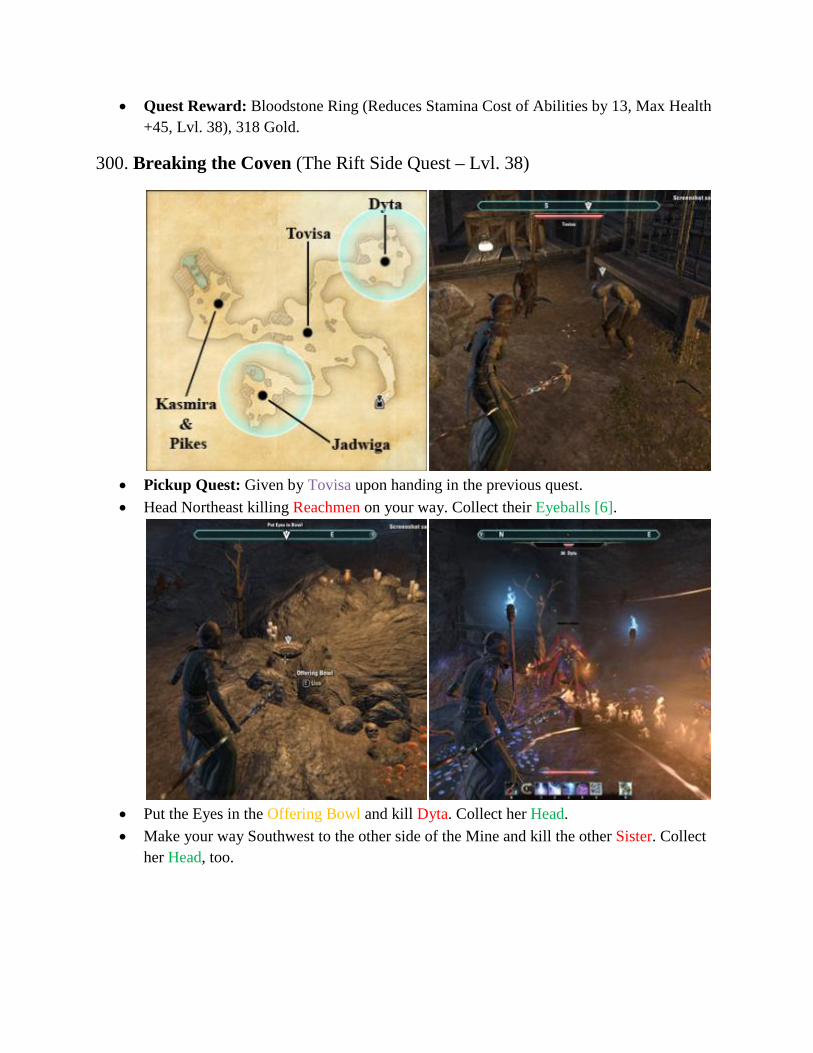
• Quest Reward: Bloodstone Ring (Reduces Stamina Cost of Abilities by 13, Max Health +45, Lvl. 38), 318 Gold.
300. Breaking the Coven (The Rift Side Quest – Lvl. 38)
• Pickup Quest: Given by Tovisa upon handing in the previous quest. • Head Northeast killing Reachmen on your way. Collect their Eyeballs [6].
• Put the Eyes in the Offering Bowl and kill Dyta. Collect her Head. • Make your way Southwest to the other side of the Mine and kill the other Sister. Collect
her Head, too.

• Head to the Northwest part of the Mine and put the Heads on the Pikes [2]. • Kill the Matriarch. • Talk to Tovisa who appears next to you and then leave through the North-exit. • Turn-in Quest: At Tovisa. • Quest Reward: Tovisa’s Dagger (Dagger, 78 Damage, On Hit: 17 Magic Damage and
Gain 7 Health, Item Sells for 150% More,Lvl. 38), 255 Gold. • Grab the Skyshard just outside the Mine. • Head to the road just Southeast and talk to Bermund.
288.2. To Vermin Woods (The Rift Side Quest – Lvl. 38)
• Turn-in Quest: At Bermund. • Quest Reward: 63 gold.
301. Dangerous Union (The Rift Side Quest – Lvl. 39)
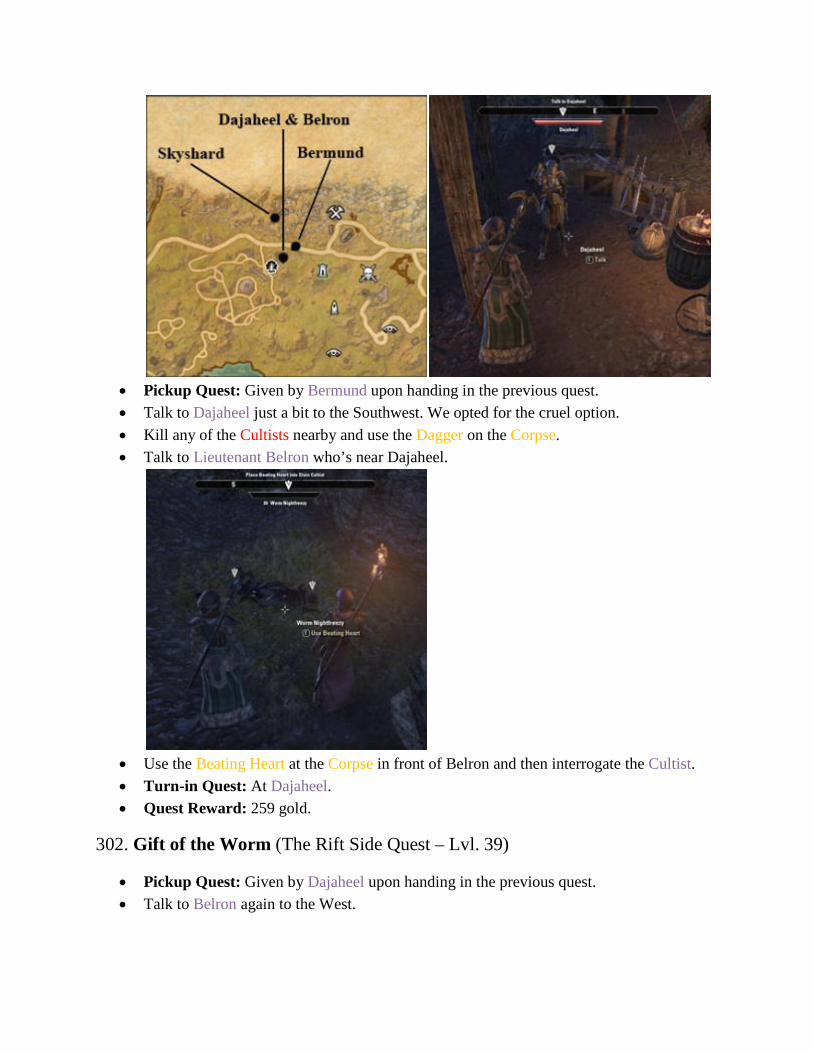
• Pickup Quest: Given by Bermund upon handing in the previous quest. • Talk to Dajaheel just a bit to the Southwest. We opted for the cruel option. • Kill any of the Cultists nearby and use the Dagger on the Corpse. • Talk to Lieutenant Belron who’s near Dajaheel.
• Use the Beating Heart at the Corpse in front of Belron and then interrogate the Cultist. • Turn-in Quest: At Dajaheel. • Quest Reward: 259 gold.
302. Gift of the Worm (The Rift Side Quest – Lvl. 39)
• Pickup Quest: Given by Dajaheel upon handing in the previous quest. • Talk to Belron again to the West.
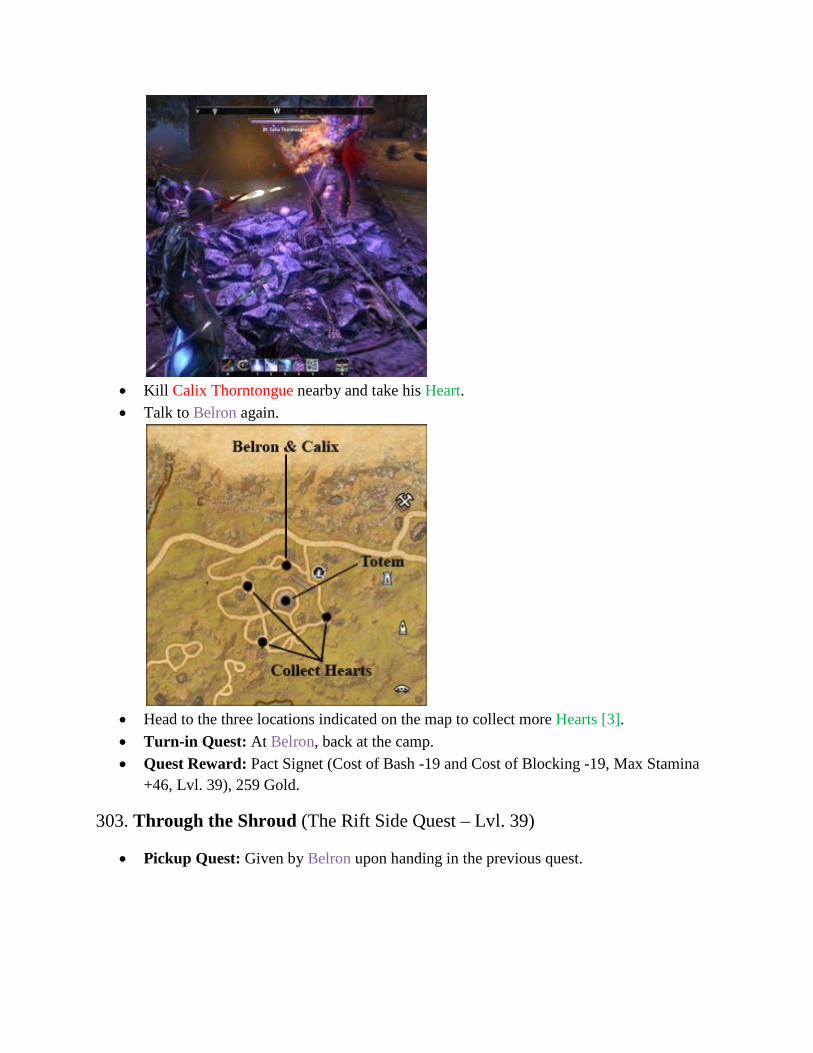
• Kill Calix Thorntongue nearby and take his Heart. • Talk to Belron again.
• Head to the three locations indicated on the map to collect more Hearts [3]. • Turn-in Quest: At Belron, back at the camp. • Quest Reward: Pact Signet (Cost of Bash -19 and Cost of Blocking -19, Max Stamina
+46, Lvl. 39), 259 Gold.
303. Through the Shroud (The Rift Side Quest – Lvl. 39)
• Pickup Quest: Given by Belron upon handing in the previous quest.

• Drink the Potion to become undead, then head to the Totem slightly Southwest and
destroy it. • Talk to Belron who’ll appear next to you.
• Enter the Ruins behind you and kill the waves of Graveborn and Skeletons that attack
you.
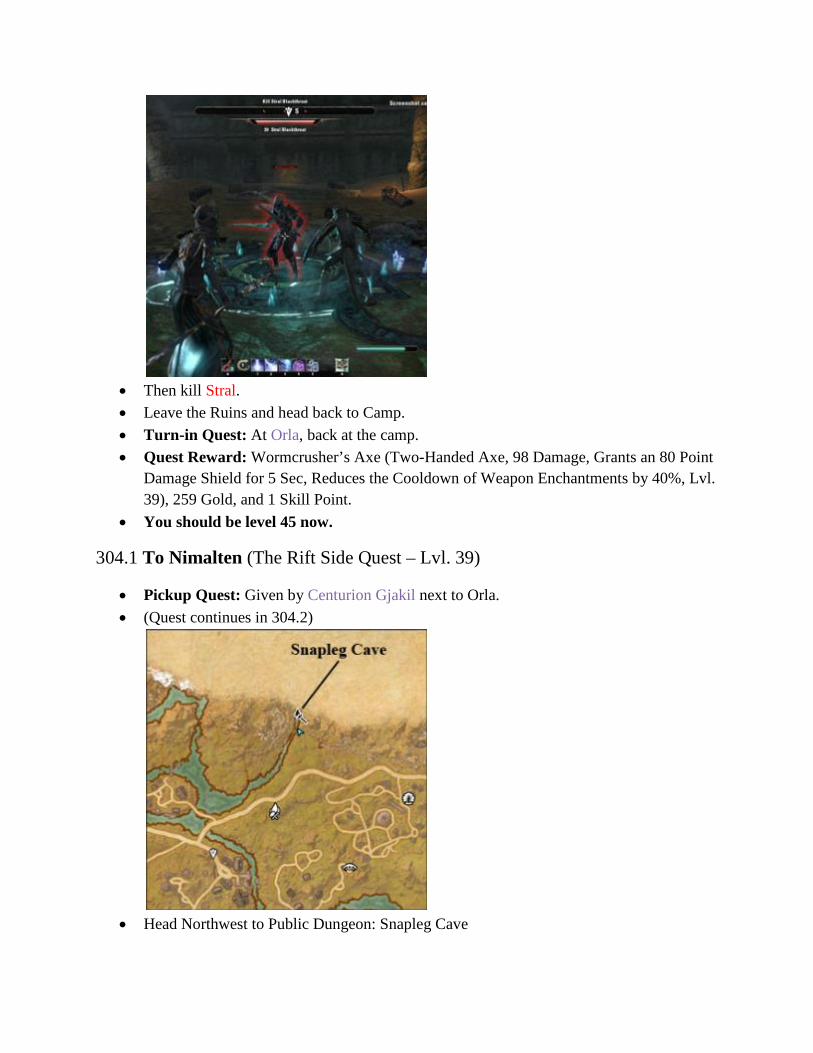
• Then kill Stral. • Leave the Ruins and head back to Camp. • Turn-in Quest: At Orla, back at the camp. • Quest Reward: Wormcrusher’s Axe (Two-Handed Axe, 98 Damage, Grants an 80 Point
Damage Shield for 5 Sec, Reduces the Cooldown of Weapon Enchantments by 40%, Lvl. 39), 259 Gold, and 1 Skill Point.
• You should be level 45 now.
304.1 To Nimalten (The Rift Side Quest – Lvl. 39)
• Pickup Quest: Given by Centurion Gjakil next to Orla. • (Quest continues in 304.2)
• Head Northwest to Public Dungeon: Snapleg Cave
• Make your way to the large room where you must kill Wispmother for Dungeon
completion and can find a Skyshard. • Leave the Dungeon and follow the road further West to Geirmund’s Hall.
305. Geirmund’s Guardian (The Rift Side Quest – Lvl. 40)
• Pickup Quest: Given by Runehild on the road to Geirmund’s Hall. • Talk to Thane Vofknir to the West. • Complete the Trials [3] in town.

• Trial of the Body: Defeat Brawlers [4] in a fight. Then defeat a Champion in a duel. • Reward: 131Gold.
• Trial of the Mind: Bribe Keema-Ta for the first riddles. First grab the Mirror from the
nearby house. Then get Water from the river just to the South. Finally get the Map from one of the other houses. Reward: 328 Gold.

• Trial of the Spirit: Drink the Mead and then head to the Spirit Fires and the other Spirit
Fires that appear. Reward: 263 Gold. • Talk to Thane Vofknir, and follow him. • Talk to Runehild. • Turn-in Quest: At Runehild. • Quest Reward: 131 Gold.
306. Save Your Voice (The Rift Side Quest – Lvl. 40)
• Pickup Quest: Given by Runehild upon handing in the previous quest.
• Talk to Logod Southwest of Geirmund’s Hall. • Talk to Jakaral further West. • Head back to town and talk to Thane Vofknir. • Turn-in Quest: At Thane Vofknir.

• Quest Reward: Bardic Surcoat (Light Armor: Chest, 111 Armor, Max Magicka +54, Increases This Item’s Armor Value +5%, Lvl. 40), 131 Gold.
• Head further West to Ivarstead.
307. Shroud Heart Barrow (The Rift Side Quest – Lvl. 40)
• Pickup Quest: Given by Malma who walks on the road in Ivarstead.
• Enter Shroud Heat Barrow. • Make your way to Brendar.

• Head further down the Barrow where you’ll find a Skyshard and the Necromancer which
you must kill for Dungeon Completion.
• Leave the Dungeon and talk to Brendar. • Turn-in Quest: At Brendar. • Quest Reward: 131 Gold.
308. Problems Into Profit (The Rift Side Quest – Lvl. 40)
• Pickup Quest: Given by Odunn Gray-Sky in Ivarstead.
• Catch Glowflies [10] nearby. • Talk to Odunn Gray-Sky.

• Talk to Ulfslod Gray-Sky at the docks nearby. • Turn-in Quest: At Ulfslod Gray-Sky. • Quest Reward: Jorunn’s Commendation (Neck, +5 Weapon Damage, Max Stamina +47,
Lvl. 40), 131 Gold. • Enter the inn.
292.2. Redguard on the Run (The Rift Side Quest – Lvl. 40)
• Talk to Adla inside Horker’s Tusk. • Talk to Akvid Gray-Sky nearby. • (Quest continues in 292.3) • Head to Pilgrim’s Rest.
309. Where the Frostheart Grows (The Rift Side Quest – Lvl. 40)

• Pickup Quest: Given by Mizrali in Pilgrim’s Rest. • Leave the Inn and head up the trail to the West until you reach the Frostheart Blossom
that you must collect. • Head back to Mizrali. • Talk to Odvild on the balcony. • Turn-in Quest: At Odvild. • Quest Reward: Odvild’s Pendant (Neck, +9 Health Recovery, Lvl. 40), 131 Gold. • Leave the Inn and head North where you’ll run into Netapatuu at the side of the road.
310.1. Tomb Beneath the Mountain (The Rift Side Quest – Lvl. 40)
• Pickup Quest: Given by Netapatuu just North of Pilgrim’s Rest. • Follow the road further North and enter the Pinepeak Caverns.

• Use the Hakra Shard on the Cultist body just inside, then talk to him. • (Quest continues in 310.2) • Talk to Nila Belavel nearby.
311. Research Subject (The Rift Side Quest – Lvl. 40)
• Pickup Quest: Given by Nila Belavel inside the Pinepeak Caverns. • Head South into the Caverns and kill Cultists. Collect the Equipment [6] they drop.
• Destroy the Urns [2] for Tomb Beneath the Mountain as you make your way to Charadin. • Make your way to the Western section of the Caverns where you must destroy the third
Urn.

• Head Northwest and kill Hakra. • Leave the Caverns and hand in both quests. • Turn-in Quest: At Nila Belavel. • Quest Reward: 263 Gold.
310.2. Tomb Beneath the Mountain (The Rift Side Quest – Lvl. 40)
• Turn-in Quest: At Hakra Cuisses. • Quest Reward: Hakra’s Cuisses (Heavy Armor: Legs, 167 Armor, Max Magicka +54,
Mundus Stone Effects +4.5%, Lvl. 40), 263 Gold.
292.3. Redguard on the Run (The Rift Side Quest – Lvl. 40)
• Kill Varnedo at the other side of the river,

• (Quest continues in 292.4) Head slightly Northeast to Nilwen.
312. Fierce Beasts of Ivarstead (The Rift Side Quest – Lvl. 40)
• Pickup Quest: Given by Nilwen just North of the Geirmund’s Hall Wayshine. • Kill Lockjaw just to the South. • Talk to Nilwen. • Head to Greatclaw to the East. • Talk to Nilwen again. • Head further East and kill Cracktooth. • Talk to Nilwen again. • Turn-in Quest: AtNilwen. • Quest Reward: Cracktooth’s Club (Two-Handed Mace, Reduces Target’s Armor by 170
for 5 Seconds, Weapon Skill Line Experience With this Weapon Type +24%, Lvl. 40), 263 Gold.
• Head to the Geirmund’s Hall Wayshrine and Fast Travel to Riften.
292.4. Redguard on the Run (The Rift Side Quest – Lvl. 40)
• Turn-in Quest: At Gorgath Deadeye, near the Wayshrine in Riften. • Quest Reward: Deadeye’s Blade (One-Handed Sword, 81 Damage, On Hit: 23 Poison
Damage, Increases Weapon and Spell Critical Values by 2%, Lvl. 40), 131 Gold. • Leave Riften in Southern direction and head towards Skald-King Jorunn. If you’ve
discovered any Wayshrines to the South you can fast travel to cut down your travel time. We’ll skip a large portion of The Rift as leveling in Cold Harbor is faster. You can come back here later to complete the remaining locales.

295.2. To The King (The Rift Side Quest – Lvl. 42)
• Turn-in Quest: At Skald-King Jorunn. • Quest Reward: 67 Gold.
313.1. Securing the Pass (The Rift Side Quest – Lvl. 42)
• Pickup Quest: Given by Skald-King Jorunn upon handing in the previous quest. • Enter Trolhetta just to the South. • (Quest continues in 313.2)
• Examine the dead Pact Soldier just inside Trolhetta.
314.1. Names of the Fallen (The Rift Side Quest – Lvl. 42)

• Pickup Quest: Given upon examination of the dead Pact Soldier just inside Trolhetta. • Collect Amulets [7] as you make your way through the Cave. • (Quest continues in 314.2).
313.2. Securing the Pass (The Rift Side Quest – Lvl. 42)
• Make your way to the end of the Cave and enter the Sanctum.
• Kill Fortuna Iceheart and her Companions [2]. • Destroy the Reaper Orb. • Leave the Cave through the Southwestern Exit. • (Quest continues in 313.3) • Talk to Plays-With-Fire at Trolhetta.
315. Worm Cult Summoner (The Rift Side Quest – Lvl. 42)

• Pickup Quest: Given by Plays-With-Fire at Trolhetta.
• Make your way up the hill and kill Kerelia Lucullus. • Enter the Sanctum nearby. • Kill Fortuna Iceheart and her Companions [2], again, and destroy the Necrosis Orb for
Securing the Pass. • Enter the Trolhetta Summit. • Turn-in Quest: At Plays-With-Fire. • Quest Reward: 67 Gold.
313.3. Securing the Pass (The Rift Side Quest – Lvl. 42)
• Turn-in Quest: At Vigrod Wraithbane. • Quest Reward: Jorunn’s Commendation (Neck, Weapon Damage +6, Max Stamina +49,
Lvl. 42), 270 Gold.

316. Stomping Sinmur (The Rift Side Quest – Lvl. 42)
• Pickup Quest: Given by Vigrod Wraithbane upon handing in the previous quest.
• Head to the Summit and talk to Skald-King Jorunn. • Help kill the Cultists.
• Kill Sinmur. • Talk to Skald-King Jorunn. • Leave Trolhetta. • Talk to Vigrod Wraithbane. • Talk to Skald-King Jorunn. • Turn-in Quest: At Skald-King Jorunn.

• Quest Reward: Mace of the Companions (One-Handed Mace, 88 Damage, On Hit: Deals 21 Magical Damage and Restores 9 Stamina, Increases Armor and Spell Resistance by 4%, Lvl. 42), 270 Gold, and 1 Skill Point.
317.1. Messages Across Tamriel (The Rift Side Quest – Lvl. 43)
• Pickup Quest: Given by Skald-King Jorunn upon handing in the previous quest. • (Quest continues in 317.2) • Fast Travel to the Trolhetta Wayshrine and then talk to Narir just to the South.
314.2. Names of the Fallen (The Rift Side Quest – Lvl. 42)
• Turn-in Quest: At Narir. • Quest Reward: Pact Shoulder Guards (Heavy Armor: Shoulders, 173 Armor, Max
Health +36, Item Takes 24% Less Durability Damage, Lvl. 42), 135 Gold.
317.2. Messages Across Tamriel (The Rift Side Quest – Lvl. 43)
• Fast Travel to Mournhold.
• Talk to Trush inside the Mage’s Guild. • Talk to Vanus. • Use the Portal to Alliance Capital. • Speak with Queen Ayrenn. • Speak with Vanus Galerion. • Use the Portal to Alliance Capital. • Speak with High King Meric. • Speak with Vanus Galerion. • Use the Portal to Alliance Capital.

• Turn-in Quest: Speak to Vanus Galerion. • Quest Reward: 342 gold.
318. The Weight of Three Crowns (Bangkorai Main Story Quest – Level 43)
• Pickup Quest: Automatically given by Vanus Galerion.
• Take the Portal to Stirk. • Speak to Vanus Galerion.

• Head to the Summit Point. • Speak to Vanus Galerion then to Countess Hakruba. • Speak to the Alliance Leaders one by one.
• Speak with Vanus Galerion. • Close the Unstable Rifts [3].

• Speak to Vanus Galerion. • Head to the Portal Valley. • Speak with Vanus Galerion.
• Take the Portal to Coldharbour.
• Turn-in Quest: Speak with Cadwell.

• Quest Reward: 548 gold.
Coldharbour Quests 319. The Hollow City (Coldharbour Main Story Quest – Level 45)
• Pickup Quest: Automatically given by Cadwell. • Make your way into the Hollow City.

• Speak with The Groundskeeper. • Turn-in Quest: Follow The Groundskeeper and speak to her again. • Quest Reward: None.
320.1. The Army of Meridia (Coldharbour Main Story Quest – Level 48)
• Pickup Quest: Automatically given by The Groundskeeper.
• Travel East to the Court of Contempt Wayshrine. • (Quest continues in 337.2).
321. The Hall of Judgement (Coldharbour Main Story Quest – Level 46)
• Pickup Quest: Speak to Malkur Valos.
• Pickup the Skyshard. • Destroy the Elemental Crystals [3].
• Collect the Gate Key.

• Speak to Malkur Velos.

• Enter the Hall of Judgement. • Defeat Magistrate Bogtro.

• Enter the Holding Cells. • Take the Cage Key on top of the table then open the Cages [3].

• Speak to Tarrami.

• Head outside. • Defend the mages from the Daedric Minions.
• Defeat Judge Xiven.

• Exit the Hall of Judgement. • Turn-in Quest: Meet the Mages outside then speak to Malkur Valos.
• Quest Reward: Arbiter’s Vambraces (Heavy Armor: Hand, 106 Defense, +28 Max Magicka, Increase Armor Enchantment effect by 11%, Lvl. 46), and 357 gold.
• Us the portal to head back to the Hollow City, then take the West Gate to the Tower of Lies.

322. Truth, Lies and Prisoners (Coldharbour Main Story Quest – Level 44) • Pickup Quest: Speak to Gwilir.
• Jump into the water.
• Pickup the Skyshard.

• Speak with Skordo the Knife.
• Speak to Lyranth.

• Rescue Vikord.
• Rescue Sinfray.

• Examine Bograth.
• Head to the Overseer’s Chamber.

• Enter the Chamber then defeat Iverseer Aruz. • Take the Key from the Overseer’s Chest.

• Head to the Liar’s Passage.
• Fight your way through the passage to the Tower of Lies.

• Speak to Lyranth. • Speak to Captain Eilram.
• Find Captain Eilram’s Sword in the area marked in the map.
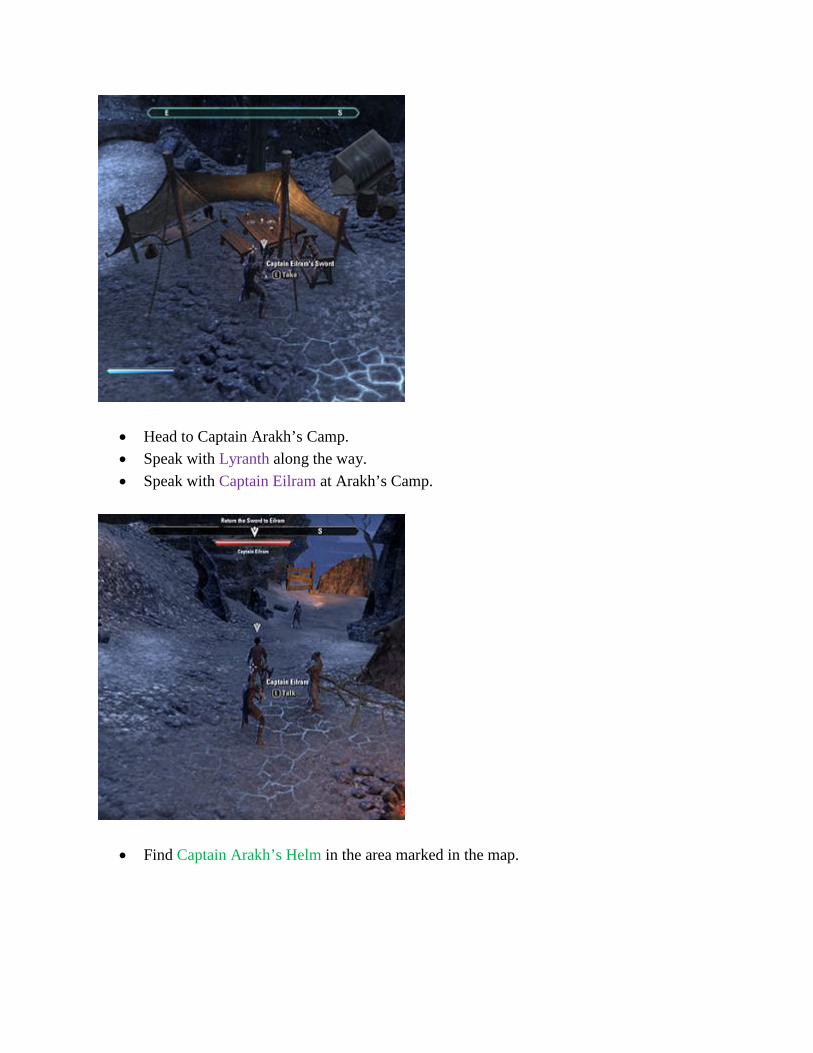
• Head to Captain Arakh’s Camp. • Speak with Lyranth along the way. • Speak with Captain Eilram at Arakh’s Camp.
• Find Captain Arakh’s Helm in the area marked in the map.

• Speak to Captain Arakh.
• Speak to Lyranth. • Head to Ifriz’s location then kill him.
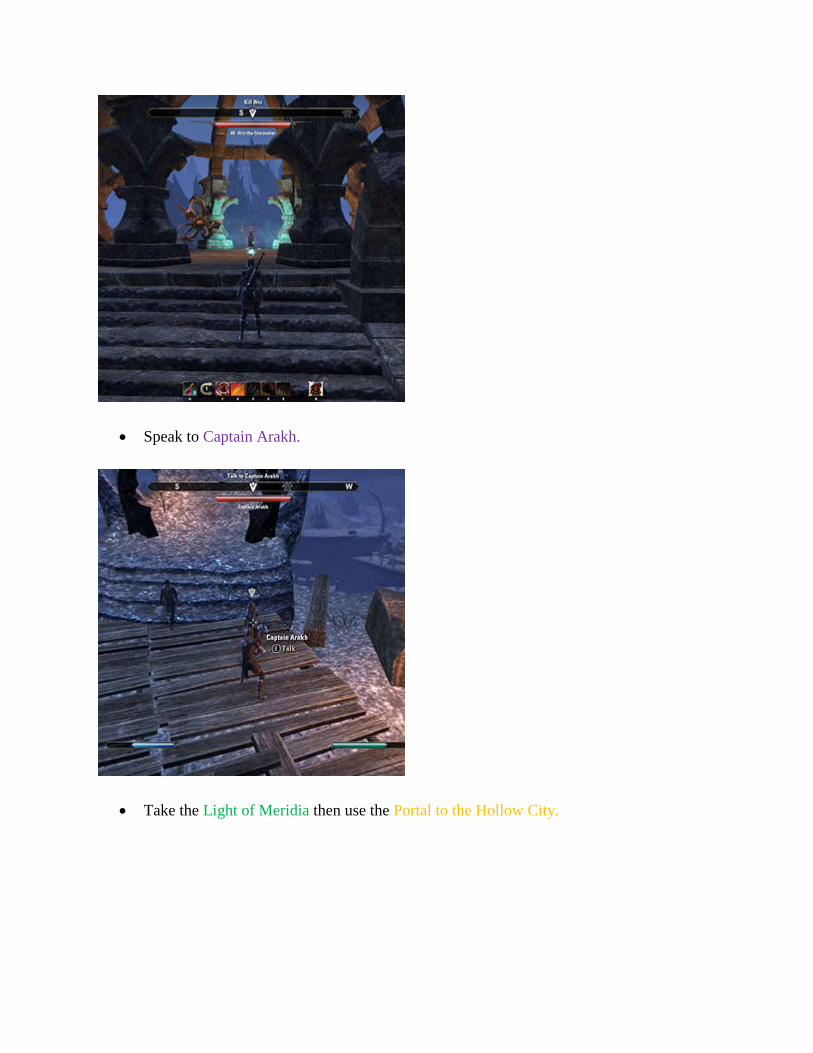
• Speak to Captain Arakh.
• Take the Light of Meridia then use the Portal to the Hollow City.

• Turn-in Quest: Speak to Skordo the Knife.

• Quest Reward: Skordo’s Stalwart (Off-Hand Shield, 123 Defense, +60 Max Stamina, Increase resistance to Critical Hits by 70, Lvl, 44), and 556 gold.
• You should be Level 47. • Head west towards the Library of Dusk.
323. Through the Daedric Lens (Coldharbour Main Story Quest – Level 44)
• Pickup Quest: Speak to the Projection of Kireth Vanos.
• Unlock the Library of Dusk Wayshrine.

• Find and destroy the Daedric Lenses [3].
• Enter the Library Gallery.
• Turn-in Quest: Speak to Kireth Vanos.

• Quest Reward: Dungeon Delving Staff (Two-Handed Lightning Staff, 88 Damage, Deals 26 Frost Damage, Increase inspiration gained from extraction by 57%, Lvl. 44), and 278 gold.
324. The Library of Dusk (Coldharbour Main Story Quest – Level 44)
• Pickup Quest: Automatically given by Kireth Vanos. • Use the Observation Windows [3].
• The details of each mage is as follows:

• Raynor Eye of Mora, Yellow crystals. • Laurent Cross of Meridia Blue crystals. • Telenger Star of Azura Blue crystals. • Enter the Library of Dusk.
• Speak to Raynor Vanos (Take note of the details of the rooms listed above). • Speak to Lady Clarisse Laurent. • Head to Telenger’s room and read his Note.
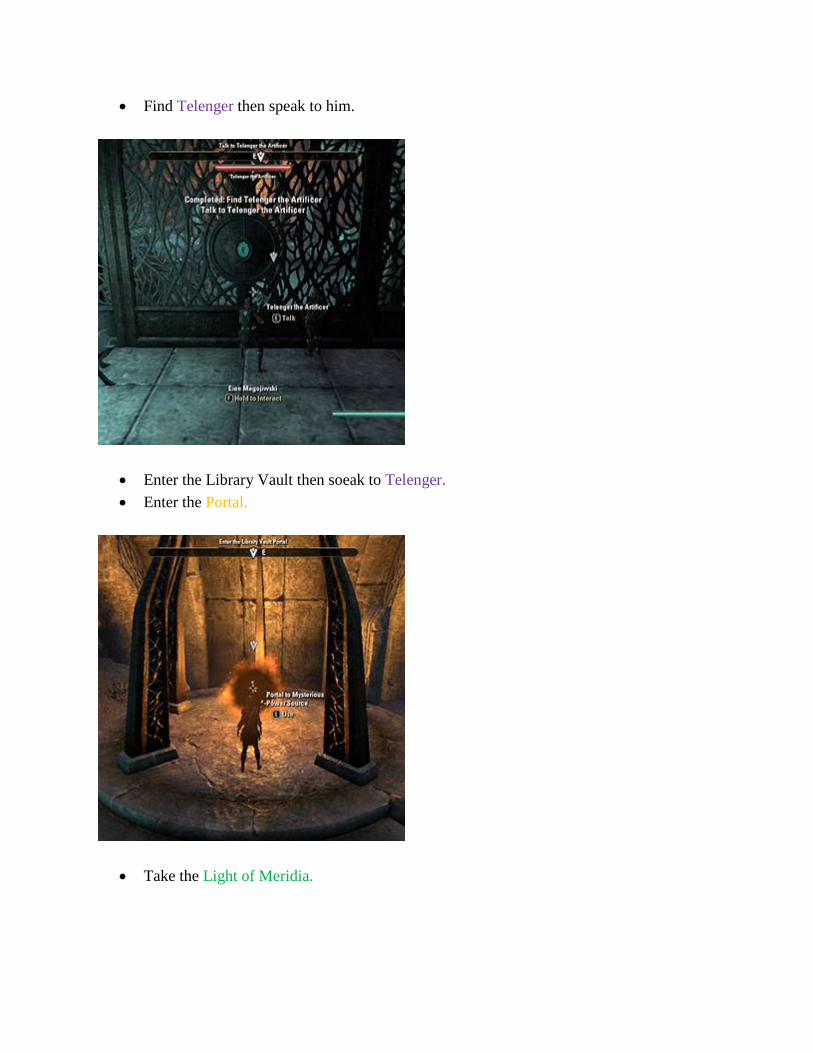
• Find Telenger then speak to him.
• Enter the Library Vault then soeak to Telenger. • Enter the Portal.
• Take the Light of Meridia.

• Fast Travel to the Library of Dusk Wayshrine. • Turn-in Quest: Speak to Telenger.
• Quest Reward: Dungeon Delving Mantle (Medium Armor: Shoulders, 148 Defense, +24 Max Stamina, 24% to avoid decay when defeated, Lvl. 44), and 556 gold.
• Make your way west towards The Moonless Walk. 325. Into the Woods (Coldharbour Main Story Quest – Level 45)
• Pickup Quest: Examine the Abandoned Pack.

• Read Captain Alphaury’s Journal.
• Examine the Placed Blade at the 1st location.
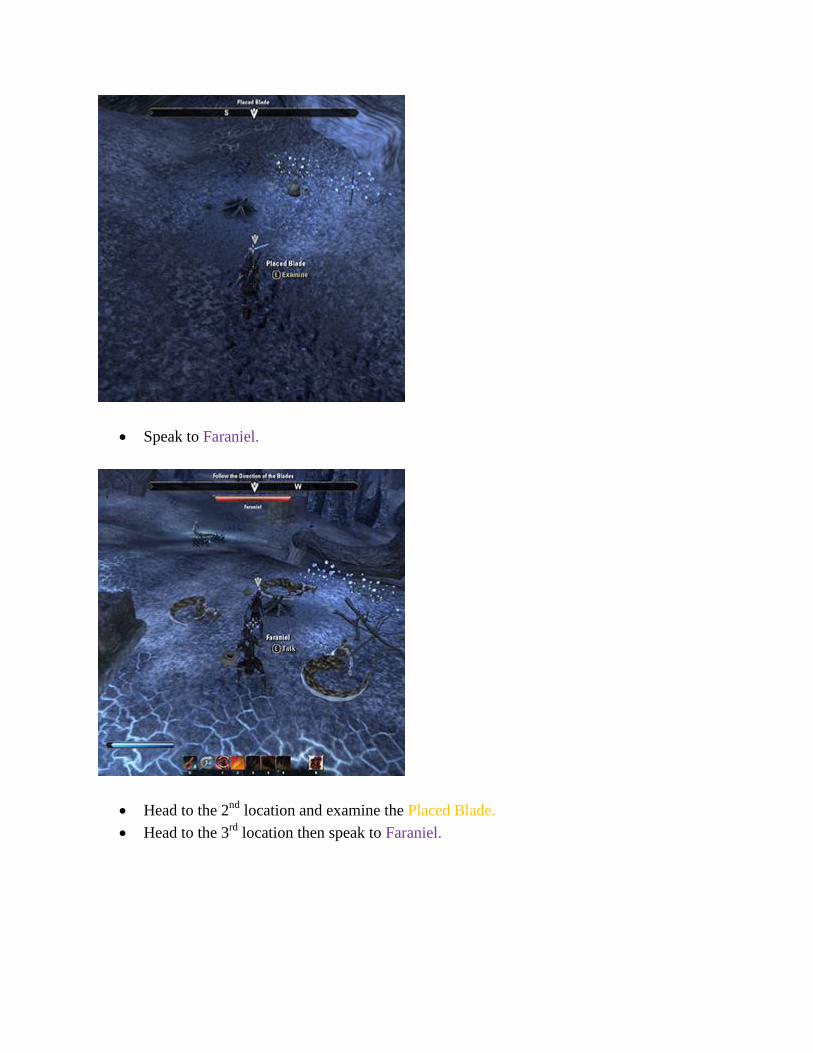
• Speak to Faraniel.
• Head to the 2nd location and examine the Placed Blade. • Head to the 3rd location then speak to Faraniel.

• Collect Spriggan Bark [3] fom Spriggans. • Bring the Spriggan Bark [3] to Faraniel. • Cross the Ayleid Bridge using the Wisps of Light to see the Shadow Runners. • Follow a Shadow Runner.
• Defeat the Shadow Walkers [3]. • Speak to Sergeant Kamu.

• Choose which side to ask for help. • (Note: In this guide we choose the Wood Elf). • Turn-in Quest: Speak to Faraniel. • Quest Reward: Fighter’s Guild Visor (Medium Armor: Head, 157 Defense, +90 Max
Health, Increases this item’s Armor Value by 5%, Lvl. 45), and 352 gold. 326. The Shadow’s Embrace (Coldharbour Main Story Quest – Level 45)
• Pickup Quest: Automatically given by Faraniel.

• Head to the Bridge to meet Faraniel.
• Head to the area marked in blue and Kill Lamias or Burn their Nests [12].

• Defeat the Lamia Champion.

• Head to the Center Camp. • Speak to Faraniel. • Speak to the Wood Elves [4] in the area (There are Persuade and Intimidate chances
here).
• Speak to Faraniel. • Use the Portal to Council of Elders.

• Speak to the Council Elders [4], the answers chosen in this guide for each conversation is as follows:
• Elder Erthor: You have been Tricked • Elder Elrasil: I’ve seen the Daedric Anchors, thousands have died. • Elder Inril: Coldharbour’s chains rip through Nirn. • Elder Gluin: Lose the attitude, and listen well
• Use the Portal then speak to Faraniel. • Speak to Elder Erthor. • Speak to Faraniel.

• Head to the Ruined Passage.
• Pickup the Skyshard. • Head inside the Ruined Passage.
• Examine the Ancient Branch.

• Take the Light of Meridia.

• Turn-in Quest: Speak to King Lalorian Dynar at the top of the stairs. • Quest Reward: Bow of Penumbra (Two-Handed Bow, 90 Damage, Deals 26 Poison
Damage, Increase Armor and Spell Penetration by 8%, Lvl. 45), and 564 gold. 327. Light from the Darkness (Coldharbour Main Story Quest – Level 46)
• Pickup Quest: Automatically given by King Lalorian Dynar.
• Enter the Tower.
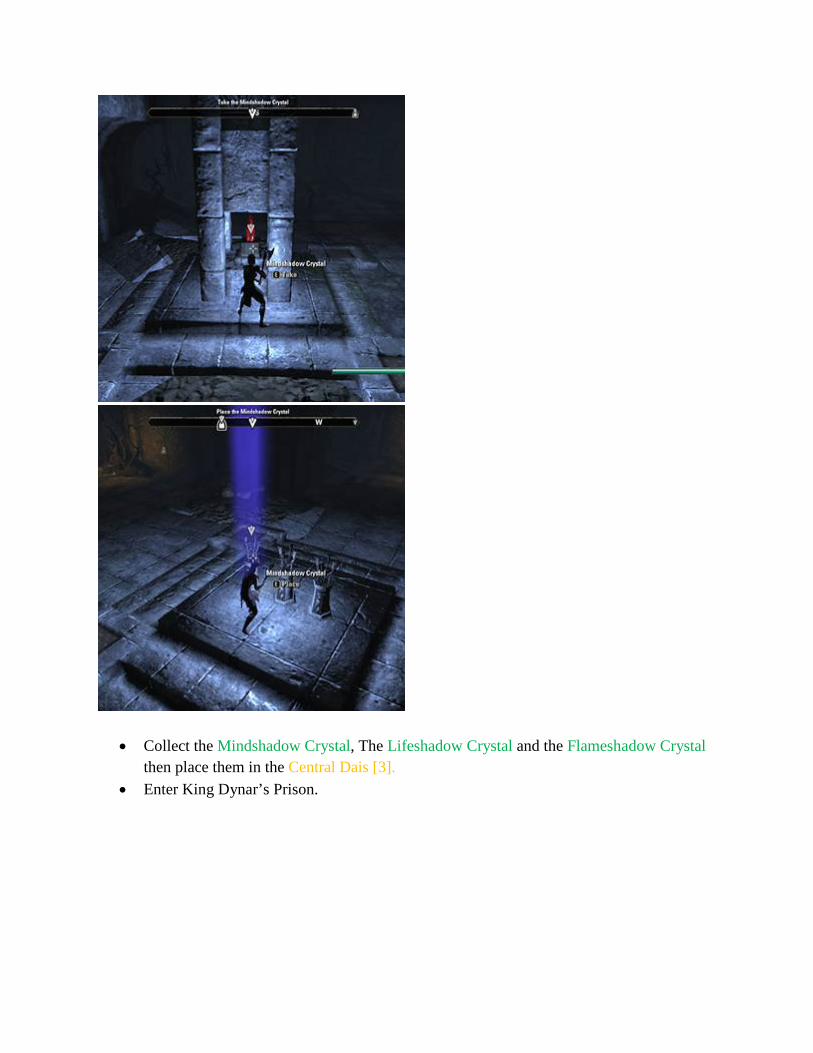
• Collect the Mindshadow Crystal, The Lifeshadow Crystal and the Flameshadow Crystal then place them in the Central Dais [3].
• Enter King Dynar’s Prison.

• Place a Light of Meridia at the North and South Emitter. • Rotate each Prism until the light reaches The Crystal Receivers [2].
• Speak to King Lalorian Dynar.

• Follow King Lalorian Dynar then take the Portal to the Hollow City. • Enter the Fighter’s Guild Training Grounds. • Turn-in Quest: Speak to King Lalorian Dynar.
• Quest Reward: Ayleids’ Coat of Memories (Heavy Armor: Chest, 213 Defense, +99 Max Health, Increase resistance to Critical Hits by 70, Lvl. 46), and 572 gold.
• You should be Level 48. • Enter the Fighter’s Guild. • Speak to Darien Gautier.

• Head out and take the east gate towards the Everfull Flagon Wayshrine. • Head to the Vault of Haman Forgefire Public Dungeon.
328. Vault of Haman Forgefire Public Dungeon (Coldharbour Public Dungeon)
• Pickup the Skyshard.
• Defeat the Dungeon Boss.

• Leave the Dungeon. • Take the road south towards the Everfull Flagon.
329. Special Blend (Coldharbour Side Quest – Level 47)
• Pickup Quest: Examine Gamirth’s Corpse.
• Read the Note. • Enter the Everfull Flagon and speak to Bernt the Brittle.

• Speak to Nelhilda upstairs.
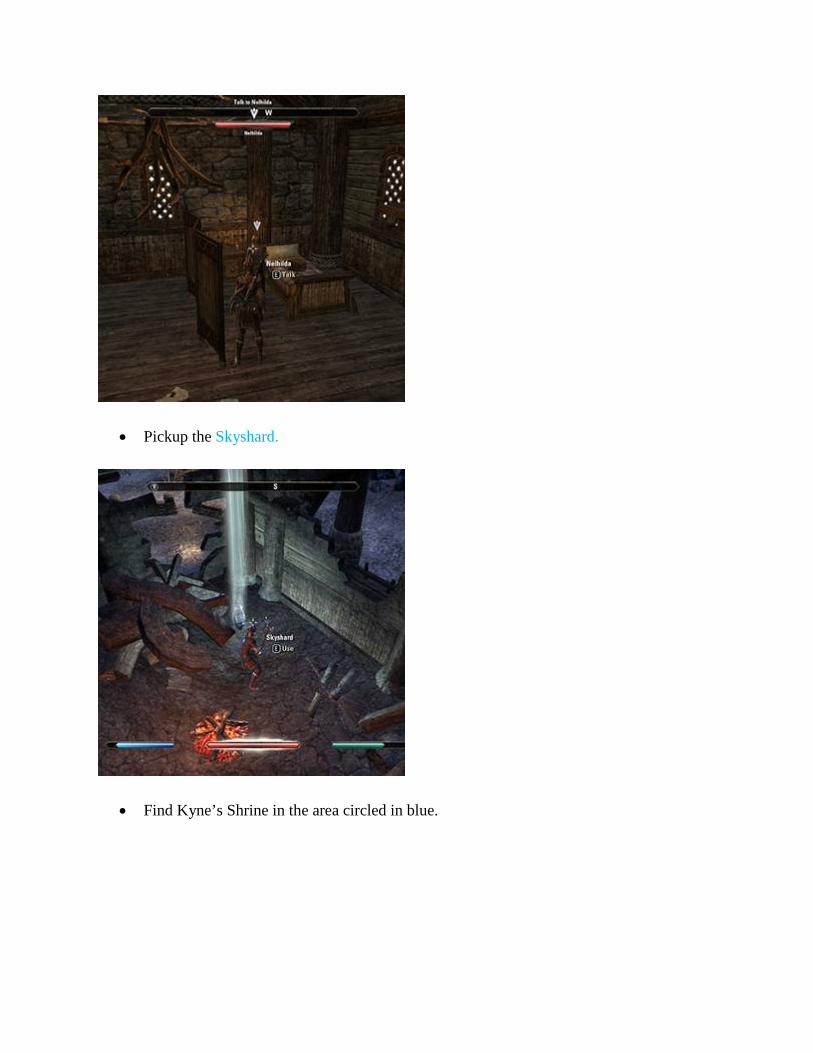
• Pickup the Skyshard.
• Find Kyne’s Shrine in the area circled in blue.

• Collect the Runestone of Kyne. • Gather Kyne’s Tears [4] around the area circled in blue.
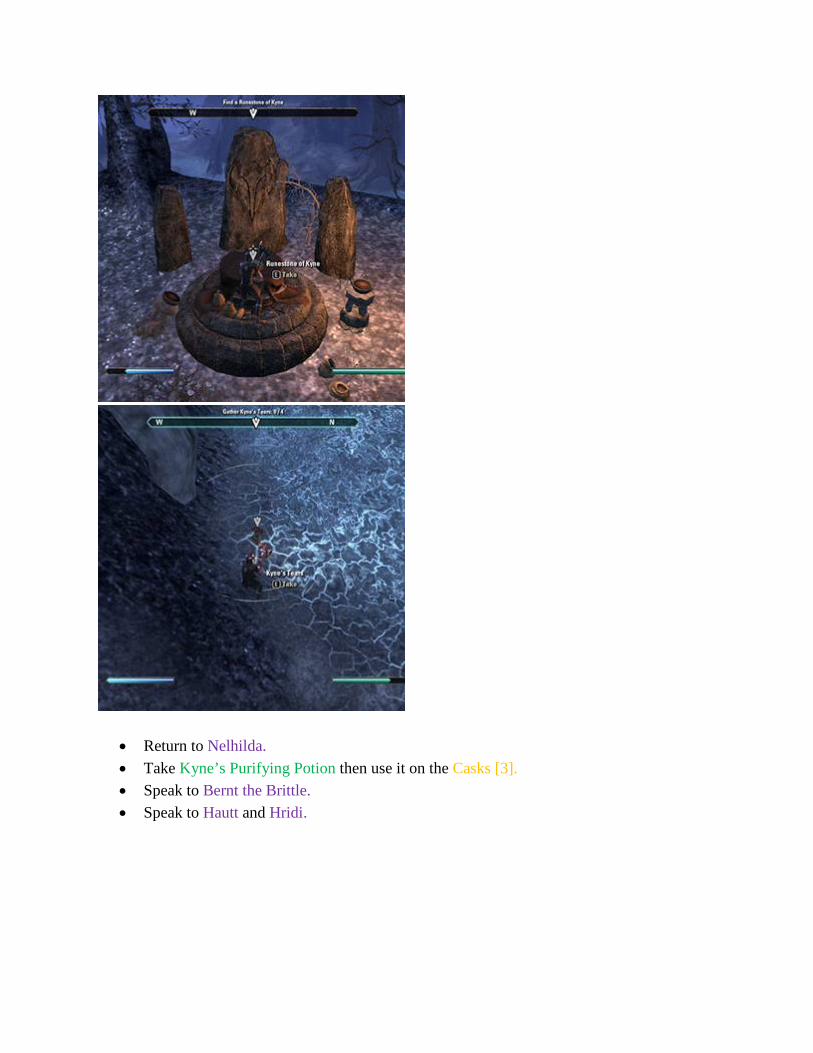
• Return to Nelhilda. • Take Kyne’s Purifying Potion then use it on the Casks [3]. • Speak to Bernt the Brittle. • Speak to Hautt and Hridi.
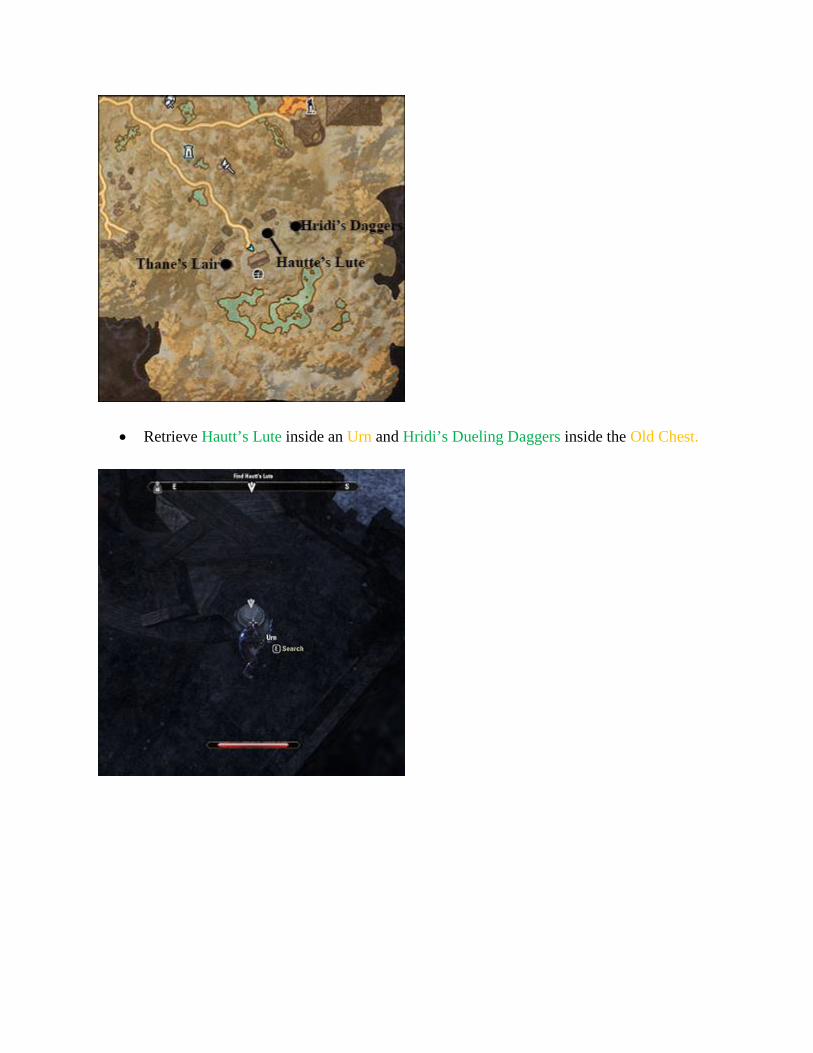
• Retrieve Hautt’s Lute inside an Urn and Hridi’s Dueling Daggers inside the Old Chest.

• Return to the Everfull Flagon. • Speak to Bernt the Brittle. • Head to the Thane’s Lair.
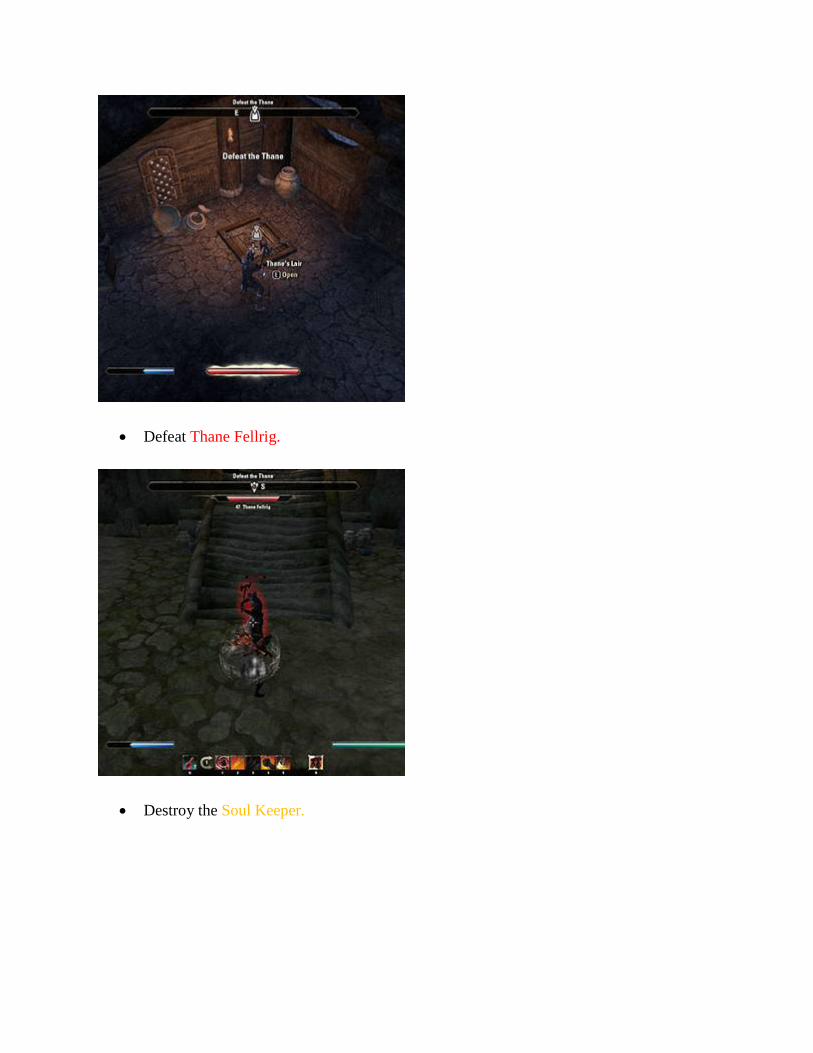
• Defeat Thane Fellrig.
• Destroy the Soul Keeper.

• Return to the Everfull Flagon. • Speak to Bernt the Brittle. • Speak to Nelhilda. • Turn-in Quest: Make your choice. • (Note: In this guide we ask Nelhilda to forgive Bernt). • Quest Reward: Everfull Girdle (Medium Armor: Waist, 66 Defense, +40 Max Health,
Reduces cost of Sprinting by 2%, Lvl. 47), and 580 gold. • Head northeast towards the Black Forge.
330. Vanus Unleashed (Coldharbour Main Story Quest – Level 47)
• Pickup Quest: Speak to the Projection of Vanus Galerion.

• Head into the Black Forge.
• (Note: The entrance is to the side, reachable by crossing the lava by jumping through a narrow land bridge).
• Speak to Galerion’s Health.

• Kill Abhorrent Soldiers in the area to collect Galerion’s Health Essences [5]. • Return to Galerion’s Health. • Enter the Slave Quarters. • Speak to Galerion’s Stamina.

• Take the Essence Extractor and use it on the Slaves in the area or just Persuade or Intimidate them to release Galerion’s Stamina Essences [5].
• Return to Galerion’s Stamina. • Enter the Foundry. • Speak to Galerion’s Magika.

• Unlock the Seals of Binding [4]. • Return to Galerion’s Magicka. • Enter the Boiler Tunnels. • Defeat Kothutuilk.

• Enter the Boiler. • Use the Conduits [3] to release Vanus Galerion.
• Turn-in Quest: Follow Vanus Galerion out. • Quest Reward: Black Forge Blade (One-Handed Sword, 93 Damage, Deals 21 Magic
Damage and recover 9 Health, Increase Weapon Enchantment effect by 16%, Lvl. 47), and 580 gold.
331. Breaking the Shackle (Coldharbour Main Story Quest – Level 48)

• Pickup Quest: Automatically given by Vanus Galerion.
• Follow Vanus Galerion. • Enter the Great Shackle. • Head to the Power Chamber. • Use the Magikca Conduit.
• Head upstairs. • Rescue Sage Tirora.
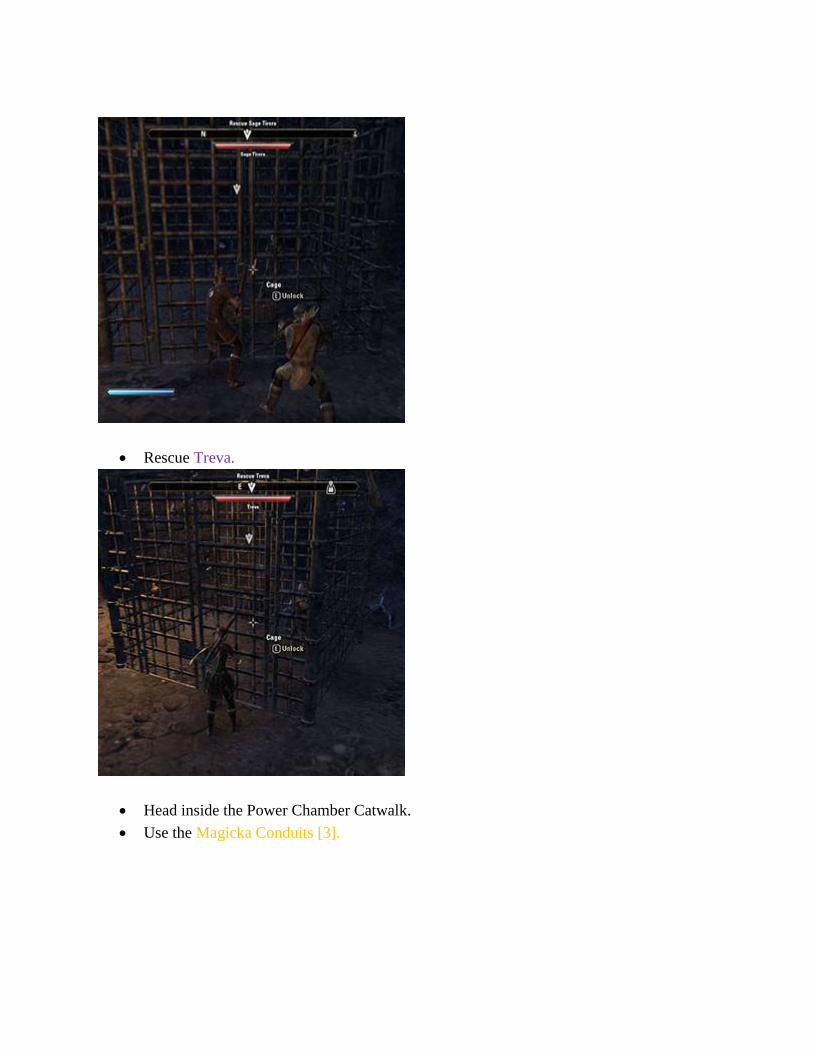
• Rescue Treva.
• Head inside the Power Chamber Catwalk. • Use the Magicka Conduits [3].

• Enter the Mooring.
• Defend Vanus Galerion.

• Observe the Great Shackle. • Take the Portal to the Hollow City. • Turn-in Quest: Speak to Vanus Galerion. • Quest Reward: Galerion’s Spare Staff (Two-Handed Flame Staff, 95 Damage, Deals 21
Magic Damage and recover 9 Magicka, Increase Weapon and Spell Critical values by 4%, Lvl. 48), and 367 gold.
• Head inside the Mage’s Guild.
• Speak to Nalia.

• Head to the Chapel. 320.2. The Army of Meridia (Coldharbour Main Story Quest – Level 48)
• Speak with The Groundskeeper at the Chapel.
• Enter the Chapel of Light. • Speak to King Lalorian Dynar.
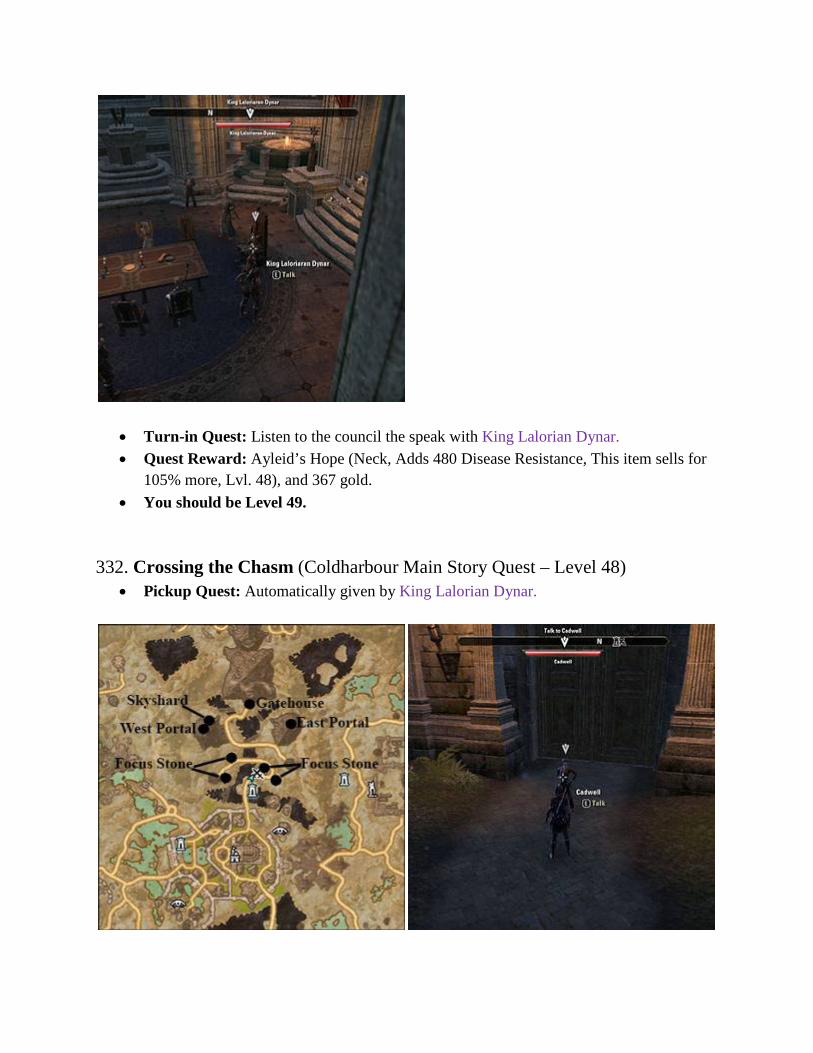
• Turn-in Quest: Listen to the council the speak with King Lalorian Dynar. • Quest Reward: Ayleid’s Hope (Neck, Adds 480 Disease Resistance, This item sells for
105% more, Lvl. 48), and 367 gold. • You should be Level 49.
332. Crossing the Chasm (Coldharbour Main Story Quest – Level 48)
• Pickup Quest: Automatically given by King Lalorian Dynar.

• Speak to Cadwell in front of the exit to the Chasm. • Speak to Gathwen.
• Destroy the Focus Stones [4].
• Speak with Cadwell. • Enter the Portal to the Chasm Second Tier.

• Close the East and West Portals. • Pickup the Skyshard.
• Head to the Gatehouse then speak with Cadwell.

• Enter the Gatehouse Span. • Cross the Span.
• Start the North Flywheel. • Start the South Flywheel. • Unlock the Gatehouse. • Enter the Chasm Gatehouse. • Defeat Tiny.

• Defeat Molag Grunda.
• Exit the Gatehouse. • Turn-in Quest: Speak to Vanus Galerion. • Quest Reward: Molag Grunda’s Girdle (Heavy Armor: Waist, 82 Defense, +28 Max
Magicka, Increase Armor Enchantment effect by 11%, Lvl. 48), and 367 gold. 333. The Harvest Heart (Coldharbour Main Story Quest – Level 49)
• Pickup Quest: Automatically Given by Vanus Galerion.

• Mark the Vampire Lairs [4] and Collect Vampire Blood [4] in the area marked on the map.
• Go to the Harvest Heart.

• Speak to Virgar the Red. • Make your choice. • (Note: In this guide we help Virgar the Red). • Go to the West Ritual Site and defend Virgar the Red.
• Go to the East Ritual Site and defend Virgar the Red. • Return to the Harvest Heart. • Speak to Virgar the Red. • Destroy the Light Binding Totems [5].

• Turn-in Quest: Return and speak to Virgar the Red. • Quest Reward: Blood-Red Brogans (Medium Armor: Feet, 161 Defense, +26 Max
Stamina, Reduces the cost of Sprinting by 2%, Lvl. 49), and 372 gold. • Head west to Mal Sorra’s Tomb.
334. News of Fallen Kin (Coldharbour Side Quest – Level 46)
• Enter Mal Sorra’s Tomb.

• Pickup Quest: Examine the Fighter’s Note.
• Pickup the Skyshard.
• Defeat the Dungeon Boss.

• Take the nearest wayshrine to the Hollow City.
• Head to the Inn. • Turn-in Quest: Speak to Grundskar.
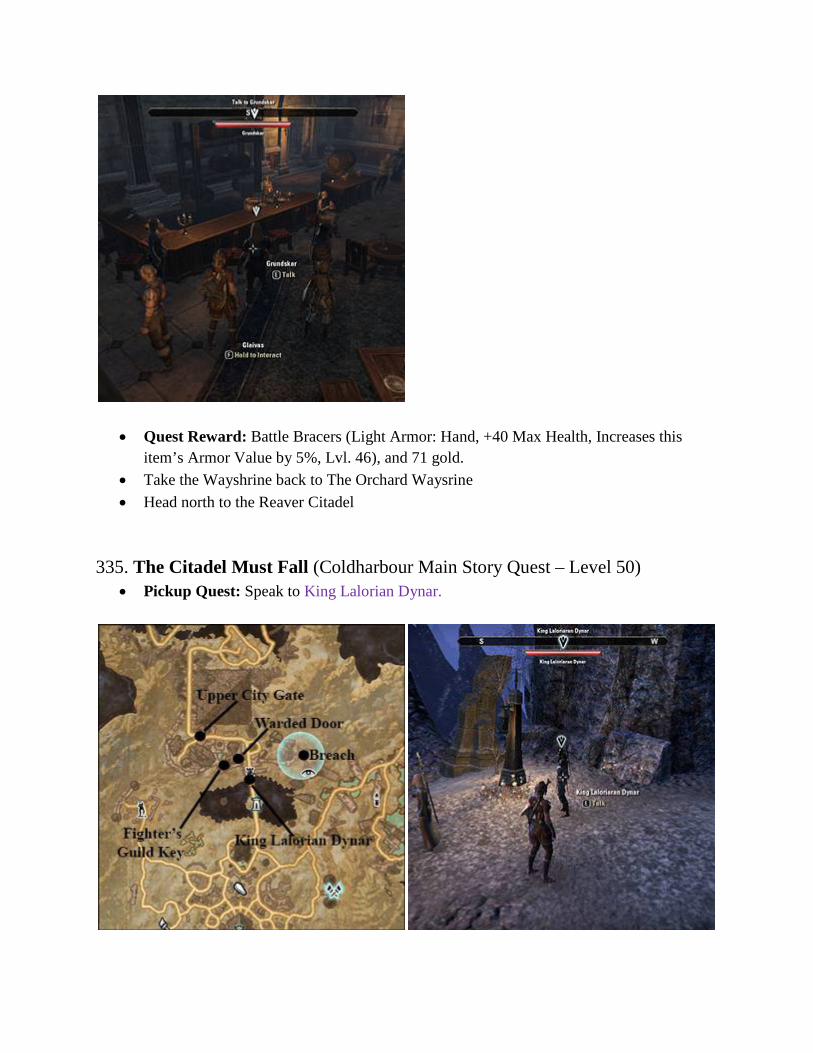
• Quest Reward: Battle Bracers (Light Armor: Hand, +40 Max Health, Increases this item’s Armor Value by 5%, Lvl. 46), and 71 gold.
• Take the Wayshrine back to The Orchard Waysrine • Head north to the Reaver Citadel
335. The Citadel Must Fall (Coldharbour Main Story Quest – Level 50)
• Pickup Quest: Speak to King Lalorian Dynar.

• Head north then speak to Lyranth.
• Travel east to the area marked in blue to find a way in. • Head inside the Citadel and speak to Lyranth. • Make your way west of the city.
• Examine the Ram Horn Lamp to find the Fighter’s Guild Ward Key.
• Unlock the Warded Door. • Enter the Fighter’s Guild Hall then speak to King Lalorian Dynar.
• Head to the Upper City. • Defeat the Dremora Soldiers that appear at the Upper Gate.

• Enter the Upper City. • Collect the Portal Stones [4] in the area marked in blue.
• Enter the Mage’s Guild Hall then restore the Portal Stones [4].

• Speak with Vanus Galerion. • Find the Pyramid Entrance. • Speak to Lyranth.

• Enter the Reaver Citadel Pyramid.
• Defeat Titan Djanax.

• Defeat Valkynaz Seris.
• Speak to Lyranth.

• Open Valkynar Seris’ Chest and take the Labyrinth Key. • Turn-in Quest: Head outside and speak to Vanus Galerion.
• Quest Reward: Bulwark of the Citadel (Heavy Armor: Shoulders, 208 Defense, +40 Max Health, Increase this item;s Armor Value by 5%, Lvl. 50), and 604 gold.
• You should be Level 50. (Note: Any quest after you reach level 50 (Veteran Rank 1) will no longer give you experience until after you start the Main Quest: Cadwell’s Silver. The quests presented below are the main

quests leading to Cadwell’s Silver and some side quests near the Skyshard areas. It is up to you to take the side quests for the rewards as they will not help you level up any further). 336. The Final Assault (Coldharbour Main Story Quest – Level 50)
• Pickup Quest: Speak to Hahnin.
• Speak to Gabrielle. • Choose a soldier to accompany you. • Speak to King Lalorian Dynar. • Head into the Endless Stair.
• Head to the Reinforcement Portal.
• Close the Reinforcement Portal. • Head to the Labyrinth.

• Speak with Vanus Galerion. • Open the Labyrinth. • Speak to Gabrielle.
• Use the Daedric Fires then launch the fire at the Cold Fire Braziers [4].

• (Note: The effect of the Daedric Fires will fade quickly. Use them on the Cold Fire Braziers before this happens).
• Enter the next area. • Cross the Dark Chamber into the Gate Bridge.
• Cross the Bridge and enter the Statue Room. • Speak to Gabrielle. • Follow Gabrielle and defend her while she opens the door. • Enter the Endless Stair. • Speak to Vanus Galerion.
• Head to the Planar Vortex Portal. • Defeat Telkor the Unforgiving.

• Speak to The Groundskeeper.
• Enter the Planar Vortex.

• Destroy the First Dark Anchor.
• Speak to Meridia. • Speak to your friends then speak to Meridia.

• Destroy the remaining Dark Anchors [2]. • Place the Light of Meridia.
• Defeat the Council of Molag Bal.

• Survive Molag Bal’s Assault. • Activate the Light of Meridia.
• Speak to Meridia.
• Turn-in Quest: Speak to King Lalorian Dynar.
• Quest Reward: Ayleid’s Wrath (Two-Handed Sword, 116 Damage, Deals 29 Flame Damage, This items sells to merchants for 150% more, Lvl. 50), and 604 gold
337. The God of Schemes (Coldharbour Main Story Quest – Level 50)
• Pickup Quest: Automatically given after you finish The Final Assault. • Head to The Harborage.

• Speak with Varen Aquilarios. • Enter the Portal to Coldharbour.

• Speak to Abnur Tharn.
• Head to Heart’s Grief.

• Explore Heart’s Grief Hall. • (Note: Some of your past opponents are trapped within chambers around the hall.
Releasing them will cause them to attack you.). • Kill the Skeletal Battlemages [4] torturing Mannimarco.
• Speak to Mannimarco. • Make your choice. • (Note: In this guide, we leave Mannimarco to his fate). • Head into the Path of Woe and fight your way to the Seat of Tyranny.

• Speak to Abnur Tharn. • Speak to each companion. • Make your choice. • Perform the Ritual.
• Head into Molag Bal’s Throne.

• (Note: You pretty much one hit kill mobs from this point. Use Area of Effect spells to your advantage).
• Defeat Molag Bal.
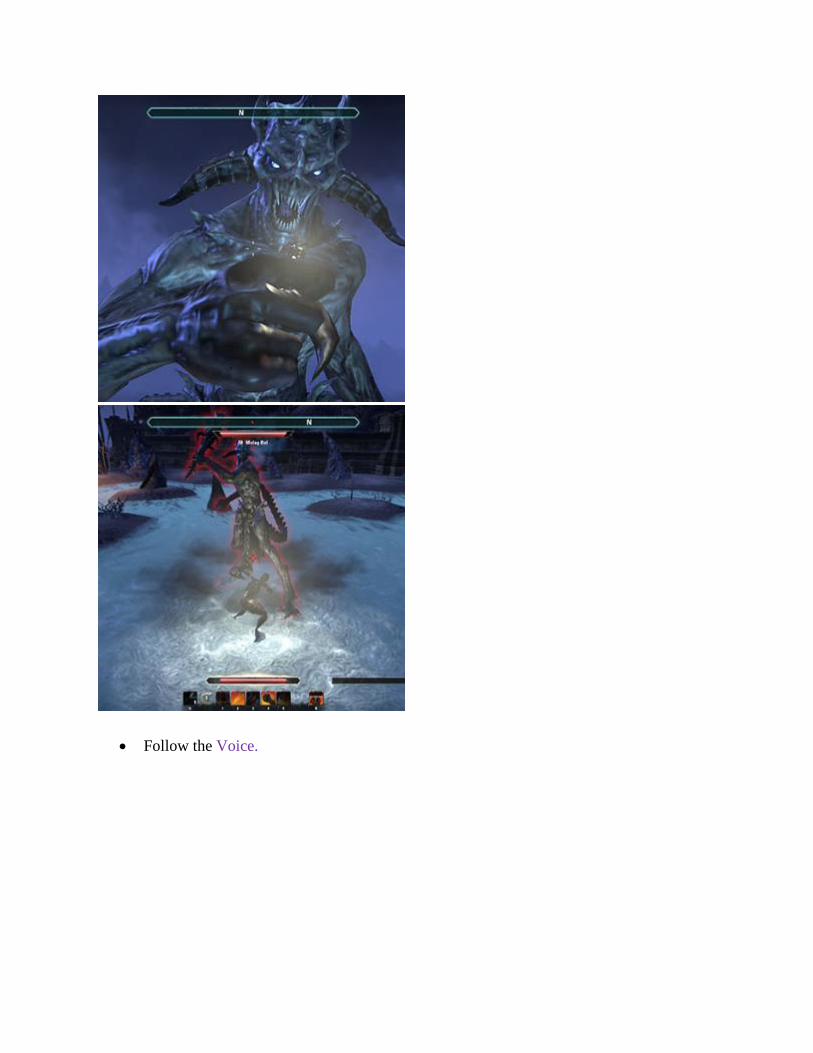
• Follow the Voice.

• Reclaim your Soul. • Witness the Aftermath. • Speak to Meridia.
• Speak with the Survivors.

• Turn-in Quest: Speak with Cadwell.
• Quest Reward: The Emperor’s Blessing (Two-Handed Healing Staff, 102 Damage, Deals 31 Flame Damage, Increase Weapon Enchantment effect by 19%, Lvl. 50), and 604 gold.
338. Cadwell’s Silver (Coldharbour Main Story Quest – Level 50)
• Pickup Quest: Speak to Cadwell.
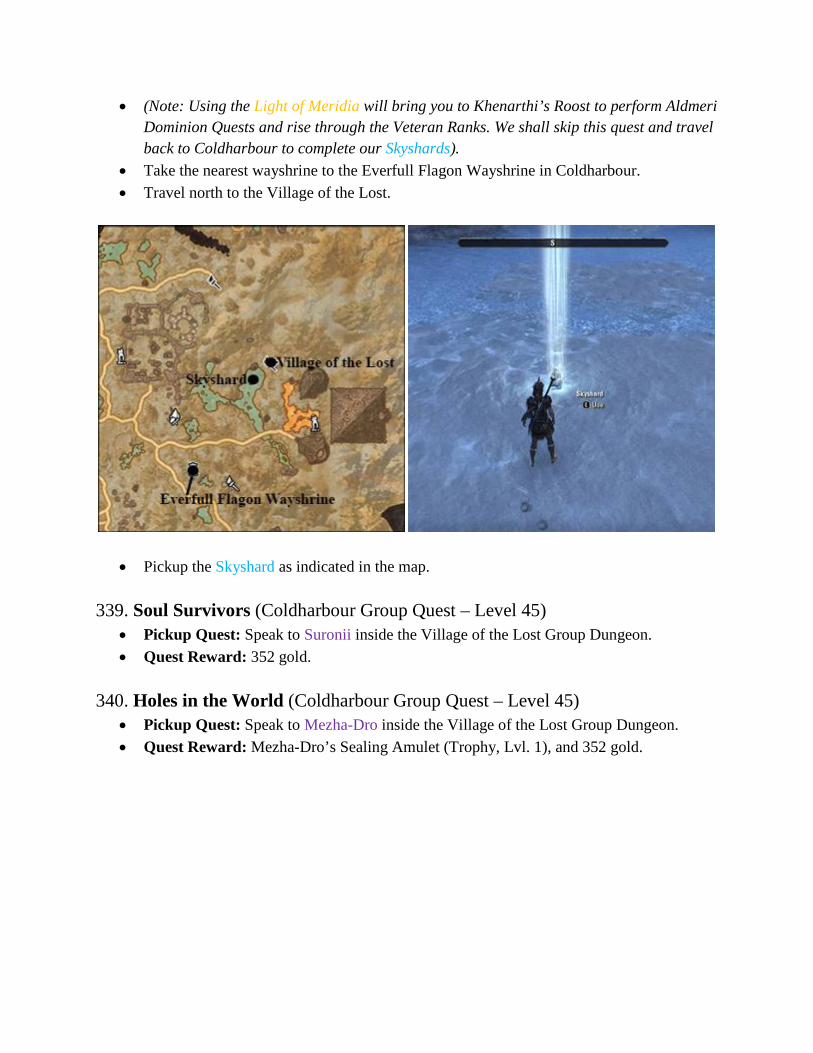
• (Note: Using the Light of Meridia will bring you to Khenarthi’s Roost to perform Aldmeri Dominion Quests and rise through the Veteran Ranks. We shall skip this quest and travel back to Coldharbour to complete our Skyshards).
• Take the nearest wayshrine to the Everfull Flagon Wayshrine in Coldharbour. • Travel north to the Village of the Lost.
• Pickup the Skyshard as indicated in the map. 339. Soul Survivors (Coldharbour Group Quest – Level 45)
• Pickup Quest: Speak to Suronii inside the Village of the Lost Group Dungeon. • Quest Reward: 352 gold.
340. Holes in the World (Coldharbour Group Quest – Level 45)
• Pickup Quest: Speak to Mezha-Dro inside the Village of the Lost Group Dungeon. • Quest Reward: Mezha-Dro’s Sealing Amulet (Trophy, Lvl. 1), and 352 gold.

• Pickup the Skyshard. • Leave the dungeon. • Head to the Court of Contempt Wayshrine and take the road to the Cave of Trophies
Public Dungeon. 341. A Misplaced Pendant (Coldharbour Side Quest – Level 46)
• Enter the Cave of Trophies Public Dungeon.
• Pickup Quest: Examine the Pendant.
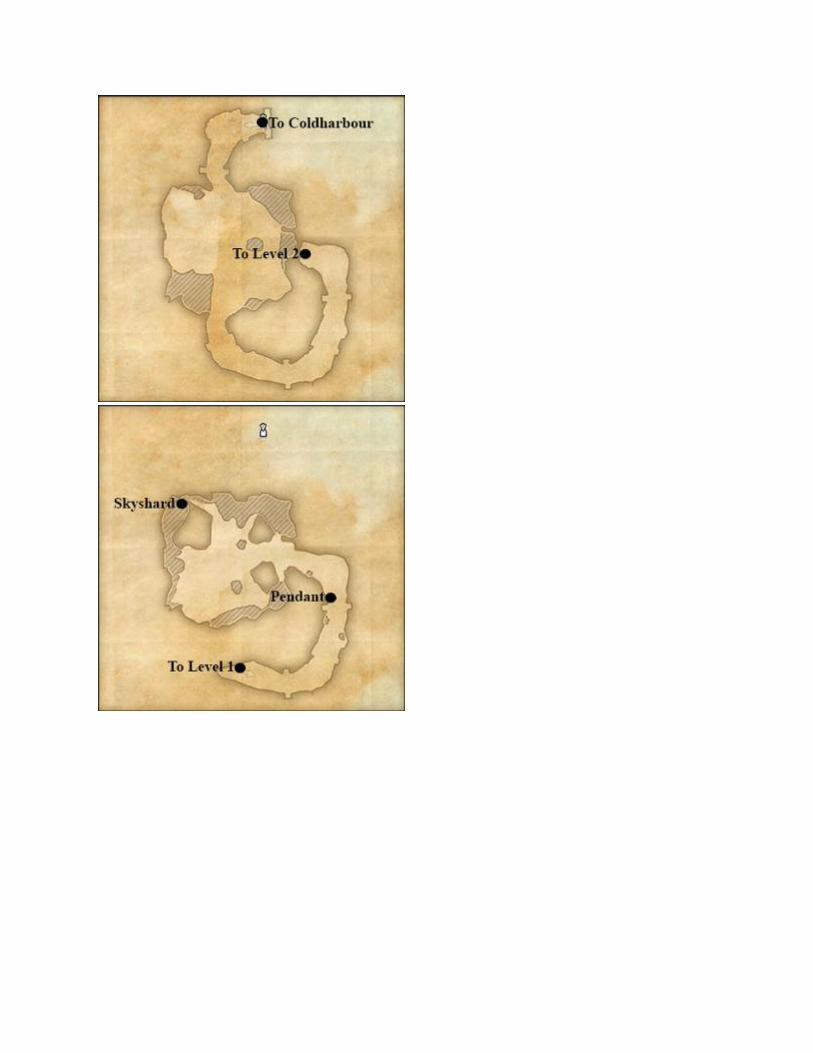

• Defeat the Dungeon Boss.
• Pickup the Skyshard.
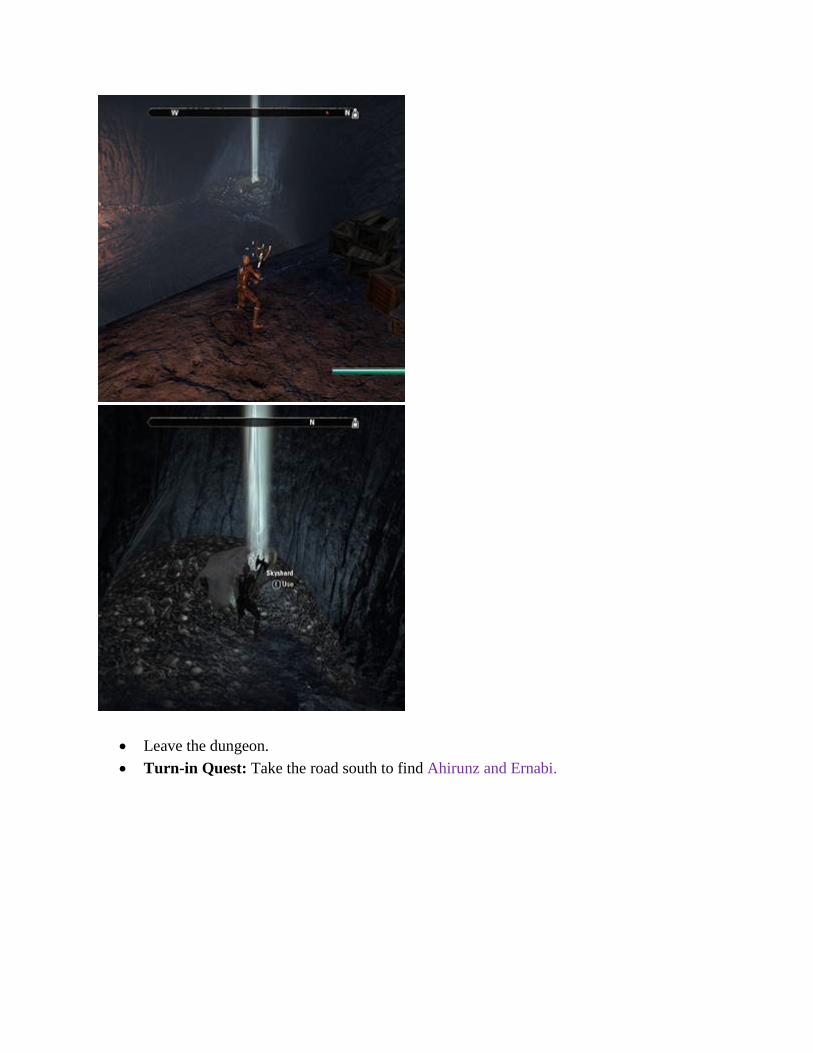
• Leave the dungeon. • Turn-in Quest: Take the road south to find Ahirunz and Ernabi.

• Quest Reward: Ahirunz’s Sash (Light Armor: Waistm 44 Defense, +40 Max Health, Reduces the cost of Sprinting by 2%, Lvl. 46), and 71 gold.
• Take the nearest Wayshrine to the Library of Dusk Wayshrine. • Head north towards Aba Loria.
342. Aba Loria Public Dungeon (Coldharbour Public Dungeon)
• Enter the Aba-Loria Public Dungeon.
• Pickup the Skyshard.
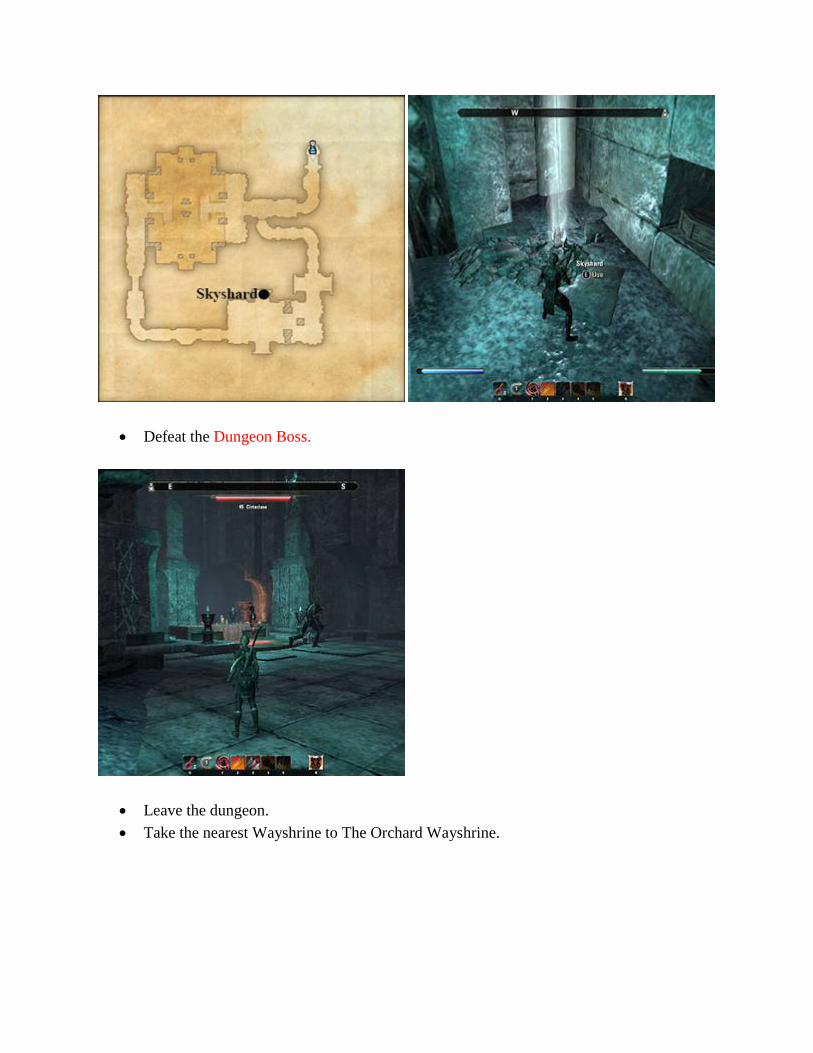
• Defeat the Dungeon Boss.
• Leave the dungeon. • Take the nearest Wayshrine to The Orchard Wayshrine.

• Head northwest towards the Manor of Revelry.
• Pickup the Skyshard. • Travel east towards the Wailing Maw.
(Note: Unlike previous side quests, A Graveyard of Ships and Between Blood and Bone are required to get to the area where the Skyshard is located). 343. A Graveyard of Ships (Coldharbour Side Quest – Level 49)

• Pickup Quest: Speak to Captain One-Eye.
• Head to the Winsome Lass and speak to First Mate Jalan.
• Defend First Mate Jalan.

• Head inside the Winsome Lass.
• Defeat First Mate Jalan.

• Head to the Wreck of the Bonnie Spriggan.
• Turn-in Quest: Speak to Captain One-Eye. • Quest Reward: 149 gold.
344. Between Blood and Bone (Coldharbour Side Quest – Level 49)
• Pickup Quest: Automatically given by Captain One-Eye.

• Speak with the Argonian Skeleton. • Speak to Captain One-Eye. • Head to the Golden Era.
• Examine the Journal.
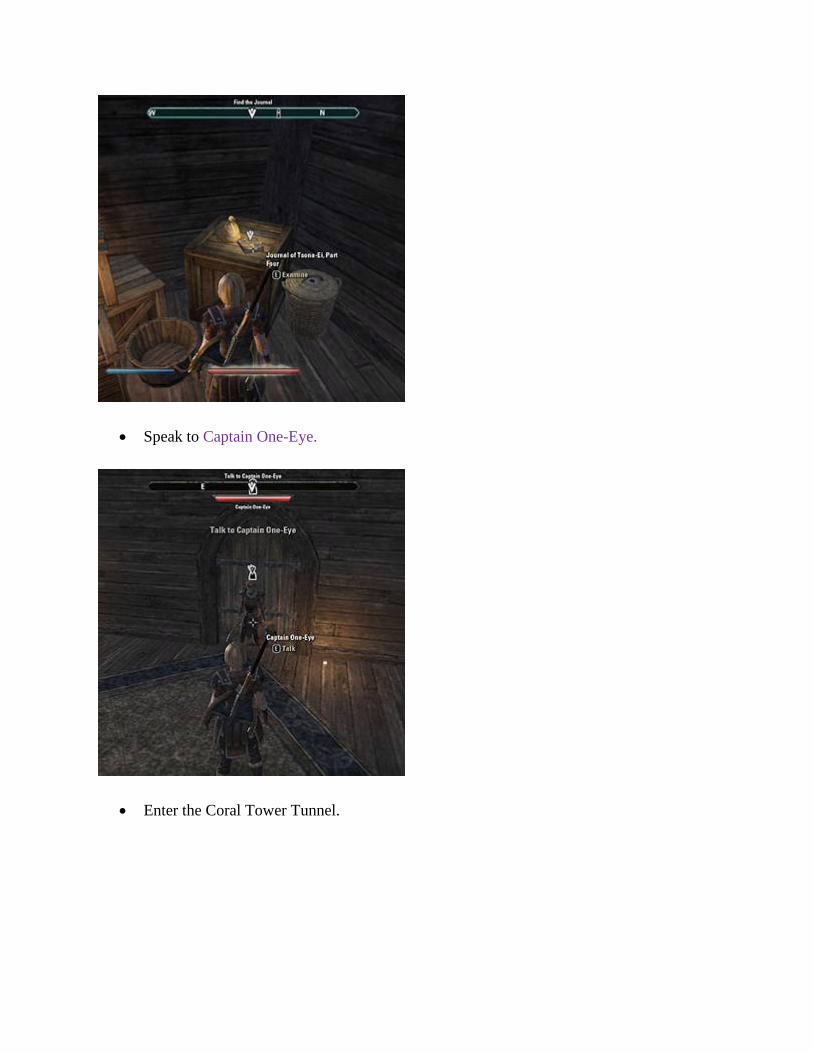
• Speak to Captain One-Eye.
• Enter the Coral Tower Tunnel.

• Head behind the Coral Tower and pickup the Skyshard.
• Enter the Coral tower and defeat the Lost Fleet Admiral.

• Turn-in Quest: Head out and speak to Captain One-Eye.
• Make your choice. • (Note: In this guide we give the Crown to Captain One Eye). • Quest Reward: Privateer Clogs (Light Armor: Feet, 108 Defense, +26 Max Stamina,
Increase Exploration Experience gained by 7%, and 372 gold). • Exit the Coral Tower area and head to the Wailing Maw.

345. The Anguish Gem (Coldharbour Side Quest – Level) • Enter the Wailing Maw Public Dungeon.
• Pickup Quest: Speak to Dralnas Moryon.
• Pickup the Skyshard.

• Defeat the Dungeon Boss.
• Destroy the Anguish Gem.

• Turn-in Quest: Speak to Dralnas Moryon. • Quest Reward: Morrowind Vambraces (Medium Armor: Hand, +28 Max Magicka,
Increase Armor Enchantment effect by 11%, Lvl. 49), and 74 gold. • Leave the dungeon and head to the Hollow City. • Go through the Mage’s Guild.
• Jump down from the back of the Mage’s Guild around the area shown below. • (Note: Use the cliffs to jump down in steps, as a direct fall WILL kill you).

• Pickup the Skyshard. • Head to the Grotto of Depravity.
346. The Lost Lute (Coldharbour Side Quest – Level 44)
• Enter the Grotto of Depravity Public Dungeon.
• Pickup the Skyshard.

• Defeat the Dungeon Boss.
• Pickup Quest: Examine Idria’s Lute.

• Leave the dungeon and head to the Hollow City.
• Turn-in Quest: Head to the Inn and return the Lute to Idria. • Quest Reward: Battle Minstrel’s Mantle (Light Armor: Shoulders, 99 Defense, +24 Max
Stamina, Increase Armor Skill Line experience with this armor type by 7%, Lvl. 44), and 69 gold.
Related Documents