How to Test Out Backup & Replication 6.5 for Hyper-V Mike Resseler May, 2013

How to Test Out Backup and Replication 6 5 for Hyperv
Dec 03, 2015
Use VEEAM as a tool to Backup and replicate
Welcome message from author
This document is posted to help you gain knowledge. Please leave a comment to let me know what you think about it! Share it to your friends and learn new things together.
Transcript
How to Test Out Backup & Replication 6.5 for Hyper-V
Mike Resseler
May, 2013
2 | How to Test Out Backup & Replication 6.5 for Hyper-V | REV 1
© 2013 Veeam Software.
All rights reserved. All trademarks are the property of their respective owners.
No part of this publication may be reproduced, transmitted, transcribed, stored in a retrieval system, or translated into any language in any form by any means, without written permission from Veeam Software Inc (Veeam). The information contained in this document represents the current view of Veeam on the issue discussed as of the date of publication and is subject to change without notice. Veeam shall not be liable for technical or editorial errors or omissions contained herein. Veeam makes no warranties, express or implied, in this document. Veeam may have patents, patent applications, trademark, copyright, or other intellectual property rights covering the subject matter of this document. All other trademarks mentioned herein are the property of their respective owners. Except as expressly provided in any written license agreement from Veeam, the furnishing of this document does not give you any license to these patents, trademarks, copyrights, or other intellectual property.
Important! Please read the End User Software License Agreement before using the accompanying software program(s). Using any part of the software indicates that you accept the terms of the End User Software License Agreement.
3 | How to Test Out Backup & Replication 6.5 for Hyper-V | REV 1
CONTENTS CONTACTING VEEAM SOFTWARE............................................................................... 4 INTRODUCTION ........................................................................................................... 5
PREREQUISITES .......................................................................................................................................... 5 HARDWARE ............................................................................................................................................... 5 SOFTWARE ................................................................................................................................................. 5
ENVIRONMENT SETTINGS ........................................................................................... 7 DOMAIN .................................................................................................................................................... 7 NETWORK SETTINGS ................................................................................................................................. 7
SETTING UP THE HYPER-V ENVIRONMENT ................................................................ 8 INSTALLING THE SERVER ........................................................................................................................... 8
CREATING TWO VIRTUAL MACHINES ....................................................................... 13 SERVER DETAILS ..................................................................................................................................... 13
PREPARING A DOMAIN CONTROLLER ...................................................................... 28 JOINING THE BR SERVER TO THE DOMAIN ............................................................... 39 SETTING UP A DUMMY VIRTUAL MACHINE ............................................................. 41 SETTING UP THE BACKUP & REPLICATION SERVER ................................................. 42 PREPARING YOUR BACKUP & REPLICATION SERVER .............................................. 46
SETTING UP THE REPOSITORY ................................................................................................................ 46 ADDING A HYPER-V SERVER ..................................................................................... 51 BACKING UP YOUR FIRST VIRTUAL MACHINE ON HYPER-V.................................... 55 RECOVERING .............................................................................................................. 60
RECOVERING SOME FILES ...................................................................................................................... 60 RECOVERING THE ENTIRE SERVER ......................................................................................................... 64
CONCLUSION ............................................................................................................. 69 APPENDICES .............................................................................................................. 70
APPENDIX A. DOWNLOADING WINDOWS SERVER 2012 .................................................................. 70 APPENDIX B. EXTRACT THE WINDOWS SERVER 2012 ISO ................................................................ 72 APPENDIX C. DOWNLOAD VEEAM BACKUP & REPLICATION 6.5 ...................................................... 74 APPENDIX D. INSTALLING WINDOWS SERVER 2012 .......................................................................... 76 APPENDIX E. RENAMING A WINDOWS SERVER ................................................................................... 80 APPENDIX F. CHANGING THE IP-ADDRESS OF A SERVER .................................................................... 83 APPENDIX G. JOINING THE SERVER TO THE DOMAIN .......................................................................... 86 APPENDIX H. CHANGING THE FIREWALL AND REMOTE DESKTOP SETTINGS .................................... 89 APPENDIX I. HYPERVISOR REQUIREMENTS ........................................................................................... 93
4 | How to Test Out Backup & Replication 6.5 for Hyper-V | REV 1
CONTACTING VEEAM SOFTWARE At Veeam Software we value the feedback from our customers. It is important not only to help you quickly with your technical issues, but it is our mission to listen to your input, and build products that incorporate your suggestions.
Customer Support
Should you have a technical concern, suggestion or question, please visit our Customer Center Portal at cp.veeam.com to open a case, search our knowledge base, reference documentation, manage your license or obtain the latest product release.
Online Support
If you have any questions about Veeam Backup & Replication, you can use the following resources:
• Full documentation set at www.veeam.com/vmware-esx-backup/resources
• Community forum at http://forums.veeam.com/
Company Contacts
For the most up-to-date information about company contacts and office locations, please visit www.veeam.com/contacts.html.
5 | How to Test Out Backup & Replication 6.5 for Hyper-V | REV 1
INTRODUCTION With all the latest technologies and protection systems that exist today, many people tend to forget that backup is still necessary in the modern day IT environment.
This document will provide you with all the steps necessary to test out Veeam Backup & Replication 6.5 in a Proof of Concept environment and validate for yourself how easy it is to protect your running virtual machines and to recover an entire virtual machine or parts of it.
Prerequisites Before we can start, we need to make sure that we have the necessary prerequisites in our environment. This part of the document will make sure that you have all the necessary hardware and software prerequisites in advance.
Hardware This Proof of Concept can be tested on any workstation or server with 500 GB of disk and 8 GB of RAM. CPU requirements are not that important but the better the CPU the better the experience will be.
Note Please note that this document is intended to do a Proof of Concept only. Because of the low level hardware requirements this can be run on many devices. However, this has consequences to the speed of the backup and recovery jobs and also on the responsiveness of the servers. If you want to see whether the responsiveness and speed are adequate with Windows Server 2012 and Backup & Replication, you need to perform this POC on hardware that matches your production environment.
This workstation or server needs to be a physical one. We will enable the hyper-v role on the server and install all additional servers as virtual servers on top of the physical one. This means that the workstation of server needs to have the capabilities to enable virtualization (see Appendix I. Hypervisor Requirements).
Software In addition to hardware, we also need software. All the software that we are going to use are evaluation versions and can be simply downloaded:
• Microsoft Windows Server 2012
Find the download link here: http://www.microsoft.com/click/services/Redirect2.ashx?CR_CC=200210614&CR_EAC=300068692.
For instructions on how to download the software, visit Appendix A. Downloading Windows Server 2012.
• Extract the ISO to USB or DVD
To install Microsoft Windows Server 2012, extract the ISO to a bootable USB device or to a DVD. For instructions, visit Appendix B. Extract the Windows Server 2012 ISO.
• Download the evaluation version of Backup & Replication 6.5
Go to www.veeam.com, register (if you don’t have an account yet) and download the evaluation software at: http://www.veeam.com/vmware-esx-backup/download.html
6 | How to Test Out Backup & Replication 6.5 for Hyper-V | REV 1
For instructions, visit Appendix C. Download Veeam Backup & Replication 6.5.
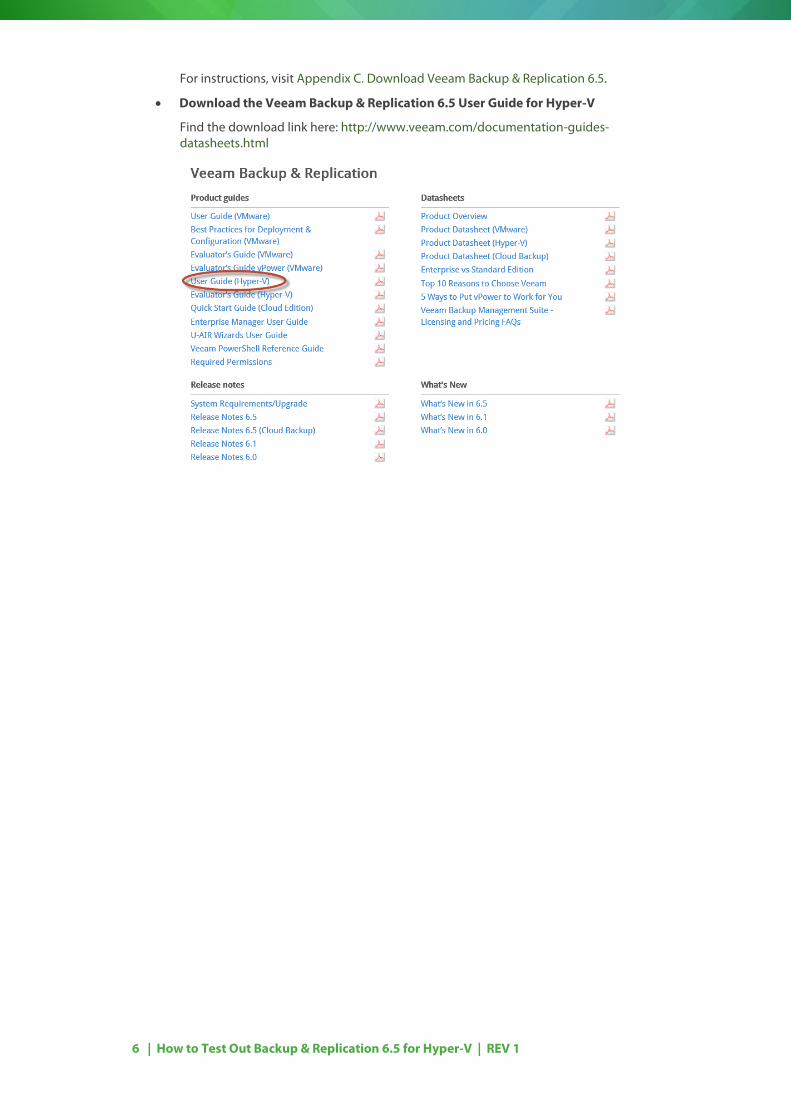
• Download the Veeam Backup & Replication 6.5 User Guide for Hyper-V
Find the download link here: http://www.veeam.com/documentation-guides-datasheets.html
7 | How to Test Out Backup & Replication 6.5 for Hyper-V | REV 1
ENVIRONMENT SETTINGS Every environment will be different. Some of the configuration settings that are used in this document might not match your environment or cannot be used for various reasons.
I will write out the settings here but you can change them to match your own environment. If that is the case, then you need to make sure that you use your settings throughout the document.
Domain Our domain is called lab.local and during this entire document we are going to use the administrator account for all actions. In a production environment this is not the correct way of doing this but since this document is written for a proof of concept it will save time in setting-up everything.
Throughout this document we use the password P@ssw0rd everywhere. Both for the local administrator accounts as the domain administrator account.
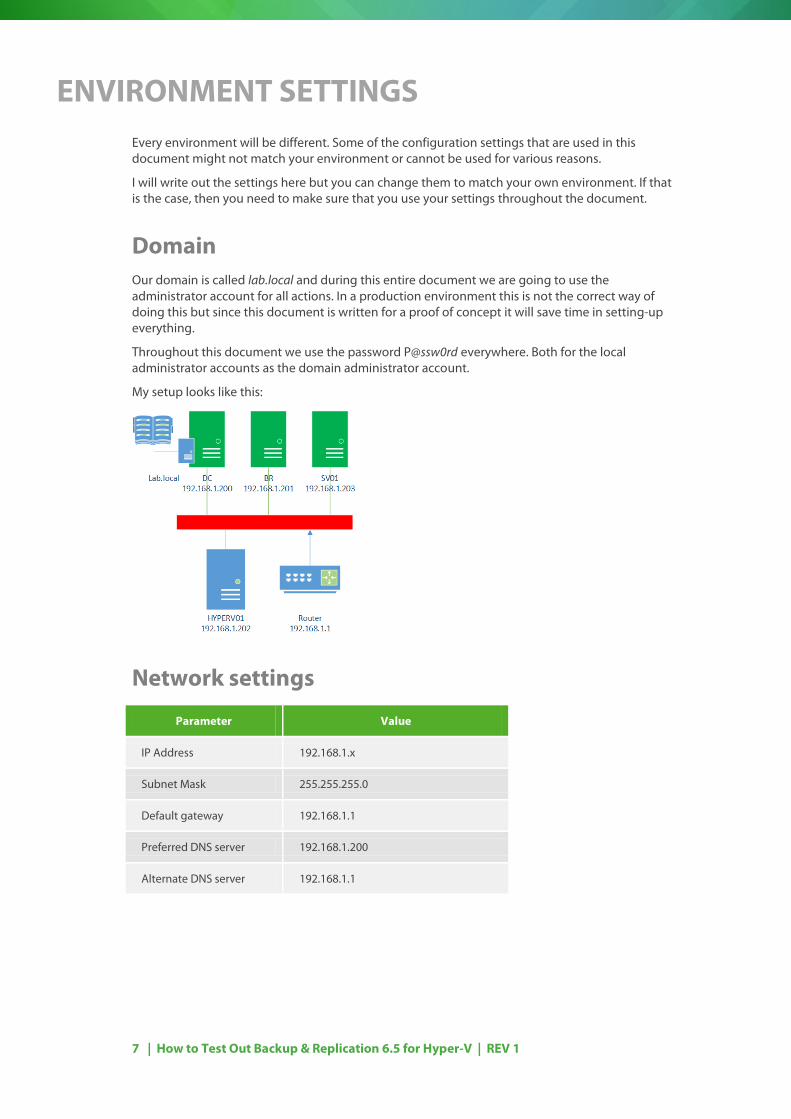
My setup looks like this:
Network settings
Parameter Value
IP Address 192.168.1.x
Subnet Mask 255.255.255.0
Default gateway 192.168.1.1
Preferred DNS server 192.168.1.200
Alternate DNS server 192.168.1.1
8 | How to Test Out Backup & Replication 6.5 for Hyper-V | REV 1
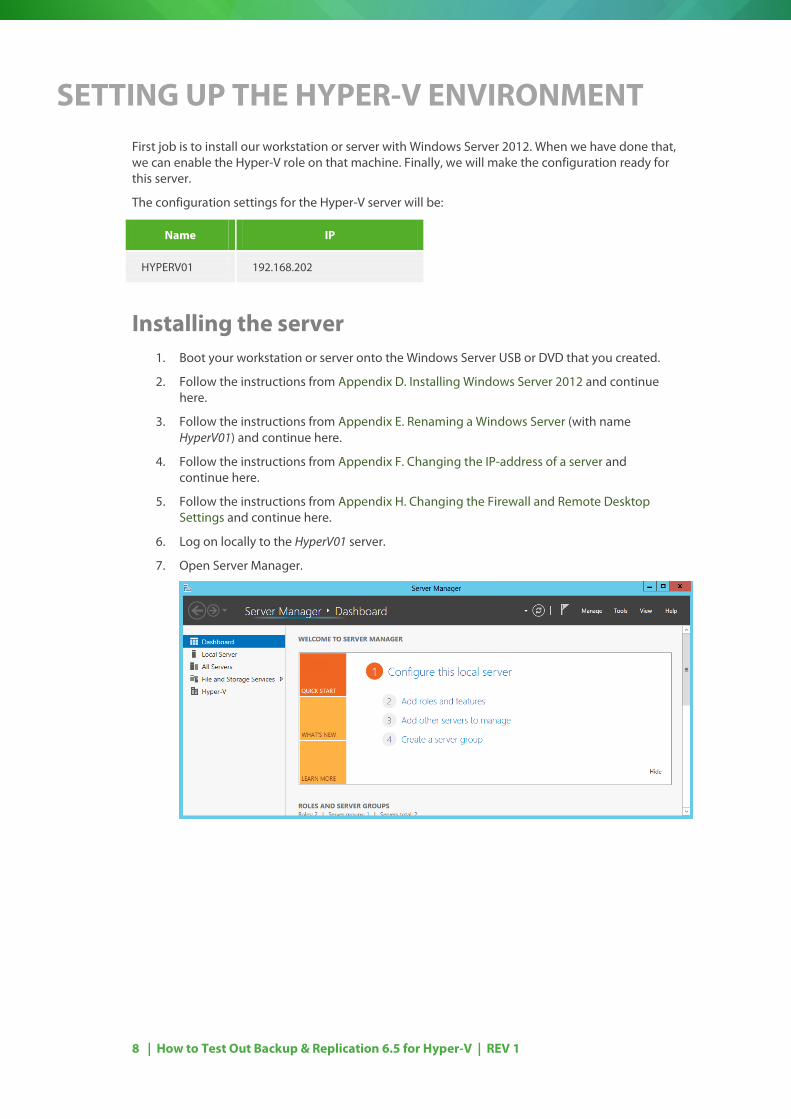
SETTING UP THE HYPER-V ENVIRONMENT First job is to install our workstation or server with Windows Server 2012. When we have done that, we can enable the Hyper-V role on that machine. Finally, we will make the configuration ready for this server.
The configuration settings for the Hyper-V server will be:
Name IP
HYPERV01 192.168.202
Installing the server 1. Boot your workstation or server onto the Windows Server USB or DVD that you created.
2. Follow the instructions from Appendix D. Installing Windows Server 2012 and continue here.
3. Follow the instructions from Appendix E. Renaming a Windows Server (with name HyperV01) and continue here.
4. Follow the instructions from Appendix F. Changing the IP-address of a server and continue here.
5. Follow the instructions from Appendix H. Changing the Firewall and Remote Desktop Settings and continue here.
6. Log on locally to the HyperV01 server.
7. Open Server Manager.

9 | How to Test Out Backup & Replication 6.5 for Hyper-V | REV 1
8. Click Add roles ad features.
9. Click Next on the welcome screen.
10 | How to Test Out Backup & Replication 6.5 for Hyper-V | REV 1
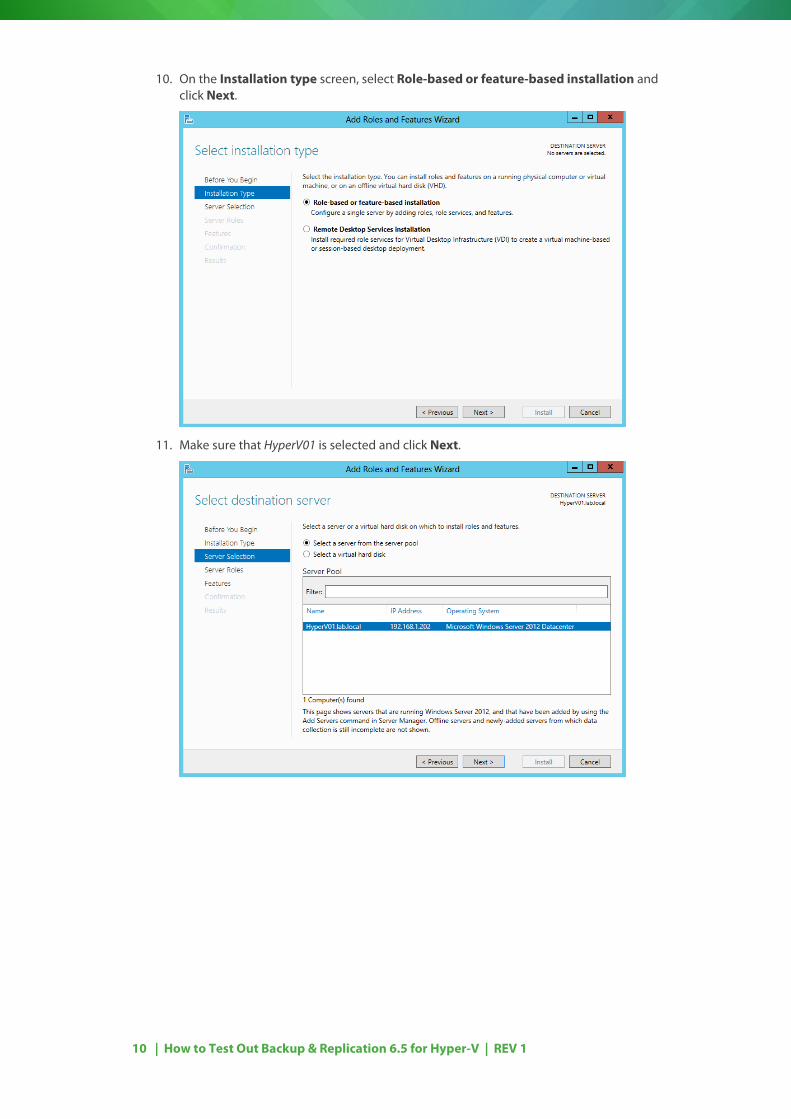
10. On the Installation type screen, select Role-based or feature-based installation and click Next.
11. Make sure that HyperV01 is selected and click Next.
11 | How to Test Out Backup & Replication 6.5 for Hyper-V | REV 1
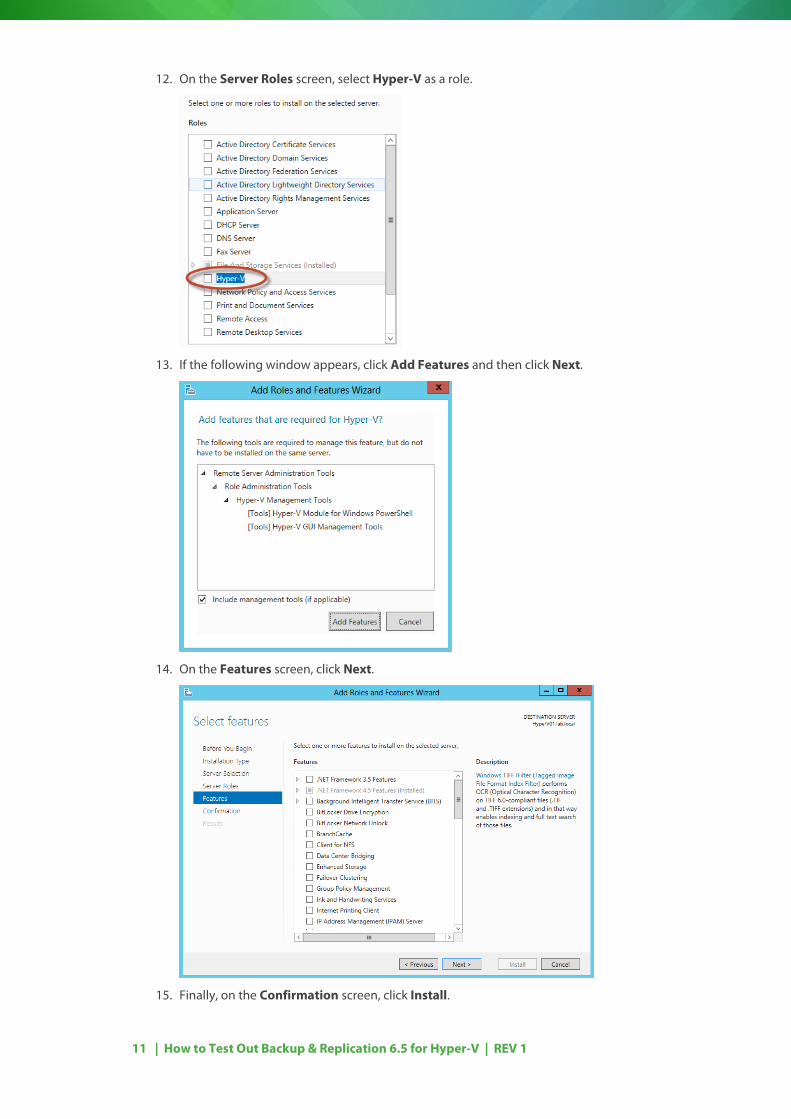
12. On the Server Roles screen, select Hyper-V as a role.
13. If the following window appears, click Add Features and then click Next.
14. On the Features screen, click Next.
15. Finally, on the Confirmation screen, click Install.

12 | How to Test Out Backup & Replication 6.5 for Hyper-V | REV 1
After the installation, your server will need to restart. When the server has restarted, log on with the local administrator account again.
Now we are going to create a network for our environment:
1. Open Hyper-V Manager and click the Virtual Switch Manager.
2. On the Create virtual switch screen, choose External and click Create Virtual Switch.
3. On the Virtual Switch Properties screen, fill in the name Network and make sure that the External network is selected and your network connection that is connected to the Internet or to the router. Also, check if the Allow management operating system to share this network adapter check box is selected and click OK.
Your first job is done. You have built yourself a workstation or server with Windows Server 2012 on it and enabled the Hyper-V role. You have also created a network that will be used by your virtual machines.
Now you can go to the next step and create your first two virtual machines running on Hyper-V.
13 | How to Test Out Backup & Replication 6.5 for Hyper-V | REV 1
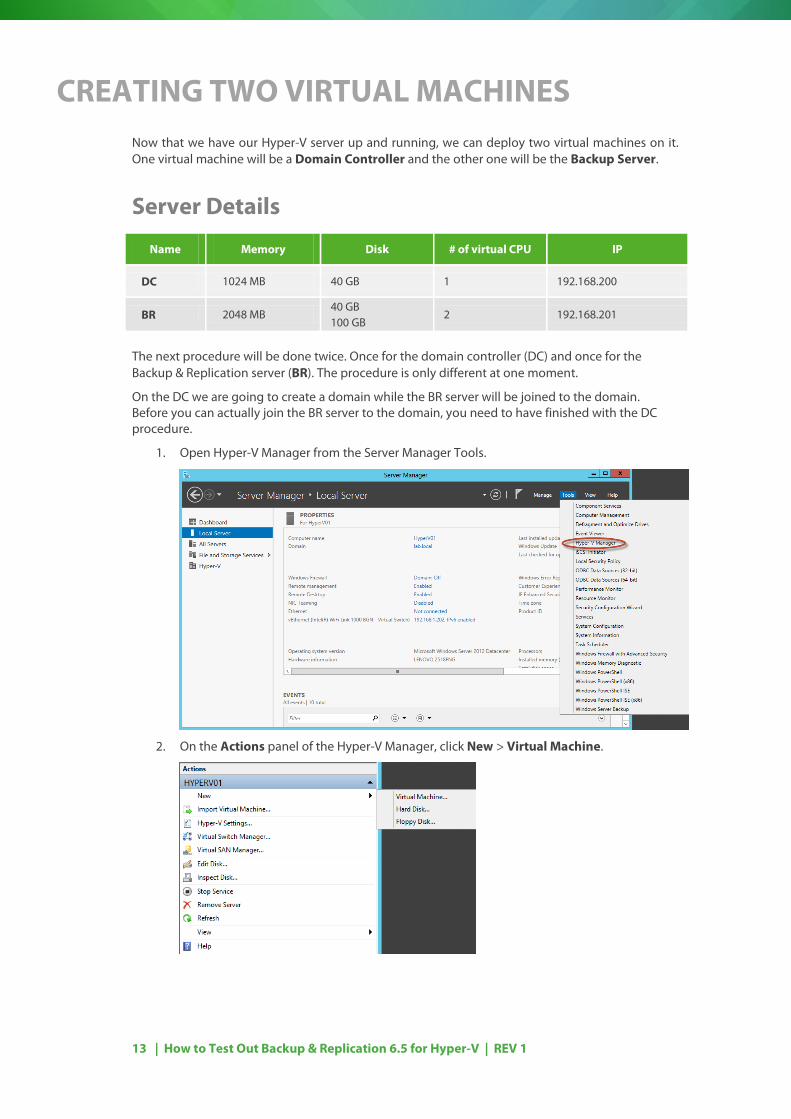
CREATING TWO VIRTUAL MACHINES Now that we have our Hyper-V server up and running, we can deploy two virtual machines on it. One virtual machine will be a Domain Controller and the other one will be the Backup Server.
Server Details
Name Memory Disk # of virtual CPU IP
DC 1024 MB 40 GB 1 192.168.200
BR 2048 MB 40 GB 100 GB
2 192.168.201
The next procedure will be done twice. Once for the domain controller (DC) and once for the Backup & Replication server (BR). The procedure is only different at one moment.
On the DC we are going to create a domain while the BR server will be joined to the domain. Before you can actually join the BR server to the domain, you need to have finished with the DC procedure.
1. Open Hyper-V Manager from the Server Manager Tools.
2. On the Actions panel of the Hyper-V Manager, click New > Virtual Machine.
14 | How to Test Out Backup & Replication 6.5 for Hyper-V | REV 1
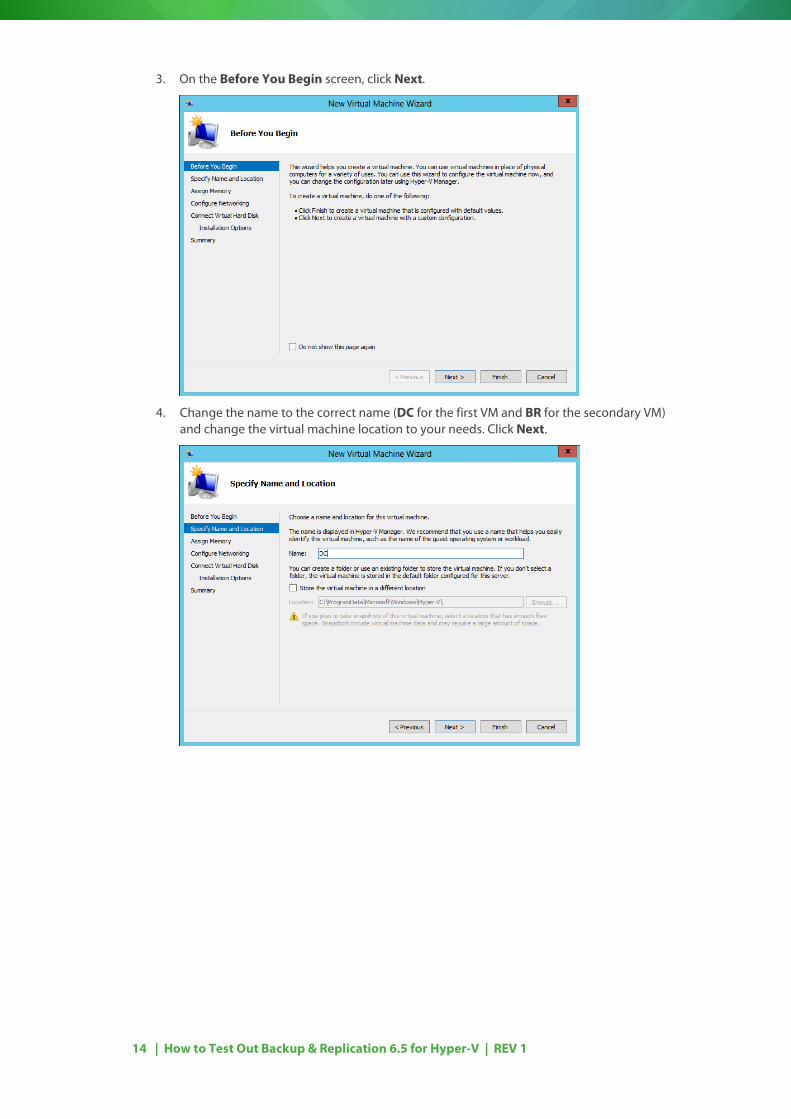
3. On the Before You Begin screen, click Next.
4. Change the name to the correct name (DC for the first VM and BR for the secondary VM) and change the virtual machine location to your needs. Click Next.
15 | How to Test Out Backup & Replication 6.5 for Hyper-V | REV 1
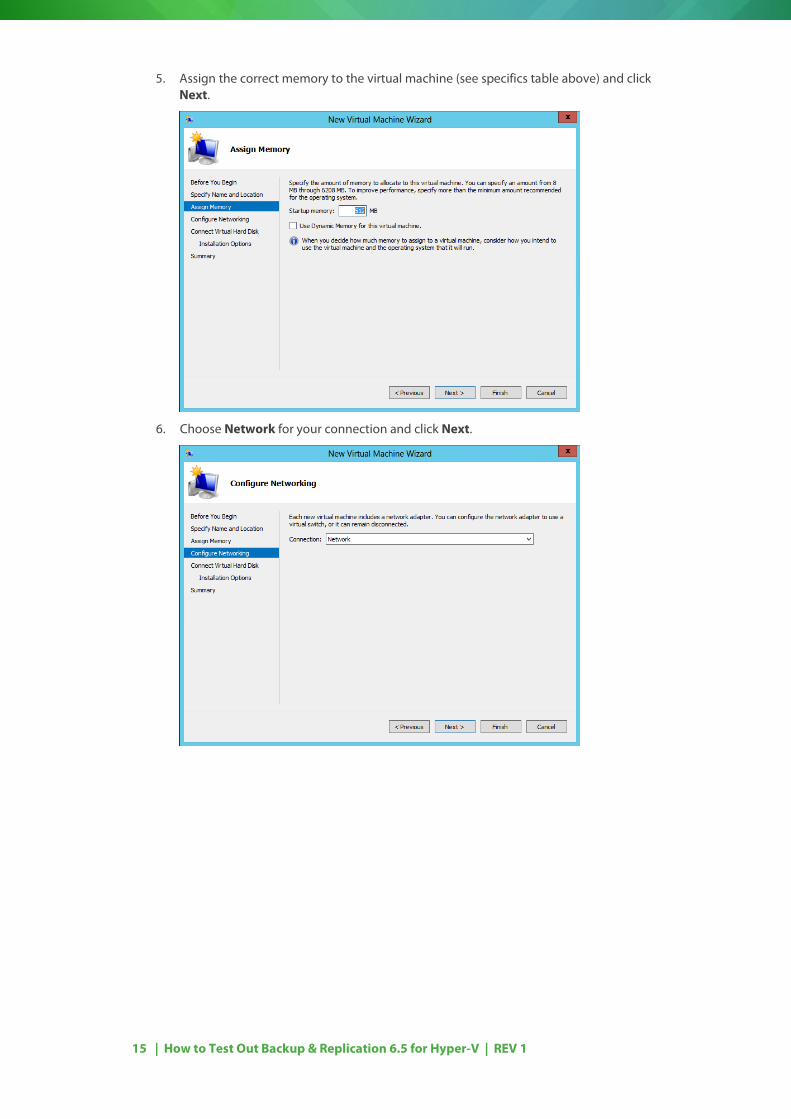
5. Assign the correct memory to the virtual machine (see specifics table above) and click Next.
6. Choose Network for your connection and click Next.
16 | How to Test Out Backup & Replication 6.5 for Hyper-V | REV 1
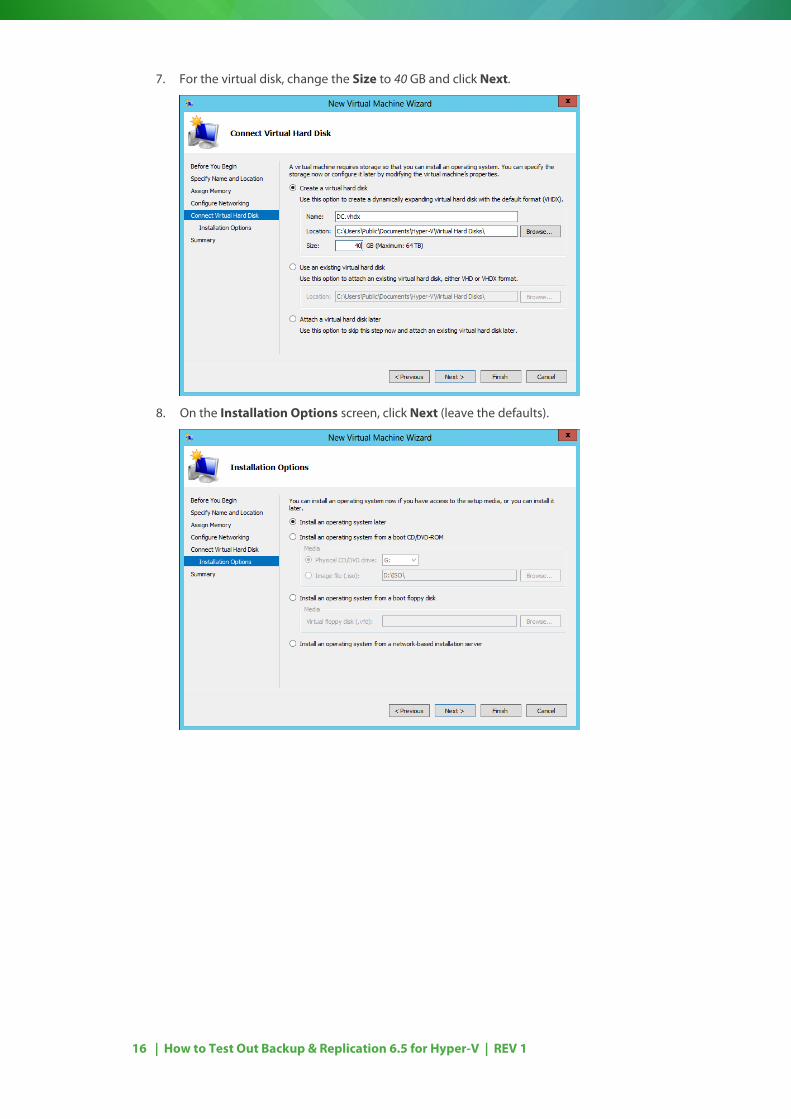
7. For the virtual disk, change the Size to 40 GB and click Next.
8. On the Installation Options screen, click Next (leave the defaults).
17 | How to Test Out Backup & Replication 6.5 for Hyper-V | REV 1
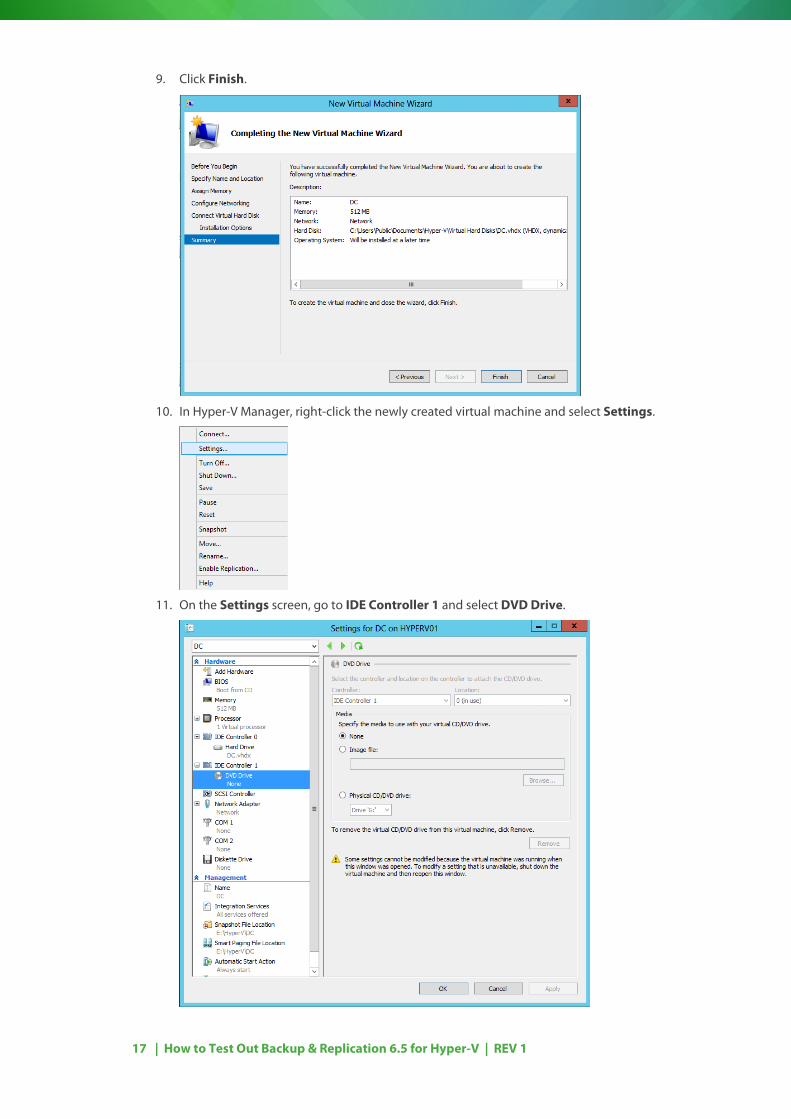
9. Click Finish.
10. In Hyper-V Manager, right-click the newly created virtual machine and select Settings.
11. On the Settings screen, go to IDE Controller 1 and select DVD Drive.
18 | How to Test Out Backup & Replication 6.5 for Hyper-V | REV 1
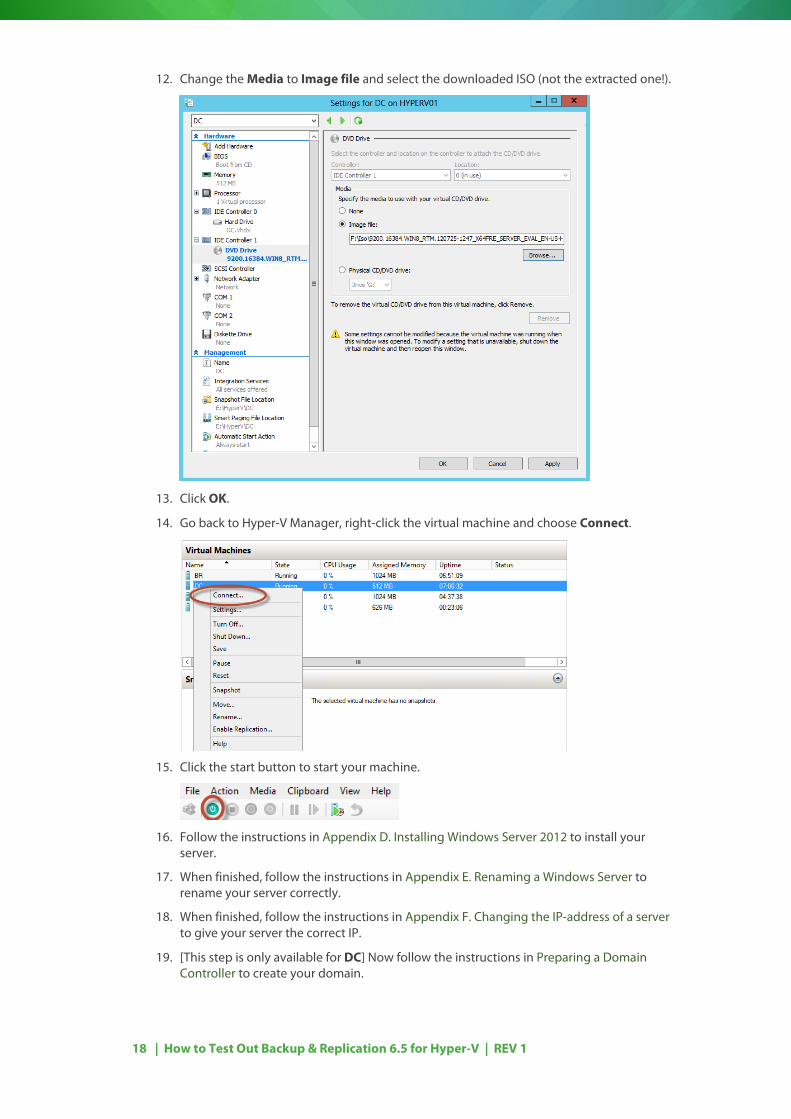
12. Change the Media to Image file and select the downloaded ISO (not the extracted one!).
13. Click OK.
14. Go back to Hyper-V Manager, right-click the virtual machine and choose Connect.
15. Click the start button to start your machine.
16. Follow the instructions in Appendix D. Installing Windows Server 2012 to install your server.
17. When finished, follow the instructions in Appendix E. Renaming a Windows Server to rename your server correctly.
18. When finished, follow the instructions in Appendix F. Changing the IP-address of a server to give your server the correct IP.
19. [This step is only available for DC] Now follow the instructions in Preparing a Domain Controller to create your domain.
19 | How to Test Out Backup & Replication 6.5 for Hyper-V | REV 1
20. [This step is only applicable for BR] Follow the instructions in Appendix G. Joining the Server to the Domain. Note: This can only be done after finishing the previous step!
21. Finally, follow the instructions in Appendix H. Changing the Firewall and Remote Desktop Settings to change the firewall and RDP settings.
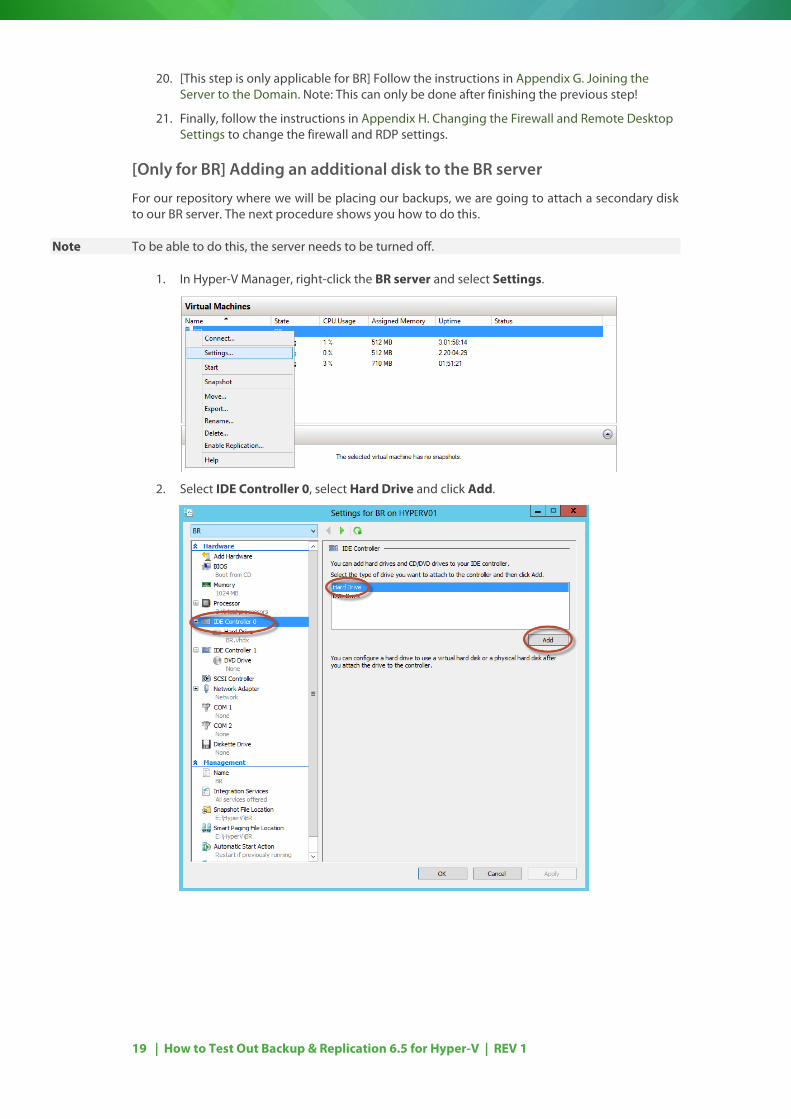
[Only for BR] Adding an additional disk to the BR server
For our repository where we will be placing our backups, we are going to attach a secondary disk to our BR server. The next procedure shows you how to do this.
Note To be able to do this, the server needs to be turned off.
1. In Hyper-V Manager, right-click the BR server and select Settings.
2. Select IDE Controller 0, select Hard Drive and click Add.
20 | How to Test Out Backup & Replication 6.5 for Hyper-V | REV 1
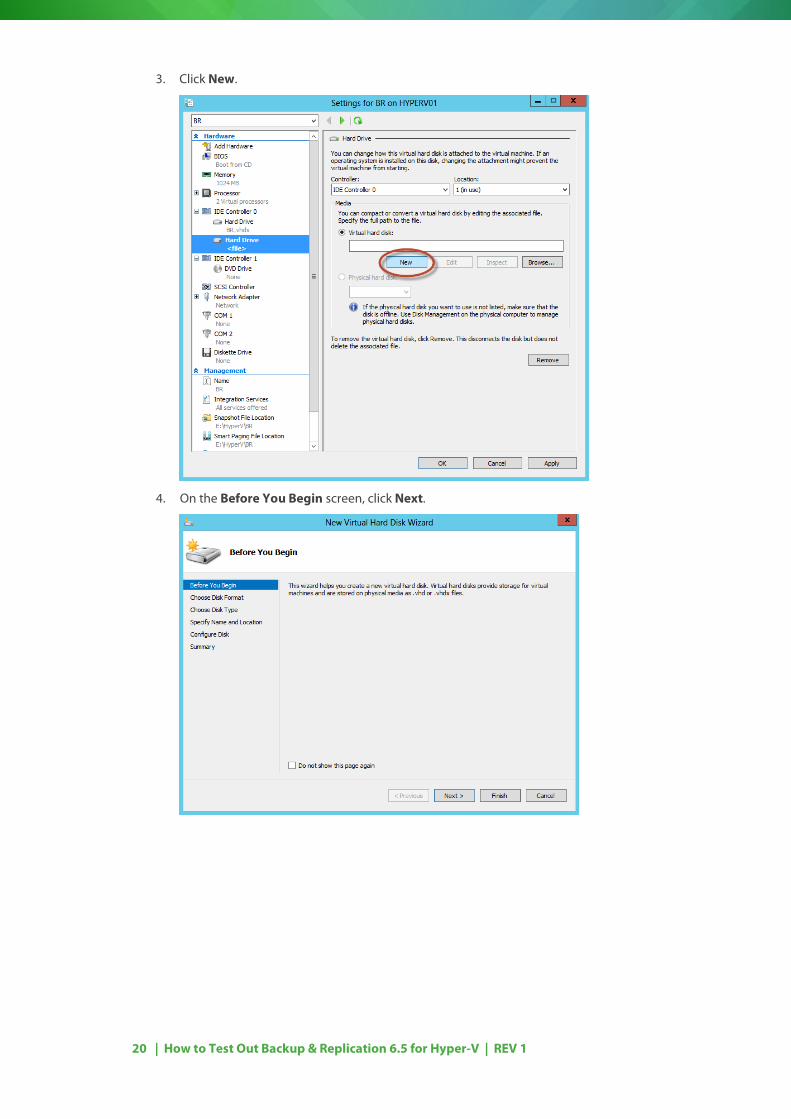
3. Click New.
4. On the Before You Begin screen, click Next.
21 | How to Test Out Backup & Replication 6.5 for Hyper-V | REV 1
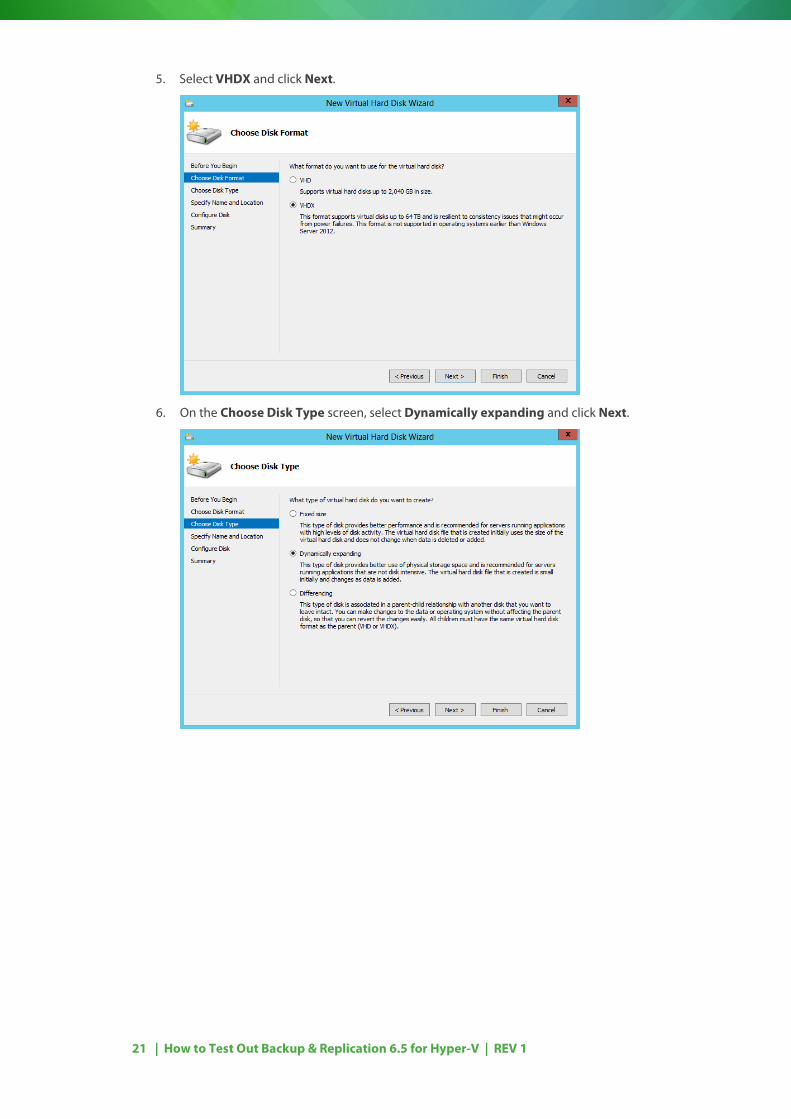
5. Select VHDX and click Next.
6. On the Choose Disk Type screen, select Dynamically expanding and click Next.
22 | How to Test Out Backup & Replication 6.5 for Hyper-V | REV 1
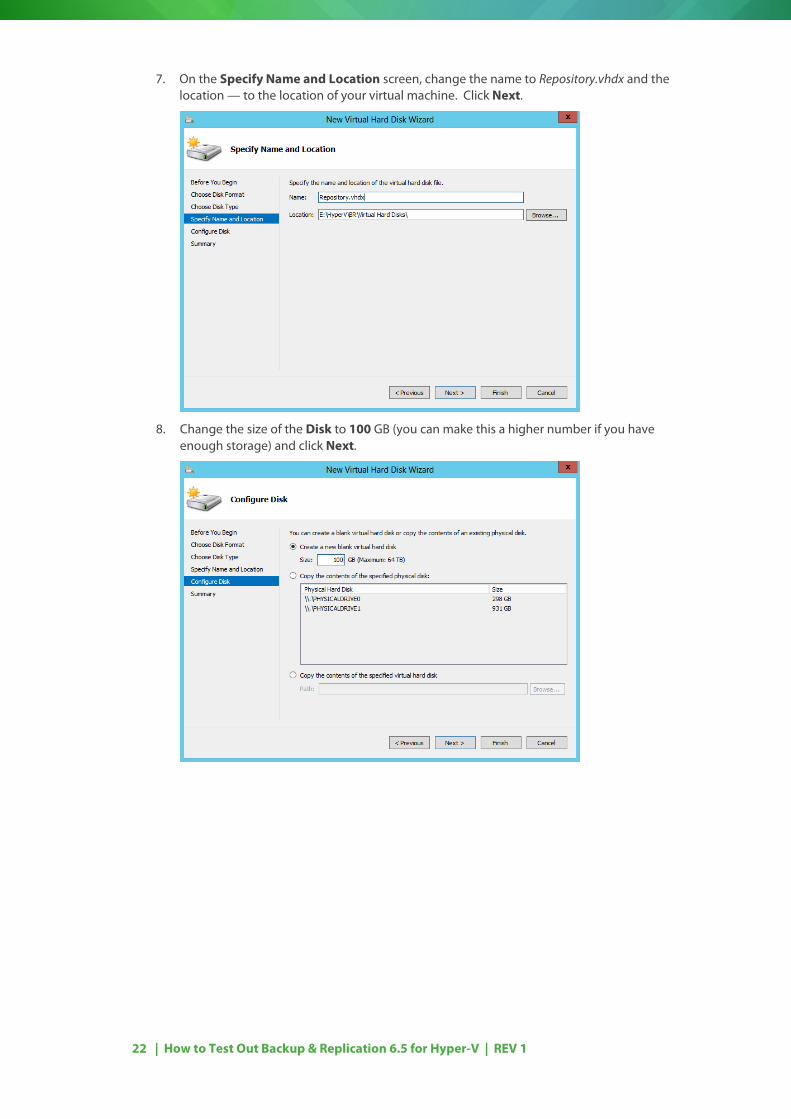
7. On the Specify Name and Location screen, change the name to Repository.vhdx and the location — to the location of your virtual machine. Click Next.
8. Change the size of the Disk to 100 GB (you can make this a higher number if you have enough storage) and click Next.
23 | How to Test Out Backup & Replication 6.5 for Hyper-V | REV 1
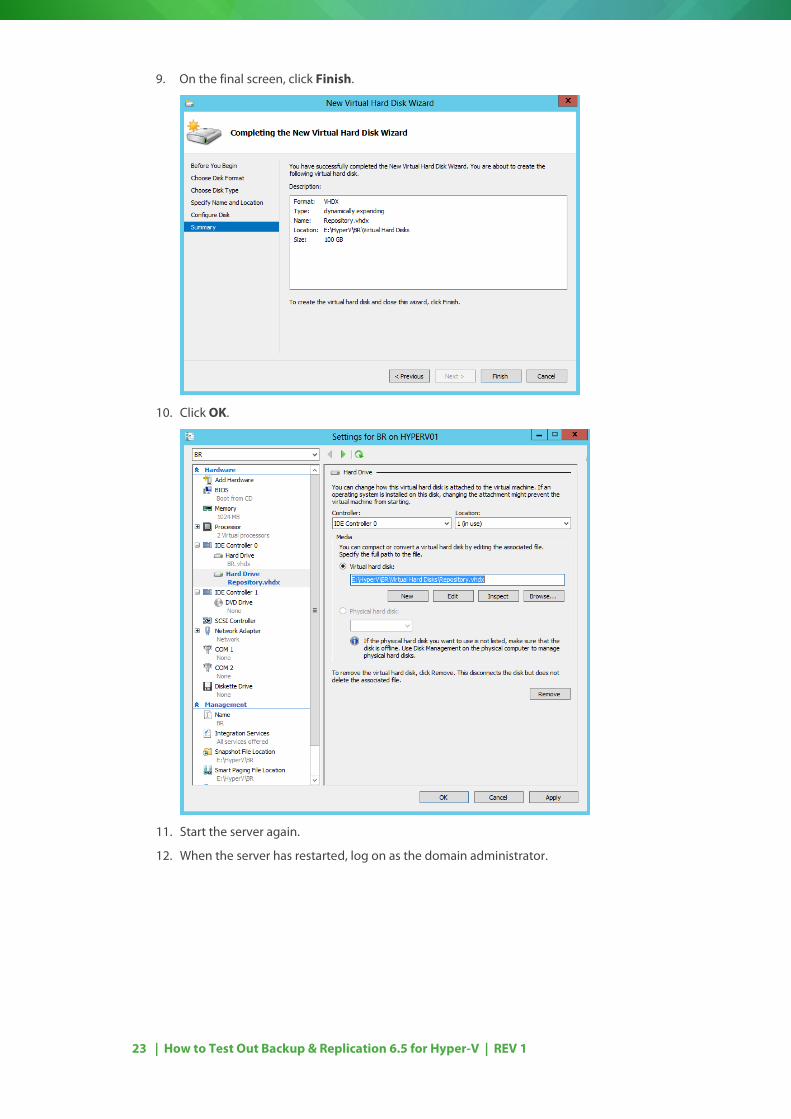
9. On the final screen, click Finish.
10. Click OK.
11. Start the server again.
12. When the server has restarted, log on as the domain administrator.
24 | How to Test Out Backup & Replication 6.5 for Hyper-V | REV 1
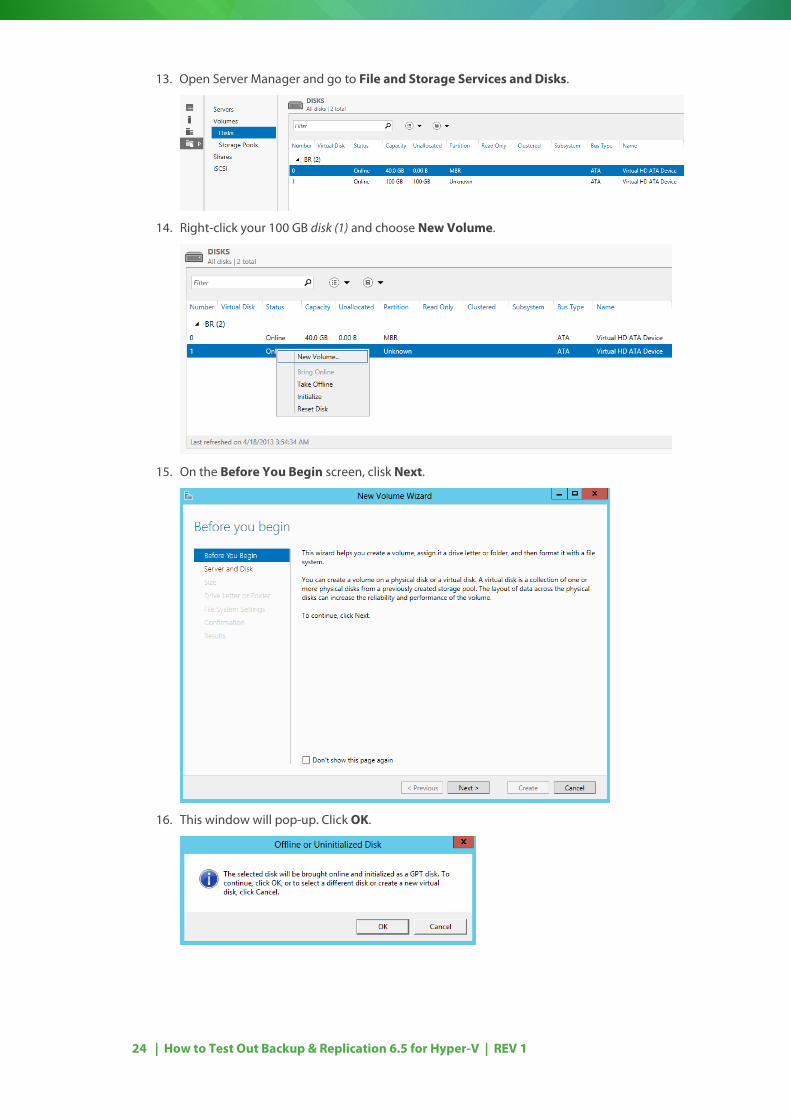
13. Open Server Manager and go to File and Storage Services and Disks.
14. Right-click your 100 GB disk (1) and choose New Volume.
15. On the Before You Begin screen, clisk Next.
16. This window will pop-up. Click OK.
25 | How to Test Out Backup & Replication 6.5 for Hyper-V | REV 1
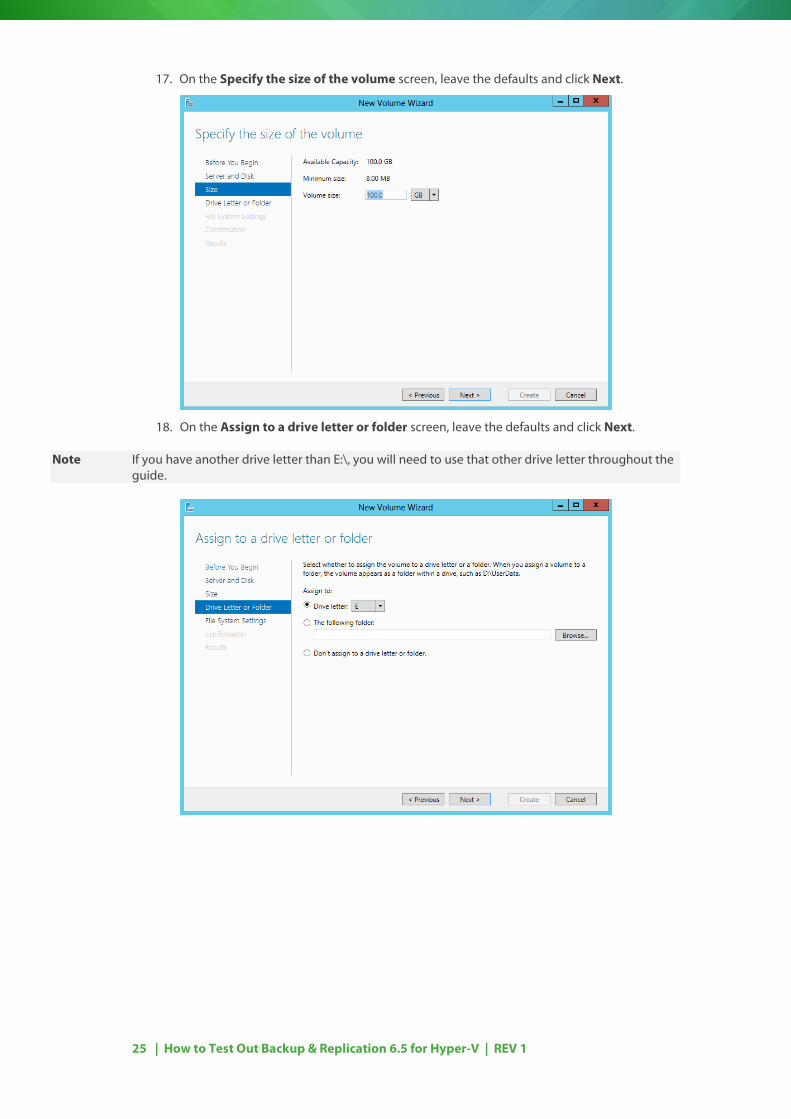
17. On the Specify the size of the volume screen, leave the defaults and click Next.
18. On the Assign to a drive letter or folder screen, leave the defaults and click Next.
Note If you have another drive letter than E:\, you will need to use that other drive letter throughout the guide.
26 | How to Test Out Backup & Replication 6.5 for Hyper-V | REV 1
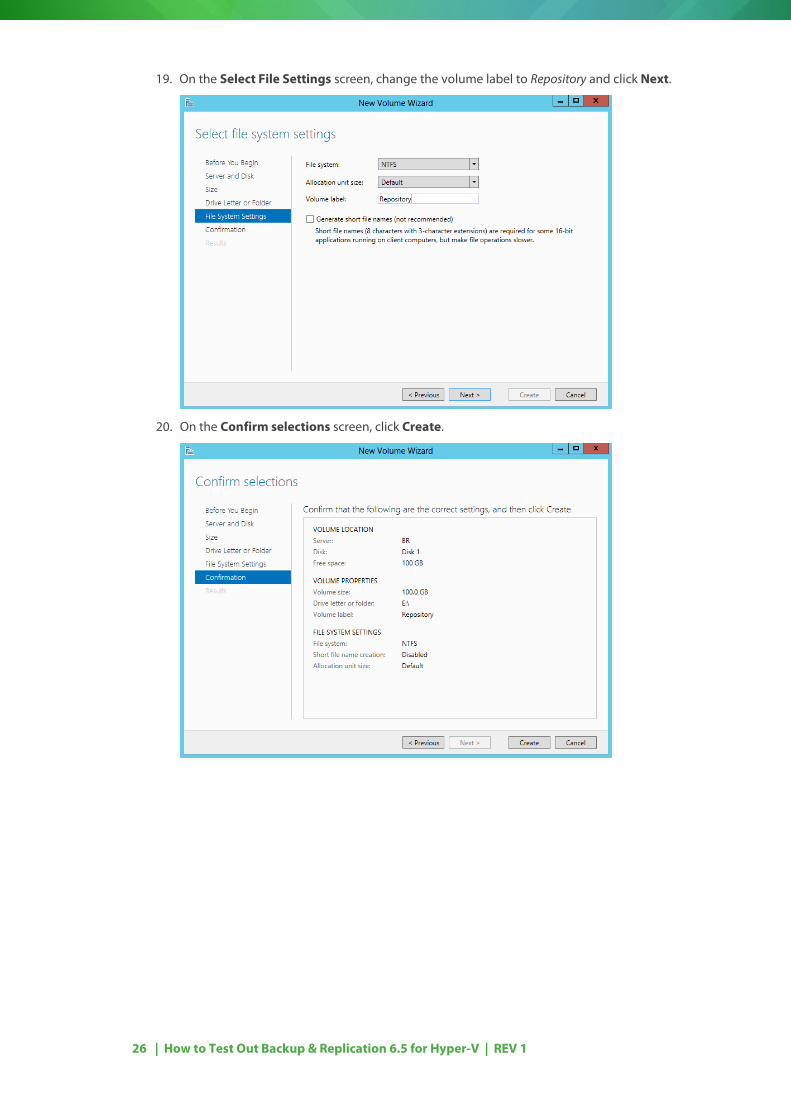
19. On the Select File Settings screen, change the volume label to Repository and click Next.
20. On the Confirm selections screen, click Create.

27 | How to Test Out Backup & Replication 6.5 for Hyper-V | REV 1
21. When the disk has been created, click Close.
After these steps, you have created two virtual machines running on your hypervisor. One of them (DC) has been made a domain controller and the other one (BR) has received an additional disk to function as a repository for your backups. Now you can continue with Joining the BR Server to the Domain.
28 | How to Test Out Backup & Replication 6.5 for Hyper-V | REV 1
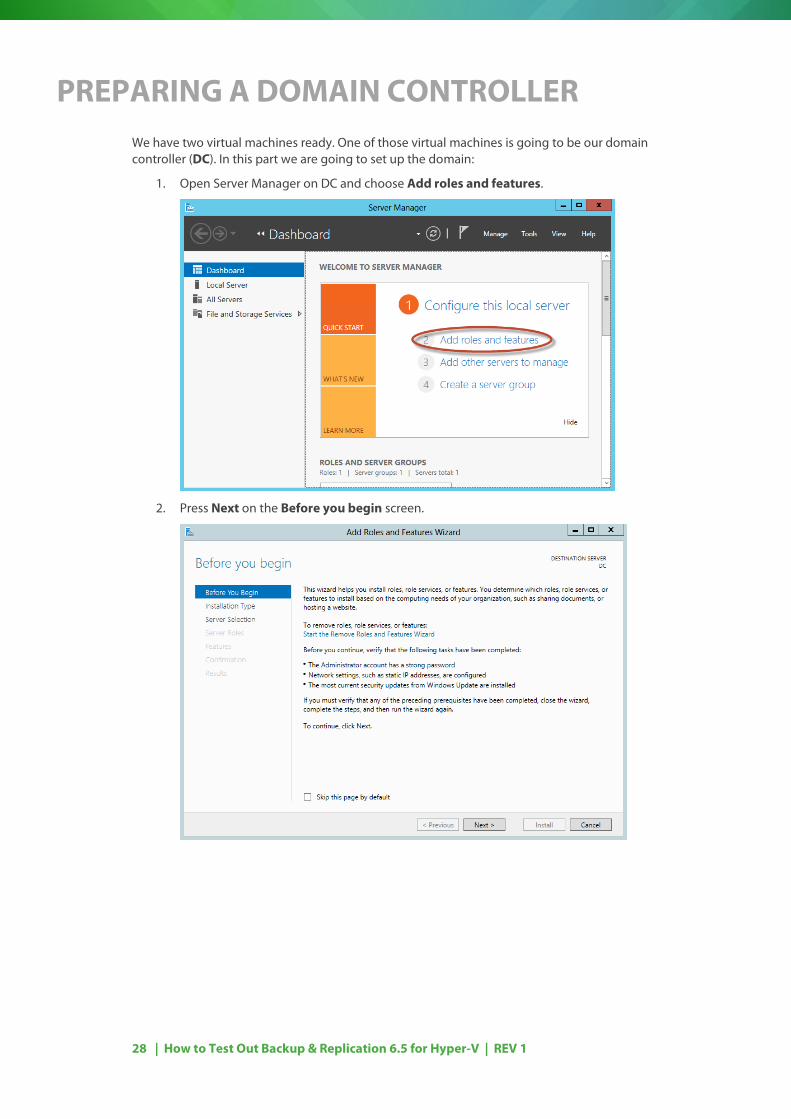
PREPARING A DOMAIN CONTROLLER We have two virtual machines ready. One of those virtual machines is going to be our domain controller (DC). In this part we are going to set up the domain:
1. Open Server Manager on DC and choose Add roles and features.
2. Press Next on the Before you begin screen.
29 | How to Test Out Backup & Replication 6.5 for Hyper-V | REV 1
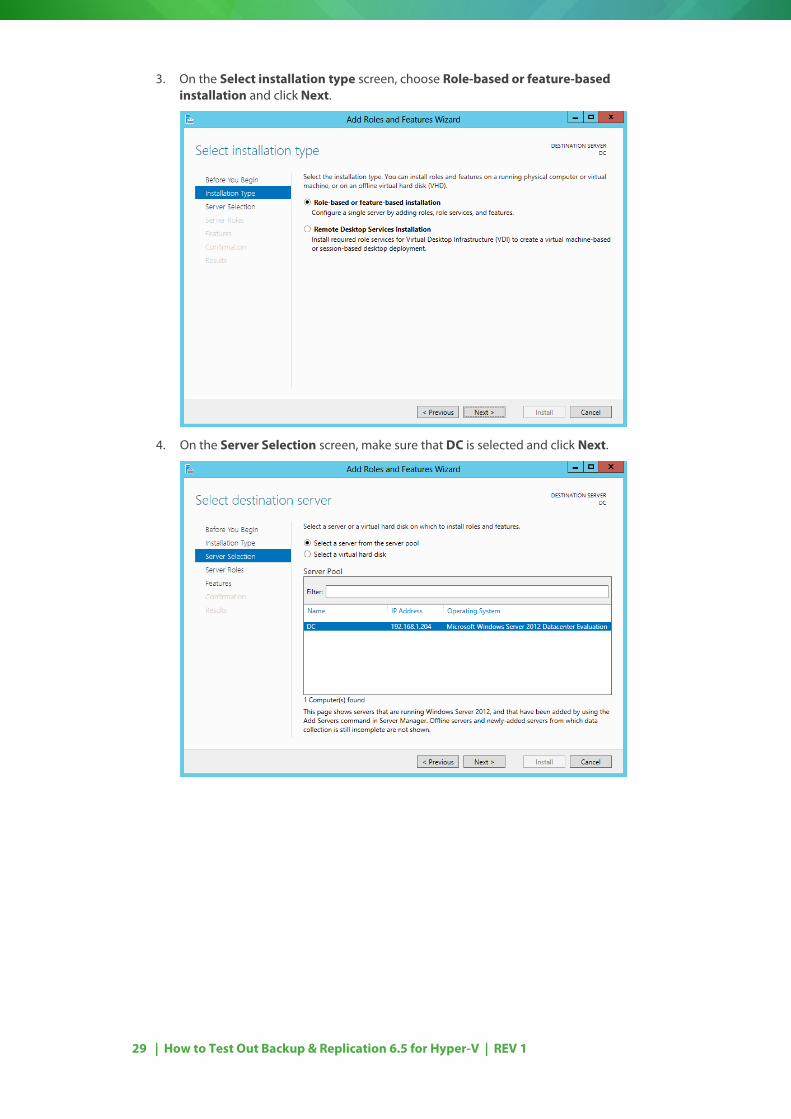
3. On the Select installation type screen, choose Role-based or feature-based installation and click Next.
4. On the Server Selection screen, make sure that DC is selected and click Next.
30 | How to Test Out Backup & Replication 6.5 for Hyper-V | REV 1
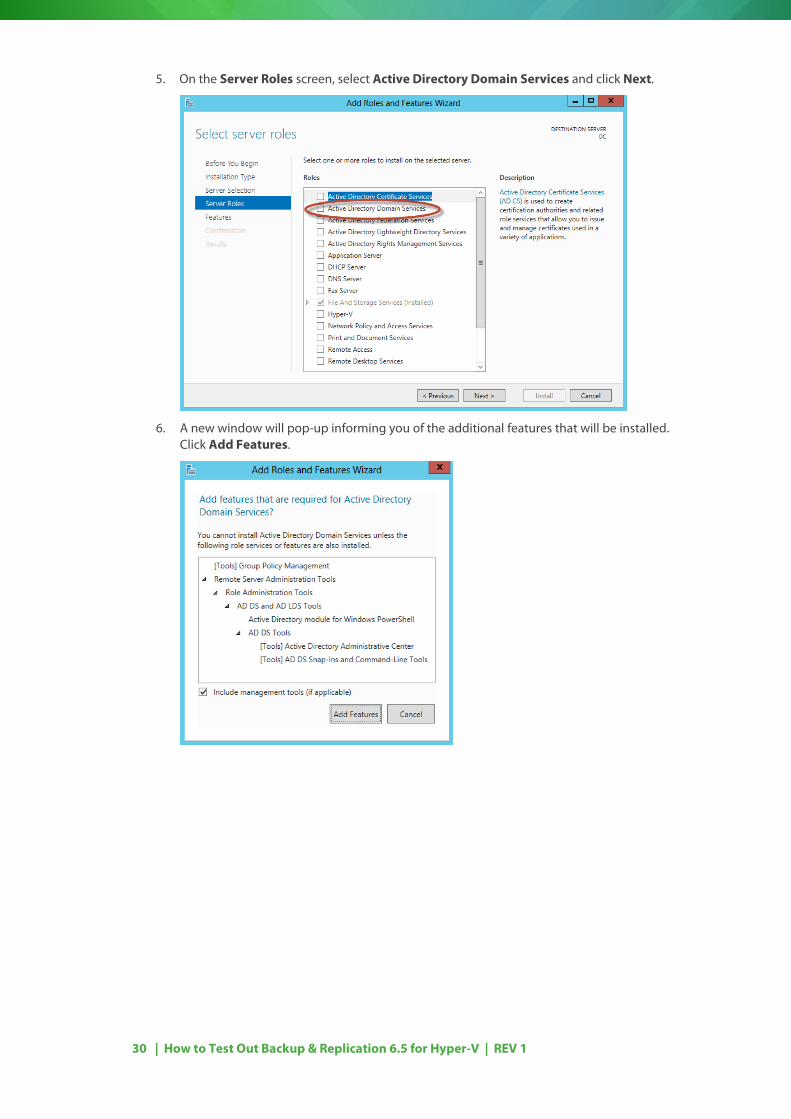
5. On the Server Roles screen, select Active Directory Domain Services and click Next.
6. A new window will pop-up informing you of the additional features that will be installed. Click Add Features.

31 | How to Test Out Backup & Replication 6.5 for Hyper-V | REV 1
7. Click Next.
8. On the Features screen, the correct features are already selected. Click Next

32 | How to Test Out Backup & Replication 6.5 for Hyper-V | REV 1
9. On the AD DS screen, click Next.
10. On the Confirmation screen, select Restart the destination server automatically if required. In the pop-up window, click Yes. Normally the server will not need to be restarted unless there is another pending operation or when you have chosen other roles/ features to be installed.

33 | How to Test Out Backup & Replication 6.5 for Hyper-V | REV 1
11. Finally, click Finish to start the installation.
12. When the installation is finished, click Close.
34 | How to Test Out Backup & Replication 6.5 for Hyper-V | REV 1
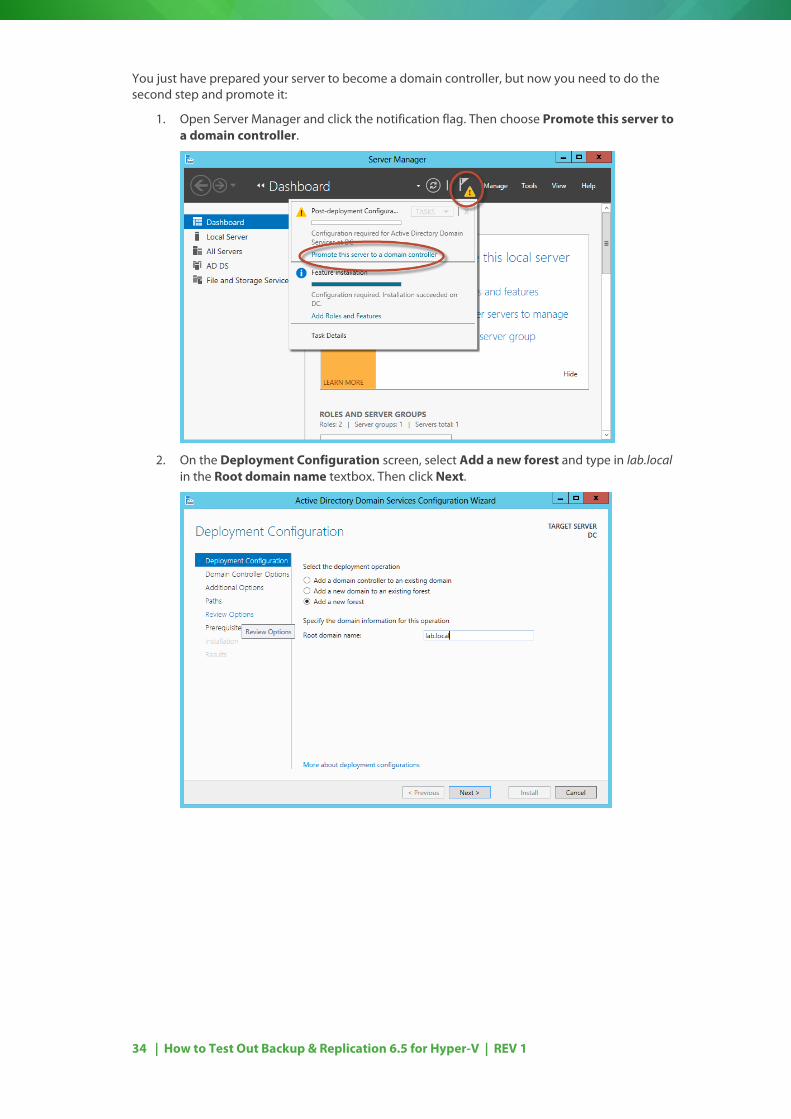
You just have prepared your server to become a domain controller, but now you need to do the second step and promote it:
1. Open Server Manager and click the notification flag. Then choose Promote this server to a domain controller.
2. On the Deployment Configuration screen, select Add a new forest and type in lab.local in the Root domain name textbox. Then click Next.
35 | How to Test Out Backup & Replication 6.5 for Hyper-V | REV 1
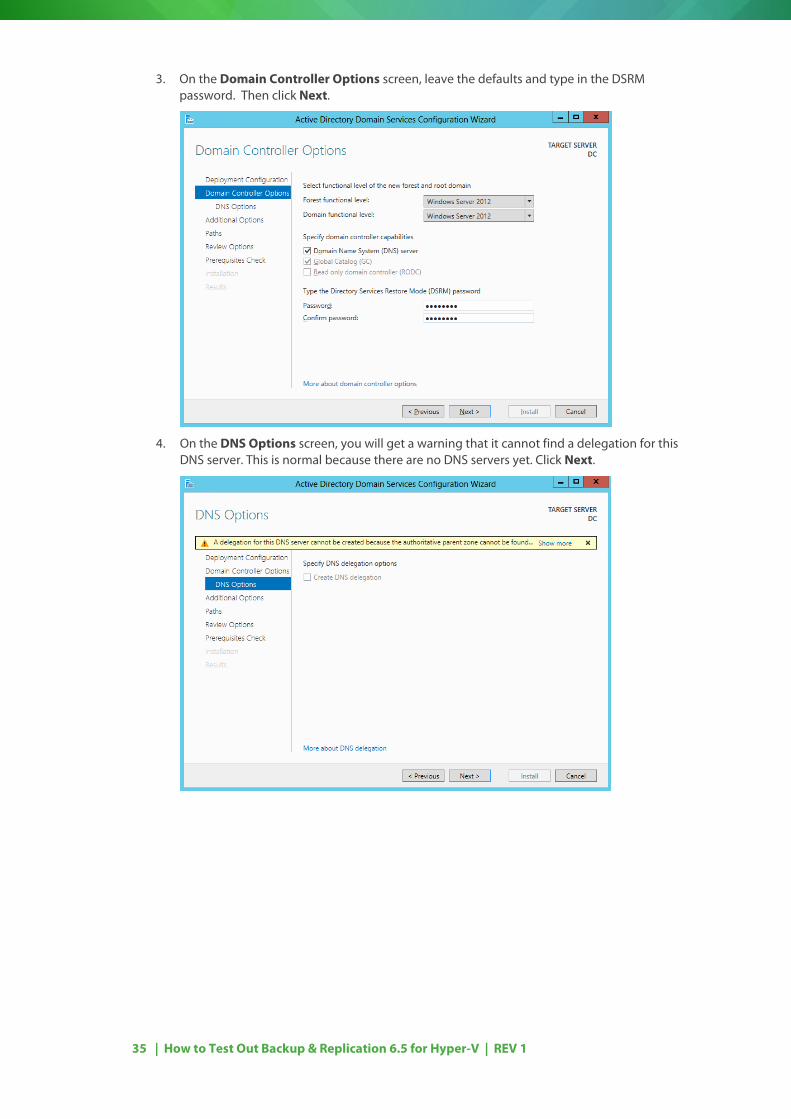
3. On the Domain Controller Options screen, leave the defaults and type in the DSRM password. Then click Next.
4. On the DNS Options screen, you will get a warning that it cannot find a delegation for this DNS server. This is normal because there are no DNS servers yet. Click Next.
36 | How to Test Out Backup & Replication 6.5 for Hyper-V | REV 1
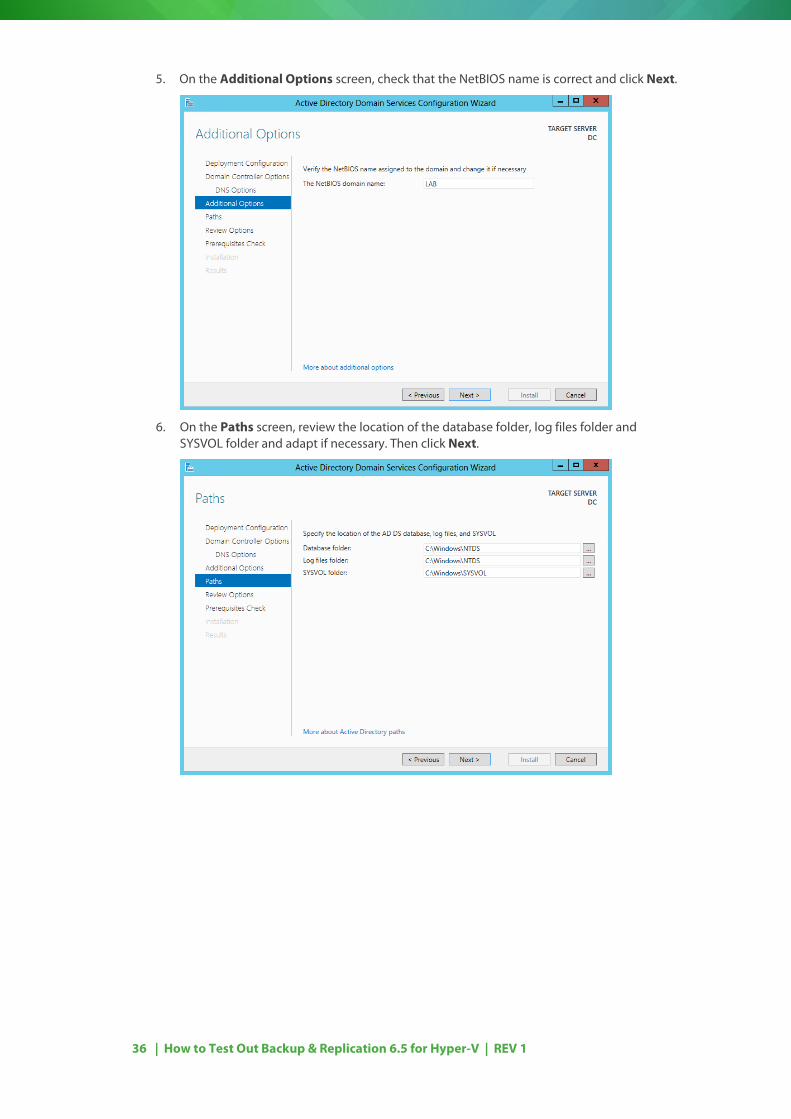
5. On the Additional Options screen, check that the NetBIOS name is correct and click Next.
6. On the Paths screen, review the location of the database folder, log files folder and SYSVOL folder and adapt if necessary. Then click Next.
37 | How to Test Out Backup & Replication 6.5 for Hyper-V | REV 1
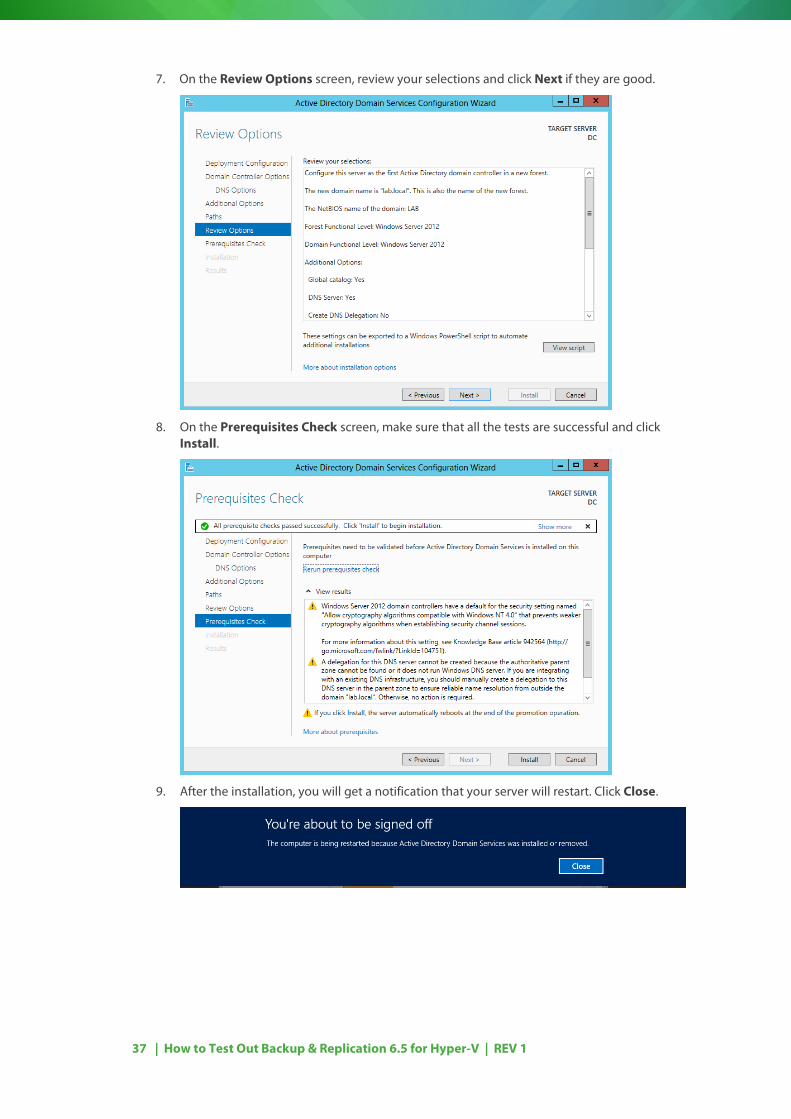
7. On the Review Options screen, review your selections and click Next if they are good.
8. On the Prerequisites Check screen, make sure that all the tests are successful and click Install.
9. After the installation, you will get a notification that your server will restart. Click Close.

38 | How to Test Out Backup & Replication 6.5 for Hyper-V | REV 1
10. When the server is restarted, log on with the domain administrator and verify that everything is working.
You have now a domain controller and can go back to the Creating Two Virtual Machines part of this document and continue by Joining the BR Server to the Domain.
39 | How to Test Out Backup & Replication 6.5 for Hyper-V | REV 1
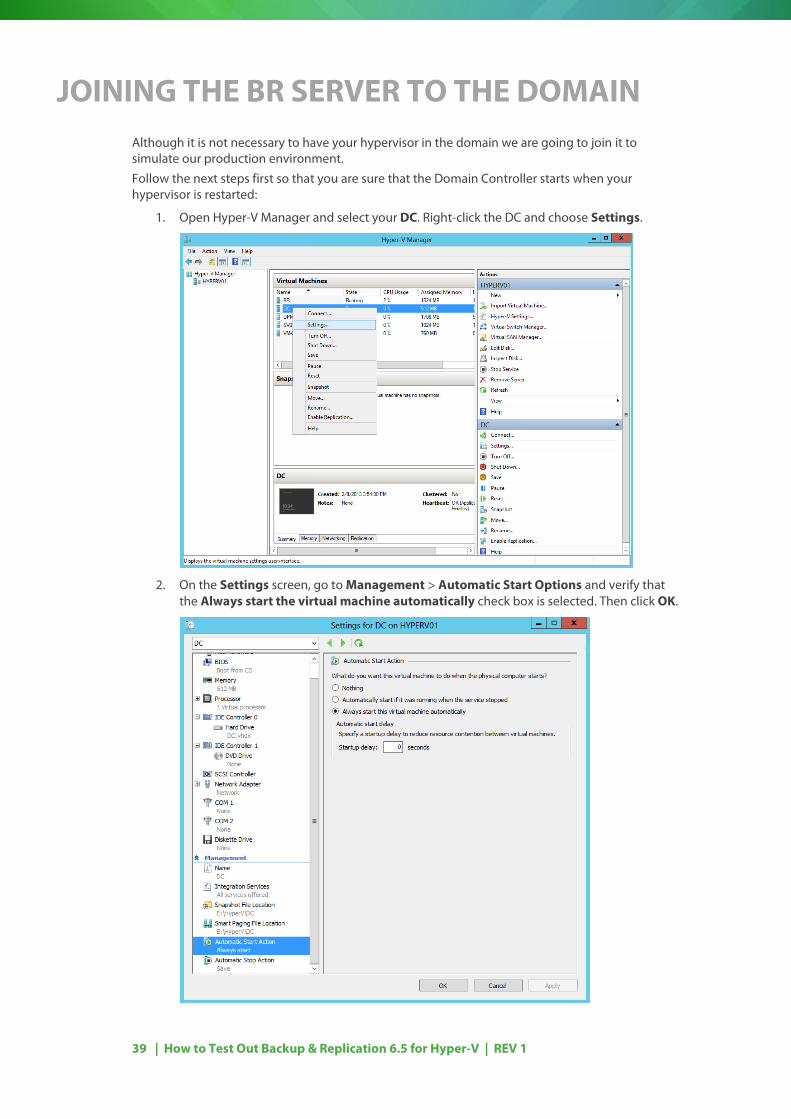
JOINING THE BR SERVER TO THE DOMAIN Although it is not necessary to have your hypervisor in the domain we are going to join it to simulate our production environment.
Follow the next steps first so that you are sure that the Domain Controller starts when your hypervisor is restarted:
1. Open Hyper-V Manager and select your DC. Right-click the DC and choose Settings.
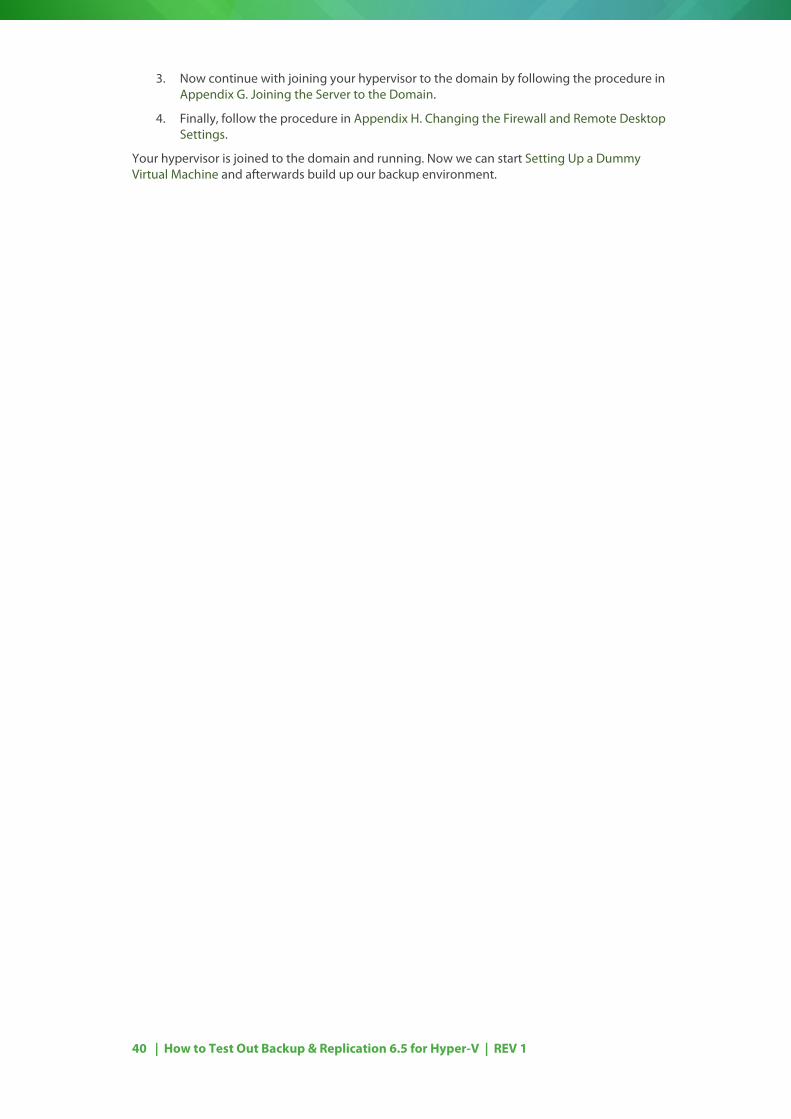
2. On the Settings screen, go to Management > Automatic Start Options and verify that the Always start the virtual machine automatically check box is selected. Then click OK.
40 | How to Test Out Backup & Replication 6.5 for Hyper-V | REV 1
3. Now continue with joining your hypervisor to the domain by following the procedure in Appendix G. Joining the Server to the Domain.
4. Finally, follow the procedure in Appendix H. Changing the Firewall and Remote Desktop Settings.
Your hypervisor is joined to the domain and running. Now we can start Setting Up a Dummy Virtual Machine and afterwards build up our backup environment.
41 | How to Test Out Backup & Replication 6.5 for Hyper-V | REV 1
SETTING UP A DUMMY VIRTUAL MACHINE We are going to build ourselves a virtual machine that will be used to demonstrate the power of Backup and Recovery on Hyper-V. This virtual machine will be used to do a full recovery and also to recover some files from that server.
Here are the specifics for that server:
Name Memory Disk # of virtual CPU IP
SV01 1024 MB 40 GB 1 192.168.1.203
1. Create a new virtual machine in Hyper-V Manager. Follow the instructions from Creating Two Virtual Machines.
2. Follow the instructions Appendix D. Installing Windows Server 2012 to install your server.
3. When finished, follow the instructions in Appendix E. Renaming a Windows Server to rename your server correctly (SV01).
4. When finished, follow the instructions in Appendix F. Changing the IP-address of a server to give your server the correct IP (192.168.1.203).
5. Follow the instructions in Appendix G. Joining the Server to the Domain to join the server to the domain.
6. Finally, follow the instructions in Appendix H. Changing the Firewall and Remote Desktop Settings to change the firewall and RDP settings
7. Connect to the server again and log on as domain administrator.
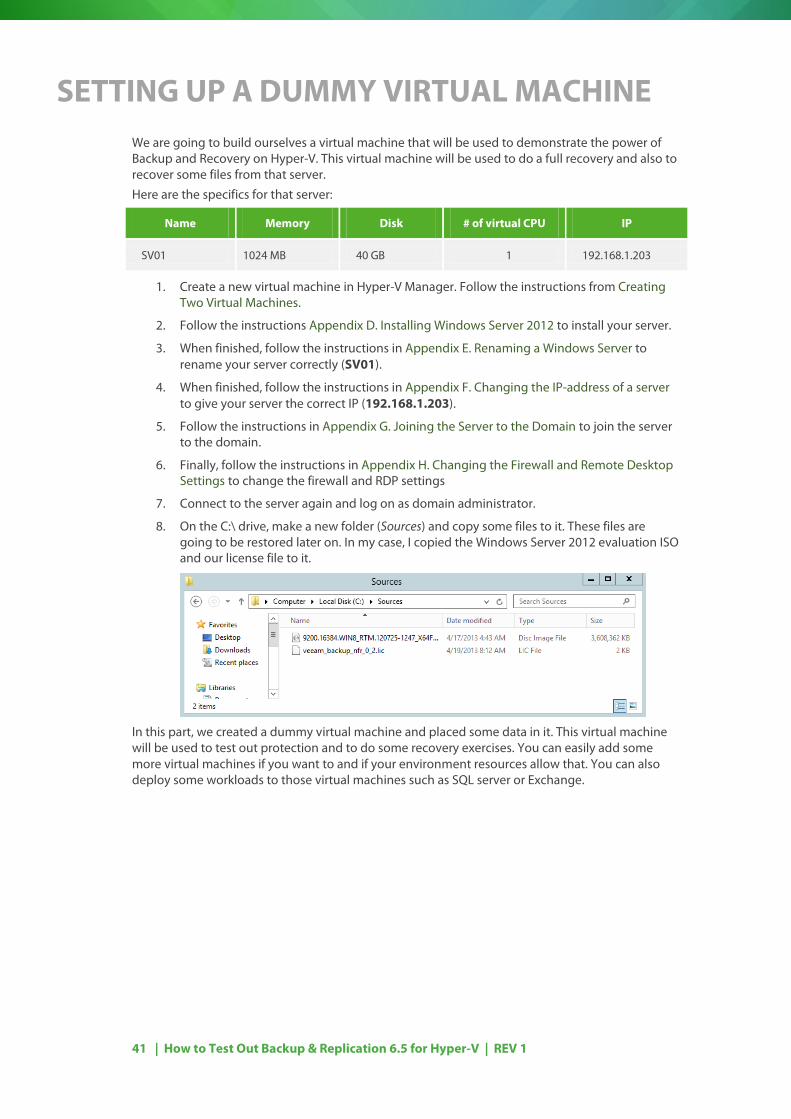
8. On the C:\ drive, make a new folder (Sources) and copy some files to it. These files are going to be restored later on. In my case, I copied the Windows Server 2012 evaluation ISO and our license file to it.
In this part, we created a dummy virtual machine and placed some data in it. This virtual machine will be used to test out protection and to do some recovery exercises. You can easily add some more virtual machines if you want to and if your environment resources allow that. You can also deploy some workloads to those virtual machines such as SQL server or Exchange.
42 | How to Test Out Backup & Replication 6.5 for Hyper-V | REV 1
SETTING UP THE BACKUP & REPLICATION SERVER
This part of the guide will install Veeam Backup & Replication Server on your BR server. It will cover the basic installation. For this trial guide, we are going to install all the features onto one server called BR.lab.local.
This server should already be created. Copy the downloaded installer files for Veeam Backup & Replication and unzip them on the BR server locally to a desired location. Copy your license file to the same location.
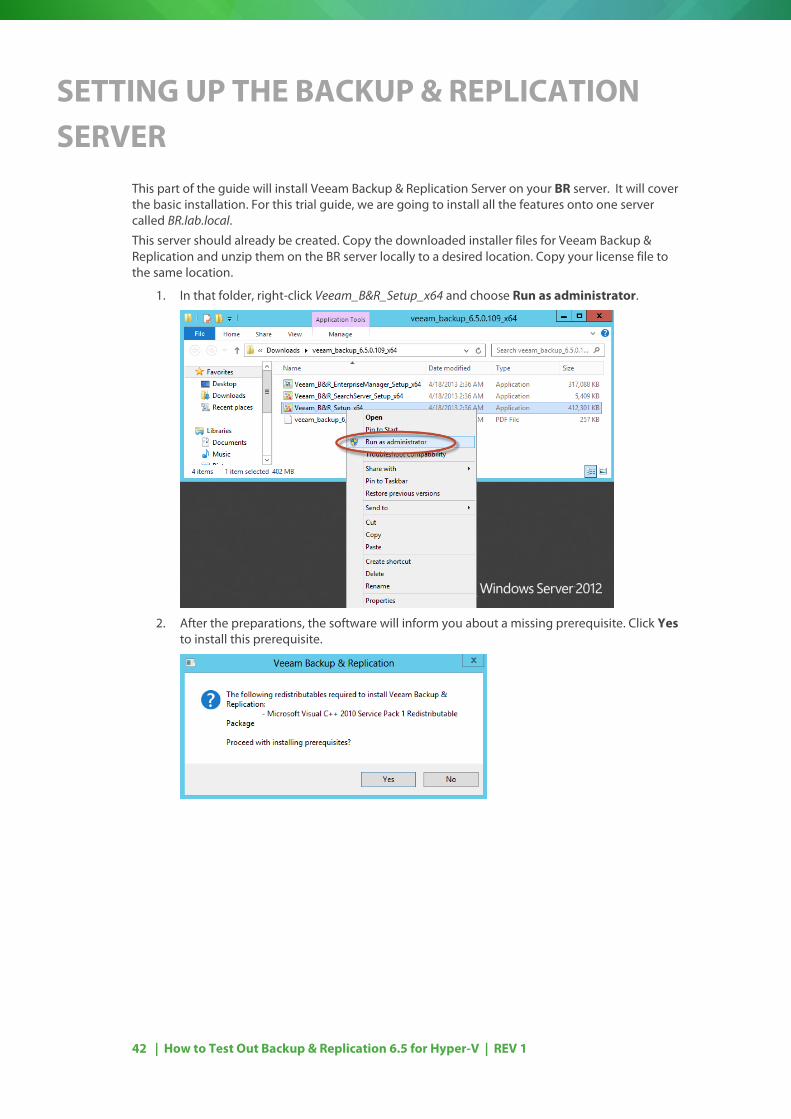
1. In that folder, right-click Veeam_B&R_Setup_x64 and choose Run as administrator.
2. After the preparations, the software will inform you about a missing prerequisite. Click Yes
to install this prerequisite.
43 | How to Test Out Backup & Replication 6.5 for Hyper-V | REV 1
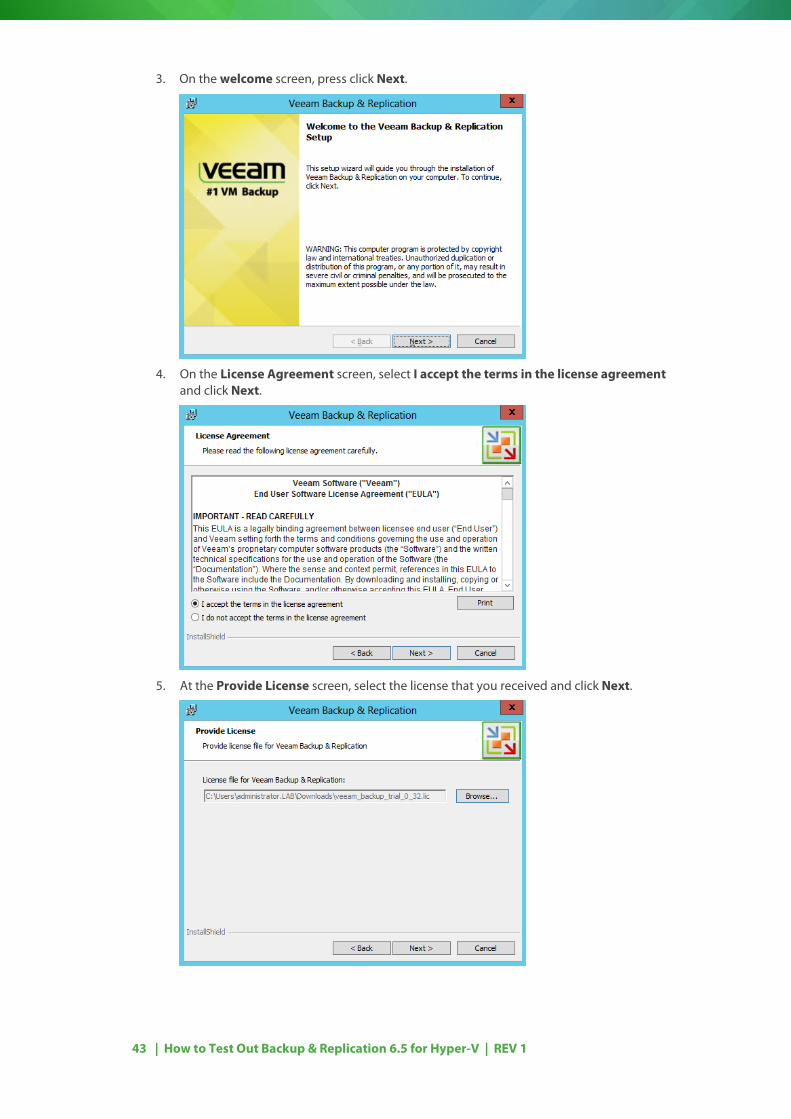
3. On the welcome screen, press click Next.
4. On the License Agreement screen, select I accept the terms in the license agreement
and click Next.
5. At the Provide License screen, select the license that you received and click Next.

44 | How to Test Out Backup & Replication 6.5 for Hyper-V | REV 1
6. On the Custom Setup screen, leave the defaults or add the PowerShell snap-in if you want to test-out the PowerShell capabilities. Change the default installation path, if you prefer, and click Next.
7. On the SQL Server Instance screen, choose Install new instance of SQL Server and click
Next.
8. On the Service Settings screen, type in the password for the administrator and click Next.
45 | How to Test Out Backup & Replication 6.5 for Hyper-V | REV 1
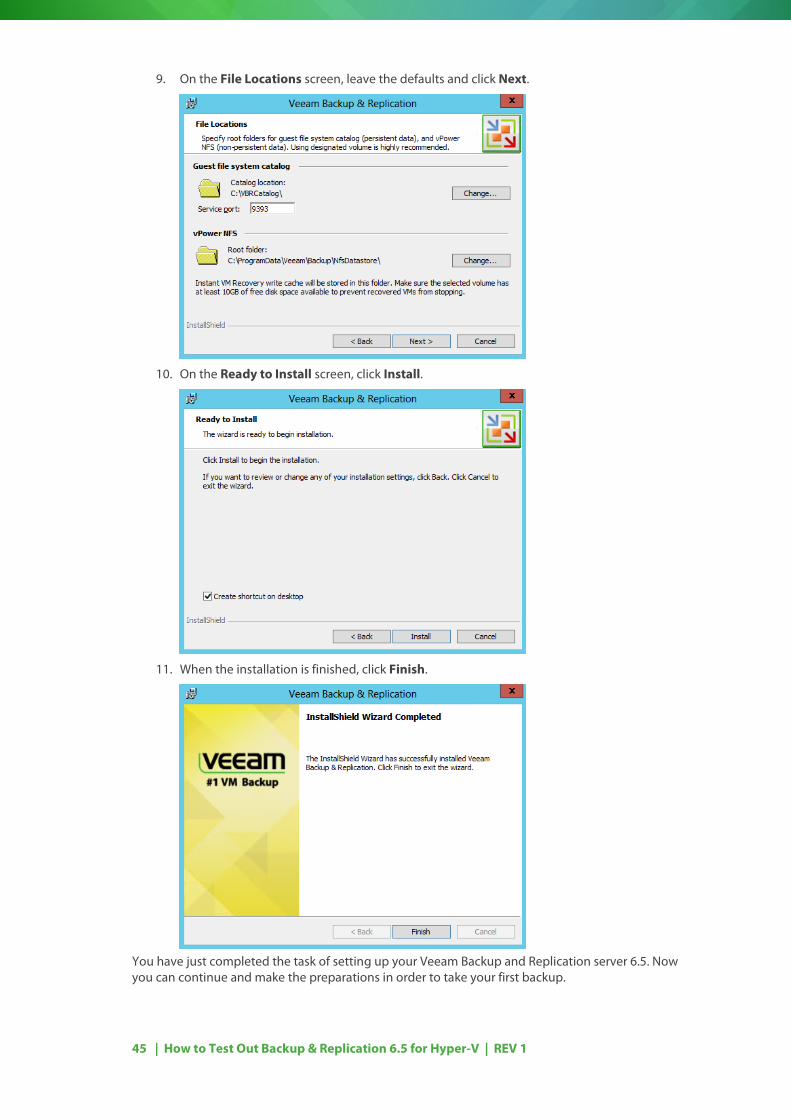
9. On the File Locations screen, leave the defaults and click Next.
10. On the Ready to Install screen, click Install.
11. When the installation is finished, click Finish.
You have just completed the task of setting up your Veeam Backup and Replication server 6.5. Now you can continue and make the preparations in order to take your first backup.
46 | How to Test Out Backup & Replication 6.5 for Hyper-V | REV 1
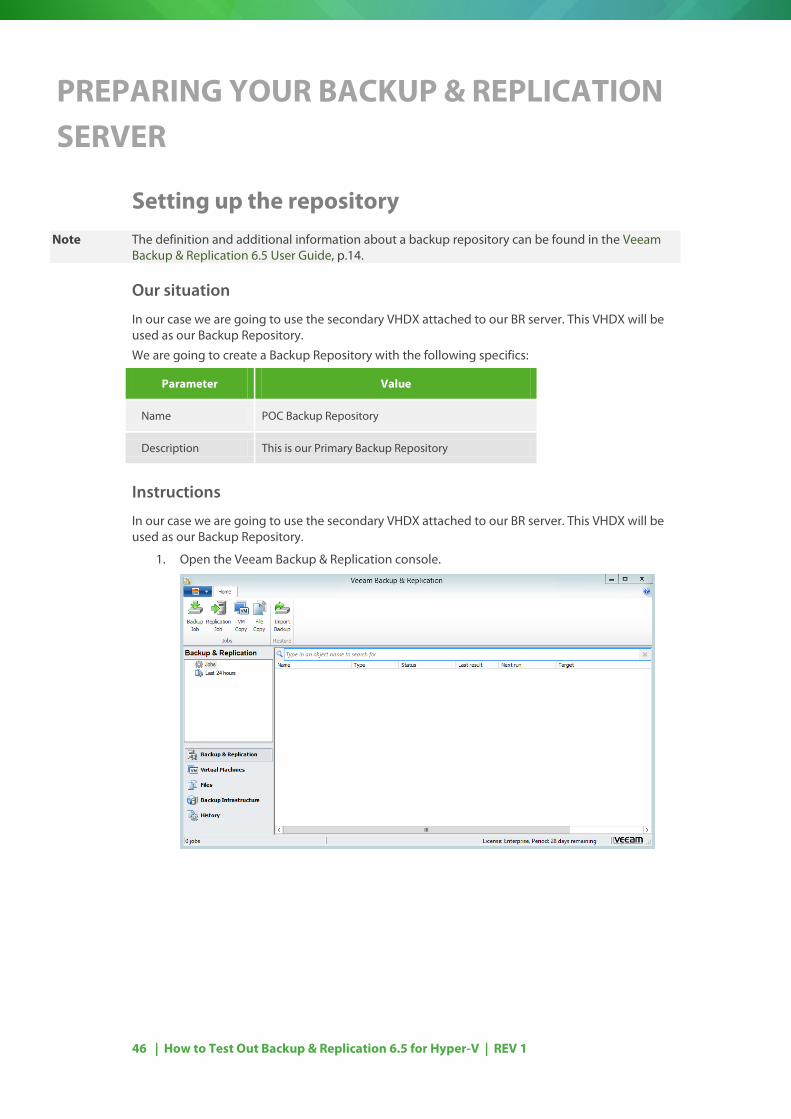
PREPARING YOUR BACKUP & REPLICATION SERVER
Setting up the repository Note The definition and additional information about a backup repository can be found in the Veeam
Backup & Replication 6.5 User Guide, p.14.
Our situation
In our case we are going to use the secondary VHDX attached to our BR server. This VHDX will be used as our Backup Repository.
We are going to create a Backup Repository with the following specifics:
Parameter Value
Name POC Backup Repository
Description This is our Primary Backup Repository
Instructions
In our case we are going to use the secondary VHDX attached to our BR server. This VHDX will be used as our Backup Repository.
1. Open the Veeam Backup & Replication console.
47 | How to Test Out Backup & Replication 6.5 for Hyper-V | REV 1
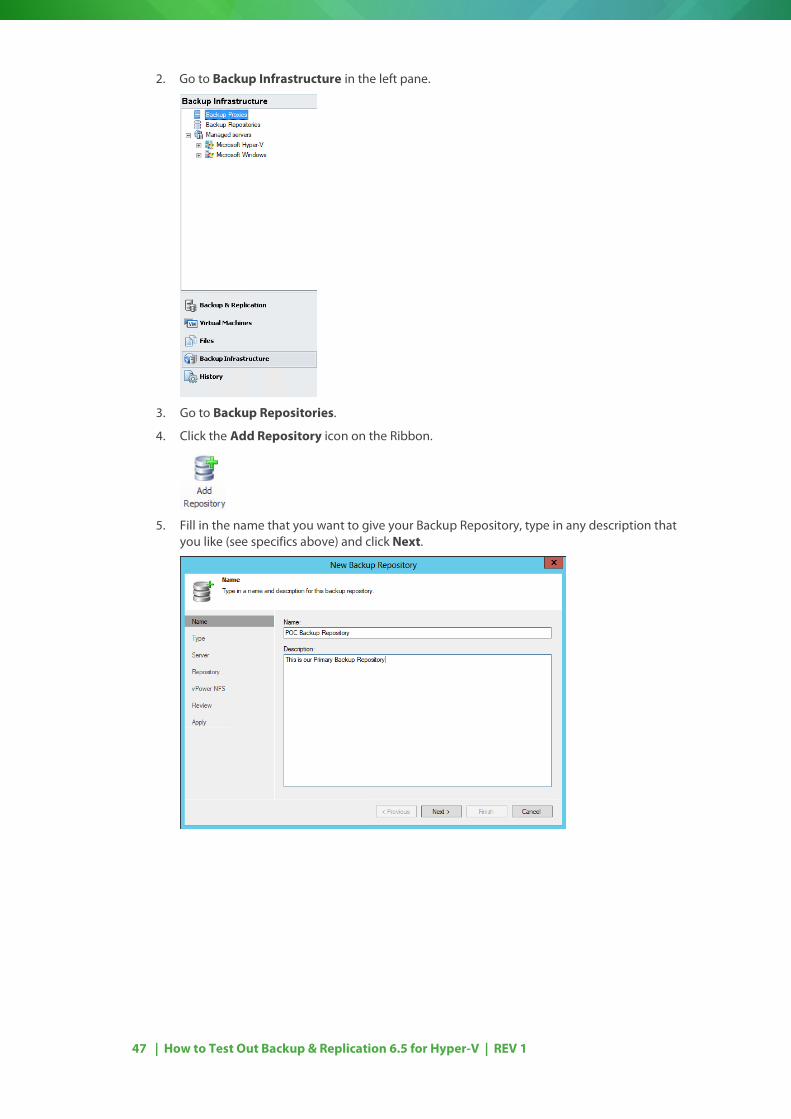
2. Go to Backup Infrastructure in the left pane.
3. Go to Backup Repositories.
4. Click the Add Repository icon on the Ribbon.
5. Fill in the name that you want to give your Backup Repository, type in any description that
you like (see specifics above) and click Next.

48 | How to Test Out Backup & Replication 6.5 for Hyper-V | REV 1
6. Choose Microsoft Windows server as the server type and click Next. For more information on type, read Veeam Backup & Replication 6.5 User Guide, p. 114
7. Leave the Repository server at This server and click Populate.
8. Choose the E:\ drive (this could be a different drive in your case) which you created before
and click Next.
49 | How to Test Out Backup & Replication 6.5 for Hyper-V | REV 1
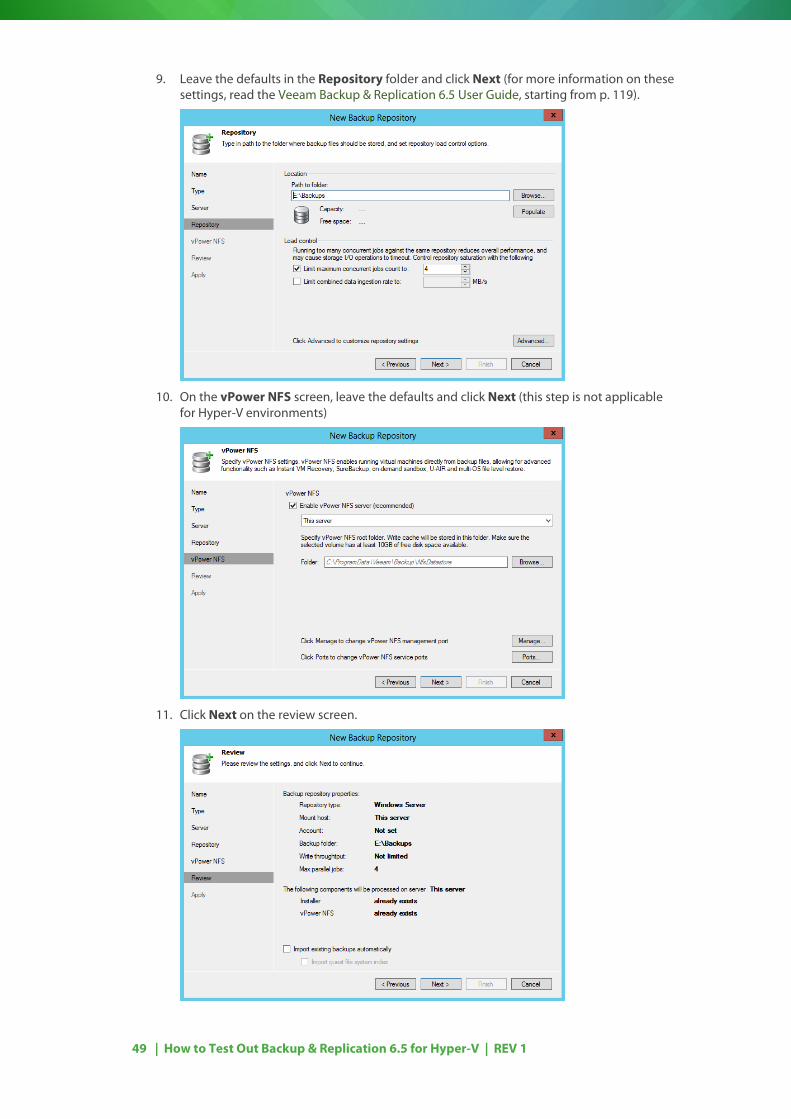
9. Leave the defaults in the Repository folder and click Next (for more information on these settings, read the Veeam Backup & Replication 6.5 User Guide, starting from p. 119).
10. On the vPower NFS screen, leave the defaults and click Next (this step is not applicable
for Hyper-V environments)
11. Click Next on the review screen.
50 | How to Test Out Backup & Replication 6.5 for Hyper-V | REV 1
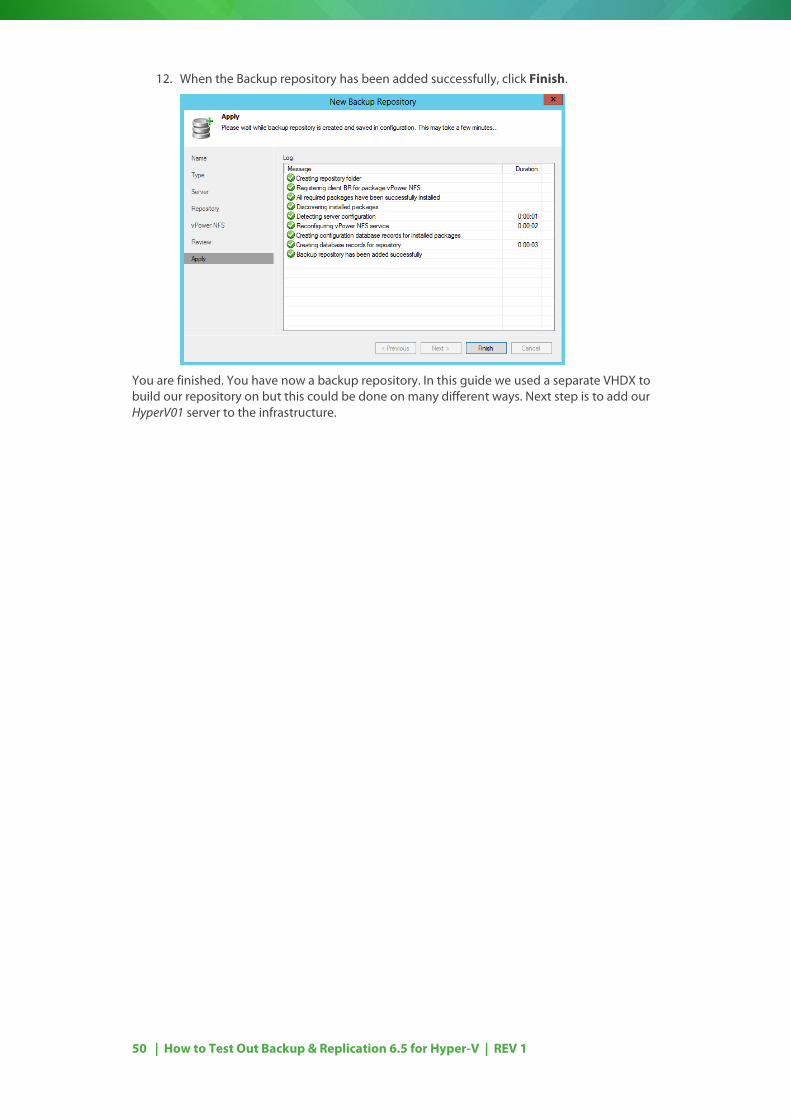
12. When the Backup repository has been added successfully, click Finish.
You are finished. You have now a backup repository. In this guide we used a separate VHDX to build our repository on but this could be done on many different ways. Next step is to add our HyperV01 server to the infrastructure.
51 | How to Test Out Backup & Replication 6.5 for Hyper-V | REV 1
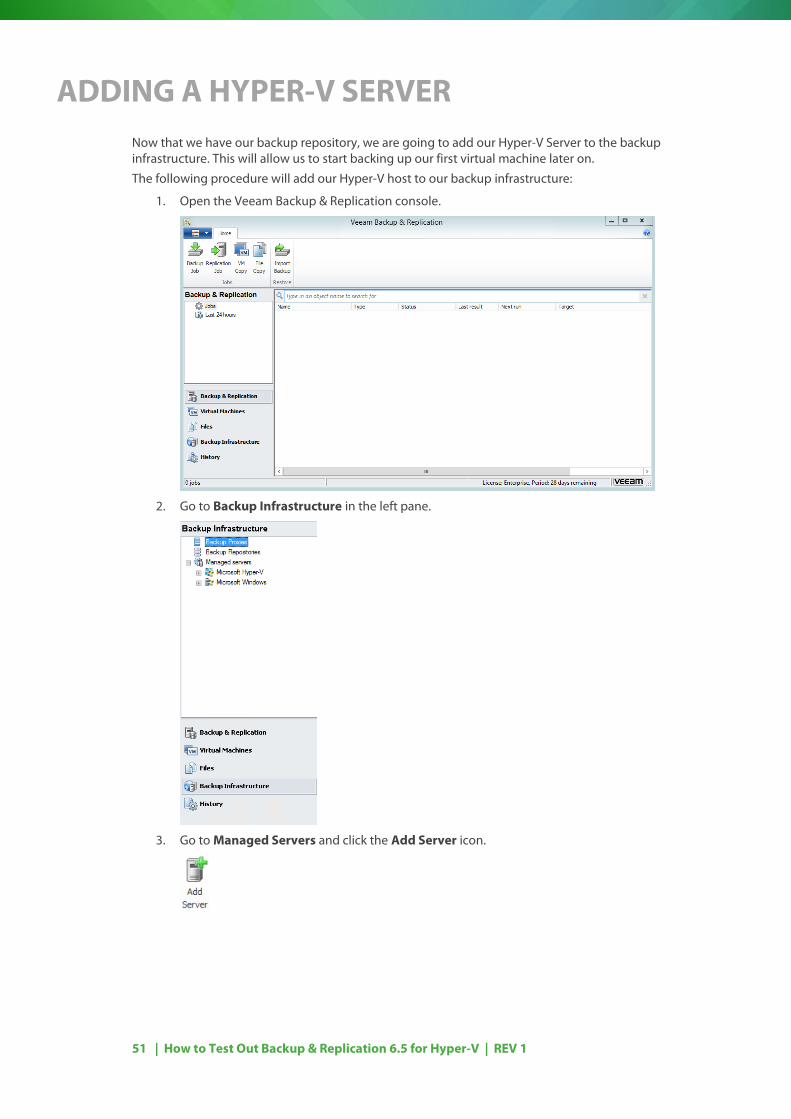
ADDING A HYPER-V SERVER Now that we have our backup repository, we are going to add our Hyper-V Server to the backup infrastructure. This will allow us to start backing up our first virtual machine later on.
The following procedure will add our Hyper-V host to our backup infrastructure:
1. Open the Veeam Backup & Replication console.
2. Go to Backup Infrastructure in the left pane.
3. Go to Managed Servers and click the Add Server icon.
52 | How to Test Out Backup & Replication 6.5 for Hyper-V | REV 1
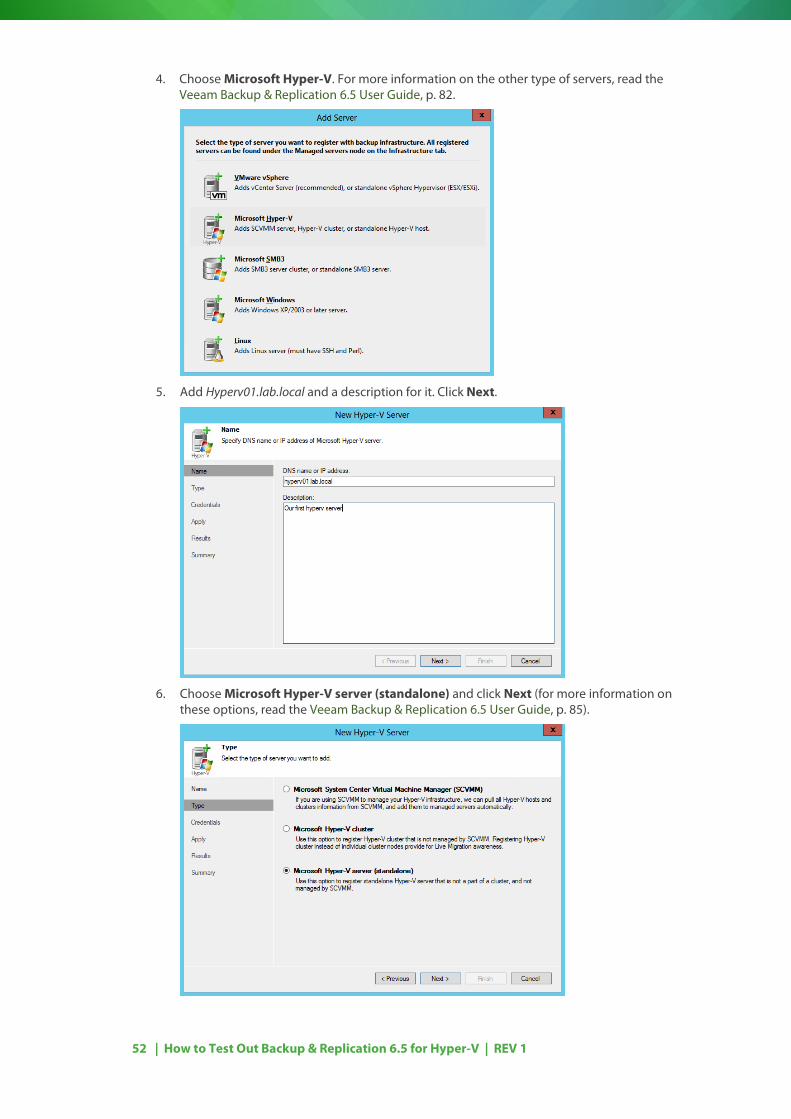
4. Choose Microsoft Hyper-V. For more information on the other type of servers, read the Veeam Backup & Replication 6.5 User Guide, p. 82.
5. Add Hyperv01.lab.local and a description for it. Click Next.
6. Choose Microsoft Hyper-V server (standalone) and click Next (for more information on these options, read the Veeam Backup & Replication 6.5 User Guide, p. 85).
53 | How to Test Out Backup & Replication 6.5 for Hyper-V | REV 1
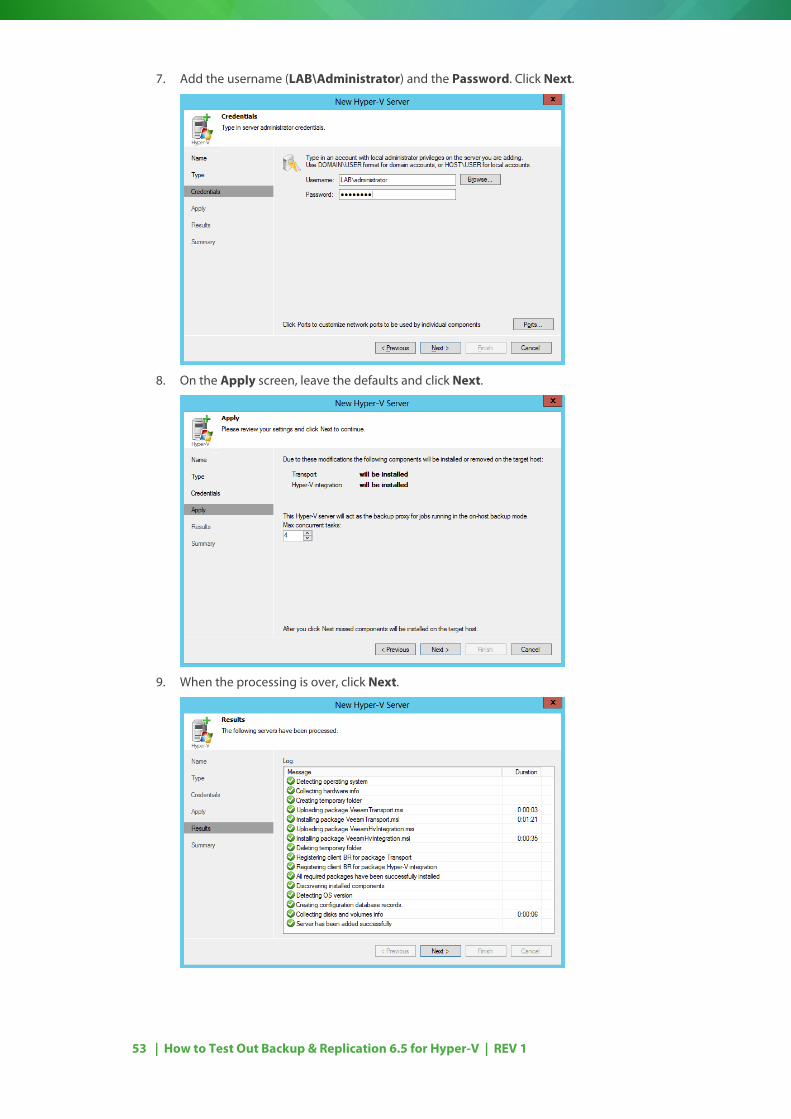
7. Add the username (LAB\Administrator) and the Password. Click Next.
8. On the Apply screen, leave the defaults and click Next.
9. When the processing is over, click Next.

54 | How to Test Out Backup & Replication 6.5 for Hyper-V | REV 1
10. Click Finish on the Summary screen.
And another job has been done. We added a repository to store our backups on and added the hypervisor to our infrastructure. You are now ready to start protecting your first server.
55 | How to Test Out Backup & Replication 6.5 for Hyper-V | REV 1
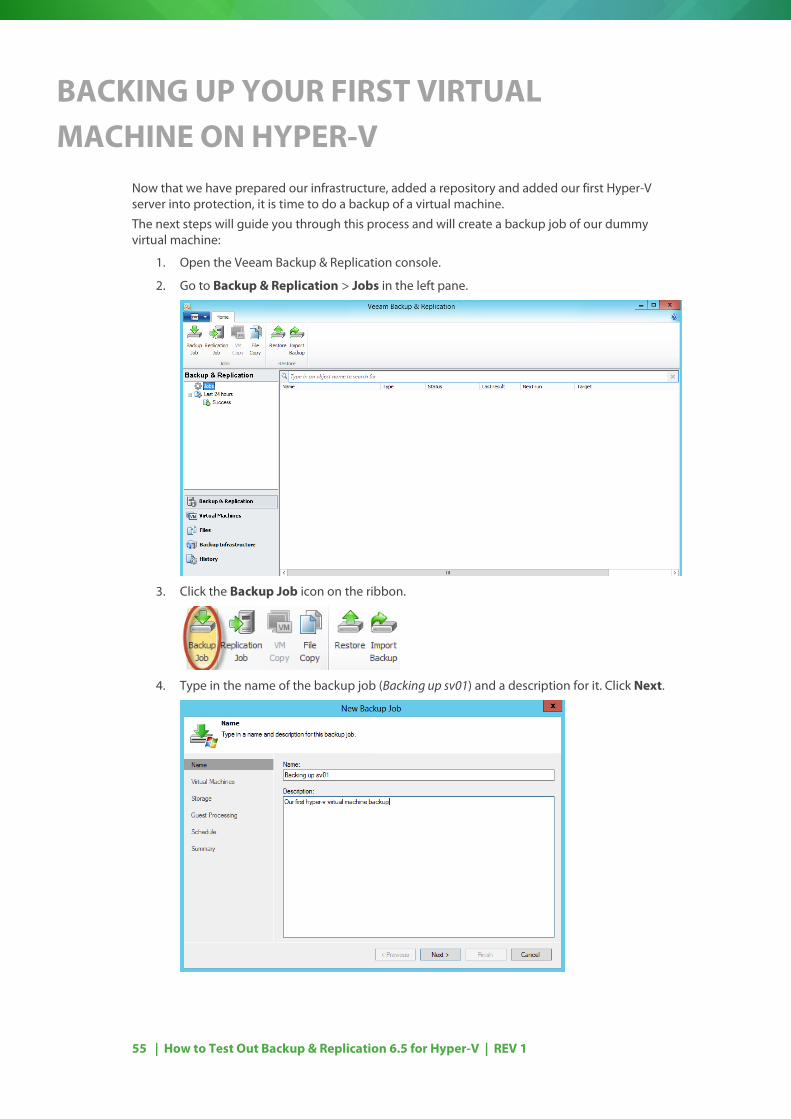
BACKING UP YOUR FIRST VIRTUAL MACHINE ON HYPER-V
Now that we have prepared our infrastructure, added a repository and added our first Hyper-V server into protection, it is time to do a backup of a virtual machine.
The next steps will guide you through this process and will create a backup job of our dummy virtual machine:
1. Open the Veeam Backup & Replication console.
2. Go to Backup & Replication > Jobs in the left pane.
3. Click the Backup Job icon on the ribbon.
4. Type in the name of the backup job (Backing up sv01) and a description for it. Click Next.
56 | How to Test Out Backup & Replication 6.5 for Hyper-V | REV 1
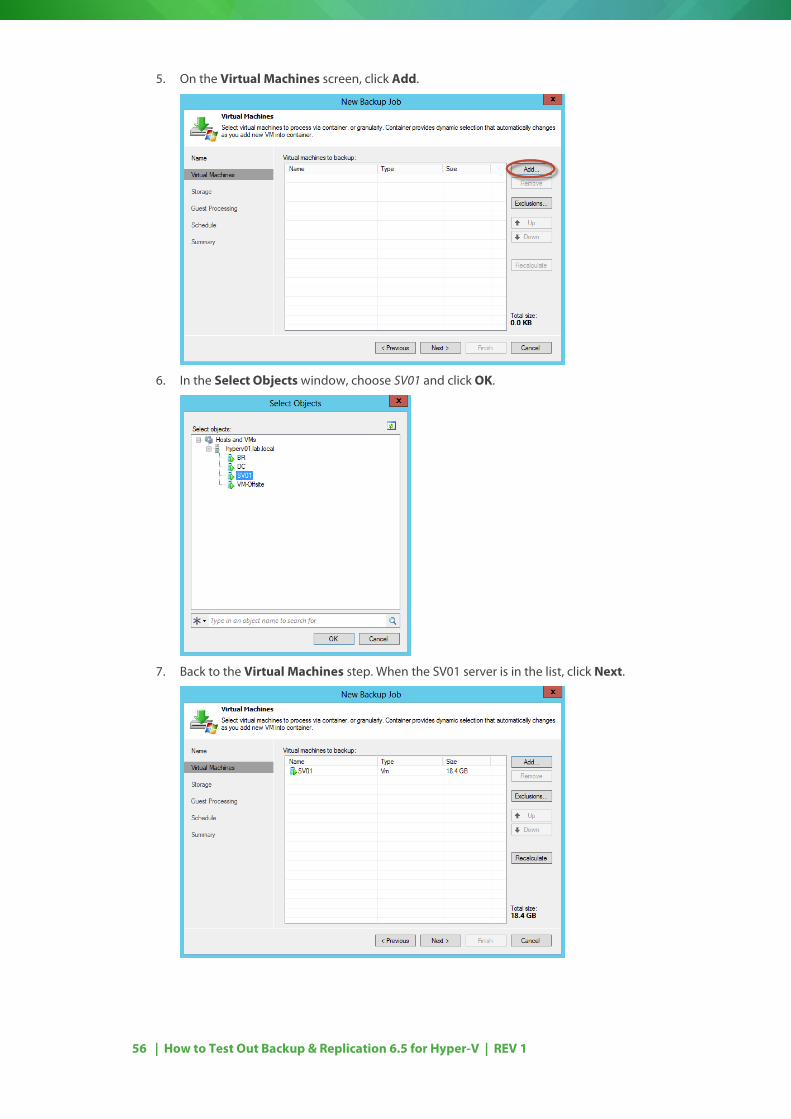
5. On the Virtual Machines screen, click Add.
6. In the Select Objects window, choose SV01 and click OK.
7. Back to the Virtual Machines step. When the SV01 server is in the list, click Next.
57 | How to Test Out Backup & Replication 6.5 for Hyper-V | REV 1
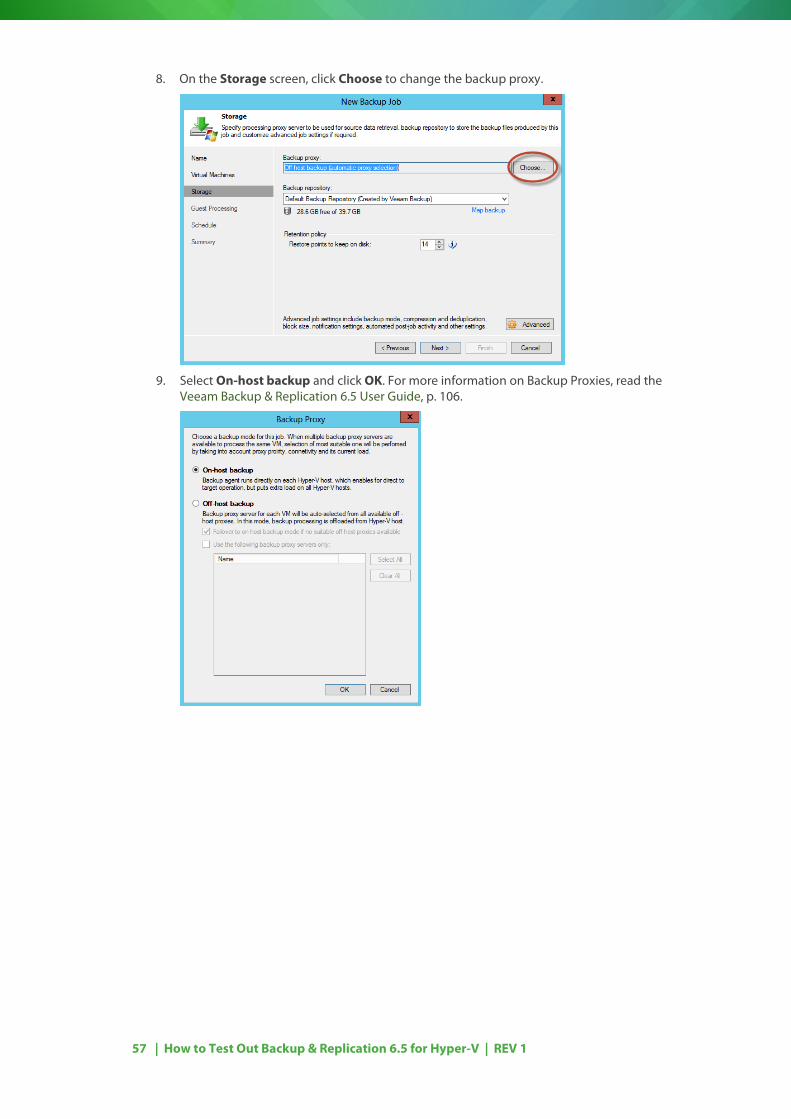
8. On the Storage screen, click Choose to change the backup proxy.
9. Select On-host backup and click OK. For more information on Backup Proxies, read the Veeam Backup & Replication 6.5 User Guide, p. 106.
58 | How to Test Out Backup & Replication 6.5 for Hyper-V | REV 1
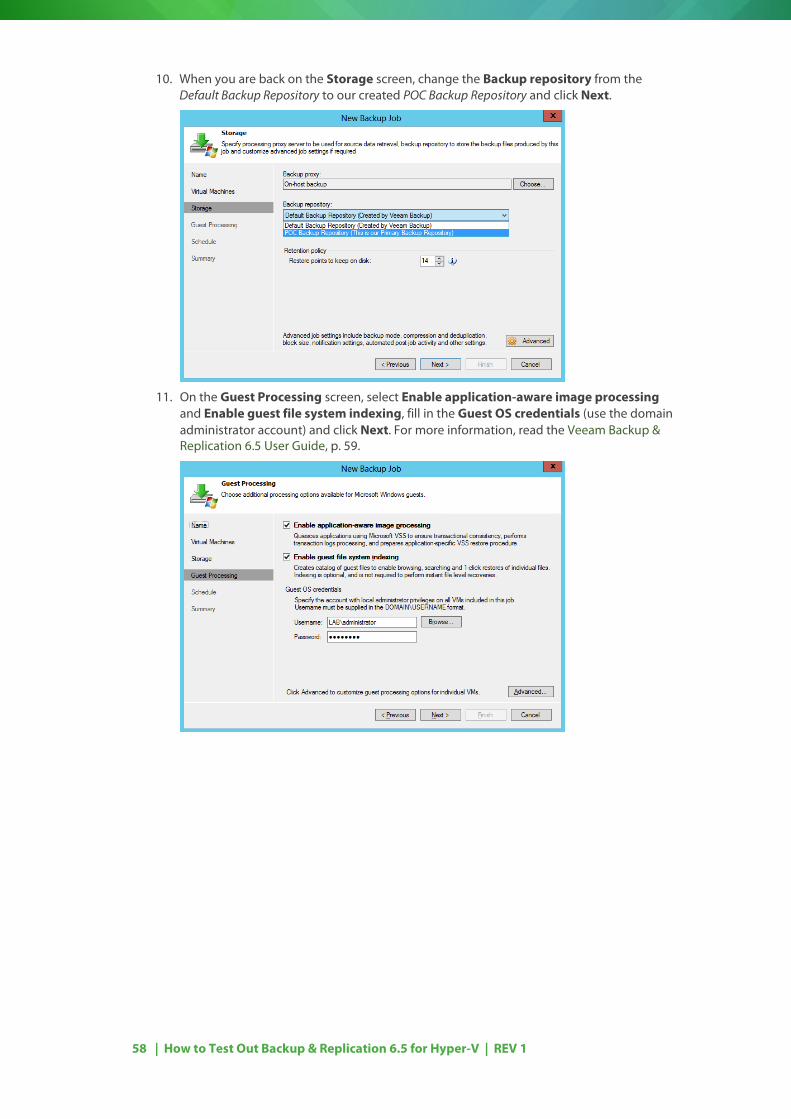
10. When you are back on the Storage screen, change the Backup repository from the Default Backup Repository to our created POC Backup Repository and click Next.
11. On the Guest Processing screen, select Enable application-aware image processing and Enable guest file system indexing, fill in the Guest OS credentials (use the domain administrator account) and click Next. For more information, read the Veeam Backup & Replication 6.5 User Guide, p. 59.
59 | How to Test Out Backup & Replication 6.5 for Hyper-V | REV 1
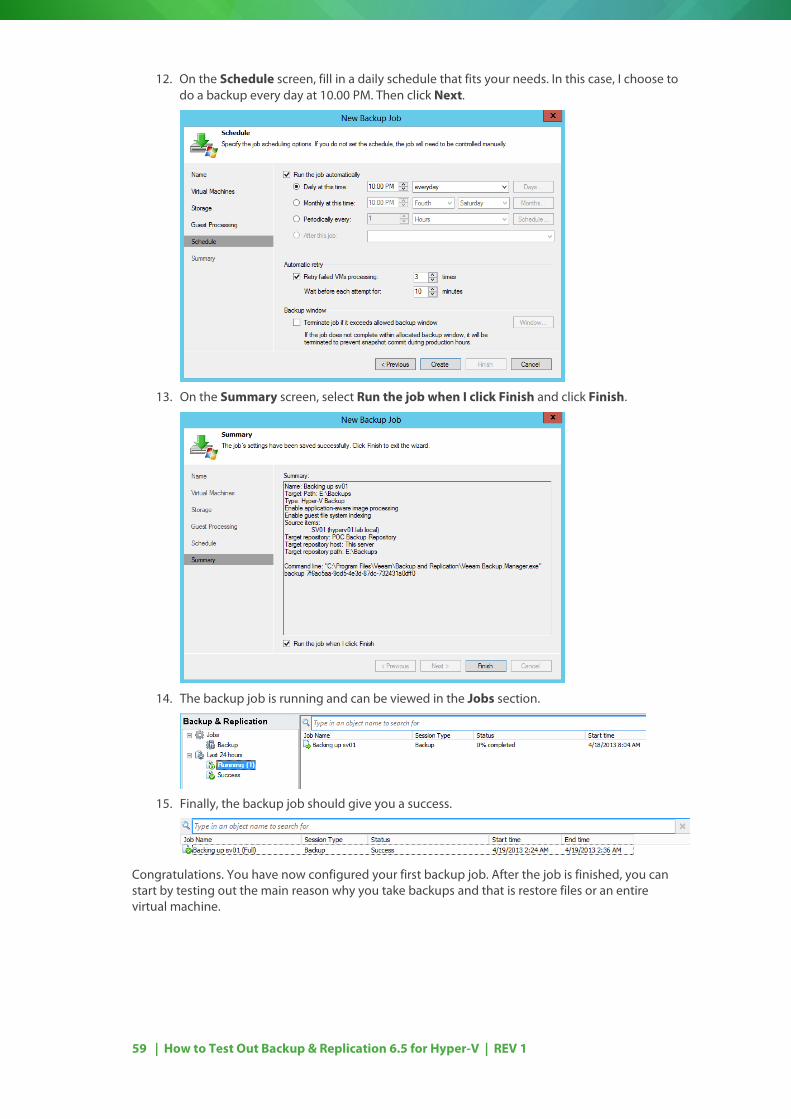
12. On the Schedule screen, fill in a daily schedule that fits your needs. In this case, I choose to do a backup every day at 10.00 PM. Then click Next.
13. On the Summary screen, select Run the job when I click Finish and click Finish.
14. The backup job is running and can be viewed in the Jobs section.
15. Finally, the backup job should give you a success.
Congratulations. You have now configured your first backup job. After the job is finished, you can start by testing out the main reason why you take backups and that is restore files or an entire virtual machine.
60 | How to Test Out Backup & Replication 6.5 for Hyper-V | REV 1
RECOVERING Backing up a virtual machine is one thing. Recovering is another. Every backup software goal is not to create a backup, but to be sure that it can do a recovery flawlessly. We are going to test out 2 features off the recovery.
Note You will not be able to perform this exercise before you have completed your first successful backup .
First feature is to go inside the virtual machine and recover some files and the second feature is to recover the entire virtual machine.
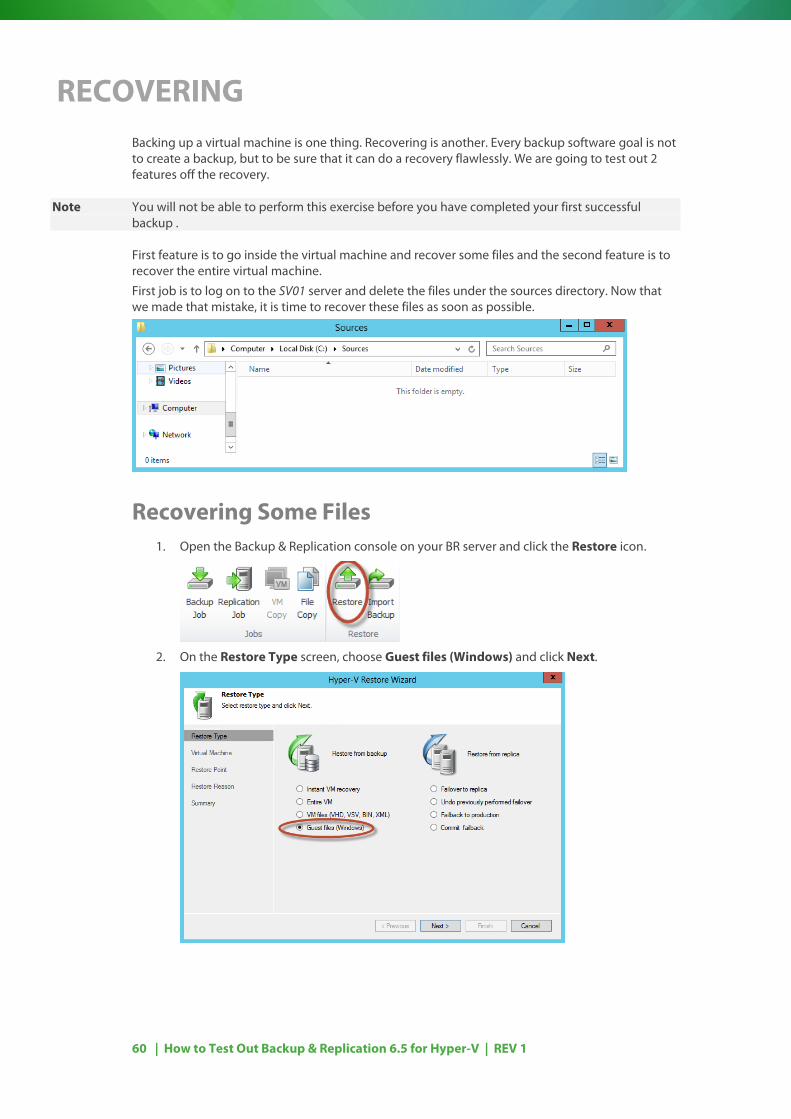
First job is to log on to the SV01 server and delete the files under the sources directory. Now that we made that mistake, it is time to recover these files as soon as possible.
Recovering Some Files 1. Open the Backup & Replication console on your BR server and click the Restore icon.
2. On the Restore Type screen, choose Guest files (Windows) and click Next.
61 | How to Test Out Backup & Replication 6.5 for Hyper-V | REV 1
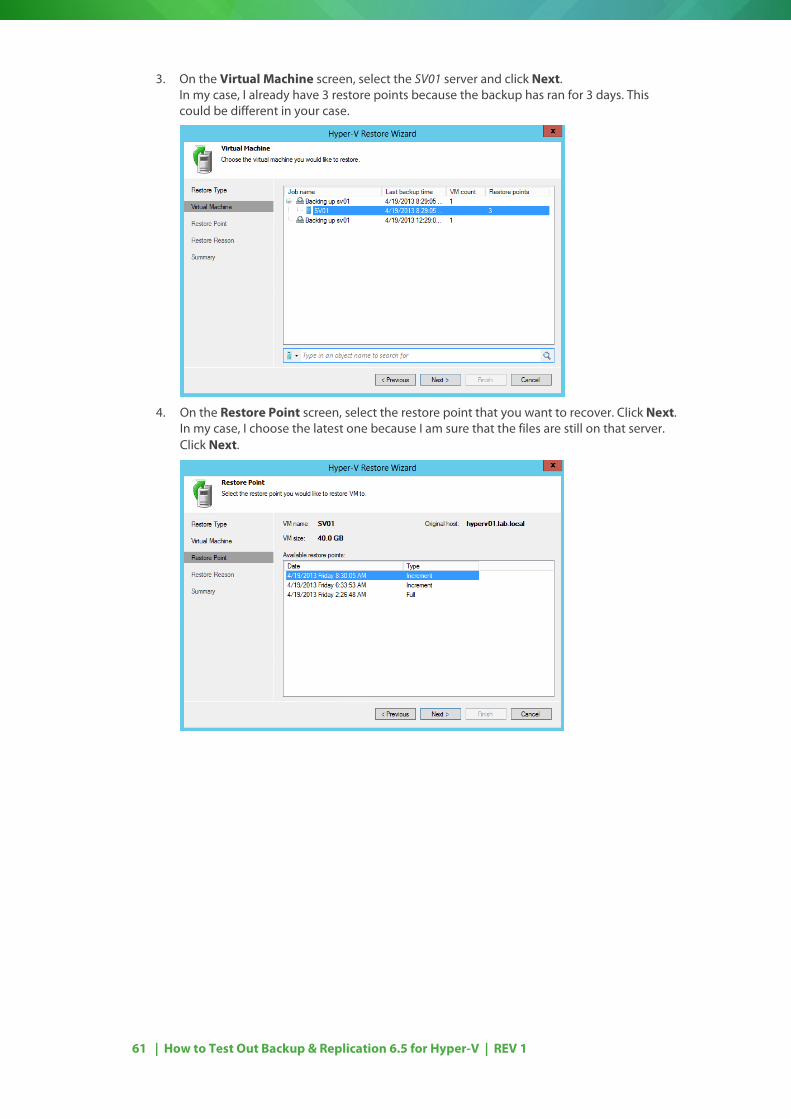
3. On the Virtual Machine screen, select the SV01 server and click Next. In my case, I already have 3 restore points because the backup has ran for 3 days. This could be different in your case.
4. On the Restore Point screen, select the restore point that you want to recover. Click Next. In my case, I choose the latest one because I am sure that the files are still on that server. Click Next.
62 | How to Test Out Backup & Replication 6.5 for Hyper-V | REV 1
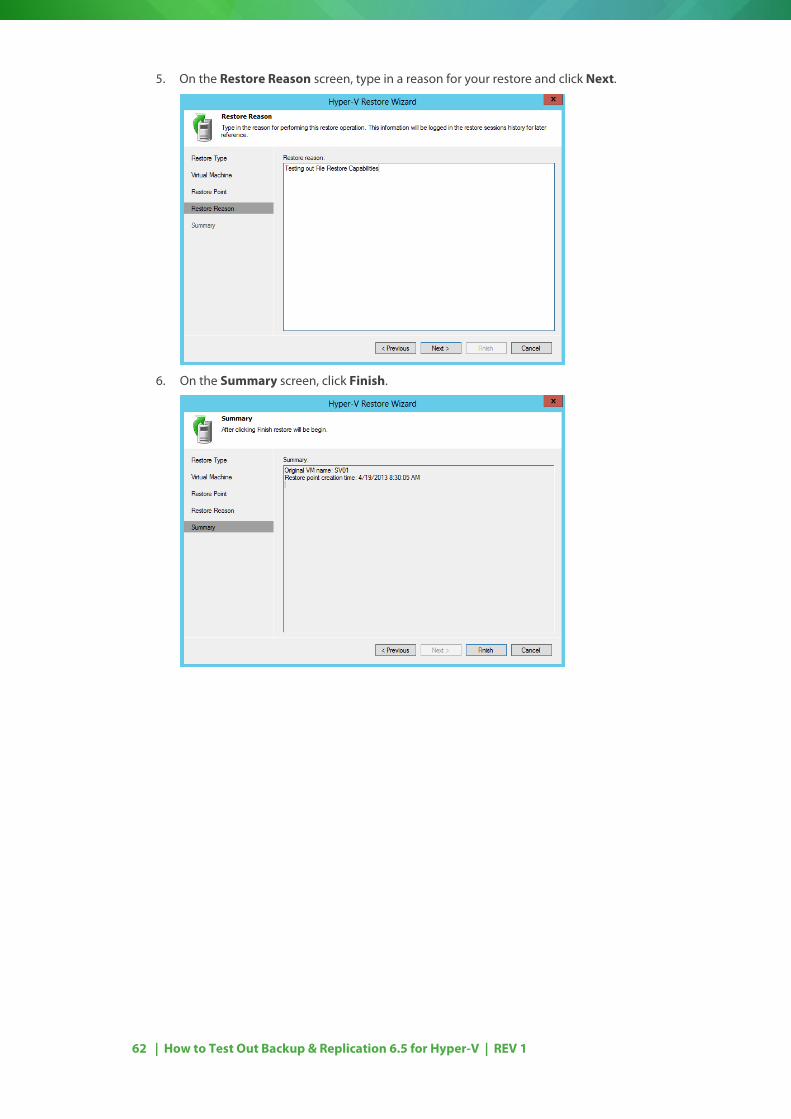
5. On the Restore Reason screen, type in a reason for your restore and click Next.
6. On the Summary screen, click Finish.
63 | How to Test Out Backup & Replication 6.5 for Hyper-V | REV 1
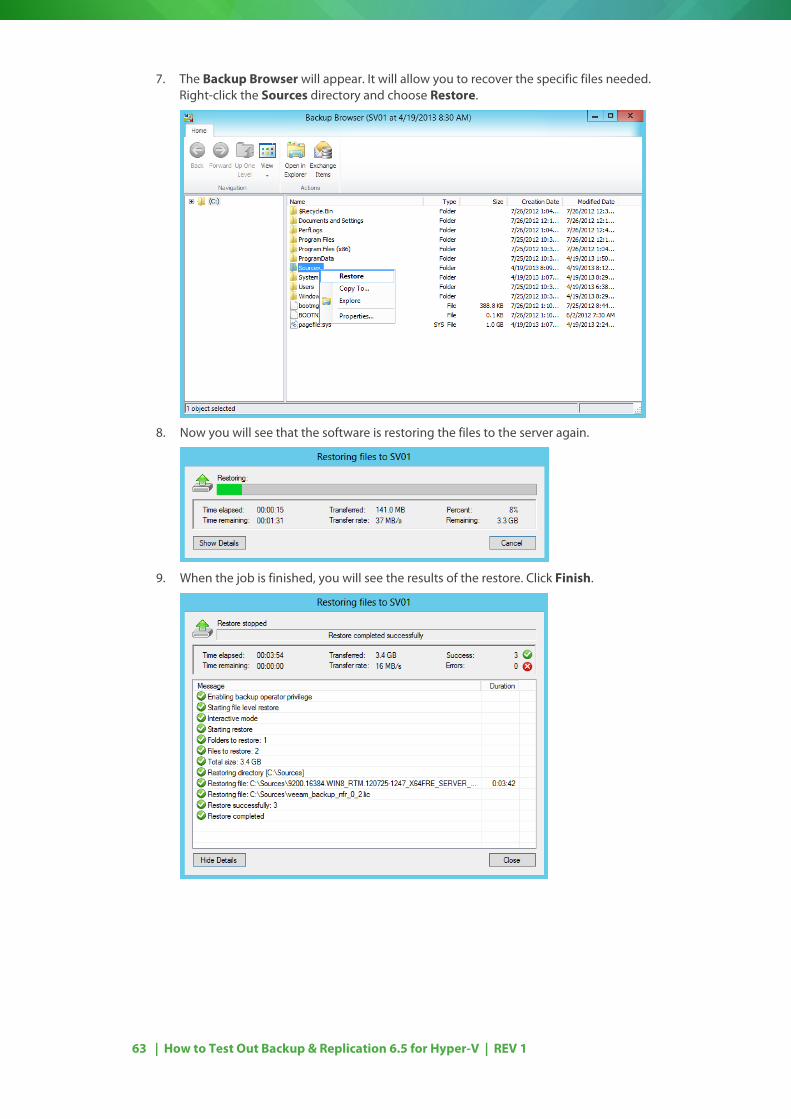
7. The Backup Browser will appear. It will allow you to recover the specific files needed. Right-click the Sources directory and choose Restore.
8. Now you will see that the software is restoring the files to the server again.
9. When the job is finished, you will see the results of the restore. Click Finish.
64 | How to Test Out Backup & Replication 6.5 for Hyper-V | REV 1
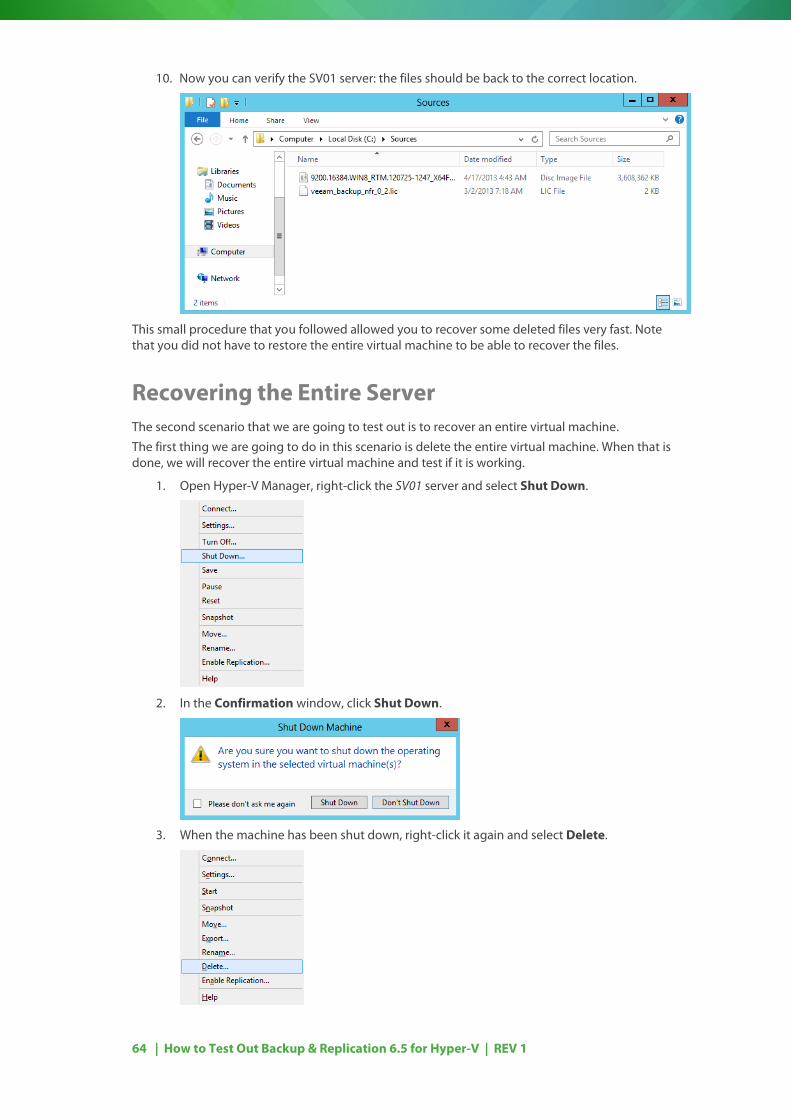
10. Now you can verify the SV01 server: the files should be back to the correct location.
This small procedure that you followed allowed you to recover some deleted files very fast. Note that you did not have to restore the entire virtual machine to be able to recover the files.
Recovering the Entire Server The second scenario that we are going to test out is to recover an entire virtual machine.
The first thing we are going to do in this scenario is delete the entire virtual machine. When that is done, we will recover the entire virtual machine and test if it is working.
1. Open Hyper-V Manager, right-click the SV01 server and select Shut Down.
2. In the Confirmation window, click Shut Down.
3. When the machine has been shut down, right-click it again and select Delete.
65 | How to Test Out Backup & Replication 6.5 for Hyper-V | REV 1
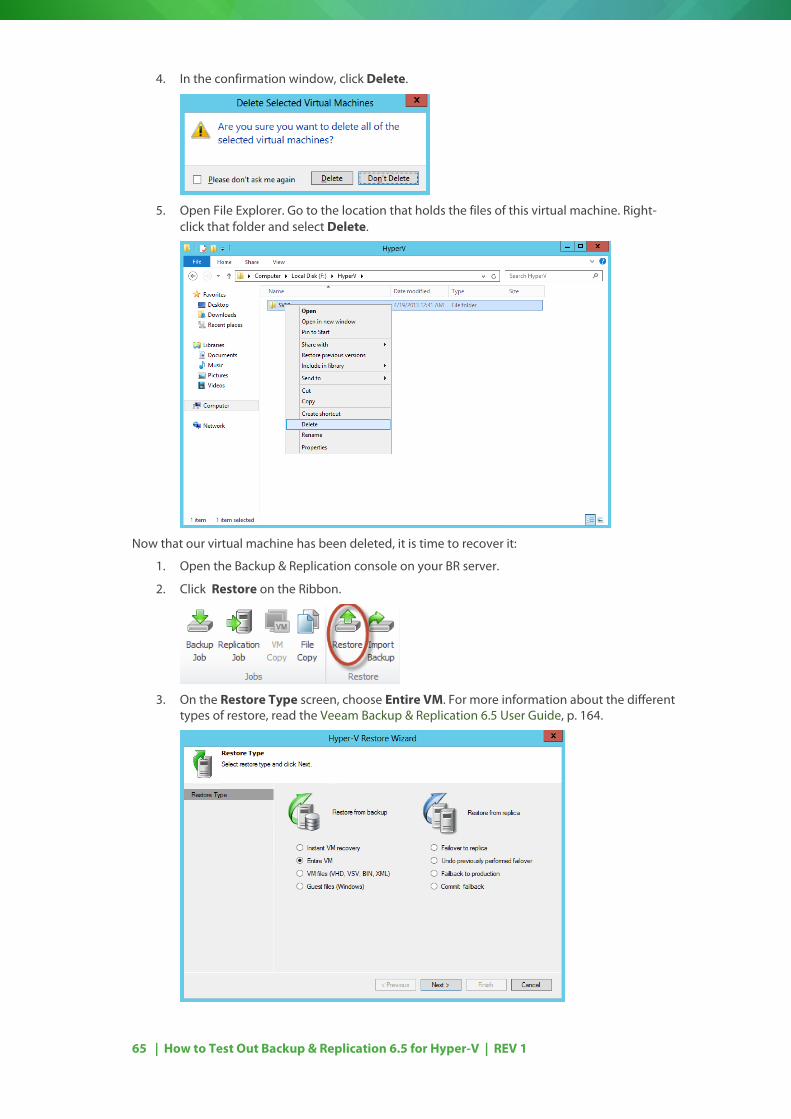
4. In the confirmation window, click Delete.
5. Open File Explorer. Go to the location that holds the files of this virtual machine. Right-
click that folder and select Delete.
Now that our virtual machine has been deleted, it is time to recover it:
1. Open the Backup & Replication console on your BR server.
2. Click Restore on the Ribbon.
3. On the Restore Type screen, choose Entire VM. For more information about the different types of restore, read the Veeam Backup & Replication 6.5 User Guide, p. 164.
66 | How to Test Out Backup & Replication 6.5 for Hyper-V | REV 1
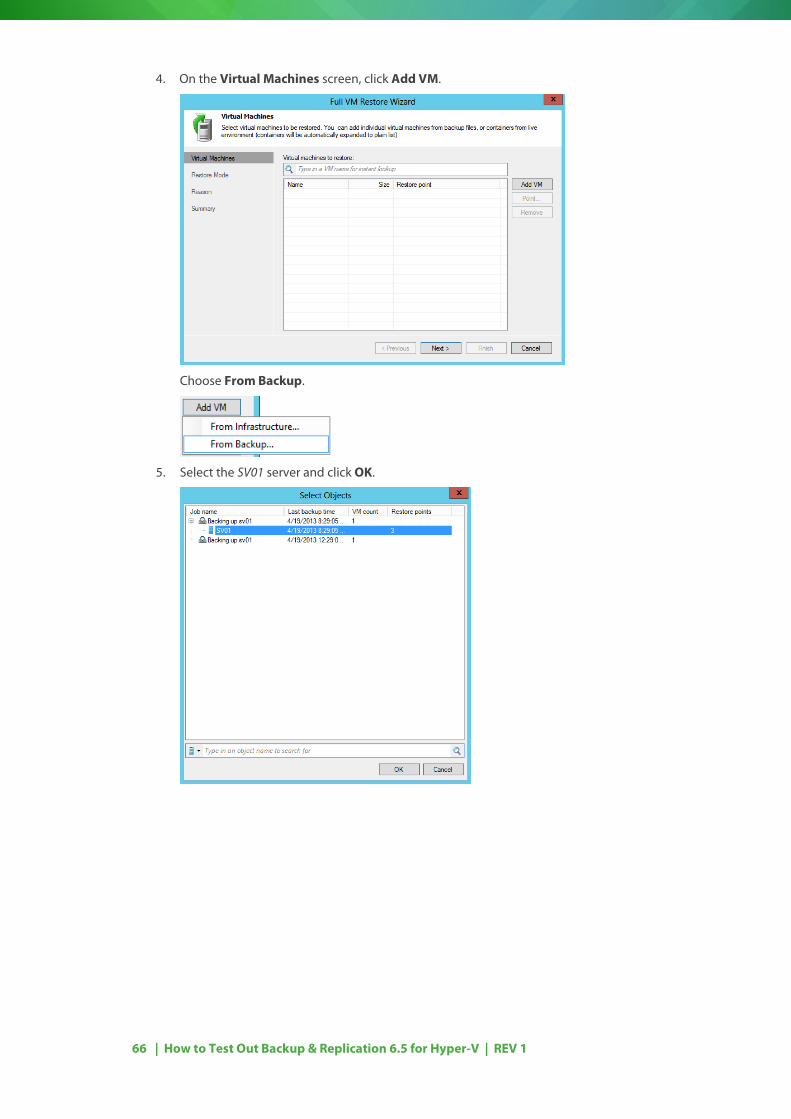
4. On the Virtual Machines screen, click Add VM.
Choose From Backup.
5. Select the SV01 server and click OK.
67 | How to Test Out Backup & Replication 6.5 for Hyper-V | REV 1
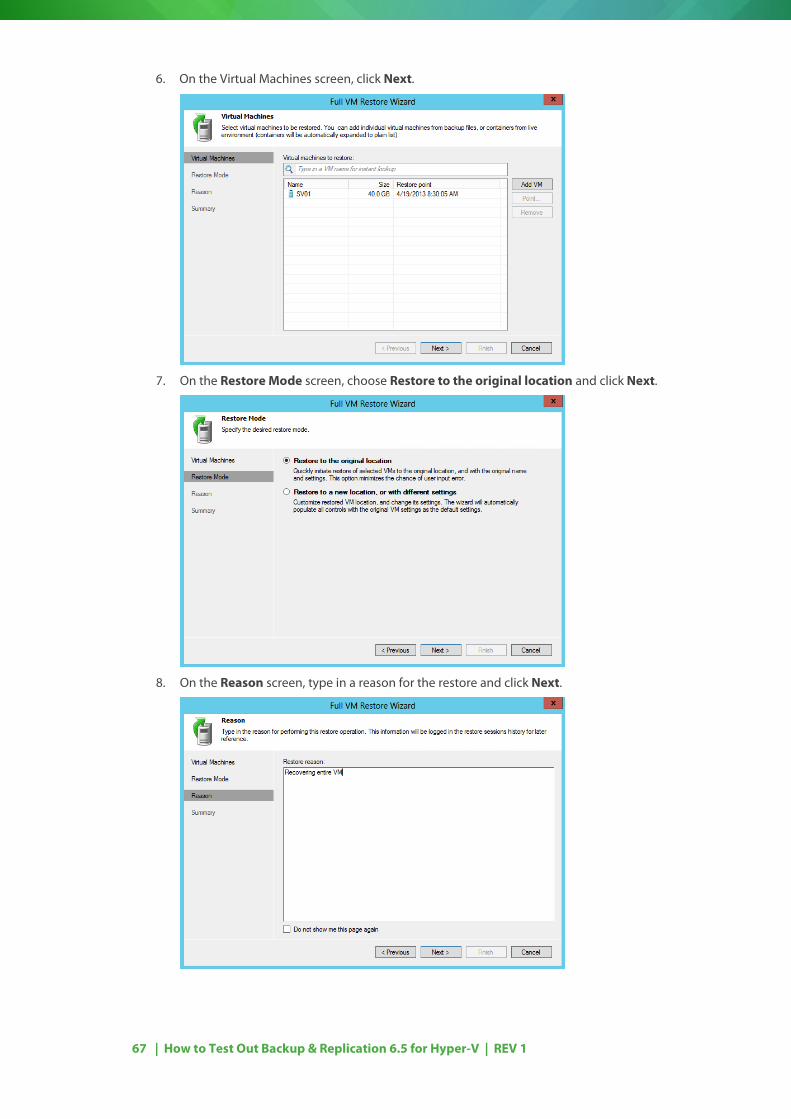
6. On the Virtual Machines screen, click Next.
7. On the Restore Mode screen, choose Restore to the original location and click Next.
8. On the Reason screen, type in a reason for the restore and click Next.
68 | How to Test Out Backup & Replication 6.5 for Hyper-V | REV 1
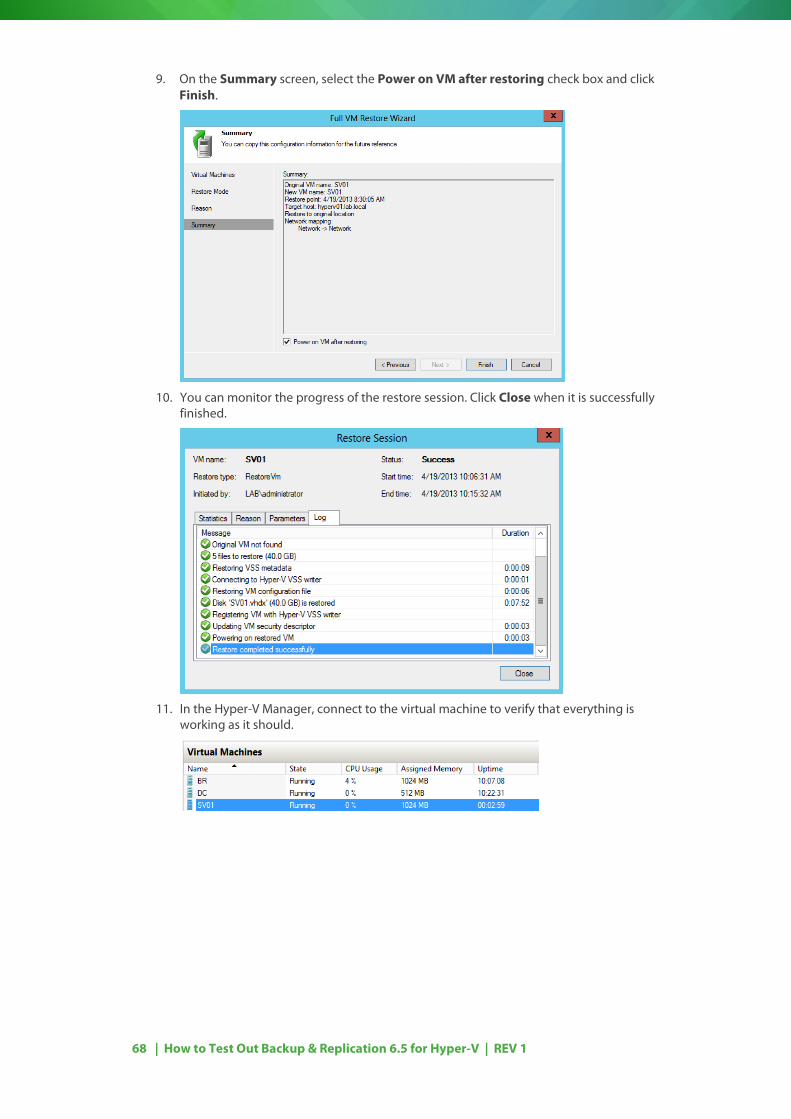
9. On the Summary screen, select the Power on VM after restoring check box and click Finish.
10. You can monitor the progress of the restore session. Click Close when it is successfully finished.
11. In the Hyper-V Manager, connect to the virtual machine to verify that everything is
working as it should.

69 | How to Test Out Backup & Replication 6.5 for Hyper-V | REV 1
CONCLUSION By following this document you have built a virtual environment based on Windows Server 2012 Hyper-V. You created two virtual machines, built a domain and tested out a few of the many options provided by Veeam Backup & Replication 6.5.
Now is the time to take the Veeam Backup & Replication 6.5 User Guide for Hyper-V with you and try some more features of the solution.
70 | How to Test Out Backup & Replication 6.5 for Hyper-V | REV 1
APPENDICES
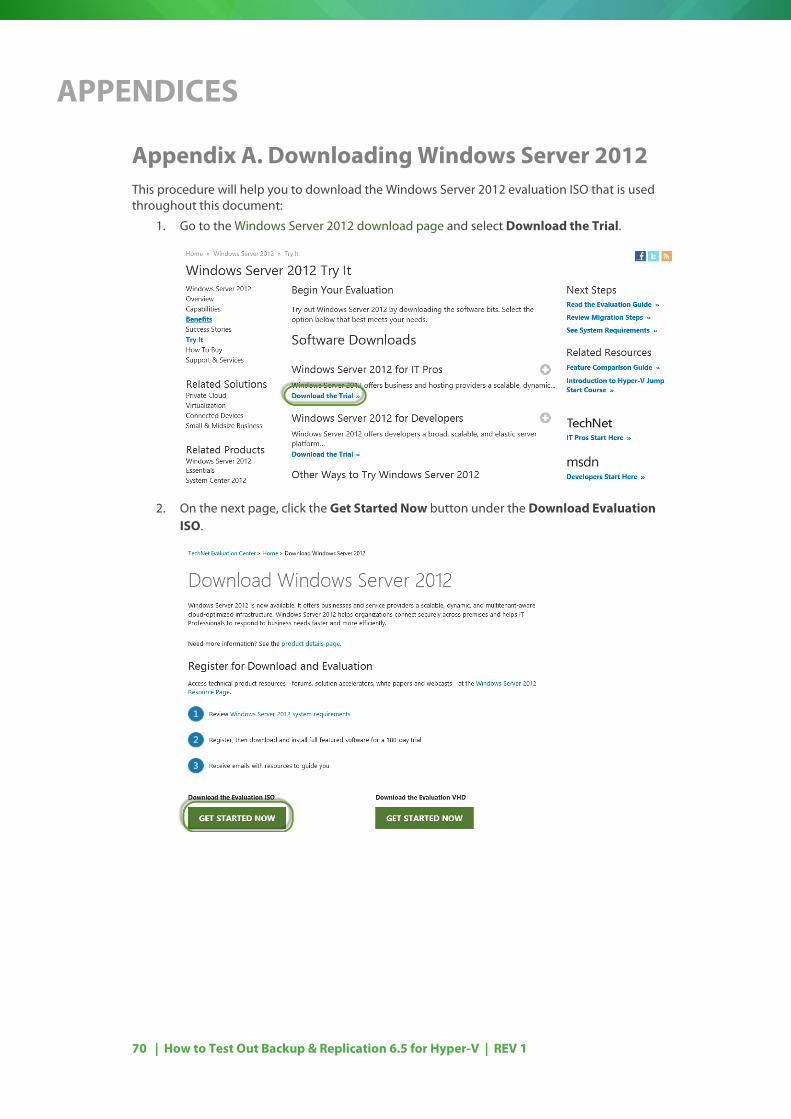
Appendix A. Downloading Windows Server 2012 This procedure will help you to download the Windows Server 2012 evaluation ISO that is used throughout this document:
1. Go to the Windows Server 2012 download page and select Download the Trial.
2. On the next page, click the Get Started Now button under the Download Evaluation ISO.
71 | How to Test Out Backup & Replication 6.5 for Hyper-V | REV 1
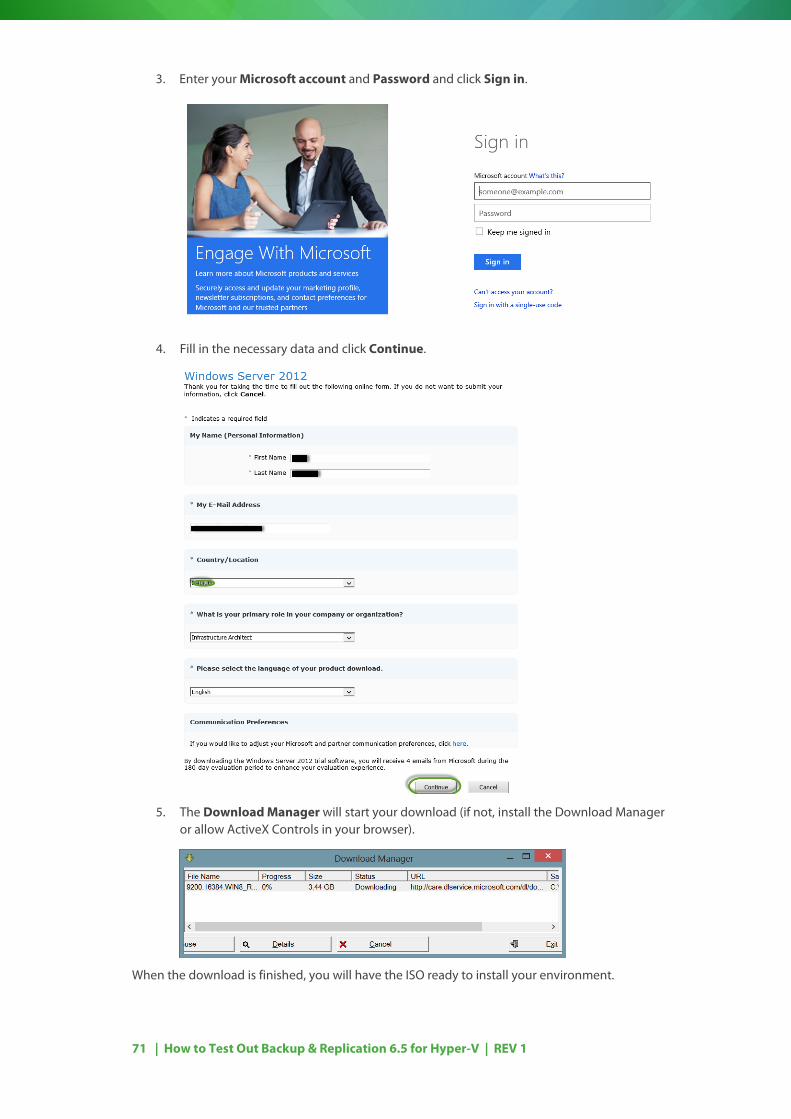
3. Enter your Microsoft account and Password and click Sign in.
4. Fill in the necessary data and click Continue.
5. The Download Manager will start your download (if not, install the Download Manager or allow ActiveX Controls in your browser).
When the download is finished, you will have the ISO ready to install your environment.
72 | How to Test Out Backup & Replication 6.5 for Hyper-V | REV 1
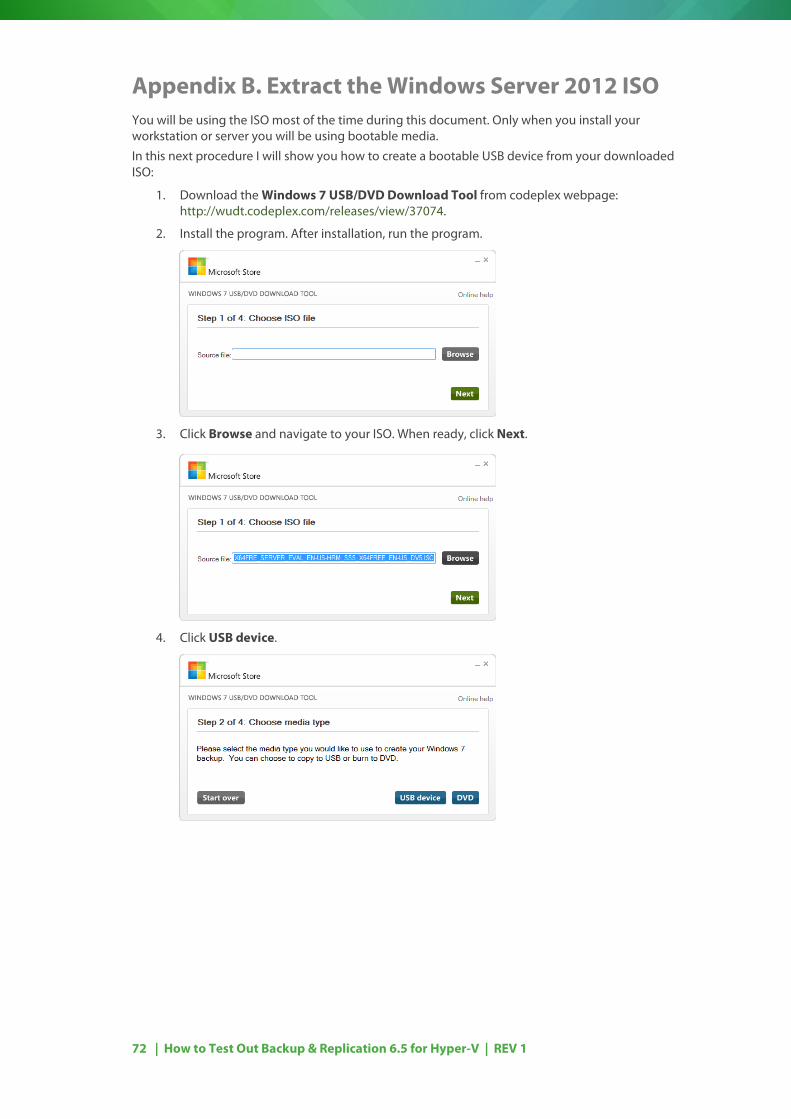
Appendix B. Extract the Windows Server 2012 ISO You will be using the ISO most of the time during this document. Only when you install your workstation or server you will be using bootable media.
In this next procedure I will show you how to create a bootable USB device from your downloaded ISO:
1. Download the Windows 7 USB/DVD Download Tool from codeplex webpage: http://wudt.codeplex.com/releases/view/37074.
2. Install the program. After installation, run the program.
3. Click Browse and navigate to your ISO. When ready, click Next.
4. Click USB device.
73 | How to Test Out Backup & Replication 6.5 for Hyper-V | REV 1
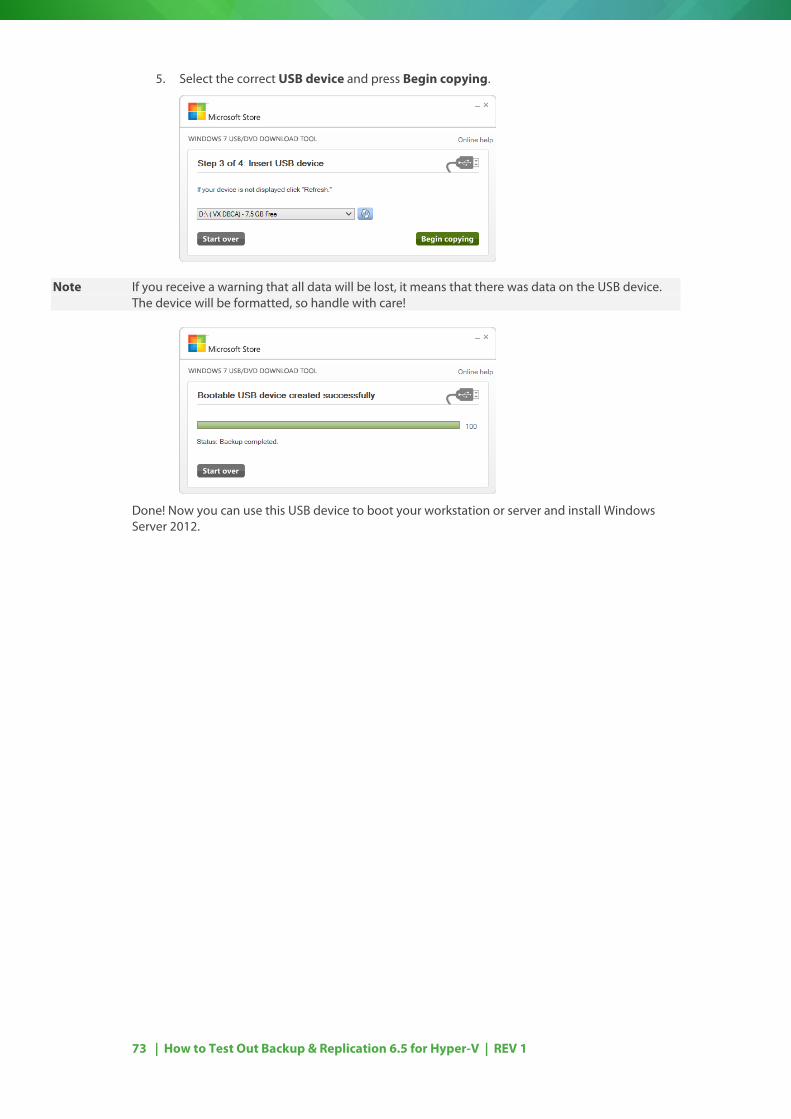
5. Select the correct USB device and press Begin copying.
Note If you receive a warning that all data will be lost, it means that there was data on the USB device. The device will be formatted, so handle with care!
Done! Now you can use this USB device to boot your workstation or server and install Windows Server 2012.
74 | How to Test Out Backup & Replication 6.5 for Hyper-V | REV 1
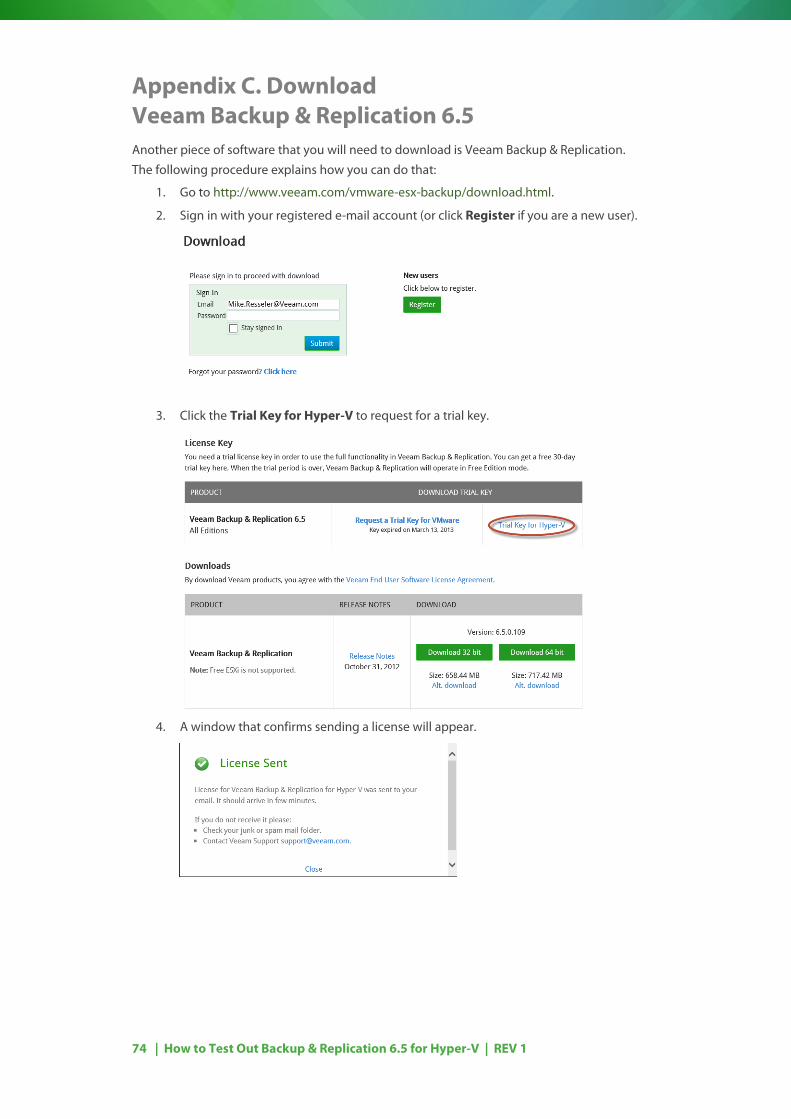
Appendix C. Download Veeam Backup & Replication 6.5 Another piece of software that you will need to download is Veeam Backup & Replication.
The following procedure explains how you can do that:
1. Go to http://www.veeam.com/vmware-esx-backup/download.html.
2. Sign in with your registered e-mail account (or click Register if you are a new user).
3. Click the Trial Key for Hyper-V to request for a trial key.
4. A window that confirms sending a license will appear.

75 | How to Test Out Backup & Replication 6.5 for Hyper-V | REV 1
5. Click Close and select Download 64 bit.
6. Save the download to your preferred location.
7. You should have received an e-mail with your evaluation key in it by now (if not, check your junk email). Save the attached license file with your other sources.
76 | How to Test Out Backup & Replication 6.5 for Hyper-V | REV 1
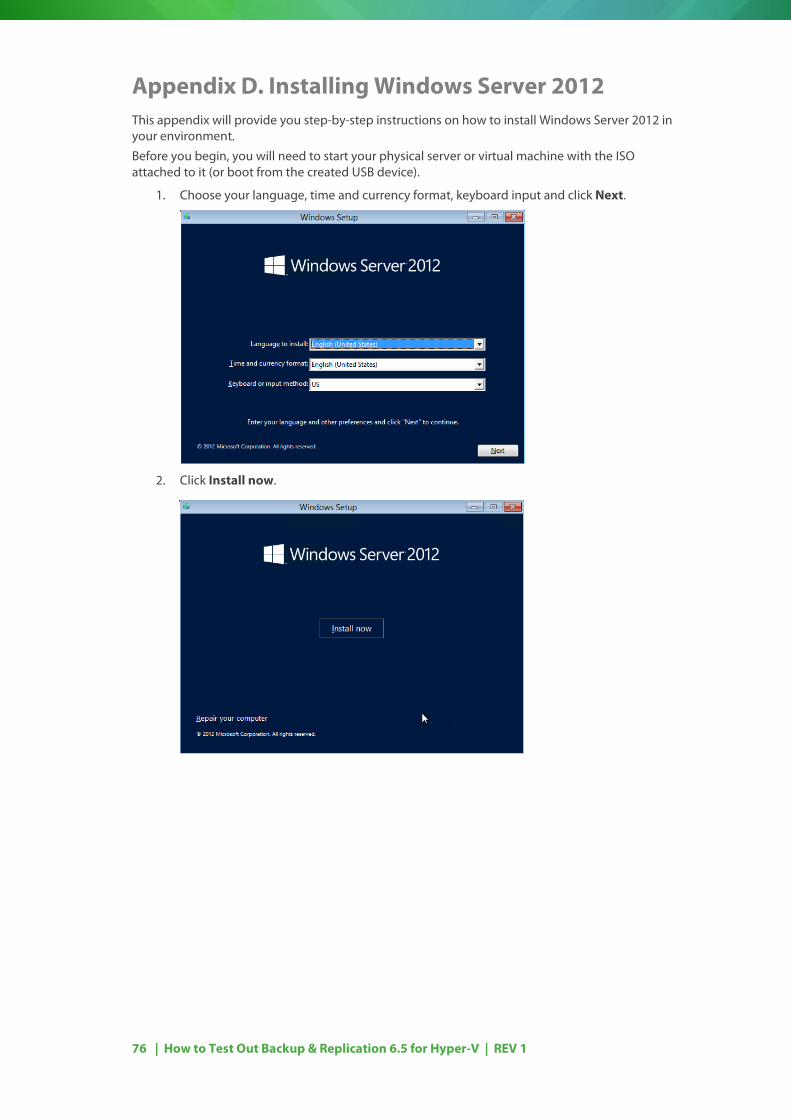
Appendix D. Installing Windows Server 2012 This appendix will provide you step-by-step instructions on how to install Windows Server 2012 in your environment.
Before you begin, you will need to start your physical server or virtual machine with the ISO attached to it (or boot from the created USB device).
1. Choose your language, time and currency format, keyboard input and click Next.
2. Click Install now.

77 | How to Test Out Backup & Replication 6.5 for Hyper-V | REV 1
3. Make sure that Windows Server 2012 Datacenter Evaluation (Server with a GUI) is selected and click Next.
4. Select the I accept the license terms check box and click Next.
5. Choose Custom: Install Windows only (advanced) and click Next.
78 | How to Test Out Backup & Replication 6.5 for Hyper-V | REV 1
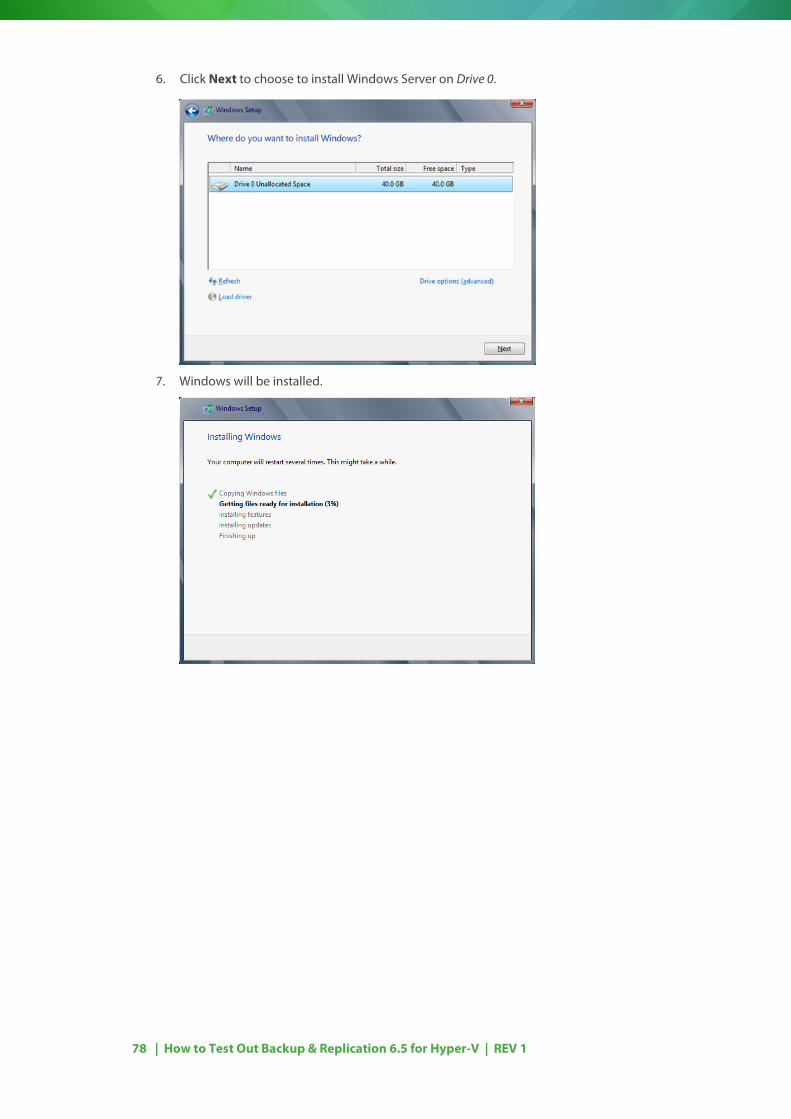
6. Click Next to choose to install Windows Server on Drive 0.
7. Windows will be installed.
79 | How to Test Out Backup & Replication 6.5 for Hyper-V | REV 1
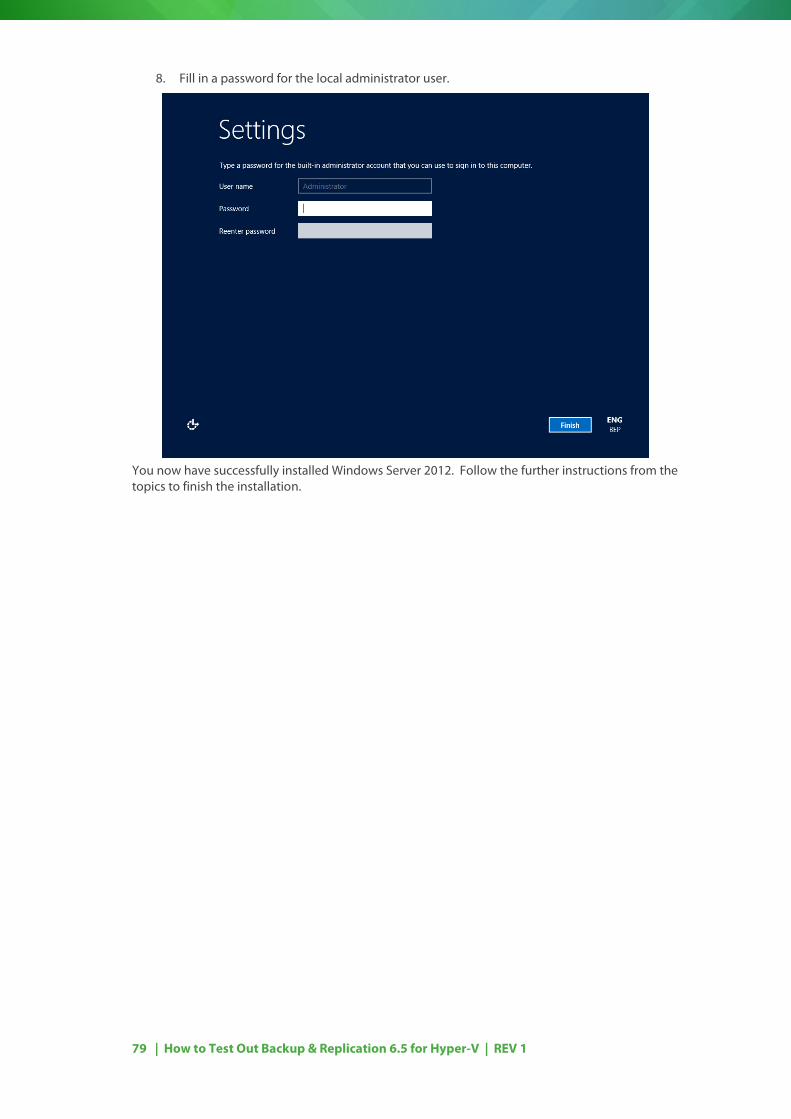
8. Fill in a password for the local administrator user.
You now have successfully installed Windows Server 2012. Follow the further instructions from the topics to finish the installation.
80 | How to Test Out Backup & Replication 6.5 for Hyper-V | REV 1
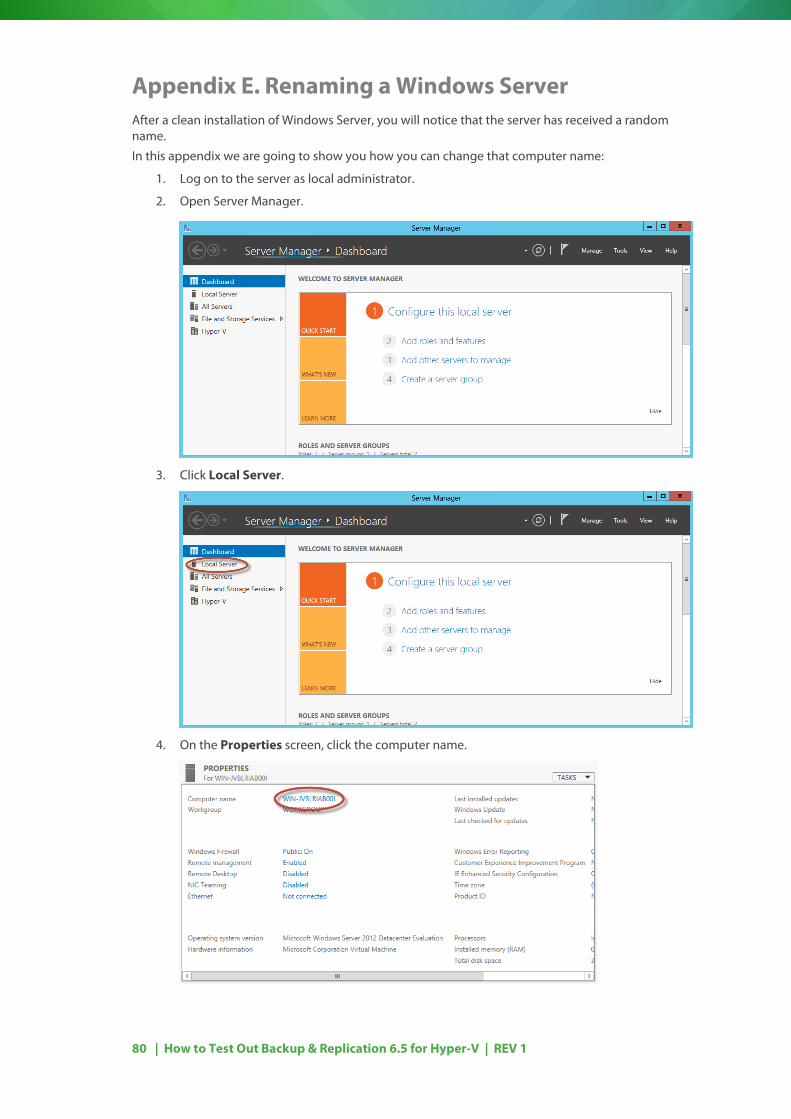
Appendix E. Renaming a Windows Server After a clean installation of Windows Server, you will notice that the server has received a random name.
In this appendix we are going to show you how you can change that computer name:
1. Log on to the server as local administrator.
2. Open Server Manager.
3. Click Local Server.
4. On the Properties screen, click the computer name.
81 | How to Test Out Backup & Replication 6.5 for Hyper-V | REV 1
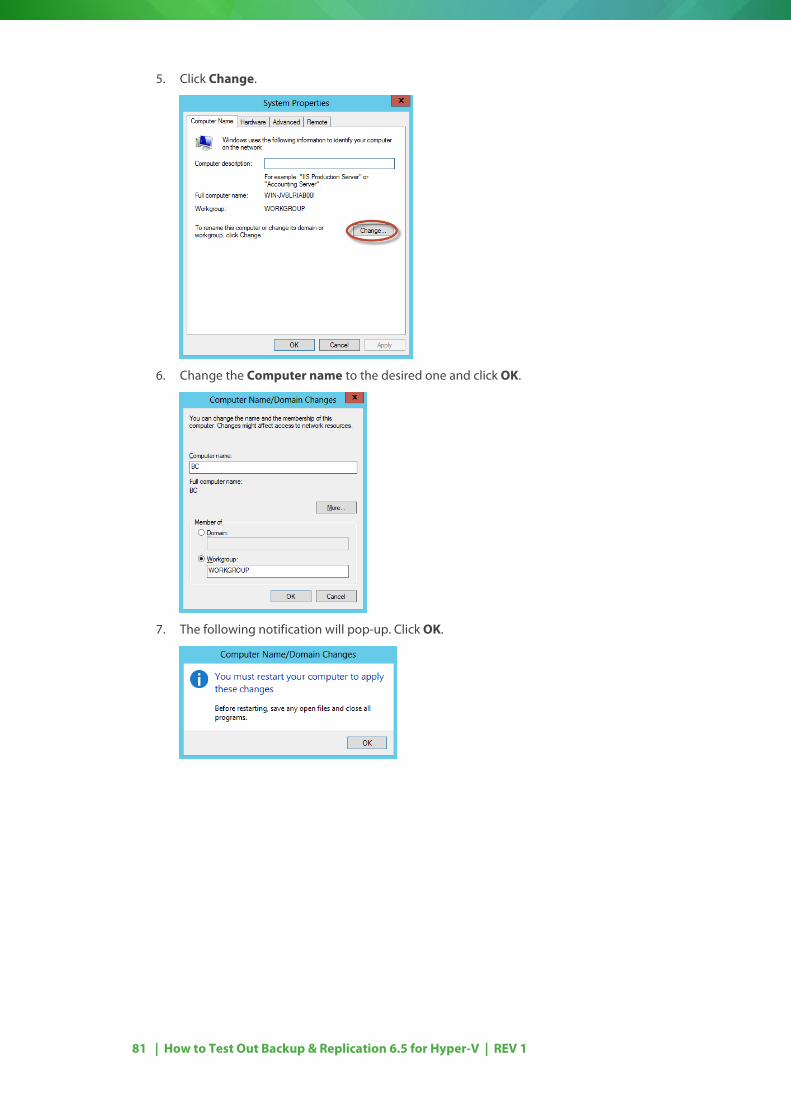
5. Click Change.
6. Change the Computer name to the desired one and click OK.
7. The following notification will pop-up. Click OK.
82 | How to Test Out Backup & Replication 6.5 for Hyper-V | REV 1
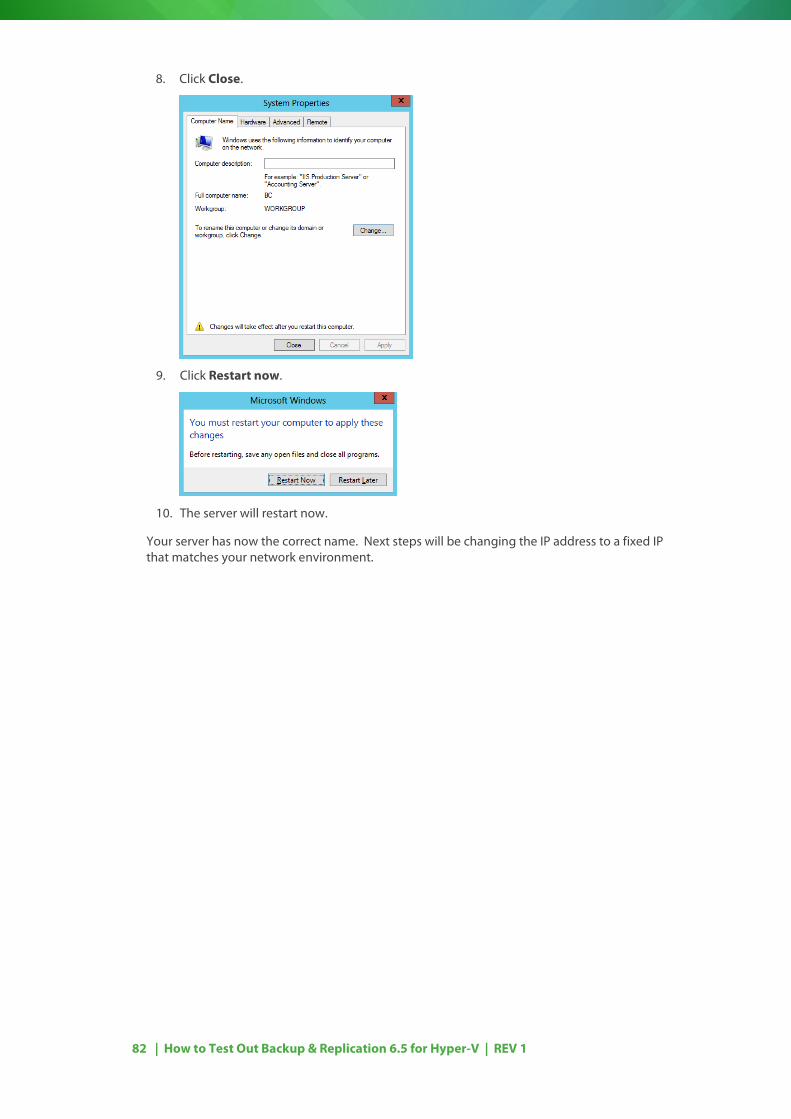
8. Click Close.
9. Click Restart now.
10. The server will restart now.
Your server has now the correct name. Next steps will be changing the IP address to a fixed IP that matches your network environment.
83 | How to Test Out Backup & Replication 6.5 for Hyper-V | REV 1
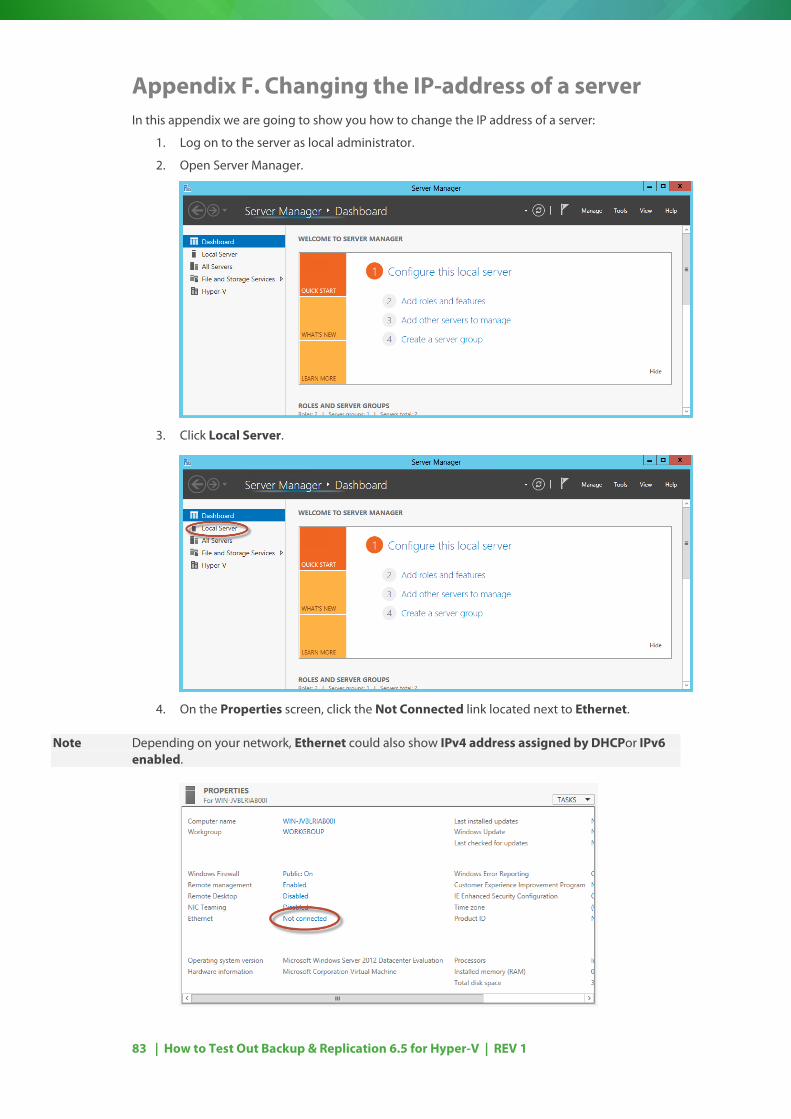
Appendix F. Changing the IP-address of a server In this appendix we are going to show you how to change the IP address of a server:
1. Log on to the server as local administrator.
2. Open Server Manager.
3. Click Local Server.
4. On the Properties screen, click the Not Connected link located next to Ethernet.
Note Depending on your network, Ethernet could also show IPv4 address assigned by DHCPor IPv6 enabled.
84 | How to Test Out Backup & Replication 6.5 for Hyper-V | REV 1
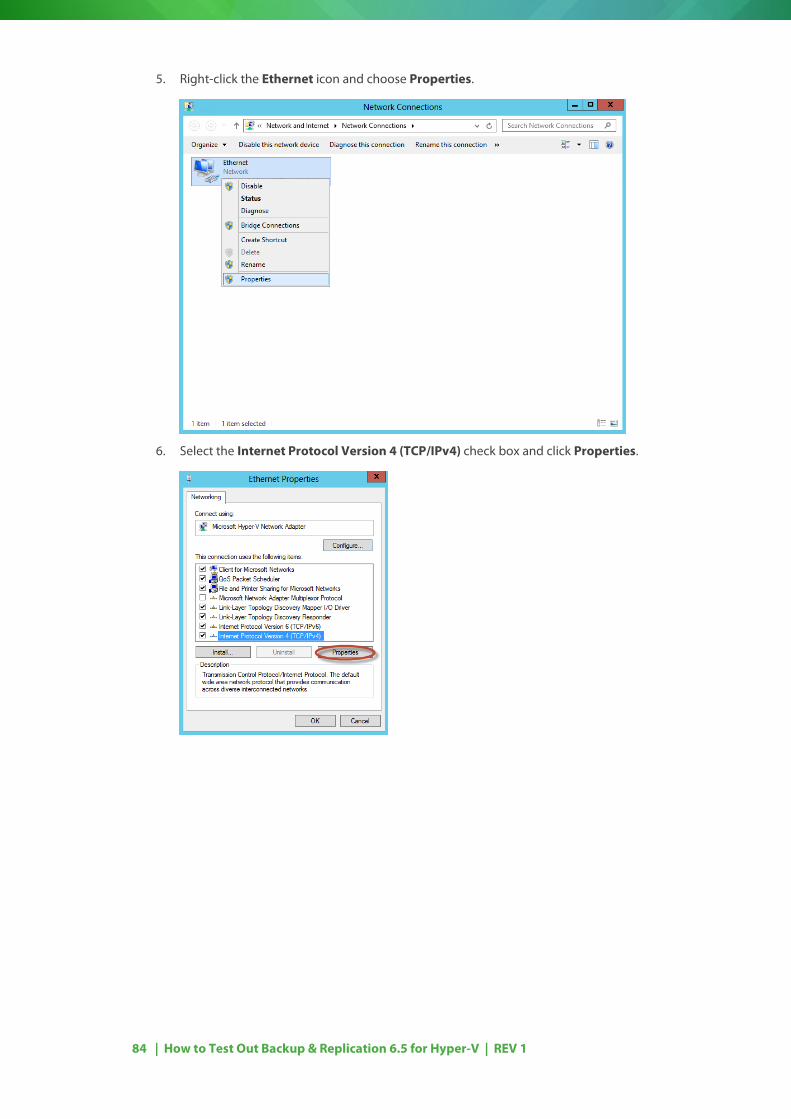
5. Right-click the Ethernet icon and choose Properties.
6. Select the Internet Protocol Version 4 (TCP/IPv4) check box and click Properties.
85 | How to Test Out Backup & Replication 6.5 for Hyper-V | REV 1
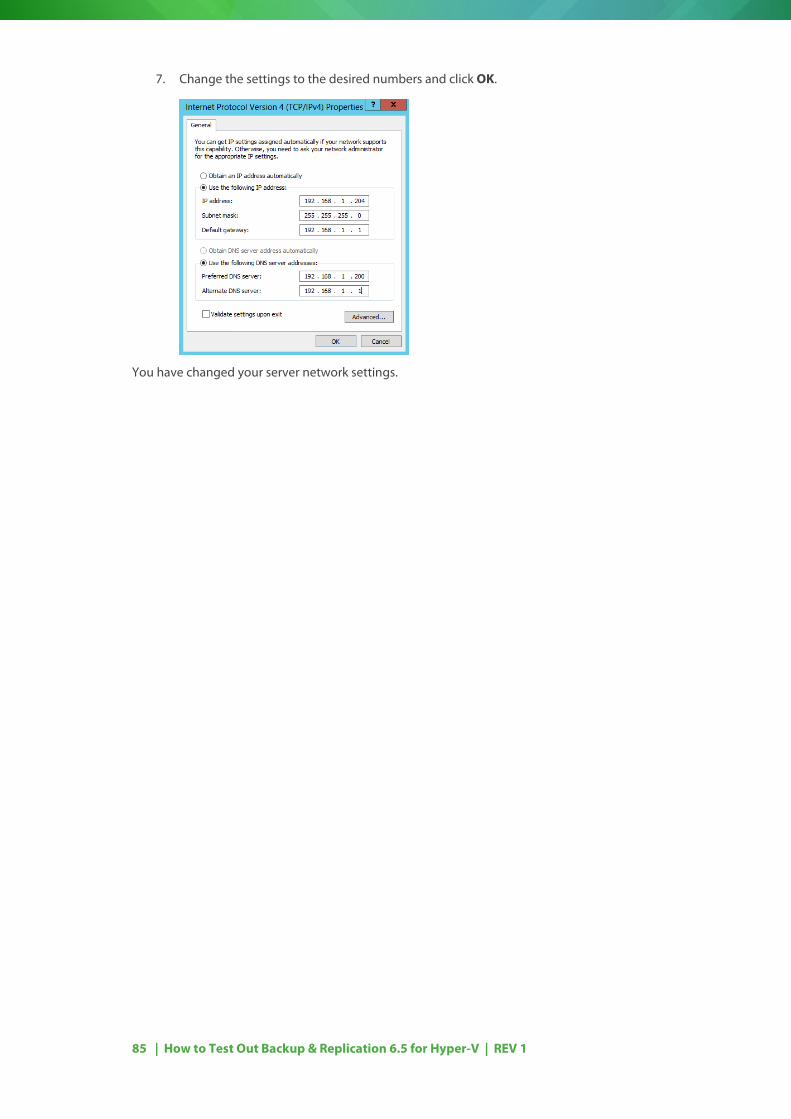
7. Change the settings to the desired numbers and click OK.
You have changed your server network settings.

86 | How to Test Out Backup & Replication 6.5 for Hyper-V | REV 1
Appendix G. Joining the Server to the Domain This appendix will show how to join your server to the domain:
1. Log on to the server as local administrator.
2. Open Server Manager.
3. Click Local Server.
4. Click the workgroup.
87 | How to Test Out Backup & Replication 6.5 for Hyper-V | REV 1
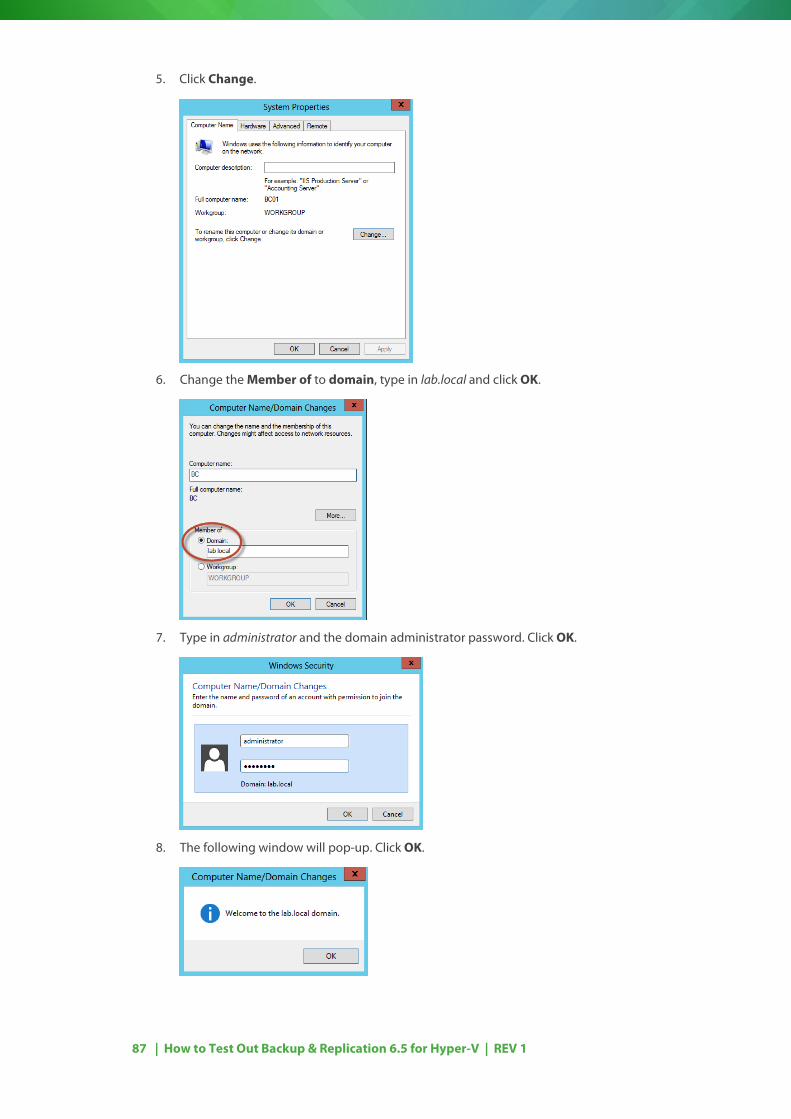
5. Click Change.
6. Change the Member of to domain, type in lab.local and click OK.
7. Type in administrator and the domain administrator password. Click OK.
8. The following window will pop-up. Click OK.
88 | How to Test Out Backup & Replication 6.5 for Hyper-V | REV 1
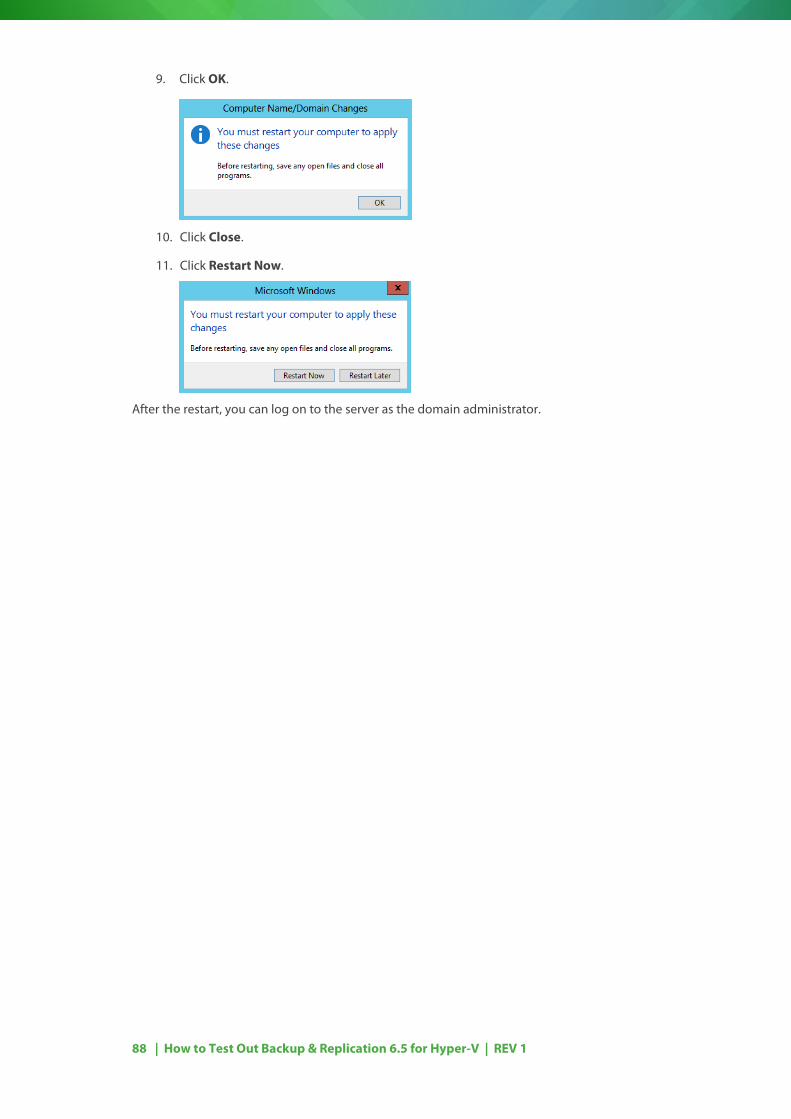
9. Click OK.
10. Click Close.
11. Click Restart Now.
After the restart, you can log on to the server as the domain administrator.
89 | How to Test Out Backup & Replication 6.5 for Hyper-V | REV 1
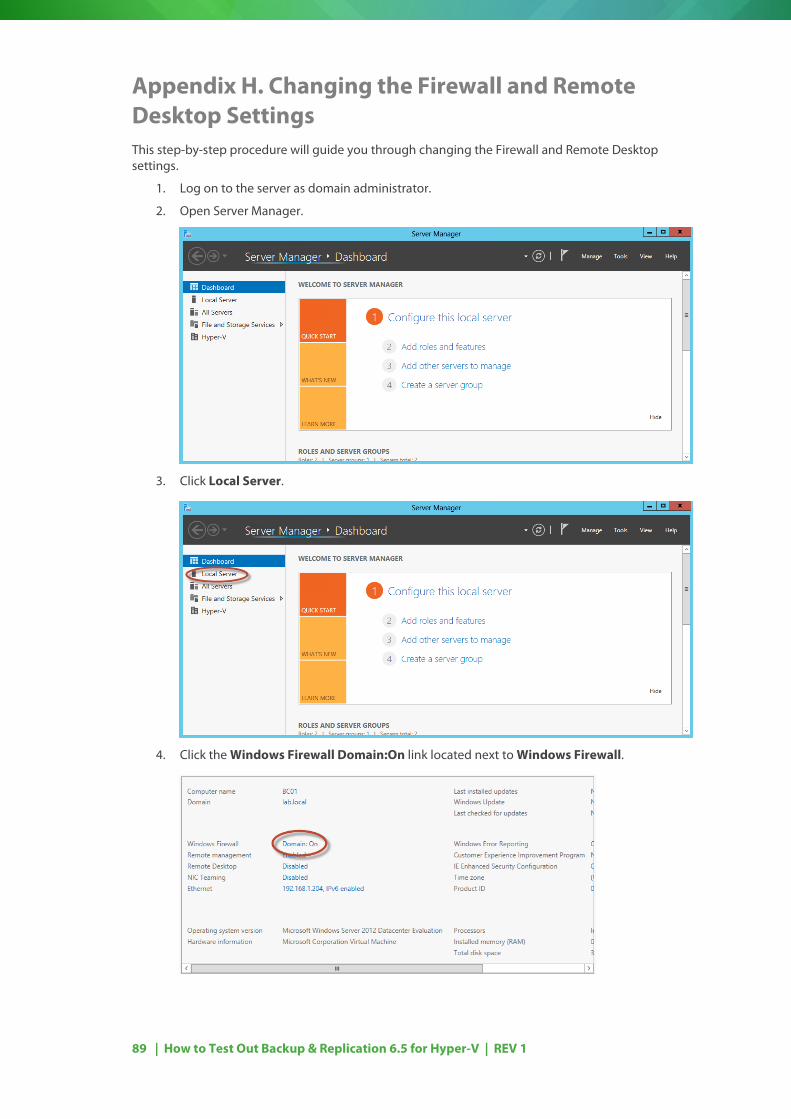
Appendix H. Changing the Firewall and Remote Desktop Settings This step-by-step procedure will guide you through changing the Firewall and Remote Desktop settings.
1. Log on to the server as domain administrator.
2. Open Server Manager.
3. Click Local Server.
4. Click the Windows Firewall Domain:On link located next to Windows Firewall.
90 | How to Test Out Backup & Replication 6.5 for Hyper-V | REV 1
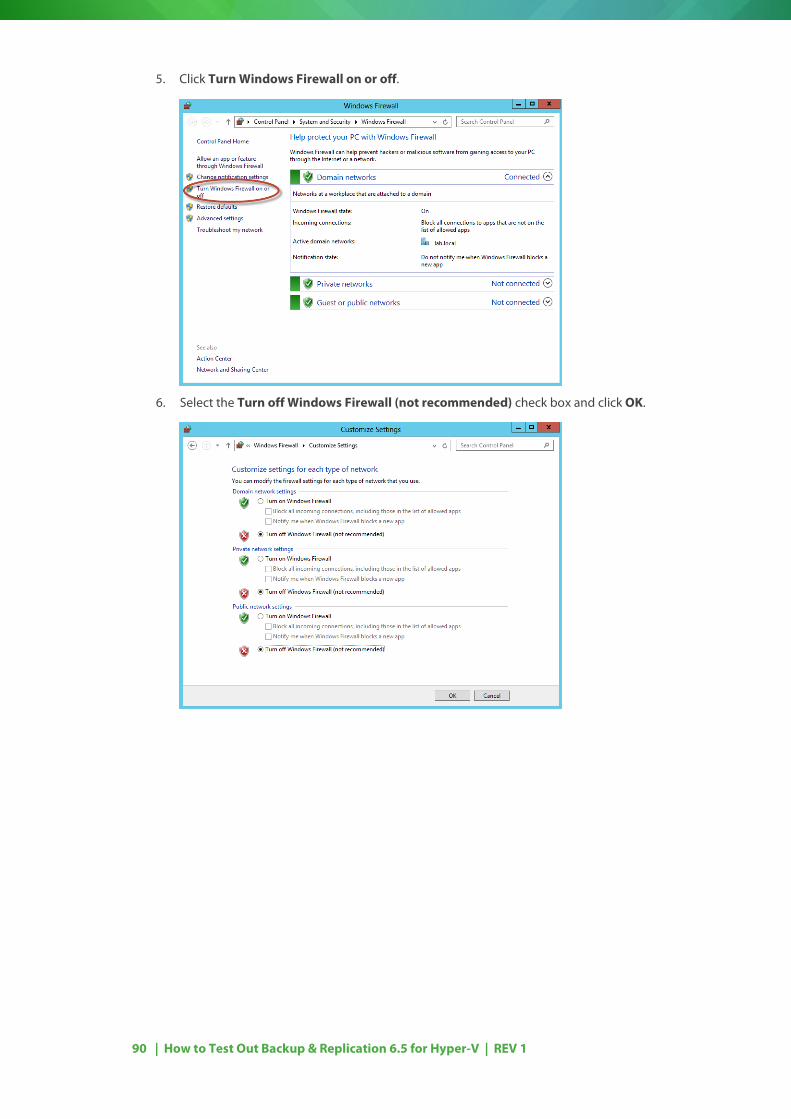
5. Click Turn Windows Firewall on or off.
6. Select the Turn off Windows Firewall (not recommended) check box and click OK.
91 | How to Test Out Backup & Replication 6.5 for Hyper-V | REV 1
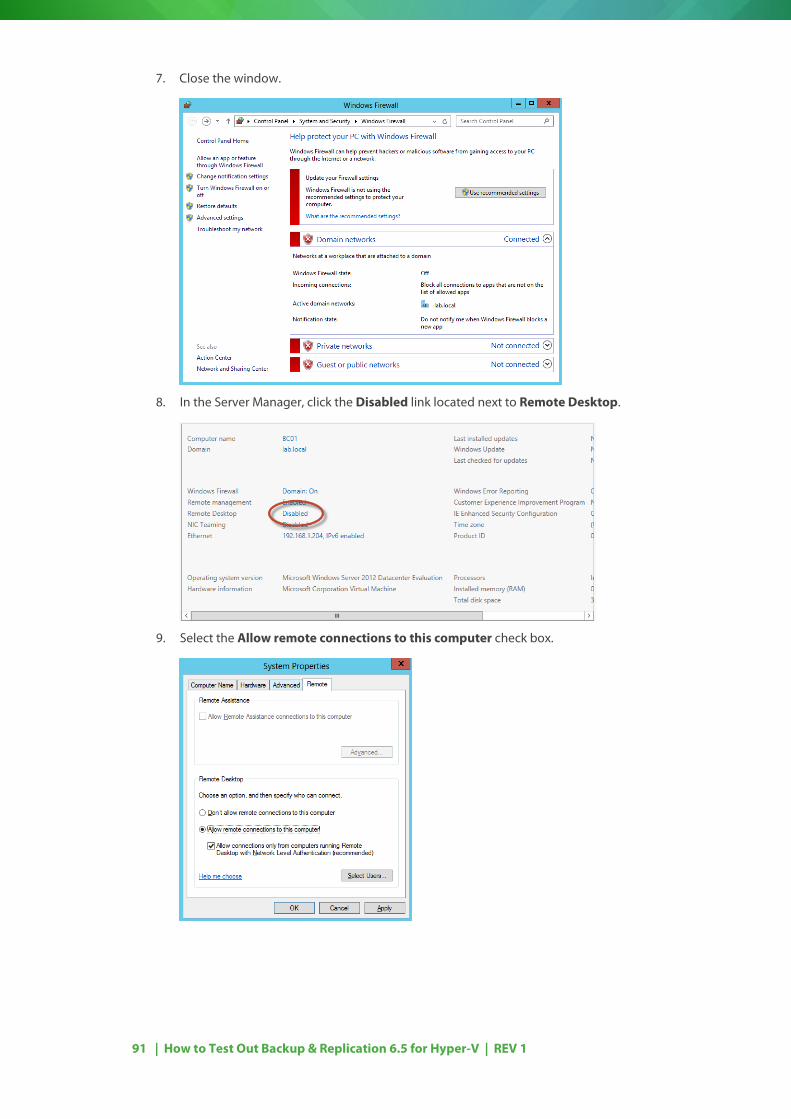
7. Close the window.
8. In the Server Manager, click the Disabled link located next to Remote Desktop.
9. Select the Allow remote connections to this computer check box.
92 | How to Test Out Backup & Replication 6.5 for Hyper-V | REV 1
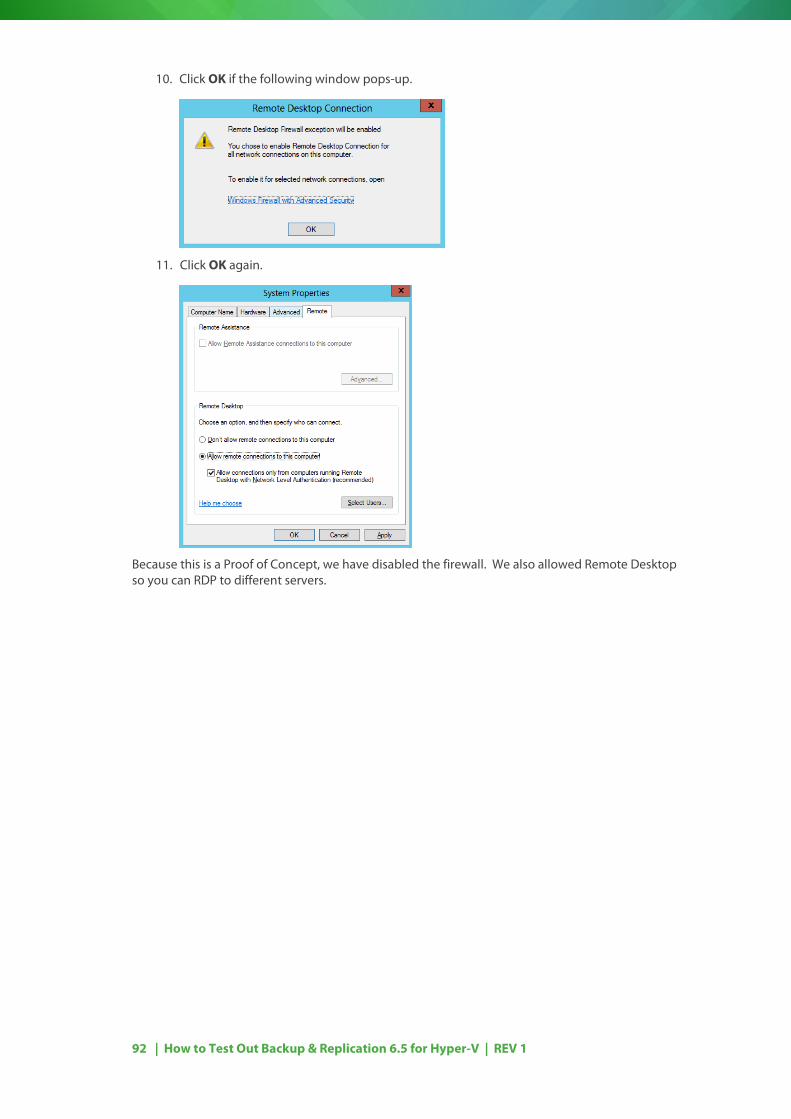
10. Click OK if the following window pops-up.
11. Click OK again.
Because this is a Proof of Concept, we have disabled the firewall. We also allowed Remote Desktop so you can RDP to different servers.

93 | How to Test Out Backup & Replication 6.5 for Hyper-V | REV 1
Appendix I. Hypervisor Requirements After installing your windows server, you will need to enable the Hyper-V role.
Before you can do that, you need to make sure that the following prerequisites are fulfilled:
1. x64-based processor
2. Hardware assisted virtualization (Intel VT or AMD-V)
3. Hardware-enforced Data Execution Prevention (DEP) available and enabled.
These requirements should be set in the BIOS.
Related Documents