Using 25Live Publishing Events to the ’Canes Calendar and to Other University of Miami Resources Office of Classroom Management This document covers some of the basics for submitting an event request through the 25Live Scheduling System and how those event requests are considered for inclusion in various University promotional venues. CollegeNet 25Live is a Webbased software commonly used by organizations to manage meeting spaces, event resources, and events. At the University of Miami, 25Live is used to manage classroom spaces, many (but not all) meeting spaces, and to push event listings to Web calendars on various University Web sites. The Office of Classroom Management administers and governs 25Live software. The Division of University Communications coordinates with the Office of Classroom Management to publish events calendars from 25Live to University Web sites. If you manage meeting spaces at the University or if you plan events regularly and currently DO NOT use 25Live as your primary resource for promoting events to Web calendars, consider contacting the Office of Classroom Management and becoming an advanced user of the system. This document is for basic users: any UM faculty, staff, and students who simply want to use 25Live to publicize an event on University Web calendars like the ‘Canes calendar, UM mobile app, the faculty/staff newsletter, or college calendars at the Miller School of Medicine, College of Arts and Sciences, etc. Once an event request is submitted it will be reviewed and considered for inclusion. You can login to the system to check on the status of your submission.

Welcome message from author
This document is posted to help you gain knowledge. Please leave a comment to let me know what you think about it! Share it to your friends and learn new things together.
Transcript
Using 25Live Publishing Events to the ’Canes Calendar and to Other University of Miami Resources
Office of Classroom Management This document covers some of the basics for submitting an event request through the 25Live Scheduling System and how those event requests are considered for inclusion in various University promotional venues.
CollegeNet 25Live is a Web-‐based software commonly used by organizations to manage meeting spaces, event resources, and events. At the University of Miami, 25Live is used to manage classroom spaces, many (but not all) meeting spaces, and to push event listings to Web calendars on various University Web sites.
The Office of Classroom Management administers and governs 25Live software. The Division of University Communications coordinates with the Office of Classroom Management to publish events calendars from 25Live to University Web sites.
If you manage meeting spaces at the University or if you plan events regularly and currently DO NOT use 25Live as your primary resource for promoting events to Web calendars, consider contacting the Office of Classroom Management and becoming an advanced user of the system.
This document is for basic users: any UM faculty, staff, and students who simply want to use 25Live to publicize an event on University Web calendars like the ‘Canes calendar, UM mobile app, the faculty/staff newsletter, or college calendars at the Miller School of Medicine, College of Arts and Sciences, etc.
Once an event request is submitted it will be reviewed and considered for inclusion. You can login to the system to check on the status of your submission.

1
Contents
How to Post an Event on the ‘Canes Calendar ....................................................................................................................... 2
Editor Card # 1 ........................................................................................................................................................................ 4
Editor Card # 2 ........................................................................................................................................................................ 5
Editor Card # 3 ........................................................................................................................................................................ 6
Editor Card # 4 ........................................................................................................................................................................ 6
Editor Card #5 ......................................................................................................................................................................... 8
Editor Card # 6 ...................................................................................................................................................................... 10
Editor Card # 7 ...................................................................................................................................................................... 11 Editor Card # 8 …………………………………………………………………………………………………………………………………………………………….. 12
Confirmation Page ................................................................................................................................................................ 12
Event Guidelines for the Miller School of Medicine Calendar and Newsletters................................................................... 15
The Lifecycle of an Event Request ........................................................................................................................................ 15
How Do I See the Events I Have Already Requested? ........................................................................................................... 16
How Do I Know If My Event Is Being Processed? .................................................................................................................. 18
How Do I Know If My Event Has Been Published? ................................................................................................................ 20
How Do I Find Out Why My Event Was Denied? .................................................................................................................. 21
How to Find Notes and Comments Entered About an Event .............................................................................................. 21
How Do I Duplicate or Copy an Event? ................................................................................................................................. 23
How Do I Edit, Delete, or Cancel An Event? ......................................................................................................................... 25
Editing an Event Request ………………………………………………………………………………………………………………………………………...... 25 Deleting an Event Request ………………………………………………………………………………………………………………………………………….. 26
How to E-‐mail the Event Scheduler (the person who can approve/cancel/edit your event after it is published)................27

2
How to Post an Event on the ‘Canes Calendar Suggested web browsers to use when working with 25Live:
§ Mozilla Firefox § Google Chrome § Safari
25Live Website: https://25live.collegenet.com/miami
Open a web browser window and navigate to the website, the Non-‐Signed In view or 25LiveViewer is displayed.
Click on the Calendar tab
Select ‘Canes Calendar Main from the Showing drop box
The events displaying here are already events published on the ’Canes Calendar.
The drop down list in the center of the page includes some of the sub-‐calendars on the ‘Canes Calendar.
3
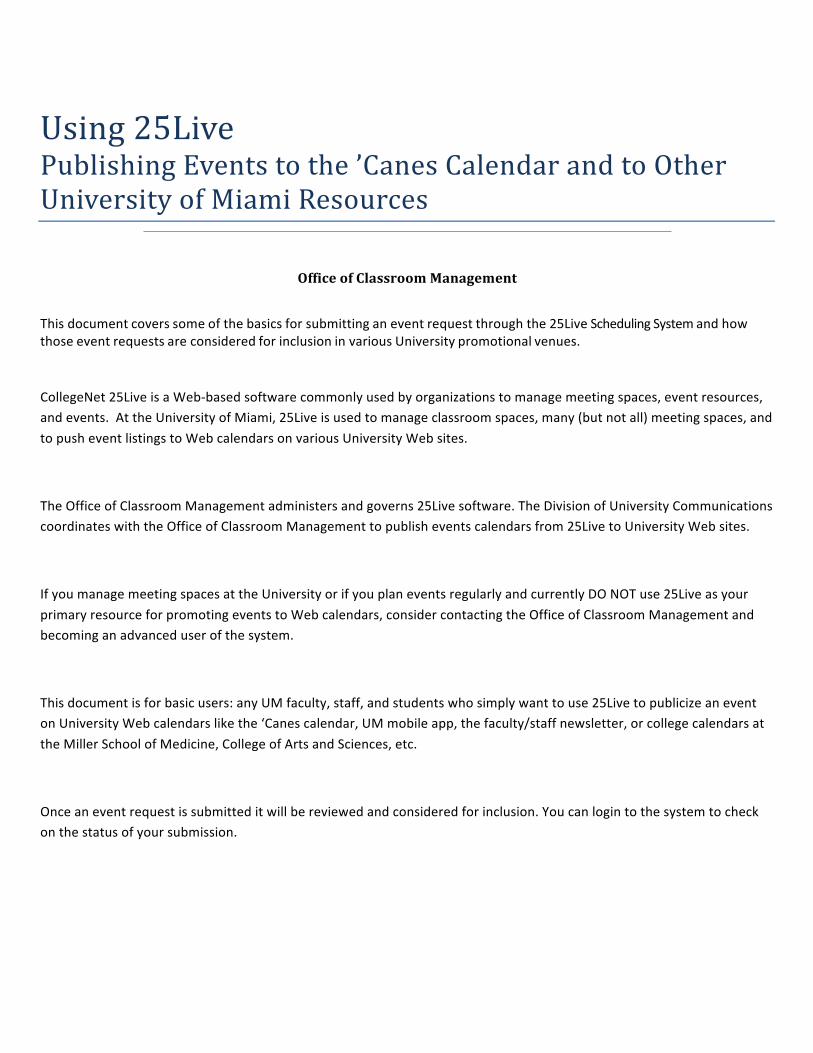
To submit an Event Request Click the Sign In option at the top of the screen. A valid CaneID is required to post an event to the ‘Canes Calendar.
For the purposes of this demo, we are using “25default” which is a CaneID service account that reflects the default user access for submitting an event request. Enter YOUR CaneID instead
After successful Sign In, you will be directed back to 25Live and your name should appear at the top of the page.

4
In addition to seeing all of the same items as the non-‐Signed In view, default access includes the Event Wizard tab. Click on the Event Wizard tab to load the event creation form.
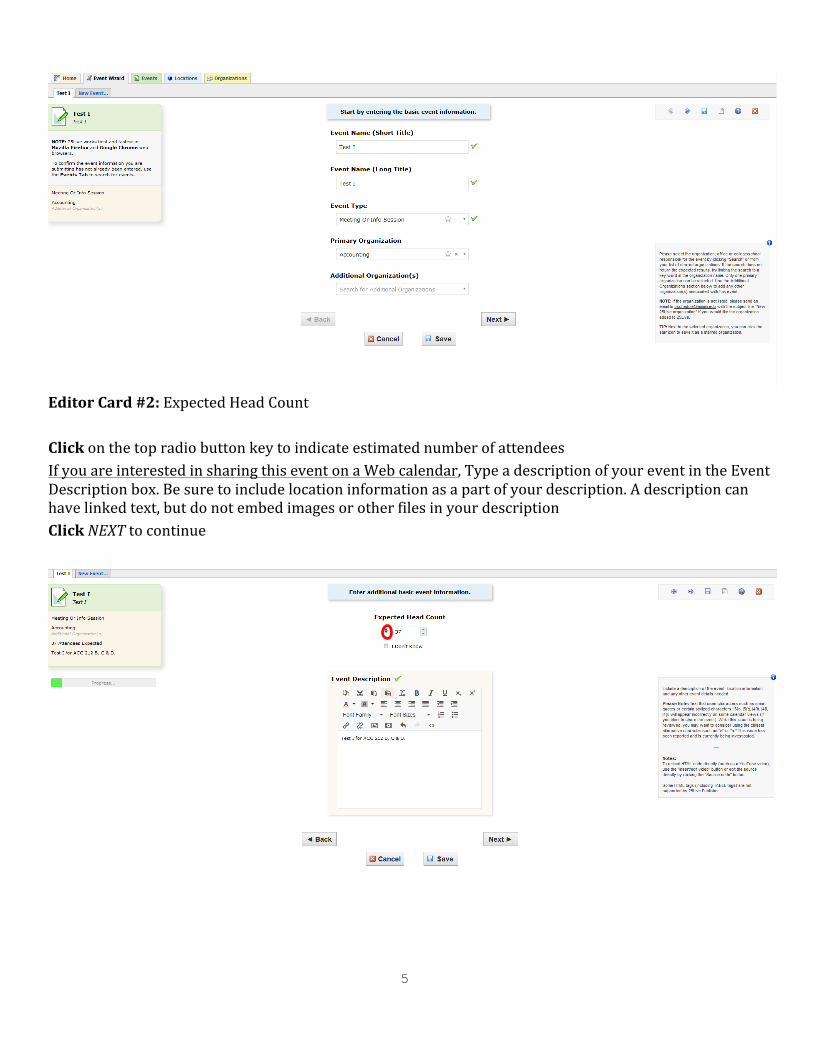
Editor Card #1: Event Name, type and primary organization. Populate information for your event. Fields showing a red asterisk are required fields. Once finished populating the fields, click on the NEXT button to continue. Such button becomes active once required fields are populated.
5
Editor Card #2: Expected Head Count Click on the top radio button key to indicate estimated number of attendees If you are interested in sharing this event on a Web calendar, Type a description of your event in the Event Description box. Be sure to include location information as a part of your description. A description can have linked text, but do not embed images or other files in your description Click NEXT to continue
6
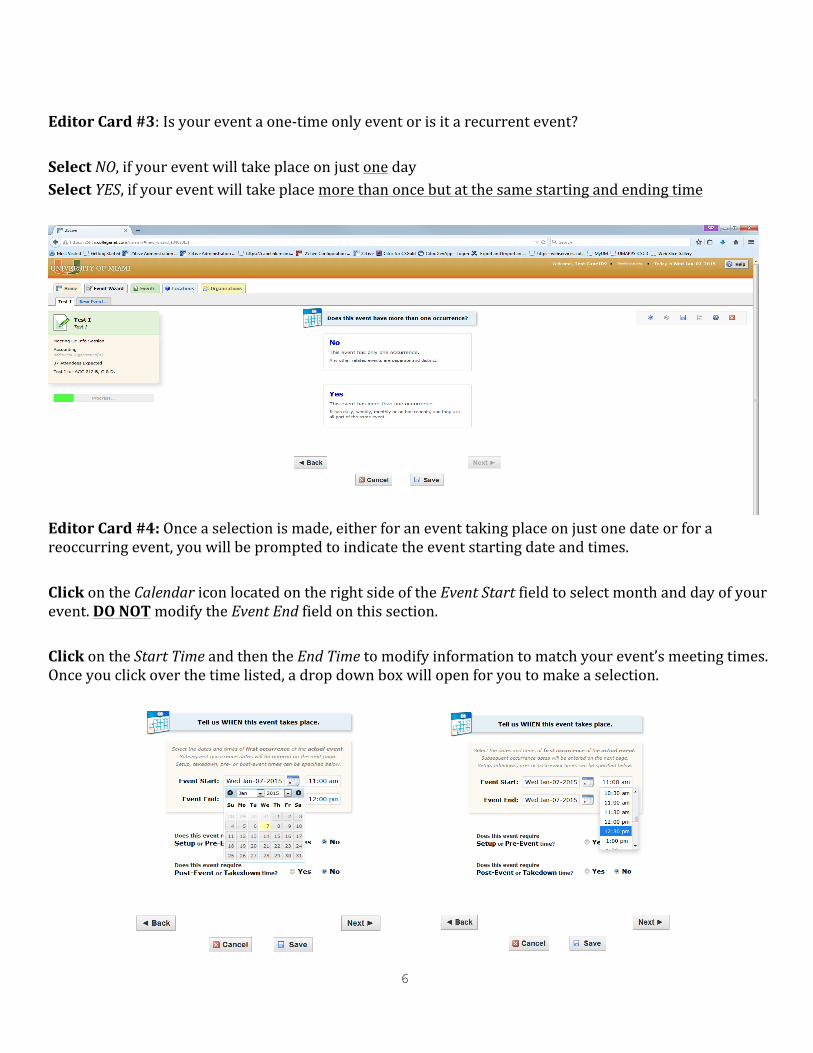
Editor Card #3: Is your event a one-‐time only event or is it a recurrent event? Select NO, if your event will take place on just one day Select YES, if your event will take place more than once but at the same starting and ending time
Editor Card #4: Once a selection is made, either for an event taking place on just one date or for a reoccurring event, you will be prompted to indicate the event starting date and times. Click on the Calendar icon located on the right side of the Event Start field to select month and day of your event. DO NOT modify the Event End field on this section. Click on the Start Time and then the End Time to modify information to match your event’s meeting times. Once you click over the time listed, a drop down box will open for you to make a selection.
7
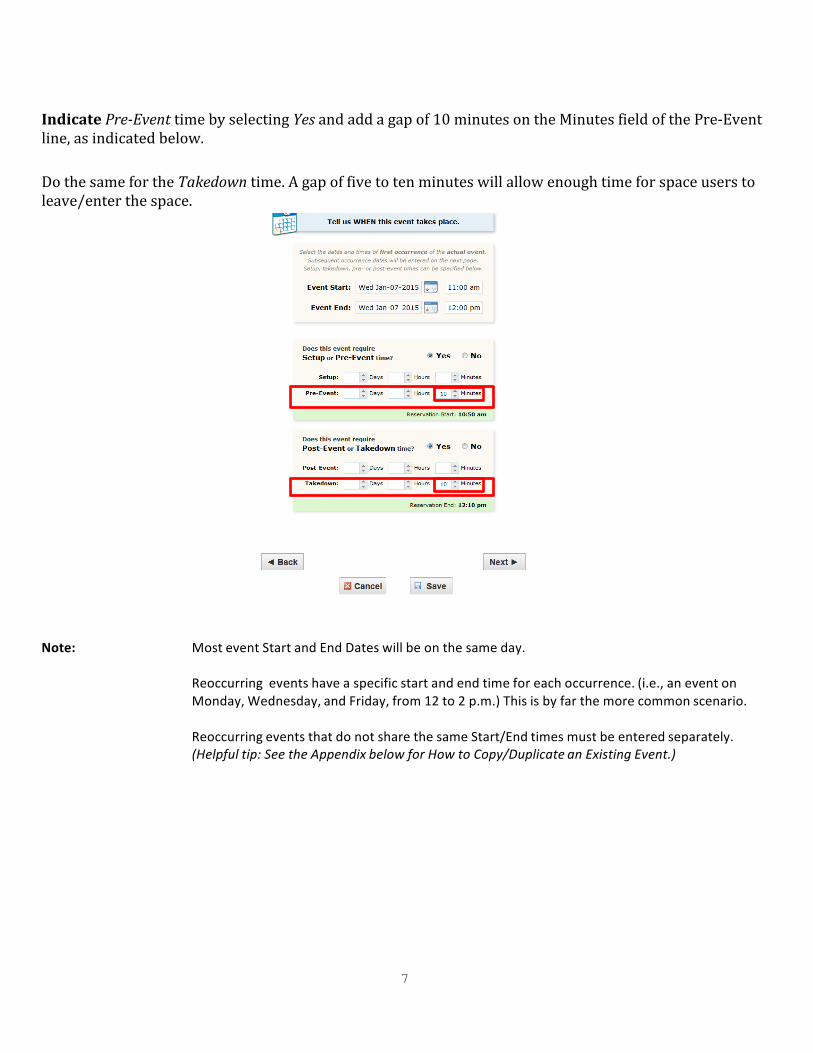
Indicate Pre-‐Event time by selecting Yes and add a gap of 10 minutes on the Minutes field of the Pre-‐Event line, as indicated below. Do the same for the Takedown time. A gap of five to ten minutes will allow enough time for space users to leave/enter the space.
Note: Most event Start and End Dates will be on the same day.
Reoccurring events have a specific start and end time for each occurrence. (i.e., an event on Monday, Wednesday, and Friday, from 12 to 2 p.m.) This is by far the more common scenario.
Reoccurring events that do not share the same Start/End times must be entered separately. (Helpful tip: See the Appendix below for How to Copy/Duplicate an Existing Event.)
8
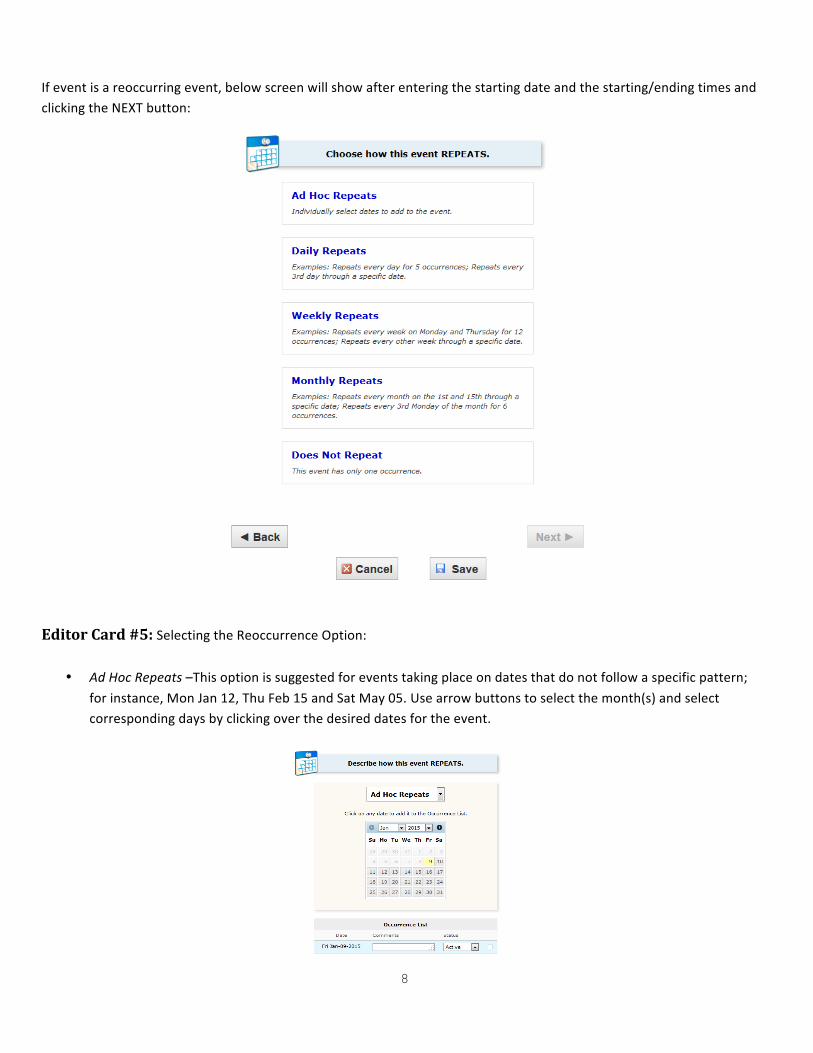
If event is a reoccurring event, below screen will show after entering the starting date and the starting/ending times and clicking the NEXT button:
Editor Card #5: Selecting the Reoccurrence Option:
• Ad Hoc Repeats –This option is suggested for events taking place on dates that do not follow a specific pattern; for instance, Mon Jan 12, Thu Feb 15 and Sat May 05. Use arrow buttons to select the month(s) and select corresponding days by clicking over the desired dates for the event.

9
• Daily Repeats – this option will prompt scheduler to indicate event occurrence frequency, how often the event
reoccurs
• Weekly Repeats – this option allows requestor to indicate that event take place on a weekly basis • Monthly Repeats – this option allows requestor to indicate dates for event that occurrs monthly.
By clicking on the first drop-‐box that appears in this screen, you will be able to modify available options for event’s frequency
After all selections are made, Click NEXT

10
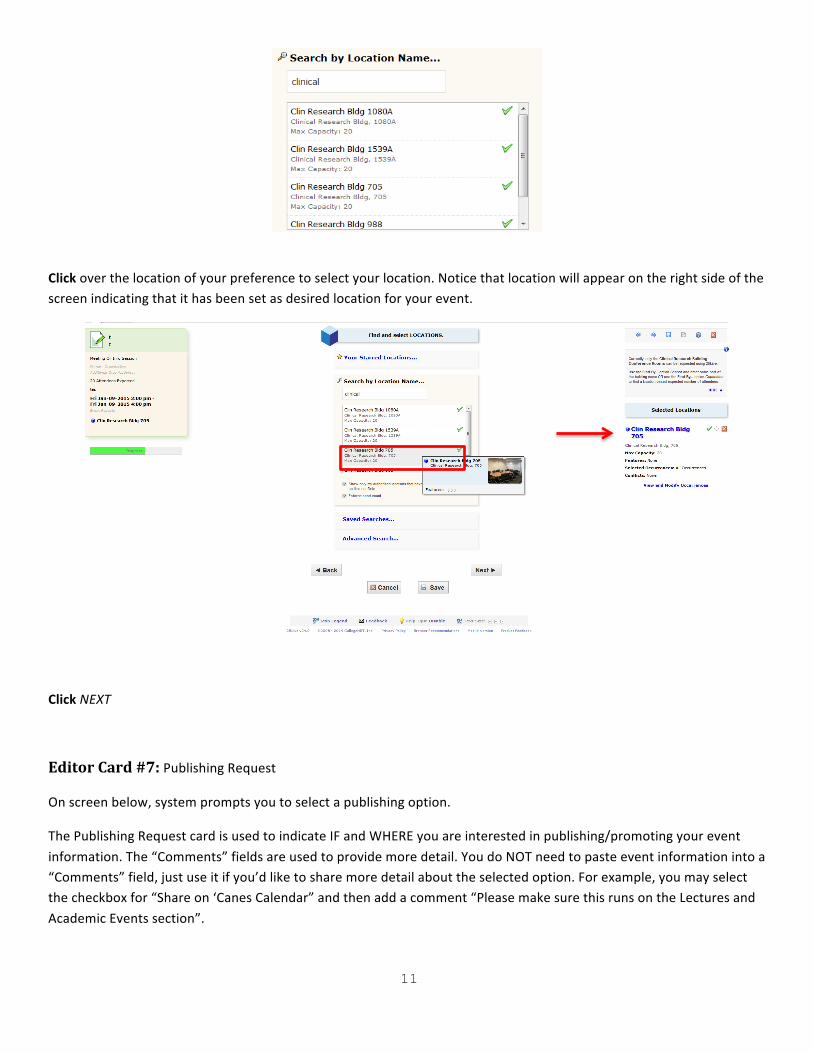
Editor Card #6: Selecting a location The LOCATION card should only appear for individuals on the Miller School of Medicine campus. If you search for a location and CANNOT find your location in the results, leave the field empty. In this case, be sure to include the location of your event in the DESCRIPTION field described earlier.
Click on the Search by Locations…link Type desired building/room to be assigned to your event Hit Enter key or click the Refresh link to search for location
All available locations will appear with a green checkmark on the right. This green checkmark indicates all available locations for date/time indicated for your event.
11
Click over the location of your preference to select your location. Notice that location will appear on the right side of the screen indicating that it has been set as desired location for your event.
Click NEXT
Editor Card #7: Publishing Request
On screen below, system prompts you to select a publishing option.
The Publishing Request card is used to indicate IF and WHERE you are interested in publishing/promoting your event information. The “Comments” fields are used to provide more detail. You do NOT need to paste event information into a “Comments” field, just use it if you’d like to share more detail about the selected option. For example, you may select the checkbox for “Share on ‘Canes Calendar” and then add a comment “Please make sure this runs on the Lectures and Academic Events section”.

12
If event is not to be published, select the first option.
If event is to be published, just select the calendar where you would like your event to show.
Editor Card # 8: Adding comments
In the text box provided, type any comments/event details you would like to have for your event.
13
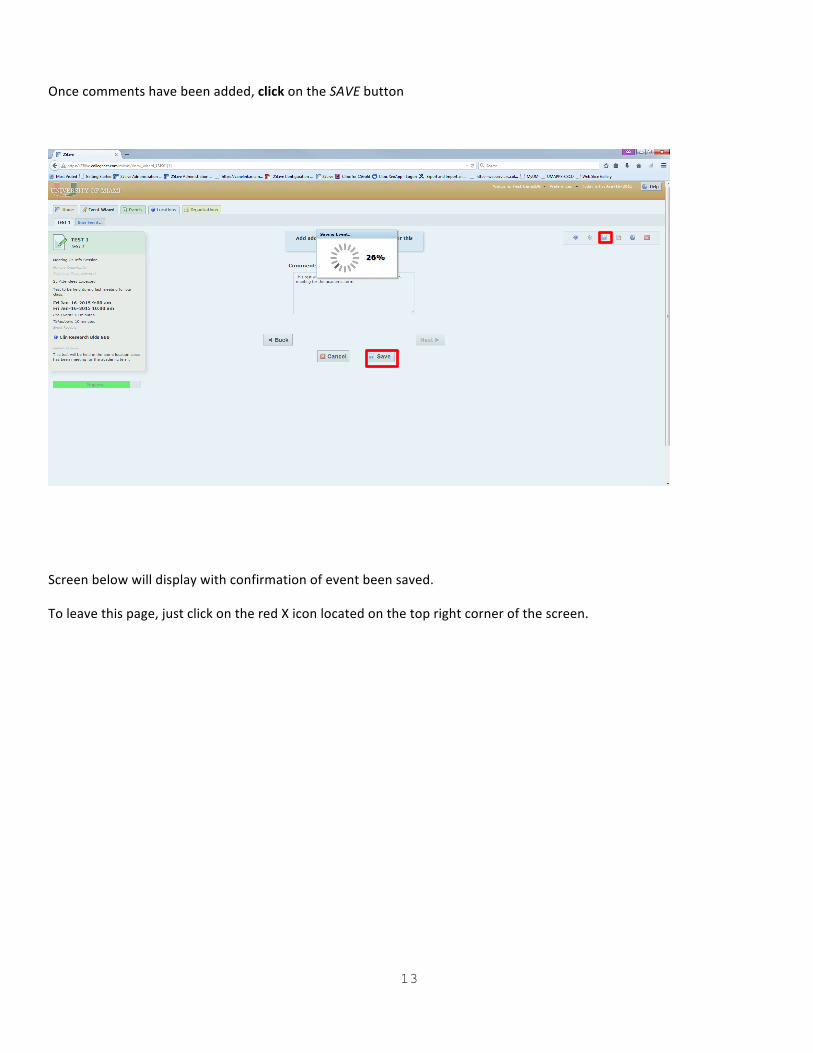
Once comments have been added, click on the SAVE button
Screen below will display with confirmation of event been saved.
To leave this page, just click on the red X icon located on the top right corner of the screen.
14
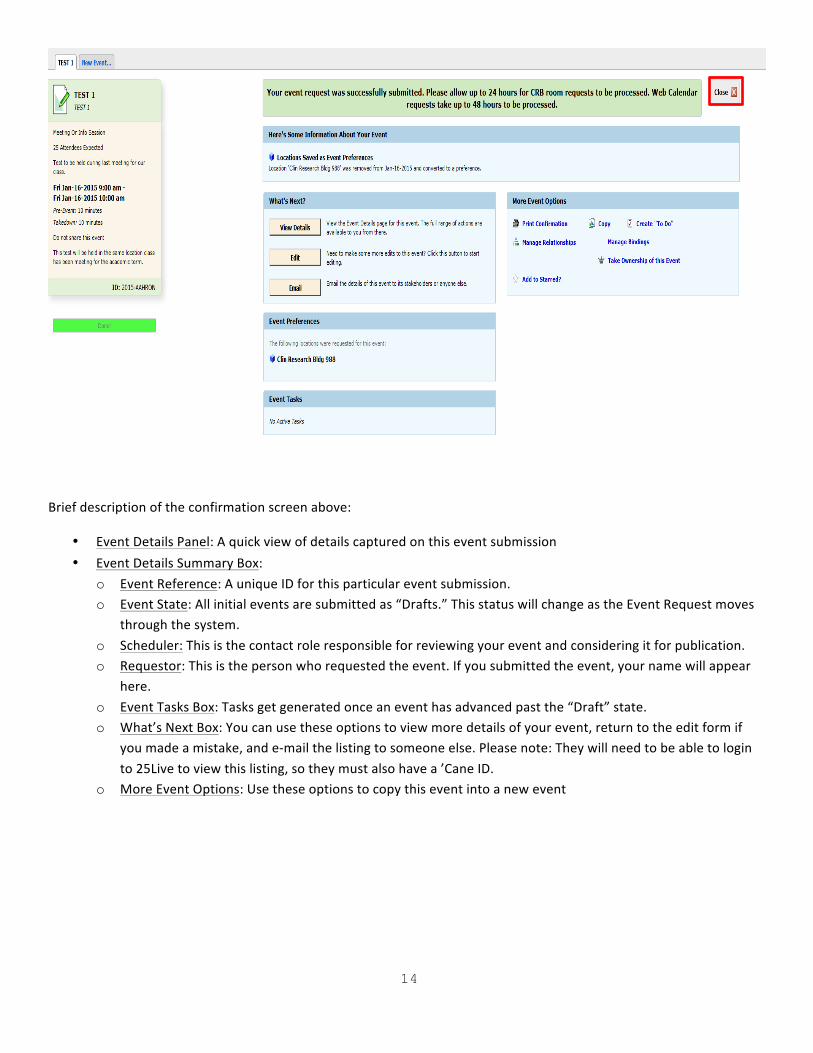
Brief description of the confirmation screen above:
• Event Details Panel: A quick view of details captured on this event submission • Event Details Summary Box:
o Event Reference: A unique ID for this particular event submission. o Event State: All initial events are submitted as “Drafts.” This status will change as the Event Request moves
through the system. o Scheduler: This is the contact role responsible for reviewing your event and considering it for publication. o Requestor: This is the person who requested the event. If you submitted the event, your name will appear
here. o Event Tasks Box: Tasks get generated once an event has advanced past the “Draft” state. o What’s Next Box: You can use these options to view more details of your event, return to the edit form if
you made a mistake, and e-‐mail the listing to someone else. Please note: They will need to be able to login to 25Live to view this listing, so they must also have a ’Cane ID.
o More Event Options: Use these options to copy this event into a new event

15
Event Guidelines for the Miller School of Medicine Calendar and Newsletters:
• Information required in the content description includes the time, date, location (complete address if off campus), speaker, topic and cost, if applicable. The first and last name, degree(s), title(s), and affiliation (if outside Miller School) must be included for all speakers.
• All events must include a contact name and phone number or email address.
• Information must be submitted in paragraph format, which includes complete sentences. Do not copy and paste
information from flyers or PDF documents.
• Do not type in all caps, bold, italics or any font color other than black.
• Only events being held on the medical campus, sponsored or hosted by the Miller School of Medicine, or affecting all or most of the employees on the medical campus will be included.
• The person submitting the event is responsible for the content; however the e-‐Update/MED editor reserves the
right to edit submissions for clarity and/or length.
• Events will be published on the main events calendar Tuesday mornings and will be featured in the newsletter the week they occur.
The Lifecycle of an Event Request
Event Requested
Event Processed
Event Published
Event Requested: Draft Event Once an event is submitted in the 25Live system, requestor is able to retrieve and edit it directly only until the point when a calendar assigner considers the listing for display in requested venues like the ‘Canes calendar or the UM mobile app After that point, edits and cancellations can be requested by: communicating via 25Live directly (clicking on the Feedback icon at the bottom of the Home screen), by calling 305-‐284-‐4846, or by e-‐ mailing [email protected] Event Processed Calendar moderators will confirm details of the event and will consider the listing for inclusion in the appropriate selected venues. The event is no longer directly editable by the person who requested the listing. Event Published When an event gets published, it may still be listed as “Tentative” in 25Live, but approved calendar resources will appear in the event’s details meaning that the event has been endorsed by a supporting organization and that the event has been published. If the event is denied, a reason for the denial will appear.

16
How Do I See the Events I Have Already Requested? Find the events you have already requested by visiting the Home tab Dashboard view.
Any current events you have requested will appear in the Your Events box.
17
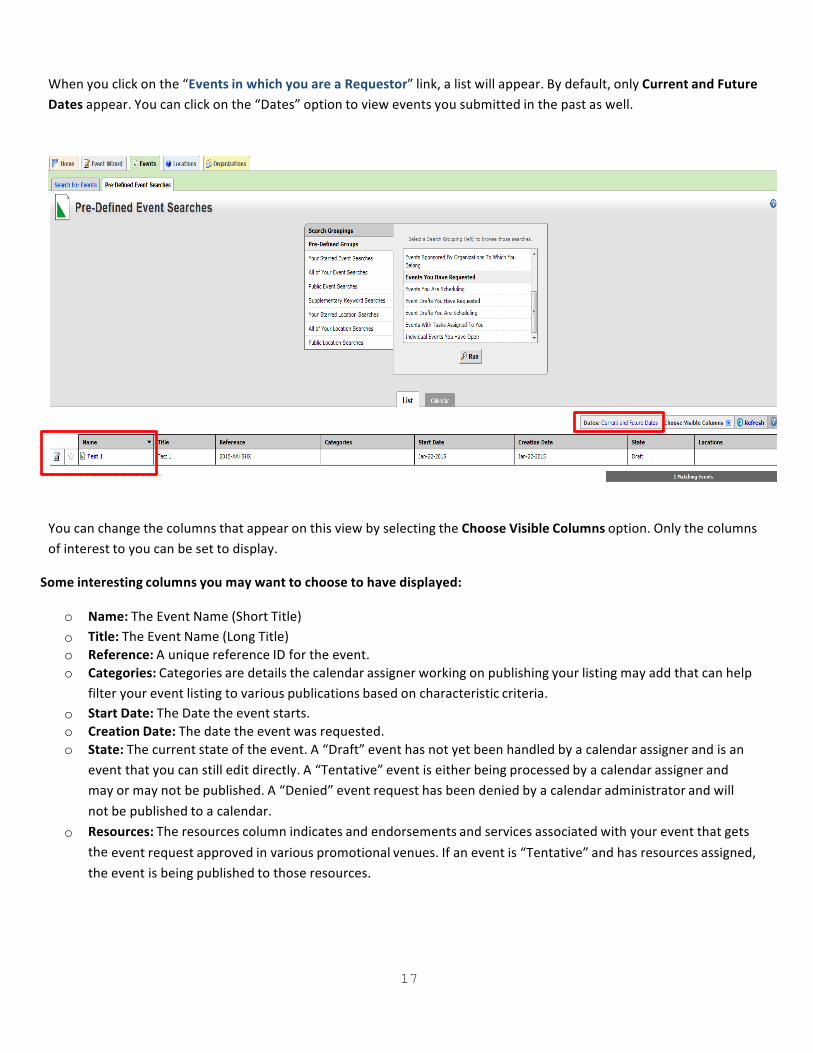
When you click on the “Events in which you are a Requestor” link, a list will appear. By default, only Current and Future Dates appear. You can click on the “Dates” option to view events you submitted in the past as well.
You can change the columns that appear on this view by selecting the Choose Visible Columns option. Only the columns of interest to you can be set to display.
Some interesting columns you may want to choose to have displayed:
o Name: The Event Name (Short Title) o Title: The Event Name (Long Title) o Reference: A unique reference ID for the event. o Categories: Categories are details the calendar assigner working on publishing your listing may add that can help
filter your event listing to various publications based on characteristic criteria. o Start Date: The Date the event starts. o Creation Date: The date the event was requested. o State: The current state of the event. A “Draft” event has not yet been handled by a calendar assigner and is an
event that you can still edit directly. A “Tentative” event is either being processed by a calendar assigner and may or may not be published. A “Denied” event request has been denied by a calendar administrator and will not be published to a calendar.
o Resources: The resources column indicates and endorsements and services associated with your event that gets the event request approved in various promotional venues. If an event is “Tentative” and has resources assigned, the event is being published to those resources.
18
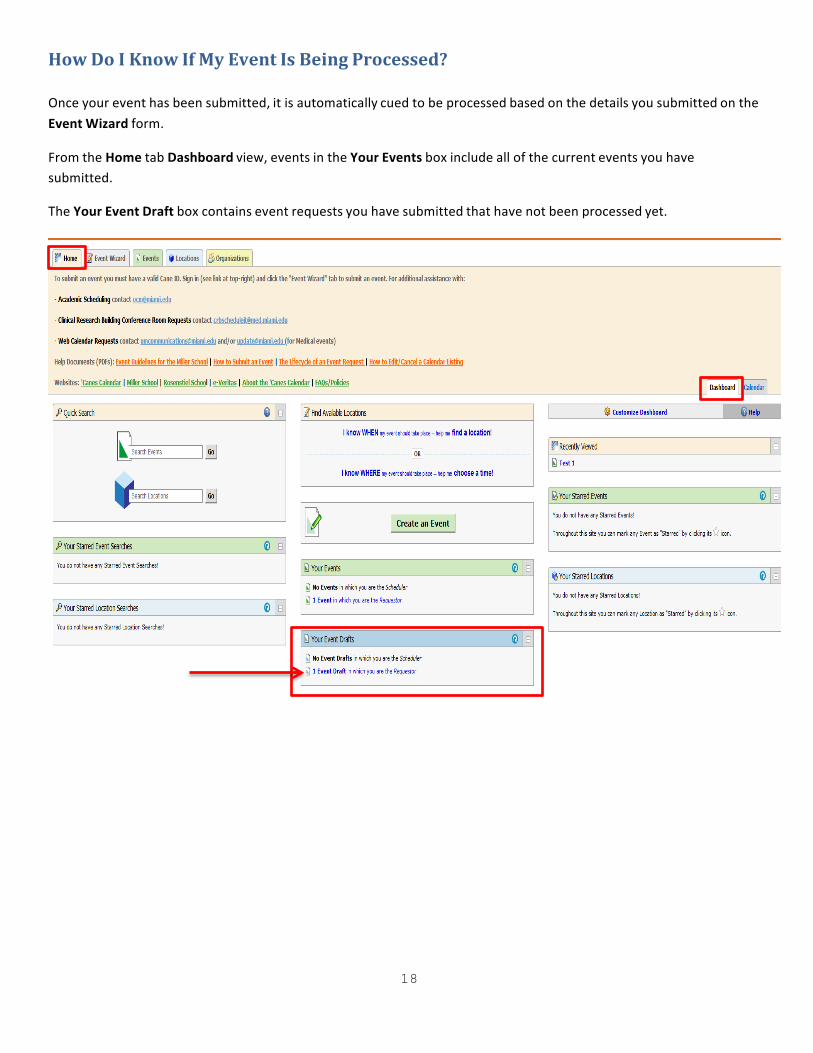
How Do I Know If My Event Is Being Processed? Once your event has been submitted, it is automatically cued to be processed based on the details you submitted on the Event Wizard form. From the Home tab Dashboard view, events in the Your Events box include all of the current events you have submitted.
The Your Event Draft box contains event requests you have submitted that have not been processed yet.
19
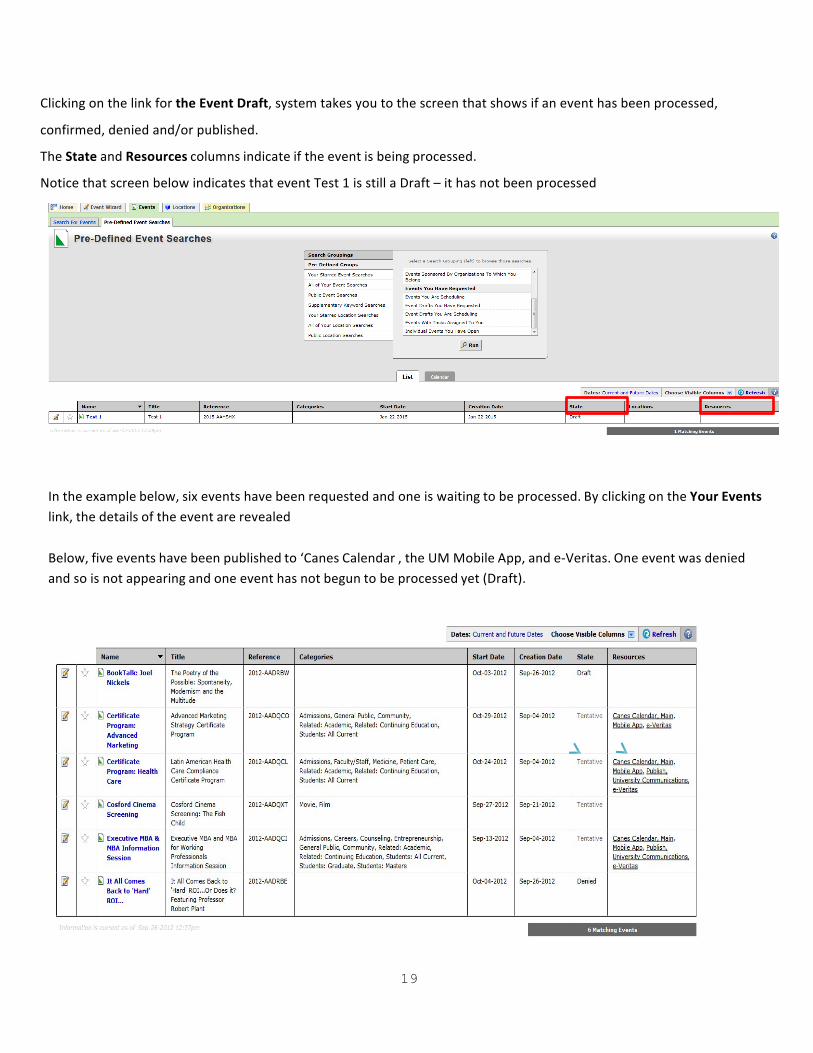
Clicking on the link for the Event Draft, system takes you to the screen that shows if an event has been processed, confirmed, denied and/or published. The State and Resources columns indicate if the event is being processed. Notice that screen below indicates that event Test 1 is still a Draft – it has not been processed
In the example below, six events have been requested and one is waiting to be processed. By clicking on the Your Events link, the details of the event are revealed Below, five events have been published to ‘Canes Calendar , the UM Mobile App, and e-‐Veritas. One event was denied and so is not appearing and one event has not begun to be processed yet (Draft).
20
How Do I Know If My Event Has Been Published?
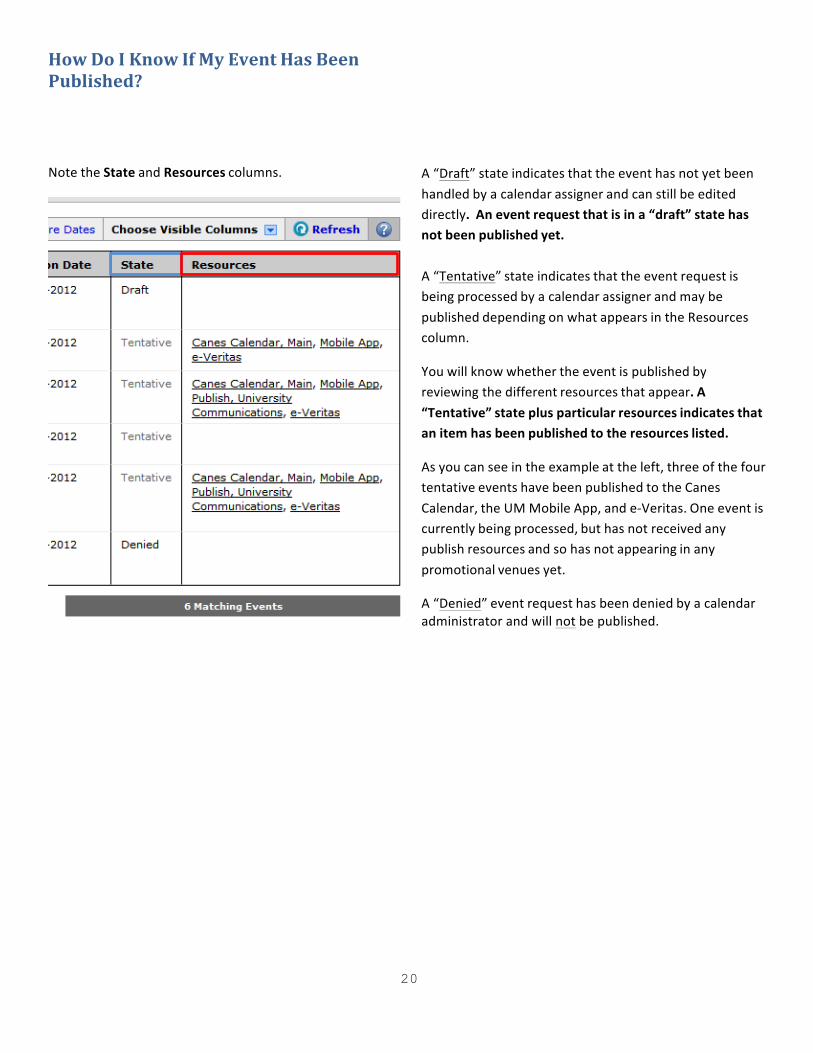
Note the State and Resources columns.
A “Draft” state indicates that the event has not yet been handled by a calendar assigner and can still be edited directly. An event request that is in a “draft” state has not been published yet.
A “Tentative” state indicates that the event request is being processed by a calendar assigner and may be published depending on what appears in the Resources column. You will know whether the event is published by reviewing the different resources that appear. A “Tentative” state plus particular resources indicates that an item has been published to the resources listed. As you can see in the example at the left, three of the four tentative events have been published to the Canes Calendar, the UM Mobile App, and e-‐Veritas. One event is currently being processed, but has not received any publish resources and so has not appearing in any promotional venues yet. A “Denied” event request has been denied by a calendar administrator and will not be published.
21
How Do I Find Out Why My Event Was Denied? There are various aspects of your event that can be denied.
• The entire event itself may be denied for inclusion in any venues. • Certain venues may be denied, while others are approved. i.e. The event may appear in the ‘Canes calendar, but
not in e-‐Veritas. In order to learn why something was denied, you can always e-‐mail [email protected] or call 305-‐284-‐4846.
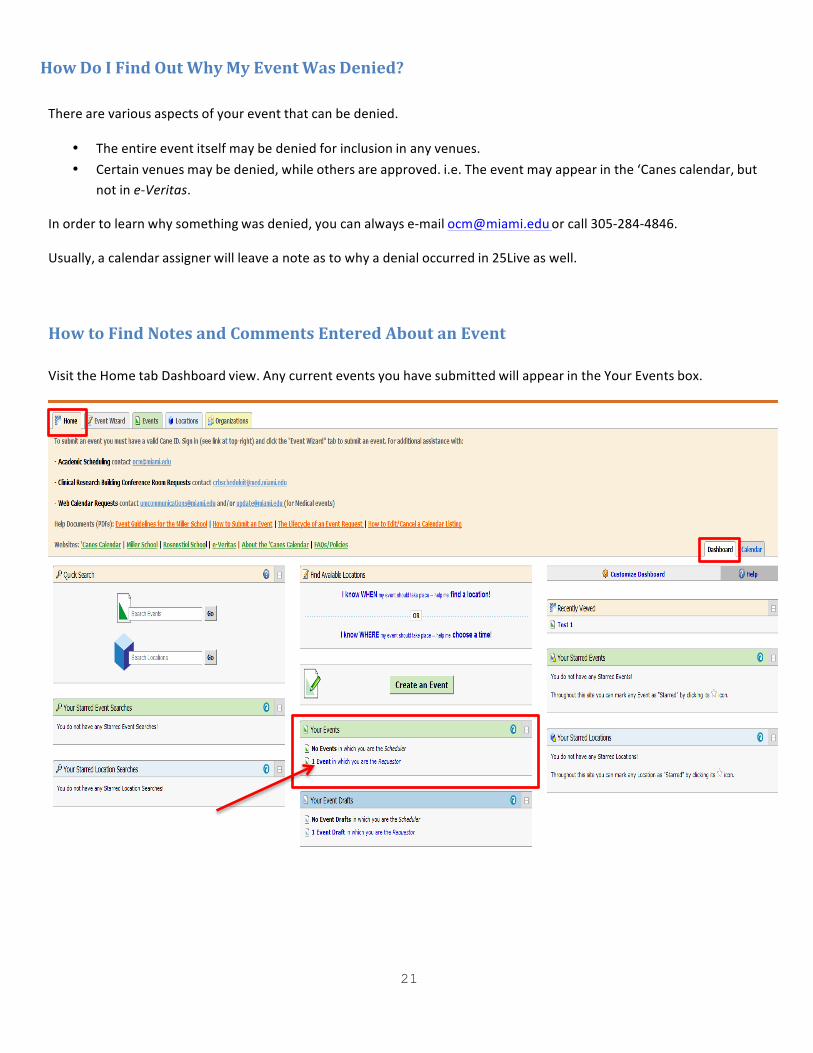
Usually, a calendar assigner will leave a note as to why a denial occurred in 25Live as well. How to Find Notes and Comments Entered About an Event
Visit the Home tab Dashboard view. Any current events you have submitted will appear in the Your Events box.
22
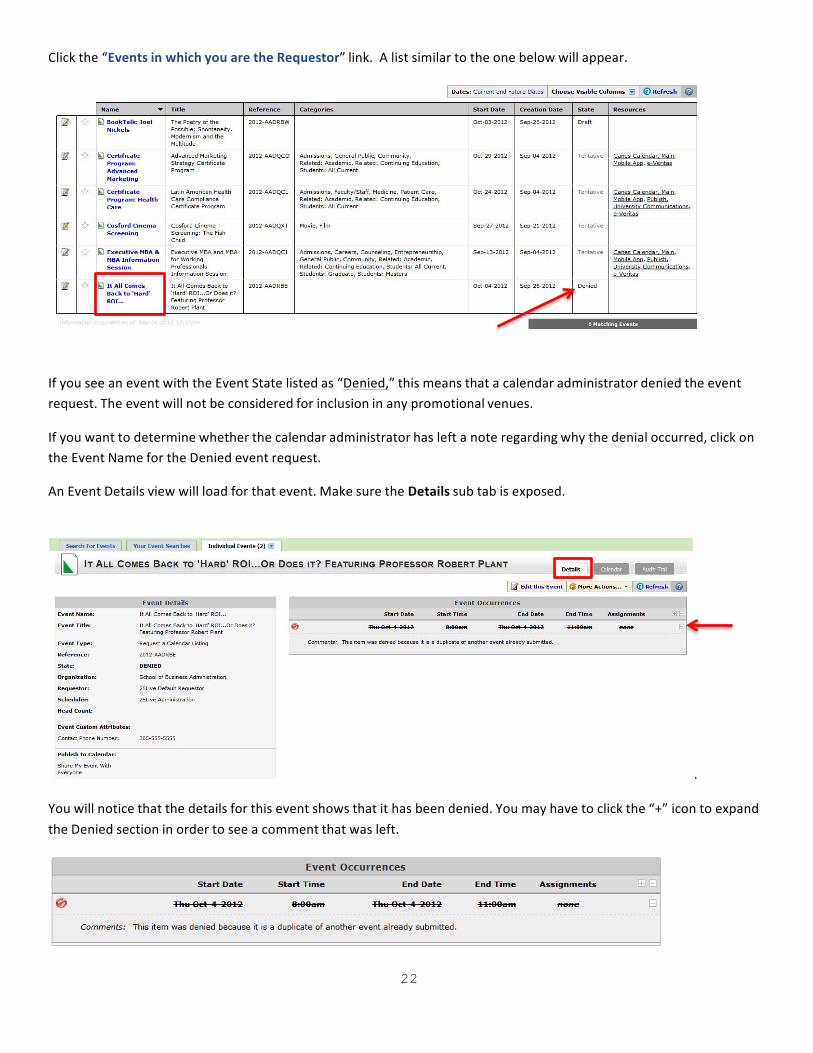
Click the “Events in which you are the Requestor” link. A list similar to the one below will appear. If you see an event with the Event State listed as “Denied,” this means that a calendar administrator denied the event request. The event will not be considered for inclusion in any promotional venues.
If you want to determine whether the calendar administrator has left a note regarding why the denial occurred, click on the Event Name for the Denied event request.
An Event Details view will load for that event. Make sure the Details sub tab is exposed.
. You will notice that the details for this event shows that it has been denied. You may have to click the “+” icon to expand the Denied section in order to see a comment that was left.

23
How Do I Duplicate or Copy An Event? There are a number of ways to Copy event information from one event request to another. Copying an event creates a duplicate event with all of the same details allowing you to save some time by requiring you to edit only the elements that you want to change.
Be careful! You should try to use the “Date and Time” field in order to establish a reoccurring event listing without having to “Copy” and duplicate anything. If the same event reoccurs, try editing the single event request and provide a pattern for the reoccurrence, that way you only have to edit one listing that will affect all of the occurrences.
Following the steps below creates a separate copy of the event based on an original source which means they become two separate events in the system. This is best for events that cannot be patterned by the Date and Time field or are different events with a large amount of similar information.
You can copy an event from the following views:
1. After you have submitted an event, select the “Copy” option from the More Event Options box on the confirmation page that appears.
24
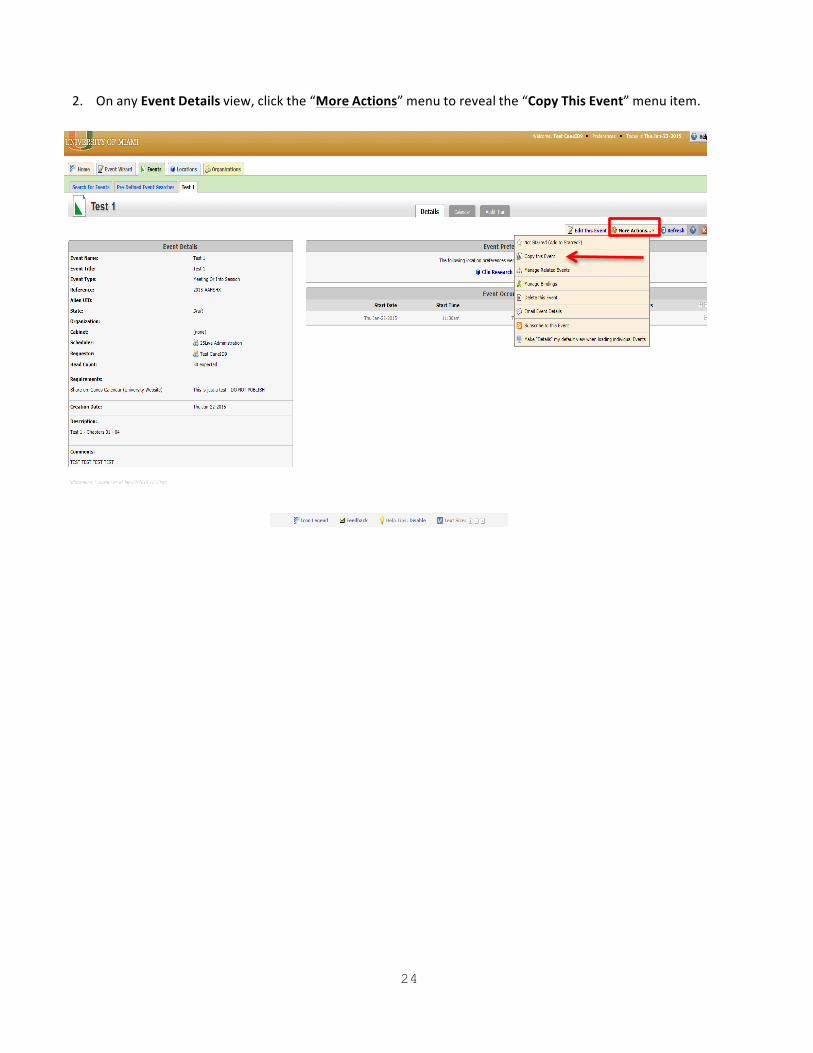
2. On any Event Details view, click the “More Actions” menu to reveal the “Copy This Event” menu item.
25
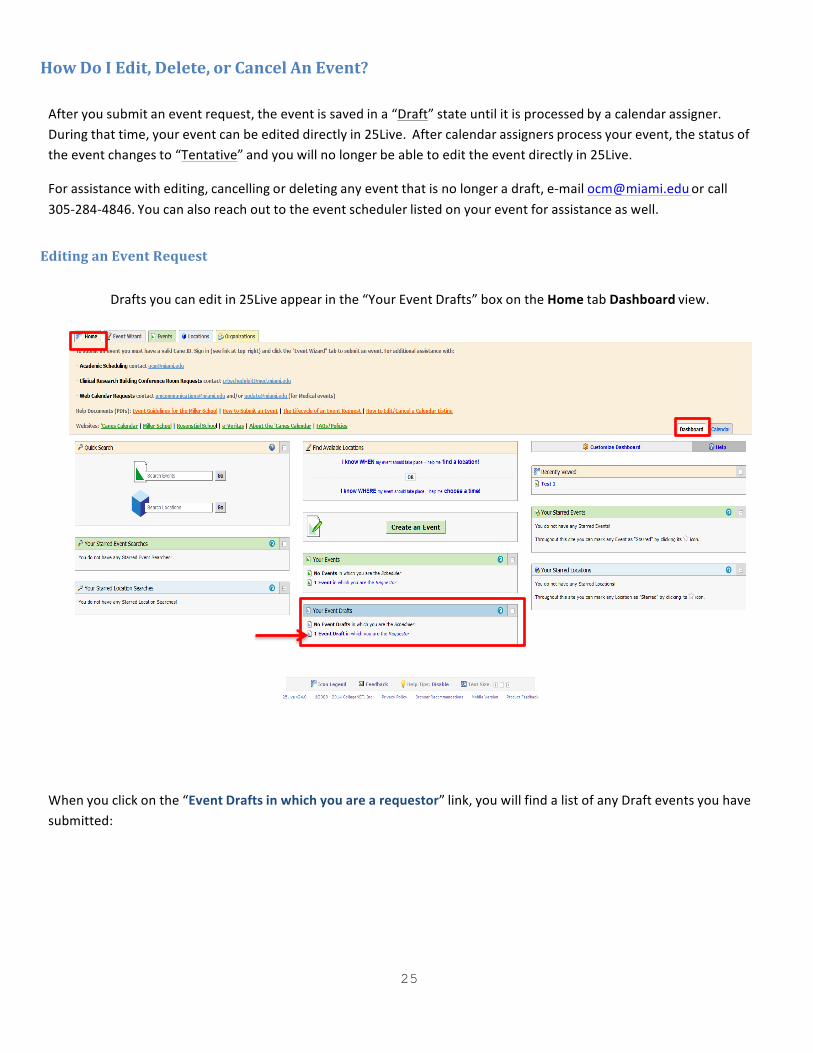
How Do I Edit, Delete, or Cancel An Event? After you submit an event request, the event is saved in a “Draft” state until it is processed by a calendar assigner. During that time, your event can be edited directly in 25Live. After calendar assigners process your event, the status of the event changes to “Tentative” and you will no longer be able to edit the event directly in 25Live.
For assistance with editing, cancelling or deleting any event that is no longer a draft, e-‐mail [email protected] or call 305-‐284-‐4846. You can also reach out to the event scheduler listed on your event for assistance as well.
Editing an Event Request
Drafts you can edit in 25Live appear in the “Your Event Drafts” box on the Home tab Dashboard view.
When you click on the “Event Drafts in which you are a requestor” link, you will find a list of any Draft events you have submitted:

26
Click the icon to edit the draft event and follow the same steps as you would when submitting a new event request. Make appropriate edits to your event and then click on Save
Deleting an Event Request You can delete an event request that is still a draft by selecting the “Delete this Event” menu option on the “More Actions”menu. You can only delete an event this way BEFORE it is handled by a calendar assigner.

27
If your event is no longer a “Draft” and you want the event deleted:
• E-‐mail [email protected] or call 305-‐284-‐4846.
• Contact the event scheduler directly (see note below) If you get a pop-‐up message stating: “Sorry, you do not have permissions to edit this event”:
• You tried to edit an event that you did not create/request. • You tried to edit an event that is no longer a “Draft” and has been processed by a calendar assigner.
To delete such events you can either:
• Contact the event scheduler directly (see note below) • E-‐mail [email protected] or call 305-‐284-‐4846.
How to E-‐mail the Event Scheduler (the person who can approve/cancel/edit your event after it is published)
From the Event Detail view of the event you require assistance with, click on the More Actions menu item and select the “Email Event Details” menu option
28
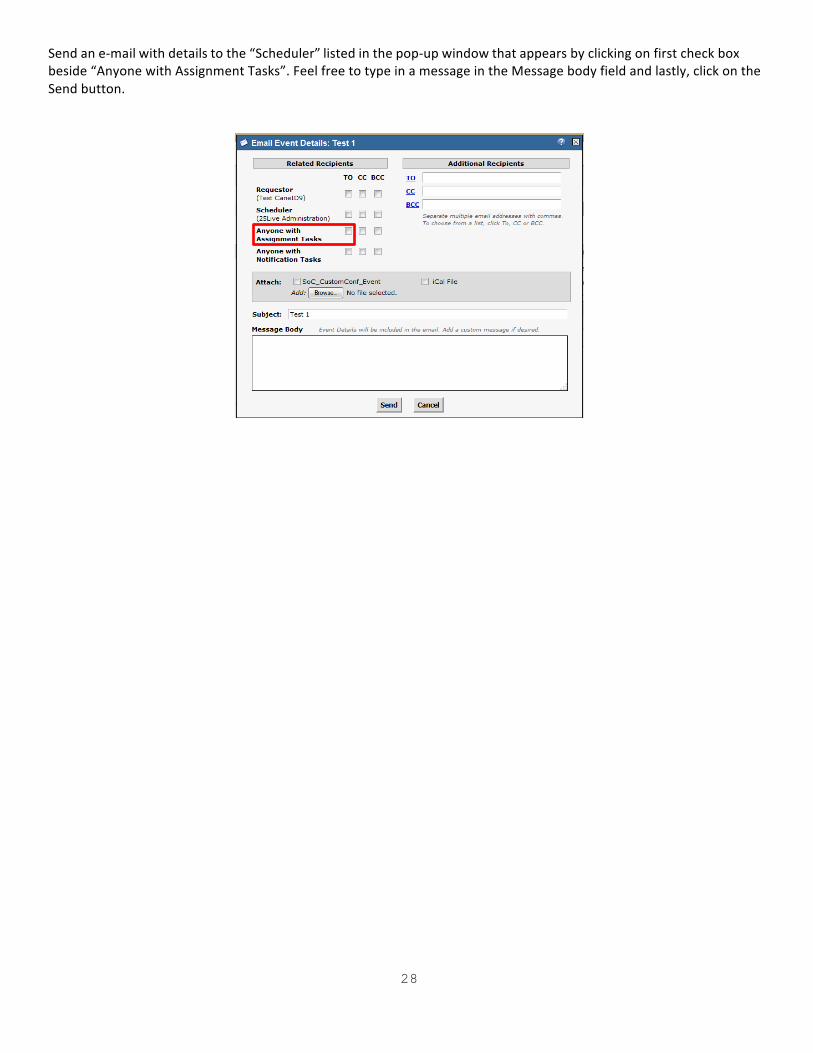
Send an e-‐mail with details to the “Scheduler” listed in the pop-‐up window that appears by clicking on first check box beside “Anyone with Assignment Tasks”. Feel free to type in a message in the Message body field and lastly, click on the Send button.
Related Documents