How to pass Magento Certification Exam in 30 days Published by David Nguyen at Smashwords Copyright 2013 David Nguyen

Welcome message from author
This document is posted to help you gain knowledge. Please leave a comment to let me know what you think about it! Share it to your friends and learn new things together.
Transcript
How to pass Magento Certification Exam in 30 days
Published by David Nguyen at Smashwords
Copyright 2013 David Nguyen
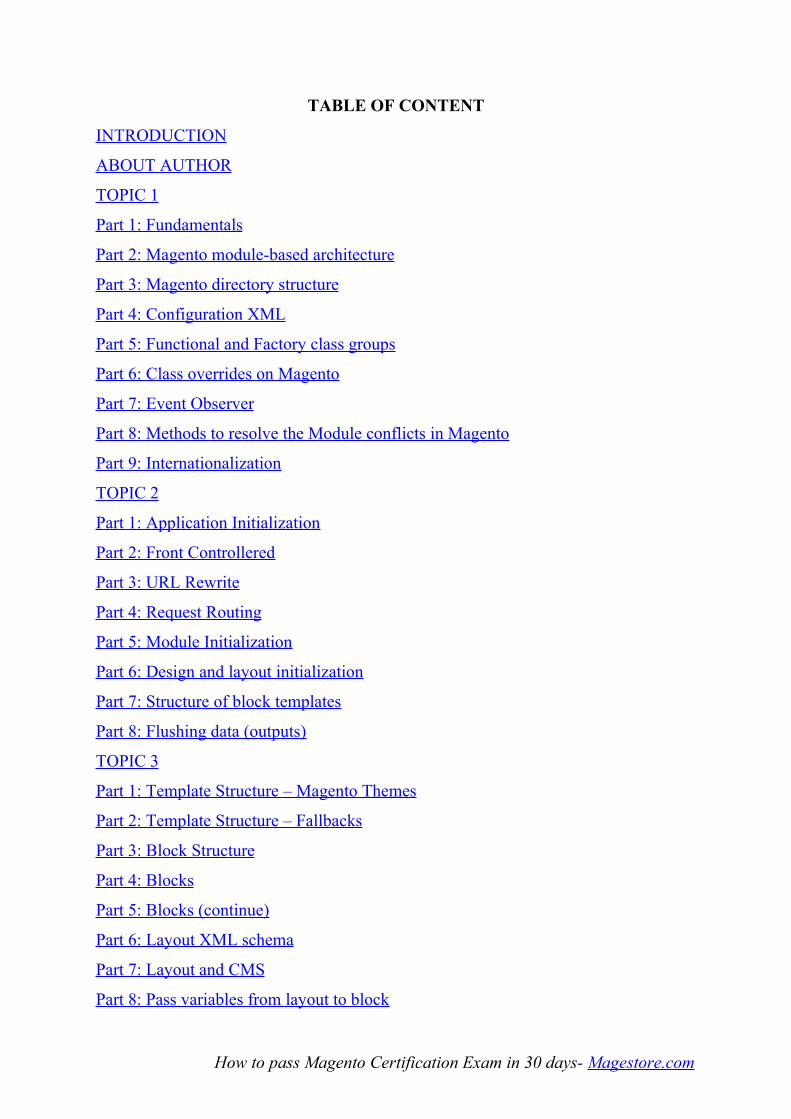
TABLE OF CONTENT
INTRODUCTION
ABOUT AUTHOR
TOPIC 1
Part 1: Fundamentals
Part 2: Magento module-based architecture
Part 3: Magento directory structure
Part 4: Configuration XML
Part 5: Functional and Factory class groups
Part 6: Class overrides on Magento
Part 7: Event Observer
Part 8: Methods to resolve the Module conflicts in Magento
Part 9: Internationalization
TOPIC 2
Part 1: Application Initialization
Part 2: Front Controllered
Part 3: URL Rewrite
Part 4: Request Routing
Part 5: Module Initialization
Part 6: Design and layout initialization
Part 7: Structure of block templates
Part 8: Flushing data (outputs)
TOPIC 3
Part 1: Template Structure – Magento Themes
Part 2: Template Structure – Fallbacks
Part 3: Block Structure
Part 4: Blocks
Part 5: Blocks (continue)
Part 6: Layout XML schema
Part 7: Layout and CMS
Part 8: Pass variables from layout to block
How to pass Magento Certification Exam in 30 days- Magestore.com

TOPIC 4
Part 1: Models, resource models, and collections
Part 2: Magento Object Relational Mapping (ORM)
Part 3: Install/Upgrade Scripts
Part 4: Install/Upgrade Scripts (continue)
TOPIC 5
Part 1: EAV Model Concepts
Part 2: Database tables for EAV entities
Part 3: Load and save EAV entities
Part 4: Magento EAV Attribute Management
TOPIC 6
Part 1: Common structure/architecture
Part 2: Form and grid widgets
Part 3: System configuration XML
Part 4: Access Control Lists (ACL) permissions
Part 5: Magento extensions
TOPIC 7
Part 1: Product Types
Part 2: Product Types (continued)
Part 3: Price Generation
Part 4: Category Structure
Part 5: Catalog Rules
Part 6: Flat catalog product
Part 7: Layered Navigation
Part 8: Custom Index
Part 9: Product Option
TOPIC 8
Part 1: Quote
Part 2: Total models
Part 3: Show Custom Total
Part 4: Shopping Cart Rules
How to pass Magento Certification Exam in 30 days- Magestore.com

Part 5: Shipping Methods
Part 6: Payment Methods
TOPIC 9
Part 1: Create order in Admin
Part 2: Invoice
Part 3: Shipment
Part 4: Refund
Part 5: Partial Operations
Part 6: Cancel Operations
Part 7: Customer Management
TOPIC 10
Part 1: Widgets
Part 2: API
How to pass Magento Certification Exam in 30 days- Magestore.com

INTRODUCTION
There is no doubt that Magento currently is one of the most powerful and fast-growing
ecommerce platforms. Over the past few years, not only the number of websites using
Magento, but also the number of developers specialized in this platform have
increased dramatically.
In 2012, Magento started Magento Certification Exams which are geared toward
professionals who want to differentiate themselves from the competition with the
ultimate Magento credential. Store-owners also benefit from this since they can easily
find a qualified developer to make sure their website is handled by trusted hands.
Magento Certificate becomes valuable and indispensable to developers from all over
the world who want to make money in Magento field.
“How to pass Magento Certification Exam in 30 days” is written based on the 10
topics announced in the Study Guide of Magento. This book presents full knowledge
of each topic as well as provides useful tips for developers to work with Magento. At
the end of some topics, you can find questions that are designed to help revise what
you have learned.
How to pass Magento Certification Exam in 30 days- Magestore.com
ABOUT AUTHOR
If you haven’t been familiar with Magestore, we would like to introduce ourselves.
We are one of the top Magento Extension providers. Founded in January 2010, until
now Magestore has more than 15,000 customers globally. One of the reasons for our
success is that we always try our best to provide good support service: lifetime update,
lifetime support. You can find customers talk about us at Magestore.com or Magento
Connect. Currently, we have about 30 extensions, a lot of them are best-seller for
years:Affiliate Plus, One Step Checkout, Gift card, Reward points, Mega menu,
Auction, Store pickup, Promotional Gift, Web POS, etc...
Right when Magento announced about Magento Certification exam, all developers at
Magestore were excited to prepare for the test. We made documents and organized
mini class to study together. As we have a Blog favored by many developers for
useful Magento tutorials, we thought why didn’t publish our Magento certification
preparing documents to the Blog as well? After posting the final part to our Blog, we
decided to make it to an eBook so that Developers can easily find and study.
This book is mainly written by David Nguyen, Technical Manager at Magestore. He
has been the leader for many important projects of Magestore. Last year, he himself
took part in Magento Certification exam and scored 66/70.
Besides David, great contributions were also made from other members in the
technical team, including: Travis Ngo, Alex Nguyen, Michael Nguyen, Blanka Pham,
Adam Pham, Kaka Nguyen and Stephen Nguyen. Content are translated and edited
thanks to the Marketing team. As we are not English native speakers, we believe this
book still has some errors of expression. Please kindly understand and contact us at
[email protected] if you have any questions.
How to pass Magento Certification Exam in 30 days- Magestore.com
5 developers of Magestore tried to study this book within 30 days before taking
Magento Certification exam and all passed. Thus we hope you will also find this book
valuable and soon achieve the desired Certificate.
June 2013
Magestore Team
How to pass Magento Certification Exam in 30 days- Magestore.com
TOPIC 1
Part 1: Fundamentals
Magento is established based on Principles of Object-Oriented Programming on Zend
Framework with MVC architecture. It uses Event-Driven Architecture (EDA) to
manage events.
In this part, we will talk about:
1.Describe and apply basic principles and processes of Object Oriented Programming
(OOP) and Model-View-Controller (MVC) to build Magento websites
2.Identify and describe principles of Event-Driven Architecture (EDA)
3.Sample questions & answers
I - Describe and apply basic principles and processes of Object Oriented
Programming (OOP) and Model-View-Controller (MVC) to build Magento
websites
1. Object Oriented Programming OOP
•Abstraction
Use function/class without knowing exactly how that function/class accomplishes its
tasks. What we concern is parameters sent to it and its returned value.
A typical example is function _init() in class Mage_Core_Model_Abstract, this
function will be executed to define with which table in CSDL the model will work.
- Inherited class of Abstract class is just the instance of the abstract class.
- Calling abstract function requires its instance function, which means in the children
class you must rewrite this function.
•Encapsulation
Objects are encapsulated. When changing data, you must go through functions to
work with that object. In other words, a product cannot know information of another
product. The common thing between the 2 products is the method working with them.
How to pass Magento Certification Exam in 30 days- Magestore.com
•Polymorphism
Object instances of a same class are different. For example, products of different types
(simple/grouped/…) have different price calculated methods.
•Inheritance
Inheritance is exploited in Magento, especially Varien_Object class which is inherited
by many classes in Magento. (Function setData/getData is inherited from
Varien_Object).
2.Model-View-Controller MVC
•Model
Model is the classes providing data, service related to data and business logic. This
class works directly with data and provides data for other elements. In a module, these
classes are contained in Model folder.
•View
View is the classes which define data presented method (not update data). These
classes are contained in the folder Block of module.
•Controller
Controller is the classes which control application stream. They receive input which is
requirement of users through HTTP request, transfer those requests to the classes
which process the requests directly. From the link, Router will get to Controller which
controls that link. In Magento module, these classes are contained in controller folder.
II - Identify and describe principles of Event-Driven Architecture (EDA)
1. Event-Driven Architecture
How to pass Magento Certification Exam in 30 days- Magestore.com

2. Magento event
•Event Listener & Generator: When an event happens, this element will Listen the
event, create signals of that event and send that signal to Event Engine.
•Event Engine: When receiving signals of the event, this element will send them to
factor Client to process that event.
•Client: When receiving signals of the event, this element will execute steps to
respond to that event.
Question
1. What is static function?
2. The order of events when several modules catch the same event
Answer
1. Static function is silent function of a class, which is stored in the memory space of a
class (not objects).
2. Order of event: The first loaded module will get the signals before others. The order
of loading modules depends on the name of module and configure of module:
- The module depending on another module will be loaded later than the module it
depends.
- Order of loading configure of module is as below:
*Mage_All.xml will be loaded first, module configure in this file will be loaded first
How to pass Magento Certification Exam in 30 days- Magestore.com
*Mage_*.xml
*.xml
And file.xml will be loaded according to the order of the file’s name.
How to pass Magento Certification Exam in 30 days- Magestore.com
Part 2: Magento module-based architecture
Magento is built based on module architecture. All activities of Magento are
processed by modules.
In this part, we will talk about:
•Describe module architecture
•List steps to add a new module
•Describe module limitations
•Sample questions & answers
I - Describe module architecture
A built module of Magento may work following the structure: MVC (model – view –
control) with functions of each are below:
•Model: is the element which works with data, stores and takes out data. Model will
ensure data’s performance and accuracy.
•View: is the expression of data, showing changes of system to users.
•Control: is the element which controls interaction between view and model,
processing application stream.
How to pass Magento Certification Exam in 30 days- Magestore.com

MVC in Magento:
Besides, module in magento may be built based on EDA architecture to send and
catch events in the system (EDA architecture has been mentioned in part 1-
Fundamentals).
II - List steps to add a new module
To add a new module in Magento, we need to follow at least 2 following steps:
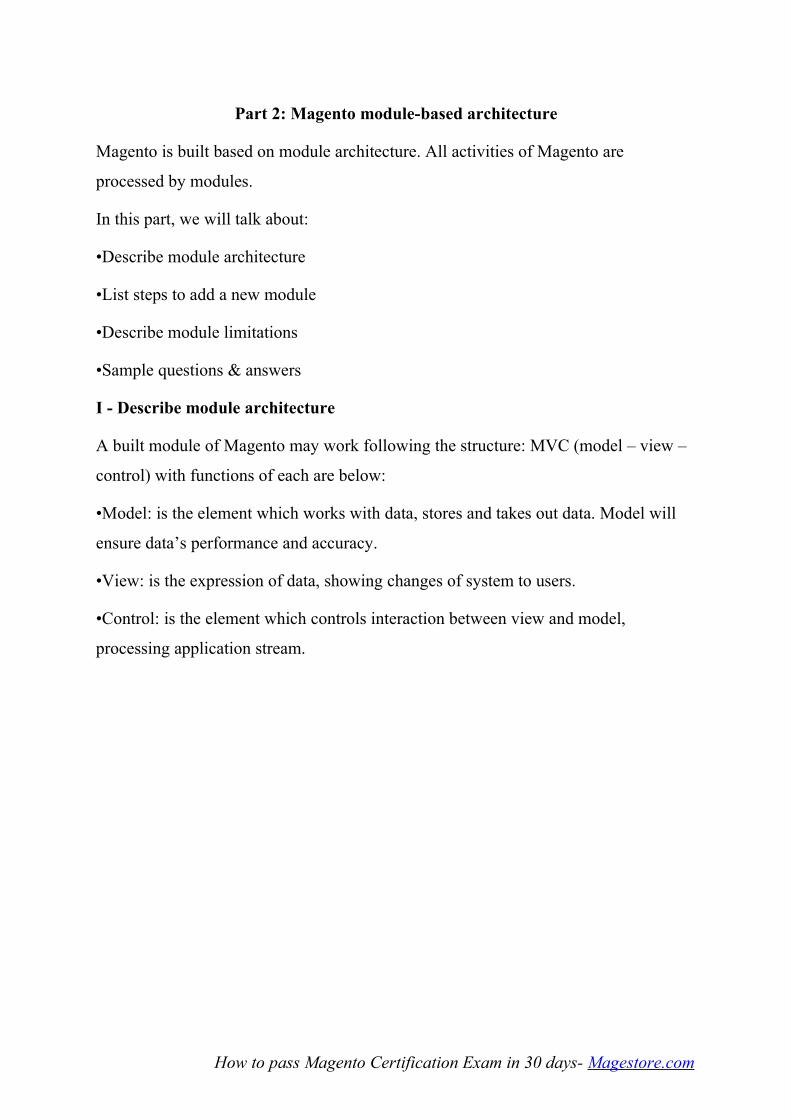
Step 1: Register module with the system by naming file configure (e.g. file
Magestore_Test.xml into the folder /app/etc/modules/. File Magestore_Test.xml with
the content like this:
<?xml version="1.0"?>
<config>
<modules>
<Magestore_Test>
How to pass Magento Certification Exam in 30 days- Magestore.com
<active>true</active>
<codePool>local</codePool>
</Magestore_Test>
</modules>
</config>
Step 2: Create code in folder /app/code/local/Magestore/Test. Files needed for module
will be shown in the next parts.
III - Describe module limitations
Limitations of modules:
•All activities of the system must go through modules and an action in Magento may
involve some modules, thus the loading and running of Magento system are quite
slow.
•Many modules working in the same system can lead to modules’ conflict.
Question
When the system runs, does it load all files in module? If not, when creating a new
object or extend class from a class without including class’s source file, why does the
system not show errors?
Answer
When running Magento, the system will just load files including the class which we
called.
Magento uses a magic function spl_autoload_register(‘name_function_autoload’); of
PHP. When you create a new object or extend class from a class that doesn’t exist, the
function name_function_autoload will automatically run before adding new or
extending from a class.
The function name_function_autoload has parameter named class, so it’s the type
function name_function_autoload(class). In Magento, from the name of a class, the
How to pass Magento Certification Exam in 30 days- Magestore.com
system can immediately find the path and files including that class (due to rules of
naming in Magento).
How to pass Magento Certification Exam in 30 days- Magestore.com
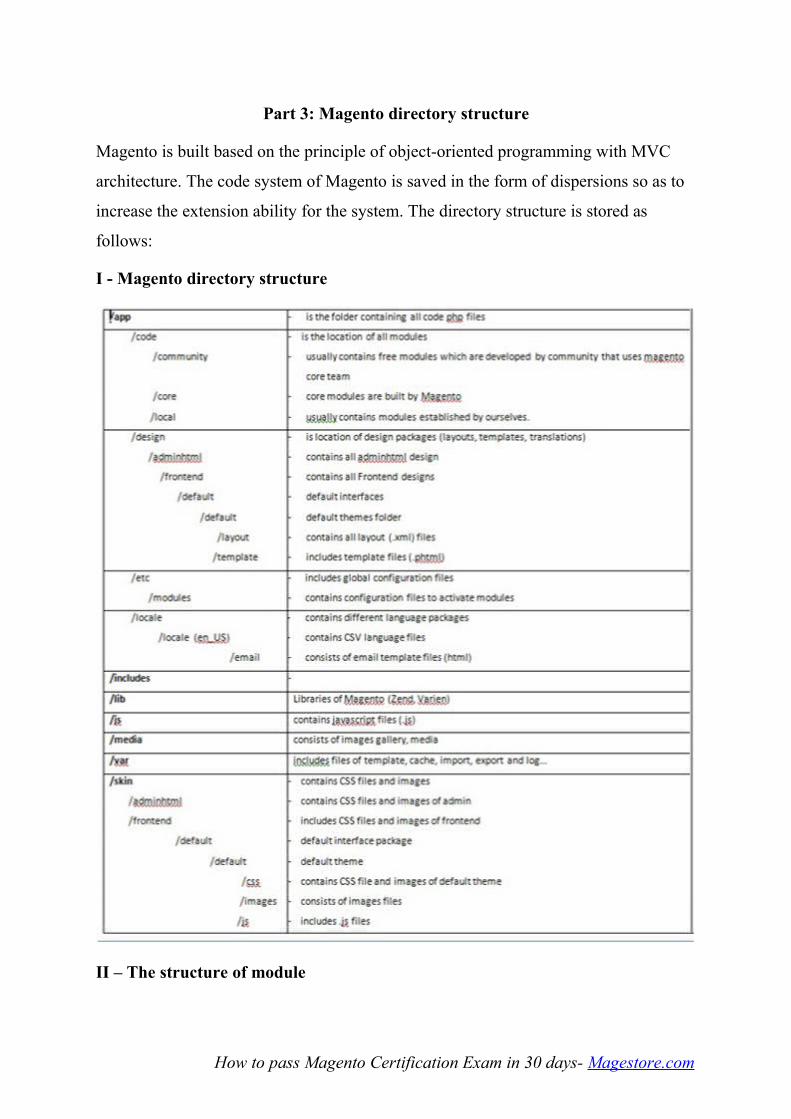
Part 3: Magento directory structure
Magento is built based on the principle of object-oriented programming with MVC
architecture. The code system of Magento is saved in the form of dispersions so as to
increase the extension ability for the system. The directory structure is stored as
follows:
I - Magento directory structure
II – The structure of module
How to pass Magento Certification Exam in 30 days- Magestore.com

•The best way to understand Magento is to know structures and activities of modules
in Magento. The entire code of one module is contained in a directory in
app/code/core/Mage
•The following is the structure of a module catalog: You must use an article before a
singular noun: a/the/my…
•Block: monitors the template system in Magento. The code in block is used to load
database and display of template. This is also the location to edit database if necessary
before showing it on the template. The display of which template will be declared in
the layout file: app/design/frontend/default/default/layout/your_module.xml.
For example:
<yourmodule_yourcontroller_youraction>
<reference name=“content”>
<block type= “yourmodule/yourblock” name= “your_name” template=
“yourmodule/yourtemplate.phtml”/>
</reference>
</yourmodule_yourcontroller_youraction>
When clients access the link: http://domain.com/yourmodule/index/index, Magento
will analyze this URL to find out names of module, controller and action which are
called out. And then, it will search in layout files to view the template which will be
used to display.
Here is the file yourmodule/yourtemplate.phtml.
How to pass Magento Certification Exam in 30 days- Magestore.com
•Etc: contains XML files which are used to configure each module. There are three
important files:
* Config.xml: directly configures module and declares Module, Resource, Block, and
Helper…
* System.xml: configures default value and display in admin menu.
* Adminhtml.xml: creates menu in admin.
•Model: handles the process of the database access. Magento designs database
according to the EAV model so the database access is quite complicated. This is the
place to write functions which directly carry out queries.
•Controllers: define process to execute request of users. Controllers are classes which
inherit from the basic one:Mage_core_Controller_Varien_Action (inherits from class
Zend_Controller_Action).
•Helper: you can add functions here in order to do anything as you wish. To call one
function (Ex: helper Test) in Helper, you need to use the command below:
Mage::helper(‘yourmodule/yourhelp’)->helperTest();
•Sql: contains files to setup database for module which interact with database (create
table, update tables…)
•Besides, there are layout and template files for admin and frontend in the folder: app/
design/adminhtml/default/default and app/design/frontend/default/default.
•To declare Magento a new module you need to create a XML file
Yournamespace_Yourmodule.xml
Question
1. What is the compilation mode in Magento?
2. When entering the link below into the Address bar of browser, which Module,
Controller and Action will Magento calls?
URL: http://domain.com/action/module/controller
a. Module: module- Controller: controller- Action: action
How to pass Magento Certification Exam in 30 days- Magestore.com

b. Module: action- Controller: controller- Action: module
c. Module: action- Controller: module- Action: controller
Answer
1. The mode inserts class files into a folder in order to speed up in Magento. In order
to use this function, you need to go to menu system->website->compilation in admin.
2. URL: http://domain.com/action/module/controller
a. Module: module- Controller: controller- Action: action
b. Module: action- Controller: controller- Action: module
c. Module: action- Controller: module - Action: controller
How to pass Magento Certification Exam in 30 days- Magestore.com
Part 4: Configuration XML
Magento system operates with the configuration set in XML. All activities are
controlled via this XML configuration system such as the registration module,
database configuration, model, block, controller, etc.
I - Create and register a module
In mounting a module in the operation of the system, the system first has to be aware
of the presence of that module. Magento System will recognize the existence of the
module by reading all the *. Xml file in the / app / etc / modules
A configured file Magestore_Test.xml to register operation of a new module has the
following form:
<?xml version="1.0"?>
<config>
<modules>
<Magestore_Test>
<active>true</active>
<codePool>local</codePool>
</Magestore_Test>
</modules>
</config>
-Magestore_Test : Name of module
-active : whether configuration of module operate or not (true/false)
-codePool: local => module này du?c d?t t?i thu m?c /app/code/local
II - Specify option in the config file
After loading the list of modules, system will find file config.xml in folder module
((app/code/(codepool)/(NameSpace)/(ModuleName)/etc/config.xml) to read operation
configuration for this module. All configurations are installed in <config></config>:
How to pass Magento Certification Exam in 30 days- Magestore.com
-modules: module configuration as active, depends, version
-global: main configuration for models, resources, blocks, helpers, fieldsets, template,
events, eav_attributes, custom_variables. These configurations in this part include
basic configs for module, configs about folders containing file class for model, block,
helper or events (frontend and admin), configures for email template.
- admin: containing configures attributes, fieldsets, routers. In this config, we often
notice to configure for router of admin.fig.
-adminhtml: including configure operation of module in admin. The cards in this part
often have layout, translate, events. These configures only have impact on backend in
Magento.
-install:
-frontend: including configure operation of module on frontend such as cards:
secure_url, events,routers, translate, layout. The configurations only have impact on
frontend.
-default: including configures of module for all stores
-stores: including configures for each store. In the card store is <store_code> of each
store.
-websites: including configure for each website. In card website is <(website_code)>
of each website.
-Operate website/stores/stores views
Configure as configure xml to control websites/stores/stores view is put on value table
in cards default, stores and websites.
<default>
<carriers>
<flatrate>
<active>1</active>
<sallowspecific>0</sallowspecific>
How to pass Magento Certification Exam in 30 days- Magestore.com

<price>5.00</price>pe>
</flatrate>
</carriers>
</default>
Configure will have impact on all websites/stores in Magento. However, when we
want to have different configure for websites or single store, we can configure as
below:
<websites>
<base>
<carriers>
<flatrate>
<active>1</active>
<sallowspecific>0</sallowspecific>
<price>5.00</price>pe>
</flatrate>
</carriers>
</base>
</websites>
<store>
<english>
<carriers>
<flatrate>
<active>1</active>
<sallowspecific>0</sallowspecific>
<price>5.00</price>pe>
How to pass Magento Certification Exam in 30 days- Magestore.com
</flatrate>
</carriers>
</english>
</store>Changes to these values are made by administrator; we put all values in file
system.xml. In system, we will find configures by clicking in menu: System->
Configuration.
Questions
When we configure in menu System -> Configuration, Advance and choose disable
module output, does module operate?
Answers
When we disable module in menu Disable module output, all functions of module still
operate normally, except for giving layout of blocks in module. Because block of
Magento rendered to html will have this condition:
final public function toHtml()
{
Mage::dispatchEvent('core_block_abstract_to_html_before', array('block' => $this));
if (Mage::getStoreConfig('advanced/modules_disable_output/'.$this-
>getModuleName())) {
return '';
}
…
How to pass Magento Certification Exam in 30 days- Magestore.com

Part 5: Functional and Factory class groups
As you know, Magento is built based on module architecture, which leads to the
requirement that there must be an interaction among modules. Hence, in this part, we
will learn about the way these modules are used.
I - Definition and Examples of Functional and Factory class groups
1. Functional Class
•Class: only contains functions and static attributes? (not sure)
•For example: Mage
2. Factory Class
•Class: consists of functions to create the instance (object) of different Classes. Class
depends on input parameters
•For example: class Mage
-Create an instance of class Mage_Catalog_Model_Product
Mage::getModel(‘catalog/product’)
-Generate an instance of class Mage_Catalog_Block_Product_View
Mage::getBlockSingleton(‘catalog/product_view’)
II - Definition of Instance, the ways to create the instance object in Magento
•Definition : In OOP, Instance is an Object
•Create an instance object in Magento
Mage::getModel(‘catalog/product’);
Mage::getBlockSingleton(‘catalog/product_view’);
Mage::app()->getLayout()-createBlock(‘catalog/product_view’)
•The process to generate an instance through the function Mage::getModel() is as
below:
1) Call function getModel() trong class Mage
How to pass Magento Certification Exam in 30 days- Magestore.com

2) Call function getModelInstance() in class Mage_Core_Model_Config
3) Call function getModelClassName(). This function will return the name of the
model with catalog/product is Mage_Catalog_Model_Product.
4) Add a new object by the New command:
$obj = new $className($constructArguments);
In this example, $className = ‘Mage_Catalog_Model_Product’
•Get different instances from different places:
- With creating a Instance of a model, the function Mage::getModel() always returns a
new object (instance).
- Function Mage::getSingleton() always gives only one object (instance) back.
III - Study Singleton Pattern
Singleton Pattern makes sure that each Class has a unique Instance. You can use a
Global Point to access that Instance (=> it is possible to call Instance anywhere).
Mage::getSingleton(‘checkout/cart’) – This function always returns only one Cart
object although you call it anywhere.
Question
According to the following command, please define the value printed?
$productA = Mage::getSingleton(‘catalog/product’)->load(9);
$productA->setPrice(100);
$productB = Mage::getSingleton(‘catalog/product’);
$productB->setPrice(200)
echo $productA->getPrice();
echo $productB->getPrice();
Answer
Print the “200” two times.
How to pass Magento Certification Exam in 30 days- Magestore.com

Part 6: Class overrides on Magento
There are some functions of Magento core which are written in Block, Model or
Helper. When we use these functions for our purposes, we see that they are not
suitable and not as we wish. We can utilize Override class feature of Magento to
rewrite those functions according to our uses.
I - For Block
For example: If we need to rewrite app/core/Mage/Catalog/Block/Product/List.php
At first, we have to create a module including at least 3 files:
•app/code/local/Magestore/Newmodule/Block/Product/List
•app/code/local/Magestore/Newmodule/etc/config.xml
•app/etc/modules/Magestore_Newmodule.xml
?Step 1: Declare the module (app/etc/modules/Magestore_Newmodule.xml) as in
Configuration XML (in the last part) > Create and register a module.
?Step 2: Edit the file
config.xml (app/code/local/Magestore/Newmodule/etc/config.xml)
<config>
<global>
<blocks>
<newmodule>
<class>Magestore_Newmodule_Block</class>
</newmodule>
<catalog>
<rewrite>
<product_list>Magestore_Newmodule_
Block_List</product_list>
How to pass Magento Certification Exam in 30 days- Magestore.com

</rewrite>
</catalog>
</blocks>
</global>
</config>
Through this step, when you call the block ‘catalog/product_list’ the system will
return a block ‘newmodule/list’.
?Step 3 : Override block (app/code/local/Magestore/Newmodule/Block/List.php)
<?php
Class Magestore_Newmodule_Block_List extends
Mage_Catalog_Block_Product_List{
// function (need be written)
protected function_getProductCollection(){
//custom code
}
}
II - For Model
For instance: override app/code/core/Mage/Catalog/Model/Product.php)
By the file app/code/local/Magestore/Newmodule/Model/Catalog/Product.php
•Step 1: Create and register a new module (as same as the part above)
•Step 2: File config.xml(app/code/local/Magestore/Newmodule/config.xml)
<config>
<global>
<models>
<newmodule>
How to pass Magento Certification Exam in 30 days- Magestore.com
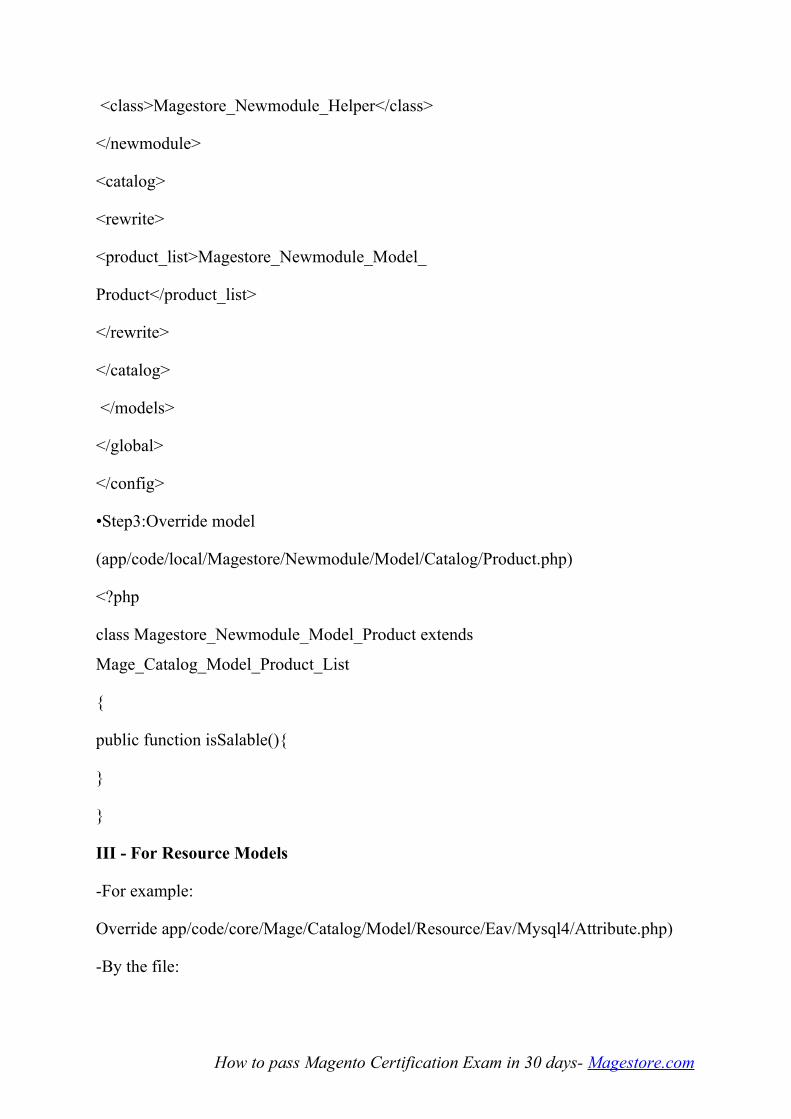
<class>Magestore_Newmodule_Helper</class>
</newmodule>
<catalog>
<rewrite>
<product_list>Magestore_Newmodule_Model_
Product</product_list>
</rewrite>
</catalog>
</models>
</global>
</config>
•Step3:Override model
(app/code/local/Magestore/Newmodule/Model/Catalog/Product.php)
<?php
class Magestore_Newmodule_Model_Product extends
Mage_Catalog_Model_Product_List
{
public function isSalable(){
}
}
III - For Resource Models
-For example:
Override app/code/core/Mage/Catalog/Model/Resource/Eav/Mysql4/Attribute.php)
-By the file:
How to pass Magento Certification Exam in 30 days- Magestore.com

app/code/local/Magestore/Newmodule/Model/Catalog/Resource/Eav/Mysql4/Attribut
e.php
•Step 1: Create and register a new module (as same as the previous part)
•Step 2: File config.xml(app/code/local/Magestore/Newmodule/config.xml)
<config>
<global>
<models>
<newmodule>
<class>Magestore_Newmodule_Model</class>
</newmodule>
<catalog_resource_eav_mysql4>
<rewrite>
<attribute> Magestore_Newmodule_
Model_Catalog_Resource_Eav_Mysql4
_Attribute </attribute>
</rewrite>
< catalog_resource_eav_mysql4>
</models>
</global>
</config>
•Step 3: Override file (as same as the way to conduct with Model)
IV - For Helper
For example: override app/code/core/Mage/Catalog/Helper/Data.php)
By the file app/code/local/Magestore/Newmodule/Helper/Catalog/Data.php
•Step 1: Create and register a new module (as same as the part above).
How to pass Magento Certification Exam in 30 days- Magestore.com
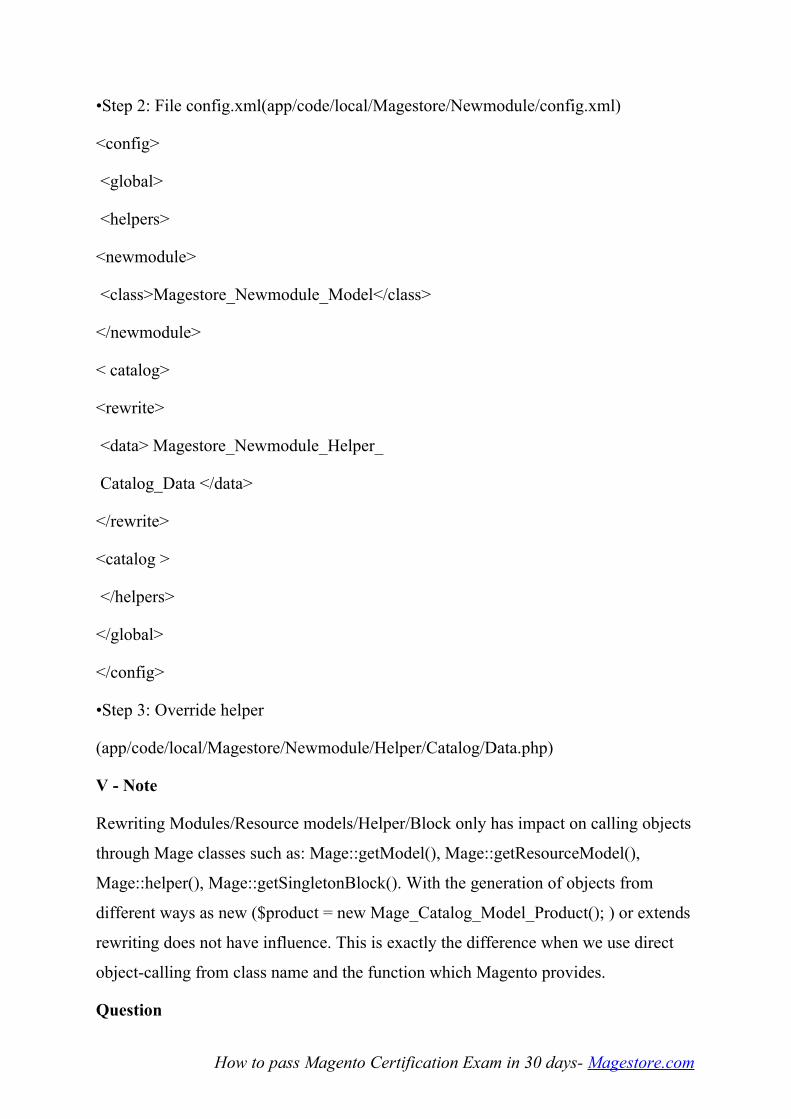
•Step 2: File config.xml(app/code/local/Magestore/Newmodule/config.xml)
<config>
<global>
<helpers>
<newmodule>
<class>Magestore_Newmodule_Model</class>
</newmodule>
< catalog>
<rewrite>
<data> Magestore_Newmodule_Helper_
Catalog_Data </data>
</rewrite>
<catalog >
</helpers>
</global>
</config>
•Step 3: Override helper
(app/code/local/Magestore/Newmodule/Helper/Catalog/Data.php)
V - Note
Rewriting Modules/Resource models/Helper/Block only has impact on calling objects
through Mage classes such as: Mage::getModel(), Mage::getResourceModel(),
Mage::helper(), Mage::getSingletonBlock(). With the generation of objects from
different ways as new ($product = new Mage_Catalog_Model_Product(); ) or extends
rewriting does not have influence. This is exactly the difference when we use direct
object-calling from class name and the function which Magento provides.
Question
How to pass Magento Certification Exam in 30 days- Magestore.com
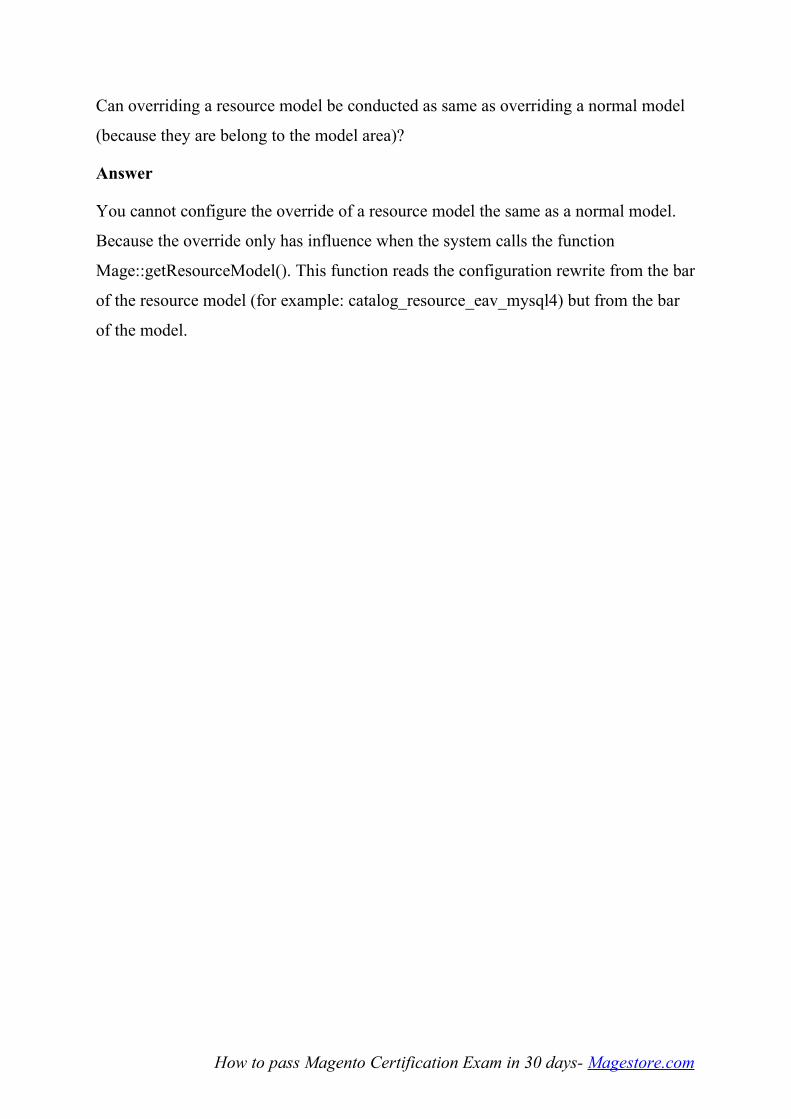
Can overriding a resource model be conducted as same as overriding a normal model
(because they are belong to the model area)?
Answer
You cannot configure the override of a resource model the same as a normal model.
Because the override only has influence when the system calls the function
Mage::getResourceModel(). This function reads the configuration rewrite from the bar
of the resource model (for example: catalog_resource_eav_mysql4) but from the bar
of the model.
How to pass Magento Certification Exam in 30 days- Magestore.com
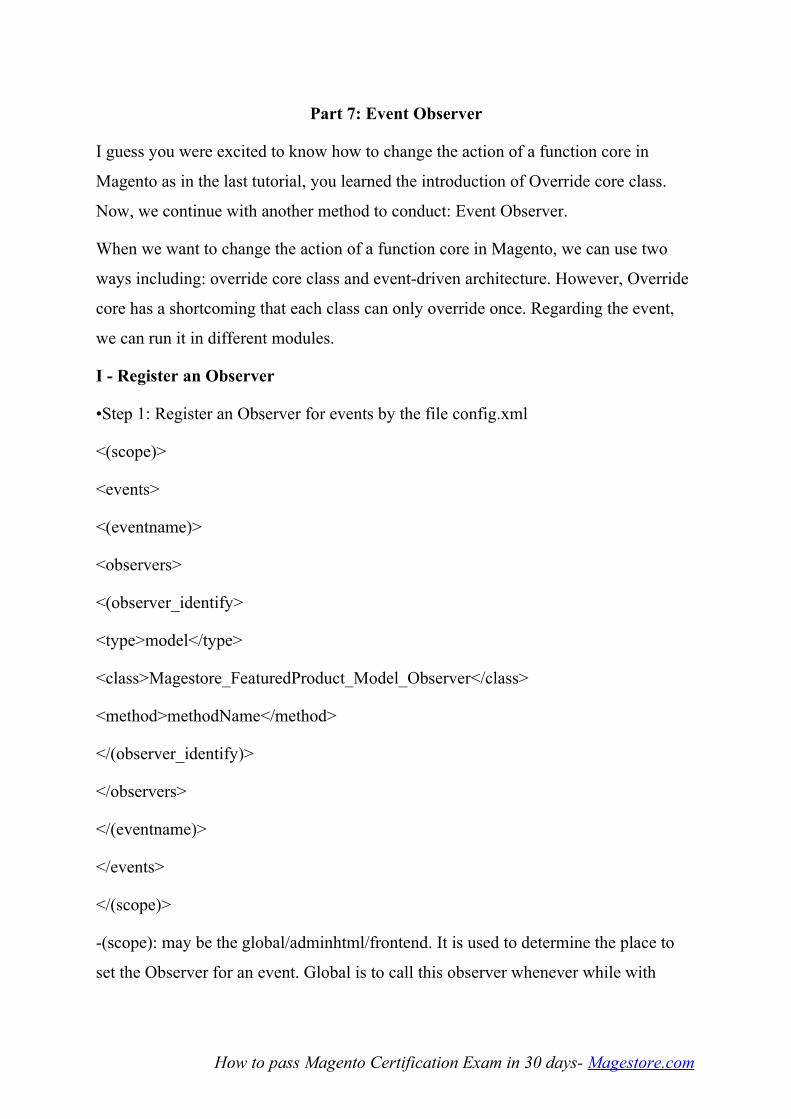
Part 7: Event Observer
I guess you were excited to know how to change the action of a function core in
Magento as in the last tutorial, you learned the introduction of Override core class.
Now, we continue with another method to conduct: Event Observer.
When we want to change the action of a function core in Magento, we can use two
ways including: override core class and event-driven architecture. However, Override
core has a shortcoming that each class can only override once. Regarding the event,
we can run it in different modules.
I - Register an Observer
•Step 1: Register an Observer for events by the file config.xml
<(scope)>
<events>
<(eventname)>
<observers>
<(observer_identify>
<type>model</type>
<class>Magestore_FeaturedProduct_Model_Observer</class>
<method>methodName</method>
</(observer_identify)>
</observers>
</(eventname)>
</events>
</(scope)>
-(scope): may be the global/adminhtml/frontend. It is used to determine the place to
set the Observer for an event. Global is to call this observer whenever while with
How to pass Magento Certification Exam in 30 days- Magestore.com
adminhtml, observer is only called in the admin area. And with frontend, observer is
only called in frontend.
-(eventname): the event name which the system dispatches.
-type: model/singleton/object – the ways to call the observer.
-class: the class name of the observer. You can use the class name (as above it is
Magestore_FeaturedProduct_Model_Observer) or magento’s class name (example:
featuredproduct/observer).
-method: the client function name which is called.
•Step 2: Write a client function for the Observer
<?php
class Magestore_FeaturedProduct_Model_Obeserver
{
public function methodName($observer){
//$object== $observer->getEvent()->getObject();
//$observer is the input parameter of the event
}
}
II – Dispatch events
Dispatching events is carried out through the function dispatchEvent in class Mage.
We can use Mage::dispatchEvent($eventName, array $params). For example:
Mage::dispatchEvent('custom_event', array('object'=>$this));
The client function can receive the parameter of this event by using the command:
$object = $observer->getEvent()->getObject();
III – Cron job
Function: runs a function according to the schedule time.
The configuration in file config.xml
How to pass Magento Certification Exam in 30 days- Magestore.com

<crontab>
<jobs>
<catalogrule_appy_all>
<schedule><cron_expr>0 2***</cron_expr></schedule>
<run><model>catalogrule/observer::dailyCatalogUpdate</model></run>
</catalogrule_apply_all>
</jobs>
</crontab>
In details:
•The tab is to set the running time. The time parameter includes:
(minute) (hour) (day) (month) (year)
•the path to the function that is run
Question
1. Which of the configuration below allows Cron Job to run every 20 minutes?
a.20 * * ** b.0,20,40 * * * * c.0 20 * * * *d.0:20 * * * *
2. Could you explain the effect of the bar <args> in the event configuration?
Answer
1. b.
How to pass Magento Certification Exam in 30 days- Magestore.com
Part 8: Methods to resolve the Module conflicts in Magento
The most common conflict happens when two or more modules inherit a module core
of Magento at the same time by using the command <rewrite> in the file config.xml
of modules.
However, there is a large number of standard modules of Magento which have never
had conflicts because Magento designs a plug-in mechanism in add-ons. For example:
standard payment and shipping module.
I – How do I identify extension conflicts?
In fact, we cannot find out the conflicts between templates. We can just discover the
conflicts between modules. With the discovery of the extension conflict, there is a
module that is being used at the moment.
II - How do I resolve the conflicts?
There are 3 solutions to resolve the conflicts between modules.
Solution 1: Merge the code from a conflict file into the remaining and remove the part
which is using <rewrite> in that file.
Solution 2: Remove <rewrite> in the config.xml of a module and let the conflict php
file of this module inherit the php file of the rest.
For example: we have two modules Extension_A và Extension_B and they have
conflicts.
•At first we have:
class Extension_A extends Core_Class
class Extension_B extends Core_Class
•We need to change into:
class Extension_A extends Extension_B
class Extension_B extends Core_Class
How to pass Magento Certification Exam in 30 days- Magestore.com
•And then we remove the parts using <rewrite> that causes the conflict in
Extension_B.
Solution 3: Use the depends module configuration in Magento.We need to put the
depends module configuration in app/etc/modules/extension_B.xml of Extension_B in
order to define that the loading order of Extension_B is after the module Extension_A
is loaded.
<config>
<modules>
<Extension_B>
<depends>
<Extension_A/>
</depends>
</Extension_B>
</modules>
</config>
Thus, the class of B module can still rewrite the class of the core (through the class of
module B). We can use the class inheritance as below:
class Extension_B extends Extension_A
class Extension_A extends Core_Class
Question
If there are two modules that rewrite a class, which module will be read by the system
to run?
Answer
The module that is loaded the configuration first will be overwritten configuration by
the next module if there is any duplications of the bar in the xml. The order of loading
How to pass Magento Certification Exam in 30 days- Magestore.com

modules depends on the name of the configuration (depends) of modules as in the last
part Fundamentals of the part one.
How to pass Magento Certification Exam in 30 days- Magestore.com
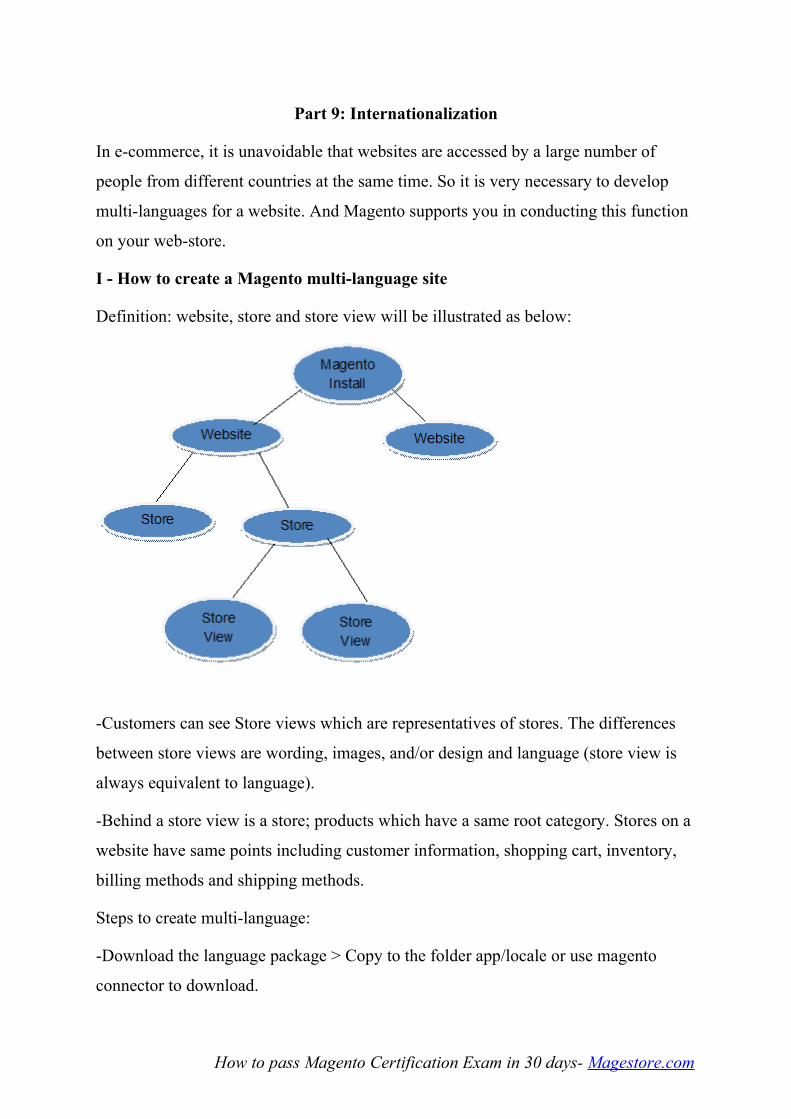
Part 9: Internationalization
In e-commerce, it is unavoidable that websites are accessed by a large number of
people from different countries at the same time. So it is very necessary to develop
multi-languages for a website. And Magento supports you in conducting this function
on your web-store.
I - How to create a Magento multi-language site
Definition: website, store and store view will be illustrated as below:
-Customers can see Store views which are representatives of stores. The differences
between store views are wording, images, and/or design and language (store view is
always equivalent to language).
-Behind a store view is a store; products which have a same root category. Stores on a
website have same points including customer information, shopping cart, inventory,
billing methods and shipping methods.
Steps to create multi-language:
-Download the language package > Copy to the folder app/locale or use magento
connector to download.
How to pass Magento Certification Exam in 30 days- Magestore.com

-Create store (store view) that has store_code
-System > Config > General > Locale Options > Locale: Select store and then choose
the language which has been downloaded. As in Magento default, the link to go to the
store is http://site.com/index.php?___store=store_code
-If in the System > Config > Web > Url Options > Add Store Code to Urls.
Afterwards select Default config and then choose Yes. The link to go to the store is:
http://site.com/index.php/store_code
For Magento site to run in website mode, we need to take the following steps:
-Link domain to the root category.
-Edit the file index.php: Add the code below:
switch($_SERVER['HTTP_HOST']) { case 'shoes.com':
case 'www.shoes.com':
$mageRunCode = 'shoes';
$mageRunType = 'website';
break;
case 'hats.com':
case 'www.hats.com':
$mageRunCode = 'hats';
$mageRunType = 'website';
break;
}
Mage::run($mageRunCode, $mageRunType);
Add subdomain, subdirectories:
-For example: themes.magestore.com or magestore.com/themes
-Create a directory: themes directory
How to pass Magento Certification Exam in 30 days- Magestore.com

-Copy the file index.php and .htaccess from the root directory into themes directory
and edit the file index.php:
-Change the line:
$mageFilename = 'app/Mage.php';
into:
$mageFilename = '../public_html/app/Mage.php';
-Add before the line below:
Mage::run($mageRunCode, $mageRunType);
Two following lines:
$mageRunCode = themes';
$mageRunType = 'website';
II -How to use Magento translate classes and translate files
The translation function is Mage::helper(‘core’)->__()
This function call to the object Mage::getSingleton(‘core/translate’);
The process to conduct in this class:
-The corresponding CSV file will be loaded (in which locale the store is and which
module the store is being called).
-String corresponds with input string which is returned.
III – Compare subdomains and subdirectories with SEO (the details are as the
table below):
How to pass Magento Certification Exam in 30 days- Magestore.com
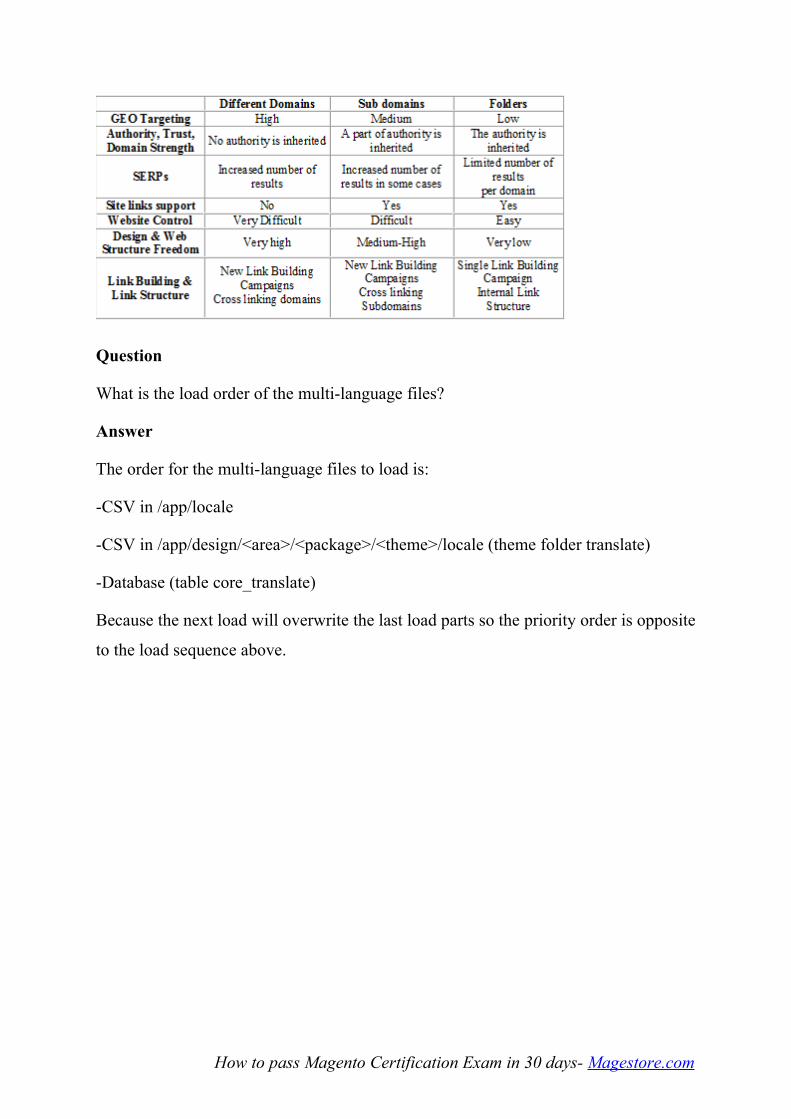
Question
What is the load order of the multi-language files?
Answer
The order for the multi-language files to load is:
-CSV in /app/locale
-CSV in /app/design/<area>/<package>/<theme>/locale (theme folder translate)
-Database (table core_translate)
Because the next load will overwrite the last load parts so the priority order is opposite
to the load sequence above.
How to pass Magento Certification Exam in 30 days- Magestore.com

TOPIC 2
Part 1: Application Initialization
We have finished Magento Basics with 9 articles which guide you about
fundamentals, configuration XML, and multi-language… in Magento. I will start the
next step of Magento Certificate Preparation. You will be introduced the first topic –
Application initialization consisting of two parts:
1.Describe the steps for the application initialization.
2.Change a website from within index.php.
I - Describe the steps for application initialization
•Run the file index.php
•Include Mage.php
-If not existing => redirect to the downloader ofmagento
-If existing a file Mage.php => Conduct the command: Mage::run($mageRunCode,
$mageRunType);
•App::run($mageRunCode, $mageRunType)
-Load configuration files in app/etc/modules
-Load configuration files in the module
(app/code/core/Mage/Customer/etc/config.xml)
-Update/create version of modules in core_resource
-Update/create database of modules
•Mage_Core_Controller_Varien_Front::dispatch()
-Use routers to define the controller and action requested
-Call dispatch() of the controller that is requested
? Call action of the controller that is requested
? Return HTML code for the browser
How to pass Magento Certification Exam in 30 days- Magestore.com

II - Change a website from within index.php
Change the website and uses of index.php by the following steps:
Step 1: Create Website
•Generate catalog, root category (Catalog > Manage Categories)
•Manage store, create website, store and store view (System > Manage Stores)
•Configure Base Url for the website which has been created (System > Configuration
tab Web)
Step 2: Insert the code below into index.php before the command:
Mage::run($mageRunCode, $mageRunType);
switch($_SERVER['HTTP_HOST']) {
case 'name_domain_1':
case 'name_domain_n':
$mageRunCode = 'website_code';
$mageRunType = 'website';
break;
}
How to pass Magento Certification Exam in 30 days- Magestore.com

Part 2: Front Controllered
The Front Controller has an array of “routers” that it uses to decide which module the
URL should trigger. Therefore, it plays a very crucial role in Magento. Besides, do
you know how to locate Front Controller class, or events that Front Controller fires as
well as Front Controller’s responsibilities? If you are interested in these issues, please
follow this part.
I - Locate Front Controller class
- The position of the directory: app/code/core/Mage/Core/Controller/Varien/Front.php
- Receive all requests from browser and return HTML code.
- Front controller uses routes of the system to define the controller and the action that
are called.
- Example: routers in the file config.xml of the Customer module.
<routers>
<customer>
<use>standard</use>
<args>
<module>Mage_Customer</module>
<frontName>Customer</frontName>
</args>
</customer>
</routers>
- Routers can receive 3 values for the bar including:
•Standard (class Mage_Core_Controller_Varien_Router_Standard)
•Admin (class Mage_Core_Controller_Varien_Router_Admin)
•Default (class Mage_Core_Controller_Varien_Router_Default)
How to pass Magento Certification Exam in 30 days- Magestore.com

II - List all events that Front Controller fires
-controller_front_init_before (app/code/core/Mage/Core/Controller/Varien/Front.php)
•‘front’ => Mage_Core_Controller_Varien_Front
-controller_front_init_routers (app/code/core/Mage/Core/Controller/Varien/Front.php)
•‘front’ => Mage_Core_Controller_Varien_Front
-controller_front_send_response_before (app/code/core/Mage/Core/Controller/Varien/
Front.php)
•‘front’ => Mage_Core_Controller_Varien_Front
-controller_front_send_response_after
(app/code/core/Mage/Core/Controller/Varien/Front.php)
•‘front’ => Mage_Core_Controller_Varien_Front
III - Explain Front Controller’s responsibilities
- Directly receive the request from browser.
•All requests call the function Mage_Core_Controller_Varien_Front::dispatch()
- URL rewriting process.
- Load the module and action controller corresponding with the requests through
routers to process the requirements which are sent from clients.
•Collect routers: admin, standard, default.
•Use the function match() of routers to define the module and controller that are
requested.
•Call the function dispatch() of the controller requested.
•Call the action requested.
- Return HTML for browser
•Call the function sendResponse() of Mage_Core_Model_Response_Http (extend
from Zend_Controller_Response_Abstract).
•Call the function sendHeaders() – use the header() function of PHP.
How to pass Magento Certification Exam in 30 days- Magestore.com
•Call the function outputBody() to show the whole content of the body part:
echo implode('', $this->_body);
Question
Where does the value of $this > _body receive from?
Answer
The variable $_body is an array() and Action controller added value to this variable.
For example: When you call $this > renderLayout() in Action controller:
$output = $this->getLayout()->getOutput();
Mage::getSingleton('core/translate_inline')
->processResponseBody($output);
$this->getResponse()->appendBody($output);
How to pass Magento Certification Exam in 30 days- Magestore.com
Part 3: URL Rewrite
URL rewrite is something that is not easy to understand. As a developer, you may
clearly know the structure, process and others of URL Rewrite. I have made several
attempts to get this job done, and I will share with you the materials of URL rewrite to
fully exploit it in Magento for the best Search Engine exposure.
I - URL structure/processing in Magento.
-URL structure in Magento
A link in Magento has format as below:
https://user:password@host:443/base_path/[base_script][storeview_path]route_name/
controller_name/action_name/param1/value1?query_param=query_value#fragment
•User:password@host:443/base_path/[base_script]: the path to the Script file which
runs Magento. Usually, it is an index.php file.
•[storeview_path]: store view code will display here. According to the configuration,
this storeview_path is inserted into the link or not.
•route_name/controller_name/action_name: the path to the action which is run by the
request of this link.
•param1/value1: name and value of the parameter for the request that is provided by
the link.
•?query_param=query_value#fragment: query
-URL processing in Magento
With the link the same as above, when you request it to run into the index.php file
firstly, and then the following files:
•app/Mage.php (Mage::app()->run())
•app/code/core/Mage/Core/Model/App.php
•Init and Dispatch controller ($this->getFrontController()->dispatch());
•app/code/core/Mage/Core/Controller/Varien/Front.php
How to pass Magento Certification Exam in 30 days- Magestore.com

•Chose the router match for dispatch ($router->match($this->getRequest()))
• app/code/core/Mage/Core/Controller/Varien/Router/Admin.php
• app/code/core/Mage/Core/Controller/Varien/Router/Standard.php
• …
• app/code/core/Mage/Core/Controller/Varien/Router/Default.php
•app/code/core/Mage/Core/Controller/Varien/Action.php
• Call Action function (Example: indexAction())
•Custom Controller/Action
•(app/code/core/Mage/Core/Controller/Response/Http.php)
The link process is primarily conducted in routers (the detail is the function
match($request). This function will analyze URL to find out the action to call. When
discovering the action, the system will leave the control authority to this action. After
carrying out, the action will return the control authority to the system. And then the
system returns the response content of that link.
II - URL rewrite process.
- The URL rewrite process takes place in 3 moments:
•Core URL rewrite: from the request path, the system will find target_path in CSDL
and rewrite the request path.
How to pass Magento Certification Exam in 30 days- Magestore.com

•Module configure URL rewrite: is the controller rewrite in the system. From the
configuration, the system will rewrite the link.
•Router URL rewrite: Use the router to analyze and rewrite the link. A typical
example: the system uses this router to rewrite the link for CMS page (use events to
add routers).
III - Rewrite a catalog/ product/ view to a different URL.
Rewriting catalog/product/view to another URL is used in the Core URL Rewrite
process. The link of rewriting catalog/product/view will be stored in the
core_url_rewrite table.
How to pass Magento Certification Exam in 30 days- Magestore.com

Part 4: Request Routing
When there is a request in browser (URL), first Magento uses Request routing to
analyze URL and finds out the suitable code to match that request. And then, it
defines Controller or Action to return Response. So, Request routing helps you
coordinate activities in Magento. You can learn more through this part below.
I - Request routing/flow in Magento
Request flow in Magento:
- Request URL
- index.php (Mage::run())
- app/Mage.php (Mage::app()->run())
- app/code/core/Mage/Core/Model/App.php
+ Install module database
(Mage_Core_Model_Resource_Setup::applyAllDataUpdates())
How to pass Magento Certification Exam in 30 days- Magestore.com

+ Init and Dispatch controller ($this->getFrontController()->dispatch());
- app/code/core/Mage/Core/Controller/Varien/Front.php
+ Chose router match for dispatch ($router->match($this->getRequest()))
- app/code/core/Mage/Core/Controller/Varien/Router/Admin.php
app/code/core/Mage/Core/Controller/Varien/Router/Standard.php
…
app/code/core/Mage/Core/Controller/Varien/Router/Default.php
+ dispatch Action ($controllerInstance->dispatch($action);)
- app/code/core/Mage/Core/Controller/Varien/Action.php
+ Call Action function (Example: indexAction())
- custom Controller/Action
- (app/code/core/Mage/Core/Controller/Response/Http.php)
Request routing in Magento:
- Init router before using: Mage_Core_Controller_Varien_Front::init()
•Init Router uses configuration file with configuration path: default/web/routers
•Init the custom router by event controller_front_init_before,
controller_front_init_routers
•Init the default router
- Try to select router: Mage_Core_Controller_Varien_Front::dispatch()
How to pass Magento Certification Exam in 30 days- Magestore.com

•Function match() of router will chose match controller/action to call.
($controllerInstance->dispatch($action);)
oPredispatch
oCall Controller Action Method
oPostdispatch
•Router will try to select router maximum – 100 times.
- Dispatch to controller/action (Example: indexAction())
II - Create module with controller
- Register module by file /app/etc/modules/Magestore_Test.xml
- Configure module /app/code/local/Magestore/Test/etc/config.xml, register router for
controller can be used.
How to pass Magento Certification Exam in 30 days- Magestore.com

-Create controller
/app/code/local/Magestore/Test/controllers/IndexController.php
III - Override an existing controller
Step 1: Add configure in config.xml file
1. First choice:
Run at \app\code\core\Mage\Core\Controller\Varien\Front.php, function dispatch()
How to pass Magento Certification Exam in 30 days- Magestore.com
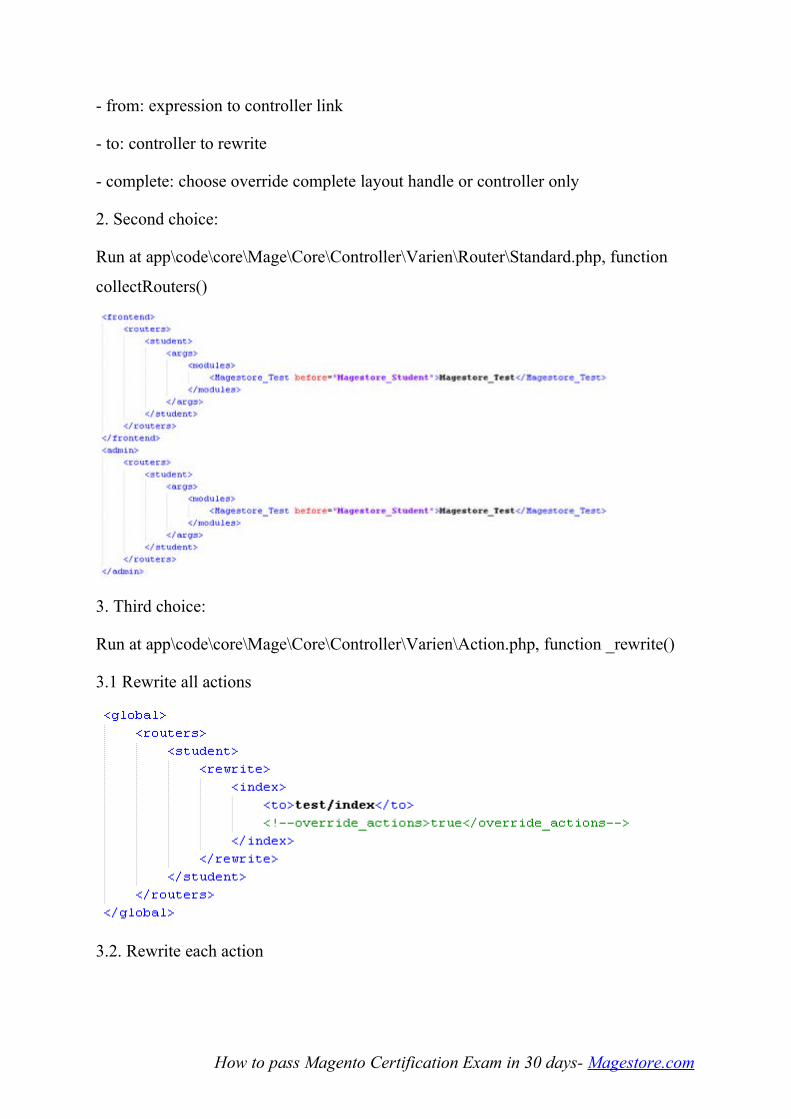
- from: expression to controller link
- to: controller to rewrite
- complete: choose override complete layout handle or controller only
2. Second choice:
Run at app\code\core\Mage\Core\Controller\Varien\Router\Standard.php, function
collectRouters()
3. Third choice:
Run at app\code\core\Mage\Core\Controller\Varien\Action.php, function _rewrite()
3.1 Rewrite all actions
3.2. Rewrite each action
How to pass Magento Certification Exam in 30 days- Magestore.com

Step 2: Write controller file.
How to pass Magento Certification Exam in 30 days- Magestore.com

Part 5: Module Initialization
This part will tell you about Module Initialization. This section has 4 contents as
below:
•Describe/identify the steps needed to create and register a new module
•Describe/identify module dependencies
•Describe/identify the steps needed to create a controller in a module
•Describe/identify the steps needed to enable and disable a module
I - Describe/identify the steps needed to create and register a new module
Creating a custom module is indispensible to customize Magento. Modules may be
from simple forms such as Static Block or quite complicated forms like
payment/shipping module and more complex modules (for example: integrating with
the 3rd modules).
A custom can do a lot such as impacting database in overriding classes (Blocks,
Controllers and Modules)… and more.
How to create a module and use it in a CMS page? We will guide you in this part with
simple steps.
We will create Magestore Example module with Magestore is NameSpace and
Example is name of the module.
Step 1: Register the module with the system
Create a file app/etc/modules/Magestore_Example.xml with content:
<?xml version="1.0>
<config>
<modules>
<Magestore_Example>
<active>true</active>
<codePool>local</codePool>
How to pass Magento Certification Exam in 30 days- Magestore.com
</Magestore_Example>
</modules>
</config>
The primary parameters of this part are:
•Module name: Name definition of the module
•Active: Status definition of the module
•CodePool: Definition of the folder that stores code of the module. The values are
usually: core, local and community.
Step 2: Create file config.xml of the module
Generate file file app/code/local/Magestore/Example/etc/config.xml.
<?xml version="1.0>
<config>
<modules>
<Magestore_Example>
<version>0.1.0</version>
</Magestore_Example>
</modules>
<global>
<blocks>
<Magestore_Example>
<class>>Magestore_Example_Block<</class>
</Magestore_Example>
</blocks>
</global>
</config>
How to pass Magento Certification Exam in 30 days- Magestore.com
In this part, we declare the version of the module and block class prefix
Magestore_Example_Block
Step 3: Create Block file
Generate file: app/code/local/Magestore/Example/Block/View.php
<?php
class Magestore_Example_Block_View extends Mage_Core_Block_Template
{
public function sayHello() {
return “Hello World!”;
}
}
?>
Step 4: Create file template (phtml)
Generate file app\design\frontend\default\default\template\example\view.phtml.
<div>
<span><strong>This is the output of Magestore example:</strong></span></br>
<?php
echo $this-> sayHello();
?>
</div>
We will have a fully-made module after these 4 steps. Now we will test the module
action by putting it into a CMS page.
{{block type="magestore_example/view" template="example/view.phtml" }}
II - Describe/identify module dependencies
How to pass Magento Certification Exam in 30 days- Magestore.com
Module dependencies is a definition which illustrates the action dependencies of a
module on another module. A simple example is as below:
<?xml version="1.0>
<config>
<modules>
<Magestore_Bundle>
<active>true</active>
<codePool>core</codePool>
<depends>
<Mage_Catalog/>
<depends>
<Magestore_Bundle>
<modules>
</config>
If the module Mage_Bundle is active and Mage_Catalog does not exist or be inactive,
the system will report the issue and stop the execution.
Besides, the module dependency is inserted in code when the system checks the
exection or in configuration, for example: configure in the following file
adminhtml.xml (Menu CMS in admin will be hidden if the module
Magestore_Student does not exist or be inactive).
<?xml version="1.0>
<config>
<menu>
<cms>
<depends>
<module>Magestore_Test</module>
How to pass Magento Certification Exam in 30 days- Magestore.com
<depends>
<Mage_Catalog/>
<depends>
<cms>
<menu>
</config>
III - Describe/identify the steps needed to create a controller in a module
In the first part, we have learned how to create a simple module. Now, we keep using
the last result and add steps below:
Step 1: Create IndexController
In this step, we create a controller with name Index.
Create file: app/code/local/Magestore/Example/controllers/IndexController.php
Controller will be generated according to a sample with the file name is:
xxxxxController.php (this file is put in the category
app/code/local/Magestore/Example/controllers).
Each action in the controller is declared based on the sample: yyyyyAction
(yyyyyAction is a function in the controller).
class Magestore_Example_IndexController extends
Mage_Core_Controller_Front_Action
{
public function sayhelloAction(){
}
}
Step 2: Edit Config.xml file
Edit file: app/local/Magestore/Example/etc/config.xml
How to pass Magento Certification Exam in 30 days- Magestore.com

<config>
...
<frontend>
<routers>
<example>
<use>standard</use>
<args>
<module>Magestore_Example</module>
<frontName>example</frontName>
</args>
</example>
</routers>
</frontend>
</config>
Some configuration tags used:
•<frontend>: Show that this router will be used in frontend of website.
•<routers>: The place to define routers.
•<example>: The ID value of routers.
•<use>standard</use> Can receive values of standard (for frontend area) or admin (for
admin area).
•<module>Magestore_Example</module>: Show which module will use this router.
•<frontName>example</frontName>: Name of the router which is used on URL
Step 3: Display a template
We need to declare a layout file which is loaded by adding the code below to
config.xml (the configuration file of the module):
How to pass Magento Certification Exam in 30 days- Magestore.com

<config>
...
<frontend>
...
<layout>
<updates>
<example>
<file>example.xml</file>
</example>
</updates>
</layout>
</frontend>
</config>
And then, create the file app/design/frontend/default/default/layout/example.xml with
the following content:
<?xml version="1.0" encoding="UTF-8"?>
<layout version="0.1.0">
<example_index_sayhello>
<reference name="root">
<action method="setTemplate">
<template>page/1column.phtml</template>
</action>
</reference>
<reference name="content">
How to pass Magento Certification Exam in 30 days- Magestore.com

<block type="example/view" name="example_index_view" template="example/
view.phtml"></block>
</reference>
</example_index_sayhello>
</layout>
The major template is used by example/index/sayhello is page/1column.phtml and the
template content is displayed on block example_index_view. This block uses the file
template example/view.phtml.
There is still a small detail for us to complete the process. We need to edit the function
sayhello in controller Index.
public function sayhelloAction(){
$this->loadLayout();
$this->renderLayout();
}
You can view your successful result by requesting to URL (in browser):
www.localhost.com/your_website/example/index/sayhello
IV - Describe/identify the steps needed to enable and disable a module
At first, plese take a look at app/etc/modules/Magestore_Example.xml in the first part.
<?xml version="1.0"?>
<config>
<modules>
<Magestore_Example>
<active>true</active>
<codePool>local</codePool>
</Magestore_Example>
</modules>
How to pass Magento Certification Exam in 30 days- Magestore.com
</config>
We have 2 ways to disable a module:
•Change from <active>true</active> to <active>false</active>
•Delete this file Magetore_Example.xml.
Now you can easily create a new module and take necessary actions in Magento for
the Initialization.
How to pass Magento Certification Exam in 30 days- Magestore.com

Part 6: Design and layout initialization
As you may know, layout is built with a small set of XML tags that are simple and
interesting to learn. By learning some key concepts and commands of layout, you will
soon be equipped with the sufficient knowledge to easily modify your store design
according to your desired specifications.
I - Identify the steps in request flow in which
- Design data is populated
•Define the position of template files: block, layout, phtml
- Layout configuration files are parsed
•Parse the layout file
- Layout is compiled
•Determine block and .phtml template file to get html string
•Translate that string
- Output is rendered
•Return html
II - Describe the module layout XML schema
- Layout:
- Layout handles:
•Correspond with a layout page
•Based on the action controller (Module_Controller_Action). Example:
category_product_list
•Layout handle is always called in any pages
- label: label of handles
- reference: is used to make reference to assigned block and adds child blocks or
updates block. In order to make the reference, you must target the reference to a block
by using the “name” attribute.
How to pass Magento Certification Exam in 30 days- Magestore.com

- block: is the definition of a new block in reference.
•name: shows the name of block (only in a page rendered).
•as: this is the block name. It is used to call blocks in file phtml (only in cha block).
•type: shows the block’s class name (core/template).
•If the type is type or subtype of core/template, blocks will assign “template” attribute
to set template.
- remove: deletes an assigned block
- action: calls a mode (function) of instance. Action positions in references or blocks.
- update: loads a handle in a current handle. The handle inherits all handles loaded
- Block types:
•core/template: This block renders a template defined by its template attribute. The
majority of blocks defined in the layout are of type or subtype of core/template.
•page/html: This is a subtype of core/template and defines the root block. All other
blocks are child blocks of this block.
•page/html_head: Defines the HTML head section of the page which contains
elements for including JavaScript, CSS etc.
•page/html_header: Defines the header part of the page which contains the site logo,
top links, etc.
•page/template_links: This block is used to create a list of links. Links visible in the
footer and header area use this block type.
•core/text_list: Some blocks like content, left, right etc. are of type core/text_list.
When these blocks are rendered, all their child blocks are rendered automatically
without the need to call thegetChildHtml() method.
•page/html_wrapper: This block is used to create a wrapper block which renders its
child blocks inside an HTML tag set by the action setHtmlTagName. The default tag
is if no element is set.
•page/html_breadcrumbs: This block defines breadcrumbs on the page.
How to pass Magento Certification Exam in 30 days- Magestore.com

•page/html_footer: Defines the footer area of page which contains footer links,
copyright message etc.
•core/messages: This block renders error/success/notice messages.
•page/switch: This block can be used for the language or store switcher.
III - Describe layout fallback
We have the following files:
•app/design/frontend/magestore/cutepet/catalog/template/product/view.phtml
•app/design/frontend/magestore/default/catalog/template/product/view.phtml
•app/design/frontend/base/default/catalog/template/product/view.phtml
•app/design/frontend/default/default/catalog/template/product/view.phtml
- Base, Default, Magestore: are called package and contain many themes
- Default, cutepet: name of theme
- Base: is called the fall back package
When calling the file product/view.phtml, if the system doesn’t see this file in
magestore/cutepet, it will find in magstore/default. The system will find in
base/default if it also doesn’t see in magestore/default. In case the system cannot see
the file anywhere, it will report the error.
IV - Describe admin and frontend scopes
When creating a module, we will declare the scope of the layout file in file config.xml
- Layout in admin: use tab <adminhtml>
- Layout in frontend: use tab < frontend >
<layout>
<updates>
<module_name>
<file>file_name.xml</file>
How to pass Magento Certification Exam in 30 days- Magestore.com
</ module_name >
</updates>
</layout>
How to pass Magento Certification Exam in 30 days- Magestore.com
Part 7: Structure of block templates
Following the previous parts, I have now extended the tutorial to bring you handy
knowledge about Structure of block templates. Please keep carefully reading this
reference for your using of Magento.
This part covers two contents:
•Define root template, non-output block
•Describe how to remove a child block from the template page
I-Define root template, non-output block
- Root template Page.xml – root layout
- Root template will be declared as below:
<block type="page/html" name="root" output="toHtml"
template="page/3columns.phtml">
Root templates can be the following files:
•3columns.phtml
•2columns-left.phtml
•2columns-right.phtml
•1colum.phtml
•Empty.phtml
•Popup.phtml
•Print.phtml
- Non-output block
• Non-output block only contains other blocks and cannot be used to render html (left,
right, content)
•getChildHtml($name, $useCache, $sorted)
•getChildChildHtml(($name $childName,$useCache, $sorted)
How to pass Magento Certification Exam in 30 days- Magestore.com
•$name: block’s name (If you leave blank, all blocks are rendered)
•$useCache: (If true, cache will be used)
•$sorted: (If true, child blocks will be rendered in the order of layout)
•$childName (option)
•getBlockHtml($name) (getBlock’s html may not be child block and call whatever
blocks)
II-Describe how to render a root template
- In the default theme, “root block” is an “output block”
- Definitions in file page.xml
- Template attributes: 1column, 2 column-left, 2 column-right, 3 column (default).
- Child blocks are: head, header, breadcrumbs, left, right, content, footer.
- Render child blocks by calling $this->getChildHtml(‘header’);\
- The process of rendering is called recursively: root block comes first, then the child
block, and so on.
III-Describe how to remove a child block from the template page
Removing a child block in the layout.
<remove name="" />(Completely remove all child blocks in a handle)
<action method="unsetChild"> >(The child block can be called back in another block)
How to pass Magento Certification Exam in 30 days- Magestore.com
Part 8: Flushing data (outputs)
You have experienced 7 steps of Request Follow topic; I will complete the Magento
knowledge of this topic with Flushing Data. As you may know, Flushing data is an
important process in Magento. This function allows you to return browser the HTML
code. It means that Flushing output is to display a content of a request in Magento.
You can learn more with my following part.
I - Describe how and when Magento renders content to the browser.
- When there is a request from the browser, an action method in Controller is called.
- Layout Instance is initialized (usually in page.xml)
- Layout Update Instance runs, adding all updates to layout Instance.
- Output blocks are automatically rendered. All other blocks are only rendered when
they are called by parent block:$this>getChildHtml(‘head’) . The process is described
as below:
•Instances of the Layout and Layout Update are created.
•Layout handles are added according to the $handles argument if passed.
•Store layout handle STORE_[store_code] is added to the Layout Update Instance.
For example, if the code of the current store is en, then layout handle STORE_en is
added.
•Theme layout handle THEME_[area]_[package]_[layout_theme] is added to the
Layout Update Instance. For example, if the page rendered is for the frontend area, the
name of the current theme package is magebase and the theme name for layout is
modern, then the layout handle THEME_frontend_magebase_modern is added.
•Action layout handle is added to the Layout Update Instance. For example, if the
page rendered is a category detail page, then Magento is executing the view action of
the catalog module’s category controller. So it will add an action handle that is
catalog_category_view.
•All Layout XML files defined for all active modules are loaded.
How to pass Magento Certification Exam in 30 days- Magestore.com
•If a layout file named local.xml exists in the current theme’s layout folder, it is last
loaded.
•Layout updates of all added layout handles from the loaded layout XML are merged
•Layout updates of all added layout handles from the database are merged
•If the $generateXML argument of loadLayout() method is passed as false, the
initialization is finished.
•The layout update data is refined by removing all blocks and block references defined
with the remove tag. (As discussed in Part 1)
•If $generateBlocks argument is passed as false, the initialization is finished.
•The instances of block classes are created according to the block definitions in the
Layout XML.
•The methods are called with specified arguments on the blocks where action tags are
defined.
II - Describe how and when Magento flushes output variables using
Front_Controller.
In the function dispatch() of Front_Controller, we will see the code below:
…
Varien_Profiler::start('mage::app::dispatch::send_response');
$this->getResponse()->sendResponse();
Varien_Profiler::stop('mage::app::dispatch::send_response');
…
This function will be called after the system selects controller and runs action
corresponding to the request.
Command line $this->getResponse()->sendResponse(); will flush output variables to
html for browser.
How to pass Magento Certification Exam in 30 days- Magestore.com
TOPIC 3
Part 1: Template Structure – Magento Themes
I am going to provide you with further understanding about how to use Magento
themes in the easiest way. By giving some main concepts and approach to Structure of
Template, this tutorial will certainly be helpful for those who have encountered
difficulties when applying Magento Themes as well as wanted to learn more about
Magento. Three main following parts will be covered:
• Define and describe how to use Magento themes
• Define and describe how to use design packages
• Define and describe how to use fallbacks
Now let’s start with the first section: Define and describe how to use Magento Themes
I- Structure of Magento Theme includes 4 major parts as follows:
? Layout
•Folder: app/design/frontend/{package}/{theme}/layout
•Including the .xml files that define the block according to tree structure
? Template
•Folder: app/design/frontend/{package}/{theme}/template
•Including: the .phtml files. In fact, they are .php files containing HTML + PHP
? Skin
•Folder: skin/frontend/{package}/{theme}
•Including: .css, images, .js files
? Locale
•Folder: app/design/frontend/{package}/{theme}/locale
•Including language files
How to pass Magento Certification Exam in 30 days- Magestore.com

II- How to use Magento Theme
? Steps to set up Magento Theme
•Copy all the files of the theme to Magento set up folder
•Login back-end
•Go to System > Configuration > Design
•Enter the package name, theme name
•Package name shown as blank is seen as “default”
Or:
•Go to System > Design > Add Design Change
•SelectStore, Theme, Time using theme
? Using a separate theme for Category
•Go to edit category page
•Choose “Custom Design” tab
How to pass Magento Certification Exam in 30 days- Magestore.com

•Set “Custom Design” to be the name of the desired theme
? Using a separate theme for Product
•Go to edit product page
•Choose “Design” tab
•Set “Custom Design” to be the name of the desired theme
How to pass Magento Certification Exam in 30 days- Magestore.com

Part 2: Template Structure – Fallbacks
As you may know, Magento Design Fall-Back is used to render themes from the
Magento basic templates and the most important part of this article will make you
focus on the fall-back hierarchy. Let’s me show you more details as below:
The fall-back hierarchy is described from Custom_theme -> default_theme -> base ->
error.
Please take a look at the following diagram:
In a nutshell, Design Fall-Back process includes 4 steps:
•Search the request file in the folder:
app/design/frontend/custom_package/custom_theme/
skin/frontend/custom_ package/custom_theme
•If not finding it, please search in the folder:
app/design/frontend/custom_package/default
skin/frontend/custom_package/default
•In case you are still unable to look for the request file, continue searching in the
folder:
How to pass Magento Certification Exam in 30 days- Magestore.com

app/design/frontend/base/default
skin/frontend/base/default
•The error notification will be displayed if the file cannot be found.
How to pass Magento Certification Exam in 30 days- Magestore.com

Part 3: Block Structure
In Magento, block is a View element of MVC (model-view-controller), having the
major task to make data displayed to the users. While creating a theme, you are
offered many content blocks that are placed in the structural block. If you are not sure
about it, please read this part which partly helps you understand the block structure
along with the relationship between templates and blocks.
I-The structure of block
All of blocks in Magento are inherited from Mage_Core_Block_Abstract. Blocks
requiring template files to be displayed are inherited from
Mage_Core_Block_Template.
A general block includes some components as below:
•Code file to get data information
•Functions to work with layout, parent blocks and children blocks
•Template file to render to html
II-The relationship between template and block
How to pass Magento Certification Exam in 30 days- Magestore.com
A block will be shown by a template file. When a block returns to HTML code by
calling toHtml() function, it will get a template file and then flush variables to this file.
One block can flush its variables many template files. Similarly, it’s possible for a
template to show lots of block types.
A template is maybe unnecessary for one block but one template compulsorily
requires a block to be attached to it in Magento. In a template file, we are able to use
$this pointer to call functions as well as take the values of the block attached to this
template.
How to pass Magento Certification Exam in 30 days- Magestore.com

Part 4: Blocks
Blocks are a way by which Magento distinguishes the array of functionalities in the
system and creates a modular way to manage it from both visual and functional stand
point. However, you can accurately hold the block lifecycle or events fired in a block?
This part will attempt to give you more knowledge of those so you can change some
actions of blocks to adjust your Magento site.
I-Stages in the lifecycle of a block
Block lifecycle starts when the block was generated and ends at the time it was
destroyed.
1.Generate a block: Block was generated when:
•The system loads layout and generates resemble blocks declared in layout file
(includes implementing the modes when declaring layout – being called when action
calls loadLayout() function)
<layout>
<adminhtml_sales_order_index>
<reference name="content">
<block type="adminhtml/sales_order" name="sales_order.grid.container" />
</reference>
</adminhtml_sales_order_index>
</layout>
•The system calls a function to create a block (maybe in controllers/action or in a
parent block)
public function indexAction(){
$block = $this->getLayout()->createBlock(‘adminhtml/sales_order’);
$this->getResponse()->setBody($block->toHtml());
How to pass Magento Certification Exam in 30 days- Magestore.com
2.Use block to: Blocks are used to create the interface for the system. Using the
block is ordinarily to render it to html. This rendering is carried out when:
•The system renders layout to html (when action calls renderLayout())
•The parent block calls render function (maybe in block or in template)
<?php echo $this->getChildHtml(‘sales_order.grid.container’) ?>
3. Destroy a block: After a block render to html, the system doesn’t use it. The blocks
generared before will be destroyed when the system ends request.
II-Events fired in block
1. Prepare Layout Event
core_block_abstract_prepare_layout_before: is fired before calling _prepareLayout
function of the block.
core_block_abstract_prepare_layout_after: is fired after calling _prepareLayout
function of the block. The parameter of this event is also block.
public function setLayout(Mage_Core_Model_Layout $layout){
$this->_layout = $layout;
Mage::dispatchEvent('core_block_abstract_prepare_layout_before', array('block' =>
$this));
$this->_prepareLayout();
Mage::dispatchEvent('core_block_abstract_prepare_layout_after', array('block' =>
$this));
return $this;
}
2.Render toHtml Event
core_block_abstract_to_html_before: is fired before the block is rendered to html.
Block is the parameter of this event.
How to pass Magento Certification Exam in 30 days- Magestore.com

core_block_abstract_to_html_after: The Parameters of this event are block and
transport. This event is fired right after the block is rendered to html.
final public function toHtml(){
Mage::dispatchEvent('core_block_abstract_to_html_before', array('block' => $this));
...
Mage::dispatchEvent('core_block_abstract_to_html_after',
array('block' => $this, 'transport' => self::$_transportObject));
$html = self::$_transportObject->getHtml();
return $html;
}
The remaining parts of Block Chapter willbe continued for the next Magento Tutorial
which must dig more deeply into and expand upon those simple definitions.
How to pass Magento Certification Exam in 30 days- Magestore.com

Part 5: Blocks (continue)
In this part, I’ll continue bringing to you further knowledge of blocks. This tutorial
will also be the last part in our series about blocks, covering 3 major contents:
•Identify different types of blocks
•Disable output block
•Describe how a typical block is rendered
I-Identify different types of blocks
1.Structural block
Structural block is used to define the layout/structure for template system in Magento.
It’s parent block of content block and to locate block area for its content block. As
usual, the structural blocks don’t work along with data in system. One typical example
for the structural block is core/text_list block.
Features of structural blocks:
•No need to accompany with template file
•No display anything if not having children blocks
How to pass Magento Certification Exam in 30 days- Magestore.com

•Every content block which is children block of this structural block will be shown its
content here
2.Content block
Content blocksare used to show the content. These blocks will take data in the system
and display them. (In most cases, they will be attached to template file).
page/html_welcome block is one of examples for the content block.
•A content block is only displayed when it is attached to a astructural block (or have
to be called from cms page)
•Block takeswelcome_messagedatastoredin the system and shows them.
II-Disable output block
To disable output block of module, we can adjust in configuration: System >>
Configuration >> Advanced >> Disable modules output. Go to module and disable. At
this time, all blocks of module will not be rendered to html.
Describe how a typical block is rendered
The process to render a block is as below:
•The layout or a parent block calls toHtmlfunctionof a block to get string html which
the block displays.
- Block checks and confirms that the output block was enabled
How to pass Magento Certification Exam in 30 days- Magestore.com

- Block calls the following functions in turn: _beforeToHtml(), _toHtml(),
_afterToHtml().
•The process to output to html:
- Fetching View is to find the template file which is set for block
- Block checks configuration template path hint to bring out template path hint for
block
- Block will include template file to render to html
- At the end, the block will return html to parent block that called it.
How to pass Magento Certification Exam in 30 days- Magestore.com
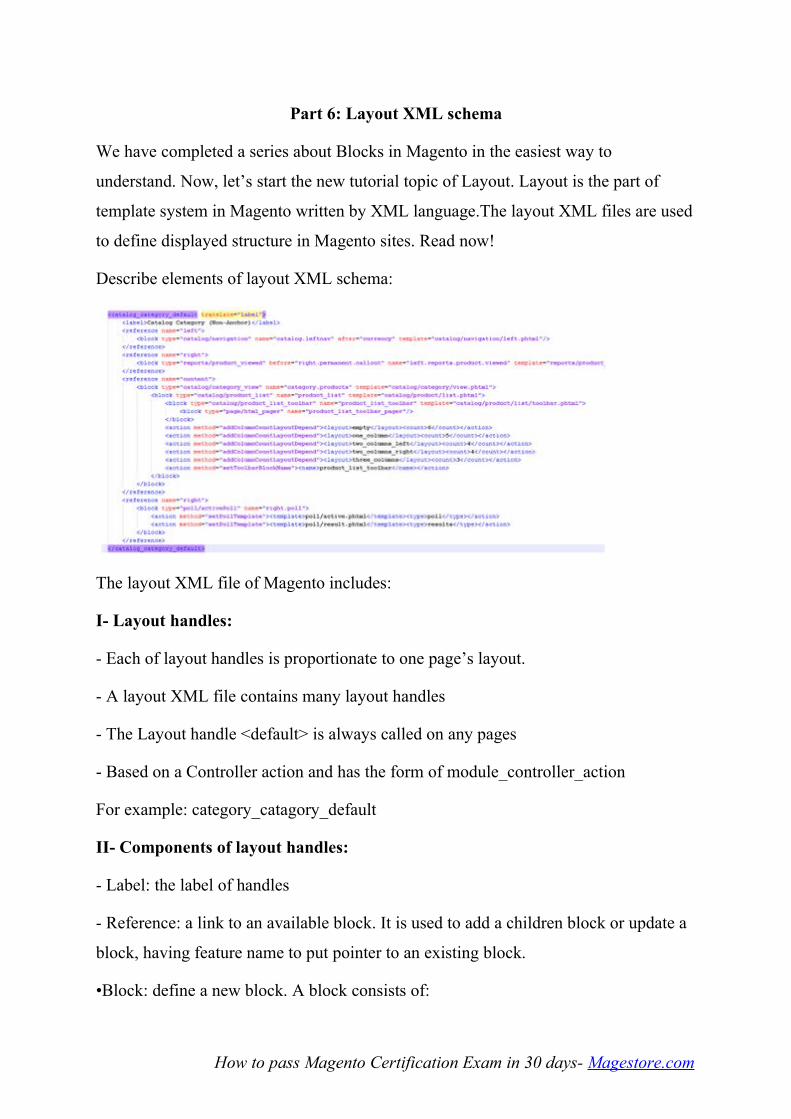
Part 6: Layout XML schema
We have completed a series about Blocks in Magento in the easiest way to
understand. Now, let’s start the new tutorial topic of Layout. Layout is the part of
template system in Magento written by XML language.The layout XML files are used
to define displayed structure in Magento sites. Read now!
Describe elements of layout XML schema:
The layout XML file of Magento includes:
I- Layout handles:
- Each of layout handles is proportionate to one page’s layout.
- A layout XML file contains many layout handles
- The Layout handle <default> is always called on any pages
- Based on a Controller action and has the form of module_controller_action
For example: category_catagory_default
II- Components of layout handles:
- Label: the label of handles
- Reference: a link to an available block. It is used to add a children block or update a
block, having feature name to put pointer to an existing block.
•Block: define a new block. A block consists of:
How to pass Magento Certification Exam in 30 days- Magestore.com
oname : to show the name of block (unique in a rendered page)
oas: the block’s name, is used to call a block in phtml file (unique in a parent block)
oType: to show the name of class (core/template). In case it is a type or subtype of
core/tempalte, the template feature is added to set the template.
otemplate: link of phtml file
•Remove: to delete an available block
•Action: to call a function of instance in reference or block
oIfconfig
<action method="addLink" translate="label title"
module="contacts"
ifconfig="contacts/contacts/enabled"><label>Contact
Us</label><url>contacts</url><title>Contact
Us</title><prepare>true</prepare></action>
•Update: to load one handle in one present handle which is inherited all of the loaded
handle
How to pass Magento Certification Exam in 30 days- Magestore.com

Part 7: Layout and CMS
With the last article of Layout XML, it seems that you haven’t fully known how the
system receives this layout file. Thus, please keep following the Layout and CMS
session to learn the way to register layout XML files and how to use it in CMS
(content management system) in Magento. It will be helpful for your configuration
operations.
I-Register Layout XML files
The code paragraph below is used to declare a layout file for both frontend and
backend.
<layout>
<updates>
<module_name>
<file>your_layout_file_name.xml</file>//(Ex:module_name.xml)
</ module_name >
</updates>
</layout>
•To declare layout file in frontend, you can put this code paragraph into tag
<frontend>
•To declare layout file in backend, you can put this code paragraph into tag
<adminhtml>
System will read this configuration and load the layout file to get layout configuration
for rendering page.
II-Create and add the code to pages
•Steps to create a CMS page:
- Login Back-end
- Select menu CMS/Pages
How to pass Magento Certification Exam in 30 days- Magestore.com
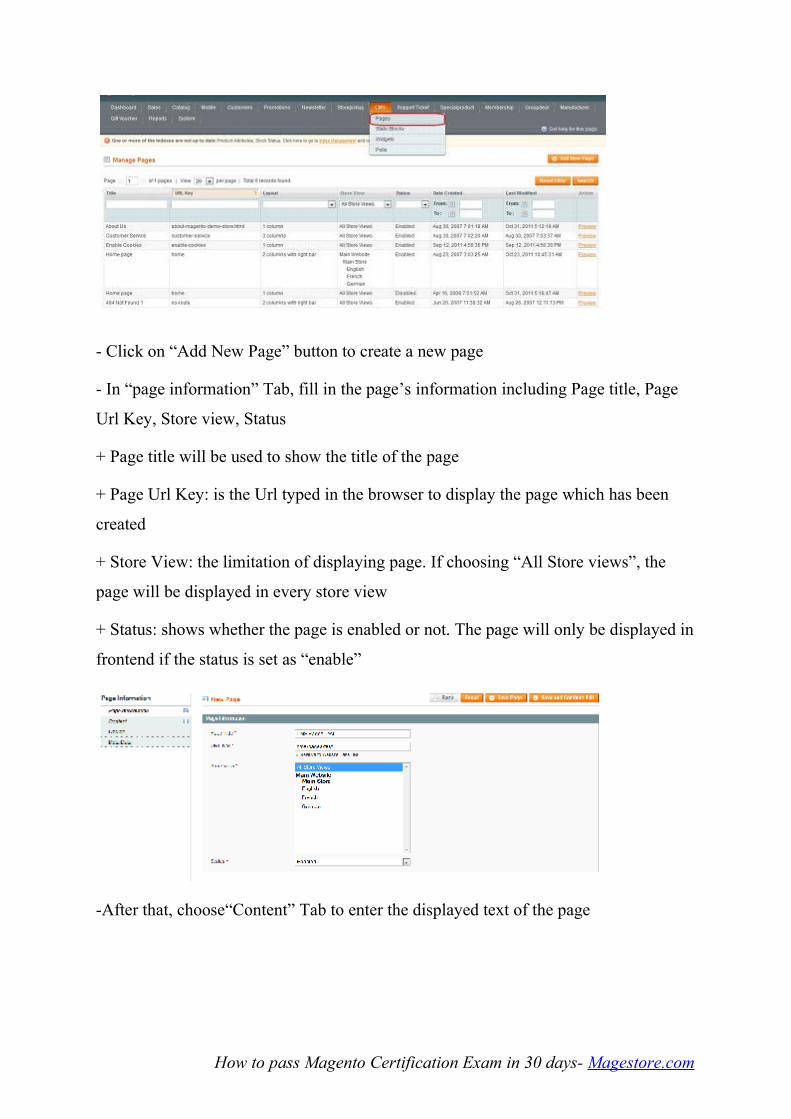
- Click on “Add New Page” button to create a new page
- In “page information” Tab, fill in the page’s information including Page title, Page
Url Key, Store view, Status
+ Page title will be used to show the title of the page
+ Page Url Key: is the Url typed in the browser to display the page which has been
created
+ Store View: the limitation of displaying page. If choosing “All Store views”, the
page will be displayed in every store view
+ Status: shows whether the page is enabled or not. The page will only be displayed in
frontend if the status is set as “enable”
-After that, choose“Content” Tab to enter the displayed text of the page
How to pass Magento Certification Exam in 30 days- Magestore.com

+ Content Heading: is shown in the header of the page
+ Enter the content to display in the text area
- Choose “Design” Tab in order to select 1 column, 2 columns-right and 2 columns-
left or 3 columns for the page’s layout
- And then, click on “Save page” button to save
- In frontend, to access to the page, you can use the following URL:(cms-pages-test is
CMS page’s url key)
How to pass Magento Certification Exam in 30 days- Magestore.com
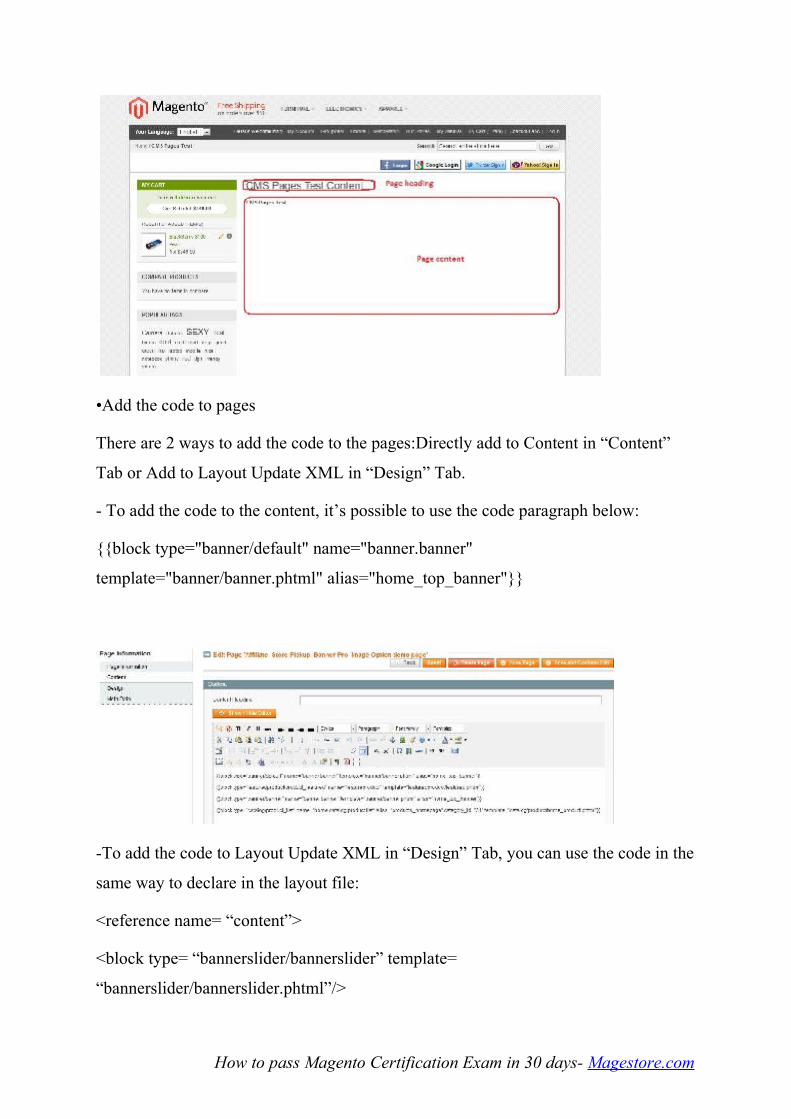
•Add the code to pages
There are 2 ways to add the code to the pages:Directly add to Content in “Content”
Tab or Add to Layout Update XML in “Design” Tab.
- To add the code to the content, it’s possible to use the code paragraph below:
{{block type="banner/default" name="banner.banner"
template="banner/banner.phtml" alias="home_top_banner"}}
-To add the code to Layout Update XML in “Design” Tab, you can use the code in the
same way to declare in the layout file:
<reference name= “content”>
<block type= “bannerslider/bannerslider” template=
“bannerslider/bannerslider.phtml”/>
How to pass Magento Certification Exam in 30 days- Magestore.com

</reference>
How to pass Magento Certification Exam in 30 days- Magestore.com

Part 8: Pass variables from layout to block
Through the last sessions, you can learn about Magento layout XML schema, the way
to register layout XML files, create and add the code to pages. In order to keep sharing
you knowledge of Magento layout, in this part, I will show you how to pass variables
from a layout to a block.
I-Pass variables from a layout to a block
-It’s possible to insert variables into a block from a .xml file by using:
<action method="setData"><name>category_id</name><value>3</value></action>
-Use the action tag with the method=”setData” attribute (setData method of block is
called when the system loads layout)
-Children tags are name, value (they are also parameters of setData method)
-In the block file, this value is taken by:
$categoryId = $this->getCategoryId();
$categoryId = $this->getData(‘category_id’);
-Besides, we can put variables into a block by {{block}} structure (used in CMS
page)
{{block type="catalog/product_list" manufacturer_id=14
template="catalog/product/brand.phtml"}}
II-Add and customize Javascript
-Use the action tag with the method=”addJs” attribute
For example:
<reference name="head">
<action method="addJs"><script>test/test.js</script></action>
</block></code>
-Or you can use action tag with the method=”addItem” attribute if your javascript file
is in the skin folder.
How to pass Magento Certification Exam in 30 days- Magestore.com

For example:
<reference name="head">
<action
method="addItem"><type>skin_js</type><name>js/test.js</name><params/></actio
n>
</block>
How to pass Magento Certification Exam in 30 days- Magestore.com

TOPIC 4
Part 1: Models, resource models, and collections
Through this topic, your can enrich your knowledge of the Model element in the MVC
(Model – View – Controller). This part will basically starts with some main concepts
of models, resource models, and collections.
•Describe basic concepts of models, resource models, and collections
A “model” is used to store data, and perhaps performs some business logics against
that data.
A “resource model” is used to interact with the database (or maybe other types of
persistent data) on behalf of the “model”. The “resource model” actually performs the
CRUD operations.
A “collection model” holds from one to many “models” and knows how to tell the
“resource model” to get rows in the basis of information it is given.
There’s a basic ActiveRecord-like/one-object-one-table Model, and there’s also an
Entity Attribute Value (EAV) Model.
•Configure a database connection
<resources>
<affiliateplus_setup>
<setup>
<module>Magestore_Affiliateplus</module>
</setup>
<connection>
<use>core_setup</use>
</connection>
</affiliateplus_setup>
<affiliateplus_write>
How to pass Magento Certification Exam in 30 days- Magestore.com
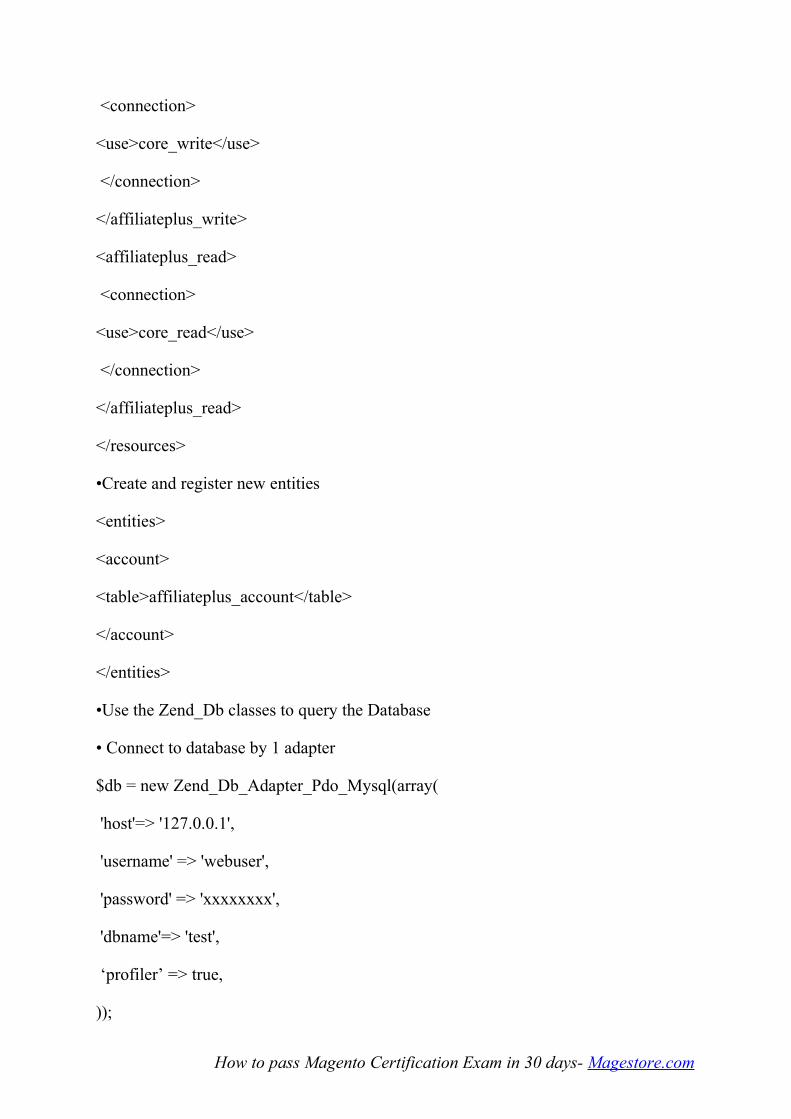
<connection>
<use>core_write</use>
</connection>
</affiliateplus_write>
<affiliateplus_read>
<connection>
<use>core_read</use>
</connection>
</affiliateplus_read>
</resources>
•Create and register new entities
<entities>
<account>
<table>affiliateplus_account</table>
</account>
</entities>
•Use the Zend_Db classes to query the Database
• Connect to database by 1 adapter
$db = new Zend_Db_Adapter_Pdo_Mysql(array(
'host'=> '127.0.0.1',
'username' => 'webuser',
'password' => 'xxxxxxxx',
'dbname'=> 'test',
‘profiler’ => true,
));
How to pass Magento Certification Exam in 30 days- Magestore.com
• Returns to the information of queries.
$profiler = $db->getProfiler();
- getTotalElapsedSecs() returns the total number of seconds elapsed for all profiled
queries.
- getQueryProfiles() returns an array of all query profiles.
- getLastQueryProfile() returns the last (most recent) query profile, regardless of
whether or not the query has finished (if it hasn’t, the end time will be NULL)
- clear() clears any past query profiles from the stack.
• Zend_Db_Statement
$sql = 'SELECT * FROM bugs WHERE reported_by = ? AND bug_status = ?';
$stmt = new Zend_Db_Statement_Mysqli($db, $sql);
• Zend_Db_Table: Each class interacts with one table in the database, and you need to
declare the database table for which this class define.
Example:
class Bugs extends Zend_Db_Table_Abstract
{
protected $_name = 'bugs';
}
$table = new Bugs(array('db' => $db));
With $table object, you can use some methods to operate with the database such as:
insert, update, delete.
• Zend_Db_Table_Row: is a record object in the table
$bugs = new Bugs();
$row = $bugs->fetchRow($bugs->select()->where('bug_id = ?', 1));
$rowArray = $row->toArray();
How to pass Magento Certification Exam in 30 days- Magestore.com
• Zend_Db_Select:
$select = $db->select()
->from( ...specify table and columns... )
->where( ...specify search criteria... )
->order( ...specify sorting criteria... );
•Database collection in Magento
The collection in Magento usually extends from class
Mage_Core_Model_Resource_ Collection_Abstract
or Mage_Core_Model_Mysql4_ Collection_Abstract.
The collection has some methods for you to filter, sort and specify the selected values:
• addFieldToFilter(,): used to filter data
• setOrder(): used to sort data
• getSelect(): returns the selected query (is instance object of class Varien_Db_Select)
to this collections. And you are able to use it to add specific selected value.
• Database resource
The database model and the collection connect to database through database resource
layer. The resource class extends from an abstract class:
abstract class Mage_Core_Model_Resource_Abstract
abstract class Mage_Core_Model_Mysql4_Abstract
In this class, you need to declare your database table and the id field of this table.
For example:
public function _construct(){
$this->_init('affiliate/program', 'program_id');
}
•Use and resolve existing table names without hard coding them
How to pass Magento Certification Exam in 30 days- Magestore.com
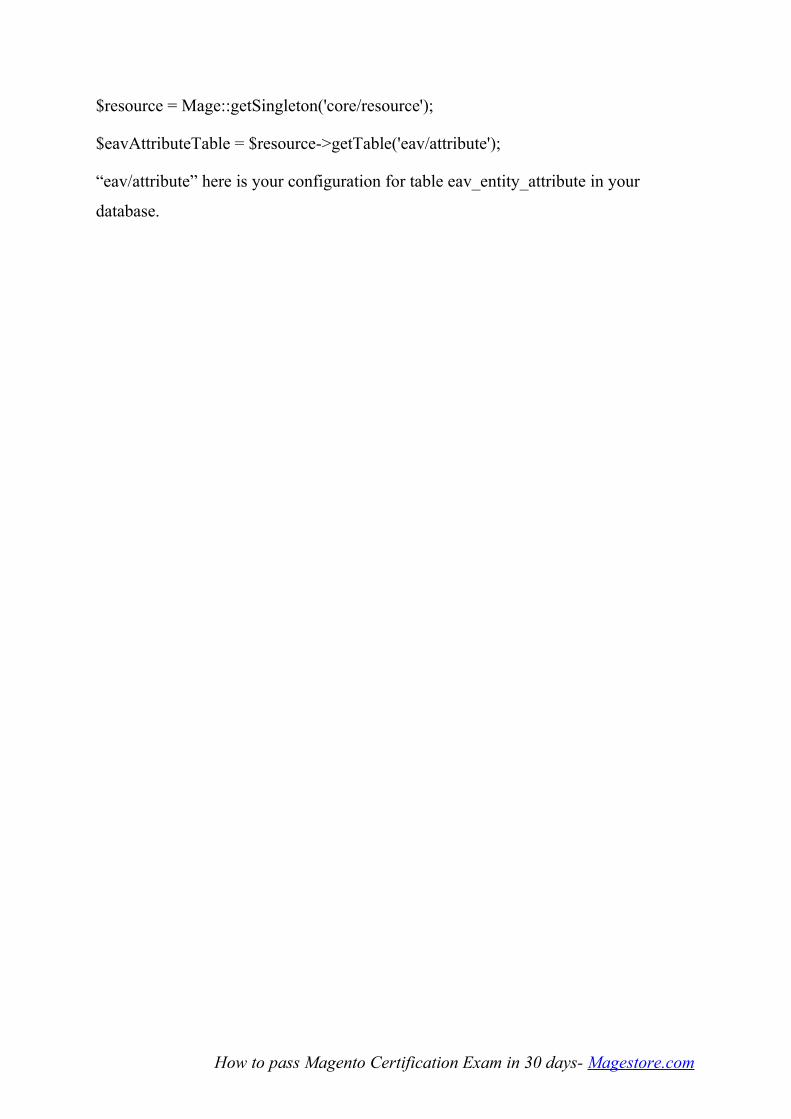
$resource = Mage::getSingleton('core/resource');
$eavAttributeTable = $resource->getTable('eav/attribute');
“eav/attribute” here is your configuration for table eav_entity_attribute in your
database.
How to pass Magento Certification Exam in 30 days- Magestore.com
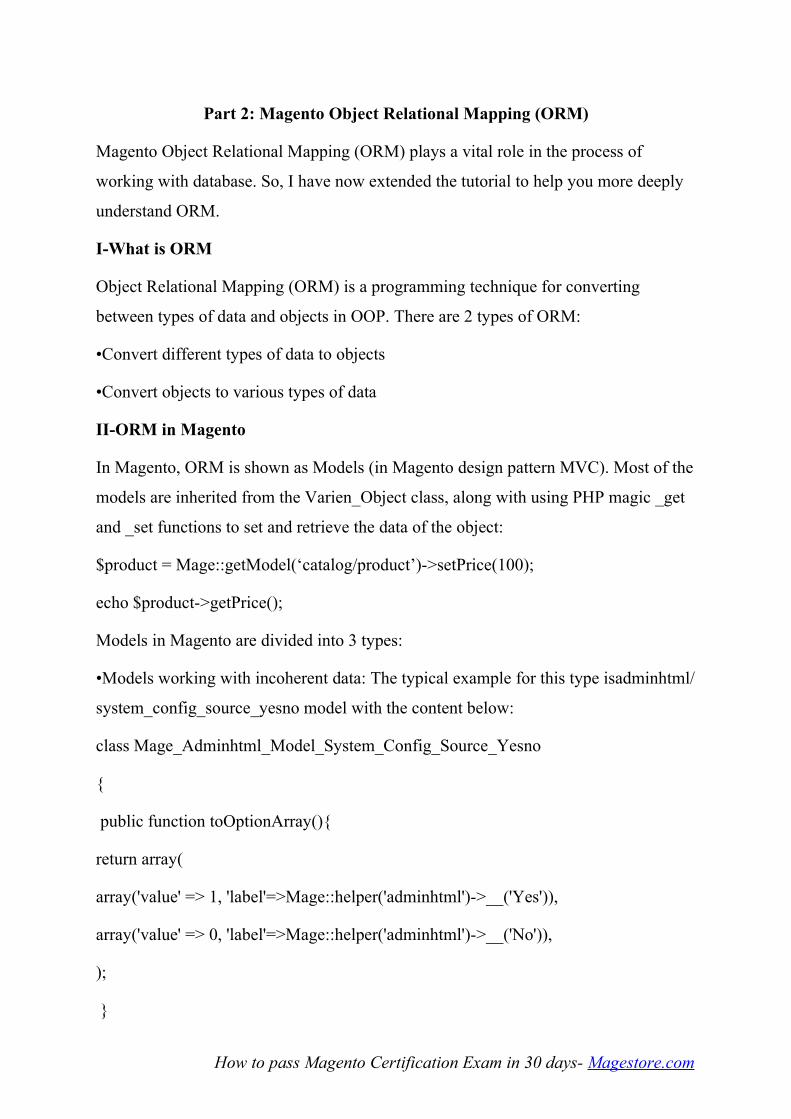
Part 2: Magento Object Relational Mapping (ORM)
Magento Object Relational Mapping (ORM) plays a vital role in the process of
working with database. So, I have now extended the tutorial to help you more deeply
understand ORM.
I-What is ORM
Object Relational Mapping (ORM) is a programming technique for converting
between types of data and objects in OOP. There are 2 types of ORM:
•Convert different types of data to objects
•Convert objects to various types of data
II-ORM in Magento
In Magento, ORM is shown as Models (in Magento design pattern MVC). Most of the
models are inherited from the Varien_Object class, along with using PHP magic _get
and _set functions to set and retrieve the data of the object:
$product = Mage::getModel(‘catalog/product’)->setPrice(100);
echo $product->getPrice();
Models in Magento are divided into 3 types:
•Models working with incoherent data: The typical example for this type isadminhtml/
system_config_source_yesno model with the content below:
class Mage_Adminhtml_Model_System_Config_Source_Yesno
{
public function toOptionArray(){
return array(
array('value' => 1, 'label'=>Mage::helper('adminhtml')->__('Yes')),
array('value' => 0, 'label'=>Mage::helper('adminhtml')->__('No')),
);
}
How to pass Magento Certification Exam in 30 days- Magestore.com

}
Data that this type of models works with is 0/1 value and Yes/No label. The model
doesn’t get data from the database and doesn’t write data in the database as well.
•Models working with XML database: such as core/config model. This model works
with XML files which are configuration files in Magento. The loading data function of
the model is as follows:
public function loadBase(){
$etcDir = $this->getOptions()->getEtcDir();
$files = glob($etcDir.DS.'*.xml');
$this->loadFile(current($files));
while ($file = next($files)) {
$merge = clone $this->_prototype;
$merge->loadFile($file);
$this->extend($merge);
}
if (in_array($etcDir.DS.'local.xml', $files)) {
$this->_isLocalConfigLoaded = true;
}
return $this;
}
The model working with XML database converts the data stored by XML
configuration file to working objects. There are separated methods to work with
theXML database like getNode, getSectionNode…
•Models working with SQL database: take and write data in the database through the
SQL structure query demand. The responsibility of these models is to change actions
to the data query demands.
How to pass Magento Certification Exam in 30 days- Magestore.com

• Models working with one database table (such as core/website model). This model
works with one table in database. Loading or saving the data will just relate to this
table. For instance:
$website = Mage::getModel(‘core/website’)->load(0);
$website->setId(1)->save();
• Models working with multi – database table: work with EVA database. For example:
catalog/productmodel. In this case, loading or saving data will be relevant to a set of
table. This model has to map the data of multi-table to its object. The data query will
be implemented during using this model.
$product = Mage::getModel(‘catalog/product’)->load(1);
$product->setId(2)->save();
How to pass Magento Certification Exam in 30 days- Magestore.com

Part 3: Install/Upgrade Scripts
This part will provide you with further knowledge of the install/upgrade workflow of
Magento module and guide you how to write install and upgrade scripts using set-up
resources.
I-The install/upgrade workflow of Magento module
When having a request, the system will check your module’s version in the
file:/app/code/local/Magestore/Mymodule/etc/config.xml
…
<modules>
<Magestore_Mymodule>
<version>0.1.3</version>
</Magestore_ Mymodule>
</modules>
Magento will continue checking in the core_resource table. The current version is on
themymodule_setup line of the database.
The folder: /app/code/local/Magestore/Mymodule/sql/mymodule_setup includes script
files creating database for the module:
mysql4-install-0.1.0.php
mysql4-install-0.1.1.php
mysql4-install-0.1.2.php
mysql4-install-0.1.3.php
mysql4-upgrade-0.1.0-0.1.1.php
mysql4-upgrade-0.1.1-0.1.2.php
mysql4-upgrade-0.1.2-0.1.3.php
…
How to pass Magento Certification Exam in 30 days- Magestore.com

If mymodule_setup doesn’t exist in the core_resource table, Magento will run the
installation script file which is compatible with the current version of the module. (In
this case, it’s mysql4-install-0.1.3.php).
What happens if the lower version of the module was installed? The answer is that
Magento will run the upgrade script files in turn from the current version (in
core_resource table) to the version which has been set up.
II-Guide to write install and upgrade scripts using set-up resources
The Script to install and upgrade the workflow using sql is as below:
<?php
$installer = $this;
$installer->startSetup();
$installer->run("
DROP TABLE IF EXISTS {$this->getTable(mymodule)};
CREATE TABLE {$this->getTable(mymodule)} (
`mymodule_id` int(11) unsigned NOT NULL auto_increment,
`title` varchar(255) NOT NULL default '',
`description` text NOT NULL default '',
`status` smallint(6) NOT NULL default '0',
`created_time` datetime NULL,
`update_time` datetime NULL,
PRIMARY KEY (`mymodule_id`)
) ENGINE=InnoDB DEFAULT CHARSET=utf8;
");
$installer->endSetup();
Basically, it has 3 main parts:
How to pass Magento Certification Exam in 30 days- Magestore.com
•Declaring the $install variable
$installer = $this;
$installer->startSetup();
•Writing the sql code to create the database
$installer->run("
//sql code here
");
•Ending
$installer->endSetup();
How to pass Magento Certification Exam in 30 days- Magestore.com
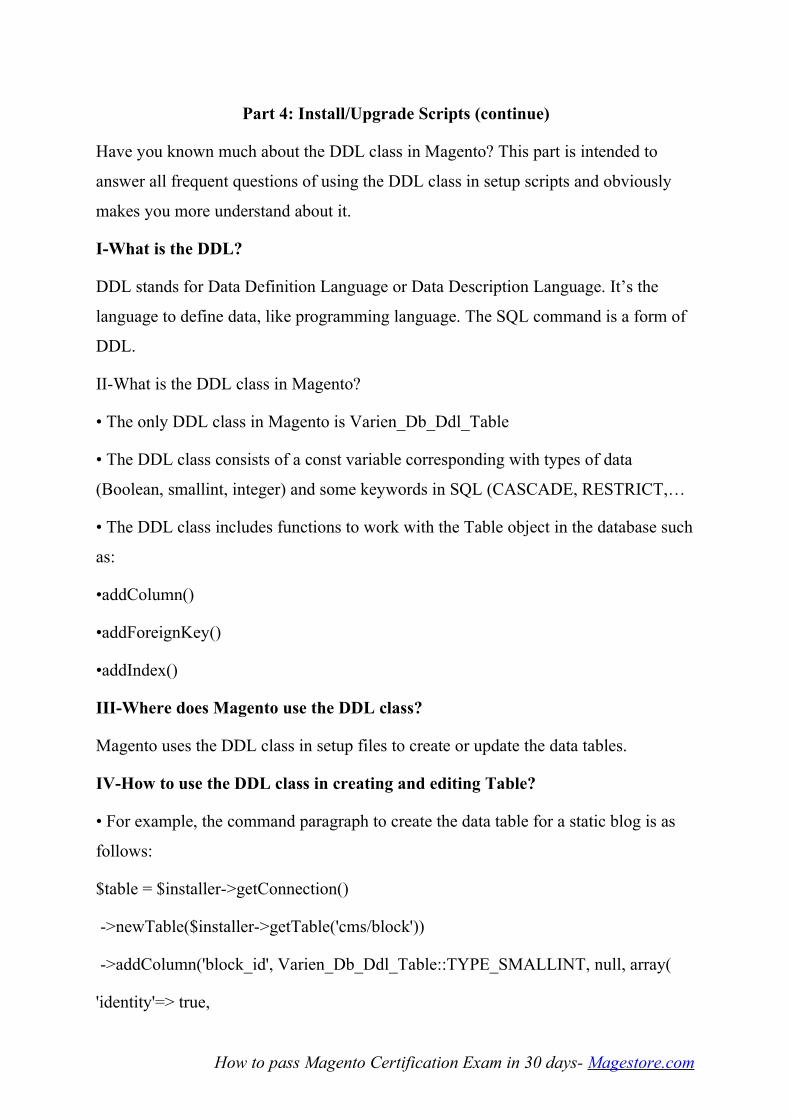
Part 4: Install/Upgrade Scripts (continue)
Have you known much about the DDL class in Magento? This part is intended to
answer all frequent questions of using the DDL class in setup scripts and obviously
makes you more understand about it.
I-What is the DDL?
DDL stands for Data Definition Language or Data Description Language. It’s the
language to define data, like programming language. The SQL command is a form of
DDL.
II-What is the DDL class in Magento?
• The only DDL class in Magento is Varien_Db_Ddl_Table
• The DDL class consists of a const variable corresponding with types of data
(Boolean, smallint, integer) and some keywords in SQL (CASCADE, RESTRICT,…
• The DDL class includes functions to work with the Table object in the database such
as:
•addColumn()
•addForeignKey()
•addIndex()
III-Where does Magento use the DDL class?
Magento uses the DDL class in setup files to create or update the data tables.
IV-How to use the DDL class in creating and editing Table?
• For example, the command paragraph to create the data table for a static blog is as
follows:
$table = $installer->getConnection()
->newTable($installer->getTable('cms/block'))
->addColumn('block_id', Varien_Db_Ddl_Table::TYPE_SMALLINT, null, array(
'identity'=> true,
How to pass Magento Certification Exam in 30 days- Magestore.com
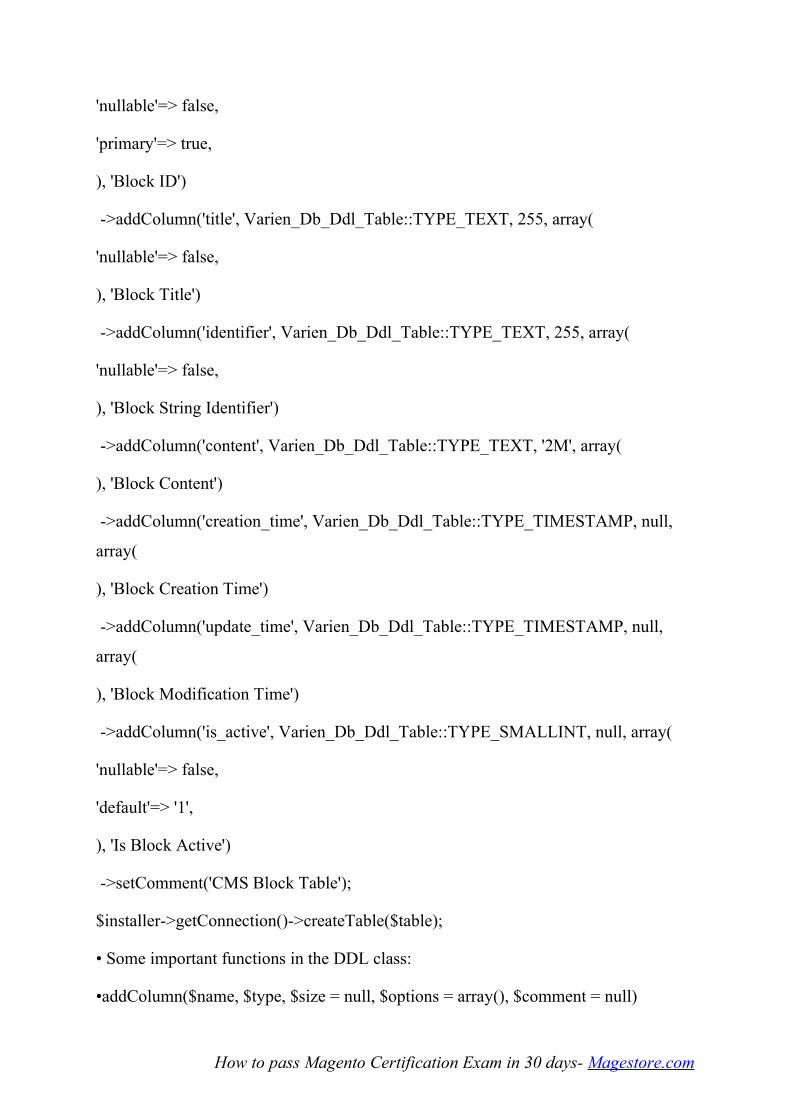
'nullable'=> false,
'primary'=> true,
), 'Block ID')
->addColumn('title', Varien_Db_Ddl_Table::TYPE_TEXT, 255, array(
'nullable'=> false,
), 'Block Title')
->addColumn('identifier', Varien_Db_Ddl_Table::TYPE_TEXT, 255, array(
'nullable'=> false,
), 'Block String Identifier')
->addColumn('content', Varien_Db_Ddl_Table::TYPE_TEXT, '2M', array(
), 'Block Content')
->addColumn('creation_time', Varien_Db_Ddl_Table::TYPE_TIMESTAMP, null,
array(
), 'Block Creation Time')
->addColumn('update_time', Varien_Db_Ddl_Table::TYPE_TIMESTAMP, null,
array(
), 'Block Modification Time')
->addColumn('is_active', Varien_Db_Ddl_Table::TYPE_SMALLINT, null, array(
'nullable'=> false,
'default'=> '1',
), 'Is Block Active')
->setComment('CMS Block Table');
$installer->getConnection()->createTable($table);
• Some important functions in the DDL class:
•addColumn($name, $type, $size = null, $options = array(), $comment = null)
How to pass Magento Certification Exam in 30 days- Magestore.com
1.$name: the name of a field (column)
2.$type: the type of data. For instance: TYPE_BOOLEAN, TYPE_SMALLINT,
TYPE_INTEGER…
3.$size: the size of a field (0, 255, 2M,…)
4.$option: identity (true/false), nullable(true/false), primary (true/false), default
(value)
5.$comment: add comments to the field
•addForeignKey($fkName, $column, $refTable, $refColumn, $onDelete = null,
$onUpdate = null)
1.$fkName: the name of the foreign key
2.$column: the name of the field (column) set into the foreign key
3.$ refTable: the name of the reference table
4.$ refColumn: the name of the column table
5.$onDelete: identify an action needs to be implemented when the data of the
reference table is deleted (ACTION_CASCADE, ACTION_SET_NULL,
ACTION_NO_ACTION, ACTION_RESTRICT, ACTION_SET_DEFAULT)
6.$onUpdate: : identify an action needs to be implemented when the data of the
reference table is updated ( ACTION_CASCADE, ACTION_SET_NULL,
ACTION_NO_ACTION, ACTION_RESTRICT, ACTION_SET_DEFAULT)
•addIndex($indexName, $fields, $options = array())
1.$ indexName: the name of index
2.$fields: the name/ array of field which is set into index (array or string)
How to pass Magento Certification Exam in 30 days- Magestore.com

TOPIC 5
Part 1: EAV Model Concepts
Working with EAV Model in Magento seems to be a quite complicated issue but you
can totally make it easier with our new series of tutorials. This part will start with
some main concepts of EAV
I-Definition of EAV
According to Wikipedia: Entity-Attribute-Value model (EAV), also known as object-
attribute-value model and open schema is a data model that is used in circumstances
where the number of attributes (properties, parameters) that can be used to describe a
thing (an “entity” or “object”) is potentially very vast, but the number that will
actually apply to a given entity is relatively modest. In mathematics, this model is
known as a sparse matrix.
The main features of EAV can be summarized as follows:
• EAV is a data model describing the organization of data
• Display the data of an object or entity
• Ability to expand the attribute set without changing the table structure
• Flexibility in storing data
• Suitable to entities having different attribute sets
II- Description of the EAV hierarchy structure
The EAV hierarchy structure includes these components:
• Entity: Lines in this table are displayed objects of an entity
• Attribute: Attributes of the object are lines in this table
• Value: Lines in this table contain the attribute values of objects
For instance, the object which is the users is stored as below:
How to pass Magento Certification Exam in 30 days- Magestore.com

III-How EAV data storage works in Magento
The EAV data storage in Magento seems quite complicated with the separated data for
each store. There are some data storage tables:
•EAV entity type: stores the entity type including the information of model for the
entity or the default attribute set
•EAV entity: Contains an eav_entity table storing objects of a certain entity type
How to pass Magento Certification Exam in 30 days- Magestore.com
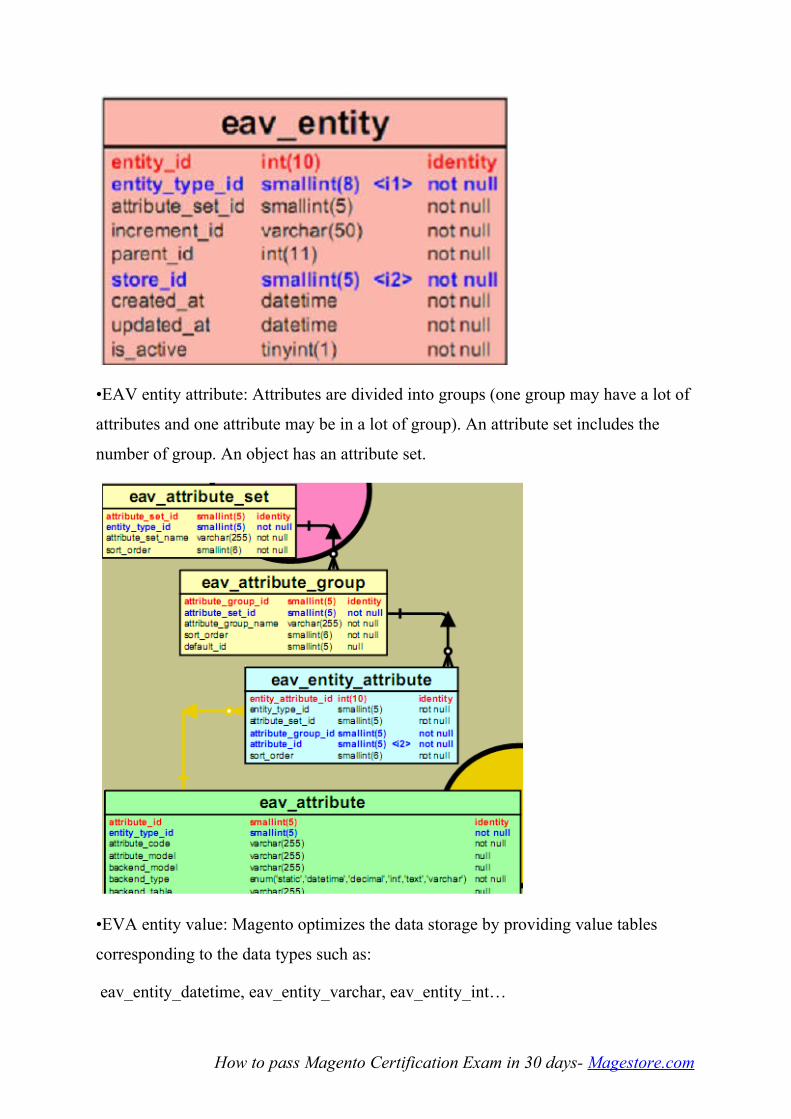
•EAV entity attribute: Attributes are divided into groups (one group may have a lot of
attributes and one attribute may be in a lot of group). An attribute set includes the
number of group. An object has an attribute set.
•EVA entity value: Magento optimizes the data storage by providing value tables
corresponding to the data types such as:
eav_entity_datetime, eav_entity_varchar, eav_entity_int…
How to pass Magento Certification Exam in 30 days- Magestore.com
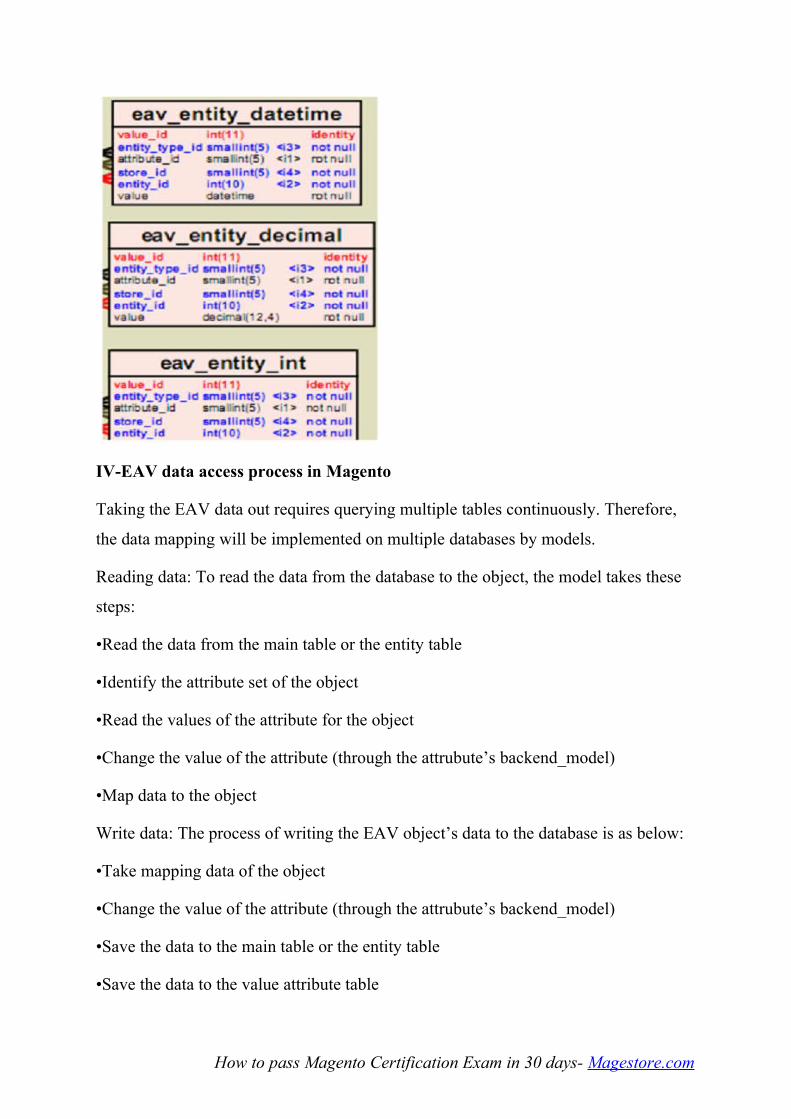
IV-EAV data access process in Magento
Taking the EAV data out requires querying multiple tables continuously. Therefore,
the data mapping will be implemented on multiple databases by models.
Reading data: To read the data from the database to the object, the model takes these
steps:
•Read the data from the main table or the entity table
•Identify the attribute set of the object
•Read the values of the attribute for the object
•Change the value of the attribute (through the attrubute’s backend_model)
•Map data to the object
Write data: The process of writing the EAV object’s data to the database is as below:
•Take mapping data of the object
•Change the value of the attribute (through the attrubute’s backend_model)
•Save the data to the main table or the entity table
•Save the data to the value attribute table
How to pass Magento Certification Exam in 30 days- Magestore.com

Part 2: Database tables for EAV entities
In the previous article, we provided you with the basic principle of EAV but have you
concretely known how Magento stores the data according to the EAV model and how
to create an EAV entity in Magento? If not, this part will surely be a good reference
for you.
I-Describe the database tables for EAV entities and how to create them
• Table Eav_Entity
This table includes the basic information of entities.
•entity_id: the ID of the entity
•entity_type_id: the ID of the entity type. To get this ID, it’s necessary to add a new
type of entity to the table eav_entity_type
•attribute_set_id: the ID of the attribute set used for the entity
• Table Eav_entity_type
The table Eav_entity_type contains the information of the entity types such as:
customer, product, order…
•entity_type_id: the ID of the entity type
How to pass Magento Certification Exam in 30 days- Magestore.com
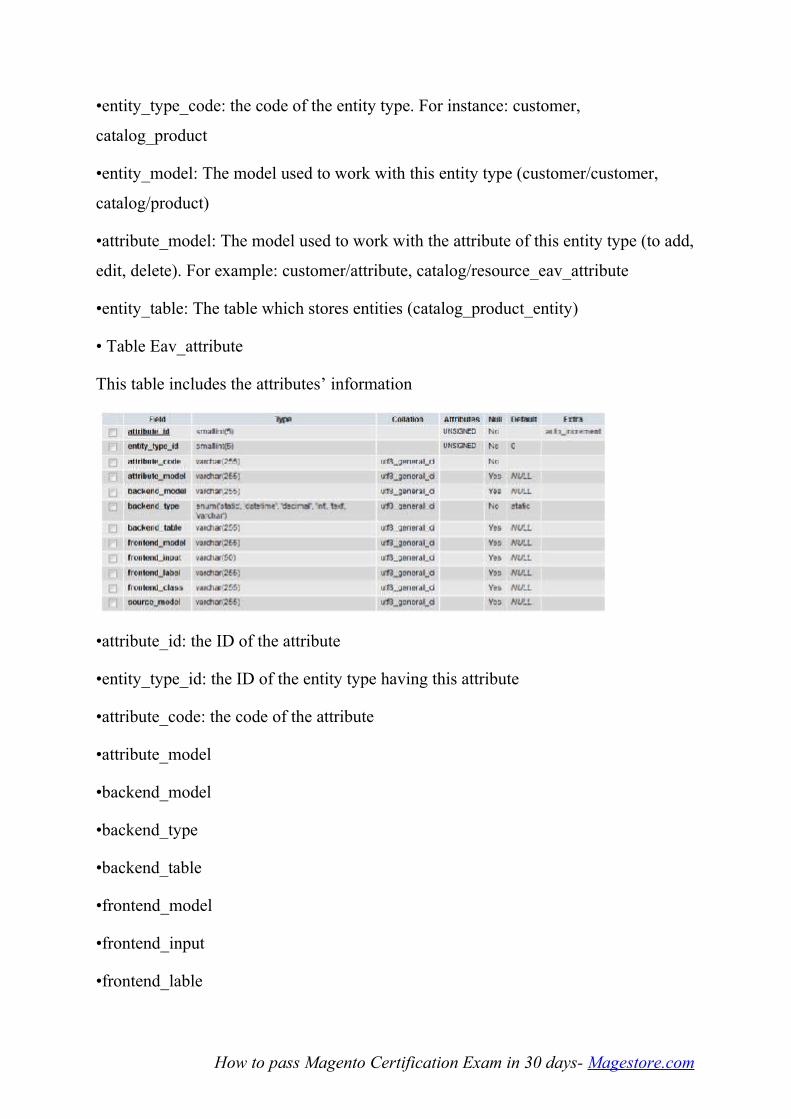
•entity_type_code: the code of the entity type. For instance: customer,
catalog_product
•entity_model: The model used to work with this entity type (customer/customer,
catalog/product)
•attribute_model: The model used to work with the attribute of this entity type (to add,
edit, delete). For example: customer/attribute, catalog/resource_eav_attribute
•entity_table: The table which stores entities (catalog_product_entity)
• Table Eav_attribute
This table includes the attributes’ information
•attribute_id: the ID of the attribute
•entity_type_id: the ID of the entity type having this attribute
•attribute_code: the code of the attribute
•attribute_model
•backend_model
•backend_type
•backend_table
•frontend_model
•frontend_input
•frontend_lable
How to pass Magento Certification Exam in 30 days- Magestore.com
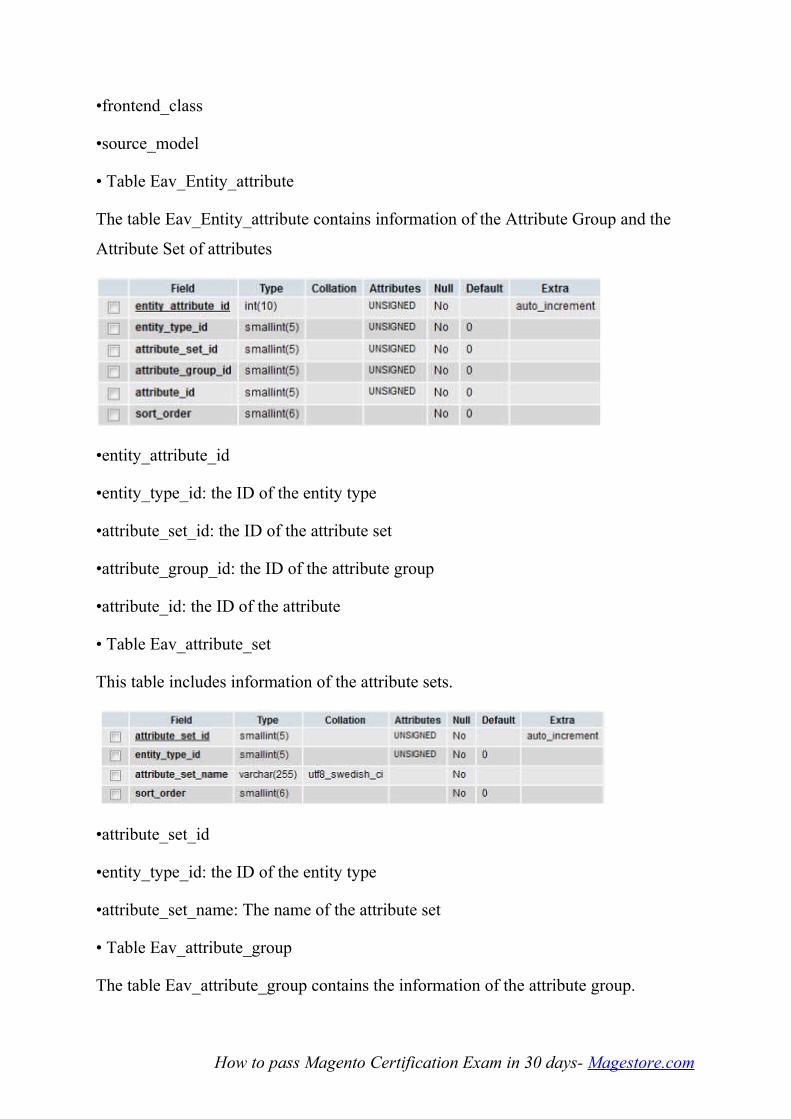
•frontend_class
•source_model
• Table Eav_Entity_attribute
The table Eav_Entity_attribute contains information of the Attribute Group and the
Attribute Set of attributes
•entity_attribute_id
•entity_type_id: the ID of the entity type
•attribute_set_id: the ID of the attribute set
•attribute_group_id: the ID of the attribute group
•attribute_id: the ID of the attribute
• Table Eav_attribute_set
This table includes information of the attribute sets.
•attribute_set_id
•entity_type_id: the ID of the entity type
•attribute_set_name: The name of the attribute set
• Table Eav_attribute_group
The table Eav_attribute_group contains the information of the attribute group.
How to pass Magento Certification Exam in 30 days- Magestore.com
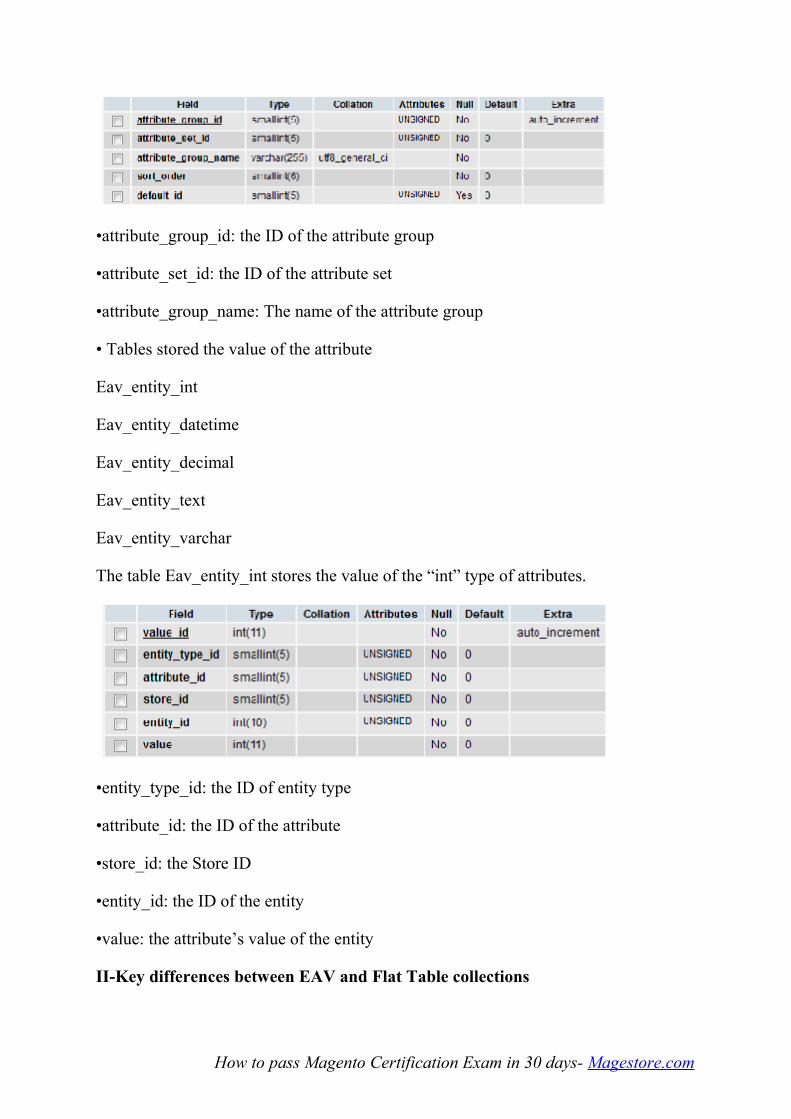
•attribute_group_id: the ID of the attribute group
•attribute_set_id: the ID of the attribute set
•attribute_group_name: The name of the attribute group
• Tables stored the value of the attribute
Eav_entity_int
Eav_entity_datetime
Eav_entity_decimal
Eav_entity_text
Eav_entity_varchar
The table Eav_entity_int stores the value of the “int” type of attributes.
•entity_type_id: the ID of entity type
•attribute_id: the ID of the attribute
•store_id: the Store ID
•entity_id: the ID of the entity
•value: the attribute’s value of the entity
II-Key differences between EAV and Flat Table collections
How to pass Magento Certification Exam in 30 days- Magestore.com

III-Give a new entity, identify the factors that influence the choice of the resource
type to use (EAV vs. flat)
For example:
The Banner Entity
Attributes: Title, Images, Link, Status, Description
•The number of attribute: small (5 attributes)
•Attributes are fixed and there’s no need to create more attributes.
? Use the flat table
The Customer Entity
Attributes: First Name, Last Name, Email, Password, Group, Gender, Birthday, Tax
Number
•The number of attributes: small (about 10 attributes)
•Need to create more attributes: Company, Interested…
? Use the EAV model
How to pass Magento Certification Exam in 30 days- Magestore.com
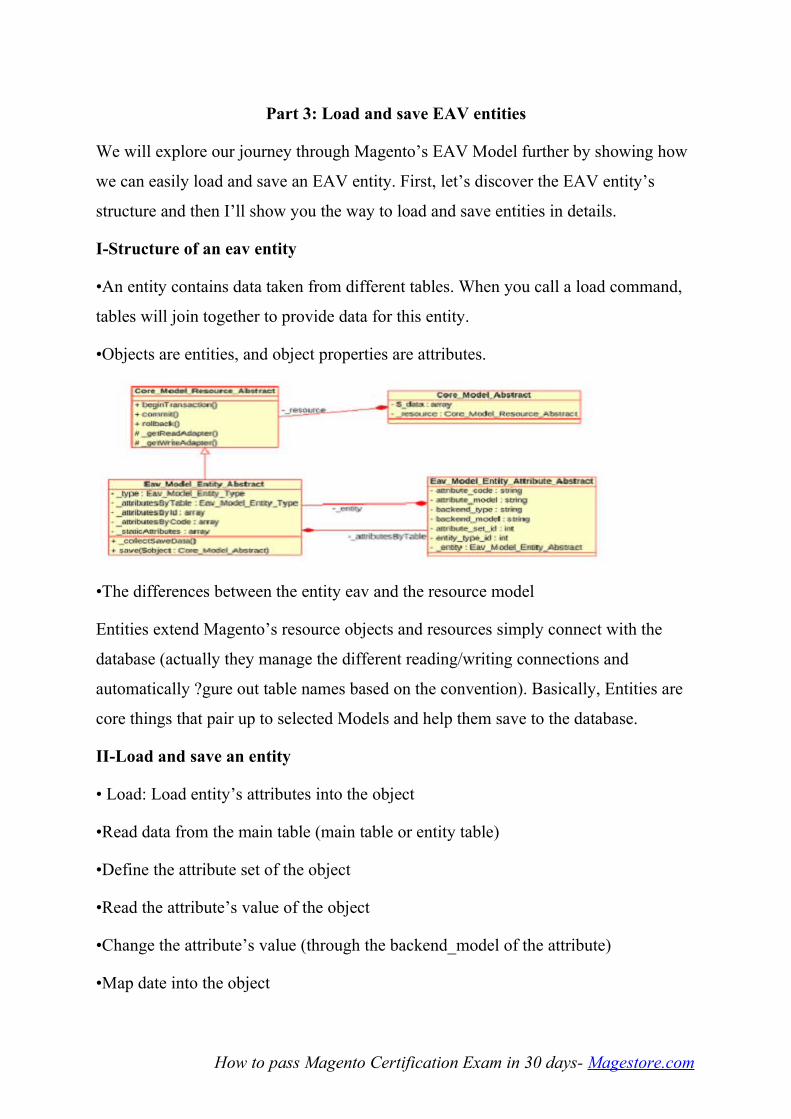
Part 3: Load and save EAV entities
We will explore our journey through Magento’s EAV Model further by showing how
we can easily load and save an EAV entity. First, let’s discover the EAV entity’s
structure and then I’ll show you the way to load and save entities in details.
I-Structure of an eav entity
•An entity contains data taken from different tables. When you call a load command,
tables will join together to provide data for this entity.
•Objects are entities, and object properties are attributes.
•The differences between the entity eav and the resource model
Entities extend Magento’s resource objects and resources simply connect with the
database (actually they manage the different reading/writing connections and
automatically ?gure out table names based on the convention). Basically, Entities are
core things that pair up to selected Models and help them save to the database.
II-Load and save an entity
• Load: Load entity’s attributes into the object
•Read data from the main table (main table or entity table)
•Define the attribute set of the object
•Read the attribute’s value of the object
•Change the attribute’s value (through the backend_model of the attribute)
•Map date into the object
How to pass Magento Certification Exam in 30 days- Magestore.com
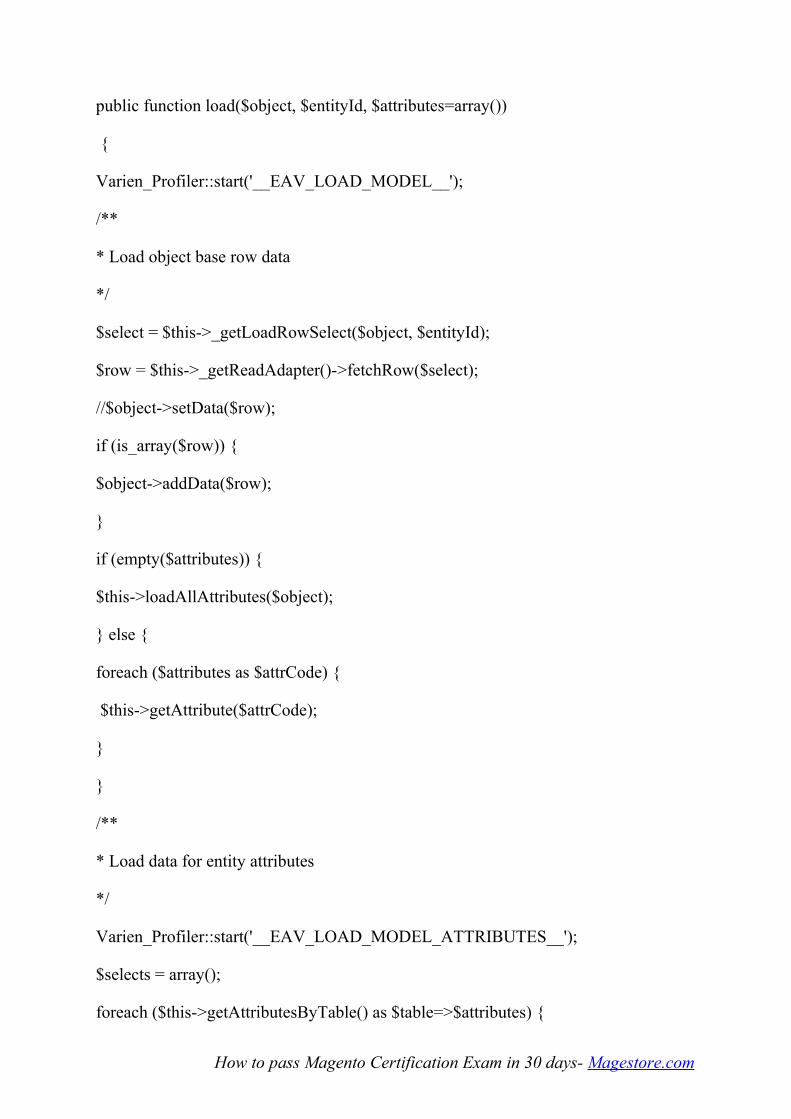
public function load($object, $entityId, $attributes=array())
{
Varien_Profiler::start('__EAV_LOAD_MODEL__');
/**
* Load object base row data
*/
$select = $this->_getLoadRowSelect($object, $entityId);
$row = $this->_getReadAdapter()->fetchRow($select);
//$object->setData($row);
if (is_array($row)) {
$object->addData($row);
}
if (empty($attributes)) {
$this->loadAllAttributes($object);
} else {
foreach ($attributes as $attrCode) {
$this->getAttribute($attrCode);
}
}
/**
* Load data for entity attributes
*/
Varien_Profiler::start('__EAV_LOAD_MODEL_ATTRIBUTES__');
$selects = array();
foreach ($this->getAttributesByTable() as $table=>$attributes) {
How to pass Magento Certification Exam in 30 days- Magestore.com
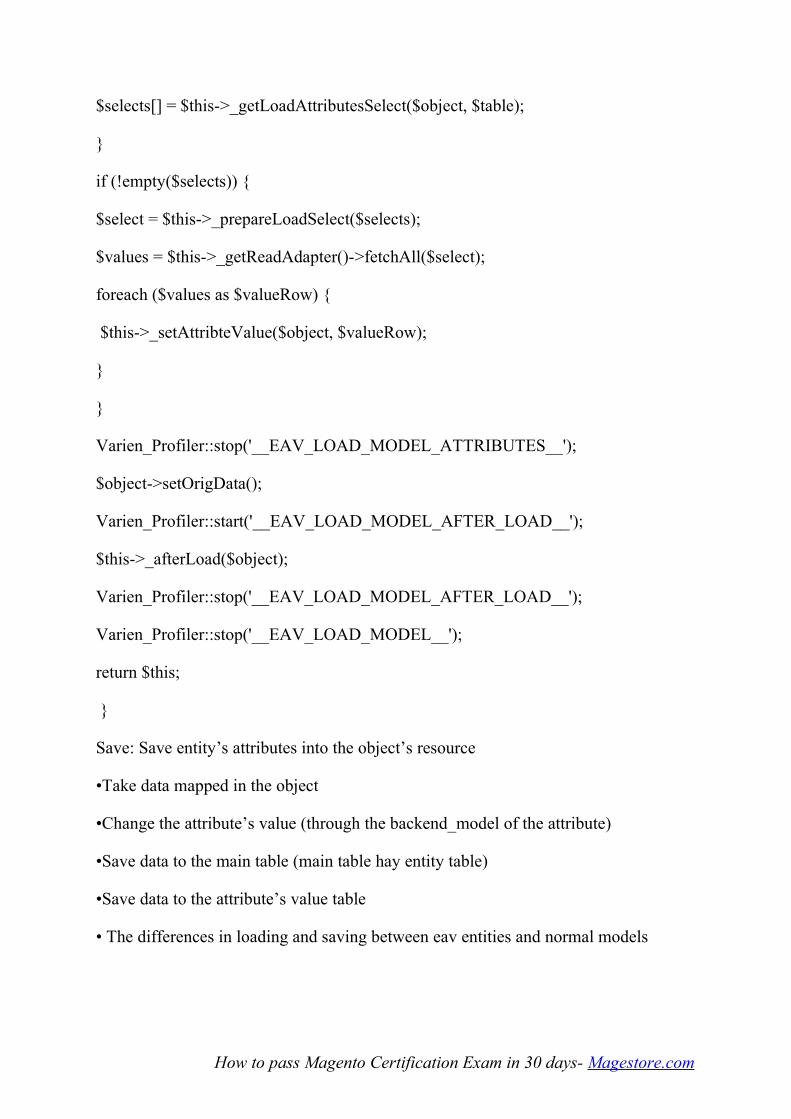
$selects[] = $this->_getLoadAttributesSelect($object, $table);
}
if (!empty($selects)) {
$select = $this->_prepareLoadSelect($selects);
$values = $this->_getReadAdapter()->fetchAll($select);
foreach ($values as $valueRow) {
$this->_setAttribteValue($object, $valueRow);
}
}
Varien_Profiler::stop('__EAV_LOAD_MODEL_ATTRIBUTES__');
$object->setOrigData();
Varien_Profiler::start('__EAV_LOAD_MODEL_AFTER_LOAD__');
$this->_afterLoad($object);
Varien_Profiler::stop('__EAV_LOAD_MODEL_AFTER_LOAD__');
Varien_Profiler::stop('__EAV_LOAD_MODEL__');
return $this;
}
Save: Save entity’s attributes into the object’s resource
•Take data mapped in the object
•Change the attribute’s value (through the backend_model of the attribute)
•Save data to the main table (main table hay entity table)
•Save data to the attribute’s value table
• The differences in loading and saving between eav entities and normal models
How to pass Magento Certification Exam in 30 days- Magestore.com
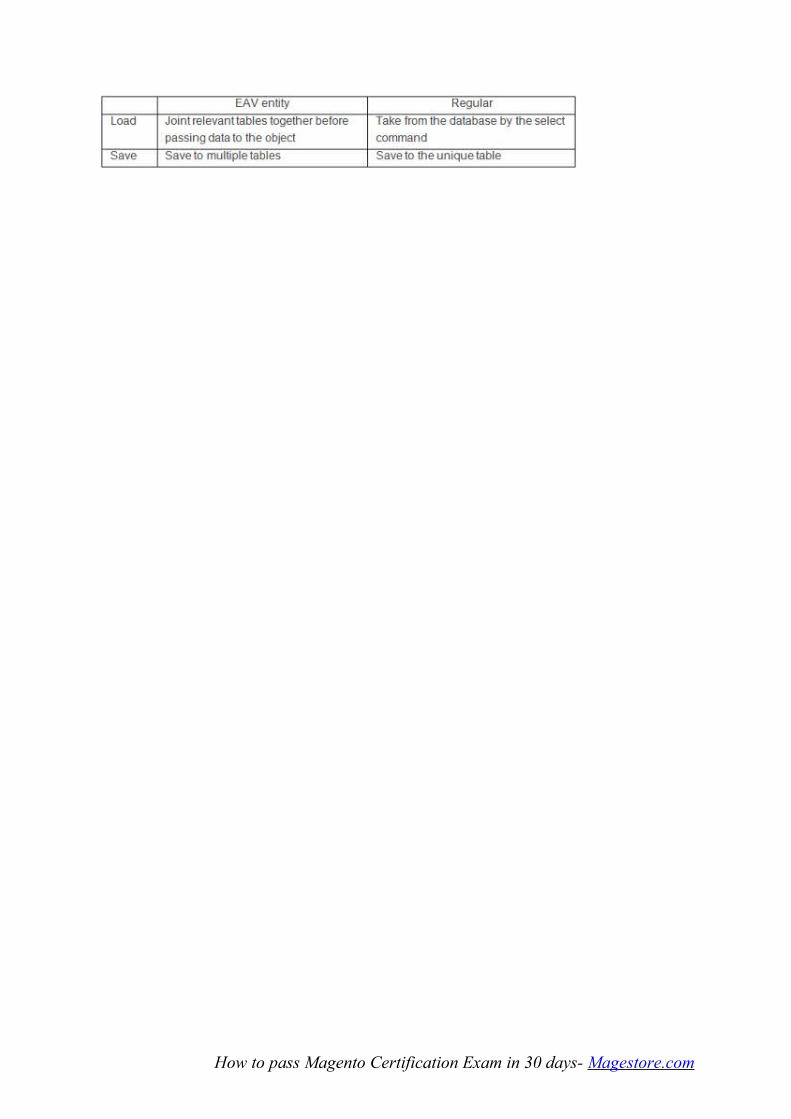
How to pass Magento Certification Exam in 30 days- Magestore.com

Part 4: Magento EAV Attribute Management
Magento is designed to work with EAV database model and an attribute management
is the indispensable part for developers to customize the system. I spent quite long
time on researching on EAV Attribute Management and I am very delighted to share
my experience and knowledge of this important issue with you. I will also guide you
how to create and customize an attribute by your code.
I-EAV Attribute
EAV attribute in Magento is stored quite complicatedly (as we mentioned in the
previous part). But Magento provides some interfaces in order to work with EAV
attribute easily. There are some needed models for an EAV attribute:
-Attribute model: extends from class Mage_Eav_Model_Entity_Attribute_Abstract,
provides functions to work with the EAV attribute.
-Backend model: extends from class
Mage_Eav_Model_Entity_Attribute_Backend_Abstract, provides functions to work
directly with database data. It is used to convert the custom type to the database type
(for storage) and vice versa (to be compatible with entity attribute value in the object).
The most important function of this class is to guarantee data is stored correctly. For
example:
class Mage_Eav_Model_Entity_Attribute_Backend_Store extends
Mage_Eav_Model_Entity_Attribute_Backend_Abstract
{
protected function _beforeSave($object)
{
if (!$object->getData($this->getAttribute()->getAttributeCode())) {
$object->setData($this->getAttribute()->getAttributeCode(), Mage::app()->getStore()-
>getId());
}
How to pass Magento Certification Exam in 30 days- Magestore.com

}
}
-Frontend model: extends from class
Mage_Eav_Model_Entity_Attribute_Frontend_Abstract, provides functions to work
with the frontend. It is used for the user interface programming. For instance:
class Mage_Eav_Model_Entity_Attribute_Frontend_Datetime extends
Mage_Eav_Model_Entity_Attribute_Frontend_Abstract
{
public function getValue(Varien_Object $object)
{
$data = '';
$value = parent::getValue($object);
$format = Mage::app()->getLocale()->getDateFormat(
Mage_Core_Model_Locale::FORMAT_TYPE_MEDIUM
);
if ($value) {
try {
$data = Mage::getSingleton('core/locale')->date($value, Zend_Date::ISO_8601, null,
false)->toString($format);
} catch (Exception $e) {
$data = Mage::getSingleton('core/locale')->date($value, null, null, false)-
>toString($format);
}
}
return $data;
How to pass Magento Certification Exam in 30 days- Magestore.com

}
}
-Source model: extends from class
Mage_Eav_Model_Entity_Attribute_Source_Abstract, provides the data source for an
attribute. It is usually used for an option attribute. And a source model needs the
override function getAllOptions() and getOptionText() for an attribute model to get all
available options and option text.
class Mage_Eav_Model_Entity_Attribute_Source_Boolean extends
Mage_Eav_Model_Entity_Attribute_Source_Abstract
{
public function getAllOptions()
{
if (is_null($this->_options)) {
$this->_options = array(
array(
'label' => Mage::helper('eav')->__('Yes'),
'value' =>1
),
array(
'label' => Mage::helper('eav')->__('No'),
'value' =>0
),
);
}
return $this->_options;
How to pass Magento Certification Exam in 30 days- Magestore.com

}
..............
public function getOptionText($value)
{
$options = $this->getAllOptions();
foreach ($options as $option) {
if ($option['value'] == $value) {
return $option['label'];
}
}
return false;
}
}
II-Create and customize an attribute by your code
An EAV attribute in Magento can be managed easily in the backend. But when you
need to create/update an attribute for your module, you can use some function
provided by Magento. Magento provides the class Mage_Eav_Model_Entity_Setup
for you to customize an EAV attribute.
-If you want to add a new attribute, you can use function addAttribute() of the class
above. Example:
$setup = new Mage_Eav_Model_Entity_Setup('catalog_setup');
$attr = array(
'group'=> 'Prices',
'type'=> 'text',
'input'=> 'textarea',
How to pass Magento Certification Exam in 30 days- Magestore.com
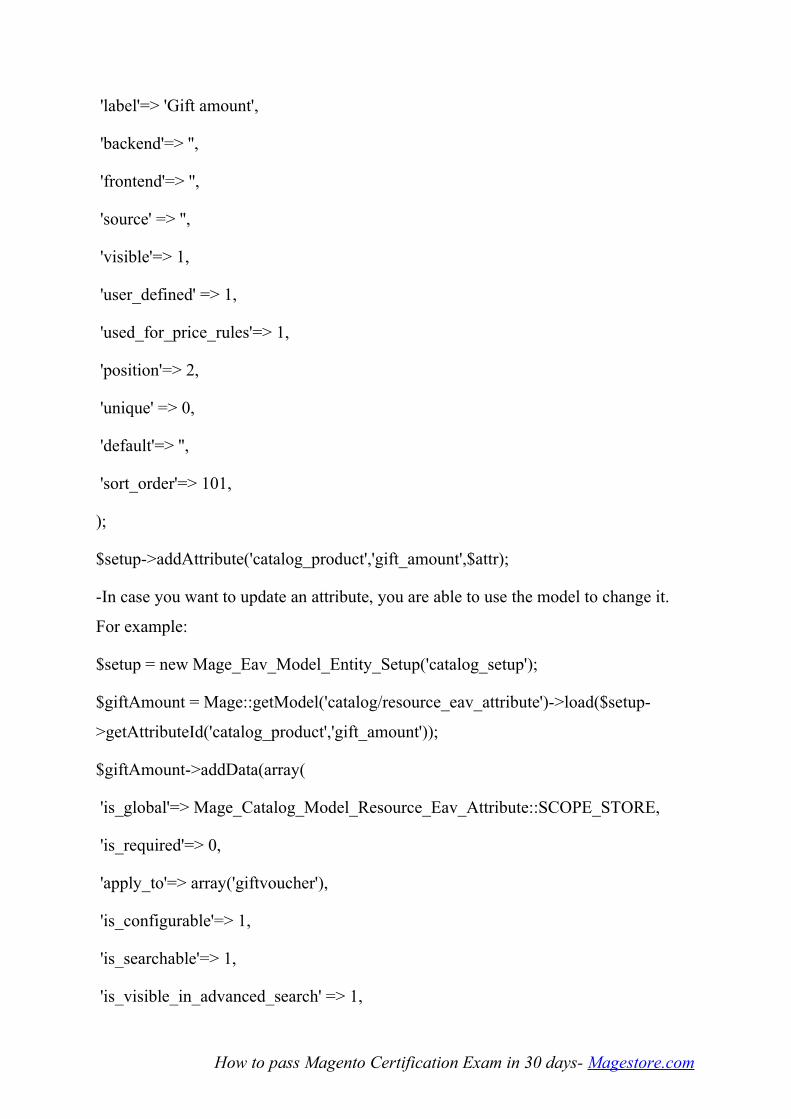
'label'=> 'Gift amount',
'backend'=> '',
'frontend'=> '',
'source' => '',
'visible'=> 1,
'user_defined' => 1,
'used_for_price_rules'=> 1,
'position'=> 2,
'unique' => 0,
'default'=> '',
'sort_order'=> 101,
);
$setup->addAttribute('catalog_product','gift_amount',$attr);
-In case you want to update an attribute, you are able to use the model to change it.
For example:
$setup = new Mage_Eav_Model_Entity_Setup('catalog_setup');
$giftAmount = Mage::getModel('catalog/resource_eav_attribute')->load($setup-
>getAttributeId('catalog_product','gift_amount'));
$giftAmount->addData(array(
'is_global'=> Mage_Catalog_Model_Resource_Eav_Attribute::SCOPE_STORE,
'is_required'=> 0,
'apply_to'=> array('giftvoucher'),
'is_configurable'=> 1,
'is_searchable'=> 1,
'is_visible_in_advanced_search' => 1,
How to pass Magento Certification Exam in 30 days- Magestore.com
'is_comparable'=> 0,
'is_filterable'=> 0,
'is_filterable_in_search'=> 1,
'is_used_for_promo_rules'=> 1,
'is_html_allowed_on_front'=> 0,
'is_visible_on_front' => 0,
'used_in_product_listing'=> 1,
'used_for_sort_by' => 0,
'backend_type'=> 'text',
))->save();
-And if you want to update an attribute value in the entity, it’s possible to use the
function updateAttribute(). The prototype function is as below:
/**
* Update Attribute data and Attribute additional data
*
* @param mixed $entityTypeId
* @param mixed $id
* @param string $field
* @param mixed $value
* @param int $sortOrder
* @return Mage_Eav_Model_Entity_Setup
*/
public function updateAttribute($entityTypeId, $id, $field, $value=null,
$sortOrder=null)
{
How to pass Magento Certification Exam in 30 days- Magestore.com
$this->_updateAttribute($entityTypeId, $id, $field, $value, $sortOrder);
$this->_updateAttributeAdditionalData($entityTypeId, $id, $field, $value);
return $this;
Well, I’ve given you the last part of the EAV model topic. The Adminhtml is also a
very interesting issue and don’t forget to follow it in next tutorials.
How to pass Magento Certification Exam in 30 days- Magestore.com

TOPIC 6
Part 1: Common structure/architecture
In Magento, the Adminhtml (Backend) is used to manage the website. Magento builds
a template pattern, helping developers easily program the Adminhtml. Thus, the
information I’m about to provide will certainly a good reference for those who are the
administrators or developers of Magento sites or simply want to have further
understanding about Magento as well.
I-Differences between the adminhtml and the frontend
II-Components of the admin structure
In general, a page in Magento’s backend has the following parts:
• Header of admin:
•Global search
•Admin menu
• Content:
•Grid Widget
•Form view
•Tabs in left panel
•…
• Footer: select a box to choose locale and the other information.
How to pass Magento Certification Exam in 30 days- Magestore.com

III-Create a controller for admin router
•Step 1: Create a module (similar to chapters above)
•Step 2: Register an admin router for the module (use the configuration)
<config>
...
<admin>
<routers>
<(modulename)>
<args>
<module>(Namespace_Modulename)</module>
<frontName>(frontname)</frontName>
</args>
</(modulename)>
</routers>
How to pass Magento Certification Exam in 30 days- Magestore.com

</admin>
...
</config>
•Step 3: Create a controller. An admin controller class needs to be extended from class
Mage_Adminhtml_Controller_Action:
<?php
class (Namespace_Modulename)_IndexController
extends Mage_Adminhtml_Controller_Action{
public function indexAction(){
// code for admin action here...
}
}
IV-How to operate with cache clearing
To clear cache in admin, you can go to menu System > Cache Management.
Then you may take these actions:
•Flush Magento Cache: clear all frontend caches
•Flush Cache Storage: all cache files in the folder /var/cache/* will be removed
•Refresh/Disable/Enable cache for the configuration, layouts, …
How to pass Magento Certification Exam in 30 days- Magestore.com
-Refresh: All caches except for enabled aspects will be cleared.
-Disable: Disable all caches
-Enable: Enable all caches
•Flush image/javascript/css cache
V-How to clear the cache using code
To clear cache in Magento using code, you can use one of some methods below:
•Clear all cache files of Magento by the command: rm -rf var/cache/*
<?php
system("rm -rf var/cache/*");
?>
•Clear by Magento’s code
•Clear all frontend caches:
Mage::app()->cleanCache();
•Clear cache by tag:
$tags = array("CONFIG");
Mage::app()->cleanCache($tags);
•Clear all caches:
Mage::app()->getCacheInstance()->flush();
How to pass Magento Certification Exam in 30 days- Magestore.com
Part 2: Form and grid widgets
In previous article, I wrote about some basic concepts of Adminhtml’s architecture. I
aim to dig deeper into the form and grid widgets and show you the easiest way to use
them in your extension.
I-Structure and template
Firstly, I will talk about Grid Widgets in Magento back-end. The Grid Widgets in
Magento have some blocks as below:
•Grid container: extended from the class
Mage_Adminhtml_Block_Widget_Grid_Container with the default template
widget/grid/container.phtml. The grid container contains the grid’s header (title and
buttons) and the grid’s content
•Grid content: extended from the class Mage_Adminhtml_Block_Widget_Grid and its
default template is widget/grid.phtml. The grid content includes a data grid, paging
grid, filter data and massaction for grid. An important method of grid is addColumn.
•Massaction: based on Mage_Adminhtml_Block_Widget_Grid_Massaction with the
default template: widget/grid/massaction.phtml. Massaction is used to operate a list of
data in a grid.
•Serializer: works with grid data (by javascript) and transforms it to serial.
In Magento, the grid container automatically finds the grid content block (based on
two protected attributes: _blockGroup, _controller) to render grid to HTML.
Secondly, the Form in Magento back-end is a basic template. The Form Widgets in
Magento have some blocks as the followings:
•Form container: extended from the class
Mage_Adminhtml_Block_Widget_Form_Container with the default template: widget/
form/container.phtml. The Form container includes form’s components such as
header, content, footer and javascript.
•Form content: extended from the class Mage_Adminhtml_Block_Widget_Form with
the default template: widget/form.phtml. The Form content includes form’s elements
How to pass Magento Certification Exam in 30 days- Magestore.com

such as fieldset, text… (the list of form’s elements in the folder lib/Varien/Data/Form/
Element).
•Form tabs: extended from class Mage_Adminhtml_Block_Widget_Tabs with the
default template:widget/tabs.phtml. Form tabs are used to divide a long form to
multiple tabs. It uses Javascript to add the content for the form.
Similar to the grid container, the form container automatically finds the form content
block (based on protected attributes: _blockGroup and _controller) to render form to
HTML.
II-How to use a grid in your extension
Now, we will create an adminhtml grid with some steps below:
Step 1: Create a grid container block. For example:
app\code\local\Magestore\Tests\Block\Adminhtml\Tests.php
<?php
class Magestore_Tests_Block_Adminhtml_Tests extends
Mage_Adminhtml_Block_Widget_Grid_Container
{
public function __construct(){
$this->_controller = 'adminhtml_tests';
$this->_blockGroup = 'tests';
$this->_headerText = Mage::helper('tests')->__('Item Manager');
$this->_addButtonLabel = Mage::helper('tests')->__('Add Item');
parent::__construct();
}
}
In this block, we need to declare some protected attributes:
_blockGroup: offen is module name
How to pass Magento Certification Exam in 30 days- Magestore.com
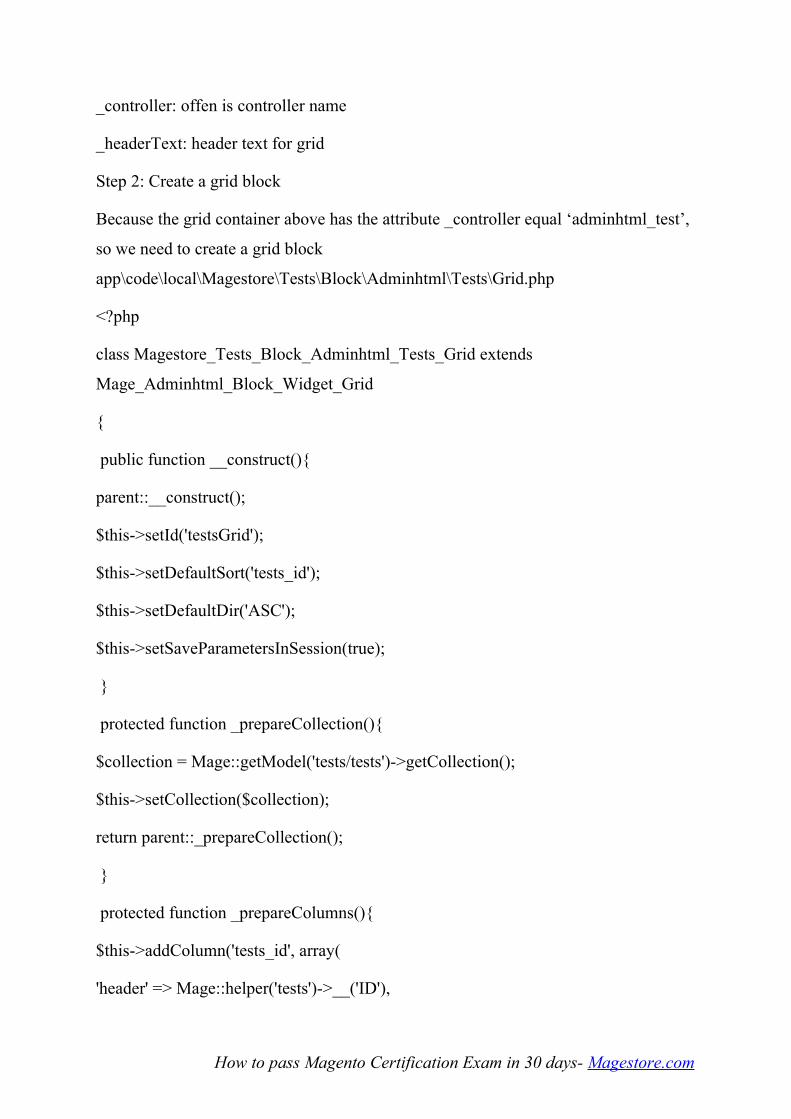
_controller: offen is controller name
_headerText: header text for grid
Step 2: Create a grid block
Because the grid container above has the attribute _controller equal ‘adminhtml_test’,
so we need to create a grid block
app\code\local\Magestore\Tests\Block\Adminhtml\Tests\Grid.php
<?php
class Magestore_Tests_Block_Adminhtml_Tests_Grid extends
Mage_Adminhtml_Block_Widget_Grid
{
public function __construct(){
parent::__construct();
$this->setId('testsGrid');
$this->setDefaultSort('tests_id');
$this->setDefaultDir('ASC');
$this->setSaveParametersInSession(true);
}
protected function _prepareCollection(){
$collection = Mage::getModel('tests/tests')->getCollection();
$this->setCollection($collection);
return parent::_prepareCollection();
}
protected function _prepareColumns(){
$this->addColumn('tests_id', array(
'header' => Mage::helper('tests')->__('ID'),
How to pass Magento Certification Exam in 30 days- Magestore.com
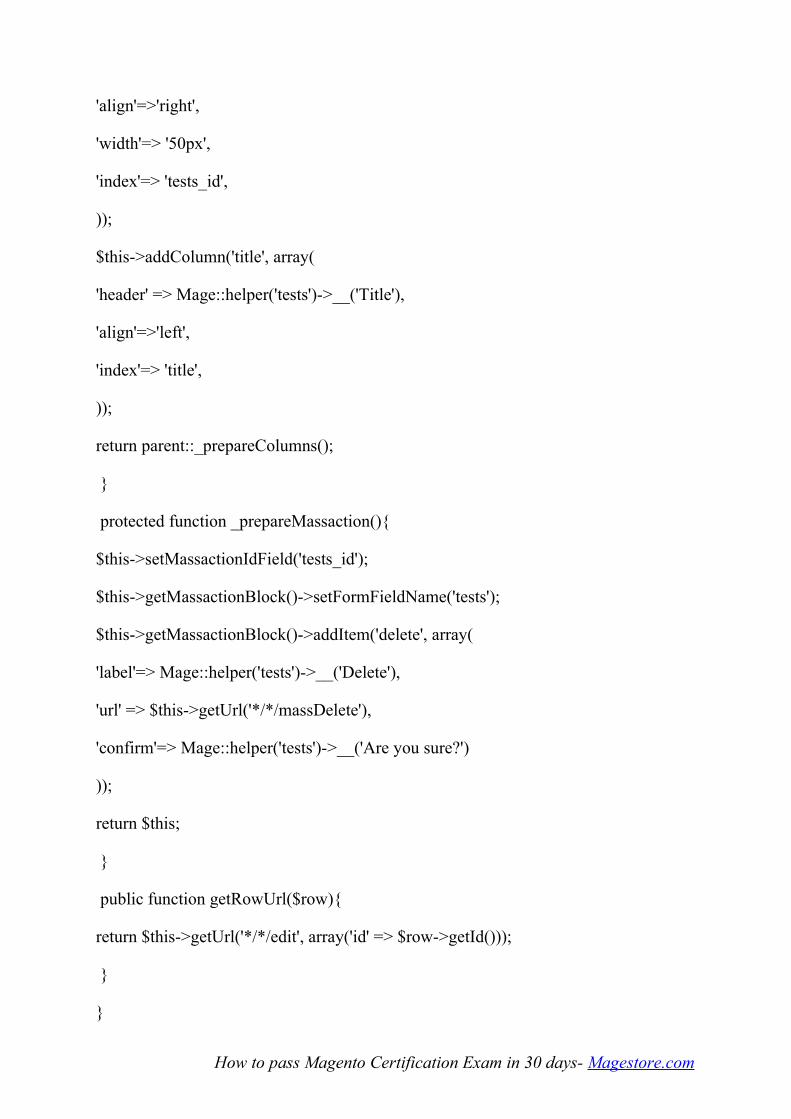
'align'=>'right',
'width'=> '50px',
'index'=> 'tests_id',
));
$this->addColumn('title', array(
'header' => Mage::helper('tests')->__('Title'),
'align'=>'left',
'index'=> 'title',
));
return parent::_prepareColumns();
}
protected function _prepareMassaction(){
$this->setMassactionIdField('tests_id');
$this->getMassactionBlock()->setFormFieldName('tests');
$this->getMassactionBlock()->addItem('delete', array(
'label'=> Mage::helper('tests')->__('Delete'),
'url' => $this->getUrl('*/*/massDelete'),
'confirm'=> Mage::helper('tests')->__('Are you sure?')
));
return $this;
}
public function getRowUrl($row){
return $this->getUrl('*/*/edit', array('id' => $row->getId()));
}
}
How to pass Magento Certification Exam in 30 days- Magestore.com

Step 3: Show the grid in a controllers/action by editing the layout file:
app\design\adminhtml\default\default\layout\tests.xml
<?xml version="1.0"?>
<layout version="0.1.0">
<testsadmin_adminhtml_tests_index>
<reference name="content">
<block type="tests/adminhtml_tests" name="tests" />
</reference>
</testsadmin_adminhtml_tests_index>
</layout>
III-How to use a form in your extension
To use a form in your extension, it’s necessary to create form’s blocks and attach them
to your controller.
Step 1: Create a form container block
(app\code\local\Magestore\Tests\Block\Adminhtml\Tests\Edit.php)
<?php
class Magestore_Tests_Block_Adminhtml_Tests_Edit extends
Mage_Adminhtml_Block_Widget_Form_Container
{
public function __construct(){
parent::__construct();
$this->_objectId = 'id';
$this->_blockGroup = 'tests';
$this->_controller = 'adminhtml_tests';
$this->_mode = 'edit';
How to pass Magento Certification Exam in 30 days- Magestore.com

$this->_updateButton('save', 'label', Mage::helper('tests')->__('Save Item'));
$this->_updateButton('delete', 'label', Mage::helper('tests')->__('Delete Item'));
}
public function getHeaderText(){
if(Mage::registry('tests_data') && Mage::registry('tests_data')->getId())
return Mage::helper('tests')->__("Edit Item '%s'", $this-
>htmlEscape(Mage::registry('tests_data')->getTitle()));
return Mage::helper('tests')->__('Add Item');
}
}
Similar to the grid container, you have to declare some protected attributes, besides
you can set _mode attribute (default is ‘edit‘).
Step 2: Create a form content block
Because form container attribute _mode is ‘edit‘, you need create form block:
(app\code\local\Magestore\Tests\Block\Adminhtml\Tests\Edit\Form.php)
<?php
class Magestore_Tests_Block_Adminhtml_Tests_Edit_Form extends
Mage_Adminhtml_Block_Widget_Form
{
protected function _prepareForm(){
$form = new Varien_Data_Form(array(
'id'=> 'edit_form',
'action' => $this->getUrl('*/*/save', array(
'id' => $this->getRequest()->getParam('id'),
How to pass Magento Certification Exam in 30 days- Magestore.com
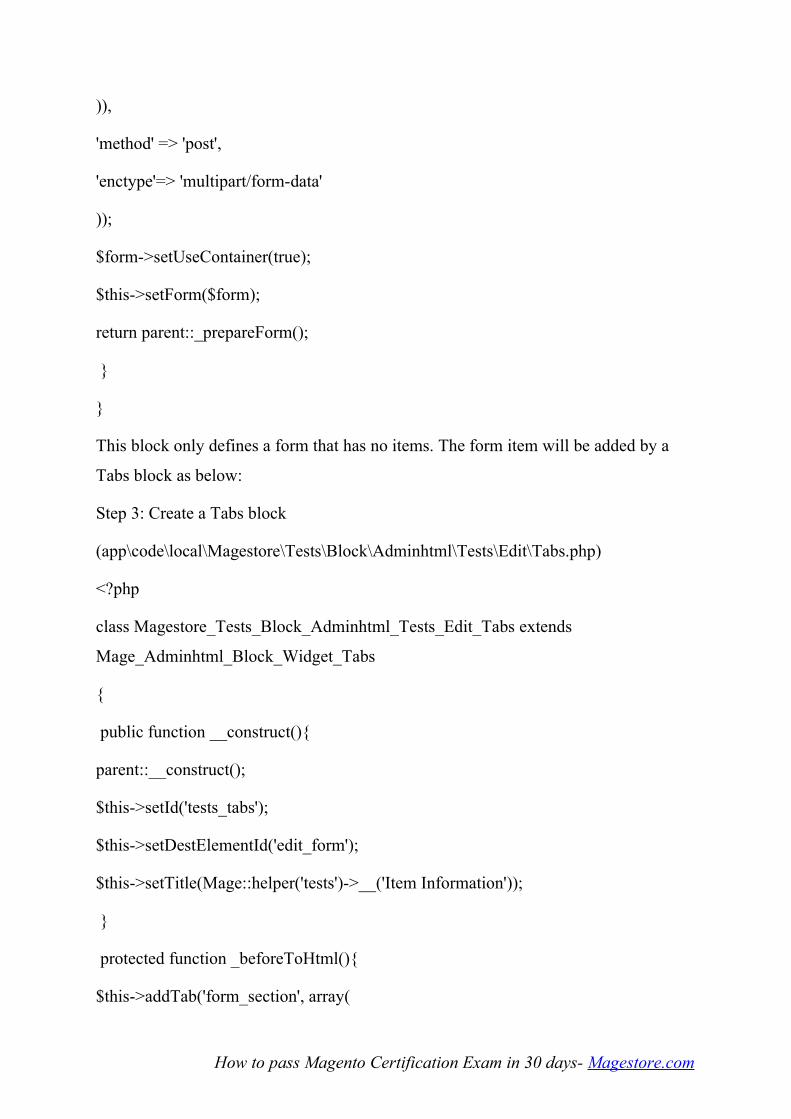
)),
'method' => 'post',
'enctype'=> 'multipart/form-data'
));
$form->setUseContainer(true);
$this->setForm($form);
return parent::_prepareForm();
}
}
This block only defines a form that has no items. The form item will be added by a
Tabs block as below:
Step 3: Create a Tabs block
(app\code\local\Magestore\Tests\Block\Adminhtml\Tests\Edit\Tabs.php)
<?php
class Magestore_Tests_Block_Adminhtml_Tests_Edit_Tabs extends
Mage_Adminhtml_Block_Widget_Tabs
{
public function __construct(){
parent::__construct();
$this->setId('tests_tabs');
$this->setDestElementId('edit_form');
$this->setTitle(Mage::helper('tests')->__('Item Information'));
}
protected function _beforeToHtml(){
$this->addTab('form_section', array(
How to pass Magento Certification Exam in 30 days- Magestore.com
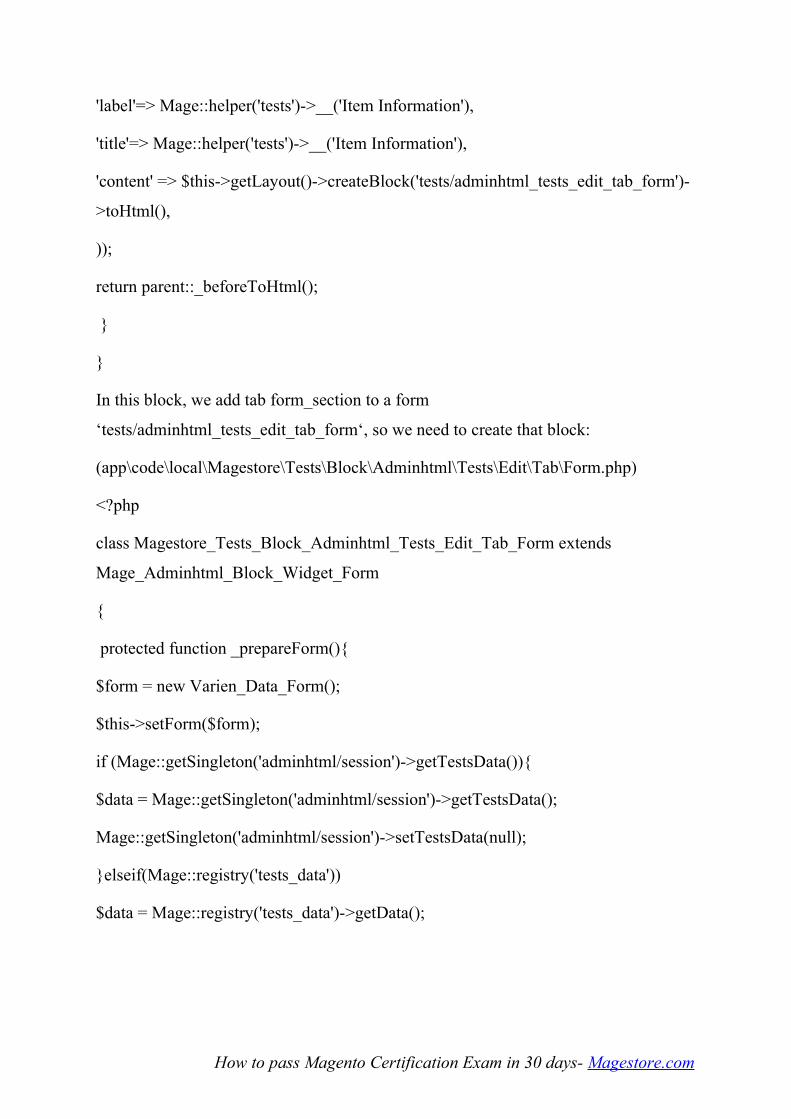
'label'=> Mage::helper('tests')->__('Item Information'),
'title'=> Mage::helper('tests')->__('Item Information'),
'content' => $this->getLayout()->createBlock('tests/adminhtml_tests_edit_tab_form')-
>toHtml(),
));
return parent::_beforeToHtml();
}
}
In this block, we add tab form_section to a form
‘tests/adminhtml_tests_edit_tab_form‘, so we need to create that block:
(app\code\local\Magestore\Tests\Block\Adminhtml\Tests\Edit\Tab\Form.php)
<?php
class Magestore_Tests_Block_Adminhtml_Tests_Edit_Tab_Form extends
Mage_Adminhtml_Block_Widget_Form
{
protected function _prepareForm(){
$form = new Varien_Data_Form();
$this->setForm($form);
if (Mage::getSingleton('adminhtml/session')->getTestsData()){
$data = Mage::getSingleton('adminhtml/session')->getTestsData();
Mage::getSingleton('adminhtml/session')->setTestsData(null);
}elseif(Mage::registry('tests_data'))
$data = Mage::registry('tests_data')->getData();
How to pass Magento Certification Exam in 30 days- Magestore.com
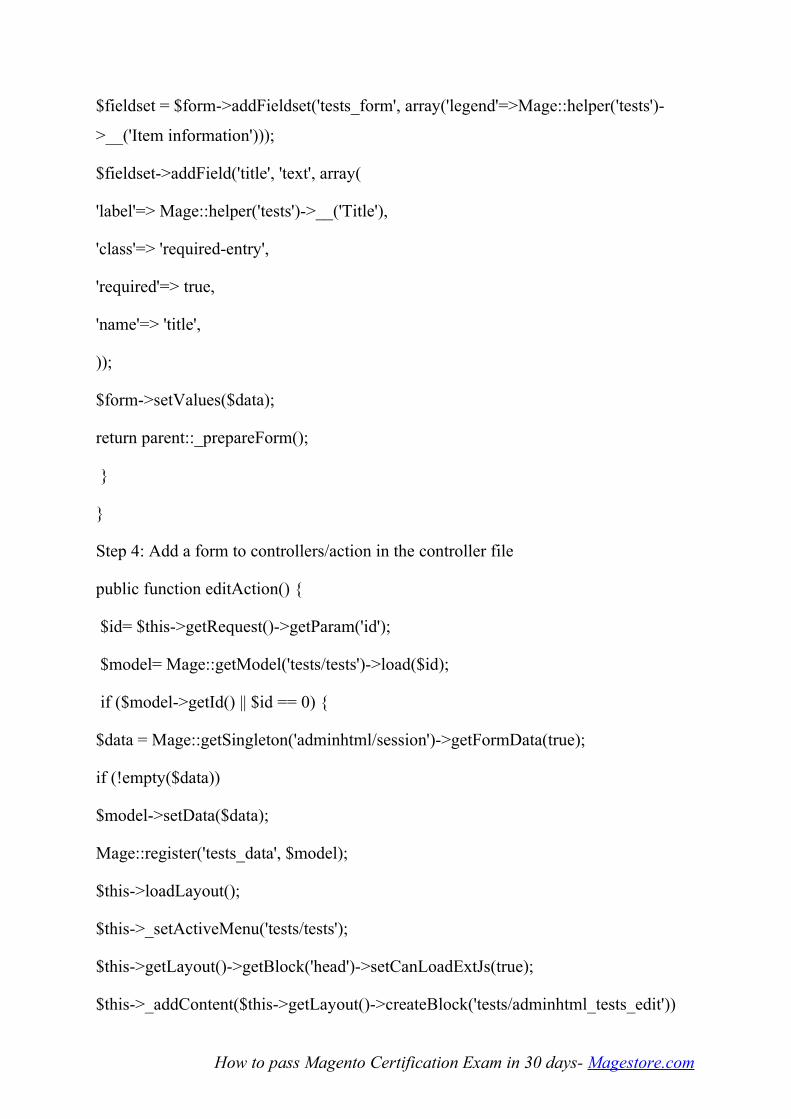
$fieldset = $form->addFieldset('tests_form', array('legend'=>Mage::helper('tests')-
>__('Item information')));
$fieldset->addField('title', 'text', array(
'label'=> Mage::helper('tests')->__('Title'),
'class'=> 'required-entry',
'required'=> true,
'name'=> 'title',
));
$form->setValues($data);
return parent::_prepareForm();
}
}
Step 4: Add a form to controllers/action in the controller file
public function editAction() {
$id= $this->getRequest()->getParam('id');
$model= Mage::getModel('tests/tests')->load($id);
if ($model->getId() || $id == 0) {
$data = Mage::getSingleton('adminhtml/session')->getFormData(true);
if (!empty($data))
$model->setData($data);
Mage::register('tests_data', $model);
$this->loadLayout();
$this->_setActiveMenu('tests/tests');
$this->getLayout()->getBlock('head')->setCanLoadExtJs(true);
$this->_addContent($this->getLayout()->createBlock('tests/adminhtml_tests_edit'))
How to pass Magento Certification Exam in 30 days- Magestore.com

->_addLeft($this->getLayout()->createBlock('tests/adminhtml_tests_edit_tabs'));
$this->renderLayout();
} else {
Mage::getSingleton('adminhtml/session')->addError(Mage::helper('tests')->__('Item
does not exist'));
$this->_redirect('*/*/');
}
}
Here you can see two functions: _addContent and _addLeft to add the form’s content
and tabs for the controllers/action.
How to pass Magento Certification Exam in 30 days- Magestore.com

Part 3: System configuration XML
The information contained in this tutorial is designed to help you obtain further
knowledge of System Configuration XML in Magento Adminhtml with a minimum of
time and effort. First, I will present the basic terms and elements of system
configuration XML and then different methods to fetch a variable from the system
configuration.
I- Basic terms and elements of system configuration XML
Magento provides the system configuration for you to configure your system and your
modules as well. You are able to add your custom module configuration via
system.xml file in the folder etc of your module folder, such as the file
app/code/local/Magestore/Ajaxcart/etc/system.xml
<?xml version="1.0"?>
<config>
<tabs>
<magestore translate="label">
<label>Magestore Extension</label>
<sort_order>400</sort_order>
</magestore>
</tabs>
<sections>
<ajaxcart translate="label" module="ajaxcart">
<class>separator-top</class>
<label>Ajax Cart</label>
<tab>magestore</tab>
<frontend_type>text</frontend_type>
<sort_order>299</sort_order>
How to pass Magento Certification Exam in 30 days- Magestore.com
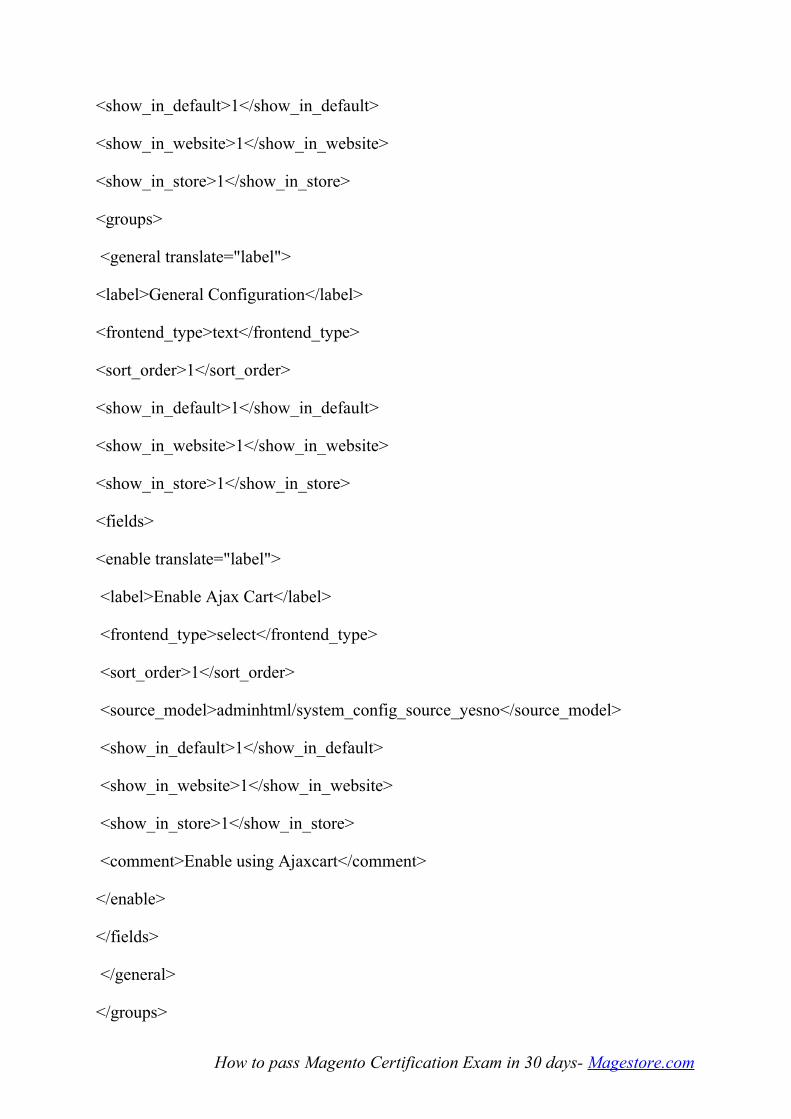
<show_in_default>1</show_in_default>
<show_in_website>1</show_in_website>
<show_in_store>1</show_in_store>
<groups>
<general translate="label">
<label>General Configuration</label>
<frontend_type>text</frontend_type>
<sort_order>1</sort_order>
<show_in_default>1</show_in_default>
<show_in_website>1</show_in_website>
<show_in_store>1</show_in_store>
<fields>
<enable translate="label">
<label>Enable Ajax Cart</label>
<frontend_type>select</frontend_type>
<sort_order>1</sort_order>
<source_model>adminhtml/system_config_source_yesno</source_model>
<show_in_default>1</show_in_default>
<show_in_website>1</show_in_website>
<show_in_store>1</show_in_store>
<comment>Enable using Ajaxcart</comment>
</enable>
</fields>
</general>
</groups>
How to pass Magento Certification Exam in 30 days- Magestore.com
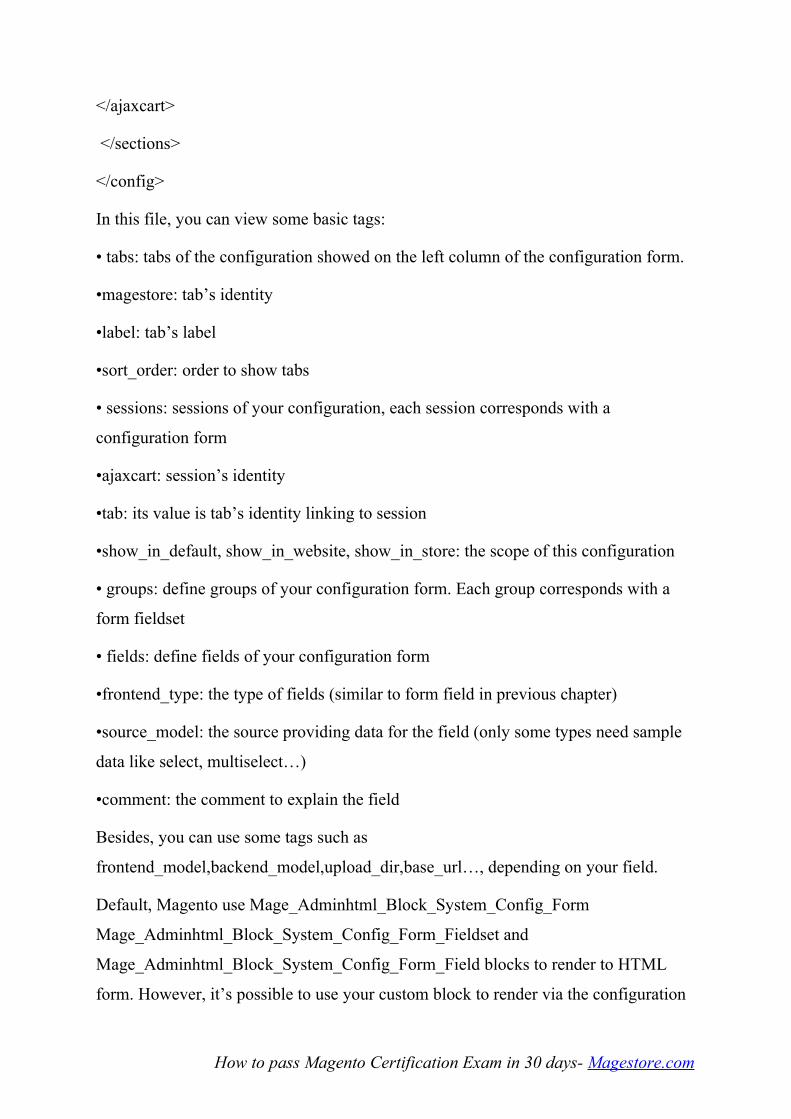
</ajaxcart>
</sections>
</config>
In this file, you can view some basic tags:
• tabs: tabs of the configuration showed on the left column of the configuration form.
•magestore: tab’s identity
•label: tab’s label
•sort_order: order to show tabs
• sessions: sessions of your configuration, each session corresponds with a
configuration form
•ajaxcart: session’s identity
•tab: its value is tab’s identity linking to session
•show_in_default, show_in_website, show_in_store: the scope of this configuration
• groups: define groups of your configuration form. Each group corresponds with a
form fieldset
• fields: define fields of your configuration form
•frontend_type: the type of fields (similar to form field in previous chapter)
•source_model: the source providing data for the field (only some types need sample
data like select, multiselect…)
•comment: the comment to explain the field
Besides, you can use some tags such as
frontend_model,backend_model,upload_dir,base_url…, depending on your field.
Default, Magento use Mage_Adminhtml_Block_System_Config_Form
Mage_Adminhtml_Block_System_Config_Form_Fieldset and
Mage_Adminhtml_Block_System_Config_Form_Field blocks to render to HTML
form. However, it’s possible to use your custom block to render via the configuration
How to pass Magento Certification Exam in 30 days- Magestore.com
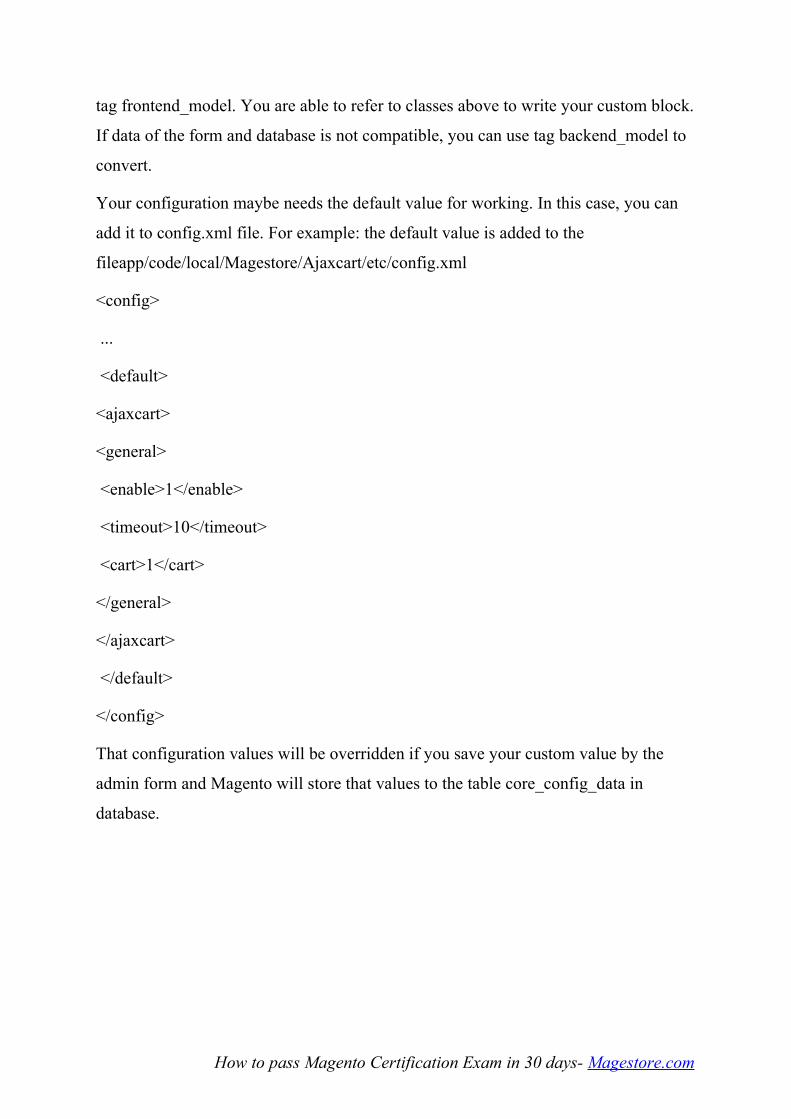
tag frontend_model. You are able to refer to classes above to write your custom block.
If data of the form and database is not compatible, you can use tag backend_model to
convert.
Your configuration maybe needs the default value for working. In this case, you can
add it to config.xml file. For example: the default value is added to the
fileapp/code/local/Magestore/Ajaxcart/etc/config.xml
<config>
...
<default>
<ajaxcart>
<general>
<enable>1</enable>
<timeout>10</timeout>
<cart>1</cart>
</general>
</ajaxcart>
</default>
</config>
That configuration values will be overridden if you save your custom value by the
admin form and Magento will store that values to the table core_config_data in
database.
How to pass Magento Certification Exam in 30 days- Magestore.com

• scope: the scope of the configuration (default,website,store)
• path: the path of the configuration, it equals <session_id>/<group_id>/<field_id>
• value: the value of the configuration
II- Fetch a variable from System configuration
It’s necessary to get the configuration value of fields above. To do that, you can
choose one of the following methods provided by Magento.
Method 1:Mage::getStoreConfig($path,$store)
• $path: is the path to your configuration which is similar to the path stored in
database, it equals<session_id>/<group_id>/<field_id>
• $store: a store to get configuration. It can be a store object, store id or store code.
For instance:
$enable = Mage::getStoreConfig('socialrecommend/general/enable','default');
Method 2: getConfig
You can use the method getConfig of a store/website object with the $path parameter
(as same as above). For example:
$enable = Mage::app()->getStore()-> getConfig('socialrecommend/general/enable');
Method 3: getNode
It’s also possible to use the method getNode of the configuration model. This function
has three parameters:
How to pass Magento Certification Exam in 30 days- Magestore.com

• $path: a path to the configuration. If $scope is store or website, this path will be
similar to two methods above. On the other hand, $path will be the path from tag to
your tag that you want to get configuration.
• $scope: not required. It can be store or website
• $scopeCode: not required. It can be store/website code.
For example:
$enable = Mage::getConfig()->
getNode('socialrecommend/general/enable','store','default');
Or getting the configuration by the path from tag:
$enable = Mage::getConfig()->
getNode('stores/default/socialrecommend/general/enable');
How to pass Magento Certification Exam in 30 days- Magestore.com
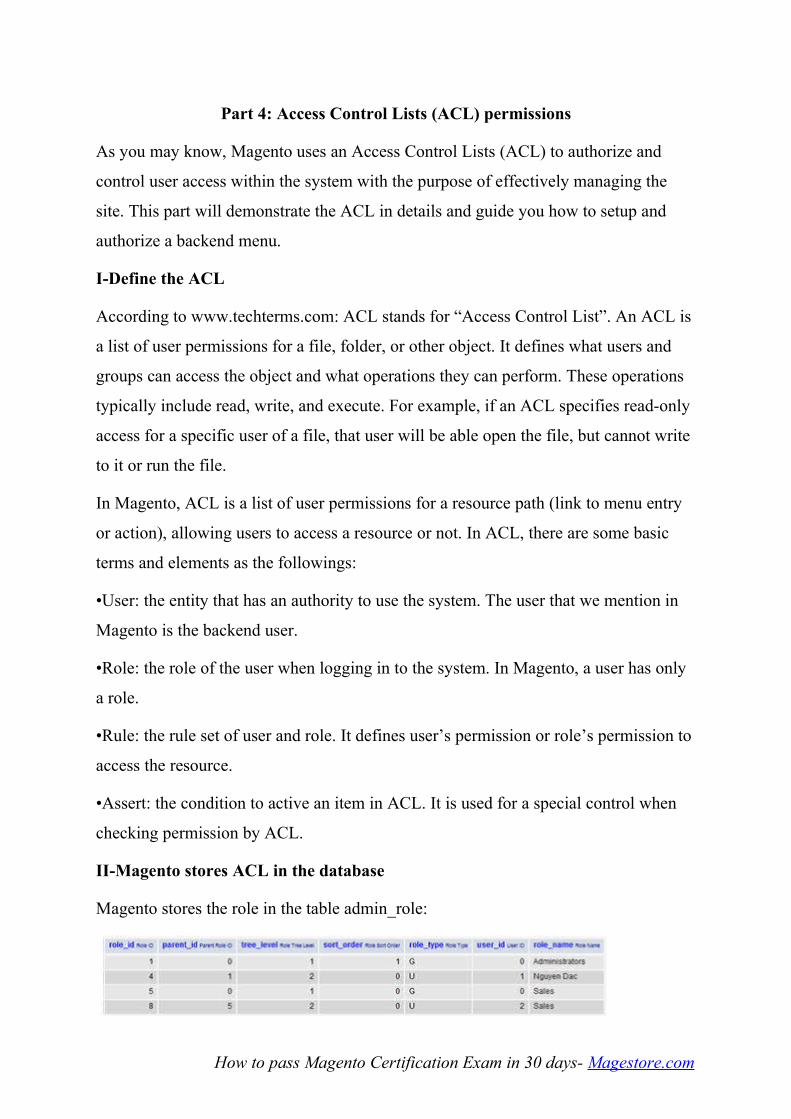
Part 4: Access Control Lists (ACL) permissions
As you may know, Magento uses an Access Control Lists (ACL) to authorize and
control user access within the system with the purpose of effectively managing the
site. This part will demonstrate the ACL in details and guide you how to setup and
authorize a backend menu.
I-Define the ACL
According to www.techterms.com: ACL stands for “Access Control List”. An ACL is
a list of user permissions for a file, folder, or other object. It defines what users and
groups can access the object and what operations they can perform. These operations
typically include read, write, and execute. For example, if an ACL specifies read-only
access for a specific user of a file, that user will be able open the file, but cannot write
to it or run the file.
In Magento, ACL is a list of user permissions for a resource path (link to menu entry
or action), allowing users to access a resource or not. In ACL, there are some basic
terms and elements as the followings:
•User: the entity that has an authority to use the system. The user that we mention in
Magento is the backend user.
•Role: the role of the user when logging in to the system. In Magento, a user has only
a role.
•Rule: the rule set of user and role. It defines user’s permission or role’s permission to
access the resource.
•Assert: the condition to active an item in ACL. It is used for a special control when
checking permission by ACL.
II-Magento stores ACL in the database
Magento stores the role in the table admin_role:
How to pass Magento Certification Exam in 30 days- Magestore.com
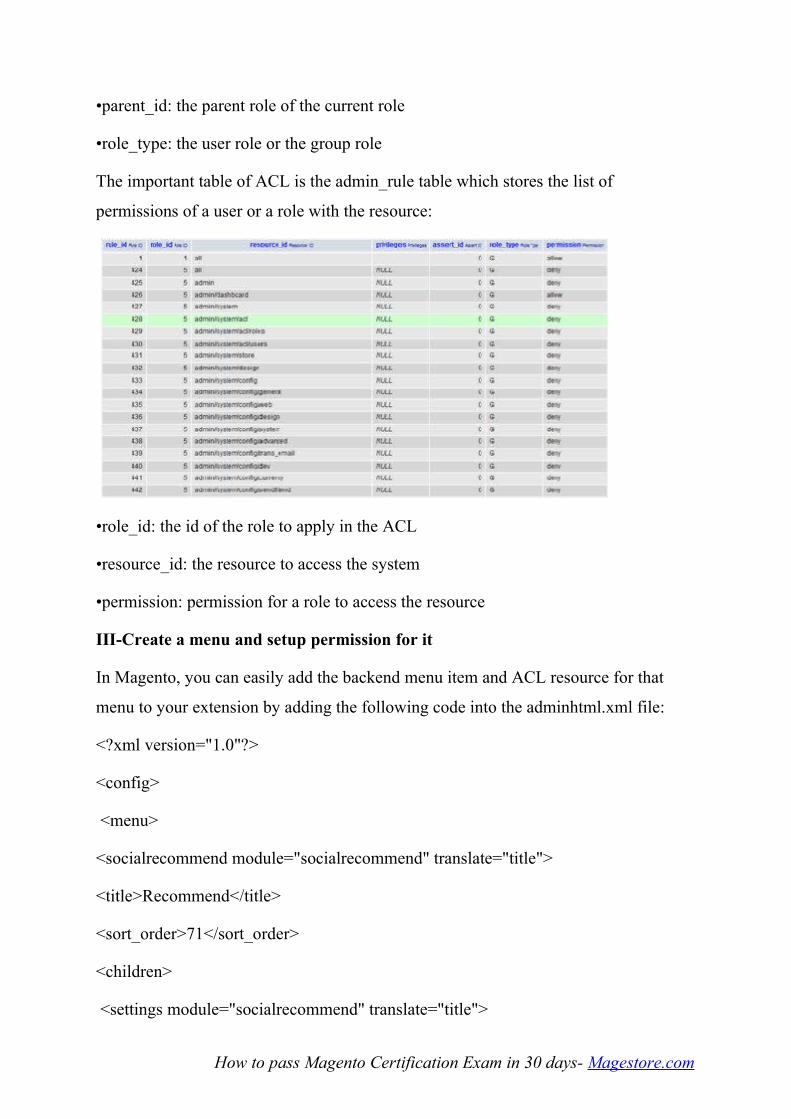
•parent_id: the parent role of the current role
•role_type: the user role or the group role
The important table of ACL is the admin_rule table which stores the list of
permissions of a user or a role with the resource:
•role_id: the id of the role to apply in the ACL
•resource_id: the resource to access the system
•permission: permission for a role to access the resource
III-Create a menu and setup permission for it
In Magento, you can easily add the backend menu item and ACL resource for that
menu to your extension by adding the following code into the adminhtml.xml file:
<?xml version="1.0"?>
<config>
<menu>
<socialrecommend module="socialrecommend" translate="title">
<title>Recommend</title>
<sort_order>71</sort_order>
<children>
<settings module="socialrecommend" translate="title">
How to pass Magento Certification Exam in 30 days- Magestore.com
<title>Settings</title>
<sort_order>1000</sort_order>
<action>adminhtml/system_config/edit/section/socialrecommend</action>
</settings>
</children>
</socialrecommend>
</menu>
<acl>
<resources>
<admin>
<children>
<system>
<children>
<config>
<children>
<socialrecommend module="socialrecommend" translate="title">
<title>Social Recommend</title>
<sort_order>71</sort_order>
</socialrecommend>
</children>
</config>
</children>
</system>
<socialrecommend module="socialrecommend" translate="title">
<title>Recommend</title>
How to pass Magento Certification Exam in 30 days- Magestore.com
<sort_order>71</sort_order>
<children>
<settings module="socialrecommend" translate="title">
<title>Settings</title>
<sort_order>1000</sort_order>
</settings>
</children>
</socialrecommend>
</children>
</admin>
</resources>
</acl>
</config>
-<menu> tag: defines menuentry in the backend
•<title>: the menu title
•<sort_order>: the order to show menu
•<action>: the link of the menu
-<acl> tag: defines the ACL entry to access to backend menu above
•<title>: the title to show in ACL’s resource list
•<sort_order>: the order to show in ACL’s resource list
Now, when adding a role to your system, you can see the ACL item in the list and
select the checkbox corresponding with the resource that allows the role to access:
How to pass Magento Certification Exam in 30 days- Magestore.com
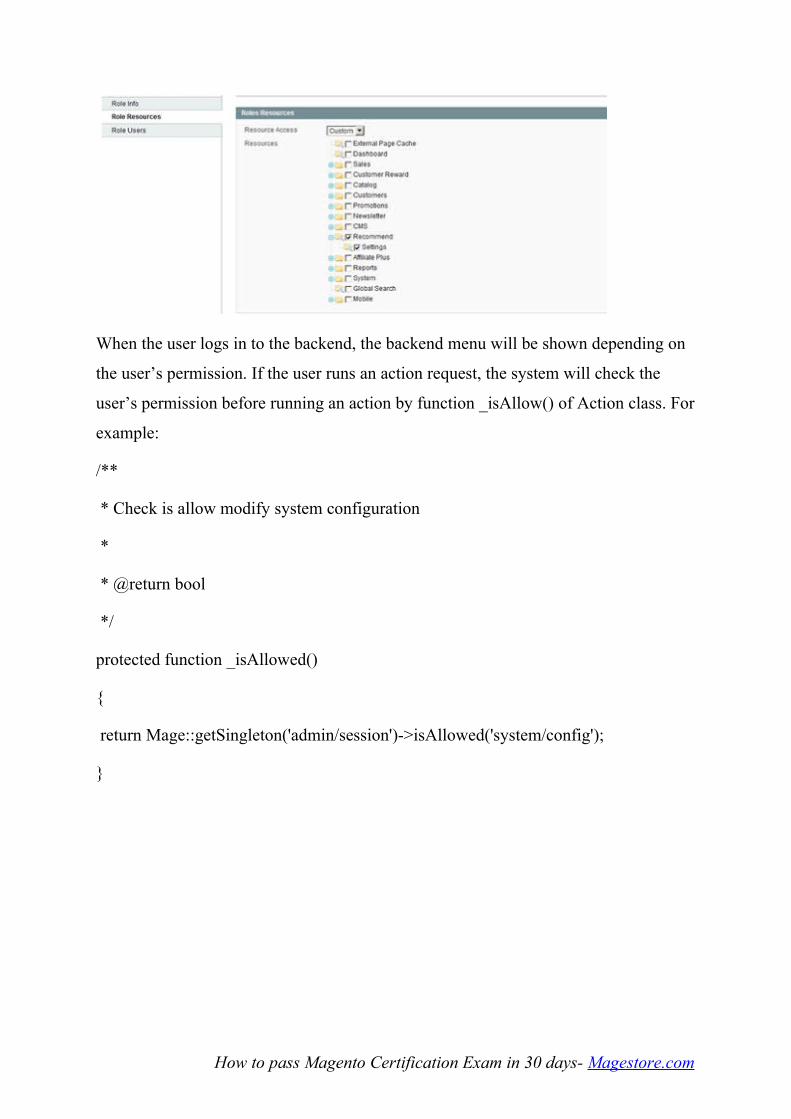
When the user logs in to the backend, the backend menu will be shown depending on
the user’s permission. If the user runs an action request, the system will check the
user’s permission before running an action by function _isAllow() of Action class. For
example:
/**
* Check is allow modify system configuration
*
* @return bool
*/
protected function _isAllowed()
{
return Mage::getSingleton('admin/session')->isAllowed('system/config');
}
How to pass Magento Certification Exam in 30 days- Magestore.com
Part 5: Magento extensions
We will continue to explore the Adminhtml by discussing Magento extensions – the
issue that always grabs a lot of attraction and interest of many people. Three main
following parts will be covered in this tutorial:
•Magento extensions
•Decouple extensions from Magento
•Install extensions from Magento Connect
Are you ready? Let’s get started!
I-Magento extensions
Magento primarily works on a base of modules. An extension is one or more modules
providing new features and functionalies for a Magento site.
Magento extensions are divided into 3 types: community, core, commercial.
•core: extensions developed by Magento core team. These extensions are located in
theapp/code/core directory. You need to keep your extensions out of the core to avoid
any conflicts with core extensions or any future updates.
•community: community-distributed extensions developed by Magento community
members or partners. These extensions are located in the app/code/community
directory. You can install them through Magento Connect or download from a source.
•commercial: extensions developed by 3rd party. They are often located in the
app/code/localdirectory and offered for sale. To install these extensions, you can
purchase them from the seller then upload the codes to your site.
II-Decouple extensions from Magento
There are two methods for you to choose in order to decouple extensions from a
Magento site.
The first way: You can copy the codes of your extension from the Magento site then
paste these code files to a folder through a structured directory.
The second way: Use the Package function in the backend of your Magento site.
How to pass Magento Certification Exam in 30 days- Magestore.com

• Step1: Login to the backend and select the menu System > Magento Connect >
Package Extensions
• Step 2: Complete the form with the information:
•The package info: includes fields as name, description… for the extension package
•Release info: releases information for the extension as a released versions, released
stability and notes.
•Author: the author’s information (name, user, email) of the extension
•Dependencies: the extension’s dependencies
•Contents: contains the information of extension’s folders and files that will be
exported to a package from the Magento site
• Step 3: Click on Save Data and Create Package button to create a packaged
extension from your site.
You can use the extension that has been decoupled to set up it into another Magento
site.
III-Install extensions from Magento Connect
• Step 1: Go to http://www.magentocommerce.com/magento-connect/ and search for
the extensions that you need. In the extension view page, you can get the extension’s
key:
You can use the extension that has been decoupled to set up another Magento site.
How to pass Magento Certification Exam in 30 days- Magestore.com
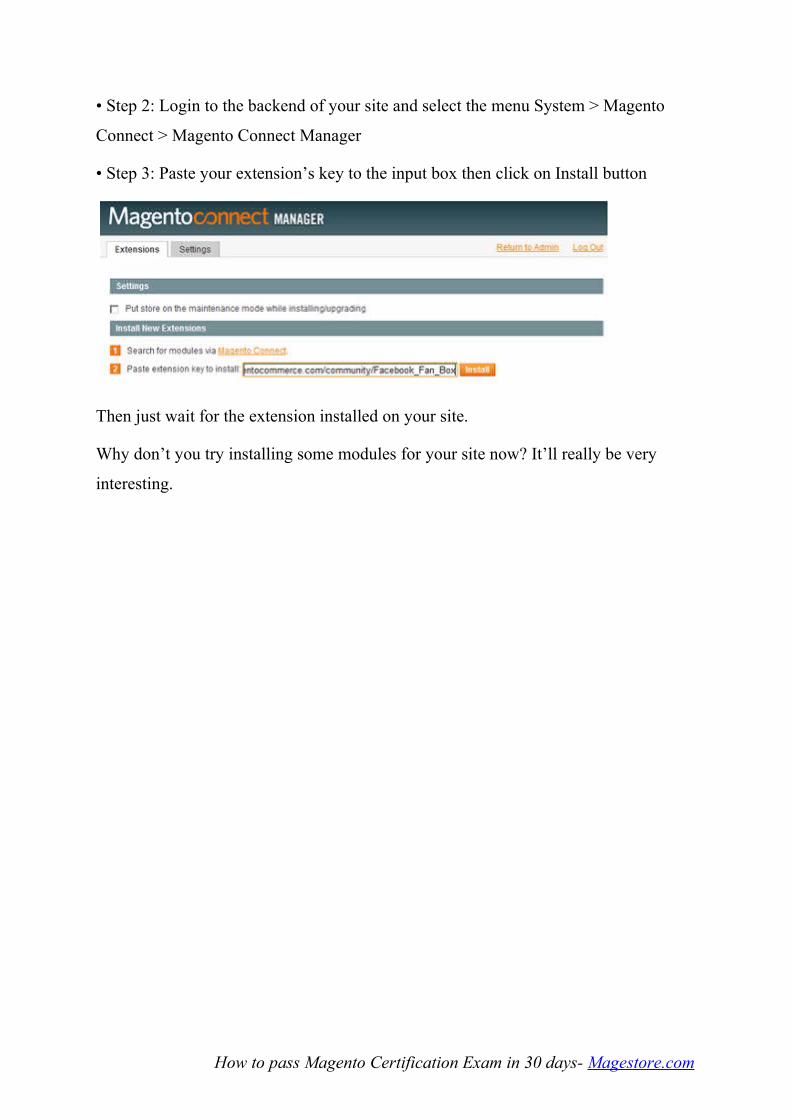
• Step 2: Login to the backend of your site and select the menu System > Magento
Connect > Magento Connect Manager
• Step 3: Paste your extension’s key to the input box then click on Install button
Then just wait for the extension installed on your site.
Why don’t you try installing some modules for your site now? It’ll really be very
interesting.
How to pass Magento Certification Exam in 30 days- Magestore.com

TOPIC 7
Part 1: Product Types
Magento provides users with different product type profiles to select when creating a
new product. Choosing the right product type is very important for accessing the
appropriate set of features required to sell your items. This part is designed to help you
understand the differences among product types and what they’re intended to set up
your Magento products.
I-Standard Product Types
Magento has 6 standard product types, including: Simple product, grouped product,
configurable product, virtual product, bundle product and downloadable product.
• Simple product: is an instance of physical products, having a single configuration
(one-size-fits-all). For example: a cell-phone, a monitor…
• Grouped product: is a product type that allows you to create a new product using one
or more existing products, such as Magento Red Furniture Set product in Magento’s
sample data. This product group has 3 separated products: Ottoman, Chair, Couch and
each one is available for purchases. When buying a grouped product, customers can
choose each separated product to add to cart:
• Configurable product: is a product type allowing customers to select the variant that
they want by choosing options. For instance: Zolof The Rock And Roll Destroyer:
How to pass Magento Certification Exam in 30 days- Magestore.com

LOL Cat T-shirt has its size andcolor for customers to choose. A simple way in this
case is that you can create some simple products with different colors and sizes to sell.
However, configurable product type helps you create the product more convenient,
faster, and easier to manage products.
• Virtual product: is a product type used for products that don’t have a physical
instance. It’s always used for service products or intellectual products (as software).
Those products don’t need to be shipped.
• Bundle product: is also known as a kit. A bundle product is one product in the
customer’s shopping cart but in fact, it is made of a number of other products.
Magento’s sample data has Computerproduct which is bundled from other products:
Case, Processor, Memory…
How to pass Magento Certification Exam in 30 days- Magestore.com

• Downloadable product: is similar to the virtual product (like an instance of the
virtual product).But these products have one or more digital files for download. This
is great for software, digital music files and other electronic products. Otherwise,
downloadable files can be used as a configuration for customers to choose when
adding to cart.
II-Product type’s modules
Magento has 6 standard product types, but just 4 product types are implemented as the
parts of the Mage_Catalog module. The bundle product and downloadable product are
implemented in the separated modules (Mage_Bundle and Mage_Downloadable). A
product type needs to be configurated (in global node) as same as below:
<catalog>
<product>
<type>
<configurable translate="label" module="catalog">
How to pass Magento Certification Exam in 30 days- Magestore.com
<label>Configurable Product</label>
<model>catalog/product_type_configurable</model>
<price_model>catalog/product_type_configurable_price</price_model>
<composite>1</composite>
<allow_product_types>
<simple/>
<virtual/>
</allow_product_types>
<index_priority>30</index_priority>
<price_indexer>catalog/product_indexer_price_configurable</price_indexer>
</configurable>
</type>
</product>
</catalog>
<model>: a model to work with the product type
•<composite>: product is simple or composite
•<price_model>: a model to work with the product type’s price
If you want to add a new product type, you can use these configurations to register
with the system. The detail instruction for Magento themes will be available in the
next tutorials. Stay tuned!
How to pass Magento Certification Exam in 30 days- Magestore.com
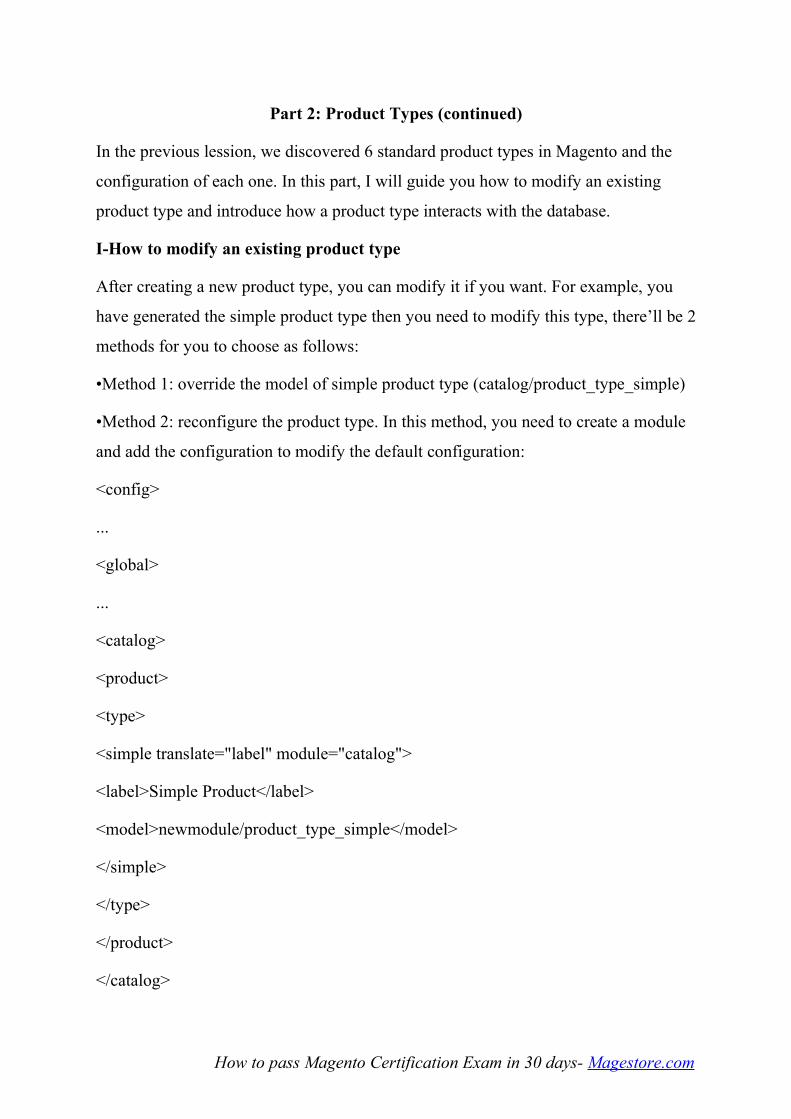
Part 2: Product Types (continued)
In the previous lession, we discovered 6 standard product types in Magento and the
configuration of each one. In this part, I will guide you how to modify an existing
product type and introduce how a product type interacts with the database.
I-How to modify an existing product type
After creating a new product type, you can modify it if you want. For example, you
have generated the simple product type then you need to modify this type, there’ll be 2
methods for you to choose as follows:
•Method 1: override the model of simple product type (catalog/product_type_simple)
•Method 2: reconfigure the product type. In this method, you need to create a module
and add the configuration to modify the default configuration:
<config>
...
<global>
...
<catalog>
<product>
<type>
<simple translate="label" module="catalog">
<label>Simple Product</label>
<model>newmodule/product_type_simple</model>
</simple>
</type>
</product>
</catalog>
How to pass Magento Certification Exam in 30 days- Magestore.com
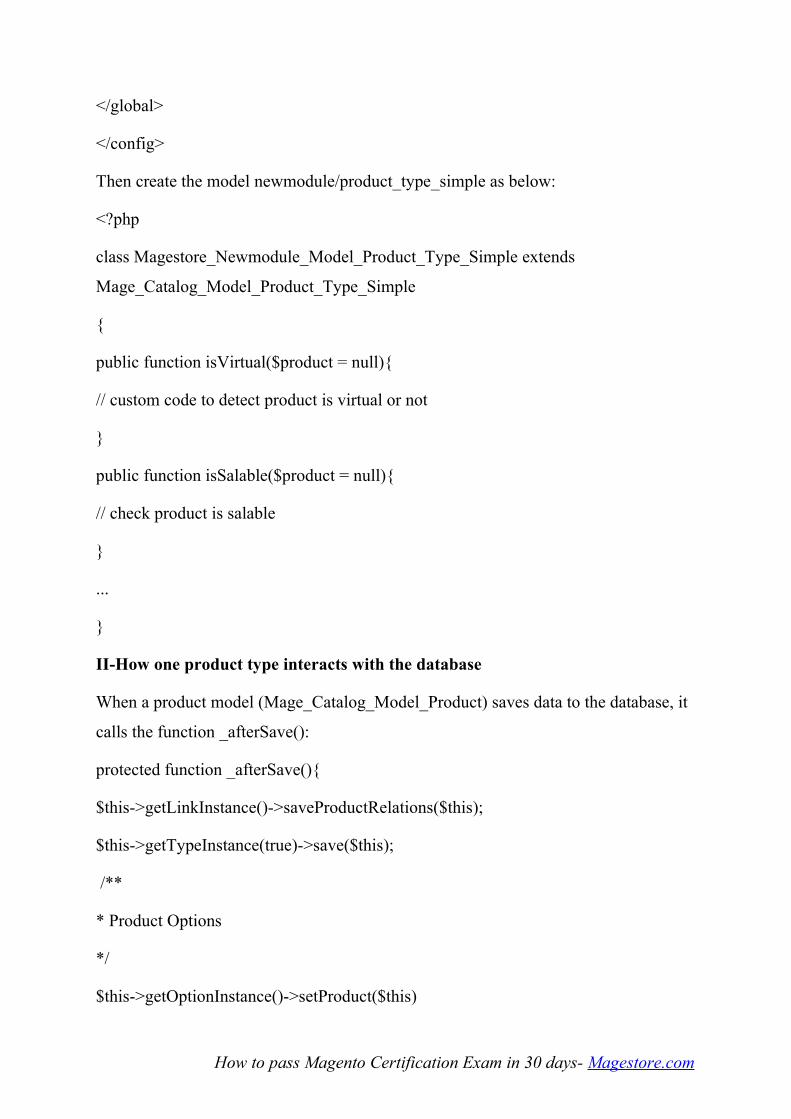
</global>
</config>
Then create the model newmodule/product_type_simple as below:
<?php
class Magestore_Newmodule_Model_Product_Type_Simple extends
Mage_Catalog_Model_Product_Type_Simple
{
public function isVirtual($product = null){
// custom code to detect product is virtual or not
}
public function isSalable($product = null){
// check product is salable
}
...
}
II-How one product type interacts with the database
When a product model (Mage_Catalog_Model_Product) saves data to the database, it
calls the function _afterSave():
protected function _afterSave(){
$this->getLinkInstance()->saveProductRelations($this);
$this->getTypeInstance(true)->save($this);
/**
* Product Options
*/
$this->getOptionInstance()->setProduct($this)
How to pass Magento Certification Exam in 30 days- Magestore.com
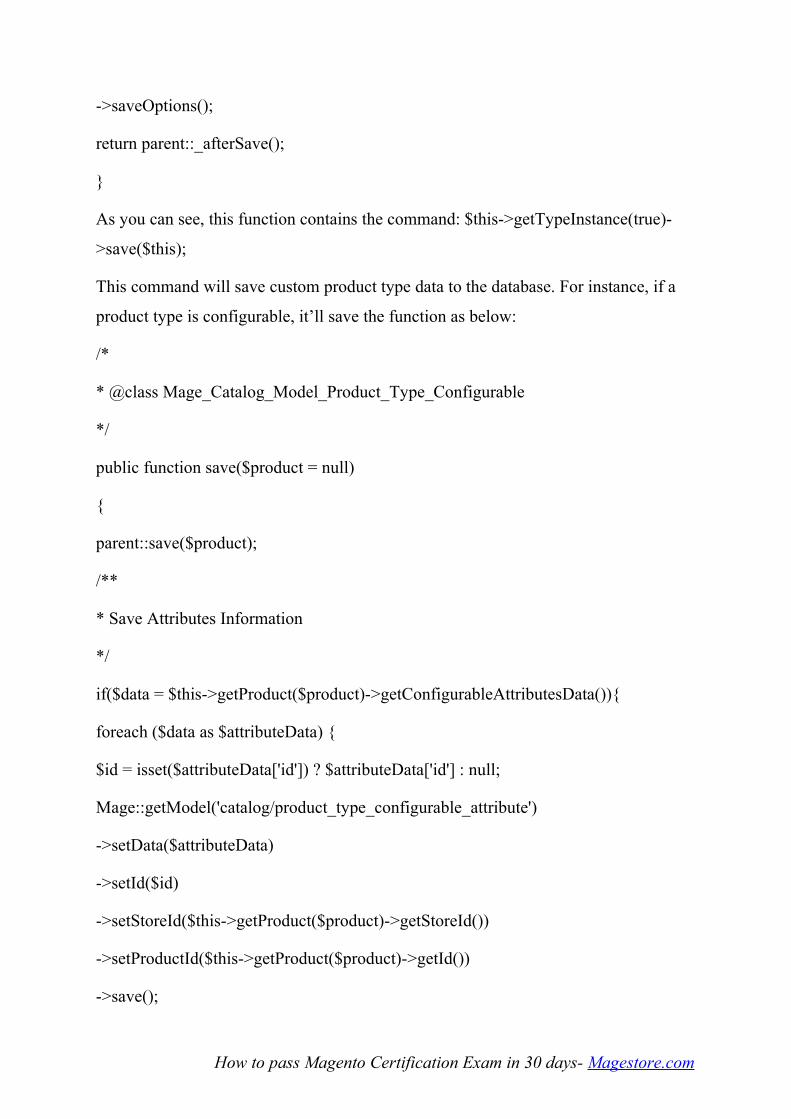
->saveOptions();
return parent::_afterSave();
}
As you can see, this function contains the command: $this->getTypeInstance(true)-
>save($this);
This command will save custom product type data to the database. For instance, if a
product type is configurable, it’ll save the function as below:
/*
* @class Mage_Catalog_Model_Product_Type_Configurable
*/
public function save($product = null)
{
parent::save($product);
/**
* Save Attributes Information
*/
if($data = $this->getProduct($product)->getConfigurableAttributesData()){
foreach ($data as $attributeData) {
$id = isset($attributeData['id']) ? $attributeData['id'] : null;
Mage::getModel('catalog/product_type_configurable_attribute')
->setData($attributeData)
->setId($id)
->setStoreId($this->getProduct($product)->getStoreId())
->setProductId($this->getProduct($product)->getId())
->save();
How to pass Magento Certification Exam in 30 days- Magestore.com

}
}
/**
* Save product relations
*/
$data = $this->getProduct($product)->getConfigurableProductsData();
if (is_array($data)) {
$productIds = array_keys($data);
Mage::getResourceModel('catalog/product_type_configurable')
->saveProducts($this->getProduct($product), $productIds);
}
return $this;
}
How to pass Magento Certification Exam in 30 days- Magestore.com

Part 3: Price Generation
As we know, price is an important attribute of a product. However, have you known
how Magento stores and calculates the price or how to adjust the price of products? In
this part, we will solve these issues.
I-Basic concepts of price generation
Price is the basic attribute of a product and it’s stored in the database. The price of an
instance product is calculated based on many factors. Magento uses the price model of
each product type to calculate the price. The final price is used as the final price of
products when products are added to cart (maybe it’s after discounting, applying the
special price, tier price…).
In product model (catalog/product), you can see the function getPrice() as below:
/**
* Get product price throught type instance
*
* @return unknown
*/
public function getPrice()
{
return $this->getPriceModel()->getPrice($this);
}
The price model depends on the product type. The default price model is
catalog/product_type_priceand it has two important functions: getPrice() and
getFinalPrice().
/**
* Default action to get price of product
*
How to pass Magento Certification Exam in 30 days- Magestore.com
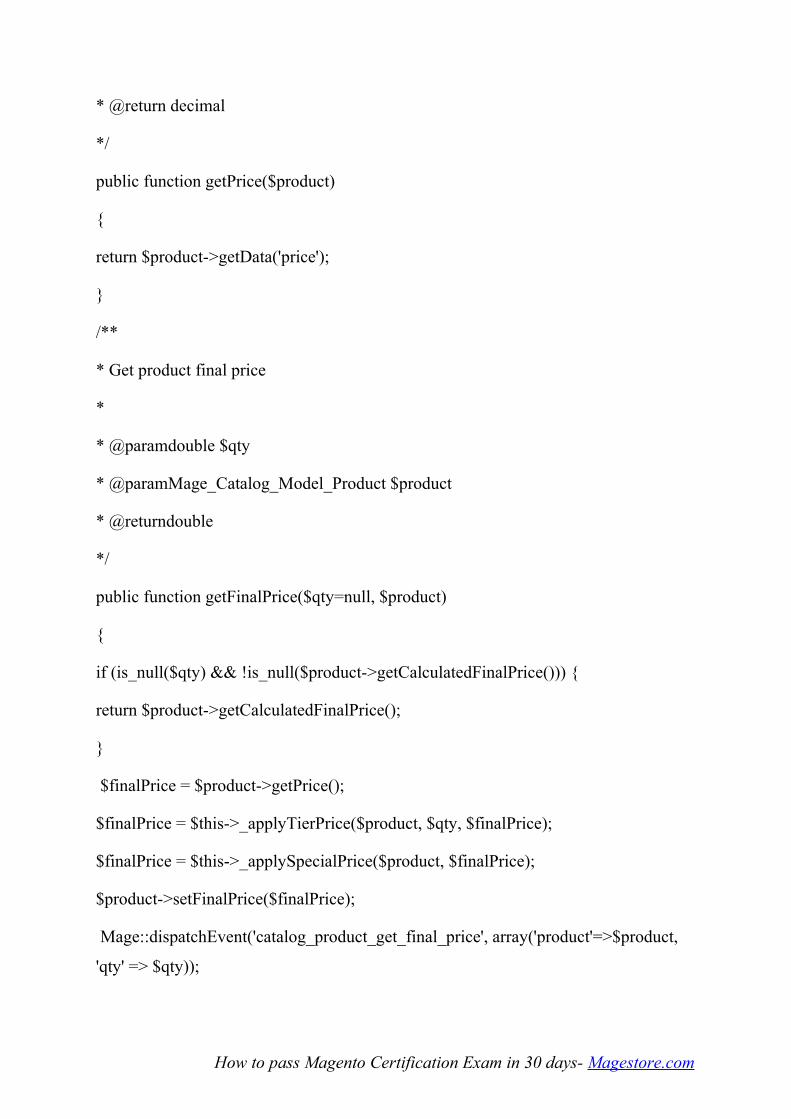
* @return decimal
*/
public function getPrice($product)
{
return $product->getData('price');
}
/**
* Get product final price
*
* @paramdouble $qty
* @paramMage_Catalog_Model_Product $product
* @returndouble
*/
public function getFinalPrice($qty=null, $product)
{
if (is_null($qty) && !is_null($product->getCalculatedFinalPrice())) {
return $product->getCalculatedFinalPrice();
}
$finalPrice = $product->getPrice();
$finalPrice = $this->_applyTierPrice($product, $qty, $finalPrice);
$finalPrice = $this->_applySpecialPrice($product, $finalPrice);
$product->setFinalPrice($finalPrice);
Mage::dispatchEvent('catalog_product_get_final_price', array('product'=>$product,
'qty' => $qty));
How to pass Magento Certification Exam in 30 days- Magestore.com
$finalPrice = $product->getData('final_price');
$finalPrice = $this->_applyOptionsPrice($product, $qty, $finalPrice);
return max(0, $finalPrice);
The price model calculates the price and returns it to the instance product.
However, when Magento loads a product collection, the price calculation for each
product will make the system runs slowly. Thus Magento uses
catalog/product_indexer_price model to index andcatalog/product_index_price table
to store the index result. When product collection is loaded or filtered (by price), the
index table is used to join with product table, so the collection will be loaded (filtered)
faster.
II-Adjust price generation for products
When you develop a module or custom your Magento site, if you need to adjust the
price for products, you can choose one of the following methods:
• Method 1: If you want to adjust the price for a product type, you can change the
configuration of that product type. For example:
<config>
...
<global>
...
<catalog>
<product>
<type>
<simple translate="label" module="catalog">
<price_model><!-- YOUR_PRICE_MODEL --></price_model>
</simple>
</type>
How to pass Magento Certification Exam in 30 days- Magestore.com
</product>
</catalog>
</global>
</config>
YOUR_PRICE_MODEL is your custom model to calculate the price. You can write
this model as below:
<?php
class /*YOUR_PRICE_MODEL*/ extends
Mage_Catalog_Model_Product_Type_Price
{
public function getPrice($product){
// your custom calculate price
}
public function getFinalPrice($qty=null, $product){
// your custom calculate final price
}
}
• Method 2: Override the product model or price model. Please read ourtutorial
guiding how to override a model in Magento. It’s possible to write your own custom
code to calculate the price into the override model.
• Method 3: You see that the function getFinalPrice() in model
catalog/product_type_price has an eventcatalog_product_get_final_price, so you can
use this event to adjust the product price. We have provided you with a tutorial which
guides you how to catch an event in Magento already. With this event, you can set the
final price for product as you want.
How to pass Magento Certification Exam in 30 days- Magestore.com

Part 4: Category Structure
In this part, we will explore how Magento works with a category which helps
customers easily find products that they need.
Category is understood as a group of products which have the same characteristics. I’ll
introduce to you the category tree, the way Magento stores database of categories and
how to use the category model in turn.
I-Category tree
Magento designs a category by tree structure. The category tree has a root category
(the category without a parent category) and a subcategory (the child category of the
parent category).
In Magento, a store associates with a root category. It makes you easily manage
categories/products of each store. A category links to products assigned to it and the
products of its child category. You can select these products in the tab Category
Products in the backend.
How to pass Magento Certification Exam in 30 days- Magestore.com
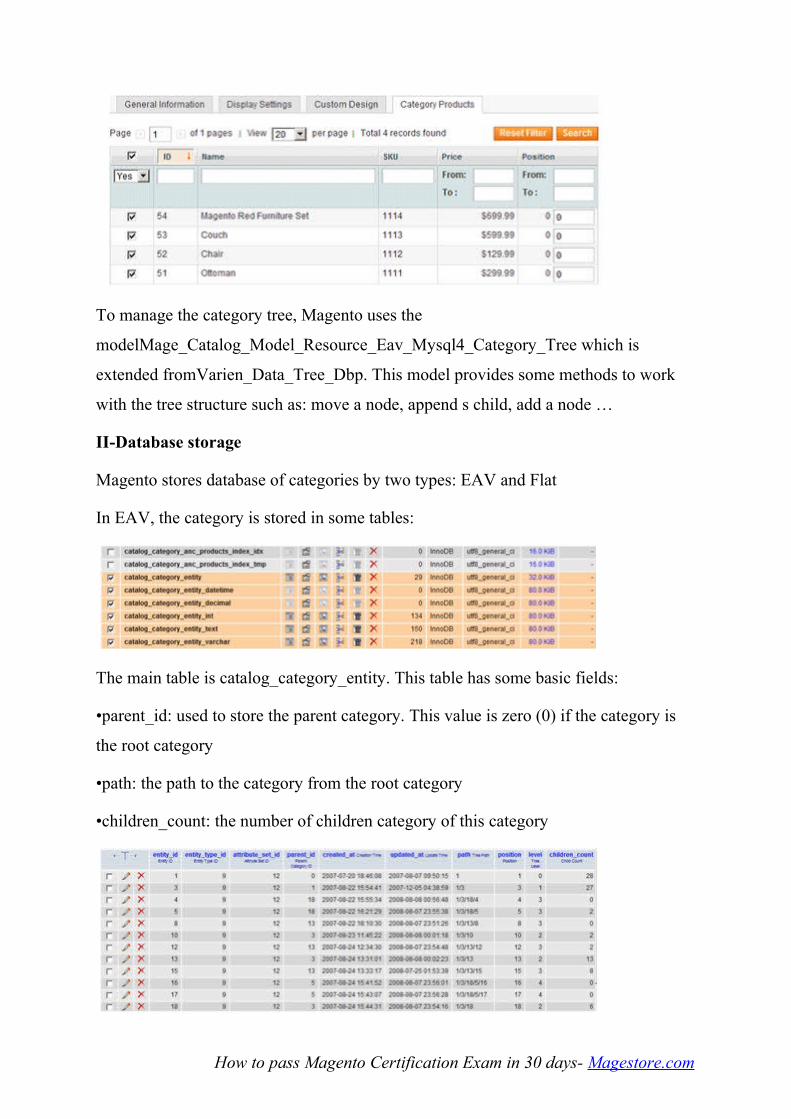
To manage the category tree, Magento uses the
modelMage_Catalog_Model_Resource_Eav_Mysql4_Category_Tree which is
extended fromVarien_Data_Tree_Dbp. This model provides some methods to work
with the tree structure such as: move a node, append s child, add a node …
II-Database storage
Magento stores database of categories by two types: EAV and Flat
In EAV, the category is stored in some tables:
The main table is catalog_category_entity. This table has some basic fields:
•parent_id: used to store the parent category. This value is zero (0) if the category is
the root category
•path: the path to the category from the root category
•children_count: the number of children category of this category
How to pass Magento Certification Exam in 30 days- Magestore.com
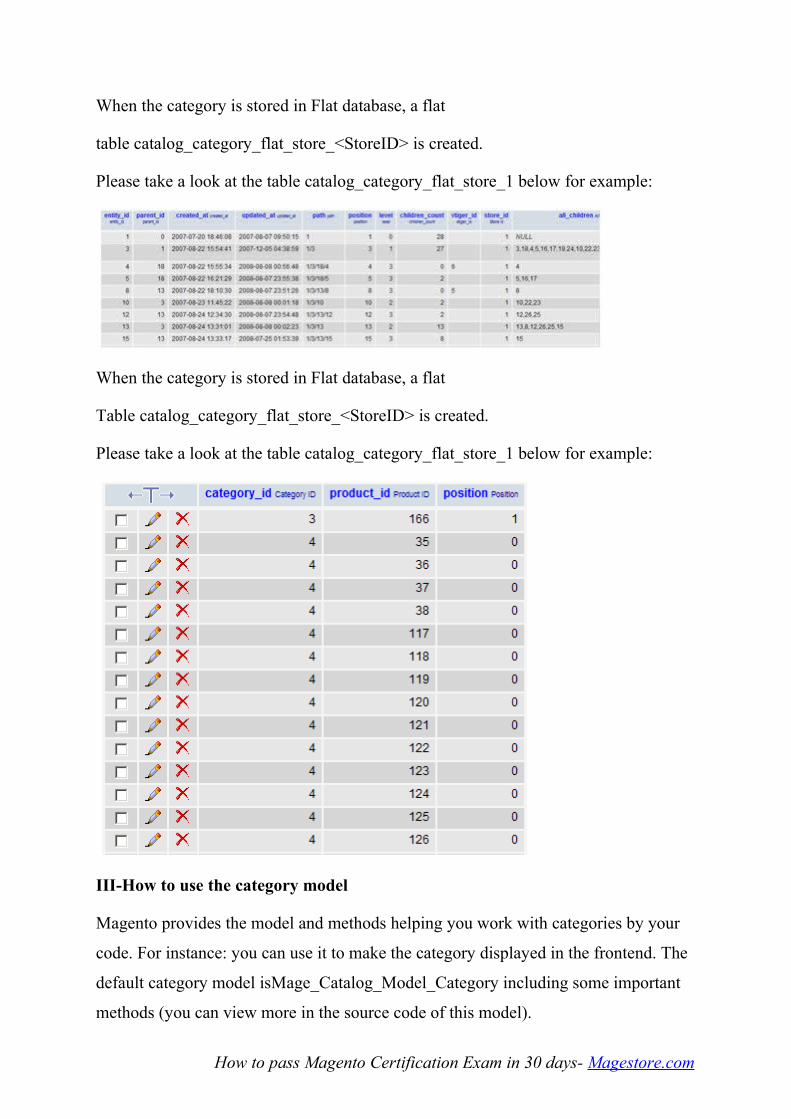
When the category is stored in Flat database, a flat
table catalog_category_flat_store_<StoreID> is created.
Please take a look at the table catalog_category_flat_store_1 below for example:
When the category is stored in Flat database, a flat
Table catalog_category_flat_store_<StoreID> is created.
Please take a look at the table catalog_category_flat_store_1 below for example:
III-How to use the category model
Magento provides the model and methods helping you work with categories by your
code. For instance: you can use it to make the category displayed in the frontend. The
default category model isMage_Catalog_Model_Category including some important
methods (you can view more in the source code of this model).
How to pass Magento Certification Exam in 30 days- Magestore.com

•getParentCategory(): this method returns the parent category of the current category
•getPathInStore(): the path of the current category that is calculated from the root
category of the store (not includes the root category id)
•hasChildren(): detects the category to have children or not
•getCategories($parent, $recursionLevel = 0, $sorted=false, $asCollection=false,
$toLoad=true): gets categories according to parents with the parameter that you
provide
•getChildrenCategories: gets children categories of the current category
•…
Understanding how to work with categories in Magento is very practical for you to
manage your store more effectively on your own initiative.
How to pass Magento Certification Exam in 30 days- Magestore.com

Part 5: Catalog Rules
After discovering how Magento works with categories, I continued to research on
Catalog Rules and found them very interesting. As you may know, Magento has two
types of price rules: catalog and shopping cart price rules. While shopping cart price
rules are applied in the shopping cart, catalog rules are applied on products before
they are added to the cart. They are used when you have a new sales policy for a set of
products.
•Rule model and conditions
Firstly, conditions are the core of a catalog rule model. They help the system
determine products that were discounted. Catalog rules use product conditions which
are similar to:
This condition will filter products of category 13 to apply this rule. When you save
and apply the rule, the product prices will be re-indexed by the function applyAll() of
the rule model (catalogrule/rule):
/**
* Apply all price rules, invalidate related cache and refresh price index
*
* @return Mage_CatalogRule_Model_Rule
*/
public function applyAll()
{
$this->_getResource()->applyAllRulesForDateRange();
How to pass Magento Certification Exam in 30 days- Magestore.com
$this->_invalidateCache();
$indexProcess = Mage::getSingleton('index/indexer')-
>getProcessByCode('catalog_product_price');
if ($indexProcess) {
$indexProcess->reindexAll();
}
}
When calculating prices for products, catalog rules catch the event
catalog_product_get_final_price to change the product’s prices:
<frontend>
<events>
<catalog_product_get_final_price>
<observers>
<catalogrule>
<class>catalogrule/observer</class>
<method>processFrontFinalPrice</method>
</catalogrule>
</observers>
</catalog_product_get_final_price>
</events>
</frontend>
The product’s price was calculated by the function processFrontFinalPrice based on
catalog rules data. The price is shown in the frontend as below:
How to pass Magento Certification Exam in 30 days- Magestore.com
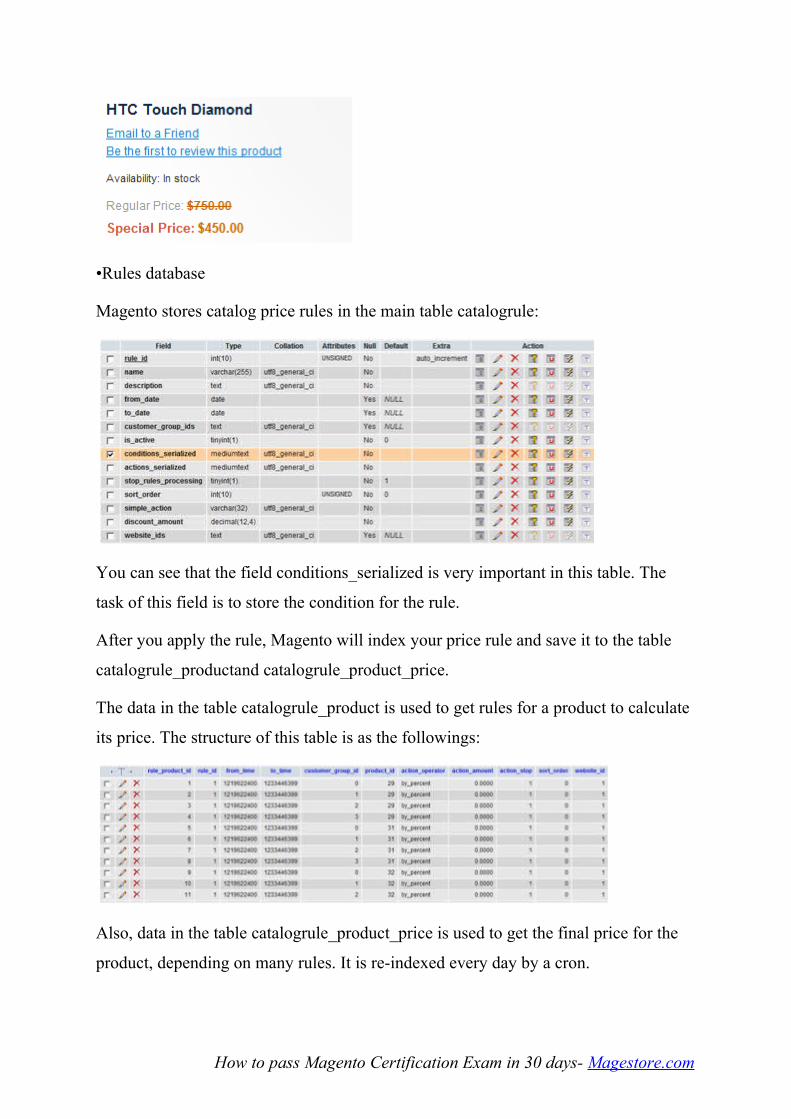
•Rules database
Magento stores catalog price rules in the main table catalogrule:
You can see that the field conditions_serialized is very important in this table. The
task of this field is to store the condition for the rule.
After you apply the rule, Magento will index your price rule and save it to the table
catalogrule_productand catalogrule_product_price.
The data in the table catalogrule_product is used to get rules for a product to calculate
its price. The structure of this table is as the followings:
Also, data in the table catalogrule_product_price is used to get the final price for the
product, depending on many rules. It is re-indexed every day by a cron.
How to pass Magento Certification Exam in 30 days- Magestore.com

For each product, Magento stores three rows for three days (current day, previous day
and the next day). Thus, it helps the system work exactly with many time zones or
even when the cron job is missed.
How to pass Magento Certification Exam in 30 days- Magestore.com
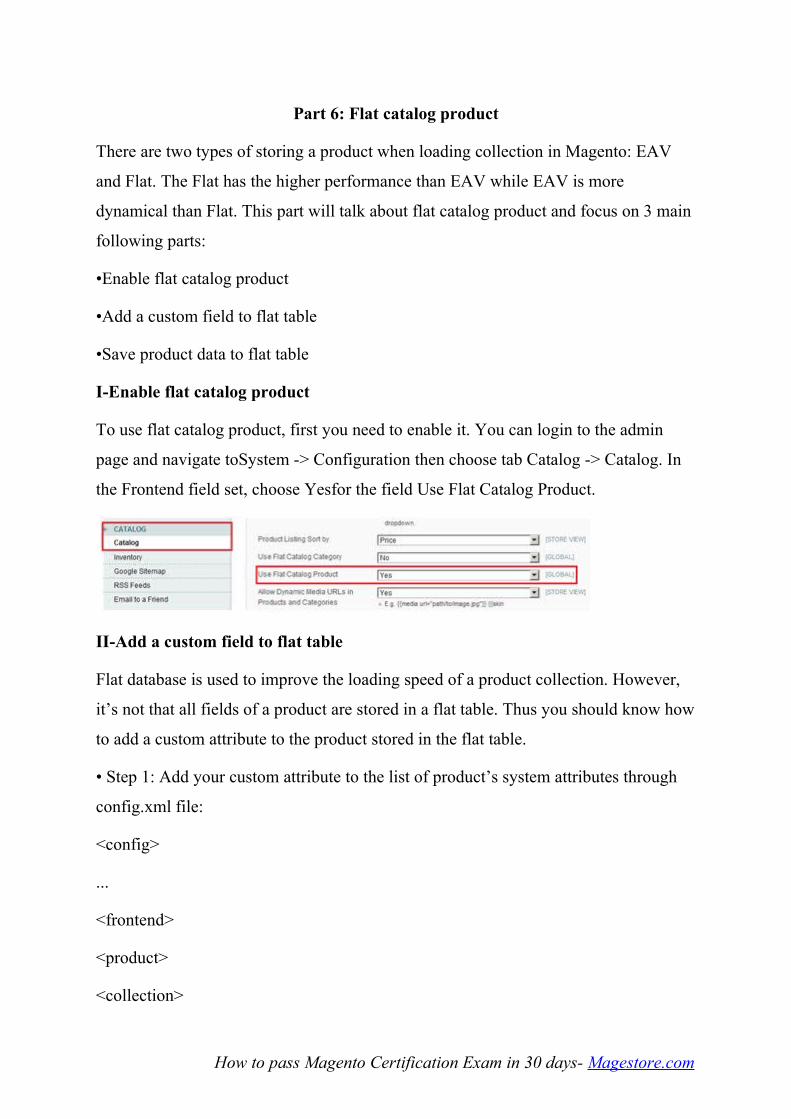
Part 6: Flat catalog product
There are two types of storing a product when loading collection in Magento: EAV
and Flat. The Flat has the higher performance than EAV while EAV is more
dynamical than Flat. This part will talk about flat catalog product and focus on 3 main
following parts:
•Enable flat catalog product
•Add a custom field to flat table
•Save product data to flat table
I-Enable flat catalog product
To use flat catalog product, first you need to enable it. You can login to the admin
page and navigate toSystem -> Configuration then choose tab Catalog -> Catalog. In
the Frontend field set, choose Yesfor the field Use Flat Catalog Product.
II-Add a custom field to flat table
Flat database is used to improve the loading speed of a product collection. However,
it’s not that all fields of a product are stored in a flat table. Thus you should know how
to add a custom attribute to the product stored in the flat table.
• Step 1: Add your custom attribute to the list of product’s system attributes through
config.xml file:
<config>
...
<frontend>
<product>
<collection>
How to pass Magento Certification Exam in 30 days- Magestore.com
<attributes>
<YOUR_CUSTOM_ATTRIBUTE />
</attributes>
</collection>
</product>
</frontend>
</config>
• Step 2: Add your custom attribute satisfying one of the followings:
•backend_type = static
•used_in_product_listing = 1
•used_for_sort_by = 1
•is_filterable > 0 (in configure, global/catalog/product/flat
•add_filterable_attributes must be enabled)
• Step 3: Use event catalog_product_flat_prepare_columns to add columns to the flat
table:
Mage::dispatchEvent('catalog_product_flat_prepare_columns', array(
'columns'=> $columnsObject
));
III-Save product data to flat table
Flat product data is stored by indexer model. This model runs when you reindex flat
data for the product. To reindex flat data, you can login to the backend, go to System -
> Index management and click on the link Reindex Data in the Product Flat Data row.
Please take a look at the picture below for more details:
How to pass Magento Certification Exam in 30 days- Magestore.com

Besides being stored when reindexing, flat data is stored when there’s any change in
product data by the function afterCommitCallback. This function is called from
catalog/product model and it will call an event to process index data for flat table.
How to pass Magento Certification Exam in 30 days- Magestore.com
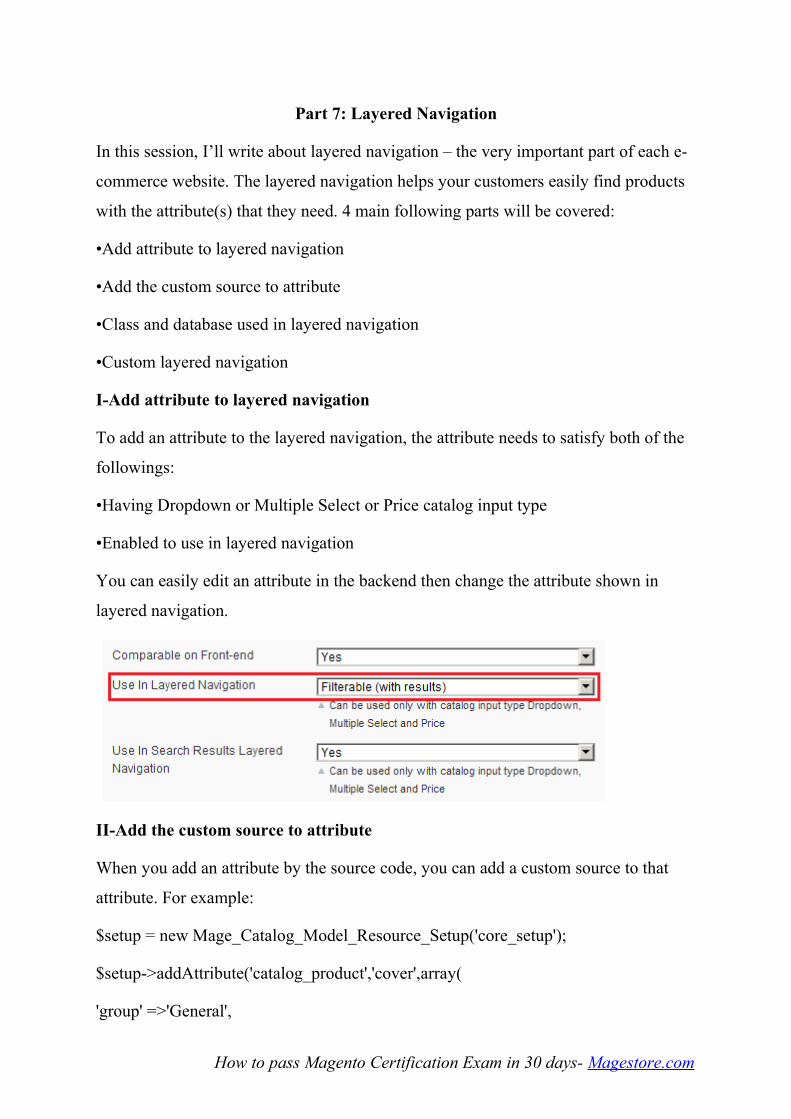
Part 7: Layered Navigation
In this session, I’ll write about layered navigation – the very important part of each e-
commerce website. The layered navigation helps your customers easily find products
with the attribute(s) that they need. 4 main following parts will be covered:
•Add attribute to layered navigation
•Add the custom source to attribute
•Class and database used in layered navigation
•Custom layered navigation
I-Add attribute to layered navigation
To add an attribute to the layered navigation, the attribute needs to satisfy both of the
followings:
•Having Dropdown or Multiple Select or Price catalog input type
•Enabled to use in layered navigation
You can easily edit an attribute in the backend then change the attribute shown in
layered navigation.
II-Add the custom source to attribute
When you add an attribute by the source code, you can add a custom source to that
attribute. For example:
$setup = new Mage_Catalog_Model_Resource_Setup('core_setup');
$setup->addAttribute('catalog_product','cover',array(
'group' =>'General',
How to pass Magento Certification Exam in 30 days- Magestore.com
'type'=>'int',
'input' =>'select',
'label' =>'cover',
'source' =>'test/source_cover',// custom source for attribute
'backend'=>'',
'frontend'=>'',
'visible'=>1,
'user_defined'=>1,// enable edit by admin
'is_filterable'=>1,// Attribute used in Layered Navigation
'visible_on_front'=>1,
'is_configurable'=>1,
));
Then, you need to write the source model for an attribute as below:
<?php
class Magestore_Test_Model_Source_Shopid extends
Mage_Eav_Model_Entity_Attribute_Source_Abstract
{
/**
* Retrieve all cover option
*/
public function getAllOptions($withEmpty = true){
return array(
array(
'value' => 1,
'label' => 'Black'
How to pass Magento Certification Exam in 30 days- Magestore.com

),
array(
'value' => 2,
'label' => 'White'
),
);
}
}
The function getAllOptions is used to get all available options for the attribute. You
can customize this function to define options for your attribute.
III-Class and database used in layered navigation
In layered navigation, Mage_Catalog_Model_Layer is the important class. It provides
product collection for layers, filter collection to be shown in the list… Besides, there
are other classes used in layered navigation such as:
•Mage_Catalog_Model_Layer_State: the state of layered navigation
•Mage_Catalog_Block_Layer_View:the block to show layered navigation in frontend
•…
To improve the performance, Magento uses an index table to filter and count the result
for each filter item. The index table for the general attribute is
catalog/product_index_eav:
How to pass Magento Certification Exam in 30 days- Magestore.com

For price attribute, it is table catalog/product_index_price:
IV-Custom layered navigation
When you show a custom list of product and want to add the layered navigation to
filter your product list, at first, you have to write your own a layer model. For
instance:
<?php
class Magestore_Test_Model_Layer extends Mage_Catalog_Model_Layer
{
public function getProductCollection(){
// get your custom product collection
return Mage::getResourceModel('catalog/product_collection');
}
In this model, you can write your own method getProductCollection to show your
custom product list.
After that, you need to write your custom layer view block:
<?php
class Magestore_Test_Block_Layer_View extends
Mage_Catalog_Block_Layer_View
{
protected function _construct(){
How to pass Magento Certification Exam in 30 days- Magestore.com

parent::_construct();
Mage::register('current_layer', $this->getLayer());
}
public function getLayer(){
return Mage::getSingleton('test/layer');
}
...
}
There’s one important point that in this block you need to write the methods getLayer
(to get your custom layer for your layered navigation) and_construct (to register your
layer with system).
Finally, you may add the layer block to your layout and refresh your page to view the
result:
<layout>
<test_product_list>
<reference name="left">
<!-- here is your custom layered navigation -->
<block type="test/layer_view" name="customlayer" after="currency"
template="catalog/layer/view.phtml"/>
</reference>
<reference name="content">
<block type="catalog/product_list" name="product_list"
template="catalog/product/list.phtml">
<block type="catalog/product_list_toolbar" name="product_list_toolbar"
template="catalog/product/list/toolbar.phtml">
<block type="page/html_pager" name="product_list_toolbar_pager"/>
How to pass Magento Certification Exam in 30 days- Magestore.com

</block>
</block>
</reference>
</test_product_list>
...
</layout>
How to pass Magento Certification Exam in 30 days- Magestore.com

Part 8: Custom Index
We know that indexer is used to index EAV database (or other database models) to
Flat database. Thus it makes users more easily query database and improve
performance. This part will guide you how to add a custom indexer. Three main parts
covered are also three main steps that you may follow.
I-Register indexer with Magento system
To register an indexer with your system, you need insert a row to table index_process
as below:
Then, add config to indexer to process the index. You can add the following code to
config.xml file:
<config>
<global>
<index>
<indexer>
<test_indexer>
<model>test/indexer</model>
<depends>
<catalog_url />
</depends>
How to pass Magento Certification Exam in 30 days- Magestore.com
</test_indexer>
</indexer>
</index>
</global>
...
</config>
•test_indexer: indexer code of the process
•model: the model to process the index
•depends: require depended indexer to be processed before this indexer (main indexer)
processes
II-Write code to process index
After registering indexer with your Magento system, you have to write the indexer
model to process your custom index.
class Magestore_Test_Model_Indexer extends Mage_Index_Model_Indexer_Abstract
{
protected $_matchedEntities = array(
'test_entity' => array(
Mage_Index_Model_Event::TYPE_SAVE
)
);
public function getName(){
return Mage::helper('test')->__('Indexer Name');
}
public function getDescription(){
return Mage::helper('test')->__('Indexer Description');
How to pass Magento Certification Exam in 30 days- Magestore.com

}
protected function _registerEvent(Mage_Index_Model_Event $event){
// custom register event
return $this;
}
protected function _processEvent(Mage_Index_Model_Event $event){
// process index event
}
public function reindexAll(){
// reindex all data
}
}
In this model, you may override these methods:
•getName: get custom indexer name
•getDescription: get custom indexer description
•_registerEvent: custom registered event
•_processEvent: used when processing the index event
•reindexAll: reindex all items of your entity
III-Use the index
You can log in the backend, go to System > Index Management and click on Reindex
Data link to process index for your custom index:
How to pass Magento Certification Exam in 30 days- Magestore.com

Or you can catch an event to process your custom index data. For example:
public function processTestSave(Varien_Event_Observer $observer){
$testModel = $observer->getEvent()->getTestEntity();
Mage::getModel('index/indexer')->processEntityAction(
$testModel,
'test_entity',
Mage_Index_Model_Event::TYPE_SAVE
);
}
How to pass Magento Certification Exam in 30 days- Magestore.com
Part 9: Product Option
If you are interested in Magento catalog, you should not skip product option – one of
interesting and useful tools in Magento. Product option on one hand helps admin to
easily manage products. On the other hand, it enables customers to choose exactly
products that they need.
How does Magento process the product option when a product is added to cart and an
order is placed? Just read on to find the detailed answer for this question.
•Add product option to cart
When product is added to cart, the product type instance (model) will process the buy
request data and prepare the option for product.
protected function _prepareProduct(Varien_Object $buyRequest, $product,
$processMode)
{
$product = $this->getProduct($product);
/* @var Mage_Catalog_Model_Product $product */
// try to add custom options
try {
$options = $this->_prepareOptions($buyRequest, $product, $processMode);
} catch (Mage_Core_Exception $e) {
return $e->getMessage();
}
...
}
This function of a product type model runs before the product is added to cart. This
function calls _prepareOptions to prepare the product option depended on customer’s
buy request.
How to pass Magento Certification Exam in 30 days- Magestore.com
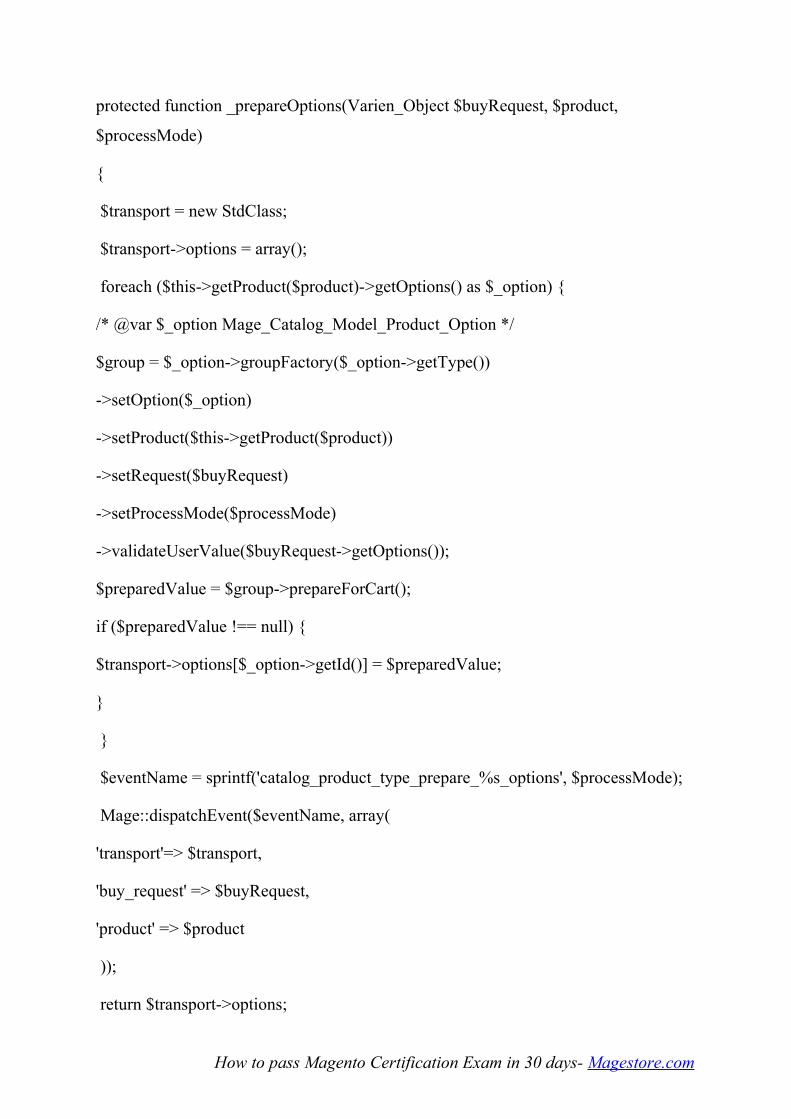
protected function _prepareOptions(Varien_Object $buyRequest, $product,
$processMode)
{
$transport = new StdClass;
$transport->options = array();
foreach ($this->getProduct($product)->getOptions() as $_option) {
/* @var $_option Mage_Catalog_Model_Product_Option */
$group = $_option->groupFactory($_option->getType())
->setOption($_option)
->setProduct($this->getProduct($product))
->setRequest($buyRequest)
->setProcessMode($processMode)
->validateUserValue($buyRequest->getOptions());
$preparedValue = $group->prepareForCart();
if ($preparedValue !== null) {
$transport->options[$_option->getId()] = $preparedValue;
}
}
$eventName = sprintf('catalog_product_type_prepare_%s_options', $processMode);
Mage::dispatchEvent($eventName, array(
'transport'=> $transport,
'buy_request' => $buyRequest,
'product' => $product
));
return $transport->options;
How to pass Magento Certification Exam in 30 days- Magestore.com

}
To change the default process custom option (Foe example: your custom product
type), you can rewrite this function or catch the event catalog_product_type_prepare_
%s_options (%s can be full or litedepending on the process mode).
•Convert product custom option from quote to order item
Magento converts product custom option from quote to order item similarly to
converting order, address… It uses the model sales/convert_quote to process the
convert:
public function itemToOrderItem(Mage_Sales_Model_Quote_Item_Abstract $item)
{
...
$options = $item->getProductOrderOptions();
if (!$options) {
$options = $item->getProduct()->getTypeInstance(true)->getOrderOptions($item-
>getProduct());
}
$orderItem->setProductOptions($options);
Mage::helper('core')->copyFieldset('sales_convert_quote_item', 'to_order_item',
$item, $orderItem);
...
}
And the custom option is taken from the product type instance by function
getOrderOptions.
public function getOrderOptions($product = null)
{
$optionArr = array();
How to pass Magento Certification Exam in 30 days- Magestore.com
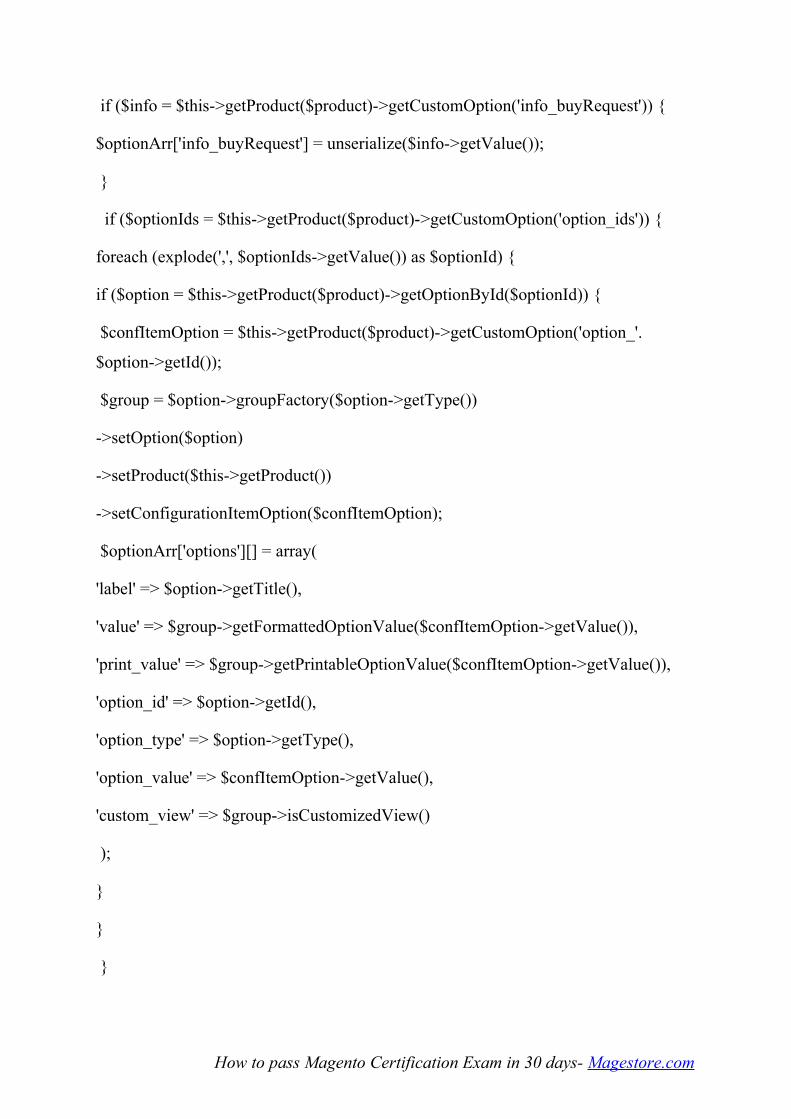
if ($info = $this->getProduct($product)->getCustomOption('info_buyRequest')) {
$optionArr['info_buyRequest'] = unserialize($info->getValue());
}
if ($optionIds = $this->getProduct($product)->getCustomOption('option_ids')) {
foreach (explode(',', $optionIds->getValue()) as $optionId) {
if ($option = $this->getProduct($product)->getOptionById($optionId)) {
$confItemOption = $this->getProduct($product)->getCustomOption('option_'.
$option->getId());
$group = $option->groupFactory($option->getType())
->setOption($option)
->setProduct($this->getProduct())
->setConfigurationItemOption($confItemOption);
$optionArr['options'][] = array(
'label' => $option->getTitle(),
'value' => $group->getFormattedOptionValue($confItemOption->getValue()),
'print_value' => $group->getPrintableOptionValue($confItemOption->getValue()),
'option_id' => $option->getId(),
'option_type' => $option->getType(),
'option_value' => $confItemOption->getValue(),
'custom_view' => $group->isCustomizedView()
);
}
}
}
How to pass Magento Certification Exam in 30 days- Magestore.com
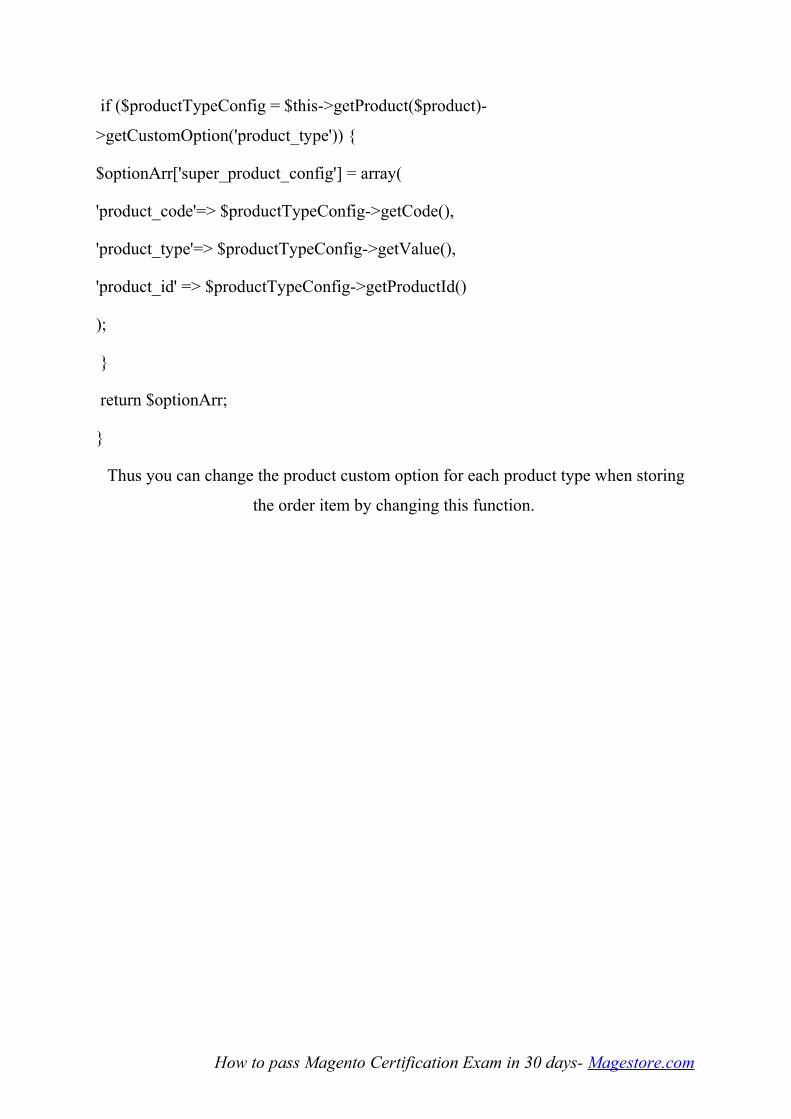
if ($productTypeConfig = $this->getProduct($product)-
>getCustomOption('product_type')) {
$optionArr['super_product_config'] = array(
'product_code'=> $productTypeConfig->getCode(),
'product_type'=> $productTypeConfig->getValue(),
'product_id' => $productTypeConfig->getProductId()
);
}
return $optionArr;
}
Thus you can change the product custom option for each product type when storing
the order item by changing this function.
How to pass Magento Certification Exam in 30 days- Magestore.com

TOPIC 8
Part 1: Quote
We have gone through 7 topics of Magento Certificate Preparation Material. We tried
to provide you with useful knowledge and information as much as possible. Let’s start
the eighth topic – Checkout.
Checkout plays an important role on every e-commerce site. It’s the core helping
customer to buy online products easily. Magento uses quote to store checkout
information and calculate subtotal, tax, shipping, grand total… values before creating
an order. When customer adds product to cart (or remove product from cart), the data
is stored into quote. The quote model includes some important methods:
•assignCustomer: assign customer model object data to the quote
•setBillingAddress/getBillingAddress: set and get billing address for the quote
•setShippingAddress/getShippingAddress: set and get shipping address for the quote
•addItem/removeItem: add and remove item from the quote
•collectTotals: calculate grand total for the quote
The address in the quote has two types: billing address and shipping address. If the
quote doesn’t have items to be shipped, it only needs billing address. Otherwise, the
quote needs both billing address and shipping address. The quote address can be
imported from customer address or order address by using methods
importCustomerAddress, importOrderAddress.
The quote consists of items which are implements of a product in the shopping cart.
Each item associates with a product. Before being added to cart, the product was
prepared the necessary information such as quantity, custom option, product type
(provided by method prepareForCartAdvanced of product type instance)… Or you can
change item’s information by the eventsales_quote_product_add_after.
I don’t show the code here because it is so long. However, you can view the code in
details in these classes Mage_Sales_Model_Quote, Mage_Sales_Model_Quote_Item,
Mage_Sales_Model_Quote_Address from Magento core.
How to pass Magento Certification Exam in 30 days- Magestore.com
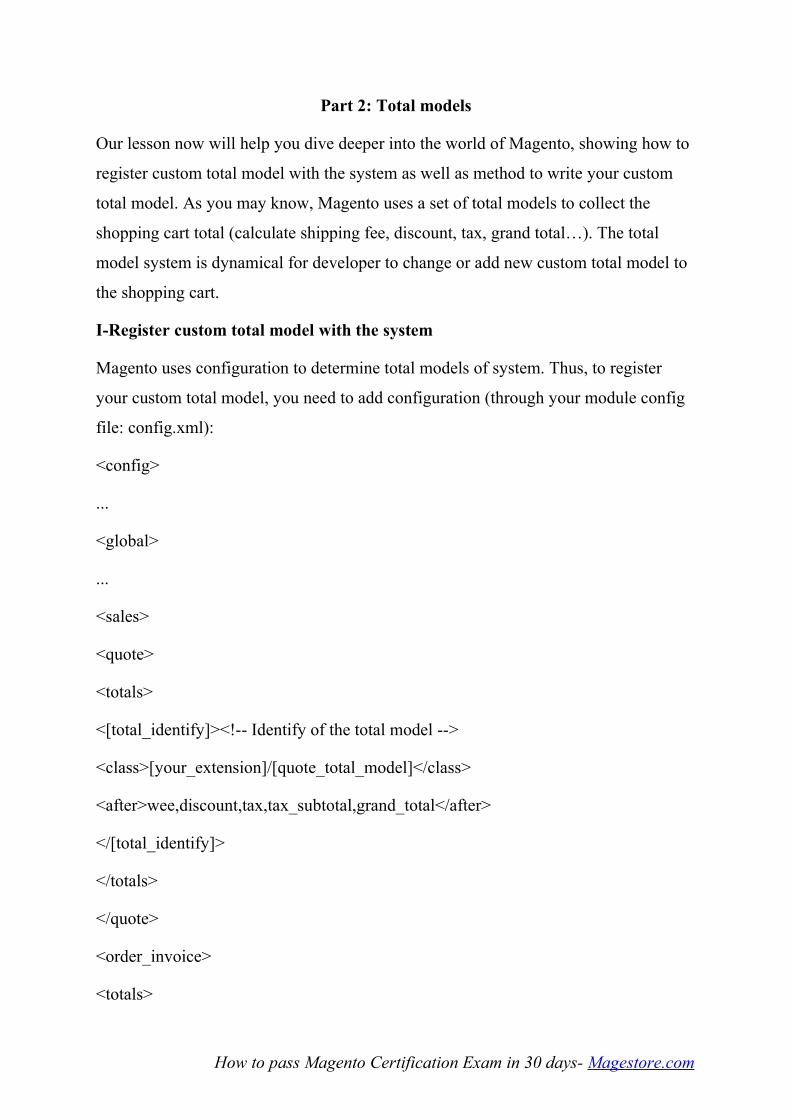
Part 2: Total models
Our lesson now will help you dive deeper into the world of Magento, showing how to
register custom total model with the system as well as method to write your custom
total model. As you may know, Magento uses a set of total models to collect the
shopping cart total (calculate shipping fee, discount, tax, grand total…). The total
model system is dynamical for developer to change or add new custom total model to
the shopping cart.
I-Register custom total model with the system
Magento uses configuration to determine total models of system. Thus, to register
your custom total model, you need to add configuration (through your module config
file: config.xml):
<config>
...
<global>
...
<sales>
<quote>
<totals>
<[total_identify]><!-- Identify of the total model -->
<class>[your_extension]/[quote_total_model]</class>
<after>wee,discount,tax,tax_subtotal,grand_total</after>
</[total_identify]>
</totals>
</quote>
<order_invoice>
<totals>
How to pass Magento Certification Exam in 30 days- Magestore.com
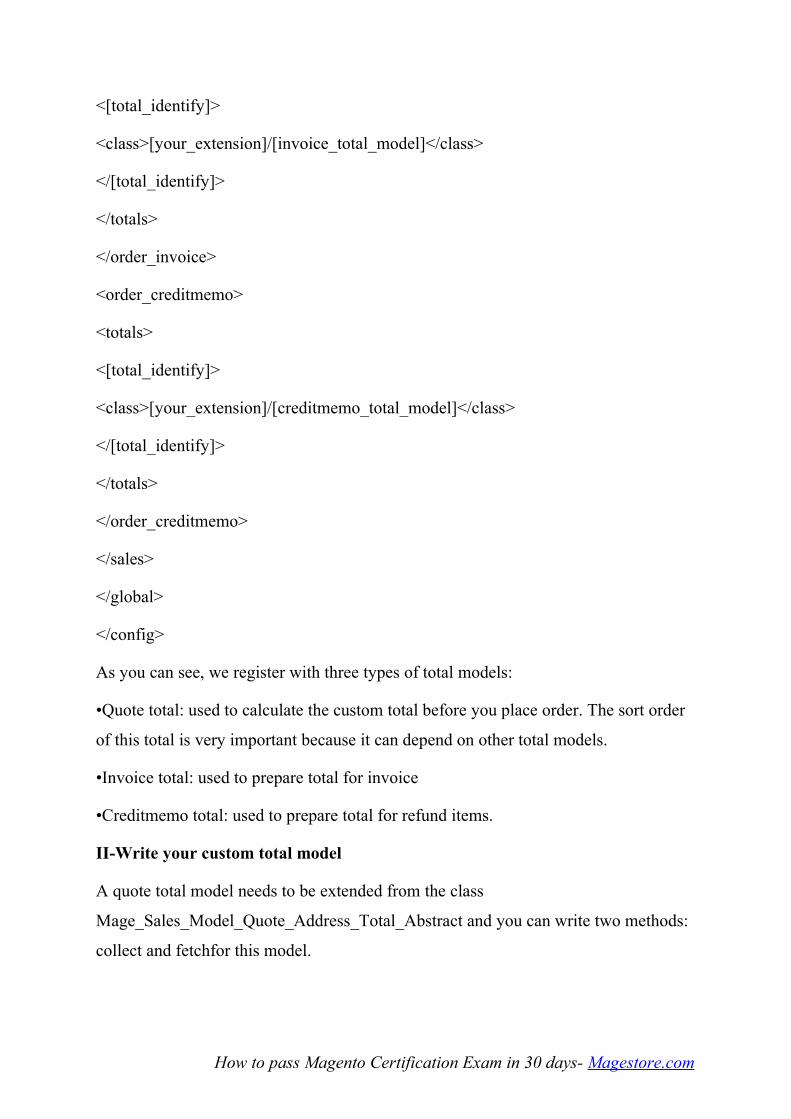
<[total_identify]>
<class>[your_extension]/[invoice_total_model]</class>
</[total_identify]>
</totals>
</order_invoice>
<order_creditmemo>
<totals>
<[total_identify]>
<class>[your_extension]/[creditmemo_total_model]</class>
</[total_identify]>
</totals>
</order_creditmemo>
</sales>
</global>
</config>
As you can see, we register with three types of total models:
•Quote total: used to calculate the custom total before you place order. The sort order
of this total is very important because it can depend on other total models.
•Invoice total: used to prepare total for invoice
•Creditmemo total: used to prepare total for refund items.
II-Write your custom total model
A quote total model needs to be extended from the class
Mage_Sales_Model_Quote_Address_Total_Abstract and you can write two methods:
collect and fetchfor this model.
How to pass Magento Certification Exam in 30 days- Magestore.com

The method collect is used to calculate total for the shopping cart, and the method
fetch is used to fetch data to display in frontend. Below is an example of a quote total
model:
<?php
class [Your_Quote_Total_Model] extends
Mage_Sales_Model_Quote_Address_Total_Abstract
{
public function collect(Mage_Sales_Model_Quote_Address $address){
/* discount 10 dollar for shopping cart */
$baseDiscount = 10;
$discount = Mage::app()->getStore()->convertPrice($baseDiscount);
$address->setCustomDiscount($baseDiscount);
$address->setBaseGrandTotal($address->getBaseGrandTotal() - $baseDiscount);
$address->setGrandTotal($address->getGrandTotal() - $discount);
return $this;
}
public function fetch(Mage_Sales_Model_Quote_Address $address){
$amount = $address->getCustomDiscount();
if ($amount != 0){
$address->addTotal(array(
'code'=> $this->getCode(),
'title' => 'Custom Discount',
'value' => $amount,
));
}
How to pass Magento Certification Exam in 30 days- Magestore.com
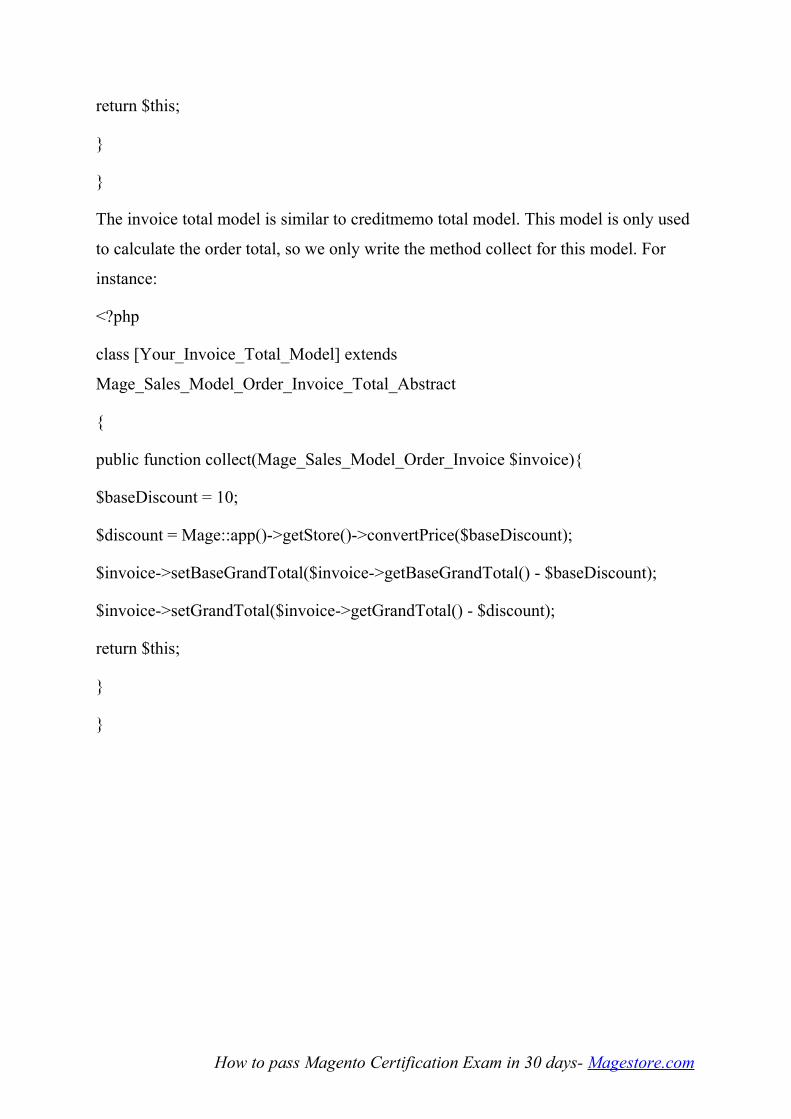
return $this;
}
}
The invoice total model is similar to creditmemo total model. This model is only used
to calculate the order total, so we only write the method collect for this model. For
instance:
<?php
class [Your_Invoice_Total_Model] extends
Mage_Sales_Model_Order_Invoice_Total_Abstract
{
public function collect(Mage_Sales_Model_Order_Invoice $invoice){
$baseDiscount = 10;
$discount = Mage::app()->getStore()->convertPrice($baseDiscount);
$invoice->setBaseGrandTotal($invoice->getBaseGrandTotal() - $baseDiscount);
$invoice->setGrandTotal($invoice->getGrandTotal() - $discount);
return $this;
}
}
How to pass Magento Certification Exam in 30 days- Magestore.com

Part 3: Show Custom Total
In this part, I’ll guide youhow to show your custom total in all areas that you see the
order.
I- Show custom total in frontend order view page
Frontend shows order view in the Customer account page. After a customer places
orders, he can go to My Orders menu to view his orders. Thus, you need to add your
total display to this layout page by using the layout handle:
<sales_order_view>
<reference name="order_totals">
<block type="[your_custom_order_total_block]" />
</reference>
</sales_order_view>
And write your total block as follows:
<?php
class [your_custom_order_total_block] extends Mage_Sales_Block_Order_Totals
{
public function initTotals(){
$order = $this->getParentBlock()->getOrder();
if($order->getCustomDiscount() > 0){
$this->getParentBlock()->addTotal(new Varien_Object(array(
'code'=> 'custom_discount',
'value' => $order->getCustomDiscount(),
'base_value' => $order->getBaseCustomDiscount(),
'label' => 'Custom Discount',
)),'subtotal');
How to pass Magento Certification Exam in 30 days- Magestore.com

}
}
}
In this block, you have to write the initTotals method to prepare data for total display.
Also, for invoice view page and credit memo view, you can add your custom total
display to the frontend page by using the layout handle sales_order_invoice,
sales_order_creditmemo. The blocks for them are similar to the blocks for order.
II-Show custom total in print page
To show custom total in print page, we need to add block to handle layout similarly to
displaying it in the view page. The handles you need to add are sales_order_print,
sales_order_printinvoice andsales_order_printcreditmemo.
<sales_order_print>
<reference name="order_totals">
<block type="[your_custom_order_total_block]" />
</reference>
</sales_order_print>
Note that you can re-use the total block of the order page view.
III- Show custom total in the email address
Similar to two parts above, to show custom total in the email address, we only need to
add block to layout handles
(sales_email_order_items,
sales_email_order_invoice_items,sales_email_order_creditmemo_items).
<sales_email_order_items>
<reference name="order_totals">
<block type="[your_custom_order_total_block]" />
</reference>
How to pass Magento Certification Exam in 30 days- Magestore.com
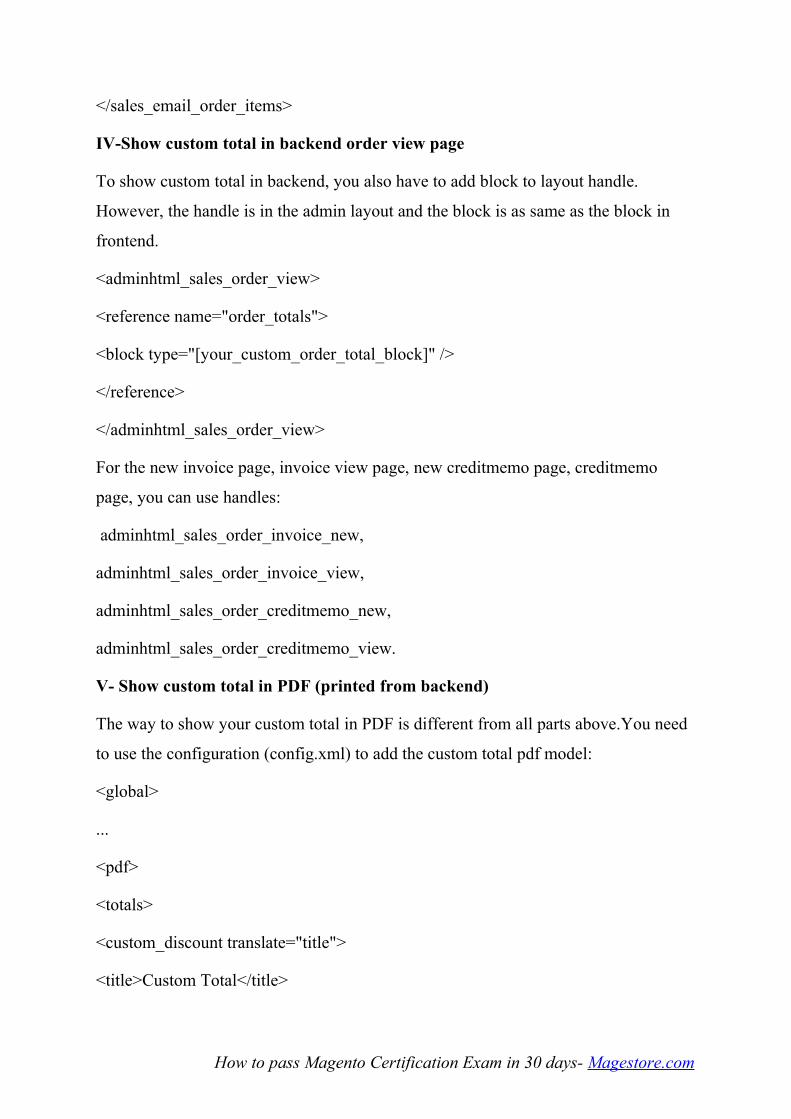
</sales_email_order_items>
IV-Show custom total in backend order view page
To show custom total in backend, you also have to add block to layout handle.
However, the handle is in the admin layout and the block is as same as the block in
frontend.
<adminhtml_sales_order_view>
<reference name="order_totals">
<block type="[your_custom_order_total_block]" />
</reference>
</adminhtml_sales_order_view>
For the new invoice page, invoice view page, new creditmemo page, creditmemo
page, you can use handles:
adminhtml_sales_order_invoice_new,
adminhtml_sales_order_invoice_view,
adminhtml_sales_order_creditmemo_new,
adminhtml_sales_order_creditmemo_view.
V- Show custom total in PDF (printed from backend)
The way to show your custom total in PDF is different from all parts above.You need
to use the configuration (config.xml) to add the custom total pdf model:
<global>
...
<pdf>
<totals>
<custom_discount translate="title">
<title>Custom Total</title>
How to pass Magento Certification Exam in 30 days- Magestore.com
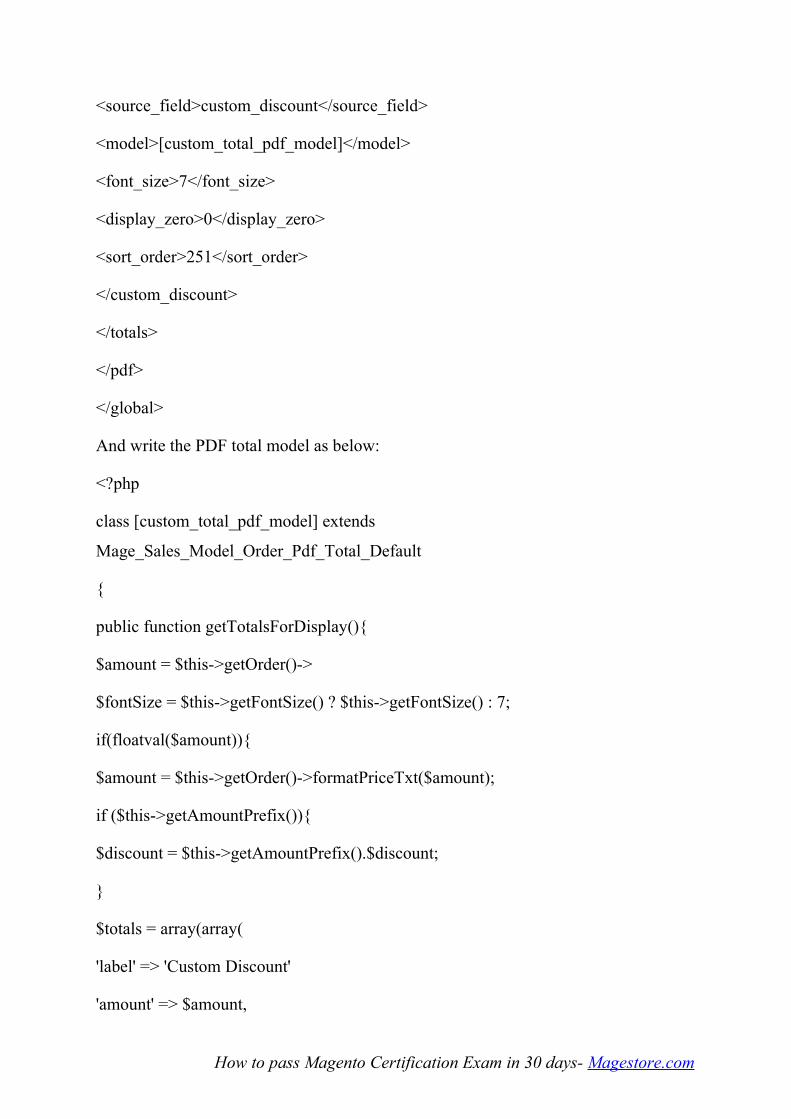
<source_field>custom_discount</source_field>
<model>[custom_total_pdf_model]</model>
<font_size>7</font_size>
<display_zero>0</display_zero>
<sort_order>251</sort_order>
</custom_discount>
</totals>
</pdf>
</global>
And write the PDF total model as below:
<?php
class [custom_total_pdf_model] extends
Mage_Sales_Model_Order_Pdf_Total_Default
{
public function getTotalsForDisplay(){
$amount = $this->getOrder()->
$fontSize = $this->getFontSize() ? $this->getFontSize() : 7;
if(floatval($amount)){
$amount = $this->getOrder()->formatPriceTxt($amount);
if ($this->getAmountPrefix()){
$discount = $this->getAmountPrefix().$discount;
}
$totals = array(array(
'label' => 'Custom Discount'
'amount' => $amount,
How to pass Magento Certification Exam in 30 days- Magestore.com

'font_size' => $fontSize,
)
);
return $totals;
}
}
}
Hope that you can show your custom total in Magento by yourself after reading.
How to pass Magento Certification Exam in 30 days- Magestore.com

Part 4: Shopping Cart Rules
Different from catalog cart rules, shopping cart rules define the promotion for
customer only when customer checks out product. They can be specified by either
coupon code or others. However, have you known how rules are applied in shopping
cart? If not, this part will certainly helpful for you.
I-Discount total model
Magento uses a total model to calculate the discount by shopping cart rules and shows
it in the cart total. This total is calculated after subtotal and shipping and before grand
total.
<global>
<sales>
<quote>
<totals>
<discount>
<class>salesrule/quote_discount</class>
<after>subtotal,shipping</after>
<before>grand_total</before>
</discount>
...
</totals>
</quote>
</sales>
</global>
The total is collected:
public function collect(Mage_Sales_Model_Quote_Address $address)
How to pass Magento Certification Exam in 30 days- Magestore.com
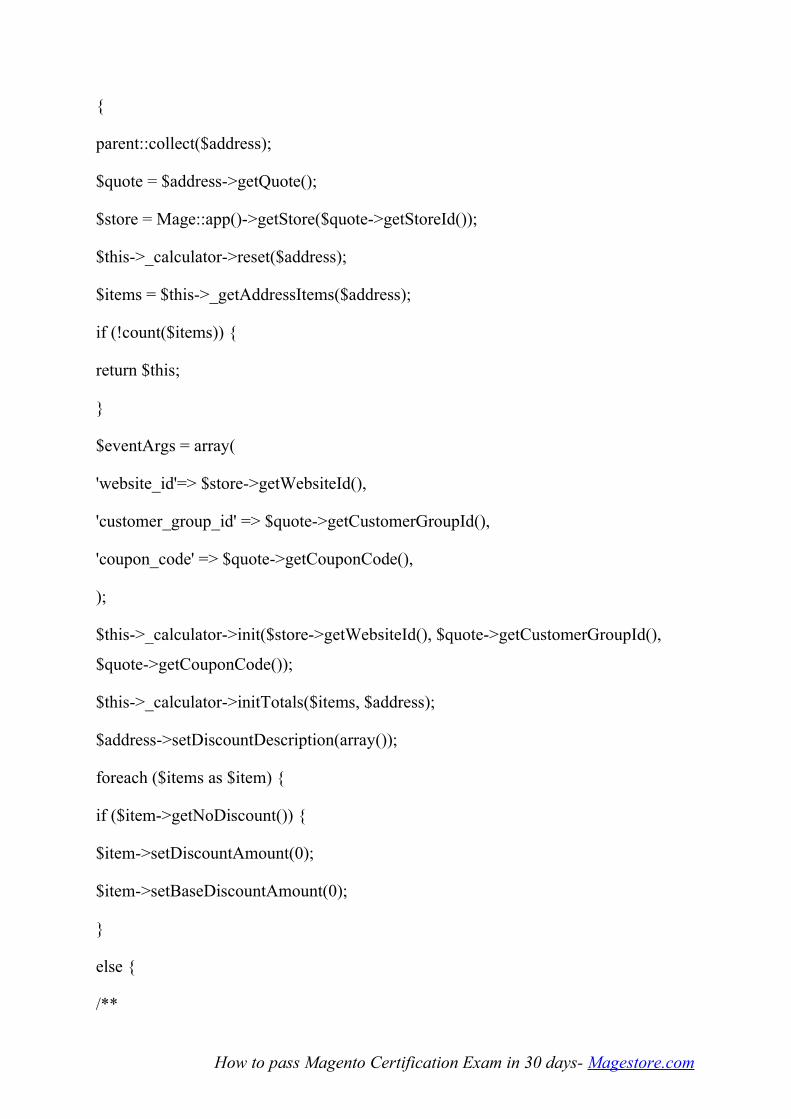
{
parent::collect($address);
$quote = $address->getQuote();
$store = Mage::app()->getStore($quote->getStoreId());
$this->_calculator->reset($address);
$items = $this->_getAddressItems($address);
if (!count($items)) {
return $this;
}
$eventArgs = array(
'website_id'=> $store->getWebsiteId(),
'customer_group_id' => $quote->getCustomerGroupId(),
'coupon_code' => $quote->getCouponCode(),
);
$this->_calculator->init($store->getWebsiteId(), $quote->getCustomerGroupId(),
$quote->getCouponCode());
$this->_calculator->initTotals($items, $address);
$address->setDiscountDescription(array());
foreach ($items as $item) {
if ($item->getNoDiscount()) {
$item->setDiscountAmount(0);
$item->setBaseDiscountAmount(0);
}
else {
/**
How to pass Magento Certification Exam in 30 days- Magestore.com
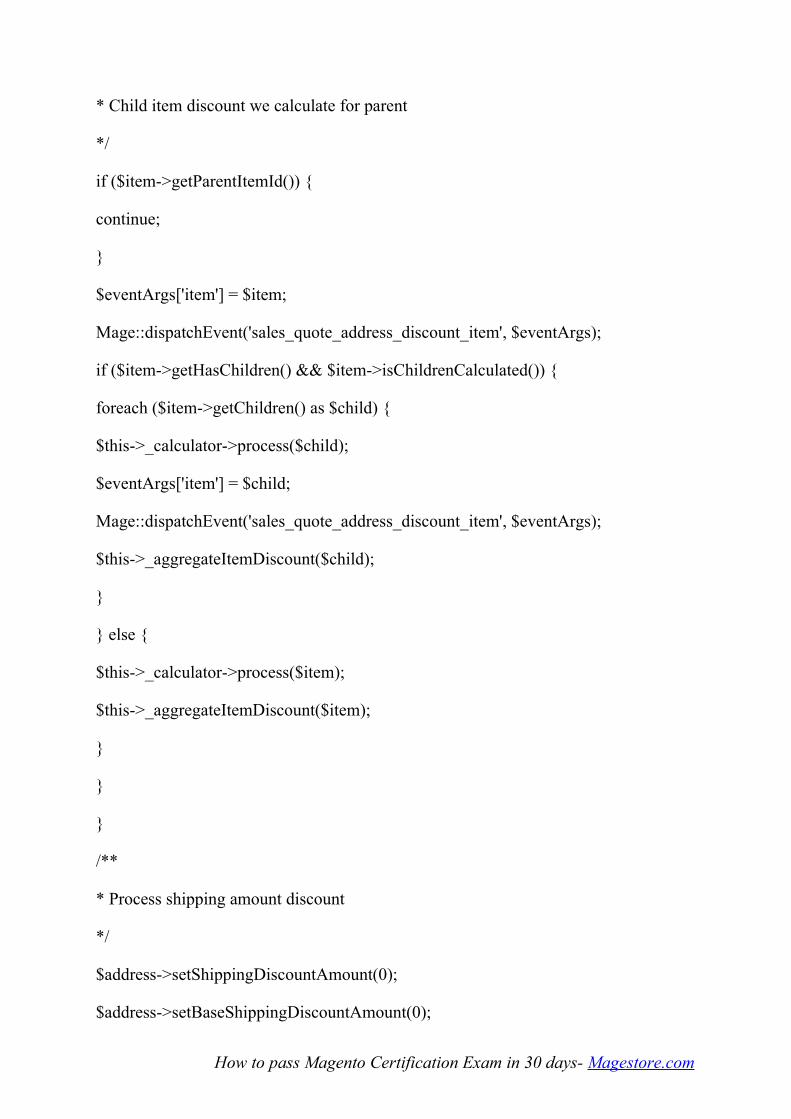
* Child item discount we calculate for parent
*/
if ($item->getParentItemId()) {
continue;
}
$eventArgs['item'] = $item;
Mage::dispatchEvent('sales_quote_address_discount_item', $eventArgs);
if ($item->getHasChildren() && $item->isChildrenCalculated()) {
foreach ($item->getChildren() as $child) {
$this->_calculator->process($child);
$eventArgs['item'] = $child;
Mage::dispatchEvent('sales_quote_address_discount_item', $eventArgs);
$this->_aggregateItemDiscount($child);
}
} else {
$this->_calculator->process($item);
$this->_aggregateItemDiscount($item);
}
}
}
/**
* Process shipping amount discount
*/
$address->setShippingDiscountAmount(0);
$address->setBaseShippingDiscountAmount(0);
How to pass Magento Certification Exam in 30 days- Magestore.com
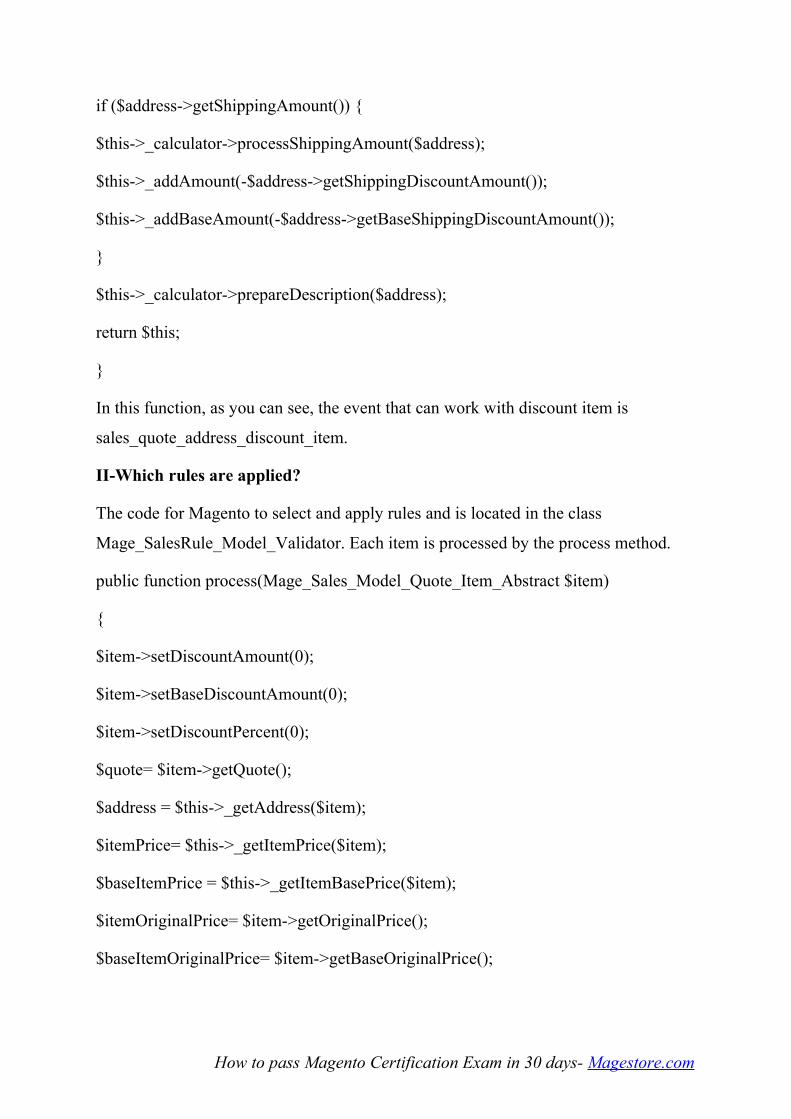
if ($address->getShippingAmount()) {
$this->_calculator->processShippingAmount($address);
$this->_addAmount(-$address->getShippingDiscountAmount());
$this->_addBaseAmount(-$address->getBaseShippingDiscountAmount());
}
$this->_calculator->prepareDescription($address);
return $this;
}
In this function, as you can see, the event that can work with discount item is
sales_quote_address_discount_item.
II-Which rules are applied?
The code for Magento to select and apply rules and is located in the class
Mage_SalesRule_Model_Validator. Each item is processed by the process method.
public function process(Mage_Sales_Model_Quote_Item_Abstract $item)
{
$item->setDiscountAmount(0);
$item->setBaseDiscountAmount(0);
$item->setDiscountPercent(0);
$quote= $item->getQuote();
$address = $this->_getAddress($item);
$itemPrice= $this->_getItemPrice($item);
$baseItemPrice = $this->_getItemBasePrice($item);
$itemOriginalPrice= $item->getOriginalPrice();
$baseItemOriginalPrice= $item->getBaseOriginalPrice();
How to pass Magento Certification Exam in 30 days- Magestore.com

if ($itemPrice <= 0) {
return $this;
}
$appliedRuleIds = array();
foreach ($this->_getRules() as $rule) {
/* @var $rule Mage_SalesRule_Model_Rule */
if (!$this->_canProcessRule($rule, $address)) {
continue;
}
if (!$rule->getActions()->validate($item)) {
continue;
}
...//calculate and apply discount for item
if ($rule->getStopRulesProcessing()) {
break;
}
}
$item->setAppliedRuleIds(join(',',$appliedRuleIds));
$address->setAppliedRuleIds($this->mergeIds($address->getAppliedRuleIds(),
$appliedRuleIds));
$quote->setAppliedRuleIds($this->mergeIds($quote->getAppliedRuleIds(),
$appliedRuleIds));
return $this;
}
How to pass Magento Certification Exam in 30 days- Magestore.com

Basically, rules are sorted by the priority and Magento applies rule by rule for each
item. The rule needs to be validated for the current shopping cart and if that rule
prevents further rule from processing, the loop will be broken.
You can go to file app\code\core\Mage\SalesRule\Model\Validator.php to view more
details of the code.
How to pass Magento Certification Exam in 30 days- Magestore.com
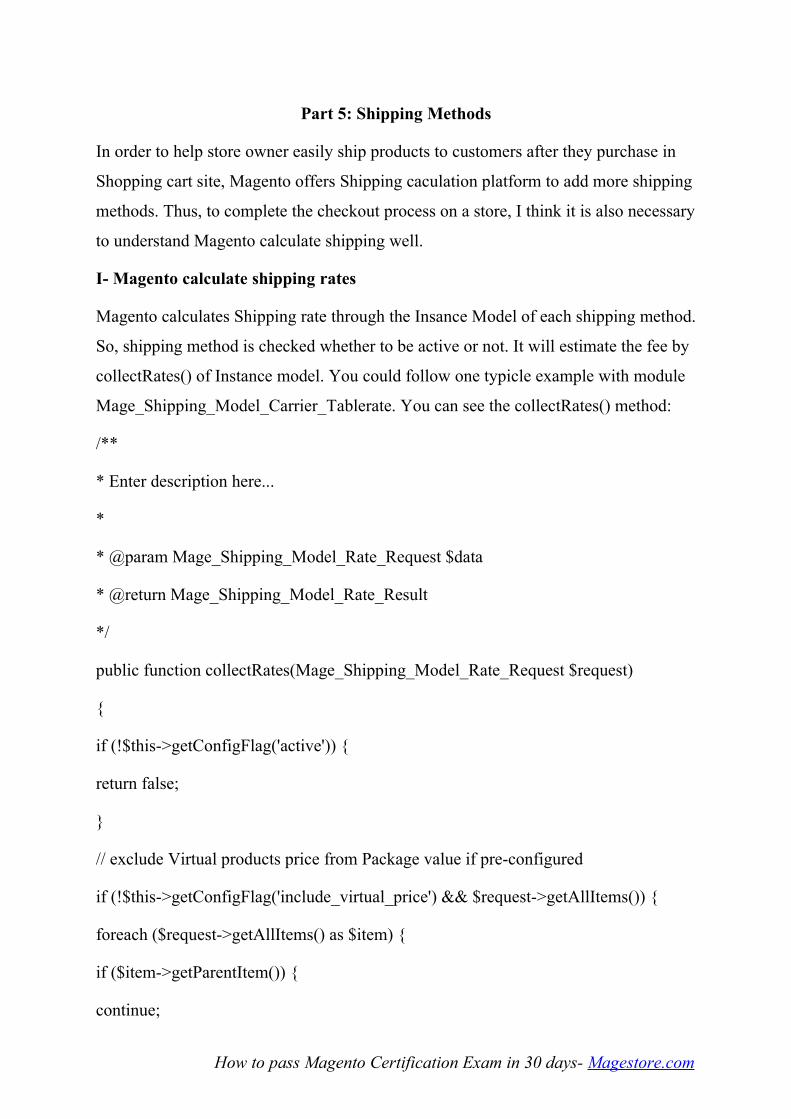
Part 5: Shipping Methods
In order to help store owner easily ship products to customers after they purchase in
Shopping cart site, Magento offers Shipping caculation platform to add more shipping
methods. Thus, to complete the checkout process on a store, I think it is also necessary
to understand Magento calculate shipping well.
I- Magento calculate shipping rates
Magento calculates Shipping rate through the Insance Model of each shipping method.
So, shipping method is checked whether to be active or not. It will estimate the fee by
collectRates() of Instance model. You could follow one typicle example with module
Mage_Shipping_Model_Carrier_Tablerate. You can see the collectRates() method:
/**
* Enter description here...
*
* @param Mage_Shipping_Model_Rate_Request $data
* @return Mage_Shipping_Model_Rate_Result
*/
public function collectRates(Mage_Shipping_Model_Rate_Request $request)
{
if (!$this->getConfigFlag('active')) {
return false;
}
// exclude Virtual products price from Package value if pre-configured
if (!$this->getConfigFlag('include_virtual_price') && $request->getAllItems()) {
foreach ($request->getAllItems() as $item) {
if ($item->getParentItem()) {
continue;
How to pass Magento Certification Exam in 30 days- Magestore.com
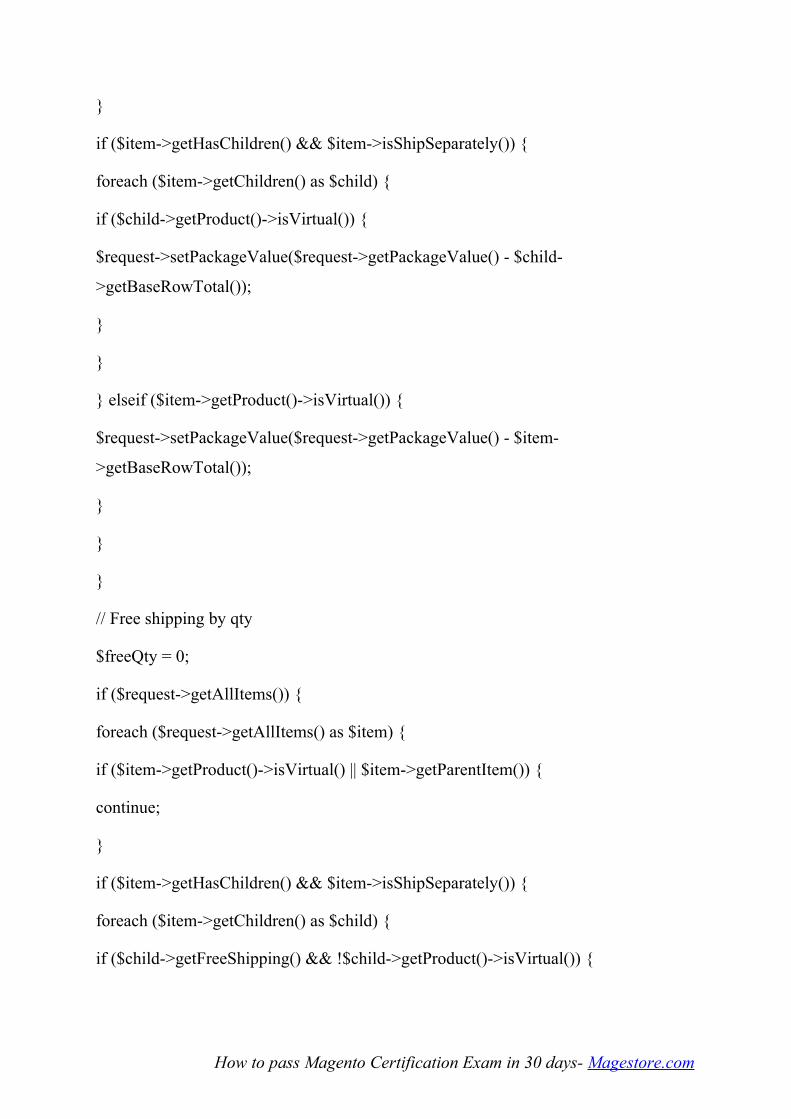
}
if ($item->getHasChildren() && $item->isShipSeparately()) {
foreach ($item->getChildren() as $child) {
if ($child->getProduct()->isVirtual()) {
$request->setPackageValue($request->getPackageValue() - $child-
>getBaseRowTotal());
}
}
} elseif ($item->getProduct()->isVirtual()) {
$request->setPackageValue($request->getPackageValue() - $item-
>getBaseRowTotal());
}
}
}
// Free shipping by qty
$freeQty = 0;
if ($request->getAllItems()) {
foreach ($request->getAllItems() as $item) {
if ($item->getProduct()->isVirtual() || $item->getParentItem()) {
continue;
}
if ($item->getHasChildren() && $item->isShipSeparately()) {
foreach ($item->getChildren() as $child) {
if ($child->getFreeShipping() && !$child->getProduct()->isVirtual()) {
How to pass Magento Certification Exam in 30 days- Magestore.com
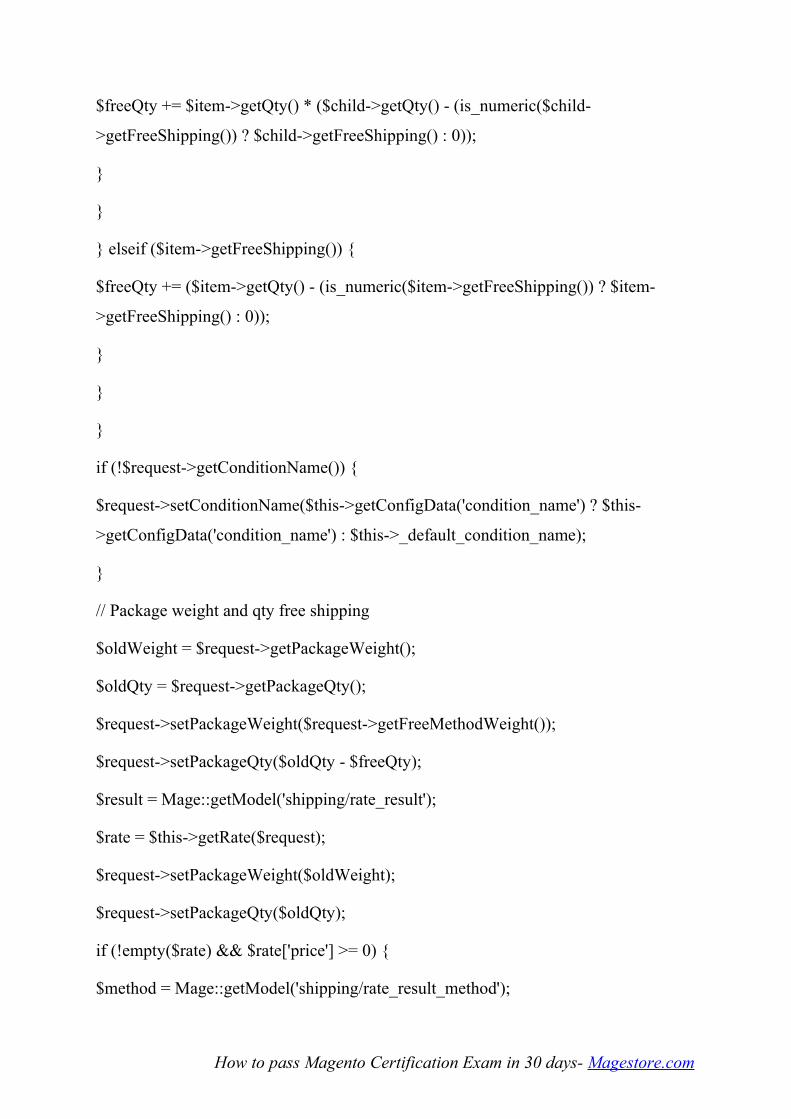
$freeQty += $item->getQty() * ($child->getQty() - (is_numeric($child-
>getFreeShipping()) ? $child->getFreeShipping() : 0));
}
}
} elseif ($item->getFreeShipping()) {
$freeQty += ($item->getQty() - (is_numeric($item->getFreeShipping()) ? $item-
>getFreeShipping() : 0));
}
}
}
if (!$request->getConditionName()) {
$request->setConditionName($this->getConfigData('condition_name') ? $this-
>getConfigData('condition_name') : $this->_default_condition_name);
}
// Package weight and qty free shipping
$oldWeight = $request->getPackageWeight();
$oldQty = $request->getPackageQty();
$request->setPackageWeight($request->getFreeMethodWeight());
$request->setPackageQty($oldQty - $freeQty);
$result = Mage::getModel('shipping/rate_result');
$rate = $this->getRate($request);
$request->setPackageWeight($oldWeight);
$request->setPackageQty($oldQty);
if (!empty($rate) && $rate['price'] >= 0) {
$method = Mage::getModel('shipping/rate_result_method');
How to pass Magento Certification Exam in 30 days- Magestore.com
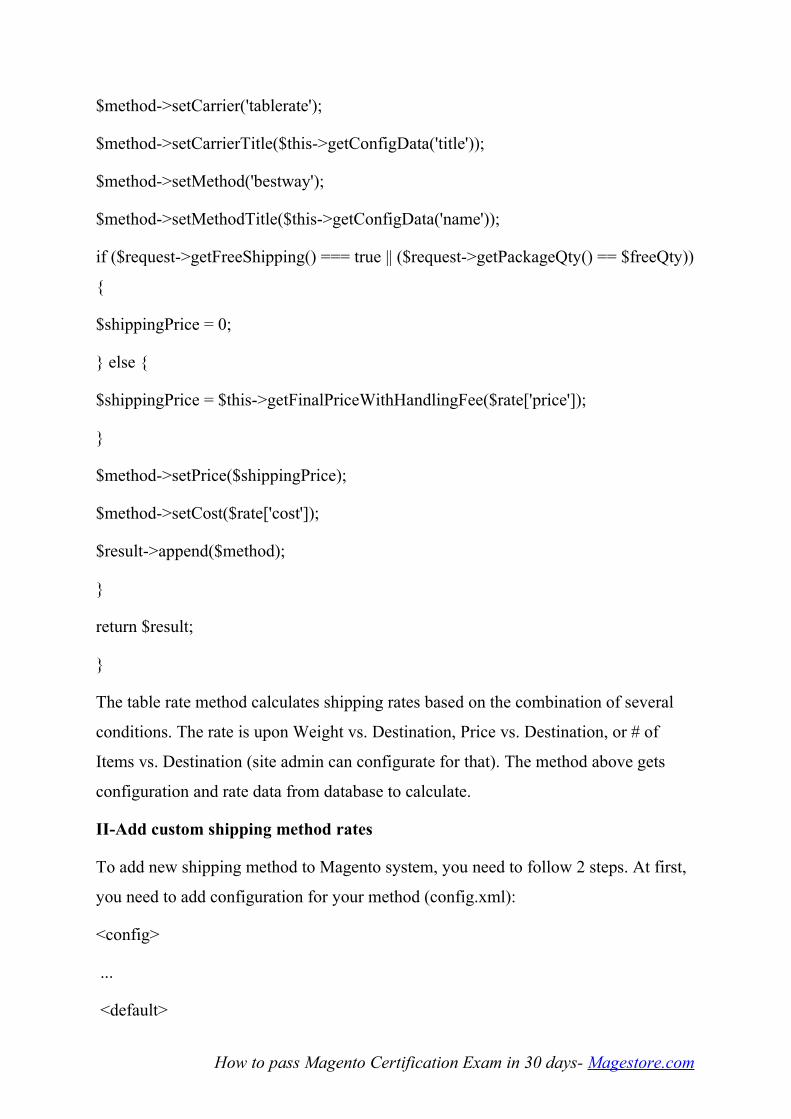
$method->setCarrier('tablerate');
$method->setCarrierTitle($this->getConfigData('title'));
$method->setMethod('bestway');
$method->setMethodTitle($this->getConfigData('name'));
if ($request->getFreeShipping() === true || ($request->getPackageQty() == $freeQty))
{
$shippingPrice = 0;
} else {
$shippingPrice = $this->getFinalPriceWithHandlingFee($rate['price']);
}
$method->setPrice($shippingPrice);
$method->setCost($rate['cost']);
$result->append($method);
}
return $result;
}
The table rate method calculates shipping rates based on the combination of several
conditions. The rate is upon Weight vs. Destination, Price vs. Destination, or # of
Items vs. Destination (site admin can configurate for that). The method above gets
configuration and rate data from database to calculate.
II-Add custom shipping method rates
To add new shipping method to Magento system, you need to follow 2 steps. At first,
you need to add configuration for your method (config.xml):
<config>
...
<default>
How to pass Magento Certification Exam in 30 days- Magestore.com
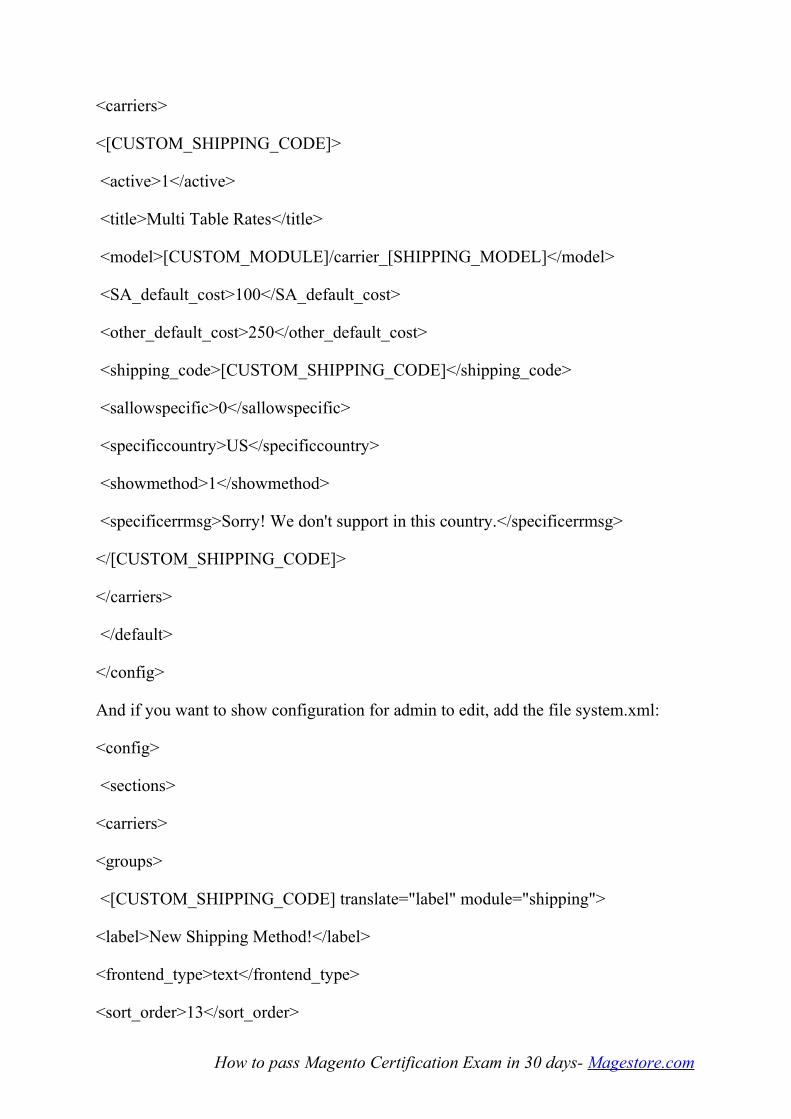
<carriers>
<[CUSTOM_SHIPPING_CODE]>
<active>1</active>
<title>Multi Table Rates</title>
<model>[CUSTOM_MODULE]/carrier_[SHIPPING_MODEL]</model>
<SA_default_cost>100</SA_default_cost>
<other_default_cost>250</other_default_cost>
<shipping_code>[CUSTOM_SHIPPING_CODE]</shipping_code>
<sallowspecific>0</sallowspecific>
<specificcountry>US</specificcountry>
<showmethod>1</showmethod>
<specificerrmsg>Sorry! We don't support in this country.</specificerrmsg>
</[CUSTOM_SHIPPING_CODE]>
</carriers>
</default>
</config>
And if you want to show configuration for admin to edit, add the file system.xml:
<config>
<sections>
<carriers>
<groups>
<[CUSTOM_SHIPPING_CODE] translate="label" module="shipping">
<label>New Shipping Method!</label>
<frontend_type>text</frontend_type>
<sort_order>13</sort_order>
How to pass Magento Certification Exam in 30 days- Magestore.com
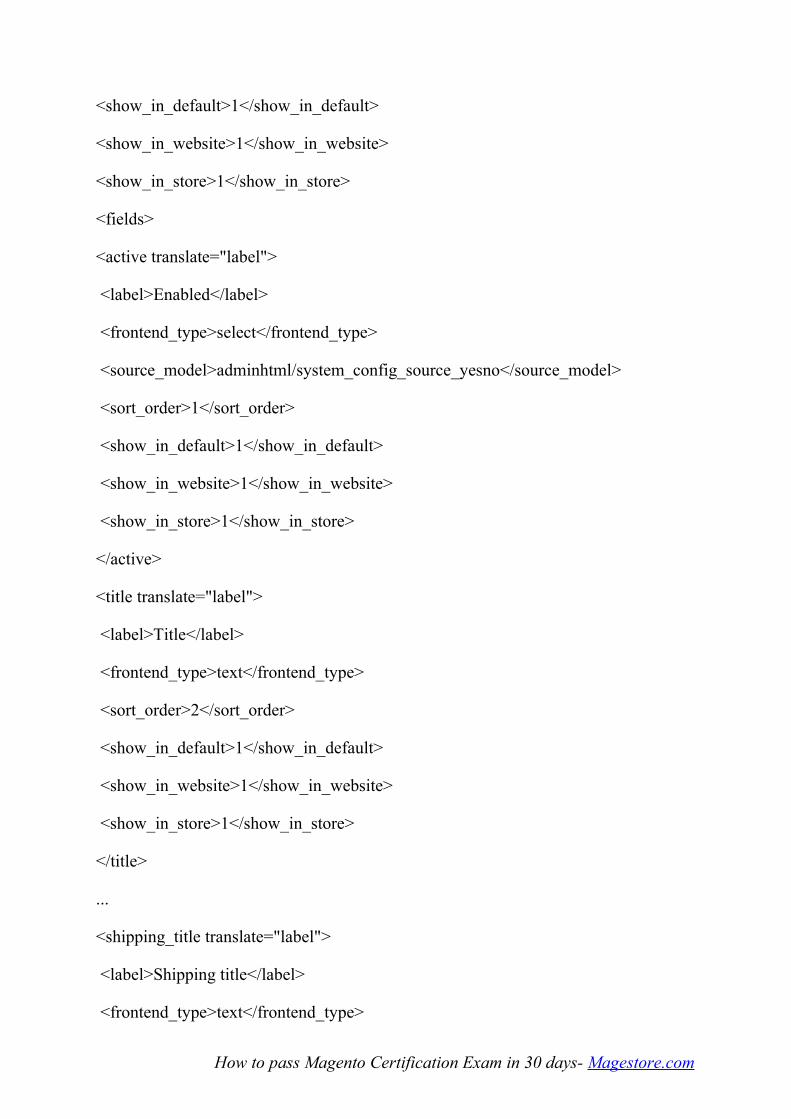
<show_in_default>1</show_in_default>
<show_in_website>1</show_in_website>
<show_in_store>1</show_in_store>
<fields>
<active translate="label">
<label>Enabled</label>
<frontend_type>select</frontend_type>
<source_model>adminhtml/system_config_source_yesno</source_model>
<sort_order>1</sort_order>
<show_in_default>1</show_in_default>
<show_in_website>1</show_in_website>
<show_in_store>1</show_in_store>
</active>
<title translate="label">
<label>Title</label>
<frontend_type>text</frontend_type>
<sort_order>2</sort_order>
<show_in_default>1</show_in_default>
<show_in_website>1</show_in_website>
<show_in_store>1</show_in_store>
</title>
...
<shipping_title translate="label">
<label>Shipping title</label>
<frontend_type>text</frontend_type>
How to pass Magento Certification Exam in 30 days- Magestore.com
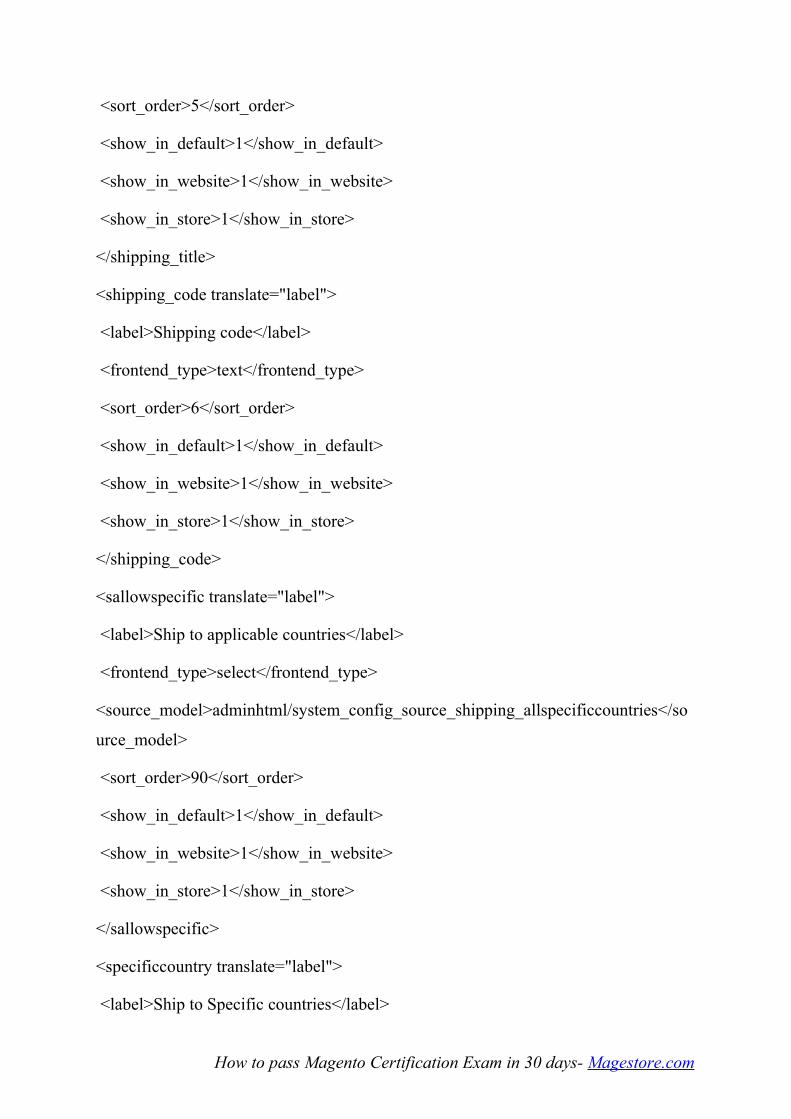
<sort_order>5</sort_order>
<show_in_default>1</show_in_default>
<show_in_website>1</show_in_website>
<show_in_store>1</show_in_store>
</shipping_title>
<shipping_code translate="label">
<label>Shipping code</label>
<frontend_type>text</frontend_type>
<sort_order>6</sort_order>
<show_in_default>1</show_in_default>
<show_in_website>1</show_in_website>
<show_in_store>1</show_in_store>
</shipping_code>
<sallowspecific translate="label">
<label>Ship to applicable countries</label>
<frontend_type>select</frontend_type>
<source_model>adminhtml/system_config_source_shipping_allspecificcountries</so
urce_model>
<sort_order>90</sort_order>
<show_in_default>1</show_in_default>
<show_in_website>1</show_in_website>
<show_in_store>1</show_in_store>
</sallowspecific>
<specificcountry translate="label">
<label>Ship to Specific countries</label>
How to pass Magento Certification Exam in 30 days- Magestore.com
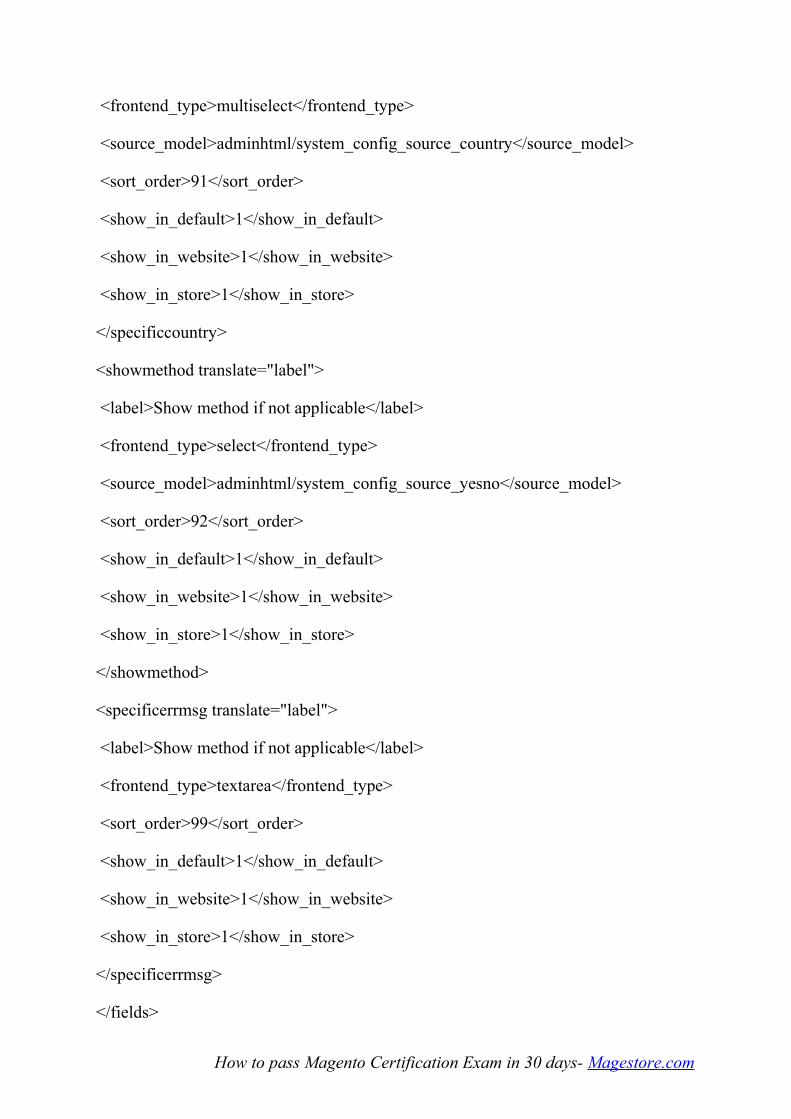
<frontend_type>multiselect</frontend_type>
<source_model>adminhtml/system_config_source_country</source_model>
<sort_order>91</sort_order>
<show_in_default>1</show_in_default>
<show_in_website>1</show_in_website>
<show_in_store>1</show_in_store>
</specificcountry>
<showmethod translate="label">
<label>Show method if not applicable</label>
<frontend_type>select</frontend_type>
<source_model>adminhtml/system_config_source_yesno</source_model>
<sort_order>92</sort_order>
<show_in_default>1</show_in_default>
<show_in_website>1</show_in_website>
<show_in_store>1</show_in_store>
</showmethod>
<specificerrmsg translate="label">
<label>Show method if not applicable</label>
<frontend_type>textarea</frontend_type>
<sort_order>99</sort_order>
<show_in_default>1</show_in_default>
<show_in_website>1</show_in_website>
<show_in_store>1</show_in_store>
</specificerrmsg>
</fields>
How to pass Magento Certification Exam in 30 days- Magestore.com
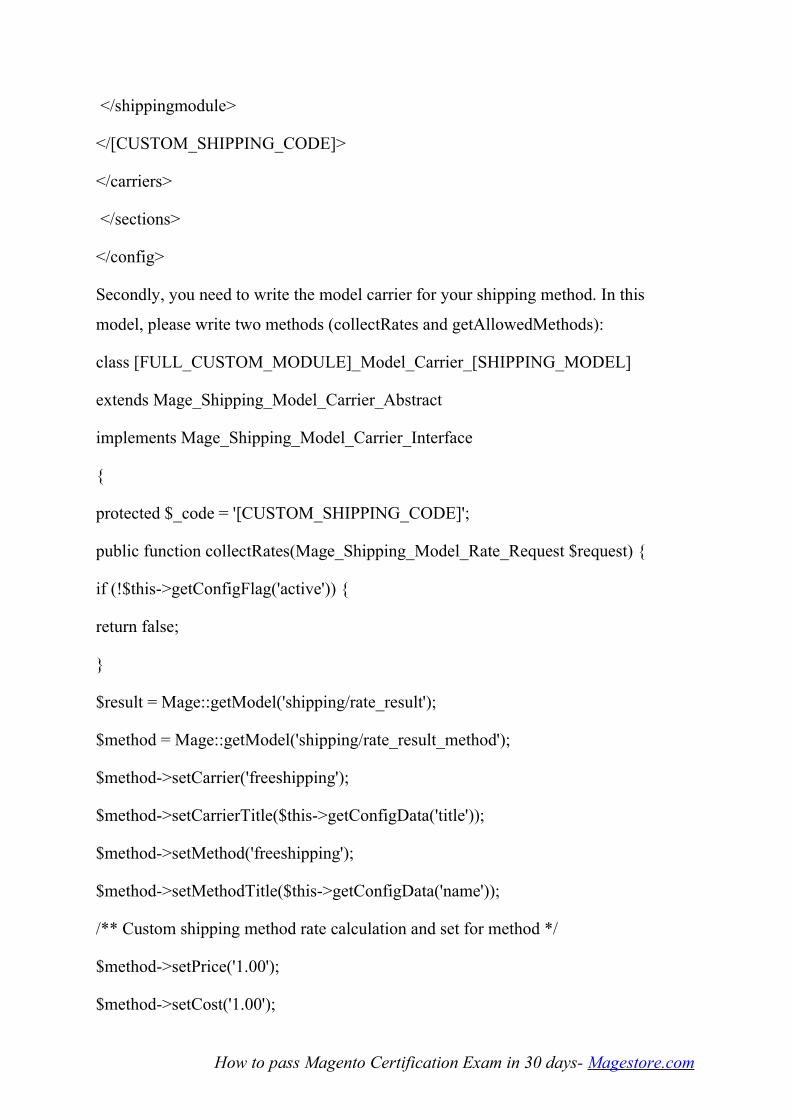
</shippingmodule>
</[CUSTOM_SHIPPING_CODE]>
</carriers>
</sections>
</config>
Secondly, you need to write the model carrier for your shipping method. In this
model, please write two methods (collectRates and getAllowedMethods):
class [FULL_CUSTOM_MODULE]_Model_Carrier_[SHIPPING_MODEL]
extends Mage_Shipping_Model_Carrier_Abstract
implements Mage_Shipping_Model_Carrier_Interface
{
protected $_code = '[CUSTOM_SHIPPING_CODE]';
public function collectRates(Mage_Shipping_Model_Rate_Request $request) {
if (!$this->getConfigFlag('active')) {
return false;
}
$result = Mage::getModel('shipping/rate_result');
$method = Mage::getModel('shipping/rate_result_method');
$method->setCarrier('freeshipping');
$method->setCarrierTitle($this->getConfigData('title'));
$method->setMethod('freeshipping');
$method->setMethodTitle($this->getConfigData('name'));
/** Custom shipping method rate calculation and set for method */
$method->setPrice('1.00');
$method->setCost('1.00');
How to pass Magento Certification Exam in 30 days- Magestore.com

$result->append($method);
return $result;
}
public function getAllowedMethods() {
return array('[CUSTOM_SHIPPING_CODE]'=>$this->getConfigData('name'));
}
}
How to pass Magento Certification Exam in 30 days- Magestore.com

Part 6: Payment Methods
Once customer details are filled in and the chosen shipping method, the payment
method forms will be shown for customer to select. After a customer selects a
payment method, the checkout will progress through the payment method’s function.
It can be the request via an API, authorization or offline payment. This part will
introduce how to add a custom payment method for Magento.
I-Declare custom payment method by configuration
To add your custom payment method, you need to declare with Magento’s system.
Thus you can add the code below to your module configuration (config.xml).
<config>
...
<default>
<payment>
<[custom_payment]>
<active>1</active>
<model>[custom_module]/method_[payment_model]</model>
<order_status>pending</order_status>
<title>Custom Payment Method</title>
<allowspecific>0</allowspecific>
...
</[custom_payment]>
</payment>
</default>
</config>
In this configuration, you see the tag model, this is the configuration of the payment
adaptor model.
How to pass Magento Certification Exam in 30 days- Magestore.com

II-Write adaptor model for custom payment method
Firstly, you have to write your custom model corresponding to the configuration
above. This model needs to be extended from class
Mage_Payment_Model_Method_Abstract. This model class is similar to the
following:
class [Custom_Module]_Model_Method_[Payment_Model] extends
Mage_Payment_Model_Method_Abstract
{
/** form block and info block for custom payment method */
protected $_formBlockType = '[custom_module/form_block]';
protected $_infoBlockType = '[custom_module/info_block]';
/** Payment method features */
protected $_isGateway = true;
protected $_canOrder= false;
protected $_canAuthorize = false;
protected $_canCapture= true;
protected $_canCapturePartial= false;
protected $_canRefund = true;
...
public function authorize(Varien_Object $payment, $amount) {
// authorize payment
}
public function capture(Varien_Object $payment, $amount) {
// capture payment
}
How to pass Magento Certification Exam in 30 days- Magestore.com

public function order(Varien_Object $payment) {
// void payment
}
public function refund(Varien_Object $payment, $amount) {
// refund payment
}
...
}
Above are some basic methods that the system calls when the order is processed. Thus
they are key functions of a payment method. If payment method uses a gateway, some
function can send request to the gateway to collect information for processing order.
III-Store payment’s information
Payment model is the abstract of an instance payment method and it works with
database. Payment model can be Mage_Sales_Model_Order_Payment or
Mage_Sales_Model_Quote_Payment depending on checkout stage. And the database
is stored corresponding with tables sales_flat_order_paymentand
sales_flat_quote_payment. However,Quote_Payment doesn’t have any method to
process the order. You can view more details in the Magento’s source code and
database.
How to pass Magento Certification Exam in 30 days- Magestore.com

TOPIC 9
Part 1: Create order in Admin
From Magento 1.4, administrators can create order for customers in the back-end. It
helps admin easily manage his store activity when customer doesn’t place order on the
website. This part will guide you how to create order in admin panel step by step and
also mention the way to calculate price when an order is created from admin as well as
order state and order status.
I-Steps to create order in admin panel
•To create anew order in admin, you can follow some steps below:
•Select Sales > Orders menu
•Click on the Create New Order button, a customer select page will be shown
•You can select Customer or Create new Customer for the order. A store select page
will be shown
•Select store where order is placed. Then the page to create order will be displayed. In
this page, you need to select product, fulfill customer information (email, address…),
select payment method and shipping method.
•After that, click on the Submit Order button to complete creating an order.
II-Calculating price when an order is created from admin
When you select a product to add to order in backend, you need to choose options (if
have) for that product. That’s information to post on sever when you click on Add
Selected Product(s) to Orderbutton. The product is added to Order as below:
// app\code\core\Mage\Adminhtml\controllers\Sales\Order\CreateController.php
// _processActionData method
/**
* Adding products to quote from special grid
*/
How to pass Magento Certification Exam in 30 days- Magestore.com

if ($this->getRequest()->has('item') && !$this->getRequest()-
>getPost('update_items') && !($action == 'save')) {
$items = $this->getRequest()->getPost('item');
$items = $this->_processFiles($items);
$this->_getOrderCreateModel()->addProducts($items);
}
And when the quote of that order is collected, subtotal is collected first and it
calculates the product price:
// app\code\core\Mage\Sales\Model\Quote\Address\Total\Subtotal.php
// _initItem method
} else if (!$quoteItem->getParentItem()) {
$finalPrice = $product->getFinalPrice($quoteItem->getQty());
$item->setPrice($finalPrice)
->setBaseOriginalPrice($finalPrice);
$item->calcRowTotal();
$this->_addAmount($item->getRowTotal());
$this->_addBaseAmount($item->getBaseRowTotal());
$address->setTotalQty($address->getTotalQty() + $item->getQty());
}
In the admin panel, you can change the product price when creating order by Custom
Price option. When product item calculates the row total, it was get for the product
price:
// app\code\core\Mage\Sales\Model\Quote\Item\Abstract.php
public function calcRowTotal()
{
How to pass Magento Certification Exam in 30 days- Magestore.com

$qty= $this->getTotalQty();
$total= $this->getCalculationPrice()*$qty;
$baseTotal= $this->getBaseCalculationPrice()*$qty;
$this->setRowTotal($this->getStore()->roundPrice($total));
$this->setBaseRowTotal($this->getStore()->roundPrice($baseTotal));
return $this;
}
/**
* Get item price used for quote calculation process.
* This method get custom price (if ut defined) or original product final price
*
* @return float
*/
public function getCalculationPrice()
{
$price = $this->_getData('calculation_price');
if (is_null($price)) {
if ($this->hasOriginalCustomPrice()) {
$price = $this->getOriginalCustomPrice();
} else {
$price = $this->getConvertedPrice();
}
$this->setData('calculation_price', $price);
}
return $price;
How to pass Magento Certification Exam in 30 days- Magestore.com
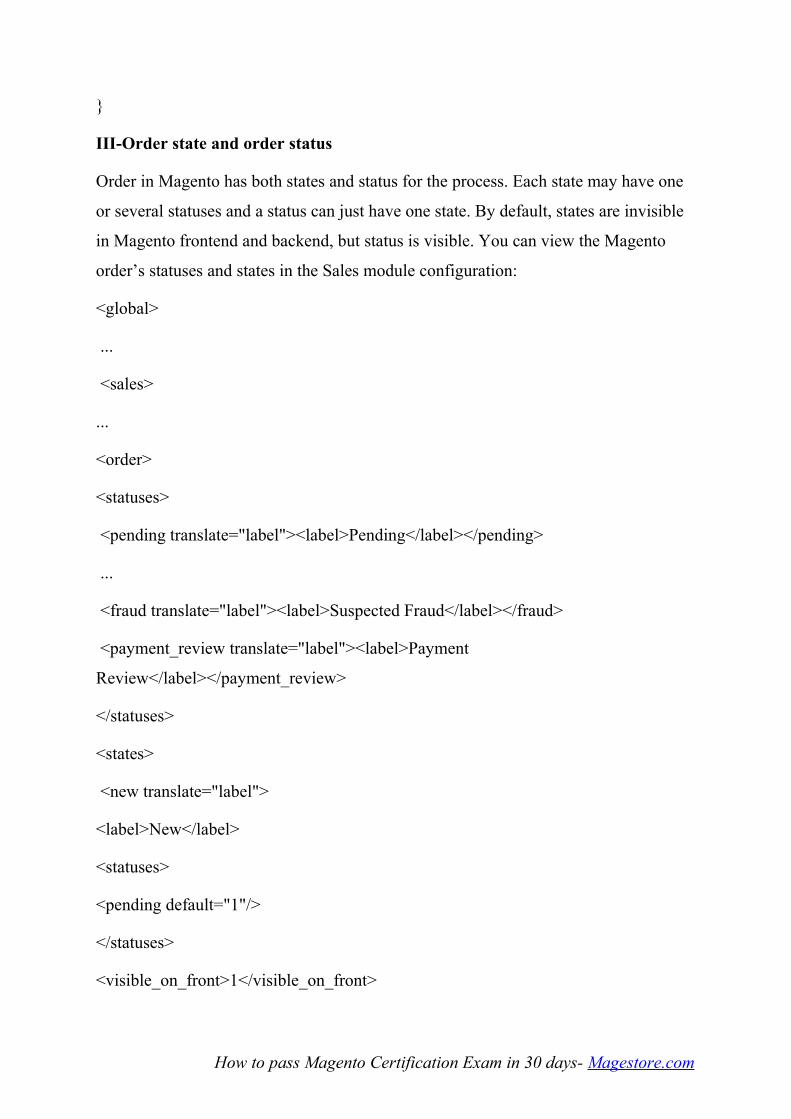
}
III-Order state and order status
Order in Magento has both states and status for the process. Each state may have one
or several statuses and a status can just have one state. By default, states are invisible
in Magento frontend and backend, but status is visible. You can view the Magento
order’s statuses and states in the Sales module configuration:
<global>
...
<sales>
...
<order>
<statuses>
<pending translate="label"><label>Pending</label></pending>
...
<fraud translate="label"><label>Suspected Fraud</label></fraud>
<payment_review translate="label"><label>Payment
Review</label></payment_review>
</statuses>
<states>
<new translate="label">
<label>New</label>
<statuses>
<pending default="1"/>
</statuses>
<visible_on_front>1</visible_on_front>
How to pass Magento Certification Exam in 30 days- Magestore.com
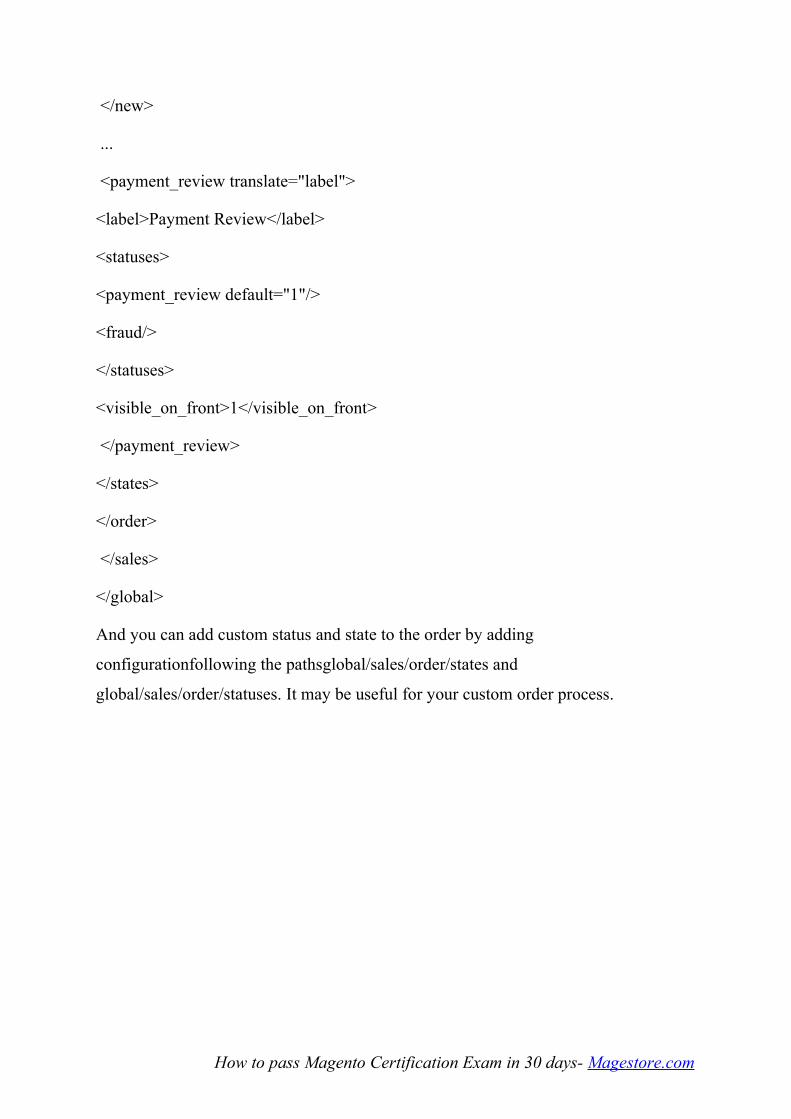
</new>
...
<payment_review translate="label">
<label>Payment Review</label>
<statuses>
<payment_review default="1"/>
<fraud/>
</statuses>
<visible_on_front>1</visible_on_front>
</payment_review>
</states>
</order>
</sales>
</global>
And you can add custom status and state to the order by adding
configurationfollowing the pathsglobal/sales/order/states and
global/sales/order/statuses. It may be useful for your custom order process.
How to pass Magento Certification Exam in 30 days- Magestore.com

Part 2: Invoice
An invoice is created when a customer pays for his order. If the order uses an online
payment method, the invoice will be created automatically. If not, invoices are
manually created by the administrator in back-end.
I-Invoice Model
Invoice model (Mage_Sales_Model_Order_Invoice) works with invoice data.
Magento allows creating many invoices for an order. With each invoice, you can pay
for some items of your order. You can get invoiced items by method getAllItems():
public function getAllItems()
{
$items = array();
foreach ($this->getItemsCollection() as $item) {
if (!$item->isDeleted()) {
$items[] =$item;
}
}
return $items;
}
In the topic 8, I mentioned invoice total. It’s collected by the method collectTotals() in
this model:
/**
* Invoice totals collecting
*
* @return Mage_Sales_Model_Order_Invoice
*/
How to pass Magento Certification Exam in 30 days- Magestore.com
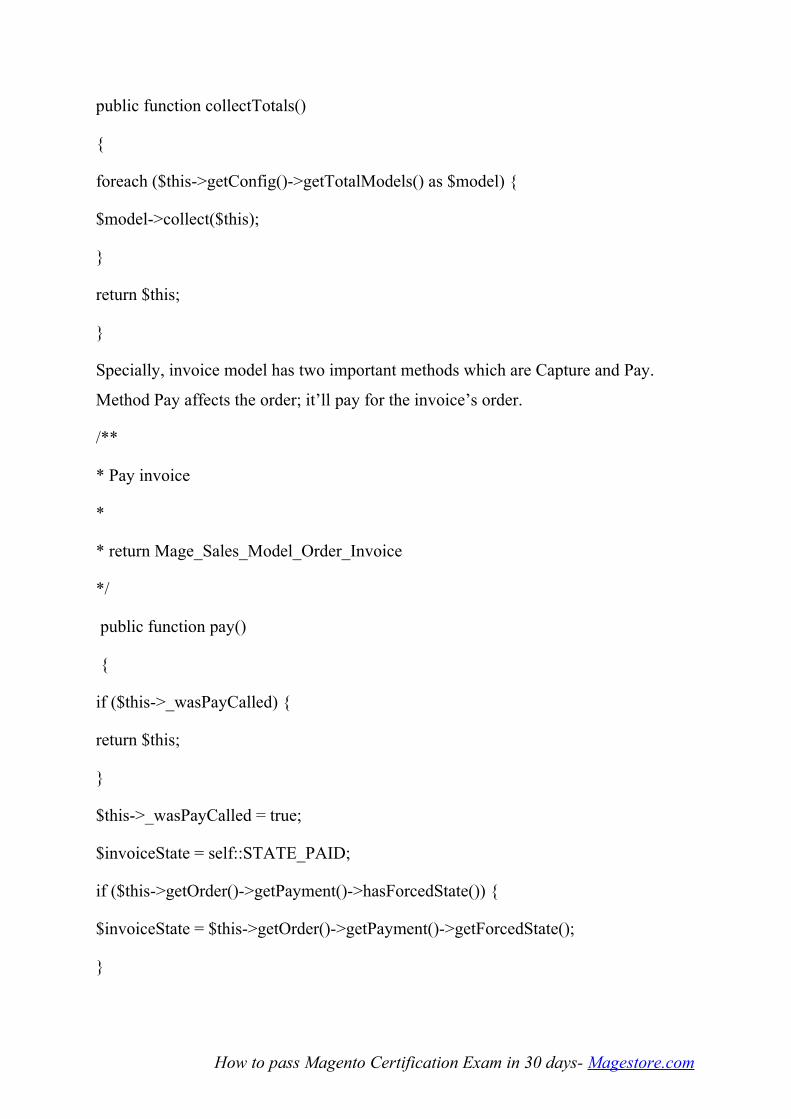
public function collectTotals()
{
foreach ($this->getConfig()->getTotalModels() as $model) {
$model->collect($this);
}
return $this;
}
Specially, invoice model has two important methods which are Capture and Pay.
Method Pay affects the order; it’ll pay for the invoice’s order.
/**
* Pay invoice
*
* return Mage_Sales_Model_Order_Invoice
*/
public function pay()
{
if ($this->_wasPayCalled) {
return $this;
}
$this->_wasPayCalled = true;
$invoiceState = self::STATE_PAID;
if ($this->getOrder()->getPayment()->hasForcedState()) {
$invoiceState = $this->getOrder()->getPayment()->getForcedState();
}
How to pass Magento Certification Exam in 30 days- Magestore.com
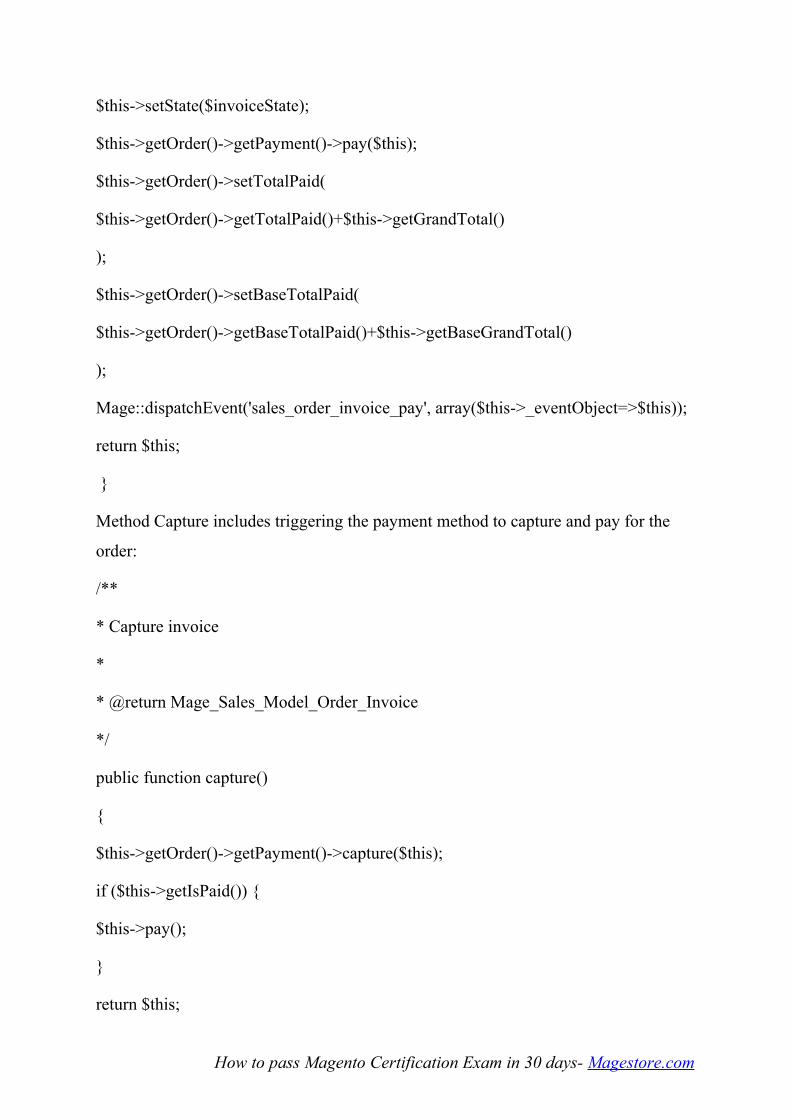
$this->setState($invoiceState);
$this->getOrder()->getPayment()->pay($this);
$this->getOrder()->setTotalPaid(
$this->getOrder()->getTotalPaid()+$this->getGrandTotal()
);
$this->getOrder()->setBaseTotalPaid(
$this->getOrder()->getBaseTotalPaid()+$this->getBaseGrandTotal()
);
Mage::dispatchEvent('sales_order_invoice_pay', array($this->_eventObject=>$this));
return $this;
}
Method Capture includes triggering the payment method to capture and pay for the
order:
/**
* Capture invoice
*
* @return Mage_Sales_Model_Order_Invoice
*/
public function capture()
{
$this->getOrder()->getPayment()->capture($this);
if ($this->getIsPaid()) {
$this->pay();
}
return $this;
How to pass Magento Certification Exam in 30 days- Magestore.com
}
You can find more methods of this model in file:
app\code\core\Mage\Sales\Model\Order\Invoice.php
II- Create an invoice for online capture payment
When you create an invoice in the back-end manual, the payment will be captured
offline and the invoice is created. But if your customer uses an online payment to pay
for his order, how and when an invoice is created?
I will take the payment method Paypal as an example. When a customer pays for his
order by PayPal, his order information is sent to the Paypal gateway. When his
payment in PayPal is completed, PayPal will call back to a link address. In Magento,
it’s linked to the Paypal/Ipn Controller. In this controller, the payment is processed
and the invoice is created as follows:
/**
* Instantiate IPN model and pass IPN request to it
*/
public function indexAction()
{
if (!$this->getRequest()->isPost()) {
return;
}
try {
$data = $this->getRequest()->getPost();
Mage::getModel('paypal/ipn')->processIpnRequest($data, new
Varien_Http_Adapter_Curl());
} catch (Exception $e) {
Mage::logException($e);
How to pass Magento Certification Exam in 30 days- Magestore.com
}
}
You can view the code to create the invoice in model paypal/ipn:
protected function _registerPaymentCapture()
{
if ($this->getRequestData('transaction_entity') == 'auth') {
return;
}
$this->_importPaymentInformation();
$payment = $this->_order->getPayment();
$payment->setTransactionId($this->getRequestData('txn_id'))
->setPreparedMessage($this->_createIpnComment(''))
->setParentTransactionId($this->getRequestData('parent_txn_id'))
->setShouldCloseParentTransaction('Completed' === $this-
>getRequestData('auth_status'))
->setIsTransactionClosed(0)
->registerCaptureNotification($this->getRequestData('mc_gross'));
$this->_order->save();
// notify customer
if ($invoice = $payment->getCreatedInvoice() && !$this->_order->getEmailSent()) {
$comment = $this->_order->sendNewOrderEmail()->addStatusHistoryComment(
Mage::helper('paypal')->__('Notified customer about invoice #%s.', $invoice-
>getIncrementId())
)
->setIsCustomerNotified(true)
How to pass Magento Certification Exam in 30 days- Magestore.com

->save();
}
}
III-Store invoice information
Magento stores invoice information in 4 following tables:
Table sales_flat_invoice stores main information of invoices.
Table sales_flat_invoice_comment stores comments on an invoice.
Table sales_flat_invoice_item stores the list of items of invoice.
Specially, table sales_flat_invoice_grid stores some information of invoices to
increase load speed when showing a grid invoice.
How to pass Magento Certification Exam in 30 days- Magestore.com
Part 3: Shipment
Coming back to our topic: Sales and Customer. In this part, I’ll talk about the
shipment, the next step of sale process.
I-Shipment Model
Shipment model (Mage_Sales_Model_Order_Shipment) works with shipment data.
Magento allows you to create many shipments for an order with items which can ship
separately. With each shipment, you can get shipment items by method getAllItems():
public function getItemsCollection()
{
if (empty($this->_items)) {
$this->_items = Mage::getResourceModel('sales/order_shipment_item_collection')
->setShipmentFilter($this->getId());
if ($this->getId()) {
foreach ($this->_items as $item) {
$item->setShipment($this);
}
}
}
return $this->_items;
}
public function getAllItems()
{
$items = array();
foreach ($this->getItemsCollection() as $item) {
if (!$item->isDeleted()) {
How to pass Magento Certification Exam in 30 days- Magestore.com

$items[] =$item;
}
}
return $items;
}
Besides, shipment has another important method, which is getAllTracks(). It returns
all track information of shipment:
public function getAllTracks()
{
$tracks = array();
foreach ($this->getTracksCollection() as $track) {
if (!$track->isDeleted()) {
$tracks[] =$track;
}
}
return $tracks;
}
How to pass Magento Certification Exam in 30 days- Magestore.com

Specifically, track information has carrier name, title, and track number. This
information allows you to track package shipment.
Shipping carriers has API (such as DHL, Federal Express…), allowing you to track
shipment online. With track number, you will get the details of package shipment as
shipping date, service, weight, length… You can find code to get tracking detail in file
app\code\core\Mage\Sales\Model\Order\Shipment\Track.php:
/**
* Retrieve detail for shipment track
*
* @return string
*/
public function getNumberDetail()
{
$carrierInstance = Mage::getSingleton('shipping/config')->getCarrierInstance($this-
>getCarrierCode());
if (!$carrierInstance) {
$custom['title'] = $this->getTitle();
$custom['number'] = $this->getNumber();
How to pass Magento Certification Exam in 30 days- Magestore.com
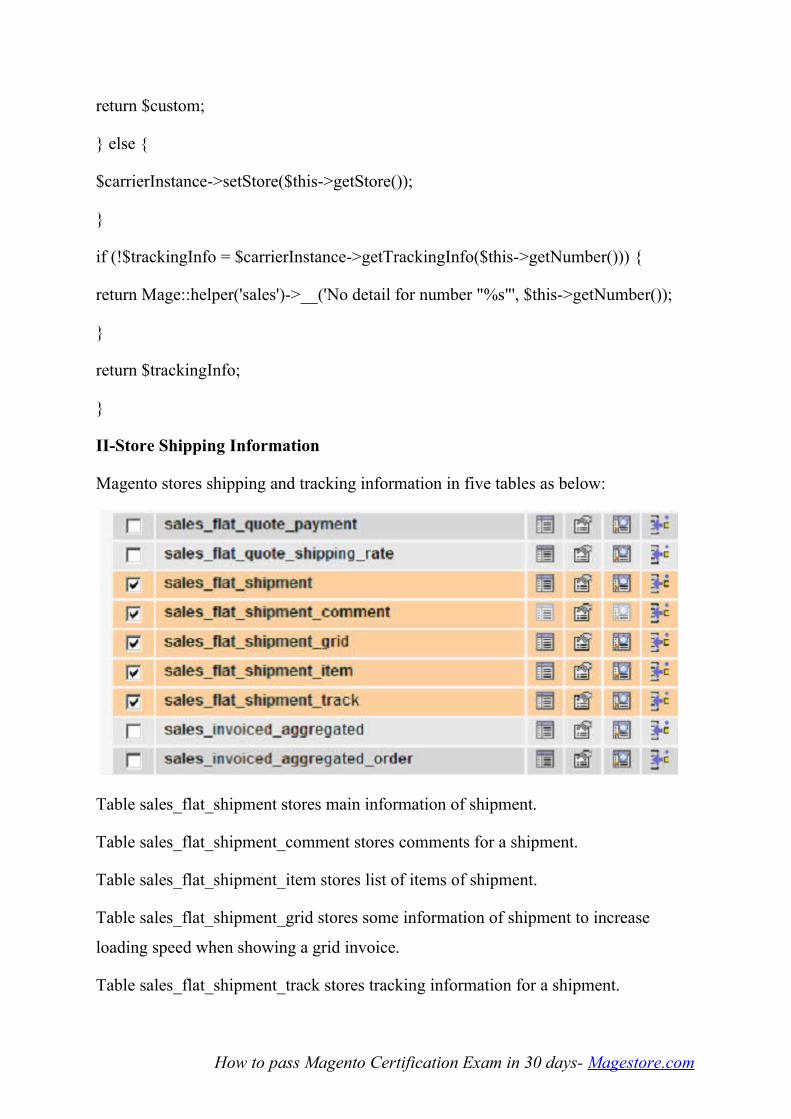
return $custom;
} else {
$carrierInstance->setStore($this->getStore());
}
if (!$trackingInfo = $carrierInstance->getTrackingInfo($this->getNumber())) {
return Mage::helper('sales')->__('No detail for number "%s"', $this->getNumber());
}
return $trackingInfo;
}
II-Store Shipping Information
Magento stores shipping and tracking information in five tables as below:
Table sales_flat_shipment stores main information of shipment.
Table sales_flat_shipment_comment stores comments for a shipment.
Table sales_flat_shipment_item stores list of items of shipment.
Table sales_flat_shipment_grid stores some information of shipment to increase
loading speed when showing a grid invoice.
Table sales_flat_shipment_track stores tracking information for a shipment.
How to pass Magento Certification Exam in 30 days- Magestore.com
That’s all about shipment. Many people think it’s so sophisticated to practice; in fact,
it’s not difficult to understand. I hope that all information in this part will help you
with your jobs.
How to pass Magento Certification Exam in 30 days- Magestore.com
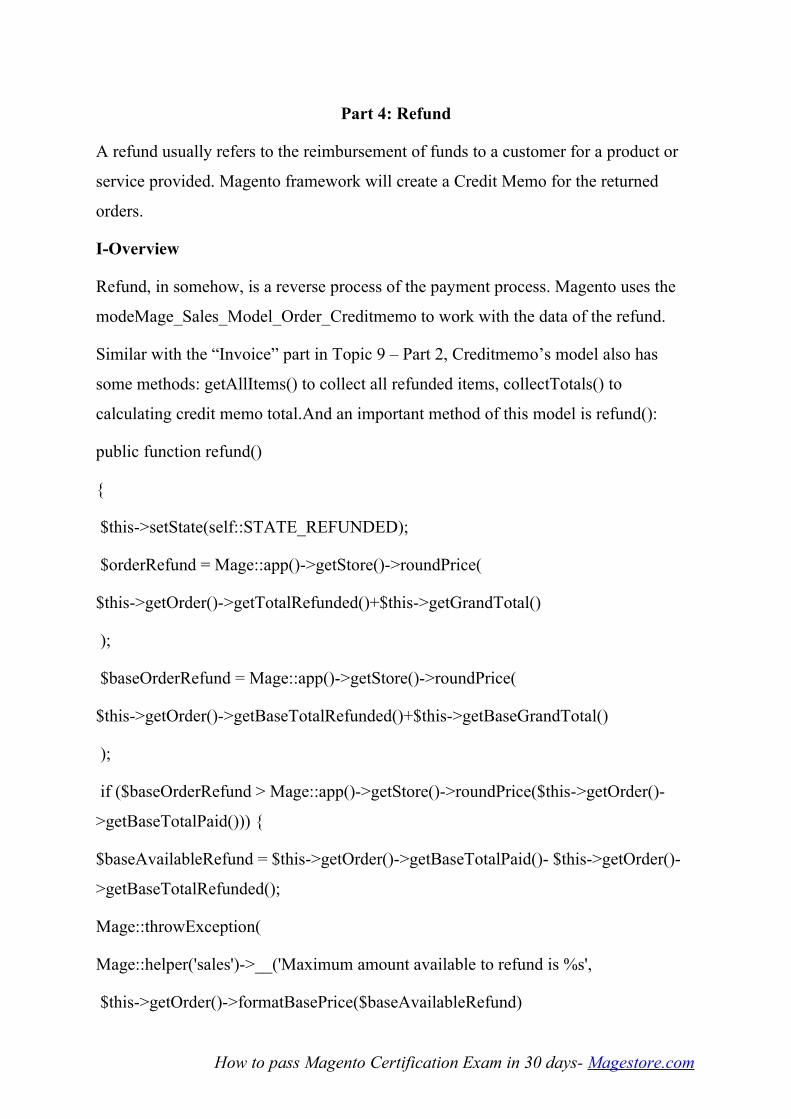
Part 4: Refund
A refund usually refers to the reimbursement of funds to a customer for a product or
service provided. Magento framework will create a Credit Memo for the returned
orders.
I-Overview
Refund, in somehow, is a reverse process of the payment process. Magento uses the
modeMage_Sales_Model_Order_Creditmemo to work with the data of the refund.
Similar with the “Invoice” part in Topic 9 – Part 2, Creditmemo’s model also has
some methods: getAllItems() to collect all refunded items, collectTotals() to
calculating credit memo total.And an important method of this model is refund():
public function refund()
{
$this->setState(self::STATE_REFUNDED);
$orderRefund = Mage::app()->getStore()->roundPrice(
$this->getOrder()->getTotalRefunded()+$this->getGrandTotal()
);
$baseOrderRefund = Mage::app()->getStore()->roundPrice(
$this->getOrder()->getBaseTotalRefunded()+$this->getBaseGrandTotal()
);
if ($baseOrderRefund > Mage::app()->getStore()->roundPrice($this->getOrder()-
>getBaseTotalPaid())) {
$baseAvailableRefund = $this->getOrder()->getBaseTotalPaid()- $this->getOrder()-
>getBaseTotalRefunded();
Mage::throwException(
Mage::helper('sales')->__('Maximum amount available to refund is %s',
$this->getOrder()->formatBasePrice($baseAvailableRefund)
How to pass Magento Certification Exam in 30 days- Magestore.com
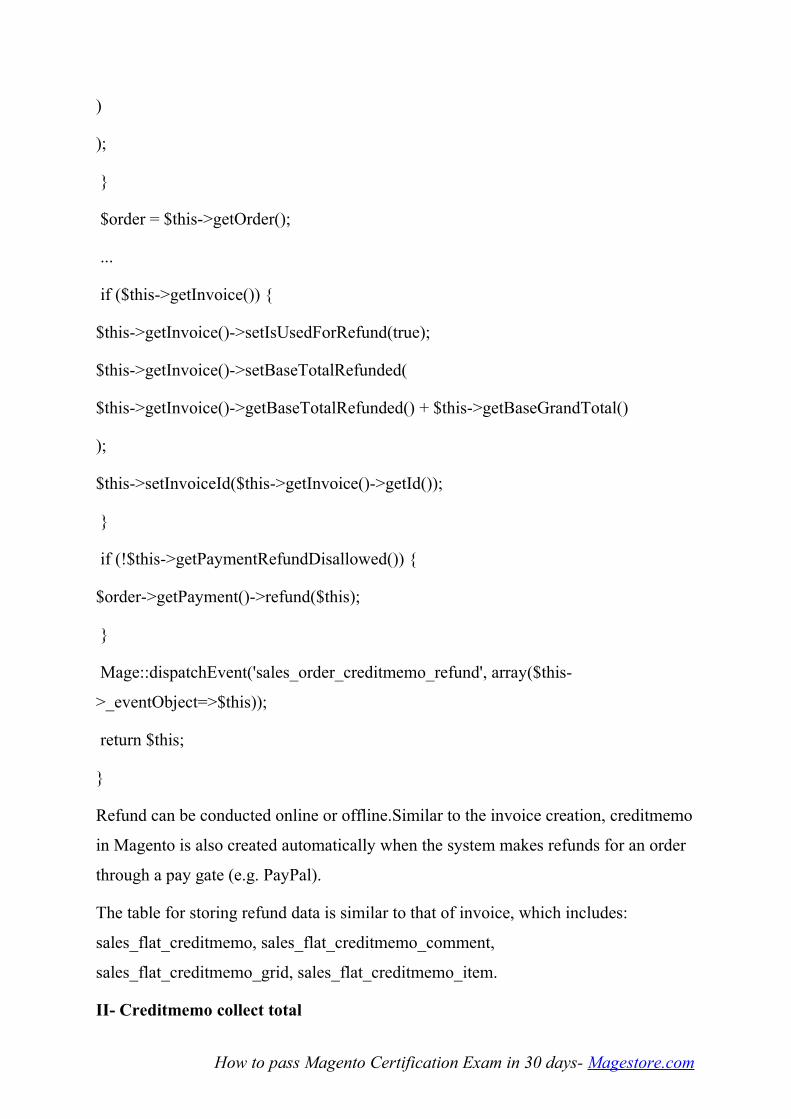
)
);
}
$order = $this->getOrder();
...
if ($this->getInvoice()) {
$this->getInvoice()->setIsUsedForRefund(true);
$this->getInvoice()->setBaseTotalRefunded(
$this->getInvoice()->getBaseTotalRefunded() + $this->getBaseGrandTotal()
);
$this->setInvoiceId($this->getInvoice()->getId());
}
if (!$this->getPaymentRefundDisallowed()) {
$order->getPayment()->refund($this);
}
Mage::dispatchEvent('sales_order_creditmemo_refund', array($this-
>_eventObject=>$this));
return $this;
}
Refund can be conducted online or offline.Similar to the invoice creation, creditmemo
in Magento is also created automatically when the system makes refunds for an order
through a pay gate (e.g. PayPal).
The table for storing refund data is similar to that of invoice, which includes:
sales_flat_creditmemo, sales_flat_creditmemo_comment,
sales_flat_creditmemo_grid, sales_flat_creditmemo_item.
II- Creditmemo collect total
How to pass Magento Certification Exam in 30 days- Magestore.com

The calculation of the totality of creditmemo (Subtotal, discount, tax…) is also similar
to that of an invoice.
However, the calculation of shipping fee and grand totality of creditmemo is a little bit
different. When a refund is conducted offline, the shipping fee is calculated based on
the data that admins import and collected for this credit memo. Moreover, the two
other boxes (Adjustment Refund and Adjustmend Fee) are added to enable the
changing the values of grand totality ad credit memo. The code of collecting
creditmemo’s grand totality is as follows:
class Mage_Sales_Model_Order_Creditmemo_Total_Grand extends
Mage_Sales_Model_Order_Creditmemo_Total_Abstract
{
public function collect(Mage_Sales_Model_Order_Creditmemo $creditmemo)
{
$grandTotal= $creditmemo->getGrandTotal();
$baseGrandTotal = $creditmemo->getBaseGrandTotal();
$grandTotal+= $creditmemo->getAdjustmentPositive();
$baseGrandTotal+= $creditmemo->getBaseAdjustmentPositive();
$grandTotal-= $creditmemo->getAdjustmentNegative();
$baseGrandTotal-= $creditmemo->getBaseAdjustmentNegative();
$creditmemo->setGrandTotal($grandTotal);
$creditmemo->setBaseGrandTotal($baseGrandTotal);
$creditmemo->setAdjustment($creditmemo->getAdjustmentPositive()-$creditmemo-
>getAdjustmentNegative());
$creditmemo->setBaseAdjustment($creditmemo->getBaseAdjustmentPositive()-
$creditmemo->getBaseAdjustmentNegative());
How to pass Magento Certification Exam in 30 days- Magestore.com

return $this;
}
}
How to pass Magento Certification Exam in 30 days- Magestore.com

Part 5: Partial Operations
Partial operation allows processing each part of order, and helps this process become
more flexible. Magento supports three partial operations: partial invoice, partial
shipping and partial refund. Three operations are similar, so I will guide you through
partial invoice in this lesson and you can apply on the two remaining operations.
I-Create a Partial Invoice
After making an order, you can create its invoice in backend. In the new invoice page,
you need to select the quantity of item to invoice.
Choosing “submit invoice” to create a partial invoice for that order. Another method is
using the following code:
$order;// Your order to create Invoice
if($order->canInvoice()){
$invoiceQtys=array(
// ItemID =>QtyOf Item to Invoice
);
How to pass Magento Certification Exam in 30 days- Magestore.com
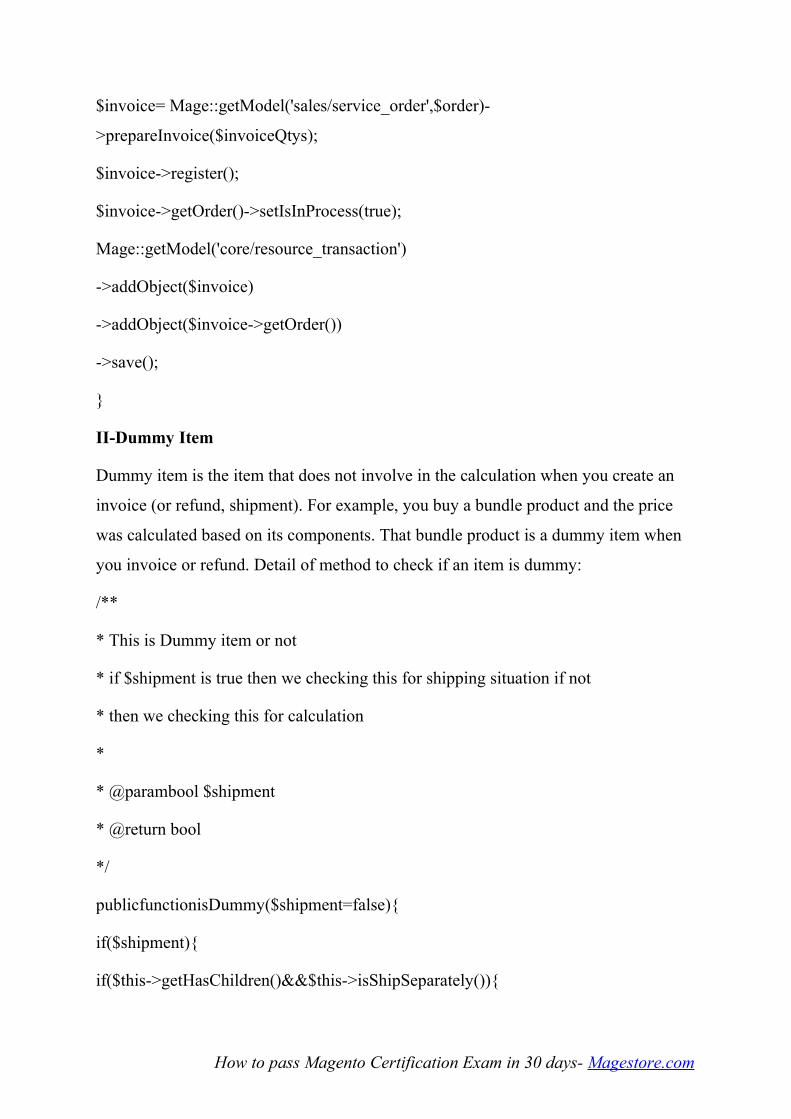
$invoice= Mage::getModel('sales/service_order',$order)-
>prepareInvoice($invoiceQtys);
$invoice->register();
$invoice->getOrder()->setIsInProcess(true);
Mage::getModel('core/resource_transaction')
->addObject($invoice)
->addObject($invoice->getOrder())
->save();
}
II-Dummy Item
Dummy item is the item that does not involve in the calculation when you create an
invoice (or refund, shipment). For example, you buy a bundle product and the price
was calculated based on its components. That bundle product is a dummy item when
you invoice or refund. Detail of method to check if an item is dummy:
/**
* This is Dummy item or not
* if $shipment is true then we checking this for shipping situation if not
* then we checking this for calculation
*
* @parambool $shipment
* @return bool
*/
publicfunctionisDummy($shipment=false){
if($shipment){
if($this->getHasChildren()&&$this->isShipSeparately()){
How to pass Magento Certification Exam in 30 days- Magestore.com

returntrue;
}
if($this->getHasChildren()&&!$this->isShipSeparately()){
returnfalse;
}
if($this->getParentItem()&&$this->isShipSeparately()){
returnfalse;
}
if($this->getParentItem()&&!$this->isShipSeparately()){
returntrue;
}
}else{
if($this->getHasChildren()&&$this->isChildrenCalculated()){
returntrue;
}
if($this->getHasChildren()&&!$this->isChildrenCalculated()){
returnfalse;
}
if($this->getParentItem()&&$this->isChildrenCalculated()){
returnfalse;
}
if($this->getParentItem()&&!$this->isChildrenCalculated()){
returntrue;
}
}
How to pass Magento Certification Exam in 30 days- Magestore.com
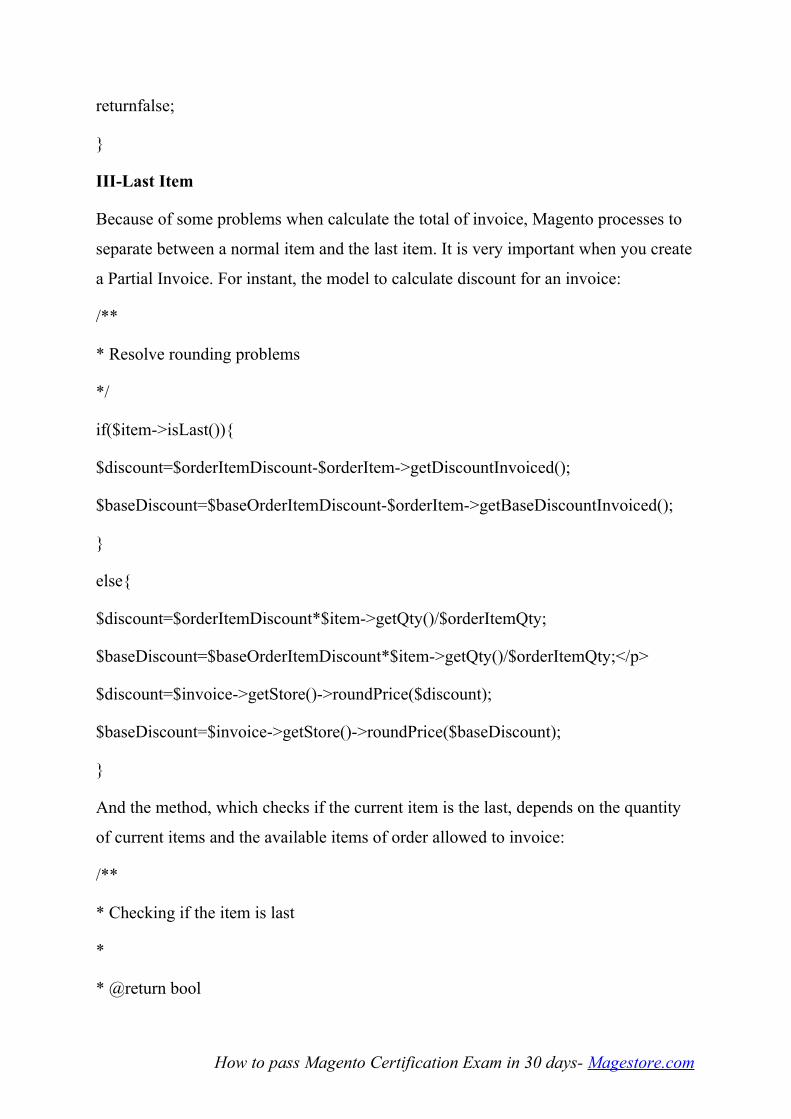
returnfalse;
}
III-Last Item
Because of some problems when calculate the total of invoice, Magento processes to
separate between a normal item and the last item. It is very important when you create
a Partial Invoice. For instant, the model to calculate discount for an invoice:
/**
* Resolve rounding problems
*/
if($item->isLast()){
$discount=$orderItemDiscount-$orderItem->getDiscountInvoiced();
$baseDiscount=$baseOrderItemDiscount-$orderItem->getBaseDiscountInvoiced();
}
else{
$discount=$orderItemDiscount*$item->getQty()/$orderItemQty;
$baseDiscount=$baseOrderItemDiscount*$item->getQty()/$orderItemQty;</p>
$discount=$invoice->getStore()->roundPrice($discount);
$baseDiscount=$invoice->getStore()->roundPrice($baseDiscount);
}
And the method, which checks if the current item is the last, depends on the quantity
of current items and the available items of order allowed to invoice:
/**
* Checking if the item is last
*
* @return bool
How to pass Magento Certification Exam in 30 days- Magestore.com
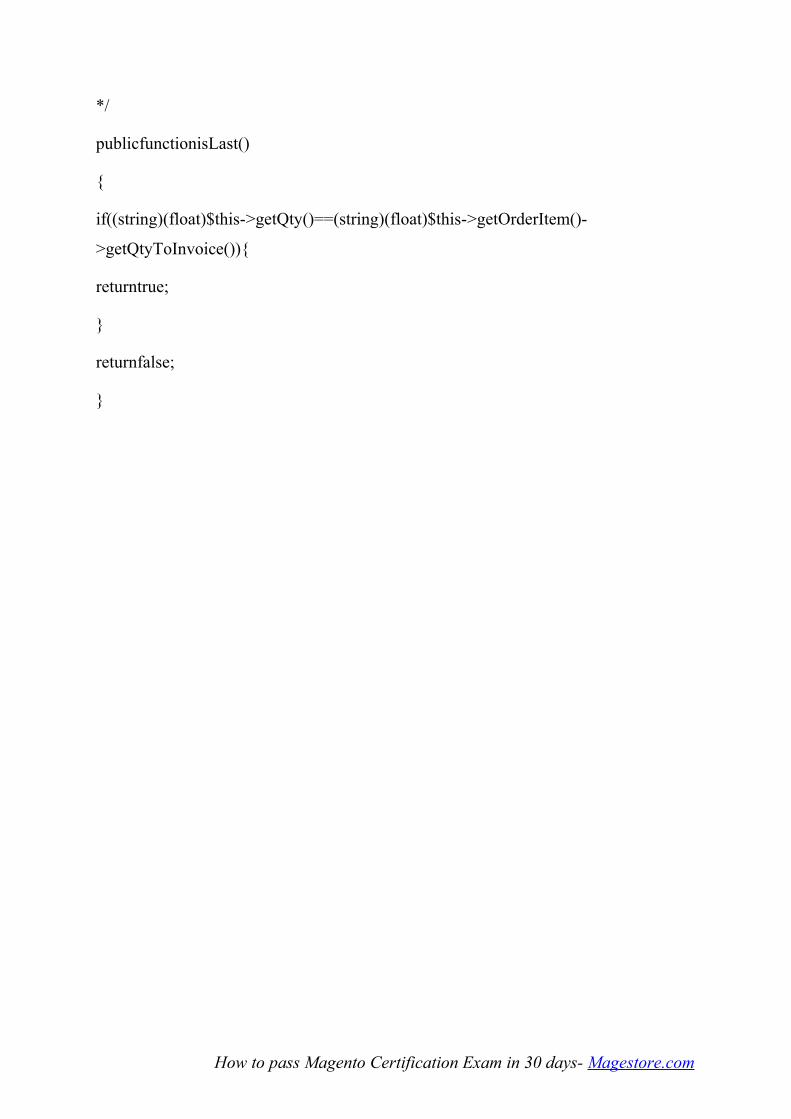
*/
publicfunctionisLast()
{
if((string)(float)$this->getQty()==(string)(float)$this->getOrderItem()-
>getQtyToInvoice()){
returntrue;
}
returnfalse;
}
How to pass Magento Certification Exam in 30 days- Magestore.com

Part 6: Cancel Operations
This lesson refers to cancelation, which is an important operation since everyone can
make a mistake sometime, right? It allows admin to cancel a wrong action while
processing the order.
I-Order entities support cancel
Not all of order’s entities in Magento support cancelling operations (the shipment for
example), and the cancelling operation is not always available.
The order allows to cancel but it checkscans cancelled order by using
methodcanCancel()in the order model:
/**
* Retrieve order cancel availability
*
* @return bool
*/
publicfunctioncanCancel()
{
if($this->canUnhold()){// $this->isPaymentReview()
returnfalse;
}
$allInvoiced=true;
foreach($this->getAllItems()as$item){
if($item->getQtyToInvoice()){
$allInvoiced=false;
break;
}
How to pass Magento Certification Exam in 30 days- Magestore.com
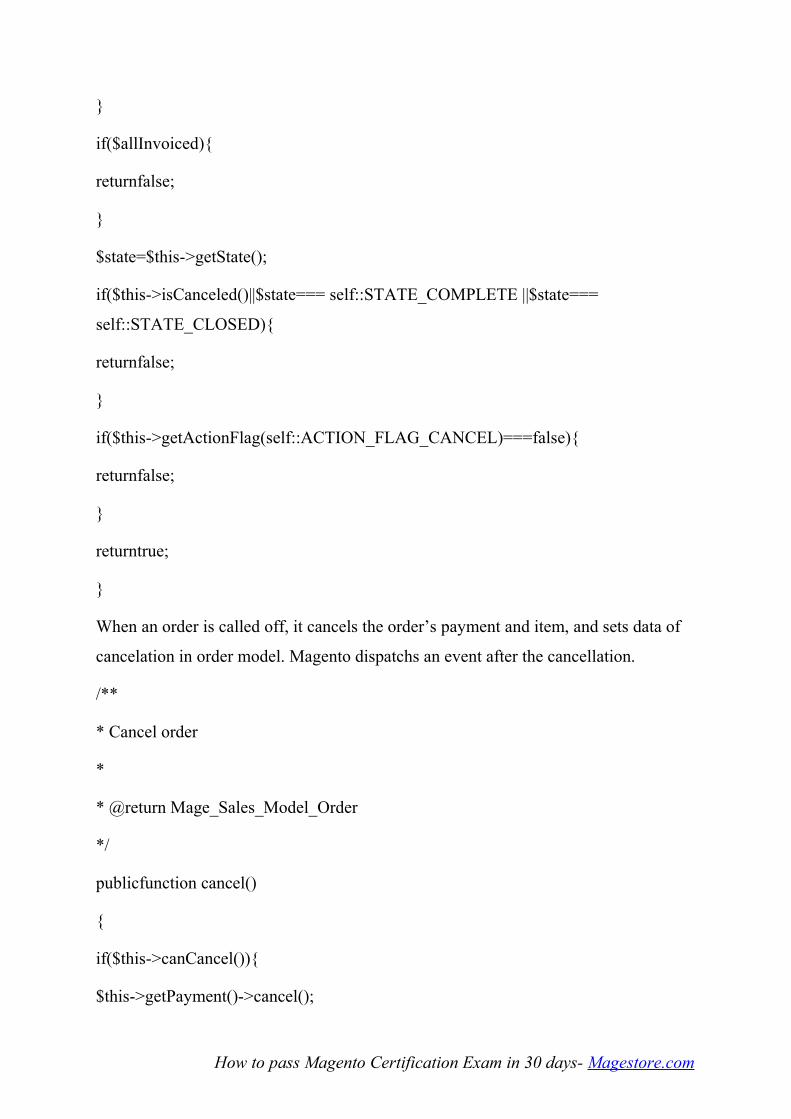
}
if($allInvoiced){
returnfalse;
}
$state=$this->getState();
if($this->isCanceled()||$state=== self::STATE_COMPLETE ||$state===
self::STATE_CLOSED){
returnfalse;
}
if($this->getActionFlag(self::ACTION_FLAG_CANCEL)===false){
returnfalse;
}
returntrue;
}
When an order is called off, it cancels the order’s payment and item, and sets data of
cancelation in order model. Magento dispatchs an event after the cancellation.
/**
* Cancel order
*
* @return Mage_Sales_Model_Order
*/
publicfunction cancel()
{
if($this->canCancel()){
$this->getPayment()->cancel();
How to pass Magento Certification Exam in 30 days- Magestore.com
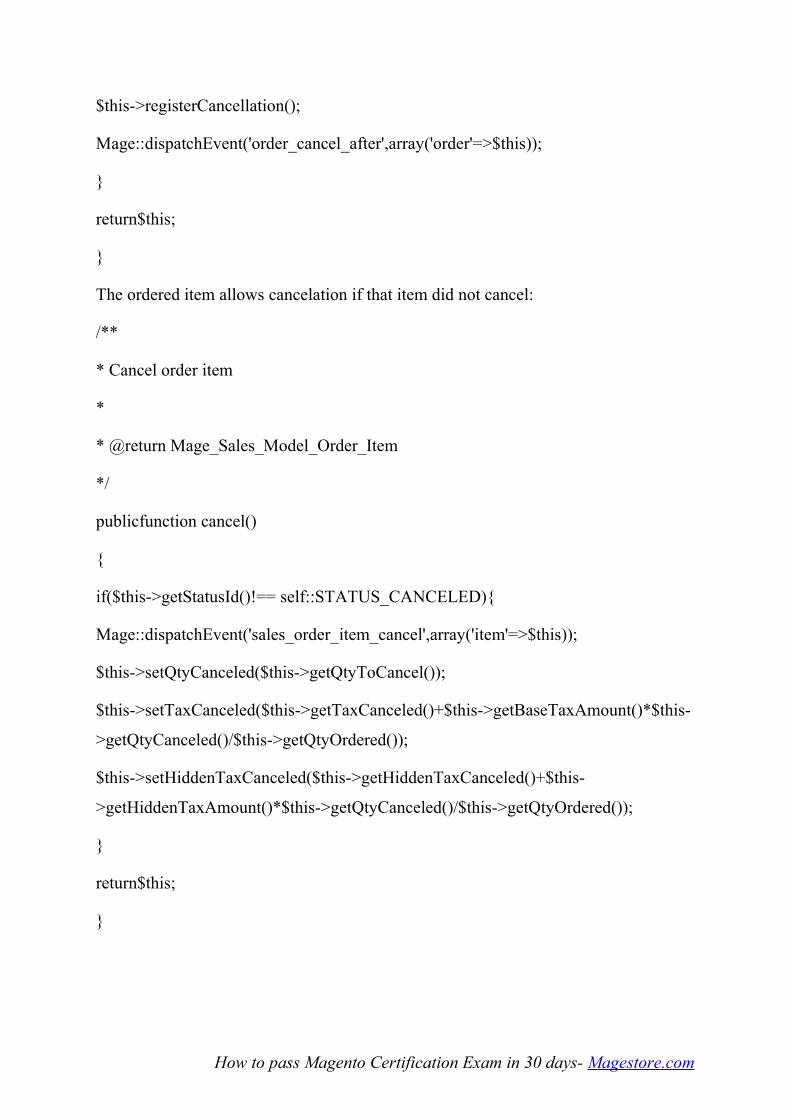
$this->registerCancellation();
Mage::dispatchEvent('order_cancel_after',array('order'=>$this));
}
return$this;
}
The ordered item allows cancelation if that item did not cancel:
/**
* Cancel order item
*
* @return Mage_Sales_Model_Order_Item
*/
publicfunction cancel()
{
if($this->getStatusId()!== self::STATUS_CANCELED){
Mage::dispatchEvent('sales_order_item_cancel',array('item'=>$this));
$this->setQtyCanceled($this->getQtyToCancel());
$this->setTaxCanceled($this->getTaxCanceled()+$this->getBaseTaxAmount()*$this-
>getQtyCanceled()/$this->getQtyOrdered());
$this->setHiddenTaxCanceled($this->getHiddenTaxCanceled()+$this-
>getHiddenTaxAmount()*$this->getQtyCanceled()/$this->getQtyOrdered());
}
return$this;
}
How to pass Magento Certification Exam in 30 days- Magestore.com

Similar to order, the invoice and invoice items, the credit memo and credit memo
items allow cancelation, too. However, you can’t cancel an invoice or a credit memo
in backend, these operations are used for the online payment.
II-Void and cancel
Void operation is used for online payment methods. It will cancel the invoice and
callback to online payment to void it. But not like the cancelation, the invoiced
quantity will no longer be able to be invoiced again. You can see the void() method in
the Invoice model:
/**
* Void invoice
*
* @return Mage_Sales_Model_Order_Invoice
*/
publicfunction void()
{
$this->getOrder()->getPayment()->void($this);
$this->cancel();
return$this;
}
And the _void() method in Payment model:
/**
* Authorize payment either online or offline (process auth notification)
* Updates transactions hierarchy, if required
* Prevents transaction double processing
* Updates payment totals, updates order status and adds proper comments
*
How to pass Magento Certification Exam in 30 days- Magestore.com

* @parambool $isOnline
* @param float $amount
* @return Mage_Sales_Model_Order_Payment
*/
protectedfunction _authorize($isOnline,$amount)
{
// update totals
$amount=$this->_formatAmount($amount,true);
$this->setBaseAmountAuthorized($amount);
// do authorization
$order=$this->getOrder();
$state=Mage_Sales_Model_Order::STATE_PROCESSING;
$status=true;
if($isOnline){
// invoke authorization on gateway
$this->getMethodInstance()->setStore($order->getStoreId())->authorize($this,
$amount);
}else{
$message= Mage::helper('sales')->__(
'Registered notification about authorized amount of %s.',
$this->_formatPrice($amount)
);
}
// similar logic of "payment review" order as in capturing
if($this->getIsTransactionPending()){
How to pass Magento Certification Exam in 30 days- Magestore.com

$message= Mage::helper('sales')->__('Authorizing amount of %s is pending approval
on gateway.',$this->_formatPrice($amount));
$state=Mage_Sales_Model_Order::STATE_PAYMENT_REVIEW;
if($this->getIsFraudDetected()){
$status=Mage_Sales_Model_Order::STATUS_FRAUD;
}
}else{
$message= Mage::helper('sales')->__('Authorized amount of %s.',$this-
>_formatPrice($amount));
}
// update transactions, order state and add comments
$transaction=$this-
>_addTransaction(Mage_Sales_Model_Order_Payment_Transaction::TYPE_AUTH);
if($order->isNominal()){
$message=$this->_prependMessage(Mage::helper('sales')->__('Nominal order
registered.'));
}else{
$message=$this->_prependMessage($message);
$message=$this->_appendTransactionToMessage($transaction,$message);
}
$order->setState($state,$status,$message);
return$this;
}
III-Tax and discount processing
While cancelling, the data was calculated and stored in database.
How to pass Magento Certification Exam in 30 days- Magestore.com
Order cancelation calculates and stores canceled tax and canceled discount:
$this->setSubtotalCanceled($this->getSubtotal()-$this->getSubtotalInvoiced());
$this->setBaseSubtotalCanceled($this->getBaseSubtotal()-$this-
>getBaseSubtotalInvoiced());
$this->setTaxCanceled($this->getTaxAmount()-$this->getTaxInvoiced());
$this->setBaseTaxCanceled($this->getBaseTaxAmount()-$this-
>getBaseTaxInvoiced());
$this->setShippingCanceled($this->getShippingAmount()-$this-
>getShippingInvoiced());
$this->setBaseShippingCanceled($this->getBaseShippingAmount()-$this-
>getBaseShippingInvoiced());
$this->setDiscountCanceled(abs($this->getDiscountAmount())-$this-
>getDiscountInvoiced());
$this->setBaseDiscountCanceled(abs($this->getBaseDiscountAmount())-$this-
>getBaseDiscountInvoiced());
The tax canceled equals the tax of order subtract the tax invoiced. Discount canceled
equals the discount of order subtract the discount invoiced. Invoice and credit memo
canceled will calculate and update tax, discount for order. See the invoice canceled
code:
/**
* Cancel invoice action
*
* @return Mage_Sales_Model_Order_Invoice
*/
publicfunction cancel()
{
How to pass Magento Certification Exam in 30 days- Magestore.com

$order=$this->getOrder();
$order->getPayment()->cancelInvoice($this);
foreach($this->getAllItems()as$item){
$item->cancel();
}
/**
* Unregister order totals only for invoices in state PAID
*/
$order->setTotalInvoiced($order->getTotalInvoiced()-$this->getGrandTotal());
$order->setBaseTotalInvoiced($order->getBaseTotalInvoiced()-$this-
>getBaseGrandTotal());
$order->setSubtotalInvoiced($order->getSubtotalInvoiced()-$this->getSubtotal());
$order->setBaseSubtotalInvoiced($order->getBaseSubtotalInvoiced()-$this-
>getBaseSubtotal());
$order->setTaxInvoiced($order->getTaxInvoiced()-$this->getTaxAmount());
$order->setBaseTaxInvoiced($order->getBaseTaxInvoiced()-$this-
>getBaseTaxAmount());
$order->setHiddenTaxInvoiced($order->getHiddenTaxInvoiced()-$this-
>getHiddenTaxAmount());
$order->setBaseHiddenTaxInvoiced($order->getBaseHiddenTaxInvoiced()-$this-
>getBaseHiddenTaxAmount());
$order->setShippingTaxInvoiced($order->getShippingTaxInvoiced()-$this-
>getShippingTaxAmount());
$order->setBaseShippingTaxInvoiced($order->getBaseShippingTaxInvoiced()-$this-
>getBaseShippingTaxAmount());
How to pass Magento Certification Exam in 30 days- Magestore.com

$order->setShippingInvoiced($order->getShippingInvoiced()-$this-
>getShippingAmount());
$order->setBaseShippingInvoiced($order->getBaseShippingInvoiced()-$this-
>getBaseShippingAmount());
$order->setDiscountInvoiced($order->getDiscountInvoiced()-$this-
>getDiscountAmount());
$order->setBaseDiscountInvoiced($order->getBaseDiscountInvoiced()-$this-
>getBaseDiscountAmount());
$order->setBaseTotalInvoicedCost($order->getBaseTotalInvoicedCost()-$this-
>getBaseCost());
if($this->getState()== self::STATE_PAID){
$this->getOrder()->setTotalPaid($this->getOrder()->getTotalPaid()-$this-
>getGrandTotal());
$this->getOrder()->setBaseTotalPaid($this->getOrder()->getBaseTotalPaid()-$this-
>getBaseGrandTotal());
}
$this->setState(self::STATE_CANCELED);
$this->getOrder()-
>setState(Mage_Sales_Model_Order::STATE_PROCESSING,true);
Mage::dispatchEvent('sales_order_invoice_cancel',array($this-
>_eventObject=>$this));
return$this;
}
How to pass Magento Certification Exam in 30 days- Magestore.com
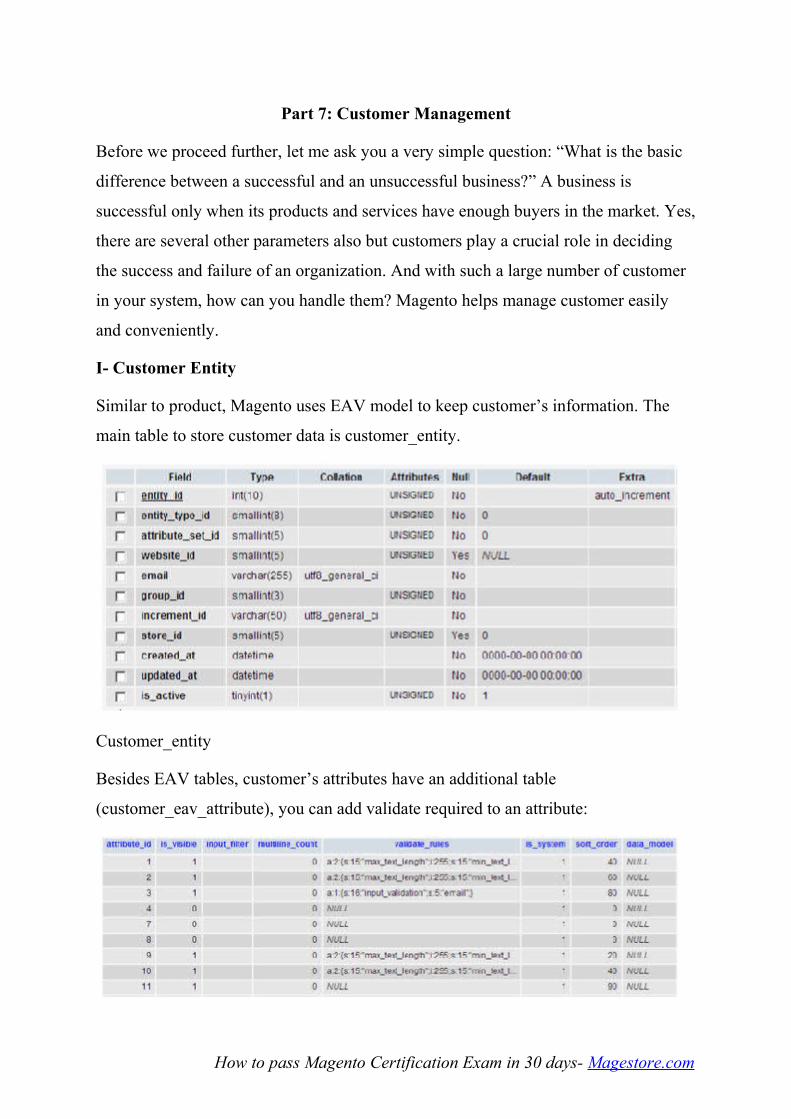
Part 7: Customer Management
Before we proceed further, let me ask you a very simple question: “What is the basic
difference between a successful and an unsuccessful business?” A business is
successful only when its products and services have enough buyers in the market. Yes,
there are several other parameters also but customers play a crucial role in deciding
the success and failure of an organization. And with such a large number of customer
in your system, how can you handle them? Magento helps manage customer easily
and conveniently.
I- Customer Entity
Similar to product, Magento uses EAV model to keep customer’s information. The
main table to store customer data is customer_entity.
Customer_entity
Besides EAV tables, customer’s attributes have an additional table
(customer_eav_attribute), you can add validate required to an attribute:
How to pass Magento Certification Exam in 30 days- Magestore.com
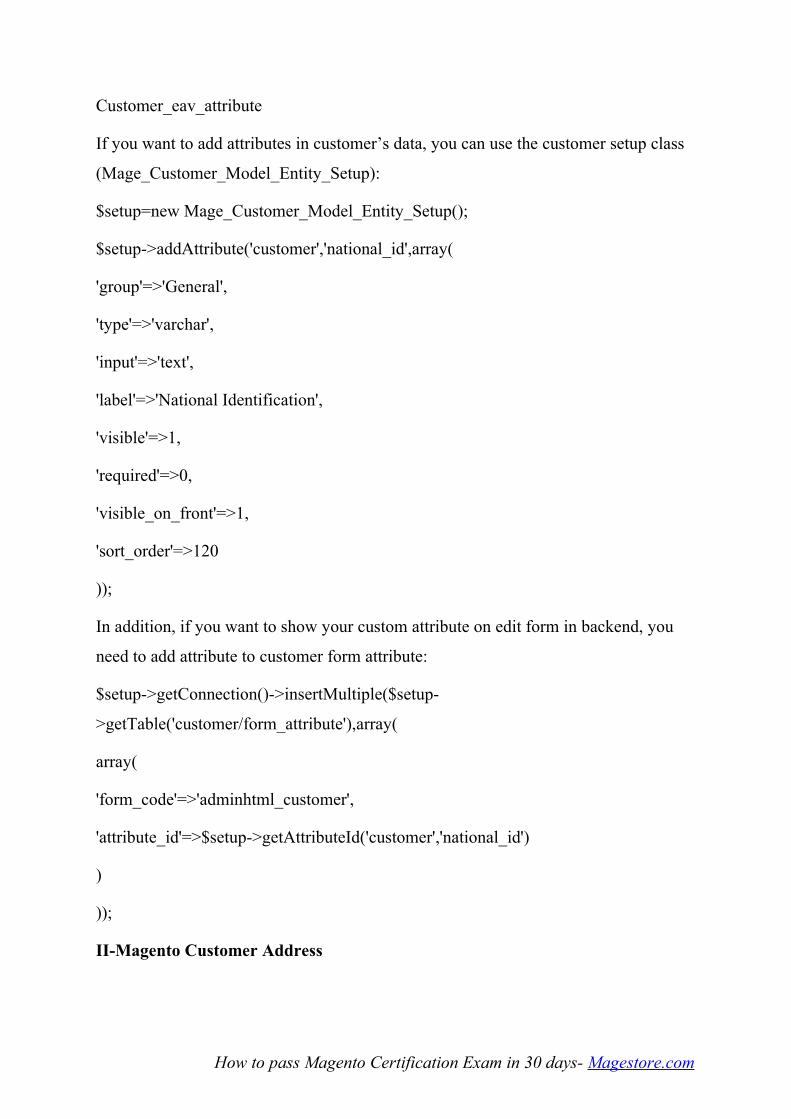
Customer_eav_attribute
If you want to add attributes in customer’s data, you can use the customer setup class
(Mage_Customer_Model_Entity_Setup):
$setup=new Mage_Customer_Model_Entity_Setup();
$setup->addAttribute('customer','national_id',array(
'group'=>'General',
'type'=>'varchar',
'input'=>'text',
'label'=>'National Identification',
'visible'=>1,
'required'=>0,
'visible_on_front'=>1,
'sort_order'=>120
));
In addition, if you want to show your custom attribute on edit form in backend, you
need to add attribute to customer form attribute:
$setup->getConnection()->insertMultiple($setup-
>getTable('customer/form_attribute'),array(
array(
'form_code'=>'adminhtml_customer',
'attribute_id'=>$setup->getAttributeId('customer','national_id')
)
));
II-Magento Customer Address
How to pass Magento Certification Exam in 30 days- Magestore.com
Magento designs multiple addresses option for one customer. In checkout process,
customer address is converted to billing address and shipping address. The billing
address is often used to calculate the tax for order, the shipping address is always used
to calculate the shipping fee. Magento configures fields that convert from customer
address to order address in config.xml file:
<config>
...
<global>
<fieldsets>
...
<customer_address>
<id><to_quote_address>customer_address_id</to_quote_address></id>
<parent_id><to_quote_address>customer_id</to_quote_address></parent_id>
<prefix><to_quote_address>*</to_quote_address></prefix>
<firstname><to_quote_address>*</to_quote_address></firstname>
<middlename><to_quote_address>*</to_quote_address></middlename>
<lastname><to_quote_address>*</to_quote_address></lastname>
<suffix><to_quote_address>*</to_quote_address></suffix>
<!--<email><to_quote_address>*</to_quote_address></email>-->
<company><to_quote_address>*</to_quote_address></company>
<street_full><to_quote_address>street</to_quote_address></street_full>
<city><to_quote_address>*</to_quote_address></city>
<region><to_quote_address>*</to_quote_address></region>
<region_id><to_quote_address>*</to_quote_address></region_id>
<postcode><to_quote_address>*</to_quote_address></postcode>
How to pass Magento Certification Exam in 30 days- Magestore.com
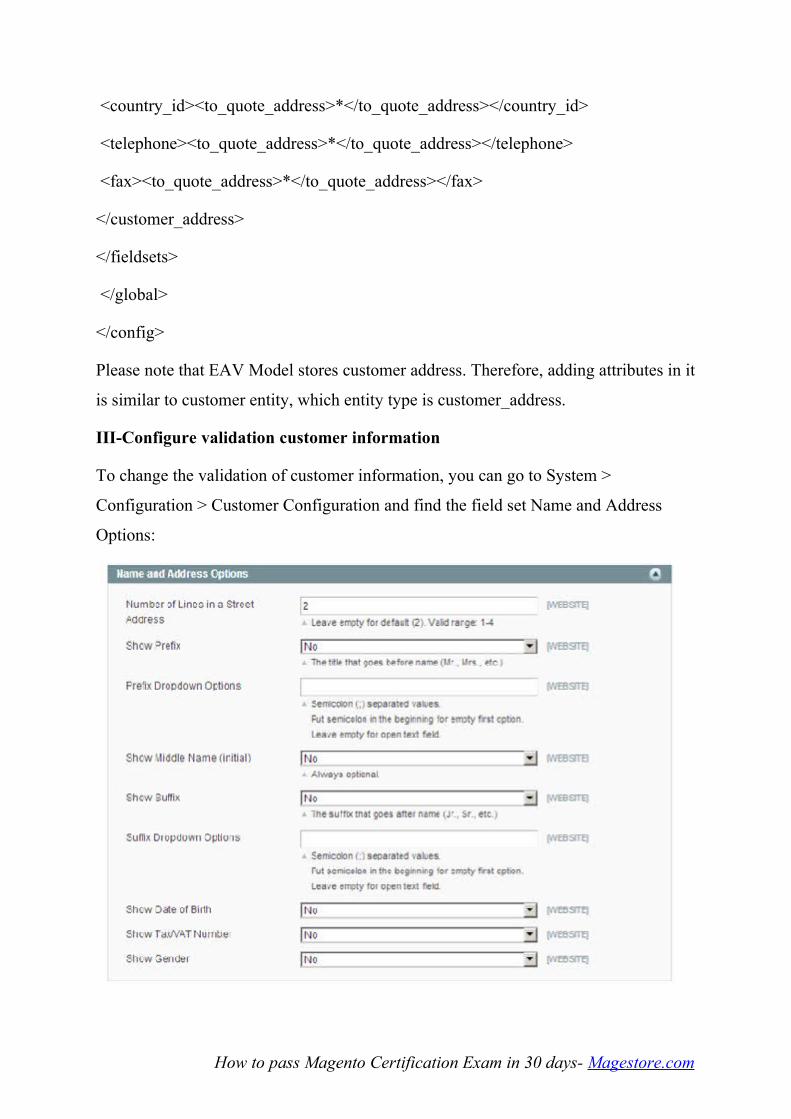
<country_id><to_quote_address>*</to_quote_address></country_id>
<telephone><to_quote_address>*</to_quote_address></telephone>
<fax><to_quote_address>*</to_quote_address></fax>
</customer_address>
</fieldsets>
</global>
</config>
Please note that EAV Model stores customer address. Therefore, adding attributes in it
is similar to customer entity, which entity type is customer_address.
III-Configure validation customer information
To change the validation of customer information, you can go to System >
Configuration > Customer Configuration and find the field set Name and Address
Options:
How to pass Magento Certification Exam in 30 days- Magestore.com
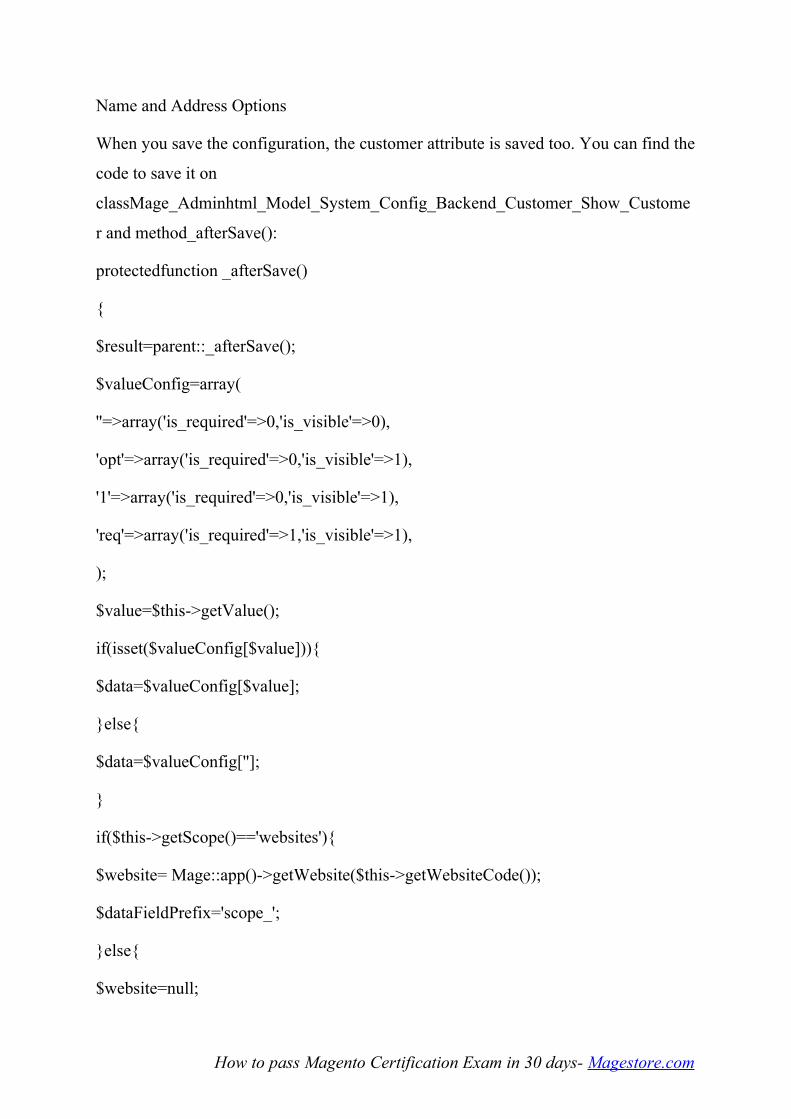
Name and Address Options
When you save the configuration, the customer attribute is saved too. You can find the
code to save it on
classMage_Adminhtml_Model_System_Config_Backend_Customer_Show_Custome
r and method_afterSave():
protectedfunction _afterSave()
{
$result=parent::_afterSave();
$valueConfig=array(
''=>array('is_required'=>0,'is_visible'=>0),
'opt'=>array('is_required'=>0,'is_visible'=>1),
'1'=>array('is_required'=>0,'is_visible'=>1),
'req'=>array('is_required'=>1,'is_visible'=>1),
);
$value=$this->getValue();
if(isset($valueConfig[$value])){
$data=$valueConfig[$value];
}else{
$data=$valueConfig[''];
}
if($this->getScope()=='websites'){
$website= Mage::app()->getWebsite($this->getWebsiteCode());
$dataFieldPrefix='scope_';
}else{
$website=null;
How to pass Magento Certification Exam in 30 days- Magestore.com
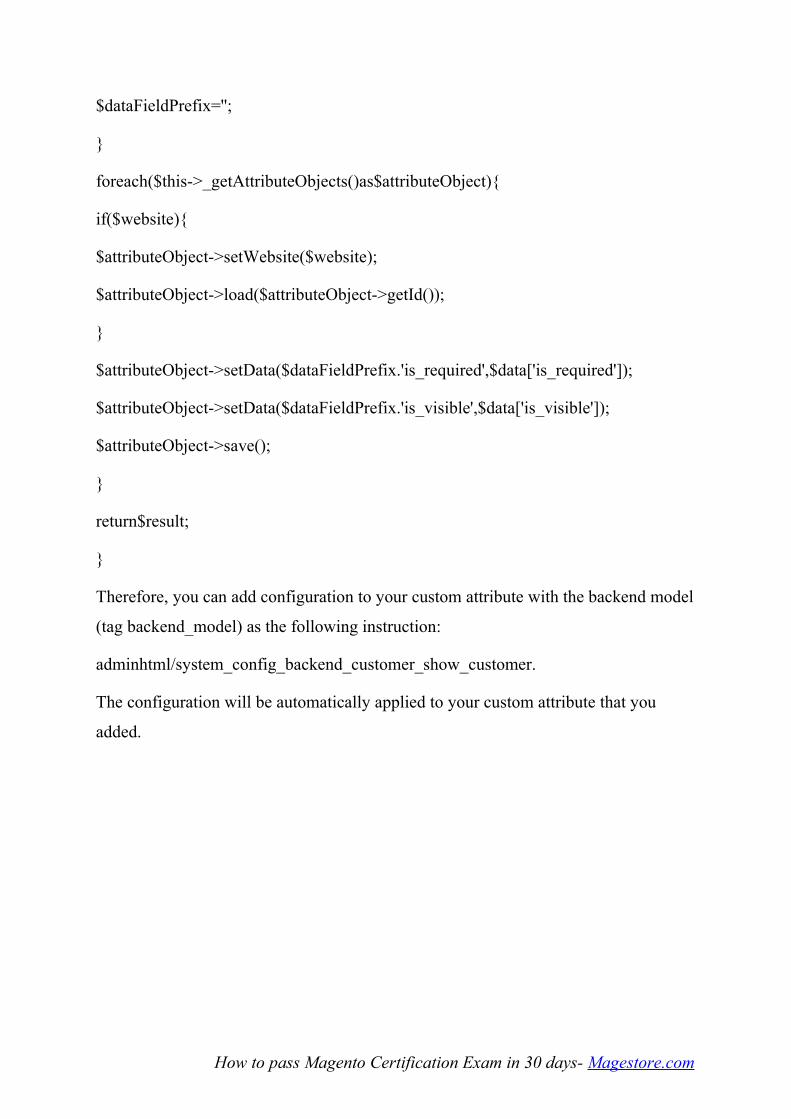
$dataFieldPrefix='';
}
foreach($this->_getAttributeObjects()as$attributeObject){
if($website){
$attributeObject->setWebsite($website);
$attributeObject->load($attributeObject->getId());
}
$attributeObject->setData($dataFieldPrefix.'is_required',$data['is_required']);
$attributeObject->setData($dataFieldPrefix.'is_visible',$data['is_visible']);
$attributeObject->save();
}
return$result;
}
Therefore, you can add configuration to your custom attribute with the backend model
(tag backend_model) as the following instruction:
adminhtml/system_config_backend_customer_show_customer.
The configuration will be automatically applied to your custom attribute that you
added.
How to pass Magento Certification Exam in 30 days- Magestore.com
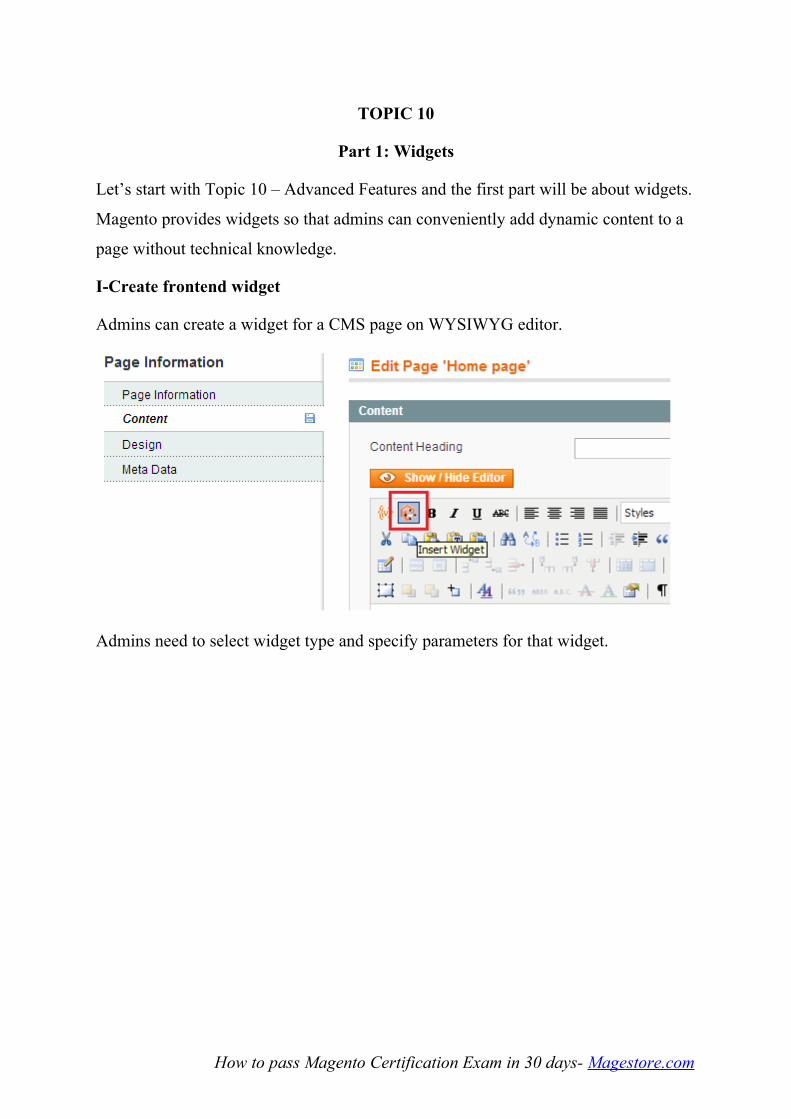
TOPIC 10
Part 1: Widgets
Let’s start with Topic 10 – Advanced Features and the first part will be about widgets.
Magento provides widgets so that admins can conveniently add dynamic content to a
page without technical knowledge.
I-Create frontend widget
Admins can create a widget for a CMS page on WYSIWYG editor.
Admins need to select widget type and specify parameters for that widget.
How to pass Magento Certification Exam in 30 days- Magestore.com
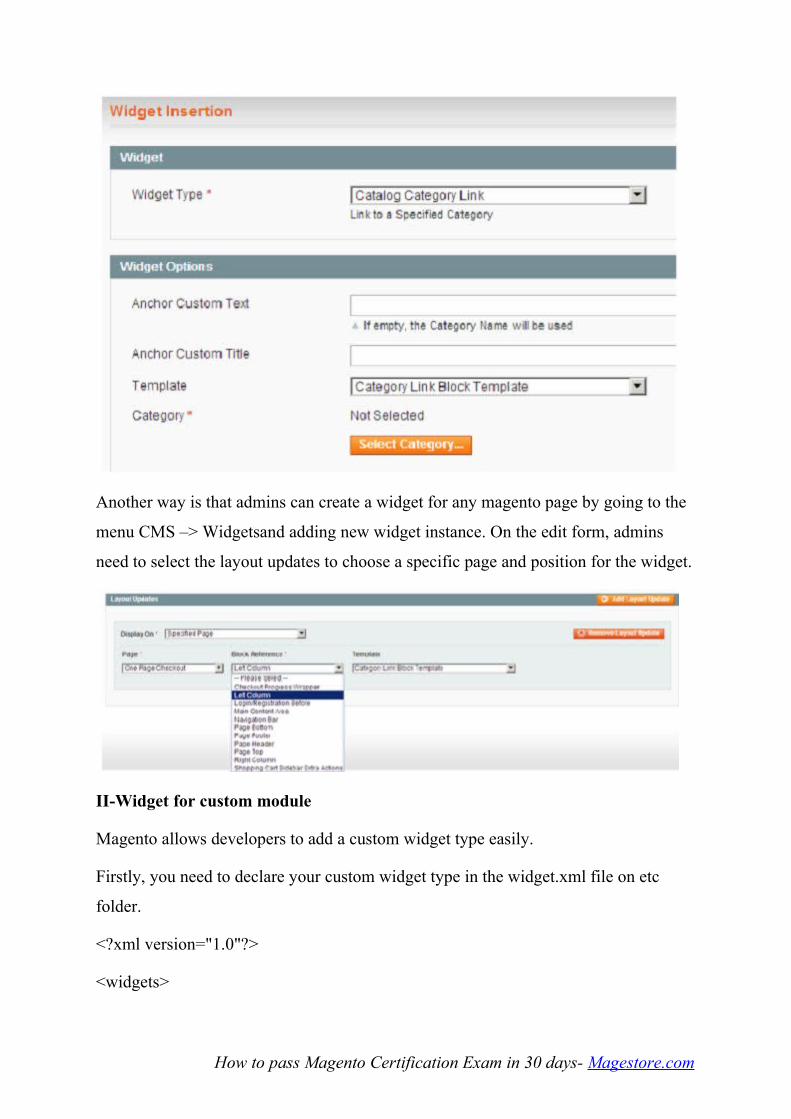
Another way is that admins can create a widget for any magento page by going to the
menu CMS –> Widgetsand adding new widget instance. On the edit form, admins
need to select the layout updates to choose a specific page and position for the widget.
II-Widget for custom module
Magento allows developers to add a custom widget type easily.
Firstly, you need to declare your custom widget type in the widget.xml file on etc
folder.
<?xml version="1.0"?>
<widgets>
How to pass Magento Certification Exam in 30 days- Magestore.com
<custom_widget type="widgets/widgets" translate="name description"
module="widgets">
<name>Custom Widget</name>
<description>Custom Module Widget</description>
<is_email_compatible>1</is_email_compatible>
<parameters>
<template>
<required>1</required>
<visible>1</visible>
<label>Template</label>
<type>select</type>
<value>widgets/widgets.phtml</value>
</template>
</parameters>
</custom_widget>
</widgets>
Then, you need to create the block class for that widget type. This block needs
implements from Mage_Widget_Block_Interface.
<?php
class Magestore_Widgets_Block_Widgets
extends Mage_Catalog_Block_Product_Abstract
implements Mage_Widget_Block_Interface
{
// content of your custom block
}
How to pass Magento Certification Exam in 30 days- Magestore.com

The next step is to create a template file:
<?php
/**
* Custom Widget template
*/
?>
<h2>
<?php echo $this->__('Your custom Widget Here') ?>
</h2>
Finally, you go to admin panel and create a widget instance for your custom widget.
This widget instance will update the layout and show your custom widget on frontend:
Magestore really hopes that you can find this part useful in assisting you to develop
widget for your custom module.
How to pass Magento Certification Exam in 30 days- Magestore.com
Part 2: API
You may probably know that API is one of the most important things to developers
and Magento provides API functions to allow developers to work with Magento from
a third party system.
I-Magento Core API
On version 1.5, Magento API supports two API protocols: SOAP and XML-RPC, of
which SOAP is the default.
To connect with Magento SOAP web services, you can use these links for your SOAP
clients:
http://magentosite/index.php/api/soap/?wsdl
http://magentosite/index.php/api/?wsdl
This is an example of SOAP client code written in PHP:
$client = new SoapClient('http://magentosite/index.php/api/soap/?wsdl');
// get sessionId before call Magento Core API function
$sessionId = $client->login('apiUser', 'apiKey');
$result = $client->call($sessionId, 'order.list');
$result = $client->call($sessionId, '.', 'arg1');
$result = $client->call($sessionId, '.', array('arg1', 'arg2', 'arg3'));
$result = $client->multiCall($sessionId, array(
array('.'),
array('.', 'arg1'),
array('.', array('arg1', 'arg2'))
));
// If you don't need the session anymore
$client->endSession($sessionId);
How to pass Magento Certification Exam in 30 days- Magestore.com
To connect with Magento XML-RPC wen services, you need to use this link for your
XML-RPC client:
http://magentosite/index.php/api/xmlrpc/
Please look at an example code using XML-RPC client:
$client = new Zend_XmlRpc_Client('http://magentosite/index.php/api/xmlrpc/');
// get sessionId before call Magento Core API function
$sessionId = $client->call('login', array('username' => 'apiUser', 'password' =>
'apiKey'));
$result = $client->call('call', array($sessionId, '.'));
$result = $client->call('call', array($sessionId, '.', 'arg1'));
$result = $client->call('call', array($sessionId, '.', array('arg1', 'arg2', 'arg3')));
$result = $client->call('multiCall', array($sessionId, array(
array('.'),
array('.', 'arg1'),
array('.', array('arg1', 'arg2'))
)));
// If you don't need the session anymore
$client->call('endSession', array($sessionId));
Magento Core API allows you to manage customers, categories, products, sales,
checkout process, countries and regions. For the full list of core API methods, we can
visit http://www.magentocommerce.com/wiki/doc/webservices-api/api. In that part, I
have an example using Magento API method customer.info, this code below:
$client = new Zend_XmlRpc_Client('http://magentohost/api/xmlrpc/');
// get sessionId before call Magento Core API function
$sessionId = $client->call('login', array('username' => 'apiUser', 'password' =>
'apiKey'));
How to pass Magento Certification Exam in 30 days- Magestore.com
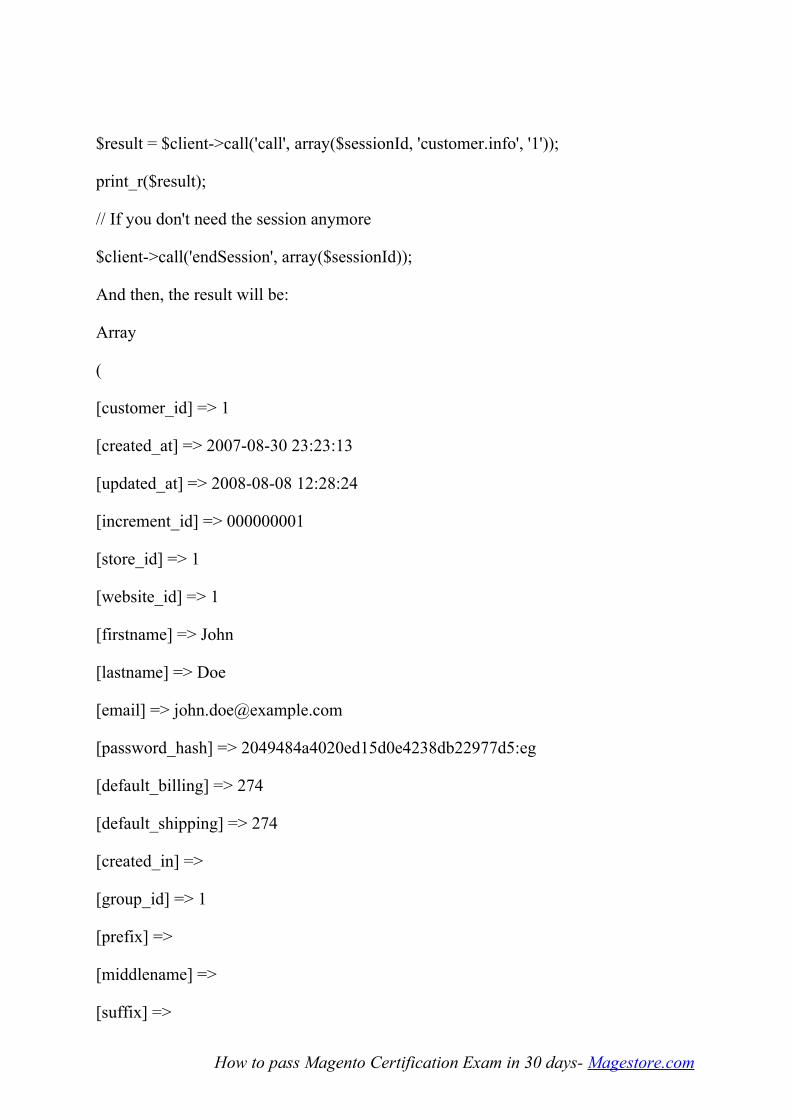
$result = $client->call('call', array($sessionId, 'customer.info', '1'));
print_r($result);
// If you don't need the session anymore
$client->call('endSession', array($sessionId));
And then, the result will be:
Array
(
[customer_id] => 1
[created_at] => 2007-08-30 23:23:13
[updated_at] => 2008-08-08 12:28:24
[increment_id] => 000000001
[store_id] => 1
[website_id] => 1
[firstname] => John
[lastname] => Doe
[email] => [email protected]
[password_hash] => 2049484a4020ed15d0e4238db22977d5:eg
[default_billing] => 274
[default_shipping] => 274
[created_in] =>
[group_id] => 1
[prefix] =>
[middlename] =>
[suffix] =>
How to pass Magento Certification Exam in 30 days- Magestore.com
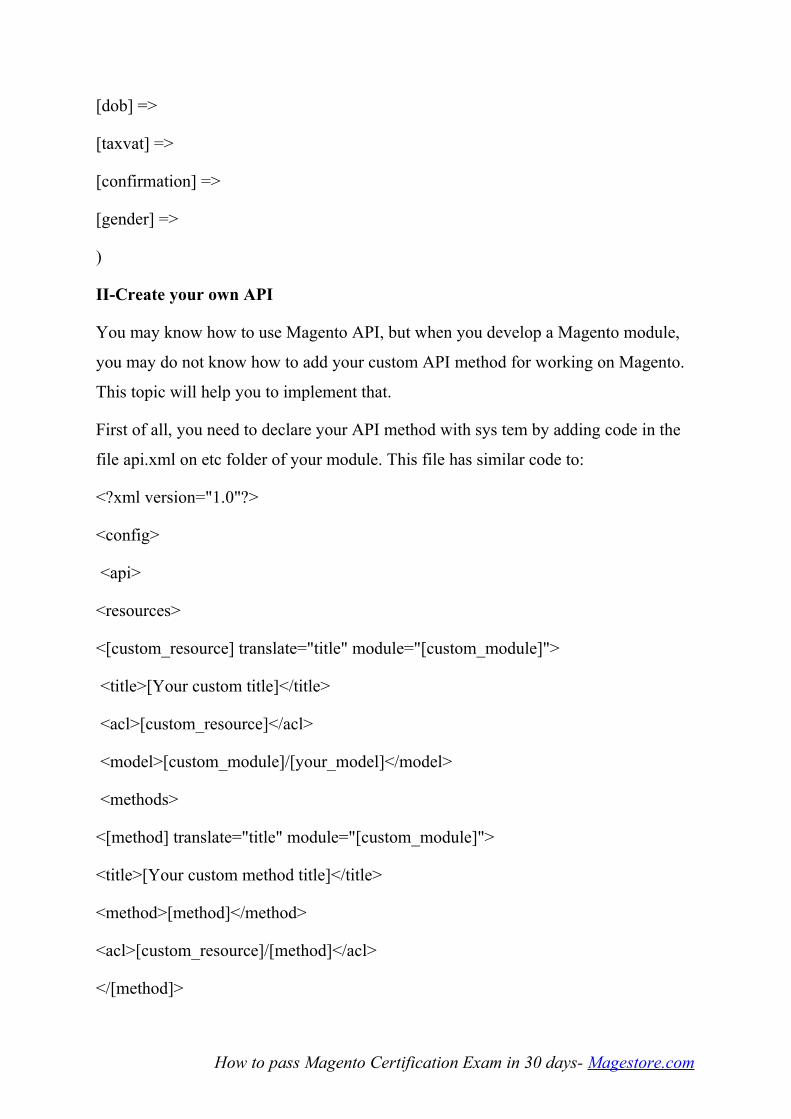
[dob] =>
[taxvat] =>
[confirmation] =>
[gender] =>
)
II-Create your own API
You may know how to use Magento API, but when you develop a Magento module,
you may do not know how to add your custom API method for working on Magento.
This topic will help you to implement that.
First of all, you need to declare your API method with sys tem by adding code in the
file api.xml on etc folder of your module. This file has similar code to:
<?xml version="1.0"?>
<config>
<api>
<resources>
<[custom_resource] translate="title" module="[custom_module]">
<title>[Your custom title]</title>
<acl>[custom_resource]</acl>
<model>[custom_module]/[your_model]</model>
<methods>
<[method] translate="title" module="[custom_module]">
<title>[Your custom method title]</title>
<method>[method]</method>
<acl>[custom_resource]/[method]</acl>
</[method]>
How to pass Magento Certification Exam in 30 days- Magestore.com

</methods>
<faults module="[custom_module]">
<!-- Example a fault response -->
<data_invalid>
<code>100</code>
<message>Invalid data. View details in error message</message>
</data_invalid>
</faults>
</[custom_resource]>
</resources>
<acl>
<resources>
<[custom_resource] translate="title" module="[custom_module]">
<title>[Your custom title]</title>
<sort_order>2000</sort_order>
<[method] translate="title" module="[custom_module]">
<title>[Your custom method title]</title>
</[method]>
</[custom_resource]>
</resources>
</acl>
</api>
</config>
Then, you need to declare your module model in config.xml file and write your model
as an adapter for API method above:
How to pass Magento Certification Exam in 30 days- Magestore.com

<?php
class [Your_Module]_Model_[your_model] extends
Mage_Api_Model_Resource_Abstract
{
public function [method]() {
// put adapter code here
try {
...
} catch (Exception $e) {
// fault with the code tag data_invalid
$this->_fault('data_invalid', $e->getMessage());
}
}
}
How to pass Magento Certification Exam in 30 days- Magestore.com
Related Documents