For each stocking you will need: • One printed stocking • Two pieces of wadding 18” x 24” each • Two pieces of lining fabric 18” x 24” each • One piece of backing fabric 18” x 24” • Printed strip of fabric printed along the selvage of the panel (or ribbon about 8” long) HOW TO MAKE UP 1813/1 NOVELTY LARGE STOCKINGS PANEL NEW FOR 2017 JPEGS AVAILABLE IF REQUIRED 15 2 17 Unit 14, Cordwallis Business Park, Clivemont Road, Maidenhead, Berkshire SL6 7BU +44(0)1628 509640 [email protected] www.makoweruk.com

Welcome message from author
This document is posted to help you gain knowledge. Please leave a comment to let me know what you think about it! Share it to your friends and learn new things together.
Transcript
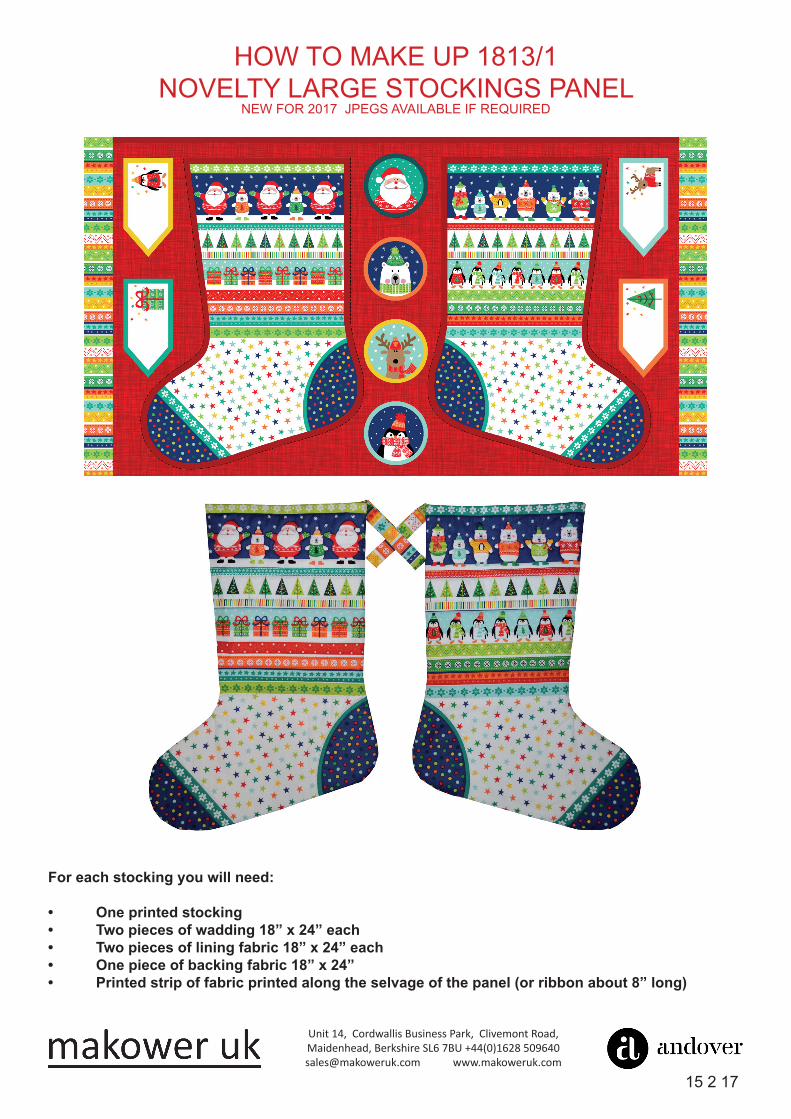
For each stocking you will need:
• One printed stocking • Two pieces of wadding 18” x 24” each• Two pieces of lining fabric 18” x 24” each• One piece of backing fabric 18” x 24”• Printed strip of fabric printed along the selvage of the panel (or ribbon about 8” long)
HOW TO MAKE UP 1813/1NOVELTY LARGE STOCKINGS PANEL
NEW FOR 2017 JPEGS AVAILABLE IF REQUIRED
15 2 17
Unit 14, Cordwallis Business Park, Clivemont Road, Maidenhead, Berkshire SL6 7BU +44(0)1628 509640 [email protected] www.makoweruk.com

Instructions for a large Novelty 1813/1 Christmas Stocking by Hilary Gooding
Sewing instructions for stocking
1. Cut out the printed stocking along the cutting line (dark red area is the seam allowance).2. Use the stocking front to cut a backing piece and two lining pieces. NB; Be careful to make sure the backing and lining pieces are facing the correct directions!3. Cut a paper pattern excluding the seam allowances from the stocking front. 4. Now cut 2 pieces of wadding using the pattern. 5. Lay the front and front lining pieces right sides together and sew the tops together. Open and press the seam to one side.6. Place the wadding on the wrong side of the front within the seam allowance area.7. Turn the lining down over the wadding and pin the edges of the front and lining together. You now have a neatly sealed top edge to the stocking.8. Quilt the sandwich as you fancy. 9. Set your stitch length to #4 and sew a line of stitching about ⅛” inside the seam allowance.10. Hanging Loop. Cut out the printed ribbon strip including a ¼”seam allowance along the long edges and fold in half lengthwise, right sides together. Sew the long edge. Now turn right sides out and press. Cut a piece about 8” long. Fold the strip in half to make the loop. You can use a length of ribbon to make the loop if you prefer.11. Lay the back right side facing up and place the folded loop with raw edges lined up along the top of the back, at the ‘heel’ edge (keep clear of the seam allowance). Pin.12. Lay the back lining piece right sides together with the back and sew along the top edge as in step 5 above. Open and press the seam to one side.13. Repeat steps 6, 7 and 8 above and the loop will be sew into the top seam.14. Place the front sandwich together with the back sandwich, front and back facing each other. Pin the edges together lining up the top edges. With the front sandwich on top (so that you can see the line of stitching (step 9)) sew the two sandwiches together sewing ⅛” away from the large stitches line back onto the printed sewing line.15. Neaten with seam edges with zigzag stitching and carefully clip the curves.16. Turn right sides out.
Instructions for labels and Christmas ornaments
1. Roughly cut out all the shapes. Lay each shape right sides together with backing fabric and pin securely.2. Sew around each shape along the sewing line leaving a small opening so that you can turn the shapes right sides out. Carefully trim corners and clip curves. Now turn right sides out and use a blunt tool to ease the corners out. Press the shapes.3. Insert ribbon loops if you wish and then sew the openings closed. Top stitch the edges if you fancy.
Unit 14, Cordwallis Business Park, Clivemont Road, Maidenhead, Berkshire SL6 7BU +44(0)1628 509640 [email protected] www.makoweruk.com
Related Documents