Updated 03/08/2016 Page 1 of 11 Module: Purchasing Topic: Requisition Processing How to Enter a Requisition Munis Version 11.1 How to Enter a Quick Requisition Objective This document provides step-by-step instruction on how to enter a quick requisition into the Munis Requisition Entry program. It assumes that the user may need to modify default information provided by the system, but uses a minimal amount of options available in the program. It is intended for a user who already has a basic understanding of the Munis Requisition Entry program. Overview By entering a requisition, you are requesting funds to make a purchase. As soon as the requisition is entered with an expense account, the funds are set aside, or “pre-encumbered” in the General Ledger account. After the requisition is released, it goes through the approval process (workflow) after which it is converted into a purchase order. The PO is sent to the vendor as authorization to provide the goods or services requested. Prerequisites Permissions and Menu Access for Requisition Entry as well as: A vendor name or vendor number from which you would like to purchase the items. The proper General Ledger expense account(s) that will be used for the intended purchase. The quantity, price, and description of what the user would like to requisition.

Welcome message from author
This document is posted to help you gain knowledge. Please leave a comment to let me know what you think about it! Share it to your friends and learn new things together.
Transcript
Updated 03/08/2016 Page 1 of 11
Module: Purchasing Topic: Requisition Processing
How to Enter a Requisition Munis Version 11.1
HowtoEnteraQuickRequisition�
Objective This document provides step-by-step instruction on how to enter a quick requisition into the Munis Requisition Entry program. It assumes that the user may need to modify default information provided by the system, but uses a minimal amount of options available in the program. It is intended for a user who already has a basic understanding of the Munis Requisition Entry program.
Overview By entering a requisition, you are requesting funds to make a purchase. As soon as the requisition is entered with an expense account, the funds are set aside, or “pre-encumbered” in the General Ledger account. After the requisition is released, it goes through the approval process (workflow) after which it is converted into a purchase order. The PO is sent to the vendor as authorization to provide the goods or services requested.
Prerequisites Permissions and Menu Access for Requisition Entry as well as: A vendor name or vendor number from which you would like to purchase the items. The proper General Ledger expense account(s) that will be used for the intended purchase. The quantity, price, and description of what the user would like to requisition.
Updated 03/08/2016 Page 2 of 11
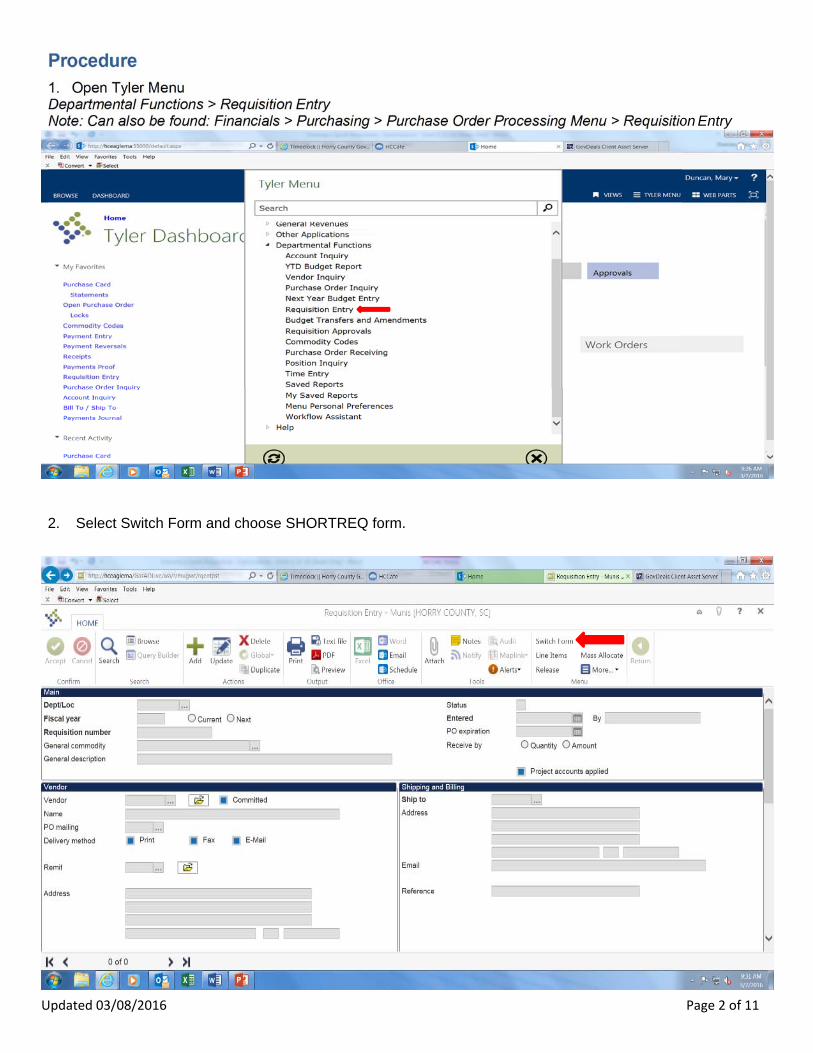
Procedure 1. Open Tyler Menu Departmental Functions > Requisition Entry Note: Can also be found: Financials > Purchasing > Purchase Order Processing Menu > Requisition Entry
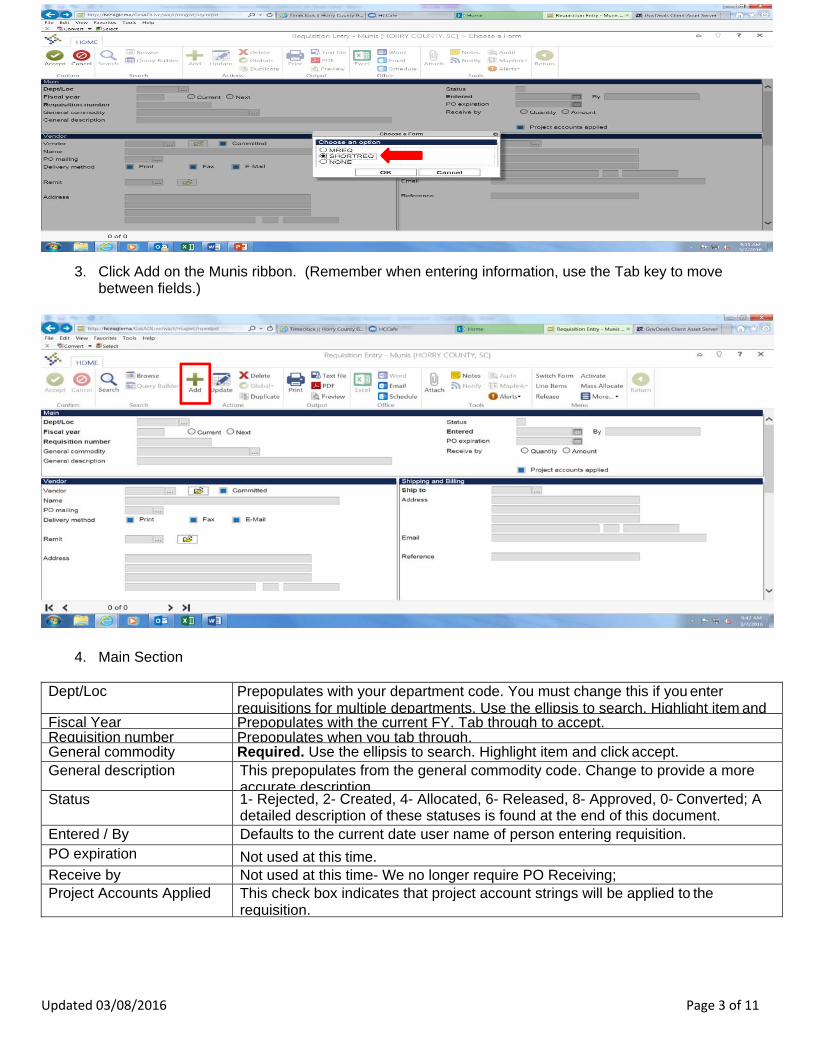
2. Select Switch Form and choose SHORTREQ form.
Updated 03/08/2016 Page 3 of 11
3. Click Add on the Munis ribbon. (Remember when entering information, use the Tab key to move between fields.)
4. Main Section
Dept/Loc Prepopulates with your department code. You must change this if you enter requisitions for multiple departments. Use the ellipsis to search. Highlight item and
Fiscal Year Prepopulates with the current FY. Tab through to accept. Requisition number Prepopulates when you tab through.General commodity Required. Use the ellipsis to search. Highlight item and click accept. General description This prepopulates from the general commodity code. Change to provide a more
accurate descriptionStatus 1- Rejected, 2- Created, 4- Allocated, 6- Released, 8- Approved, 0- Converted; A
detailed description of these statuses is found at the end of this document. Entered / By Defaults to the current date user name of person entering requisition. PO expiration Not used at this time. Receive by Not used at this time- We no longer require PO Receiving; Project Accounts Applied This check box indicates that project account strings will be applied to the
requisition.
Updated 03/08/2016 Page 4 of 11
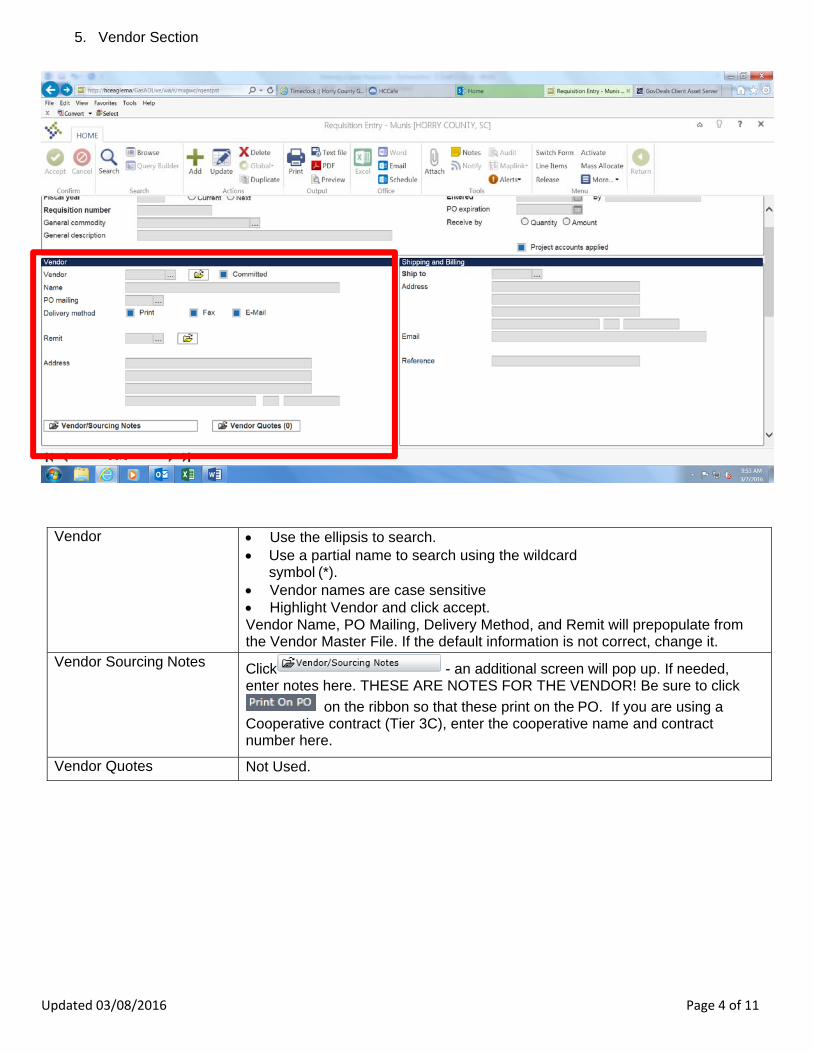
5. Vendor Section
Vendor Use the ellipsis to search.
Use a partial name to search using the wildcard symbol (*).
Vendor names are case sensitive Highlight Vendor and click accept. Vendor Name, PO Mailing, Delivery Method, and Remit will prepopulate from the Vendor Master File. If the default information is not correct, change it.
Vendor Sourcing Notes Click - an additional screen will pop up. If needed, enter notes here. THESE ARE NOTES FOR THE VENDOR! Be sure to click
on the ribbon so that these print on the PO. If you are using a Cooperative contract (Tier 3C), enter the cooperative name and contract number here.
Vendor Quotes Not Used.
Updated 03/08/2016 Page 5 of 11
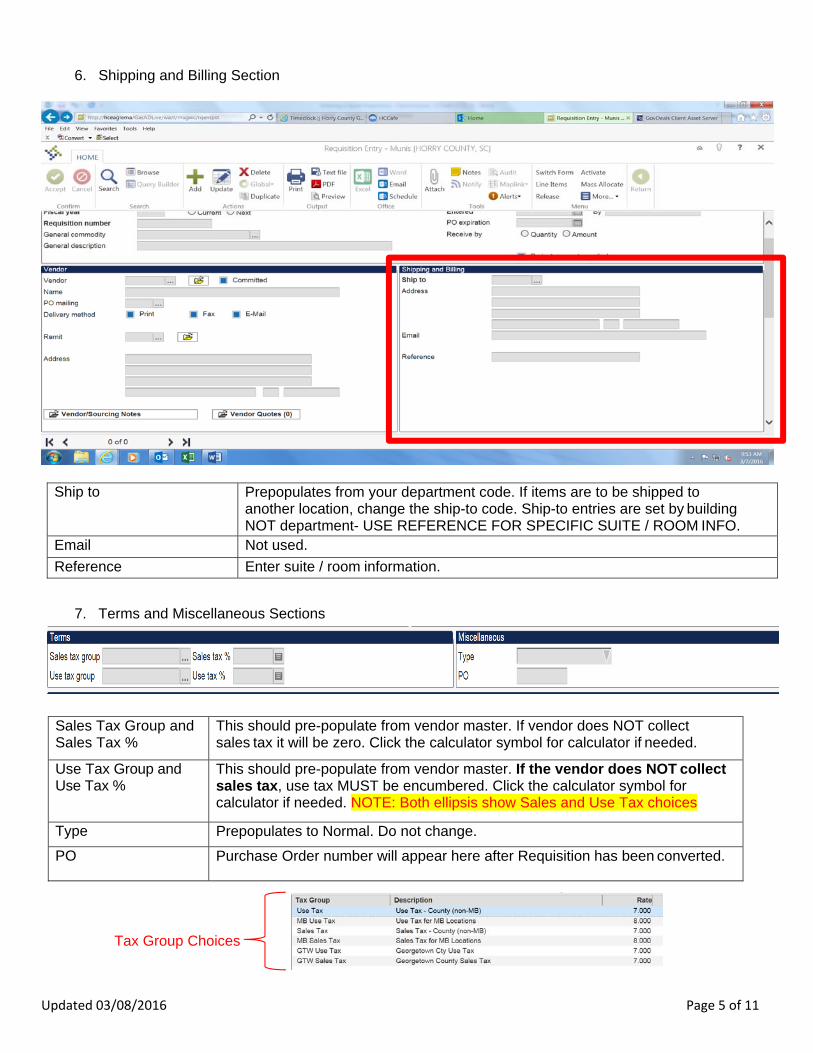
6. Shipping and Billing Section
Ship to Prepopulates from your department code. If items are to be shipped to another location, change the ship-to code. Ship-to entries are set by building NOT department- USE REFERENCE FOR SPECIFIC SUITE / ROOM INFO.
Email Not used.
Reference Enter suite / room information.
7. Terms and Miscellaneous Sections
Sales Tax Group and Sales Tax %
This should pre-populate from vendor master. If vendor does NOT collect sales tax it will be zero. Click the calculator symbol for calculator if needed.
Use Tax Group and Use Tax %
This should pre-populate from vendor master. If the vendor does NOT collect sales tax, use tax MUST be encumbered. Click the calculator symbol for calculator if needed. NOTE: Both ellipsis show Sales and Use Tax choices
Type Prepopulates to Normal. Do not change.
PO Purchase Order number will appear here after Requisition has been converted.
Tax Group Choices
Updated 03/08/2016 Page 6 of 11
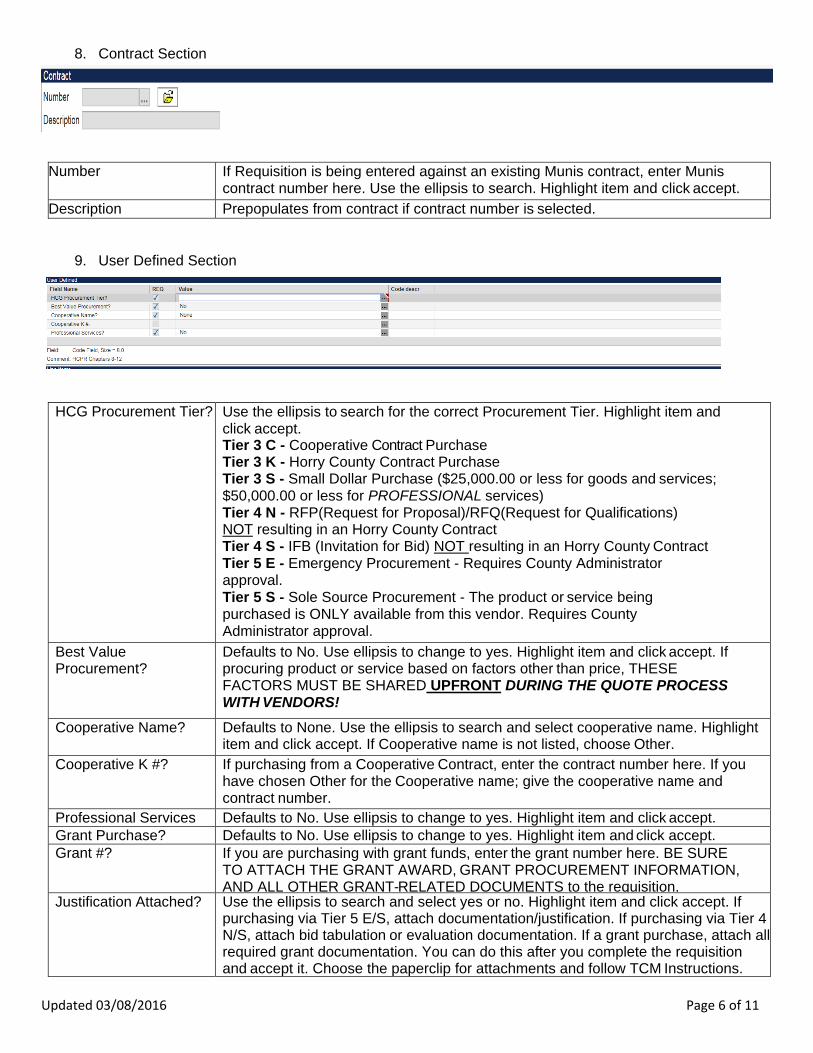
8. Contract Section
Number If Requisition is being entered against an existing Munis contract, enter Munis
contract number here. Use the ellipsis to search. Highlight item and click accept.
Description Prepopulates from contract if contract number is selected.
9. User Defined Section
HCG Procurement Tier? Use the ellipsis to search for the correct Procurement Tier. Highlight item and click accept. Tier 3 C - Cooperative Contract Purchase Tier 3 K - Horry County Contract Purchase Tier 3 S - Small Dollar Purchase ($25,000.00 or less for goods and services; $50,000.00 or less for PROFESSIONAL services) Tier 4 N - RFP(Request for Proposal)/RFQ(Request for Qualifications) NOT resulting in an Horry County Contract Tier 4 S - IFB (Invitation for Bid) NOT resulting in an Horry County Contract Tier 5 E - Emergency Procurement - Requires County Administrator approval. Tier 5 S - Sole Source Procurement - The product or service being purchased is ONLY available from this vendor. Requires County Administrator approval.
Best Value Procurement?
Defaults to No. Use ellipsis to change to yes. Highlight item and click accept. If procuring product or service based on factors other than price, THESE FACTORS MUST BE SHARED UPFRONT DURING THE QUOTE PROCESS WITH VENDORS!
Cooperative Name? Defaults to None. Use the ellipsis to search and select cooperative name. Highlight item and click accept. If Cooperative name is not listed, choose Other.
Cooperative K #? If purchasing from a Cooperative Contract, enter the contract number here. If you have chosen Other for the Cooperative name; give the cooperative name and contract number.
Professional Services Defaults to No. Use ellipsis to change to yes. Highlight item and click accept. Grant Purchase? Defaults to No. Use ellipsis to change to yes. Highlight item and click accept. Grant #? If you are purchasing with grant funds, enter the grant number here. BE SURE
TO ATTACH THE GRANT AWARD, GRANT PROCUREMENT INFORMATION, AND ALL OTHER GRANT-RELATED DOCUMENTS to the requisition.
Justification Attached? Use the ellipsis to search and select yes or no. Highlight item and click accept. If purchasing via Tier 5 E/S, attach documentation/justification. If purchasing via Tier 4 N/S, attach bid tabulation or evaluation documentation. If a grant purchase, attach allrequired grant documentation. You can do this after you complete the requisition and accept it. Choose the paperclip for attachments and follow TCM Instructions.
Updated 03/08/2016 Page 7 of 11
Quotes Attached? Use the ellipsis to search and select yes or no. Highlight item and click accept. If you are purchasing via Tier 3 C, Tier 3 S (over $5000.00), Tier 5 E, Tier 5 S, quotes MUST be attached.
Insurance Required? Defaults to Yes. Use the ellipsis to change to no. Highlight item and click accept. Change if insurance is not required.
Once all fields are filled out Press Tab or Enter on the keyboard or click the Accept button. This will bring you to the Line Detail section.
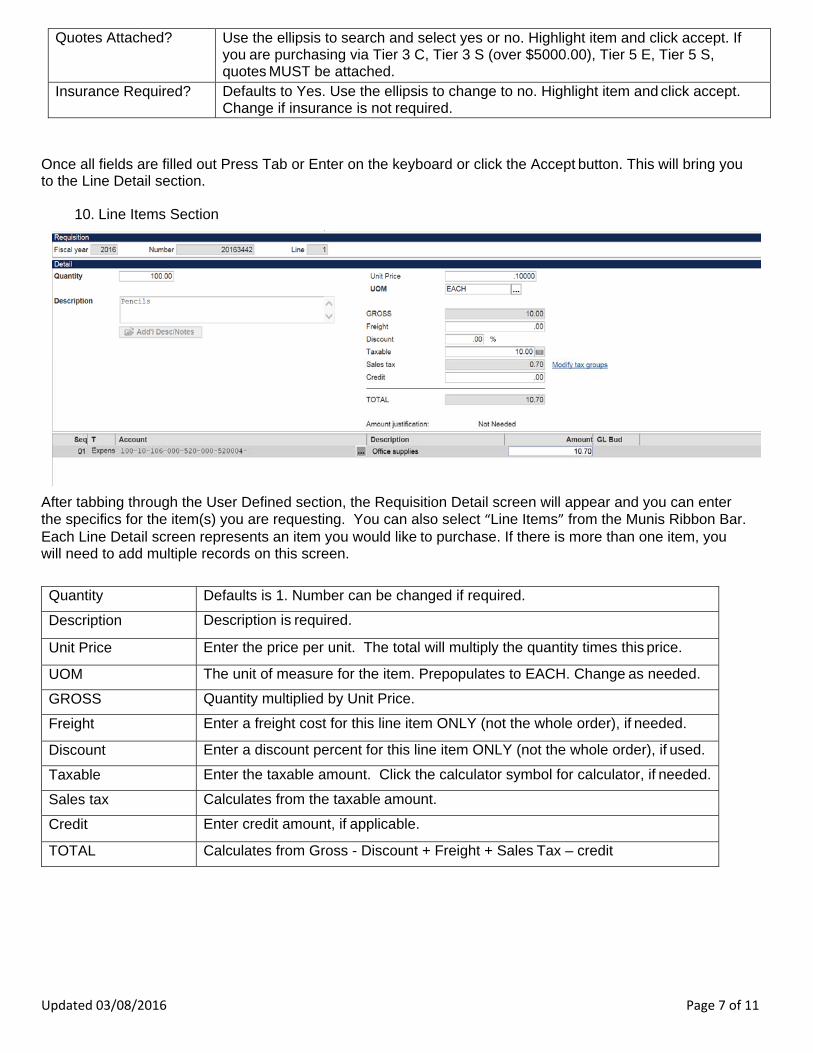
10. Line Items Section
After tabbing through the User Defined section, the Requisition Detail screen will appear and you can enter the specifics for the item(s) you are requesting. You can also select “Line Items” from the Munis Ribbon Bar. Each Line Detail screen represents an item you would like to purchase. If there is more than one item, you will need to add multiple records on this screen.
Quantity Defaults is 1. Number can be changed if required.
Description Description is required.
Unit Price Enter the price per unit. The total will multiply the quantity times this price.
UOM The unit of measure for the item. Prepopulates to EACH. Change as needed.
GROSS Quantity multiplied by Unit Price.
Freight Enter a freight cost for this line item ONLY (not the whole order), if needed.
Discount Enter a discount percent for this line item ONLY (not the whole order), if used.
Taxable Enter the taxable amount. Click the calculator symbol for calculator, if needed.
Sales tax Calculates from the taxable amount.
Credit Enter credit amount, if applicable.
TOTAL Calculates from Gross - Discount + Freight + Sales Tax – credit
Updated 03/08/2016 Page 8 of 11
Cursor will be in the account field; choose the account this purchase should be allocated to. If the entire amount of this line item will be allocated to a single GL Account, verify the amount, and
click Accept to save that line item. If you need to allocate the amount to more than one GL account, change the amount of the first GL
expense account. Then press the tab key through the amount field, and you will be taken to a second line where you can enter another expense account and amount. Always review the amounts and accounts before clicking OK/Accept to save the line item.
11. If you would like to purchase more than one item with this requisition, you will need to click the Add button to add another Line Detail record. Follow the same process as above for each item you are requesting.
12. Click Accept to save the items and requisition.
13. To return to the Requisition Header screen, select the Return button in the Munis ribbon.
Attaching Quotes and Justification
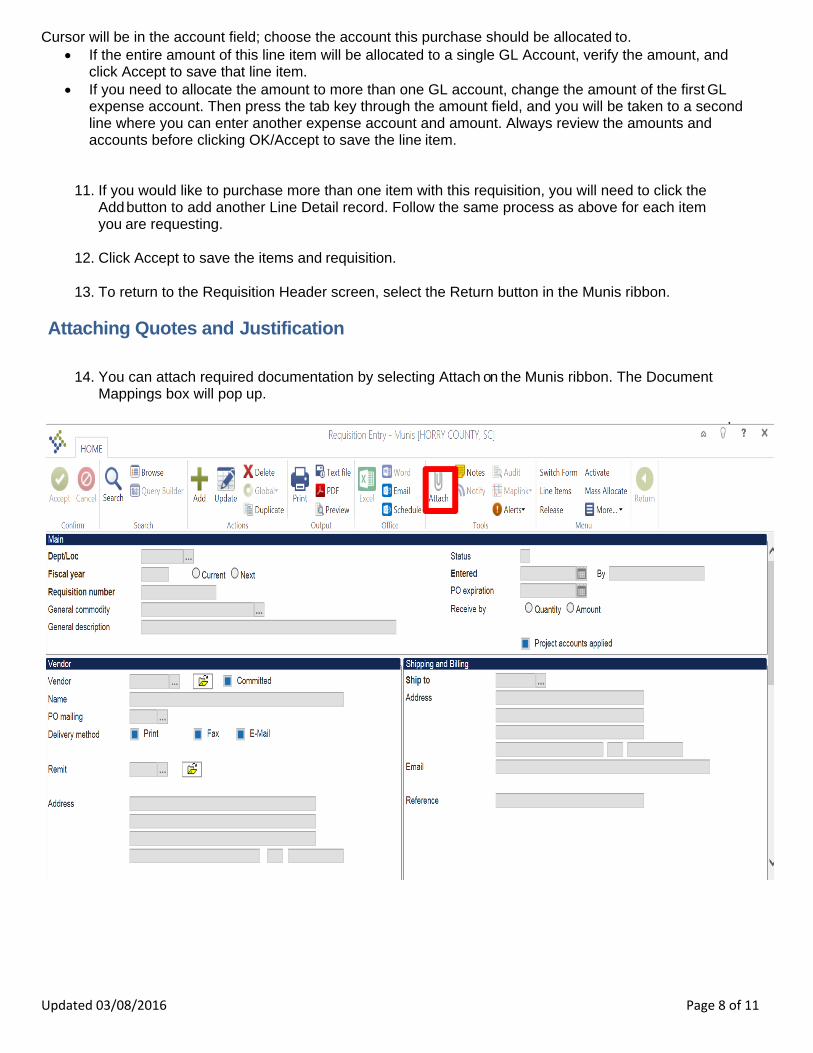
14. You can attach required documentation by selecting Attach on the Munis ribbon. The Document Mappings box will pop up.
.
Updated 03/08/2016 Page 9 of 11
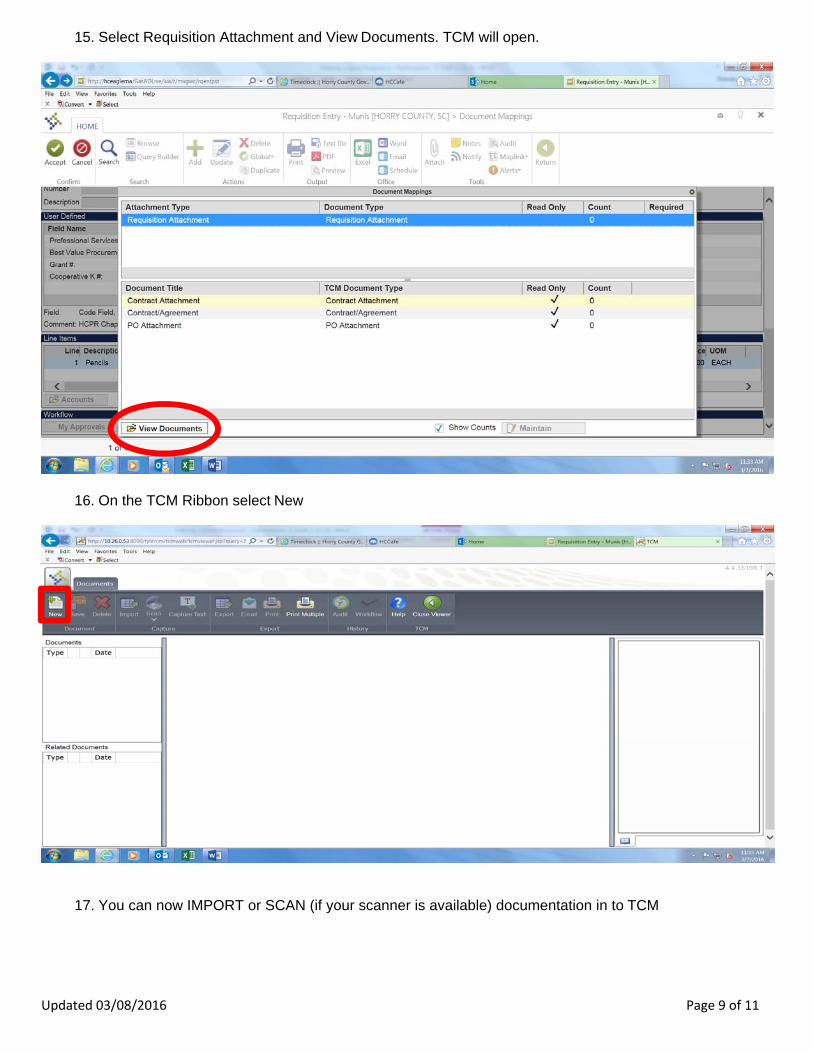
15. Select Requisition Attachment and View Documents. TCM will open.
16. On the TCM Ribbon select New
17. You can now IMPORT or SCAN (if your scanner is available) documentation in to TCM

Updated 03/08/2016 Page 10 of 11
a) IMPORT: Select Import. This will allow you to browse your computer documents. Select the appropriate file and click Open. YOUR FILE IS NOW ATTACHED TO TCM.
b) SCAN: Select Scan. This will bring up the Select a Scanner Box. Select the appropriate scanner from the list and click Scan. Follow the instructions from your scanner software. Once complete, your scan will show in TCM.
18. Select Save and Close Viewer to return to your requisition.
19. Once you have entered all required items, select Release from the Munis ribbon. This releases your requisition into the workflow and starts the approval process.
20. Workflow Section
Once the requisition has been released into workflow. You can view where it is by Clicking Approvers at the bottom of the requisition.

Updated 03/08/2016 Page 11 of 11
Status Change
The following are valid status values for requisition approvals:
1- Rejected: The requisition has been rejected by an approver. Click the Approvers button to view the
rejection comments. To update a rejected requisition, click the Activate button. 2- Created: The requisition header (general) details have been entered, but general ledger (GL) details
have not been entered, or, the requisition has header and GL detail, but does not have the appropriate budget to move it to a Status 4. In this case, a budget transfer must be made and posted, after which, you can click the Allocate button to move the requisition to a status 4-Allocated.
4- Allocated: The requisition has been entered and has been allocated (charged) to a general ledger account, therefore money is being taken from available budget. The requisition has not been released into Workflow. A requisition must be in a status 4-Allocated to be released into Workflow; click Release to initiate the Workflow process.
6- Released: The requisition has been released into Workflow and is awaiting approval. Click the Approvers button to see the current approval status.
8- Approved: The requisition has been fully approved in Workflow and is ready to be converted to a purchase order.
0- Converted: The requisition has been converted to a purchase order. The number is included on the Terms/Miscellaneous tab in Requisition Entry.
Related Documents