RESTAURANT MANAGEMENT for WINDOWS HOST CONTROL MANUAL Version 6.01.00

Welcome message from author
This document is posted to help you gain knowledge. Please leave a comment to let me know what you think about it! Share it to your friends and learn new things together.
Transcript

RESTAURANT MANAGEMENT for WINDOWS
HOST CONTROL MANUAL Version 6.01.00


HCFW Host Control System
Table of Contents
i
Table of Contents INTRODUCTION ....................................................................................................................................................... 1 CONVENTIONS USED IN THIS MANUAL............................................................................................................... 1 INSTALLATION ........................................................................................................................................................ 2 OVERVIEW OF THE HOST CONTROL STRUCTURE............................................................................................ 5 LOGGING ONTO HCFW .......................................................................................................................................... 7 STORE CONFIGURATION....................................................................................................................................... 9
PARAMETERS........................................................................................................................................................... 9 STORE TYPES........................................................................................................................................................ 10 STORE .................................................................................................................................................................. 11 USER .................................................................................................................................................................... 14 COMPANY INFORMATION......................................................................................................................................... 15
POLLING OPERATIONS........................................................................................................................................ 16 CENTRALIZATION ................................................................................................................................................... 16 START POLLING ..................................................................................................................................................... 17 DEFINE POLLING SCHEDULE................................................................................................................................... 19
LOGS....................................................................................................................................................................... 21 VIEW DAILY WORK LOG.......................................................................................................................................... 21 PURGE DAILY WORK LOG....................................................................................................................................... 22
REPORTS ............................................................................................................................................................... 23 SALES SUMMARY REPORT...................................................................................................................................... 23 ITEM SALES REPORT.............................................................................................................................................. 27 STORE STATISTIC .................................................................................................................................................. 31 SALES COMPARISON REPORT................................................................................................................................. 33

HCFW Host Control System
Introduction
1
Introduction Profitek’s Host Control for Windows (HCFW) is one of many modules that seamlessly integrate with the Restaurant Management for Windows (RMW) system. It further extends RMW to support central management for multiple stores from one location. From this one location, called the head office, management can define items, menus, events, employees as well as other definitions, and effortlessly apply these definitions to other stores. Furthermore, using Host Control, the head office can retrieve information such as Sales statistics, Work hours and much more, from all the managed stores and with this information, generate informative reports. With Host Control, managing multiple store locations becomes easy, convenient and reliable.
Conventions Used in this Manual Click
Press once on the left button of your mouse. Or touch the screen once if you are using a touch screen monitor.
Enabled/Disabled A function is “enabled” if the box next to it is checked, and “disabled” if the box next to it is unchecked (empty).
A list of “buttons” and their functions used throughout the program:
Delete the highlighted selection
Clear the Form without saving data, or Exit the Form when it is blank
Bring up a Search List with related to the subject beside it
Bring up a pull down menu for selection
Confirm the function
Cancel the function
Display the information of the highlighted selection for editing
Save the entered information
Exit the current pop up screen

HCFW Host Control System
Introduction 2
Installation System Requirements In order for Host Control for Windows to operate properly, the following minimum requirements must be met: • Windows 2000 or later operating system • RMW 6.00.00 or newer running on SQL Server 2000/MSDE • If a dial-up connection is used for polling, Service Pack 2 for SQL Server 2000/MSDE is needed Setup Remote Access Service This setup procedure must be performed at each remote location that is to be polled by the head office using dial up connection • Go to Start Settings Control Panel Administrative Tools Services • Find Routing and Remote Service. Change its Startup Type property to ‘Automatic’ and ‘Start’ it:

HCFW Host Control System
Introduction
3
• Click the <Apply> button and then the <OK> button • Next, go to Start Settings Network and Dial-up Connections • Right-click on Incoming Connections and select Properties. Then:
1) Configure the users allowed to connect to the network Under the ‘User’ tab, create a new account by clicking the <New> button Enter the user name for the account and the password for this user name Click the <Apply> button and then the <OK> button
2) Set the IP Addresses Under the ‘Networking’ tab, select ‘Internet Protocol’ and click on Properties Check ‘Allow callers to access my local area network’ Click on ‘Specify TCP/IP addresses’, then type in From 192.168.10.1 To
192.168.10.2:
Uncheck ‘Allow calling computer to specify its own IP Address’ Click on <OK>

HCFW Host Control System
Introduction 4
Install HCFW HCFW only needs to be installed at the Head Office. Run the HCFWSetup.exe and install to the location of the other Profitek software (default is D:\profitek). Once install is finished, you will need to create a desktop shortcut. Browse to the ..\Profitek\bin folder and locate the HCFW.exe. Right click and choose the option to Copy. Right click on the desktop and choose Paste Shortcut. Rename the shortcut to “Host Control”. Run RMConfig.exe from the ..\Profitek\Bin directory. Ensure that the settings are correct. Click on the <Save As…> button and save to the UserConfig.cfg file. Start the HCFW.exe program Double click on the Host Control Icon that was just created on the desktop. At the login screen enter the Profitek password. Once logged in, go to the Housekeeping Menu and choose User. Under the User Maintenance window, ensure that the user has sufficient permissions and access control to use the Host Control module. Create Blank Databases Blank databases need to be created at the Head Office. For each store the host control program polls, you must also create a local blank database for that particular store before any polling can begin. You can accomplish this easily by logging into the head office’s RMW Order Entry with the super password and then pressing CTRL-SHIFT-ALT-S. The following screen will appear:
The Source Store # should be ‘0’, representing the head office. For the destination store #, you should enter the Store # of the Store you are going to create (please refer to Store Configuration Store to understand how to create Stores). For example, if you are going to define a remote Store as Store # 1, you should input ‘1’ in the Destination Store #. Press <OK> after inputting the Source and Destination Store #. Repeat this process for each store you will be defining in ‘Configuration Store’ to create all the blank databases.

HCFW Host Control System
Overview of the Host Control Structure 5
Overview of the Host Control Structure A host control system involves a local head office and multiple remote store locations. The local head office is the central point of the structure, being the system that communicates with all other store locations. All remote store location database definitions (e.g. items, menus, events, etc.) are derived from the head office database, and conversely, the head office collects all the raw data (sales, work hours, etc.) from the databases of the remote store locations. So we have a basic relationship similar to the following with information flowing back and forth:
REMOTEStore #1
REMOTEStore #2
REMOTEStore #3
REMOTEStore #4
LOCALHead Office
Looking at an individual relationship between the head office and a store, we have:
LOCALHEAD OFFICE
REMOTESTORE
Database Definitions:Items, Menus, Events, etc.
Raw Data:Sales, Workhours, etc.

HCFW Host Control System
Overview of the Host Control Structure 6
The head office has its own local database and also an ‘image’ database for each remote location the head office communicates with. So conceptually, the head office location contains image databases that represent the remote databases. The structure becomes:
REMOTESTORE #1
REMOTESTORE #2
REMOTESTORE #3
REMOTESTORE #4
DATABASE IMAGESTORE #1
DATABASE IMAGESTORE #2
DATABASE IMAGESTORE #3
DATABASE IMAGESTORE #4
LOCAL DATABASEHEAD OFFICE
LOCAL HEAD OFFICE SYSTEM
Whenever the local head office wants to make changes to the database definition of a remote store, it actually changes the local image of the store, and THEN transfers the updated image to the remote store location. Copying from the local head office database to the corresponding remote store ‘image’ is a process termed “centralization”. A separate “transfer” process is necessary after a centralization to transfer the local image database over to the remote store location. Only after the transfer process is complete, do the new database definitions take effect in the remote locations. Working in the opposite effect, the head office can transfer raw data information from the remote locations. Whenever the head office polls a certain remote store, it transfers the relevant data to the corresponding local database image, and reads off of this image directly when needed (e.g. for reports).

HCFW Host Control System
Logging onto HCFW 7
Logging onto HCFW When you first run HCFW, you will be immediately prompted with the login screen:

HCFW Host Control System
Logging onto HCFW 8
Upon successfully logging into the system, you will see the main menu:
The main menu contains a menu bar on top with headings. Clicking on each heading will reveal addition functions. To access a function, click on the heading and then select from the list of available functions that appear:
The remaining portion of the manual will explain in detail the different type of functions available, what each of these functions does, and the settings and parameters that control how the function operates.

HCFW Host Control System
Store Configuration 9
Store Configuration Extra attention should be given when configuring the Host Control system, as an incorrect system configuration will result in improper operation. Please go through each menu in the ‘Housekeeping’ section and refer to the manual to configure each part properly.
Parameters This menu configures the general system parameters.
Head Office Store #
Enter the head office’s store number here. Usually, the head office is denoted as Store # 0. Please note that this Head Office Store # MUST be defined in ‘Stores’ (please refer to Housekeeping Stores).
Exit Program After Polling
If enabled, the host control application will automatically exit after it has finished performing its scheduled polling.

HCFW Host Control System
Store Configuration 10
Store Types This function allows you to define the different store types you may have. The types you define represent a logical organization of the stores being managed. For example, you can create a type representing a certain province of the country, and group the stores according to these provinces. You can then poll by store type (i.e. all stores belonging to a store type will be polled), rather than just by individual stores. These logical grouping of stores make it much easier to manage the polling process involving many stores.
Type #
Enter a three-character alpha-numeric Type # for the store type you are defining. Description1/Description2 Enter the description of the store type in the primary and secondary language.
HCFW Host Control System
Store Configuration 11
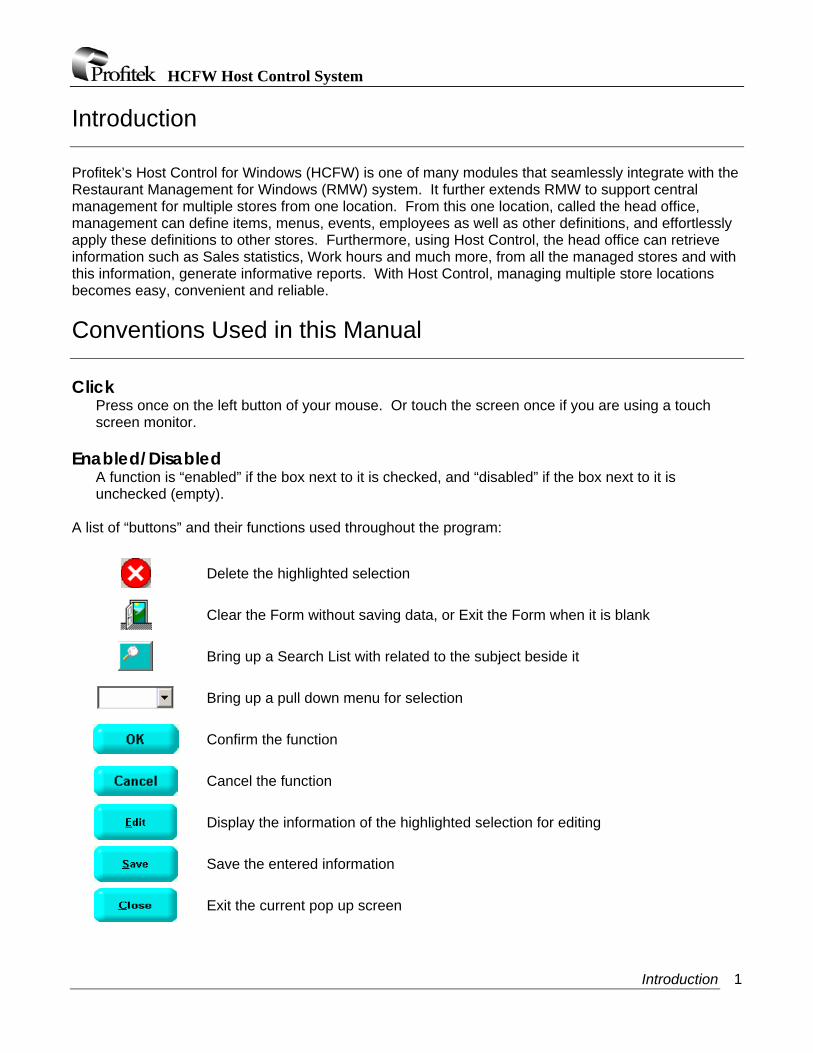
Store This section is for configuring each store that is managed by host control. For every store that will communicate with the head office, a store definition must be created and configured properly here.
Store #
Enter a four-digit Store # for the particular store you are defining. Name
Enter the name of the store. Note: the Head Office store MUST also be created. It only requires the Store # field (usually 0) but inputting the Name as well is suggested to avoid any type of confusion. Connection
Select “Local” if the actual store data is on the same SQL server as the Head office. Select “High Speed” or “Dial Up” depending on what type of connection to use to connect to the remote store.
DB#
Enter the database number of the remote store’s database that will be retrieved when polling (usually this is 0).
IP Address
If the head office connects to this store via a TCP/IP connection, enter the IP Address of the remote system. If the store requires a dial-up connection, ensure this field is empty.

HCFW Host Control System
Store Configuration 12
Phone # / User Name / Password These parameters pertain only to stores that require a dial-up connection for the polling process. Enter the phone number of the remote dial-up system, as well as the user name and password required to login, as configured during the installation stage (please refer to Installation).
Centralize
Enable this parameter to have the corresponding information type (Item, Special Item, etc.) centralize when the ‘Centralize’ function is used (please refer to Polling Centralization for information on the ‘Centralize’ function). When the selected information is being centralized, the head office copies its own information over to the local image of the store. This updated image then needs to be transferred to the remote store location via a “transfer” in order for the new information to take effect. Thus, whenever you have ‘Centralize’ enabled, ‘TSF to Store’ should also be enabled, to have the local image database transfer over to the remote store location at the time of polling.
TSF to Store
To have the head office’s database definition transfer to the remote store, enable the parameter beside the corresponding information type. If this parameter is not enabled, no local changes will update to the remote locations.
Note: Sometimes a Head Office may enable ‘TSF to Store’ but disable ‘Centralize’. This is usually the case when the head office wants to manually make changes directly to the particular store’s image database (instead of copying from head office to image using centralize), and then have such changes transferred at the time of polling. Change Data
• Update and Append If enabled, definitions at the remote store that exist at the head office are updated to reflect the head office’s definitions. Definitions at the remote store that do not exist at the head office are left unmodified.
• Overwrite If enabled, existing definitions at the remote store are updated, but non-existing ones are removed.
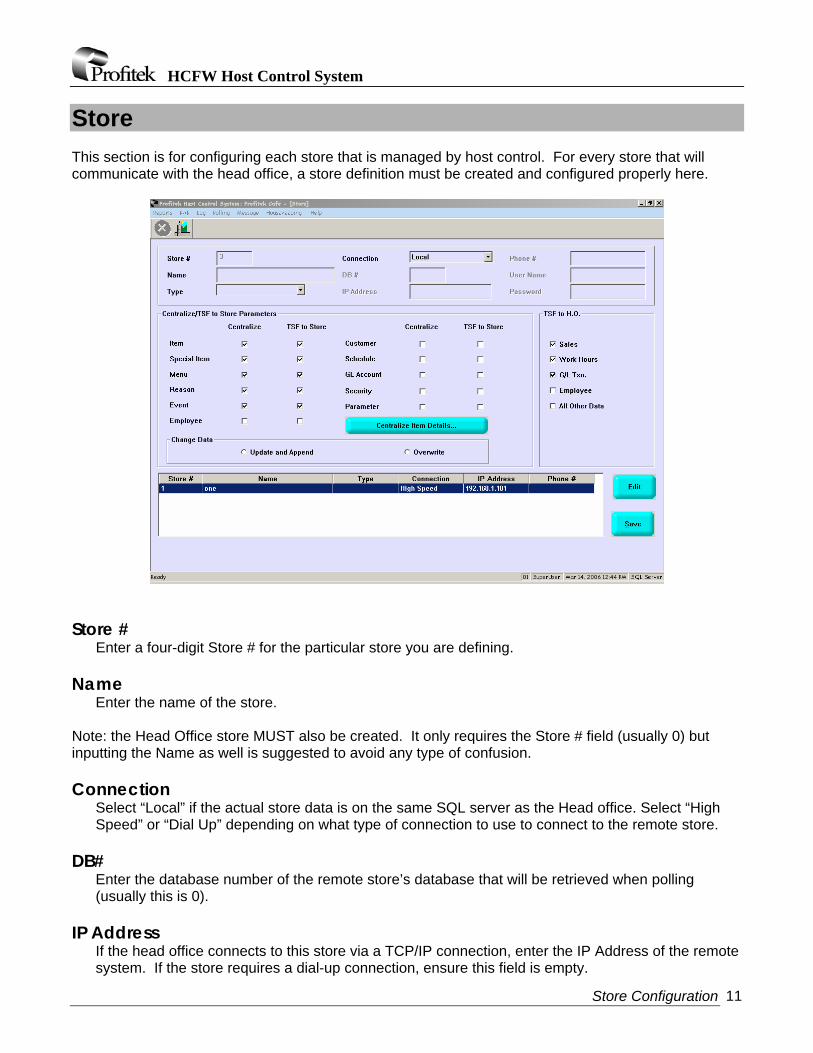
To further fine tune your centralization configuration, you can specify exactly which Item attributes are to be centralized. Check all the item attributes you would like to be centralized.
- Special Item: Polls the Special (Sale) item info. - Menu: Polls Menu layout info to store. - Reason: Polls Promo/Void/Discount Reason codes to store. - Event: Polls Event info to Store. - Employee: Polls Employee info to stores. - Customer: Polls customer data to stores. - Schedule: Polls employee schedule to store. - GL Account: Polls GL account info to Stores. - Security: Polls security settings to store. - Parameter: Polls system parameters to store. - Change Data: This determines how the databases are updated.
HCFW Host Control System
Store Configuration 13
Centralize Item Details…
- Item: Centralizes/Transfers item info to store – can be further customized using the “Centralize Item Detail” button.
TSF to H.O.
Check all types of data that you would like to transfer from the remote store to the local head office.
- Sales: Transfer Sales to HO data. - Work Hours: Trafser Employee work hours to HO data. - G/L Txn: Transfer GL Transactions to HO data. - Employee: Transfer store employee list to HO. - All Other Data: Includes store parameters and company info.

HCFW Host Control System
Store Configuration 14
User This section allows you to define the authorized users of the Host Control program.
User ID
Enter a nine-digit User ID number for the user you are defining. Password
Enter the password for this particular user to access the system. Personal Information
Enter all pertinent personal information, such as the name, phone number, etc. in the appropriate fields.
Language
Select the language (primary or secondary) of the system for this user. Description
Select the description (1 or 2) that the system will use for this user. Access Level
Field reserved for future use.

HCFW Host Control System
Store Configuration 15
Company Information This section is for the input of the company’s information.
Company Information
Enter all company information in their corresponding fields. Please note that all information entered must be 100% accurate, otherwise the serial number will not be valid and hence the program will not be functional.
Serial No. / Number of Licenses Information provided by Infospec. Version No.
Displays the version number of the Host Control program. This field cannot be modified.

HCFW Host Control System
Polling Operations 16
Polling Operations This section describes the polling related operations that are used in Host Control.
Centralization This function allows you to centralize your stores. Whenever you run this operation, for the selected stores that have the ‘Centralize’ parameter enabled under the store definition, the local head office database definitions will be copied over to the local image representations. But as noted before, these changes will not actually take effect until they are transferred from the local image to the remote locations via the next polling process (assuming the store has ‘TSF to Store’ enabled in its definition).
Select the stores you would like to centralize by clicking on each one. Selected stores are highlighted in blue. To de-select a store, simply click it again. When all stores have been selected, click on <OK>.

HCFW Host Control System
Polling Operations 17
Start Polling This command performs the polling process. Before any polling can take place, you must define your polling schedules. How to accomplish this is described in the next section ‘Define Schedule’.
Start Polling Choose when to start polling:
• On Schedule Start at the time specified by the chosen polling schedule.
• Now
Start polling now regardless of chosen schedule’s polling time. Note: the time of the chosen schedule will be irrelevant, but the selected stores in the schedule will be used.
Schedules
All the available schedules are listed on the bottom. When you click on a schedule, its corresponding schedule information (Schedule #, Start Time, Description, and Stores) will be displayed on the screen. Select the schedule of choice.
HCFW Host Control System
Polling Operations 18
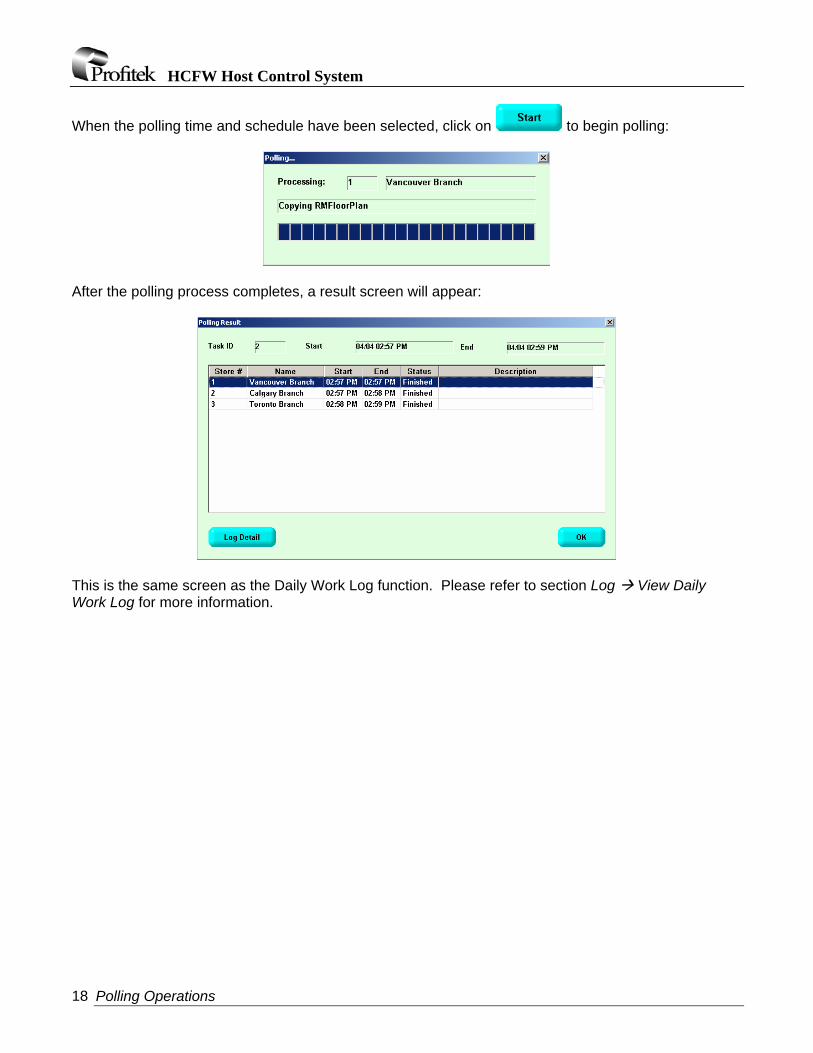
When the polling time and schedule have been selected, click on to begin polling:
After the polling process completes, a result screen will appear:
This is the same screen as the Daily Work Log function. Please refer to section Log View Daily Work Log for more information.

HCFW Host Control System
Polling Operations 19
Define Polling Schedule This function allows you to define specific polling schedules that host control can use when performing the polling operation. *** NOTE *** Store polling must be completed in TWO steps, first the store(s) needs to be scheduled for Centralization (this must be done). This step updates the Store database copies with HO data. The Second step is to do either Polling (transfer to Store and transfer to HO), TSF to Store Only or TSF to HO Only; this will transmit the data between the HO and Store databases. Each store will therefore have TWO schedules one for Centralization and one for the Polling.
Schedule # Enter a four-digit schedule # for the particular schedule you are defining. Description 1& 2
Descriptions for the schedule being crated.
Schedule For o Polling: the two way transfer of data from the store & HO o Centralize: the updating of the Store DB at the Head Office ONLY o TSF to Store Only: Polling option that transfer data from HO to Store ONLY o TSF to HO only: Polling option that transfers data from Store to HO ONLY

HCFW Host Control System
Polling Operations 20
Start Time Lets you set a start time for the polling. Blank will poll immediately
Store List Select the stores that will be polled for this schedule.
Clicking on or will respectively add or remove the selected store to the schedule.
Clicking on or will respectively add all or remove all the stores from the schedule. How to schedule polling in Windows Scheduler. Create a new schedule, and browse for the HCFW.exe. Once you have this set and scheduled open the properties for the Scheduled task and add the “Schedule #” from the Define Polling Schedules list as a Parameter to the Run line in the Windows Scheduled Task.

HCFW Host Control System
Logs 21
Logs
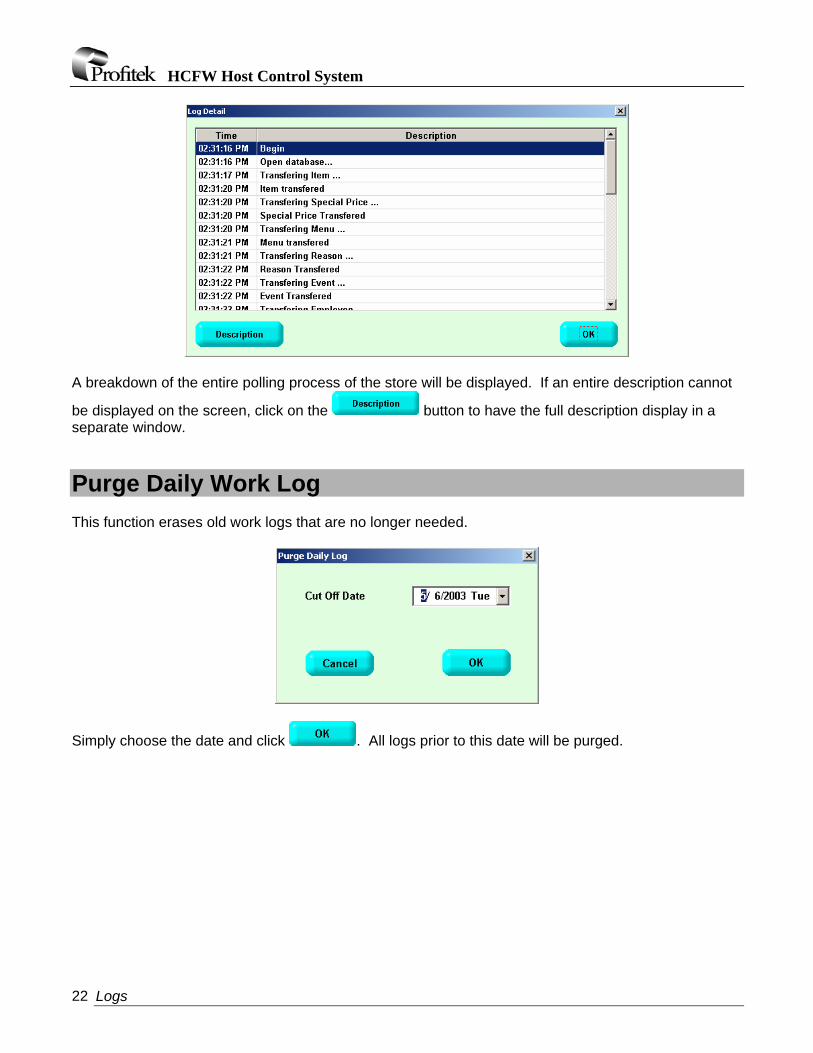
View Daily Work Log This function allows you to view the logs of all the tasks that were performed. The logs contain useful information on which tasks were performed, which stores were polled, the start and end times of the polls, the results of the polls, and also specific details for each poll.
To display the details of a certain task, select the ask by clicking on it from the list, then click . The details of the selected task will appear:
Here you can see all the stores that were polled, the start and end times, and the status of the poll. To display even more specific details about a particular poll of a store, select it from the list and click on
:
HCFW Host Control System
Logs 22
A breakdown of the entire polling process of the store will be displayed. If an entire description cannot
be displayed on the screen, click on the button to have the full description display in a separate window.
Purge Daily Work Log This function erases old work logs that are no longer needed.
Simply choose the date and click . All logs prior to this date will be purged.

HCFW Host Control System
Reports 23
Reports Host control’s reporting feature provides valuable information for each and every store being managed. Reports containing consolidated data across multiple stores can be generated and used to assess overall group or company performance. Host control can also generate reports for each individual store, to pin-point detailed information about a specific store of interest. Furthermore, comparison reports are also available to assess the stores’ performance relative to each other. The wide range of reporting capabilities of host control offers accessibility to demanded information from all managed stores with the ease of a few clicks.
Sales Summary Report This report provides a summary of the sales for the specified time period.
Store
Select the stores to include in the report by clicking on each individual store, or check ‘All Stores’ for all stores.
Store Type
Select the store types to include. If you include a store type, all stores belonging to that particular store type will be automatically included in the report, without having to select them individually.
HCFW Host Control System
Reports 24
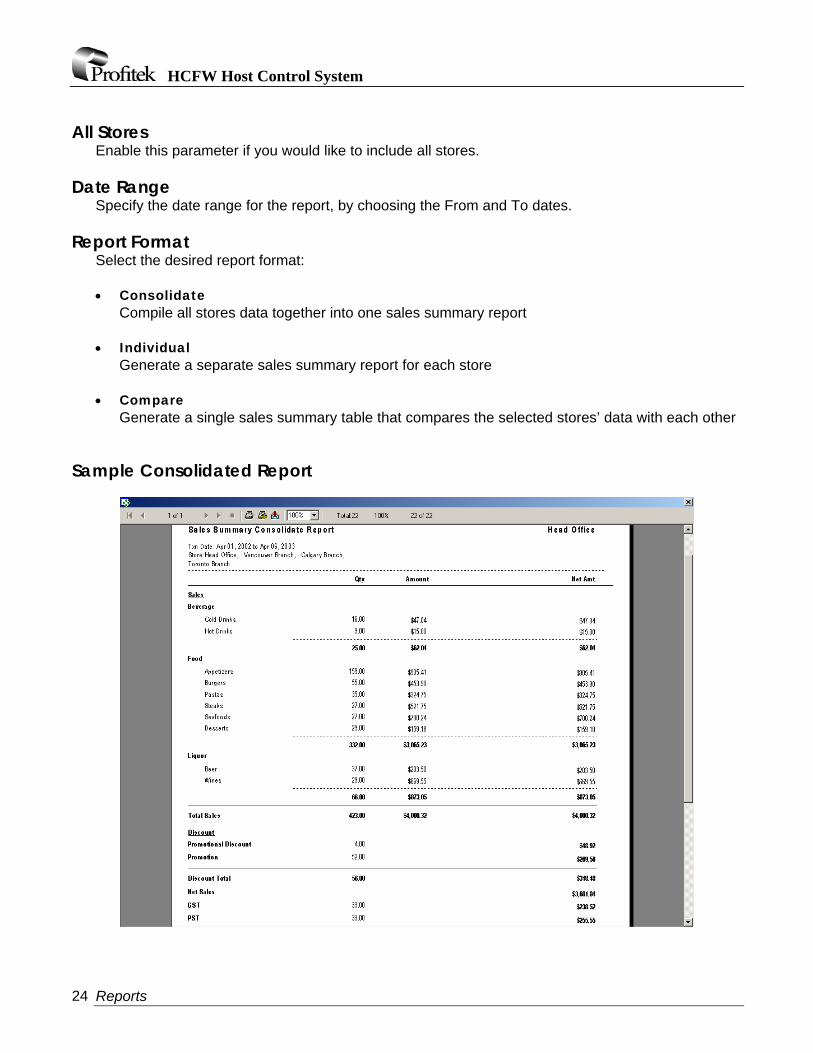
All Stores Enable this parameter if you would like to include all stores. Date Range Specify the date range for the report, by choosing the From and To dates. Report Format Select the desired report format:
• Consolidate Compile all stores data together into one sales summary report
• Individual
Generate a separate sales summary report for each store
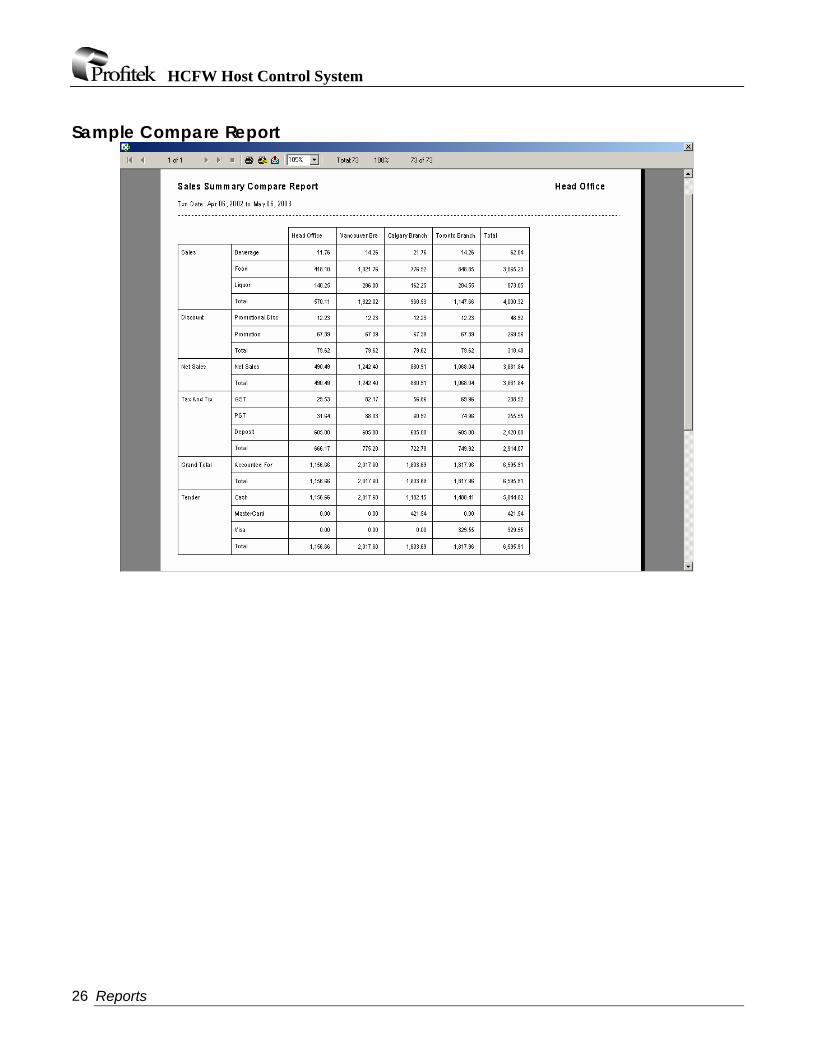
• Compare Generate a single sales summary table that compares the selected stores’ data with each other
Sample Consolidated Report

HCFW Host Control System
Reports 25
Sample Individual Report
HCFW Host Control System
Reports 26
Sample Compare Report

HCFW Host Control System
Reports 27
Item Sales Report This report provides information on item sales for the selected time range.
Store
Select the stores to include in the report by clicking on each individual store, or check ‘All Stores’ for all stores.
Store Type
Select the store types to include. If you include a store type, all stores belonging to that particular store type will be automatically included in the report, without having to select them individually.
All Stores Enable this parameter if you would like to include all stores. Date Range Specify the date range for the report, by choosing the From and To dates. Subcategory Select the subcategories to include in the Item Sales report. All Subcategories Enable this parameter if you would like to include all subcategories.

HCFW Host Control System
Reports 28
Report Format Select the desired report format:
• Consolidate Compile all stores data together into one item sales report
• Individual
Generate a separate item sales report for each store
• Compare Generate a single item sales report that compares the selected stores’ data with each other
Sample Consolidated Report

HCFW Host Control System
Reports 29
Sample Individual Report

HCFW Host Control System
Reports 30
Sample Compare Report

HCFW Host Control System
Reports 31
Store Statistic This report provides general statistics for each store. These statistics include Net Sales, Check Totals, the # of Checks and Guests, and the amount of sales per Check and per Guest.
Store
Select the stores to include in the report by clicking on each individual store, or check ‘All Stores’ for all stores.
Store Type
Select the store types to include. If you include a store type, all stores belonging to that particular store type will be automatically included in the report, without having to select them individually.
All Stores Enable this parameter if you would like to include all stores. Date Range Specify the date range for the report, by choosing the From and To dates.

HCFW Host Control System
Reports 32
Sample Store Statistics Report

HCFW Host Control System
Reports 33
Sales Comparison Report This report compares the sales statistics from a selected date, to the same day of the week a year ago.
Store
Select the stores to include in the report by clicking on each individual store, or check ‘All Stores’ for all stores.
Store Type
Select the store types to include. If you include a store type, all stores belonging to that particular store type will be automatically included in the report, without having to select them individually.
All Stores Enable this parameter if you would like to include all stores. Compare
Select the date of the comparison. The ‘With’ date will automatically adjust to the same day of the week a year ago.

HCFW Host Control System
Reports 34
Sample Sales Comparison Report
Related Documents