ALTITUDE KIT HAK8.02.18 HIGH ALTITUDE REPLACEMENT KIT Engine performance decreases as altitude increases. Proper operation can be ensured by installing an altitude kit when required. See the table below to determine when an altitude kit is required. Operating this generator without the proper altitude kit installed may increase the engine’s emissions and decrease fuel economy and performance. Altitude Range Kit Part Number 0-2000ft Not required 2000-3000ft 14546 - A 3000-6000ft 14546 - B 6000-7000ft 14546 - C Altitude Range Kit Part Number 0-2000ft Not required 2000-3000ft 14545 - A 3000-5000ft 14545 - B 5000-6000ft 14545 - C 6000-7000ft 14545 - D ALTITUDE KIT FOR 212CC GASOLINE GENERATOR - Westinghouse Part No. 14546 ALTITUDE KIT FOR 420CC GASOLINE GENERATOR - Westinghouse Part No. 14545 Please note: • This high altitude kit is to be used at elevations above 2000 feet. • At elevations above 7000 feet, the engine may experience decreased performance, even with the high altitude kit. • If the carburetor is replaced, the proper high altitude kit jet will need to be installed into the replacement carburetor. • The warranty may be void if necessary adjustments are not made for high altitude use. • DO NOT throw away any carburetor jets. You may need them again if you change altitude of operation. WARNING! TO PREVENT SERIOUS INJURY FROM FIRE: Perform kit procedures in a well ventilated area away from ignition sources. If the engine is hot from use, shut the engine off and wait for it to cool before proceeding. Do not smoke near generator. It is recommended to completely drain all the gasoline from the fuel tank and carburetor float. See owners manual for proper instructions on how to safely drain fuel.

Welcome message from author
This document is posted to help you gain knowledge. Please leave a comment to let me know what you think about it! Share it to your friends and learn new things together.
Transcript

ALTITUDE KIT
HAK8.02.18
HIGH ALTITUDE REPLACEMENT KITEngine performance decreases as altitude increases. Proper operation can be ensured by installing an altitude kit when required. See the table below to determine when an altitude kit is required. Operating this generator without the proper altitude kit installed may increase the engine’s emissions and decrease fuel economy and performance.
Altitude Range Kit Part Number0-2000ft Not required2000-3000ft 14546 - A3000-6000ft 14546 - B6000-7000ft 14546 - C
Altitude Range Kit Part Number0-2000ft Not required2000-3000ft 14545 - A3000-5000ft 14545 - B5000-6000ft 14545 - C6000-7000ft 14545 - D
ALTITUDE KIT FOR 212CC GASOLINE GENERATOR - Westinghouse Part No. 14546
ALTITUDE KIT FOR 420CC GASOLINE GENERATOR - Westinghouse Part No. 14545
Please note:• This high altitude kit is to be used at elevations above
2000 feet.• At elevations above 7000 feet, the engine may
experience decreased performance, even with the high altitude kit.
• If the carburetor is replaced, the proper high altitude kit jet will need to be installed into the replacement carburetor.
• The warranty may be void if necessary adjustments are not made for high altitude use.• DO NOT throw away any carburetor jets. You may need them again if you change
altitude of operation.
WARNING! TO PREVENT SERIOUS INJURY FROM FIRE:Perform kit procedures in a well ventilated area away from ignition sources.If the engine is hot from use, shut the engine off and wait for it to cool before proceeding. Do not smoke near generator.
It is recommended to completely drain all the gasoline from the fuel tank and carburetor float. See owners manual for proper instructions on how to safely drain fuel.
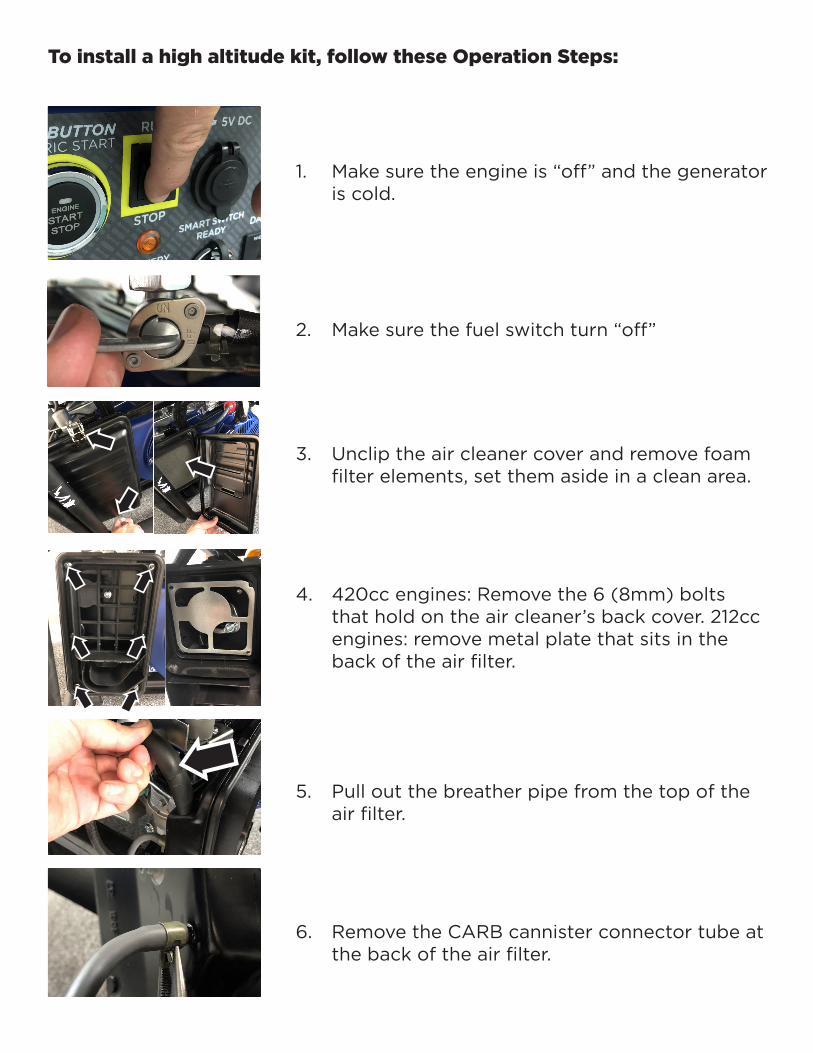
1. Make sure the engine is “off” and the generator is cold.
2. Make sure the fuel switch turn “off”
3. Unclip the air cleaner cover and remove foam filter elements, set them aside in a clean area.
4. 420cc engines: Remove the 6 (8mm) bolts that hold on the air cleaner’s back cover. 212cc engines: remove metal plate that sits in the back of the air filter.
5. Pull out the breather pipe from the top of the air filter.
6. Remove the CARB cannister connector tube at the back of the air filter.
To install a high altitude kit, follow these Operation Steps:

7. Remove the fuel hose that feeds through the U-shape fitting on the back of the air cleaner.
8. Remove two nuts in the back of the air cleaner.
9. Remove the bolt behind the air cleaner that secures it to the engine block. Remove the air cleaner.
10. (Remote start generators only) Carefully remove the stepper motor bracket. Make sure to secure the black step motor drive shaft and spring as they may fall out.
11. Carefully remove the throttle governor rod (A) and throttle return spring (B) from the throttle arm (C). Tip: Moving the governor arm can release tension and make it easier to release the rod and spring. BE CAREFUL TO NOT BEND ROD AND SPRING.
ABC
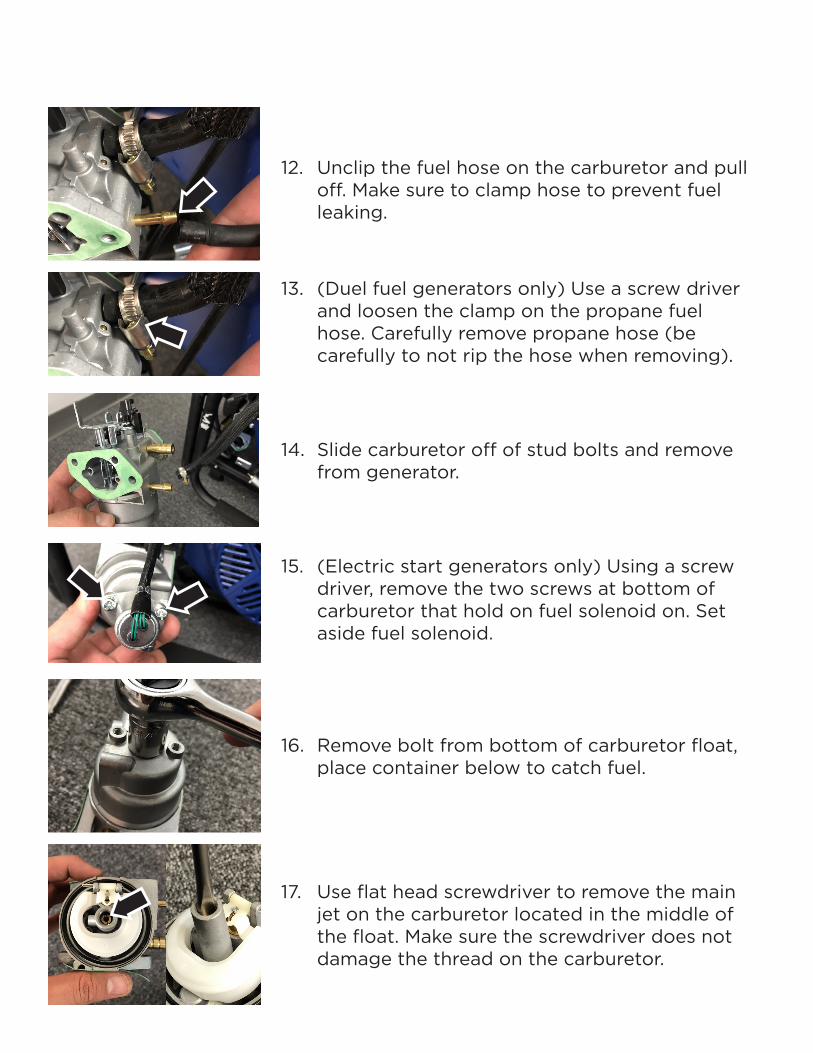
12. Unclip the fuel hose on the carburetor and pull off. Make sure to clamp hose to prevent fuel leaking.
13. (Duel fuel generators only) Use a screw driver and loosen the clamp on the propane fuel hose. Carefully remove propane hose (be carefully to not rip the hose when removing).
14. Slide carburetor off of stud bolts and remove from generator.
15. (Electric start generators only) Using a screw driver, remove the two screws at bottom of carburetor that hold on fuel solenoid on. Set aside fuel solenoid.
16. Remove bolt from bottom of carburetor float, place container below to catch fuel.
17. Use flat head screwdriver to remove the main jet on the carburetor located in the middle of the float. Make sure the screwdriver does not damage the thread on the carburetor.

18. Refer to tables on page 1, install the proper high altitude jet on the carburetor, and assemble the carburetor properly, the torque of bolt on carburetor is: 8 10N.m. DO NOT DISCARD OLD CARBURETOR JET.
19. Make sure to replace any damaged o-rings (provided) where the bowl meets the carburetor.
20. (Electric start generators only) Reattach the fuel solenoid that was removed in step 15.
21. Reinstall the fuel hose and secure with clip. If it is a dual fuel generator, reinstall the propane hose and secure hose clamp.
22. Reinstall the carburetor by sliding it back onto the stud bolts.
23. (Remote start generators only) Reinstall the stepper motor bracket. Make sure to correctly install the black step motor drive shaft (A) and spring (B). See image to see correct position.
24. For manual start generators make sure choke lever (A) and choke shaft (B) are installed properly.
A
A
B
B
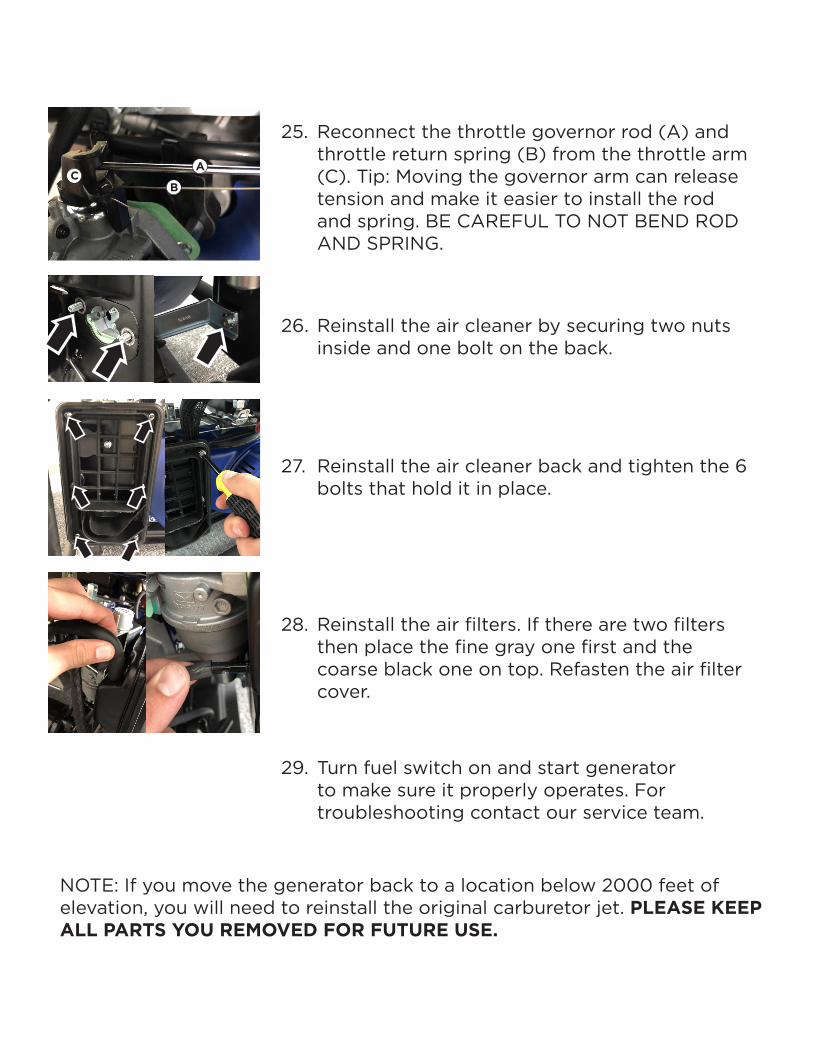
25. Reconnect the throttle governor rod (A) and throttle return spring (B) from the throttle arm (C). Tip: Moving the governor arm can release tension and make it easier to install the rod and spring. BE CAREFUL TO NOT BEND ROD AND SPRING.
26. Reinstall the air cleaner by securing two nuts inside and one bolt on the back.
27. Reinstall the air cleaner back and tighten the 6 bolts that hold it in place.
28. Reinstall the air filters. If there are two filters then place the fine gray one first and the coarse black one on top. Refasten the air filter cover.
29. Turn fuel switch on and start generator to make sure it properly operates. For troubleshooting contact our service team.
A
BC
NOTE: If you move the generator back to a location below 2000 feet of elevation, you will need to reinstall the original carburetor jet. PLEASE KEEP ALL PARTS YOU REMOVED FOR FUTURE USE.
Related Documents


