March 2022 Herta – Avigilon Control Center Notifier integration Installation Guide v1.0.0

Welcome message from author
This document is posted to help you gain knowledge. Please leave a comment to let me know what you think about it! Share it to your friends and learn new things together.
Transcript
March 2022
Herta – Avigilon Control Center Notifier integration
Installation Guide v1.0.0
2
Table of contents
Table of contents 2
1. Introduction 3
2. Integration Architecture Graphic 3
3. Requirements 4
4. Installation 5
4.1. Herta installation 5
4.2. Integration installation 10
5. Configuration 10
5.1. Herta configuration 10
5.1.1. Activate MQTT communication 10
5.1.2. Configuring Herta to publish on MQTT Broker 10
5.1.3. Active Herta API Rest Services 12
5.2. Avigilon configuration 12
5.3.1. POS Transactions configuration 12
5.3. Integration configuration 16
6. Known limitations 21
7. For more information 22
8. Reference document 22
3
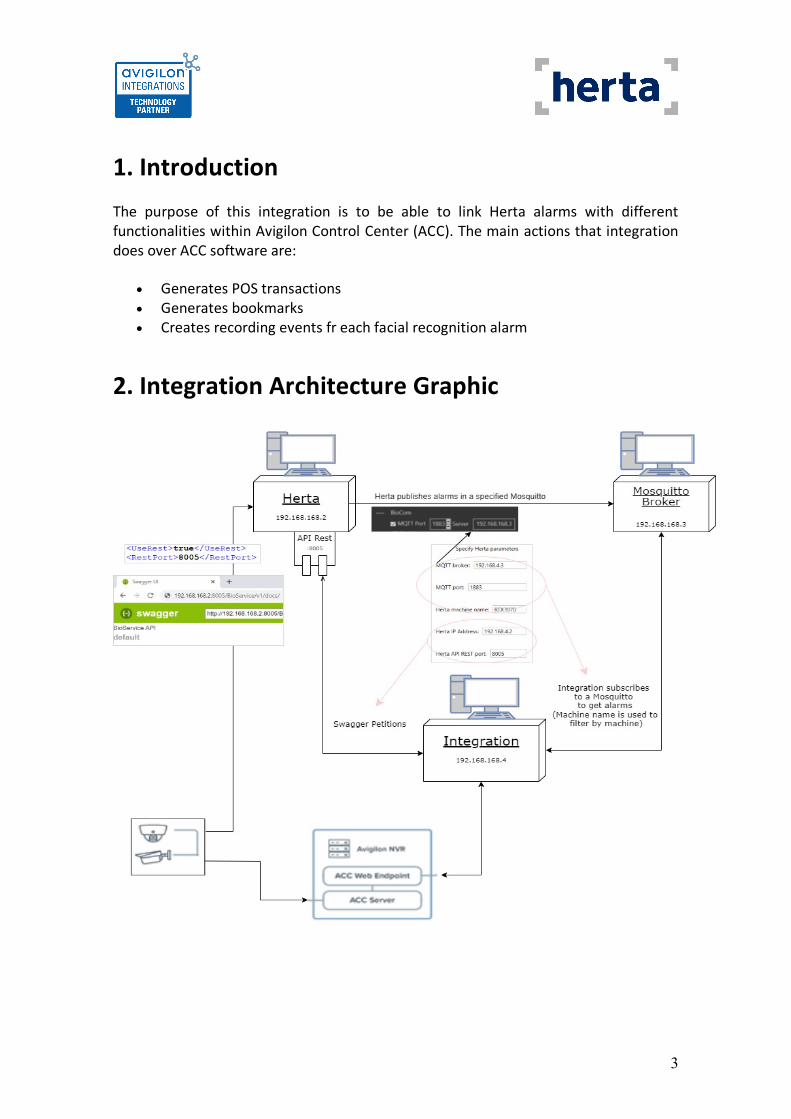
1. Introduction The purpose of this integration is to be able to link Herta alarms with different functionalities within Avigilon Control Center (ACC). The main actions that integration does over ACC software are:
• Generates POS transactions • Generates bookmarks • Creates recording events fr each facial recognition alarm
2. Integration Architecture Graphic
4
3. Requirements Herta license requirements:
• BioSurveillance/BioSurveillance Next/BioAccess license • BioCom license
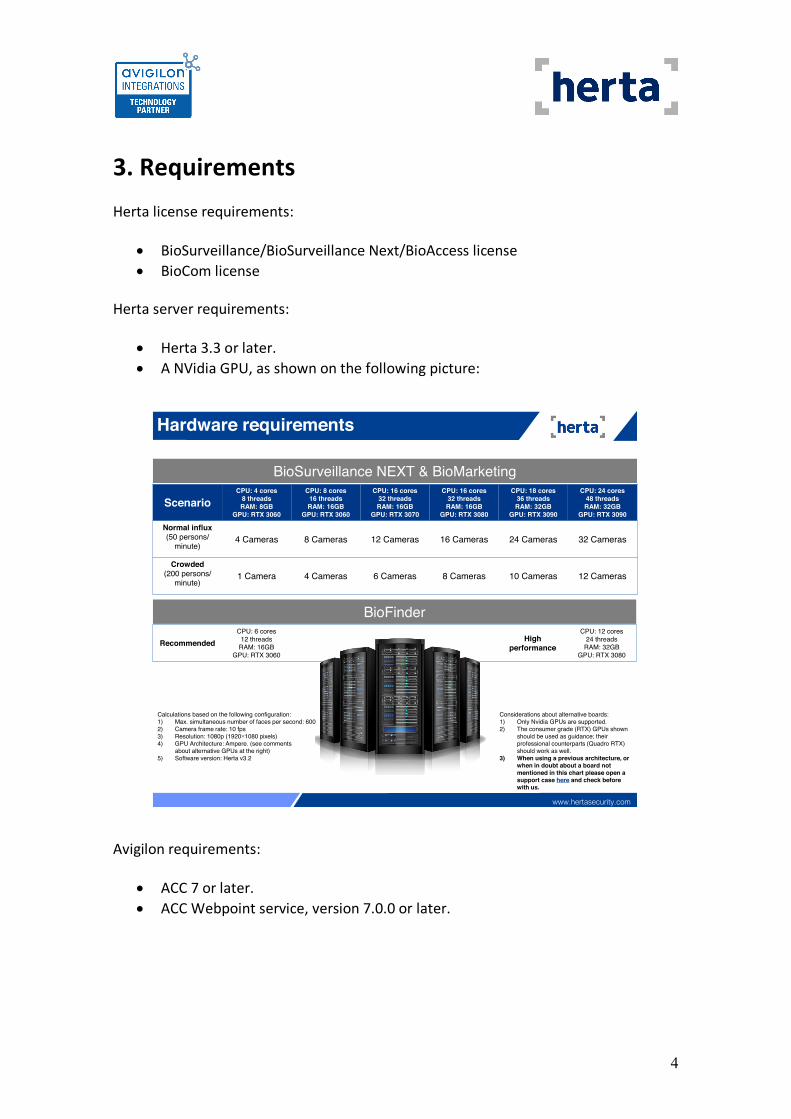
Herta server requirements:
• Herta 3.3 or later. • A NVidia GPU, as shown on the following picture:
Avigilon requirements:
• ACC 7 or later. • ACC Webpoint service, version 7.0.0 or later.
HERTA www.hertasecurity.comwww.hertasecurity.com
Hardware requirements
ScenarioCPU: 4 cores
8 threads RAM: 8GB
GPU: RTX 3060
CPU: 8 cores16 threadsRAM: 16GB
GPU: RTX 3060
CPU: 16 cores32 threadsRAM: 16GB
GPU: RTX 3070
CPU: 16 cores32 threadsRAM: 16GB
GPU: RTX 3080
CPU: 18 cores36 threadsRAM: 32GB
GPU: RTX 3090
CPU: 24 cores48 threadsRAM: 32GB
GPU: RTX 3090
Normal influx(50 persons/
minute)4 Cameras 8 Cameras 12 Cameras 16 Cameras 24 Cameras 32 Cameras
Crowded(200 persons/
minute)1 Camera 4 Cameras 6 Cameras 8 Cameras 10 Cameras 12 Cameras
BioSurveillance NEXT & BioMarketing
BioFinder
RecommendedCPU: 6 cores
12 threads RAM: 16GB
GPU: RTX 3060
High performance
CPU: 12 cores24 threads
RAM: 32GBGPU: RTX 3080
Calculations based on the following configuration:1) Max. simultaneous number of faces per second: 6002) Camera frame rate: 10 fps3) Resolution: 1080p (1920×1080 pixels)4) GPU Architecture: Ampere. (see comments
about alternative GPUs at the right)5) Software version: Herta v3.2
Considerations about alternative boards:1) Only Nvidia GPUs are supported.2) The consumer grade (RTX) GPUs shown
should be used as guidance; their professional counterparts (Quadro RTX) should work as well.
3) When using a previous architecture, or when in doubt about a board not mentioned in this chart please open a support case here and check before with us.
5
4. Installation
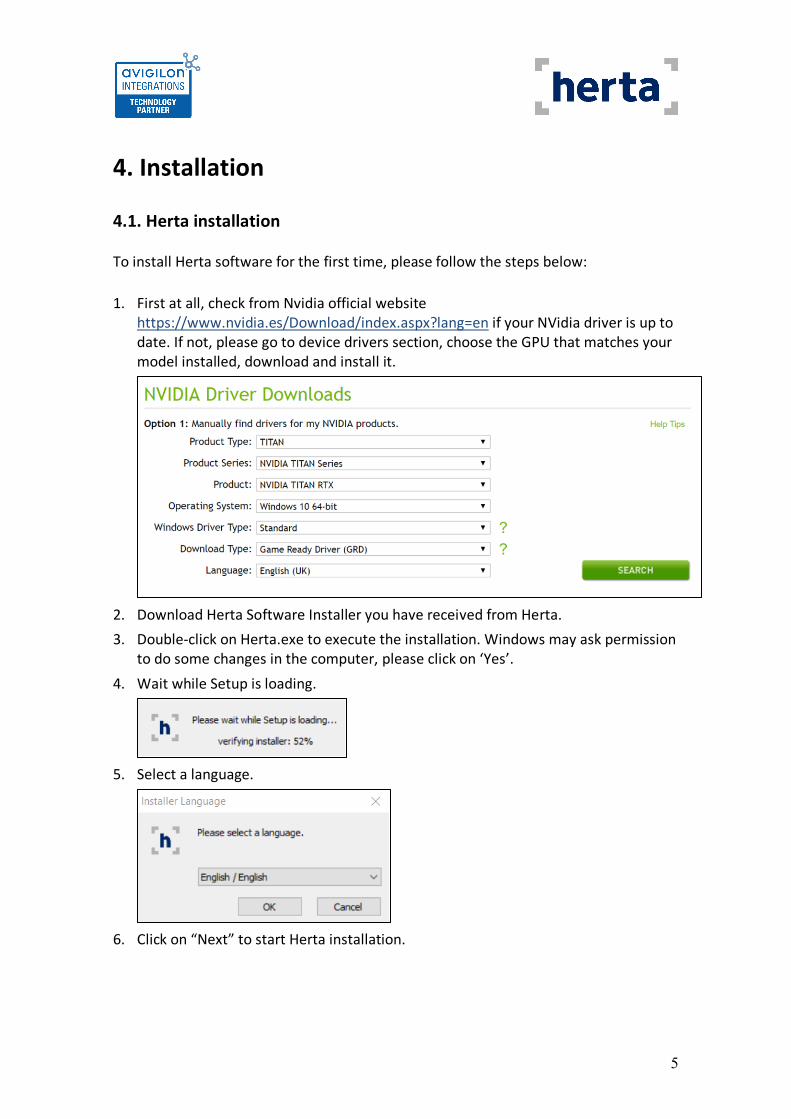
4.1. Herta installation To install Herta software for the first time, please follow the steps below: 1. First at all, check from Nvidia official website
https://www.nvidia.es/Download/index.aspx?lang=en if your NVidia driver is up to date. If not, please go to device drivers section, choose the GPU that matches your model installed, download and install it.
2. Download Herta Software Installer you have received from Herta. 3. Double-click on Herta.exe to execute the installation. Windows may ask permission
to do some changes in the computer, please click on ‘Yes’. 4. Wait while Setup is loading.
5. Select a language.
6. Click on “Next” to start Herta installation.
6
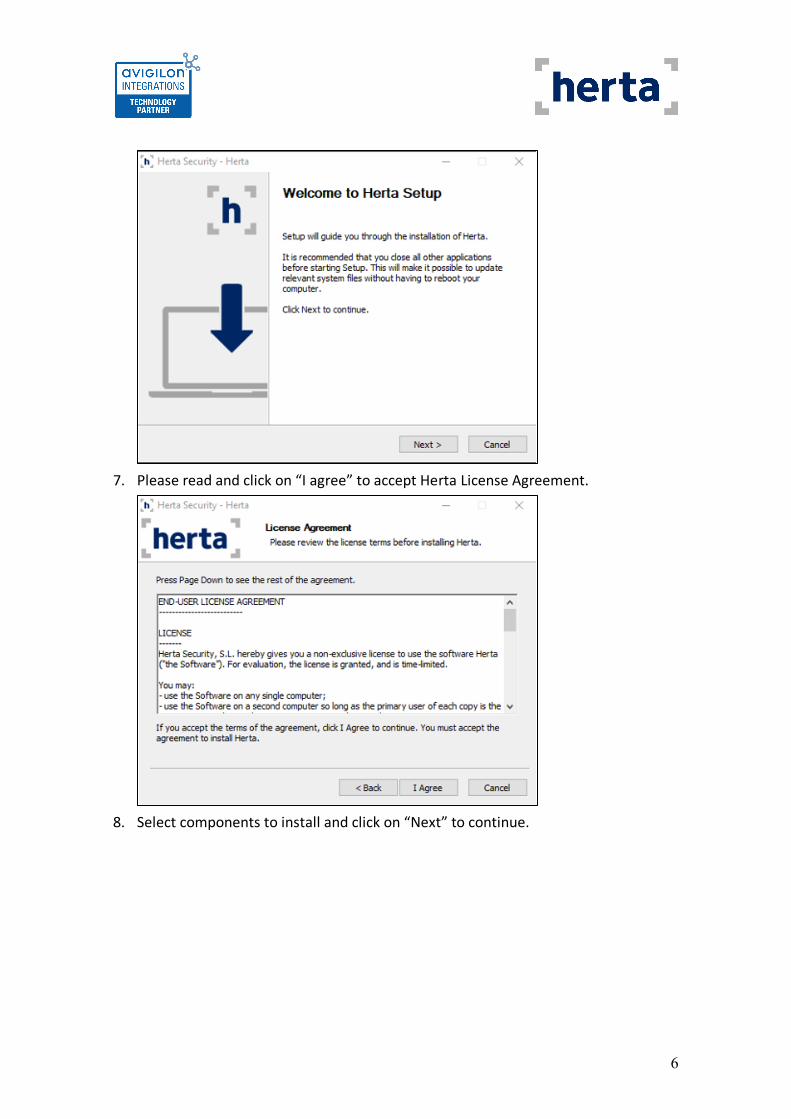
7. Please read and click on “I agree” to accept Herta License Agreement.
8. Select components to install and click on “Next” to continue.

7
9. Choose Install location and click on “Next” to continue.
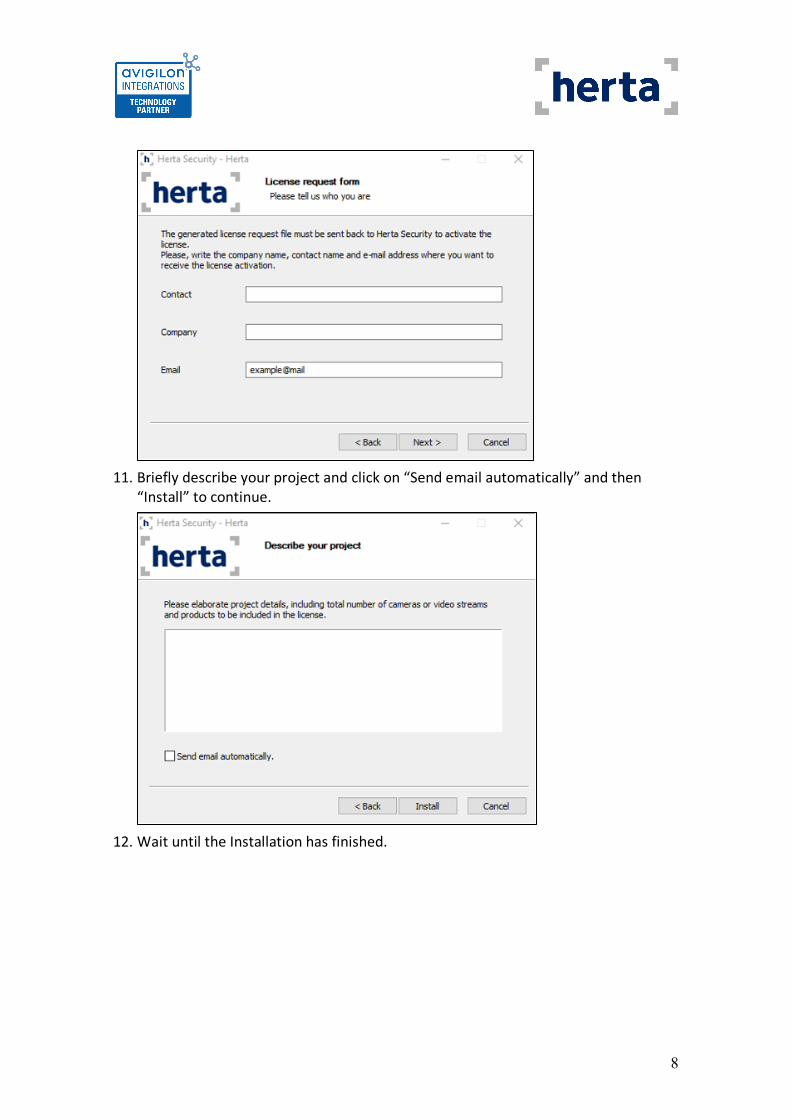
10. Fill in License Request Form and click on “Next” to continue.
8
11. Briefly describe your project and click on “Send email automatically” and then
“Install” to continue.
12. Wait until the Installation has finished.

9
13. When installation has finished, a message will confirm the successful installation.
14. You will receive the activation file (.v2c) from our Support Team in the next
business days. 15. To apply the license, just double-click on Herta application and apply the activation
license when requested. 16. Now you should be able to run Herta software.
If you have not selected “Send email automatically” on step 10, you will need to follow next steps: 1. Send to [email protected] the “hwkey.txt” file located on C:\Program
Files\Herta Security\Packages\Tools. 2. You will receive the activation file (.v2c) from our Support Team in the next
business days. 3. To apply the license, just double-click on Herta application and apply the activation
license when requested. 4. Now you should be able to run Herta software.
10
4.2. Integration installation Herta-Avigilon ACC integration is an executable middleware that does not require any installation, just download the integration from the link provided by the Herta support team and double click on “ACC_Notifier_integration.exe” to open the integration.
5. Configuration
5.1. Herta configuration
5.1.1. Activate MQTT communication
The integration uses MQTT communication protocol in order to subscribe to events published by Herta system.
To activate MQTT, you have to follow the next steps:
For MQTT Broker we are going to use Mosquitto (you can download from here)
• Install Mosquitto • Install a client to check published messages MQTT.fx [optional]
You must configure MQTT Server for support WebSockets.
Edit file: %programfiles%/mosquitto/mosquitto.conf and add next lines at beginning of file:
1 listener 1883 2 listener 9001 3 protocol websockets
If the version of Mosquitto is 2.0.0 or newer, you also need to add the following line:
1 allow_anonymous true 5.1.2. Configuring Herta to publish on MQTT Broker
Go to %appdata%/Herta Security\Herta\3\setting.xml and set next values:

11
/Settings/BioCom/Active = true /Settings/BioCom/MQTTSettings/ConnectToMQTTServer = true /Settings/BioCom/MQTTSettings/Server= localhost /Settings/BioCom/MQTTSettings/Port = 1883 It must look like:
1<Settings> 2 (...) 3 <BioCom> 4 (...) 5 <Active>true</Active> 6 (...) 7 <MQTTSettings> 8 <ConnectToMQTTServer>true</ConnectToMQTTServer> 9 <Server>localhost</Server> 10 <Port>1883</Port> 11 </MQTTSettings> 12 (...) 13 </BioCom> 14 (...) 15</Settings>
Then restart Herta.
The next time you open Herta, you will see that MQTT option is enabled in settings tab:

12
5.1.3. Active Herta API Rest Services
Go to %appdata%/Herta Security\Herta\3\setting.xml and set next values:
1<Settings> 2 (...) 3 <BioCom> 4 (...) 5 <Active>true</Active> 6 (...) 7 <UseRest>true</UseRest> 8 <RestPort>8005</RestPort> 9 </BioCom> 10 (...) 11</Settings>
RestPort represents the port in which API Rest is working.
Note: You have to create a rule in windows firewall machine in which Herta is running, in order to be able to communicate with ACC software properly.
5.2. Avigilon configuration
First at all, you have to configure a site and add some cameras to the system. Note that these configured cameras will be mapped within the integration, in order to attach some alarm from Herta to a certain camera in ACC.
5.2.1. POS Transactions configuration
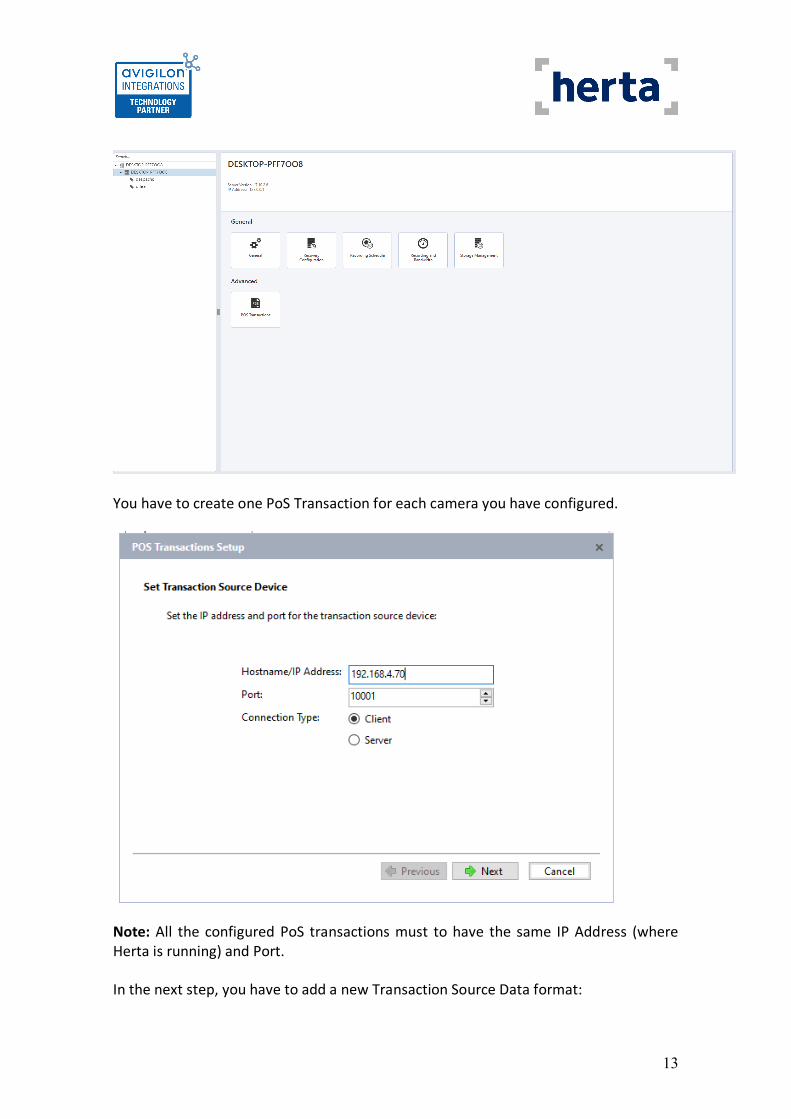
In order to use PoS transactions to receive some metadata alarm information, you have to configure the Pos Transactions in ACC software:
13
You have to create one PoS Transaction for each camera you have configured.
Note: All the configured PoS transactions must to have the same IP Address (where Herta is running) and Port.
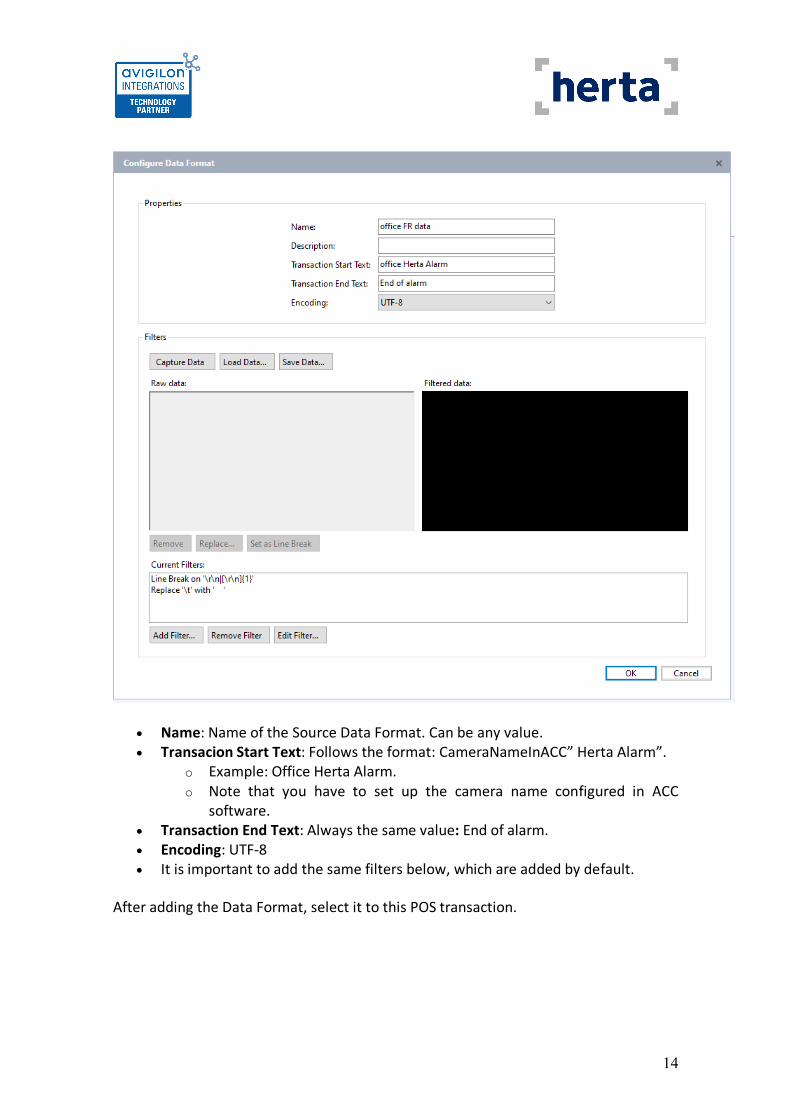
In the next step, you have to add a new Transaction Source Data format:
14
• Name: Name of the Source Data Format. Can be any value. • Transacion Start Text: Follows the format: CameraNameInACC” Herta Alarm”.
o Example: Office Herta Alarm. o Note that you have to set up the camera name configured in ACC
software. • Transaction End Text: Always the same value: End of alarm. • Encoding: UTF-8 • It is important to add the same filters below, which are added by default.
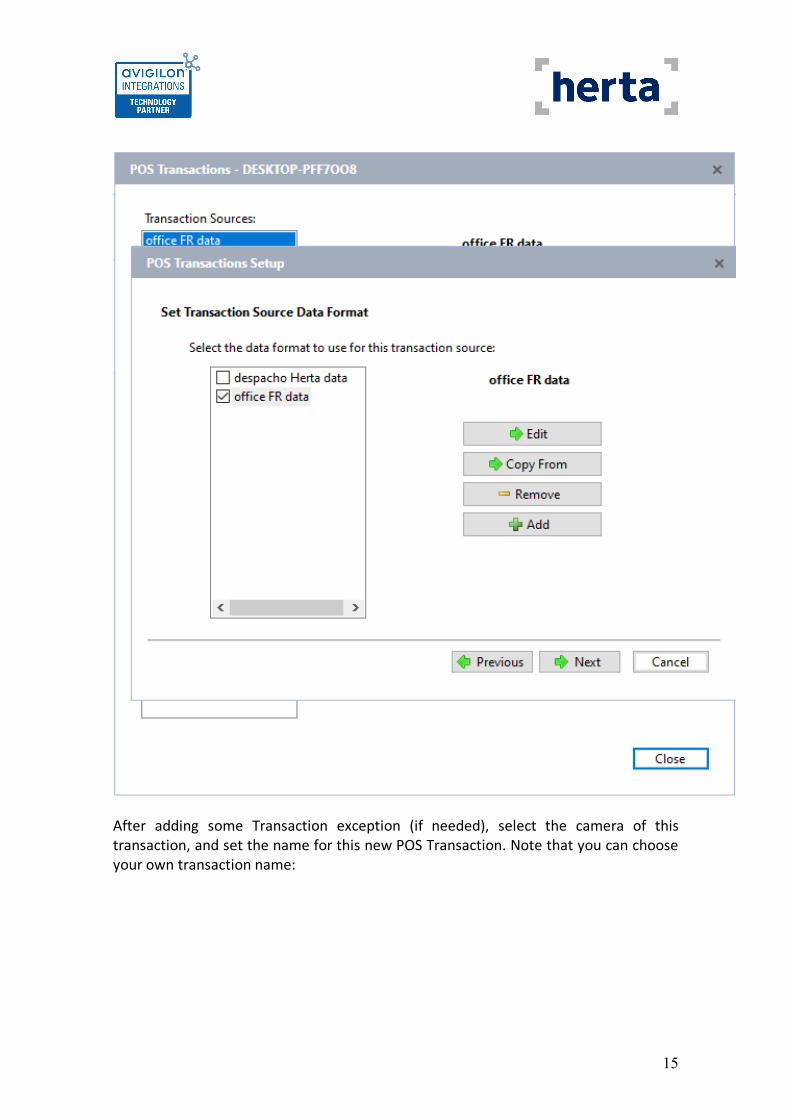
After adding the Data Format, select it to this POS transaction.
15
After adding some Transaction exception (if needed), select the camera of this transaction, and set the name for this new POS Transaction. Note that you can choose your own transaction name:

16
5.3. Integration configuration
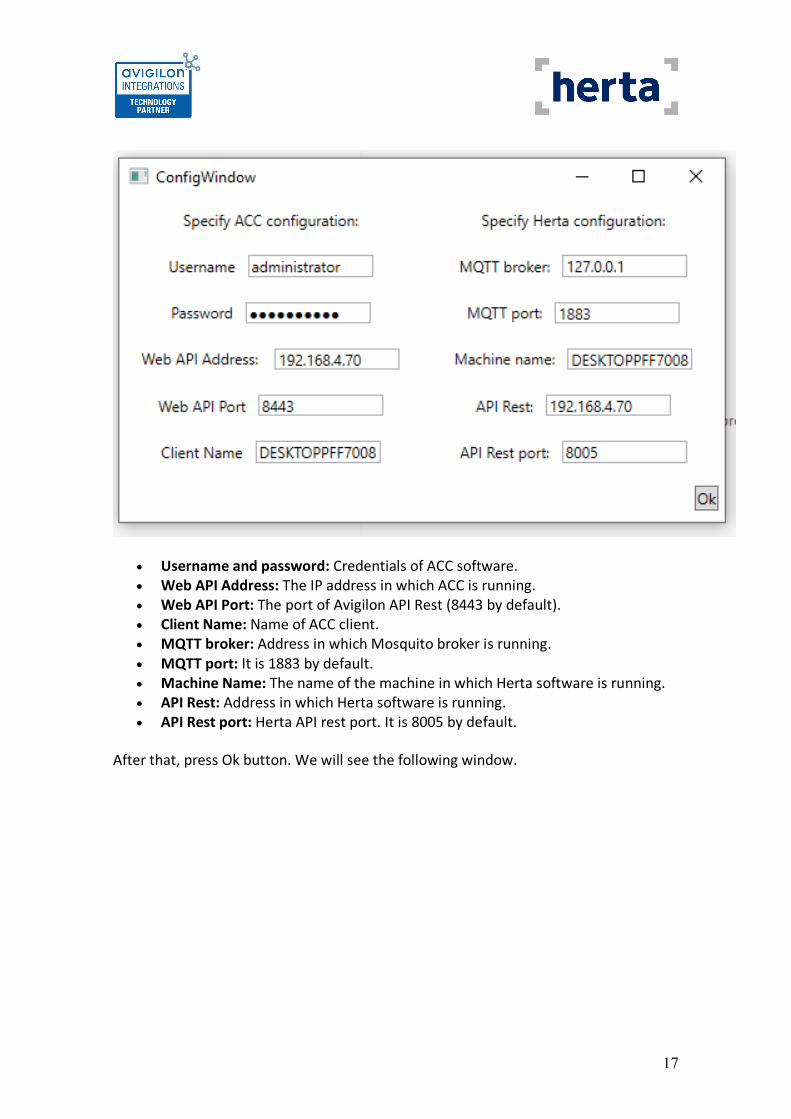
Execute the integration. The first window is for login into ACC system and configure Herta connection.
17
• Username and password: Credentials of ACC software. • Web API Address: The IP address in which ACC is running. • Web API Port: The port of Avigilon API Rest (8443 by default). • Client Name: Name of ACC client. • MQTT broker: Address in which Mosquito broker is running. • MQTT port: It is 1883 by default. • Machine Name: The name of the machine in which Herta software is running. • API Rest: Address in which Herta software is running. • API Rest port: Herta API rest port. It is 8005 by default.
After that, press Ok button. We will see the following window.

18
• Refresh button: Used to refresh the cameras list of Avigilon and Herta systems. • Add mapping button: Used to link into a table an Avigilon camera with Herta
camera. • Tracker time: Time in seconds in which a new identification alarm is processed
as a repetition of the previous one (useful to avoid duplications). • Start button: Start the alarms subscription. • Clear button: Used to clear the right panel, notifications list. • PoS Port: The port in which PoS transactions are configured in ACC software. • PoS Transactions: Enable / disable PoS transactions when alarms subscription is
started.
Once you start the integration, you will see how the alarms comes to integration, and generate some actions over Avigilon Control Center software.

19
In ACC software, you can see in the Bookmarks section the bookmarks generated for the integration.
In live tab, you can see when integration generate a recording event by checking the upper left corner icon in camera view.

20
It changes when start recording, and the icon turns blue.
The recording events are of a concrete duration (15 seconds).
If POS Transactions are activated, you will see the text notifications in ACC software:

21
Note: After clicking Start button, the connection with POS channel needs some seconds to be able. You will see a windows popup message when the connection is done.
6. Known limitations There are none known issues.
22
7. For more information For more information about Herta-Avigilon Control Center integration, please contact our technical support at http://hertasecurity.com/en/herta-support-case-creation-form.
8. Reference document Herta User Guide
Related Documents