HeroKit User Guide Create your dream game without programming You have a creative mind bursting with game ideas but you don't know how to program. No sweat! HeroKit lets you drag & drop your way to an amazing game. And building a game with HeroKit is way faster than coding something from scratch. Learn how to code Once you've mastered the basics with HeroKit, dive deeper! HeroKit comes with over 200 actions that you can use in your game. You can modify the code for these actions or create entirely new actions. Once you've mastered scripting actions, you can take it a step further and modify HeroKit itself. Join our tribe HeroKit is tribe-source software. What does this mean? It means that everyone who buys HeroKit is not actually buying a product. Your buying a place in the HeroKit tribe. As a tribe member, you get full access to the source code on GitHub. If you spot some code in HeroKit that can be optimized, you can fork a fix and if everything looks legit, we'll merge it into the next version of HeroKit. Play your games on everything One of the most awesome HeroKit features is that your games will port to everything. Phones, tablets, PCs, Macs, Linux, TVs, Consoles, Virtual Reality (VR) headsets, and more. Getting Started HeroKit lets you build your dream game quickly without coding. And if you do know how to code, you can customize HeroKit to create games even faster. Key Features HeroKit is powerful, flexible, and fun to use! Out of the box, you can use HeroKit to build 3D RPGs, SIMs, adventure games, and first-person shooters. Here are a few key features that make HeroKit awesome: • Use drag-and-drop actions to make objects in your game do cool things. • +200 actions to choose from. (or create your own) • Objects can use local and global variables. • Lots of menus. • Dialog system that supports choices, formatting, localization, and variables. • Ability to save and load games. • Touch, mouse, keyboard, and joystick support. • Play your finished game on +24 platforms. • Comes with full C# Source code. How to Install HeroKit HeroKit is easy to install. Follow these steps to get your project up and running: 1. Download and install Unity (FREE). 2. Create a folder on your computer that will contain your game project.

Welcome message from author
This document is posted to help you gain knowledge. Please leave a comment to let me know what you think about it! Share it to your friends and learn new things together.
Transcript
HeroKit User Guide Create your dream game without programming You have a creative mind bursting with game ideas but you don't know how to program. No sweat! HeroKit lets you drag & drop your way to an amazing game. And building a game with HeroKit is way faster than coding something from scratch.
Learn how to code Once you've mastered the basics with HeroKit, dive deeper! HeroKit comes with over 200 actions that you can use in your game. You can modify the code for these actions or create entirely new actions. Once you've mastered scripting actions, you can take it a step further and modify HeroKit itself.
Join our tribe HeroKit is tribe-source software. What does this mean? It means that everyone who buys HeroKit is not actually buying a product. Your buying a place in the HeroKit tribe. As a tribe member, you get full access to the source code on GitHub. If you spot some code in HeroKit that can be optimized, you can fork a fix and if everything looks legit, we'll merge it into the next version of HeroKit.
Play your games on everything One of the most awesome HeroKit features is that your games will port to everything. Phones, tablets, PCs, Macs, Linux, TVs, Consoles, Virtual Reality (VR) headsets, and more.
Getting Started HeroKit lets you build your dream game quickly without coding. And if you do know how to code, you can customize HeroKit to create games even faster.
Key Features HeroKit is powerful, flexible, and fun to use! Out of the box, you can use HeroKit to build 3D RPGs, SIMs, adventure games, and first-person shooters. Here are a few key features that make HeroKit awesome:
• Use drag-and-drop actions to make objects in your game do cool things.
• +200 actions to choose from. (or create your own)
• Objects can use local and global variables.
• Lots of menus.
• Dialog system that supports choices, formatting, localization, and variables.
• Ability to save and load games.
• Touch, mouse, keyboard, and joystick support.
• Play your finished game on +24 platforms.
• Comes with full C# Source code.
How to Install HeroKit HeroKit is easy to install. Follow these steps to get your project up and running:
1. Download and install Unity (FREE). 2. Create a folder on your computer that will contain your game project.
3. Open Unity. In the Start Page, click New Project. Give your project a name. In the directory field, select the folder that you created for your project. Click Create Project. The Unity Editor opens.
4. Click Windows > Asset Store. The Unity asset store opens.
5. In the asset store, search for HeroKit and open it. a. Click Buy Now, if you haven't purchased HeroKit. b. Click Download, if you haven't download it. c. Click Import.
6. A window appears with the contents of HeroKit. Click Import.
How to Update HeroKit If a new version of HeroKit comes out and you need to update your project, follow these steps:
1. Make a backup of your project. 2. Open your project in Unity and click Windows > Asset Store. 3. Click the Download Manager icon. The Download manager opens. 4. Next to HeroKit, click Download. 5. When the download completes, click Import. 6. A window appears with the contents of HeroKit. Click Import.
Get Support If you need support, please go to Aveyond.com.
HeroKit Components HeroKit contains a small group of powerful components that you can use together to create simple or complex games. Let's take a quick look at them.
• Hero Game Object In Unity, the objects in a scene are called game objects. A hero game object is simply a game object that can have a hero object attached to it.
• Hero Object A hero object is the "brain" for an object in a scene. For example, if you have a monster in the scene, the hero object would determine where it moves, when it should attack the player, and what should happen if it dies. You can attach a single hero object as many objects in a scene as you want. The result will be a bunch of scene objects that do the same thing. For example, you could create a horde of monsters that chase the player.
• Hero Action A hero action is an action that an object in the scene can perform. For example, if you want a monster in the scene to jump, you would assign it a Jump action. You assign hero actions to a hero object.
• Hero Property A hero property is a list of common variables that you want a group of hero objects to have. For example, maybe you want all monsters to have a variable for Health and Attack. You can assign one hero property to a hero object.
• Hero Listener A hero listener is a component that you can attach to any game object in a scene. If

something happens on the game object, this information can be passed via the hero listener on the object to a hero game object in the scene.
HeroKit Editor You can build hero objects, hero properties, and hero actions in the HeroKit Editor. There are a few ways you can open this editor. Let's take a look at them:
• Double-click on a hero object, hero property, or hero action in the Project tab.
• Double-click on a hero game object in the Scene View.
• Double-click on a hero object inside a hero game object in the Inspector.
• Click on the Edit Hero Object button that is inside a hero game object in the Inspector.
• Double-click on a hero property or hero action inside a hero object.
Hero Game Object A hero game object is an item in a scene that can have a hero object attached to it.
How to create a hero game object There are two ways you can add a hero game object to a scene:
• In the Unity toolbar, click HeroKit > Create Hero Game Object.
• Add a game object to the scene and then add a component to it called Hero Kit Object.
Assign a hero object to a hero game object Once you've added a hero game object to a scene, you can assign a hero object to it. To do this:
• In the Hierarchy tab, click on the Hero Game Object.
• In the Inspector tab, drag your hero object into the Hero Object field. Note: Or you can click the icon to the right of the Hero Object field, select Assets, and get it there.
Overview of the hero game object This is what a hero kit object looks like in the Hierarchy tab:
A hero game object looks like this in the Inspector tab before you add a hero object to it:
A hero game object looks like this in the Inspector tab after you add a hero object to it:
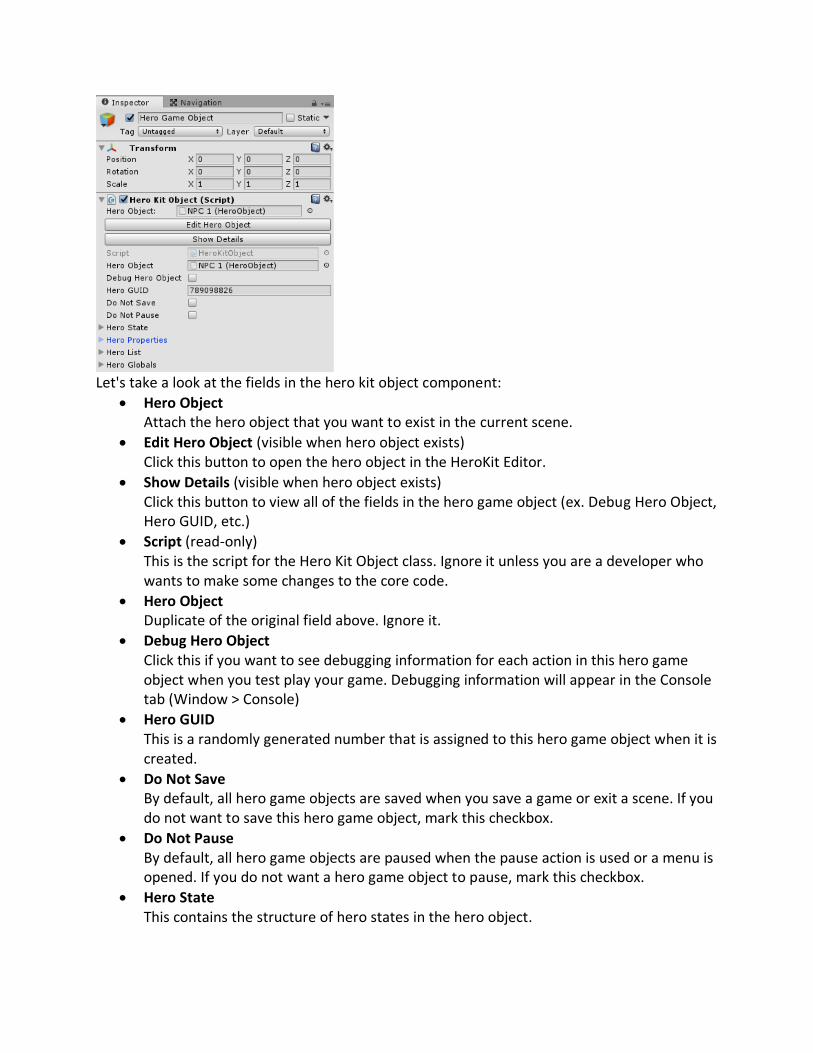
Let's take a look at the fields in the hero kit object component:
• Hero Object Attach the hero object that you want to exist in the current scene.
• Edit Hero Object (visible when hero object exists) Click this button to open the hero object in the HeroKit Editor.
• Show Details (visible when hero object exists) Click this button to view all of the fields in the hero game object (ex. Debug Hero Object, Hero GUID, etc.)
• Script (read-only) This is the script for the Hero Kit Object class. Ignore it unless you are a developer who wants to make some changes to the core code.
• Hero Object Duplicate of the original field above. Ignore it.
• Debug Hero Object Click this if you want to see debugging information for each action in this hero game object when you test play your game. Debugging information will appear in the Console tab (Window > Console)
• Hero GUID This is a randomly generated number that is assigned to this hero game object when it is created.
• Do Not Save By default, all hero game objects are saved when you save a game or exit a scene. If you do not want to save this hero game object, mark this checkbox.
• Do Not Pause By default, all hero game objects are paused when the pause action is used or a menu is opened. If you do not want a hero game object to pause, mark this checkbox.
• Hero State This contains the structure of hero states in the hero object.
• Hero Properties This contains the structure of the hero property in the hero object. When the game is active, you can look in here to see the current values assigned to the hero properties. (ex. Ints > Items > Health: 23)
• Hero List This contains the structure of the local variables in the hero object. When the game is active, you can look in here to see the current values assigned to local variables. (ex. Bools > Items > Hungry: True)
• Hero Globals This contains the structure of the global variables in the game. When the game is active, you can look in here to see the current values assigned to global variables. (ex. Ints > Items > Days: 8)
Hero Object A hero object represents an item in your game. An item could be the player, a monster, a treasure chest, a timer, an event system, a cutscene, an animation sequence, a dialog sequence, etc. I could go on and on, but just remember this: you can make a LOT of cool things with them.
How to create a hero object To create a hero object:
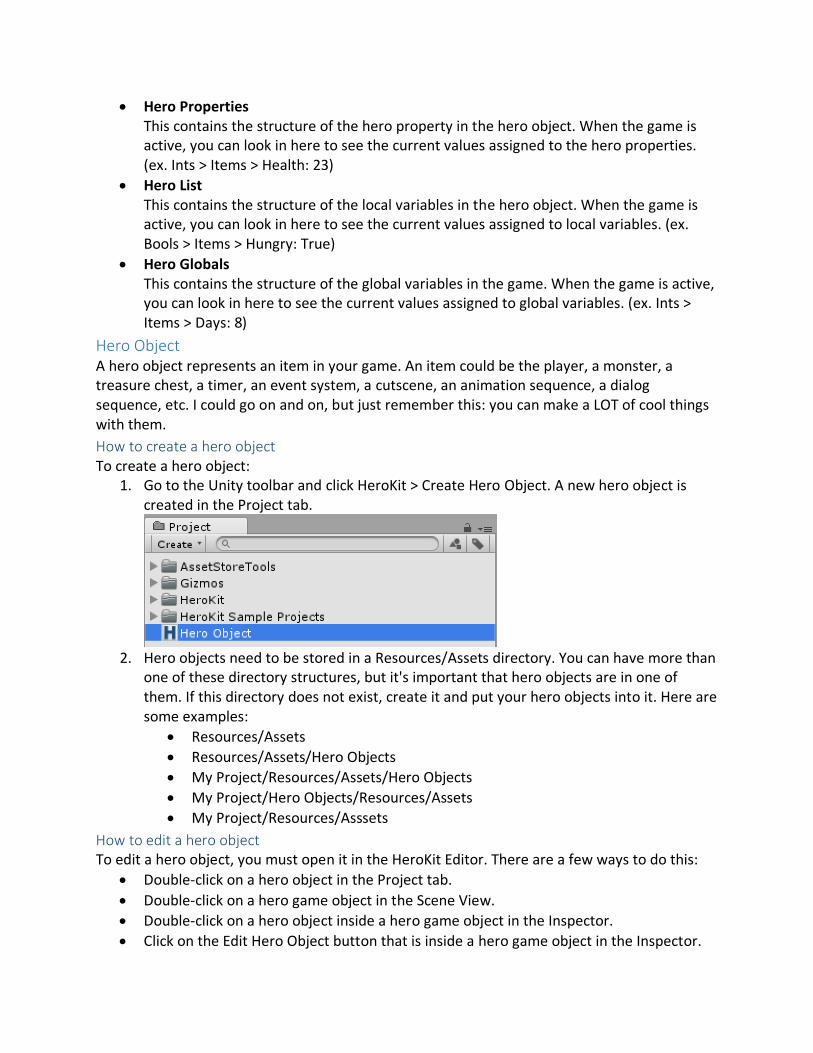
1. Go to the Unity toolbar and click HeroKit > Create Hero Object. A new hero object is created in the Project tab.
2. Hero objects need to be stored in a Resources/Assets directory. You can have more than
one of these directory structures, but it's important that hero objects are in one of them. If this directory does not exist, create it and put your hero objects into it. Here are some examples:
• Resources/Assets
• Resources/Assets/Hero Objects
• My Project/Resources/Assets/Hero Objects
• My Project/Hero Objects/Resources/Assets
• My Project/Resources/Asssets
How to edit a hero object To edit a hero object, you must open it in the HeroKit Editor. There are a few ways to do this:
• Double-click on a hero object in the Project tab.
• Double-click on a hero game object in the Scene View.
• Double-click on a hero object inside a hero game object in the Inspector.
• Click on the Edit Hero Object button that is inside a hero game object in the Inspector.
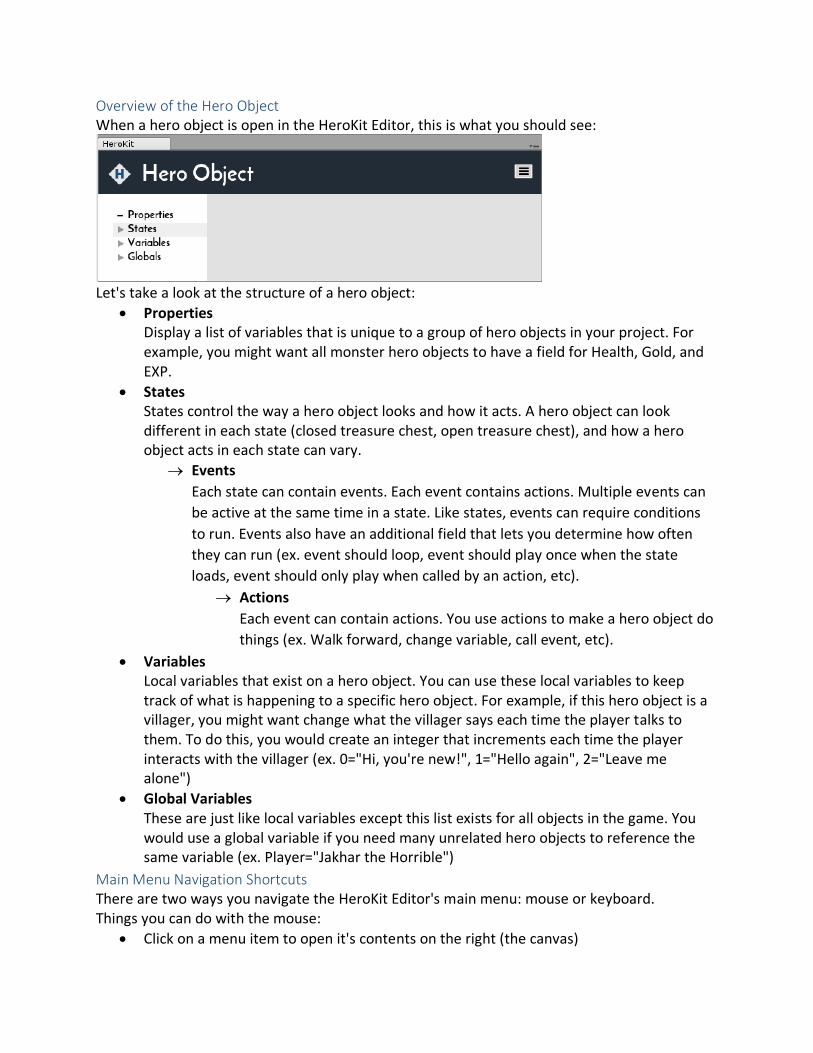
Overview of the Hero Object When a hero object is open in the HeroKit Editor, this is what you should see:
Let's take a look at the structure of a hero object:
• Properties Display a list of variables that is unique to a group of hero objects in your project. For example, you might want all monster hero objects to have a field for Health, Gold, and EXP.
• States States control the way a hero object looks and how it acts. A hero object can look different in each state (closed treasure chest, open treasure chest), and how a hero object acts in each state can vary.
Events
Each state can contain events. Each event contains actions. Multiple events can
be active at the same time in a state. Like states, events can require conditions
to run. Events also have an additional field that lets you determine how often
they can run (ex. event should loop, event should play once when the state
loads, event should only play when called by an action, etc).
Actions
Each event can contain actions. You use actions to make a hero object do
things (ex. Walk forward, change variable, call event, etc).
• Variables Local variables that exist on a hero object. You can use these local variables to keep track of what is happening to a specific hero object. For example, if this hero object is a villager, you might want change what the villager says each time the player talks to them. To do this, you would create an integer that increments each time the player interacts with the villager (ex. 0="Hi, you're new!", 1="Hello again", 2="Leave me alone")
• Global Variables These are just like local variables except this list exists for all objects in the game. You would use a global variable if you need many unrelated hero objects to reference the same variable (ex. Player="Jakhar the Horrible")
Main Menu Navigation Shortcuts There are two ways you navigate the HeroKit Editor's main menu: mouse or keyboard. Things you can do with the mouse:
• Click on a menu item to open it's contents on the right (the canvas)
• Click on an arrow to expand or collapse the contents of a sub menu.
• Right-click (or shift-control-click) a specific state, event, or action to bring up a context menu that contains tools to copy, paste, move, enable, and disable an item.
Things you can do with your keyboard:
• Use the arrow keys to move up and down the main menu.
• Use the return key to expand or collapse the contents of a sub menu.
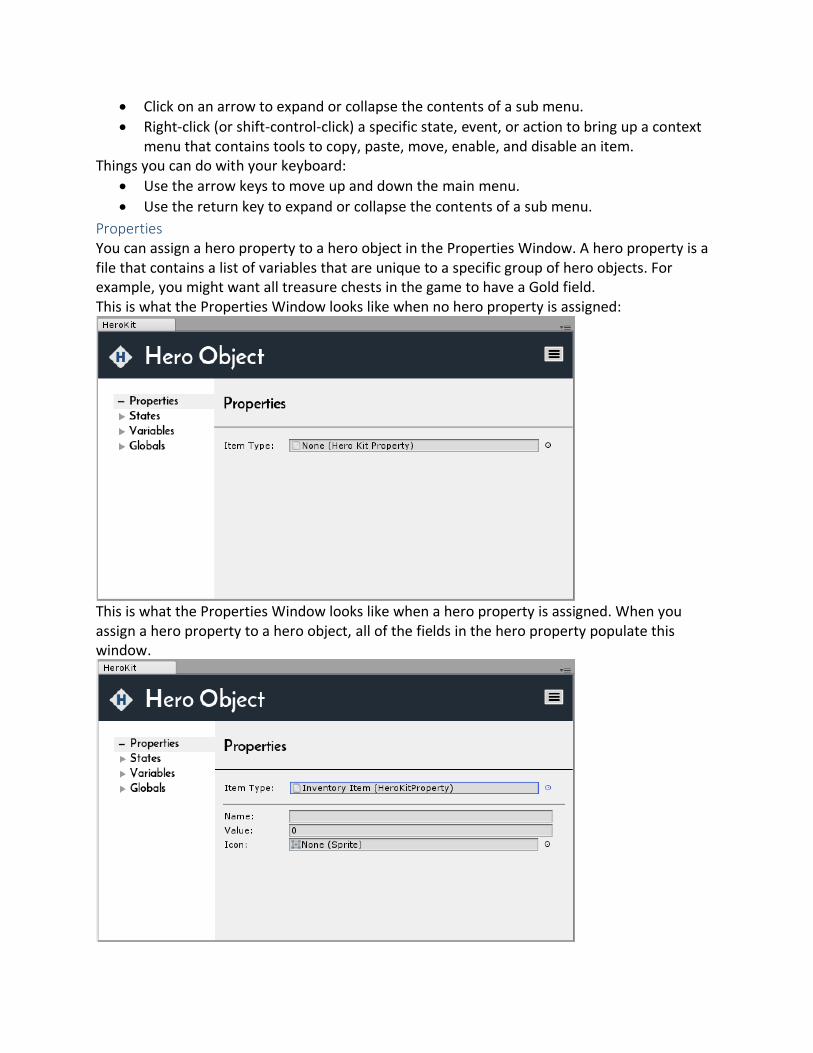
Properties You can assign a hero property to a hero object in the Properties Window. A hero property is a file that contains a list of variables that are unique to a specific group of hero objects. For example, you might want all treasure chests in the game to have a Gold field. This is what the Properties Window looks like when no hero property is assigned:
This is what the Properties Window looks like when a hero property is assigned. When you assign a hero property to a hero object, all of the fields in the hero property populate this window.
How to add a hero property to a hero object To add a hero property to a hero object, follow these steps:
1. Open the hero object in the HeroKit Editor 2. Click Properties 3. Drag a hero property file from the Project tab into the Item Type field. Fields for the
property populate the window. Note: You can alternatively click the icon to the right of the Item Type field, select Assets, and choose your hero property from the list.
Note: The values in these fields will not change the values in any fields on another hero object or in the hero property itself. Note: Game object and hero object fields will not appear in the properties window because you cannot assign anything to them in the editor. These fields can only get values from a scene in a live game.
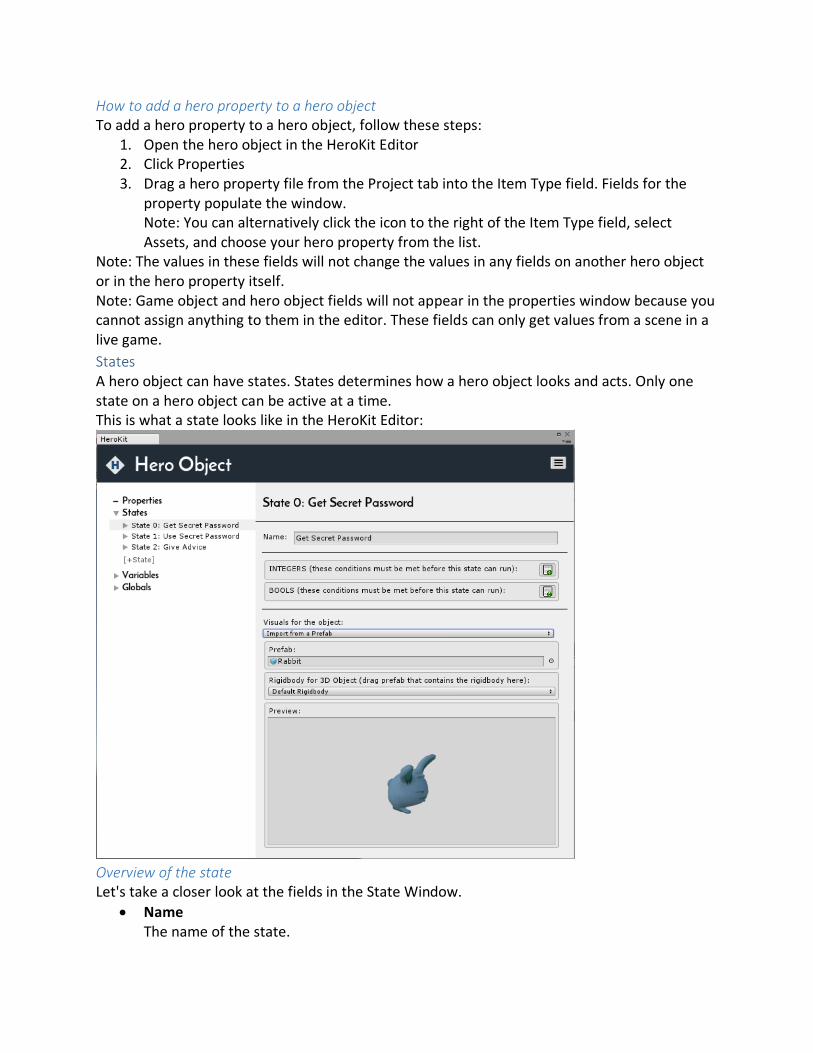
States A hero object can have states. States determines how a hero object looks and acts. Only one state on a hero object can be active at a time. This is what a state looks like in the HeroKit Editor:
Overview of the state Let's take a closer look at the fields in the State Window.
• Name The name of the state.
• INTEGERS (these conditions must be met before this state can run) Conditions that must be met for this state to be active. Conditions must be integers.
• BOOLS (these conditions must be met before this state can run) Conditions that must be met for this state to be active. Conditions must be bools.
• Visuals for the object Choose how the hero object should look in the scene while this state is active. The choices are:
Use what is already on the game object If you don't want to change what is on the hero object, select this.
Import from a prefab Attach a prefab that contains a model for this hero object. The prefab will appear in the scene.
Prefab The prefab that contains the model to display in the scene. Note: the prefab should not contain a ridigbody. Note: the prefab can contain colliders.
Rigidbody for 3D Object Choose the rigidbody that the hero object should use. A rigidbody gives a hero object physics. The choices are:
Default Rigidbody The default rigidbody that comes with HeroKit. Note: This rigidbody is store here: HeroKit/Hero Engine/Assets/Resources/Hero Templates/Components/HeroKit 3D Rigidbody
Custom Rigidbody Attach a prefab that contains a rigidbody that you want to use for this hero object.
No Rigidbody This hero object should not have a rigidbody.
None Do no show any visuals on this hero object.
A note about conditions By default, when a scene loads, the first state assigned to a hero object is loaded. If you attach conditions to this state, the state will only activate if the conditions are true. If the conditions are false, HeroKit will move to the next state and check to see if it can be activated, and so on. If no states can be activated, no state will be assigned to the hero object in the scene.
How to add an integer condition to a state To add an integer condition, follow these steps:
1. Open the hero object in the HeroKit Editor. 2. Click on the state to update. 3. To the right of INTEGERS, click the Add Condition icon. A new condition is added. 4. Set the following fields:
• Value 1 The first integer to compare.
• Operator The operator to use in the comparison.
• Value 2 The second integer to compare.
How to add a bool condition to a state To add a bool condition, follow these steps:
1. Open the hero object in the HeroKit Editor. 2. Click on the state to update. 3. To the right of BOOLS, click the Add Condition icon. A new condition is added. 4. Set the following fields:
• Value 1 The first bool to compare.
• Operator The operator to use in the comparison.
• Value 2 The second bool to compare.
How to attach a model and physics to a state To attach a model to a state, follow these steps:
1. Open the hero object in the HeroKit Editor. 2. Click on the state to update. 3. In the Visuals for the Object drop down list, select Import from a Prefab. 4. Drag your prefab that contains the model into the Prefab field. 5. In the Rigidbody for 3D Object field, select Default Rigidbody or Custom Rigidbody. If
you select Custom Rigidbody, drag a prefab that contains the rigidbody you want to use into the provided field.
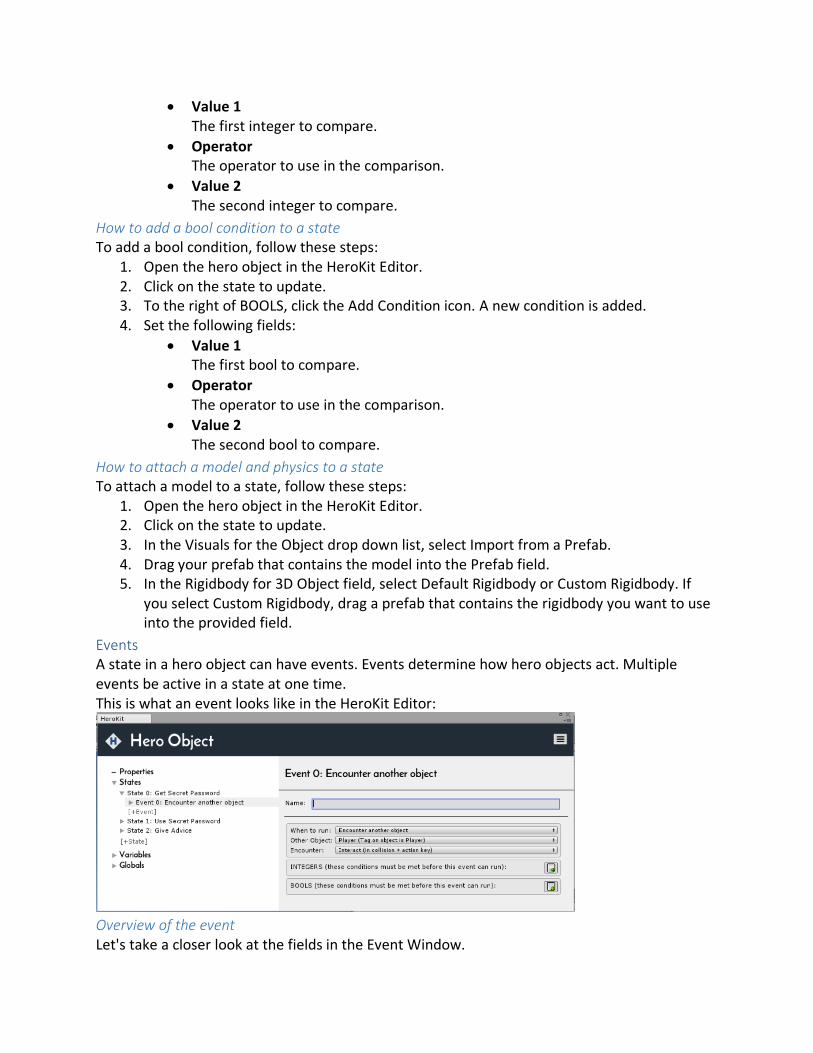
Events A state in a hero object can have events. Events determine how hero objects act. Multiple events be active in a state at one time. This is what an event looks like in the HeroKit Editor:
Overview of the event Let's take a closer look at the fields in the Event Window.
• Name The name of the event. If no name is specified, the value in the When to run field is used.
• When to run Choose when the event should run. Your choices are:
Loop (general) Run this event every frame.
Loop (physics, animation, movement) Run this event every fixed frame. Use this for smooth, visible movement.
Autoplay (play once when state starts) Run this event once when this state loads.
Called by an action Run this event when it is called by an action in another event.
Receive input (mouse, keyboard, joystick) Run this event when input is received by the player.
Encounter another object Run this event when this object encounter's another object.
• INTEGERS (these conditions must be met before this state can run) Conditions that must be met for this event to be active. Conditions must be integers.
• BOOLS (these conditions must be met before this state can run) Conditions that must be met for this event to be active. Conditions must be bools.
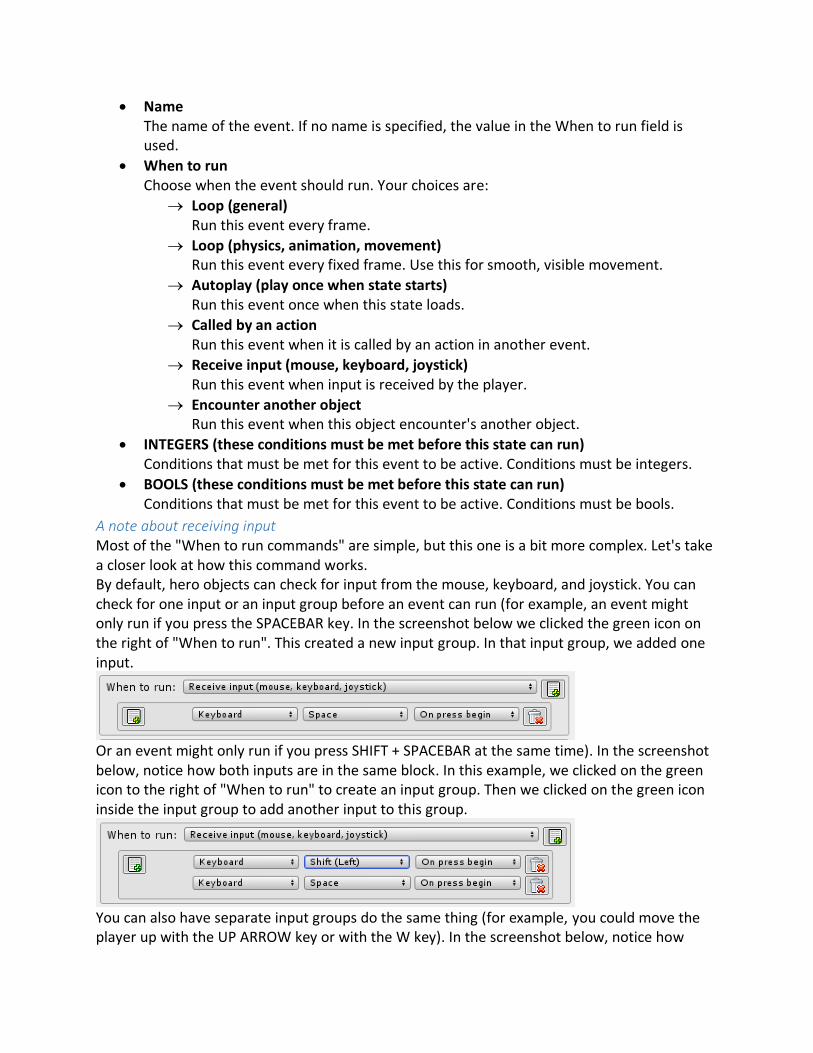
A note about receiving input Most of the "When to run commands" are simple, but this one is a bit more complex. Let's take a closer look at how this command works. By default, hero objects can check for input from the mouse, keyboard, and joystick. You can check for one input or an input group before an event can run (for example, an event might only run if you press the SPACEBAR key. In the screenshot below we clicked the green icon on the right of "When to run". This created a new input group. In that input group, we added one input.
Or an event might only run if you press SHIFT + SPACEBAR at the same time). In the screenshot below, notice how both inputs are in the same block. In this example, we clicked on the green icon to the right of "When to run" to create an input group. Then we clicked on the green icon inside the input group to add another input to this group.
You can also have separate input groups do the same thing (for example, you could move the player up with the UP ARROW key or with the W key). In the screenshot below, notice how
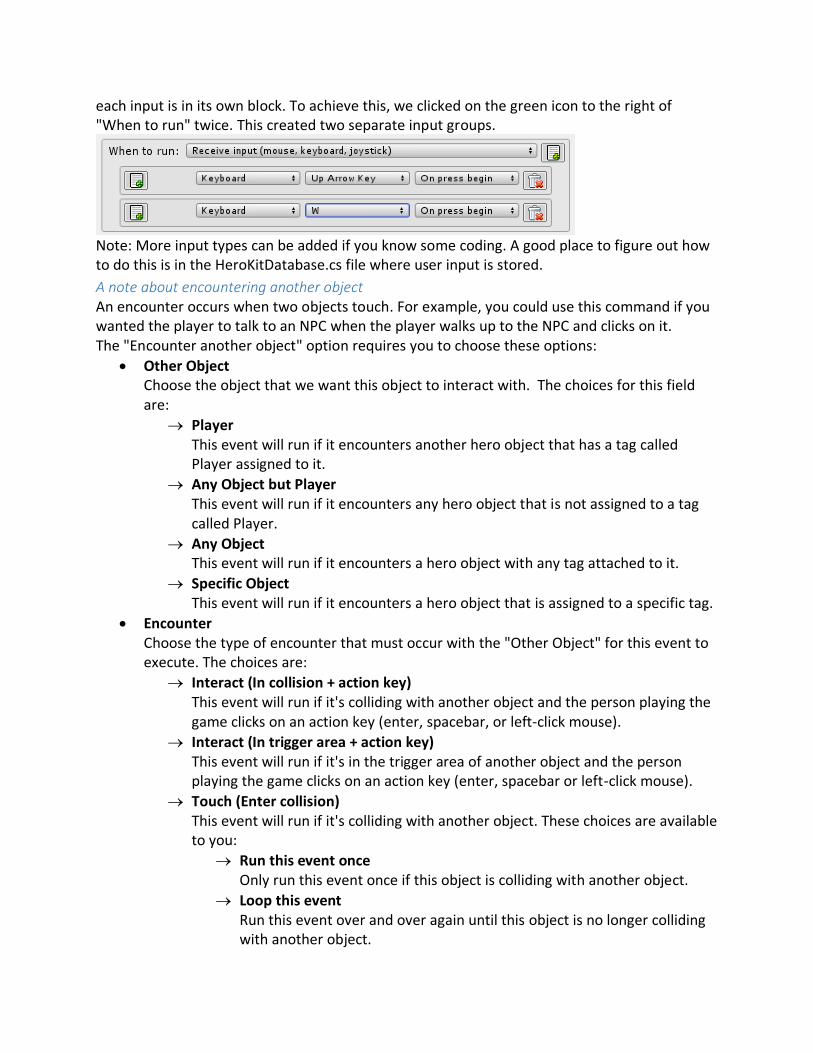
each input is in its own block. To achieve this, we clicked on the green icon to the right of "When to run" twice. This created two separate input groups.
Note: More input types can be added if you know some coding. A good place to figure out how to do this is in the HeroKitDatabase.cs file where user input is stored.
A note about encountering another object An encounter occurs when two objects touch. For example, you could use this command if you wanted the player to talk to an NPC when the player walks up to the NPC and clicks on it. The "Encounter another object" option requires you to choose these options:
• Other Object Choose the object that we want this object to interact with. The choices for this field are:
Player This event will run if it encounters another hero object that has a tag called Player assigned to it.
Any Object but Player This event will run if it encounters any hero object that is not assigned to a tag called Player.
Any Object This event will run if it encounters a hero object with any tag attached to it.
Specific Object This event will run if it encounters a hero object that is assigned to a specific tag.
• Encounter Choose the type of encounter that must occur with the "Other Object" for this event to execute. The choices are:
Interact (In collision + action key) This event will run if it's colliding with another object and the person playing the game clicks on an action key (enter, spacebar, or left-click mouse).
Interact (In trigger area + action key) This event will run if it's in the trigger area of another object and the person playing the game clicks on an action key (enter, spacebar or left-click mouse).
Touch (Enter collision) This event will run if it's colliding with another object. These choices are available to you:
Run this event once Only run this event once if this object is colliding with another object.
Loop this event Run this event over and over again until this object is no longer colliding with another object.
Touch (Enter trigger area) This event will run if it's in the trigger area of another object.
Leave (Exit collision) This event will run when it stops colliding with another object.
Leave (Exit trigger area) This event will run when it leaves the trigger area around another object.
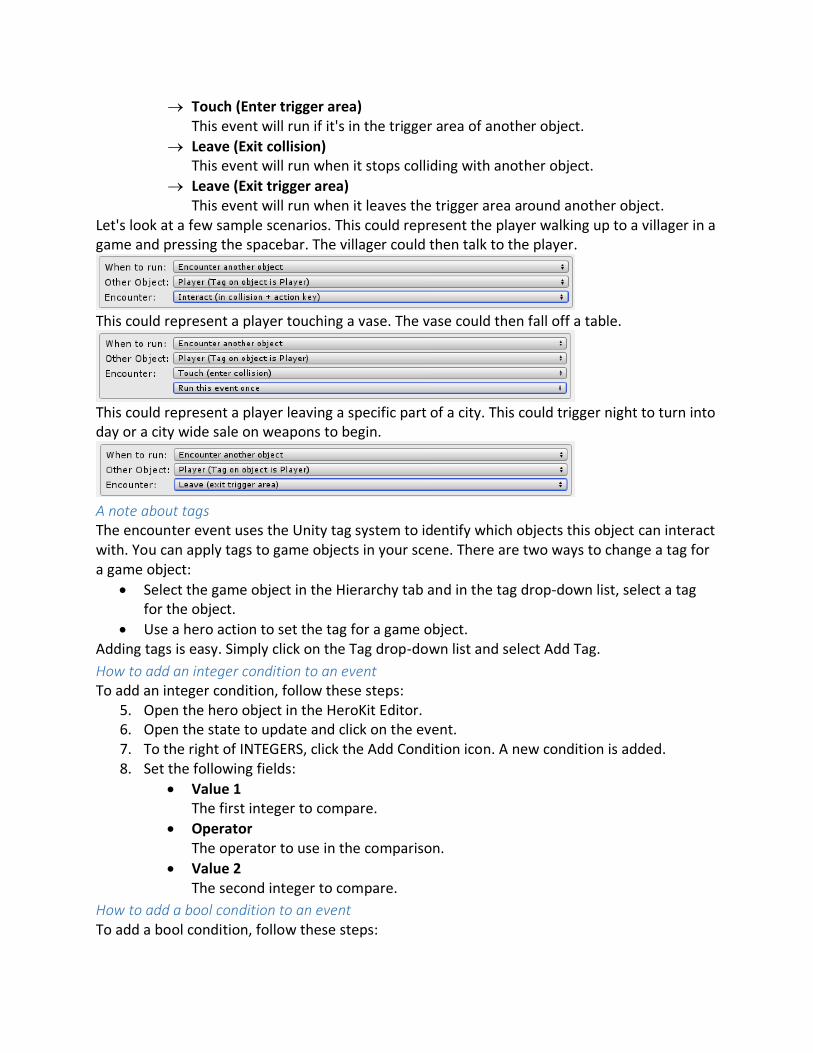
Let's look at a few sample scenarios. This could represent the player walking up to a villager in a game and pressing the spacebar. The villager could then talk to the player.
This could represent a player touching a vase. The vase could then fall off a table.
This could represent a player leaving a specific part of a city. This could trigger night to turn into day or a city wide sale on weapons to begin.
A note about tags The encounter event uses the Unity tag system to identify which objects this object can interact with. You can apply tags to game objects in your scene. There are two ways to change a tag for a game object:
• Select the game object in the Hierarchy tab and in the tag drop-down list, select a tag for the object.
• Use a hero action to set the tag for a game object. Adding tags is easy. Simply click on the Tag drop-down list and select Add Tag.
How to add an integer condition to an event To add an integer condition, follow these steps:
5. Open the hero object in the HeroKit Editor. 6. Open the state to update and click on the event. 7. To the right of INTEGERS, click the Add Condition icon. A new condition is added. 8. Set the following fields:
• Value 1 The first integer to compare.
• Operator The operator to use in the comparison.
• Value 2 The second integer to compare.
How to add a bool condition to an event To add a bool condition, follow these steps:
5. Open the hero object in the HeroKit Editor. 6. Open the state to update and click on the event. 7. To the right of BOOLS, click the Add Condition icon. A new condition is added. 8. Set the following fields:
• Value 1 The first bool to compare.
• Operator The operator to use in the comparison.
• Value 2 The second bool to compare.
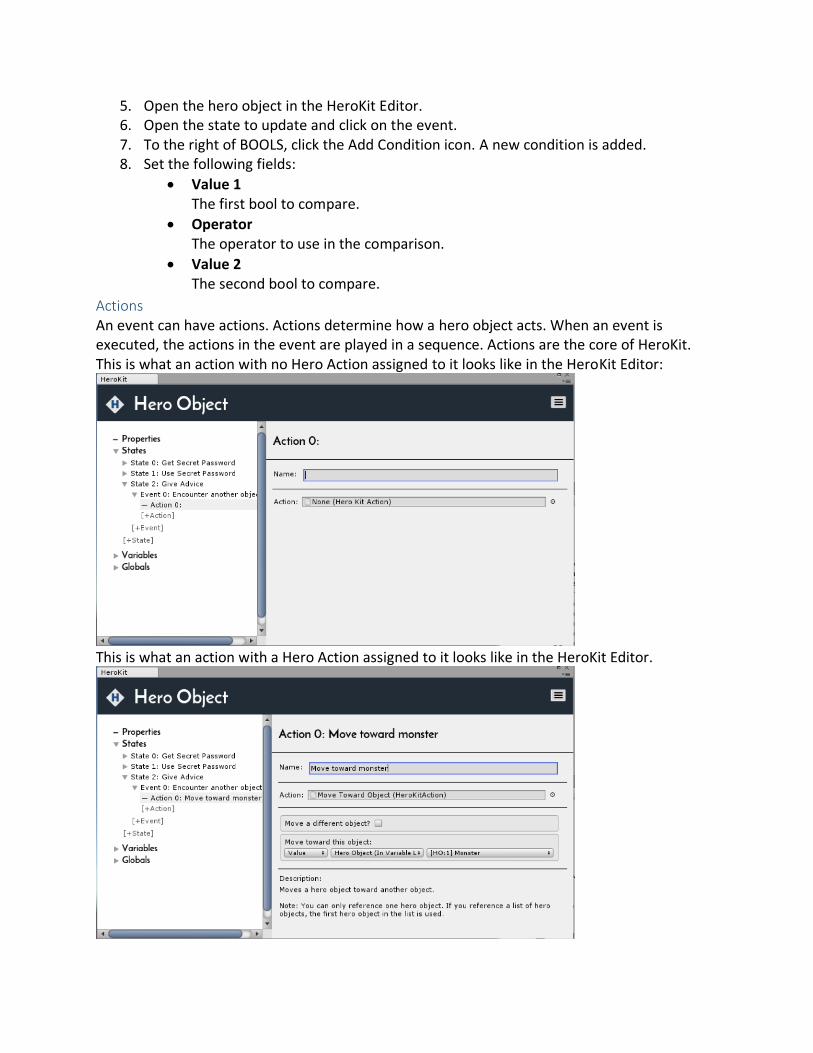
Actions An event can have actions. Actions determine how a hero object acts. When an event is executed, the actions in the event are played in a sequence. Actions are the core of HeroKit. This is what an action with no Hero Action assigned to it looks like in the HeroKit Editor:
This is what an action with a Hero Action assigned to it looks like in the HeroKit Editor.
Overview of the action Let's take a closer look at the fields in the Action Window.
• Name The name of the action. If no name is specified, the value in the Action field is used.
• Action The Hero Action assigned to this action.
• Action Fields The action fields are unique to each Hero Action.
• Description A tip to help you better understand how this action is used.
How to add a hero action to an action To add a hero action to an action, follow these steps:
4. Open the hero object in the HeroKit Editor 5. Go to the event that contains the action you want to update. 6. Drag a hero action file from the Project tab into the Action field. Fields for the action
populate the window. Note: You can alternatively click the icon to the right of the Action field, select Assets, and choose your hero action from the list.
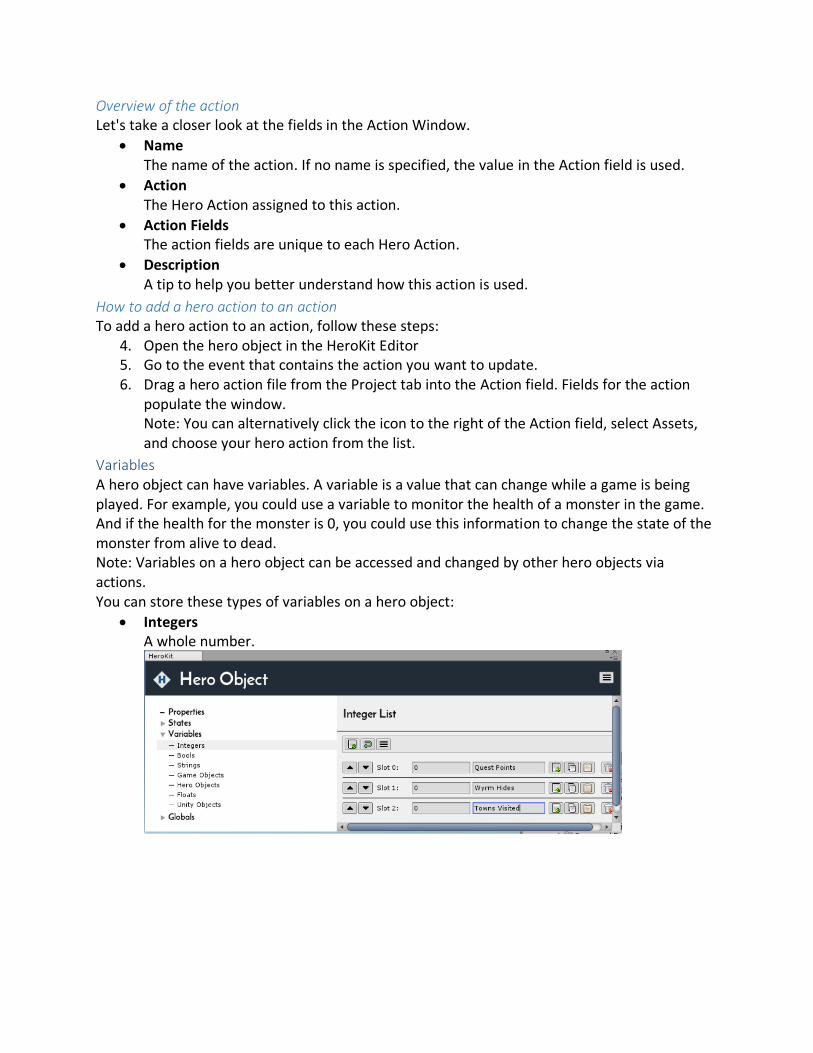
Variables A hero object can have variables. A variable is a value that can change while a game is being played. For example, you could use a variable to monitor the health of a monster in the game. And if the health for the monster is 0, you could use this information to change the state of the monster from alive to dead. Note: Variables on a hero object can be accessed and changed by other hero objects via actions. You can store these types of variables on a hero object:
• Integers A whole number.
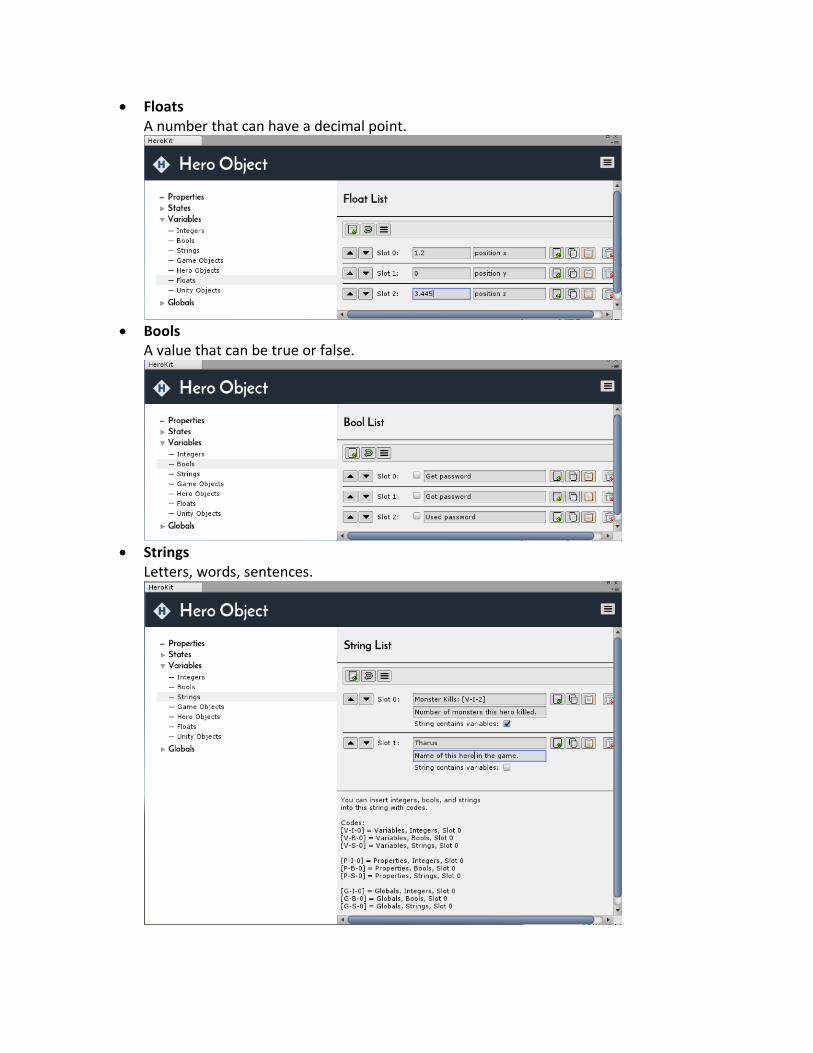
• Floats A number that can have a decimal point.
• Bools
A value that can be true or false.
• Strings
Letters, words, sentences.
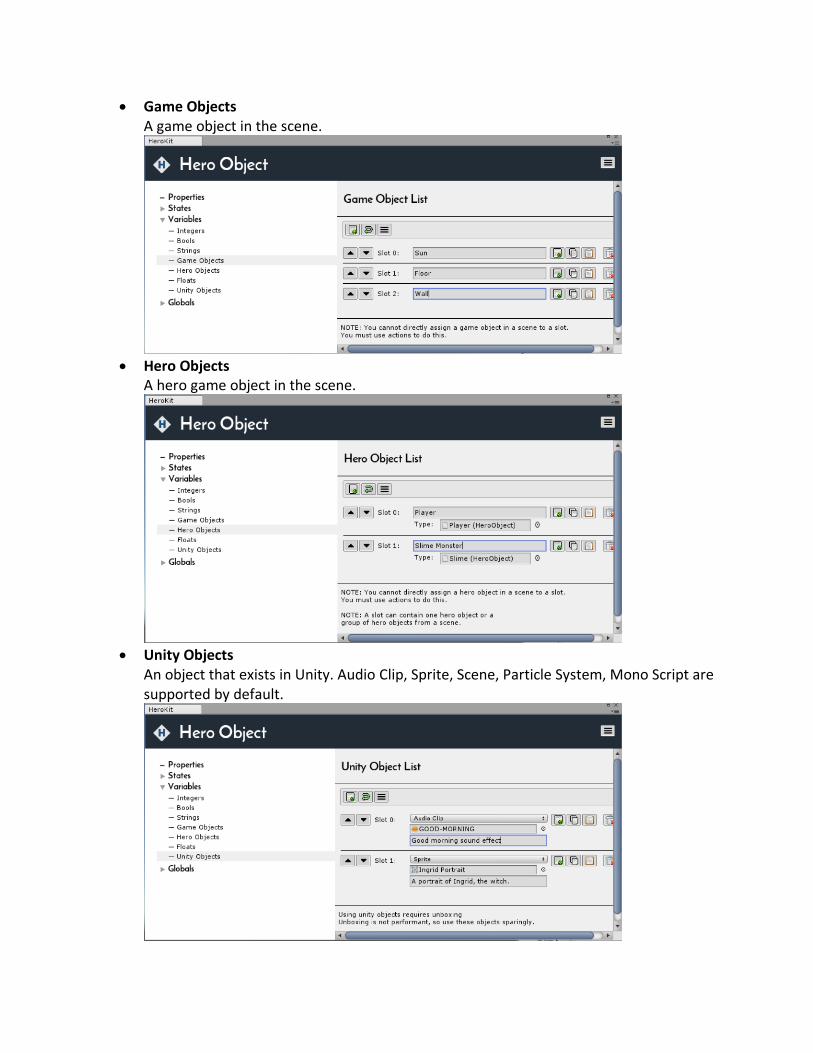
• Game Objects A game object in the scene.
• Hero Objects
A hero game object in the scene.
• Unity Objects
An object that exists in Unity. Audio Clip, Sprite, Scene, Particle System, Mono Script are supported by default.
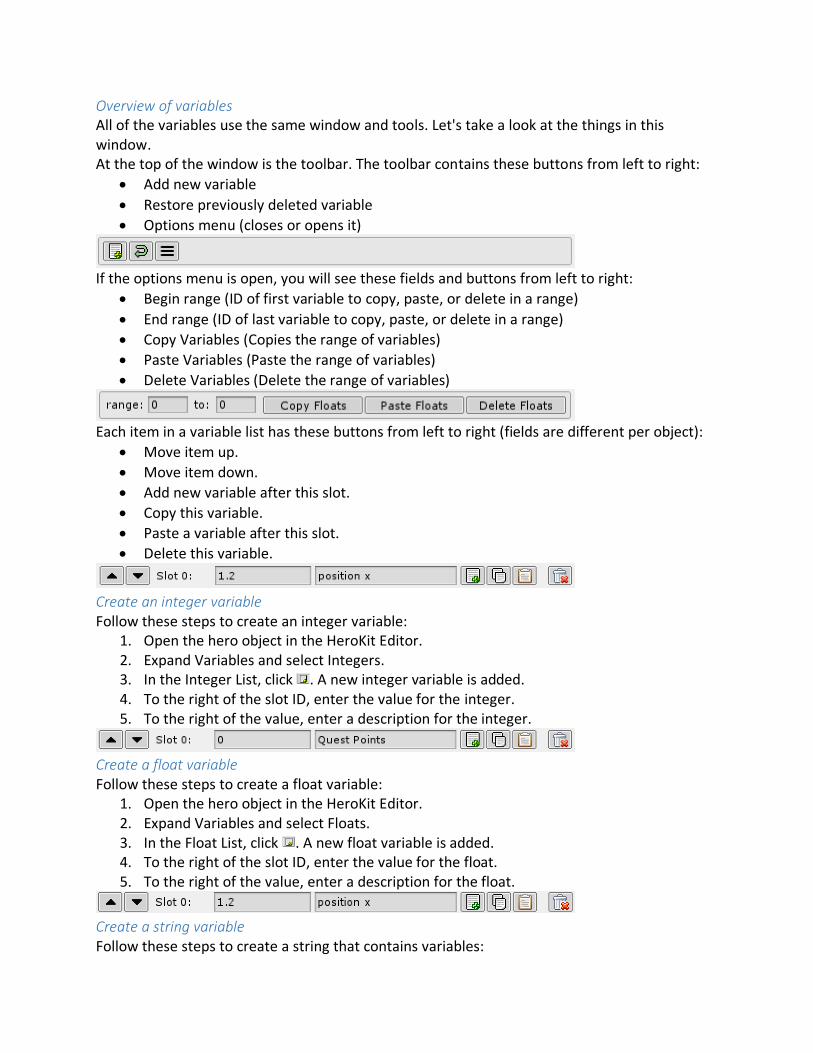
Overview of variables All of the variables use the same window and tools. Let's take a look at the things in this window. At the top of the window is the toolbar. The toolbar contains these buttons from left to right:
• Add new variable
• Restore previously deleted variable
• Options menu (closes or opens it)
If the options menu is open, you will see these fields and buttons from left to right:
• Begin range (ID of first variable to copy, paste, or delete in a range)
• End range (ID of last variable to copy, paste, or delete in a range)
• Copy Variables (Copies the range of variables)
• Paste Variables (Paste the range of variables)
• Delete Variables (Delete the range of variables)
Each item in a variable list has these buttons from left to right (fields are different per object):
• Move item up.
• Move item down.
• Add new variable after this slot.
• Copy this variable.
• Paste a variable after this slot.
• Delete this variable.
Create an integer variable Follow these steps to create an integer variable:
1. Open the hero object in the HeroKit Editor. 2. Expand Variables and select Integers. 3. In the Integer List, click . A new integer variable is added. 4. To the right of the slot ID, enter the value for the integer. 5. To the right of the value, enter a description for the integer.
Create a float variable Follow these steps to create a float variable:
1. Open the hero object in the HeroKit Editor. 2. Expand Variables and select Floats. 3. In the Float List, click . A new float variable is added. 4. To the right of the slot ID, enter the value for the float. 5. To the right of the value, enter a description for the float.
Create a string variable Follow these steps to create a string that contains variables:
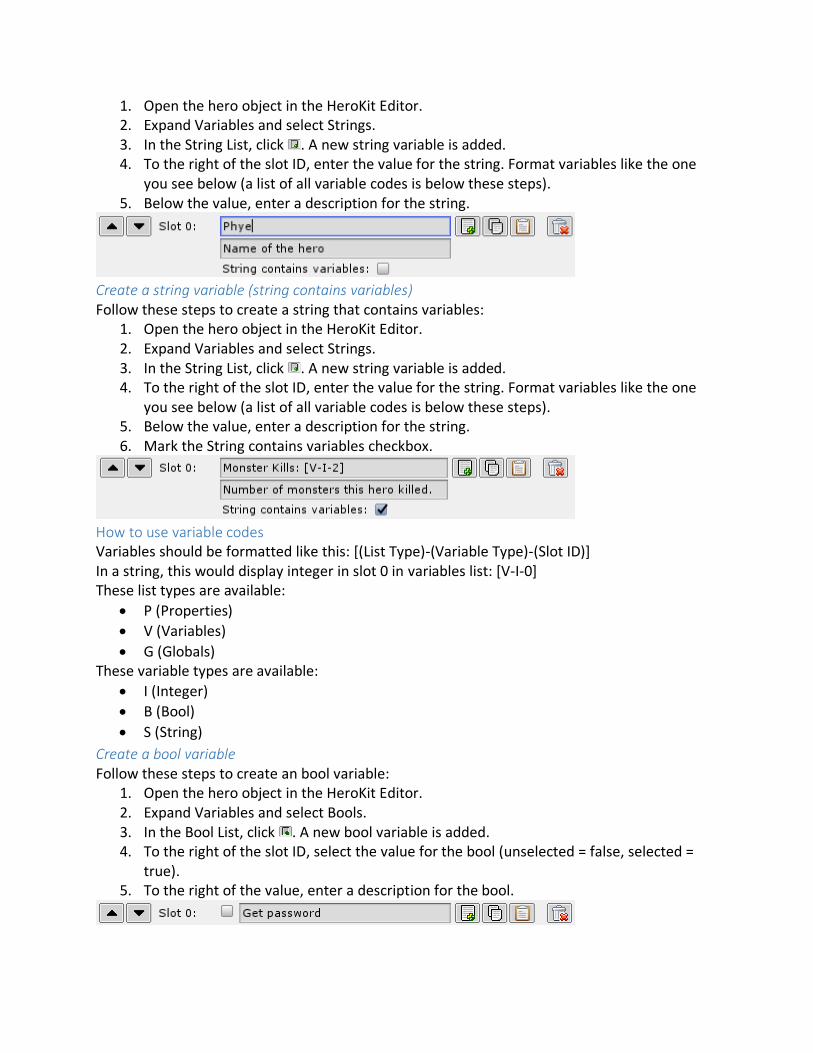
1. Open the hero object in the HeroKit Editor. 2. Expand Variables and select Strings. 3. In the String List, click . A new string variable is added. 4. To the right of the slot ID, enter the value for the string. Format variables like the one
you see below (a list of all variable codes is below these steps). 5. Below the value, enter a description for the string.
Create a string variable (string contains variables) Follow these steps to create a string that contains variables:
1. Open the hero object in the HeroKit Editor. 2. Expand Variables and select Strings. 3. In the String List, click . A new string variable is added. 4. To the right of the slot ID, enter the value for the string. Format variables like the one
you see below (a list of all variable codes is below these steps). 5. Below the value, enter a description for the string. 6. Mark the String contains variables checkbox.
How to use variable codes Variables should be formatted like this: [(List Type)-(Variable Type)-(Slot ID)] In a string, this would display integer in slot 0 in variables list: [V-I-0] These list types are available:
• P (Properties)
• V (Variables)
• G (Globals) These variable types are available:
• I (Integer)
• B (Bool)
• S (String)
Create a bool variable Follow these steps to create an bool variable:
1. Open the hero object in the HeroKit Editor. 2. Expand Variables and select Bools. 3. In the Bool List, click . A new bool variable is added. 4. To the right of the slot ID, select the value for the bool (unselected = false, selected =
true). 5. To the right of the value, enter a description for the bool.
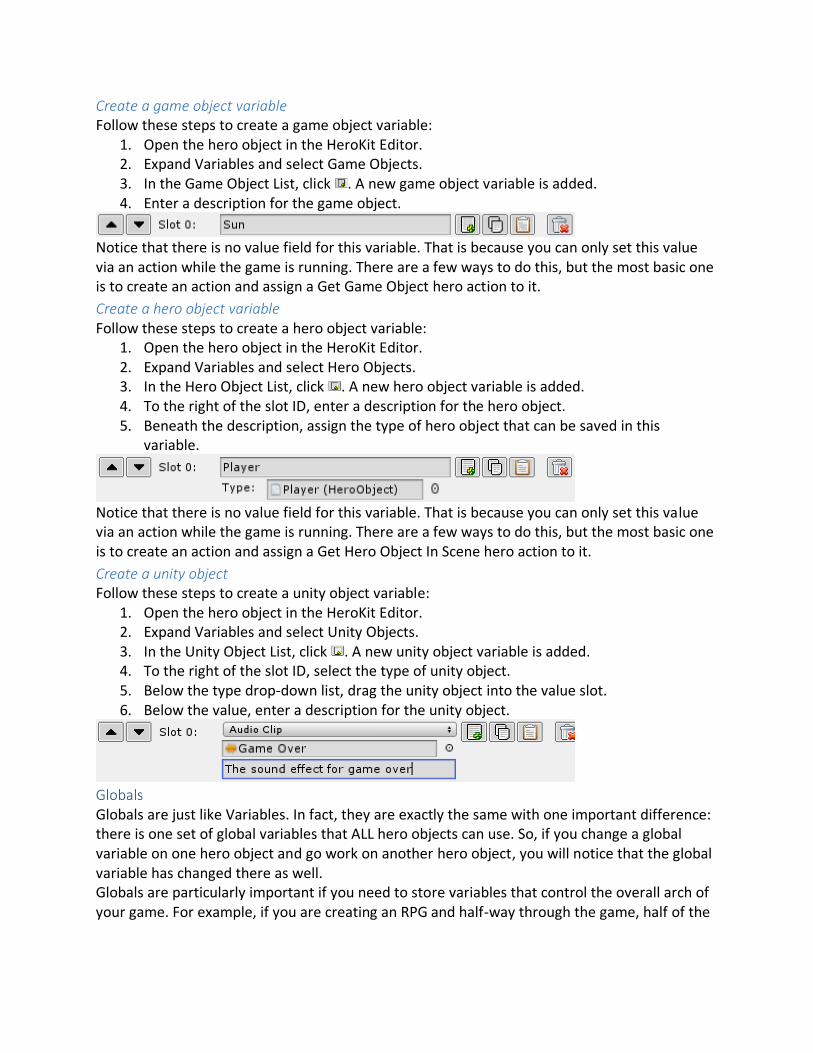
Create a game object variable Follow these steps to create a game object variable:
1. Open the hero object in the HeroKit Editor. 2. Expand Variables and select Game Objects. 3. In the Game Object List, click . A new game object variable is added. 4. Enter a description for the game object.
Notice that there is no value field for this variable. That is because you can only set this value via an action while the game is running. There are a few ways to do this, but the most basic one is to create an action and assign a Get Game Object hero action to it.
Create a hero object variable Follow these steps to create a hero object variable:
1. Open the hero object in the HeroKit Editor. 2. Expand Variables and select Hero Objects. 3. In the Hero Object List, click . A new hero object variable is added. 4. To the right of the slot ID, enter a description for the hero object. 5. Beneath the description, assign the type of hero object that can be saved in this
variable.
Notice that there is no value field for this variable. That is because you can only set this value via an action while the game is running. There are a few ways to do this, but the most basic one is to create an action and assign a Get Hero Object In Scene hero action to it.
Create a unity object Follow these steps to create a unity object variable:
1. Open the hero object in the HeroKit Editor. 2. Expand Variables and select Unity Objects. 3. In the Unity Object List, click . A new unity object variable is added. 4. To the right of the slot ID, select the type of unity object. 5. Below the type drop-down list, drag the unity object into the value slot. 6. Below the value, enter a description for the unity object.
Globals Globals are just like Variables. In fact, they are exactly the same with one important difference: there is one set of global variables that ALL hero objects can use. So, if you change a global variable on one hero object and go work on another hero object, you will notice that the global variable has changed there as well. Globals are particularly important if you need to store variables that control the overall arch of your game. For example, if you are creating an RPG and half-way through the game, half of the
world is destroyed, you could use a global variable change the way all NPCs (non-playing characters) behave after this sudden change in their world. Gobals are powerful. If you have any variables that are needed by more than two hero objects, consider putting them into the Globals list. Note: Globals are stored in a file called HeroKitGlobals. You can find this file in this directory: HeroKit/Hero Engine/Assets/Resources/Hero Globals. If you delete this file, a new empty one will be created. The Global List and Variable List are identical. Please see the previous section, Variables, to learn more about the variable types and how to use them.
Hero Property A hero property is a list of variables that you want to assign to one or more hero objects. Any hero object that contains the hero property will inherit the variable fields in that hero property. The values in the hero property will not be copied over to the hero object. If you change a value on a hero object, it will not change the value on another hero object. Hero properties are valuable if you want specific variables to be used for a group of hero objects. For example, let's say you have 100 different monsters in your game and you want all of them to have health, defense, and attack variables. You would simply create a hero property with a variable for health, defense, and attack and then assign this file to all of your monsters.
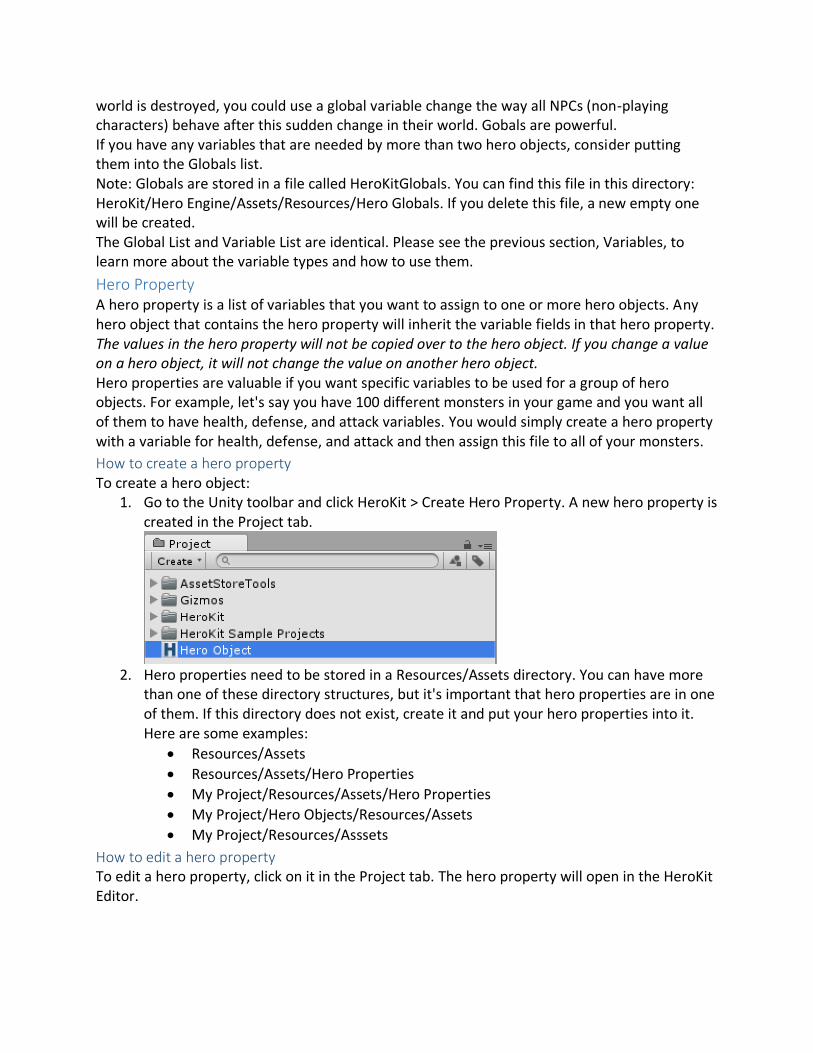
How to create a hero property To create a hero object:
1. Go to the Unity toolbar and click HeroKit > Create Hero Property. A new hero property is created in the Project tab.
2. Hero properties need to be stored in a Resources/Assets directory. You can have more
than one of these directory structures, but it's important that hero properties are in one of them. If this directory does not exist, create it and put your hero properties into it. Here are some examples:
• Resources/Assets
• Resources/Assets/Hero Properties
• My Project/Resources/Assets/Hero Properties
• My Project/Hero Objects/Resources/Assets
• My Project/Resources/Asssets
How to edit a hero property To edit a hero property, click on it in the Project tab. The hero property will open in the HeroKit Editor.
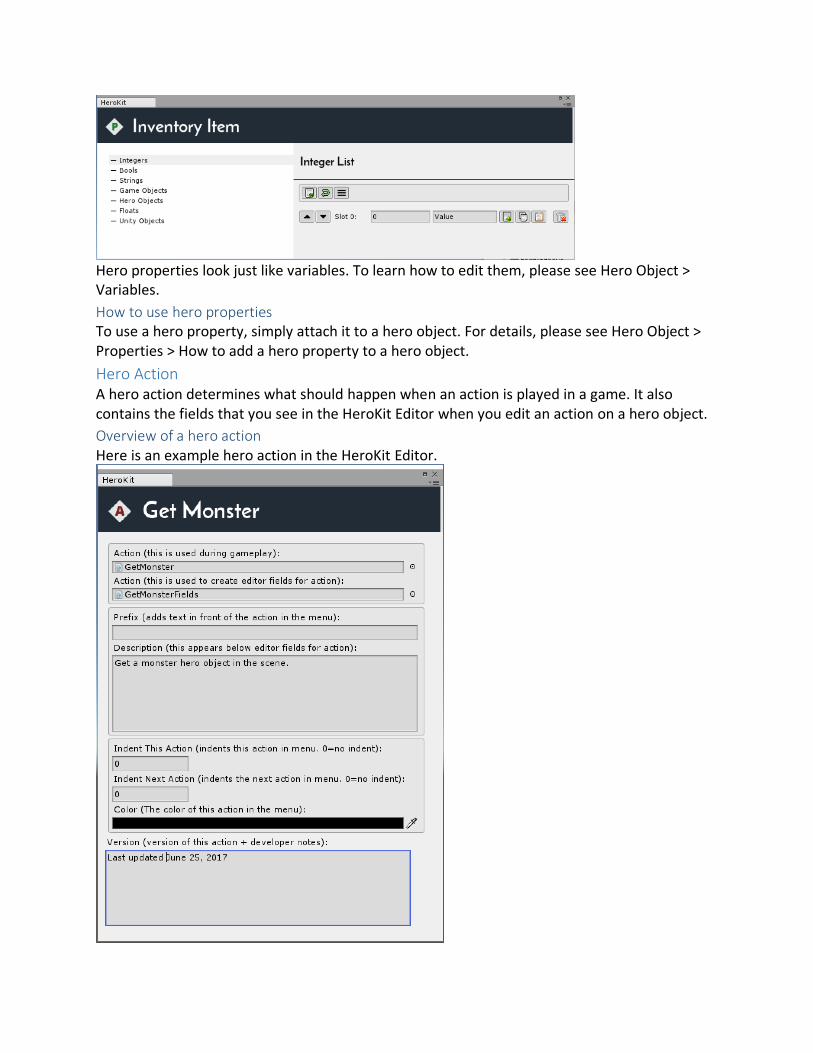
Hero properties look just like variables. To learn how to edit them, please see Hero Object > Variables.
How to use hero properties To use a hero property, simply attach it to a hero object. For details, please see Hero Object > Properties > How to add a hero property to a hero object.
Hero Action A hero action determines what should happen when an action is played in a game. It also contains the fields that you see in the HeroKit Editor when you edit an action on a hero object.
Overview of a hero action Here is an example hero action in the HeroKit Editor.
The hero action has these fields:
• Action (this is used during gameplay) Drag the script for the hero action here.
• Action (this is used to create editor fields for action) Drag the script for the hero action fields here.
• Prefix If you want to display text to the left of the action in the hero object main menu, enter this text here.
• Description Enter a description for the hero action here. This will appear in the form for the action when you edit a hero object.
• Indent Indent this action in the hero object main menu. (End If action uses this)
• Indent Next Action Indent the next actions after this action in the hero object main menu (If actions use this)
• Color Change the color of the action in the hero object main menu. Note: If you are using the Unity Dark Skin, what you use will be slightly brighter in the HeroKit Editor.
• Version Notes about when this action was created/modified.
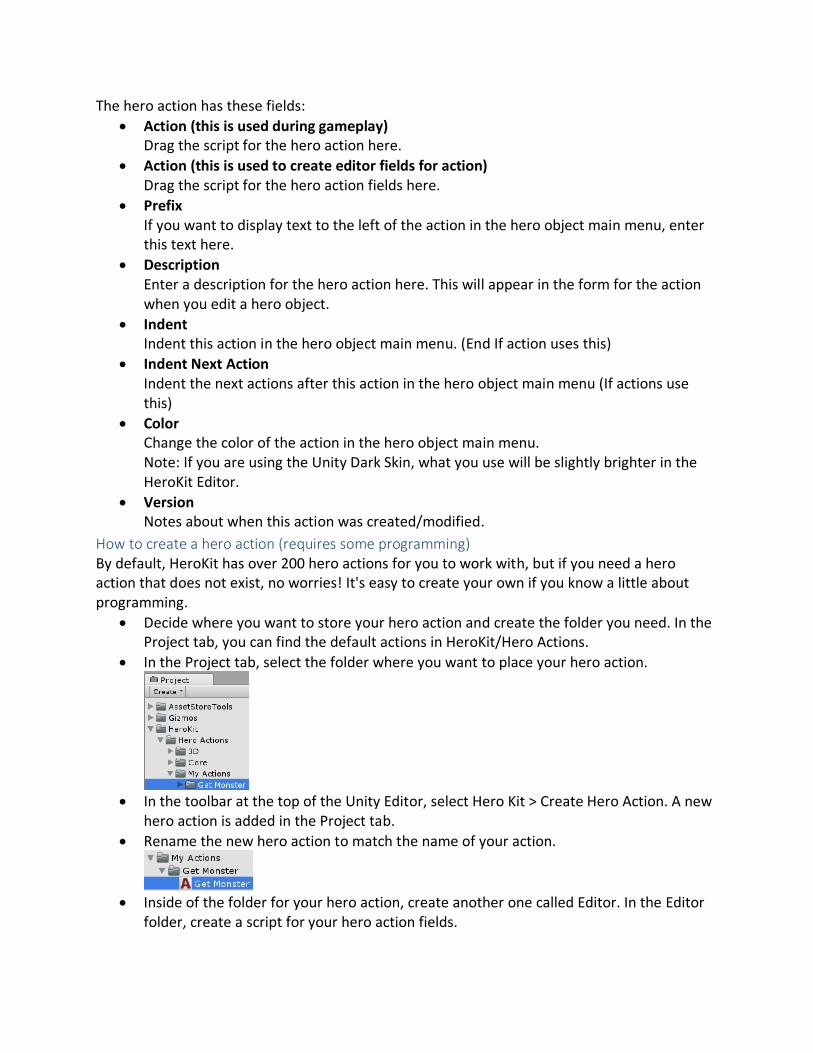
How to create a hero action (requires some programming) By default, HeroKit has over 200 hero actions for you to work with, but if you need a hero action that does not exist, no worries! It's easy to create your own if you know a little about programming.
• Decide where you want to store your hero action and create the folder you need. In the Project tab, you can find the default actions in HeroKit/Hero Actions.
• In the Project tab, select the folder where you want to place your hero action.
• In the toolbar at the top of the Unity Editor, select Hero Kit > Create Hero Action. A new
hero action is added in the Project tab.
• Rename the new hero action to match the name of your action.
• Inside of the folder for your hero action, create another one called Editor. In the Editor
folder, create a script for your hero action fields.
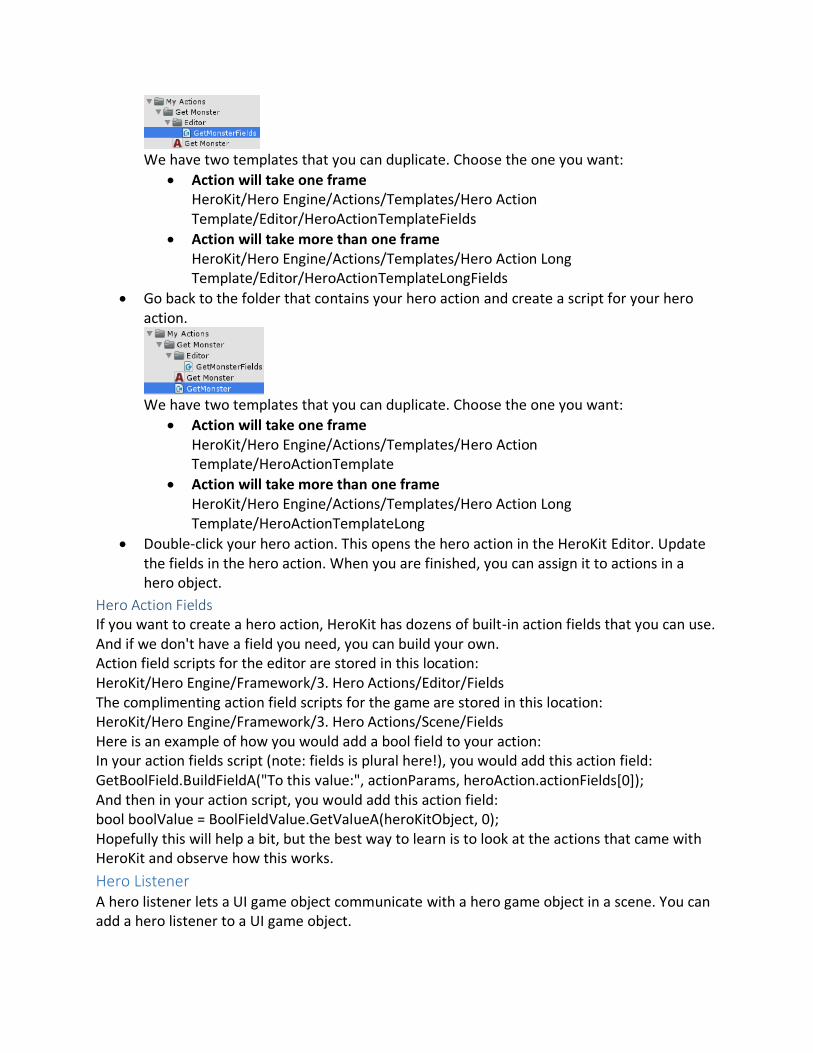
We have two templates that you can duplicate. Choose the one you want:
• Action will take one frame HeroKit/Hero Engine/Actions/Templates/Hero Action Template/Editor/HeroActionTemplateFields
• Action will take more than one frame HeroKit/Hero Engine/Actions/Templates/Hero Action Long Template/Editor/HeroActionTemplateLongFields
• Go back to the folder that contains your hero action and create a script for your hero action.
We have two templates that you can duplicate. Choose the one you want:
• Action will take one frame HeroKit/Hero Engine/Actions/Templates/Hero Action Template/HeroActionTemplate
• Action will take more than one frame HeroKit/Hero Engine/Actions/Templates/Hero Action Long Template/HeroActionTemplateLong
• Double-click your hero action. This opens the hero action in the HeroKit Editor. Update the fields in the hero action. When you are finished, you can assign it to actions in a hero object.
Hero Action Fields If you want to create a hero action, HeroKit has dozens of built-in action fields that you can use. And if we don't have a field you need, you can build your own. Action field scripts for the editor are stored in this location: HeroKit/Hero Engine/Framework/3. Hero Actions/Editor/Fields The complimenting action field scripts for the game are stored in this location: HeroKit/Hero Engine/Framework/3. Hero Actions/Scene/Fields Here is an example of how you would add a bool field to your action: In your action fields script (note: fields is plural here!), you would add this action field: GetBoolField.BuildFieldA("To this value:", actionParams, heroAction.actionFields[0]); And then in your action script, you would add this action field: bool boolValue = BoolFieldValue.GetValueA(heroKitObject, 0); Hopefully this will help a bit, but the best way to learn is to look at the actions that came with HeroKit and observe how this works.
Hero Listener A hero listener lets a UI game object communicate with a hero game object in a scene. You can add a hero listener to a UI game object.
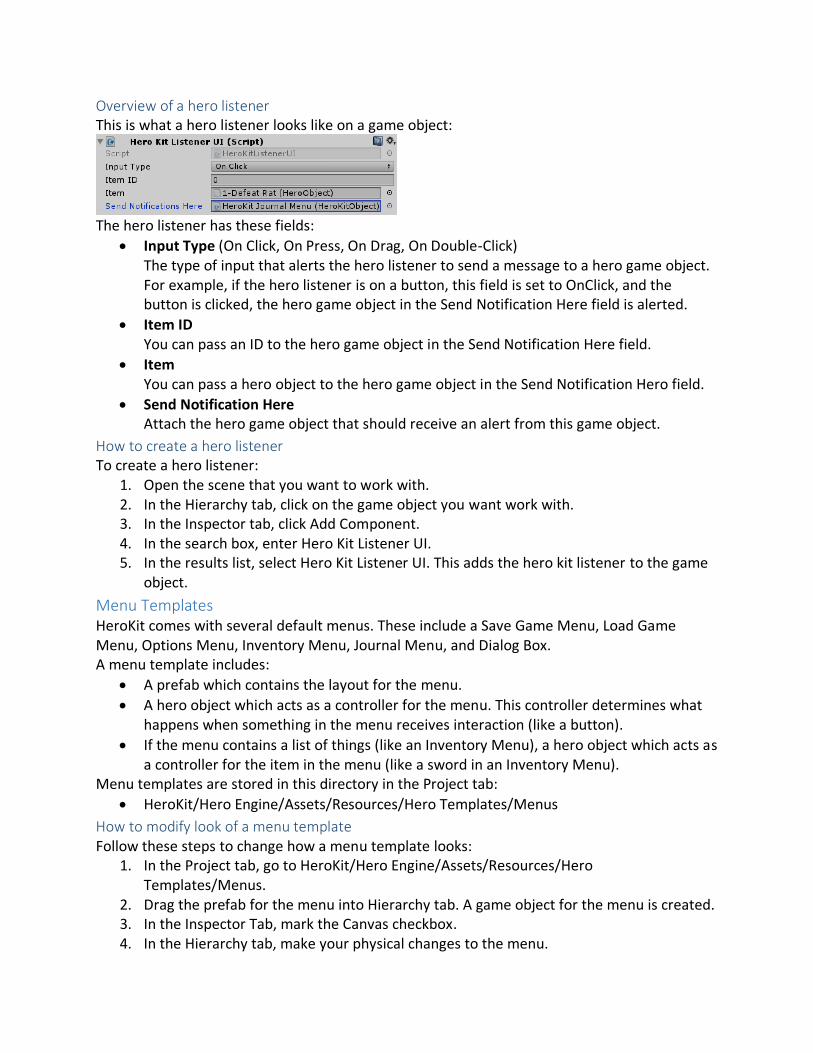
Overview of a hero listener This is what a hero listener looks like on a game object:
The hero listener has these fields:
• Input Type (On Click, On Press, On Drag, On Double-Click) The type of input that alerts the hero listener to send a message to a hero game object. For example, if the hero listener is on a button, this field is set to OnClick, and the button is clicked, the hero game object in the Send Notification Here field is alerted.
• Item ID You can pass an ID to the hero game object in the Send Notification Here field.
• Item You can pass a hero object to the hero game object in the Send Notification Hero field.
• Send Notification Here Attach the hero game object that should receive an alert from this game object.
How to create a hero listener To create a hero listener:
1. Open the scene that you want to work with. 2. In the Hierarchy tab, click on the game object you want work with. 3. In the Inspector tab, click Add Component. 4. In the search box, enter Hero Kit Listener UI. 5. In the results list, select Hero Kit Listener UI. This adds the hero kit listener to the game
object.
Menu Templates HeroKit comes with several default menus. These include a Save Game Menu, Load Game Menu, Options Menu, Inventory Menu, Journal Menu, and Dialog Box. A menu template includes:
• A prefab which contains the layout for the menu.
• A hero object which acts as a controller for the menu. This controller determines what happens when something in the menu receives interaction (like a button).
• If the menu contains a list of things (like an Inventory Menu), a hero object which acts as a controller for the item in the menu (like a sword in an Inventory Menu).
Menu templates are stored in this directory in the Project tab:
• HeroKit/Hero Engine/Assets/Resources/Hero Templates/Menus
How to modify look of a menu template Follow these steps to change how a menu template looks:
1. In the Project tab, go to HeroKit/Hero Engine/Assets/Resources/Hero Templates/Menus.
2. Drag the prefab for the menu into Hierarchy tab. A game object for the menu is created. 3. In the Inspector Tab, mark the Canvas checkbox. 4. In the Hierarchy tab, make your physical changes to the menu.
5. When you are finished, go to the Inspector Tab. 6. Unmark the Canvas checkbox. 7. Click Apply. This updates the prefab for the menu in the Project tab.
HeroKit menus are just like any menu you can make in Unity. To learn more about general menu design in Unity, there are tons of tutorials on YouTube. Just do a search for Unity Menu Tutorial and you'll find lots of help.
Create a new menu template You can create a new menu template, but please be advised that this requires some programming. Here is an example of how you might do this:
1. In the Project tab, go to HeroKit/Hero Engine/Assets/Resources/Hero Templates/Menus.
2. Duplicate an existing menu template (and menu item) that is similar to what you want to create.
3. Duplicate the hero object controllers that are assigned to the menu template you duplicated.
4. Follow the steps in How to modify look of a menu template to customize the look of your menu.
5. Update the menu template (and menu item) so that any hero game objects attached to it are the new ones you just duplicated.
6. In the Project tab, go to HeroKit/Hero Actions/Core/Menus and duplicate the actions that you want to use in your new menu.
7. Duplicate the scripts for the actions that you duplicated. 8. Edit the scripts to do what you want in your new menu.
• Menu templates contain the layout for these menus and
• What are they?
• Where are they located?
• How to modify them to match your game.
• How to create new menu templates. (see developer guide)
Related Documents