HWGUm-54 Hercules Wireless G USB Ultra-mini CONTENTS Clicking on a title in this table of contents will display the corresponding section INTRODUCTION .......................................................................................................................... 4 1. HERCULES WIRELESS G USB ULTRA-MINI SPECIFICATIONS .................................. 4 1.1. Technical specifications .............................................................................................. 4 1.2. System requirements .................................................................................................. 4 1.3. Box contents ............................................................................................................... 4 2. HERCULES WIRELESS G USB ULTRA-MINI INSTALLATION .................................................. 5 Installing the WiFi Station pack and the key ......................................................................... 5 3. THE WIRELESS LOCAL AREA WIFI NETWORK ............................................................ 7 3.1. Selecting your network type ........................................................................................ 7 3.2. Wireless local area WiFi network security .................................................................. 8 4. THE WIFI STATION UTILITY ............................................................................................ 9 4.1. Determining your connection status............................................................................ 9 4.2. Launching WiFi Station ............................................................................................... 9 4.3. Connecting to a network with Wi-Fi Protected Setup TM .............................................. 9 4.3.1. Connecting to a network with the WPS button in WiFi Station ..................... 10 4.3.2. Connecting to a network with a PIN code ..................................................... 10 4.4. Connecting to a network via the list of networks ....................................................... 11 4.5. Adding a network to your Favorites .......................................................................... 14 4.6. Scanning for networks .............................................................................................. 14 4.7. Viewing connection settings ...................................................................................... 15 4.8. Viewing, modifying or adding Favorites – Creating an Ad hoc network ................... 16 4.8.1. Security options ............................................................................................. 16 4.8.2. View/Modify Favorites ................................................................................... 17 4.8.3. Adding a new Favorite manually or creating an Ad hoc network .................. 18 4.9. About ......................................................................................................................... 21 4.10. Re-enabling your computer’s integrated WiFi function ............................................. 21 4.11. Temporarily disabling the Hercules Wireless G USB adapter’s WiFi function.......... 21 4.12. Exiting WiFi Station ................................................................................................... 22 5. WELCOME TO THE WIRELESS ATTITUDE! ................................................................. 23 5.1. Some requirements ................................................................................................... 23 5.2. Computers running Windows Vista: Sharing folders, a printer or an ADSL connection ............................................................................................. 23

Welcome message from author
This document is posted to help you gain knowledge. Please leave a comment to let me know what you think about it! Share it to your friends and learn new things together.
Transcript

HWGUm-54 Hercules Wireless G USB Ultra-mini
CONTENTS Clicking on a title in this table of contents will display the corresponding section
INTRODUCTION .......................................................................................................................... 4
1. HERCULES WIRELESS G USB ULTRA-MINI SPECIFICATIONS .................................. 4
1.1. Technical specifications .............................................................................................. 4 1.2. System requirements .................................................................................................. 4 1.3. Box contents ............................................................................................................... 4
2. HERCULES WIRELESS G USB ULTRA-MINI INSTALLATION.................................................. 5
Installing the WiFi Station pack and the key ......................................................................... 5
3. THE WIRELESS LOCAL AREA WIFI NETWORK ............................................................ 7
3.1. Selecting your network type ........................................................................................ 7 3.2. Wireless local area WiFi network security .................................................................. 8
4. THE WIFI STATION UTILITY ............................................................................................ 9
4.1. Determining your connection status............................................................................ 9 4.2. Launching WiFi Station ............................................................................................... 9 4.3. Connecting to a network with Wi-Fi Protected SetupTM .............................................. 9
4.3.1. Connecting to a network with the WPS button in WiFi Station ..................... 10 4.3.2. Connecting to a network with a PIN code ..................................................... 10
4.4. Connecting to a network via the list of networks ....................................................... 11 4.5. Adding a network to your Favorites .......................................................................... 14 4.6. Scanning for networks .............................................................................................. 14 4.7. Viewing connection settings ...................................................................................... 15 4.8. Viewing, modifying or adding Favorites – Creating an Ad hoc network ................... 16
4.8.1. Security options ............................................................................................. 16 4.8.2. View/Modify Favorites ................................................................................... 17 4.8.3. Adding a new Favorite manually or creating an Ad hoc network .................. 18
4.9. About ......................................................................................................................... 21 4.10. Re-enabling your computer’s integrated WiFi function ............................................. 21 4.11. Temporarily disabling the Hercules Wireless G USB adapter’s WiFi function .......... 21 4.12. Exiting WiFi Station ................................................................................................... 22
5. WELCOME TO THE WIRELESS ATTITUDE! ................................................................. 23
5.1. Some requirements ................................................................................................... 23 5.2. Computers running Windows Vista: Sharing folders, a printer
or an ADSL connection ............................................................................................. 23
Hercules Wireless G USB Ultra-mini HWGUm-54
5.2.1. Enabling sharing ............................................................................................ 23 5.2.2. Windows Vista: Sharing public or personal folders ....................................... 26 5.2.3. Computers running Windows Vista: Accessing shared folders ................................... 28 5.2.4. Windows Vista: Sharing a printer .......................................................................... 28 5.2.5. Computers running Windows Vista : Accessing the shared printer .............................. 30 5.2.6. Windows Vista: Sharing an ADSL connection in an Infrastructure type
network .......................................................................................................... 32 5.3. Computers running Windows XP: Sharing folders, a printer or an ADSL connection34
5.3.1. Windows XP: Using the Network Setup Wizard in an Infrastructure network .......................................................................................................... 34
5.3.2. Windows XP: Using the Network Setup Wizard in an Ad hoc network ......... 38 5.3.3. Windows XP: Sharing folders ........................................................................ 43 5.3.4. Computers running Windows XP: Accessing shared folders ................................ 44 5.3.5. Windows XP: Sharing a printer...................................................................... 44 5.3.6. Windows XP: Modifying a workgroup name .................................................. 46 5.3.7. Windows XP: Manually enabling or disabling your adapter’s WiFi
connection (advanced users) ........................................................................ 47
6. GLOSSARY ...................................................................................................................... 48
7. TECHNICAL SUPPORT ................................................................................................... 52
8. WARRANTY ..................................................................................................................... 52


Hercules Wireless G USB Ultra-mini HWGUm-54
4/54 – User Manual
INTRODUCTION
A local area WiFi network allows users to easily exchange data between computers located in the same room or in different rooms, share an Internet connection and/or a printer among several computers, play network games and, above all, does away with the need for kilometers worth of cables.
By following the instructions in this manual, you can install a local area WiFi network on your own and also create a protective "wall" around your network to secure it.
Finally, thanks to your Hercules Wireless G WiFi key, you will now be able to enjoy faster transfer speeds along with enhanced coverage and experience the new world of wireless networking.
1. HERCULES WIRELESS G USB ULTRA-MINI SPECIFICATIONS
1.1. Technical specifications Compatible with the following WiFi protocols:
- 802.11b: 1, 2, 5.5 and 11Mbits/s data rates in the 2.4GHz band - 802.11g: 6, 9, 12, 18, 24, 36, 48 and 54Mbits/s data rates in the 2.4GHz band
DSSS/CCK frequency range and OFDM modulation from 2.412GHz to 2.484GHz (13 channels) Compatible with the following security protocols:
- WEP with 64 and 128-bit key length - WPA-PSK with TKIP or AES encryption (802.11i security protocol) - WPA2 with TKIP and AES encryption (802.11i security protocol)
- WPS (WiFi Protected Setup)
1.2. System requirements
Intel Pentium III or AMD 500MHz and higher or compatible Available USB 1.1 port or higher 64MB RAM 50MB free hard disk space for installing drivers and application CD-ROM drive Operating system: Microsoft Windows XP Home & Professional, Vista, Windows 7
If you connect your Hercules Wireless G USB Ultra-mini to a USB 1.1 bus, Windows may inform you that your device will function at a reduced speed. Instead of providing theoretical transfer rates of 300Mbits/s, Hercules Wireless G USB Ultra-mini will instead be limited to 12Mbits/s.
1.3. Box contents
USB 2.0-type WiFi network adapter
USB 2.0 adapter cover
User Manual
Installation CD-ROM containing manual in PDF format, drivers and the WiFi Station pack for client adapter configuration

HWGUm-54 Hercules Wireless G USB Ultra-mini
User Manual – 5/54
2. HERCULES WIRELESS G USB ULTRA-MINI INSTALLATION
Before connecting your Hercules Wireless G USB, you must first install Hercules WiFi Station, which includes the drivers and the WiFi Station application, a utility for detecting and configuring network settings.
Installing the WiFi Station pack and the key
To install the WiFi Station pack, proceed as follows:
- Insert the included installation CD-ROM into your CD-ROM drive.
The installation menu appears automatically.
If the installation menu does not launch automatically:
- Double-click My Computer.
- Double-click .
- Double-click Setup.exe, if necessary.
- Click the INSTALL button.
- Follow the on-screen instructions.
Windows Vista - When the installation Assistant prompts you to install the Hercules Network adapters device, click the
Install button and continue the installation.

Hercules Wireless G USB Ultra-mini HWGUm-54
6/54 – User Manual
Windows XP/Vista
When the installation Assistant prompts you to connect your WiFi adapter, plug your Hercules Wireless G USB Ultra-mini into a USB port of your computer.
The Assistant automatically detects your adapter and continues the installation. If the Windows New Hardware Found window appears, wait until it closes.
Once installation is complete, the Hercules WiFi Station icon appears in the taskbar and WiFi Station is launched automatically.
If the New network device installed message appears in the taskbar:
- Do not click the information bubble: wait for it to disappear or click the X to close it.
- Please refer to chapter 5. Welcome to the Wireless Attitude! for details on how to configure your network.
You will obtain optimal performance by placing the antenna a minimum distance of 2m from the router (for an Infrastructure network) or from another WiFi adapter (for an Ad hoc network). The maximum WiFi range indoors may vary from 10 to 30m depending on the router’s power, the type of antenna (directional or not), its position in a room and the presence of obstacles such as paper (a bookcase), metal, water (an aquarium) or a wall made of reinforced concrete between the access point and the antenna(e) of the WiFi computer(s).
In the installation menu, you can also view and print out this manual in pdf format by clicking Manual.
By clicking Register online, you can register your product on the Hercules website (an Internet connection is required) and then take advantage of technical support.
HWGUm-54 Hercules Wireless G USB Ultra-mini
User Manual – 7/54
3. THE WIRELESS LOCAL AREA WIFI NETWORK What exactly is WiFi? An abbreviated form of “Wireless Fidelity,” WiFi is the commercial name for wireless local area network technology compliant with the 802.11 standard. Therefore a WiFi network is actually a 802.11 network, but it’s easier to talk about WiFi than the 802.11 standard! In practical terms, WiFi allows for the connection of laptop computers, desktop computers or Personal Digital Assistants (PDAs) many tens of meters distant from one another via an access point, allowing them to communicate with one another without any cables and exchange data at high speeds.
Your Hercules Wireless G USB Ultra-mini key, combined with a WiFi N router, will make up one of the elements of your local area wireless network. You will also benefit from its MIMO technology, allowing for the transfer of a greater amount of data between the WiFi transmitter (a WiFi N router or “box”, for example) and your key over a greater distance. With a theoretical maximum transfer rate of 300Mbits/s (compared with 54Mbits/s for the 802.11g standard), you will be able to get around walls and other obstacles in your home and enjoy high-definition video images or transferring large files with amazing efficiency.
The theoretical maximum transfer rate can only be attained with a WiFi N router transmitting the signal on two channels (for more information on two-channel transmission, please refer to your router's manual) in the absence of obstacles between your router and your key. For more information on MIMO technology and 802.11n, please refer to the glossary at the end of the manual or click here).
3.1. Selecting your network type
The choice of network type depends on the hardware you have at your disposal.
You have… You should…
One or more computers plus a WiFi ADSL modem router (or an Ethernet ADSL modem connected to a WiFi router).
Opt for Infrastructure mode (the default mode for WiFi adapters), whereby adapters are connected to your access point, otherwise known as a router. Infrastructure mode is ideal for exchanging data, network gaming, and also for sharing an Internet connection and/or a printer among several computers. To find out how to install and configure your modem router or your router, please refer to the manufacturer’s documentation.
A USB or Ethernet ADSL modem directly connected to one of your computers by a cable (you don’t have a WiFi router).
Opt for Ad hoc mode (also known as Peer to Peer), whereby clients are connected to one another without an access point, which is to say without a router. To create an Ad hoc network, you must configure one of the computers in Ad hoc mode (preferably the one connected to the modem) so that the other computer detects this network. Ad hoc mode allows users to exchange data or play network games between two computers. Due to certain dysfunctions inherent to this mode, however, it is reserved for advanced users only.
Two computers equipped with WiFi adapters (you don’t have a WiFi router).
Opt for Ad hoc mode. A variety of WiFi adapter formats are available depending on the type of computer you have: PCI card (to be inserted inside of a desktop computer), USB adapter (to be plugged into a desktop or laptop computer’s USB port), or PCMCIA card (to be connected to an available Type II PCMCIA port on a laptop computer). Once equipped with its adapter, your computer becomes what is known as a client within the WiFi system
Hercules Wireless G USB Ultra-mini HWGUm-54
8/54 – User Manual
If you only have two computers and simply wish for them to be able to communicate with one another, the purchase of a router is optional. Without a router, however, your WiFi network will very soon be limited, should you wish to invest in a third computer for example, or if you want to share an Internet connection. To share an Internet connection, one of the two computers must be running and connected to an ADSL modem.
Ad hoc mode should only be used if your network is made up of two computers. With more than two computers, it is preferable to opt for Infrastructure mode (router + clients).
3.2. Wireless local area WiFi network security
Taking advantage of the freedom offered by WiFi technology does not simply mean connecting computers to one another without the presence of wires. All computers in a wireless network communicate with one another, exchange data, and share an Internet connection. It is therefore imperative that you secure your system in the best way possible. Why secure your system? Imagine a neighbor who lives in the same building as you and is also equipped with a WiFi network, which detects several wireless networks and chooses yours inadvertently, since it is unsecured. In this way, the neighbor can share your Internet connection even though he doesn’t even have a modem! Admittedly this does not make him a computer hacker (although it might seem like it!), but it’s you who is footing the bill.
In order to avoid this kind of undesirable situation, we invite you to refer to the following chapter which will explain how to connect to a wireless network and how to protect it using one of the security methods available.

HWGUm-54 Hercules Wireless G USB Ultra-mini
User Manual – 9/54
4. THE WIFI STATION UTILITY
The WiFi Station utility has been specifically developed by Hercules for the Hercules Wireless G family of adapters. It allows you to get the most out of all your adapter’s functionalities via a user-friendly interface that is easy to operate and features a very high level of security, based on WPA-PSK and WPA2 encryption.
4.1. Determining your connection status
After installing WiFi Station, the Hercules WiFi Station icon appears in the Windows taskbar. Once your adapter has been connected (please see the “Hardware installation” chapter), you will immediately be able to view your connection status:
- If the icon appears green, a connection to the network is established, and signal strength is excellent.
- If the icon appears yellow, a connection to the network is established, and signal strength is good.
- If the icon appears red, a connection to the network is established, but signal strength is weak: try moving the client adapter’s antenna closer to the antenna on the access point.
- If the icon appears gray, your WiFi client adapter has been detected, but is not connected to any WiFi network: you must connect to a network detected by WiFi Station.
- If the icon appears, your WiFi client adapter has not been detected by Windows: verify that it
is properly connected and enabled and repeat the installation, if necessary.
4.2. Launching WiFi Station
To launch WiFi Station, simply double-click the icon in the taskbar.
4.3. Connecting to a network with Wi-Fi Protected SetupTM If connecting to a WiFi network and configuring your network seems like tedious work to you, use the integrated WPS (Wi-Fi Protected SetupTM) function, indicated on the product or packaging by way of the following logos:
or
This technology simplifies the procedure for connecting to a wireless network between a WPS-compatible router and your Hercules Wireless G USB Ultra-mini key. Two methods are available: simply click the button in WiFi Station, or enter a PIN code in the WiFi Station interface.
In order to benefit from a simplified connection thanks to the WPS (Wi-Fi Protected SetupTM) function, your router must be WPS-compatible and certified.

Hercules Wireless G USB Ultra-mini HWGUm-54
10/54 – User Manual
4.3.1. Connecting to a network with the WPS button in WiFi Station
- On your WiFi router: press the WPS button (for more information, please refer to your WPS-compatible router's manual).
You then have two minutes to connect your key via WPS.
- In WiFi Station, go to the Connection page.
- Click the logo next to this option.
Your Hercules Wireless G key connects to your WiFi router using the security key defined on the router.
If the connection is not secure, a WPA2 security key is generated automatically.
If the WPS router is only compatible with WPA keys (and not WPA2), a WPA key will be generated.
4.3.2. Connecting to a network with a PIN code
- In WiFi Station, go to the Advanced Settings page.
- Make a note of the PIN code that is displayed.
- Enter this PIN code in the interface of your WiFi router (for more information, please refer to your WPS-compatible router's manual).
You then have two minutes to connect your key via WPS.
- In WiFi Station, go to the Connection page.
- Click the button.
WiFi Station connects your Hercules Wireless G key to your WiFi router using the security key defined on the router. If the connection is not secure, a WPA2 security key is generated automatically.
Note: if another WiFi device has the same PIN code, click the Re-new button to obtain a new code.

HWGUm-54 Hercules Wireless G USB Ultra-mini
User Manual – 11/54
4.4. Connecting to a network via the list of networks
WiFi Station opens by default to the Connection page and WiFi network detection begins automatically. The List of detected networks displays all secured, unsecured or hidden networks, whether Infrastructure or Ad hoc.
To connect to an unsecured network (the value No appears in the Secure field):
- Select the network you wish to connect to.
- Click the Connect button.
- If you wish, you can add the network to your Favorites by ticking the Yes box and giving it a name.
After a few seconds, a green icon appears beside the network, indicating that you are connected to the network.
If you want your computer to automatically reconnect to a specific network, add the network to your list of Favorites and select the Automatic Connection option (for more information, please refer to chapter 4.6 Adding a network to your Favorites).
If connection to the selected network fails in Infrastructure mode, verify the router’s security settings (key, MAC address filtering, etc.).

Hercules Wireless G USB Ultra-mini HWGUm-54
12/54 – User Manual
To connect to a secured network (the value Yes appears in the Secure field, along with the type of key used):
- Select the network you wish to connect to.
- Click the Connect button.
- Enter the security key when prompted to do so by WiFi Station.
- If you wish, you can add the network to your Favorites by ticking the Yes box and giving it a name.
If you wish to connect to a secure network, you must know the security key used. Before establishing a connection, WiFi Station will prompt you to enter this key (a message will help you to identify the type of key required).
To connect to a hidden network (the Network Name (SSID) field is empty):
If one or more of the detected networks does not include a name (the Network Name (SSID) field is empty), this means that the network is not broadcasting its name. To connect to this network, select it and then:
- Click the Connect button.
- Enter the network name (SSID) in the window that appears.
- If the network is secure, enter the key used.
- If you wish, you can add the network to your Favorites by ticking the Yes box and giving it a name.
Now that you know how to connect to a network, you will immediately be able to put into practice the different possibilities offered by WiFi. By referring to chapter 5. Welcome to the Wireless Attitude!, you will be able to enter the exciting world of wireless computing and learn how to share folders, a printer or an ADSL connection.
If you first wish to explore all of WiFi Station’s functionalities, we invite you to read the following chapters.
HWGUm-54 Hercules Wireless G USB Ultra-mini
User Manual – 13/54
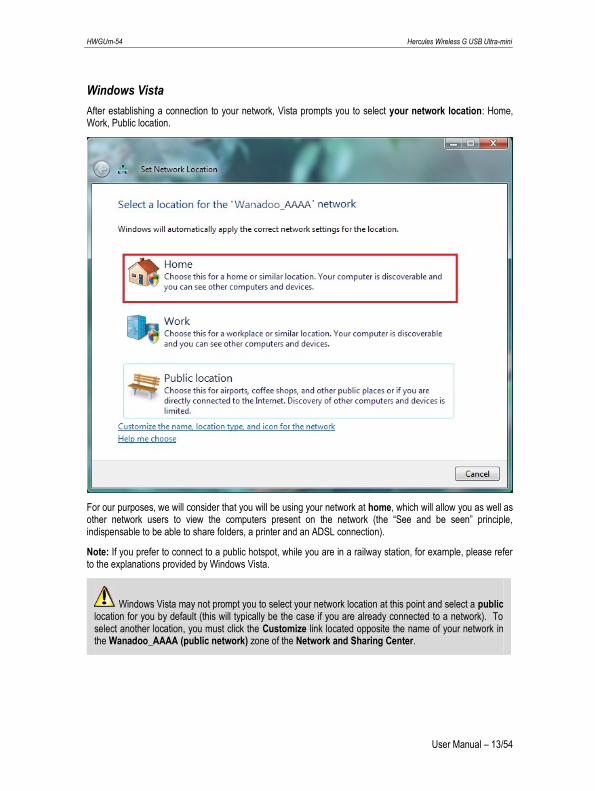
Windows Vista
After establishing a connection to your network, Vista prompts you to select your network location: Home, Work, Public location.
For our purposes, we will consider that you will be using your network at home, which will allow you as well as other network users to view the computers present on the network (the “See and be seen” principle, indispensable to be able to share folders, a printer and an ADSL connection).
Note: If you prefer to connect to a public hotspot, while you are in a railway station, for example, please refer to the explanations provided by Windows Vista.
Windows Vista may not prompt you to select your network location at this point and select a public location for you by default (this will typically be the case if you are already connected to a network). To select another location, you must click the Customize link located opposite the name of your network in the Wanadoo_AAAA (public network) zone of the Network and Sharing Center.

Hercules Wireless G USB Ultra-mini HWGUm-54
14/54 – User Manual
4.5. Adding a network to your Favorites
To add a network to your list of Favorites, select it in the list of detected networks, then click the Add to Favorites button. This launches the Assistant for creating a new Favorite.
This Assistant simplifies adding networks to your Favorites by automatically filling in certain windows with the settings supplied by WiFi Station. All you have to do then is enter the following information: the Favorite’s name (Step 1), the security key (Step 4) if the network is secured, and whether or not to automatically connect to the network (Step 5). For more information on this Assistant, please refer to chapter 4.9 Viewing, modifying or adding Favorites – Creating an Ad Hoc network.
4.6. Scanning for networks
When WiFi Station is launched, a scan for detected networks takes place automatically. Afterwards, you can manually refresh the list of detected networks by clicking the Rescan button. The following scanning radius icon is displayed while the scan is carried out:
During the scan, it may happen that the scanning radius icon remains fixed and does not change. This means that the Flash animation module is not installed on your computer. To view the animation, you must download this module via the Internet and follow the installation instructions.

HWGUm-54 Hercules Wireless G USB Ultra-mini
User Manual – 15/54
4.7. Viewing connection settings
Information in the Connection status zone is not accessible or modifiable. It includes all settings corresponding to the network to which the computer is connected:
- Network Name (SSID): the SSID (Service Set Identifier) is the unique name shared by clients and the access point in a wireless network.
- Name: the Favorite name you have entered, if the network has already been saved.
- Security type: The WiFi security standard allows you to secure the information exchanged over your network. The security types supported by WiFi Station are WEP, WEP (Shared), WPA-PSK (TKIP), WPA-PSK (AES) and WPA2.
- TCP/IP Details: information relating to the TCP/IP Internet protocols assigned by the router/access point once a connection to the network has been established.
- RF channel: frequency channel used by the local area WiFi network to communicate.
- Network type: the selected network architecture, Infrastructure or Ad hoc (Peer to Peer).
- Upload speed: value indicating the data transmission rate.
- Link Quality: a progressive bar (from 0 to 100%) displays the status of the connection between the access point and the Hercules Wireless G WiFi adapter.

Hercules Wireless G USB Ultra-mini HWGUm-54
16/54 – User Manual
4.8. Viewing, modifying or adding Favorites – Creating an Ad hoc network
A Favorite is a group of settings for connection to a known Infrastructure or Ad hoc network (your own, a neighbor’s, a friend’s). WiFi Station allows you to easily store the settings for a network in memory, or view or modify existing Favorites.
In an Ad hoc (Peer to Peer) network, creating a Favorite is the equivalent of actually creating the wireless link between the computers.
4.8.1. Security options
To avoid having an individual on the outside improperly connect to your network, we strongly recommend that you secure your network. The table below sums up the 4 security types supported by WiFi Station.
Type Level of security Key used
WEP The lowest level of security, in which a single encryption key is used for the data exchanged. Each wireless client in the network must use the same key to decode the transmission.
64-bit (10 characters) or 128-bit (26 characters) key in hexadecimal format.
WEP (Shared) Level of security based on WEP, moreover employing an authentication method via a shared
64-bit (10 characters) or 128-bit (26 characters) key

HWGUm-54 Hercules Wireless G USB Ultra-mini
User Manual – 17/54
key. in hexadecimal format.
WPA-PSK (TKIP) Latest-generation high level of security, specially designed for environments such as a small business or the home, using a pre-shared key.
Password with a minimum of 8 alphanumeric characters.
WPA-PSK (AES) Level of security superior to WPA-PSK (TKIP), using an encryption method based on the new IEEE 802.11i security standard.
Password with a minimum of 8 alphanumeric characters.
WPA2 (TKIP) Latest-generation very high level of security, specially designed for environments such as a small business or the home, using a pre-shared key.
Password with a minimum of 8 alphanumeric characters.
An alphanumeric character corresponds either to a number (0-9), or to a letter (a-z or A-Z).
WPA2 (AES) Level of security superior to WPA2 (TKIP), also of the latest generation, specially designed for environments such as a small business or the home, using a pre-shared key.
Password with a minimum of 8 alphanumeric characters.
An alphanumeric character corresponds either to a number (0-9), or to a letter (a-z or A-Z).
A hexadecimal key is composed of numbers from 0 to 9 and letters from A to F (example: A123BCD45E for a 64-bit key). An alphanumeric character corresponds either to a number (0-9), or a letter (a-z or A-Z).
4.8.2. View/Modify Favorites
View/Modify Favorites window In this window, you can:
- Delete a Favorite from the list. - Modify the basic, security or advanced settings for your
Favorite. - Connect to the network corresponding to the selected
Favorite. - Click the New button to create a new favorite.

Hercules Wireless G USB Ultra-mini HWGUm-54
18/54 – User Manual
Network tab (accessible after clicking the Modify button) Network name (SSID): enter the SSID (Service Set Identifier), which is to say the unique name shared by clients and the access point in your wireless network. Network type: Infrastructure or Ad hoc. RF channel (Ad hoc only): select the RF channel from a list of available channels (1 to 13), channel 1 being the default channel. Automatic connection: tick this box to have the client automatically connect to this network.
Security tab (accessible after clicking the Modify button) Secure: the network may be unsecured (No) or secure (Yes); in this case, you must select the security type and enter an encryption key. Security type: WEP, WEP (Shared), WPA-PSK (TKIP), WPA-PSK (AES) or WPA2. Security Key: enter an encryption key of 10 or 26 hexadecimal characters for a WEP key, or from 8 to 63 characters for a WPA-PSK key.
A hexadecimal key is composed of numbers 0 to 9 and letters A to F (example: A123BCD45E).
4.8.3. Adding a new Favorite manually or creating an Ad hoc network
A practical way to create a Favorite (Infrastructure or Ad hoc network) specifically for your home or office, for example, is to use the New Favorite creation Assistant. To launch this Assistant, you must click New in the Favorites management tab.
If you know your network settings, you can also create your Favorite or Ad hoc network yourself by clicking the Add new Favorite manually/Create an Ad hoc network button.
The manual creation of a new Favorite or an Ad hoc network includes the following steps:

HWGUm-54 Hercules Wireless G USB Ultra-mini
User Manual – 19/54
- Step 1: enter a name for your Favorite (for example: Work, Sport, etc.).
- Step 2: select either Infrastructure or Ad hoc mode for your network architecture; Infrastructure architecture is selected by default. Reminder: Infrastructure is a type of network with an access point + at least two computers, whereas in Ad hoc mode there will be two or more computers without an access point (one of the computers creates the network, while the other only detects it). If you have already clicked the Add to Favorites button, the fields will already be filled in.
If you opt for Ad hoc mode, you must select the RF channel from a list of available channels (1 to 13), channel 1 being the default channel.
- Step 3: enter the name of your network (SSID name). If you have already clicked the Add to Favorites button in the Connection window, the field will be filled in with the appropriate SSID name.
If you want to create your Ad hoc network, give it the name of your choice here.
Hercules Wireless G USB Ultra-mini HWGUm-54
20/54 – User Manual
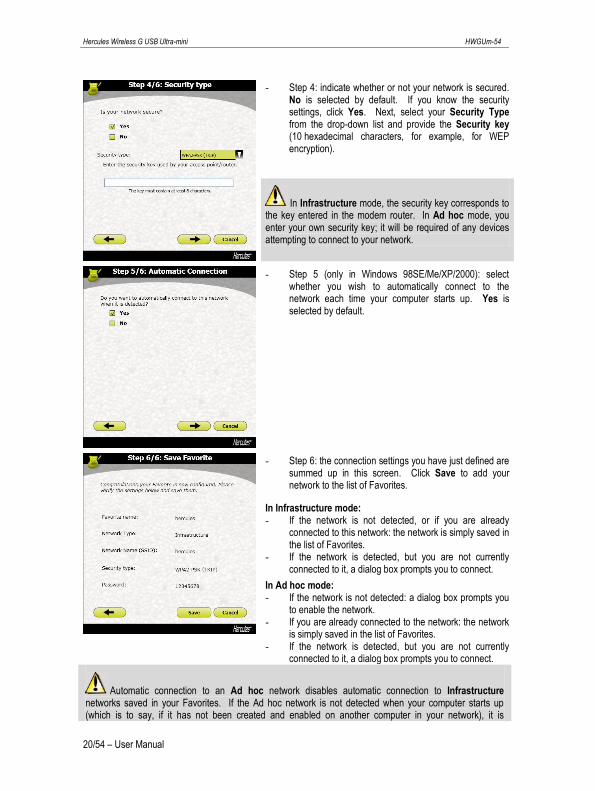
- Step 4: indicate whether or not your network is secured. No is selected by default. If you know the security settings, click Yes. Next, select your Security Type from the drop-down list and provide the Security key (10 hexadecimal characters, for example, for WEP encryption).
In Infrastructure mode, the security key corresponds to the key entered in the modem router. In Ad hoc mode, you enter your own security key; it will be required of any devices attempting to connect to your network.
- Step 5 (only in Windows 98SE/Me/XP/2000): select whether you wish to automatically connect to the network each time your computer starts up. Yes is selected by default.
- Step 6: the connection settings you have just defined are summed up in this screen. Click Save to add your network to the list of Favorites.
In Infrastructure mode: - If the network is not detected, or if you are already
connected to this network: the network is simply saved in the list of Favorites.
- If the network is detected, but you are not currently connected to it, a dialog box prompts you to connect.
In Ad hoc mode: - If the network is not detected: a dialog box prompts you
to enable the network. - If you are already connected to the network: the network
is simply saved in the list of Favorites. - If the network is detected, but you are not currently
connected to it, a dialog box prompts you to connect.
Automatic connection to an Ad hoc network disables automatic connection to Infrastructure networks saved in your Favorites. If the Ad hoc network is not detected when your computer starts up (which is to say, if it has not been created and enabled on another computer in your network), it is
HWGUm-54 Hercules Wireless G USB Ultra-mini
User Manual – 21/54
automatically enabled on your computer (it is then detected by the other computers in your network).
4.9. About
The button, located in the lower left-hand corner of the window, displays information regarding the version of the WiFi Station utility and the version of drivers used by the WiFi client.
4.10. Re-enabling your computer’s integrated WiFi function
If your computer features an integrated WiFi function, WiFi Station disables it automatically during installation (only in Windows 98SE/Me/XP/2000). To re-enable this function:
- In the Windows taskbar, right-click the Hercules WiFi Station icon and select Use Microsoft Zero Config as configuration utility (Windows XP only).
Your integrated WiFi function is enabled once again. You can remove your Hercules Wireless G adapter.
To re-enable WiFi Station as the configuration utility for your Hercules Wireless G adapter:
- In the Windows taskbar, right-click the Hercules WiFi Station icon and select Use Hercules WiFi Station as configuration utility.
If you are using Microsoft Zero Config configuration (Windows XP only) and your Hercules Wireless G adapter is still connected, some WiFi Station tabs, buttons or options will not be displayed or will not be available.
4.11. Temporarily disabling the Hercules Wireless G USB adapter’s WiFi function
In order to avoid completely uninstalling the WiFi application, or disabling your WiFi adapter via Windows or disconnecting it, Hercules has included a function which allows you to very simply cut off WiFi transmission/reception. In this way, you can leave your computer for a few hours with complete peace of mind, secure in the knowledge that any intrusions onto your network are impossible. When you return, all you have to do is switch WiFi back on.
To disable the WiFi function while you are away:
- In the Windows taskbar, right-click the Hercules WiFi Station icon and select Switch ON my WiFi.
To re-enable the WiFi function:
- In the Windows taskbar, right-click the Hercules WiFi Station icon and select Switch OFF my WiFi.
Hercules Wireless G USB Ultra-mini HWGUm-54
22/54 – User Manual
4.12. Exiting WiFi Station
The Close button allows you to move WiFi Station to the background, but the application remains enabled. To exit WiFi Station completely, you must right-click the WiFi Station icon in the Windows taskbar and select Exit.

HWGUm-54 Hercules Wireless G USB Ultra-mini
User Manual – 23/54
5. WELCOME TO THE WIRELESS ATTITUDE!
In the following chapters, we will show you how wireless computing is closely linked to user-friendliness and ease of use. Sharing your folders, your printer, or letting friends use your ADSL connection for online gaming are some examples of the things we will help you to do. Enter the world of wireless and join in the Wireless Attitude!
5.1. Some requirements
- Each computer that you wish to connect to the network must be equipped with a WiFi adapter.
- To share an ADSL connection, your ADSL modem must be switched on and your ADSL line enabled.
- You must determine in advance whether you are using an Infrastructure or Ad hoc network. Reminder: Infrastructure is a type of network with an access point + at least two computers, whereas in Ad hoc mode, you have two computers without an access point.
5.2. Computers running Windows Vista: Sharing folders, a printer or an ADSL connection
To create a network of computers, share data, a printer or an ADSL connection between computers running Windows Vista, it is not imperative that the computers belong to the same workgroup. However, if you wish to share between Windows Vista and an earlier operating system, make sure to define the same workgroup on all computers. For information on how to create a workgroup, please refer to the manual of your Hercules product.
Note: The access paths described hereafter may vary slightly if you have modified the default display in Windows Vista (that is to say, the Start menu properties and the Control Panel display).
You have connected your computer to a private network (as opposed to a public network). Therefore, the discovery options (namely, the ability to view outside devices and computers and to be seen by other networks) are enabled, but sharing options are not. You must therefore enable them manually before you can share your folders, your Internet connection or your printer.
5.2.1. Enabling sharing Before setting up sharing for your folders, your printer or your Internet connection, you must enable sharing in the Network and Sharing Center.

Hercules Wireless G USB Ultra-mini HWGUm-54
24/54 – User Manual
Note: To open the Network and Sharing Center, click the network icon in the Windows taskbar, then the Network and Sharing Center link.
Enabling file sharing
- In the Sharing and Discovery zone, click the Off link or the button located opposite File sharing.
- Select the Turn on file sharing radio button.
- Click Apply. In the Windows Vista confirmation window, click Continue.
Enabling public folder sharing
Note: A public folder is a folder which can be shared by other users of the same computer or of the same network.

HWGUm-54 Hercules Wireless G USB Ultra-mini
User Manual – 25/54
- In the Sharing and Discovery zone, click the Off link or the button located opposite Public folder sharing.
- Select the Turn on sharing so anyone with network access can open files radio button (they will only be able to consult files) or select Turn on sharing so anyone with network access can open, change, and create files (there will be no limitations on the contents of these folders in terms of viewing, making changes and additions or other actions).
- Click Apply. In the Windows Vista confirmation window, click Continue.
Enabling printer sharing
Note: To enable printer sharing, you must first have installed a printer.
- In the Sharing and Discovery zone, click the Off link or the button located opposite Printer sharing.
- Select the Turn on printer sharing radio button.
- Click Apply. In the Windows Vista confirmation window, click Continue.
Enabling media file sharing
Note: This option allows you to enable sharing of your music, videos and images.
- In the Sharing and Discovery zone, click the Off link or the button located opposite Media sharing.
- Click Change…

Hercules Wireless G USB Ultra-mini HWGUm-54
26/54 – User Manual
- In the Media Sharing window that appears, tick the Share my media box.
- Click Apply. In the Windows Vista confirmation window, click Continue.
- In the following window, you can define the different settings, such as: authorize or refuse groups of users, set parental controls, select media types to be shared, and so on.
- When you’re done, click Apply, then OK.
5.2.2. Windows Vista: Sharing public or personal folders Reminder: In Windows Vista, there are two types of folders: personal or local folders and public folders. A personal folder is a folder belonging to a specific user created on the computer, whereas a public folder is a folder that can be shared by any other user of the same computer or the same network. In essence, a public folder is shared, and therefore available to everyone for viewing (minimum authorization level). For sharing personal folders (your folder of your own images, for example), you must select the users who will be able to access their contents and set the authorization level, as indicated in the following procedure.

HWGUm-54 Hercules Wireless G USB Ultra-mini
User Manual – 27/54
1. Select the folder that you wish to share, without opening it. Here, your Pictures folder.
2. Right-click the folder. Select Share.
3. In the File Sharing window, select the user(s) who will be able to access this folder, then click Add.
Hercules Wireless G USB Ultra-mini HWGUm-54
28/54 – User Manual
Note: You can provide access to all users with no restrictions (Everyone option) or select specific users previously created on your PC. You can also create new users by clicking Create a new user… in the drop-down list.
4. Select the Permission Level you wish to assign by clicking on the line for that user: Reader (authorization to view only), Contributor (authorization to view, add and delete) or Co-owner (authorization to view, modify, add and delete).
5. Click Share. Be sure to note the path indicated, which will allow for access to the shared folder on the network from another computer. For example: \\PC-WIFI\Users\My documents\Shared Pictures Folders.
6. Click Done.
The folder is now shared. You can now display all shared folders and files on the computer or the shared files on the network by clicking the links in the Network and Sharing Center.
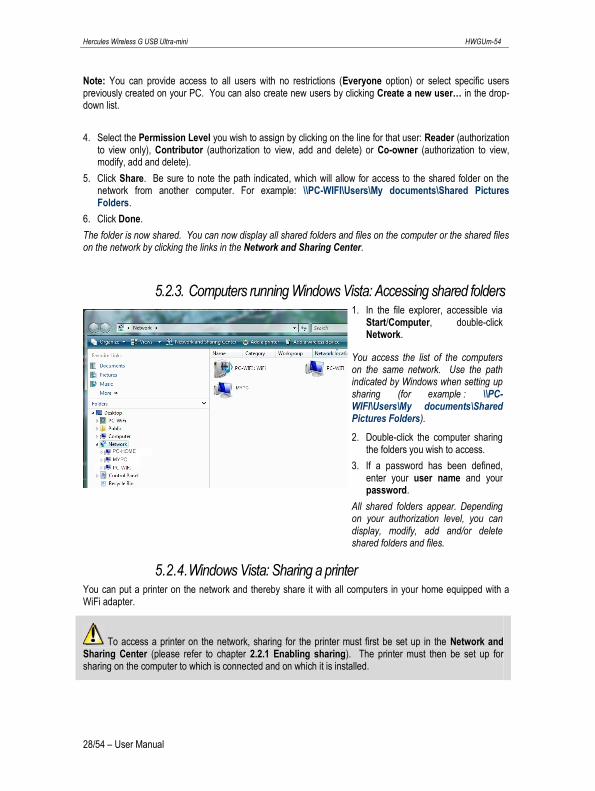
5.2.3. Computers running Windows Vista: Accessing shared folders
1. In the file explorer, accessible via Start/Computer, double-click Network.
You access the list of the computers on the same network. Use the path indicated by Windows when setting up sharing (for example : \\PC-WIFI\Users\My documents\Shared Pictures Folders).
2. Double-click the computer sharing the folders you wish to access.
3. If a password has been defined, enter your user name and your password.
All shared folders appear. Depending on your authorization level, you can display, modify, add and/or delete shared folders and files.
5.2.4. Windows Vista: Sharing a printer You can put a printer on the network and thereby share it with all computers in your home equipped with a WiFi adapter.
To access a printer on the network, sharing for the printer must first be set up in the Network and Sharing Center (please refer to chapter 2.2.1 Enabling sharing). The printer must then be set up for sharing on the computer to which is connected and on which it is installed.

HWGUm-54 Hercules Wireless G USB Ultra-mini
User Manual – 29/54
On the computer connected to the printer:
1. Click Start/Control Panel.
2. Under the Hardware and Sound heading, click the Printer link.
The list of installed printers is displayed.
3. Right-click the printer and select the Sharing… option.

Hercules Wireless G USB Ultra-mini HWGUm-54
30/54 – User Manual
4. In the Printer Properties window, click the Change sharing options button.
5. In the Windows Vista confirmation window, click Continue.
6. Tick the Share this printer box.
7. Select the name of the printer which will be displayed on the network under Share name.
8. Click Apply, then OK.
5.2.5. Computers running Windows Vista : Accessing the shared printer
On the computers that will use the shared printer:
1. Click Start/Control Panel.
2. Under the Hardware and Sound heading, click the Printer link.

HWGUm-54 Hercules Wireless G USB Ultra-mini
User Manual – 31/54
3. Click the Add a printer button.
The Add a printer assistant appears.
4. Click Add a network, wireless or Bluetooth printer.

Hercules Wireless G USB Ultra-mini HWGUm-54
32/54 – User Manual
5. Windows searches for the shared printers on your network. Select the shared printer.
6. Click Next.
7. if required, accept installation of the printer’s drivers when you are being prompted by Windows.
8. Validate the name of your printer, then click Next.
9. Click Finish to close the assistant.
5.2.6. Windows Vista: Sharing an ADSL connection in an Infrastructure type network
Reminder: If you have a Livebox, a modem router or a router connected to a modem and one or more computers, your network will be in Infrastructure mode by default. In this mode, the WiFi adapters are connected to your access point, which might be your Livebox, your Hercules Modem Router or your Hercules Router connected to a modem. Infrastructure mode is ideal for exchanging data, playing online, and also for sharing an Internet connection and/or printer among several computers. Follow the instructions below to finally free yourself from the cable that connects you to your modem… without cutting the links to your ADSL connection. Viva the Wireless Attitude!
Proceed as follows for each computer that will use the shared Internet connection:
1. Connect to your wireless network (Hercules or Livebox_AAAA, for example).
2. Access the Network and Sharing Center. To do so, click the network icon on the Windows taskbar, then click the Network and Sharing Center link.
3. Click the View status link.

HWGUm-54 Hercules Wireless G USB Ultra-mini
User Manual – 33/54
4. In the Wireless Network Connection Status window, click Properties.
5. In the Windows Vista confirmation window, click Continue.
6. In the Wireless Network Connection Properties tab, select Internet Protocol version 4 (TCP/IPv4).
7. Click Properties.
Hercules Wireless G USB Ultra-mini HWGUm-54
34/54 – User Manual
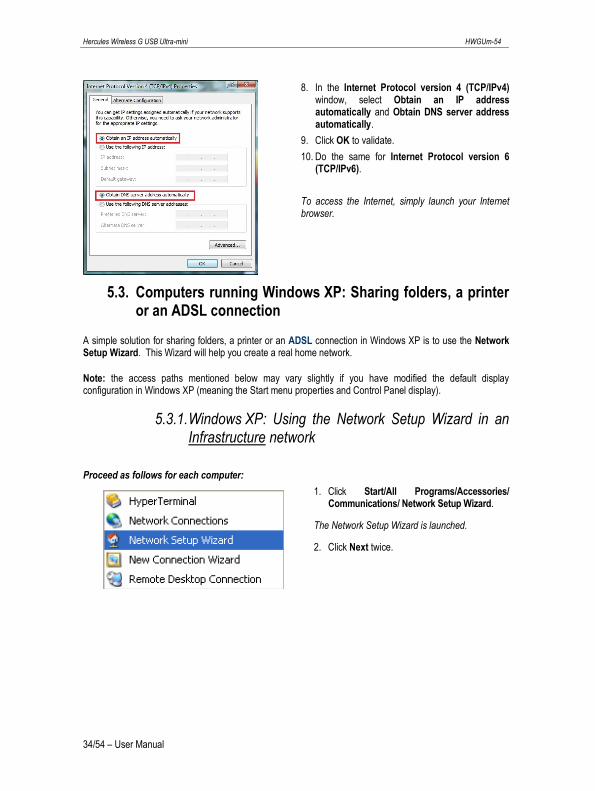
8. In the Internet Protocol version 4 (TCP/IPv4) window, select Obtain an IP address automatically and Obtain DNS server address automatically.
9. Click OK to validate.
10. Do the same for Internet Protocol version 6 (TCP/IPv6).
To access the Internet, simply launch your Internet browser.
5.3. Computers running Windows XP: Sharing folders, a printer or an ADSL connection
A simple solution for sharing folders, a printer or an ADSL connection in Windows XP is to use the Network Setup Wizard. This Wizard will help you create a real home network.
Note: the access paths mentioned below may vary slightly if you have modified the default display configuration in Windows XP (meaning the Start menu properties and Control Panel display).
5.3.1. Windows XP: Using the Network Setup Wizard in an Infrastructure network
Proceed as follows for each computer:
1. Click Start/All Programs/Accessories/ Communications/ Network Setup Wizard.
The Network Setup Wizard is launched.
2. Click Next twice.

HWGUm-54 Hercules Wireless G USB Ultra-mini
User Manual – 35/54
The window opposite may appear if The Wizard found disconnected network hardware.
3. If your Hercules Wireless G Adapter wireless network connection is not displayed in the list, tick the Ignore disconnected network hardware box, then click Next. Otherwise, exit the Wizard by clicking Cancel and establish the connection from your network device to your router (for more information, please refer to chapter 4. The WiFi Station utility).
The window opposite may appear if The Wizard found a shared Internet connection on the computer.
4. Select No, let me choose another way to connect to the Internet, then click Next.
5. In the Select a connection method window, select the Other option.
6. In the following window, select This computer connects to the Internet directly or through a network hub, then click Next.

Hercules Wireless G USB Ultra-mini HWGUm-54
36/54 – User Manual
7. If the window opposite appears, select the Hercules Wireless G wireless network connection, then click Next.
8. When this warning screen appears, ignore it by clicking Next.
If you are using the Hercules modem router, your computers are already protected by the integrated firewall.
9. If your computer has at least three connections (or network devices), the window opposite appears. In this case, let the Wizard determine the appropriate connections.
10. Click Next.

HWGUm-54 Hercules Wireless G USB Ultra-mini
User Manual – 37/54
11. Enter the computer name and a description, if required.
Give the computer a name that is unique and sufficiently distinctive, making it easy to recognize on your network (my-computer, wifi-computer or julie, for example).
12. Click Next.
13. Enter the workgroup name (HOME, OFFICE or HERCULES, for example) and a description, if required.
The workgroup name must be identical (be sure to respect the case of letters) for all computers you wish to link together in a network.
14. Click Next.
15. Verify the configuration settings you have entered in the window that appears, then click Next.
The Wizard configures the computer for the home network. This may take a few minutes.
16. Before completing the procedure, you may select the Create a Network Setup Disk option. This consists of copying this Wizard onto a storage medium (your choice of floppy disk or USB key) so that it can be launched on computers equipped with operating systems other than Windows XP.
This operation is carried out automatically, once you have selected a medium for saving the Wizard.

Hercules Wireless G USB Ultra-mini HWGUm-54
38/54 – User Manual
17. Click Finish to exit the Wizard.
Once the procedure is finished, Windows XP may prompt you to restart your computer.
The procedures described in this chapter are specific to Windows XP. For all other questions related to sharing folders, a printer or an Internet connection, or on using Windows, please refer to the Windows online help utility.
5.3.2. Windows XP: Using the Network Setup Wizard in an Ad hoc network
Proceed as follows for each computer:
1. Click Start/All Programs/Accessories/ Communications/ Network Setup Wizard.
The Network Setup Wizard is launched.
2. Click Next twice.
The window opposite may appear if The Wizard found disconnected network hardware.
3. If your Hercules Wireless G Adapter wireless network connection is not displayed in the list, tick the Ignore disconnected network hardware box, then click Next. Otherwise, exit the Wizard by clicking Cancel and establish the connection from your network device (for more information, please refer to the “The WiFi Station utility” chapter).

HWGUm-54 Hercules Wireless G USB Ultra-mini
User Manual – 39/54
The window opposite may appear if The Wizard found a shared Internet connection on the computer.
4. Select No, let me choose another way to connect to the Internet, then click Next.
On the computer equipped with the ADSL modem:
5. In the Select a connection method window, select the This computer connects directly to the Internet. The other computers on my network connect to the Internet through this computer option.
6. Click Next, then select the Internet connection corresponding to your modem. Click Next again.
7. If your computer has at least three connections (or network devices), the window opposite appears. In this case, select the Let me choose the connections to my network option, then click Next.

Hercules Wireless G USB Ultra-mini HWGUm-54
40/54 – User Manual
8. Among the connections displayed, leave the box corresponding to your Wireless Network Connection Hercules Wireless G ticked and deselect the others, then click Next.
On the computers that will use the shared Internet connection:
5. In the Select a connection method window, select the This computer connects to the Internet through another computer on my network or through a residential gateway option.
6. Click Next.
7. If your computer has at least three connections (or network devices), the window opposite appears. In this case, select the Determine the appropriate connections for me option.
8. Click Next.

HWGUm-54 Hercules Wireless G USB Ultra-mini
User Manual – 41/54
Proceed as follows for each computer:
9. Enter the computer name and a description, if required.
Give the computer a name that is unique and sufficiently distinctive, making it easy to recognize on the network (my-computer, wifi-computer or julie, for example).
10. Click Next.
11. Enter the workgroup name (HOME, OFFICE or HERCULES, for example) and a description, if required.
The workgroup name must be identical (be sure to respect the case of letters) for all computers you wish to link together in a network.
12. Click Next.
13. Verify the configuration settings you have entered in the window that appears, then click Next.
The Wizard configures the computer. This may take a few minutes.
If your network is only composed of computers running Windows XP:
14. Select the Just finish the wizard option.
If your network is composed of computers running Windows XP and/or computers running Windows 98 SE, Me, 2000):
15. You can select the Create a Network Setup Disk option. This consists of copying this Wizard onto a storage medium (your choice of floppy disk or USB key) so that it can be launched on computers equipped with operating systems other than Windows XP.
This operation is carried out automatically, once you have selected a medium for saving the Wizard.

Hercules Wireless G USB Ultra-mini HWGUm-54
42/54 – User Manual
16. Click Finish to exit the Wizard.
Once the procedure is finished, Windows XP may prompt you to restart your computer.
You can now access the Internet simply by launching your browser (Internet Explorer or Netscape Navigator). Sharing folders or a printer, however, requires a few additional operations, but by following the step-by-step instructions in the next chapters, the subtleties involved will no longer remain a mystery to you.
With some Internet service providers, it may happen that your shared connection is not established automatically when you launch your Internet browser. If this occurs, you must first establish an Internet connection on the computer equipped with the modem.
The procedures described in this chapter are specific to Windows XP. For all other questions related to sharing folders, a printer or an Internet connection, or on using Windows, please refer to the Windows online help utility.

HWGUm-54 Hercules Wireless G USB Ultra-mini
User Manual – 43/54
5.3.3. Windows XP: Sharing folders After having configured all of your computers using the Network Setup Wizard, you can now share data located on different disk drives, as long as the user has authorized access.
1. Select the folder you wish to share, without opening it.
2. Right-click the folder. Select Sharing and Security....
3. In the Network sharing and security section of the Sharing tab, tick the Share this folder on the network box.
4. On the Share name line, enter the folder name as it will be displayed on the network (12 characters maximum to ensure compatibility with other operating systems).
You can also tick the Allow network users to change my files box. In this case, the user will be able to read files and save any changes. If this box is not ticked, the shared files can only be read, and not changed.
The [Shared folder name] Properties window is divided into two sections. Local sharing and security only allows for the sharing of files among several users on the same PC. The files are then placed in a Shared Documents folder. Network sharing and security, however, allows for the sharing of files among more than one computer.
5. Click Apply to validate your choices, then click OK to close the window.
An icon representing a hand beneath the folder indicates that the folder is now shared.
You can only share the contents of a folder, and not an individual file. We therefore recommend that you create a folder specifically for this purpose where you will put files to be shared.
Hercules Wireless G USB Ultra-mini HWGUm-54
44/54 – User Manual
5.3.4. Computers running Windows XP: Accessing shared folders
To easily access folders set up for sharing by several computers, it is preferable that the computers belong to the same workgroup. In Windows XP, the workgroup name has been defined using the Network Setup Wizard.
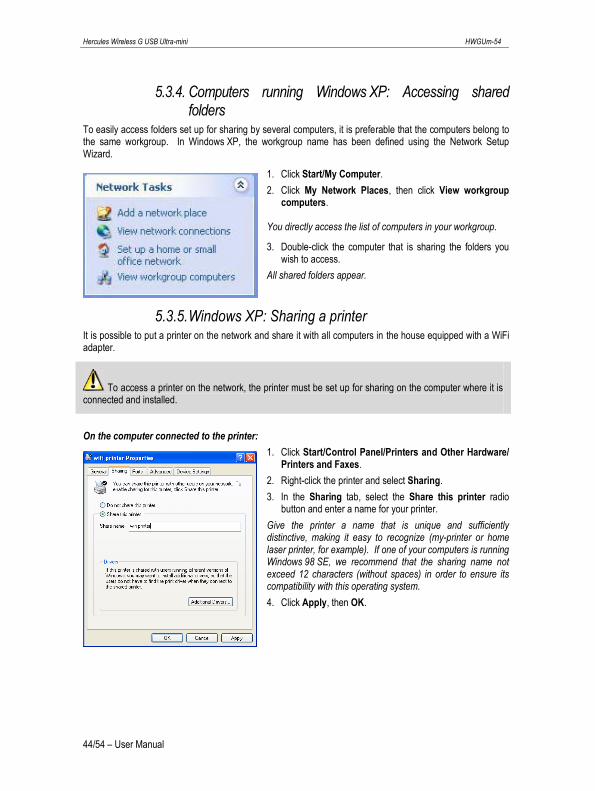
1. Click Start/My Computer.
2. Click My Network Places, then click View workgroup computers.
You directly access the list of computers in your workgroup.
3. Double-click the computer that is sharing the folders you wish to access.
All shared folders appear.
5.3.5. Windows XP: Sharing a printer It is possible to put a printer on the network and share it with all computers in the house equipped with a WiFi adapter.
To access a printer on the network, the printer must be set up for sharing on the computer where it is connected and installed.
On the computer connected to the printer:
1. Click Start/Control Panel/Printers and Other Hardware/ Printers and Faxes.
2. Right-click the printer and select Sharing.
3. In the Sharing tab, select the Share this printer radio button and enter a name for your printer.
Give the printer a name that is unique and sufficiently distinctive, making it easy to recognize (my-printer or home laser printer, for example). If one of your computers is running Windows 98 SE, we recommend that the sharing name not exceed 12 characters (without spaces) in order to ensure its compatibility with this operating system.
4. Click Apply, then OK.

HWGUm-54 Hercules Wireless G USB Ultra-mini
User Manual – 45/54
On the computers that will use the shared printer:
1. Click Start/Control Panel/Printers and Other Hardware/ Printers and Faxes. In the Printer Tasks section, select Add a printer.
2. The Add Printer Wizard is launched. Click Next.
3. Select the A network printer, or a printer attached to another computer option, then click Next.
4. In the window that appears, click Next to launch the search for shared printers.
5. In the list displayed, double-click the computer connected to the printer.
6. Select the shared printer, then click Next.
7. If you wish, set the shared printer as the default printer, then click Next.
8. Click Finish to exit the Wizard.
You can now use the network printer thanks to your WiFi connection. For more information on sharing a printer, please refer to your printer’s manual.

Hercules Wireless G USB Ultra-mini HWGUm-54
46/54 – User Manual
5.3.6. Windows XP: Modifying a workgroup name It may happen that you need to change the name of your workgroup (advanced users only). To do so, proceed as follows:
1. Click Start/Control Panel/Performance and Maintenance/System.
2. In the System Properties window, select the Computer Name tab.
3. Click the Change… button.
4. In the Computer Name zone, enter a name sufficiently distinctive that it can easily be recognized in the list of computers for the workgroup (my-computer, wifi-computer or julie, for example).
5. In the Workgroup zone, enter a name for the group (HOME, OFFICE or HERCULES, for example).
The workgroup name must be identical (be sure to respect the case of letters) for all computers you wish to link together in a network.
6. A Windows message indicates that the task has been carried out successfully and that you must restart the computer.
7. Repeat this procedure for each computer.
HWGUm-54 Hercules Wireless G USB Ultra-mini
User Manual – 47/54
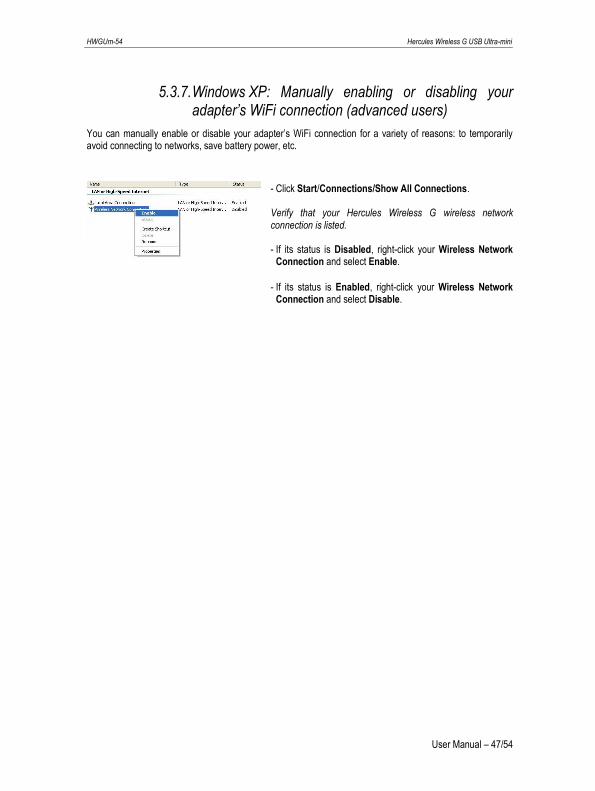
5.3.7. Windows XP: Manually enabling or disabling your adapter’s WiFi connection (advanced users)
You can manually enable or disable your adapter’s WiFi connection for a variety of reasons: to temporarily avoid connecting to networks, save battery power, etc.
- Click Start/Connections/Show All Connections.
Verify that your Hercules Wireless G wireless network connection is listed.
- If its status is Disabled, right-click your Wireless Network Connection and select Enable.
- If its status is Enabled, right-click your Wireless Network Connection and select Disable.

Hercules Wireless G USB Ultra-mini HWGUm-54
48/54 – User Manual
6. GLOSSARY 802.11 Standard established in 1997 by the IEEE (Institute of Electrical and Electronics Engineers, an American organization), defining wireless networks in the 2.4 – 2.48GHz frequency range and offering transfer speeds of between 1 and 2Mbits/s. Revisions have been made to the original standard in order to optimize transfers (this is the case for the 802.11a, 802.11b and 802.11g standards, referred to as physical 802.11 standards) or to ensure better security or improved interoperability of equipment.
802.11b Standard established by the IEEE (Institute of Electrical and Electronics Engineers, an American organization) in the 802.11 family, allowing for theoretical transfer rates of 11Mbits/s in the 2.4GHz frequency range with a physical range of up to 300m in an environment free from obstructions. The frequency range used is the 2.4GHz band, with 3 radio channels available.
802.11g Standard established by the IEEE (Institute of Electrical and Electronics Engineers, an American organization) in the 802.11 family, allowing for theoretical transfer rates of 54Mbits/s in the 2.4GHz frequency range with a physical range of up to 300m in an environment free from obstructions. The 802.11g standard offers backwards compatibility with the 802.11b standard, which means that equipment compliant with the 802.11g standard will also work with 802.11b.
802.11i Standard established by the IEEE (Institute of Electrical and Electronics Engineers, an American organization) in the 802.11 family, whose goal is to improve security by integrating WPA-PSK authentication into AES encryption. This Hercules client is compatible with this standard.
802.11n Standard established by the IEEE (Institute of Electrical and Electronics Engineers, an American organization) in the 802.11 family, allowing for theoretical transfer rates of 300Mbits/s in the 2.4GHz frequency range with a physical range of up to 300m in an environment free from obstructions. The 802.11n standard offers backwards compatibility with the 802.11b and g standards, which means that equipment compliant with the 802.11n standard will also work with 802.11b and/or g.
Access point The access point is the heart of your local WiFi network. The system access point is a wireless router whose function is to bring several clients together, which is to say link together all computers equipped with WiFi adapters, thanks to its radio antenna.
Ad hoc mode Mode allowing several computers equipped with WiFi to communicate directly with one another. This mode is also referred to as Peer to Peer.
ADSL (Asymmetric Digital Subscriber Line) This equipment, connected to a standard telephone line, offers great speed in terms of sending and receiving data.
AES (Advanced Encryption Standard) A symmetrical block-based encryption standard supporting different key lengths, this is a powerful, quick and efficient encryption method.
ATM (Asynchronous Transfer Mode) High-speed transfer mode for fixed-size data.
CCK (Complementary Code Keying) Advanced encoding scheme for radio waves in wireless networks allowing for high transfer speeds.
Client Computer equipped with a PCI, USB or PCMCIA WiFi adapter.

HWGUm-54 Hercules Wireless G USB Ultra-mini
User Manual – 49/54
DHCP (Dynamic Host Configuration Protocol) Protocol managing the allocation of IP addresses to computers.
DSSS (Direct Sequence Spread Spectrum) Technique for using radio frequencies in broad-spectrum wireless networks meant to increase the range of transmissions.
ESSID (Service Set Identifier) 8 to 32-character identifier, often abbreviated as SSID, serving as the unique name for a network shared by clients and the access point.
Ethernet port (or RJ-45) Port allowing for the connection of two devices via a cable, such as a PC and a router, in order to exchange data packets without collision.
Filter Device placed between the telephone plug and the modem to improve the quality of telephone communications, which are often degraded by ADSL signals.
Firewall Combination of software and security devices protecting a network connected to the Internet.
Infrastructure mode Communication mode consisting of grouping together several computers equipped with WiFi in a network via a wireless access point such as the Hercules ADSL router.
IP address Unique computer address assigned by the router. Each computer has its own IP address, allowing it to be identified within the network.
LEAP (Lightweight Extensible Authentication Protocol) Security protocol developed by the company Cisco for the world of Windows. The format used is identifier/password.
MAC address (Message Authentication Code) Unique address created by the builder of the client adapter or router, serving to identify this element within a network.
MIMO technology (Multiple In, Multiple Out) Technology used in the 802.11n standard, allowing for the WiFi signal to be shared over several antennas with a corresponding increase in terms of signal range and transfer speeds. Transmission can take place on one channel in the 20MHz frequency band (for theoretical maximum transfer speeds of 144.44Mbits/s) or two channels simultaneously (for theoretical maximum transfer speeds of 300Mbits/s) with 40MHz bandwidth. In both cases, the WiFi signal's coverage and range are the same. The choice of one mode or the other (20 or 40MHz) depends solely on the transmitter used. The Hercules Wireless G key will automatically adapt to the signal received.
NAT (Network Address Translation) Technique allowing for the masking of IP addresses of local area network computers with respect to the Internet.
OFDM (Orthogonal Frequency Division Multiplexing) Radio transmission technique providing very high transfer speeds widespread within DSL technology, in the wireless terrestrial distribution of television signals and adopted for the high-speed 802.11 wireless communication standard.
PPPoA (Point-to-Point Protocol over ATM) Protocol allowing for connection to the Internet of computers linked over an ATM network, while still identifying the user.

Hercules Wireless G USB Ultra-mini HWGUm-54
50/54 – User Manual
PPPoE (Point-to-Point Protocol over Ethernet) Protocol allowing for connection to the Internet of computers linked over an Ethernet network via a high-speed modem.
Static IP Permanent IP address assigned to a computer by the access supplier.
Subnet mask Part of an IP address indicating the class of the network used (class C, type 255.255.255.0 for a local area network).
TKIP (Temporal Key Integrity Protocol) The WPA standard uses the TKIP protocol, which consists of regenerating new keys for each data packet, whereas WEP uses a system based on a fixed key.
UPnP (Universal Plug n’ Play) Protocol allowing for the connection to one another of many computers and peripherals available on a network.
WEP (Wired Equivalent Privacy) Security protocol for wireless networks using encryption based on a 64-bit, 128-bit or 256-bit fixed key used only once, at the start of the decryption phase. To decode a transmission, each wireless network client must use the same 64, 128 or 256-bit key. WEP is part of the 802.11 standard with a view to ensuring authentication (access is only authorized for those who know the WEP key) and confidentiality (encryption). An encryption key is composed of numbers 0 to 9 and letters A to F (example: A123BCD45E).
WiFi (Wireless Fidelity) An abbreviation of Wireless Fidelity, WiFi is the commercial name adopted by the WECA (Wireless Ethernet Compatibility Alliance), an organization responsible for maintaining the interoperability of equipment in a wireless local area network (WLAN) compliant with the IEEE 802.11 standard. Thus, a WiFi network is actually a 802.11 network. In practice, WiFi allows for the connection of laptop computers, desktop computers or Personal Digital Assistants (PDAs) many tens of meters distant from one another via an access point, allowing them to communicate with one another without any cables and exchange data at high speeds.
WiFi Manager Utility developed by Hercules to configure and view settings for the Hercules Modem Router.
WiFi Router Device installed at the heart of a WiFi network, allowing for the connection of several computers equipped with WiFi adapters for the exchange of data.
WiFi Station Utility developed by Hercules to define, verify and configure all connection and security settings regarding your WiFi installation.
WLAN (Wireless Local Area Network) Wireless local area network, generally employing the 802.11b, g or n standards.
WMM (Wi-Fi Multimedia) Function certified by the Wi-Fi Alliance, which aims to define the levels of priority according to available bandwidth. Thus, Voice over IP (Priority 1) will take precedence over the transmission of video data (Priority 2), which will itself take precedence over applications using the network, such as Internet browsing (Priority 3). Last in terms of priority are background task applications, such as printing jobs or downloads (Priority 4).
Workgroup Group of computers with which you wish to communicate or share resources such as folders, a printer or an Internet connection. To be part of a workgroup, computers must have the same group name.

HWGUm-54 Hercules Wireless G USB Ultra-mini
User Manual – 51/54
WPA (WiFi Protected Access) Wireless network security standard put in place by manufacturers, employing a data encryption algorithm relying on dynamic key management, which was lacking in WEP, the difference being that once communication is established, the key changes randomly for enhanced security.
WPA2 (WiFi Protected Access 2) Security standard for wireless networks based on the WPA standard, which adds support for the TKIP or AES encryption algorithm, for heightened security.
WPA-PSK (WiFi Protected Access-Pre-Shared Key) Latest-generation heightened security protocol specially designed for use in environments such as a small office or the home, based on a pre-shared key (a single password). This key is also used for TKIP or AES data encryption.
WPS (Wi-Fi Protected Setup™) Technology standardized by the Wi-Fi Alliance, which aims to simplify the connection and configuration of a wireless network while at the same time maintaining a high level of security. This technology allows the user to enable protection of a WiFi network via a single button located on the WiFi client, or via entry of a PIN code in the software supplied with the router.
Log on now to our website (www.hercules.com) to download the latest driver and software versions, consult the list of Frequently Asked Questions (FAQs) relating to your adapter and access User Manual updates. You can also discover the entire Hercules range and get information on upcoming products.

Hercules Wireless G USB Ultra-mini HWGUm-54
52/54 – User Manual
7. TECHNICAL SUPPORT
If you encounter a problem with your product, please go to http://ts.hercules.com and select your language. From there you will be able to access various utilities (Frequently Asked Questions (FAQ), the latest versions of drivers and software) that may help to resolve your problem. If the problem persists, you can contact the Hercules products technical support service (“Technical Support”):
By email: In order to take advantage of technical support by email, you must first register online. The information you provide will help the agents to resolve your problem more quickly. Click Registration on the left-hand side of the Technical Support page and follow the on-screen instructions. If you have already registered, fill in the Username and Password fields and then click Login.
By telephone:
United Kingdom 08450800942 Charges at local
rate
Monday to Friday from Noon to 4pm and 5pm to 10pm Saturday from 9am to Noon and 1pm to 7pm Sunday from 9am to Noon and 1pm to 4pm
Denmark 80887690 Free
Monday to Friday from 1pm to 5pm and 6pm to 11pm (English) Saturday from 9am to 1pm and 2pm to 8pm Sunday from 10am to 1pm and 2pm to 5pm
Sweden 0200884567 Free
Monday to Friday from 1pm to 5pm and 6pm to 11pm (English) Saturday from 9am to 1pm and 2pm to 8pm Sunday from 10am to 1pm and 2pm to 5pm
Finland 0800 913060 Free
Monday to Friday from 2pm to 6pm and 7pm to Midnight (English) Saturday from 10am to 2pm and 3pm to 9pm Sunday from 11am to 2pm and 3pm to 6pm
8. WARRANTY Worldwide, Guillemot Corporation S.A. (“Guillemot”) warrants to the consumer that this Hercules product will be free from material defects and manufacturing flaws for a period of two (2) years from the original date of purchase. Should the product appear to be defective during the warranty period, immediately contact Technical Support, who will indicate the procedure to follow. If the defect is confirmed, the product must be returned to its place of purchase (or any other location indicated by Technical Support). Within the context of this warranty, the consumer’s defective product will, at Technical Support’s option, be either repaired or replaced. Where authorized by applicable law, the full liability of Guillemot and its subsidiaries (including for indirect damages) is limited to the repair or replacement of the Hercules product. The consumer’s legal rights with respect to legislation applicable to the sale of consumer goods are not affected by this warranty. This warranty shall not apply: (1) if the product has been modified, opened, altered, or has suffered damage as a result of inappropriate or abusive use, negligence, an accident, normal wear, or any other cause not related to a material defect or manufacturing flaw; (2) in the event of failure to comply with the instructions provided by Technical Support; (3) to software not published by Guillemot, said software being subject to a specific warranty provided by its publisher.
Trademarks
Hercules® is a registered trademark of Guillemot Corporation S.A. Wireless AttitudeTM ! is a trademark of Guillemot Corporation S.A. Microsoft® Windows® 2000, XP and Vista are either trademarks or registered trademarks of Microsoft Corporation in the United States and/or other countries. All other trademarks and brand names are hereby acknowledged and are property of their respective owners. Illustrations not binding.

HWGUm-54 Hercules Wireless G USB Ultra-mini
User Manual – 53/54
Declaration of conformity with EU directives
This device can be used in: AT, BE, FR, DE, IE, IT, LU, NL, PL, ES, SE, GB, FI, CH.
Hereby, GUILLEMOT CORPORATION, Carentoir France, declares that this Hercules HWGUm-54 is in compliance with the essential requirements and other relevant provisions of Directive 1999/5/EC. The Declaration of Conformity can be consulted at this website address:
ftp://ftp.hercules.com/wifi/DoC/HWGUm-54/DoC-eng_Hercules_HWGUm-54.pdf
Hercules is a division of Guillemot Corporation.
EUROPEAN USERS: This equipment has been tested and found to comply with Directive 1999/5/EC of the European Parliament and of the Council on radio equipment and telecommunications terminal equipment and the mutual recognition of their conformity. After assessment, the equipment has been found to comply with the following standards: EN 300.328 (radio), EN 301 489-1, EN 301 489-17 (electromagnetic compatibility) and EN 60950 (safety). This equipment may be used in all European Union countries and in all countries applying Directive 1999/5/EC, without restriction, with the exception of the following countries: FRANCE: When this equipment is used outdoors, output power is limited to within the frequency bands listed below. For more information, consult the ART website: www.art-telecom.fr.
Location Frequency band (MHz) Power (EIRP)
Indoor (no restrictions) 2400 – 2483.5 100mW (20dBm)
Outdoor 2400 – 2454 2454 – 2483.5
100mW (20dBm) 10mW (10dBm)
Operation of this equipment in a residential environment may give rise to radio interference; if so, it is incumbent upon the user to rectify the situation. ITALY: This device complies with the National Radio Interface and the requirements of the Frequency Allocation Table. Use of this wireless product outside of the boundaries of the owner’s property requires a general authorization. For more information, consult the website www.comunicazioni.it.
Environmental Protection Recommendation
At the end of its working life, this product should not be disposed of with standard household waste, but rather dropped off at a collection point for the disposal of Waste Electrical and Electronic Equipment (WEEE) for recycling.
This is confirmed by the symbol found on the product, user manual or packaging.
Depending on their characteristics, the materials may be recycled. Through recycling and other forms of processing Waste Electrical and Electronic Equipment, you can make a significant contribution towards helping to protect the environment.
Please contact your local authorities for information on the collection point nearest you.

Hercules Wireless G USB Ultra-mini HWGUm-54
54/54 – User Manual
Copyright © Guillemot Corporation S.A. 2009. All rights reserved. This publication may not be reproduced in whole or in part, summarized, transmitted, transcribed, stored in a retrieval system, or translated into any language or computer language, in any form or by any means, electronic, mechanical, magnetic, photocopying, recording, manual or otherwise, without the prior written permission of Guillemot Corporation S.A.
Disclaimer Guillemot Corporation S.A. reserves the right to make changes to specifications at any time and without notice. The information provided by this document is believed to be accurate and reliable. However, no responsibility is assumed by Guillemot Corporation S.A. either for its use or for the infringement of patents or other rights of third parties resulting from its use. This product may exist in a light or special version for PC integration or other purposes. Certain functions detailed in this manual may not be available in these versions. Wherever possible, a README.TXT will be included on the installation CD-ROM detailing the differences between the supplied product and the product described in the present documentation.
End-user software license Agreement IMPORTANT: please read the Agreement carefully prior to opening and installing the Software. By opening the Software package, you agree to be bound by the terms of this Agreement. The Software enclosed in this package is licensed, not sold, and is only available under the terms of the present license Agreement. If you do not agree with the terms hereafter, you must promptly return the Software within 15 days, together with the entire contents of the box, to the place of purchase. The Guillemot Corporation S.A. Software (hereafter named the “Software”) is copyrighted by Guillemot Corporation S.A. All rights are reserved. The term “Software” refers to all documentation and related material, including drivers, executable programs, libraries and data files. The purchaser is granted a license to use the Software only. The licensee also agrees to be bound by the terms and conditions of the present Agreement concerning copyright and all other proprietary rights for any third party Software, documentation and related material included in the Software package.
Guillemot Corporation S.A. reserves the right to terminate this license in the event of failure to comply with any of the terms or conditions laid out in the present Agreement. On termination, all copies of the Software shall immediately be returned to Guillemot Corporation S.A.; the purchaser remaining liable for any and all resulting damages. License: 1. The license is granted to the original purchaser only. Guillemot Corporation S.A. retains all title to and ownership of the
Software and reserves all rights not expressly granted. The licensee is not permitted to sub-license or lease any of the rights that are hereby granted. Transfer of the license is permitted, provided that the transferor does not retain any part or copy of the Software and the transferee accepts to be bound by the terms and conditions of the present Agreement.
2. The licensee may only use the Software on a single computer at any time. The machine-readable portion of the Software may be transferred to another computer provided it is previously erased from the first machine and there is no possibility that the Software can be used on more than one machine at any one time.
3. The licensee acknowledges the copyright protection belonging to Guillemot Corporation S.A. The copyright notice must not be removed from the Software, nor from any copy thereof, nor from any documentation, written or electronic, accompanying the Software.
4. The licensee is granted the right to make one back-up copy of the machine-readable portion of the Software on the condition that all copyright and proprietary notices are also reproduced.
5. Except where the present Agreement expressly permits, the licensee is strictly prohibited from engaging in, nor may he permit third parties to engage in, the following: providing or disclosing the Software to third parties; providing use of the Software in a network, multiple PCs, multi-user or time-sharing arrangement where the users are not individual licensees; making alterations or copies of any kind of the Software; making any attempt to disassemble, de-compile or reverse engineer the Software in any way or form, or engaging in any activity aimed at obtaining underlying information not visible to the user during normal use of the Software; making copies or translations of the User Manual.
Related Documents