Help Documentation V1.7.6 Copyright _________________________________________________ Copyright 2015, FormConnections, Inc. All rights reserved. Page of 1 33

Welcome message from author
This document is posted to help you gain knowledge. Please leave a comment to let me know what you think about it! Share it to your friends and learn new things together.
Transcript

Help Documentation V1.7.6
Copyright _________________________________________________
Copyright 2015, FormConnections, Inc. All rights reserved.
Page � of �1 33

FormConnect Help
1. Overview
• FormConnect is an easy to use app for creating business forms on your iPad. Its simple design allows you to customize forms the way you want them to look.
2. Viewing Forms
• The main screen displays all of your forms. You can navigate through all of your forms by either swiping with your finger or tapping on the “white” dots at the bottom of the screen. Tapping on the form will open it.
!
Page � of �2 33

3. Viewing Tags
• The “tags” view displays all records that have a tag associated with it. A tag is a way to group records that are related.
!
4. Viewing Tagged Records
• All records associated with the forms that they are linked to can be viewed in a folder tab.
!
Page � of �3 33
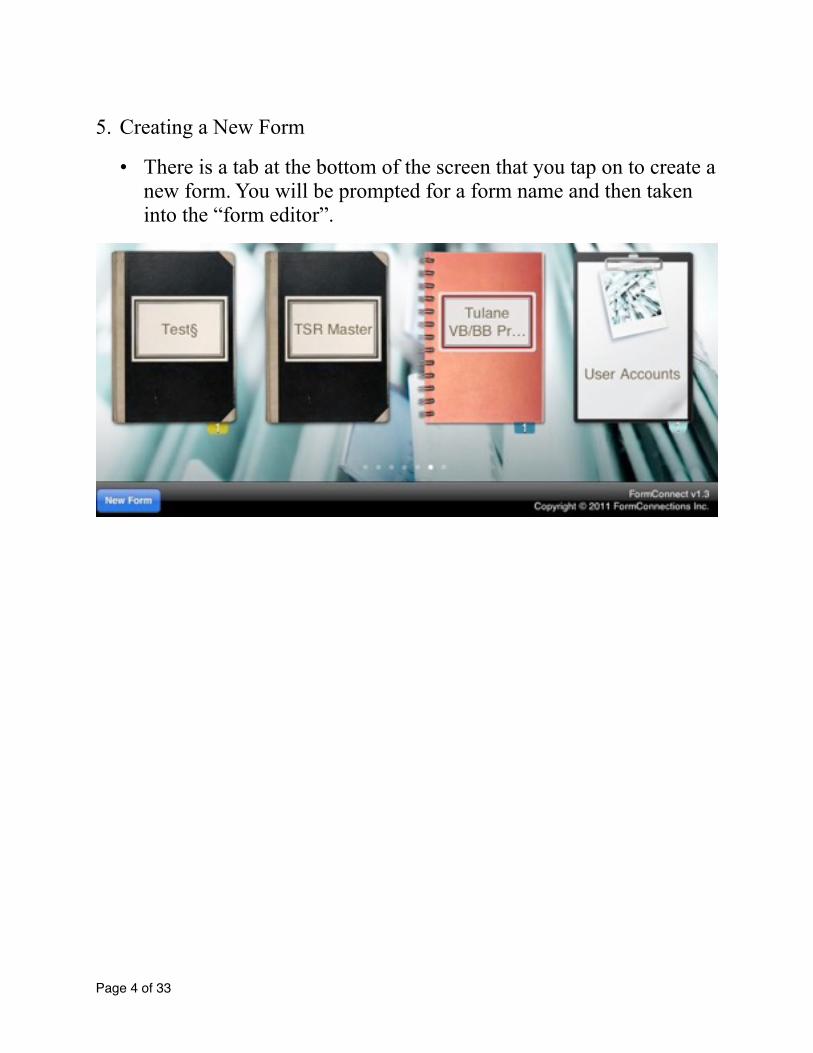
5. Creating a New Form
• There is a tab at the bottom of the screen that you tap on to create a new form. You will be prompted for a form name and then taken into the “form editor”.
!
Page � of �4 33

6. Renaming, Cloning and Deleting a Form
• Tap on the form for two seconds and a pop-up screen will display with the following options (Rename Clone Delete).
!
7. Editing a Form
• Tap on the “Paint brush” icon to open the editor.
Page � of �5 33

• Tap on the field that you wish to edit and a pop-up screen will display.
• The “Select Multiple” and “Select All” choices specify one or more fields that can be copied or deleted.
• Tap on the “Edit” button and a field parameter screen will display. You can specify the field name, the font size, the option to hide the text and an option to copy a field when cloning a record.
!
Page � of �6 33

8. Adding Fields
• Tap on the plus symbol (+).
!
Page � of �7 33

9. Creating a Drop-Down list
• There is no limit to the number of items in your list. You can organize them in any order that you want by dragging the items up and down.
!
Page � of �8 33

10. Adding/Removing Pages Tap on the ! to add or remove a page.
!
11. Setting Form Options !
!
Page � of �9 33

12. Specifying the Primary Field(s)
• The primary field is where records are named.
!
Page � of �10 33

13. Adding a Template Theme
• A template theme is how the form looks on the screen when you’re filling it out.
!
Page � of �11 33

14. Locking the Form Designer Upon Exporting a Form
• When exporting the form to other users, you can lock the edit function so that others cannot edit the form.
!
Page � of �12 33

15. Viewing Records !
• Records are displayed on the left frame based on the primary field settings.
Page � of �13 33
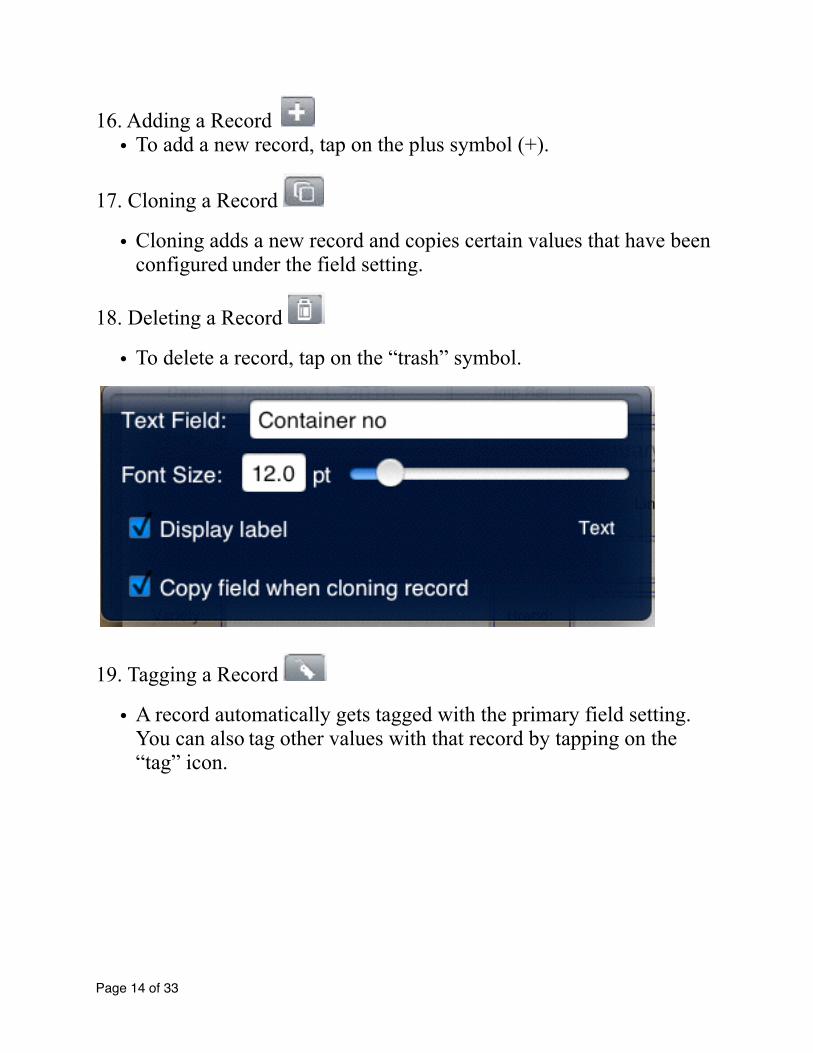
16. Adding a Record ! • To add a new record, tap on the plus symbol (+).
17. Cloning a Record !
• Cloning adds a new record and copies certain values that have been configured under the field setting.
18. Deleting a Record !
• To delete a record, tap on the “trash” symbol.
!
19. Tagging a Record !
• A record automatically gets tagged with the primary field setting. You can also tag other values with that record by tapping on the “tag” icon.
Page � of �14 33

20. Exporting a Record/Form !
• Tap on the Share (Arrow) button on the menu bar.
• Select the record(s) or the Form template.
• Select “Export”.
Page � of �15 33

• Select the File Format: FMC, PDF, CSV, XML or HTML
• Choose the Export Delivery Method - Email, Dropbox, Box, Google Drive, Open In, etc.
Note: The “FMC” file format is for exporting/importing forms between two or more FormConnect users.
Page � of �16 33

21. Importing a Record/Form
• Tap on the file attachment. It will display the FormConnect logo.
• Select Open In - FormConnect.
Page � of �17 33

22. Print Function
• Tap on the Share (Arrow) button on the menu bar.
• Make sure the record is ticked and choose the “Print” button.
Page � of �18 33

• Select the appropriate printer, the page range and the number of copies.
• Note: To view a list of Air Print supported printers, click on the following: https://support.apple.com/en-us/HT201311
Page � of �19 33

23. Field Calculations (FormConnect Pro)
• FormConnect Pro includes a field type setting (Calculation) that you can choose when creating a new text field.
!
• A formula can be entered into a field to calculate the value between two or more fields.
• Formulas require the following computational symbols (+ - * /).
Page � of �20 33

• Each field has a field ID (A1, A2, B1, B2) that displays when you enter a formula.
!
Page � of �21 33

24. Record Locking ( ! ).
• A record can be locked to prevent changes from being made to it. The “lock” symbol will display next to the record indicating the record has been locked.
!
• Note: Once a record has been locked, it cannot be unlocked.
Page � of �22 33

25. Kiosk Mode (FormConnect Pro)
• A display mode that hides the menu bar icons and only displays the
Submit, Clear and Kiosk ( ! ) buttons for data entry.
• Customer records are not visible to the person filling out the form when in kiosk mode.
!
Page � of �23 33

• Kiosk mode must be set to “ON” in the “Form Settings” before this function operates.
!
Page � of �24 33

• Kiosk mode ( ! ) requires a password to invoke and exit this mode.
• Kiosk mode will work in both portrait and landscape but works best in portrait mode.
!
Page � of �25 33

26. GPS Field Type (FormConnect Pro)
• A field type called “Location” that automatically inputs the GPS location into a field.
• The GPS setting can be displayed in one of three formats: Decimal Degrees; Degrees, minutes, seconds; and Degrees, decimal minutes. All three field formats can be enlarged to include a map as well.
!
Page � of �26 33

27. Automatic Exporting (FormConnect Pro)
• There is a form setting for automating the export of records.
Page � of �27 33

• It can be configured for either Email or Dropbox.
• You can specify the file format, default subject, message, email recipients and default Dropbox directory.
Page � of �28 33

• The export process begins when you tap on the arrow icon ! , select the record(s) and tap the export button.
Page � of �29 33

28. Photo Annotation
• A photo can be annotated on by tapping on it to enlarge it. Then selecting a color palette to draw on it.
Page � of �30 33

29. Linking Fields (FormConnect Pro)
• Two or more fields can be linked together so that data entered into one field automatically updates the second field.
• When creating a new text field, there is an option to specify the field parameter as a “Linked Field” and then define which field to link (E.g., Business Name on pg. 2 links to Site Name on pg. 1).
Page � of �31 33

30. Linking Fields (FormConnect Pro)
Page � of �32 33

31. Required Field (FormConnect Pro)
• A required field is a field where data must be entered in order for the record to be saved.
• There is a field setting where you can specify that the field is required.
• There is also an option to specify a minimum and maximum value.
Page � of �33 33
Related Documents