1 Escan Technologies Corporation Exeba ® -COMM ™ User Guide Magnetic Stripe Reader/Writer Software Escan Technologies Corp 41765 Elm Street Suit #102 Murrieta, CA 92562 Phone (951) 270-1911 • Fax (951) 304-1267

Welcome message from author
This document is posted to help you gain knowledge. Please leave a comment to let me know what you think about it! Share it to your friends and learn new things together.
Transcript

1
Escan Technologies Corporation
Exeba®-COMM™ User Guide
Magnetic Stripe Reader/Writer Software
Escan Technologies Corp 41765 Elm Street Suit #102
Murrieta, CA 92562 Phone (951) 270-1911 • Fax (951) 304-1267

2
E S C A N T E C H N O L O G I E S C O R P O R A T I O N Exeba®-COMM™ User Guide
The Exeba®-COMM™ user documentation has been written by Escan Technologies Corp. No part of this publication may be reproduced or distributed in any form or by any means without the prior written permission of Escan Technologies Corp. We welcome your suggestions and comments regarding improvements to Exeba®-COMM™ or this manual. Changes will be incorporated in the new editions of this manual and in new versions of Exeba®-COMM™. Escan Technologies Corp. reserves the right to make improvements or changes to this product at any time without notice. While every reasonable precaution has been taken in the preparation of this manual and software, Escan Technologies Corp. assumes no responsibility or liability of any kind for errors or omissions, or for the consequences of such errors. Exeba®-COMM™ is provided “as is” without warranty of any kind. The entire risk as to the quality and performance of Exeba®-COMM™ is on the user. This documentation was last updated for Version 16.0 of Exeba®-COMM™. Document Revision: 16.0.0.0
Serial Number

3
License Agreement This license agreement is your proof of license. Please treat it as valuable property. This is an agreement between you (either individual or entity), the end user, and Escan Technologies Corp. If you do not agree to the terms of this agreement, promptly return the disk package and accompanying items (including written materials and binders or other containers) to the place you obtained them for a full refund. 1. GRANT OF LICENSE. This License Agreement permits you to use one copy of the specified version of the Exeba®-COMM™ software product identified above ("SOFTWARE") on any single computer, provided the SOFTWARE is in use only on one computer at any time. If you have multiple Licenses for the SOFTWARE, then at any time you may have as many copies of the SOFTWARE in use as you have Licenses. The SOFTWARE is "in use" on computer when it is loaded into the temporary memory (i.e. RAM) or installed into the permanent memory (e.g. hard disk, CD-ROM, or other storage device) of that computer, except that a copy installed on a network server for the sole purpose of distribution to other computers is not "in use". If the anticipated number of users of the SOFTWARE will exceed the number of applicable Licenses, then you must have a reasonable mechanism or process in place to assure that the number of persons using the SOFTWARE concurrently does not exceed the number of Licenses. If the SOFTWARE is permanently installed on the hard disk or other storage device of a computer (other than a network server) and one person uses that computer more than 80% of the time it is in use, then that person may also use the SOFTWARE on the portable or home computer. 2. COPYRIGHT. The SOFTWARE is owned by Escan Technologies Corp. or its suppliers and is protected by United States copyright laws and International treaty provisions. Therefore, you must treat the SOFTWARE like any other copyrighted material (e.g. book or musical recording) except that you may either (a) make one copy of the SOFTWARE solely for backup or archival purposes, or (b) transfer the SOFTWARE to a single hard disk provided you keep the original solely for backup or archival purposes. You may not copy the written materials accompanying the SOFTWARE. 3. OTHER RESTRICTIONS. This Exeba®-COMM™ License Agreement is your proof of license to exercise the rights granted herein and must be retained by you. You may not rent or lease the SOFTWARE, but you may transfer your rights under this Exeba®-COMM™ License Agreement on a permanent basis provided you transfer this License Agreement, the SOFTWARE, and all accompanying written materials and retain no copies and the recipient agrees to the terms of this Agreement. You may not reverse engineering, decompile, or disassemble the SOFTWARE. Any transfer of the SOFTWARE must include the most recent update and all prior versions. 4. DUAL MEDIA SOFTWARE. If the SOFTWARE package contains both 3.5-inch disks and CD-ROM, then you must use only the media appropriate for your single designated computer or network server. You must not use the other media on another computer or computer networks, or loan, rent, lease, or transfer them to another user except as part of a transfer or other use as expressly permitted by this Exeba®-COMM™ License Agreement. LIMITED WARRANTY. Escan Technologies Corp. warrants that (a) the SOFTWARE will perform substantially in accordance with the accompanying written materials for a period of thirty (30) days from the date of receipt; and (b) any hardware accompanying the SOFTWARE will be free from defects in materials and workmanship under normal use and service for a period of one (1) year from the date of receipt. Any implied warranties on the SOFTWARE and hardware are limited to thirty (30) days and one (1) year, respectively. Some states do not allow limitations on duration of an implied warranty, so the above limitation may not apply to you.

4
CUSTOMER REMEDIES. Escan Technologies Corp.'s entire liability and your exclusive remedy shall be, at Escan Technologies Corp.'s option, either (a) return of the price paid or (b) repair or replacement of the SOFTWARE or hardware that does not meet Escan Technologies Corp.'s Limited Warranty and that is returned to Escan Technologies Corp. with a copy of your receipt. This limited warranty is void if failure of the SOFTWARE or hardware had resulted from accident, abuse, or misapplication. Any replacement SOFTWARE will be warranted for the remainder of the original warranty period or thirty (30) days, whichever is longer. Neither these remedies nor any product support services offered by Escan Technologies Corp. are available for this U.S.A. version product outside of the United States of America. NO OTHER WARRANTIES. Escan Technologies Corp. Disclaims all other warranties, either express or implied, including but not limited to implied warranties of merchantability and fitness for a particular purpose, with respect to the SOFTWARE, the accompanying written materials, and any accompanying hardware. This limited warranty gives you specific legal rights. You may have others, which may vary from state to state. NO LIABILITY FOR CONSEQUENTIAL DAMAGES. In no event shall Escan Technologies Corp. or its suppliers be liable for any damages whatsoever (including, without limitation, damages for loss of business profits, business interruption, loss of business information, or other pecuniary loss) arising out of the use of or inability to use this Escan Technologies Corp. product, even if Escan Technologies Corp. has been advised of the possibility of such damages. Because some states do not allow the exclusion or limitation of liability for consequential damages, the above limitation may not apply to you. U.S. GOVERNMENT RESTRICTED RIGHTS This SOFTWARE and documentation are provided with RESTRICTED RIGHTS. Use, duplication, or disclosure by the Government is subject to restrictions as set forth in subparagraph (c)(1)(ii) of the Rights in Technical Data and Computer Software clause at DFARS 252.227-7013 or subparagraphs (c)(1) and (2) of the Commercial Computer Software--Restricted Rights at 48 CFR 52-227-19, as applicable. This Agreement is governed by the laws of the State of California. COPYRIGHT Information in this document is subject to change without notice and does not represent a commitment on the part of Escan Technologies Corp. The software described in this document is subject to the license agreement that is included with Exeba®-COMM™, in whole or in part, in print, or in any other storage and retrieval system is prohibited. No part of this publication may be reproduced, transmitted, transcribed, stored in a retrieval system, or translated into any language in any form by any means for any purpose other the purchaser's personal use without express written permission of Escan Technologies Corp Copyright 2016 Escan Technologies Corp. All rights reserved. Printed in the United States of America. This manual was produced using Microsoft Word for Windows. TRADEMARKS Exeba® and the Exeba® logo are registered trademarks of Escan Technologies Corporation. Escan Technologies Corp® and the Escan Technologies Corp® logo are registered trademarks of Escan Technologies Corporation.

5
Microsoft and Windows are registered trademarks of Microsoft Corporation. Visual Basic is registered trademark of Microsoft Corporation. True DBGrid is registered trademark of Apex Software Corporation. Crystal Reports is registered trademark of Seagate Crystal Reports. SuperComm is a registered trademark of Adontec Software Products. MiniReader is a registered trademark of ScanCity Inc.

6
Table of Contents License Agreement ........................................................................................................................................ 3
LIMITED WARRANTY ......................................................................................................................... 3 CUSTOMER REMEDIES. ...................................................................................................................... 4 NO OTHER WARRANTIES .................................................................................................................. 4 NO LIABILITY FOR CONSEQUENTIAL DAMAGES. .................................................................... 4 U.S. GOVERNMENT RESTRICTED RIGHTS ................................................................................... 4 COPYRIGHT ........................................................................................................................................... 4 TRADEMARKS ....................................................................................................................................... 4
Software Features .........................................................................................................................................18 General Software Features .....................................................................................................................18 Encoder General Features ......................................................................................................................18 MSR605x/MSRx6 Encoder(s) Features .................................................................................................19 MSR605/606 Encoder Features ..............................................................................................................19 MSE630A Encoder Features ..................................................................................................................19 MSE750 Encoder Features .....................................................................................................................19 MSR206 Encoder Features .....................................................................................................................19 MSR905 Encoder Features .....................................................................................................................19 MSR905H Encoder Features ..................................................................................................................20 MSR705 Encoder Features .....................................................................................................................20 KDT4000 Encoder Features ...................................................................................................................20 MT95 Features .........................................................................................................................................20 MT I-380 Features ...................................................................................................................................21 Reader General Features ........................................................................................................................21 MPR 1000/2000/3000 (PDC/MPDC/SPDC) Reader Features .............................................................21 MINI400/Mini400 BT/ Mini400 2G Reader Features ..........................................................................22 MINI600 Reader Features ......................................................................................................................22 MSR500 Features ....................................................................................................................................22 Mini123U-SC ...........................................................................................................................................23 Reader Features .......................................................................................................................................23 Mini123EX and MiniDX Readers’ Features .........................................................................................23 PMR102 / 202 (TA90/48) Reader Features............................................................................................23 TA32 Reader Features ............................................................................................................................24 MAGDC Reader Features ......................................................................................................................24 Serial Reader (Non Portable) Features ..................................................................................................25 Keyboard Reader (Non Portable) Features ...........................................................................................25

7
Installing Exeba®-COMM™ .......................................................................................................................26 System Requirements ..............................................................................................................................26 Installation ...............................................................................................................................................26
Starting the Software ....................................................................................................................................27 Hardware Types ............................................................................................................................................28
Magstripe Encoders .................................................................................................................................28 Magstripe Portable Readers ...................................................................................................................28 Quick Start Tutorial (Encoder / Reader) ..............................................................................................30
Main Menu Window .....................................................................................................................................31 Opening the port ...........................................................................................................................................32 Closing the Port ............................................................................................................................................33 Create Database ............................................................................................................................................35
Command Function ..................................................................................................................................35 Menu Access .............................................................................................................................................35 How it works? ...........................................................................................................................................35
Open Database ..............................................................................................................................................37 Command Function ..................................................................................................................................37 Menu Access .............................................................................................................................................37 How it works? ...........................................................................................................................................37
Set Database Password .................................................................................................................................38 Command Function ..................................................................................................................................38 Menu Access .............................................................................................................................................38 How it works? ...........................................................................................................................................38
Clear Database Password .............................................................................................................................40 Command Function ..................................................................................................................................40 Menu Access .............................................................................................................................................40 How it works? ...........................................................................................................................................40
Database Reader Data ..................................................................................................................................42 Format.......................................................................................................................................................42 Sources ......................................................................................................................................................42 Usage .........................................................................................................................................................42
Database Card Data......................................................................................................................................43 Format.......................................................................................................................................................43 Source .......................................................................................................................................................43 Usage .........................................................................................................................................................43
General Settings ............................................................................................................................................45 Command Function ..................................................................................................................................45

8
Menu Access .............................................................................................................................................45 General Settings Options ........................................................................................................................45
Port Settings ..........................................................................................................................................45 Date Format ...........................................................................................................................................45
Button Function .......................................................................................................................................45 Encoder Settings ...........................................................................................................................................46
Command Function ..................................................................................................................................46 Menu Access .............................................................................................................................................46 Encoder Settings Options ........................................................................................................................46
Port Settings ..................................................................................................................................................48 Command Function ..................................................................................................................................48 Command Access ......................................................................................................................................48 Port and Port Settings .............................................................................................................................48 Button Functions ......................................................................................................................................49
Port Settings ..................................................................................................................................................50 Encoder(s): MSE630A, MSE750, ...............................................................................................................50 Port Settings ..................................................................................................................................................51 Encoder(s): MSR605/MSR606, MSR206, MT I380, KDT4000, MSR905, MSR705 ...............................51 Port Settings ..................................................................................................................................................52 Encoder(s): MT95 ........................................................................................................................................52 Poll /Delay Settings .......................................................................................................................................53
Command Function ..................................................................................................................................53 Command Access ......................................................................................................................................53 Poll/Delay Options ....................................................................................................................................53 Button Functions ......................................................................................................................................53
Export Records .............................................................................................................................................56 Command Function ..................................................................................................................................56 Menu Access .............................................................................................................................................56 How it works? ...........................................................................................................................................56 Field Selection ..........................................................................................................................................57
Import Records .............................................................................................................................................58 Command Function ..................................................................................................................................58 Menu Access .............................................................................................................................................58 How it works? ...........................................................................................................................................58
Card Data Report ..........................................................................................................................................59 Command Function ..................................................................................................................................59 Command Access ......................................................................................................................................59 How it works? ...........................................................................................................................................59
9
Initialize Hardware .......................................................................................................................................61 Encoder(s): MSE630A, MSE750, MSR206, MSR606, MSR605, MSRx6, MSR605x, MSR905, MSR905H, MSR705, MT I-380 ...................................................................................................................61
Command Function ..................................................................................................................................61 Command Access ......................................................................................................................................61
Set Coercivity ................................................................................................................................................62 Encoder(s): MSE630, MSE750, MSR606, MSR605, MSR605x, MSRx6, MSR206, MSR905, MSR705, MT95, MT I-380, MSR905H ........................................................................................................................62
Command Function ..................................................................................................................................62 Command Access ......................................................................................................................................62
Configure KDT Encoder ..............................................................................................................................63 Initialize Hardware .................................................................................................................................63
Initialize and eject the card to front .......................................................................................................63 Initialize and eject the card to back .......................................................................................................63 Initialize and retain the card ..................................................................................................................63
Card Entry ...............................................................................................................................................64 Card Status ..............................................................................................................................................64 Eject Card ................................................................................................................................................64 Retrieve Ejected Card .............................................................................................................................64
Configure MT95 Encoder ............................................................................................................................65 Set Encode Mode (MT95) .......................................................................................................................65 Normal Mode ........................................................................................................................................65
Secure Mode ..........................................................................................................................................65 Card Type Setup ...........................................................................................................................................67
Command Function ..................................................................................................................................67 Command Access ......................................................................................................................................67 Create New Type .....................................................................................................................................67 Update card type......................................................................................................................................68 Card Type Example ................................................................................................................................69
Encode Card Data ........................................................................................................................................70 Command Function ..................................................................................................................................70 Command Access ......................................................................................................................................70 Fields Description ....................................................................................................................................70 Creating and Updating Records .............................................................................................................71 Navigating ................................................................................................................................................72
Encoding Functions .....................................................................................................................................74 Track Data Format ..................................................................................................................................74 Read Card Data .......................................................................................................................................74 Write Card Data ......................................................................................................................................75

10
Build Tracks .............................................................................................................................................75 Validate Function ....................................................................................................................................76 Next # ........................................................................................................................................................76
Write Batch ...................................................................................................................................................77 Erase Card Data ...........................................................................................................................................79
Command Function ..................................................................................................................................79 Command Access ......................................................................................................................................79 How it works? ...........................................................................................................................................79
Duplicate Card ..............................................................................................................................................81 Setup Prefix ..................................................................................................................................................82
Command Function ..................................................................................................................................82 Command Access ......................................................................................................................................82 How it works? ...........................................................................................................................................82
General Settings ............................................................................................................................................84 Command Function ..................................................................................................................................84 Menu Access .............................................................................................................................................84 General Settings Options ........................................................................................................................84
Port Settings ..........................................................................................................................................84 Date Format ...........................................................................................................................................84
Button Function .......................................................................................................................................84 Port Settings ..................................................................................................................................................85
Command Function ..................................................................................................................................85 Command Access ......................................................................................................................................85 Port and Port Settings .............................................................................................................................85 Button Functions ......................................................................................................................................86
Reader Port Settings .....................................................................................................................................87 Reader(s): MPR 1000, MPR 2000, MPR 3000, PDC, MPDC, SPDC, Mini400, Mini400 2G, Mini123EX, Mini400BT ....................................................................................................................................................87 Reader(s): MSR 300, MSR 500, Mini123U-SC, Mini123EX, Mini600, PMR102, PMR202, TA90, TA48, TA32, MAGDC, Serial Reader (Non Portable) ...........................................................................................88 Poll /Delay Settings .......................................................................................................................................89
Command Function ..................................................................................................................................89 Command Access ......................................................................................................................................89 Poll/Delay Options ....................................................................................................................................89 Button Functions ......................................................................................................................................89
Text Editor ....................................................................................................................................................92 Main Menu ...............................................................................................................................................92 Toolbar .....................................................................................................................................................92
11
Working with Files .......................................................................................................................................93 Create a New File .....................................................................................................................................93 Open a File ...............................................................................................................................................93 Save a File .................................................................................................................................................93 Close a File ...............................................................................................................................................94 Print a File ................................................................................................................................................94
Working with Text ........................................................................................................................................96 Cut Text ....................................................................................................................................................96 Copy Text .................................................................................................................................................96 Paste Text .................................................................................................................................................96 Search for Text ........................................................................................................................................96
Export Records .............................................................................................................................................98 Command Function ..................................................................................................................................98 Menu Access .............................................................................................................................................98 How it works? ...........................................................................................................................................98
Import Records ...........................................................................................................................................100 Command Function ................................................................................................................................100 Menu Access ...........................................................................................................................................100 How it works? .........................................................................................................................................100
Reader Data Report ....................................................................................................................................102 Command Function ................................................................................................................................102 Menu Access ...........................................................................................................................................102
Log In ..........................................................................................................................................................104 Reader(s): MPR1000, MPR 2000, MPR3000, PDC, MPDC, SPDC ........................................................104
Command Function ................................................................................................................................104 Command Access ....................................................................................................................................104
Set Password ...............................................................................................................................................105 Reader(s): MPR1000, MPR 2000, MPR3000, PDC, MPDC, SPDC ........................................................105
Command Function ................................................................................................................................105 Command Access ....................................................................................................................................105
Reset Password ...........................................................................................................................................106 Reader(s): MPR1000, MPR 2000, MPR3000, PDC, MPDC, SPDC ........................................................106
Command Function ................................................................................................................................106 Command Access ....................................................................................................................................106
Setup Tracks ...............................................................................................................................................107 Reader(s): MPR1000, MPR 2000, MPR3000, PDC, MPDC, SPDC ........................................................107
Command Function ................................................................................................................................107

12
Command Access ....................................................................................................................................107 How it works? .........................................................................................................................................107
Set Power Mode ..........................................................................................................................................108 Reader(s): MPR1000, MPR 2000, MPR3000, PDC, MPDC, SPDC ........................................................108
Command Function ................................................................................................................................108 Command Access ....................................................................................................................................108
Set Time ......................................................................................................................................................109 Reader(s): MPR1000, MPR 2000, MPR3000, PDC, MPDC, SPDC ........................................................109
Command Access ....................................................................................................................................109 Send Command ...........................................................................................................................................110 Reader(s): MPR1000, MPR 2000, MPR3000, PDC, MPDC, SPDC ........................................................110
Command function .................................................................................................................................110 Command Access ....................................................................................................................................110 How it works? .........................................................................................................................................110
Reader(s): Mini400, Mini400BT, Mini400-2G, Mini 600, MSR 500, Mini123EX, MSR 500M, MiniDX3 HID, MiniDX4 HID, MiniDX3, and MiniDX4 .........................................................................................111 Log In ..........................................................................................................................................................112
Command Function ................................................................................................................................112 Command Access ....................................................................................................................................112 How it works? .........................................................................................................................................112
Set Password ...............................................................................................................................................114 Command Function ................................................................................................................................114 Command Access ....................................................................................................................................114 How it works? .........................................................................................................................................114
Get Password ..............................................................................................................................................116 Reader(s): Mini400, Mini 400 2G, Mini400BT, Mini123EX, Mini123U-SC ...........................................116
Command Function ................................................................................................................................116 Command Access ....................................................................................................................................116 How it works? .........................................................................................................................................116
Reset Password ...........................................................................................................................................118 Reader(s): MiniDX3, MiniDX4, MiniDX3 HID, MiniDX4 HID ..............................................................118
Command Function ................................................................................................................................118 Command Access ....................................................................................................................................118
Get Version .................................................................................................................................................119 Command Function ................................................................................................................................119 Command Access ....................................................................................................................................119
Get Total Records .......................................................................................................................................120

13
Command Function ................................................................................................................................120 Command Access ....................................................................................................................................120
Set Time ......................................................................................................................................................121 Command Function ................................................................................................................................121 Command Access ....................................................................................................................................121 How it works? .........................................................................................................................................121
Set Power Mode ..........................................................................................................................................122 Command Function ................................................................................................................................122 Command Access ....................................................................................................................................122 How it works? .........................................................................................................................................122 Get Power ...............................................................................................................................................123
Setup Tracks ...............................................................................................................................................124 Command Function ................................................................................................................................124
Setup Tracks ...............................................................................................................................................125 Command Function ................................................................................................................................125
Set Buzzer ...................................................................................................................................................126 Reader(s): Mini 600 ....................................................................................................................................126
Command Function ................................................................................................................................126 Command Access ....................................................................................................................................126
Set Backlight Duration ...............................................................................................................................127 Reader(s): Mini 600 ....................................................................................................................................127
Command Function ................................................................................................................................127 Command Access ....................................................................................................................................127
Send Command ...........................................................................................................................................128 Reader(s): Mini 400, Mini 600, MSR 500, MSR 500M / Mini 123, Mini 123EX ....................................128
Command Function ................................................................................................................................128 Command Access ....................................................................................................................................128 How it works? .........................................................................................................................................128
Reader(s): PMR 102, PMR 202, TA90, TA48, TA32 ..............................................................................129 Log In ..........................................................................................................................................................130
Command Function ................................................................................................................................130 Command Access ....................................................................................................................................130 How it works? .........................................................................................................................................130
Log Out .......................................................................................................................................................132 Command Function ................................................................................................................................132 Command Access ....................................................................................................................................132
Setup Password ...........................................................................................................................................133

14
Command Function ................................................................................................................................133 Command Access ....................................................................................................................................133 How it works? .........................................................................................................................................133
Reset Password ...........................................................................................................................................134 Command Function ................................................................................................................................134 Command Access ....................................................................................................................................134 How it works? .........................................................................................................................................134
Set Echo Mode ............................................................................................................................................135 Command Function ................................................................................................................................135 Command Access ....................................................................................................................................135 How it works? .........................................................................................................................................135
Setup Tracks ...............................................................................................................................................136 Set Track 3 (TA32) .....................................................................................................................................137
Command Function ................................................................................................................................137 Command Access ....................................................................................................................................137
Set Inactivity Timeout .................................................................................................................................138 Command Function ................................................................................................................................138 Command Access ....................................................................................................................................138 How it works? .........................................................................................................................................138
Set Time ......................................................................................................................................................139 Command Function ................................................................................................................................139
Get Reader Status .......................................................................................................................................140 Command Function ................................................................................................................................140
Get Version .................................................................................................................................................141 Command Function ................................................................................................................................141
Get Hardware Serial # ................................................................................................................................142 Send Command ...........................................................................................................................................143
Command Function ................................................................................................................................143 Command Access ....................................................................................................................................143
MAG DC, and Serial Reader ......................................................................................................................144 Reset Reader ...............................................................................................................................................145 Reader(s): MAG DC, ..................................................................................................................................145
Command Function ................................................................................................................................145 Set Password ...............................................................................................................................................146 Reader(s): MAGDC ....................................................................................................................................146
Command Function ................................................................................................................................146 Command Access ....................................................................................................................................146

15
Set a new Password ...............................................................................................................................146 Disable Password ...................................................................................................................................147 Clear Password ......................................................................................................................................147 Check Password .....................................................................................................................................148
Set Magstripe Options ................................................................................................................................149 Reader(s): MAGDC ....................................................................................................................................149 Get Version MAGDC ..................................................................................................................................151 Get Total Records .......................................................................................................................................152 Reader(s): MAGDC ....................................................................................................................................152 Send Command ...........................................................................................................................................153 Poll Data to a database ...............................................................................................................................155
Command Function ................................................................................................................................155 Command Access ....................................................................................................................................155 View Records .........................................................................................................................................155 Poll Data .................................................................................................................................................155 Cancel Polling ........................................................................................................................................156 Save Data ................................................................................................................................................156 Delete Data .............................................................................................................................................156 Purging Reader Data .............................................................................................................................156 Preview / Print Report ..........................................................................................................................156
Poll data to a text File.................................................................................................................................158 Poll Data .................................................................................................................................................158 Stop Polling ............................................................................................................................................158 Save Data ................................................................................................................................................158 Purge .......................................................................................................................................................158
Purge Reader Data .....................................................................................................................................159 Card Data ....................................................................................................................................................160 Compact and Repair Database ...................................................................................................................162 Import Database .........................................................................................................................................163
Command Function ................................................................................................................................163 Command Access ....................................................................................................................................163
Switch Hardware ........................................................................................................................................164 Product Support ..........................................................................................................................................165 On-Line Help ..............................................................................................................................................166 User Documentation ...................................................................................................................................166 Customer Support .......................................................................................................................................166
Email Address: ....................................................................................................................................166 Telephone / Fax: ..................................................................................................................................166

16
Standard Mailing Address: ..................................................................................................................167 On-line Support ..........................................................................................................................................167

17
Quick Start Exeba®-COMM™ is magnetic stripe reader / encoder software. It has two main functions, first to obtain the data from various magnetic card readers, second to send the data to be encoded on magnetic cards using an encoder or to obtain the data read by an encoder. In this chapter you will learn,
About the main features of the software How to install the software How to unlock the software About the main window features How to get started
Chapter

18
Software Features Exeba-COMM works with many different hardware. This topic lists the general features of the software as well the specific reader or encoder features. General Software Features The following features are available to all encoders and readers. Select different ports and port settings. Adjust delays and time-out according to the hardware requirements. Select between American and European date formats. Create and manipulate a database. Set a default database. Provides database security: setup a new password or change an existing one. Compact and repair a database Import a database
Encoder General Features The following is a list of features available to all the encoders. Auto initializes encoders on startup. Enable and disable each individual track. Select between two different account sequences. Import card data from a text file. Export card data to a text file Query report data and print. Setup a card type template and set a default card type. Setup a prefix database and manipulate it. Read and write standard ISO card data. Copy and write data from one card to another. Erase multiple cards. Write multiple cards. Advanced search for card data records. Swipe search for card data records. Extract fields from tracks’ data. Build tracks from card data fields. Set coercivity to high or low. Create multiple database records with different accounts in sequence.

19
In addition to all the features listed above, each encoder has the following specific commands. MSR605x/MSRx6 Encoder(s) Features Get coercivity settings from the encoder. Get encoder version. Set coercivity to high or low.
MSR605/606 Encoder Features Get coercivity settings from the encoder. Get encoder version. Set coercivity.
MSE630A Encoder Features Read non-ISO standard format. Change track data format. Write non-ISO standard format. Change Write density. Send a command to encoder.
MSE750 Encoder Features Switch between two different emulation modes: MSE, MSR. Read non-ISO standard format. Change track data format. Write non-ISO standard format. Change Write density. Send a command to encoder.
MSR206 Encoder Features Get coercivity settings from the encoder. Get encoder version. Get encoder model#. Send any command to the encoder.
MSR905 Encoder Features

20
Get coercivity settings from the encoder. Get encoder version. Get encoder model#. Send any command to the encoder.
MSR905H Encoder Features Automatically detects HID port Get coercivity settings from the encoder. Get encoder version. Get encoder model#. Send any command to the encoder.
MSR705 Encoder Features Get coercivity settings from the encoder. Get encoder version. Get encoder model#. Send any command to the encoder.
KDT4000 Encoder Features Provides three different ways for initializing the hardware. Provides information about the status of the card (detected, not detected). Provide the encoder version. Eject the card. Retrieve the card. Get encoder version. Send any encoder command.
MT95 Features Set coercivity to high, low or automatic selection where card coercivity is detected
automatically by the hardware. Supports two different modes for encoding:
a) Normal Mode: encoder is set to encode at any time. b) Secure Mode: encoder validates a good read before it encodes a card.
Get tracks setup. Provides the encoder version. Provides the encoder configuration.

21
Programming commands can be sent to the hardware. MT I-380 Features Set coercivity to high, low or automatic selection where card coercivity is detected
automatically by the hardware. Provides hardware model. Eject card command. Setup encoder. Programming commands can be sent to the hardware.
Reader General Features In addition to the general features, all readers share the following features.
Build in text editor. Poll data from readers. Purge data in the readers. Save data to a database. Save data in a text file. View data in the same format stored in reader. View data formatted to tracks and date and time fields. View data in a tabular format. View and manipulate date in American or European format. Query data to view. Query report data.
In addition to the general software features and the reader general features, each reader has specific features. Here is a list for each reader, MPR 1000/2000/3000 (PDC/MPDC/SPDC) Reader Features Manual log in to the reader. Automatic log in to the reader. Set reader password for security purpose. Reset password without deleting the data file. Reset reader to manufacture default and erasing all data. Set the length of time before the reader powers OFF. Change the reader’s date and time. Set track(s) configuration. Send programming commands.

22
MINI400/Mini400 BT/ Mini400 2G Reader Features Manual log in to the reader. Automatic log in to the reader. Get the total number of records stored in the reader. Set Password for security purpose. Provides a way to retrieve the password. Get product version. Set the date and time. Get the data and time. Set inactivity time out. Get inactivity time out. Program track(s) settings. Set buzzer settings. Send programming commands
MINI600 Reader Features Manual log in to the reader. Automatic log in to the reader. Get total number of records stored in reader memory. Set Password for security purpose Reset password to default. Get product version. Set date and time. Get date and time. Set inactivity power timeout. Get inactivity power timeout setting. Program tracks settings. Send programming commands. Set backlight duration.
MSR500 Features Manual log in to the reader. Automatic log in to the reader. Get the total number of records stored in the reader. Set Password for security purposes.

23
Set date and time. Get total records stored in reader. Get reader version. Send programming commands
Mini123U-SC Reader Features Manual log in to the reader. Automatic log in to the reader. Get the total number of records stored in the reader. Set Password for security purposes. Get password set in reader. Get product version. Set the date and time. Set power off options. Get power off setting. Setup tracks options. Set buzzer settings. Send programming commands
Mini123EX and MiniDX Readers’ Features Manual log in to the reader. Automatic log in to the reader. Get the total number of records stored in the reader. Set Password for security purposes. Get password set in reader. Get product version. Set the date and time. Get the date and time. Set power mode. Get power modes settings. Setup tracks options. Set buzzer settings. Send programming commands
PMR102 / 202 (TA90/48) Reader Features Detects reader type automatically.

24
Provides easy log in/out process. Provides a menu to change the reader password. Provides two different log-in modes: with a password for security or without a password for
faster log in. Provides a way to get the reader password without deleting the reader's data. Set echo mode. Set the inactivity time-out. Change the reader date and time. Get reader version. Get reader status. Get the hardware serial #. Change the settings for tracks 1 & 2. Send programming commands.
TA32 Reader Features Provides two different log in modes: with password for security or without password for
faster log in. Provides a menu to change the reader password. Provides a way to get the reader password without deleting or updating the reader's data. Set echo mode. Set the inactivity time-out. Change the reader date and time. Get reader version. Get reader status. Get the hardware serial #. Change the settings for tracks 1, 2 and 3. Send programming command.
MAGDC Reader Features Get the total number of records saved in the reader. Program the reader by sending reader commands. Enable and disable the password in the reader. Configure tracks 1&2. Set the date and time. Get reader version. Reset reader to manufacture defaults. Send programming commands.

25
Serial Reader (Non Portable) Features Get reader version. Reset reader to manufacture defaults. Send programming commands to reader
Keyboard Reader (Non Portable) Features Poll data to a text file.

26
Installing Exeba®-COMM™ The installation program installs Exeba®-COMM™ from a CD. Before you begin, ensure that your computer meets the requirements listed below. System Requirements Exeba®-COMM™ has the following system requirements: An IBM PC or compatible computer Microsoft Windows Me, 2000, XP, NT , Vista, Win 7, Win 8, and Win 10 Approximately 30 MB of available disk space Installation
1. Start Microsoft Windows. 2. Close other applications. 3. Insert the Exeba®-COMM™ installation CD into your CD-ROM drive. 4. Once the installation menu appears, select the desired option. 5. Follow the on-screen instructions.

27
Starting the Software Before you start the software for the first time, make sure the hardware key driver is installed. Then connect the key. The key has to be connected all the times in order for the software to run. Then start Exeba®-COMM. The window below will appear. This window is used to select the hardware you are communicating with, to register the software, and to link to the Exeba® web site.
If the hardware key is not properly installed or is not connected, an error message will appear. You can connect the key without restarting the software. Once the key is detected the following message will appear:
Click on the Ok button and then select the hardware type to access the main screen.

28
Hardware Types Before you start the application, click on one of the following buttons: Magstripe Encoders MSE630A Encoder - Click on the button when the MSE630A encoder is used with the software. MSE750 Encoder – Click on the button when the MSE750 encoder is used with the software MSR206 Encoder - Click on the button when the MSR206 encoder is used with the software. MSR905 Encoder – Click on the button when the MSR905 encoder is used with the software. MSR 905H Encoder – Click on this button when the MSR905H encoder is used with the software. MSR X6 Encoder – Click on this button when the MSRX6 encoder is used with the software. MSR 705 Encoder – Click on this button when the MSR705 encoder is used with the software. MSR605x/MSRx6 Encoder – Click on the button when the MSR605x or MSRx6 encoder is used with the software. MSR605/MSR606 Encoder – Click on the button when the MSR605 or MSR606 encoder is used with the software. KDT4000 - Click on the button when the KDT4000 encoder is used with the software. This will make the KDT 4000 menu appear in the application’s main window. MT95 Encoder- Click on the button when the MT95 encoder is used with the software. This will make the MT95 menu appear in the application’s main window. MT I-380 Encoder- Click on the button when the MT I-380 encoder is used with the software. This will make the MT I-380 menu appear in the application’s main window. MSR605/606 Encoder – Click on this button when either the MSR605 or the MSR606 encoder is used with the software. Magstripe Portable Readers MPR 1000/2000/3000 MPDC/PDC/SPDC- Click on this button when a MPR1000, MPR2000, MPR3000, MPDC, PDC, or SPDC reader is used with the software. This will make the MPR menu appear in the application’s main window. MINI400 – Click on this button when a Mini400 reader is used with the software. This will make the Mini400 menu appear in the application’s main window. MINIDX – Click on this button when a MiniDX reader is used with the software. This will make the MiniDX menu appear in the application’s main window. MFR120U – Click on this button when a MFR120U reader is used with the software. This will make the Mini120U menu appear in the application’s main window.

29
MINI400BT – Click on this button when a Min400BT reader is used with the software. This will make the Mini400BT menu appear in the application’s main window. MINI400-2G – Click on this button when a Mini400-2G reader is used with the software. This will make the Mini400 menu appear in the application’s main window. MINI600 – Click on this button when a Mini600 reader is used with the software. This will make the Mini 600 menu appear in the application’s main window. MSR500 – Click on this button when a MSR500 reader is used with the software. This will make the MSR menu appear in the application’s main window. Mini123U-SC - Click on this button when a Mini123U-SC reader is used with the software. This will make the Mini123 menu appear in the application’s main window. PMR 102/202 TA90/48 – Click on this button when a PMR102, PMR202 TA 90 or TA 48 reader is used with the software. This will make the PMR menu appear in the application’s main window. TA32 – Click on this button when a TA32 reader is used with the software. This will make the TA32 menu appear in the application’s main window. MAGDC – Click on this button if the hardware type you will be using with the software is the IBC Portable Magnetic card reader, DC model. Serial Reader (Non Portable) - Click on the button when the RS232 serial reader communication type reader is used with the software. Mini 123EX – Click on this button if the hardware type is a Mini123EX portable reader. Keyboard Reader (Non Portable) – Click this button if the hardware type is a Keyboard Reader.

30
Quick Start Tutorial (Encoder / Reader) When starting Exeba®-COMM™, the hardware selection window will appear. From this window, select the hardware type being used. Once selected, the main window appears with different menus and submenus according to your hardware selection. The following section explains the features of the main window in details. When running the program for the first time, you need to create a database and save it as default. From the Database Menu, select Create Database. The default database will always open when an encoder or reader is selected from the hardware menu. A database is where polled reader data will be saved. It is also used by the encoder when the Encode Card menu is opened. Since the default database automatically opens when the encoder or reader is selected from the hardware menu, the same database is shared between the encoder and the reader. Any data polled from the reader can be accessed by the encoder from the Encode Card menu. After your default database is created, it is recommended to secure your database by adding a password using the Set Database Password window. Once a database is created or opened, the main menu will appear with various options. You will notice that some options in the menu may disappear or appear when a different hardware type is selected. If you are working with more than one hardware type, select the hardware type by clicking on Switch Hardware button. In this section you will learn about the various options available while navigating through Exeba®-COMM™. Each menu has its own chapter. Each Chapter describes the function for each option in more detail.

31
Main Menu Window From this window, you can access all the software functions. The menu selection for this window will be different depending on the hardware selected.
Main Menu - This menu has several selections. It is located at the top of the main window. Button Bar - It is located under the main menu and contains buttons that can be used to easily access some of the frequently used commands in Exeba®-COMM™ Status Bar - It is located at the bottom of the main window and displays communication status messages being used in Exeba®-COMM™. The following is an explanation of each: Status – displays any error message returned from the port Port – displays the port number for the selected port Settings – displays the current port settings for the selected reader Reader/Encoder – displays the current settings for the selected reader/encoder Encoder Settings – the last panel of the status bar, displays encoder settings such as coercivity. The status bar might be slightly different depending on the hardware selected.

32
Opening the port When you select any of the menu commands that require the communication port (USB, RS232, or HID) to be open, Exeba®-COMM™ will open the port automatically. Exeba®-COMM™ will open the port only if it is closed. It will also reopen it when the port settings are modified. To open the port manually, click on the light bulb icon in the Status Bar. The light bulb icon also serves as an indicator for the status of the port. A green bulb icon indicates that the port is open. A red bulb icon indicates that the port is closed. The status bar for the main window displays the status and settings for the communication port.
NOTE When communicating with an HID hardware, Exeba®-COMM™ will automatically select and open the port or allow you to select between a list of HID ports.

33
Closing the Port Once the port is opened, it will not automatically close. To close the port, click on the light bulb icon in the status bar. The port is closed automatically when you exit Exeba®-COMM™.
NOTE When a communication error occurs, Exeba®-COMM™ will ask you to cancel or ignore the error. If you select to cancel, the port will be closed.

34
Database Menu The Database menu is used to create and open a database. The database Password is also changed from this menu. Once the database is unlocked in the software, this menu becomes available for all types of readers and encoders.
In this chapter the following topic are explained in details:
Create a new Database Open an Existing Database Change Password Clear Password Card Data Records Reader Data Records
Chapter

35
Create Database Command Function This command will create a new database and save it in the location that you specify. It will also allow you to set the new database as the default database. When the program is used for the first time, it is recommended to use this command to create the default database. Menu Access From the Database menu, select Create Database. The standard Save As dialog window will appear as shown below.
How it works? 1. In the Save In box, select the drive and folder where the database file will be saved. 2. In the File Name box enter the name of the new database file. You do not need to enter an extension. All database files will be saved with .mdb (access format) extension. If the file already exists, a warning message will pop up asking you if you want to overwrite it. 3. Click on the Save button to create the database. 4. Once created, you will be asked whether you want to set the new database as the default database. As shown in the figure below.

36
When set as default, the database file will open automatically every time the program is launched. Click on Yes button to set the database as default. Click on No if you would like to work with the new database until you exit the program. Once the database is created, all the database functions will be enabled in the software. A new database is not password protected. It is recommended to use the Set Database Password to create a new password.

37
Open Database Command Function The Open Database command will allow you to open a previously created database. It also allows you to set an existing database as default. Menu Access From the Database menu, select Open Database. Or click on the Open Database button of the button bar. The following window will appear,
How it works? 1. In the Look In box, select the drive and folder where the database file is located. 2. In the File Name box enter or select the name of the database file. 3. Click on the Open button to open the database. If the database file you selected is password protected, the following window will appear.
Enter the database password. Then click on the Ok button. The name of the active database file will appear at the top of the main menu.
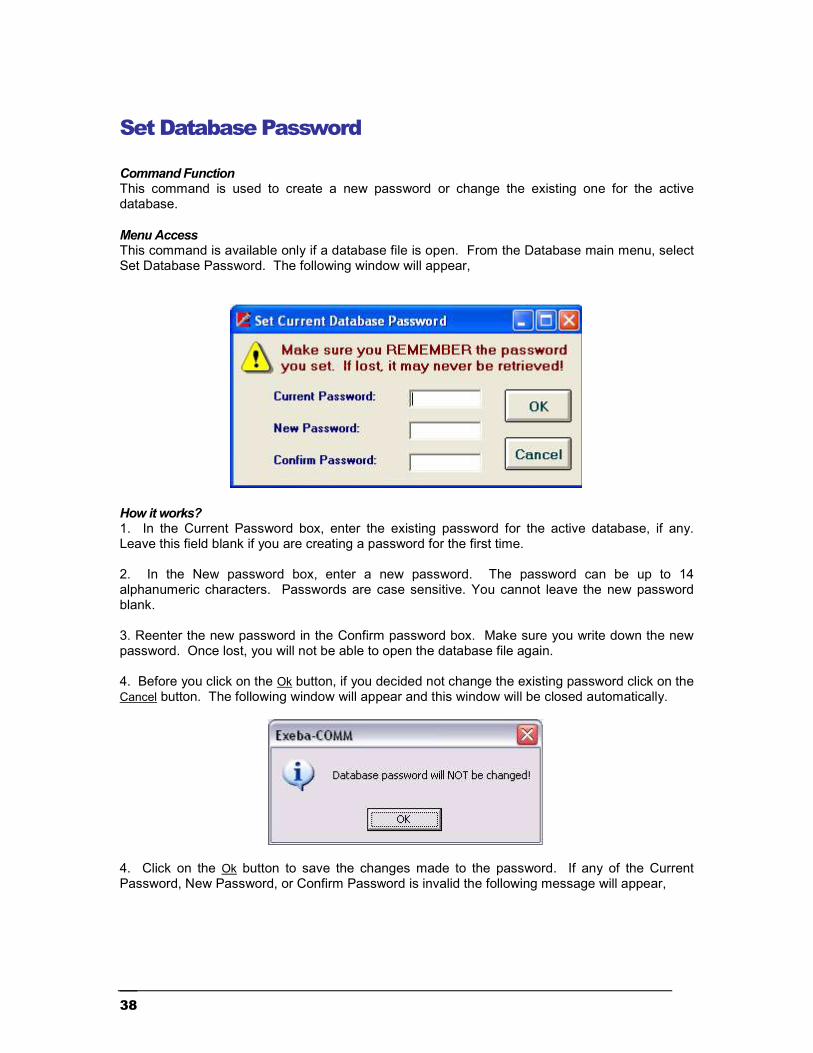
38
Set Database Password Command Function This command is used to create a new password or change the existing one for the active database. Menu Access This command is available only if a database file is open. From the Database main menu, select Set Database Password. The following window will appear,
How it works? 1. In the Current Password box, enter the existing password for the active database, if any. Leave this field blank if you are creating a password for the first time. 2. In the New password box, enter a new password. The password can be up to 14 alphanumeric characters. Passwords are case sensitive. You cannot leave the new password blank. 3. Reenter the new password in the Confirm password box. Make sure you write down the new password. Once lost, you will not be able to open the database file again. 4. Before you click on the Ok button, if you decided not change the existing password click on the Cancel button. The following window will appear and this window will be closed automatically.
4. Click on the Ok button to save the changes made to the password. If any of the Current Password, New Password, or Confirm Password is invalid the following message will appear,

39
If the changes were successful, the following message will appear and the window will be closed automatically.

40
Clear Database Password Command Function Use this command to clear the existing database password. Menu Access From the Database menu select Clear Database Password. The following window will appear,
How it works? In the Current Password box, enter the existing password. Then click on the Clear button to clear the password. If the password you entered is correct then the following message will appear and the window will be closed automatically.
Otherwise, the following message will appear,
Enter the password and try again. If you do not wish to clear the password then click on the Cancel button. The following message will appear, and the window will be closed automatically.

41

42
Database Reader Data The reader data referred to in the software is the database record with the format explained in this section. Format When the data is obtained from the different sources listed below, it will be saved in the following fields in the database.
Track 1 – this field can contain up to 150 alphanumeric characters. For example, data from track 1 will be automatically saved to this field. Track 2 – this field can contain a maximum of 150 alphanumeric characters.
Track 3 – this field can contain a maximum of 150 alphanumeric characters. Date – whether the source is the reader or computer date, this field will save data in one
of the following formats: mm/dd/yyyy or dd/mm/yyyy according to your date selection. Time – this field will save the time as follows hh:mm:ss.
Sources Reader – When data is polled from any of the following readers currently working with
the software: MPR 1000, MPR 2000, MPR 3000, MPDC, PDC, SPDC, Mini 400, Mini400BT, MiniDX, MFR120U, Mini400 2G, Mini 600, MSR 500, Mini123 U-SC, Mini123 EX, MAGDC, TA32, PMR 102, PMR 202, TA 90, TA 48, Serial reader (Non Portable), keyboard reader (Non Portable). It is saved in the database in the fields listed above.
Import Utility – Using the import utility you can import data from a text file into the database reader data.
Import Database – This utility imports merges reader data from another database. Usage The reader data is used by the software as follows: Encode – After the reader data is obtained from the sources listed above, the software
will automatically extract the card data using the default card type if the data matches the specification of the card type. This will make the data available for encoding.
Report – When this data is saved in the database, you will be able to generate reports as explained in section X.X
Export Utility – If you need to use this data with different software, this utility will allow you to transfer the data to a text file as explained in section X.X
43
Database Card Data Format When data is obtained from the sources list below it will be saved in the database with the following format:
Account# - any alphanumeric characters (maximum 20). Title – up to 5 alphabetic characters. Last Name – any alphabetic characters up to 25. First Name – any alphabetic characters up to 25. Record Date – date format (mm/dd/yyyy). Issue Date – Date format (mm/dd/yyyy). Member Since – Numeric data in the following format (mmyy). Expiration Date – Numeric data in the following format(yymm). Extra Info – this field can contain up to 20 alphanumeric character.
Source Encoders – When you read a card using any of the following encoders that work with the
software: MT95, MT I-380, KDT4000, MSR206, MSR705, MSR905H, MSE630A, MSE750, MSR605x, MSRx6, MSR606 or MSR605 and the encoder window.
Readers – As described in the previous section, data that comes from the reader is automatically extracted into card data according to a default type you select.
User Created - Unlike the Reader Data, the Card Data can be created and manipulated one record at a time manually by the user in the Encoder window. Import Utility – this utility allows you to import data from a text file to the database reader data as explained in section X.X
Import Database – data can be imported from an older version of Exeba-COMM Usage Export – card data can be exported into a text comma delimited text file.
Report – or you can print the data in the form of a detailed report. Encode Data - most important function is that you can write this data on a card using any
of the encoders used in the software.

44
Setup Menu The Setup menu is available to all types of encoders that work with the software. It allows you to make changes to the following:
The software general settings. The encoders’ settings in the software. The port number and port settings The delay, machine speed and timeout settings
Once you select the encoder from the hardware selection window, click on the Setup menu. The following window will appear.
This chapter explains each submenu as well as the default communication settings for each encoder.
Chapter

45
General Settings Command Function Using this command you will be able to change settings for the application in general. Menu Access From the Setup main menu, select General Settings. The following window will appear.
General Settings Options Currently there are two settings to change under the general settings. Port Settings Port Settings Disabled - When you select the Port Settings Disabled option, you are disabling the selection of the following port parameters: Baud Rate, Data Bits, Parity and Stop Bits. Port Settings Enabled – Contrary to the above settings, when the Port Settings Enabled option is selected, the user is allowed to make changes to the port settings described later in this chapter. Date Format The date field is used extensively throughout the software. It is used when polling data from the reader, setting up a card record, importing and exporting data, reports etc…The date format defines how you would like the date field to appear in the software. Select one of the following date formats according to your requirements and according to your computer date settings. American Date – This is the default settings, select this option if you computer is set to American date format where the month is followed by the day and year. European Date – Select this option if your computer is set to European date where the day comes before the month. Button Function Click on the Save button to save any changes made. Click on the Close button to close this window.

46
Encoder Settings Command Function As the name indicates, this command allows you to change the software encoder settings only. In other words, it allows you to change the default encoder settings in the application. Menu Access This command is available for encoders only. From the Setup menu, select Encoder Settings. The following window will appear,
Encoder Settings Options Auto Initialize on Startup – check this option if you would like the encoder to be initialized automatically once the software is started. Read/Write Tracks Settings – Enable and disable each track individually according to your requirements. For example, if track 3 is not used, uncheck the Read and Write options for this track. Then track 3 will be disabled throughout the software. Default Card Type – Select from this list the card type that you mainly work with. For example, if your cards are encoded for Employee Cards, once you setup this type in the Card Type Setup window, you can select it from this list. Account Sequence – These options are used by the Next# function of the Encode Card window. It will show the next number in sequence based on the option you choose. This function can be enabled and disabled according to the Enable Next# Function option. If enabled, select one of two sequences as following: Mod-10 – When selected the next account# will be based on modulus 10 or mod 10 algorithm.

47
Increment of – This option will add the increment number you select to the next account#. For example, if you selected Increment of 5 and your account # is 10000, then the next account# number will be 10005. Emulation Mode – This option is available only if an MSE750 encoder is selected. It defines what mode the encoder is currently set to. The default setting is MSE. Before you start using the encoder, make sure you match this software setting with your hardware settings. Click on the Save button to save any changes made. Click on the Close button to close this window.

48
Port Settings Command Function This command allows you to select the port the encoder is connected to. If the option Enable Port Settings is selected under the General Settings, then you will be able to change the default port settings as well. Command Access After you connect the encoder to your computer, from the Setup main menu, select Port Settings. The following window will appear:
Port and Port Settings Port - Select the com port or HID port the encoder is connected to. The software will automatically detect all the available ports on your computer. Baud Rate - Select the baud rate. The selectable range is 600 to 256000. Data Bit - Select 7 or 8 Parity - Select Even, Odd, None, Mark, or Space Stop Bits - Select 1, 1.5, or 2
NOTE If the communication port was open before you changed these setting, the message “Current port should be closed before making any changes. Close Port?” will appear. Click on the Yes button so that changes will be in effect.

49
Button Functions Default - Returns the settings to the recommended port settings for the encoder being used. It also saves the default settings. Save - Before you close this window, make sure you save any changes made to the port or port settings by clicking on the Save button. Close - Close this window and return to the main menu. Exit X - This button closes the window.
NOTE If the selected hardware is the MSR905H, this function will be disabled. The software will automatically detect the HID port which the encoder is connected to. The port will also open and close automatically.

50
Port Settings Encoder(s): MSE630A, MSE750, Port Settings – automatically detected when they are selected from the main menu. The figure below shows the default port settings for the MSE630A, or MSE750:

51
Port Settings Encoder(s): MSR605/MSR606, MSR206, MT I380, KDT4000, MSR905, MSR705 The figure below shows the default port settings for the MSR605, MSR606, MSR206, MSR905, MSR705, Magtek I-380 and KDT4000 Encoders:

52
Port Settings Encoder(s): MT95 The figure below shows the default port settings for the Magtek MT95 Encoder:

53
Poll /Delay Settings Command Function The settings of the poll and delay parameters affect the commands that send and receive data to and from the encoder. It may be necessary to try different settings until the correct configuration is established for the hardware being used. Command Access From the Setup main menu, select Poll / Delay Settings. The following figure will appear. The figure below shows the default Poll / Delay settings for the encoders supported by this software:
Poll/Delay Options These settings are as follows: Delay - Used by the polling commands only. The delay is the number of milliseconds (00000-99999) the polling function should wait between polls. The default is 100 milliseconds. Time Out - The number of milliseconds (00000-99999) the software should wait, after sending a command, for a response from the reader before timing out. The default is 100 milliseconds. Machine Speed - The amount of time Exeba®-COMM™ should wait after sending a command and before receiving data from the encoder. You can select any number from 1 to 50. The number you select is represented as a multiple of 10th of a milliseconds. For example: if you select 1, the wait time will be 10 milliseconds. The larger the number, the slower the data will be transferred. However, a small value may cause polled data to be fragmented. Button Functions Default - Sets and saves the poll and delay settings to the recommended settings. Save - Saves any changes made.

54
Close - Closes this window and return to the main menu. This button closes the window without any warning of unsaved changes. Make sure the changes are saved before you exit. Exit X - Use to exit this window.
NOTE Exeba-COMM allows you to save different settings for each type of encoder used. For example, you can select two machine speeds for an MSR and an MSE encoder. These settings will appear when the specific encoder is selected.

55
Encoder File Menu From the File menu you can access commands to import, export, and print reports, as shown in the figure below. This menu is available for the MSE630A, MSR206, MSE750, MSR605x, MSRx6, MSR605, MSR606, MSR705, MSR905, MSR905H, KDT4000, MT95, and MT I-380 encoders. This chapter explains in details the following submenus,
Import Card Data records Export Card Data records Print Card Data Reports
Chapter

56
Export Records Command Function This command exports data saved in the active Database into a comma text delimited file. Menu Access This command is available when any encoder is selected and a database is open. From the File menu select Export Records then select Card Data. The following window will appear.
How it works? 1. Enter the location and name of the file in the File Path and Name box. You can also click on the Browse button to locate or create the file using the Save as standard window. When this window appears, select the drive, folder and name of the file to export the data to. 2. Then select the range of data you would like to include in the file. The available options are: All Records – will basically export all the card data in the current database. Card Type – if you prefer to export only the data of a specific card type then click on this option and select the card type from the list. Record Date – if you need to export only the records that were created between specific dates select this option then select the range of dates. Issue Date – if you only need the records that have an issue date between specific dates, select this option and select the range of date. 3. The next step would be to select the field(s) to export and in the order required.
Export From List - This box lists all the available fields that can be exported. Export To List - This box shows the fields that you select to export.

57
Field Selection To select the fields use the following buttons. -> - This button will add a single field to the end of the Export To List. Highlight the field in the Export From List then click on this button. >> - This button will move all the fields in the Export From List to the Export To List. The contents of the Export To List will be replaced by the Export From List. <- - To remove a field from the export list, highlight the field in the Export To List, and click on this button. << - To remove all the fields in the export list, click on this button. Export - By clicking this button, the fields in the list box Export To List will be written to the specified text file. Close - Use this button to close the window and return to the main menu.

58
Import Records Command Function This command is used to import card data records from a comma delimited text file to the active database card data. Menu Access From the File menu, select Import, then select Encoder Data. The following window will appear,
How it works? 1. When creating the text file to import keep the following rules in mind:
Unless the file contains only one field, all fields should be separated with commas. The records (or lines) must end with a carriage return. The order of the fields in the file should be the same as the import list fields. If a record contains a blank field it should be replaced by a comma. Conform to the format of the fields as described in the topic Database Card Data.
2. In the File Name and Path box, enter the location and name of the file to import. You can also use the browse button (…). When you click on this button the Save As standard window appears. Select the drive, folder and name of the file to be imported. 3. Select the fields list by highlighting the field, then clicking on one of the following buttons to add it to the import list. - adds a single field to the end of the list - deletes a single field from the list >> - adds all the fields to the import list << - deletes the import list 4. Click on the Import button to import the file. If successful a message will be displayed and the data can be viewed in the Card Data Setup window, Reports, etc...

59
Card Data Report Command Function This command allows you to select data to print reports of the card data stored in the active database. It also allows you to select the range of data to print. Command Access In order from this command to be available, an encoder should be selected and a database should be open. From the File menu, select Report, then select Card Data. The following window will appear.
How it works? 1. Select the range of data to be included in the report as follows: All – When you select this option, all the records based on the Status you choose, will be included in the report. Account# - If you would like to see a report of cards with specific account #, select this option then enter the account# in the designated box. Record Date – Select this option if you would to see a report of all the records that were created on a specific date. Then select the date from the calendar provided. 2. Select the status of the card data from the following options: Valid – For a report of only the card with a non-expired date, select this option. Expired – Contrary to the above option, if you would like to see a report of the expired cards, select this option. Both – selecting this option will include expired and valid cards in the report. 3. Click on one of the following buttons, View – this button allows you to preview a report before printing it. Then you can click on the printer icon of this window to print the report. Print – click on this button to print a report without viewing it.

60
Encoder Menu In this chapter you will learn how to configure the encoder before encoding any card. All of the commands explained in this chapter are available under the Encoder menu. These commands will differ slightly depending on the type of encoder selected.
This chapter discusses the following topics,
Initialize Encoder Set Coercivity Get Coercivity Set Encoder Mode Get Tracks Setup Eject Card
Chapter

61
Initialize Hardware Encoder(s): MSE630A, MSE750, MSR206, MSR606, MSR605, MSRx6, MSR605x, MSR905, MSR905H, MSR705, MT I-380 Command Function You need to run the Initialize Hardware command in order for the encoder menu options to become available. This command warm boots the encoder. Once initialized, you can set the coercivity, and start encoding cards. Command Access Once you select the encoder, the specific Configure Encoder menu will appear. Select the Initialize Hardware command. Or click on the Initialize Encoder button of the main button bar. You can also set the encoder to be initialized automatically as described in the Encoder Settings topic. If successfully initialized, the message, “Encoder initialized successfully!” will appear.

62
Set Coercivity Encoder(s): MSE630, MSE750, MSR606, MSR605, MSR605x, MSRx6, MSR206, MSR905, MSR705, MT95, MT I-380, MSR905H Command Function Use this command to set the coercivity for the encoder being used. Depending on your requirement, you can set the coercivity to high or low. Command Access From the Encoder menu select Set Coercivity. Then select Low Coercivity, or High Coercivity. If successful, a message such as the figure below will appear.

63
Configure KDT Encoder This section describes the menu commands of the Configure menu of the KDT 4000 encoder.
Initialize Hardware This command initializes (or warm boots) the selected hardware. A confirmation message appears when the initialization is successful. There are three different ways for initializing the KDT 4000 Encoder: Initialize and eject the card to front This menu Command initialize (or warm boots) the Encoder. Also it ejects the card to the front if there's any card detected. Initialize and eject the card to back This menu Command is similar to the above one with the only difference that the card is ejected to the back of the encoder. Initialize and retain the card This menu Command warm boots the Encoder and keep the card inside. After selecting any of the above referenced menu commands, a confirmation message appears if the initialization succeeds.
When an error occurs, the following warning message appears:

64
Card Entry This command is used to insert a card into the encoder. The Encoder waits for the card as long as no card is detected in the gate (entry point). The difference between this menu and "Retrieve Card" menu command is that the "Retrieve Card" command does not wait for a card to be inserted. Card Status This command is used to find out if a card is detected inside the Encoder. Eject Card This menu is used to eject the card from the front or back depending on the user's selection. If the card is ejected from the front, it can be retrieved and inserted using the "Retrieve Card" menu command. The "Retrieve Card" command cannot be used if the card is removed from the encoder. Retrieve Ejected Card Retrieve an ejected card that is not removed. This menu command does not work after "Initialize & Eject Card (front or back)." It only works after the "Eject Card" command. The difference between "Card Entry" and "Retrieve Ejected Card" is that "Retrieve Ejected Card" does not wait for the card to be inserted.

65
Configure MT95 Encoder This section describes some of the command of the Configure MT95 menu.
Set Encode Mode (MT95) This option is used to select either Normal Mode or Secure Mode for Magtek MT95 encoder. When this selection is made, the following menu appears: Normal Mode In Normal Mode, the MT95 operates as a simple card reader and card encoder: When a card is inserted and swiped, all track information will be transmitted via the RS232 connection to the PC. After the card has been successfully read, the card should be removed from the slot. If a card is to be encoded, the PC will prepare the track data and transmit it to the encoder. The unit will beep and prompt the user for a card to be inserted into the slot for encoding. Secure Mode In some applications it may be necessary to ensure that the information that is encoded onto a card goes back onto the same card that it came from. This may occur in a financial institution when a customer’s card is read and only a portion of the track data is modified, such as with a PIN change. In this case the MT95 will ensure that the card is not removed from the unit between the read and encode operations. This will help to prevent skimming of cards.

66
Encoding Cards Once the encoder is initialized, all the commands that communicate with it, such as Encode Cards, will be enabled in the software. In this chapter you will learn how to create a card template, how to read and write card data, and how to write a batch of card. Also you will learn how to erase the card data, and duplicate a card. The commands described in this chapter are accessible to all encoder types.
Chapter

67
Card Type Setup Command Function This command allows you to define your own card type template. The card type is used by the Build Track function and Extract Fields function. By creating a type, you are defining what fields should be on the track. Command Access Once an encoder is selected, this command becomes available. Unlike the encoder commands, you do not need to initialize the encoder first. From the Card menu, select Card Type Setup. The following window will appear,
Create New Type To create a new card template, follow the steps below: 1. Click on the New button. This will clear all the fields and initialize some fields to a default
value. 2. Enter a name for the card type in the Name Box. This name should not exist in the database.
It can be up to 15 characters. 3. Enter a description of the card type in the designated box. This field is optional and can be up
to 100 characters long. 4. Select the track you want to define from the tracks’ list. Then start adding the fields list to the
track as follows: Under the Field Properties, select the name of the field from the list provided. The Text
field is any fixed text you want to include on the track. If selected, enter the text in the Value box.
Select the size of the field. If the field is fixed size, select this option then enter a number for the size. Or if the size varies, select the Range option and enter the minimum and

68
maximum sizes. Select the data type for the field. This can be numeric, alphanumeric, or alphabetic. Enter prefix if any. For example, the Title field in some financial cards should be preceded
by a period (.Mr) Enter up to three possible delimiters in the order of importance. For example, the First
Name field in a Visa type card can be delimited by a period if a title follows (John.Mr), or by a space (John ), or by a carat (John^0901).
Select one of the following conditions from the Condition list, Field should exist – that is the field should not be left blank in order for the Build Track
and Extract Fields functions to work. Field is optional – in this case, the field may or may not contain data. Either field or delimiter exists – this means when building tracks, if the field data is
blank, the delimiter is inserted on the track instead and vise versa. For example, if the expiry date is missing on a Visa type card a delimiter will be in place.
5. Click on the Add button to add the field to the end of the list. Or highlight a field in the list and click on the Insert button to add a field before it.
6. Use the button to move a field up the list or button to move a field down the list. 7. When you are done adding the field for all the tracks in the desired order, click on the Save
button. Update card type To update a card type,
1. Move to the record using the Previous or Next button or enter the name in the Name box. 2. Select the track. 3. To make any changes to the field specification, highlight the field in the list and make the
necessary to its properties. Then click on the Update button 4. To add a new field, create the field as described above and then click on the Add or Insert
button. 5. To change the order of the list, use the button or button. 6. To delete a field, highlight it in the list and click on the Delete button. 7. When done with all the updates, click on the Save button.

69
Card Type Example Card Type name: Employee ID Description: Employee Identification Card Track 1: Field Value Size Data Type Prefix Delimiter Condition Text CS Field should exist Account# Fixed (6) Numeric ^ Field should exist First Name Range(0-15) Alphabetic / Field is optional Last Name Range(0-15) Alphabetic Field is optional If your fields contain the following sample data, Account#:100225 First Name: John Last Name: Doe When building tracks the result will be as follows for track1: CS100225^John/Doe

70
Encode Card Data Command Function When you are ready to read or write the data on magnetic card, use the Encode Card Data. Besides encoding cards, this command allows you to write a batch of cards, duplicate a card, search for card data in a database, and create card data for writing and or storing in the database. Command Access You can access this command in two ways, from the Card menu, select Encode Card Data. Or click on the Encode Cards button of the button bar in the main window. When this command is selected, the following window appears:
Fields Description This section describes the card data fields. Each record can contain one or more of these fields. Card Type – This field defines the format of the data on the tracks to the Build Tracks function and the Extract Fields function. These types are created in the Card Type Setup window or predefined in the database. Select from the list provided. If not selected, it will be defaulted to the settings of the Default Card Type field of the Encoder Settings. Record Date – This field is not currently encoded on the track. It is automatically created once a new record is saved in the database. It indicated the date the record was created. Title – This field is limited to the list provided. If you like to add a title, select from this list. First Name, Last Name – This is the first and last name of the account holder or the person you are creating the card data record for. Enter up to 25 characters for each of the first or last name or as you define it in the card type.

71
Account# - This is the account number for the current record. You can enter up to 20 digits or characters. Expiry Date - This field displays the account’s expiration date. The expiry date is entered as YYMM. The first two digits represent the year (00 – 99) and the last two digits represent the month (01 - 12). Issue Date – This could be the account issue date, the card issue date, or anyway you define it. The data type of this field is date. Member Since – This could be the year the account holder became a member. It can be stored on the card as a year in the following format YYYY (e.g. 2008) Extra Info – This field can contain up to 20 characters. You can use it for any purpose to store extra information that the other fields do not provide. Prefix Info - Based on the account#, this field determines the issuing institution for certain types of credit cards. This information will automatically appear if it is predefined. You will not be able to enter data for this field on this window. Notes - Use this field for any notes regarding this record. Track 1, Track 2, Track 3: These fields contain the data that has been read from, or will be written to, the corresponding tracks on the magnetic stripe. When a card is read, the data will appear exactly as it is on each of the three tracks. The data can be replaced or modified simply by pressing the Edit Tracks button. Creating and Updating Records There are three way for creating encoder data. You can read a card and then save the data in the database as explained later in this chapter or you can create it manually as explained in this section. Encoder records are also created automatically when polling or importing reader data which will be extracted using a default data type. To create a new record manually, 1. Click on the New button. This button clears all the fields and displays default values for
some fields, to allow you to enter data. 2. Enter information for the card data fields on this window as required. You can use the Build
Tracks button to create the tracks. 3. Click on the Save button.
To update data for an existing record, 1. Move to the record using the navigation buttons as explained later in this chapter. 2. Update the fields as required. To update the tracks, you need to click on the Edit Tracks
window. 3. Click on the Save button.
To delete a record from the database, 1. Move to the record using the navigation buttons. 2. Click on the Delete button.

72
Navigating The Record# field displays the number for the current record and the total number of records in the active database. This field cannot be modified. It will only change as you move between the records or if records are added or deleted. The following buttons let you navigate through the active database: Previous - Displays the previous database record that follows the current record. Next - Displays the next database record that follows the current record. Move To – Instead of moving one record at a time using the above buttons, you can move to any record by entering its number. When you click on this button, the following window will appear,
Enter the number of the record in the box then click on the Ok button. Search - This command is used to search for a specific record based on criteria. When you click on this button the following window will appear.
Using this utility you can search for a record based on an account#, First Name, Last Name, Issue Date, or Record Date. To search for a record, 1. Select the criteria from the Search For list. 2. If your criterion is by Issue Date or by Record Date, then enter the correct date in the Enter
Data box. Otherwise, if your criteria is by Account#, First Name or Last Name, then enter the exact data or part of the data and wild cards ( * any number of character, ? any single characters). For example, if you know only the first 3 digits of the account enter the 3 digits followed by an asterisk (Such as 123*). The search function will look for all records that

73
have an account# that start with 123. 3. Click on the Search button. If one or more records are found, they will be displayed in the
table as shown above. Highlight the record you want and double click on it. This window will disappear and you will go back to the Encoder window.
4. If you need to start over, click on the Clear button to clear the Enter Data box. 5. To cancel the search at anytime, click on the Cancel button. 6. If the search function does not find the account # in the database, the following message will
appear:
Swipe Search - Another method for looking for a record in the database is the Swipe Search. This method allows you to find out if a card’s data is already stored in the database. After clicking on this button, the following window will appear:
Swipe a card using the selected encoder. If the track information matches a record in the database, the database record will appear. Otherwise, the data read will appear in the tracks and the following message will appear,

74
Encoding Functions This section explains how the encoding functions of the Encoder window work. Track Data Format Before you start encoding the card, you might need to select the track data format. Depending on the encoder and version of the software you are using one or both of the following formats will be enabled: Driver License – Select this format before you read or write a driver license. This option is currently not available to all encoders. ISO Standard – Select this format if your data conforms to the ISO standard format. The following is a brief explanation of this format. Track1 - Up to 79 alphanumeric characters can be encoded on this track using the standard format. Track2 - Up to 40 numeric characters can be encoded on this track. Track 3 - Up to 107 numeric characters can be encoded on this track. Non-ISO Standard – If you need to encode alphanumeric characters on track 2 or you need to encode more data than the maximum allowed for the ISO standard, select the Non-ISO standard by clicking on this option before you read or write to a card. Before you read a card in non-standard format, select this option and then click on the Read button. The following window will appear,
This window is divided into two sections. If you are just reading the card, the Write Data Density section will be disabled. Select the track’s character configuration. For example, if Track 2 was written using 7 bits per character, then select this option. When all required selections are made, click on the Done button to start reading the card. If you don’t need to read the card, click on the Cancel button. When writing a non-standard card, also select the Non ISO Standard option and click on the Write button. The above window will appear. In this case, you need to select the character configuration as well as the write density. When the selection is made, click on the Done button. Read Card Data
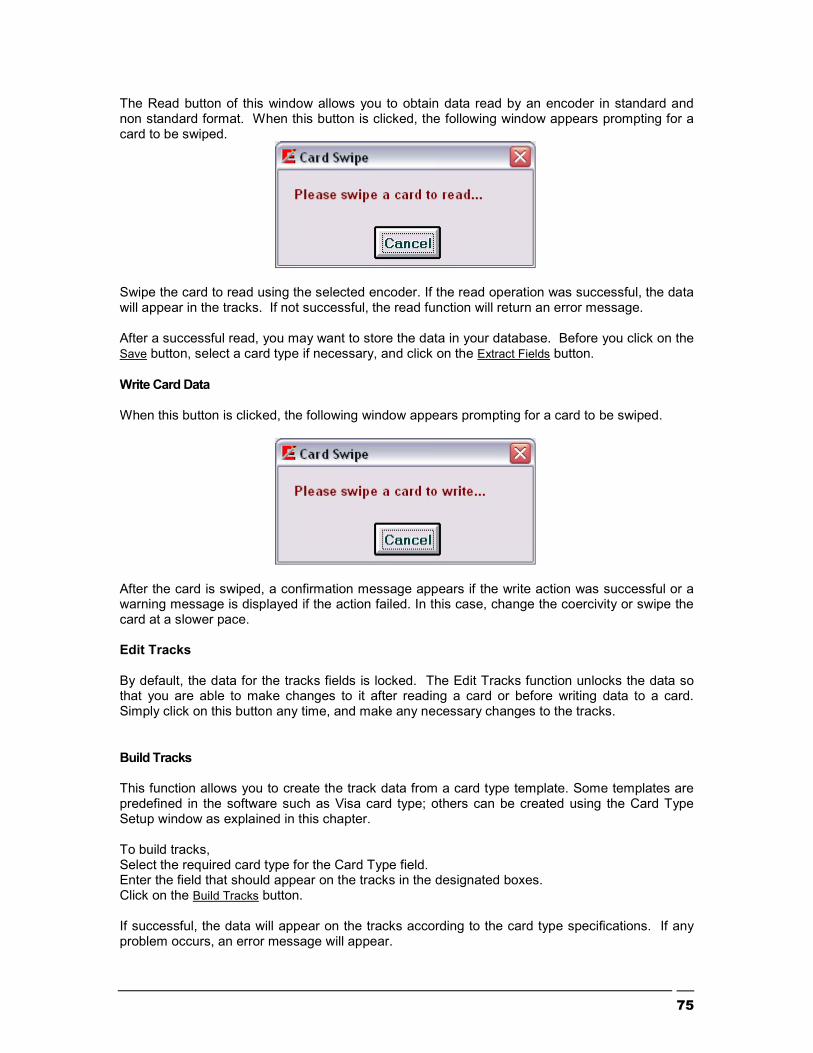
75
The Read button of this window allows you to obtain data read by an encoder in standard and non standard format. When this button is clicked, the following window appears prompting for a card to be swiped.
Swipe the card to read using the selected encoder. If the read operation was successful, the data will appear in the tracks. If not successful, the read function will return an error message. After a successful read, you may want to store the data in your database. Before you click on the Save button, select a card type if necessary, and click on the Extract Fields button. Write Card Data When this button is clicked, the following window appears prompting for a card to be swiped.
After the card is swiped, a confirmation message appears if the write action was successful or a warning message is displayed if the action failed. In this case, change the coercivity or swipe the card at a slower pace. Edit Tracks By default, the data for the tracks fields is locked. The Edit Tracks function unlocks the data so that you are able to make changes to it after reading a card or before writing data to a card. Simply click on this button any time, and make any necessary changes to the tracks. Build Tracks This function allows you to create the track data from a card type template. Some templates are predefined in the software such as Visa card type; others can be created using the Card Type Setup window as explained in this chapter. To build tracks, Select the required card type for the Card Type field. Enter the field that should appear on the tracks in the designated boxes. Click on the Build Tracks button. If successful, the data will appear on the tracks according to the card type specifications. If any problem occurs, an error message will appear.

76
Extract Fields Contrary to Build Tracks function, this function obtains the fields’ data from the tracks. In other words, use this function in order to determine which fields are on the tracks. To extract fields, Select the required card type from the Card Type list. Make sure the tracks contain the data from reading a card, an existing record in the database, etc… Click on the Extract Fields button. Validate Function When creating an account#, use this function to check if the number you entered is correct. This function uses Mod-10 algorithm to check the last digit in the account. If correct, a confirmation message will appear. Otherwise, a message with the correct account# will appear. Enter this number manually for the account#. Next # Based on the current account# and the settings of the Next# function in the Encoder settings, this function will automatically create the next record(s) in sequence in the database. Click on the Next# button. The following window will appear,
Enter the total number of records to be created in sequence. Click on the Ok button. For example, if your record has an account# of 292810002048 and the sequence is set to an Increment of 3. Then the next record will be created with an account number of 292810002051, then next one is 292810002054 etc..

77
Write Batch This command allows you to write multiple cards at the same time. Click on the Write Batch button, the following window will appear,
There are two methods for writing a batch of card, Current Record – allows you to write a batch of cards based on the account# of the current record. To write a batch of card, 1. Make sure the account# field on the Card Data Setup window is not left blank since this is
the field that will be incremented. 2. Make sure a specific type other then the Undefined type is selected for the Card Type. 3. Select Current Record option. 4. Enter the number the account# should be incremented by. 5. Enter total number of records to write. 6. Click on the Start button.
Starting with the current record, this function will increment the account# wherever it appears on the tracks as defined by the card type. Database Record – writes a sequence of card according to the database record number. To write a batch of card, 1. Select Database Record option. 2. Enter a valid number for the From Record field.

78
3. Enter a valid number for the To Record field. 4. Click on the Start button.
No matter what option you select, once you click on the Start button, the following window will appear,
Swipe a card for writing. If successful, swipe the next card. If not successful, an error message appears and the process will be stopped. The number of cards written successfully appears at the bottom of that window.

79
Erase Card Data Command Function Use this command to erase the data written to a single or multiple magnetic card. Command Access Before you access this command, make sure the encoder is initialized. From the Card menu, select Erase Card Data. The following window will appear:
How it works? Depending on the track(s) setting of the Encoder Settings, when this window appears, the tracks will be enabled or disabled. To delete the data, Select the specific track(s) to perform a secure erase of data on a magnetic stripe card. Click on the Erase button. The following message will appear,
Swipe the card to be erased or click on the Stop button to cancel the process. The following confirmation message appears when the swipe function is successful.
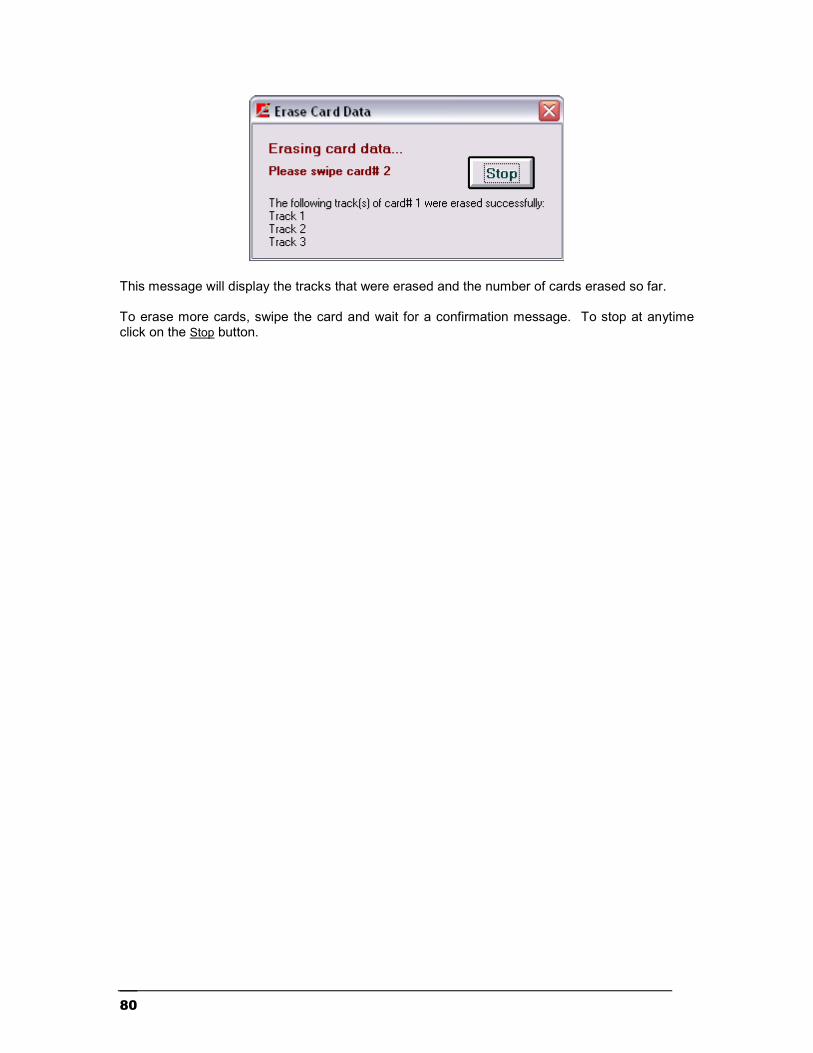
80
This message will display the tracks that were erased and the number of cards erased so far. To erase more cards, swipe the card and wait for a confirmation message. To stop at anytime click on the Stop button.

81
Duplicate Card This Command duplicates information from one card to another. The user will be prompted in an alternating cycle for the card from which the data will be read, then the card to which the data will be written. Upon pressing the Cancel button, the process terminates. From the Card menu, select Duplicate Card. The following window will appear,
Swipe the card to copy the data from. If successfully read, the following message will appear,
Swipe an empty card to copy to. If successful, the following message will appear.

82
Setup Prefix Command Function Exeba®-COMM™ comes with a database of prefix. This database includes over 1500 records of known card type prefixes. If you like to add or delete any of these prefix use the Setup Prefix command. Command Access From the System main menu, select Setup Prefix. The following window will appear,
How it works? To add a prefix, 1. Enter the prefix in the Prefix Value box. 2. Enter a description for the prefix in the Organization Name box. 3. Click on the Add button. To delete a prefix, 1. Enter the prefix in the Prefix Value box 2. Click on the Delete button. To search for a prefix, 1. Enter the prefix in the Prefix Value box. 2. Click on the Find button. If the prefix exists in the database, the description will appear in the
Organization Name box. To print or preview the existing prefixes in the database, simply click on the Preview button. You can also export the exiting prefixes in the database in a text file by clicking on the Export button then entering the path and name of the file.

83
Reader Setup Menu The Setup menu is used to change the communication settings in the software by accessing the following commands: This menu works for the MPR1000, MPR 2000, MPR 3000, PDC, MPDC, SPDC, MSR500, Mini123U-SC/MSR500M, Mini400, Mini400BT, Mini600, Mini 123EX, PMR102, PMR 202, TA90, TA48, TA32, MAGDC, Serial Reader (Non Portable), and Keyboard Reader (Non Portable).
Chapter

84
General Settings Command Function Using this command you will be able to change settings for the application in general. Menu Access From the Setup main menu, select General Settings. The following window will appear.
General Settings Options Currently there are two settings to change under the general settings. Port Settings Port Settings Disabled - When you select the Port Settings Disabled option, you are disabling the selection of the following port parameters: Baud Rate, Data Bits, Parity and Stop Bits. Port Settings Enabled – Contrary to the above settings, when the Port Settings Enabled option is selected, the user is allowed to make changes to the port settings described later in this chapter. Date Format The date field is used extensively throughout the software. It is used when polling data from the reader, importing and exporting data, reports etc…The date format defines how you would like the date field to appear in the software. Select one of the following date formats according to your requirements and according to your computer date settings. American Date – This is the default settings, select this option if you computer is set to American date format where the month is followed by the day and year. European Date – Select this option if your computer is set to European date where the day comes before the month. Button Function Click on the Save button to save any changes made. Click on the Close button to close this window.

85
Port Settings Command Function This command allows you to select the port the reader is connected to. If the option Enable Port Settings is selected under the General Settings, then you will be able to change the default port settings as well. Command Access After you connect the reader to your computer, from the Setup main menu, select Port Settings. The following window will appear:
Port and Port Settings Port - Select the port the reader is connected to. The software will automatically detect all the available Com ports and HID ports on your computer. Baud Rate - Select the baud rate. The selectable range is 600 to 256000. Data Bit - Select 7 or 8 Parity - Select Even, Odd, None, Mark, or Space Stop Bits - Select 1, 1.5, or 2
NOTE If the communication port was open before you changed these setting, the message “Current port should be closed before making any changes. Close Port?” will appear. Click on the Yes button so that changes will be in effect.

86
Button Functions Default - Returns the settings to the recommended port settings for the encoder being used. It also saves the default settings. Save - Before you close this window, make sure you save any changes made to the port or port settings by clicking on the Save button. Close - Close this window and return to the main menu. Exit X - This button closes the window.

87
Reader Port Settings Reader(s): MPR 1000, MPR 2000, MPR 3000, PDC, MPDC, SPDC, Mini400, Mini400 2G, Mini123EX, Mini400BT Port Settings – automatically detected when they are selected from the main menu. The figure below shows the default port settings for the MPR1000/2000/3000, Mini400 2G, Mini123EX, Mini400 and Mini400BT readers:

88
Reader(s): MSR 300, MSR 500, Mini123U-SC, Mini123EX, Mini600, PMR102, PMR202, TA90, TA48, TA32, MAGDC, Serial Reader (Non Portable) The figure below shows the default port settings for the MSR 300, MSR 500, Mini123U-SC, Mini123EX, Mini600, PMR102, PMR202, TA90, TA48, TA32, MAGDC, and Serial Reader (Non Portable)

89
Poll /Delay Settings Command Function The settings of the poll and delay parameters affect the commands that send and receive data to and from the reader. It may be necessary to try different settings until the correct configuration is established for the hardware being used. Command Access From the Setup main menu, select Poll / Delay Settings. The following figure will appear. The figure below shows the default Poll / Delay settings for the encoders supported by this software:
Poll/Delay Options These settings are as follows: Delay - Used by the polling commands only. The delay is the number of milliseconds (00000-99999) the polling function should wait between polls. The default is 100 milliseconds. Time Out - The number of milliseconds (00000-99999) the software should wait, after sending a command, for a response from the reader before timing out. The default is 100 milliseconds. Machine Speed - The amount of time Exeba®-COMM™ should wait after sending a command and before receiving data from the encoder. You can select any number from 1 to 50. The number you select is represented as a multiple of 10th of a milliseconds. For example: if you select 1, the wait time will be 10 milliseconds. The larger the number, the slower the data will be transferred. However, a small value may cause polled data to be fragmented. Button Functions Default - Sets and saves the poll and delay settings to the recommended settings. Save - Saves any changes made.

90
Close - Closes this window and return to the main menu. This button closes the window without any warning of unsaved changes. Make sure the changes are saved before you exit. Exit X - Use to exit this window.
NOTE Exeba-COMM allows you to save different settings for each type of reader used. For example, you can select two machine speeds for an MSR 500 and a Mini 400 reader. These settings will appear when the specific reader is selected.

91
Portable Reader File Menu The File menu allows you to save and change the data polled from the reader in a text file. The importing and exporting of records is also done from this menu. This menu works for the MPR1000, MPR 2000, MPR 3000,PDC, MPDC, SPDC, MSR500, Mini123U-SC/MSR500M, Mini400, Mini400BT, Mi123EX, Mini600, PMR102, PMR202, TA90, TA48, TA32 and MAGDC portable readers. It can also be used for Serial Reader (Non Portable). From this menu you can also print reader data reports.
This chapter explains the following submenus:
Text Editor Export Records Import Records Print Report
Chapter

92
Text Editor This command launches the file editor. When this command is selected, the following window appears:
The Exeba®-COMM™ text editor is a basic editor that is used to create and save a text file. It is also used to view the log files or polled data files uploaded from the reader. Main Menu File – used to create, open and save a file Edit – used to edit the text in an open file Search – used to search for text in an open file Options – used to show or hide the editor’s toolbar Toolbar The toolbar has buttons that quickly provide access the editor’s features. These buttons are: New File - used to create a new file Open File - used to open an existing file Save File - used to save a new or existing file Copy - used to copy text Cut - used to cut text Paste - used to paste text Find - used to search for text

93
Working with Files Create a New File To create a new text file, follow the steps below: 1. From the editor's main menu select File 2. Then select New or click on the New File button in the toolbar 3. If changes are made to an open file, Exeba®-COMM™ will prompt you to save the changes.
Save the file, if necessary, and continue to the next step. 3. Once created the file is created, begin typing
NOTE When the Exeba®-COMM™ text editor is first opened, a new file is automatically created.
Open a File To open a file in COMM text editor, follow these steps: 1. From the File menu, select Open or click on the Open File button in the toolbar. 2. From the Look In list box, select the drive and folder where the file is located. 3. Double-click on the file name or highlight it and click on the Open button.
Note The editor cannot open files that are larger than 65k.
Save a File After you make changes to a file in the editor window, save it. To save a new file, from the File menu, select Save As. The Save As dialog window will appear.

94
5. In the File name text box, type the file name. 6. In the Save as type list box, select the file type. 7. In the Save In list box, select the path (drive name and folder) where you want the file to be saved. The default is the application path. 8. Then click on the Save button to save the file. The Cancel button in this dialog box cancels the save operation. To save the changes to an existing file, follow these steps: From the File menu, select Save. The file will automatically be saved under the path and name that appears in the title bar. If you want to change the name or location of the file, use the Save as command as described above. Close a File Exeba®-COMM™ cannot upload or download to and from a file if it is being used by any application including its text editor. There are two ways to close an open file in the text editor: By opening another file or by creating a new file By closing the text editor Print a File Exeba®-COMM™ text editor allows you to send the contents of the text file to the printer from the Print menu command under the File main menu. The printing function is very basic in Exeba®-COMM™. Most of the print settings are fixed in the software. These settings are: The print job is assigned only to the default printer. If you have not set up a default printer in Windows please do so before printing from Exeba®-COMM™’s text editor.

95
- The paper size is set to 8 1/2 X 11. - The right and top margins are preset in the software. - The number of lines printed on a page is set to 30. - The font is set to Arial and the font size is set to 10. NOTE: The font type and font size are the only things that can be changed from the editor window. - The page number will be printed at the beginning of every page.

96
Working with Text Exeba®-COMM™'s text editor allows you to cut, copy, paste and search for text. All these options are located under its Edit menu. But before you use any of them, select the text. Under the Edit menu, the Select All option allows you to select all the text at once. Cut Text Select the text you want to cut Select Edit and then select Cut, or click on the Cut button of the toolbar Now you can paste the text you cut anywhere in the document. Copy Text To copy text using Exeba®-COMM™'s text editor, follow these steps: 1. Select the text you want to copy 2. Select Edit and then select Copy or click on the Copy button in the COMM text editor's toolbar. The copied text can be pasted in another location in the document using he paste command. Paste Text The text should be copied or cut before it be can pasted. To paste text, follow these steps:
1. Place the insertion point where you want to paste the text. 2. From the Edit menu, select Paste.
Search for Text From COMM's text editor Search menu, you can access commands that help you locate specific words or characters quickly and easily. To locate text, 1. In the document, click where you want to start searching. 2. From the Search menu select Find. The Find Text window will appear.
3. In the Find What text box type the text you want the text editor to look for. 4. Check the Match Case box if you want to find the text that matches the upper and lower case of the text you typed.

97
5. The text editor will start searching the document from the insertion point and in the direction you specify in the Find dialog box. 6. Click on the Find button. 7. If you want to find additional instance of the same text, select Search and then select Find Next.

98
Export Records Command Function This command exports reader data records saved in the active database into a comma text delimited file. It allows you to select the fields and fields’ order in the export file. Menu Access From the File menu, select Export then select Reader Data. The following window will appear.
How it works? 1. Enter the location and name of the file in the File Path and Name box. You can also click on the Browse button to locate or create the file using the Save As standard window. When this window appears, select the drive, folder and name of the file to export data to. 2. Then select the range of data you would like to include in the file. The available options are: All Records – this option will export all the reader data in the current database Date Range – this option will export all the records that have a log in date between specific date ranges. Once selected, select the date range from the provided calendars. 3. The next step would be to select the field(s) to export and in the order required. There are mainly two lists. Export From List - displays all the fields that can be exported. Export To List - displays the fields you select. The following four buttons allow you to select the fields in order. -> - Highlight the field in the Export From list then click on this button to add the highlighted field to the Export To list. >> - To export all the fields in the list, click on this button. <- - To remove a field from the Export To List, highlight the field, then click on this button. << - To remove all the fields in the list, click on this button.

99
Export - By clicking this button, the fields in the list box Export To will be written to the specified text file. Close - Use this button to close the window and return to the main menu. Example Database records: Track 1 Track 2 Track 3 Date Time ABD999999000^123 999999000 1/20/2008 8:00:00 ABF999999001^378 999999001 1/20/2008 8:13:40 If you Export To list looks like the following: Track1 Track2 Date Time The exported file will contain data as follows: ABD999999000^123, 999999000, 01/20/2008, 8:00:00 ABF999999001^378, 999999001, 01/20/2008, 8:13:40
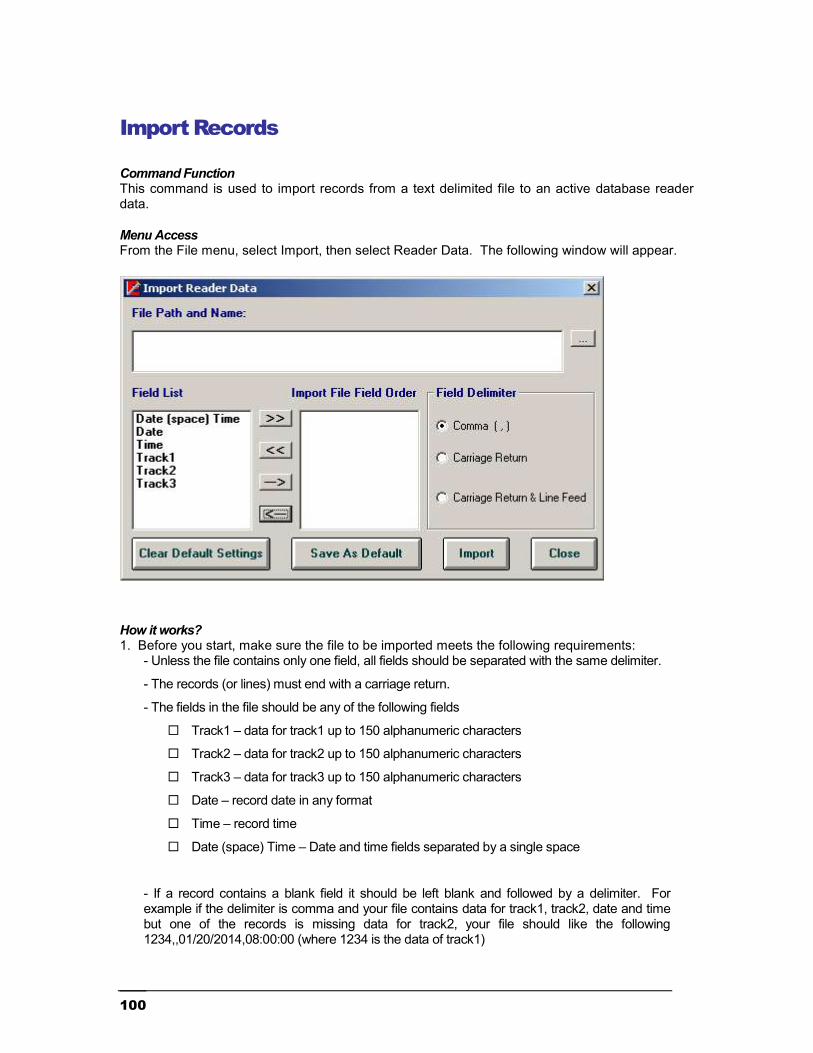
100
Import Records Command Function This command is used to import records from a text delimited file to an active database reader data. Menu Access From the File menu, select Import, then select Reader Data. The following window will appear.
How it works? 1. Before you start, make sure the file to be imported meets the following requirements:
- Unless the file contains only one field, all fields should be separated with the same delimiter. - The records (or lines) must end with a carriage return. - The fields in the file should be any of the following fields
Track1 – data for track1 up to 150 alphanumeric characters Track2 – data for track2 up to 150 alphanumeric characters Track3 – data for track3 up to 150 alphanumeric characters Date – record date in any format Time – record time Date (space) Time – Date and time fields separated by a single space
- If a record contains a blank field it should be left blank and followed by a delimiter. For example if the delimiter is comma and your file contains data for track1, track2, date and time but one of the records is missing data for track2, your file should like the following 1234,,01/20/2014,08:00:00 (where 1234 is the data of track1)

101
2. In the File Name and Path box, enter the location and name of the file to import. You can also use the browse button (…). When you click on this button the Save As standard window appears. Select the drive, folder and name of the file to be imported. 3. Add the fields to the Import File Field Order list, in the same order as it is in the file, using the following buttons: >> click on this button to bring all the fields (in the default order) to the import list. << click on this button to clear the import list. - > click on this button to add a field to the import list. < - click on this button to remove a field from the import list. If the file does not contain a Date/Time fields the computer date and time will be added to each record. 4. Select the delimiter. 5. Click on the Import button to import the file. If successful, a message will be displayed and the data can be viewed in the Poll Reader window, Reports, or even in the encoder data. If you would like to save your selection for later, click on the Save As Default button. This will bring the same selection everytime you open this window. To clear your selection, click on the Clear Default Settings button.

102
Reader Data Report Command Function This command allows you to print reports from the database. Also before printing, this command allows you to select data to print. Menu Access From the File menu, select Report, then select Reader Data. The following window will appear,
To print a report, select all the records. Or you can narrow it down to the records with a specific date range. Once you make your selection click on the View button to preview a report and print it. Or click on the Print button to print it. When done with the report, click on the Close button to close this window.

103
Configure Reader Reader(s): MPR1000, MPR 2000, MPR3000, PDC, MPDC, SPDC This chapter provides instructions on how to configure the readers listed above. When any of these readers is selected from the main hardware menu, the MPR menu will appear in Main window as follows:
This menu will vary slightly with each reader. In this chapter all of the commands are explained in details and these are:
Log in to the reader Set and reset a password Reset reader Setup tracks configuration Set the power mode Change reader’s date and time Send a command
Chapter

104
Log In Reader(s): MPR1000, MPR 2000, MPR3000, PDC, MPDC, SPDC Command Function Log in to the reader is required in order to start the communication process. Exeba-COMM will automatically log in to the reader if no password is set. However, if the reader is password protected, then you need to log in using the Log In command. Command Access The Log In window will appear automatically when communication with the reader fails. But you can login manually by selecting Configure menu then Log In. Or click on the Log In button in main button bar. The following window will appear,
If the correct password is entered, the Log In window will disappear. If the password was entered incorrectly, a Wrong Password message will appear as follows.
If the communication failed, the following message will appear on the screen:
Depending on what is causing the communication to fail, power the reader on, select the correct port and port settings…etc. Then try again.

105
Set Password Reader(s): MPR1000, MPR 2000, MPR3000, PDC, MPDC, SPDC Command Function The Set Password command allows you to set a new password in the reader or change the existing one. Command Access To set a password, select the Set Password menu from the Configure menu and the following window will appear:
If you’re setting a password for the first time Current Password box must remain blank. If not, enter the old hardware password in the Current Password box, then your new password in the New Password box and finally confirm your new password by entering it again in the Confirm Password box. Click on the OK button.

106
Reset Password Reader(s): MPR1000, MPR 2000, MPR3000, PDC, MPDC, SPDC Command Function If the login password for the MPR1000, MPR2000, MPR3000, PDC, MPDC, or SPDC is lost, you can reset it to default using the Reset Password command. This command will set the password back to blank without deleting the data in the reader. Command Access From the Configure MPR menu, select Reset Password. Once selected the following window will appear:
Resetting the password requires contacting Escan Technologies Corp to obtain the response codes. Click on the Ok button from the window above and call Escan’s support line at the number listed in the message.
Provide the User Code information to the customer service representative:
1. User Code 1, User Code 2 and the hardware that was purchased. 2. The representative will give you two codes: Response 1, and Response 2. 3. Enter them in the designated boxes and click on the Register button.
If the unlocking was successful, the password will be reset to blank.

107
Setup Tracks Reader(s): MPR1000, MPR 2000, MPR3000, PDC, MPDC, SPDC Command Function Use this command to configure the tracks for MPR/PDC readers. Command Access From the Configure MPR main menu, select Setup Tracks. The following window will appear,
How it works? When the desired selection is made, click on the Set button. If the command was successfully sent to the reader, the tracks will be enabled or disabled accordingly. This command will fail if the reader does not have the specified track, or if the communication with the reader cannot be established. Click on the Close button to exit this window.

108
Set Power Mode Reader(s): MPR1000, MPR 2000, MPR3000, PDC, MPDC, SPDC Command Function Use this command to set the reader to a specific power off time. In order to conserve battery power, the reader will power off after a specific amount of inactivity time. Command Access When the Set Power Mode is selected from the Configure MPR menu, the following window will appear:
Please note that The MPR default power off time is 20 seconds. Enter the desired time in seconds, and then click on the Set button to configure the reader. Click on the Close button to exit this window without saving the setting.

109
Set Time Reader(s): MPR1000, MPR 2000, MPR3000, PDC, MPDC, SPDC Command Access To set the date and time in the MPR reader, use the Set Time menu command under the Configure MPR menu.
Select the desired date and time. Then click on the Set button, to set the time in the reader. If the communication between the software and reader timed out, the MPR Log In window will appear. If the time and date were set successfully, the message “Time is set!” will appear in the response box.

110
Send Command Reader(s): MPR1000, MPR 2000, MPR3000, PDC, MPDC, SPDC Command function Send Command allows you to program the reader, to get data from the reader or to test the reader. Command Access From the Configure menu select Send Command. The Send Command window will appear, as shown in the figure below:
How it works? To send a command to the reader, follow the steps below: 1. Type the command in the text box provided. 2. Click on the Send button. The responses coming back from the reader (if any) are displayed in the Reader’s Response box. The responses will appear in the format that they are received. However, the software eliminates the ACK, NAK, ETX and STX characters from the string of data received. If the reader receives a command, a response of ACK will appear as "Command Acknowledged" and a response of NAK will appear as "Command Not Acknowledged". The response received will depend on the type of reader being used.
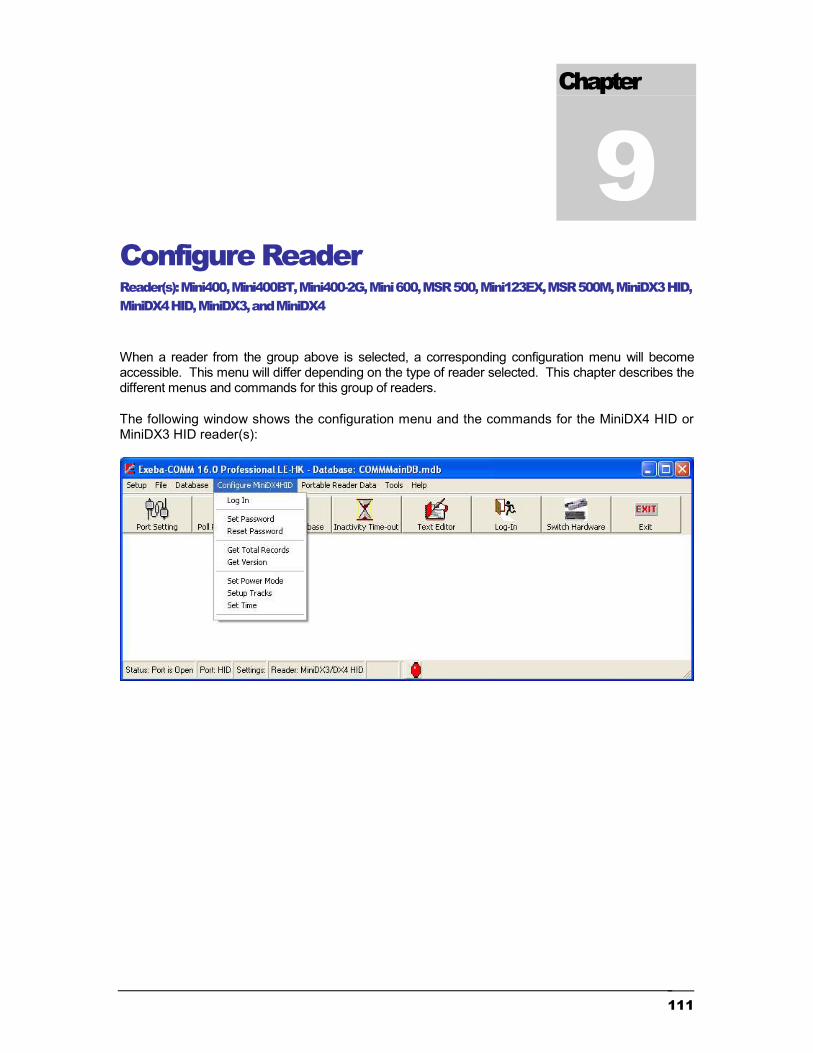
111
Configure Reader Reader(s): Mini400, Mini400BT, Mini400-2G, Mini 600, MSR 500, Mini123EX, MSR 500M, MiniDX3 HID, MiniDX4 HID, MiniDX3, and MiniDX4 When a reader from the group above is selected, a corresponding configuration menu will become accessible. This menu will differ depending on the type of reader selected. This chapter describes the different menus and commands for this group of readers. The following window shows the configuration menu and the commands for the MiniDX4 HID or MiniDX3 HID reader(s):
Chapter
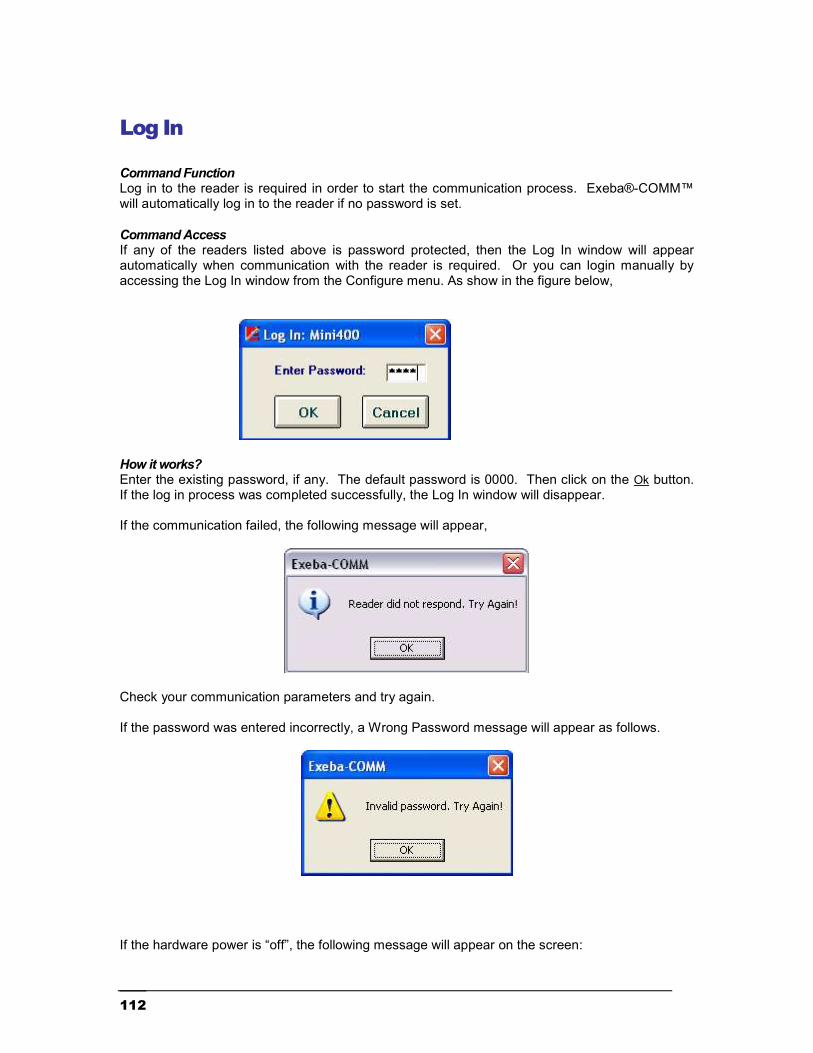
112
Log In Command Function Log in to the reader is required in order to start the communication process. Exeba®-COMM™ will automatically log in to the reader if no password is set. Command Access If any of the readers listed above is password protected, then the Log In window will appear automatically when communication with the reader is required. Or you can login manually by accessing the Log In window from the Configure menu. As show in the figure below,
How it works? Enter the existing password, if any. The default password is 0000. Then click on the Ok button. If the log in process was completed successfully, the Log In window will disappear. If the communication failed, the following message will appear,
Check your communication parameters and try again. If the password was entered incorrectly, a Wrong Password message will appear as follows.
If the hardware power is “off”, the following message will appear on the screen:

113
Turn the power on the reader and try again.

114
Set Password Command Function Using the Set Password you can change the password protection setting in the reader. In other words, you can create a new password, turn off password protection or change an existing one. Command Access Select the Set Password menu command from the Configure menu and the following window will appear:
How it works? If you’re setting a password for the first time, you should leave the current password box blank. Otherwise, enter the existing password. Then enter the new password in the New Password box. Confirm your new password by entering it again in the Confirm Password box. If for example, you entered a value of 1111 for the new password and the changes were successful, the following message will appear,
If you click on the Cancel button, no changes will be made to the password.
NOTE

115
The password can contain digits only. It should be exactly 4 digits. Before you click on the Set button, write down the password. Once it is lost, it can not be retrieved.
Once a password is set, Exeba®-COMM™ will not be able to communicate with the reader unless the correct password is entered in the Log In window.
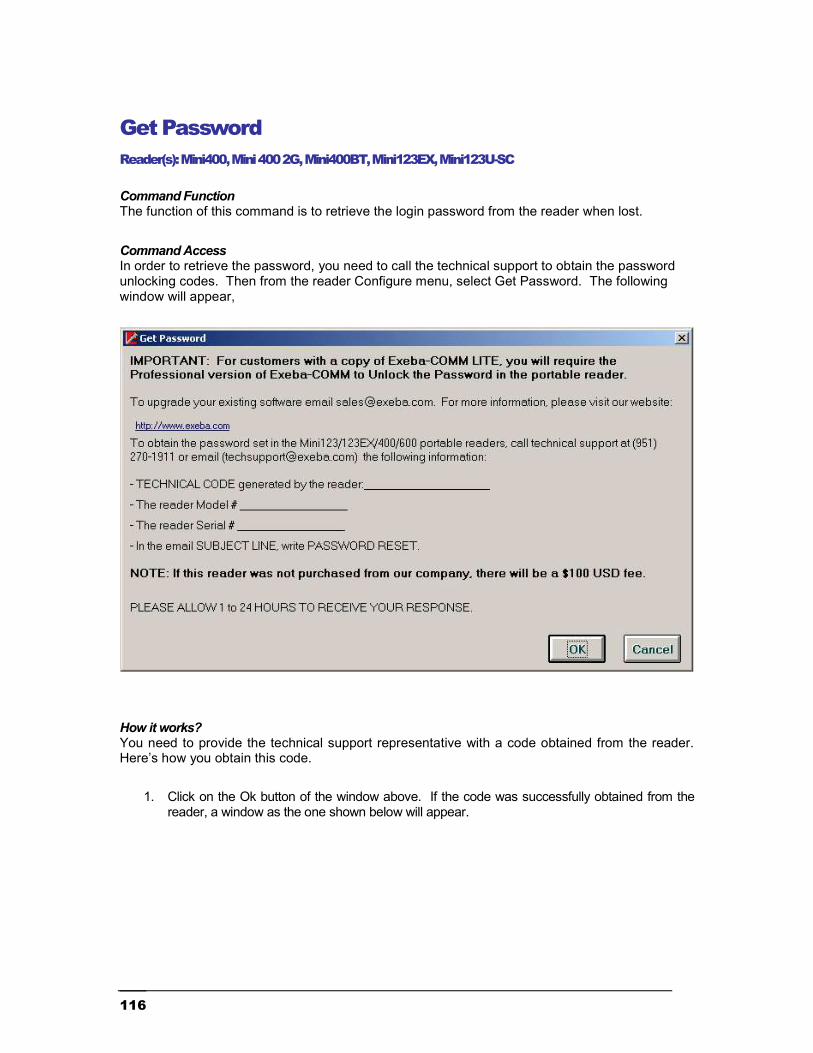
116
Get Password Reader(s): Mini400, Mini 400 2G, Mini400BT, Mini123EX, Mini123U-SC Command Function The function of this command is to retrieve the login password from the reader when lost. Command Access In order to retrieve the password, you need to call the technical support to obtain the password unlocking codes. Then from the reader Configure menu, select Get Password. The following window will appear,
How it works? You need to provide the technical support representative with a code obtained from the reader. Here’s how you obtain this code.
1. Click on the Ok button of the window above. If the code was successfully obtained from the reader, a window as the one shown below will appear.

117
3. Contact technical support by email or phone to give them the code. For example, the figure above shows that the code is: 554<055;4830. Before you click on the Ok button make sure you gave the correct code to technical support. Then they will give you back the correct password set in the reader.

118
Reset Password Reader(s): MiniDX3, MiniDX4, MiniDX3 HID, MiniDX4 HID Command Function The function of this command is to reset the login password from the reader when lost. Please note that this command will ERASE all data in the reader. Command Access In order to reset the password, from the Configure menu, select Reset Password. The following window will appear,
Select the port or HID for HID readers. Then click on Set Password button.

119
Get Version Command Function The Get Version command is used to obtain the identification string from the reader. This string contains information such as reader model and version number. This command allows you to test the communication between the software and the hardware. Also, by obtaining the version number, the manufacturer will be able to identify the features and updates to the reader. Command Access To get the reader identification string, from the Configure main menu, select Get Version. The reader identification string will appear. An example of the version number obtained from a reader is shown in the figure below:

120
Get Total Records Command Function This command obtains the total number of records saved in the readers. This information is important in determining the maximum memory capacity in the reader. Command Access To get the total records, from the Configure reader menu, select Get Total Records. If the communication with the reader was successful, a message such as the one appearing in the figure below will be displayed.
If the communication with the reader failed, the message “Reader did not respond!” will appear.

121
Set Time Command Function The time in the reader will be initially set to the manufacturer’s settings. Using the Set Time command you will be able to change the time the reader is set to. This is important when Day Savings Time occurs since the reader will not automatically change the time. This command will also allow you to get the time from the following readers only: Mini 400, Mini 600, Mini123U-SC/MSR500M, Mini 123EX. Command Access To set the date and time in any of the readers listed above, from the Configure menu, select Set Time. The following window appears.
How it works? To set the time, first make sure the reader is communicating properly with the software. It is very important that the reader is polled and purged before you change the date and time. Then change the date and time if necessary. Then click on the Set button to change the time in the reader. If the communication between the software and reader timed out, the Log In window will appear. If the time and date were set successfully, the message “Time is set!” will appear in the response box. To make sure the reader is set to the time and date desired, click on the Get button to obtain the current time in the reader.

122
Set Power Mode Command Function Use this command to set the Mini400, Mini400BT, Mini600, Mini123EX, or Mini123U-SC/MSR500M reader to a specific power off time. In order to conserve battery power, the reader will power off after a specific amount of inactivity time. The default power off time is 20 seconds. Command Access When the Set Power Mode is selected, from the Configure menu the following window will appear:
How it works? Select on of the following three options. Real Time Control
Keep Power On Always Select this option if you don’t need the reader to be shut off automatically. The reader will remain on until the power is manually turned off. Click on the Set button, if successfully set, the following message will appear,
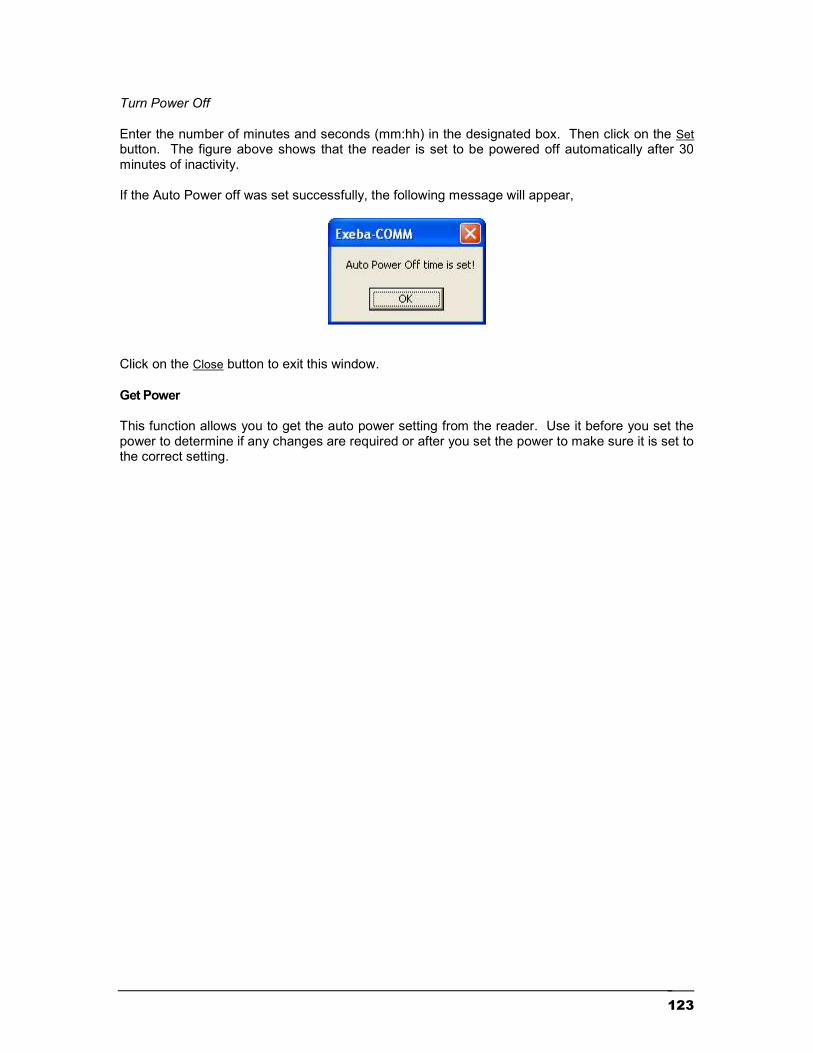
123
Turn Power Off Enter the number of minutes and seconds (mm:hh) in the designated box. Then click on the Set button. The figure above shows that the reader is set to be powered off automatically after 30 minutes of inactivity. If the Auto Power off was set successfully, the following message will appear,
Click on the Close button to exit this window. Get Power This function allows you to get the auto power setting from the reader. Use it before you set the power to determine if any changes are required or after you set the power to make sure it is set to the correct setting.

124
Setup Tracks Reader(s): Mini 600, Mini 123EX, Mini400, Mini400 2G, Mini400 BT, Mini123 SC Command Function On any of the readers listed above, you may want to enable or disable the tracks’ filter.
Click on the button to the left of the command to program the reader. If successful, a message will appear in the Reader Response box. When a reader is configured to: Disable Track Filter – data on the corresponding track will not be read when a card is read. Enable Track Filter – the data (if any) will be read when a card is scanned. Require Track Filter – the corresponding track should have data, otherwise the card will not be read. Click on the Close button to close this window.

125
Setup Tracks Reader(s): MiniDX3, MiniDX4, MiniDX3 HID, MiniDX4 HID Command Function On any of the readers listed above, you may want to enable or disable the tracks’ filter.
Click on the option for each track and then click on Set button. If successful, a message will appear in the Reader Response box. When a reader is configured to: Disable – data on the corresponding track will not be read when a card is read. Enable – the data (if any) will be read when a card is scanned. Request - the corresponding track should have data, otherwise the card will not be read. Click on the Close button to close this window.

126
Set Buzzer Reader(s): Mini 600 Command Function When the user scans a card, the buzzer setting will determine if a sound will come on. Command Access From the Configure menu, select Set Buzzer. The following window will appear,
If the reader is communicating properly with the software, click on the button to the left of the command to turn the buzzer settings on or off. If successful a confirming message will appear in the Reader Response box.

127
Set Backlight Duration Reader(s): Mini 600 Command Function This programming command is available on the Mini600 reader only. It is used to set the length of time the back light in the reader should stay on. Command Access From the Configure menu, select Set Backlight Duration
Enter the number of seconds in the designated box. Then click on the Set button. You can also get the current setting in the reader by clicking on the Get button.

128
Send Command Reader(s): Mini 400, Mini 600, MSR 500, MSR 500M / Mini 123, Mini 123EX Command Function Most of the reader commands are automated in the software. For example, if you need to get the version#, use the Get Version command. However, this command is provided if you would like to manually send a command to the reader. It is essential, if the command is not already automated in the software or for testing. Command Access This command is available to all readers. To send a command to the reader, from the Configure menu, select Send Command. The Send Command window will appear, as shown in the figure below:
How it works? Then follow the steps below: 1. Type the command in the text box provided. 2. Click on the Send button. The responses coming back from the reader (if any) are displayed in the Reader’s Response box. The responses will appear in the format that they are received. However, the software eliminates the ACK, NAK, ETX and STX characters from the string of data received. If the reader receives a command, a response of ACK will appear as "Command Acknowledged" and a response of NAK will appear as "Command Not Acknowledged". The response received will depend on the type of reader being used. To clear the command typed, click on the Clear button.

129
Configure Reader Reader(s): PMR 102, PMR 202, TA90, TA48, TA32 Once the PMR102, PMR202, TA90, TA48, or TA32 is selected from the hardware type menu, the Configure PMR or Configure TA32 menu will appear in main window as follows:
The chapter describes each menu command.
Chapter

130
Log In Command Function Logging into the reader is required to start the communication process between the software and the reader. Exeba®-COMM™ automatically logs in to the reader if no password is set. However, if the reader is password protected then the Log In window will appear automatically when required. Command Access To log into the reader manually, Select Configure PMR or Configure TA32, and then select Log In. The following screen will appear:
How it works? Press the power button on the reader. In addition to turning the power on, some readers require a backward swipe of an encoded magstripe card. To cancel the log in process at any time, press the Cancel button. If the reader responds, the following screen will appear:
When Exeba®-COMM™ displays the message "Waiting for response from reader...," you should release the power button and stop scanning the card. If a password was detected in the reader, the following screen will appear followed by the initial Log In screen.

131
Enter the correct password and click on the Send button. If an incorrect password was entered, steps 2 and 3 should be repeated.
When no password is set or when the reader receives the correct password, the message, "Logged In successfully" will appear.

132
Log Out Command Function The Log Out menu command under the Configure PMR or Configure TA32 main menu is used to log out from a PMR102/202 (TA90/48) or TA32 connection. Command Access Use this command, when the communication with a PMR102/202 (TA90/48) or TA32 should be terminated or when communication needs to be established with a different reader.

133
Setup Password Command Function To set a password on the PMR102/202 (TA90/48) or TA32, use the Set Password window. Command Access From the Configure PMR or Configure TA32 main menu, select Setup Password. The following window will appear:
How it works? Enter the existing password in the Current Password box. If no password is set yet in the reader, enter the default password 00000. Enter the new password in the New Password box and the Confirm Password box. The password can be any of 5 digits. Then click on the Set button. If successful the following message will appear showing the password you set the reader to.
If the communication between the software and reader timed out, the PMR or TA32 Log In window will appear.

134
Reset Password Command Function If you forgot the password set in the reader, you can reset it back to the default password using the Reset Password command. You will not lose any data from the reader. However, this command requires technical support to obtain the password unlocking codes as explained in this topic. Command Access Select Get Password from the Configure PMR or Configure TA32 menu. Once selected the following window will appear:
How it works? Get the password by unlocking this command, using one of two following methods: 1) Unlock command by Email: If your computer is connected to the Internet, click on the Email button. The Email button will open the Unlocking web page. Once all the required information is entered, click on the Submit button. The response codes will be emailed to the email address provided. NOTE: Please copy and paste your User Code 1 and User Code 2 into the appropriate fields. Then click on the Close button. 2) Unlock command by Phone: Call Escan’s support line at (951) 270-1911 Ext 222. Please provide the customer support representative the following information: User Code 1, User Code 2 and the hardware that was purchased. The representative will provide you with two codes: Response 1 and Response 2. Enter them in the designated boxes, and then click on the Register button. NOTE: It is necessary for you to be in front of your computer, and have the software running when you call to unlock. After unlocking, the password will be displayed on the screen. If logging into the reader is required, the Log In window will appear.

135
Set Echo Mode Command Function This command is used to change the mode in which data is transferred between the reader and the PC. Command Access To change the Echo Mode, from the Configure main menu, select Set Echo Mode. The window above will appear.
How it works? Click on the button to the left of each command to change the echo mode. The different echo modes are explained below: Echo Mode: OFF - The data is stored on the reader and must be downloaded to the PC. Echo Mode: ON (data stored in memory) - The data is transferred directed to the PC and also stored in reader’s memory. Echo Mode: ON (data not stored in memory) - The data is transferred directed to the PC and not stored in reader’s memory. NOTE: The reader must be connected to the PC via a serial or USB cable in order for the data to be transferred to the PC. If the reader responded, a corresponding message will appear in the Reader response.

136
Setup Tracks Command Function This command is used to set the magstripe options in the reader. Command Access Select Setup Tracks command from the Configure PMR or Configure TA32 main menu. If the reader is a PMR 102, PMR 202, TA 90, or TA 48, then the following window will appear:
If the reader is a TA32, the following window will appear:
There are different options available to change track 1, track 2 or track 3. Click on the button that appears to the left, to set the track according to the command. If a response is returned from the reader, it will be displayed in the Reader Response box.

137
Set Track 3 (TA32) Command Function This command is available for the readers that are equipped with 3 tracks such as TA32. It allows you to change the options specific to track3. Command Access When a TA32 is selected, you can select Setup Track 3 submenu from the Configure menu. The following window will appear,
There are 3 different options available to change track 3. Click on the button that appears to the left, to set the track according to the command. If a response is returned from the reader, it will be displayed in the Reader Response box.

138
Set Inactivity Timeout Command Function The reader can be set to automatically shut down after a specific idle time. To change the inactivity timeout in the PMR102/202 (TA90/48) or TA32 reader, use the Set Inactivity Timeout command. Command Access This command can be accessed from the Configure PMR or Configure TA32 main menu.
How it works? To set the inactivity timeout, simply select one of the following options: Keep Power On Always - This option is not recommended since by keeping the reader on all the time, the battery will drain quickly. Turn Power Off automatically after X min X sec - This will allow you to set the length of time the reader will stay on after the last scan then shut off. Select the min and sec from the boxes provided. Then click on the Set button. The Log In window will appear, when you log into the reader.

139
Set Time Command Function To set the date and time in the PMR102/202 (TA90/48) or TA32 reader, use the Set Time menu command under the Configure PMR or Configure TA32 menu.
If necessary, change the date and time that appears in the Set Time window. Then click on the Set button. If the communication between the software and reader timed out, the PMR102/202 (TA90/48) or TA32 Log In window will appear. If the time and date were set successfully, the message “Time is set!” will appear in the response box.

140
Get Reader Status Command Function The Get Status command displays the PMR102, PMR202, TA90,TA48 or TA32 reader settings. This information will include the following: Total number of records stored in the reader
Total number of tracks Reader password Inactivity timeout Echo mode Reader date and time Reader version
To get the above information from the reader, select Get Status command from the Configure PMR or Configure TA32 menu. The reader will return the information as shown in the following figure:
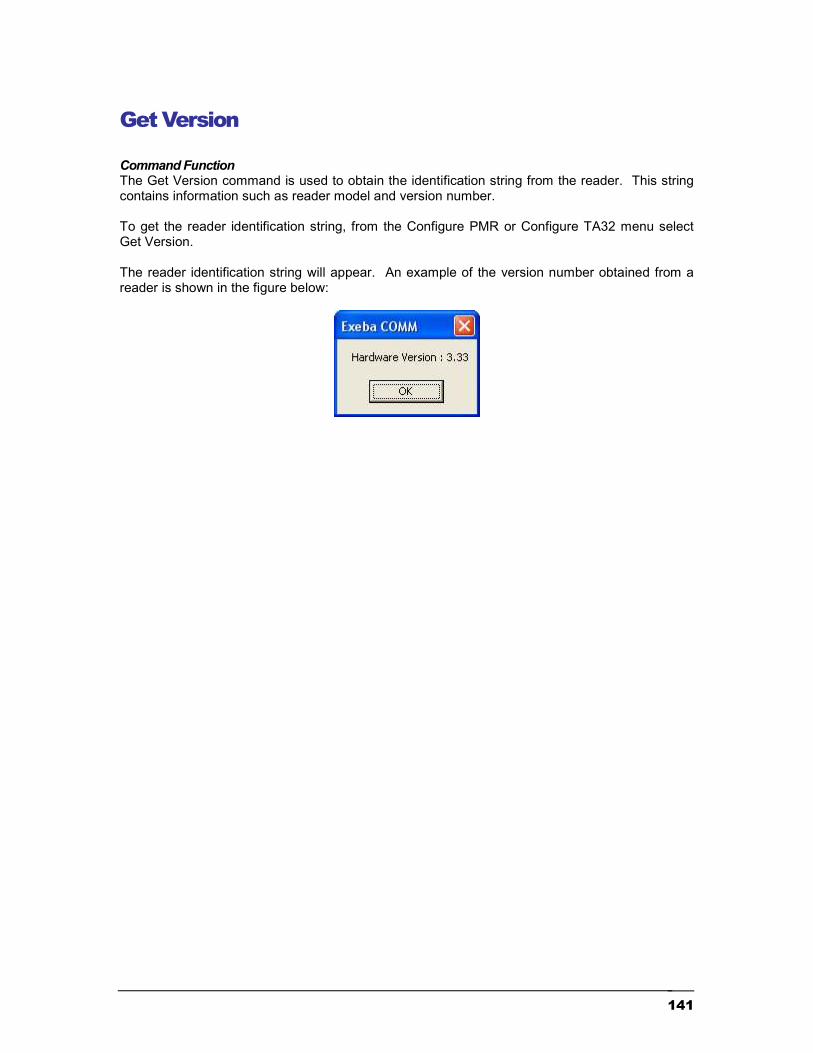
141
Get Version Command Function The Get Version command is used to obtain the identification string from the reader. This string contains information such as reader model and version number. To get the reader identification string, from the Configure PMR or Configure TA32 menu select Get Version. The reader identification string will appear. An example of the version number obtained from a reader is shown in the figure below:

142
Get Hardware Serial # This command is used to retrieve the serial number within the PMR102, PMR202, TA90, TA48 or TA32 reader. When this command is selected, the following window will appear:
After the Log In window appears, you will be prompted to enter the password. Once the password is entered the following Hardware Serial# window will appear:

143
Send Command Command Function Send Command allows you to program the reader, to get data from it or to test it. To send a command to the reader, follow the steps below: Command Access This command is available in all readers. Select Configure PMR or Configure TA menu then select Send Command. The Send Command window will appear, as shown in the figure below:
To send a command, type the command in the text box provided. Then click on the Send button. The responses coming back from the reader (if any) are displayed in the Reader’s Response box. The responses will appear in the format that they are received. However, the software eliminates the ACK, NAK, ETX and STX characters from the string of data received. If the reader receives a command, a response of ACK will appear as "Command Acknowledged" and a response of NAK will appear as "Command Not Acknowledged". The response received will depend on the type of reader being used.

144
Configure Reader MAG DC, and Serial Reader This chapter explains the software commands that are specific to the MAGDC readers and a few commands that are common between the MAGDC and Serial Reader (Non Portable). The following topics are covered:
How to reset the reader to factory defaults How to change a password How to set the magstripe options How to obtain information such as version#, and total records saved How to send the reader a programming command
Chapter
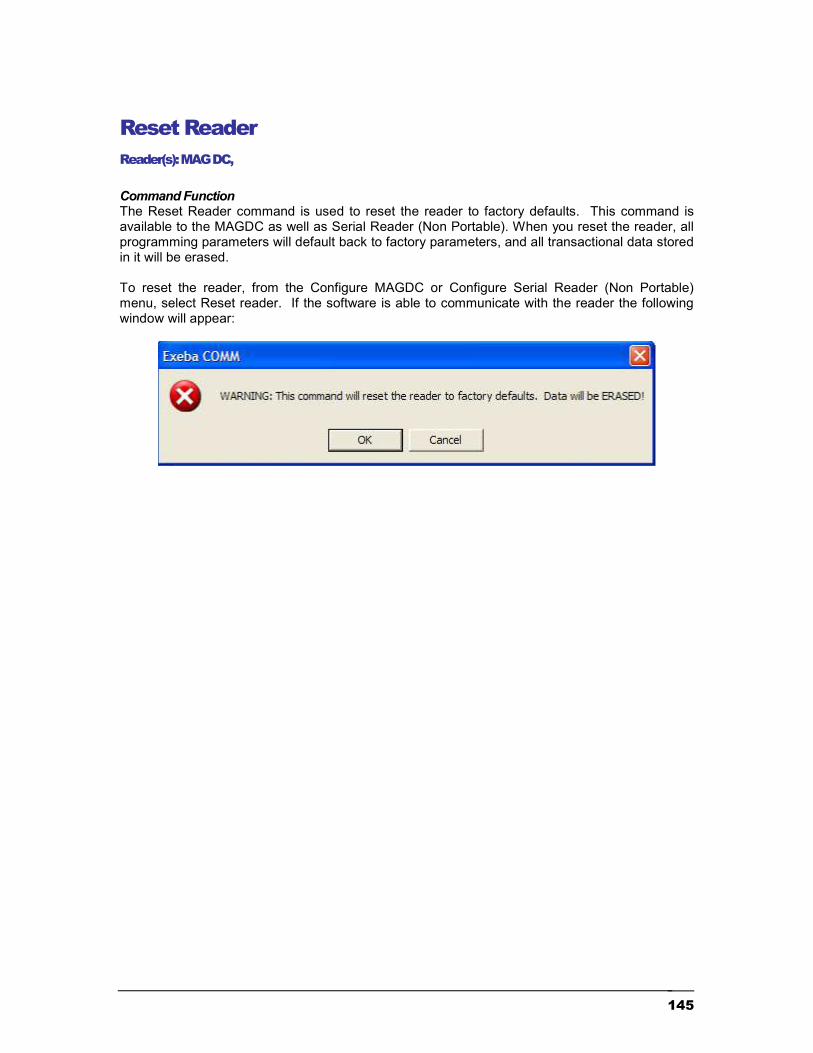
145
Reset Reader Reader(s): MAG DC, Command Function The Reset Reader command is used to reset the reader to factory defaults. This command is available to the MAGDC as well as Serial Reader (Non Portable). When you reset the reader, all programming parameters will default back to factory parameters, and all transactional data stored in it will be erased. To reset the reader, from the Configure MAGDC or Configure Serial Reader (Non Portable) menu, select Reset reader. If the software is able to communicate with the reader the following window will appear:

146
Set Password Reader(s): MAGDC Command Function The Set Password command is used to set the password in the DC reader. Additionally, you will be able to disable the password protection temporarily or turn it off completely. Command Access Access this command from the Configure MAGDC menu, click on Set Password. The following window will appear.
Set a new Password When no password is set, use this command to create a new password or to change the existing one. When the password protection is turned on, you cannot upload or reprogram the reader until the password is turned off. To set a new password,
1. Enter the default password 00000 in the Existing Password box. 2. Then enter the new password in the New Password box. The password can be up to 5
characters in length (numeric and/or alpha characters). 3. Click on the Set button.
To change the existing password, enter the password that is set in the reader in the password text box. Then follow the steps 2 through 3 as described above.

147
Disable Password Use the Disable Password command to turn off the password protection temporarily.
To disable the password, 1. Enter the 5-character password that is set in the reader in the password text box. 2. Click on the Disable button. Clear Password Use the Clear Password command to turn the password protection off.

148
To clear the password, 1. Enter the password set in the reader in the password text box. 2. Then click on the Clear button. Check Password Use the Check button after setting, disabling, or clearing the password to check if the command has succeeded or to check if a password exists in the reader.

149
Set Magstripe Options Reader(s): MAGDC The Set Magstripe Options command allows you to program every track available in DC reader. This command is located in the Configure MAGDC menu. Once selected, the following window will appear:
The individual tracks are programmed as follows: Enable or disable track Transmit /Don't transmit the LRC character Set the magstripe length Transmit /Don't transmit stop and start character Select the prefix character Select the delimiter character Transmit /Don't transmit the direction indicator For multi-track readers, each track can be programmed to: Use the standard character set for the track or another character set Transmit before the other track Set intertrack delimiter The figure above shows all the commands you can program to Track 2. To program the magstripe tracks, follow these steps:

150
1. If the command has a selection box, select the required setting from the list. For example, the ‘Set Prefix to’ command has a selection box for you to select the prefix character you want. You can enter the character in the list box provided or you can select the character from the list. However, there are certain characters that you should always select instead of typing. These characters are: None - disable the prefix Space - space character Tab - tab character 2. Commands such as ‘Set Magstripe Length to 00’, requires a change to the ‘00’ in the command to the desired length. 3. Click on the command button to the left of the command
Note Programming track 1 is equivalent to programming track 3 on readers that read tracks 2 and 3.
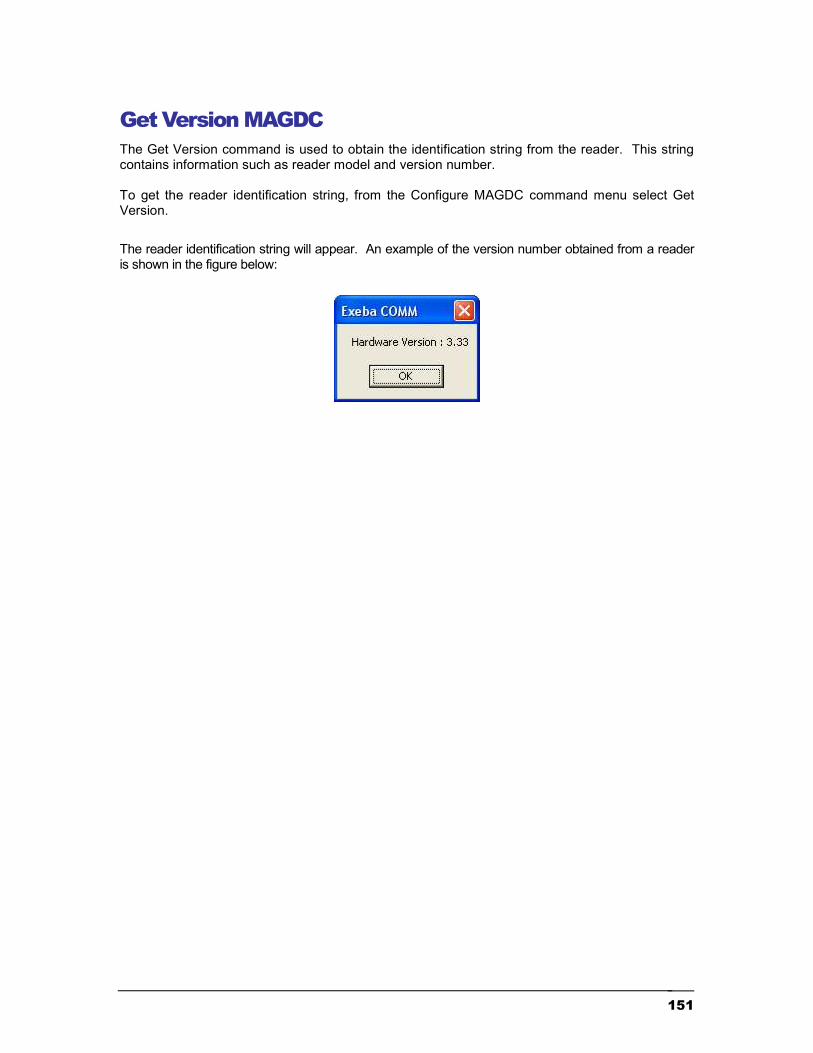
151
Get Version MAGDC The Get Version command is used to obtain the identification string from the reader. This string contains information such as reader model and version number. To get the reader identification string, from the Configure MAGDC command menu select Get Version. The reader identification string will appear. An example of the version number obtained from a reader is shown in the figure below:

152
Get Total Records Reader(s): MAGDC The Get Total Records command is used to obtain the total number of records stored in the reader and uploaded from the reader. This information is important in determining the maximum memory capacity in the reader. To access the reader’s total records, from the Configure MAGDC command menu select Get Total Records. Total number of slots - This is the total number of records the reader can save. Total number of slots used – This is the total number of records the reader has saved. To determine the number of available slots, subtract the total number of slots used from the total number of slots. Total number of records uploaded – This figure shows how many records have been uploaded from the reader.

153
Send Command This command is available in all readers. Send Command allows you to program the reader, to get data from it or to test it. To send a command to the reader, follow the steps below Select Configure MAGDC then select Send Command. The Send Command window will appear, as shown in the figure below:
Type the command in the text box provided. Click on the Send button. The responses coming back from the reader (if any) are displayed in the Reader’s Response box. The responses will appear in the format that they are received. However, the software eliminates the ACK, NAK, ETX and STX characters from the string of data received. If the reader receives a command, a response of ACK will appear as "Command Acknowledged" and a response of NAK will appear as "Command Not Acknowledged". The response received will depend on the type of reader being used.

154
Portable Reader Data The previous chapters explained how to change the port settings and the reader settings as necessary. This chapter explains how to get the data from the reader once it is scanned and saved, how to save the data in the database or in a text file, and finally, how to purge this data in the reader. The Poll commands explained in this chapter also support readers such as the Serial Reader (Non Portable) which do not store the data.
Chapter

155
Poll Data to a database Command Function The data that is stored in the reader after the user scans a card can be obtained by using the Poll command. The Poll Data to Database command polls the data and displays it in a table. Command Access Before you access this command, it is recommended to open a database first to save the poll data in it, if it is not already open. To poll the reader, select Portable Reader Data, then select Poll Data to Database command. The following window will appear,
View Records When this window first appears, all the data in the active database, if any, will appear in the table. You can limit the records displayed in this table to a specific range of date as follows:
1- Click on the Date Range option. 2- Select the range of dates you would like to view from the date tables. 3- Click on the Load button.
If you need to view all the records in the database, click on the All Records option, and then click on the Load button. Poll Data To poll the reader, make sure the selected reader is connected to the communication port, and then click on the Poll Reader Data button. The total number of records saved in the reader will appear in the Total Records in Reader box. If the polling process succeeds, the data will appear in the rows of the table and the Total Records Transferred box will display the total records polled so far. Starting from the first record, the poll function will poll every record into a single row in the table, and every track into a single column. The first column will be the record number. The data of tracks 1-3 will appear in next 3 columns and the date and time will appear in the last column. If

156
the reader does not have a real time clock or there was an error in transferring the date and time, the computer’s date and time will appear in that column instead. The polling process will continue until the total number of records is reached. If the reader operates in real mode, such as the Serial Reader (Non Portable), the records are not saved in the reader. Every record should be polled before another card is scanned. The polling process will run in the same way. Cancel Polling To cancel the polling process at any time, click on the Stop Polling button. Save Data When polled, a copy of the data remains in the reader. But the data that appears in the table after the polling process terminates, will be lost if not saved. In order to save the data, click on one of the following buttons: Save (Text File) button - If you want to save the polled data in a text file, click on this button. Then enter a path and name of the file in the File Name text box. Then click on the Open button. Save (Database) button - This button will save the data that appears in the table to the current database. The name of the current database will appear at the header of the Main window. Delete Data To delete a record from the database, highlight the record in the table and click on the DEL button of your keyboard or the Delete Record button. If you need to delete more than one record at a time, select the records using the Shift key or the Ctrl key of your keyboard then click on the Delete Record button. Purging Reader Data To purge the data in the reader, click on the Purge button. The data does not need to be polled in order to be purged. This button will erase the exiting data in the reader and not the data that appears in the table. Preview / Print Report To preview or print the report data, 1- Select the data range. If you select the All Records option, then all the records in the database will be included in the report. If you select the Date Range option, then all the records with dates falling in that range will be included in the report. 2- Click on the Preview button. Once the Preview window appears, you can print the report by clicking on the Print button shown in the menu at the top of the report page. Then the following window will appear:
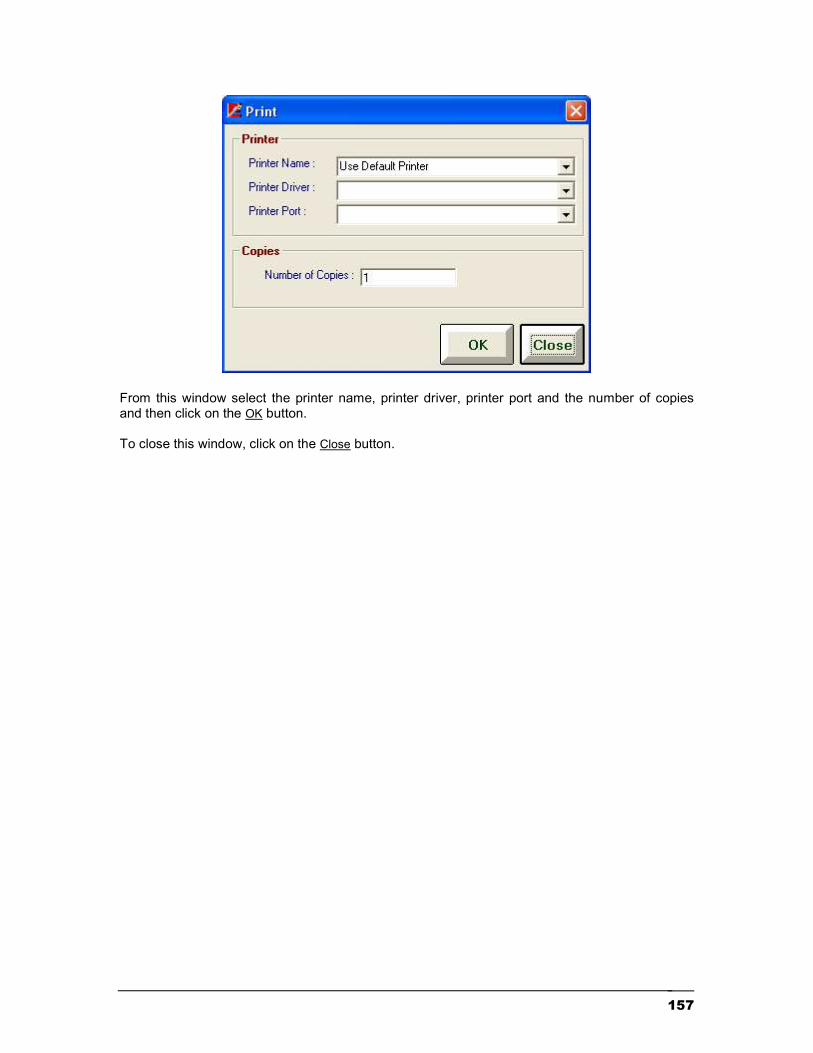
157
From this window select the printer name, printer driver, printer port and the number of copies and then click on the OK button. To close this window, click on the Close button.

158
Poll data to a text File This command polls the saved data from the reader and saves it in a text file only. To access this command, select Poll Data To Text File from the Portable Reader Data menu. The following window will appear:
Poll Data Poll Data (Raw) – This button transfers the data in the same format in which the reader saves it. Poll Data (Formatted) – This button transfers the data from the reader and formats it into comma delimited fields. The data will appear in the box shown above. Saving the data formatted, allows you to import it into the database using the Import utility. Stop Polling The polling function will continue until all the data is polled from the reader. To cancel the polling process at any time, click on the Stop button. Save Data To save the data to a text file, click on the Save button, then enter or select the name and path of the file in the dialog window that appears. The data will be saved in the same format in which it appears in the text box. Purge To erase the data in the reader, click on the Purge button.

159
Purge Reader Data When the data is polled, a copy of it will remain in the reader. To erase the data, the Purge command should be used. It is recommended to select this operation when the data in the reader is not required or after polling the data using the Poll command. To purge the data, select Purge Reader Data command from the Portable Reader Data menu.

160
Card Data The card data window allows you to view and manipulate the data saved in the database a record at a time. When the card type is predefined, you will be able to view the data separated into fields. From the Portable Reader Data menu select Card Data. The following window will appear,
Using this window, you can manipulate the card data as follows: Create new card – Click on the New button, enter data and then click on Save button. Update an existing card – Go to the card data record that you want to update, make the
changes and then click on the Save button. Delete an existing card – Go to the card data record that you want to delete, and then click on the Delete button. Browse – You can go to a previous record by clicking on the Previous button, go to the next record by clicking on the Next button. Or you can search for a particular record based on a criterion. View and print a report of all or selected cards – click on the Report button.

161
Tools The tools menu is available to all readers and encoders. Under this menu you will find commands to compact, and if necessary, repair the application database, to import an old database and to change the hardware selection.
Chapter Chapter

162
Compact and Repair Database As the data is updated, the size of the database file grows over time. The Compact Database utility compacts and repairs the database, thus making it smaller in size. It also allows all of the software functions to run more efficiently. To compact the database, select the Tools menu, then click on the Compact and Repair Database. Before you use this function, make sure all the windows in the software are closed and only a single user is running the software. If the database is corrupted, the Compact Database utility will attempt to repair it. Since this utility cannot fix all the possible forms of database corruption, it is recommended to always back-up the database files to avoid unrecoverable data loss. The Compact and Repair Database submenu is found in Tools menu. The following menu will appear when you click on the Tools menu.

163
Import Database Command Function If you have an older version off Exeba-COMM, use this utility to import the database into this new version. Command Access From the Tools menu, select Import Database. The following window will appear,
Locate the database and click on the Open button of the above window. If the database is imported successfully, a confirmation message will appear. When the data is imported into the database, the reader data will be added as new records. For the encoder data, this utility uses the default card type to extract the fields according to the specification of the new database.

164
Switch Hardware This command is used to switch from one hardware type to another. The Switch Hardware submenu is found in the Tools menu. When the Switch Hardware command is selected, the following hardware window will appear:

165
Product Support A variety of resources are available to help you use Exeba®-COMM™. These resources are covered in this appendix and can be divided into the following sections:
On-line documentation User Guides On-line technical support Escan technical support
Appendix

166
On-Line Help Exeba®-COMM™ has a comprehensive on-line help system that allows you to locate information quickly and easily. On-line help can be accessed from the Start menu. You can also access it while working with Exeba®-COMM™, by selecting Help from the main menu.
User Documentation This manual contains detailed information on how to use Exeba®-COMM™. For commands and questions related to the hardware, consult the manufacturer’s User Guide that is included with this software purchase.
Customer Support Escan Technologies Corp. welcomes your questions, suggestions and comments regarding improvements to Exeba®-COMM™ and this manual. Your comments can be mailed to Escan Technologies Corp., or sent electronically via e-mail or via our World Wide Web (WWW) site. If you have a bug report that requires immediate attention, please contact us as soon as possible. If you would like to purchase any of the hardware described in this manual, you may contact us for the current price and availability. In order to be eligible for technical support, you must register your version of Exeba®-COMM™ with Escan Technologies Corp. In addition to technical support, you will receive updates regarding what is new in the upcoming versions of Exeba®-COMM™. When reporting a problem, please include the following information: Company Mailing Address Phone Number Your Name/Contact Person E-mail Address (if available) Exeba®-COMM™ Serial Number Date of Purchase Operating system (Windows Me, NT, 2000, XP, Vista, Win 7, Win 8, and Win 10) Where to send your registration/correspondence: Email Address: [email protected] Telephone / Fax: Tel: (951) 270-1911 (8:00 am - 4:00 pm PST) Fax: (951) 304-1267

167
Standard Mailing Address: Escan Technologies Corp. 41765 Elm Street, Suite # 102 Murrieta, CA 92562
On-line Support As an alternative to mailing your registration, you may visit our www site. In addition to on-line registration, comments or suggestions are posted, read about upcoming versions of Exeba®-COMM™, related software, and download up-to-date files. Our WWW site is at the following addresses: http://www.e-scan.com http://www.exeba.com Notes…
Related Documents


