Welcome message from author
This document is posted to help you gain knowledge. Please leave a comment to let me know what you think about it! Share it to your friends and learn new things together.
Transcript


Headlight Installation Guide - English P. 03
Headlight Installation Guide - Spanish P. 10
Registration Card - English P. 17
Registration Card - Spanish P. 18
Table of Contents

QUICK GUIDE
Please contact Spyder Auto directly if you have any questions or concerns regarding our products
Please contact Spyder Auto at (866) 845-6608email : [email protected]
Spyder Auto19395 E. Walnut Dr. NorthCity of Industry, CA 91748
Office HoursMon- Fri 8:00 AM-5:30 PM PSTwww.spyderauto.com
is a registered trademark, Copyright © 2013 all rights reserved
PLEASE DO NOT RETURN THE PRODUCT TO THE STORE
4
Safety Goggles
Wire Crimper
Screwdriver
Spyder Auto highly recommends professional installation
SUGGESTED INSTALLATION TOOLS(Please use safe pre-cautions)
Safety Gloves
Soldering Iron
Socket Wrench
Soft Towel
12v Test Light Volt Meter
Storage Tray / Box
Electrical Tape
Panel Popper
(lay out over work area) (prevent missing parts)
Installation Tips:• Always wear eye protection and safety gloves to avoid any possible injuries.• DO NOT cut or connect any wires without identifying them to avoid any possible electrical shortage.• Spyder Auto recommends soldering each wire connection for optimal connectivity• Please check to ensure no electrical connection is exposed after installation To prevent damage to the product or vehicle, please use electrical tape or zip ties to organize loose wires.
Note: Installation may vary depending on vehicle. Removal of your vehicle’s front bumper may be required.
Warning: Please use the recommended safety equipment when installing Spyder Auto Headlights. Spyder Auto is not liable for any injuries or accidents that may occur during installation.
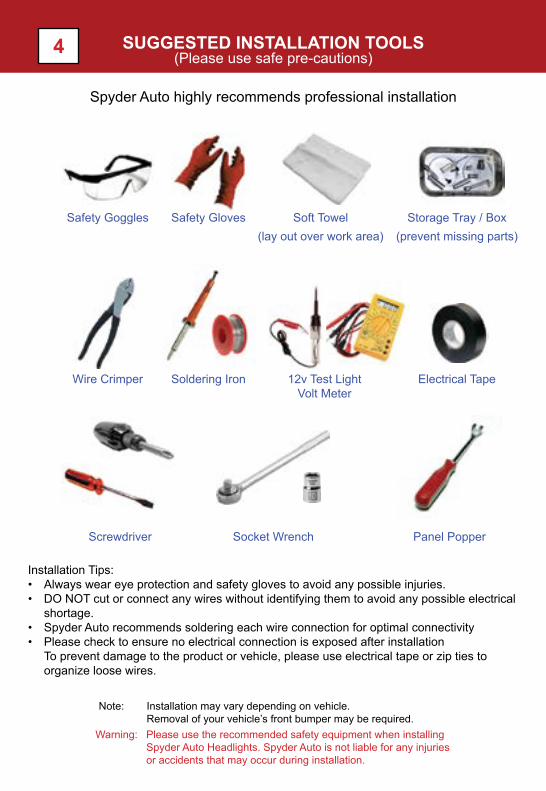
5WARNING PRE-INSTALLATION CHECK LIST
Please read carefully before installation
Professional installation is highly recommended. Spyder Auto is not responsible for any damages or injuries due to improper installation.
Note: If your lights are not functioning properly, please check the fuse box and refer to your owner’s manual on replacing the fuse.
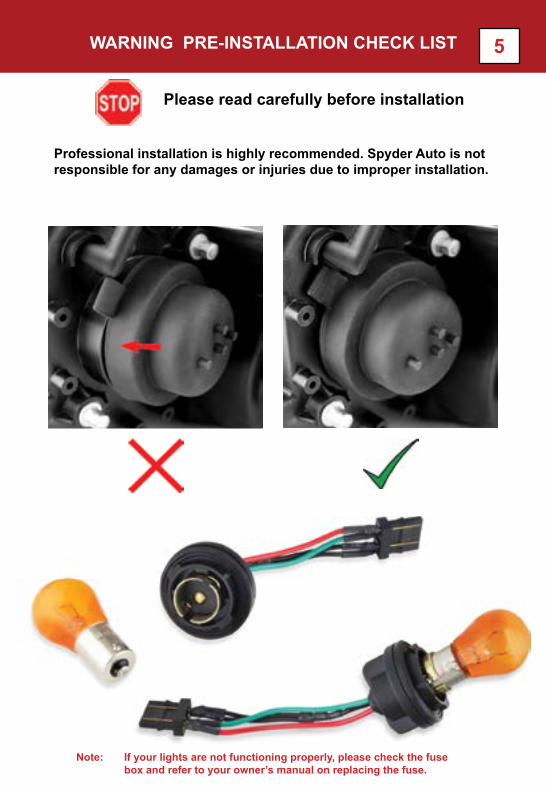
6 CONDENSATION
Condensation Vs. Water Leak
A. B.
Lens Fog build up Water Leak
Manufacturers note: Condensation is a common problem that all lighting manufacturers encounter. As climate changes, the humidity in the headlights can cause the lens to fog up. Once the headlights are turned on, the heat produced from the bulb will evaporate and cause condensation.
Warning: Do not attempt to re-seal, bake or rinse your headlights out. This can cause damage to your headlights and its internal electronic components.
To prevent condensation please check that all rubber gaskets, seals and o-rings are tightly sealed and secured.
Helpful hints:• Fitment is not guaranteed if the vehicle has been in a prior collision. • To avoid scratches and damage to your Spyder Auto Headlight, Never lay the item on the lens face down. as shown in Fig 2.7• Do not modify, alter, or tamper with this product in any way. Failure to comply will void your warranty.
Never place the lens down
Fig 2.7
Slight fog or light condensation is normal. If this happens, park your vehicle in the sun to alleviate the condensation. Then reaseat all gaskets and caps to ensure they are tightly sealed.
This is a image of an actual water leak. If this occurs please refer to your warranty guide either found in your packaging or please visit our website for more information.
A.
B.
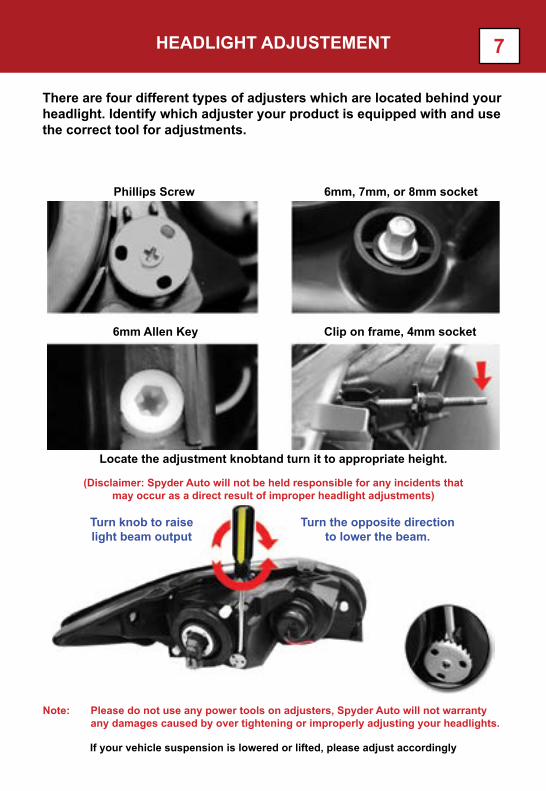
7HEADLIGHT ADJUSTEMENT
There are four different types of adjusters which are located behind your headlight. Identify which adjuster your product is equipped with and use the correct tool for adjustments.
Phillips Screw 6mm, 7mm, or 8mm socket
Clip on frame, 4mm socket
Locate the adjustment knobtand turn it to appropriate height.
(Disclaimer: Spyder Auto will not be held responsible for any incidents that may occur as a direct result of improper headlight adjustments)
6mm Allen Key
Turn knob to raise light beam output
Turn the opposite direction to lower the beam.
Note: Please do not use any power tools on adjusters, Spyder Auto will not warranty any damages caused by over tightening or improperly adjusting your headlights.
If your vehicle suspension is lowered or lifted, please adjust accordingly
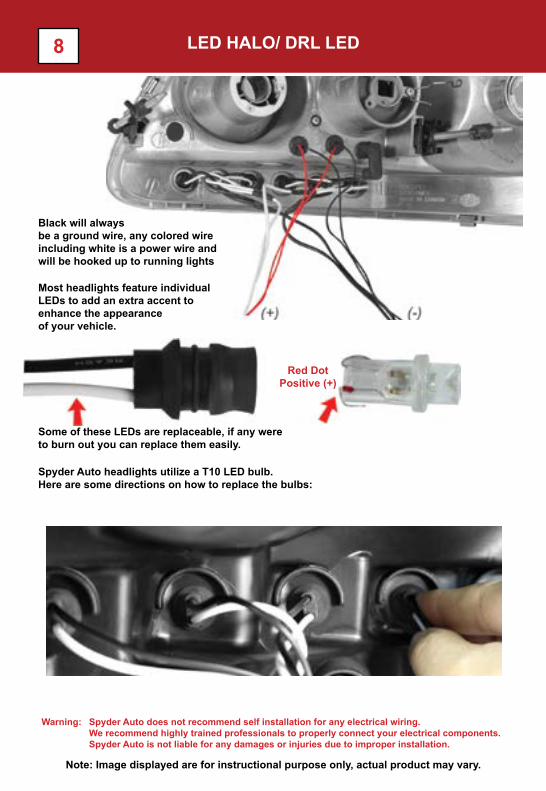
8 LED HALO/ DRL LED
Red DotPositive (+)
Black will always be a ground wire, any colored wire including white is a power wire and will be hooked up to running lights
Most headlights feature individual LEDs to add an extra accent to enhance the appearance of your vehicle.
Some of these LEDs are replaceable, if any wereto burn out you can replace them easily.
Spyder Auto headlights utilize a T10 LED bulb. Here are some directions on how to replace the bulbs:
Spyder Auto does not recommend self installation for any electrical wiring. We recommend highly trained professionals to properly connect your electrical components. Spyder Auto is not liable for any damages or injuries due to improper installation.
Warning:
Note: Image displayed are for instructional purpose only, actual product may vary.

9CCFL HALO (Cold Cathode Fluorescent Lighting)
1. Locate the CCFL Power inverter and then find the corresponding plugs from the headlights and clip them together.2. Once connected, heat the shrink tube to ensure the connection is secured
Connect to parking lights
Black Wire Ground (-)Red Wire Postive (+)
Note: Image displayed are for instructional purpose only, actual product may vary.
CCFL power inverter installation
10
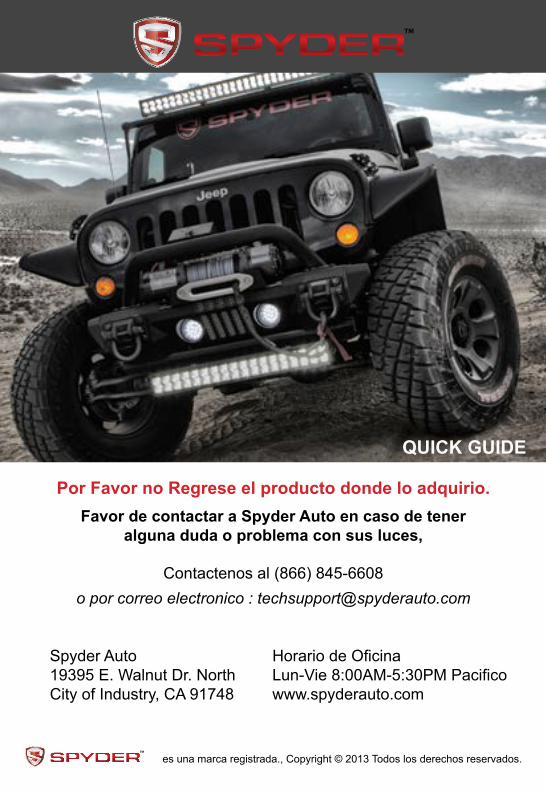
QUICK GUIDE
Favor de contactar a Spyder Auto en caso de teneralguna duda o problema con sus luces,
Contactenos al (866) 845-6608o por correo electronico : [email protected]
Spyder Auto19395 E. Walnut Dr. NorthCity of Industry, CA 91748
Horario de OficinaLun-Vie 8:00AM-5:30PM Pacificowww.spyderauto.com
es una marca registrada., Copyright © 2013 Todos los derechos reservados.
Por Favor no Regrese el producto donde lo adquirio.
11
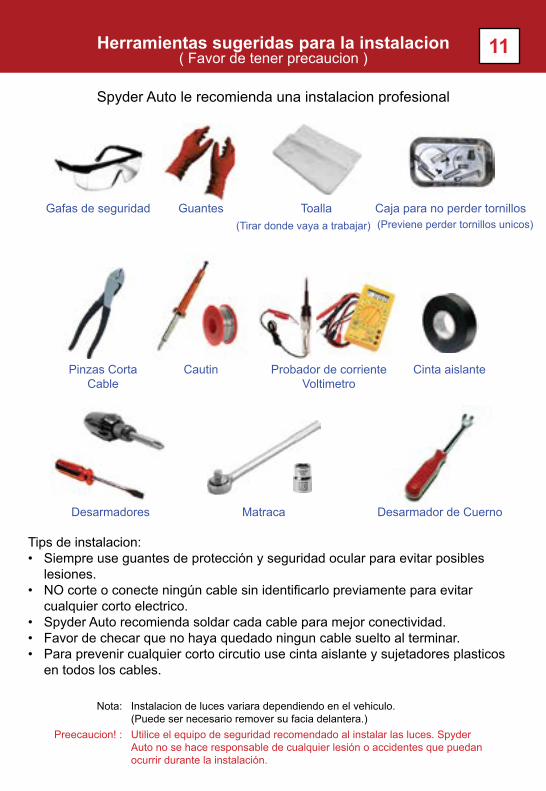
Gafas de seguridad
Pinzas CortaCable
Desarmadores
Spyder Auto le recomienda una instalacion profesional
Herramientas sugeridas para la instalacion( Favor de tener precaucion )
Guantes
Cautin
Matraca
Toalla
Probador de corrienteVoltimetro
Caja para no perder tornillos
Cinta aislante
Desarmador de Cuerno
(Tirar donde vaya a trabajar) (Previene perder tornillos unicos)
Tips de instalacion:• Siempre use guantes de protección y seguridad ocular para evitar posibles lesiones.• NO corte o conecte ningún cable sin identificarlo previamente para evitar cualquier corto electrico.• Spyder Auto recomienda soldar cada cable para mejor conectividad.• Favor de checar que no haya quedado ningun cable suelto al terminar.• Para prevenir cualquier corto circutio use cinta aislante y sujetadores plasticos en todos los cables.
Utilice el equipo de seguridad recomendado al instalar las luces. Spyder Auto no se hace responsable de cualquier lesión o accidentes que puedan ocurrir durante la instalación.
Preecaucion! :
Instalacion de luces variara dependiendo en el vehiculo.(Puede ser necesario remover su facia delantera.)
Nota:
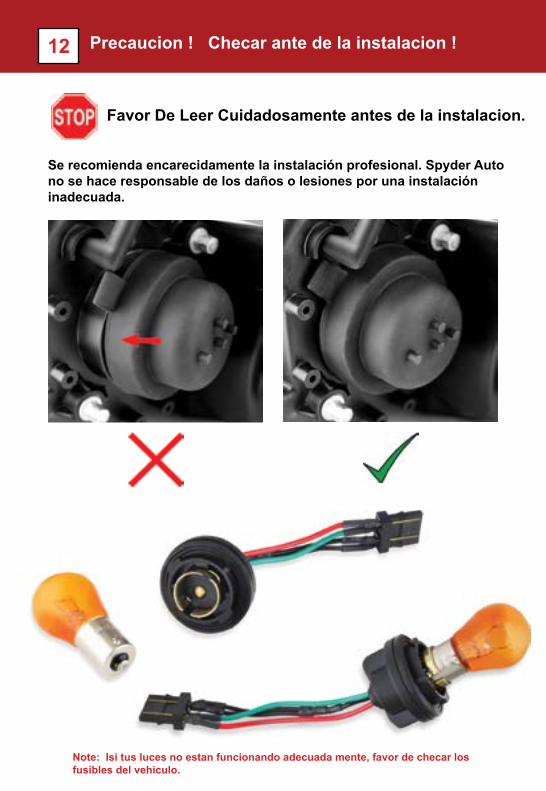
12 Precaucion ! Checar ante de la instalacion !
Favor De Leer Cuidadosamente antes de la instalacion.
Se recomienda encarecidamente la instalación profesional. Spyder Auto no se hace responsable de los daños o lesiones por una instalación inadecuada.
Note: Isi tus luces no estan funcionando adecuada mente, favor de checar los fusibles del vehiculo.

13
A. B.
CONDENSACION
Condensacion Contra Fuga de Agua
Condensacion Normal Empaque dañado
Nota de Fabricantes : La condensación es un problema común que todos los fabricantes deluces se encuentran. A medida que cambia el clima, la humedad en los faros puede hacer que ellente se empañe arriba. Una vez que los faros están encendidos, la condensacion producida por la lámpara evaporará la condensacion.
Advertencia: No intente volver a sellar, hornear o enjuaguar sus faros internamente. Esto puede causar daños a sus faros y sus componentes electrónicos internos.
Luz de niebla o condensación de luz es normal. Si esto sucede, estacione su vehículo en el sol para aliviar la condensación. Entonces recelle todos las juntas y tapas para asegurarse de que están bien selladas.Esta es una imagen de una fuga de aqua real. Si esto ocurre, por favor consulte la garantía que se encuentra en su embalaje o visite nuestro sitio web para más información.
Para evitar la condensación, por favor verifique que todas las juntas de goma,sellos y juntas tóricas estén bien sellados y asegurados.
Consejos útiles:• Montaje no está garantizado si el vehículo ha estado en una colisión previa.• Para evitar rasguños y daños a su luz, nunca coloque el lente hacia abajo. Como lo muestra la Fig 2.7• No modificar, alterar o manipular este producto de cualquier manera. El incumplimiento se anulará la garantía.
Nunca coloque ellente hacia abajo
Fig 2.7
A.
B.
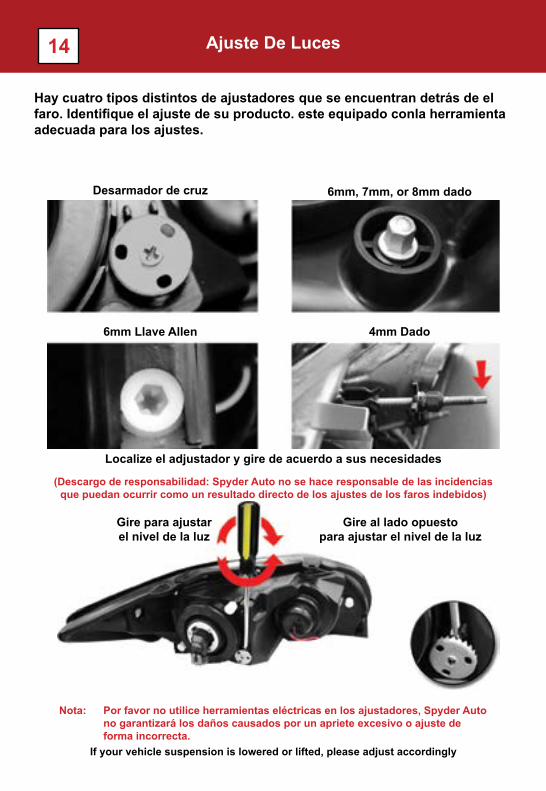
14 Ajuste De Luces
Hay cuatro tipos distintos de ajustadores que se encuentran detrás de elfaro. Identifique el ajuste de su producto. este equipado conla herramienta adecuada para los ajustes.
Desarmador de cruz 6mm, 7mm, or 8mm dado
4mm Dado
Localize el adjustador y gire de acuerdo a sus necesidades
(Descargo de responsabilidad: Spyder Auto no se hace responsable de las incidencias que puedan ocurrir como un resultado directo de los ajustes de los faros indebidos)
6mm Llave Allen
Gire para ajustarel nivel de la luz
Gire al lado opuestopara ajustar el nivel de la luz
Por favor no utilice herramientas eléctricas en los ajustadores, Spyder Auto no garantizará los daños causados por un apriete excesivo o ajuste de forma incorrecta.
Nota:
If your vehicle suspension is lowered or lifted, please adjust accordingly

15
Punto RojoPositivo (+)
LED HALO/ DRL LED
Negro siempre seraun cable negativo.cualquier cable de color incluyendo blanco esun cable positivo.
Algunos de estos LEDs son reemplazables, si lo sonpuede reemplazarlos con bastante facilidad
Spyder Autos utilizan un T10 bombilla LED.He aquí algunas indicaciones sobre cómo reemplazar las bombillas:
Spyder Auto no recomienda la instalación personal en el cableado eléctrico.Recomendamos profesionales altamente capacitados para conectar correctamente los com-ponentes eléctricos.Spyder Auto no se hace responsable de los daños o lesiones debido a una instalación inade-cuada.
Advertencia:
Nota: La imagen que se muestra son para fines de instrucción solamente, el producto real puede variar.
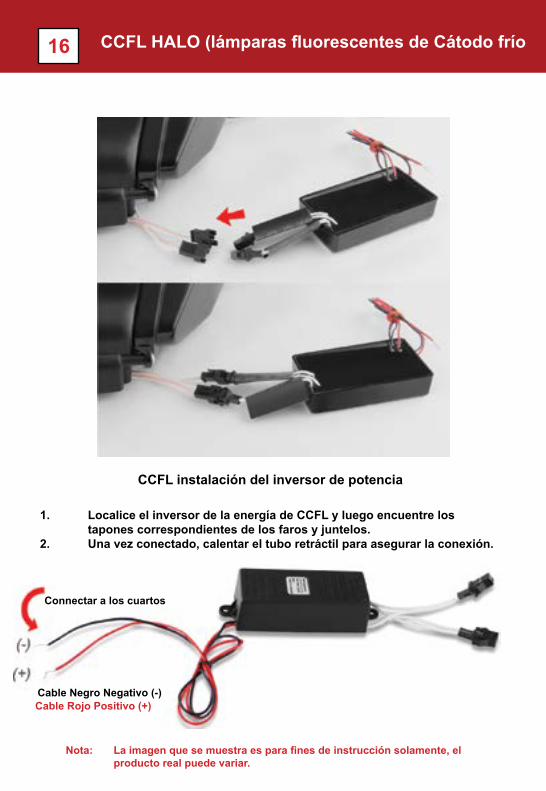
16 CCFL HALO (lámparas fluorescentes de Cátodo frío
1. Localice el inversor de la energía de CCFL y luego encuentre los tapones correspondientes de los faros y juntelos.2. Una vez conectado, calentar el tubo retráctil para asegurar la conexión.
Connectar a los cuartos
Cable Negro Negativo (-)Cable Rojo Positivo (+)
Nota: La imagen que se muestra es para fines de instrucción solamente, el producto real puede variar.
CCFL instalación del inversor de potencia

Model
Register your product on line at www.spyderauto.com/registration
PRODUCT REGISTRATION
To learn more about Spyder Auto’s warranty informationand terms and conditions, please visit :
Follow Spyder Auto’s Social Media
www.spyderauto.com/terms
or by mail : Product Registration Card
Spyder Auto19395 E. Walnut Dr. NorthCity of Industry, CA 91748
Mail to:
Name
Email Address
Year
Place of Purchase
Item #
Date of Purchase
Product Description
Make
Phone
facebook.com/SpyderAuto instagram.com/SpyderAuto twitter.com/SpyderAuto

PRODUCT REGISTRATION
Si desea mayor informacion sobre su garantia favor de visitar nuestro sitio de internet:
siganos en linea:
www.spyderauto.com/terms
o por correo : Tarjeta de registracion de producto
Spyder Auto19395 E. Walnut Dr. NorthCity of Industry, CA 91748
direccionpostal:
Nombre Apellido
Correo Electronico
Año
Lugar De Compra
Numero De Parte
Fecha de Compra
Descripcion de Producto
Marca Modelo
Telefono
facebook.com/SpyderAuto instagram.com/SpyderAuto twitter.com/SpyderAuto
registre su producto en linea en www.spyderauto.com/registration

TM
DEFINE YOUR STYLE

Related Documents