Head Start Design Guide A Guide for Building a Head Start Facility US Department of Health and Human Services Administration for Children and Families Administration on Children, Youth and Families Head Start Bureau

Welcome message from author
This document is posted to help you gain knowledge. Please leave a comment to let me know what you think about it! Share it to your friends and learn new things together.
Transcript

Head Start Design GuideA Guide for Building a Head Start Facility
US Department of Health and Human ServicesAdministration for Children and Families Administration on Children, Youth and Families Head Start Bureau

HEAD START DESIGN GUIDE A Guide for Building a Head Start Facility


Head Start Design GuideA Guide for Building a Head Start Facility
®

This document was prepared under Contract No. 233-02-0002 of the Head Start
Bureau, Administration on Children, Youth and Families, Administration for
Children and Families, U.S. Department of Health and Human Services, by the
National Head Start Training and Technical Assistance Resource Center, 1000
Wilson Blvd. Suite 1000, Arlington, VA 22209.
ii Head Start Design Guide 2005

Table of ContentsChapter 1: Introduction to the Guide 3
1.1 Purpose 41.2 Users 51.3 Applicable Documents and Web Sites 61.4 Organization 8
Chapter 2: Mission, Goals, Administration and Policy 112.1 Program Goals and Objectives 122.2 Process 132.3 Standards 142.4 Center Management 15
Chapter 3: Adults and Children in the Center 173.1 Parents 183.2 Teachers 193.3 Administration 203.4 Service Personnel 203.5 Children 21
3.5.1 Early Head Start—Infants 223.5.2 Early Head Start—Young Toddlers 243.5.3 Early Head Start—Older Toddlers 253.5.4 Head Start—Pre-School Children 26
Chapter 4: Head Start Centers and Use of Space 294.1 Design Implications of Program Standards 30
4.1.1 Interactions Among Staff and Children 304.1.2 Facilities and Learning 304.1.3 Staff-Parent Interaction 314.1.4 Skilled Staff and Center Design 314.1.5 Administration and Space 324.1.6 Staffing and Classroom Space 324.1.7 Physical Environment 334.1.8 Health and Safety 344.1.9 Nutrition and Meal Service 344.1.10 Record Storage 34
4.2 Head Start Program Performance Standards on Space 35
4.3 Additional Requirements 35
Head Start Design Guide 2005 iii

Chapter 5: Planning Space and Location 375.1 Criteria for Center Location 385.2 Construction and Renovation Terms 385.3 Overall Space Requirements 395.4 Environmental Quality 405.5 Security 415.6 Approach and Access 425.7 Historic Preservation 435.8 Space for Children 435.9 Space for Adults 44
Chapter 6: Site Design 476.1 Concepts for Site Design 48
6.1.1 Context 486.2 Entry and Circulation 49
6.2.1 Entry Approach 496.2.2 Parking 496.2.3 Service 506.2.4 Security 51
6.3 Concepts for Play Space Design 51
6.4 General Design Concepts 536.4.1 Location 546.4.2 Separation 546.4.3 Transitional Areas 546.4.4 Porches and Decks 546.4.5 Shade 546.4.6 Circulation 556.4.7 Site Furniture 556.4.8 Storage 56
6.5 Types of Outdoor Play Spaces 566.5.1 Sand and Water 566.5.2 Dramatic Play 566.5.3 Large Motor Play 57
6.6 Play Yards for Different Age Groups 586.6.1 Infant Outdoor Play Areas 586.6.2 Toddler Outdoor Play Areas 586.6.3 Head Start Outdoor Play Areas 59
6.7 Specific Site Technical Criteria 606.7.1 Fences and Enclosures 606.7.2 Plant Materials 616.7.3 Dimensions and Clearances 626.7.4 Shading 636.7.5 Play Yard Surfaces 636.7.6 Resilient Surfaces 636.7.7 Hard Surfaces 656.7.8 Grasses/Turf Surfaces 65
iv Head Start Design Guide 2005

Chapter 7: Interior Space Design 677.1 General Information 68
7.1.1 Entry and Circulation 687.1.2 Staff Areas 687.1.3 Classrooms 687.1.4 Common Areas 687.1.5 Service Areas 697.1.6 Entrance and Circulation 697.1.7 Exterior Transition Spaces 707.1.8 Vestibule 707.1.9 Reception 707.1.10 Main Circulation 717.1.11 Staff Spaces 727.1.12 Director’s Office 737.1.13 Parent/Teacher Conference Room 737.1.14 Staff Lounge 737.1.15 Staff Lavatory 747.1.16 Central Resource Storage 74
7.2 General Concepts for Classroom Design 757.2.1 Classroom Areas 757.2.2 Classroom Location 787.2.3 Classroom Size 787.2.4 Separation of Spaces 78
7.3 Scale 80Table 7.3 — PHYSICAL DIMENSIONS OF CHILDREN 807.4 Architectural Form 817.5 Classroom Component Areas 84
7.5.1 Classroom Entrances 847.5.2 Cubby Storage Area 847.5.3 Infant and Young Toddler Cubbies 847.5.4 Older Toddler and Head Start
Children’s Cubbies 857.5.5 Open Activity Area 857.5.6 Activity Area for Infants 867.5.7 Activity Area for Toddlers 877.5.8 Activity Area for Head Start Children 88
7.6 Lofts and Platforms 887.6.1 Infant Lofts and Platforms 887.6.2 Toddler and Pre-School Children’s
Lofts and Platforms 89
Head Start Design Guide 2005 v

7.7 Other Areas 907.7.1 Art Sinks 907.7.2 Toilets and Sinks 917.7.3 Diapering Station and Storage Areas 937.7.4 Sleeping and Napping Areas 947.7.5 Nursing and Lactation Areas 947.7.6 Food Preparation 957.7.7 Eating/Table Area 957.7.8 Child-Accessible Display 967.7.9 Classroom and Teacher Storage 967.7.10 Teacher Storage 977.7.11 Multi-Purpose and
Motor Activity Spaces 977.7.12 Sick Bay 987.7.13 Service Spaces 987.7.14 Kitchen 987.7.15 Laundry 1007.7.16 Janitor’s Closet 1017.7.17 Service Entrance 101
7.8 Mechanical/Electrical Telephone Equipment 1027.9 Design Features to Avoid 102
Chapter 8: Furnishings and Equipment 1058.1 General Criteria 106
8.1.1 Storage 1078.1.2 Flammability Codes and Standards 1078.1.3 Upholstered Furniture 1078.1.4 Chemicals 1078.1.5 Safety 1088.1.6 Storage Units 1088.1.7 Seating 1088.1.8 Tables and Chairs 1088.1.9 Countertops 108
8.2 Playground Equipment 109
Chapter 9: Interior Finishes 1119.1 General Requirements 1129.2 Color and Texture 114
9.2.1 Use of Color 1149.2.2 Use of Texture 115
9.3 Types of Finish Materials 1159.3.1 Wall Finishes 1159.3.2 Floor Finishes 116
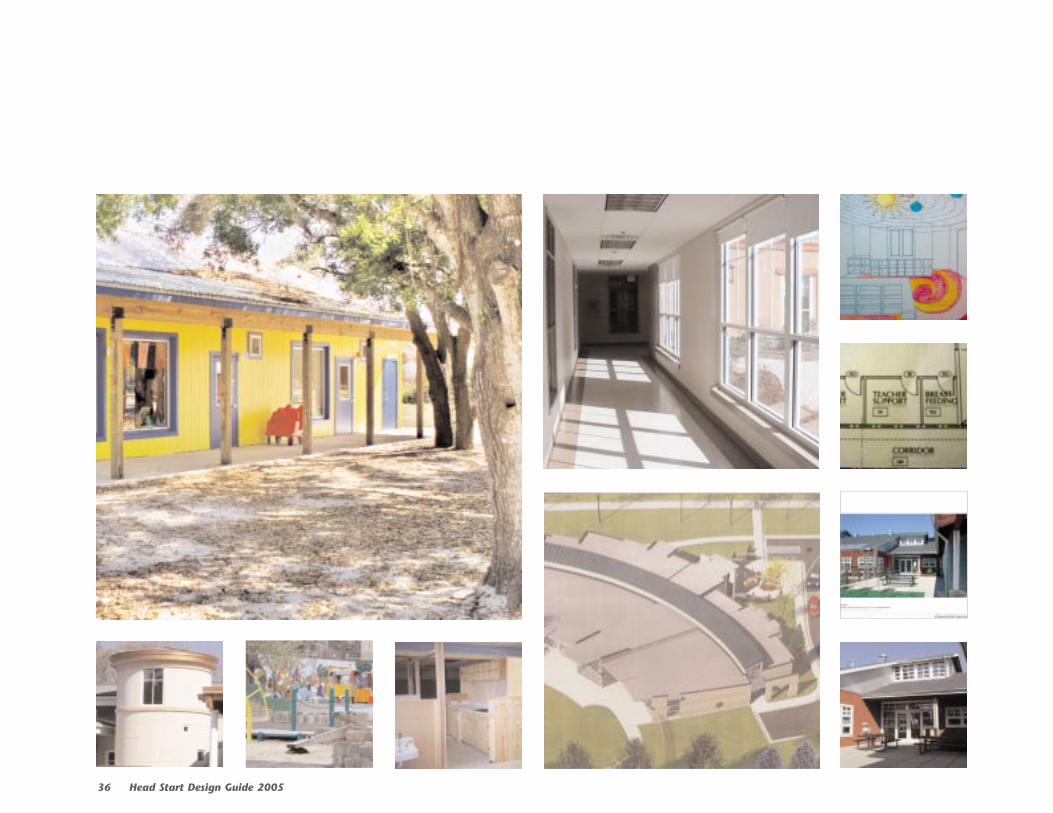
9.4 Ceilings 118
vi Head Start Design Guide 2005

Chapter 10: Technical Criteria 12110.1 Fire Protection, Safety and
Environmental Issues 12210.1.1 Compliance 12210.1.2 National Codes and Standards 12210.1.3 Means of Egress 122
10.2 Security 12410.3 Accessibility 12510.4 Historic Preservation 12610.5 Acoustics 126
10.5.1 Control of Exterior Noise 12610.5.2 Modulating Interior Noise
Generated within the Space 12710.5.3 Controlling the Transfer of Noise
Inside the Space 12710.5.4 Controlling the Transfer of Sound
to Adjoining Areas 12810.6 Windows, Doors, and Hardware 128
10.6.1 Windows 12810.6.2 Standards for Safety Glass 12910.6.3 Doors 13010.6.4 Door Hardware 13010.6.5 Mounting 130
10.7 Plumbing 131
10.8 Heating/Ventilation and Air Conditioning 13210.8.1 Temperature and Humidity Levels 13210.8.2 Ventiliation 13210.8.3 Heating and Cooling Safety Issues 133
10.9 Lighting 133Table 10.9— LIGHTING REQUIREMENTS 13210.10 Electrical 135
10.10.1 Electrical Safety Issues 13510.10.2 Electrical Requirements 136
10.11 Lead-Based Paint 13610.12 Lead in Water 13710.13 Asbestos 13710.14 Radon 13810.15 Off-Gassing 13810.16 CO2 Monitoring 138
Head Start Design Guide 2005 vii

Appendix A: Accessibility 139
Appendix B: Head Start Centers and Sustainable Design 143
Appendix C: Head Start Bureau Central Office and ACF Regional Offices 146
Appendix D: Metric/English Conversions 150
Appendix E: Head Start Program Performance Standards on Design and Space Use 152
Performance Standard 1304.21(a) (5) (i) (5) 152Performance Standard 1304.22(e) (6) 152Performance Standard 1304.53(a) (1) (a) 152Performance Standard 1304.53(a) (2) 153Performance Standard 1304.53(a) (3) 153Performance Standard 1304.53(a) (4) 153Performance Standard 1304.53(a) (5) 153Performance Standard 1304.53(a) (6) 154Performance Standard 1304.53(a) (7) 154Performance Standard 1304.53(a) (8) 154Performance Standard 1304.53(a) (9) 154Performance Standard 1304.53(a) (10) 155Performance Standard 1304.53(a) (10) (i) 155Performance Standard 1304.53(a) (10) (ii) 155Performance Standard 1304.53(a) (10) (iii) 156Performance Standard 1304.53(a) (10) (iv) 156
Performance Standard 1304.53(a) (10) (v) 156Performance Standard 1304.53(a) (10) (vi) 156Performance Standard 1304.53(a) (10) (vii) 157Performance Standard 1304.53(a) (10) (viii) 157Performance Standard 1304.53(a) (10) (ix) 157Performance Standard 1304.53(a) (10) (x) 158Performance Standard 1304.53(a) (10) (xi) 158Performance Standard 1304.53(a) (10) (xii) 158Performance Standard 1304.53(a) (10) (xiii) 158Performance Standard 1304.53(a) (10) (xiv) 159Performance Standard 1304.53(a) (10) (xv) 159Performance Standard 1304.53(a) (10) (xvi) 160Performance Standard 1304.53(a) (10) (xvii) 160Performance Standard 1304.53(b) (1) 160Performance Standard 1304.53(b) (1) (i) 160Performance Standard 1304.53(b) (1) (ii) 160Performance Standard 1304.53(b) (1) (iii) 160Performance Standard 1304.53(b) (1) (iv) 161Performance Standard 1304.53(b) (1) (v) 161Performance Standard 1304.53(b) (1) (vi) 161Performance Standard 1304.53(b) (1) (vii) 161
Appendix F: Terms Used in Construction and Renovation Projects 162
viii Head Start Design Guide 2005

Appendix G: Poisonous Plants 185HIGH TOXICITY PLANTS 186MEDIUM TOXICITY PLANTS 187LOW TOXICITY PLANTS 188NON-TOXIC PLANTS BY COMMON NAME ONLY 189TOXIC PLANTS BY COMMON NAME ONLY 189
Appendix H: Playgrounds and Their Environment 190
Appendix I: Glossary of Head Start Terms 192
Photo Credits 201
Head Start Design Guide 2005 ix

2 Head Start Design Guide 2005

Chapter 1Introduction to the Guide
This chapter describes the purpose of the Head Start Center
Design Guide, its organization, intended audiences,
how the information may be applied to Head Start centers,
and other useful references. The Guide also contains a
helpful glossary of Head Start terms, included in
Appendix I.
Head Start Design Guide 2005 3

1.1 Purpose
The Head Start Center Design Guide (hereafter referred to as the Guide in this
document) contains suggested guidelines for planning and designing
Head Start centers that are federally funded but locally owned or man-
aged. To simplify the text, throughout this Guide the term Head Start
represents both Head Start and Early Head Start programs, agencies,
grantees, and delegate grantees.
The objective of the Guide is to encourage careful design of centers that are
child-oriented, developmentally appropriate, beautiful, environmentally
sensitive, and functional. A child may be in a center up to 12,500 hours, if
he or she enters Head Start as an infant and remains until entering kinder-
garten. Since all enrolled children spend many hours at Head Start centers,
the design of the space is important to their sense of well-being.
The suggested guidelines are intended for use both in developing new
centers and expanding or renovating existing centers. To support design
professionals and their judgment, the Guide explains both design guide-
lines and the rationale for the guidelines. The Guide also includes the
baseline levels of features and finishes for Head Start centers and desirable
best practice design features.
Experience has demonstrated that the design effort must allow for, and be
sensitive to, the differences in space attributes for children and adults, as
well as the differences in space usage by children in different age groups.
To provide a rationale for specific design aspects, information about the
characteristics and activities of children is included in the text. Specific
maximum or minimum guidelines are stated, when appropriate. The Guide
also provides a discussion of issues that affect design.
The recommendations in the Guide are intended to establish optimal design and
4 Head Start Design Guide 2005
Chapter One

to set a benchmark for best practice. However, there may be situations when rec-
ommendations for optimal design elements cannot be adopted. These concerns
should be discussed with the design professional during the planning and design
phase of the project.
1.2 Users
This Guide is intended to be the source of basic architectural information
for all individuals involved in the design of Head Start centers. Individuals
seeking detailed information on Head Start practices, center operations, or
general Head Start building standards should refer to the Head Start
Performance Standards, 45 CFR 1304, et. seq.
Specific users of the Guide will include the following:
• Architects and Engineers (A/E’s) who provide design services under
the direction of the Head Start grantee. These individuals should use
the Guide for pre-design planning or to assess the extent of improve-
ments required in an existing center in order to achieve the standards
established herein.
• Head Start Bureau staff, who use the guide for reference and offer
guidance to the Regional Offices and grantees.
• Head Start center Property Managers, who maintain the centers and
improve existing ones to meet the benchmarks set in the Guide. In
addition, the Head Start center managers will use it for guidance in
the repair and replacement of existing conditions and equipment.
• The Head Start design team, including parents, teachers, administra-
tors, staff and others.
• Head Start grantees and agencies planning to contract with private
sector architectural firms to establish new centers or renovate
existing ones.
• Head Start Regional Office staff, who will use the guide to help
Head Start Design Guide 2005 5
Chapter One

interpret the application of best practices to the center plans
and specifications.
• Head Start staff members, including program managers, agency
administrators, financial officers, center directors, facility managers,
and others concerned with facility design and management who may
refer to the Guide, especially when they contract with private architec-
tural firms to establish new centers or renovate existing ones.
• Head Start staff, parents, boards, Policy Councils, and others
interested in Head Start space may want to use the Guide as
a reference.
1.3 Applicable Documents and Web Sites
A Web site that may be useful was developed by the Department of the
Army to include their facilities standardization program for child develop-
ment centers. The address is
http://www.ccb.org/docs/UFC/4_740_14.pdf.
Other Web sites and facility information may be linked through the Head Start
Bureau’s Web site www.acf.dhhs.gov/programs/hsb.
Current editions of documents that users may reference may be obtained by
contacting the Head Start Publications Management Center
(www.hsinfo.org), the Facilities Referral and Information System
(http://www.hsnrc.org), or the Head Start Bureau (www.acf.dhhs.gov/
programs/hsb).
They include the latest edition of the following documents:
• The Head Start Act, as amended, 42 USC 9801, et. seq.
• The Head Start Facilities Manual, Head Start Bureau, Administration
on Children and Families. This manual contains thirteen assessment
worksheets for Head Start and Early Head Start grantees to use when
preparing budgets, planning preventive and routine maintenance of
classrooms and playgrounds, purchasing furniture, ensuring safety,
and other matters.
• The Head Start Program Performance Standards, 45 CFR 1304, et. seq.
6 Head Start Design Guide 2005
Chapter One

• The Head Start Deep Look Survey, Health Resources and Services
Administration, Office of Engineering Services, February 2000.
• The Individuals with Disabilities Education Act (IDEA), P.L.105-17.
• Section 504 of the Rehabilitation Act of 1973, as amended.
• Uniform Federal Accessibility Standards (UFAS), Federal Standard
795, General Services Administration.
• Americans with Disabilities Act (ADA), and the Americans with
Disabilities Act Architectural Guidelines (ADAAG), Department of
Justice, Office of the Attorney General.
• Accreditation Criteria and Procedures of the National Academy of
Early Childhood Programs, National Association for the Education of
Young Children (NAEYC).
• Developmentally Appropriate Practice in Early Childhood Programs
Serving Children from Birth to Age Eight, National Association for the
Education of Young Children (NAEYC).
The following documents are available from the source:
• Lead in School Drinking Water, EPA 570/89-001.
• State licensing requirements for the individual states where Head Start
centers are located.
• Handbook for Public Playground Safety, U.S. Consumer Product
Safety Commission (CPSC).
• The Secretary of the Interior’s Standards for Rehabilitation and
Guidelines for Rehabilitating Historic Buildings, U.S. National Park
Service.
• Fire Safety Retrofitting in Historic Buildings, August 1989, Advisory
Council on Historic Preservation and the General Services
Administration.
• Lead-Based Paint Interim Guidelines for Hazard Identification and
Abatement in Public and Indian Housing, September 1990,
Department of Housing and Urban Development (HUD).
• Radon in Water Sampling Manual (EPA/EERF-Manual-78-1),
Environmental Protection Agency.
• The Environmental Resource Guide, with Supplements, the American
Institute of Architects, 1996.
• Building Security Assessment provided by the regional Federal
Protective Service (FPS).
• Leadership in Energy and Environmental Design (LEED) Green
Building Rating System, Version 2.0, US Green Building Council,
March 2000. Including draft version for Renovation, March 2002.
www.usgbc.org.
• Leadership in Energy and Environmental Design (LEED) Reference
Guide, Version 2.0, US Green Building Council, August 2000.
• The Environmental Protection Agency’s “Comprehensive Procurement
Guidelines,” which addresses requirements for use of recycled materi-
als in government procurement.
Head Start Design Guide 2005 7
Chapter One

1.4 Organization
The following are brief descriptions of each chapter.
Chapter 1: Introduction to the GuideThe chapter describes the purpose of the Guide, its organization, the
intended audiences, how the information may be applied to Head Start
centers, and other useful references.
Chapter 2: Mission, Goals, Administration, and PolicyThe chapter describes the Head Start Bureau’s goals and objectives for center
design and operation, the persons and processes involved in planning and
designing the center, real estate management policies affecting center devel-
opment, and standards with which design and operations must comply.
Chapter 3: Adults and Children in the CenterThe chapter identifies the adults and children who will use the center and
describes their activities. It also includes a discussion on basic develop-
mental needs and activities for each age group, and how these needs and
activities affect the design of the center.
Chapter 4: Head Start Centers and Use of SpaceThis chapter summarizes the Head Start Program Performance Standards
relevant to the design and use of space, including child group sizes and
staff-child ratios.
Chapter 5: Planning Space and Location
The chapter contains general criteria to be used when selecting a center
location and for planning and programming the space requirements.
Chapter 6: Site DesignThis chapter provides concepts and criteria for site design and design
of play yards. It describes the general types of outdoor areas, the
relationships of these areas to other outdoor and indoor spaces, and
detailed criteria for fences, dimensions, and surfaces for these spaces.
Chapter 7: Interior Space DesignThe chapter provides concepts and criteria for the design of the interior
spaces of a Head Start center. Area categories include entry and circulation
areas, staff rooms, classrooms, common, and service areas.
Chapter 8: Furnishings and EquipmentThis chapter includes general criteria regarding furnishings and equipment
for centers and includes references to applicable codes and regulations.
Chapter 9: Interior FinishesThe chapter provides a consolidated discussion of finishes required in
Head Start centers, establishes the baseline finishes for walls, floors and
ceilings, and discusses acceptable options.
8 Head Start Design Guide 2005
Chapter One

Chapter 10: Technical Criteria
This chapter includes technical criteria for fire protection, security, and
accessibility and for the design of electrical, plumbing, lighting, heating
and cooling systems throughout the center. This chapter also covers testing
for hazardous materials.
Appendices: Appendix A provides accessibility standards.
Appendix B provides information on Sustainable Design and the
environment.
Appendix C provides listings of Head Start Central and Regional Offices.
Appendix D provides additional technical information on metric
conversion.
Appendix E provides information on the Head Start Program Performance
Standards.
Appendix F provides terms used for construction and/or renovation
projects.
Appendix G provides listings of high, medium, low, and non-toxic plants
so designers can make judgments about appropriate plantings in the
vicinity of Head Start centers.
Appendix H provides information on the playgrounds and playground
products that reduce environmental impact.
Appendix I provides a glossary of commonly used terms in the Head Start
and early childhood education communities.
Head Start Design Guide 2005 9
Chapter One

10 Head Start Design Guide 2005

Chapter 2 Mission, Goals, Administration and Policy
This chapter describes the Head Start Bureau’s goals and
objectives for center design and operation, the persons
and processes involved in planning and designing the
center, real estate management policies affecting center
development, and standards with which design and
operations must comply.
Head Start Design Guide 2005 11

2.1 Program Goals and Objectives
An important goal of all Head Start programs is to offer the community
an opportunity for quality child care services and programs in locally
owned or controlled spaces. The Head Start center design must meet the
needs of children, their parents, classroom personnel, service personnel,
and administrators.
To achieve these objectives, HSB recommends that planners take the
following steps:
• Support the care of children by creating environments that allow staff
to focus their efforts on nurturing and caring for children. The design
should provide features that encourage strong, positive relationships
between staff and children.
• Create an environment that comfortably accommodates the needs of
staff in order to attract and retain highly qualified people.
• Design centers that are pleasing and will enhance the involvement of
families and the children’s caregivers in the center.
• Respond to local cultures, climate, and regional preferences in design-
ing the center. Seek and consider the goals of parents, the sponsoring
agency, and the governing board of directors.
• Create a center environment that attests to Head Start’s high level
of commitment to providing appropriate, well-planned and beautiful
environments for children of the community. The appearance
and functional arrangement of the center should enhance the
center’s assets.
• Design “through the eyes of a child” with sensitivity to children’s
scale. Consider how the children will use the space, what they will see
from their perspective, and what kind of experience they will have in
the environment.
• Provide an intriguing environment with features and literal “themes”
that reflect the community and its culture. For example, tribal Head
Start programs may
provide language
activities, legends,
and dance activi-
ties, use traditional
symbols for their
wall decorations, or
use traditional col-
ors, songs, and
music during their
“circle” activities.
• Size the classroom
to accommodate
recommended
group sizes and
adult-to-child ratios. The design should use space efficiently and
incorporate features such as strategically situated storage.
• Provide durable and cost effective materials and design details.
Designers should consider the intense use a center receives and should
be particularly sensitive to the life cycle cost of materials.
12 Head Start Design Guide 2005
Chapter Two

• Establish a distinctly child-oriented envi-
ronment within a controlled facility. The
impression created by the design should be
the antithesis of a typical institutional set-
ting. The center should “feel like home” for
the child.
• Create an accessi-
ble center for the
disabled, staff,
parents and chil-
dren and empha-
size cost effective-
ness. Refer to
Appendix A for
accessibility
requirements.
• Provide a health-
ful indoor and
outdoor environ-
ment.
2.2 Process
Through experience with design and construction, the Head Start Bureau
has learned that grantee or delegate involvement during initial planning at
the beginning of the design process is a valuable investment that can
ensure an excellent and cost effective result.
Head Start Design Guide 2005 13
Chapter Two

The process starts with planning and pre-design
stages and continues through the design
concept. The early stages of design, leading
up to the concept, form the foundation for
functional design.
A well-designed center requires an array of
functional and aesthetic requirements in a
relatively small space and must satisfy a wide
range of customers. Therefore, the design
process for new construction or major center
renovation/ expansions should begin with a
high level of communication.
To accommodate this need, the Head Start
Bureau recommends that projects start with a
“design workshop.” The design workshop also
can be associated with a partnering session,
which can be highly effective in clarifying roles
and responsibilities. For example, the partner-
ing session can result in a written charter
signed by attendees who commit themselves to taking clearly defined
collaborative steps.
2.3 Standards
Best practice suggests that Head Start center design comply with the
following guidelines:
• Uniform Federal Accessibility Standards (UFAS) and Americans with
Disabilities Act (ADA). The design must accommodate children and
adults with disabilities. (Refer to Accessibility Standards in Appendix A.)
• Historic Preservation Act. Modification of historic buildings or build-
ings deemed eligible for the National Register of Historic Places must
follow specific guidelines. The guidelines affect a structure with the
following characteristics:
• At least fifty years old (or will be when the renovation is
completed).
• Deemed to be exemplary of a particular style.
• Historically significant in terms of events related to the building.
• Comprehensive Procurement Guideline (CPG), US EPA, Office of
Solid Waste and Emergency Response. Through this document,
EPA designates items that must contain recycled content when
purchased by federal, state, and local agencies, or by government
contractors using appropriated federal funds. Under E.O. 13101
EPA is required to update the CPG every 2 years.
• The Energy Policy Act of 1992. The center design should minimize
energy use. It should use the life-cycle costing methodology in
estimating and comparing investment decisions involving capital
and operating costs. Mechanical systems and introduction of
14 Head Start Design Guide 2005
Chapter Two

features, such as overhangs to diminish energy use, are examples
of such considerations.
• Head Start centers must comply with state and local licensing reg-
ulations and any other applicable standards.
• In addition, there should be discussions about including sustain-
able features in the design during the initial stages of the project.
This empha-
sis on non-
toxic green
building is
explained
further in
Appendix B.
2.4 Center Management
The Head Start Bureau does not directly operate Head Start centers.
Instead, each Head Start program is responsible for the day-to-day man-
agement and operation of the center.
In addition, a Policy Council is established for the purpose of providing
information to parents and other community members and engaging them
in the operation of the center. The Policy Council can be a valuable
resource for comments on center design.
Appendix C includes contact information for the Administration on
Children, Youth and Families’ Head Start Bureau and Regional Offices.
Head Start Design Guide 2005 15
Chapter Two

16 Head Start Design Guide 2005

Chapter 3 Adults and Children in the Center
When designing a Head Start center, it is important to
accommodate the needs of children, parents, teachers,
visitors, administrators, and service personnel. This
chapter describes how and why adults and children use
Head Start centers and the needs of each group.
The center environment should be comfortable,
nurturing, and allow adults to care for children in settings
designed primarily for use by children. Metric/English
conversions are included in Appendix D. The activities of
groups of children categorized by age are included in the
chapter for design purposes.
Head Start Design Guide 2005 17

3.1 Parents
The designers of Head
Start centers should
keep in mind the
needs of busy parents
and caregivers who
bring children to
Head Start centers. The design should provide a setting that supports a
community of center users and serves the needs of the children and their
families. Designers can respond to these needs by addressing the following:
• Temporary parking arrangements for drop-off and pickup.
• Ease of navigating corridors for people pushing strollers and buggies
(angled corners are an aid).
• Stroller storage.
• A clearly visible bulletin board.
• Mail boxes for parents.
• A central, relaxed place for parents to meet and talk to other parents
and staff.
• Spaces that accommodate several children and adults who wish to
remove or need assistance removing outer garments.
• Private space for parents and teachers to conference.
• Adequate refrigerator space to store formula and food.
• The need for parents and caregivers to visit the center while drop-
ping off children, spending time with them in classrooms, on the
playground, and picking them up. Parents and caregivers also may
eat lunch at the center with the children, meet with teachers and
staff, socialize with other adults, and participate in center activities,
organizations, and programs. Some adults enjoy the center because
it offers friendly human contact that may not be available in their
work environment .
• Parents who bring children to Head Start may accompany them to the
classroom and help the children remove and store outdoor clothing.
They may bring infants in strollers. They also may leave messages for
teachers and receive messages from them, usually at one location
designed specifically for that purpose. They may linger to spend time
with the child or to talk to the teacher before departing. The entry,
reception, and classroom cubby areas should provide a social setting
for the parents, without disrupting the flow of activity in the class-
rooms. Nursing mothers who visit the center to feed their infants need
a private, quiet area for that purpose.
• Information may be posted for the parents on a bulletin board, which
typically will be located along the entrance path.
• Finally, parents and other adult caregivers are encouraged to partici-
pate in volunteer activities at the center, such as serving on committees
or boards, participating in fund-raising activities, assisting with field
trips, and offering classroom assistance. Center design should offer
space for their involvement and for meetings between adults with
storage for their belongings.
18 Head Start Design Guide 2005
Chapter Three

3.2 Teachers
Teachers care for and supervise children. In a Head Start program, they
promote learning and developmental activities through a curriculum
designed for learning. Curriculum activities occur in classrooms, play
yards, multiple-purpose spaces, and on excursions outside the center.
Teachers are responsible for children while at the center. They greet them
and their families or caregivers when they arrive. Teachers prepare cur-
riculum materials and projects for children and confer with parents and
administrators. To help them prepare, teachers need time away from their
classrooms. A lounge, which doubles as a workroom, can meet this need.
Teachers also need adequate storage areas, not only for curriculum materi-
als and supplies, but also to secure their personal possessions. The teacher
has a demanding job that requires focus on the children. Because highly
organized spaces are required, designing a center can be challenging. The
design can facilitate the needs of teachers for organized space by providing
the following:
• Ample elevated wall hung storage (above children’s level but also
located to avoid the possibility of adults striking their heads)
designed to avoid the possibility of items inadvertently falling on
children below.
• Elevated electrical outlets for equipment such as audio devices. (There
also should be CD and tape storage.) Locations should comply with
local code and licensing agencies.
• Planning and designing the center so that
the location of
outlets is conven-
ient to elevated
electronic
equipment.
• Conveniently
located, accessible
adult toilet(s),
complying with
ADAAG.
• Convenient
storage for
teachers’ outer
garments and
locked space to
store personal belongings.
• A comfortable and private place to confer with parents.
• A resource room for orderly visible storage of teaching materials and
equipment.
• A comfortable lounge that teachers can use for breaks, lunches, and to
prepare teaching plans and materials.
• Adequate shelving or counter space for teachers to display teaching
materials.
• An area for displaying children’s art projects at their eye level.
Head Start Design Guide 2005 19
Chapter Three

3.3 Administration
The Administrator also referred to as director, center director, executive
director, CEO, coordinator, or site supervisor is responsible for managing
the center, supervising the teaching staff, and
communicating with parents, boards of directors
and the ACF regional offices. In small centers,
the administrator also may assume a teaching
role for part of the day. In large centers, the
director usually will have a secretary or assistant
to help with the administrative workload.
The needs of the center administrator may be met by providing
the following:
• Optimal visibility of those approaching and entering the facility.
• Locked space for personal belongings.
• An office with room for a desk, an office chair, at least two visitor
chairs, filing cabinets, space for equipment (unless it is placed else-
where) including a personal computer, printer, copier and fax machine.
• Center personnel, including the administrator, should be consulted
during design for their input about workflow, filing, and equipment
needs. This Guide will assist designers in making informed judgments
about center staff requests.
3.4 Service Personnel
Centers require food, laundry, janitorial service, delivery, waste and refuse
removal, and general maintenance services. The design must provide
space and controlled access for those performing these services.
Some centers use catered food services while others have an in-house
preparation kitchen with heavy-duty equipment and a cooking staff.
Infants and toddlers generally use disposable diapers provided by parents.
All soiled diapers are to be contained and processed separately from other
waste and linens. Facilities should provide space for these tasks.
The needs of the service personnel can be expedited by the following:
• Adequate locked space in a well-located
closet for cleaning materials.
• Space for easy supply delivery.
• Facilities that are efficiently designed for
waste disposal.
• Spaces and containers that accommodate
recycling.
• Adequate counter space and efficient kitchen arrangements that support
easy transit of food to classrooms or other places designed for eating.
• Adequate refrigerator space.
20 Head Start Design Guide 2005
Chapter Three

• Generous, deep, three-compartment sinks, gooseneck faucets with
spray attachments, and disposals in kitchens.
• Finish materials and building design features that are easy to clean
with minimal use of cleaning materials.
• Design that offers protection from the potential health and indoor air
quality impacts of cleaning and maintenance activities.
3.5 Children
Head Start and Early Head Start children who
are in center based programs may spend up to of
nine hours or more per day at the center. For
most of their day, children remain at the facility.
There are occasions when the children leave the
center on field trips with teachers and center vol-
unteers. Best practice suggests the center promote a child’s optimal devel-
opment by providing safe, interesting, and appropriate environments that
allow the children to engage in developmentally appropriate activities.
Children’s needs often correspond to their ages. Although each child
develops according to his or her unique pattern, children can be character-
ized as belonging to general age categories of development,. Each age
group has a different set of needs. To meet these needs, the space designed
for each age group will have different characteristics.
Head Start Design Guide 2005 21
Chapter Three

The following three age groupings will be referenced throughout the
Guide. In many centers, actual age ranges of groups overlap. In some cen-
ters, children may be grouped in mixed-age classrooms.
Age ranges follow:
• Early Head Start Infants (birth to 18 months)
• Early Head Start Toddlers (18 to 36 months)
• Toddler subgroups:
• EHS Younger toddlers (18 to 24 months)
• EHS Older toddlers (24 to 36 months)
• Head Start pre-school age children (3 to 5
years old)
3.5.1 Early Head Start—Infants The infant classroom should be warm and nur-
turing in character. Ideally, the classroom envi-
ronment should provide opportunities for
infants to enjoy activities throughout the day.
Typically, infant groups will be comprised of no
more than eight infants cared for by two teach-
ers, on a 4:1 ratio. In Head Start centers, infants
are brought to their classroom by their parents
or caregiver.
Storage is an important consideration in the infant area. Clothing and
supplies, usually carried in a diaper bag, are stored in each infant’s
cubby. Diapers and wipes are stored in separate compartments and
within easy reach at the diapering area. Strollers or tote bags are stored
on pegs or rods in storage areas. Formula and breast milk are kept
refrigerated and clearly marked with the name
of the infant and date.
Spaces designed for infants are used for a
variety of activities. Sleeping areas should be
separate from areas of greater activity. Each
infant will have a unique sleeping schedule.
As they mature, their sleep needs decrease
from the frequent naps of young infancy to
a few naps at regular times during the day.
Besides sleeping, infants will be playing,
eating, cuddling, and nursing.
Since most infants have not begun toilet train-
ing, frequent diaper changes are needed. A
teacher with an infant at the diaper-changing
table needs to maintain visibility of all other
infants. The design and location of changing
tables should enable visible connection between
teachers and other infants.
22 Head Start Design Guide 2005
Chapter Three

The design and scale of furnishings and equipment in the infant room
should be appropriate for the infant’s activities. The design must allow
teachers to see and hear all the infants at any given time and to quickly
reach any one of them if the need arises. Infants must be able to see the
teacher because they need the security of a teacher’s presence.
During the first year, the infant’s diet progresses from nursing and bottle-
feeding to soft foods and finger foods. Eating is nurturing for the infant
whether nursed by mothers or bottle fed by another adult. Teachers may
start to feed infants soft foods at around 5-6 months. At around 9 months,
infants, seated in low high chairs, begin to feed themselves and drink
from cups. This process can be messy, since infants are exploring, and
floor surfaces should accommodate this. Later,
at or near 12 months of age, infants eat at low,
round tables. At that point, the dining atmos-
phere changes from a quiet, intimate environ-
ment to an active, social event, and it is impor-
tant to provide adequate easy-to-clean space for
this activity.
Developmentally appropriate activities for
infants include interaction with teachers, chil-
dren, and other infants; experiencing the envi-
ronment through all the senses; and physical
movement through space. Infants need a safe,
stimulating environment where they can
explore, absorb, and organize information about their world. They exercise
muscles by crawling and climbing on soft surfaces and over slight level
changes. They also can pull to standing and practice walking by using low
grab bars.
Stimulating toys and learning materials that can be manipulated and
help infants learn about objects and increase development of motor
coordination. Toys should be on low, open shelving where the infant can
see and grasp them. In rooms with high ceilings, mobiles hung from the
ceiling should be at least 6.6 feet above the floor.
Head Start Design Guide 2005 23
Chapter Three

The classroom should offer a series of intriguing attractions for crawling
and standing infants, particularly at eye level (12 to 18 inches above the
floor). The environment, including toys, should aid the
infants’ language development by including objects teachers can name
and describe.
Infants, particularly those crawling and starting to walk, require outdoor
opportunities to explore and move about the safe world of the infant play
yard. They spend time in their outdoor play yard under the supervision of
their teachers. This space should be apart from, but usually in view of, the
older children.
Teachers may assist infants in their exploration of the world by taking
them on strolls through the building and outdoors. Infants, riding in
groups in multi-passenger strollers, benefit from both social interaction
and sensory stimulation on these excursions. Therefore, hallways and
play yards should be designed to accommodate the strollers.
Conditions that enhance the quality of care that teachers provide to
infants include:
• A gross motor area (away from the main area of circulation) with a
continuous soft mat that can be easily cleaned. The area should be
defined by a low (12 – 18 inches) padded bumper, which is built-in to
contain the crawl area and provides adult seating near the infants.
• Low padded risers for level change.
• Visibility of the exterior of the gross motor area at infants’ eye-level.
• Cribs that can be observed easily by teachers.
• Cribs located under soft, preferably dimmer-controlled lighting.
• Toys easily accessible to infants on open shelving.
• Continuous impervious flooring in the feeding area.
It is essential that the A/E verify dimensions and indicate the location
(using dotted lines) of all major equipment on the architectural plans, par-
ticularly cribs and components of the feeding area. This will ensure the
proper fit of equipment and adequate clearances above and between items.
3.5.2 Early Head Start—Young ToddlersThe toddler classroom hums with activity as toddlers quickly move
through their space. They are usually anxious to be involved in all
the activities available to them. This environment is stimulating and
offers the child a safe, warm, and nurturing place to spend the day. This
group typically includes 2 teachers and 8
young toddlers.
At the beginning of the day, toddlers arrive at
the classroom with their parents, who may
assist them in removing their outdoor clothing
and in storing items in cubbies. Young toddlers
usually will have diaper bags to store in their
cubbies and supplies to be placed at the diapering area.
24 Head Start Design Guide 2005
Chapter Three

Toddlers are in the process of gaining independ-
ence, and are advancing in their feeding, toilet-
ing, and dressing skills. Furnishings and equip-
ment should be scaled for this age group to
encourage growth toward independence.
Younger toddlers nap often and need a crib in a
quiet area. Most care functions take place in the classroom with the
teacher’s assistance.
Toddlers gather at child-scaled tables for snacks and lunch. They can feed
themselves with some assistance. Young toddlers need diapering areas as
well as child sized toilet facilities.
3.5.3 Early Head Start—Older ToddlersOlder toddlers are busy experiencing their environment and developing
essential motor skills as they take part in active play. They are mastering
walking and are beginning to develop running, jumping, and climbing
skills. The toddler’s room should provide stimulating opportunities for
active crawling, pushing wheeled toys, climbing in and out of play
components, cruising, (movement through space to view and select from
a variety of activities), and beginning to walk and climb up and down
stairs. They may nap only once each day. Adequate space for storage if
cots and mats must be part of design phase planning.
Older toddlers may bring lunches or toys from home in satchels or back-
packs that can be used to carry papers and artwork home at the end of the
day. These items may be stored in cubbies or in the classroom on hooks.
Toddlers tend to move about very quickly, often in groups rather than
individually, and the design must allow for this group activity. Features,
such as wide access to lofts and generous, clear pathways that avoid sharp
corners, should be provided. These pathways should accommodate multi-
passenger strollers.
Toddlers thrive on exploration and creativity; enjoying fantasy activities,
playing with props, and making choices. Manipulative toys, blocks, pic-
tures, puzzles, music, and other materials should be located on low, open
shelving where the toddler can see and reach them easily.
Teachers in the toddler classroom assist and interact with the toddler, encour-
aging the development of greater independence. Though space should be
scaled to a child’s size, the classroom design also must permit teacher access
to all spaces. Experience has shown that a diaper-changing table should be
provided in older toddler classrooms to help teachers of toddlers not yet
toilet trained. The space
also should contain a
child-scaled toilet.
While toddlers are
beginning to develop,
they need easy visual
Head Start Design Guide 2005 25
Chapter Three

access to their teachers for security and comfort. One highly recommended
functional and nurturing feature is a simple series of three to four low ris-
ers (not necessarily built-in) that several toddlers at a time can occupy. This
arrangement also provides excellent seating for adults while they interact
with several children when reading them a story, for example.
Toddlers accompanied by their teachers will spend time in their outdoor
play space. This should be apart from but not visually or acoustically
separated from play spaces for older children. The outdoor space offers
many opportunities for activities, such as cruising, climbing, and manipu-
lative play involving materials such as sand and water. Toddlers may take
part in activities in a multiple-purpose area.
Toddlers and their teachers, may go on excursions for more exploration and
interaction. Older toddlers may walk hand-in-hand with their teachers.
3.5.4 Head Start—Pre-School ChildrenHead Start or pre-school children are expanding their vocabulary, devel-
oping language, enhancing small and large muscle coordination, and
learning complex
cognitive/social
skills. This group
may consist of as
many as 18 to 20 chil-
dren (with a teacher,
an aide and a parent
volunteer) busily
pursuing all recom-
mended activities
available for their age
group. Their environ-
ment should be safe,
durable, and interest-
ing without being over-stimulating.
The children arrive at the classroom with their parents or caregivers or on
the school bus. After storing their outdoor clothing and personal items, they
begin their day. The Head Start classroom should include large, bright, unre-
stricted spaces, as well as intimate, quiet areas outfitted with soft materials.
Head Start children usually need a nap or quiet time. This normally occurs
in the classroom on cots or mats that are stored appropriately when not in
use. The design and sizes of classrooms to accommodate stored items such
as cots and mats should be carefully considered.
26 Head Start Design Guide 2005
Chapter Three

Children at this age are actively exploring their
environment; exercising large muscles by run-
ning, jumping, galloping, riding wheeled toys,
and engaging in dramatic play. Because they
have become more independent, the children
tend to initiate their own activity by accessing
appropriate materials and are interested in dis-
playing their own work. Other activities for this age group include music,
painting, puzzles, block play, and storytelling. Children are involved in art
projects, manipulative play, simple food preparation, elementary math,
problem solving, science, and gardening.
The ideal Head Start classroom will include large architecturally unrestricted
available space that teachers and children can divide into smaller learning
environments. The number of children in the group and the type of activities
in which they are involved will affect the requirements of this space.
Head Start children will enjoy time in an outdoor play space and in a
multiple-purpose
space. They will
participate in many
of the same activities
in the play space as
they pursue in the
classroom.
Children also go on
field trips outside the
center, either walking
with their teachers or
using transport.
Head Start Design Guide 2005 27
Chapter Three

28 Head Start Design Guide 2005

Chapter 4 Head Start Centers and Use of Space
This chapter summarizes the Head Start Program
Performance Standards relevant to the design and use of
space including child group sizes and staff-child ratios.
Should a conflict arise between Head Start standards and
other applicable codes and regulations, those deemed most
restrictive will apply. Refer to Appendix E for a
comprehensive listing of relevant standards and guidance
on design and space use.
Head Start Design Guide 2005 29

4.1 Design Implications of Program Standards
The Head Start standards criteria are stated in ten broad categories, each
having a primary goal. Citations of the minimum goals and discussion of
the general design implications follow. The design criteria in the Guide
should achieve or exceed the Head Start standards.
4.1.1 Interactions Among Staff and Children
G O A L : Proper organization of the space ensures that the full program
of activities can be accomplished. Successful programs take place with
high-quality interactions between children and staff. Refer to 45 CFR
§1304.53(a).
Successful design allows teachers and children to interact verbally and non-
verbally in large and small groups. Classroom space should not be crowded
with material and equipment that is used occasionally such as cots and
mats. Ideally, classroom size should be sufficient so that this equipment can
be stored out of sight. Classrooms should include low tables, several interest
areas, and space for teachers to communicate individually with children. If
there is adequate space, tables and counters that put children face-to-face
can encourage social interaction.
All rooms should have comfortable seating for adults. The design should
include chairs and may include hammocks and built-in benches. Window
seats can be particularly inviting for adult-child interaction. Space for glid-
er chairs can be included in infant rooms to offer soothing motion for
infants and comfortable seating for teachers and visiting parents. The
design of the glider chairs should prevent fingers from being trapped in
moving parts.
4.1.2 Facilities and Learning
G O A L : The physical environment and facilities must be conducive to
learning and reflect the different stages of development of each child.
30 Head Start Design Guide 2005
Chapter Four

Making facilities welcoming, accessible, comfortable and safe for all chil-
dren, including those with disabilities, ensures their full participation in
Head Start.
Best practice indicates
that classrooms should
have sufficient space,
equipment, and stor-
age to support a devel-
opmentally appropri-
ate curriculum.
Classrooms must be
configured to allow cir-
culation to each area
while minimizing dis-
turbances to other chil-
dren engaged in an
activity. Well-located storage is vital for ease of circulation and supervision.
The center should have child-accessible displays of curriculum materials,
either on built-in open shelving at the child’s height or on movable, open,
child-scale shelving units. The design should support a balance of the follow-
ing activities:
• Indoor and outdoor
• Quiet and active
• Individual and group
• Large and small motor activity
• Child and staff initiated activity
Best practice includes unencumbered wall space at the child’s level that
promotes interesting room arrangements and displays. There also is a need
for flexible space and easily changeable furniture arrangements.
4.1.3 Staff-Parent InteractionG O A L : Parents must be invited to become actively involved in the
development of the program and in the approach to child development
and education. Refer to 45 CFR § 1304.21 (a) (2).
Best practice indicates that the center should provide adequate areas for
private consultation between teachers and parents. A reception area for
check-in and check-out is advisable. Space in the classroom should be
adequate to accommodate parent visits. Bulletin boards for parent notices
are worthwhile.
4.1.4 Skilled Staff and Center Design
G O A L : Head Start programs must comply with section 648A of the
Head Start Act and any subsequent amendments regarding the qualifica-
tions of classroom teachers. Refer to 45 CFR §1306.21.
The quality of a center’s design can play an important role in attracting and
retaining skilled staff who spend so much of their time in classrooms. A prop-
Head Start Design Guide 2005 31
Chapter Four

erly designed center can improve staff attitude, reduce stress, and ease the
workload of the teachers. It also can integrate appropriate acoustical treat-
ment and separation of active and quiet areas to reduce noise levels.
In an Early Head Start classroom, strategic arrangment of the diapering areas
allows teachers to supervise other children and makes the staff’s job easier.
Classroom features ought to make performing teachers’ tasks easier.
Conference space should be adequate for staff training sessions and regu-
lar staff meetings. A separate lounge can provide staff members with a
quiet break area and should include ample storage space for resources,
equipment, and lockable storage space.
4.1.5 Administration and Space
G O A L : The program is administered in accordance with the Head Start
Program Performance Standards and addresses the needs of children, par-
ents, staff, and visitors.
The location of the director’s office space should facilitate frequent contact
with the children, parents, and staff. Space should be available for parent
orientation sessions, workspace, and file storage to support administrative
tasks. Office space should be arranged to ensure available storage and
equipment should be placed conveniently.
4.1.6 Staffing and Classroom Space
G O A L : Staffing is in accordance with the Head Start Program
Performance Standards to meet the needs of children and promote their
physical, social, emotional, and cognitive development. Refer to 45 CFR
§1306.32 (a)(1-12)
Classrooms size must allow for an optimal supervision ratio between staff
and children. Head Start Performance Standards establish the permissible
staff-child ratios and group sizes:
PREDOMINANT AGE OF CHILDREN IN THE CLASSAges Class Size4 and 5 year olds Program average of 17-20 children enrolled per
class. No more than 20 children enrolled in any class
4 and 5 year olds Program average of 15-17 children enrolled per class.
in double session No more than 17 children enrolled in any class.
3 year olds Program average of 15-17 children enrolled per class.
No more than 17 children enrolled in any class.
3 year olds in Program average of 13-15 children enrolled per class
double session in these classes. No more than 15 children enrolled
in any class.
32 Head Start Design Guide 2005
Chapter Four

Head Start classes must be staffed by a teacher and an aide or two teachers
and, when possible, a volunteer. For Head Start, a maximum staff-to-child
ratio of 1:10 with class sizes of fewer than 20 children; Early Head Start
staff ratios are 1:4. However, EHS group sizes are limited to 8 children.
Head Start centers also must comply with local licensing and zoning regu-
lations.
4.1.7 Physical Environment
G O A L : Grantee and delegate agencies must provide appropriate space
for of all program activities. Refer to 45 CFR
§1304.53(a)(2) and 3404.53 (a)(10) and 45 CFR
§1308.4.
The physical environment not only supports the
operational quality of a center and affects the
behavior and development of children, but also
the efficient functioning and sense of well-being
of adult caregivers. A pleasant functional
environment influences the way caregivers react
to children and also will have a positive effect on
children who are receptive to their environment.
The ideal environment is intriguing, rich, and
challenging to children but is not over-stimulat-
ing. It is rich in subtle visual and tactile experience, incorporating natural
elements as much as possible. Best practice indicates that the center must
have sufficient activity space, storage, and curriculum materials for all chil-
dren including those with disabilities. Both outdoor and indoor space must
be provided for activities featuring quiet and active play areas.
4.1.8 Health and SafetyG O A L : A safety inspection must be conducted to ensure that each facil-
ity’s space, light, ventilation, heat, and other physical elements are consis-
tent with the health, safety, and developmental needs of children. Refer to
45 CFR §1304.53 (a) (10).
The center’s design must comply with the
requirements of the Head Start Program
Performance Standards. The center also must
comply with state and local codes and their
applicable standards. The center design should
facilitate both teacher supervision and ease of
maintenance. Design details should take into
account the fact that centers must be cleaned fre-
quently. Properly designed, well-located toilet
and hand-washing facilities are essential.
Lockable storage should be provided for all
cleaning materials in each classroom, kitchen,
and laundry area.
Head Start Design Guide 2005 33
Chapter Four

There should be formal consultations with local fire officials to deter-
mine appropriate fire drill practices and procedures.
4.1.9 Nutrition and Meal ServiceG O A L : Grantee and delegate agencies must ensure that nutritional
services in center-based settings contribute to the development and social-
ization of enrolled children. Refer to 45 CFR §1304.23.
The center design
should provide ample
space for storing and
preparing food. Space
requirements depend
on whether food is
catered or prepared
on site. (Usually food
is prepared on site.)
Food service facilities
should accommodate
the serving of nutri-
tious meals and main-
tain the highest quali-
ty of food. Best practice indicates that special accommodations should be
provided for infant feeding and nursing.
4.1.10 Record Storage
G O A L : Grantee and delegate agencies must establish and maintain effi-
cient and effective record-keeping systems to provide accurate and timely
information regarding children, families, and staff. They must ensure
appropriate confidentiality of this information. Refer to 45 CFR §1304.51(g).
Space should be supplied for filing and storing records, observations, case
studies, and other reports.
34 Head Start Design Guide 2005
Chapter Four

4.2 Head Start Program Performance Standards on Space
The Head Start Program Performance Standards, 45 CFR § 1304, et seq.,
contain specific requirements for the use of space, physical environment,
functional areas, maintenance, repair, safety and security, fireproofing,
heat, cooling, lighting, cleaning, ventilation, equipment, and sewage. Refer
to Appendix E.
4.3 Additional Requirements
In addition to complying with Head Start Program Performance
Standards, Head Start centers must comply with the licensing and zoning
requirements of the state or jurisdiction in which they are located. When
there is conflict between Head Start and state, tribal, and/or local criteria,
the most stringent requirements apply.
Licensing requirements vary among states and jurisdictions and are
constantly being updated and modified. The user should review the
requirements of the specific state, tribal, and local jurisdictions early in
the design process.
Head Start Design Guide 2005 35
Chapter Four
36 Head Start Design Guide 2005

Chapter 5Planning Space and Location
This chapter contains general criteria to be used when
selecting a center location and planning and programming
the space requirements.
The center is subject to state licensing requirements.
The designer, architect, engineer, and user must review
these requirements during the initial phases of design to
avoid redesign. When the requirements of the Head Start
Program Performance Standards and state and local
requirements differ, the standards deemed more restrictive
shall apply.
Head Start Design Guide 2005 37

5.1 Criteria for Center Location
The location of the Head Start center is critical to a child’s safety, well
being, and quality of care. Best practice indicates that location require-
ments can be grouped according to the following
broad facility categories of mandatory and
recommended criteria: available useable space,
environment, safety, security, and accessibility.
For further technical information on these
categories, refer to Chapter 10 of this document.
5.2 Construction and Renovation Terms
See APPENDIX F:
TERMS USED FOR
CONSTRUCTION
AND
RENOVATION
PROJECTS
38 Head Start Design Guide 2005
Chapter Five

5.3 Overall Space Requirements
I n t e r i o r : The Head Start Performance Standards, 45 CFR
1304.53(a)(5), provide that centers must have at least 35 square feet of
available usable indoor space per child. This footage is exclusive of bath-
rooms, halls, kitchen, staff rooms, and storage
places. (It should be noted that this is a mini-
mum standard.)
E x t e r i o r : The Head Start Performance
Standards, 45 CFR 1304.53(a)(5), provide that
there must be at least
75 square feet of
usable outdoor play space per child.
Best Practice:The outdoor play space should be divided, with
each outdoor area having no dimension less
than 8.1 feet and a minimum size not less than
1,205 square feet. At least 50 percent of the out-
door play space must be exposed to sunlight at
any given time during hours of operation.
There must be shade in the outdoor play space
provided by planting, gazebos, umbrellas or
other similar elements offering. When play
space cannot meet these criteria, the center should provide access to
alternate play areas for developing large-muscle skills. This alternate area
may include, but is not limited to, an open courtyard or an outdoor
space, such as a nearby public park, if permitted by state, tribal, and local
licensing requirements.
In areas of the country with particularly rainy weather (for instance, the
Northwest), it is desirable to provide covered areas, such as generous
porches, for exterior play. Interior multipurpose space is particularly
valuable in areas of the country with inclement winter weather but it
should not be considered a substitute for exterior play space.
See Chapter 6, Section 6.2.2, for a full discussion
of parking requirements.
Head Start Design Guide 2005 39
Chapter Five

5.4 Environmental QualityBest Practice:
• Natural lighting is an important feature of nurturing and quality envi-
ronments for children. Natural light should be the primary source of
light in classroom spaces in Head Start centers. Total natural lighting
would be ideal. Designers should face classroom space south, if possi-
ble, so that children benefit from the light throughout the day. Absence
of natural light
should be a prime
consideration
when contemplat-
ing relocating an
existing center.
• Classrooms with-
out windows
should have full
spectrum, indirect
lighting as
described in
Chapter 10,
Section 10.9, of
this Guide and, if
possible, a variety of light sources.
• Minimum quality design requires that classrooms have window space
to the exterior area not less than 8 percent of the floor area.
• Since artificial light cannot substitute for the quality of natural light, if
artificial lighting is needed, it should include a variety of fixture and
lighting types with high color rendition. See Chapter 10 for artificial
light requirements.
• Classroom and facility designers should use natural lighting from at
least two directions. Window seats also are effective in maximizing the
effects of natural light.
• Design for good indoor air quality uses low- or non-toxic finishes (see
Chapter 9), acceptable ventilation levels, and
careful system design (see Section 10.8.2 in
Chapter 10).
• Studies suggest that indoor plants may
improve indoor air quality by filtering
pollutants from the air. Indoor plants also
create a more “home-like” atmosphere and
may positively affect the behavior and well-
being of both adults and children.
• The center should not be located near noisy
areas, such as major highways, street inter-
sections, railroad lines, or under airport
flight paths. If proximity to high levels of
noise is unavoidable, acoustical control
measures are necessary, as discussed in
Chapter 10, Section 10.5.
• Maximum acceptable noise levels depend on the area around the
center and whether or not the sound is continuous or intermittent.
Children and infants are particularly sensitive to unexpected or inter-
40 Head Start Design Guide 2005
Chapter Five

mittent loud noise. See Chapter 10, Section 10.5 for guidelines on max-
imum acceptable noise levels.
• The center should not be exposed to fumes or dust from industrial
operations and vehicles, furnace and incinerator exhaust, mists from
cooling towers, or other similar pollutants. Avoid placing centers near
exhausts from food processing and waste
handling operations, loading docks, or simi-
lar sources of unpleasant odors.
• Ideally, the site should have desirable natural
features, such as trees, south-facing slopes,
and views of natural or man-made vistas.
• The selected location should allow outdoor
play yard orientation appropriate for local
climatic conditions.
• The building structure should comply with area limitations, mixed-use
separation, and construction requirements in state, tribal, or local
codes and other applicable standards.
• Ideally, the center location should provide direct at-grade exit with
a minimum of two means of egress from each floor if the center is
located on two floors.
• The center should be located away from hazardous conditions or sites.
This includes contaminants from hazardous materials such as lead and
PCBs. The site, including the playground, should be certified as free of
these contaminants before design begins.
• The location should meet criteria to prevent exposure to Legionella
Pneumophilia.
• The location must allow for the safe arrival and departure of children.
• The location must be free of hazards, including fountains, wells, open
pools, unprotected ledges, drop-offs and cliffs, and dangerous equip-
ment. Play areas must not have open drainage ditches or openings to
storm sewer systems.
• The location must be free of rodents, hazardous insects, vermin, and
toxic plants.
• The center should have operable windows that allow ventilation.
Awning and hopper windows below head level on the exterior or inte-
rior of the building should not be used.
• Consider proposed major future construction projects within the
building and adjacent to the site. If possible, avoid these locations
because of extended disruptive high noise levels and poor air quality.
5.5 SecurityBest Practice:• The location must meet requirements established by state and local
building and licensing codes.
• The center location must be readily identifiable and accessible to
emergency response personnel.
• The location must allow for secure exits
and entrances. Normally, movement
should be restricted through one secured
main entrance and perhaps an additional
secured service entry for kitchen and other
bulk supply deliveries.
Head Start Design Guide 2005 41
Chapter Five

• Provide maximum visibility of entry points from inside the center.
• Ideally, the location should be a defensible space with a secure perime-
ter and controlled access.
5.6 Approach and AccessBest Practice:
• If possible, the center location should be within walking distance of
public transportation. Bicyclists and persons using mass transit
need safe approaches to the building
which do not endanger child or adult
pedestrians.
• The center’s layout must accommodate
adults with disabilities. The center must
comply with the UFAS (Uniform Federal
Accessibility Standards) and ADA
(Americans with Disabilities Act). Where
there is real or apparent conflict, the center
must comply with the more stringent of the
two standards.
• The play yard should be directly accessible
from the building or as close to it as practi-
cal. If the site cannot support a play yard,
consider using a public or a private park
within walking distance.
• The center should not be close to busy streets and intersections.
Otherwise, the designer should devise mitigation measures, such as
bollards, to lessen the effect of congestion and to increase safety, espe-
cially at playgrounds near busy intersections. Intersections where
traffic is heavy require particular attention.
• The center location should provide ease of short-term, drop-off
42 Head Start Design Guide 2005
Chapter Five

parking for parents and buses as children arrive and depart. Sufficient
short-term parking spaces are needed for parents. This parking should
be as close to the center as possible.
• Ideally, classrooms should have direct access to the play yard.
5.7 Historic PreservationThe decision to locate a center in a National Historic Building must take
into consideration the historic preservation. If located in a historic building,
any renovation activities or changes in the building must be in compliance
with all federal and state regulations in close coordination with the
State Historic Preservation Office (SHPO) or tribal organization. Play
space location also is a vital consideration in assessing the effect of the
center location on
historic structures or
neighborhoods.
5.8 Space for ChildrenClassrooms
A classroom is the area that contains each group of children and their
teacher(s). Classrooms may be separated by full partitions or full (floor to
ceiling) walls or non-permanent barriers that allow controlled visual or
acoustical connections to other groups. However, best practice indicates
that at least one interior viewing panel at children’s height should be locat-
ed both adjacent to corridors and between classrooms, where possible. The
classrooms themselves should be as open as possible allowing for supervi-
sion and the accumulation of natural light. Classrooms should be flexible
enough to adjust to variable demographics and to allow program adjust-
ments to serve a fluctuating demand for Head Start services. Adequate
space is necessary for storing children’s and teachers’ personal items, cur-
riculum materials, supplies, and equipment.
Common SpacesSpaces shared by more than one group are included in this category. The
designer should be aware that the children spend long hours of the day
away from their own homes and the center becomes their home away from
home. A common area that feels like the core of
the center is an excellent organizing concept that
will dispel an institutional feeling, especially if
it is developed as a friendly environment.
This may simply be an area of circulation that
provides a stopping place and allows social
interaction. However, it should not be the
Head Start Design Guide 2005 43
Chapter Five

multi-purpose room. Circulation through the
multi-purpose room has proved to be an unde-
sirable design feature.
Other common areas may consist of one or more
of the following: multi-purpose areas, large
motor activity areas, meeting/gathering areas,
and separate sick bays, if required to meet local
licensing requirements.
Play SpacesPlay spaces are outdoor extensions of the class-
rooms providing many of the same opportuni-
ties as indoor spaces.
They should provide
for a variety of devel-
opmentally appropri-
ate activities and
include storage for
curriculum equip-
ment as well as
wheeled toys, tricycles, and wagons. Spending
time on the playground is undoubtedly the
preferred activity of children. Therefore, to the
greatest extent possible, the design should
incorporate ease of access to the play spaces.
5.9 Space for AdultsParent Spaces
Spaces within the center that are used by parents
include the entry, reception/living room area,
conference room, and the classroom (for observ-
ing, visiting, conferring with teachers, and feed-
ing infants). Parents should have direct access to
a lavatory. A lactation area, preferably near the
nap area, should be provided to offer privacy for
nursing mothers. This need not be an enclosed
room or even a partitioned area.
Staff SpacesSpaces designed for use by teachers and direc-
tors may include the resource room, the class-
room and play spaces, the entry and reception
areas, offices, conference and lounge, resource
storage, and adult lavatories.
Service SpacesSpaces allocated for service and support to the
center include the kitchen and food storage,
laundry, janitor’s closet, and the electrical/
mechanical and telephone equipment room.
44 Head Start Design Guide 2005
Chapter Five

Circulation
This term applies to
the space dedicated
to major pathways
that connect all the
interior spaces.
Head Start Design Guide 2005 45
Chapter Five

46 Head Start Design Guide 2005

Chapter 6Site Design
This chapter provides concepts and criteria for site and play
yard design. It identifies the general types of outdoor areas
required, discusses the relationships of the outdoor and
indoor spaces, and provides detailed criteria for fences,
dimensions, and surfaces for these spaces.
Head Start Design Guide 2005 47

6.1 Concepts for Site Design
The conceptual site design for Head Start centers must be integrated into
the design of the overall site to include the movement of vehicles and
pedestrians, parking, entry and service points, and constructed or land-
scape features, such as porches, decks, fences, and shrubs. The site should
meet general site design principles and should include specific details on
orientation, grading of landscape forms, aesthetics, construction, plant
selection, lighting, signage, and amenities.
Before site or playground selection, the soil should be tested for dangerous
contaminants such as lead and PCBs. After development, the site should
be monitored periodically under the direction of the environmental safety
staff to ensure that it does not become contaminated, especially by lead.
This is particularly important in urban areas or where there are large num-
bers of automobiles or nearby industrial facilities. Any old structure locat-
ed near a playground should be checked for lead or other hazards.
Five conceptual areas of site design relating to Head Start centers include:
• Entry and Circulation
• Parking
• Service
• Safety and security
• Outdoor play space
6.1.1 Context
The designer should consider the building in the context of the existing
site and should design to enhance that site. Examples of context and exteri-
or design include culturally sensitive art and play activities, colors and tex-
tures that reflect regional and community orientation, and games that pro-
mote and reflect nationality.
48 Head Start Design Guide 2005
Chapter Six

6.2 Entry and Circulation
The standards for entrances, parking, service, and security are
addressed below.
6.2.1 Entry ApproachThe center design
should include a
feature, such as
a porch, as a welcome
to those arriving
and as a transition
from the outside.
The transition porch
could be combined
with a covered
walkway (recom-
mended for all cli-
mates) and connect
with short-term
parking. The walk-
way would protect arriving children and par-
ents from inclement weather.
Space should be provided at exit doors to ensure
that doors can completely open without obstruc-
tion. Drop-off areas should be arranged so that a
child and adult may exit a vehicle from the pedestrian side and proceed
directly to the center without crossing in front of traffic, or in front of or
behind vehicles.
Ideally, the center entrance should be separate from both the main
entrances to the building and from the service area entrances.
6.2.2 ParkingShort-term parking should be provided for adults bringing children to
the center.
Most often, parents or caregivers bring their children into the center to
“sign in” and later “sign out.” Parking spaces are needed to allow time for
adults and caregivers who drop off children to have brief conversations
with teachers.
Short-term parking for the center should be separated from other tenant
parking and located as close to the center as possible. The arrangement
should minimize the risk to pedestrians and allow vehicles to move
safely. Parking should be located away from busy intersections or
vehicle circulation routes. The parking arrangement should never force
children or persons in wheelchairs to move behind parked cars.
Walkways in front of vehicles must be protected by tire guards, bollards,
or other means to prevent any portion of a vehicle from advancing into
the walkway.
Head Start Design Guide 2005 49
Chapter Six

At least one parking space, typically for the center director’s use but also
for emergency use, should be provided as near to the center entrance as
possible. One service parking space in front of the center is desirable for
local mail or package deliveries.
Ideally, an unobstructed line of sight should be provided between the inte-
rior of the center director’s office through the center entrance and into the
short-term parking area.
Employee parking spaces should be as close to the center as possible for
ease of access and for safety. This is particularly important in winter
months when staff members may leave the cen-
ter after dark. Staff parking should be provided
for 80 percent of employees at peak capacity. As
in any other work place, staff may choose to
travel to work using a variety of means. Features
to assist those choosing to commute via bicycle,
public transportation or carpool should be
provided to serve at least 5 percent of the adults
occupying the building. These features may include secure bicycle parking,
safe walkways to bus or metro stops, and designated preferred parking
spaces for carpools.
Parking should include spaces for staff vans as well as for vans for the
handicapped. Van accessible parking spaces must be wide. Parking for
staff and visitors who are disabled should be located close to the center
6.2.3 Service
Centers that occupy part of an existing building may make use of that
building’s dock space and service access or provide its own service
access (although a completely separate dock may not be necessary). In a
stand-alone center, service access will be important, but a dock may not
be necessary.
The service access for sanitation removal and for food and supply delivery
should be separate from short-term and staff parking. Likewise, a sanitation
dumpster should have private access away from parking and play spaces.
The ventilation system design should ensure that emissions from vehicles at
the service entry cannot permeate the indoor air of the Head Start center.
50 Head Start Design Guide 2005
Chapter Six

6.2.4 Security
The security of the center is a prime area of concern in establishing a site.
Centers should be separated from public areas by buffer zones and
barriers such as
fences or screens
particularly in
high-security-risk
areas. Buffer zones
can be created
with open turf
areas or with rows
of trees, perimeter hedges, berms, or any combi-
nation of these elements.
Buffer zones are useful because they offer the
center staff the opportunity to observe individu-
als as they approach the center. In addition, they
help shield children from unwanted wind, noise,
and other disruptions. The center location and local conditions may
necessitate the use of fences and screens to block the view of the exterior.
These should be designed to enhance the relationship of the center to its
neighboring buildings and their residents.
6.3 Concepts for Play Space Design
The activity spaces in play yards are largely determined by the outdoor
play space’s architectural landscape features. Individual play spaces
should provide for a range of developmentally
appropriate activities for social, emotional,
intellectual, and physical development. All play
spaces should be designed according to the
guidelines in the most recent edition of the
Handbook for Public Playground Safety by the
Consumer Product Safety Commission.
Best practice indicates that outdoor play spaces
should serve as extensions of classroom
spaces, especially where a temperate climate
allows children and staff to move easily in
and out of the exterior space. To the greatest
extent possible, outdoor play spaces should
be integrated into the overall design of the
center. Separate play spaces are necessary for Head Start and Early
Head Start.
Head Start Design Guide 2005 51
Chapter Six

Some states require a separate play space for infants and toddlers. Even
without such complete separation, individual play areas can be developed
to serve each of the following age classifications
• Infants
• Toddlers
• Head Start children (ages 3-5)
Within each age-appropriate play space, spaces should be developed to
support and promote each of the following activities:
• Sand/water play
• Dramatic play
• Large muscle play (climbing and playing on toys with wheels)
In addition, equipment storage should be directly accessible from play
spaces. It is important to consider installing walk-off mats at every entry
point from the play yard to the building, especially for the Early Head
Start children.
Additional information on play spaces and play equipment may be
obtained from any of the following sources:
• US Product Safety Commission, Child Care Center Design Guide
• The latest ASTM F1487-01-F15.29 Standard Consumer Safety
Performance Specifications for Playground Equipment for Public Use
• The latest ASTM F1292-99 Standard Specification for Impact
Attenuation of Surface Systems under and around playground
equipment
• The latest ASTM F1951-99 Standard Specification for the determination
of accessibility of surface systems under and around playground
equipment
• The latest ASTM F2049-00 Guide for Fences/Barriers for Public,
Commercial and Multi-Family Residential Use Outdoor Play Areas
• American Society for Testing and Materials (ASTM)
100 Bar Harbour Drive
West Conshohocken, PA 19428-2959
(610) 832-9585, Fax: (610) 832-9555
• 36 CFR Part 1191 The Americans with Disabilities Act (ADA)
• Architectural and Barrier Compliance - latest of all applicable Sections
• Architectural and Transportation Barriers Compliance Board
1331 F Street, NW., suite 1000
Washington, DC 20004-1111
(202) 272-5434 extension 139 (voice); (202) 272-5449 (TTY)
52 Head Start Design Guide 2005
Chapter Six

• Uniform Federal Accessibility Guidelines (UFAS) for General Services
Administration
www.access-board.gov/ufas/ufas-html/ufas.htm
• American Academy of Public Health Association Academy of
Pediatrics-Caring for our Children/Out of Home Head Start
Programs 2002
• American Academy of Pediatrics. Injury Control for Children and
Youth. Elk Grove, IL: American Academy of Pediatrics, 1987
(under revision).
• Head Start Information and Publication Center, Toll Free: 866-763-6481
6.4 General Design Concepts
Areas within the play space should be zoned by activity type, age group,
and landscape character. Play areas for infants and toddlers must be
physically separated from play areas for older children but should retain
some visual connection.
Fencing without sharp edges is to be used to separate the play areas. It should
end 3.3 feet above the
ground and should be
similar in appearance
to the perimeter fence
or wall. The tops of
fencing and spacing
of pickets must pres-
ent no hazard to chil-
dren or adults. Spacing between pickets should
be no more than 3.5 inches.
Tops of fence pickets should be flat and end
at the top horizontal rail to protect against
punctures. Horizontal elements that can be
used as ladders should not be included in the
design of the fence. Walls adjacent to playgrounds should not be accessi-
ble for climbing.
Head Start Design Guide 2005 53
Chapter Six

6.4.1 Location
Activity areas within the play yard should be placed near elements that
serve as a point of reference by both children and teachers as they move
throughout the different play spaces. Entrance points, transition and stag-
ing areas, storage facilities, seating areas, overhead structures, trees, gath-
ering areas, and larger play structures may all function as points of refer-
ence or landmarks within play spaces.
6.4.2 SeparationCirculation paths, barriers, screens, structures, play equipment, plant-
ings, landscape
forms, grade changes,
and open buffer
areas may define
specific play spaces.
Separation of play
spaces should be sub-
tle, allowing some
visual, audible, or
physical connections.
A 3-ft. evergreen
shrub or picket
fence with rounded
corners are appropriate for separating infant/toddler play yards from
preschool areas.
6.4.3 Transitional Areas
Linkage of interior and exterior spaces with transitional areas,
such as decks or open vestibules is appropriate and allows for blending
these environments.
They also may
function as a point of
departure or staging
area for play yard
excursions.
6.4.4 Porches and DecksPorches are desirable outdoor play areas where weather is problematic.
Porches and decks can be used for shade to avoid heat, sun, and rain. In
areas with moderate year-round temperatures, porches and decks can be
used throughout the year.
Porches provide the nurturing environment and serve as a transition
to natural elements. They are substantially less expensive than interior,
conditioned, or finished space. If west-facing glass is required, a
connected covered porch at least 7 feet wide will significantly reduce
the air conditioning load in the classroom and the center.
6.4.5 ShadeApproximately half of the play space should be shaded, and the other half
of the play space should be exposed to direct sunlight. Levels of exposed
direct sunlight may be measured at noon on the Summer Solstice
54 Head Start Design Guide 2005
Chapter Six

(June 21st). The following solar declension Web site is a useful resource:
http://www.usc.edu/dept/architecture/mbs/tools/vrsolar/index.html
6.4.6 CirculationCirculation within play spaces should allow movement throughout the
various areas. Dedicated pathways and routes suitable for wheeled toys
should be provided. A circulation pathway 60 inches wide at a minimum
provides the primary element that ties the play yard together. These path-
ways should be wide enough to accommodate movement of wheeled vehi-
cles in both directions (unless movement is restricted to one direction).
The play yard should have a minimum of two access points, one from
the classroom and
one from the play
yard to outside the
site. The access point
from the play yard
to outside the site
should allow for retrieval of play equipment.
The design should accommodate the movement of maintenance equip-
ment into the play yard and allow an emergency exit. All access points
should be controlled and readily visible for security purposes.
The design of the playground should accommodate the movement of dis-
abled children and adults through the play yard.
6.4.7 Site FurnitureIt is advisable to provide child seating in a shaded area of the play space with
views of other areas. Children should be able to talk with each other or their
teachers in a relaxed fashion or enjoy a story group. Tables and chairs, a
bench, or a picnic table will allow children and visiting parents to eat their
lunches or snacks or to occupy themselves with drawing and other activities.
Easels for open-air painting are desirable and can improve the appear-
ance of centers. There should be adequate approach and fall zones for
equipment and furniture, as prescribed by the current edition of
Handbook for Public Playground Safety, issued by the Consumer
Product Safety Commission.
Wood treated with pentachlorophenol or creosote should not be used on
the site.
Head Start Design Guide 2005 55
Chapter Six

6.4.8 Storage
Storage areas and containers should be uniquely marked and easily
recognized to indicate their use. Storage bins provide an opportunity
for children to learn
organization and
cooperation skills
and acquire a sense
of responsibility
by learning to
return toys and
tools to the correct
storage areas.
There should be
visibility and
ventilation into
storage areas. Exterior
storage should have
locks that operate on the exterior but can be released from inside.
6.5 Types of Outdoor Play Spaces6.5.1 Sand and WaterFacilities offering sand and water play allow children to pretend and to proj-
ect their ideas using those elements. Sand and water play should be accessi-
ble to children to encourage their imaginations, play, and social skills.
Sand and water tables should have play sur-
faces at children’s height allowing them to dip
out a portion of sand or water onto a stable
surface. It is valuable to allow play space and
storage for props such as spoons, shovels, pails,
plastic toys, containers, and buckets, as these
add to the quality of play experiences.
It is wise to provide a hose connection for water
play and for filling wading pools that is accessi-
ble. It also is desirable to emphasize the source of
the water in the design, since it is such an impor-
tant part of the play yard.
In particularly warm areas, there will be a need for a child-scaled drink-
ing fountain on the playground. This should be discussed during the
design phase.
6.5.2 Dramatic PlayChildren often use many different areas of the play yard as stage settings
for dramatic play. Good design will offer many opportunities for children
to engage in role-playing and make-believe activities.
Playhouse structures should have seating, adequate play areas, and stor-
age for a wide variety of props, such as boards, scrap lumber, dress-up
clothes, cooking utensils, tarpaulins, banners, signs, and other items that
56 Head Start Design Guide 2005
Chapter Six

support high quality dramatic play. The dramatic play area should be adja-
cent to and incorporate paths and parking areas for wheeled toys. Level
changes greatly enhance the quality of dramatic play.
6.5.3 Large Motor PlayLarge motor play areas support the physical
development of children. These areas offer
opportunities for climbing and riding wheeled
toys, as well as running, jumping, sliding,
and balancing. Fixed equipment, such as super-
structure play pieces and slides, encourage
children to explore the limits of their physical
abilities by offering
varying levels of
difficulty and
challenge. Berms
that create small hills
provide challenges,
and are cost effective
additions. They also provide visual interest and can help add a connec-
tion to nature.
The degree of difficulty, challenge, or risk must be obvious to children
involved in any given activity. Hidden or unforeseen risks are dangerous
and can result in injuries
Small berms and hills, large rocks, stumps, trees and bushes not only
provide settings and obstacles for children to
climb over, jump on, dodge around, or hide
behind but also present challenges. Playing
with wheeled toys, such as tricycles and wag-
ons, helps develop coordination and physical
strength. The large space required for these
activities and the boisterous character of this
play dictate that this area be established away
from more quiet areas. Local licensing authorities should be consulted as
early as possible in order to avoid design misinterpretations.
Play areas should be made accessible to children with disabilities. The
proposed rules are quite complex, and the designer should consult with
playground equipment manufacturers and refer to the Web site:
www.access-board.gov/
Head Start Design Guide 2005 57
Chapter Six

To provide a safe environment that allows gross motor activity, move the
children rather than equipment. The following elements have been found
to be unsafe in group care settings:
• Metal slides can cause burns when they become hot.
• Enclosed tunnel slides make observation difficult and can allow one
climbing child above the enclosed tunnel to fall on top of another at
the tunnel exit.
• Traditional seesaws can result in injuries when one child unexpectedly
jumps off.
• Spring mounted, rocking toys with very heavy animal seats
can strike a child. (There are acceptable, lighter weight rocking
toy alternatives.)
• Swings, other than tire swings.
6.6 Play Yards for Different Age Groups6.6.1 Infant Outdoor Play AreasPlay areas for infants require special design considerations. Best practice indi-
cates that separate spaces for infants should be near toddler play areas, pro-
viding visual and audible connections but limited
physical contact. Ideally, infant play areas should
be exposed to the natural environment, though
shielded from wind or sun.
Infant play area surfaces should consist of soft,
resilient materials that protect crawling children
and provide a comfortable surface on which they can sit. Soft surfaces
may have different textures and colors that indicate changes in activities
and challenges.
Developmentally appropriate challenges should be contained within
boundaries or behind slight barriers. These challenges could take the form
of crawling spaces with slight inclines, low, easy-to-cross barriers or berms,
pull-up bars, and low platforms and slides. There should be a surface hard
enough to allow the use of wheeled and push toys.
6.6.2 Toddler Outdoor Play AreasToddlers should have play areas for walking, jumping, climbing, running,
drawing, painting,
block play, group play,
sorting, and exploring.
The play environment
should allow for a
wide range of move-
ment and stimulate the
senses through a vari-
ety of novel challenges.
Simple climbing equip-
ment is more appropri-
ate for toddlers than
scaled-down versions
of older children’s play
58 Head Start Design Guide 2005
Chapter Six

structures. Toddlers enjoy semi-enclosed spaces, such as small playhouses or
climb-through tunnels. They also enjoy small slides. Toddlers seek out experi-
ences offering motion or movement.
Play structures in toddler areas should be surrounded by a resilient sur-
face. A variety of surfaces and materials (including sand and dirt, pave-
ment, and open grassy areas) should be provided so the toddlers can play
with an assortment of objects. There should be a hard surface area and
paths for wheeled toys.
When combined with toys, sand is a major resource for toddler play. All
sand areas require fitted water-permeable covers to deter rodents and
other pests.
6.6.3 Head Start Outdoor Play AreasPlay areas for Head Start children should
support dramatic, constructive, and creative
play, active and quiet play, sand and water
play, and exploration of nature. Head Start
children interact, socialize, discuss, negotiate,
and engage in socio-dramatic play. Running,
jumping, climbing, and swinging are often part
of make-believe play.
The center should include a large, open-ended
play structure offering many activities lending to
dramatic play. The center site should have elements such as playhouses,
stages, and props to encourage dramatic play and should be positioned
within the play area to allow dramatic play to spill out and flow into other
spaces. Facilities for play with sand and water should be included and
placed adjacent to one another allowing these activities to overlap.
Pathways for wheeled toys provide circulation and allow activities to
flow through the play areas. Safety helmets should be required on hard
surfaces. Circulation surfaces in play yards should be suitable for wheel-
chair use.
Materials for creative play, such as musical devices, painting materials,
chalkboards, construction materials, and blocks,
should be included. A covered porch is an ideal
location for painting and drawing.
Generally, the best large muscle activities in
group care settings occur when children are
moving, not the equipment. Though tire
swings are appropriate, standard swings are
too problematic.
Head Start Design Guide 2005 59
Chapter Six

6.7 Specific Site Technical Criteria6.7.1 Fences and Enclosures
These best practices should guide the play yard design:
• Play yards must be enclosed with a fence or shrubs to define play
space, allow ease of supervision, and provide security and protection
from unauthorized individuals. Since fence design and shrubs are
visible elements in the center, they should be attractive elements.
Chain link fencing is discouraged; however, if used, it should be dark
and vinyl-coated (not green). Exposed galvanized wire is not appro-
priate because it has an institutional look. The fence can have no sharp
exposed connections accessible to children. Note: A/E to reference
ASTM fence stan-
dards (F2049-00).
• Bollards, raised
planters or other
devices should be
used to keep
automobiles from
veering into the
play yard area.
• The height,
tranparency or
opaqueness of the
fence will depend
on the location
and environmental conditions.
• Spaces between fence pickets should be between 3.4 and 9 inches wide
to prevent children’s heads from becoming trapped. There should be
no openings between 0.3 inch and 1 inch wide. Refer to the most
recent edition of the Handbook for Public Playground Safety of the
Consumer Product Safety Commission (CPSC).
• A 6-foot-high fence should enclose the play yard. Also acceptable is a
shorter fence with plantings or landscape features that are positioned
so that an adult can not reach over the fence.
• When the play yard is adjacent to hazardous areas such as busy road-
ways or a high-security-risk neighborhood, an 8-foot-high fence is rec-
ommended. Views from the play yard should be screened by either
plants or other suitable alternatives.
• The fence bottom should be no higher than 3 inches above the ground.
Exposed fence bottoms should have a smooth finish.
• Wood fences should have a smooth finish, be splinter-free and
guaranteed to be non-toxic.
• Gates should be self-closing and latching. Children’s fingers should be
protected from pinching or being crushed on gate hinges. Ideally, each
play yard should have a vehicle gate as a service entrance.
60 Head Start Design Guide 2005
Chapter Six

• Fences may be
used for protec-
tion from the
elements and to
control sunlight
and wind exposure.
• Fences must have smooth caps and no finials or sharp picket tops.
• Fence design should discourage climbing and the fence must be able
to withstand code-specific force applied horizontally.
• Fence construction should not use horizontal rails except for the cap
and base to prevent climbing.
• Fastening devices should not project outward since that could
injure children.
• Remove or trim trees with low hanging limbs if they allow for climb-
ing from either side of the fenced area. In no case should limbs project
below 6.5 feet from the ground.
6.7.2 Plant Materials
All plant materials must be non-toxic. See
Appendix G for a listing of common toxic and
non-toxic plant material. The local agricultural
Extension Service can provide detailed informa-
tion on toxic or poisonous plants in the local
area. Common plant hazards include berries,
thorns, and plants with toxic leaves, stems, roots,
or flowers.
It is advisable to design planting and irrigation
systems to eliminate using potable water.
Instead, maximize
the use of native vege-
tation, which has
lower maintenance
requirements than
introduced species.
Avoid the use of
chemical fertilizers
and pesticides.
Use locally acquired
composted materials
for fertilizing and
practice integrated
pest management to
Head Start Design Guide 2005 61
Chapter Six

control pests using the
least toxic methods
feasible. Use alternate,
less toxic termite
prevention systems
rather than chemical
soil treatment for
wood-framed build-
ings. Where soil
treatment is deter-
mined to be necessary,
use less toxic chemi-
cals than chlorpyrifos
(“Dursban”), which is currently being phased out by the EPA.
Consider the following advice about plant materials:
• Plants should be used to introduce nature to the play yard
environment.
• The center atmosphere is enlivened by the color, texture, sound, and
motion of plant materials.
• Observation of plant growth is beneficial to children.
• Plant materials that change with the seasons are desirable. Visual barri-
ers, screens, and shade and wind protection can be created using plant
materials with or instead of man-made structures.
• Plant materials should be used to define interesting play areas.
6.7.3 Dimensions and Clearances
Best practice indicates that centers should be designed with the following
guidelines in mind:
• Main entrance pathways should be 6 to 8 feet wide. All pathways
must provide adequate clearance as prescribed by the UFAS and ADA
standards. Pathway slopes should be no greater than 1:20 and should
include handrails.
• Platforms, stairs, handrails on stairs, guardrails, and protective barri-
ers on platforms should comply with requirements in the latest edition
of the Handbook for Public Playground Safety of the CPSC. The height of
platforms and the age group using the platform will determine when
a guardrail or protective barrier is required. Guardrails may be used
on platforms at lower heights, while protective barriers should be
provided on higher platforms.
• Handrails should be provided to accommodate the intended age
group including adults on all stairs. For children, heights will range
between 20 and 36 inches above the leading edge of the tread. In cer-
tain instances, it may be necessary to have dual railings mounted at
different heights.
• Guardrails should be provided for infants and toddlers on all plat-
forms higher than 12 inches above adjacent surfaces. Guardrails must
be provided for Head Start-age children on all platforms greater than
20 inches above adjacent surfaces. The top of the guardrail must be 30
inches above the platform. The guardrail should not have openings
between 3.4 and 9 inches to avoid the possibility of head entrapment.
62 Head Start Design Guide 2005
Chapter Six

There should be no openings in the fence between 0.3 and 1 inch wide
to prevent finger entrapments.
• Protective barriers should be provided for all children on all platforms
more than 30 inches above adjacent surfaces. The protective barrier
should be 30 inches above the platform with no openings larger than 3
inches and no horizontal footholds.
• Maximum platform height for infants is 18 inches above the adjacent
floor level.
• Maximum platform height for toddlers is 36 inches above the adjacent
floor level.
• Maximum platform height for Head Start children is 4.5 feet above
the adjacent floor level.
• Pathways under
trees and con-
structed elements
must have at
least 6.7 feet of
headroom.
• There must be a
fall zone with a
resilient surface
under all climb-
ing and moving
fixed play equip-
ment, as specified
in the current
CPSC and local licensing criteria. Typically, a minimum 6-foot radius
is required. The criteria for resilient surfaces are discussed below.
• There should be a 6-foot radius clear approach zone to all play equip-
ment not including the fall zone. No tricycle path should run through
a fall zone.
6.7.4 ShadingAt least half of the play yard should be exposed to sunlight during the
morning and afternoon hours when it is in use.
The degree of shade depends on local climatic conditions. Shade areas,
including porches, gazebos, and other structures, should provide a
minimum shaded area of 6 feet in all directions. Shade may be provided
by trees, exterior screened rooms, park shelters and structures, awnings,
and umbrellas.
6.7.5 Play Yard SurfacesA variety of ground surface texture is required on a playground.
Surfaces for play yards are based on their physical properties and are
categorized into three general types: resilient, hard, and grass/turf.
6.7.6 Resilient SurfacesResilient surfaces reduce the impact from falls and should be used in
specific equipment areas referred to as fall zones. Refer to ASTM F-355,
Shock Absorbing Properties of Playing Surface Systems and Materials and the
most recent publication of the CPSC’s Handbook for Public Playground Safety,
Head Start Design Guide 2005 63
Chapter Six

for specific requirements concerning these resilient surfaces. Examples of
approved resilient surface materials include pre-engineered wood chips
(not simply wood mulch), pre-formed rubber matting, and poured-in-place
rubberized surfaces. Water should drain through these surfaces.
If using a rubber play yard surface, the EPA’s Comprehensive
Procurement Guidelines (CPG) indicate that
rubber play yard surfacing materials should be
made from at least 90-100 percent recycled tire
rubber including rubber pavers or loose granu-
lated rubber surfacing.
The fall-absorbing capacity of each surface
depends upon the installed thickness and the
method of installation. Designers should follow the CPSC recommenda-
tions for the type of surface used.
These surfaces vary dramatically in cost. The least expensive are the loose-
fill variety which typically require a much higher level of maintenance to
ensure that the required depth is maintained. This problem should be
discussed during the design process. The designer may recommend the
more expensive rubberized solutions for ease of maintenance, but should
receive written assurance that exposure to sunlight does not lessen the
impact-absorptive properties. Adequate drainage should be provided
beneath any resilient material including wood chips.
A combination of materials, such as grass,
resilient surface, and pre-engineered wood
chips, incorporates the advantages of each
material and renders a more natural, less
institutional appearance than any one
surface alone.
The designer also
should take note of
the following informa-
tion when planning:
• Organic materials,
such as wood
chips, bark chips, and pre-engineered wheel chair accessible processed
wood fibers, have good impact-absorbing potential but require proper
maintenance to ensure they retain consistent depth.
• Although tire chips have good resiliency and are relatively inexpen-
sive, they can leave black marks on shoes and clothing and require
ongoing maintenance to ensure that proper depths are maintained.
Steel belt residue should be removed.
• It is important to ensure that manufactured resilient mats retain
slip resistance when wet and are tightly installed to prevent
tripping hazards.
• Artificial turf alone does not have enough resiliency for fall zones
and can be abrasive.
64 Head Start Design Guide 2005
Chapter Six

6.7.7 Hard Surfaces
Hard surfaces should be provided in areas used for wheeled riding, in
game court areas, and on some all-weather pathways, such as those
for wheelchair access. Examples of hard surface materials include concrete,
asphalt, stone, or masonry pavers. The durability of each material
will vary based on factors such as installation and the thickness of the
surface material.
Although the severity of weather affects all paving surfaces, cast-in-place
concrete over a well-compacted sub-grade is the most durable, mainte-
nance-free paving material for hard surface areas. It should be finished to
be non-slip. Asphalt paving is an acceptable alternative in vehicular areas,
but it degrades more quickly than concrete. Masonry pavers can make a
durable surface and have numerous options for patterns.
Consider the following when planning hard surfaces and pathways:
• The use of pavers may introduce joints and textures in the paving
surface. They can become uneven over time, if they are not laid
over a concrete base. Unevenness may present a tripping hazard.
Cost varies depending on the method of installation. Asphalt
usually is the least expensive, and stone or masonry pavers are the
most expensive. It is possible to use a variety of surface configura-
tions and materials to increase the impression of “naturalness”
in the play yard. Specifications and supervision to ensure excellent
compaction will affect the serviceability of the surface material.
• Materials for pathways should allow use during inclement weather.
Acceptable materials include concrete, asphalt, stone or masonry
pavers, rubberized surfaces, rubber matting, or wood chips. The edges
of pathways should not create trip hazards and should be tapered for
transitions. All surfaces should allow wheelchair access.
• The main entrance pathway should be paved. Gravel and loose stone
are not recommended for walkway surfaces for children. Smooth sur-
faces provided for wheeled toys on pathways should not have joints
wider than 1/2 inch because wide joints can cause toys to tip.
6.7.8 Grasses/Turf SurfacesGrass/turf is desirable for open play areas but is not appropriate in fall
zones. This surface is seasonal and is not suitable during periods of rainfall
or snow. Exposure to grass/turf allows children to experience natural mate-
rials and provides a pleasant texture to play on, but the surface requires
constant maintenance and may need an irrigation system. This type of sur-
face requires maintenance regularly.
Head Start Design Guide 2005 65
Chapter Six

66 Head Start Design Guide 2005

Chapter 7Interior Space Design
This chapter provides concepts and criteria for the design
of the interior spaces of a Head Start center. Area categories
include entry and circulation areas, staff rooms,
classrooms, common areas, and service areas.
Head Start Design Guide 2005 67

7.1 General Information
Spaces within the center can be separated into three major types: 1) the
classroom and common use areas for children; 2) the staff areas for teach-
ers and administrators; and 3) the service areas for servicing the center.
The entries to the center and main circulation pathways unify these areas.
Descriptions for each space type are as follows. See Chapter 9 for finish
recommendations.
7.1.1 Entry and CirculationThe entry includes the transition space,
vestibule, and reception area where parents,
teachers, children, and visitors enter the facility.
The main circulation provides pathways
between discreet functional spaces.
7.1.2 Staff AreasStaff areas include the director’s office, assistant or secretary’s work space,
staff lounge and work area, staff toilet, parent/teacher conference area, and
central resource storage.
7.1.3 ClassroomsClassrooms for infants, toddlers, and Head Start
children are specific to the group using the space.
Best practice indicates that these classrooms must
have a variety of spaces to support the children’s
care and developmentally appropriate activities.
Architecturally defined spaces within classrooms include the entrance,
cubby storage, classroom and teacher storage,
diapering station and storage, toileting and hand
washing, sleeping, nursing, and food prepara-
tion. The classroom should have an art sink,
raised areas, and loft areas (though these level
changes need not be built in), and open, architec-
turally unrestricted areas.
7.1.4 Common AreasThe center may have additional space in a centrally located area for
use by children, teachers, and parents. A beneficial by-product of a
Head Start center is a stronger sense of community among those using
the center.
The center may include a multiple-purpose
space. The multiple-purpose space may be used
as a meeting area and as a large-motor-activity
area. Best practice indicates that if no adequate
outdoor play yard space is available or climate is
not conducive to outdoor play during significant
portions of the year, an indoor large-motor-activity area should be provid-
ed. If either portable or permanent lofts are to be located in this room,
appropriate protective surfacing should be provided for the highest unpro-
tected deck. (Ref: ASTM-F1292-99)
68 Head Start Design Guide 2005
Chapter Seven

Unless local licensing
requires a separate
sick bay, the area
should be near
the center director’s
office. A sick child
must wait here
until he is picked
up by his parent.
(See Chapter 10
for ventilation
requirements.)
7.1.5 Service AreasThe center requires space for services including food, laundry, janitorial,
and service dock/entrance.
7.1.6 Entrance and CirculationThese spaces should provide a safe and conven-
ient arrival and departure site. The main entry
is vital to creating a friendly impression for
children and a non-threatening transition from
parents’ care to staff care.
Certain features help promote a successful transition:
• An entrance door glazed with safety glass provides full visibility for
children and adults.
• Entryway visibility of classrooms and interesting displays for children
can help to ensure a smooth transition at arrival time.
• A reception desk that allows children to see the adult staffing recep-
tion, if one is required. (Typically centers with a population of 74 or
more might have a reception desk to monitor access to the center.) The
reception desk should be simple not a high counter. Note that the need
for a reception desk should be discussed during design development
because this feature is often underutilized in existing centers.
• The main entrance should be in close proximity to an adult lavatory
for use by parents and staff.
Other points of entry for the facility include service entry access to the play
yards and the classrooms. The main entry should include an exterior tran-
sition area, or a covered bench for good-byes, shoe-tying and other
child/parent interactions. Ideally, the entry that conforms to ADA dimen-
sion requirements would include a vestibule for energy conservation and
a reception area. Secondary entries should have transition areas but do
not require thermal vestibules. Depending on the climate, porches or
mudrooms can serve this purpose. In spaces that are difficult to monitor,
fire egress doors should be alarmed.
Head Start Design Guide 2005 69
Chapter Seven

7.1.7 Exterior Transition Spaces
Rough textured ground surfaces combined with landscaping that keeps
soil and foliage away from the entry path are appropriate in these areas,
Ground materials and landscaping leading to the building entry should
be designed to minimize the potential for tracking soil and water into
the building.
All exterior entries
used by children
should have transition
spaces with a bench
and a covered area of
at least 22.5 square
feet. The covered area
may be a roof, canopy,
or trellis. Transition
spaces are important
in creating a comfort-
able environment and
integrating the exteri-
or and the interior. These spaces allow children to adjust to the changes
between interior and exterior light levels and temperatures.
A transition space also may serve as a mud room or may provide an area
for children in the outdoor environment.
Elements extending from the building, such as porches, verandas,
canopies, or arcades, can create successful transition spaces and in warm
climates can be used as program areas.
7.1.8 VestibuleProvide views of the short-term-parking area from the entry vestibule
and design the windows with low sills so that children can look through
the windows. Vestibules should consist of two sets of doors to provide
energy conservation. The doors must be arranged to permit use by
those in wheelchairs. There should be a flush-mounted walk-off mat to
prevent tracking of water and soil into the center. The entrance may
need security devices. This equipment should be non-intrusive and have
a non-threatening appearance. Refer to Chapter 10 for more information
on technical requirements. In areas with snow and ice, a roof overhang
or canopy should be installed to ensure that the exit is readily accessible
at all times.
7.1.9 ReceptionA reception area should be located immediately inside the entry. It should
be warm, bright, and welcoming. The reception area connects the entrance
to the main circulation pathways of the center. Parents escort children to
the classroom from this location.
A small reception table at desk height may be provided in large centers. It
can serve as a sign-in facility or a spot for parent/teacher mailboxes. A
counter, which is typically simpler and less expensive than a reception
desk, may serve these functions. A child should be able to see the adult
70 Head Start Design Guide 2005
Chapter Seven

behind the desk. Furnishings in the reception area may include a sofa, chair,
end table, and coffee table.
The design team should select durable finishes (Chapter 9) that have an
informal, comfortable appearance and should establish a warm, inviting
feeling through use of color, soft seating, plants, and artwork.
Recommended finishes include a carpeted floor and a washable durable
wall finish. Cut-pile carpet has proven less durable than looped pile.
Oriental-style patterned rugs may be associated with a home environment.
All rugs in the center should have non-slip backing.
7.1.10 Main CirculationAcenter includes two types of circulation paths: the main circulation con-
necting the various classrooms and major spaces of the center path, and
the internal circulation patterns within those spaces. Circulation within
classrooms will be discussed in the classroom section of this chapter.
The main circulation path serves as a community space as well as a
pathway. The circulation space should not be utilitarian in character.
Instead, it should be a street or a gallery with stopping and queuing areas
along the way. There should be an opportunity for important social
interaction along the circulation path. It is a space to meet other children
and parents, a vantage point to see into classrooms, and an exhibition
space for children’s art.
The designer should strive to limit the floor space devoted to pure
building circulation.
There should be at
least one accessible
drinking fountain in
the corridor. It is
advisable to avoid the
institutional appear-
ance that is created by
long, undeviating,
double-loaded corri-
dors with doors to
rooms on both sides.
When it is not feasi-
ble to vary the layout of the circulation corridor, consider adopting
the following design strategies to deemphasize the impression long
corridors make:
• Lighting: The designer can introduce artificial lighting. Instead of the
dead-center placement of fluorescent lights in corridor ceilings, add
strategically placed wall washing lights or natural light through sky-
lights. Putting a window, glazed door, or skylight at the end of a corri-
dor is advisable.
• Floor Pattern: Using patterns can create a strong sense of place for
children and when skillfully used will diminish the impression of
long, double-loaded corridors. Large pattern repeats are often effective
Head Start Design Guide 2005 71
Chapter Seven

for de-emphasizing the tunnel appearance of double-loaded corridors.
Patterns that are not symmetrically arranged or that emphasize func-
tional areas, such as entrances to classrooms, are an effective means to
achieve the same end.
• Color: The designer should use color to visually alter the dimensions
of otherwise institutional looking double-loaded corridors. Care
should be taken in choosing the colors. Some think that bright colors
may over-stimulate a child. However, since some cultures and com-
munities use colors as
a means of identity,
color is an important
local decision.
Children gain a sense
of orientation when
they can see the
entrance to their class-
room and recognize
landmarks, such
as displays, common
areas, and other
design features.
Teachers and children
require clear views between the classroom and circulation areas at their
viewing levels.
The main circulation path should be designed to serve as a primary means
of regular and emergency egress. Through judicious arrangement, the
designer should strive to reduce the area devoted to purely utilitarian cir-
culation. No more than 30 percent (some design suggests no more than 20
to 25 percent) of the Occupiable Floor Area (OFA) within a facility should
be used for primary circulation and service areas, unless the center loca-
tion is irregular. The Occupiable Floor Area (OFA) allowance includes cir-
culation within the classroom.
Outside corners in the circulation pathways should be eliminated as much
as possible. Angled or curved corners can facilitate cart and stroller traffic
and may decrease the possibility of injury.
Recommended finishes for major circulation paths include impervious sur-
faces at the floor and at wainscot height, paint above wainscot height, and
safety glass in windows along the corridor.
7.1.11 Staff SpacesStaff areas usually include the following spaces:
• Director’s office
• Assistant’s or secretary’s work space
• Parent/teacher conference area
• Area for family workers and health staff to work and interact
with parents.
• Staff lounge and work area
72 Head Start Design Guide 2005
Chapter Seven

• Staff toilet
• Central resource storage
Spaces used by the staff, particularly teachers, should be easily accessible
from the main circulation area.
7.1.12 Director’s OfficeThe director will normally perform deskwork and interviews in his/her
office. The director may use this space to meet with parents, staff members,
children, or other visitors and to conduct parent interviews. Larger centers
may have an assistant or secretary who works closely with and shares
duties with the director. Space for this staff member should be located near
the director’s office.
Place this office in a quiet space, next to the reception area and accessible to
visitors. To supervise properly, the director’s office must have excellent views
of the main entry, the reception area, and as many classrooms as possible.
The director’s office should be comfortable with a carpeted floor and
washable wall surfaces. There should be adequate lighting with task
lighting components and acoustical separation of at least 45 STC from
the children’s active areas.
Furnishings probably would include a desk and chair, two guest chairs, fil-
ing cabinets, a coat rack, shelving for books and resources, and lockable
storage cabinets or a closet for personal belongings and first aid items.
The director’s office requires a telephone and may have security video
monitors. There should be adequate power supply to accommodate a
personal computer, printer, and a fax machine. A copier and video equip-
ment also may be stored here.
7.1.13 Parent/Teacher Conference RoomParent/teacher conferences and meetings between staff members normally
require space. This space should be located in a private area, adjacent
either to the director’s office or the staff lounge. It should have data
connect cables and jacks.
The conference space should be comfortable, pleasant, and quiet.
Furnishings should include a conference table and seating for a suggested
minimum of six, shelving for books, and a notice/bulletin board. Lighting
should be dimmable so that video tapes may be viewed.
7.1.14 Staff LoungeThe staff may use this space as both a retreat and a workroom. They may
relax and eat here, plan curricula, and prepare classroom materials. The
lounge may contain a cot or sofa and should be located near the adult
lavatory and central resource storage area. This space requires visual and
acoustical separation from children’s areas but should be easily accessible
to the staff.
The lounge should be comfortable, pleasant, and soothing. It should con-
tain a counter with a microwave, a sink, an under-counter refrigerator, and
Head Start Design Guide 2005 73
Chapter Seven

cabinets. The flooring at the counter area should be impervious. All base
cabinets should have childproof hardware. Recommended furnishings
include a table with four chairs, a small sofa, and storage cabinets, some of
which lock.
The workroom should have adequate space and power connections for
telephone, computer, video equipment, and laminating and copy machines
(unless they are in the director’s office). The machines should be isolated
in an alcove for better control of noise. There also should be space on the
counter for a butcher paper holder and an art waxer (a piece of equipment
that allows children’s art to be hung without tape or pins).
7.1.15 Staff LavatoryA center must provide at least one adult lavatory, although two, at either
end of the center are recommended. Two adult lavatories improve the
center’s functioning because this enables teachers to be out of classrooms
for shorter periods.
Adult lavatories in the center must meet all UFAS and ADA code require-
ments. Lavatories should be accessible from the reception area and staff
lounge. Recommended finishes include impervious flooring such as
linoleum and painted walls above an impervious wainscot. One adult
lavatory should be located in or near the infant and young toddler
classroom areas. Electronic faucets are advisable in adult lavatories.
7.1.16 Central Resource Storage
The director and teachers may use a centrally located resource room for
bulk storage of curricula materials and supplies and for storage of resource
tapes, books, and audio/video equipment. The central resource storage is
not a substitute for small-scale storage within the classroom. This storage
is typically wall-mounted cabinets in the classrooms. The base of these
securely anchored cabinets must be no lower than 4.5 feet above the fin-
ished floor below.
The storage room should have open shelving, lockable, closed-door stor-
age, and filing cabinets. If space permits, a work counter and a counter-
height stool may be provided.
74 Head Start Design Guide 2005
Chapter Seven

7.2 General Concepts for Classroom Design
Children spend most of their day in the classroom. Classrooms afford facil-
ities for care and opportunities for developmentally appropriate activities.
Parents typically drop off and pick up children in the classroom, and
adults may visit during the day or help as classroom volunteers.
7.2.1 Classroom AreasThe classroom design includes functional areas defined by furniture
arrangements and constructed elements that vary depending on the age
of the children in the class. To maximize the
space devoted to these important functions,
the circulation between entrance and exits
should be as direct as possible. It is appropriate
to position tables and work surfaces adjacent
to circulation areas, while retaining corners
and floor areas for more protected and nurtur-
ing activities.
Ideally, classroom areas should be designed or arranged to fit four or five
children and one adult. There also should be a group gathering area. Areas
located in alcoves can allow children to be by themselves or in small
groups. Classrooms should be equipped with convenient bins for recycling
waste paper and other items.
Major classroom elements, such as plumbing connections, risers or
case goods secured in place for safety reasons will remain fixed.
Children and their teachers may modify the remaining space to create
areas for their activities. The classrooms should provide flexibility for
these activities.
Manufactured cub-
bies anchored to
full partitions have
been found to be
more cost-effective
than built-in types.
The designer
should ensure that
the classroom space
can accommodate
the manufactured
cubbies. It is wise to
prevent an excess of
children’s personal items in and around cubbies
that would affect the order and function of the
classroom. The cubbies could be arranged to
form a cloakroom, an entrance alcove, or a
transition area with openings facing away from
the main classroom.
Children should have opportunities for diverse activities in the class-
room. Lofts offer an opportunity for exploration; however, built-in lofts
Head Start Design Guide 2005 75
Chapter Seven

are not recommended. Low shelves and partitions should be secured to
prevent tipping if they are used to separate use areas.
A well-equipped classroom for particular age groups should have the
following areas:
Infant Classroom• Entrance
• Cubby storage
• Classroom and teacher storage
• Adult lavatory within the classroom (preferable) but no more than 33
feet from the infant
classroom entry
• Diapering station
and storage
• Sleeping/crib area
• Nursing area
• Eating/table area
• Food preparation
area
• Open activity
and crawling area
for play and
development
Young Toddler Classroom
• Entrance
• Cubby storage
• Classroom and teacher storage
• Adult lavatory within 10 meters of entry
• Diapering station and storage
• Children’s toilets and sinks
• Eating/table area
• Food preparation area
• Open activity area for play and development
• Area with level change (three risers minimum)
• Cot storage
76 Head Start Design Guide 2005
Chapter Seven

Older Toddler Classroom• Entrance
• Cubby storage
• Classroom and teacher storage
• Children’s toilets and sinks (one sink at toilet exit is preferable to
avoid congestion)
• Eating/table area
• Art sink
• Area with level change (three risers minimum)
• Open, unrestricted activity area
• Water fountain
• Cot storage
Head Start Classroom
• Entrance
• Cubby storage
• A classroom for three-year old children requires a small diaper chang-
ing area
• Classroom and teacher storage
• Children’s toilets and sinks (one sink at toilet exit preferable to avoid
congestion)
• Eating/table area
• Art sink
• Water play area
• Drinking fountain
Head Start Design Guide 2005 77
Chapter Seven

• Loft area (not built in)
• Area with level change (three risers minimum)
• Open, unrestricted activity area
• Block area (64 square feet minimum) located away from main
circulation
• Cot storage
Separate male/female child-sized toilets should comply with ADAAG and
with UFAS. If this is a problem, the designers should insure that the doors
are low enough (59 inches max.) to allow adult supervision.
If windows are installed, they should be located to allow adult supervision
of the classroom.
The proper zoning of classrooms is critical to the success of the center. The
designer and users should consult at length.
General classroom design principles include the following:
• Discreet functional areas need to be included in the design of the class-
room even though they may be created primarily with furniture.
• Noisy and active areas need to be away from quiet areas.
• The circulation from equipment such as slides should flow away from
activity centers.
• Block play is an essential activity and areas must be provided where
blocks can remain in position for more than a day and be protected
from main circulation pathways and active play.
• Do not crowd the space with more tables than necessary for mealtime.
and avoid excessive distance between tables. Rectangular tables
should be arranged with 3.25 feet of clear space between them.
7.2.2 Classroom LocationTo receive the maximum access to natural light, classrooms should be
located along the exterior perimeter of the building. If not possible, the
classroom should be located near areas that are along an exterior wall
with windows.
Where possible, classrooms should have direct access to a central circula-
tion system and direct access to play yards. They should be close to
common use spaces.
7.2.3 Classroom SizeDesign classrooms to accommodate the number of children for each age
group. The Head Start Program Performance Standards and local licensing
requirements must be referenced. Infants and young toddlers must have
classrooms separate from other age groups. The design should allow for
future expansion in all centers.
7.2.4 Separation of SpacesSolid or glazed partitions at full height, doors, casework, cabinets, pan-
els, and railings can be used for separation.
78 Head Start Design Guide 2005
Chapter Seven

Three types of separation must be considered:
• Acoustical separation
• Visual separation
• Physical separation
The following aspects of separation should be considered when designing
the classroom spaces:
• Groups or classrooms of children must be physically separated from
each other.
• Sound transmission between classrooms should be controlled
with not less than
34 STC partitions,
although complete
acoustical separa-
tion is not
suggested.
• High noise levels
from adjoining classroom spaces can negatively affect class activities.
• Small, strategically placed windows between classrooms are recom-
mended to offer children a view of other classroom activities.
Placement of windows should not interfere with potential placement
of classroom furniture. Install at least one window at child and
adult levels.
Provide partial height enclosure for fixed elements in the following areas:
food preparation, children’s toilet and hand washing, and the rear of
cubbies. Food preparation and toileting/diapering areas must be separated
to reduce the chance that a caregiver could inadvertently spread germs.
Partitions with vision panels can be used effectively to separate these areas
while allowing supervision.
Provide complete enclosure for teacher storage within the classroom and
complete enclosure for the adult toilets.
Head Start Design Guide 2005 79
Chapter Seven

7.3 Scale
The design of a nurturing classroom must reflect
the designers’ appreciation of children’s scale,
including the size of individual spaces within
the classroom and the scale of furnishings.
(Refer to Table 7.3 showing Physical Dimensions
of Children.).
While areas of high ceilings in a classroom may
be desirable, height must be modified in spaces
that the child perceives as too high to have a res-
idential character (for example, 85 percent of the
room is over 11 feet high).
Consider using pendant lighting or ceiling
fans hung no lower than 7.5 feet above the
occupied floor area below. Pendant task
lighting over fixed elements may hang as low
as 5.5 feet as long as headroom is not required
for passage. Choose fans to improve air
flow and energy efficiency with rotation that
can be reversed. Aside from the obvious
mechanical and lighting enhancements that
these strategies provide, they also help tailor
spaces to children’s spatial perceptions. In addition, this provides the
opportunity to hang banners and create trellis ceilings over activity
areas. It is important to ensure that they do not interfere with the func-
tion of the sprinkler system.
80 Head Start Design Guide 2005
Table 7.3 — PHYSICAL DIMENSIONS OF CHILDRENThe following dimensions are stated in inches and represent averages. Metric measures have been converted toEnglish equivalents using the conversions in Appendix D.
AGE IN YEARS BIRTH .5 1.0 2.0 3.0 4.0 5.0
BODY LENGTH 20.0 26.4 30.0 34.4 38.0 41.6 45.7
HEAD LENGTH 4.9 5.9 6.9 7.5 7.7 7.8 7.9
HEAD WIDTH 3.8 4.7 5.2 5.5 5.6 5.7 5.7
HEAD CIRCUMFERENCE 21.9 17.3 18.6 19.6 19.6 19.9 20.1
TRUNK LENGTH 8.3 11.6 12.6 13.6 14.3 15.0 15.3
SHOULDER WIDTH 5.9 7.0 8.0 8.8 9.3 9.7 10.0
CHEST CIRCUMFERENCE 13.0 17.2 18.7 20 20.5 20.8 21.7
ABDOMINAL CIRCUMFERENCE N/A 16.1 17.5 18.2 8.5 20.3 20.4
PELVIC WIDTH 4.6 4.6 5.1 5.7 6.2 6.3 7.3
ARM LENGTH 7.6 10.0 12.0 14.6 6.4 16.7 19.8
HAND LENGTH N/A N/A 3.8 4.2 4.7 4.9 5.0
HAND WIDTH 1.4 1.6 1.7 1.9 2.0 2.0 2.2
LEG AND THIGH LENGTH 6.6 8.2 9.6 12.2 14.6 17.2 22.9
SITTING HEIGHT N/A 17.6 19.2 21.2 22.5 23.5 24.5
KNEE WIDTH 1.5 N/A 2.5 2.6 2.7 2.7 2.7
WEIGHT IN POUNDS 7.5 16.7 22.0 28.0 32.0 38.0 43.0
KNEE PIVOT TO FLOOR N/A N/A N/A 9.6 10.4 11.3 12.5
KNEE WIDTH 1.5 N/A 2.5 2.6 2.7 2.7 2.7
Source: Anita R. Olds, Ph.D., Architectural Prototype Document, Commonwealth of Massachusetts, 1987; Diffrient, N., Tilley, A.R., and Bardagly, J.C.,
Humanscale 1/2/3 Manual, Cambridge: MIT Press, 1974; Society of Automotive Engineers, Inc., Anthropometry of U.S. Infants & Children,
Michigan: 1975.
Chapter Seven

The height of windowsills and counters depends upon the age of the chil-
dren using the space. Leave 1.5 feet beneath windowsills (measured to the
classroom finish floor) so that furniture and equipment can be placed easi-
ly along exterior walls. Storefront-type windows starting at the finished
floor are not desirable.
Any furnishings and equipment for children should be child-scaled.
Countertop height and reach depth should provide children with the
opportunities to use them unassisted.
Consideration should be given to the adults using the space. Center
design should be both adult and child friendly. Not all elements should
be reduced in scale. Door locks, light switches, fire alarm pull stations,
and other functional elements should retain adult scale and be mounted
at standard heights. Food preparation, storage and service spaces, and
other areas of the center used primarily by adults should remain at
standard scale.
Furnishings that adults use should be adult scale. Some items may have a
double function for both children and adults.
In placing electrical/telecommunication or security equipment, ensure that
cords and wires are not placed within reach of children.
7.4 Architectural Form
The architectural form of the classroom should create an appropriate set-
ting for a child. It should convey a definite sense of place while preserving
optimal flexibility. The majority of the space should be free of constructed
elements, and furniture arrangements should be used to create required
functional areas.
The following guidance applies to architectural form:
• Vary ceiling
heights to define
areas, disperse
light, and create
interest. Higher
ceiling heights
often encourage
greater activity
levels. Lower ceil-
ings support quiet
activities. The
probability of
higher construc-
tion costs must be
considered in determining the extent of ceiling variation.
• Vary floor levels to create riser lofts and low platforms. Sunken areas
also are effective. The designer should be aware that permanent,
Head Start Design Guide 2005 81
Chapter Seven

constructed level changes may restrict flexi-
bility and use valuable open floor space.
Fixed level changes will require a wheel-
chair accessible ramp. When deciding
where to place level changes, consider
placement of furniture that is not fixed
to the floor or walls. Used effectively,
level changes can add interest and create
intimate areas for children. For example,
terraces and platforms provide areas for
dramatic play activities and can double
as seating areas. Lofts that accommodate
3-5 children offer space for large motor
activities, dramatic play, or quiet activities.
The designer should keep in mind that low-level changes can
cause tripping.
• Vary wall configurations to create interest, soften a space, or create a
more nurturing impression in special spaces. The designers should
avoid 90 degree or acute outside corners that pose hazards to children
who may walk or run into them. Instead, consider curved or obtuse
angled partitions. One inch rounded outside corner drywall beads
should be used. The designer must keep in mind that visibility of all
areas within the classroom is a key factor and avoid creating “blind”
areas that make teacher supervision difficult.
• Locate plumbing fixtures in one area for efficiency. For example, ele-
ments with plumbing connections, such as toilet areas and art sinks,
should be grouped. The food preparation
area must be separate from diapering and
lavatory areas, though the areas can be
placed on the opposite sides of a wall that
separates them.
• Provide ample display space at children’s
height for display of art work and projects.
Devices for display of artwork should not
involve tacks or tape. Use tacky tape, mag-
nets, clamps, or similar fasteners.
• Preserve inside corners to create differen-
tiated areas. Use features such as low
partitions behind
cubbies to create
nurturing corner spaces.
• Providing natural light benefits centers by
reducing total energy use and improves the
indoor environment. Day lit schools saved
an average of $0.27/SF in energy costs over
non-daylit schools. (Source: Energy
Performance of Daylit Schools Innovative
Design, NC)
• Provide views for children to increase their
awareness of their surroundings and the
world beyond the center. Views should be
provided to the outside, particularly to play
82 Head Start Design Guide 2005
Chapter Seven

yards. Views to atria and planters, common spaces, other classrooms,
and circulating pathways also benefit children. Windows should be
located at sills low enough for children to see outside and yet should
allow placement of small-scaled furniture
beneath them.
• Provide visibility so teachers have an unre-
stricted view of the children at all times in
the classrooms and play yards. Views
should be provided between classrooms and
other spaces in the center. Any interior
doors, with the exception of adult lavatories,
should have visibility panels. The top sash
of a Dutch door should be secured when in
the open position. Interior glazing allows
visual supervision and lets children see oth-
ers in the center. Partitions at the sides of
toilets should be no higher than 3.5 feet.
Finally, there should be gates (with view
panels) in infant and toddler classrooms to prevent children from
accessing kitchen and diaper areas.
• Zone classroom space to separate active and quiet activities.
• Use variations in ceiling and floor height, wall configuration, light lev-
els, finishes, and open areas to modulate activity levels in different
areas of the classroom. Zone high-activity areas,
such as the entrances, eating/table areas, and
exits to the play yard away from areas intended
for sleeping and other quiet activities. Likewise,
separate messy and clean areas.
Head Start Design Guide 2005 83
Chapter Seven

7.5 Classroom Component Areas7.5.1 Classroom Entrances
Each classroom should have a distinct and welcoming entrance that meets
all emergency exit requirements. A second classroom entrance to the main
circulation path or to play yards should be considered for egress depend-
ing on center configuration. Place the classroom entrance along
a wall leaving corners available for activity areas. Entrances should allow
views from the main circulation area into classrooms. There should be
a sign-in counter (with storage below) near the classroom door at approxi-
mately 845 millimeters above the finished floor.
7.5.2 Cubby Storage AreaChildren typically store their outdoor clothing and personal belongings in
a cubby alcove when they arrive in the classroom. Designers should be
aware that children may again need their outdoor clothing during the day.
Parents may linger in the cubby alcove spending time with their children
or with teachers or other parents. The design of the cubby area must con-
sider this activity so bottlenecks do not occur. Cubbies should be arranged
in a cloak room so as not to take up valuable classroom wall space.
Cubby storage areas should include the following features:
• Open-front cubbies scaled to child size, one for each child in the class-
room, and secured to the floor and wall to prevent tipping accidents.
• A three foot clear area in front of the cubbies to ensure easy access.
• Seating which may be integrated with the cubby for either adult or
child use, such as a bench.
• A parent bulletin board and mail box may also be located in the
reception area.
The size and type of cubby storage may vary according to the age group in
the classroom. It is wise to include a shelf for child safety seats, if space
allows. If the cubbies are purchased, the designer should ensure that the
dimensions fit the classroom space and design.
7.5.3 Infant and Young Toddler CubbiesInfants and young toddlers need storage for diaper bags, clothing, and
supplies. Typically, these purchased cubbies are about 1 foot wide,
1 foot deep and 1.5 feet high. The bench in the infant area should be
about 1.2 feet above floor level so parents can sit comfortably while
removing or putting on their children’s outdoor clothing.
Parents may wish to leave collapsible strollers or other child-carrying
equipment at the center during the day. Rods for this purpose should be
provided in this storage area or near the reception area. Provide 9 to 12
inches of rod length for every five children and install rods approximately
4.5 to 5 feet above the floor. If a double storage rod is needed, install the
top rod about 7 feet above the floor and the bottom rod about 3.5 feet
above the floor. Provide a retaining rail to keep the lower end of the
strollers in place.
84 Head Start Design Guide 2005
Chapter Seven

7.5.4 Older Toddler and Head Start Children’s Cubbies
Older toddlers and Head Start children need to store bulkier outdoor
clothing in their cubbies. Satchels and backpacks may be stored on hooks.
These cubbies should be a minimum of 1 foot wide, 1 foot deep, and 3 to 4
feet high. Two hooks are needed in each compartment for hanging gar-
ments. A shelf should be included for boxes, boots, or extra shoes. The
bench in this area should be about 10 inches high for children to sit com-
fortably while preparing for outdoor activity.
7.5.5 Open Activity AreaEach classroom should have an open, unrestricted activity area, clear of con-
structed elements. Teachers and children are the architects of this space and
should be able to adjust and alter this flexible area in response to their needs
and activities. This can be accomplished through the use of elements such as
curricula equipment and materials, moveable panels and demountable
walls, fabrics, furniture such as seating or shelving, and display racks. The
required space allotment for this area is described in Chapter 5, Section 5.8.
Requirements for activities occurring within this space will vary according
to the age of children. Play activities may involve:
• Discovery, including sand and water play
• Large motor activity
• Art/Music/Dramatic play
• Reading/listening
• Manipulation of small puzzles and finger toys
• Block building
• Woodworking
• Science, including nature study
• Math
It is wise to locate an
open activity area
within the classroom
to take full advantage
of natural light.
Arrange the fixed elements along inside walls to reduce bottlenecks
and maximize use of natural light in the space. The design should
encourage traffic pathways minimizing disruption and avoiding
areas of activity. Offset walls or partition patterns will allow more
intimate areas for children but not obstruct teachers’ views of the
activity area. Corner areas providing natural boundaries can set
apart an activity area.
Head Start Design Guide 2005 85
Chapter Seven

Include the following architectural features in
open activity areas:
• Acoustically treated surfaces to reduce noise.
• Full-spectrum dimmable lighting to supple-
ment natural light.
• Blunt corner angles since it is important to
avoid acute or 90-degree angles on outside
corners projecting into the space. Provide a
1/2-inch radius or beveled edge on all out-
side corners of constructed features.
• Ample counter areas at child height for
work surfaces and display areas. Consider a
counter near the windows for growing
plants and conducting nature studies.
• Adequate electrical outlets to serve counter areas for items such as
radios, tape players, projectors, and keyboards. Locate outlets for this
kind of equipment at least 4.5 feet above the finished floor, so that
children cannot reach the outlet or pull equipment off counters using
cords connected to low-mounted outlets.
• Consideration of how the child views the surroundings. Spending
time on the floor at a small child’s viewing level is a helpful exercise
for a designer of children’s spaces.
• Furnishings that are child-scale, including tables, chairs, and open
storage units. Adult-sized comfortable seating is needed. Bulletin
boards and other display areas should be placed at children’s height.
Continuous strips from which to hang children’s art are strongly rec-
ommended. These strips may be placed approximately 3.2 feet to 4.5
feet above the finished floor.
• Adequate storage for all curricula materials and supplies. Refer to the
discussions on storage in this chapter. (Sections 7.1.1b, 7.5.2, 7.53, 7.5.4,
7.7.3, 7.7.9, 7.7.10, and 7.7.16)
7.5.6 Activity Area for InfantsThe infant open activity area should offer opportunities for discovery and
learning. This area must be designed as a safe, soft, print rich, stimulating
environment in which babies can crawl, explore, and interact with teachers
and other adults.
86 Head Start Design Guide 2005
Chapter Seven

Provide the following architectural features in the infant classroom:
• Soft-surfaced level changes that should be slight with a maximum of 3
to 4 inches between levels. The space should be soft and cushioned
with a variety of textures and coverings. Create level changes using
constructed platforms with ramps or stacked upholstered blocks in
various configurations. Maximum unenclosed platform height for
padded level changes should be 1.5 feet above the floor. Consider
including an enclosed raised area for infants at 3 feet above floor level
so infants can be at the same eye level as seated adults and be able to
view the entire room.
• Nests and crawl spaces that provide a safe environment for infant
exploration can be constructed with low, permanent, soft barriers
or with movable objects such as crawling tubes, tunnels, or
cardboard boxes.
• Low grab bars at 1.5 feet above floor level to help infants pull up to a
standing position may aid an infant’s sense of security while develop-
ing walking skills. A minimum total length of 5 feet should be provid-
ed in each infant classroom.
• Licensing requirements in some states preclude carpet in infant rooms.
Therefore, unpadded floors should be constructed of tile, linoleum,
or wood that can be mopped and sanitized daily. Soft areas can be
provided using area rugs, and floor mats with anti-slip surfaces to
prevent accidents.
• Views to the outside and to the circulation pathways from floor level,
if possible.
• Interesting things to observe from a baby’s point of view including
views while the child is being held by seated or standing adults.
• Mirrors placed at approximately 1.5 feet above the finished floor so
babies can see reflections. Mirror material must be shatterproof, such
as safety glass, acrylic, or reflective metal with no sharp edges.
7.5.7 Activity Area for ToddlersThe toddler open activity area should offer an even greater range of chal-
lenging opportunities for exploring and developing large muscles and
motor skills. Toddlers often move quickly in groups of two or three. The
activity area must allow for running and cruising (movement through
space to view and select from a variety of activities) without disrupting
children engaged in other activities.
Consider the following architectural features in the open activity area
for toddlers:
• Broad pathways to accommodate group movement or cruising.
• Intimate spaces that allow toddlers to maintain a visual connection
with the teacher.
• Hard surface, impervious flooring throughout, unless the initial design
meetings reveal a strong preference for carpet. If carpet is chosen, the
quantity will be determined during the initial design concept phase.
Area carpets with non-skid backing and mats should be provided for
quiet areas.
• Sand and water play areas that may consist of freestanding tables or
Head Start Design Guide 2005 87
Chapter Seven

troughs with nearby hooks for smocks and towels and impervious
floor finish. If feasible, provide a floor drain. Sand and water play can
occur in the art sink area. Art sinks should be provided only for older
toddlers but not for young toddlers.
7.5.8 Activity Area for Head Start ChildrenThe Head Start open activity area is larger than the areas designed for
younger children. Head Start children are involved in a wide range of activ-
ities. Their skill level enables them to take part in more advanced activities
than infants and toddlers and requires a greater number of interest areas,
configured for small groups of children.
Consider the following architectural features in the Head Start classroom:
• Design the space to allow for maturing skills in large muscle develop-
ment. Refer to the discussion on lofts and platforms in Section 7.6 of
this chapter.
• Allow sand and water play using freestanding tables or troughs with
nearby hooks for smocks and towels. An impervious waterproof floor
finish and a floor drain should be used where feasible. Sand and water
play also can occur in the art sink area or outside.
• Include hard, impervious floor surfacing throughout with area rugs
for quiet areas. If carpeting is required, the amount of carpet will be
determined during the initial design concept phase.
7.6 Lofts and Platforms
Lofts and platform areas are optional constructed elements within the class-
room. They offer many activity opportunities and advantages. Lofts and
platforms are not appropriate for every classroom, because they can mini-
mize flexibility. Lofts must be designed and positioned with child safety in
mind. Constructed elements should reduce the risk of children falling from
the loft. Typically, lofts will be purchased pieces of equipment that the archi-
tect-engineer will include in the design.
Lofts with slides and steps offer a variety of experiences. However, it is
best for circulation if they descend in the same direction.
It is important to coordinate sprinkler requirements and to avoid placing
sprinkers under lofts too close to children.
7.6.1 Infant Lofts and PlatformsInfant classrooms require soft, colorful crawling areas with slight level
changes such as low, carpeted, constructed platforms, moveable foam
shapes, or forms that provide level changes. Ramps or small 3– to 4–inch
steps should be used between levels. All corners
should be rounded, and all surfaces should be
soft to minimize falls. The maximum height of
platforms for infants is 18 inches.
Recessed constructed areas provide infants with
large, contained spaces in which to move and
88 Head Start Design Guide 2005
Chapter Seven

explore. Low retaining sides allow infants to pull themselves up and move.
Similar portable low boundaries also might be effective. Use caution if
planning to permanently construct such an area as a permanent installa-
tion could reduce classroom flexibility.
7.6.2 Toddler and Preschool Children’s Lofts and Platforms
Lofts enhance toddler and Head Start class-
rooms by offering the following advantages:
• Challenging, large-muscle activities
• Small intimate spaces
• Additional spaces for exploration
• Opportunities for a child to view the envi-
ronment from another level
• A classroom with more character
The following design requirements should be considered in the design of a
loft for toddler and Head Start age groups:
• Lofts should be no higher than 3 feet above the finished floor for
toddlers and 4.5 feet above the finished floor for Head Start
children. The design should minimize conflict and allow more than
one child at a time to use the space. For instance, offering stairs
going up and a slide coming down can minimize congestion and
possible conflict.
• Loft features should meet the definition for fall zones and have resilient
surfaces, as prescribed by the CPSC’s Handbook for Public Playground
Safety. Refer to Chapter 6, Section 6.7.5, Play Yard Surfaces.
• Lofts should meet applicable local, state, or other standards.
• Guardrails should be provided to protect children from falling from
raised areas.
• Toddlers should have guardrails on any constructed surface more than
10 inches above adjacent surfaces. Head Start children should have
guardrails on any raised surface more than 20 inches above floor level.
The top of the guardrail must be at least 2.5 feet above the platform,
or in accordance with local codes, whichever is more stringent.
Openings between 3.5 and 9 inches should be avoided to prevent head
Head Start Design Guide 2005 89
Chapter Seven

entrapment and openings between 0.3 inch and 1 inch should be
avoided to prevent finger and hand entrapment.
• Protective barriers should be provided on all raised surfaces 2.5 feet
above floor level or higher for Head Start and younger children.
Protective barriers can be vertical slats or acrylic panels (for clear visi-
bility). Openings in these panels should be no larger than 3 inches to
prevent entrapment. Avoid using horizontal rails that allow climbing.
• All protruding corners should have a minimum radius of 1/2 inch.
• Teachers must be able to see and reach all areas of a loft.
• The loft should present an image of safety and should not include
overly challenging elements, such as cantilevers or narrow bridges.
• Level changes should be appropriate to the age group and accessible
by ramps, steps, or ladders. Two children should be able to use the
steps and ladders at the same time. Riser heights for stairs should be a
maximum of 5 inches for toddlers and Head Start children. Minimum
tread depth should be approximately 11 inches. Stairs and ramps
should be a minimum of 3 feet wide.
• Handrails should be provided for all stairs and ramps at 22 inches
above the leading edge of the treads. All handrails should adjoin the
wall to avoid the possibility of injury. Handrails should meet state,
tribal, and local codes.
7.7 Other Areas
In addition to required spaces in the classroom, others located elsewhere in
the center can provide specialized activity settings for children, teachers,
and parents. These areas should not be considered part of the minimum
required activity square footage area.
7.7.1 Art SinksFor toddler and preschool classrooms, HSB suggests providing a stainless
steel sink with a gooseneck faucet and wrist handles mounted in a
22-inch-high counter for children to use in art and other activities requir-
ing water and cleanup. The gooseneck faucet will allow teachers and
children to place a bucket under the faucet. Traps should be accessible for
easy cleaning.
The art sink area should include storage, display, and drying areas for
finished work or works-in-progress. The counter should be 16 to 22 inches
deep, so that children can reach the faucet. The design should provide 3 to
4 feet of open counter length adjacent to the sink. It is good practice to pro-
vide an adult height art sink in all toddler and Head Start classrooms.
Faucets and levers should be located behind the sink adjacent to the wall
rather than at the side of the sink. Faucet controls should be no less than
14 inches from the leading edge of the counter.
The art sink should be next to the eating/table area, since most art activi-
ties require tables; and this provides a dual use for tables with similar fin-
ishes. Ideally, the sink should be close to display walls and equipped with
90 Head Start Design Guide 2005
Chapter Seven

dry marker boards or chalkboards. Install impervious floor coverings with
sealed seams and a floor drain in this area.
Including a built-in counter with a configuration that allows children to
face each other during activities is advisable. A shatterproof mirror above
the counter is a desirable feature.
7.7.2 Toilets and SinksThe following plumbing requirements are for areas devoted to toddlers
and Head Start children:
• A minimum of two toilets in the center but not less than one toilet and
two child-height hand-washing sinks. Include one lavatory and one
drinking fountain for every 10 children. Two classrooms may share
one toilet area.
• Toddlers: Two adult sinks at a minimum, one for diapering in the tod-
dler room and one for use near food preparation.
• Head Start: One adult sink and one or two hand-washing sinks for
every 10-20 children and one connection for water play.
• Toilet areas may be used by both girls and boys and may be partially
screened. If doors are provided, they should not lock. This offers
some privacy but allows adult supervision. Toilet areas are to have
gates or half doors at entrances and may have child-height partition-
ing between toilets. As with all full-height doors, these elements
should have hinge protection so that children’s hands and fingers are
not accidentally pinched.
• An adult toilet
should be located
outside the older
toddler and Head
Start classrooms
and either in or
near infant and
young toddler classrooms.
• Classroom toilets should be placed toward the interior perimeter to
leave the exterior free for access to natural light and views. They
should be constructed as part of the fixed elements and, where possi-
ble, should share plumbing walls with other areas requiring plumb-
ing connections. The
toilet area should be
physically separated
from food prepara-
tion and eating areas
and partially
screened from the
view of remaining
spaces. Hand-wash-
ing sinks may be
located within the
toilet area but are
best placed in the
classroom on a wall
Head Start Design Guide 2005 91
Chapter Seven

adjacent to the toilet area to facilitate supervision and reduce conges-
tion in the toilet area.
• Toilets are to be child-size for toddlers. Larger toilets may be chosen
for Head Start children. They must be accessible to children with spe-
cial needs.
• Toddler and Head Start toilet areas should have durable, water-resist-
ant finishes and bright, cheerful lighting. Recommended flooring
includes ceramic tile with an integral cove base and a ceramic tile
wainscot to 3 feet above the floor with a painted wall above.
Following are suggested features for the toilet area:
• For toddlers, a toilet seat height of approximately 11 inches including
the seat. Head Start children who are four to five years old may use
adult-size toilets.
• A floor drain.
• A toilet tissue dispenser next to toilet.
• Exhaust ventilation.
Recommended features for the hand-washing sink include:
• A sink mounted 22 inches above the floor and counters 16 to
22 inches deep allow children to reach controls. Junior-height wash
fountains also may be used with a washbasin rim height of approxi-
mately 25 inches.
• The hot water temperature should be controlled to a maximum of
109.4° F. Hot water heaters should be placed where they are not acces-
sible to children.
• Soap dispensers should be at each sink.
• One paper towel dispenser per sink area. Metered roll dispensers
are preferred with one at each sink area. The dispenser should not
have a serrated edge. Even though rolled goods are usually more
economical and environmentally sensitive, note that children often
waste rolled goods because they lack the coordination to tear rolled
paper easily.
• One freestanding pedal-operated waste receptacle per sink area. Metal
receptacles should not have sharp edges.
• Moveable waste
receptacles.
• Safety mirrors
mounted at child
height.
92 Head Start Design Guide 2005
Chapter Seven

7.7.3 Diapering Station and Storage Areas
A diapering station and diaper storage area are needed in each classroom
serving infants or toddlers. Locate this area in an easily accessible, central
location, but apart from food preparation and eating areas. Orient the dia-
pering station so that a teacher can maintain visual supervision of the
other children while diapering a baby or toddler, and the children can see
the teacher. This component should be constructed as part of the fixed ele-
ments within the classroom and designed to maximize use of the existing
plumbing connections.
The diapering station and storage area consists of a changing table, counter-
top with sink, waste bin, and upper storage cabinets for diapers and other
supplies. All equip-
ment and storage
needed for this area
must be easily cleaned,
non-porous, and acces-
sible to the teacher at
the changing table.
The teacher should not
move away from the
child being diapered.
The diapering station
should be designed to
reduce possible trans-
mission of blood-borne pathogens. The table should be easily sanitized or
sterilized, and all material contaminated with feces should be stored safely
and hygienically in sealed receptacles.
Specific equipment at the diaper station should include:
• Changing table with an impervious surface. The top surface should be
at least 2.8 feet above the floor. There must be a safety device on either
side of the baby, such as a tubular rail to provide side restraint 3 inch-
es above the surface of the mat. Since mats are typically 1 inch thick,
the top of the rail should be approximately 4 inches above the surface
of the changing table. The table should be 2 feet wide and 3.3 feet
long. It should have a waterproof covered pad. Check with local
licensing for possible additional requirements.
• Hand washing sink with sloped sides and within reach of the changing
table. It should have hands-free or wrist-blade faucet controls. Diaper
sinks should not have gooseneck faucets because this type causes more
splashing than standard faucets.
• Paper towel, soap, and rubber glove dispensers within reach of the
teacher at the changing table.
• Open compartmentalized upper cabinets approximately 9 inches wide,
9 inches high, and 12 inches deep.
• Waste storage for disposable diapers must be in a waterproof, wash-
able container with a disposable plastic liner. The waste storage must
be covered with an airtight lid and must be within reach of the teacher
at the changing table and must be operable without utilizing both
Head Start Design Guide 2005 93
Chapter Seven

hands. A pedal-operated waste container may be used and should be
placed under the counter out of reach of children. If both cloth and
disposable diapers are used, separate containers must be provided.
• Movable or retractable steps are necessary to help toddlers up onto the
changing table. Steps are particularly helpful for caregivers who may
be challenged by excessive lifting.
• Exhaust ventilation free from drafts would be ideal. A separate zone or
a ceiling-mounted unit heater may be provided at the changing table
to maintain a temperature warmer than the rest of the classroom.
Recommended finishes include impervious flooring and millwork,
countertops, and a wall splash. Wall surfaces adjacent to the changing
table should have impervious finishes. Finishes must be unaffected by
disinfectants used to clean the changing table surface.
7.7.4 Sleeping and Napping AreasSpecial areas for sleeping are provided in infant rooms and often in young
toddler rooms. Infant sleeping areas should be quiet and pleasant and located
in a space within the classroom where infants can sleep according to their
individual schedules. Teachers must have visual and acoustical access to this
area at all times. It is best to locate sleeping areas away from active areas.
Installation of walls or half walls and glass in the nap area is not advisable
as this may mean the nap area will be designated as a separate sleeping
area. Some licensing authorities might require a teacher to be stationed in
the nap room. Allow ample space for one crib per infant, placed 36 inches
apart. Recommended finishes include carpeted floor and painted walls
above an impervious wainscot and washable, glossy paint, or another
washable surface. It is important to use dimmable lighting. Window treat-
ments can be used to control direct sunlight through exterior windows.
Provide a crib for each infant and young toddler. One of every four cribs
should be an evacuation crib that is especially constructed for this pur-
pose. It should be equipped with 4-inch wheels and capable of holding
and transporting up to five infants. The evacuation crib(s) should be
placed closest to the emergency exit point and must be capable of easily
passing through a 3-foot-wide door.
Sleeping areas should be equipped with smoke detectors. Recommended
fire safety requirements for children’s sleeping rooms can be found in
Section 10.1, Chapter 10.
Older toddler and Head Start classrooms generally will not have space
allocated for a sleeping area but will provide napping cots that can be
stored within the classroom when not in use. A few cribs may be needed in
a toddler classroom.
7.7.5 Nursing and Lactation AreasA quiet, semi-private area in the infant classroom may be provided for a
mother to visit and nurse her infant or for lactation. Locate this space
near the sleeping area with some visual separation from the other areas
of the classroom and privacy from the circulation pathways. This space
should be located near a sink and be as comfortable as possible. It should
94 Head Start Design Guide 2005
Chapter Seven

have adjacent counter space and a carpeted floor. Include at least one
comfortable chair.
7.7.6 Food PreparationChildren usually eat in their classrooms with teachers. A food preparation
area should be provided in infant and young toddler classrooms for stor-
ing and heating bottles and for preparing foods.
It is advisable to locate infant and young toddler food preparation areas near
fixed elements within the classroom. The area should be adjacent to the eat-
ing/table area and separated from the diapering station, toilet, and hand-
washing areas. Placing food preparation areas near activity areas provides
teachers with clear views of the classroom. No food preparation area should
be located under sewer or drainpipes concealed in the ceiling.
The food preparation areas in classrooms may include the following
heavy-duty items:
• Upper and lower washable cabinet storage: HSB recommends provid-
ing childproof latches or locks to prevent child access to any storage
within reach
• Counter area: It is wise to provide an adult-scale impervious counter,
at least 8 feet long with a back splash. The top of the counter should be
2.8 feet high. Drawer and door pulls should be non-projecting types.
Hinges should be heavy duty and durable because they receive inten-
sive use. One cabinet should be lockable.
• A sink with a single-lever faucet, spray hose, and garbage disposal.
The hot water temperature should be limited to 109.4°F.
• A bottle warmer
• A refrigerator providing a minimum of 8 cubic feet of refrigerator stor-
age and a lockable box in each refrigerator for storing medication.
• Finishes include impervious flooring and a gloss-painted wall
above an impervious wainscot. Plastic laminate finishes include
laminate countertop, cabinet face, and back splash. Use post-formed
counters with integral coves and bullnose. Ceiling tile should have
washable facing.
7.7.7 Eating/Table AreaMeal and snack times in the classroom are opportunities for children and
their teachers and visiting adults to enjoy social interaction in small groups,
such as the family would at home. A parent may join the child at the table
to share lunch. Usually, this area is part of the open, unrestricted portion
of the classroom and is used for other activities during the day.
Small infants are held during bottle-feeding, while older infants who are
able to sit may be placed in a low high chair
while being fed soft foods. Traditional high
chairs are not recommended because of the risk
of falling and tipping and the reduced opportu-
nity for social interaction.
Head Start Design Guide 2005 95
Chapter Seven

Provide low stools for the teachers to sit on while feeding older infants.
Provide a gliding chair or other comfortable chair for a teacher to sit in
while bottle-feeding. Locate the infant eating space near the food prepara-
tion area, away from the open, unrestricted area where other children may
be moving about. Young toddlers may be seated together at the same low
table. Rectangular tables make better use of space than round tables.
Locate eating/table areas for older children in a central location away from
toilet areas and in a pleasant area with natural light and items of interest,
such as plants. For toddlers and older children, the eating/table area can
be part of the general activity space.
Children older than infancy need movable chairs and tables built at the
appropriate scale for their eating area. Storable tables may be used so the
room can accommodate other activities. Each toddler and Head Start class-
room should provide a separate, drinking fountain, preferably in the eat-
ing area. Mount the drinking fountain at 1.8 feet above the floor in a cen-
tral location on a plumbing wall for toddlers. For Head Start children in
general areas, the fountain should be mounted at 2.6 feet above the floor.
Recommended finishes for the eating/table areas include sheet vinyl floor-
ing and a vinyl wall covering or a high-gloss, washable painted wall.
96 Head Start Design Guide 2005
7.7.8 Child-Accessible Display
Shelving placed low to the floor allows children to see available curricu-
lum materials and make selections. These materials may include books, art
supplies and equipment, manipulative toys, large or small blocks, pull or
push toys, and dramatic play materials. HSB suggests using open shelving
approximately 16 inches deep by 30 inches high for this purpose.
Small items requiring further organization can be placed on this shelving
in containers, such as plastic tubs or wire or wicker baskets. Shelving can
be built-in millwork or freestanding movable units. Where appropriate,
open shelving should be considered to create an open feeling in the class-
room. If shelf backing is used, it should be attractive and useful. For
instance, it may be mirrored with non-breakable reflective material.
Movable units lend greater flexibility, though they should be equipped
with locking casters. A combination of built-in and freestanding units offer
the best design solution. Some state, tribal, and local codes may require
these units to be fixed to the floor.
7.7.9 Classroom and Teacher StorageIt is essential for classroom design to include adequate storage for the
items required for a quality program. Inadequate storage conveys a clut-
tered, chaotic, or shoddy impression. Plan storage for cots, strolling equip-
ment, curriculum materials, and supplies. Use of doors on storage areas
should be minimized, because doors can cause finger entrapment and
create a greater possibility of an accident occurring.
Chapter Seven

Any necessary door should have full-vision panels and the hardware to
allow a trapped child to exit when the door is locked from the outside.
Alcoves without doors can be used for storing stackable cots.
Provide some lockable storage in the classroom but ensure that some
cabinets are situated to limit a child’s access. Provide one lockable cabinet
in each group of cabinets. This storage area is
necessary for storing classroom equipment,
materials, and supplies. Hooks and pegboards
can be used to provide easy storage of aprons
and small equipment.
Other storage may include overhead cabinets or
shelves in food preparation areas. A lockable cab-
inet should be located above children’s reach for
storage of items such as medications, cleaning
products, and other restricted items. Medications
also may be stored in the refrigerator or food
preparation area in a locked container.
7.7.10 Teacher Storage Some lockable storage should be provided in the classroom for
teachers to store outdoor clothing and other personal belongings. This
storage may be provided in the storage area or in cabinets intended
for the teacher’s use. It should include a closet with a rod for hanging
coats as well as shelving installed above the rod.
7.7.11 Multi-Purpose and Motor Activity Spaces
If space is available, HSB suggests providing a versatile, large, indoor open
area for activities. A multipurpose space is especially important when
large-muscle activity typically occuring on a playground must take place
indoors because of poor climate. This indoor space also can be used for
group gatherings or meetings. Note that use of multi-purpose space
should never be considered an adequate perma-
nent substitute for playing outdoors.
Play equipment should be considered carefully
to ensure that it can be used within the confines
of an enclosed room. Such a room may have fea-
tures, such as sprinklers and pendant-hung
lighting fixtures, which must be protected from
damage. Windows are not as important a fea-
ture in multipurpose spaces as they are in
classrooms. However, natural lighting from
non-breakable skylights is highly desirable and
energy efficient.
It is wise to include movable partitions and a
carpeted raised area for dramatic play in the multipurpose space.
Furthermore, locating the multipurpose room near the kitchen and includ-
ing a pass-through can increase the versatility of the space.
Head Start Design Guide 2005 97
Chapter Seven

HSB suggests providing the following architectural features and equip-
ment for multipurpose areas:
• High ceilings.
• Acoustical treatment on walls and ceilings and consideration of
acoustical separation between the multipurpose room and
adjoining rooms.
• Impervious flooring. If carpeted areas are desired to provide soft areas,
non-slip area rugs should be used.
• A hard, durable, washable surface as a wall finish.
• Play equipment.
• Protective resilient surfaces in fall zones.
• Hard-surface pathways for wheeled toys.
• Storage for equipment and supplies.
7.7.12 Sick BayThe sick bay which is required n some states, is used to temporarily isolate
ill children until they can be taken home. Typically, if state licensing
allows, a sick child waits on a cot in an alcove adjacent to the center direc-
tor’s office rather than in seclusion. If the sick bay is a separate space,
locate it adjacent to the director’s office or other program staff offices for
uninterrupted supervision.
The sick bay should be near a toilet and include a cot or bed with a night-
light. This area should have simple, pleasant, finishes that are easy to clean
and lockable storage for first aid supplies. A bookshelf for the storage of
books and toys is appropriate, and a view of the exterior is recommended.
7.7.13 Service Spaces Spaces for service areas such as the kitchen, laundry, the janitor’s closet, and
a telephone equipment room should be located at the rear of the facility near
the service entrance and separate from children’s activities. These service
areas should not be accessible to children with the exception of the kitchen.
Major food staging and serving activities should be centralized in a kitchen
area. The kitchen should be near the Head Start classroom.
Locating the multipurpose area near the kitchen makes it easier for
children to use that space to work on cooking activities. This arrangement
also provides an area for group lunches and other gatherings that may
need kitchen access.
7.7.14 KitchenThe type of food service provided to the center affects the scope and size
of the kitchen area. HSB does not recommend any standards, codes, or
requirements for full commercial kitchens with deep-fat fryers, ventilation
hoods, and similar equipment. If the center includes a kitchen of this type,
a food service specialist should be consulted as part of design services.
98 Head Start Design Guide 2005
Chapter Seven

It is desirable to install a kitchen with heavy-duty equipment that can
function primarily as a warming area for food or snacks and a staging area
for receiving catered meals. Large centers may have two kitchen areas. The
architect-engineer should not design a commercial kitchen on a scale that
may trigger the need for sophisticated venting and hood-mounted fire
suppression equipment. Especially in existing buildings, this type of com-
mercial kitchen could force expensive modifications that could affect other
sections of the building. For instance, in a multi-story building, this type of
kitchen may require openings through several floors as well as through the
roof to accommodate a vent duct.
The kitchen should be accessible to service personnel, staff, and other
adults. For safety reasons, children will not be allowed in this space unless
escorted by an adult. The kitchen should be in a central location with
access to the service entrance near the multi-purpose area and separate
from the classrooms.
Suggested components inclue:
• A stainless steel, three-compartment, deep sink with required plumb-
ing and hot and cold water connections located near the dishwasher
and include a gooseneck faucet.
• A separate hand-washing sink.
• A garbage disposal with plumbing connections.
• A floor drain.
• A heavy duty, commercial-type dishwasher.
• A commercial-type refrigerator with storage at or below 39.2°F and
freezer storage at or below -0.4°F. (Many centers will require two
refrigerators and one or two commercial freezers. This issue should be
clarified during initial design meetings.)
• A microwave oven (but not for warming formula or baby food).
• A convection oven and range.
• A range.
• Adequate deep counter space (2-foot minimum).
• Closed storage for dry food, equipment, and supplies on wire
metal shelves.
• A recycling bin.
• Commercial style kitchen equipment with washable finishes such as
stainless steel.
Head Start Design Guide 2005 99
Chapter Seven

• A dietitian corner with a telephone.
• Ample, easily washed metal cabinets with accessible interior shelving.
• Stainless steel countertops and washable, seamless wall surfaces made
for kitchens.
• An impervious, durable, easily cleaned floor finish.
• A washable ceiling finish.
• Space for two or more stainless steel food carts
• Adequate lighting, ventilation, and clearances .
• Locked storage for hazardous materials.
• Clean, dry, well-ventilated storage off the floor for food not requiring
refrigeration.
• Shelving in kitchen areas that is not exposed wood. Metal wire shelv-
ing is the best choice for this purpose.
• Storage for all utensils and equipment off the floor in clean, dry,
closed spaces.
• Food storage, preparation, and service areas placed in areas without
sewage or drainpipes above.
• Ample electrical outlets out of children’s reach with ground-fault
interruption (GFI) in wet areas.
7.7.15 LaundryLaundry rooms should only be accessible to adults. They should be locat-
ed near the infant/toddler classrooms and convenient to food service
areas. For acoustical purposes and to ensure adult-controlled access, the
laundry rooms should be away from children’s areas and have lockable
doors that can be opened from inside.
Ideally, the laundry
rooms should be close
to exterior walls to
minimize the run of
the dryer exhaust
vent to the exterior.
Note that dryer
exhausts contain com-
bustible lint which
can present a fire
hazard when the
exhaust is excessive.
Dryers must be vent-
ed separately and not
combined with other building exhaust systems.
Recommended equipment includes:
• A heavy-duty residential style washer and dryer.
• Large centers may require additional equipment.
• An electrical power outlet, venting, plumbing connections, floor drain,
deep sink, and millwork with closed, and lockable storage.
• A dishwasher to wash toys that are often soiled by children, if space
and budget allow.
• A counter for folding clothes and lockable wall cabinets for storage.
100 Head Start Design Guide 2005
Chapter Seven

7.7.16 Janitor’s Closet
Service personnel and staff use this space for storing janitorial supplies
and equipment which should include a mop sink with plumbing connec-
tions and storage for pails, mops, vacuums, and related cleaning supplies
and equipment. The door should have a lock, which can be opened from
the inside without a key and lockable cabinets
for cleaning supplies. Provide exhaust ventila-
tion. Special fire safety and ventilation require-
ments can be found in Chapter 10.
Though isolated from children’s activity areas,
janitor’s closets and maintenance facilities
should be designed for the convenience of the
cleaning and maintenance staff.
To protect indoor air quality from the potential impact of cleaning and
maintenance activities, the following should be considered:
• Fully enclosed areas with separate outside exhaust;
• No air recirculation ;
• Negative pressure where chemical use occurs, as described in LEED
Version 2.0; and
• Automatic chemical mixing dispensers to assure correct dilutions of
cleaning materials.
7.7.17 Service Entrance
A key-access service entrance is needed by service personnel to deliver
food and supplies and for trash removal. This entrance should be accessi-
ble to maintenance and kitchen staff. Locate the entrance next to service
areas and away from the front entry and children’s activity areas.
Head Start Design Guide 2005 101
Chapter Seven

7.8 Mechanical/Electrical Telephone Equipment
Except when they are freestanding buildings, centers typically will be pro-
vided with mechanical service by a central plant. In freestanding buildings,
interior space should be provided for mechanical or rooftop equipment.
When deciding to use rooftop equipment careful consideration should be
given to the additional maintenance and roof support needed and the type
of structural engineering that this configuration entails. This caution is par-
ticularly applicable to regions of the country with significant precipitation.
HSB suggests using equipment and systems that will have long-term oper-
ating and maintenance costs that are low.
Space for telephone service should be centrally located and separate from
the children’s areas. Although a dedicated telephone closet is not always
necessary, if one is provided, it should have a lockable door not accessible
by children, but which can be opened from the inside. Finishes may
include painted walls and sealed concrete for the floor.
7.9 Design Features to Avoid
A short list of undesirable center features follows. The list is not
exhaustive:
• Excessive areas of fixed carpet.
• Sinks that are not deep enough.
• Inaccessible shelving.
• Excessive space devoted to lavatories such as separate areas for each
classroom instead of shared areas. If separate lavatories are provided,
ADA-mandated wheelchair clearances must be included in each room
and this is not an economical use of space.
• Cubbies that line up facing the classroom waste precious classroom
wall space and create a chaotic visual impression.
• Solid interior doors that do not allow supervision.
• Inadequate or improper storage creating crowded chaotic-looking
classroom environments. Note that large central storage rooms will not
solve a center’s storage problems. Instead, wall-mounted cabinets and
closets close to children’s activity areas in the classroom are essential.
• Diapering areas that face walls and do not allow supervision.
• Ceiling-mounted institutional troffer-type fluorescent light fixtures
typical of office space that have no dimmers and poor color rendition.
This type of poor lighting is often accompanied by a lack of adequate
task lighting.
• Using 90-degree or acute-angled walls where an obtuse angle would
be safer and easier to negotiate.
102 Head Start Design Guide 2005
Chapter Seven

• Windows mounted too high for children’s use or without risers to
allow accessing the view.
• Long dead-end corridors do not maximize efficiency. Corridors that
must be lengthy because of site configuration need areas available for
stopping, queuing, and socializing.
• Inadequate natural light.
• Misuse of color. This includes over-stimulating, overly-bright, or dark
and oppressive wall colors. Since these mistakes usually result from
relying on small sample color chips, color choice should be based on
large samples.
Head Start Design Guide 2005 103
Chapter Seven

104 Head Start Design Guide 2005

Chapter 8Furnishings and Equipment
This chapter provides suggestions regarding furnishings
and equipment for centers and includes references to
applicable codes and regulations.
Head Start Design Guide 2005 105

8.1 General Criteria
Following are the general criteria for center furnishings and equipment:
• Age appropriate.
• Sufficient quantity.
• Sufficient variety.
• Durable.
• Readily accessible.
• Child-scale for child use.
• Adult-scale for adult use.
• Safe.
• Easily cleaned.
• Adaptable, flexible, movable.
• Dual purpose, where appropriate.
• Stackable/hangable, if possible.
• Does not convey an institutional impression.
• Soft and comfortable, where appropriate.
• Optimizes the use of natural materials and contains minimal amounts
of formaldehyde and other chemicals which may affect children, par-
ticularly those with allergies.
• Texture rich.
• Calm, soothing, coordinated color schemes.
Furnishings and equipment in the center shall meet all applicable codes
and standards. Where synthetic materials are used, use products made
with recycled content and avoid finishes with polyvinyl chloride (PVC)
content to the extent possible. The following agencies and organizations
have established criteria pertaining to play equipment for all age groups of
children, and this criteria should be used as a reference:
• Consumer Product Safety Commission
• American Society for Testing and Materials (ASTM) for Juvenile
Products (1487-1-F 15.29, F1292-99,F1951-99,F2049-00, 36 CFR
Part 1191)
Below is a reference list of ASTM requirements specific to a childcare cen-
ter, including Head Start:
• Chairs with high sides or foam nests for infant feeding - ASTM F-404
• Cribs - ASTM F-966 and ASTM F-1169
• Carriages/strollers - ASTM F-833
• Gates/enclosures - ASTM F-1004
• Hook-on chairs - ASTM F1235
• Toy safety - ASTM F-963
• Evacuation cribs are required for all infants and, depending on local
licensing, for young toddler groups (typically one for every four chil-
dren). These special cribs must be of durable construction, narrow
enough to pass through a 3 foot wide door, and have sturdy caster
wheels approximately 4 inches in diameter, which allow one person to
easily roll the cribs over different indoor/outdoor surfaces. The evacu-
ation crib must have the capability of supporting and transporting a
minimum of five 18-month-old children weighing a total of 121 lbs.
106 Head Start Design Guide 2005
Chapter Eight

The evacuation cribs will be placed closest to the exit in the sleeping
rooms. They also will function as standard sleeping cribs.
8.1.1 StorageEasily accessible adequate storage space should be provided for items such
as carriages and strollers, wheeled toys, and cots or mats for Head Start
classrooms. In the initial design process, the designer should obtain the
number and approximate size of equipment to be stored.
Storage within the classrooms should appear uncluttered when the classroom
is occupied and should meet functional needs. A combination of low open
shelving, baskets, drawers, cabinets with doors, boxes, chests, hooks that do
not present a hazard, adult height shelves, wall-hung cabinets, storage bags,
buckets, crates, and bins may be utilized.
8.1.2 Flammability Codes and StandardsAll textiles and upholstered components should comply with the applica-
ble interior finish requirements stated in the Head Start Performance
Standards and any other local or state standards that apply.
8.1.3 Upholstered FurnitureIf possible, choose furniture upholstered with recycled fiber fabrics, such as
PET from recycled beverage containers. Textile materials that can be removed
easily for regular cleaning are generally preferred over fixed materials.
8.1.4 Chemicals
Volatile Organic Compounds (VOC):
Carpets must have been tested for VOCs and bear a green label from the
Carpet and Rug Institute indicating that the carpet emissions are within
the acceptable range. (See Section 9.3.2 for carpet requirements and Section
9.3.1 for VOC and harmful ingredient restrictions for paint.)
Formaldehyde: Formaldehyde is a known irritant. Products should con-
tain less than 0.05 parts per million (ppm) of formaldehyde or have tested
emission levels of formaldehyde lower than 0.05 ppm. Give preference to
products made with zero added formaldehyde. Any product purchased
with formaldehyde levels above 0.05 ppm must bear a label in accordance
with 29 CFR 1910.1048.
EPA’s Agency-wide Multimedia Persistent, Bioaccumulative, and Toxic
(PBT) Pollutants Initiative focuses on the following top priority PBTs:
aldrin/dieldrin, DDT, DDD, and DDE, mirex, toxaphene, hexachloroben-
zene, chlordane, octachlorostyrene, benzo(a)pyrene, alkyl-lead, mercury,
and compounds, PCBs, and dioxins and furans. Only materials and equip-
ment whose manufacturing processes are completely free of the above
chemicals should be used in Head Start facilities.
8.1.5 SafetyShelving, tabletops, and counters should have 1/2-inch rounded edges.
Furnishings in children’s areas that are 3 feet high or higher should be
secured in place. Local codes may require all large furnishings to be
Head Start Design Guide 2005 107
Chapter Eight

secured in place. Mirrors should be constructed of safety glass, acrylic, or
reflective metal.
8.1.6 Storage UnitsStorage units for the children must be visible, accessible, and easy to use.
Units may be dual purpose and serve as space dividers as well as storage
units. They may be movable with locking casters except where local codes
prohibit and should be designed to prevent climbing. Shelving open on
both sides creates an uncluttered, light appearance. The back of a shelving
unit can display children’s art.
8.1.7 SeatingAdult seating in the infant and toddler classroom should be soft and com-
fortable to provide a place where teachers can nurture children. Child-
scaled seating can include upholstered or exposed frame chairs, foam
cubes, carpeted constructed seating, or cushions and pillows. Bean bag pil-
lows should not be used for infants, since infants can easily suffocate if
face down.
8.1.8 Tables and ChairsTables and chairs should be scaled to the child. The table height should be
approximately 12 inches for infants; 16 inches for toddlers; and 20 inches
for Head Start children.
Chair seat height should be 10 inches for toddlers and 12 inches for
pre-school children. Infants and toddlers require high-sided chairs.
Seating should have backs and arms with a seat height of approximate-
ly 8 to 12 inches for Head Start children.
Work surfaces or tables should have appropriate knee clearance for chil-
dren in wheelchairs and should be 24 inches above the finished floor,
24 inches deep, and 30 inches wide. Top surface height should be a maxi-
mum of 2 inches higher than knee clearance and adjustable, if possible.
8.1.9 CountertopsCountertops should be approximately 18 inches above the finished floor
for toddlers and 20 inches above the floor for pre-school children. Counter
depth should be 18 to 20 inches when accessed from only one side.
Counters that children can access from both sides encourage socialization
and should be at least 24 inches deep.
108 Head Start Design Guide 2005
Chapter Eight

8.2 Playground Equipment
The basic purpose of playground equipment is to stimulate play and offer
challenges while safeguarding children and minimizing hazards. Play
structures should be versatile and allow opportunities to rearrange ele-
ments for imaginative play.
Major parameters in determining quality in playground equipment are
durability, low maintenance, safety, functionality, challenge, and appeal to
the child. All equipment should comply with the CPSC’s Handbook for
Public Playground Safety. Refer to Appendix H for information on products
that reduce environmental impact.
It is important to follow safety guidelines regarding playground equip-
ment. Refer to ASTM F1148-88 (Home Playground Equipment) and ASTM
F15.29 (Entrapment, Installation and Maintenance, Materials, Terminology,
Falls, Environmental), ASTM 1487-95, PS 83-97, F1292 and the Consumer
Product Safety Commission requirements.
Refer also to the American Public Health Association and American
Academy of Pediatrics in the publication Caring for Our Children; National
Health and Safety Performance Standards: Guidelines for Out-Of-Home Child
Care Programs, 1992, particularly Appendices 0-1 through 0-12, for recom-
mendations on playground equipment.
Major types of playground equipment are:
• Slides
• Tire swings
• Climbing equipment
• Sand and water tables
• Playhouses
• Benches with seating
• Crawl-through structures
• Tables with seating
• Balancing equipment
• Wheeled toys
• Platforms/lofts
• Trash receptacles
Head Start Design Guide 2005 109
Chapter Eight

110 Head Start Design Guide 2005

Chapter 9Interior Finishes
This chapter provides a consolidated discussion of the
types of finishes required in Head Start centers, establishes
the baseline finishes for walls, floors and ceilings, and
discusses acceptable options.
Head Start Design Guide 2005 111

9.1 General Requirements
Because safety is of the utmost importance, finishes shall meet all local or
state smoke and flame retardant requirements. In addition, designers
should consider toxicity and the off-gassing of materials.
Because children are more vulnerable to toxic materials than adults, it is
important to adopt the following rigorous requirements:
• Test carpets for volatile organic compounds
(VOCs) and request a green label from
the Carpet and Rug Institute indicating
that the carpet emissions are within the
acceptable range.
• Ensure that the carpet meets the State of
Washington Standards. Adhesives should be
the least toxic, effective products available.
Reference the AIA Environmental Resource
Guide, with the 1997 supplement.
• The carpet should be recyclable to reduce
the nation’s waste stream.
• HSB supports compliance with the GSA’s
Facilities Standards for Public Buildings
Services as it pertains to flame spread ratings and smoke development.
• Formaldehyde. Products should contain less than 0.05 parts per mil-
lion (PPM) of formaldehyde or have tested emission levels of
formaldehyde lower than 0.05 ppm. Any product purchased with
formaldehyde levels above 0.05 PPM must bear a label in accordance
with 29 CFR 1910.1048. Provide chamber tests of materials to substan-
tiate formaldehyde content. Give preference to products made with
zero added formaldehyde. (See also Section 8.1.4 in Chapter 8.)
• Sequence the installation of finishes in a manner consistent with EPA’s
protocol for Environmental Requirements, Baseline IAQ and Materials,
for the Research Triangle Park Campus, Section 01445. This will allow
adequate time in the construction schedule to
ventilate gas-containing materials prior to the
installation of absorptive materials (carpet,
acoustical tiles, and upholstered furniture). In
new centers, allow up to a month between the
installation of materials that need to off-gas and
the occupancy of the center. Renovations should
allow the maximum feasible time of one month
and no less than one week to off-gas. If necessary, use mechanical
means to ventilate the space once renovation is complete.
• Durability, maintenance requirements, life cycle costs, appropriateness,
and aesthetics of materials must be considered when choosing
finishes. In addition, the selection should be environmentally sensitive.
Consider the following:
• Recycled content materials, following EPA’s Comprehensive
Procurement Guidelines (CPG), where possible.
• Locally manufactured materials, where possible, including locally
112 Head Start Design Guide 2005
Chapter Nine

mined or harvested raw materials and/or
locally manufactured end products, to
reduce transportation impacts.
• FSC-certified sustainable harvested wood
for minimum 50 percent of all wood materi-
als, including temporary formwork as well
as permanent building components.
• Rapidly renewable, bio-based materials
(such as fiberboards made from non-wood
agricultural materials).
• Low-embodied energy materials.
• Materials whose components have zero
ozone-depleting potential.
• Zero- or low-VOC adhesives, sealants,
paints and coatings, CRI Green Label carpeting and formaldehyde-free
composite wood or agrifiber products, where applicable.
• Low-maintenance materials, requiring minimal use of cleaning
products or equipment.
• Materials that are likely to have a long life expectancy when installed
in a Head Start facility.
• Materials that can be recycled or are biodegradable after their
useful life.
• Finishes should feel “home-like.” Small-scale finish materials,
such as bricks, are typically preferable to large pre-cast panels,
because the brick’s dimension is more congruent with the size
of a child. Finishes should emphasize natural materials, and
harmonize a variety of textures, colors, and
shapes.
All construction should be designed for safe use
by children and should comply with the follow-
ing criteria:
• Rounded (bullnose) outside corners (mini-
mum radius 1/2 inch).
• Non-toxic finishes.
• Finished hardwood with eased edges to
reduce splinters.
• Slip-resistant floor coverings.
• Sealed seams and joints for sanitary cleaning
and reduction of tripping hazards.
• No projecting connections.
• Impervious finishes in wet areas.
• Protective resilient fall zones under interior climbing equipment in
accordance with the Handbook for Public Playground Safety, US
Consumer Product Safety Commission.
• Additional protection for gypsum wallboard, such as veneered plaster,
impact resistant wallboard, or fiberglass wall covering to “toughen”
otherwise vulnerable surfaces in high use areas.
Head Start Design Guide 2005 113
Chapter Nine

9.2 Color and Texture
Both color and texture have a great impact on children. The sense of touch
is directly related to cognitive development, and color has far-reaching
effects influencing
behavior. While cool
colors tend to have a
calming effect and
warm colors tend to
create warmth and
excitement, neither
extreme is desirable.
9.2.1 Use of Color
Overstimulation and excited behavior can result from the overuse of a
strong color scheme. The predominant color above the level of the wainscot
should be neutral. Stronger, more vivid colors
may be applied on one wall in corridors and
along the rear walls of classrooms (opposite win-
dows). Bear in mind that children’s clothing is
usually much more colorful than that of adults,
and their toys and art add a great deal of color to
the environment. Too little color is better than too
much in an environ-
ment where children
will spend a great deal
of time. Avoid com-
plex patterns on walls
and floor coverings.
Select colors appropri-
ate to the activity
using color cues to
identify particular
areas. Warm as
opposed to bright
hues are preferred.
114 Head Start Design Guide 2005
Chapter Nine

9.2.2 Use of Texture
Provide a variety of textures on surfaces within reach of children,
especially for infants and toddlers. Soft textures promote relaxed and quiet
behavior when used
in quiet or sleeping
areas. Hard textures
are more appropriate
for large motor activi-
ty areas where livelier
behavior occurs.
Subtle, varied, natural
textures are encour-
aged, since they are
soothing and interest-
ing to children.
9.3 Types of Finish Materials
The following sections contain guidelines for finishes for floors, walls, and
ceilings and discuss issues to consider when selecting finishes.
9.3.1 Wall FinishesPaint: Paint should be non-toxic with 200 grams/liter of VOC or less.
Consider paint which contains a minimum of 50 percent post-consumer
waste paint taken from community collections. In addition, it should be
lead and chromate free as defined by Department of Housing and Urban
Development guidelines, and should not contain any of the EPA 17 chemi-
cals. More informa-
tion is available on
the Internet from
GSA’s Paints and
Chemicals Center at
1-800-241-RAIN
(7246) or GSA
Advantage! at the
following address: http://www.gsa.gov.
High-build coatings: High-build coatings are
durable, can be scrubbed, and should be used in
high-wear areas. Allow ample time to off-gas in
projects when specified.
Glazed coatings: Glazed coatings are appropriate for wet areas.
Head Start Design Guide 2005 115
Chapter Nine

Vinyl wall coverings: Type II vinyl wall coverings are durable with
Oznaburg fabric backing. Vinyl wall coverings
should be neutral in color and scrubbable. Allow
ample time to off-gas in projects when specified.
Reference the AIA Environmental Resource
Guide with Supplements for guidance on adhe-
sives. Vinyl coverings typically may require cor-
ner guards to deter delaminating at corners in a
high-use facility. Ensure that corner guards have
a minimum 1/2-inch radius bullnose.
Textiles: Textiles on vertical surfaces within
reach of children are not recommended, but they
work well for surfaces, such as bulletin boards
above children’s reach.
Glazed ceramic tile: Glazed ceramic tile is appropriate for wet areas, such
as toilets and kitchens. Ceramic tile is durable, non-porous, and easily
cleaned, especially if the grout material is epoxy. Sound deflection can be a
problem with this type of finish.
Display surfaces: Marker boards and magnet boards may be provided
as a wainscot up to 3 feet or higher. Display systems requiring tacks
should not be used nor should tape which may damage finishes. The
baseline amount of space available for display for each classroom should
be 8 feet long and 3 feet high. Consider using art wax equipment, which
allows children’s art to adhere to finishes without clamps, tacks, or tape.
Mirrors: Provide shatterproof mirror surfaces,
particularly in crawling and toddler areas.
Install grab bars in front of mirrors for infants
and toddlers. Mirrors should be acrylic or
reflective metal and mirror space for infants
and toddlers should be 6 feet long and 1.5 feet
high per classroom.
9.3.2 Floor FinishesCarpet: Carpet is
appropriate in quiet
areas and crawling
spaces. Fixed carpet
over a large area is not
recommended since carpets can retain dust and
other allergens to which many children are sus-
ceptible. The carpet selected should include a
high-quality yarn system (currently type 6.6
nylon) with inherent stain resistance; a mini-
mum face yarn density of 5000; low-level loop or
cut-pile construction (maximum pile height, 1/4
inch); a minimum of 10 stitches per inch; and an anti-microbial feature; a 6
foot minimum width, and a backing system. The recommended backing
system should be bonded permanently with a permanent moisture barrier
116 Head Start Design Guide 2005
Chapter Nine

and installed with factory-applied adhesive with
seams sealed on-site. The designer also should
consider using a carpet with subtle flecks, pat-
terns, or color variations that do not accentuate
wear. Refer to the AIA Environmental Resource
Guide, 1997 Supplement, for environmental rec-
ommendations includ-
ing the recommended
types of adhesive.
Sheet vinyl: Sheet
vinyl is recommended
for children’s toilets,
wet areas, and
kitchens. Sheet vinyl
is capable of receiving
chemically sealed
seams at joints and an
integral cove base to
create a moisture bar-
rier. Provide a high-
quality commercial grade with high vinyl content, a minimum 0.05-inch
wear layer, and 860 kPa. Provide slip-resistant materials in wet areas. The
designer should consider using material with subtle flecks, patterns, or
color variations, which do not accentuate scuffs and wear. This material
should not be used without adequate time to off-gas, as defined above.
Resilient vinyl tile:
Although this materi-
al is economical, it
requires higher main-
tenance than sheet
vinyl. It is durable
and can be scrubbed
but cannot form a
moisture barrier
because it has many
joints.
Linoleum: Linoleum
is a material without
the off-gassing problems associated with vinyl,
is durable and can be used under the same
conditions as vinyl.
Fluid-applied flooring: This material can be
costly but is durable, easily cleaned, and can
create a moisture barrier. However, it also can
result in an undesirable, institutional appearance. This material should not
be used without adequate time to off-gas.
Sealed concrete: Sealed concrete is economical and appropriate for hard-
surface areas. With an appropriate admixture, stain, and finish, it can
Head Start Design Guide 2005 117
Chapter Nine

dispel the impression
that it is unfriendly or
industrial.
Rugs: Rugs provide
comfort and are eco-
nomical. Tripping and
slipping hazards cre-
ated by rugs should
be addressed through
use of proper under-
layment pads
designed for rugs or
by the use of effective
edge binding and transitions. Non-slip surfacing on the reverse side of
throw rugs is essential.
Ceramic mosaic slip-resistant tile: Ceramic mosaic slip-resistant tile is
appropriate and decorative for wet areas.
9.4 CeilingsBecause acoustical ceiling tile is economical, most children’s areas use this
type of tile, 0.8 to 1 inch thick, for effective acoustical ceiling treatment.
When the ceiling is too low and fluorescent fixtures are integral with the
ceiling, 2x2 feet fixtures render a less institutional appearance and offer
greater flexibility. The designer should consider the benefits of incorporat-
ing other materials such as gypsum board bulkheads and soffits, as well as
a variety of lighting that produce a more home-like environment.
118 Head Start Design Guide 2005
Chapter Nine
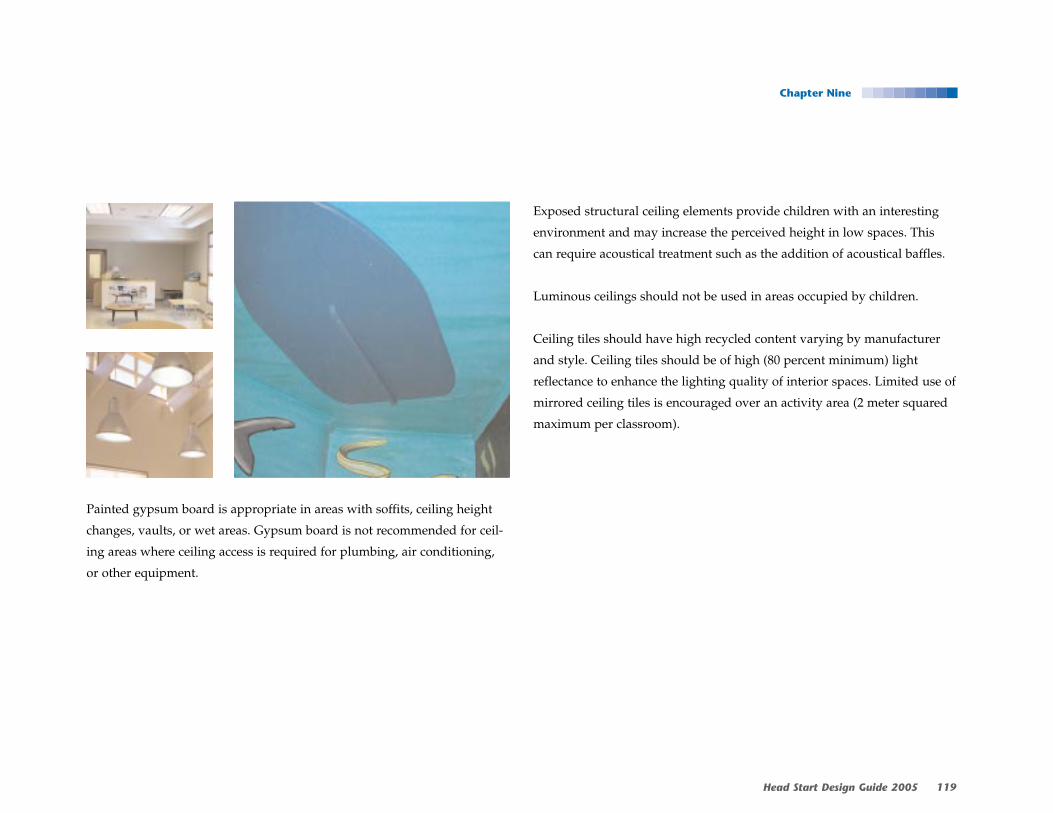
Painted gypsum board is appropriate in areas with soffits, ceiling height
changes, vaults, or wet areas. Gypsum board is not recommended for ceil-
ing areas where ceiling access is required for plumbing, air conditioning,
or other equipment.
Exposed structural ceiling elements provide children with an interesting
environment and may increase the perceived height in low spaces. This
can require acoustical treatment such as the addition of acoustical baffles.
Luminous ceilings should not be used in areas occupied by children.
Ceiling tiles should have high recycled content varying by manufacturer
and style. Ceiling tiles should be of high (80 percent minimum) light
reflectance to enhance the lighting quality of interior spaces. Limited use of
mirrored ceiling tiles is encouraged over an activity area (2 meter squared
maximum per classroom).
Head Start Design Guide 2005 119
Chapter Nine

120 Head Start Design Guide 2005

Chapter 10:Technical Criteria
This chapter provides technical criteria for fire protection,
security, accessibility and the electrical, plumbing, lighting,
heating, and cooling systems throughout the center.
The chapter also covers testing for hazardous materials.
Head Start Design Guide 2005 121

10.1 Fire Protection, Safety and Environmental Issues10.1.1 Compliance
The majority of the fire protection, environmental, and safety requirements
are contained in numerous national codes and standards. Compliance with
the most stringent national or state codes and standards is mandatory.
10.1.2 National Codes and StandardsFor new construction and renovation projects, HSB requires compliance
with the nationally recognized model building codes or with state building
codes, whichever is more stringent. However, for all new construction and
renovation projects, the exit requirements of the National Fire Protection
Association (NFPA) Life Safety Code must be met instead of exit require-
ments of the national model building code. See section 10.1.3.
10.1.3 Means of ExitThe exit requirements of the NFPA Life Safety Code shall be used instead
of the requirements in the national model building code.
Special requirements for Head Start centers using the Life Safety
Code include:
Each center shall have at least two means of exit through protected corri-
dors with the required fire separations. The center should have at least one
door leading directly to the outside, and two exits for each floor unless
local codes require another arrangement.
Mount panic hardware on exit doors a maximum of 3 feet above the fin-
ished floor or as required by local codes.
Provide both audible and visual fire alarm signals. In addition to fire
alarms sounding in the center, any fire emergency should be announced on
the central building panel or a 24-hour manned security post. See the most
current editions of NFPA 72 Chapter 5 and UL 1971 for requirements on
audible and visible alarms.
No common path of travel shall exceed 75 feet.
The distance between any room door intended as an exit access and an exit
shall not exceed 100 feet.
The distance between any point in a room and an exit shall not exceed
150 feet.
The distance between any point in a room and an exit shall not exceed
150 feet.
Each classroom and activity room shall be provided with one direct exit to
the outside if at all possible in Head Start buildings.
Center doors shall be arranged so that they open readily from the exit side
whenever the center is occupied. Locks shall not require the use of a key, a
tool, or special knowledge or effort for operation from the exit side. All
122 Head Start Design Guide 2005
Chapter Ten

locking arrangements shall meet the requirements of the latest edition of
the NFPA Life Safety Code if local codes do not require other arrange-
ments.
Every effort shall be made to locate the entire center on the ground level
(level of exit exit) along either an outside wall with window access to the
exterior or a courtyard with window access. Centers adjacent to a court-
yard should have approved fire exit out of the courtyard to an area of safe-
ty. If portions of the center are located on the floor above the level of exit,
only Head Start children should be housed there. In no instance shall any
portion of the center be located higher than the floor above the level of
exit. The center should not be located below an exit, unless the entire
building is fitted for sprinklers, and the local fire authority approves the
arrangement. All arrangements should ensure safe exit in the event of fire.
Head Start centers should be separated from other occupancies depending
on the fire gradient of the adjacent occupancy. In no case should the separa-
tion be less than a minimum of a one-hour fire-resistant-rated wall with
doors having a fire protection rating of not less than 20 minutes. A fire
detection, alarm, and communications system should be installed in all cen-
ters that meet the requirements of the NFPA Standards No. 70, NEC, NFPA
72, Standard for the Installation, Maintenance, and Use of Protective
Signaling Systems, NFPA 72E, Standard on Automatic Fire Detector. The
design should comply with local and state fire safety requirements. In the
event of conflict, the more stringent requirements should apply.
Adjacent hazardous areas, e.g., a boiler room without sprinklers, shall be
separated from the center by a minimum two-hour fire-resistant-rated
wall with self-closing doors and a fire protection rating of not less than
90 minutes.
Adjacent hazardous areas, e.g., a boiler room with sprinklers should be
separated from the center by a minimum one-hour fire-resistant-rated
wall with self-closing doors and a fire protection rating of not less than
45 minutes.
The center should be protected by an approved supervised automatic sys-
tem using quick-response sprinkler heads throughout. Sprinklers should
have guards in areas such as multipurpose rooms where there may be ball-
throwing activities.
An approved supervised smoke detection system should be located in the
sleeping and napping areas of the center. Smoke detectors should be
installed in all areas of the center, especially in unoccupied areas including
closets and closed space. This provision increases flexibility, since it allows
the location of sleeping and napping areas that require smoke detection to
be changed.
When screened operable windows are used, window guards should be
installed to protect children from falling through the screens.
Head Start Design Guide 2005 123
Chapter Ten

10.2 Security
Additional safety issues can affect space planning. HSB suggests treating
the perimeter of the building and play yards as a controlled filter with only
one primary means of public access and exit. All other service and
emergency exit points should be controlled with access limited to author-
ized individuals.
Recommendations:The entry approach should be visible by center staff located inside.
Position the reception area adjacent to the entry and director’s office.
Buildings should be covered by security personnel.
The design should ensure that a child is unable to leave the center without
the knowledge of the staff. For instance, the designer should avoid placing
operable windows near a public sidewalk and be mindful of the ability of
children to open exit doors.
Keeping children safe within the center, safeguarding them from outside
intruders, and protecting them from hazards to the fullest extent possible
is the purpose of security measures. HSB recommends that systems
include equipment, electrical power, and a conduit to protect electrical
cables and wires, as required. All security alarms should report either to an
alarm system or to a central monitoring station or to both as an audible
and visual alarm signal. Security equipment may include a perimeter secu-
rity alarm system, video surveillance for entrance doors and vestibules,
and an announcement system for main entrance doors.
The following should be provided:
• A video camera at the entry/exit doors is recommended when the cen-
ter entrance cannot be seen by the building security staff or if a securi-
ty risk assessment prescribes video monitoring at the entrance.
• Announcement at the entry door
• An electronic security system, including alarms, cameras and hard-
ware. Monitors should be at the director’s office and should have cov-
ers to conform to the ADA requirement to lower mounting heights for
fire pulls and duress alarms while also minimizing children’s access to
them.
• A keypad at the entry door for authorized entry to the center without
relying on other staff for assistance or monitoring and suitable for use
by the disabled.
• Alarms at all entry points and delayed alarm locks at exit doors. Exit
doors not intended for children’s use should be equipped with elec-
tronic magnetic locks.
• Duress alarms if prescribed by a security risk assessment.
• Audible and visible emergency alarm signals.
124 Head Start Design Guide 2005
Chapter Ten

10.3 Accessibility
The site as well as the access to and within the center should comply with
the most stringent of the current edition of the Uniform Federal
Accessibility Standards (UFAS), the final rules of the Americans with
Disabilities Act Accessibility Guidelines (ADAAG), and local accessibility
codes. The designer should ensure that there is an accessible route to all
ground-level play areas. Refer to Appendix A.
Head Start design teams may wish to examine the standards for buildings
and facilities that contain child care facilities. The standards were issued
on January 13, 1998, and include scoping and technical requirements for
accessibility to and within such buildings. The standards are available via
the Internet at www.access-board.gov/rules/child.htm or from the
Department of Justice.
Pertinent standards for children with disabilities follow:
• Passage width: The minimum clear width of aisles and corridors for
children’s wheelchairs is 3 feet with a passing space of 5 feet provided
at least every 200 feet.
• Minimum door width: 2.7 feet wide with a 5- foot-deep landing
area in front of all ramps, gates, and doors. Doors through which
evacuation cribs must pass to reach an exit should have a minimum
width of 3 feet.
• Forward and side reach: Maximum high reach should be 35 inches and
minimum low reach should be 20 inches.
• If space is available slope and rise: 1:16 to l: 20 is preferred; the maxi-
mum should be 1:12.
• Curbs should have cuts that comply with UFAS requirements.
• Drinking fountain controls should be front or side operable, and the
spout should be a maximum of 29.5 inches above the finished floor.
Knee clearance space should be 16 inches above the finished floor, 18
inches deep, and 30 inches wide.
• At least one side bar and one grab bar should be provided in an acces-
sible location in the children’s toilet areas. Follow the most recent
requirements established by ADAAG.
Head Start Design Guide 2005 125
Chapter Ten

10.4 Historic Preservation
If a center is housed in a building included in or eligible for inclusion in
the National Register of Historical Places (NRHP), or if the center or its
playground is within visible, close proximity to such a building, the center
design should retain, respond to, and respect the use and character of the
historic structure(s). State historic preservation officers must be contacted if
changes are contemplated to historic structures.
Work on historic buildings, structures, or properties should comply
with the Secretary of the Interior’s Standards for Rehabilitation and Guidelines
for Rehabilitating Historic Structures (current edition) and the Fire
Safety Retrofitting in Historic Buildings (August 1989) jointly written
by the Advisory Council on Historic Preservation and the General
Services Administration.
10.5 Acoustics
Acoustical concerns include (1) controlling exterior noise entering the
space; (2) modulating and controlling the transfer of interior noise generat-
ed within the space; and (3) controlling the transfer of noise between the
center and adjacent tenants.
10.5.1 Control of Exterior NoiseMinimizing exterior noise is typically required only when the center is
adjacent to or near airport flight paths, major highways, or busy rail lines.
If proximity to high levels of noise is unavoidable, acoustical measures
may be necessary. Maximum acceptable noise levels depend on which area
of the center is subject to the noise and whether the sound is continuous or
intermittent. Suggested maximum acceptable noise levels at the center’s
exterior follow:
Outdoor play yards:
• Continuous: 70 dBA
• Intermittent: 80 dBA
Centers with sleeping and quiet areas placed next to outside walls:
• Continuous: 60 dBA
• Intermittent: 65 dBA
126 Head Start Design Guide 2005
Chapter Ten

Centers with sleeping and quiet areas protected by and not located along
outside walls:
• Continuous: 65 dBA
• Intermittent: 70 dBA
If noise exceeds these levels, acoustical treatment may be necessary. Under
these circumstances, HSB recommends the following:
• Window and door glazing should be acoustically laminated glass with
an STC rating of 35 to 45 with an air space of 2 to 4 inches.
(Conventional double-glazing and thermal glazing are not effective in
this case.)
• Exterior doors should be high-quality commercial doors with an STC
rating of 30.
• Sound-rated doors are an acceptable but more costly solution.
10.5.2 Modulating Interior Noise Generated within the SpaceIn addition to standard commercial construction, other provisions are nec-
essary to ensure sound control within a center:
• Acoustical ceiling tile should be installed throughout the center except
in service areas.
• Either non-slip throw rugs or permanently installed carpet should be
used in appropriate spaces. Carpet may be particularly effective in
noisy narrow corridors.
• Acoustical panels should be installed where appropriate.
• Baffles, banners, and fabrics should be considered in the design to help
absorb sound generated within a center.
10.5.3 Controlling the Transfer of Noise Inside the SpaceMaintaining low noise levels in sleeping, napping and quiet areas is
important.
The following methods can be used:
• Extend interior partitions to the structure above the ceiling. Partitions
may be single- layer gypsum wallboard and should have cavity insu-
lation and be completely caulked at the top and bottom.
• Use solid-core doors for openings into noisy areas.
• Use fabrics and baffles to absorb sound.
• Provide acoustical baffles in all ductwork that penetrates sound-atten-
uating partitions.
• Avoid back-to-back electrical outlet boxes.
Head Start Design Guide 2005 127
Chapter Ten

10.5.4 Controlling the Transfer of Sound to Adjoining Areas
Separation between centers and adjacent office spaces is recommended
to be STC55. This may involve considerable expense, since not only
should partitions be insulated but also should be continued to the struc-
ture above any suspended ceiling. Joints may require complete caulking.
No door or window openings should be placed in walls adjoining other
building tenants.
Acoustical baffles should be provided in all ductwork that penetrates
sound-attenuating partitions.
10.6 Windows, Doors, and Hardware10.6.1 Windows
Natural light into the interior, visual access from the interior to the outside,
and visual access within the center are important in environments for
children. Windows should be provided from classrooms to the outside,
between classrooms, and from classrooms to circulation paths.
Both children and adults should be considered. The height and scale of
windows, type of glass, clear view, control of light, and safety factors
should be weighed. At a minimum, the designer should provide an exterior
window for every classroom. In interior areas for children, the design
should allow optimal access to light and view via clerestories, sidelights,
windows, and clear lite-doors with safety glass.
Children’s spaces have a total window area of at least:
• Eight percent of the floor area of the room, if windows face south
directly to the outdoors.
• Ten percent of the floor area of the room, if windows face east or west.
• Fifteen percent of the floor area of the room, if windows face north.
• Twenty percent of the floor area of the room, if windows are not on an
exterior wall. These windows should be oriented to capture the maxi-
mum natural light. Toilets, kitchen areas, laundry areas, multipurpose
rooms, offices, conference rooms, lounges, and storage rooms do not
need windows if the design cannot accommodate them
128 Head Start Design Guide 2005
Chapter Ten

Window systems (glazing, frames, anchorage to supporting walls) on the
exterior facades of centers should be designed to mitigate the hazard of
glass fragments or panes of glass flying into occupied space because of an
exterior explosion. The design should balance the features of the glazing,
framing, and attachments with the capacity of the supporting structure to
ensure maximum resistance. Horizontal window muntins (horizontal mul-
lions) should not be located between 2 feet and 3.6 feet above the finished
floor, because they might be used for climbing.
Windows should be placed at children’s viewing height above the floor.
Maximum windowsill heights for children are 1.5 feet above the finished
floor for infants, 2 feet above the finished floor for toddlers, and 2.5 feet
above the finished floor for pre-school children. Planning sill placement
lower than 1.5 feet above the floor is undesirable because placing furniture
in front of such a window would block the view and light. For the same rea-
son and because of the likelihood of drafts, glass to the floor is undesirable.
Windows and doors with glass lower than 3 feet above the finished floor
should have safety guards or be constructed of safety-grade glass or poly-
mer and should be equipped with a vision strip. If cost permits, wire glass
should be replaced with an approved alternative. All glazing should be
clear glass. Tinted glass is not recommended except when matching exist-
ing glazing as in a renovation project.
Guards should be installed to protect children from falling through the
screens when screened operable windows are used.
10.6.2 Standards for Safety Glass
The standards for safety glass follow:
• Consumer Product Safety Commission, 16 CFR, Part 1201, Safety
Standards for Architectural Glazing.
• ANSI Z97.1, Safety Performance Specifications and Methods of Testing
for Safety Glazing Materials Used in Buildings.
• Operable windows may be mandatory to provide for rescue and/or
ventilation. All operable windows should have draft deflectors,
screens, and safety locks, to prevent children from falling through the
windows. Exterior window glazing should be insulated glass. Interior
windows should not be insulated, although interior spaces requiring
acoustical separation may employ laminated glazing.
• Interior glass should not present a safety risk for children and should
comply with code. Use only glass that will not break in areas near chil-
dren’s activities or glass that will not harm children or puncture skin
when it breaks.
• All exterior windows in children’s areas should have light control and
energy conservation features either by exterior or interior methods. In
new construction, either exterior overhangs, low-E-glass or both
should be included in areas of the country with a warm climate. They
should prove cost effective over the life cycle of the building and may
well justify a higher first cost, particularly in elevations with excessive
heat gain. Overhangs are desirable but should not restrict natural light
excessively, especially during winter months. In addition, simple
blinds, shades, or draperies also should be used where it is important
Head Start Design Guide 2005 129
Chapter Ten

to control light and heat gain. Valances may be used to provide color,
sound absorption, and a non-institutional appearance.
• Exterior windows in napping and sleeping areas may require window
treatments to control direct sunlight, and the staff should have the
flexibility to change window treatments. Light levels in all rooms,
including sleeping rooms, should be sufficient to provide visual obser-
vation of the space from adjoining spaces. All blind cords should be
kept out of children’s reach.
10.6.3 DoorsDoors and openings should include the following features:
• Vision panels at adult and child viewing height except on doors to
adult toilets.
• Clear opening widths of doors in paths of exit at a minimum of 3 feet
wide to allow crib movement.
• Interior doors that swing in the direction of emergency exit toward the
exterior. Avoid Dutch doors, because children’s fingers can be injured
in the hinge space. Young children are vulnerable to injury when they
strike projecting hinges. Inexpensive devices that fit over hinges are
available and should be used to ensure safety.
• Panic hardware on exit doors in centers. Since this hardware is accessi-
ble to children, centers should consider installing alarms on doors
with delayed-activation hardware for emergencies. The designer
should select doors that require the maximum amount of force
allowed by ADAAG and applicable codes.
10.6.4 Door Hardware
All door hardware should comply with UFAS. Lever types appropriate for
use by the disabled should be used on all door locks, latch sets and on the
opposite side of a door leaf with a panic hardware device. To prevent
injury, all doors should have rate-restrictor closers. Doors accessible to chil-
dren should have hardware operable from both sides using components
with smooth edges and no sharp protrusions. Door openings intended for
adult use only should have hardware installed at adult height. Panic hard-
ware should be mounted per code.
All exit doors should be equipped with appropriate emergency hardware.
Doors to the exterior not used by children should have electronic magnetic
locks that operate in an emergency. Consider an electronic strike release
with a keypad or a card reader and remote release for main entrance
doors. Keypads and card readers must meet UFAS standards.
10.6.5 MountingThe following standards apply for mounting plumbing fixtures, mirrors,
and paper towel dispensers:
• Flush controls should be mounted 20 to 30 inches above the finished
floor on the wide side of toilet areas.
• Toilet paper dispensers should be mounted 14 inches above the fin-
ished floor within children’s reach.
• The sink top should measure 22 inches above the finished floor with a
minimum clearance of 19 inches for knee space.
130 Head Start Design Guide 2005
Chapter Ten

• Faucets on children’s lavatories may be fitted with sanitary and energy-
conserving automatic controls, but the designer should ensure that these
devices are acceptable to local licensing. Faucet controls mounted on the
face or rim of a counter surface should be no more than 14 inches from
the leading edge.
• Mirrors should be mounted over the sink with the bottom edge no
higher than 29.5 inches above the finished floor. One full-length mirror
should be provided with the bottom edge a maximum of 18 inches
above the finished floor. All mirrors should be shatterproof.
• Paper towel dispensers should be mounted beside or close to the
sinks. No dispensers of any kind within children’s reach should have
serrated edges.
10.7 Plumbing
The following plumbing features are important:
• Provide paper towel and soap dispensers without serrated edges at
all sinks.
• Provide easily reached clean-outs for waste piping.
• Provide a shut-off valve for each fixture so that maintenance proce-
dures do not affect multiple plumbing facilities.
• Provide a floor drain in each toilet for children, in the laundry, and in
each water play activity area.
• Provide hot water supplies accessible to children with a controlled
temperature not to exceed 105° F, unless local regulation requires oth-
erwise. Provide a hot water supply to the dishwasher.
• Provide drinking fountains with a mouth guard and an angled jet with
a spout height of no more than 21 inches above the finished floor.
• Check drinking fountains to ensure they are not contributing to high
levels of lead or asbestos in water.
• Use lead-free solder for domestic water piping.
Head Start Design Guide 2005 131
Chapter Ten

10.8 Heating/Ventilation and Air Conditioning
The comfort and safety of the children and adults in the center are of
prime importance. Consider the following standards for temperature
and ventilation.
10.8.1 Temperature and Humidity LevelsTemperature and humidity should be maintained within selected ranges.
Temperature levels are measured at lower than normal heights above the
floor to accommodate children. Children spend a great deal of time on the
floor. Therefore, it is important to control temperature and avoid drafts.
Best practice suggests maximum insulation of floors (depending on the
project location) including perimeter insulation of floor slabs. Heating sys-
tems installed in the floor slab are not recommended because of problems
with maintenance and flexibility.
Use the following guidelines for acceptable temperature and humidity
(measured at 3 feet above the finished floor):
• Winter: 69.8 °F and 35 percent minimum relative humidity
• Summer: 75.2° to 78.8°F and 50 percent maximum relative humidity
• Tamper-proof thermostats should be located at least 3 feet above the
finished floor to monitor the temperature at a child’s level. The opti-
mum temperature control is zoned, and it should be appropriately
adjusted for different activity areas. Infant areas may be more comfort-
able for these children at 1-3 degrees warmer temperatures than other
areas. The design A/E needs to consider this issue and make recom-
mendations for the optimal solution to heating and cooling distribu-
tion during the concept development stage. Thermostats should be
accessible to the center director or other designated staff members.
10.8.2 VentiliationIn addition to heating and cooling equipment, a humidifier/dehumidifier
may be needed to meet suggested levels. Each space should be supplied
with a minimum of 15 liters per second of outside air for each occupant to
control odors. None of this air is to be returned to the rest of the building.
To ensure comfort levels, the air motion in the occupied space should not
exceed 8,000 mm per minute.
There should be proper exhaust venting for a range and clothes dryer.
It is wise to consider noise level, service, and efficiency when locating
equipment. Whenever possible, HVAC should be separate from the other
building systems. Apart from other advantages, this will facilitate better
filtration of the dust and molds to which many children are particularly
sensitive. Air diffusers can be used to minimize drafts.
132 Head Start Design Guide 2005
Chapter Ten
10.8.3 Heating and Cooling Safety Issues
The following restrictions are suggested:
• Prohibit portable electric fans.
• Prohibit space heaters.
• Vent heating units that use flames to the outside and supply them
with sufficient combustion air.
• Ensure that heating units hotter than 109.4°F are inaccessible to
children by using locks or other barriers.
10.9 Lighting
Well-considered lighting for each activity area is a key element in creating
a home-like environment in Head Start centers. The quality of light should
remind children of a home environment. To achieve this effect, use broad
ambient lighting for large-muscle activity areas, task lighting for manipula-
tive activities, and lower light levels for quiet and sleeping areas.
The amount and orientation of natural light should be considered in the
design. Variation in light levels up to a maximum of 500 lx is acceptable in
rooms with poor natural lighting capability. See Table 10.9 for the mini-
mum suggested light levels for various functions.
Head Start Design Guide 2005 133
Chapter Ten

Table 10.9: LIGHTING REQUIREMENTSSpace Natural Light Lighting in lux
Vestibule View 250-350
Reception View 250-350
Main Circulation 100 - 350
Director’s Office View 500
Sick Bay 300 - 500 (dimmable)
Staff Lounge View 500 (dimmable)
Parent/Teacher Conference 500 (dimmable)
Adult Toilet 150-250
Central Storage 250-350
Laundry 300 - 400
Kitchen 300 - 500
Janitor’s Closet 300 - 400
Telephone Closet 400 - 500
Multipurpose Space
Play Area 300 - 500Meeting Area 300 - 500 (dimmable)Play Yard Storage 300 - 500
Infant Activity Area Natural light 250-500 (quiet areas dimmable)
Toddler Activity Area Natural light 300-1000 (quiet areas dimmable)
Pre-Schooler Activity Area Natural light 300-1000 (quiet areas dimmable)
School-Age Activity Area Natural light 300-1000 (quiet areas dimmable)
Cubby Storage Area/Locker 300 - 500
Food Preparation 300 - 500
Eating Natural light 300 - 500
Children’s Art Sink Natural light 500 - 1000 (dimmable)
Sleeping/Crib/Napping 50 - 500 (dimmable)
Diapering Station 300 - 500
Children’s Toilet 300 - 500
Children’s Hand-washing Sink 300 - 500
Children’s Private Toilet 300 - 500
In addition, the following should be provided:
• Use 500 lux (lx) on children’s work surfaces for reading and
close work.
• Use 250 lx ambient light for class and play areas with additional task
lighting up to 500 lx provided where appropriate.
• Ensure that light is capable of being dimmed in a range of 500 lx to
50 lx for sleeping and napping areas.
• Use 100 lx in stairs and corridors.
• Install dimmable light fixtures in classrooms and nap rooms.
• Light levels in all rooms, including sleeping rooms, should be main-
tained at a sufficient level to allow observation of the space from adjoin-
ing spaces. Lighting should be used to emphasize areas, designate
boundaries, create a pleasant environment, or support a certain activity.
When using fluorescent lighting, electronic ballast light fixtures are recom-
mended. Their high-frequency cycles avoid perceptible flickering and
allow dimming. Fluorescent lamps should have a color temperature of
4,100 degrees Kelvin with the highest possible color-rendering index (CRI).
Minimum CRI should be 80 or greater to enhance the center’s environmen-
tal quality. If there is adequate ceiling height, use better quality reflected,
ambient lighting from pendants or recesses instead of troffer-style down-
light fluorescent fixtures.
134 Head Start Design Guide 2005
Chapter Ten

Using reflected light will ensure that children, who are at a far lower van-
tage point than adults, avoid looking directly into the light source which
can cause eye fatigue because of the glare. If troffer use is unavoidable, a
specular finish and parabolic louver are recommended. Provide dimmable
lighting in infant sleep areas and in all classrooms. Task lights, such as
those provided by residential-type pendant fixtures, should be used for
reading, painting, and close work.
Variety is advisable in designing lighting. Use devices such as dimming
controls, separate switching, adjustable directional fixtures, and pendant
fixtures positioned over work areas. Consider using specialized lighting to
display artwork, pools of light to create excitement and variety, and high
levels of light in areas designed for physical activity. Food preparation
areas should have fixtures that have shielded or shatterproof bulbs.
Light entering from the exterior can be controlled with adjustable blinds,
shades, or other types of window coverings. Window treatments on interior
windows should allow clear visibility.
Planning adequate exterior lighting for a building will allow safe exterior
circulation and site security.
All lamps should have shatterproof lenses or covers.
10.10 Electrical
Consideration for the safety of children and future electrical needs is criti-
cal. Defining data, equipment, and communication requirements in
advance may prevent the need to expand electrical capacity in the future.
10.10.1 Electrical Safety IssuesIf there are other applicable codes and standards deemed more stringent
than the safety standards listed below, the more stringent standards
should apply.
Outlets in areas accessible to children must be tamper resistant as defined
by NEC Article 517-18c. Outlets that are within children’s reach should be
modified to avoid any possibility of electrocution. An alternative is to
locate them out of children’s reach at least 4.3 feet above floor level.
No electrical outlet should be located within 6.2 feet of a water source
unless it is protected by an approved ground fault circuit interrupter.
Computer cables should be encased in conduits or channels.
No cables or wires in the center should have enough slack present to risk
strangulation of a child.
Locate tamper-proof outlets 4 inches above the finished floor wherever
counters are provided for adult use and at computer stations.
Head Start Design Guide 2005 135
Chapter Ten

No raised electrical boxes with sharp metal edges should be installed in
areas or passageways used by children.
All hot equipment, including resistance-heating elements, should be
screened and inaccessible to children.
Care should be taken in selecting and locating telephone sets and other
devices, to avoid a child’s entanglment in the device’s wires and cords. The
same applies to window blinds with pull cords. Such wires, cords, and
strings should be 4.5 feet above the floor and out of children’s reach.
10.10.2 Electrical RequirementsRecommnedations:
• Provide wall duplex outlets at intervals of approximately 13 feet.
• Provide one duplex outlet per wall on walls less than 10 feet wide.
• Provide electrical power outlets for kitchen and laundry areas for a
refrigerator, oven, range, garbage disposal, and washer/dryer.
• Consider closed-circuit TV cameras at all entrances and exits.
• Provide for a possible additional monitor location in the staff area.
• Coordinate requirements and provide for the installation of the follow-
ing: electrically switched doors, security alarms, and intercom systems.
• Provide a power supply for a TV, a VCR, audiovisual equipment, tele-
phones, and computers for staff and children’s areas.
• Provide smoke detectors in each closet or enclosed space.
10.11 Lead-Based Paint
Test all existing painted surfaces in the center interior and playground
equipment for lead-based paint following Department of Housing and
Urban Development (HUD) guidelines. Exterior paint in any area that chil-
dren may access must be tested. All detected lead-based paint must be
abated using HUD procedures and re-tested to ensure compliance.
Please refer to Lead-Based Paint: Interim Guidelines for Hazard Identification
and Abatement in Public and Indian Housing, 1990 (HUD).
136 Head Start Design Guide 2005
Chapter Ten

10.12 Lead in Water
In new and major renovation projects that involve plumbing, conduct
lead tests for all sources of water used by the center for lead when the
substantially completed project is accepted. At a minimum, water in
buildings over 25 years old should be tested annually, using guidance in
the Environmental Protection Agency pamphlet Lead in School’s Drinking
Water, EPA 570/9-89-001, January 1989. If the lead exceeds safe levels, the
affected water supply must not be used, and mitigation actions must be
taken immediately.
10.13 Asbestos
Survey the center (or the area anticipated to house the center) for the pres-
ence of asbestos-containing materials. An asbestos abatement and control
program must be implemented if asbestos is present. Asbestos-containing
materials that are damaged or subject to disturbance should be abated in
accordance with regulatory requirements and guidelines.
In a limited area of the country with highly acidic drinking water, water
also may contain asbestos. This is considered a lesser hazard than
crumbling asbestos found in buildings. Nevertheless, tests should be
conducted and, if the drinking water supply shows the presence of
asbestos, it should be eliminated as a hazard. (See Raising Children Toxic
Free, referenced in the “Selected References” section of the Guide.)
Head Start Design Guide 2005 137
Chapter Ten

10.14 Radon
For a minimum of 90 days, test the center for radon in the air using alpha
track detectors or electric ion chambers. If radon levels are at, or exceed,
4 picoCuries per liter, corrective actions must be taken immediately
followed by re-testing.
Test the center water for radon if the drinking water is obtained from a non-
public water source. Environmental Protection Agency guidelines shall be
used for testing as prescribed in Radon in Water Sampling Manual
(EPA/EERF-Manual-78-1). If radon levels are at, or exceed, 300 picoCuries
per liter, the affected water supply must not be used and mitigation actions
must be taken immediately followed by re-testing.
10.15 Off-Gassing
Allow a new center to “air out” before occupancy. The schedule of work
should provide ventilation for off-gassing of new synthetic materials for
30 days.
10.16 CO2 MonitoringProvide the capacity for permanent carbon dioxide monitoring, including
operational set point parameters to prevent indoor CO2 levels from
exceeding outdoor levels by more than 700 parts per million (ppm), as
described in LEED Version 2.0.
138 Head Start Design Guide 2005
Chapter Ten

Head Start Design Guide 2005 139
Appendix AAccessibility
This Appendix is included primarily to aid non-design
professionals in understanding accessibility requirements.
Architects and engineers should consult the latest ADAAG
and UFAS regulations.
Note that the following information is in feet and
inches because the codes and regulations that they
reference are expressed in that manner. If the contract calls
for drawings to be in metric, it is the A/E’s responsibility
to express all dimensions metrically.

ACCESSIBLE ROUTE
Passage width: The minimum clear width of aisles and corridors for chil-
dren’s wheelchairs is 3 feet with passing space of 5 feet provided at least
every 66 feet.
ALARMSCare must be taken to prevent audible signals greater than 90dbo to
prevent hearing damage in young children.
CONTROLS AND OPERATING MECHANISMSForward and side reach: Maximum high reach is 35 inches; minimum low
reach is 20 inches.
CURB RAMPSCurbs must have cuts that comply with UFAS requirements.
DOORSDoors should be accessible but not so easily that young children could
escape. Keep in mind that doors must be operable only by adults.
Hardware on doors leading out of classrooms should be installed as high
as possible – 48 inches AFF. Hardware on doors to toilets serving the class-
room should be as low as practical for the age group. Minimum door
width is 32 inches with a 5-foot deep landing area in front of all ramps,
gates, and doors. For doors providing evacuation cribs access to exits, the
minimum width is 3 feet.
140 Head Start Design Guide 2005
DRINKING FOUNTAINS
Drinking fountain controls are front or side operable. The spout should be
a maximum of 29.5 inches above the finished floor. Clearance under the
unit is not required if clear floor space for a parallel approach is provided.
Also, provide a clear floor space of 30 inches x 48 inches to allow a child in
a wheelchair to approach the unit facing forward.
ELEVATORSElevator controls should be installed as high as possible so that young chil-
dren cannot interfere with their operation.
FAUCETSFaucets on children’s lavatories may be fitted with sanitary and energy
conserving automatic controls, but the designer must ensure that these
devices will be acceptable to local licensing authorities before specifying
them. Faucet controls mounted on the face or rim of counter surface
should be no greater than 14 inches from the leading edge.
Appendix A

FIXED OR BUILT-IN SEATING AND TABLES
Fixed or built-in seating or tables used primarily by Head Start and Early
Head Start children who are age 5 are not required to be accessible if
parallel side approach is provided.
Tops of accessible counters and tables shall be 26 inches to 30 inches above
the floor. If knee space is required, it shall be at least 24 inches high, 30
inches wide and 19 inches deep. Clear floor space also must be provided.
HANDRAILSA second set of handrails with a gripping surface shall be provided a maxi-
mum of 28 inches above the floor. Elements of the adult handrail shall not
interfere with the children’s handrail. Nine inches must be provided
between handrails to prevent entrapment.
LAVATORIES AND MIRRORSLavatories used by Head Start children and Early Head Start children are
not required to have knee or apron clearance if a side parallel approach
is provided.
Mirrors must be mounted over the sink with the bottom edge no higher
than 29.5 inches above the finished floor. Provide one full-length mirror
with the bottom edge a maximum of 18 inches above the finished floor.
All mirrors are to be shatterproof.
Head Start Design Guide 2005 141
Appendix A
RAMPS
Maximum slope and rise is 1:16; a slope and rise of l: 20 are preferred if
space is available. The maximum is 1:12.
SIGNAGEChildren’s signs shall be mounted a maximum of 40 inches above the floor.
SINKSSinks used by Head Start and Early Head Start are not required to have
knee or apron clearance if a side parallel approach is provided.
SPACE ALLOWANCE AND REACH RANGESCirculation surfaces leading to play events in the play yards shall accom-
modate wheelchair access and use.
Improper reach ranges create unsafe situations in Head Start and Early
Head Start centers. Electrical plugs, switches, fire alarm pulls, intercoms,
etc. fascinate children. These devices must be kept away from curious
hands. The maximum side reach for an adult in a wheelchair
is 54” from a side approach. Although 60” is preferred, 54” will keep
most children safe.

STORAGE
Closets and storage areas should not be accessible to children.
Built in or fixed storage accessible to children shall be located at 20 inches
to 44 inches above the finished floor.
Clothes hanger rods, coat hooks, or shelves shall be located 36 inches to
44 inches maximum above the finished floor.
TOILET STALLSToilets and toileting are major issues in Head Start centers. Children
become “toilet trained” within a broad range of ages but at an average age
of 2 years. Before this time, they are diapered. Until the age of 5 or 6, toilets
are an extension of the classroom, where children learn proper health
habits. Therefore, properly designed Head Start centers have toilets directly
accessible to the classroom not multiple toilets as used in elementary
schools. The most pressing problem in Head Start classroom design is the
application of the regulations to every toilet room. BOCA Code states that
non-required bathrooms, designed for children’s use are not required to be
accessible. Generally, toilet rooms will be located between two classrooms.
If the tank height or the flush valve prevent the placement of a grab bar
over a fixture, a 24-inch grab bar may be placed (offset) to the wide side.
142 Head Start Design Guide 2005
Appendix A
TOWEL DISPENSERS
Towel dispensers should be mounted beside or in close proximity to the
sinks. No dispensers within a child’s reach should have serrated edges.
WATER CLOSETSToilets shall be sized for the intended age.
Children’s toilets should have (at a minimum) one-side grab bar in the
children’s toilet area. In areas designated as accessible, there should
be two grab bars on each side plus one on the back wall. In all cases,
follow the most recent requirements established by ADAAG.
Flush controls should be mounted 19.5 inches to 29.5 inches above the
finished floor on the wide side of toilet areas.
Toilet paper dispensers should be mounted 13.5 inches above the finished
floor within children’s reach.

Head Start Design Guide 2005 143
Appendix BHead Start Centers and
Sustainable Design
Greening Head Start CentersAs designers and planners learn more about the effects the environment
has on the learning and attention, they realize that the built environment is
a concern. Buildings can turn their backs on their surroundings and
depend on mechanical and electrical systems to create comfort, or they can
be designed to work with the site and natural systems and become healthy
and productive places. This approach, called sustainable design, provides
huge benefits to children, staff, community, and the environment at large.
The grantee and Design Team will benefit from addressing the complex
issues of sustainable design for Head Start centers. Perhaps in no other
building type, other than private homes, are the benefits of green design
more applicable and timely. The care and nurturing of the nation’s children
who are preparing to enter school are of major importance.
There is an abundance of data from research on K-12 children. The paral-
lels to pre-school children are compelling since the benefits of green design
may be even more effective for pre-schoolers. Research has shown
improved test scores, increased attentiveness and higher attendance
because of daylighting factors and natural ventilation. This research has

been repeated and corroborated in different parts of the country. The evi-
dence shows that natural light provides better visual acuity for 3D objects,
which are so important for pre-school children. Daylight also stimulates
higher hormonal levels through the pituitary gland resulting in better
attentiveness and calmer behavior.
Natural ventilation contributes to these benefits. Fresh air combined with
daylight can transform a static indoor environment into an environment
connected with natural rhythms. This in turn results in a more stimulating
space. Natural ventilation also contributes to improved indoor air quality
and is linked directly to health and attendance.
One of the biggest problems in schools has been poor indoor air quality
that contributes to higher levels of asthma and "sick building" syndrome.
Poor air quality and indoor pollutants have an even higher potential for
adverse effects on pre-school children. Today, Americans spend up to 90
percent of their time indoors, and pollution concentrations are frequently 2
to 5 times greater than those outdoors.
The way buildings are heated and cooled and the designs used to modu-
late the environment have a marked effect on indoor air quality. Coupled
with the type of materials used, especially the indoor finishes, design has
an even more marked effect.
144 Head Start Design Guide 2005
Appendix B
Following are some of the design solutions and systems that support the
goals of green building:
• Effective and comprehensive daylighting design may be the single
most important design issue for spaces for children. Different
spaces, locations, and site conditions require different approaches to
daylighting and designers should be aware of the options. Benefits to
daylighting include potentially reduced cooling requirements and
reduced artificial lighting requirements.
• Green roofs, cool roofs, sunshades all contribute towards reduced
energy requirements and can benefit Head Start grantees by reducing
their operating costs.
• Using green materials with low or no Volatile Organic Compounds
(VOCs) can help restore good indoor air quality. Such materials can be
found for most finishes, paints, caulks, carpeting, flooring, wall cover-
ings, and other surfaces.
• Flushing out buildings prior to occupancy can improve air quality.
• Installing operable windows in schools and child care centers increas-
es air circulation. (Over the last 15 years these windows have almost
disappeared.)
• Effective landscaping for control of water run-off, shading, and
cooling.
• Carefully designing parking and providing access to public trans-
portation.

It is possible to aid the process of preparing children to learn by carefully
designing facilities and surrounding areas. There is another reference to
environmentally sensitive planning in Section 2.3 of Chapter 2. Grantees
also should be aware of Historic Preservation restrictions where applicable
when renovating or rehabilitating an existing facility. Head Start’s Facilities
Environment Documentation Course is available on a CD-ROM and has
information about special procedures for dealing with historic preservation.
Head Start Design Guide 2005 145
Appendix B
The Head Start Bureau appreciates the contributions to this
Appendix by Daniel F. Hellmuth, AIA, hellmuth + bicknese archi-
tects, St. Louis, Missouri .

Appendix C Head Start Bureau Central Office and
ACF Regional Offices
Refer to the Head Start Bureau contacts Web page
for updates to the following information:
http://www.acf.hhs.gov/programs/hsb/
contacts/index.htm
146 Head Start Design Guide 2005
CENTRAL OFFICE
US Department of Health and Human Services
Administration for Children and Families
Administration on Children, Youth and Families
Head Start Bureau
330 C St., SW
Washington, D.C. 20447
202-205-8572
ACF REGIONAL OFFICES REGION I(Connecticut, Maine, Massachusetts, New Hampshire, Rhode Island,
and Vermont)
ACF - BOSTON
Government Center
JFK Federal Building, Room 2000
Boston, MA 02203
617-565-1020

REGION II
(New Jersey, New York, Puerto Rico, and the Virgin Islands)
ACF – NEW YORK
26 Federal Plaza, Room 4114
New York, NY 10278
212-264-2890
REGION III(Delaware, District of Columbia, Maryland, Pennsylvania, Virginia, and
West Virginia)
ACF - PHILADELPHIA
150 South Independence Mall, West, Suite 864
Philadelphia, PA 19106
215-861-4000
Head Start Design Guide 2005 147
Appendix C
REGION IV
(Alabama, Florida, Georgia, Kentucky, Mississippi, North Carolina,
South Carolina, and Tennessee)
ACF – ATLANTA
61 Forsyth Street, SW, Suite 4M60
Atlanta, GA 30303
404-562-2900
REGION V(Illinois, Indiana, Michigan, Minnesota, Ohio, and Wisconsin)
ACF – CHICAGO
233 North Michigan,
Suite 400Chicago, IL 60601
312-353-4237
REGION VI(Arkansas, Louisiana, New Mexico, Oklahoma, and Texas)
ACF – DALLAS
1301 Young Street, Suite 914
Dallas, TX 75202
214-767-9648

REGION VII
(Iowa, Kansas, Missouri, and Nebraska)
ACF - KANSAS CITY
Federal Building
601 East 12th Street, Rm. 276
Kansas City, MO 64106
816-426-2223
REGION VIII(Colorado, Montana, North Dakota, South Dakota,
Utah, and Wyoming)
ACF – DENVER
Federal Office Building
1961 Stout Street, 9th Floor
Denver, CO 80294
303-844-1129
148 Head Start Design Guide 2005
Appendix C
REGION IX
(Arizona, California, Hawaii, Nevada, American Samoa,
Commonwealth of the Northern Mariana Islands,
Federated States of Micronesia, Guam, Marshall Islands,
and Republic of Palau)
ACF - SAN FRANCISCO50
United Nations PlazaRoom 450
San Francisco, CA 94102
415-437-8400
REGION X(Alaska, Idaho, Oregon, and Washington)
ACF – SEATTLE
Blanchard Plaza
2201 Sixth Ave., Suite 600
Seattle, WA 98121
206-615-2557

Administration for Children and Families
American Indian/Alaska Native Branch
330 C Street, S.W.
Washington, D.C. 20447
202-205-8539
Administration for Children and Families
Migrant and Seasonal Branch
330 C Street, S.W.
Washington, D.C. 20447
202-205-8397
Head Start Design Guide 2005 149
Appendix C

Appendix DMetric/English Conversions
150 Head Start Design Guide 2005
The list below includes Metric to English conversions used in the Guide.
GIVEN MULTIPLY BY TO OBTAIN
Length
Centimeters 0.0328 Feet
Centimeters 0.3937 Inches
Feet 0.3048 Meters
Feet 304.8 Millimeters
Inches 25.4 Millimeters
Inches 2.54 Centimeters
Inches 0.0254 Meters
Meters 3.28084 Feet
Meters 39.37 Inches
Yards 0.9144 Meters
Area
Acre 4046.87 Sq. meters
Hectares 2.471040 Acres
Square centimeters 0.155 Sq. inches
Square meters 10.76 Sq. feet
Square feet 0.0929 Sq. meters
Square inches 645.16 Sq. mm
Volume
Cubic centimeters .06102 Cu. inches
Cubic feet 0.028317 Cu. meters
Cubic inches 16.38 Cu. cm
Cubic meters 1.38 Cu. yards
Cubic yards 0.7645 Cu. meters
Gallons, US 3.7854 Liters
Liters 0.26417 Gallons

GIVEN MULTIPLY BY TO OBTAIN
Weight/Mass
Kilograms 2.2046 Pounds
Pounds 0.4535 Kilograms
Tons 907.2 Kilograms
Mass per Unit Area
Kilograms per sq. cm 14.22 Lb/sq. inch
Kilograms per sq. meter 0.0205 Lb/sq. foot
Pounds per sq. foot 4.8824 Kg/sq. meter
Pounds per sq. inch 0.0703 Kg/sq. centimeter
Mass per Unit Length
Kilograms per meter 0.672 Lb/foot
Pounds per foot 1.49 Kg/meter
Mass per Unit Volume
Kilograms per cubic meter 0.0624 Lb/cu. foot
Pounds per cubic foot 16.02 Kg/cu. meter
Energy
BTU 1055 Joules
BTU per hour 0.293 Watts
Volume per Unit Time
Cubic feet per minute 0.0004719 meter3/second
Cubic meters per second 2119 Ft3/minute
Cubic meters per second 15,580 Gallons/minute
Units of Temperature
1 Degree Celsius (- 32) x 5/9 Fahrenheit degree
1 Degree Fahrenheit (32) x 9/5 Celsius degree
Head Start Design Guide 2005 151
Appendix D

Appendix EHead Start Program Performance Standards
on Design and Space Use
The following Head Start Program Performance
Standards, 45 CFR Part 1304, are relevant to
facilities. Those cited apply to fixed, built-in
environments. A summary of the official guidance
is included, where applicable.
Performance Standard 1304.21(a) (5) (i) (5)
In center-based settings, grantee and delegate agencies must promote each
child's physical development by providing sufficient time, indoor and out-
door space, equipment, materials and adult guidance for active play and
movement that support the development of gross motor skills.
Performance Standard 1304.22(e) (6) Potties that are utilized in a center-based program must be emptied into
the toilet, cleaned, and disinfected after each use in a utility sink used for
this purpose.
Performance Standard 1304.53(a) (1) (a) Grantee and delegate agencies must provide a physical environment and
facilities conductive to learning and reflective of the different stages of
development of each child.
Guidance: There should be developmentally appropriate indoor and out-
door environments that are safe, clean, attractive, and spacious.
Indoor environments include floor coverings and soft elements such as
rugs and cushions; an open area on the floor allowing for the safe move-
ment of infants and toddlers; a configuration of existing space that pro-
motes individual and group activities; and low, open shelves, which allow
children to see and to select their own materials.
152 Head Start Design Guide 2005

Outdoor environments include a variety of surfaces, such as soil or sand
for digging; hills; flat, grassy, and hard areas for wheeled toys; areas of
sunlight as well as shade or portable shade equipment; a variety of equip-
ment for riding, climbing, balancing, and digging; areas for individual and
small group play.
Performance Standard 1304.53(a) (2)Grantee and delegate agencies must provide appropriate space for the con-
duct of all program activities.
Guidance: There should be doors, gates, counters, and walls to keep food
preparation areas separate from other areas; cribs and cots for infants and
toddlers are kept at least 3 feet apart. There should be space for children
who become ill during the day and cannot be sent home; there should be
sufficient space for program activities and support functions, including
office work, the storage of staff belongings, food preparation, janitorial
services, and children and parent activities.
Performance Standard 1304.53(a) (3)The center space provided by the grantee and delegate agencies must be
organized into functional areas that can be recognized by the children and
that allow for individual activities and social interactions.
Guidance: Classrooms should be divided into functional areas, using child-
sized, age-appropriate shelving; low walls; large pillows; mats; or platforms
to separate the different areas. Space for preschool children and older tod-
Head Start Design Guide 2005 153
Appendix E
dlers is arranged to facilitate a variety of large group, small group, and
individual program activities. Active or noisy areas are separated from inac-
tive or quiet spaces. Activity areas are near necessary resources. (For
instance, art areas are near water.)
Indoor traffic patterns should keep preschool children from running, yet
enable them to move easily between areas.
Playgrounds should be laid out to ensure clearance space from walkways,
buildings, and other structures, and to avoid crowding in any one area.
Outdoor separate space should be provided for each type of activity -
throwing or kicking balls, climbing hills, digging, and using stationary
playground equipment.
Performance Standard 1304.53(a) (4)The indoor and outdoor space in Early Head Start or Head Start centers in
use by mobile infants and toddlers must be separated from general walk-
ways and from areas in use by preschoolers.
Guidance: Mobile infants and toddlers must be kept away from surfaces
and equipment that may injure them. Carpeting should be well padded,
secure, and clean.
Performance Standard 1304.53(a) (5)Centers must have at least 35 square feet of usable indoor space per child
available for the care and use of children (i.e., exclusive of bathrooms,

halls, kitchen, staff rooms, and storage places) and at least 75 square feet of
usable outdoor play space per child.
Guidance: Indoors: cribs and cots should be at least 3 feet apart. If less
than 75 square feet of accessible outdoor space is available per child, a
large indoor activity room meeting the 75-square- foot room requirement-
per-child should be used. This indoor space should accommodate activities
performed outdoors. These interior spaces must be ventilated with fresh
air when windows cannot be opened.
An adjoining or nearby school yard, park, or playground that is safe, clean,
and provides drinking water and toilet facilities may be provided in lieu of
on-site outdoor play area.
Performance Standard 1304.53(a) (6)Facilities owned or operated by Early Head Start and Head Start grantee
or delegate agencies must meet the licensing requirements of 45 CFR
1306.30.
Performance Standard 1304.53(a) (7)Grantee and delegate agencies must provide for the maintenance, repair,
safety, and security of all Early Head Start and Head Start facilities, materi-
als, and equipment.
Guidance: Outdoor play areas must be free of broken glass, stones, sharp
objects, standing water, poisonous plants, brush or high grass, and ice and
snow accumulations. There should be a system to monitor entry into the
building. Staff should check the facility regularly for damage or other con-
ditions that present hazard to children (e.g., plumbing, electrical, structural
problems). Leases and rental agreements should specify the property
owner’s responsibilities for maintenance and repairs. A facility that is
unsafe, unclean, or otherwise in disrepair will be suspended from use.
Performance Standard 1304.53(a) (8)Grantee and delegate agencies must provide a center-based environment
free of toxins, such as cigarette smoke, lead, pesticides, herbicides, and
other air pollutants as well as soil and water contaminants.
Guidance: The facility must work with health officials to determine
inspections that are conducted for environmental hazards such as asbestos,
radon, and formaldehyde. Inspection and removal of any environmental or
health hazards should be by certified or licensed contractors.
Performance Standard 1304.53(a) (9)Outdoor play areas at center-based programs must be arranged so as to
prevent any child from leaving the premises and getting into unsafe and
unsupervised areas. En-route to play areas, children must not be exposed
to vehicular traffic without supervision.
Guidance: Streets crossed should be clearly marked by traffic lights and
have marked crosswalks. Fences or other physical barriers should be
installed to separate the outdoor play areas from vehicular traffic and other
154 Head Start Design Guide 2005
Appendix E

dangers. Fences and other physical barriers should be high enough and
constructed well enough to prevent children from exiting the area. When a
rooftop is used as a play area, it should be enclosed with a fence that is high
enough to prevent falls and constructed of materials that can prevent chil-
dren from climbing the fence. The rooftop must have an approved fire
escape. Bus loading and unloading areas must be safely configured.
Performance Standard 1304.53(a) (10)Grantee and delegate agencies must conduct a safety inspection, at least
annually, to ensure that each facility's space, light, ventilation, heat, and
other physical arrangements are consistent with the health, safety, and
developmental needs of children.
Guidance: Fire prevention measures (e.g., absence of flammable materials,
presence of currently inspected and fully charged fire extinguishers, smoke
detectors with working batteries, exits, and evacuation routes) must be in
use. Painted surfaces must be lead-free. Inspections should be conducted
of playground equipment and surfaces, electrical outlets, water supply, toi-
lets and hand-washing facilities, diaper and changing areas, ventilation
and air quality, and sewage and waste disposal systems. Adaptations to
the facility must comply with the Americans with Disabilities Act.
Performance Standard 1304.53(a) (10) (i)In climates where such systems are necessary, there is a safe and effective
heating and cooling system that is insulated to protect children and staff
from potential burns.
Head Start Design Guide 2005 155
Appendix E
Guidance: Safe cooling and heating systems should be checked by staff or
by other appropriate professionals to ensure that tribal, state, and local
laws are followed. Heating and cooling units should be vented properly.
Radiators, hot water pipes, and similar equipment should be screened or
insulated to prevent burns and other injuries. Heating units, including
baseboard heaters hotter than 110 degrees Fahrenheit, should be inaccessi-
ble to children. Electric space heaters that are UL-approved should be
placed in locations inaccessible to children and at least 3 feet from curtains,
papers, and furniture. These heaters also should have protective coverings
to prevent injury. Portable open-flame and kerosene space heaters and
portable gas stoves may not be used. Electric fans must be inaccessible to
children. Heating and ventilating equipment should be professionally
inspected annually, or immediately after there is a concern or malfunction.
An inspection should verify that the equipment is properly installed,
cleaned, and maintained.
Performance Standard 1304.53(a) (10) (ii)No highly flammable furnishings, decorations, or materials that emit high-
ly toxic fumes when burned are used.
Guidance: Agencies are to follow state, tribal, and local licensing regula-
tions and the guidelines of the U.S. Consumer Product Safety Commission
regarding the flammability of materials, furnishings, and equipment.

Performance Standard 1304.53(a) (10) (iii)
Flammable and other dangerous materials and potential poisons are stored
in locked cabinets or storage facilities separate from stored medications and
food and are accessible only by authorized persons. All medications includ-
ing those required for staff and volunteers are labeled, stored under lock
and key, refrigerated if necessary, and kept out of the reach of children.
Guidance: Cleaning materials, detergents, aerosol cans, pesticides, medica-
tions, poisons, chemicals used in lawn-care treatments, and other toxic
materials should be stored in their original containers and entirely separat-
ed from food and out of children's reach. Medications must be under lock
and key, have child-protective caps, labels, and be stored away from food
at the proper temperature.
Performance Standard 1304.53(a) (10) (iv)Rooms are well lit and provide emergency lighting in the case of
power failure.
Guidance: Test emergency lighting regularly. Light fixtures should contain
shielded or shatterproof bulbs. The facility should not have sodium or
mercury vapor lamps since they produce toxic fumes. In case of power
failure, electrical and circuit breaker panels are to be readily accessible to
authorized adults and the circuits clearly labeled. Lights used in places
where infants look at the ceiling should not be unnecessarily harsh, bright,
or glaring.
Performance Standard 1304.53(a) (10) (v)
Approved working fire extinguishers are readily available.
Guidance: Agencies should support fire prevention by:
Determining the size, type, placement, and number of fire extinguishers to
be installed by consulting with the fire marshal or an insurance company
fire loss prevention representative, and by examining local building and
fire codes.
Placing fire extinguishers in accessible locations and making staff aware of
their precise locations.
Providing staff with training on how to use fire extinguishers and posting
instructions for their use on or near the extinguishers themselves.
Servicing fire extinguishers annually and tagging them with the
service date.
Performance Standard 1304.53(a) (10) (vi)An appropriate number of smoke detectors are installed and
tested regularly.
Guidance: Smoke detectors are to be placed throughout the facility, no
more than 40 feet apart, and in accordance with the manufacturer's instruc-
tions. Smoke detectors and evacuation procedures are to be tested monthly.
156 Head Start Design Guide 2005
Appendix E

Smoke detectors are to be replaced annually. The facility should comply
with all smoke detection requirements in state, tribal, or local building
codes and should conduct installation and testing of the fire alarm system
as prescribed by state, tribal, or local licensing requirements.
Performance Standard 1304.53(a) (10) (vii)Exits are clearly visible and evacuation routes are clearly marked and
posted so that the path to safety outside is unmistakable.
Guidance: Agencies should ensure the safe evacuation from the facility by
following the recommendations of the National Fire protection Agency
(NFPA) including the suggestion that exits have a minimum width of 36
inches. Exits must be unobstructed and not padlocked or chained shut
during program hours. All exit doors are to operate easily and open out-
ward. Entrance and exit routes should be examined and approved by
local fire authorities and clearly marked. Monthly fire and evacuation
drills should be conducted. The facility should have enough evacuation
cribs and strollers available to evacuate infants, toddlers, and children
with disabilities who cannot walk on their own, and smooth ramps on
which evacuation cribs and strollers can be wheeled. There are to be at
least two exits on each floor of a building, each of which leads to an open
space at ground level.
Performance Standard 1304.53(a) (10) (viii)Indoor and outdoor premises are cleaned daily and kept free of undesir-
able and hazardous materials and conditions.
Guidance: There are to be outward-opening, self-closing doors, closed
windows, screening and curtains, and any other effective means to prevent
entrance of flies or other airborne insects. Basement windows used for
ventilation and all other openings to a basement or cellar should not per-
mit the entry of rodents. Each foundation, floor, wall, ceiling, roof, win-
dow, exterior door, basement, cellar hatchway or other opening is to be
free from cracks and holes. Trash and garbage containers are to be placed
in designated areas. Play areas should not provide shelter or a breeding
ground for pests.
Performance Standard 1304.53(a) (10) (ix)Paint coatings on both interior and exterior premises used for the care of
children do not contain hazardous quantities of lead.
Guidance: Qualified professional assistance should be obtained for testing
surfaces (exterior and Interior) painted prior to 1978 for lead levels of 0.06
percent or more. If professional inspection reveals paint with excessive lead
levels, agencies are to obtain qualified professional assistance in removing
lead-contaminated paint, or the area is to be refinished with lead-free,
encapsulate paint or other locally approved, nontoxic materials. Sanding,
scraping, or burning of high lead surfaces should be strictly prohibited, and
the agency is to ensure that no paint containing hazardous quantities is ever
used. Products containing lead are to be replaced immediately.
Agencies with concerns about lead paint should seek the assistance of the
Lead Poisoning Prevention Program at the Centers for Disease Control and
Head Start Design Guide 2005 157
Appendix E

Prevention in Atlanta, Georgia, or Environmental Protection Agency (EPA)
or Housing and Urban Development (HUD) authorities.
Performance Standard 1304.53(a) (10) (x)The selection, layout, and maintenance of playground equipment and sur-
faces minimize the possibility of injury to children.
Guidance: Playgrounds and playground equipment is to be designed,
installed, inspected, and maintained with the children's safety in mind so
that equipment does not pose the threat of serious falls and will not pinch,
crush, or entrap the head or any part of a child's body or clothing. All play-
ground equipment is to be installed in strict accordance with the manufac-
turer's instructions over shock-absorbing materials, and equipment is to be
securely anchored to the ground. The agency is to consult the U.S.
Consumer Product Safety Commission to insure proper surfaces surround-
ing playground equipment and to verify if any recalls of equipment have
occurred. Equipment is to be situated so that the clearance space allocated to
one piece of equipment does not encroach on that allocated for another piece
of equipment. Moving equipment, such as swings, is to be located toward
the edge or corner of a play area, or the space is to be designed in another
way to protect children from running into the path of the equipment.
Performance Standard 1304.53(a) (10) (xi)Electrical outlets accessible to children prevent shock through the use of
child-resistant covers, the installation of child protection outlets, or the use
of safety plugs.
Guidance: Agencies are to prevent shocks by insuring that all electrical
equipment and appliances are properly grounded and that all electrical
cords are in good condition and placed out of the reach of children. All
electrical outlets are to be covered with child-resistant safety covers, unless
childproof electrical outlets are installed.
Performance Standard 1304.53(a) (10) (xii)Windows and glass doors are constructed, adapted, or adjusted to prevent
injury to children.
Guidance: Windows and glass door panels in rooms used by children are
to have safety guards (e.g., rails or mesh), or are to be constructed of safe-
ty-grade glass or polymer. Windows that can be opened are to be equipped
with childproof devices that do not block natural light, and screened when
open so children cannot pass through the windows or become stuck in any
way. All glass doors are to be marked with opaque tape or other materials.
Performance Standard 1304.53(a) (10) (xiii)Only sources of water approved by the local or state health authority
are used.
Guidance: Agencies are to ensure that their facilities are supplied with
piped running water that is under correct pressure and from a source
approved by the Environmental Protection Agency (EPA) or by the state,
tribal, or local health authority, and that provides an adequate water
supply to every available fixture. When water is supplied by well or other
158 Head Start Design Guide 2005
Appendix E

private source, the agency is to ensure that it meets all applicable federal,
state, tribal, and local health standards, and that the local health depart-
ment or its designee approves it. The agency is to keep documentation of
water supply approval on file.
Performance Standard 1304.53(a) (10) (xiv)Toilets and hand-washing facilities are adequate, clean, in good repair, and
easily reached by children. Toileting and diapering areas must be separated
from areas used for cooking, eating, or children's activities.
Guidance: Agencies are to ensure that the following guidelines are met:
Accessible toilets and sinks are to be provided at a ratio of roughly 1 to 10
for toddlers and preschool children. A maximum toilet height of 11 inches
and a maximum hand sink height of 22 inches are recommended. (Step
stools or low platforms are used where toilets or hand-washing facilities
are too high.)
Every toilet room door is to be easily opened by children from the inside
and the outside.
A hand-washing sink is to be accessible to each classroom and group
of infants.
Utility sinks are to be used for rinsing soiled clothing or for cleaning toilet
training equipment.
A separate sink is provided for washing and sanitizing mops and
cleaning equipment.
Diapering areas are not to be located in dental hygiene or food preparation
areas and are never to be used for the temporary placement or serving
of food.
Diapering areas are to be separate from adult bathrooms.
Changing tables should have impervious, nonabsorbent, clean surfaces,
and be sturdy, at an appropriate height for adults to work at when stand-
ing, and equipped with railings.
Storage areas are to be close to or within diapering areas for clean diapers,
wipes, gloves, and other supplies.
Hand-washing sinks are to be adjacent to the diaper changing tables.
Performance Standard 1304.53(a) (10) (xv)Toilet training equipment is provided for children being toilet trained.
Guidance: Child-sized toilets, safe step aids that can be sanitized and
modified toilet seats (where there are only adult-sized toilets) should be
used in all facilities. If child-sized toilets, step-aids, or modified toilet seats
cannot be used, potty chairs that are easily sanitized are to be provided for
toddlers, preschoolers, and children with disabilities who require them.
Head Start Design Guide 2005 159
Appendix E

Hand-washing sinks must be located nearby.
Performance Standard 1304.53(a) (10) (xvi)All sewage and liquid waste is disposed of through a locally approved
sewer system, and garbage and trash are stored in a safe and
sanitary manner.
Guidance: Waste is to be kept away from children's indoor and outdoor
activity areas used for storage and preparation of food. Raw or treated
wastes are not to be discharged on ground surfaces.
Performance Standard 1304.53(a) (10) (xvii)Adequate provisions are made for children with disabilities to ensure their
safety, comfort, and participation.
Guidance: The facility is to be accessible to persons with disabilities by
making accommodations such as ramps and railings, wider pathways, and
wheel-chair-accessible toilets, sinks, and drinking fountains. The physical
environment is to be maintained in a consistent and stable manner for chil-
dren with visual or hearing problems. Appropriate space is to be provided
for children who may require individual therapy or activities.
Performance Standard 1304.53(b) (1)Grantee and delegate agency must provide and arrange sufficient equip-
ment, toys, materials, and furniture to meet the needs and facilitate the
participation of children and adults.
Performance Standard 1304.53(b) (1) (i)
Equipment, materials, and furniture are supportive of the specific educa-
tional objectives of the program:
Guidance: (If fixed) A variety of climbing structures and steps as well as
other structures that are safe for exploration are provided.
In outdoor environments, a variety of materials are provided as well as
equipment and structures for climbing, riding, pushing, pulling, and
digging. Materials should be offered that extend indoor activities to
the outdoors.
Performance Standard 1304.53(b) (1) (ii)Equipment, materials and furniture are supportive of the cultural and eth-
nic backgrounds of the children.
Guidance: Materials used should demonstrate acceptance of each child's
gender, family, race, language, and culture. Environments should be estab-
lished and maintained to support the culture of the children. The outdoor
area safely should utilize the natural environment, adding culturally rele-
vant structures and materials when possible.
Performance Standard 1304.53(b) (1) (iii)Equipment, materials, and furniture are age-appropriate, safe, and sup-
portive of the abilities and developmental level of each child served, with
adaptations if necessary for children with disabilities.
160 Head Start Design Guide 2005
Appendix E

Guidance: All federally assisted programs, including Head Start, must be
accessible to persons with disabilities, including staff, parents, and children.
This does not mean that every building or part of a building must be physi-
cally accessible, but the program services as a whole must be accessible.
Structural changes to make program services available are required if alterna-
tives, such as reassignment of classes or moving to different rooms, are not
possible. For nonverbal children, communication boards, computers, and
other assistive technology devices may be helpful. Surfaces are to ensure
safety of children with disabilities and promote their learning. Staff is to
ensure that children with physical disabilities have chairs and other pieces of
furniture of the correct size and type for their individual needs as they grow.
Performance Standard 1304.53(b) (1) (iv)Equipment, materials, and furniture are accessible, attractive, and inviting
to children.
Guidance: Learning materials are to be easily accessible on low shelves
that children can explore by themselves. Materials are to have interesting
shapes, textures, and colors that invite play, exploration, and learning.
Equipment and furniture is to be child-sized, age-appropriate, and adapt-
able for children's use. Equipment and materials should be selected and
designed to give children choices.
Performance Standard 1304.53(b) (1) (v)
Head Start equipment, materials, and furniture are designed to provide a
variety of learning experiences and to encourage each child to experiment
and explore.
Performance Standard 1304.53(b) (1) (vi)Head Start equipment, materials, and furniture (fixed) are safe, durable,
and kept in good condition.
Performance Standard 1304.53(b) (1) (vii)Head Start equipment is stored in a safe and orderly fashion when not
in use.
Guidance: Each activity area is to have its own storage space. As much
space as possible should be reserved for children's use by storing materials
in locations not used by children. Children must not be able to pull over
bookcases and shelves. Outdoor equipment is to be stored in a shed or
other enclosed storage space to protect these items and to keep the outdoor
area free from clutter.
Head Start Design Guide 2005 161
Chapter OneAppendix E

Appendix FTerms Used in Construction and
Renovation Projects
Architects, engineers, contractors, and managers
in construction projects use specific terms,
phrases, and definitions. Those involved in center
development may wish to be familiar with
construction terminology.
162 Head Start Design Guide 2005

Abate or abatement: To remove material.
Acceptance test: A test conducted by a purchaser (or his or her agent) to
determine if the material, devices, or equipment delivered conform to the
purchase contract specifications or the product supplied by the vendor.
Access: A means of approach, e.g., a road, street, or walk.
Accessible: Allowing physical contact, as by means of an easily removable
cover or door, or a part of the building structure or finish materials.
Providing access to a fixture, appliance, or piece of equipment; removal of
a cover, panel, plate, or similar obstruction may be required.
Acre: A unit of land measurement equal to 43,560 sq. ft. or 4,046.85 sq. m.
One sq. mile (2.59 sq. km.) equals 640 acres.
ADD: On drawings, abbreviation for addendum.
Addendum: A supplement to bidding documents issued prior to the sub-
mission of bids for the purpose of clarifying, correcting, or adding to the
specifications previously issued.
Addition: A floor or floors, a room, a wing, or other expansion to an exist-
ing building, or any new construction that increases the height or floor
area of an existing building or adds to it, such as a porch or attached
garage. An amount added to the contract sum by a change order.
Additional services: The professional services that may upon the owner's
request or approval be rendered by the architect in addition to the basic
services identified in the owner-architect agreement.
Additive alternate: An alternate bid in an addition to the same bidder's
base bid. Same as alternate bid.
Administrative authority: The individual, official, board, department,
council, or leader established and authorized by a political subdivision cre-
ated by law to administer and enforce the provisions of the code.
Advertisement for bids: The published public notice soliciting bids for a
construction project. Most frequently used to conform to legal require-
ments pertaining to projects to be constructed under public authority, and
usually published in newspapers of general circulation in those districts
from which the public funds are derived.
A/E: Abbreviation for architect-engineer.
Agent: One who is empowered to enter into binding transactions on
behalf of another person
Agreement form: A document setting forth in printed form the general
provisions of an agreement with spaces provided for inserting specific data
relating to a particular project.
Head Start Design Guide 2005 163
Appendix F

All-in contract: Same as turn-key job.
Alterations: Remodeling.
Alternate bid: The amount stated in the bid to be added to or deducted
from the amount of the base bid if the corresponding change in project
scope or alternate materials and/or methods of construction is accepted.
Application for payment: The contractor's written request for payment
of amount due for completed portions of the work. This may include, if
the contract so provides, materials delivered and suitably stored pending
their incorporation into the work.
Appraisal: An evaluation or estimate (preferably by a qualified profes-
sional appraiser) of the market or other value, cost, utility, or other attrib-
ute of land or other facility.
Approved equal: Materials, equipment, or methods approved by the
architect for use in the work as acceptable as an equivalent in essential
attributes of the material, equipment, or methods specified in the contract
document.
Architect: A person trained and experienced in the design of buildings
and coordination and supervision of all aspects of the construction of
buildings.
Architect-engineer: An individual or firm offering professional services
as both architect and engineer. This term generally is used in government
contracts, particularly those involving the federal government.
Area method: A method of estimating the probable total construction cost
by multiplying the adjusted gross floor area by a predetermined cost per
unit of area.
Base bid: The amount of money stated in the bid as the sum for which the
bidder offers to perform the work, not including that work for which alter-
nate bids also are submitted.
Base services: The services performed by an architect during the follow-
ing five phases of a project: schematic design; design development; con-
struction documents; bidding or negotiation; and contract administration.
Bid: An offer to perform the work described in a contract at a specified
cost, a complete and properly signed proposal to do the work.
Competition for a job based on lowest cost to do the work. Bids generally
are cost specific, based on the cost of labor, materials, profit, and overhead.
Bids are normally not negotiated and cannot be changed once accepted by
the owner. Bids are time sensitive and are generally good for 30 to 60 days
after the bid opening.
Bid bond: A form of bid security executed by the bidder as principal and
by a surety.
164 Head Start Design Guide 2005
Appendix F

Bid date: The date established by the owner or the architect for the receipt
of bids.
Bidder: One who submits a bid for a prime contract with the owner, as
distinct from a sub-bidder who submits a bid to a prime bidder. A bidder
is not a contractor on a specific project until a contract exists between him
and the owner.
Bid documents: The advertisement or invitation to bid, instructions to
bidders, the bid form, and the proposed contract documents, including any
addenda issued prior to receipt of bids.
Bidding or negotiation phase: The fourth phase of the architect's basic
service, during which competitive bids or negotiated proposals are sought
as the basis for awarding a contract.
Bidding period: The calendar period beginning at the time of issuance of
bidding requirements and contract documents and ending at the pre-
scribed bid time.
Bidding requirements: Those documents providing information and
establishing procedures and conditions for the submission of bids. They
consist of the notice to bidders or advertisement for bids, instructions to
bidders, invitation to bid, and sample forms.
Bid form: A form furnished to a bidder to be filled out, signed, and sub-
mitted as his bid.
Bid guarantee: Same as bid security.
Bid opening: The opening and tabulation of bids submitted by the pre-
scribed bid time and in conformity with the prescribed procedures.
Bid price: The sum stated in the bid for which the bidder offers to per-
form the work.
Bid security: The deposit of cash, certified check, cashier's check, bank
draft, money order, or bid bond submitted with a bid and serving to guar-
antee to the owner that the bidder, if awarded the contract, will execute
such contract in accordance with the bidding requirements and the con-
tract documents.
Bid time: The date and hour established by the owner or the architect for
the receipt of bids.
Bona fide bid: A bid submitted in good faith, complete and in prescribed
form which meets the conditions of the bidding requirements and is prop-
erly signed by someone legally authorized to sign such bid.
Bond: A financial guarantee by a surety company that work will be com-
pleted as described in a contract.
Head Start Design Guide 2005 165
Appendix F

Bonding capacity: An indication of a contractor's credit rating.
Bonus and penalty clause: A provision in a construction contract for pay-
ment of a bonus to the contractor for completing the work prior to a stipu-
lated date, and a charge against the contractor for failure to complete the
work by such stipulated date.
Boundary survey: A mathematically closed diagram of the completed
peripheral boundary of a site, reflecting dimensions, compass bearings,
and angles.
Builder's risk insurance: A specialized form of property insurance to
cover work in the course of construction. Also property insurance.
Building code: A collection of rules and regulations adopted by authori-
ties having appropriate jurisdiction to control the design and construction
of buildings, alteration, repair, quality of materials, use and occupancy, and
related factors of the buildings within their jurisdiction.
Building inspector: A member of a building department, usually of a
municipality, who inspects construction to determine if it conforms to both
the requirements of the building code and the approved plans.
Building permit: A written authorization to an applicant for a specific
project allowing him to proceed with construction; granted by the author-
ized agency, a tribe, or local municipality having jurisdiction after plans
have been filed and reviewed.
Cash allowance: An amount established in the contract documents for
inclusion in the contract sum to cover the cost of prescribed items not spec-
ified in detail, with provision that variations between such amount and the
finally determined cost of the prescribed items will be reflected in change
orders appropriately adjusting the contract sum.
Certificate for payment: A statement from the architect to the owner con-
firming the amount of money due to the contractor for work accom-
plished, or for materials and equipment suitably stored, or both.
Certificate of insurance: A memorandum issued by an authorized
representative of an insurance company stating the types, amounts, and
effective dates of insurance in force for a designated insured.
Certificate of occupancy: A document issued by governmental authority
certifying that all or a designated portion of a building complies with
the provisions of applicable statutes and regulations, and permitting
occupancy for its designated use.
Change order: A written order to the contractor signed by the owner and
the architect issued after the execution of the contract, authorizing a
166 Head Start Design Guide 2005
Appendix F

change in the work or an adjustment in the contract sum or the contract
time as originally defined by the contract document. It may add to, sub-
tract from, or vary the scope of work. A change order may be signed by the
architect alone, provided he has written authority from the owner.
Closed specifications: Specifications stipulating the use of specific prod-
ucts or processes without provision for substitution. Same as base bid
specifications.
Code: A legal instrument adopted within a political jurisdiction that pre-
scribes the minimum acceptable levels of the design, construction, installa-
tion, and performance of materials, components, devices, items of equip-
ment, appliances used in a building, or building system and/or subsystem.
Code of practice: A technical document setting forth standards of good
construction for various materials and trades.
Completion bond, construction bond, contract bond: The guarantee of
a bonding company that a contractor will perform and deliver the work
contracted free of all encumbrances and liens.
Completion date: In the contract documents, the date of substantial com-
pletion of the work.
Comprehensive general liability insurance: A broad form of liability
insurance covering claims for bodily injury and property damage which
combines under one policy coverage for all liability exposures on a
blanket basis and automatically covers new and unknown hazards that
may develop. It automatically includes contractual liability coverage for
certain types of contracts.
Comprehensive services: Professional services performed by the archi-
tect in addition to the basic services in such related areas as project analy-
sis, programming, land use studies, feasibility investigations, financing,
construction management, and special consulting services.
Conditions of the bid: Conditions set forth in the instructions to bidders,
the notice to bidders or advertisement for bids, the invitation to bidders, or
other similar bid documents prescribing the conditions under which bids
are to be prepared, executed, submitted, received, and accepted.
Conditions of the contract: Those portions of the contract documents
which define, set forth, or relate to the following: contract terminology; the
rights and responsibilities of the contracting parties and of others involved
in the work; requirements for safety and compliance with laws and regula-
tions; general procedures for the orderly prosecution and management of
the work; payments to the contractor; and similar provisions of a general,
non-technical nature.
Head Start Design Guide 2005 167
Appendix F

Consent of surety: Written consent of the surety on a performance bond
and/or labor and material payment bond to contract changes, such as
change orders or reductions in the contractor's retainage, final payment, or
waiving notification of contract changes.
Construction: All the on-site work done in building or altering structures,
from land clearance through completion, including excavation, erection,
and the assembly and installation of components and equipment.
Construction bond: A completion bond.
Construction budget: The sum established by the owner as available for
construction of the project, or the highest acceptable bid.
Construction cost: The cost of all the construction portions of a project.
This is generally based upon the sum of the construction contracts and
other direct construction costs. It does not include the compensation paid
to the architect and consultants, the cost of land, right-of-way, or other
costs defined in the contract documents as being the responsibility of the
owner.
Construction documents: The working drawings and specifications.
Construction documents phase: The third phase of the architect's basic
services. In this phase the architect prepares from the approved design
development documents, for approval by the owner, the working draw-
ings and specifications and the necessary bidding information. In this
phase the architect also assists the owner in the preparation of bidding
forms, the conditions of the contract, and the form of agreement between
the owner and the contractor.
Construction inspector: Same as project representative.
Construction loan: A loan to a builder for a short-term, financing of con-
struction prior to permanent financing.
Construction management: The special management services performed
by the architect or others during the construction phase of the project,
under separate or special agreement with the owner. This is not part of the
architect's basic services, but is an additional service sometimes included
in the comprehensive services.
Construction phase - administration of the construction contract: The
fifth and final phase of the architect's basic services, which includes the
architect's general administration of the construction contract.
Consultant: An individual or organization engaged by the owner or the
architect to render professional consulting services complementing or sup-
plementing the architect's services.
Contract: A legally enforceable promise or agreement between two or
more persons.
168 Head Start Design Guide 2005
Appendix F

Contract administration: The duties and responsibilities of the architect
or consultant during the construction phase.
Contract bond: Same as completion bond.
Contract date: Same as date of agreement.
Contract documents: Those documents that comprise a contract, includ-
ing: the owner-contractor agreement, conditions of the contract, plans
and/or drawings, specifications, all addenda, modifications, and changes
together with any other items stipulated as being specifically included.
Contracting officer: The person designated as the official representative
of the federal government with specific authority to act on behalf of the
government in connection with the project.
Contractor: One who undertakes responsibility for the performance of
construction work, including the provision of labor and materials, in accor-
dance with plans and specifications and under a contract specifying cost
and a schedule for completion of the work; the person or organization
responsible for performing the work and identified as such in the owner-
contractor agreement.
Contractor's estimate: A forecast of construction cost, as opposed to
a firm proposal, prepared by the contractor for a project or a portion of
a project.
Contractor's liability insurance: Insurance purchased and maintained by
the contractor to protect him from specified claims which may arise out of
or result from his operations under the contract, whether such operations
are by him, by any subcontractor, or by anyone directly or indirectly
employed by either, or by anyone for whose acts the contractor or subcon-
tractors may be liable.
Contractor's option: A provision of the contract documents under which
the contractor may select certain specified materials, methods, or systems
at his own option, without change in the contract sum.
Contractor's proposal: Same as bid.
Contract sum: The price stated in the owner-contractor agreement, which
is the total amount payable by the owner to the contractor for the perform-
ance of the work under the contract document. This can be adjusted only
by a signed change order.
Contract time: The period of time established in the contract document
pursuant to other agreements between the parties, or by operation of law,
within which the work must be completed.
Contractual liability: Liability assumed by a party under a contract by
express language, implication, or operation of law.
Head Start Design Guide 2005 169
Appendix F

Cost breakdown: Same as schedule of values.
CPM: Abbreviation for critical path method.
Critical path method: CPM, a system of project planning, scheduling,
and control which combines all relevant information into a single master
plan, permitting the establishment of the optimum sequence and duration
of operations. It contains the interrelation of all the efforts required to com-
plete a construction project and includes the efforts critical to timely com-
pletion of the project.
Damages: Same as liquidated damages.
Date of agreement: The date stated on the face of the agreement. If no
date is stated, it may be the date on which the agreement is actually
signed, if this is recorded, or it may be the date established by the award.
This date also is referred to as the contract date.
Date of commencement of the work: The date established in a notice to
proceed, or, in the absence of such notice, the date of the agreement, or
another date established by the concerned parties.
Date of substantial completion: The date certified by the architect when
the work or a designated portion of the work is sufficiently complete in
accordance with the contract documents so the owner may occupy or use
the designated portion as intended.
Debt service: The periodic payment of a loan, including both accrued
interest and a portion of the principal.
Deduction: The amount deducted from the contract sum by a
change order.
Deductive alternate: A substitute bid resulting in a deduction from the
bidder's base bid. This is the same as an alternate bid.
Deed: Any duly attested, written document executed under seal and
delivered to effect a transfer, bond, or contract, such as a conveyance of
real property or interest in the property.
Deed restriction: A limitation on the use of land, which is set forth in a
deed conveying the restrictions.
Defective work: Work not complying with the contract requirements.
Demolition: The systematic destruction of a building, all or in part.
Deposit for bidding documents: Monetary deposit required to obtain a
set of construction documents and bidding requirements, customarily
refunded to bona fide bidders on return of the documents in good condi-
tion within a specified time.
170 Head Start Design Guide 2005
Appendix F

Design: To compose a plan for a building. The architectural concept
of a building as represented by plans, elevations, renderings, and
other drawings.
Design development phase: The second phase of the architect's basic
services. In this phase the architect prepares the design development docu-
ments consisting of drawings and other documents to fix and describe the
size and character of the entire project, including structural, mechanical,
and electrical systems, materials, and such other essentials as may be
appropriate. The architect also submits to the owner a further statement of
probable construction cost.
Design documents: Same as structural design documents.
Detailed estimate of construction costs: A forecast of construction costs
prepared on the basis of a detailed analysis of materials and labor for all
items of work, as contrasted with an estimate based on current area, vol-
ume, or similar unit costs.
Employer's liability insurance: Insurance protection for the employer
against claims by employees for damages which arise out of injuries
or diseases sustained in the course of their work and which are based
on common law negligence rather than on liability under workmen's
compensation acts.
Engineer: A person trained and experienced in the profession of
engineering; a person licensed to practice the profession by the authority
in the area.
Engineering survey: A survey conducted to obtain essential information
for planning an engineering project or developing and estimating its cost.
Environmental design professionals: The professionals collectively
responsible for the design of man's physical environment.
Environmental impact statement: A detailed analysis of the probable
environmental consequences of proposed federal legislation, major federal
actions, or large-scale construction making use of federal funds likely to
significantly affect environmental quality; such a statement is required by
the National Environmental Policy Act of 1969.
Estimate: Same as detailed estimate of construction costs. Same as state-
ment of probable construction costs. Same as contractor's estimate.
Extended coverage insurance: Same as property insurance.
Facility: The building(s), playground(s), parking area(s), and campus
where the program or construction site is located.
Field supervision: That portion of the architect's supervisory work done
at the construction site.
Head Start Design Guide 2005 171
Appendix F

Final acceptance: The owner's acceptance of a project from the contractor
upon certification by the architect that it is complete and in accordance
with the contract requirements. Final acceptance is confirmed by making
final payment, unless otherwise stipulated at the time of making such pay-
ment.
Final completion: The completion of work and all contract requirements
by the contractor.
Final inspection: The final review of the project by the architect prior to
his issuance of the final certificate for payment.
Final payment: Payment made by the owner to the contractor of the
entire unpaid balance of the contract sum as adjusted by change orders
upon issuance by the architect of the final certificate for payment,
Fire and extended coverage insurance: Same as property insurance.
Fixed limit of construction cost: The maximum allowable cost of the
construction work as established in the agreement between the owner and
the architect. Same as construction budget.
Force account: A term used when work is ordered to be done without
prior agreement as to lump-sum or unit- price cost thereof, and is to be
billed for at the cost of labor, materials and equipment, insurance, taxes,
etc., plus an agreed percentage for overhead and profit.
General conditions: That part of the contract document that sets forth
many of the rights, responsibilities, and relationships of the parties
involved. Same as conditions of the contract.
General contract: Under the single contract system, the contract between
the owner and the contractor for construction of the entire work.
General contractor: The prime contractor who is responsible for most of
the work at the construction site including that performed by the subcon-
tractors.
Generally accepted standard: A specification, code, rule, guide, or
procedure in or related to the field of construction that is recognized and
accepted as authoritative.
Guarantee: A legally enforceable assurance of the quality or duration of a
product or of work performed.
Guaranteed maximum cost: An amount estimated in an agreement
between the owner and contractor as the maximum cost of performing
specified work on the basis of cost of labor and materials plus overhead
expense and profit.
Guaranty bond: Same as bid bond. Same as labor and material payment
bond. Same as performance bond. Same as surety bond.
172 Head Start Design Guide 2005
Chapter One Appendix F

Inspection list: A list of items of work to be completed or corrected by
the contractor during or after completion of the work and during the war-
ranty period.
Instructions to bidders: Instructions contained in the bidding require-
ments for preparing and submitting bids for a construction project. Same
as notice to bidders.
Invitation to bid: A solicitation of competitive bids. The term usually is
employed in connection with private construction projects, but also may be
used for government projects, for the purchase of supplies or other goods,
or in connection with the sale of property. Same as advertisement for bids.
Invited bidders: The bidders selected by the architect and the owner as
the only ones from whom bids will be received.
Job: Same as project. Same as work.
Job site: The site of the construction project.
Job superintendent: Same as superintendent.
Labor and material payment bond: A bond of the contractor in which a
surety guarantees to the owner that the contractor will pay for labor and
materials used in the performance of the contract. The claimants under the
bond are those having direct contracts with the contractor or any subcon-
tractor.
Landscape architect: A person trained and experienced in the design and
development of landscapes and gardens.
Land survey: A survey of landed property establishing or reestablishing
lengths and directions of boundary lines. Land boundaries are usually
defined by ownership, commencing with the earliest owners through suc-
cessive ownerships and partitions.
Latest start date: The latest possible point in time by which an activity
must be started if the project is not to be delayed.
Letter of intent: A letter signifying an intention to enter into a formal
agreement, usually setting forth the general terms of such agreement.
Liability insurance: Insurance that protects the insured against liability
on account of injury to the person or property of another.
Licensed architect: Same as architect.
Head Start Design Guide 2005 173
Appendix F

Licensed contractor: A person or organization certified by governmental
authority, where required by law, to engage in construction contracting.
Licensed engineer: Same as professional engineer.
Lien: A right enforceable against specific property to secure payment of an
obligation.
Lien waiver: Same as waiver of lien.
Life-cycle cost: The cost of a building or equipment based not only on the
initial expenditure but also on its maintenance and operating cost over its
entire lifetime.
Liquidated damages: A sum specified in a contract whereby damages in
the event of breach are to be determined. In a construction contract, liqui-
dated damages usually are specified as a fixed sum per day for failure to
complete the work within a specified time.
Lowest responsible bidder, lowest qualified bidder: The bidder who
submits the lowest bona fide bid and is considered to be fully responsible
and qualified to perform the work for which the bid is submitted.
Lowest responsive bid: The lowest bid that is responsive to and complies
with the bidding requirements.
Lump-sum agreement: Same as stipulated sum agreement.
Main contractor: Same as general contractor.
Maintenance bond: A bond that provides a guarantee to an owner that
the contractor will rectify defects in workmanship or materials reported to
the contractor within a specified time period following final acceptance of
the work under contract.
Measured drawing: An architectural drawing of an existing structure,
drawn to scale.
Mechanic's lien: A lien on privately owned real property created by state
statute in favor of persons supplying labor or materials for a building or
structure or improvements thereof, generally for the value of the labor or
materials supplied by them.
Model code: A proposed building code that is written and published by
building official associations available for adoption by states, counties, and
municipalities.
Modification: A written amendment to the contract document signed by
both parties. A change order. A written order for a minor change in the
work issued by the architect.
174 Head Start Design Guide 2005
Appendix F

Modular construction: Construction in which a selected unit or
module, such as a box or other sub-component, is used repeatedly in the
aggregate construction.
Negligence: Failure to exercise a degree of care that a reasonable and pru-
dent person would exercise under the same circumstances.
Negotiation phase: Same as bidding or negotiation phase.
Non-collusion affidavit: A notarized statement by a bidder that he has
prepared his bid without collusion of any kind.
Nonconforming work: Work that does not fulfill the requirement of the
contract documents.
Notice to bidders: A notice contained in the bidding requirements
informing prospective bidders of the opportunity to submit bids on a proj-
ect and setting forth the procedures for doing so.
Notice to proceed: Written communication issued by the owner to the
contractor authorizing him to proceed with the work and establishing the
date of commencement of the work.
Occupancy permit: Same as certificate of occupancy.
Opening of bids: Same as bid opening.
Ordinance: A law or rule adopted by a local governmental authority.
Orientation: The placement of a structure on a site with regard to local
conditions of sunlight, wind, and drainage.
OSHA: Abbreviation for Occupational Safety and Health Administration,
Department of Labor.
Over design: As applied to structural design, a design based on require-
ments higher than service demands, usually as a means of compensating
for unknown or anticipated deficiencies.
Owner: The architect's client and party to the owner-architect agreement.
Owner-architect agreement: A contract between the architect and the
client for professional services.
Owner-contractor agreement: A contract between the owner and con-
tractor for a construction project.
Owner's inspector: A person employed by the owner to inspect construc-
tion in the owner's behalf.
Head Start Design Guide 2005 175
Appendix F

Owner's liability insurance: Insurance that protects the owner
against claims arising from his ownership of property and that may be
extended to cover claims arising from operations of others under the
construction contract.
Parcel: Of land, a contiguous land area that is considered as a unit, that is
subject to a single ownership, and that is legally recorded as a single piece.
Partial occupancy: Occupancy by the owner of a portion of a project prior
to final completion.
Partial payment: A progress payment.
Payment request: Same as application for payment.
P.E.: Abbreviation for professional engineer.
Penalty clause: A contract provision setting forth the damages a party
must pay in the event of breach. If such a clause is regarded by the court as
too harsh to be regarded as a fair estimate of probable damages, it will nor-
mally be held invalid. Same as liquidated damages.
Percentage agreement: An agreement for professional services in which
the compensation is based upon a percentage of the construction cost.
Percentage fee: Compensation based on a percentage of construction cost.
Same as fee.
Performance bond: A bond of the contractor in which a surety guarantees
to the owner that the work will be performed in accordance with the con-
tract documents. This is frequently combined with the labor and materials
payment bond, except where prohibited by statute.
Permit: A document issued by a governmental authority having jurisdic-
tion to authorize specific work by the applicant.
Personal injury: In insurance terminology, injury or damage to the char-
acter or reputation of a person, as well as bodily injury. Personal injury
insurance usually covers such situations. Same as bodily injury.
Personal property: Movable and other property not classified as real
property.
PERT: Acronym for project evaluation and review technique.
PERT schedule: A PERT chart of the activities and events anticipated in a
work process. Same as critical path method (CPM).
Planning: The process of studying the layout of spaces within buildings
and of buildings and other facilities or installations in open spaces in order
to develop the general scheme of a building or group of buildings.
176 Head Start Design Guide 2005
Appendix F

Post-completion services: Additional services rendered after issuance of
the final certificate for payment, such as consultation regarding mainte-
nance, processes, systems, etc.
Preliminary drawings: Drawings prepared during the early stages of the
design of a project.
Preliminary estimate: same as statement of probable construction costs.
Premises: Land and/or its appurtenances.
Pre-bid conference or pre-bid walk-through: A meeting of any
interested bidder, at the job site, giving an opportunity to review the
project and discuss any unclear design or programming issues.
Pre-qualification of prospective bidders: The process of investigating
the qualifications of prospective bidders on the basis of their competence,
integrity, and responsibility relative to the contemplated project.
Prime contract: A contract between the owner and contractor for con-
struction of a project or a portion of a project.
Prime contractor: The contractor on a project having a contract directly
with the owner.
Head Start Design Guide 2005 177
Appendix F
Prime professional: Any person or firm having a contract directly with
the owner for professional services.
Principal: One on whose behalf or in whose name binding transactions
may be entered into by another, usually called the agent.
Production drawings: Same as working drawings.
Professional adviser: An architect engaged by the owner to direct an
authorized design competition for the selection of an architect.
Professional engineer: A designation reserved, usually by law, for a per-
son or organization professionally qualified and duly licensed to perform
engineering services such as structural, mechanical, electrical, sanitary,
and civil.
Professional liability insurance: Insurance designed to insure an archi-
tect or engineer against claims for damages resulting from alleged profes-
sional negligence. Also known as errors and omissions insurance.
Program: A statement prepared by or for an owner, with or without an
architect's assistance, setting forth the conditions and objectives for a build-
ing project, including its general purpose and detailed requirements, such
as a complete list of the rooms required, their sizes, and special facilities.

Program evaluation and review technique (PERT): A management con-
trol technique applied to building construction. It explains what must be
done to complete construction by a given date.
Progress chart: A chart prepared by a contractor and updated monthly.
The principal trades involved in the project are tabulated vertically and the
scheduled construction time is shown horizontally.
Progress payment: A partial payment made during progress of the work
for work completed and/or materials suitably stored.
Progress schedule: A diagram, graph, or other pictorial or written sched-
ule showing proposed and actual times of starting and completing the var-
ious work elements.
Project: A construction undertaking, composed of one or more buildings,
and site improvements planned and executed in a fixed time period.
Project budget: The sum established by the owner as available for the
entire project, including the construction budget, land costs, equipment
costs, financing costs, compensation of professional services, contingency
costs, and other similar established or estimated costs.
Project cost: The total cost of a project, including professional compensa-
tion, land costs, furnishings and equipment, financing, and other changes,
as well as the construction cost.
Project manager: A third party consultant or employee of the owner who
works for the owner and coordinates the activities of the project. Assists
with the development of specific strategies of the project (including bid-
ding and contracting), establishing time frames and benchmarks for the
project, hiring other professional services, reviewing plans and drawings
and making recommendations to the owners, monitoring the budget in all
phases of the project, working with all consultants, monitoring the day-to-
day work progress of the contractor, performing close-out activities, and
preparing for occupancy.
Project manual: The manual prepared by the architect for a project,
including the bidding requirements, conditions of the contract, and techni-
cal specifications.
Property: Any asset, real or personal.
Property damage insurance: Part of general liability insurance covering
injury to or destruction of tangible property, including loss of use of the
property resulting from the damage.
Property line: A recorded boundary of a plot.
Property survey: Same as boundary survey.
Proposal: A document prepared by an applicant for a contract and used to
evaluate the professional capabilities of a business, agency, or individual
178 Head Start Design Guide 2005
Appendix F

against a set of criteria that may include previous working experience. The
content of the proposal may be weighted on a numerical scale using a set
of questions that allows the person or persons choosing the contractor to
determine the best business, agency, or individual to hire for a specific job.
Preference can be given to local or in-state businesses. The proposal also
includes the qualifications of the lead professional and team that will be
working on the project. Normally, a proposal does not include the cost of
services. Cost is generally a negotiated amount after the competing pro-
posals have been evaluated and ranked.
Proposal form: Same as bid form.
Public liability insurance: Insurance covering liability of the insured for
negligent acts resulting in bodily injury, disease, or death of other than
employees of the insured, and/or property damage.
Quality assurance: The inspection, testing, and other relevant action
taken to ensure that the desired level of quality is in accordance with the
applicable standards or specifications for the product or work.
Quality control: The inspection, analysis, and other relevant action taken
to provide control over what is being done, manufactured, or fabricated, so
that a desired level of quality is achieved and maintained.
Quality survey: A detailed analysis and listing of all materials and equip-
ment necessary to construct a project.
Quotation: A price quoted by a contractor, subcontractor, material
supplier, or vendor to furnish materials, labor, or both.
Real estate: Property in the form of land and all its appurtenances, such
as buildings.
Real property: Land, everything growing on it, and all improvements
made to it.
Realty Officer: An employee who assists the government in realty issues
including, but not limited to, disputes, developments, and assignments.
Record drawings: Construction drawings revised to show significant
changes made during the construction process, usually based on marked-
up prints, drawings, and other data furnished by the contractor to the
architect.
Record sheet: On a construction job, a sheet or printed form for keeping a
record of materials delivered, number of men working at the various
trades, hours worked, and other information.
Regulation: Any rule prescribing permitted or forbidden conduct,
whether found in legislation or in the actions of an administrative agency
or federal agency.
Head Start Design Guide 2005 179
Appendix F

Release of lien: An instrument executed by one supplying labor, materi-
als, or professional services on a project that releases his mechanic's lien
against the project property.
Render: To create a mechanical drawing, including elevation and an indi-
cation of shades and shadows.
Resident engineer: A person representing the owner's interests at the
project site during the construction phase. This term is frequently used on
projects in which a governmental agency is involved.
Resident inspector: Same as owner's inspector.
Responsible bidder: Same as lowest responsible bidder.
Restricted list of bidders: Same as invited bidders.
Restriction: On land, an encumbrance limiting its use.
Restrictive covenant: An agreement between two or more individuals,
incorporated within a deed that stipulates how land may be used.
Retainage: A sum withheld from progress payments to the contractor in
accordance with the terms of the owner-contractor agreement.
Retention: The withholding of a portion (usually 10 percent) of a periodic
payment to a contractor, by prior agreement, for work completed. The
retention is held in escrow for a stipulated time period after the acceptance
of the completed work by the architect and owner.
Retention money: Same as retention.
Right-of-way: Any strip of land, including surface and overhead or
underground space that is granted by deed or easement for the construc-
tion and maintenance of specified linear elements, such as power and
–telephone lines.
Satisfaction: Cancellation of an encumbrance on real property, usually by
payment of the secured debt.
Schedule: A detailed tabulation of components, items, or parts to be fur-
nished.
Schedules of values: A statement furnished by the contractor to the
–architect reflecting the portions of the contract sum allotted to the work
and used as the basis for reviewing the contractor's application for a
progress payment.
Schematic design phase: The first phase of the architect's basic services.
In this phase, the architect consults with the owner to ascertain the require-
ments of the project and prepares schematic design studies consisting of
drawings and other documents illustrating the scale and relationship of
180 Head Start Design Guide 2005
Appendix F

the project components for approval by the owner. The architect also sub-
mits to the owner a statement of probable construction costs.
Schematic drawing: Same as schematic design phase.
Scheme: The basic arrangement for an architectural composition; the pri-
mary sketch for a design.
Selected bidder: The bidder selected by the owner for discussion relative
to the possible award of the construction contract.
Selected list of bidders: Same as invited bidders.
Setback: The minimum distance between a reference line and a building,
or a portion thereof.
Shop drawings: Drawings, diagrams, illustrations, schedules, perform-
ance charts, brochures, and other data prepared by the contractor or any
subcontractor, manufacturer, supplier, or distributor that illustrate how
specific portions of the work shall be fabricated and/or installed.
Single contract: A contract for construction of a project under which a sin-
gle prime contractor is responsible for all the work.
Site: An area or plot of ground with defined limits on which a building or
project is located or proposed to be located.
Site investigation: An examination of the subsoil and surface of a site to
obtain complete information necessary for the design of foundations and
structures on them.
Site plan: A plan of a construction site showing the position and
dimensions of the building to be erected and the dimensions and contour
of the lot.
Special conditions: A section of the conditions of the contract, other than
general conditions and supplemental conditions, which may be prepared
for a particular project. This is the same as conditions of the contract.
Special hazards insurance: Additional perils insurance to be included in
property insurance.
Specifications: A written document contained in the project manual
describing in detail the scope of work, materials to be used, methods of
installation, technical nature of materials, equipment construction systems,
and standards and quality of workmanship for a parcel of work to be
placed under contract. This is usually used in conjunction with working
drawings in building construction.
Standard: A document prepared by a recognized standard-setting organi-
zation that prescribes methods and materials for the safe use and consis-
tent performance of specific technologies.
Head Start Design Guide 2005 181
Appendix F

Standards of professional practice: Statements of ethical principles
promulgated by professional societies to guide their members in the con-
duct of professional practice.
Statement of probable construction cost: Cost forecasts prepared by the
architect during the schematic design, design development, and construc-
tion phases of basic services for the guidance of the owner.
Statute of limitations: A statute specifying the period of time within
which legal action must be brought for alleged damage or injury. The
length of the period varies from state to state and depends upon the type
of legal action.
Stipulated sum agreement: A contract in which a specific amount is set
forth as the total payment for performance of the contract.
Structural design documents: The plans, design details, and job specifi-
cations prepared by the structural designer.
Structural drawings: Drawings, usually prepared by a structural engi-
neer, of the design, and working drawings of a building's structure.
Structural engineering: That branch of engineering concerned with the
design and construction of structures to withstand physical forces.
Sub-bidder: One who offers to a bidder on a prime contract a proposal to
provide materials and/or labor.
Subcontract: An agreement between a prime or general contractor and a
subcontractor for the execution of a portion of the contractual obligation of
the prime contractor to the owner.
Subcontractor: A person or organization who has a direct contract with a
prime contractor to perform a portion of the work at the site.
Subcontractor bond: A performance bond given by a subcontractor that
guarantees performance of a contract and the payment of bills for labor
and materials.
Substantial completion: Same as date of substantial completion.
Substitutions: Materials or processes offered in lieu of, and understood to
be equivalent to, specified materials or processes.
Successful bidder: Same as selected bidder.
Superintendent: At a construction site, the contractor's representative
who is responsible for continuous field supervision, coordination, and
completion of the work, and, unless another person is designated in
writing by the contractor, is responsible to the owner and the architect for
any accidents.
182 Head Start Design Guide 2005
Appendix F

Supervision: The observation and inspection of construction work to
ensure conformity with the contract documents. This includes direction of
work by the contractor's personnel.
Supplemental or supplementary conditions: Part of the contract
documents that supplement and may modify provisions of the general
conditions.
Surety: A person or organization who, for a consideration, promises in
writing to make good the debt or default of another.
Surety bond: A legal instrument under which one party agrees to answer
to another party for the debt, default, or failure to perform by a third party.
Survey: A boundary and/or topographic mapping of a site.
Terminal expense: An expense incurred in connection with the termina-
tion of a contract.
Time: Time limits or period stated in the contract.
Timely completion: Completion of the work or a designated portion of
the work on or before the date required.
Time of completion: The date established in the contract, by name or by
number of days, for substantial completion of the work.
Title insurance: Insurance, offered by a company, that the title to property
is clear or that it may be cleared by curing specified defects.
Title search: An inquiry into the historical ownership record of a property.
Topographical survey: The configuration of a surface, including its relief
and the locations of its natural and man-made features.
Trade: A person's occupation or craft, usually involving manual skill.
Turn-key job: A job in which the contractor completes all work and fur-
nishings of a building so that it is ready for immediate use.
Variation order: Same as change order.
Waiver of lien: An instrument by which a person or organization who has
or may have a right of mechanic's lien against the property of another
relinquishes such right. Same as release of lien.
Work: All labor necessary to produce the construction required by the
contract document.
Working drawings: Drawings intended for use by a contractor,
subcontractor, or fabricator that form part of the contract documents
for a building project.
Head Start Design Guide 2005 183
Appendix F

Workman's compensation insurance: Insurance covering liability of an
employer to his employees for compensation and other benefits required
by workmen's compensation laws.
Zoning: The control by a municipality of the use of land and buildings,
the height and bulk of the buildings, the density of population, the relation
of a lot's building coverage to open space, size and location of yards and
setbacks, and the provision of any ancillary facilities.
Zoning permit: A permit issued by appropriate governmental authority
authorizing land use for a specific purpose.
184 Head Start Design Guide 2005
Appendix F

Appendix GPoisonous Plants
Many popular house and garden plants are poisonous
and can produce symptoms ranging from minor to
severe. This list in this Appendix is not exhaustive, but
provides some of the most popular plantings that are both
poisonous and non-poisonous. The list is provided by the
U.S. Army Corps of Engineers. Check with local extensions
of the U.S. Department of Agriculture and
local poison control centers for more information about
the nature of common plantings in specific locations.
Toxic levels are based on the best information
available. However, precise scientific data is not available.
Head Start Design Guide 2005 185
Toxicity is subject to numerous variables, including
quantity, exposure, and individual reactions.
Plants on the high toxicity list are known to have
caused death and could be hazardous with very little
exposure. They should never be used. Plants on the
medium toxicity list have toxic parts, but deaths have been
rare, usually after prolonged exposure or consuming large
quantities. Do not use these plants inside the play yard.
Plants on the low toxicity list include those that may cause
a rash or dermatitis. Use these plants with caution.

HIGH TOXICITY PLANTSBotanical Common Toxic Part
Abrus Precatorius Rosary Pea seeds
Acokanthera spectabilis/ Winter sweet fruit & plantCarissa spectabilis
Aconitum napellus/ Aconita, Monkshood all parts
Delphinum spp Cunjrvoi all partsAlocasia macrorrhiza
Brugmansia sanguinea Red Angles trumpet nectar, seeds
Conium maculatum Hemlock, carrot fern or all parts,Carrot weed large amounts
Convallaria majalis Lily of the Valley all parts
Daphne spp Daphne berries
Diefenbachia spp. Dumbcane berries, few
Duranta repens Duranta or Golden berriesDewdrop
Ervatamia coronaria Crepe Jasmine all parts
Euphorbia pulcherrima Poinsettia sap
Euphorbia tirucalli Naked Lady or sapPencil bush
Gloriosa superba Glory lily all parts, esp. roots
Ilex spp English/ fruits & American Hollytree leaves
Jatropha spp Physic nut, Coral bush seeds
Kalmia spp Mountain/Western Laurel all partsCalico Bush
Laburnum anagyroides Laburnum or all partsGolden Chain
Lantana camara Lantana green fruits
Lobrlia cardinalis Cardinal flower all parts
Lingustrum spp. Privet fruit
Malus spp. Apple leaves, seed in large amt.
186 Head Start Design Guide 2005
Appendix G
Botanical Common Toxic PartMelia azedarch Cape lilac or White cedar fruit, leaves,
bark, flowers
Melianthus comosus Tufted honey flower entire plant, esp. roots
Nerium oleander Oleander all parts
Nicotiana glauca Tree tobacco entire plant; esp. leaves
Prunus armeniaca Apricot kernel in large amounts
Prunus dulcis Almond kernel-bitter type
Prunus persica Peach kernel, lower, leaf, bark
Rheum Rhaponticum Rhubarb leaf blade
Rhododendrom Rhododendron or Azalea leaf
Ricinus communis Castor Oil plant seeds: 2-8
Solanum nigrum Black nightshade or green fruitBlackberry nightshade
Solanum psedocapsicum Madeira winter cherry or berriesJerusalem cherry
Solanum sodomaeum Apple or Sodom fruit
Solanum tuberosum Potatoes green skin
Taxus baccata Yew all parts, esp. seed in pod
Thevetia peruviana Yellow oleander all parts, esp. seed in kernel
Wisteria floribunda, Wisteria seeds & podsW. sinensis
Zanthedeschia aethiopica Calla lily or all parts, esp. White Arum lily juice of leaves
& stem

MEDIUM TOXICITY PLANTSBotanical Common Toxic Part
Aesculus spp Horse Chestnut, Buckeye all parts
Aleurites fordii Tung-oil tree fruit kernel
Allamanda spp Allamanda fruit
Alocasia maculatum Lords & Ladies sap
Amaryllis belladonna Belladonna lily bulb
Anemone Windflower all parts
Aquilegia spp Columbine seeds
Arum italicum Italian Arum sap, esp. in berries
Asclepias fruticosa Swan plant pods
Castanospermum australe Black bean or Moreton seedsBay chestnut
Celastrus orbiculatus, Bittersweet all partsC. scandens
Cestrum spp Green cestrum, Cestrum all parts, esp. or Jessamine fruit
Colocasia esculenta Elephant’s ears or Taro root
Cotoneaster spp Cotoneaster fruit, flowers
Crataegus spp Hawthorn fruit
Botanical Common Toxic Part
Cycas spp Zamia palm or seeds, fresh tree Zamia or
improperly prepared
Cydonia oblonga Quince seeds, fresh leaves
Delphinium spp Larkspur all parts
Digitalis purpurea Foxglove all parts
Eriobotrya japonica Loquat seeds (many)
Euonymus europaeus Spindle tree all parts, esp. fruit & seeds
Euphorbia marginata Snow-on-the-mountain sap
Head Start Design Guide 2005 187
Appendix G
Botanical Common Toxic Part
Gelsimium sempervirens Carolina Jessamine all parts
Hedera helix English Ivy all parts, esp. berries
Hura crepitans Sandbox Tree all parts
Hyacinthus orientalis Hyacinth all parts, esp. bulb
Hydrangea spp Hydrangea flowers
Iris germanica Flag iris, Flag lily, or all parts
Fleur de lis
Laburnum anagyroides Common gold chain seeds
Lupinus spp Lupine seed pods
Manihot esculenta Cassava raw roots
Moraea spp Butterfly iris all parts
Narcissus jonquilla Jonquil sap & bulb
Narcissus pseudonarcissus Daffodil sap & bulb
Nerine spp Spider lily bulb
Ornithogalum thyrsoides Star-of-Bethlehem or bulb & flower Chincerinches spike
Philodendron spp Philodendron all parts
Physalis spp Ground cherry, Chinese unripe fruitLanterns, Tomatillo
Plumeria spp Frangipani sap
Poinciana gilliesii Bird-of-paradise plant unripe seed pod
Prunus cerasus Cherry kernels
Prunus laurocerasus Cherry laurel bruised leaves
Pyrus communis Pear seeds
Rhamnus spp Buckthorns & Cascara fruitSagrade
Robinia pseudoacacia Black locust or Robinia all parts

188 Head Start Design Guide 2005
Appendix G
Botanical Common Toxic Part
Schinus molle Pepper tree fruit
Schinus terebinthifolius Japanese pepper tree fruit, large amounts
Scilla jonscripta, peruviana Bluebell, squill bulb
Solandra spp. Golden chalice sap, leaves, flowers
Solanum dulcamara Bittersweet or Woody berriesNightshade
Solanum laciniatum or Kangaroo Apple green fruitvescum
LOW TOXICITY PLANTSBotanical Common Toxic Part
Achillea millefolium Yarrow or Milfoil all parts
Agapanthus orientalis Agapanthus or African sapBlue Lily
Artemisia absinthium Wormwood all parts
Caladium spp Caladium all parts
Chrysanthemum morifolium Florist’s chrysanthemum all parts
Chrysanthemum parthenium Feverfew all parts
Chrysanthemum coccineum Pyrethrum all parts
Chrysanthemum maximum Shasta daisy all parts
Clematis spp Traveller’s joy all parts
Colohicum autumnale Autumn crocus flowers
Cosmos bipinnatus Cosmos all parts
Dicentra Bleeding heart all parts
Echium lycopsis Paterson’s curse all parts
Euphorbia milii Crown of Thorns sap
Helenium autumnale Sneezeweed all parts
Helianthus annuus Sunflower all parts
Monstera deliciosa Fruit salad or Swiss ripe fruitCheese plant
Primula obconica Primul all parts
Ranunculus spp. Buttercups all parts
Rhus cotinus Smoke tree sap
Rudeckia hirta Black-eyed-Susan all parts
Sencio cineraria Dusty miller all parts
Tanacetum vulgare Common pansy all parts
Urtica spp. Stinging nettle all parts

Head Start Design Guide 2005 189
Appendix G
Common
Amaryllis
Barberry
Boxwood
Castor bean
Chinaberry
Chinese evergreen
English ivy
Euonymous
Four o’clock
Gladiola
Holly
Jerusalem cherry
Jimsonweed
Jonquil
Mistletoe
Mountain laurel
Narcissus
Nephthytis/Arrowhead
Nightshade family
Oak (acorns)
Peony
Philodendron family
Poison ivy/oak/sumac
Pokeweed
Privet
Snowball bush/Hydrangea
Water hemlock
Common
African violet
Christmas cactus
Coleus
Corn plant
Crocus (spring)
Dandelion
Dogwood
Dracaena
Easter lily
Ferns
Ficus*
Forsythia
Fuchsia
Geranium
Hibiscus
Honeysuckle
Impatiens
*Sap may be irritating
Jade plant
Lilac
Marigold
Norfolk pine tree
Peperomia
Petunia
Prayer plant
Pyracantha/Firethorn
Rose
Rubber tree plant
Sansevieria/Snake plant
Scheffiera*
Spider plant
Swedish Ivy
Tulip*
Wandering Jew
Wax plant
Wild strawberry/Snake berry
Zebra plant
TOXIC PLANTS BY COMMON NAME ONLY(Fruits, pits or seeds are toxic.)
NON-TOXIC PLANTS BY COMMON NAME ONLY(No evidence currently exists that these plants are poisonous.)

Appendix HPlaygrounds and Their Environment
Legislation and Executive Order number 13101 mandates the purchase of
playground products that reduce environmental impact. The
Environmental Protection Agency (EPA) has developed a list of designated
products, commonly referred to as the CPG (Comprehensive Procurement
Guidelines). The CPG items are those which Federal agencies are required
to purchase. EPA has established specified amounts of post-consumer
materials required as the recycled content for each designated item. To
date, EPA has grouped 54 CPG items into eight product categories. Two
specific product categories (Park and Recreation Equipment and
Playground Surfacing) apply to the development of Head Start and Early
Head Start play space.
As the first step in a play space plan, the coordinator and designer must
consider what size and type of equipment is optimal for the specific proj-
ect. At this point, it is necessary to consider CPG requirements for recycled
content materials as identified under "Park and Recreation Equipment."
This general heading includes requirements for park benches and picnic
tables, playground equipment, playground surfaces, and plastic fencing.
Refer to www.epa.gov/cpg.
In the bid process, the vendor’s proposal must include the proportion of
recycled material that is in the product.
The EPA standard is:
— Steel 4, 16% (post consumer) /25–30% (total) 67% (post consumer)
— Aluminum 25% (post consumer) /25% (total)
— Plastic 3, 90–100% (post consumer)/100% (total)
— Plastic Composites, 50–75% (post consumer)/95–100% (total)
Some wood playground and landscaping equipment may deteriorate at a
more rapid pace opposed to plastic or metal structures. However, with the
proper care, wood playground and landscape equipment will last for
many years. There are alternatives that do not have the problems of wood
on play yards. Exceptions include marine plywood as well as engineered
wood fiber impact resistance surfacing. If using wood, check vendors that
offer this kind of product and request as part of their proposal the amount
of recycled material that is used as part of the structures. The standard is:
— Structural Fiberboard, recovered materials - 80-100%
— Laminated Paperboard, post consumer paper - 100%
190 Head Start Design Guide 2005

The center may or may not be seeking proposals for the fall zone surfaces
as part of the same scope of work. Regardless of the approach to this pur-
chase, it is important to first consider what type of fall zone material is
most appropriate for the specific application. If the decision is to use a rub-
ber mat, poured in place rubber surface, or rubber pieces, recycled material
may be used. The standard is:
— Plastic or Rubber, 90–100% (post consumer)
If the decision is to go with an engineered wood fiber, the standard is:
— Wood/Paper, 100% (total)
When developing a bidders’ list or listing potential playground contractors,
it is important to inquire about the CPG designation and number. If a ven-
dor lacks the CPG designation, request that they provide on letterhead or
other commonly available company literature/Web site the amount of recy-
cled material in the playground components that are part of the request.
Refer to http://www.epa.gov/cpg/pdf/parks.pdf. (The vendors on the
EPA Web site may or may not be on the GSA schedule.)
It may be possible to locate environmentally sensitive products and com-
panies/ vendors that use such products on the Internet. Two Web sites
offering this information are:
http://www.gsaadvantage.gov (and look for the CPG icon)
http://www.epa.gov/cpg/pdf/parks.pdf
Head Start Design Guide 2005 191
Appendix H

Appendix IGlossary of Head Start Terms
Administration for Children and Families (ACF)–An agency within
the Department of Health and Human Services (DHHS) that is responsible
for federal programs that promote the economic and social wellbeing of
families, children, individuals, and communities.
Administration on Children, Youth and Families (ACYF)–An agency
within the Administration for Children and Families (ACF) that adminis-
ters the major federal programs that support: social services promoting the
positive growth and development of children and youth and their families;
protective services and shelter for children and youth in at-risk situations;
child care for working families and families on public assistance; and
adoption for children with special needs.
Americans with Disabilities Act–Signed in 1990, it provides disabled
Americans, including those with AIDS, the same rights to jobs, public
transportation and public accommodations that women and racial, reli-
gious and ethnic minorities receive under the Civil Rights Act of 1964.
Center-based programs–Programs that provide for the growth and devel-
opment of children, including physical development through outdoor and
indoor active play and development of cognitive and language skills
through creative expression, at a Head Start sponsored facility.
192 Head Start Design Guide 2005
Child Care–Provision of safe environments, nurturing care, and appropri-
ate developmental experiences for children--usually while their parents
work or attend school. Childcare is locally and individually administered
under not-for-profit or for-profit status, and is diversely funded, largely
through parent fees, although the Department of Health and Human
Services (DHHS) and state childcare agencies are providing growing sup-
port, especially to families with low incomes.
Children with disabilities–Children whose condition may include men-
tal retardation; hearing impairments, speech or language impairments;
visual impairments; serious emotional disturbances; orthopedic impair-
ments; autism; traumatic brain injury; specific learning disabilities and
who by reason thereof, need special education and related services.
Code of Federal Regulations–Publication containing all federal regula-
tions, including Head Start 45 CFR Parts 1300-1308.
Curriculum–A written plan that includes the goals for children's develop-
ment and learning; the experiences through which they will achieve the
goals; what staff and parents do to help children achieve the goals; and the
materials needed to support the implementation of the curriculum.
Davis-Bacon Act–Signed in 1931, it requires payment of prevailing wages
to employees of contractors or subcontractors working on government
construction projects, including construction of Head Start facilities.

Delegate agencies–Public or private nonprofit organizations to which
a grantee can delegate the carrying on of all or part of its Head
Start program.
Department of Health and Human Services (DHHS or USDHHS or
HHS)–An agency within the federal government, of which the
Administration for Children and Families (ACF) is a part, that is responsi-
ble for all federal programs dealing with health and general welfare.
Developmental stages–Natural or common divisions of the process of
human growth, characterized by types of behavior, by biological properties
or manifestations, or by mental processes.
Developmentally appropriate–Any behavior or experience that is
matched to the maturity of the individual child with respect to age, needs,
interests, developmental levels, and cultural background.
Early childhood–Birth to eight years.
Early childhood development–The process by which children from birth
to age eight gradually gain the skills and confidence needed to succeed in
their present environment and the cognitive skills needed to form a foun-
dation for school readiness and later school success.
Early childhood education–Activities and/or experiences that are
intended to effect developmental changes in children from birth through
Head Start Design Guide 2005 193
the primary units of elementary school (grades K-3).
Early Head Start–A program that provides low-income pregnant women
and families with children from birth to age three with family-centered
services that facilitate child development, support parental roles, and pro-
mote self-sufficiency.
Early intervention–Efforts to redirect individuals at risk for, or in the early
stages of mental, physical, learning or other disorders; usually targeted at
early childhood, sometimes including prenatal care.
Education environment–Conditions, forces, or factors within or outside a
teaching setting capable of influencing the setting or those within it.
Eligibility–Qualifying for certain benefits or services (e.g. enrollment in
Head Start or Early Head Start).
Eligibility criteria–Those elements that would render an individual or
family qualified to participate in a program, or a program qualified for
funding, or an individual qualified for a position.
English as a Second Language (ESL)–Designation given to programs for
students whose first language is other than English.
Environmental education–Utilization of the natural world and its rela-
tionships to promote experiential learning and to enrich the curriculum.
Appendix I

Exceptional children–Refers to children with disabilities and to
gifted children.
Experiential learning–Learning by doing; acquisition of knowledge and
skills outside of book/lecture learning sessions, through work, play and
other life experiences.
Extended families–A form of family organization consisting of blood rel-
atives and their several nuclear family units.
Family literacy–The ability of the family as a whole to read and write.
Family literacy services–Programs that promote early childhood educa-
tion, literacy training for parents (including teaching English as a second
language), interactive family literacy activities, and training for parents for
their role as primary teacher of their children and full partners in their
education.
Family partnership agreements–Opportunities to expand parents'
knowledge about community services and resources and to develop
networks and relationships with families, service providers, community
agencies and school systems.
Federal Register–The official daily U.S. Government publication of
proposed and final federal regulations and announcements of programs
and policies.
194 Head Start Design Guide 2005
Federal-State relationship–Interaction between federal and state officials,
agencies and programs.
Free Appropriate Public Education–What the Local Education Agency
(LEA) is required to provide to all children including those with
eligible disabilities.
Full day/full year programs–Programs in which a child is enrolled for a
substantial part of each day for the period of twelve months.
Governing boards–Groups charged with the responsibility for some degree
of management or control over affairs of public or private institutions.
Grantee–A local corporation or other legal entity, either public or private,
to which a Head Start grant is awarded.
Grants–Funds given by a foundation, government, institution or other
organization, usually for a specific purpose.
Head Start Bureau–The bureau within the Department of Health and
Human Services/Administration on Children, Youth and Families which
administers the Head Start Program.
Head Start Program–Founded in 1965, the program provides comprehen-
sive child development services to low-income children and families
through a network of grantee and delegate agencies.
Appendix I

Head Start Reauthorization Act of 1998–Signed into law to amend the
Head Start Act and extend the Head Start program authorization period
through fiscal year 2003.
Health care screening–A series of tests used to identify individuals who
are likely to benefit from, or have difficulty in, some program or treatment,
or who should be examined in greater depth.
Health care services–Refers to medical, dental and mental health support
provided to individuals and families. Services must be provided by staff or
consultants with training and experience in public health, nursing, health
education, maternal and child health or health administration.
Health Services Advisory Committee–A group that includes profession-
als and volunteers from the community, established to address health serv-
ice issues and to help agencies respond to community needs.
Home visitor–The staff member in the home-based program option
assigned to work with parents to provide comprehensive services
to children and their families through home visits and group socialization
activities.
Home visits–Used to assist, encourage and support parents as they foster
the growth and development of their children, including physical develop-
ment through outdoor and indoor active play, and the development of cog-
nitive and language skills through creative self-expression.
Head Start Design Guide 2005 195
Home-based–A program option for serving children and families in their
homes, in which the parent is trained to provide for the comprehensive
needs of the family.
Homeless families–Families without permanent or fixed residences, typi-
cally living in abandoned buildings, public places, or the streets, and at
times seeking temporary shelter with public or private charities.
Immunization recommendations–Issued by the Centers for Disease
Control and Prevention, as well as any additional recommendations from
the local Health Services Advisory Committee that are based on prevalent
community health problems.
Indian reservations–Tracts of land, set aside by agreements between gov-
ernments and Indian tribes, which are reserved for the exclusive use and
occupancy of those tribes.
Individualized Education Program (IEP)–Educational plan geared to an
individual student's needs, and conducted in accordance with a written
agreement between the student (and/or parents) and school officials.
Individualized Family Service Plan (IFSP)–A written plan for provid-
ing early intervention services to a child eligible under Part H of the
Individuals with Disabilities Education Act (IDEA), developed by multi-
disciplinary teams of health care and educational practitioners for families
of young children.
Appendix I

Individuals with Disabilities Education Act (IDEA)–Federal special
education legislation which states must implement and which requires
special education for all children age three and older; states may also serve
children younger than three at their discretion.
Indoor active play–Activities that take place inside (e.g. within a center
or within the child's home).
Infants–Children in the earliest period of life, especially before they
can walk.
Infants and toddlers–Children from birth through approximately three
years of age.
Intellectual development–Increasing complexity or growth of reasoning
and thought processes.
Interagency cooperation–Cooperation of organizations with each other
or with other groups.
Kindergarten–A program or class for four- to six-year-old children that
serves as an introduction to school.
Kinship families–Relatives other than biological parents that are caring
for children.
196 Head Start Design Guide 2005
Learning disabilities–Category in federal legislation referring to disorders
involved in understanding or using language, manifested in imperfect abili-
ty to listen, think, speak, read, write, spell or do mathematical calculations.
Learning problems–Conditions interfering with the ability to learn,
which may be caused by visual, hearing or motor impairments; mental
retardation; behavioral disorders; health impairments; or by cultural, envi-
ronmental or economic disadvantage.
Learning readiness–State or condition of an individual that makes it pos-
sible for him or her to engage profitably in a given educational activity.
Least Restrictive Environment–An educational placement that ensures
that, to the maximum extent possible, children with special needs are edu-
cated with children not in need of special education services.
Local Education Authority (LEA)–A general term used in the
Individuals with Disabilities Education Act (IDEA) for school districts
or Regional Special Education Districts mandated to provide special
education.
Mainstreaming–Progressively including exceptional students (disabled or
gifted) in classes and schools with regular or normal students, with steps
taken to see that special needs are satisfied.
Appendix I

Meal services–Nutritional services in center-based settings; grantee and
delegate agencies must ensure that meals contribute to the development
and socialization of enrolled children by serving a variety of food to broad-
en each child's food experience.
Mental health services–Assistance for mental and emotional disorders,
provided by licensed or certified mental health professionals with experi-
ence and expertise in serving young children and their families.
Migrant Head Start Programs–A Head Start program that serves families
who are engaged in agricultural work and who have changed their
residence from one geographical location to another in the preceding two-
year period.
Minimum requirements–The lowest levels of overall accomplishment
that a Head Start agency may achieve and still remain in compliance with
the program performance standards.
Minority groups–Subgroups within a larger society that are distinguished
from the majority and each other by race, national heritage, or by religious
or cultural affiliation.
Motor development–Stages of growth in the ability to manipulate and
control limbs and body movement.
Multicultural education–Education involving two or more ethnic groups
Head Start Design Guide 2005 197
and designed to help participants clarify their own ethnic identity and
appreciate that of others, to reduce prejudice and stereotyping, and to pro-
mote cultural pluralism and equal participation.
Multicultural principles–Program elements that validate and build
upon the cultures and strengths of the children enrolled in Head Start and
their families.
Non-Federal Share–Cash or in-kind contributions required to match a
federal grant.
Notice of Financial Assistance–Official notification by the federal gov-
ernment that an agency's request for funding has been approved and
funds are available for expenditure.
Notice of Proposed Rule Making–Publication of proposed, new, or
revised federal regulations in the Federal Register for public comment.
Office of Financial Operations–Monitors the financial portion of the
Head Start grant. Located in the Administration for Children and Families
(ACF) Regional Office.
Office of Management and Budget–The federal agency that oversees the
budgeting process of the executive branch of the federal government and
that approves information-gathering forms before they can be used.
Appendix I

PA 20 Program Account 20–A category within the Head Start grant
budget specifically for training and technical assistance needs.
PA 22 Program Account 22–The largest and most flexible category within
the Head Start grant budget, which is used for program operations.
PA 25 Program Account 25–A category within the Head Start grant
budget for funds for Parent and Child Centers which are awarded to a
limited number of grantees.
PA 26 Program Account 26–A category within the Head Start grant
budget for Full Day, Full Year Head Start funds.
Parent Committees–Groups comprised of parents of children currently
enrolled at the center level for center-based programs or at the equivalent
level for other program options that share governance with the Policy
Committee and Policy Council.
Performance Standards–A federally defined set of minimum criteria for
each component in Head Start.
Policy Committee–An appointed group that shares program governance
with the Parent Committee and Policy Council; at least 50% of the mem-
bership must be parents of the children enrolled in that delegate agency
program and it must also include representatives from the community.
198 Head Start Design Guide 2005
Policy Council –A committee set up at the grantee level which shares pro-
gram governance with the Parent and Policy Committees; includes repre-
sentation from parents, community, and all delegate agencies. If the
grantee has no delegates, then the representation is from all centers and
other factions of that program.
Policy groups–The formal group of parents and community representa-
tives required to be established by the agency to assist in decisions about
the planning and operation of the program.
Program evaluation–Judging the feasibility, efficacy, and value of a pro-
gram in relation to its stated objectives, standards, or criteria.
Program governance–A formal structure of shared administration
through which parents can participate in policy making or in other deci-
sions about the program.
Program implementation–Carrying out a plan or design through con-
crete measures.
Program Information Report–An annual report completed and filed
electronically at the end of each school year by every Head Start program
in the nation, supplying data used by the Administration on Children,
Youth and Families (ACYF) to report to Congress and for program moni-
toring. Note: Forms for this report are sent to every grantee to fill out and
Appendix I

return. Collated results are distributed to all programs, with data reflecting
state, regional and national trends.
Program performance measures–Methods and procedures used to assess
the strengths and weaknesses of Head Start programs, and to identify
problem areas that require training and technical assistance resources.
Program planning–A systematic, ongoing process that includes consulta-
tion with the program's governing body, policy groups and program staff,
and other community organizations; also includes community assessment,
formulation of short term objectives and long range goals, and develop-
ment of written plans for implementing services.
Quality Improvement Plan–A document developed by grantees to out-
line solid solutions for eliminating identified program deficiencies, and
including the time frame within which each will be corrected.
Regional Office–Main office in each of twelve nationally stipulated
Department of Health and Human Services (DHHS) administrative areas.
Related services–Transportation and other developmental, corrective and
supportive assistance that is required to help a child with disabilities bene-
fit from special education; assistance also can include social services and
parent counseling and training.
Request for Proposals (RFP)–An official/formal solicitation by an
Head Start Design Guide 2005 199
agency or organization for proposals in a wide range of categories such as
funding, special projects, training events, and so forth.
Safety councils–National organizations, such as the Children's Safety
Network, Program for Playground Safety, Consumer Product Safety
Commission, the American Academy of Pediatrics, Safe Kids Coalitions
and the National Highway Transportation Safety Association, which
are concerned with identifying and publicizing hazards and helpful
information.
School readiness–Levels of cognitive, physical and psychosocial maturity
prerequisite to learning in a school setting.
Sensory development–Stages of growth in organizing and understanding
impressions gathered through the senses, i.e., the process of recognizing,
identifying or becoming aware of objects, qualities or relations.
Special education–Teaching programs and services for disabled and/or
gifted individuals who have intellectual, physical, emotional, or social
characteristics different from those who can be taught through normal
methods or materials.
Special needs students–Broad legislative category referring to all stu-
dents identified as needing special assistance to achieve educational equity,
e.g., the disabled, the disadvantaged, those seeking nontraditional careers,
limited English speakers, and others.
Appendix I

Special populations–Refers to culturally distinct groups such as
American Indians, refugees, Eskimos, and others.
Staff-parent conference–Meetings at which parents can discuss their child's
development, progress and education with teachers and other caregivers.
State Early Childhood Programs–Locally and state-funded child devel-
opment services, either for all interested families or primarily for families
with low income.
State Education aAency (SEA)–A department of education at the state
level composed of the chief state school officer and staff who carry out
work delegated to them by law.
State licensing boards–Agencies that authorize the practice of a profes-
sion or operation of a business in a state after determining that established
standards and requirements have been met.
Toddlers–Children approximately one to three years of age.
Transition coordination–Refers to the management of activities that facil-
itate a child's transition from Head Start programs to elementary school.
Transition planning–A process undertaken for each child and family at
least six months prior to the child's third birthday that takes into account
the child's health status and developmental level, progress made by the
200 Head Start Design Guide 2005
child and family while in the program, current and changing family cir-
cumstances, and the availability of child care services in the community.
Transition programs or transition services–Procedures to support suc-
cessful transitions for enrolled children and families from previous child
care programs into Early Head Start or Head Start programs and from
Head Start into elementary school or other child care settings.
Tribal government–Governments of American Indian tribes.
Tribal sovereignty–The authority or right of tribal entities to exercise
decision-making power and choice regarding their political, social and cul-
tural patterns.
University partnerships–Grants awarded to universities to work with
Head Start agencies in conducting research on Head Start programs, or
awarded to graduate students to conduct research in Head Start programs.
Verbal development–Growth in the ability to use and comprehend words
in either oral or written form.
Waivers–Dispensations from rules or penalties.
Wrap Around–Arrangements between Head Start and other funding
sources to provide a full range of comprehensive services for Head Start
children according to their needs.
Appendix I

Photo CreditsJohn Allard, Consultant, Head Start Facilities Group, Elizabethtown,
Kentucky
Bob Crooks, Facilities Specialist, National Head Start Training aand
Technical Assistance Resource Center, Arlington, Virginia
Greg Premru, Photographer, 840 Summer Street, Boston, MA 02127. Phone:
617-269-9977
Brough Schamp, Photographer, Baltimore, Maryland. Phone: 410-769-8016;
email [email protected]
Rod Walker, Facilities Manager, Oregon Child Development Coalition,
Wilsonville, Oregon
Photos are identified in the following order, from top to bottom, then left to right.
Head Start Design Guide 2005 201

Cover
Walker, Crooks, Allard, Crooks,
Crooks, Allard, Crooks,
Walker, Allard, Schamp
Chapter One
pg2 Walker, Crooks, Crooks, Walker,
Allard, Walker,
Crooks, Walker, Crooks, Crooks
pg3 Schamp
pg4 Walker
pg5 Crooks
pg10 Allard, Crooks, Allard, Schamp
Premru, Allard
Crooks, Schamp, Schamp, Premru
pg11 Crooks, Crooks
pg12 Allard
pg13 Crooks, Allard, Allard
pg14 Allard, Allard, Crooks
pg15 Premru
pg16 Schamp, Crooks, Crooks,
Crooks, Allard, Allard
Allard, Schamp, Allard, Schamp
pg17 Crooks, Schamp, Allard
pg18 Allard, Allard
pg19 Crooks
pg20 Allard, Crooks
pg21 Crooks, Allard, Crooks, Schamp
pg22 Schamp, Crooks
pg23 Allard, Allard
pg24 Allard
202 Head Start Design Guide 2005
Photo Credits

pg25 Schamp, Crooks, Allard
pg26 Schamp, Schamp, Schamp, Crooks
pg27 Walker, Crooks, Crooks, Crooks
pg28 Crooks, Walker, Allard, Schamp,
Allard, Allard, Schamp, Walker, Schamp, Schamp
pg29 Walker, Walker, Walker, Walker
pg31 Allard
pg33 Allard
pg34 Crooks
pg36 Schamp, Allard, Crooks, Allard
Crooks, Crooks,
Allard, Crooks, Walker, Walker
pg37 Allard, Allard
pg38 Crooks, Crooks
pg39 Crooks, Crooks, Allard, Crooks, Crooks
pg40 Walker, Allard, Allard
pg41 Crooks, Allard
pg42 Crooks, Crooks
pg43 Allard, Crooks
pg44 Allard, Allard, Walker
pg45 Crooks, Allard, Allard, Allard, Crooks, Crooks
pg46 Allard, Walker, Allard, Walker, Crooks, Crooks,
Allard, Crooks, Walker, Allard
pg47 Allard, Allard, Walker
pg48 Allard, Walker, Allard, Crooks, Allard
pg49 Allard, Crooks
pg50 Crooks
Head Start Design Guide 2005 203
Photo Credits

pg51 Crooks, Allard, Crooks,
Crooks, Crooks
pg53 Crooks, Crooks, Crooks
pg54 Allard, Allard, Crooks
pg55 Crooks, Allard
pg56 Allard, Crooks, Crooks
pg57 Crooks, Allard, Crooks, Crooks
pg58 Allard, Crooks
pg59 Crooks
pg60 Crooks
pg61 Allard, Allard,
Walker, Walker, Walker
pg62 Premru
pg63 Crooks
pg64 Allard, Crooks, Allard, Allard
pg66 Crooks, Crooks, Crooks, Schamp,
Walker, Schamp, Schamp,
Allard, Allard, Crooks
pg67 Crooks, Walker, Crooks, Allard
pg68 Crooks, Allard, Crooks, Allard
pg69 Crooks, Crooks
pg70 Walker
pg71 Walker
pg72 Crooks
pg75 Schamp, Schamp, Crooks
pg76 Crooks, Allard, Crooks, Allard
pg77 Crooks, Schamp, Allard, Allard, Allard, Crooks
pg79 Crooks, Schamp
204 Head Start Design Guide 2005
Photo Credits
pg81 Crooks
pg82 Crooks, Crooks, Allard
pg83 Allard
pg85 Crooks, Crooks, Schamp
pg86 Schamp, Crooks
pg88 Allard
pg89 Crooks, Crooks, Crooks, Crooks
pg91 Schamp, Allard, Allard
pg92 Schamp
pg93 Crooks
pg95 Schamp
pg97 Crooks
pg99 Crooks, Crooks, Crooks
pg100 Crooks
pg101 Crooks
pg104 Schamp, Schamp, Allard, Schamp,
Allard, Schamp,
Schamp, Schamp, Schamp, Crooks
pg105 Crooks, Crooks
pg110 Schamp, Crooks, Crooks, Walker,
Crooks, Allard,
Crooks, Crooks, Crooks, Crooks
pg111 Allard, Crooks, Schamp
pg112 Crooks, Schamp, Crooks
pg113 Schamp
pg114 Schamp, Crooks, Crooks
pg115 Crooks, Allard, Schamp, Crooks
pg116 Crooks, Crooks, Allard
Head Start Design Guide 2005 205
Photo Credits

pg117 Allard, Allard, Walker, Schamp
pg118 Crooks, Walker, Crooks, Crooks
pg119 Crooks, Walker, Crooks
pg120 Allard, Crooks, Crooks, Crooks,
Schamp, Allard,
Allard, Crooks, Allard
pg121 Crooks, Crooks, Crooks, Walker
206 Head Start Design Guide 2005
Photo Credits
Related Documents