HD WiFi Indoor / Outdoor Camera Kit Quick Start Guide Connect with Beam VER-Z3

Welcome message from author
This document is posted to help you gain knowledge. Please leave a comment to let me know what you think about it! Share it to your friends and learn new things together.
Transcript
HD WiFi Indoor / Outdoor Camera Kit
Quick Start Guide
Connect with
Beam
VER-Z3
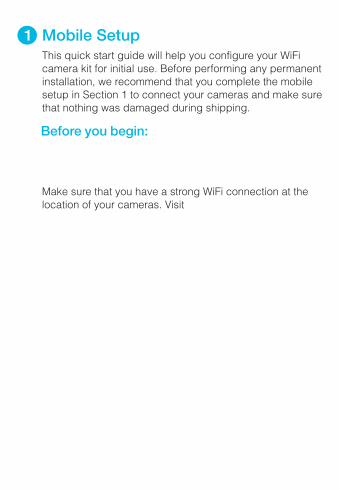
This quick start guide will help you configure your WiFi camera kit for initial use. Before performing any permanent installation, we recommend that you complete the mobile setup in Section 1 to connect your cameras and make sure that nothing was damaged during shipping.
1 Mobile Setup
Before you begin:
Make sure that you have a strong WiFi connection at the location of your cameras. Visit www.zmodo.com/supportfor advice on improving your WiFi signal range.
Make sure you know the SSID (WiFi network name) and password of the 2.4GHz WPA-PSK/WPA2-PSK WiFi
network that you want your cameras to connect to. Your network cannot be hidden.
Make sure your network has at least 1Mbps upload speedfor each camera when live viewing or 2Mbps uploadspeed for each camera when using the Zmodo CloudService.
TMDownload and install the “Zmodo” app from Google Play TM TM or the App Store (compatibility: iOS 9.0+ or Android
4.0+). Launch the app and sign up for a free Zmodo account. All of your devices will be bound to this account.
We are constantly working to improve our product and app. Please visit www.zmodo.com/support for updated instructions, manuals, and more.
Zmodo
1
Plug in and power on all cameras near your router for initial setup. Fasten the antennas (if applicable) onto the cameras.
2
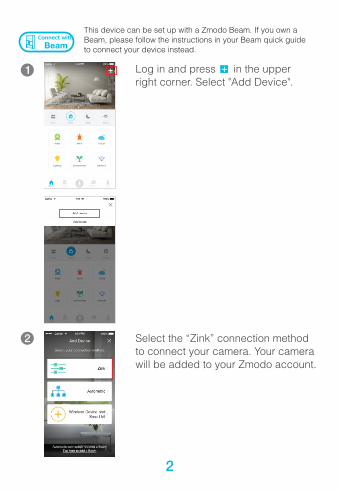
Select the “Zink” connection method to connect your camera. Your camera will be added to your Zmodo account.
2
This device can be set up with a Zmodo Beam. If you own a Beam, please follow the instructions in your Beam quick guide to connect your device instead.
Connect with
Beam
1 Log in and press in the upper right corner. Select "Add Device".
+
3
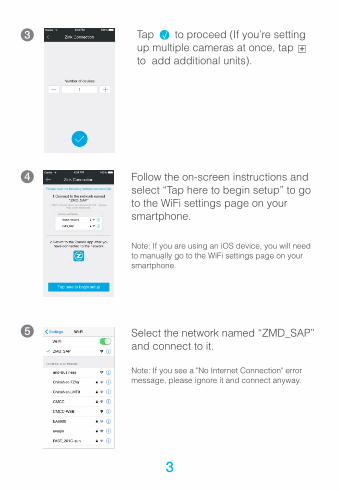
5 Select the network named “ZMD_SAP” and connect to it.
Note: If you see a "No Internet Connection" error message, please ignore it and connect anyway.
Follow the on-screen instructions and select “Tap here to begin setup” to go to the WiFi settings page on your smartphone.
4
3 √Tap to proceed (If you’re setting up multiple cameras at once, tap to add additional units).
+
Note: If you are using an iOS device, you will need to manually go to the WiFi settings page on your smartphone.
4
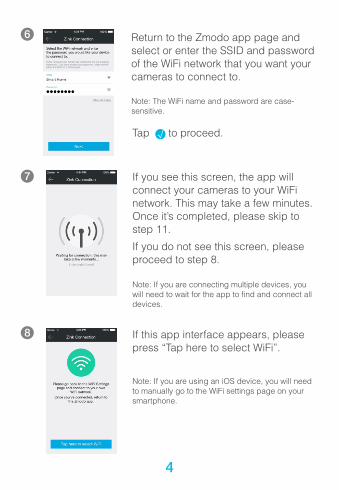
7 If you see this screen, the app will connect your cameras to your WiFi network. This may take a few minutes. Once it’s completed, please skip to step 11.
If you do not see this screen, please proceed to step 8.
Note: If you are connecting multiple devices, you will need to wait for the app to find and connect all devices.
8 If this app interface appears, please press “Tap here to select WiFi”.
ZMD_SAP
Return to the Zmodo app page and select or enter the SSID and password of the WiFi network that you want your cameras to connect to.
Note: The WiFi name and password are case-sensitive.
Tap to proceed.√
6
Note: If you are using an iOS device, you will need to manually go to the WiFi settings page on your smartphone.
5
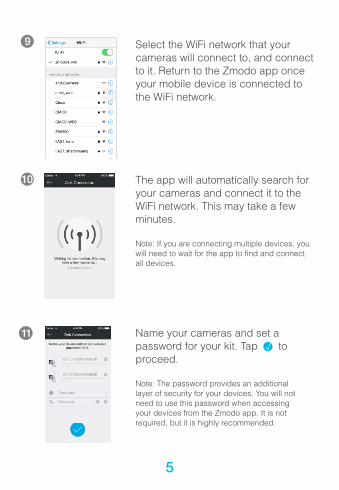
10 The app will automatically search for your cameras and connect it to the WiFi network. This may take a few minutes.
Note: If you are connecting multiple devices, you will need to wait for the app to find and connect all devices.
9 Select the WiFi network that your cameras will connect to, and connect to it. Return to the Zmodo app once your mobile device is connected to the WiFi network.
Name your cameras and set a password for your kit. Tap to proceed.
Note: The password provides an additional layer of security for your devices. You will not need to use this password when accessing your devices from the Zmodo app. It is not required, but it is highly recommended.
√
11
6
2 Mounting Your Cameras
If you’re installing your cameras outdoors, all wired connections must be weatherproofed.
Before installing the cameras, carefully plan where and how they will be positioned, and how you will route the wiring that connects your cameras to the power adapters.
Try to avoid WiFi signal interference from concrete, cement, and metal as much as possible. Do not place cameras in a location where these materials stand between your cameras and your WiFi router.
Make sure that your cameras are within range of your WiFi network, and that your network meets all of the bandwidth requirements from Section 1.
Installation Requirements & Tips:
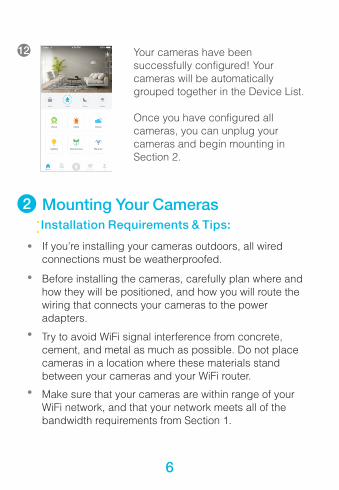
12 Your cameras have been successfully configured! Your cameras will be automatically grouped together in the Device List.
Once you have configured all cameras, you can unplug your cameras and begin mounting in Section 2.
7
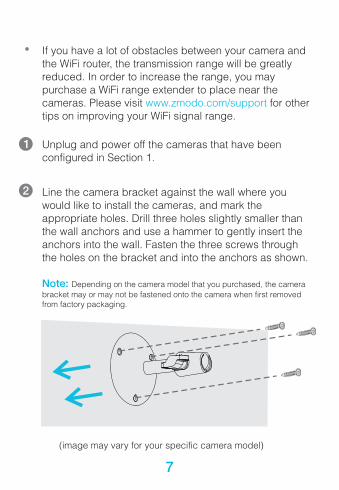
Unplug and power off the cameras that have been configured in Section 1.
1
Line the camera bracket against the wall where you would like to install the cameras, and mark the appropriate holes. Drill three holes slightly smaller than the wall anchors and use a hammer to gently insert the anchors into the wall. Fasten the three screws through the holes on the bracket and into the anchors as shown.
Note: Depending on the camera model that you purchased, the camera
bracket may or may not be fastened onto the camera when first removed from factory packaging.
2
(image may vary for your specific camera model)
If you have a lot of obstacles between your camera and the WiFi router, the transmission range will be greatly reduced. In order to increase the range, you may purchase a WiFi range extender to place near the cameras. Please visit for other www.zmodo.com/supporttips on improving your WiFi signal range.
8
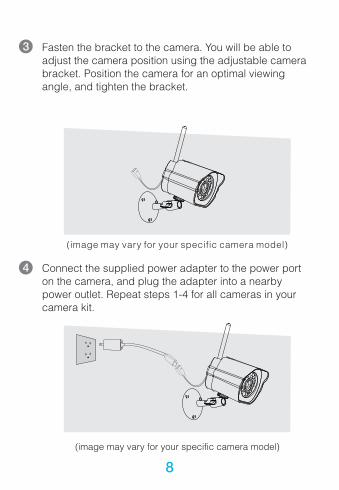
Fasten the bracket to the camera. You will be able to adjust the camera position using the adjustable camera bracket. Position the camera for an optimal viewing angle, and tighten the bracket.
3
Connect the supplied power adapter to the power port on the camera, and plug the adapter into a nearby power outlet. Repeat steps 1-4 for all cameras in your camera kit.
4
(image may vary for your specific camera model)
(image may vary for your specific camera model)
9
3 Recording and Viewing Options
Recording Options
Record continuously and store footage on our secure cloud servers.
Create and save video clips from your recordings.
Access your footage and clips at any time from any location.
Enjoy more smart features in the future!
This device is compatible with the Zmodo Cloud Service. Please visit www.zmodo.com/cloud for more information about the Zmodo Cloud Service. The cloud service will allow you to:
All of your Zmodo devices will be bound to your Zmodo user account. You can access your camera and other
TMdevices by using the Zmodo app with any Android or ®iOS device. Just download the Zmodo app from
TM TMGoogle Play or the App Store .
You can also access your devices from any web browser with our web app. Visit and log in with user.zmodo.com your Zmodo user account information.
Viewing Options
10
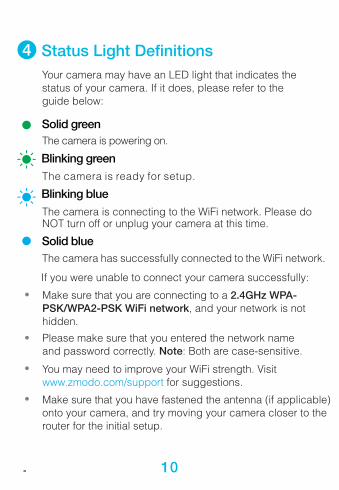
Status Light Definitions4
Blinking blue
The camera is connecting to the WiFi network. Please do NOT turn off or unplug your camera at this time.
Blinking green
The camera is ready for setup.
The camera is powering on.
Solid green
The camera has successfully connected to the WiFi network.
Solid blue
If you were unable to connect your successfully:camera
Please make sure that you entered the network name and password correctly. Note: Both are case-sensitive.
Make sure that you are connecting to a 2.4GHz WPA-PSK/WPA2-PSK WiFi network, and your network is not hidden.
Your camera may have an LED light that indicates the status of your camera. If it does, please refer to the guide below:
You may need to improve your WiFi strength. Visitwww.zmodo.com/support for suggestions.
Make sure that you have fastened the antenna (if applicable) onto your camera, and try moving your camera closer to the router for the initial setup.
11
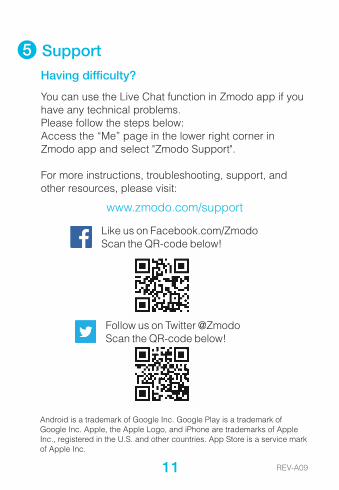
Support5
REV-A09
Having difficulty?
You can use the Live Chat function in Zmodo app if you have any technical problems.Please follow the steps below:Access the “Me” page in the lower right corner in Zmodo app and select "Zmodo Support".
For more instructions, troubleshooting, support, and other resources, please visit:
www.zmodo.com/support
Follow us on Twitter @ZmodoScan the QR-code below!
Like us on Facebook.com/Zmodo Scan the QR-code below!
Android is a trademark of Google Inc. Google Play is a trademark of Google Inc. Apple, the Apple Logo, and iPhone are trademarks of Apple Inc., registered in the U.S. and other countries. App Store is a service mark of Apple Inc.
Related Documents