Havforskningsinstituttet - Rederiavdelingen

Welcome message from author
This document is posted to help you gain knowledge. Please leave a comment to let me know what you think about it! Share it to your friends and learn new things together.
Transcript

Havforskningsinstituttet - Rederiavdelingen

SOLAS training manual Kronprins Haakon
Ref.id.: KS&SMS-3-2.13.8.2-02 Håndbok
Page: 2 of 80
Table of Contents
1 Introduction ......................................................................................................................... 6
1.1 Purpose ......................................................................................................................... 6
1.2 Scope ............................................................................................................................ 6
1.3 Responsibilities .............................................................................................................. 6
1.4 Definitions ...................................................................................................................... 6
2 Procedure ............................................................................................................................ 7
2.1 Introduction .................................................................................................................... 7
2.2 Muster Stations / Life Boats / Life Boats / Life Rafts ....................................................... 7
2.2.1 Muster Station ........................................................................................................ 7
2.2.2 Lifeboats ................................................................................................................. 7
2.2.3 Evacuation Chute Life Rafts ................................................................................... 8
2.3 Fire Stations .................................................................................................................. 8
2.4 Life Saving Appliances ................................................................................................... 8
2.4.1 Fire & Safety Plans and Station Bills ....................................................................... 8
2.4.2 Life jackets .............................................................................................................. 8
2.4.3 Immersion suits..................................................................................................... 13
2.4.4 MOB / Work boat Rescue suits ............................................................................. 15
2.5 Lifeboats ...................................................................................................................... 15
2.5.1 Entrance ............................................................................................................... 17
2.5.2 Seatbelts............................................................................................................... 17
2.5.3 Operating instructions ........................................................................................... 18
2.5.4 Preparation before Launching ............................................................................... 18
2.5.5 Setting painter hook .............................................................................................. 18
2.5.6 Embarkation ......................................................................................................... 20
2.5.7 Launching the boat ............................................................................................... 20
2.5.8 Normal Hook Release ........................................................................................... 21
2.5.9 Emergency hook release - On-load release .......................................................... 24
2.5.10 Painter release and lifeboat operation - Clearing the ship. .................................... 25
2.5.11 Recovery operation ............................................................................................... 26
2.5.12 Hoisting the lifeboat .............................................................................................. 30
2.5.13 Emergency steering .............................................................................................. 30
2.5.14 Lifeboat equipment ............................................................................................... 31

SOLAS training manual Kronprins Haakon
Ref.id.: KS&SMS-3-2.13.8.2-02 Håndbok
Page: 3 of 80
2.6 Viking Evacuation MiniChute - VEMC .......................................................................... 34
2.7 FRC – Fast Rescue Craft ............................................................................................. 35
2.7.1 Lowering operation ............................................................................................... 37
2.7.2 Hoisting operation ................................................................................................. 38
2.7.3 MOB Boat equipment............................................................................................ 44
2.7.4 VHF radio ............................................................................................................. 44
2.7.5 UHF ...................................................................................................................... 44
2.7.6 EPIRB (Emergency positioning indicating radio beacon) ...................................... 45
2.7.7 SART .................................................................................................................... 46
2.8 Pyrotechnics ................................................................................................................ 48
2.8.1 Parachute flares.................................................................................................... 48
2.8.2 Hand flares ........................................................................................................... 48
2.8.3 Smoke signals ...................................................................................................... 48
2.8.4 Line-throwing appliance ........................................................................................ 49
2.8.5 Life-buoys ............................................................................................................. 51
2.9 Survival at Sea............................................................................................................. 51
2.9.1 Advice on how to use survival craft facilities in order to survive ............................ 51
2.9.2 Hazards of exposure - a guide to Cold Water Survival .......................................... 54
2.9.3 Hypothermia ......................................................................................................... 56
2.9.4 Ship abandonment ................................................................................................ 57
2.9.5 Use of the survival craft facilities ........................................................................... 59
2.9.6 Treatment of the immersion survivor ..................................................................... 59
2.9.7 Cold injury ............................................................................................................. 61
2.9.8 Freezing cold injury (frostbite) ............................................................................... 61
2.9.9 Non-freezing cold injury (immersion foot) .............................................................. 62
2.10 Fire Protection ............................................................................................................. 63
2.10.1 Introduction ........................................................................................................... 63
2.10.2 Principles and theory of fire .................................................................................. 69
2.10.3 Advice on fire-fighting on board ............................................................................ 70
2.10.4 Fire extinguisher ................................................................................................... 73
2.10.5 Fire lockers ........................................................................................................... 77
2.10.6 Fire Blankets ......................................................................................................... 77
2.10.7 Smoke/heat detectors ........................................................................................... 78
2.10.8 SOPEP ................................................................................................................. 78

SOLAS training manual Kronprins Haakon
Ref.id.: KS&SMS-3-2.13.8.2-02 Håndbok
Page: 4 of 80
2.10.9 Firefighting and protection systems....................................................................... 78
1 Introduksjon ........................................................................................................................ 2
1.1 Hensikt .......................................................................................................................... 2
1.2 Omfang .......................................................................................................................... 2
1.3 Arbeidsoppgaver ............................................................................................................ 2
1.4 Definisjoner .................................................................................................................... 2
2 Fremgangsmåte .................................................................................................................. 3
2.1 Introduksjon ................................................................................................................... 3
2.2 Mønstringsstasjoner / livbåter /Redningsflåter / Marine evakueringsstrømpe. ................ 3
2.2.1 Mønstringsstasjon ................................................................................................... 3
2.2.2 Livbåter ................................................................................................................... 3
2.2.3 Evakueringsrenne redningsflåter ............................................................................ 3
2.3 Brannstasjoner............................................................................................................... 3
2.4 Rednings utstyr .............................................................................................................. 4
2.4.1 Brann & Sikkerhets Plan og Mønstringsrulle ........................................................... 4
2.4.2 Redningsvester ....................................................................................................... 4
2.4.3 Overlevningsdrakter ................................................................................................ 9
2.4.4 MOB / arbeidsbåt redningsdrakter ........................................................................ 11
2.5 Livbåter ........................................................................................................................ 11
2.5.1 Inngang ................................................................................................................ 13
2.5.2 Setebelter ............................................................................................................. 13
2.5.3 Instruksjon av livbåt .............................................................................................. 14
2.5.4 Forberedelse før låring .......................................................................................... 14
2.5.5 Forhaler festepunkt ............................................................................................... 14
2.5.6 Ombordstigning .................................................................................................... 15
2.5.7 Utsetting av båten ................................................................................................. 15
2.5.8 Normal krokutløser ............................................................................................... 16
2.5.9 Nødprosedyre krokfrigjøring – ved last ................................................................. 19
2.5.10 Frigjøring av forhaler og livbåtoperasjon vekk fra skuteside. ................................. 20
2.5.11 Tilbakeføringsoperasjon ........................................................................................ 21
2.5.12 Heising av livbåt.................................................................................................... 25
2.5.13 Nødstyring ............................................................................................................ 25
2.5.14 Utstyr livbåt ........................................................................................................... 25
2.6 Viking Evakuering MiniChute - VEMC .......................................................................... 28

SOLAS training manual Kronprins Haakon
Ref.id.: KS&SMS-3-2.13.8.2-02 Håndbok
Page: 5 of 80
2.7 FRC - Fast Rescue Craft - MOB båt ........................................................................... 28
2.7.1 Låring av MOB-båt ................................................................................................ 30
2.7.2 Heisings oprasjon ................................................................................................. 30
2.7.3 MOB båt utstyr ...................................................................................................... 37
2.7.4 VHF-radio ............................................................................................................. 37
2.7.5 UHF ...................................................................................................................... 37
2.7.6 EPIRB (Emergency Position Radio Beacon) ......................................................... 37
2.7.7 SART .................................................................................................................... 39
2.8 Pyroteknikk .................................................................................................................. 40
2.8.1 Fallskjermraketter ................................................................................................. 40
2.8.2 Håndbluss ............................................................................................................. 40
2.8.3 Røyksignaler ......................................................................................................... 40
2.8.4 Linekasterapparat ................................................................................................. 41
2.8.5 Redningsbøyer ..................................................................................................... 42
2.9 Overlevelse på sjøen ................................................................................................... 42
2.9.1 Råd om bruk av utstyr for overlevelse for å overleve ............................................ 42
2.9.2 Fare for eksponering – Retningslinjer for overlevelse i kaldt vann ......................... 44
2.9.3 Hypotermi ............................................................................................................. 46
2.9.4 Før man forlater skipet .......................................................................................... 47
2.9.5 Bruk av overlevelsesutstyr i livbåt/flåte ................................................................. 48
2.9.6 Behandling av overlevende som har havnet I sjøen .............................................. 48
2.9.7 Kuldeskadevarianter ............................................................................................. 50
2.9.8 Frostskade ............................................................................................................ 50
2.9.9 Kuldeskade (ikke frysende) ................................................................................... 51
2.10 Brannvern .................................................................................................................... 52
2.10.1 Innledning ............................................................................................................. 52
2.10.2 Prinsipper og teori om brann ................................................................................. 58
2.10.3 Råd om brannslukking om bord ............................................................................ 59
2.10.4 Brannslukker ......................................................................................................... 62
2.10.5 Brannskap ............................................................................................................ 66
2.10.6 Branntepper .......................................................................................................... 66
2.10.7 Røyk / varmedetektorer ........................................................................................ 66
2.10.8 SOPEP ................................................................................................................. 67
2.10.9 Brannslokkings og beskyttelsessystemer .............................................................. 67

SOLAS training manual Kronprins Haakon
Ref.id.: KS&SMS-3-2.13.8.2-02 Håndbok
Page: 6 of 80
1. Introduction
1.1 Purpose
The purpose of this Manual is to provide all crew with information on the life-saving appliances and
fire-fighting equipment on board. The manual may also serve as an overall source of guidance to
safety and survival at sea.
1.2 Scope
This Manual is provided to comply with the international convention for the Safety of Life At Sea
1974 as amended (SOLAS) Chapter III, Regulation 35, regarding life- saving appliances and
Chapter II-2, Regulation 15, concerning fire-fighting.
Information provided by manufacturers and regulatory organizations, such as IMO, as well as
practical experience has been used in compiling this manual.
A copy of the SOLAS Training Manual shall always be available in each recreational room.
1.3 Responsibilities
Safety Officer (Chief Officer) under the supervision of the Master onboard, are responsible for
keeping this Manual up to date and reflecting the actual status of the safety and fire equipment on
board.
1.4 Definitions
COSHH Control of Substances Hazardous to Health
EPIRB Emergency Position Indicating Radio Beacon
CRO Control Room Operator
ECR Engine Control Room
ECC Emergency Control Centre
MOB Man Over Board
MRT POB Marine Rescue Technologies, Personnel on board system
Muster To gather together at a certain place Muster station A certain place where everyone is ordered to go when there is an emergency
Particulars Information about details of something
PA system Public Address system for messages and alarms POB Persons on Board PPE Personal Protective Equipment Safety Induction A walkthrough of the vessel overall safety system Including drills, alarms and mustering for
newly arrived
SART Search and Rescue Transponder
SO Safety Officer
SOLAS training manual Kronprins Haakon
Ref.id.: KS&SMS-3-2.13.8.2-02 Håndbok
Page: 7 of 80
2 Procedure
2.1 Introduction
On arrival on board, or shortly thereafter, all crew will be taken on a Safety Induction through the
ship (safety induction) where the safety system will be explained in more detail together with other
essential information for newcomers.
The important information given to the crew during their Safety Induction should be memorized and
are as follows:
• The meaning of the alarm signals
• The location of muster stations, assigned lifeboat and life rafts.
• The location of lifejackets and immersion suits
• The location of escape routes
• The location of the nearest fire extinguishers, fire hydrants and manual call points (alarm push-buttons) in relation to the cabin, public spaces commonly used and the working area if applicable.
2.2 Muster Stations / Life Boats / Life Boats / Life Rafts
2.2.1 Muster Station
When the General Alarm, Fire alarm, Gas alarm or evacuation alarm sounds all personnel that are
members of Emergency Response Teams shall proceed to their Emergency Muster station or as
directed over the PA system and contact the bridge. All other personnel that are not members of
any emergency team shall proceed to their assigned muster station.
Communications shall be used in the following priority:
• UHF radio
• VHF radio
• Telephone
• PA announcements
On board Kronprins Haakon there is 1 muster station located on deck 5 in the Messroom.
2.2.2 Lifeboats
If the Evacuation alarm sounds and the order is given to muster at the muster stations to prepare for
abandon Kronprins Haakon by lifeboats; all personnel should collect their survival suit from lockers
on deck 5. Additional survival suits are located at the muster stations, bridge and engine control
room (ECR).
Kronprins Haakon lifeboats are located:
• Lifeboat 1, port side deck 5
• Lifeboat 2, stbd. side deck 5

SOLAS training manual Kronprins Haakon
Ref.id.: KS&SMS-3-2.13.8.2-02 Håndbok
Page: 8 of 80
2.2.3 Evacuation Chute Life Rafts
There are 2 evacuation chute life rafts on board which are located on Deck 5 SB and Deck 4 PS aft
of the work boat and MOB boat respectively.
2.3 Fire Stations
There are two fire stations on board.
Fire Station 1: Located in locker Deck 4 PS / mob boat area. Fire Station 2: Located in helicopter hangar, Deck 6.
2.4 Life Saving Appliances
The ship is equipped with 2 enclosed lifeboats for 68persons at current location. They are
constructed and equipped in accordance with the LSA code.
There are 2 evacuation chute life-rafts available. 1 x 100 persons capacity each.
One davit launched self-righting MOB boat, Stinger 760 Jet, is located at port side Deck 4. It is
capable of 6 persons on board.
Lifebuoys:
2.4.1 Fire & Safety Plans and Station Bills
In the passage ways and public areas there are Fire & Safety Plans and Station Bills / muster lists
posted.
2.4.2 Life jackets
These are SOLAS type lifejackets and have self-righting capability that keeps the body afloat in the
right position even if the person is unconscious. The life jackets are fitted with a flashing white light
and whistle. The light is automatically activated when in contact with water.

SOLAS training manual Kronprins Haakon
Ref.id.: KS&SMS-3-2.13.8.2-02 Håndbok
Page: 9 of 80
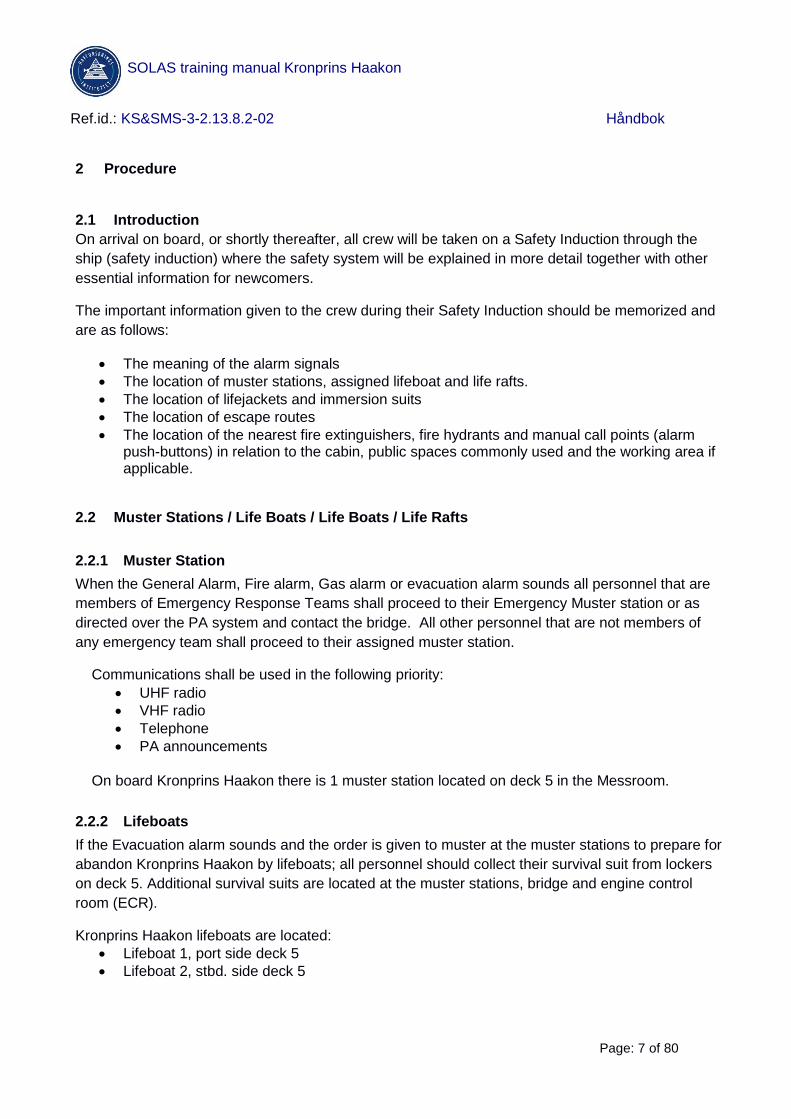
Donning of life jackets:
Onboard there are different types of life jackets. Donning instructions for each is show:
SOLAS training manual Kronprins Haakon
Ref.id.: KS&SMS-3-2.13.8.2-02 Håndbok
Page: 10 of 80

SOLAS training manual Kronprins Haakon
Ref.id.: KS&SMS-3-2.13.8.2-02 Håndbok
Page: 11 of 80

SOLAS training manual Kronprins Haakon
Ref.id.: KS&SMS-3-2.13.8.2-02 Håndbok
Page: 12 of 80

SOLAS training manual Kronprins Haakon
Ref.id.: KS&SMS-3-2.13.8.2-02 Håndbok
Page: 13 of 80
2.4.3 Immersion suits
The immersion suit onboard is the PS 4170 Wiking Immersion Suit.
The insulation in an immersion suit works by locking air and radiant body heat in the suit, which
helps prevent hypothermia and extends survival time in the water. Hypothermia occurs when body
temperature drops below normal, specifically when the core temperature falls below 35°C. Signs
and symptoms that may develop include gradual loss of mental and physical abilities. Severe
hypothermia can lead to death.

SOLAS training manual Kronprins Haakon
Ref.id.: KS&SMS-3-2.13.8.2-02 Håndbok
Page: 14 of 80
Donning of Immersion suit:

SOLAS training manual Kronprins Haakon
Ref.id.: KS&SMS-3-2.13.8.2-02 Håndbok
Page: 15 of 80
2.4.4 MOB / Work boat Rescue suits
There are 6 rescue suits available. These are to be used during rescue operations. The MOB survival suits are located Deck 4 SB locker.
Instructions on how to don the MOB suit:
1. Don the suit – legs first. 2. Put on the hood. 3. Zip the front zipper. 4. Put on the gloves and zip up the zip.
2.5 Lifeboats
The ship is equipped with two totally enclosed self-righting lifeboats, Harding. Each boat is rated for
68persons, reduced to, constructed and equipped in accordance with LSA code and have sufficient
fuel for 24 hours running at full speed. (For operation of engine ref technical documentation)

SOLAS training manual Kronprins Haakon
Ref.id.: KS&SMS-3-2.13.8.2-02 Håndbok
Page: 16 of 80
SOLAS training manual Kronprins Haakon
Ref.id.: KS&SMS-3-2.13.8.2-02 Håndbok
Page: 17 of 80
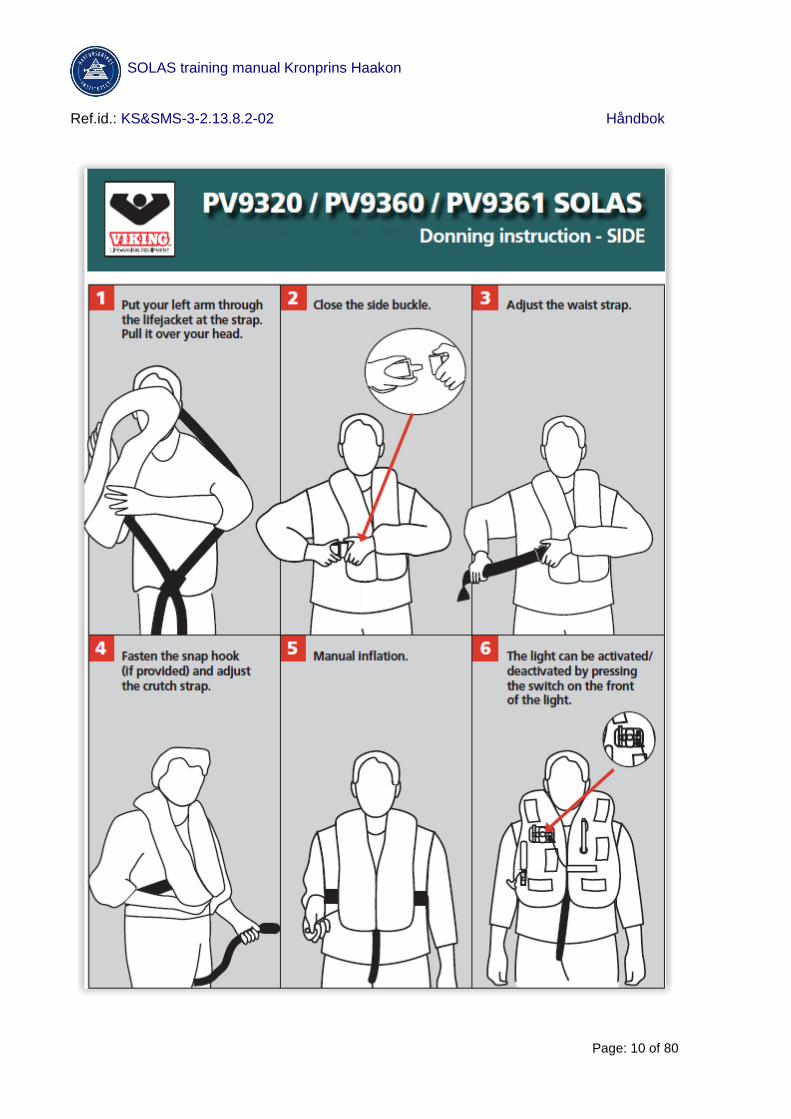
2.5.1 Entrance
Entrance is primarily through side doors. To expedite boarding, always occupy the innermost seat first. Last one to enter the lifeboat must close the hatch making sure that handles are turned to the position “CLOSED”.
Seating positions of persons should be carefully selected to maintain a good trim of the lifeboat.
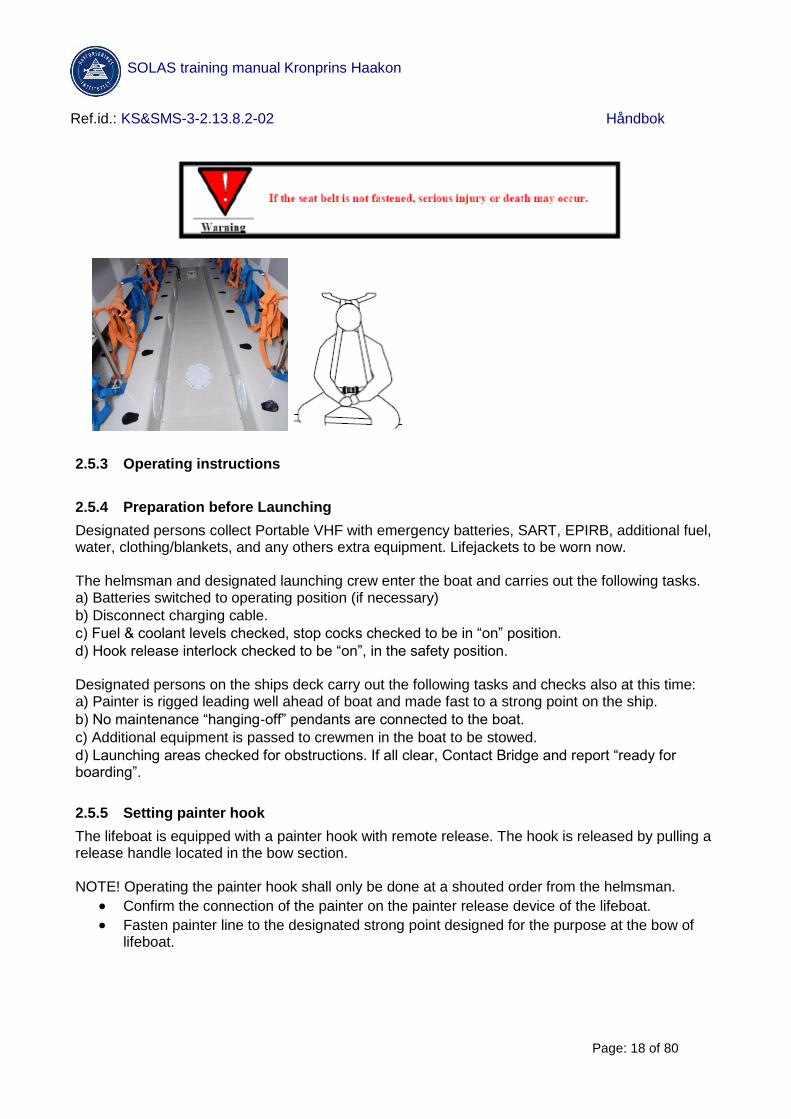
2.5.2 Seatbelts
Each seat in the lifeboat is indicated by a black seating-sign
All seats have a 4-point safety belt. Make sure that both shoulder straps are in place before lap belt is tightened. Lap belt is secured with an “aircraft” type buckle, and tightened by pulling the right-hand tab. The seat belts are designed to hold each occupant securely in case of heavy rolling, capsize or
a self-righting condition. When seated, the seatbelt should always be fastened.
SOLAS training manual Kronprins Haakon
Ref.id.: KS&SMS-3-2.13.8.2-02 Håndbok
Page: 18 of 80
2.5.3 Operating instructions
2.5.4 Preparation before Launching
Designated persons collect Portable VHF with emergency batteries, SART, EPIRB, additional fuel, water, clothing/blankets, and any others extra equipment. Lifejackets to be worn now. The helmsman and designated launching crew enter the boat and carries out the following tasks. a) Batteries switched to operating position (if necessary)
b) Disconnect charging cable.
c) Fuel & coolant levels checked, stop cocks checked to be in “on” position.
d) Hook release interlock checked to be “on”, in the safety position. Designated persons on the ships deck carry out the following tasks and checks also at this time: a) Painter is rigged leading well ahead of boat and made fast to a strong point on the ship.
b) No maintenance “hanging-off” pendants are connected to the boat.
c) Additional equipment is passed to crewmen in the boat to be stowed.
d) Launching areas checked for obstructions. If all clear, Contact Bridge and report “ready for boarding”.
2.5.5 Setting painter hook
The lifeboat is equipped with a painter hook with remote release. The hook is released by pulling a release handle located in the bow section. NOTE! Operating the painter hook shall only be done at a shouted order from the helmsman.
• Confirm the connection of the painter on the painter release device of the lifeboat.
• Fasten painter line to the designated strong point designed for the purpose at the bow of lifeboat.

SOLAS training manual Kronprins Haakon
Ref.id.: KS&SMS-3-2.13.8.2-02 Håndbok
Page: 19 of 80
SOLAS training manual Kronprins Haakon
Ref.id.: KS&SMS-3-2.13.8.2-02 Håndbok
Page: 20 of 80
2.5.6 Embarkation
• Those who are able board the lifeboat on their own. Casualties on stretchers are passed onboard and secured. All passengers put on seatbelts. Helmsman starts the engine.
• The last person to board re-confirms that launching area is clear.
• All doors and portholes are closed.
2.5.7 Launching the boat
• Make sure that all lifeboat lashings are removed before launching. (In emergency launching this don't apply)
• Confirm that all crew boarded in the lifeboat are seated and their seatbelts are fastened. • Start the engine • Pull control wire nr 1, this wil activate the lifeboat davit. keep pressure on the wire until
lifeboat davit stops, Lifeboat are now clear of the shipside and ready to be lowered to sea level.
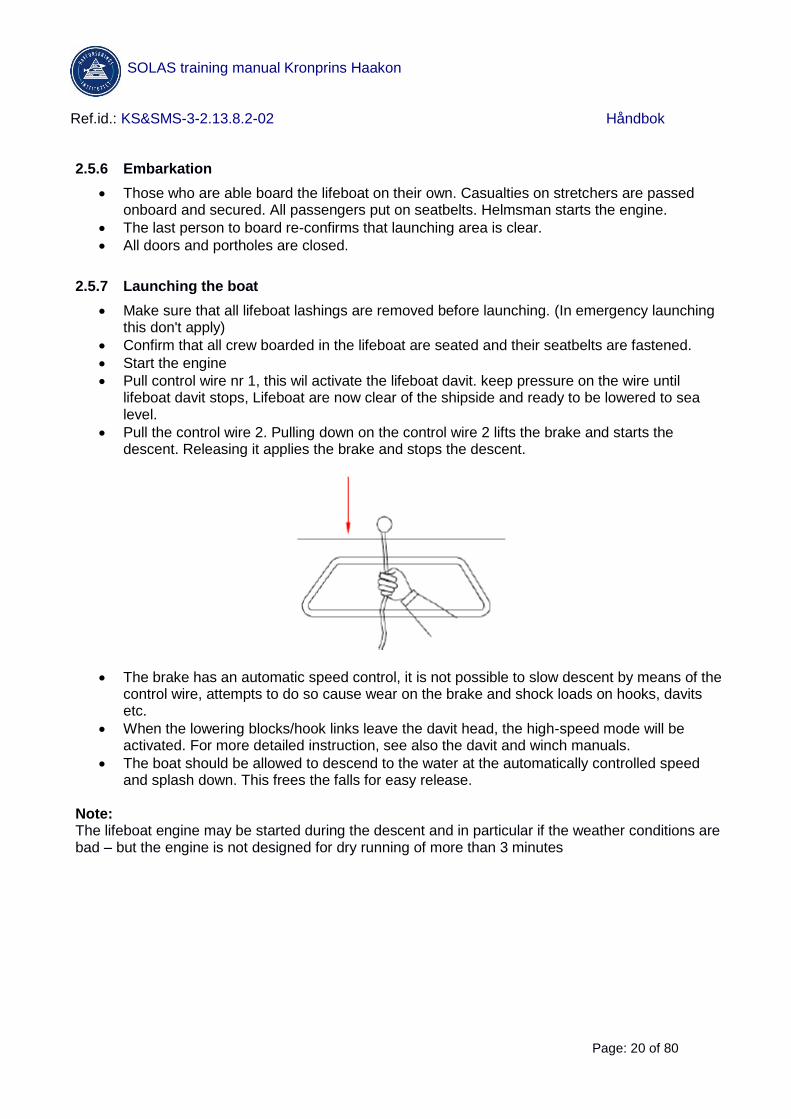
• Pull the control wire 2. Pulling down on the control wire 2 lifts the brake and starts the descent. Releasing it applies the brake and stops the descent.
• The brake has an automatic speed control, it is not possible to slow descent by means of the control wire, attempts to do so cause wear on the brake and shock loads on hooks, davits etc.
• When the lowering blocks/hook links leave the davit head, the high-speed mode will be activated. For more detailed instruction, see also the davit and winch manuals.
• The boat should be allowed to descend to the water at the automatically controlled speed and splash down. This frees the falls for easy release.
Note: The lifeboat engine may be started during the descent and in particular if the weather conditions are bad – but the engine is not designed for dry running of more than 3 minutes

SOLAS training manual Kronprins Haakon
Ref.id.: KS&SMS-3-2.13.8.2-02 Håndbok
Page: 21 of 80
2.5.8 Normal Hook Release
The helmsman checks that the Hook Release Interlock is now in the “off”, cleared position. Having removed the manual locking devices, he operates the lever to release both hooks simultaneously. Should the Release Interlock not have disengaged automatically the emergency override must be used. See below for detailed instructions Off-load release This operation is the normal method of launch and release and is conducted when the lifeboat is fully waterborne.

SOLAS training manual Kronprins Haakon
Ref.id.: KS&SMS-3-2.13.8.2-02 Håndbok
Page: 22 of 80

SOLAS training manual Kronprins Haakon
Ref.id.: KS&SMS-3-2.13.8.2-02 Håndbok
Page: 23 of 80

SOLAS training manual Kronprins Haakon
Ref.id.: KS&SMS-3-2.13.8.2-02 Håndbok
Page: 24 of 80
2.5.9 Emergency hook release - On-load release
This operation is conducted when the lifeboat is not fully waterborne

SOLAS training manual Kronprins Haakon
Ref.id.: KS&SMS-3-2.13.8.2-02 Håndbok
Page: 25 of 80
2.5.10 Painter release and lifeboat operation - Clearing the ship.
With the lifeboat released the falls hanging loose now present a hazard to the ship and lifeboat; helmsmen need to acquire skill by practicing the necessary manoeuvres, every boat behaves differently. The principle entails twisting the lifeboat from the ships side by kicking the stern out with rudder hard over and with short bursts of engine power. The bow should swing in towards the ships side, the stern out. Releasing the painter at this stage and with engine full astern and rudder amidships, the lifeboat should pull clear. Once away, the lifeboats should be run into clear water as quickly as possible. If the skates which
are of the type which must be released in order to achieve speed, should be released now.
SOLAS training manual Kronprins Haakon
Ref.id.: KS&SMS-3-2.13.8.2-02 Håndbok
Page: 26 of 80
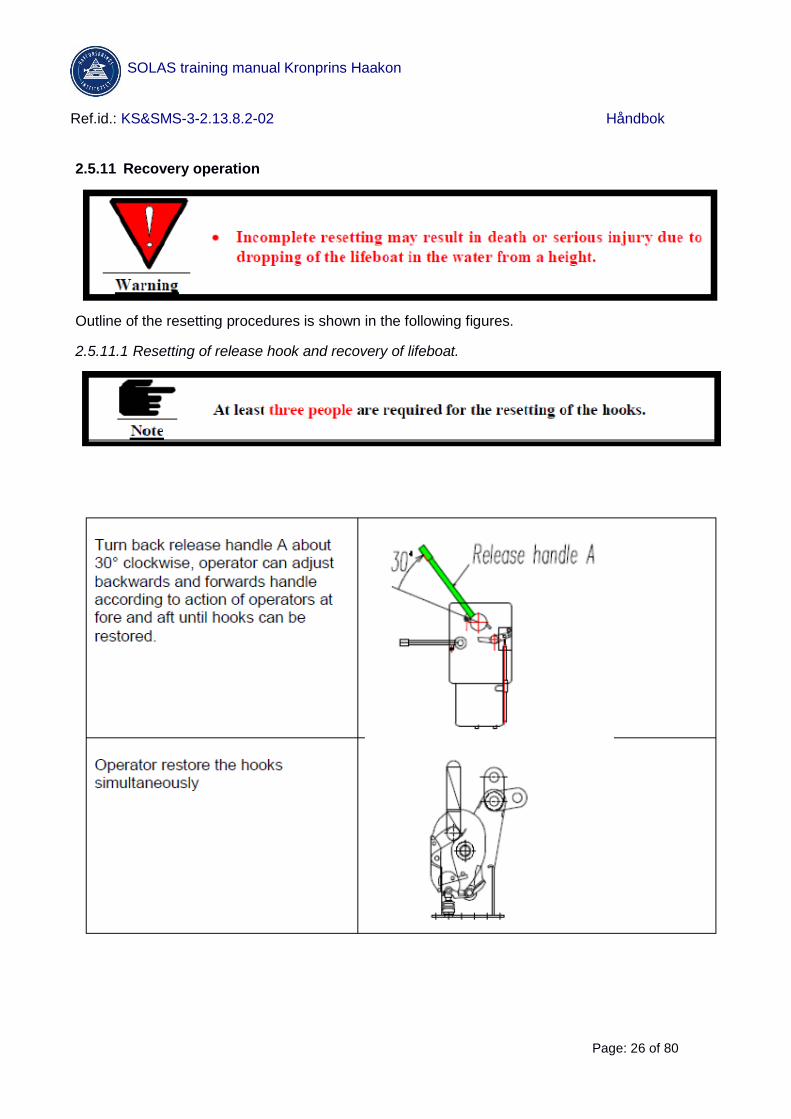
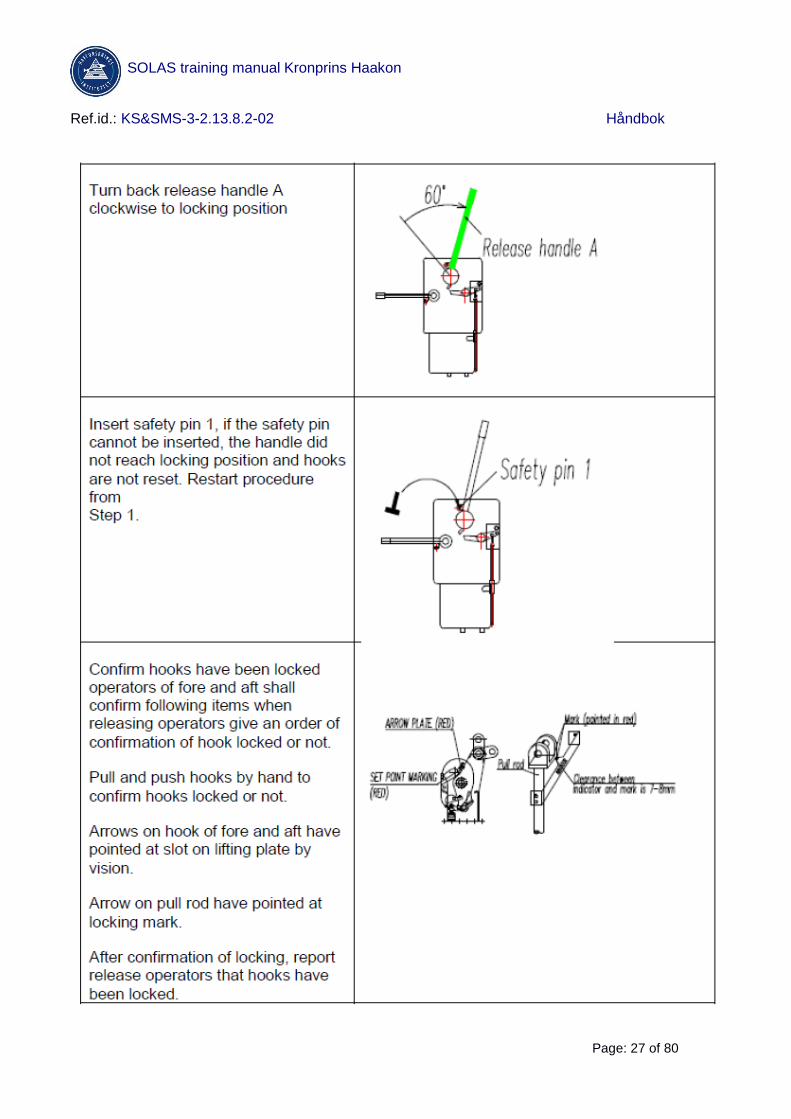
2.5.11 Recovery operation
Outline of the resetting procedures is shown in the following figures.
2.5.11.1 Resetting of release hook and recovery of lifeboat.
SOLAS training manual Kronprins Haakon
Ref.id.: KS&SMS-3-2.13.8.2-02 Håndbok
Page: 27 of 80

SOLAS training manual Kronprins Haakon
Ref.id.: KS&SMS-3-2.13.8.2-02 Håndbok
Page: 28 of 80

SOLAS training manual Kronprins Haakon
Ref.id.: KS&SMS-3-2.13.8.2-02 Håndbok
Page: 29 of 80
The recovery procedure is to be in accordance with the above steps only after completing the
release gear resetting.
With excess persons disembarked the skates should be refitted (if it was necessary to remove them) and the boat returns to the ship. The boat’s painter should be hanging vertically down the side of the ship and the first step is to approach and retrieve it. Wind/tide/current conditions will determine the best approach angle and direction but once the
painter eye is re-attached to its’ own release hook forward, it will assist in positioning the boat at or
near its’ falls. Running the boat astern and drawing the painter out towards the ships stern will result

SOLAS training manual Kronprins Haakon
Ref.id.: KS&SMS-3-2.13.8.2-02 Håndbok
Page: 30 of 80
in the bow being drawn alongside the ship. With engine and rudder movements the stern can be
controlled in most conditions, but it may be sometimes necessary to run a line to the stern of the
lifeboat as well. Another method is to have a tail rope attached to the falls for the same purpose.
The lifeboat is brought under the falls taking care that they do not make heavy contact with the lifeboat or ship. The rings are attached to the hooks, checked, and the order given to the winch controller to begin to lift the lifeboat just clear of the water and then stop. During the lift the two crewmen should watch their hooks carefully, checking both outside and inside for any sign of movement as the weight is taken. The checks should be made continuously, any problem being reported to the helmsman immediately. When clear of the water the hook release’s interlock should be sighted to confirm that it has re-
engaged itself automatically. If everything is found in good order and an embarkation ladder is
available, it may be prudent to disembark the remaining crewmen, otherwise the crewmen should be
seated wearing lifejackets, and securely belted before the order to continue hoisting is given. The
engine may now be stopped, but not before now.
2.5.12 Hoisting the lifeboat
▪ Hoist the lifeboat by operating the winch using the push-button switch following instructions given by officer in charge.
▪ Hoist lifeboat until the winch is stopped by the limit switch.
▪ Disembark from the lifeboat.
2.5.13 Emergency steering
When normal steering gear work out, emergency steering be carried out by spare tiller ”A”, which is stored in the steering accessory store and marked

SOLAS training manual Kronprins Haakon
Ref.id.: KS&SMS-3-2.13.8.2-02 Håndbok
Page: 31 of 80
2.5.14 Lifeboat equipment
A manual bilge pump is located in the aft section of the lifeboat, bailing either the engine room or the lifeboat. The bilge pump has a capacity of 60 litres per minute.
SART (Search and Rescue Transponder) (optional) A SART radar transponder are mounted stern of the lifeboat.

SOLAS training manual Kronprins Haakon
Ref.id.: KS&SMS-3-2.13.8.2-02 Håndbok
Page: 32 of 80
EPIRB (Emergency Position-Indicating Radio Beacon) (optional) An EPIRB are mounted stern of the lifeboat

SOLAS training manual Kronprins Haakon
Ref.id.: KS&SMS-3-2.13.8.2-02 Håndbok
Page: 33 of 80
Sea anchor
Radar reflector The radar reflector is located starboard aft and should be mounted in the bracket on top of cockpit
tower.

SOLAS training manual Kronprins Haakon
Ref.id.: KS&SMS-3-2.13.8.2-02 Håndbok
Page: 34 of 80
Fresh water and food There is 1 litre of fresh water per person in 0,5 litre bags. The fresh water is stowed into the aft
compartments marked “WATER”. There is also food in the compartments marked “FOOD”.
Rain water drinking kit The rain water collector consists of a rectangle section on top of the canopy with drain hole. The
water will be collected in the supplied plastic containers.
Additional lifeboat equipment is for example: boat hooks and oars, electric torch with spare batteries,
rescue quoit, knife, signalling mirror, rockets and flares, VHF radio, SART (search and radar
transponder).
2.6 Viking Evacuation MiniChute - VEMC
Kronprins Haakon is equipped with a combination system of life raft (100 persons each) and evacuation chute. A complete manual for the system is attached as appendix to this manual.

SOLAS training manual Kronprins Haakon
Ref.id.: KS&SMS-3-2.13.8.2-02 Håndbok
Page: 35 of 80
2.7 FRC – Fast Rescue Craft
The Man Over Board (MOB Boat) is the primary way of saving a person in the water. The boat is
positioned Deck 4, Portside midships.
The function of the MOB Boat is to carry out rescue operations e.g. man over board incidents.

SOLAS training manual Kronprins Haakon
Ref.id.: KS&SMS-3-2.13.8.2-02 Håndbok
Page: 36 of 80
The boat has foam-filled compartments in the hull and provides sufficient buoyancy to prevent boat
from sinking even when damaged.
The deck being self-bailing through transom stern. The strength of hull and superstructure is
sufficient to withstand all normal forces encountered under normal use at sea, at maximum boat
speed. A single point lifting arrangement for davit or crane is fitted.
There is self-righting equipment fitted on the stern. If the boat capsizes the crew members can then
pull the wire to inflate the airbag and the boat will rotate back into position.

SOLAS training manual Kronprins Haakon
Ref.id.: KS&SMS-3-2.13.8.2-02 Håndbok
Page: 37 of 80
2.7.1 Lowering operation
Before launch A. Remove all protection covers, if any.
B. Remove boat lashings, if any.
C. Make sure the wire ropes create no obstruction, preventing the lowering procedure.
D. Check the conditions and efficiency of the wire and that the hook is properly connected to the boat.
E. Check and remove any obstruction / railing.
F. Check the boat drains.
G. Check that the remote-control wires are not connected to the boat. Lowering operation When an emergency situation has occurred in normal conditions, the davit can be launched out: A. Embarkation of the crew.
B. For your safety, if the craft is equipped with seat belts, they should be fastened.
C. Pivot the davit in to outer position by use of the remote control.
D. To lower the boat, use the push button on the remote. Important! If the hook has to be lowered without load, the winch wire has to have tension to secure proper spooling of wire. E. Start the engine of the craft when waterborne, following the instruction of the boat manufacturer.
F. Release hook, when there is no side force on lifting wire.
G. Release painter line.
Lowering operation in "dead ship" conditions When an emergency situation has occurred, and you have a dead ship, the davit can be launched out by stored energy in the accumulator. Oil pressure from the preloaded accumulator connected to the hydraulic circuit is used for that purpose. The system is designed so that the accumulator is automatically filled.

SOLAS training manual Kronprins Haakon
Ref.id.: KS&SMS-3-2.13.8.2-02 Håndbok
Page: 38 of 80
A pressure compensated flow control valve in the system will regulate maximum lowering speed. Operation of the davit: A. Switch over to emergency system, by operating the emergency system valve (Picture 3.1), located and marked next to hand pump, before embarking the boat.
B. Pull emergency pivoting line (green coloured nylon rope) to pivot the davit in to outer position.
C. Pull emergency lowering pull line (orange coloured nylon rope), and keep tension on the rope/bag until the boat are waterborne.
D. Then follow point E, F and G section above. Important! Emergency system valve needs always to be closed under normal conditions, and to be opened under emergency conditions. Important! For personal safety, never wrap the emergency rope around your fingers or
hand.
2.7.2 Hoisting operation
Hoisting operation A. Fasten the painter line to the craft.
B. For your safety, if the craft is equipped with seat belts these should be fastened.
C. Fasten the hook to the craft, then tension the lifting wire.
D. Stop the engine of the craft, following the instruction of the boat manufacturer.
E. Hoist the boat by use of the remote control (the end stop function will automatically stop the boat when the highest lifting position is reached).
F. Pivot the davit in to inner position by use of the remote control.
G. When boat is secured, disembark the crew.
H. Check if the emergency lowering rope is properly spooled/ packed.
I. To prepare the craft for stowing, follow the instructions as given in the manual for the survival craft.
J. Replace all protection covers, if any. Important! It is recommended to switch from high speed to low speed hoisting just
before the wire/boat is reaching its highest point. See also section 4.5
Hoisting operation in "dead ship" conditions A. Follow point A, B, C and D above.
B. Close the emergency system valve (Picture below).
C. Insert shaft in hand pump.
D. Pump up accumulator pressure to 190-240 bar.
E. Open the emergency system valve (Picture below).
F. Operate the manual hoisting valve (Picture below), to relief pressure in the accumulator. The hoisting operation will start. Important! Repeat operation until boat is at highest lifting position. G. Repeat operation B, C, D, E and F until the highest lifting position is reached. For pivot the davit inboard (cylinder in) in “dead ship” condition, please see section Direct
manual operation.
SOLAS training manual Kronprins Haakon
Ref.id.: KS&SMS-3-2.13.8.2-02 Håndbok
Page: 39 of 80
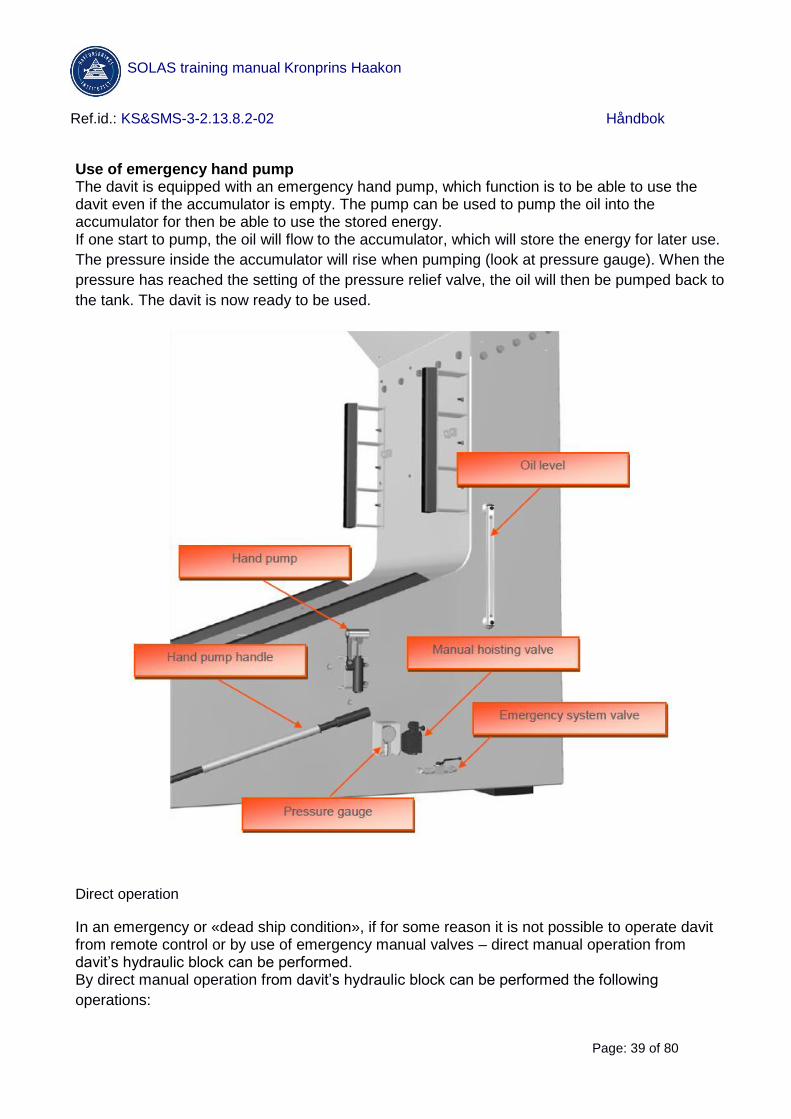
Use of emergency hand pump The davit is equipped with an emergency hand pump, which function is to be able to use the davit even if the accumulator is empty. The pump can be used to pump the oil into the accumulator for then be able to use the stored energy. If one start to pump, the oil will flow to the accumulator, which will store the energy for later use.
The pressure inside the accumulator will rise when pumping (look at pressure gauge). When the
pressure has reached the setting of the pressure relief valve, the oil will then be pumped back to
the tank. The davit is now ready to be used.
Direct operation
In an emergency or «dead ship condition», if for some reason it is not possible to operate davit from remote control or by use of emergency manual valves – direct manual operation from davit’s hydraulic block can be performed. By direct manual operation from davit’s hydraulic block can be performed the following
operations:

SOLAS training manual Kronprins Haakon
Ref.id.: KS&SMS-3-2.13.8.2-02 Håndbok
Page: 40 of 80
In order to operate davit, the following operations need to be conducted: A. Open the hatch where davit’s hydraulic block situated.
B. Open, by push and twist, a manual override (A) on a Y1 poppet valve (Pic. 3.2 and Pic. 3.3).
C. Push in manual override (B) on a directional control valves (YX), by use of screwdriver or similar tool (Pic. 3.4). Davit will start to operate

SOLAS training manual Kronprins Haakon
Ref.id.: KS&SMS-3-2.13.8.2-02 Håndbok
Page: 41 of 80
D. Conduct all needed operations.
E. Close, by push and twist, a manual override (A) on a Y1 poppet valve (Pic. 3.2 and Pic. 3.3).
F. Close the hatch
Remote control The remote control comes with 5 buttons. Two buttons operate the cylinder, in to outer position (CYLINDER OUT) and in to inner position (CYLINDER IN). Two buttons operate the winch, down (LOWERING) and up (HOIST), these two buttons have two steps. Level one is normal speed, level two is high speed. Red button is the EMERGENCY STOP. Remote control can be equipped with extra buttons depending on additional equipment of the
davit.
Important! The davit shall always be operational under normal conditions, emergency
stop button shall not be activated.
Launching by pull lines within the craft A. Prepare davit for launching according to procedure described in manual section 3.1.1 and 3.1.3

SOLAS training manual Kronprins Haakon
Ref.id.: KS&SMS-3-2.13.8.2-02 Håndbok
Page: 42 of 80
B. Detach “Velcro” straps to take off bag with lowering pull line (orange coloured nylon rope) from davit and keep it in a rescue boat.
C. Pull pivoting line (green coloured nylon rope). This will initiate pivoting of the davit. Keep tension on line until pivoting completed.
D. Open the bag with lowering pull line (orange coloured nylon rope) by releasing “Velcro” tape. The bag is ready to use.
E. Pull the bag with lowering pull line (orange coloured nylon rope) and keep tension on it. This will initiate lowering. Pivoting line shall remain in davit wire gland.
Important! During lowering, tension shall be kept on bag itself (not on nylon rope). Nylon
rope will freely unfold from the bag.
F. Continue to keep tension on bag with lowering pull line (orange coloured nylon rope) until rescue boat is waterborne.
G. Follow the procedure described in manual section 3.1.3

SOLAS training manual Kronprins Haakon
Ref.id.: KS&SMS-3-2.13.8.2-02 Håndbok
Page: 43 of 80
Important! After the use line need to be placed into bag properly: 1. Line cannot be knotted.
2. Line should be dry and clean.
3. Close the bag by “Velcro” tape.
4. The bag is ready to be used again.
8.4 Launching by pull lines from deck A. Prepare davit for launching according to procedure described in manual section 3.1.1 and 3.1.3
B. Detach “Velcro” straps to take off bag with lowering pull line (orange coloured nylon rope) from davit and take it on to the deck. Length of line should allow this.
C. Grab the pivoting line (green coloured nylon rope) and take it on to the deck. Length of line should allow this.
D. Pull pivoting line (green coloured nylon rope). This will initiate pivoting of the davit. Keep tension on line until pivoting completed.
E. Pull the bag with lowering pull line (orange coloured nylon rope) and keep tension on it. This will initiate lowering.

SOLAS training manual Kronprins Haakon
Ref.id.: KS&SMS-3-2.13.8.2-02 Håndbok
Page: 44 of 80
F. Continue to keep tension on lowering pull line (orange coloured nylon rope) until rescue boat is waterborne.
G. Follow the procedure described in manual section 3.1.3
Important! After the use line need to be placed into bag properly: 1. Line cannot be knotted.
2. Line should be dry and clean.
3. Close the bag by “Velcro” tape.
4. The bag is ready to be used again.
2.7.3 MOB Boat equipment
Item Description No.of Dimension 1 Boat hook 1 2 Paddles 2 3 Radar Reflector 1 4 Buoyant Bailer, Plastic 1 5 Waterproof Torch 1 One spare set of battery and one spare bulb 1 6 Signal Whistle, Plastic 1 7 First Aid Outfit, Waterproof package 1 8 Thermal Protective Aid 2 9 Rescue Quoit, with 30 m. buoyant line 2 10 Painter, L=15m. or required 1 11 Jack knife with lanyard 1 12 Buoyant line 1 50 m. 13 Compass 1 (mounted in boat) 14 Search light 1 (mounted in boat) 15 Fire extinguisher 1 (mounted in boat) 16 Bucket with line, plastic 1 17 Sea-anchor, PVC & rope 1 18 Engine tools 1 (engine supply) 19 Engine spare parts 1 (engine supply) 20 GRP Repair kit 1 21 Emergency steering handle 1 22 Rope ladder 1
2.7.4 VHF radio
The use of VHF radios is done on a day to day basis. Portable units available on the bridge.
2.7.5 UHF
UHFs are used daily and are also part of the emergency communication between the different
emergency teams. i.e. Bridge, Emergency Response team and First Aid team. UHF channel 5 is
used by all teams except the Technical team that uses UHF channel 9.

SOLAS training manual Kronprins Haakon
Ref.id.: KS&SMS-3-2.13.8.2-02 Håndbok
Page: 45 of 80
2.7.6 EPIRB (Emergency positioning indicating radio beacon)
EPIRBs operating on the 406 MHz frequency is used for satellite detection and tracking of survival
craft and vessels in distress. This frequency has been designated internationally for use only for
distress. Other types of communication on this frequency are forbidden.
When activated, either manually or by a hydrostatic release, the EPIRB’s signal can be instantly
detected by geostationary satellites. This means that even a brief inadvertent signal can generate a
false alert. If the EPIRB should be activated or released into the sea by mistake, the relevant
maritime authorities must be notified at once.
Once the EPIRB is activated it sends distress signals to a satellite in the COSPAS-SARSAT system.
The distress signal includes a digital message that uniquely identifies each beacon and the satellites
calculate the position of the beacon. The signal is then further relayed to a LUT land user terminal
(ground station), which processes the signal and starts the search and rescue. The EPIRB’s signal
is coded with the identification of the vessel it belongs to.
The 406 MHz EPIRBs are divided into two categories. Category I EPIRBs are activated either
manually or automatically. The automatic activation is triggered when the EPIRB is released from its
bracket. Category I EPIRBs are housed in a special bracket equipped with a hydrostatic release.
This mechanism releases the EPIRB at a water depth of 2-4 meters. The buoyant EPIRB then floats
to the surface and begins transmitting. A Category I EPIRB must be mounted outside where it will be
able to "float free" of a sinking vessel. Category II EPIRBs are manually activated units and should
be stored in the most accessible locations on board for easy access in an emergency.
2.7.6.1 Activation of the EPIRB
Manual operation: 1. Pull pin from release rod to remove cover.
2. Take away the cover with caution.
3. Break the seal and pull the locking pin holding the main
activator switch.
4. Push slider to move switch to “ON” position.
SOLAS training manual Kronprins Haakon
Ref.id.: KS&SMS-3-2.13.8.2-02 Håndbok
Page: 46 of 80
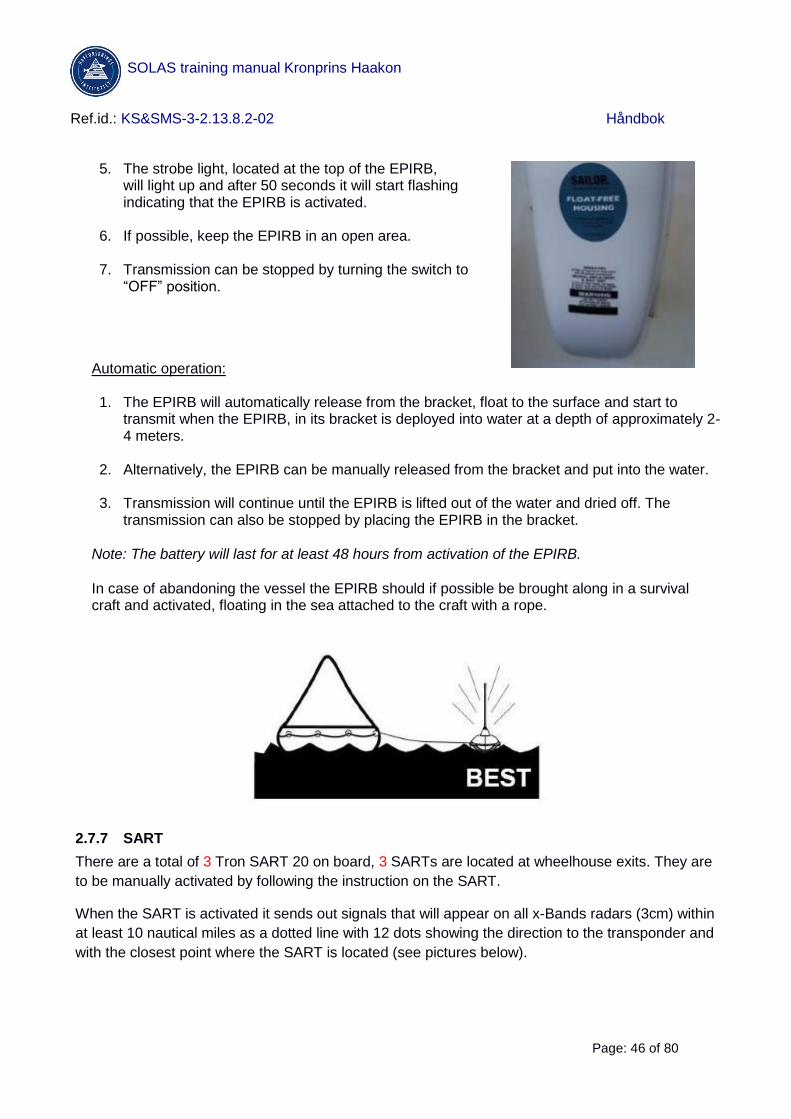
5. The strobe light, located at the top of the EPIRB, will light up and after 50 seconds it will start flashing indicating that the EPIRB is activated.
6. If possible, keep the EPIRB in an open area.
7. Transmission can be stopped by turning the switch to
“OFF” position.
Automatic operation:
1. The EPIRB will automatically release from the bracket, float to the surface and start to transmit when the EPIRB, in its bracket is deployed into water at a depth of approximately 2-4 meters.
2. Alternatively, the EPIRB can be manually released from the bracket and put into the water.
3. Transmission will continue until the EPIRB is lifted out of the water and dried off. The
transmission can also be stopped by placing the EPIRB in the bracket.
Note: The battery will last for at least 48 hours from activation of the EPIRB.
In case of abandoning the vessel the EPIRB should if possible be brought along in a survival craft and activated, floating in the sea attached to the craft with a rope.
2.7.7 SART
There are a total of 3 Tron SART 20 on board, 3 SARTs are located at wheelhouse exits. They are
to be manually activated by following the instruction on the SART.
When the SART is activated it sends out signals that will appear on all x-Bands radars (3cm) within
at least 10 nautical miles as a dotted line with 12 dots showing the direction to the transponder and
with the closest point where the SART is located (see pictures below).

SOLAS training manual Kronprins Haakon
Ref.id.: KS&SMS-3-2.13.8.2-02 Håndbok
Page: 47 of 80
Activation of SART:
1. Pull the ring and push the black button. 2. Mount it if possible to the survival craft.
Once the SART is activated it will transmit for 8 hours.

SOLAS training manual Kronprins Haakon
Ref.id.: KS&SMS-3-2.13.8.2-02 Håndbok
Page: 48 of 80
2.8 Pyrotechnics
2.8.1 Parachute flares
The best signal to use in case of a distress is the parachute rocket signal. The light is seen high
above the horizon and appears in an altitude of 250-300 metres for about 30-60 seconds. In good
visibility, the light can be observed in a 25-30 nautical miles range. The rockets are located 4 in each
lifeboat and life raft. There are also 12 rockets on the bridge. Follow the instructions on the rocket.
2.8.2 Hand flares
The flares are used to show a rescuer your exact position. Await using the hand flares until you can
see the light of the other ship. Hand flares can be launched in different ways according to different
procedures. 6 flares are located in each lifeboat and life raft. Follow the operating instruction on the
hand flare.
2.8.3 Smoke signals
Smoke signals are a day distress signals with a dense orange smoke that will burn for at least 3
minutes and will float. The smoke signal can also be used to mark the position during a rescue
operation. There are 2 smoke signals in each lifeboat and life rafts. Follow the operating instruction
on the signal.

SOLAS training manual Kronprins Haakon
Ref.id.: KS&SMS-3-2.13.8.2-02 Håndbok
Page: 49 of 80
2.8.4 Line-throwing appliance
Line-throwing appliance are used to pass a line from ship to ship, ship to shore or by rescue
services. Kronprins Haakon has 4 line throwers located in the wheelhouse. The throwing line has a
throwing range of 230 meters. Follow the operating instructions on the line-thrower.

SOLAS training manual Kronprins Haakon
Ref.id.: KS&SMS-3-2.13.8.2-02 Håndbok
Page: 50 of 80
SOLAS training manual Kronprins Haakon
Ref.id.: KS&SMS-3-2.13.8.2-02 Håndbok
Page: 51 of 80
2.8.5 Life-buoys
There are 16 life-buoys on board, some with a smoke and light signal, located on deck 6, 4 and 3,
These are used when there is a man overboard situation. If you discover someone falling overboard
or is already in the water, follow these steps:
1. Raise the alarm (shout “Man overboard!”, use telephone or manual call point).
2. Throw the life-buoy as close as possible.
3. Stay put and keep your eyes on the person in the water. It is very important to try to maintain visual contact of the person in the water at all times to be able to guide the MOB Boat to the location as fast as possible.
2.9 Survival at Sea
2.9.1 Advice on how to use survival craft facilities in order to survive
Immediate actions after launching of survival craft:
• Cut the painter and by means of engine, oars or paddles clear the foundering ship.
• Recover and gather all survival crafts and look for survivors still in the water.
• Set the sea anchor afloat to reduce the leeway and stabilize the craft.
• Appoint a person in charge, and arrange a duty watchman’s schedule for constant lookout.
• Familiarize as much as possible under the circumstances with the surroundings and the functioning of the craft.
Actions on board survival craft:
• Take off wet clothes and wring them before putting them on again, use thermal protective bag.
• Inflate life raft floor by means of portable pump.
• Distribute seasick pills if appropriate.
• Treat wounded people.
• Try to get radio connection.
• Activate SART and also EPIRB if on board.
• Locate pyrotechnics for easy access when needed.
• Read the survival instruction booklet.
• Start collecting water and continue to do so at every opportunity.
Location and how to draw attention:
• Try to stay close to the position of distressed vessel.
• Use radio to send emergency signals.
• The EPIRB is automatically sending emergency signals when activated.
• The SART will send signals visible by a closing ship’s radar, if activated.

SOLAS training manual Kronprins Haakon
Ref.id.: KS&SMS-3-2.13.8.2-02 Håndbok
Page: 52 of 80
• Flares and rockets must be used only when there is a potential that somebody will see them.
The following equipment can be used in order to attract the attention of airplanes and ships:
• Portable radio
• Parachute rockets. Visible up to 20-30 km.
• Hand flares. Visible up to 10 km.
• Smoke signal. Visible up to 10 km.
• Heliograph. Sun reflecting to mirror can be visible up to 30 km.
• Signal torch. Try to transmit S.O.S. (3 short, 3 long, 3 short)
Water and food:
• The life boats have a water supply of 1 litre per person.
• The life rafts have a water supply of 1.5 litres per person.
• Do not distribute water the first 24 hours, then start with a daily ration of 0, 5 litres per day and person. This may have to be reduced if the water supply is getting low.
• Always try to collect as much rain water as possible.
• Life raft food rations are 100-125 g/day/person.
• Additional sources of food are fish, birds, turtles etc.
MORE DETAILS
Life rafts:
Bail out all bottom water as fast as possible and use the sponge to dry up the remaining water. It is
important to inflate both the bottom and the canopy since this provides proper insulation against the
cold. Further, various packing materials from the emergency packs, (foam, rubber and cardboard),
may be used for additional insulation by putting it at the bottom. Protect face and back head against
the sun. For the night, dry up the raft interior, inflate the bottom, and close the entrance if deemed
necessary. Rainwater can be drawn from the rubber valve at the canopy down into plastic bags,
however, do not use the first water since it will contain too much salt.
Emergency rations (Food and Water):
Do not hand out any emergency rations for the first 24 hours. The body will grow accustomed to a
reduced consumption and those who are seasick have probably become somewhat used to the
movements of the craft. The food and water rations are divided into equally large portions, so that
the first ration is shared by the shipwrecked after the first 24 hours preferably distributed over three
times. The rations are intended for a stay of four to six days. Never drink saltwater.
Regulations:
Regulations should be laid down by the person in command. An important matter is the discipline on
board. Some may have been shocked by the situation, but it is the duty of the leader to encourage

SOLAS training manual Kronprins Haakon
Ref.id.: KS&SMS-3-2.13.8.2-02 Håndbok
Page: 53 of 80
everyone that the situation is far from hopeless, thus making it clear that the emergency crafts have
been specially designed and equipped for this particular situation.

SOLAS training manual Kronprins Haakon
Ref.id.: KS&SMS-3-2.13.8.2-02 Håndbok
Page: 54 of 80
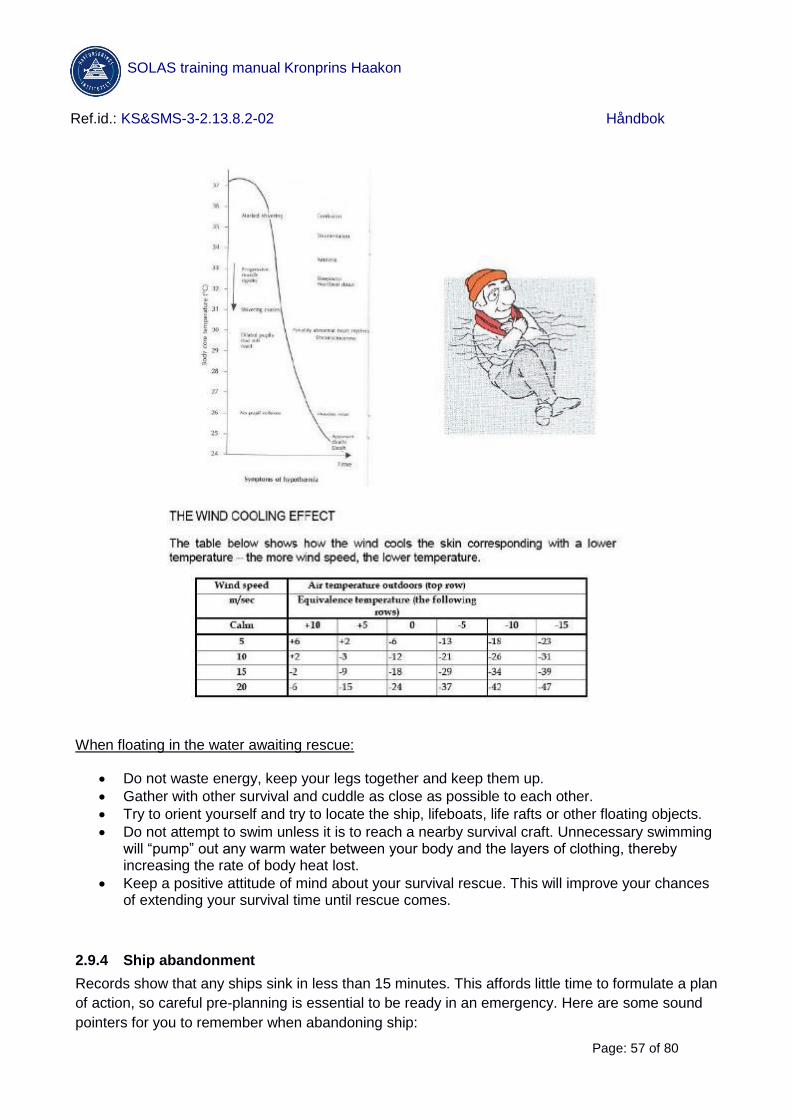
2.9.2 Hazards of exposure - a guide to Cold Water Survival
Introduction:
The purpose of this guide is to examine the hazards of cold exposure that may endanger your life,
and to provide you with advice on how to prevent or minimize those dangers. A thorough
understanding of the information contained in this chapter may someday save your life.
The sinking of the Titanic in 1912 provided a dramatic example of the effects of cold water
immersion. Partially due to a lack of preparedness with protective clothing, of adequate flotation
equipment and of knowledge of survival procedures, none of the 1489 persons immersed in the 0°C
water was alive when rescue vessels arrived one hour and fifty minutes after the sinking. Countless
lives could have been saved had the survivors known more of how to cope with cold water; almost
all of the people in lifeboats were alive.
During the Second World War the Royal Navy of the United Kingdom alone lost about 45 000 men
at sea, of whom it is estimated 30 000 died from drowning and hypothermia. Many of those who
drowned did so because of incapacitation due to cold. Even today the pattern is similar.
It is important to realize that you are not helpless to affect your own survival in cold water. Body heat
loss is a gradual process, and research shows that in calm weather at 5°C a normally dressed
person has only a 50% chance of surviving one hour. Simple self-help techniques can extend this
time, particularly if the person is wearing a lifejacket. You can make the difference; this pamphlet is
intended to show you how.
Your body:
An understanding of how your body reacts to cold air or water exposure and knowing the steps you
can take to help your body delay the damaging effects of cold stress, will help you in your struggle to
stay alive in the event of cold water exposure.
Imagine your body to consist of an inner core and outer layer. Within the core, your body produces a
great deal of heat as a result of normal body functions, such as physical exercise and digesting your
food.
Nature requires that your body core be kept at an ideal temperature of 37 degrees Celsius. A
network of blood vessels running through the core and the outer layer of your body picks up the heat
produced by the ''furnace'' within the core, and distributes the heat throughout the body. Nature also
gives your body a very accurate system to automatically regulate the core temperature at 37
degrees Centigrade. For example, if the temperature around you is high, as on a warm day or in a
hot boiler room, the blood vessels near the skin of your body will enlarge, allowing more blood to
flow to the outer layer and increase body heat loss. This will keep you comfortable (37 degrees
Centigrade) from rising. If the surroundings are cool, your body will narrow the blood vessels in the
outer layer and keep that valuable body heat from being lost too rapidly.
This regulatory system strives to keep the core temperature of the body constant despite variations
in ambient temperature around you. The body can only do this within certain limits. There are levels
of cold exposure when the body must have help in maintaining the core temperature at nature's

SOLAS training manual Kronprins Haakon
Ref.id.: KS&SMS-3-2.13.8.2-02 Håndbok
Page: 55 of 80
choice of 37 degrees Centigrade. You must give it that help by taking the correct actions and
wearing protective clothing
Body heat loss and insulation:
The body gives off its heat to the surroundings in the following ways:
CONDUCTION is the transfer of heat by direct contact with cold water or other materials. Heat
passes from your body, which is at a relatively high temperature, to a substance which is lower in
temperature. Certain substances are better conductors of heat than others. Water conducts heat
many times faster than air.
CONVECTION is the transfer of heat by air or water
currents. Moving air is far cooler to the body than still air.
Cooling by wind is known as the ''wind chill'' effect.
Similarly, disturbed or moving water around your body is
more chilling than still water at the same temperature.
RADIATION is the transfer of heat by rays of energy without
direct contact with other substances, such as a radiator
heating a room.
EVAPORATION is the vaporization or ''drying up'', of liquid,
such as sweat or moisture from wet clothing. When the
body gets too hot, sweating will occur, and the evaporation
of this sweat will help to cool the skin. Although sweating
can be very useful in providing you with comfortable cooling effect on a hot day, evaporation of
moisture from clothing can rob you of valuable body heat on a cold day.
In almost all parts of the world, man cannot survive without the aid of clothes. Clothes by themselves
do not warm the body it is actually warmed by its own heat production. The body heat warms the
layer of air trapped between the skin and clothing. It is this layer of air that provides insulation. If the
layer of air is lost, then that insulation is diminished. This layer of trapped air between skin and
clothing may be disturbed by movement or displaced by water. In either case, valuable warm air is
displaced, and skin temperature will fall. Heat from your body core will then be used in an
endeavour to maintain skin temperature. If heat loss from the skin remains unchecked, body core
temperature will fall.

SOLAS training manual Kronprins Haakon
Ref.id.: KS&SMS-3-2.13.8.2-02 Håndbok
Page: 56 of 80
2.9.3 Hypothermia
The loss of body heat is one of the greatest hazards to the survival of a person, at sea. The rate of
body heat loss depends on water temperature, the protective clothing worn, and the manner in
which the survivor conducts himself. An abnormally low body core temperature can be recognized
by a variety of symptoms. Very early during exposure, the body tries to combat the excessive heat
loss both by narrowing its surface blood vessels (to reduce heat transfer by blood to the surface)
and by shivering (to produce more body heat). However, if the exposure is severe, the body is
unable to conserve or produce enough heat. Body core temperature begins to fall. When body core
temperature is below 35 degrees Centigrade the person is suffering from ''hypothermia''.
By then, discomfort, tiredness, poor co-ordination, numbness, impaired speech, dis-orientation and
mental confusion are well established. As the internal temperature decreases below 31 degrees
Centigrade, unconsciousness may occur, shivering is usually replaced by muscle stiffness, and the
pupils of the eyes may be enlarged. The heart becomes irregular and weak and the pulse is barely
detectable. Although death may occur at any stage of hypothermia, when a person's temperature is
below 30 degrees Centigrade it is very difficult to be sure whether he is alive or dead. Death by
hypothermia is the defined as a failure to revive on re-warming.
SOLAS training manual Kronprins Haakon
Ref.id.: KS&SMS-3-2.13.8.2-02 Håndbok
Page: 57 of 80
When floating in the water awaiting rescue:
• Do not waste energy, keep your legs together and keep them up.
• Gather with other survival and cuddle as close as possible to each other.
• Try to orient yourself and try to locate the ship, lifeboats, life rafts or other floating objects.
• Do not attempt to swim unless it is to reach a nearby survival craft. Unnecessary swimming will “pump” out any warm water between your body and the layers of clothing, thereby increasing the rate of body heat lost.
• Keep a positive attitude of mind about your survival rescue. This will improve your chances of extending your survival time until rescue comes.
2.9.4 Ship abandonment
Records show that any ships sink in less than 15 minutes. This affords little time to formulate a plan
of action, so careful pre-planning is essential to be ready in an emergency. Here are some sound
pointers for you to remember when abandoning ship:

SOLAS training manual Kronprins Haakon
Ref.id.: KS&SMS-3-2.13.8.2-02 Håndbok
Page: 58 of 80
1. Put on as much warm clothing as possible, making sure to cover head, neck, hands and feet.
2. If an immersion suit is available put it on over the warm clothing.
3. If the immersion suit does not have inherent floatation, put on a lifejacket and be sure to
secure it correctly.
4. All persons who know that they are likely to be affected by seasickness should, before or immediately after boarding the survival craft, take some recommended preventative tablets or medicine in a dose recommended by the manufacturer. The incapacitation caused by seasickness interferes with your survival chances. The vomiting removes precious body fluid, while seasickness in general makes you more prone to hypothermia.
5. Avoid entering the water if possible, e.g. board davit-launched survival craft on the
embarkation deck. If davit-launched survival crafts are not available, use over-side ladders, or if necessary lower yourself by means of a rope or fire hose.
6. Unless it is unavoidable, do not jump from higher than 5 meters into the water. Try to
minimize the shock of sudden cold immersion. A sudden plunge into the cold water can cause rapid death or an uncontrollable rise in breathing rate may result in an intake of water into the lungs. On occasions it may be necessary to jump into the water, if so, you should keep your elbows to your side, cover your nose and mouth with one hand while holding the wrist or elbow firmly with the other hand. One should not jump into the water astern of the life raft or lifeboat in case there are many remaining headways on the ship.
7. Once in the water, whether accidentally or by ship’s abandonment, orientate yourself and try
to locate the ship, lifeboats, life rafts, other survivors or other floating objects. If you were unable to prepare yourself before entering the water, button up clothing now. In cold water you may experience violent shivering and great pain. These are natural body reflexes that are not dangerous. You do, however, need to take action as quickly as possible before you lose full use of your hands, button up clothing, turn on signal lights, locate whistle, etc.
8. While afloat in the water, do not attempt to swim unless it is to reach a nearby craft, a fellow
survivor, or a floating object on which you can lean or climb. Unnecessary swimming will pump out any warm water between your body and the layers of clothing, thereby increasing the rate of body heat loss. In addition, unnecessary movements of your arms and legs send warm blood from the inner core to the outer layers of the body. This results in very rapid heat loss. Hence it is most important to remain as still as possible in the water, however painful it may be. Remember, pain will not kill you, but heat loss will.
9. The body position you assume in the water is also very important in conserving heat. Float
as still as possible with your legs together, elbows close to your side and arms folded across the front of your lifejacket. This position minimizes the exposure of the body surface to the cold water. Try to keep your head and neck out of the water.
10. Try to board a lifeboat, raft, or other floating platform or object as soon as possible in order to
shorten the immersion time. Remember, you lose body heat many times faster in water than in air. Since the effectiveness of your insulation has been seriously reduced by water soaking, you must now try to shield yourself from wind to avoid a wind-chill effect (connective cooling). If you manage to climb aboard a lifeboat, shielding can be accomplished with the

SOLAS training manual Kronprins Haakon
Ref.id.: KS&SMS-3-2.13.8.2-02 Håndbok
Page: 59 of 80
aid of a canvas cover or tarpaulin, or an unused garment. Huddling close to the other occupants of the lifeboat or raft will also conserve body heat.
11. Keep a positive attitude of mind about your survival and rescue. This will improve your
chances of extending your survival time until rescue comes. Your will to live does make a difference.
2.9.5 Use of the survival craft facilities
There is several survival equipment's in the lifeboat and in the life raft. For
example, the lifeboat contains a manually operated bilge pump, a buoyant bailer
and two buckets in case of that the boat has taken
in water. Later on, the buckets in can be used for
collecting rainwater.
If there are people around in the water, you can use
the two buoyant rescue quoits. These ones are
attached to a buoyant line.
Throw the quoits towards the people, but try not to
hit them.
When the lifeboat is clear of the ship you can use the
sea anchor (drogue). The sea anchor is found in the
lifeboat as well as life rafts. The use of a drogue serves
two purposes. The first one is to keep the stem of the
boat against the sea and the second is to prevent
drifting from the position where the accident took place. Search and rescue operations will normally
start at that position. A swivel is fitted to the sea anchor in order to prevent the hawser un laying as a
result of rotation. The drogue will also make it more comfortable for the passengers in the survival
craft.
Far at sea, days may pass before you are rescued and therefore the lifeboat is equipped with
watertight receptacles containing 1 litres of fresh water for each person. When rationing use the
following rule:
No water for the first 24 hours and thereafter 0,5 litres per person and day. For distribution of water
you will find a dipper with lanyard and graduated drinking cup.
NEVER DRINK SEAWATER
2.9.6 Treatment of the immersion survivor
The treatment for hypothermia will of course depend on both the condition of the survivor and the
facilities available. Generally speaking, survivors who are rational and capable of recounting their

SOLAS training manual Kronprins Haakon
Ref.id.: KS&SMS-3-2.13.8.2-02 Håndbok
Page: 60 of 80
experiences, although shivering dramatically merely require removal of all wet clothes and
replacement with dry clothes or blankets. Hot sweet drinks, and rest in a warm environment not
exceeding 22 degrees Centigrade (normal room temperature) are also recommended. However,
always bear in mind that even conscious survivors can collapse and become unconscious shortly
after rescue. Alcohol should be avoided at all costs.
How to you examine/treat a person:
If the person is conscious:
A person who responds/reacts after you have spooked/shaken him/her, does often not need any
medical help. If the person seems to be confused or groggy, or in another way seriously sick, then
you shall remain as long as possible, so you can see if the condition is getting worse. If necessary,
call somebody for assistance and do not leave the person on your site until help arrives.
If the person is unconscious but breathing and has a pulse:
• If the survivor is breathing but unconscious, lay him in the unconscious
position as illustrated. This is necessary to ensure that the person’s
breathing is not obstructed by his tongue or by vomit.
• The lower arm is placed behind the neck.
• The upper arm is bent with the hand under the neck. The lower leg is
bent at the knee.
• The upper leg is straight.
If the person is unconscious and has a pulse but is not breathing:
If the person is not breathing but has a pulse you must start mouth to mouth
procedure. If you are alone, give the unconscious 10 artificial respirations
before you call for help.
If possible, let someone else get help.
Continue the artificial respiration in the same tempo as you self breathe
until you are relieved or until you cannot manage to breathe anymore. If the
person starts to breathe again then place the person in the unconscious position.
If the person is unconscious with no breath or pulse:
If the person who is unconscious does not breathe or have any
pulse you must call for help and then start CPR. Give 30 chest
compressions and then 2 artificial respirations. Continue this
with fast exchanges.
The correct way of placing the hand:

SOLAS training manual Kronprins Haakon
Ref.id.: KS&SMS-3-2.13.8.2-02 Håndbok
Page: 61 of 80
Follow the lower edges of the chest with two fingers were the ribs
meet. Place the index finger into one other on the chest. The other
hand’s wrist shall be placed above the index finger on the
breastbone without the fingers touching the breastbone. Put the
first hand above the other hand.
In more serious cases, where the survivor is not shivering and is semi-conscious, unconscious, or
apparently dead, immediate first aid measures will be necessary to preserve life while awaiting
medical advice on more detailed management procedures. The recommended first aid measures for
such an immersion survivor are as follows:
• On rescue always check the survivor's breathing, carotid pulse for one minute (as illustrated),
and pupillary action.
• Medical authorities disagree on the best method of rewarming, but either an active ore
passive method is normally used.
• Active method of warming: This is done preferably in a bath of warm water (38°C to 40°C –
hand hot) or alternatively using heated blankets or sheets (about 45°C, but not hotter).
• Passive method of warming: Cut the persons clothing so that it can be removed with the
minimum of disturbance. Then wrap the person in blankets to reduce further heat loss. Do
not attempt to warm the person by vigorous actions. Apply heating pads or hot water bottles
under the blanket, to the person’s head, neck, chest and groin, but never place these warm
objects against the bare skin, as cold skin is easily burned.
• If active or passive methods of warming are not available, then apply body warmth by direct
body-to-body contact with the rescued person and the person or persons supplying the
warmth. In all cases try to monitor the pulse and breathing.
2.9.7 Cold injury
Another problem confronting a survivor in cold environments is the threat of acquiring a cold injury.
Such injuries usually result from prolonged exposure to low ambient temperatures, especially when
wind speeds are high. Cold injuries may be of a freezing or non-freezing variety.
2.9.8 Freezing cold injury (frostbite)
Frostbite is the term given to the condition when tissue fluids freeze in localized areas of the body,
the hands, face and feet are particularly susceptible.
2.9.8.1 Cause and signs
Exposure, particularly of bare skin to low temperature, especially when combined with movements
of moist/humid air. Look-outs in life rafts or survivors in open boats are particularly prone to this
injury. Accordingly, consideration should be given to the length of watch period.
Early signs of frostbite are:
1. Extreme waxy pallor of the skin.
2. Initial local tingling and stiffness, it is difficult to wrinkle the face or wriggle affected toes or fingers.

SOLAS training manual Kronprins Haakon
Ref.id.: KS&SMS-3-2.13.8.2-02 Håndbok
Page: 62 of 80
3. Complete absence of sensation in the area affected.
4. Local hardness due to freezing of the flesh.
Note: Be watchful for the early signs of frostbite in yourself and in others.
2.9.8.2 Prevention
If bare skin has to be exposed to the elements, the periods of exposure should be kept to a
minimum and freezing winds particularly avoided. Moderate exercise and massage at an early stage
will help to prevent the onset of cold injury. DO NOT smoke, smoking reduces the blood supply to
the hands and feet. Alcoholic drinks should not be consumed.
2.9.8.3 Treatment
On detection of the above signs, immediate steps should be taken to rewarm the frozen part before
permanent damage occurs. Get out of the wind. Rewarm the frozen areas by applying them to a
warmer part of the body, e.g. hands under armpits, cupped hands over cheek, nose, ear, etc. The
frozen areas can also be rewarmed by placing them in water with a temperature of not more than
50°C. Once freezing has occurred, DO NOT rub or massage affected areas.
2.9.9 Non-freezing cold injury (immersion foot)
Immersion foot is a term given to the condition when the temperature of local tissues in the limbs
(usually the feet) remains sub-normal but above freezing for a prolonged period. It is commonly
encountered by shipwreck survivors who have been adrift and cold for several days. Usually the feet
have been wet and immobile, but this injury can also occur in dry conditions. Other contributory
factors are tight footwear and sitting still with the feet down as when sitting in a chair for prolonged
periods.
2.9.9.1 Diagnosis
Feet become white, numb, cold and frequently are slightly swollen. When returned to the warmth
the feet become hot, red, swollen and usually painful.
2.9.9.2 Prevention
Every effort should be made by survivors to keep their feet warm and dry. Shoe laces should be
loosened; the feet should be raised, and toe and ankle exercises encouraged several times a day.
When possible, shoes should be removed, and feet kept warm by placing them under the armpits,
but outside the clothing, of an adjacent occupant. Alternatively, un-wanted spare clothing may be
wrapped round the feet to keep them warm. Smoking should be discouraged.
2.9.9.3 Treatment
After rescue every effort should be made to avoid rapid rewarming of the affected limbs. Care
should be taken to avoid damaging the skin or breaking blisters. Elevate the lower to reduce
swelling and cover lightly.
Remember: Numb limbs do not feel heat or any other pain and are very easily burned. Do not
massage affected limbs.

SOLAS training manual Kronprins Haakon
Ref.id.: KS&SMS-3-2.13.8.2-02 Håndbok
Page: 63 of 80
2.10 Fire Protection
2.10.1 Introduction
Everyone on board, should learn how to extinguish small fires safely and how to behave in more
serious fires. This is done by attending fire courses.
Usually, materials burn in much the same way in similar conditions. Dry wood, arranged properly in
a fireplace, burns with a yellow or orange flame, creates grey or white smoke, and sends sparks up
a chimney.
A small amount of fuel oil in a pan creates dense, black smoke and a hot, orange, rolling flame.
A burner on a gas stove, when supplied at normal pressure, produces an even, blue flame of a
certain temperature.
These normal fires can be put out easily.
But if conditions are changed, the fires' behaviour can be different. The small pile of dry wood may
be in a field, dense brush, or a forest, and when the fire starts, it may spread rapidly beyond control.
The small amount of fuel oil in the pan might instead be a larger quantity in a fuel tank and if ignition
occurs, a rolling mass of flames may race along the vessel. If pressure increases in the pipeline to a
gas stove, that safe, little flame may flare upward and burn someone or ignite combustible materials
nearby.
A Fire Control and Safety Plan is posted on key places on the vessel. Reference is made to the
clippings below with description, quantity and remarks of the icons and their meaning.
(Drawing nr. 08-6543-00-503-001)

SOLAS training manual Kronprins Haakon
Ref.id.: KS&SMS-3-2.13.8.2-02 Håndbok
Page: 64 of 80

SOLAS training manual Kronprins Haakon
Ref.id.: KS&SMS-3-2.13.8.2-02 Håndbok
Page: 65 of 80

SOLAS training manual Kronprins Haakon
Ref.id.: KS&SMS-3-2.13.8.2-02 Håndbok
Page: 66 of 80
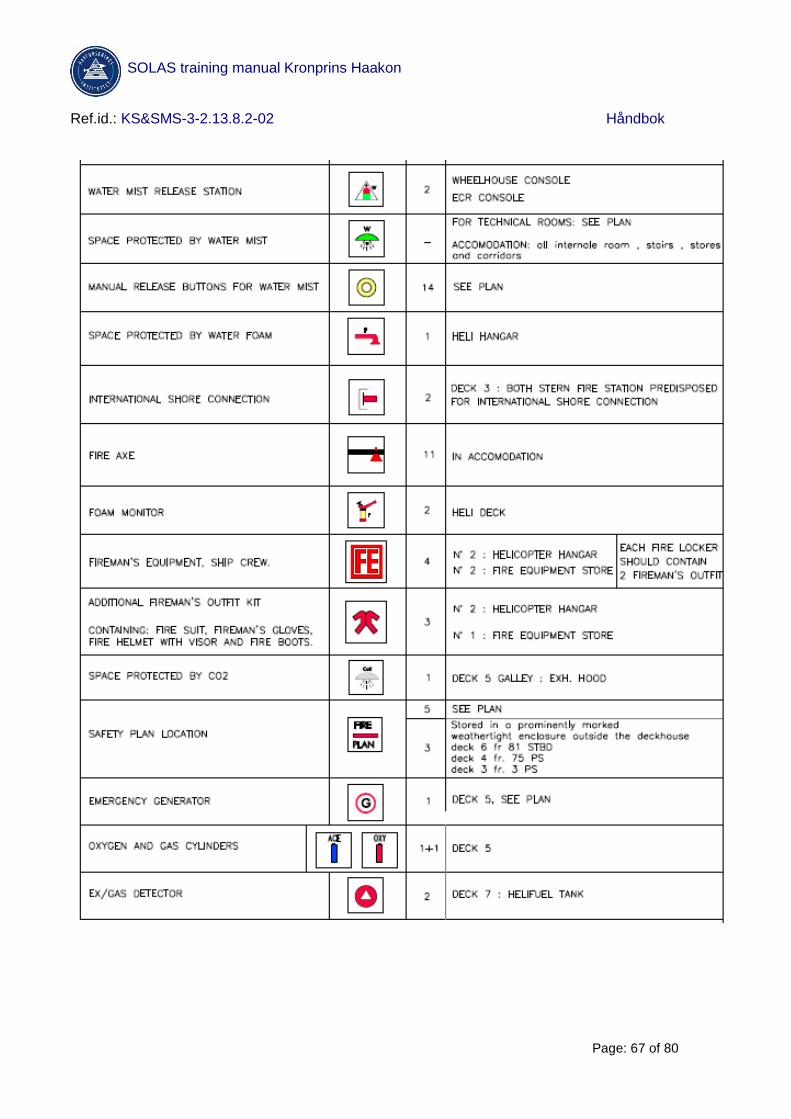
SOLAS training manual Kronprins Haakon
Ref.id.: KS&SMS-3-2.13.8.2-02 Håndbok
Page: 67 of 80

SOLAS training manual Kronprins Haakon
Ref.id.: KS&SMS-3-2.13.8.2-02 Håndbok
Page: 68 of 80
2.10.1.1 Basic knowledge of fires
When fighting a fire, it is important to bear in mind that saving lives is most important and after that
to preserve property. However, there is always a combination between life-saving and property
preservation when fighting a fire. If anyone is missing during a fire, it is very important to search in a
pattern settled beforehand. Otherwise it is easy to forget to search for example a cabin or part of the
cargo hold/engine room. Therefore, the smoke divers may need to start with property preservation
until the missing person is found. But when the person is found it is of course of most importance to
help the person to safe area of the vessel. Probably medical attention is needed.

SOLAS training manual Kronprins Haakon
Ref.id.: KS&SMS-3-2.13.8.2-02 Håndbok
Page: 69 of 80
It takes seconds to spread upwards
It takes minutes to spread sideways
It takes hours to be spread downwards
This is a good picture to have in mind when action is taken to avoid the fire to be
spread.
2.10.2 Principles and theory of fire
2.10.2.1 Fire Triangle
There are three elements in order to create a fire, they are:
OXYGEN FUEL (Inflammable Material)
HEAT (Ignition temperature) If the mixtures of the above elements are perfect, a fire will start. By removing one of the elements
the fire will be extinguished.
Fuel, Inflammable Material:
The gas from the inflammable material must have the right proportion of air (oxygen).
Oxygen:
The air that surrounds us contains sufficient oxygen to sustain a fire in what we call inflammable
materials.
Heat, Ignition temperature:
For an inflammable material to burn in air, it must be heated until it reaches its ignition temperature.
Precautions against fire:
• Take precautions to prevent fire that is equal to a safe ship.
• Always keep fire doors closed (but not blocked), to restrict the spread of flames and smoke.
Always keep working areas clean and tidy. Do not allow flammable waste to accumulate.

SOLAS training manual Kronprins Haakon
Ref.id.: KS&SMS-3-2.13.8.2-02 Håndbok
Page: 70 of 80
• Keep oil away from hot surfaces which might ignite it - check that all feed pipes and joints are
sound.
• Take great care when pumping oil to ready use tanks - avoid spillage or overflow which could
lead to fire.
• Put out all cigarettes completely.
• Comply with no smoking area signs at all times.
• Switch off electrical equipment when not in use - be particularly careful in galleys where
there are deep fat fryers.
• Take great care when using oxyacetylene or other equipment which might ignite flammable
materials.
2.10.3 Advice on fire-fighting on board
Activate Manual Call Point
The manual call point and smoke/heat detectors are alarmed and displayed on the fire control panel
A delay in sounding the alarm usually allows a small fire to become a large one. The crew member
who discovers a fire or the indication of fire must sound the alarm IMMEDIATLY.
Try to extinguish the fire
Evacuate all persons from the area.
When evacuating areas always warn all persons in the area to keep away. If
the area is smoke filled, always keep a low position under the smoke. If you
are in the cabin use the escape mask in the “grab bag” which will last for 15
minutes.
Secure: Close all fire screen doors.

SOLAS training manual Kronprins Haakon
Ref.id.: KS&SMS-3-2.13.8.2-02 Håndbok
Page: 71 of 80
Emergency Escape Breathing Device (EEBD)
20 Units have been stored on board on strategic places. (On tank top and deck 1 – 9)
2.10.3.1 Hidden fires
Before a compartment or bulkhead door is opened to check for fire, the door should be examined. If
flames can be seen, the location of the fire is obvious. However, if only smoke is evident, the fire
may be hidden behind a bulkhead or a compartment door. If so, certain precautions must be taken.
Discoloured or blistered paint indicates fire directly behind the door. Smoke puffing from cracks at
door seals or where wiring passes through the bulkhead is also an indication of fire. The bulkhead or
door should be touched with the back of a bare hand. If it is hotter than normal, it is probably hiding
a fire. Do not open a door hiding a fire until help and a charged hose line are at hand. A fire burning
in a closed compartment consumes the oxygen within that space. Opening the door will feed
additional oxygen to the fire, and usually means that the fire will grow with explosive force. Flames
and superheated gases are then forced out through the door, and anyone standing in the path could
be severely burned. Therefore, before opening it, cool the door with water and have everyone stand
clear.
If you need to enter a smoke-filled area to rescue a person, always remember: If a lot of smoke is
coming out, close the door again.
Always enter the room in a low position and keep the door open while in the room. When leaving
the room, close the door.
2.10.3.2 Size-Up
Size-up is the evaluation of the fire situation. The Incident Controller together with the Emergency
Response Team leader should determine:
• The type of fire: what combustible materials are burning? The appropriate extinguishing
method.
• The appropriate method of attack. How to prevent the fire from spreading.
• The required manpower and firefighting assignments.

SOLAS training manual Kronprins Haakon
Ref.id.: KS&SMS-3-2.13.8.2-02 Håndbok
Page: 72 of 80
A small fire might be extinguished by the first few crew members to arrive. Larger fires require a
coordinated attack and efficient use of manpower and equipment.
2.10.3.3 Attacking the Fire
The attack should be started as soon as possible, to gain immediate control of the fire and to
prevent or minimize its spread. The attack will either be direct or indirect, depending on the fire
situation. Direct and indirect attacks differ widely in how they achieve extinguishment. Both are
efficient when properly employed.
2.10.3.4 Direct Attack
In a direct attack, fire-fighters advance to the immediate fire area and apply the extinguishing agent
directly into the seat of the fire. However, if heat and smoke make it
impossible to locate or reach the seat of the fire, an indirect attack
should be considered.
Attack the seat of fire directly with the extinguishing media, e.g. water.
The water is extinguishing the seat of the fire, and the water will evolve
into steam and cool down the combustible gases.
This will make the combustible gases inflammable.
2.10.3.5 Indirect Attack
An indirect attack is employed when it is impossible for fire-fighters to reach the seat of the fire.
Generally, this is the case when the fire is in the lower portions of the vessel. The success of an
indirect attack depends on the complete containment of the fire. One technique involves making a
small opening into the fire space, inserting a fire hose nozzle and injecting a water spray. By means
of spraying the walls in the room with water, the water will evolve into steam and cool down the
combustible gases. This will make the combustible gases inflammable.
For this method, the space must be completely sealed and the fire hot enough to convent the water
to steam. Another indirect method is to flood the space with water. Here as well, the space must be
completely sealed.
Note: The above procedures are only applicable for the fire groups on board.
2.10.3.6 Ventilation
Ventilation is the action taken to release combustion products trapped within the vessel and vent
them outside the vessel. Most fire fatalities result from suffocation by combustion gases or lack of
oxygen rather than burning. However, ventilation is only used when a direct attack is made on a fire.
During an indirect attack, the fire area must be kept as airtight as possible to keep oxygen out and
the extinguishing agent in.

SOLAS training manual Kronprins Haakon
Ref.id.: KS&SMS-3-2.13.8.2-02 Håndbok
Page: 73 of 80
2.10.3.7 Preventing Fire Spread
If a fire can be prevented from spreading beyond the space in which it originated, it can usually be
controlled and extinguished without extensive damage. To do this, the fire must be virtually
surrounded on six sides: Fire-fighters with hose lines or portable extinguishers must be positioned to
cover the flanks and the spaces above and below the fire. The possibility of the fire travelling
through the venting system must also be considered.
2.10.3.8 Overhaul
Overhaul is begun after the main body of the fire is out. It is a combination of two procedures:
examination and clean up. The purpose of the examination is to find and extinguish hidden fire and
hot embers, and to determine if the fire has spread to other parts of the vessel. At the same time
debris should be cleaned up and free water removed. Any unsafe condition should be corrected. For
example, hanging isolation should be removed, hanging wires should be secured, and all debris
should be removed to make the fire area as safe as possible.
2.10.3.9 Dewatering
Free water can impair the stability of a vessel. Every effort should be made to limit the accumulation
of water in large compartments and cargo holds. The efforts should begin with the use of water in
methods which produce maximum cooling with minimum quantities of water, for example,
preference should be given to water spray over solid streams. As soon as water is used for
extinguishment, dewatering procedures should commence.
2.10.3.10 When the Fire is Out
Before a fire can be considered out, the Incident controller and Emergency Response Team leader
must ensure that certain essential steps have been taken. These include:
• A thorough examination of the fire area to ensure that all potential paths of fire spread have
been examined.
• All smoke and combustion gases have been removed through ventilation.
• A fire-flash watch has been established. Crew members must be assigned to do nothing but
check for re-ignition, and to sound the alarm if it occurs.
• An examination has been made to see if the vessel has been damaged by the fire. High
temperatures can cause decks, bulkheads and other structural constructions to collapse or
become structurally unsound.
• Any necessary dewatering procedures have been started. A muster has been conducted to
account for all personnel.
2.10.4 Fire extinguisher
On board, the Kronprins Haakon there are 4 different types of fire extinguishers.
Water A Powder A, B, C Foam A, B CO2 B

SOLAS training manual Kronprins Haakon
Ref.id.: KS&SMS-3-2.13.8.2-02 Håndbok
Page: 74 of 80
Not all fires are the same, and they are classified according to the type of fuel that is burning. If the wrong type
of fire extinguisher is used on the wrong class of fire, matters can in fact become worse.
It is therefore very important to understand the four different fire classifications.
Most fire extinguishers are marked with a label clarifying which classifications of fire the extinguisher is
designed for.
Class A: Wood, paper, cloth, trash, plastics, solid combustible materials that are not
metals. Class A fires generally leave an ash.
Class B: Flammable liquids: gasoline, oil, grease, acetone, any non-metal in a liquid
state, on fire. This classification also includes flammable gases. Class B fires
generally involve materials that boil or bubble.
Class C: Electrical - energized electrical equipment. If it's "plugged in," it would be
considered a class C fire. Class C fires generally deals with electrical current.
Class D: Metals – potassium, sodium, aluminium, magnesium. It takes special
extinguishing agents (Metal-X, foam) to fight class D fires.
A. Fire in fibrous materials such as wood,
linen, paper and furniture.
B. Fire in flammable liquids such as oil, fat and paint.
C. Fire in electrical equipment such as
TV, stereo and computer.
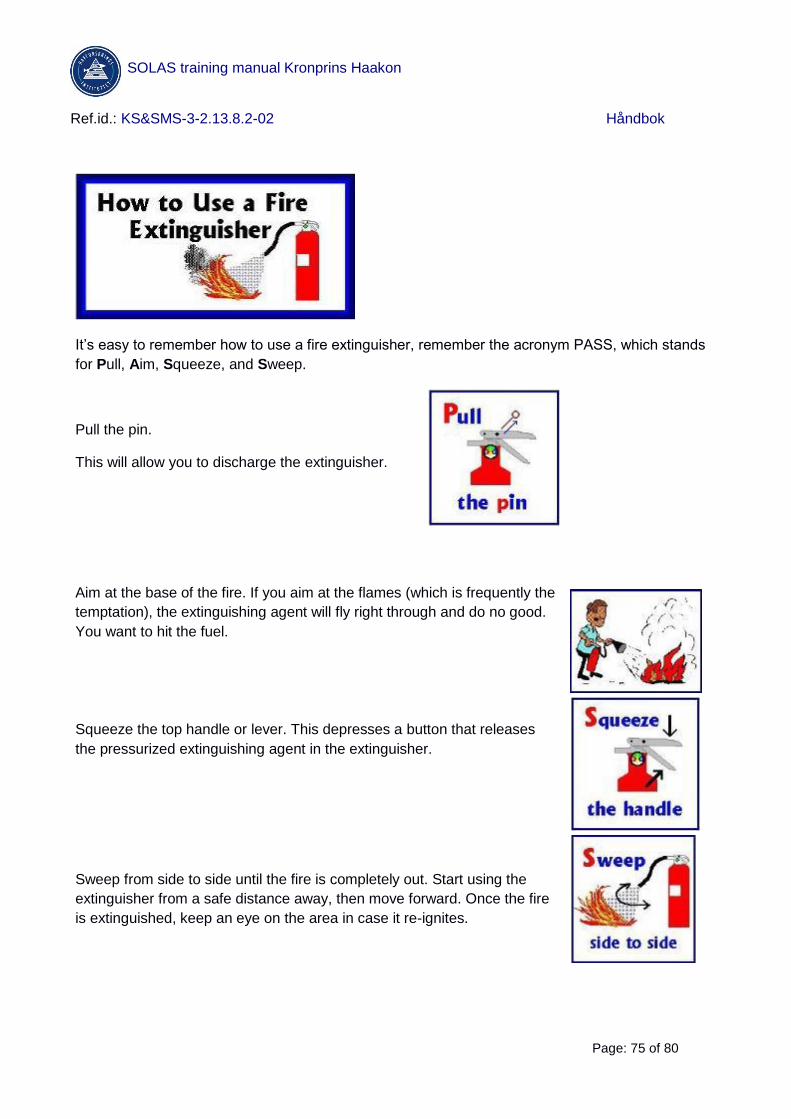
SOLAS training manual Kronprins Haakon
Ref.id.: KS&SMS-3-2.13.8.2-02 Håndbok
Page: 75 of 80
It’s easy to remember how to use a fire extinguisher, remember the acronym PASS, which stands
for Pull, Aim, Squeeze, and Sweep.
Pull the pin.
This will allow you to discharge the extinguisher.
Aim at the base of the fire. If you aim at the flames (which is frequently the
temptation), the extinguishing agent will fly right through and do no good.
You want to hit the fuel.
Squeeze the top handle or lever. This depresses a button that releases
the pressurized extinguishing agent in the extinguisher.
Sweep from side to side until the fire is completely out. Start using the
extinguisher from a safe distance away, then move forward. Once the fire
is extinguished, keep an eye on the area in case it re-ignites.

SOLAS training manual Kronprins Haakon
Ref.id.: KS&SMS-3-2.13.8.2-02 Håndbok
Page: 76 of 80
2.10.4.1 Water extinguisher
Water has a good cooling effect. When using water to extinguish a fire you are removing “HEAT”.
Note: Not to be used on electrical equipment.
The water extinguishers consist of a steel container that holds about 9 litres of water, enough to last
for about 60 seconds. Water will cause heat from the fire to evaporate.
Water demands great amounts of heat to evaporate, it is therefore an excellent extinguishing media.
Water has the best extinguishing effect when it is supplied to the fire in a way that will make it
evaporate as soon as possible, i.e. in a fine shower or fog.
The main effect of water is that it is cooling, but it will also have a suffocating effect because 1 litre of
water becomes 1 700 litres of water-steam that will block out the air from the fire area.
Water shall be used for fire in solid materials such as wood, paper and textiles.
To activate the extinguisher, remove the safety pin, hold the hose to avoid injuries and press down
the handle on top of the container, the CO2 gas press the water out in the hose and the water jet will
flow out, until the handle is released again.
The water extinguisher has a range of about 6 - 8 meters, but try to get as near to the fire as
possible.
Hold the extinguisher in an upright position and aim the jet of water at the base of fire.
2.10.4.2 Powder extinguisher
Extinguish effects are suffocating, cooling and inhibition. Both “OXYGEN and HEAT” are removed.
The powder extinguisher consists of a steel container that holds about 12 kgs of powder, enough for
about 20 seconds use.
Powder is an effective extinguishing agent for fires in solid materials, inflammable liquids and gases
or electrical installations.
To activate the extinguisher, hold the hose to avoid injuries remove the safety pin and press down
the handle on top of the container, the powder will blow out in a steady stream until the handle is
released again.
The jet of powder has a range of about 6 to 7 meters, but the most effective usage range is 2 to 3
meters.
Hold the extinguisher in an upright position and aim the jet of powder at the base of fire.
2.10.4.3 Foam extinguisher
Foam works like water with a cooling effect, but it also has a suffocating effect. It is used mainly for
Class B fires, flammable liquids, oil’s etc. For fires involving solids, point the jet at the base of the
flames and keep it moving across the area of the fire. Ensure that all areas of the fire are out. For
fire involving liquids, do not aim the jet straight into the liquid.

SOLAS training manual Kronprins Haakon
Ref.id.: KS&SMS-3-2.13.8.2-02 Håndbok
Page: 77 of 80
Where the liquid on fire is in a container, point the jet at the inside edge of the container or on a
nearby surface above the burning liquid. Allow the foam to build up and flow across the liquid.
2.10.4.4 CO2 Carbon dioxide extinguisher
Has both a suffocating and cooling effect but it is by suffocating that the fire is extinguished.
“OXYGEN” is removed.
The CO2 extinguisher holds about 6 kg. Liquid carbon dioxide, enough for about 20 seconds. CO2
is preferred as an extinguishing remedy when there is fire in electrical installations, delicate
instruments and machines, because the gas doesn’t lead electricity and does not cause damage to
electrical components.
CO2 is an inert, colourless, odourless gas and is toxic in higher concentrations, it is 1,5 times
heavier than air and in itself not poisonous, but when large quantities are used, it may cause
suffocation for humans. When CO2 is expelled from an extinguisher, it will freeze into solid particles
“dry ice”, and thereby smother the fire.
To activate the extinguisher, always hold the extinguisher in the handle to avoid freezing injuries.
Remove the safety pin and press down the handle on top of the container.
The hose funnel is made from insulated material to protect your hands. The range of the CO2
extinguisher is short, so get as near as possible.
2.10.5 Fire lockers
Around the vessel there are fire lockers containing a hose, nozzle and spanner.
2.10.6 Fire Blankets
In the galley, there are fire blankets located. In case that a person’s clothing will catch fire, do the
following:
• Put the person horizontal the floor in order to keep the fire away from the face.
• Put the fire blanket over the burning clothes to extinguish the fire.
• When you check if the fire is extinguished, start to uncover the blanket from the feet slowly. Be careful the fire might not be extinguished and might flame up, keep your head away.

SOLAS training manual Kronprins Haakon
Ref.id.: KS&SMS-3-2.13.8.2-02 Håndbok
Page: 78 of 80
2.10.7 Smoke/heat detectors
Two different types of detectors are installed on board, smoke and heat. Smoke detectors are
throughout the accommodation and engine room. Heat detectors are installed in the galley, laundry,
workshops and engine room. See below icon and total number on board.
2.10.8 SOPEP
As part of the firefighting system the SOPEP equipment should be used to prevent fires from
starting.
The SOPEP equipment is used to clean up oil and chemical spills that easily could start a fire when
it comes in contact with i.e. “hot” engines. SOPEP stations are located on main deck.
The SOPEP equipment is also used to prevent spills from going overboard.
2.10.9 Firefighting and protection systems
The following resources are available on board for fire protection and fire-fighting:
• Main fire system (water)
• Water mist system
• Helideck / Heli hangar water / foam system
• Heli-Crash Equipment
• Firefighting monitors
• CO2 system (galley)
• Portable Fire-Fighting Equipment (Firemen’s outfits, Breathing Devices)
• Passive Fire Protection (Standard B15-A60 Insulation and fire dampers)

SOLAS training manual Kronprins Haakon
Ref.id.: KS&SMS-3-2.13.8.2-02 Håndbok
Page: 79 of 80
2.10.9.1 Main fire water system
2.10.9.2 Sprinkler system
A Water-FOG system is installed on board. These are released automatically and can also be
released manually.
2.10.9.3 Helideck water/foam system and Heli-Crash Equipment

SOLAS training manual Kronprins Haakon
Ref.id.: KS&SMS-3-2.13.8.2-02 Håndbok
Page: 80 of 80
2.10.9.4 CO2 system
The galley is protected by CO2, Except the vent hood. This system will automatically be activated in
case of fire but can also be released manually.
2.10.9.5 Portable firefighting equipment
Kronprins Haakon has three fire stations.
These are fully equipped with smoke diving sets. Other equipment is spare BA bottles, safety lines,
fireman axes, crow bar etc.
There are fire extinguishers up to 12kgs and wheeled fire extinguishers up to 25kgs throughout the
vessel. The International shore connections are located on main deck. There is also a fire and safety
plan located at deck 3 PS, 4 PS and 6 SB
Fire dampers are fitted throughout the ventilation system. When the dampers close the fan stops.
Emergency fan stops are divided into fan and damper groups.
Note: More detailed instruction is available in the various manufacturer manuals.
• 816-566 Heli Foam System
• 817 Water Mist Total Fire Fighting
• 602-866 Viking Evacuation Minichute
• Novenco: Fire Damper and Smoke Damper
• Microdata: 811 Fire Detection System
• Marsis – External fire fighting (EFF-1)
• Harding
o 1_Lifeboat davit NPD 11300H
o 1_Waterjet HJ274
o 2_Rescue boat, Workboat davit NPDS 4000H
o 2_Steyr SE engine
o 3_Lifeboat LBT 750C
o 4_Rescue boat Stinger 760 Jet
o 5_Workboat Polarcirkel 785
• Viking
o Lifesaving equipment
o FIFI equipment
• Safety Plan
• Fire control plan
• LSA Arrangement

Havforskningsinstituttet - Rederiavdelingen

Havforskningsinstituttet - Rederiavdelingen
Title: SOLAS training manual Kronprins Haakon Rev.: 2
Page: 2 of 69
1 Introduksjon
1.1 Hensikt
Hensikten med denne håndboken er å gi alt mannskap informasjon om redningsredskaper og
brannslokkingsutstyr om bord. Denne manual kan også tjene som en generell kilde for veiledning til
sikkerhet og overlevelse til sjøs.
1.2 Omfang
Manualen er i tråd med (SOLAS) kapittel III, regel 35 om livredningsutstyr og kapittel II-2, regel 15 om brannslukking. Informasjon gitt av produsenter, flaggstat, IMO, samt praktisk erfaring har vært brukt i å samle denne manualen. En kopi av SOLAS opplæringsmanual skal alltid være tilgjengelig for besetningen i oppholdsrom.
1.3 Arbeidsoppgaver
Sikkerhetsoffiser (overstyrmann) under tilsyn av Kaptein om bord, er ansvarlig for å holde denne manualen oppdatert og gjenspeile statusen til sikkerhets- og brannutstyret ombord.
1.4 Definisjoner
COSHH Control of Substances Hazardous to Health
EPIRB Emergency Position Indicating Radio Beacon
CRO Kontrollromsoperatør
ECR Engine Control Room
ECC Emergency Control Center
MOB Mann overbord
MRT POB Marine Rescue Technologies, personell om bord system
Muster At man samles når det er en nødsituasjon Mønstringsstasjon Et samlingsted der alle er beordret til å gå når det er en nødsituasjon
Particulars Informasjon om detaljene av noe
PA-system Public Announcement - system for meldinger og alarmer POB Personer om bord PPE Personlig verneutstyr Sikkerhetsinduksjon En gjennomgang av fartøyets samlede sikkerhetssystemet Inkludert øvelser, alarmer og
mønstring for nyankomne
SART Sart
SO Sikkerhet Offiser

Havforskningsinstituttet - Rederiavdelingen
Title: SOLAS training manual Kronprins Haakon Rev.: 2
Page: 3 of 69
2 Fremgangsmåte
2.1 Introduksjon
Ved ankomst ombord, eller kort tid etter, vil alt mannskap bli tatt med på en sikkerhetsintroduksjon
gjennom skipet (safety induction) hvor sikkerhetssystemer vil bli forklart i mer detalj sammen med
annen viktig informasjon for nykommere.
Viktig informasjon gitt til besetningen under Sikkerhetsintroduksjon bør huskes og er som følger:
• Betydningen av alarmsignalene
• Plasseringen av mønstringsstasjonene, tildelt livbåt og redningsflåter / MES.
• Plasseringen av redningsvester og redningsdrakter
• Plasseringen av rømningsveier
• Plasseringen av de nærmeste brannslukningsapparatene, hydranter / slager og manuelle brannmeldere i forhold til lugar, vanlige fellesrom og arbeidsområdet, hvis det er aktuelt
2.2 Mønstringsstasjoner / livbåter /Redningsflåter / Marine evakueringsstrømpe.
2.2.1 Mønstringsstasjon
Når generell alarm, brannalarm, eller evakueringsalarm går, skal alt personell som er medlemmer av brann- evakueringslag fortsette til deres mønstringsstasjon, eller som angitt over PA-systemet og kontakte broen . Alt annet personell som ikke er medlem av et lag skal gå videre til en mønstringsstasjon.
Kommunikasjon skal brukes i følgende prioritet: • UHF radio
• VHF radio
• Telefon
• PA kunngjøringer
På skipet er det 1 mønstringsstasjon som ligger på dekk 5 i Messa.
2.2.2 Livbåter
Hvis evakueringsalarmen går og ordren blir gitt å mønstre på mønstringsstasjonene for å forberede seg på å forlate Kronprins Haakon med livbåter eller redningsflåter; skal mannskap dele ut overlevelsesdrakter fra skap på dekk 5. Ytterligere overlevelsesdrakter er plassert på mønstringsstasjonene, bro og maskin kontrollrom (ECR).
Kronprins Haakon livbåter er lokalisert: • Livbåt 1, styrbord side dekk 5
• Livbåt 2, babord side dekk 5
2.2.3 Evakueringsrenne redningsflåter
Det er to evakueringsstrømper med flåter om bord som er plassert på Dekk 5 styrbord og Dekk 4 babord henholdsvis bak arbeidsbåten og MOB-båten.
2.3 Brannstasjoner
Det er to brannstasjoner ombord.

Havforskningsinstituttet - Rederiavdelingen
Title: SOLAS training manual Kronprins Haakon Rev.: 2
Page: 4 of 69
Brannstasjon 1: Plassert i garderoben Dekk 4 PS / mob båt området. Brannstasjon 2: Plassert i helikopteret hangar, Dekk 6.
2.4 Rednings utstyr
Skipet er utstyrt med 2 lukkede livbåter for 68 personer. De er konstruert og utstyrt i
overensstemmelse med LSA-koden.
Det er 2 evakuerings renner redningsflåter tilgjengelig. 1 x 100 personer kapasitet hver.
En davit med selvrettende MOB-båt, Stinger 760 Jet, er plassert på babord side Dekk 4. Det er
plass til 6 personer om bord.
Livbøyer:
2.4.1 Brann & Sikkerhets Plan og Mønstringsrulle
I fellesområder er brann- sikkerhetsplaner og mønstringsrulle oppført.
2.4.2 Redningsvester
Dette er SOLAS typen redningsvester og har selvrettende evne som holder kroppen flytende i riktig
posisjon selv om personen er bevisstløs. Redningsvester er utstyrt med et blinkende hvitt lys og
fløyte. Lyset aktiveres automatisk når den er i kontakt med vann.

Havforskningsinstituttet - Rederiavdelingen
Title: SOLAS training manual Kronprins Haakon Rev.: 2
Page: 5 of 69
Påkledning av redningsvester:
Om bord er det forskjellige typer redningsvester. Påkledningsinstruksjoner for hver er vist:
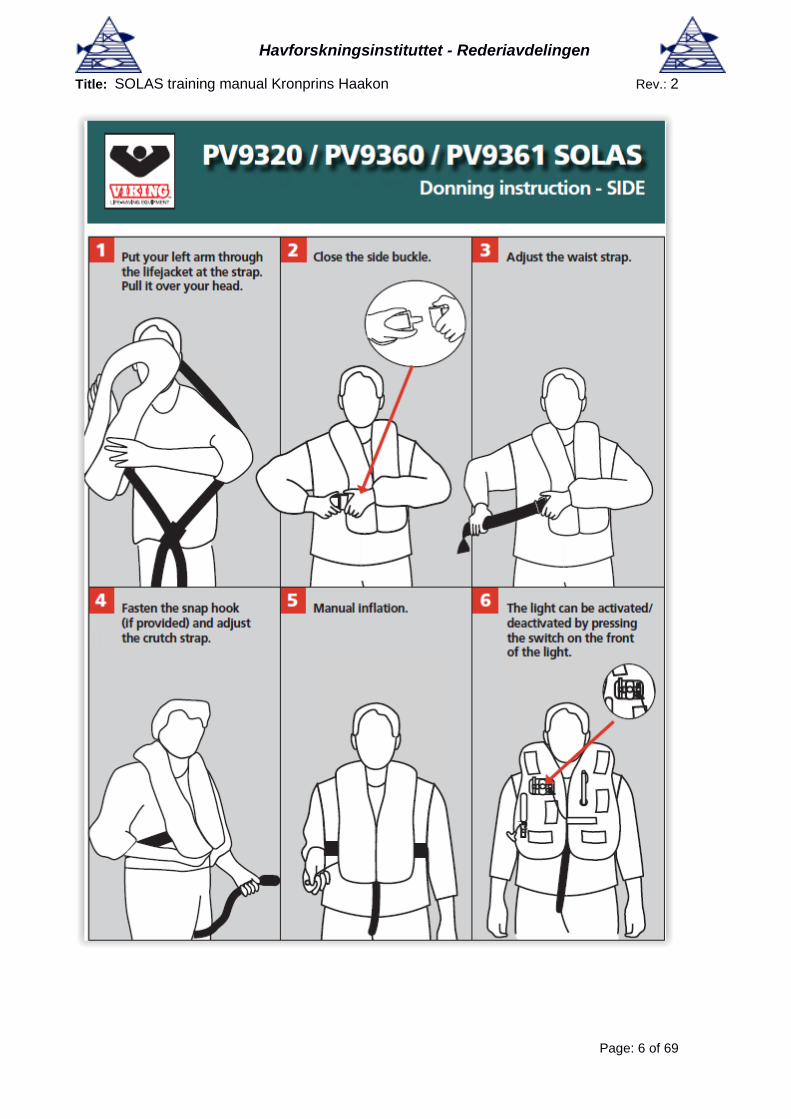
Havforskningsinstituttet - Rederiavdelingen
Title: SOLAS training manual Kronprins Haakon Rev.: 2
Page: 6 of 69

Havforskningsinstituttet - Rederiavdelingen
Title: SOLAS training manual Kronprins Haakon Rev.: 2
Page: 7 of 69

Havforskningsinstituttet - Rederiavdelingen
Title: SOLAS training manual Kronprins Haakon Rev.: 2
Page: 8 of 69

Havforskningsinstituttet - Rederiavdelingen
Title: SOLAS training manual Kronprins Haakon Rev.: 2
Page: 9 of 69
2.4.3 Overlevningsdrakter
Overlevningsdrakten ombord er Viking PS 4170 Immersion Suit.
Luften i en drakt virker som isolasjon ved at kroppsvarmen varmer opp drakten, noe som forhindrer hypotermi og forlenger overlevelsestiden i vannet. Hypotermi oppstår når kroppstemperaturen faller under normal temperatur, spesielt når kjernetemperaturen faller under 35 ° C. Tegn og symptomer som kan utvikles inkluderer gradvis tap av mentale og fysiske evner. Alvorlig hypotermi kan føre til døden.

Havforskningsinstituttet - Rederiavdelingen
Title: SOLAS training manual Kronprins Haakon Rev.: 2
Page: 10 of 69
Prosedyre for Redningsdrakt:

Havforskningsinstituttet - Rederiavdelingen
Title: SOLAS training manual Kronprins Haakon Rev.: 2
Page: 11 of 69
2.4.4 MOB / arbeidsbåt redningsdrakter
Det er 6 redningsdrakter tilgjengelig. Disse skal brukes under redningsaksjoner. MOB overlevelsesdrakter er plassert på dekk 4.
Instruksjoner om hvordan du tar på deg MOB drakten:
1. Ta på drakten - bena først. 2. Sett på hetten. 3. Lukk glidelåsen. 4. Sett på hanskene og lås på glidelåsen.
2.5 Livbåter
Skipet er utstyrt med to helt lukkede selvrettende livbåter, av type Harding. Hver båt er vurdert for 68
personer, konstruert og utstyrt i overensstemmelse med LSA. De har tilstrekkelig drivstoff til 24
timer’s kjøring med full hastighet. (For drift av motoren ref teknisk dokumentasjon)

Havforskningsinstituttet - Rederiavdelingen
Title: SOLAS training manual Kronprins Haakon Rev.: 2
Page: 12 of 69

Havforskningsinstituttet - Rederiavdelingen
Title: SOLAS training manual Kronprins Haakon Rev.: 2
Page: 13 of 69
2.5.1 Inngang
Inngang er primært gjennom sidedører. For raskere ombordstigning, fyll alltid opp fra innerste setet først. Siste til å gå inn i livbåten må lukke luken og pass på at håndtakene er vridd til stillingen “lukket”. Når båten er halvfull, bør fordelingen av personer bør være nøye utvalgt for å opprettholde en god
trim av livbåten.
2.5.2 Setebelter
Hvert sete i livbåten er merket med et sort sittemerke.
Alle seter har en 4-punkts sikkerhetsbelte. Pass på at begge skulderstroppene er på plass før belte strammes. Belte er sikret med en "fly" type spenne, og strammet ved å trekke høyre flik. Sikkerhetsbelte er konstruert for å holde hver person trygg i tilfelle av tung rulling, velt eller selvrettende tilstand. Når du sitter, skal setebeltet alltid festes.
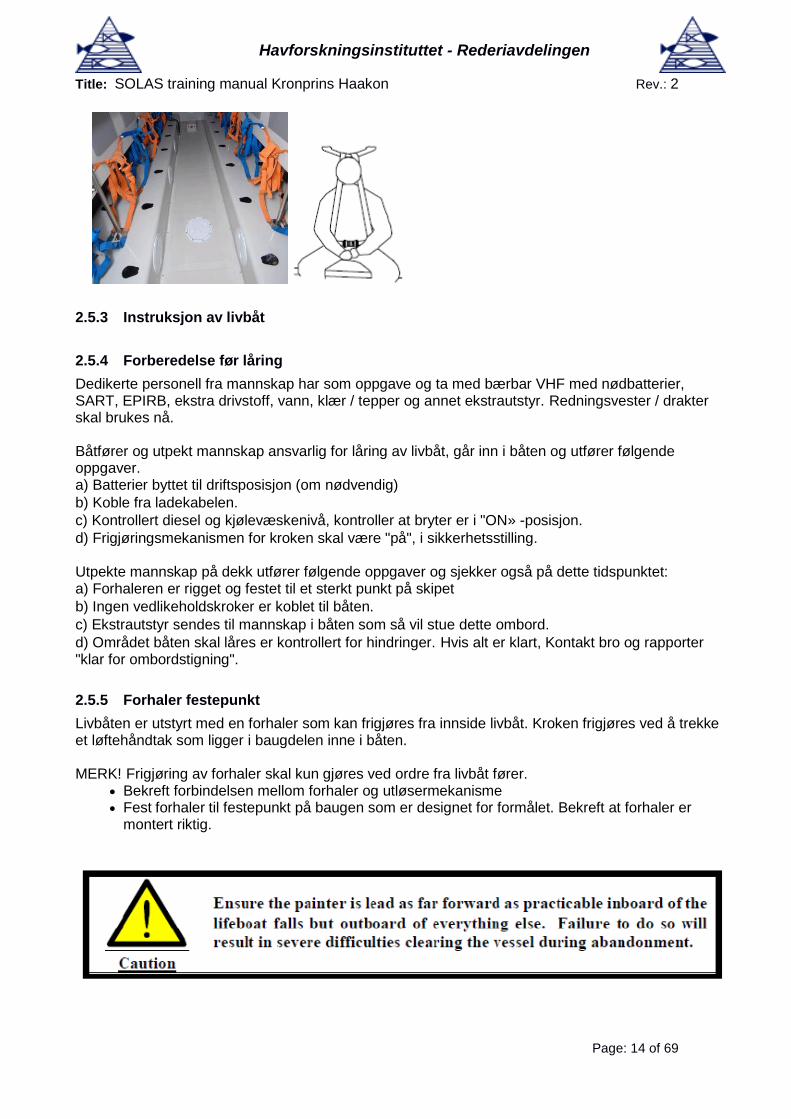
Havforskningsinstituttet - Rederiavdelingen
Title: SOLAS training manual Kronprins Haakon Rev.: 2
Page: 14 of 69
2.5.3 Instruksjon av livbåt
2.5.4 Forberedelse før låring
Dedikerte personell fra mannskap har som oppgave og ta med bærbar VHF med nødbatterier, SART, EPIRB, ekstra drivstoff, vann, klær / tepper og annet ekstrautstyr. Redningsvester / drakter skal brukes nå. Båtfører og utpekt mannskap ansvarlig for låring av livbåt, går inn i båten og utfører følgende oppgaver. a) Batterier byttet til driftsposisjon (om nødvendig)
b) Koble fra ladekabelen. c) Kontrollert diesel og kjølevæskenivå, kontroller at bryter er i "ON» -posisjon. d) Frigjøringsmekanismen for kroken skal være "på", i sikkerhetsstilling. Utpekte mannskap på dekk utfører følgende oppgaver og sjekker også på dette tidspunktet: a) Forhaleren er rigget og festet til et sterkt punkt på skipet
b) Ingen vedlikeholdskroker er koblet til båten. c) Ekstrautstyr sendes til mannskap i båten som så vil stue dette ombord. d) Området båten skal låres er kontrollert for hindringer. Hvis alt er klart, Kontakt bro og rapporter "klar for ombordstigning".
2.5.5 Forhaler festepunkt
Livbåten er utstyrt med en forhaler som kan frigjøres fra innside livbåt. Kroken frigjøres ved å trekke et løftehåndtak som ligger i baugdelen inne i båten. MERK! Frigjøring av forhaler skal kun gjøres ved ordre fra livbåt fører.
• Bekreft forbindelsen mellom forhaler og utløsermekanisme • Fest forhaler til festepunkt på baugen som er designet for formålet. Bekreft at forhaler er montert riktig.

Havforskningsinstituttet - Rederiavdelingen
Title: SOLAS training manual Kronprins Haakon Rev.: 2
Page: 15 of 69
2.5.6 Ombordstigning
• De som er i stand til å entre livbåten alene, går ombord. Skadede personer på båre fraktes ombord først og sikres. Alle tar på sikkerhetsbelter. Livbåt fører starter motoren. • Den siste personen ombord bekrefter at området under båten er klart. • Alle dører og luker er stengt.
2.5.7 Utsetting av båten
• Pass på at alle feste stropper er fjernet før du starter. (I nød er dette ikke nødvendig) • Bekreft at alle besetninger som er om bord i livbåten, sitter og har sikkerhetsbelter festet. • Start motoren • Trekk i wire nr. 1 som aktiverer livbåtdavit. Hold nede wire til davit stopper helt opp, livbåt er nå klar av skutesiden og kan bli låret til sjø. • Trekk i låringswire 2. Ved å trekke ned på låringswire 2 løfter bremsen og starter nedstigningen. Når wire slippes lukkes bremsen og stopper nedstigningen.
• Bremsen har en automatisk hastighetsregulering, det er ikke mulig å senke nedstigninghastigheten ved hjelp av låringswiren, forsøk på å gjøre dette vil gi slitasje på bremsen og støtbelastning på kroker, davit etc. • Når blokkene forlater daviten, aktiveres høyhastighetsmodusen. For mer detaljert instruksjon, se også davit- og vinsjhåndbøkene.
Merk: Livbåtsmotoren kan startes under nedstigningen og spesielt hvis værforholdene er dårlige - men motoren er ikke beregnet for tørrkjøring på mer enn 3 minutter

Havforskningsinstituttet - Rederiavdelingen
Title: SOLAS training manual Kronprins Haakon Rev.: 2
Page: 16 of 69
2.5.8 Normal krokutløser
Livbåt fører kontrollerer at krok utløseren er nå i "av", posisjon. Etter å ha fjernet de manuelle låseinnretningene, skyves spaken for å frigjøre begge krokene samtidig. Hvis frigjøringslåsen ikke har koblet seg fra automatisk, må nødoverstyringen brukes. Se nedenfor for detaljerte instruksjoner Off-load-utløser Denne operasjonen er den normale metoden for låring og frigjøring og gjennomføres når livbåten er helt nede på vannet.

Havforskningsinstituttet - Rederiavdelingen
Title: SOLAS training manual Kronprins Haakon Rev.: 2
Page: 17 of 69

Havforskningsinstituttet - Rederiavdelingen
Title: SOLAS training manual Kronprins Haakon Rev.: 2
Page: 18 of 69

Havforskningsinstituttet - Rederiavdelingen
Title: SOLAS training manual Kronprins Haakon Rev.: 2
Page: 19 of 69
2.5.9 Nødprosedyre krokfrigjøring – ved last
Denne operasjonen utføres når livbåten ikke er helt på vannet.

Havforskningsinstituttet - Rederiavdelingen
Title: SOLAS training manual Kronprins Haakon Rev.: 2
Page: 20 of 69
2.5.10 Frigjøring av forhaler og livbåtoperasjon vekk fra skuteside.
Når livbåten er frigitt fra kroker, vil det være en fare for at livbåten treffer skipets skuteside. Livbåten manøvreres vekk ved å vrenge seg ut fra skutesiden, legge roret hardt over og mye maskinkraft slik at hekken kommer klar av skutesiden. Forhaler frigjøres slik at livbåten bakker klar av skutesiden. Når livbåten er fri fra skutesiden, så skal livbåten kjøre så fort som mulig mot fritt vann. Frigjør nå støtte puter som henger ned fra begge sidene forut og akter for og oppnå maksimal fart.

Havforskningsinstituttet - Rederiavdelingen
Title: SOLAS training manual Kronprins Haakon Rev.: 2
Page: 21 of 69
2.5.11 Tilbakeføringsoperasjon
Tilbakestillings prosedyrer er vist i figurene nedenfor.
2.5.11.1 Tilbakestilling av frigjøringskrok og klargjøring av livbåt for returnere til krybbe.
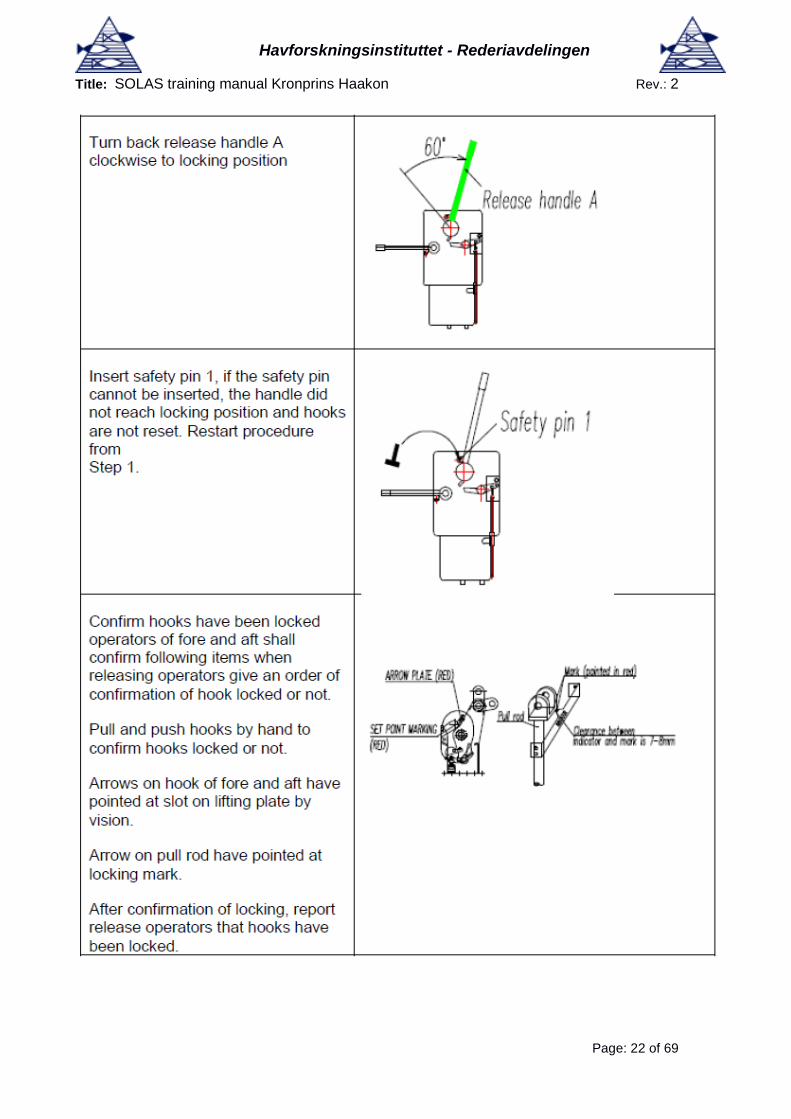
Havforskningsinstituttet - Rederiavdelingen
Title: SOLAS training manual Kronprins Haakon Rev.: 2
Page: 22 of 69

Havforskningsinstituttet - Rederiavdelingen
Title: SOLAS training manual Kronprins Haakon Rev.: 2
Page: 23 of 69

Havforskningsinstituttet - Rederiavdelingen
Title: SOLAS training manual Kronprins Haakon Rev.: 2
Page: 24 of 69
2.5.11.2 Tilbakeføring av utløserkrok og montering av livbåt.
Tilbakeføringsprossedyrene skal være i samsvar med trinnene ovenfor, etter at du har fullført resetting av krok systemet.
Når livbåten kommer tilbake til skipet skal forhaleren henge vertikalt ned langs skutesiden, og det første trinnet er å nærme seg og hente den. Vind / tidevann / strømforhold vil bestemme den beste tilnærmingsvinkelen og retningen, men når forhaleren er festet til frigjøringskroken, vil den hjelpe til med å plassere båten i korrekt posisjon. Med motor kraft og rorbevegelser kan hekken styres inn til rett posisjon under de rådende forhold.

Havforskningsinstituttet - Rederiavdelingen
Title: SOLAS training manual Kronprins Haakon Rev.: 2
Page: 25 of 69
Når livbåten er i posisjon skal to fra mannskapet feste på krokene og når alle er klare skal vinsjoperatør heise livbåten.
Når båten er fri fra vannet skal krokene og utløser systemet kontrolleres at det er i rett låseposisjon. Hvis ikke skal båten låres tilbake til sjø og prosedyren må gjennomføres på nytt.
Mannskap går enten ut av livbåten eller er klare i båten for heising iført sikkerhetsbelte før videre heising blir iverksatt.
Motoren kan nå stoppes.
2.5.12 Heising av livbåt
▪ Heis livbåten ved å betjene vinsjen ved hjelp av trykknappbryteren, etter instruksjonene gitt av ansvarlig leder.
▪ Heis livbåt inntil at vinsjen stoppes av endebryteren.
▪ Ta inn davit til den stopper av seg selv, Livbåten er nå helt tilbake i krybben
▪ På ordre fra leder gå ut av livbåt.
2.5.13 Nødstyring
Når normal styring er ute av funksjon, kan rorkult til nødstyring brukes rett på vinsjen. Se figur:
2.5.14 Utstyr livbåt
En manuell lensepumpe befinner seg i akterkant av livbåten. Lensepumpen har en kapasitet på 60 liter per minutt.

Havforskningsinstituttet - Rederiavdelingen
Title: SOLAS training manual Kronprins Haakon Rev.: 2
Page: 26 of 69
SART (Søk og rednings transponder/sender) (valgfritt) En SART radartransponder er montert i akterenden av livbåten.
EPIRB (Emergency posisjonsindikator Radio Beacon) (valgfritt) En EPIRB er montert i akterenden av livbåten

Havforskningsinstituttet - Rederiavdelingen
Title: SOLAS training manual Kronprins Haakon Rev.: 2
Page: 27 of 69
Drivanker
Radarreflektor En radarreflektor er å finne styrbord akter og bør monteres på braketten på toppen av styrehus
taket.

Havforskningsinstituttet - Rederiavdelingen
Title: SOLAS training manual Kronprins Haakon Rev.: 2
Page: 28 of 69
Ferskvann og mat Det er 1 liter ferskvann per person i 0,5 liters pakker. Ferskvannet er stuet inn i de bakre seksjoner
som er merket “vann”. Det er også mat i boksene merket “mat”.
Regn drikkevann kit Regnvannet samleren består av et rektangel seksjon på toppen av kalesjen med dreneringshull.
Vannet vil bli samlet i de medfølgende plastbeholdere.
Annet livbåt utstyr er for eksempel: Båtshake og årer, lommelykt med ekstra batterier, redningsline
med flyte ring, kniv, signalspeil, raketter og bluss, VHF-radio, SART (søk og radartransponder).
2.6 Viking Evakuering MiniChute - VEMC
Kronprins Haakon er utstyrt med et kombinationssystem for redningsflåte (100 personer hver) og evakueringstrømper. En komplett manual for systemet følger som vedlegg til denne manual.
2.7 FRC - Fast Rescue Craft - MOB båt
Første prioritet ved bruken av MOB båt er å redde personer i vannet. Båten er plassert dekk 4, babord.
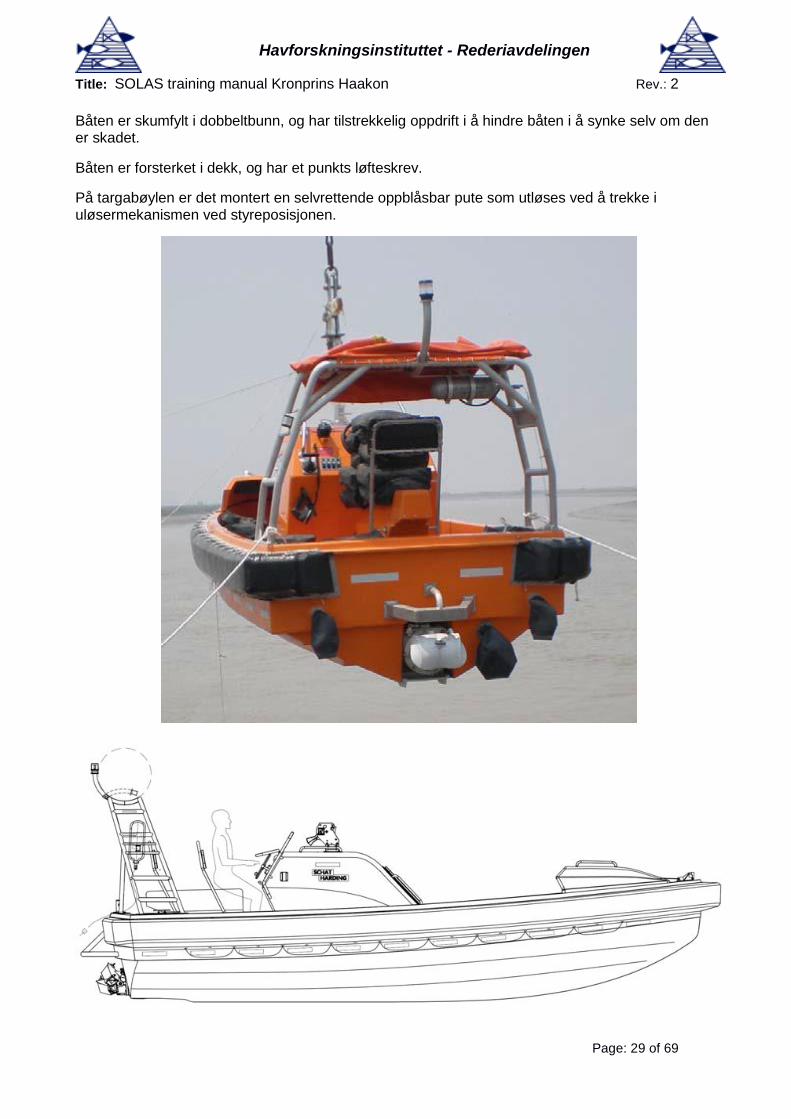
Havforskningsinstituttet - Rederiavdelingen
Title: SOLAS training manual Kronprins Haakon Rev.: 2
Page: 29 of 69
Båten er skumfylt i dobbeltbunn, og har tilstrekkelig oppdrift i å hindre båten i å synke selv om den er skadet.
Båten er forsterket i dekk, og har et punkts løfteskrev.
På targabøylen er det montert en selvrettende oppblåsbar pute som utløses ved å trekke i uløsermekanismen ved styreposisjonen.

Havforskningsinstituttet - Rederiavdelingen
Title: SOLAS training manual Kronprins Haakon Rev.: 2
Page: 30 of 69
2.7.1 Låring av MOB-båt
Før låring A. Fjern alle presenninger hvis noen. B. Fjern sikringsstropper, hvis noen. C. Forsikre deg om at wire og trommel er i orden. D. Kontroller at kroken er riktig koblet til båten. E. Kontroller og fjern eventuell rekkverk. F. Kontroller båtens lenseplugger G. Kontroller at fjernkontrollkablene / ladekabel ikke er koblet til båten. låring Når en nødsituasjon har oppstått under normale forhold, kan davit senkes til ombordstigningsposisjon. A. Mannskapet går om bord. B. For din sikkerhet, hvis båten er utstyrt med sikkerhetsbelter, bør de festes. C. Senk daviten inn i ytre stilling ved bruk av fjernkontrollen. D. For å senke båten, bruk trykknappen på fjernkontrollen.
Viktig! Hvis kroken må senkes uten last, må vinsjwire ha motstand for å sikre riktig
spooling av wire. E. Start båtenes motor når den er på vannet, etter instruksjon fra båtprodusenten. F. Frigjør kroken når wire er slakk. G. Frigjør baugtrossen.
Lårings operasjon under "dødt skip" forhold Når en krisesituasjon har oppstått, og du har et dødt skip, kan davit bli låret ut ved hjelp av lagret energi i akkumulatoren. Oljetrykket fra den for belastede akkumulatoren forbundet med den hydrauliske krets brukes for dette formål. Systemet er utformet slik at akkumulatoren fylles automatisk. En trykkompensert reguleringsventil i systemet vil regulere maksimal synkehastighet. Drift av davit: A. bytte over til beredskapssystemet, ved betjening av nødsystemet ventilen (Bilde 3.1), som ligger og er markert ved siden av håndpumpe, før de går om båten.
B. Trekk nød pivoting linje (grønn nylontau) svinger daviten i til ytre posisjon.
C. Trekk nøds senke trekkline (oransje farget nylon tau), og holde spenningen på tauet / posen før båten er vannbaserte.
D. Deretter følger punkt E, F og G ovenfor. Viktig! Nødsystem ventil skal alltid være lukket under normale forhold, for å kunne bli åpnet under nødsituasjonen. Viktig! For personlig sikkerhet, aldri vikle nødtau rundt fingrene eller hånden.
2.7.2 Heisings oprasjon
Heising drift A. Fest wirekroken til båten.
B. For din egen sikkerhet, dersom fartøyet er utstyrt med setebelter skal disse festes.
C. Fest kroken til fartøyet, før løftevaieren strammes.
D. Stopp motoren på båten, ihht instruksjon fra båtprodusenten.

Havforskningsinstituttet - Rederiavdelingen
Title: SOLAS training manual Kronprins Haakon Rev.: 2
Page: 31 of 69
E. Heis båten ved bruk av fjernkontrollen (endestopper funksjonen vil automatisk stoppe båten når den høyeste løfteposisjon er nådd).
F. Før daviten til innerstilling ved bruk av fjernkontrollen.
G. Når MOB båten er sikret, kan mannskapet forlate MOB båten..
H. Kontroller om nødsenking tauet er riktig spolet / pakket.
I. For å forberede MOB båten for stuing, følg instruksjonene som gis i bruksanvisningen for redningsfarkoster.
J. Erstatt alle beskyttelsesdeksler, hvis noen. Viktig! Det anbefales å bytte fra høy hastighet til lav hastighet heising like før wire / båten
nådde sitt høyeste punkt. Se også avsnitt 4.5
Heising drift i "dødt skip" forhold A. Følg punkt A, B, C og D ovenfor.
B. I nærheten nødsystemet ventilen (Bilde nedenfor).
C. Sett akselen i håndpumpen.
D. Pump opp akkumulatortrykk til 190-240 bar.
E. Åpent nødsystemet ventilen (Bilde nedenfor).
F. betjene den manuelle løfteventilen (Bilde nedenfor), for å avlaste trykket i akkumulatoren. Heiseoperasjonen starter. Viktig! Gjenta operasjonen inntil båten er i høyeste løfteposisjon. G. Gjenta drift B, C, D, E og F til den høyeste løfteposisjon er nådd. For pivot davit innenbords (sylinder i) i “dødt skip” tilstand, se pkt direkte manuell betjening.
Bruk av akutthåndpumpe Daviten er utstyrt med en nødsituasjon håndpumpe, som funksjon er å være i stand til å bruke davit selv om akkumulatoren er tom. Pumpen kan brukes til å pumpe olje inn i akkumulatoren for deretter være i stand til å bruke den lagrede energi. Hvis man begynner å pumpe, vil oljen strømme til akkumulatoren, som vil lagre energi for
senere bruk. Trykket inne i akkumulatoren vil stige når pumping (se manometer). Når trykket har
nådd innstillingen av trykkavlastningsventilen, vil oljen deretter pumpes tilbake til tanken. Davit
er nå klar til bruk.
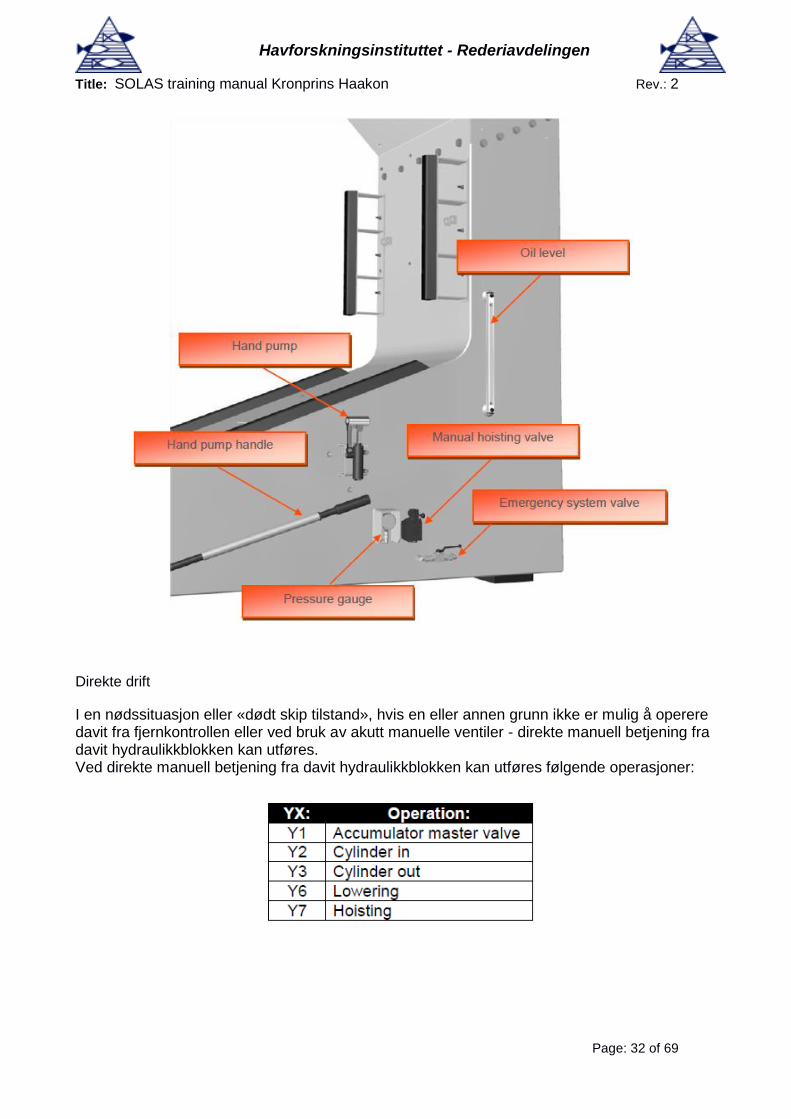
Havforskningsinstituttet - Rederiavdelingen
Title: SOLAS training manual Kronprins Haakon Rev.: 2
Page: 32 of 69
Direkte drift
I en nødssituasjon eller «dødt skip tilstand», hvis en eller annen grunn ikke er mulig å operere davit fra fjernkontrollen eller ved bruk av akutt manuelle ventiler - direkte manuell betjening fra davit hydraulikkblokken kan utføres. Ved direkte manuell betjening fra davit hydraulikkblokken kan utføres følgende operasjoner:

Havforskningsinstituttet - Rederiavdelingen
Title: SOLAS training manual Kronprins Haakon Rev.: 2
Page: 33 of 69
For å operere davit, følgende operasjoner må gjennomføres: A. Åpne luken der davit hydraulikkblokken ligger.
B. Åpen, ved trykk og vri, en manuell overstyring (A) på et Y1 tallerkenventil (Fig. 3,2 og bilde. 3.3).
C. Trykk i manuell overstyring (B) på et retningsstyreventilene (YX), ved bruk av skrutrekker eller lignende verktøy (Fig. 3.4). Davit vil begynne å operere

Havforskningsinstituttet - Rederiavdelingen
Title: SOLAS training manual Kronprins Haakon Rev.: 2
Page: 34 of 69
D. Gjennomføre alle nødvendige operasjoner.
E. Close, ved trykk og vri, en manuell overstyring (A) på et Y1 tallerkenventil (Fig. 3,2 og Pic. 3.3).
F. Lukk luken
Fjernkontroll Fjernkontrollen leveres med 5 knapper. To knapper betjener sylinderen, i til den ytre stilling (SYLINDER OUT) og inn til innerstilling (sylinder). To knapper betjener vinsjen, ned (NED) og opp (HOIST), disse to knappene har to trinn. Nivå én er normal hastighet, nivå to er høy hastighet. Rød knapp er nødstopp. Fjernkontrollen kan utstyres med ekstra knapper avhengig av tilleggsutstyr av davit.
Viktig! Davit skal alltid være i drift under normale forhold, skal nødstoppknappen ikke bli
aktivert.
Utsetting ved å trekke i tau i farkosten A. Fremstill davit for utsetting i henhold til fremgangsmåten beskrevet i manualen avsnitt 3.1.1 og 3.1.3
B. Koble fra “Velcro” bånd for å ta ut posen med å senke trekkline (oransje farget nylontau) fra davit og holde den i en MOB-båt.
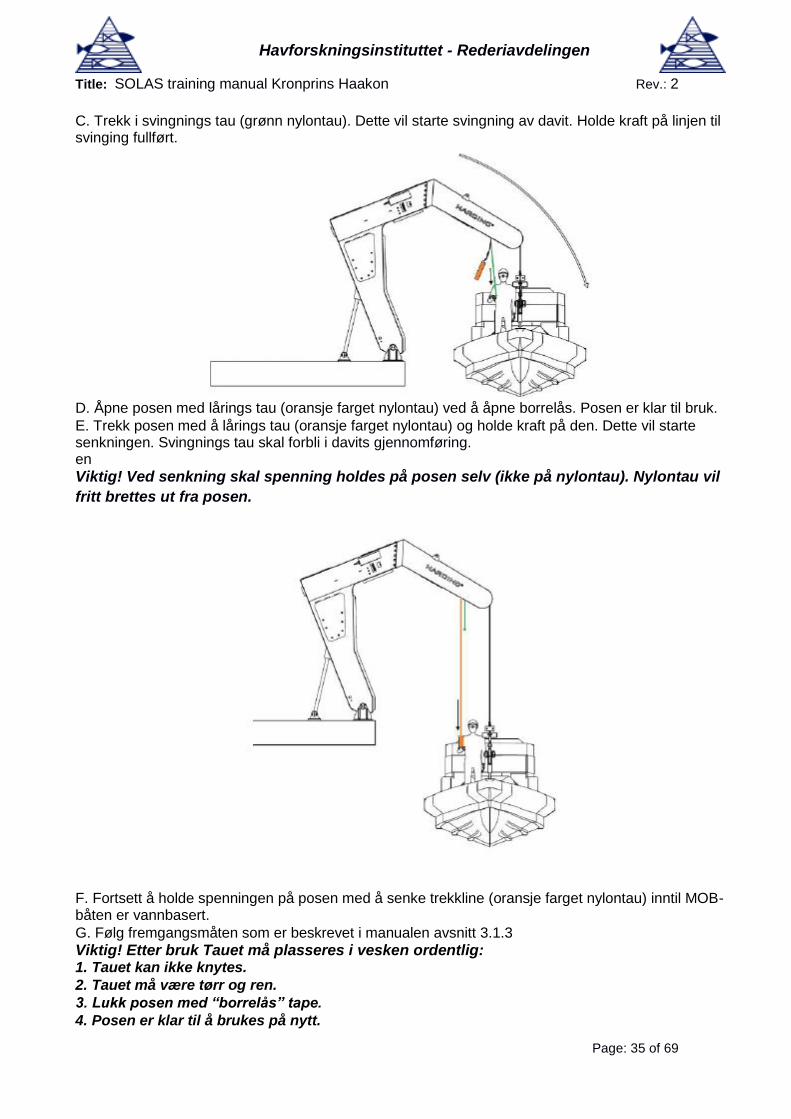
Havforskningsinstituttet - Rederiavdelingen
Title: SOLAS training manual Kronprins Haakon Rev.: 2
Page: 35 of 69
C. Trekk i svingnings tau (grønn nylontau). Dette vil starte svingning av davit. Holde kraft på linjen til svinging fullført.
D. Åpne posen med lårings tau (oransje farget nylontau) ved å åpne borrelås. Posen er klar til bruk.
E. Trekk posen med å lårings tau (oransje farget nylontau) og holde kraft på den. Dette vil starte senkningen. Svingnings tau skal forbli i davits gjennomføring. en
Viktig! Ved senkning skal spenning holdes på posen selv (ikke på nylontau). Nylontau vil
fritt brettes ut fra posen.
F. Fortsett å holde spenningen på posen med å senke trekkline (oransje farget nylontau) inntil MOB-båten er vannbasert.
G. Følg fremgangsmåten som er beskrevet i manualen avsnitt 3.1.3
Viktig! Etter bruk Tauet må plasseres i vesken ordentlig: 1. Tauet kan ikke knytes.
2. Tauet må være tørr og ren.
3. Lukk posen med “borrelås” tape.
4. Posen er klar til å brukes på nytt.

Havforskningsinstituttet - Rederiavdelingen
Title: SOLAS training manual Kronprins Haakon Rev.: 2
Page: 36 of 69
8.4 Utsetting ved å trekke linjer fra dekk A. Fremstill davit for utsetting i henhold til fremgangsmåten beskrevet i manualen avsnitt 3.1.1 og 3.1.3
B. Fjern borrelås for å ta av bag med å låretau (oransje farget nylontau) fra davit og ta den på dekket. Lengde på linjen bør tillate dette.
C. Ta i svingnings tau (grønt nylontau) og legg den på dekket. Lengde på linjen bør tillate dette.
D. Trekk i svingnings tau (grønt nylontau). Dette vil starte dreining av davit. Hold kraft på tauet til svinging fullført.
E. Trekk posen med å senke trekkline (oransje farget nylontau) og holde kraft på den. Dette vil starte senkningen.
F. fortsette å holde kraft på låretauet (oransje farget nylontau) inntil MOB-båten er på vannet.
G. Følg fremgangsmåten som er beskrevet i manualen avsnitt 3.1.3
Viktig! Etter bruk må tauet plasseres i vesken ordentlig: 1. Tauet kan ikke knytes.
2. Tauet må være tørr og ren.

Havforskningsinstituttet - Rederiavdelingen
Title: SOLAS training manual Kronprins Haakon Rev.: 2
Page: 37 of 69
3. Lukk posen med “borrelås” tape.
4. Posen er klar til å brukes på nytt.
2.7.3 MOB båt utstyr
Beskrivelse Ant Dimensjon 1 En båtshake 1 2 Årer 2 3 Radarreflektor 1 4 Oppdrifts øsekar, Plastic 1 5 Vanntett lommelykt 1 Ett ekstra sett med batterier og en ekstra pære 1 6 Signal fløyte, Plastikk 1 7 Førstehjelps utstyr, vanntett pakke 1 8 Varmebeskyttelses Aid 2 9. Rednings bøye , med 30 m. oppdrift linje 2 10 Painter, L = 15m. eller påkrevd 1 11 Jack kniv med snor 1 12 Oppdrifts linje 1 50 m. 13 Compass 1 (Montert i båt) 14 Søk lys 1 (Montert i båt) 15 Brannslukker 1 (Montert i båt) 16. Bøtte med tau, plastisk 1 17 Sjø anker, PVC og tau 1 18 Engine verktøy 1 (Motor tilførsel) 19 Motor reservedeler 1 (Motor tilførsel) 20 GRP Reparasjonssett 1 21 Nødstyring håndtak 1 22 taustige 1
2.7.4 VHF-radio
Bruken av VHF-radioer bestemmes fra dag til dag. Bærbare enheter tilgjengelig på broen.
2.7.5 UHF
UHFs anvendes daglig og er også en del av den nøds kommunikasjon mellom de forskjellige
redningsmenn. dvs. Bridge, Emergency Response team og First Aid team. UHF-kanal fem brukes
av alle lag bortsett fra det tekniske team som bruker UHF-kanal 9.
2.7.6 EPIRB (Emergency Position Radio Beacon)
EPIRB som opererer på 406 MHz-frekvensen anvendes for satellitt deteksjon og sporing av
redningsfarkoster og fartøy i nød. Denne frekvensen er utpekt internasjonalt for bruk for nød. Andre
typer kommunikasjon på denne frekvensen er forbudt.
Når den aktiveres, enten manuelt eller ved hjelp av en hydrostatisk utløser, EPIRB signal kan
umiddelbart detekteres av geostasjonære satellitter. Dette betyr at selv et kort utilsiktet signal kan
generere en falsk varsel. Dersom EPIRB skal aktiveres eller slippes ut i sjøen ved en feil, må de
relevante maritime myndigheter varsles samtidig.
Når EPIRB aktiveres, sender nødsignaler til en satellitt i COSPAS-SARSAT system.

Havforskningsinstituttet - Rederiavdelingen
Title: SOLAS training manual Kronprins Haakon Rev.: 2
Page: 38 of 69
Nødsignalet omfatter en digital melding som unikt identifiserer hver enhet og satellittene beregner
posisjonen av radiofyret. Signalet blir så ytterligere videresendt til en LUT land brukerterminal
(bakkestasjoner), som behandler signalet og begynner å søke etter og redning. EPIRB signal er
kodet med den identifikasjon av fartøyet den tilhører.
406 MHz-EPIRB er delt inn i to kategorier. Kategori I EPIRB aktiveres enten manuelt eller
automatisk. Den automatiske aktivering utløses når EPIRB frigjøres fra sitt feste. Kategori I EPIRB
er plassert i en spesiell brakett er utstyrt med en hydrostatisk utløser. Denne mekanismen frigjør
EPIRB ved en vanndybde på 2-4 meter. Oppdrifts EPIRB deretter flyte til overflaten og begynner å
sende. En Kategori I EPIRB skal monteres utenfor der det vil være i stand til å "flyte fritt" på et
synkende skipet. Kategori II EPIRB aktiveres manuelt enheter og bør oppbevares i de mest
tilgjengelige steder om bord for enkel tilgang i en nødsituasjon.
2.7.6.1 Aktivering av EPIRB
Manuell operasjon: 1. Trekk tapp fra utløser stangen å fjerne dekslet.
2. Ta bort dekselet med forsiktighet.
3. Bryte forseglingen og trekker låsebolten som holder
hovedbryteren aktivator.
4. Trykk glidebryteren til å flytte bryteren til “ON” posisjon.
5. Blits lys, som ligger på toppen av EPIRB, vil lyse opp og etter 50 sekunder, vil den begynne å blinke for å indikere at den EPIRB er aktivert.
6. Hvis mulig, holde EPIRB i et åpent område.
7. Sendingen kan stoppes ved å vri bryteren til “OFF”.
Automatisk drift:
1. EPIRB vil automatisk gi ut fra braketten, flyte til overflaten og begynner å overføre når EPIRB, i sin brakett er utplassert i vann på en dybde av omtrent 2-4 meter.
2. Alternativt kan den EPIRB frigis manuelt fra braketten og sette ut i vannet.
3. Overføringen vil fortsette inntil EPIRB er løftet ut av vannet og tørket av. Transmisjonen kan
også stoppes ved å plassere EPIRB i braketten.
Merk: Batteriet vil vare i minst 48 timer fra aktivering av EPIRB.

Havforskningsinstituttet - Rederiavdelingen
Title: SOLAS training manual Kronprins Haakon Rev.: 2
Page: 39 of 69
Ved forlating av fartøyet, bør om mulig EPIRB bli brakt med i en redningsfarkost og aktivert. Beste måten er flytende i sjøen, festet til redningsfarkosten med et tau.
2.7.7 SART
Det er totalt 3 Tron SART 20 om bord, 3 Radartranspondere er plassert på styrehuset utganger. De
skal aktiveres manuelt ved å følge instruksjonene på SART.
Når en SART aktiveres, sender den ut signaler som vises på alle x-bånd radarer (3 cm) i løpet av
minst 10 nautiske miles som en stiplet linje med 12 prikker som viser retningen til transponderen og
med det nærmeste punktet hvor den SART befinner (se bilder nedenfor).
Aktivering av SART:
1. Trekk ring og presse den sorte knappen. 2. Montere den hvis det er mulig å redningsfarkosten.
Når SART er aktivert vil den overføre i 8 timer.

Havforskningsinstituttet - Rederiavdelingen
Title: SOLAS training manual Kronprins Haakon Rev.: 2
Page: 40 of 69
2.8 Pyroteknikk
2.8.1 Fallskjermraketter
Det beste signalet til bruk i nødstilfelle er en signalrakett med fallskjerm. Lyset kan ses høyt over
horisonten og vises i en høyde av 250-300 m i 30-60 sekunder. I god sikt, kan lyset bli observert i en
25-30 nautiske mil rekkevidde. Rakettene er plassert fire i hver livbåt og redningsflåte. Det er også
12 raketter på broen. Følg instruksjonene på raketten.
2.8.2 Håndbluss
Fakler brukes til å vise en redningsmann din nøyaktige posisjon. Avvent bruk av håndbluss til du kan
se lys fra det andre skipet. Håndbluss kan brukes på forskjellige måter i henhold til ulike prosedyrer.
6 bluss er plassert i hver livbåt og redningsflåte. Følg brukerveiledningen på håndbluss.
2.8.3 Røyksignaler
Røyksignaler er dag nødsignaler med en tykk oransje røyk som vil brenne i minst 3 minutter, og vil
flyte. Røyk signal kan også benyttes for å markere posisjonen under en redningsoperasjon. Det er 2
røyksignaler i hver livbåt og redningsflåter. Følg brukerveiledningen på signalet.

Havforskningsinstituttet - Rederiavdelingen
Title: SOLAS training manual Kronprins Haakon Rev.: 2
Page: 41 of 69
2.8.4 Linekasterapparat
Linekasterapparat blir brukt til å passere en line fra skip til skip, skip til land eller redningstjeneste.
Kronprins Haakon har 4 linekastere som befinner seg i styrehuset. De har en kaste rekkevidde på
230 meter. Følg bruksanvisningen på line-kasteren.

Havforskningsinstituttet - Rederiavdelingen
Title: SOLAS training manual Kronprins Haakon Rev.: 2
Page: 42 of 69
2.8.5 Redningsbøyer
Det er 16 redningsbøyer ombord, noen med røyk og lyssignal, som ligger på dekk 6, 4 og 3, disse
blir brukt når det er en mann over bord situasjon. Hvis du oppdager noen faller over bord eller
allerede er i vannet, gjør du følgende:
1. Slå alarm (rope “Mann over bord!”, Bruke telefon eller manuell melder).
2. Kast livbøyen så nært som mulig.
3. Bli værende og hold øynene på personen i vannet. Det er svært viktig å prøve å opprettholde visuell kontakt til personen i vannet til enhver tid får å kunne veilede MOB båt til stedet så raskt som mulig.
2.9 Overlevelse på sjøen
2.9.1 Råd om bruk av utstyr for overlevelse for å overleve
Umiddelbare tiltak etter låring av livbåt :
• Kutt «the painter» og styr unna skipet ved hjelp av motor, årer eller padleutstyr. • Gjenopprett og samle alt overlevelsesutstyr og se etter overlevende som fremdeles er i vannet. • Sett ut drivanker for å redusere sidedrifting og stabilisere båten. • Utnevne en ansvarlig person og organiser en tidsplan for konstant utkikk. • Forsøk å gjøre deg kjent med så mye som mulig av fartøyets funksjon og omgivelsene.
Handlinger om bord på livbåt :
• Ta av våte klær og vri dem før du tar dem på igjen, bruk termisk beskyttelsespose. • Blås opp redningsflåter ved hjelp av bærbar pumpe. • Fordel sjøsyketabletter hvis det er aktuelt. • Behandle sårede mennesker. • Prøv å få radiokontakt . • Aktiver SART og EPIRB om bord. • Finn pyroteknikk for å ha klart når det er nødvendig. • Les overlevelsesinstruksjonsheftet. • Begynn å samle vann og fortsett å gjøre det ved enhver anledning.
Plassering og hvordan tiltrekke oppmerksomhet :
• Prøv å holde deg nær posisjonen til forulykket fartøy. • Bruk radio til å sende nødsignaler. • EPIRB sender automatisk nødsignaler når den aktiveres. • SART vil sende signaler som er synlige for andres skipsradar, hvis det er aktivert. • Bluss og raketter må bare brukes når det er potensielt mulig for at noen vil se dem.
Følgende utstyr kan brukes for å tiltrekke seg oppmerksomhet til fly og skip:
• Bærbar radio
• Fallskjermraketter. Synlig opptil 20-30 km. • Håndflammer. Synlig opptil 10 km.

Havforskningsinstituttet - Rederiavdelingen
Title: SOLAS training manual Kronprins Haakon Rev.: 2
Page: 43 of 69
• Røyksignal. Synlig opptil 10 km. • Heliograph. Speil som reflekterer sollyset kan være synlig opptil 30 km. • Signallampe . Prøv å overføre SOS (3 korte, 3 lange, 3 korte)
Vann og mat :
• Livbåtene har en vannforsyning på 1 liter per person. • Redningsflåten har en vannforsyning på 1,5 liter per person. • Ikke distribuer vann de første 24 timene, og start deretter med en daglig rasjon på 0, 5 liter per dag og person. Dette må kanskje reduseres dersom vannforsyningen blir lav. • Prøv alltid å samle så mye regnvann som mulig . • Redningsflåtenes matrasjoner er 100-125 g / dag / person. • Ytterligere kilder til mat er fisk, fugler, skilpadder etc.
MER INFORMASJON
Redningsflåter:
Tøm ut alt bunn vann så fort som mulig, og bruk svampen til å tørke opp gjenværende vann. Det er viktig å blåse opp både bunn og baldakin, da dette gir riktig isolasjon mot kulde. Videre kan forskjellige pakningsmaterialer fra nødpakningene (skum, gummi og papp) brukes til ekstra isolasjon ved å sette den på bunnen. Beskytt ansikt og bakhodet mot solen. For natten tørker du opp flåten, blås opp bunnen og lukk inngangen hvis nødvendig. Regnvannet kan trekkes fra gummiventilen ved himlingen ned i plastposer, men bruk ikke det første vannet da det vil inneholde for mye salt.
Nødrasjoner (mat og vann) :
Ikke utlever noen nødrasjoner i de første 24 timene. Kroppen vil etterhvert bli vant til et redusert forbruk og de som er sjøsyke vil bli litt vant til bevegelsens bevegelser. Mat- og vannrasjonene er delt inn i like store deler, slik at den første rasjonen deles mellom de skipbrudne etter de første 24 timene, fortrinnsvis fordelt over tre ganger. Rasjonene er ment for et opphold på fire til seks dager. Drikk aldri saltvann.
Forskrifter :
Rasjonene bør fastsettes av den som er ansvarlig person ombord. En viktig sak er disiplin om bord. Noen kan ha blitt sjokkert av situasjonen, men det er lederens oppgave å oppfordre alle til at situasjonen er langt fra håpløs, og dermed gjøre det klart at redningsbåter/flåter er spesialdesignet og utstyrt for denne spesielle situasjonen.

Havforskningsinstituttet - Rederiavdelingen
Title: SOLAS training manual Kronprins Haakon Rev.: 2
Page: 44 of 69
2.9.2 Fare for eksponering – Retningslinjer for overlevelse i kaldt vann
Introduksjon:
Hensikten med denne veiledningen er å undersøke farene ved eksponering for kaldt vann som kan true livet ditt, og gi deg råd om hvordan du kan forhindre eller minimere disse farene. En grundig forståelse av informasjonen i dette kapittelet kan en dag redde livet ditt.
Titanic i 1912 ga et dramatisk eksempel på effekten av kaldtvannspåvirkning. Delvis på grunn av manglende beredskap med verneklær, tilstrekkelig flyteutstyr og kunnskap om overlevelse prosedyrer, ingen av de 1489 personer var nedsenket i 0°C var i live da redningsfartøy kom en time og femti minutter etter synkingen. Utallige liv kunne blitt reddet hvis overlevende var kjent med hvordan man skal takle kaldt vann; nesten alle menneskene i livbåter var i live.
Royal Navy i Storbritannia mistet alene ca 45 000 menn på sjøen under andre verdenskrig, av de er det anslått at 30 000 døde av drukning og nedkjøling. Mange av de som druknet gjorde det på grunn av kulde. Selv i dag er mønsteret det samme.
Det er viktig å innse at du ikke er hjelpeløs i påvirkningen av din egen overlevelse i kaldt vann. Kroppsvarmetap er en gradvis prosess, og forskning viser at i rolig vær ved 5°C har en normalt kledd person bare 50% sjanse for å overleve en time. Enkle selvhjelpsteknikker kan forlenge dette, spesielt hvis personen har en redningsvest. Du kan utgjøre forskjellen; Denne brosjyren er ment å vise deg hvordan.
Kroppen din :
En forståelse av hvordan kroppen din reagerer på kald luft/vann eksponering og vite de trinnene du kan ta for å hjelpe kroppen din til å forsinke de skadelige effektene av kaldt stress, vil hjelpe deg i kampen din for å holde deg i live ved eksponering for kaldt vann.
Tenk deg at kroppen din består av et indre og ytre lag. Innenfor kjernen produserer kroppen mye varme som følge av normale kroppsfunksjoner, som fysisk trening og fordøyelse av maten.
Naturen krever at kroppens kjerne holdes til en ideell temperatur på 37 grader Celsius. Et nettverk av blodårer som går gjennom kjernen og ytre lag av kroppen din, tar opp varmen som produseres av '' ovnen '' i kjernen, og fordeler varmen gjennom hele kroppen. Naturen gir også kroppen din et veldig nøyaktig system for automatisk å regulere kjernetemperaturen ved 37 grader Celsius. For eksempel, hvis temperaturen rundt deg er høy, som på en varm dag eller i et varmt kjelerom, vil blodkarene i nærheten av huden på kroppen din forstørre, slik at mer blod kan strømme til ytterlaget og øke kroppsvarmetapet. Dette vil holde deg komfortabel (37 grader Celsius) og hindre kroppsvarmen fra å stige. Hvis omgivelsene er kalde, vil din kropp begrense blodkarene i ytre lag og holde den verdifulle kroppsvarmen fra å gå tapt for fort.
Dette reguleringssystemet forsøker å holde kroppens kjernetemperatur konstant til tross for variasjoner i omgivelsestemperaturen rundt deg. Kroppen kan bare gjøre dette innenfor visse grenser. Det er nivåer av kald eksponering når kroppen må ha hjelp til å opprettholde kjernetemperaturen ved naturens valg på 37 grader Celsius. Du må gi den den hjelpen ved å ta de riktige tiltakene og bruke beskyttende klær.

Havforskningsinstituttet - Rederiavdelingen
Title: SOLAS training manual Kronprins Haakon Rev.: 2
Page: 45 of 69
Kroppsvarmetap og isolasjon:
Kroppen avgir varme til omgivelsene på følgende måter:
Ledning er overføringen av varme ved direkte kontakt med kaldt vann eller andre materialer. Varme KONDUKSJON (ledning) er overføring av varme ved direkte kontakt med kaldt vann eller annet materiale. Varme passerer fra kroppen din, som er relativt høy temperatur, til et stoff som er lavere i temperatur. Visse stoffer er bedre ledere av varme enn andre. Vann utfører varme mange ganger raskere enn luft.
KONVEKSJON er overføring av varme ved luft eller vannstrømmer. Luft som beveger seg er langt kaldere enn stille luft. Kjøling ved vind er kjent som "wind chill" -effekten. På samme måte er bevegelig vann rundt kroppen din mer kjølende enn stille vann på samme temperatur.
RADIATION er overføring av varme ved stråling av energi uten direkte kontakt med andre stoffer, for eksempel en radiator oppvarming et rom.
FORDAMPNING er fordampning eller ''opptørking'' av væske, slik som svette eller fuktighet fra våte klær. Når kroppen blir for varm, vil det oppstå svetting og fordampningen av denne svetten vil bidra til å avkjøle huden. Selv om svetting kan være svært nyttig for å gi deg komfortabel avkjølende effekt på en varm dag, så vil fordamping av fuktighet fra klær frarøve deg verdifull kroppsvarme på en kald dag.
I nesten alle deler av verden, kan man ikke overleve uten hjelp av klær. Klær i seg selv vil ikke varme opp kroppen, det varmes faktisk av egen varmeproduksjon. Kroppsvarmen varmer opp luftlaget som er fanget mellom huden og klærne. Det er dette laget av luft som gir isolasjon. Hvis luftlaget går tapt, blir den isolasjonen redusert. Dette laget av fanget luft mellom hud og klær kan forstyrres av luft- eller vannbevegelse. I begge tilfeller er verdifull varm luft forskjøvet, og hudtemperaturen vil falle. Varmen fra kjernen din vil da bli brukt for å opprettholde hudtemperatur. Hvis varmetap fra huden forblir ukontrollert, vil kroppstemperaturen falle.

Havforskningsinstituttet - Rederiavdelingen
Title: SOLAS training manual Kronprins Haakon Rev.: 2
Page: 46 of 69
2.9.3 Hypotermi
Tapet av kroppsvarme er en av de største farene til sjøs. Hastigheten til kroppsvarmetap er avhengig av vanntemperaturen, beskyttelsesklær og den måten overlevende oppfører seg på. En unormalt lav kroppstemperatur kan gjenkjennes av en rekke symptomer. Svært tidlig under eksponering forsøker kroppen å bekjempe overdrevent varmetap både ved å redusere overflaten til blodkarene (for å redusere varmeoverføring av blod til overflaten) og ved skjelving (for å produsere mer kroppsvarme). Men hvis eksponeringen er alvorlig, kan kroppen ikke spare eller produsere nok varme. Kroppstemperaturen begynner å falle. Når kroppstemperaturen er under 35 grader Celsius, lider personen av '' hypotermi ''.
Dermed er ubehag, tretthet, dårlig koordinering, nummenhet, nedsatt tale, dis-orientering og mental
forvirring godt etablert. Når den indre temperaturen senkes under 31 grader Celsius, kan
bevisstløshet forekomme, skjelving blir vanligvis erstattet av muskelstivhet,
og pupillene forstørres. Hjertet blir uregelmessig og svakt, og puls er knapt detekterbar. Selv
om døden kan forekomme i et hvilket som helst stadium av hypotermi, når en persons temperatur er
under 30 grader Celsius, er det svært vanskelig å være sikker på om han er i live eller død. Dødsfall
ved hypotermi er definert som en manglende gjenoppliving ved gjenoppvarming

Havforskningsinstituttet - Rederiavdelingen
Title: SOLAS training manual Kronprins Haakon Rev.: 2
Page: 47 of 69
Når man flyter i vannet og venter på redning:
• Ikke kast bort energi, hold bena sammen og hold dem opp mot kroppen hvis mulig.
• Alle bør samle seg ved overlevelsesutstyr og holde så nært som mulig om hverandre.
• Prøv å orientere deg og forsøke å finne skipet, livbåter, redningsflåter eller andre flytende gjenstander.
• Ikke prøv å svømme med mindre det er å nå en nærliggende redningsbåt. Unødvendig svømming vil "pumpe" ut alt varmt vann mellom kroppen din og lagene av klær, og dermed øke hastigheten på varmetapet
• Forsøk å ha en positiv holdning til din overlevelse/redning. Dette vil forbedre sjansene dine for å forlenge overlevelsestiden til redning kommer.
2.9.4 Før man forlater skipet
Erfaring viser at noen skip synker på mindre enn 15 minutter. Dette gir lite tid til å formulere en handlingsplan, så forsiktig forhåndsplanlegging er viktig for å være klar i en nødsituasjon. Her er noen punkter å huske på når du forlater skipet:
Når man flyter i vannet og venter på redning:

Havforskningsinstituttet - Rederiavdelingen
Title: SOLAS training manual Kronprins Haakon Rev.: 2
Page: 48 of 69
• Ikke kast bort energi, hold bena sammen og hold dem opp mot kroppen hvis mulig.
• Alle bør samle seg ved overlevelsesutstyr og holde så nært som mulig om hverandre.
• Prøv å orientere deg og forsøke å finne skipet, livbåter, redningsflåter eller andre flytende gjenstander.
• Ikke prøv å svømme med mindre det er å nå en nærliggende redningsbåt. Unødvendig svømming vil "pumpe" ut alt varmt vann mellom kroppen din og lagene av klær, og dermed øke hastigheten på varmetapet
• Forsøk å ha en positiv holdning til din overlevelse/redning. Dette vil forbedre sjansene dine for å forlenge overlevelsestiden til redning kommer.
2.9.5 Bruk av overlevelsesutstyr i livbåt/flåte
Det er flere typer overlevelsesutstyr i livbåten, og i
redningsflåten. For eksempel inneholder livbåten
en manuelt betjent lensepumpe, et øsekar og to
bøtter i tilfelle båten har tatt i vann. Senere kan
bøttene brukes for å samle regnvann.
Hvis det er folk rundt i vannet, bruker du de to flytende redningsringer. Disse er festet til en flytende line.
Kast redningsringen i retning av personer i vannet, uten å treffe dem direkte.
Når livbåten er fri fra skipet kan du bruke drivanker. Drivanker finner du i livbåten og flåten. Bruken av et drivanker tjener to formål. Den første er å holde båtens baug mot sjøen, og den andre er å hindre driving fra stedet der ulykken fant sted. Søke- og redningsoperasjoner starter normalt på det aktuelle stedet. En svivel er montert på drivankeret for å forhindre at tau/trossen til drivankeret vil tvinne seg. Draget vil også gjøre det mer behagelig for passasjerene i overlevelsesbåten.
Langt til sjøs, kan dagene passere før du blir reddet, og derfor er båten utstyrt med vanntette beholdere som inneholder 1 liter ferskvann for hver person. Ved rasjonalisering bruker du følgende regel:
Ingen vann i de første 24 timene og deretter 0,5 liter per person og dag. For distribusjon av vann finner du en øse og snor, samt en målekopp.
Drikk aldri sjøvann
2.9.6 Behandling av overlevende som har havnet I sjøen
Behandlingen av hypotermi vil selvsagt avhenge av både tilstanden til de overlevende og de
tilgjengelige fasilitetene. Generelt sett er metoden bare å fjerne alle våte klær og erstatte med tørre
klær eller tepper. Varm søtt drikke og hvile i et varmt miljø som ikke overstiger 22 grader Celsius
(vanlig romtemperatur) anbefales også. Vær imidlertid alltid oppmerksom på at selv bevisste
overlevende kan kollapse og bli bevisstløs kort tid etter redning. Alkohol bør unngås for enhver pris.
Hvordan du undersøke / behandle en person:
Hvis personen er ved bevissthet:
En person som svarer/ reagerer etter at du har ristet i ham / henne, trenger ofte ikke medisinsk hjelp. Hvis personen synes å være forvirret eller groggy eller på en annen måte alvorlig syk, så skal

Havforskningsinstituttet - Rederiavdelingen
Title: SOLAS training manual Kronprins Haakon Rev.: 2
Page: 49 of 69
du forbli i nærheten så lenge som mulig, slik at du kan se om tilstanden blir verre. Om nødvendig, ring noen til hjelp og ikke forlat personen på nettstedet ditt før hjelp kommer.
Hvis personen er bevisstløs, men puster og har puls:
• Hvis den overlevende puster, men bevisstløs, legge ham i det
ubevisste stilling som vist på bildet. Dette er nødvendig for å sikre at
personen puster ikke er hindret av hans tunge eller ved oppkast.
• Den nedre arm er plassert bak i nakken.
• Den øvre arm bøyes med hånden under halsen. Leggen er bøyd i
kneet.
• Det øvre ben er rett.
Hvis personen er bevisstløs, og har en puls, men er ikke puster:
Hvis personen ikke puster, men har en puls må du begynne munn til munn
prosedyre. Hvis du er alene, gi ubevisste 10 kunstig åndedrett før du ringer
etter hjelp.
Hvis mulig, la noen andre få hjelp.
Fortsett kunstig åndedrett i samme tempo som du selv puster til du er lettet
eller til du ikke klarer å puste lenger. Hvis personen begynner å puste igjen
deretter plassere personen i bevisstløs posisjon.
Hvis personen er bevisstløs uten pust eller puls:
Hvis personen som er bevisstløs ikke puster eller har noen puls
må du ringe etter hjelp, og deretter starte HLR. Gi 30
brystkompresjoner og deretter 2 kunstig åndedrett. Fortsett
dette med raske børser.
Den riktige måten å plassere hånden:
Følge de nedre kanter av brystet med to fingre var ribbeinene møtes. Plasser pekefingeren inn en annen på brystet. Plasser pekefingeren inntil avslutningen på brystet. Håndledd fra den andre hånden skal plasseres ovenfor pekefingeren på brystbenet uten at fingrene berører brystbenet.
I mer alvorlige tilfeller, hvor overlevende ikke skjelver og er halvbevisst, bevisstløs eller tilsynelatende død, vil umiddelbare førstehjelpstiltak være nødvendige for å bevare livet mens man venter på medisinsk rådgivning. De anbefalte førstehjelpstiltakene for en slik overlevende er som følger:
• Ved redning, kontroller alltid overlevendes pust, puls i ett minutt (som illustrert), og pupillenes reaksjon. • Medisinske myndigheter er uenige om den beste oppvarmingsmetoden, men enten brukes en aktiv eller passiv metode:
• Aktiv oppvarmingsmetode: Dette gjøres fortrinnsvis i et bad med varmt vann (38 ° C til 40 ° C-hånd varm) eller alternativt ved bruk av oppvarmede tepper eller ark (ca. 45 ° C, men ikke varmere).

Havforskningsinstituttet - Rederiavdelingen
Title: SOLAS training manual Kronprins Haakon Rev.: 2
Page: 50 of 69
• Passiv varmemåte: Klipp personens klær slik at den kan fjernes med minst mulig forstyrrelser. Deretter pakk personen i teppe for å redusere ytterligere varmetap. Forsøk ikke å varme personen ved kraftige tiltak. Påfør oppvarmingsputer eller varmtvannflasker under teppet, til personens hode, nakke, bryst og lyske, men legg aldri disse varme gjenstandene mot den blanke huden, da kald hud lett brenner.
• Hvis aktive eller passive oppvarmingsmetoder ikke er tilgjengelige, må du påføre kroppsvarme ved direkte kontakt mellom kroppen og kroppen og den person eller personer som leverer varmen. Prøv å overvåke puls og pust i alle tilfeller.
2.9.7 Kuldeskadevarianter
Et annet problem står overfor en overlevende i kalde omgivelser er faren for å få en kulde skade.
Slike skader vanligvis skyldes langvarig eksponering for lave omgivelsestemperaturer, særlig når
vindstyrken er høy. Kuldeskader kan være av en frysing eller ikke-fryse variasjon.
2.9.8 Frostskade
Frostskader er betegnelsen på den betingelse når vevsvæsker fryse i lokaliserte områder av
kroppen, hender, ansikt og føtter er spesielt utsatt.
2.9.8.1 Årsak og tegn
Eksponering, spesielt av bar hud til lav temperatur, spesielt når kombinert med bevegelser av fuktig / fuktig luft. Utkikk i redningsflåter eller overlevende i åpne båter er en del av denne typen skade. Følgelig bør det tas hensyn til lengden på utkikksperioden.
Tidlige tegn på frostskade er:
1. Ekstrem voksaktig blek av huden.
2. Initial lokal prikking og stivhet, det er vanskelig å rynke ansiktet eller bevege berørte tær eller fingre.
3. Fullstendig fravær av følelse i det berørte området.
4. Lokal hardhet på grunn av frysing av kjøttet.
Merk: Vær oppmerksom på de tidligste tegn på frostskade på deg selv og andre.
2.9.8.2 Forebygging
Dersom bar hud har blitt utsatt for vær og vind, bør de perioder med eksponering bli holdt til et minimum, og vinder spesielt unngås. Moderat trening og massasje på et tidlig stadium vil bidra til å forhindre frostskade. Ikke røyk, røyking reduserer blodtilførselen til hender og føtter. Alkoholholdige drikker bør ikke konsumeres.
2.9.8.3 Behandling
Ved påvisning av de ovennevnte tegnene, bør det tas umiddelbare skritt for å gjenoppvarme den frosne delen før permanent skade oppstår. Fjern deg fra vinden. Varm de frosne områdene ved å påføre dem på en varmere del av kroppen, f.eks. hender under armhulene, kuppede hender over kinn, nese, øre osv. De frosne områdene kan også gjenoppvarmes ved å plassere dem i vann med en temperatur på ikke mer enn 40 ° C. Når det er blitt frosset, må du IKKE gni eller massere berørte områder.

Havforskningsinstituttet - Rederiavdelingen
Title: SOLAS training manual Kronprins Haakon Rev.: 2
Page: 51 of 69
2.9.9 Kuldeskade (ikke frysende)
Kuldeskade er et begrep som gis når temperaturen i lokale vev i benene (vanligvis fot) forblir sub-
normale, men over frysepunktet for en lengre periode. Det er ofte overlevende som har vært i drift
og under kalde forhold i flere dager. Vanligvis har føttene vært våte og immobile, men denne skaden
kan også oppstå under tørre forhold. Andre medvirkende faktorer er tett fottøy og fat man fortsatt
sitter med føttene ned som når du sitter i en stol for lengre perioder.
2.9.9.1 Diagnose
Føttene blir hvite, numne, kalde og ofte er litt hovne. Når varmen kommer tilbake blir føttene, røde,
hovne og vanligvis smertefulle.
2.9.9.2 Forebygging
Alle anstrengelser bør gjøres av overlevende å holde føttene varme og tørre. Skolisser bør løsnes;
føttene bør heves, og tå og ankel øvelser oppfordret flere ganger om dagen. Når det er mulig, bør
sko fjernes, og føttene holdes varm ved å plassere dem under armhulene, men utenfor klær, av en
tilstøtende person. Alternativt kan ekstra klær pakkes rundt føttene for å holde dem varme. Røyking
bør frarådes.
2.9.9.3 Behandling
Etter rednings alle anstrengelser bør gjøres for å unngå rask gjenoppvarming av de berørte lemmer.
Forsiktighet bør tas for å unngå å skade huden eller bryte blemmer. Heve den nedre for å redusere
svelling og dekker lett.
Husk: nummen lemmer føler ikke varme eller andre smerter og blir veldig lett brent. Ikke massere
berørte lemmer.

Havforskningsinstituttet - Rederiavdelingen
Title: SOLAS training manual Kronprins Haakon Rev.: 2
Page: 52 of 69
2.10 Brannvern
2.10.1 Innledning
Alle om bord, bør lære å slukke små branner trygt, og hvordan man oppfører seg i mer alvorlige
branner. Dette gjøres ved å delta på brannkurs.
Vanligvis, vil forskjellige materialer brenner ganske likt under tilsvarende forhold. Tørt tre, anordnet
på riktig måte i en peis, brenner med en gul eller oransje flamme, skaper grå eller hvit røyk, og
sender gnister opp en skorstein.
En liten mengde av brennolje i en panne skaper tett, svart røyk og en varm, orange, rullende
flamme.
En brenner på en gasskomfyr, når tilført ved normalt trykk, gir en jevn, blå flamme av en viss
temperatur.
Disse vanlige branner kan slukkes enkelt.
Men hvis forholdene endres, kan brannenes atferd være annerledes. En liten haug av tørt trevirke
kan være i et felt, eller en skog, og når brannen starter, kan det spre seg raskt utenfor kontroll.
Den lille mengden av brenselolje i pannen kan i stedet være en større mengde i en drivstofftank, og
hvis tenning skjer, kan en masse av flammer komme rullende langs skipet. Dersom trykket øker i
rørledningen til en gasskomfyr, kan den trygge lille flammen blusse opp og brenne noen eller tenne
brennbare materialer i nærheten.
Fire Control and Safety Plan er plassert på sentrale steder på fartøyet. Under er en beskrivelse
med, antall og bemerkninger av ikonene og deres betydning.
(Tegning nr. 08-6543-00-503-001)

Havforskningsinstituttet - Rederiavdelingen
Title: SOLAS training manual Kronprins Haakon Rev.: 2
Page: 53 of 69

Havforskningsinstituttet - Rederiavdelingen
Title: SOLAS training manual Kronprins Haakon Rev.: 2
Page: 54 of 69

Havforskningsinstituttet - Rederiavdelingen
Title: SOLAS training manual Kronprins Haakon Rev.: 2
Page: 55 of 69

Havforskningsinstituttet - Rederiavdelingen
Title: SOLAS training manual Kronprins Haakon Rev.: 2
Page: 56 of 69

Havforskningsinstituttet - Rederiavdelingen
Title: SOLAS training manual Kronprins Haakon Rev.: 2
Page: 57 of 69
2.10.1.1 Grunnleggende kunnskap om branner
Ved brannbekjempelse, er det viktig å huske på at å redde liv er det viktigste, og deretter bevare
materiell og skip.. Men det er alltid en kombinasjon når man bekjemper en brann. Hvis det mangler
noen under en brann, er det svært viktig å søke i et mønster avgjort på forhånd. Ellers er det lett å
glemme å søke for eksempel en lugar eller en del av lasterommet / maskinrommet. Derfor trenger
røykdykkere begynne med slukking av brann, frem til en savnet personen blir funnet. Men når
personen er funnet er det selvfølgelig størst betydning for å hjelpe personen til trygt område av
fartøyet. Sannsynligvis vil legehjelp være nødvendig.

Havforskningsinstituttet - Rederiavdelingen
Title: SOLAS training manual Kronprins Haakon Rev.: 2
Page: 58 of 69
Det tar sekunder å spre oppover
Det tar minutter å spre sidelengs
Det tar timer å bli spredt nedover
Dette er et godt bilde å ha i bakhodet når du blir iverksatt tiltak for å unngå brannen
skal spre seg.
2.10.2 Prinsipper og teori om brann
2.10.2.1 Brann Triangel
Det er tre elementer for å skape en brann, er de:
OKSYGEN BRENSEL (Brennbart materiale)
VARME (Antennelsestemperatur) Dersom blandinger av de ovennevnte elementer er perfekt, vil en brann starte. Ved å fjerne ett av
elementene vil brannen slukkes.
Brensel, brennbart materiale:
Gassen fra det brennbare materialet må ha den riktige andel av luft (oksygen).
Oksygen:
Luften som omgir oss inneholder tilstrekkelig oksygen til å opprettholde en brann i det vi kaller
brennbare materialer.
Varme, Antennelsestemperatur:
For at et brennbart materiale skal kunne brenne i luft, må det bli oppvarmet før den når sin
antennelsestemperatur.
Forholdsregler mot brann:
• Ta forholdsregler for å unngå brann.
• Hold alltid branndører lukket (men ikke blokkert) for å begrense spredning av flammer og
røyk. Hold alltid arbeidsområder rent og ryddig. Ikke la brannfarlig avfall akkumulere.
• Hold oljen vekk fra varme flater som kan antenne den - sjekk at alle slanger og koblinger er
tette.
• Utvis stor forsiktighet ved pumping av olje til tanker - unngå søl som kan føre til brann.
• Slukk ut alle sigaretter helt.

Havforskningsinstituttet - Rederiavdelingen
Title: SOLAS training manual Kronprins Haakon Rev.: 2
Page: 59 of 69
• Røyking forbudt under bunkring eller bruk av brennbare vesker.
• Slå av elektrisk utstyr når den ikke er i bruk - være spesielt forsiktig i bysser der det er
frityrgryter.
• Vær ytterst forsiktig når du bruker oksygen-acetylen eller annet utstyr som kan antenne
brennbare materialer.
2.10.3 Råd om brannslukking om bord
Aktivér manuell melder
Brannmelder og røyk / varmedetektorer vil bli aktivert og vist på brannstyrepanelet.
En forsinket alarmering fører vanligvis til at en liten brann blir en stor en. Mannskap som oppdager
en brann eller en indikasjon på brann må slå alarm øyeblikkelig.
Prøv å slukke brannen
Evakuere alle personer i området.
Når områder evakueres, advare alle personer i området for å holde seg
unna. Hvis området er røykfylt, hold alltid en lav posisjon under røyken. Hvis
du er i lugaren, bruk fluktmaske i “grab bag” som vil vare i 15 minutter.
Sikker: Lukk alle branndører.

Havforskningsinstituttet - Rederiavdelingen
Title: SOLAS training manual Kronprins Haakon Rev.: 2
Page: 60 of 69
Rømningsåndedrettsapparat (EEBD)
20 enheter har blitt lagret om bord på strategiske steder. (På tanktopp og dekk 1 - 9)
2.10.3.1 Skjulte branner
Før et område eller døren åpnes for å kontrollere for brann, skal døren undersøkes. Hvis flammene
kan sees, er brannen åpenbar. Men hvis bare røk er tydelig, kan brannen være skjult bak et skott
eller et område. Hvis ja, må visse forholdsregler tas. Misfarget eller blemmer på maling indikerer
brann rett bak døren. Av og til vil røykpuffing fra sprekker i dørtetninger eller hvor ledningene føres
gjennom skottet også være en indikasjon på brann. Skottet eller dør skal berøres med baksiden av
en naken hånd. Hvis det er varmere enn normalt, er det trolig at det skjuler en brann. Ikke åpne en
dør før du har backup tilgjengelig med slange. Brann i et lukket rom forbruker oksygen. Åpning av
døren vil mate ytterligere oksygen til ilden, og betyr vanligvis at brannen vil vokse med eksplosiv
kraft. Flammer og overhetede gasser blir så tvunget ut gjennom døren, og den som står i veien kan
bli alvorlig forbrent. Derfor, før du åpner den, kjøle døren med vann og ha alle til å stå klar.
Hvis du trenger å gå inn et røykfylt område for å redde en person, husk alltid: Hvis mye røyk
kommer ut, lukker døren igjen.
Alltid entre rom i en lav posisjon og holde døren åpen mens en er i rommet. Når du forlater rommet,
lukk døren.
2.10.3.2 Size-Up
Size-up er evalueringen av brannsituasjon. Emergency leader sammen med Emergency Response
Team leder bør fastslå:
• Type brann: hvilket brennbart material brenner? Passende slukkemetode.
• Passende metode for angrep. Hvordan hindre at brannen sprer seg.
• Nødvendige arbeidskraft og brannslukkingsøvelser.
En liten brann kan bli slukket av det første mannskapet som ankommer. Større branner krever et
koordinert angrep og effektiv bruk av arbeidskraft og utstyr.
2.10.3.3 Angripe Brann
Å angripe brannen bør begynne så snart som mulig, for å få umiddelbar kontroll og for å forhindre
eller begrense utbredelsen. Angrepet vil enten være direkte eller indirekte avhengig av

Havforskningsinstituttet - Rederiavdelingen
Title: SOLAS training manual Kronprins Haakon Rev.: 2
Page: 61 of 69
brannsituasjon. Direkte og indirekte angrep er forskjellig i måten man oppnår opphør. Begge er
effektive når de er riktig brukt.
2.10.3.4 Direkte angrep
I et direkte angrep, vil røykdykkere gå umiddelbart til brannområdet, og påføre slukkemiddel direkte
inn i mot brannstedet. Men hvis varme og røyk gjør det umulig å finne
eller komme til brannstedet, bør et indirekte angrep vurderes.
Angrip kjernen for brannen direkte med slukningsmiddel, for eksempel
vann. Vannet blir slukke brannen, og vannet vil utvikle seg til damp og
kjøle ned de brennbare gassene.
Dette vil gjøre brennbare gasser u-antennelig.
2.10.3.5 Indirekte angrep
Et indirekte angrep er når det er umulig for røykdykkere å komme til brannstedet. Vanligvis er dette
tilfellet når brannen er i de nedre deler av fartøyet. Suksessen til et indirekte angrep avhenger av
brannen. En teknikk innebærer å lage en liten åpning inn i brannområdet, samt sette inn en
brannslangedyse og injisere en vanndusj. Ved hjelp av sprøyting av veggene i rommet med vann, vil
vannet utvikle seg til damp og kjøle ned de brennbare gassene. Dette vil gjøre brennbare gasser
antennelig.
For denne fremgangsmåten, må plassen være helt tett, og ilden varm nok til å omforme vann til
damp. En annen indirekte metode er å oversvømme plass med vann. Her også, må plassen være
helt tett.
Merk: Ovennevnte prosedyrer gjelder bare for brann grupper om bord.
2.10.3.6 Ventilasjon
Ventilasjon er tiltak for å slippe forbrenningsproduktene som er fanget inne i beholderen, og
ventilere dem utenfor karet. De fleste brann dødsfall skyldes kvelning av forbrenningsgasser eller
mangel på oksygen i stedet for å brenne. Imidlertid kan ventilasjon bare brukes når et direkte angrep
er gjort på en brann. I løpet av et indirekte angrep, må brannområdet holdes så lufttett som mulig for
å holde oksygen ute, og slukningsmiddelet inne.
2.10.3.7 Hindre brannspredning
Hvis en brann kan hindres fra å spre seg utover der den kommer fra, kan den vanligvis kontrolleres
og slukkes uten omfattende skader. For å gjøre dette, må brannen være praktisk talt omgitt på seks
sider: Brannslukningspersonell med slanger eller bærbare brannslukkere må posisjoneres for å
dekke kantene og rommene over og under brann. Muligheten for at brannen går gjennom
luftesystemet må også vurderes.

Havforskningsinstituttet - Rederiavdelingen
Title: SOLAS training manual Kronprins Haakon Rev.: 2
Page: 62 of 69
2.10.3.8 Overhaling
Overhaling påbegynnes etter at hoveddelen av brannen er slukket. Det er en kombinasjon av to
prosedyrer: undersøkelse og rydde opp. Formålet med undersøkelsen er å finne og slokke skjult ild
og glør, og for å finne ut om brannen har spredt seg til andre deler av fartøyet. Rusk bør renses opp
og vann fjernes. Enhver usikker tilstand bør sjekkes og branntilløp fjernes. For eksempel bør
hengende isolasjon fjernes, hengende ledninger festes, og alle rester må fjernes for å gjøre
brannområdet så sikker som mulig.
2.10.3.9 Over vanning
Fri veskeoverflate kan forringe stabiliteten av et fartøy. Alle anstrengelser bør gjøres for å begrense
opphopning av vann i store rom og lasterom. Innsatsen bør begynne ved bruk av vann i metoder
som produserer maksimal kjøling med minimale mengder vann, for eksempel, vannspray med
konsentrert stråle. Så snart vann brukes, skal lense prosedyrer starte.
2.10.3.10 Når brannen er slukket
Før en brann kan betraktes slukket, må Emergency Response Team leder sikre at visse essensielle
skritt er tatt. Disse inkluderer:
• En grundig undersøkelse av brannområdet for å sikre at alle potensielle stier brannspredning
er kontrollert.
• Alle røyk og forbrenningsgassene er blitt fjernet med ventilasjon.
• Brannvakt er etablert. men sjekk for gjenantenning, og å varsle dersom det skjer.
• En undersøkelse har blitt gjort for å se om fartøyet har blitt skadet av brannen. Høye
temperaturer kan føre til dekk, skott og andre strukturelle konstruksjoner til å kollapse eller bli
strukturelt uholdbar.
• Eventuelle nødvendige lensingsprosedyrer er i igangsatt. En mønstring har blitt gjennomført
for å gjøre rede for alt personell.
2.10.4 Brannslukker
Ombord på Kronprins Haakon er det 4 forskjellige typer brannslukkere.
Vann EN Pulver A, B, C skum A, B CO2 B
Ikke alle branner er de samme, og de er klassifisert i henhold til type drivstoff som brenner. Hvis feil
type brannslukningsapparat brukes på feil klasse for brann, kan det faktisk blitt verre.

Havforskningsinstituttet - Rederiavdelingen
Title: SOLAS training manual Kronprins Haakon Rev.: 2
Page: 63 of 69
Det er derfor svært viktig å forstå de fire ulike brannklassifisering.
De fleste brannslukningsapparater er merket med en etikett for å avklare hvilke grupperinger av
brann apparat er konstruert for.
Klasse A: tre, papir, tøy, søppel, plast, faste brennbare materialer som ikke er
metaller. Klasse A branner vanligvis gitt en aske.
Klasse B: Brennbare væsker: bensin, olje, fett, aceton, en hvilken som helst ikke-
metall i flytende tilstand, i brann. Denne klassifiseringen omfatter også brannfarlige
gasser. Klasse B-branner involverer generelt materialer som koker eller boble.
Klasse C: Elektrisk – spenningssatt elektrisk utstyr. Hvis det er "koblet", det vil bli
vurdert en klasse C brann. Klasse C branner generelt omhandler elektrisk strøm.
Klasse D: Metaller - kalium, natrium, aluminium, magnesium. Det tar spesielle
slukningsmidler (Metal-X, skum) for å bekjempe klasse D branner.
A. Brann i fibermaterialer som tre, lin, papir
og møbler.
B. Brann i brennbare væsker, slik som olje, fett og maling.
C. Brann i elektrisk utstyr, for eksempel
TV, stereo og datamaskin.

Havforskningsinstituttet - Rederiavdelingen
Title: SOLAS training manual Kronprins Haakon Rev.: 2
Page: 64 of 69
Det er lett å huske hvordan du bruker et brannslukningsapparat, husker akronym PASS, som står
for Pull, Aim, Squeeze, og Sweep. (Dra, Sikt, Klem og side bevegelse)
Trekk pinnen.
Dette vil tillate deg å bruke apparatet
Sikt på bunnen av brannen. Hvis du tar sikte på flammene (som er ofte
fristelsen), vil slukkemiddel fly rett gjennom og gjøre noe godt. Du ønsker
å treffe drivstoffet.
Klem toppen håndtak eller spak. Dette presser en knapp som frigjør den
trykksatte brannslokningsmiddel i slukkeren.
Fei fra side til side til brannen er helt ute. Begynn å bruke apparat fra en
trygg avstand, og deretter gå videre. Når brannen er slukket, holde et øye
med området i tilfelle det re-antennes.

Havforskningsinstituttet - Rederiavdelingen
Title: SOLAS training manual Kronprins Haakon Rev.: 2
Page: 65 of 69
2.10.4.1 Vannapparat
Vann har en god kjøleeffekt. Ved bruk av vann for å slukke en brann «stjeler» du varme.
Merk: Skal ikke brukes på elektrisk utstyr.
Vannapparater består av en stålbeholder som inneholder ca. 9 liter vann, nok til å vare i ca 60
sekunder. Vann vil føre til varmen fra brannen til å fordampe.
Vann krever store mengder av varme til å fordampe, det er derfor et utmerket slukningsmiddel.
Vann har den beste slokkeeffekt når det leveres til brannen på en måte som vil gjøre det til damp så
snart som mulig, det vil si i en fin dusj eller tåke.
Hovedeffekten av vann er at det er kjølende, men det vil også ha en kvelende effekt fordi 1 liter vann
blir 1 700 liter vann-damp som kan blokkere ut luften fra brannområdet.
Vann skal benyttes for brann i faste materialer, slik som trevirke, papir og tekstiler.
For å aktivere apparat, fjern sikkerhetssplint, hold slangen for å unngå skader, og trykk nedover på
håndtaket på toppen av beholderen, mens CO2-gass presser vannet ut i slangen og vannstrålen vil
strømme ut, inntil man slipper håndtaket en gang til.
Vannapparat har en rekkevidde på ca 6-8 meter, men prøv å få så nær ilden som mulig.
Hold apparat i en oppreist stilling, og tar sikte på vannstrålen på bunnen av brann.
2.10.4.2 Pulverapparat
Slukke effekter er kvelende, avkjøling og hemming. Både “oksygen og varme” er fjernet.
Pulverapparat består av en stålbeholder som inneholder omtrent 12 kg pulver, nok til omtrent 20
sekunder bruk.
Pulveret er et effektivt slukkemiddel mot brann i faste materialer, brannfarlige væsker og gasser eller
elektriske anordninger.
For å aktivere apparat, hold slangen for å unngå skader. Fjern sikkerhetsnål, og trykk nedover på
håndtaket på toppen av beholderen, pulveret vil blåse ut i en jevn strøm til håndtaket slippes igjen.
Strålen fra pulveret har en rekkevidde på ca. 6 til 7 meter, men den mest effektive behandling er
mellom 2 til 3 meter.
Hold apparat i en oppreist stilling, og tar sikte på strålen av pulver på bunnen av brann.
2.10.4.3 skumslokker
Skum fungerer som vann med en kjølende effekt, men det har også en kvelende effekt. Den brukes
først og fremst for B-branner, brennbare væsker, oljens etc. For brann i faste stoffer, rettes strålen
mot bunnen av flammene og beveg den over området av brann. Sørg for at alle områder av brannen
nås. For brann som involverer væsker, ikke rett strålen rett inn i væsken.
Hvor væsken i brann er i en beholder, rett strålen mot den indre kanten av beholderen eller på en
nærliggende overflate over den brennende væske. La skummet å bygge seg opp og flyte over
væsken.
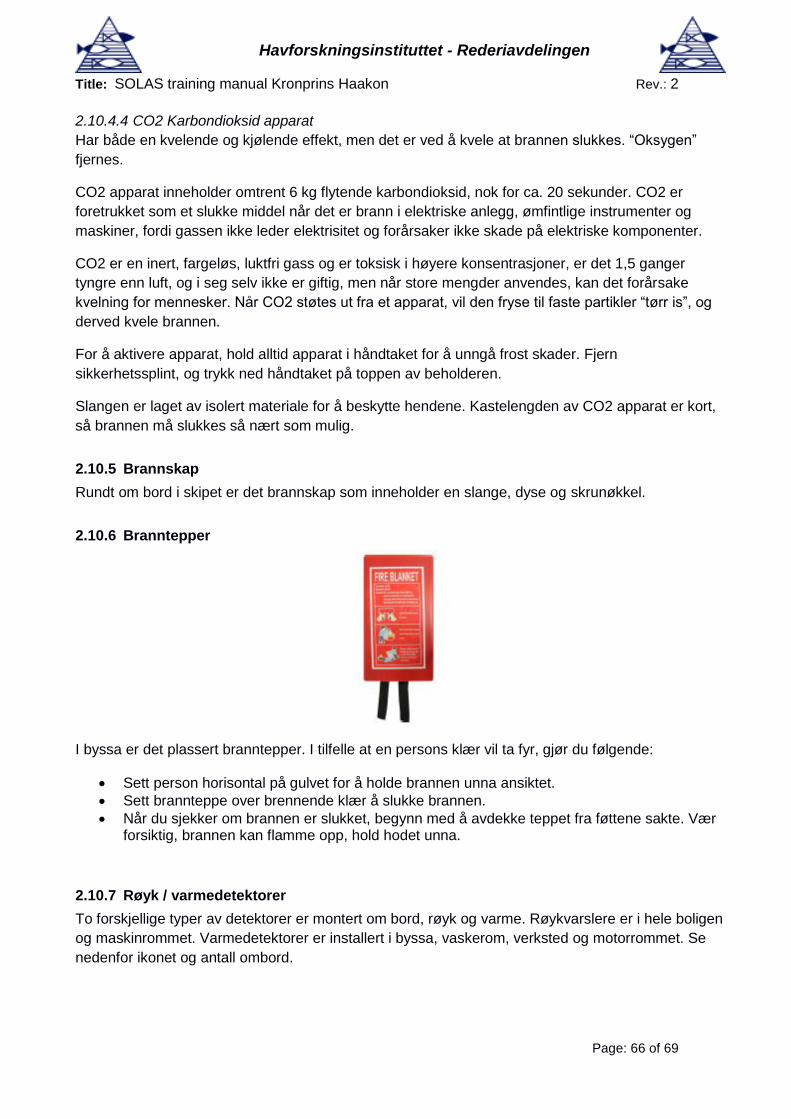
Havforskningsinstituttet - Rederiavdelingen
Title: SOLAS training manual Kronprins Haakon Rev.: 2
Page: 66 of 69
2.10.4.4 CO2 Karbondioksid apparat
Har både en kvelende og kjølende effekt, men det er ved å kvele at brannen slukkes. “Oksygen”
fjernes.
CO2 apparat inneholder omtrent 6 kg flytende karbondioksid, nok for ca. 20 sekunder. CO2 er
foretrukket som et slukke middel når det er brann i elektriske anlegg, ømfintlige instrumenter og
maskiner, fordi gassen ikke leder elektrisitet og forårsaker ikke skade på elektriske komponenter.
CO2 er en inert, fargeløs, luktfri gass og er toksisk i høyere konsentrasjoner, er det 1,5 ganger
tyngre enn luft, og i seg selv ikke er giftig, men når store mengder anvendes, kan det forårsake
kvelning for mennesker. Når CO2 støtes ut fra et apparat, vil den fryse til faste partikler “tørr is”, og
derved kvele brannen.
For å aktivere apparat, hold alltid apparat i håndtaket for å unngå frost skader. Fjern
sikkerhetssplint, og trykk ned håndtaket på toppen av beholderen.
Slangen er laget av isolert materiale for å beskytte hendene. Kastelengden av CO2 apparat er kort,
så brannen må slukkes så nært som mulig.
2.10.5 Brannskap
Rundt om bord i skipet er det brannskap som inneholder en slange, dyse og skrunøkkel.
2.10.6 Branntepper
I byssa er det plassert branntepper. I tilfelle at en persons klær vil ta fyr, gjør du følgende:
• Sett person horisontal på gulvet for å holde brannen unna ansiktet.
• Sett brannteppe over brennende klær å slukke brannen.
• Når du sjekker om brannen er slukket, begynn med å avdekke teppet fra føttene sakte. Vær forsiktig, brannen kan flamme opp, hold hodet unna.
2.10.7 Røyk / varmedetektorer
To forskjellige typer av detektorer er montert om bord, røyk og varme. Røykvarslere er i hele boligen
og maskinrommet. Varmedetektorer er installert i byssa, vaskerom, verksted og motorrommet. Se
nedenfor ikonet og antall ombord.

Havforskningsinstituttet - Rederiavdelingen
Title: SOLAS training manual Kronprins Haakon Rev.: 2
Page: 67 of 69
2.10.8 SOPEP
Som en del av brannslukkingssystemet skal SOPEP utstyr brukes for å hindre brann i å starte.
SOPEP utstyr brukes til å rydde opp olje- og kjemikalieutslipp som lett kan starte en brann når det
kommer i kontakt med varme maskiner. SOPEP stasjonene er plassert på hoveddekket.
SOPEP utstyret brukes også for å hindre søl fra å gå overbord.
2.10.9 Brannslokkings og beskyttelsessystemer
Følgende ressurser er tilgjengelig om bord for brannvern og brannslukking:
• Hovedbrann system (vann)
• Vanntåkesystemer
• Helikopterdekket / Heli hangar vann / skumsystem
• Heli-krasj Utstyr
• Brannslokkings skjermer
• CO2 system (Bysse)
• Bærbare brannslokkingsutstyr (brannmannsutstyr, Puste enheter)
• Passive brann beskyttelse (Standard B15-A60 Isolasjon og brannspjeld)
2.10.9.1 Hovedbrannvannsystem
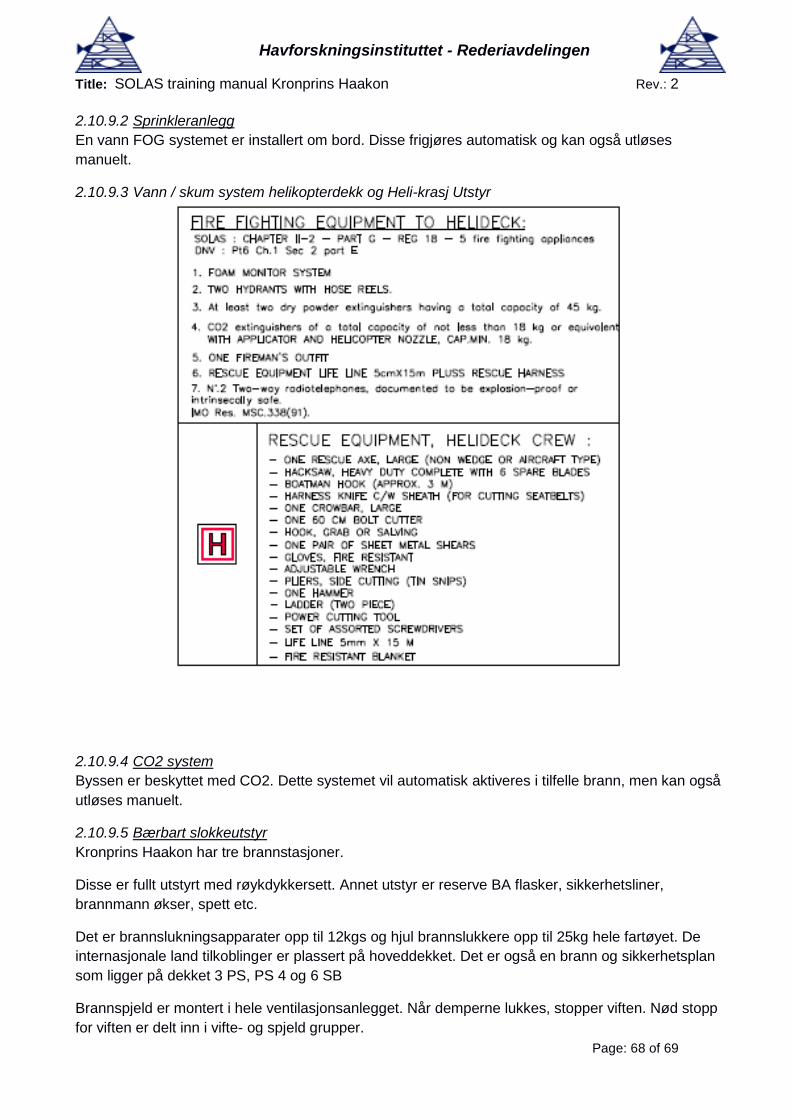
Havforskningsinstituttet - Rederiavdelingen
Title: SOLAS training manual Kronprins Haakon Rev.: 2
Page: 68 of 69
2.10.9.2 Sprinkleranlegg
En vann FOG systemet er installert om bord. Disse frigjøres automatisk og kan også utløses
manuelt.
2.10.9.3 Vann / skum system helikopterdekk og Heli-krasj Utstyr
2.10.9.4 CO2 system
Byssen er beskyttet med CO2. Dette systemet vil automatisk aktiveres i tilfelle brann, men kan også
utløses manuelt.
2.10.9.5 Bærbart slokkeutstyr
Kronprins Haakon har tre brannstasjoner.
Disse er fullt utstyrt med røykdykkersett. Annet utstyr er reserve BA flasker, sikkerhetsliner,
brannmann økser, spett etc.
Det er brannslukningsapparater opp til 12kgs og hjul brannslukkere opp til 25kg hele fartøyet. De
internasjonale land tilkoblinger er plassert på hoveddekket. Det er også en brann og sikkerhetsplan
som ligger på dekket 3 PS, PS 4 og 6 SB
Brannspjeld er montert i hele ventilasjonsanlegget. Når demperne lukkes, stopper viften. Nød stopp
for viften er delt inn i vifte- og spjeld grupper.

Havforskningsinstituttet - Rederiavdelingen
Title: SOLAS training manual Kronprins Haakon Rev.: 2
Page: 69 of 69
Merk: Mer detaljert instruksjon er tilgjengelig i de ulike produsenten håndbøker.
• 816-566 Heli Foam System
• 817 Water Mist Total brannslukking
• 602-866 Viking Evakuering Minichute
• Novenco: Brannspjeld og Røyk Spjeld
• Mikrodata: 811 branndeteksjonssystem
• MARSIS - Ekstern brannslukking (EFF-1)
• Harding
o 1_Lifeboat davit OD 11300H
o 1_Waterjet HJ274
o 2_Rescue båt, arbeidsbåt davit ODs 4000H
o 2_Steyr SE motor
o 3_Lifeboat LBT 750C
o 4_Rescue båt Stinger 760 Jet
o 5_Workboat Polarcirkel 785
• Viking
o livreddende utstyr
o FIFI utstyr
• Safety Plan
• Brann kontrollplan
• LSA arrangement
Related Documents