HASPORT PERFORMANCE Installation Instructions For: Part Number EGK3 for K-series engines used with the Accord and TSX Transmission into 1992-1995 Honda Civic, 1994-1997 Del Sol And 1994-2001 Acura Integra Hasport Performance mounts and mount kit accessories are designed in house using the latest in CAD/CAM Engineering software. The designs are the result of many years of pioneering Honda engine swaps and Hasport’s extensive racing experience. Each mount is constructed of lightweight 6061-T6-billet aluminum and CNC machined in our state of the art machining facility. Hasport Performance motor mounts control engine movement, transferring more power to the wheels. All mounts and brackets have a limited lifetime warranty against any defects. Complete warranty information is available at www.hasport.com . Please read all instructions before proceeding with the installation EGK3 INSTALLATION INSTRUCTIONS WARNING: The instructions here, deal only with the installation of the engine and transmission using Hasport’s EGK3 mount kit. There are no instructions for hooking up Air Conditioning, Power Steering, Wiring, Emissions Equipment, Exhaust or other peripherals. Please read through the entire instructions before attempting this engine swap. If you have questions regarding other aspects of this swap please call Hasport @ 602.470.0065

Welcome message from author
This document is posted to help you gain knowledge. Please leave a comment to let me know what you think about it! Share it to your friends and learn new things together.
Transcript

HASPORTPERFORMANCE
Installation Instructions For:Part Number EGK3 for K-series engines
used with the Accord and TSX Transmissioninto 1992-1995 Honda Civic, 1994-1997 Del Sol
And 1994-2001 Acura Integra
Hasport Performance mounts and mount kit accessories are designed in house using the latest in CAD/CAM Engineering software. The designs are the result of many years of pioneering Honda engine swaps and Hasport’s extensive racing experience. Each mount is constructed of lightweight 6061-T6-billet aluminum and CNC machined in our state of the art machining facility. Hasport Performance motor mounts control engine movement, transferring more power to the wheels. All mounts and brackets have a limited lifetime warranty against any defects. Complete warranty information is available at www.hasport.com.
Please read all instructions before proceeding with the installation
EGK3 INST
ALLA
TION
INST
RUCT
IONS
WARNING: The instructions here, deal only with the installation of the engine and transmission using Hasport’s EGK3 mount kit. There are no instructions for hooking up Air Conditioning, Power Steering, Wiring, Emissions Equipment, Exhaust or other peripherals. Please read through the entire instructions before attempting this engine swap. If you have questions regarding other aspects of this swap please call Hasport @ 602.470.0065
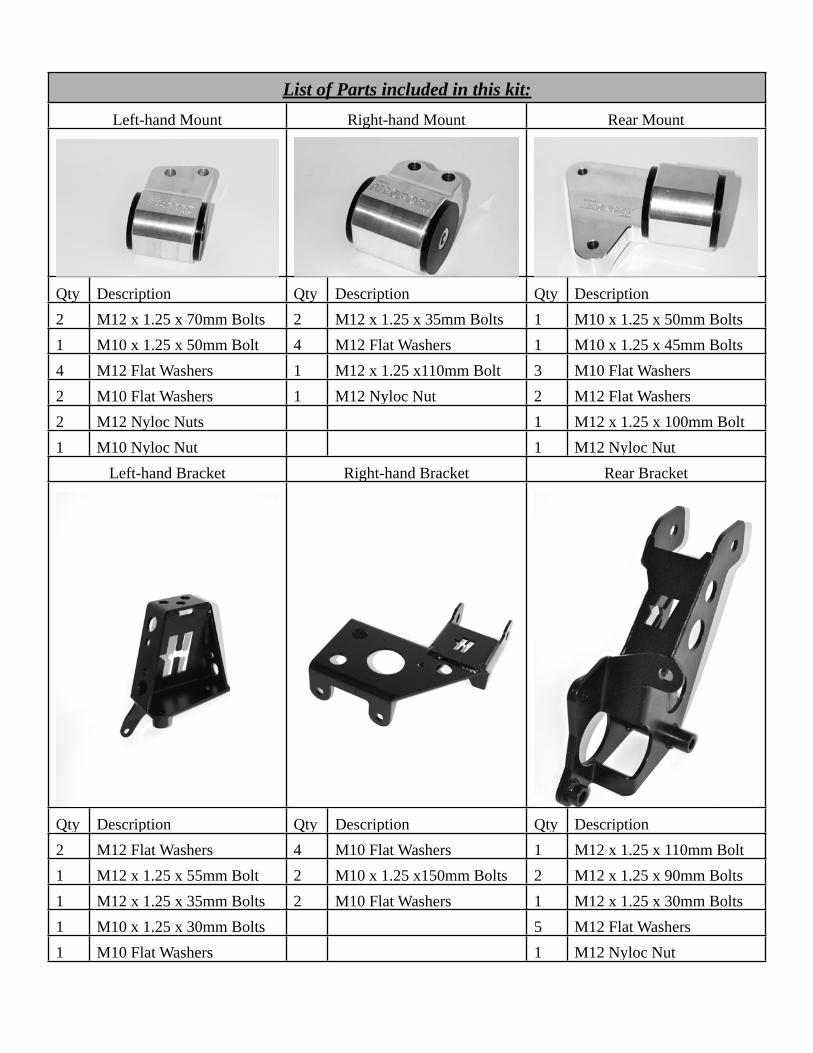
List of Parts included in this kit:Left-hand Mount Right-hand Mount Rear Mount
Qty Description Qty Description Qty Description2 M12 x 1.25 x 70mm Bolts 2 M12 x 1.25 x 35mm Bolts 1 M10 x 1.25 x 50mm Bolts1 M10 x 1.25 x 50mm Bolt 4 M12 Flat Washers 1 M10 x 1.25 x 45mm Bolts4 M12 Flat Washers 1 M12 x 1.25 x110mm Bolt 3 M10 Flat Washers2 M10 Flat Washers 1 M12 Nyloc Nut 2 M12 Flat Washers2 M12 Nyloc Nuts 1 M12 x 1.25 x 100mm Bolt1 M10 Nyloc Nut 1 M12 Nyloc Nut
Left-hand Bracket Right-hand Bracket Rear Bracket
Qty Description Qty Description Qty Description2 M12 Flat Washers 4 M10 Flat Washers 1 M12 x 1.25 x 110mm Bolt1 M12 x 1.25 x 55mm Bolt 2 M10 x 1.25 x150mm Bolts 2 M12 x 1.25 x 90mm Bolts1 M12 x 1.25 x 35mm Bolts 2 M10 Flat Washers 1 M12 x 1.25 x 30mm Bolts1 M10 x 1.25 x 30mm Bolts 5 M12 Flat Washers1 M10 Flat Washers 1 M12 Nyloc Nut

Extra Tools Required for this SwapCenter Punch, Electric Hand Drill, 1/8” Drill Bit,
3/8” Pilot Point Drill Bit, Die Grinder
Additional Recommended ItemsFactory Service Manual for the chassis you are using
(Available from www.helminc.com or Honda/Acura Dealer)
Please read all instructions before proceeding with the installation
If you have never performed an engine swap before, Hasport recommends that you have this swap performed by a competent shop. These instructions pertain ONLY to the ENGINE MOUNTING of a K-Series motor and Accord or TSX style K-series manual transmission into a 92-95 Civic, 92-97 Del Sol, and 94-01 Integra chassis. There are still many other parts including wiring and ECU that will be needed for proper operation of the engine. These parts may be available from Hasport and other companies.
Our kit will allow the mounting of K20A, K20Z, or K24A engines with Accord or TSX manual transmissions. Manual transmissions for this swap can be found on the following models. 2003 and later model Accord (except V6 models) and 2004 -2008 Acura TSX.
It is important to remember that engine swaps are not legal in all states or countries. It's best to check local laws regarding engine swaps before proceeding.
A general list of some of the additional parts needed for the K-Series swap with Accord and TSX transmission is listed below.
Quantity Description
1 Hasport EGK3 Bolt In Mount Kit (This Kit)
1 K-Series Engine complete (see list of recommended engines below)
1 Hasport Performance EGK-series Swap Axles
1 K-Series Manual Transmission from 03-07 Accord or 04-08 Acura TSX
1 K20 Intermediate Shaft (See list of compatible K-series intermediate shafts below)
1 Compatible Engine harness and ECU
List of compatible engines is below. As a general rule all 2.0 liter K-series engines and 2007 and older K24 engines are compatible.
Engine Code Year and Model
K20A JDM Integra (DC5), Civic Type R and Accord Euro R
K20A2 02-04 RSX Type S
K20A3 03-05 Civic Si, 02-06 RSX
K20Z1 05-07 RSX Type S
K20Z3 06 -10 Civic Si
K24A1 02-06 CR-V
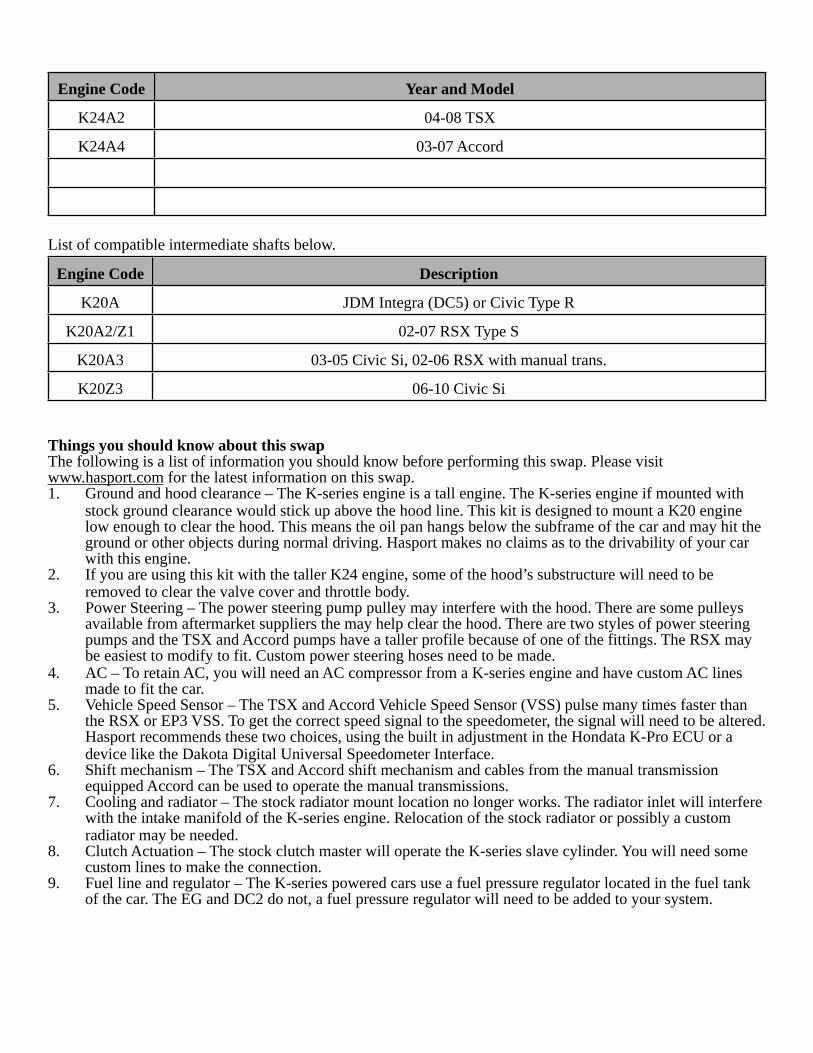
Engine Code Year and Model
K24A2 04-08 TSX
K24A4 03-07 Accord
List of compatible intermediate shafts below.
Engine Code Description
K20A JDM Integra (DC5) or Civic Type R
K20A2/Z1 02-07 RSX Type S
K20A3 03-05 Civic Si, 02-06 RSX with manual trans.
K20Z3 06-10 Civic Si
Things you should know about this swapThe following is a list of information you should know before performing this swap. Please visit www.hasport.com for the latest information on this swap. 1. Ground and hood clearance – The K-series engine is a tall engine. The K-series engine if mounted with
stock ground clearance would stick up above the hood line. This kit is designed to mount a K20 engine low enough to clear the hood. This means the oil pan hangs below the subframe of the car and may hit the ground or other objects during normal driving. Hasport makes no claims as to the drivability of your car with this engine.
2. If you are using this kit with the taller K24 engine, some of the hood’s substructure will need to be removed to clear the valve cover and throttle body.
3. Power Steering – The power steering pump pulley may interfere with the hood. There are some pulleys available from aftermarket suppliers the may help clear the hood. There are two styles of power steering pumps and the TSX and Accord pumps have a taller profile because of one of the fittings. The RSX may be easiest to modify to fit. Custom power steering hoses need to be made.
4. AC – To retain AC, you will need an AC compressor from a K-series engine and have custom AC lines made to fit the car.
5. Vehicle Speed Sensor – The TSX and Accord Vehicle Speed Sensor (VSS) pulse many times faster than the RSX or EP3 VSS. To get the correct speed signal to the speedometer, the signal will need to be altered. Hasport recommends these two choices, using the built in adjustment in the Hondata K-Pro ECU or a device like the Dakota Digital Universal Speedometer Interface.
6. Shift mechanism – The TSX and Accord shift mechanism and cables from the manual transmission equipped Accord can be used to operate the manual transmissions.
7. Cooling and radiator – The stock radiator mount location no longer works. The radiator inlet will interfere with the intake manifold of the K-series engine. Relocation of the stock radiator or possibly a custom radiator may be needed.
8. Clutch Actuation – The stock clutch master will operate the K-series slave cylinder. You will need some custom lines to make the connection.
9. Fuel line and regulator – The K-series powered cars use a fuel pressure regulator located in the fuel tank of the car. The EG and DC2 do not, a fuel pressure regulator will need to be added to your system.
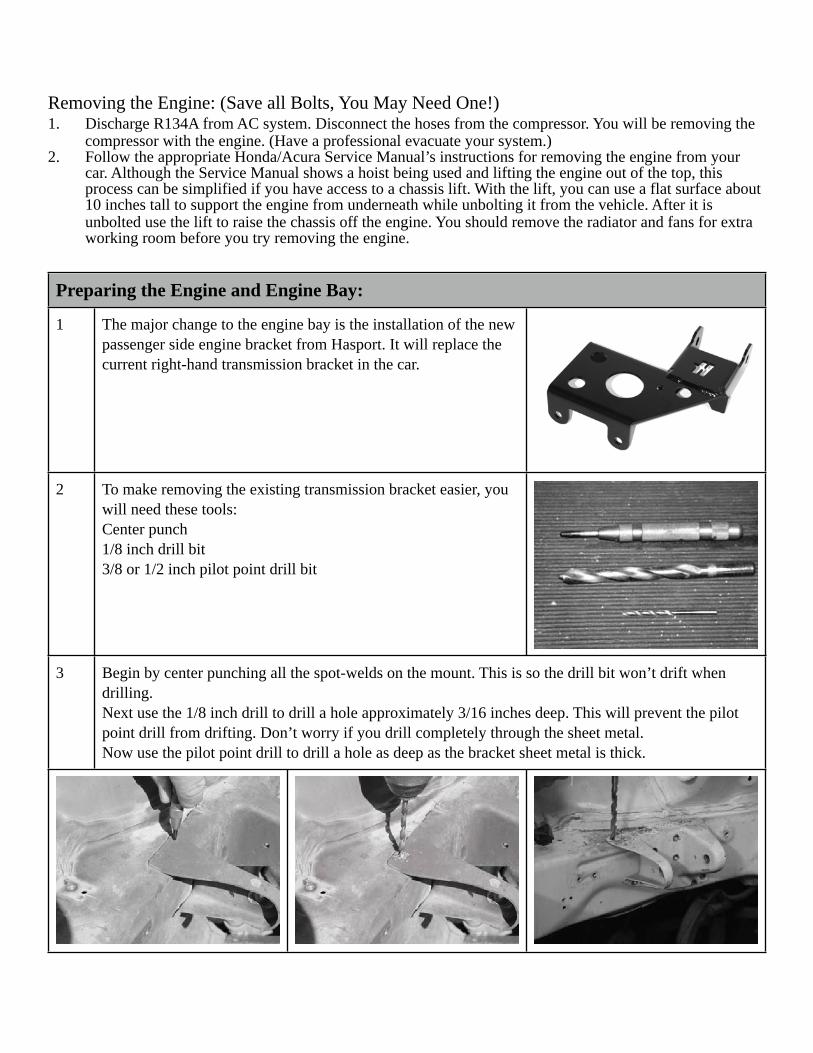
Removing the Engine: (Save all Bolts, You May Need One!)1. Discharge R134A from AC system. Disconnect the hoses from the compressor. You will be removing the
compressor with the engine. (Have a professional evacuate your system.)2. Follow the appropriate Honda/Acura Service Manual’s instructions for removing the engine from your
car. Although the Service Manual shows a hoist being used and lifting the engine out of the top, this process can be simplified if you have access to a chassis lift. With the lift, you can use a flat surface about 10 inches tall to support the engine from underneath while unbolting it from the vehicle. After it is unbolted use the lift to raise the chassis off the engine. You should remove the radiator and fans for extra working room before you try removing the engine.
Preparing the Engine and Engine Bay:
1 The major change to the engine bay is the installation of the new passenger side engine bracket from Hasport. It will replace the current right-hand transmission bracket in the car.
2 To make removing the existing transmission bracket easier, you will need these tools:Center punch1/8 inch drill bit3/8 or 1/2 inch pilot point drill bit
3 Begin by center punching all the spot-welds on the mount. This is so the drill bit won’t drift when drilling. Next use the 1/8 inch drill to drill a hole approximately 3/16 inches deep. This will prevent the pilot point drill from drifting. Don’t worry if you drill completely through the sheet metal. Now use the pilot point drill to drill a hole as deep as the bracket sheet metal is thick.

Preparing the Engine and Engine Bay:
4 A chisel and hammer can now be used to finish removing the bracket. Once it is off use the die grinder with a sanding wheel to remove any left over material.
5 Installing the right-hand mount bracket will require the two 10mm x 150mm bolts, four 10mm washers and two 10mm nyloc nuts supplied with the Hasport mount kit.
6 Start by sliding the bracket over the frame rail so the holes at the bottom of the bracket line up with the torque mount holes on the bottom of the frame rail. Next mark the frame rail on the top using the mount bracket as a guide. After removing the bracket, use a 3/8ths inch drill bit and drill the two holes in the frame rail.
7 Slide the bracket back on the frame rail and thread the two bolts down through the bracket and out the bottom. Tighten the bolts to about 10ft/lbs of torque. Be careful to check the alignment of the bracket so the bolts thread easily all the way through the bracket. Do not over tighten.
Preparing the Engine and Engine Bay:
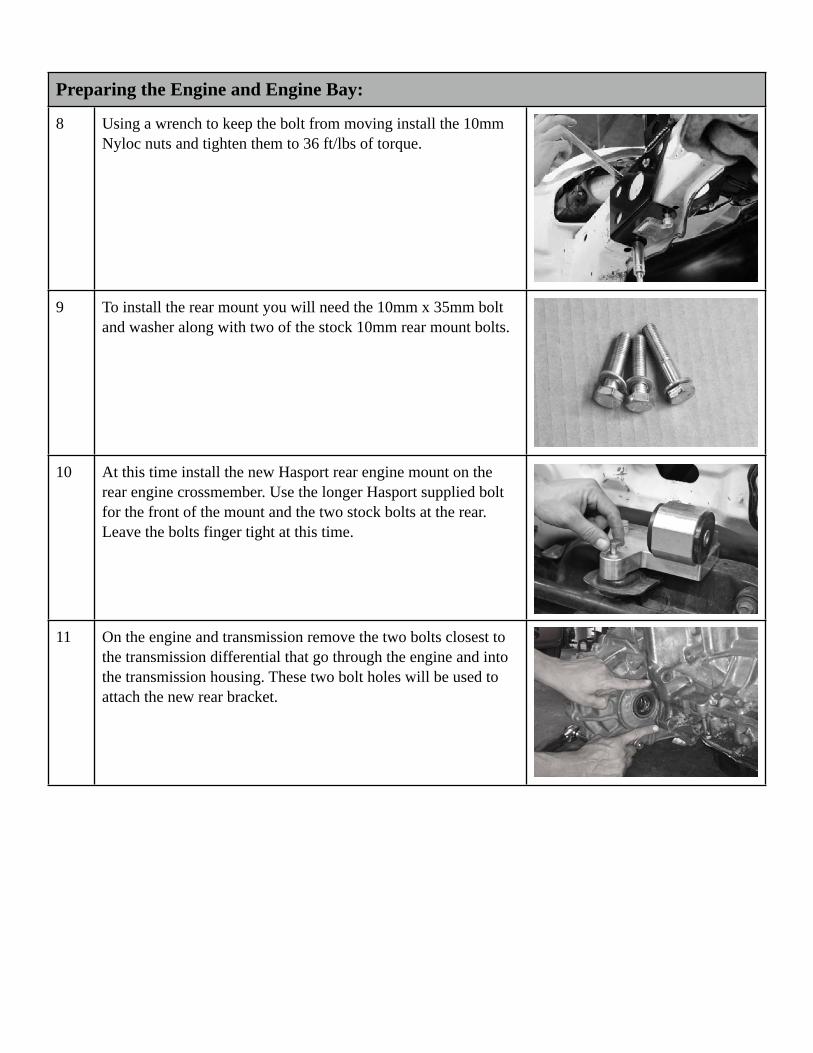
8 Using a wrench to keep the bolt from moving install the 10mm Nyloc nuts and tighten them to 36 ft/lbs of torque.
9 To install the rear mount you will need the 10mm x 35mm bolt and washer along with two of the stock 10mm rear mount bolts.
10 At this time install the new Hasport rear engine mount on the rear engine crossmember. Use the longer Hasport supplied bolt for the front of the mount and the two stock bolts at the rear. Leave the bolts finger tight at this time.
11 On the engine and transmission remove the two bolts closest to the transmission differential that go through the engine and into the transmission housing. These two bolt holes will be used to attach the new rear bracket.
Installing the Engine:
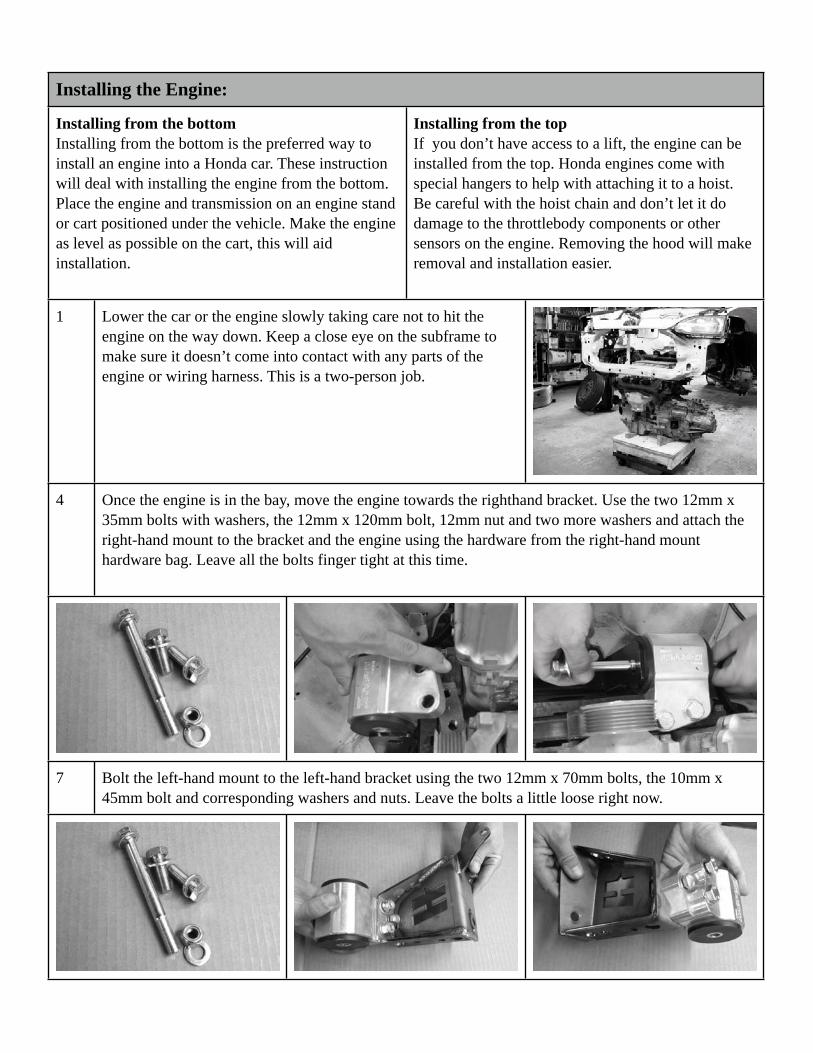
Installing from the bottomInstalling from the bottom is the preferred way to install an engine into a Honda car. These instruction will deal with installing the engine from the bottom. Place the engine and transmission on an engine stand or cart positioned under the vehicle. Make the engine as level as possible on the cart, this will aid installation.
Installing from the topIf you don’t have access to a lift, the engine can be installed from the top. Honda engines come with special hangers to help with attaching it to a hoist. Be careful with the hoist chain and don’t let it do damage to the throttlebody components or other sensors on the engine. Removing the hood will make removal and installation easier.
1 Lower the car or the engine slowly taking care not to hit the engine on the way down. Keep a close eye on the subframe to make sure it doesn’t come into contact with any parts of the engine or wiring harness. This is a two-person job.
4 Once the engine is in the bay, move the engine towards the righthand bracket. Use the two 12mm x 35mm bolts with washers, the 12mm x 120mm bolt, 12mm nut and two more washers and attach the right-hand mount to the bracket and the engine using the hardware from the right-hand mount hardware bag. Leave all the bolts finger tight at this time.
7 Bolt the left-hand mount to the left-hand bracket using the two 12mm x 70mm bolts, the 10mm x 45mm bolt and corresponding washers and nuts. Leave the bolts a little loose right now.

Installing the Engine:
8 Take the assembled left-hand mount and bracket and install it on the transmission using the 12mm x55mm bolt, 12mm x 35mm bolt, and 10mm x 30mm bolt. Use the stock bolt to attach the mount to the frame rail bracket. Leave the bolts finger tight at this time.
9 Now that the engine is supported by the left and right-hand mounts we can connect the rear bracket to the transmission. Use the two 12mm x 90mm and 12mm x 30mm bolts and washers to attach the bracket to the transmission. Use the 12mm x 100mm bolt nyloc nut and washers to attach the bracket to the rear mount. You may need to lift the rear of the engine slightly to get the mount hole to line up line up with the bracket.
10 Once all the mounts are installed tighten ALL the mount and bracket bolts. 10mm bolts should be torqued to 33 ft/lbs and 12mm bolts to 43 ft/lbs.
Related Documents