Cover Caddy Installation Instructions 1. Lay out all the parts and verify that they are all present according to the Cover Caddy Parts and Hardware List. See Fig 1. Figure 1 Name Quantity Part Description ccAA 1 Main Unit ccBB 2 U-Arm, w/out extension (Left) ccCC 2 U-Arm, w/out extension (Right) ccDD 1 Gas Shock ccEE 1 Pivot Arm ccFF 1 Base Plate ccGG 2 Support Leg ccSPACER2 2 U-Arm Extension ccA 4 Round Head Bolt ccE 2 Adjustment Bolt ccF 2 Pin ccG 4 Washer for Round Head Nut (Black) ccH 2 Washer for Adjustment Bolt (Silver) ccK 2 Lock Nut ccL 2 Ball Stud ccN 4 Round Head Nut ccZ 4 Lag Screw

Welcome message from author
This document is posted to help you gain knowledge. Please leave a comment to let me know what you think about it! Share it to your friends and learn new things together.
Transcript

Cover Caddy Installation Instructions
1. Lay out all the parts and verify that they are all present according to the Cover Caddy Parts and Hardware List. See Fig 1.
Figure 1
Name Quantity Part Description
ccAA 1 Main Unit
ccBB 2 U-Arm, w/out extension (Left)
ccCC 2 U-Arm, w/out extension (Right)
ccDD 1 Gas Shock
ccEE 1 Pivot Arm
ccFF 1 Base Plate
ccGG 2 Support Leg
ccSPACER2 2 U-Arm Extension
ccA 4 Round Head Bolt
ccE 2 Adjustment Bolt
ccF 2 Pin
ccG 4 Washer for Round Head Nut (Black)
ccH 2 Washer for Adjustment Bolt (Silver)
ccK 2 Lock Nut
ccL 2 Ball Stud
ccN 4 Round Head Nut
ccZ 4 Lag Screw
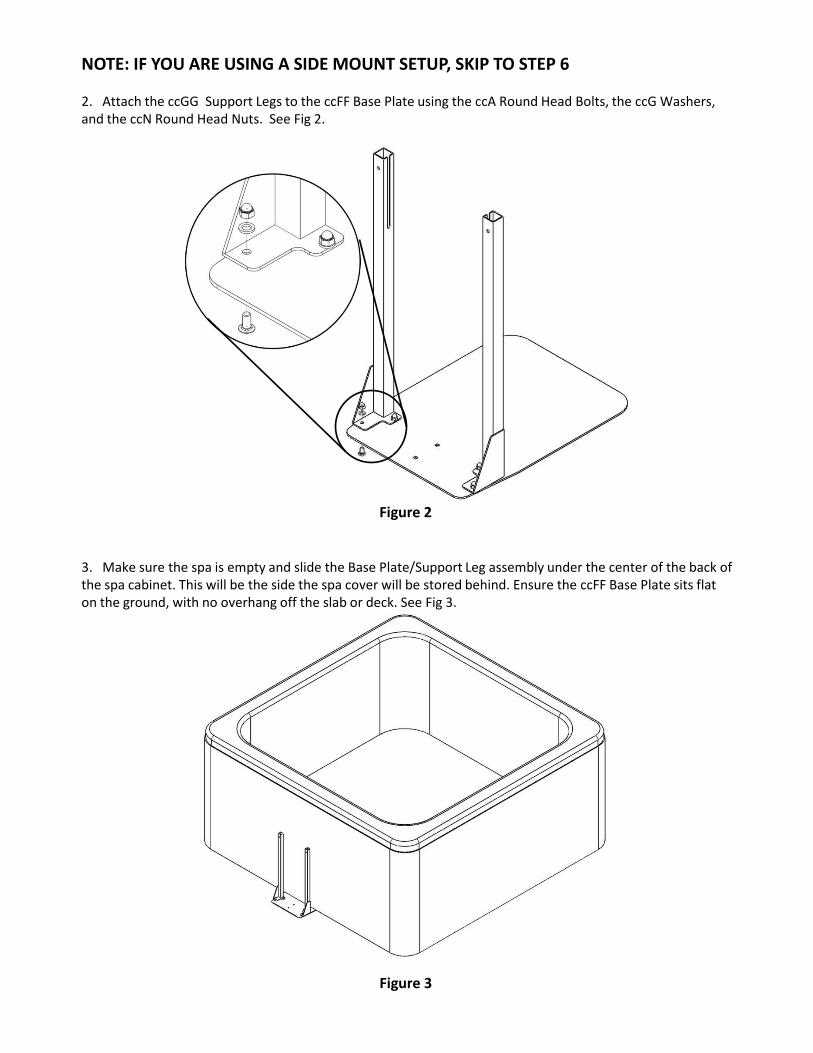
Figure 3
NOTE: IF YOU ARE USING A SIDE MOUNT SETUP, SKIP TO STEP 6 2. Attach the ccGG Support Legs to the ccFF Base Plate using the ccA Round Head Bolts, the ccG Washers, and the ccN Round Head Nuts. See Fig 2.
Figure 2
3. Make sure the spa is empty and slide the Base Plate/Support Leg assembly under the center of the back of the spa cabinet. This will be the side the spa cover will be stored behind. Ensure the ccFF Base Plate sits flat on the ground, with no overhang off the slab or deck. See Fig 3.

4. Slide the legs of the ccAA Main Unit/ccEE Pivot Arm assembly over the ccGG Support Legs. See Fig 4.
Figure 5
5. Loosely thread the ccE Adjustment Bolt through the ccH Adjustment Bolt Washer and into the threaded holes in the Support Legs. DO NOT tighten the adjustment screws yet. See Fig 5. TO CONTINUE WITH BASE MOUNT SETUP, SKIP TO STEP 8
Figure 4
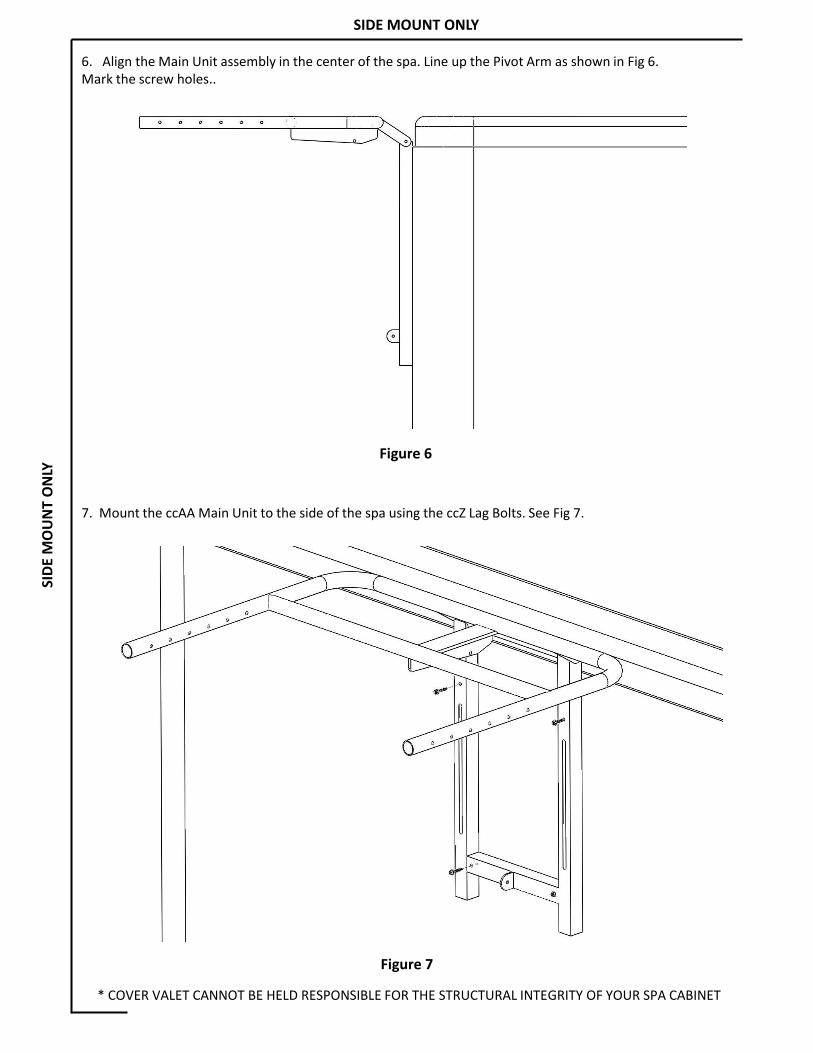
6. Align the Main Unit assembly in the center of the spa. Line up the Pivot Arm as shown in Fig 6. Mark the screw holes..
Figure 7
7. Mount the ccAA Main Unit to the side of the spa using the ccZ Lag Bolts. See Fig 7.
Figure 6
SID
E M
OU
NT
ON
LY
SIDE MOUNT ONLY
* COVER VALET CANNOT BE HELD RESPONSIBLE FOR THE STRUCTURAL INTEGRITY OF YOUR SPA CABINET

8. Attach the left and right U-Arm assemblies to the open tubes of the ccEE Pivot Arm using the spring buttons. Use the hole that will allow the U-Arms to swing as low as possible, without hitting the ground. See Fig 8.
Figure 8
NOTE: If your folded spa cover is too thick to fit within the U-Arms, use the ccF U-Arm Extension to widen the arms.
Figure 9
9. Swing the U-Arms up so that they are parallel to the ground. Raise the Main Unit so that the bottom tube of the U-Arms is level with the top of the spa without the cover. See Fig 9.
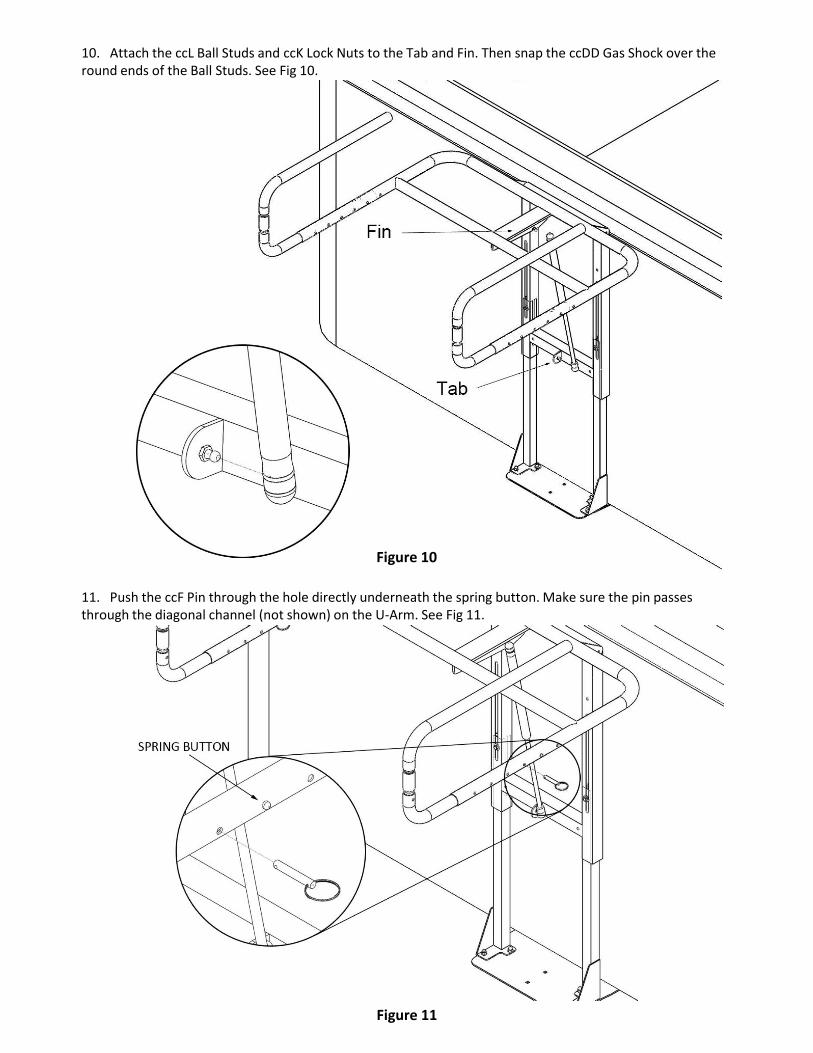
10. Attach the ccL Ball Studs and ccK Lock Nuts to the Tab and Fin. Then snap the ccDD Gas Shock over the round ends of the Ball Studs. See Fig 10.
Figure 10
11. Push the ccF Pin through the hole directly underneath the spring button. Make sure the pin passes through the diagonal channel (not shown) on the U-Arm. See Fig 11.
Figure 11
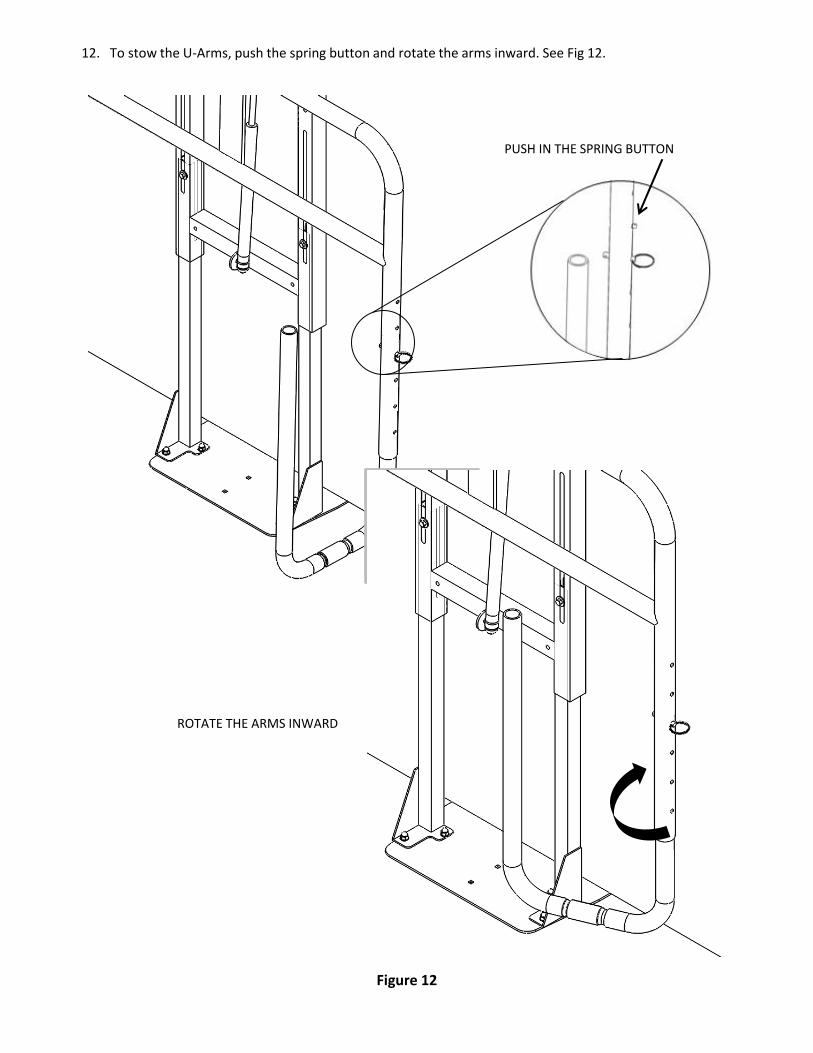
12. To stow the U-Arms, push the spring button and rotate the arms inward. See Fig 12.
Figure 12
PUSH IN THE SPRING BUTTON
ROTATE THE ARMS INWARD

F. Push the cover downward
13. To use the Cover Caddy, follow the steps in Fig 13.
Figure 13
B. Rotate the arms outward and make sure the spring pins lock.
D. Fold the cover in half
E. Slide the cover in between the U-Arms
C. Cover Caddy deployed
A. Cover on the spa with Cover Caddy stowed

Any Cover Caddy shown to be unserviceable due to defects in materials or workmanship within 5 years from the date of purchase will be repaired or replaced at the option of California Home Spas, INC, without charge for labor or materials. (This excludes the cost of freight to and from the manufacturer). EXCLUSIONS: A. This warranty does not cover damage incurred by the use of the Cover Caddy and/or the spa cover, other than in
accordance with the printed literature provided by California Home Spas, INC. B. Defects in components of any part, which are not part of the Cover Caddy. C. Misuse, abuse, negligence, accident, or alterations other than authorized by California Home Spas, INC. D. Improper installation, normal fading and minor deterioration caused by exposure to the sun, rain, chemicals or
environmental factors. E. Use of solvents, abrasive cleaners or brushes, and strong detergents. F. Gas shock: 1 year. Except as expressly provided, there shall be no additional warranty obligation expressed or implied oral or statutory ADDITIONS: A. California Home Spas, INC. shall not be liable for consequential damages or incidental expenses resulting from any breach
of the before mentioned warranties. B. This warranty gives you specific legal rights and you may have other rights which can vary in different states and
countries. C. Any dispute between the Buyer and California Home Spas, INC. pertaining to this warranty may, at the option of the
Buyer, be resolved in the State of California, USA, in according to the rules of the American Arbitration Association. D. Should any one or more of the terms, provisions, covenants, or conditions of this warranty be determined void, invalid,
illegal, or unlawful in any respect, then it shall be so, however it will not affect any of the other terms or provisions of this warranty and the remainder hereof shall still be in effect.
California Home Spas, Inc. Cover Caddy 5-Year Limited Warranty
------------------------------------------------------------------------------------------------------------------------------------------------------------------------------------
COVER VALET WARRANTY REGISTRATION FORM
Complete and return within (10) days. Please type or print clearly. Incomplete and/or unreadable forms may not be registered. You can also register your warranty online at www.covervalet.com
Owners Name: _________________________________________________________________________________________________. Address: ______________________________________________________________________________________________________. Phone Number: (__________) ____________________________________________________________________________________. E-Mail Address: ________________________________________________________________________________________________. Date of Purchase: _______________________. Dealer’s Name: ________________________________________________________. How did you hear about us? 1. Dealer ________. 4. Home Show ________. 7. Other _____________________________________. 2. Showroom Display ________. 5. Magazine ________. 8. Internet (website) ___________________________ 3. Friend ________. 6. T.V. ________. ____________________________________________. For more information, Please contact us at: Cover Valet Toll free: 1-800-730-7727 1621 East Spring Street. International: (001) (562) 283-0595 Visit us at: www.CoverValet.com Long Beach, CA. 90806 USA E-mail: [email protected]
Related Documents