1 HAPPY HCH-701 EMBROIDERY MACHINE TRAINING CLASS WORKBOOK COURSE OUTLINE / CONTENTS Embroidery Theory • about embroidery in general 2 Overall familiarization with the machine • Sewing arm, power on/off • upper and lower thread • Hoops • Control panel 3 Setup tips • general machine setup, • control panel shortcuts 7 Skills to practice in-class • bobbin & upper thread • adjusting upper tension • needles • flat hooping • cap hooping 5 Important practice skills illustrated in detail • bobbin & upper thread • adjusting upper tension • needles • flat hooping 9-14 Steps to setup most typical embroidery jobs condensed in 1 page 15 • thread • needle • hooping garments • setup in the control panel Setups for different fabrics / types of embroiderables • digitizing • needle, stabilizer • alternate hooping options 16-17 Important additional functions for sewing • error recovery • repositioning • common adjustments/settings 18 Maintenance • A oiling • B oiling • Cleaning the hook area • Overall cleaning 20 Troubleshooting • Thread breaks • Error messages 21 Embroidering on ballcaps • Guidelines • Setting up 23 Resources • Support information • Online reference material • Other 24

Welcome message from author
This document is posted to help you gain knowledge. Please leave a comment to let me know what you think about it! Share it to your friends and learn new things together.
Transcript
1
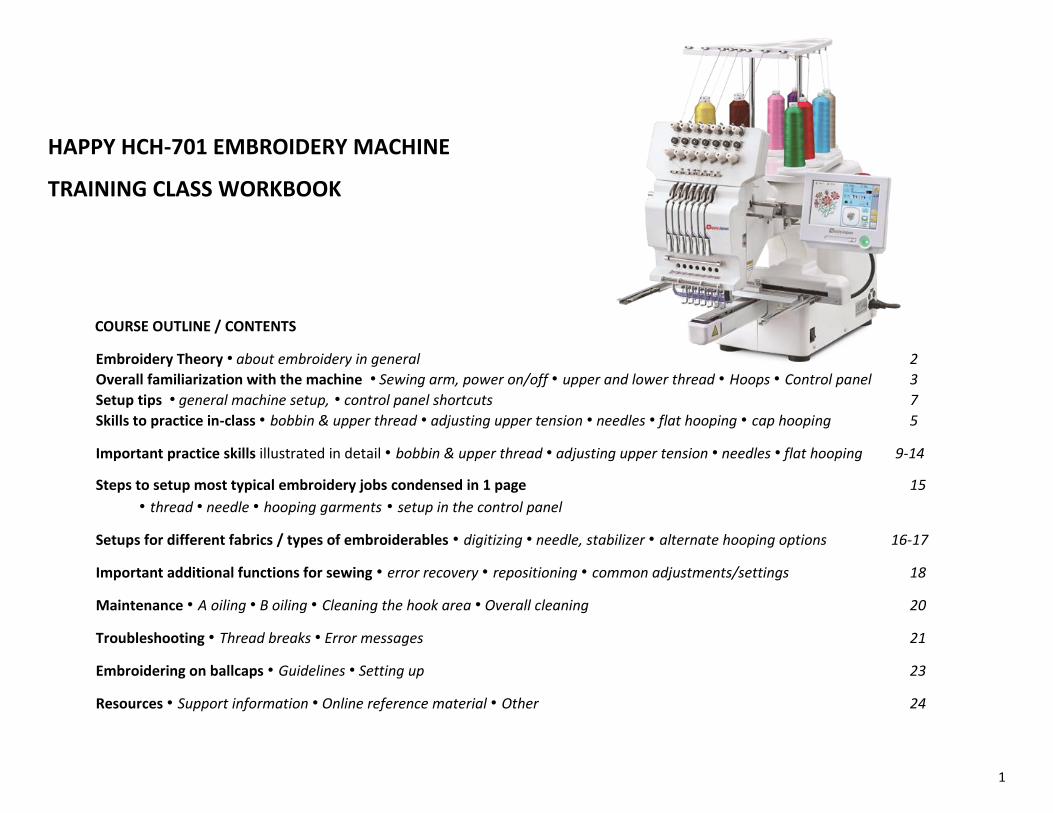
HAPPY HCH-701 EMBROIDERY MACHINE
TRAINING CLASS WORKBOOK
COURSE OUTLINE / CONTENTS
Embroidery Theory • about embroidery in general 2
Overall familiarization with the machine • Sewing arm, power on/off • upper and lower thread • Hoops • Control panel 3
Setup tips • general machine setup, • control panel shortcuts 7
Skills to practice in-class • bobbin & upper thread • adjusting upper tension • needles • flat hooping • cap hooping 5
Important practice skills illustrated in detail • bobbin & upper thread • adjusting upper tension • needles • flat hooping 9-14
Steps to setup most typical embroidery jobs condensed in 1 page 15
• thread • needle • hooping garments • setup in the control panel
Setups for different fabrics / types of embroiderables • digitizing • needle, stabilizer • alternate hooping options 16-17
Important additional functions for sewing • error recovery • repositioning • common adjustments/settings 18
Maintenance • A oiling • B oiling • Cleaning the hook area • Overall cleaning 20
Troubleshooting • Thread breaks • Error messages 21
Embroidering on ballcaps • Guidelines • Setting up 23
Resources • Support information • Online reference material • Other 24

2
ABOUT EMBROIDERY IN GENERAL
How embroidery works to decorate garments Embroidery’s Strengths: The advantages that embroidery gives to decorating a garment vs. printing or other forms sets up a strong business case for selling it: It costs very little to produce (thread is very inexpensive, the machines don’t use a lot of electricity, but the going price for embroidery is a lot higher than the cost to make it. The strong value of embroidery based on some advantages that it presents as a method of decoration or personalization:
1. Embroidery is a 3D medium. By the nature of the way embroidery creates an image, by sewing a design part by part, with every layer on top of or overlapping each other, and because of the different textures you can achieve with different types of stitching, a well-done design can look and feel sculpted in 3D.
2. Embroidery is soft and part of the garment and lasts for the life of the garment, and its application is generally considered a high-end form of decoration.
Embroidery’s Limitations: While embroidery has its advantages over other forms of decoration, it also comes with limitations in comparison to other media. It is important to understand these limitations because you’ll see frequent requests to embroider lettering and detail that looks good in one form, but will not “translate” very well into embroidery. Some common examples of this include:
1. Small detail or detail at very small sizes (think of the level of detail printed on a dollar bill. Embroidery cannot render this level of detail at such small sizes very well.) – a typical example is small text, at or less than ¼” in height. Due to the thickness of the thread and width of the needle, there is a minimum size limit below which many design areas will not render clearly in embroidery
2. Very large areas – embroidery can accomplish this well, but large areas in embroidery can be too heavy for light garments and take a lot of time to embroider, which can drive up the cost. To cover large areas in embroidery, a technique called applique is often used in the design.
It is important to learn to recognize, over time (and through some of the lessons we’ll go over in training) where these limits are to make it easier for you to create high quality embroidery.
Types of embroidery you can accomplish with this machine The machine can embroider a wide variety of heavy and light items from delicate, sheer material to heavy, lined jackets, bags, canvas suitcases and more. The machine can embroider “tubular” goods/ applications – One of the machine’s primary strengths over 1-needle home/hobby-type embroidery machines is its ability to embroider many types of finished goods that, in the past, were embroidered pre-assembly or, today, often have to be taken apart to be embroidered, then re-assembled. Usually, these are items that are shaped like a tube, such as:
1. Shirts, jackets, sweaters etc. 2. Shirt sleeves/cuffs, pant legs and cuffs, beanies (knit caps), pockets on purses, bags, some pockets
3. Ballcaps – This type of machine embroiders on the front and sides of ballcaps very well, very reliably. Additionally, your Happy embroidery machine is built durably enough to run nonstop for hours of production each day, for years on end.

3
OVERALL FAMILIARIZATION OF THE MACHINE
Try these things to get yourself generally familiar with the machine.
MOVING THE SEWING ARM BY HAND
1. The sewing arm can be moved by hand. It is important to know that the arm c – there is some resistance, but it should move smoothly and slowly.
a. Move the silver metal arm (mounted on the large white horizontal bar) left and right. This is called the tubular arm. The left and right movement is the X direction.
b. Move the large white bar frontwards and backwards – this is a little harder to move, but it should move slowly. This large white bar is called the X carriage. The movement in the forwards/backwards direction is the Y direction.
POWERING THE MACHINE ON AND OFF 1. Power on the machine and go to the boot screen - be ready for the arm
(x-carriage and tubular arms) to test move when you press NEXT 2. There are 2 ways to turn off the machine:
a. Normal – with the black switch, when the machine is stopped. Powering off this way, the machine will not lose the sewing position, even in the middle of a design.
b. Emergency stop – be sure to un-twist the red knob to pop it back up/reset it, or it will not power on.
Green lines = X-direction
Red lines = Y-direction
Power switch
4
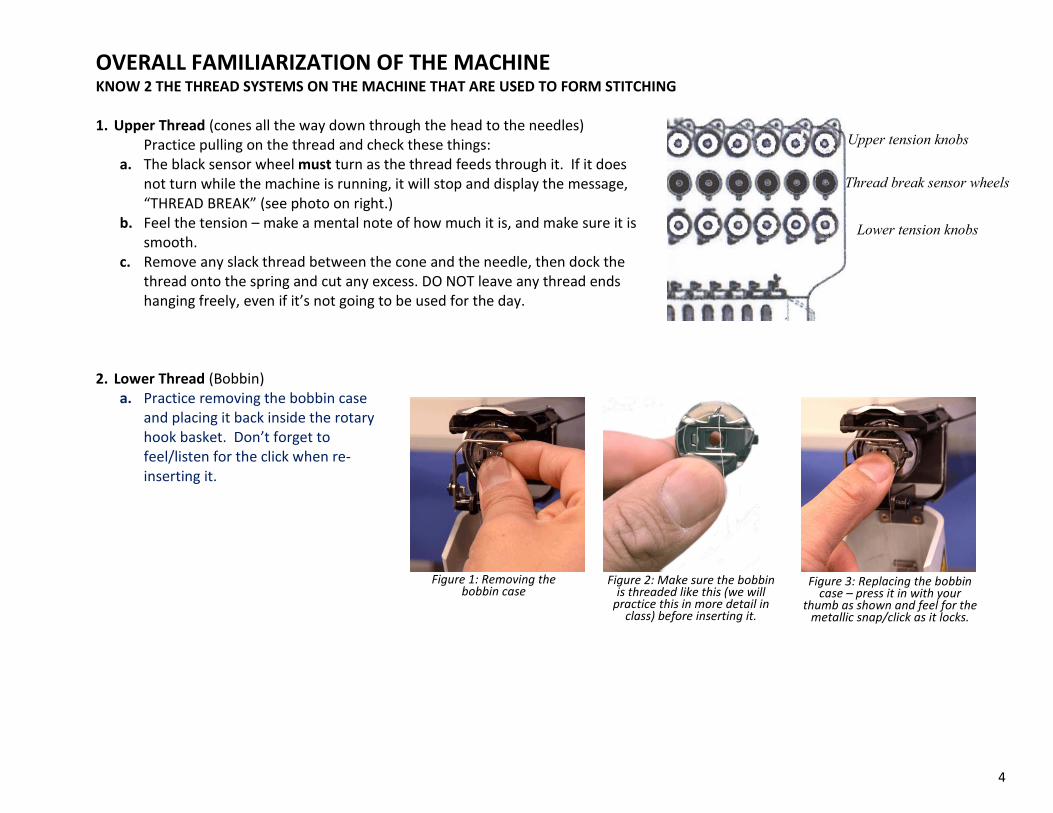
Figure 1: Removing the bobbin case
Figure 2: Make sure the bobbin is threaded like this (we will
practice this in more detail in class) before inserting it.
Figure 3: Replacing the bobbin case – press it in with your
thumb as shown and feel for the metallic snap/click as it locks.
OVERALL FAMILIARIZATION OF THE MACHINE
KNOW 2 THE THREAD SYSTEMS ON THE MACHINE THAT ARE USED TO FORM STITCHING
1. Upper Thread (cones all the way down through the head to the needles) Practice pulling on the thread and check these things:
a. The black sensor wheel must turn as the thread feeds through it. If it does not turn while the machine is running, it will stop and display the message, “THREAD BREAK” (see photo on right.)
b. Feel the tension – make a mental note of how much it is, and make sure it is smooth.
c. Remove any slack thread between the cone and the needle, then dock the thread onto the spring and cut any excess. DO NOT leave any thread ends hanging freely, even if it’s not going to be used for the day.
2. Lower Thread (Bobbin)
a. Practice removing the bobbin case and placing it back inside the rotary hook basket. Don’t forget to feel/listen for the click when re-inserting it.
Lower tension knobs
Upper tension knobs
Thread break sensor wheels

5
17.25”x 16.4” wooden hoop
12. 5”x 12.5” hoop
U-shaped notch should be on the right side facing towards the machine.
Front corners of hoop arm should slide under these clips
Hoop is locked on when the screw heads of the arms snap into the round holes of the hoop arms.
This notch should always be on your right and face towards the machine.
These round holes should face towards you as you’re inserting the hoop onto the machine.
5.74” round hoop
OVERALL FAMILIARIZATION OF THE MACHINE Continued
HOOPS
1. Identify the ones that come with the machine and what they are best used for. Rule of thumb: it is always best to use the smallest hoop that will fit the design with a little extra room. Too large a hoop wastes material and increases the margin for error.
2. Understand how to lock the hoop onto the machine and remove it: Find the holes on the hoop arm that lock it onto the machine and the u-shape on one side that determines which direction it’s oriented in.
3. Practice putting any hoop onto the machine’s arms, checking that it is firmly locked in, and learn how to lift it off the arm. See the photos below for reference:
2 hoops that come with the machine
6
OVERALL FAMILIARIZATION OF THE MACHINE Continued
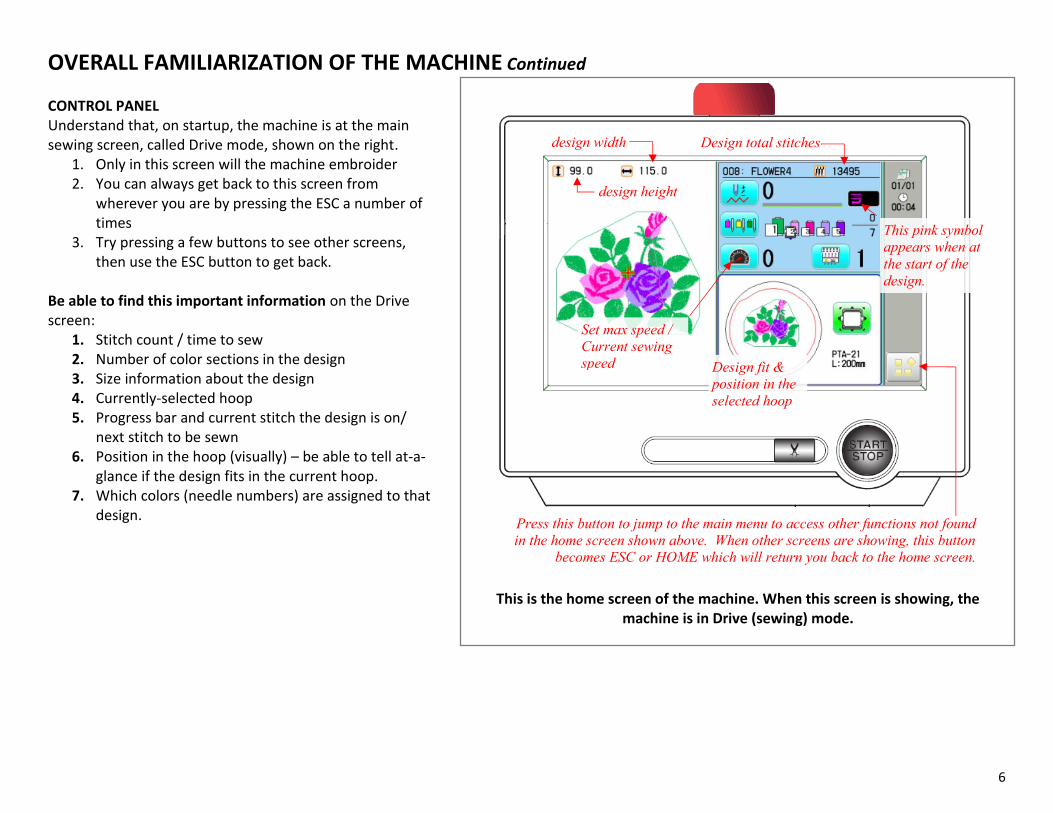
CONTROL PANEL Understand that, on startup, the machine is at the main sewing screen, called Drive mode, shown on the right.
1. Only in this screen will the machine embroider 2. You can always get back to this screen from
wherever you are by pressing the ESC a number of times
3. Try pressing a few buttons to see other screens, then use the ESC button to get back.
Be able to find this important information on the Drive screen:
1. Stitch count / time to sew 2. Number of color sections in the design 3. Size information about the design 4. Currently-selected hoop 5. Progress bar and current stitch the design is on/
next stitch to be sewn 6. Position in the hoop (visually) – be able to tell at-a-
glance if the design fits in the current hoop. 7. Which colors (needle numbers) are assigned to that
design.
Press this button to jump to the main menu to access other functions not found
in the home screen shown above. When other screens are showing, this button
becomes ESC or HOME which will return you back to the home screen.
design height
Design fit &
position in the
selected hoop
This pink symbol
appears when at
the start of the
design.
Set max speed /
Current sewing
speed
This is the home screen of the machine. When this screen is showing, the machine is in Drive (sewing) mode.
design width Design total stitches

7
SETUP: TIPS ON SETTING UP YOUR MACHINE ONCE IT’S ASSEMBLED
1. Environment: Humidity-controlled, away from flowing air, particles/sprays,
dust-free as practical, away from direct sunlight.
2. Steady, strong surface to allow for higher operating speed, optionally thick
enough to allow for cap gauge mounting next to the machine.
a. If you bought the table, turn the wheels outwards 45 degrees and
lock them down
b. Allow enough room to get to the back of the machine for
maintenance or to wheel the machine out to turn it around
3. Electrical: Well-grounded 110v outlet, NOT on GFCI circuit, provide good
surge protection, and CLEAN power (true 110v AC, clean sine curve power) –
be prepared to protect against “dirty”/uneven power.
4. Setup Tips
a. Know the correct thread path!
b. Maintain upper thread DISCIPLINE: Prevent loose thread loops
anywhere along the thread path especially at the cone and at the
needle. Loose thread can catch on other threads or under the cone.
At the needle, thread tail must be docked in the front spring or the
thread holder assembly behind the needle – NEVER hanging loosely!
c. Make sure the driving device (sewing arm or cap driver) is on tightly
enough not to come loose during sewing.
i. Thumbscrews should be a little beyond finger-tight.
ii. If using the sewing arm, make sure the arm is tight without
any free play.
iii. Learn how to properly lock a hoop onto the arms so they do
not come loose when sewing.
Upper Tensioner Thread only makes ½
turn – make sure it
passes to the left
between the 2 metal
discs.
Lower Tensioner Thread makes 1 full turn
clockwise around the base
of the knob – make sure it
runs in the V-shaped groove
of the spoked wheel.
Thread Break Sensor Thread this like the upper
tensioner – ½ turn to the left.
Make sure the thread falls in
the groove as shown.
Thread should be “docked” in thread holding spring or
in the thread holder assembly behind the needles.
8
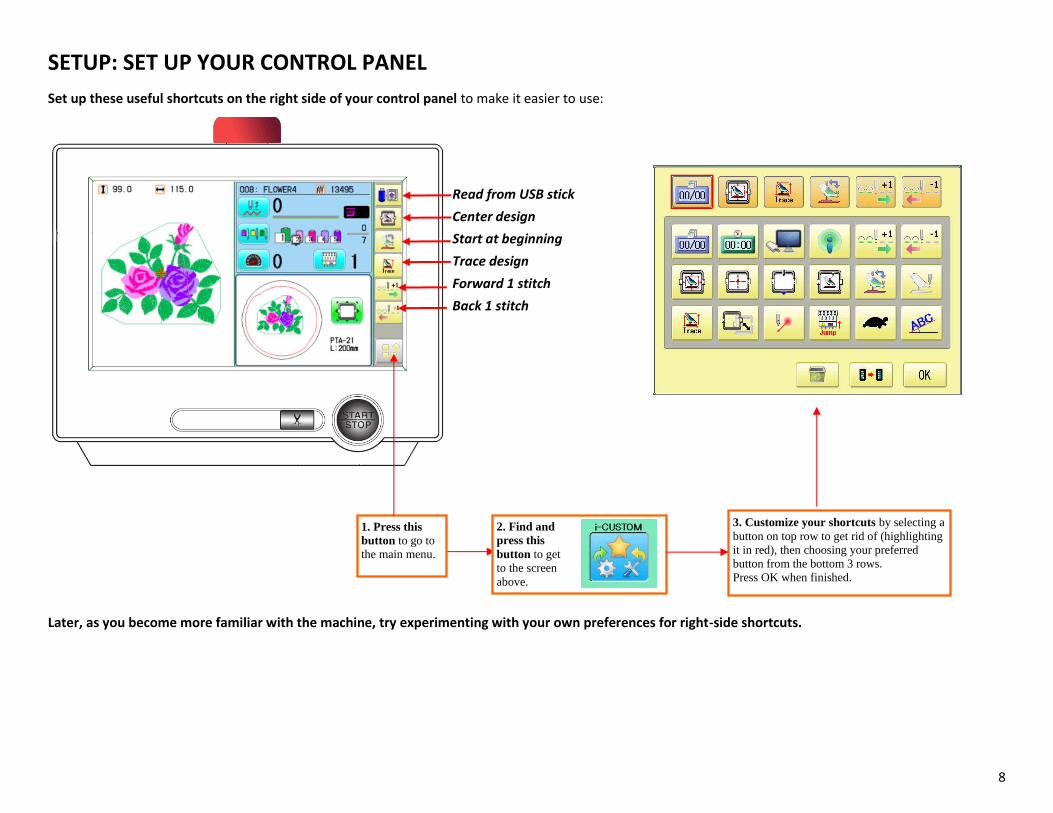
SETUP: SET UP YOUR CONTROL PANEL
Set up these useful shortcuts on the right side of your control panel to make it easier to use:
Later, as you become more familiar with the machine, try experimenting with your own preferences for right-side shortcuts.
Read from USB stick
Center design
Start at beginning
Trace design
Forward 1 stitch
Back 1 stitch
1. Press this
button to go to
the main menu.
3. Customize your shortcuts by selecting a
button on top row to get rid of (highlighting
it in red), then choosing your preferred
button from the bottom 3 rows. Press OK when finished.
2. Find and
press this
button to get
to the screen
above.
9
CAP HOOPING:
SKILLS WORKSHOPS TO PRACTICE IN-CLASS On this page are listed important hands-on skills you’ll need to operate your embroidery machine. The pages after this go more in detail.
BOBBIN – learn how to: - Re-load the bobbin - Check tension and adjust as needed - Properly insert it into the machine
UPPER THREAD: - Learn to tie on a thread cone.
- Basic Pull-check
o How do you properly pull-test the thread? __________________________________
o What 4 important things does it show you? __________________________________
- Lift checks on tensioners: o They should be done while you’re _________. o You’re feeling for ______ when lifted, ______
when released. o Upper tensioner:
▪ How should the disk be aligned? ▪ The thread should pass ___________.
o Lower tensioner: ▪ The thread should be in __________ . ▪ How far around should it wind? ____. ▪ How tight is too tight? ____________.
NEEDLES: - Can you find the front and back of a needle? - How should the needle be turned? - Learn how to replace a needle yourself. - How often should you replace a needle? - What can happen if the tension is too loose?
FLAT HOOPING: - Know how to mount & unmount from the machine - List the order, top to bottom, of the hoop “sandwich”:
1. _________ 2. _________ 3. _______ 4. _________ - How tight should it be hooped? - Learn a method to position the hoop on the garment
(in class we’ll practice with the Embroiderer’s Helper) o
CONTROL PANEL: - Know how to get to the home (sewing) screen. - What 3 things do you need to learn to set up a design?
1. __________ 2. ___________ 3. ______________ - What is TRACE? - Other “go-to” functions should you know:
- Origin/Back to origin - Move FWD/BACK +/- 1 stitch - Adjust speed
OIL: HOW DO YOU OIL THE HOOK? HOW OFTEN? (Hint: you can refer to the YouTube video on oiling for a more efficient procedure)
ADJUSTING UPPER TENSION: - What MUST be set first before adjusting? - What kind of stitch is used to check tension? - How does the “stripe” look if tension is:
loose? ______ tight? ________ correct? ______ - Work to make the upper and lower knobs
approximately __________ in tightness - Make _________ turns with the knobs. - What happens if knobs are imbalanced? - What can happen if the tension is too loose?

10
Insert the bobbin, pull the free end and ensure it turns clockwise, then feed down this slit (red arrow)
1.
Pull the thread to the right and out this opening (red arrow)
2.
Perform the tension test (“drop” test) – do only with a full bobbin
3.
Run the thread through the loop at the top (red arrow)
4.
Press bobbin case into place with finger- feel/listen for the “click”.
5.
IMPORTANT PRACTICE SKILLS. (on the next few pages are illustrated steps for some of the skills listed on the previous page.) THREAD: Learn how to check that both upper (colored) thread and lower (bobbin) thread feed properly and are tensioned properly.
1. Bobbin - Properly reload a bobbin and check its tension then re-insert into the machine. Follow the steps shown here:
2. Upper thread: a. Learn to tie a thread cone onto the
machine. Take 2 ends of embroidery thread (each about 2ft long) and practice tying a square knot. With a properly-tied square knot, you can replace/move thread cone colors anywhere you want on the machine by tying the knot and pulling the new thread through the eye of the needle without having to thread it. This saves time and makes the overall experience using the machine a lot easier.
Learn to tie this square knot: If done right, replacement thread can be pulled through the needle, including the knot, so the needle doesn’t have to be threaded.
3. Cross and twist the 2 ends together like starting to tie a shoe, crossing right over left.
2. Cross and twist again, this time crossing left over right.
1. Give several sharp tugs on opposing ends to seat the knot so it doesn’t unravel.
11
b. Basic upper thread check: check the thread on any given needle position to make sure it’s running / threading correctly from the cone all the way to the needle
i. Make sure there are no loops/snags/unnecessary slack. ii. Make sure the thread path is correct (see the diagram on the head.)
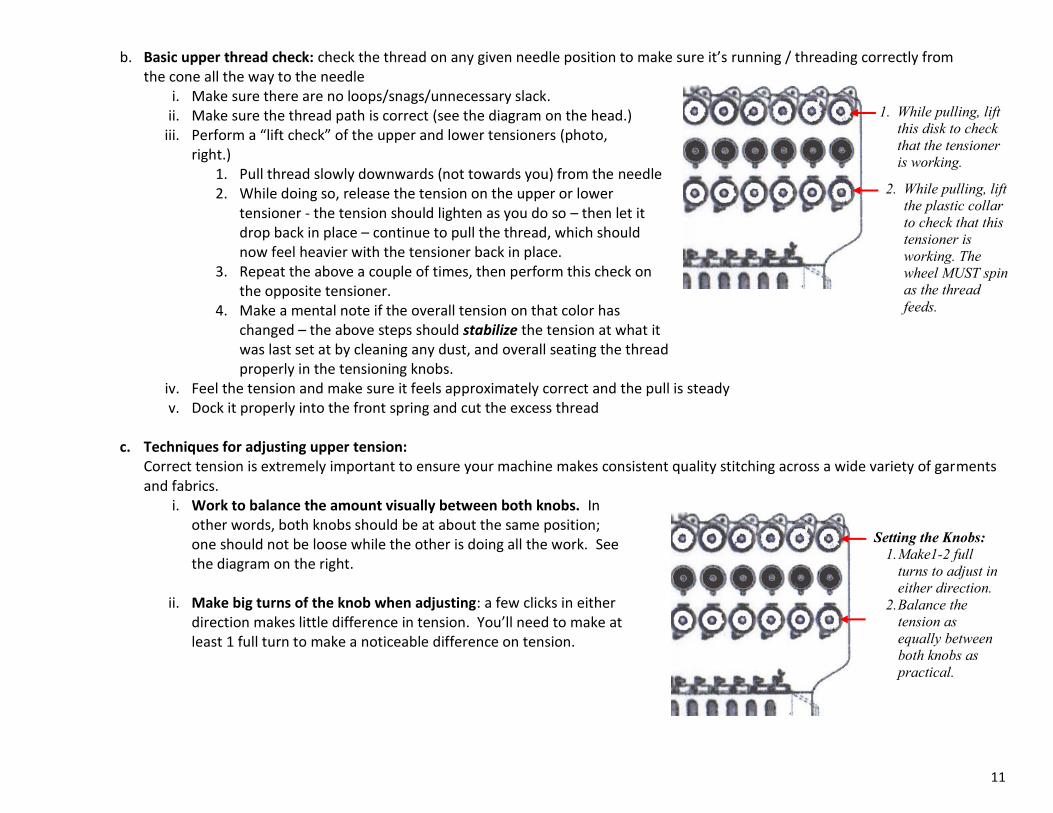
iii. Perform a “lift check” of the upper and lower tensioners (photo, right.)
1. Pull thread slowly downwards (not towards you) from the needle 2. While doing so, release the tension on the upper or lower
tensioner - the tension should lighten as you do so – then let it drop back in place – continue to pull the thread, which should now feel heavier with the tensioner back in place.
3. Repeat the above a couple of times, then perform this check on the opposite tensioner.
4. Make a mental note if the overall tension on that color has changed – the above steps should stabilize the tension at what it was last set at by cleaning any dust, and overall seating the thread properly in the tensioning knobs.
iv. Feel the tension and make sure it feels approximately correct and the pull is steady v. Dock it properly into the front spring and cut the excess thread
c. Techniques for adjusting upper tension:
Correct tension is extremely important to ensure your machine makes consistent quality stitching across a wide variety of garments and fabrics.
i. Work to balance the amount visually between both knobs. In other words, both knobs should be at about the same position; one should not be loose while the other is doing all the work. See the diagram on the right.
ii. Make big turns of the knob when adjusting: a few clicks in either direction makes little difference in tension. You’ll need to make at least 1 full turn to make a noticeable difference on tension.
1. While pulling, lift
this disk to check
that the tensioner
is working.
2. While pulling, lift
the plastic collar
to check that this
tensioner is
working. The
wheel MUST spin
as the thread
feeds.
Setting the Knobs:
1. Make1-2 full
turns to adjust in
either direction.
2. Balance the
tension as
equally between
both knobs as
practical.
12
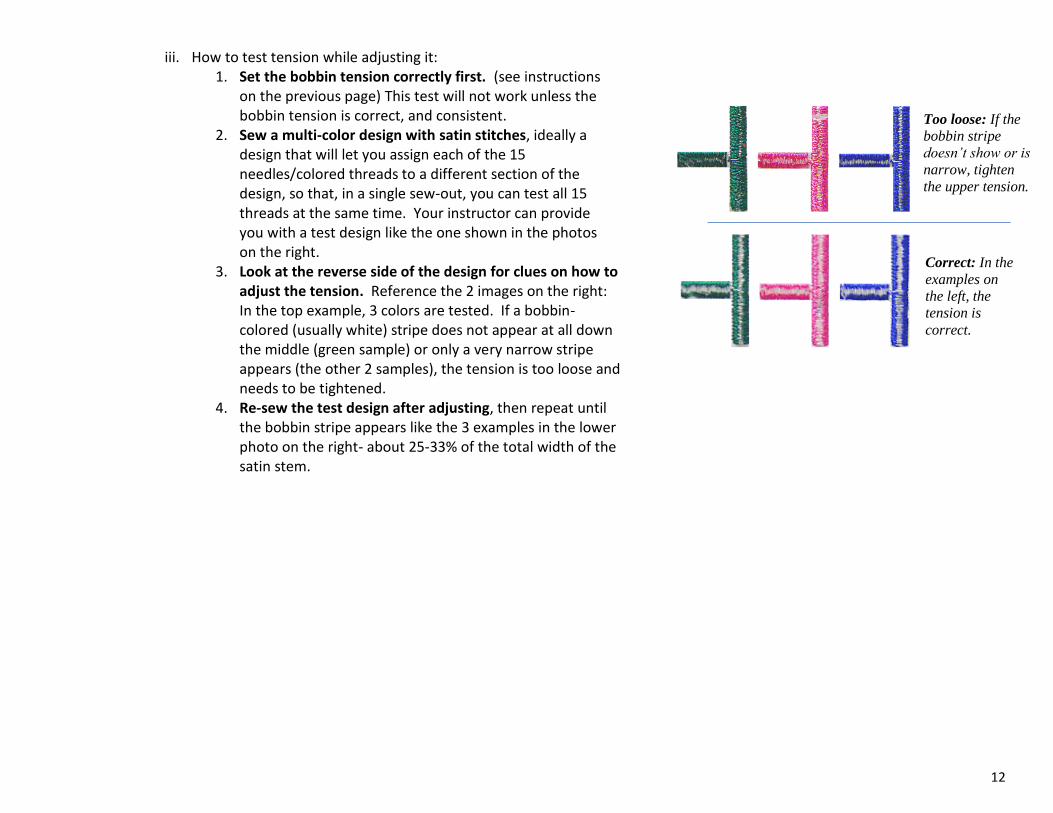
iii. How to test tension while adjusting it: 1. Set the bobbin tension correctly first. (see instructions
on the previous page) This test will not work unless the bobbin tension is correct, and consistent.
2. Sew a multi-color design with satin stitches, ideally a design that will let you assign each of the 15 needles/colored threads to a different section of the design, so that, in a single sew-out, you can test all 15 threads at the same time. Your instructor can provide you with a test design like the one shown in the photos on the right.
3. Look at the reverse side of the design for clues on how to adjust the tension. Reference the 2 images on the right: In the top example, 3 colors are tested. If a bobbin-colored (usually white) stripe does not appear at all down the middle (green sample) or only a very narrow stripe appears (the other 2 samples), the tension is too loose and needs to be tightened.
4. Re-sew the test design after adjusting, then repeat until the bobbin stripe appears like the 3 examples in the lower photo on the right- about 25-33% of the total width of the satin stem.
Too loose: If the
bobbin stripe
doesn’t show or is
narrow, tighten
the upper tension.
Correct: In the
examples on
the left, the
tension is
correct.

13
IMPORTANT PRACTICE SKILLS continued
3. Embroidery Machine Needles.
a. About Needles: Your machine uses DBxK5 round shank needles, typically 75/11 or 80/12 in size. Needles appropriate for your machine also come in sharp point (ideal for wovens) and ball points (ideal for knits). There are additional size needles that can be used (65/9 for finer work, or 90/14 for sewing through very thick/dense materials and/or for larger-gauge thread), but the 75/11 and 80/12 needles are far the most common.
b. Handling Needles: i. Hold a needle in your hand and be
able to find the front and the back of the needle. Go by the diagrams shown on the right.
c. Learn / Practice changing a Needle:
Follow the steps on the right to change a needle. THE NEEDLE MUST BE ORIENTED CORRECTLY as shown or the machine will not sew stitches. Turn the needle so that the eye, as shown on the right, is just barely right of center.
Left side of the needle: Find this cut-out, called the scarf. When properly oriented, the scarf should face towards the back of the machine (away from you).
Front view of the needle: This groove runs the length of the front of shaft the needle, is on the opposite side of the scarf, and should face towards you as you are installing it on the machine.
shank shank
shaft
eye
1. Loosen screw
only enough to
allow you to
pull the needle
down/out – not
so loose that
the needle falls
out on its own.
2. Push new
needle up
fully until
it stops.
3. Rotate the needle so the
scarf faces backwards &
the groove is in front, and
the eye is slightly to the
right of center – NOT
LEFT OF CENTER!.
4. Tighten
screw.

14
IMPORTANT PRACTICE SKILLS continued
4. Some Tips on Hooping / Hooping Practice
a. Practice hooping material or a garment to prep it for embroidery. You can use 2 layers of cutaway backing as a sample to start, but work your way up to hooping different kinds of garments
b. Hooping tips: i. Always hoop on a level surface with enough room for the largest item you plan to sew to sit completely flat.
ii. Inner ring and outer ring should be flush or past flush with each other. iii. The hooped material should be taut / no slack but should not be stretched iv. Be sure the hoop arms are level with the garment so that the embroidery will sew straight. v. Set the adjustment screw so that the outer ring is tight but not too tight.
1. Too loose – the hoop will fall apart while embroidering especially at higher speeds 2. Too tight – the hoop will leave white marks on darker fabrics, called hoop burn. Also, setting it too tight will make it
unnecessary difficult to unhoop the item and re-hoop the next item for sewing. vi. Aligning a garment in the hoop: There are numerous methods that you can follow. An example is this rule for logo
placement on a shirt:
Horizontal
placement:
halfway
between
placket and
sleeve seam.
Vertical placement:
Either halfway between
top and bottom of sleeve
or between the last 2
buttons.

15
THREAD SETUP
1. Tie on any thread cones needed for the job.
2. Test pull any thread that hasn’t been used recently.
3. Change needle(s) if necessary.
4. Check bobbin
SET UP THE DESIGN IN THE CONTROL PANEL
HOOP THE GARMENT
1. Select the hoop for the job
2. Select the stabilizer (backing and possibly
topping)
3. Determine the position on the garment &
mark
4. Hoop the garment
SEW IT OUT !
1. Oil the hook if needed
2. Mount the hooped garment on the machine
3. Check for clearance, ensure the garment is properly AROUND the sewing arm
4. Trace to verify the position
5. Press START/STOP to start sewing
6. Adjust speed if necessary
STEPS FOR SETTING UP AND SEWING A JOB
1. Read the design
from the USB stick.
2. Set the colors of
the design
3. Select a hoop
4. Center the design
in the hoop
5. Trace the
design to verify
fit and position
6. Start Sewing!

16
PREPARING FOR DIFFERENT TYPES OF GARMENTS/SUBSTRATES Digitizing, Needles & Thread, Stabilizer, Hoop Choices
Digitizing – Ideally, a design should be digitized specifically for the garment or fabric type. For example, a design sewing on
knit fabric will have different kinds of stabilization stitches and shape compensation built into the design than if it were on
sewing on a woven item. The sewing sequence of a design will differ on flat goods than if sewn on ballcaps.
Needles – Generally 2 sizes are most commonly used (75 and 80), and 2 point types are used (sharp and ball) giving 4
combinations. 3 of these are used the most often:
- 75/11 ballpoints – ideal for knit goods. Use to prevent shredding of the knit fabric that would be caused by sharp
points
- 75/11 sharp point needles – ideal for woven goods, and good general purpose needle that is in practice being used on
most knits, too.
- 80/12 sharp point needles – better suited than 75/11 needles for thick or dense material such as ballcaps, dense thick
fabrics (backpacks, heavy jackets) etc.
Stabilizer -
- Cutaway for knits and wearables in general
- Tear-away - for hats and anything where the edge of the backing is not desirable (backs of towels)
- Use heavier (3 oz vs 2 oz, for example) backing or extra layers of backing for heavier designs
- Action Back works really well on moisture-wicking poly shirts / Spandex type material
- Water-soluble topping – is absolutely necessary for textured fabrics

17
PREPARING FOR DIFFERENT TYPES OF GARMENTS/SUBSTRATES continued Deciding on Alternate types of Hooping Techniques (magnetic hoops, clamps, floating)
Alternate hooping techniques are more expensive but may provide advantages or enable sewing where conventional hoops
are not possible that may justify their cost.
- MAGNETIC (MIGHTY) HOOPS:
o Advantages:
▪ Reduce strain on hands/wrists required to hoop a garment
▪ Distribute the hooping force evenly on the garment resulting in less hoop burn/marks
o Disadvantages:
▪ High cost of each hoop compared to equivalent-sized conventional hoops
▪ Magnets are strong enough to create a serious pinching hazard
▪ Take away from available sewing area because of the thick hoop walls
- CLAMPS (HOOPTECH):
o Advantages:
▪ Reduce hooping time – open jaws, insert item & stabilizer, close jaws
▪ Does not force the material into double 90-degree bend – good for “unbendable” items like heavy canvas,
cooler bags, etc
o Disadvantages:
▪ High initial cost to purchase the base +1 window.
▪ Item embroidered can only be inserted so far into the clamp (for example, it is not possible to embroider
on the middle of a blanket).
▪ Risk of the clamp base hitting the sewing head if not handled properly
- FLOATING (holding the item on a hoop surface using adhesive tear-away backing)
o Advantages:
▪ Very easy and inexpensive. Items only need to be lain on top of the adhesive surface. Very little hooping
effort
o Disadvantages:
▪ Use of adhesive backing may gum up needle/hook/plate. Does not hold some heavy items well enough.

18
WARNING! CLEAR POSITION?
IMPORTANT ADDITIONAL PROCEDURES & FUNCTIONS TO KNOW
RECOVERING FROM MOST INTERRUPTIONS (thread breaks, errors) General procedure:
1. Clear the error message if it appears (try Auto before Manual)
2. Clear any obvious cause (re-thread/replace needle/remove any blockage)
3. Use the +1 -1 keys to backup and / or check position before resuming sewing
JUMPING/MOVING QUICKLY TO ANOTHER PART OF THE DESIGN Press this button found at the top on the main screen. This panel appears, which let you move more quickly forward or back through a design or jump to
another part of the design.
RE-ALIGNING A DESIGN If, in mid-sewing, the design falls out of alignment, you can shift the design position. Normally, the machine default settings prevent you from
shifting the design position with the arrow keys. To disable this protection, go to the main menu, choose , then choose the machine icon,
and scroll to find this item, and set it to NO.
Then, follow this short procedure to shift the design:
1. Use the to verify current sewing position
2. Go to the design positioning screen by pressing this button:
3. Use the arrow keys to best-guess adjust the hoop left/right up/down
4. Press the button to return to the sewing screen.
5. Press the round START/STOP button. The message appears. Press OK.
6. Go to step 1 and check the new position. If not, repeat this procedure until satisfied.
7
1
1
Jump to color block #
Jump to stitch #
Advance/move back to the next or previous color block in the design
19
IMPORTANT ADDITIONAL PROCEDURES & FUNCTIONS TO KNOW continued
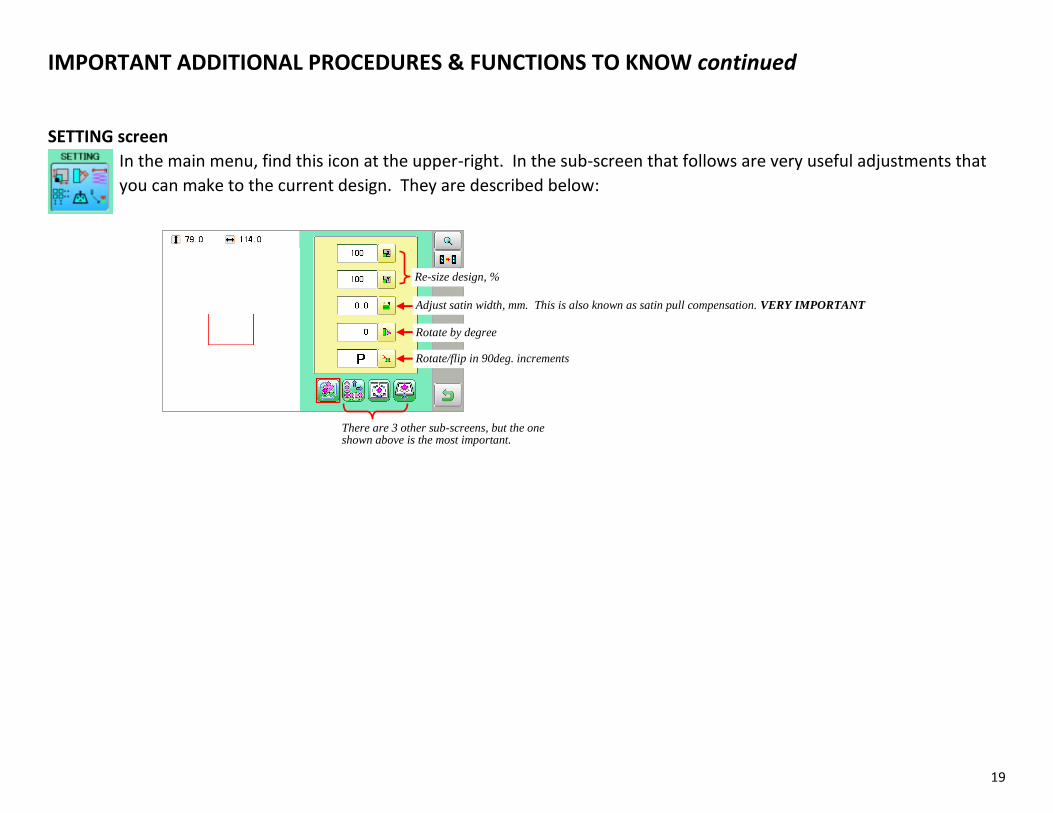
SETTING screen
In the main menu, find this icon at the upper-right. In the sub-screen that follows are very useful adjustments that
you can make to the current design. They are described below:
Re-size design, %
Adjust satin width, mm. This is also known as satin pull compensation. VERY IMPORTANT
Rotate by degree
Rotate/flip in 90deg. increments
There are 3 other sub-screens, but the one shown above is the most important.

20
MAINTENANCE
Your HAPPY machine requires very little general maintenance and can be done completely by the owner/operator. There are 4 general maintenance
procedures that need to be followed, all of which are discussed in detail for your model machine in the Maintenance section of TEXMAC’s YouTube channel
https://youtube.com/texmachappyembroiderymachines
1. “A” Oiling (rotary hook race) –This reminder appears onscreen every 125,000 indicating to oil the rotary hook race:
As suggested in the video, it can save you time to instead oil the rotary hook every other bobbin change, as shown
in the video, which is approximately every 125,000 stitches, since the oiling point is already exposed when the bobbin is being changed. It is
important to rotate the rotary hook immediately after oiling to spread the oil through the entire circumference of the hook race.
2. “B” Oiling (needle bars and reciprocator) –This reminder appears onscreen every 1,000,000 stitches: As suggested in
the video, perform this oiling at the end of the day when this message appears, as the oil applied in this case must be allowed to sit for several hours. It
is very important to follow the very specific instructions for oiling these locations according to the video made for your specific model machine.
3. Clean the rotary hook area and knife - following the instructions on the video, when the reminder for appears onscreen for this, or when the rotary
hook area is visibly coated with debris (dust, thread, lint, etc) oil and other substances, remove the needle plate and clean this area very thoroughly
with rubbing alcohol or Hookwash plus appropriate brushes and cloths. Be sure to re-oil the moving knife and rotary hook after cleaning.
4. Keep the machine and thread free of dust and other substances – From time to time, carefully clean up any material/dust buildup along the thread
path, especially the tension knobs/discs, guides. As with the rotary hook area, look for buildup due to combined coatings of oil/spray and dust and lint.
Use compressed air, cloth, brushes and detergent as needed. Unthread the sewing head as necessary, although a useful trick is to pull excess thread
down from all needles, temporarily twist/tie them together and hold in place while blowing out the sewing head with compressed air to minimize
unthreading.
PLACE TO OIL A
PLACE TO OIL B

21
TROUBLESHOOTING
TROUBLESHOOTING THREAD BREAKS
Thread breaks are the number 1 cause of machine stoppage among new and experienced operators alike. Listed below are the majority causes –
learning to avoid these causes will help you operate your machine as productively and trouble-free as possible.
(1) Is the bobbin empty? or (2) Sensor wheel MUST turn smoothly with the thread feed.
NO
YES
Thread Break
Check Thread Feed/Path: - thread path: is it correct at all points? - feed: is it smooth? Is it catching on anything? Correct Needle orientation? Scarf should be at
back, eye should be straight or slightly to the right.
Thread quality/condition: Old or mis-handled thread will break more frequently, especially when running in significant volume/speed. Do not subject thread to changes in humidity or longterm exposure to direct sunlight. Use only high-quality thread (Madeira, Rapos, Isacord, etc)
Digitizing problem if breaks in the same place(s) usually caused by too much layering or too many short stitches in a very small space.
Check for damage/scarred surfaces from hoop strike or needle break. Broken bits of needle/other metal may scar/bur surfaces that contact thread i.e. needle, presser foot, needle plate, point area of rotary hook. Replace needle, use fine abrasive cord/cloth to “polish” these surfaces smooth again.
Is the thread actually broken?
These are the majority causes of thread breaks among new
operators. Simply following good procedure can dramatically
improve your experience and productivity.
Not very likely causes if you use good, new thread and use designs
from experienced digitizers. You can easily test for bad thread by
swapping it for a new cone to see if the thread breaks go away.
Learn to suspect this cause after an incident such as a hoop strike or
broken needle. A good way to troubleshoot for scarred surfaces is to
determine if the thread breaks are happening on all needle positions
or only on certain ones. If on all needle positions, look for the cause
in what’s common to all – the needle plate, knife, rotary hook. If
only on certain needle positions, focus on what’s unique to those
positions – needle, needle bar, presser foot.

22
TROUBLESHOOTING continued
COMMON ERROR MESSAGES AND RESOLUTIONS.
For the most part, when most error messages occur, try to clear them by choosing AUTO. If that doesn’t work, here is a little
more information on some of the more common error messages:
E-050 C-Point – machine has failed to return the main shaft position to its at-rest position (270 or 275 degrees) after it last stopped. If AUTO does
not clear this error, go to the back of the machine, remove the round black rubber cap, insert a 3mm Allen wrench into the socket of the main
shaft dial and try to manually turn the dial clockwise until C point is at the pointer (usually 270 or 275 degrees depending on machine model).
While doing this, turn the shaft all the way around to make sure it can do so without any resistance.
E-018 Main Shaft – unusual mechanical resistance was encountered as the main shaft tried to turn. Check for blockage/make sure main shaft can
turn all the way around.
E-021, 022, 024 – needle move, needle center. The head failed to move enough left-right to completely to the current needle position. It may be
off even slightly.
E-020, 026 – needle detect, needle differ. Machine is unsure or incorrect about which needle number is currently sitting over the needle plate.
E-051, 052 – C and L sensors may be dirty or out of alignment with the shaft.
E-060 X-Limit, E-061 Y-Limit – Part of the design will sew outside of allowable limits. Adjust design position or reduce size.
E-114 Id Over- memory is full. Delete some designs.
E-190 Cut blade – the moving knife failed to swing completely shut after a cut cycle
E-193 Catcher – this is caused by the catcher (upper thread hook) failing to fully retract upwards. This can either be due to a catcher problem, or,
if the thread is still not cut after a cut cycle, the catcher tried to grab the uncut thread, which is strong enough to prevent the catcher from
retracting. In the latter case, the machine had a problem cutting, which in turn caused the catcher error.
23
E-155 Takeup Cover – 12-needle Voyager only. Close the clear take-up lever door.
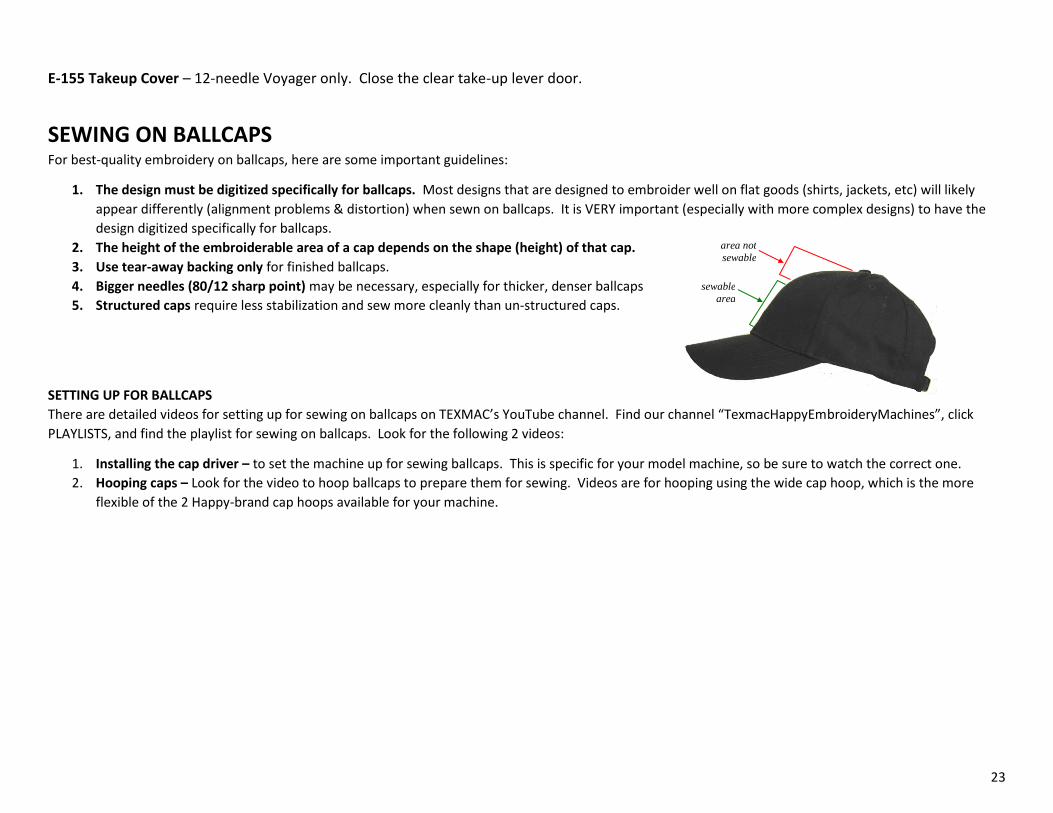
SEWING ON BALLCAPS For best-quality embroidery on ballcaps, here are some important guidelines:
1. The design must be digitized specifically for ballcaps. Most designs that are designed to embroider well on flat goods (shirts, jackets, etc) will likely
appear differently (alignment problems & distortion) when sewn on ballcaps. It is VERY important (especially with more complex designs) to have the
design digitized specifically for ballcaps.
2. The height of the embroiderable area of a cap depends on the shape (height) of that cap.
3. Use tear-away backing only for finished ballcaps.
4. Bigger needles (80/12 sharp point) may be necessary, especially for thicker, denser ballcaps
5. Structured caps require less stabilization and sew more cleanly than un-structured caps.
SETTING UP FOR BALLCAPS
There are detailed videos for setting up for sewing on ballcaps on TEXMAC’s YouTube channel. Find our channel “TexmacHappyEmbroideryMachines”, click
PLAYLISTS, and find the playlist for sewing on ballcaps. Look for the following 2 videos:
1. Installing the cap driver – to set the machine up for sewing ballcaps. This is specific for your model machine, so be sure to watch the correct one.
2. Hooping caps – Look for the video to hoop ballcaps to prepare them for sewing. Videos are for hooping using the wide cap hoop, which is the more
flexible of the 2 Happy-brand cap hoops available for your machine.
area not
sewable
sewable
area

24
RESOURCES
- Help Videos: www.youtube.com/texmachappyembroiderymachines
- Support Documents: www.happyemb.com – click Support & Learn & go to your machine page
- Support contact information:
o Education: Rene Rosales 704-393-6558, [email protected]
o Support Team: 866-838-2424.
- Social Media (Facebook Groups)
o Official Events & Announcements page: TEXMAC Happy Embroidery Machines
o Official Texmac Support page: TEXMAC Support
o Unofficial (but very useful) Owner-run group: Happy Multi-needle Embroidery Machine Help Group
DIGITIZERS
QualityPunch.com – many digitizers on-staff, fast turn around, good quality
QDigitizing.com – very affordable, many digitizers on-staff1
APEX digitizing – www.apexembroidery.com
Louis Vitor Nieto www.facebook.com/vitordigitizing Scott Holtzendorff Black Tip Graphics (386) 233-9769 Ormond Beach, FL
STOCK DESIGN COMPANIES
DakotaCollectibles.com
Greatnotions.com
Urbanthreads.com
Embroiderylibrary.com
WHOLESALERS
Sanmar – www.sanmar.com
AlphaBroder – www.alphabroder.com
Related Documents