AN INTRODUCTION TO THE PHYSICS OF PARTICLE ACCELERATORS (Second Edition) © World Scientific Publishing Co. Pte. Ltd. http://www.worldscibooks.com/physics/6683.html A Species-Specific Information — Techniques for Handling, Sexing, Injection, and Blood Collection

Handling of laboratory animals
Dec 21, 2015
Handling laboratory animals,
Welcome message from author
This document is posted to help you gain knowledge. Please leave a comment to let me know what you think about it! Share it to your friends and learn new things together.
Transcript

AN INTRODUCTION TO THE PHYSICS OF PARTICLE ACCELERATORS (Second Edition)© World Scientific Publishing Co. Pte. Ltd.http://www.worldscibooks.com/physics/6683.html
ASpecies-SpecificInformation —Techniques for
Handling, Sexing,Injection, and
Blood Collection
b643_Chapter-A.qxd 9/10/2008 9:05 AM Page 1

AN INTRODUCTION TO THE PHYSICS OF PARTICLE ACCELERATORS (Second Edition)© World Scientific Publishing Co. Pte. Ltd.http://www.worldscibooks.com/physics/6683.html
2 � Species-Specific Information
A.1 Animal Handling
When handling animals, always remember to approach them ina confident and relaxed manner. Animals should be handled asregularly as possible to help reduce stress and to allow theanimals to get used to you.
It is important to undergo training if you are going torestrain an animal for a procedure, as some techniques requirea lot of practice and you may make a mistake if you are unfa-miliar with the methods whilst trying to perform a procedure.Techniques vary from species to species; other factors such asthe size, weight, age, and temperament of the animal are con-sidered when selecting the method of restraint.
Handling methods may differ between handlers. Forinstance, some handlers may be able to lift a 5-kg rabbit withlittle effort, whereas some others may find it quite heavy to pickup and will therefore probably not be able to restrain it usingthe same method. There are also different techniques for nor-mal handling and sexing of the animal and for transferring itfrom one cage to the next, as opposed to restraining or handlingsick animals.
Injection and blood collection are the most common proce-dures that research personnel perform on animals, and thesetechniques require knowledge of general handling of animals.
A.1.1 General principles for animal handling
• Animals should be approached in a confident and relaxedmanner.
• Animals should be handled regularly to help reduce stressand to calm them down when restraining them for proce-dures to be performed on them.
• Most animals have sharp claws and prefer not to be placedon slippery surfaces, so, where possible, use a cage top (forrodents) or a nonslip cover/liner for benches.
• With practice, most species of animals are easily restrainedand handled.
• There is no one correct method of handling or restraining ani-mals, but the general principle is that it should not cause pain
b643_Chapter-A.qxd 9/10/2008 9:05 AM Page 2

AN INTRODUCTION TO THE PHYSICS OF PARTICLE ACCELERATORS (Second Edition)© World Scientific Publishing Co. Pte. Ltd.http://www.worldscibooks.com/physics/6683.html
Injections and Blood Collection � 3
or discomfort to the animal. It should also be comfortablefor the handler, especially when the animal is being restrainedfor an injection, so that the handler is able to concentrate onthe injection procedure.
• The methods shown in the species-specific sections are rec-ommended, although some people may feel more comfort-able using slightly different ways to restrain the animals,which is also acceptable.
It may be obvious, but one basic tip to remember is to keepyour fingers away from the mouth of the animal, especiallywhen performing a procedure such as an injection. Many peo-ple, while busy concentrating on positioning the needle, forgetthat their fingers are within easy reach of the mouth of amouse or rat and hence get bitten.
A.2 Injections and Blood Collection
As dosing and blood collection of experimental animals arecommon procedures, it is necessary to look at these in greaterdetail. Blood sampling is a common procedure that is performedregularly on all species, whether for diagnostic purposes (healthmonitoring) or as part of the experiment requirements. Thereare many different methods of compound administration andblood collection, some of which will be described in the species-specific sections.
Below are some considerations to keep in mind beforeinjecting or taking blood, such as the volume that may be safelyadministered or withdrawn.
A.2.1 Injections
A.2.1.1 Animal handling
• The correct restraint technique — manual, mechanical(restrainers), or chemical (anaesthetics) — should be usedto minimise stress to animals.
• Good animal handling prevents injury to animals, e.g. vertebralinjuries in rabbits.
b643_Chapter-A.qxd 9/10/2008 9:05 AM Page 3

AN INTRODUCTION TO THE PHYSICS OF PARTICLE ACCELERATORS (Second Edition)© World Scientific Publishing Co. Pte. Ltd.http://www.worldscibooks.com/physics/6683.html
4 � Species-Specific Information
Table A.1 Recommended maximum volumes.
Route and Volumes (mL/kg except *mL/site)
IVIV (slow
Species Oral SC IP IM (bolus) injection)
Mouse 10 (50) 10 (40) 20 (80) 0.05* (0.1)* 5 (25)Rat 10 (40) 5 (10) 10 (20) 0.1* (0.2)* 5 (20)Rabbit 10 (15) 1 (2) 5 (20) 0.25 (0.5) 2 (10)Dog 5 (15) 1 (2) 1 (20) 0.25 (0.5) 2.5 (5)NHP 5 (15) 2 (5) −(10) 0.25 (0.5) 2 (—)Mini-pig 10 (15) 1 (2) 1 (20) 0.25 (0.5) 2.5 (5)
Note: SC, subcutaneous; IP, intraperitoneal; IM, intramuscular; IV,intravenous; NHP, nonhuman primate; (—), data not available.Figures on the left side of the columns are intended as a guide to “goodpractice” for single or multiple dosing. The second set of figures inparentheses are the possible maximum volumes which, if exceeded,may result in scientific and welfare concerns.
• Good animal handling also helps personnel to avoid injuriessuch as bites, scratches, and needlestick injuries.
A.2.1.2 Administration volumes
Table A.1 lists the recommended maximum volumes that areconsidered as good practice for the commonly employed routesin the species covered in this book.
• For nonaqueous injection material, consideration must begiven to the time of absorption before redosing.
• No more than two intramuscular sites should be usedper day.
• Subcutaneous sites should be limited to two to three sitesper day.
A.2.1.3 Administrative routes
A.2.1.3.1 Oral route
If the experimental protocol requires restriction of the animal’sfood intake, care must be taken, as large-dose volumes (40 mL/kg)
b643_Chapter-A.qxd 9/10/2008 9:05 AM Page 4

AN INTRODUCTION TO THE PHYSICS OF PARTICLE ACCELERATORS (Second Edition)© World Scientific Publishing Co. Pte. Ltd.http://www.worldscibooks.com/physics/6683.html
have been shown to overload the stomach capacity and passimmediately into the small bowel.a Larger volumes may also refluxinto the oesophagus.
A.2.1.3.2 Parenteral routes
For substances administered by injection, there are several fac-tors to consider, including the dose volume, stability (beforeand after administration), pH, viscosity, osmolality, bufferingcapacity, sterility, and biocompatibility of the formulation. Thesmallest needle size should always be used, taking into accountthe dose volume, viscosity of injection material, speed of injec-tion, and animal species.
A.2.1.3.3 Subcutaneous (SC/SQ/Subcut) injection
Subcutaneous injection is given under the skin (cutis) and isfrequently used. The rate and extent of absorption depend onthe formulation. Large volumes can safely be administeredusing the SC route.
A.2.1.3.4 Intraperitoneal (IP) injection
Intraperitoneal injection is not frequently used for multiple-dose studies because of possible complications such as acci-dental injection into the intestinal tract, causing peritonitis.Drug absorption from the peritoneal cavity after the adminis-tration of the compound as a suspension is dependent on theproperties of the drug particles and the vehicle, and may beabsorbed into both systemic and portal circulations. The largestvolumes may be injected relatively safely by experienced indi-viduals using the intraperitoneal route.
A.2.1.3.5 Intramuscular (IM) injection
Intramuscular injections may be painful because muscle fibres,which are closely packed together, are distended by the injection
Injections and Blood Collection � 5
a Hejgaard KC et al. Assessing welfare of rats undergoing gavaging with varyingvolumes. Measurements on open field behaviour, temperature, plasma corti-costerone and glucose [Abstract]. Rev Cienc 23/24: 16, 1999.
b643_Chapter-A.qxd 9/10/2008 9:05 AM Page 5

AN INTRODUCTION TO THE PHYSICS OF PARTICLE ACCELERATORS (Second Edition)© World Scientific Publishing Co. Pte. Ltd.http://www.worldscibooks.com/physics/6683.html
article. Sites need to be chosen to minimise the possibility ofnerve damage and pain. If dosing multiple times, a range of sitesshould be selected.
A.2.1.3.6 Intravenous (IV) injection
There are two types of intravenous injection: bolus, where asingle large sample is given rapidly; and slow injection, wherethe article is administered over a period of time.
• Bolus injections require the test substance to be compatiblewith blood and not too viscous. When large volumes arerequired to be given, the injection material should be warmedto body temperature. The rate of injection is an important fac-tor in intravenous administration; it is suggested that, forrodents, the rate should not exceed 3 mL/min.
No detectable changes in haematocrit or heart rate wereobserved in dogs following rapid intravenous injection of6 mL/kg saline, but 20 mL/kg was associated with 15%haemodilution and a transient tachycardia (up 46% over1 min).b
• Slow intravenous injections are usually given either becausethe compound is insoluble or unstable in solution or due toirritancy of a large volume. For slow intravenous injectionsover the course of 5–10 min, a standard or butterfly needlemay be used, or an intravenous cannula may be taped intoplace or surgically implanted to minimise the stress ofrepeated injections or prolonged anaesthesia/sedation.
It has been shown that rats may be given daily intravenousinjections of isotonic saline at dosages of up to 80 mL/kg at1 mL/min for 4 days without any significant signs of distressor pulmonary lesions.c However, pulmonary lesions increasedin incidence and severity when the duration of treatment wasincreased to 30 days and the injection was administered at
6 � Species-Specific Information
b Zeoli et al. A limit rapid intravenous injection volume in dogs [Abstract 284].Toxicol Sci 42: 58, 1998.c Morton D et al. Effects of infusion rates in rats receiving repeated large vol-umes of saline solution intravenously. Lab Anim Sci 47: 656–659, 1997.
b643_Chapter-A.qxd 9/10/2008 9:05 AM Page 6

AN INTRODUCTION TO THE PHYSICS OF PARTICLE ACCELERATORS (Second Edition)© World Scientific Publishing Co. Pte. Ltd.http://www.worldscibooks.com/physics/6683.html
0.25 mL/min, 0.5 mL/min, or 1.0 mL/min.d There may wellhave been adverse effects at an earlier time point, but thepathology had not had time to develop.
A.2.1.3.7 Intradermal (ID) injection
Intradermal injection is typically used for the assessment ofimmune, inflammatory, or sensitisation responses.e,f Materialmay be formulated with an adjuvant to enhance the response,but care must be taken, as quite often this route of administra-tion is painful for the animal (specifically in footpad and eyepinea injections). Volumes of 0.05–0.1 mL can be used, depend-ing on the thickness of skin and the species.
A.2.1.3.8 Vehicles for administration
The vehicle or solution that the injection article is placed inneeds to be carefully selected. The vehicles should offer opti-mal exposure without influencing the results obtained for thecompound under investigation; they should ideally be biologi-cally inert, and have no effect on the biophysical properties ofthe compound or any toxic effects on the animals. Simple vehi-cles used to administer compounds include aqueous isotonicsolutions, buffered solutions, cosolvent systems, suspensions,and oils. For nonaqueous injection articles, it is important toconsider the time of absorption before redosing.
A.2.1.3.9 Frequency of needle punctures
It is important to carry out the minimum number of needlepunctures consistent with obtaining good scientific data. The
Injections and Blood Collection � 7
d Morton et al. Histologic lesions associated with intravenous infusions of largevolumes of isotonic saline solution in rats for 30 days. Toxicol Pathol 25:390–394, 1997.e Leenars PPAM. Adjuvants in Laboratory Animals (Synopsis of PhD thesisand publications). Ponsen & Looijen BV, Wageningen, The Netherlands, p. 214,1997.f Leenars PPAM et al. Assessment of side-effects induced by injection ofdifferent adjuvant/antigen combinations in rabbits and mice. Lab Anim 32:387–406, 1998.
b643_Chapter-A.qxd 9/10/2008 9:05 AM Page 7

AN INTRODUCTION TO THE PHYSICS OF PARTICLE ACCELERATORS (Second Edition)© World Scientific Publishing Co. Pte. Ltd.http://www.worldscibooks.com/physics/6683.html
same puncture site should not be used, i.e. use different pointsalong a vein or different locations on the skin (for subcuta-neous injections).
A.2.2 Blood collection
Before you start collecting blood, you need to know the following:
A.2.2.1 Cardiovascular physiology
A.2.2.1.1 Total blood volume
In all species, the total blood volume is approximately 6%–8%of the total body weight (of lean animals), so, to be safe, we canassume that 6% of body weight = blood.
• 6 mL of blood per 100 g• 60 mL per blood per kg
A.2.2.1.2 Safe acute sampling volume
Acute blood sampling is the one-time removal of a large volumeof blood or multiple small samples of blood over a short periodof time (24 h).
• 10%–15% of circulating blood volume may be removedonce every 3 weeks.
• 1% of body weight can be collected every 3 weeks (orin total over a 24-h period).
A.2.2.1.3 Chronic sampling
Chronic blood sampling is the frequent and repeated removal ofsmall quantities of blood over a long period of time.
• For chronic sampling, the rule of thumb is 0.1% of bodyweight every day for 21 days (e.g. a 30-g mouse can have0.03 mL of blood collected every day for 21 days).
• The total volume of blood collected by chronic sampling ishigher than acute, as the body continuously produces bloodto replace that taken.
8 � Species-Specific Information
b643_Chapter-A.qxd 9/10/2008 9:05 AM Page 8

AN INTRODUCTION TO THE PHYSICS OF PARTICLE ACCELERATORS (Second Edition)© World Scientific Publishing Co. Pte. Ltd.http://www.worldscibooks.com/physics/6683.html
A.2.2.2 Anatomy
It is important that before you start to collect the blood of ananimal, you have a good idea of its basic anatomy, such as thelocation of its heart, veins, and arteries, and how much bloodcan be collected from each site.
A.2.2.2.1 Venous access
For the collection of small volumes of blood (<0.1 mL), forhaematological or chemical estimations requiring only 50–200 µL(1–4 drops), a superficial vein can be punctured, such as the tailvein, saphenous vein, or marginal ear vein.
A.2.2.2.2 Arteries
Large volumes of blood can be obtained relatively easilyand quickly from the arteries, such as the central ear arteryin rabbits, but care must be taken to prevent excessivebleeding.
A.2.2.2.3 Cardiac puncture
Cardiac puncture should always be carried out under a generalanaesthetic and must be considered a terminal procedure in allspecies.
A.2.2.2.4 Cannulation
Cannulation is important to reduce the discomfort of repeatedbleeds. Temporary cannulae such as butterfly needles and over-the-needle cannulae may be used in the short term, whereassurgical implantation of biocompatible cannulae may berequired for long-term use. Cannulation allows repeated bloodsampling with minimal distress and discomfort to the animal.
• Indwelling catheters need to be flushed with a solution ofheparin to reduce the risk of thrombosis (blood clot).
• Discard a sample at least three times the volume of the linebefore a specimen is obtained for analysis.
Injections and Blood Collection � 9
b643_Chapter-A.qxd 9/10/2008 9:05 AM Page 9

AN INTRODUCTION TO THE PHYSICS OF PARTICLE ACCELERATORS (Second Edition)© World Scientific Publishing Co. Pte. Ltd.http://www.worldscibooks.com/physics/6683.html
10 � Species-Specific Information
A.2.2.3 Steps involved in blood collection
• Be prepared! Preparing all necessary equipment is essentialbefore beginning the procedure. Once blood starts toflow, it is very difficult to go and get something you haveforgotten.
• Animal preparation — handle the animal before the event toreduce the animal’s stress. Bring the animal cage to the pro-cedure room or biosafety cabinet and restrain/sedate the ani-mal, depending on the technique to be used and the species.
• Site preparation — remove the fur if necessary and swab thecollection site with alcohol.
• Collect blood.• Animal and site monitoring — hold a gauze pad on the blood
collection site until bleeding stops (haemostasis).
Remember: If you lack the confidence to perform a proce-dure, inform your colleagues. Training by the animal facil-ity care staff or veterinarian is usually available.Colleagues and principal investigators (PIs) may also beable to assist. Do not perform a procedure you are not con-fident in or comfortable with, as there is a higher chanceof you making a mistake which will add to the animal’sdiscomfort.
A.2.2.4 Recognition of signs of hypovolaemic shockand anaemia
If too much blood is taken or if the blood is taken from a partic-ular site too quickly, hypovolaemic shock or anaemia may result.The signs of hypovolaemic shock and anemia are as follows:
A.2.2.4.1 Hypovolaemic shock
• Fast and thready pulse• Pale, dry mucous membranes• Cold skin and extremities• Hyperventilation (panting, shortness of breath)• Subnormal body temperature
b643_Chapter-A.qxd 9/10/2008 9:05 AM Page 10

AN INTRODUCTION TO THE PHYSICS OF PARTICLE ACCELERATORS (Second Edition)© World Scientific Publishing Co. Pte. Ltd.http://www.worldscibooks.com/physics/6683.html
A.2.2.4.2 Anaemia
• Pale mucous membranes inside mouth and conjunctiva (eye)• Pale tongue, gums, ears, and footpads• Capillary refill test (where you pinch the mucous membrane
for a moment and then wait for blood to refill) that takesmore than 3 seconds
• Exercise intolerance• Increased respiratory rate at rest (extreme conditions)
A.2.2.5 Blood collection volumes
Tables A.2 and A.3 list the recommended sites for blood sam-pling as well as the total blood volumes and maximum samplingvolumes that are considered as good practice for the speciescovered in this book.
A.2.2.5.1 Lateral tarsal (saphenous) vein
Saphenous vein injection is used routinely in a number of smalland large animal species. Volumes as large as 5% of the circu-lating blood volume may be taken. Generally, it does not requirethe use of an anaesthetic and is therefore particularly suitable forrepeated blood sampling, as required in pharmacokinetic studies.
The saphenous vein is on the lateral aspect of the tarsal joint,and is easier to see when the fur is shaved and the area wipedwith alcohol. There appear to be no complications reportedother than persistent (minor) bleeding, and the method has theadvantage that anaesthesia is generally not required.
Injections and Blood Collection � 11
Table A.2 Recommended sites for blood sampling.
Species Recommended site
Mouse Saphenous vein, lateral tail veinRat Saphenous vein, lateral tail vein, sublingual veinRabbit Marginal ear vein, central ear artery, jugular veinDog Cephalic vein, jugular vein, saphenous veinMacaque Cephalic vein, saphenous vein, femoral veinMini-pig Cranial vena cava
b643_Chapter-A.qxd 9/10/2008 9:05 AM Page 11

AN INTRODUCTION TO THE PHYSICS OF PARTICLE ACCELERATORS (Second Edition)© World Scientific Publishing Co. Pte. Ltd.http://www.worldscibooks.com/physics/6683.html
A.2.2.5.2 Marginal ear vein/Central ear artery
Blood sampling from the marginal ear vein is commonly usedin rabbits, guinea pigs, and miniature swine. Good restraint isnecessary, and the application of a local anaesthetic cream orspray (e.g. xylocaine) 20 to 30 minutes before taking bloodhelps to prevent pain and distress.
A.2.2.5.3 Lateral tail vein
In principle, this route is similar to the lateral tarsal vein, buttends to yield smaller blood volumes (0.1–0.15 mL in mice, upto 2 mL in warmed rats). Blood is removed either by a syringe/needle or by stab puncture of a lateral tail vein. Anaesthesia isusually not required, which makes this route particularly suitedfor repeated blood sampling. Vasodilation is important to pro-mote bleeding and can be enhanced by placing the animal undera heat lamp or on a warming plate for a few minutes prior tothe procedure.
A.2.2.5.4 Retro-orbital plexus
Retro-orbital bleeding is quite a commonly used technique,but has been observed to cause adverse effects. Bleeding from
12 � Species-Specific Information
Table A.3 Total blood volumes and recommended maximum bloodsample volumes for species of given body weight.
BloodSpecies volume 7.5% 10% 15% 20%(Weight) (mL) (mL) (mL) (mL) (mL)
Mouse (25 g) 1.8 0.1 0.2 0.3 0.4Rat (250 g) 16 1.2 1.6 2.4 3.2Rabbit (4 kg) 224 17 22 34 45Dog (10 kg) 850 64 85 127 170Macaque (Rhesus) 280 21 28 42 56
(5 kg)Macaque 325 24 32 49 65
(Cynomolgus)(5 kg)
Mini-pig (15 kg) 975 73 98 146 195
b643_Chapter-A.qxd 9/10/2008 9:05 AM Page 12

AN INTRODUCTION TO THE PHYSICS OF PARTICLE ACCELERATORS (Second Edition)© World Scientific Publishing Co. Pte. Ltd.http://www.worldscibooks.com/physics/6683.html
the plexus should always be carried out under general anaes-thesia in all species; anaesthesia is a requirement in somenational regulations. An interval of 2 weeks between bleeds atthe same site should allow damaged tissue to repair in mostcases,g but this does not mean that the animals do not experi-ence some discomfort during the early stages before healing iscomplete.
The potential adverse effects of this technique include thefollowing:
• Retro-orbital haemorrhage resulting in haematoma and exces-sive pressure on the eye, which is painful for the animal;
• Pressure on the eye to stop bleeding, which may result incorneal ulceration, keratitis, pannus formation, rupture of theglobe, and micro-ophthalmia;
• Damage to the optic nerve and other intraorbital structuresthat can lead to deficits in vision and even blindness; and
• Fracture of the fragile bones of the orbit and neural damageby the micropipette and penetration of the eye globe itself.
A.2.2.6 Equipment
The following are required for routine blood collection:
• Blood collection tubes — blood can be collected with a regu-lar needle and syringe, with a butterfly needle attacheddirectly into the collection tube.
• Evacuated containers are designed to fill with a predeter-mined volume of blood by vacuum. The rubber stoppers arecolour-coded according to the additive that the tube contains.Various sizes are available. Vacutainers should only be usedwith large animals or for cardiac puncture in animals the sizeof a large guinea pig and above.
• Blood should never be poured from one tube to another incase the tubes have different additives or coatings.
Injections and Blood Collection � 13
g van Herck H et al. Histological changes in the orbital region of rats after orbitalpuncture. Lab Anim 26: 53–58, 1992.
b643_Chapter-A.qxd 9/10/2008 9:05 AM Page 13

AN INTRODUCTION TO THE PHYSICS OF PARTICLE ACCELERATORS (Second Edition)© World Scientific Publishing Co. Pte. Ltd.http://www.worldscibooks.com/physics/6683.html
14 � Species-Specific Information
• Blood from each individual animal should be collected in anew container to ensure that an accurate diagnosis of theindividual’s blood can be carried out.
• Needles — the gauge number indicates the diameter of theneedle: the larger the gauge, the smaller the needle. Needlesare available for evacuated systems and for use with asyringe, single draw, or butterfly system. Always use thesmallest needle suitable for the technique to minimise dis-tress to the animal.
• Holder/Adapter — this is for use with the evacuated collectionsystem.
• Tourniquet — this is a band or device that applies pressureto the blood vessel to aid blood collection. When using atourniquet, ensure that it is not too tight and remember toremove it after blood collection.
• Alcohol swab — 70% isopropyl alcohol is generally appliedto a small gauze pad, then wiped over the injection/bloodcollection site to disinfect it.
• Iodine wipes/swabs — these should be used if blood cultureis to be drawn.
• Gauze — this should be applied to the blood collection siteafter withdrawal of the needle.
• Sharps container — needles should be placed in the sharpscontainer immediately after use. Needles should never bebroken, bent, or recapped.
Note: Tubes with additives must be thoroughly mixed toensure that the additive is evenly distributed in theblood.
A.2.2.6.1 Needles (see Fig. A.1)
Needles come in various sizes, referred to as the “gauge” (G). Asthe gauge size increases, the diameter of the needle decreases.The gauge ranges from 10 to 33; however, in general, only sizesbetween 18G and 30G are used. Needles from around 18G to20G are generally used for large animals or to collect large vol-umes of blood by cardiac puncture in other species; needlesfrom 21G to 27G are most commonly used for all species; and
b643_Chapter-A.qxd 9/10/2008 9:05 AM Page 14

AN INTRODUCTION TO THE PHYSICS OF PARTICLE ACCELERATORS (Second Edition)© World Scientific Publishing Co. Pte. Ltd.http://www.worldscibooks.com/physics/6683.html
smaller needles (higher than 27G) are generally not used, unlessintradermal injections of small volumes are required in smallanimals.
The other important factor to note is the length of the nee-dle. Needles come in various lengths, but the length used forinjection in laboratory animals usually varies from ½″ to 1 ½″,depending on the location of the injection and the size of theanimal.
Needles come in different colours, both on the packagingand on the hub of the needle, that correspond to the gauge.
When selecting the size of the needle, you need to considerthe following:
• Size of the animal;• Injection site;• Volume of injection article/blood withdrawal — larger volumes
tend to require bigger needles; and • Viscosity of injection article — aqueous solutions will easily
flow through high-gauge needles, whereas oil immersions willrequire a wider needle (lower gauge).
Injections and Blood Collection � 15
Fig. A.1 Different needle sizes and their functions. (a) 18G 1½″needles — usually used for cardiac puncture in medium to largeanimals and for large-volume injection in large animals.
b643_Chapter-A.qxd 9/10/2008 9:05 AM Page 15

AN INTRODUCTION TO THE PHYSICS OF PARTICLE ACCELERATORS (Second Edition)© World Scientific Publishing Co. Pte. Ltd.http://www.worldscibooks.com/physics/6683.html
16 � Species-Specific Information
Fig. A.1 (Continued) (b) 22G 1½″ needles — can be used invarious species for injection or blood collection, but one needs to becautious when using these in small animals due to their length.(c) 23G 1″ needles — good for cardiac puncture in rodents and forinjection of viscous material.
b643_Chapter-A.qxd 9/10/2008 9:05 AM Page 16

AN INTRODUCTION TO THE PHYSICS OF PARTICLE ACCELERATORS (Second Edition)© World Scientific Publishing Co. Pte. Ltd.http://www.worldscibooks.com/physics/6683.html
Injections and Blood Collection � 17
Fig. A.1 (Continued) (d) 25G 1″ needles — can be used for bloodcollection or injection in a variety of species. (e) 27G ½″ needles —usually used for injection in small animals only.
b643_Chapter-A.qxd 9/10/2008 9:05 AM Page 17

AN INTRODUCTION TO THE PHYSICS OF PARTICLE ACCELERATORS (Second Edition)© World Scientific Publishing Co. Pte. Ltd.http://www.worldscibooks.com/physics/6683.html
A.2.2.7 Vein selection
• Palpate and trace the path of the vein with the indexfinger. Arteries pulsate, are more elastic, and have a thickwall.
• If superficial veins are not readily apparent, you can forceblood into the vein by massaging the arm from the wrist tothe elbow, tapping the site with the index and second finger,applying a warm, damp washcloth to the site for 5 minutes,or lowering the extremity over the bedside to allow the veinsto fill.
A.2.2.7.1 Preventing haematomas (bruising)
• Use the major superficial veins.• Make sure the needle fully penetrates the uppermost wall of
the vein. (Partial penetration may allow blood to leak into
18 � Species-Specific Information
Fig. A.1 (Continued) (f) 25G ¾″ “Butterfly” needles — usually usedfor injection or blood collection in medium to large animals. “Butterfly”needles have the advantage of allowing for some movement duringinjection/blood collection, resulting in less stress.
b643_Chapter-A.qxd 9/10/2008 9:05 AM Page 18

AN INTRODUCTION TO THE PHYSICS OF PARTICLE ACCELERATORS (Second Edition)© World Scientific Publishing Co. Pte. Ltd.http://www.worldscibooks.com/physics/6683.html
the soft tissue surrounding the vein by way of the needlebevel.)
• When using a tourniquet, remember to remove it beforeremoving the needle.
• Apply pressure to the blood collection site.
A.2.2.7.2 Preventing haemolysis (which can interfere with tests)
• Mix tubes with anticoagulant additives gently 5–10 times.• Avoid drawing blood from a haematoma.• Avoid drawing the plunger back (aspirating) too forcefully,
when using a needle and syringe; aspirate slowly and allowthe syringe to fill before continuing.
• Avoid “probing” with the needle.
A.2.2.8 Safety
• Always wear appropriate personal protective equipment (PPE)(gloves, lab coat, etc.) when handling blood/body fluids.
• Change gloves after handling each animal/cage of animals,or when contaminated.
• Dispose of items in appropriate containers (sharps bins, bio-hazard bags, etc.).
• Dispose of needles immediately after blood withdrawal. Donot bend, break, recap, or resheath needles to avoid acciden-tal needle puncture or splashing of contents.
• Clean up any blood spills with a suitable disinfectant such as10% bleach.
A.2.2.8.1 If you get a needlestick injury
• Remove your gloves.• Squeeze the puncture site to promote bleeding.• Wash the area well with soap and water.• Record the animal cage number/animal ID (especially for
nonhuman primates and biohazard animals).• Report the incident to your superior/safety officer or doctor
for appropriate treatment and follow-up.
Injections and Blood Collection � 19
b643_Chapter-A.qxd 9/10/2008 9:05 AM Page 19

AN INTRODUCTION TO THE PHYSICS OF PARTICLE ACCELERATORS (Second Edition)© World Scientific Publishing Co. Pte. Ltd.http://www.worldscibooks.com/physics/6683.html
A.2.2.9 Troubleshooting — what to do if no bloodis obtained (see Fig. A.2)
20 � Species-Specific Information
Fig. A.2 What to do if no blood is obtained. (a) Change the positionof the needle. Move the needle forward, as it may not be in the lumenof the vein. (b) Try moving the needle backward, as it may havepenetrated too far and gone through the vein and out the other side.(c) Adjust the angle of the needle (by rotating), as the bevel of theneedle (flat part) may be blocked by the vein wall.
(a)
(b)
(c)
b643_Chapter-A.qxd 9/10/2008 9:05 AM Page 20

AN INTRODUCTION TO THE PHYSICS OF PARTICLE ACCELERATORS (Second Edition)© World Scientific Publishing Co. Pte. Ltd.http://www.worldscibooks.com/physics/6683.html
A.2.2.10 Troubleshooting — what to do if bloodstops flowing
• The needle may have slipped out of the vein; this often hap-pens when collecting large quantities of blood with morethan one tube. Reposition the needle.
• The vein may have collapsed; this may be the result of toomuch aspiration. Remove the needle and insert it higher upon the vein or in an alternative location.
A.2.2.11 Blood collection tubes
Blood collection tubes are colour-coded to make it easier foroperators to see what additive is in the tube. The following is alist of the tubes and their uses:
Table A.4 Colour codes of blood collection tubes.
Colour Additive Action Uses
Red top None Blood clots and Chemistries,the serum is immunology andseparated by serology, bloodcentrifuge bank
Light Plasma Anticoagulants Chemistriesgreen separating with lithiumtop tube (PST) heparin;
with lithium plasma isheparin separated
with PST gelat the bottomof the tube
Purple EDTA Forms calcium Haematologytop salts to (complete blood
remove count) and blood calcium bank; requires full
draw — invert8 times to preventclotting andplatelet clumping
(Continued)
Injections and Blood Collection � 21
b643_Chapter-A.qxd 9/10/2008 9:05 AM Page 21

AN INTRODUCTION TO THE PHYSICS OF PARTICLE ACCELERATORS (Second Edition)© World Scientific Publishing Co. Pte. Ltd.http://www.worldscibooks.com/physics/6683.html
Table A.4 (Continued)
Colour Additive Action Uses
Light Sodium citrate Forms calcium Coagulation tests;blue salts to requires full drawtop remove
calcium
Green Sodium Inactivates Lithium level —top heparin or thrombin and use sodium
lithium thromboplastin heparinheparin
Ammonia level —use sodium orlithium heparin
Dark EDTA Tube is Trace element testingblue designed to (zinc, copper, lead,top contain no mercury) and
contaminating toxicologymetals
Light Sodium Antiglycolytic For lithium level usegrey fluoride and agent sodium heparintop potassium preserves glucoses; requires
oxalate glucose for up full draw (mayto 5 days cause haemolysis if
short draw)
Yellow- Broth mixture Preserves Microbiology —black viability of aerobes, anaerobes,top microorganisms fungi
Black top Sodium citrate Forms calcium Westergren(buffered) salts to sedimentation rate;
remove requires full drawcalcium
Orange Thrombin Quickly clots STAT serumtop blood chemistries
Light Sodium Inactivates Serum leadbrown heparin thrombin and determinationtop thromboplastin;
containsvirtually nolead
Pink top Potassium Forms calcium Molecular/Viral loadEDTA salts testing
22 � Species-Specific Information
b643_Chapter-A.qxd 9/10/2008 9:05 AM Page 22

AN INTRODUCTION TO THE PHYSICS OF PARTICLE ACCELERATORS (Second Edition)© World Scientific Publishing Co. Pte. Ltd.http://www.worldscibooks.com/physics/6683.html
Careful handling and restraint are required to minimise discom-fort when injecting any substance into a small animal. Practiceshould be carried out by first using models or euthanisedanimals. Always use aseptic techniques.
Mice should be picked up by the base of the tail, close tothe body. Pregnant animals and young animals (preweaning)may need to be scooped up with one or both hands. Weanermice may need to be picked up by the tail, and care shouldbe taken as they are usually very lively and will jump out ofthe cage at any given opportunity. When transferring wean-ers, make sure that the cage lid is on the cage; and if it isnecessary to leave a space, just push the lid back to make asmall gap that allows the mice through yet prevents anyescapees.
When handling mice, always observe the animal facility reg-ulations, as many facilities now house mice in individuallyventilated cages (IVCs) that should only be opened in a cage-changing station/laminar flow hood to protect the health of theanimals (and sometimes the users). Gloves and other PPE willbe required for handling animals; again, this may vary depend-ing on the animal facility.
A.3.1 Sentinels
Sentinel animals are usually housed in each rodent room andtested periodically (monthly to biannually for common viruses,bacteria, and parasites). Serology is performed on a more regu-lar basis to test for viruses, and a comprehensive test (includ-ing necropsy, serology, virology, parasitology, and histology ofselected target tissues) is performed periodically.
Mice � 23
A.3 Mice (Mus musculus)
b643_Chapter-A.qxd 9/10/2008 9:05 AM Page 23

AN INTRODUCTION TO THE PHYSICS OF PARTICLE ACCELERATORS (Second Edition)© World Scientific Publishing Co. Pte. Ltd.http://www.worldscibooks.com/physics/6683.html
24 � Species-Specific Information
Reports of all test results are maintained by the animal facil-ity management/veterinarians and are available upon request.Any positive results need to be discussed with the veterinarystaff regarding the possible impact to the animal’s health andthe research programme, and a course of action can then bedecided upon.
A.3.2 Physiologic parameters
Body temperature = 36.5°C–38.0°CHeart rate = 325–780/minRespiratory rate = 94–163/minTidal volume = 0.09–0.23 mL
Avertin is widely used in mice as it offers good, reliable anaes-thesia that is easy to use; operators are able to weigh the miceand give the dose according to the anaesthetic dose chart.Avertin does not provide much analgesia, so pain relief mustbe administered either at the time of anaesthesia or shortlythereafter. Avertin is made by mixing equal amounts of tri-bromyl ethyl alcohol and tertiary amyl alcohol (usually to a2.5% dilution). If avertin is improperly prepared or stored inthe light, it will break down into dibromoacetic acid andhydrobromic acid, which can be lethal in 24 hours. Freshlymixed solutions are strongly recommended for safe use.The solution can be kept for as long as 4 months if it is storedin the dark at 4°C (usually inside a refrigerator). Often, plastictubes wrapped in aluminium foil are used to protect the solu-tion from the light. The solution should be tested to ensurethat it has a pH > 5.
A.3.3 Volume for injection
The maximum volume to be injected depends on the site ofinjection and the size of the mouse. Too much fluid too rapidlymay cause pulmonary oedema (see Tables A.5 and A.6).
b643_Chapter-A.qxd 9/10/2008 9:05 AM Page 24

AN INTRODUCTION TO THE PHYSICS OF PARTICLE ACCELERATORS (Second Edition)© World Scientific Publishing Co. Pte. Ltd.http://www.worldscibooks.com/physics/6683.html
The following are widely accepted standards:
Table A.5 Volume for injection.
IP IM IV SC
Mouse Up to 2.0 mL 0.05 mL/site 0.1–0.2 mL 0.5 mL (up to(Adult) 4 sites);
2 mL totalNeedle 27G–30G 27G–30G 26G–27G 25G–27G
size
Table A.6 Anaesthesia and analgesia (suggested agents and doses).
Dosage and RouteAgent of Administration
Restraint/Premedication
Atropine 0.02–0.05 mg/kg IMDiazepam (Valium®) 5 mg/kg IPKetamine (Ketaset®, Vetalar®) 22–44 mg/kg IMTelazol® (for restraint) 100–160 mg/kg IM/IPCarbon dioxidea Until onset of Inhalant
(in O² concentration of anaesthesia10%–50%)
Anaesthesia
Sodium pentobarbital 50–90 mg/kg IPKetamineb 50–200 mg/kg IPAvertin (tribromoethanol) 125–250 mg/kg IP
0.02 mL/g (1.2%solution)
Ketamine/Xylazine:Add 7 mg xylazinec to 70–80 mg/kg IM/IP
35 mg ketamineOrAdd 1.0 mL xylazine 0.1 mL/20 g IM/IP
(20 mg/mL)+1.0 mL ketamine(100 mg/mL)+4.6 mL sterile water
Halothane (Fluothone®) — InhalantIsoflurane — Inhalant
(Continued)
Mice � 25
b643_Chapter-A.qxd 9/10/2008 9:05 AM Page 25

AN INTRODUCTION TO THE PHYSICS OF PARTICLE ACCELERATORS (Second Edition)© World Scientific Publishing Co. Pte. Ltd.http://www.worldscibooks.com/physics/6683.html
Table A.6 (Continued)
Dosage and RouteAgent of Administration
Analgesia
Butorphanol tartrate 2.5–5 mg/kg/1–2 h SC(Torbugesic®)
Buprenorphine (Temgesic®) 2 mg/kg/12 h SC/IPOxymorphone 0.15 mg/kg/4 h IMKetorolac (Toradol®) 0.7–10 mg/kg/24 h Oral dosing
a Take care when using CO2 for short-acting anaesthesia, as the doserequired is close to the lethal dose. Once onset of anaesthesia is con-firmed, remove the animal from the chamber immediately.b Suitable for minor surgery procedures only, as it is short-acting.c Xylazine is available in two strengths (20 mg/mL and 100 mg/mL).Ensure the correct dose is calculated based on the strength being used.
A.3.4 Mouse handling and sexing — for removalfrom caging and transport
1. Grasp the mouse near the base of its tail [Fig. A.3(a)].2. Lift the animal out of the cage and place it in new caging or
on a firm surface.3. Do not suspend the mouse by its tail for a prolonged period
of time because of stress on the animal. Support its bodyweight quickly, especially for pregnant animals.
4. Always double-check the sex of the animal with the cagecard [Fig. A.3(b)].
A.3.5 Mouse restraint techniques for technicalmanipulation
A.3.5.1 Scruffing
1. Restrain the mouse by grasping near the base of its tail.2. Place the mouse onto a cage top to take advantage of the
mouse gripping the top.3. Grasp the nape of its neck with the forefinger and thumb of
the other hand, gathering the loose skin from around theneck (below the head) and back.
26 � Species-Specific Information
b643_Chapter-A.qxd 9/10/2008 9:05 AM Page 26

AN INTRODUCTION TO THE PHYSICS OF PARTICLE ACCELERATORS (Second Edition)© World Scientific Publishing Co. Pte. Ltd.http://www.worldscibooks.com/physics/6683.html
4. Ensure that you gather enough skin to prevent the head fromturning, while allowing the animal to breathe normally.
5. Place the tail between your ring and little fingers to secureand control the animal. The tail must be secured to preventthe mouse from moving and loosening the grip.
6. The tail can also be held against the palm of the hand.
Mice � 27
Fig. A.3 Mouse handling and sexing. (a) Removal from the cage andtransport. (b) Identification of the sex of the animal. (Female on theleft, male on the right. Notice the distance between the anus and gen-itals is greater in the male.)
b643_Chapter-A.qxd 9/10/2008 9:05 AM Page 27

AN INTRODUCTION TO THE PHYSICS OF PARTICLE ACCELERATORS (Second Edition)© World Scientific Publishing Co. Pte. Ltd.http://www.worldscibooks.com/physics/6683.html
7. The mouse is now ready for technical manipulation(Fig. A.4).
8. Make sure that you feel comfortable holding the mouse inthis position for some time because if you are not comfort-able, there is a higher risk of failure.
9. Always use the alternative hand to your writing hand forrestraining the mouse.
28 � Species-Specific Information
Fig. A.4 Scruffing — for technical manipulation.
b643_Chapter-A.qxd 9/10/2008 9:05 AM Page 28
AN INTRODUCTION TO THE PHYSICS OF PARTICLE ACCELERATORS (Second Edition)© World Scientific Publishing Co. Pte. Ltd.http://www.worldscibooks.com/physics/6683.html
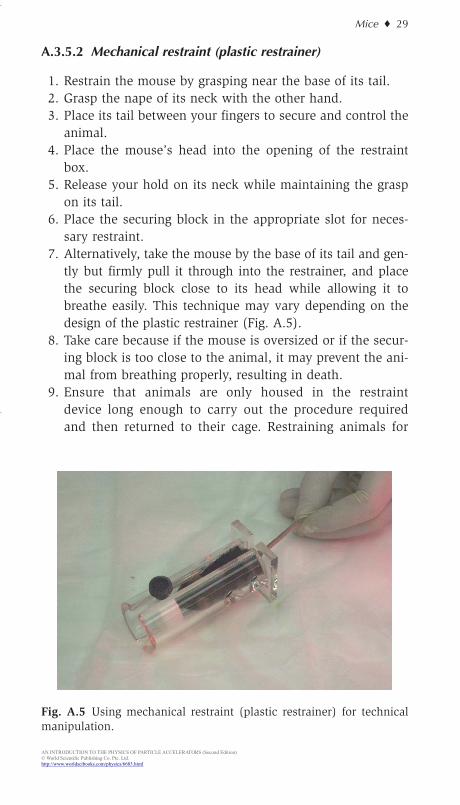
A.3.5.2 Mechanical restraint (plastic restrainer)
1. Restrain the mouse by grasping near the base of its tail.2. Grasp the nape of its neck with the other hand.3. Place its tail between your fingers to secure and control the
animal.4. Place the mouse’s head into the opening of the restraint
box.5. Release your hold on its neck while maintaining the grasp
on its tail.6. Place the securing block in the appropriate slot for neces-
sary restraint.7. Alternatively, take the mouse by the base of its tail and gen-
tly but firmly pull it through into the restrainer, and placethe securing block close to its head while allowing it tobreathe easily. This technique may vary depending on thedesign of the plastic restrainer (Fig. A.5).
8. Take care because if the mouse is oversized or if the secur-ing block is too close to the animal, it may prevent the ani-mal from breathing properly, resulting in death.
9. Ensure that animals are only housed in the restraintdevice long enough to carry out the procedure requiredand then returned to their cage. Restraining animals for
Mice � 29
Fig. A.5 Using mechanical restraint (plastic restrainer) for technicalmanipulation.
b643_Chapter-A.qxd 9/10/2008 9:05 AM Page 29

AN INTRODUCTION TO THE PHYSICS OF PARTICLE ACCELERATORS (Second Edition)© World Scientific Publishing Co. Pte. Ltd.http://www.worldscibooks.com/physics/6683.html
extended periods of time will result in additional stress,which may have detrimental effects on the animal andyour experiment.
10. Take care when using heated lamps/warming plates withthe restraint device, as the animal will not have the abilityto escape if the area is too hot and, again, this may havedetrimental effects and may even lead to death due todehydration.
A.3.6 Ear punching for identification
1. Restrain the mouse by scruffing.2. Place an ear punch in the desired location [Fig. A.6(a)].3. Firmly and quickly punch its ear to avoid an incomplete cut.4. Occasionally, the piece of tissue removed will be attached to
the ear. This can usually be removed with the help of a pairof forceps.
30 � Species-Specific Information
Fig. A.6 Ear punching — for identification.
b643_Chapter-A.qxd 9/10/2008 9:05 AM Page 30

AN INTRODUCTION TO THE PHYSICS OF PARTICLE ACCELERATORS (Second Edition)© World Scientific Publishing Co. Pte. Ltd.http://www.worldscibooks.com/physics/6683.html
Mice � 31
5. Ear punches are available in various sizes. For mice, a 1-mm or1.5-mm-diameter ear punch is generally suitable [Fig. A.6(b)].
6. Monitor the animals frequently and inspect those with earpunches, as these can sometimes tear or heal over (if theoriginal hole is too small) and may need to be repeated.
7. There are several different ear punch numbering systemsavailable. Any of these are suitable, but it is important toensure that they are in conformation with the system beingused in your facility. If your facility does not have a standardsystem for ear punch numbering, make a note on the cagecard of the system you are using for future reference.
A.3.7 Subcutaneous (SC) injection
Materials required:
• Personal protective equipment (PPE)• Syringe (1 mL)• Hypodermic needle (25G–30G)• Injection article• Isopropyl alcohol• Gauze
1. Fill the syringe with the appropriate amount of article to beadministered.
2. Remember to use different needles for drawing up the injec-tion article and for injection to prevent contamination of theinjection site.
3. Restrain the mouse by scruffing or use an appropriateanaesthesia.
4. Prepare the area with an alcohol swab to disinfect the skin(this should be routinely done before all injections/bloodcollections).
5. Insert the needle at the base of the skin fold between yourthumb and forefinger [Figs. A.7(a) and A.7(b)], keeping theneedle straight because if there is an angle to the needle, it maypierce the muscle or go through the skin and into your finger.
6. Aspirate the syringe to ensure proper placement. Any sign ofblood in the syringe indicates improper placement, in whichcase the needle needs to be repositioned.
b643_Chapter-A.qxd 9/10/2008 9:05 AM Page 31

AN INTRODUCTION TO THE PHYSICS OF PARTICLE ACCELERATORS (Second Edition)© World Scientific Publishing Co. Pte. Ltd.http://www.worldscibooks.com/physics/6683.html
32 � Species-Specific Information
Fig. A.7 Subcutaneous injection.
7. Administer the article in a steady, fluid motion. As youinject, you can feel the injection article creating a bulbousunder the skin between your fingers.
8. A safer method is to inject into the flank [Fig. A.7(c)],between the hind leg and the front leg. This is also the pre-ferred location for injecting tumour cells, as there is room forthe tumour to grow safely without putting pressure on vitalorgans/blood vessels.
A.3.8 Intraperitoneal (IP) injection
Materials required:
• Personal protective equipment (PPE)• Syringe (1 mL)• Hypodermic needle (25G–30G), ½″• Injection article• Isopropyl alcohol• Gauze
b643_Chapter-A.qxd 9/10/2008 9:06 AM Page 32

AN INTRODUCTION TO THE PHYSICS OF PARTICLE ACCELERATORS (Second Edition)© World Scientific Publishing Co. Pte. Ltd.http://www.worldscibooks.com/physics/6683.html
1. Fill the syringe with the appropriate amount of article to beadministered.
2. Restrain the mouse by scruffing.3. Prepare the area with an alcohol swab to disinfect the skin
(this should be routinely done before all injections/bloodcollections).
4. Position the animal so that its head is lower than its body toallow any internal organs to move out of the way. Draw animaginary line horizontally across the top of the hind legs,dividing the abdomen into four “quadrants”.
5. Insert the needle into the lower left/right quadrant of theabdomen at a 30° angle (Fig. A.8).
6. Aspirate the syringe to ensure proper placement. Any signof blood in the syringe indicates improper placement, inwhich case the needle needs to be repositioned.
7. If other fluids are seen in the syringe upon aspiration, such asa yellow/clear colour (indicating puncture of the urinary blad-der) or green/brown colour (indicating puncture of the intes-tines/caecum), discard the needle and syringe and start again.
8. Administer the article in a steady, fluid motion.
A.3.9 Intradermal (ID) injection
Materials required:
• Personal protective equipment (PPE)• Syringe (1 mL)• Hypodermic needle (27G–30G)
Mice � 33
Fig. A.8 Intraperitoneal injection.
(Continued)
b643_Chapter-A.qxd 9/10/2008 9:06 AM Page 33

AN INTRODUCTION TO THE PHYSICS OF PARTICLE ACCELERATORS (Second Edition)© World Scientific Publishing Co. Pte. Ltd.http://www.worldscibooks.com/physics/6683.html
• Injection article• Isopropyl alcohol• Gauze• Clippers, or #40 scalpel blade and scalpel blade holder
1. Intradermal injection is not typically carried out in mice,apart from the administration of certain compounds via thefootpad or ear pinea.
2. Intradermal injection must be performed under anaesthesia.3. Anaesthetise the mouse. Once the mouse is anaesthetised,
proceed.4. When injecting on the back of the mouse, take the scalpel
holder and scalpel carefully in one hand and extend the skinbetween the fingers of the other hand. With the scalpelalmost flat against the fur, gently rub the scalpel blade backand forth to remove the hair. This will give a nice, smoothsurface and is better than using hair clippers, as it is easierto visualise the skin after injection.
5. Prepare the area with an alcohol swab to disinfect the skin(this should be routinely done before all injections/bloodcollections).
6. Insert the needle carefully through the dermis at a 30° angle. 7. Aspirate the syringe to ensure proper placement. Any sign
of blood in the syringe indicates improper placement, inwhich case the needle needs to be repositioned.
8. Administer the article slowly, with a maximum volume of50 µL for footpad and ear pinea injection, to 100 µL perinjection site for intradermal injections on the back of theanimal to avoid tissue trauma. Successful injection results ina small, circular skin welt.
A.3.10 Intravenous (IV) injection utilising lateraltail veins
Materials required:
• Personal protective equipment (PPE)• Plexiglas restraint box
34 � Species-Specific Information
(Continued)
(Continued)
b643_Chapter-A.qxd 9/10/2008 9:06 AM Page 34

AN INTRODUCTION TO THE PHYSICS OF PARTICLE ACCELERATORS (Second Edition)© World Scientific Publishing Co. Pte. Ltd.http://www.worldscibooks.com/physics/6683.html
• Syringe (1 mL)• Hypodermic needle (25G–30G)• Injection article• Isopropyl alcohol• Gauze
1. Place the mouse into a plastic restraint device or anaes-thetise it.
2. Prepare the tail with an alcohol swab to disinfect the skin(this should be routinely done before all injections/bloodcollections).
3. Needle placement should be no closer to the body than halfthe length of the tail. It is good practice to start as close tothe tip of the tail as possible, moving closer to the body ifthe injection is unsuccessful, as it is not possible to insert ata lower location.
4. Ensure that you can visualise the lateral tail veins. This canbe assisted with the use of a heated lamp or by placing theanimal in a cage warmer or on top of a warming plate for afew minutes prior to injection.
5. With the tail under tension, insert the needle approximatelyparallel to the vein (Fig. A.9).
6. Ensure proper needle placement by inserting the needle atleast 3 mm into the lumen of the vein. Once in the lumen,the needle should feel smooth and there should be no resist-ance upon injection.
Mice � 35
Fig. A.9 Intravenous injection utilising lateral tail veins.
(Continued)
b643_Chapter-A.qxd 9/10/2008 9:06 AM Page 35

AN INTRODUCTION TO THE PHYSICS OF PARTICLE ACCELERATORS (Second Edition)© World Scientific Publishing Co. Pte. Ltd.http://www.worldscibooks.com/physics/6683.html
7. Administer the article in a slow, fluid motion to avoid ruptureof the vessel. You will be able to visualise a clearing of thelumen as the injection article replaces the blood in the vein.
8. If the solution leaks into the surrounding tissues or forms ableb, remove the needle and insert again slightly higher onthe vein (closer to the body).
9. Upon completion, ensure good haemostasis (i.e. that anybleeding has stopped) before returning the mouse to its cage.
A.3.11 Gavaging of mouse
Materials required:
• Personal protective equipment (PPE)• Biomedical needles (animal feeding needles 1′′–1½′′,
20G–22G)• Syringe (1–3 mL)• Injection article
1. Select the correct-sized gavage needle, ensuring that thereis a metal ball on the end to prevent the tip from beingsharp [Fig. A.10(a)]. Never use a hypodermic needle fororal gavage.
2. Measure the needle length against the mouse’s body; theneedle should be no longer than from the nose to the lastrib (approximate level of the stomach). If the needle islonger, take care to only insert the appropriate length to pre-vent damaging the stomach. Shorter gavage needles can beused; but if injecting acidic compounds, ensure that theneedle fits adequately into the stomach to prevent damageto the oesophagus.
3. Fill the syringe with the appropriate amount of article to bedosed.
4. Restrain the mouse by scruffing [Fig. A.10(b)].5. Place the tip of the needle in the mouse’s mouth [Fig.
A.10(c)].6. Slide the tip down the back of the mouth, moving it toward
the front in one fluid motion.7. Take your time; any resistance felt indicates improper place-
ment, in which case remove the needle and start again.
36 � Species-Specific Information
b643_Chapter-A.qxd 9/10/2008 9:06 AM Page 36

AN INTRODUCTION TO THE PHYSICS OF PARTICLE ACCELERATORS (Second Edition)© World Scientific Publishing Co. Pte. Ltd.http://www.worldscibooks.com/physics/6683.html
Do not force the needle, as it may enter the trachea anddamage the epiglottis. The needle should slide down intothe oesophagus easily.
8. Once the needle is properly placed [Fig. A.10(d)], adminis-ter the injection article.
9. Remove the needle carefully so as not to damage theoesophagus.
10. If the animal’s breathing is laboured, monitor it closely incase the injection article enters the lungs, in which case theanimal may need to be euthanised unless it recovers withina few minutes.
A.3.12 Blood withdrawal utilising retro-orbitalsinus for large-volume blood collection
Materials required:
• Personal protective equipment (PPE)• Anaesthetic agent• Haematocrit tubes or Pasteur pipettes
Mice � 37
Fig. A.10 Gavaging of mouse.
(Continued)
b643_Chapter-A.qxd 9/10/2008 9:06 AM Page 37

AN INTRODUCTION TO THE PHYSICS OF PARTICLE ACCELERATORS (Second Edition)© World Scientific Publishing Co. Pte. Ltd.http://www.worldscibooks.com/physics/6683.html
• Collection vessel• Isopropyl alcohol• Gauze
1. Retro-orbital bleeds must be performed under anaesthesia.2. Anaesthetise the mouse. After the mouse is anaesthetised,
proceed.3. Place the haematocrit tube or Pasteur pipette at the medial
canthus of the eye [Fig. A.11(a)].4. With a rotating motion, apply gentle pressure to insert the
tube through the membrane.5. Continue rotating the tube on the back of its orbit until
blood flows. 6. Collect the blood in an appropriate vessel [Fig. A.11(b)].7. Upon completion, ensure good haemostasis before returning
the animal to the cage by closing the eyelids and placing agauze pad over the eye until bleeding stops (usually for afew seconds).
8. A pump can be attached to the haematocrit tube to expelblood into a collection tube after completion [Fig. A.11(b)].
38 � Species-Specific Information
Fig. A.11 Blood withdrawal utilising retro-orbital sinus for large-volume blood collection.
(Continued)
b643_Chapter-A.qxd 9/10/2008 9:06 AM Page 38

AN INTRODUCTION TO THE PHYSICS OF PARTICLE ACCELERATORS (Second Edition)© World Scientific Publishing Co. Pte. Ltd.http://www.worldscibooks.com/physics/6683.html
A.3.13 Blood withdrawal utilising lateral tailveins for small-volume blood collection
Materials required:
• Personal protective equipment (PPE)• Plexiglas restrain box or anaesthesia• Haematocrit tube• Hypodermic needle (23G–30G)• Isopropyl alcohol• Gauze
1. Please note that it is not acceptable to remove part of thetail in order to collect blood only, unless the tissue sampletaken is very small (3–5 mm in length) and is required forgenotyping.
2. Restrain the mouse using a plastic restraint device or anaes-thetise it.
3. Prepare the tail with an alcohol swab to disinfect the skin(this should be routinely done before all injections/bloodcollections).
4. Needle placement should be no closer to the body than halfthe length of the tail.
5. Ensure that you can visualise the lateral tail veins. Thiscan be assisted with the use of a heated lamp or by plac-ing the animal in a cage warmer or on top of a warmingplate for a few minutes prior to injection. The lateral tailvein runs along either side of the tail and can be visu-alised easily in albino mice. In nonalbino strains, it ismore important to warm the tail or palpate the vein to findthe correct location.
6. With the tail under tension, insert the needle approximatelyparallel to the vein [Fig. A.12(a)].
7. Ensure proper needle placement by inserting the needle atleast 3 mm into the lumen of the vein.
8. Once blood starts to flow into the hub of the needle, placethe haematocrit tube into the needle hub or remove the
Mice � 39
b643_Chapter-A.qxd 9/10/2008 9:06 AM Page 39

AN INTRODUCTION TO THE PHYSICS OF PARTICLE ACCELERATORS (Second Edition)© World Scientific Publishing Co. Pte. Ltd.http://www.worldscibooks.com/physics/6683.html
needle to allow the blood to collect directly into a suitablecollection tube [Fig. A.12(b)].
9. Blood collection can be assisted by “milking” the vein, bygentle rubbing it to stimulate blood flow.
10. Upon completion, ensure good haemostasis before return-ing the animal to the cage by placing the gauze pad overthe blood collection site and applying pressure until bleed-ing stops (usually for a few seconds).
A.3.14 Blood withdrawal utilising saphenous veinsfor small-volume blood collection
Materials required:
• Personal protective equipment (PPE)• Plexiglas restrain box or anaesthesia• Haematocrit tube• Hypodermic needle (23G–30G)• Isopropyl alcohol• Gauze• Clippers, or #40 scalpel blade and scalpel blade holder
1. Restrain the mouse using a plastic restraint device or anaes-thetise it.
2. Attach the scalpel blade to the holder.3. Extend the hind leg and use the scalpel blade or clippers to
remove the hair above the heel of the foot until the top of
40 � Species-Specific Information
Fig. A.12 Blood withdrawal utilising lateral tail veins for small-volume blood collection.
b643_Chapter-A.qxd 9/10/2008 9:06 AM Page 40

AN INTRODUCTION TO THE PHYSICS OF PARTICLE ACCELERATORS (Second Edition)© World Scientific Publishing Co. Pte. Ltd.http://www.worldscibooks.com/physics/6683.html
the leg. When shaving a nonanaesthetised mouse, an assis-tant may be required.
4. Prepare the skin on the leg with an alcohol swab to disinfectthe skin (this should be routinely done before all injections/blood collections). Blood can be collected from either leg.
5. The saphenous vein should be easily visualised on the sur-face of the leg/thigh.
6. The needle can then be inserted into the vein and removedquickly to puncture the vein to commence bleeding.
7. Using the haematocrit tube, collect the blood from thesaphenous vein, applying pressure in a pumping motion tothe vein with your fingers to stimulate blood flow.
8. Once the required amount of blood has been collected, flexthe foot of the mouse to reduce the flow of blood back to thepuncture site.
9. Upon completion, ensure good haemostasis before returningthe animal to the cage by placing the gauze pad over theblood collection site and applying pressure until bleedingstops (usually for a few seconds).
A.3.15 Blood withdrawal utilising facial veinsfor small-volume blood collection
Materials required:
• Personal protective equipment (PPE)• Haematocrit tube• Hypodermic needle (18G–25G)• Isopropyl alcohol• Gauze
1. This is a relatively new technique, which is gaining moresupport from scientists who require only 1–10 drops ofblood.
2. The facial vein runs just along the bottom of the mandible(jaw) and just at the position of the freckle on the bottomleft and right sides of the mouse’s face.
3. Restrain the mouse by scruffing. It is important to collect alot of skin from around the neck, so that the mouse’s eyes
Mice � 41
b643_Chapter-A.qxd 9/10/2008 9:06 AM Page 41

AN INTRODUCTION TO THE PHYSICS OF PARTICLE ACCELERATORS (Second Edition)© World Scientific Publishing Co. Pte. Ltd.http://www.worldscibooks.com/physics/6683.html
start to bulge (just as if under anesthesia and totally relaxed)and the forelegs stick to the sides.
4. Locate the hairless freckle on the side of the jaw. 5. Take the needle and align it so that you are pointing it at the
far side of the mouse’s face, at the base of the far ear or atthe base of the far side of the mouth.
6. The needle can then be inserted into the freckle and removedquickly to puncture the vein to commence bleeding.
7. Using the haematocrit tube, collect the blood from thesaphenous vein. Typically, you can get anything from 1 to 10drops of blood.
8. Once the required amount of blood has been collected, gen-tly dab the site with the gauze and release the mouse backinto its cage.
9. Bleeding should stop immediately.
A.3.16 Intracardiac (IC) puncture for large-volume blood collection
Materials required:
• Personal protective equipment (PPE)• Syringe (1–3 mL)• Hypodermic needle (22G–25G)• Isopropyl alcohol• Gauze• Anaesthesia/CO²
1. Intracardiac puncture must be performed under anaesthe-sia or shortly after euthanasia.
2. Anaesthetise the mouse. After the mouse is anaesthetised,proceed.
3. Prepare the blood collection site with an alcohol swab todisinfect the skin (this should be routinely done before allinjections/blood collections).
42 � Species-Specific Information
b643_Chapter-A.qxd 9/10/2008 9:06 AM Page 42

AN INTRODUCTION TO THE PHYSICS OF PARTICLE ACCELERATORS (Second Edition)© World Scientific Publishing Co. Pte. Ltd.http://www.worldscibooks.com/physics/6683.html
4. Make sure that you are aware of the location of the heart. Ifyou are not able to locate it, you can place a finger over thechest and feel for the mouse’s heartbeat.
5. Insert the needle at the base of the sternum at a 15°–20°angle just lateral of the midline (mouse’s left side), and pushthe needle up into the position of the heart (Fig. A.13).
6. Aspirate the syringe slowly, allowing the blood to collect intothe syringe before continuing to aspirate. If the blood flow stopsor slows down, rotate the needle and syringe or adjust slightly,as the blood may have clotted (especially in euthanised mice).
7. Do not probe around the chest with the needle as it is verysharp and may cut or damage other tissues, causing internalbleeding.
8. Once the required amount of blood has been collected, themouse should be euthanised by an appropriate method.
9. Exsanguination (removal of all circulating blood) will initself cause death if the animal is under anaesthesia at thetime of collection, but it is always important to ensure thatdeath has occurred either by monitoring the vital signs orby performing an additional method of euthanasia on theanimal as a precaution.
Mice � 43
Fig. A.13 Intracardiac puncture for large-volume blood collection.
b643_Chapter-A.qxd 9/10/2008 9:06 AM Page 43

AN INTRODUCTION TO THE PHYSICS OF PARTICLE ACCELERATORS (Second Edition)© World Scientific Publishing Co. Pte. Ltd.http://www.worldscibooks.com/physics/6683.html
Careful handling and restraint is essential to minimise discom-fort for the animal. Practise on euthanised animals. Always useaseptic techniques.
The procedures listed here may be carried out by a singleoperator. Inexperienced operators may prefer to work in pairs,with one person restraining the rat and another injecting. Verylarge rats may also be difficult to restrain using only one hand.Rats are intelligent animals and are much more amenable toprocedures if they are accustomed to the handler.
A.4.1 Physiologic parameters
Body temperature = 35.9°C–37.5°CHeart rate = 250–450/minRespiratory rate = 70–115/minTidal volume = 0.6–2.0 mL
Rats are often used for obesity studies; and as such, malerats fed on low-calorie diets usually require higher doses ofbarbiturates. Avertin has been reported to cause ileus (preven-tion of the passage of intestinal contents) in rats.
Tables A.7 and A.8 show the maximum volumes to beinjected as well as the suggested agents and doses for anaes-thesia and analgesia.
Table A.7 Maximum injection volumes per site.
Rat IV IP SC IM
Volume (mL) 1 5–10 1–2 0.1
44 � Species-Specific Information
A.4 Rats (Rattus norvegicus)
b643_Chapter-A.qxd 9/10/2008 9:06 AM Page 44

AN INTRODUCTION TO THE PHYSICS OF PARTICLE ACCELERATORS (Second Edition)© World Scientific Publishing Co. Pte. Ltd.http://www.worldscibooks.com/physics/6683.html
Table A.8 Anaesthesia and analgesia (suggested agents and doses).
Dosage and RouteAgent of Administration
Restraint/Premedication
Atropine 0.04–0.1 mg/kg SCDiazepam (Valium®) 0.5–15 mg/kg IPKetamine (Ketaset®, Vetalar®) 22–50 mg/kg IMCarbon dioxidea Until onset of Inhalant
(in O² concentration of anaesthesia10%–50%)
Anaesthesia
Sodium pentobarbital 30–60 mg/kg IV/IPKetamine (10 mg/mL solution) 50–90 mg/kg IM
50–100 mg/kg IPKetamine/Xylazineb:
Ketamine 40–80 mg/kg IM/IPXylazine 10 mg/kg IM/IP
Halothane (Fluothane®) — InhalantIsoflurane — InhalantCarbon dioxide)a Until onset of Inhalant
anaesthesiaTelazol® 20–40 mg/kg IP
20 mg/kg IMKetamine/Medetomidine:
Ketamine 60–75 mg/kg IPMedetomidine (Domitor®) 0.25–0.5 mg/kg SC
Analgesia
Morphine 1.5–6 mg/kg/2–4 h SCButorphanol tartrate (Torbugesic®) 2.5–5 mg/kg/1–2 h SCCarprofen 5 mg/kg/12 h SCKetorolac 3–5 mg/kg/12–24 h Oral dosing
1 mg/kg/12–24 h IMBuprenorphine 0.01–0.05 mg/kg SC/IP
Reversal Agents
Yohimbine 1–2 mg/kg IM/IP(reversal agent for xylazineor medetomidine)
a Take care when using CO2 for short-acting anaesthesia, as the doserequired is close to the lethal dose. Once onset of anaesthesia is con-firmed, remove the animal from the chamber immediately.b Xylazine is available in two strengths (20 mg/mL and 100 mg/mL).Ensure that the correct dose is calculated based on the strength beingused.
Rats � 45
b643_Chapter-A.qxd 9/10/2008 9:06 AM Page 45

AN INTRODUCTION TO THE PHYSICS OF PARTICLE ACCELERATORS (Second Edition)© World Scientific Publishing Co. Pte. Ltd.http://www.worldscibooks.com/physics/6683.html
A.4.2 Rat handling and sexing
1. First, assess the rats in their cage for normal behaviour[Fig. A.14(a)]. The rats should be alert and inquisitive, andwill usually stand on their hind legs and move around thecage exploring their environment.
2. Place your hands into the cage, and gently pet and touchthe animals. At this point, be careful of touching theirfaces and of stressing them. Try to calm them and let themsniff you.
3. With firm but gentle pressure, grasp the rat around thethorax with your thumb and forefinger under each of itsfront legs.
4. Lift the rat out of the cage and place it in a new cage or ona firm surface.
5. For aggressive rats, pick them up by grasping them by thebase of the tail, close to the body.
46 � Species-Specific Information
Fig. A.14 Rat handling and sexing. (a) Rats in cage. (b) Female rat and(c) male rat.
b643_Chapter-A.qxd 9/10/2008 9:06 AM Page 46

AN INTRODUCTION TO THE PHYSICS OF PARTICLE ACCELERATORS (Second Edition)© World Scientific Publishing Co. Pte. Ltd.http://www.worldscibooks.com/physics/6683.html
6. Do not suspend the rat by its tail or its upper body for a pro-longed time period. Support its body weight quickly, eitheron the cage top or on the arm of your lab coat.
7. Do not let the rats hold on to the cage top whilst you attemptto handle them, as they are strong and can easily pull away,resulting in injuries.
8. Check the sex of the rats and ensure that the cage card infor-mation is correct [Figs. A.14(b) and A.14(c)].
A.4.3 Rat restraint techniques for technicalmanipulation
A.4.3.1 Manual restraint
1. With firm yet gentle pressure, grasp the rat around the tho-rax with your thumb and middle finger under each of itsfront legs (Fig. A.15).
2. With your free index finger still under its leg, grasp the looseskin on the nape of its neck.
3. Take care not to squeeze the rat or apply too much pres-sure to its diaphragm, as this may result in injury andsuffocation.
4. Do not attempt to scruff rats unless you are very experienced,as rats, unlike mice, object strongly and vocally to beingscruffed unless they are handled frequently.
Rats � 47
Fig. A.15 Rat restraint technique for technical manipulation.
b643_Chapter-A.qxd 9/10/2008 9:06 AM Page 47

AN INTRODUCTION TO THE PHYSICS OF PARTICLE ACCELERATORS (Second Edition)© World Scientific Publishing Co. Pte. Ltd.http://www.worldscibooks.com/physics/6683.html
5. Extend the tail to keep the back straight, preventing the ratfrom turning around.
6. The animal is now ready for technical manipulation.7. If you encounter an aggressive rat, you can wear a cloth glove
or place a small hand towel around your hand when restraining.8. Take care when using metal chain gloves, as the rat’s claws
can get caught in the links, resulting in injuries to the rat.
A.4.3.2 Mechanical restraint
Materials required:
• Personal protective equipment (PPE)• Plexiglas restraint box
1. With firm but gentle pressure, grasp the rat around thethorax with your thumb and forefinger under each of itsfront legs.
2. Place the animal’s tail between your fingers to secure andcontrol it.
3. Place the rat’s head in the opening of the restraint box.4. Release your hold on its body, while maintaining your grasp
on its tail.
48 � Species-Specific Information
Fig. A.16 Mechanical restraint for technical manipulation.
b643_Chapter-A.qxd 9/10/2008 9:06 AM Page 48

AN INTRODUCTION TO THE PHYSICS OF PARTICLE ACCELERATORS (Second Edition)© World Scientific Publishing Co. Pte. Ltd.http://www.worldscibooks.com/physics/6683.html
5. Place the securing block in the appropriate slot for necessaryrestraint (Fig. A.16).
6. Alternatively, take the rat by the base of its tail and gentlybut firmly pull it through into the restrainer, and place thesecuring block close to the head while allowing the rat tobreathe easily. This technique may vary depending on thedesign of the plastic restrainer (Fig. A.16).
7. Take care because if the rat is oversized or if the securingblock is too close to the animal, it may prevent the animalfrom breathing properly, resulting in death.
8. Ensure that animals are only housed in the restraintdevice long enough to carry out the procedure requiredand then returned to their cage. Restraining animals forextended periods of time will result in additional stress,which may have detrimental effects on the animal andyour experiment.
9. Take care when using heated lamps/warming plates with therestraint device, as the animal will not have the ability toescape if the area is too hot and, again, this may have detri-mental effects and may even lead to death due to dehydration.
A.4.4 Ear punching for identification
Materials required:
• Personal protective equipment (PPE)• Ear punch
1. Restrain the rat (refer to the restraint technique).2. Place ear punch in the desired location.3. Firmly and quickly punch the ear to avoid an incomplete cut
(Fig. A.17).4. Occasionally, the piece of tissue removed will be attached to
the ear. This can usually be removed with the help of a pairof forceps.
5. Ear punches are available in various sizes. For rats, a 1-mm-or 1.5-mm-diameter ear punch is generally suitable.
6. Monitor the animals frequently and inspect those with earpunches, as these can sometimes tear or heal over (if theoriginal hole is too small) and may need to be repeated.
Rats � 49
b643_Chapter-A.qxd 9/10/2008 9:06 AM Page 49

AN INTRODUCTION TO THE PHYSICS OF PARTICLE ACCELERATORS (Second Edition)© World Scientific Publishing Co. Pte. Ltd.http://www.worldscibooks.com/physics/6683.html
7. There are several different ear punch numbering systemsavailable. Any of these are suitable, but it is important toensure that they are in conformation with the system beingused in your facility. If your facility does not have a standardsystem for ear punch numbering, make a note on the cagecard of the system you are using.
A.4.5 Intramuscular (IM) injection
Materials required:
• Personal protective equipment (PPE)• Syringe (1 mL)• Hypodermic needle (22G–30G)• Injection article• Isopropyl alcohol• Gauze
1. Fill the syringe with the appropriate amount of article to beadministered.
2. Remember to use different needles for drawing up the injec-tion article and for injection to prevent contamination of theinjection site.
50 � Species-Specific Information
Fig. A.17 Ear punching for identification.
b643_Chapter-A.qxd 9/10/2008 9:06 AM Page 50

AN INTRODUCTION TO THE PHYSICS OF PARTICLE ACCELERATORS (Second Edition)© World Scientific Publishing Co. Pte. Ltd.http://www.worldscibooks.com/physics/6683.html
3. Restrain the rat (refer to the restraint technique) or anaes-thetise it.
4. Prepare the area with an alcohol swab to disinfect the skin(this should be routinely done before all injections/bloodcollections).
5. Insert the needle into the caudal thigh (at the top back of thehind leg) or quadricep muscles (behind the femur) (Fig. A.18).
6. Aspirate the syringe to ensure proper placement. Any sign ofblood in the syringe indicates improper placement, in whichcase the needle needs to be repositioned.
7. Administer the article in a steady, fluid motion. Do notadminister rapidly, as this may cause tissue trauma.
8. Note that only small quantities (maximum 0.1 mL) shouldbe administered intramuscularly to prevent tissue traumaand discomfort.
A.4.6 Subcutaneous (SC) injection
Materials required:
• Personal protective equipment (PPE)• Syringe (1–2 mL)• Hypodermic needle (22G–30G)• Injection article
Rats � 51
Fig. A.18 Intramuscular injection.
(Continued)
b643_Chapter-A.qxd 9/10/2008 9:06 AM Page 51

AN INTRODUCTION TO THE PHYSICS OF PARTICLE ACCELERATORS (Second Edition)© World Scientific Publishing Co. Pte. Ltd.http://www.worldscibooks.com/physics/6683.html
• Isopropyl alcohol• Gauze
1. Fill the syringe with the appropriate amount of article to beadministered.
2. Remember to use different needles for drawing up the injec-tion article and for injection to prevent contamination of theinjection site.
3. Restrain the rat by scruffing; using the base of your palm,pin the rat down onto a smooth surface [Fig. A.19(a)].
4. Prepare the area with an alcohol swab to disinfect the skin(this should be routinely done before all injections/bloodcollections).
52 � Species-Specific Information
Fig. A.19 Subcutaneous injection.
(Continued)
b643_Chapter-A.qxd 9/10/2008 9:06 AM Page 52

AN INTRODUCTION TO THE PHYSICS OF PARTICLE ACCELERATORS (Second Edition)© World Scientific Publishing Co. Pte. Ltd.http://www.worldscibooks.com/physics/6683.html
5. Insert the needle at the base of the skin fold between yourthumb and forefinger, keeping the needle straight because ifthere is an angle to the needle, it may pierce the muscle orgo through the skin and into your finger.
6. Aspirate the syringe to ensure proper placement. Anysign of blood indicates improper placement, in which casethe needle needs to be repositioned.
7. Administer the article in a steady, fluid motion. As youinject, you can feel the injection article creating a bulbousunder the skin between your fingers.
8. A safer method is to inject into the flank [Fig. A.19(b)],between the hind leg and the front leg. This is also the pre-ferred location for injecting tumour cells, as there is room forthe tumour to grow safely without putting pressure on vitalorgans/blood vessels.
A.4.7 Intraperitoneal (IP) injection
Materials required:
• Personal protective equipment (PPE)• Syringe (1–3 mL)• Hypodermic needle (25–30G), ½′′–1′′• Injection article• Isopropyl alcohol• Gauze
1. It is recommended that two persons carry out thisprocedure — one person can restrain the rat, whilst theother injects — unless the operator has sufficient handlingskills to restrain the rat comfortably with one hand.
2. Fill the syringe with the appropriate amount of article to beadministered.
3. Restrain the rat by using the restraint technique or by scruff-ing if a single operator is injecting.
4. Prepare the area with an alcohol swab to disinfect the skin(this should be routinely done before all injections/bloodcollections).
5. Position the animal so that its head is lower than its body toallow any internal organs to move out of the way. Draw an
Rats � 53
b643_Chapter-A.qxd 9/10/2008 9:06 AM Page 53

AN INTRODUCTION TO THE PHYSICS OF PARTICLE ACCELERATORS (Second Edition)© World Scientific Publishing Co. Pte. Ltd.http://www.worldscibooks.com/physics/6683.html
imaginary line horizontally across the top of the hind legs,dividing the abdomen into four “quadrants”.
6. Insert the needle into the lower right quadrant (on the bot-tom left) of the rat’s abdomen at a 30° angle.
7. Aspirate the syringe to ensure proper placement. Any sign ofblood in the syringe indicates improper placement, in whichcase the needle needs to be repositioned.
8. If other fluids are seen in the syringe upon aspiration, suchas a yellow/clear colour (indicating puncture of the urinarybladder) or a green/brown colour (indicating puncture ofthe intestines/caecum), discard the needle and syringe andstart again.
9. Administer the article in a steady, fluid motion.
A.4.8 Intradermal (ID) injection
Materials required:
• Personal protective equipment (PPE)• Syringe (1 mL)• Hypodermic needle (22G–25G)• Anaesthetic• Isopropyl alcohol• Gauze• Clippers, or #40 scalpel blade and scalpel blade holder
1. Intradermal injection must be carried out under anaesthesia.2. It is not a common procedure on rats, but it may be per-
formed if small volumes are injected.3. Anaesthetise the rat. Once the rat is anaesthetised, proceed.4. When injecting on the back of the rat, take the scalpel holder
and scalpel carefully in one hand and extend the skinbetween the fingers of the other hand. With the scalpelalmost flat against the fur, gently rub the scalpel blade backand forth to remove the hair. This will give a nice, smoothsurface and is better than using hair clippers, as it is easierto visualise the skin after injection.
54 � Species-Specific Information
b643_Chapter-A.qxd 9/10/2008 9:06 AM Page 54

AN INTRODUCTION TO THE PHYSICS OF PARTICLE ACCELERATORS (Second Edition)© World Scientific Publishing Co. Pte. Ltd.http://www.worldscibooks.com/physics/6683.html
5. Prepare the area with an alcohol swab to disinfect the skin(this should be routinely done before all injections/bloodcollections).
6. Insert the needle carefully through the dermis at a 30° angle(Fig. A.20).
7. Aspirate the syringe to ensure proper placement. Any signof blood in the syringe indicates improper placement, inwhich case the needle needs to be repositioned.
8. Administer the article slowly with a maximum volume of100 µL per injection site for intradermal injections on theback of the animal to avoid tissue trauma. Successful injec-tion results in a small, circular skin welt.
A.4.9 Intravenous (IV) injection utilisinglateral tail veins
Materials required:
• Personal protective equipment (PPE)• Syringe (1 mL)
Rats � 55
Fig. A.20 Intradermal injection.
(Continued)
b643_Chapter-A.qxd 9/10/2008 9:06 AM Page 55

AN INTRODUCTION TO THE PHYSICS OF PARTICLE ACCELERATORS (Second Edition)© World Scientific Publishing Co. Pte. Ltd.http://www.worldscibooks.com/physics/6683.html
• Restraint box• Hypodermic needle (25G–30G)• Isopropyl alcohol• Gauze• Injection article
1. Place the rat into a plastic restraint device or anaesthetise it.2. Prepare the tail with an alcohol swab to disinfect the skin
(this should be routinely done before all injections/bloodcollections).
3. Needle placement should be no closer to the body than halfthe length of the tail. It is good practice to start as close tothe tip of the tail as possible, moving closer to the body ifthe injection is unsuccessful, as it is not possible to insert ata lower location.
4. Ensure that you can visualise the lateral tail veins. This canbe assisted with the use of a heated lamp or by placing theanimals in a cage warmer or on top of a warming plate fora few minutes prior to injection.
5. With the tail under tension, insert the needle approximatelyparallel to the vein (Fig. A.21).
6. Ensure proper needle placement by inserting the needle atleast 3 mm into the lumen of the vein. Once in the lumen,
56 � Species-Specific Information
Fig. A.21 Intravenous injection utilising lateral tail veins.
(Continued)
b643_Chapter-A.qxd 9/10/2008 9:06 AM Page 56

AN INTRODUCTION TO THE PHYSICS OF PARTICLE ACCELERATORS (Second Edition)© World Scientific Publishing Co. Pte. Ltd.http://www.worldscibooks.com/physics/6683.html
the needle should feel smooth and there should be no resist-ance upon injection.
7. Administer the article in a slow, fluid motion to avoid ruptureof the vessel. You will be able to visualise a clearing of thelumen as the injection article replaces the blood in the vein.
8. If the solution leaks into the surrounding tissues or forms ableb, remove the needle and insert again slightly higher onthe vein (closer to the body).
9. Upon completion, ensure good haemostasis (i.e. that anybleeding has stopped) before returning the animal to its cage.
A.4.10 Gavaging of rat
Materials required:
• Personal protective equipment (PPE)• Syringe (1–3 mL)• Biomedical needles (animal feeding; 2′′–3′′, 16G–18G)• Injection article
1. Select the correct-sized gavage needle, ensuring that thereis a metal ball on the end to prevent the tip from beingsharp. Never use a hypodermic needle for oral gavage.
2. Measure the needle length against the mouse’s body; theneedle should be no longer than from the nose to the lastrib (approximate level of the stomach). If the needle islonger, take care to only insert the appropriate length to pre-vent damaging the stomach. Shorter gavage needles can beused; but if injecting acidic compounds, ensure that theneedle fits adequately into the stomach to prevent damageto the oesophagus.
3. It is recommended that two persons carry out this proce-dure. One person can restrain the rat, whilst the otherinserts the gavage needle. Experienced operators may beable to restrain the rat with one hand whilst gavaging withthe other, but care must be taken.
4. Fill the syringe with the appropriate amount of article to bedosed.
5. Restrain the rat using the restraint technique or by scruffing(if single operator).
Rats � 57
b643_Chapter-A.qxd 9/10/2008 9:06 AM Page 57

AN INTRODUCTION TO THE PHYSICS OF PARTICLE ACCELERATORS (Second Edition)© World Scientific Publishing Co. Pte. Ltd.http://www.worldscibooks.com/physics/6683.html
6. Place the tip of the needle into the rat’s mouth.7. Slide the tip down the back of the mouth, moving it toward
the front in one fluid motion.8. Take your time; any resistance felt indicates improper place-
ment, in which case remove the needle and start again. Donot force the needle, as it may enter the trachea and dam-age the epiglottis. The needle should slide down into theoesophagus easily.
9. Once the needle is properly placed, administer the injectionarticle.
10. Remove the needle carefully so as not to damage theoesophagus.
11. If the animal’s breathing is laboured, monitor it closely incase the injection article enters the lungs, in which case theanimal may need to be euthanised unless it recovers withina few minutes.
A.4.11 Blood withdrawal utilising orbital sinusfor large-volume blood collection
Materials required:
• Personal protective equipment (PPE)• Anaesthetic• Haematocrit tubes or Pasteur pipettes• Collection vessel• Gauze
1. Retro-orbital bleeds must be performed under anaesthesia.2. Anaesthetise the rat. After the rat is anaesthetised, proceed.3. Place the haematocrit tube or Pasteur pipette at the medial
canthus of the eye (Fig. A.22).4. With a rotating motion, apply gentle pressure to insert the
tube through the membrane.5. Continue rotating the tube on the back of its orbit until
blood flows. 6. Note that the membrane on rats is harder to pierce through
than mice, so additional pressure and rotations are required.7. Collect the blood in an appropriate vessel.
58 � Species-Specific Information
b643_Chapter-A.qxd 9/10/2008 9:06 AM Page 58

AN INTRODUCTION TO THE PHYSICS OF PARTICLE ACCELERATORS (Second Edition)© World Scientific Publishing Co. Pte. Ltd.http://www.worldscibooks.com/physics/6683.html
8. Upon completion, ensure good haemostasis before returningthe animal to the cage by closing the eyelids and placing thegauze pad over the eye until bleeding stops (usually for afew seconds).
9. A pump can be attached to the haematocrit tube to expelblood into a collection tube after completion.
A.4.12 Blood withdrawal utilising lateral tailveins for small-volume blood collection
Materials required:
• Personal protective equipment (PPE)• Restraint box or anaesthesia• Hypodermic needle (25G–30G)• Isopropyl alcohol• Gauze
1. Please note that it is not acceptable to remove part of thetail in order to collect blood only, unless the tissue sampletaken is very small (3–5 mm in length) and is required forgenotyping.
Rats � 59
Fig. A.22 Blood withdrawal utilising orbital sinus for large-volumeblood collection.
b643_Chapter-A.qxd 9/10/2008 9:06 AM Page 59

AN INTRODUCTION TO THE PHYSICS OF PARTICLE ACCELERATORS (Second Edition)© World Scientific Publishing Co. Pte. Ltd.http://www.worldscibooks.com/physics/6683.html
2. Restrain the rat using a plastic restraint device or anaes-thetise it.
3. Prepare the tail with an alcohol swab to disinfect the skin(this should be routinely done before all injections/bloodcollections).
4. Needle placement should be no closer to the body than halfthe length of the tail.
5. Ensure that you can visualise the lateral tail veins. Thiscan be assisted with the use of a heated lamp or by plac-ing the animals in a cage warmer or on top of a warmingplate for a few minutes prior to injection. The lateral tailvein runs along either side of the tail and can be visu-alised easily in albino rats. In nonalbino strains, it is moreimportant to warm the tail or palpate the vein to find thecorrect location.
6. With the tail under tension, insert the needle approximatelyparallel to the vein.
7. Ensure proper needle placement by inserting the needle atleast 3 mm into the lumen of the vein.
8. Once blood starts to flow into the hub of the needle, placethe haematocrit tube into the needle hub or remove theneedle to allow the blood to collect directly into a suitablecollection tube (Fig. A.23).
60 � Species-Specific Information
Fig. A.23 Blood withdrawal utilising lateral tail veins for small-volume blood collection.
b643_Chapter-A.qxd 9/10/2008 9:06 AM Page 60

AN INTRODUCTION TO THE PHYSICS OF PARTICLE ACCELERATORS (Second Edition)© World Scientific Publishing Co. Pte. Ltd.http://www.worldscibooks.com/physics/6683.html
9. Blood collection can be assisted by “milking” the vein, bygentle rubbing to stimulate blood flow.
10. Upon completion, ensure good haemostasis before return-ing the animal to the cage by placing the gauze pad over theblood collection site and applying pressure until bleedingstops (usually for a few seconds).
A.4.13 Intracardiac (IC) puncture for large-volume blood collection
Materials required:
• Personal protective equipment (PPE)• Syringe (1–3 mL)• Hypodermic needle (21G–25G)• Isopropyl alcohol• Gauze• Anaesthesia/CO2
1. Intracardiac puncture must be performed under anaesthesiaor shortly after euthanasia.
2. Anaesthetise the rat. After the rat is anaesthetised, proceed.3. Prepare the blood collection site with an alcohol swab to
disinfect the skin (this should be routinely done before allinjections/blood collections).
4. Make sure that you are aware of the location of the heart. Ifyou are not able to locate it, you can place a finger over thechest and feel for the rat’s heartbeat.
5. Insert the needle at the base of the sternum at a 20°–30°angle just lateral of the midline (rat’s left side) and push theneedle up into the position of the heart [Fig. A.24(a)].
6. Aspirate the syringe slowly, allowing the blood to collectinto the syringe before continuing to aspirate. If the bloodflow stops or slows down, rotate the needle and syringe oradjust slightly, as the blood may have clotted (especially ineuthanised rats) [Fig. A.24(b)].
7. Do not probe around the chest with the needle as it is verysharp and may cut or damage other tissues, causing internalbleeding.
Rats � 61
b643_Chapter-A.qxd 9/10/2008 9:06 AM Page 61

AN INTRODUCTION TO THE PHYSICS OF PARTICLE ACCELERATORS (Second Edition)© World Scientific Publishing Co. Pte. Ltd.http://www.worldscibooks.com/physics/6683.html
8. Once the required amount of blood has been collected, therat should be euthanised by an appropriate method.
9. Exsanguination (removal of all circulating blood) will initself cause death if the animal is under anaesthesia at thetime of collection, but it is always important to ensure thatdeath has occurred either by monitoring the vital signs or byperforming an additional method of euthanasia on the ani-mal as a precaution.
A.5 Guinea Pigs (Cavia porcellus)
62 � Species-Specific Information
Fig. A.24 Intracardiac puncture for large-volume blood collection.
Guinea pigs have a mild disposition and are generally easy tohandle. Care must be taken when approaching guinea pigs, asthey are nervous animals and are easily startled. Approachthem slowly and gently, and try not to make sudden move-ments or loud noises.
b643_Chapter-A.qxd 9/10/2008 9:06 AM Page 62

AN INTRODUCTION TO THE PHYSICS OF PARTICLE ACCELERATORS (Second Edition)© World Scientific Publishing Co. Pte. Ltd.http://www.worldscibooks.com/physics/6683.html
A.5.1 Physiologic parameters
Body temperature = 37.2°C–39.5°CHeart rate = 230–380/minRespiratory rate = 42–104/minTidal volume = 2.3–5.3 mL/kg
Guinea pigs have a large caecum that can act as a reservoir foranaesthetics. Depending on the drug solubility, the caecum canalter the pharmacologic effect.
Induction of anaesthesia using volatile anaesthetics (e.g.halothane and isoflurane) should be used with caution due toinitial breath holding when animals are first exposed to the gasvapours. Repeated exposure to halothane can cause hepatotox-icity. Isoflurane is a safer inhalant anaesthetic to use.
Self-mutilation has been reported in guinea pigs afterketamine administration.
Table A.9 shows suggested agents and doses for anaesthesiaand analgesia.
Table A.9 Anaesthesia and analgesia (suggested agents and doses).
Dosage and RouteAgent of Administration
Restraint/Preanaesthesia
Atropine 0.05 mg/kg SCDiazepam (Valium®) 2.5–5.0 mg/kg IP/IMAcetylpromazine 5–10 mg/kg IM/SC/IVKetamine (Ketaset®, Vetalar®) 22–30 mg/kg IM
Anaesthesia
Sodium pentobarbital 15–40 mg/kg IPSodium thiopental 20 mg/kg IVKetamine 40–50 mg/kg IMKetamine/Xylazinea:
Xylazine+ 5–13 mg/kg SCKetamine 44 mg/kg SC
Halothane (Fluothane®) — InhalantIsoflurane — Inhalant
(Continued )
Guinea Pigs � 63
b643_Chapter-A.qxd 9/10/2008 9:06 AM Page 63

AN INTRODUCTION TO THE PHYSICS OF PARTICLE ACCELERATORS (Second Edition)© World Scientific Publishing Co. Pte. Ltd.http://www.worldscibooks.com/physics/6683.html
Table A.9 (Continued )
Analgesia
Buprenorphine 0.05 mg/kg/8–12 h SCMorphine 10 mg/kg/2–4 h SC/IMAspirin 86 mg/kg Oral dosingButorphanol tartrate (Torbugesic®) 0.25–0.4 mg/kg IV/SC
Reversal Agent
Atipemazole (Antisedan®) 1 mg/kg IM/IV/SC/IP
a Xylazine is available in two strengths (20 mg/mL and 100 mg/mL).Ensure that the correct dose is calculated based on the strength being used.
A.5.2 Guinea pig handling and sexing
1. First, assess the guinea pigs in their cage/pen for normalbehaviour.
2. With firm but gentle pressure, grasp the guinea pig aroundthe thorax, placing its front leg between your index and mid-dle finger for added support (Fig. A.25).
3. Check the sex of the guinea pigs by applying gentle pressureabove the genitalia. The penis of the male will protrude,making sexing easier. Ensure that the cage card informationis correct (Fig. A.25).
A.5.3 Guinea pig restraint techniquefor technical manipulation
Guinea pigs are quite docile animals. Adequate restraint is usu-ally achieved by placing the animal on a table top and sup-porting it with one hand at the head and the other hand aroundthe rump. It may be necessary for an assistant to help hold theguinea pig in place whilst the other person performs the proce-dures. Alternatively, the guinea pig can be anaesthetised.
A.5.4 Ear punching for identification
Materials required:
• Personal protective equipment (PPE)• Ear punch
64 � Species-Specific Information
b643_Chapter-A.qxd 9/10/2008 9:06 AM Page 64

AN INTRODUCTION TO THE PHYSICS OF PARTICLE ACCELERATORS (Second Edition)© World Scientific Publishing Co. Pte. Ltd.http://www.worldscibooks.com/physics/6683.html
1. Restrain the guinea pig (refer to the restraint technique).2. Place the ear punch in the desired location.3. Firmly and quickly punch the ear to avoid an incomplete cut.4. Occasionally, the piece of tissue removed will be attached to
the ear. This can usually be removed with the help of a pairof forceps.
5. Ear punches are available in various sizes. For guinea pigs,a 1.5-mm-diameter ear punch is generally suitable.
6. Monitor the animals frequently and inspect those with earpunches, as these can sometimes tear or heal over (if theoriginal hole is too small) and may need to be repeated.
7. There are several different ear punch numbering systemsavailable. Any of these are suitable, but it is important to
Guinea Pigs � 65
Fig. A.25 Guinea pig handling and sexing. (a) Female guinea pig;(b) male guinea pig.
b643_Chapter-A.qxd 9/10/2008 9:06 AM Page 65

AN INTRODUCTION TO THE PHYSICS OF PARTICLE ACCELERATORS (Second Edition)© World Scientific Publishing Co. Pte. Ltd.http://www.worldscibooks.com/physics/6683.html
ensure that they are in conformation with the system beingused in your facility. If your facility does not have a standardsystem for ear punch numbering, make a note on the cagecard of the system you are using for future reference.
A.5.5 Intramuscular (IM) injection
Materials required:
• Personal protective equipment (PPE)• Syringe (1 mL)• Hypodermic needle (22G–30G)• Injection article• Isopropyl alcohol• Gauze
1. Intramuscular injections may be performed with the help ofan assistant.
2. Withdraw the appropriate amount of solution to beadministered.
3. Restrain the guinea pig (refer to the restraint technique) oranaesthetise it.
4. Prepare the area with an alcohol swab to disinfect the skin(this should be routinely done before all injections/bloodcollections).
5. Insert the needle into the caudal thigh, quadriceps, or lum-bar (back) muscles.
6. Aspirate the syringe to ensure proper placement. Any sign ofblood in the syringe indicates improper placement, in whichcase the needle needs to be repositioned.
7. Administer the article in a steady, fluid motion. Do notadminister rapidly, as this may cause tissue trauma.
A.5.6 Subcutaneous (SC) injection
Materials required:
• Personal protective equipment (PPE)• Syringe (1–2 mL)
66 � Species-Specific Information
(Continued)
b643_Chapter-A.qxd 9/10/2008 9:06 AM Page 66

AN INTRODUCTION TO THE PHYSICS OF PARTICLE ACCELERATORS (Second Edition)© World Scientific Publishing Co. Pte. Ltd.http://www.worldscibooks.com/physics/6683.html
• Hypodermic needle (22G–30G)• Injection article• Isopropyl alcohol• Gauze
1. Fill the syringe with the appropriate amount of article to beadministered.
2. Restrain the guinea pig (refer to the restraint technique).3. Prepare the area with an alcohol swab to disinfect the skin
(this should be routinely done before all injections/bloodcollections).
4. Insert the needle at the base of the skin fold between yourthumb and forefinger, keeping the needle straight because ifthere is an angle to the needle, it may pierce the muscle orgo through the skin and into your finger.
5. Aspirate the syringe to ensure proper placement. Any sign ofblood indicates improper placement, in which case the nee-dle needs to be repositioned. As you inject, you can feel theinjection article creating a bulbous under the skin betweenyour fingers.
6. Administer the article in a steady, fluid motion.
A.5.7 Intraperitoneal (IP) injection
Materials required:
• Personal protective equipment (PPE)• Syringe (1–3 mL)• Hypodermic needle (25G–30G)• Injection article• Isopropyl alcohol• Gauze
1. It is recommended that two persons carry out this procedure.One person can restrain the guinea pig, whilst the otherinjects.
2. Fill the syringe with the appropriate amount of article to beadministered.
3. Restrain the guinea pig.
Guinea Pigs � 67
(Continued)
b643_Chapter-A.qxd 9/10/2008 9:06 AM Page 67

AN INTRODUCTION TO THE PHYSICS OF PARTICLE ACCELERATORS (Second Edition)© World Scientific Publishing Co. Pte. Ltd.http://www.worldscibooks.com/physics/6683.html
68 � Species-Specific Information
Fig. A.26 Intraperitoneal injection.
4. Prepare the area with an alcohol swab to disinfect the skin(this should be routinely done before all injections/bloodcollections).
5. Position the animal so that its head is lower than its body toallow any internal organs to move out of the way. Draw animaginary line horizontally across the top of the hind legs,dividing the abdomen into four “quadrants”.
6. Insert the needle into the lower left/right quadrant of theabdomen at a 30° angle (Fig. A.26).
7. Aspirate the syringe to ensure proper placement (Fig. A.26).Any sign of blood indicates improper placement, in whichcase the needle needs to be repositioned.
8. If other fluids are seen in the syringe upon aspiration, such as ayellow/clear colour (indicating puncture of the urinary bladder)or a green/brown colour (indicating puncture of the intestines/caecum), discard the needle and syringe and start again.
9. Administer the article in a steady, fluid motion.
A.5.8 Intradermal (ID) injection
Materials required:
• Personal protective equipment (PPE)• Syringe (1 mL)
(Continued)
b643_Chapter-A.qxd 9/10/2008 9:06 AM Page 68

AN INTRODUCTION TO THE PHYSICS OF PARTICLE ACCELERATORS (Second Edition)© World Scientific Publishing Co. Pte. Ltd.http://www.worldscibooks.com/physics/6683.html
• Hypodermic needle (22G–25G)• Anaesthetic• Isopropyl alcohol• Gauze• Clippers, or #40 blade and scalpel blade holder
1. Intradermal injection must be done under anaesthesia.2. Anaesthetise the guinea pig. After the guinea pig is anaes-
thetised, proceed.3. When injecting on the back of the guinea pig, take the
scalpel holder and scalpel carefully in one hand and extendthe skin between the fingers of the other hand. With thescalpel almost flat against the fur, gently rub the scalpelblade back and forth to remove the hair. This will give anice, smooth surface and is better than using hair clippers,as it is easier to visualise the skin after injection.
4. Prepare the area with an alcohol swab to disinfect the skin(this should be routinely done before all injections/bloodcollections).
5. Insert the needle carefully through the dermis at a 30° angle(Fig. A.27).
Guinea Pigs � 69
Fig. A.27 Intradermal injection.
(Continued)
b643_Chapter-A.qxd 9/10/2008 9:06 AM Page 69

AN INTRODUCTION TO THE PHYSICS OF PARTICLE ACCELERATORS (Second Edition)© World Scientific Publishing Co. Pte. Ltd.http://www.worldscibooks.com/physics/6683.html
6. Aspirate the syringe to ensure proper placement. Any sign ofblood in the syringe indicates improper placement, in whichcase the needle needs to be repositioned.
7. Administer the article slowly with a maximum volume of100 µL per injection site to avoid tissue trauma. Successfulinjection results in a small, circular skin welt.
A.5.9 Intravenous (IV) injection utilisingsaphenous or cephalic veins
Materials required:
• Personal protective equipment (PPE)• Syringe (1 mL)• Restraint box• Hypodermic needle (25G–30G)• Isopropyl alcohol• Gauze• Injection article• Clippers, or #40 blade and scalpel blade holder
1. Intravenous injections to guinea pigs are difficult, as theguinea pig does not have a tail and has very small ear veins.
2. The saphenous veins (on the hind leg, just above the heel)or cephalic veins (on the foreleg) need to be used.
3. It is recommended to anaesthetise the guinea pig beforestarting.
4. Remove the hair around the vein using hair clippers or ascalpel blade.
5. Prepare the vein with an alcohol swab to disinfect the skin(this should be routinely done before all injections/bloodcollections).
6. A tourniquet may be applied to the vein to assist with dila-tion, or an assistant can apply pressure to the vein.
7. Insert the needle into the skin approximately parallel to the vein.
8. Release the pressure/tourniquet.9. Ensure proper placement by inserting the needle at least
3 mm into the lumen of the vein.
70 � Species-Specific Information
b643_Chapter-A.qxd 9/10/2008 9:06 AM Page 70

AN INTRODUCTION TO THE PHYSICS OF PARTICLE ACCELERATORS (Second Edition)© World Scientific Publishing Co. Pte. Ltd.http://www.worldscibooks.com/physics/6683.html
Guinea Pigs � 71
10. Administer the article in a steady, fluid motion to avoid rup-ture of the vessel.
11. Upon completion, ensure good haemostasis (i.e. that anybleeding has stopped) before returning the animal to itscage.
Note: Using a heated lamp may enhance the person’sability to view the vein.
A.5.10 Gavaging of guinea pig
Gavaging of guinea pigs is not recommended, as they keep foodin their mouths that can easily be forced into the trachea by mis-take. If gavaging is essential, use a cotton bud to remove foodstored in cheek pouches before proceeding. The gavaging tech-nique is the same as for other rodent species (mice and rats).
A.5.11 Blood withdrawal utilising marginal earveins for small-volume blood collection
Materials required:
• Personal protective equipment (PPE)• Hypodermic needle (25G–30G)• Isopropyl alcohol• Gauze
1. Restrain the guinea pig or anaesthetise it.2. Prepare the vein with an alcohol swab to disinfect the skin
(this should be routinely done before all injections/bloodcollections).
3. Ensure proper needle placement by inserting the needle atleast 3 mm into the lumen of the vein.
4. Once blood starts to flow into the hub of the needle, placethe haematocrit tube into the needle hub or remove theneedle to allow the blood to collect directly into a suitablecollection tube.
5. Blood collection can be assisted by “milking” the vein, bygentle rubbing to stimulate blood flow.
b643_Chapter-A.qxd 9/10/2008 9:06 AM Page 71

AN INTRODUCTION TO THE PHYSICS OF PARTICLE ACCELERATORS (Second Edition)© World Scientific Publishing Co. Pte. Ltd.http://www.worldscibooks.com/physics/6683.html
6. Upon completion, ensure good haemostasis before returningthe animal to the cage by placing the gauze pad over theblood collection site and applying pressure until bleedingstops (usually for a few seconds).
7. To increase blood flow, use a heated lamp. Care must betaken that the animal does not get too hot.
A.5.12 Intracardiac (IC) puncture for large-volume blood collection
Materials required:
• Personal protective equipment (PPE)• Syringe (1–3 mL)• Hypodermic needle (21G–25G)• Isopropyl alcohol• Gauze• Anaesthetic/CO2
1. Intracardiac puncture must be performed under anaesthesia.2. Anaesthetise the guinea pig. After the guinea pig is anaes-
thetised, proceed.3. Prepare the blood collection site with an alcohol swab to
disinfect the skin (this should be routinely done before allinjections/blood collections).
4. Make sure that you are aware of the location of the heart. Ifyou are not able to locate it, place a finger over the chest andfeel for the guinea pig’s heartbeat.
5. Insert the needle at the base of the sternum at a 20°–30°angle just lateral of the midline (guinea pig’s left side) andpush the needle up into the position of the heart.
6. Aspirate the syringe slowly, allowing the blood to collectinto the syringe before continuing to aspirate. If the bloodflow stops or slows down, rotate the needle and syringe oradjust slightly, as the blood may have clotted (especially ineuthanised guinea pigs).
7. Do not probe around the chest with the needle as it is verysharp and may cut or damage other tissues, causing internalbleeding.
72 � Species-Specific Information
b643_Chapter-A.qxd 9/10/2008 9:06 AM Page 72

AN INTRODUCTION TO THE PHYSICS OF PARTICLE ACCELERATORS (Second Edition)© World Scientific Publishing Co. Pte. Ltd.http://www.worldscibooks.com/physics/6683.html
8. Once the required amount of blood has been collected, theguinea pig should be euthanised by an appropriate method.
9. Exsanguination (removal of all circulating blood) will initself cause death if the animal is under anaesthesia at thetime of collection, but it is always important to ensure thatdeath has occurred either by monitoring the vital signs orby performing an additional method of euthanasia on theanimal as a precaution.
A.6 Rabbits (Oryctolagus cuniculus)
Rabbits � 73
A.6.1 Physiologic parameters
Body temperature = 38°C–39.6°CHeart rate = 130–325/minRespiratory rate = 32–60/minTidal volume = 4–6 mL/kg
Many rabbits have serum atropinesterase, which causes reducedresponse to atropine. Glycopyrrolate, another anticholinergic,can be used instead of atropine. Rabbits have a large caecumthat can act as a reservoir for anaesthetics. Depending on thedrug solubility, the caecum can alter the pharmacologic effect.Induction of anaesthesia using volatile anaesthetics (e.g.halothane and isoflurane) should be done with caution due toinitial breath holding when animals are first exposed to irritat-ing gas vapours.
Self-mutilation has been reported in rabbits after IM keta-mine administration. Dilution of ketamine with saline will limitthis side-effect.
b643_Chapter-A.qxd 9/10/2008 9:06 AM Page 73

AN INTRODUCTION TO THE PHYSICS OF PARTICLE ACCELERATORS (Second Edition)© World Scientific Publishing Co. Pte. Ltd.http://www.worldscibooks.com/physics/6683.html
Table A.10 shows the suggested agents and doses for anaes-thesia and analgesia.
Table A.10 Anaesthesia and analgesia (suggested agents and doses).
Dosage and RouteAgent of Administration
Restraint/Preanaesthesia
Ketamine (Ketaset®, Vetalar®) 15–50 mg/kg IMAcetylpromazine 1.0–10 mg/kg IM/SC/IVKetamine/Acetylpromazine 15–50 mg/kg IM
(10:1)Diazepam (Valium®) 5–10 mg/kg IV/IMGlycopyrrolate 0.005–0.011 mg/kg IMButorphanol/Acetylpromazine:
Butorphanol tartrate 1 mg/kg SC(Torbugesic®)
Acetylpromazine 1 mg/kg SC
Anesthesia
Sodium pentobarbital 15–40 mg/kg IV(3% solution given slowly
to effect)Ketamine/Xylazine+/Acepromazine:
Xylazinea 5–10 mg/kg IMKetamine 35–50 mg/kg IMAcepromazine 0.75 mg/kg IM
Ketamine/Midazolam:Ketamine 25 mg/kg IMMidazolam 1 mg/kg IM
Ketamine/Diazepam:Ketamine 15–50 mg/kg IMDiazepam 5–10 mg/kg IM
Ketamine/Acepromazine/Butorphanol:
Ketamine 35 mg/kg SCAcepromazine 0.75 mg/kg SCButorphanol tartrate 0.1 mg/kg SC
(Torbugesic®)Halothane (Fluothane®) — InhalantIsoflurane — Inhalant
Analgesia
Morphine 5 mg/kg/2–4 h SC/IMAcetylsalicytic acid (Aspirin) 500 mg/kg Oral dosing
(Continued )
74 � Species-Specific Information
b643_Chapter-A.qxd 9/10/2008 9:06 AM Page 74

AN INTRODUCTION TO THE PHYSICS OF PARTICLE ACCELERATORS (Second Edition)© World Scientific Publishing Co. Pte. Ltd.http://www.worldscibooks.com/physics/6683.html
Table A.10 (Continued )
Dosage and RouteAgent of Administration
Buprenorphine 0.02-0.1 mg/kg/8–12 h SCButorphanol tartrate 0.1–1.5 mg/kg/4 h IV
(Torbugesic®) 1.0–7.5 mg/kg/4 h IM/SCFlunixin meglumine 1.1 mg/kg/12 h IM/SC
(Banamine®)Carprofen 1.5 mg/kg/12 h Oral dosingKetoprofen 3 mg/kg/12 h IM
Reversal Agent
Yohimbine 0.2 mg/kg IV(reversal agent for xylazine
or medetomidine)
a Xylazine is available in two strengths (20 mg/mL and 100 mg/mL).Ensure that the correct dose is calculated based on the strength beingused.
A.6.2 Rabbit handling and sexing
1. Always check the condition of the rabbit before removing itfrom the cage [Fig. A.28(a)].
2. Grasp the rabbit firmly by the nape of its neck. Place onehand on the rump of the rabbit and lift it from the cage.
3. Support its hind legs with the opposite hand. Tuck its headbetween its arm and body.
4. Check the sex of the rabbit by applying gentle pressureabove the genitalia. The penis of the male will protrude,making sexing easier. Ensure that the sex of the rabbitmatches what is written on the cage card [Fig. A.28(b)].
A.6.3 Rabbit restraint technique for technicalmanipulation
Materials required:
• Personal protective equipment (PPE)• Restraint box/towel (Fig. A.29)
Rabbits � 75
b643_Chapter-A.qxd 9/10/2008 9:06 AM Page 75

AN INTRODUCTION TO THE PHYSICS OF PARTICLE ACCELERATORS (Second Edition)© World Scientific Publishing Co. Pte. Ltd.http://www.worldscibooks.com/physics/6683.html
1. Grasp the rabbit firmly by the nape of its neck. Place onehand on the rump of the rabbit and lift it from the cage.
2. For manual restraint, an assistant can hold the nape of therabbit’s neck and place a gentle but firm hand on the backof the rabbit. Whilst in this normal seated position, the rab-bit may be shaved for injections or given IM injections withrelative ease.
3. If you are working alone, you should use a plastic restrainer,cat bag, or towel wrap (Fig. A.29), as it is safer for both youand the rabbit.
76 � Species-Specific Information
Fig. A.28 Rabbit handling and sexing. (a) Male rabbit; (b) female rabbit.
b643_Chapter-A.qxd 9/10/2008 9:06 AM Page 76

AN INTRODUCTION TO THE PHYSICS OF PARTICLE ACCELERATORS (Second Edition)© World Scientific Publishing Co. Pte. Ltd.http://www.worldscibooks.com/physics/6683.html
4. Take care when using plastic restrainers as rabbits can getquite stressed when they are placed inside and will occa-sionally panic, which may result in spinal injuries.
5. Cat bags are commercially available zipper bags, made of adurable material, that prevents the claws of the rabbit (orcat) from scratching through. The head and ears of the rab-bit can protrude through the opening, and the rest of the ani-mal is secure within the bag. Please note that these bags canonly be used for short-term restraint, as the rabbit will over-heat if restrained for prolonged periods.
6. The towel wrap is by far the easiest technique and doesnot require any special equipment, just a regular towel ordrape.
7. Open the towel onto a nonslip surface. Place the rabbit inthe centre of the towel and fold one side of the towel over,ensuring that the rabbit’s head and ears are not covered,but that the feet and body are covered. The other side ofthe towel can then be folded in and under, and the backfolded under as well, so that the rabbit’s weight is on topof the towel, preventing it from wriggling free. The rabbitcan comfortably stay in this restraint long enough to begiven an injection, or to have its blood drawn or teethtrimmed.
Rabbits � 77
Fig. A.29 Restraint towel for technical manipulation.
b643_Chapter-A.qxd 9/10/2008 9:06 AM Page 77

AN INTRODUCTION TO THE PHYSICS OF PARTICLE ACCELERATORS (Second Edition)© World Scientific Publishing Co. Pte. Ltd.http://www.worldscibooks.com/physics/6683.html
A.6.4 Intramuscular (IM) injection
Materials required:
• Personal protective equipment (PPE)• Syringe (1–3 mL)• Hypodermic needle (22G–30G)• Injection article• Isopropyl alcohol• Gauze
1. Withdraw the appropriate amount of solution to beadministered.
2. Restrain the rabbit (refer to the restraint technique).3. Prepare the area with an alcohol swab to disinfect the skin
(this should be routinely done before all injections/bloodcollections).
4. Insert the needle into the lumbar muscles [Fig. A.30(a)],caudal thigh muscles [Fig. A.30(b)], or quadriceps muscles.
5. Aspirate the syringe to ensure proper placement. Any signof blood in the syringe indicates improper placement, inwhich case the needle needs to be repositioned.
6. Administer the article in a steady, fluid motion. Do notadminister rapidly, as this may cause tissue trauma.
7. Caution must be taken to avoid the spine when injecting intothe lumbar muscles, and to avoid the sciatic (ischiatic) nervewhen injecting the leg.
8. The rabbit may flinch when you are injecting into its lumbarmuscles, so it may be necessary to hold the rabbit close toyour body to provide added support.
78 � Species-Specific Information
Fig. A.30 Intramuscular injection.
b643_Chapter-A.qxd 9/10/2008 9:06 AM Page 78

AN INTRODUCTION TO THE PHYSICS OF PARTICLE ACCELERATORS (Second Edition)© World Scientific Publishing Co. Pte. Ltd.http://www.worldscibooks.com/physics/6683.html
A.6.5 Subcutaneous (SC) injection
Materials required:
• Personal protective equipment (PPE)• Syringe (1–3 mL)• Hypodermic needle (22G–25G)• Injection article • Isopropyl alcohol• Gauze• Clipper
1. Fill the syringe with the appropriate amount of article to beadministered.
2. Restrain the rabbit (refer to the restraint technique). Placethe animal on a firm surface.
3. Shave the fur with hair clippers, and then prepare the areawith an alcohol swab to disinfect the skin (this should beroutinely done before all injections/blood collections).
4. Insert the needle at the base of the skin fold between yourthumb and forefinger (Fig. A.31), keeping the needle straightbecause if there is an angle to the needle, it may pierce themuscle or go through the skin and into your finger.
5. Aspirate the syringe to ensure proper placement. Any signof blood indicates improper placement, in which case the
Rabbits � 79
Fig. A.31 Subcutaneous injection.
b643_Chapter-A.qxd 9/10/2008 9:06 AM Page 79

AN INTRODUCTION TO THE PHYSICS OF PARTICLE ACCELERATORS (Second Edition)© World Scientific Publishing Co. Pte. Ltd.http://www.worldscibooks.com/physics/6683.html
needle needs to be repositioned. As you inject, you can feelthe injection article creating a bulbous under the skinbetween your fingers.
6. Administer the article in a steady, fluid motion.
A.6.6 Intraperitoneal (IP) injection
Materials required:
• Personal protective equipment (PPE)• Syringe (1–3 mL)• Hypodermic needle (18G–23G)• Injection article• Isopropyl alcohol• Gauze• Clippers
1. Fill the syringe with the appropriate amount of article to beadministered.
2. Restrain the rabbit (refer to the restraint technique). Placethe animal in a ventral recumbent position.
3. It is best to work in pairs, so that one person can restrain therabbit whilst the other injects.
4. Shave the fur with hair clippers, and then prepare the areawith an alcohol swab to disinfect the skin (this should beroutinely done before all injections/blood collections).
5. Insert the needle into the lower left/right quadrant of theabdomen at a 30° angle.
6. Aspirate the syringe to ensure proper placement. Any sign ofblood in the syringe indicates improper placement, in whichcase the needle needs to be repositioned.
7. Administer the article in a steady, fluid motion.
A.6.7 Intradermal (ID) injection
Materials required:
• Personal protective equipment (PPE)• Syringe (1–3 mL)
80 � Species-Specific Information
(Continued)
b643_Chapter-A.qxd 9/10/2008 9:06 AM Page 80

AN INTRODUCTION TO THE PHYSICS OF PARTICLE ACCELERATORS (Second Edition)© World Scientific Publishing Co. Pte. Ltd.http://www.worldscibooks.com/physics/6683.html
• Hypodermic needle (25G–30G)• Injection article• Isopropyl alcohol• Gauze• Clippers• #40 blade• Scalpel blade holder
1. Fill the syringe with the appropriate amount of article to beadministered.
2. Restrain the rabbit (refer to the restraint technique). Placethe animal in a ventral recumbent position (two-person tech-nique) or anaesthetise it.
3. Shave the fur on the back with hair clippers, and then pre-pare the area with an alcohol swab to disinfect the skin(this should be routinely done before all injections/bloodcollections). The scalpel blade can be used to get a closershave, after removing most of the hair from the site.
4. Insert the needle between the layers of skin on the back at a20° angle [Fig. A.32(a)] by stretching or pinching the skinand then injecting into it [Fig. A.32(b)].
5. Aspirate the syringe to ensure proper placement. Any signof blood in the syringe indicates improper placement, inwhich case the needle needs to be repositioned.
6. Administer the article slowly with a maximum volume of250 µL per injection site to avoid tissue trauma. Successfulinjection results in a small, circular skin welt.
Rabbits � 81
Fig. A.32 Intradermal injection.
(Continued)
b643_Chapter-A.qxd 9/10/2008 9:06 AM Page 81

AN INTRODUCTION TO THE PHYSICS OF PARTICLE ACCELERATORS (Second Edition)© World Scientific Publishing Co. Pte. Ltd.http://www.worldscibooks.com/physics/6683.html
A.6.8 Intravenous (IV) injection utilisingmarginal ear vein
Materials required:
• Personal protective equipment (PPE)• Syringe (1–3 mL)• Hypodermic needle (22G–30G)• Injection article• Isopropyl alcohol• Gauze• Restraint device• #40 blade• Scalpel blade holder
1. Fill the syringe with the appropriate amount of article to beadministered.
2. Restrain the rabbit (refer to the restraint technique).3. Take the scalpel holder and the scalpel carefully in one hand
and extend the rabbit’s skin between the fingers of the otherhand. With the scalpel almost flat against the fur, gently rubthe scalpel blade back and forth to remove the hair.
4. Prepare the ear with an alcohol swab to disinfect the skin(this should be routinely done before all injections/bloodcollections).
5. Insert the needle into the marginal ear vein at a 20° angle(Fig. A.33).
6. Aspirate the syringe to ensure proper placement.7. As soon as blood appears in the hub of the syringe, admin-
ister the article in a slow, fluid motion.8. Upon completion, ensure good haemostasis before returning
the animal to its cage.
A.6.9 Gavaging of rabbit
Materials required:
• Personal protective equipment (PPE)• Restraint box
82 � Species-Specific Information
(Continued)
b643_Chapter-A.qxd 9/10/2008 9:06 AM Page 82

AN INTRODUCTION TO THE PHYSICS OF PARTICLE ACCELERATORS (Second Edition)© World Scientific Publishing Co. Pte. Ltd.http://www.worldscibooks.com/physics/6683.html
• Feeding tube (8–16 French)• Syringes (3–10 mL)• Injection article
1. Fill the syringe with the appropriate amount of article to bedosed.
2. Restrain the rabbit (refer to the restraint technique).3. Secure the animal’s mouth in an open position by placing
your thumb and forefinger behind its incisors, or by using aplastic tube of the correct size.
4. Measure and mark on the tubing the amount needed toreach the rabbit’s stomach.
5. Insert the tubing until resistance is released by swallowingreflex. At this time, introduce the tubing into the oesophagus.Ensure correct placement, i.e. you are not in the trachea, byinserting the tip of the tube into water and watching for bubbles.
6. Insert the remaining length of the tubing required to reachthe stomach.
7. Once the tubing is properly placed, administer the article.8. Flush the tubing with water afterwards to ensure that all of
the article to be dosed has left the tube.9. Clamp off the tubing and remove it from the rabbit’s mouth,
ensuring no article is inhaled.
Rabbits � 83
Fig. A.33 Intravenous injection utilising marginal ear vein.
(Continued)
b643_Chapter-A.qxd 9/10/2008 9:06 AM Page 83

AN INTRODUCTION TO THE PHYSICS OF PARTICLE ACCELERATORS (Second Edition)© World Scientific Publishing Co. Pte. Ltd.http://www.worldscibooks.com/physics/6683.html
84 � Species-Specific Information
A.6.10 Blood withdrawal utilising auricular(central ear) artery and marginal earvein for large-volume blood collection
Materials required:
• Personal protective equipment (PPE)• Restraint box• Syringe (5–60 mL)• Hypodermic needle or paediatric scalp vein needle
(butterfly; 21G–22G)• Isopropyl alcohol• Gauze
1. Restrain the rabbit (refer to the restraint technique).2. Prepare the area with an alcohol swab. Raise the artery
(located in the centre of the external ear) by rubbing acrossthe external ear with gentle, quick motions.
3. With the ear under tension, insert the needle approximatelyparallel to the central artery.
4. Needle placement should be no closer to the base of the earthan the midpoint.
5. Ensure proper placement by inserting the needle at least10 mm into the lumen of the artery.
6. Aspirate the syringe slowly to avoid artery constriction.7. Let the blood flow freely into your collection tube.8. Upon completion, ensure good haemostasis before return-
ing the animal to its cage.9. Alternatively, small quantities of blood can be withdrawn
from the vein by inserting a 27G or 25G needle without asyringe and collecting the blood from the hub of the needle(Fig. A.34).
10. When collecting blood from the artery, ensure that the bloodflow has stopped before returning the animal to its cage.This can be achieved by applying pressure to the gauze cov-ering the artery for a few minutes. Take care when usingadditional items, such as paper clips and clamps, as thesemay damage the ear.
b643_Chapter-A.qxd 9/10/2008 9:06 AM Page 84

AN INTRODUCTION TO THE PHYSICS OF PARTICLE ACCELERATORS (Second Edition)© World Scientific Publishing Co. Pte. Ltd.http://www.worldscibooks.com/physics/6683.html
11. Additional blood flow can be assisted with the use of aheated lamp prior to collection.
12. Small volumes of blood can be collected from the marginalear vein on the exterior of the ear positioned furthest fromthe head.
13. It is difficult to withdraw blood from the marginal ear veinusing a needle and syringe, as the blood pressure is verylow. Hence, blood collection directly from the needle hubinto the haematocrit tube using just a needle is the pre-ferred method.
A.6.11 Intracardiac (IC) puncture for large-volume blood collection
Materials required:
• Personal protective equipment (PPE)• Syringe (5–60 mL) or evacuated container• Hypodermic needle (20G–25G)• Anaesthetic
Rabbits � 85
Fig. A.34 Blood withdrawal utilising auricular (central ear) artery andmarginal ear vein for large-volume blood collection.
(Continued)
b643_Chapter-A.qxd 9/10/2008 9:06 AM Page 85

AN INTRODUCTION TO THE PHYSICS OF PARTICLE ACCELERATORS (Second Edition)© World Scientific Publishing Co. Pte. Ltd.http://www.worldscibooks.com/physics/6683.html
• Isopropyl alcohol• Gauze
1. Intracardiac puncture must be performed under anaesthesia.2. Anaesthetise the rabbit by intramuscular injection (refer to
the intramuscular injection technique). Restrain the rabbit indorsal recumbency.
3. Prepare the injection site with an alcohol swab to disinfectthe skin (this should be routinely done before all injections/blood collections).
4. After the rabbit is anaesthetised, insert the needle at thebase of the sternum at a 30°–45° angle just lateral of themidline (rabbit’s left side).
5. Alternatively, place the rabbit on its right side, check for aheartbeat to locate the heart, and enter between the thirdand fourth ribs at the point of the elbow (Fig. A.35).
6. Aspirate the syringe slowly until blood flows. 7. If no blood flows, remove the needle and start again.8. Care must be taken not to “probe around” inside the chest.9. It is strongly recommended that this procedure be followed
by euthanasia.
86 � Species-Specific Information
Fig. A.35 Intracardiac puncture for large-volume blood collection.
(Continued)
b643_Chapter-A.qxd 9/10/2008 9:06 AM Page 86

AN INTRODUCTION TO THE PHYSICS OF PARTICLE ACCELERATORS (Second Edition)© World Scientific Publishing Co. Pte. Ltd.http://www.worldscibooks.com/physics/6683.html
A.7 Dogs (Canis familiaris)
Dogs � 87
Dogs should be purchased from licensed laboratory breedersand dealers who provide health records, vaccination for majordiseases, deworming, and a minimum 1-month conditioningperiod. Upon arrival, a physical examination should be per-formed on each dog and a faecal sample checked for endopar-asites; if found positive, the animal will need to be treated.
A dog should always be carried with proper support.Physical restraint (in lateral recumbency or in a sitting position)is used when performing nonpainful procedures such as bloodcollection and injection. Anaesthesia is generally used for allother procedures. You can restrain a dog for examination byplacing an arm around the dog’s chest; you then use the otherarm to restrain the dog’s head or leg, depending on the proce-dure being performed.
Leashes should be used to handle dogs whenever possible.Aggressive or intractable dogs may need to be muzzled.Always bear in mind that proper restraint is necessary to pre-vent movement that may result in accidental injury to the dogor handler.
Dogs are social animals, and as such require frequent posi-tive human interaction or interaction with other dogs. You mayneed to spend extra time with a shy or fearful dog in order tomake it feel more comfortable. Moving slowly and speakinggently to it will help to prevent it from being alarmed.
Commonly used blood collection sites in dogs are cephalic,saphenous, femoral, and jugular veins. Cardiac puncture forblood collection must be performed as a terminal procedure, and
b643_Chapter-A.qxd 9/10/2008 9:06 AM Page 87

AN INTRODUCTION TO THE PHYSICS OF PARTICLE ACCELERATORS (Second Edition)© World Scientific Publishing Co. Pte. Ltd.http://www.worldscibooks.com/physics/6683.html
88 � Species-Specific Information
the animal must be under general anaesthesia. Regardless of themethod of collection used, ensure that complete haemostasis hasbeen achieved (using gauze and direct pressure) prior to return-ing the animal to its cage.
It is recommended that at least two persons carry out aprocedure — one to restrain the dog, and the other to performthe injection or blood withdrawal.
A.7.1 Physiologic parameters
Body temperature = 39°CHeart rate = 100–130/minRespiratory rate = 22/minTidal volume = 250 mL
Ketamine should not be used alone in dogs, as it may causeseizures in some cases. Ketamine should be used in combina-tion with a tranquiliser.
Nonsteroidal anti-inflammatory drugs (NSAIDs) should beused with caution in dogs. Acetaminophen and ibuprofen arecontraindicating. Aspirin must be dosed very carefully.
Combinations of narcotics and nonsteroidal agents arecommonly used (see Tables A.11 and A.12).
Table A.11 Volume for injection.
Dog IV IP SC IM
Volume (mL) 10–15 200–500 100–200 2–5(slowly)
Table A.12 Anaesthesia and analgesia (suggested agents and doses).
Dosage and RouteAgent of Administration
Restraint/Premedication
Atropine 0.02–0.05 mg/kg IM/SC/IVGlycopyrrolate 0.01–0.02 mg/kg IM/SC
(Continued)
b643_Chapter-A.qxd 9/10/2008 9:06 AM Page 88

AN INTRODUCTION TO THE PHYSICS OF PARTICLE ACCELERATORS (Second Edition)© World Scientific Publishing Co. Pte. Ltd.http://www.worldscibooks.com/physics/6683.html
Table A.12 (Continued )
Dosage and RouteAgent of Administration
Acetylpromazine 0.055–0.11 mg/kg IM/SC/IV0.55–2.2 mg/kg Oral dosing
Diazepam (Valium®) 1–5 mg/kg IM0.2–0.6 mg/kg IV
Medetomidine 0.1–0.8 mg/kg IM/SC/IVXylazinea,b 1.0–2.0 mg/kg IM/SC
Anaesthesia
Sodium pentobarbital 30 mg/kg IVThiopental sodium 10–35 mg/kg IVKetamine/Xylazinea,b:
Ketamine 5–10 mg/kg IMXylazinea 1–2 mg/kg IM
Ketamine/Diazepam (2:1)c:Ketamine 5.5 mg/kg IVDiazepam 0.33 mg/kg IV
Ketamine/Medetomidineb:Ketamine 2.5–7.5 mg/kg IMMedetomidine (Domitor®) 0.04 mg/kg IM
Ketamine/Midazolamc:Ketamine 5–10 mg/kg IVMidazolam 0.28–0.5 mg/kg IV
Propofolc 5.0–7.5 mg/kg IVHalothane (Fluothane®) — InhalantIsoflurane — InhalantHalothane/Nitrous oxide — Inhalant
(50% O2 + 50% N2O)
Analgesia
Morphine 0.5–5 mg/kg/2–4 h SC/IMAcetylsalicytic acid (Aspirin) 2.5 mg/kg/8 h Oral dosingFlunixin meglumine 0.5–2.2 mg/kg daily IM/IV
(Banamine®)Butorphanol tartrate 0.055–0.11 mg/kg/ SC
(Torbugesic®) 6–12 h0.55 mg/kg/6–12 h Oral dosing
Buprenorphine 0.01–0.02 mg/kg/12 h SC/IMCarprofen (Rimadyl®) 4 mg/kg/24 h SC/IV
1–2 mg/kg/12 h Oral dosingKetoprofen 1–2 mg/kg/24 h SC/IM/IV/
Oral dosing
(Continued)
Dogs � 89
b643_Chapter-A.qxd 9/10/2008 9:06 AM Page 89

AN INTRODUCTION TO THE PHYSICS OF PARTICLE ACCELERATORS (Second Edition)© World Scientific Publishing Co. Pte. Ltd.http://www.worldscibooks.com/physics/6683.html
Table A.12 (Continued )
Dosage and RouteAgent of Administration
Reversal Agents
Yohimbine (reverses xylazine) 0.1 mg/kg IVAtipamezole (Antisedan®) 0.05 mg/kg IMNaloxone (reverses opioids) 0.005–0.02 mg/kg IV
a Xylazine is available in two strengths (20 mg/mL, 100 mg/mL).Ensure that the dose calculated is based on the strength being used.b Premedication with atropine or glycopyrrolate is suggested to avoidbradycardia and cardiac arrhythmias with these agents.c Poor analgesia. Only suitable for minor nonpainful procedures.
A.7.2 Dog handling and sexing
1. Restrain the dog (refer to the restraint technique).2. Check the external genitalia of the dog to identify its sex
based on the following criteria:
• In male dogs, the penis and anus are clearly farther apartthan the anus and vulva of the female.
• In males, the penis can be palpated through the skin dueto the presence of an os penis.
• The external scrotal sac and testicles are visible in oldermales.
• The vulva is present in females just below their analopenings.
• Females in oestrus have swollen vulvas and bloodydischarge.
3. Ensure that the information on the cage card is correct.
A.7.3 Dog restraint technique for technicalmanipulation
Dogs can be restrained on the floor or on a nonslip table top. Adog should always be handled with a gentle but firm grip.Proper personal protective equipment (PPE) must be wornbefore handling the dog.
90 � Species-Specific Information
b643_Chapter-A.qxd 9/10/2008 9:06 AM Page 90

AN INTRODUCTION TO THE PHYSICS OF PARTICLE ACCELERATORS (Second Edition)© World Scientific Publishing Co. Pte. Ltd.http://www.worldscibooks.com/physics/6683.html
1. Restraining a standing dog
• Put one arm under the neck of the dog and the otherbehind its rear legs or under its abdomen.
• Pull the dog’s head toward your shoulder for morecontrol.
2. Restraining a sitting dog
• Put one arm under the neck of the dog and the otheraround the dog’s hind quarters or under its abdomen.
• Pull the dog’s head snugly towards your shoulder.
3. Restraining a dog lying in sternal recumbency
• Put one arm under the neck of the dog and the other overits back.
• Lean slightly over the dog.• Pull the dog’s head toward your shoulder for more control.
4. Restraining a dog in lateral recumbency (unassisted)
• While the dog is standing, place one arm around the frontof the animal, holding its leg on the opposite side fromwhere you are standing.
• Put your other arm around the dog’s hindquarters, hold-ing its leg on the opposite side from where you are stand-ing.
• Pull the dog snugly to your body.• Lift the dog up and gently lay it on its side.• Hold the dog’s legs (closest to the table), placing your
elbow across the dog’s hips and neck.
5. Restraining a dog in lateral recumbency (assisted)
• While the dog is standing, the first person places his/herarms around the front of the animal, holding its front legs.
• The second person then places his/her arms around thedog’s hindquarters, holding its rear legs.
• Together, the two handlers gently lift the dog up and lay iton its side.
• Both the dog’s front and rear legs must be restrained,while you use your elbows to restrain its hips and neck.
Dogs � 91
b643_Chapter-A.qxd 9/10/2008 9:06 AM Page 91

AN INTRODUCTION TO THE PHYSICS OF PARTICLE ACCELERATORS (Second Edition)© World Scientific Publishing Co. Pte. Ltd.http://www.worldscibooks.com/physics/6683.html
6. Leash
• A leash (with or without a collar) is used to lead the dogto another cage, room, or carrier.
7. Muzzle
• Muzzles are used to restrain aggressive dogs.• Muzzles must not be left on a dog that is unattended.
8. Chemical restraint
• Tranquilisers or anaesthetic agents may be given eitheralone or in combination with physical restraint.
A.7.4 Identification methods
Materials required:
• Personal protective equipment (PPE)• Needle and ink for tattooing, or microchip transponder
and reader, or metal tag for collar
1. Properly restrain the dog (refer to the restraint technique). 2. Quickly use any of the below-mentioned techniques to iden-
tify the dog:
• Tattooing: Using a needle and ink, tattoo permanent num-bers and/or letters on a suitable location on the animal,such as its upper rear leg (better visibility).
• Microchipping: Insert the chip subcutaneously under theskin at the back of the neck with the use of an applicator.
• Collar tag: Attach a tag with a unique identificationmethod to the dog’s collar. However, collar tags should beused in addition to another form of identification.
A.7.5 Intramuscular (IM) injection
Several sites can be used for intramuscular injections in dogs,including the quadriceps, triceps, lumbar musculature, andhamstring group. Avoid hitting the sciatic or caudal nervewhen injecting into the hamstring muscle group by directing
92 � Species-Specific Information
b643_Chapter-A.qxd 9/10/2008 9:06 AM Page 92

AN INTRODUCTION TO THE PHYSICS OF PARTICLE ACCELERATORS (Second Edition)© World Scientific Publishing Co. Pte. Ltd.http://www.worldscibooks.com/physics/6683.html
the needle backward. Needle sizes for intramuscular injectionsrange from 22G to 25G, and small volumes (2–5 mL) can beinjected by this route.
Materials required:
• Personal protective equipment (PPE)• Syringe • Hypodermic needle • Substance to be injected• Isopropyl alcohol• Gauze
1. Fill the syringe with the exact amount of the substance to beadministered before handling the dog.
2. Properly restrain the dog in standing/sternal/lateral recum-bency (refer to the restraint technique). Depending on thetemperament of the dog, you may or may not need a han-dler for intramuscular injection.
3. Swab the site with alcohol to wet the hair coat to ensureintramuscular needle placement.
4. Insert the needle into the muscles of any of the abovemen-tioned sites.
5. Aspirate the syringe to ensure proper placement.6. Any sign of blood in the syringe indicates improper place-
ment. Reinsert the needle at a different site.7. If no blood is aspirated, administer the substance.8. Withdraw the needle, and massage the injection site to facil-
itate dispersion of the injected substance and to relieve anydiscomfort.
A.7.6 Subcutaneous (SC) injection
Subcutaneous injections can be given anywhere over the dorsalcervical, thoracic, or lumbar regions, the loose skin over theshoulders and neck being an ideal site. For large volumes, inject10–20 mL/kg at each site. Needle sizes for subcutaneous injec-tions range from 22G to 25G, depending on animal size and theviscosity and volume of the fluid being injected.
Dogs � 93
b643_Chapter-A.qxd 9/10/2008 9:06 AM Page 93

AN INTRODUCTION TO THE PHYSICS OF PARTICLE ACCELERATORS (Second Edition)© World Scientific Publishing Co. Pte. Ltd.http://www.worldscibooks.com/physics/6683.html
Materials required:
• Personal protective equipment (PPE)• Syringe• Hypodermic needle• Substance to be injected• Isopropyl alcohol• Gauze
1. Fill the syringe with the exact amount of the substance to beadministered before handling the dog.
2. Properly restrain the dog in standing/lateral recumbency(refer to the restraint technique). Depending on the tem-perament of the dog, you may or may not need a handler forsubcutaneous injection.
3. Swab the site with alcohol to better define the skin surface(optional).
4. Grasp a loose fold of skin and insert the needle under theskin, parallel to the long axis of the skin fold.
5. Aspirate the syringe to ensure proper placement before injecting.6. Air or blood in the syringe indicates improper placement.
Withdraw and reposition the needle.7. After proper placement is achieved, administer the sub-
stance as rapidly as it can be ejected from the syringe.8. For large volumes, use a flexible delivery system (e.g. infu-
sion set) instead of a needle rigidly attached to a syringe.
Note: Do not use this route in severely dehydrated animals.
A.7.7 Intraperitoneal (IP) injection
Materials required:
• Personal protective equipment (PPE)• Syringe• Hypodermic needle (18G–22G)• Substance to be injected• Isopropyl alcohol• Gauze
94 � Species-Specific Information
b643_Chapter-A.qxd 9/10/2008 9:06 AM Page 94

AN INTRODUCTION TO THE PHYSICS OF PARTICLE ACCELERATORS (Second Edition)© World Scientific Publishing Co. Pte. Ltd.http://www.worldscibooks.com/physics/6683.html
1. Fill the syringe with the exact amount of the substance to beadministered before handling the dog.
2. Restrain the dog using suitable anaesthesia/sedative.3. Swab the site with alcohol.4. Insert the needle into the abdominal cavity in the lower right
quadrant, avoiding the abdominal organs. The needle shouldbe directed towards the animal’s head at an angle of 15°–20°.
5. Aspirate the syringe to ensure proper placement before injecting.6. If any material is aspirated, the syringe should be removed
and disposed of, and the needle repositioned.7. Administer the substance in a steady motion.
A.7.8 Intradermal (ID) injection
Intradermal injections are commonly given for skin testing andfor local blocks. Intradermal injections should be given over thedorsal thoracic or lumbar region. Multiple sites (up to 10) and20G–25G needles can be used.
Materials required:
• Personal protective equipment (PPE)• Syringe• Hypodermic needle• Substance to be injected• Isopropyl alcohol• Gauze
1. Fill the syringe with the exact amount of the substance to beadministered before handling the dog.
2. Properly anaesthetise the dog. 3. Clip the fur so that the injection site can be clearly observed.
Swab the site with alcohol.4. Insert the needle bevel up into the skin at approximately a
15°–20° angle.5. Aspirate the syringe to ensure proper placement before
injecting.6. If any blood or fluid is aspirated, reposition the needle.7. Administer the substance slowly, creating a small bleb
that typically takes several minutes to resolve. Immediate
Dogs � 95
b643_Chapter-A.qxd 9/10/2008 9:06 AM Page 95
AN INTRODUCTION TO THE PHYSICS OF PARTICLE ACCELERATORS (Second Edition)© World Scientific Publishing Co. Pte. Ltd.http://www.worldscibooks.com/physics/6683.html
dissolution of the bleb indicates that the substance hasbeen injected subcutaneously.
A.7.9 Intravenous (IV) injection utilisingcephalic vein
Needle sizes for intravenous injections range from 20G to 25G.Before administering the substance, make sure that there are noair bubbles in the syringe.
Materials required:
• Personal protective equipment (PPE)• Syringe• Hypodermic needle• Substance to be injected• Isopropyl alcohol• Gauze• Electric clippers
1. Fill the syringe with the exact amount of the solution to beadministered before handling the dog.
2. Properly restrain the dog (refer to the restraint technique).A handler is required for this injection.
3. The handler extends one of the dog’s front legs.4. Shave the extended leg two inches in length below the
elbow on the anterior side, and swab the site with alcohol.5. Ask the handler to apply slight pressure on the blood ves-
sel using his/her thumb.6. Insert the needle into the cephalic vein.7. Aspirate the syringe to ensure proper placement (blood
should appear in the syringe).8. Ask the handler to release his/her hold on the blood vessel
before injecting the solution.9. Administer the injection in a slow, steady flow.
10. Achieve haemostasis using the gauze and direct pressurebefore returning the dog to its cage.
96 � Species-Specific Information
b643_Chapter-A.qxd 9/10/2008 9:06 AM Page 96

AN INTRODUCTION TO THE PHYSICS OF PARTICLE ACCELERATORS (Second Edition)© World Scientific Publishing Co. Pte. Ltd.http://www.worldscibooks.com/physics/6683.html
A.7.10 Intravenous (IV) injection utilisingsaphenous vein
Needle sizes for intravenous injections range from 20G to 25G.Before administering the substance, make sure that there are noair bubbles in the syringe.
Materials required:
• Personal protective equipment (PPE)• Syringe• Hypodermic needle• Substance to be injected• Isopropyl alcohol• Gauze• Electric clippers
1. Fill the syringe with the exact amount of the solution to beadministered before handling the dog.
2. Properly restrain the dog (refer to the restraint technique).A handler is required for this injection.
3. The handler extends one of the dog’s rear legs.4. Shave the lateral aspect of the extended rear leg to
expose the saphenous vein, and swab the site withalcohol.
5. Ask the handler to apply slight pressure to the blood vesselusing his/her thumb.
6. Insert the needle into the saphenous vein.7. Aspirate the syringe to ensure proper placement (blood should
appear in the syringe).8. Ask the handler to release his/her hold on the blood vessel
before injecting the solution.9. Administer the injection in a slow, steady flow.
10. Achieve haemostasis using the gauze and direct pressurebefore returning the dog to its cage.
Dogs � 97
b643_Chapter-A.qxd 9/10/2008 9:06 AM Page 97

AN INTRODUCTION TO THE PHYSICS OF PARTICLE ACCELERATORS (Second Edition)© World Scientific Publishing Co. Pte. Ltd.http://www.worldscibooks.com/physics/6683.html
A.7.11 Gavaging of dog/Gastric intubation
Gastric intubation is generally performed using a large-boregastric tube. The diameter of the tube should be approximatelythe same size as an endotracheal tube used in the same animal.Gavaging is more effective when performed on an anaesthetisedor sedated animal.
Materials required:
• Personal protective equipment (PPE)• Syringe• Gastric tube• Substance to be injected
1. Fill the syringe with the appropriate amount of substance tobe instilled.
2. Properly restrain the dog. If awake, the animal is restrained insternal recumbency with its head in a neutral position. Anaes-thesia is needed if the purpose is to remove toxic contents.
3. Measure the length of the tube from the tip of the nose to theninth intercostal space.
4. Put a tape to mark the proper length.5. Place a speculum between the dental arcades.6. Introduce the tube into the oral cavity, ensuring that the
head is neither extended nor flexed.7. Insert the tube up to the previously measured length (tape
mark).8. Administer the substance.9. Carefully monitor the animal during its recovery from anaes-
thesia, making sure that it does not vomit and aspirate resid-ual gavage solution.
A.7.12 Blood withdrawal utilising cephalic veinfor small-volume blood collection
Materials required:
• Personal protective equipment (PPE)• Syringe
98 � Species-Specific Information
(Continued)
b643_Chapter-A.qxd 9/10/2008 9:06 AM Page 98

AN INTRODUCTION TO THE PHYSICS OF PARTICLE ACCELERATORS (Second Edition)© World Scientific Publishing Co. Pte. Ltd.http://www.worldscibooks.com/physics/6683.html
• Hypodermic needle (20G–25G)• Collection tube• Isopropyl alcohol• Gauze• Electric clippers
1. Properly restrain the dog (refer to the restraint technique).Usually, only physical restraint is required to collect blood.A handler is required for this technique.
2. The handler extends one of the dog’s front legs.3. Shave the extended leg two inches in length below the elbow
on the anterior side, and swab the site with alcohol.4. Ask the handler to apply slight pressure on the blood vessel
using his/her thumb.5. Insert the needle into the cephalic vein.6. Collect the desired amount of blood (0.5 mL).7. Before removing the needle, ask the handler to release his/
her hold on the blood vessel.8. Achieve haemostasis using the gauze and direct pressure
before returning the dog to its cage.
Note: Always use aseptic techniques including clipping ofhair around the sampling site.
A.7.13 Blood withdrawal utilising saphenous vein
Materials required:
• Personal protective equipment (PPE)• Syringe• Hypodermic needle (20G–25G)• Collection tube• Isopropyl alcohol• Gauze• Electric clippers
1. Properly restrain the dog (refer to the restraint technique).Usually, only physical restraint is required to collect blood.A handler is required for this technique.
Dogs � 99
(Continued)
b643_Chapter-A.qxd 9/10/2008 9:06 AM Page 99

AN INTRODUCTION TO THE PHYSICS OF PARTICLE ACCELERATORS (Second Edition)© World Scientific Publishing Co. Pte. Ltd.http://www.worldscibooks.com/physics/6683.html
2. The handler extends one of the dog’s rear legs.3. Shave the lateral aspect of the extended rear leg to expose
the saphenous vein, and swab the site with alcohol.4. Ask the handler to apply slight pressure on the blood vessel
using his/her thumb.5. Insert the needle into the saphenous vein.6. Collect the desired amount of blood (2–5 mL/sample).7. Before removing the needle, ask the handler to release his/
her hold on the blood vessel.8. Achieve haemostasis using the gauze and direct pressure
before returning the dog to its cage.
Note: Always use aseptic techniques including clipping ofhair around the sampling site.
A.7.14 Blood withdrawal utilising jugular vein forsmall- and large-volume blood collection
The jugular vein is superficial and easily accessible, so samplingfrom the jugular vein is quick and simple.
Materials required:
• Personal protective equipment (PPE)• Syringe• Hypodermic needle (20G–25G)• Collection tube• Isopropyl alcohol• Gauze• Electric clippers
1. Properly restrain the dog in sternal recumbency. This techniquecan usually be carried out with only the use of physical restraintto collect blood. A handler is required to restrain the dog,using the manual restraint technique described earlier, whilstthe operator removes the hair and performs the technique.
2. Shave the lateral aspect of one side of the ventral neck toexpose the jugular vein, and swab the site with alcohol.
100 � Species-Specific Information
b643_Chapter-A.qxd 9/10/2008 9:06 AM Page 100

AN INTRODUCTION TO THE PHYSICS OF PARTICLE ACCELERATORS (Second Edition)© World Scientific Publishing Co. Pte. Ltd.http://www.worldscibooks.com/physics/6683.html
3. Using your thumb, apply pressure on the lower neck regionto exclude the blood vessel in the jugular furrow.
4. Insert the needle into the jugular vein.5. Collect the desired amount of blood (2–20 mL/sample).6. Before removing the needle, release your hold on the blood
vessel.7. Achieve haemostasis using the gauze and direct pressure
before returning the dog to its cage.
Note: Always use aseptic techniques including clipping ofhair around the sampling site.
A.7.15 Intracardiac (IC) puncture for terminalcollection of large blood volumes
Materials required:
• Personal protective equipment (PPE)• Syringe• Hypodermic needle (16G or wider, preferably 1.5′′ long)• Collection tube• Isopropyl alcohol• Gauze• Anaesthetic
1. Deep surgical anaesthesia is necessary for intracardiac punc-ture, unless the animal is already dead.
2. Swab the site with alcohol.3. Palpate the xyphoid process at the caudal aspect of the ster-
num. A notch is present on both sides of this process.4. Insert the needle into either notch and direct it toward the
heart.5. Aspirate the syringe slowly once it has been inserted
beneath the skin.6. Blood will start to flow into the syringe once the needle pen-
etrates the heart.
Dogs � 101
b643_Chapter-A.qxd 9/10/2008 9:06 AM Page 101

AN INTRODUCTION TO THE PHYSICS OF PARTICLE ACCELERATORS (Second Edition)© World Scientific Publishing Co. Pte. Ltd.http://www.worldscibooks.com/physics/6683.html
7. Collect blood preferably from the right or left ventricle(100–900 mL, depending on the size of the dog and whetherthe heart is beating).
8. Verify the animal’s death at the end of the bleed.
Note: Intracardiac puncture should be performed only asa terminal procedure; the animal is not allowed torecover from anaesthesia following the puncture. An alter-nate euthanasia method is recommended after the bloodwithdrawal.
A.8 Nonhuman Primates (NHPs)
102 � Species-Specific Information
Many problems are encountered while handling and restrainingnonhuman primates (NHPs). The use of proper restraintdevices and techniques allows safe handling of these animals,and minimises stress and alterations in their physiologicalparameters. Always ask for help if you are not confident in han-dling/restraining the animals, and ensure the use of aseptictechniques for procedures. Prior to working with NHPs, youmust be familiarised with the procedures to follow in the eventof a bite or scratch.
NHPs carry a variety of zoonotic diseases, some of whichcan cause fatal diseases in humans (e.g. simian herpes B virus,Mycobacterium tuberculosis), so proper safeguards should betaken by all personnel involved. It is important to note that, inmany cases, the transmission of disease can go in both direc-tions. Therefore, the use of protective clothing protects not onlyyou, but also the animals.
b643_Chapter-A.qxd 9/10/2008 9:06 AM Page 102

AN INTRODUCTION TO THE PHYSICS OF PARTICLE ACCELERATORS (Second Edition)© World Scientific Publishing Co. Pte. Ltd.http://www.worldscibooks.com/physics/6683.html
The use of proper personal protective equipment (PPE) willhelp reduce zoonotic and physical trauma risks. Minimally, thefollowing PPE must be worn while handling and restrainingNHPs:
• Disposable latex or nitrile gloves (double)• Scrubs• Gown (long-sleeved)• Properly fitting face mask (N95)• Face shield• Nonslippery closed-toe shoes with shoe covers• Hair cover
The procedures listed here should be carried out quicklyand by experienced personnel. Inexperienced operators shouldnever work alone. Make sure you are well trained and experi-enced before handling conscious primates. Always keep inmind that NHPs are quite aggressive animals; therefore, chem-ical restraint (ketamine) is generally preferred over physicalrestraint.
The blood volumes of NHPs vary, but are generally around8% of body weight. The maximum safe volume for a single col-lection is 6–10 mL/kg. Common blood collection sites in NHPsinclude the cephalic, jugular, saphenous, and femoral veins.
A.8.1 Physiologic parameters
Macaque BaboonBody temperature = 37°C–39°C Body temperature = 39°CHeart rate = 120–180/min Heart rate = 150/minRespiratory rate = 32–50/min Respiratory rate = 35/minTidal volume = 21 mL Tidal volume = 50 mL
The dosage and frequency of the administration of all anal-gesic agents must be tailored to the animal, procedure, andmagnitude of pain present. Combinations of narcotics andnonsteroidal agents are commonly used (see Tables A.13and A.14).
Nonhuman Primates � 103
b643_Chapter-A.qxd 9/10/2008 9:06 AM Page 103

AN INTRODUCTION TO THE PHYSICS OF PARTICLE ACCELERATORS (Second Edition)© World Scientific Publishing Co. Pte. Ltd.http://www.worldscibooks.com/physics/6683.html
Table A.13 Volume for injection of (a) small NHP and (b) large NHP.
(a)
NHP (small) IV IP SC IM
Volume (mL) 0.5 10–15 5–10 0.3–05(slowly)
(b)
NHP (large) IV IP SC IM
Volume (mL) 10–20 50–100 10–30 1–3(slowly)
Table A.14 Anaesthesia and analgesia (suggested agents and doses).
Dosage and RouteAgent of Administration
Restraint/PremedicationAtropine 0.02–0.05 mg/kg IM/SCGlycopyrrolate 0.005–0.01 mg/kg IM/SCDiazepam (Valium®) 0.5–1.0 mg/kg IMXylazinea 0.5–2.0 mg/kg IM
AnaesthesiaSodium pentobarbital 20–30 mg/kg IVSodium thiopental (2.5%) 15–20 mg/kg IVKetamine/Xylazinea,b:
Ketamine 7–10 mg/kg IMXylazinea 0.25–2.0 mg/kg IM
Ketamine/Diazepamc:Ketamine 15 mg/kg IVDiazepam (Valium®) 1 mg/kg IV
Ketamine/Midazolamc:Ketamine 15 mg/kg IVMidazolam 0.5–0.15 mg/kg IV
Telazol® 4.0–6.0 mg/kg IMHalothane (Fluothane®) — InhalantIsoflurane — Inhalant
AnalgesiaMorphine 1–2 mg/kg/4 h IM/SCOxymorphone 0.15 mg/kg/4–6 h IMBuprenorphine 0.01–0.03 mg/kg/8–12 h IM/SCAcetylsalicytic acid (Aspirin) 10–20 mg/kg/6h Oral dosing
(Continued )
104 � Species-Specific Information
b643_Chapter-A.qxd 9/10/2008 9:06 AM Page 104

AN INTRODUCTION TO THE PHYSICS OF PARTICLE ACCELERATORS (Second Edition)© World Scientific Publishing Co. Pte. Ltd.http://www.worldscibooks.com/physics/6683.html
Table A.14 (Continued )
Dosage and RouteAgent of Administration
Acetaminophen 10 mg/kg/8 h Oral dosingFlunixin meglumine 0.5 mg/kg daily IM
(Banamine®)Butorphanol tartrate 0.025 mg/kg/3–6 h IM
(Torbugesic®)Naproxen 10 mg/kg/12 h Oral dosingKetorolac 15–30 mg/kg IM
Reversal AgentsYohimbine (reverses xylazine) 0.05 mg/kg IVNaloxone (reverses opioids) 0.1–0.2 mg/kg as needed IV
a Xylazine is available in two strengths (20 mg/mL, 100 mg/mL).Ensure that the dose calculated is based on the strength being used.b Premedication with atropine or glycopyrrolate is suggested to avoidbradycardia and cardiac arrhythmias with these agents.c Poor analgesia. Only suitable for minor nonpainful procedures.
A.8.2 NHP handling and sexing
1. NHPs are handled only with a catchpole and collar, or whilechemically restrained. Only experienced/trained personnelshould handle NHPs. If a NHP gets loose, a net or blowdartmay be used to catch the animal. Never handle a NHP alone.
2. NHPs should be habituated to restraint devices and humanpresence prior to the commencement of the experimentalprotocol.
3. Check the external genitalia of a NHP to identify its sex.
• Scrotum and testicles are clearly visible in males.• Penis can be palpated through the skin in males.• Vulva is present in females (clitoris and labial folds).
4. Ensure that the cage card information is correct.
A.8.3 NHP physical restraint
Physical restraint should only be attempted by trained, experi-enced personnel, and it should be both effective and as gentleas possible. Various restraint devices used for NHPs include
Nonhuman Primates � 105
b643_Chapter-A.qxd 9/10/2008 9:06 AM Page 105
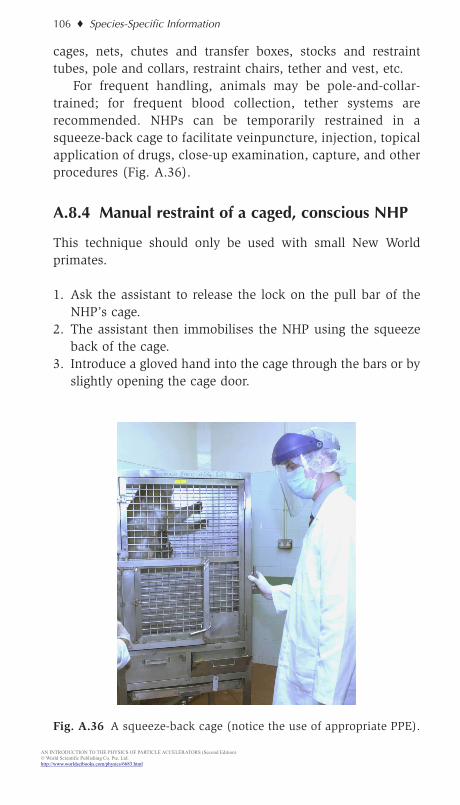
AN INTRODUCTION TO THE PHYSICS OF PARTICLE ACCELERATORS (Second Edition)© World Scientific Publishing Co. Pte. Ltd.http://www.worldscibooks.com/physics/6683.html
cages, nets, chutes and transfer boxes, stocks and restrainttubes, pole and collars, restraint chairs, tether and vest, etc.
For frequent handling, animals may be pole-and-collar-trained; for frequent blood collection, tether systems arerecommended. NHPs can be temporarily restrained in asqueeze-back cage to facilitate veinpuncture, injection, topicalapplication of drugs, close-up examination, capture, and otherprocedures (Fig. A.36).
A.8.4 Manual restraint of a caged, conscious NHP
This technique should only be used with small New Worldprimates.
1. Ask the assistant to release the lock on the pull bar of theNHP’s cage.
2. The assistant then immobilises the NHP using the squeezeback of the cage.
3. Introduce a gloved hand into the cage through the bars or byslightly opening the cage door.
106 � Species-Specific Information
Fig. A.36 A squeeze-back cage (notice the use of appropriate PPE).
b643_Chapter-A.qxd 9/10/2008 9:06 AM Page 106

AN INTRODUCTION TO THE PHYSICS OF PARTICLE ACCELERATORS (Second Edition)© World Scientific Publishing Co. Pte. Ltd.http://www.worldscibooks.com/physics/6683.html
4. Grasp firmly the forearm of the NHP with your oppositehand (grasp the animal’s right hand with your left hand andvice versa).
5. Extending the animal’s arm, grasp its upper arm with yourfree hand so that you have the NHP’s upper right arm inyour right hand or upper left arm in your left hand.
6. Ask the assistant to “release”.7. Pull the NHP from the cage in a pre-agreed direction as the
assistant releases the cage back. This allows the assistant tomove in the opposite direction and around the primate.
8. Grasp the NHP’s free upper arm with your free hand.Now you have control of both arms of the NHP, with the ani-mal facing away from your body. Remember to keep theNHP’s legs away from your legs; otherwise, it might graspyour legs and pull itself close enough to bite you.
9. The assistant can now grasp the NHP’s rear legs, while yourestrain the animal between the both of you for technicalmanipulation (sample collection, drug administration, andphysical examination).
A.8.5 NHP chemical immobilisation
Chemical restraint is preferred over physical restraint whenhandling NHPs, and is more suitable for safe handling.Chemical restraint is advised prior to any direct contact withNHPs.
1. Make sure that all of the necessary equipment and reagentsfor the procedure are ready prior to restraint.
2. Immobilise the NHP by following one of the options belowfor administering chemical agents:
• IM injection with a hand-held syringe for animals in asqueeze-back cage or physically restrained (e.g. ketamine;10 mg/kg bwt).
• Pole syringe for animals confined to a small area such asa cage, chute, or transfer box.
• Dart systems for delivering chemical agents from a distancein aggressive animals.
• Blowdart/Pipe for short-range delivery of chemical agents.
Nonhuman Primates � 107
b643_Chapter-A.qxd 9/10/2008 9:06 AM Page 107

AN INTRODUCTION TO THE PHYSICS OF PARTICLE ACCELERATORS (Second Edition)© World Scientific Publishing Co. Pte. Ltd.http://www.worldscibooks.com/physics/6683.html
3. Keep the amount of chemical restraint and its duration to theminimum necessary to complete the procedure. Revive theanimal soon after the completion of the procedure.
4. After the procedure, return the animal to the same cage inwhich it was initially housed.
5. Observe the behaviour, appetite, hydration status, urine, andfaeces of the animal following recovery from chemicalimmobilisation.
Note: For prolonged immobilisation, endotracheal intuba-tion is recommended, followed by gaseous anaesthetic.
A.8.6 Identification methods
A.8.6.1 Tattoo
Tattoo is the most common method of identification in NHPs,but there is a risk of fading, so periodic renewal may berequired. Tattoos are easier and faster to read in comparison toother methods.
Materials required:
• Personal protective equipment (PPE)• Tattoo ink and needle
1. Restrain the NHP (refer to the restraint technique).2. Properly sedate the animal.3. Find a location where the tattoo may be easily read without
excessive handling of the animal (typically, the inner thighor inner arm).
4. Apply the tattoo legibly (with numbers or letters), accordingto the recorded sequence.
A.8.6.2 Microchip
Microchip identification is probably the best available methodfor permanent identification of NHPs. Microchips are perma-nent and tamper-proof, but are costly to use.
108 � Species-Specific Information
b643_Chapter-A.qxd 9/10/2008 9:06 AM Page 108

AN INTRODUCTION TO THE PHYSICS OF PARTICLE ACCELERATORS (Second Edition)© World Scientific Publishing Co. Pte. Ltd.http://www.worldscibooks.com/physics/6683.html
Materials required:
• Personal protective equipment (PPE)• Microchip• Transponder• Surgical instruments
1. Restrain the NHP (refer to the restraint technique).2. Properly sedate the animal.3. Choose the location for implant (interscapular skin, behind
the ear, at the elbow or wrist).4. Quickly insert the microchip subcutaneously using a spe-
cially designed hypodermic needle (usually supplied ready-loaded with a microchip).
5. Using a scanner, check that the coded digits are reflected.
A.8.7 Intramuscular (IM) injection
The best sites for intramuscular injection are the anterior aspectof the rear leg muscles (quadriceps), the caudal aspect of the armmuscles (triceps), and the muscles of the hip and lower back.
Materials required:
• Personal protective equipment (PPE)• Syringe • Hypodermic needle (21G–25G)• Substance to be injected• Isopropyl alcohol• Gauze
1. Fill the syringe with the exact amount of the substance to beadministered before handling the NHP.
2. Properly restrain the NHP by means of a squeeze-back cage(refer to the restraint technique).
3. Swab the site with alcohol to wet the hair coat to ensureintramuscular needle placement.
4. Palpate a large muscle group and carefully insert the needleinto the muscle.
Nonhuman Primates � 109
b643_Chapter-A.qxd 9/10/2008 9:06 AM Page 109

AN INTRODUCTION TO THE PHYSICS OF PARTICLE ACCELERATORS (Second Edition)© World Scientific Publishing Co. Pte. Ltd.http://www.worldscibooks.com/physics/6683.html
5. Aspirate by applying slight negative pressure to the plungerto ensure proper needle placement.
6. Any sign of blood in the syringe indicates improper place-ment. Reinsert the needle at a different site.
7. If no blood is aspirated, administer the substance.8. Withdraw the needle, and massage the injection site to facil-
itate dispersion of the injected substance and to relieve anydiscomfort.
A.8.8 Subcutaneous (SC) injection
Subcutaneous injections are best administered under the skinbetween the shoulders or in the flank area, although delivery ofthe substance subcutaneously is slightly more difficult toensure. The most common use of the subcutaneous route is forreplacement fluid therapy in cases where intravenous adminis-tration is not critical.
Materials required:
• Personal protective equipment (PPE)• Syringe• Hypodermic needle (21G–25G)• Substance to be injected• Isopropyl alcohol• Gauze
1. Fill the syringe with the exact amount of the substance to beadministered before handling the NHP.
2. Properly restrain the NHP by means of a squeeze-back cage(refer to the restraint technique).
3. Swab the site with alcohol to better define the skin surface.4. Grasp the skin between your thumb and forefinger, and
retract from the underlying skin.5. Penetrate the skin with the needle at approximately a 15°
angle to the injection site. 6. Aspirate the syringe to ensure proper placement before
injecting.
110 � Species-Specific Information
b643_Chapter-A.qxd 9/10/2008 9:06 AM Page 110

AN INTRODUCTION TO THE PHYSICS OF PARTICLE ACCELERATORS (Second Edition)© World Scientific Publishing Co. Pte. Ltd.http://www.worldscibooks.com/physics/6683.html
7. Air or blood in the syringe indicates improper placement.Withdraw and reposition the needle.
8. After proper placement is achieved, administer the sub-stance rapidly. A small bleb should appear as the dosingprogresses.
9. Compress the needle exit site for approximately 30 secondsafter dosing to prevent leakage of the administered substance.
Note: This procedure is not advisable for use in severelydehydrated animals.
A.8.9 Intraperitoneal (IP) injection
Materials required:
• Personal protective equipment (PPE)• Syringe• Hypodermic needle (18G–22G)• Substance to be injected• Isopropyl alcohol• Gauze
1. Fill the syringe with the exact amount of the substance to beadministered before handling the NHP.
2. Properly anaesthetise the NHP, keeping its head at a lowerlevel than the rest of the body to move the viscera forward.A handler is required to perform this technique.
3. Swab the site with alcohol.4. Insert the needle into the abdominal cavity in the lower
quadrant, avoiding the abdominal organs. The needle shouldbe directed towards the NHP’s head at an angle of 15°–20°.
5. Aspirate the syringe to ensure proper placement beforeinjecting.
6. If any material is aspirated, the syringe should be removedand disposed of, and the needle repositioned.
7. Administer the substance in a smooth and steady motion.Large volumes can be given by this route.
Nonhuman Primates � 111
b643_Chapter-A.qxd 9/10/2008 9:06 AM Page 111

AN INTRODUCTION TO THE PHYSICS OF PARTICLE ACCELERATORS (Second Edition)© World Scientific Publishing Co. Pte. Ltd.http://www.worldscibooks.com/physics/6683.html
A.8.10 Intradermal (ID) injection
Intradermal injection is commonly given into the dermis of theeyelid for tuberculin testing.
Materials required:
• Personal protective equipment (PPE)• Syringe• Hypodermic needle (22G–27G)• Substance to be injected• Isopropyl alcohol• Gauze
1. Fill the syringe with the exact amount of the substance to beadministered before handling the NHP.
2. Properly anaesthetise the NHP.3. Swab the site with alcohol after clipping the fur from the
injection site, if required.4. Insert the needle bevel up into the skin at approximately a
5°–10° angle. Once the hole of the bevel is under the skin,do not move the needle any further.
5. Aspirate the syringe to ensure proper placement beforeinjecting.
6. If any blood or fluid is aspirated, reposition the needle.7. Administer the substance slowly, creating a small bleb that
typically takes several minutes to resolve. Immediate disso-lution of the bleb indicates that the substance has beeninjected subcutaneously.
A.8.11 Intravenous (IV) injection utilisingsaphenous vein
Materials required:
• Personal protective equipment (PPE)• Syringe • Hypodermic needle (20G–24G)• Substance to be injected
112 � Species-Specific Information
(Continued)
b643_Chapter-A.qxd 9/10/2008 9:06 AM Page 112

AN INTRODUCTION TO THE PHYSICS OF PARTICLE ACCELERATORS (Second Edition)© World Scientific Publishing Co. Pte. Ltd.http://www.worldscibooks.com/physics/6683.html
• Isopropyl alcohol• Gauze• Electric clippers
1. Fill the syringe with the exact amount of the solution to beadministered before handling the NHP.
2. Properly restrain the NHP (refer to the restraint technique).A handler is required to perform this technique.
3. Extend one of the NHP’s rear legs.4. Shave the lateral aspect of the extended rear leg to expose
the saphenous vein, and swab the site with alcohol.5. Insert the needle into the saphenous vein.6. Aspirate the syringe to ensure proper placement (blood will
start to draw back into the syringe).7. Administer the injection in a slow, steady flow. Watch
out for perivascular fluid accumulation. If fluid accumulates,stop the injection and remove the catheter, and restartthe procedure.
8. Achieve haemostasis using the gauze and direct pressure tothe injection site. Confirm by flexing and extending the NHP’sleg several times before returning the animal to its cage.
Note: Always use aseptic techniques including clipping ofhair around the sampling site.
A.8.12 Gavaging of NHP for deliveryof intragastric medication
Materials required:
• Personal protective equipment (PPE)• Syringe• Gastric tube• Substance to be injected
1. Fill the syringe with the appropriate amount of substance tobe instilled.
Nonhuman Primates � 113
(Continued)
b643_Chapter-A.qxd 9/10/2008 9:06 AM Page 113

AN INTRODUCTION TO THE PHYSICS OF PARTICLE ACCELERATORS (Second Edition)© World Scientific Publishing Co. Pte. Ltd.http://www.worldscibooks.com/physics/6683.html
2. Properly restrain the NHP in a restraint chair (refer to therestraint technique). A handler is required to perform thistechnique.
3. Attach an infant-feeding tube to the syringe.4. Lubricate the tube with a small amount of lubricant jelly.5. Measure the length of the tube to be inserted by holding it
next to the NHP and measuring from the nose to the last rib.6. Put a tape to mark the proper length.7. Insert the tube into the ventral-medial corner of one of the
NHP’s nostrils.8. Gently push the tube up to the previously measured length
(tape mark). Watch the throat to ensure that the NHP isswallowing.
9. Aspirate. If stomach contents or detectable vacuum is notedin the tube, administer 1 mL of the substance.
10. Aspirate again to confirm proper placement (stomach con-tents in the tube) and administer the remaining substance.
11. Slowly remove the tube.
A.8.13 Blood withdrawal utilising cephalic veinfor small-volume blood collection
Handling procedures for NHPs often trigger anxiety and fear,which may lead to deviations in the animals’ normal physio-logical functions. Training the animals to cooperate during veinpuncture can help to avoid distress responses associated withthe conventional involuntary blood collection procedures.
Training NHPs to cooperate during vein puncture can helpin the refinement of research protocols by eliminating signifi-cant cortisol responses. These benefits are also extended toanimal care staff by reducing their chances of being bitten orscratched.
Materials required:
• Personal protective equipment (PPE)• Syringe• Hypodermic needle (20G–25G)
114 � Species-Specific Information
(Continued)
b643_Chapter-A.qxd 9/10/2008 9:06 AM Page 114

AN INTRODUCTION TO THE PHYSICS OF PARTICLE ACCELERATORS (Second Edition)© World Scientific Publishing Co. Pte. Ltd.http://www.worldscibooks.com/physics/6683.html
• Collection tube • Isopropyl alcohol• Gauze• Electric clippers
1. Properly restrain the NHP (refer to the restraint technique).A handler is required for this technique.
2. Extend either the front or hind leg of the NHP to access thecephalic vein on the anterior side.
3. Shave the extended leg, and swab the site with alcohol.4. Ask the handler to hold off the blood vessel using his/her
thumb.5. Insert the needle into the cephalic vein at an acute angle.6. Create negative pressure by slightly withdrawing the syringe
plunger as soon as the needle passes under the skin.7. Advance the needle until blood is aspirated in the syringe
barrel, indicating proper placement.8. Ask the handler to release his/her hold on the blood vessel.9. Collect the desired amount of blood (1–2 mL).
10. Achieve haemostasis using the gauze and direct pressure tothe injection site. Confirm by flexing and extending theNHP’s leg several times.
11. Check for evidence of swelling or haematoma before return-ing the animal to its cage.
Note: Always use aseptic techniques including clipping ofhair around the sampling site.
A.8.14 Blood withdrawal utilising saphenousvein for small-volume blood collection
Materials required:
• Personal protective equipment (PPE)• Syringe • Hypodermic needle (20G–25G)
Nonhuman Primates � 115
(Continued)
(Continued)
b643_Chapter-A.qxd 9/10/2008 9:06 AM Page 115

AN INTRODUCTION TO THE PHYSICS OF PARTICLE ACCELERATORS (Second Edition)© World Scientific Publishing Co. Pte. Ltd.http://www.worldscibooks.com/physics/6683.html
• Collection tube• Isopropyl alcohol• Gauze• Electric clippers
1. Properly restrain the NHP (refer to the restraint technique).A handler is required for this technique.
2. Extend the NHP’s hind leg to access the saphenous vein onthe posterior side.
3. Shave the extended leg, and swab the site with alcohol.4. Ask the handler to hold off the blood vessel using his/her
thumb.5. Insert the needle into the saphenous vein at an acute angle.6. Create negative pressure by slightly withdrawing the syringe
plunger as soon as the needle passes under the skin.7. Advance the needle until blood is aspirated in the syringe
barrel, indicating proper placement.8. Ask the handler to release his/her hold on the blood vessel.9. Collect the desired amount of blood (1–2 mL).
10. Achieve haemostasis using the gauze and direct pressure tothe injection site. Confirm by flexing and extending theNHP’s leg several times.
11. Check for evidence of swelling or haematoma before return-ing the animal to its cage.
Note: Always use aseptic techniques including clipping ofhair around the sampling site.
A.8.15 Blood withdrawal utilising femoral veinfor large-volume blood collection
Bleeding from the femoral vein can be quite difficult, as thefemoral vein is not normally visible.
Materials required:
• Personal protective equipment (PPE)• Syringe
116 � Species-Specific Information
(Continued)
(Continued)
b643_Chapter-A.qxd 9/10/2008 9:06 AM Page 116

AN INTRODUCTION TO THE PHYSICS OF PARTICLE ACCELERATORS (Second Edition)© World Scientific Publishing Co. Pte. Ltd.http://www.worldscibooks.com/physics/6683.html
Nonhuman Primates � 117
• Hypodermic needle• Collection tube • Isopropyl alcohol• Gauze
1. Properly restrain the NHP (refer to the restraint technique).A handler is required for this technique.
2. Extend one of the NHP’s rear legs and access the femoralvein in the upper inner thigh. This can sometimes be aidedby using a tourniquet to dilate the vein and rolling the veinover the femur, so that it is prevented from moving.
3. Swab the site with alcohol, and locate the blood vessel bypalpating the pulse of the femoral artery.
4. Insert the needle medially to the pulse at an acute angle.5. Create negative pressure by slightly withdrawing the syringe
plunger as soon as the needle passes under the skin.6. Aspiration of dark blood into the syringe barrel indicates
proper placement.7. Collect the desired amount of blood.8. Achieve haemostasis using the gauze and direct pressure to
the injection site. Confirm by flexing and extending the NHP’sleg several times.
9. Check for evidence of swelling or haematoma before return-ing the animal to its cage.
A.8.16 Intracardiac (IC) puncture for terminalcollection of large blood volumes
Materials required:
• Personal protective equipment (PPE)• Syringe• Hypodermic needle (18G–21G, preferably 2′′ long)• Collection tube• Isopropyl alcohol• Gauze• Anaesthetic
(Continued)
b643_Chapter-A.qxd 9/10/2008 9:06 AM Page 117

AN INTRODUCTION TO THE PHYSICS OF PARTICLE ACCELERATORS (Second Edition)© World Scientific Publishing Co. Pte. Ltd.http://www.worldscibooks.com/physics/6683.html
1. Deep surgical anaesthesia is necessary for intracardiacpuncture.
2. Place the unconscious animal in dorsal or lateral recum-bency and palpate the heart.
3. Swab the site with alcohol.4. Insert the needle either at the intercostal space between the
fourth and sixth ribs (at a 90° angle) or alternatively next tothe xyphoid process of the sternum (at a 45° angle), directingit toward the heart.
5. Aspirate the syringe slowly once it has been insertedbeneath the skin.
6. Reflux of blood is apparent once the needle penetrates theheart.
7. Collect blood preferably from the right or left ventricle.8. Verify the animal’s death at the end of the bleed.
Note: Intracardiac puncture should be performed only asa terminal procedure, and the animal is not allowed torecover from anaesthesia following the puncture. An alter-native euthanasia method is recommended after the bloodwithdrawal.
A.9 Miniature Swine
118 � Species-Specific Information
Miniature swine are increasingly being used in research, astheir appropriate size and temperament make them much bet-ter suited to the laboratory (due to space restrictions) and eas-ier to work with. Miniature swine also have organs and tissuesthat are similar in size to those of humans (compared withadult farm breeds), making them more suitable for many surgi-cal research protocols.
b643_Chapter-A.qxd 9/10/2008 9:06 AM Page 118

AN INTRODUCTION TO THE PHYSICS OF PARTICLE ACCELERATORS (Second Edition)© World Scientific Publishing Co. Pte. Ltd.http://www.worldscibooks.com/physics/6683.html
Miniature swine generally have a milder disposition thanfarm breeds, which — along with their smaller size — makesthem easier to handle and restrain. These animals are alsogood for long-term studies, as they do not become as large asdomestic swine.
A.9.1 Safety
Swine are generally large animals with low centres of gravity;this, along with their strength, makes them quite hazardous toindividuals entering a pen or enclosed space. Miniature swine,though smaller than regular domestic breeds, can still weigh upto 80–100 kg and are capable of inflicting injury.
Personal protective equipment (PPE) should be worn whenworking with swine, including gloves, water-resistant shoe cov-ers or boots (preferably with safety toes to prevent damage tofeet), and long-sleeved apparel (such as lab coats).
Most miniature swine breeds are docile, but some maybecome aggressive and may bite or charge, potentially inflictingserious injury. Never work alone when dealing with large oraggressive animals.
When lifting animals or restraining them, ensure that youuse proper lifting or restraining equipment to prevent injury(especially to the back).
Pigs can be noisy, especially during feeding times and whenthey are being restrained. Prolonged exposure to such high lev-els of noise can cause irreversible ear damage; therefore, it isimportant to use protective devices such as earplugs or mufflerswhen working around swine.
A.9.2 Catheterisation
When it is necessary to take frequent blood samples from pigsor to give frequent injections, a good alternative is to insert apermanent venous catheter. This may be placed in the externaljugular vein. The catheter is inserted between the shoulders,under general anaesthesia, and is tunneled under the skin tothe neck using a metal rod, where it is inserted into the jugularvein. It is then possible to take blood samples without causingpain or distress to the animal.
Miniature Swine � 119
b643_Chapter-A.qxd 9/10/2008 9:06 AM Page 119

AN INTRODUCTION TO THE PHYSICS OF PARTICLE ACCELERATORS (Second Edition)© World Scientific Publishing Co. Pte. Ltd.http://www.worldscibooks.com/physics/6683.html
The port is positioned between the shoulders to prevent theanimal from biting at it, and may be easily accessed for injec-tion or blood withdrawal. After injection or blood withdrawal,the catheter is rinsed with a heparin solution to prevent bloodfrom clotting inside, which would block the catheter.
A.9.3 Miniature swine handling and sexing
1. First, assess the swine in their pen for normal behaviour.2. Pigs may be herded from one area to another with the aid of
a pig board, which is usually made of plastic and preventsthe pigs from escaping.
3. Using the pig board, guide a pig to the side of the pen, whereit may then be picked up or examined. Note that pigs willgenerally squeal at a very high level when being handled,unless they are accustomed to regular handling.
4. Smaller pigs may be picked up by their hind legs, but takecare that you grip firmly but gently at the thigh, so as not tocause pain or injury.
5. Small pigs may also be picked up under the thorax with onehand below the head and keeping it close to the body.
6. Larger animals may be herded into a suitable trolley formanoeuver, or with a squeeze-back, to restrain the animalfor injection.
7. Male pigs can easily be identified by their external genitalia,and females by the vulva below the anus.
A.9.4 Miniature swine restraint techniquefor technical manipulation
1. Swine may be restrained manually or with the aid of arestraint device, such as a squeeze-back trolley or a Panepintosling (Fig. A.37).
2. Panepinto slings are very useful as they immobilise theanimal, preventing it from moving during procedures.
3. When using a restraint device such as the Panepinto sling orsqueeze-back trolley, it is good practice to acclimatise theanimal to it beforehand in order to prevent the animal fromgetting stressed.
120 � Species-Specific Information
b643_Chapter-A.qxd 9/10/2008 9:06 AM Page 120

AN INTRODUCTION TO THE PHYSICS OF PARTICLE ACCELERATORS (Second Edition)© World Scientific Publishing Co. Pte. Ltd.http://www.worldscibooks.com/physics/6683.html
4. Aggressive animals may be given a suitable sedative or tran-quiliser to restrain them for injection and blood collection.In rare cases where it is not possible to inject an aggressiveanimal with an anaesthetic, it is also possible to herd the piginto an enclosed area, such as a large plastic bin, anddirectly pipe in a low concentration of anaesthetic gas torelax the animal suitably enough to inject with an appropri-ate agent.
A.9.5 Identification methods
Materials required:
• Personal protective equipment (PPE)• Microchip transponder and reader, or plastic coloured
tag for ear tagging
1. Properly restrain the pig (refer to the restraint technique).2. Quickly use either of the below-mentioned techniques to
identify the pig:
• Microchipping: Insert the chip subcutaneously underthe skin at the back of the neck with the use of anapplicator.
Miniature Swine � 121
Fig. A.37 Panepinto sling for restraint.
b643_Chapter-A.qxd 9/10/2008 9:06 AM Page 121

AN INTRODUCTION TO THE PHYSICS OF PARTICLE ACCELERATORS (Second Edition)© World Scientific Publishing Co. Pte. Ltd.http://www.worldscibooks.com/physics/6683.html
• Ear tag: Take an appropriately coloured ear tag, corre-sponding to the sow or boar colour, and place it inside theapplicator. The applicator should be placed behind the earwith the tag in front. Hold the ear still with one hand andquickly and firmly squeeze the applicator so that the metaldisk at the back adheres to the ear tag, keeping it in place.
A.9.6 Intramuscular (IM) injection
Several sites can be used for intramuscular injections in pigs,but the rump at the top of the buttocks remains the most com-mon as there is a large muscle mass there, although other loca-tions such as the quadriceps, triceps, lumbar musculature, andhamstring group may also be used. Avoid hitting the sciatic orcaudal nerve when injecting into the hamstring musclegroup by directing the needle backward. Needle sizes forintramuscular injections range from 22G to 25G. Small volumes(2–5 mL) can be injected by this route.
Materials required:
• Personal protective equipment (PPE)• Syringe• Hypodermic needle• Substance to be injected• Isopropyl alcohol• Gauze
1. Fill the syringe with the exact amount of the substance to beadministered before handling the pig.
2. Properly restrain the pig, either in a standing position or usinga butterfly needle and syringe for animals that are enclosed ina trolley or a Panepinto sling (refer to the restraint technique).
3. Swab the site with alcohol.4. Insert the needle into the muscles of any of the abovemen-
tioned sites.5. Aspirate the syringe to ensure proper placement.6. Any sign of blood in the syringe indicates improper place-
ment. Reinsert the needle at a different site.
122 � Species-Specific Information
b643_Chapter-A.qxd 9/10/2008 9:06 AM Page 122

AN INTRODUCTION TO THE PHYSICS OF PARTICLE ACCELERATORS (Second Edition)© World Scientific Publishing Co. Pte. Ltd.http://www.worldscibooks.com/physics/6683.html
7. If no blood is aspirated, administer the substance.8. Withdraw the needle, and massage the injection site to facil-
itate dispersion of the injected substance and to relieve anydiscomfort.
A.9.7 Subcutaneous (SC) injection
Subcutaneous injections are generally difficult to administer inpigs, as they do not have loose skin that can easily be grasped.If subcutaneous injection is required, the most likely site wouldbe behind the neck. Needle sizes for subcutaneous injectionsrange from 22G to 25G, depending on the animal size and theviscosity and volume of the fluid being injected.
Materials required:
• Personal protective equipment (PPE)• Syringe • Hypodermic needle • Substance to be injected• Isopropyl alcohol• Gauze
1. Fill the syringe with the exact amount of the substance to beadministered before handling the pig.
2. Properly restrain the pig (refer to the restraint technique).3. Swab the site with alcohol.4. Grasp a loose fold of skin and insert the needle under the
skin, parallel to the long axis of the skin fold. 5. Aspirate the syringe to ensure proper placement before
injecting.6. Air or blood in the syringe indicates improper placement.
Withdraw and reposition the needle.7. After proper placement is achieved, administer the sub-
stance as rapidly as it can be ejected from the syringe.
A.9.8 Intraperitoneal (IP) injection
Intraperitoneal injection is not generally given to pigs, unlessthey are under general anaesthesia.
Miniature Swine � 123
b643_Chapter-A.qxd 9/10/2008 9:06 AM Page 123

AN INTRODUCTION TO THE PHYSICS OF PARTICLE ACCELERATORS (Second Edition)© World Scientific Publishing Co. Pte. Ltd.http://www.worldscibooks.com/physics/6683.html
Materials required:
• Personal protective equipment (PPE)• Syringe• Hypodermic needle (18G–22G)• Substance to be injected• Isopropyl alcohol• Gauze
1. Fill the syringe with the exact amount of the substance to beadministered before handling the pig.
2. Restrain the pig using suitable anaesthesia/sedative.3. Swab the site with alcohol.4. Insert the needle into the abdominal cavity in the lower right
quadrant, avoiding the abdominal organs. The needle shouldbe directed towards the animal’s head at an angle of 15°–20°.
5. Aspirate the syringe to ensure proper placement beforeinjecting.
6. If any material is aspirated, the syringe should be removedand disposed of, and the needle repositioned.
7. Administer the substance in a steady motion.
A.9.9 Intradermal (ID) injection
Intradermal injections are commonly given for skin testing andfor local blocks. Intradermal injections should be given over thedorsal thoracic or lumbar region. Multiple sites (up to 10) and20G–25G needles can be used.
Materials required:
• Personal protective equipment (PPE)• Syringe • Hypodermic needle • Substance to be injected• Isopropyl alcohol• Gauze
124 � Species-Specific Information
b643_Chapter-A.qxd 9/10/2008 9:06 AM Page 124

AN INTRODUCTION TO THE PHYSICS OF PARTICLE ACCELERATORS (Second Edition)© World Scientific Publishing Co. Pte. Ltd.http://www.worldscibooks.com/physics/6683.html
1. Fill the syringe with the exact amount of the substance to beadministered before handling the pig.
2. Properly anaesthetise the pig, or use an appropriate sedativeor tranquiliser.
3. Insert the needle bevel up into the skin at approximately a15°–20° angle.
4. Aspirate the syringe to ensure proper placement before injecting.5. If any blood or fluid is aspirated, reposition the needle.6. Administer the substance slowly, creating a small bleb that
typically takes several minutes to resolve. Immediate disso-lution of the bleb indicates that the substance has beeninjected subcutaneously.
A.9.10 Intravenous (IV) injection utilisingcephalic vein
Needle sizes for intravenous injections range from 20G to 25G.Before administering the substance, make sure that there are noair bubbles in the syringe.
Materials required:
• Personal protective equipment (PPE)• Syringe • Hypodermic needle • Substance to be injected• Isopropyl alcohol• Gauze
1. Fill the syringe with the exact amount of the solution to beadministered before handling the pig.
2. Properly restrain the pig (refer to the restraint technique). Ahandler is required for this injection.
3. The handler extends one of the pig’s front legs.4. Swab the site with alcohol.5. Ask the handler to apply slight pressure on the blood ves-
sel using his/her thumb.6. Insert the needle into the cephalic vein.
Miniature Swine � 125
b643_Chapter-A.qxd 9/10/2008 9:06 AM Page 125

AN INTRODUCTION TO THE PHYSICS OF PARTICLE ACCELERATORS (Second Edition)© World Scientific Publishing Co. Pte. Ltd.http://www.worldscibooks.com/physics/6683.html
7. Aspirate the syringe to ensure proper placement (bloodshould appear in the syringe).
8. Ask the handler to release his/her hold on the blood vesselbefore injecting the solution.
9. Administer the injection in a slow, steady flow.10. Achieve haemostasis using the gauze and direct pressure
before returning the pig to its pen.
A.9.11 Intravenous (IV) injection stilisingsaphenous vein
Needle sizes for intravenous injections range from 20G to 25G.Before administering the substance, make sure that there are noair bubbles in the syringe.
Materials required:
• Personal protective equipment (PPE)• Syringe • Hypodermic needle • Substance to be injected• Isopropyl alcohol• Gauze
1. Fill the syringe with the exact amount of the solution to beadministered before handling the pig.
2. Properly restrain the pig (refer to the restraint technique). Ahandler is required for this injection.
3. The handler extends one of the pig’s rear legs.4. Swab the site with alcohol.5. Ask the handler to apply slight pressure to the blood vessel
using his/her thumb.6. Insert the needle into the saphenous vein.7. Aspirate the syringe to ensure proper placement (blood
should appear in the syringe).8. Ask the handler to release his/her hold on the blood vessel
before injecting the solution.9. Administer the injection in a slow, steady flow.
10. Achieve haemostasis using the gauze and direct pressurebefore returning the pig to its pen.
126 � Species-Specific Information
b643_Chapter-A.qxd 9/10/2008 9:06 AM Page 126

AN INTRODUCTION TO THE PHYSICS OF PARTICLE ACCELERATORS (Second Edition)© World Scientific Publishing Co. Pte. Ltd.http://www.worldscibooks.com/physics/6683.html
A.9.12 Intravenous (IV) injection utilisingear vein
Needle sizes for intravenous injections range from 20G to 25G.Before administering the substance, make sure that there are noair bubbles in the syringe.
Materials required:
• Personal protective equipment (PPE)• Syringe • Hypodermic needle• Substance to be injected• Isopropyl alcohol• Gauze
1. Fill the syringe with the exact amount of the solution to beadministered before handling the pig.
2. Properly restrain the pig (refer to the restraint technique). Ahandler is required for this injection.
3. Swab the site with alcohol.4. The needle and the pig’s ear are fixed between the operator’s
thumb and forefinger to assist in dilating the vein.5. Insert the needle into the ear vein.6. Aspirate the syringe to ensure proper placement (blood
should appear in the syringe).7. Ask the handler to release his/her hold on the blood vessel
before injecting the solution.8. Administer the injection in a slow, steady flow.9. Achieve haemostasis using the gauze and direct pressure
before returning the pig to its pen.
A.9.13 Intravenous (IV) injection utilisingcranial vena cava
Needle sizes for intravenous injections range from 20G to 25G.Before administering the substance, make sure that there are noair bubbles in the syringe.
Miniature Swine � 127
b643_Chapter-A.qxd 9/10/2008 9:06 AM Page 127

AN INTRODUCTION TO THE PHYSICS OF PARTICLE ACCELERATORS (Second Edition)© World Scientific Publishing Co. Pte. Ltd.http://www.worldscibooks.com/physics/6683.html
Materials required:
• Personal protective equipment (PPE)• Syringe • Hypodermic needle • Substance to be injected• Isopropyl alcohol• Gauze
1. Fill the syringe with the exact amount of the solution to beadministered before handling the pig.
2. Properly restrain the pig (refer to the restraint technique). Ahandler is required for this injection.
3. Swab the site with alcohol.4. In order to avoid injury to the vagus nerve, the needle is
inserted into the right side of the neck, lateral to themanubrium sterni, and directed at a 30°–45° angle towardthe left shoulder.
5. A popping sensation will be felt by the sampler when theneedle enters the vein, and then blood can be readily with-drawn.
6. Aspirate the syringe to ensure proper placement (bloodshould appear in the syringe).
7. Ask the handler to release his/her hold on the blood vesselbefore injecting the solution.
8. Administer the injection in a slow, steady flow.9. Achieve haemostasis using the gauze and direct pressure
before returning the pig to its pen.
A.9.14 Gavaging of miniature swine
Gastric intubation is generally performed using a large-boregastric tube. The diameter of the tube should be approximatelythe same size as an endotracheal tube used in the same animal.Gavaging is more effective when performed in an anaesthetisedor sedated animal.
128 � Species-Specific Information
b643_Chapter-A.qxd 9/10/2008 9:06 AM Page 128

AN INTRODUCTION TO THE PHYSICS OF PARTICLE ACCELERATORS (Second Edition)© World Scientific Publishing Co. Pte. Ltd.http://www.worldscibooks.com/physics/6683.html
Materials required:
• Personal protective equipment (PPE)• Syringe • Gastric tube/“Balling” tube (Fig. A.38)• Substance to be injected
1. Fill the syringe with the appropriate amount of substance tobe instilled.
2. Properly restrain the pig (refer to the restraint technique)3. Measure the length of the tube from the tip of the nose to
the ninth intercostal space.4. Put a tape to mark the proper length.5. Place a speculum between the dental arcades.6. Introduce the tube into the oral cavity, ensuring that the
head is neither extended nor flexed.7. Insert the tube up to the previously measured length (tape
mark).8. Administer the substance.9. Carefully monitor the animal during its recovery from
anaesthesia, making sure that it does not vomit and aspi-rate residual gavage solution.
10. The “balling” tube may be used as an alternative in whichthe dosing article is put into a pellet form so that when thetube is inserted into the mouth, the plunger may be pressed,
Miniature Swine � 129
Fig. A.38 Gavaging of miniature swine. (a) Balling tube with capsule(for administration); (b) balling tube in use.
b643_Chapter-A.qxd 9/10/2008 9:06 AM Page 129

AN INTRODUCTION TO THE PHYSICS OF PARTICLE ACCELERATORS (Second Edition)© World Scientific Publishing Co. Pte. Ltd.http://www.worldscibooks.com/physics/6683.html
forcing the pellet down the throat and administering the arti-cle (Fig. A.38).
A.9.15 Blood withdrawal utilising jugular veinfor large-volume blood collection
Materials required:
• Personal protective equipment (PPE)• Syringe • Hypodermic needle (20G–25G)• Collection tube • Isopropyl alcohol• Gauze
1. Properly restrain the pig (refer to the restraint technique).Usually, only physical restraint is required to collect blood.A handler is required for this technique.
2. Swab the site with alcohol.3. The animal must be held with its neck stretched upwards. 4. The needle should be directed caudodorsally, in this case
perpendicular to the skin. 5. The correct puncture site is in the deepest point of the jugu-
lar groove formed between the medial sternocephalic andlateral brachiocephalic muscles.
6. Right-handed operators will usually find it easier to use theanimal’s right jugular vein.
7. The blood sample should be taken from the right externaljugular vein, with the assistant holding the needle holderwith his/her left hand while at the same time pressing itgently against the pig’s neck.
8. Collect the desired amount of blood.9. Before removing the needle, ask the handler to release his/
her hold on the blood vessel.10. Achieve haemostasis using the gauze and direct pressure
before returning the pig to its pen.
130 � Species-Specific Information
b643_Chapter-A.qxd 9/10/2008 9:06 AM Page 130

AN INTRODUCTION TO THE PHYSICS OF PARTICLE ACCELERATORS (Second Edition)© World Scientific Publishing Co. Pte. Ltd.http://www.worldscibooks.com/physics/6683.html
A.9.16 Blood withdrawal utilising milk veinfor small-volume blood collection
The milk vein (the subcutanous abdominal vein) is easily visi-ble lateral to the teats on smaller pigs. The vein can often bepalpated as a groove in the muscle.
Materials required:
• Personal protective equipment (PPE)• Syringe • Hypodermic needle (20G–25G)• Collection tube • Isopropyl alcohol• Gauze
1. Properly restrain the pig (refer to the restraint technique).Usually, anaesthesia/sedative restraint is required.
2. Swab the site with alcohol.3. The needle is inserted where the vein is most visible. 4. The vein is palpated, and the skin is punctured at the point
where the vein is felt most clearly. 5. Insert the needle caudally.6. Collect the desired amount of blood.7. Before removing the needle, apply pressure to the blood vessel.8. Achieve haemostasis using the gauze and direct pressure
before returning the pig to its pen.
A.9.17 Blood withdrawal utilising tail veinfor small-volume blood collection
Materials required:
• Personal protective equipment (PPE)• Syringe
Miniature Swine � 131
(Continued)
b643_Chapter-A.qxd 9/10/2008 9:06 AM Page 131

AN INTRODUCTION TO THE PHYSICS OF PARTICLE ACCELERATORS (Second Edition)© World Scientific Publishing Co. Pte. Ltd.http://www.worldscibooks.com/physics/6683.html
• Hypodermic needle (20G–25G)• Collection tube • Isopropyl alcohol• Gauze
1. Properly restrain the pig (refer to the restraint technique).Usually, anaesthesia/sedative restraint is required.
2. Swab the site with alcohol.3. The medial caudal vein lies in a groove under the tail, next
to the artery. 4. The operator raises the tail with one hand and punctures
the vein with the other. 5. The puncture site is at the first freely movable tail joint.
This is around the fifth tail vertebra. 6. In adult pigs, the needle should be inserted at an angle of
45° to the skin. 7. In smaller pigs, it is recommended to hold the tail nearly
horizontally and to stick the needle in nearly parallel to theskin.
8. Collect the desired amount of blood.9. Before removing the needle, apply pressure to the blood
vessel.10. Achieve haemostasis using the gauze and direct pressure
before returning the pig to its pen.
132 � Species-Specific Information
(Continued)
b643_Chapter-A.qxd 9/10/2008 9:06 AM Page 132
Related Documents