1 A Programme Under the Compumitra Series Copyright 2014 © Sunmitra Education Technologies Limited, India Handling Action Bar The action bar is a window feature that identifies the user location, and provides user actions and navigation modes.

Handling action bar in Android
Jul 13, 2015
Welcome message from author
This document is posted to help you gain knowledge. Please leave a comment to let me know what you think about it! Share it to your friends and learn new things together.
Transcript

1A Programme Under the Compumitra Series
Copyright 2014 © Sunmitra Education Technologies Limited, India
Handling Action Bar
The action bar is a window feature that identifies the user location, and provides
user actions and navigation modes.
2
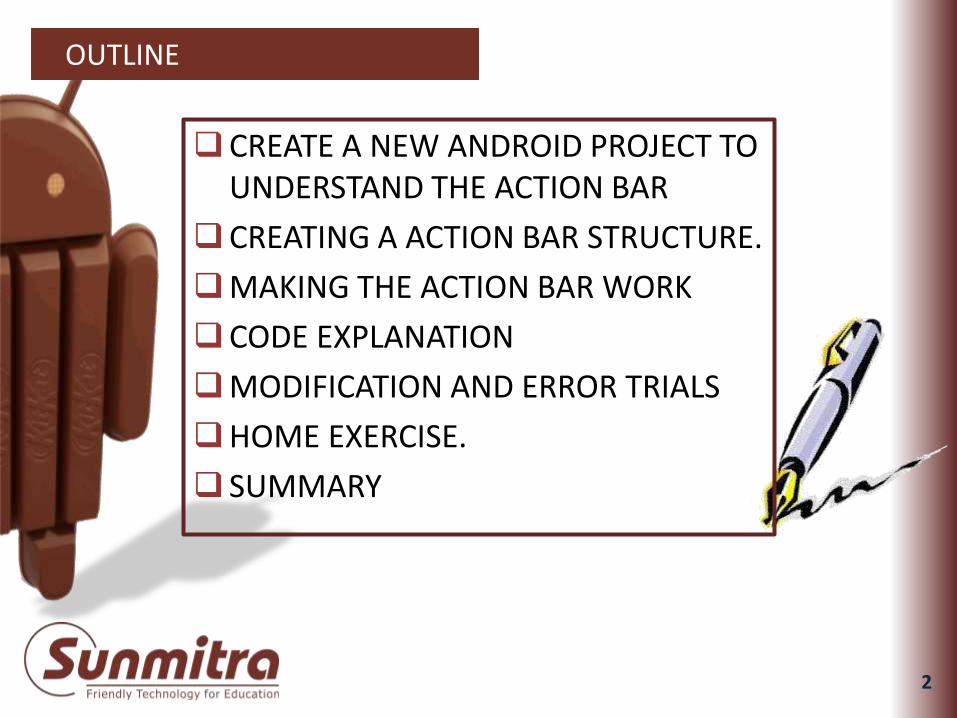
OUTLINE
CREATE A NEW ANDROID PROJECT TO UNDERSTAND THE ACTION BAR
CREATING A ACTION BAR STRUCTURE.
MAKING THE ACTION BAR WORK
CODE EXPLANATION
MODIFICATION AND ERROR TRIALS
HOME EXERCISE.
SUMMARY

3
Create A New Android Project to understand the Action Bar Making.

4
Create New Android Project with1) Application Name: HandlingActionBar2) Project Name: HandlingActionBar3) Package Name:
com.company.handlingactionbar4) Set Minimum Required SDK: API 85) Target SDK: API 196) Compile With: API 197) Theme: Holo Light with…8) Activity Name: MainActivity9) And Navigation Type: None
CREATE NEW APPLICATION

5
CREATING A ACTION BAR STRUCTURE.
To create a menu structure which appears on clicking the menu button on your
emulator.

6
<item android:id="@+id/action_google"
android:title="@string/google"
android:orderInCategory="100"
app:showAsAction="never" />
<item android:id="@+id/action_yahoo"
android:title="@string/yahoo"
android:orderInCategory="101"
app:showAsAction="never" />
MODIFICATION IN MENUMAIN.XML FILE
Go to HandlingActionBar->res->menu->main.xml file (XML view).
1) Remove pre-written <item android:id....... ="never"/> code.
2) Add this code with in <menu> element of main.xml file.

7
<string name="google">Google</string>
<string name="yahoo">Yahoo</string>
<string name="hello_world">Select any option from Action Bar</string>
EDITING STRINGS.XML FILE
1. Go to HandlingActionBar ->res->values->strings.xml file.
2. Click on strings.xml (XML view ).
1) Change value of string app_name to Action Bar
2) Change value of string hello_world to Select any option from Action Bar
3)Add these codes in strings.xml
8
MAKING THE ACTION BAR WORK
To make the items defined in a action bar to operate their respective functions.

9
fragment1.xml
CREATE NEW RESOURCE FILE: fragment1.xml-1
1. Go to HandlingActionBar ->res->layout.2. Right click on layout.3. Select New->File (from the drop down list).
1.A new dialog box appears. Type fragment1.xml in File_name and click on Finish.

10
CREATE NEW RESOURCE FILE: fragment1.xml-2
1.Copy all code from fragment_main.xml and Paste it in fragment1.xml

11
EDITING RESOURCE FILE: fragment1.xml -1
1. Go to HandlingActionBar->res->layout->fragment1.xml file.2. Click on the Graphical Layout.3.Delete the default TextView
1.Select the given TextViewand press delete.

12
EDITING RESOURCE FILE: fragment1.xml -2
Go to Pallete and drag and drop WebView widget from Composite.
13
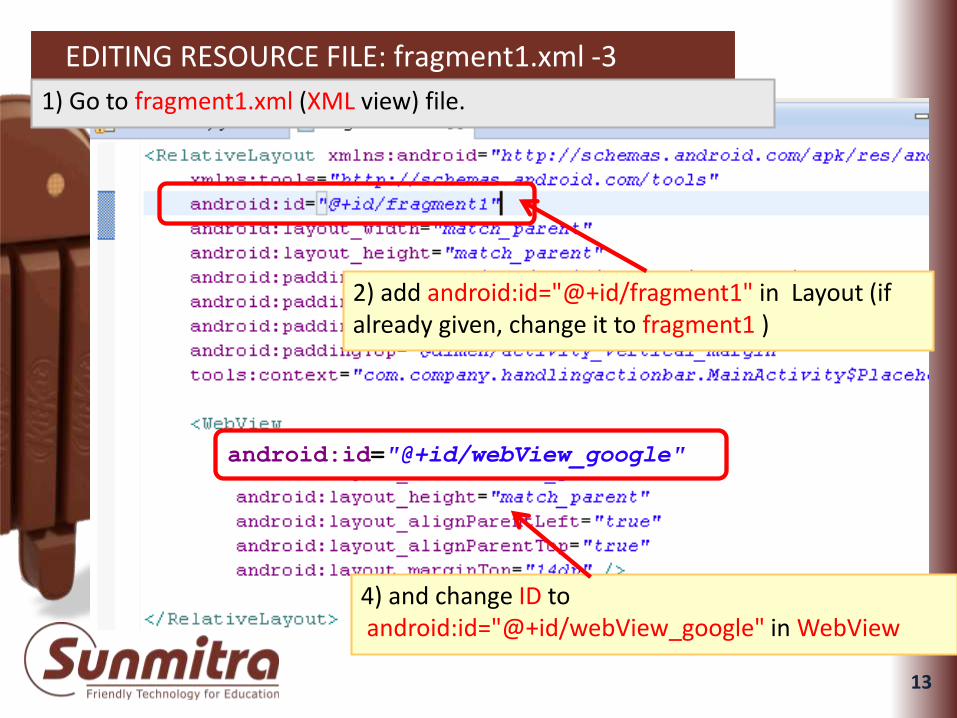
android:id="@+id/webView_google"
EDITING RESOURCE FILE: fragment1.xml -3
1) Go to fragment1.xml (XML view) file.
2) add android:id="@+id/fragment1" in Layout (if already given, change it to fragment1 )
4) and change ID to android:id="@+id/webView_google" in WebView

14
CREATE NEW RESOURCE FILE: fragment2.xml-1
1. Go to HandlingActionBar ->res->layout.2. Right click on layout.3. Select New->File (from the drop down list).
1.A new dialog box appears. Type fragment2.xml in File_name and click on Finish.

15
CREATE NEW RESOURCE FILE: fragment2.xml-2
Copy all code from fragment1.xml and Paste it in fragment2.xml
2) Change its ID to android:id="@+id/fragment2"in Layout
3) and change ID of WebView to android:id="@+id/webView_yahoo"

16
android:id="@+id/fragment_main "
EDITING RESOURCE FILE: fragment_main.xml
1) Go to fragment_main.xml (XML view) file.
2) add android:id="@+id/ fragment_main " in Layout (if already given, change it to fragment_main)
17
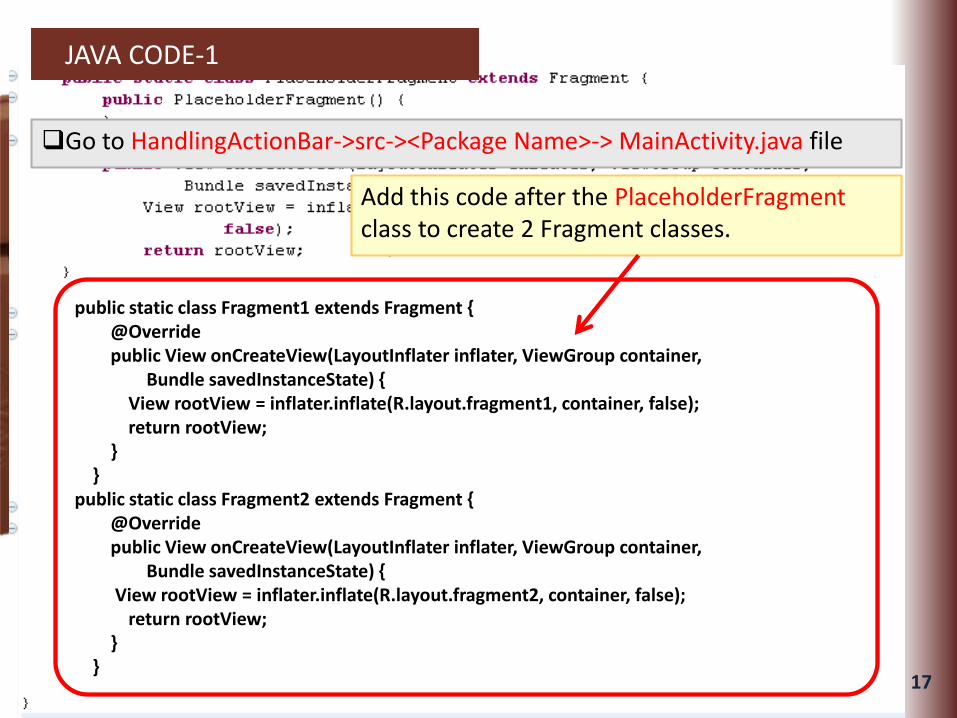
public static class Fragment1 extends Fragment {@Overridepublic View onCreateView(LayoutInflater inflater, ViewGroup container,
Bundle savedInstanceState) {View rootView = inflater.inflate(R.layout.fragment1, container, false);return rootView;
}}
public static class Fragment2 extends Fragment {@Overridepublic View onCreateView(LayoutInflater inflater, ViewGroup container,
Bundle savedInstanceState) { View rootView = inflater.inflate(R.layout.fragment2, container, false);
return rootView;}
}
JAVA CODE-1
Add this code after the PlaceholderFragmentclass to create 2 Fragment classes.
Go to HandlingActionBar->src-><Package Name>-> MainActivity.java file

18
JAVA CODE-2
getSupportFragmentManager().beginTransaction().add(R.id.container, new Fragment2()).commit();
getSupportFragmentManager().beginTransaction().add(R.id.container, new Fragment1()).commit();
2. Add this code before the pre-written lines in if statement of onCreate method of MainActivity class.
pre-written lines in if statement of onCreate method.
1. Import android.webkit.WebView; ,android.webkit.WebViewClient;,android.widget.RelativeLayout;.

19
JAVA CODE-3
Now delete the highlighted code (which showing error because we have removed action-settings menu item from menu>main.xml file) from onOptionsItemSelectedmethod of MainActivity class.
20
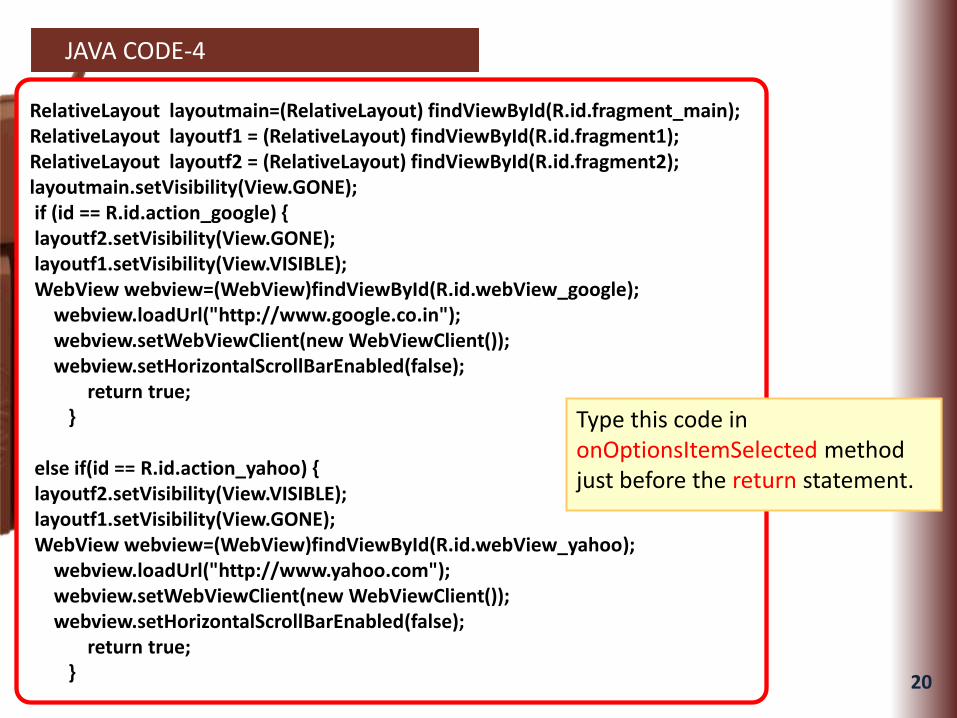
RelativeLayout layoutmain=(RelativeLayout) findViewById(R.id.fragment_main);RelativeLayout layoutf1 = (RelativeLayout) findViewById(R.id.fragment1);RelativeLayout layoutf2 = (RelativeLayout) findViewById(R.id.fragment2);layoutmain.setVisibility(View.GONE);if (id == R.id.action_google) { layoutf2.setVisibility(View.GONE);layoutf1.setVisibility(View.VISIBLE); WebView webview=(WebView)findViewById(R.id.webView_google);
webview.loadUrl("http://www.google.co.in"); webview.setWebViewClient(new WebViewClient()); webview.setHorizontalScrollBarEnabled(false);
return true;}
else if(id == R.id.action_yahoo) {layoutf2.setVisibility(View.VISIBLE);layoutf1.setVisibility(View.GONE); WebView webview=(WebView)findViewById(R.id.webView_yahoo);
webview.loadUrl("http://www.yahoo.com"); webview.setWebViewClient(new WebViewClient()); webview.setHorizontalScrollBarEnabled(false);
return true;}
JAVA CODE-4
Type this code in onOptionsItemSelected method just before the return statement.
21
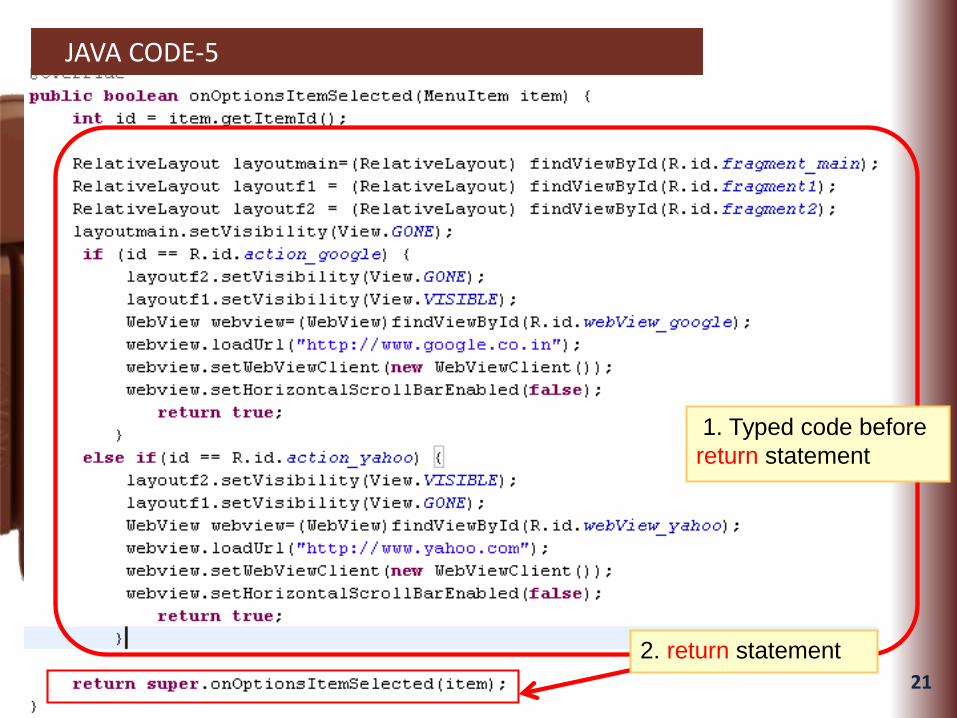
JAVA CODE-5
1. Typed code before
return statement
2. return statement

22
EDIT MANIFEST.XML FILE-1
1. Go to HandlingActionBar -> AndroidManifest.xml file.
2. Click on the Permissions.
3. Now click on Add Button.

23
EDIT MANIFEST.XML FILE-2
1. A new dialog box appears.
Now select Uses Permissionand click on OK.
2. Now write android.permission.INTERNET in the Name or you can also select from the drop down window.

24
RUNNING THE APPLICATION ON EMULATOR-1
Run your application on your emulator.
2. Select any one from the given options.
1. Click on default Action bar icon to open Action bar sub menu.

25
RUNNING THE APPLICATION ON EMULATOR-2
Similarly when you will select Google, Google page in WebView of Fragment1 will be displayed on your emulator screen.
1.Select Yahoo, and wait to load page. your emulator screen will display Yahoo page in WebView of Fragment2.

26
CODE EXPLANATION

27
CODE EXPLANATION: menu->main.xml
<menu xmlns:android="http://schemas.android.com/apk/res/android"
xmlns:app="http://schemas.android.com/apk/res-auto"
xmlns:tools="http://schemas.android.com/tools" tools:context="com.company.handlingactionbar.MainActivity" >
<item android:id="@+id/action_google"
android:title="@string/google"
android:orderInCategory="100"
app:showAsAction="never" />
<item android:id="@+id/action_yahoo"
android:title="@string/yahoo"
android:orderInCategory="101"
app:showAsAction="never" />
</menu>
The first attribute ID allows the item
tag to be given a name and
referenced in your Java code.
Title attribute id is the title or
label for the menu button.
Menu tag is used
to use menu.
This keyword Defines, When and
how this item should appear as an
action item in the Action Bar.

28
CODE EXPLANATION: MainActivity.java-1
public static class Fragment1 extends Fragment {
@Override
public View onCreateView(LayoutInflater inflater, ViewGroup container,
Bundle savedInstanceState) {
View rootView = inflater.inflate(R.layout.fragment1, container, false);
return rootView;
}
}
public static class Fragment2 extends Fragment {
@Override
public View onCreateView(LayoutInflater inflater, ViewGroup container,
Bundle savedInstanceState) {
View rootView = inflater.inflate(R.layout.fragment2, container, false);
return rootView;
}
} Here we creates 2 classes Fragment1 and Fragment2 for fragment1 and fragment2 layout.

29
@Override
protected void onCreate(Bundle savedInstanceState) {
super.onCreate(savedInstanceState);
setContentView(R.layout.activity_main);
if (savedInstanceState == null) {
getSupportFragmentManager().beginTransaction()
.add(R.id.container, new Fragment1()).commit();
getSupportFragmentManager().beginTransaction()
.add(R.id.container, new Fragment2()).commit();
getSupportFragmentManager().beginTransaction()
.add(R.id.container, new PlaceholderFragment()).commit();
}
} These lines adds Fragment1, Fragment2,
PlaceholderFragment to MainActivity.
CODE EXPLANATION: MainActivity.java-2

30
@Override
public boolean onCreateOptionsMenu(Menu menu) {
// Inflate the menu; this adds items to the action bar if it is present.
getMenuInflater().inflate(R.menu.main, menu);
return true;
}
Inflate the menu; this adds items to the action bar if it is
present.
Uses the inflate( ) method and the R.menu.main path to
our mein.xml file.
The R equates to the res folder of our
project.
CODE EXPLANATION: MainActivity.java-3

31
public boolean onOptionsItemSelected(MenuItem item) {
int id = item.getItemId();
RelativeLayout layoutmain=(RelativeLayout)
findViewById(R.id.fragment_main);
RelativeLayout layoutf1 = (RelativeLayout)
findViewById(R.id.fragment1);
RelativeLayout layoutf2 = (RelativeLayout)
findViewById(R.id.fragment2);
layoutmain.setVisibility(View.GONE);
if (id == R.id.action_google) {
layoutf2.setVisibility(View.GONE);
layoutf1.setVisibility(View.VISIBLE);
CODE EXPLANATION: MainActivity.java-4
Gets the selected Action
Bar item ID.
This method is called on
selection of menu item.
Creates the objects of
fragment_main,
fragment1 and
fragment2 layout types.
Sets the visibility of
layoutmain to hidden
Sets the visibility of layoutf1 (fragment1) and
layoutf1(fragment2).
Checks, whether selected
item ID matches with given
item ID or not.

32
WebView webview=(WebView)findViewById(R.id.webView_google);
webview.loadUrl("http://www.google.co.in");
webview.setWebViewClient(new WebViewClient());
webview.setHorizontalScrollBarEnabled(false);
return true;
}
else if(id == R.id.action_yahoo) {
layoutf2.setVisibility(View.VISIBLE);
layoutf1.setVisibility(View.GONE);
WebView webview=(WebView)findViewById(R.id.webView_yahoo);
webview.loadUrl("http://www.yahoo.com");
webview.setWebViewClient(new WebViewClient());
webview.setHorizontalScrollBarEnabled(false);
return true;
}
return super.onOptionsItemSelected(item);
}
Creates the object
of webview and
sets its URL.
CODE EXPLANATION: MainActivity.java-5
Checks, whether selected
item ID matches with given
item ID or not.

33
MODIFICATION AND ERROR TRIALS

34
android:icon="@drawable/google "
app:showAsAction="ifRoom" />
android:icon="@drawable/yahoo "
app:showAsAction="ifRoom" />
MODIFICATION TRIAL-1
1) Add attribute android:icon="@drawable/google" in action_googleitem
1. Go to HandlingActionBar->res->menu->main.xml file (XML view).
3) Add Change attribute value of app:showAsAction to "ifRoom" from both items.
2) Add attribute android:icon="@drawable/yahoo" in action_google item
Note: If Minimum Required SDK of your app is Android 3.0 and Above (If your app is not using the Support Library for compatibility) then use android:showAsAction instead of app:showAsAction
35
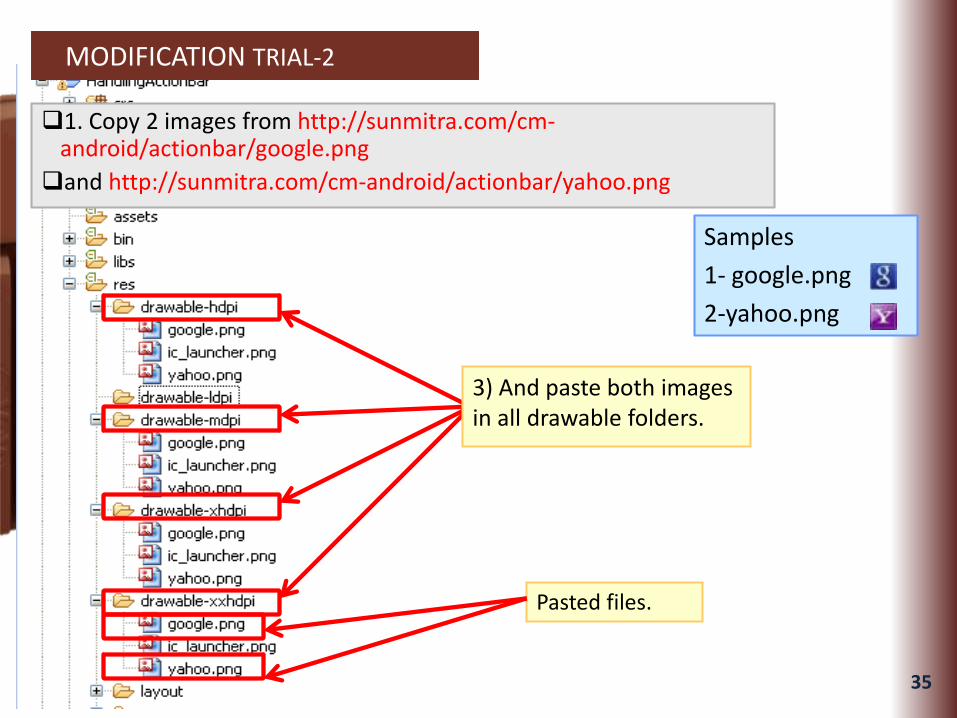
MODIFICATION TRIAL-2
1. Copy 2 images from http://sunmitra.com/cm-android/actionbar/google.png
and http://sunmitra.com/cm-android/actionbar/yahoo.png
Samples
1- google.png
2-yahoo.png
Pasted files.
3) And paste both images in all drawable folders.

36
RUNNING THE APPLICATION ON EMULATOR-1
Watch the affect on Action Bar items position.
Run your application on your emulator .

37
ERROR TRIALS-1
Go to HandlingActionBar->src-><Package Name>-> MainActivity.java file
getSupportFragmentManager().beginTransaction().add(R.id.container, new Fragment2()).commit();
getSupportFragmentManager().beginTransaction().add(R.id.container, new Fragment1()).commit();
Pre-written lines.
Remove these lines from onCreatemethod of MainActivity class and write again after the pre-written lines.
RUN project and watch the affects.

38
else if(id == R.id.action_yahoo) {layoutf2.setVisibility(View.VISIBLE);layoutf1.setVisibility(View.GONE); WebView webview=(WebView)findViewById(R.id.webView_yahoo);
webview.loadUrl("http://www.yahoo.com"); webview.setWebViewClient(new WebViewClient()); webview.setHorizontalScrollBarEnabled(false);
return true;}
ERROR TRIALS-2
Go to HandlingActionBar->src-><Package Name>-> MainActivity.java file
1.Remove these lines from onOptionsItemSelectedmethod of MainActivity class.
2.RUN project and watch the affects on Action Bar item selection.

39
HOME EXERCISE
Create a Project to create a Action Bar with 3 items.
1. 1st item displays the Wikipedia.
2. 2nd item displays Youtube.
3. 3rd item should be Back link to return on main fragment.

40
SUMMARY
Creating a Action Bar structure.
Making the Action Bar menu work.
Understanding the use of MenuInflater.
Handling Action Bar item selection.
Adding Action Bar items in different ways.

41
Ask me and guide me at
Share this information with as many
people as possible.
Keep visiting www.sunmitra.com for
programme updates.
THANK YOU…
Related Documents