Hand Dryer Installation & User Manual Please read instruction in conjunction with the illustrations Please save these instructions.

Welcome message from author
This document is posted to help you gain knowledge. Please leave a comment to let me know what you think about it! Share it to your friends and learn new things together.
Transcript

Hand Dryer Installation & User Manual
Please read instruction in conjunction with the illustrations Please save these instructions.
2
Safety & Guidance notes Important:- Read all these instructions before commencing the installation.
All wiring of this hand dryer should be in accordance with the current IEE regulations, or the appropriate standards in your country.
This hand dryer MUST be installed by a suitably qualified person. Ensure that the mains supply (voltage, frequency, and phase) complies with the hand dryers
rating label. This appliance is not intended for use by persons (including children) with reduced physical,
sensory or mental capabilities, or lack of experience and knowledge, unless they have been given supervision or instruction concerning use of the appliance by a person responsible for their safety.
Children should be supervised to ensure that they do not play with the appliance. Do not open the front panel once installed. Do not allow hand dryer to get excessively wet. Do not modify and disassemble the unit unnecessarily. The hand dryer should be provided with a fused spur, isolator switch capable of disconnecting
all poles, having a contact separation of at least 3mm. Ensure the hand dryer is properly earthed Always use the hand dryer with the drain tank & air filter provided. We recommend installing a RCD (residual current device) use a single phase 220-240V 50Hz
cable with a 20A rated current, 15mA-type rated operating current. Do not let children hang from the hand dryer Wear gloves when inspecting and cleaning the unit. Do not use the hand dryer in the following places:-
Where the ambient temperature is below -10°C or above 40°C Where the hand dryer may come into direct contact with water Where the unit is under direct or strong sunlight Where condensation may form within the unit.
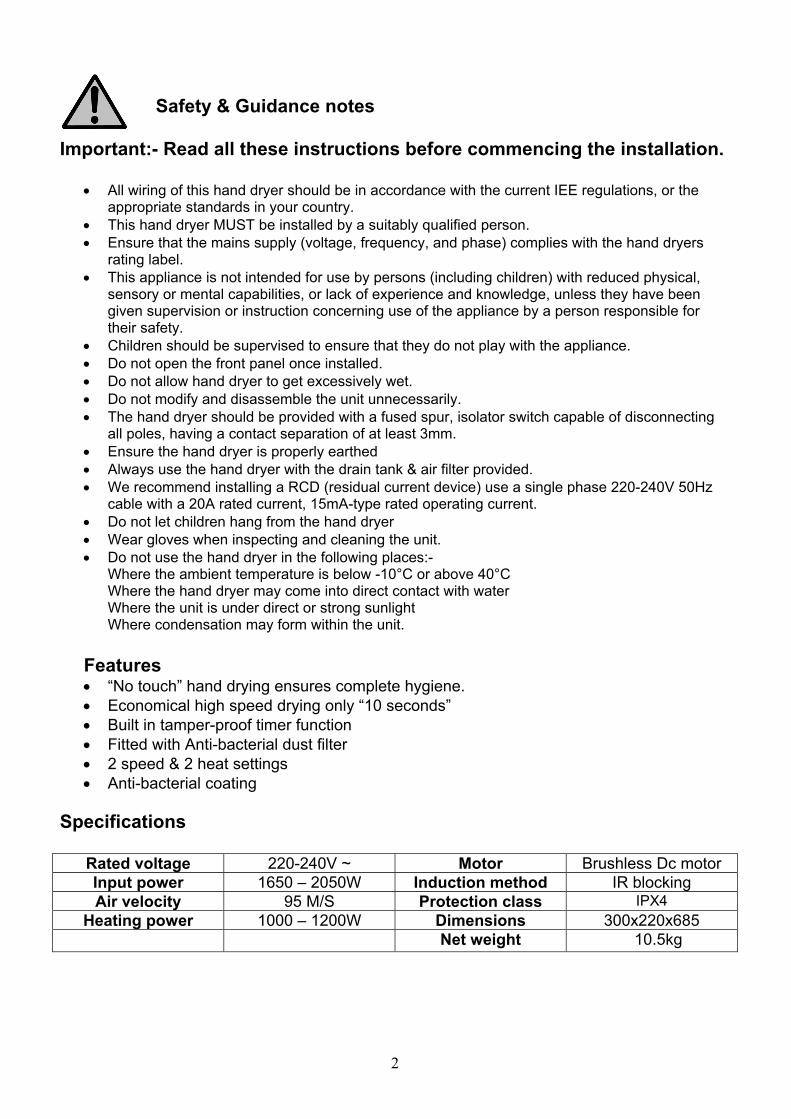
Features “No touch” hand drying ensures complete hygiene. Economical high speed drying only “10 seconds” Built in tamper-proof timer function Fitted with Anti-bacterial dust filter 2 speed & 2 heat settings Anti-bacterial coating
Specifications
Rated voltage 220-240V ~ Motor Brushless Dc motor Input power 1650 – 2050W Induction method IR blocking Air velocity 95 M/S Protection class IPX4
Heating power 1000 – 1200W Dimensions 300x220x685 Net weight 10.5kg
3
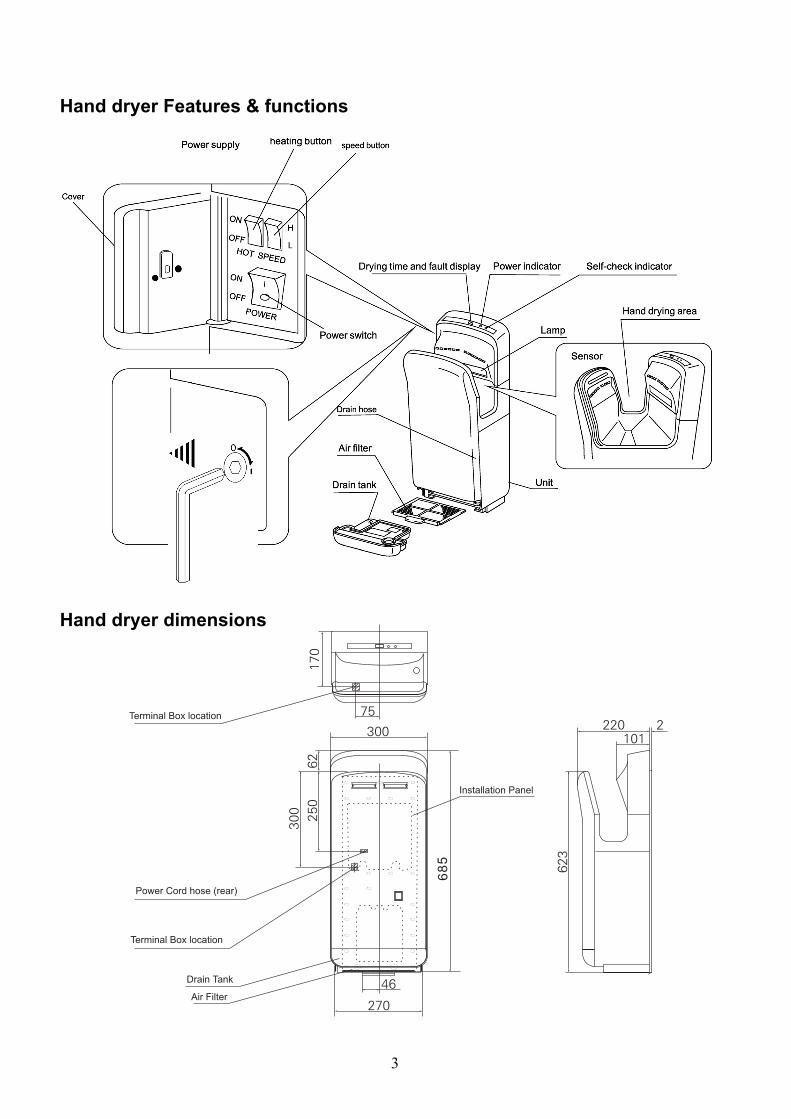
Hand dryer Features & functions Hand dryer dimensions
4
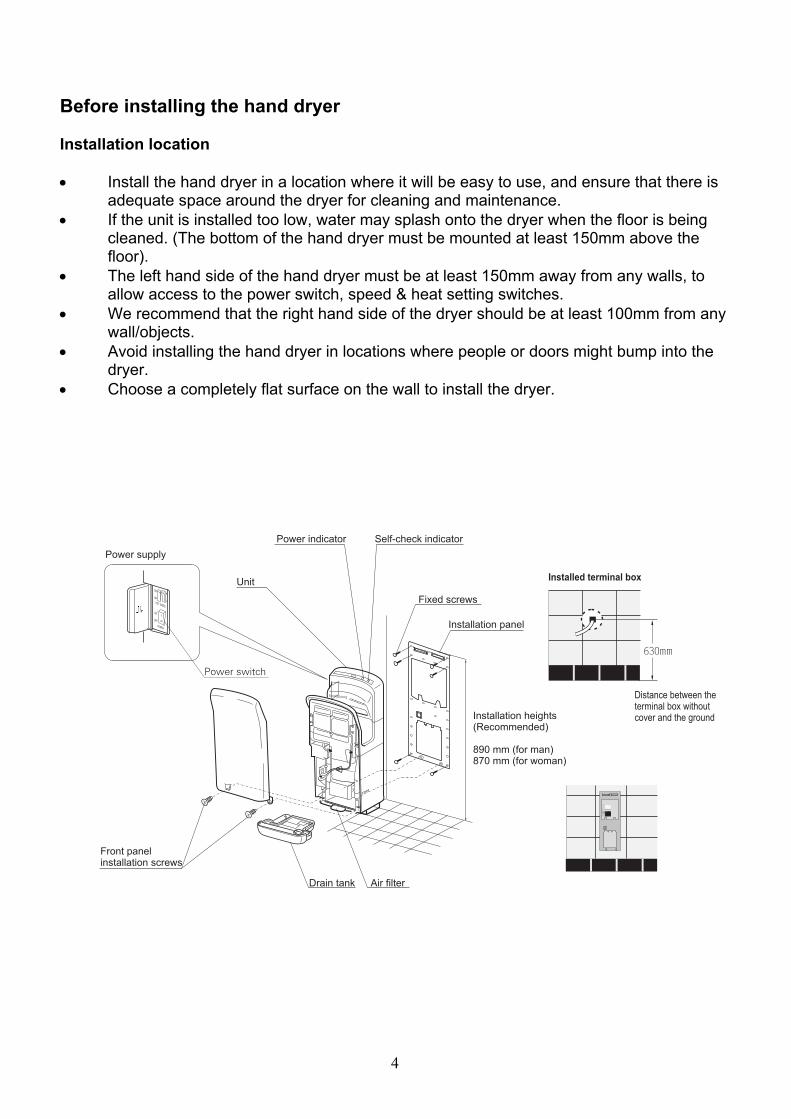
Before installing the hand dryer Installation location Install the hand dryer in a location where it will be easy to use, and ensure that there is
adequate space around the dryer for cleaning and maintenance. If the unit is installed too low, water may splash onto the dryer when the floor is being
cleaned. (The bottom of the hand dryer must be mounted at least 150mm above the floor).
The left hand side of the hand dryer must be at least 150mm away from any walls, to allow access to the power switch, speed & heat setting switches.
We recommend that the right hand side of the dryer should be at least 100mm from any wall/objects.
Avoid installing the hand dryer in locations where people or doors might bump into the dryer.
Choose a completely flat surface on the wall to install the dryer.
5
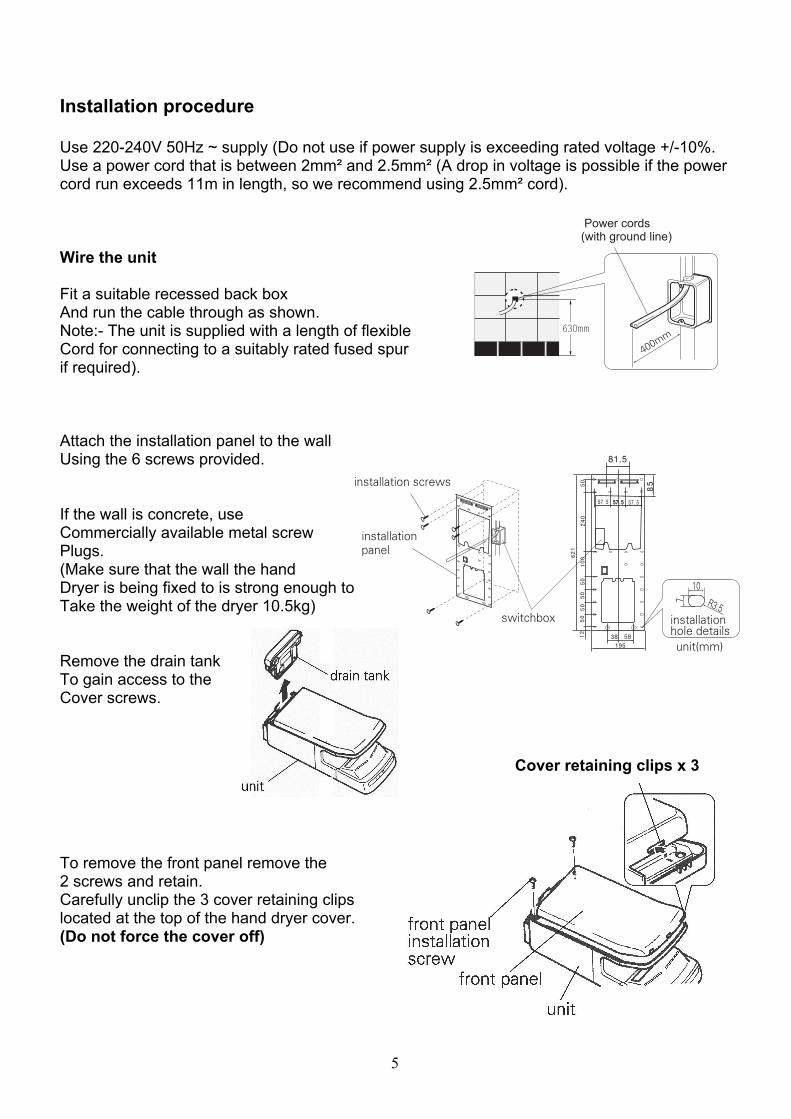
Installation procedure Use 220-240V 50Hz ~ supply (Do not use if power supply is exceeding rated voltage +/-10%. Use a power cord that is between 2mm² and 2.5mm² (A drop in voltage is possible if the power cord run exceeds 11m in length, so we recommend using 2.5mm² cord). Wire the unit Fit a suitable recessed back box And run the cable through as shown. Note:- The unit is supplied with a length of flexible Cord for connecting to a suitably rated fused spur if required). Attach the installation panel to the wall Using the 6 screws provided. If the wall is concrete, use Commercially available metal screw Plugs. (Make sure that the wall the hand Dryer is being fixed to is strong enough to Take the weight of the dryer 10.5kg) Remove the drain tank To gain access to the Cover screws. To remove the front panel remove the 2 screws and retain. Carefully unclip the 3 cover retaining clips located at the top of the hand dryer cover. (Do not force the cover off)
Cover retaining clips x 3
6
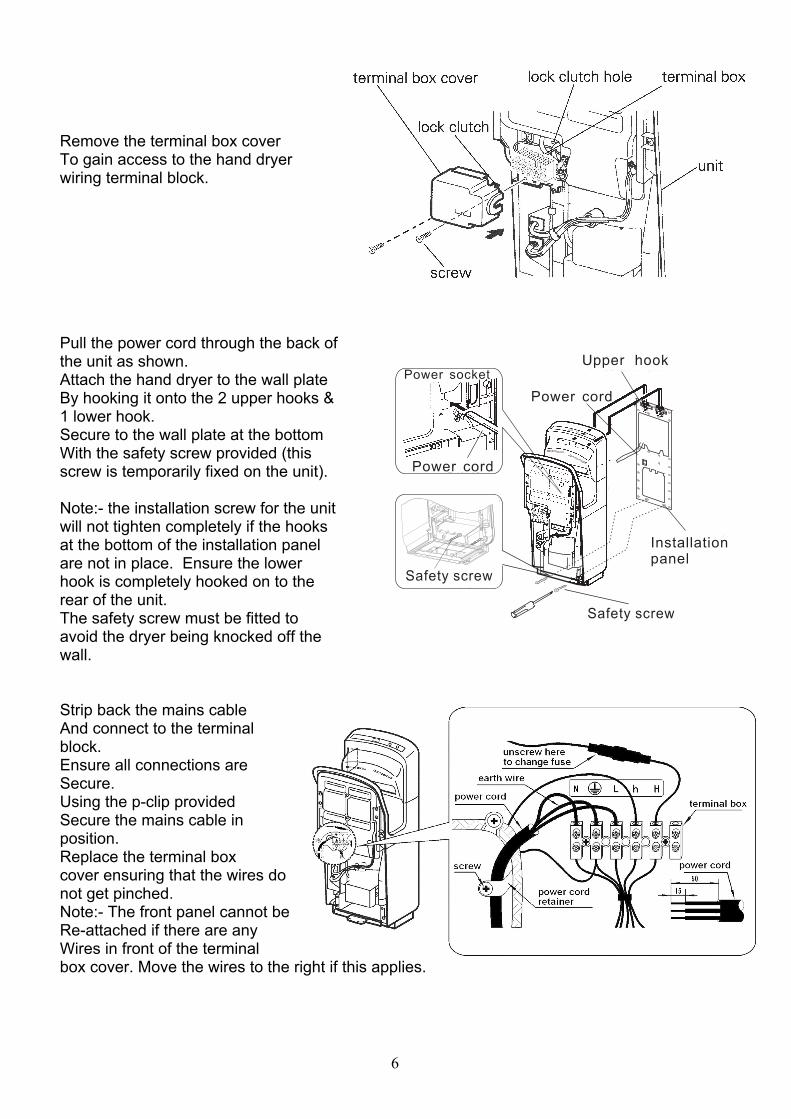
Remove the terminal box cover To gain access to the hand dryer wiring terminal block. Pull the power cord through the back of the unit as shown. Attach the hand dryer to the wall plate By hooking it onto the 2 upper hooks & 1 lower hook. Secure to the wall plate at the bottom With the safety screw provided (this screw is temporarily fixed on the unit). Note:- the installation screw for the unit will not tighten completely if the hooks at the bottom of the installation panel are not in place. Ensure the lower hook is completely hooked on to the rear of the unit. The safety screw must be fitted to avoid the dryer being knocked off the wall. Strip back the mains cable And connect to the terminal block. Ensure all connections are Secure. Using the p-clip provided Secure the mains cable in position. Replace the terminal box cover ensuring that the wires do not get pinched. Note:- The front panel cannot be Re-attached if there are any Wires in front of the terminal box cover. Move the wires to the right if this applies.
7
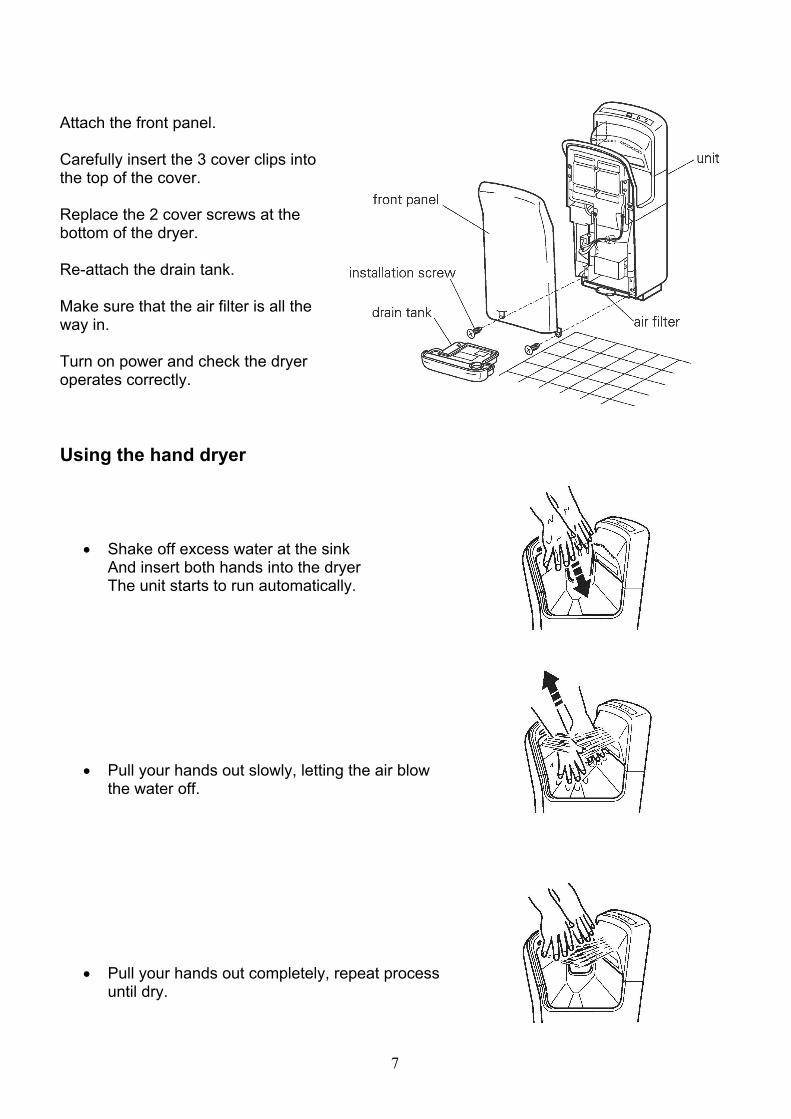
Attach the front panel. Carefully insert the 3 cover clips into the top of the cover. Replace the 2 cover screws at the bottom of the dryer. Re-attach the drain tank. Make sure that the air filter is all the way in. Turn on power and check the dryer operates correctly. Using the hand dryer
Shake off excess water at the sink And insert both hands into the dryer The unit starts to run automatically.
Pull your hands out slowly, letting the air blow the water off.
Pull your hands out completely, repeat process until dry.
8
Self-check indicator
When a malfunction or error occurs, the self-check indicator located on the top of the dryer “check” will either light up or flash. Turn off the power switch, wait about 40 seconds until all the indicators go off, and then turn the dryer back on. If the indicator still lights up or flashes, turn off the unit, Isolate the dryer from the mains supply and contact a service engineer.
Routine Cleaning & Maintenance of the hand dryer
Warning:- The Hand dryer must be isolated from the power
supply before any cleaning and maintenance takes place.
Cleaning the body of the hand dryer Clean the unit with a soft cloth. If the unit gets very dirty, clean with a soft damp cloth with a neutral cleaning agent, then
clean with a dry soft cloth. Remove any dirt from the sensor area. Only use a neutral cleaning agent. Do not use thinners, acidic or alkaline toilet cleaners, or any type of brushes. (use of these
may damage the surface of the hand dryer. If chemical cloths are to be used, please read their instructions first.
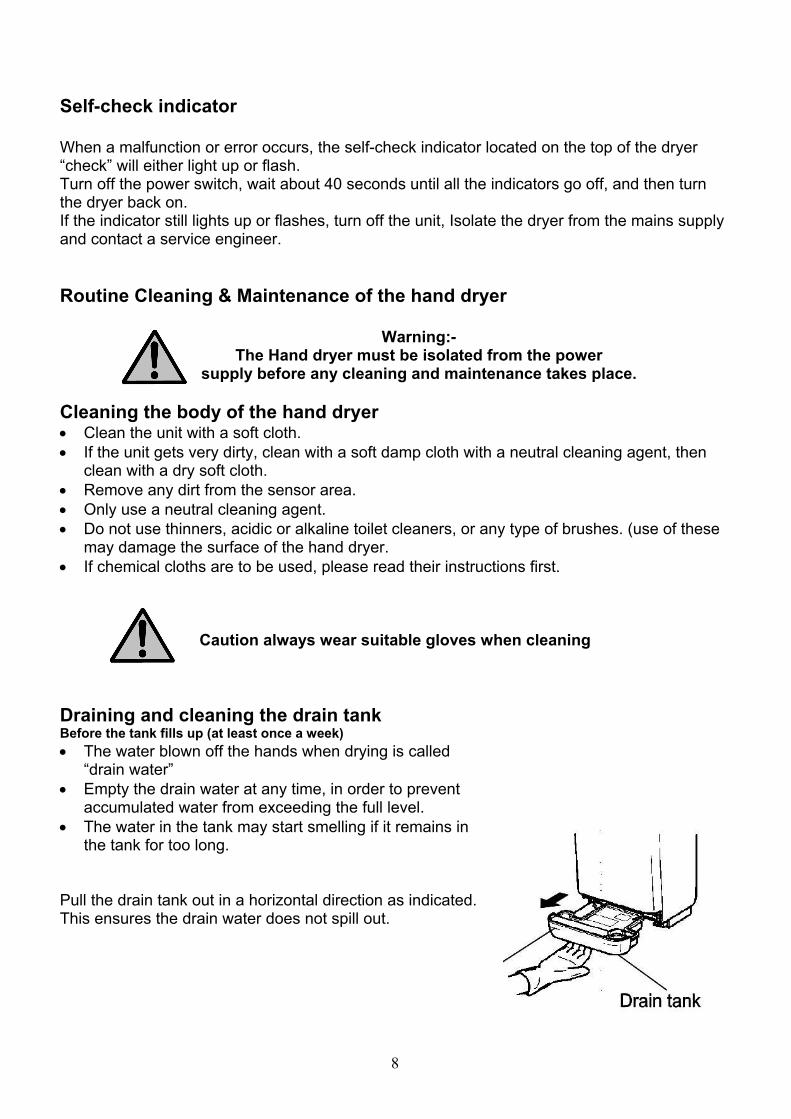
Caution always wear suitable gloves when cleaning Draining and cleaning the drain tank Before the tank fills up (at least once a week)
The water blown off the hands when drying is called “drain water”
Empty the drain water at any time, in order to prevent accumulated water from exceeding the full level.
The water in the tank may start smelling if it remains in the tank for too long.
Pull the drain tank out in a horizontal direction as indicated. This ensures the drain water does not spill out.
9
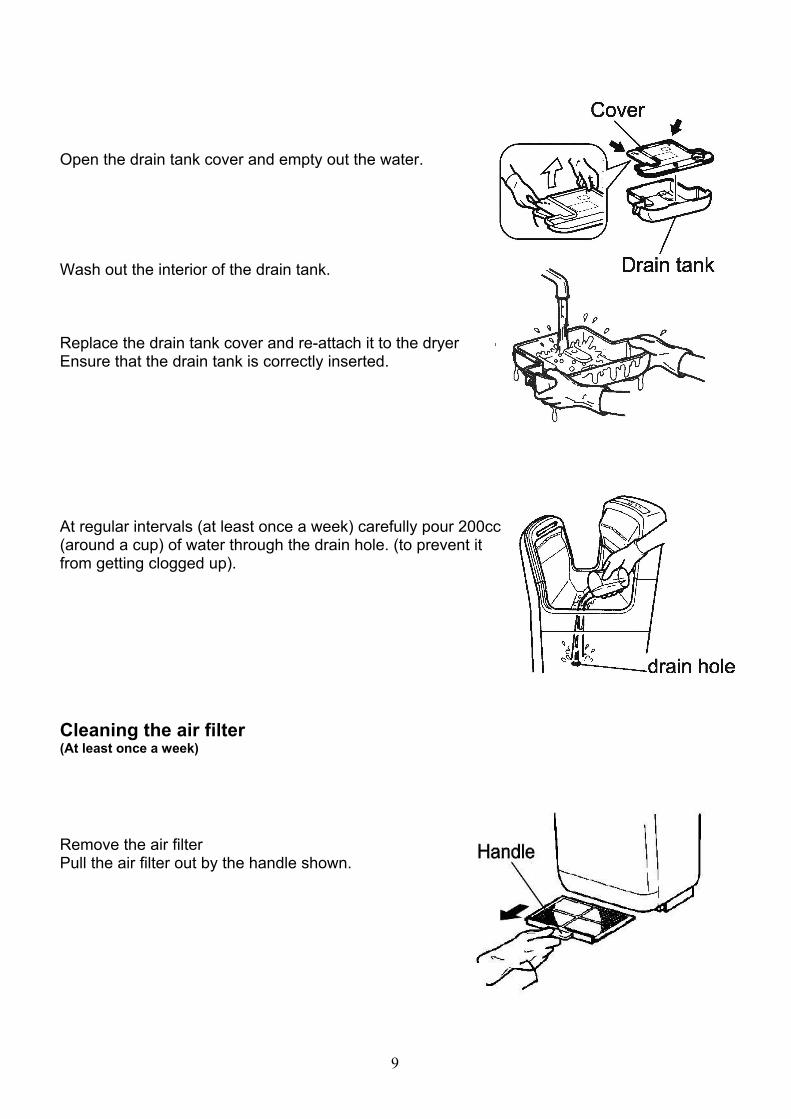
Open the drain tank cover and empty out the water. Wash out the interior of the drain tank. Replace the drain tank cover and re-attach it to the dryer Ensure that the drain tank is correctly inserted. At regular intervals (at least once a week) carefully pour 200cc (around a cup) of water through the drain hole. (to prevent it from getting clogged up). Cleaning the air filter (At least once a week)
Remove the air filter Pull the air filter out by the handle shown.
10
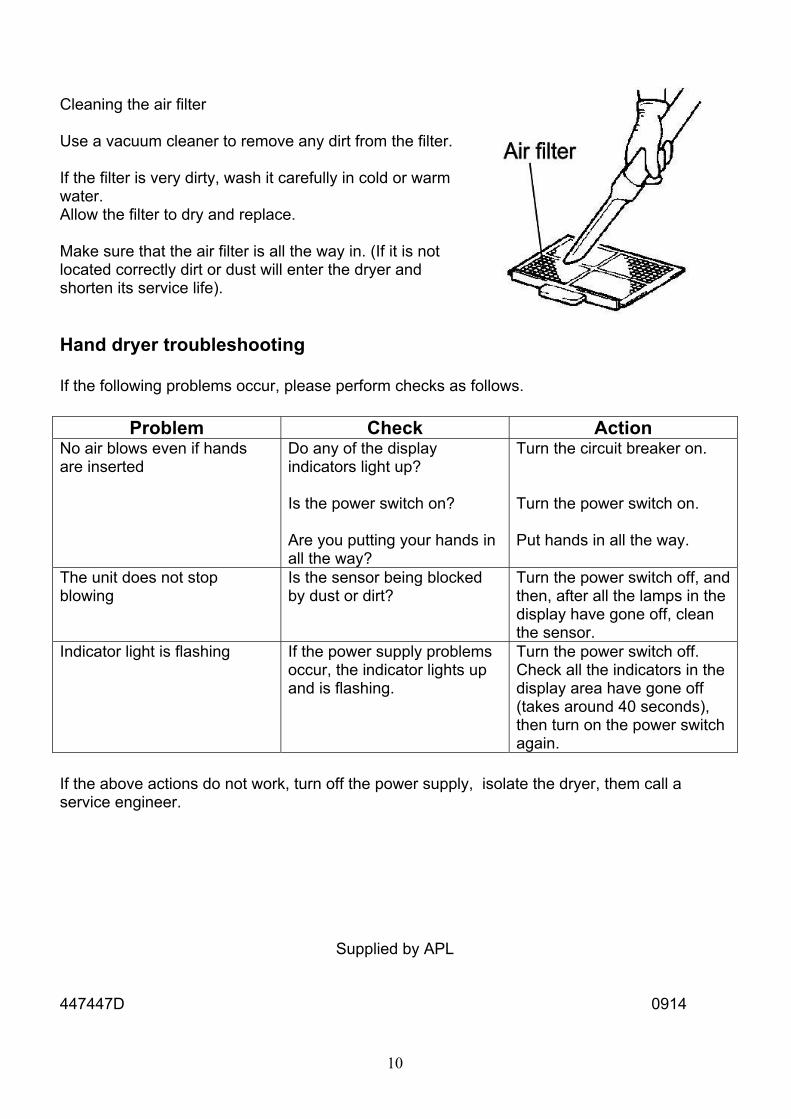
Cleaning the air filter Use a vacuum cleaner to remove any dirt from the filter. If the filter is very dirty, wash it carefully in cold or warm water. Allow the filter to dry and replace. Make sure that the air filter is all the way in. (If it is not located correctly dirt or dust will enter the dryer and shorten its service life). Hand dryer troubleshooting If the following problems occur, please perform checks as follows.
Problem Check Action No air blows even if hands are inserted
Do any of the display indicators light up? Is the power switch on? Are you putting your hands in all the way?
Turn the circuit breaker on. Turn the power switch on. Put hands in all the way.
The unit does not stop blowing
Is the sensor being blocked by dust or dirt?
Turn the power switch off, and then, after all the lamps in the display have gone off, clean the sensor.
Indicator light is flashing If the power supply problems occur, the indicator lights up and is flashing.
Turn the power switch off. Check all the indicators in the display area have gone off (takes around 40 seconds), then turn on the power switch again.
If the above actions do not work, turn off the power supply, isolate the dryer, them call a service engineer.
Supplied by APL
447447D 0914
Related Documents