GUITAR RIG SESSION SETUP GUIDE Connect your guitar or bass to the in- strument input 1 of the SESSION I/O interface. Make sure the Line/Instru- ment switch is set to Instrument. To use a microphone, connect it to the XLR input. Please refer to the SESSION I/O manual for more infor- mation. You will find the manual in the “Guitar Rig 3” application folder on your Mac and in the “Session IO” fold- er on your PC. Connect your power amplifier, mixer or active speakers to the output 1/2 jacks on the back of the SESSION I/O. NOTE: Please take notice of the output 1/2 level (volume) settings when doing this! Start your GUITAR RIG 3 XE software. In GUITAR RIG 3 XE, go to Audio and MIDI Settings (PC) or Preferences (Mac ® ). 4 Please use the “Guitar Rig 3” installer to install the GUITAR RIG 3 XE software and the NI USB Audio hardware driver on your computer. Please connect the SESSION I/O interface to a USB 2.0 socket on your computer when asked during installation.

Welcome message from author
This document is posted to help you gain knowledge. Please leave a comment to let me know what you think about it! Share it to your friends and learn new things together.
Transcript

GUITAR RIG SESSION SETUP GUIDE
Connect your guitar or bass to the in-strument input 1 of the SESSION I/O interface. Make sure the Line/Instru-ment switch is set to Instrument.
To use a microphone, connect it to the XLR input. Please refer to the SESSION I/O manual for more infor-mation. You will fi nd the manual in the
“Guitar Rig 3” application folder on your Mac and in the “Session IO” fold-er on your PC.
Connect your power amplifi er, mixer or active speakers to the output 1/2 jacks on the back of the SESSION I/O.
NOTE: Please take notice of the output 1/2 level (volume) settings when doing this!
Start your GUITAR RIG 3 XE software.
In GUITAR RIG 3 XE, go to Audio and MIDI Settings (PC) or Preferences (Mac®).
4
Please use the “Guitar Rig 3” installer to install the GUITAR RIG 3 XE software and the NI USB Audio hardware driver on your computer. Please connect the SESSION I/O interface to a USB 2.0 socket on your computer when asked during installation.
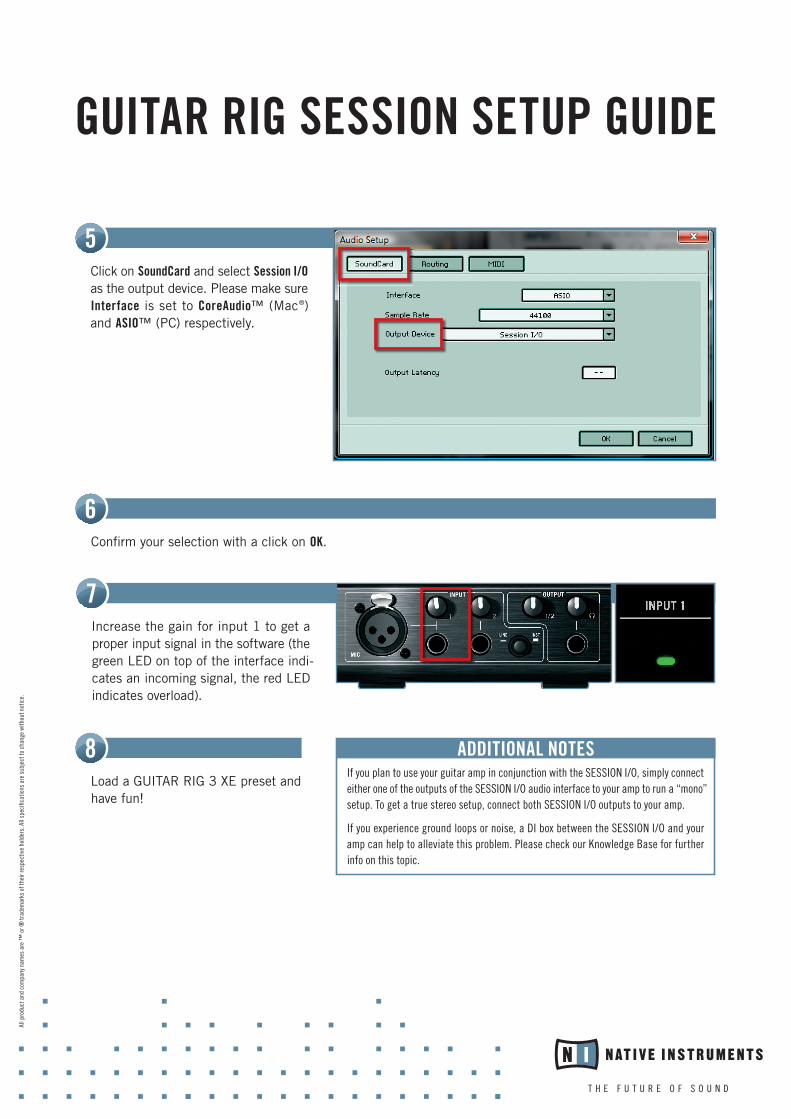
Click on SoundCard and select Session I/O as the output device. Please make sure Interface is set to CoreAudio™ (Mac®) and ASIO™ (PC) respectively.
5
Confi rm your selection with a click on OK.
6
Increase the gain for input 1 to get a proper input signal in the software (the green LED on top of the interface indi-cates an incoming signal, the red LED indicates overload).
7
Load a GUITAR RIG 3 XE preset and have fun!
8If you plan to use your guitar amp in conjunction with the SESSION I/O, simply connect either one of the outputs of the SESSION I/O audio interface to your amp to run a “mono” setup. To get a true stereo setup, connect both SESSION I/O outputs to your amp.
If you experience ground loops or noise, a DI box between the SESSION I/O and your amp can help to alleviate this problem. Please check our Knowledge Base for further info on this topic.
ADDITIONAL NOTES
All p
rodu
ct a
nd c
ompa
ny n
ames
are
™ o
r ® tr
adem
arks
of t
heir
resp
ectiv
e ho
lder
s. A
ll sp
ecifi
catio
ns a
re s
ubje
ct to
cha
nge
with
out n
otic
e.
GUITAR RIG SESSION SETUP GUIDE
Related Documents