Guidelines for Print Files File Types We Can Accept The best results are achieved in Illustrator with vector based output. Please save the file in one of the following formats: • PDF • AI • EPS How to Get the File to Us • Using an FTP program (we recommend Filezilla) • Upload your file to our FTP site: ftp.vistalogics.com o User name: client o Password: artwork o After uploading, send the file name to your account representative. • Deliver a CD or DVD to 2342 Danbury Lane, Gainesville GA 30507. • We can download from your FTP site or other online file delivery system. Send the link to your account representative. Building Your File • File dimensions – set up the file at full size of the output. Include ½” outside trim marks for areas that bleed. • Document color mode – Supply all files in RGB. • Graphics – vector graphics are preferred. Non-vector images, such as photographs: o Must be at least 150 dpi at final print size. Never use low resolution images; re-saving a low res image as a larger file will not increase its quality. o Must be converted to RGB. o Check resolution of your file by zooming in to 100% on your computer screen. If the image looks unfocused or pixilated, the resolution is too low. • Layers – do not flatten file. Keeping layers intact allows us to color correct pieces of your file if needed. • Fonts – convert all fonts to outlines • Links – embed all graphics into one final file; there should be no links. • To open the Pantone solid coated palette, click the menu icon in the upper right corner of the Illustrator swatches palette, go to Open Swatch Library > Color Books > PANTONE Solid Coated. In Photoshop, go directly to PANTONE Solid Coated. • When changing color modes, please note that selecting objects then going to Edit>Edit Colors> Convert to RGB or Convert to CMYK will delete the Pantone information in your file. • When printed, some RGB and CMYK colors, especially oranges, reds and blacks, will appear dull and faded. If you have a color that needs to “pop” when printed, be sure to specify a Pantone color. These guidelines are provided to help achieve the best results as efficiently as possible. If you need assistance with these guidelines or want more information on how to best build and submit graphics files for our large format printers, please contact us. Pantone CMYK Pantone CMYK General Color Guidelines The following guidelines will yield the best results: • Color matching – use the Pantone Solid Coated Swatch Book to specify colors in the file. Due to different printers, ink and media, not all colors can be precisely duplicated. We will do our best to come as close as possible to the colors you request, but we cannot guarantee exact color matches. If you need a very close or exact color match please discuss this with your account representative. • Backup Color Specifications: In addition to specifying these colors in your file, please provide the spot colors to your account representative. • Black: For a rich black, specify Pantone Black C. Be sure to use this throughout your file. • Transparencies: Do not overuse transparencies. Color matching a transparency is impossible. • If color-matching has not been properly specified in your file, we will print directly from the files provided. P O Box 1690 Flowery Branch GA 30542 | 678-717-1200 | VISTALOGICS.COM

Welcome message from author
This document is posted to help you gain knowledge. Please leave a comment to let me know what you think about it! Share it to your friends and learn new things together.
Transcript

Guidelines for Print Files
File Types We Can Accept
The best results are achieved in Illustrator with vector based output. Please save the file in one of the following formats: • PDF• AI• EPS
How to Get the File to Us• Using an FTP program (we recommend Filezilla)• Upload your file to our FTP site: ftp.vistalogics.com o User name: client o Password: artwork o After uploading, send the file name to your account representative.• Deliver a CD or DVD to 2342 Danbury Lane, Gainesville GA 30507.• We can download from your FTP site or other online file delivery system. Send the link to your account representative.
Building Your File
• File dimensions – set up the file at full size of the output. Include ½” outside trim marks for areas that bleed.• Document color mode – Supply all files in RGB.• Graphics – vector graphics are preferred. Non-vector images, such as photographs: o Must be at least 150 dpi at final print size. Never use low resolution images; re-saving a low res image as a larger file will not increase its quality. o Must be converted to RGB. o Check resolution of your file by zooming in to 100% on your computer screen. If the image looks unfocused or pixilated, the resolution is too low.• Layers – do not flatten file. Keeping layers intact allows us to color correct pieces of your file if needed.• Fonts – convert all fonts to outlines• Links – embed all graphics into one final file; there should be no links.
• To open the Pantone solid coated palette, click the menu icon in the upper right corner of the Illustrator swatches palette, go to Open Swatch Library > Color Books > PANTONE Solid Coated. In Photoshop, go directly to PANTONE Solid Coated.
• When changing color modes, please note that selecting objects then going to Edit>Edit Colors> Convert to RGB or Convert to CMYK will delete the Pantone information in your file.
• When printed, some RGB and CMYK colors, especially oranges, reds and blacks, will appear dull and faded. If
you have a color that needs to “pop” when printed, be sure to specify a Pantone color.
These guidelines are provided to help achieve the best results as efficiently as possible.If you need assistance with these guidelines or want more information on how to best build and submit graphics files
for our large format printers, please contact us.
Pantone CMYK Pantone CMYK
General Color Guidelines
The following guidelines will yield the best results:
• Color matching – use the Pantone Solid Coated Swatch Book to specify colors in the file. Due to different printers, ink and media, not all colors can be precisely duplicated. We will do our best to come as close as possible to the colors you request, but we cannot guarantee exact color matches. If you need a very close or exact color match please discuss this with your account
r epresentative.
• Backup Color Specifications: In addition to specifying these colors in your file, please provide the spot colors to your account representative.
• Black: For a rich black, specify Pantone Black C. Be sure to use this throughout your file.
• Transparencies: Do not overuse transparencies. Color matching a transparency is impossible.
• If color-matching has not been properly specified in your file, we will print directly from the files provided.
P O Box 1690 Flowery Branch GA 30542 | 678-717-1200 | VISTALOGICS.COM
• Before printing your file, we will test it for any gradient issues such as banding. We will inform you of any problems before we proceed with printing.
• You may request a sample print of your file by contacting your account representative. A sample print will give you a good example of how our printers will interpret your file.
Posterization
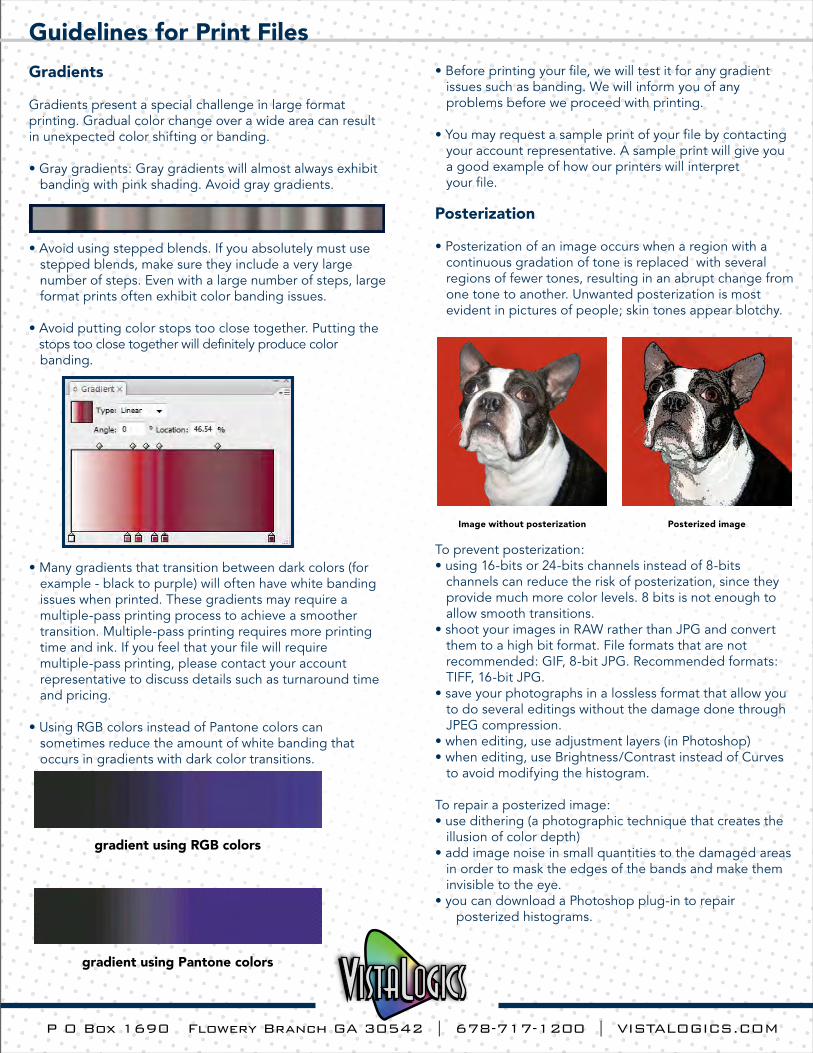
• Posterization of an image occurs when a region with a continuous gradation of tone is replaced with several regions of fewer tones, resulting in an abrupt change from one tone to another. Unwanted posterization is most evident in pictures of people; skin tones appear blotchy.
To prevent posterization:• using 16-bits or 24-bits channels instead of 8-bits channels can reduce the risk of posterization, since they provide much more color levels. 8 bits is not enough to allow smooth transitions. • shoot your images in RAW rather than JPG and convert them to a high bit format. File formats that are not recommended: GIF, 8-bit JPG. Recommended formats: TIFF, 16-bit JPG. • save your photographs in a lossless format that allow you to do several editings without the damage done through JPEG compression. • when editing, use adjustment layers (in Photoshop)• when editing, use Brightness/Contrast instead of Curves to avoid modifying the histogram.
To repair a posterized image:• use dithering (a photographic technique that creates the illusion of color depth)• add image noise in small quantities to the damaged areas in order to mask the edges of the bands and make them invisible to the eye.• you can download a Photoshop plug-in to repair
posterized histograms.
Guidelines for Print Files
Gradients
Gradients present a special challenge in large format printing. Gradual color change over a wide area can result in unexpected color shifting or banding.
• Gray gradients: Gray gradients will almost always exhibit banding with pink shading. Avoid gray gradients.
• Avoid using stepped blends. If you absolutely must use stepped blends, make sure they include a very large number of steps. Even with a large number of steps, large format prints often exhibit color banding issues.
• Avoid putting color stops too close together. Putting the stops too close together will definitely produce color banding.
• Many gradients that transition between dark colors (for example - black to purple) will often have white banding issues when printed. These gradients may require a multiple-pass printing process to achieve a smoother transition. Multiple-pass printing requires more printing time and ink. If you feel that your file will require multiple-pass printing, please contact your account representative to discuss details such as turnaround time and pricing.
• Using RGB colors instead of Pantone colors can sometimes reduce the amount of white banding that occurs in gradients with dark color transitions.
Image without posterization Posterized image
P O Box 1690 Flowery Branch GA 30542 | 678-717-1200 | VISTALOGICS.COM

Guidelines for Print Files
Transparency, Overprinting and Flattening:
Transparency refers to objects that are not 100% opaque or those that use effects such as blending modes, soft drop shadows, or feathered edges. Transparencies add complexity to a design since they interact closely with other layered artwork.
Overprinting is when one graphical element is placed over the top of another so only the top graphic is visible. Overprinting requires that the file contain information about the depth of the objects and layers in relation to each other.
When using transparencies or overprinting what appears on the screen can differ from what is printed. This will depending on the workflow, formats used, and printing device. To overcome these problems, graphics with transparent effects are often completely flattened or rasterized. When you print a file, flatten a file or convert it into a format that does not support native transparency instructions, all transparent objects in a file as well as objects that interact with transparency are flattened. The process of flattening removes the transparency settings and creates individual objects that take on the same appearance as the original transparent objects, but in a format that can be understood by the printing device or file format. During flattening, all overlapping areas of a group of objects affected by transparency are broken down into separate opaque pieces that may include vectors, raster data, or both. The end result no longer contains native graphical elements or transparency settings. Once flattened, the original objects can no longer be modified. For this reason, it is best to retain live transparency settings until the last possible point in the workflow.
The following file formats do not support native transparency, and must be flattened.
• Native Illustrator 8 or earlier
• EPS files created by Illustrator 8 or earlier
• Adobe PDF 1.3 (Acrobat 4 compatibility)
• Artwork copied to the clipboard with both AICB and Preserve Appearance and Overprints checked (found in Preferences > File Handling & Clipboard)
• Any format that does not support native transparency, such as PICT, EMF, WMF, GIF, JPEG, BMP, and TIFF
The problems caused by flattening include:
• Pantone and other spot colors are converted to process.
• Overprinting instructions for the arrangement of graphical elements from back to front may get lost or confused either in the initial flattening or at the RIP.
• Vector objects often get rasterized at a resolution too low for the output device.
• Stitching or artifacts may appear.
• It is very complicated and time consuming to edit or fix a flattened filed if the RIP cannot process it correctly.
When sending a file to be printed it is best not to flatten the file at all. This permits the RIP to interpret the file and flatten it for the particular printer, ink and substrate that is being used.
Why We Recommend RGB and Not CMYK You will get the best results if you design in RGB and specify colors using the Pantone Solid Coated Swatch Book. Our RIP recognizes Pantone Solid Coated Swatch color specifications, and our printers are profiled to meet or exceed the Pantone Color Bridge color specifications using ICC profiling software. The ICC profile yields the nearest conversions from Pantone Solid Coated colors specified in your file to the mixture of four colors that our printers use, yielding a close approximation, but not an exact match, to the Pantone Solid Coated swatch book.
If you design using CMYK, your CMYK values will be sent directly to our printer. To get accurate colors you would need to have a custom CMYK profile that matches our printer and ink. The default CMYK ICC profile in the Adobe workflow is the U.S. Web Coated (SWOP) profile. SWOP stands for Specifications for Web Offset Publications and means that default CMYK files target an offset press. It is not possible for us to repurpose a file built with default or custom CMYK profiles to target our dye sublimation printers while faithfully producing the colors you desire.
The use of RGB files is consistent with the process called late binding, recommended by the International Color Consortium (color.org). The idea behind late binding is that you work in the color space appropriate to your device. Computer displays are RGB devices. The software that is used to print your file applies an ICC profile that converts the RGB input into CMYK output.
Keep in mind that digital printers can only print a limited range of colors. If you need to match colors exactly, be sure to request a sample print.
In conclusion, you will get the best results if you design in RGB and specify colors using the Pantone Solid Coated Swatch
Book.
flattened file printedflattened file on screen
P O Box 1690 Flowery Branch GA 30542 | 678-717-1200 | VISTALOGICS.COM
Related Documents