1 Guidebook for First-Time kintone Users Published by Cybozu, Inc. Log in

Welcome message from author
This document is posted to help you gain knowledge. Please leave a comment to let me know what you think about it! Share it to your friends and learn new things together.
Transcript
1
Guidebook for First-Time
kintone Users
Published by Cybozu, Inc.
Log in
2
~ From creating apps to beginning operating ~
Use kintone’s basic functions
Create an app from the beginning ................................................................................. P5~P10
Register kintone users . ............................................................................................... P11~P14
Use the app you created .............................................................................................. P15~P18
Comment functions ...................................................................................................... P19~P20
Change log .................................................................................................................. P21~P22
Benefits of using kintone apps ............................................................................................. P23
Import Excel files to create apps ................................................................................. P24~P27
Add from the app store P28~P30
Beginner Level Section
This section will mainly
focus on explaining the
basic things to do once you
log in to kintone, such as
the fundamentals of
making apps, how to add
users, as well as how to
use basic functions.
3
Create an app from the beginning
In this section, we will utilize an actually usable app as an example of how to create an app. Now let’s
create a task management chart that can be shared among team members.
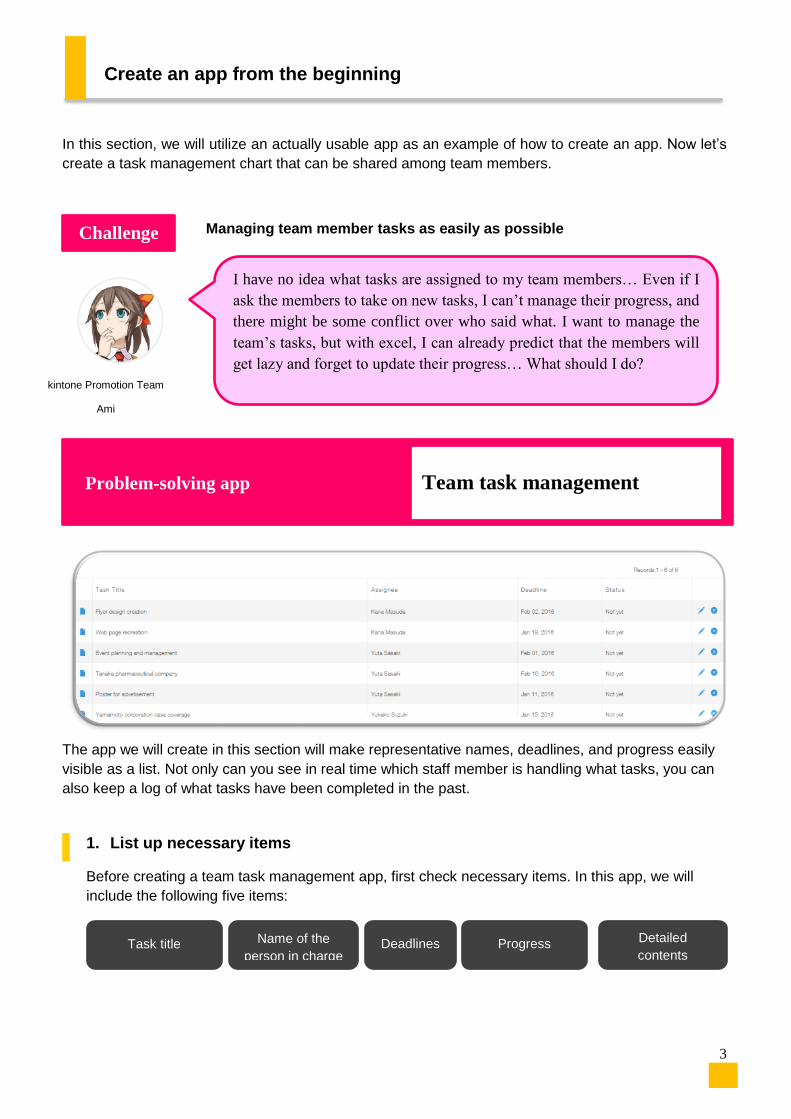
Managing team member tasks as easily as possible
The app we will create in this section will make representative names, deadlines, and progress easily
visible as a list. Not only can you see in real time which staff member is handling what tasks, you can
also keep a log of what tasks have been completed in the past.
1. List up necessary items
Before creating a team task management app, first check necessary items. In this app, we will
include the following five items:
Challenge
kintone Promotion Team
Ami
Ahmin
Problem-solving app Team task management
Task title Name of the
person in charge Deadlines Progress Detailed
contents
I have no idea what tasks are assigned to my team members… Even if I
ask the members to take on new tasks, I can’t manage their progress, and
there might be some conflict over who said what. I want to manage the
team’s tasks, but with excel, I can already predict that the members will
get lazy and forget to update their progress… What should I do?
4
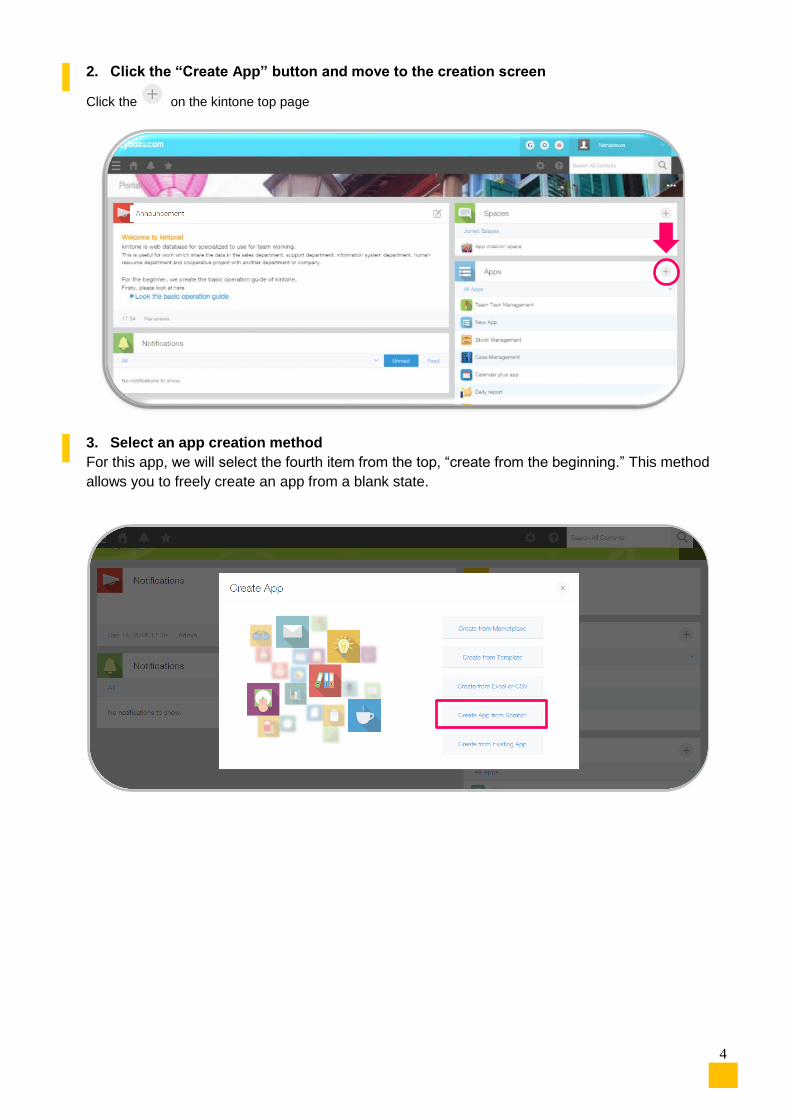
2. Click the “Create App” button and move to the creation screen
Click the on the kintone top page
3. Select an app creation method
For this app, we will select the fourth item from the top, “create from the beginning.” This method
allows you to freely create an app from a blank state.
5
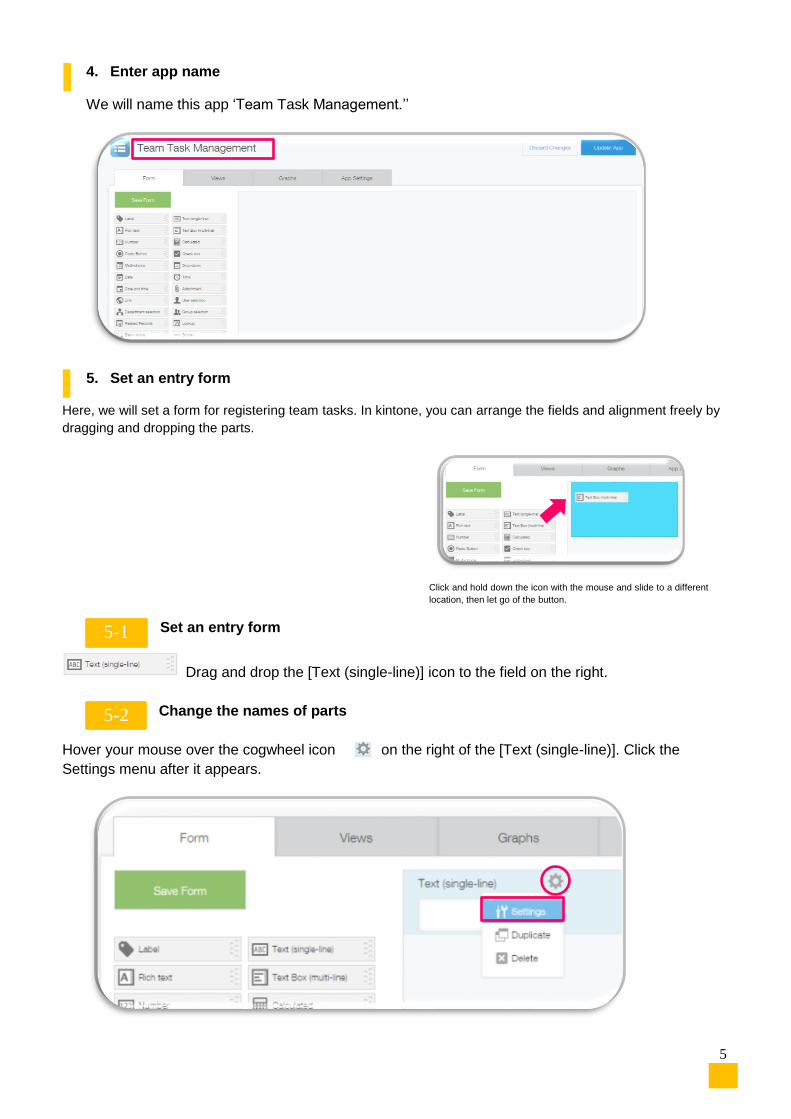
4. Enter app name
We will name this app ‘Team Task Management.’’
5. Set an entry form
Here, we will set a form for registering team tasks. In kintone, you can arrange the fields and alignment freely by
dragging and dropping the parts.
Set an entry form
Drag and drop the [Text (single-line)] icon to the field on the right.
Change the names of parts
Hover your mouse over the cogwheel icon on the right of the [Text (single-line)]. Click the
Settings menu after it appears.
5-1
Click and hold down the icon with the mouse and slide to a different
location, then let go of the button.
5-2
6
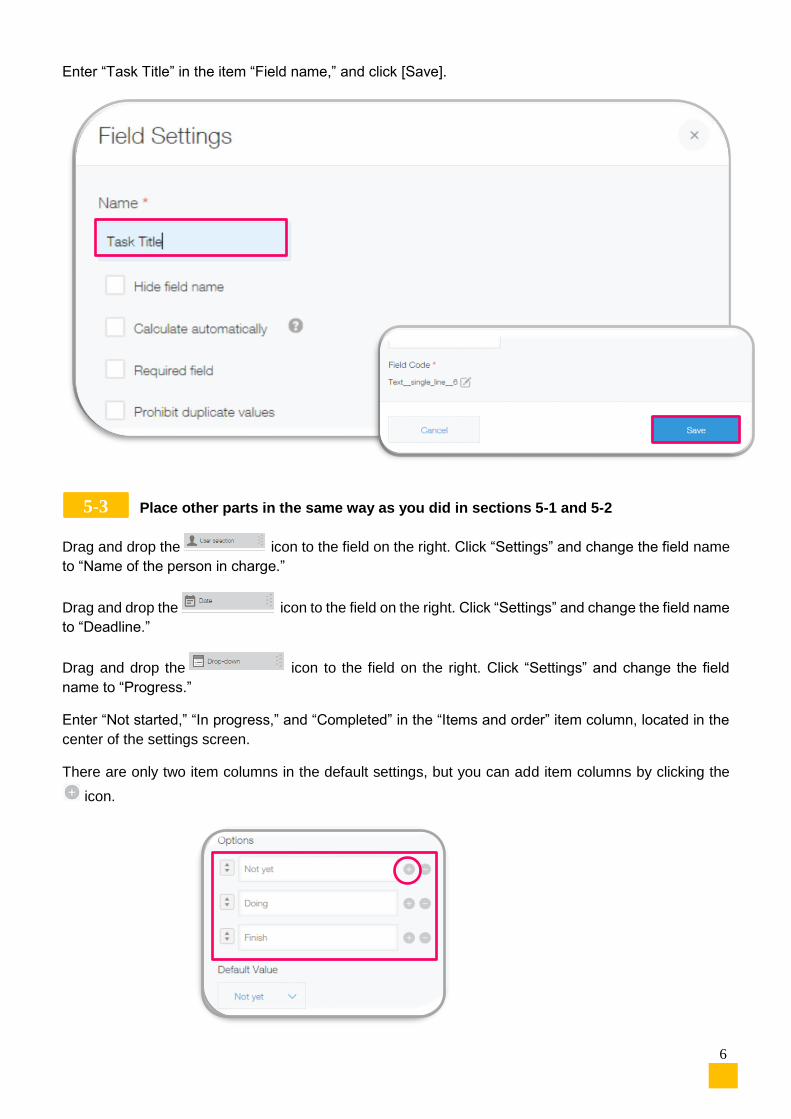
Enter “Task Title” in the item “Field name,” and click [Save].
Place other parts in the same way as you did in sections 5-1 and 5-2
Drag and drop the icon to the field on the right. Click “Settings” and change the field name
to “Name of the person in charge.”
Drag and drop the icon to the field on the right. Click “Settings” and change the field name
to “Deadline.”
Drag and drop the icon to the field on the right. Click “Settings” and change the field
name to “Progress.”
Enter “Not started,” “In progress,” and “Completed” in the “Items and order” item column, located in the
center of the settings screen.
There are only two item columns in the default settings, but you can add item columns by clicking the
icon.
5-3

7
Drag and drop the icon to the field on the right.
Click “Settings,” and change the field name to “Detailed contents.
This concludes the item settings. If there are no problems with the contents, click “Save form” on the
upper left.

8
Click “Publish app” to begin operating the app
This concludes the basic settings of the app.
Click “Publish app” to begin operating the app.
The “Team Task Management App” is complete!
You now have a box to manage your team’s tasks. Register tasks, designate people, and share tasks
with the team using the app to visualize your team’s tasks.
5-4
Add frequently used apps to “Favorites.”
Click the pushpin icon on the left of the app names to save them to your favorites. You can filter and search for apps saved under your favorites in the
top page.
Tips
9
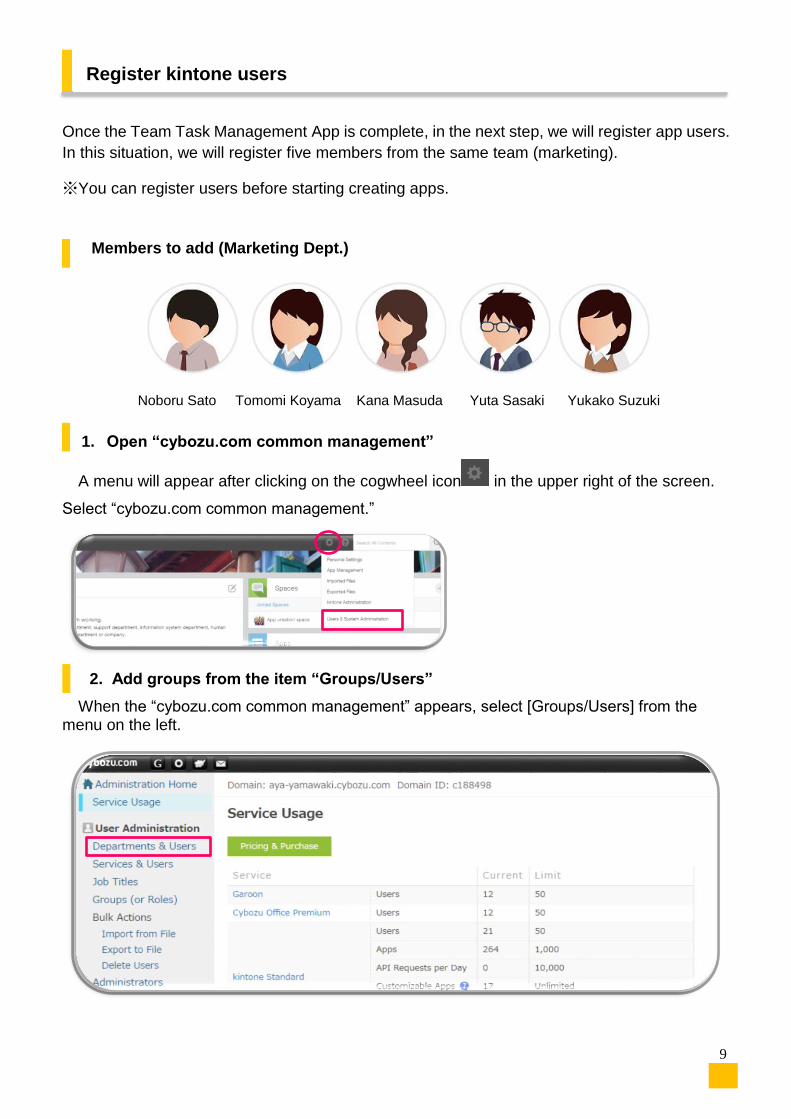
Register kintone users
Once the Team Task Management App is complete, in the next step, we will register app users.
In this situation, we will register five members from the same team (marketing).
※You can register users before starting creating apps.
Members to add (Marketing Dept.)
Noboru Sato Tomomi Koyama Kana Masuda Yuta Sasaki Yukako Suzuki
1. Open “cybozu.com common management”
A menu will appear after clicking on the cogwheel icon in the upper right of the screen.
Select “cybozu.com common management.”
2. Add groups from the item “Groups/Users”
When the “cybozu.com common management” appears, select [Groups/Users] from the menu on the left.
10
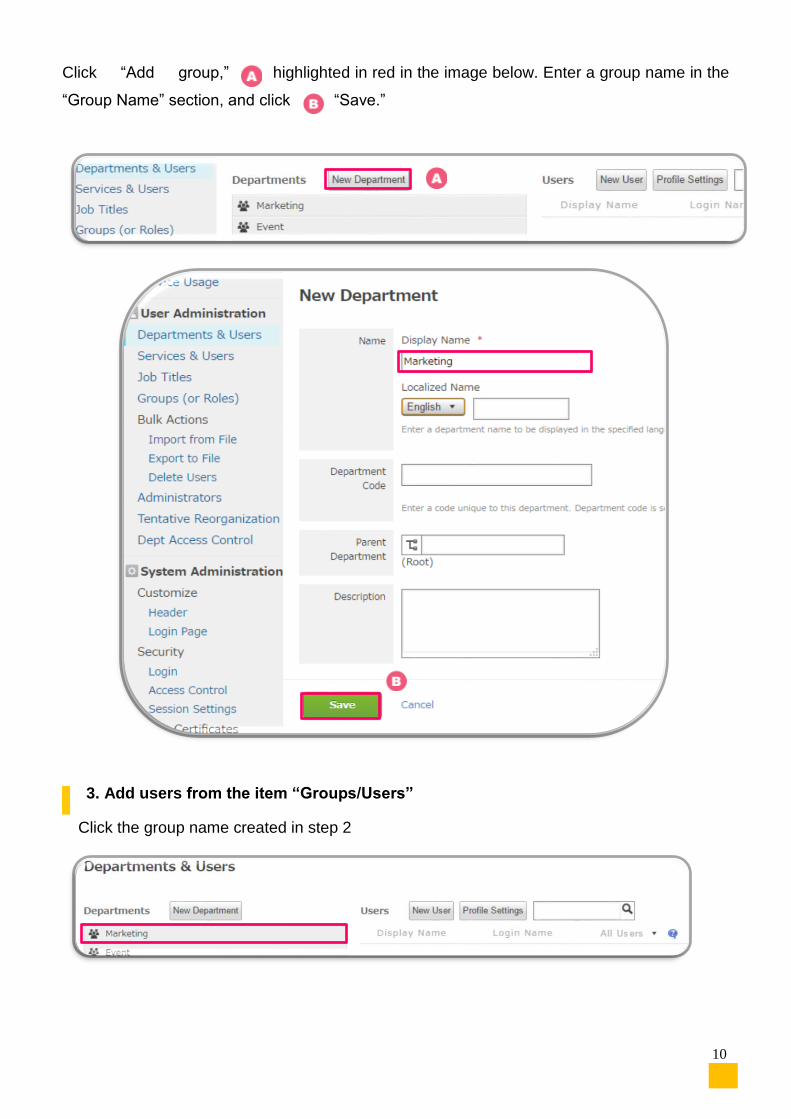
Click “Add group,” highlighted in red in the image below. Enter a group name in the
“Group Name” section, and click “Save.”
3. Add users from the item “Groups/Users”
Click the group name created in step 2
11
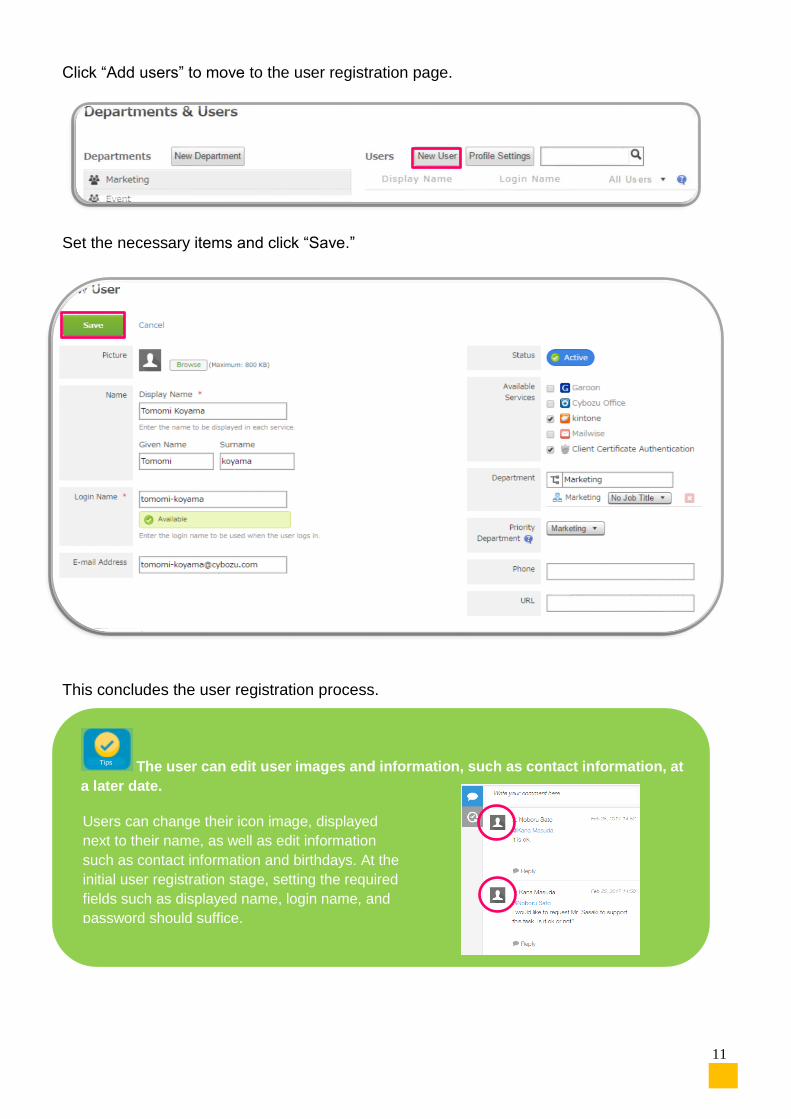
Click “Add users” to move to the user registration page.
Set the necessary items and click “Save.”
This concludes the user registration process.
The user can edit user images and information, such as contact information, at
a later date.
Users can change their icon image, displayed
next to their name, as well as edit information
such as contact information and birthdays. At the
initial user registration stage, setting the required
fields such as displayed name, login name, and
password should suffice.
Tips
12
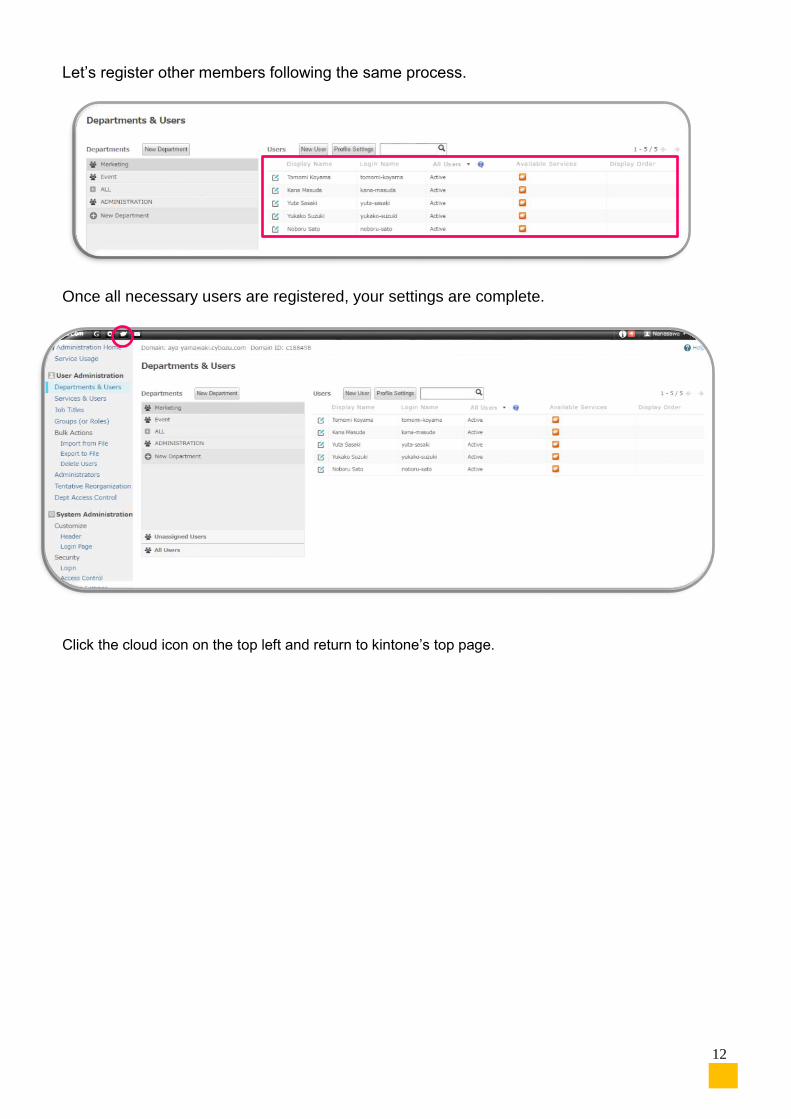
Let’s register other members following the same process.
Once all necessary users are registered, your settings are complete.
Click the cloud icon on the top left and return to kintone’s top page.
13
Use the app you created
Let’s use the app we created with the users we added in the previous section.
Before that, we must determine the current tasks of all members of the marketing department
and register them.
Tomomi Koyama
・Creating the kintone
catalog
・Creating new novelties
・Drafting press releases
Yukako Suzuki
・Creating guidebooks, such as
the one for kintone
・Implementing user
questionnaire surveys
・Coverage of an example case
from Yamamoto Inc.
Sasaki Yuta
・Creating promotional
posters
・Coverage of an example
case from Tanaka Pharmaceuticals
・Planning and managing
event exhibitions
Kana Masuda
· Web site renewal · Creating flyer designs
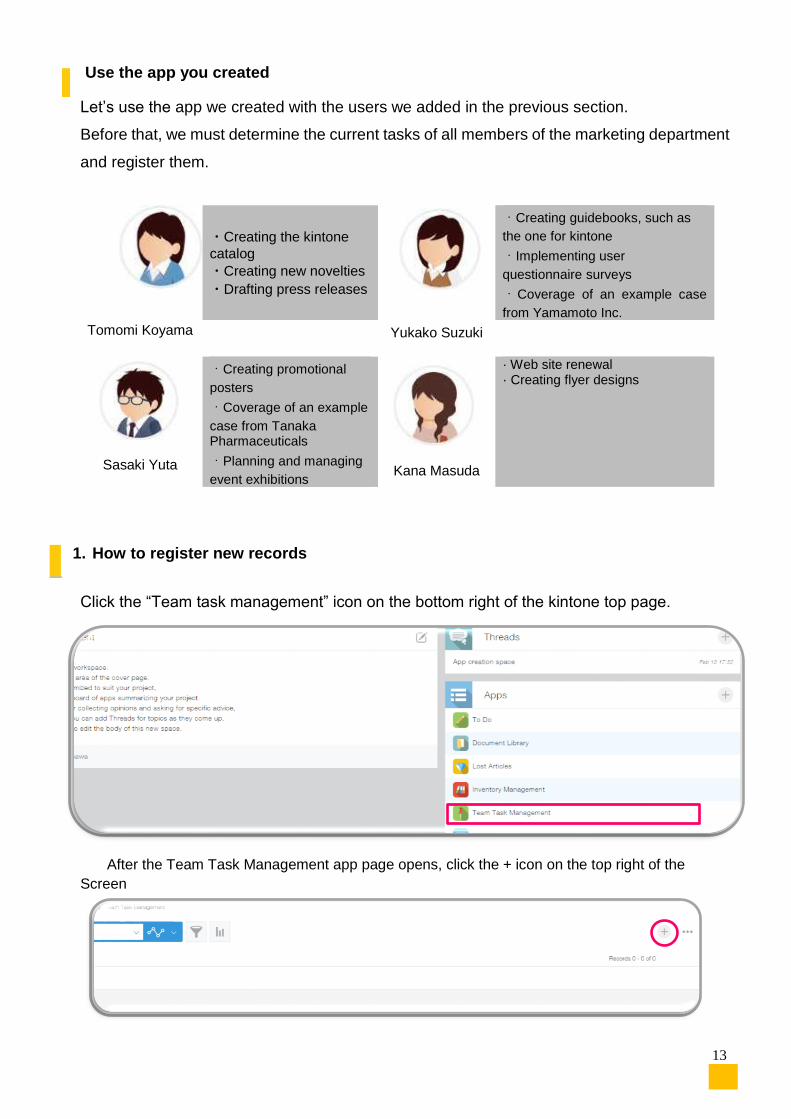
1. How to register new records
Click the “Team task management” icon on the bottom right of the kintone top page.
After the Team Task Management app page opens, click the + icon on the top right of the
Screen
14
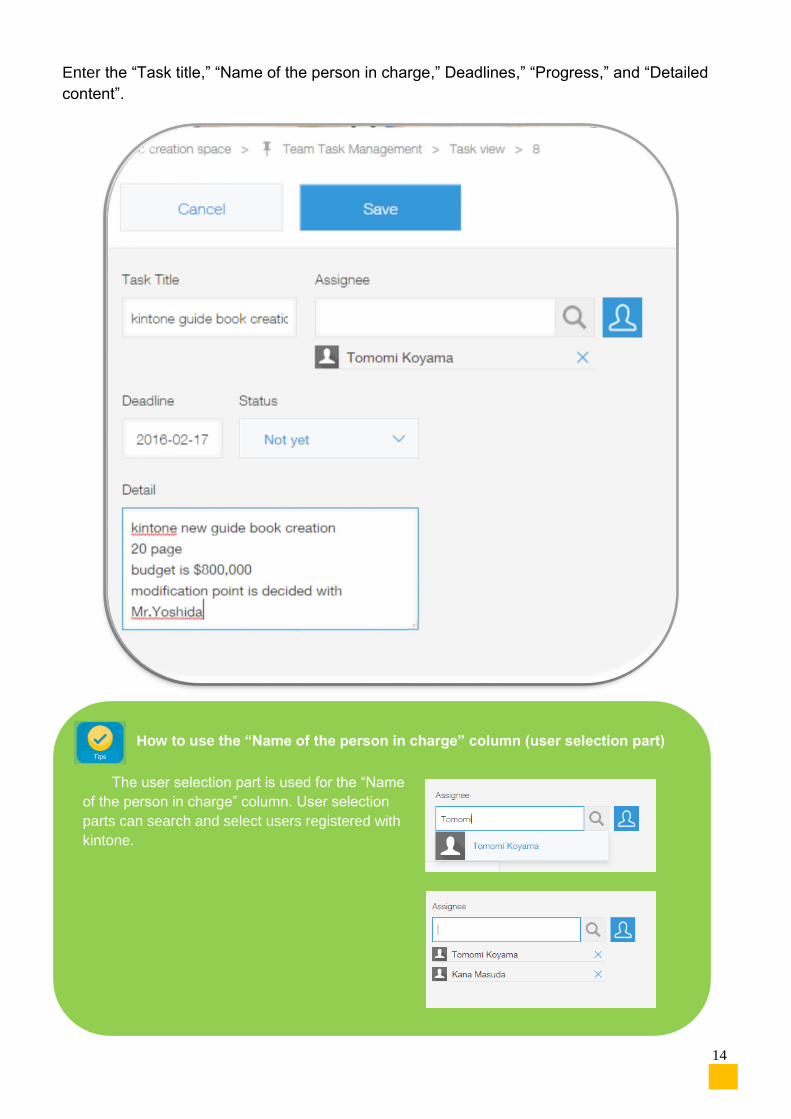
Enter the “Task title,” “Name of the person in charge,” Deadlines,” “Progress,” and “Detailed
content”.
How to use the “Name of the person in charge” column (user selection part)
The user selection part is used for the “Name
of the person in charge” column. User selection
parts can search and select users registered with
kintone.
Tips
15
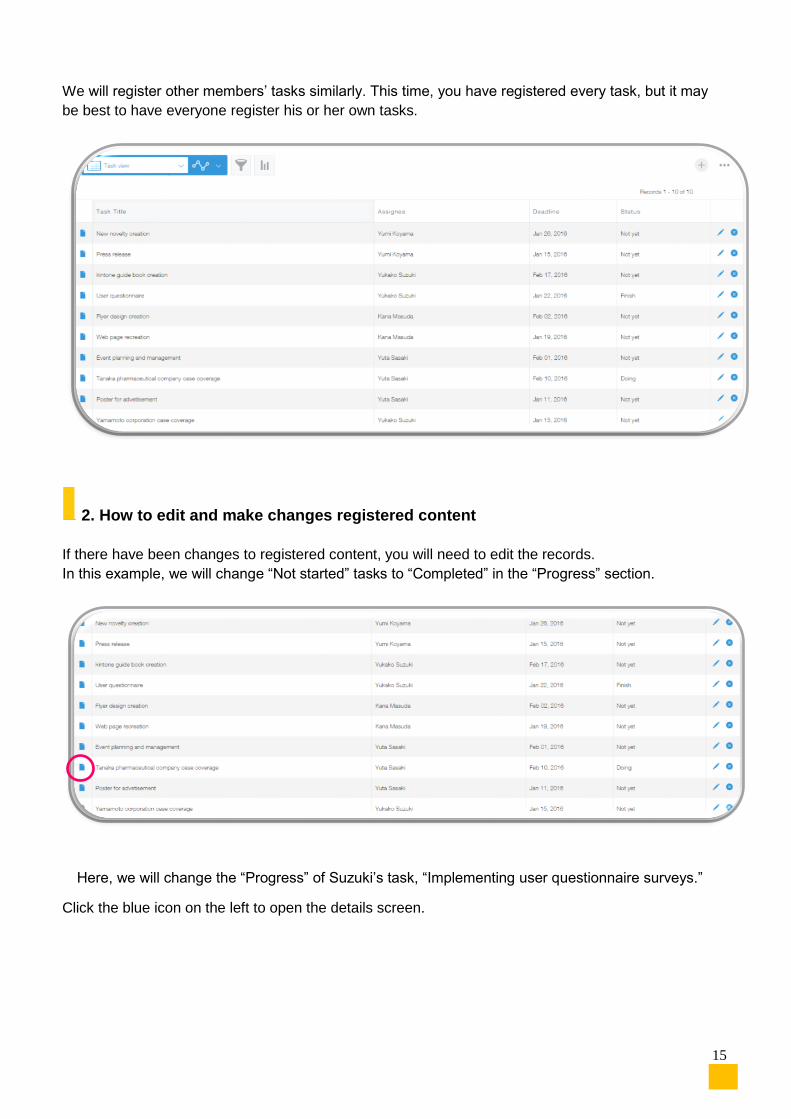
We will register other members’ tasks similarly. This time, you have registered every task, but it may
be best to have everyone register his or her own tasks.
2. How to edit and make changes registered content
If there have been changes to registered content, you will need to edit the records.
In this example, we will change “Not started” tasks to “Completed” in the “Progress” section.
Here, we will change the “Progress” of Suzuki’s task, “Implementing user questionnaire surveys.”
Click the blue icon on the left to open the details screen.
16
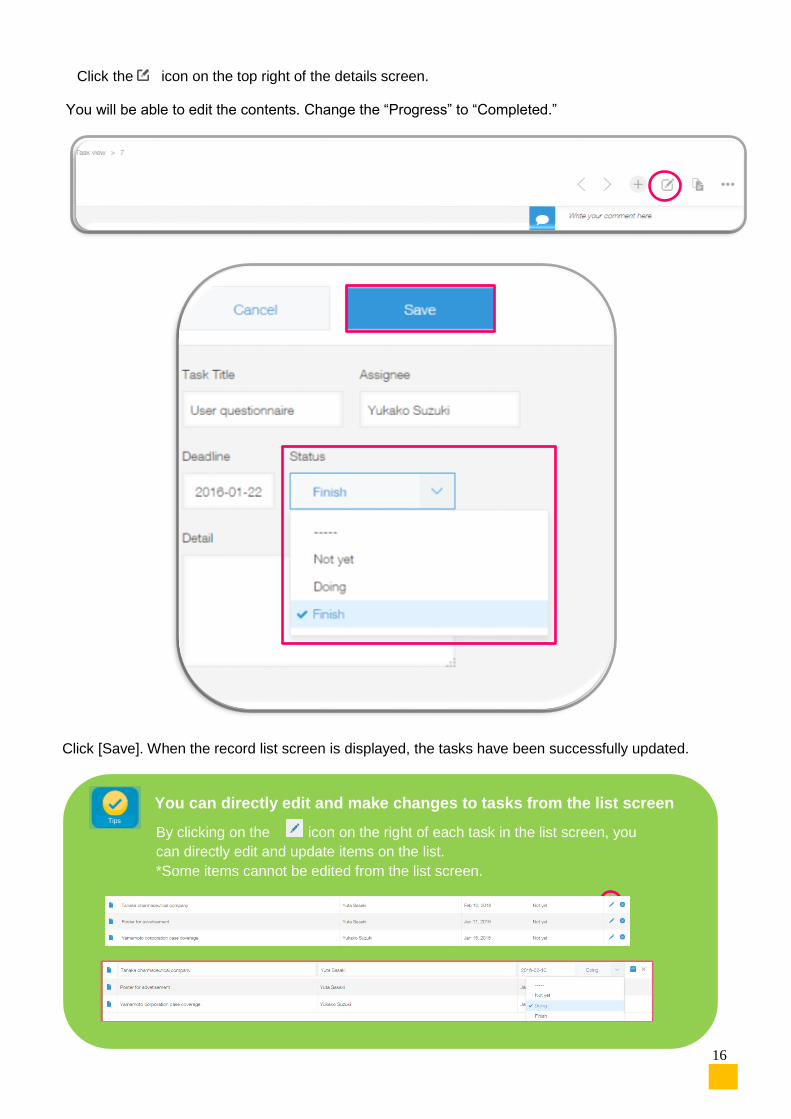
Click the icon on the top right of the details screen.
You will be able to edit the contents. Change the “Progress” to “Completed.”
Click [Save]. When the record list screen is displayed, the tasks have been successfully updated.
You can directly edit and make changes to tasks from the list screen
By clicking on the icon on the right of each task in the list screen, you
can directly edit and update items on the list.
*Some items cannot be edited from the list screen.
Tips
17
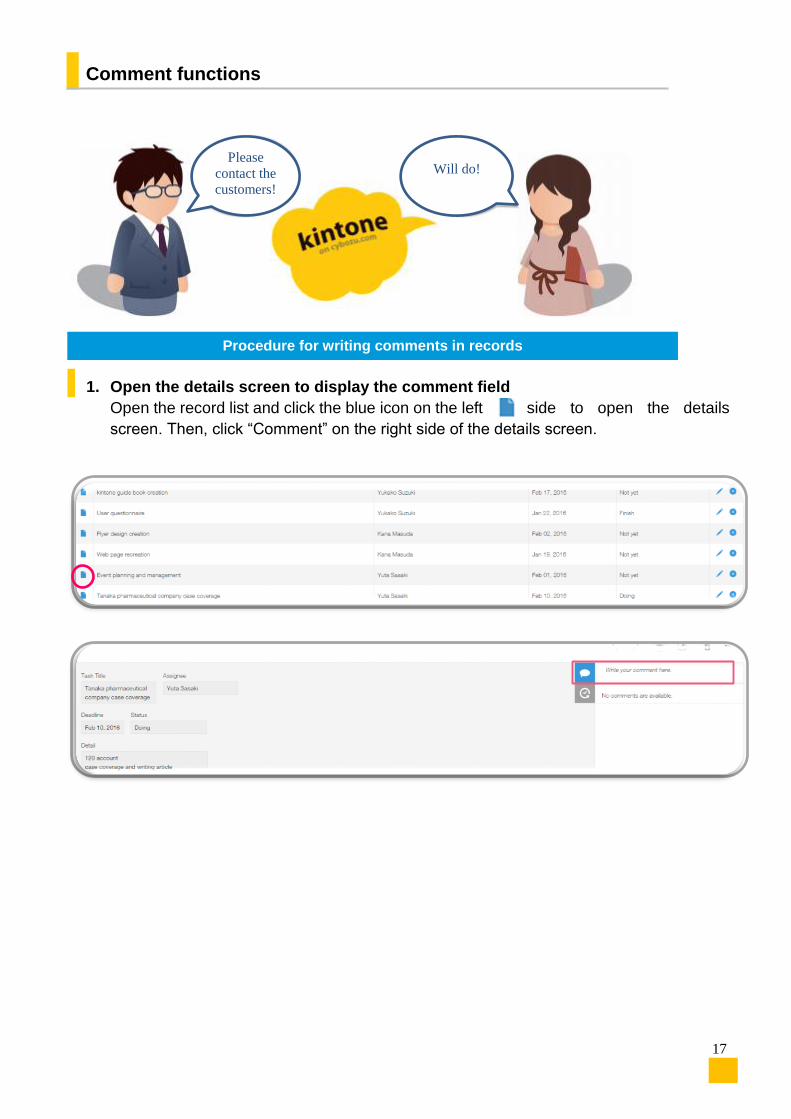
Comment functions
1. Open the details screen to display the comment field
Open the record list and click the blue icon on the left side to open the details
screen. Then, click “Comment” on the right side of the details screen.
Please
contact the
customers!
Will do!
Procedure for writing comments in records
18
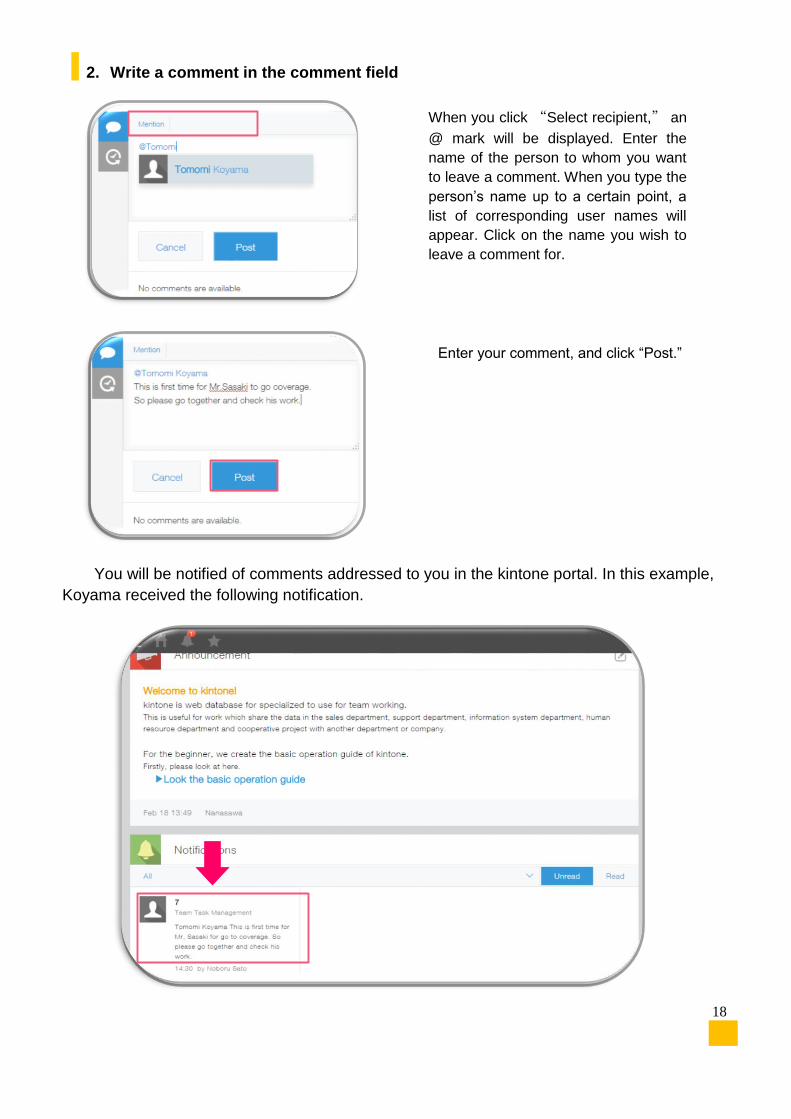
2. Write a comment in the comment field
You will be notified of comments addressed to you in the kintone portal. In this example,
Koyama received the following notification.
When you click “Select recipient,” an
@ mark will be displayed. Enter the
name of the person to whom you want
to leave a comment. When you type the
person’s name up to a certain point, a
list of corresponding user names will
appear. Click on the name you wish to
leave a comment for.
Enter your comment, and click “Post.”
19
Revision history
kintone apps feature a “Revision history” function, which automatically keeps a record of who
made what changes to what items. When sharing information on software such as Excel, it is
easy to lose track of which file is the latest, or what changes have been made.
The revision history function not only prevents such situations, but also allows users to revert to
older data, in case someone accidentally overwrites a file, preventing issues that often occur
when sharing data.
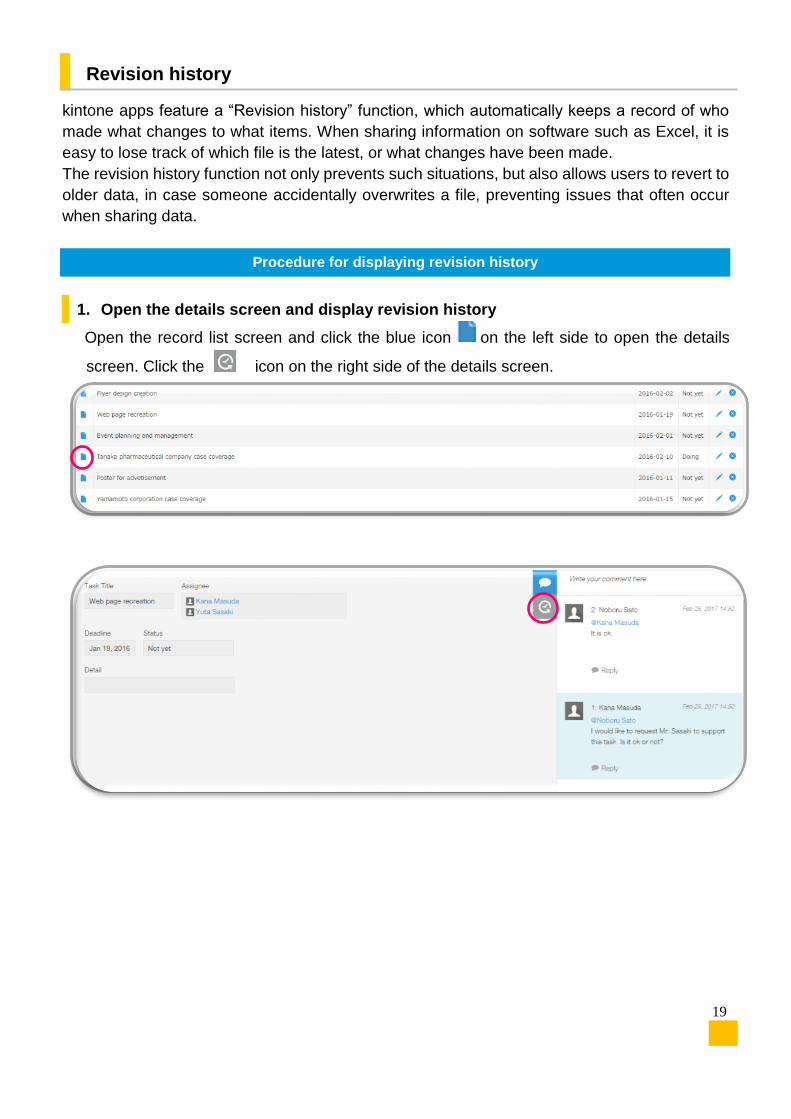
1. Open the details screen and display revision history
Open the record list screen and click the blue icon on the left side to open the details
screen. Click the icon on the right side of the details screen.
Procedure for displaying revision history
20
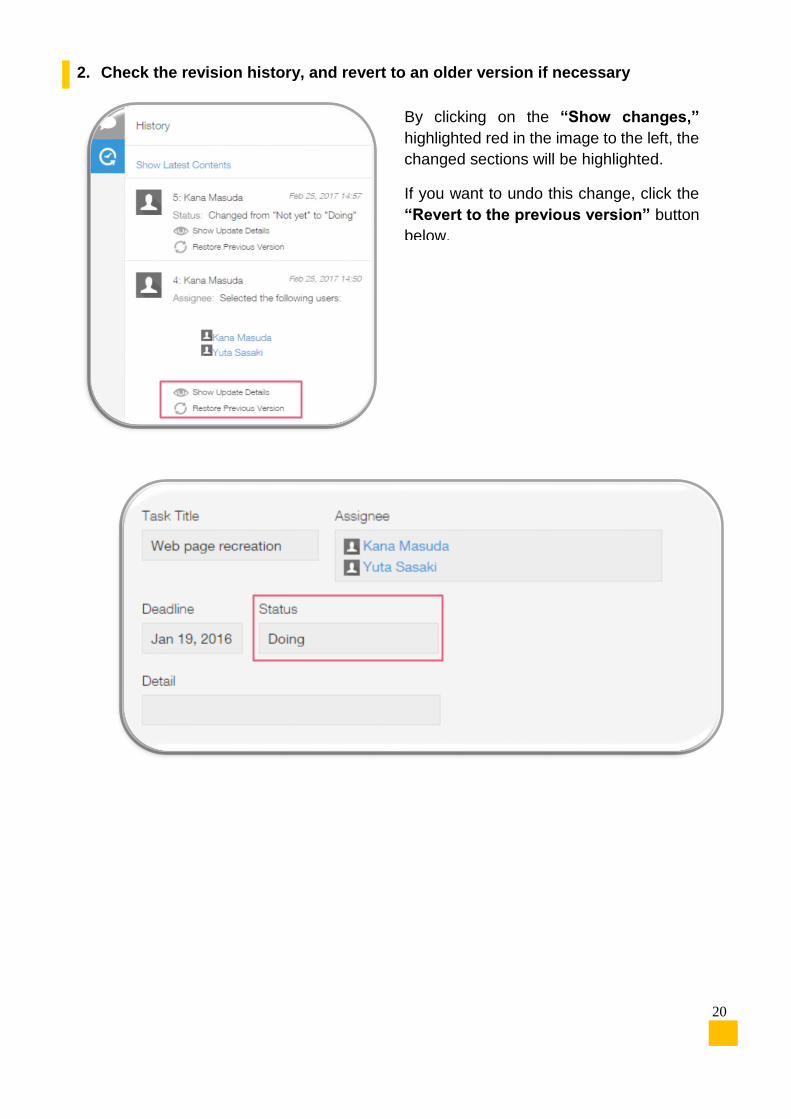
2. Check the revision history, and revert to an older version if necessary
By clicking on the “Show changes,”
highlighted red in the image to the left, the
changed sections will be highlighted.
If you want to undo this change, click the
“Revert to the previous version” button
below.
21
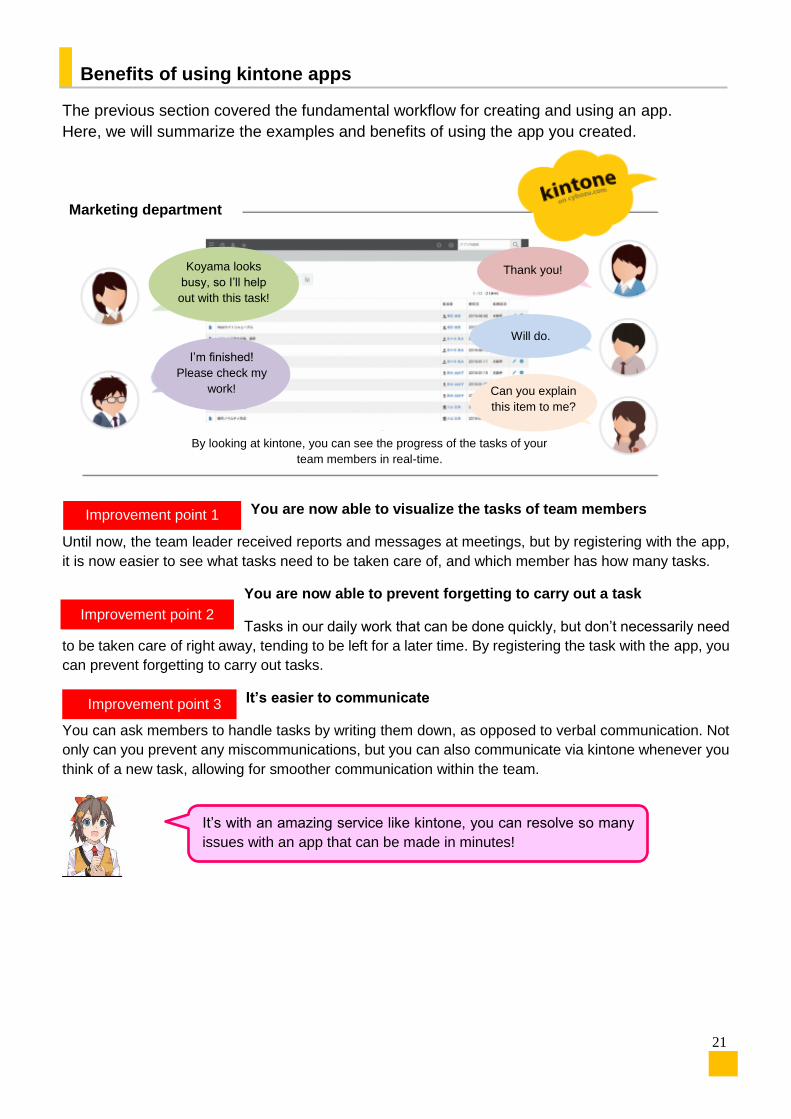
Benefits of using kintone apps
The previous section covered the fundamental workflow for creating and using an app.
Here, we will summarize the examples and benefits of using the app you created.
You are now able to visualize the tasks of team members
Until now, the team leader received reports and messages at meetings, but by registering with the app,
it is now easier to see what tasks need to be taken care of, and which member has how many tasks.
You are now able to prevent forgetting to carry out a task
Tasks in our daily work that can be done quickly, but don’t necessarily need
to be taken care of right away, tending to be left for a later time. By registering the task with the app, you
can prevent forgetting to carry out tasks.
It’s easier to communicate
You can ask members to handle tasks by writing them down, as opposed to verbal communication. Not
only can you prevent any miscommunications, but you can also communicate via kintone whenever you
think of a new task, allowing for smoother communication within the team.
Marketing department
By looking at kintone, you can see the progress of the tasks of your
team members in real-time.
Koyama looks
busy, so I’ll help
out with this task!
I’m finished!
Please check my
work!
Thank you!
Will do.
Can you explain
this item to me?
Improvement point 2
Improvement point 1
Improvement point 3
It’s with an amazing service like kintone, you can resolve so many
issues with an app that can be made in minutes!

22
Import Excel file and make an app
In addition to making an app from scratch by dragging and dropping, kintone users can import
Excel files or use ready-made templates to create apps.
In this section, we will be making a “Client List” app that displays client information as a list.
1. Click the “Create app” button, and move to the creation page
Click the + icon on the kintone portal page.
Our next app Client list app
23
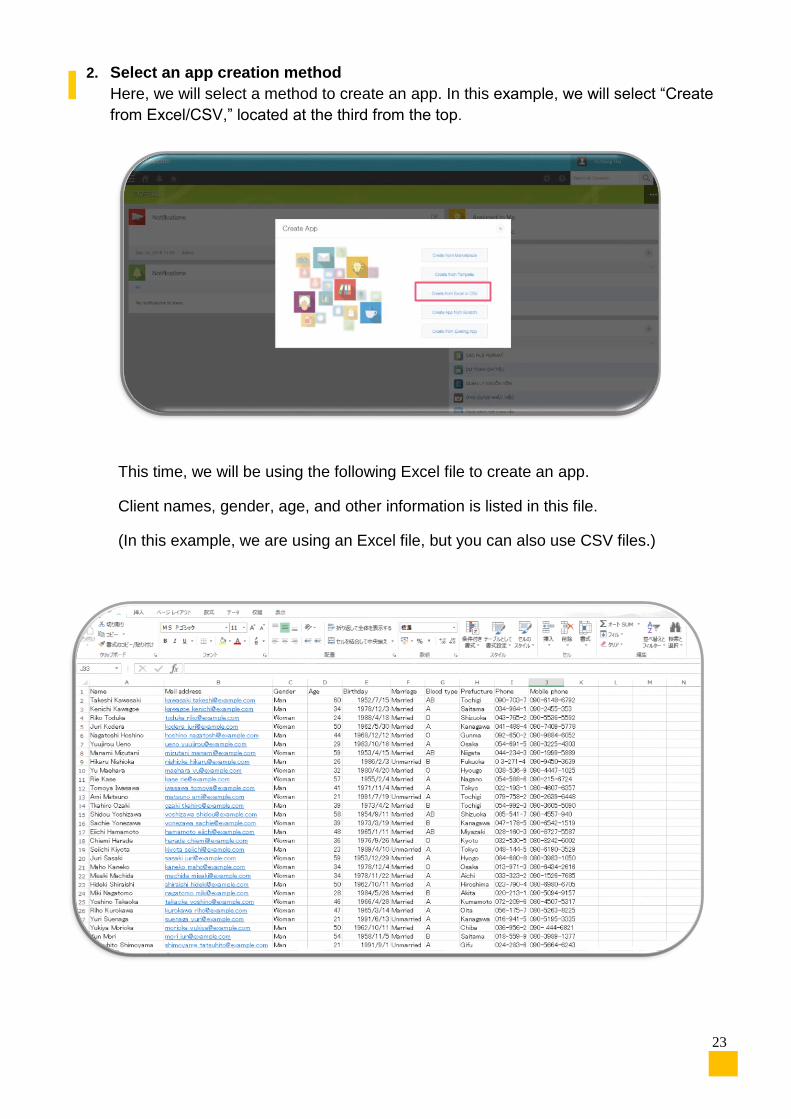
2. Select an app creation method
Here, we will select a method to create an app. In this example, we will select “Create
from Excel/CSV,” located at the third from the top.
This time, we will be using the following Excel file to create an app.
Client names, gender, age, and other information is listed in this file.
(In this example, we are using an Excel file, but you can also use CSV files.)
24
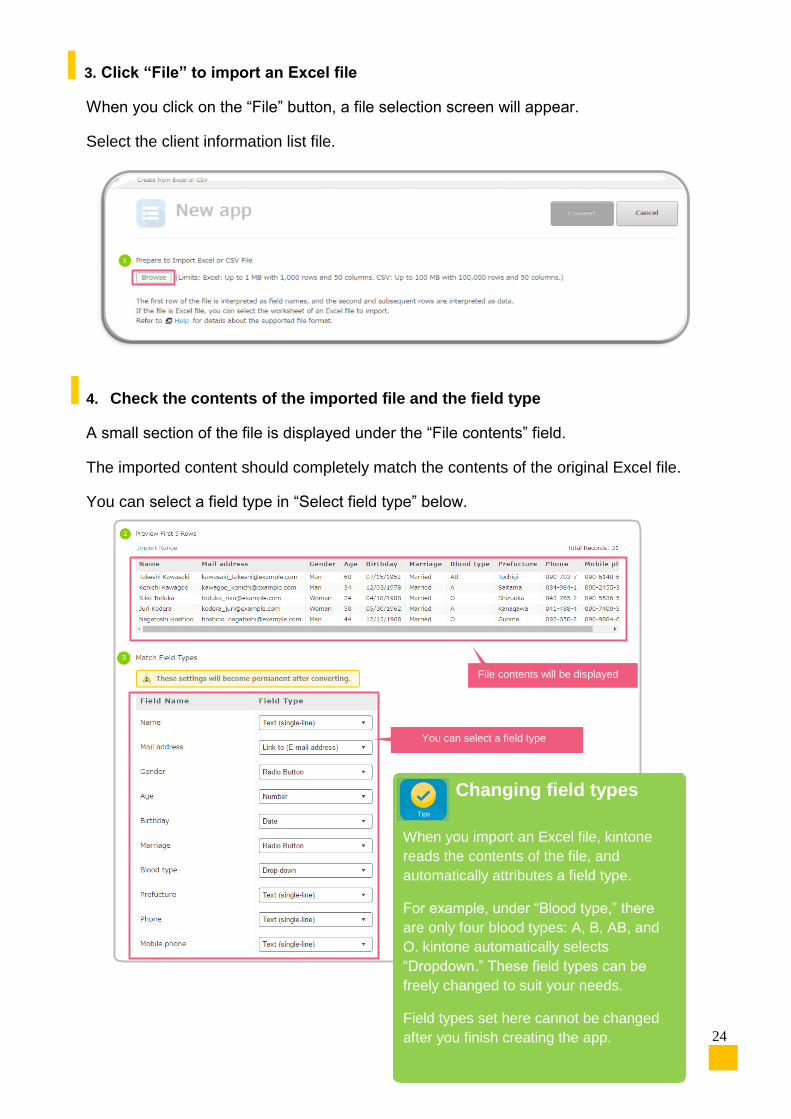
3. Click “File” to import an Excel file
When you click on the “File” button, a file selection screen will appear.
Select the client information list file.
4. Check the contents of the imported file and the field type
A small section of the file is displayed under the “File contents” field.
The imported content should completely match the contents of the original Excel file.
You can select a field type in “Select field type” below.
Changing field types
When you import an Excel file, kintone
reads the contents of the file, and
automatically attributes a field type.
For example, under “Blood type,” there
are only four blood types: A, B, AB, and
O. kintone automatically selects
“Dropdown.” These field types can be
freely changed to suit your needs.
Field types set here cannot be changed
after you finish creating the app.
File contents will be displayed
You can select a field type
Tips
25
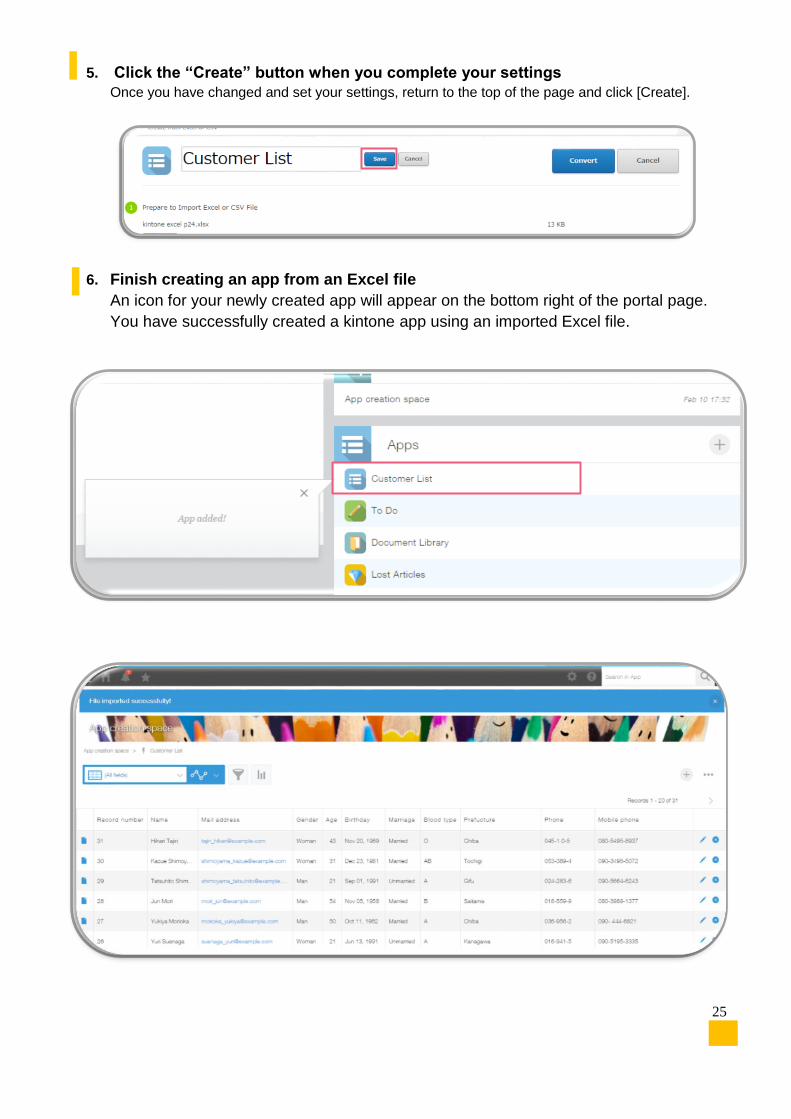
5. Click the “Create” button when you complete your settings
Once you have changed and set your settings, return to the top of the page and click [Create].
6. Finish creating an app from an Excel file
An icon for your newly created app will appear on the bottom right of the portal page.
You have successfully created a kintone app using an imported Excel file.
26
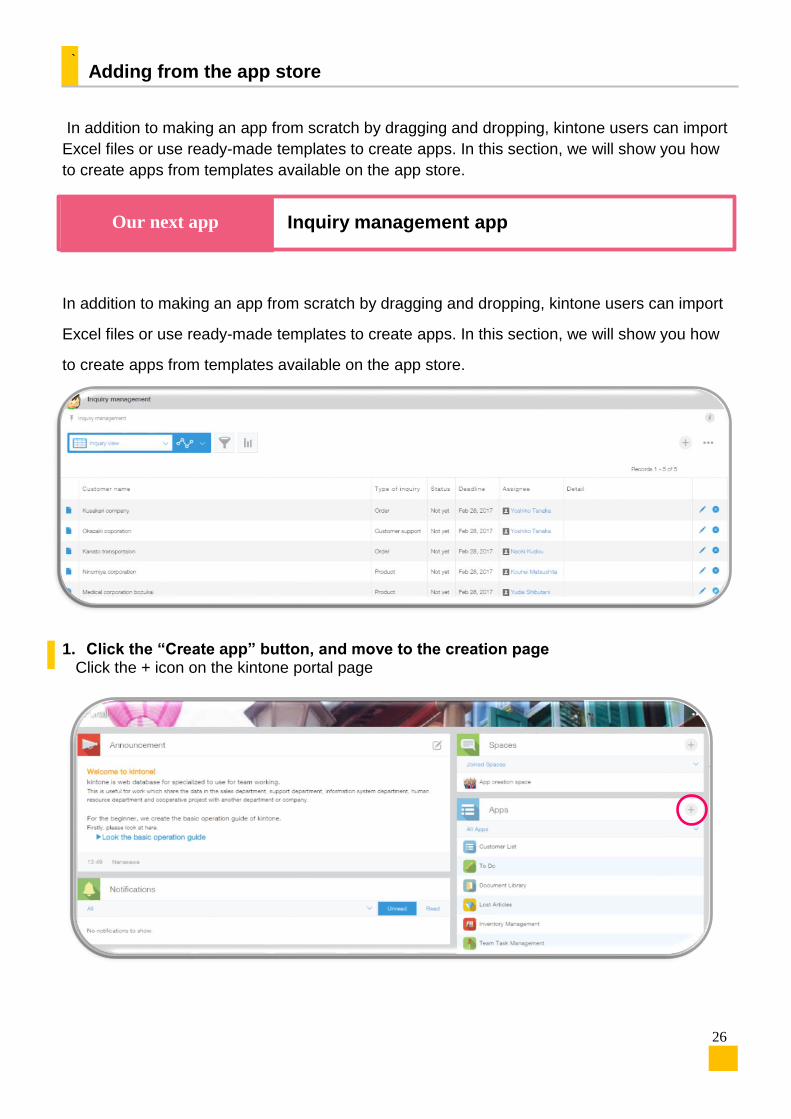
` Adding from the app store
In addition to making an app from scratch by dragging and dropping, kintone users can import
Excel files or use ready-made templates to create apps. In this section, we will show you how
to create apps from templates available on the app store.
In addition to making an app from scratch by dragging and dropping, kintone users can import
Excel files or use ready-made templates to create apps. In this section, we will show you how
to create apps from templates available on the app store.
1. Click the “Create app” button, and move to the creation page
Click the + icon at the top of the kintone portal page.
1. Click the “Create app” button, and move to the creation page Click the + icon on the kintone portal page
Inquiry management app Our next app
27
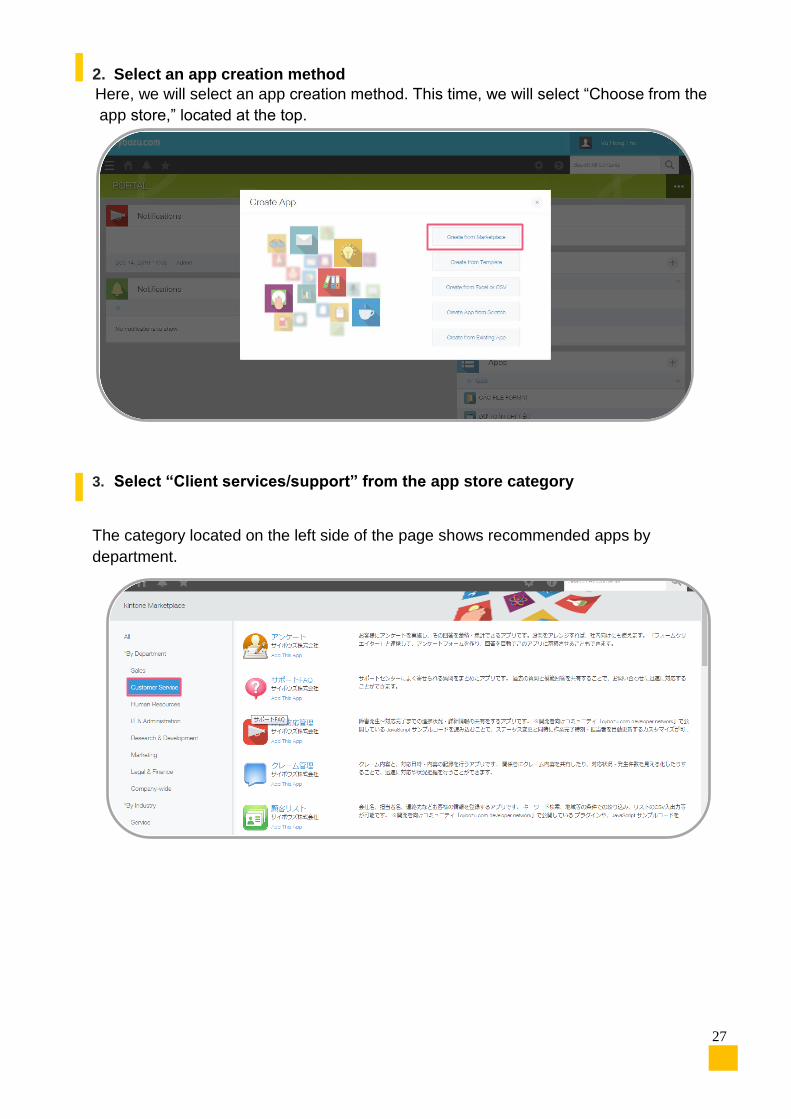
2. Select an app creation method
Here, we will select an app creation method. This time, we will select “Choose from the
app store,” located at the top.
3. Select “Client services/support” from the app store category
The category located on the left side of the page shows recommended apps by
department.
28
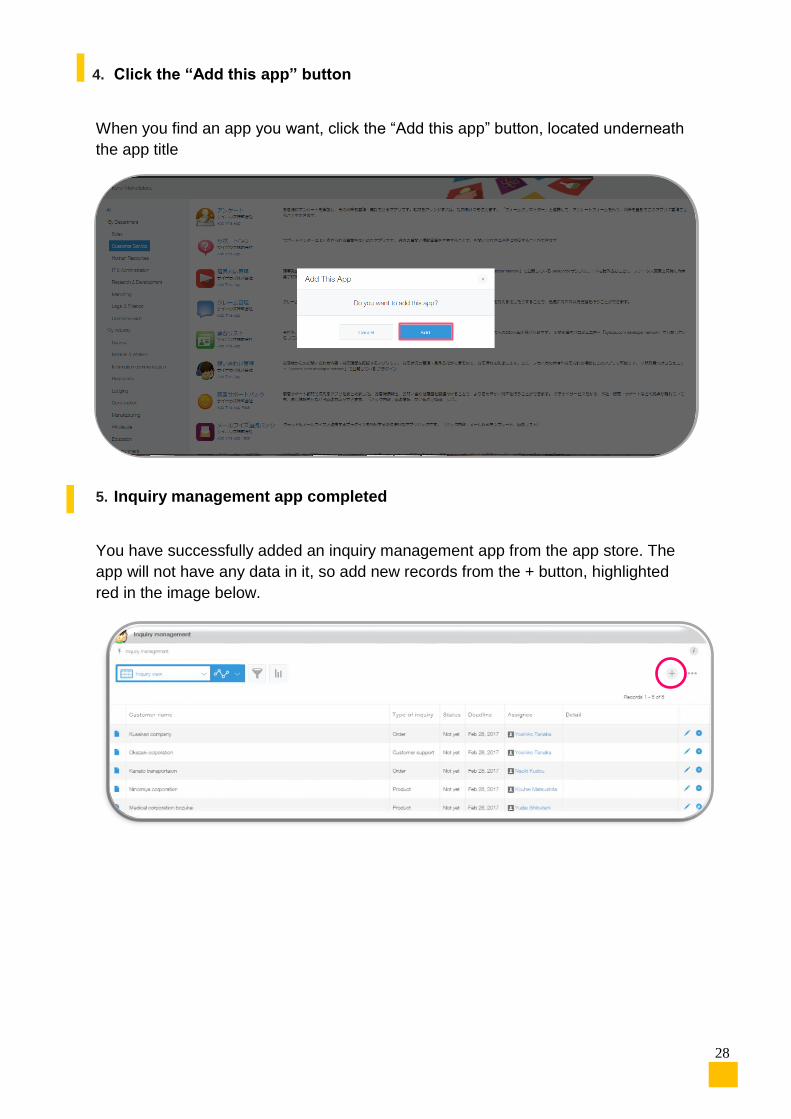
4. Click the “Add this app” button
When you find an app you want, click the “Add this app” button, located underneath
the app title
5. Inquiry management app completed
You have successfully added an inquiry management app from the app store. The
app will not have any data in it, so add new records from the + button, highlighted
red in the image below.
29
Intermediate Level Section
~The freedom to customize for your task~
Make the most of kintone’s useful features.
App customization ............................................................................................................................... P32~P35
Make a graph ....................................................................................................................................... P36~P39
Other useful kintone features ............................................................................................................... Back cover
From here on, we’ll explain how to
take the next step, such as by in
customizing the app or using
a graph to calculate data.
30
Basic customization (adding forms)
App customization
One of kintone’s greatest unique features is that it allows anyone to easily create web apps
and customize them. There are so many cases where as you use an app you created, you
realize there are some forms you’d like to add. Since kintone lets you do everything from
creation to customization without any programming skill, even if the app’s creator transfers out
or leaves their position, the app can be easily customized.
Let’s start by introducing a basic customization method. This time, we’ll try customizing the
“inquiry management” app we downloaded from the app store on page 30.
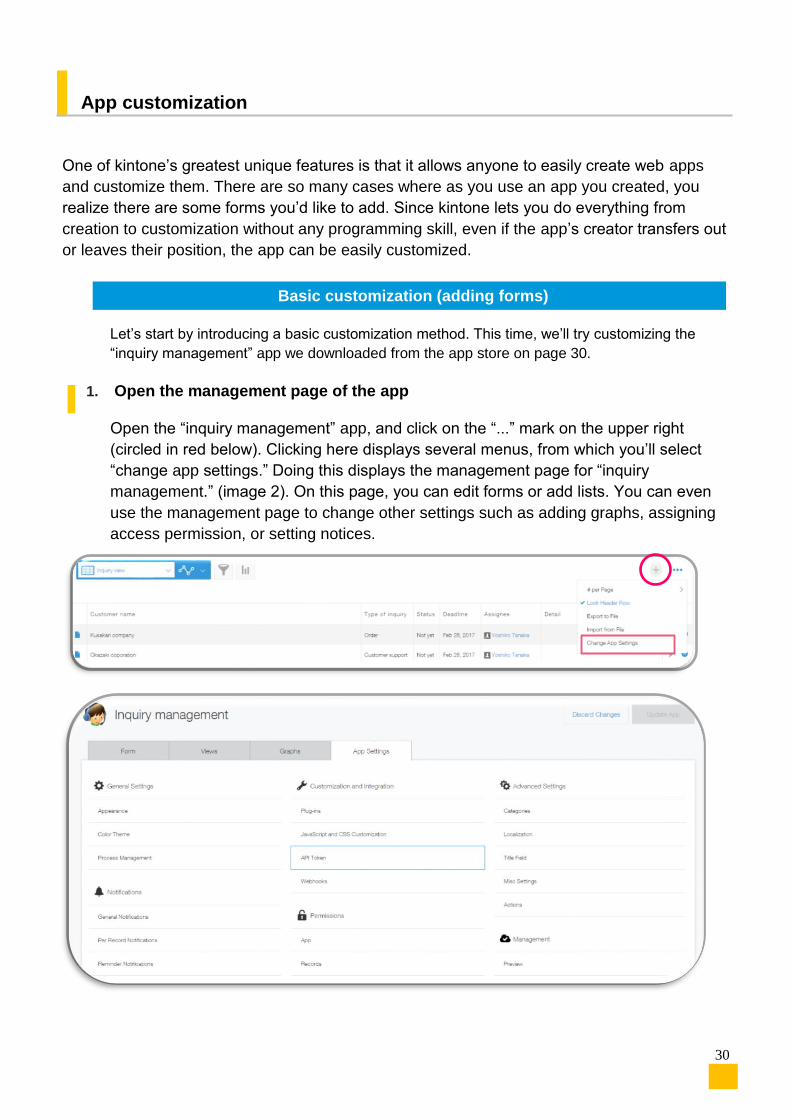
1. Open the management page of the app
Open the “inquiry management” app, and click on the “...” mark on the upper right
(circled in red below). Clicking here displays several menus, from which you’ll select
“change app settings.” Doing this displays the management page for “inquiry
management.” (image 2). On this page, you can edit forms or add lists. You can even
use the management page to change other settings such as adding graphs, assigning
access permission, or setting notices.
31
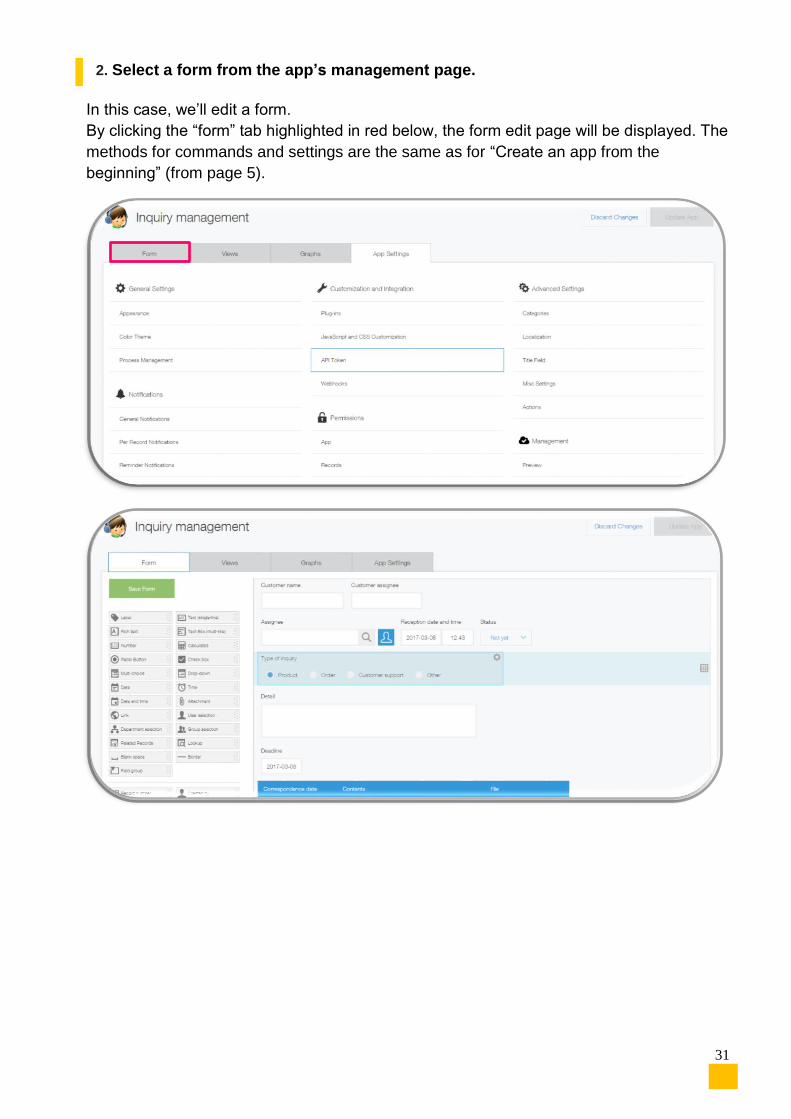
2. Select a form from the app’s management page.
In this case, we’ll edit a form.
By clicking the “form” tab highlighted in red below, the form edit page will be displayed. The
methods for commands and settings are the same as for “Create an app from the
beginning” (from page 5).
32
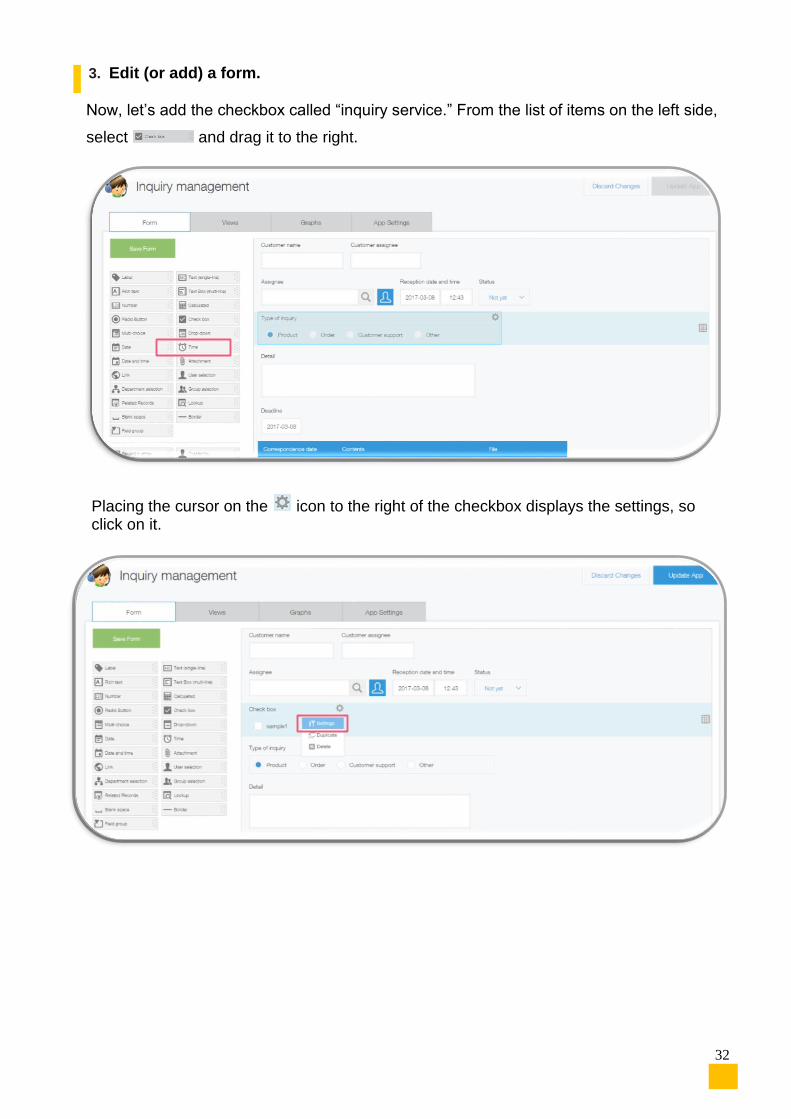
3. Edit (or add) a form.
Now, let’s add the checkbox called “inquiry service.” From the list of items on the left side,
select and drag it to the right.
Placing the cursor on the icon to the right of the checkbox displays the settings, so click on it.
33
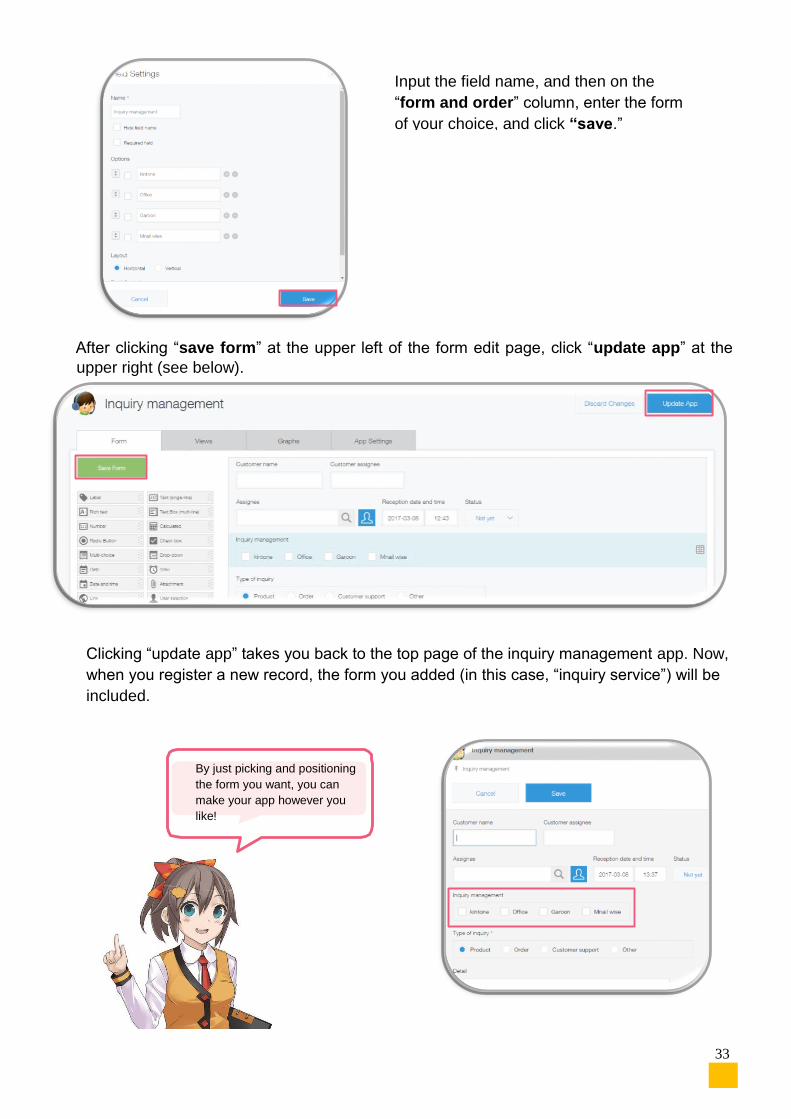
By just picking and positioning
the form you want, you can
make your app however you
like!
After clicking “save form” at the upper left of the form edit page, click “update app” at the
upper right (see below).
Clicking “update app” takes you back to the top page of the inquiry management app.
Now, when you register a new record, the form you added (in this case, “inquiry service”)
will be included.
Clicking “update app” takes you back to the top page of the inquiry management app. Now,
when you register a new record, the form you added (in this case, “inquiry service”) will be
included.
Input the field name, and then on the
“form and order” column, enter the form
of your choice, and click “save.”
34
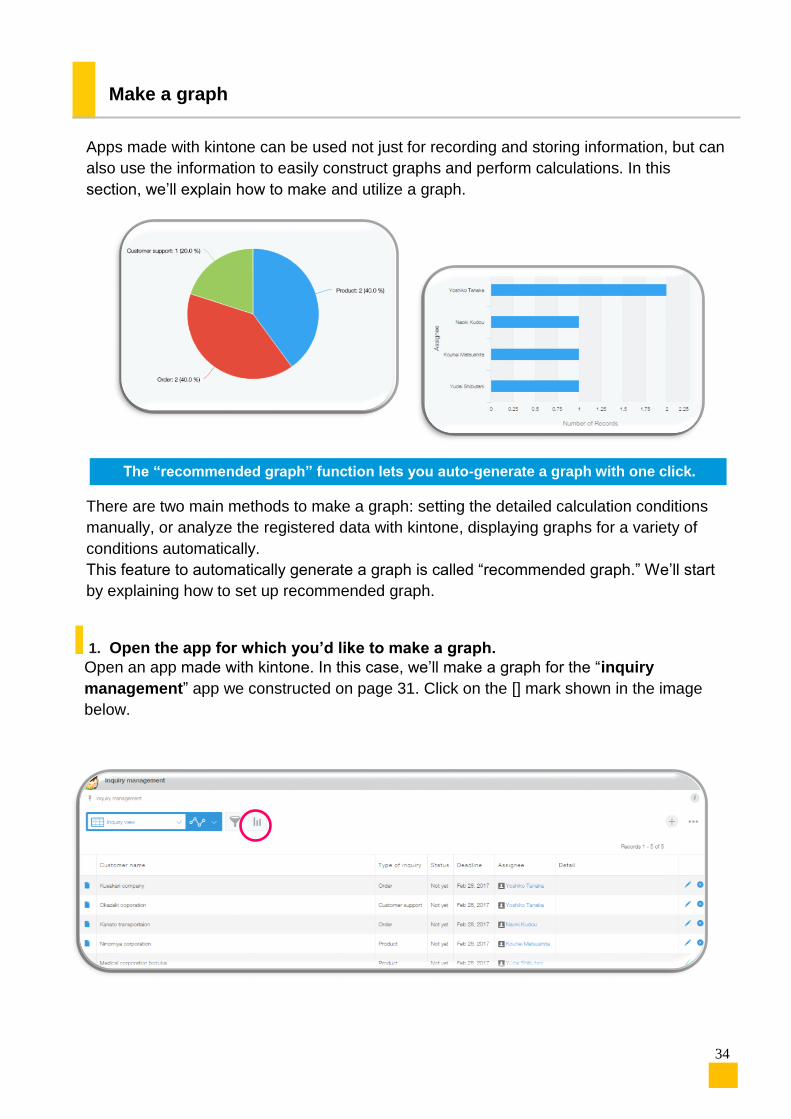
The “recommended graph” function lets you auto-generate a graph with one click.
Make a graph
Apps made with kintone can be used not just for recording and storing information, but can
also use the information to easily construct graphs and perform calculations. In this
section, we’ll explain how to make and utilize a graph.
There are two main methods to make a graph: setting the detailed calculation conditions
manually, or analyze the registered data with kintone, displaying graphs for a variety of
conditions automatically.
This feature to automatically generate a graph is called “recommended graph.” We’ll start
by explaining how to set up recommended graph.
1. Open the app for which you’d like to make a graph.
Open an app made with kintone. In this case, we’ll make a graph for the “inquiry
management” app we constructed on page 31. Click on the [] mark shown in the image
below.
37
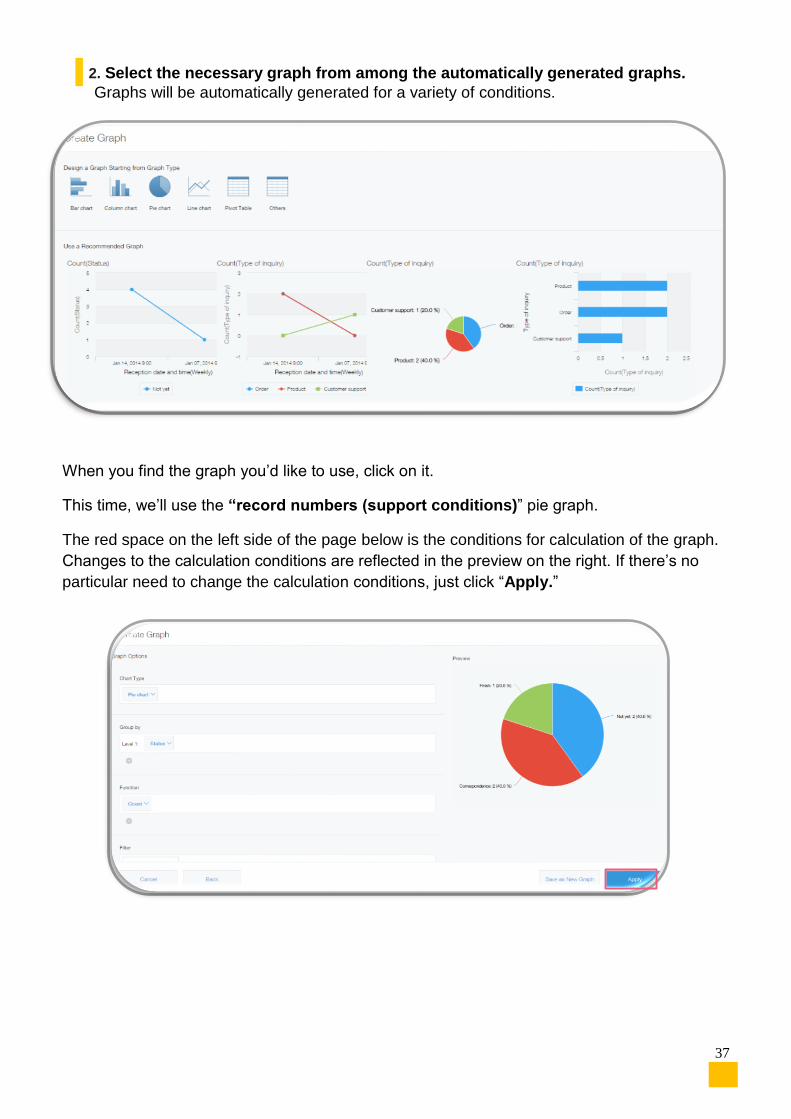
2. Select the necessary graph from among the automatically generated graphs.
Graphs will be automatically generated for a variety of conditions.
When you find the graph you’d like to use, click on it.
This time, we’ll use the “record numbers (support conditions)” pie graph.
The red space on the left side of the page below is the conditions for calculation of the graph.
Changes to the calculation conditions are reflected in the preview on the right. If there’s no
particular need to change the calculation conditions, just click “Apply.”
38
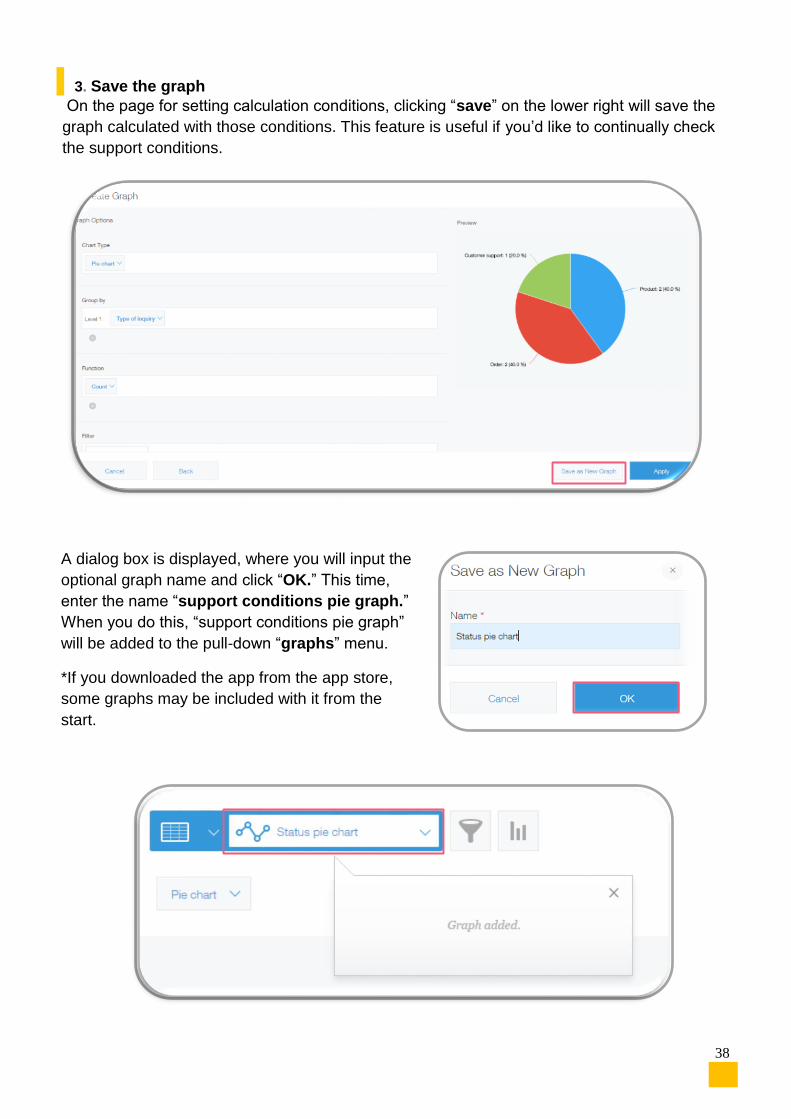
3. Save the graph
On the page for setting calculation conditions, clicking “save” on the lower right will save the
graph calculated with those conditions. This feature is useful if you’d like to continually check
the support conditions.
A dialog box is displayed, where you will input the
optional graph name and click “OK.” This time,
enter the name “support conditions pie graph.”
When you do this, “support conditions pie graph”
will be added to the pull-down “graphs” menu.
*If you downloaded the app from the app store,
some graphs may be included with it from the
start.

39
Create your own graph
Next, we will explain how to set your own parameter to create a graph from scratch.
1. Select a graph type you want to create Click the icon to display the graph creation screen.
First, select the type of graph you wish to create from “select graph type.”
This time, we will use a column chart to show unresolved inquiries per team member. Click
“column chart” from the graph menu, and set the graph options.
Items that need to be categorized: The major item is set to “Responsible personnel,” with
the conditions set to “Status: Including one of the following: Unresolved.” Doing so will
enable you to visually grasp which staff member has how many unresolved cases. As you can
see, you can quickly create any graph by setting the items and parameters.
Người phụ trách

40
Other useful functions in kintone
There are many more useful functions in kintone, which all can be extremely helpful in using several
apps. This section shows a few examples of these functions.
Access rights
You can set detailed access rights such as per app, per record, or per field.
For example, you can flexibly set the access rights to meet your demands, such as setting the access
rights so all employees can see client information, but the information is only editable by the sales
department, or hide personal information, such as names and E-mail addresses, from partial users.
▼How to set access rights
Lookup
If you set up the lookup function, you can acquire information in other apps and register them. For
example, if you connect information from the client management app, such as company names,
representative names, addresses, phone numbers, and E-mail addresses with the sales department’s
project management app, you can acquire and register the information straight from the client
management app. Not only can you save the time required to re-enter all the information, you can also
prevent errors.
▼ How to set up lookup
Notifications
You can set up notifications to be sent to all users when records have been edited, or when comments
have been given to records. Additionally, kintone apps also have a feature that sends a notification
when records satisfy a specific condition. For example, you can set notifications to be sent out to users
a day before deadlines as a reminder.
▼How to set notifications and reminders
Process management
The process management function helps manage business processes so that they comply with
business rules. You can set processes and person in charge per task on the app. Not only can you
visualize individual task status, but also because the data will be shown as a graph, you can grasp the
progress of all duties in real-time.
▼How to set up process management
https://help.cybozu.com/ja/k/user.html
For other details about using kintone, please check the user help.
Related Documents