UK Guide to Keeping Bees and Assembly Instructions

Welcome message from author
This document is posted to help you gain knowledge. Please leave a comment to let me know what you think about it! Share it to your friends and learn new things together.
Transcript
UK
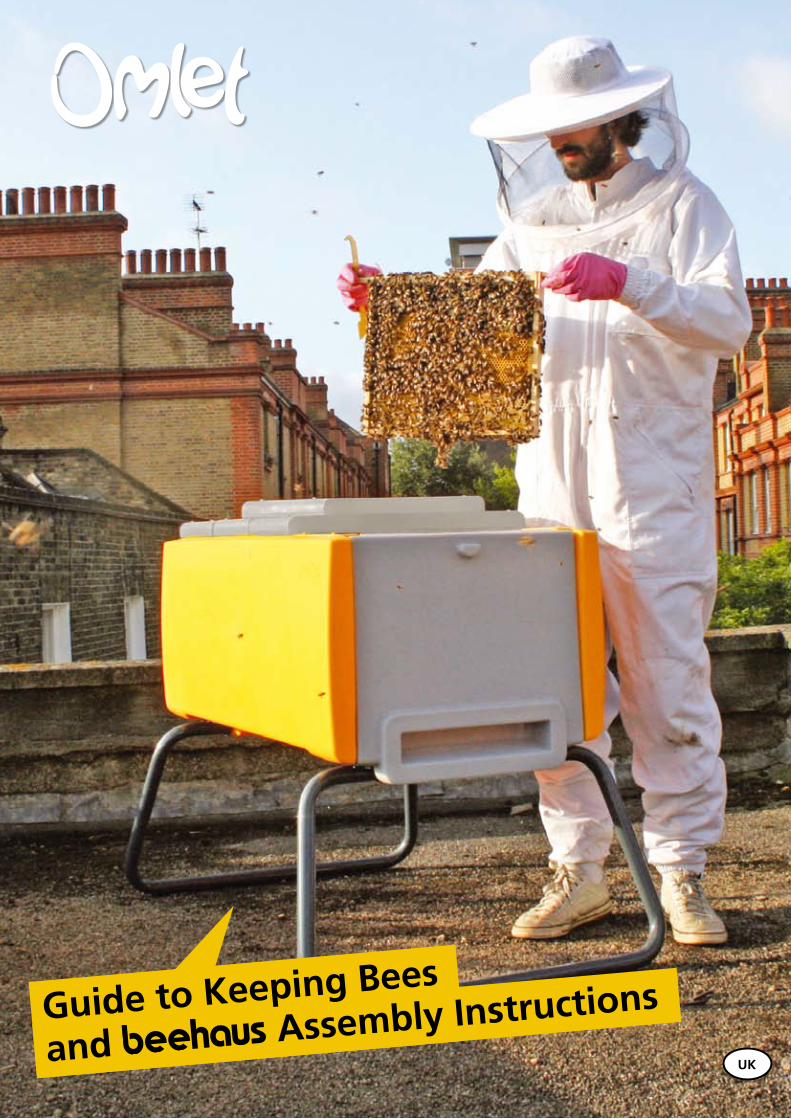
Guide to Keeping Bees
and Assembly Instructions
Page 2 www.omlet.co.uk
Thank you for buying a Beehaus
This guide is copyright Omlet Limited 2010. It is licensed under the Creative Commons License: Attribution-Non-Commercial-No Derivative Works 2.0 UK: England & Wales.
This means that you are free to copy, distribute, display, and perform the work under the following conditions:
•Attribution.Youmustgivetheoriginalauthor(i.eOmlet)credit.•Non-Commercial.Youmaynotusethisworkforcommercialpurposes (I.eyoucanprovideitfreeofchargebutnotsellit).•NoDerivativeWorks.Youmaynotalter,transform, or build upon this work.•Foranyreuseordistribution,youmustmakecleartoothersthe licencetermsofthiswork.Fulldetailsofthelicensearelocatedhere: http://creativecommons.org/licenses/by-nd/2.0/uk/legalcode.
If you have any comments or suggestion please email us at [email protected]
© Copyright Omlet 2010. Omlet and Beehaus are registered trademarks.
This guide could not have been made without the help and advice from many experienced bee keepers. In particular we would like to thank the following:RobinDartington,JohnChappell,ChrisDeaves,FERA,MauriceVaughan, Paul Peacock and Sally Wadsworth.
ContributorsLicense & Copyright
Congratulations on becoming a Beehaus owner! We hope that you will have many years of pleasure from your Beehaus and that your bees will soon fill the supers with lots of delicious, fresh honey.
This is a very exciting time but you may still have some questions especially if you are new to keeping bees. We want to help you every step of the way so that your experience is straightforward and fun. In this fantastic guide to keeping honey bees you will learn about the bees, the role of the beekeeper, how the Beehaus works and much more.
Yourbeeswillfascinateyou,providehoursofenjoymentandwonderasyou watch and learn about their way of life. They will also occasionally surpriseyou.For this reasonthisguidealonecannotcoverevery singleaspect of beekeeping and there are times when the bees, being complex and free spirited, may act in a way which has not been described here.
Thisispartofthejoyofbeekeeping.Evenpeoplewhohavebeenkeepingbees for 30 years or more will readily admit that they are still learning.
The important thing is to give it a go and once you have your bees you will soon find that the basics of recognising eggs, larvae, nectar and pollen as well as spotting the queen become second nature.
If you haven’t yet been on a course it’s a good idea to go along, even for justoneortwosessions.Thepracticalexperiencewillcomeinusefulandyou will also get to know other beekeepers in your area who you can call on for advice and help when needed.
The first part of the guide will explain how to assemble your Beehaus and what all the different parts are called and how to use them. The second part of the guide deals with practical beekeeping skills. There are also really useful films on the Omlet website with beginners and experts sharing their tips, tricks and advice – well worth watching. Visit www.omlet.co.uk/tv for more information.
And remember, we are always happy to help, so if you have any questions noworinthefuturepleasecalluson08454502056.Youcanalsofindlotsof information on our website, www.omlet.co.uk or you can email our bee expert [email protected].
We always like to hear from you - especially if you would like our expert opiniononyourhoney-justsendajartoOmletHoneyEvaluationServices,Tuthill Park, Wardington, OX17 1RR - we’ll be happy to taste it!
James, Johannes, Simon and William.
[email protected] 450 20 56
www.omlet.co.uk Page 3
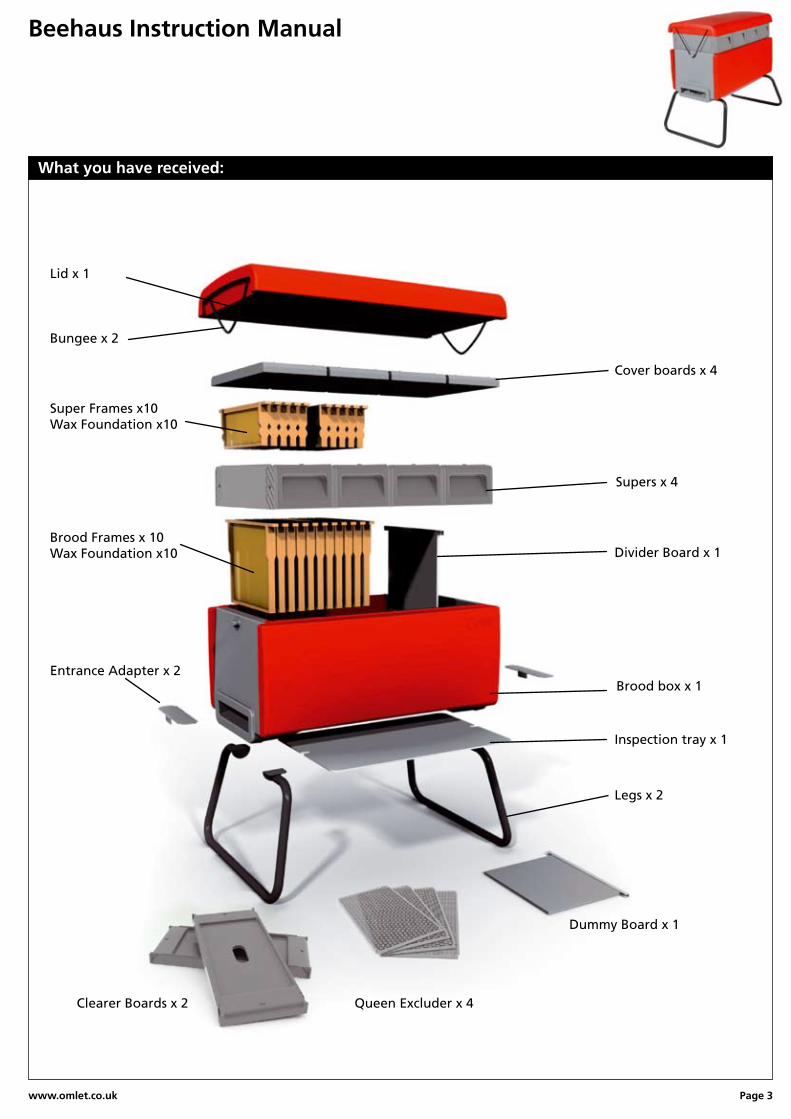
Beehaus Instruction Manual
Legs x 2
Brood box x 1Entrance Adapter x 2
Clearer Boards x 2 Queen Excluder x 4
Dummy Board x 1
Lid x 1
Bungee x 2
Inspection tray x 1
Divider Board x 1
Cover boards x 4
Supers x 4
What you have received:
SuperFramesx10WaxFoundationx10
BroodFramesx10WaxFoundationx10
Page 4 www.omlet.co.uk
If your Beehaus arrived by courier, please remember to retain all the packaging it arrived in. In the case that you wish to return your Beehaus or any part of the Beehaus, please call us within 30 days of the delivery. It must be sent back in the original packaging and have no more than normal wear and tear to receive the full product refund.
What to do with your packaging
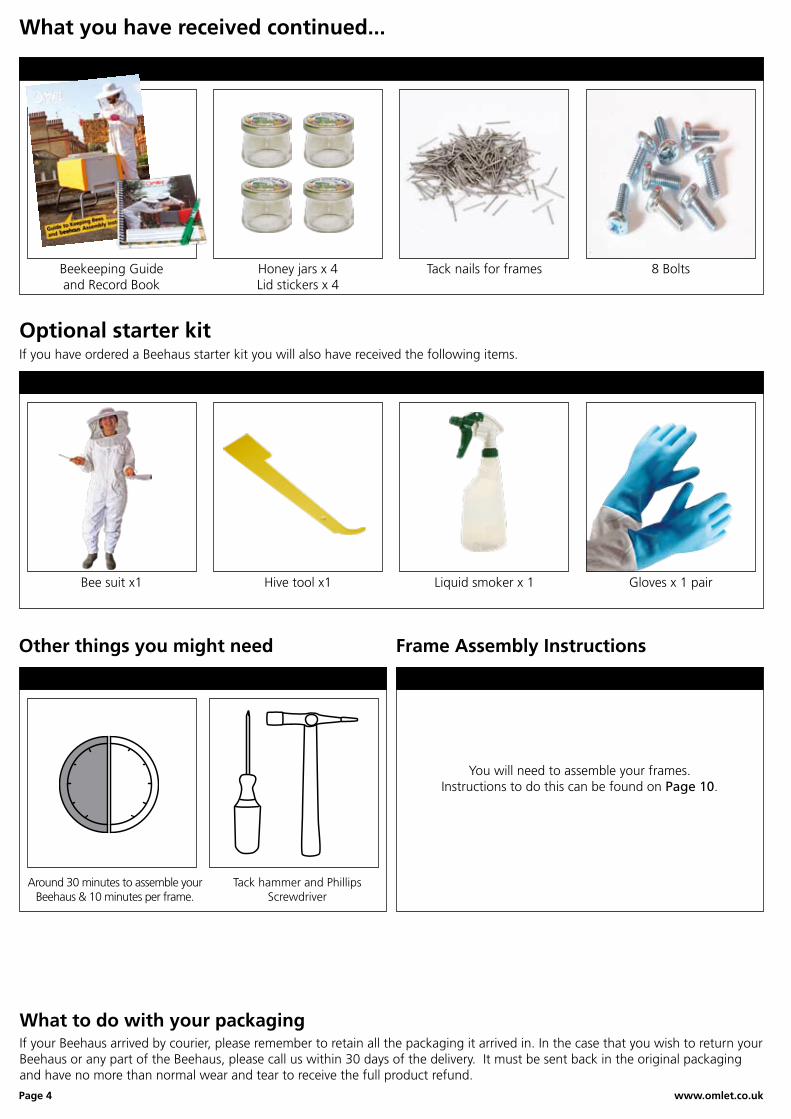
If you have ordered a Beehaus starter kit you will also have received the following items.
What you have received continued...
Optional starter kit
Beekeeping Guideand Record Book
Honey jars x 4Lid stickers x 4
Tack nails for frames 8 Bolts
Bee suit x1 Hive tool x1 Liquid smoker x 1 Gloves x 1 pair
Other things you might need
Around 30 minutes to assemble your Beehaus & 10 minutes per frame.
Tack hammer and Phillips Screwdriver
Frame Assembly Instructions
You will need to assemble your frames. Instructions to do this can be found on Page 10.

www.omlet.co.uk Page 5
Assembly of your Beehaus
Step 1 - Attaching the legs
Bolt the legs into place using the bolts provided.Repeat on both sides then turn the Beehaus upright.
Turn the empty Beehaus brood box upside down so the mesh faces upward. Then line up the legs with the bolt holes.
Step 2 - Inserting the inspection tray
Slide the inspection tray on the ledge underneath the Beehaus. You normally just leave this in for a week to monitor mite drop.
Step 4 - Inserting the brood frames
The assembled brood frames fit in the Beehaus like this.
Step 5 - Inserting the dummy board
The dummy board fits at the end of the brood frames. You use it when you have more or less than a full set of frames.
Step 6 - Adding the cover boards
The cover boards sit on top of the brood box.
Step 7 - Adding the lid
Secure the lid by pulling the bungee cord down onto the knob. Repeat at the opposite end.
Step 3 - Inserting the divider board
The divider fits in the middle of the Beehaus. The tabs fit over the central rib on the side of the Beehaus.
Page 6 www.omlet.co.uk
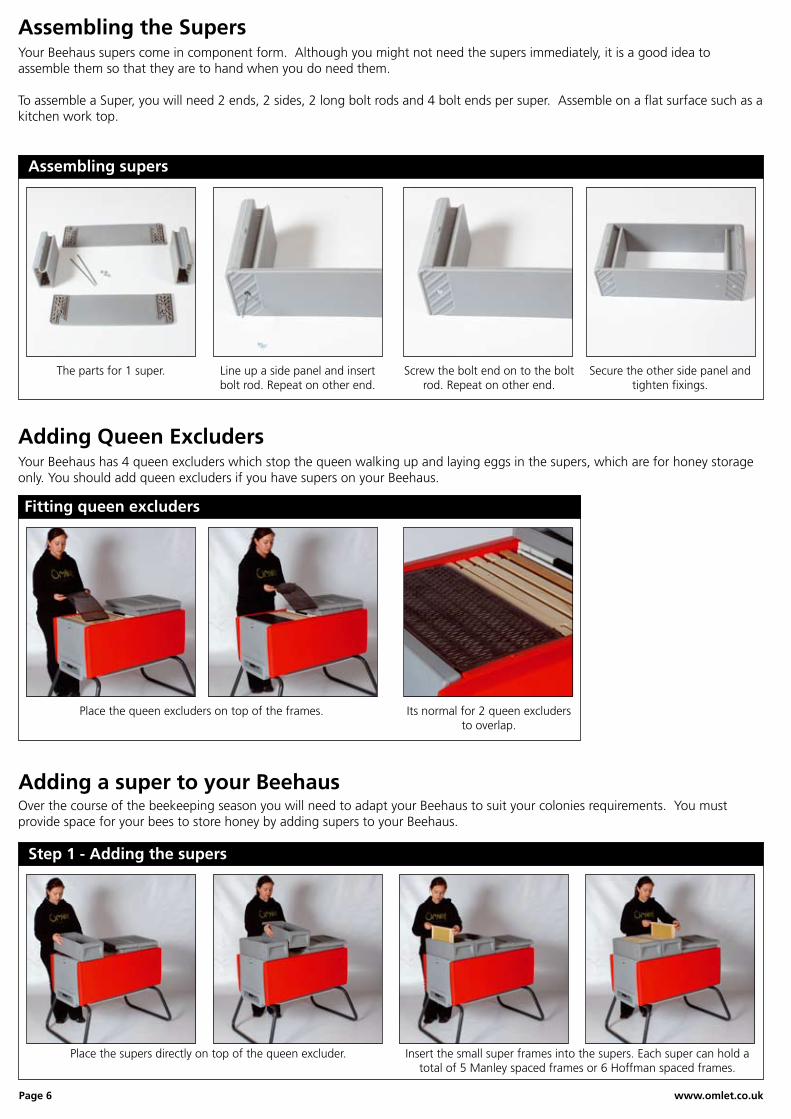
Assembling the SupersYour Beehaus supers come in component form. Although you might not need the supers immediately, it is a good idea to assemble them so that they are to hand when you do need them.
To assemble a Super, you will need 2 ends, 2 sides, 2 long bolt rods and 4 bolt ends per super. Assemble on a flat surface such as a kitchen work top.
vaTht
Screw the bolt end on to the bolt rod. Repeat on other end.
Secure the other side panel and tighten fixings.
Assembling supers
The parts for 1 super. Line up a side panel and insert bolt rod. Repeat on other end.
Fitting queen excluders
Place the queen excluders on top of the frames. Its normal for 2 queen excluders to overlap.
Adding Queen ExcludersYour Beehaus has 4 queen excluders which stop the queen walking up and laying eggs in the supers, which are for honey storage only. You should add queen excluders if you have supers on your Beehaus.
Adding a super to your BeehausOver the course of the beekeeping season you will need to adapt your Beehaus to suit your colonies requirements. You must provide space for your bees to store honey by adding supers to your Beehaus.
Step 1 - Adding the supers
Insert the small super frames into the supers. Each super can hold a total of 5 Manley spaced frames or 6 Hoffman spaced frames.
Place the supers directly on top of the queen excluder.
www.omlet.co.uk Page 7
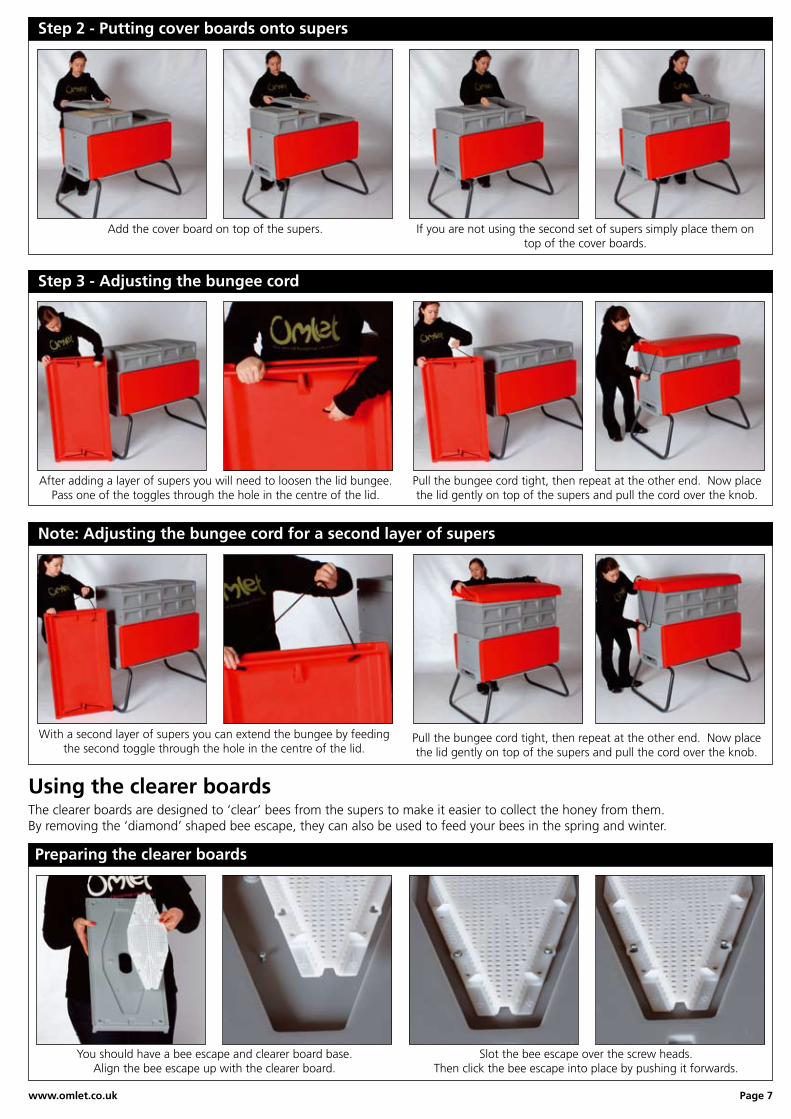
Step 2 - Putting cover boards onto supers
If you are not using the second set of supers simply place them on top of the cover boards.
Add the cover board on top of the supers.
Step 3 - Adjusting the bungee cord
After adding a layer of supers you will need to loosen the lid bungee. Pass one of the toggles through the hole in the centre of the lid.
Pull the bungee cord tight, then repeat at the other end. Now place the lid gently on top of the supers and pull the cord over the knob.
Note: Adjusting the bungee cord for a second layer of supers
Pull the bungee cord tight, then repeat at the other end. Now place the lid gently on top of the supers and pull the cord over the knob.
With a second layer of supers you can extend the bungee by feeding the second toggle through the hole in the centre of the lid.
Using the clearer boards
Preparing the clearer boards
You should have a bee escape and clearer board base.Align the bee escape up with the clearer board.
Slot the bee escape over the screw heads. Then click the bee escape into place by pushing it forwards.
The clearer boards are designed to ‘clear’ bees from the supers to make it easier to collect the honey from them. By removing the ‘diamond’ shaped bee escape, they can also be used to feed your bees in the spring and winter.

Page 8 www.omlet.co.uk
Using the clearer boards
Lift the supers that you want to clear and place the clearer board on the hive. Make sure the bee escape is on the bottom.
Put the supers on top of the clearer boards. Note: When you re-attach the lid it will be on a slight angle which is okay.
Wasp guard
Slide the adapter in so that the word ‘wasp’ is shown.Once it is pushed in, it will hold in place.
Completely closing the entrance
Slide the adapter in so that the word ‘closed’ is shown.Two sprung clips hold the adapter in place.
Using the entrance adapterYou can use the entrance adapter to completely close the entrance to the Beehaus. For example, if you are transporting your bees. If you turn the entrance adapter around it becomes an entrance restrictor, which makes it easier for the bees to defend the hive against wasps. You can also use it like this over winter to protect against mice or to reduce the entrance when initially hiving a swarm of bees.
Step 2 - Inserting the mini queen excluder
With the blanking plate removed you can fit the queen excluder
Step 1 - Removing the blanking plate
The blanking plate can be removed by pulling up.
Divider board - See page 42 in the Bee Guide for details
www.omlet.co.uk Page 9
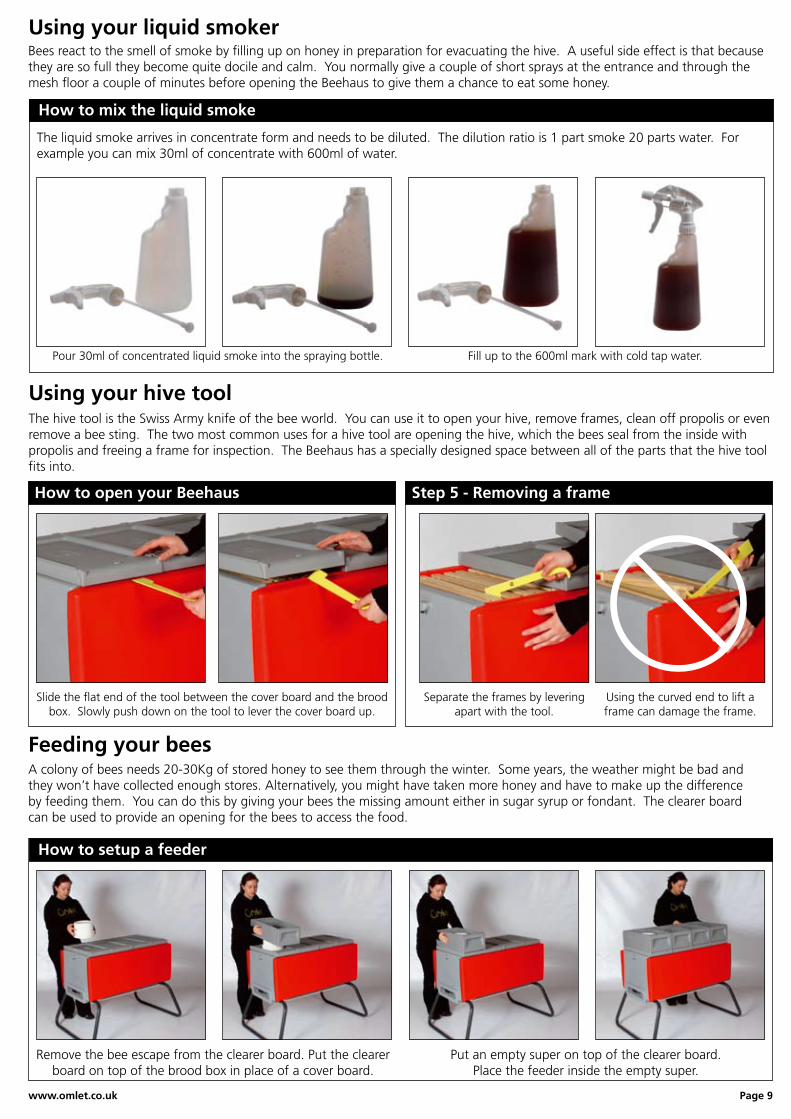
Using your hive toolThe hive tool is the Swiss Army knife of the bee world. You can use it to open your hive, remove frames, clean off propolis or even remove a bee sting. The two most common uses for a hive tool are opening the hive, which the bees seal from the inside with propolis and freeing a frame for inspection. The Beehaus has a specially designed space between all of the parts that the hive tool fits into.
Using the curved end to lift a frame can damage the frame.
Separate the frames by levering apart with the tool.
Step 5 - Removing a frameHow to open your Beehaus
Slide the flat end of the tool between the cover board and the brood box. Slowly push down on the tool to lever the cover board up.
How to mix the liquid smoke
Using your liquid smokerBees react to the smell of smoke by filling up on honey in preparation for evacuating the hive. A useful side effect is that because they are so full they become quite docile and calm. You normally give a couple of short sprays at the entrance and through the mesh floor a couple of minutes before opening the Beehaus to give them a chance to eat some honey.
The liquid smoke arrives in concentrate form and needs to be diluted. The dilution ratio is 1 part smoke 20 parts water. For example you can mix 30ml of concentrate with 600ml of water.
Pour 30ml of concentrated liquid smoke into the spraying bottle. Fill up to the 600ml mark with cold tap water.
How to setup a feeder
Remove the bee escape from the clearer board. Put the clearer board on top of the brood box in place of a cover board.
Put an empty super on top of the clearer board. Place the feeder inside the empty super.
A colony of bees needs 20-30Kg of stored honey to see them through the winter. Some years, the weather might be bad and they won’t have collected enough stores. Alternatively, you might have taken more honey and have to make up the difference by feeding them. You can do this by giving your bees the missing amount either in sugar syrup or fondant. The clearer board can be used to provide an opening for the bees to access the food.
Feeding your bees
Page 10 www.omlet.co.uk
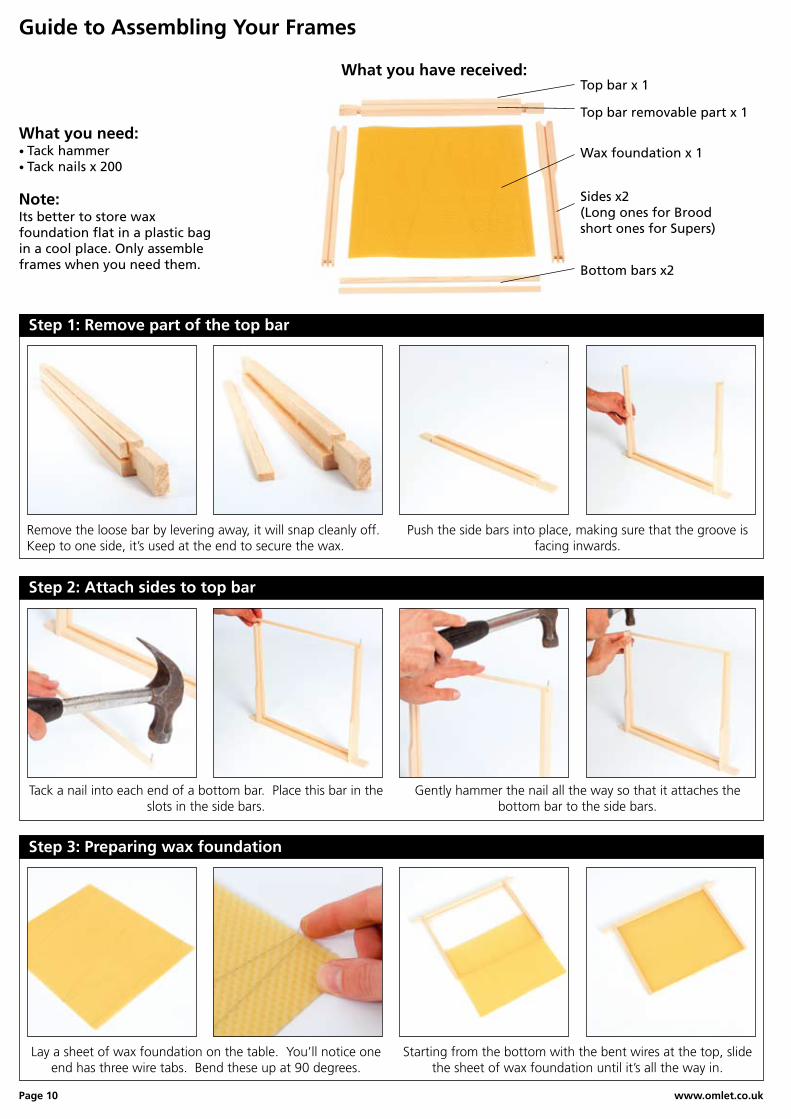
What you have received:
What you need:
Note:
Top bar x 1
Top bar removable part x 1
Wax foundation x 1
Sides x2 (Long ones for Brood short ones for Supers)
Bottom bars x2
• Tack hammer• Tack nails x 200
Its better to store wax foundation flat in a plastic bag in a cool place. Only assemble frames when you need them.
Step 1: Remove part of the top bar
Remove the loose bar by levering away, it will snap cleanly off. Keep to one side, it’s used at the end to secure the wax.
Push the side bars into place, making sure that the groove is facing inwards.
Step 2: Attach sides to top bar
Tack a nail into each end of a bottom bar. Place this bar in the slots in the side bars.
Gently hammer the nail all the way so that it attaches the bottom bar to the side bars.
Step 3: Preparing wax foundation
Lay a sheet of wax foundation on the table. You’ll notice one end has three wire tabs. Bend these up at 90 degrees.
Starting from the bottom with the bent wires at the top, slide the sheet of wax foundation until it’s all the way in.
Guide to Assembling Your Frames
www.omlet.co.uk Page 11
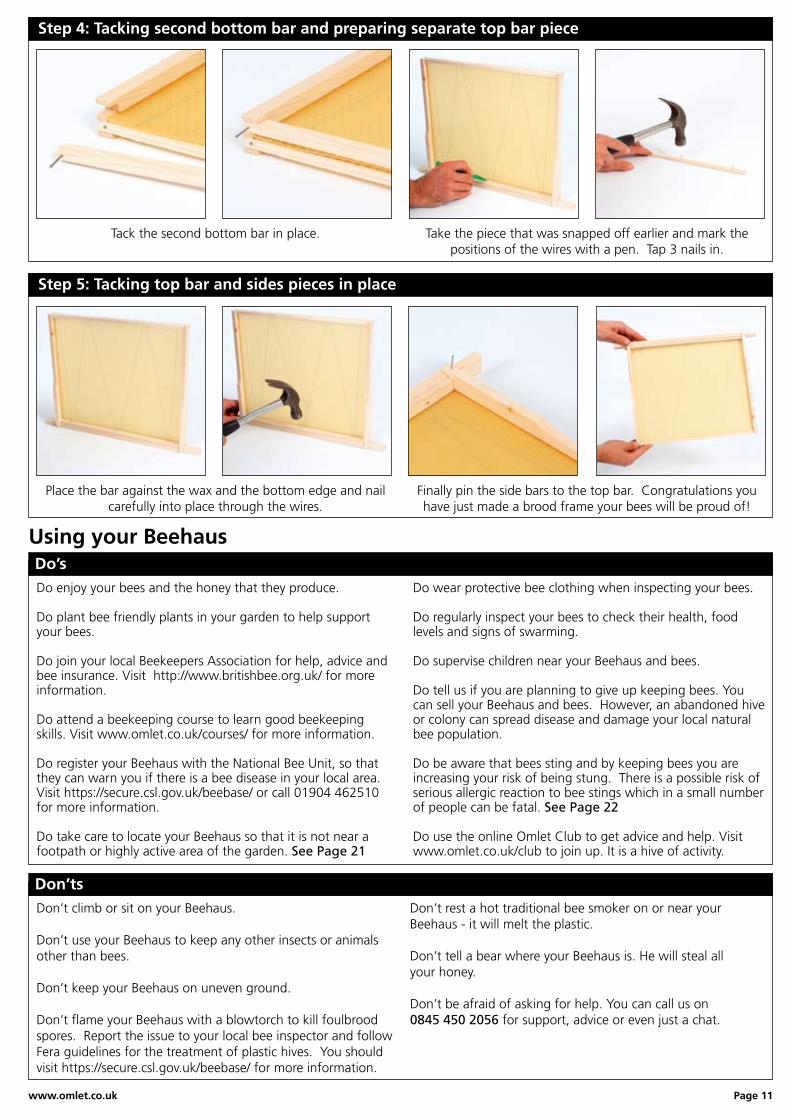
Step 4: Tacking second bottom bar and preparing separate top bar piece
Tack the second bottom bar in place. Take the piece that was snapped off earlier and mark the positions of the wires with a pen. Tap 3 nails in.
Using your Beehaus
Don’ts
Don’t climb or sit on your Beehaus.
Don’t use your Beehaus to keep any other insects or animals other than bees.
Don’t keep your Beehaus on uneven ground.
Don’t flame your Beehaus with a blowtorch to kill foulbrood spores. Report the issue to your local bee inspector and follow Fera guidelines for the treatment of plastic hives. You should visit https://secure.csl.gov.uk/beebase/ for more information.
Don’t rest a hot traditional bee smoker on or near your Beehaus - it will melt the plastic.
Don’t tell a bear where your Beehaus is. He will steal all your honey.
Don’t be afraid of asking for help. You can call us on 0845 450 2056 for support, advice or even just a chat.
Do wear protective bee clothing when inspecting your bees.
Do regularly inspect your bees to check their health, food levels and signs of swarming.
Do supervise children near your Beehaus and bees.
Do tell us if you are planning to give up keeping bees. You can sell your Beehaus and bees. However, an abandoned hive or colony can spread disease and damage your local natural bee population.
Do be aware that bees sting and by keeping bees you are increasing your risk of being stung. There is a possible risk of serious allergic reaction to bee stings which in a small number of people can be fatal. See Page 22
Do use the online Omlet Club to get advice and help. Visit www.omlet.co.uk/club to join up. It is a hive of activity.
Do’s
Do enjoy your bees and the honey that they produce.
Do plant bee friendly plants in your garden to help support your bees.
Do join your local Beekeepers Association for help, advice and bee insurance. Visit http://www.britishbee.org.uk/ for more information.
Do attend a beekeeping course to learn good beekeeping skills. Visit www.omlet.co.uk/courses/ for more information.
Do register your Beehaus with the National Bee Unit, so that they can warn you if there is a bee disease in your local area. Visit https://secure.csl.gov.uk/beebase/ or call 01904 462510 for more information.
Do take care to locate your Beehaus so that it is not near a footpath or highly active area of the garden. See Page 21
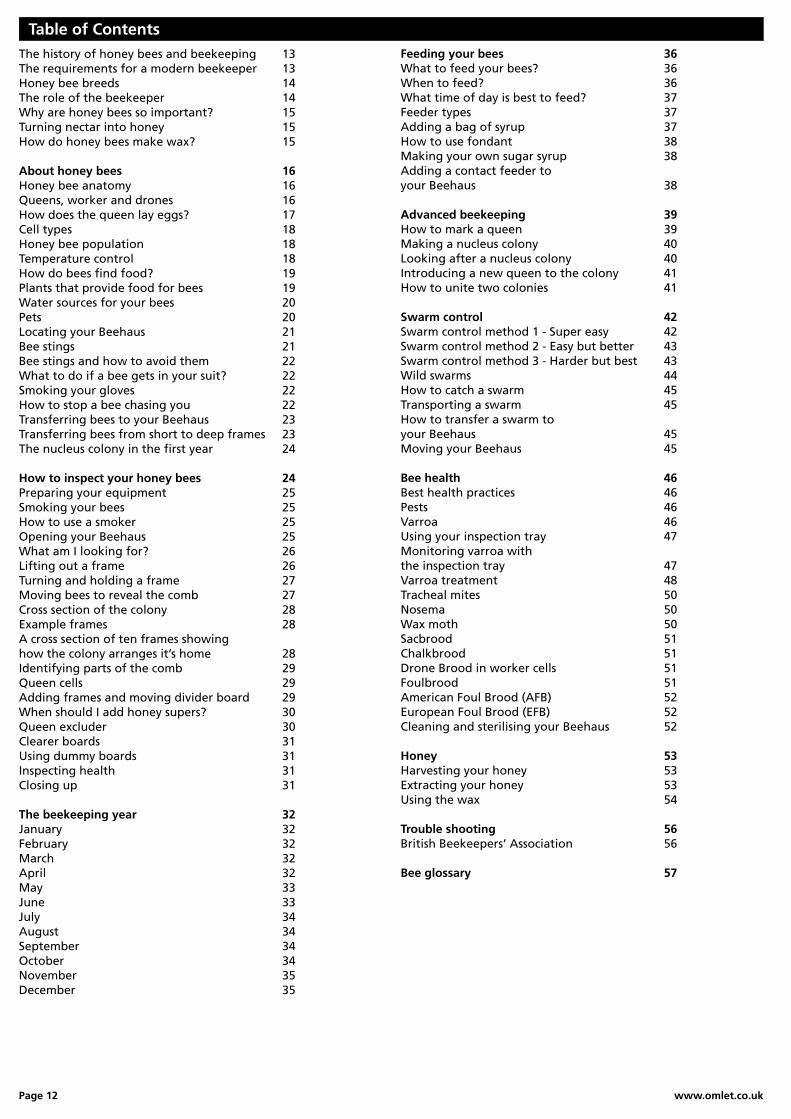
Step 5: Tacking top bar and sides pieces in place
Place the bar against the wax and the bottom edge and nail carefully into place through the wires.
Finally pin the side bars to the top bar. Congratulations you have just made a brood frame your bees will be proud of!
Page 12 www.omlet.co.uk
The history of honey bees and beekeeping 13The requirements for a modern beekeeper 13Honey bee breeds 14The role of the beekeeper 14Why are honey bees so important? 15Turning nectar into honey 15How do honey bees make wax? 15
About honey bees 16 Honey bee anatomy 16 Queens, worker and drones 16How does the queen lay eggs? 17Cell types 18Honey bee population 18Temperature control 18How do bees find food? 19Plants that provide food for bees 19Water sources for your bees 20Pets 20Locating your Beehaus 21Bee stings 21Bee stings and how to avoid them 22What to do if a bee gets in your suit? 22Smoking your gloves 22How to stop a bee chasing you 22Transferring bees to your Beehaus 23Transferring bees from short to deep frames 23 The nucleus colony in the first year 24
How to inspect your honey bees 24Preparing your equipment 25Smoking your bees 25How to use a smoker 25 Opening your Beehaus 25What am I looking for? 26Lifting out a frame 26Turning and holding a frame 27Moving bees to reveal the comb 27Cross section of the colony 28Example frames 28A cross section of ten frames showing how the colony arranges it’s home 28Identifying parts of the comb 29Queen cells 29Adding frames and moving divider board 29When should I add honey supers? 30Queen excluder 30Clearer boards 31Using dummy boards 31Inspecting health 31Closing up 31
The beekeeping year 32January 32February 32March 32April 32May 33June 33July 34August 34September 34October 34November 35December 35
Feeding your bees 36What to feed your bees? 36When to feed? 36What time of day is best to feed? 37Feeder types 37Adding a bag of syrup 37How to use fondant 38Making your own sugar syrup 38Adding a contact feeder to your Beehaus 38
Advanced beekeeping 39How to mark a queen 39Making a nucleus colony 40Looking after a nucleus colony 40Introducing a new queen to the colony 41How to unite two colonies 41
Swarm control 42Swarm control method 1 - Super easy 42Swarm control method 2 - Easy but better 43Swarm control method 3 - Harder but best 43Wild swarms 44How to catch a swarm 45Transporting a swarm 45How to transfer a swarm to your Beehaus 45Moving your Beehaus 45
Bee health 46Best health practices 46Pests 46Varroa 46Using your inspection tray 47Monitoring varroa with the inspection tray 47Varroa treatment 48Tracheal mites 50Nosema 50Wax moth 50Sacbrood 51Chalkbrood 51Drone Brood in worker cells 51Foulbrood 51American Foul Brood (AFB) 52European Foul Brood (EFB) 52Cleaning and sterilising your Beehaus 52
Honey 53Harvesting your honey 53Extracting your honey 53Using the wax 54
Trouble shooting 56British Beekeepers’ Association 56
Bee glossary 57
Table of Contents
www.omlet.co.uk Page 13
The requirements for a modern beekeeperA location for your bees - Honey bees can be kept anywhere from country orchards to urban gardens to city roof tops. It is a common misconception that you need a large garden or the countryside on your doorstep. Although lots of space can make siting your bees easier, urban gardens are arguably better. Nectar and pollen can be gathered from a wide variety of plants that will give your honey a wonderful flavour. This means that there is often a constant source of food throughout the summer and a lack of harmful pesticides. Wherever you live, you can be sure that a colony of bees will enhance you and your surroundings.
Time - Keeping honey bees requires small amounts of regular time with the bees. During the summer (March - September) you typically have to spend around one hour per week with a hive. You can do this at the weekend or, if the weather is still good, when you return from work. Most beekeepers would like to spend more time with their bees rather than less, as beekeeping is highly addictive. Unlike keeping other animals, the bees mostly look after themselves and will not notice if you go on holiday. From October through to February you don’t need to inspect your bees at all as they over-winter in the hive. In all, you might spend 20-30 hours over the course of a year with the bees.
Support and learning more - Beekeeping is an interesting hobby with lots to learn and it is often helpful to have someone friendly to support you. You can find someone to help by attending an Omlet Course and meeting follow beekeepers (see www.omlet.co.uk/courses for more information).
You can also become part of the beekeeping community on the Omlet Club Forum (see www.omlet.co.uk/club). It’s also a good idea to join your local Beekeeping Association (see www.britishbee.org.uk for more information).
Before we get started, it’s good to know just a little of how the honeybee came to be, as well as how humans developed a way of keeping them for our own benefit.
The honeybee is a highly sophisticated insect that has evolved over millions of years. The earliest recorded bee was found in Myanmar, Burma. It was perfectly preserved, encased in amber, and has been dated as 100 million years old. In those early days, bees were more like wasps, with a diet that consisted mainly of other insects. Although this worked quite well, it did mean that bees were restricted to regions that were warm all year round and an unappealing diet of flies. In order to prosper bees needed a new source of food.
As luck would have it, flowers were in need of a new way of pollinating. In order to reproduce most plants must mate but this is a bit tricky when you’re rooted in the ground and your partner is on the other side of the field. In the early days they did this by sending out lots of pollen on the wind in the hope some would land on another plant. This wasn’t efficient and required a huge effort to produce lots of pollen. A much more accurate system for delivering the pollen would mean less effort for the plant and a higher chance of successful mating.
Although nature didn’t have a Fed Ex account, it did have a daughter called innovation and she put bees and flowers together in the most brilliant way. Flowers evolved with bright colours and markings to attract bees who were much more likely to transport the pollen to the next plant to pollinate it.
The bees were happy to perform this courier service because in return they received nectar and pollen to eat. This relationship between bees and plants has proved an extremely fruitful one. In fact, scientists believe that bees are responsible for most of the rich flower diversity we enjoy today.
By reducing the water content in the nectar and storing it in a sealed wax cell, bees could prevent it fermenting and provide themselves with a nutritious food for the winter. This innovation allowed the honeybee to spread throughout the world as they could now survive the cold winters found in more northern climates. It also meant that bees had a unique attraction for man.
This evaporated nectar is known more commonly as honey. Discovering honey must have been almost as exciting as when the first sticks were rubbed together to produce fire and until the invention of the beesuit it probably produced a similar sensation when you got too close. For thousands of years honey provided the only sweetness in human’s diet and beeswax, turned into candles, the only means of light.
Bees were accordingly highly valued by all the great ancient civilisations but it wasn’t until the Eygyptians that people stopped robbing wild bees nests and started keeping bees at home. The Egyptian hive design was a simple upturned straw basket called a skep. These are still used today although mainly for temporarily housing a colony of bees that has recently swarmed.
Early beehives, such as the skep, were not designed for long term use. The honey couldn’t be extracted without destroying the hive and therefore the colony. The system only worked if the colony produced enough bees to create a swarm, which would be caught and go on to provide the honey in the following year. Otherwise, each year a new swarm of bees had to be caught.
Egyptian hives were straw baskets. These are still used today and are called skeps.
Spanish cave painting dated around 6000 BC.
The history of honey bees and beekeeping There was a desperate need for a way of keeping the same colony of bees year after year so that more honey could be produced and the apiary expanded. In the 1851, a breakthrough discovery in beekeeping was made by a man called Lorenzo Langstroth. He discovered that bees would keep a ‘bee sized’ pathway clear within a hive if it was between 6 and 8mm wide.
He named the discovery ‘spazio di ape’ (or ‘bee space’ in English). This discovery was important because it led to the development of hives with moveable frames of comb. This allowed the beekeeper to remove comb and honey without destroying
the hive. It also enabled the beekeeper to start manipulating the colony; helping it develop and grow. This discovery is often cited as the start of modern beekeeping.
‘Spazio di ape’ was Lorenzo Langstroth’s famous discovery.
Page 14 www.omlet.co.uk
The role of the beekeeperHoneybee breedsNowadays, there are not nearly enough wild colonies of honeybees to pollinate all our crops and the shops would soon run out of honey if this was the only source. The world needs more beekeepers! Even if you have just one colony, your bees will visit every vegetable plot, orchard and flower bed in a three mile radius boosting the harvest of beans, apples and roses no end whilst you will enjoy the most delicious fresh honey from their collective wandering.
However, unlike conventional domesticated animals such as cats and dogs, a colony of honey bees is essentially wild and can decide to leave at any moment. This is what is known as a swarm and is an entirely natural instinct that all bees have. It is actually a sign that your bees are doing very well, because it occurs when a colony has grown large enough to be able to reproduce itself by splitting in two. A swarm of bees consists of the old queen and a large number of bees. On a warm, sunny day they leave the hive and a new queen takes over the existing nest. Meanwhile, the swarm looks for a suitable place to make a new nest.
From a beekeepers point of view, this behaviour is undesirable for two reasons. Firstly a great many bees are lost and therefore the hive will not produce much honey that year. Secondly non-beekeepers, tend to find a large number of bees hanging in a tree or on a lampost while they look for a new place to live, a bit scary.
With this in mind, the role of the beekeeper is to guide the honeybee colony to achieve it’s full potential, whilst at the same time managing and reducing the bees urge to swarm. This can be done, and in fact one of the great benefits of the Beehaus is that it is designed to make this easy.
Amateur Beekeepers An amateur beekeeper might have anywhere between 1-40 hives. Over this number and you have to start spending all your time with the bees. Commercial BeekeepersCommercial beekeepers typically have over 40 hives and spend most of their time tending to them. They may be keeping bees to produce honey or can earn money by hiring the bees out to farmers for crop pollination. Hiring colonies is a huge business , especially in America and China where some bee farmers have literally thousands of hives which they move to wherever they are needed.
Honeybees are not all the same and vary from country to country in their size, colour and temperament. The Latin name for all honey bees is Apis Mellifera. Apis is Latin for “bee”, mellifera comes from the Greek melli- meaning “honey” and ferre “bear”. The name was possibly given because the Greeks liked to compare the appearance of bees to bears who, as made famous by Pooh bear, also love honey.
Within the bee species there are several subspecies which have particular qualities. Many common honeybees today are mixed breeds created by beekeepers for desirable qualities such as honey collection, ability to survive cold winters, good egg laying and calm temperaments, making them easy to work with.
The Buckfast beeOne of the most famous bee breeders was a monk called Brother Adam who made it his life’s work to create the ultimate honey bee. He travelled all over the world collecting queens from wild colonies in remote locations, which he brought back to a monastry in Buckfast. His approach was rigorous and scientific and the Buckfast bee was subsequently exported all over the world.
The three main sub species of honey bees available for the beekeeper are as follows.
The British black bee (Apis mellifera mellifera) The British black bee is a relatively small, dark coloured bee that was almost wiped out by Isle of Wight disease. A few beekeepers still have almost pure strains in the more remote parts of Britain. It’s considered to be a hardy bee, able to cope with the short summers and long wet winters typical in the UK.
The Carniolan bee (Apis mellifera carnica pollman)The Carniolan honey bee is the native bee of Slovenia, a great beekeeping nation. It is a dusky brown colour with lighter brown stripes. The Carniolan (also known as Carnica) is a very popular bee throughout Europe because it has several desirable qualities. It is a very gentle bee that is calm and can be easily worked, making it ideal for bee keepers who live in urban areas.
It is good at resisting disease and defends the hive strongly against pests such as wasps. Carniolans are also good at quickly adjusting the size of the colony according to the available nectar supply. This, combined with an unusually long tongue for reaching nectar other bees can’t get, results in colonies of carniolans storing large quantities of honey and pollen.
Italian bee (Apis mellifera ligustica)The Italian honey bee has distinctive yellow striping and is quite a small bee. Italian queens are very prolific egg layers and build up big colonies able to collect a lot of nectar. This is one of the reasons they are so popular. They have adapted well to most climates apart from northern countries where the cold winters and wet springs don’t seem to suit them.
They have very relaxed, easy going characters and are good to work with. Some beekeepers think they have less tendency to swarm making them good for urban areas. Perhaps most interestingly though is that Italian drones are considered to be among the most successful at romancing Queens on mating flights.
Bee InspectorA bee inspector is a specially trained beekeeper with a large amount of experience. If you keep bees, then at some point you may have your bees inspected. Every area has a local bee inspector and it’s a good idea to find out who your local inspector is. You are required by law to report some bee diseases to the inspector. You don’t get told off if your bees do have disease, in fact it’s quite the opposite. By reporting disease you will be helping reduce the risk of your bees transferring it to other colonies. The inspectors are managed centrally by the National Bee Unit, visit http://beebase.csl.gov.uk/ for more information.
An Amateur Beekeeper. A Commercial Beekeeper.
The Carniolan bee is very popular. Image: Richard Bartz.
The Buckfast bee can be found all over the world.
Italian bees have a distinctive yellow colour.
The British black bee is quite a rare sight. Image: Rachel Graham.

www.omlet.co.uk Page 15
Why are honey bees so important?The most important reason for bees is, funnily enough, not honey, but the pollination service that they provide. Pollination is the process by which many plants reproduce. It involves the movement of pollen between plants - i.e. the male gametes (or sperm) are transferred to the female gametes. Although other insects such as butterflies pollinate flowers, honeybees are the most important pollen transporters for the plants. They are responsible for the pollination of a wide variety of crops, fruits and flowers.
How does pollination work?The plants and bees have a symbiotic relationship. The plant provides food for the bees in the form of nectar (a sugary water produced as a by-product to photosynthesis). As the bee collects the nectar it brushes against the anthers of the plant and pollen grains stick to the bee’s hairy body. When the bee then visits another plant some of the pollen on its body will rub off on the stigma of the plant. By this process bees pollinate about a third of our food. Pollen is also an important source of food for the bees themselves - this is covered in the next section.
Pollination ServicesUnfortunately, the number of wild bee colonies has decreased over many years, as their natural habitat has been cleared to make way for farm land. Now, many farms often have to hire bees to help pollinate their crops. This is especially important in America where about 50% of
all beehives are transported to California each year to help pollinate the almond orchards. The beehives are loaded onto pallets and then transported 1000’s of miles across the country on trucks. This is obviously stressful for the bees and many believe that this is one of the factors in Colony Collapse Disorder (often abbreviated to CCD).
Bees pollinate about a third of our food.
Truck loaded with beehives.
Although our main supply of sweetness now comes from sugar produced from sugar cane and sugar beet, honey is still consumed in massive quantities and if you love honey there’s nothing better than harvesting some from your own beehive.
Bees make honey from nectar, which consists of the sugars fructose and glucose as well as other elements such as aromas, antibacterial enzymes and of course water. During the spring and summer, the colony sends out thousands of foraging bees who collect the vast amounts of nectar produced by flowering plants as a bi-product of photosynthesis. A single cherry tree can produce 2kg of nectar per day and honeybees have evolved a long straw-like tongue for collecting it. Beekeepers talk about a “good flow” of nectar. This means that there are plenty of flowering plants nearby producing lots of nectar that the bees are bringing back to the hive.
The best nectar collectorsHoneybees are simply the best collectors of nectar around, they are so good that they have very little competition from other insects. However, because there are not enough bees to collect it all, thousands of tonnes of nectar (and therefore honey) go to waste every year.
The foraging bees transfer the nectar at the entrance of the hive to other bees, who have the job of packing it into the storage cells. Firstly, they will make sure there is enough instant access honey around the brood but, when a surplus occurs, they will store the nectar in the super frames that you place above the hive. This can then be harvested by the beekeeper. The amount of nectar that the bees can collect is influenced greatly by the weather. In very wet summers, the nectar produced by plants and trees is much diluted and therefore of poor quality. In very hot weather the plants stop producing nectar entirely. How much honey you will be able to collect will vary from year to year depending on the colony and the weather, but in a good year you could be looking at a harvest of 50kg or more!
Turning nectar into honey
How do honey bees make wax?Everyone is familiar with the hexagonal pattern of honeycomb and most people probably know that it is made of wax, but have you ever wondered where the wax comes from in the first place? Well, the bees make it themselves from a special gland in their abdomen. If this seems amazing, it is, but for the bees of course it’s quite normal.
The production of wax is stimulated by temperature and a good flow of nectar. Discs of wax are secreted from between the third and fourth segments of the abdomen. The bees who are on wax building duty form chains and pass wax between each other. When a wild colony builds a nest you can actually see great necklace like chains of bees hanging from the comb. In the Beehaus you will sometimes see a chain of bees, who have been making wax, forming a bridge between two new frames as you move them apart.
The bees chew the wax before forming it into honeycomb. The latest research suggests that bees don’t actually build the cells as hexagons. Instead they build the comb as round cylinders which become hexagonal when the bees warm the wax until its almost fluid. The points where the cylinders are touching pull tight under surface tension creating the hexagonal shape. To imagine this, picture what happens when two soap bubbles touch - the surface created between them is completely flat – have a look next time you are doing the washing up!
FoundationIn a managed beehive, the bees are given sheets of beeswax with the exact cell size pressed in. This sheet is called foundation. The foundation encourages the bees to build uniform honeycomb within the frames meaning that they can be lifted out without damaging comb. You might hear a beekeeper say their bees are “drawing out lots of new wax”. This means that the bees are building comb onto new frames of foundation. If a beekeeper says a frame is “fully drawn” it means that the bees have completely finished building the comb on the frame. When wax is very new it is pure white in colour. With use, it becomes darker and very old comb is almost black.
PropolisBees make the honeycomb tough by coating it in propolis. Propolis is made from resin that the bees collect from flower buds and trees. It has antibacterial properties which the bees use to keep the comb sterile. Propolis is also referred to as ‘bee glue’ as the bees use it to seal any little holes in their hive. You will also see it where parts meet for example where the frames rest on the brood box.
A new sheet of foundation ready to go in the hive. The wires in the wax strengthen it.
In the foreground you can see the wax foundation; towards the top the bees have started adding new, white wax.
The wax on a frame that is over a year old looks much darker.
A frame of comb that has been in the hive for a few months is light brown.
Page 16 www.omlet.co.uk
A colony of honey bees is made up of 1 queen bee several hundred male bees called drones and thousands of female worker bees.
The Queen - 1 per colony. Lives up to 4 years.The queen bee is head of the entire colony. Her character determines the behaviour and mood of all the bees in the hive. She achieves this remarkable level of control by producing pheromones which, to the worker bees, must be like the Lynx effect and Chanel No. 5 rolled into one. They pass these complex scents around the hive by touch.Within 30 minutes all the bees in the hive are aware of any change in the queen.
As the queen grows old she produces less pheromones and this is the trigger for the bees to produce a new queen. They will also do this if she is accidentally lost or killed by the beekeeper.
BroodAs well as managing her subjects, the queen is also responsible for giving birth to them. A queen honeybee only needs to mate once in her life and she does this a few days after she hatches. On a warm sunny day she leaves the hive escorted by some of her workers to minimise the chance of her getting lost or eaten by a bird. The queen flies high and fast so that only the very fittest drones have the chance of mating with her. She may be mated by one or several drones and then returns to the hive where she is greeted back by the colony. The fully mature queen is now capable of laying up to 2000 eggs per day, which would take a chicken 6 years to produce.
However for all her skills, she is a terrible mother, having completely lost any instinct to care for her young and the queen therefore relies on the female worker bees to raise her young. Beekeepers refer to the eggs and larvae collectively as brood.
The queen is physically quite different from the other bees in the hive. She is long and slender, with a much smoother, less hairy body. Her abdomen is quite pointy and her head is proportionally small. Despite this she can be difficult to spot in amongst 50,000 other fast moving bees and so it’s normal to mark her with a small bright dot of paint. This technique is described later in the guide. The queen does have a sting but she only ever uses it against a rival queen.
A marked queen surrounded by workers.
Queens, worker and dronesThe next part of this guide will give you a good understanding of the biology of honeybees, their organisation within the hive and in particular the life cycle of the colony so that, with a little well-timed help, you can ensure it not only survives, but prospers.
About honey bees
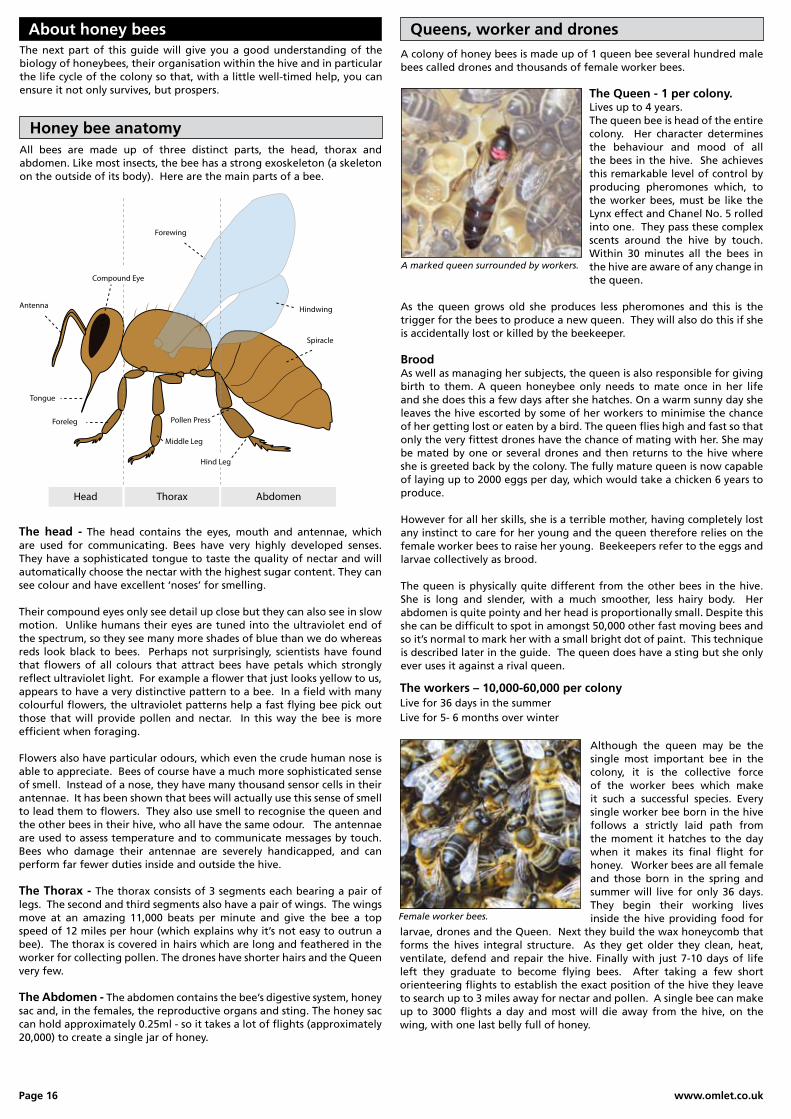
Honey bee anatomy
The head - The head contains the eyes, mouth and antennae, which are used for communicating. Bees have very highly developed senses. They have a sophisticated tongue to taste the quality of nectar and will automatically choose the nectar with the highest sugar content. They can see colour and have excellent ‘noses’ for smelling.
Their compound eyes only see detail up close but they can also see in slow motion. Unlike humans their eyes are tuned into the ultraviolet end of the spectrum, so they see many more shades of blue than we do whereas reds look black to bees. Perhaps not surprisingly, scientists have found that flowers of all colours that attract bees have petals which strongly reflect ultraviolet light. For example a flower that just looks yellow to us, appears to have a very distinctive pattern to a bee. In a field with many colourful flowers, the ultraviolet patterns help a fast flying bee pick out those that will provide pollen and nectar. In this way the bee is more efficient when foraging.
Flowers also have particular odours, which even the crude human nose is able to appreciate. Bees of course have a much more sophisticated sense of smell. Instead of a nose, they have many thousand sensor cells in their antennae. It has been shown that bees will actually use this sense of smell to lead them to flowers. They also use smell to recognise the queen and the other bees in their hive, who all have the same odour. The antennae are used to assess temperature and to communicate messages by touch. Bees who damage their antennae are severely handicapped, and can perform far fewer duties inside and outside the hive.
The Thorax - The thorax consists of 3 segments each bearing a pair of legs. The second and third segments also have a pair of wings. The wings move at an amazing 11,000 beats per minute and give the bee a top speed of 12 miles per hour (which explains why it’s not easy to outrun a bee). The thorax is covered in hairs which are long and feathered in the worker for collecting pollen. The drones have shorter hairs and the Queen very few.
The Abdomen - The abdomen contains the bee’s digestive system, honey sac and, in the females, the reproductive organs and sting. The honey sac can hold approximately 0.25ml - so it takes a lot of flights (approximately 20,000) to create a single jar of honey.
All bees are made up of three distinct parts, the head, thorax and abdomen. Like most insects, the bee has a strong exoskeleton (a skeleton on the outside of its body). Here are the main parts of a bee.
The workers – 10,000-60,000 per colonyLive for 36 days in the summerLive for 5- 6 months over winter
Although the queen may be the single most important bee in the colony, it is the collective force of the worker bees which make it such a successful species. Every single worker bee born in the hive follows a strictly laid path from the moment it hatches to the day when it makes its final flight for honey. Worker bees are all female and those born in the spring and summer will live for only 36 days. They begin their working lives inside the hive providing food for
larvae, drones and the Queen. Next they build the wax honeycomb that forms the hives integral structure. As they get older they clean, heat, ventilate, defend and repair the hive. Finally with just 7-10 days of life left they graduate to become flying bees. After taking a few short orienteering flights to establish the exact position of the hive they leave to search up to 3 miles away for nectar and pollen. A single bee can make up to 3000 flights a day and most will die away from the hive, on the wing, with one last belly full of honey.
Female worker bees.
ThoraxHead Abdomen
Compound Eye
Antenna
Foreleg
Middle Leg
Hind Leg
Forewing
Hindwing
Pollen Press
Spiracle
Tongue

www.omlet.co.uk Page 17
The drones – up to 1000 per colonyLive for 22 days in the SummerNone are left in the hive over winter
A drone is a male bee, he is about the same length as the queen but, to put it politely, much more squarely built. Less politely, he looks quite dumpy with a large, round abdomen and two big eyes which meet at the top of his head. The drones are quite often to be found hanging around the honey where they lazily feed themselves or let themselves be fed by the workers. As they have no sting, they cannot defend the hive, they never offer to help keep the place clean and surprisingly (given their taste for it,) have never learnt how
to make honey. In fact, the drones only purpose in life is to mate with new queens, which they do on sunny days on mating flights - what a life! The one sting in the tail for this happy existence is that, having mated, they promptly die.
The colony always keeps a few hundred to a thousand drones in case a new queen needs to be mated throughout the spring and summer. But once autumn arrives, the workers literally drag any remaining drones out of the hive and leave them outside to die. Suddenly being a drone doesn’t seem quite seem so appealing.
Interestingly, in some countries, drones are considered a delicacy and are said to be a potent aphrodisiac; if you’re in the mood for love you could test this - please let us know if it works.
How does the queen lay eggs?Bee eggs are parthenogenetic, which means they will hatch even if not fertilised. Fertilisation is the deciding factor as to whether the egg that hatches is a male or female bee. Unfertilised eggs will produce males, known as drones. Fertilised eggs will produce females, which will be either workers or queens. There is no difference between queen eggs or worker eggs, they are exactly the same; the difference occurs in how they are fed when they hatch. An egg that is selected to be a new queen will be fed only royal jelly - an extremely protein rich food produced by the bees. Because the queen is larger the bees construct a special cell for a new queen which is larger and quite easy to spot.
It is believed that the queen measures the cell size with her front legs. A large cell is for a male drone bee and a smaller cell is for a female worker bee. To produce a worker bee the queen adds sperm to fertilise the egg in her vagina. If it’s a male drone cell then she simply lays an unfertilised egg. When the egg hatches into a larva, it looks like a little maggot and the nurse bees start to feed it.
The nurse bees feed the larvae with bee milk. This is masticated pollen and is an extremely nutritious protein rich food. The cell is regularly topped up for the first three days, thereafter it is fed less frequently until the cell is capped. Drones are thought to be fed a similar ration to the workers.
Days afteregg is laid
QUEEN DRONE WORKER
Hatching of egg 3 3 3
Cell sealed 8 10 8-9
Spinning of cocoon 9 12 10
Moult of pupa to adult 15 22 20
Emerges from cell 16 24 21
Ready to mate 20 37 N/A
In the diagram above you can see how the egg changes daily in the cell until it finally emerges as a fully formed bee.
Fresh eggs! But a bit small for frying.
Larvae at different stages. Note the wire running through the foundation.
The queen, drones and worker bees take different amounts of time to complete the stages of development. This is useful to know when you come to inspect your hive as you can tell how long ago the queen has laid a particular type of egg.
Is it possible for a worker bee to lay eggs?Worker bees do occasionally lay eggs. This only happens if you have a failing queen or a queenless hive and the bees have been unable to requeen, perhaps because it’s the wrong time of year for a new queen to be able to mate. Worker bees can only lay drone brood because they haven’t mated and are not carrying any sperm. You can spot eggs laid by worker bees because they will often be on the side of the cell rather than on the bottom and there may be more than one egg per cell. If this happens you will need to either unite the colony with one that has a queen or introduce a new queen.
The drone bee is larger than the workers and has bigger eyes.
Worker Bee Development in Days
Some worker bees are assigned to the duty of ensuring the hive is not penetrated by unwanted guests, these can range from wasps, mice and occasionally the beekeeper! The guard bees can be seen at the entrance to the Beehaus, checking in the arriving bees. The smoke will placate them too but if you stay too long these are the bees that you will first notice buzzing around your veil urging you to close up the hive and come back another day.
The queen cell is fed bee milk with a higher sugar content than worker larvae. This super bee milk is called “Royal Jelly” and the queen larva is fed as much of this as possible until the cell is capped. This difference produces a strong queen with properly developed ovaries. Incidentally, the cell caps are a mixture of pollen and wax which is porous, unlike the airtight wax caps for honey. This is a great bit of trivia to use to impress a school teacher.
Page 18 www.omlet.co.uk
1. Worker Cells - Small hexagonal with a flat cap. These are the most common cells in the hive and are used for breeding worker bees.
Cell typesInside the hive you will see different cells within the combs that the bees construct. These cells vary according to their purpose as follows:
3. Queen Cells - Large, thimble shape and hang vertically. These can appear at any time of year if the bees are producing a queen, although most common is spring and early summer.
5. Pollen cells - Pollen is stored by the bees directly around the brood. It comes in all sorts of different colours depending on the plant it was collected from.
2. Drone Cells - Large hexagonal with a domed cap. Only found in the spring and early summer. More often than not, drone cells are found towards the bottom of a frame.
4. Nectar and honey cells - These are the same size as the cells used by the bees for raising brood. Bees store nectar in cells around the brood. They will use this nectar as fuel while they are working. They also convert some of the nectar into honey which they cap ( as in the cells in the top left,) and for making bee milk.
Temperature control The temperature of the brood is critical. The eggs must be incubated within 32-36oC, otherwise the bees will not develop and hatch properly.
The worker bees control the temperature by either fanning their wings to cool the hive or by metabolizing honey to heat it. The brood also produces heat as the larvae and pupae grow. If the colony is too hot, the workers douse their bodies in water and bring it into the hive. They then fan the air with their wings, thus bringing the temperature
down by evaporation. In cooler times, they huddle together around the brood of eggs to keep it warm.
Bees fanning their wings.
Honey bee populationThe population of the colony expands in the spring and contracts in the autumn. Understanding this is the very essence of beekeeping.
A typical colony will build up it’s population using the nectar of the early spring flowers. Then, with a large workforce, it can harvest the higher quality nectar in the summer. The colony reduces it’s numbers in preparation for winter when around 10,000 bees will cluster around the queen using the stored honey to keep warm until the following spring when the cycle begins again.
This is the simple pattern that you will see in your own colony. The rise in spring can be quite dramatic. Don’t forget a good queen will lay up to 2000 eggs a day so in a couple of weeks the population of the colony can easily increase by 10,000 bees, even taking into account the older bees dying. You should be careful not to be caught out by this and ensure that the colony has plenty of space to expand into with new brood frames and supers added as soon as the temperature increases enough to allow you to open the Beehaus. There is more on managing the colony throughout the seasons later in the guide.
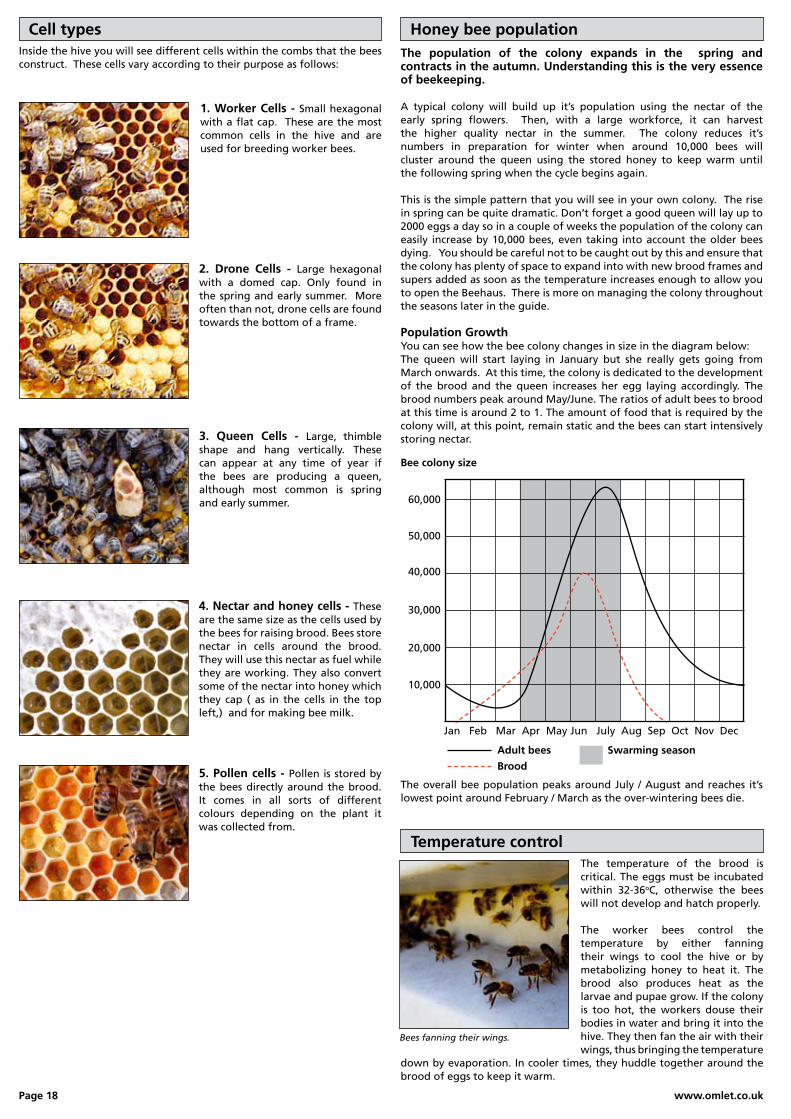
Population GrowthYou can see how the bee colony changes in size in the diagram below:The queen will start laying in January but she really gets going from March onwards. At this time, the colony is dedicated to the development of the brood and the queen increases her egg laying accordingly. The brood numbers peak around May/June. The ratios of adult bees to brood at this time is around 2 to 1. The amount of food that is required by the colony will, at this point, remain static and the bees can start intensively storing nectar.
The overall bee population peaks around July / August and reaches it’s lowest point around February / March as the over-wintering bees die.
60,000
Bee colony size
Adult bees Swarming season
Brood
50,000
10,000
Jan Feb Mar Apr May Jun July Aug Sep Oct Nov Dec
20,000
30,000
40,000

www.omlet.co.uk Page 19
As you can see, bees have to be experts in air conditioning and are able to maintain the required temperature in the hive even when the outside air temperature is significantly different. However, by providing a well insulated hive (such as the Beehaus,) you are giving them a helping hand. They do not need to expend as much energy, either cooling in summer or heating in winter, which means that you are likely to be able to harvest more honey.
TEMPERATURE OUTSIDE OC
ACTIvITy
20 Queen cannot fly
16 Minimum temperature for opening hive
15 Drones do not fly
14 All bees will cluster inside the Beehaus to keep warm
10 Queen will stop laying
TEMPERATURE INSIDE OC
ACTIvITy
38+ Colony need water to cool the hive
33-36 Bees able to create wax
32-36 Nest temperature for hatching eggs and raising brood
15-20 Winter cluster temperature
6 Bees will be inactive as muscles too cold
4 A single bee will die without colony
The chart below shows the key temperatures and relationship between temperatures and the bees.
Honeybees are fantastic foragers and fly up to 3 miles away from their hive to find food if they have to, although they will of course choose closer supplies when possible. A typical worker bee will make 3000 visits to flowers in a day and will keep visiting the same area until all the nectar is finished.
The waggle danceIn a colony, over half the bees will spend their time foraging. Within these foragers, there are a small number of elite ‘scout bees’. The scouts spend their time looking for good sources of food. Once they have found a source of quality nectar, they return to the hive and tell the other bees where to find it. They do this by performing the famous waggle dance.
The scout bee dances on the honey comb. As it’s quite dark in the beehive, the other bees have to feel the dance with their antennae. The scout also shares some of the nectar, to let the other bees know the quality that they have found.
How do bees find food?
The bee dances on the surface of the comb at an angle to the vertical that denotes the angle the bee should fly at when it leaves the hive relative to the sun. The length of the dance on the comb denotes the distance.
The amount of water in the nectar is a measure of its quality and your bees will actively source the flowers producing nectar with the lowest percentage of water and the highest percentage of sugar. In a good season the bees will actually become quite discerning about this and foraging bees who return with watery nectar will have their load rejected by the hive bees and sent out into the field to do better.
Plants that provide food for beesYou can help your bees and other wildlife by planting bee friendly plants in your garden. Even window boxes and hanging baskets can be planted to be useful food sources for your bees as well as you. For example a herb garden with basil, thyme and rosemary will please the bees (and make your cooking more interesting). A flower bed full of lavender will give honey a delightful flavour and the dried flowers can be used to make your drawers beautifully scented.
There are lots of plants that are fantastic for bees. As a general rule, you should try to plant as wide a variety as possible so that the bees have sources of food throughout the entire season (March-September). You should aim to plant them in clumps to make it easier for the bees to find and if possible choose local plants rather than exotic ones.
The bees waggle at an angle to vertical. The longer the waggle the further the nectar.
This is the same angle as the flowers are to the sun.
Angle
Distan
ce
Corn flower.
Honesty. Allium.
Marigold.
Thyme. Love-in-the-mist.
Annual poppy. Fox glove.
Page 20 www.omlet.co.uk
A pond surrounded by pebbles is an ideal place for bees to drink from.
Water is essential for bees. They use it to regulate the temperature of the hive and to dilute honey for eating.
Nuisance beesIf the closest water source to your bees is the neighbours swimming pool or pond then this can cause a problem as a large number of bees will visit the pool everyday for water. Other sources of water that might be near by are: dripping taps, bird baths, horse troughs, ponds or washing hung out to dry.
Providing water close to the hiveYou can stop the bees from causing a nuisance by providing a closer source of water. However, you should place the water over 3 meters away from the hive. The bees will not drink from water placed directly next to the hive because they might have defecated in it. Suitable water sources you can provide are:
Bees can be kept in a garden with other pets such as chickens, rabbits and dogs. Dogs should be prevented from being able to get close to the hive as the bees may well treat the dog as a potential danger and sting it. If you have a dog, it would be a good idea to fence off the area of the garden that the bees are in so that the dog can’t investigate.
A bucket or tray with pebbles in the bottom to stop the bees drowning.
A drinker for a chicken can be used for bees.
Water sources for your bees
Pets
Salvia. Purple toadflax.
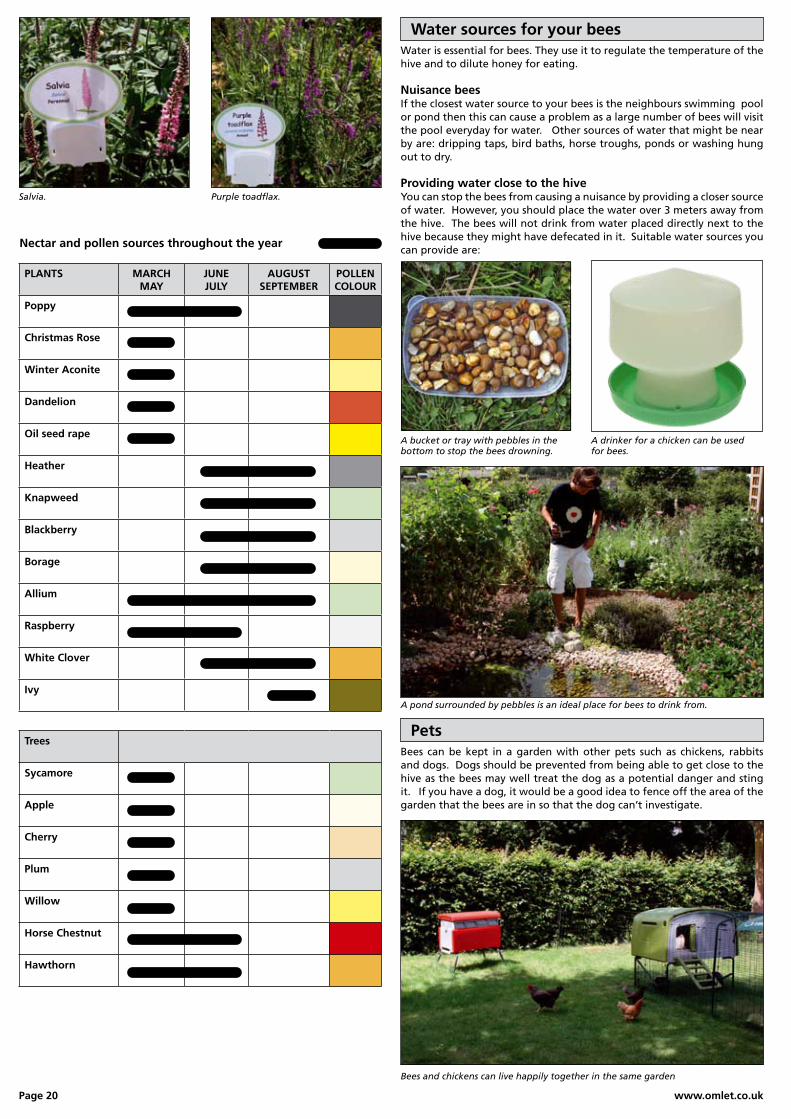
Nectar and pollen sources throughout the year
PlANTS MARCHMAy
JUNEJUly
AUGUSTSEPTEMBER
POllENCOlOUR
Poppy
Christmas Rose
Winter Aconite
Dandelion
Oil seed rape
Heather
Knapweed
Blackberry
Borage
Allium
Raspberry
White Clover
Ivy
Trees
Sycamore
Apple
Cherry
Plum
Willow
Horse Chestnut
Hawthorn
Bees and chickens can live happily together in the same garden
www.omlet.co.uk Page 21
locating your BeehausThe position you choose for your bees is very important. You can place your Beehaus in a variety of places, from rooftops to a country orchard. Choosing the right location will make it much easier to manage bees. Once you have put your bees in location it can be slightly complicated to move them, so it is worth giving it some thought. Here is a rough guide:
General concepts
1. Choose a quiet, level location away from busy footpaths.
2. Ensure you leave about 2m of space in front of the hive entrance to give the bees space to fly out. You can encourage your bees to fly up and away above head height by placing an obstacle (such as a hedge or fence) a short distance (i.e 1.5m) from the hive entrance.
3. You should try to shelter the entrance of the hive from the prevailing wind to make it easy for the bees to take off and land.
4. Ideally you should have a water source, such as a pond, bird bath etc near the bees but not within 3m. If this is not possible, don’t worry, the bees will find water locally.
5. You should avoid locating your bees near horses (which bees don’t like), high voltage power lines, children’s play areas or under trees.
At a later date, you may want to move your bees to a different location. For example: if you are moving house or rearranging the garden. The simple rule is: You can move a beehive less than 1m or more than three miles. This is covered in more detail on Page 45.
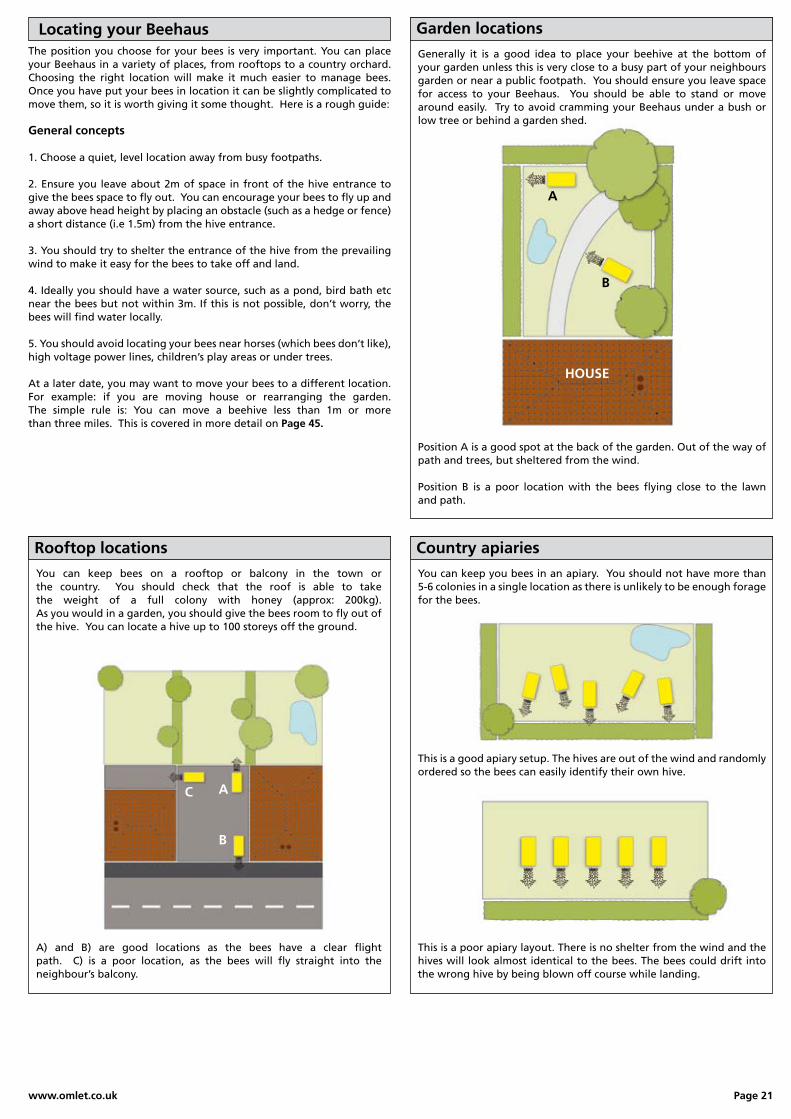
Garden locations
Country apiaries
You can keep you bees in an apiary. You should not have more than 5-6 colonies in a single location as there is unlikely to be enough forage for the bees.
This is a poor apiary layout. There is no shelter from the wind and the hives will look almost identical to the bees. The bees could drift into the wrong hive by being blown off course while landing.
This is a good apiary setup. The hives are out of the wind and randomly ordered so the bees can easily identify their own hive.
Rooftop locations
A) and B) are good locations as the bees have a clear flight path. C) is a poor location, as the bees will fly straight into the neighbour’s balcony.
You can keep bees on a rooftop or balcony in the town or the country. You should check that the roof is able to take the weight of a full colony with honey (approx: 200kg). As you would in a garden, you should give the bees room to fly out of the hive. You can locate a hive up to 100 storeys off the ground.
A
B
C
A
B
HOUSE
Generally it is a good idea to place your beehive at the bottom of your garden unless this is very close to a busy part of your neighbours garden or near a public footpath. You should ensure you leave space for access to your Beehaus. You should be able to stand or move around easily. Try to avoid cramming your Beehaus under a bush or low tree or behind a garden shed.
Position A is a good spot at the back of the garden. Out of the way of path and trees, but sheltered from the wind.
Position B is a poor location with the bees flying close to the lawn and path.
Page 22 www.omlet.co.uk
What to do if a bee gets in your suit?There are several things you can do to avoid being stung. •Always wear a beesuit when working with bees. Wear long sleeved tops and trousers underneath as a suit on it’s own is not always 100% effective against a bee sting. •Wear wellington boots over your beesuit. Bees crawl upwards so it’s always better to tuck clothing in rather than leave it out. •Don’tstandinfrontofthehiveentrancewherethebeesareflying. •Don’twearshinyjewellery. •Don’tstandnearthehiveaftereatingstrongsmellingfoodoralcohol eg curry. •Bananasareparticularlyoffensivetobees,soavoidthem. •Don’tusescentedsoap,cosmeticsorfabricconditioner. •Don’tletvisitorswanderovertothehivewithoutabeesuiton.
If a bee gets into your hair, the best thing to do is to calmly and quickly squash it by whacking your hand on top. Our hair is like velcro to a bee and they find it almost impossible to get out.
If a bee gets in your suit, quickly but calmly walk away from the hive. It is often quite hard to release a bee from your suit and the most straightforward way of dealing with it is unfortunately to squash the bee.
you should never open your veil next to a hive of bees.
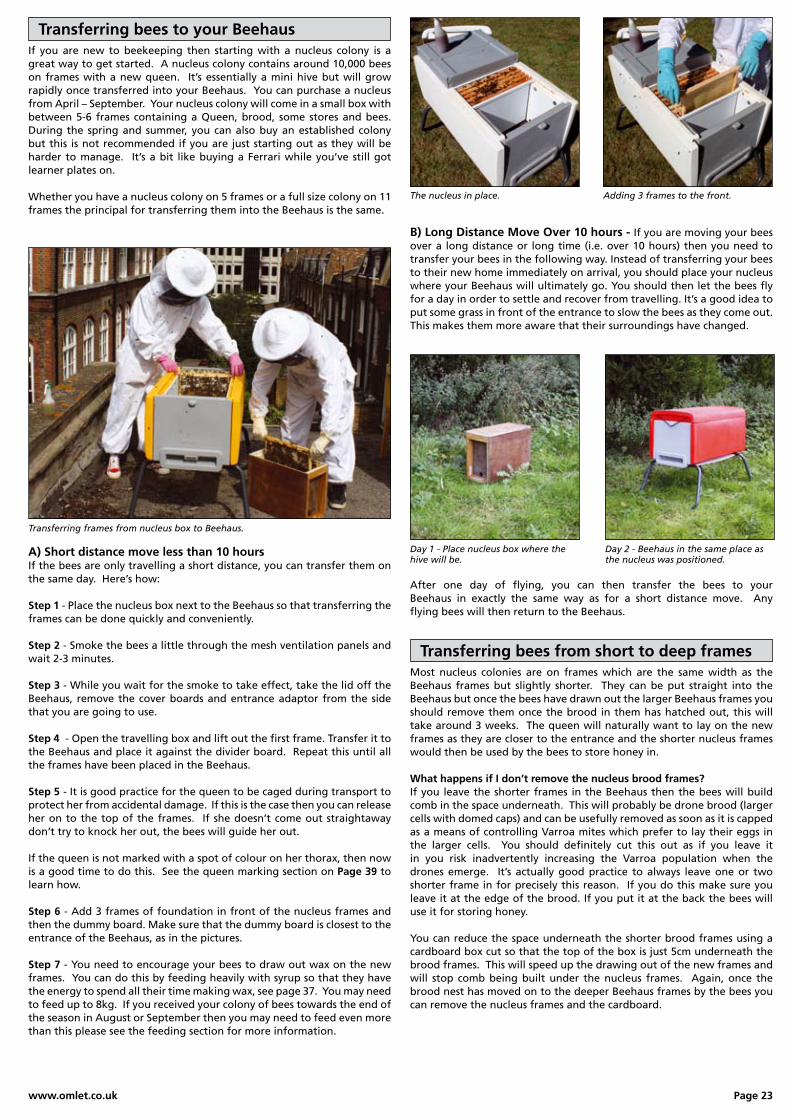
Smoking your gloves
If a bee does sting on your gloves or suit while inspecting your hive this can encourage further bees to sting the same area. You can stop this happening by smoking the area with either liquid smoke or traditional smoke. This masks the smell of the sting from other bees. You should also wash your suit and gloves regularly as the alarm smell can remain for several weeks in clothes.
Spray your gloves with a liquid smoker.
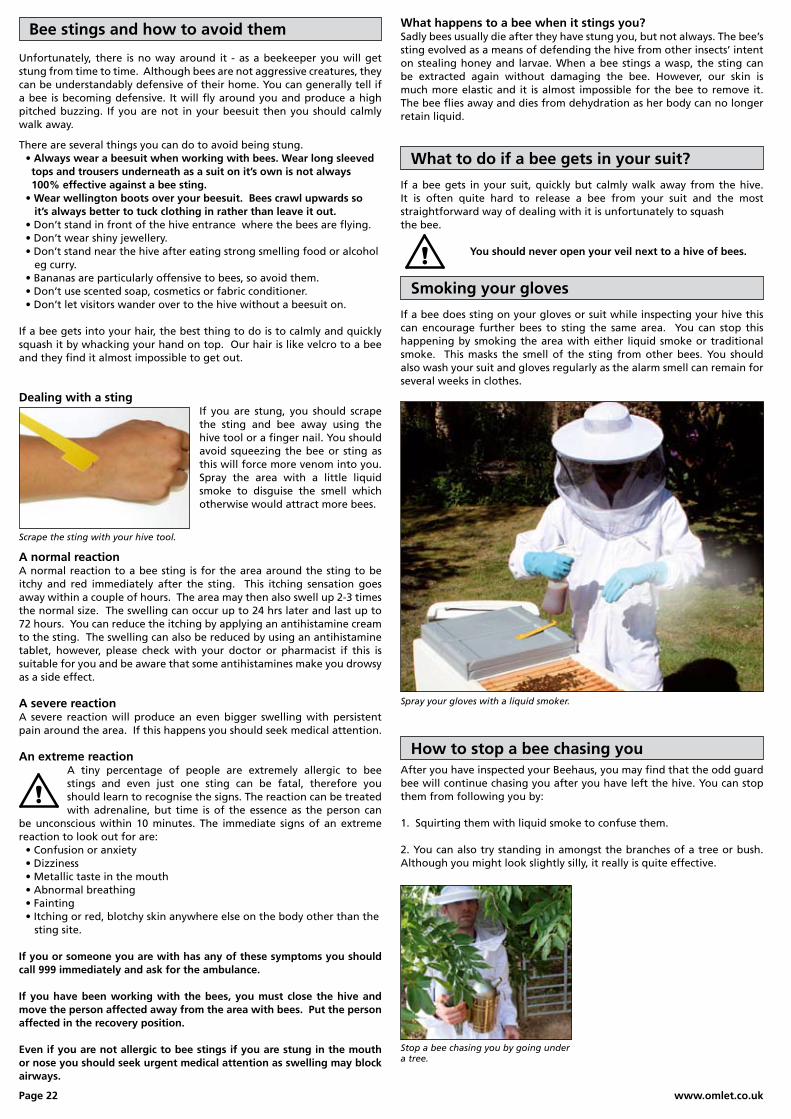
Dealing with a stingIf you are stung, you should scrape the sting and bee away using the hive tool or a finger nail. You should avoid squeezing the bee or sting as this will force more venom into you. Spray the area with a little liquid smoke to disguise the smell which otherwise would attract more bees.
A normal reactionA normal reaction to a bee sting is for the area around the sting to be itchy and red immediately after the sting. This itching sensation goes away within a couple of hours. The area may then also swell up 2-3 times the normal size. The swelling can occur up to 24 hrs later and last up to 72 hours. You can reduce the itching by applying an antihistamine cream to the sting. The swelling can also be reduced by using an antihistamine tablet, however, please check with your doctor or pharmacist if this is suitable for you and be aware that some antihistamines make you drowsy as a side effect.
A severe reaction A severe reaction will produce an even bigger swelling with persistent pain around the area. If this happens you should seek medical attention.
An extreme reactionA tiny percentage of people are extremely allergic to bee stings and even just one sting can be fatal, therefore you should learn to recognise the signs. The reaction can be treated with adrenaline, but time is of the essence as the person can
be unconscious within 10 minutes. The immediate signs of an extreme reaction to look out for are: •Confusionoranxiety •Dizziness •Metallictasteinthemouth •Abnormalbreathing •Fainting •Itchingorred,blotchyskinanywhereelseonthebodyotherthanthe sting site.
If you or someone you are with has any of these symptoms you should call 999 immediately and ask for the ambulance.
If you have been working with the bees, you must close the hive and move the person affected away from the area with bees. Put the person affected in the recovery position.
Even if you are not allergic to bee stings if you are stung in the mouth or nose you should seek urgent medical attention as swelling may block airways.
Unfortunately, there is no way around it - as a beekeeper you will get stung from time to time. Although bees are not aggressive creatures, they can be understandably defensive of their home. You can generally tell if a bee is becoming defensive. It will fly around you and produce a high pitched buzzing. If you are not in your beesuit then you should calmly walk away.
Bee stings and how to avoid them
Scrape the sting with your hive tool.
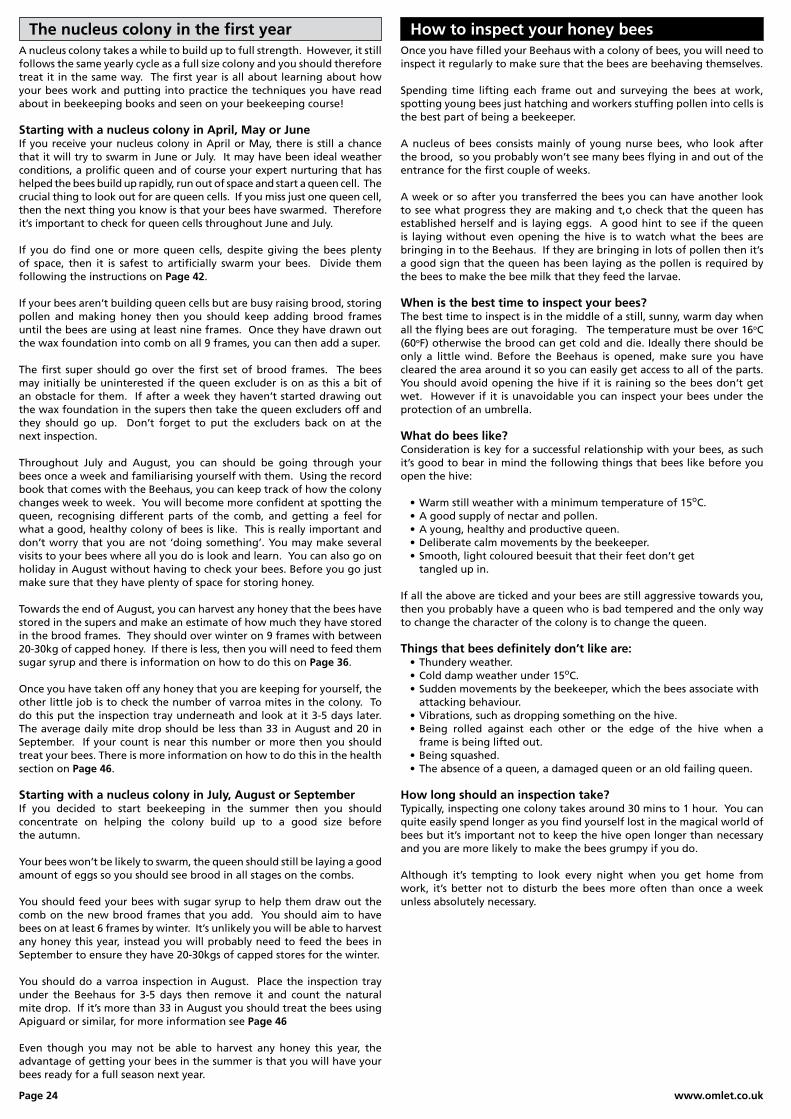
Stop a bee chasing you by going under a tree.
After you have inspected your Beehaus, you may find that the odd guard bee will continue chasing you after you have left the hive. You can stop them from following you by:
1. Squirting them with liquid smoke to confuse them.
2. You can also try standing in amongst the branches of a tree or bush. Although you might look slightly silly, it really is quite effective.
How to stop a bee chasing you
What happens to a bee when it stings you?Sadly bees usually die after they have stung you, but not always. The bee’s sting evolved as a means of defending the hive from other insects’ intent on stealing honey and larvae. When a bee stings a wasp, the sting can be extracted again without damaging the bee. However, our skin is much more elastic and it is almost impossible for the bee to remove it. The bee flies away and dies from dehydration as her body can no longer retain liquid.
www.omlet.co.uk Page 23
B) long Distance Move Over 10 hours - If you are moving your bees over a long distance or long time (i.e. over 10 hours) then you need to transfer your bees in the following way. Instead of transferring your bees to their new home immediately on arrival, you should place your nucleus where your Beehaus will ultimately go. You should then let the bees fly for a day in order to settle and recover from travelling. It’s a good idea to put some grass in front of the entrance to slow the bees as they come out. This makes them more aware that their surroundings have changed.
Day 1 - Place nucleus box where the hive will be.
Day 2 - Beehaus in the same place as the nucleus was positioned.
After one day of flying, you can then transfer the bees to your Beehaus in exactly the same way as for a short distance move. Any flying bees will then return to the Beehaus.
Transferring frames from nucleus box to Beehaus.
Transferring bees to your BeehausIf you are new to beekeeping then starting with a nucleus colony is a great way to get started. A nucleus colony contains around 10,000 bees on frames with a new queen. It’s essentially a mini hive but will grow rapidly once transferred into your Beehaus. You can purchase a nucleus from April – September. Your nucleus colony will come in a small box with between 5-6 frames containing a Queen, brood, some stores and bees. During the spring and summer, you can also buy an established colony but this is not recommended if you are just starting out as they will be harder to manage. It’s a bit like buying a Ferrari while you’ve still got learner plates on.
Whether you have a nucleus colony on 5 frames or a full size colony on 11 frames the principal for transferring them into the Beehaus is the same.
A) Short distance move less than 10 hoursIf the bees are only travelling a short distance, you can transfer them on the same day. Here’s how:
Step 1 - Place the nucleus box next to the Beehaus so that transferring the frames can be done quickly and conveniently.
Step 2 - Smoke the bees a little through the mesh ventilation panels and wait 2-3 minutes. Step 3 - While you wait for the smoke to take effect, take the lid off the Beehaus, remove the cover boards and entrance adaptor from the side that you are going to use.
Step 4 - Open the travelling box and lift out the first frame. Transfer it to the Beehaus and place it against the divider board. Repeat this until all the frames have been placed in the Beehaus.
Step 5 - It is good practice for the queen to be caged during transport to protect her from accidental damage. If this is the case then you can release her on to the top of the frames. If she doesn’t come out straightaway don’t try to knock her out, the bees will guide her out.
If the queen is not marked with a spot of colour on her thorax, then now is a good time to do this. See the queen marking section on Page 39 to learn how.
Step 6 - Add 3 frames of foundation in front of the nucleus frames and then the dummy board. Make sure that the dummy board is closest to the entrance of the Beehaus, as in the pictures.
Step 7 - You need to encourage your bees to draw out wax on the new frames. You can do this by feeding heavily with syrup so that they have the energy to spend all their time making wax, see page 37. You may need to feed up to 8kg. If you received your colony of bees towards the end of the season in August or September then you may need to feed even more than this please see the feeding section for more information.
The nucleus in place. Adding 3 frames to the front.
Most nucleus colonies are on frames which are the same width as the Beehaus frames but slightly shorter. They can be put straight into the Beehaus but once the bees have drawn out the larger Beehaus frames you should remove them once the brood in them has hatched out, this will take around 3 weeks. The queen will naturally want to lay on the new frames as they are closer to the entrance and the shorter nucleus frames would then be used by the bees to store honey in.
What happens if I don’t remove the nucleus brood frames?If you leave the shorter frames in the Beehaus then the bees will build comb in the space underneath. This will probably be drone brood (larger cells with domed caps) and can be usefully removed as soon as it is capped as a means of controlling Varroa mites which prefer to lay their eggs in the larger cells. You should definitely cut this out as if you leave it in you risk inadvertently increasing the Varroa population when the drones emerge. It’s actually good practice to always leave one or two shorter frame in for precisely this reason. If you do this make sure you leave it at the edge of the brood. If you put it at the back the bees will use it for storing honey.
You can reduce the space underneath the shorter brood frames using a cardboard box cut so that the top of the box is just 5cm underneath the brood frames. This will speed up the drawing out of the new frames and will stop comb being built under the nucleus frames. Again, once the brood nest has moved on to the deeper Beehaus frames by the bees you can remove the nucleus frames and the cardboard.
Transferring bees from short to deep frames
Page 24 www.omlet.co.uk
A nucleus colony takes a while to build up to full strength. However, it still follows the same yearly cycle as a full size colony and you should therefore treat it in the same way. The first year is all about learning about how your bees work and putting into practice the techniques you have read about in beekeeping books and seen on your beekeeping course!
Starting with a nucleus colony in April, May or JuneIf you receive your nucleus colony in April or May, there is still a chance that it will try to swarm in June or July. It may have been ideal weather conditions, a prolific queen and of course your expert nurturing that has helped the bees build up rapidly, run out of space and start a queen cell. The crucial thing to look out for are queen cells. If you miss just one queen cell, then the next thing you know is that your bees have swarmed. Therefore it’s important to check for queen cells throughout June and July.
If you do find one or more queen cells, despite giving the bees plenty of space, then it is safest to artificially swarm your bees. Divide them following the instructions on Page 42.
If your bees aren’t building queen cells but are busy raising brood, storing pollen and making honey then you should keep adding brood frames until the bees are using at least nine frames. Once they have drawn out the wax foundation into comb on all 9 frames, you can then add a super.
The first super should go over the first set of brood frames. The bees may initially be uninterested if the queen excluder is on as this a bit of an obstacle for them. If after a week they haven’t started drawing out the wax foundation in the supers then take the queen excluders off and they should go up. Don’t forget to put the excluders back on at the next inspection.
Throughout July and August, you can should be going through your bees once a week and familiarising yourself with them. Using the record book that comes with the Beehaus, you can keep track of how the colony changes week to week. You will become more confident at spotting the queen, recognising different parts of the comb, and getting a feel for what a good, healthy colony of bees is like. This is really important and don’t worry that you are not ‘doing something’. You may make several visits to your bees where all you do is look and learn. You can also go on holiday in August without having to check your bees. Before you go just make sure that they have plenty of space for storing honey.
Towards the end of August, you can harvest any honey that the bees have stored in the supers and make an estimate of how much they have stored in the brood frames. They should over winter on 9 frames with between 20-30kg of capped honey. If there is less, then you will need to feed them sugar syrup and there is information on how to do this on Page 36.
Once you have taken off any honey that you are keeping for yourself, the other little job is to check the number of varroa mites in the colony. To do this put the inspection tray underneath and look at it 3-5 days later. The average daily mite drop should be less than 33 in August and 20 in September. If your count is near this number or more then you should treat your bees. There is more information on how to do this in the health section on Page 46.
Starting with a nucleus colony in July, August or SeptemberIf you decided to start beekeeping in the summer then you should concentrate on helping the colony build up to a good size before the autumn.
Your bees won’t be likely to swarm, the queen should still be laying a good amount of eggs so you should see brood in all stages on the combs.
You should feed your bees with sugar syrup to help them draw out the comb on the new brood frames that you add. You should aim to have bees on at least 6 frames by winter. It’s unlikely you will be able to harvest any honey this year, instead you will probably need to feed the bees in September to ensure they have 20-30kgs of capped stores for the winter.
You should do a varroa inspection in August. Place the inspection tray under the Beehaus for 3-5 days then remove it and count the natural mite drop. If it’s more than 33 in August you should treat the bees using Apiguard or similar, for more information see Page 46
Even though you may not be able to harvest any honey this year, the advantage of getting your bees in the summer is that you will have your bees ready for a full season next year.
The nucleus colony in the first yearOnce you have filled your Beehaus with a colony of bees, you will need to inspect it regularly to make sure that the bees are beehaving themselves.
Spending time lifting each frame out and surveying the bees at work, spotting young bees just hatching and workers stuffing pollen into cells is the best part of being a beekeeper.
A nucleus of bees consists mainly of young nurse bees, who look after the brood, so you probably won’t see many bees flying in and out of the entrance for the first couple of weeks.
A week or so after you transferred the bees you can have another look to see what progress they are making and t,o check that the queen has established herself and is laying eggs. A good hint to see if the queen is laying without even opening the hive is to watch what the bees are bringing in to the Beehaus. If they are bringing in lots of pollen then it’s a good sign that the queen has been laying as the pollen is required by the bees to make the bee milk that they feed the larvae.
When is the best time to inspect your bees?The best time to inspect is in the middle of a still, sunny, warm day when all the flying bees are out foraging. The temperature must be over 16oC (60oF) otherwise the brood can get cold and die. Ideally there should be only a little wind. Before the Beehaus is opened, make sure you have cleared the area around it so you can easily get access to all of the parts. You should avoid opening the hive if it is raining so the bees don’t get wet. However if it is unavoidable you can inspect your bees under the protection of an umbrella.
What do bees like?Consideration is key for a successful relationship with your bees, as such it’s good to bear in mind the following things that bees like before you open the hive:
•Warmstillweatherwithaminimumtemperatureof15oC. •Agoodsupplyofnectarandpollen. •Ayoung,healthyandproductivequeen. •Deliberatecalmmovementsbythebeekeeper. •Smooth,lightcolouredbeesuitthattheirfeetdon’tget tangled up in.
If all the above are ticked and your bees are still aggressive towards you, then you probably have a queen who is bad tempered and the only way to change the character of the colony is to change the queen.
Things that bees definitely don’t like are: •Thunderyweather. •Colddampweatherunder15oC. •Suddenmovementsbythebeekeeper,whichthebeesassociatewith attacking behaviour. •Vibrations,suchasdroppingsomethingonthehive. •Being rolled against each other or the edge of the hive when a frame is being lifted out. •Beingsquashed. •Theabsenceofaqueen,adamagedqueenoranoldfailingqueen.
How long should an inspection take?Typically, inspecting one colony takes around 30 mins to 1 hour. You can quite easily spend longer as you find yourself lost in the magical world of bees but it’s important not to keep the hive open longer than necessary and you are more likely to make the bees grumpy if you do.
Although it’s tempting to look every night when you get home from work, it’s better not to disturb the bees more often than once a week unless absolutely necessary.
How to inspect your honey bees
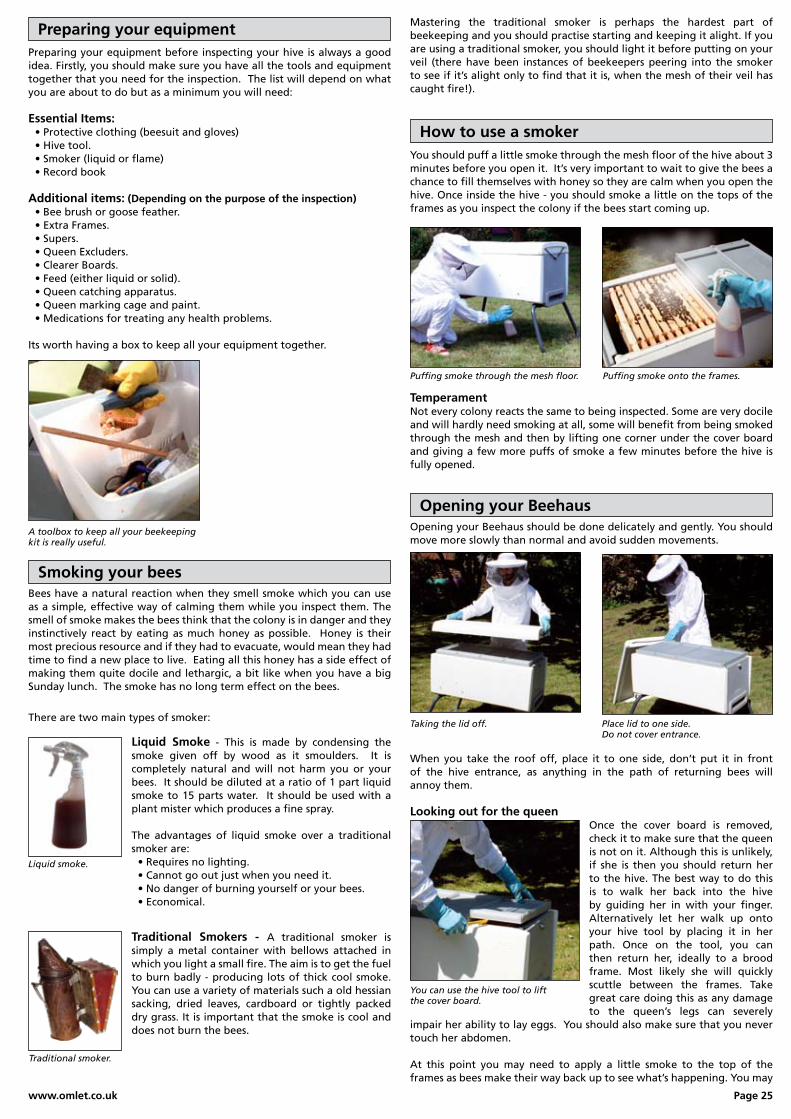
www.omlet.co.uk Page 25
Preparing your equipment before inspecting your hive is always a good idea. Firstly, you should make sure you have all the tools and equipment together that you need for the inspection. The list will depend on what you are about to do but as a minimum you will need:
Essential Items: •Protectiveclothing(beesuitandgloves) •Hivetool. •Smoker(liquidorflame) •Recordbook
Additional items: (Depending on the purpose of the inspection) •Beebrushorgoosefeather. •ExtraFrames. •Supers. •QueenExcluders. •ClearerBoards. •Feed(eitherliquidorsolid). •Queencatchingapparatus. •Queenmarkingcageandpaint. •Medicationsfortreatinganyhealthproblems.
Its worth having a box to keep all your equipment together.
Preparing your equipment
A toolbox to keep all your beekeepingkit is really useful.
TemperamentNot every colony reacts the same to being inspected. Some are very docile and will hardly need smoking at all, some will benefit from being smoked through the mesh and then by lifting one corner under the cover board and giving a few more puffs of smoke a few minutes before the hive is fully opened.
How to use a smokerYou should puff a little smoke through the mesh floor of the hive about 3 minutes before you open it. It’s very important to wait to give the bees a chance to fill themselves with honey so they are calm when you open the hive. Once inside the hive - you should smoke a little on the tops of the frames as you inspect the colony if the bees start coming up.
Puffing smoke through the mesh floor. Puffing smoke onto the frames.
Bees have a natural reaction when they smell smoke which you can use as a simple, effective way of calming them while you inspect them. The smell of smoke makes the bees think that the colony is in danger and they instinctively react by eating as much honey as possible. Honey is their most precious resource and if they had to evacuate, would mean they had time to find a new place to live. Eating all this honey has a side effect of making them quite docile and lethargic, a bit like when you have a big Sunday lunch. The smoke has no long term effect on the bees.
Smoking your bees
There are two main types of smoker:
Liquid Smoke - This is made by condensing the smoke given off by wood as it smoulders. It is completely natural and will not harm you or your bees. It should be diluted at a ratio of 1 part liquid smoke to 15 parts water. It should be used with a plant mister which produces a fine spray.
The advantages of liquid smoke over a traditional smoker are: •Requiresnolighting. •Cannotgooutjustwhenyouneedit. •Nodangerofburningyourselforyourbees. •Economical.
Liquid smoke.
Traditional Smokers - A traditional smoker is simply a metal container with bellows attached in which you light a small fire. The aim is to get the fuel to burn badly - producing lots of thick cool smoke. You can use a variety of materials such a old hessian sacking, dried leaves, cardboard or tightly packed dry grass. It is important that the smoke is cool and does not burn the bees.
Mastering the traditional smoker is perhaps the hardest part of beekeeping and you should practise starting and keeping it alight. If you are using a traditional smoker, you should light it before putting on your veil (there have been instances of beekeepers peering into the smoker to see if it’s alight only to find that it is, when the mesh of their veil has caught fire!).
Traditional smoker.
Place lid to one side. Do not cover entrance.
Opening your Beehaus should be done delicately and gently. You should move more slowly than normal and avoid sudden movements.
Taking the lid off.
Opening your Beehaus
When you take the roof off, place it to one side, don’t put it in front of the hive entrance, as anything in the path of returning bees will annoy them.
Looking out for the queenOnce the cover board is removed, check it to make sure that the queen is not on it. Although this is unlikely, if she is then you should return her to the hive. The best way to do this is to walk her back into the hive by guiding her in with your finger. Alternatively let her walk up onto your hive tool by placing it in her path. Once on the tool, you can then return her, ideally to a brood frame. Most likely she will quickly scuttle between the frames. Take great care doing this as any damage to the queen’s legs can severely
impair her ability to lay eggs. You should also make sure that you never touch her abdomen.
At this point you may need to apply a little smoke to the top of the frames as bees make their way back up to see what’s happening. You may
You can use the hive tool to lift the cover board.
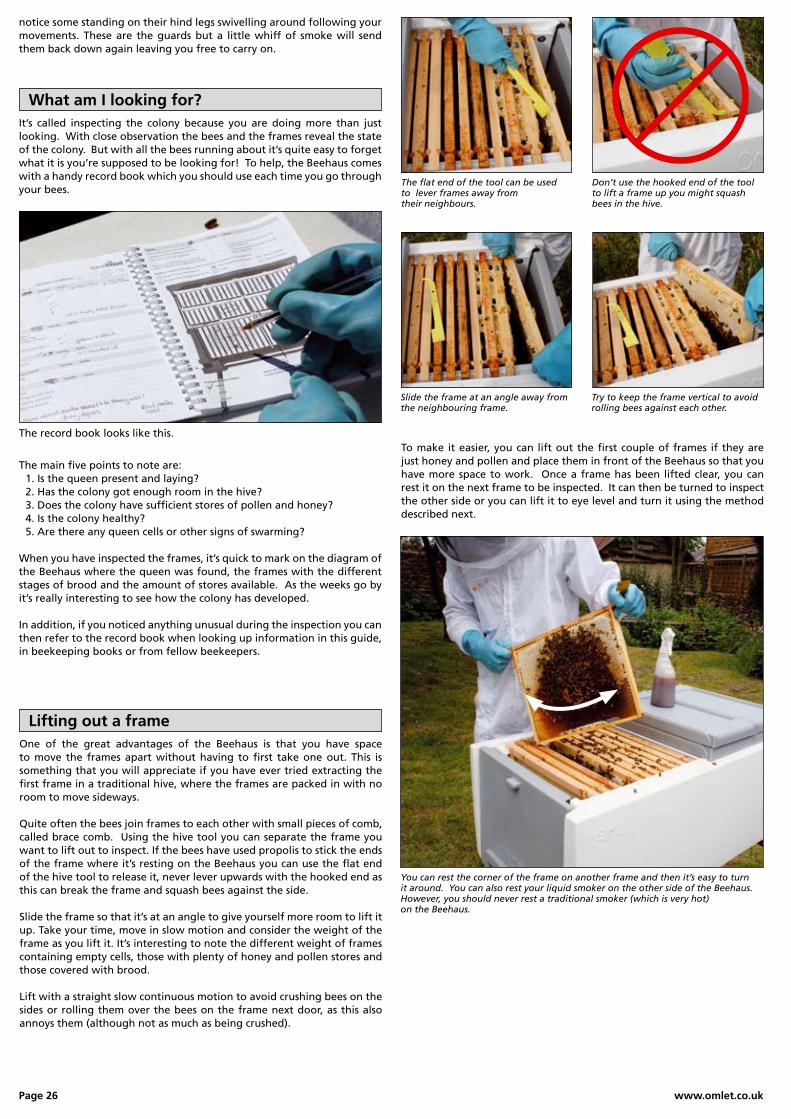
Page 26 www.omlet.co.uk
Lifting out a frameOne of the great advantages of the Beehaus is that you have space to move the frames apart without having to first take one out. This is something that you will appreciate if you have ever tried extracting the first frame in a traditional hive, where the frames are packed in with no room to move sideways.
Quiteoftenthebeesjoinframestoeachotherwithsmallpiecesofcomb,called brace comb. Using the hive tool you can separate the frame you want to lift out to inspect. If the bees have used propolis to stick the ends of the frame where it’s resting on the Beehaus you can use the flat end of the hive tool to release it, never lever upwards with the hooked end as this can break the frame and squash bees against the side.
Slide the frame so that it’s at an angle to give yourself more room to lift it up. Take your time, move in slow motion and consider the weight of the frame as you lift it. It’s interesting to note the different weight of frames containing empty cells, those with plenty of honey and pollen stores and those covered with brood.
Lift with a straight slow continuous motion to avoid crushing bees on the sides or rolling them over the bees on the frame next door, as this also annoys them (although not as much as being crushed).
The flat end of the tool can be used to lever frames away from their neighbours.
Don’t use the hooked end of the tool to lift a frame up you might squash bees in the hive.
Slide the frame at an angle away from the neighbouring frame.
Try to keep the frame vertical to avoid rolling bees against each other.
You can rest the corner of the frame on another frame and then it’s easy to turn it around. You can also rest your liquid smoker on the other side of the Beehaus. However, you should never rest a traditional smoker (which is very hot) on the Beehaus.
To make it easier, you can lift out the first couple of frames if they are just honey and pollen and place them in front of the Beehaus so that you have more space to work. Once a frame has been lifted clear, you can rest it on the next frame to be inspected. It can then be turned to inspect the other side or you can lift it to eye level and turn it using the method described next.
The main five points to note are: 1. Is the queen present and laying? 2. Has the colony got enough room in the hive? 3. Does the colony have sufficient stores of pollen and honey? 4. Is the colony healthy? 5. Are there any queen cells or other signs of swarming?
Whenyouhaveinspectedtheframes,it’squicktomarkonthediagramofthe Beehaus where the queen was found, the frames with the different stages of brood and the amount of stores available. As the weeks go by it’s really interesting to see how the colony has developed.
In addition, if you noticed anything unusual during the inspection you can then refer to the record book when looking up information in this guide, in beekeeping books or from fellow beekeepers.
It’s called inspecting the colony because you are doing more than just looking.Withcloseobservationthebeesandtheframesrevealthestateof the colony. But with all the bees running about it’s quite easy to forget what it is you’re supposed to be looking for! To help, the Beehaus comes with a handy record book which you should use each time you go through your bees.
What am I looking for?
The record book looks like this.
notice some standing on their hind legs swivelling around following your movements. These are the guards but a little whiff of smoke will send them back down again leaving you free to carry on.

www.omlet.co.uk Page 27
Turning a frame without it becoming horizontal.
Once you have fully extracted the frame you can hold it up to eye level to inspect it. Avoid tipping the frame horizontally as nectar and unsealed brood can drop out accidentally. Instead hold the frame in front of you like you would a book and begin to read the pattern. Always hold the frame over the hive so if anything drops off the frame, it will land in the Beehaus. Keep all your movements slow and steady, the vibrations from any bumps or jerky movements will upset the bees.
Rotating a frame - You should inspect both side of each frame. You can do this by rotating as shown in the pictures below:
Turning and holding a frame
Side A Side A Side B Side B
Looking at the first side of the frame. Lower your left hand and raise your right.
Now spin the frame keeping your hands in the same position.
As if by magic you are now looking at the other side of the frame.
Bring your left hand back up. Reading a frame like a book. Hold the frame over the Beehaus ensuring any bees that fall off drop into the hive.
Normally when you are trying to look at a frame it’s impossible to see the comb and what’s in it because it’s covered with bees! There are a couple of ways of dealing with this: either brush all the bees off the comb with a bee brush or goose feather, or you can move bees with the back of your hand. This technique is really useful (and quite impressive to onlookers) because it doesn’t disturb the bees as much as brushing them. Simply rest the frame you are looking at on the Beehaus and slowly bring the back of your hand towards the comb until it is resting very gently on the bees. They will immediately start to walk away from under your hand. After a few seconds you can take your hand away to reveal a patch of comb completely free of bees.
You can also blow on the bees to move them, perhaps to check if they are covering a queen cell. This is useful if you are holding the frame with both hands.
Of course if you want to look at the whole frame then you will need to brush the bees off. To do this rest the frame on the beehaus and quickly brush the bees off onto the tops of the brood frames.
Moving bees to reveal the comb
I wonder what’s under all those bees?
A Beehaus frau’s work is never done.
I knew it! They are hiding honey from me!
Thankfully the bee brush makes it easy.
I will use my amazing X-ray glove to reveal their secrets...
All these bees need to swept away.
Voila! The comb is revealed along with a ghostly image...
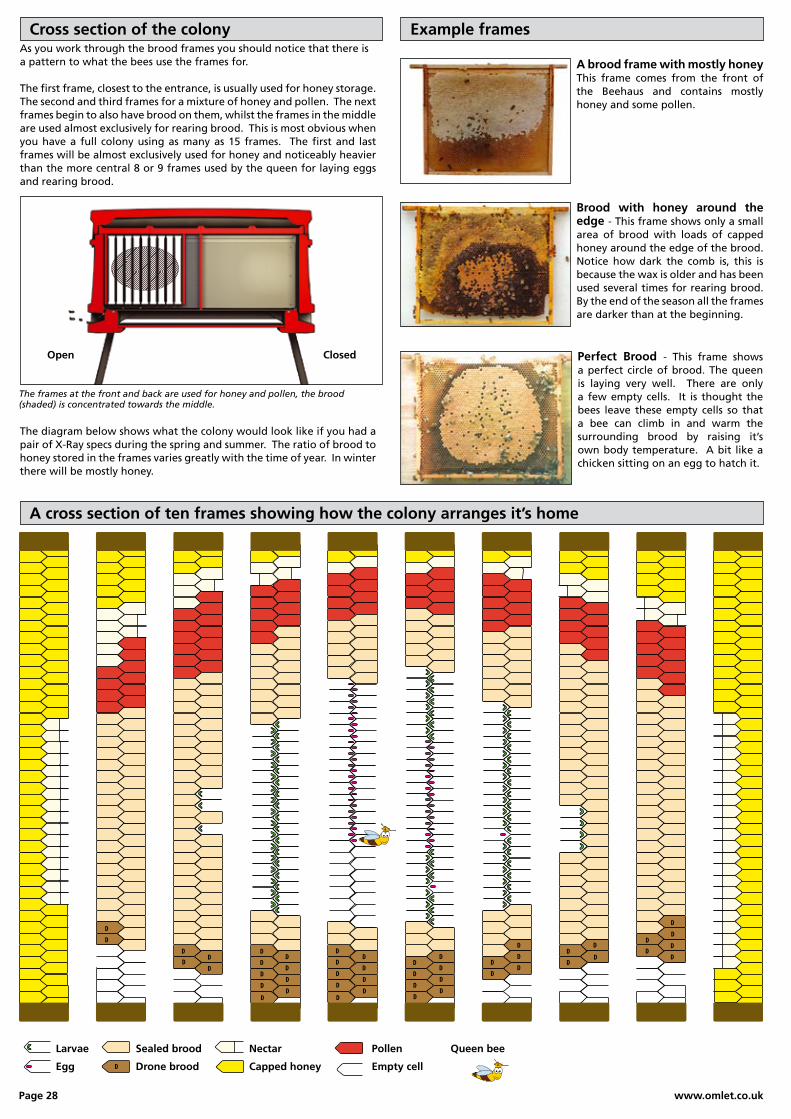
Page 28 www.omlet.co.uk
D
DD
DD
D
D
D
D
D
D
DD
D
D
D
D
D
D
D
D
D
D
DD
D
D
DD
D
D
D
D
DD
DD
D
D
D
D
D D
D
DD
D
D
As you work through the brood frames you should notice that there is a pattern to what the bees use the frames for.
The first frame, closest to the entrance, is usually used for honey storage. The second and third frames for a mixture of honey and pollen. The next frames begin to also have brood on them, whilst the frames in the middle are used almost exclusively for rearing brood. This is most obvious when you have a full colony using as many as 15 frames. The first and last frames will be almost exclusively used for honey and noticeably heavier than the more central 8 or 9 frames used by the queen for laying eggs and rearing brood.
The diagram below shows what the colony would look like if you had a pairofX-Rayspecsduringthespringandsummer.Theratioofbroodtohoney stored in the frames varies greatly with the time of year. In winter there will be mostly honey.
Larvae Sealed brood Nectar Pollen Queen bee
Egg Drone brood Capped honey Empty cell
Perfect Brood - This frame shows a perfect circle of brood. The queen is laying very well. There are only a few empty cells. It is thought the bees leave these empty cells so that a bee can climb in and warm the surrounding brood by raising it’s own body temperature. A bit like a chicken sitting on an egg to hatch it.
Brood with honey around the edge - This frame shows only a small area of brood with loads of capped honey around the edge of the brood. Notice how dark the comb is, this is because the wax is older and has been used several times for rearing brood. By the end of the season all the frames are darker than at the beginning.
A brood frame with mostly honey This frame comes from the front of the Beehaus and contains mostly honey and some pollen.
Cross section of the colony
A cross section of ten frames showing how the colony arranges it’s home
Example frames
The frames at the front and back are used for honey and pollen, the brood (shaded) is concentrated towards the middle.
Open Closed
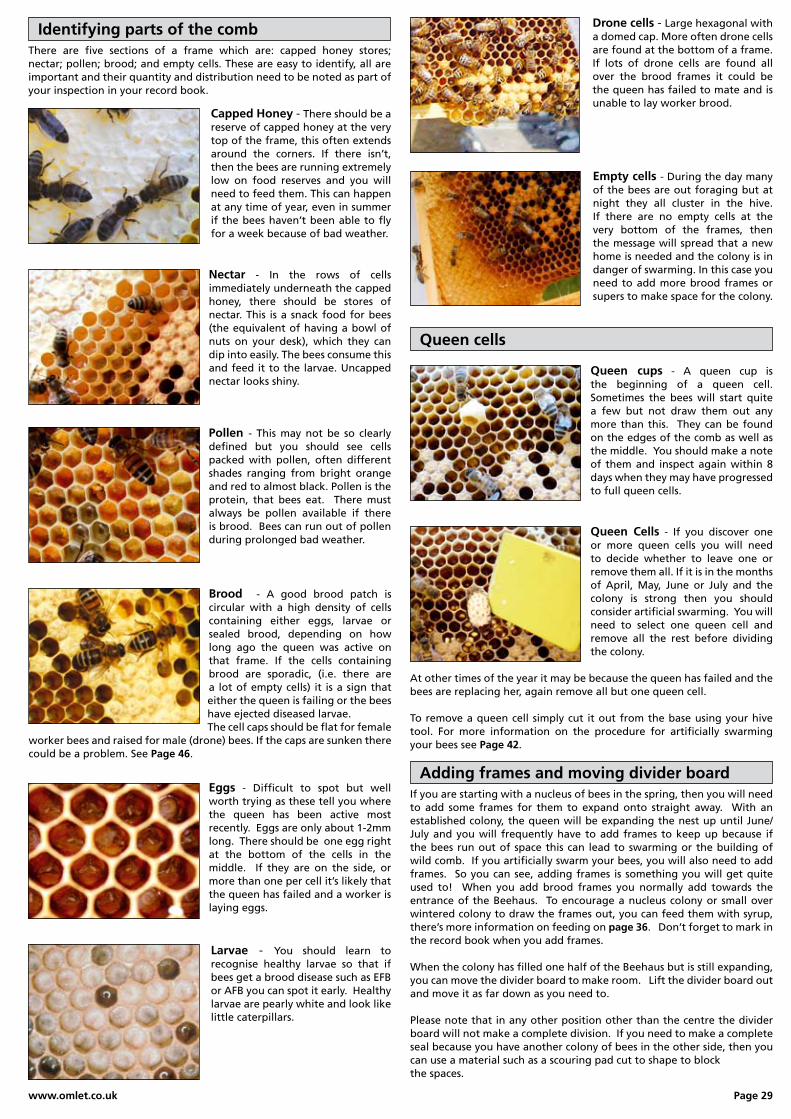
www.omlet.co.uk Page 29
There are five sections of a frame which are: capped honey stores; nectar; pollen; brood; and empty cells. These are easy to identify, all are important and their quantity and distribution need to be noted as part of your inspection in your record book.
Nectar - In the rows of cells immediately underneath the capped honey, there should be stores of nectar. This is a snack food for bees (the equivalent of having a bowl of nuts on your desk), which they can dip into easily. The bees consume this and feed it to the larvae. Uncapped nectar looks shiny.
Capped Honey - There should be a reserve of capped honey at the very top of the frame, this often extends around the corners. If there isn’t, then the bees are running extremely low on food reserves and you will need to feed them. This can happen at any time of year, even in summer if the bees haven’t been able to fly for a week because of bad weather.
Identifying parts of the comb
Pollen - This may not be so clearly defined but you should see cells packed with pollen, often different shades ranging from bright orange and red to almost black. Pollen is the protein, that bees eat. There must always be pollen available if there is brood. Bees can run out of pollen during prolonged bad weather.
Eggs - Difficult to spot but well worth trying as these tell you where the queen has been active most recently. Eggs are only about 1-2mm long. There should be one egg right at the bottom of the cells in the middle. If they are on the side, or more than one per cell it’s likely that the queen has failed and a worker is laying eggs.
Drone cells - Large hexagonal with a domed cap. More often drone cells are found at the bottom of a frame. If lots of drone cells are found all over the brood frames it could be the queen has failed to mate and is unable to lay worker brood.
Larvae - You should learn to recognise healthy larvae so that if bees get a brood disease such as EFB or AFB you can spot it early. Healthy larvae are pearly white and look like little caterpillars.
Brood - A good brood patch is circular with a high density of cells containing either eggs, larvae or sealed brood, depending on how long ago the queen was active on that frame. If the cells containing brood are sporadic, (i.e. there are a lot of empty cells) it is a sign that either the queen is failing or the bees have ejected diseased larvae. The cell caps should be flat for female
worker bees and raised for male (drone) bees. If the caps are sunken there could be a problem. See Page 46.
Queen cups - A queen cup is the beginning of a queen cell. Sometimes the bees will start quite a few but not draw them out any more than this. They can be found on the edges of the comb as well as the middle. You should make a note of them and inspect again within 8 days when they may have progressed to full queen cells.
Queen Cells - If you discover one or more queen cells you will need to decide whether to leave one or remove them all. If it is in the months of April, May, June or July and the colony is strong then you should consider artificial swarming. You will need to select one queen cell and remove all the rest before dividing the colony.
At other times of the year it may be because the queen has failed and the bees are replacing her, again remove all but one queen cell.
To remove a queen cell simply cut it out from the base using your hive tool. For more information on the procedure for artificially swarming your bees see Page 42.
Empty cells - During the day many of the bees are out foraging but at night they all cluster in the hive. If there are no empty cells at the very bottom of the frames, then the message will spread that a new home is needed and the colony is in danger of swarming. In this case you need to add more brood frames or supers to make space for the colony.
Adding frames and moving divider board
Queen cells
If you are starting with a nucleus of bees in the spring, then you will need to add some frames for them to expand onto straight away. With anestablished colony, the queen will be expanding the nest up until June/July and you will frequently have to add frames to keep up because if the bees run out of space this can lead to swarming or the building of wild comb. If you artificially swarm your bees, you will also need to add frames. So you can see, adding frames is something you will get quite used to! When you add brood frames you normally add towards theentrance of the Beehaus. To encourage a nucleus colony or small over wintered colony to draw the frames out, you can feed them with syrup, there’s more information on feeding on page 36. Don’t forget to mark in the record book when you add frames.
WhenthecolonyhasfilledonehalfoftheBeehausbutisstillexpanding,you can move the divider board to make room. Lift the divider board out and move it as far down as you need to.
Please note that in any other position other than the centre the divider board will not make a complete division. If you need to make a complete seal because you have another colony of bees in the other side, then you can use a material such as a scouring pad cut to shape to block the spaces.
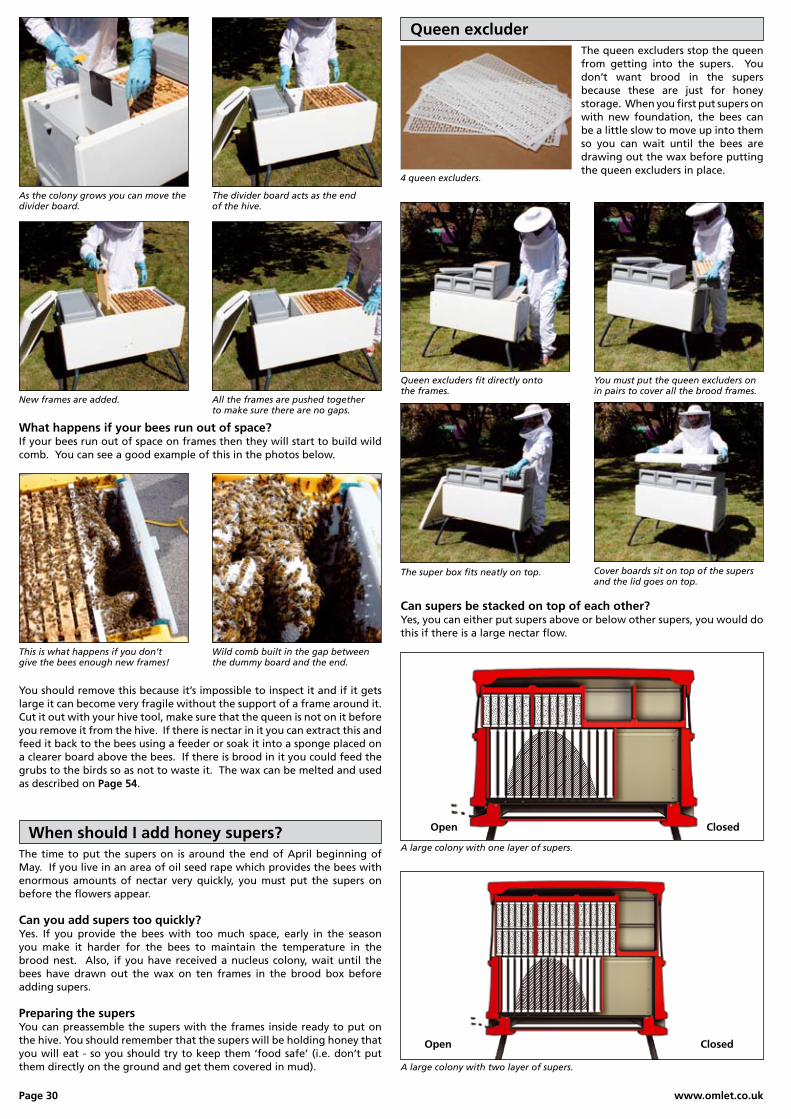
Page 30 www.omlet.co.uk
What happens if your bees run out of space?If your bees run out of space on frames then they will start to build wild comb. You can see a good example of this in the photos below.
You should remove this because it’s impossible to inspect it and if it gets large it can become very fragile without the support of a frame around it. Cut it out with your hive tool, make sure that the queen is not on it before you remove it from the hive. If there is nectar in it you can extract this and feed it back to the bees using a feeder or soak it into a sponge placed on a clearer board above the bees. If there is brood in it you could feed the grubs to the birds so as not to waste it. The wax can be melted and used as described on Page 54.
As the colony grows you can move the divider board.
New frames are added.
The divider board acts as the end of the hive.
All the frames are pushed together to make sure there are no gaps.
This is what happens if you don’t give the bees enough new frames!
Wild comb built in the gap between the dummy board and the end.
The time to put the supers on is around the end of April beginning of May. If you live in an area of oil seed rape which provides the bees with enormous amounts of nectar very quickly, you must put the supers on before the flowers appear.
Can you add supers too quickly?Yes. If you provide the bees with too much space, early in the season you make it harder for the bees to maintain the temperature in the brood nest. Also, if you have received a nucleus colony, wait until the bees have drawn out the wax on ten frames in the brood box before adding supers.
Preparing the supersYou can preassemble the supers with the frames inside ready to put on the hive. You should remember that the supers will be holding honey that you will eat - so you should try to keep them ‘food safe’ (i.e. don’t put them directly on the ground and get them covered in mud).
When should I add honey supers?
Queen excluders fit directly onto the frames.
You must put the queen excluders on in pairs to cover all the brood frames.
The super box fits neatly on top.
The queen excluders stop the queen from getting into the supers. You don’t want brood in the supers because these are just for honey storage.Whenyoufirstputsupersonwith new foundation, the bees can be a little slow to move up into them so you can wait until the bees are drawing out the wax before putting the queen excluders in place.
4 queen excluders.
Queen excluder
A large colony with two layer of supers.
Can supers be stacked on top of each other?Yes, you can either put supers above or below other supers, you would do this if there is a large nectar flow.
A large colony with one layer of supers.
Cover boards sit on top of the supers and the lid goes on top.
Open Closed
Open Closed
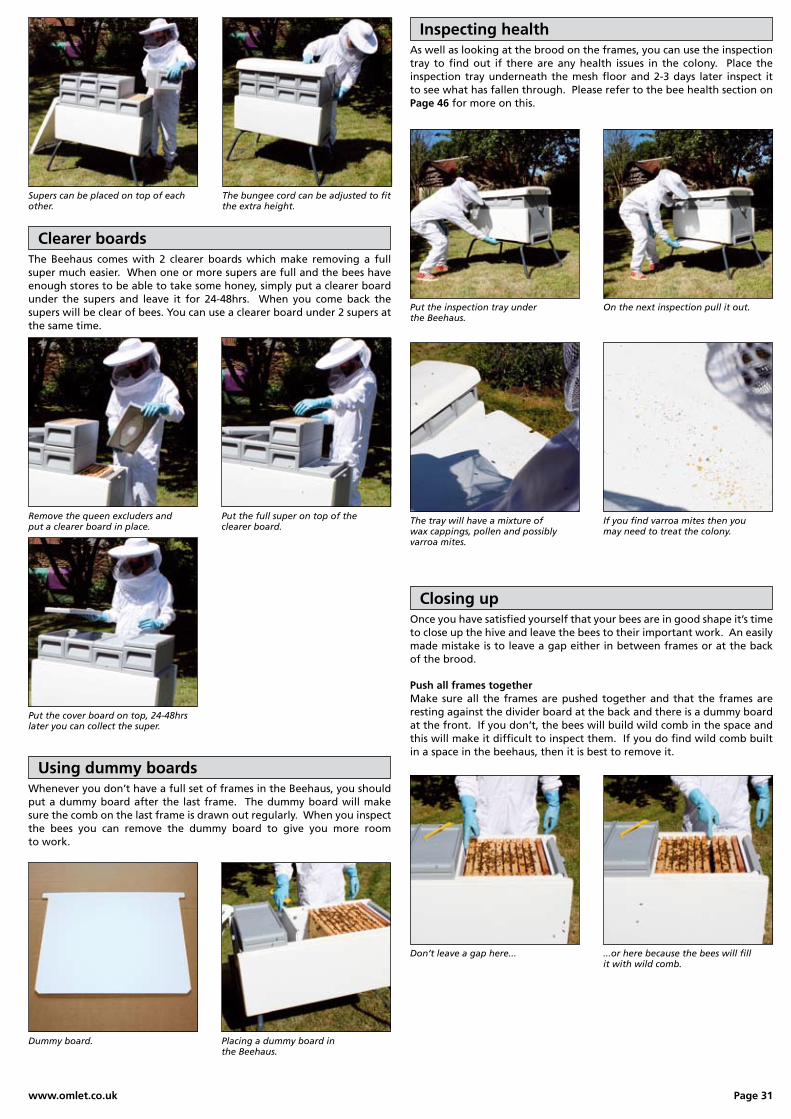
www.omlet.co.uk Page 31
Put the inspection tray under the Beehaus.
The tray will have a mixture of wax cappings, pollen and possibly varroa mites.
On the next inspection pull it out.
If you find varroa mites then you may need to treat the colony.
Using dummy boardsWheneveryoudon’thaveafullsetofframesintheBeehaus,youshouldput a dummy board after the last frame. The dummy board will make surethecombonthelastframeisdrawnoutregularly.Whenyouinspectthe bees you can remove the dummy board to give you more room to work.
Inspecting healthAs well as looking at the brood on the frames, you can use the inspection tray to find out if there are any health issues in the colony. Place the inspection tray underneath the mesh floor and 2-3 days later inspect it to see what has fallen through. Please refer to the bee health section on Page 46 for more on this.
Don’t leave a gap here... ...or here because the bees will fill it with wild comb.
Dummy board. Placing a dummy board in the Beehaus.
Closing up Once you have satisfied yourself that your bees are in good shape it’s time to close up the hive and leave the bees to their important work. An easily made mistake is to leave a gap either in between frames or at the back of the brood.
Supers can be placed on top of each other.
The bungee cord can be adjusted to fit the extra height.
Clearer boardsThe Beehaus comes with 2 clearer boards which make removing a full supermucheasier.Whenoneormoresupersarefullandthebeeshaveenough stores to be able to take some honey, simply put a clearer board under the supers and leave it for 24-48hrs. When you come back thesupers will be clear of bees. You can use a clearer board under 2 supers at the same time.
Remove the queen excluders and put a clearer board in place.
Put the cover board on top, 24-48hrs later you can collect the super.
Put the full super on top of the clearer board.
Push all frames togetherMake sure all the frames are pushed together and that the frames are resting against the divider board at the back and there is a dummy board at the front. If you don’t, the bees will build wild comb in the space and this will make it difficult to inspect them. If you do find wild comb built in a space in the beehaus, then it is best to remove it.
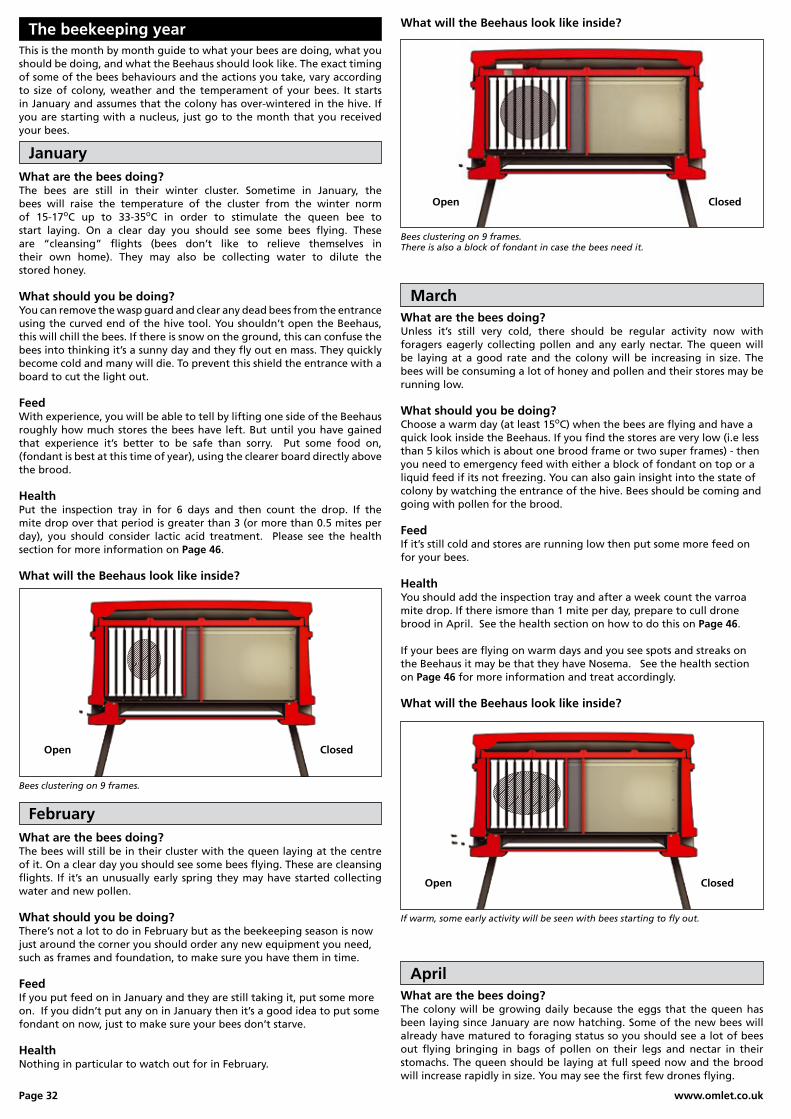
Page 32 www.omlet.co.uk
January
March
April
February
This is the month by month guide to what your bees are doing, what you should be doing, and what the Beehaus should look like. The exact timing of some of the bees behaviours and the actions you take, vary according to size of colony, weather and the temperament of your bees. It starts in January and assumes that the colony has over-wintered in the hive. If you are starting with a nucleus, just go to the month that you received your bees.
What are the bees doing?The bees are still in their winter cluster. Sometime in January, the bees will raise the temperature of the cluster from the winter norm of 15-17oC up to 33-35oC in order to stimulate the queen bee to start laying. On a clear day you should see some bees flying. These are “cleansing” flights (bees don’t like to relieve themselves in their own home). They may also be collecting water to dilute the stored honey.
What should you be doing?You can remove the wasp guard and clear any dead bees from the entrance using the curved end of the hive tool. You shouldn’t open the Beehaus, this will chill the bees. If there is snow on the ground, this can confuse the bees into thinking it’s a sunny day and they fly out en mass. They quickly become cold and many will die. To prevent this shield the entrance with a board to cut the light out.
FeedWith experience, you will be able to tell by lifting one side of the Beehaus roughly how much stores the bees have left. But until you have gained that experience it’s better to be safe than sorry. Put some food on, (fondant is best at this time of year), using the clearer board directly above the brood.
HealthPut the inspection tray in for 6 days and then count the drop. If the mite drop over that period is greater than 3 (or more than 0.5 mites per day), you should consider lactic acid treatment. Please see the health section for more information on Page 46.
What will the Beehaus look like inside?
What are the bees doing?The bees will still be in their cluster with the queen laying at the centre of it. On a clear day you should see some bees flying. These are cleansing flights. If it’s an unusually early spring they may have started collecting water and new pollen.
What should you be doing?There’s not a lot to do in February but as the beekeeping season is now just around the corner you should order any new equipment you need, such as frames and foundation, to make sure you have them in time.
Feed If you put feed on in January and they are still taking it, put some more on. If you didn’t put any on in January then it’s a good idea to put some fondant on now, just to make sure your bees don’t starve.
HealthNothing in particular to watch out for in February.
What will the Beehaus look like inside?
Bees clustering on 9 frames.
What are the bees doing?Unless it’s still very cold, there should be regular activity now with foragers eagerly collecting pollen and any early nectar. The queen will be laying at a good rate and the colony will be increasing in size. The bees will be consuming a lot of honey and pollen and their stores may be running low.
What should you be doing?Choose a warm day (at least 15oC) when the bees are flying and have a quick look inside the Beehaus. If you find the stores are very low (i.e less than 5 kilos which is about one brood frame or two super frames) - then you need to emergency feed with either a block of fondant on top or a liquid feed if its not freezing. You can also gain insight into the state of colony by watching the entrance of the hive. Bees should be coming and going with pollen for the brood.
FeedIf it’s still cold and stores are running low then put some more feed on for your bees.
HealthYou should add the inspection tray and after a week count the varroa mite drop. If there ismore than 1 mite per day, prepare to cull drone brood in April. See the health section on how to do this on Page 46.
If your bees are flying on warm days and you see spots and streaks on the Beehaus it may be that they have Nosema. See the health section on Page 46 for more information and treat accordingly.
What will the Beehaus look like inside?
What are the bees doing?The colony will be growing daily because the eggs that the queen has been laying since January are now hatching. Some of the new bees will already have matured to foraging status so you should see a lot of bees out flying bringing in bags of pollen on their legs and nectar in their stomachs. The queen should be laying at full speed now and the brood will increase rapidly in size. You may see the first few drones flying.
If warm, some early activity will be seen with bees starting to fly out.
The beekeeping year
Bees clustering on 9 frames.There is also a block of fondant in case the bees need it.
Open Closed
Open Closed
Open Closed
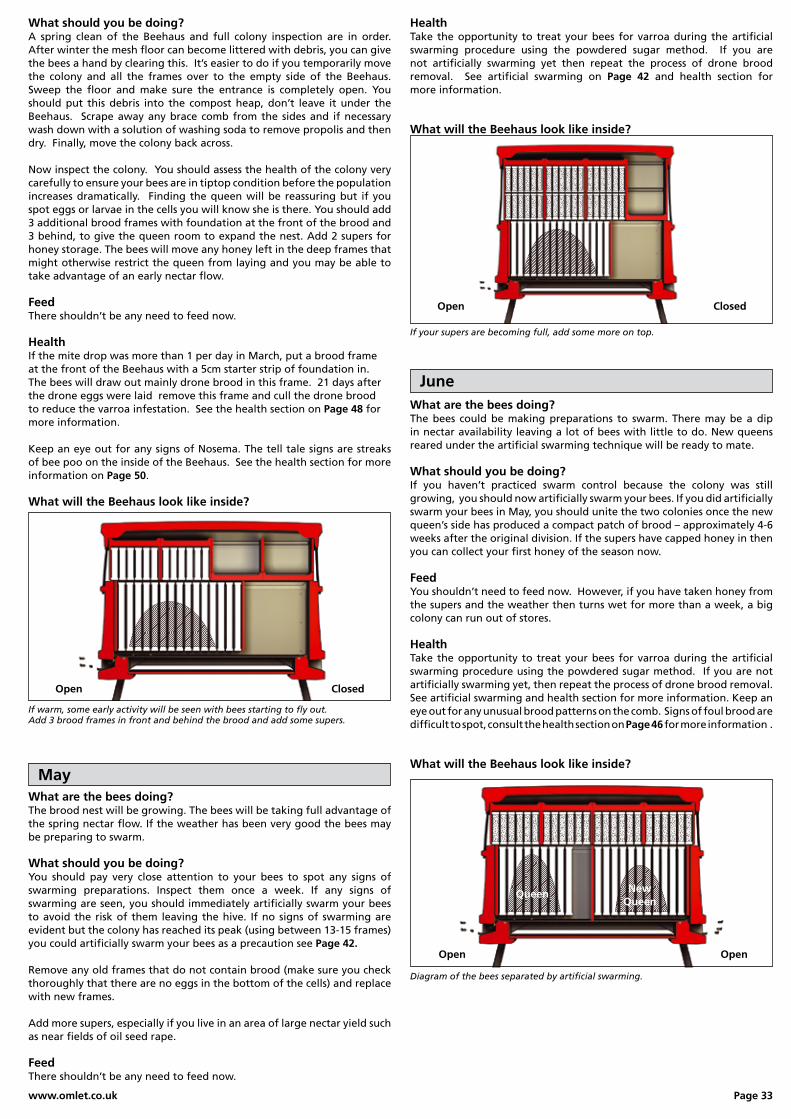
www.omlet.co.uk Page 33
If warm, some early activity will be seen with bees starting to fly out.Add 3 brood frames in front and behind the brood and add some supers.
MayWhat are the bees doing?The brood nest will be growing. The bees will be taking full advantage of the spring nectar flow. If the weather has been very good the bees may be preparing to swarm.
What should you be doing?You should pay very close attention to your bees to spot any signs of swarming preparations. Inspect them once a week. If any signs of swarming are seen, you should immediately artificially swarm your bees to avoid the risk of them leaving the hive. If no signs of swarming are evident but the colony has reached its peak (using between 13-15 frames) you could artificially swarm your bees as a precaution see Page 42.
Remove any old frames that do not contain brood (make sure you check thoroughly that there are no eggs in the bottom of the cells) and replace with new frames.
Add more supers, especially if you live in an area of large nectar yield such as near fields of oil seed rape.
FeedThere shouldn’t be any need to feed now.
HealthTake the opportunity to treat your bees for varroa during the artificial swarming procedure using the powdered sugar method. If you are not artificially swarming yet then repeat the process of drone brood removal. See artificial swarming on Page 42 and health section for more information.
What will the Beehaus look like inside?
If your supers are becoming full, add some more on top.
JuneWhat are the bees doing?The bees could be making preparations to swarm. There may be a dip in nectar availability leaving a lot of bees with little to do. New queens reared under the artificial swarming technique will be ready to mate.
What should you be doing?If you haven’t practiced swarm control because the colony was still growing, you should now artificially swarm your bees. If you did artificially swarm your bees in May, you should unite the two colonies once the new queen’s side has produced a compact patch of brood – approximately 4-6 weeks after the original division. If the supers have capped honey in then you can collect your first honey of the season now.
FeedYou shouldn’t need to feed now. However, if you have taken honey from the supers and the weather then turns wet for more than a week, a big colony can run out of stores.
HealthTake the opportunity to treat your bees for varroa during the artificial swarming procedure using the powdered sugar method. If you are not artificially swarming yet, then repeat the process of drone brood removal. See artificial swarming and health section for more information. Keep an eye out for any unusual brood patterns on the comb. Signs of foul brood are difficult to spot, consult the health section on Page 46 for more information .
What will the Beehaus look like inside?
Diagram of the bees separated by artificial swarming.
Open Closed
Open Closed
Open Open
Queen NewQueen
What should you be doing?A spring clean of the Beehaus and full colony inspection are in order. After winter the mesh floor can become littered with debris, you can give the bees a hand by clearing this. It’s easier to do if you temporarily move the colony and all the frames over to the empty side of the Beehaus. Sweep the floor and make sure the entrance is completely open. You should put this debris into the compost heap, don’t leave it under the Beehaus. Scrape away any brace comb from the sides and if necessary wash down with a solution of washing soda to remove propolis and then dry. Finally, move the colony back across.
Now inspect the colony. You should assess the health of the colony very carefully to ensure your bees are in tiptop condition before the population increases dramatically. Finding the queen will be reassuring but if you spot eggs or larvae in the cells you will know she is there. You should add 3 additional brood frames with foundation at the front of the brood and 3 behind, to give the queen room to expand the nest. Add 2 supers for honey storage. The bees will move any honey left in the deep frames that might otherwise restrict the queen from laying and you may be able to take advantage of an early nectar flow.
Feed There shouldn’t be any need to feed now.
HealthIf the mite drop was more than 1 per day in March, put a brood frame at the front of the Beehaus with a 5cm starter strip of foundation in. The bees will draw out mainly drone brood in this frame. 21 days after the drone eggs were laid remove this frame and cull the drone brood to reduce the varroa infestation. See the health section on Page 48 for more information.
Keep an eye out for any signs of Nosema. The tell tale signs are streaks of bee poo on the inside of the Beehaus. See the health section for more information on Page 50.
What will the Beehaus look like inside?

Page 34 www.omlet.co.uk
July
August
What are the bees doing?There should be a lot of activity now, with foragers eagerly collecting the main summer nectar. The queen will start to reduce her rate of laying eggs. The number of bees will still increase because the eggs will be hatching.
What should you be doing?Add supers as necessary. If you did artificially swarm your bees in June, you should unite the two colonies once the new queen’s side has produced a compact patch of brood – approximately one month after the original division. Enjoy watching your bees collecting all that delicious honey! It may still be necessary to keep an eye out for swarming signs.
FeedYou shouldn’t need to feed now. However, if you have taken honey from the supers and the weather then turns wet for more than a week, a big colony can run out of stores.
HealthKeep an eye out for any unusual brood patterns on the comb. Signs of foul brood are difficult to spot, consult the health section on Page 46 for more information.
What will the Beehaus look like inside?
If your supers are becoming full, add some more on top. The hive is at full production capacity! Enjoy some honey.
What are the bees doing?The population in the hive will have reached its peak and will now reduce quickly. There will be far fewer bees flying because there is little nectar available. The drones start to be evicted from the hive by the workers who realise that they are no longer needed and will just be a strain on resources over the winter. Keep an eye out for robbing by wasps or other bees.
What should you be doing?If there are a lot of wasps around restrict the entrance with the entrance adapter to prevent robbing. There is very little risk now of swarming so you can go on holiday!
FeedNothing to do if you are leaving the honey on until September. If you are taking all the honey off, or more than would leave the bees with enough for winter, you will need to start feeding the bees with sugar syrup to replace the lost stores. See the feeding section on Page 36 for more information.
HealthMonitor the natural mite drop by putting the inspection tray under the beehaus for 5-7 days. If the drop is higher than 10 mites per day apply a treatment such as Apiguard, Apilife VAR or Exomite Apis but only after all the honey to be collected has been removed from the Beehaus! Refer to the health section on Page 46 for more information.
What will the Beehaus look like inside?
Make sure your wasp guard is in place in August.
September
October
What are the bees doing?The queen will be laying very few if any eggs but there will still be brood on around 5 frames at the beginning of September. These are the bees that will over-winter in the hive. The drones will all be removed by the end of the month.
What should you be doing?September is the traditional month for collecting honey! The bees need at least 20-30kg of stores to see them through winter which is equivalent to around 6 - 9 full brood frames. Use the clearer board under the supers 24 hrs before you remove them. You can also collect honey from any surplus brood frames. You should leave the bees on 9 brood frames for the winter.
FeedIf the bees have less than 20kg of stores in the brood frames then you should feed them until they have 20kg of stores for the winter (approx 5 full brood frames). See the feeding section on Page 36 for more information.
HealthIf you didn’t already in August, monitor the natural mite drop by putting the inspection tray under the beehaus for 5-7 days. If the drop is higher than 10 mites per day apply a treatment such as Apiguard, Apilife VAR or Exomite Apis but only after all the honey to be collected has been removed from the Beehaus! Please refer to the health section on Page 46 for more information.
What will the Beehaus look like inside?
What are the bees doing?The bees will be finishing preparations for winter and will not spend much time outside the hive. They will be processing any feed given at the end of September.
What should you be doing?The colony winters on nine deep frames, positioned half-way down the body - nine frames are enough to hold the bees plus 20kg of stores. The outermost combs are insulated by the pair of dummy frames and if
Bees clustering on 9 frames with contact feeder in a super.
Open Closed
Open Closed
Open Closed
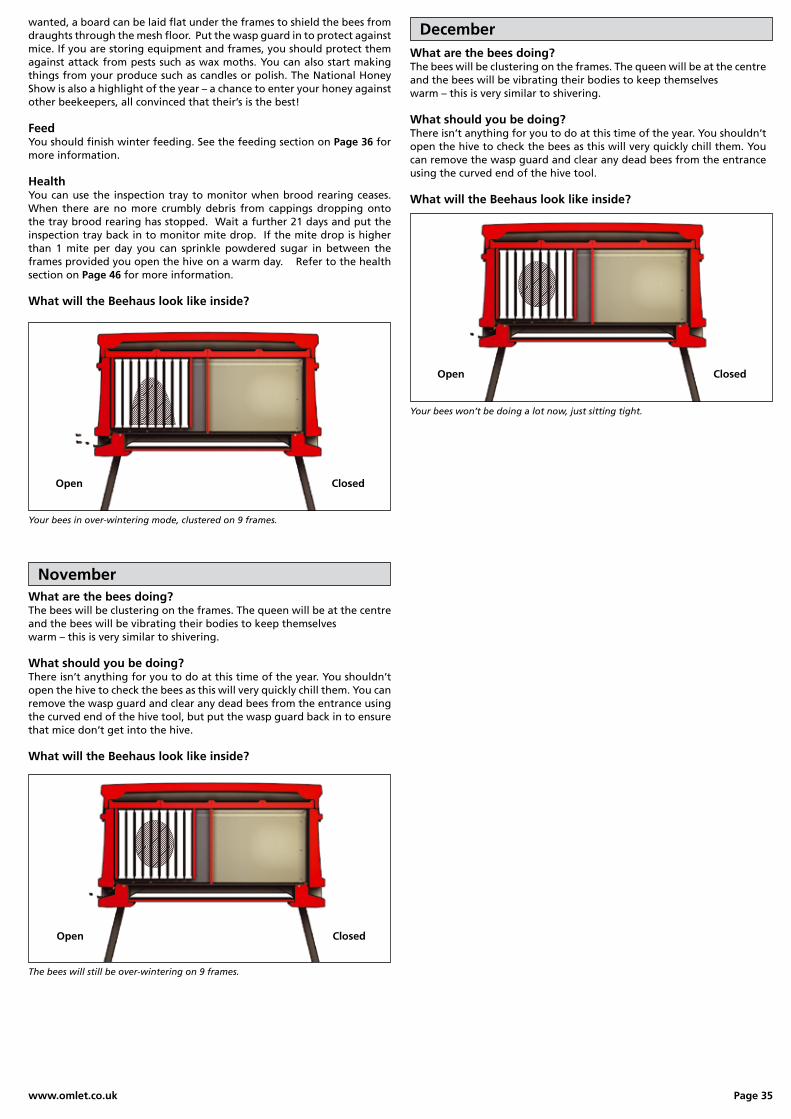
www.omlet.co.uk Page 35
December
November
wanted, a board can be laid flat under the frames to shield the bees from draughts through the mesh floor. Put the wasp guard in to protect against mice. If you are storing equipment and frames, you should protect them against attack from pests such as wax moths. You can also start making things from your produce such as candles or polish. The National Honey Show is also a highlight of the year – a chance to enter your honey against other beekeepers, all convinced that their’s is the best!
FeedYou should finish winter feeding. See the feeding section on Page 36 for more information.
HealthYou can use the inspection tray to monitor when brood rearing ceases. When there are no more crumbly debris from cappings dropping onto the tray brood rearing has stopped. Wait a further 21 days and put the inspection tray back in to monitor mite drop. If the mite drop is higher than 1 mite per day you can sprinkle powdered sugar in between the frames provided you open the hive on a warm day. Refer to the health section on Page 46 for more information.
What will the Beehaus look like inside?
What are the bees doing?The bees will be clustering on the frames. The queen will be at the centre and the bees will be vibrating their bodies to keep themselveswarm – this is very similar to shivering.
What should you be doing?There isn’t anything for you to do at this time of the year. You shouldn’t open the hive to check the bees as this will very quickly chill them. You can remove the wasp guard and clear any dead bees from the entrance using the curved end of the hive tool.
What will the Beehaus look like inside?
The bees will still be over-wintering on 9 frames.
Your bees in over-wintering mode, clustered on 9 frames.
Your bees won’t be doing a lot now, just sitting tight.
What are the bees doing?The bees will be clustering on the frames. The queen will be at the centre and the bees will be vibrating their bodies to keep themselveswarm – this is very similar to shivering.
What should you be doing?There isn’t anything for you to do at this time of the year. You shouldn’t open the hive to check the bees as this will very quickly chill them. You can remove the wasp guard and clear any dead bees from the entrance using the curved end of the hive tool, but put the wasp guard back in to ensure that mice don’t get into the hive.
What will the Beehaus look like inside?
Open Closed
Open Closed
Open Closed
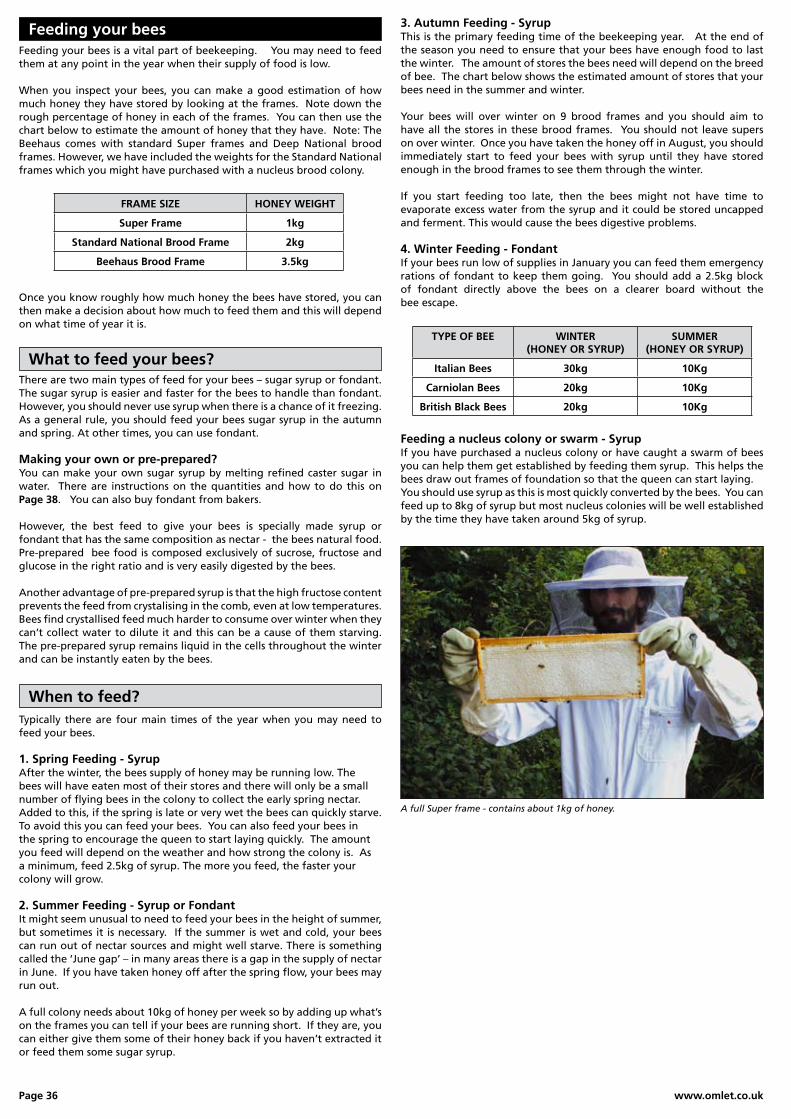
Page 36 www.omlet.co.uk
Feeding your bees
What to feed your bees?
When to feed?
Feeding a nucleus colony or swarm - SyrupIf you have purchased a nucleus colony or have caught a swarm of bees you can help them get established by feeding them syrup. This helps the bees draw out frames of foundation so that the queen can start laying.You should use syrup as this is most quickly converted by the bees. You can feed up to 8kg of syrup but most nucleus colonies will be well established by the time they have taken around 5kg of syrup.
There are two main types of feed for your bees – sugar syrup or fondant. The sugar syrup is easier and faster for the bees to handle than fondant. However, you should never use syrup when there is a chance of it freezing. As a general rule, you should feed your bees sugar syrup in the autumn and spring. At other times, you can use fondant.
Making your own or pre-prepared?You can make your own sugar syrup by melting refined caster sugar in water. There are instructions on the quantities and how to do this on Page 38. You can also buy fondant from bakers.
However, the best feed to give your bees is specially made syrup or fondant that has the same composition as nectar - the bees natural food. Pre-prepared bee food is composed exclusively of sucrose, fructose and glucose in the right ratio and is very easily digested by the bees.
Another advantage of pre-prepared syrup is that the high fructose content prevents the feed from crystalising in the comb, even at low temperatures. Bees find crystallised feed much harder to consume over winter when they can’t collect water to dilute it and this can be a cause of them starving. The pre-prepared syrup remains liquid in the cells throughout the winter and can be instantly eaten by the bees.
Feeding your bees is a vital part of beekeeping. You may need to feed them at any point in the year when their supply of food is low.
When you inspect your bees, you can make a good estimation of how much honey they have stored by looking at the frames. Note down the rough percentage of honey in each of the frames. You can then use the chart below to estimate the amount of honey that they have. Note: The Beehaus comes with standard Super frames and Deep National brood frames. However, we have included the weights for the Standard National frames which you might have purchased with a nucleus brood colony.
FRAME SIZE HONEY WEIGHT
Super Frame 1kg
Standard National Brood Frame 2kg
Beehaus Brood Frame 3.5kg
Typically there are four main times of the year when you may need to feed your bees.
1. Spring Feeding - SyrupAfter the winter, the bees supply of honey may be running low. The bees will have eaten most of their stores and there will only be a small number of flying bees in the colony to collect the early spring nectar. Added to this, if the spring is late or very wet the bees can quickly starve. To avoid this you can feed your bees. You can also feed your bees in the spring to encourage the queen to start laying quickly. The amount you feed will depend on the weather and how strong the colony is. As a minimum, feed 2.5kg of syrup. The more you feed, the faster your colony will grow.
2. Summer Feeding - Syrup or FondantIt might seem unusual to need to feed your bees in the height of summer, but sometimes it is necessary. If the summer is wet and cold, your bees can run out of nectar sources and might well starve. There is something called the ‘June gap’ – in many areas there is a gap in the supply of nectar in June. If you have taken honey off after the spring flow, your bees may run out.
A full colony needs about 10kg of honey per week so by adding up what’s on the frames you can tell if your bees are running short. If they are, you can either give them some of their honey back if you haven’t extracted it or feed them some sugar syrup.
3. Autumn Feeding - SyrupThis is the primary feeding time of the beekeeping year. At the end of the season you need to ensure that your bees have enough food to last the winter. The amount of stores the bees need will depend on the breed of bee. The chart below shows the estimated amount of stores that your bees need in the summer and winter.
Your bees will over winter on 9 brood frames and you should aim to have all the stores in these brood frames. You should not leave supers on over winter. Once you have taken the honey off in August, you should immediately start to feed your bees with syrup until they have stored enough in the brood frames to see them through the winter.
If you start feeding too late, then the bees might not have time to evaporate excess water from the syrup and it could be stored uncapped and ferment. This would cause the bees digestive problems.
4. Winter Feeding - FondantIf your bees run low of supplies in January you can feed them emergency rations of fondant to keep them going. You should add a 2.5kg block of fondant directly above the bees on a clearer board without the bee escape.
TYPE OF BEE WINTER(HONEY OR SYRUP)
SUMMER(HONEY OR SYRUP)
Italian Bees 30kg 10Kg
Carniolan Bees 20kg 10Kg
British Black Bees 20kg 10Kg
Once you know roughly how much honey the bees have stored, you can then make a decision about how much to feed them and this will depend on what time of year it is.
A full Super frame - contains about 1kg of honey.
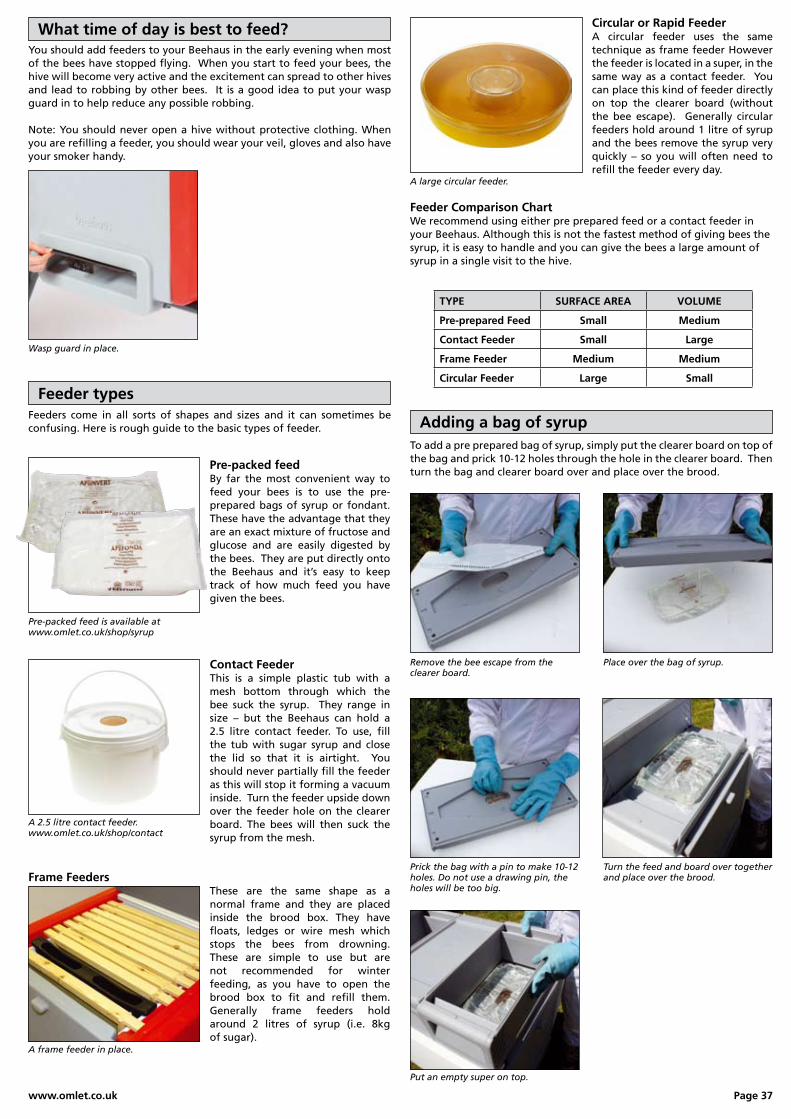
www.omlet.co.uk Page 37
Wasp guard in place.
You should add feeders to your Beehaus in the early evening when most of the bees have stopped flying. When you start to feed your bees, the hive will become very active and the excitement can spread to other hives and lead to robbing by other bees. It is a good idea to put your wasp guard in to help reduce any possible robbing.
Note: You should never open a hive without protective clothing. When you are refilling a feeder, you should wear your veil, gloves and also have your smoker handy.
What time of day is best to feed?
Adding a bag of syrupTo add a pre prepared bag of syrup, simply put the clearer board on top of the bag and prick 10-12 holes through the hole in the clearer board. Then turn the bag and clearer board over and place over the brood.
Prick the bag with a pin to make 10-12 holes. Do not use a drawing pin, the holes will be too big.
Remove the bee escape from the clearer board.
A large circular feeder.
Put an empty super on top.
Turn the feed and board over together and place over the brood.
Place over the bag of syrup.
Feeder types
Pre-packed feedBy far the most convenient way to feed your bees is to use the pre-prepared bags of syrup or fondant. These have the advantage that they are an exact mixture of fructose and glucose and are easily digested by the bees. They are put directly onto the Beehaus and it’s easy to keep track of how much feed you have given the bees.
Contact FeederThis is a simple plastic tub with a mesh bottom through which the bee suck the syrup. They range in size – but the Beehaus can hold a 2.5 litre contact feeder. To use, fill the tub with sugar syrup and close the lid so that it is airtight. You should never partially fill the feeder as this will stop it forming a vacuum inside. Turn the feeder upside down over the feeder hole on the clearer board. The bees will then suck the syrup from the mesh.
Frame Feeders These are the same shape as a normal frame and they are placed inside the brood box. They have floats, ledges or wire mesh which stops the bees from drowning. These are simple to use but are not recommended for winter feeding, as you have to open the brood box to fit and refill them. Generally frame feeders hold around 2 litres of syrup (i.e. 8kg of sugar).
Circular or Rapid FeederA circular feeder uses the same technique as frame feeder However the feeder is located in a super, in the same way as a contact feeder. You can place this kind of feeder directly on top the clearer board (without the bee escape). Generally circular feeders hold around 1 litre of syrup and the bees remove the syrup very quickly – so you will often need to refill the feeder every day.
Feeder Comparison ChartWe recommend using either pre prepared feed or a contact feeder in your Beehaus. Although this is not the fastest method of giving bees the syrup, it is easy to handle and you can give the bees a large amount of syrup in a single visit to the hive.
Feeders come in all sorts of shapes and sizes and it can sometimes be confusing. Here is rough guide to the basic types of feeder.
TYPE SURFACE AREA VOLUME
Pre-prepared Feed Small Medium
Contact Feeder Small Large
Frame Feeder Medium Medium
Circular Feeder Large Small
Pre-packed feed is available at www.omlet.co.uk/shop/syrup
A 2.5 litre contact feeder.www.omlet.co.uk/shop/contact
A frame feeder in place.
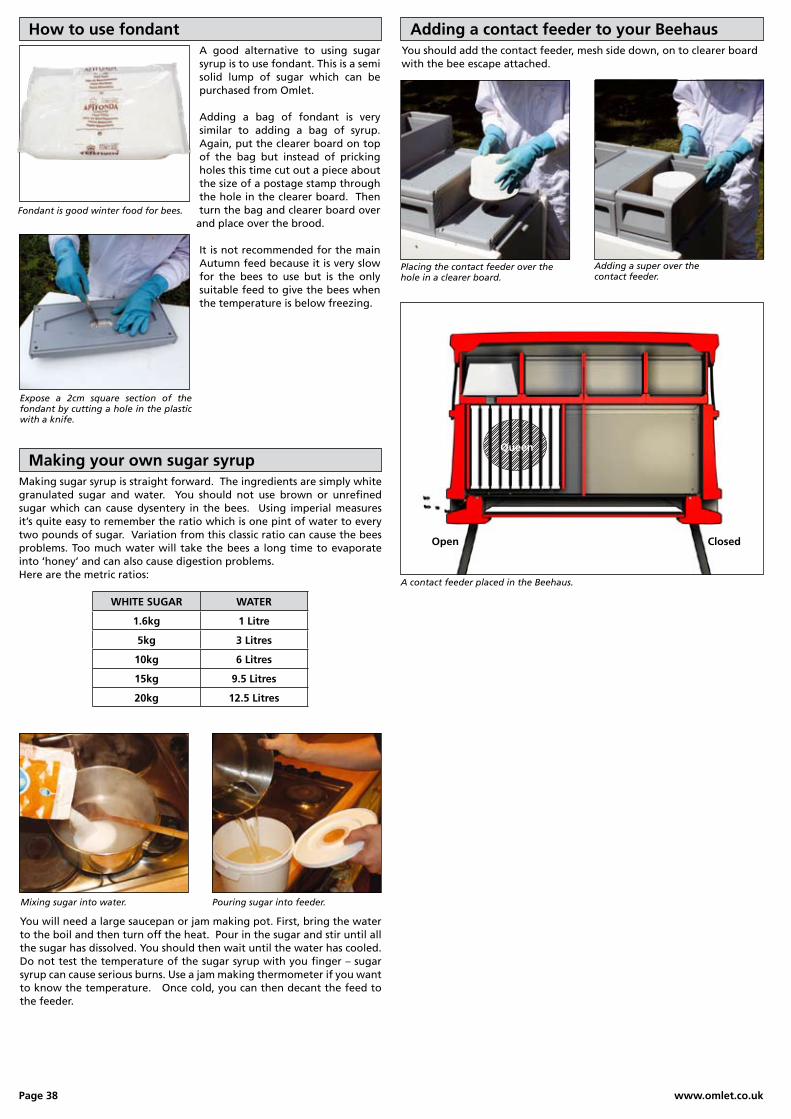
Page 38 www.omlet.co.uk
Making your own sugar syrup
Adding a contact feeder to your Beehaus
Placing the contact feeder over the hole in a clearer board.
Adding a super over the contact feeder.
Making sugar syrup is straight forward. The ingredients are simply white granulated sugar and water. You should not use brown or unrefined sugar which can cause dysentery in the bees. Using imperial measures it’s quite easy to remember the ratio which is one pint of water to every two pounds of sugar. Variation from this classic ratio can cause the bees problems. Too much water will take the bees a long time to evaporate into ‘honey’ and can also cause digestion problems. Here are the metric ratios:
WHITE SUGAR WATER
1.6kg 1 Litre
5kg 3 Litres
10kg 6 Litres
15kg 9.5 Litres
20kg 12.5 Litres
Mixing sugar into water. Pouring sugar into feeder.
You will need a large saucepan or jam making pot. First, bring the water to the boil and then turn off the heat. Pour in the sugar and stir until all the sugar has dissolved. You should then wait until the water has cooled. Do not test the temperature of the sugar syrup with you finger – sugar syrup can cause serious burns. Use a jam making thermometer if you want to know the temperature. Once cold, you can then decant the feed to the feeder.
A contact feeder placed in the Beehaus.
You should add the contact feeder, mesh side down, on to clearer board with the bee escape attached.
How to use fondant
Fondant is good winter food for bees.
Expose a 2cm square section of the fondant by cutting a hole in the plastic with a knife.
A good alternative to using sugar syrup is to use fondant. This is a semi solid lump of sugar which can be purchased from Omlet.
Adding a bag of fondant is very similar to adding a bag of syrup. Again, put the clearer board on top of the bag but instead of pricking holes this time cut out a piece about the size of a postage stamp through the hole in the clearer board. Then turn the bag and clearer board over
and place over the brood.
It is not recommended for the main Autumn feed because it is very slow for the bees to use but is the only suitable feed to give the bees when the temperature is below freezing.
Open Closed
Queen

www.omlet.co.uk Page 39
Advanced beekeepingThis section covers beekeeping techniques that you might not use very often but may come in handy.
When should you mark the queen?The best time to find the queen is in April, at the start of the season when there are only a small number of bees in the colony. It’s usually easy to find the queen in a nucleus so mark her as soon as you can.
You might find it handy to practise marking a drone which isn’t critical to the colony so that you feel confident when it comes to marking the queen.
MethodYou will see in some books, beekeepers picking the queen up in their fingers to mark her. This is extremely risky because it’s very easy to damage the queen or accidentally drop and loose her. It is much safer to use a queen marking cage like the one pictured. You can order one from the Omlet shop.
First find the queen on the comb and then gently rest this frame flat on top of the Beehaus. Place the queen marking cage over the queen and, using the flat end of the hive tool to cover the opening, lift the cage up so that you can slide the plunger in. It doesn’t matter if you trap a few worker bees in as well.
Queen marking cage and plunger. (www.omlet.co.uk/shop/plunger)
The queen is held against the screen by the plunger.
What colour to choose?You can use any colour you like but if you are going to be selling bees then it’s worth sticking to the international colour code. This allows you to tell the age of any a marked queen. For example if you requeened a colony in 2012 - you would put a yellow dot on her upper thorax.
Place the cage over the queen. Marking kit and a nucleus colony.
You can rest the cage on it’s side while you get the paint ready.
It’s safer to put the first dab on your glove.
Use two fingers to hold the plunger.
Delicately mark the queen with paint.
Gently slide the hive tool under to trap the queen in the cage.
Turn the cage over and make sure the queen is at the bottom.
Now you can lift the cage.
Remove the hive tool and slide the plunger in.
At this point you can put the cage with the plunger in down on it’s side so that you can get your paint ready. If you are using a pot of paint you can use the stem of a blade of grass or a very fine brush; if you are using a pen then uncap it now.
Using both hands pick up the cage and slide the plunger up so that the queen is gently pushed up against the grid. If she is the wrong way up you need to wait until she turns over. You are aiming to trap her so that her thorax (the part of her body just behind her head) is neatly positioned in one of the openings in the grid. When she is trapped like this, use two fingers of the hand holding the cage to hold the plunger in position. Now, with your free hand, take your paint brush or paint pen and put the first dib of paint on your glove. The reason for this is to avoid accidentally covering the queen in a great blob of paint, put the second dib of paint on the queen’s thorax. It’s better to make several small marks rather than one large one.
Now release the pressure on the plunger, but leave the queen in the cage for for a minute or two for the paint to dry. It’s very important not to rush the queen back into the hive. Place the marking cage and plunger on the frames and let the bees find the queen. They will all crowd around her, touching her to check that she is their queen and after a few minutes should guide her back down into the frames.
How to mark a queenWhenever you inspect your bees it’s useful to check that the queen is alive and well. However, this is easier said than done with a strong colony of over 40,000 bees. So, to make your life easier, you can mark the queen with a coloured dot on her back.
What do you mark her with?You can mark the queen with hobby paint or even a stick-on dot.
YEAR ENDING QUEEN
5 or 0 Blue
6 or 1 White
7 or 2 Yellow
8 or 3 Red
9 or 4 Green
A marked queen is easier to spot.
The international colour code for queens.

Page 40 www.omlet.co.uk
The bees greet the queen, don’t rush her back into the hive.
When she is ready, the queen returns.
Once marked leave the queen in the cage for a minute or two.
Then release her onto the brood frames.
Making a nucleus colonyMany beekeepers like to have a spare colony of bees that can be used in case the main colony looses it’s queen or to boost a colony to take advantage of a good honey flow. The spare colony can be made in the other side of the Beehaus and recombined with the original colony at any time. You can also make a nucleus colony in specially designed nucleus hives which usually take a maximum of 6 frames.
When is the best time to make a nucleus?You can divide a colony during the spring and summer but if you are going to raise a new queen instead of buying one then you will need to make the nucleus while there are still drones and the weather is warm enough for the queen to mate with them. The best time is May or June and this corresponds with the swarming season when you may well need to artificially swarm your bees. Artificially swarming your bees and creating a nucleus are very similar. The earlier in the season you create the nucleus, the more time the colony will have to build in strength and be in good shape for the winter.
What sort of colony can I divide?You can divide any successful colony with bees on 8 frames or more. You shouldn’t divide a colony that is less than a year old, has disease, or bad tempered bees.
What effect does dividing the colony have.Removing some frames of brood and nurse bees will not cause a strong colony any problems if it is done quite early in the season and you should still get a good honey crop. However, the more brood you take from the colony, the fewer bees that colony will have and this will have an impact on the amount of honey it will be able to produce. MethodStep 1 - Smoke the bees lightly and wait 2-3 mins for the smoke to take effect. Open the Beehaus and find the queen. You don’t want to accidentally transfer her to the nucleus side so to make sure you can put her in a matchbox or a queen cage on top of the frames until you have finished.
A strong colony from with 12 frames of bees and good food stores.
Step 2 - Select 2-3 frames with a good covering of brood in all stages but certainly some with eggs so that the bees can start a new queen cell. Transfer these to the other side of the Beehaus and place them towards the entrance with a dummy board behind the last frame.
Step 3 - Select one frame with a good covering of honey and pollen. The nucleus colony will not have any older flying bees for a while and they will need the honey and pollen for brood rearing. Place this as the first frame in front of the brood.
Step 4 - Add the divider board. If it was not in already, put the divider board in place to completely separate the two sides of the Beehaus
Step 5 - Open the second entrance. Put the entrance adapter in place in the wasp guard position. All the flying bees will leave the nucleus side and return to the other side of the Beehaus leaving only the nurse bees on the frames.
Step 6 - Release the queen from the matchbox or queen cage back into her side of the Beehaus.
You can check the nucleus in a weeks time. You should find queen cells and you can then select the best one (largest and with a thick coating of wax indicated by a rippled surface) and remove all the others. Within the next 2-3 weeks the new queen should have mated and be laying.
The Beehaus with a nucleus should look as above. Note the feeder above the nucleus brood frames on the right hand side.
Looking after a nucleus colonyOnce you have established your nucleus colony there are few tips and tricks to ensure that your nucleus colony does well:
1. It is a good idea to feed sugar syrup (see feeding section on Page 36) so that the bees have a good amount of food.
2. Once you have a laying queen, you should ensure that they have enough space to expand, so add more frames as necessary.
3. Finally, if you need to strengthen the number of bees in the nucleus colony, you can add brood taken from a stronger colony. If you do add brood from another colony, you should ensure that there are no bees on the brood when it is moved. Either shake them off or brush them off. The brood shouldn’t be left out of a hive for more than 5 minutes.
Queen
Open
Open Open
Closed
Queen
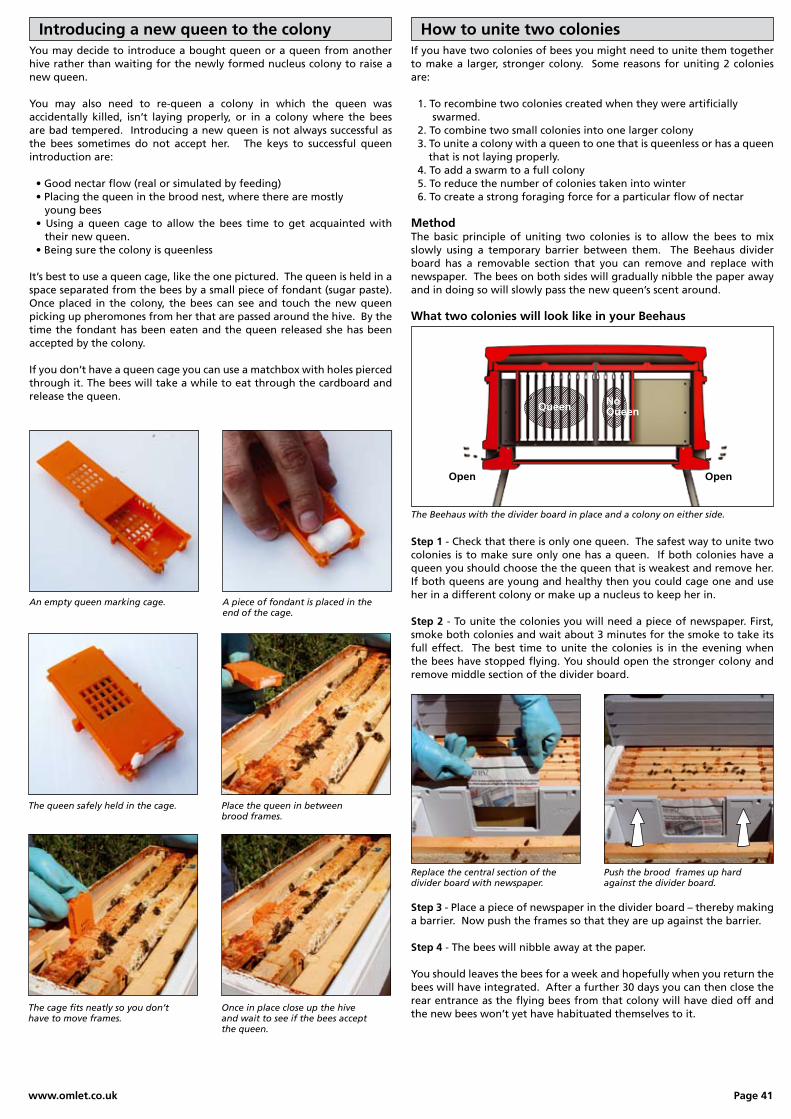
www.omlet.co.uk Page 41
Introducing a new queen to the colonyYou may decide to introduce a bought queen or a queen from another hive rather than waiting for the newly formed nucleus colony to raise a new queen.
You may also need to re-queen a colony in which the queen was accidentally killed, isn’t laying properly, or in a colony where the bees are bad tempered. Introducing a new queen is not always successful as the bees sometimes do not accept her. The keys to successful queen introduction are:
•Goodnectarflow(realorsimulatedbyfeeding) •Placingthequeeninthebroodnest,wheretherearemostly young bees • Using a queen cage to allow the bees time to get acquainted with their new queen. •Beingsurethecolonyisqueenless
It’s best to use a queen cage, like the one pictured. The queen is held in a space separated from the bees by a small piece of fondant (sugar paste). Once placed in the colony, the bees can see and touch the new queen picking up pheromones from her that are passed around the hive. By the time the fondant has been eaten and the queen released she has been accepted by the colony.
If you don’t have a queen cage you can use a matchbox with holes pierced through it. The bees will take a while to eat through the cardboard and release the queen.
The queen safely held in the cage.
The cage fits neatly so you don’t have to move frames.
Place the queen in between brood frames.
Once in place close up the hive and wait to see if the bees accept the queen.
A piece of fondant is placed in the end of the cage.
An empty queen marking cage.
The Beehaus with the divider board in place and a colony on either side.
Step 1 - Check that there is only one queen. The safest way to unite two colonies is to make sure only one has a queen. If both colonies have a queen you should choose the the queen that is weakest and remove her. If both queens are young and healthy then you could cage one and use her in a different colony or make up a nucleus to keep her in.
Step 2 - To unite the colonies you will need a piece of newspaper. First, smoke both colonies and wait about 3 minutes for the smoke to take its full effect. The best time to unite the colonies is in the evening when the bees have stopped flying. You should open the stronger colony and remove middle section of the divider board.
Step 3 - Place a piece of newspaper in the divider board – thereby making a barrier. Now push the frames so that they are up against the barrier.
Step 4 - The bees will nibble away at the paper.
You should leaves the bees for a week and hopefully when you return the bees will have integrated. After a further 30 days you can then close the rear entrance as the flying bees from that colony will have died off and the new bees won’t yet have habituated themselves to it.
Replace the central section of the divider board with newspaper.
Push the brood frames up hard against the divider board.
If you have two colonies of bees you might need to unite them together to make a larger, stronger colony. Some reasons for uniting 2 colonies are:
1. To recombine two colonies created when they were artificially swarmed. 2. To combine two small colonies into one larger colony 3. To unite a colony with a queen to one that is queenless or has a queen that is not laying properly. 4. To add a swarm to a full colony 5. To reduce the number of colonies taken into winter 6. To create a strong foraging force for a particular flow of nectar
MethodThe basic principle of uniting two colonies is to allow the bees to mix slowly using a temporary barrier between them. The Beehaus divider board has a removable section that you can remove and replace with newspaper. The bees on both sides will gradually nibble the paper away and in doing so will slowly pass the new queen’s scent around.
What two colonies will look like in your Beehaus
How to unite two colonies
Open Open
Queen NoQueen
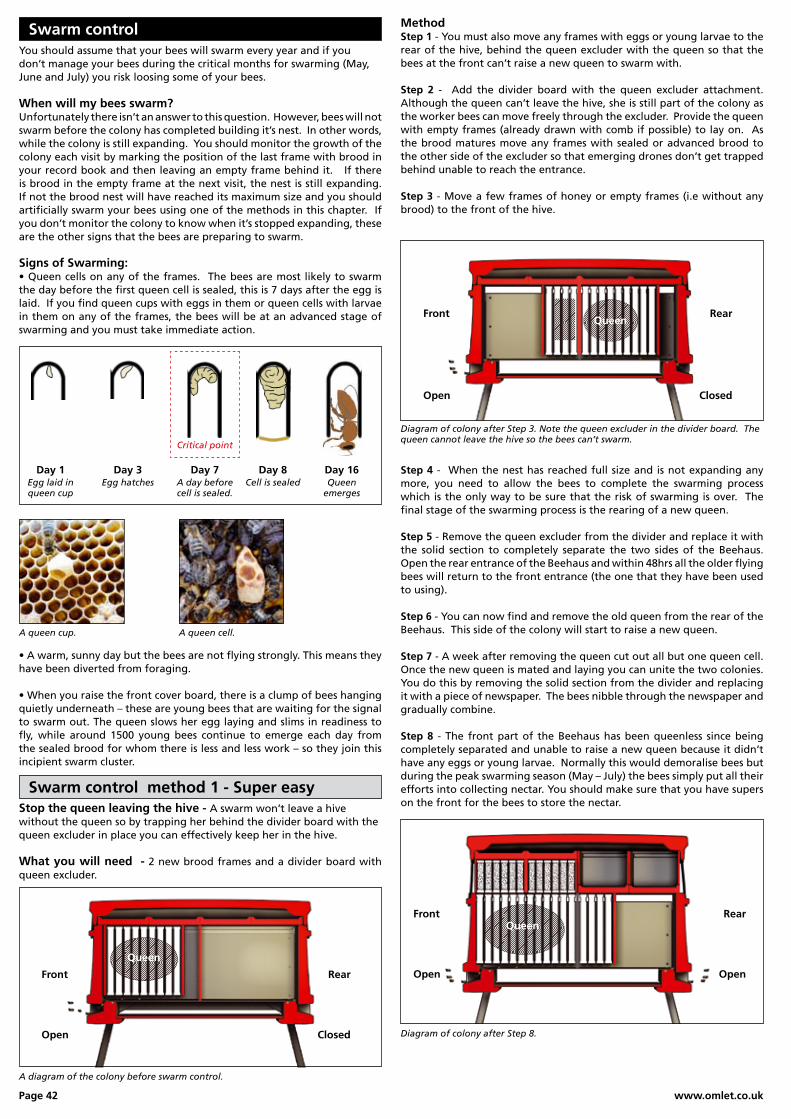
Page 42 www.omlet.co.uk
Swarm control method 1 - Super easy
Swarm controlYou should assume that your bees will swarm every year and if youdon’t manage your bees during the critical months for swarming (May,June and July) you risk loosing some of your bees.
When will my bees swarm?Unfortunatelythereisn’tananswertothisquestion.However,beeswillnotswarm before the colony has completed building it’s nest. In other words, while the colony is still expanding. You should monitor the growth of the colony each visit by marking the position of the last frame with brood in your record book and then leaving an empty frame behind it. If there is brood in the empty frame at the next visit, the nest is still expanding. If not the brood nest will have reached its maximum size and you should artificially swarm your bees using one of the methods in this chapter. If you don’t monitor the colony to know when it’s stopped expanding, these are the other signs that the bees are preparing to swarm.
Signs of Swarming:•Queencellsonanyoftheframes.Thebeesaremostlikelytoswarmthe day before the first queen cell is sealed, this is 7 days after the egg is laid. If you find queen cups with eggs in them or queen cells with larvae in them on any of the frames, the bees will be at an advanced stage of swarming and you must take immediate action.
Stop the queen leaving the hive - A swarm won’t leave a hive without the queen so by trapping her behind the divider board with the queen excluder in place you can effectively keep her in the hive.
What you will need - 2 new brood frames and a divider board with queen excluder.
MethodStep 1 - You must also move any frames with eggs or young larvae to the rear of the hive, behind the queen excluder with the queen so that the bees at the front can’t raise a new queen to swarm with.
Step 2 - Add the divider board with the queen excluder attachment. Although the queen can’t leave the hive, she is still part of the colony as the worker bees can move freely through the excluder. Provide the queen with empty frames (already drawn with comb if possible) to lay on. As the brood matures move any frames with sealed or advanced brood to the other side of the excluder so that emerging drones don’t get trapped behind unable to reach the entrance.
Step 3 - Move a few frames of honey or empty frames (i.e without any brood) to the front of the hive.
Step 4 - When the nest has reached full size and is not expanding any more, you need to allow the bees to complete the swarming process which is the only way to be sure that the risk of swarming is over. The final stage of the swarming process is the rearing of a new queen.
Step 5 - Remove the queen excluder from the divider and replace it with the solid section to completely separate the two sides of the Beehaus. Open the rear entrance of the Beehaus and within 48hrs all the older flying bees will return to the front entrance (the one that they have been used to using).
Step 6 - You can now find and remove the old queen from the rear of the Beehaus. This side of the colony will start to raise a new queen.
Step 7 - A week after removing the queen cut out all but one queen cell. Once the new queen is mated and laying you can unite the two colonies. You do this by removing the solid section from the divider and replacing it with a piece of newspaper. The bees nibble through the newspaper and gradually combine.
Step 8 - The front part of the Beehaus has been queenless since being completely separated and unable to raise a new queen because it didn’t have any eggs or young larvae. Normally this would demoralise bees but during the peak swarming season (May – July) the bees simply put all their efforts into collecting nectar. You should make sure that you have supers on the front for the bees to store the nectar.
A diagram of the colony before swarm control.
Queen
•Awarm,sunnydaybutthebeesarenotflyingstrongly.Thismeanstheyhave been diverted from foraging.
•Whenyouraisethefrontcoverboard,thereisaclumpofbeeshangingquietly underneath – these are young bees that are waiting for the signal to swarm out. The queen slows her egg laying and slims in readiness to fly, while around 1500 young bees continue to emerge each day from the sealed brood for whom there is less and less work – so they join this incipient swarm cluster.
A queen cell.A queen cup.
Diagram of colony after Step 3. Note the queen excluder in the divider board. The queen cannot leave the hive so the bees can’t swarm.
QueenFront Rear
Open Closed
Diagram of colony after Step 8.
Queen
Egg laid in queen cup
Day 1 Day 3 Day 7 Day 8 Day 16Egg hatches A day before
cell is sealed.
Critical point
Cell is sealed Queen emerges
Front Rear
Open Closed
Front Rear
Open Open
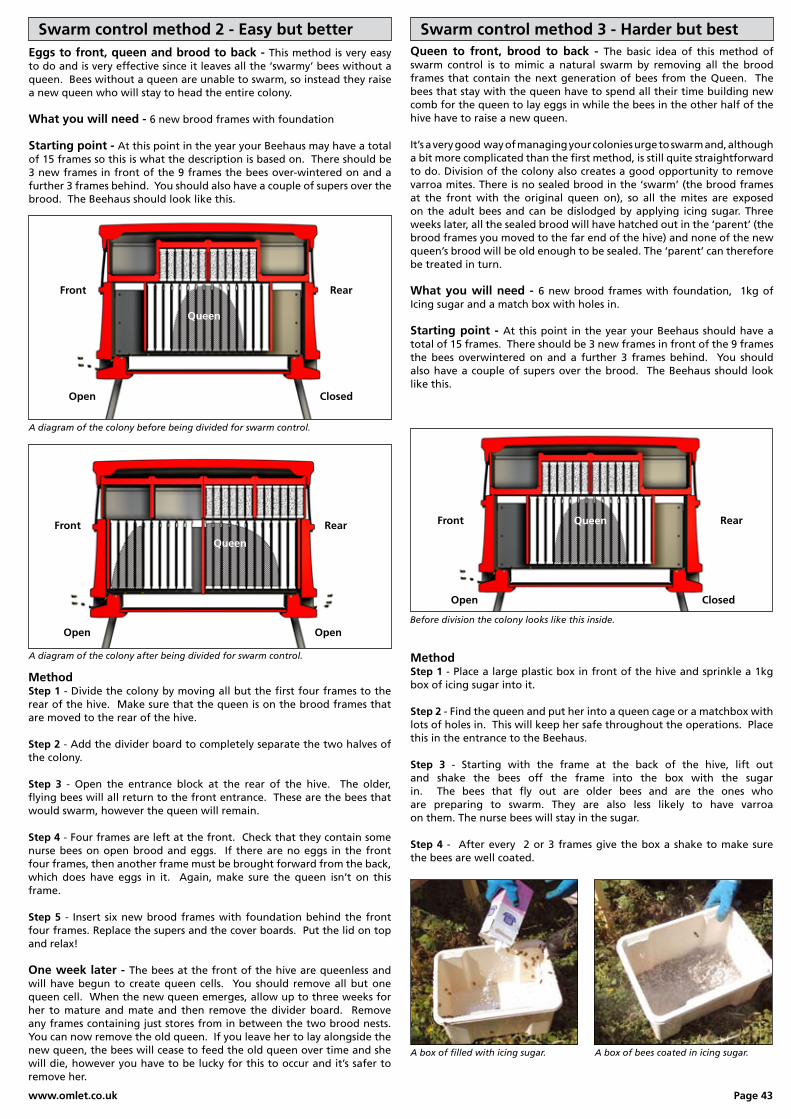
www.omlet.co.uk Page 43
Eggs to front, queen and brood to back - This method is very easy to do and is very effective since it leaves all the ‘swarmy’ bees without a queen. Bees without a queen are unable to swarm, so instead they raise a new queen who will stay to head the entire colony.
What you will need - 6 new brood frames with foundation
Starting point - At this point in the year your Beehaus may have a total of 15 frames so this is what the description is based on. There should be 3 new frames in front of the 9 frames the bees over-wintered on and a further 3 frames behind. You should also have a couple of supers over the brood. The Beehaus should look like this.
Swarm control method 2 - Easy but better
MethodStep 1 - Divide the colony by moving all but the first four frames to the rear of the hive. Make sure that the queen is on the brood frames that are moved to the rear of the hive.
Step 2 - Add the divider board to completely separate the two halves of the colony.
Step 3 - Open the entrance block at the rear of the hive. The older, flying bees will all return to the front entrance. These are the bees that would swarm, however the queen will remain.
Step 4 - Four frames are left at the front. Check that they contain some nurse bees on open brood and eggs. If there are no eggs in the front four frames, then another frame must be brought forward from the back, which does have eggs in it. Again, make sure the queen isn’t on this frame.
Step 5 - Insert six new brood frames with foundation behind the front four frames. Replace the supers and the cover boards. Put the lid on top and relax!
One week later - The bees at the front of the hive are queenless and will have begun to create queen cells. You should remove all but one queen cell. When the new queen emerges, allow up to three weeks for her to mature and mate and then remove the divider board. Remove any frames containing just stores from in between the two brood nests. You can now remove the old queen. If you leave her to lay alongside the new queen, the bees will cease to feed the old queen over time and she will die, however you have to be lucky for this to occur and it’s safer to remove her.
Swarm control method 3 - Harder but bestQueen to front, brood to back - The basic idea of this method of swarm control is to mimic a natural swarm by removing all the brood framesthatcontainthenextgenerationofbeesfromtheQueen. Thebees that stay with the queen have to spend all their time building new comb for the queen to lay eggs in while the bees in the other half of the hive have to raise a new queen.
It’s a very good way of managing your colonies urge to swarm and, although a bit more complicated than the first method, is still quite straightforward to do. Division of the colony also creates a good opportunity to remove varroa mites. There is no sealed brood in the ‘swarm’ (the brood frames at the front with the original queen on), so all the mites are exposed on the adult bees and can be dislodged by applying icing sugar. Three weeks later, all the sealed brood will have hatched out in the ‘parent’ (the brood frames you moved to the far end of the hive) and none of the new queen’s brood will be old enough to be sealed. The ‘parent’ can therefore be treated in turn.
What you will need - 6 new brood frames with foundation, 1kg of Icing sugar and a match box with holes in.
Starting point - At this point in the year your Beehaus should have a total of 15 frames. There should be 3 new frames in front of the 9 frames the bees overwintered on and a further 3 frames behind. You should also have a couple of supers over the brood. The Beehaus should look like this.
MethodStep 1 - Place a large plastic box in front of the hive and sprinkle a 1kg box of icing sugar into it.
Step 2 - Find the queen and put her into a queen cage or a matchbox with lots of holes in. This will keep her safe throughout the operations. Place this in the entrance to the Beehaus.
Step 3 - Starting with the frame at the back of the hive, lift out and shake the bees off the frame into the box with the sugar in. The bees that fly out are older bees and are the ones who are preparing to swarm. They are also less likely to have varroa on them. The nurse bees will stay in the sugar.
Step 4 - After every 2 or 3 frames give the box a shake to make sure the bees are well coated.
Before division the colony looks like this inside.
QueenFront Rear
A box of bees coated in icing sugar.A box of filled with icing sugar.
Rear
A diagram of the colony after being divided for swarm control.
Queen
A diagram of the colony before being divided for swarm control.
Queen
RearFront
Open Closed
RearFront
Open Open
Open Closed
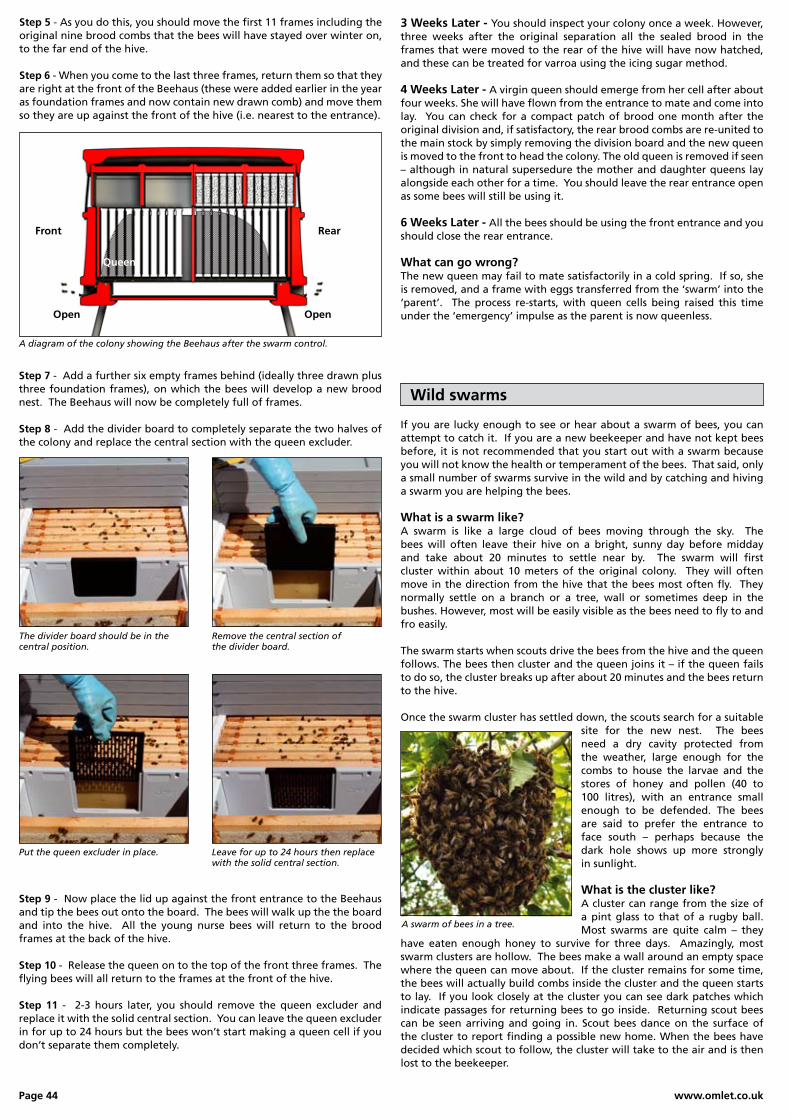
Page 44 www.omlet.co.uk
3 Weeks Later - You should inspect your colony once a week. However, three weeks after the original separation all the sealed brood in the frames that were moved to the rear of the hive will have now hatched, and these can be treated for varroa using the icing sugar method.
4 Weeks Later - A virgin queen should emerge from her cell after about four weeks. She will have flown from the entrance to mate and come into lay. You can check for a compact patch of brood one month after the original division and, if satisfactory, the rear brood combs are re-united to the main stock by simply removing the division board and the new queen is moved to the front to head the colony. The old queen is removed if seen – although in natural supersedure the mother and daughter queens lay alongside each other for a time. You should leave the rear entrance open as some bees will still be using it.
6 Weeks Later - All the bees should be using the front entrance and you should close the rear entrance.
What can go wrong?The new queen may fail to mate satisfactorily in a cold spring. If so, she is removed, and a frame with eggs transferred from the ‘swarm’ into the ‘parent’. The process re-starts, with queen cells being raised this time under the ‘emergency’ impulse as the parent is now queenless.
If you are lucky enough to see or hear about a swarm of bees, you can attempt to catch it. If you are a new beekeeper and have not kept bees before, it is not recommended that you start out with a swarm because you will not know the health or temperament of the bees. That said, only a small number of swarms survive in the wild and by catching and hiving a swarm you are helping the bees.
What is a swarm like?A swarm is like a large cloud of bees moving through the sky. The bees will often leave their hive on a bright, sunny day before midday and take about 20 minutes to settle near by. The swarm will first cluster within about 10 meters of the original colony. They will often move in the direction from the hive that the bees most often fly. They normally settle on a branch or a tree, wall or sometimes deep in the bushes. However, most will be easily visible as the bees need to fly to and fro easily.
The swarm starts when scouts drive the bees from the hive and the queen follows. The bees then cluster and the queen joins it – if the queen fails to do so, the cluster breaks up after about 20 minutes and the bees return to the hive.
Once the swarm cluster has settled down, the scouts search for a suitable site for the new nest. The bees need a dry cavity protected from the weather, large enough for the combs to house the larvae and the stores of honey and pollen (40 to 100 litres), with an entrance small enough to be defended. The bees are said to prefer the entrance to face south – perhaps because the dark hole shows up more strongly in sunlight.
What is the cluster like?A cluster can range from the size of a pint glass to that of a rugby ball. Most swarms are quite calm – they
have eaten enough honey to survive for three days. Amazingly, most swarm clusters are hollow. The bees make a wall around an empty space where the queen can move about. If the cluster remains for some time, the bees will actually build combs inside the cluster and the queen starts to lay. If you look closely at the cluster you can see dark patches which indicate passages for returning bees to go inside. Returning scout bees can be seen arriving and going in. Scout bees dance on the surface of the cluster to report finding a possible new home. When the bees have decided which scout to follow, the cluster will take to the air and is then lost to the beekeeper.
A swarm of bees in a tree.
Wild swarms
Step 5 - As you do this, you should move the first 11 frames including the original nine brood combs that the bees will have stayed over winter on, to the far end of the hive.
Step 6 - When you come to the last three frames, return them so that they are right at the front of the Beehaus (these were added earlier in the year as foundation frames and now contain new drawn comb) and move them so they are up against the front of the hive (i.e. nearest to the entrance).
A diagram of the colony showing the Beehaus after the swarm control.
Step 7 - Add a further six empty frames behind (ideally three drawn plus three foundation frames), on which the bees will develop a new brood nest. The Beehaus will now be completely full of frames.
Step 8 - Add the divider board to completely separate the two halves of the colony and replace the central section with the queen excluder.
Queen
Front Rear
The divider board should be in the central position.
Put the queen excluder in place.
Remove the central section of the divider board.
Leave for up to 24 hours then replace with the solid central section.
Step 9 - Now place the lid up against the front entrance to the Beehaus and tip the bees out onto the board. The bees will walk up the the board and into the hive. All the young nurse bees will return to the brood frames at the back of the hive.
Step 10 - Release the queen on to the top of the front three frames. The flying bees will all return to the frames at the front of the hive.
Step 11 - 2-3 hours later, you should remove the queen excluder and replace it with the solid central section. You can leave the queen excluder in for up to 24 hours but the bees won’t start making a queen cell if you don’t separate them completely.
Open Open
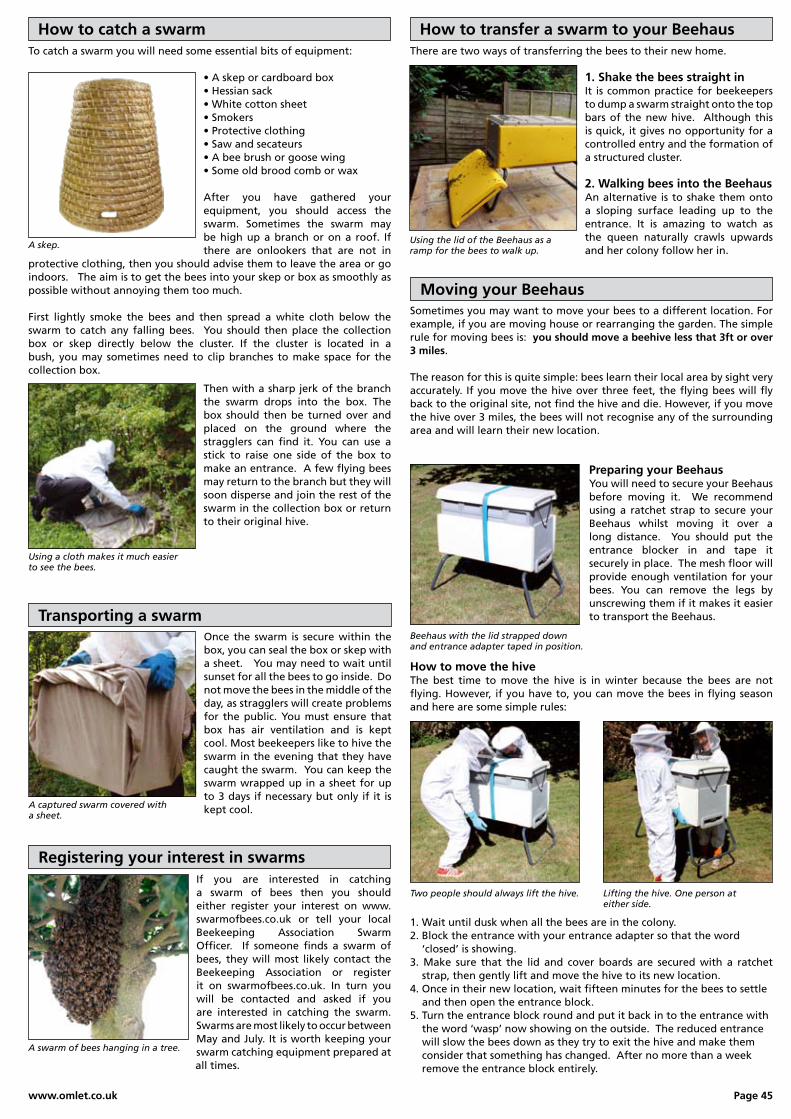
www.omlet.co.uk Page 45
How to catch a swarm How to transfer a swarm to your BeehausTo catch a swarm you will need some essential bits of equipment:
•Askeporcardboardbox•Hessiansack•Whitecottonsheet•Smokers•Protectiveclothing•Sawandsecateurs•Abeebrushorgoosewing•Someoldbroodcomborwax
After you have gathered your equipment, you should access the swarm. Sometimes the swarm may be high up a branch or on a roof. If there are onlookers that are not in
protective clothing, then you should advise them to leave the area or go indoors. The aim is to get the bees into your skep or box as smoothly as possible without annoying them too much.
First lightly smoke the bees and then spread a white cloth below the swarm to catch any falling bees. You should then place the collection box or skep directly below the cluster. If the cluster is located in a bush, you may sometimes need to clip branches to make space for the collection box.
A skep.
Then with a sharp jerk of the branch the swarm drops into the box. The box should then be turned over and placed on the ground where the stragglers can find it. You can use a stick to raise one side of the box to make an entrance. A few flying bees may return to the branch but they will soon disperse and join the rest of the swarm in the collection box or return to their original hive.
Using a cloth makes it much easier to see the bees.
A captured swarm covered with a sheet.
Transporting a swarmOnce the swarm is secure within the box, you can seal the box or skep with a sheet. You may need to wait until sunset for all the bees to go inside. Do not move the bees in the middle of the day, as stragglers will create problems for the public. You must ensure that box has air ventilation and is kept cool. Most beekeepers like to hive the swarm in the evening that they have caught the swarm. You can keep the swarm wrapped up in a sheet for up to 3 days if necessary but only if it is kept cool.
Using the lid of the Beehaus as a ramp for the bees to walk up.
There are two ways of transferring the bees to their new home.
1. Shake the bees straight in It is common practice for beekeepers to dump a swarm straight onto the top bars of the new hive. Although this is quick, it gives no opportunity for a controlled entry and the formation of a structured cluster.
2. Walking bees into the BeehausAn alternative is to shake them onto a sloping surface leading up to the entrance. It is amazing to watch as the queen naturally crawls upwards and her colony follow her in.
Registering your interest in swarmsIf you are interested in catching a swarm of bees then you should either register your interest on www.swarmofbees.co.uk or tell your local Beekeeping Association Swarm Officer. If someone finds a swarm of bees, they will most likely contact the Beekeeping Association or register it on swarmofbees.co.uk. In turn you will be contacted and asked if you are interested in catching the swarm. Swarms are most likely to occur between May and July. It is worth keeping your swarm catching equipment prepared at all times.
How to move the hiveThe best time to move the hive is in winter because the bees are not flying. However, if you have to, you can move the bees in flying season and here are some simple rules:
1. Wait until dusk when all the bees are in the colony. 2. Block the entrance with your entrance adapter so that the word ‘closed’ is showing. 3. Make sure that the lid and cover boards are secured with a ratchet strap, then gently lift and move the hive to its new location. 4. Once in their new location, wait fifteen minutes for the bees to settle and then open the entrance block. 5. Turn the entrance block round and put it back in to the entrance with the word ‘wasp’ now showing on the outside. The reduced entrance will slow the bees down as they try to exit the hive and make them consider that something has changed. After no more than a week remove the entrance block entirely.
Moving your BeehausSometimes you may want to move your bees to a different location. For example, if you are moving house or rearranging the garden. The simple rule for moving bees is: you should move a beehive less that 3ft or over 3 miles.
The reason for this is quite simple: bees learn their local area by sight very accurately. If you move the hive over three feet, the flying bees will fly back to the original site, not find the hive and die. However, if you move the hive over 3 miles, the bees will not recognise any of the surrounding area and will learn their new location.
Preparing your BeehausYou will need to secure your Beehaus before moving it. We recommend using a ratchet strap to secure your Beehaus whilst moving it over a long distance. You should put the entrance blocker in and tape it securely in place. The mesh floor will provide enough ventilation for your bees. You can remove the legs by unscrewing them if it makes it easier to transport the Beehaus.
Beehaus with the lid strapped down and entrance adapter taped in position.
Lifting the hive. One person at either side.
Two people should always lift the hive.
A swarm of bees hanging in a tree.
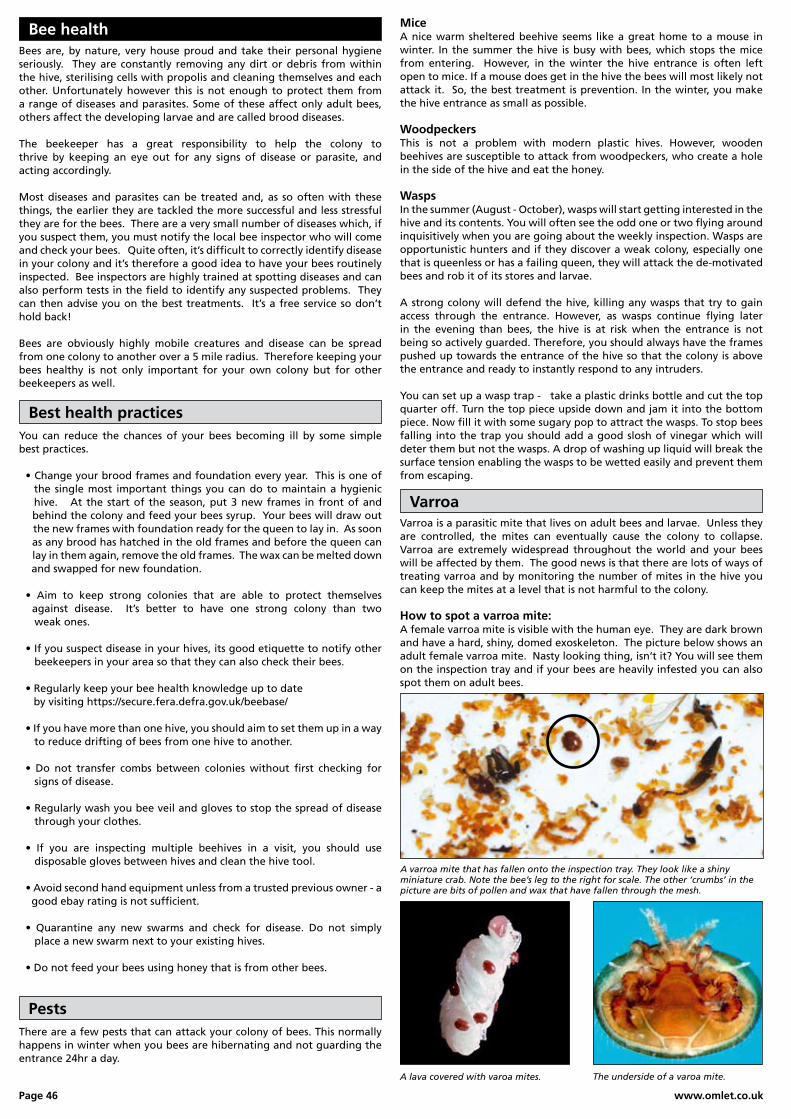
Page 46 www.omlet.co.uk
Bee health
Best health practices
Pests
Bees are, by nature, very house proud and take their personal hygiene seriously. They are constantly removing any dirt or debris from within the hive, sterilising cells with propolis and cleaning themselves and each other.Unfortunatelyhowever this isnotenough toprotect themfroma range of diseases and parasites. Some of these affect only adult bees, others affect the developing larvae and are called brood diseases.
The beekeeper has a great responsibility to help the colony to thrive by keeping an eye out for any signs of disease or parasite, and acting accordingly.
Most diseases and parasites can be treated and, as so often with these things, the earlier they are tackled the more successful and less stressful they are for the bees. There are a very small number of diseases which, if you suspect them, you must notify the local bee inspector who will come andcheckyourbees.Quiteoften,it’sdifficulttocorrectlyidentifydiseasein your colony and it’s therefore a good idea to have your bees routinely inspected. Bee inspectors are highly trained at spotting diseases and can also perform tests in the field to identify any suspected problems. They can then advise you on the best treatments. It’s a free service so don’t hold back!
Bees are obviously highly mobile creatures and disease can be spread from one colony to another over a 5 mile radius. Therefore keeping your bees healthy is not only important for your own colony but for other beekeepers as well.
You can reduce the chances of your bees becoming ill by some simple best practices.
•Changeyourbroodframesandfoundationeveryyear.Thisisoneof the single most important things you can do to maintain a hygienic hive. At the start of the season, put 3 new frames in front of and behind the colony and feed your bees syrup. Your bees will draw out the new frames with foundation ready for the queen to lay in. As soon as any brood has hatched in the old frames and before the queen can lay in them again, remove the old frames. The wax can be melted down and swapped for new foundation.
• Aim to keep strong colonies that are able to protect themselves against disease. It’s better to have one strong colony than two weak ones.
•Ifyoususpectdiseaseinyourhives,itsgoodetiquettetonotifyother beekeepers in your area so that they can also check their bees.
•Regularlykeepyourbeehealthknowledgeuptodate by visiting https://secure.fera.defra.gov.uk/beebase/
•Ifyouhavemorethanonehive,youshouldaimtosetthemupinaway to reduce drifting of bees from one hive to another.
• Do not transfer combs between colonies without first checking for signs of disease.
•Regularlywashyoubeeveilandglovestostopthespreadofdisease through your clothes.
• If you are inspecting multiple beehives in a visit, you should use disposable gloves between hives and clean the hive tool.
•Avoidsecondhandequipmentunlessfromatrustedpreviousowner-a good ebay rating is not sufficient.
• Quarantine any new swarms and check for disease. Do not simply place a new swarm next to your existing hives.
•Donotfeedyourbeesusinghoneythatisfromotherbees.
There are a few pests that can attack your colony of bees. This normally happens in winter when you bees are hibernating and not guarding the entrance 24hr a day.
MiceA nice warm sheltered beehive seems like a great home to a mouse in winter. In the summer the hive is busy with bees, which stops the mice from entering. However, in the winter the hive entrance is often left open to mice. If a mouse does get in the hive the bees will most likely not attack it. So, the best treatment is prevention. In the winter, you make the hive entrance as small as possible.
WoodpeckersThis is not a problem with modern plastic hives. However, wooden beehives are susceptible to attack from woodpeckers, who create a hole in the side of the hive and eat the honey.
WaspsIn the summer (August - October), wasps will start getting interested in the hive and its contents. You will often see the odd one or two flying around inquisitively when you are going about the weekly inspection. Wasps are opportunistic hunters and if they discover a weak colony, especially one that is queenless or has a failing queen, they will attack the de-motivated bees and rob it of its stores and larvae.
A strong colony will defend the hive, killing any wasps that try to gain access through the entrance. However, as wasps continue flying later in the evening than bees, the hive is at risk when the entrance is not being so actively guarded. Therefore, you should always have the frames pushed up towards the entrance of the hive so that the colony is above the entrance and ready to instantly respond to any intruders.
You can set up a wasp trap - take a plastic drinks bottle and cut the top quarter off. Turn the top piece upside down and jam it into the bottom piece. Now fill it with some sugary pop to attract the wasps. To stop bees falling into the trap you should add a good slosh of vinegar which will deter them but not the wasps. A drop of washing up liquid will break the surface tension enabling the wasps to be wetted easily and prevent them from escaping.
Varroaisaparasiticmitethatlivesonadultbeesandlarvae.Unlesstheyare controlled, the mites can eventually cause the colony to collapse. Varroa are extremely widespread throughout the world and your bees will be affected by them. The good news is that there are lots of ways of treating varroa and by monitoring the number of mites in the hive you can keep the mites at a level that is not harmful to the colony.
How to spot a varroa mite:A female varroa mite is visible with the human eye. They are dark brown and have a hard, shiny, domed exoskeleton. The picture below shows an adult female varroa mite. Nasty looking thing, isn’t it? You will see them on the inspection tray and if your bees are heavily infested you can also spot them on adult bees.
A varroa mite that has fallen onto the inspection tray. They look like a shiny miniature crab. Note the bee’s leg to the right for scale. The other ‘crumbs’ in the picture are bits of pollen and wax that have fallen through the mesh.
A lava covered with varoa mites. The underside of a varoa mite.
Varroa
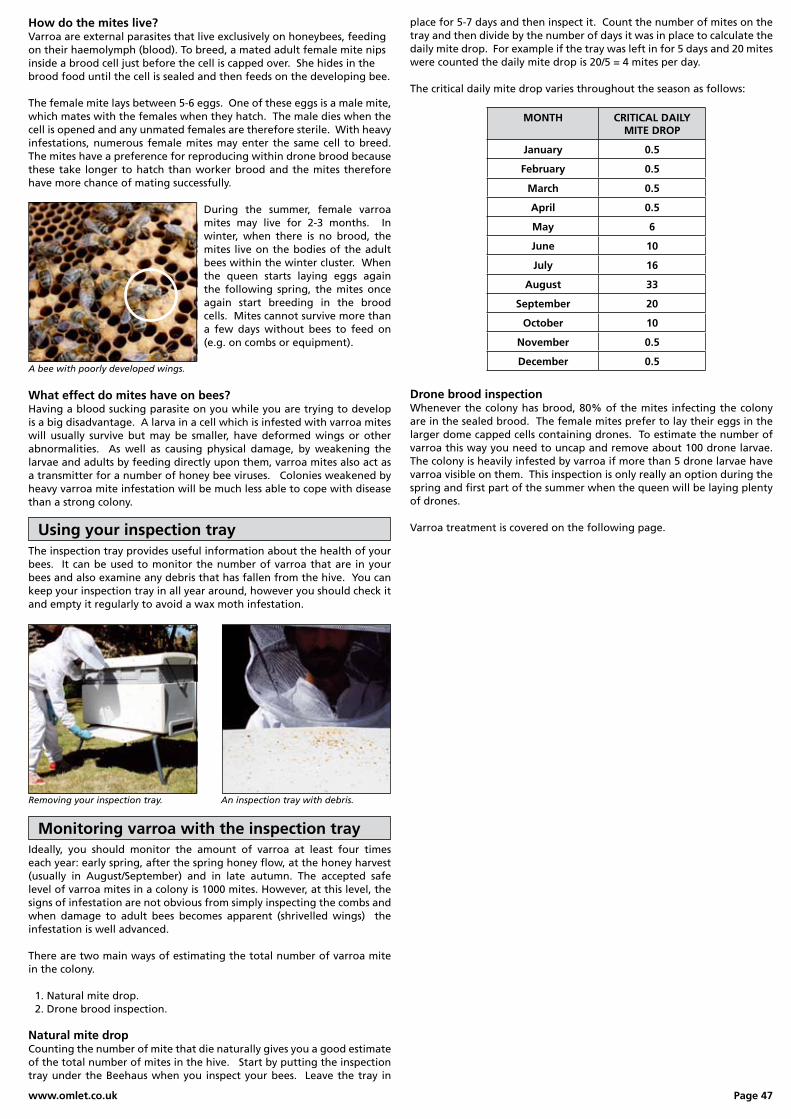
www.omlet.co.uk Page 47
How do the mites live?Varroa are external parasites that live exclusively on honeybees, feeding on their haemolymph (blood). To breed, a mated adult female mite nips inside a brood cell just before the cell is capped over. She hides in the brood food until the cell is sealed and then feeds on the developing bee.
The female mite lays between 5-6 eggs. One of these eggs is a male mite, which mates with the females when they hatch. The male dies when the cell is opened and any unmated females are therefore sterile. With heavy infestations, numerous female mites may enter the same cell to breed. The mites have a preference for reproducing within drone brood because these take longer to hatch than worker brood and the mites therefore have more chance of mating successfully.
During the summer, female varroa mites may live for 2-3 months. In winter, when there is no brood, the mites live on the bodies of the adult bees within the winter cluster. When the queen starts laying eggs again the following spring, the mites once again start breeding in the brood cells. Mites cannot survive more than a few days without bees to feed on (e.g. on combs or equipment).
What effect do mites have on bees?Having a blood sucking parasite on you while you are trying to develop is a big disadvantage. A larva in a cell which is infested with varroa mites will usually survive but may be smaller, have deformed wings or other abnormalities. As well as causing physical damage, by weakening the larvae and adults by feeding directly upon them, varroa mites also act as a transmitter for a number of honey bee viruses. Colonies weakened by heavy varroa mite infestation will be much less able to cope with disease than a strong colony.
A bee with poorly developed wings.
The inspection tray provides useful information about the health of your bees. It can be used to monitor the number of varroa that are in your bees and also examine any debris that has fallen from the hive. You can keep your inspection tray in all year around, however you should check it and empty it regularly to avoid a wax moth infestation.
Removing your inspection tray. An inspection tray with debris.
Using your inspection tray
Monitoring varroa with the inspection trayIdeally, you should monitor the amount of varroa at least four times each year: early spring, after the spring honey flow, at the honey harvest (usually in August/September) and in late autumn. The accepted safe level of varroa mites in a colony is 1000 mites. However, at this level, the signs of infestation are not obvious from simply inspecting the combs and when damage to adult bees becomes apparent (shrivelled wings) the infestation is well advanced.
There are two main ways of estimating the total number of varroa mite in the colony.
1. Natural mite drop. 2. Drone brood inspection.
Natural mite dropCounting the number of mite that die naturally gives you a good estimate of the total number of mites in the hive. Start by putting the inspection tray under the Beehaus when you inspect your bees. Leave the tray in
place for 5-7 days and then inspect it. Count the number of mites on the tray and then divide by the number of days it was in place to calculate the daily mite drop. For example if the tray was left in for 5 days and 20 mites were counted the daily mite drop is 20/5 = 4 mites per day.
The critical daily mite drop varies throughout the season as follows:
MONTH CRITICAL DAILY MITE DROP
January 0.5
February 0.5
March 0.5
April 0.5
May 6
June 10
July 16
August 33
September 20
October 10
November 0.5
December 0.5
Drone brood inspectionWhenever the colony has brood, 80% of the mites infecting the colony are in the sealed brood. The female mites prefer to lay their eggs in the larger dome capped cells containing drones. To estimate the number of varroa this way you need to uncap and remove about 100 drone larvae. The colony is heavily infested by varroa if more than 5 drone larvae have varroa visible on them. This inspection is only really an option during the spring and first part of the summer when the queen will be laying plenty of drones.
Varroa treatment is covered on the following page.
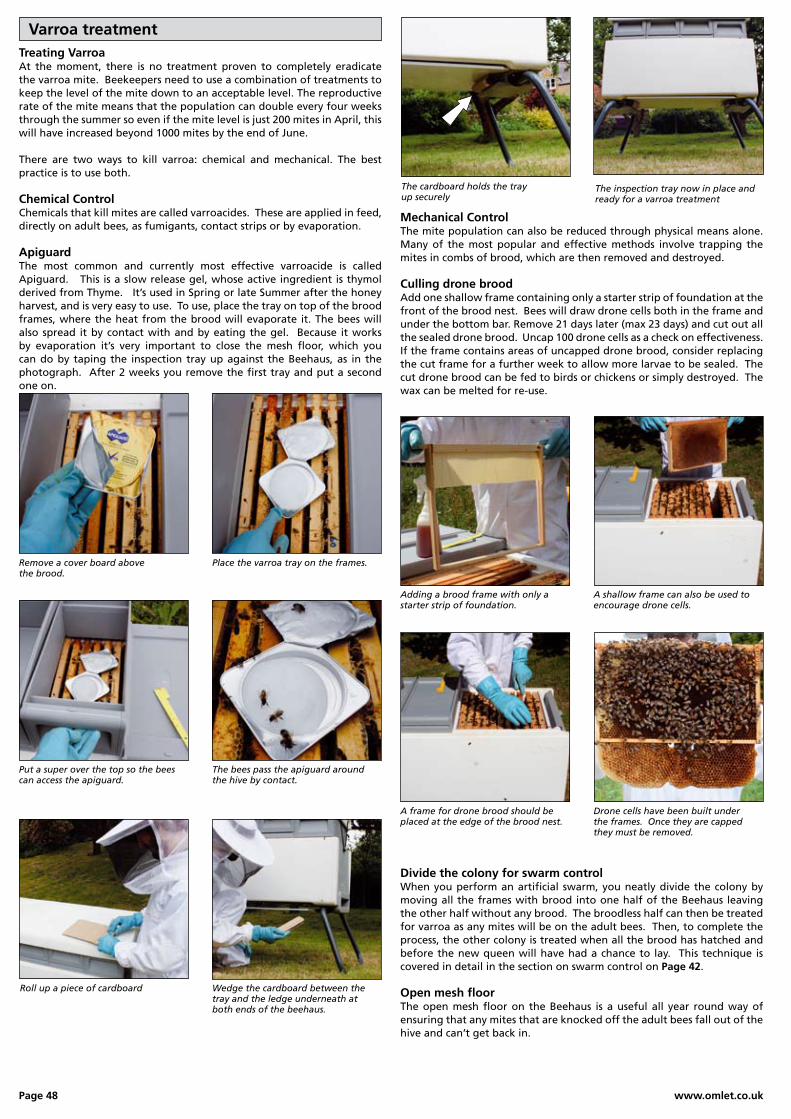
Page 48 www.omlet.co.uk
The cardboard holds the tray up securely
The inspection tray now in place and ready for a varroa treatment
Roll up a piece of cardboard Wedge the cardboard between the tray and the ledge underneath at both ends of the beehaus.
Put a super over the top so the bees can access the apiguard.
Remove a cover board above the brood.
The bees pass the apiguard around the hive by contact.
Place the varroa tray on the frames.
Treating VarroaAt the moment, there is no treatment proven to completely eradicate the varroa mite. Beekeepers need to use a combination of treatments to keep the level of the mite down to an acceptable level. The reproductive rate of the mite means that the population can double every four weeks through the summer so even if the mite level is just 200 mites in April, this will have increased beyond 1000 mites by the end of June.
There are two ways to kill varroa: chemical and mechanical. The best practice is to use both.
Chemical ControlChemicals that kill mites are called varroacides. These are applied in feed, directly on adult bees, as fumigants, contact strips or by evaporation.
ApiguardThe most common and currently most effective varroacide is called Apiguard. This is a slow release gel, whose active ingredient is thymol derived from Thyme. It’s used in Spring or late Summer after the honey harvest, and is very easy to use. To use, place the tray on top of the brood frames, where the heat from the brood will evaporate it. The bees will also spread it by contact with and by eating the gel. Because it works by evaporation it’s very important to close the mesh floor, which you can do by taping the inspection tray up against the Beehaus, as in the photograph. After 2 weeks you remove the first tray and put a second one on.
Varroa treatment
Mechanical ControlThe mite population can also be reduced through physical means alone. Many of the most popular and effective methods involve trapping the mites in combs of brood, which are then removed and destroyed.
Culling drone broodAdd one shallow frame containing only a starter strip of foundation at the front of the brood nest. Bees will draw drone cells both in the frame and under the bottom bar. Remove 21 days later (max 23 days) and cut out all the sealed drone brood. Uncap 100 drone cells as a check on effectiveness. If the frame contains areas of uncapped drone brood, consider replacing the cut frame for a further week to allow more larvae to be sealed. The cut drone brood can be fed to birds or chickens or simply destroyed. The wax can be melted for re-use.
Divide the colony for swarm controlWhen you perform an artificial swarm, you neatly divide the colony by moving all the frames with brood into one half of the Beehaus leaving the other half without any brood. The broodless half can then be treated for varroa as any mites will be on the adult bees. Then, to complete the process, the other colony is treated when all the brood has hatched and before the new queen will have had a chance to lay. This technique is covered in detail in the section on swarm control on Page 42.
Open mesh floorThe open mesh floor on the Beehaus is a useful all year round way of ensuring that any mites that are knocked off the adult bees fall out of the hive and can’t get back in.
Adding a brood frame with only a starter strip of foundation.
A frame for drone brood should be placed at the edge of the brood nest.
A shallow frame can also be used to encourage drone cells.
Drone cells have been built under the frames. Once they are capped they must be removed.
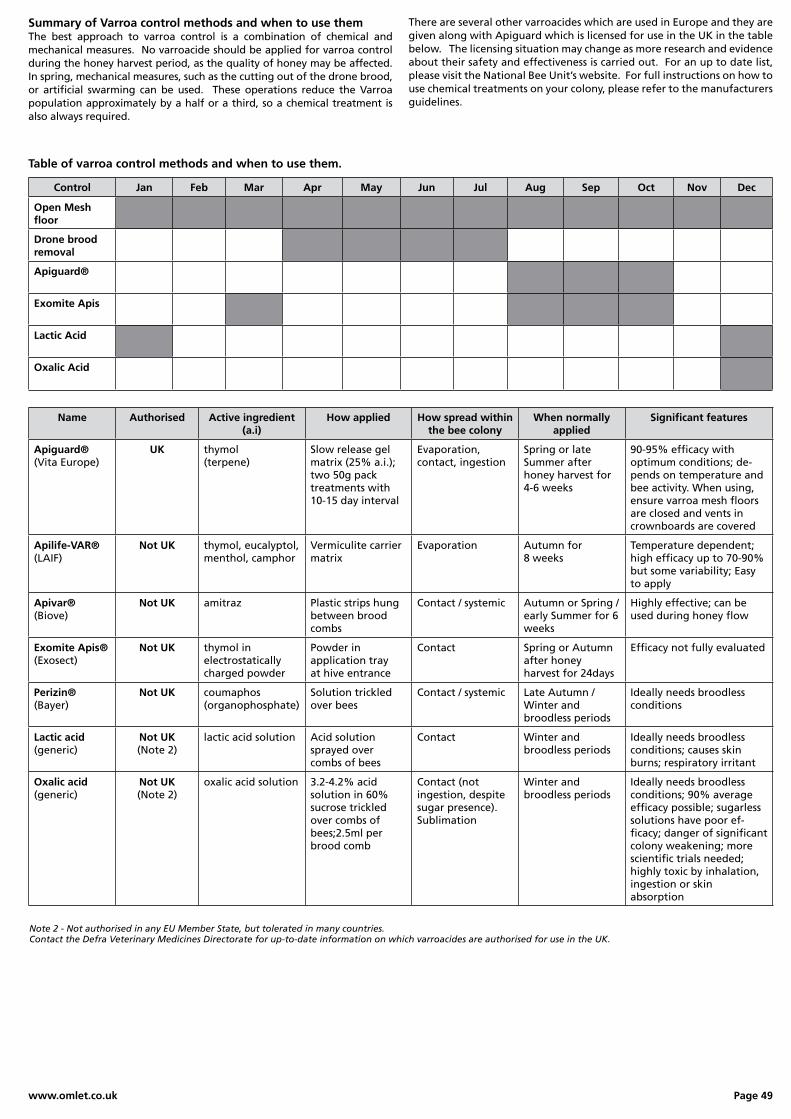
www.omlet.co.uk Page 49
Name Authorised Active ingredient(a.i)
How applied How spread within the bee colony
When normally applied
Significant features
Apiguard®(Vita Europe)
UK thymol(terpene)
Slow release gel matrix (25% a.i.); two 50g pack treatments with 10-15 day interval
Evaporation, contact, ingestion
Spring or late Summer after honey harvest for 4-6 weeks
90-95% efficacy with optimum conditions; de-pends on temperature and bee activity. When using, ensure varroa mesh floors are closed and vents in crownboards are covered
Apilife-VAR®(LAIF)
Not UK thymol, eucalyptol,menthol, camphor
Vermiculite carriermatrix
Evaporation Autumn for 8 weeks
Temperature dependent; high efficacy up to 70-90% but some variability; Easy to apply
Apivar®(Biove)
Not UK amitraz Plastic strips hung between brood combs
Contact / systemic Autumn or Spring / early Summer for 6 weeks
Highly effective; can be used during honey flow
Exomite Apis®(Exosect)
Not UK thymol in electrostatically charged powder
Powder in application trayat hive entrance
Contact Spring or Autumn after honey harvest for 24days
Efficacy not fully evaluated
Perizin®(Bayer)
Not UK coumaphos(organophosphate)
Solution trickled over bees
Contact / systemic Late Autumn / Winter and broodless periods
Ideally needs broodless conditions
Lactic acid(generic)
Not UK(Note 2)
lactic acid solution Acid solution sprayed over combs of bees
Contact Winter and broodless periods
Ideally needs broodless conditions; causes skin burns; respiratory irritant
Oxalic acid(generic)
Not UK(Note 2)
oxalic acid solution 3.2-4.2% acid solution in 60% sucrose trickled over combs of bees;2.5ml per brood comb
Contact (not ingestion, despite sugar presence). Sublimation
Winter and broodless periods
Ideally needs broodless conditions; 90% average efficacy possible; sugarless solutions have poor ef-ficacy; danger of significant colony weakening; more scientific trials needed; highly toxic by inhalation, ingestion or skin absorption
Control Jan Feb Mar Apr May Jun Jul Aug Sep Oct Nov Dec
Open Mesh floor
Drone brood removal
Apiguard®
Exomite Apis
Lactic Acid
Oxalic Acid
Summary of Varroa control methods and when to use themThe best approach to varroa control is a combination of chemical and mechanical measures. No varroacide should be applied for varroa control during the honey harvest period, as the quality of honey may be affected. In spring, mechanical measures, such as the cutting out of the drone brood, or artificial swarming can be used. These operations reduce the Varroa population approximately by a half or a third, so a chemical treatment is also always required.
There are several other varroacides which are used in Europe and they are given along with Apiguard which is licensed for use in the UK in the table below. The licensing situation may change as more research and evidence about their safety and effectiveness is carried out. For an up to date list, please visit the National Bee Unit’s website. For full instructions on how to use chemical treatments on your colony, please refer to the manufacturers guidelines.
Table of varroa control methods and when to use them.
Note 2 - Not authorised in any EU Member State, but tolerated in many countries.Contact the Defra Veterinary Medicines Directorate for up-to-date information on which varroacides are authorised for use in the UK.
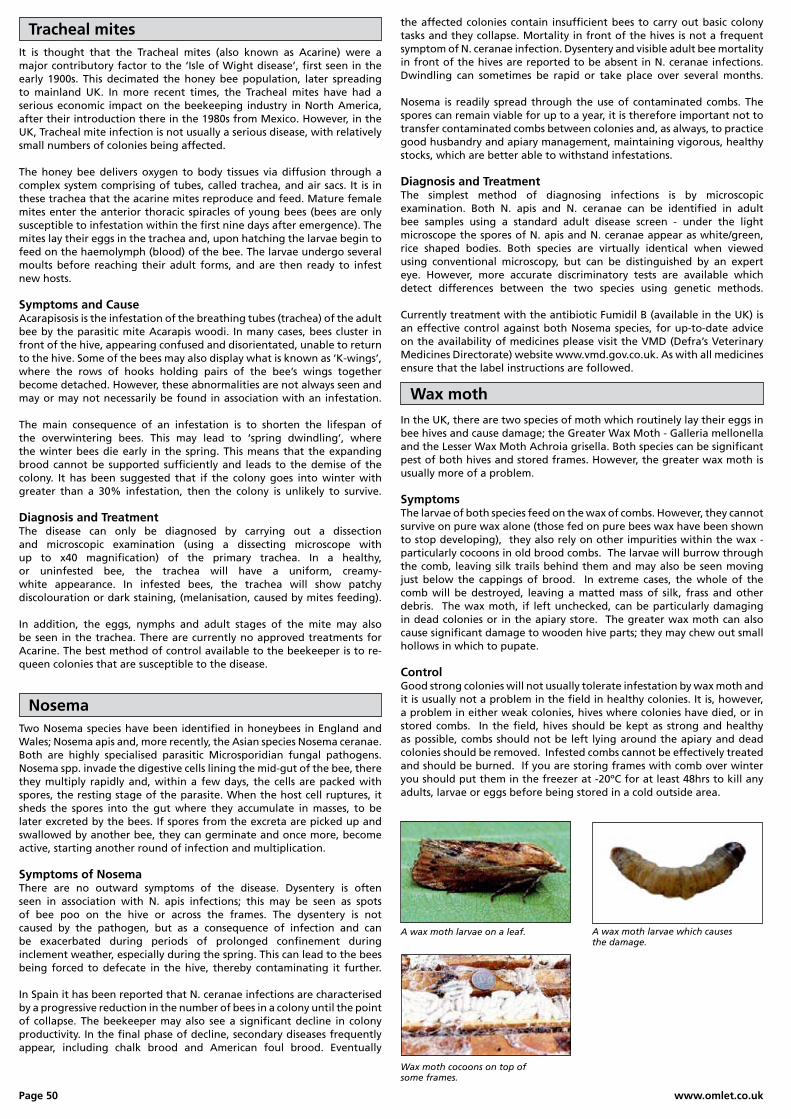
Page 50 www.omlet.co.uk
It is thought that the Tracheal mites (also known as Acarine) were a major contributory factor to the ‘Isle of Wight disease’, first seen in the early 1900s. This decimated the honey bee population, later spreading to mainland UK. In more recent times, the Tracheal mites have had a serious economic impact on the beekeeping industry in North America, after their introduction there in the 1980s from Mexico. However, in the UK, Tracheal mite infection is not usually a serious disease, with relatively small numbers of colonies being affected.
The honey bee delivers oxygen to body tissues via diffusion through a complex system comprising of tubes, called trachea, and air sacs. It is in these trachea that the acarine mites reproduce and feed. Mature female mites enter the anterior thoracic spiracles of young bees (bees are only susceptible to infestation within the first nine days after emergence). The mites lay their eggs in the trachea and, upon hatching the larvae begin to feed on the haemolymph (blood) of the bee. The larvae undergo several moults before reaching their adult forms, and are then ready to infest new hosts.
Symptoms and CauseAcarapisosis is the infestation of the breathing tubes (trachea) of the adult bee by the parasitic mite Acarapis woodi. In many cases, bees cluster in front of the hive, appearing confused and disorientated, unable to return to the hive. Some of the bees may also display what is known as ‘K-wings’, where the rows of hooks holding pairs of the bee’s wings together become detached. However, these abnormalities are not always seen and may or may not necessarily be found in association with an infestation. The main consequence of an infestation is to shorten the lifespan of the overwintering bees. This may lead to ‘spring dwindling’, where the winter bees die early in the spring. This means that the expanding brood cannot be supported sufficiently and leads to the demise of the colony. It has been suggested that if the colony goes into winter with greater than a 30% infestation, then the colony is unlikely to survive.
Diagnosis and TreatmentThe disease can only be diagnosed by carrying out a dissection and microscopic examination (using a dissecting microscope with up to x40 magnification) of the primary trachea. In a healthy, or uninfested bee, the trachea will have a uniform, creamy-white appearance. In infested bees, the trachea will show patchy discolouration or dark staining, (melanisation, caused by mites feeding). In addition, the eggs, nymphs and adult stages of the mite may also be seen in the trachea. There are currently no approved treatments for Acarine. The best method of control available to the beekeeper is to re-queen colonies that are susceptible to the disease.
Tracheal mites
Two Nosema species have been identified in honeybees in England and Wales; Nosema apis and, more recently, the Asian species Nosema ceranae. Both are highly specialised parasitic Microsporidian fungal pathogens. Nosema spp. invade the digestive cells lining the mid-gut of the bee, there they multiply rapidly and, within a few days, the cells are packed with spores, the resting stage of the parasite. When the host cell ruptures, it sheds the spores into the gut where they accumulate in masses, to be later excreted by the bees. If spores from the excreta are picked up and swallowed by another bee, they can germinate and once more, become active, starting another round of infection and multiplication.
Symptoms of NosemaThere are no outward symptoms of the disease. Dysentery is often seen in association with N. apis infections; this may be seen as spots of bee poo on the hive or across the frames. The dysentery is not caused by the pathogen, but as a consequence of infection and can be exacerbated during periods of prolonged confinement during inclement weather, especially during the spring. This can lead to the bees being forced to defecate in the hive, thereby contaminating it further. In Spain it has been reported that N. ceranae infections are characterised by a progressive reduction in the number of bees in a colony until the point of collapse. The beekeeper may also see a significant decline in colony productivity. In the final phase of decline, secondary diseases frequently appear, including chalk brood and American foul brood. Eventually
the affected colonies contain insufficient bees to carry out basic colony tasks and they collapse. Mortality in front of the hives is not a frequent symptom of N. ceranae infection. Dysentery and visible adult bee mortality in front of the hives are reported to be absent in N. ceranae infections. Dwindling can sometimes be rapid or take place over several months. Nosema is readily spread through the use of contaminated combs. The spores can remain viable for up to a year, it is therefore important not to transfer contaminated combs between colonies and, as always, to practice good husbandry and apiary management, maintaining vigorous, healthy stocks, which are better able to withstand infestations.
Diagnosis and TreatmentThe simplest method of diagnosing infections is by microscopic examination. Both N. apis and N. ceranae can be identified in adult bee samples using a standard adult disease screen - under the light microscope the spores of N. apis and N. ceranae appear as white/green, rice shaped bodies. Both species are virtually identical when viewed using conventional microscopy, but can be distinguished by an expert eye. However, more accurate discriminatory tests are available which detect differences between the two species using genetic methods. Currently treatment with the antibiotic Fumidil B (available in the UK) is an effective control against both Nosema species, for up-to-date advice on the availability of medicines please visit the VMD (Defra’s Veterinary Medicines Directorate) website www.vmd.gov.co.uk. As with all medicines ensure that the label instructions are followed.
Nosema
A wax moth larvae which causes the damage.
Wax moth cocoons on top of some frames.
A wax moth larvae on a leaf.
In the UK, there are two species of moth which routinely lay their eggs in bee hives and cause damage; the Greater Wax Moth - Galleria mellonella and the Lesser Wax Moth Achroia grisella. Both species can be significant pest of both hives and stored frames. However, the greater wax moth is usually more of a problem.
SymptomsThe larvae of both species feed on the wax of combs. However, they cannot survive on pure wax alone (those fed on pure bees wax have been shown to stop developing), they also rely on other impurities within the wax - particularly cocoons in old brood combs. The larvae will burrow through the comb, leaving silk trails behind them and may also be seen moving just below the cappings of brood. In extreme cases, the whole of the comb will be destroyed, leaving a matted mass of silk, frass and other debris. The wax moth, if left unchecked, can be particularly damaging in dead colonies or in the apiary store. The greater wax moth can also cause significant damage to wooden hive parts; they may chew out small hollows in which to pupate.
ControlGood strong colonies will not usually tolerate infestation by wax moth and it is usually not a problem in the field in healthy colonies. It is, however, a problem in either weak colonies, hives where colonies have died, or in stored combs. In the field, hives should be kept as strong and healthy as possible, combs should not be left lying around the apiary and dead colonies should be removed. Infested combs cannot be effectively treated and should be burned. If you are storing frames with comb over winter you should put them in the freezer at -20ºC for at least 48hrs to kill any adults, larvae or eggs before being stored in a cold outside area.
Wax moth
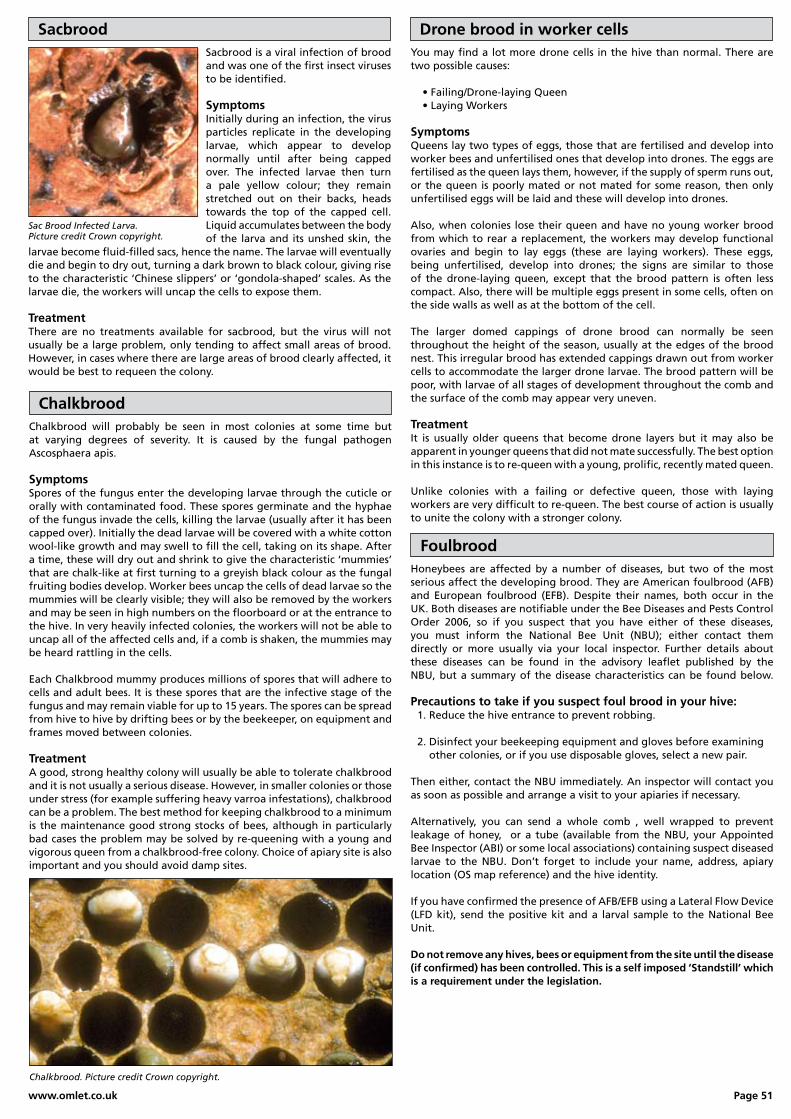
www.omlet.co.uk Page 51
Sacbrood is a viral infection of brood and was one of the first insect viruses to be identified.
SymptomsInitially during an infection, the virus particles replicate in the developing larvae, which appear to develop normally until after being capped over. The infected larvae then turn a pale yellow colour; they remain stretched out on their backs, heads towards the top of the capped cell. Liquid accumulates between the body of the larva and its unshed skin, the
larvae become fluid-filled sacs, hence the name. The larvae will eventually die and begin to dry out, turning a dark brown to black colour, giving rise to the characteristic ‘Chinese slippers’ or ‘gondola-shaped’ scales. As the larvae die, the workers will uncap the cells to expose them.
TreatmentThere are no treatments available for sacbrood, but the virus will not usually be a large problem, only tending to affect small areas of brood. However, in cases where there are large areas of brood clearly affected, it would be best to requeen the colony.
Sacbrood
Chalkbrood. Picture credit Crown copyright.
Chalkbrood will probably be seen in most colonies at some time but at varying degrees of severity. It is caused by the fungal pathogen Ascosphaera apis.
SymptomsSpores of the fungus enter the developing larvae through the cuticle or orally with contaminated food. These spores germinate and the hyphae of the fungus invade the cells, killing the larvae (usually after it has been capped over). Initially the dead larvae will be covered with a white cotton wool-like growth and may swell to fill the cell, taking on its shape. After a time, these will dry out and shrink to give the characteristic ‘mummies’ that are chalk-like at first turning to a greyish black colour as the fungal fruiting bodies develop. Worker bees uncap the cells of dead larvae so the mummies will be clearly visible; they will also be removed by the workers and may be seen in high numbers on the floorboard or at the entrance to the hive. In very heavily infected colonies, the workers will not be able to uncap all of the affected cells and, if a comb is shaken, the mummies may be heard rattling in the cells.
Each Chalkbrood mummy produces millions of spores that will adhere to cells and adult bees. It is these spores that are the infective stage of the fungus and may remain viable for up to 15 years. The spores can be spread from hive to hive by drifting bees or by the beekeeper, on equipment and frames moved between colonies.
TreatmentA good, strong healthy colony will usually be able to tolerate chalkbrood and it is not usually a serious disease. However, in smaller colonies or those under stress (for example suffering heavy varroa infestations), chalkbrood can be a problem. The best method for keeping chalkbrood to a minimum is the maintenance good strong stocks of bees, although in particularly bad cases the problem may be solved by re-queening with a young and vigorous queen from a chalkbrood-free colony. Choice of apiary site is also important and you should avoid damp sites.
You may find a lot more drone cells in the hive than normal. There are two possible causes:
• Failing/Drone-laying Queen • Laying Workers
SymptomsQueens lay two types of eggs, those that are fertilised and develop into worker bees and unfertilised ones that develop into drones. The eggs are fertilised as the queen lays them, however, if the supply of sperm runs out, or the queen is poorly mated or not mated for some reason, then only unfertilised eggs will be laid and these will develop into drones.
Also, when colonies lose their queen and have no young worker brood from which to rear a replacement, the workers may develop functional ovaries and begin to lay eggs (these are laying workers). These eggs, being unfertilised, develop into drones; the signs are similar to those of the drone-laying queen, except that the brood pattern is often less compact. Also, there will be multiple eggs present in some cells, often on the side walls as well as at the bottom of the cell.
The larger domed cappings of drone brood can normally be seen throughout the height of the season, usually at the edges of the brood nest. This irregular brood has extended cappings drawn out from worker cells to accommodate the larger drone larvae. The brood pattern will be poor, with larvae of all stages of development throughout the comb and the surface of the comb may appear very uneven.
TreatmentIt is usually older queens that become drone layers but it may also be apparent in younger queens that did not mate successfully. The best option in this instance is to re-queen with a young, prolific, recently mated queen. Unlike colonies with a failing or defective queen, those with laying workers are very difficult to re-queen. The best course of action is usually to unite the colony with a stronger colony.
Chalkbrood
Drone brood in worker cells
Honeybees are affected by a number of diseases, but two of the most serious affect the developing brood. They are American foulbrood (AFB) and European foulbrood (EFB). Despite their names, both occur in the UK. Both diseases are notifiable under the Bee Diseases and Pests Control Order 2006, so if you suspect that you have either of these diseases, you must inform the National Bee Unit (NBU); either contact them directly or more usually via your local inspector. Further details about these diseases can be found in the advisory leaflet published by the NBU, but a summary of the disease characteristics can be found below. Precautions to take if you suspect foul brood in your hive: 1. Reduce the hive entrance to prevent robbing.
2. Disinfect your beekeeping equipment and gloves before examining other colonies, or if you use disposable gloves, select a new pair.
Then either, contact the NBU immediately. An inspector will contact you as soon as possible and arrange a visit to your apiaries if necessary.
Alternatively, you can send a whole comb , well wrapped to prevent leakage of honey, or a tube (available from the NBU, your Appointed Bee Inspector (ABI) or some local associations) containing suspect diseased larvae to the NBU. Don’t forget to include your name, address, apiary location (OS map reference) and the hive identity.
If you have confirmed the presence of AFB/EFB using a Lateral Flow Device (LFD kit), send the positive kit and a larval sample to the National Bee Unit.
Do not remove any hives, bees or equipment from the site until the disease (if confirmed) has been controlled. This is a self imposed ‘Standstill’ which is a requirement under the legislation.
Foulbrood
Sac Brood Infected Larva. Picture credit Crown copyright.
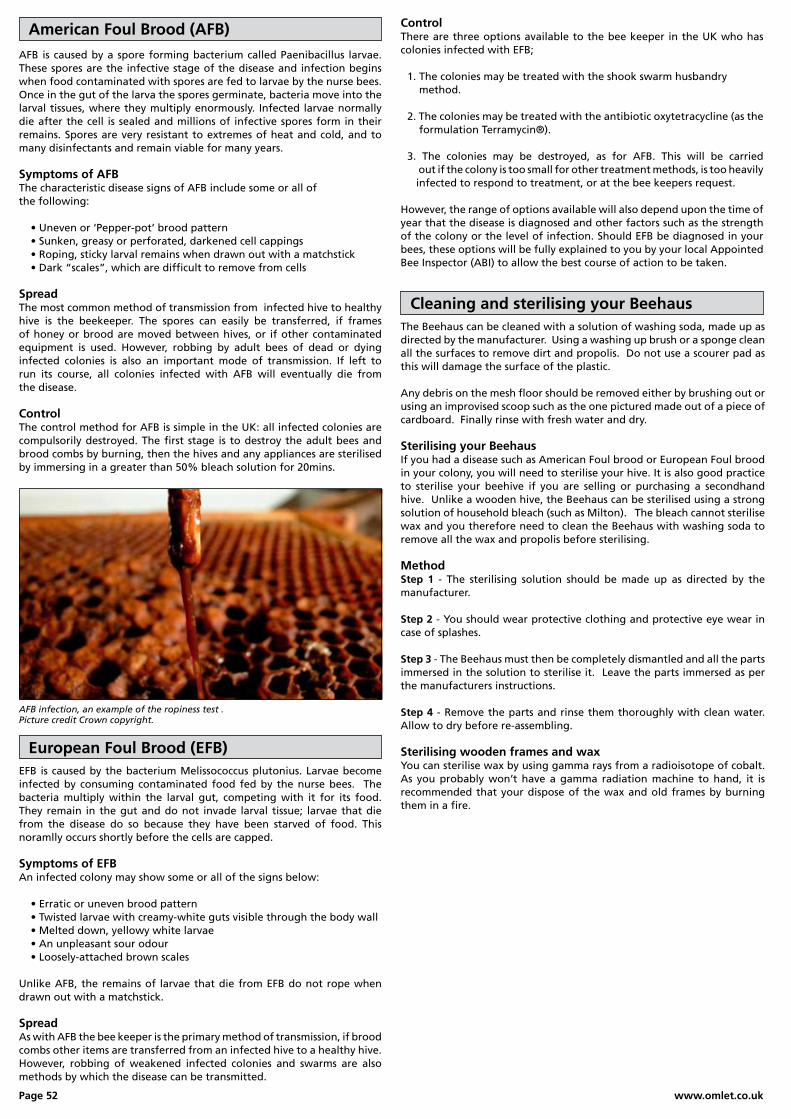
Page 52 www.omlet.co.uk
AFB is caused by a spore forming bacterium called Paenibacillus larvae. These spores are the infective stage of the disease and infection begins when food contaminated with spores are fed to larvae by the nurse bees. Once in the gut of the larva the spores germinate, bacteria move into the larval tissues, where they multiply enormously. Infected larvae normally die after the cell is sealed and millions of infective spores form in their remains. Spores are very resistant to extremes of heat and cold, and to many disinfectants and remain viable for many years.
Symptoms of AFBThe characteristic disease signs of AFB include some or all of the following:
• Uneven or ‘Pepper-pot’ brood pattern • Sunken, greasy or perforated, darkened cell cappings • Roping, sticky larval remains when drawn out with a matchstick • Dark “scales”, which are difficult to remove from cells
SpreadThe most common method of transmission from infected hive to healthy hive is the beekeeper. The spores can easily be transferred, if frames of honey or brood are moved between hives, or if other contaminated equipment is used. However, robbing by adult bees of dead or dying infected colonies is also an important mode of transmission. If left to run its course, all colonies infected with AFB will eventually die from the disease.
ControlThe control method for AFB is simple in the UK: all infected colonies are compulsorily destroyed. The first stage is to destroy the adult bees and brood combs by burning, then the hives and any appliances are sterilised by immersing in a greater than 50% bleach solution for 20mins.
American Foul Brood (AFB)
EFB is caused by the bacterium Melissococcus plutonius. Larvae become infected by consuming contaminated food fed by the nurse bees. The bacteria multiply within the larval gut, competing with it for its food. They remain in the gut and do not invade larval tissue; larvae that die from the disease do so because they have been starved of food. This noramlly occurs shortly before the cells are capped.
Symptoms of EFBAn infected colony may show some or all of the signs below:
• Erratic or uneven brood pattern • Twisted larvae with creamy-white guts visible through the body wall • Melted down, yellowy white larvae • An unpleasant sour odour • Loosely-attached brown scales
Unlike AFB, the remains of larvae that die from EFB do not rope when drawn out with a matchstick.
SpreadAs with AFB the bee keeper is the primary method of transmission, if brood combs other items are transferred from an infected hive to a healthy hive. However, robbing of weakened infected colonies and swarms are also methods by which the disease can be transmitted.
ControlThere are three options available to the bee keeper in the UK who has colonies infected with EFB;
1. The colonies may be treated with the shook swarm husbandry method. 2. The colonies may be treated with the antibiotic oxytetracycline (as the formulation Terramycin®).
3. The colonies may be destroyed, as for AFB. This will be carried out if the colony is too small for other treatment methods, is too heavily infected to respond to treatment, or at the bee keepers request.
However, the range of options available will also depend upon the time of year that the disease is diagnosed and other factors such as the strength of the colony or the level of infection. Should EFB be diagnosed in your bees, these options will be fully explained to you by your local Appointed Bee Inspector (ABI) to allow the best course of action to be taken.
European Foul Brood (EFB)
Cleaning and sterilising your BeehausThe Beehaus can be cleaned with a solution of washing soda, made up as directed by the manufacturer. Using a washing up brush or a sponge clean all the surfaces to remove dirt and propolis. Do not use a scourer pad as this will damage the surface of the plastic.
Any debris on the mesh floor should be removed either by brushing out or using an improvised scoop such as the one pictured made out of a piece of cardboard. Finally rinse with fresh water and dry.
Sterilising your BeehausIf you had a disease such as American Foul brood or European Foul brood in your colony, you will need to sterilise your hive. It is also good practice to sterilise your beehive if you are selling or purchasing a secondhand hive. Unlike a wooden hive, the Beehaus can be sterilised using a strong solution of household bleach (such as Milton). The bleach cannot sterilise wax and you therefore need to clean the Beehaus with washing soda to remove all the wax and propolis before sterilising.
MethodStep 1 - The sterilising solution should be made up as directed by the manufacturer.
Step 2 - You should wear protective clothing and protective eye wear in case of splashes.
Step 3 - The Beehaus must then be completely dismantled and all the parts immersed in the solution to sterilise it. Leave the parts immersed as per the manufacturers instructions.
Step 4 - Remove the parts and rinse them thoroughly with clean water. Allow to dry before re-assembling.
Sterilising wooden frames and waxYou can sterilise wax by using gamma rays from a radioisotope of cobalt. As you probably won’t have a gamma radiation machine to hand, it is recommended that your dispose of the wax and old frames by burning them in a fire.
AFB infection, an example of the ropiness test . Picture credit Crown copyright.

www.omlet.co.uk Page 53
Have you ever wondered how a tiny little insect like a bee could ever fill a jar of honey? If it were just down to one bee it would be a mighty task but the work is shared by many thousands of bees and is a great example of what can be achieved by a co-ordinated effort. Think of it in terms of humans creating something like a pyramid.
A jar of honey weighs 454g and a bee can carry about 0.04g of nectar. But nectar is only about 40% sugar and honey needs to be about 80% sugar so the bee actually only carries about 0.02g of honey on each trip. So how many bees would we need to fill a jar of honey? The answer is 454 / 0.02g which equals =
22,700 bee trips are required to fill a single jar of honey.
This sounds impressive enough but of course a colony of bees doesn’t just make one jar of honey. Over the year the queen will produce between 100,000 and 200,000 bees that will each spend between 10 and 20 days collecting nectar. At its most productive a single colony of bees could theoretically produce around 800kg of honey, that’s almost a tonne!
The reason that beehives aren’t the size of warehouses to accommodate all this honey is that it is being continually used up by the bees as fuel, primarily to keep the brood warm. So at any given time there may only be between 10 and 20kg of honey in the hive.
Honey
Harvesting your honey
There is no rule for when you can and can’t collect honey provided that the bees have enough stores for themselves. As the flavour of the honey the bees store varies throughout the year it’s interesting to taste the difference yourself and to try to figure out which flowers contributed to it. If the bees haven’t filled a whole super you can collect a single frame. Choose a frame which has been completely capped or if not all the honey is capped then you can do a simple test to see if it’s ok to take. Shake the frame over the hive, if liquid spills out then the honey is not yet ‘ripe’ and should be left in. If the liquid is too thick to shake out then the honey can be harvested. If you were to collect unripe honey it would ferment and go off. To remove any bees from the frame either brush off using a bee brush or shake off and then quickly put the frame in a bee proof bag.
Clearing bees from a superCollecting a whole super full of honey is made a lot easier by the clearer boards. These handy devices fit underneath the supers and have a one way valve fitted so that bees leaving the super can’t find their way back in. They should be put on the day before collecting and usually 24hrs is sufficient time for all the bees to have cleared the super so that it can be collected.
A good tip if clearing more than one super at once, ie a super stacked on another super with a clearer board at the bottom, is to separate them first to to expose any brace comb. The bees will clean up any spilt honey from the brace comb leaving the frames clean when you come to remove them.
What can go wrong with collecting honey from the supers?If you forgot to put the queen excluders on and the queen has been allowed to lay in the super frames then you must first wait for the brood to hatch before using the clearer boards as the bees won’t leave the
brood. You should put the queen excluders in place to prevent any more eggs being laid. Once the bees have hatched you can remove the supers and extract the honey.
Any spilt honey around the hive can attract other bees and wasps who are after a free lunch, they will soon find the spilt honey and then also try to take honey from inside the hive. Be really careful not to drip honey from frames. It’s also best to collect the honey in the evening when the bees are no longer flying to reduce the chance of other bees or wasps being attracted to the honey which can start robbing. Remember wasps fly later than bees and can be a real nuisance . You should use the entrance adapter placed in the wasp position in the beehaus from August onwards to prevent robbing.
It’s a good idea to put a new super with frames underneath the clearer board if you are collecting supers early in the season. At this time of year the colony is large and removing supers can cause congestion in the hive which can lead to swarming.
Extracting your honeyThe easiest way to harvest your honey is by hand. You can buy extractors which work by spinning the honey out of the frames but this is probably only worth investing in if you have more than 5 beehives.
The basic principle of harvesting honey by hand is to scrape the honey off the frames and then filter it to remove the wax. How much you filter it will depend on whether you want to remove all the wax or just a bit.
EquipmentYou should be able to find all the equipment you need in your kitchen. However, one bit of kit worth investing in is a proper honey strainer that you can buy from the Omlet shop.
Essential equipment • 2 Large bowls or big baking trays • A knife • A large sieve • A table spoon • A large spoon or spatula
Option extras • A piece of muslin or cheese cloth • A deep bucket with a honey gate
Before you start make sure your windows are shut to prevent any unwanted insects stealing your honey. Also, it’s a good idea to put newspaper on the floor and make sure dogs and cats can’t get into the area you’re working. Even if you’re really careful some honey will drip and it’s sticky stuff to get off again.
Step 1 - Take each frame in turn and place it in a bowl. If the foundation you used wasn’t wired then you can just cut the comb out completely by running the knife around the edge. if the foundation was wired, scrape off the honey using the spoon down to the foundation. In these photos, the foundation was wired. Place the empty frames into the second bowl/baking tray so that any honey left can run off.
If the bees have stored some pollen in the supers then you can avoid these cells or if you’re not fussy add the pollen to the honey. it’s actually good if you’re a hay fever sufferer to eat this pollen as it desensitizes you to it.
Step 2 - Repeat for all the super frames you are harvesting and then crush the collected honey and wax using a large spoon to break down all the wax cells so that the honey inside can flow out.
Step 3 - Strain this wax and honey mixture through a sieve or you can stretch a piece of cloth over a large bowl, even a clean tea towel or pair of nylon stockings will do the job. Then leave covered overnight to allow gravity to do the work. The next day the honey will have drained from the wax, you’ll be amazed at just how effective this is. If you used a sieve to drain the honey and you then decide you’d like to strain it some more then you can do this now through a piece of muslin or some nylon stockings.
Step 4 - The honey that has filtered through can now be bottled or put into sterilised jars. Honey absorbs moisture from the air so it’s important that the jars have a good fitting lid.
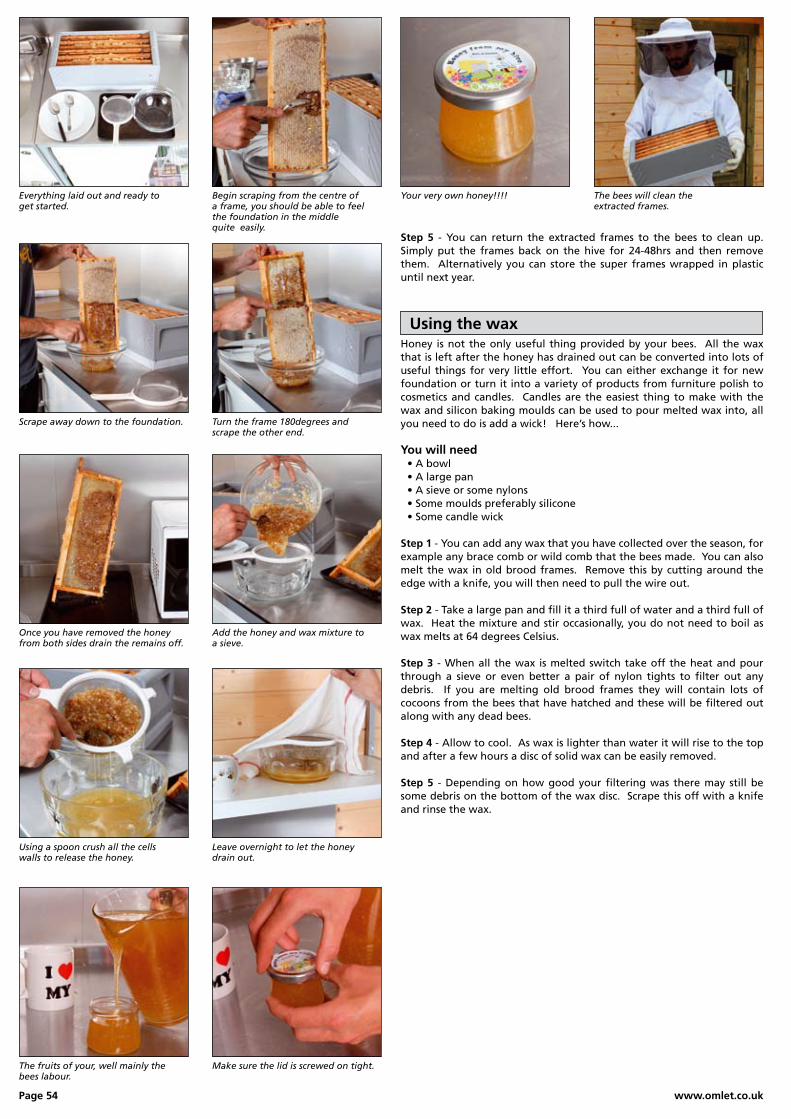
Page 54 www.omlet.co.uk
The fruits of your, well mainly the bees labour.
Make sure the lid is screwed on tight.
Your very own honey!!!! The bees will clean the extracted frames.
Everything laid out and ready to get started.
Begin scraping from the centre of a frame, you should be able to feel the foundation in the middle quite easily.
Scrape away down to the foundation. Turn the frame 180degrees and scrape the other end.
Once you have removed the honey from both sides drain the remains off.
Using a spoon crush all the cells walls to release the honey.
Add the honey and wax mixture to a sieve.
Leave overnight to let the honey drain out.
Step 5 - You can return the extracted frames to the bees to clean up. Simply put the frames back on the hive for 24-48hrs and then remove them. Alternatively you can store the super frames wrapped in plastic until next year.
Honey is not the only useful thing provided by your bees. All the wax that is left after the honey has drained out can be converted into lots of useful things for very little effort. You can either exchange it for new foundation or turn it into a variety of products from furniture polish to cosmetics and candles. Candles are the easiest thing to make with the wax and silicon baking moulds can be used to pour melted wax into, all you need to do is add a wick! Here’s how...
You will need • A bowl • A large pan • A sieve or some nylons • Some moulds preferably silicone • Some candle wick
Step 1 - You can add any wax that you have collected over the season, for example any brace comb or wild comb that the bees made. You can also melt the wax in old brood frames. Remove this by cutting around the edge with a knife, you will then need to pull the wire out.
Step 2 - Take a large pan and fill it a third full of water and a third full of wax. Heat the mixture and stir occasionally, you do not need to boil as wax melts at 64 degrees Celsius.
Step 3 - When all the wax is melted switch take off the heat and pour through a sieve or even better a pair of nylon tights to filter out any debris. If you are melting old brood frames they will contain lots of cocoons from the bees that have hatched and these will be filtered out along with any dead bees.
Step 4 - Allow to cool. As wax is lighter than water it will rise to the top and after a few hours a disc of solid wax can be easily removed.
Step 5 - Depending on how good your filtering was there may still be some debris on the bottom of the wax disc. Scrape this off with a knife and rinse the wax.
Using the wax
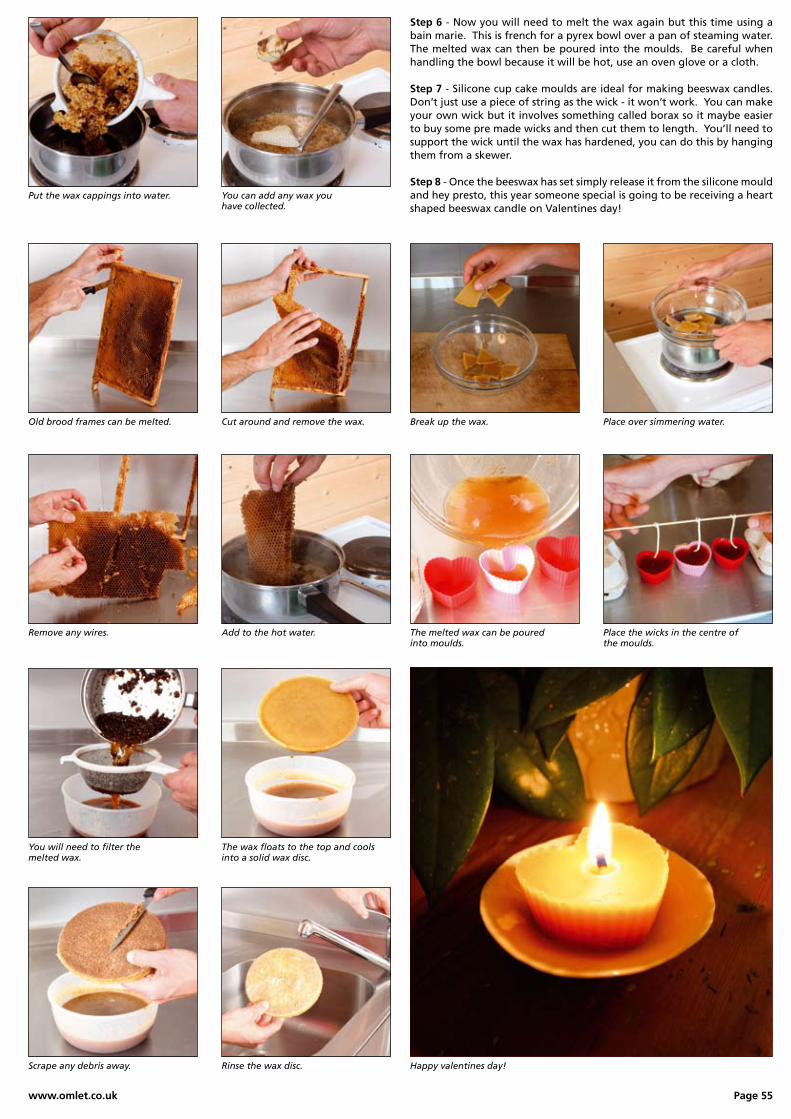
www.omlet.co.uk Page 55
You will need to filter the melted wax.
The wax floats to the top and cools into a solid wax disc.
Put the wax cappings into water. You can add any wax you have collected.
Remove any wires. Add to the hot water.
Old brood frames can be melted. Cut around and remove the wax.
Step 6 - Now you will need to melt the wax again but this time using a bain marie. This is french for a pyrex bowl over a pan of steaming water. The melted wax can then be poured into the moulds. Be careful when handling the bowl because it will be hot, use an oven glove or a cloth.
Step 7 - Silicone cup cake moulds are ideal for making beeswax candles. Don’t just use a piece of string as the wick - it won’t work. You can make your own wick but it involves something called borax so it maybe easier to buy some pre made wicks and then cut them to length. You’ll need to support the wick until the wax has hardened, you can do this by hanging them from a skewer.
Step 8 - Once the beeswax has set simply release it from the silicone mould and hey presto, this year someone special is going to be receiving a heart shaped beeswax candle on Valentines day!
Scrape any debris away. Rinse the wax disc. Happy valentines day!
Place over simmering water.Break up the wax.
Place the wicks in the centre of the moulds.
The melted wax can be poured into moulds.
Page 56 www.omlet.co.uk
Trouble shootingIf you are having a problem with your bees that you can’t identify, have a read through this list.
My bees are standing at the entrance of the hive swaying. Are they ill? No, they are simply cleaning the entrance of the hive.
Lots of my bees are visiting my neighbour’s pond and bath bird. This is causing a nuisance. How can I stop this happening? Your bees will need water for their cooling their hive and diluting honey. Your neighbour’s pond is probably the closest water source that they have found. If you provide a closer water source, it is likely that they will visit this instead. You can read about how to create a water source in the Beekeeping Section under Water on Page 20.
There is a lot of activity in the hive, with bees flying in and out of the hive very quickly. The bees appear to be fighting one another and some are falling on the ground. What is going on? It is most likely that your bees are being attacked by another colony of bees or wasps. They are trying to steal the honey from the hive. You should take action to stop this immediately to avoid lots of bees getting killed. You should place the wasp guard in immediately (don’t forget to wear your veil and gloves).
My bees were really nice and friendly, but have now become aggressive and unpleasant. What should I do to make them nice again? There are several reasons that a colony can become more aggressive.
1. Have you been smoking the colony properly? If you are not using a smoker properly,the bees will be much harder to manage. The most common mistake is not smoking the bees 3 minutes before opening the hive or simply not smoking the bees enough. Read Page 25 for more details.
2. Has the colony grown a lot? If you started out with a nucleus colony or swarm, the number of bees that you have in the hive might have increased over the time that you have kept bees.
3. Have you washed your beesuit or gloves lately? If your veil and gloves have been stung on previous inspections, they can be covered with old stings and alarm pheromone, which causes the bees to become defensive. It is a good idea to regularly wash your veil and gloves to stop the build up of these. It is also good to keep your veil clean for hygiene reasons.
4. Has your queen changed? If your queen has changed, the temperament of the hive can change too. This can happen because the old queen has died, been superseded or the old bee might have swarmed. You might not be able to tell unless you have a marked queen. If you have tried all the other options above and you still have aggressive bees, it might be worth considering re-queening your colony. This is covered on Page 41.
There are a lot of bees hanging on the front of the hive.If what looks like a beard of bees has formed on the outside of your Beehaus and it’s a hot day it could just be the nest has got too hot and the bees are trying to cool it. This normally only happens if they don’t have enough space so check, and add more brood or super frames as necessary. If the same thing happens in the evening, it means there is not enough space for the foraging bees in the hive. You should add more frames.
I can’t find the queen.If you can’t find the queen, check for eggs. This will tell you if a queen has been in the hive within the last 3 days. If you find eggs, note the frames you saw eggs on and check again in the next couple of days, if you find more eggs you know the queen is there.
If you don’t find any eggs it could be that the queen has stopped laying or that she has been lost or accidentally killed. To find the queen you can secure the queen excluder over the entrance to the hive and then shake all the bees off the frames onto the lid of the Beehaus. The bees will all walk up the lid (which you have leaned up against the entrance) into the Beehaus. If she’s there the queen will not be able to get back in through the excluder giving you an opportunity to catch her and mark her.
My bees are queenlessIf your queen has been lost or accidentally killed and your colony has eggs they will re-queen themselves and, once you have selected just one queen cell and removed the rest, the best thing is to leave them undisturbed 2-4 weeks.
British Beekeepers’ Association
If you are thinking of starting to keep bees, we highly recommend that you join your local Beekeeping Association. The BBKA is a charity made up of over 63 local associations and has over 15,000 members. They are very helpful in getting new beekeepers started. What do you get for joining?
Lectures and Bee BooksMost associations have a wide range of lectures covering all manner of beekeeping topics. They run throughout the year and cover interesting topics such a hive management and disease control. Most associations also have a really good book library, which you can use free of charge.
InsuranceYou will get public liability insurance for all beekeeping activities and also disease insurance. Disease insurance covers you in the unlikely event that your bees catch American Foulbrood (a rare disease). In this unfortunate situation your hive would have to be destroyed by a Bee Inspector and the insurance should cover the cost of a new hive for you.
Friendly AdviceLast, but not least, the beekeeping associations are full of like minded friendly people. You can get advice about your hives, find someone with bees to spare and make friends. To find out more visit www.britishbee.org.uk.
If your bees don’t have any eggs, you can take a frame of brood from another colony and put it in the hive so they can raise a queen. If you don’t have another colony, you will need to buy a new queen, which you can do throughout the season. She will arrive in the post and can be placed into the hive.
My bees are not using the supers. Is this a problem?It could be that you have put the supers on a bit early, in which case don’t worry, just leave them on. You could try taking the queen excluders off until the bees have started drawing out the wax foundation. Once they have done this, put the queen excluders back on.
I forgot to put the queen excluders on and there is brood in the supers. What should I do?It’s not a problem, just make sure the queen isn’t in the supers (if she is carefully move her down into the brood nest) and then put the queen excluders on. Within 4 weeks all the brood will have hatched and the bees will use the cells for honey. This is still perfectly hygienic and good to eat.
I am spending too much time with my bees and neglecting my husband/wife/children/job. Should I see a doctor?This is normal, bees are highly addictive. The best thing is buy beesuits for the rest of your family and boss and encourage them to join in.
Clouds of bees are taking off from the hive. Should I worry?This could be one of two things:1. When a new queen goes on a mating flight she is accompanied by an entourage from the hive who protect the queen from being eaten by a bird and from getting lost. 2. Your bees are swarming. Refer to Page 45 on how to catch a swarm and try to keep the swarm in sight. Once caught, you can either transfer them to a free end of your beehaus or call your local Beekeeping Association who will put you in touch with someone that would like to collect the swarm from you.
A lot of bees are crawling around outside the hive and there are quite a lot of dead bees.Are the bees mostly drones? At the end of the season the workers ruthlessly throw out any drones in the hive and you can see these bumbling around outside the hive where they often die overnight.
There are a lot of drones in the hive. Is this a problem?It could be that you have a drone laying queen – caused by a queen that hasn’t mated properly. If you haven’t seen the queen for a while, it could also be she was lost and the bees couldn’t raise a new queen. In this situation occasionally a worker will start to lay but, because they haven’t been mated, they will only produce drones. Either way, you will need to re-queen the colony by buying a queen and introducing her into the colony. Alternatively you could combine the colony with another or add a frame of brood with eggs in it from another colony with a good queen, so the bees can raise their own queen.
www.omlet.co.uk Page 57
Bee glossaryBeekeeping is full of lots of new words... here is a useful summary.
Alarm pheromone - This alerts guard bees to potential threats to the colony. It is produced by worker bees.
Abdomen - The third section of a bee’s body. It contains the stomach, honey stomach, intestines, sting and reproductive organs.
Acarapis woodi - The tracheal mite (different from the varoa mite). It lives in the tracheal air tubes and affects the bee’s breathing.
Aldehydes - An organic compound that contributes to the flavour and aroma of the honey. If you heat your honey, this will be released, reducing the flavour of the honey.
Anthers - Part of the stamen of a plant that contains pollen.
Amino acids - What proteins are made from.
Bacillus larvae - The bacteria that cause American Foulbrood.
Bee bread - A mixture of pollen, yeast and honey, that when mixed and fermented, creates delicious bee food. It is stored in the combs and fed to larvae.
Bee blower - Rather like an industrial cool hair dryer - a bee blower is used to blow bees off supers of honey.
Bee brush - A soft brush used to remove bees from a comb. Can be artificial or you could use a goose feather. If you choose a goose feather, you should choose a left- or right-handed feather to give a better brushing action. If you are harvesting, you should clear bees from the honey boxes using a bee escape rather than a brush.
Bee escape - A one way valve or exit which the bees can go through.
BS - British Standard.
Bee space - Spaces smaller than this will be filled with propolis; spaces larger than this will be filled with comb. The magic space is 6-8mm. This allows bees to pass without building anything in the way. The discovery of this led to moveable frame hives.
Bee veil - Protective cloth of wire netting which stops a beekeeper’s head and neck from being stung.
Bees wax - Wax that is secreted by special glands on the underside of the bees.
Blending - Like making a fine whiskey, mixing various varieties of honey can make something better than the sum of the parts, typically improving flavour and colour.
Breeding stock - The brood (i.e. eggs and larvae) from a good colony from which queens will be reared.
Brood - The area of comb that has developing bees in its cells (i.e eggs and larvae).
Brood chamber - The part of the hive where the brood is based. Generally this is at the bottom of most modern hives.
Brood pheromone - A pheromone produced by the brood which tells the house bees to provide food, and for foragers to collect food.
Buckfast hybrid - A hybrid bee developed by the famous monk - Brother Adam, at Buckfast Abbey in England. The breed is regarded as calm, disease resistant and easy to manage.
Burr comb - Comb which has overgrown the frame (ignoring the beespace) and linked to the hive body.
Capped brood - As the larvae cells develop, they are capped with wax allowing them to spin cocoons and turn into pupae and eventually a bee.
Castes - A term which describes the three types of adult bees in a colony - drones, workers and the queen.
Cell - The hexagonal wax compartment in the comb. Amazingly, these start round but, by the tension in the comb, change into hexagons. Bees use these cells to store honey and pollen or raise bees.
Chalk brood - A fungal disease which affects bee larvae. If left untreated, the larvae turn into hard, chalky mummies.
Chilled brood - If the brood become too cold, the immature bees (including larvae and eggs) can die. This is often cause by the hive being opened on a cold day.
Cluster - A mass of bees which huddle together. These are commonly seen in winter when the bees try to keep warm, or in a swarm hanging from a tree.
Colony - A working group of bees, which includes a queen, worker and drones.
Comb - A group of cells.
Crystallisation - This natural process occurs when the honey turns from liquid to solid, creating granulate. You can make the honey liquid again by heating it slowly.
Drawn comb - The processing of building comb is called ‘drawing’. Once the comb is completely built it is called “drawn comb”.
Drifting - Sometimes bees loose their location and enter another hive. This might occur if you keep two hives next door to one another and it is a slightly windy day.
Drone - The male bee. The main role of the drone is to fertilise the queen, although this will only happen once in his life.
Extractor - A device which removes honey from the comb. This normally involves spinning the comb around.
Flight path - The area and direction that the bees take when leaving the hive. It is best to keep this area clear.
Foulbrood - A bacterial disease which affect bees, causing the brood to become brown and sticky. See the bee health section for more information on this disease.
Foundation - A thin sheet of wax that is the ‘foundation’ on which the bee build honey comb. Normally foundation is embossed with lots of hexagons, to encourage the bees to start building.
Frame - This is a rectangle of either plastic or wood in which comb will be built by the bee. It allows the beekeeper to move the comb around and was invented by Langstroth in 1852.
Frame wire - Wire used to reinforce frames to keep the foundation from moving or sagging in the frame.
Guard bee - Worker bees that guard the hive entrance from predators (including bee from other colonies or wasps).
Hive - A bee’s home.
Hive tool - A multifunctional tool used by a beekeeper to open and clean the hive.
Honey flow - A term used to describe the collection of nectar (to make honey) by the bees (e.g. “The weather is good and there is good honey flow at the moment”).
Honey stomach or Honey sac - The stomach the bees use for carrying nectar, honey and water. It is in the abdomen.
Honeycomb - Comb which has been filled with lots of lovely honey.
Larvae - The stage when an egg undergoes metamorphosis into a bee.
Page 58 www.omlet.co.uk
Marked queen - A beekeeper typically will attempt to find the queen while tending to their bees. To help speed this process up, many beekeepers mark their queen with a light colour dot.
Mead - A delicious wine made from honey. It is highly recommend that you are patient and leave your mead for at least 10 years to mature.
Nectar - A sugar-rich liquid secreted by plants. It is derived from the Latin word nectar which means “drink of the gods”. The bees collect the nectar and turn it into honey.
Nucleus hive - Often called a Nuc, this is a small colony from which a full colony will grow. Typically, this will be a group of bees living on 4-5 frames of brood.
Nurse Bee - An immature worker bee whose role in the hive is to feed the larvae.
Observation hive - A small hive, normally made from glass, which allows the colony to be observed.
Pheromone - A chemical signal which triggers a response in other bees. For example, if the colony is attacked, they release an alarm pheromone which alerts other bees to the danger. By using a smoker the beekeeper disrupts this pheromone signal and keeps the bees calm.
Piping - A sound made by a queen which normally precedes her emerging from her cell.
Pollen - A fine powder product by the male of a plant. It fertilises other plants and also provides and valuable source of protein for the bees.
Pollen trap - A device which is placed on the entrance of the hive and rubs the pollen from the legs of the incoming bees. The beekeeper can use this to collect pollen.
Porter bee escape - A type of bee escape based on two thin metal leaf springs. See ‘bee escape’ for more details.
Propolis - A resinous substance that bees collect from trees and plants. It is used by the bees to seal up cracks (reducing movement or vibration). Sometimes it is used to mummify something within the hive that they cannot throw out - such as a mouse.
Pupa - The final stage of a developing bee within its cell.
Queen - A mated female. Normally, there will be only one queen within a hive. Unlike a worker bee, she has fully developed ovaries and can lay eggs which can develop into other queens, workers or drones.
Queen cell - A large peanut like cell which is design to rear a queen. It normally hangs vertically and is about 2 centimetres in length.
Queen excluder - A metal or plastic crate that is large enough for worker bees to climb through, but which the queen cannot fit through. It is normally used to stop the queen from entering and laying eggs in the comb used for honey.
Queen right - A ‘queen right’ colony is a colony that has a laying queen. If the queen is not laying then she is not ‘queen right.’
Requeen - To introduce a new queen to an existing queenless colony.
Robbing - The stealing of honey from a weak colony by other bees or insects.
Royal jelly - A food produced by the young worker bees. Some royal jelly is fed to all of the larvae in the colony. However, if a queen is being reared, then she is fed purely on royal jelly.
Sacbrood - A viral disease which affect the larvae.
Scout bee - A worker bee who looks out for sources of pollen, nectar, water or a new site for the colony.
Skep - A traditional simple beehive made from straw. It resembles an upturned waste paper basket.
Smoker - A box with bellows, in which a wide variety of materials are burnt to product cool thick smoke. The smoke is used to hide the pheromone signals produced by the bees, allowing the beekeeper to easily access the hive.
Supercedure - The process of replacing an existing queen with a new one. This is natural process - but can be induced artificially.
Surplus honey - If a colony is successfull, it will produce more honey than it can use for its own stores. This surplus honey can then be collected for the beekeeper’s own use.
Swarm - A group of bees that have decided to move hive.
Wax moth - A particular type of moth which lays it eggs in the brood comb of a colony of bees.
Winter cluster - A cluster of bees that huddle together to keep warm.
Worker bee - A female bee who cannot lay eggs. The vast majority of bees in the hive are workers. The worker bees keep the hive running smoothly (feeding, cleaning, searching and gathering nectar and pollen for the hive).
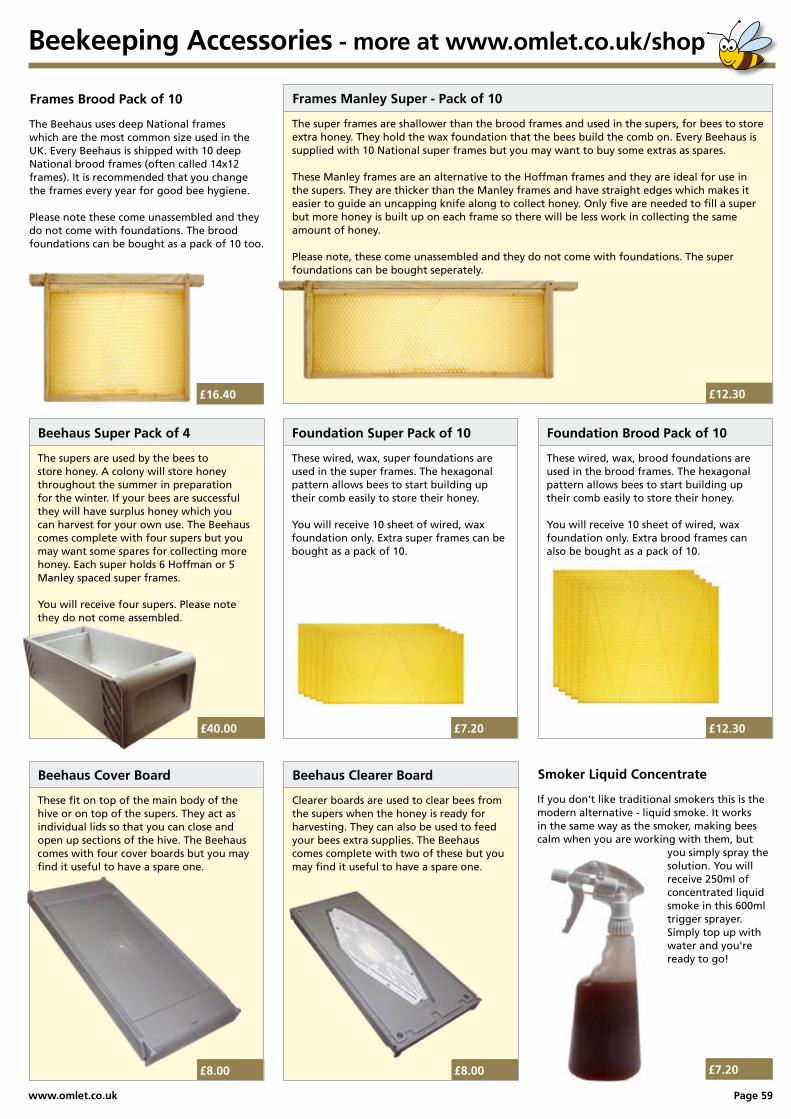
www.omlet.co.uk Page 59
Beekeeping Accessories - more at www.omlet.co.uk/shop
£8.00
Beehaus Clearer Board
Clearer boards are used to clear bees from the supers when the honey is ready for harvesting. They can also be used to feed your bees extra supplies. The Beehaus comes complete with two of these but you may find it useful to have a spare one.
Beehaus Super Pack of 4
The supers are used by the bees to store honey. A colony will store honey throughout the summer in preparation for the winter. If your bees are successful they will have surplus honey which you can harvest for your own use. The Beehaus comes complete with four supers but you may want some spares for collecting more honey. Each super holds 6 Hoffman or 5 Manley spaced super frames.
You will receive four supers. Please note they do not come assembled.
£40.00 £12.30
Foundation Brood Pack of 10
These wired, wax, brood foundations are used in the brood frames. The hexagonal pattern allows bees to start building up their comb easily to store their honey.
You will receive 10 sheet of wired, wax foundation only. Extra brood frames can also be bought as a pack of 10.
£7.20
Foundation Super Pack of 10
These wired, wax, super foundations are used in the super frames. The hexagonal pattern allows bees to start building up their comb easily to store their honey.
You will receive 10 sheet of wired, wax foundation only. Extra super frames can be bought as a pack of 10.
£12.30
Frames Manley Super - Pack of 10
The super frames are shallower than the brood frames and used in the supers, for bees to store extra honey. They hold the wax foundation that the bees build the comb on. Every Beehaus is supplied with 10 National super frames but you may want to buy some extras as spares.
These Manley frames are an alternative to the Hoffman frames and they are ideal for use in the supers. They are thicker than the Manley frames and have straight edges which makes it easier to guide an uncapping knife along to collect honey. Only five are needed to fill a super but more honey is built up on each frame so there will be less work in collecting the same amount of honey.
Please note, these come unassembled and they do not come with foundations. The super foundations can be bought seperately.
£8.00
Beehaus Cover Board
These fit on top of the main body of the hive or on top of the supers. They act as individual lids so that you can close and open up sections of the hive. The Beehaus comes with four cover boards but you may find it useful to have a spare one.
Frames Brood Pack of 10
The Beehaus uses deep National frames which are the most common size used in the UK. Every Beehaus is shipped with 10 deep National brood frames (often called 14x12 frames). It is recommended that you change the frames every year for good bee hygiene.
Please note these come unassembled and they do not come with foundations. The brood foundations can be bought as a pack of 10 too.
£16.40
£7.20
Smoker Liquid Concentrate
If you don’t like traditional smokers this is the modern alternative - liquid smoke. It works in the same way as the smoker, making bees calm when you are working with them, but
you simply spray the solution. You will receive 250ml of concentrated liquid smoke in this 600ml trigger sprayer. Simply top up with water and you’re ready to go!

Page 60 www.omlet.co.uk
Beekeeping Accessories - more at www.omlet.co.uk/shop
£12.30
Gloves Beekeeping Leather
These nappa leather gloves are thinner than heavy duty leather which gives better comfort and a great sense of feel. They have elasticated cuffs, reducing the chance of a bee crawling up your sleeve, and a handy clip to keep the gloves as a pair so you won’t lose one! Sizes, from XS - XXXL
Prices from £54.20
Bee Suit Full Body
Every beekeeper needs a suit to give full protection when handling their bees. This full body suit is perfect for head to foot protection, giving you the confidence to get close to and handle your bees.
The suit has a number of great features which make it both safe and practical:• A ventilated hat that can be adjusted to different sizes with a zipper that means it can be flipped back or taken off• A dark veil that is easy to see through and extra strong with double distance rings that will hold it off your face.• Six pockets for all the tools you need to take to the hive with you• Zippers on the legs for ease of putting on the suit without having to take your shoes off• Elasticated cuffs for a tight fit, making it hard for bees to crawl up sleeves
The bee suit comes in a range of sizes from XS - XXXXL.
£6.15£29.64
Smoker Liquid in Refill BottleSmoker Stainless Steel
You will receive 250ml of concentrated liquid smoke in this bottle, which can be poured into a trigger sprayer and topped up with water.
This traditional smoker is a stainless steel container with bellows attached, in which you light a small fire. You can burn a variety of materials such as dried leaves, cardboard or tightly packed dry grass but it is important that the smoke is cold and does not burn the bees. This smoker has a diameter of 10cm and has a protection frame.
Beekeeping Protective Jacket
The jacket has a number of great features which make it both safe and practical:A ventilated hat that can be adjusted to different sizes with a zipper that means it can be flipped back or taken offA dark veil that is easy to see through and extra strong with double distance rings that will hold it off your face if you chooseThree pockets for all the tools you need to take to the hive with you Elasticated cuffs for a tight fit, making it hard for bees to crawl up sleeves
Comes in a range of sizes from XS - XXXXL.
Prices from £36.80
It is important to wear protective gloves when handling bees, especially if you are a beginner, to allow you to get close to them without being stung. The benefits of these rubber gloves are that they are insulated, long lasting and easy to wash. The gauntlets give extra coverage and more protection.Sizes, from XS - XXXL
£10.24
Gloves Beekeeping Rubber
£8.20
Hive Tool
This multifunctional tool is used by beekeepers to open and clean their hives. The hooked end can be used for levering frames up to easily remove them from the beehaus and the sharpened end is great for removing propolis. Heavy duty and long lasting, this is a great tool to own.
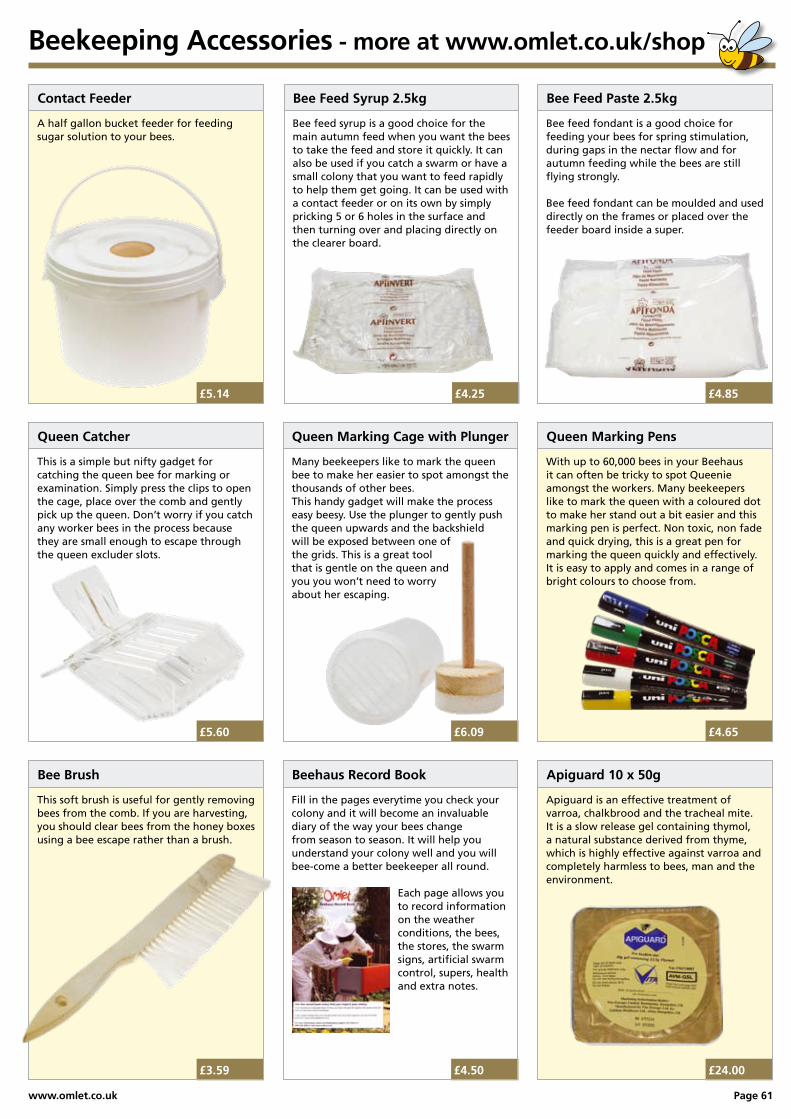
www.omlet.co.uk Page 61
Beekeeping Accessories - more at www.omlet.co.uk/shop
£6.09
Queen Marking Cage with Plunger
Many beekeepers like to mark the queen bee to make her easier to spot amongst the thousands of other bees. This handy gadget will make the process easy beesy. Use the plunger to gently push the queen upwards and the backshield will be exposed between one of the grids. This is a great tool that is gentle on the queen and you you won’t need to worry about her escaping.
£4.65
Queen Marking Pens
With up to 60,000 bees in your Beehaus it can often be tricky to spot Queenie amongst the workers. Many beekeepers like to mark the queen with a coloured dot to make her stand out a bit easier and this marking pen is perfect. Non toxic, non fade and quick drying, this is a great pen for marking the queen quickly and effectively. It is easy to apply and comes in a range of bright colours to choose from.
£5.14
Contact Feeder
A half gallon bucket feeder for feeding sugar solution to your bees.
£4.25
Bee Feed Syrup 2.5kg
Bee feed syrup is a good choice for the main autumn feed when you want the bees to take the feed and store it quickly. It can also be used if you catch a swarm or have a small colony that you want to feed rapidly to help them get going. It can be used with a contact feeder or on its own by simply pricking 5 or 6 holes in the surface and then turning over and placing directly on the clearer board.
£4.85
Bee Feed Paste 2.5kg
Bee feed fondant is a good choice for feeding your bees for spring stimulation, during gaps in the nectar flow and for autumn feeding while the bees are still flying strongly.
Bee feed fondant can be moulded and used directly on the frames or placed over the feeder board inside a super.
£5.60
Queen Catcher
This is a simple but nifty gadget for catching the queen bee for marking or examination. Simply press the clips to open the cage, place over the comb and gently pick up the queen. Don’t worry if you catch any worker bees in the process because they are small enough to escape through the queen excluder slots.
£3.59
Bee Brush
This soft brush is useful for gently removing bees from the comb. If you are harvesting, you should clear bees from the honey boxes using a bee escape rather than a brush.
£4.50
Beehaus Record Book
Fill in the pages everytime you check your colony and it will become an invaluable diary of the way your bees change from season to season. It will help you understand your colony well and you will bee-come a better beekeeper all round.
Each page allows you to record information on the weather conditions, the bees, the stores, the swarm signs, artificial swarm control, supers, health and extra notes.
£24.00
Apiguard 10 x 50g
Apiguard is an effective treatment of varroa, chalkbrood and the tracheal mite. It is a slow release gel containing thymol, a natural substance derived from thyme, which is highly effective against varroa and completely harmless to bees, man and the environment.
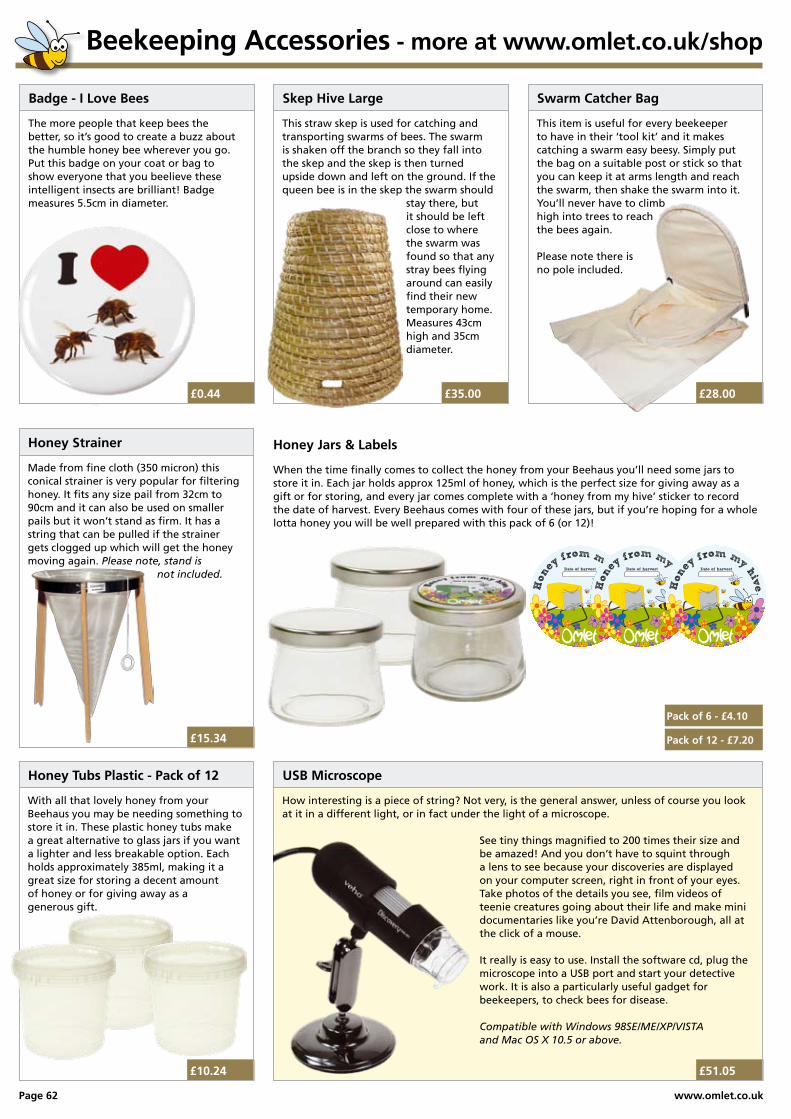
Page 62 www.omlet.co.uk
Beekeeping Accessories - more at www.omlet.co.uk/shop
£35.00
Skep Hive Large
This straw skep is used for catching and transporting swarms of bees. The swarm is shaken off the branch so they fall into the skep and the skep is then turned upside down and left on the ground. If the queen bee is in the skep the swarm should
stay there, but it should be left close to where the swarm was found so that any stray bees flying around can easily find their new temporary home. Measures 43cm high and 35cm diameter.
£28.00
Swarm Catcher Bag
This item is useful for every beekeeper to have in their ‘tool kit’ and it makes catching a swarm easy beesy. Simply put the bag on a suitable post or stick so that you can keep it at arms length and reach the swarm, then shake the swarm into it. You’ll never have to climb high into trees to reach the bees again.
Please note there is no pole included.
£0.44
Badge - I Love Bees
The more people that keep bees the better, so it’s good to create a buzz about the humble honey bee wherever you go. Put this badge on your coat or bag to show everyone that you beelieve these intelligent insects are brilliant! Badge measures 5.5cm in diameter.
£15.34
Honey Strainer
Made from fine cloth (350 micron) this conical strainer is very popular for filtering honey. It fits any size pail from 32cm to 90cm and it can also be used on smaller pails but it won’t stand as firm. It has a string that can be pulled if the strainer gets clogged up which will get the honey moving again. Please note, stand is
not included.
Honey Jars & Labels
When the time finally comes to collect the honey from your Beehaus you’ll need some jars to store it in. Each jar holds approx 125ml of honey, which is the perfect size for giving away as a gift or for storing, and every jar comes complete with a ‘honey from my hive’ sticker to record the date of harvest. Every Beehaus comes with four of these jars, but if you’re hoping for a whole lotta honey you will be well prepared with this pack of 6 (or 12)!
Pack of 6 - £4.10
Pack of 12 - £7.20
£10.24
Honey Tubs Plastic - Pack of 12
With all that lovely honey from your Beehaus you may be needing something to store it in. These plastic honey tubs make a great alternative to glass jars if you want a lighter and less breakable option. Each holds approximately 385ml, making it a great size for storing a decent amount of honey or for giving away as a generous gift.
£51.05
USB Microscope
How interesting is a piece of string? Not very, is the general answer, unless of course you look at it in a different light, or in fact under the light of a microscope.
See tiny things magnified to 200 times their size and be amazed! And you don’t have to squint through a lens to see because your discoveries are displayed on your computer screen, right in front of your eyes. Take photos of the details you see, film videos of teenie creatures going about their life and make mini documentaries like you’re David Attenborough, all at the click of a mouse.
It really is easy to use. Install the software cd, plug the microscope into a USB port and start your detective work. It is also a particularly useful gadget for beekeepers, to check bees for disease.
Compatible with Windows 98SE/ME/XP/VISTA and Mac OS X 10.5 or above.
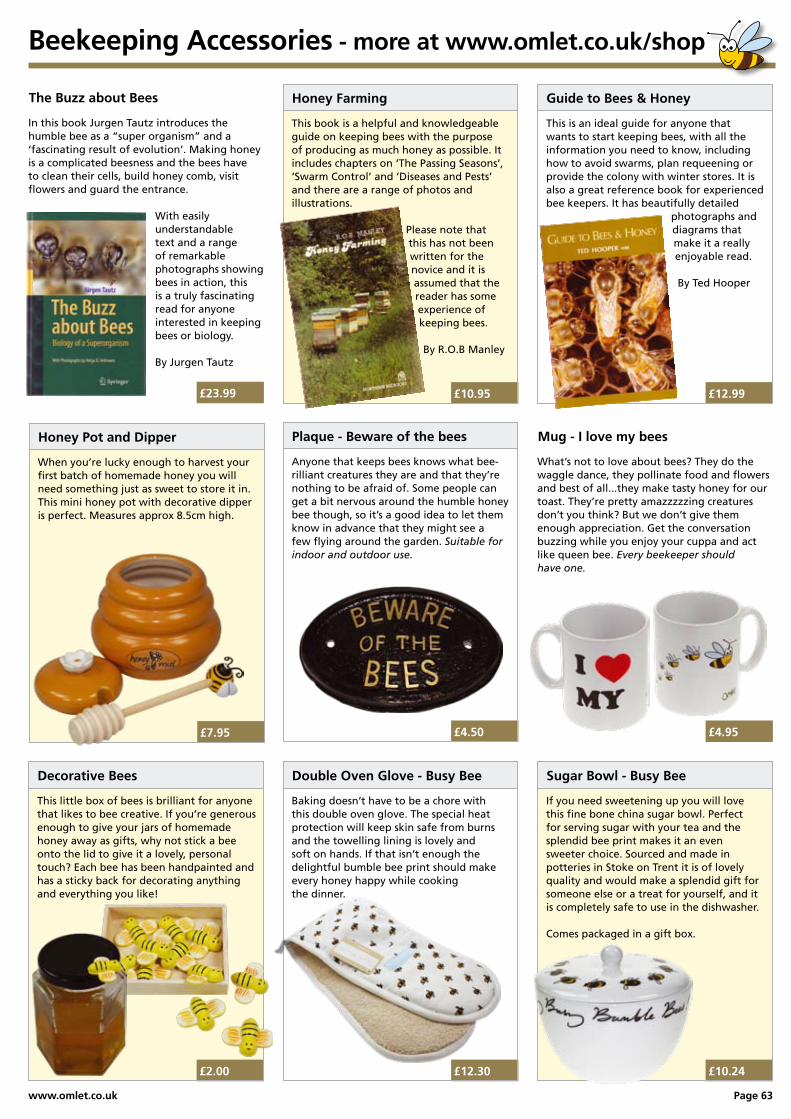
www.omlet.co.uk Page 63
£23.99
The Buzz about Bees
In this book Jurgen Tautz introduces the humble bee as a “super organism” and a ‘fascinating result of evolution’. Making honey is a complicated beesness and the bees have to clean their cells, build honey comb, visit flowers and guard the entrance.
With easily understandable text and a range of remarkable photographs showing bees in action, this is a truly fascinating read for anyone interested in keeping bees or biology.
By Jurgen Tautz
£12.99
Guide to Bees & Honey
This is an ideal guide for anyone that wants to start keeping bees, with all the information you need to know, including how to avoid swarms, plan requeening or provide the colony with winter stores. It is also a great reference book for experienced bee keepers. It has beautifully detailed
photographs and diagrams that make it a really enjoyable read.
By Ted Hooper
£10.95
Honey Farming
This book is a helpful and knowledgeable guide on keeping bees with the purpose of producing as much honey as possible. It includes chapters on ‘The Passing Seasons’, ‘Swarm Control’ and ‘Diseases and Pests’ and there are a range of photos and illustrations.
Please note that this has not been written for the novice and it is assumed that the reader has some experience of keeping bees.
By R.O.B Manley
£10.24
Sugar Bowl - Busy Bee
If you need sweetening up you will love this fine bone china sugar bowl. Perfect for serving sugar with your tea and the splendid bee print makes it an even sweeter choice. Sourced and made in potteries in Stoke on Trent it is of lovely quality and would make a splendid gift for someone else or a treat for yourself, and it is completely safe to use in the dishwasher.
Comes packaged in a gift box.
Beekeeping Accessories - more at www.omlet.co.uk/shop
£2.00
Decorative Bees
This little box of bees is brilliant for anyone that likes to bee creative. If you’re generous enough to give your jars of homemade honey away as gifts, why not stick a bee onto the lid to give it a lovely, personal touch? Each bee has been handpainted and has a sticky back for decorating anything and everything you like!
£12.30
Double Oven Glove - Busy Bee
Baking doesn’t have to be a chore with this double oven glove. The special heat protection will keep skin safe from burns and the towelling lining is lovely and soft on hands. If that isn’t enough the delightful bumble bee print should make every honey happy while cooking the dinner.
£4.50
Plaque - Beware of the bees
Anyone that keeps bees knows what bee-rilliant creatures they are and that they’re nothing to be afraid of. Some people can get a bit nervous around the humble honey bee though, so it’s a good idea to let them know in advance that they might see a few flying around the garden. Suitable for indoor and outdoor use.
£4.95
Mug - I love my bees
What’s not to love about bees? They do the waggle dance, they pollinate food and flowers and best of all...they make tasty honey for our toast. They’re pretty amazzzzzing creatures don’t you think? But we don’t give them enough appreciation. Get the conversation buzzing while you enjoy your cuppa and act like queen bee. Every beekeeper should have one.
£7.95
Honey Pot and Dipper
When you’re lucky enough to harvest your first batch of homemade honey you will need something just as sweet to store it in. This mini honey pot with decorative dipper is perfect. Measures approx 8.5cm high.
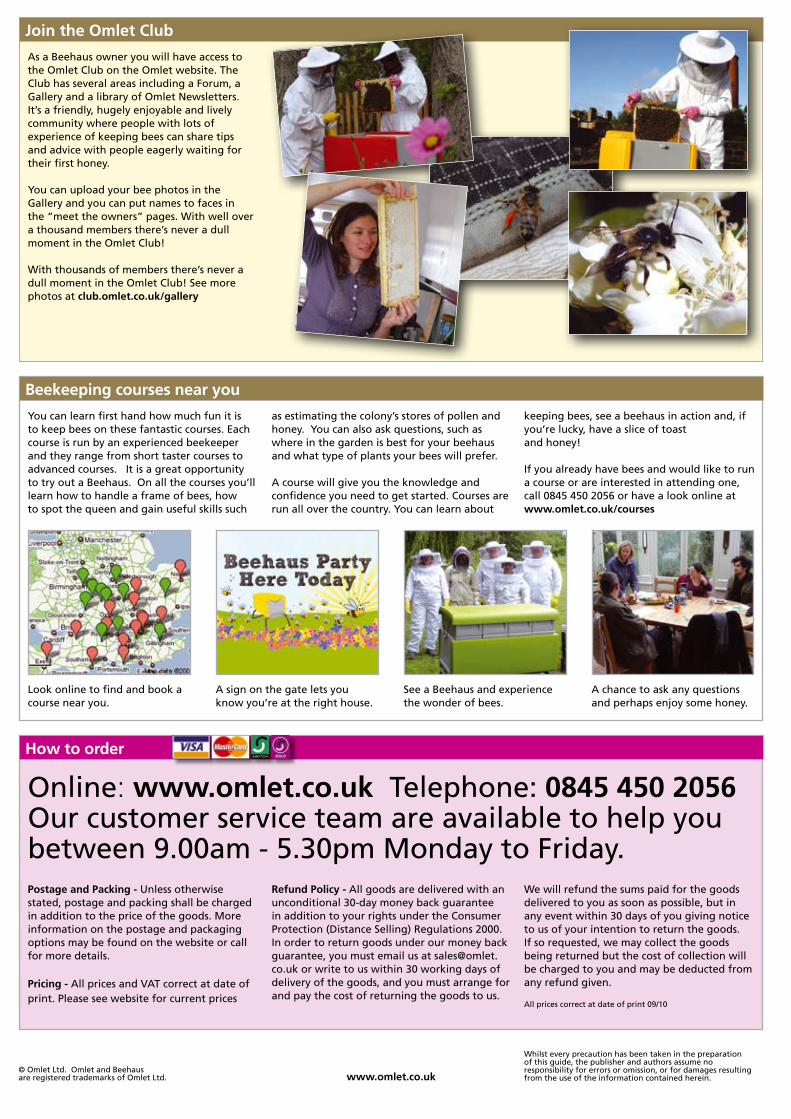
www.omlet.co.uk
As a Beehaus owner you will have access to the Omlet Club on the Omlet website. The Club has several areas including a Forum, a Gallery and a library of Omlet Newsletters. It’s a friendly, hugely enjoyable and lively community where people with lots of experience of keeping bees can share tips and advice with people eagerly waiting for their first honey.
You can upload your bee photos in the Gallery and you can put names to faces in the “meet the owners” pages. With well over a thousand members there’s never a dull moment in the Omlet Club!
With thousands of members there’s never a dull moment in the Omlet Club! See more photos at club.omlet.co.uk/gallery
Join the Omlet Club
© Omlet Ltd. Omlet and Beehaus are registered trademarks of Omlet Ltd.
as estimating the colony’s stores of pollen and honey. You can also ask questions, such as where in the garden is best for your beehaus and what type of plants your bees will prefer.
A course will give you the knowledge and confidence you need to get started. Courses are run all over the country. You can learn about
Refund Policy - All goods are delivered with an unconditional 30-day money back guarantee in addition to your rights under the Consumer Protection (Distance Selling) Regulations 2000. In order to return goods under our money back guarantee, you must email us at [email protected] or write to us within 30 working days of delivery of the goods, and you must arrange for and pay the cost of returning the goods to us.
keeping bees, see a beehaus in action and, if you’re lucky, have a slice of toast and honey!
If you already have bees and would like to run a course or are interested in attending one, call 0845 450 2056 or have a look online at www.omlet.co.uk/courses
We will refund the sums paid for the goods delivered to you as soon as possible, but in any event within 30 days of you giving notice to us of your intention to return the goods. If so requested, we may collect the goods being returned but the cost of collection will be charged to you and may be deducted from any refund given.
Beekeeping courses near you
How to order
You can learn first hand how much fun it is to keep bees on these fantastic courses. Each course is run by an experienced beekeeper and they range from short taster courses to advanced courses. It is a great opportunity to try out a Beehaus. On all the courses you’ll learn how to handle a frame of bees, how to spot the queen and gain useful skills such
Postage and Packing - Unless otherwise stated, postage and packing shall be charged in addition to the price of the goods. More information on the postage and packaging options may be found on the website or call for more details.
Pricing - All prices and VAT correct at date of print. Please see website for current prices
Look online to find and book a course near you.
A sign on the gate lets you know you’re at the right house.
See a Beehaus and experience the wonder of bees.
A chance to ask any questions and perhaps enjoy some honey.
Online: www.omlet.co.uk Telephone: 0845 450 2056Our customer service team are available to help youbetween 9.00am - 5.30pm Monday to Friday.
Whilst every precaution has been taken in the preparation of this guide, the publisher and authors assume no responsibility for errors or omission, or for damages resulting from the use of the information contained herein.
All prices correct at date of print 09/10
Related Documents