Guide to Creating Object Lessons Using the Object of History-Omeka Package Center for History and New Media chnm.gmu.edu George Mason University 4400 University Drive, MSN 1E7 Fairfax, VA 22030 703-993-9277 [email protected]

Welcome message from author
This document is posted to help you gain knowledge. Please leave a comment to let me know what you think about it! Share it to your friends and learn new things together.
Transcript
Guide to Creating Object Lessons Using the Object of History-Omeka Package
Center for History and New Media chnm.gmu.edu
George Mason University
4400 University Drive, MSN 1E7 Fairfax, VA 22030
703-993-9277
2
Table of Contents
Guide to Creating Object Lessons: Using the Object of History-Omeka Package 3 Installing the Object of History-Omeka Package 5 System requirements 5 Installation and set-up 5
Activating plug-ins 6 Customizing Omeka 6 Sizes and standards 6 Preparation and compression 7
Working with Omeka 8 Create a collection 8 Add items 11 Building object lessons 14 Features for Students and Teachers 24 Virtual exhibit activity 24 Preparing Content for the Object of History Modules 26 Selecting objects 27 Introductory narrative and themes 28 Editing objects 28 Writing annotations 28 Permissions 28 Interviews and Forums 28 Additional resources 29 Teaching activities 29 Working with items 29
3
Guide to Creating Object Lessons
Using the Object of History-Omeka Package
I. Introduction Welcome to the Guide to Creating Object Lessons using the Object of History/Omeka Package. Based on the successful museum education project Object of History: Behind the Scenes at the National Museum of American History (OOH) <http://objectofhistory.org/>, this software package and guide is designed to assist small museums and historical societies in creating their own object-based educational outreach websites. This guide will provide you both with technical instructions about how to install, set-up and customize the OOH/Omeka software package, as well as with pedagogical information about creating Object Lessons that increase students’ content knowledge and their practice with historical thinking skills. OOH was designed and built with the notion that museums and historical societies needed an easy way for curators and educators to bring their collections and expertise to students and teachers who may be unable to visit a physical site or to spend quality time with content experts. As such each of the Object Lessons focus on a single item out of an institution’s collection, and builds a universe of associated primary source materials and curator expertise around that item to introduce students to the object itself, the historical context of that object and the life of the object in the museum. These materials emphasize the teaching and learning of historical thinking skills and the particular skills that students need to analyze and understand material culture as an historical source. Website Elements: Once you have completed installing the OOH-Omeka Package (Downloadable from <http://objectofhistory.org/>), you will be able to build a site that includes the following features:
1. Guide to Working with Your Collection: This page will enable you to publish an essay that specifically addresses the features of your institution’s collection and the objects that you are featuring on your site. You are welcome to use the “Guide to Doing History with Objects” <http://objectofhistory.org/guide/> as a model for your essay.
2. Object Lessons: These modules will make up the heart of your site, and will include an introduction to the object with high resolution images or Quicktime Virtual Reality, a set of pages that bring together primary sources and secondary material which may consist of curator interviews that address the main object as a piece of material culture, in its historical context, and in the life of the museum. Object Lessons also include a series of annotated links to associated internet resources. Finally, each Object Lesson has a page for teachers that locates the main object in the history standards of learning (either state or “national”) and provides some suggested classroom activities.
3. Forums: This page is a central location for podcasts or interviews with curators, educators or historians. We suggest that users create at least one podcast to accompany each Object Lesson. These might be Q&A sessions where an educator presents curators with questions submitted by students, or a more formally scripted podcast that presents additional framing material about the
4
object.
4. Virtual Exhibit Activity: This feature of the package allows students or teachers to login into the system, and collect and tag items from the site that they then can reassemble into a “virtual exhibit” poster. This interactive activity provides students a way to assemble a narrative response that showcases what they have learned from working with the materials. Additionally, students can draw on materials from any of the “Object Lessons,” thus, creating virtual exhibits that illuminate themes across subjects and time periods.
5
II. Installing OOH-Omeka [Mostly for Technical Staff and Web Masters] A. System Requirements Before installing Omeka, make sure the web server you will be using meets our system requirements. Thankfully, Omeka only requires free and open source software that is already installed by most web hosting services. After these system requirements are met, all you need to do is install the Omeka software:
• Linux operating system: Apache HTTP server: make sure mod_rewrite is enabled • PHP scripting language: 5.2.x or greater (with mysqli extensions) • MySQL relational database management system: 5.0 or greater • ImageMagick image manipulation software: installation is mandatory for resizing images in
Omeka If you are interested in installing Omeka in a VMWare virtual machine running Ubuntu Linux on Mac (VMWare Fusion) and Windows (VMWare server and workstation) desktop platforms, see these instructions (pdf ). Browser recommendations: while the Omeka /admin interface runs on all browsers, we recommend Firefox (Mac/PC) or Safari (Mac/PC). B. Installing and set-up up OOH-Omeka
1. Download <http://objectofhistory.org>
2. Upload the resulting directory to your server. (Make sure the '.htaccess' and 'admin/.htaccess' files move along with the directory. Omeka requires these files to be present and unmodified to work properly.) You may change the name of the directory if you wish.
3. Make sure the /archives/ directory and its contents are writable by the server.
4. Create a MySQL database, and a user with permissions to modify that database, for Omeka on your server. Make sure the database you create has a collation of 'utf8_unicode_ci' and a 'utf8' charset.
5. Find and open 'application/config/db.ini'. Edit it by replacing 'XXXXX' with your database credentials. Further information is available at “Configuring the Omeka Database (omeka.org/codex/Configuring_omeka_database).
6. Open your web browser and go to the URL where your site should be, and click Install.
7. Complete the form as you see fit. "Site Name" and "Administrator Email" are required fields.
8. Submit the form and your Omeka website should work. To log into the administrative interface and begin adding items to your archive, go to your website's web address and add '/admin/' to the URL.
6
C. Activating OOH-Omeka plugins Log in at XXX/admin, click the [Settings] tab, and then the [plugins] tab. You will see a list of plugins; each has a button for you to activate or deactivate the application. Activate each plugin. Note: While you can choose others as well, you must select and activate the following plugins:
1. “Terms of Service” 2. “MyOmeka” (you must also check the button that says “Require Terms of Service and
privacy Policy” when you configure the MyOmeka plugin. 3. “HTML Purifier” 4. “Simple Contact Form” 5. “SimplePages”
Finally, you should insert the following snippet of code in the common/header.php file of your homepage: <?php echo my_omeka_user_status(); ?> Your file should look like this: <?php echo my_omeka_user_status(); ?> <div id="search"> <?php echo simple_search(); ?> <?php echo link_to_advanced_search(); ?> </div> If you wish to install any additional plugins, they can be found at (omeka.org/codex/install_a_Plugin). You may view your plugins by logging in at XXX/admin, clicking the [Settings] tab, and then the [plugins] tab. You will see a list of available plugins; each has a button for you to activate or deactivate the application. Select the plugins you wish to use. If you need additional help, there is a resource page located at (omeka.org/codex/install_a_Plugin).
D. Customizing OOH-Omeka:The easiest way to change the appearance of Omeka is by downloading and installing themes, which have preinstalled code and color schemes. You may find a list of Omeka-approved themes at (omeka.org/add-ons/themes). Installing them is as easy as unzipping the files, and dropping the folder onto the server at XXX/themes. Then, you must slick the “settings” button while logged in, then the “themes” tab, and select your theme. You must save your changes before they will take effect.
E. If you wish to customize the appearance of your archive, by changing colors, fonts, or other aspects, you may do that using cascading style sheets (CSS). It is quite easy to customize Omeka, but you will want to make sure you are familiar with style sheets, Wordpress, or internet publishing.
The CSS files for OOH are located in the public folder of the site directory: (XXX/content/public/styles/screen.css)
7
By editing the CSS files you can easily make changes across your site. For example, we can change the size and style of the font on the site’s home page:
1. Open the style sheet called “screen.css” using a text editor. You’ll notice a series of designations including “color,” “font-size,” and “font-weight,” as well as others.
2. Next to the “font:” designation are the characters “62.5%, Verdana, Arial, Helvetica, sans-serif,” which refer to the size and style of the text on the website, respectively.
3. If you change the size to 75%, save the file, and upload it into the folder, the text will render on the screen larger.
4. If you change the text “Verdana, Arial, Helvetica, sans-serif” to “Times New Roman, Times, serif,” and reload the page, the text will render in that style (this is for illustrative purposes—studies have shown that sans-serif styles are more easily read on a computer screen.).
5. Similarly, if you change the expression “color: #444” to “color: #CC0000,” the color of the text will change from black to red. Using these instructions, you can change almost every aspect of your site’s appearance.
6. If you would like to replace the default Object of History Logo, replace the image file
located at XXX/themes/default/images/logo.jpg with your organization's logo. If you would prefer not to have a logo in the header, open the file XXX/themes/default/common/header.php and delete the line that reads:
<a href="<?php echo uri(''); ?>"><img id="logo" alt="Site Logo" src="<?php echo img('logo.jpg'); ?>" /></a>
7. Go into the file XXX/themes/default/index.php and find the text that begins with
“Lorem ipsum…” in the “secondary” section, and replace this with a description of your site’s overall mission. This text appears on the site as a sidebar on the main page. A step-by-step guide to using CSS to change the appearance of your archive can be found on the Omeka page under Design and Templating (omeka.org/codex/Main_Page). A note about the exhibit: The Omeka framework is set up to highlight your featured items and/or collections on the home page. If you would like to feature your exhibit on the home page, you can paste the following code into your home page: <?php echo show_exhibit_list(); ?> It should look like this: <div id="primary"> <!-- Featured Item --> <div id="featured-item"> <?php echo display_random_featured_item(); ?> </div><!--end featured-item-->
8
<!-- Featured Collection --> <div id="featured-collection"> <?php echo display_random_featured_collection(); ?> </div><!-- end featured collection --> <?php echo show_exhibit_list(); ?> E. Sizes and Standards: The two size constraint fields refer to the size of the images that Omeka generates. Fullsize is the display size for images, thumbnail is the thumbnail that shows up for images, and square thumbnails are derivative images that are cropped to have an equal width and height. The default value of 600 says that any image will have a maximum width or height of 600 depending on whether it is a landscape or portrait-oriented photo. Similarly, you should consider the resolution of any images you place in your archive. A computer’s screen resolution is 72 dpi, and printable quality begins around 300 dpi. Copyright holders may insist that you post images at less-than-photo quality, however, so you will find 150 dpi to be an optimal compromise. It provides high enough resolution for draft-quality printing without violating copyright conventions or providing high-resolution versions of copyrighted materials. F. Preparation and compression: Audio files should be in the mp3 format to include on Object of History. Depending on the way the audio was captured, it may already be in that format, but if not, any audio editing software will allow you to export or convert as an mp3 file. The standard for video is Quicktime (mpeg). No matter how you capture our video footage, you'll need to edit out the clips or selections you wish to include. Once you have edited the clips, you may export them as mpeg files for inclusion in the database. Most likely, you'll need to compress them, as well, since you'll want your clips to viewable with a minimum of loading time. For Object of History, select the frame size 240 by 180 when you export, and Sorenson 3 is a good compromise between quality and file size
9
III. Working with Omeka [User instructions for Curators, Educators and Interns working with Omeka after it is installed and set up] You will likely want to create an “About” page to give out institutional information or otherwise identify your museum or school. To do this, you’ll use the SimplePages plugin you downloaded before. It asks you to use a slug to identify your page—in this case you would use the word”about”—and gives you the opportunity to paste in any text you want to use on the page. Institutional information or short biographical sketches are appropriate here. The OOH/Omeka system draws all of the elements that are visible on the publicly viewable portion of the site from a database system that is available only to curators, educators and staff with permission to view and work with the administrative elements of the site. The work of populating the archive and building the Object Lessons takes place within this administrative area that is known as the Dashboard. At any point, you may return to the main page of your archive by clicking the [Dashboard] tab at the top left of the page. To create an Object Lesson, complete the following steps. A. Create a collection based on the featured item for the Object Lesson, i.e. the Jefferson Desk collection, or the Voting Machine collection.
10
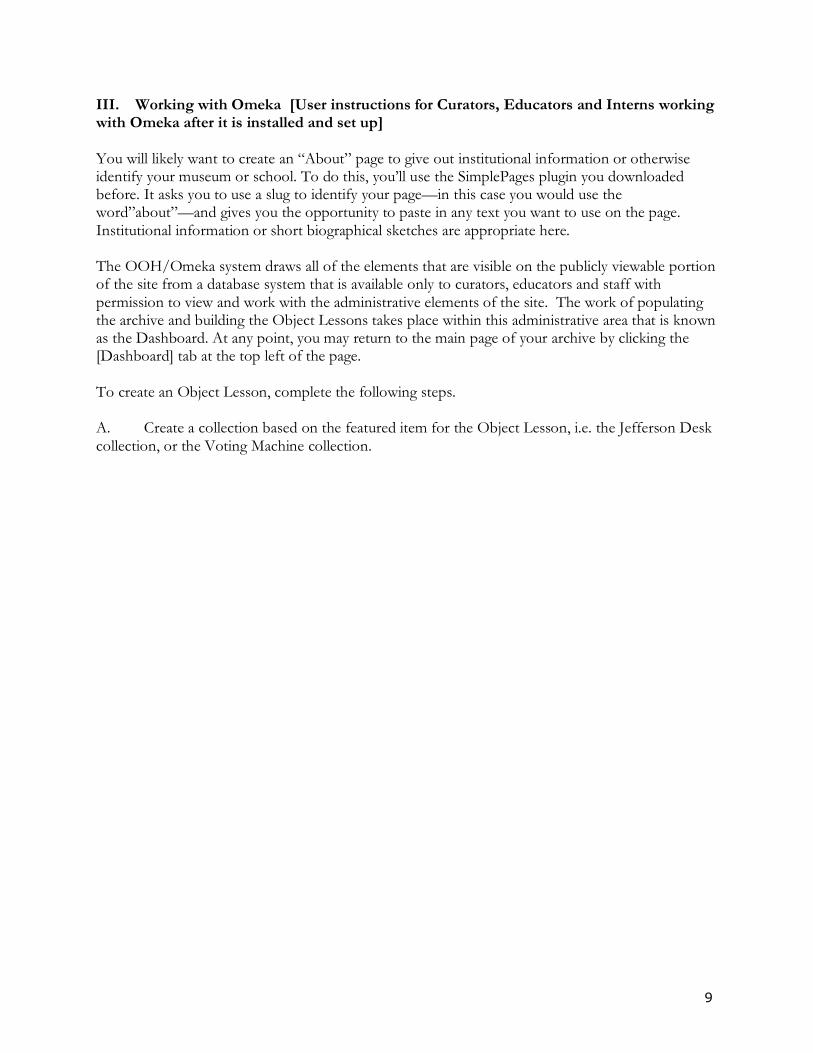
Figure 1: To add a collection, use the “Add a Collection” button
1. Click the [Archive] tab, followed by the [Collections] tab. On the right side of the screen, click the Add a Collection button. (See Figure 1)
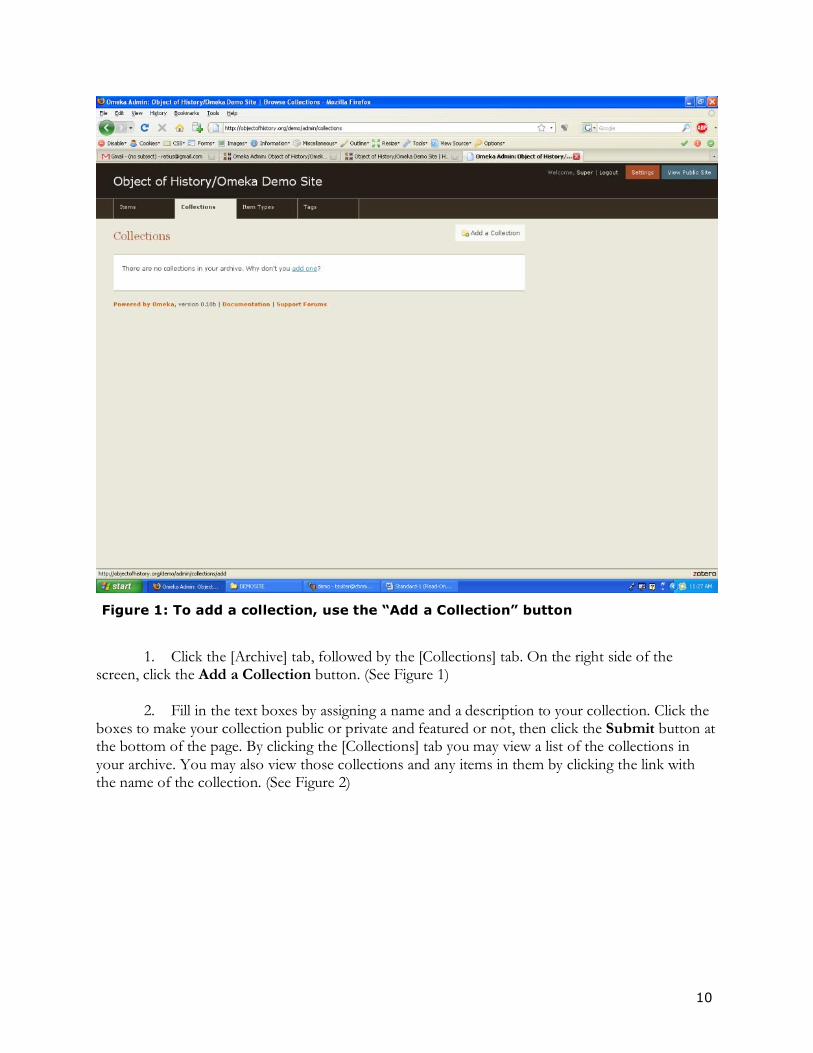
2. Fill in the text boxes by assigning a name and a description to your collection. Click the boxes to make your collection public or private and featured or not, then click the Submit button at the bottom of the page. By clicking the [Collections] tab you may view a list of the collections in your archive. You may also view those collections and any items in them by clicking the link with the name of the collection. (See Figure 2)
11
Figure 2: Here, you’ll fill in the text boxes to add details about your collection.
B. Once you have created a collection, you will need to add the items to that collection that will populate the pages of the Object Lesson. These items will include the images/qtvr of the main object, each primary source, each secondary commentary, each curator interview, each website resource, each teaching activity, and each set of teaching standards. The item record has an interface that allows users to upload files and to provide data that is associated with that item. When a user creates a new item s/he will have the option of uploading a file, selecting an item type, filling in the core metadata (data fields that are common to all item types), and filling in the item metadata (special fields that are associated with particular item types, such as the “transcript” field that accompanies the Oral History item type). There are thirteen types of items that come preloaded with this software: Document, Moving Image, Oral History, Sound, Still Image, Website, Event, Emails, Lesson Plan, Hyperlink, Person, Podcast, and Interactive Resources. They may be sufficient for your needs in creating Object Lessons, but if they are not, you may create your own item type.
12
To do so, go to your Dashboard, click on the [types] tab. On the right side, click the button to Add an Item Type. There you will be able to create a new item type and customize the metadata fields that accompany it. These fields will be in addition to the core metadata fields that are associated with each item. While you may add any type of items you wish to the various pages of your exhibit, in order to realize the fullest potential of your site, you should make sure you include the following specific items:
1. Podcast (for the “forum” section of the site) 2. Document, Still Image, Moving Image, Oral History, and/or Sound (for the main content of
the Object Lessons) 3. Websites (for the “Resources” section of each Object Less) 4. Lesson plan (for the “Teaching” section of each Object Lesson)
For more information on core metadata, item type metadata, and item types, please consult the Metadata Scheme Appendix. From the Dashboard, you may begin to add items to your Archive. Click the button that says Add an item to your archive.
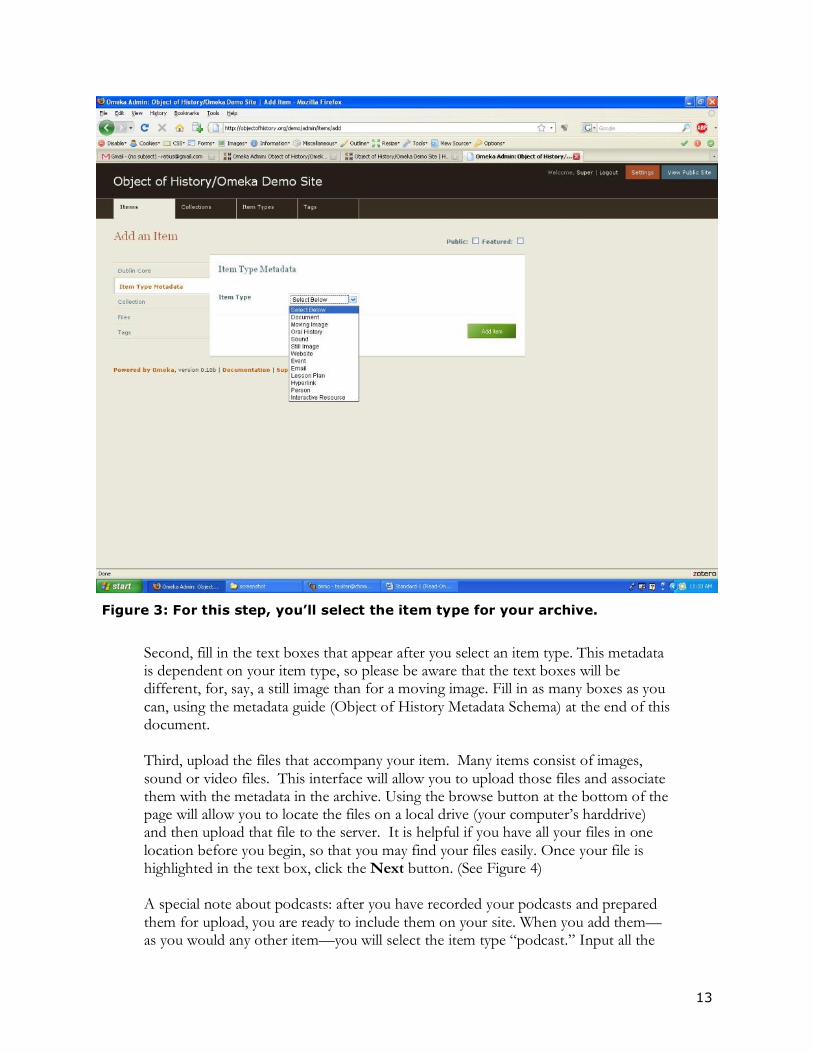
Step 1: Item Type First, use the pull-down menu to select your item type. (See Figure 3)
13
Figure 3: For this step, you’ll select the item type for your archive.
Second, fill in the text boxes that appear after you select an item type. This metadata is dependent on your item type, so please be aware that the text boxes will be different, for, say, a still image than for a moving image. Fill in as many boxes as you can, using the metadata guide (Object of History Metadata Schema) at the end of this document. Third, upload the files that accompany your item. Many items consist of images, sound or video files. This interface will allow you to upload those files and associate them with the metadata in the archive. Using the browse button at the bottom of the page will allow you to locate the files on a local drive (your computer’s harddrive) and then upload that file to the server. It is helpful if you have all your files in one location before you begin, so that you may find your files easily. Once your file is highlighted in the text box, click the Next button. (See Figure 4) A special note about podcasts: after you have recorded your podcasts and prepared them for upload, you are ready to include them on your site. When you add them—as you would any other item—you will select the item type “podcast.” Input all the
14
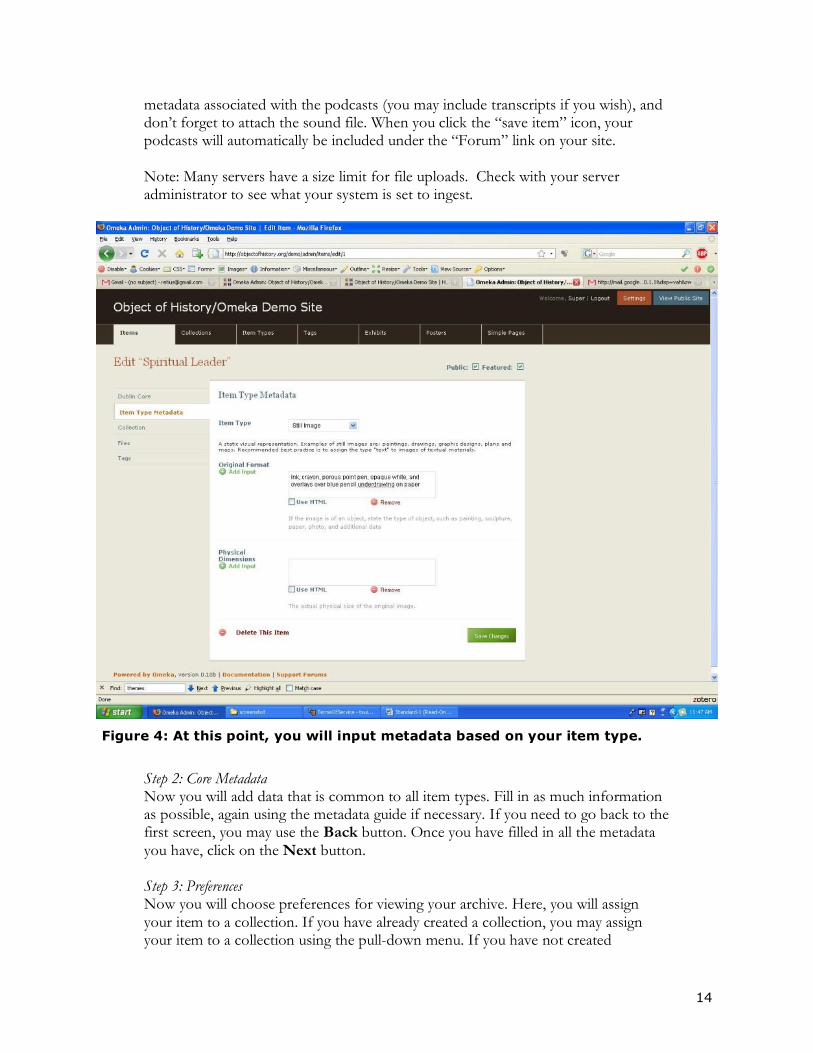
metadata associated with the podcasts (you may include transcripts if you wish), and don’t forget to attach the sound file. When you click the “save item” icon, your podcasts will automatically be included under the “Forum” link on your site. Note: Many servers have a size limit for file uploads. Check with your server administrator to see what your system is set to ingest.
Figure 4: At this point, you will input metadata based on your item type.
Step 2: Core Metadata Now you will add data that is common to all item types. Fill in as much information as possible, again using the metadata guide if necessary. If you need to go back to the first screen, you may use the Back button. Once you have filled in all the metadata you have, click on the Next button. Step 3: Preferences Now you will choose preferences for viewing your archive. Here, you will assign your item to a collection. If you have already created a collection, you may assign your item to a collection using the pull-down menu. If you have not created
15
collections, you can still add individual items to the archive, but you will have to go back later and edit each item to add it to a collection. You must also select whether to make your item public or not, and whether it will be a featured item or not. Although you will eventually want your archive to be public, it is often better to keep your items private until they are ready for public viewing. You may change these preferences at any time. You may also assign tags to your items at this time. Tags work like keywords, and allow users to search for items using the keywords. Once you have selected the appropriate preferences and assigned tags, click the Add Item button at the bottom to add your item to the archive. You may view your items by clicking the [Archive] tab at the top of the page, followed by the [Items] tab. A list of your items appears with a summary of archival information. The most recently added items appear at the top of the list by default. You may use the search feature to locate other items, or you may browse the archive using the page numbers. At any time you may edit an item by clicking the Edit button at the right of that item.
C. Building Object Lessons In the OOH/Omeka Package, Object Lessons are created by building exhibits.
1. Click the [Exhibits] tab at the top of the page. On the right side of the page, notice a button labeled Add an Exhibit; click this button. (See Figure 5)
16
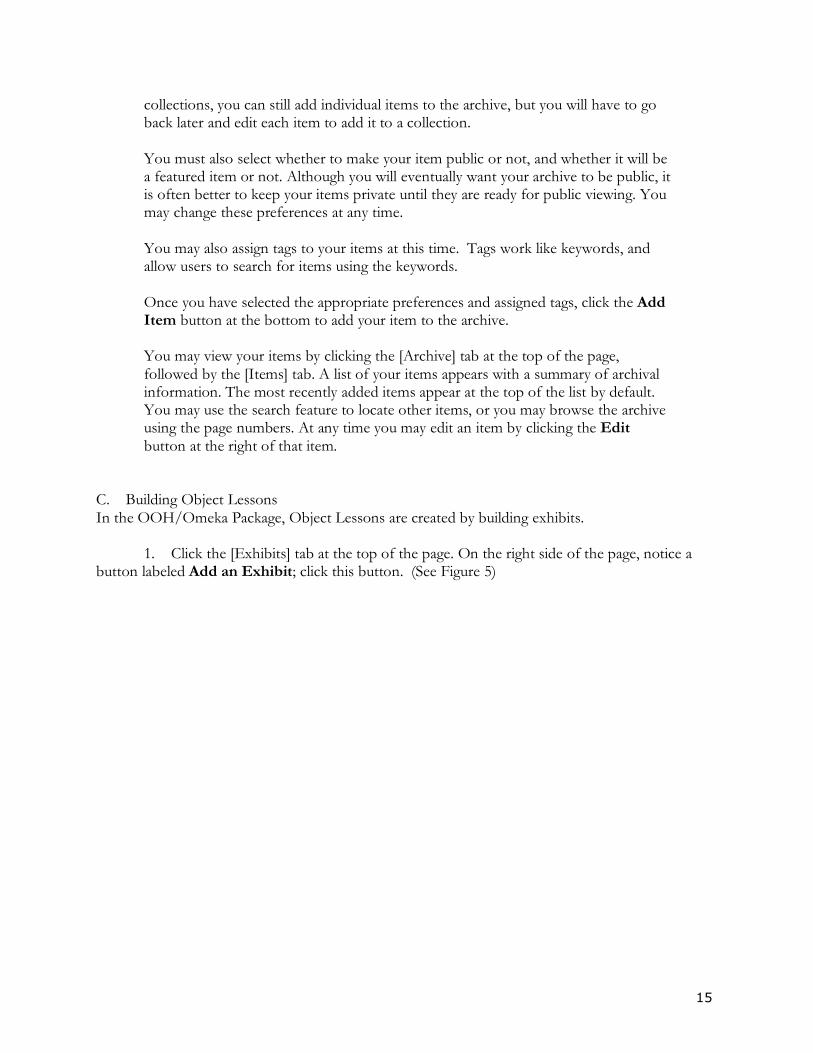
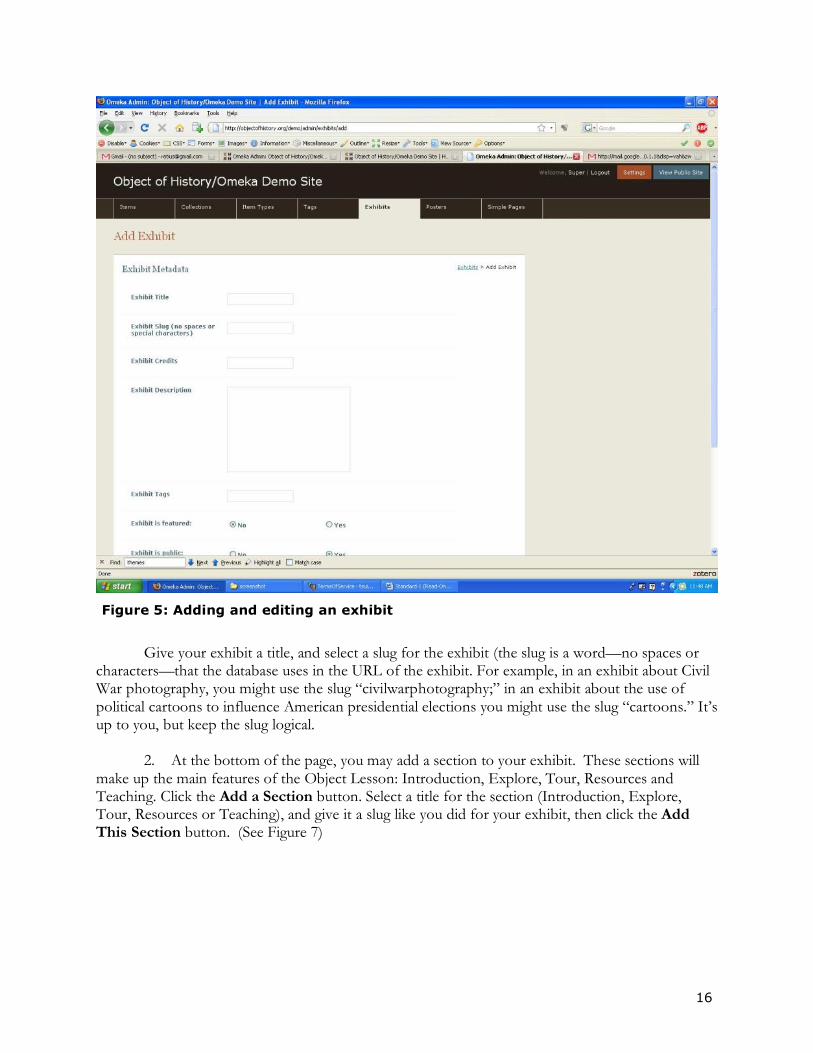
Figure 5: Adding and editing an exhibit
Give your exhibit a title, and select a slug for the exhibit (the slug is a word—no spaces or
characters—that the database uses in the URL of the exhibit. For example, in an exhibit about Civil War photography, you might use the slug “civilwarphotography;” in an exhibit about the use of political cartoons to influence American presidential elections you might use the slug “cartoons.” It’s up to you, but keep the slug logical.
2. At the bottom of the page, you may add a section to your exhibit. These sections will
make up the main features of the Object Lesson: Introduction, Explore, Tour, Resources and Teaching. Click the Add a Section button. Select a title for the section (Introduction, Explore, Tour, Resources or Teaching), and give it a slug like you did for your exhibit, then click the Add This Section button. (See Figure 7)
17
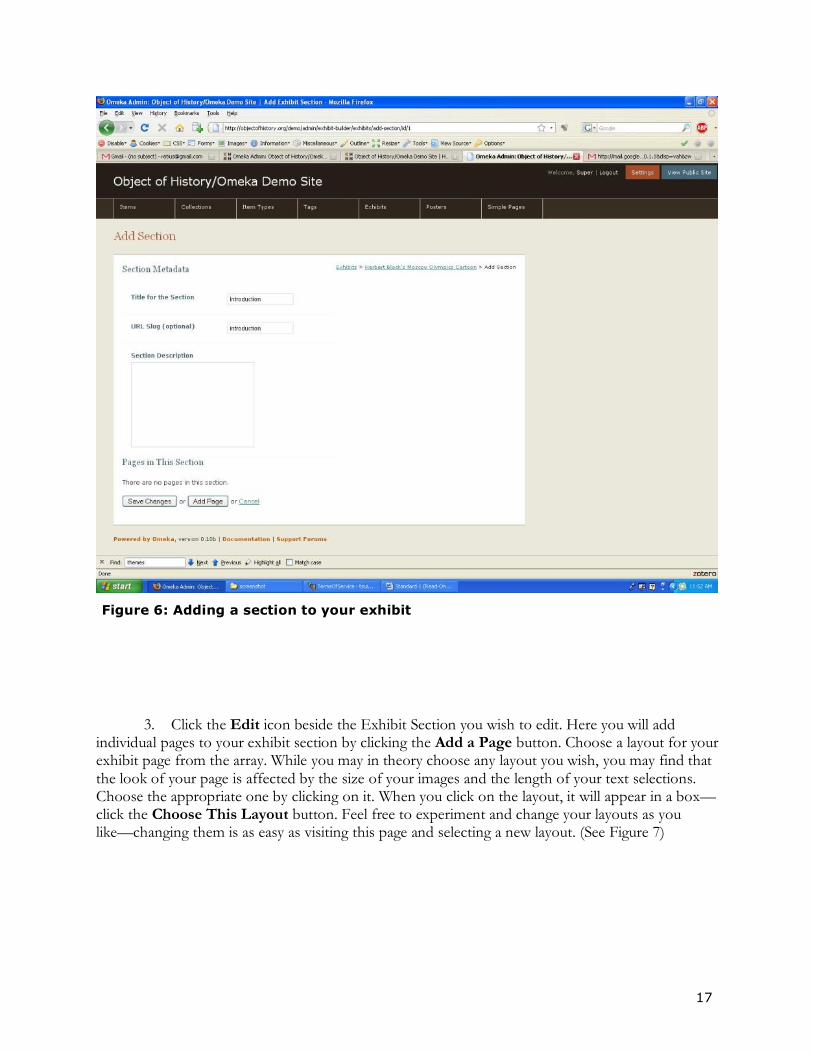
Figure 6: Adding a section to your exhibit
3. Click the Edit icon beside the Exhibit Section you wish to edit. Here you will add individual pages to your exhibit section by clicking the Add a Page button. Choose a layout for your exhibit page from the array. While you may in theory choose any layout you wish, you may find that the look of your page is affected by the size of your images and the length of your text selections. Choose the appropriate one by clicking on it. When you click on the layout, it will appear in a box—click the Choose This Layout button. Feel free to experiment and change your layouts as you like—changing them is as easy as visiting this page and selecting a new layout. (See Figure 7)

18
Figure 7: Selecting your page layout
4. On the “Add Exhibit” page, you will see one or more empty squares on the right side of
the page, and thumbnails on the left side. Using your mouse and placing the cursor on the green arrows in the thumbnails, drag the photo thumbnails you wish to use into their position on the page. When you have the photo where you want it, you may release the mouse. (See Figure 5) If you wish to remove the photo, click on the red button inside the square. Add any text that goes with the exhibit page in the text box, and click one of the boxes at the bottom of the page. If you want to change the layout, click that button. If you are finished adding pages, click the button that says Save and Return to Section, and if you are finished with THIS page but want to add more, then click the Save and Add Another Page button. (See Figure 8)
19
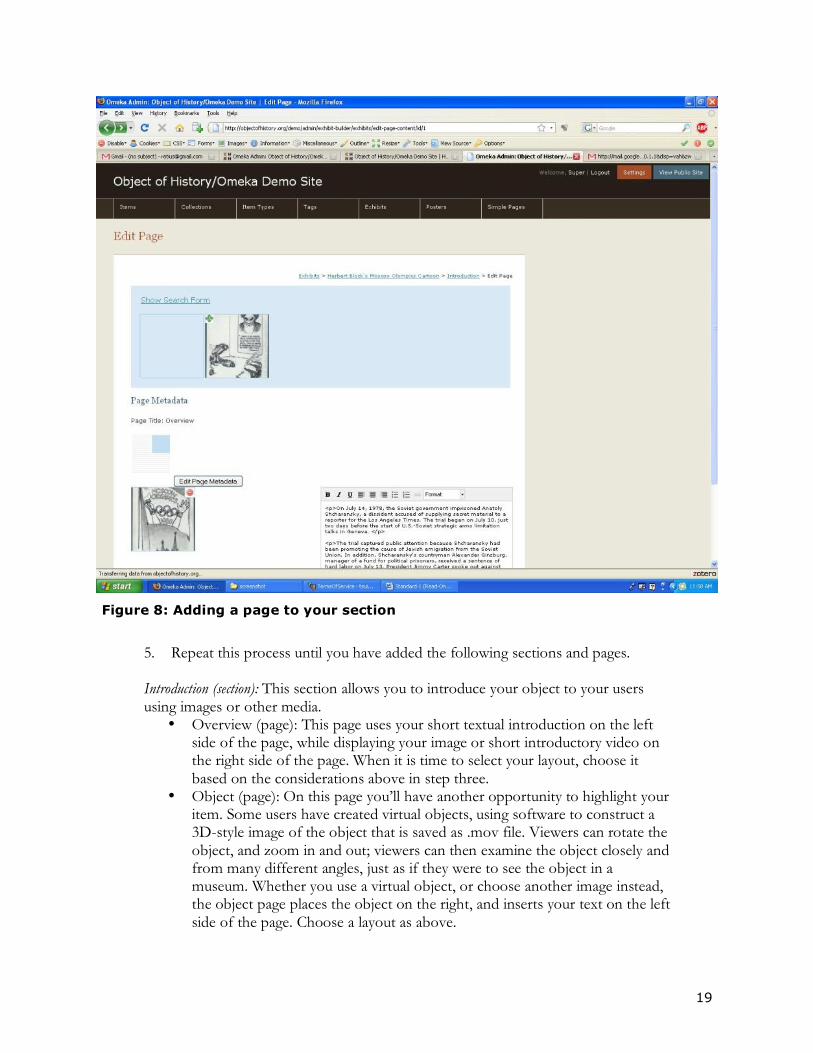
Figure 8: Adding a page to your section
5. Repeat this process until you have added the following sections and pages.
Introduction (section): This section allows you to introduce your object to your users using images or other media.
• Overview (page): This page uses your short textual introduction on the left side of the page, while displaying your image or short introductory video on the right side of the page. When it is time to select your layout, choose it based on the considerations above in step three.
• Object (page): On this page you’ll have another opportunity to highlight your item. Some users have created virtual objects, using software to construct a 3D-style image of the object that is saved as .mov file. Viewers can rotate the object, and zoom in and out; viewers can then examine the object closely and from many different angles, just as if they were to see the object in a museum. Whether you use a virtual object, or choose another image instead, the object page places the object on the right, and inserts your text on the left side of the page. Choose a layout as above.
20
Explore (section): In the Explore section, your viewers take a look at the object and others that are related to it. The section should contain three sections that reflect different perspectives on the object.
• Material Culture (page): This page examines the object as a historical artifact. You should include on this page items that deal with the object in that way, for example, other objects that are similar, or video clips of experts describing the object. Choose a layout as above.
• In Historical Context (page): On this page, the object is displayed as a part of one or more historical narratives. Thus, you should include other items that discuss the impact of your object, for example, or examine your object as a force in the historical process. As you complete this page, choose a layout as above.
• In the Museum (page): This, the third page in the Explore section, places the object as part of a museum. Here, you may include documents that detail the museum’s acquisition of the object, or which describe the condition of the object as it was acquired, or you may include video clips of curators discussing the actual display of the object, or any other similar items. Choose a layout as above.
Tours (section): Here, you have the opportunity to construct two tours, a short one and an extended one. In each case, you will include other items that tell some sort of story.
• Brief (page): The brief tour uses only a few items—we recommend using four items for this tour. Choose a layout as above.
• Extended (page): The extended tour allows you to tell a more extensive story using more items—we recommend twelve. Any particular item may be used in both tours. To construct an extended tour, choose a layout as above.
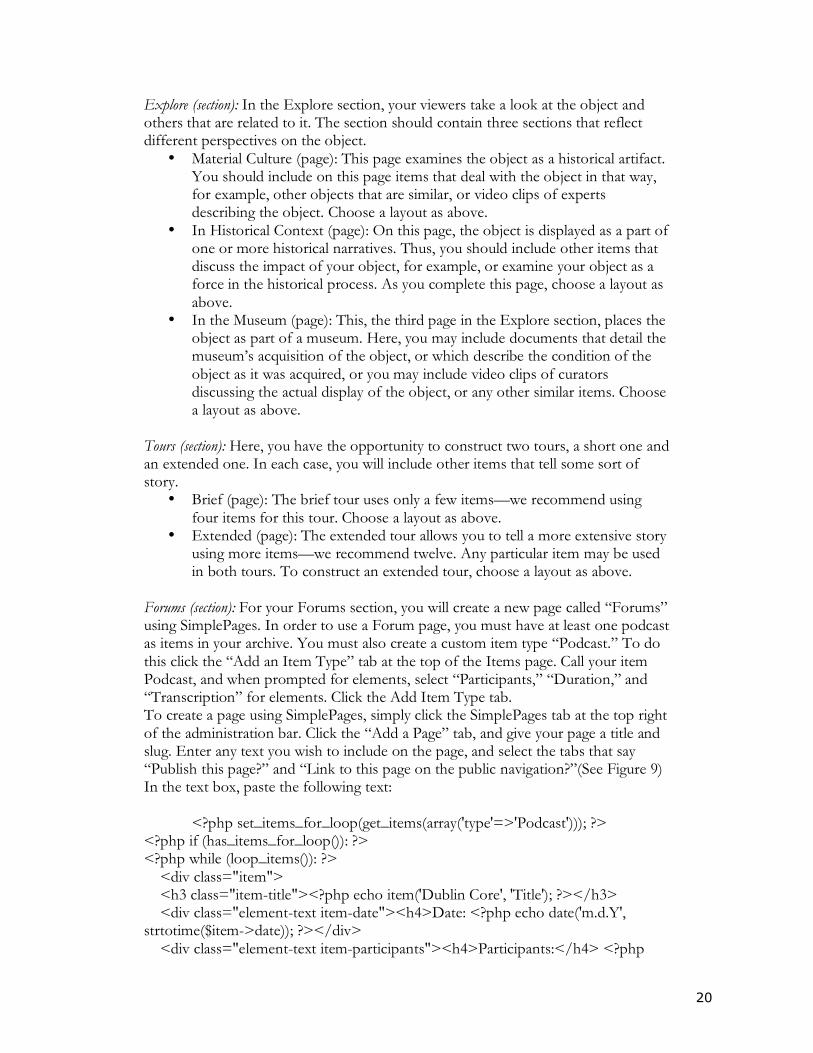
Forums (section): For your Forums section, you will create a new page called “Forums” using SimplePages. In order to use a Forum page, you must have at least one podcast as items in your archive. You must also create a custom item type “Podcast.” To do this click the “Add an Item Type” tab at the top of the Items page. Call your item Podcast, and when prompted for elements, select “Participants,” “Duration,” and “Transcription” for elements. Click the Add Item Type tab. To create a page using SimplePages, simply click the SimplePages tab at the top right of the administration bar. Click the “Add a Page” tab, and give your page a title and slug. Enter any text you wish to include on the page, and select the tabs that say “Publish this page?” and “Link to this page on the public navigation?”(See Figure 9) In the text box, paste the following text: <?php set_items_for_loop(get_items(array('type'=>'Podcast'))); ?> <?php if (has_items_for_loop()): ?> <?php while (loop_items()): ?> <div class="item"> <h3 class="item-title"><?php echo item('Dublin Core', 'Title'); ?></h3> <div class="element-text item-date"><h4>Date: <?php echo date('m.d.Y', strtotime($item->date)); ?></div> <div class="element-text item-participants"><h4>Participants:</h4> <?php
21
echo item('Item Type Metadata', 'Participants') ?></div> <div class="element-text item-duration"><h4>Duration:</h4> <?php echo item('Item Type Metadata', 'Duration') ?></div> <div class="element-text item-description"><?php echo item('Dublin Core', 'Description'); ?></div> <div class="element-text item-file">Listen to the podcast: <?php echo display_files_for_item(); ?></div> </div> <?php endwhile; ?> <?php else: ?> <p>You have no Podcasts. Why don't you add some?</p> <?php endif; ?>
This page will retrieve the all the Podcasts you have entered as items into a single page for viewers.
Figure 9: Adding a Forums page
Resources (section): In this section you’ll include outside resources that users can consult
22
to learn more about the items in your archive. (See Figure 10) • To create a Resources page, create a page called “Resources” using
SimplePages. Next, copy the following text, and paste it into the text box: <?php set_items_for_loop(get_items(array('type'=>'Website'))); ?> <?php if (has_items_for_loop()): ?> <?php while (loop_items()): ?> <div class="item"> <h3 class="item-title"><?php echo item('Dublin Core', 'Title'); ?></h3> <div class="element-text item-url"><em><a href="<?php echo item('Item Type Metadata', 'Local URL') ?>"><?php echo item('Item Type Metadata', 'Local URL') ?></a></em></div> <div class="element-text item-description"><?php echo item('Dublin Core', 'Description'); ?></div> </div> <?php endwhile; ?> <?php else: ?> <p>You have no Resources listed. Why don't you add some?</p> <?php endif; ?>
This page will collect the websites you entered as items into a single page of resources.

23
Figure 10: Adding a Resources Page
Teachers (section): The teachers’ section is designed specifically for educators, and allows you to include classroom activities and highlight any educational standards covered by the site and activities. Your standards are included at the top of the page, while the bottom will include your activities.
• Standards: Include here any state or local standards that your site and activities address or cover.
• Activities: Use the items in your archive to devise classroom activities that will reinforce historical learning. They can be group or individual activities, but they should focus on images, documents, or other items in your site.
• To create your Teachers page, you will use the SimplePages plugin, and copy the following code:
<?php set_items_for_loop(get_items(array('type'=>'Lesson Plan'))); ?> <?php if (has_items_for_loop()): ?> <?php while (loop_items()): ?> <div class="item"> <h3 class="item-title"><?php echo item('Dublin Core', 'Title'); ?></h3>
24
<div class="element-text item-description"><?php echo item('Dublin Core', 'Description'); ?></div> <div class="element-text item-duration"><h4>Duration:</h4> <?php echo item('Item Type Metadata', 'Duration') ?></div> <div class="element-text item-standards"><h4>Standards:</h4> <?php echo item('Item Type Metadata', 'Standards') ?></div> <div class="element-text item-objectives"><h4>Objectives:</h4> <?php echo item('Item Type Metadata', 'Objectives') ?></div> <div class="element-text item-materials"><h4>Materials:</h4> <?php echo item('Item Type Metadata', 'Materials') ?></div> <div class="element-text item-lessonplantext"><h4>Lesson Plan:</h4> <?php echo item('Item Type Metadata', 'Lesson Plan Text') ?></div> </div> <?php endwhile; ?> <?php else: ?> <p>You have no Lesson Plans listed. Why don't you add some?</p> <?php endif; ?> This code will format a Teaching Activities page (you will add the activities as Lesson Plans.) for you, including links to the sites you have selected.
25
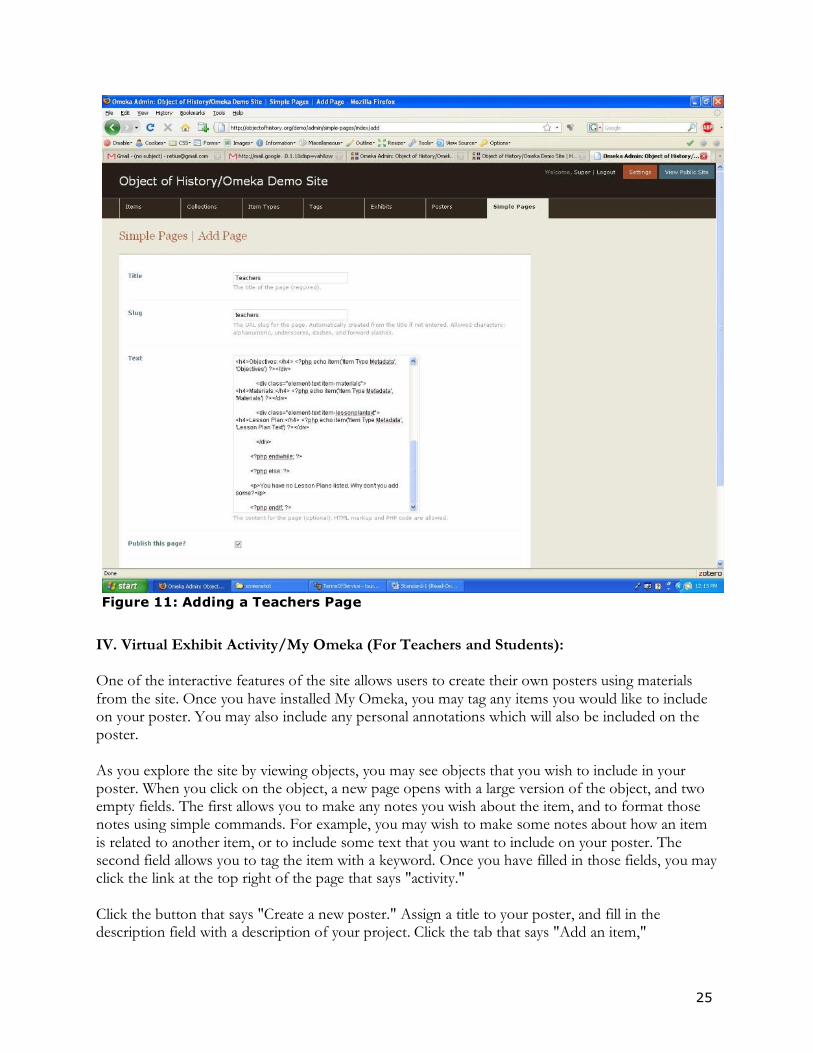
Figure 11: Adding a Teachers Page
IV. Virtual Exhibit Activity/My Omeka (For Teachers and Students): One of the interactive features of the site allows users to create their own posters using materials from the site. Once you have installed My Omeka, you may tag any items you would like to include on your poster. You may also include any personal annotations which will also be included on the poster. As you explore the site by viewing objects, you may see objects that you wish to include in your poster. When you click on the object, a new page opens with a large version of the object, and two empty fields. The first allows you to make any notes you wish about the item, and to format those notes using simple commands. For example, you may wish to make some notes about how an item is related to another item, or to include some text that you want to include on your poster. The second field allows you to tag the item with a keyword. Once you have filled in those fields, you may click the link at the top right of the page that says "activity." Click the button that says "Create a new poster." Assign a title to your poster, and fill in the description field with a description of your project. Click the tab that says "Add an item,"
26
and select the items that you wish to include in your poster. Be sure to save your poster; you may return to edit your poster at any time by clicking the "activity" link at the top of the home page. A note about your home page: When finished, your archive will feature a home page which lists all of your featured collections and items. Should you wish to highlight one particular exhibit—so your visitors will not have to click through to find the exhibit you are highlighting—you may paste this code snippet into the code of your chosen theme: <?php echo show_exhibit_list(); ?> That will tell the browser to place that exhibit prominently on your home page.
27
V. Preparing Content for the Object of History Modules (For Curators and Educators working with content) A. Selecting objects for modules: Selecting the right objects to create Object Lessons around is half the battle. Some objects are iconic and point to key themes and issues in history and others are interesting in and of themselves as pieces of material culture. One hopes to locate items from an institution’s collections that are both. Regardless, as an effort to engage students and teachers with history through careful work with museum’s collections, the Object of History project tries to foreground the importance of teaching both content and historical thinking skills. Though the format of the Object Lessons may not seem to closely direct students in their work, it allows them to explore content based on their interest. Additionally, the narrative text that accompanies each section provides a space for directing student inquiry through the use of investigative questions and prompts. Finally, the accompanying teaching activities allow museum educators to provide authentic tasks that encourage students to think like historians. For examples of the best work that is being done on history education and digital history, consult the National History Education Clearinghouse <http://teachinghistory.org/>. While the site focuses on United States history, the theories and methods that it showcases can be transferred to World History.
1. Teaching standards: Given the rise in high stakes testing on the state level, teachers are frequently tied both to their state standards and to their district pacing guides. Thus, it is useful for museum educators to explicitly tie their materials to those standards. Though there are no official “National” standards, institutions with a nationwide audience can consult the standards developed by the National Center for History in the Schools at the University of California, Los Angeles <http://nchs.ucla.edu/standards/>. Institutions that focus primarily on a local audience will want to use state standards. In some shape or form, each state publishes the current standards that their teachers address. The United States standards for each state have been gathered into a searchable database by the National History Education Clearinghouse <http://teachinghistory.org/teaching-materials>.
2. Historical Thinking and Learning: Teaching historical habits of mind is also a goal of The Object of History Project. While students often have to recall a slew of individual facts for the the multiple choice assessments they take, the craft of history calls for more complex analytical skills. Thus, the teaching activities that accompany Object Lessons have the opportunity to ask students to work with concepts such as multiple perspectives, multiple causality, and change and continuity over time. The selection of the main object and the supporting materials in each Object Lesson are essential to being able to push students to fully grapple with these concepts.
Also, significant cognitive work has been done on the ways that historians address historical evidence. This work, by Sam Wineburg and others, suggests that educators should push students to develop habits of historical reading that lead them to pay attention to the source of an historical source, to read it closely, to contextualize it within the scope of their other knowledge, and to corroborate the claims and content of those sources with other available material. Object Lessons and their teaching activities have the possibility of addressing and reinforcing these skills if the materials are carefully selected, edited and scaffolded.
For more information on the current work on historical thinking, see the following:
• “Best Practices,” National History Education Clearinghouse,
28
<http://teachinghistory.org/best-practices>: A showcase of guides to using different genres of primary sources, examples of historical thinking and exemplary teaching.
• “Issues and Research,” National History Education Clearinghouse, <http://teachinghistory.org/issues-and-research>: contains briefs on the major research on history education, and in-depth analysis of individual topics.
• “Why Historical Thinking Matters,” Historical Thinking Matters http://historicalthinkingmatters.org/why/: a Flash movie introduction to the “habits of mind” that students need to learn to used in analyzing historical sources (sourcing, close reading, contextualizing, and corroboration).
Additional Reading:
• M. Suzanne Donovan and John D. Bransford, eds., How Students Learn History in the Classroom (Washington DC: National Academies Press, 2005). Available at <http://www.nap.edu/catalog.php?record_id=11100>.
• Linda Levstik and Keith Barton, Doing History: Investigating with Children in Elementary and Middle School (Mahwah, NJ: Lawrence Erlbaum Associates, 2005).
• Peter Stearns, Peter Sexias, and Sam Wineburg, eds. Knowing, Teaching, and Learning History: National and International Perspectives (New York: New York University Press, 2000).
• Bruce VanSledgright, In Search of America’s Past: Learning to Read History in Elementary School (New York: Teachers College Press, 2002).
• Sam Wineburg, Historical Thinking and Other Unnatural Acts (Philadelphia: Temple University Press, 2001).
B. Introductory Narrative and themes: The introductory section of the Object Lesson offers the opportunity to set the tone for the entire exploration. Use the text field for those pages to provide some historical background and to lay out the inquiry questions that you suggest students keep in mind as they encounter the main object and the associated materials. If you have the capacity to create an introductory movie, you can raise those issues in that narrative.
1. QTVR or High Resolution images of the objects: The introductory section also allows you the possibility to provide students with a close-up look at the object. Whether you decide to use a 360 degree view through the use of Quicktime Virtual Reality, or you decide to provide a series of high resolution images that focus on different aspects of the object, it is important to direct students to examine the object closely, noting details that might be relevant to its historical significance. C. Selecting supporting materials: You'll want to use other material to help tell your story. You may include documents, photographs or other images, interviews, or other materials. While you may include any items you wish, here we include some recommendations for each page: 1. Object: For this page, you will select and include items that relate to your object in terms of material culture. Documents that specifically address the object and video or audio clips of curators discussing the object itself lend themselves well to this page. 2. Object in History: This page features items that highlight your object’s historical context. Items from the same historical era as your featured object, items that relate to the same themes as your featured object, or items that have similar purposes as your object are all good choices. 3. Object in the Museum: Here, you will include items that deal with the object and its
29
acquisition or display in the museum. Accession records and condition reports are appropriate here, as are video or audio clips of curators discussing ideas for display or exhibit. D. Editing Documents: You may include historical documents on your site, in whole or in part, as supporting materials. When possible, it is nice to provide both an image of the document and a transcription. This allows students to get a feeling for the time period and the style of the communication. Regardless of whether or not you can obtain an image of the source, you should carefully edit the materials. You will want to keep in mind the reading level and attention span of your student audience. A shorter selection that provides meaty content for students to focus on is always better than a long rambling selection that they might not fully and closely read. For reasons both of copyright (with materials created after 1923) and attention span, selections of documents that are 1,000 words or less in length are best. E. Writing annotations: Providing good contextual hints for students is important. Using the Description field in the core metadata, educators should provide and “annotation” or a “headnote” for each source that serves the goal of orienting the student. Annotations provide an opportunity to, first, provide background information about the item, both respect to the larger historical context and the immediate context of the source in relation to the theme of the Object Lesson. Second, the annotations allow for educators to point out particularly elements that students might want to focus on as they analyze the source. F. Securing permissions and providing sourcing information: It is important to let viewers know where the images or documents came from, even if they are public domain items and not subject to copyright. Thus, you should always provide a source for your item, using the Bibliographic Citation field in the core metadata. Libraries, archives, or collections often insist, in fact, that you provide a source and a credit for items you include. You may also find it necessary to secure formal permission for the use of your items, as well. For educational or non-profit use, many institutions will grant permission for a reduced, nominal fee, but you must contact the copyright holder for their terms and policies. G. Interviewing Experts: Along with material objects and documents, you may include clips from experts as objects in your database. The clips may be audio or video, and can add a great deal to the depth and historical perspective in your Object Lessons. In order to keep viewers' interest, keep the clips short—no more than a minute or two. Interviews work best when you have the expert focus on a few general areas: first, ask the expert to spend some time physically describing the object. Next, ask the expert to discuss other items that relate to your object, or that contribute somehow to a historical narrative. Finally, make sure your expert talks about issues of display—how does the object fit into other displays or exhibits, or whether the way it has been exhibited has changed over time.
1. Audio: You may capture audio clips from experts using a variety of methods. Many computers have audio recording capabilities, and handheld digital recorders are common, as well. Once you have recorded your expert's comments, you may edit the audio files and post them as objects in the database.
2. Video: In principle, adding video objects is no different from adding audio objects. The files are somewhat bigger, but the same general concepts apply.
30
H. Additional Resources: This section of the Object Lesson allows you to point to other resources on the Internet that students and teachers might want to explore to learn more about the historical themes associated with the main object. Thus, this page draws together all of the “Website” items from the collection associated with the Object Lesson. In this case, the Description field offers an opportunity to describe the resource and how it might be useful for future work. I. Teaching activities: Each Object Lesson has a space for museum educators to suggest some teaching activities for classroom use. The “Lesson Plan” item type provides a space to identify the relevant standards of learning, and to define a particular activity that teachers might want to use with their students. Here is the place to really address both key historical themes and historical thinking skills mentioned above. J. Forum podcasts: You may provide call-in type forums for your site, as well. Once you have secured subject-matter experts, you can then solicit questions from students or teachers for the expert. If those sessions are recorded, they can be converted to mp3 format and posted on the site for others. While you may use any sound editor you like, we have used Audacity and provide directions here for turning your recorded forums into podcasts (Audacity is free and available for download at http://audacity.sourceforge.net/):
A. Create a new Audacity project by collating your audio clips into the proper sequence.
Use the plot spectrum and compressor tool to normalize the audio. See: http://www.linux.com/feature/52956.
B. Edit the ID3 tags. We have been using v2. Fill in the fields as such:
1) Title-Title of the Episode. A good convention is to begin each one with Episode followed by two numbers, so the first podcast would be Episode 01. Then follow with a title. So it could be Episode 01 Our New Podcast.
2) Artist-Center for History and New Media 3) Album-Title of the Podcast, e.g. Digital Campus, or Voices from the Storm. 4) Genre-Speech
C. Export to mp3. You will need to download and install the LAME library for this. Links and instructions are available on the Audacity site. Once installed, go into the preferences and set mp3 export bit rate to 64. Click File->Export as MP3. Name the file with a similar, but shorter, version of the title. For example Episode 01 Our New Podcast could be ep_01_ournew.
K. Guide to working with your items: Each Object of History site provides a space for institutions to provide a specific guide to working with the types of items in its collection. You may simply link to the Object of History “Guide to Doing History with Objects” < http://objectofhistory.org/guide/>, or by linking to any of the appropriate guides that can be
31
accessed through the National History Education Clearinghouse < http://teachinghistory.org/best-practices/using-primary-sources>, or you may draft your own guide to be posted on this page. If you choose to write your own, you will have to directly edit the individual page using the appropriate html mark-up (see your webmaster for help with this).
Related Documents


