Guide to Confocal 8 Starting session 1.Switch on microscope – box under microscope table. 2.Switch on fluorescent lamp – check that power dial is turned on. 3.Controls to the right of monitors: switch on scan electronics button, switch on fan for lasers and turn key to vertical position to switch lasers on. Check that the orange light above the key comes on. The PC is always left on. 1. Microscope power 2. Fluorescent lamp Heater – if required press orange switch to turn on. Heater is on when the green numbers are illuminated. Change desired temperature with controls on front. Confocal 8 is generally kept close to room temperature (22-27°C). Allow time for the temperature to stabilize if warming. If you want to run an experiment at higher temperatures such as 37°C please use Confocal 9 or one of the other confocals. 3.

Welcome message from author
This document is posted to help you gain knowledge. Please leave a comment to let me know what you think about it! Share it to your friends and learn new things together.
Transcript
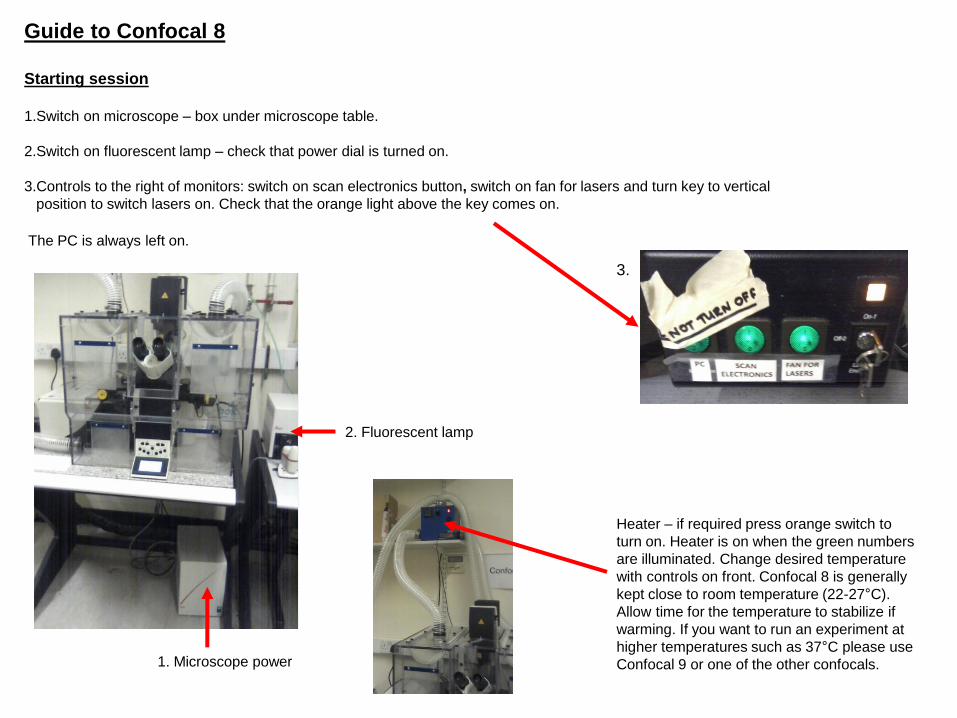
Guide to Confocal 8
Starting session
1.Switch on microscope – box under microscope table.
2.Switch on fluorescent lamp – check that power dial is turned on.
3.Controls to the right of monitors: switch on scan electronics button, switch on fan for lasers and turn key to vertical
position to switch lasers on. Check that the orange light above the key comes on.
The PC is always left on.
1. Microscope power
2. Fluorescent lamp
Heater – if required press orange switch to
turn on. Heater is on when the green numbers
are illuminated. Change desired temperature
with controls on front. Confocal 8 is generally
kept close to room temperature (22-27°C).
Allow time for the temperature to stabilize if
warming. If you want to run an experiment at
higher temperatures such as 37°C please use
Confocal 9 or one of the other confocals.
3.

Starting software:
Remember to make sure scan electronics is switched on before opening software.
To open software click on LAS AF icon on desktop
When prompted do not select “Activate Resonant Scanner” unless you require extremely high speed imaging..
If you want to do a tile scan or “mark and
find” multisite imaging you will need to
initialise the stage. Before clicking “Yes”,
make sure nothing is on the microscope
stage that can come into contact with the
condenser as the stage moves during the
initialisation.
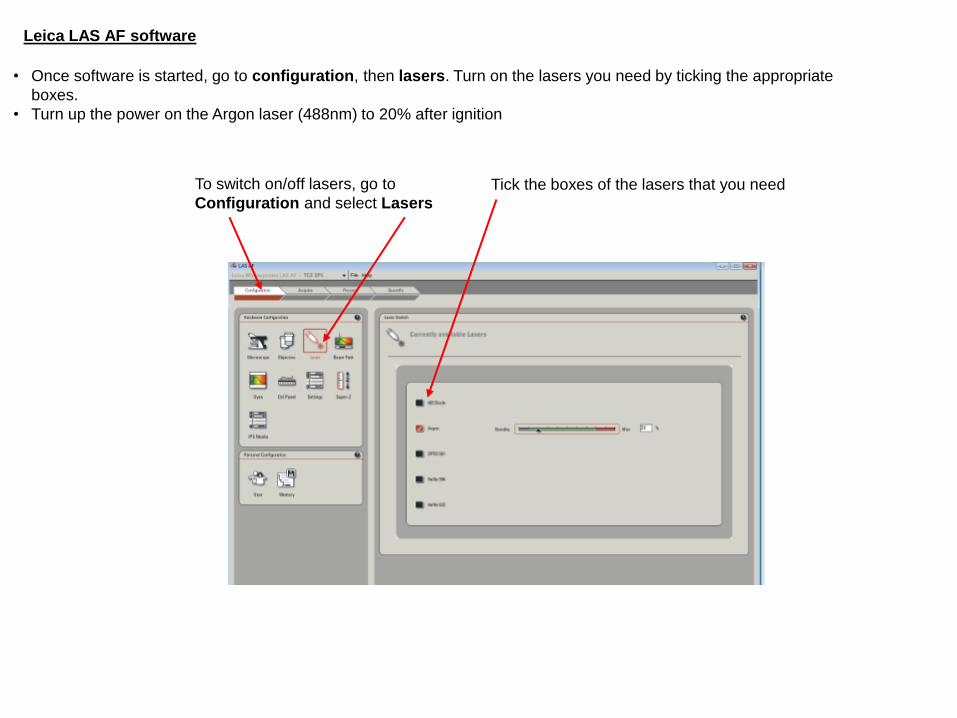
To switch on/off lasers, go to
Configuration and select Lasers Tick the boxes of the lasers that you need
• Once software is started, go to configuration, then lasers. Turn on the lasers you need by ticking the appropriate
boxes.
• Turn up the power on the Argon laser (488nm) to 20% after ignition
Leica LAS AF software

Using the microscope
• Very Important – always select or change objective lens through the software. Do not change lens by hand as this can damage
them by scraping the underside of the stage.
INT- changes intensity of
fluorescent or brightfield
lamp – depending on what
mode is in use
FD -adjusts field diaphragm
of brightfield lamp
AP- adjusts field
diaphragm of
fluuorescent lamp
TL/IL -toggles between fluorescence
and brighfield modes
Toggles through transmitted
light modes.
FITC
filter
cube
TRITC
filter
cube
DAPI filter
cube
Shutter

Notes on using the microscope
• The microscope stage is fitted with a universal specimen holder – adjust the sliders (gently) to the appropriate width.
• Check sample is clean. Clean with tissue and 75% ethanol if necessary.
• Check lens is clean by wiping with non abrasive lens tissue, check the spring loaded top is fully up, check adjustable
aperture dial is fully open (on some lenses).
• Select the correct immersion liquid (type F oil or glycerine) and apply a small drop to lens or sample
• If looking at microscope slides, invert the slide so the coverslip is on the underside.
• If using an oil lens, bring lens up until the lens touches oil.
• Get desired cells in focus and in the middle of the field of view before scanning.
• Avoid exposing your cells unnecessarily to fluorescent light (close shutter asap). Photodamage can also be reduced by reducing
lamp intensity.
• Fluorescent lamp intensity can be increased if fluorescence is weak using the dial on the lamp box.
Fluorescent lamp box
Power dial
Focus Dial (behind)
Select fine focus
Select coarse focus
Move stage in X direction
Move stage in Y direction
For fine XY control
For course XY control

Transmitted light
You can capture transmitted light images (brightfield or DIC) simultaneously with
fluorescence images. Note that none of the lenses on confocal 8 are phase lenses.
Often the microscope will be already set up correctly but if in doubt follow these
steps:
Check that the microscope is set up correctly for viewing transmitted light:
• Get your sample into focus
• Push the top button behind the focus wheel on the left to view sample with
brightfield. Press the upper button behind the focus wheel twice for DIC.
Note that the current mode will be displayed on the front display on the
microscope and if the mode is not possible with the current lens the display
will flash.
• Check aperture diaphragm is open using AP buttons on left side
• Check the condenser position is correct:
• Fully close field diaphragm (see figure), look down eyepieces and
adjust height of the condenser until octagon of light comes into sharp
focus.
• Centre the light if necessary using the pull out screw adjusters (don’t
use these until you can see the outline of the octagon).
• Open field diaphragm
Field diaphragm Adjust height of
condenser
Press once to select brightfield
Press twice to select DIC
For DIC:
When you select DIC a small metal bar will appear on the right hand side of the condenser.
Move this bar from side to side whilst looking down the eyepieces to obtain the best DIC
Image
Ensure that there is no plastic in the light path as this will negatively affect your DIC image.
AP buttons

General acquisition controls
1. View experiment folder – and open new experiment
2. In Acquisition Folder - Select scan mode
3. Activate sequential scan
4. Select tile scan or “Mark and Find” – only active if you have initialised stage
when starting up software. Not available if greyed out.
5. Bidirectional scanning – effectively doubles scan speed. Make sure phase
correction X is set at -33.64
6. General scan settings – minimum recommended pixel size 80nm
7. Zoom control – can either select “Zoom in” and draw ROI on screen or type
in required zoom factor.
8. When zoomed can use these controls to position the image.
9. Line/Frame Average – useful for reducing background noise
10. Z-stack controls –see later for detail
11. Sequential scan controls –see later for details.
1
2
3 4
6
5
7
9
11
8
10
Controls along the bottom of the screen:
Click to scan continuously while
setting PMT gains, laser power,
focus etc……….
Click to capture
series of images
(in Z, T or λ)
Click to capture a
single image

Beam Path Settings
Selecting a flurophore from
this list brings up its
emission spectrum for reference
Click here to select
and change lens
Tick box to capture
brightfield images
(Scan-BF or Scan TL-
DIC)
Fluorescent PMTs
Hybrid Detectors
Brightfield PMT
Tick box to activate detector (PMT or HyD)
Select scan setting
(non sequential settings)
Select to activate lasers
AOTF sliders control % transmission of
lasers. NB the hybrid detectors are very
sensitive and so need only a very low
laser power (usually ≤10%) Setting the
laser power too high will cause the
detector to shut off and may damage the
system.
More important info
about hybrid
detectors on next
page ……………
Double click on the
detector’s slider to define
exact emission wavelengths
to detect
Notch filters suppress
reflection from lasers
(automatically selected).

Hybrid detectors – greater sensitivity and lower noise
There are 3 options
when a hybrid detector is
selected:
Standard – for most
applications
Bright R – can increase
dynamic range by
amplifying dim signals
more than bright ones.
Photon Counting –
allows quantitative
analysis of photons
Always start scanning with a low laser power
(<5%) to avoid hitting detector with too much
light. If there is a lot of saturation, the detector
can be damaged and the software will shut it
off.
It is easier to set the laser power by clicking
on % power and then typing in required value
in box.
Hybrid detector gain is given as a
percentage and smart offset is unavailable.

Basic image optimisation and capture
• Ensure the top of the microscope is in the upright position (90° vertical).
• Select or define a scan setting.
• Check general scan settings – in ‘Acquisition’ and ‘XY’ panels which should be :
• Scan mode (default is xyz), image format (default is 512x512), scan speed (default is 400hz), zoom = 1.
• Usually advantageous to tick [Bidirectional X] which doubles scan speed. (default position is -33.64 and should not be altered)
• Check pinhole size – 1 Airy Unit is optimum
• Click “Live” – sample is scanned continuously allowing you to see changes to the image as you adjust the following main controls:
• Z position (focus) dial
• Gain for PMTs - max 1250v, ideally about 700v to reduce noise
for HyDs - max 500%, ideally ≤100%
• Laser power (using AOTF sliders, or type in required value after right clicking on % power. For the 488 laser can
also use the power slider in the laser configuration window)
• Zoom (either type factor required, move slide, use soft zoom or tick “Zoom in” then select rectangle tool and draw
box on image)
• Adjust these controls quickly to reduce sample fading and then click “STOP”
• Select number of averages – typically 2-4. (NB select either line or frame average – the result will be almost the same for fixed cells
but line averaging (or no averaging) preferable for most live cell imaging.
• Click [Capture Image] to capture single image.
Smart
Gain Smart
offset
Field
Rotation Pinhole Soft
Zoom Z position
Notes:
• Increase format (> 512x512) and/or zoom to optimise XY sampling (pixels 70-100nm, no point going smaller) for best resolution.
• When using PMTs you can decrease the smart offset to make the background blacker, but use carefully as negative offset will subtract
from real signal as well as the background.
• Pinhole should normally be left at its optimum size (1 Airy Unit) but can be increased (e.g. to 2-3) to increase signal (with small loss of
z-resolution). NB pinhole adjustment in software needs pinhole box to be ticked.
• Use “QLUT” next to image window to help judge optimum brightness – pixels will turn blue on saturation and green at zero.
• Double click the PMT or HyD slider to specify the emission wavelengths that you want to detect (emission range should start at least
10nm higher than the excitation wavelength to avoid reflection). Selecting an appropriate notch filter will supress reflection and allow
you to go closer to the excitation line.
• If you have more than 1 fluorophore it’s often advisable to use the sequential scanning mode to avoid “crosstalk” (see next page)

Sequential Scanning set up – for multi-channel imaging
• Click “seq” button and the sequential scan setup window will appear
• The between lines option will be selected by default. This option
acquires images with the smallest time delay between channels
• “Scan 1” will be highlighted. Define settings for your 1st channel:
Select which laser is active, which PMT/HyD is active and the emission
wavelengths you want to detect. These settings will be held in “scan 1”.
• Click on the + sign and “Scan 2” will appear. Turn the laser power for your
1st channel down to 0 and select the laser for your 2nd channel. Deselect
the PMT/HyD used in “Scan 1”and activate a new detector and define the emission
wavelengths.
• Click + again and repeat if you have 3 or more fluorophores.
• Transmitted light channel can be added to any of the sequential channels – contrast usually better
with lower wavelength excitation.
• You can save these settings and then load them up next time by clicking save.
• Click “Live”. The software will start scanning your sample sequentially, switching between your
scan channels after every line in your image – allowing you to view and optimize all the channels
at the same time:
• In your image window, click on the channel you want to adjust. The “smart gain” and “smart
offset” dials will make their adjustments on the channel selected.
• To alter the laser power for a channel, first click on that channel in the sequential scan window,
then change the power using the slider (don’t change a laser power before selecting the
appropriate channel).
• Optimise images (see previous page).

Setting up a Z-stack
1) Open up Z-stack window by clicking arrow top right
2) Set upper and lower limits of the z position for your sample:
Click “Live” and adjust the z position dial until you reach one extreme. Turning
the dial anticlockwise moves to the lowest position.
Click the Begin arrow to mark this position (arrow will be highlighted).
Focus through in the other direction until the other extreme. Click the “end” arrow
Then top the live scan.
3) Click and define Z-step size (better standardisation between stacks) or number of steps.
Note that the “system optimised” value is the optimum step size to maximise Z-resolution with lens you
are using – this is likely to be OTT for most applications except for best quality 3D data. Step size 0.5-
1.0 micron more commonly used, depending on data required and depth of specimen.
4) Click “Start” to capture the stack
Notes
• The default focus mechanism is the z-galvo. This is faster than the other option (z-wide) but has a
range limit of 500 microns.
• Photobleaching is more likely to occur when capturing large stacks of data compared with single
images. If this is a problem, try:
Using a lower laser power and higher gain
Taking fewer sections
Using fewer averages
• As a rough guide, to get a decent set of data for 3D reconstruction, you typically need at least 20
sections and 0.5 micron steps or smaller for relatively thin samples.
• Brightness levels of your fluorophore may be different at different z positions. When adjusting laser
powers and gains, bear this in mind – a good setting at one z position may oversaturate the PMT at
another.

Timecourses
1. Select the appropriate acquisition mode from the drop down list.
• xyt for capturing images at a single plane of focus over time.
• xyzt for capturing a z-stack over time
2. A new dialogue box appears in which you can define the timecourse
• Time interval – time between acquisiton of images
• Ticking “Minimize” will give the minimum time interval at the
current settings taking into account the scan speed, scan
resolution, number of averages etc…
• Define the number of frames, duration of experiment or whether
to continue until stopped
3. Click “Apply”
4. In the XY dialogue box set the number of averages (best to use line
average with live cells)
5. Click “Start” to begin capturing timecourse
Notes
• Generally use a lower laser power, less averaging and consider opening
pinhole for live cell imaging to limit photo-damage.
• To increase the speed of acquisition you can alter these settings in the xy
dialogue box:
• Bidirectional scanning (doubles speed. No effect on image quality).
• Use less averages.
• Change scan format (e.g. 512 x 256 pixel resolution will double
speed).
• Change scan speed (faster speeds will decrease image quality).
• Use the environmental chamber heater if you want your experiments to
run at a particular temperature. The heater should be switched on at
least 1 hour (preferably much longer) prior to use to allow the system
temperature to stabilize.
• Consider using the Adaptive Focus Control to avoid focal drift during
your experiment due to thermal expansion / contraction (see next page)
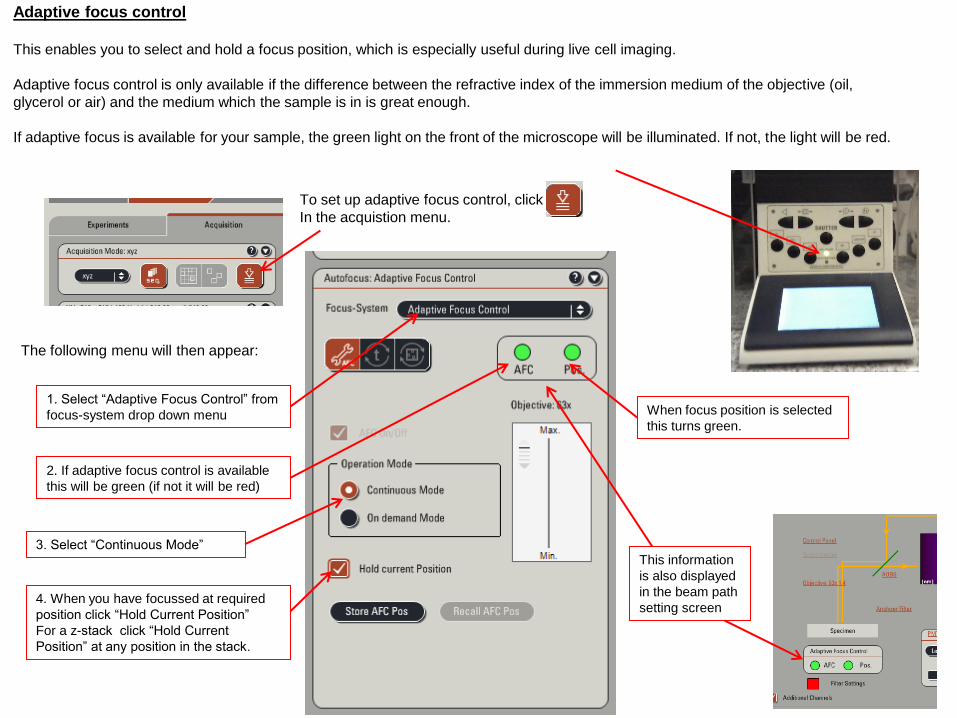
Adaptive focus control
This enables you to select and hold a focus position, which is especially useful during live cell imaging.
Adaptive focus control is only available if the difference between the refractive index of the immersion medium of the objective (oil,
glycerol or air) and the medium which the sample is in is great enough.
If adaptive focus is available for your sample, the green light on the front of the microscope will be illuminated. If not, the light will be red.
To set up adaptive focus control, click
In the acquistion menu.
The following menu will then appear:
1. Select “Adaptive Focus Control” from
focus-system drop down menu
2. If adaptive focus control is available
this will be green (if not it will be red)
3. Select “Continuous Mode”
4. When you have focussed at required
position click “Hold Current Position”
For a z-stack click “Hold Current
Position” at any position in the stack.
When focus position is selected
this turns green.
This information
is also displayed
in the beam path
setting screen

Saving images
• Each single scan or series scan sends a file to the experiment folder.
These files are held in RAM until you save them to the hard disk. Click “Save all”
to save the experiment folder and all of the images within it.
• The first time you click save you will be prompted to give the experiment folder a
name and location. Save your images in your own folder within the “users”
directory on the D-drive.
• A single lif file is saved for all the images within an experiment folder. The lif file
contains information about how the images were captured which may be useful
post-acquisition.
• Images or series can be exported as tiffs or avi files by right clicking on the file in
the experiment folder….export. After selecting a file type you can chose whether
to export an overlay of your different channels or separate images for
different channels.
Data on our computers should not be considered secure and should be backed up
as soon as possible. Old data is also regularly deleted from our computers at the
end of each month.
The users directory is shared and can be contacted over the network from your
own computer:
• Using a pc: go to the start menu….run
enter \\ IP address confocal 8
• Using a mac: goto go menu….connect to server
enter smb:\\ IP address confocal 8

Ending the session
• Clean oil off lenses with lens tissue.
• If doing live cell imaging, dampen lens tissue with 100% ethanol, clean lens, then dry lens with a dry piece of lens tissue.
• Clean other used surfaces with 75% ethanol
• Fill in log sheet – shortcut on desktop of computer – you need to enter the date, your UOB username and the time you
started and ended your session. Save file after completion.
• Check Google calendar to see if system is booked after you:
If someone else is booked on within next 3 hours:
• Go to Laser configuration window:
• Turn Argon laser power down to 0% but leave box ticked
• Untick other lasers
• Fluorescent lamp can be switched off if there is a small gap (>5 minutes) before next booking
• Leave everything else on
If there is no booking within the next 3 hours:
• Go to laser configuration window:
• Turn down power on the Argon laser to 0% and untick box.
• Untick all other laser boxes
• Turn key off (box on right of table) and leave fan running for at least 5 minutes
• Exit software. Wait until software is fully closed before switching off scan electronics button.
• Switch off fluorescent lamp
• Switch off microscope.

Appendix
Other features not covered in this guide:
• Resonance scanner mode (scan speed of 8000Hz)
• “Mark and Find” imaging – allows capture of images at mulitple sites during a timecourse.
• Tile scanning – allows capture and automatic stitching of adjacent area on a sample.
• Live data mode – allows capture of images at multiple sites, using different lasers, laser powers, detector gains, zoom
factor etc.. at each site
• FRAP wizard
• FRET wizard
Related Documents