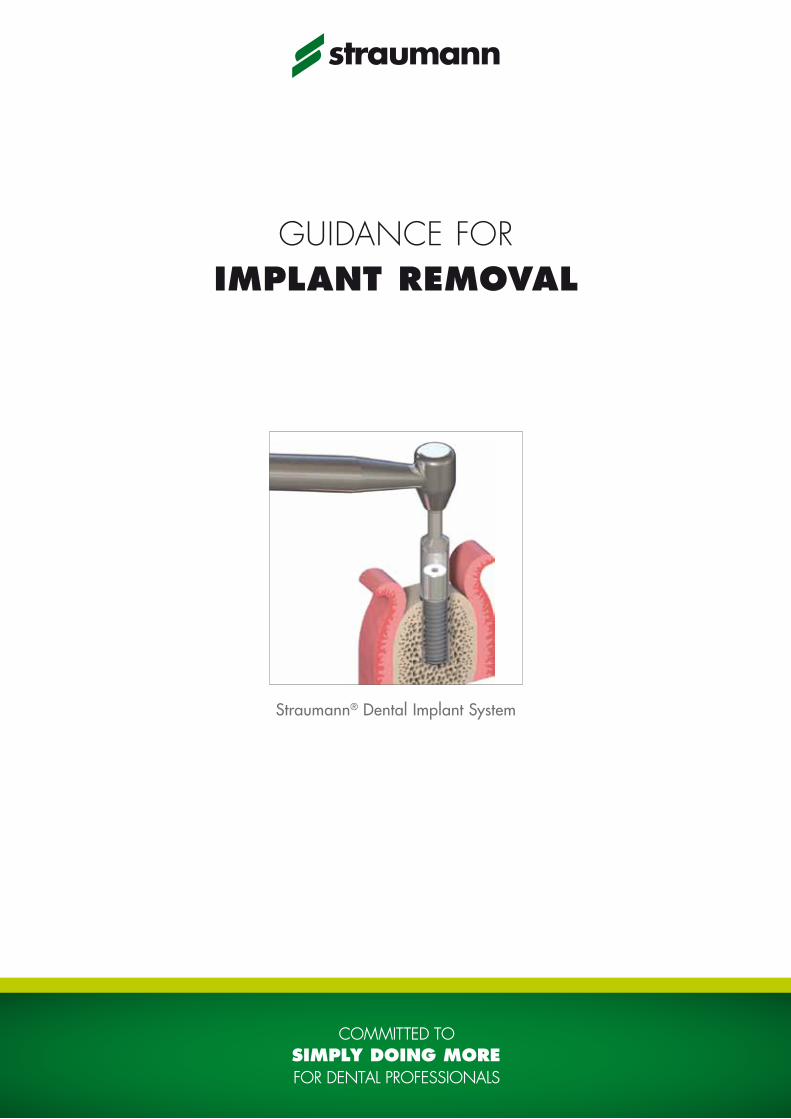
GUIDANCE FOR IMPLANT REMOVAL Straumann ® Dental Implant System

Welcome message from author
This document is posted to help you gain knowledge. Please leave a comment to let me know what you think about it! Share it to your friends and learn new things together.
Transcript
Guidance for implant removal
Straumann® Dental Implant System
The iTi (international Team for implantology) is academic partner of institut Straumann aG in the areas of research and education.
conTenTS
1. About this guide 2
2. Guidance for implant removal 42.1 removal of non-osseointegrated implants 4
2.1.1 Potential situations that might require the removal of non-osseointegrated implants 4
2.1.2 devices required for the removal of non-osseointegrated implants 4
2.1.3 Step-by-step instruction for removal of non-osseointegrated implants 6
2.1.4 removal of a fractured transfer piece 8
2.2 removal of osseointegrated implants 10
2.1.1 Potential situations that might require the removal of osseointegrated implants 10
2.2.2 devices required for the removal of osseointegrated implants 10
2.2.3 Step-by-step instruction for removal of osseointegrated implants 15
3. Further information 193.1 care and maintenance 19
4. Important guidelines 20
2
Straumann® implants have been extensively researched, clinically tested and successfully used. The optimized design follows a philosophy called Bone control design™, which is based on the five biological key principles in implant dentistry:
p osteoconductivity of the implant surface p control of the microgap p Biomechanical implant design p Biological distance p Position of the surface interface
With the Bone control design™, Straumann® implants are designed to achieve optimal preservation of crestal bone and soft tissue stability.
However, there might be circumstances that require a removal of an implant. in the event a removal of a Straumann® implant is needed, this guide provides rules and instructions. it is valid for the whole Straumann® dental implant System*.
This guide contains two major sections: removal of non-osseointegrated im-plants and removal of osseointegrated implants.
Note it is the clinicians’ responsibility to assess the extent of osseointegration at the time of the planned removal.
WarningThe descriptions given are insufficient to allow immediate use of the Straumann® dental implant System. Guidance in the handling of the Straumann® dental implant System by an operator experienced in its use is strongly recommended. Straumann® implants must only be used by dentists, doctors, and operators trained in the use of the system. The iTi and institut Straumann aG hold regular training courses.
* Straumann® ceramic implants excluded.
1. aBouT THiS Guide
3
Straumann products must be secured against aspiration and swallowing when used intraorally. do not use damaged or blunt instruments. always inspect instruments before use. The Straumann® 48 h explantation device for the Straumann® dental implant System may only be used for the explantation of non-osseointegrated Straumann® implants.
Cautionfederal law restricts this device to sale by or on the order of a dental profes-sional.
4
2.1 Removal of non-osseointegrated implants
in principle, tools for the removal of non-osseointegrated implants can be used within 48 hours after implant insertion. it is the clinicians’ responsibility to assess the extent of osseointegration at the time of the planned removal.
2.1.1 Potential situations that might require the removal of non-osseointegrated implants
p Surgical complications p Sub-optimal position with or without broken transfer piece p infection of the surrounding tissue p Patient’s wish
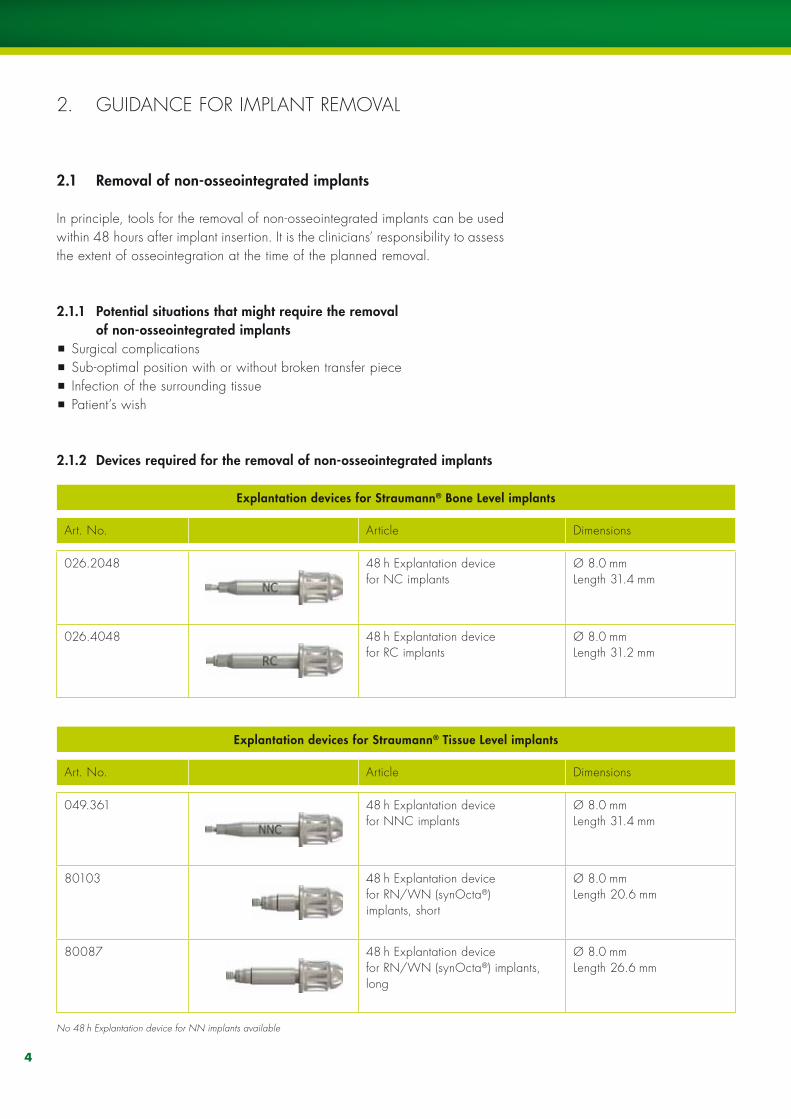
2.1.2 Devices required for the removal of non-osseointegrated implants
2. Guidance for iMPLanT reMoVaL
Explantation devices for Straumann® Bone Level implants
art. no. article dimensions
026.2048 48 h explantation device for nc implants
Ø 8.0 mm Length 31.4 mm
026.4048 48 h explantation device for rc implants
Ø 8.0 mm Length 31.2 mm
Explantation devices for Straumann® Tissue Level implants
art. no. article dimensions
049.361 48 h explantation device for nnc implants
Ø 8.0 mm Length 31.4 mm
80103 48 h explantation device for rn/Wn (synocta®) implants, short
Ø 8.0 mm Length 20.6 mm
80087 48 h explantation device for rn/Wn (synocta®) implants, long
Ø 8.0 mm Length 26.6 mm
No 48 h Explantation device for NN implants available
5
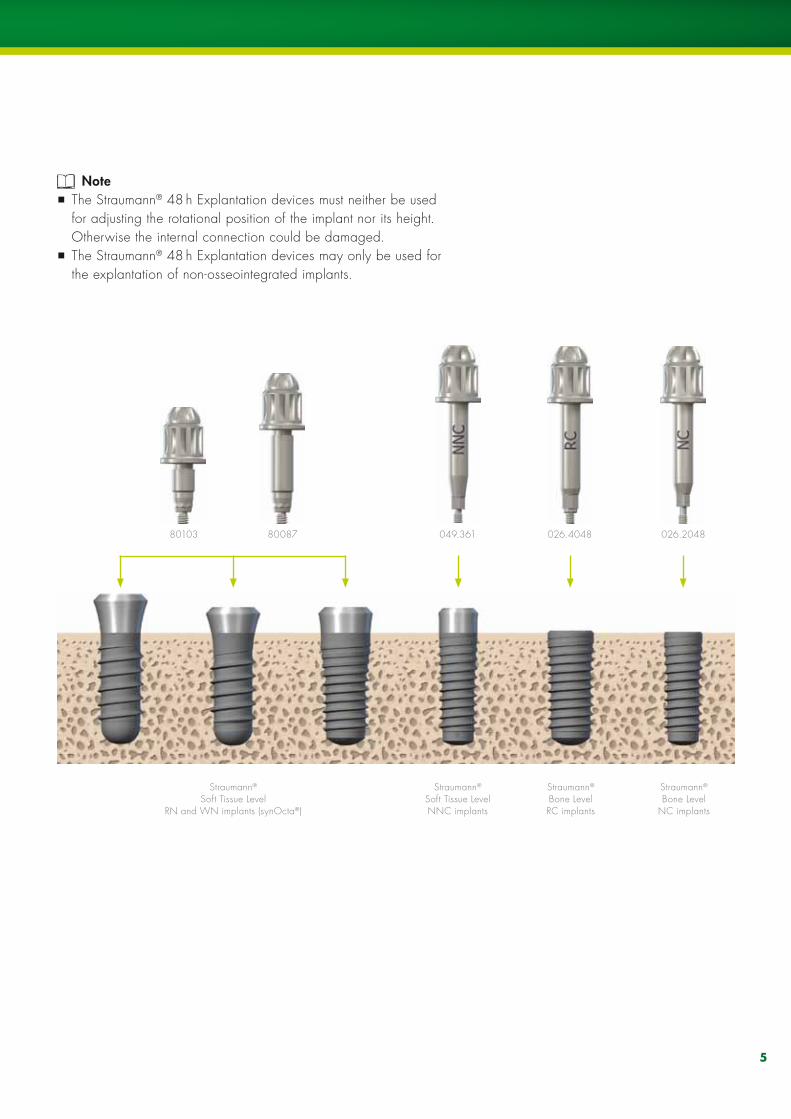
Note p The Straumann® 48 h explantation devices must neither be used for adjusting the rotational position of the implant nor its height. otherwise the internal connection could be damaged.
p The Straumann® 48 h explantation devices may only be used for the explantation of non-osseointegrated implants.
Straumann® Soft Tissue Level
rn and Wn implants (synocta®)
Straumann® Soft Tissue Levelnnc implants
80103 80087 049.361 026.4048 026.2048
Straumann® Bone Level rc implants
Straumann® Bone Level
nc implants
6
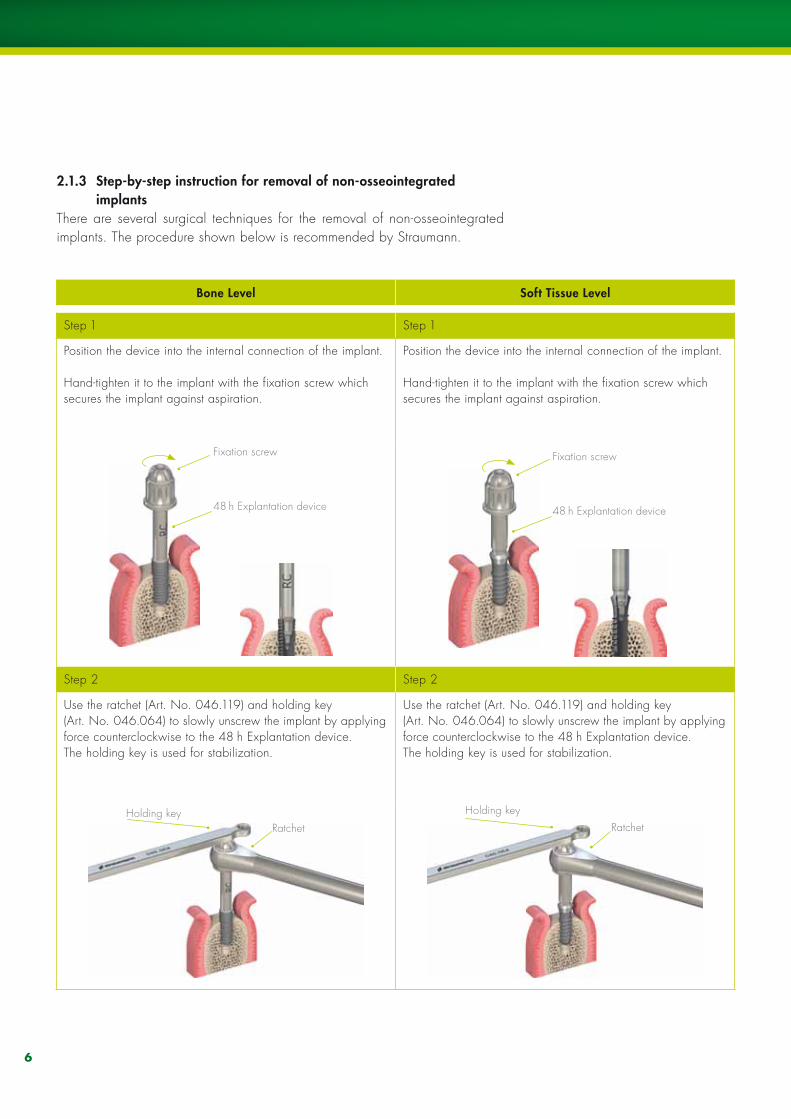
2.1.3 Step-by-step instruction for removal of non-osseointegrated implants
There are several surgical techniques for the removal of non-osseointegrated implants. The procedure shown below is recommended by Straumann.
Bone Level Soft Tissue Level
Step 1 Step 1
Position the device into the internal connection of the implant.
Hand-tighten it to the implant with the fixation screw which secures the implant against aspiration.
Position the device into the internal connection of the implant.
Hand-tighten it to the implant with the fixation screw which secures the implant against aspiration.
fixation screw
48 h explantation device
fixation screw
48 h explantation device
Step 2 Step 2
use the ratchet (art. no. 046.119) and holding key (art. no. 046.064) to slowly unscrew the implant by applying force counterclockwise to the 48 h explantation device. The holding key is used for stabilization.
use the ratchet (art. no. 046.119) and holding key (art. no. 046.064) to slowly unscrew the implant by applying force counterclockwise to the 48 h explantation device. The holding key is used for stabilization.
Holding keyratchet
Holding key
ratchet
7
Warningremoved implants must not be reused! The connection configuration of the implant might be damaged after usage of the 48 h explantation device which may impact the prosthetic restoration.
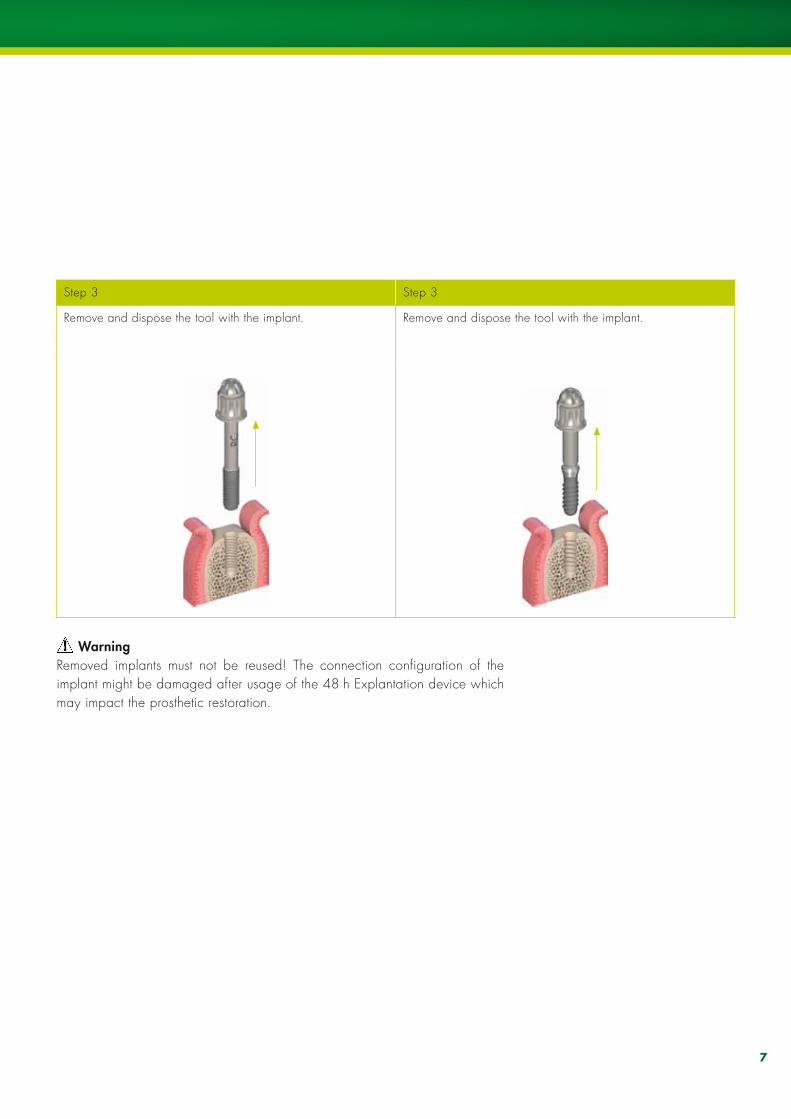
Step 3 Step 3
remove and dispose the tool with the implant. remove and dispose the tool with the implant.
8
2.1.4 Removal of a fractured transfer piecea broken transfer piece is a result of a too high torque. The predetermined breakage point protects the implant against deformation.
in case of fracture of the transfer piece, the following additional steps (steps 0a, 0b and 0c) are required first, followed by the general procedure shown in Step 1, Step 2 and Step 3 (see pages 15–18).
Note if the implant is positioned correctly, only the broken transfer piece has to be removed. The implant can be kept.
CautionSmall parts can be swallowed or aspirated. Make sure the counter nut is not aspirated or swallowed! as a protection, the use of rubber dam or a fixation with dental floss is recommended.
Bone Level Soft Tissue Level
Step 0a Step 0a
remove the adapter with the screw head. remove the adapter with the screw head.
adapter
Screw head
counter nut
implant
Transfer piece
adapter
Screw head
counter nut
implant
Transfer piece

9
Bone Level Soft Tissue Level
Step 0b Step 0b
remove the counter nut from the implant.unscrewing is not needed.
in case of jamming, turn the counter nut counterclockwise with the holding key until it loosens. Then remove the counter nut.
remove the counter nut from the implant.unscrewing is not needed.
in case of jamming, turn the counter nut counterclockwise with the holding key until it loosens. Then remove the counter nut.
Step 0c Step 0c
remove the remaining screw, which is still fixed with the implant by tweezers, artery forceps or by hand with counterclockwise rotations.
remove the remaining screw, which is still fixed with the implant by tweezers, artery forceps or by hand with counterclockwise rotations.
Then follow steps 1–3 as described on page 6 and 7.
10
2.2 Removal of osseointegrated implants
it is the clinicians’ responsibility to assess the extent of osseointegration at the time of the planned implant removal.
2.1.1 Potential situations that might require the removal of osseointegrated implants
p unsatisfactory osseointegration p Peri-implantitis p infection of the surrounding tissue p Sub-optimal position of the implant p Patient’s wish
2.2.2 Devices required for the removal of osseointegrated implantsfor the removal of an osseointegrated Straumann® dental implant an explanta-tion drill as well as the corresponding explantation aid is needed.
Explantation drillsMake sure that the length of the inner bore of the explantation drill is longer than the overall length of implant and explantation aid. otherwise a full immer-sion of the explantation drill into the bone is not possible.
Explantation drill length
Maximum implant length
BL implants. S implants SP implants
Short drill 10 mm 6 mm 8 mm
Medium drill all lengths 12 mm 14 mm
Long drill for all implant lengths
choose diameter of the explantation drill according to endosteal implant diameter. for Te implants choose explantation drills for Straumann® dental implants Ø 4.8 mm. note, there is no drill for the Te Wn implant (with shoulder Ø 6.5 mm).
11
Explantation drills for Straumann® dental implants Ø 3.3 mm
art. no. article dimensions Speed
044.330 explantation drill, short
inner Ø 3.6 mmouter Ø 4.2 mmoverall length 32 mm
max. 400 rpm
044.331 explantation drill, medium
inner Ø 3.6 mmouter Ø 4.2 mmoverall length 37.5 mm
max. 400 rpm
044.332 explantation drill, long
inner Ø 3.6 mmouter Ø 4.2 mmoverall length 40.5 mm
max. 400 rpm
Explantation drills for Straumann® dental implants Ø 4.1 mm
art. no. article dimensions Speed
044.340 explantation drill, short
inner Ø 4.2 mmouter Ø 4.8 mmoverall length 32 mm
max. 300 rpm
044.341 explantation drill, medium
inner Ø 4.2 mmouter Ø 4.8 mmoverall length 37.5 mm
max. 300 rpm
044.342 explantation drill, long
inner Ø 4.2 mmouter Ø 4.8 mmoverall length 40.5 mm
max. 300 rpm
Explantation drills for Straumann® dental implants Ø 4.8 mm
art. no. article dimensions Speed
044.344 explantation drill, short
inner Ø 4.9 mmouter Ø 5.5 mmoverall length 32 mm
max. 200 rpm
044.345 explantation drill, medium
inner Ø 4.9 mmouter Ø 5.5 mmoverall length 37.5 mm
max. 200 rpm
044.346 explantation drill, long
inner Ø 4.9 mmouter Ø 5.5 mmoverall length 40.5 mm
max. 200 rpm
12
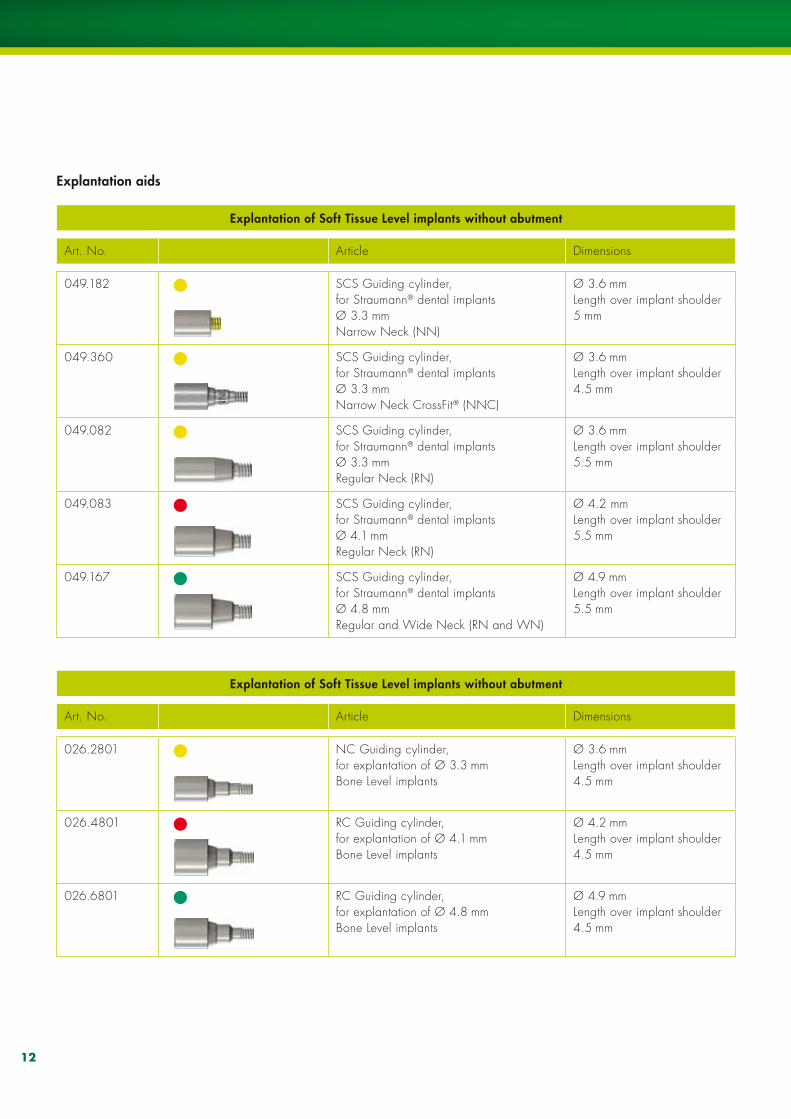
Explantation of Soft Tissue Level implants without abutment
art. no. article dimensions
049.182 ScS Guiding cylinder,for Straumann® dental implantsØ 3.3 mmnarrow neck (nn)
Ø 3.6 mmLength over implant shoulder 5 mm
049.360 ScS Guiding cylinder,for Straumann® dental implants Ø 3.3 mmnarrow neck crossfit® (nnc)
Ø 3.6 mmLength over implant shoulder 4.5 mm
049.082 ScS Guiding cylinder, for Straumann® dental implantsØ 3.3 mmregular neck (rn)
Ø 3.6 mmLength over implant shoulder 5.5 mm
049.083 ScS Guiding cylinder, for Straumann® dental implantsØ 4.1 mmregular neck (rn)
Ø 4.2 mmLength over implant shoulder 5.5 mm
049.167 ScS Guiding cylinder, for Straumann® dental implantsØ 4.8 mm regular and Wide neck (rn and Wn)
Ø 4.9 mmLength over implant shoulder 5.5 mm
Explantation of Soft Tissue Level implants without abutment
art. no. article dimensions
026.2801 nc Guiding cylinder, for explantation of Ø 3.3 mmBone Level implants
Ø 3.6 mmLength over implant shoulder 4.5 mm
026.4801 rc Guiding cylinder, for explantation of Ø 4.1 mmBone Level implants
Ø 4.2 mmLength over implant shoulder 4.5 mm
026.6801 rc Guiding cylinder, for explantation of Ø 4.8 mmBone Level implants
Ø 4.9 mmLength over implant shoulder 4.5 mm
Explantation aids
13
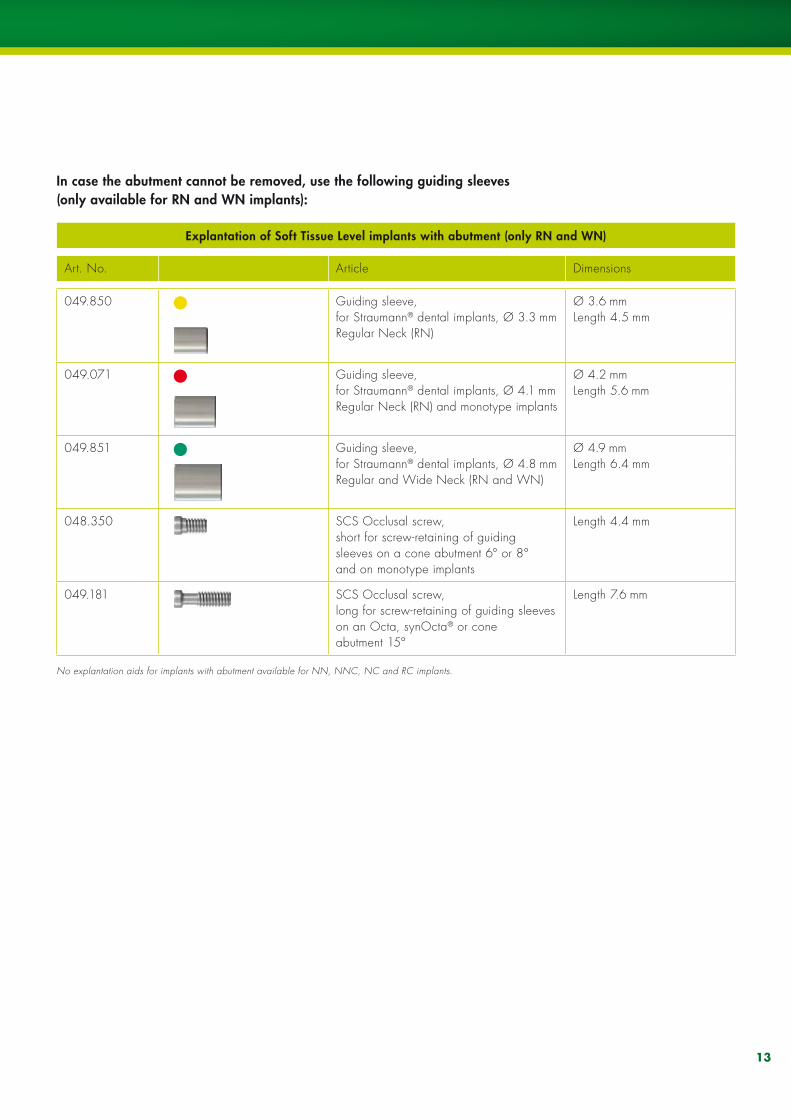
Explantation of Soft Tissue Level implants with abutment (only RN and WN)
art. no. article dimensions
049.850 Guiding sleeve, for Straumann® dental implants, Ø 3.3 mm regular neck (rn)
Ø 3.6 mmLength 4.5 mm
049.071 Guiding sleeve, for Straumann® dental implants, Ø 4.1 mmregular neck (rn) and monotype implants
Ø 4.2 mmLength 5.6 mm
049.851 Guiding sleeve, for Straumann® dental implants, Ø 4.8 mmregular and Wide neck (rn and Wn)
Ø 4.9 mmLength 6.4 mm
048.350 ScS occlusal screw, short for screw-retaining of guiding sleeves on a cone abutment 6° or 8° and on monotype implants
Length 4.4 mm
049.181 ScS occlusal screw, long for screw-retaining of guiding sleeves on an octa, synocta® or cone abutment 15°
Length 7.6 mm
In case the abutment cannot be removed, use the following guiding sleeves (only available for RN and WN implants):
No explantation aids for implants with abutment available for NN, NNC, NC and RC implants.
14
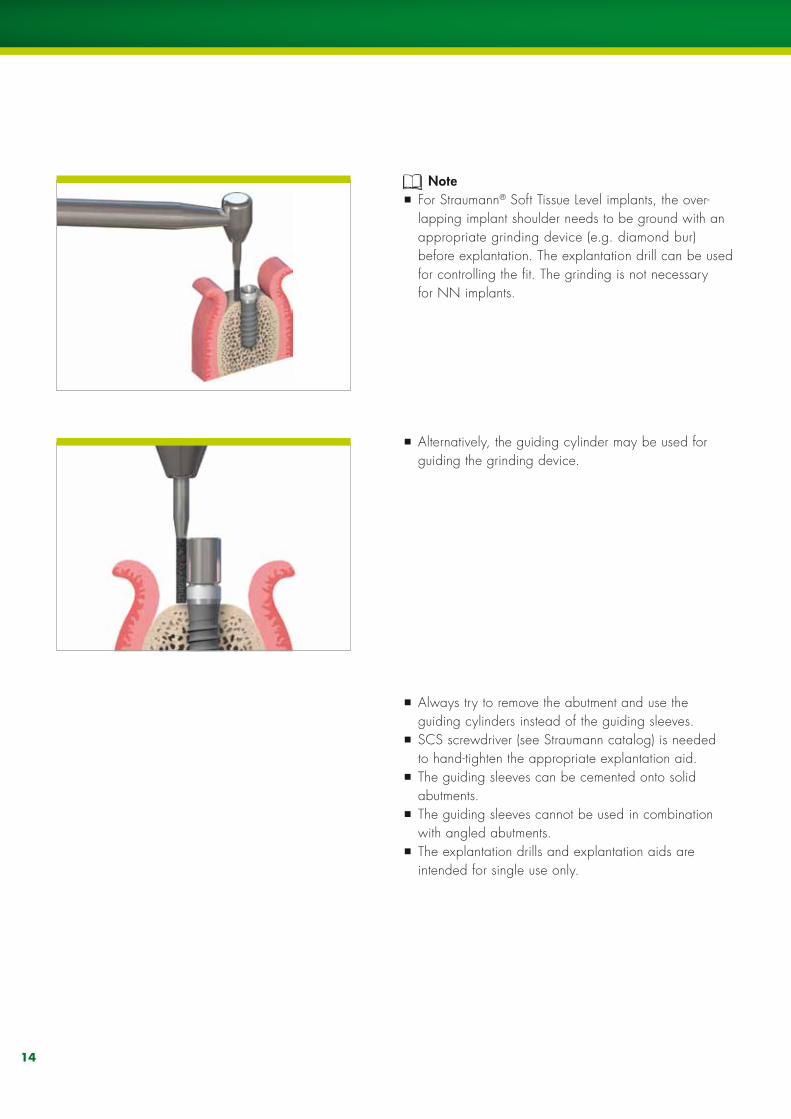
Note p for Straumann® Soft Tissue Level implants, the over-lapping implant shoulder needs to be ground with an appropriate grinding device (e.g. diamond bur) before explantation. The explantation drill can be used for controlling the fit. The grinding is not necessary for nn implants.
p alternatively, the guiding cylinder may be used for guiding the grinding device.
p always try to remove the abutment and use the guiding cylinders instead of the guiding sleeves.
p ScS screwdriver (see Straumann catalog) is needed to hand-tighten the appropriate explantation aid.
p The guiding sleeves can be cemented onto solid abutments.
p The guiding sleeves cannot be used in combination with angled abutments.
p The explantation drills and explantation aids are intended for single use only.
15
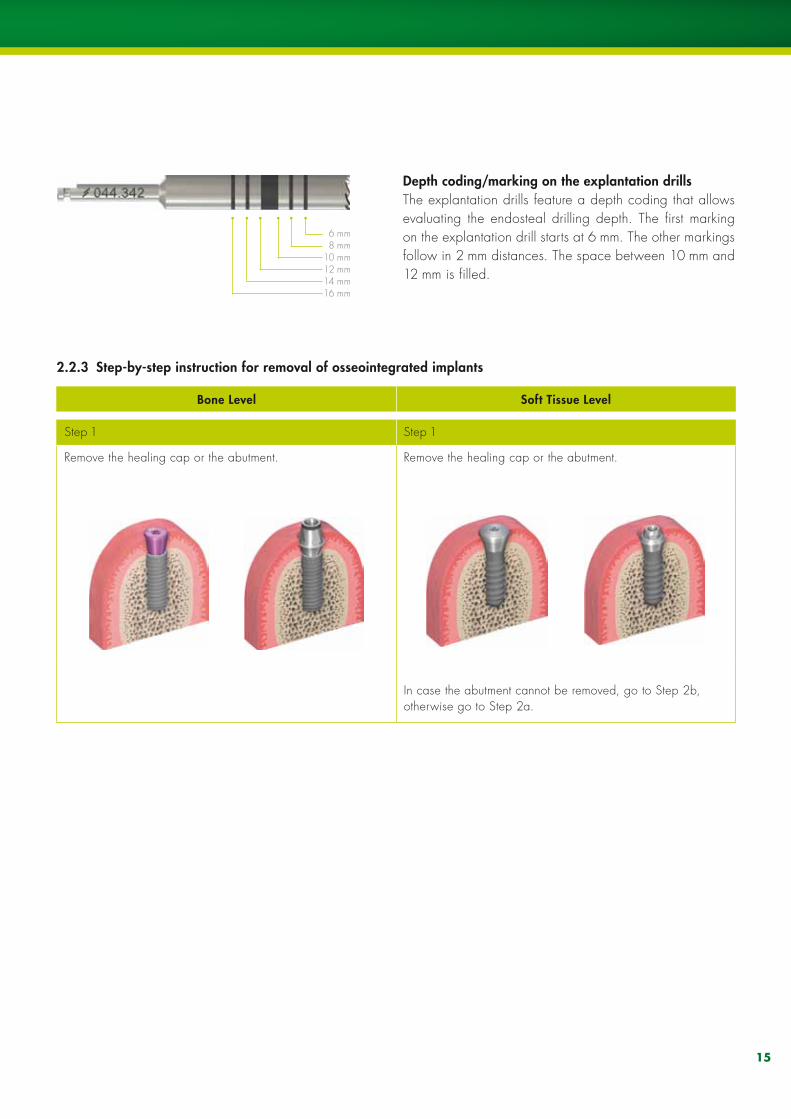
6 mm8 mm
10 mm12 mm14 mm16 mm
2.2.3 Step-by-step instruction for removal of osseointegrated implants
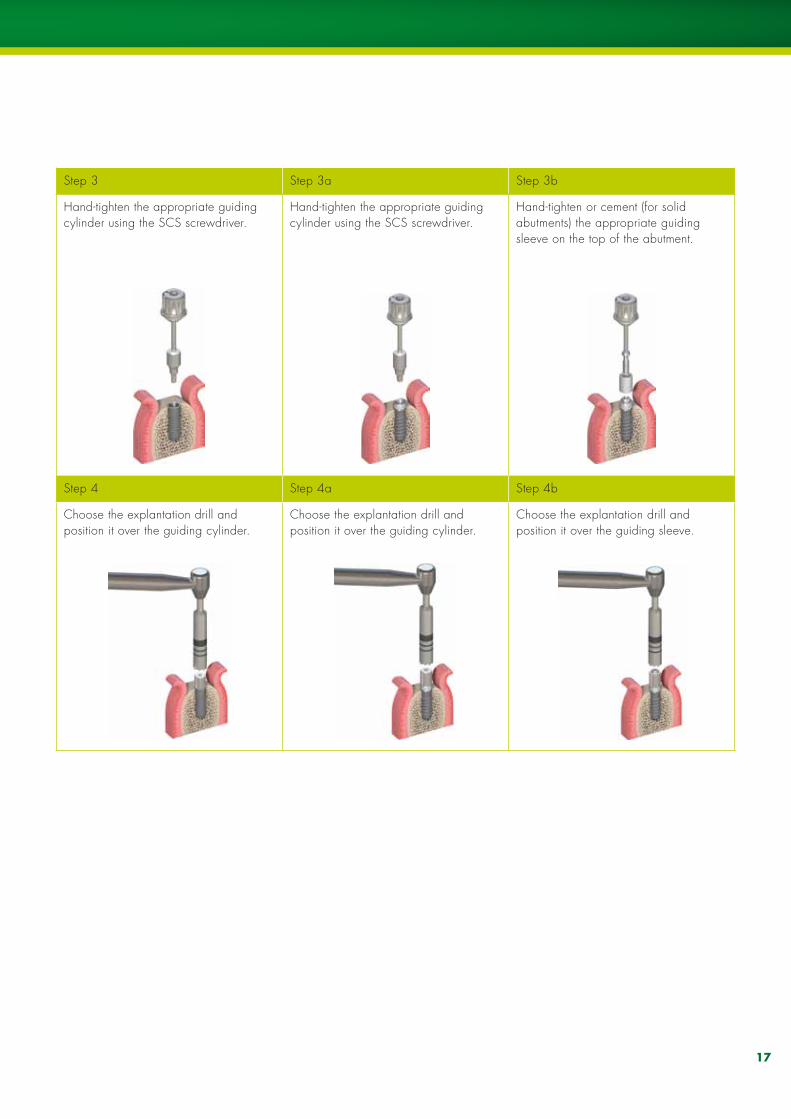
Bone Level Soft Tissue Level
Step 1 Step 1
remove the healing cap or the abutment. remove the healing cap or the abutment.
in case the abutment cannot be removed, go to Step 2b, otherwise go to Step 2a.
Depth coding/marking on the explantation drillsThe explantation drills feature a depth coding that allows evaluating the endosteal drilling depth. The first marking on the explantation drill starts at 6 mm. The other markings follow in 2 mm distances. The space between 10 mm and 12 mm is filled.
16
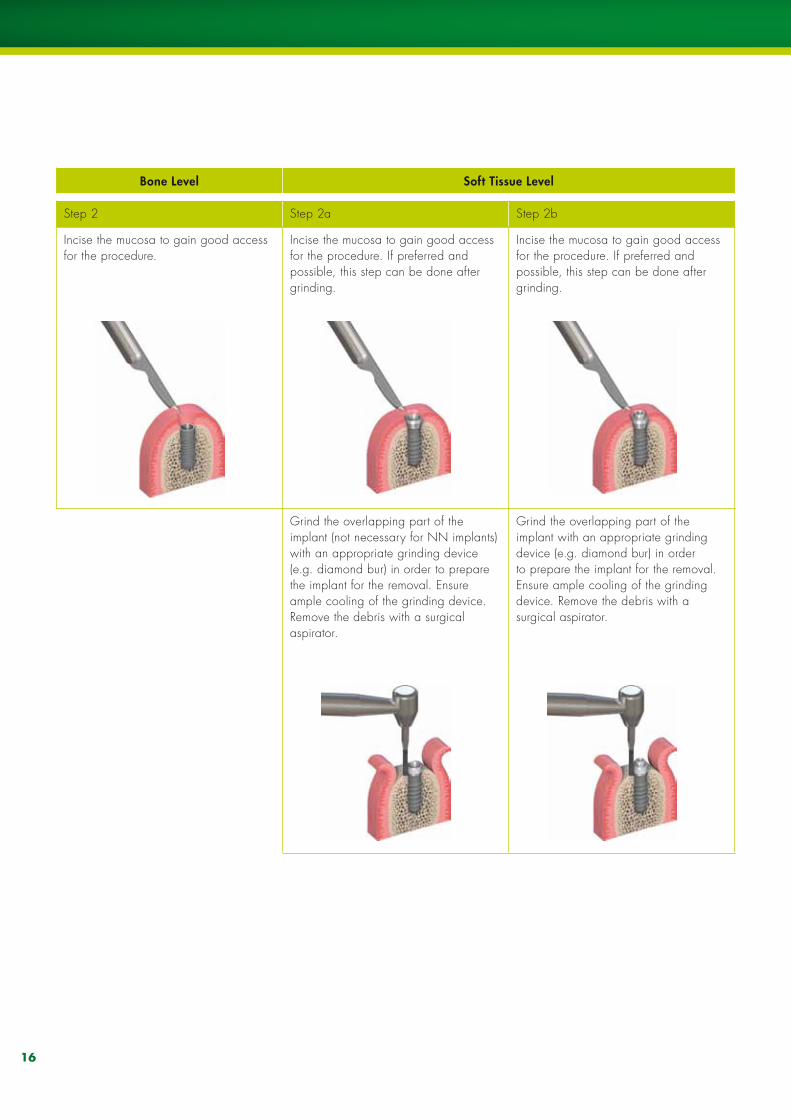
Bone Level Soft Tissue Level
Step 2 Step 2a Step 2b
incise the mucosa to gain good access for the procedure.
incise the mucosa to gain good access for the procedure. if preferred and possible, this step can be done after grinding.
incise the mucosa to gain good access for the procedure. if preferred and possible, this step can be done after grinding.
Grind the overlapping part of the implant (not necessary for nn implants) with an appropriate grinding device (e.g. diamond bur) in order to prepare the implant for the removal. ensure ample cooling of the grinding device. remove the debris with a surgical aspirator.
Grind the overlapping part of the implant with an appropriate grinding device (e.g. diamond bur) in order to prepare the implant for the removal. ensure ample cooling of the grinding device. remove the debris with a surgical aspirator.
17
Step 3 Step 3a Step 3b
Hand-tighten the appropriate guiding cylinder using the ScS screwdriver.
Hand-tighten the appropriate guiding cylinder using the ScS screwdriver.
Hand-tighten or cement (for solid abutments) the appropriate guiding sleeve on the top of the abutment.
Step 4 Step 4a Step 4b
choose the explantation drill and position it over the guiding cylinder.
choose the explantation drill and position it over the guiding cylinder.
choose the explantation drill and position it over the guiding sleeve.
18
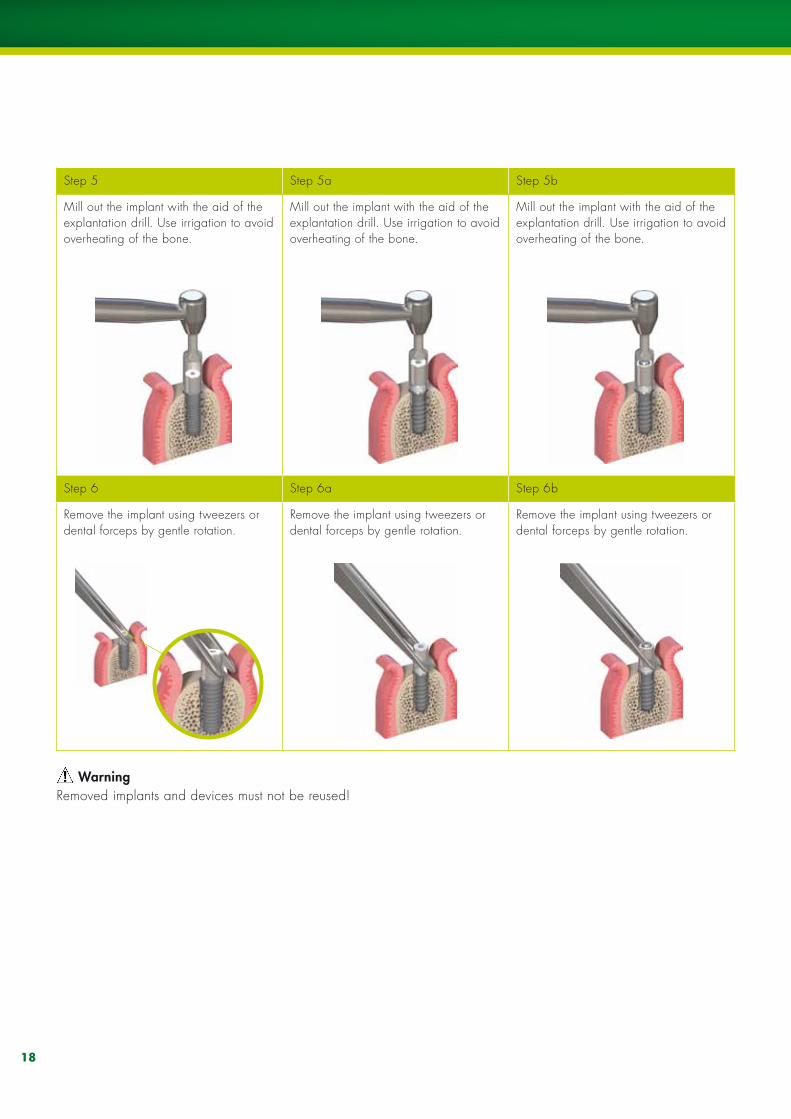
Step 5 Step 5a Step 5b
Mill out the implant with the aid of the explantation drill. use irrigation to avoid overheating of the bone.
Mill out the implant with the aid of the explantation drill. use irrigation to avoid overheating of the bone.
Mill out the implant with the aid of the explantation drill. use irrigation to avoid overheating of the bone.
Step 6 Step 6a Step 6b
remove the implant using tweezers or dental forceps by gentle rotation.
remove the implant using tweezers or dental forceps by gentle rotation.
remove the implant using tweezers or dental forceps by gentle rotation.
Warningremoved implants and devices must not be reused!
19
3.1 Care and maintenance
Some of the instruments mentioned in this guide are delivered sterile, some of them are delivered non-sterile. Please take notice of the product label.
detailed information regarding sterilization methods can be found in the brochure “care and maintenance of surgical and prosthetic instruments”, art. no. 152.008.
3. furTHer inforMaTion

20
4. iMPorTanT GuideLineS
Please notePractitioners must have appropriate knowledge and instruction in the handling of the Straumann CADCAM products or other Straumann products (“Straumann Products”) for using the Straumann Products safely and properly in accordance with the instructions for use.
The Straumann Product must be used in accordance with the instructions for use provided by the manufacturer. It is the practitioner’s responsibility to use the device in accordance with these instructions for use and to determine, if the device fits to the individual patient situation.
The Straumann Products are part of an overall concept and must be used only in conjunction with the corresponding original components and instruments distributed by Institut Straumann AG, its ultimate parent company and all affiliates or subsidiaries of such parent company (“Straumann”), except if stated otherwise in this document or in the instructions for use for the respective Straumann Product. If use of products made by third parties is not recommended by Straumann in this document or in the respective instructions for use, any such use will void any warranty or other obligation, express or implied, of Straumann.
AvailabilitySome of the Straumann Products listed in this document may not be available in all countries.
Caution In addition to the caution notes in this document, our products must be secured against aspiration when used intraorally.
ValidityUpon publication of this document, all previous versions are superseded.
Documentation For detailed instructions on the Straumann Products contact your Straumann representative.
Copyright and trademarksStraumann® documents may not be reprinted or published, in whole or in part, without the written authorization of Straumann. Straumann® and/or other trademarks and logos from Straumann® mentioned herein are the trademarks or registered trademarks of Straumann Holding AG and/or its affiliates.
Explanation of the symbols on labels and instruction leaflets
IMPorTAnT GUIDELInES
Batch code
Catalogue number
Sterilized using irradiation
…min.
Lower limit of temperature
…max.
Upper limit of temperature
…max.
…min.
Temperature limitation
Caution: Federal law restricts this device to sale by or on the order of a dental professional.
Do not re-use
non-sterile
Caution, consult accompanying documents
Use by
Keep away from sunlight
Straumann Products with the CE mark fulfill the requirements of the Medical Devices Directive 93/42 EEC
0123
Consult instructions for use

International Headquartersinstitut Straumann aG Peter Merian-Weg 12cH-4002 Basel, SwitzerlandPhone +41 (0)61 965 11 11fax +41 (0)61 965 11 01
www.s t raumann.com
Stra
uman
n pr
oduc
ts ar
e c
e m
arke
d
03/
12
152.
806/
en
© institut Straumann aG, 2012. all rights reserved. Straumann® and/or other trademarks and logos from Straumann® mentioned herein are the trademarks or registered trademarks of Straumann Holding aG and/or its affiliates. all rights reserved.
Related Documents