Skill Demo 2: Introduction to Arduino should result in Understanding of how to solder pin headers on to a board Ability to program and communicate with your Teensy Ability to sense a switch and light a LED with your Teensy Tools/supplies: Teensy pin headers (2 rows of 12) various resistors LED laptop breadboard USB cable soldering iro solder Background: CS 3651 videos that should have been watched by this time: CS3651 - Intro to Multimeters CS3651 - Using Multimeter in a Circuit CS 3651 Introduction to Circuit Schematics CS 3651 Introduction to Resistors CS 3651 Introduction to Capacitors IntroToLED.mov pullupdown1.mov How and WHY to Solder Correctly (if did not attend class) Introduction to Breadboard (Protoboards) (if don't remember from ECE2031) CS 3651 Pull-up resistors CS 3651 - APIA - Pull down resistors Relevant section of book (Practical Electronics for Inventors 2000 edition): pages 1-14 Name: GTID:

Welcome message from author
This document is posted to help you gain knowledge. Please leave a comment to let me know what you think about it! Share it to your friends and learn new things together.
Transcript

Skill Demo 2: Introduction to Arduino should result in
Understanding of how to solder pin headers on to a boardAbility to program and communicate with your TeensyAbility to sense a switch and light a LED with your Teensy
Tools/supplies:
Teensypin headers (2 rows of 12)various resistors LED laptopbreadboardUSB cablesoldering irosolder
Background:
CS 3651 videos that should have been watched by this time: CS3651 - Intro to Multimeters CS3651 - Using Multimeter in a Circuit CS 3651 Introduction to Circuit Schematics CS 3651 Introduction to Resistors CS 3651 Introduction to Capacitors IntroToLED.mov pullupdown1.mov How and WHY to Solder Correctly (if did not attend class) Introduction to Breadboard (Protoboards) (if don't remember from ECE2031)CS 3651 Pull-up resistorsCS 3651 - APIA - Pull down resistors
Relevant section of book (Practical Electronics for Inventors 2000 edition): pages 1-14
Name:
GTID:

1. Get a Teensy and pin header (36 pins).
2. Break set of header pins into two groups of 12
3. Place header pins into breadboard so that the Teensy can rest comfortably on top. The short side of the pins should be in the Teensy. Do not press the pins all the way into the breadboard (or else when we solder, the breadboard will melt). Just make sure they do not move around.

4. Solder the header pins to the pads on the Teensy board. To do this: 1. Touch your soldering iron to the top of a header 2. Touch the end of your solder to the point where the pad and pin meet 3. Repeat until you have soldered all of the header pins
The soldering will have a conical shape if applied correctly as shown in the soldering videos. If it is spherical the connection is not strong. After you have finished soldering, have one of the mentors confirm that you've done it correctly.
Sign-off initials:________________ Date:____________ Time:__________________
5. Connect the Teensy to your laptop and connect to it using Arduino software.
6. Create the following circuit and create a program the shows the state of the switch (open or closed) on your laptop screen.
Sign-off initials:________________ Date:____________ Time:__________________
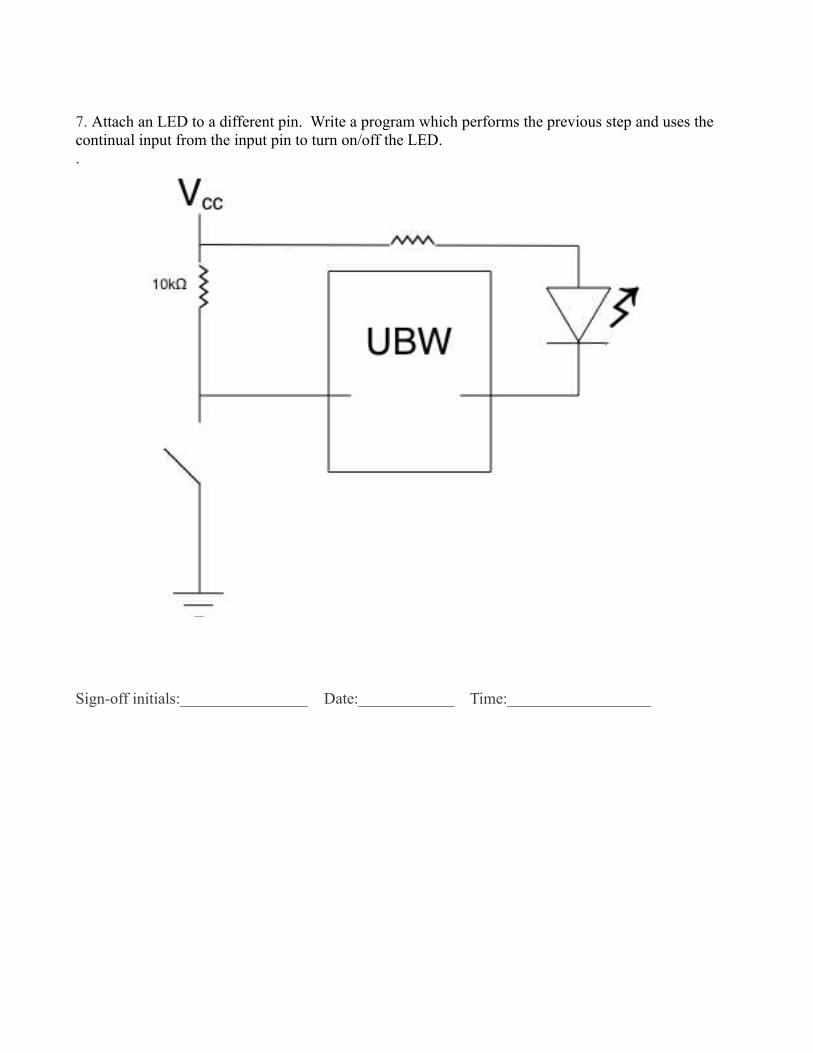
7. Attach an LED to a different pin. Write a program which performs the previous step and uses the continual input from the input pin to turn on/off the LED. .
Sign-off initials:________________ Date:____________ Time:__________________
Related Documents


![3.5” Disk Size SBC USER’S MANUAL · eDP 30-pin connector x 1 2 ports x SATA . III [Blue color] 2x4 pins header x 1 for 2 x USB 2.0 ports[DF11 x 1] DF-11 2x6 pins box header x1](https://static.cupdf.com/doc/110x72/6020d8a0358a9d494f67b08f/35a-disk-size-sbc-useras-manual-edp-30-pin-connector-x-1-2-ports-x-sata-iii.jpg)
![The security of customer-chosen banking PINs › doc › BPA12-FC-banking_pin_security.pdfchosen PINs, providing one sentence about PIN selection [2]: \Select a PIN that cannot be](https://static.cupdf.com/doc/110x72/60ce4ac6103f3e39205801d4/the-security-of-customer-chosen-banking-pins-a-doc-a-bpa12-fc-bankingpinsecuritypdf.jpg)