GSM Server Installation and Configuration Guide Rev. 1.2

Welcome message from author
This document is posted to help you gain knowledge. Please leave a comment to let me know what you think about it! Share it to your friends and learn new things together.
Transcript
GSM Server
Installation and Configuration GuideRev. 1.2
Copyright© 2021 GIGA-BYTE TECHNOLOGY CO., LTD. All rights reserved.The trademarks mentioned in this manual are legally registered to their respective owners.
DisclaimerInformation in this manual is protected by copyright laws and is the property of GIGABYTE. Changes to the specifications and features in this manual may be made by GIGABYTE without prior notice. No part of this manual may be reproduced, copied, translated, transmitted, or published in any form or by any means without GIGABYTE's prior written permission.
Documentation ClassificationsIn order to assist in the use of this product, GIGABYTE provides the following types of documentation: User Manual: detailed information & steps about the installation, configuration and use of this product (e.g. motherboard, server barebones), covering hardware and BIOS. User Guide: detailed information about the installation & use of an add-on hardware or software component (e.g. BMC firmware, rail-kit) compatible with this product. Quick Installation Guide: a short guide with visual diagrams that you can reference easily for installation purposes of this product (e.g. motherboard, server barebones).
Please see the support section of the online product page to check the current availability of these documents.
For More InformationFor related product specifications, the latest firmware and software, and other information please visit our website at http://www.gigabyte.com
For GIGABYTE distributors and resellers, additional sales & marketing materials are available from our reseller portal: http://reseller.b2b.gigabyte.com
For further technical assistance, please contact your GIGABYTE representative or visit https://esupport.gigabyte.com/ to create a new support ticket
For any general sales or marketing enquiries, you may also message GIGABYTE server directly by email: [email protected]
- 3 -
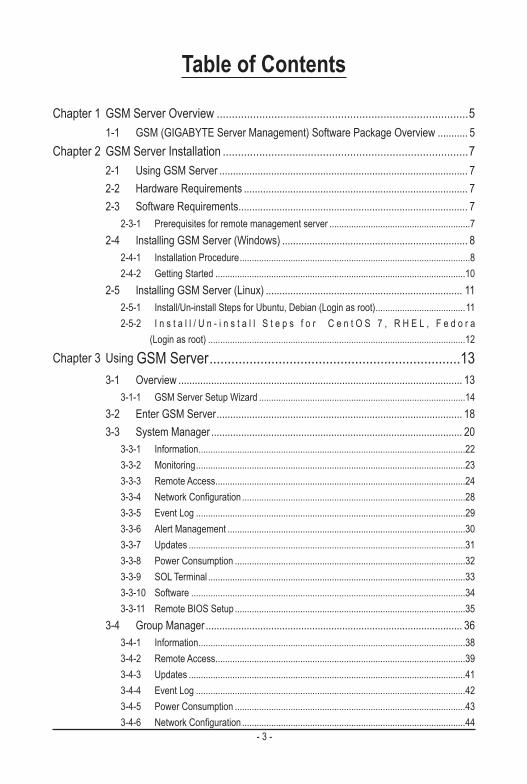
Table of Contents
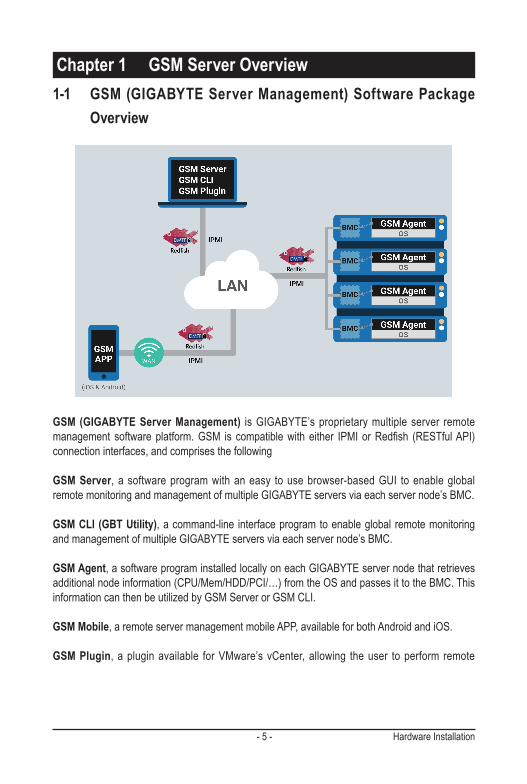
Chapter 1 GSM Server Overview ...................................................................................51-1 GSM (GIGABYTE Server Management) Software Package Overview ........... 5
Chapter 2 GSM Server Installation .................................................................................72-1 Using GSM Server ........................................................................................... 72-2 Hardware Requirements .................................................................................. 72-3 Software Requirements .................................................................................... 7
2-3-1 Prerequisites for remote management server ..........................................................72-4 Installing GSM Server (Windows) .................................................................... 8
2-4-1 Installation Procedure ...............................................................................................82-4-2 Getting Started .......................................................................................................10
2-5 Installing GSM Server (Linux) ........................................................................ 112-5-1 Install/Un-install Steps for Ubuntu, Debian (Login as root) .....................................112-5-2 I n s t a l l / U n - i n s t a l l S t e p s f o r C e n t O S 7 , R H E L , F e d o r a (Login as root) ..........................................................................................................12
Chapter 3 Using GSM Server .....................................................................133-1 Overview ........................................................................................................ 13
3-1-1 GSM Server Setup Wizard .....................................................................................143-2 Enter GSM Server .......................................................................................... 183-3 System Manager ............................................................................................ 20
3-3-1 Information ..............................................................................................................223-3-2 Monitoring ...............................................................................................................233-3-3 Remote Access .......................................................................................................243-3-4 NetworkConfiguration ............................................................................................283-3-5 Event Log ...............................................................................................................293-3-6 Alert Management ..................................................................................................303-3-7 Updates ..................................................................................................................313-3-8 Power Consumption ...............................................................................................323-3-9 SOL Terminal ..........................................................................................................333-3-10 Software .................................................................................................................343-3-11 Remote BIOS Setup ...............................................................................................35
3-4 Group Manager .............................................................................................. 363-4-1 Information ..............................................................................................................383-4-2 Remote Access .......................................................................................................393-4-3 Updates ..................................................................................................................413-4-4 Event Log ...............................................................................................................423-4-5 Power Consumption ...............................................................................................433-4-6 NetworkConfiguration ............................................................................................44
- 4 -
3-4-7 Alert Management ..................................................................................................443-5 Deployment .................................................................................................... 453-6 Alert ................................................................................................................ 463-7 Account .......................................................................................................... 473-8 Preference ...................................................................................................... 50
3-8-1 IP Range .................................................................................................................513-8-2 Event Log ...............................................................................................................523-8-3 Alert Management ..................................................................................................533-8-4 Database ................................................................................................................553-8-5 Properties ...............................................................................................................563-8-6 Gbt Interactive Utility ..............................................................................................573-8-7 Update ....................................................................................................................583-8-8 Language ................................................................................................................58
3-9 Help ................................................................................................................ 593-10 Logout ............................................................................................................ 60
Chapter 5 Appendix ......................................................................................................615-1 Event Log List ................................................................................................ 61
- 5 - Hardware Installation
1-1 GSM (GIGABYTE Server Management) Software Package Overview
GSM (GIGABYTE Server Management) is GIGABYTE’s proprietary multiple server remote management softwareplatform.GSM is compatiblewith either IPMIorRedfish (RESTfulAPI)connection interfaces, and comprises the following
GSM Server, a software program with an easy to use browser-based GUI to enable global remote monitoring and management of multiple GIGABYTE servers via each server node’s BMC.
GSM CLI (GBT Utility), a command-line interface program to enable global remote monitoring and management of multiple GIGABYTE servers via each server node’s BMC.
GSM Agent, a software program installed locally on each GIGABYTE server node that retrieves additional node information (CPU/Mem/HDD/PCI/…) from the OS and passes it to the BMC. This information can then be utilized by GSM Server or GSM CLI.
GSM Mobile, a remote server management mobile APP, available for both Android and iOS.
GSM Plugin, a plugin available for VMware’s vCenter, allowing the user to perform remote
Chapter 1 GSM Server Overview
Hardware Installation - 6 -
monitoring and management of GIGABYTE server nodes without having to switch to a separate software platform.
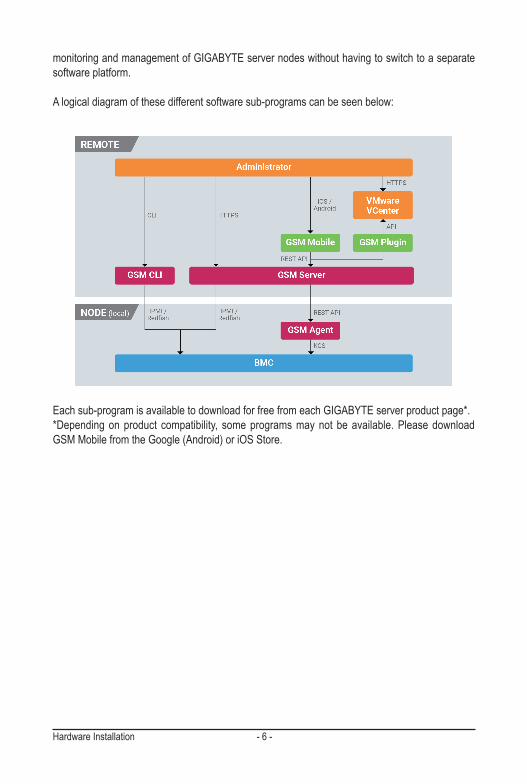
A logical diagram of these different software sub-programs can be seen below:
Each sub-program is available to download for free from each GIGABYTE server product page*.*Depending on product compatibility, some programs may not be available. Please download GSM Mobile from the Google (Android) or iOS Store.
- 7 - GSM Server
Chapter 2 GSM Server Installation2-1 Using GSM ServerGSM (Gigabyte Server management) Server has a user-friendly Graphics User Interface (GUI) called the GSM Server GUI. It is designed to be easy to use. It has a low learning curve because it uses a standard Internet browser. You can expect to be up and running in less than fiveminutes.This chapter allows you to become familiarwith theGSMServerGUI’s variousfunctions. Each function is described in detail.
2-2 Hardware RequirementsBefore using GSM Server, please check your system for the following required configuration requirements:
• System Processor: 2 GHz and above• System Memory: Minimum 4 GB RAM• Free Disk Space: 10 GB at least • Node servers : 255 maximum
2-3 Software Requirements2-3-1 Prerequisites for remote management serverSupported Browsers:• Google Chrome 39.0.2171.65 m or later• Mozilla Firefox 33.1.1
Operating System:• Windows 2008 / 2012 R2 / 2019• Ubuntu 16.04 or later • Redhat/CentOS 6.3 or later
GSM Server - 8 -
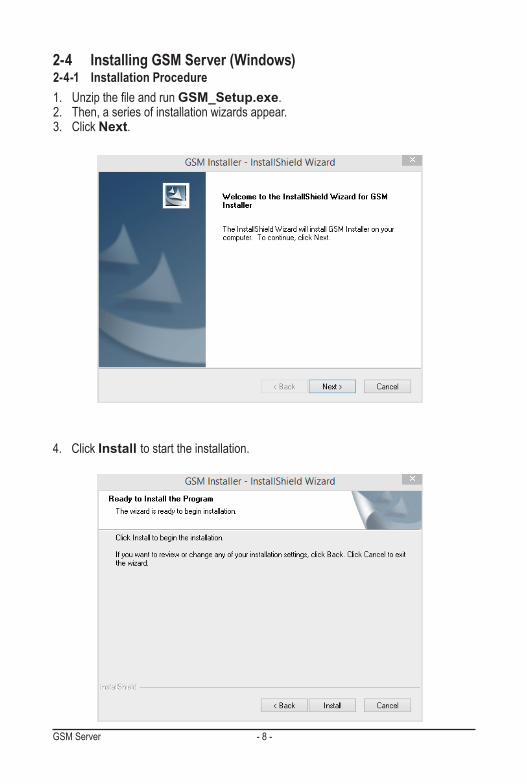
2-4 Installing GSM Server (Windows)2-4-1 Installation Procedure1. UnzipthefileandrunGSM_Setup.exe.2. Then, a series of installation wizards appear. 3. Click Next.
4. Click Install to start the installation.
- 9 - GSM Server
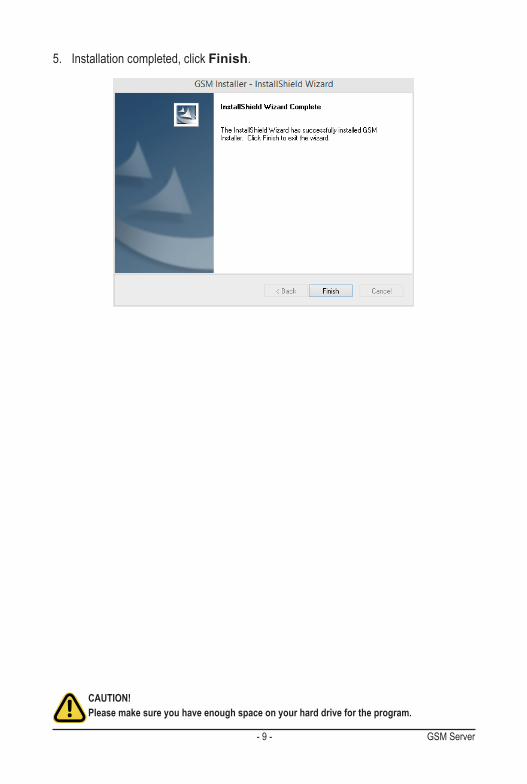
5. Installation completed, click Finish.
CAUTION! Please make sure you have enough space on your hard drive for the program.
- 10 - GSM Server
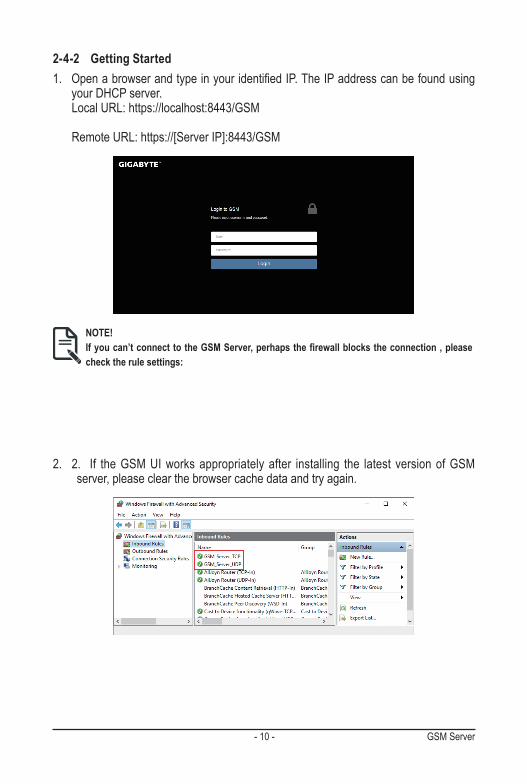
2-4-2 Getting Started1. OpenabrowserandtypeinyouridentifiedIP.TheIPaddresscanbefoundusing
your DHCP server. Local URL: https://localhost:8443/GSM
Remote URL: https://[Server IP]:8443/GSM
NOTE! If you can’t connect to the GSM Server, perhaps the firewall blocks the connection , please check the rule settings:
2. 2. If the GSM UI works appropriately after installing the latest version of GSM server, please clear the browser cache data and try again.
GSM Server - 11 -
2-5 Installing GSM Server (Linux)2-5-1 Install/Un-install Steps for Ubuntu, Debian (Login as root)
1. Before installation, please check the packages sudo and ufw are already installed. Otherwise, GSM Server installation will fail.
#apt-get install sudo ufw
2. 2.2 Use deb package to install GSM. #dpkg -i gsm_x. x_all.deb
3. Makesurethatthepackage‘fontconfig’hasalreadybeeninstalledbeforestartingGSM. Installthepackage:‘fontconfig’.
#apt-getinstallfontconfig
4. Finish and start up GSM web page.
Connect to GSM: https://{your IP address}:8443/GSM
5. Uninstall GSM
#dpkg –r gsm
NOTE! 1. Installation will install and place Java sources for GSM to /opt. Do not
modify and remove them. It’s very important.2. After finishing installation, installer would add firewall exception, such
as 8080, 8443, 162, 69 and tftp to public zone. If you do not use public zone as default, please add firewall exception manually.
- 12 - GSM Server
1. Before installation, please check that packages sudo and firewalld have already been installed, or GSM installation will be failed.
#yuminstallsudofirewalld
2. Use RPM package to install GSM. # rpm -ivh gsm-x.x-1.x86_64.rpm
3. Makesurethatthepackage‘fontconfig’hasalreadybeeninstalledbeforestartingGSM.
Installthepackage:‘fontconfig’.#yuminstallfontconfig
4. Finish and start up GSM web page Connect to GSM: https://{your IP address}:8443/GSM
5. Uninstall GSM Server
#rpm –e gsm-x.x-1.x86_64
NOTE! 1. Installation will install and place Java sources for GSM to /opt. Do not
modify and remove them. It’s very important.2. After finishing installation, installer would add firewall exception, such
as 8080, 8443, 162, 69 and tftp to public zone. If you do not use public zone as default, please add firewall exception manually.
2-5-2 I n s t a l l / U n - i n s t a l l S t e p s f o r C e n t O S 7, R H E L , F e d o r a (Login as root)
- 13 - GSM Server
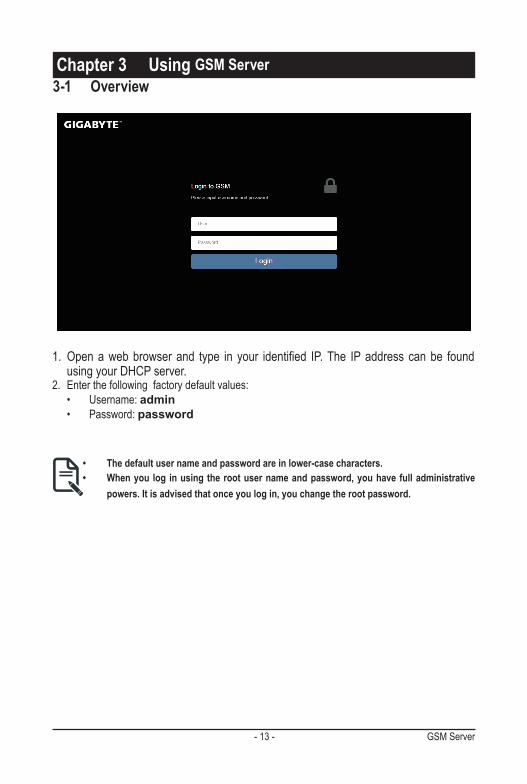
Chapter 3 Using GSM Server3-1 Overview
1. Openawebbrowserand type in your identified IP.The IPaddress canbe foundusing your DHCP server.
2. Enter the following factory default values:• Username: admin• Password: password
• The default user name and password are in lower-case characters.• When you log in using the root user name and password, you have full administrative
powers. It is advised that once you log in, you change the root password.
GSM Server - 14 -
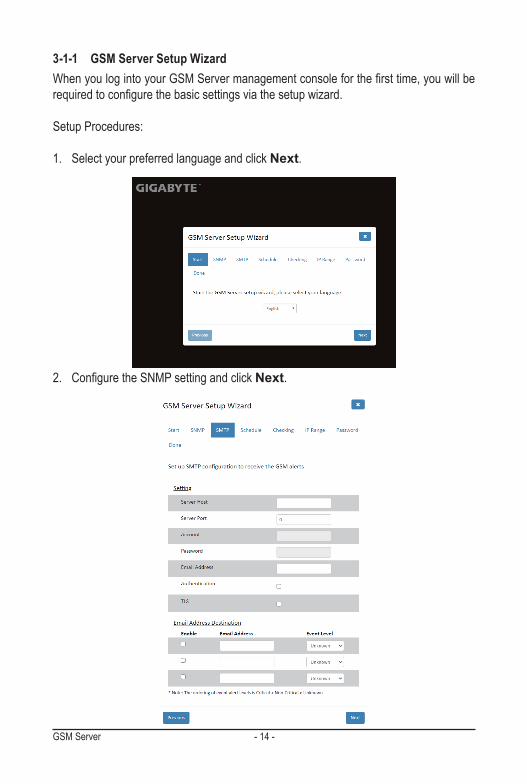
3-1-1 GSM Server Setup WizardWhenyoulogintoyourGSMServermanagementconsoleforthefirsttime,youwillberequiredtoconfigurethebasicsettingsviathesetupwizard.
Setup Procedures:
1. Select your preferred language and click Next.
2. ConfiguretheSNMPsettingandclickNext.
- 15 - GSM Server
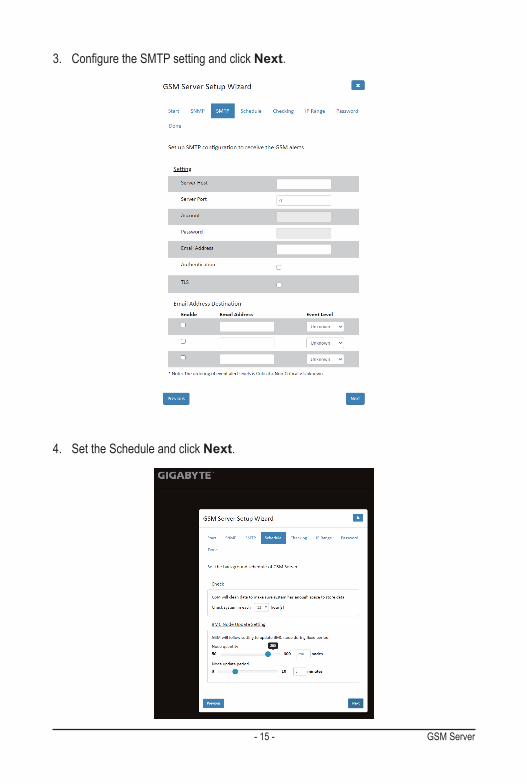
3. ConfiguretheSMTPsettingandclickNext.
4. Set the Schedule and click Next.
GSM Server - 16 -
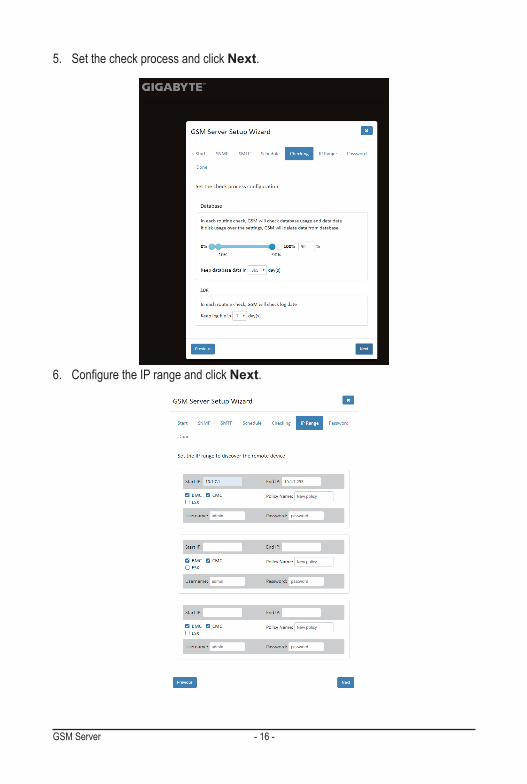
5. Set the check process and click Next.
6. ConfiguretheIPrangeandclickNext.

- 17 - GSM Server
7. Set the password for administrator and click Next.
8. Setup completed, click DONE to close the wizard.
GSM Server - 18 -
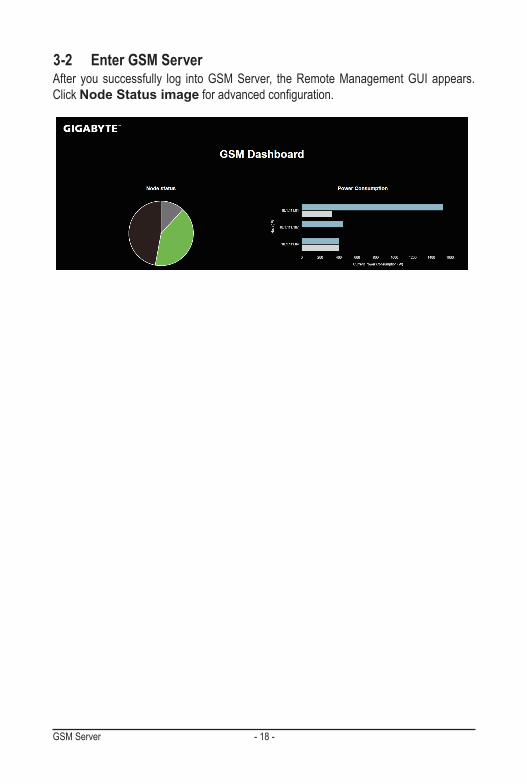
3-2 Enter GSM ServerAfter you successfully log into GSM Server, the Remote Management GUI appears. Click Node Status imageforadvancedconfiguration.
- 19 - GSM Server
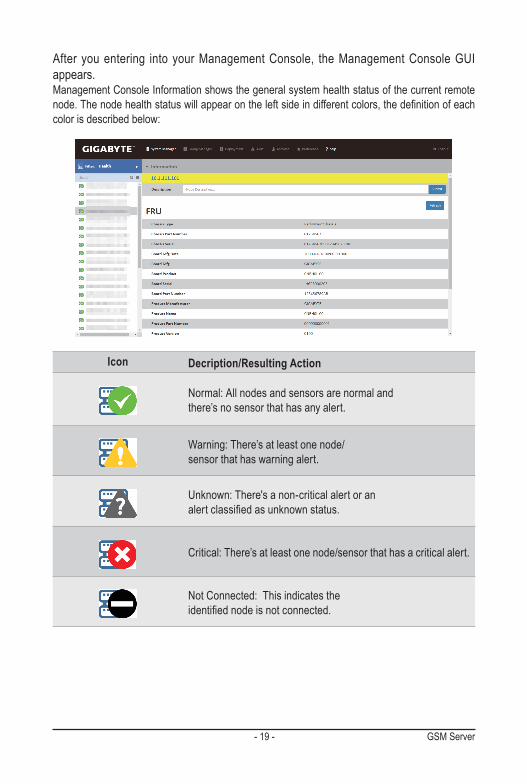
After you entering into your Management Console, the Management Console GUI appears.Management Console Information shows the general system health status of the current remote node.Thenodehealthstatuswillappearontheleftsideindifferentcolors,thedefinitionofeachcolor is described below:
Icon Decription/Resulting Action
Normal: All nodes and sensors are normal and there’s no sensor that has any alert.
Warning: There’s at least one node/sensor that has warning alert.
Unknown: There's a non-critical alert or an alertclassifiedasunknownstatus.
Critical: There’s at least one node/sensor that has a critical alert.
Not Connected: This indicates the identifiednodeisnotconnected.
GSM Server - 20 -
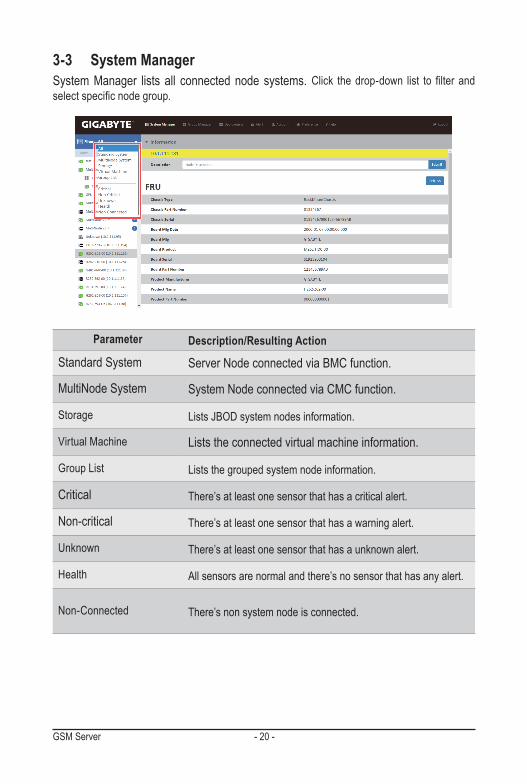
System Manager lists all connected node systems. Click thedrop-down list to filter andselectspecificnodegroup.
Parameter Description/Resulting Action
Standard System Server Node connected via BMC function.
MultiNode System System Node connected via CMC function.
Storage Lists JBOD system nodes information.
Virtual Machine Lists the connected virtual machine information.
Group List Lists the grouped system node information.
Critical There’s at least one sensor that has a critical alert.
Non-critical There’s at least one sensor that has a warning alert.
Unknown There’s at least one sensor that has a unknown alert.
Health All sensors are normal and there’s no sensor that has any alert.
Non-Connected There’s non system node is connected.
3-3 System Manager
- 21 - GSM Server
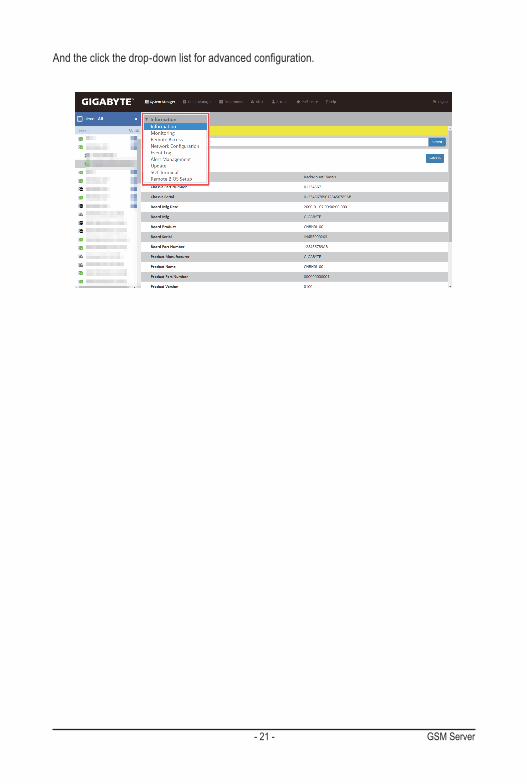
Andtheclickthedrop-downlistforadvancedconfiguration.
GSM Server - 22 -
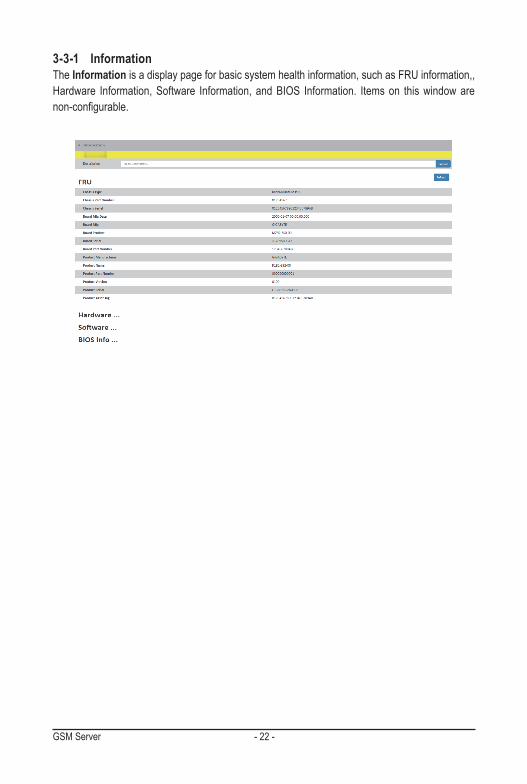
3-3-1 InformationThe Information is a display page for basic system health information, such as FRU information,, Hardware Information, Software Information, and BIOS Information. Items on this window are non-configurable.
- 23 - GSM Server
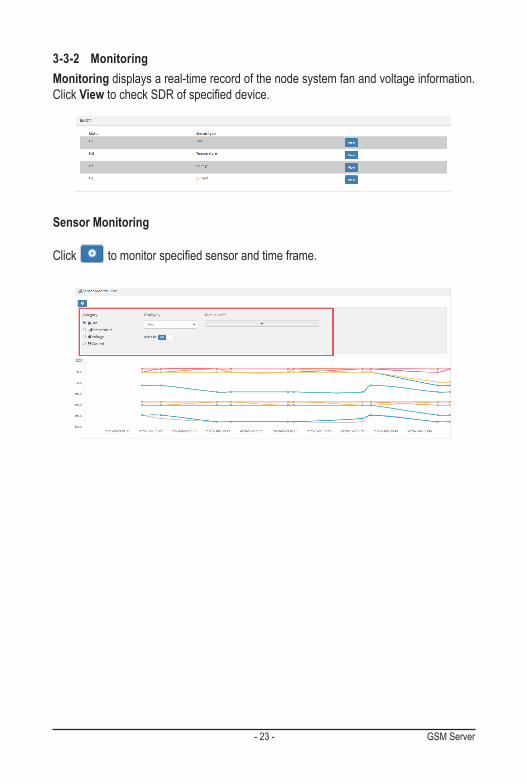
3-3-2 MonitoringMonitoring displays a real-time record of the node system fan and voltage information. Click ViewtocheckSDRofspecifieddevice.
Sensor Monitoring
Click tomonitorspecifiedsensorandtimeframe.
GSM Server - 24 -
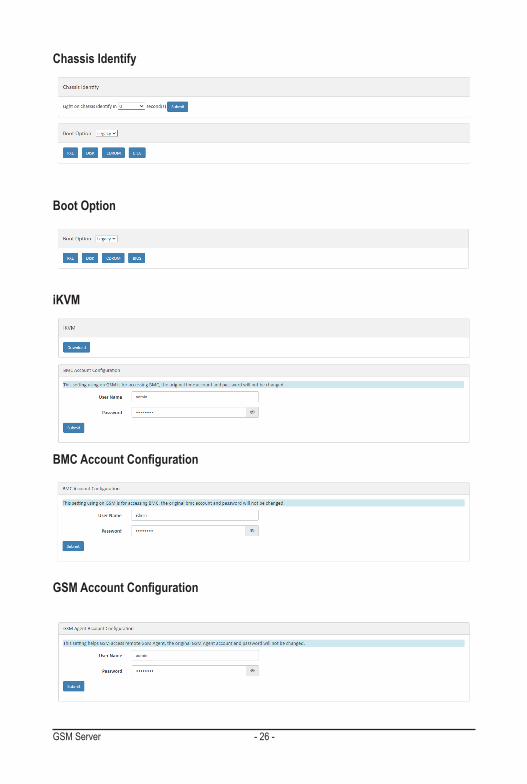
3-3-3 Remote AccessRemote Access provides the following remote functions:• PowerControlConfiguration• Chassis Identify• Boot Option• iKVM• BMCAccountConfiguration• GSMAgentAccountConfiguration
- 25 - GSM Server
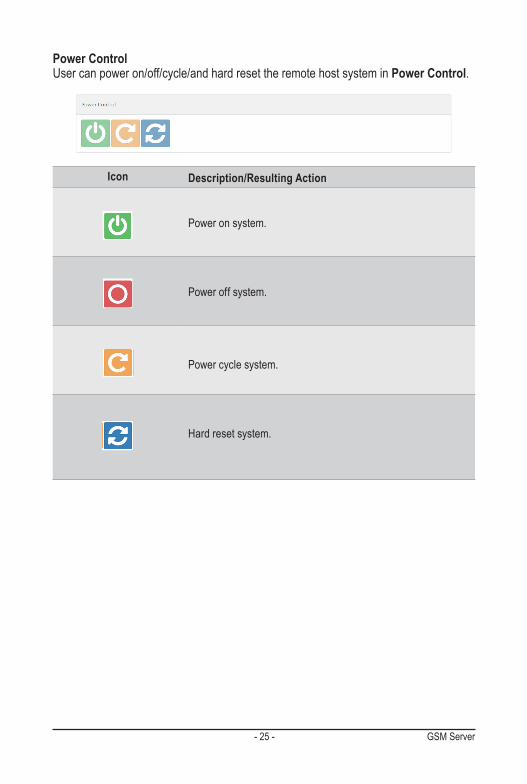
Power ControlUser can power on/off/cycle/and hard reset the remote host system in Power Control.
Icon Description/Resulting Action
Power on system.
Power off system.
Power cycle system.
Hard reset system.
GSM Server - 26 -
Chassis Identify
Boot Option
iKVM
BMC Account Configuration
GSM Account Configuration
- 27 - GSM Server
Parameter Description/Resulting Action
Chassis Identify Definethechassislightingtime.Whenyoufinishtheconfiguration,clickSubmit.
Boot Option Selectbootoptionbyclickingspecifieddevicetab.
iKVM
Click Launch to launch the redirection console and manage the server remotely.Please ensure that you have latest version of JAVA tool to active the Java KVM console.
NOTE! Before using the KVM console, you need to set theJavasecuritysettingsfirst.ThensettheIPaddressof the remote system in the Exception Site List area.
BMC Account Configuration
Configure the administrator ID and password in this section. Afterfinishingconfiguration,clickSubmit.
GSM Account Configuration
Set the User Name and password to connect to the GSM Agent account. Click Submit when setting is complete.

GSM Server - 28 -
3-3-4 Network ConfigurationThis page provides GroupIPv4andIPv6DHCPconfiguration.
Parameter Description/Resulting ActionIPv4 settingIPv6 Setting
Enabled Displays IPv4/IPv6 enabled status.
Use DHCP Click on tab to enable or disable this function
IP Address Identify the IP address.
Subnet Mask ConfiguretheSubnetMaskaddress.
Gateway DefinetheGatewayaddress
Whenyoufinishtheconfiguration,clkickSubmittosaveyourconfiguration.
- 29 - GSM Server
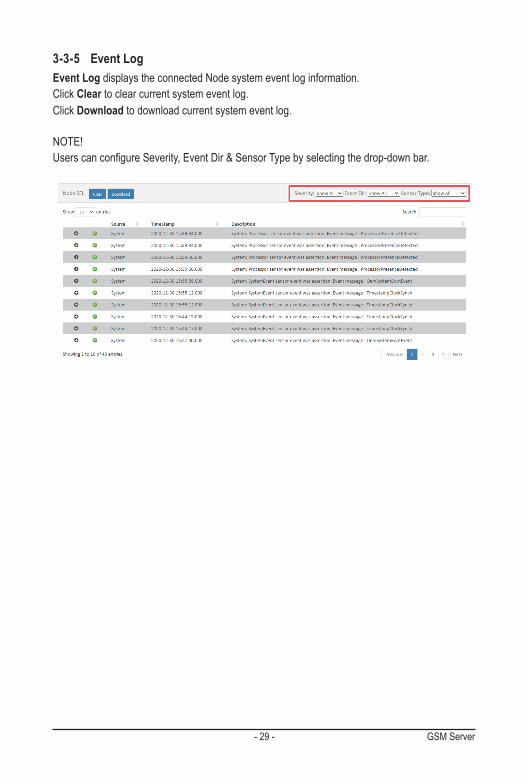
3-3-5 Event LogEvent Log displays the connected Node system event log information. Click Clear to clear current system event log.Click Download to download current system event log.
NOTE!UserscanconfigureSeverity,EventDir&SensorTypebyselectingthedrop-downbar.
GSM Server - 30 -
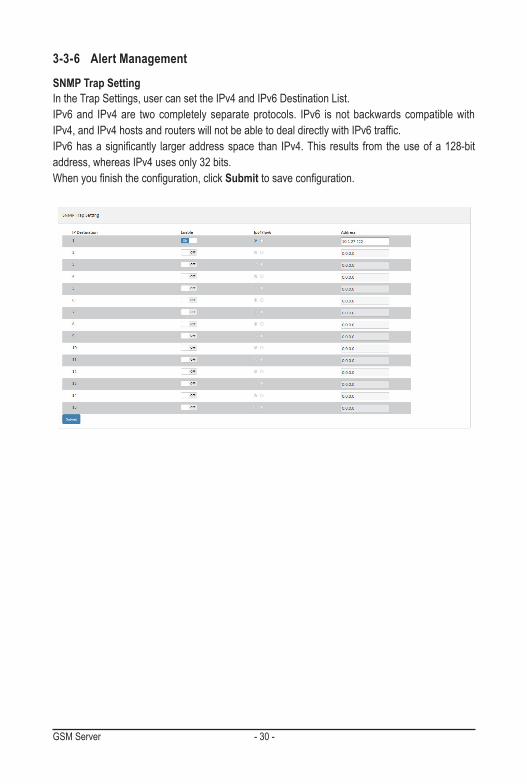
3-3-6 Alert Management
SNMP Trap Setting In the Trap Settings, user can set the IPv4 and IPv6 Destination List.IPv6 and IPv4 are two completely separate protocols. IPv6 is not backwards compatible with IPv4,andIPv4hostsandrouterswillnotbeabletodealdirectlywithIPv6traffic.IPv6hasasignificantly largeraddressspace than IPv4.This results from theuseofa128-bitaddress, whereas IPv4 uses only 32 bits.Whenyoufinishtheconfiguration,clickSubmittosaveconfiguration.
- 31 - GSM Server
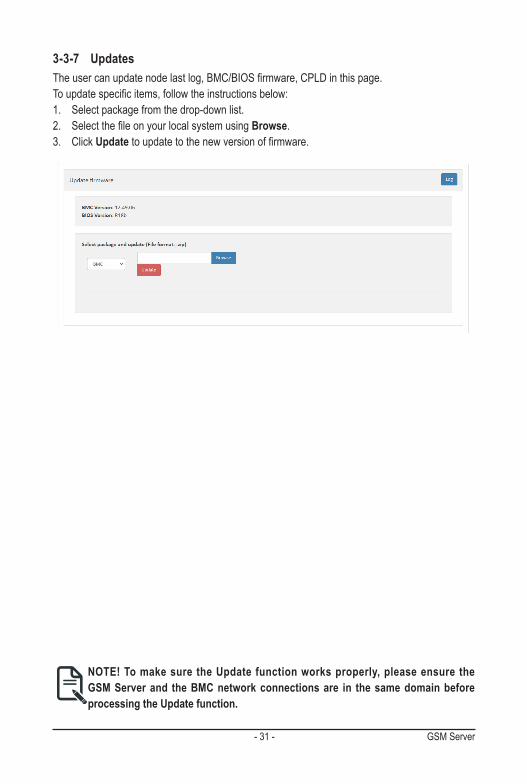
3-3-7 UpdatesTheusercanupdatenodelastlog,BMC/BIOSfirmware,CPLDinthispage.Toupdatespecificitems,followtheinstructionsbelow:1. Select package from the drop-down list.2. SelectthefileonyourlocalsystemusingBrowse.3. Click Updatetoupdatetothenewversionoffirmware.
NOTE! To make sure the Update function works properly, please ensure the GSM Server and the BMC network connections are in the same domain before processing the Update function.
GSM Server - 32 -
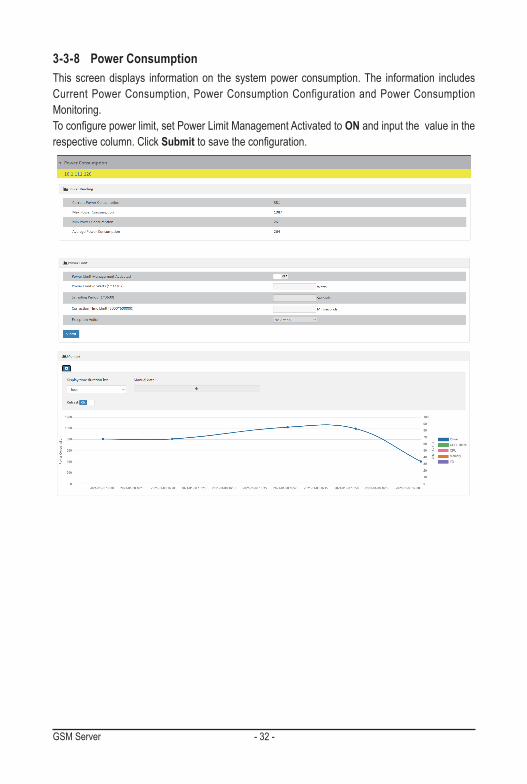
3-3-8 Power ConsumptionThis screen displays information on the system power consumption. The information includes Current Power Consumption, Power Consumption Configuration and Power Consumption Monitoring.Toconfigurepowerlimit,setPowerLimitManagementActivatedtoON and input the value in the respective column. Click Submittosavetheconfiguration.
- 33 - GSM Server
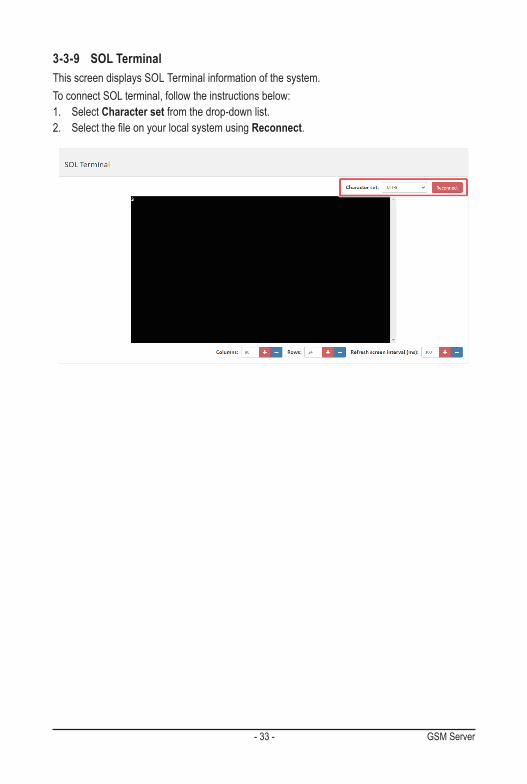
3-3-9 SOL TerminalThis screen displays SOL Terminal information of the system.To connect SOL terminal, follow the instructions below:1. Select Character set from the drop-down list.2. SelectthefileonyourlocalsystemusingReconnect.
GSM Server - 34 -
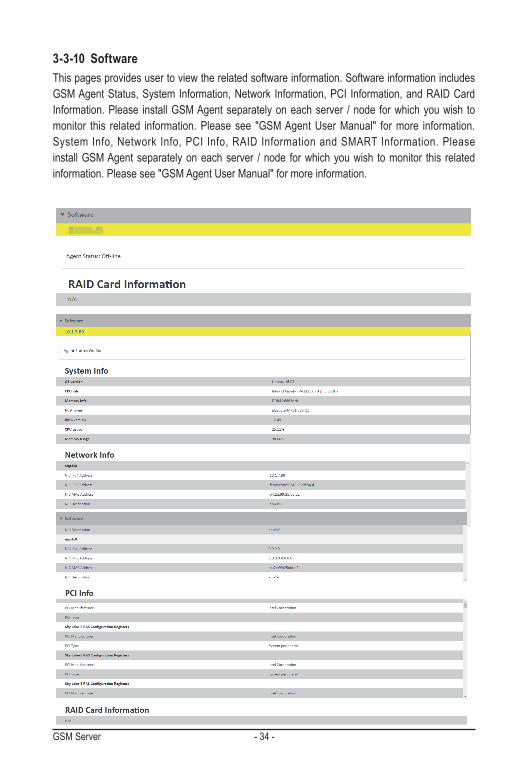
3-3-10 SoftwareThis pages provides user to view the related software information. Software information includes GSM Agent Status, System Information, Network Information, PCI Information, and RAID Card Information. Please install GSM Agent separately on each server / node for which you wish to monitor this related information. Please see "GSM Agent User Manual" for more information.System Info, Network Info, PCI Info, RAID Information and SMART Information. Please install GSM Agent separately on each server / node for which you wish to monitor this related information. Please see "GSM Agent User Manual" for more information.
- 35 - GSM Server
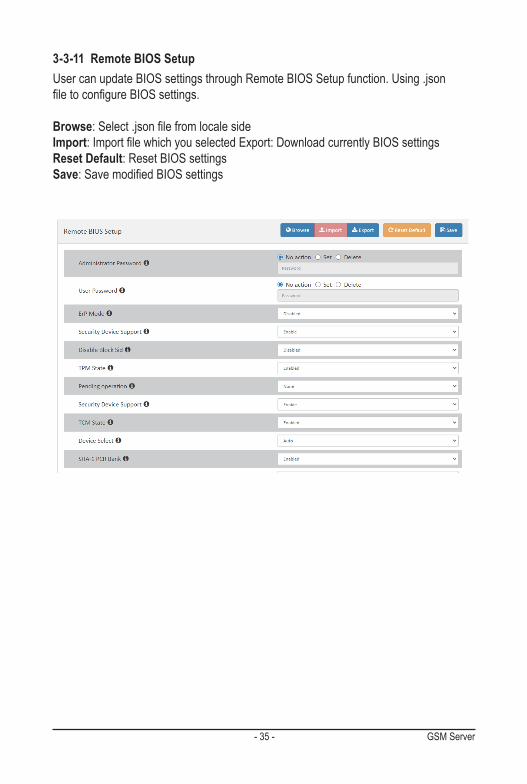
3-3-11 Remote BIOS SetupUser can update BIOS settings through Remote BIOS Setup function. Using .jsonfiletoconfigureBIOSsettings.
Browse:Select.jsonfilefromlocalesideImport:ImportfilewhichyouselectedExport:DownloadcurrentlyBIOSsettingsReset Default: Reset BIOS settingsSave:SavemodifiedBIOSsettings
GSM Server - 36 -
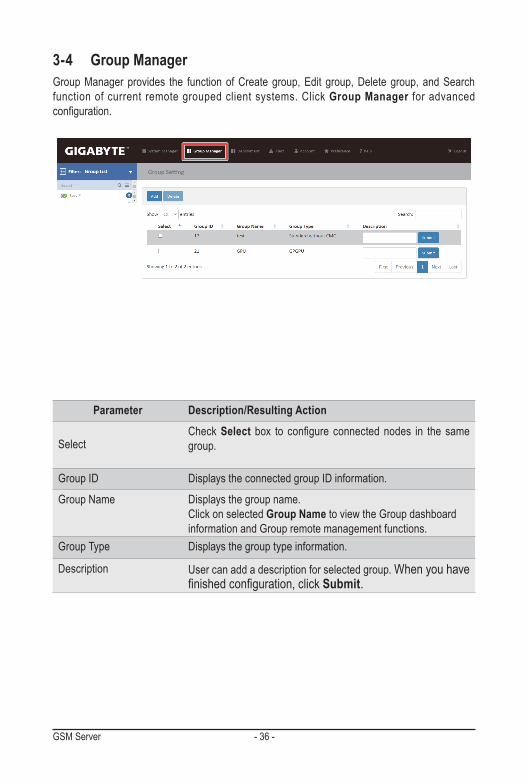
3-4 Group ManagerGroup Manager provides the function of Create group, Edit group, Delete group, and Search function of current remote grouped client systems. Click Group Manager for advanced configuration.
Parameter Description/Resulting Action
SelectCheck Select box to configure connected nodes in the samegroup.
Group ID Displays the connected group ID information.
Group Name Displays the group name. Click on selected Group Name to view the Group dashboard information and Group remote management functions.
Group Type Displays the group type information.
Description User can add a description for selected group. When you have finishedconfiguration,clickSubmit.
- 37 - GSM Server
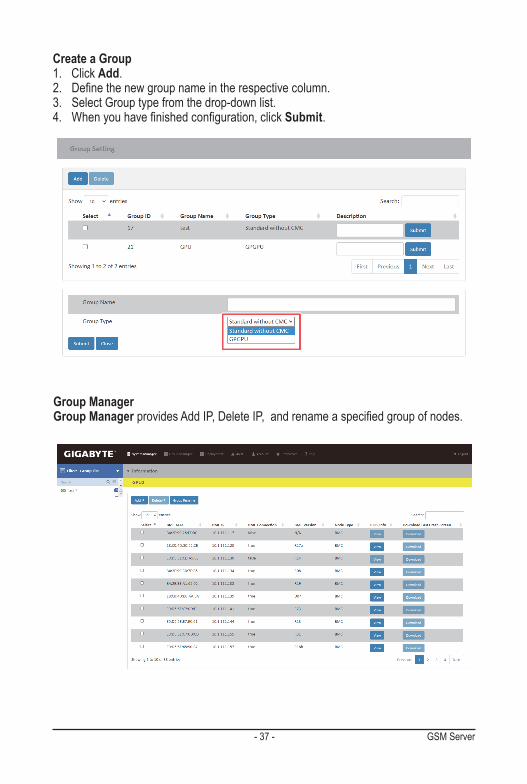
Create a Group1. Click Add.2. Definethenewgroupnameintherespectivecolumn.3. Select Group type from the drop-down list.4. Whenyouhavefinishedconfiguration,clickSubmit.
Group ManagerGroup Manager providesAddIP,DeleteIP,andrenameaspecifiedgroupofnodes.
GSM Server - 38 -
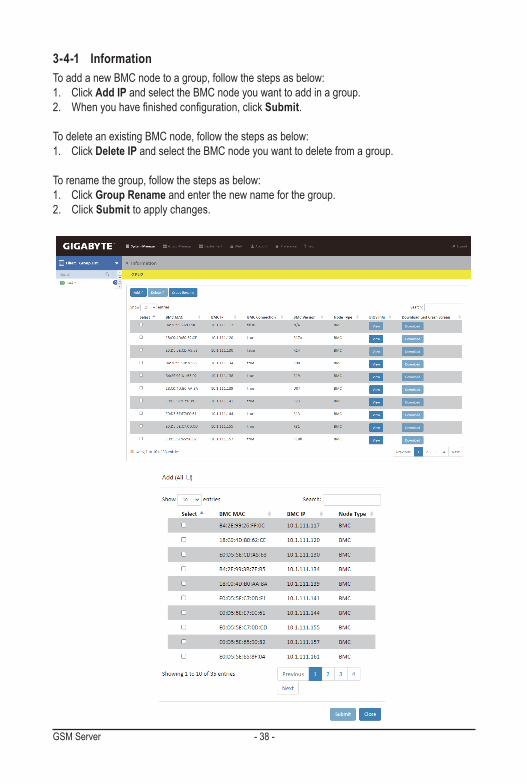
3-4-1 InformationTo add a new BMC node to a group, follow the steps as below:1. Click Add IP and select the BMC node you want to add in a group.2. Whenyouhavefinishedconfiguration,clickSubmit.
To delete an existing BMC node, follow the steps as below:1. Click Delete IP and select the BMC node you want to delete from a group.
To rename the group, follow the steps as below:1. Click Group Rename and enter the new name for the group.2. Click Submit to apply changes.
- 39 - GSM Server
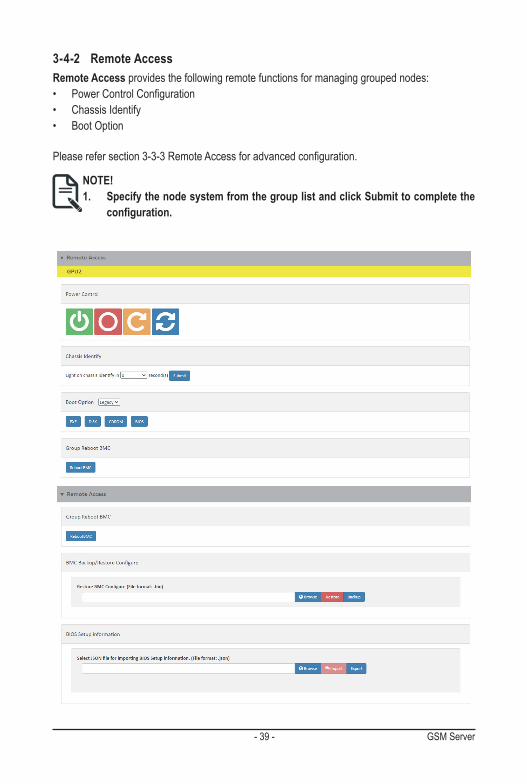
3-4-2 Remote AccessRemote Access provides the following remote functions for managing grouped nodes:• PowerControlConfiguration• Chassis Identify• Boot Option
Pleaserefersection3-3-3RemoteAccessforadvancedconfiguration.
NOTE! 1. Specify the node system from the group list and click Submit to complete the
configuration.

GSM Server - 40 -
- 41 - GSM Server
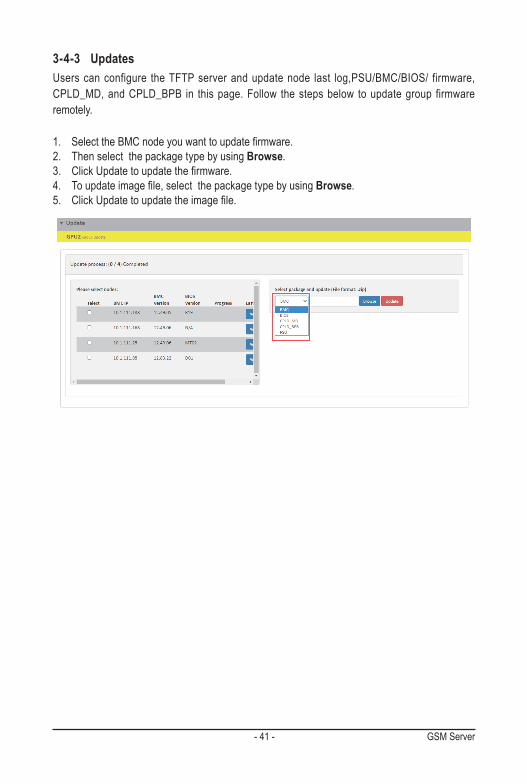
3-4-3 UpdatesUsers can configure the TFTP server and update node last log,PSU/BMC/BIOS/ firmware, CPLD_MD, and CPLD_BPB in this page. Follow the steps below to update group firmware remotely.
1. SelecttheBMCnodeyouwanttoupdatefirmware.2. Then select the package type by using Browse.3. ClickUpdatetoupdatethefirmware.4. Toupdateimagefile,selectthepackagetypebyusingBrowse.5. ClickUpdatetoupdatetheimagefile.
GSM Server - 42 -
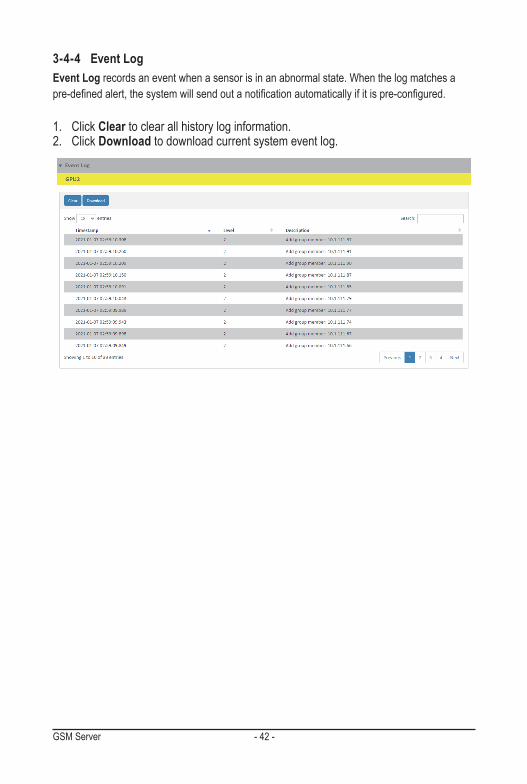
3-4-4 Event LogEvent Log records an event when a sensor is in an abnormal state. When the log matches a pre-definedalert,thesystemwillsendoutanotificationautomaticallyifitispre-configured.
1. Click Clear to clear all history log information.2. Click Download to download current system event log.
- 43 - GSM Server
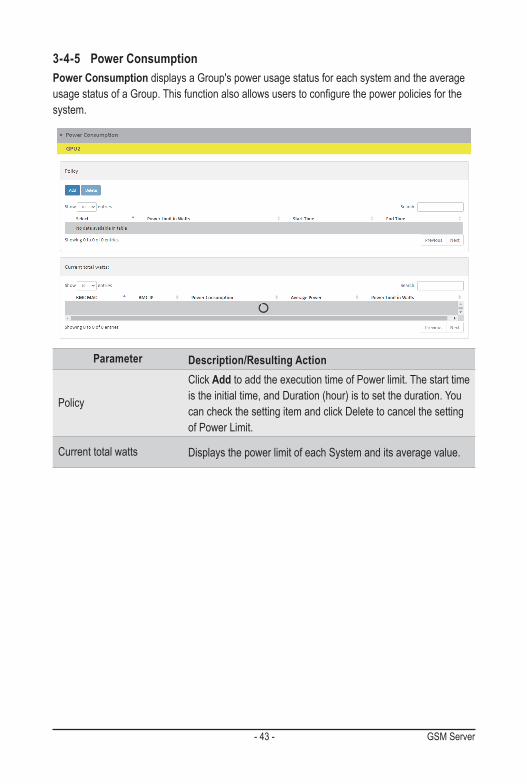
3-4-5 Power ConsumptionPower Consumption displays a Group's power usage status for each system and the average usagestatusofaGroup.Thisfunctionalsoallowsuserstoconfigurethepowerpoliciesforthesystem.
Parameter Description/Resulting Action
Policy
Click Add to add the execution time of Power limit. The start time is the initial time, and Duration (hour) is to set the duration. You can check the setting item and click Delete to cancel the setting of Power Limit.
Current total watts Displays the power limit of each System and its average value.
GSM Server - 44 -
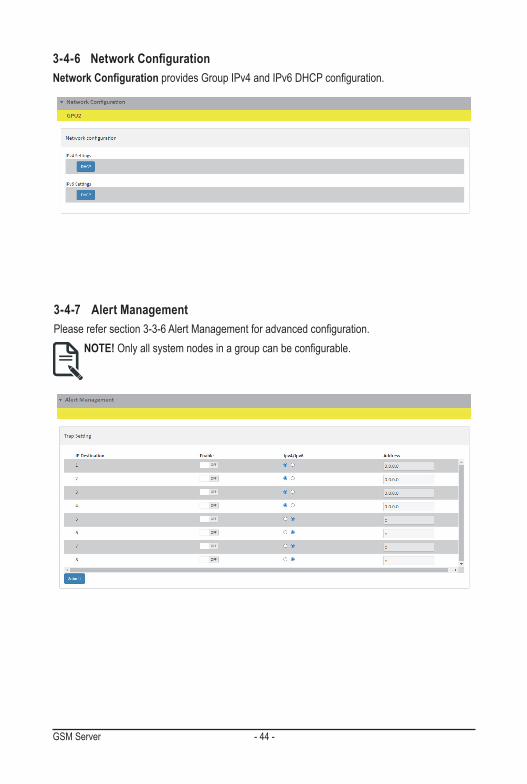
3-4-6 Network ConfigurationNetwork Configuration provides GroupIPv4andIPv6DHCPconfiguration.
3-4-7 Alert ManagementPleaserefersection3-3-6AlertManagementforadvancedconfiguration.
NOTE!Onlyallsystemnodesinagroupcanbeconfigurable.
- 45 - GSM Server
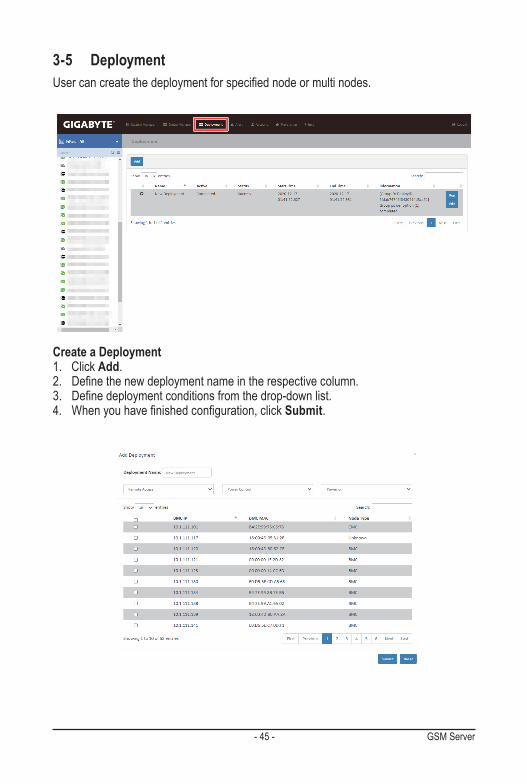
3-5 DeploymentUsercancreatethedeploymentforspecifiednodeormultinodes.
Create a Deployment1. Click Add.2. Definethenewdeploymentnameintherespectivecolumn.3. Definedeploymentconditionsfromthedrop-downlist.4. Whenyouhavefinishedconfiguration,clickSubmit.

GSM Server - 46 -
3-6 AlertAlert page shows you data related to the sensor’s health, such as sensor reading.
NOTE! The number beside the Alert header represents the number of Alert events that have occurred.
- 47 - GSM Server
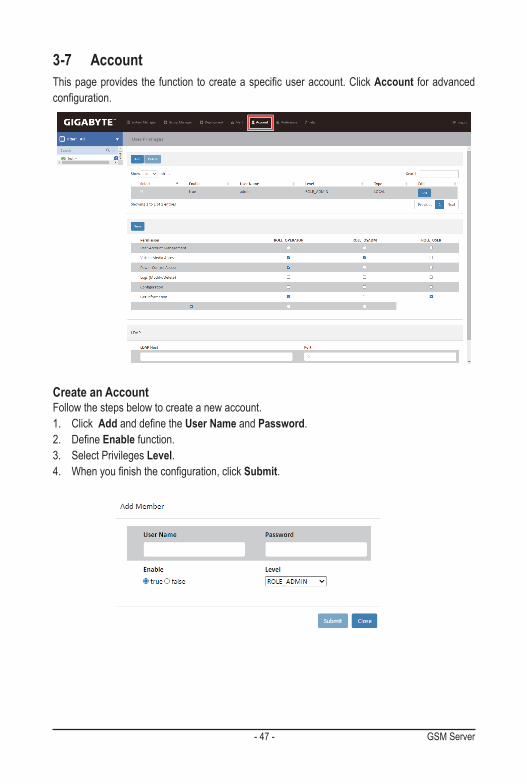
3-7 AccountThispageprovides the function tocreateaspecificuseraccount.Click Account for advanced configuration.
Create an AccountFollow the steps below to create a new account.1. Click AddanddefinetheUser Name and Password.2. DefineEnable function.3. Select Privileges Level. 4. Whenyoufinishtheconfiguration,clickSubmit.
GSM Server - 48 -
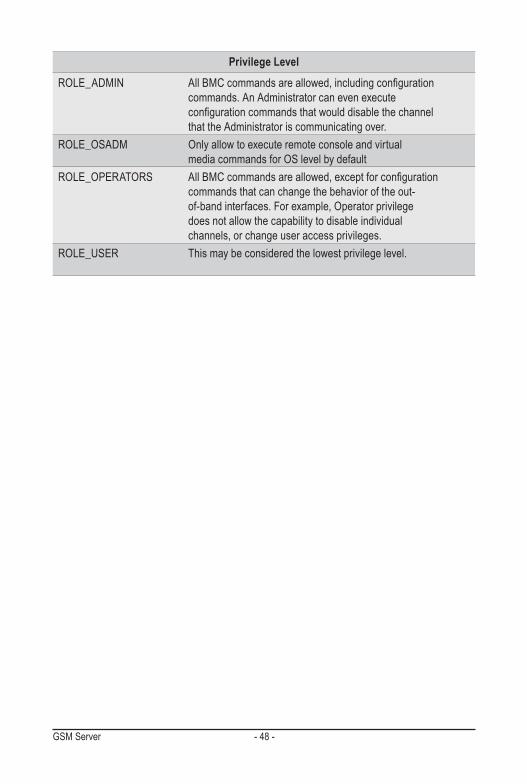
Privilege LevelROLE_ADMIN AllBMCcommandsareallowed,includingconfiguration
commands. An Administrator can even execute configurationcommandsthatwoulddisablethechannelthat the Administrator is communicating over.
ROLE_OSADM Only allow to execute remote console and virtual media commands for OS level by default
ROLE_OPERATORS AllBMCcommandsareallowed,exceptforconfigurationcommands that can change the behavior of the out-of-band interfaces. For example, Operator privilege does not allow the capability to disable individual channels, or change user access privileges.
ROLE_USER This may be considered the lowest privilege level.
- 49 - GSM Server
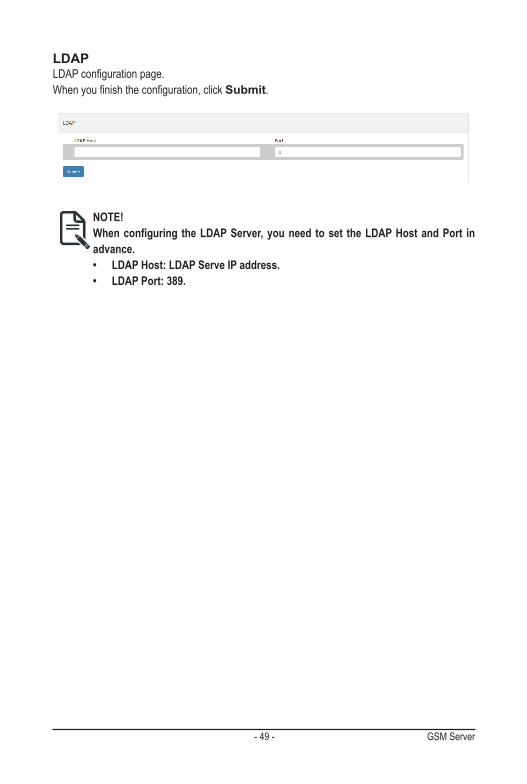
LDAP LDAPconfigurationpage.Whenyoufinishtheconfiguration,clickSubmit.
NOTE! When configuring the LDAP Server, you need to set the LDAP Host and Port in advance.• LDAP Host: LDAP Serve IP address.• LDAP Port: 389.
GSM Server - 50 -
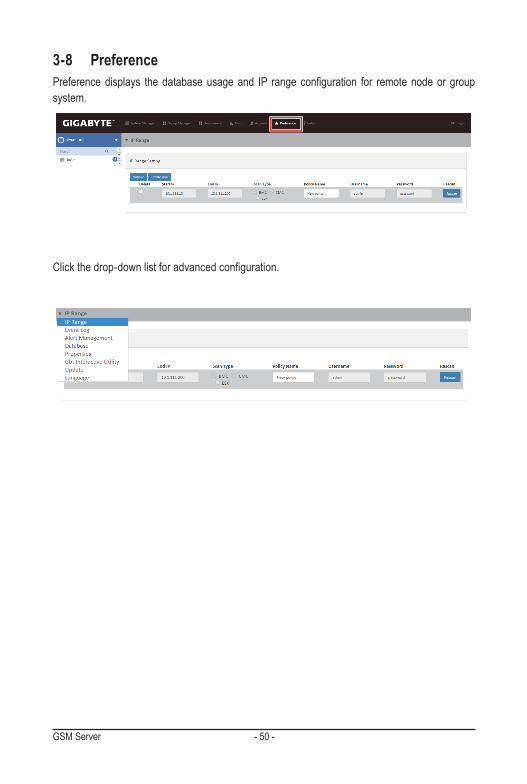
3-8 PreferencePreferencedisplays thedatabaseusageand IP range configuration for remotenodeor groupsystem.
Clickthedrop-downlistforadvancedconfiguration.
- 51 - GSM Server
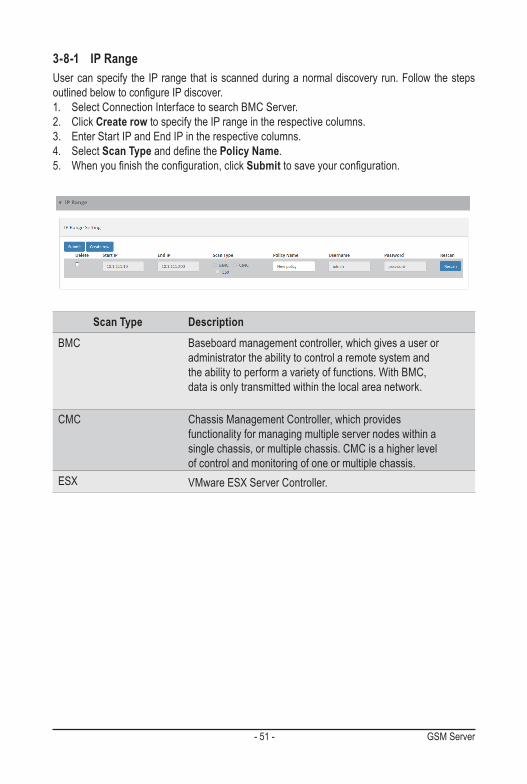
3-8-1 IP RangeUser can specify the IP range that is scanned during a normal discovery run. Follow the steps outlinedbelowtoconfigureIPdiscover.1. Select Connection Interface to search BMC Server.2. Click Create row to specify the IP range in the respective columns.3. Enter Start IP and End IP in the respective columns.4. Select Scan Type anddefinethe Policy Name.5. Whenyoufinishtheconfiguration,clickSubmittosaveyourconfiguration.
Scan Type DescriptionBMC Baseboard management controller, which gives a user or
administrator the ability to control a remote system and the ability to perform a variety of functions. With BMC, data is only transmitted within the local area network.
CMC Chassis Management Controller, which provides functionality for managing multiple server nodes within a single chassis, or multiple chassis. CMC is a higher level of control and monitoring of one or multiple chassis.
ESX VMware ESX Server Controller.
GSM Server - 52 -
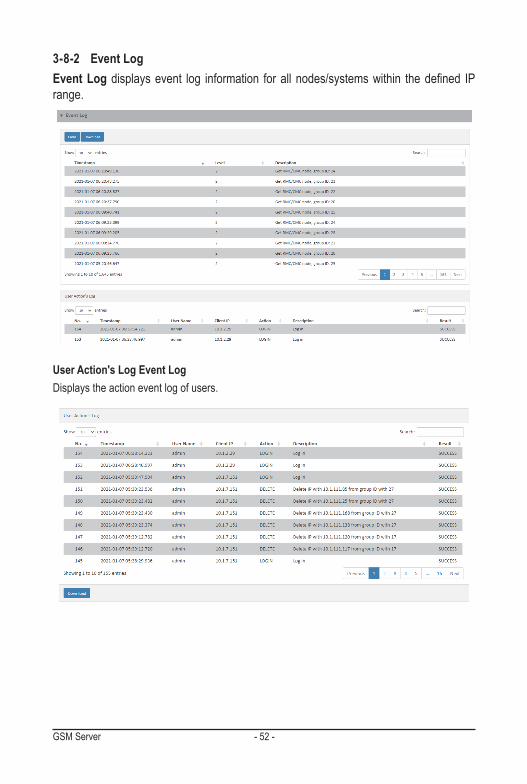
3-8-2 Event LogEvent Log displaysevent log information forallnodes/systemswithin thedefined IPrange.
User Action's Log Event Log Displays the action event log of users.

- 53 - GSM Server
3-8-3 Alert ManagementAlert Management enables the following configuration: GSM SNMP Setting and IPv4 Destination configuration,SMTP Serverconfiguration,andSend Mailconfigurationforallnodes/systemswithinthedefinedIPrange.
GSM SNMPGSMSNMPtrapconfigurationincludesSNMPsettingandSNMPdestinationconfiguration.
Parameter Description/Resulting ActionAlerting Enable Determine whether the trap is sent by connected node.
Host address Displays the host address information.
Alerting Level Determine the alerting level from the drop-down list.Please refer to Section 3-3-5 Event Log for description of alerting level.
GSM Server - 54 -
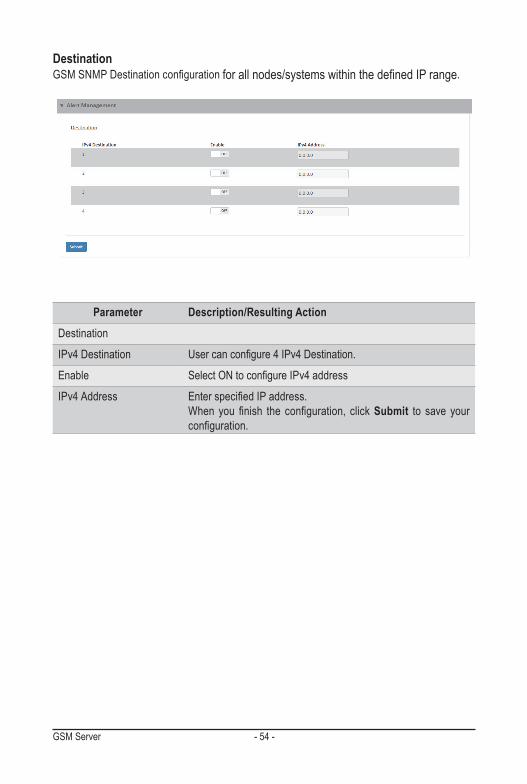
DestinationGSMSNMPDestinationconfigurationforallnodes/systemswithinthedefinedIPrange.
Parameter Description/Resulting ActionDestination
IPv4 Destination Usercanconfigure4IPv4Destination.
Enable SelectONtoconfigureIPv4 address
IPv4 Address EnterspecifiedIPaddress.When you finish the configuration, clickSubmit to save your configuration.
- 55 - GSM Server
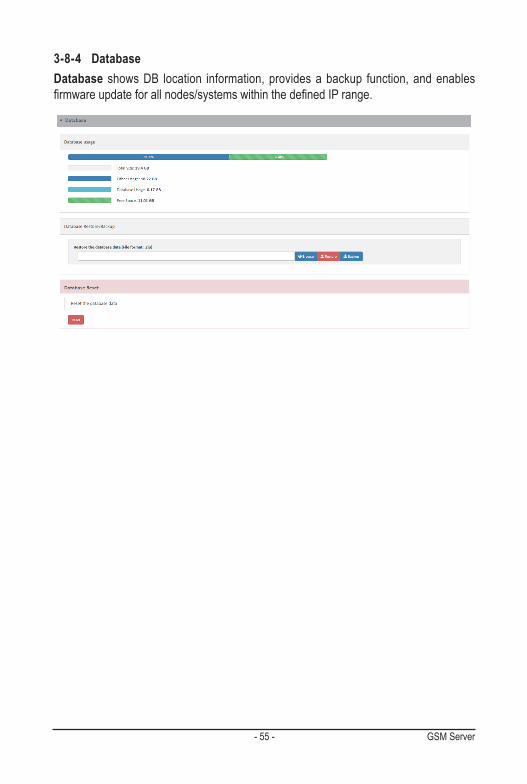
3-8-4 DatabaseDatabase shows DB location information, provides a backup function, and enables firmwareupdateforallnodes/systemswithinthedefinedIPrange.
GSM Server - 56 -
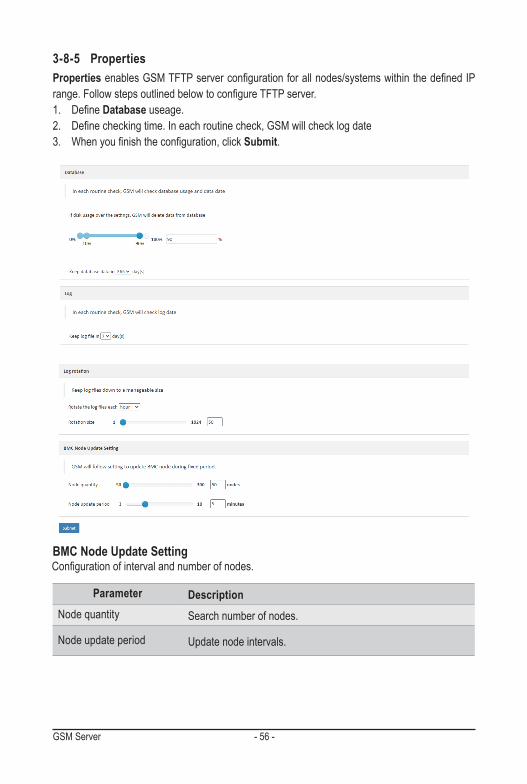
3-8-5 PropertiesProperties enablesGSMTFTPserverconfigurationforallnodes/systemswithinthedefinedIPrange. FollowstepsoutlinedbelowtoconfigureTFTP server.1. DefineDatabase useage.2. Definecheckingtime.Ineachroutinecheck,GSMwillchecklogdate3. Whenyoufinishtheconfiguration,clickSubmit.
Parameter DescriptionNode quantity Search number of nodes.
Node update period Update node intervals.
BMC Node Update SettingConfigurationofintervalandnumberofnodes.
- 57 - GSM Server
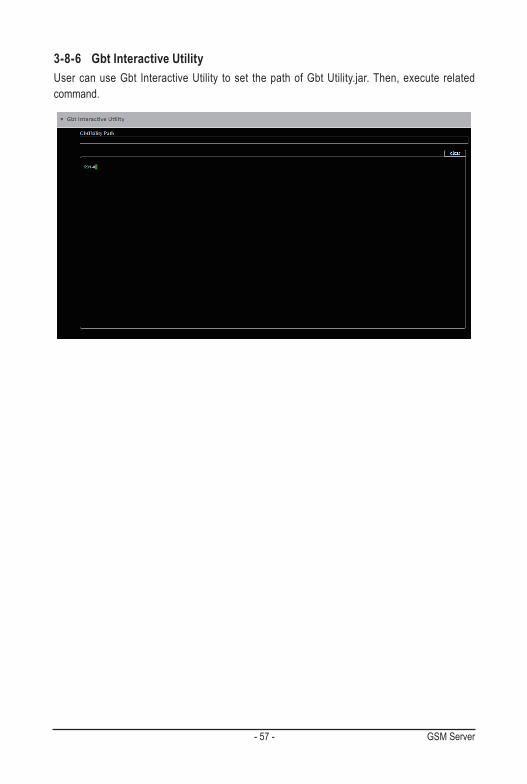
3-8-6 Gbt Interactive UtilityUser can use Gbt Interactive Utility to set the path of Gbt Utility.jar. Then, execute related command.
GSM Server - 58 -
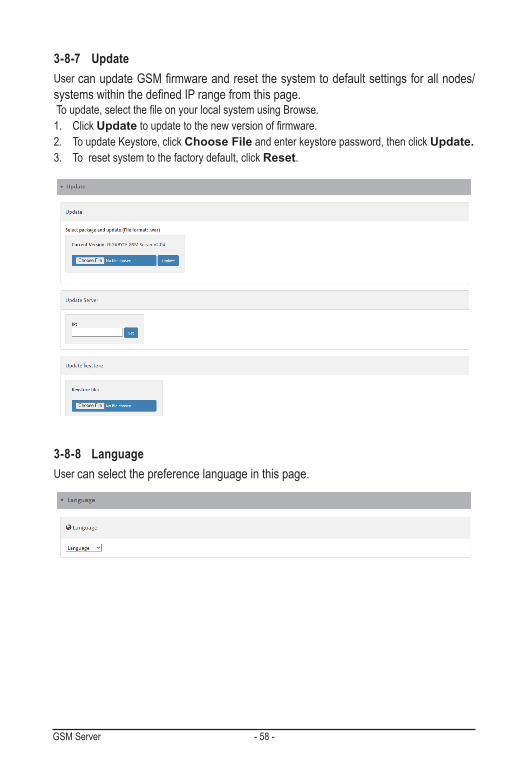
3-8-7 UpdateUser canupdateGSMfirmwareandresetthesystemtodefaultsettingsforallnodes/systemswithinthedefinedIPrangefromthispage.Toupdate,selectthefileonyourlocalsystemusingBrowse.1. Click Updatetoupdatetothenewversionoffirmware.2. To update Keystore, click Choose File and enter keystore password, then click Update.3. To reset system to the factory default, click Reset.
3-8-8 LanguageUser can select the preference language in this page.
- 59 - GSM Server
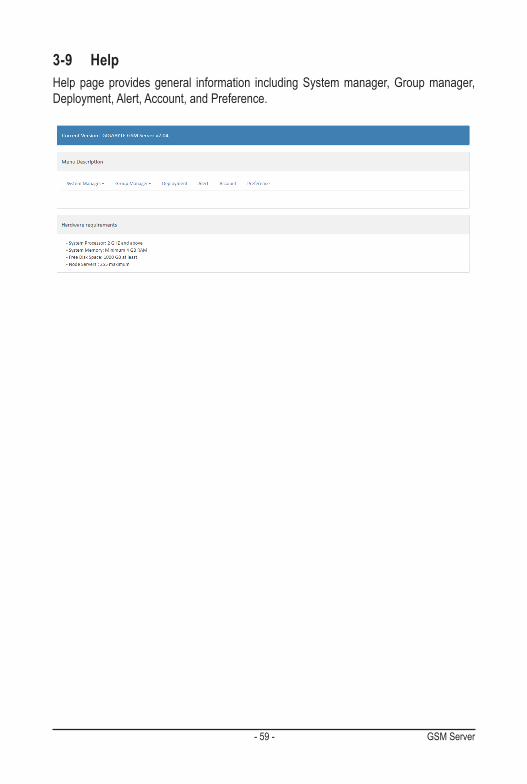
3-9 HelpHelp page provides general information including System manager, Group manager, Deployment, Alert, Account, and Preference.
GSM Server - 60 -
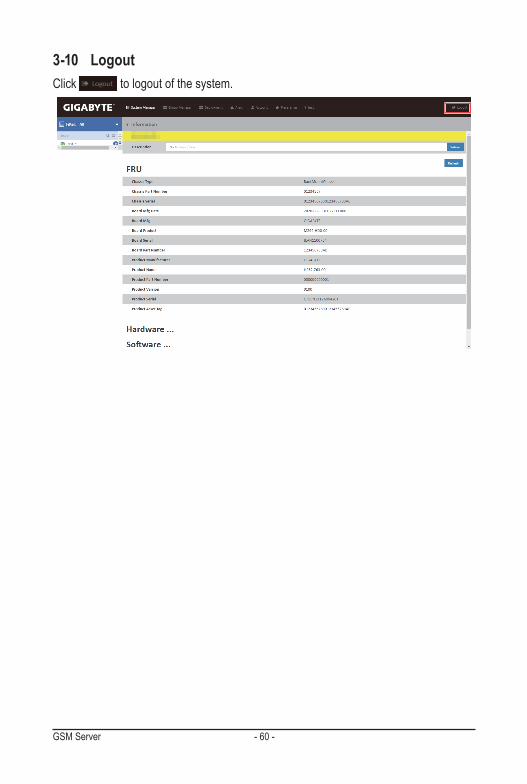
3-10 LogoutClick to logout of the system.

- 61 - GSM Server
5-1 Event Log List
SNMP ID Event Level Event Function Event DescriptionD06F00 FATAL DB Database connnection failed.D06F01 ERROR DB Database connnection denied.D16F00 ERROR NetworkConfiguration GetIPv4configurationfailedD16F01 ERROR NetworkConfiguration SetIPv4configurationfailedD16F02 ERROR NetworkConfiguration GetIPv6configurationfailedD16F03 ERROR NetworkConfiguration SetIPv6configurationfailedD26F00 ERROR Chassis Control Power control failedD26F01 ERROR Chassis Control Set chassis identify failedD26F02 ERROR Chassis Control Get chassis status failedD36F00 ERROR Power Limit Get power limit failedD36F01 ERROR Power Limit PowerlimitconfigurationfailedD36F02 ERROR Power Limit PowerlimitconfigurationfailedD46F00 ERROR Platform Event Platform event log failedD46F01 ERROR Platform Event Set platform event failedD56F00 ERROR Trap Destination Get IPv4 destination failedD56F01 ERROR Trap Destination Set IPv4 destination failedD56F02 ERROR Trap Destination Get IPv4 activate status failedD56F03 ERROR Trap Destination Set IPv4 activate status failedD56F04 ERROR Trap Destination Get IPv6 destination failedD56F05 ERROR Trap Destination Set IPv6 destination failedD56F06 ERROR Trap Destination Get IPv6 activate status failedD56F07 ERROR Trap Destination Set IPv6 activate status failedD36F03 WARN Group Power Limit Policy already existD36F04 INFO Group Power Limit Add new policyD36F05 INFO Group Power Limit Delete policyD36F06 INFO Group Power Limit Group XXX: enable power limitD36F07 INFO Group Power Limit Group XXX: reduce power limit
to XXXD36F08 INFO Group Power Limit Group XXX: disable power limitD66F00 WARN User Management User account: XXX already existD66F01 INFO User Management Add new user account: XXXD66F02 INFO User Management Delete user account: XXXD76F00 INFO System Reset System reset successD76F01 ERROR System Reset System reset failed, please wait a
few minutesD86F00 INFO Group Setting Create groupD86F01 INFO Group Setting Delete groupD86F02 INFO Group Setting Add group memberD86F03 INFO Group Setting Delete group memberD86F04 INFO Group Setting Rename group
Chapter 5 Appendix
GSM Server - 62 -
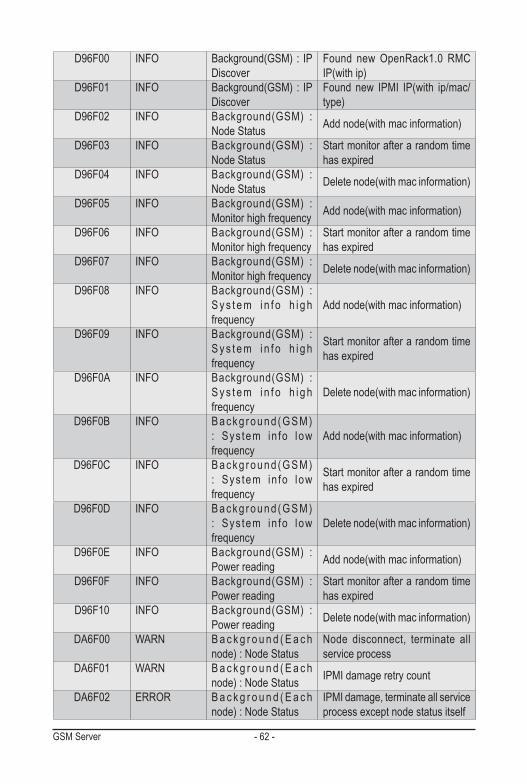
D96F00 INFO Background(GSM) : IP Discover
Found new OpenRack1.0 RMC IP(with ip)
D96F01 INFO Background(GSM) : IP Discover
Found new IPMI IP(with ip/mac/type)
D96F02 INFO Background(GSM) : Node Status Add node(with mac information)
D96F03 INFO Background(GSM) : Node Status
Start monitor after a random time has expired
D96F04 INFO Background(GSM) : Node Status Delete node(with mac information)
D96F05 INFO Background(GSM) : Monitor high frequency Add node(with mac information)
D96F06 INFO Background(GSM) : Monitor high frequency
Start monitor after a random time has expired
D96F07 INFO Background(GSM) : Monitor high frequency Delete node(with mac information)
D96F08 INFO Background(GSM) : S y s t e m i n f o h i g h frequency
Add node(with mac information)
D96F09 INFO Background(GSM) : S y s t e m i n f o h i g h frequency
Start monitor after a random time has expired
D96F0A INFO Background(GSM) : S y s t e m i n f o h i g h frequency
Delete node(with mac information)
D96F0B INFO B a c k g r o u n d ( G S M ) : Sys tem in fo low frequency
Add node(with mac information)
D96F0C INFO B a c k g r o u n d ( G S M ) : Sys tem in fo low frequency
Start monitor after a random time has expired
D96F0D INFO B a c k g r o u n d ( G S M ) : Sys tem in fo low frequency
Delete node(with mac information)
D96F0E INFO Background(GSM) : Power reading Add node(with mac information)
D96F0F INFO Background(GSM) : Power reading
Start monitor after a random time has expired
D96F10 INFO Background(GSM) : Power reading Delete node(with mac information)
DA6F00 WARN B a c k g r o u n d ( E a c h node) : Node Status
Node disconnect, terminate all service process
DA6F01 WARN B a c k g r o u n d ( E a c h node) : Node Status IPMI damage retry count
DA6F02 ERROR B a c k g r o u n d ( E a c h node) : Node Status
IPMI damage, terminate all service process except node status itself
- 63 - GSM Server
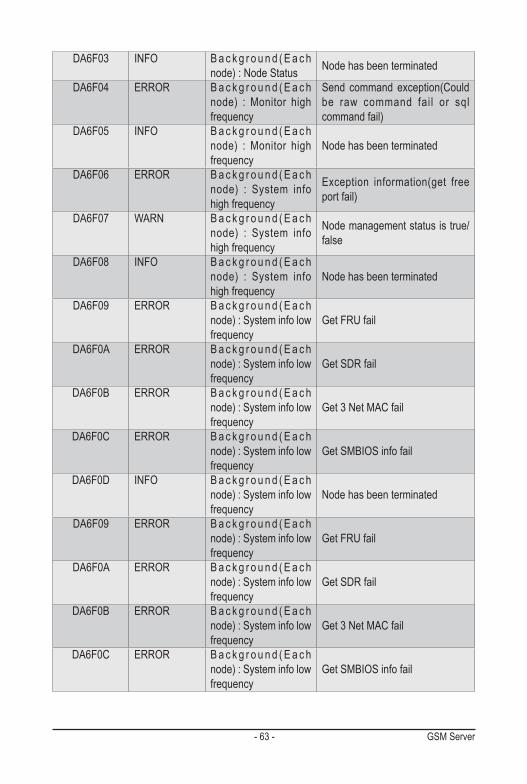
DA6F03 INFO B a c k g r o u n d ( E a c h node) : Node Status Node has been terminated
DA6F04 ERROR B a c k g r o u n d ( E a c h node) : Monitor high frequency
Send command exception(Could be raw command fai l or sql command fail)
DA6F05 INFO B a c k g r o u n d ( E a c h node) : Monitor high frequency
Node has been terminated
DA6F06 ERROR B a c k g r o u n d ( E a c h node) : System info high frequency
Exception information(get free port fail)
DA6F07 WARN B a c k g r o u n d ( E a c h node) : System info high frequency
Node management status is true/false
DA6F08 INFO B a c k g r o u n d ( E a c h node) : System info high frequency
Node has been terminated
DA6F09 ERROR B a c k g r o u n d ( E a c h node) : System info low frequency
Get FRU fail
DA6F0A ERROR B a c k g r o u n d ( E a c h node) : System info low frequency
Get SDR fail
DA6F0B ERROR B a c k g r o u n d ( E a c h node) : System info low frequency
Get 3 Net MAC fail
DA6F0C ERROR B a c k g r o u n d ( E a c h node) : System info low frequency
Get SMBIOS info fail
DA6F0D INFO B a c k g r o u n d ( E a c h node) : System info low frequency
Node has been terminated
DA6F09 ERROR B a c k g r o u n d ( E a c h node) : System info low frequency
Get FRU fail
DA6F0A ERROR B a c k g r o u n d ( E a c h node) : System info low frequency
Get SDR fail
DA6F0B ERROR B a c k g r o u n d ( E a c h node) : System info low frequency
Get 3 Net MAC fail
DA6F0C ERROR B a c k g r o u n d ( E a c h node) : System info low frequency
Get SMBIOS info fail
GSM Server - 64 -
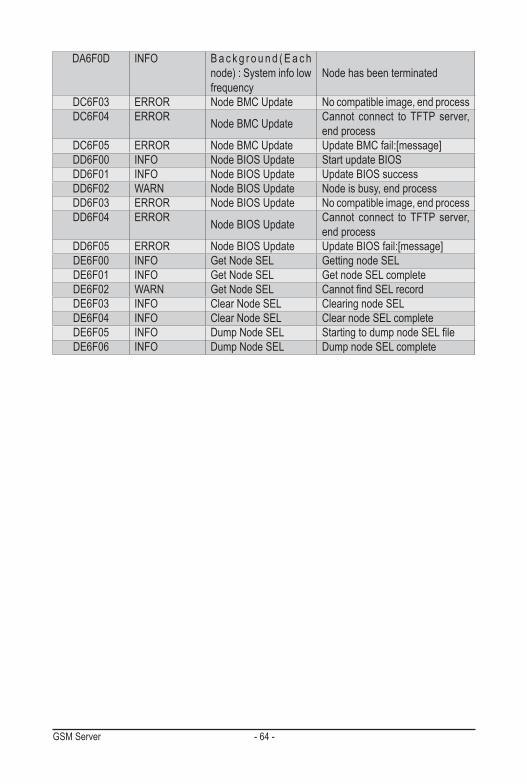
DA6F0D INFO B a c k g r o u n d ( E a c h node) : System info low frequency
Node has been terminated
DC6F03 ERROR Node BMC Update No compatible image, end processDC6F04 ERROR Node BMC Update Cannot connect to TFTP server,
end processDC6F05 ERROR Node BMC Update Update BMC fail:[message]DD6F00 INFO Node BIOS Update Start update BIOSDD6F01 INFO Node BIOS Update Update BIOS successDD6F02 WARN Node BIOS Update Node is busy, end processDD6F03 ERROR Node BIOS Update No compatible image, end processDD6F04 ERROR Node BIOS Update Cannot connect to TFTP server,
end processDD6F05 ERROR Node BIOS Update Update BIOS fail:[message]DE6F00 INFO Get Node SEL Getting node SELDE6F01 INFO Get Node SEL Get node SEL completeDE6F02 WARN Get Node SEL CannotfindSELrecordDE6F03 INFO Clear Node SEL Clearing node SELDE6F04 INFO Clear Node SEL Clear node SEL completeDE6F05 INFO Dump Node SEL StartingtodumpnodeSELfileDE6F06 INFO Dump Node SEL Dump node SEL complete
Related Documents