Recreating Groovejet by Spiller 1 Groovejet by Spiller This will describe how to make up “Groovejet” by Spiller; the building blocks that you'll have are small sampled sectio ns taken from the original so ng, “Love is You”, by Carol Williams. No audio anywhere is take n from the Spiller version. You should create a new project in Cubase, and then create 5 new audio tracks (all of them stereo), and also create a Marker track – this makes it much easier to navigate through the song, and is good practice generally. Go to the bar for the beginning of each section shown in the table on page 2, and drop a marker for each one, making navigation easier and also help keep you in sync if you miss something out. Name your 5 audio tracks – I chose “whoosh”, “Sample”, “Kick”, “Maracas”, “Timbales”, although you can call them whatever you like. Now import the files from their current location using Pool > Open Pool Window and clicking Import. The audio files provided are: intro 2.aif stringy bit 2.aif harpy 1.aif kick.aif timbales.aif woosh.aif maracas.aif verse 1.aif verse 2.aif string bit e-g.aif stringy bit 1.aif Set the session tempo to 122.80 by de-selecting TEMPO on the transport bar, and then double- clicking and typing the new tempo on the transport bar. The table on the next page shows where to place the samples on the “Sample” track. This can be done by going to the Pool ( Pool > Open Pool Window or CTRL+P), and then clicking and dragging the required file from this window to the Projec t Window. It is good practice whe n doing this kind of work to colour-code the samples as you add them – this makes spotting different sections or samples quick and easy from almost any zoom level. For the initial placement of most samples, the grid should be set to Bar, but for some of the editing it will be necessary to change to ¼, 1/8 th and even 1/16 th notes (the table shows when this is the case). To start off, pl ace the samples where there are no “comments ” – these are just straightforward repeats; once you are comfortable with doing that you can then place and edit the samples on the following pages; it’s a good idea to leave Bar 16 until last as it is the most complex edit in the entire piece. The song plan given starts at bar 5 to give room to use the “woosh” sample to imitate the initi al sound on the original version; this will need fade in/outs, reverb and EQ applied to make it sound more authentic.

Welcome message from author
This document is posted to help you gain knowledge. Please leave a comment to let me know what you think about it! Share it to your friends and learn new things together.
Transcript

8/3/2019 Groovejet by Spiller - Cubase 5
http://slidepdf.com/reader/full/groovejet-by-spiller-cubase-5 1/6
Recreating Groovejet by Spiller
1
Groovejet by Spiller
This will describe how to make up “Groovejet” by Spiller; the building blocks that you'll have are
small sampled sections taken from the original song, “Love is You”, by Carol Williams. No audio
anywhere is taken from the Spiller version. You should create a new project in Cubase, andthen create 5 new audio tracks (all of them stereo), and also create a Marker track – this makes
it much easier to navigate through the song, and is good practice generally. Go to the bar for
the beginning of each section shown in the table on page 2, and drop a marker for each one,
making navigation easier and also help keep you in sync if you miss something out. Name your
5 audio tracks – I chose “whoosh”, “Sample”, “Kick”, “Maracas”, “Timbales”, although you can
call them whatever you like.
Now import the files from their current location using Pool > Open Pool Window and
clicking Import.
The audio files provided are:
intro 2.aif stringy bit 2.aif harpy 1.aif
kick.aif timbales.aif woosh.aif
maracas.aif verse 1.aif verse 2.aif
string bit e-g.aif stringy bit 1.aif
Set the session tempo to 122.80 by de-selecting TEMPO on the transport bar, and then double-
clicking and typing the new tempo on the transport bar.
The table on the next page shows where to place the samples on the “Sample” track. This can
be done by going to the Pool (Pool > Open Pool Window or CTRL+P), and then clicking anddragging the required file from this window to the Project Window. It is good practice when
doing this kind of work to colour-code the samples as you add them – this makes spotting
different sections or samples quick and easy from almost any zoom level.
For the initial placement of most samples, the grid should be set to Bar, but for some of the
editing it will be necessary to change to ¼, 1/8 th and even 1/16th notes (the table shows when
this is the case). To start off, place the samples where there are no “comments” – these are just
straightforward repeats; once you are comfortable with doing that you can then place and edit
the samples on the following pages; it’s a good idea to leave Bar 16 until last as it is the most
complex edit in the entire piece.
The song plan given starts at bar 5 to give room to use the “woosh” sample to imitate the initial
sound on the original version; this will need fade in/outs, reverb and EQ applied to make it
sound more authentic.

8/3/2019 Groovejet by Spiller - Cubase 5
http://slidepdf.com/reader/full/groovejet-by-spiller-cubase-5 2/6
Recreating Groovejet by Spiller
2
Main Loop table
Section Bar File No Snap Comments
Intro 5 Intro 2 4 1 See page 3 for editing of bar 6
9 Verse 1 7 116 Verse 1 1 8 See page 3 for editing details
Verse 17 Verse 1 3 1
20 Verse 1 0.5 8 See page 4 for how to do this
Mix: EQ cuts out bass on 20.5 to 2120.5 String e-g 1
21 Verse 1 4 1
25 Verse 2 3 1
28 Stringy Bit 2 1 1
29 Verse 1 4 1
33 Verse2 3 1
36 Stringy Bit 2 1 1
37 Verse 1 3 1
40 String e-g 1 1
Verse 2 41 Verse 1 8 1
49 Verse 2 3 1
52 Stringy Bit 2 1 1
53 Verse 1 4 1
57 Verse 2 3 1
60 Stringy Bit 2 1 1
61 Verse 1 4 1
Bridge 65 Harpy 3 1
68 Stringy Bit 1 1 1 Trim to be six beats long
69.5 Verse 1 0.5 4 Last two beats of verse 1 to fill to next bar
70 Verse 1 2 1
72 Verse 1 0.5 16
See page 4 for how to do this72.5 String e-g 1
Verse 3 73 Verse 1 4 1
77 Verse 2 3 1
80 Verse 2 1 1 Second half of verse 2 sample repeated
81 Verse 1 2 1
Chorus 83 Stringy Bit 2 3 1
86 String e-g 1 1 Mix: EQ cuts out bass here (86.5 → 91)
87 Stringy Bit 2 4 1
91 Verse 1 4 1
Chorus 2 95 Verse 2 4 1 Mix: EQ cut on last 2 beats of 4th
time(bar 98.5)
99 Verse 1 2 1
101 Harpy 1 3 1
104 Stringy Bit 1 1 4 Trim to be six beats long105.5 Verse 1 0.5 8 Last two beats to fill to next bar, as bar 69.5
106 Verse 1 3 1
109 Verse 2 4 8 See pages 4-5
113 Intro 2 3 8 Replace 1st 8th with 1st 8th of verse 1 sample
Ending 116 Verse 1 13 8 1 ½ beats repeated – see page 5
8/3/2019 Groovejet by Spiller - Cubase 5
http://slidepdf.com/reader/full/groovejet-by-spiller-cubase-5 3/6
Recreating Groovejet by Spiller
3
Bars with editing
Bar 6
Bar 6 is mostly made up of the original sample, but beat 4 is deleted and then replaced with
two copies of the second half of beat 3 (beat 3.5 as shown in the diagram). These are thentrimmed to be only a 16
thlong to give a staccato feel.
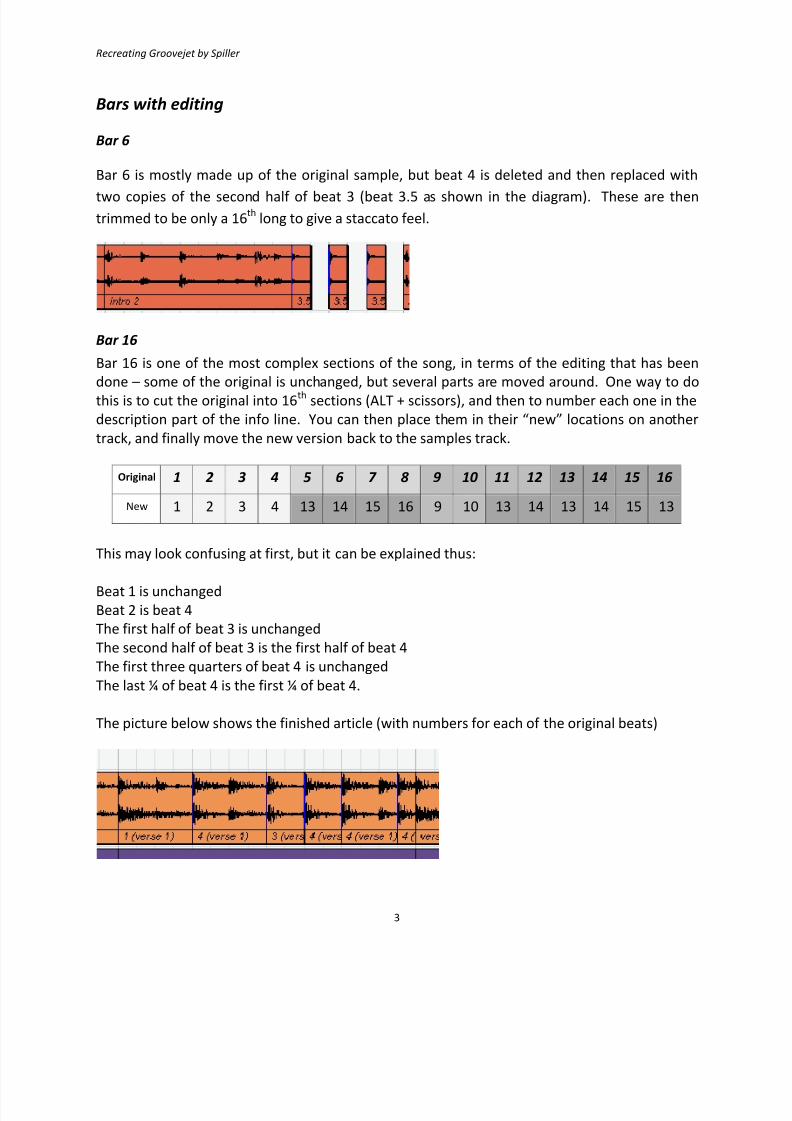
Bar 16
Bar 16 is one of the most complex sections of the song, in terms of the editing that has been
done – some of the original is unchanged, but several parts are moved around. One way to do
this is to cut the original into 16th sections (ALT + scissors), and then to number each one in the
description part of the info line. You can then place them in their “new” locations on another
track, and finally move the new version back to the samples track.
Original 1 2 3 4 5 6 7 8 9 10 11 12 13 14 15 16
New 1 2 3 4 13 14 15 16 9 10 13 14 13 14 15 13
This may look confusing at first, but it can be explained thus:
Beat 1 is unchangedBeat 2 is beat 4
The first half of beat 3 is unchanged
The second half of beat 3 is the first half of beat 4
The first three quarters of beat 4 is unchanged
The last ¼ of beat 4 is the first ¼ of beat 4.
The picture below shows the finished article (with numbers for each of the original beats)

8/3/2019 Groovejet by Spiller - Cubase 5
http://slidepdf.com/reader/full/groovejet-by-spiller-cubase-5 4/6
Recreating Groovejet by Spiller
4
Bar 20 and 72
Bars 20 and 72 are made up of two samples. The first two beats are the first two beats of verse
1 and the second two are made up of a 3/16ths
long sample from the beginning of string bit e-g.This is then repeated again, and then finally once more but with it being trimmed down to only
be 2/16ths
long.
The next few bars are created by taking the original sample (verse 2), and with the grid set to
8ths, cutting it into 8 slices. Each bar is then created by repeating/moving/copying the originalpieces as shown in each table
Bar 109
Original 1 2 3 4 5 6 7 8
New 1 1 3 3 5 6 7 8
Bar 110
Original 1 2 3 4 5 6 7 8
New 1 2 3 4 5 6 6 6
This will sound better if once the slices are placed as above, to set the grid to 32nd, and then trim the last
32nd from each of the “6” slices, so there is a short silence at the end of each.

8/3/2019 Groovejet by Spiller - Cubase 5
http://slidepdf.com/reader/full/groovejet-by-spiller-cubase-5 5/6
Recreating Groovejet by Spiller
5
Bar 111 – as bar 109
Original 1 2 3 4 5 6 7 8
New 1 1 3 3 5 6 7 8
Bar 112
Original 1 2 3 4 5 6 7 8
New 1 5 1 5 1 6 7 8
Bars 113-115
These bars are made up of two samples – most of the bar is intro 2 but the first 1/8 th of the bar is
replaced using the first 1/8th of verse 1
116 to 121
This ‘odd time’ section is quite simple – it’s just 1½ beats from the verse 1 sample repeated, as seen
below.
8/3/2019 Groovejet by Spiller - Cubase 5
http://slidepdf.com/reader/full/groovejet-by-spiller-cubase-5 6/6
Recreating Groovejet by Spiller
6
Kick drum and Maracas:
These samples are longer; they need to be placed at bar 9, and then zoom into the end of each
and trim their ends to fit accurately at bar 13 (hint: use grid mode for this, and zoom setting 5).
Then they can be repeated 26 times, and trimmed to suit the end (where the repeated section
that will fade out is, at bar 116). Finally there are a few sections that need to be cut out; bars
41 to 45, 72.5 to 73 and 86.5 to 91.
Automation
There are some edits that can make the song sound more authentic; the first one is to apply
volume automation to the master output to make a smooth fade-out from bars 116-119; just
two points will take care of that (one at 0db at bar 116, one at -infinity at bar 119)
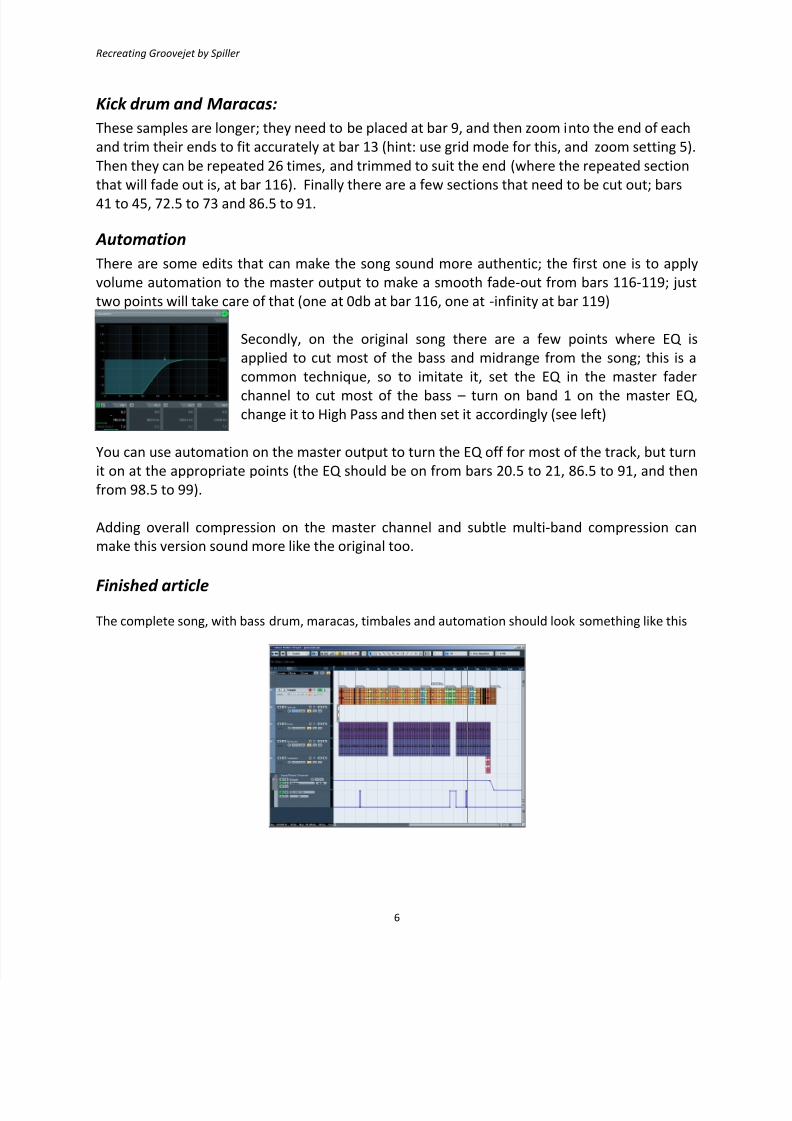
Secondly, on the original song there are a few points where EQ is
applied to cut most of the bass and midrange from the song; this is a
common technique, so to imitate it, set the EQ in the master fader
channel to cut most of the bass – turn on band 1 on the master EQ,change it to High Pass and then set it accordingly (see left)
You can use automation on the master output to turn the EQ off for most of the track, but turn
it on at the appropriate points (the EQ should be on from bars 20.5 to 21, 86.5 to 91, and then
from 98.5 to 99).
Adding overall compression on the master channel and subtle multi-band compression can
make this version sound more like the original too.
Finished article
The complete song, with bass drum, maracas, timbales and automation should look something like this
Related Documents