Greenplum Data Loader Installation and User Guide 1 Greenplum ® DataLoader 1.2 Installation and User Guide Rev: A01

Welcome message from author
This document is posted to help you gain knowledge. Please leave a comment to let me know what you think about it! Share it to your friends and learn new things together.
Transcript
Greenplum Data Loader Installation and User Guide
1
Greenplum® DataLoader 1.2Installation and User Guide
Rev: A01

Greenplum Data Loader Installation and User Guide
2
Copyright © 2012 EMC Corporation. All rights reserved. EMC believes the information in this publication is accurate as of its publication date. The information is subject to change without notice. THE INFORMATION IN THIS PUBLICATION IS PROVIDED “AS IS.” EMC CORPORATION MAKES NO REPRESENTATIONS OR WARRANTIES OF ANY KIND WITH RESPECT TO THE INFORMATION IN THIS PUBLICATION, AND SPECIFICALLY DISCLAIMS IMPLIED WARRANTIES OF MERCHANTABILITY OR FITNESS FOR A PARTICUAR PURPOSE. Use, copying, and distribution of any EMC software described in this publication requires an applicable software license. For the most up-to-date listing of EMC product names, see EMC Corporation Trademarks on EMC.com All other trademarks used herein are the property of their respective owners.
Greenplum Data Loader Installation and User Guide
3
Greenplum Data Loader Installation and User Guide
Greenplum Data Loader Installation and User Guide ....................... 3
Overview of Greenplum Data Loader ............................................................. 5 Benefits of Greenplum Data Loader ......................................................................... 5
Getting Started With Greenplum Data Loader ........................................ 5 Greenplum Data Loader Components ..................................................................... 5 Greenplum Data Loader Dependencies ................................................................. 6 Greenplum Data Loader RPMs ...................................................................................... 6 Greenplum Data Loader Deployment Structure ............................................. 7
Master Node ............................................................................................................................................... 7 Slave Node .................................................................................................................................................. 7 BulkLoader CLI ........................................................................................................................................ 7
Preparing to Install Greenplum Data Loader .......................................... 8
Installing Greenplum Data Loader ................................................................... 9
Configuring Greenplum Data Loader ............................................................ 10
Using Greenplum Data Loader .......................................................................... 15 Registering or Deleting a Data Store .................................................................... 16 Submitting a Job ................................................................................................................... 20 Suspending a Job ................................................................................................................. 24 Resuming a Job ...................................................................................................................... 25 Stopping a Job ........................................................................................................................ 25
Trouble Shooting ......................................................................................................... 25
Appendix A: Command Line Reference ...................................................... 26
bulkloader ......................................................................................................................... 26 Synopsis ...................................................................................................................................... 26 Submit .......................................................................................................................................................... 26 Suspend ....................................................................................................................................................... 27 Resume .......................................................................................................................................................... 28 Stop ................................................................................................................................................................ 28 Query ............................................................................................................................................................. 29 List ................................................................................................................................................................ 29 Config .......................................................................................................................................................... 29
Appendix B: Data Store Registration Properties ................................. 31 FTP Data Store Registration Properties ............................................................................. 31

Greenplum Data Loader Installation and User Guide
4
HTTP Data Store Registration Properties ......................................................................... 31 HDFS Data Store Registration Properties ........................................................................ 32 LocalFS Data Store Registration Properties ................................................................... 32 NFS Data Store Registration Properties ............................................................................ 32 NFS Data Store ..................................................................................................................................... 34 HDFS Data Store .................................................................................................................................. 34
Appendix C: Greenplum Data Loader Copy Strategies ................... 35 Copy Strategies .................................................................................................................................... 35
Appendix D: Zookeeper Installation and Configuration ................ 37
Appendix E: Installing and Configuring the MapReduce Cluster ................................................................................................................................................... 40
Appendix F: Installing and Configuring Bookkeeper ....................... 45
Appendix G: Sample Deployment Topology ............................................ 48 Using an Existing MapReduce Cluster .................................................................. 48 Installing a Dedicated MapReduce Cluster ....................................................... 48
Appendix H: Properties for Each Datastore Type ............................... 50
Glossary .............................................................................................................................. 51

Greenplum Data Loader Installation and User Guide
5
Overview of Greenplum Data Loader Greenplum Data Loader is an advanced Big Data transporting tool. It focuses on loading Big Data into data analytics platforms. It is an enterprise solution for staged, batch data-loading.
It features loading batch data onto large data warehouse or analytics platforms for offline analysis. It deploys code, partitions data into chunks, splits jobs into multiple tasks, schedules the tasks taking into account data locality and network topology, and handles job failures.
Greenplum Data Loader can dynamically scale the execution of data loading tasks to maximize the system resource. With single node deployment, it linearly scales out on disk numbers up to the maximum machine bandwidth. With multi-node cluster deployment, it linearly scales out on machine numbers up to the maximum network bandwidth. This horizontal scalability promises optimized, and best possible throughput
Benefits of Greenplum Data Loader
In summary, Greenplum Data Loader: • Focuses on optimizing throughput with resource efficiency and linear scalability • Enables higher throughput via parallel load, data locality and averaging files into
similar-sized chunks • Supports multiple data transfer jobs simultaneously • Supports a wide variety of source data store/access protocols – HDFS, Local FS
(DAS), NFS, FTP, HTTPS • Uses master/slave architecture and can be managed through both CLI and GUI
Getting Started With Greenplum Data Loader This topic describes the Greenplum Data Loader components, and the RPMs included in the package.
Greenplum Data Loader Components
Bulkloader consists of the following components:
Component Description
BulkLoader Manager Provides an operational and administrative graphical user interface. It also provides REST programmatic interface for integration with other tools.
Greenplum Data Loader Installation and User Guide
6
BulkLoader CLI A command line tool that interacts with BulkLoader Manager to provide the command line access for loading job operation.
BulkLoader Scheduler Provides a job and task scheduling service.
BulkLoader worker Performs data loading work.
Greenplum Data Loader Dependencies
Greenplum Data Loader has the following dependencies:
• Zookeeper Cluster: Provides registration and coordination service for Greenplum Data Loader
• MapReduce Cluster: Manages the Greenplum Data Loader cluster • Persistent Storage: Provides a distributed, shared storage for Greenplum Data
Loader cluster to store and access data transfer plan
Greenplum Data Loader RPMs
The following RPMs are part of this release:
Package Name Description
bulkloader-scheduler-1.0-GA.x86_64.rpm
bulkloader-scheduler provides the essential files to setup bulkloader master server.
bulkloader-worker-1.0-GA.x86_64.rpm
bulkloader-worker provides the essential files to setup bulkloader slave server.
bulkloader-cli-1.0-GA.x86_64.rpm
bulkloader-cli provides the essential files and binaries to setup bulkloader client. Client can interact with bulkloader server to perform data loading operations.
bulkloader-datastore-1.0-GA.x86_64.rpm
bulkloader-datastore provides the essential files to support different data stores.
bulkloader-manager-1.0-GA.x86_64.rpm
bulkloader-manager provides the http server.
bulkloader-bookkeeper-1.0-GA.x86_64.rpm
bulkloader-bookkeeper provides the essential files and binaries to set up the bookkeeper.
bulkloader-httpfs-1.0-GA.x86_64.rpm
Bulkloader-httpfs provides the essential files to setup httpfs.

Greenplum Data Loader Installation and User Guide
7
bulkloader-zookeeper-1.0-GA.x86_64.rpm
bulkloader-zookeeper provides the essential files and binaries to setup zookeeper.
Greenplum Data Loader Deployment Structure
The Greenplum Data Loader cluster copies data from the source datastore to the destination cluster. The cluster is composed of three types of logical nodes:
• Master Node
• Slave Node
• CLI Node Note: If you already have a MapReduce deployment, you can choose to leverage the existing MapReduce and use its HDFS as source or destination data store. Otherwise, you can install a dedicated MapReduce cluster and use its JobTracker filesystem.
Master Node You must install the following components:
• BulkLoader Manager • BulkLoader Scheduler
• BulkLoader DataStore Note: In a dedicated MapReduce cluster, you can have the following components on the master machine: • MapReduce JobTracker
• Hadoop-http-fs file system
Slave Node You must install the following components: • BulkLoader DataStore
• BulkLoader Worker Note: Each BulkLoader slave node must also have TaskTracker installed.
BulkLoader CLI The CLI can be installed on any client machine that has access to BulkLoader Manager.
Greenplum Data Loader Installation and User Guide
8
Preparing to Install Greenplum Data Loader Perform the following tasks to prepare your environment for Greenplum Data Loader. 1. Install the JDK: Download and install the Oracle JDK1.6 (Java SE6 or JDK 6) from
http://www.oracle.com/technetwork/java/javase/downloads/index.html (http://www.oracle.com/technetwork/java/archive-139210.html)
2. After installing JDK, set the JAVA_HOME environment variable referring to where you installed JDK. On a typical Linux installation with Oracle JDK 1.6, the value of this variable should be /usr/java/default/jre . Then add $JAVA_HOME/bin into your PATH environment variable. On a Linux platform with bash shell, you add the following lines into the file ~/.bashrc:
export JAVA_HOME=/usr/java/default/jre export PATH=$JAVA_HOME/bin:$PATH
3. Install and set up Zookeeper cluster. Please refer to Appendix E: Zookeeper
Installation and Configuration. 4. Install and set up the Map Reduce Cluster: If you need to install a new MapReduce
cluster, see Appendix F: Installing and Configuring the MapReduce for more information.
5. Configure the MapReduce cluster for Greenplum Data Loader. a. Add the properties mapred.jobtracker.taskScheduler and
mapred.job.tracker.http.address to the mapred-site.xml configuration file.
Note: See the following sample mapred-site.xml file for more information. Sample mapred-site.xml file
<!-- mapred.jobtracker.taskScheduler property must be set to the following value --> <property> <name>mapred.jobtracker.taskScheduler</name> <value>org.apache.hadoop.mapred.FairScheduler</value> </property> <1-- replace with your JobTracker host name in the value --> <property> <name>mapred.job.tracker.http.address</name> <value>Your_JobTracker_Hostname:50030</value> </property>
b. (Optional, only needed if your MapReduce cluster is not setup with the installation package shipped with Bulk Loader). Find and delete hadoop-
Greenplum Data Loader Installation and User Guide
9
fairscheduler-*.*.*.jar in the HADOOP_HOME/lib.
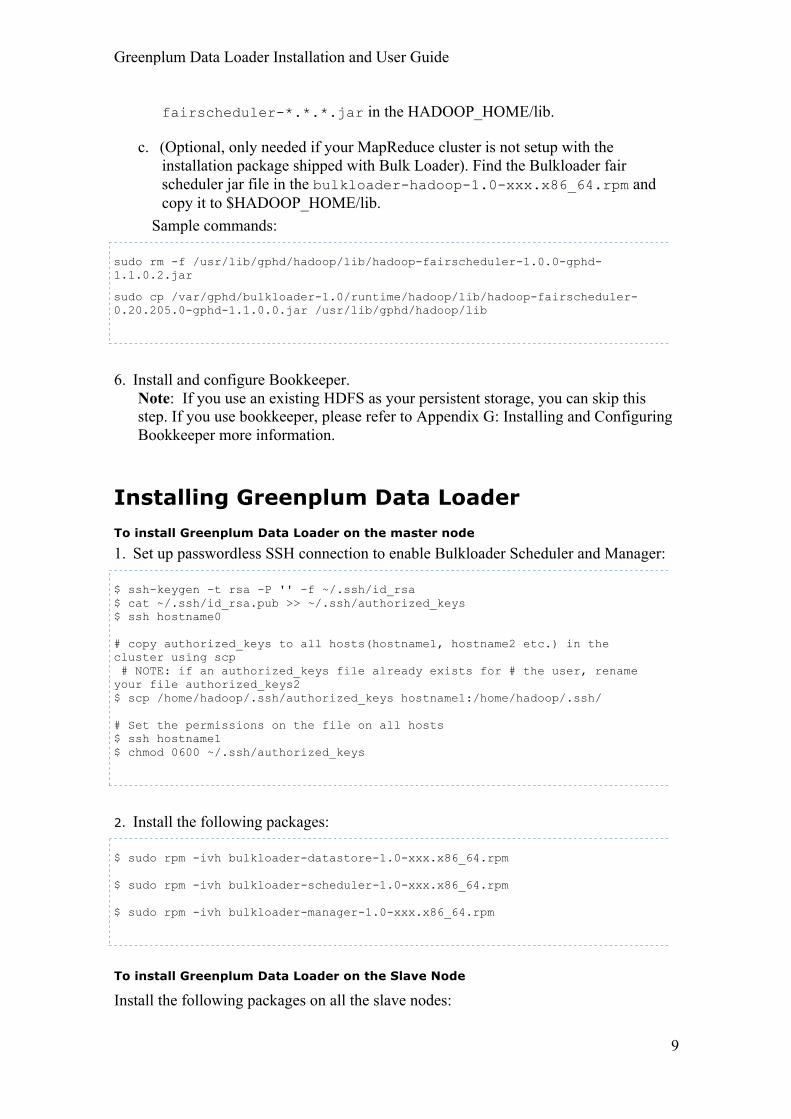
c. (Optional, only needed if your MapReduce cluster is not setup with the installation package shipped with Bulk Loader). Find the Bulkloader fair scheduler jar file in the bulkloader-hadoop-1.0-xxx.x86_64.rpm and copy it to $HADOOP_HOME/lib.
Sample commands:
sudo rm -f /usr/lib/gphd/hadoop/lib/hadoop-fairscheduler-1.0.0-gphd-1.1.0.2.jar
sudo cp /var/gphd/bulkloader-1.0/runtime/hadoop/lib/hadoop-fairscheduler-0.20.205.0-gphd-1.1.0.0.jar /usr/lib/gphd/hadoop/lib
6. Install and configure Bookkeeper.
Note: If you use an existing HDFS as your persistent storage, you can skip this step. If you use bookkeeper, please refer to Appendix G: Installing and Configuring Bookkeeper more information.
Installing Greenplum Data Loader To install Greenplum Data Loader on the master node
1. Set up passwordless SSH connection to enable Bulkloader Scheduler and Manager:
$ ssh-keygen -t rsa -P '' -f ~/.ssh/id_rsa $ cat ~/.ssh/id_rsa.pub >> ~/.ssh/authorized_keys $ ssh hostname0 # copy authorized_keys to all hosts(hostname1, hostname2 etc.) in the cluster using scp # NOTE: if an authorized_keys file already exists for # the user, rename your file authorized_keys2 $ scp /home/hadoop/.ssh/authorized_keys hostname1:/home/hadoop/.ssh/ # Set the permissions on the file on all hosts $ ssh hostname1 $ chmod 0600 ~/.ssh/authorized_keys
2. Install the following packages:
$ sudo rpm -ivh bulkloader-datastore-1.0-xxx.x86_64.rpm $ sudo rpm -ivh bulkloader-scheduler-1.0-xxx.x86_64.rpm $ sudo rpm -ivh bulkloader-manager-1.0-xxx.x86_64.rpm
To install Greenplum Data Loader on the Slave Node
Install the following packages on all the slave nodes:
Greenplum Data Loader Installation and User Guide
10
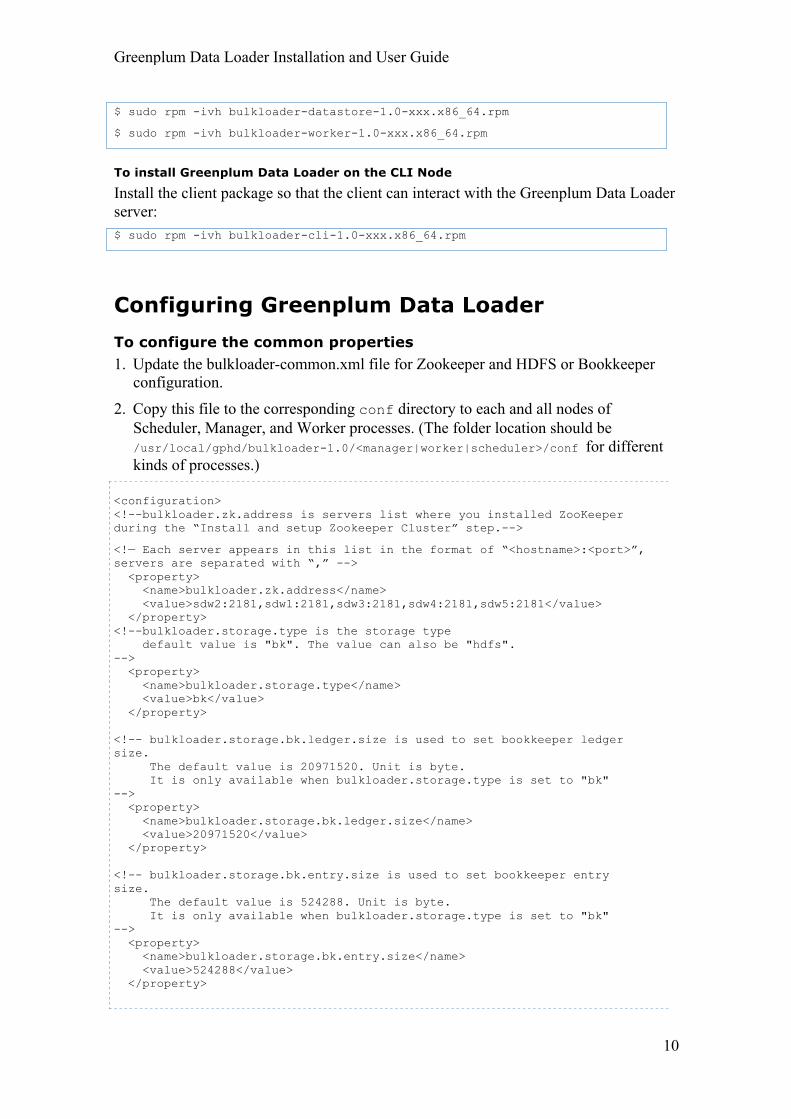
$ sudo rpm -ivh bulkloader-datastore-1.0-xxx.x86_64.rpm
$ sudo rpm -ivh bulkloader-worker-1.0-xxx.x86_64.rpm
To install Greenplum Data Loader on the CLI Node
Install the client package so that the client can interact with the Greenplum Data Loader server: $ sudo rpm -ivh bulkloader-cli-1.0-xxx.x86_64.rpm
Configuring Greenplum Data Loader To configure the common properties 1. Update the bulkloader-common.xml file for Zookeeper and HDFS or Bookkeeper
configuration.
2. Copy this file to the corresponding conf directory to each and all nodes of Scheduler, Manager, and Worker processes. (The folder location should be /usr/local/gphd/bulkloader-1.0/<manager|worker|scheduler>/conf for different kinds of processes.)
<configuration> <!--bulkloader.zk.address is servers list where you installed ZooKeeper during the “Install and setup Zookeeper Cluster” step.-->
<!— Each server appears in this list in the format of “<hostname>:<port>”, servers are separated with “,” --> <property> <name>bulkloader.zk.address</name> <value>sdw2:2181,sdw1:2181,sdw3:2181,sdw4:2181,sdw5:2181</value> </property> <!--bulkloader.storage.type is the storage type default value is "bk". The value can also be "hdfs". --> <property> <name>bulkloader.storage.type</name> <value>bk</value> </property> <!-- bulkloader.storage.bk.ledger.size is used to set bookkeeper ledger size. The default value is 20971520. Unit is byte. It is only available when bulkloader.storage.type is set to "bk" --> <property> <name>bulkloader.storage.bk.ledger.size</name> <value>20971520</value> </property> <!-- bulkloader.storage.bk.entry.size is used to set bookkeeper entry size. The default value is 524288. Unit is byte. It is only available when bulkloader.storage.type is set to "bk" --> <property> <name>bulkloader.storage.bk.entry.size</name> <value>524288</value> </property>

Greenplum Data Loader Installation and User Guide
11
<!-- bulkloader.storage.hdfs.uri is used to set storage hdfs uri. It is only available when bulkloader.storage.type is set to "hdfs" --> <property> <name>bulkloader.storage.hdfs.uri</name> <value>hdfs://hdfs_hostname:port</value> </property> <!-- bulkloader.storage.hdfs.rootdir is used to set the root directory in hdfs. It is only available when bulkloader.storage.type is set to "hdfs" --> <property> <name>bulkloader.storage.hdfs.rootdir</name> <value>/storage/hdfs/root/directory</value> </property> </configuration>
To configure the datastore The bulkloader-datastore.xml contains the configuration properties for datastore. Copy the bulkloader-datastore.xml file to the corresponding conf directory on each node for the Scheduler, Manager, and Worker processes.
<configuration> <!-- bulkloader.datastore.meta.dir is the datastore directory installed with RPM package. The default is "/usr/local/gphd/bulkloader-1.0/datastore" --> <property> <name>bulkloader.datastore.meta.dir</name> <value>/usr/local/gphd/bulkloader-1.0/datastore</value> </property> </configuration>
To configure the Scheduler 1. Configure the following properties in the /usr/local/gphd/bulkloader-
1.0/scheduler/conf/bulkloader-scheduler.xml file.
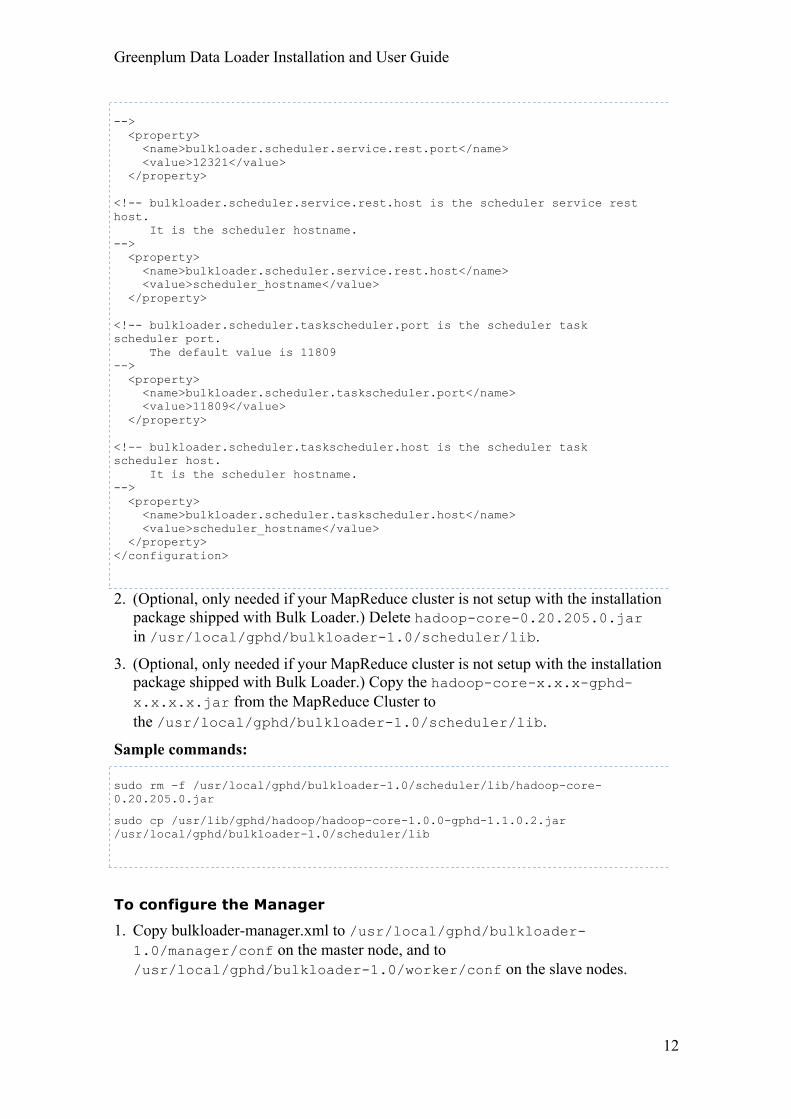
<configuration> <!-- bulkloader.scheduler.mapred.conf.dir is set to the MapReduce cluster configuration directory --> <property> <name>bulkloader.scheduler.mapred.conf.dir</name> <value>/MapReduce/cluster/configuration/directory</value> </property> <!-- bulkloader.scheduler.service.rest.port is the scheduler service rest port. The default value is "12321"
Greenplum Data Loader Installation and User Guide
12
--> <property> <name>bulkloader.scheduler.service.rest.port</name> <value>12321</value> </property> <!-- bulkloader.scheduler.service.rest.host is the scheduler service rest host. It is the scheduler hostname. --> <property> <name>bulkloader.scheduler.service.rest.host</name> <value>scheduler_hostname</value> </property> <!-- bulkloader.scheduler.taskscheduler.port is the scheduler task scheduler port. The default value is 11809 --> <property> <name>bulkloader.scheduler.taskscheduler.port</name> <value>11809</value> </property> <!-- bulkloader.scheduler.taskscheduler.host is the scheduler task scheduler host. It is the scheduler hostname. --> <property> <name>bulkloader.scheduler.taskscheduler.host</name> <value>scheduler_hostname</value> </property> </configuration>
2. (Optional, only needed if your MapReduce cluster is not setup with the installation package shipped with Bulk Loader.) Delete hadoop-core-0.20.205.0.jar in /usr/local/gphd/bulkloader-1.0/scheduler/lib.
3. (Optional, only needed if your MapReduce cluster is not setup with the installation package shipped with Bulk Loader.) Copy the hadoop-core-x.x.x-gphd-x.x.x.x.jar from the MapReduce Cluster to the /usr/local/gphd/bulkloader-1.0/scheduler/lib.
Sample commands:
sudo rm -f /usr/local/gphd/bulkloader-1.0/scheduler/lib/hadoop-core-0.20.205.0.jar
sudo cp /usr/lib/gphd/hadoop/hadoop-core-1.0.0-gphd-1.1.0.2.jar /usr/local/gphd/bulkloader-1.0/scheduler/lib
To configure the Manager
1. Copy bulkloader-manager.xml to /usr/local/gphd/bulkloader-1.0/manager/conf on the master node, and to /usr/local/gphd/bulkloader-1.0/worker/conf on the slave nodes.

Greenplum Data Loader Installation and User Guide
13
Sample bulkloader-manager xml:
<configuration> <!-- bulkloader.manager.service.port is the manager service port. Default value is 8080. --> <property> <name>bulkloader.manager.service.port</name> <value>8080</value> </property> <!-- bulkloader.manager.data.dir is the manager data directory. Default is "data". The "data" directory would be here: /usr/local/gphd/bulkloader-1.0/manager/bin/data --> <property> <name>bulkloader.manager.data.dir</name> <value>data</value> </property> <!-- bulkloader.manager.monitoring.enable is to enable or disable manager monitoring Default is true --> <property> <name>bulkloader.manager.monitoring.enable</name> <value>true</value> </property> <!-- bulkloader.manager.monitoring.host is the manager monitoring host --> <property> <name>bulkloader.manager.monitoring.host</name> <value>manager_hostname</value> </property> <!-- bulkloader.manager.monitoring.port is the manager monitoring port Default is 12345 --> <property> <name>bulkloader.manager.monitoring.port</name> <value>12345</value> </property> </configuration>
2. (Optional, only needed if your MapReduce cluster is not setup with the installation package shipped with Bulk Loader.) Delete the hadoop-core-0.20.205.0.jar from the /usr/local/gphd/bulkloader-1.0/manager/lib.
3. (Optional, only needed if your MapReduce cluster is not setup with the installation package shipped with Bulk Loader.) Copy the hadoop-core-x.x.x-gphd-x.x.x.x.jar from the MapReduce Cluster to the /usr/local/gphd/bulkloader-1.0/manager/webapps/WEB-INF/lib
sudo rm -f /usr/local/gphd/bulkloader-1.0/manager/webapps/WEB-INF/lib/hadoop-core-0.20.205.0.jar

Greenplum Data Loader Installation and User Guide
14
sudo cp /usr/lib/gphd/hadoop/hadoop-core-1.0.0-gphd-1.1.0.2.jar /usr/local/gphd/bulkloader-1.0/manager/webapps/WEB-INF/lib
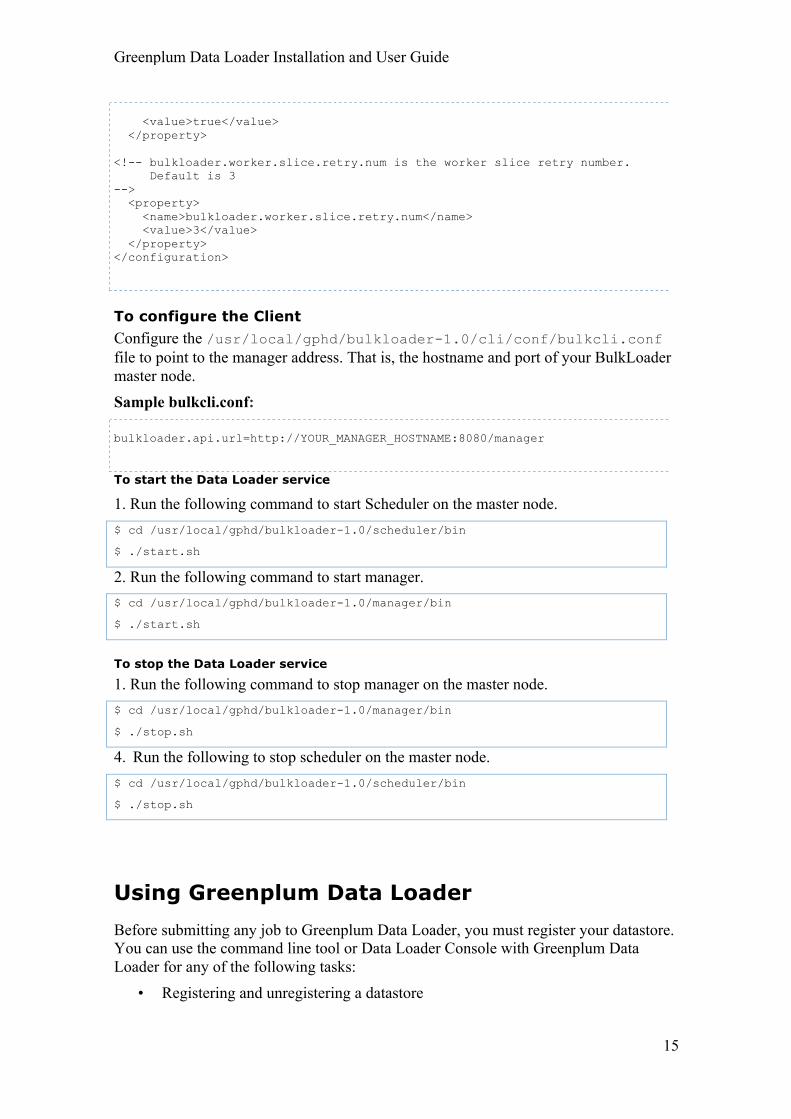
To configure the Worker Copy the bulkloader-worker.xml to the directory /usr/local/gphd/bulkloader-1.0/worker/conf for each slave node.
Sample bulkloader-worker.xml:
<configuration> <!-- bulkloader.worker.reader.num is the worker reader number. Default is 2 --> <property> <name>bulkloader.worker.reader.num</name> <value>2</value> </property> <!-- bulkloader.worker.writer-pipeline.num is the worker writer pipeline number. Default is 5 --> <property> <name>bulkloader.worker.writer-pipeline.num</name> <value>5</value> </property> <!-- bulkloader.worker.buffer.num is the worker buffer number. Default is 16 --> <property> <name>bulkloader.worker.buffer.num</name> <value>16</value> </property> <!-- bulkloader.worker.buffer.size is the worker buffer size. Default is 16M. The unit is byte --> <property> <name>bulkloader.worker.buffer.size</name> <value>16777216</value> </property> <!-- bulkloader.worker.progress.interval is teh worker progress interval. Default is 1800 ms --> <property> <name>bulkloader.worker.progress.interval</name> <value>1800</value> </property> <!-- bulkloader.worker.slice.retry.enable is to enable or disable the worker slice retry Default is true --> <property> <name>bulkloader.worker.slice.retry.enable</name>
Greenplum Data Loader Installation and User Guide
15
<value>true</value> </property> <!-- bulkloader.worker.slice.retry.num is the worker slice retry number. Default is 3 --> <property> <name>bulkloader.worker.slice.retry.num</name> <value>3</value> </property> </configuration>
To configure the Client Configure the /usr/local/gphd/bulkloader-1.0/cli/conf/bulkcli.conf file to point to the manager address. That is, the hostname and port of your BulkLoader master node. Sample bulkcli.conf:
bulkloader.api.url=http://YOUR_MANAGER_HOSTNAME:8080/manager
To start the Data Loader service
1. Run the following command to start Scheduler on the master node. $ cd /usr/local/gphd/bulkloader-1.0/scheduler/bin
$ ./start.sh
2. Run the following command to start manager. $ cd /usr/local/gphd/bulkloader-1.0/manager/bin
$ ./start.sh
To stop the Data Loader service
1. Run the following command to stop manager on the master node. $ cd /usr/local/gphd/bulkloader-1.0/manager/bin
$ ./stop.sh
4. Run the following to stop scheduler on the master node. $ cd /usr/local/gphd/bulkloader-1.0/scheduler/bin
$ ./stop.sh
Using Greenplum Data Loader Before submitting any job to Greenplum Data Loader, you must register your datastore. You can use the command line tool or Data Loader Console with Greenplum Data Loader for any of the following tasks:
• Registering and unregistering a datastore
Greenplum Data Loader Installation and User Guide
16
• Starting or stopping a job
• Suspending or resuming a job • Querying a job
• Configuring a job • Listing jobs
• Monitoring job progress You can access the Data Loader Console at: http://your_manager_hostname:8080/bulkloader/rest/jsp/joblist
Registering or Deleting a Data Store
To load data from a data store, the data store must be registered with the Greenplum Data Loader. You can register the data store using the Command Line or through the Data Loader Console.
To register a data store using the command line
Note: Perform the following command line operations on the Bulkloader CLI machine.
1. On the Client node, create the property file for the datastore in the directory /usr/local/gphd/bulkloader-1.0/cli/bin.

Greenplum Data Loader Installation and User Guide
17
Provide values for the following properties:
Data store registry values
Property Description
datahandler.handlers Type of datastore.
host Host name of the datastore to register.
port The port number of the datastore. Does not require a local file store.
scheme Datastore schema
Supported Datastore Types
• nfs
• ftp
• internal HDFS
• http
• localFS
• GPHD1.1
• GPHD1.2
• HDFS apache1.0.3
• GPHD1.1.0.2 2. Run the following command to register the data store in cli node: $ cd /usr/local/gphd/bulkloader-1.0/cli/bin
$ ./bulkloader config --command register -i <propertyfile>
Any file in the following Sample Property Files can be used as <propertyfile> in the above command. For example, to register an nfs datastore, the commands would be: $ cd /usr/local/gphd/bulkloader-1.0/cli/bin
$ ./bulkloader config --command register -i nfs.property
Regarding datastore registration properties, please see Appendix B: Data Store Registration Properties for more information. Sample Property Files Sample internalHDFS.property file
type=internal_hdfs_ host=mdw port=9500 rootPath=/ scheme=hdfs dfs.replication=1

Greenplum Data Loader Installation and User Guide
18
dfs.block.size=134217728
Note: dfs.replication and dfs.block.size are two special properties for HDFS data store. They are used to set replication number and block size of the destination HDFS.
Sample hdfs1.1.property file
type=hdfs_gphd1_1_ host=mdw port=9500 rootPath=/ scheme=hdfs
Sample localfs.property file
type=rawfs host=hdp1-w2 rootPath=/ scheme=localfs
Note: The host must be the hostname of the node. Sample ftp.property file
type=ftp host=sdw6 rootPath=/ port=21 scheme=ftp user=wangh26 passwd=Password
Note: user and passwd are two special properties for ftp data store. They are the username and password of ftp user. Sample http.property file
type=http host=10.37.7.163 rootPath=/ port=80 scheme=http
Sample nfs.property file
type=nfs host=sdw6 rootPath=/ scheme=nfs mountPoint=/mnt
Greenplum Data Loader Installation and User Guide
19
Note: mountPoint is specific to NFS data store. It is the mount point of NFS client. Sample GPHD1.2.property file
type=hdfs_gphd1_2_ host=mdw port=9500 rootPath=/ scheme=hdfs
Sample GPHD1.1.0.2.property file
type=hdfs_gphd1_1_02_ host=mdw port=9500 rootPath=/ scheme=hdfs
Sample hdfs_apache_1_0_3_.property file
type=hdfs_apache_1_0_3_ host=mdw port=9500 rootPath=/ scheme=hdfs
To register a Data Store using the Data Loader Console 1. Go to the web page at http://your_manager_hostname:8080 and select the data
stores button to enter the data store register page. 2. Select the Register new Data Store button to bring up the New Data Store Instance
page. 3. Enter values in the New Data Store Instance page to register new data store.
Note: a. To register a NFS type data store, you should mount NFS server to both master
machine and slave machines. Also, all the mount points should be the same. b. To register a local FS type data store, the slave machines must be used. You can
register any data loader slave machines as local FS type data store. 4. If you need to specify more data store properties select Add Property. See
Appendix B: Data Store Registration Properties for more information. 5. Select the Create button on the page to complete the registration. The new data store
can be found in Data Store Instances page.
To unregister or delete a data store using the command line
1. Run the following command to list all the registered datastore IDs: $ cd /usr/local/gphd/bulkloader-1.0/cli/bin
Greenplum Data Loader Installation and User Guide
20
$ ./bulkloader config --command list
2. Run the following command to delete the datastore. $ ./bulkloader config --command delete -n datastore_ID
To unregister or delete a data store using the Data Loader Console 1. Select the Data Stores tab to see the Data Store Instances page. 2. Select the Remove button of the data store you want to remove.
Submitting a Job
To submit a job using the command line 1. Prepare the Transfer Specification File
You must prepare the transfer specification file to submit a job using the command line. It is an XML file that specifies the source and destination data store, and the file or folder to load.
Values for the transfer specification file
Property Description
fsURI in source The source data store hostname and port.
rootPath in source The root path of the file sets to load.
fullPath The full path of the file to load.
type The entry file type. The types are as follows: • folder - used to transfer the folder to the destination cluster • file - transfers data listed in the specification file • glob - expands and replaces glob patterns such as *.log to
the list of matches
fsURI in target The destination data store hostname and port.
rootPath in target The destination root path of the files to copy.
2. Submit the job through the command line after the transfer specification file is ready:
$ bulkloader submit -i <transfer specification file> -s <strategy>
See Appendix D: Greenplum Data Loader Copy Strategies for more information.
For example, the command to submit a job with a local FS data store is: $ bulkloader submit -i localdisk.xml -s localfs --max-disk-mapper 2
See Appendix A: Command Line Reference for more details.

Greenplum Data Loader Installation and User Guide
21
File Entry Type Samples Sample ftp.xml file with file entry type "glob"
<FileTransferSpec xmlns="http://www.greenplum.com/gphd/bulkloader"> <source> <fileSet fsURI="ftp://YOUR_SOURCE_HOSTNAME:21" rootPath="/ "> <filePath type="glob"> <globString>/photo//</globString> <filterPattern>^MOV.*$</filterPattern> </filePath> </fileSet> </source> <target fsURI="hdfs://YOUR_TARGET_HOSTNAME:9500/" rootPath="/user/hadoop"/> </FileTransferSpec>
The ftp.xml transfers filenames that match the pattern "^MOV.*$" from the source ftp://YOUR_SOURCE_HOSTNAME:21/photo/*/* to the destination hdfs://YOUR_TARGET_HOSTNAME:9500/user/hadoop. Sample http.xml with file entry type "file"
<FileTransferSpec xmlns="http://www.greenplum.com/gphd/bulkloader"> <source> <fileSet fsType="" fsURI="http://YOUR_SOURCE_HOSTNAME:8080/datastore_rootPath" rootPath="/rootpath"> <filePath fullPath="/filename_1" type="file"/> <filePath fullPath="/filename_2" type="file"/> … <filePath fullPath="/filename_n" type="file"/> </fileSet> </source> <target fsType="" fsURI="hdfs://YOUR_TARGET_HOSTNAME:9500/" rootPath="/destination_directory"/> </FileTransferSpec>
The specification transfers the files filename_1, filename_2, through to filename_n from the source http://YOUR_SOURCE_HOSTNAME:8080/datastore_rootPath/rootpath to the destination hdfs://YOUR_TARGET_HOSTNAME:9500/destination_directory. Sample localfs.xml
<FileTransferSpec xmlns="http://www.greenplum.com/gphd/bulkloader"> <source> <fileSet fsType="" fsURI="file://YOUR_SLAVE_HOSTNAME/datastore_rootPath" rootPath="rootpath"> <filePath fullPath="filename_1 " type="file"/> <filePath fullPath=”filename_2” type=”file”/> … <filePath fullPath=”filename_n” type=”file”/> </fileSet>

Greenplum Data Loader Installation and User Guide
22
</source> <target fsType="" fsURI="hdfs://YOUR_TARGET_HOSTNAME:9500/" rootPath="/destination_directory"/> </FileTransferSpec>
The hostname name of the slave machine is YOUR_SLAVE_HOSTNAME. When you transfer data from the local FS to the destination HDFS, the local FS is a slave machine. Sample localfs_disk.xml file
<FileTransferSpec xmlns="http://www.greenplum.com/gphd/bulkloader"> <source> <fileSet fsType="" fsURI="file://YOUR_SLAVE_HOSTNAME/datastore_rootPath1" rootPath="rootpath" disk="disk0"> <filePath fullPath="filename_1 " type="file"/> <filePath fullPath="filename_2" type="file"/> … <filePath fullPath="filename_n" type="file"/> </fileSet> <fileSet fsType="" fsURI="file://YOUR_SLAVE_HOSTNAME/datastore_rootPath2" rootPath="rootpath" disk="disk1"> <filePath fullPath="filename_1 " type="file"/> <filePath fullPath="filename_2" type="file"/> … <filePath fullPath="filename_n" type="file"/> </fileSet> </source> <target fsType="" fsURI="hdfs://hdsh211:9500/" rootPath="/destination_directory"/> </FileTransferSpec>
The example above is the FileTransferSpec for localfs strategy when you use max-disk-mapper in the command line. See Appendix A: Command Line Reference for more detail. In the sample, YOUR_SLAVE_HOSTNAME is the hostname of a slave machine. Note that multiple disks can reside on the same host, but must be different physical disks. Sample nfs.xml file with file entry type "folder"
<FileTransferSpec xmlns="http://www.greenplum.com/gphd/bulkloader"> <source> <fileSet fsType="" fsURI="nfs://YOUR_SOURCE_HOSTNAME/datastore_rootPath" rootPath="rootpath"> <filePath fullPath="/foldername_1" type="folder"/> <filePath fullPath="/foldername_2" type="folder"/> … <filePath fullPath="/foldername_n" type="folder"/> </fileSet> </source> <target fsType="" fsURI="hdfs://YOUR_TARGET_HOSTNAME:9500/" rootPath="/destination_directory"/> </FileTransferSpec>
The specification file transfers folders foldername_1, foldername_2, through
Greenplum Data Loader Installation and User Guide
23
foldername_n from the source nfs://YOUR_SOURCE_HOSTNAME/datastore_rootPath/rootpath to the destination hdfs://YOUR_TARGET_HOSTNAME:9500/destination_directory. Sample hdfs.xml file
<FileTransferSpec xmlns="http://www.greenplum.com/gphd/bulkloader"> <source> <fileSet fsType="" fsURI="hdfs://YOUR_SOURCE_HDFS_HOSTNAME:9000/datastore_rootPath" rootPath="rootpath"> <filePath fullPath="filename_1" type="file"/> <filePath fullPath="filename_2" type="file"/> … <filePath fullPath="filename_n" type="file"/> </fileSet> </source> <target fsType="" fsURI="hdfs://YOUR_TARGET_HDFS_HOSTNAME:9500/" rootPath="/rootpath"/> </FileTransferSpec>
To submit a job using the Greenplum Data Loader Console
1. Select Create a New Job on the home page. You can submit your job using basic or advanced properties.
a. To submit using the basic option, provide the required values shown in Basic property values for submitting a job. Go to Step 2.
Basic property values for submitting a job
Property Description
Source datastore The source data store hostname and port.
Source path The path of the data you want to load in the source data store.
Target URI The destination data store hostname and port.
Target Path The path of the data you want to copy to in the destination data store.
b. To submit using advanced options, click Show Advanced Options. See Advanced property values for submitting a job for more information about the required property values.
Advanced property values for submitting a job
Property Description
Copy strategy Select a copy strategy.
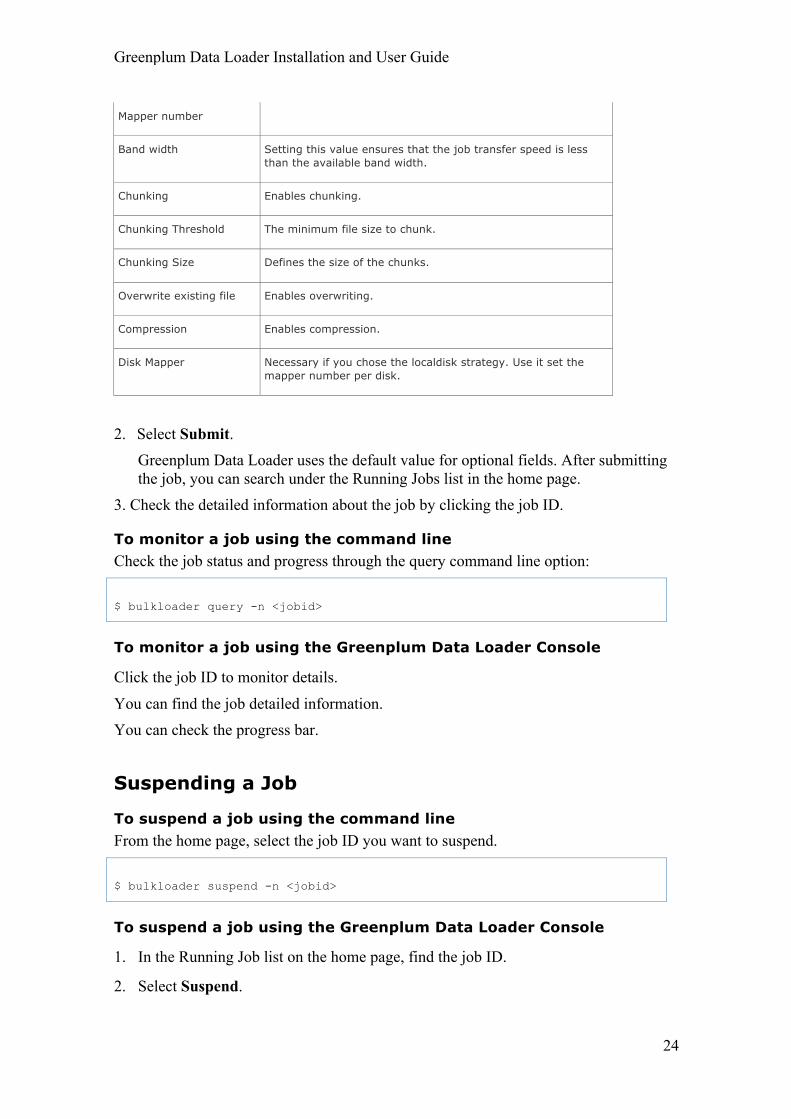
Greenplum Data Loader Installation and User Guide
24
Mapper number
Band width Setting this value ensures that the job transfer speed is less than the available band width.
Chunking Enables chunking.
Chunking Threshold The minimum file size to chunk.
Chunking Size Defines the size of the chunks.
Overwrite existing file Enables overwriting.
Compression Enables compression.
Disk Mapper Necessary if you chose the localdisk strategy. Use it set the mapper number per disk.
2. Select Submit.
Greenplum Data Loader uses the default value for optional fields. After submitting the job, you can search under the Running Jobs list in the home page.
3. Check the detailed information about the job by clicking the job ID.
To monitor a job using the command line Check the job status and progress through the query command line option:
$ bulkloader query -n <jobid>
To monitor a job using the Greenplum Data Loader Console
Click the job ID to monitor details.
You can find the job detailed information. You can check the progress bar.
Suspending a Job
To suspend a job using the command line From the home page, select the job ID you want to suspend.
$ bulkloader suspend -n <jobid>
To suspend a job using the Greenplum Data Loader Console
1. In the Running Job list on the home page, find the job ID.
2. Select Suspend.

Greenplum Data Loader Installation and User Guide
25
You can find the job in the suspended job list.
Resuming a Job
To resume a job using the command line
$ bulkloader resume -n <jobid>
To resume a job using the Data Loader Console 1. In the Suspended Jobs list on the Home page, find the Job ID.
2. Select Resume in the Job Operations list. You can check the home page to confirm that the job is running again.
Stopping a Job
Note: You can stop a job while it is running or been suspended. Once stopped you cannot resume a job.
To stop a job using the command line
$ bulkloader stop -n <jobid>
To stop a job using the Greenplum Data Loader Console 1. On the home page, search the Running Jobs or the Suspended Jobs list to find the job
you want to stop.
2. Select the Job ID. 3. From the Job Operation list, select the Cancel button.
4. Confirm that the job is listed in the Canceled Jobs list.
Trouble Shooting Check the scheduler log on the master node, /usr/local/gphd/bulkloader-1.0/scheduler/log/scheduler.log.
Check the manager log on the manager node, /usr/local/gphd/bulkloader-1.0/manager/log/manager.

Greenplum Data Loader Installation and User Guide
26
Appendix A: Command Line Reference
bulkloader This is the bulkloader client utility.
Synopsis
bulkloader [COMMAND] [OPTIONS]
The bulkloader utility supports the following commands:
• submit
• suspend
• resume
• stop
• query
• list
Submit
You will need to create a specification file before using the submit command.
The bulkloader command requires the following options:
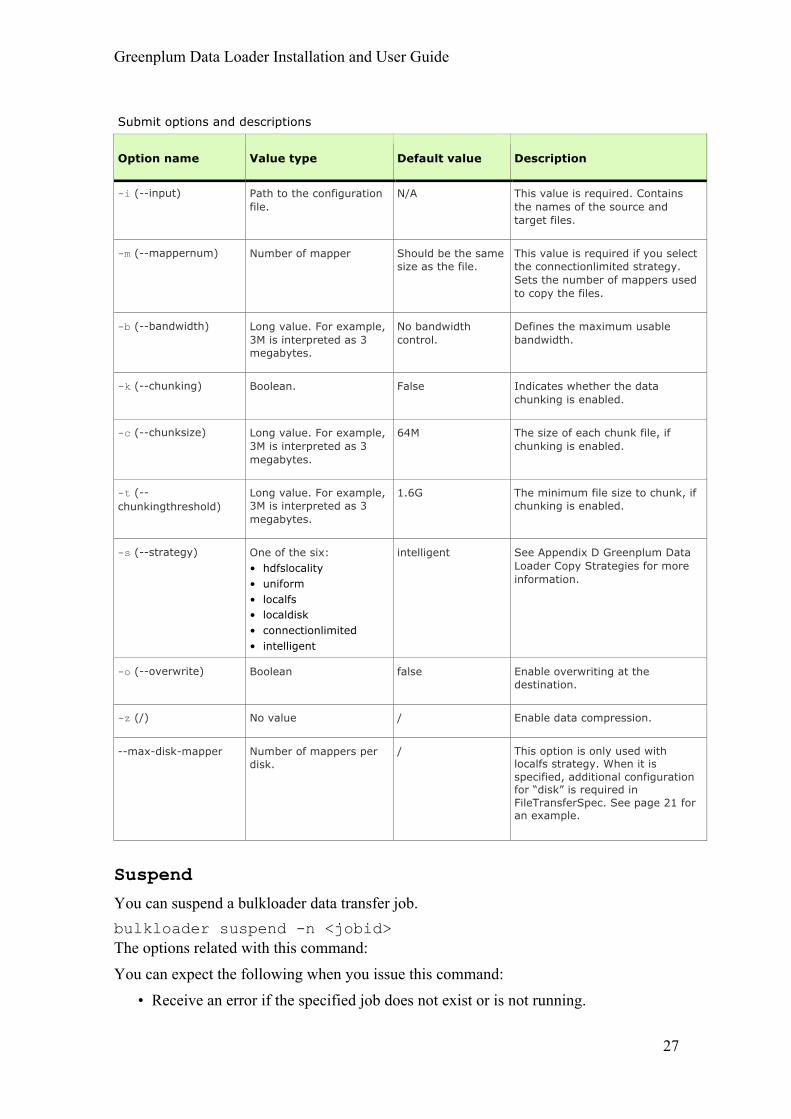
$ bulkloader submit -i <transfer specification> [-s <strategy>, -m <mapper number>, -b <bandwidth>, -k true|false, -c <chunking size>, -t true|false, -o true|false, -z]
Sample bulkloader command
bulkloader submit -i myfileset.xml -k true -o true -c 512M -m 24 -b 2M -s intelligent
You can expect the following when you issue this command: • Receive a job id. • See an error in the console if it fails.
Greenplum Data Loader Installation and User Guide
27
Submit options and descriptions
Option name Value type Default value Description
-i (--input) Path to the configuration file.
N/A This value is required. Contains the names of the source and target files.
-m (--mappernum) Number of mapper Should be the same size as the file.
This value is required if you select the connectionlimited strategy. Sets the number of mappers used to copy the files.
-b (--bandwidth) Long value. For example, 3M is interpreted as 3 megabytes.
No bandwidth control.
Defines the maximum usable bandwidth.
-k (--chunking) Boolean. False Indicates whether the data chunking is enabled.
-c (--chunksize) Long value. For example, 3M is interpreted as 3 megabytes.
64M The size of each chunk file, if chunking is enabled.
-t (--chunkingthreshold)
Long value. For example, 3M is interpreted as 3 megabytes.
1.6G The minimum file size to chunk, if chunking is enabled.
-s (--strategy) One of the six: • hdfslocality • uniform • localfs • localdisk • connectionlimited • intelligent
intelligent See Appendix D Greenplum Data Loader Copy Strategies for more information.
-o (--overwrite) Boolean false Enable overwriting at the destination.
-z (/) No value / Enable data compression.
--max-disk-mapper Number of mappers per disk.
/ This option is only used with localfs strategy. When it is specified, additional configuration for “disk” is required in FileTransferSpec. See page 21 for an example.
Suspend
You can suspend a bulkloader data transfer job. bulkloader suspend -n <jobid> The options related with this command: You can expect the following when you issue this command:
• Receive an error if the specified job does not exist or is not running.
Greenplum Data Loader Installation and User Guide
28
• Suspends the target job.
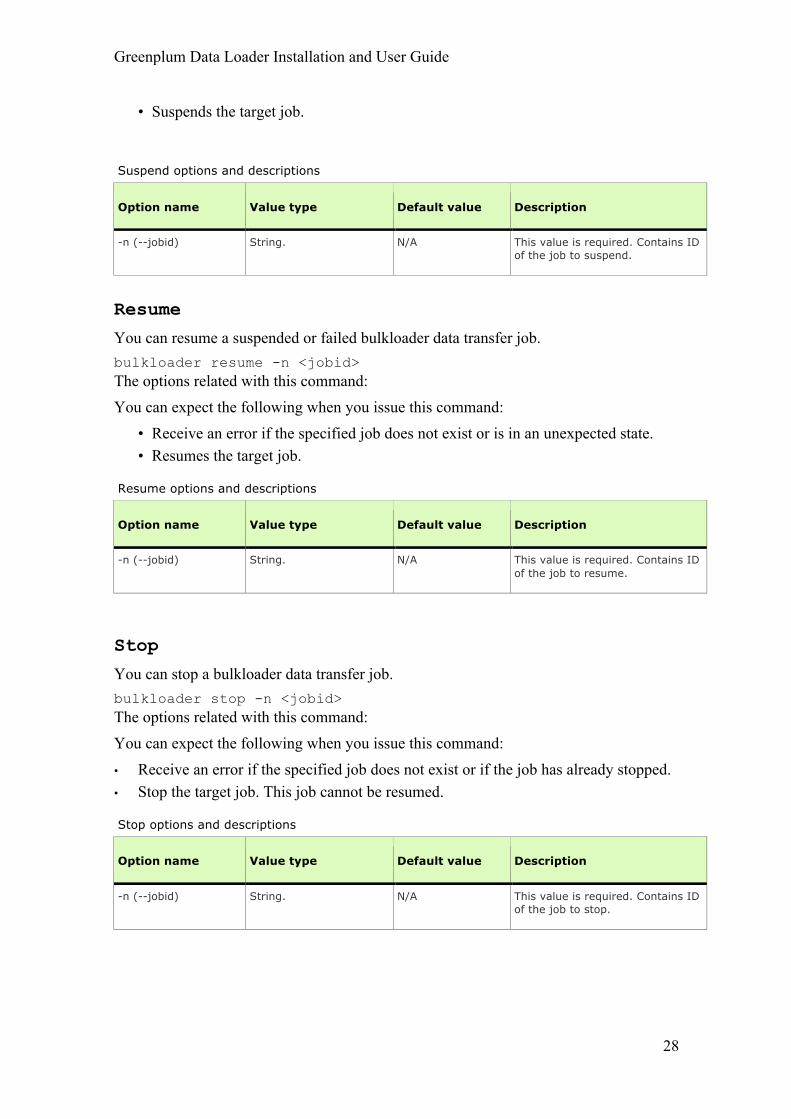
Suspend options and descriptions
Option name Value type Default value Description
-n (--jobid) String. N/A This value is required. Contains ID of the job to suspend.
Resume
You can resume a suspended or failed bulkloader data transfer job. bulkloader resume -n <jobid> The options related with this command: You can expect the following when you issue this command:
• Receive an error if the specified job does not exist or is in an unexpected state. • Resumes the target job.
Resume options and descriptions
Option name Value type Default value Description
-n (--jobid) String. N/A This value is required. Contains ID of the job to resume.
Stop
You can stop a bulkloader data transfer job. bulkloader stop -n <jobid> The options related with this command: You can expect the following when you issue this command: • Receive an error if the specified job does not exist or if the job has already stopped. • Stop the target job. This job cannot be resumed.
Stop options and descriptions
Option name Value type Default value Description
-n (--jobid) String. N/A This value is required. Contains ID of the job to stop.

Greenplum Data Loader Installation and User Guide
29
Query
You can query the progress of a specified data transfer job. bulkloader query -n <jobid> The options related with this command:
You can expect the following when you issue this command: • Receive an error if the specified job does not exist. • Display status of the specified job. • If Map Reduce is running, displays the progress of the transfer.
Query options and descriptions
Option name Value type Default value Description
-n (--jobid) String. N/A This value is required. Contains ID of the job to query.
List
You can list all the running and completed jobs. bulkloader list -status <options>
List options and descriptions
Option name Value type Default value Description
-status One of the following: • STARTED • COMPLETED • CANCELED • SUSPENDED
N/A List of running or completed jobs.
Config
You can configure the data store.
$ bulkloader config --command list|register -i <property_file>|delete -n <Datastore_ID>

Greenplum Data Loader Installation and User Guide
30
Config options and descriptions
Option name Value type Default value Description
--command One of the following: • list • register • delete
N/A Configures the data store.
-i (/) String. N/A This is required for the register option. The name of the property file.
-n (/) String. N/A Required for the delete command. The ID of the datastore.
Greenplum Data Loader Installation and User Guide
31
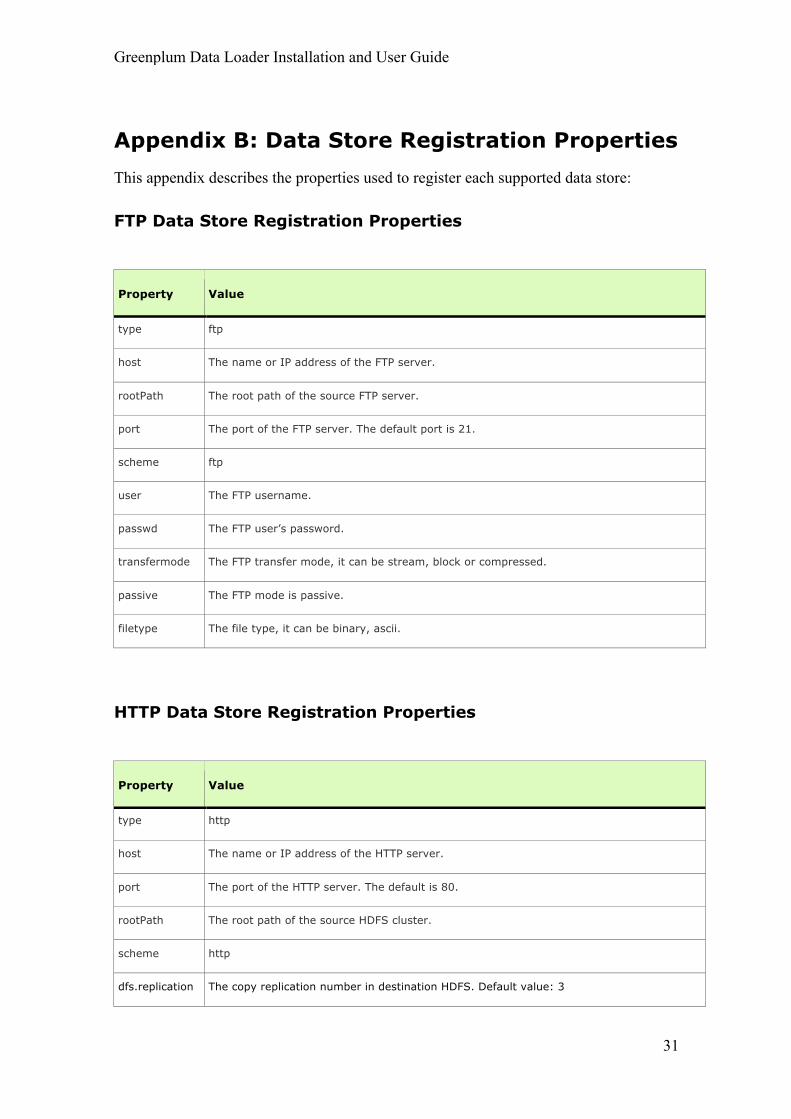
Appendix B: Data Store Registration Properties This appendix describes the properties used to register each supported data store:
FTP Data Store Registration Properties
Property Value
type ftp
host The name or IP address of the FTP server.
rootPath The root path of the source FTP server.
port The port of the FTP server. The default port is 21.
scheme ftp
user The FTP username.
passwd The FTP user’s password.
transfermode The FTP transfer mode, it can be stream, block or compressed.
passive The FTP mode is passive.
filetype The file type, it can be binary, ascii.
HTTP Data Store Registration Properties
Property Value
type http
host The name or IP address of the HTTP server.
port The port of the HTTP server. The default is 80.
rootPath The root path of the source HDFS cluster.
scheme http
dfs.replication The copy replication number in destination HDFS. Default value: 3

Greenplum Data Loader Installation and User Guide
32
HDFS Data Store Registration Properties
Property Value
type • For Internal HDFS, the value is: internal_hdfs_ • For GPHD1.1 HDFS, the value is: hdfs_gphd1_1_ • For GPHD1.2 HDFS, the value is: hdfs_gphd1_2_ • For GPHD1.1.0.2 HDFS, the value is: hdfs_gphd1_1_1_02_ • For Apache 1.0.3 HDFS, the vaue is: hdfs_apache_1.0_3_
host The name of HDFS host, this is the same as the value in the hdfs dfs.name.dir.
port The port of the HDFS directory, this is the same as the value for the port in the hdfs dfs.name.dir.
rootPath The root path of the source HDFS cluster.
scheme hdfs
dfs.replication The copy replication number in destination HDFS. Default value: 3
LocalFS Data Store Registration Properties
Properties of the LocalFS data store register
Property Value
type rawfs
host The name of a local host machine. Data is copied from this machine when you select the localfs strategy.
rootPath The root path of the local machine from where the data is shared.
scheme localfs
NFS Data Store Registration Properties
Property Value
type nfs
host The nfs server ip address or host name.
Greenplum Data Loader Installation and User Guide
33
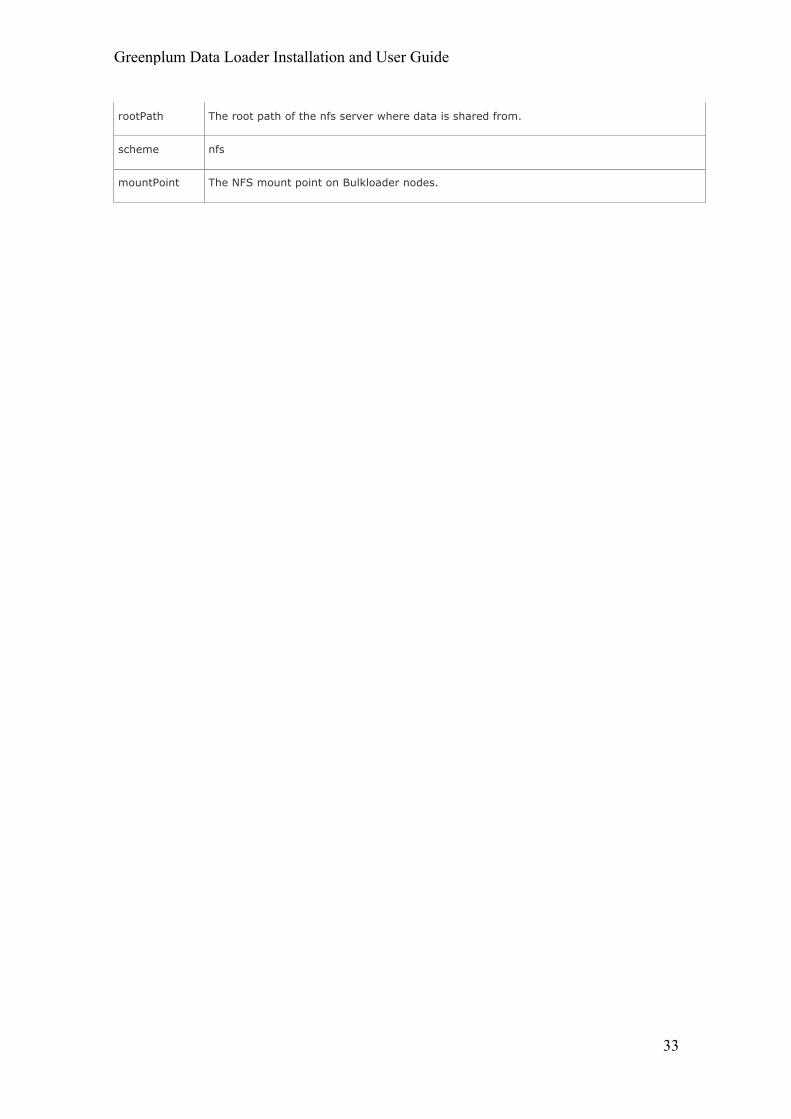
rootPath The root path of the nfs server where data is shared from.
scheme nfs
mountPoint The NFS mount point on Bulkloader nodes.

Greenplum Data Loader Installation and User Guide
34
NFS Data Store
Key Default Value Description
mountPoint / The NFS mount point on Bulkloader nodes
HDFS Data Store
Key Default Value Description
dfs.replication 3 The copy replication number in destination HDFS.
Greenplum Data Loader Installation and User Guide
35
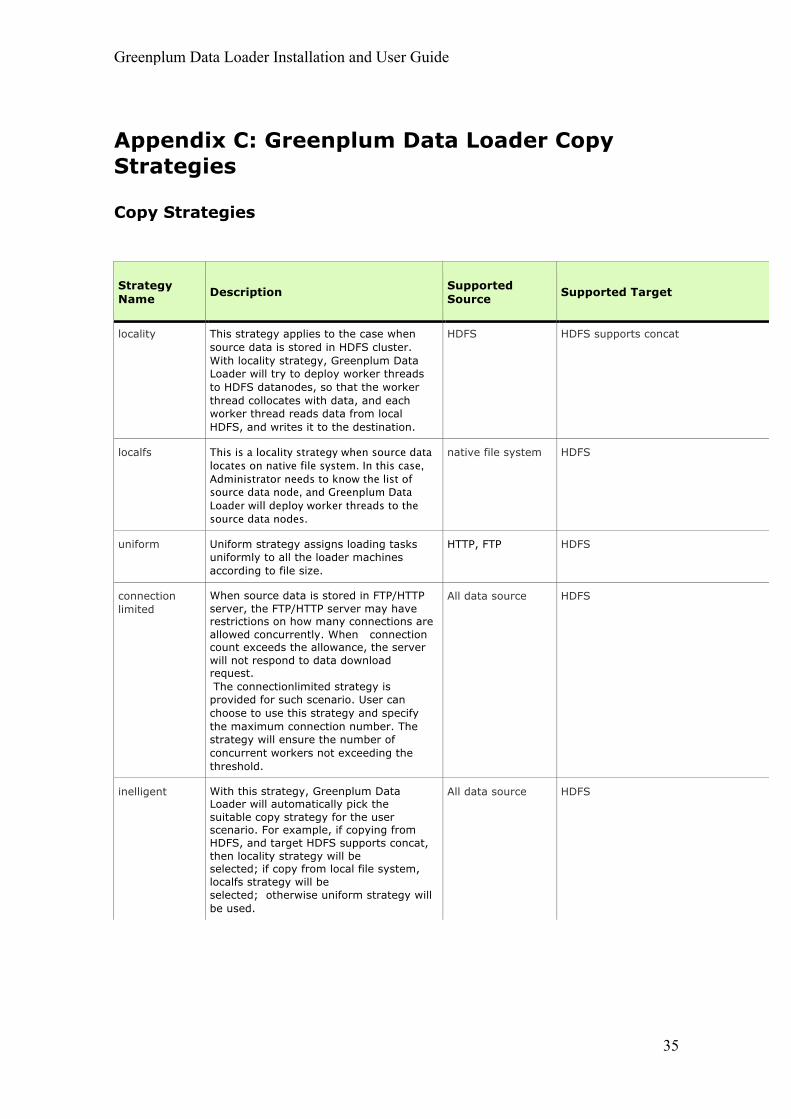
Appendix C: Greenplum Data Loader Copy Strategies
Copy Strategies
Strategy Name Description Supported
Source
Supported Target
locality This strategy applies to the case when source data is stored in HDFS cluster. With locality strategy, Greenplum Data Loader will try to deploy worker threads to HDFS datanodes, so that the worker thread collocates with data, and each worker thread reads data from local HDFS, and writes it to the destination.
HDFS HDFS supports concat
localfs This is a locality strategy when source data locates on native file system. In this case, Administrator needs to know the list of source data node, and Greenplum Data Loader will deploy worker threads to the source data nodes.
native file system HDFS
uniform Uniform strategy assigns loading tasks uniformly to all the loader machines according to file size.
HTTP, FTP HDFS
connection limited
When source data is stored in FTP/HTTP server, the FTP/HTTP server may have restrictions on how many connections are allowed concurrently. When connection count exceeds the allowance, the server will not respond to data download request. The connectionlimited strategy is provided for such scenario. User can choose to use this strategy and specify the maximum connection number. The strategy will ensure the number of concurrent workers not exceeding the threshold.
All data source HDFS
inelligent With this strategy, Greenplum Data Loader will automatically pick the suitable copy strategy for the user scenario. For example, if copying from HDFS, and target HDFS supports concat, then locality strategy will be selected; if copy from local file system, localfs strategy will be selected; otherwise uniform strategy will be used.
All data source HDFS

Greenplum Data Loader Installation and User Guide
36
Copy strategies for different data store types
Data Store Type Copy Strategy Policy
HDFS • Locality (if destination data store supports concat*) • Uniform • connectionlimited • dynamic • intelligent
• Chunking • Bandwidth-throttling • Overwrite • Set Num of Mappers • Compression (if chunk enabling is enabled)
NFS • uniform • connectionlimited • dynamic • inelligent
• Chunking • Bandwidth-throttling • Overwrite • Set Num of Mappers • Compression (If chunk enabling is enabled)
LocalFS • uniform • connectionlimited • dynamic • inelligent
• Chunking • Bandwidth-throttling • Overwrite • Set Num of Mappers • Compression (if chunk enabling is enabled)
FPP/HTTP • uniform • connectionlimited • dynamic • intelligent
• Chunking • Bandwidth-throttling • Overwrite • Set Num of Mappers • Compression (if chunk enabling is enabled)
* The concat feature in HDFS is the ability to concatenate two or more files into one big file.
Greenplum Data Loader Installation and User Guide
37
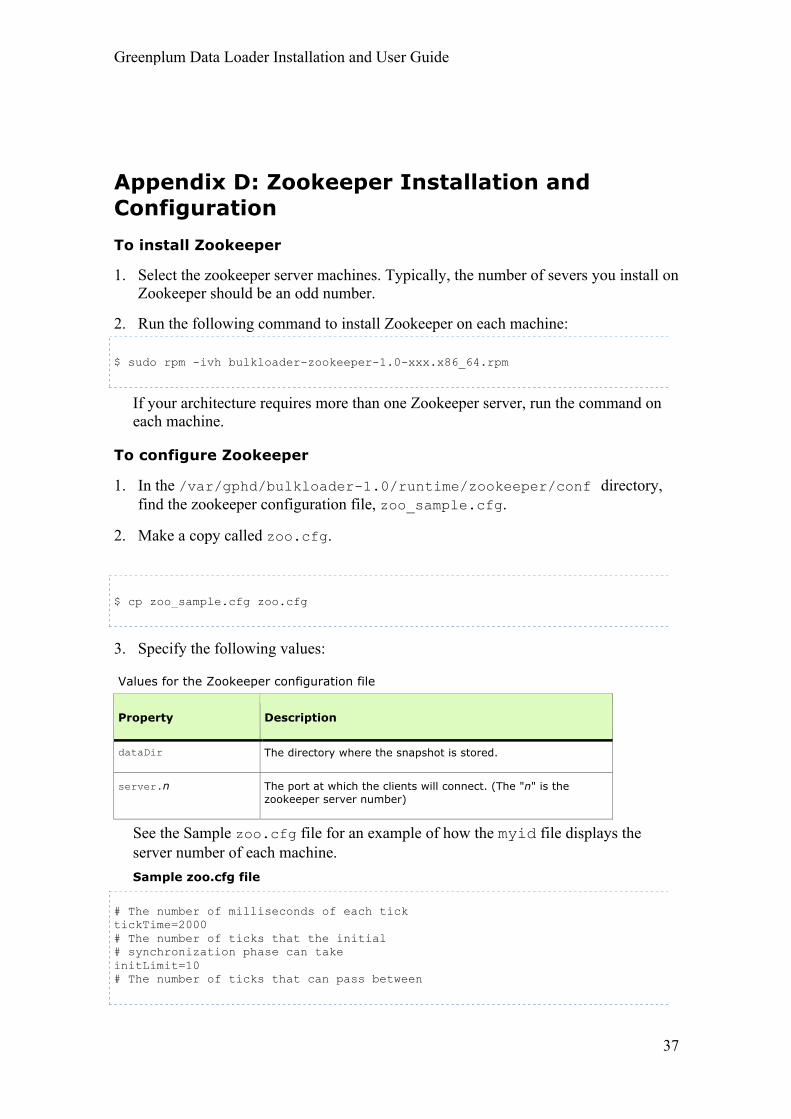
Appendix D: Zookeeper Installation and Configuration To install Zookeeper
1. Select the zookeeper server machines. Typically, the number of severs you install on Zookeeper should be an odd number.
2. Run the following command to install Zookeeper on each machine:
$ sudo rpm -ivh bulkloader-zookeeper-1.0-xxx.x86_64.rpm
If your architecture requires more than one Zookeeper server, run the command on each machine.
To configure Zookeeper
1. In the /var/gphd/bulkloader-1.0/runtime/zookeeper/conf directory, find the zookeeper configuration file, zoo_sample.cfg.
2. Make a copy called zoo.cfg.
$ cp zoo_sample.cfg zoo.cfg
3. Specify the following values:
Values for the Zookeeper configuration file
Property Description
dataDir The directory where the snapshot is stored.
server.n The port at which the clients will connect. (The "n" is the zookeeper server number)
See the Sample zoo.cfg file for an example of how the myid file displays the server number of each machine. Sample zoo.cfg file
# The number of milliseconds of each tick tickTime=2000 # The number of ticks that the initial # synchronization phase can take initLimit=10 # The number of ticks that can pass between

Greenplum Data Loader Installation and User Guide
38
# sending a request and getting an acknowledgement syncLimit=5 # the directory where the snapshot is stored. # do not use /tmp for storage, /tmp here is just # example sakes. dataDir=/data2/zookeeper # the port at which the clients will connect clientPort=2181 server.1=sdw3:2888:3888 server.2=sdw4:2888:3888 server.3=sdw5:2888:3888 # Be sure to read the maintenance section of the # administrator guide before turning on autopurge. # [http://zookeeper.apache.org/doc/current/zookeeperAdmin.html#sc_maintenance] # The number of snapshots to retain in dataDir # autopurge.snapRetainCount=3 # Purge task interval in hours # Set to "0" to disable auto purge feature # autopurge.purgeInterval=1
4. Create a file called myid on each Zookeeper server and place it under the dataDir directory (specified in zoo.cfg). The myid file myid contains the server number of the machine.
5. Add the variables $ZK_HOME, $ZOOCFGDIR and $ZK_HOME/bin to the .bashrc file.
Sample Zookeeper .bashrc file
export ZK_HOME=/var/gphd/bulkloader-1.0/runtime/zookeeper export ZOOCFGDIR= $ZK_HOME/conf export PATH=$PATH:$ZK_HOME/bin
6. To make changes to the .bashrc file take effect the user should logout and login again before taking the following steps. For user login via SSH, disconnect SSH connection and connect again.
To start Zookeeper
1. Run the following command to start Zookeeper on each machine:
$ zkServer.sh start
2. Check that the zkServer started successfully:
$ echo ruok|nc sdw3 2181
imok $
If the zkServer started successfully, the system returns the result, imok.
Greenplum Data Loader Installation and User Guide
39
To stop Zookeeper
Run the following command to stop Zookeeper on each machine:
$ zkServer.sh stop

Greenplum Data Loader Installation and User Guide
40
Appendix E: Installing and Configuring the MapReduce Cluster To install a MapReduce Cluster
1. Run the following command to install bulkloader-hadoop-1.0-xxx.x86_64.rpm on the master machine and slave machines:
sudo rpm -ivh bulkloader-hadoop-1.0-xxx.x86_64.rpm
Skip this step if you are using an existing MapReduce installation.
2. (Optional, if you want MapReduce to useHTTPFS as the Job Tracker.) To install and use HTTPFS as the Job Tracker file system on your master machine:
sudo rpm -ivh bulkloader-httpfs-1.0-xxx.x86_64.rpm
To configure MapReduce to use HDFS as the Job Tracker
1. Change to this directory:
cd /var/gphd/bulkloader-1.0/runtime/hadoop/conf
2. Modify hadoop-env.sh to set up JAVA_HOME to point to the local version of the jdk1.6.
3. Modify the core-site.xml to set up the fs.default.name property: Sample core-site.xml file for HDFS
<?xml version="1.0"?> <?xml-stylesheet type="text/xsl" href="configuration.xsl"?> <!-- Put site-specific property overrides in this file. --> <configuration> <property> <name>fs.default.name</name> <value>hdfs://smdw:8020</value> <final>true</final> </property> </configuration>
4. Modify mapred-site.xml to setup the following properties.

Greenplum Data Loader Installation and User Guide
41
MapRed site xml file
Property Description
mapred.job.tracker Host or IP and port of JobTracker. Should be the host or ip of bulkloader master server.
mapred.system.dir Path on the HDFS where the Map/Reduce framework stores system files e.g. /hadoop/mapred/system/.
mapred.local.dir Comma-separated list of paths on the local filesystem where temporary Map/Reduce data is written.
mapred.jobtracker.taskScheduler
It is used to set task scheduler.
Sample mapred-site.xml file for HDFS
<?xml version="1.0"?> <?xml-stylesheet type="text/xsl" href="configuration.xsl"?> <!-- Put site-specific property overrides in this file. --> <configuration> <property> <name>mapred.job.tracker</name> <value>smdw:9051</value> </property> <property> <name>mapred.system.dir</name> <value>/hadoop/mapred/system</value> </property> <property> <name>mapred.tmp.dir</name> <value>/hadoop/mapred/temp</value> </property> </configuration>
5. Ensure directories you specified in mapred-site.xml with property names mapred.system.dir and mapred.tmp.dir already exist, if not, create them.
6. Modify the hdfs-site.xml to setup the HDFS.
hdfs-site.xml file
Property Description
dfs.name.dir The namenode directory.
dfs.data.dir The data directory on datanode.
dfs.permissions Check that the value is set to false.
Greenplum Data Loader Installation and User Guide
42
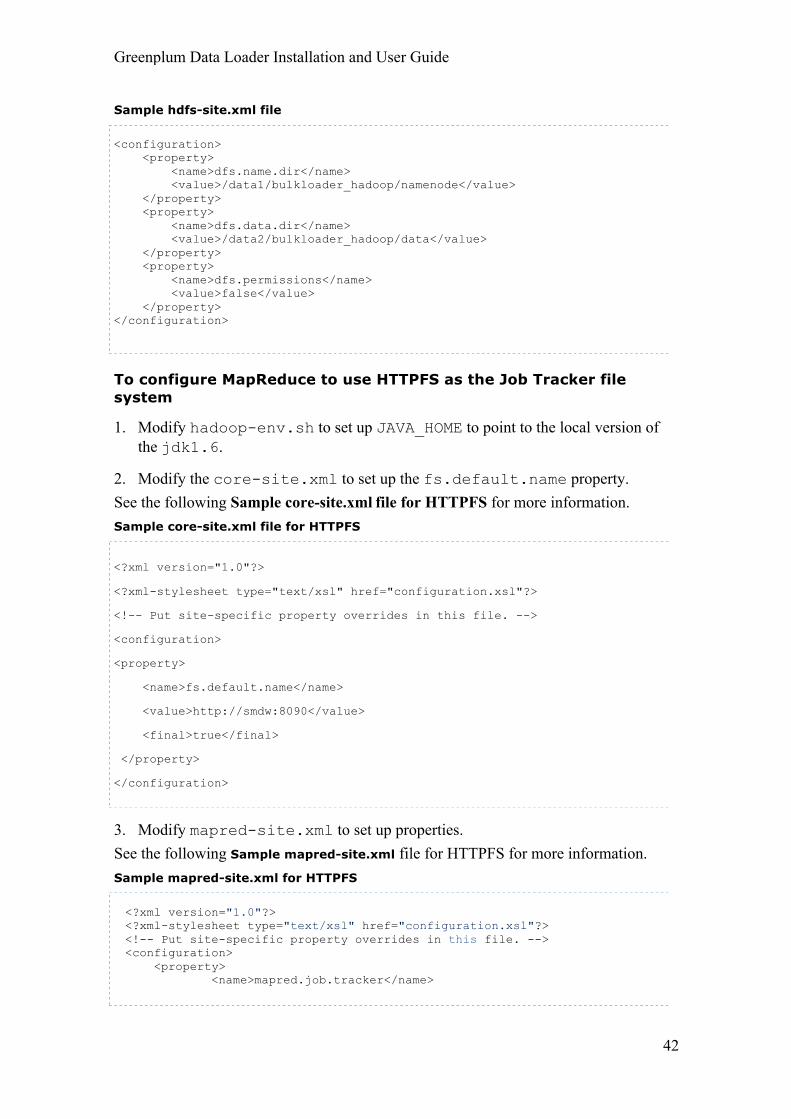
Sample hdfs-site.xml file
<configuration> <property> <name>dfs.name.dir</name> <value>/data1/bulkloader_hadoop/namenode</value> </property> <property> <name>dfs.data.dir</name> <value>/data2/bulkloader_hadoop/data</value> </property> <property> <name>dfs.permissions</name> <value>false</value> </property> </configuration>
To configure MapReduce to use HTTPFS as the Job Tracker file system
1. Modify hadoop-env.sh to set up JAVA_HOME to point to the local version of the jdk1.6.
2. Modify the core-site.xml to set up the fs.default.name property. See the following Sample core-site.xml file for HTTPFS for more information. Sample core-site.xml file for HTTPFS
<?xml version="1.0"?>
<?xml-stylesheet type="text/xsl" href="configuration.xsl"?>
<!-- Put site-specific property overrides in this file. -->
<configuration>
<property>
<name>fs.default.name</name>
<value>http://smdw:8090</value>
<final>true</final>
</property>
</configuration>
3. Modify mapred-site.xml to set up properties. See the following Sample mapred-site.xml file for HTTPFS for more information. Sample mapred-site.xml for HTTPFS
<?xml version="1.0"?> <?xml-stylesheet type="text/xsl" href="configuration.xsl"?> <!-- Put site-specific property overrides in this file. --> <configuration> <property> <name>mapred.job.tracker</name>

Greenplum Data Loader Installation and User Guide
43
<value>smdw:9051</value> </property> <property> <name>mapred.system.dir</name> <value>/wangh26/mapred/system</value> </property> <property> <name>mapred.tmp.dir</name> <value>/wangh26/mapred/temp</value> </property> <property>
<name>fs.http.impl</name> <value>org.apache.hadoop.fs.http.client.HttpFSFileSystem</value> </property>
</configuration>
4. Ensure directories you specified in mapred-site.xml with property names mapred.system.dir and mapred.tmp.dir already exist, if not, create them.
To start a MapReduce Cluster with a HDFS
1. Start the Name Node:
$ hadoop-daemon.sh start namenode
2. Start the Job Tracker:
$ hadoop-daemon.sh start jobtracker
3. Start the Data Node:
$ hadoop-daemon.sh start datanode
4. Start the Task Tracker:
$ hadoop-daemon.sh start tasktracker
To start a MapReduce Cluster with HTTPFS 1. If your Job Tracker file system is HTTPFS, start HTTPFS before starting your
MapReduce cluster.
2. On master machine, start HTTPFS:
$ cd /usr/local/gphd/bulkloader-1.0/httpfs/bin $ ./start.sh
3. To start the JobTracker:

Greenplum Data Loader Installation and User Guide
44
$ hadoop-daemon.sh start jobtracker
4. Start the TaskTracker on slave machines:
$ hadoop-daemon.sh start tasktracker
To stop the MapReduce Cluster with HDFS
1. Stop the NameNode:
$ hadoop-daemon.sh stop namenode
2. Stop the JobTracker
$ hadoop-daemon.sh stop jobtracker
3. Stop the DataNode:
$ hadoop-daemon.sh stop datanode
4. Stop the TaskTracker:
$ hadoop-daemon.sh stop tasktracker
To stop the MapReduce Cluster with HTTPFS
1. Stop the HTTPFS instance running on the Master Node:
$ cd /usr/local/gphd/bulkloader-1.0/httpfs/bin $ ./stop.sh
2. Stop the JobTracker:
$ hadoop-daemon.sh stop jobtracker
3. Stop TaskTracker on the slave machines:
$ hadoop-daemon.sh stop tasktracker

Greenplum Data Loader Installation and User Guide
45
Appendix F: Installing and Configuring Bookkeeper To install Bookkeeper
1. Discover the resource you use to record the Bulkloader entity:
• HDFS - If you are using HDFS to record entity, you can continue to record.
• Bookkeeper - If you are using Bookkeeper, perform the following:
2. Change the property in the bulkloader-common.xml configuration file.
3. Run the following command to install Bookkeeper.
$ sudo rpm -ivh bulkloader-bookeeper-1.0-xxx.x86_64.rpm
If your architecture requires more than one Bookkeeper server, run the command on each machine.
To configure Bookkeeper
1. Configure the following properties in the bk_server.conf file:
Property Description
journalDirectory Directory Bookkeeper outputs its write ahead log.
ledgerDirectories Directory Bookkeeper outputs ledger snapshots.
zkLedgersRootPath Root zookeeper path to store ledger metadata.
flushInterval Interval to watch whether bookie is dead or not, in milliseconds.
zkServers A list of one of more servers on which zookeeper is running.
zkTimeout ZooKeeper client session timeout in milliseconds.
Note: The ledger dirs and journal dir should be on a different device to reduce the contention between random I/O and sequential write.
2. Create a directory on Zookeeper server. The directory name is specified in the property zkLedgersRootPath in the bk_server.conf file.
3. Run the following command on one of the Zookeeper servers.
Greenplum Data Loader Installation and User Guide
46
$ zkCli.sh
4. Check that the Zookeeper client can connect to the Zookeeper server.
5. Run the following command to create the Zookeeper ledgers root path:
zk: localhost:2181(CONNECTED) 0] create /ledgers ""
You can check the newly created path with the following command:
[zk: localhost:2181(CONNECTED) 0] ls /ledgers
6. Complete the process to create the available path as follows:
[zk: localhost:2181(CONNECTED) 0] ls /ledgers
Note: If your architecture requires more than one Bookkeeper server, run the command on each machine.
Sample bk_server.conf file
## Bookie settings # Port that bookie server listen on bookiePort=3181 # Directory Bookkeeper outputs its write ahead log journalDirectory=/data1/bookkeeper/bk-txn # Directory Bookkeeper outputs ledger snapshots # could define multi directories to store snapshots, separated by ',' # For example: # ledgerDirectories=/tmp/bk1-data,/tmp/bk2-data # # Ideally ledger dirs and journal dir are each in a differet device, # which reduce the contention between random i/o and sequential write. # It is possible to run with a single disk, but performance will be significantly lower. ledgerDirectories=/data2/bookkeeper/bk-data # Root zookeeper path to store ledger metadata # This parameter is used by zookeeper-based ledger manager as a root znode to # store all ledgers. zkLedgersRootPath=/ledgers # How long the interval to flush ledger index pages to disk, in milliseconds # Flushing index files will introduce much random disk I/O. # If separating journal dir and ledger dirs each on different devices, # flushing would not affect performance. But if putting journal dir # and ledger dirs on same device, performance degrade significantly # on too frequent flushing. You can consider increment flush interval # to get better performance, but you need to pay more time on bookie # server restart after failure. flushInterval=100 ## zookeeper client settings

Greenplum Data Loader Installation and User Guide
47
# A list of one of more servers on which zookeeper is running. # The server list can be comma separated values, for example: # zkServers=zk1:2181,zk2:2181,zk3:2181 zkServers=sdw3:2181,sdw4:2181,sdw5:2181 # ZooKeeper client session timeout in milliseconds # Bookie server will exit if it received SESSION_EXPIRED because it # was partitioned off from ZooKeeper for more than the session timeout # JVM garbage collection, disk I/O will cause SESSION_EXPIRED. # Increment this value could help avoiding this issue zkTimeout=10000
5. Add the $BK_HOME and $BK_HOME/bin variables to the .bashrc file.
Sample Bookkeeper ~/.bashrc file
export BK_HOME=/var/gphd/bulkloader-1.0/bk
export PATH=$PATH:$HADOOP_HOME/bin:$JAVA_HOME/bin:$ZK_HOME/bin:$BK_HOME/bin
To start Bookkeeper
1. Run the following command to start the Bookkeeper server on each Bookkeeper server machine.
$ bookkeeper bookie > book.log 2>&1 &
2. Use the following command to check that the Bookkeeper server is running.
$ ps -ef|grep BookieServer
To stop Bookkeeper Kill the Bookkeeper process.
Greenplum Data Loader Installation and User Guide
48
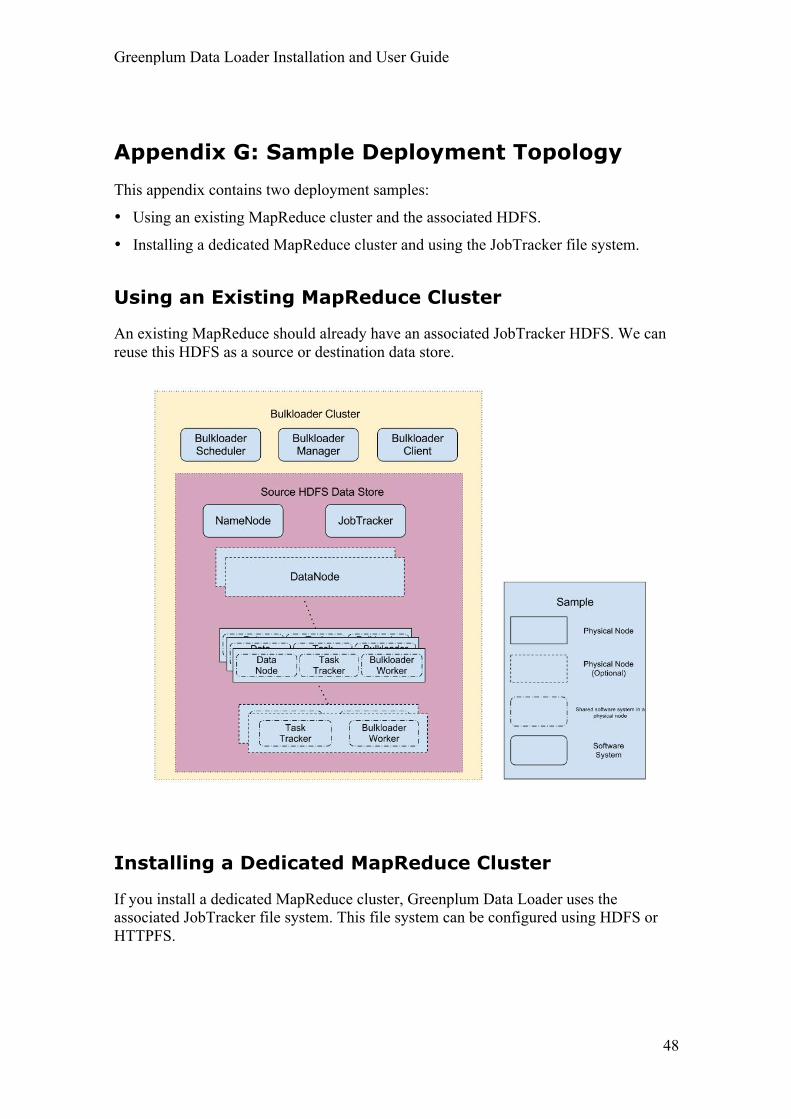
Appendix G: Sample Deployment Topology This appendix contains two deployment samples:
• Using an existing MapReduce cluster and the associated HDFS.
• Installing a dedicated MapReduce cluster and using the JobTracker file system.
Using an Existing MapReduce Cluster
An existing MapReduce should already have an associated JobTracker HDFS. We can reuse this HDFS as a source or destination data store.
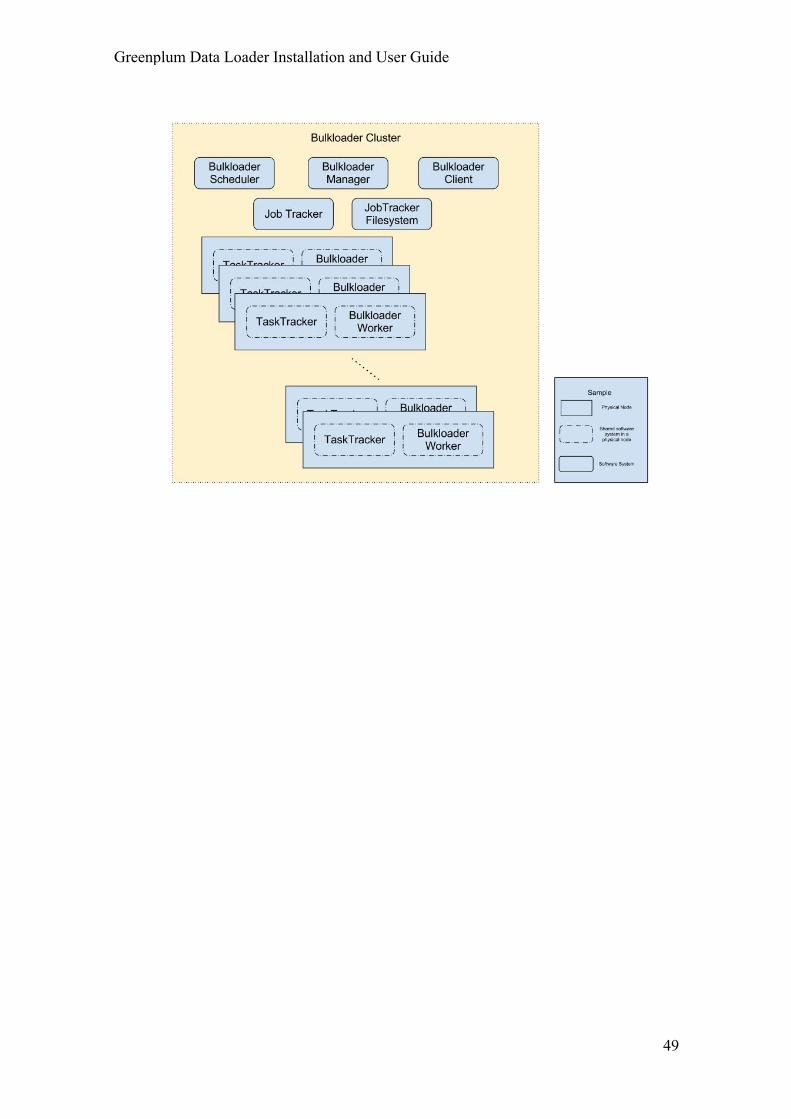
Installing a Dedicated MapReduce Cluster
If you install a dedicated MapReduce cluster, Greenplum Data Loader uses the associated JobTracker file system. This file system can be configured using HDFS or HTTPFS.
Greenplum Data Loader Installation and User Guide
49
Greenplum Data Loader Installation and User Guide
50
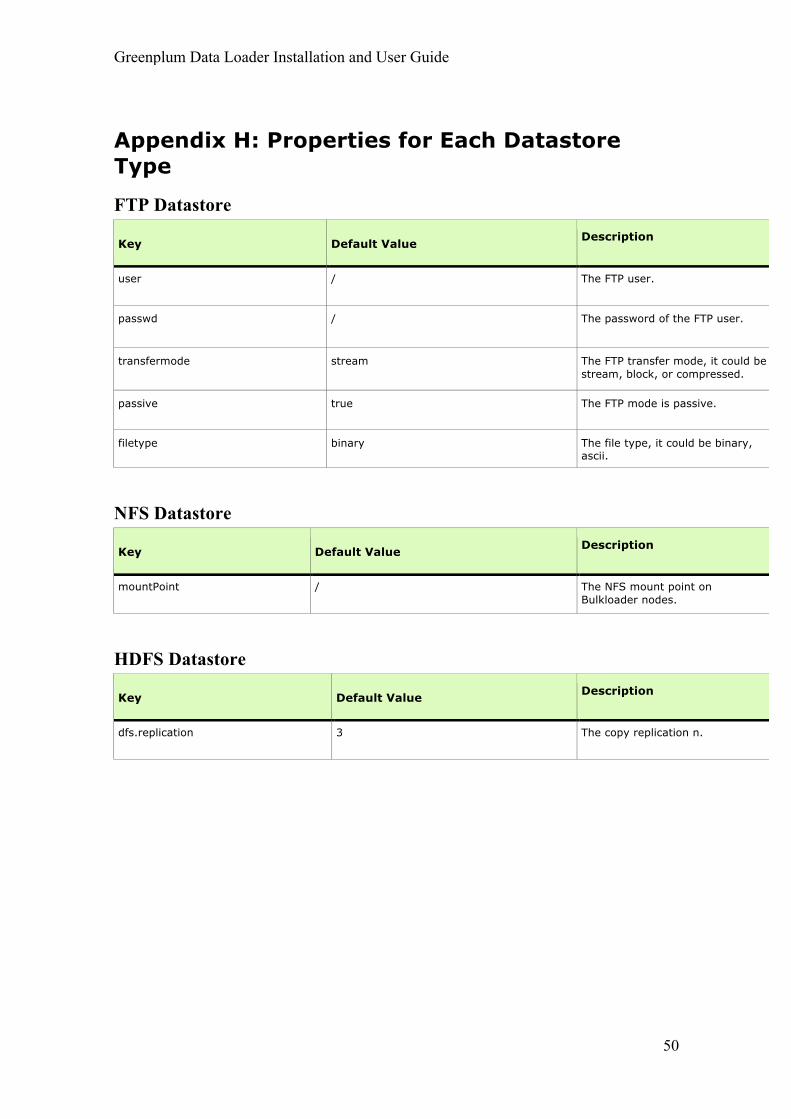
Appendix H: Properties for Each Datastore Type
FTP Datastore
Key Default Value Description
user / The FTP user.
passwd / The password of the FTP user.
transfermode stream
The FTP transfer mode, it could be stream, block, or compressed.
passive true
The FTP mode is passive.
filetype binary
The file type, it could be binary, ascii.
NFS Datastore
Key Default Value Description
mountPoint / The NFS mount point on Bulkloader nodes.
HDFS Datastore
Key Default Value Description
dfs.replication 3 The copy replication n.
Greenplum Data Loader Installation and User Guide
51
Glossary
B
bandwidth-throttling
The upper limit of aggregated network bandwidth consumed by a job.
C
chunking
Splitting a file into chunks with fixed size such as 640MB per chunk, and allocating data chunks to different data loading tasks.
compression
A file is compressed first before copying to the destination data store. The data is stored in the compressed format. GPLoader supports compression format, Snappy. Compression and chunking cannot be used at the same time.
connectionlimited
Use this to restrict concurrent connections to a data store.
D
data store
A file system used to store data.
dynamic
Dynamically allocates the copying to a Greenplum Loader worker. The data is assigned to worker machines in small batches. The scheduler allocates the next task after the worker finishes a job.
G
glob
Expression of the path and file name. The source data store uses this path and filename to filter the files being copied.
I
intelligent
The Greenplum scheduler decides the data copy strategy and policy based on the source data type and destination data store configuration.
Greenplum Data Loader Installation and User Guide
52
L
locality
This describes an architecture where the source data store should be a HDFS shared with the MapReduce JobTracker.
MVCC minimizes lock contention in order to allow for reasonable performance in multiuser environments by eschewing explicit locking methodologies of traditional database systems. The main advantage to using the MVCC model of concurrency control rather than locking is in MVCC locks acquired for querying (reading) data do not conflict with locks acquired for writing data.
S
strategy
A method of distributing and allocating data loading tasks to GPLoader workers.
U
uniform
Uniformly distribute the copying blocks to the GPLoader workers. This is based on data size.

Greenplum Data Loader Installation and User Guide
53
Related Documents