GP GP - - PRO EX Quick Start Guides PRO EX Quick Start Guides Internal and External device Addressing 1

Welcome message from author
This document is posted to help you gain knowledge. Please leave a comment to let me know what you think about it! Share it to your friends and learn new things together.
Transcript
GPGP--PRO EX Quick Start GuidesPRO EX Quick Start Guides
Internal and External device Addressing
1

2
Internal and External device Addressing
Overview –Internal and External device addressing with GP-Pro EX.
Objective-At the end of this Chapter you should be able to :
Enter Internal AddressesAccess External Device AddressesAccess AGP Logic Variables Access SymbolsUse the Symbol Editor Use the Address MapUse the Global Cross reference Use Drag & Drop to speed development Rename your PLC
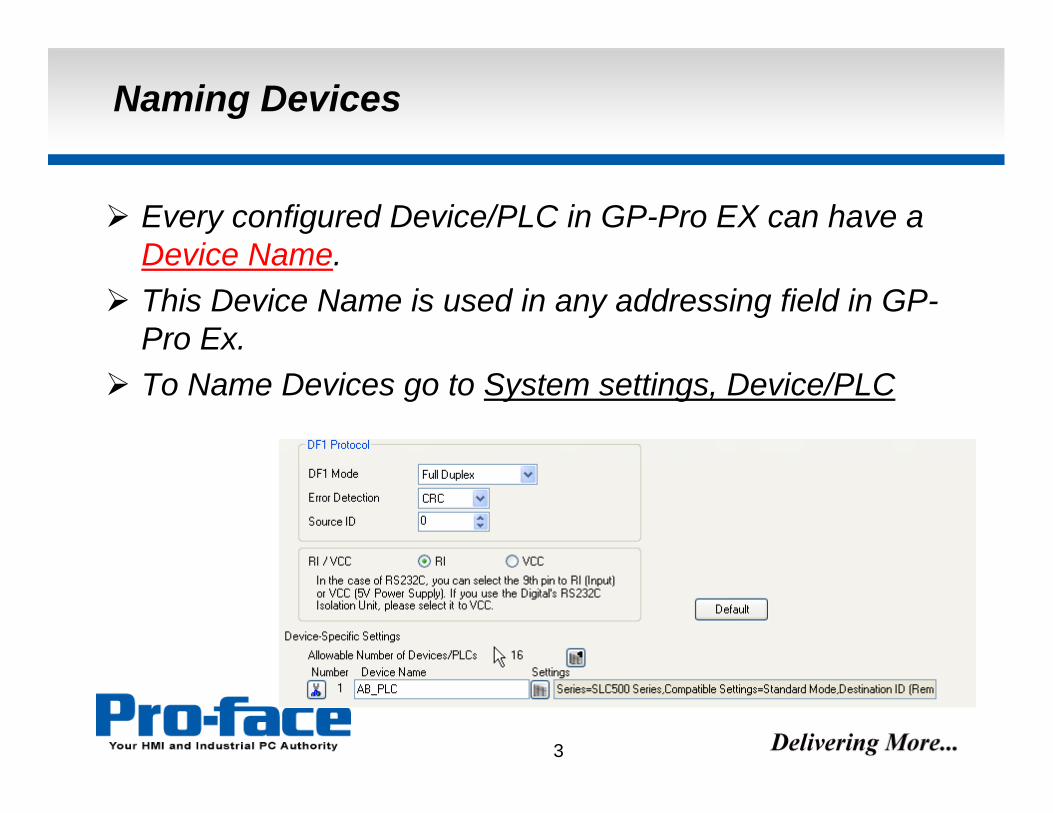
Naming Devices
Every configured Device/PLC in GP-Pro EX can have a Device Name. This Device Name is used in any addressing field in GP-Pro Ex. To Name Devices go to System settings, Device/PLC
3

4
Bit Addressing
If an Object is created in GP Pro EX that expects a BIT(Boolean) type address,only BIT type symbols, Logic Variables and PLC addresses can be entered.
For most PLC’s,individualbits within Words(Registers) can be addressed.

CONFIDENTIAL
5
If an object is created in GP PRO EX, that expects a WORD(Register) type address, only WORD type Symbols, Logic Variables and PLC addresses can be entered.This includes 16-bit, 32-bit and Floating Point numbers.
Objects expecting a WORD address
By clicking here, you can configure the switch to do a certain operation, based on the WORD address you choose. (Write, Add,Subtract,Digitaddition, Digit subtraction, and Operation) are the choices
CONFIDENTIAL
6
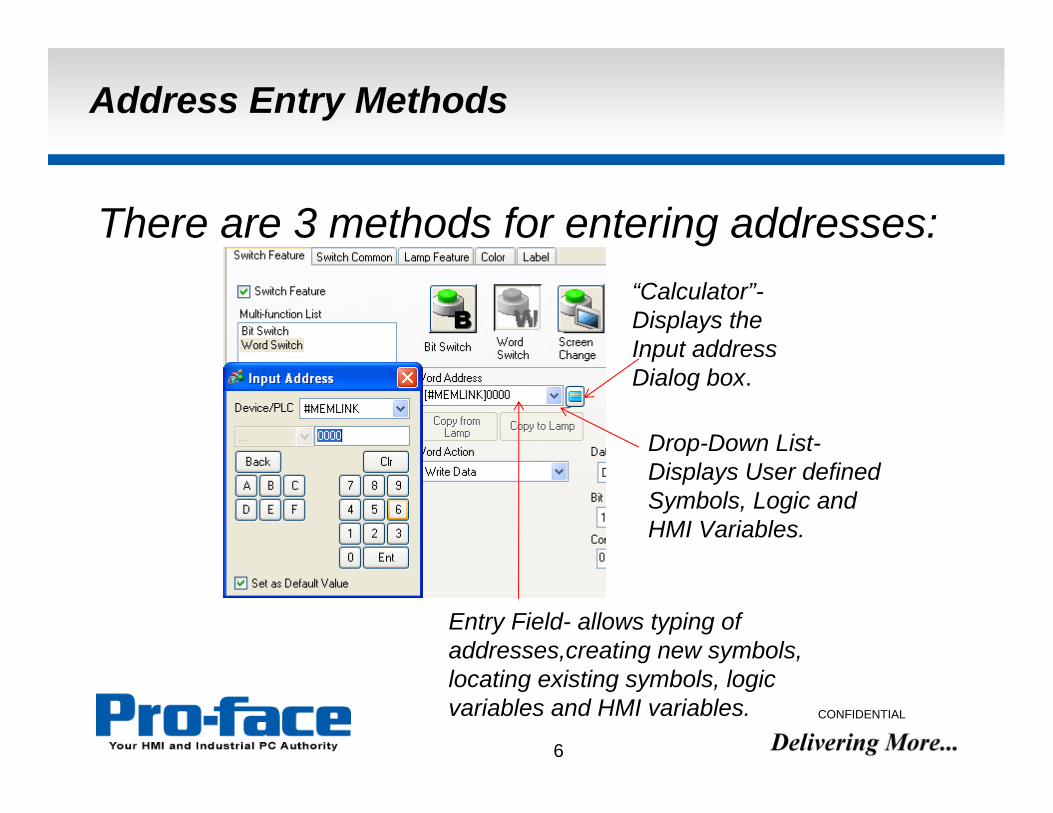
Address Entry Methods
There are 3 methods for entering addresses:“Calculator”-Displays the Input address Dialog box.
Drop-Down List-Displays User defined Symbols, Logic and HMI Variables.
Entry Field- allows typing of addresses,creating new symbols, locating existing symbols, logic variables and HMI variables.
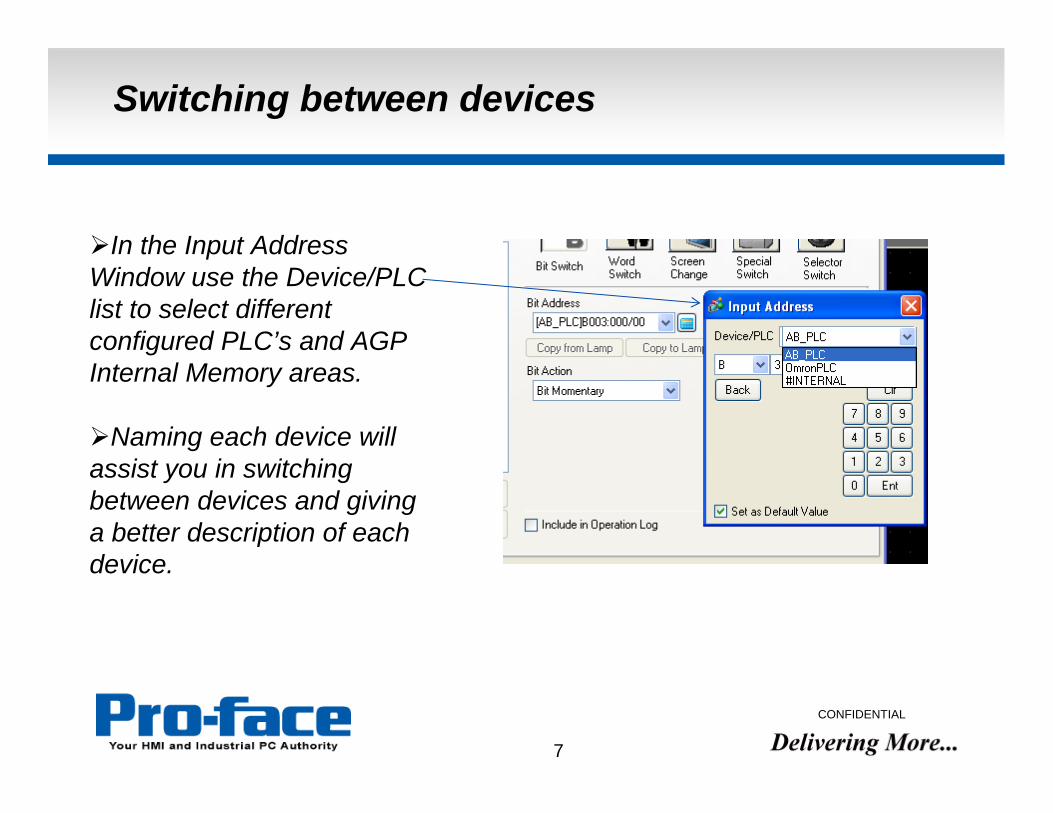
Switching between devices
CONFIDENTIAL
7
In the Input Address Window use the Device/PLC list to select different configured PLC’s and AGP Internal Memory areas.
Naming each device will assist you in switching between devices and giving a better description of each device.
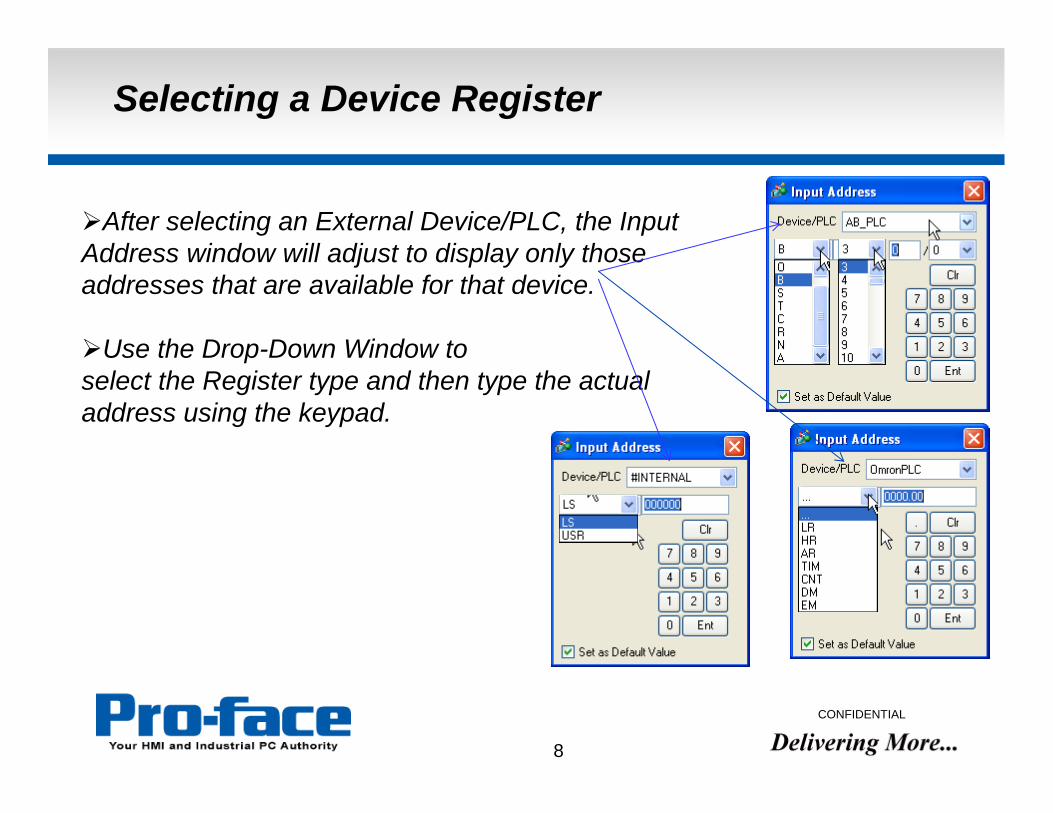
Selecting a Device Register
CONFIDENTIAL
8
After selecting an External Device/PLC, the Input Address window will adjust to display only those addresses that are available for that device.
Use the Drop-Down Window to select the Register type and then type the actual address using the keypad.

Selecting an Internal Memory Register
CONFIDENTIAL
9
Select #Internal to use the AGP internal memory registers.
Depending on the selected protocol you have access to the following address ranges:
LS : 0-8191 USR: 0-30000( these are particularly
effective as you can use them to address variables also. )

Word and Bit Symbols
CONFIDENTIAL
10
Symbols are “friendly names” for internal AGP or external PLC/Device registers/addresses.
Symbols can be created by typing a new name in the Input Address Field.
You must “register” your symbol or variable in the software. When you click on the action field the dialog box below will ask which type you want to register it as.
A “Symbol” registration interprets that the bit orword will have an address location. when registering as a “Variable”, the software willinterpret that as just a temporary location withno address location.
CONFIDENTIAL
11
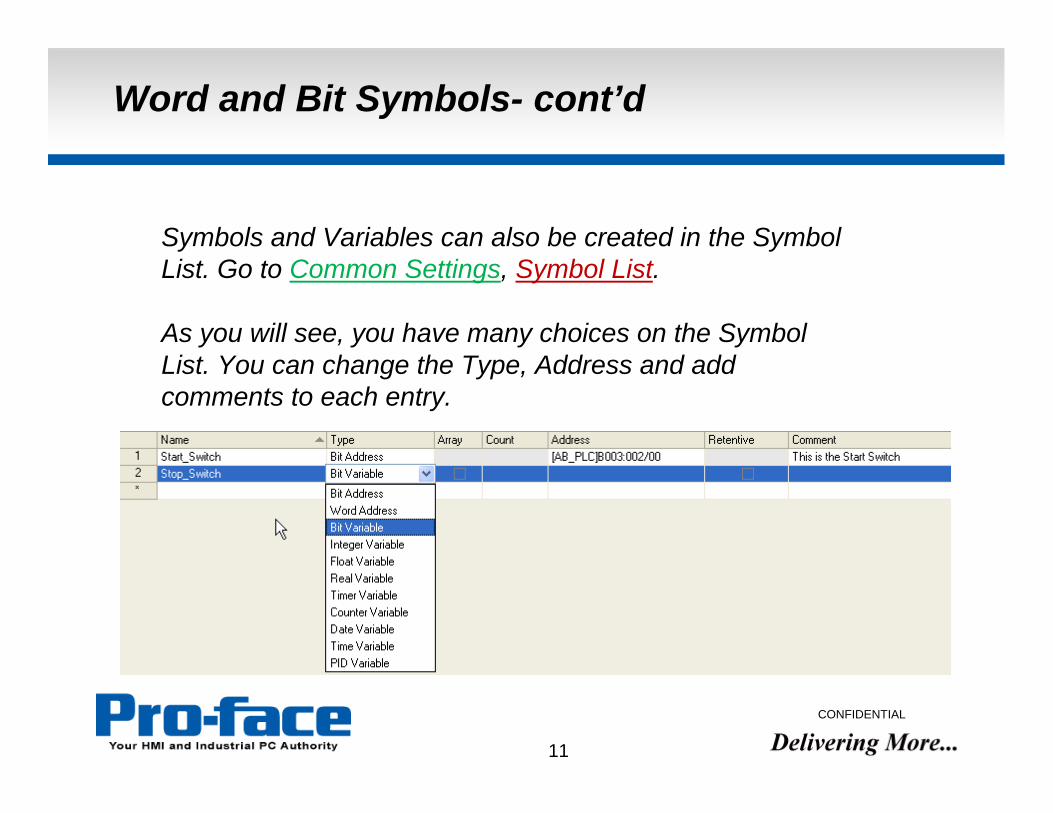
Word and Bit Symbols- cont’d
Symbols and Variables can also be created in the Symbol List. Go to Common Settings, Symbol List.
As you will see, you have many choices on the Symbol List. You can change the Type, Address and add comments to each entry.

Logic Variables
CONFIDENTIAL
12
User-Defined Logic Variables can be created in the Symbol List and used on screens and in AGP logic.
Logic Variables preceded by #L or # H are pre-defined system variables.
Use the Address Drop Down list to select variables.

Screen Variables to Logic Variable
CONFIDENTIAL
13
When using an AGP Logic Screen with a Bit Address, you can drag the address to the NO or NC relay .
If the object contains multiple addresses(like a switch with a Lamp) you can choose which one by utilizing the Pop-Up window.

CONFIDENTIAL
14
Logic Variables to Screen Variables
You can drag a Contact or Coil from the AGP Logic screen onto a Base Screen. If the switch already exists, it will give the switch the address that is dragged. If you drag itto an Empty space, you can place a NEW Switch on the screen and set all the properties of that switch.
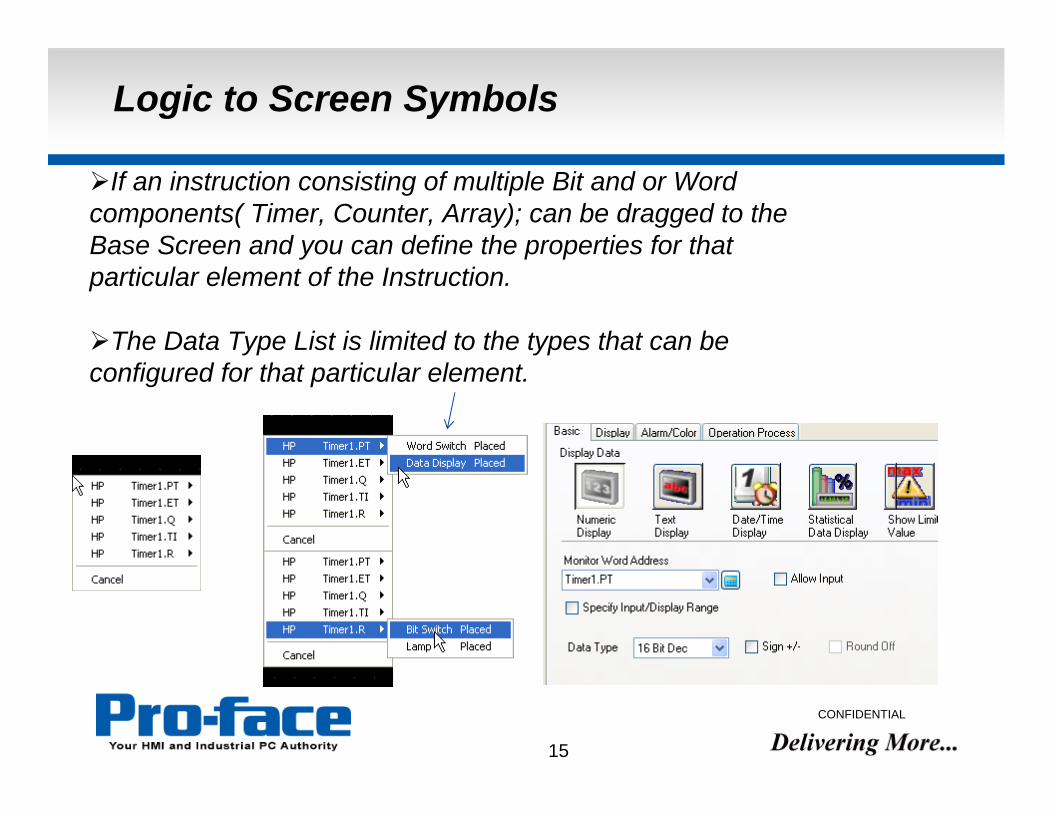
Logic to Screen Symbols
CONFIDENTIAL
15
If an instruction consisting of multiple Bit and or Word components( Timer, Counter, Array); can be dragged to the Base Screen and you can define the properties for that particular element of the Instruction.
The Data Type List is limited to the types that can be configured for that particular element.

Address Map
CONFIDENTIAL
16
Use the Address Workspace to drag selected addresses to a Base Screen or Logic Object.
Use the Device Address/ Symbol Variable and Type Selection to display any register.
Use the address bar to enter the display start Address.

Address Map- Used Addresses
CONFIDENTIAL
17
In the Address Workspace, all used addresses will be highlighted in RED.
Highlighting an Address in the Map will highlight the object on the screen and display all objects in which it is referenced at the bottom of the List.

Address Search and Replace
CONFIDENTIAL
18
Use the Search Workspace to quickly locate any use of specific registers any where in the project. The Range setting can be used to limit the scope of the search.
Address Block Conversion can be used to convert addresses without having to locate and edit every object seperately. Address Block conversion can be found under the PROJECT menu(Project, Utility).

Cross Reference
CONFIDENTIAL
19
Use the Project, Utility, Cross Reference menu to display the Cross Reference window.
Display can be limited to specific device or objects in GP Pro EX
Address conversion quickly converts a Range of addresses.

Questions
Please refer to the Reference Manual that is installed along with GPPRO-EX.
Manuals are also available on-line at:
http://www.hmisource.com/otasuke/download/manual/
For further support please e-mail: [email protected]
Or call: +1 734 429-4971
Related Documents